Use & Care Guide
Manual de uso y cuidado
Guide d'utilisation et d'entretien
English / Espafiol / Fran_ais
Model/Modelo/Mod_le. 596.7931", 596.793,4*
l(enmore
@
= color numbe_, n@nero de colo_, le num@o de M couleu_
P/N W10797150B
Sears Brands Management Corporation
Hoffman Estates, IL, U.S.A. 60179
www.kenmore.com
Sears Canada Inc.
Toronto, Ontario, Canada M5B 2C3
www.sears.ca
TABLE OF CONTENTS
PROTECTION AGREEMENTS .................................................................... 2
WARRANTY .............................................................................................. 3
REFRIGERATOR SAFETY ........................................................................... 3
Proper Disposal of Your Old Refrigerator .................................... 4
INSTALLATION INSTRUCTIONS ............................................................... 5
Unpack the Refrigerator ..................................................................................... 5
Location Requirements ........................................................................................ 5
Water Supply Requirements .............................................................................. 5
Connect the Water Supply ................................................................................ 6
Electrical Requirements ....................................................................................... 7
Refrigerator Door(s) and Drawer ...................................................................... 8
Door Closing and Door Alignment ................................................................... 12
REFRIGERATOR USE ............................................................................... 12
Using the Controls ............................................................................................... 12
REFRIGERATOR FEATURES ..................................................................... 13
Refrigerator Shelves ............................................................................................ 13
Crisper and Crisper Cover ................................................................................. 13
Crisper Humidity Control .................................................................................. 14
Snack Drawer ..................................................................................................... 14
FREEZER FEATURES ................................................................................ 14
Freezer Door Shelf .............................................................................................. 14
DOOR FEATURES ................................................................................... 14
Dairy Center ........................................................................................................ 14
Door Bins .............................................................................................................. 14
Full-Width Door Shelf ........................................................................................ 14
Ice Maker ............................................................................................................. 15
REFRIGERATOR CARE ............................................................................. 15
Cleaning ............................................................................................................... 15
Changing the Light Bulb .................................................................................... 16
Power Interruptions ............................................................................................. 16
Vacation and Moving Care .............................................................................. 16
TROUBLESHOOTING .............................................................................. 17
Refrigerator Operation ...................................................................................... 17
Temperature and Moisture ............................................................................... 18
Ice and Water ..................................................................................................... 18
Accessories ........................................................................................................... 19
SERVICE NUMBERS .............................................................. BACK COVER
JNDICE .................................................................................................... 20
TABLE DES MATIERES ........................................................................... 40
PROTECTION AGREEMENTS
Master Prote_-_on Agreements
Congrafu/afions on rnaking a srnarf purchase. Your new Kenmore <_product
is designed and manufactured for years of dependable operation. But like
all products, it may require preventive maintenance or repair from time to
time. That's when having a Master Protection Agreement can save you
money and aggravation.
The Master Protection Agreement also helps extend the life of your new
product. Here's what the Agreement _ includes:
I/Parts and labor not just for repairing defects, but to help keep products
operating properly under normal use. Our coverage goes well beyond
the product warranty. No deductibles, no functional failure excluded
from coverage - real protection.
I/Expert service by a force of more than 10,000 authorized Sears service
technicians, which means someone you can trust will be working on
your product.
I/Unlimited service calls and nationwide service, as often as you want us,
whenever you want us.
I/"No-lemon" guarantee - replacement of your covered product if four
or more product failures occur within twelve months.
I/Product replacement if your covered product can't be fixed.
I/Annual Preventive Maintenance Check at your request - no extra
charge.
I_' Fast help by phone - we call it Rapid Resolution - phone support from
a Sears representative on all products. Think of us as a "talking owner's
manual."
II' Power surge protection against electrical damage due to power
fluctuations.
II' $250 Food Loss Protection annually for any food spoilage that is the
result of mechanical failure of any covered refrigerator or freezer.
I/Rental reimbursement if repair of your covered product takes longer
than promised.
I/25% discount off the regular price of any non-covered repair service
and related installed parts.
Once you purchase the Agreement, a simple phone call is all that it takes
for you to schedule service. You can call anytime day or night, or schedule
a service appointment online.
The Master Protection Agreement is a risk free purchase. If you cancel for
any reason during the product warranty period, we will provide a full
refund. Or, a prorated refund anytime after the product warranty period
expires. Purchase your Master Protection Agreement today!
Some limitations and exclusions apply. For prices and additional
information in the U.S.A. call 1-800-827-6655.
*Coverage in Canada varies on some items. For full details call Sears
Canada at 1-800-361-6665.
Sears Installation Service
For Sears professional installation of home appliances, garage door
openers, water heaters, and other major home items, in the U.S.A. call
1-844-553-6667_ and in Canada call 1-800-469-4663.
2
KENMORE APPLIANCE WARRANTY
KENMORE LIMITED WARRANTY
FOR ONE YEAR from the date of sale this appliance is warranted against
defects in material or workmanship when it is correctly installed, operated
and maintained according to all supplied instructions.
WITH PROOF OF SALE, a defective appliance will receive free repair or
replacement at option of seller.
For warranty coverage details about obtaining free repair or replacement,
visit www.kenmore.com/warra nty.
This warranty applies for only 90 DAYS from the sale date in the United
States, and is void in Canada, if this appliance is ever used for other than
private household purposes.
This warranty covers ONLY defects in material and workmanship,
and will NOT pay for:
1. Expendable items that can wear out from normal use, including but not
limited to filters, belts, bags or screw-in base light bulbs.
2. A service technician to clean or maintain this appliance, or to instruct
the user in correct appliance installation, operation and maintenance.
3. Service calls to correct appliance installation not performed by Sears
authorized service agents, or to repair problems with house fuses,
circuit breakers, house wiring, and plumbing or gas supply systems
resulting from such installation.
4. Damage to or failure of this appliance resulting from installation not
performed by Sears authorized service agents, including installation
that was not in accord with electrical, gas or plumbing codes.
5. Damage to or failure of this appliance, including discoloration or
surface rust, if it is not correctly operated and maintained according to
all supplied instructions.
6. Damage to or failure of this appliance, including discoloration or
surface rust, resulting from accident, alteration, abuse, misuse or use
for other than its intended purpose.
7. Damage to or failure of this appliance, including discoloration or
surface rust, caused by the use of detergents, cleaners, chemicals or
utensils other than those recommended in all instructions supplied with
the product.
8. Damage to or failure of parts or systems resulting from unauthorized
modifications made to this appliance.
9. Service to an appliance if the model and serial plate is missing,
altered, or cannot easily be determined to have the appropriate
certification logo.
Disclaimer of implied warranties; limitation of remedies
CustomeCs sole and exclusive remedy under this limited warranty shall be
product repair or replacement as provided herein. Implied warranties,
including warranties of merchantability or fitness for a particular purpose,
are limited to one year or the shortest period allowed by law. Seller shall
not be liable for incidental or consequential damages. Some states and
provinces do not allow the exclusion or limitation of incidental or
consequential damages, or limitations on the duration of implied
warranties of merchantability or fitness, so these exclusions or limitations
may not apply to you.
This warranty applies only while this appliance is used in the United States
or Canada _.
This warranty gives you specific legal rights, and you may also have other
rights which vary from state to state.
_ln-home repair service is not available in all Canadian geographical
areas, nor will this warranty cover user or servicer travel and
transportation expenses if this product is located in a remote area (as
defined by Sears Canada Inc.) where an authorized servicer is not
available.
Sears Brands Management Corporation
Hoffman Estates, IL 60179
Sears Canada Inc.
Toronto, Ontario, Canada MSB 2C3
PRODUCT RECORD
Record your complete model number, serial number, and purchase date.
You can find this information on the model and serial number label located
on the product.
Have this information available to help you obtain assistance or service
more quickly whenever you contact Sears concerning your appliance.
Model number
Serial number
Purchase date
Save these instructions and your sales receipt for future reference.
REFRIGERATOR SAFETY
Your safety and the safety of others are very important.
We have provided many important safety messages in this manual and on your appliance. Always read and obey all safety
messages.
This is the safety alert symbol.
This symbol alerts you to potential hazards that can kill or hurt you and others.
All safety messages will follow the safety alert symbol and either the word "DANGER" or "WARNING."
These words mean:
You can be killed or seriously injured if you don't immediately
follow instructions.
You can be killed or seriously injured if you don't follow
instructions.
All safety messages will tell you what the potential hazard is, tell you how to reduce the chance of injury, and tell you what can
happen if the instructions are not followed.
IMPORTANT SAFETY INSTRUCTIONS
WARNING: To reduce the risk of fire, electric shock, or injury when using your refrigerator, follow these basic precautions:
• Plug into a grounded 3 prong outlet.
• Do not remove ground prong.
• Do not use an adapter.
• Do not use an extension cord.
• Disconnect power before servicing.
• Replace all parts and panels before operating.
• Remove doors from your old refrigerator.
• Use nonflammable cleaner.
• Keep flammable materials and vapors, such as gasoline,
away from refrigerator.
• Use two or more people to move and install refrigerator.
• Disconnect power before installing ice maker (on ice maker
kit ready models only).
• Use a sturdy glass when dispensing ice (on some models).
• Do not hit the refrigerator glass doors (on some models).
SAVE THESE INSTRUCTIONS
State of California Proposition 65 Warnings:
WARNING: This product contains one or more chemicals known to the State of California to cause cancer.
WARNING: This product contains one or more chemicals known to the State of California to cause birth defects or other
reproductive harm.
Proper Disposal of Your Old Refrigerator
Suffocation Hazard
Remove doors from your old refrigerator.
Failure to do so can result in death or brain damage.
IMPORTANT: Child entrapment and suffocation are not problems of the
past. Junked or abandoned refrigerators are still dangerous - even if they
will sit for "just a few days." If you are getting rid of your old refrigerator,
please follow these instructions to help prevent accidents.
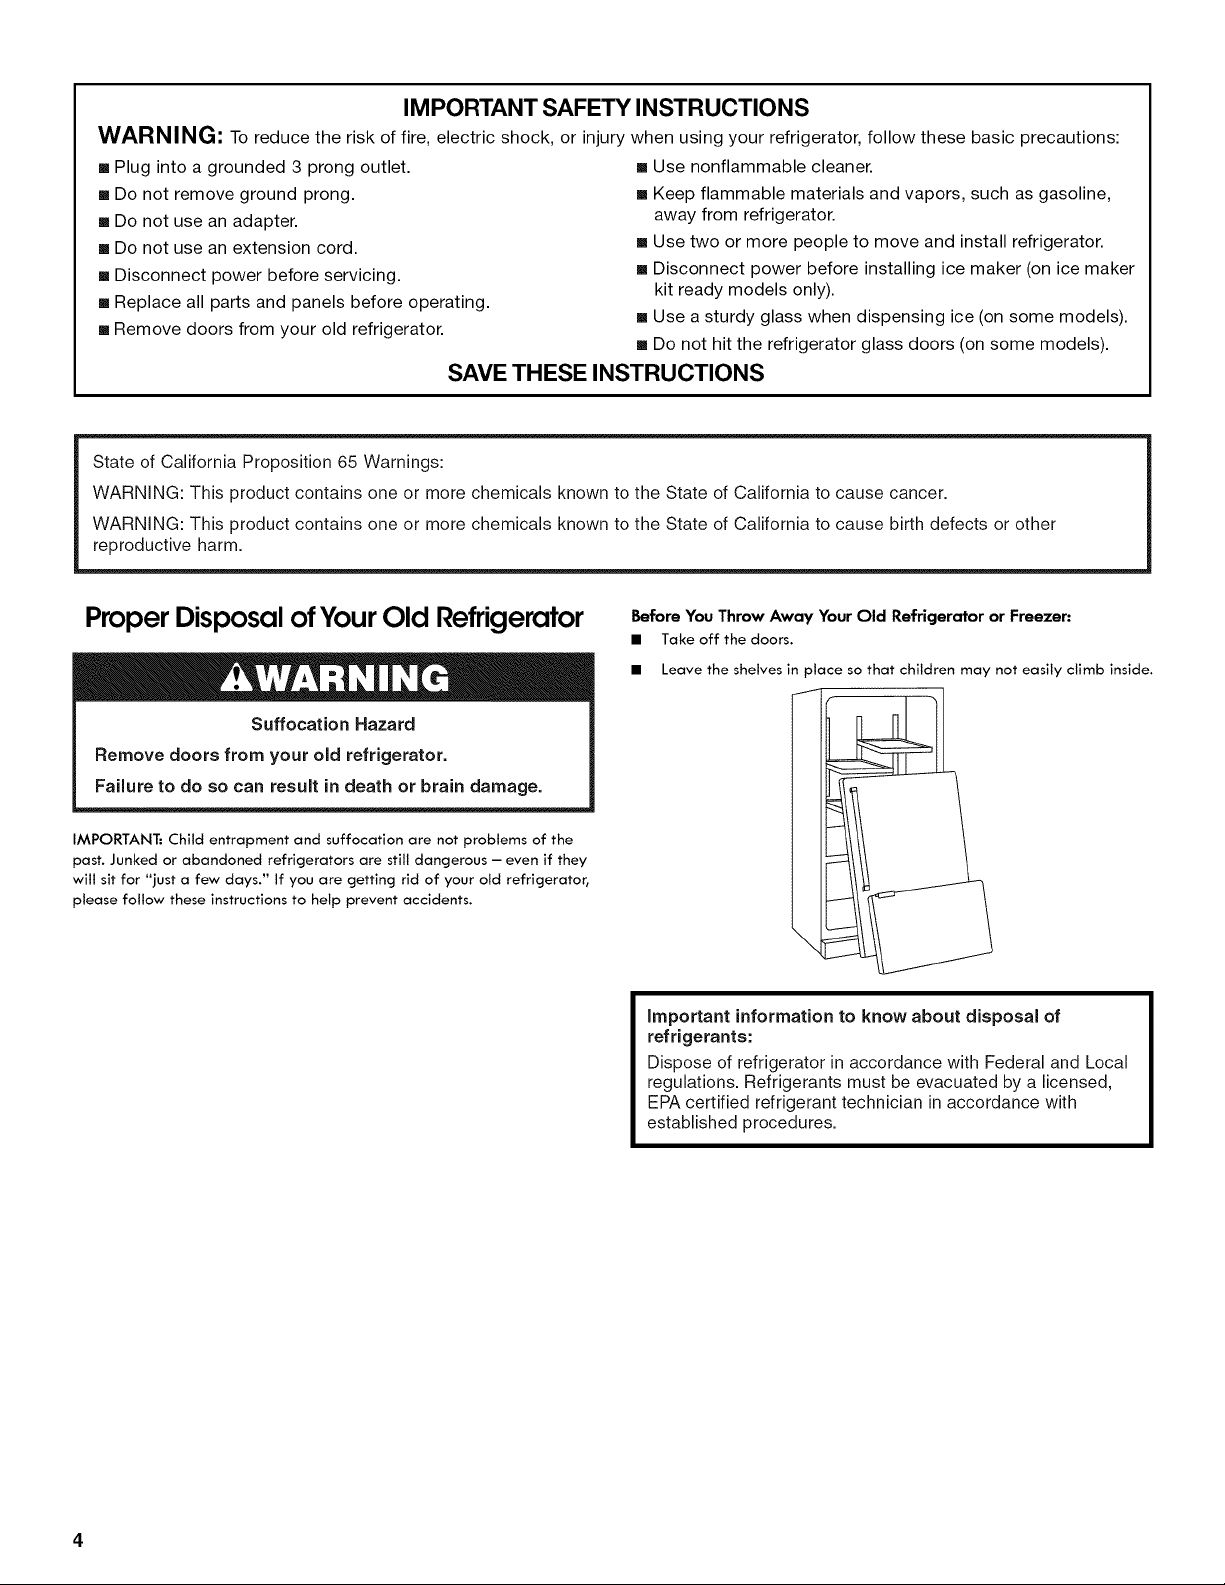
Before You Throw Away Your Old Refrigerator or Freezer:
• Take off the doors.
• Leave the shelves in place so that children may not easily climb inside.
\
important information to know about disposal of
refrigerants:
Dispose of refrigerator in accordance with Federal and Local
regulations. Refrigerants must be evacuated by a licensed,
EPA certified refrigerant technician in accordance with
established procedures.
INSTALLATION INSTRUCTIONS
Excessive Weight Hazard
Use two or more people to move and install
refrigerator.
Failure to do so can result in back or other injury.
Remove the Packaging
Remove tape and glue residue from surfaces before turning on the
refrigerator. Rub a small amount of liquid dish soap over the adhesive
with your fingers. Wipe with warm water and dry.
Do not use sharp instruments, rubbing alcohol, flammable fluids, or
abrasive cleaners to remove tape or glue. These products can damage
the surface of your refrigerator. For more information, see
"Refrigerator Safety."
• Shelves, bins, door shelf rails, and other feature parts may be
packaged in the Interior FeaturePak. Follow the instructions contained
in the package for proper assembly.
• Dispose of/recycle all packaging materials.
When Moving "{our Refrigerator:
Your refrigerator is heavy. When moving the refrigerator for
cleaning or service, be sure to cover the floor with
cardboard or hardboard to avoid floor damage. Always pull
the refrigerator straight out when moving it. Do not wiggle or
"walk" the refrigerator when trying to move it, as floor
damage could occur.
Clean Before Using
After you remove all of the packaging materials, clean the inside of your
refrigerator before using it. See the cleaning instructions in "Refrigerator
Care."
important information to know about glass shelves
and covers:
Do not clean glass shelves or covers with warm water when
they are cold. Shelves and covers may break if exposed to
sudden temperature changes or impact, such as bumping.
Tempered glass is designed to shatter into many small,
pebble-size pieces. This is normal. Glass shelves and covers
are heavy. Use both hands when removing them to avoid
dropping.
Explosion Hazard
Keep flammable materials and vapors, such as
gasoline, away from refrigerator.
Failure to do so can result in death, explosion, or fire.
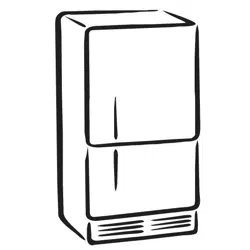
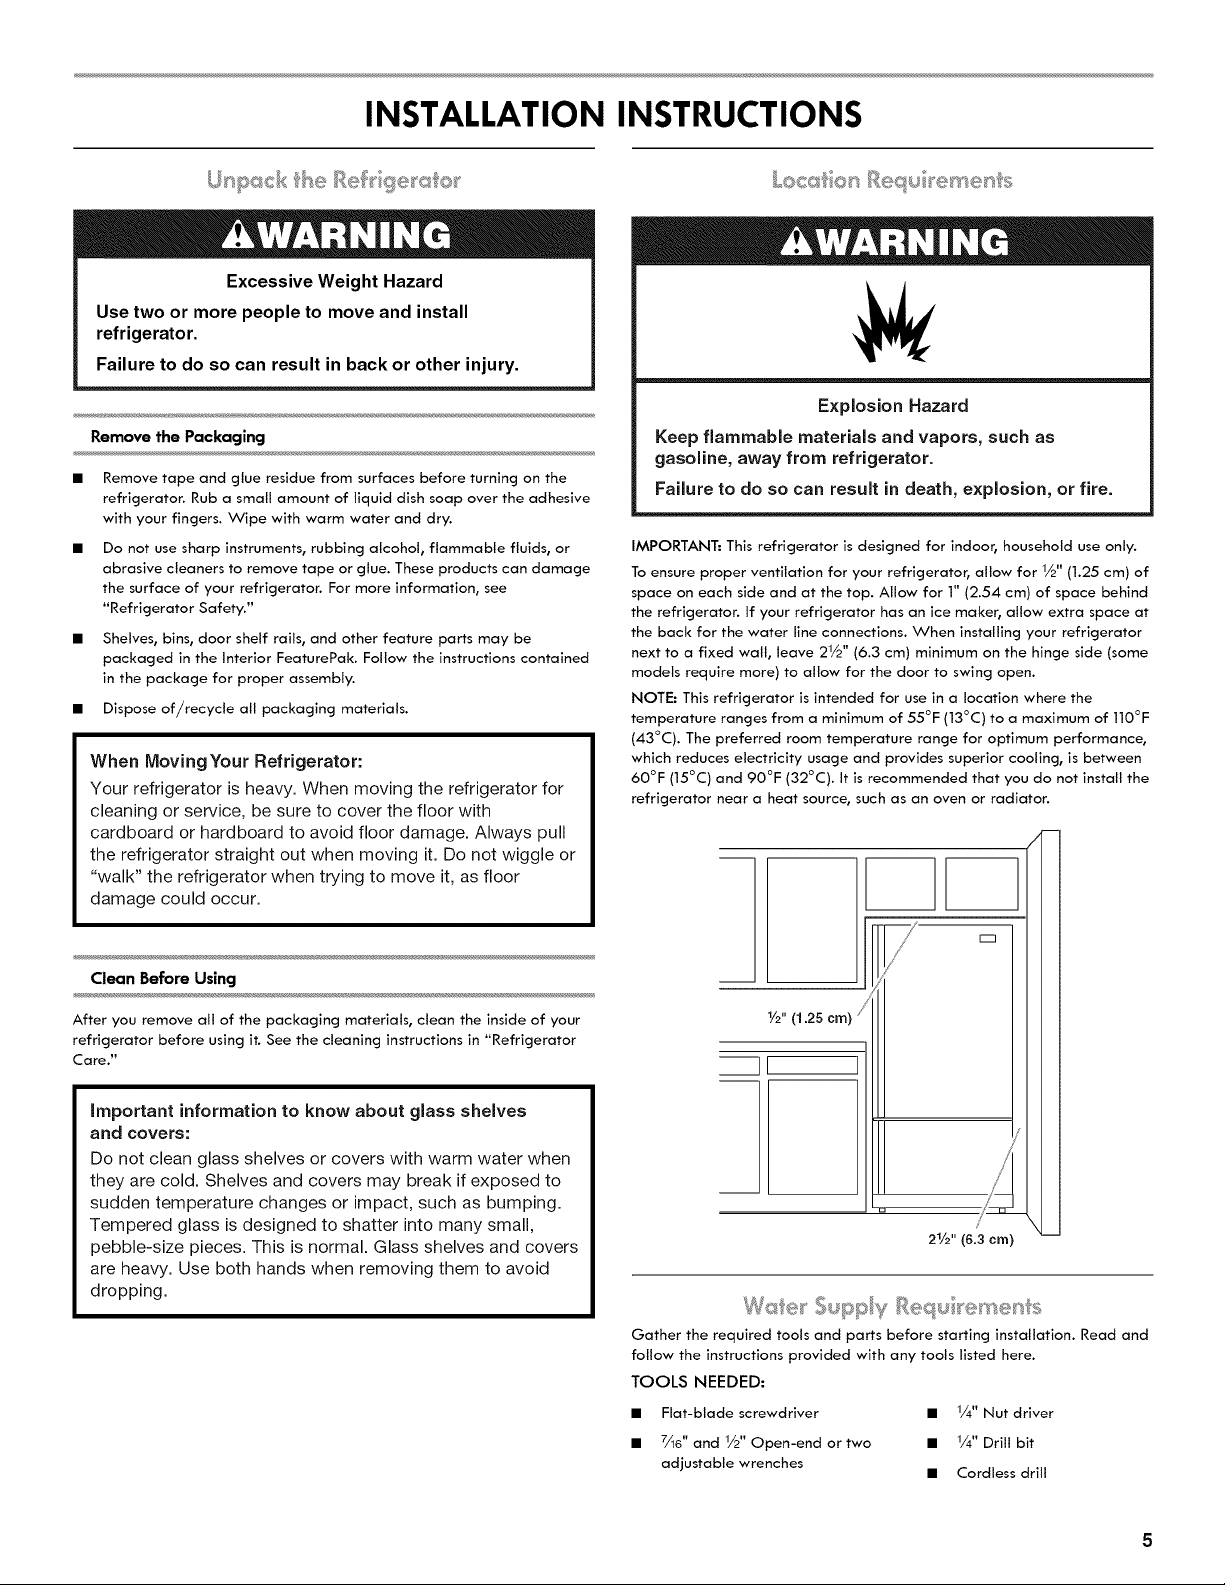
IMPORTANT: This refrigerator is designed for indoor, household use only.
To ensure proper ventilation for your refrigerator, allow for 1/2" (1.25 cm) of
space on each side and at the top. Allow for 1" (2.54 cm) of space behind
the refrigerator. If your refrigerator has an ice maker, allow extra space at
the back for the water line connections. When installing your refrigerator
next to a fixed wall, leave 21/2" (6.3 cm) minimum on the hinge side (some
models require more) to allow for the door to swing open.
NOTE: This refrigerator is intended for use in a location where the
temperature ranges from a minimum of 55°F (13°C) to a maximum of 110°F
(43°C). The preferred room temperature range for optimum performance,
which reduces electricity usage and provides superior cooling, is between
60°F (15°C) and 90°F (32°C). It is recommended that you do not install the
refrigerator near a heat source, such as an oven or radiator.
W' (1.25 cm)
][
21/2" (6.3 cm)
Gather the required tools and parts before starting installation. Read and
follow the instructions provided with any tools listed here.
TOOLS NEEDED:
• Flat-blade screwdriver • 1/4" Nut driver
• 7/16" and 1/2" Open-end or two • 1/4" Drill bit
adjustable wrenches
• Cordless drill
IMPORTANT:
• Allinstallationsmustmeetlocalplumbingcoderequirements.
• Donot use a piercing-type or _6" (4.76 ram) saddle valve which
reduces water flow and clogs more easily.
• Use copper tubing and check for leaks. Install copper tubing only in
areas where the household temperatures will remain above freezing.
• For models with water filters, the disposable water filter should be
replaced at least every 6 months.
Water Pressure
A cold water supply with water pressure of between 35 and 120 psi
(241 and 827 kPa) is required to operate the water dispenser and ice
maker. If you have questions about your water pressure, call a licensed,
qualified plumber.
Reverse Osmosis Water Supply
IMPORTANT: The pressure of the water supply coming out of a reverse
osmosis system going to the water inlet valve of the refrigerator needs to
be between 35 and 120 psi (241 and 827 kPa).
If a reverse osmosis water filtration system is connected to your cold water
supply, the water pressure to the reverse osmosis system needs to be a
minimum of 40 to 60 psi (276 to 414 kPa).
If the water pressure to the reverse osmosis system is less than 40 to 60 psi
(276 to 414 kPa):
• Check to see whether the sediment filter in the reverse osmosis system
is blocked. Replace the filter if necessary.
• Allow the storage tank on the reverse osmosis system to refill after
heavy usage.
• If your refrigerator has a water filter, it may further reduce the water
pressure when used in conjunction with a reverse osmosis system.
Remove the water filter. See "Water Filtration System."
If you have questions about your water pressure, call a licensed, qualified
plumber.
Read all directions before you begin.
IMPORTANT:
• Plumbing shall be installed in accordance with the International
Plumbing Code and any local codes and ordinances.
The gray water tubing on the back of the refrigerator (which is used to
connect to the household water line) is a PEX (cross-linked
polyethylene) tube. Copper and PEX tubing connections from the
household water line to the refrigerator are acceptable, and will help
avoid off-taste or odor in your ice or water. Check for leaks.
If PEX tubing is used instead of copper, we recommend the following
part numbers:
W10505928RP (7 ft [2.14 m] jacketed PEX),
8212547RP (5 ft [1.52 m] PEX), or
W10267701RP (25 ft [7.62 m] PEX).
• Install tubing only in areas where temperatures will remain above
freezing.
• If you turn on the refrigerator before the water line is connected, turn
off the ice maker to avoid excessive noise or damage to the water
valve.
3.
4.
5.
Find a 1/2" to 11/4" (12.7 mm to 31.8 mm) vertical cold water pipe near
the refrigerator.
IMPORTANT:
• Make sure it is a cold water pipe.
• Horizontal pipe will work, but the following procedure must be
followed: Drill on the top side of the pipe, not the bottom. This will
help keep water away from the drill. This also keeps normal
sediment from collecting in the valve.
Determine the length of copper tubing you need. Measure from the
connection on the lower right rear of the refrigerator to the water pipe.
Add 7 ft (2.1 m) to allow for cleaning. Use 1/4" (6.35 mm) O.D. (outside
diameter) copper tubing. Be sure both ends of copper tubing are cut
sq ua re.
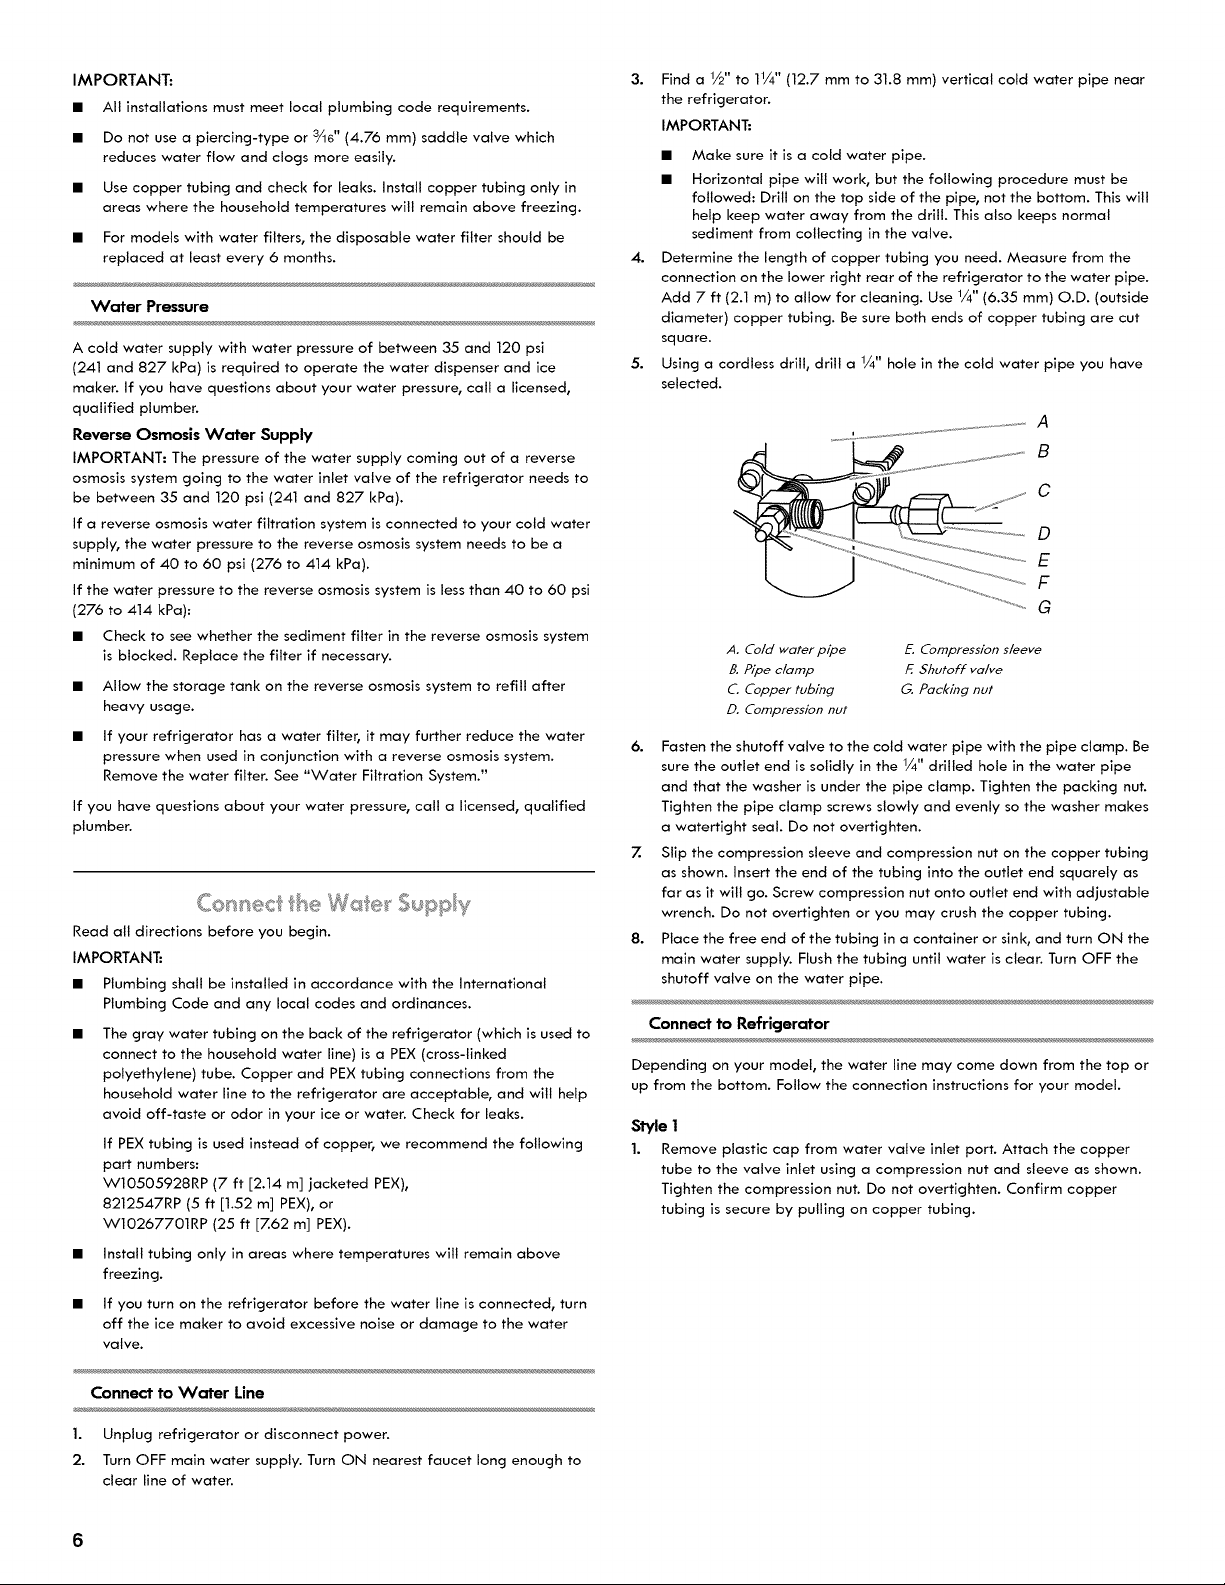
Using a cordless drill, drill a 1/4" hole in the cold water pipe you have
selected.
C
D
E
F
G
A. Co/c/waterpipe E. Compression sleeve
B. Pipe c/amp E Shutoff valve
C. Copper tubing G. Packing nut
D. Compression nut
6. Fasten the shutoff valve to the cold water pipe with the pipe clamp. Be
sure the outlet end is solidly in the 1/4" drilled hole in the water pipe
and that the washer is under the pipe clamp. Tighten the packing nut.
Tighten the pipe clamp screws slowly and evenly so the washer makes
a watertight seal. Do not overtighten.
7. Slip the compression sleeve and compression nut on the copper tubing
as shown. Insert the end of the tubing into the outlet end squarely as
far as it will go. Screw compression nut onto outlet end with adjustable
wrench. Do not overtighten or you may crush the copper tubing.
8. Place the free end of the tubing in a container or sink, and turn ON the
main water supply. Flush the tubing until water is clear. Turn OFF the
shutoff valve on the water pipe.
Connect to Refrigerator
Depending on your model, the water line may come down from the top or
up from the bottom. Follow the connection instructions for your model.
Style 1
1. Remove plastic cap from water valve inlet port. Attach the copper
tube to the valve inlet using a compression nut and sleeve as shown.
Tighten the compression nut. Do not overtighten. Confirm copper
tubing is secure by pulling on copper tubing.
1.
2.
Connect to Water Line
Unplug refrigerator or disconnect power.
Turn OFF main water supply. Turn ON nearest faucet long enough to
clear line of water.
6
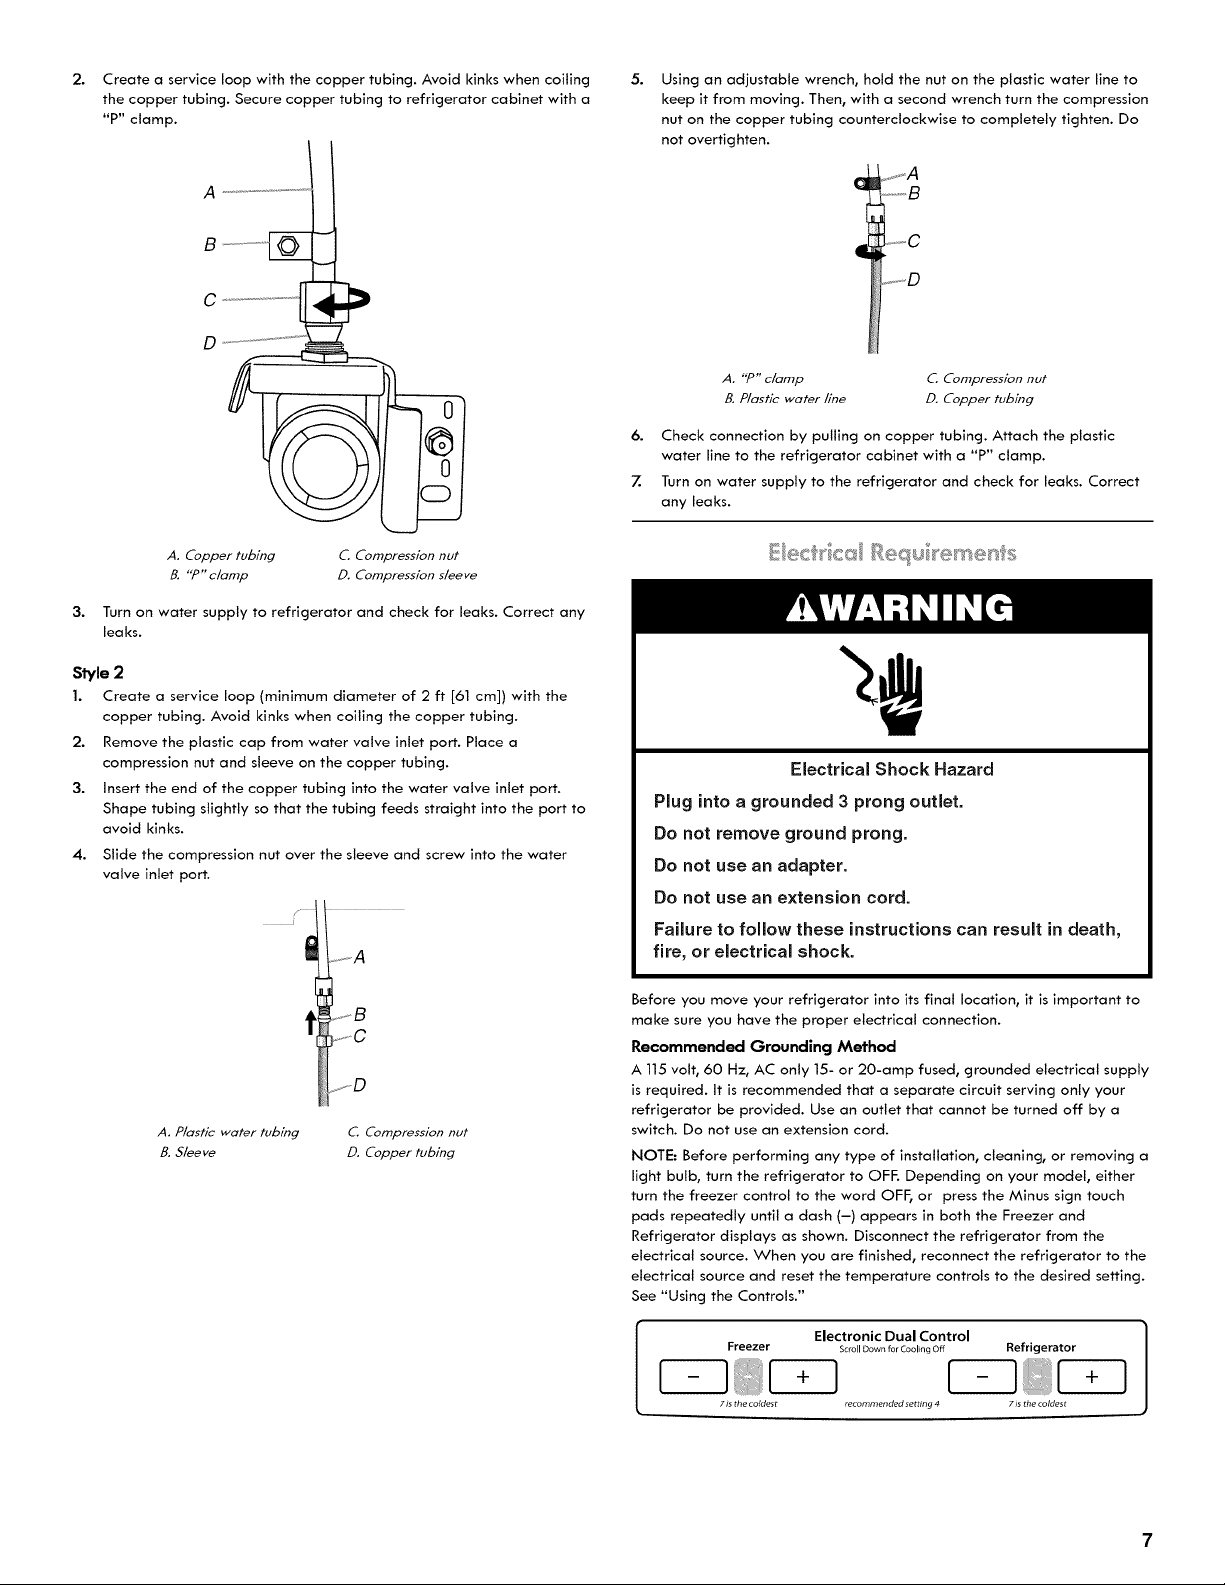
2. Create a service loop with the copper tubing. Avoid kinks when coiling
the copper tubing. Secure copper tubing to refrigerator cabinet with a
"P" clamp.
A
A. Copper tubing C. Compression nut
B. "P"clamp D. Compression sleeve
3. Turn on water supply to refrigerator and check for leaks. Correct any
leaks.
Style2
1. Create a service loop (minimum diameter of 2 ft [61 cm]) with the
copper tubing. Avoid kinks when coiling the copper tubing.
2. Remove the plastic cap from water valve inlet port. Place a
compression nut and sleeve on the copper tubing.
3. Insert the end of the copper tubing into the water valve inlet port.
Shape tubing slightly so that the tubing feeds straight into the port to
avoid kinks.
4. Slide the compression nut over the sleeve and screw into the water
valve inlet port.
/
i
t
..........A
_ B
........D
A. Plastic water tubing
B. Sleeve
C. Compression nut
D. Copper tubing
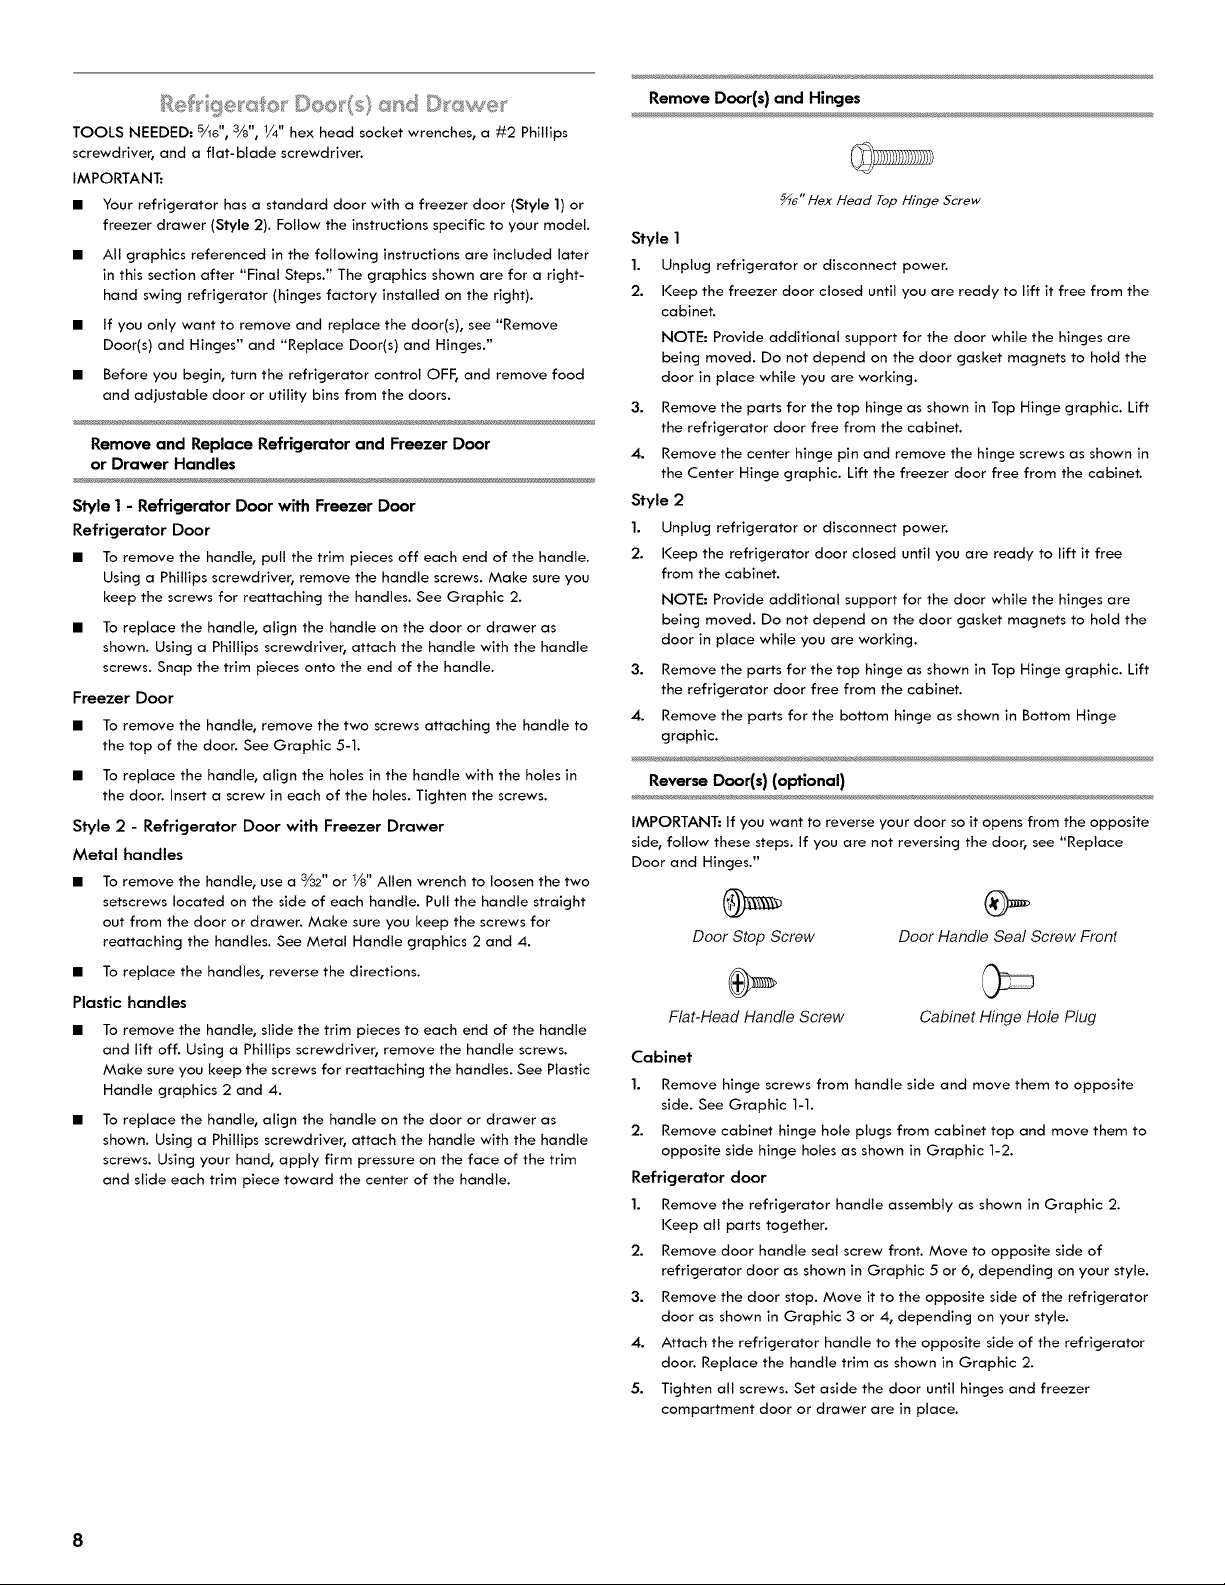
5.
Using an adjustable wrench, hold the nut on the plastic water line to
keep it from moving. Then, with a second wrench turn the compression
nut on the copper tubing counterclockwise to completely tighten. Do
not overtighten.
i
....... O
A. "P" clamp C. Compression nut
B. Plastic water line D. Copper tubing
6. Check connection by pulling on copper tubing. Attach the plastic
water line to the refrigerator cabinet with a "P" clamp.
Z Turn on water supply to the refrigerator and check for leaks. Correct
any leaks.
}_e_<_" <x;_ R _,_ _,_}<_+_/:'___ _}_
Electrical Shock Hazard
Plug into a grounded 3 prong outlet.
Do not remove ground prong.
Do not use an adapter.
Do not use an extension cord.
Failure to follow these instructions can result in death,
fire, or electrical shock.
Before you move your refrigerator into its final location, it is important to
make sure you have the proper electrical connection.
Recommended Grounding Method
A 115 volt, 60 Hz, AC only 15- or 20-amp fused, grounded electrical supply
is required. It is recommended that a separate circuit serving only your
refrigerator be provided. Use an outlet that cannot be turned off by a
switch. Do not use an extension cord.
NOTE: Before performing any type of installation, cleaning, or removing a
light bulb, turn the refrigerator to OFF. Depending on your model, either
turn the freezer control to the word OFF, or press the Minus sign touch
pads repeatedly until a dash (-) appears in both the Freezer and
Refrigerator displays as shown. Disconnect the refrigerator from the
electrical source. When you are finished, reconnect the refrigerator to the
electrical source and reset the temperature controls to the desired setting.
See "Using the Controls."
Electronic Dual Control
Freezer Scroll Down for Cooling Off Refrigerator
• is the coldest recommended setting 4 • is the coldest
TOOLS NEEDED: 5/16", 3/8", 1/4" hex head socket wrenches, a #2 Phillips
screwdriver, and a flat-blade screwdriver.
IMPORTANT:
• Your refrigerator has a standard door with a freezer door (Style 1) or
freezer drawer (Style 2). Follow the instructions specific to your model.
• All graphics referenced in the following instructions are included later
in this section after "Final Steps." The graphics shown are for a right-
hand swing refrigerator (hinges factory installed on the right).
• If you only want to remove and replace the door(s), see "Remove
Door(s) and Hinges" and "Replace Door(s) and Hinges."
• Before you begin, turn the refrigerator control OFF, and remove food
and adjustable door or utility bins from the doors.
Remove and Replace Refrigerator and Freezer Door
or Drawer Handles
Style 1 - Refrigerator Door wffh Freezer Door
Refrigerator Door
• To remove the handle, pull the trim pieces off each end of the handle.
Using a Phillips screwdriver, remove the handle screws. Make sure you
keep the screws for reattaching the handles. See Graphic 2.
• To replace the handle, align the handle on the door or drawer as
shown. Using a Phillips screwdriver, attach the handle with the handle
screws. Snap the trim pieces onto the end of the handle.
Freezer Door
• To remove the handle, remove the two screws attaching the handle to
the top of the door. See Graphic 5-1.
• To replace the handle, align the holes in the handle with the holes in
the door. Insert a screw in each of the holes. Tighten the screws.
Style 2 - Refrigerator Door with Freezer Drawer
Metal handles
• To remove the handle, use a %2" or 1/8" Allen wrench to loosen the two
setscrews located on the side of each handle. Pull the handle straight
out from the door or drawer. Make sure you keep the screws for
reattaching the handles. See Metal Handle graphics 2 and 4.
• To replace the handles, reverse the directions.
Plastic handles
To remove the handle, slide the trim pieces to each end of the handle
and lift off. Using a Phillips screwdriver, remove the handle screws.
Make sure you keep the screws for reattaching the handles. See Plastic
Handle graphics 2 and 4.
To replace the handle, align the handle on the door or drawer as
shown. Using a Phillips screwdriver, attach the handle with the handle
screws. Using your hand, apply firm pressure on the face of the trim
and slide each trim piece toward the center of the handle.
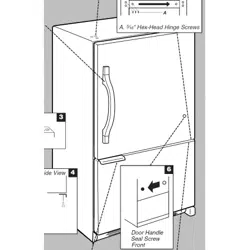
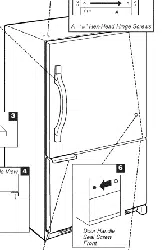
Remove Door(s) and Hinges
_6" Hex Head Top Hinge Screw
Style 1
1. Unplug refrigerator or disconnect power.
2. Keep the freezer door closed until you are ready to lift it free from the
cabinet.
NOTE: Provide additional support for the door while the hinges are
being moved. Do not depend on the door gasket magnets to hold the
door in place while you are working.
3. Remove the parts for the top hinge as shown in Top Hinge graphic. Lift
the refrigerator door free from the cabinet.
4. Remove the center hinge pin and remove the hinge screws as shown in
the Center Hinge graphic. Lift the freezer door free from the cabinet.
Style 2
1. Unplug refrigerator or disconnect power.
2. Keep the refrigerator door closed until you are ready to lift it free
from the cabinet.
NOTE: Provide additional support for the door while the hinges are
being moved. Do not depend on the door gasket magnets to hold the
door in place while you are working.
3. Remove the parts for the top hinge as shown in Top Hinge graphic. Lift
the refrigerator door free from the cabinet.
4. Remove the parts for the bottom hinge as shown in Bottom Hinge
graphic.
Reverse Door(s) (optional)
IMPORTANT: If you want to reverse your door so it opens from the opposite
side, follow these steps. If you are not reversing the door, see "Replace
Door and Hinges."
Door Stop Screw
Flat-Head Handle Screw
Door Handle Seal Screw Front
Cabinet Hinge Hole Plug
Cabinet
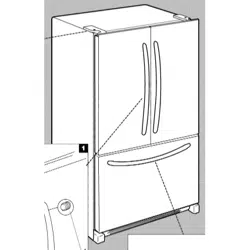
1. Remove hinge screws from handle side and move them to opposite
side. See Graphic 1-1.
2. Remove cabinet hinge hole plugs from cabinet top and move them to
opposite side hinge holes as shown in Graphic 1-2.
Refrigerator door
1. Remove the refrigerator handle assembly as shown in Graphic 2.
Keep all parts together.
2. Remove door handle seal screw front. Move to opposite side of
refrigerator door as shown in Graphic 5 or 6, depending on your style.
3. Remove the door stop. Move it to the opposite side of the refrigerator
door as shown in Graphic 3 or 4, depending on your style.
4. Attach the refrigerator handle to the opposite side of the refrigerator
door. Replace the handle trim as shown in Graphic 2.
5. Tighten all screws. Set aside the door until hinges and freezer
compartment door or drawer are in place.
8
Freezer door
1. Remove freezer handle assembly as shown. Keep all parts together.
See Graphic 5-1.
2. Remove freezer door handle seal screw. Move to opposite side of
freezer door.
3. Remove door stop. Move to opposite side of freezer door as shown.
See Graphic 4.
4. Attach handle to opposite side of freezer door.
5. Tighten all screws. Set aside door until bottom hinge is installed on
product.
Replace Door(s) and Hinges
Style 1
1. Replace the parts for the bottom hinge as shown. Tighten screws.
Replace the freezer door.
NOTE: Provide additional support for the door while the hinges are
being moved. Do not depend on the door gasket magnets to hold the
door in place while you are working.
2. Assemble the parts for the center hinge as shown in the Center Hinge
graphic, and tighten all the screws. Replace the refrigerator door.
3. Assemble the parts for the top hinge as shown in the Top Hinge
graphic. Do not tighten the screws completely.
4. Adjust the doors so that the bottom of the refrigerator door is aligned
with the top of the freezer door. Tighten all screws.
Style 2
1. Replace the parts for the bottom hinge as shown. Tighten screws.
NOTE: Provide additional support for the door while the hinges are
being moved. Do not depend on the door gasket magnets to hold the
door in place while you are working.
2. Assemble the parts for the top hinge as shown in Top Hinge graphic.
Do not tighten screws completely.
3. Adjust the door so that the bottom of the refrigerator door is aligned
with the top of the freezer drawer. Tighten all screws.
Remove and Replace Freezer Drawer
IMPORTANT: Two people may be required to remove and replace the
freezer drawer. All graphics are included later in this section after "Final
Steps."
Remove Drawer Front
1. Open the freezer drawer to full extension.
2. Loosen the four screws attaching the drawer glides to the drawer front.
See Drawer Front Removal graphic.
NOTE: Loosen screws three to four turns. Keep the screws in the
drawer front.
3. Lift drawer front upward and off the screws. See Drawer Front
Removal graphic.
Replace Drawer Front
1. Slide the drawer glides out of the freezer compartment. Insert the
screws in the top of the drawer front into the slots in the drawer
brackets. See Drawer Front Replacement graphic.
2. Pull the drawer brackets toward you to insert the two screws in the
bottom of the drawer front into the brackets. See Drawer Front
Replacement graphic.
3. Completely tighten the four screws.
Final Steps
1. Check all holes to make sure that hole plugs and screws are in place.
Reinstall top hinge cover as shown in Top Hinge graphic.
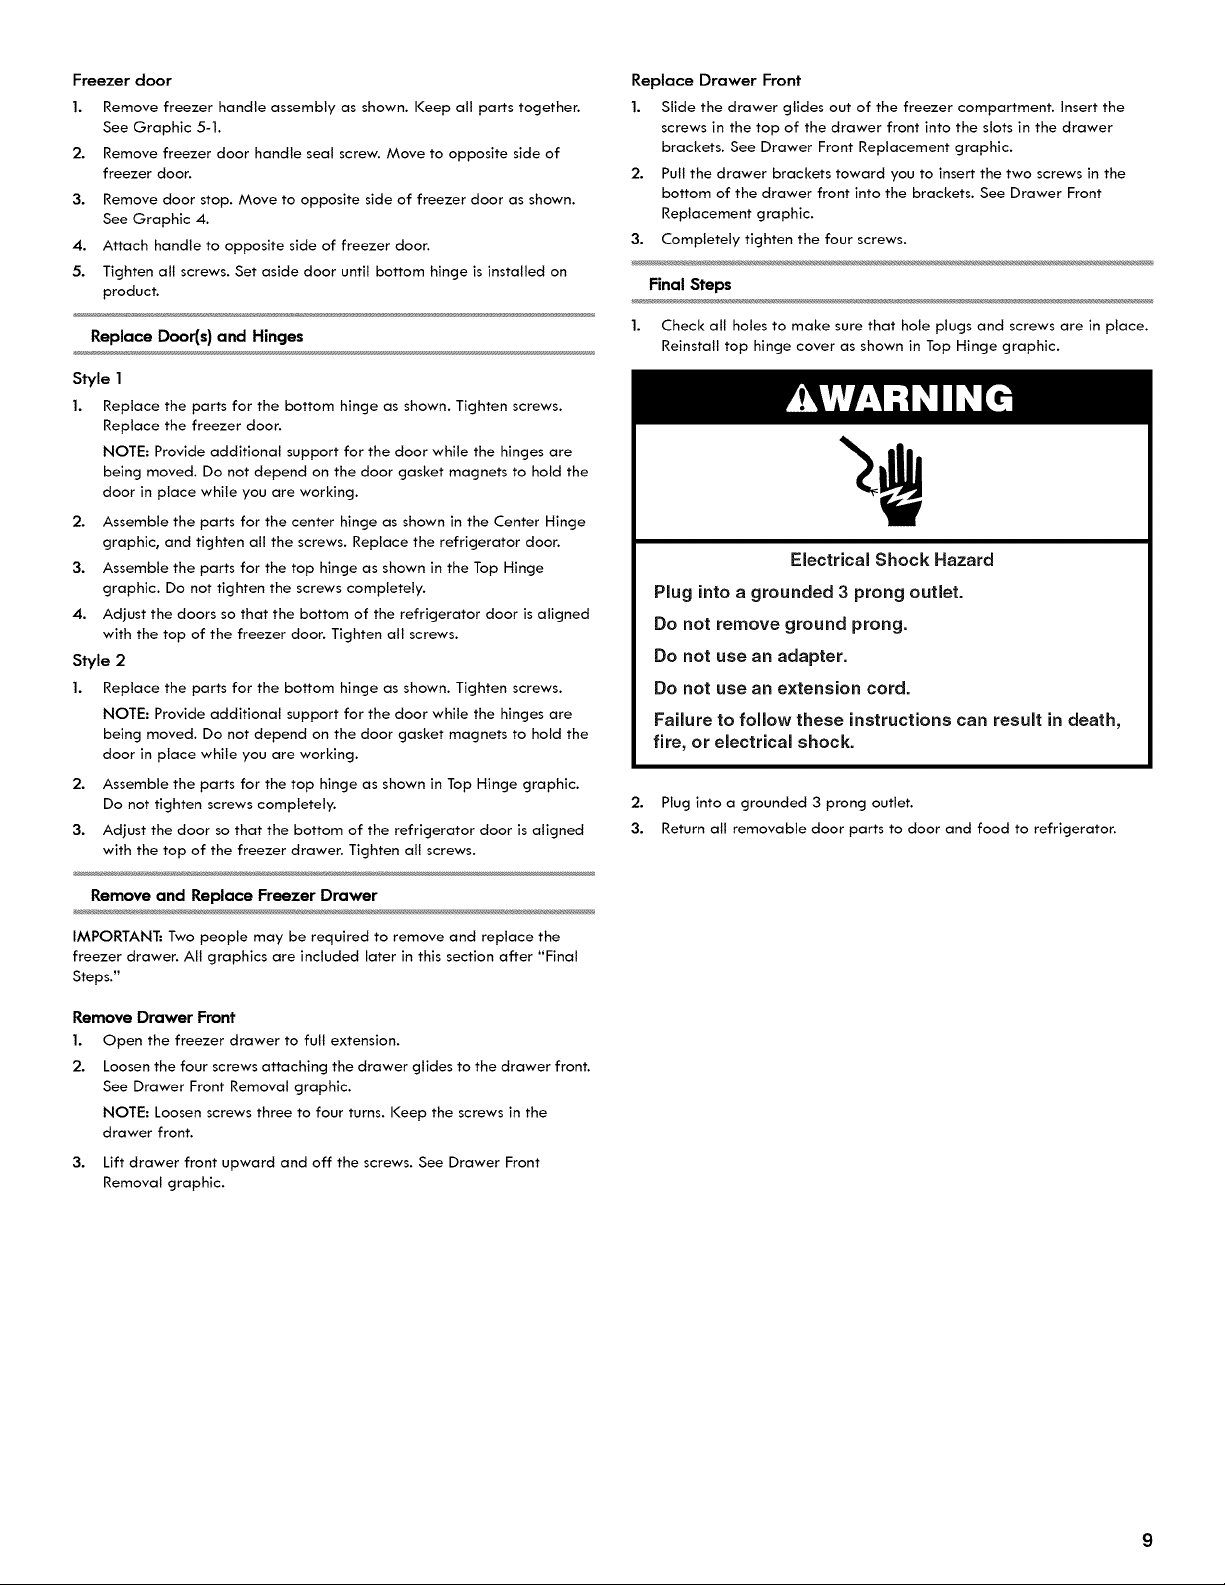
Electrical Shock Hazard
Plug into a grounded 3 prong outlet.
Do not remove ground prong.
Do not use an adapter.
Do not use an extension cord.
Failure to follow these instructions can result in death,
fire, or electrical shock.
2. Plug into a grounded 3 prong outlet.
3. Return all removable door parts to door and food to refrigerator.
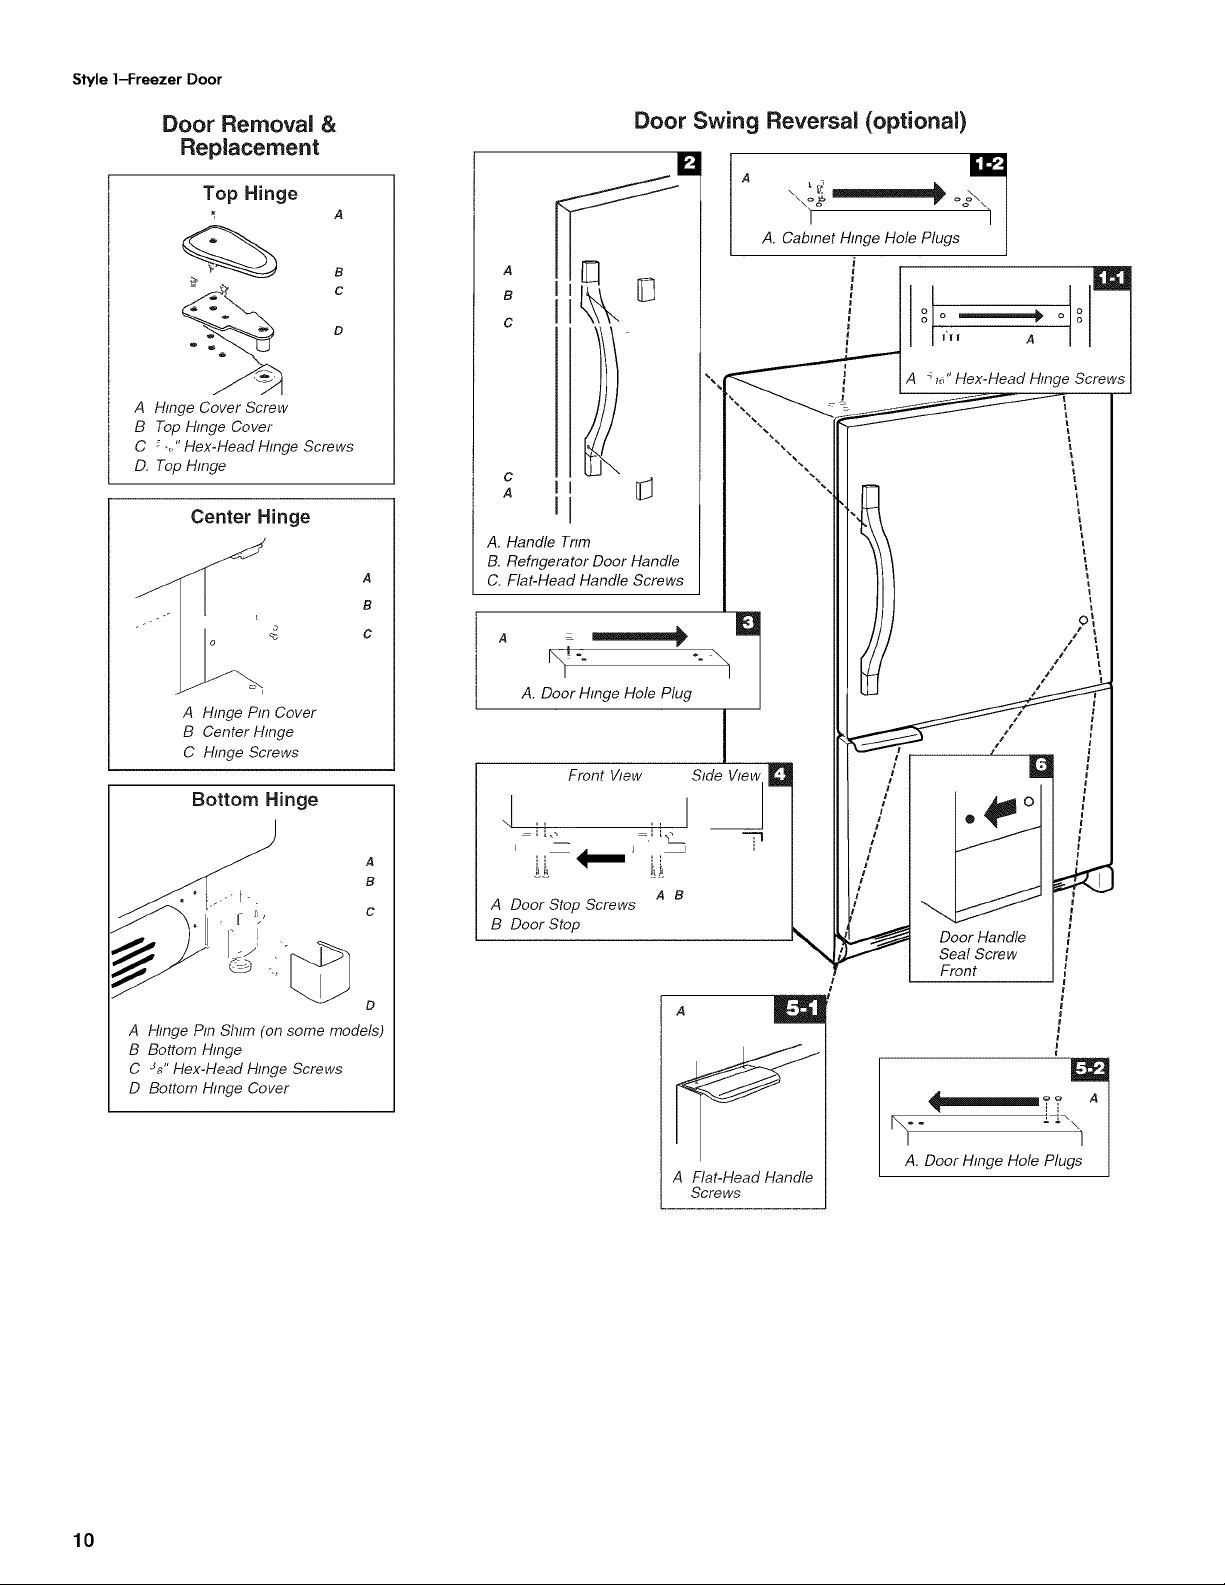
Style 1-Freezer Door
Door Removal &
Replacement
Top Hinge
A
_ c
A Hinge Cover Screw
B Top Hinge Cover
C _ ,,," Hex-Head Hinge Screws
D. Top Hinge
Center Hinge
A
B
o
._ C
A Hinge Pin Cover
B Center Hinge
C Hinge Screws
Bottom Hinge
D
A Hinge Pin Shim (on some models)
B Bottom Hinge
C Js" Hex-Head Hinge Screws
D Bottom Hinge Cover
Door Swing Reversal (optional)
lU _ < Mr.!
I I I1/ ",, _ _ I A _7-_"Hex-Head Hinge ScrewsrewsI
//[U\ "'"-....III _ ,
A. HandleTrlm III \\\ _ /
B.Refrigerator DoorHandle Ill /1/ t /
" _ IIIIIIIIIIIII_ i I_ I I// lefO i
Ill ,.'L
-- I|l _ / I
I / I
I_1 ## I
..... • /" I0 i
Front View Side View
; III/I
=:L., :,=L._ _ III / I I/ I
,_ Ill.," I. I __'-
ADoorStopScrews II_' ]
B Door Stop _ _ Door Handle
/ Seal Screw
"f Front
A
A Flat-Head Handle
Screws
i
i
_AA.'Door Hinge Hole-PI--u_
10
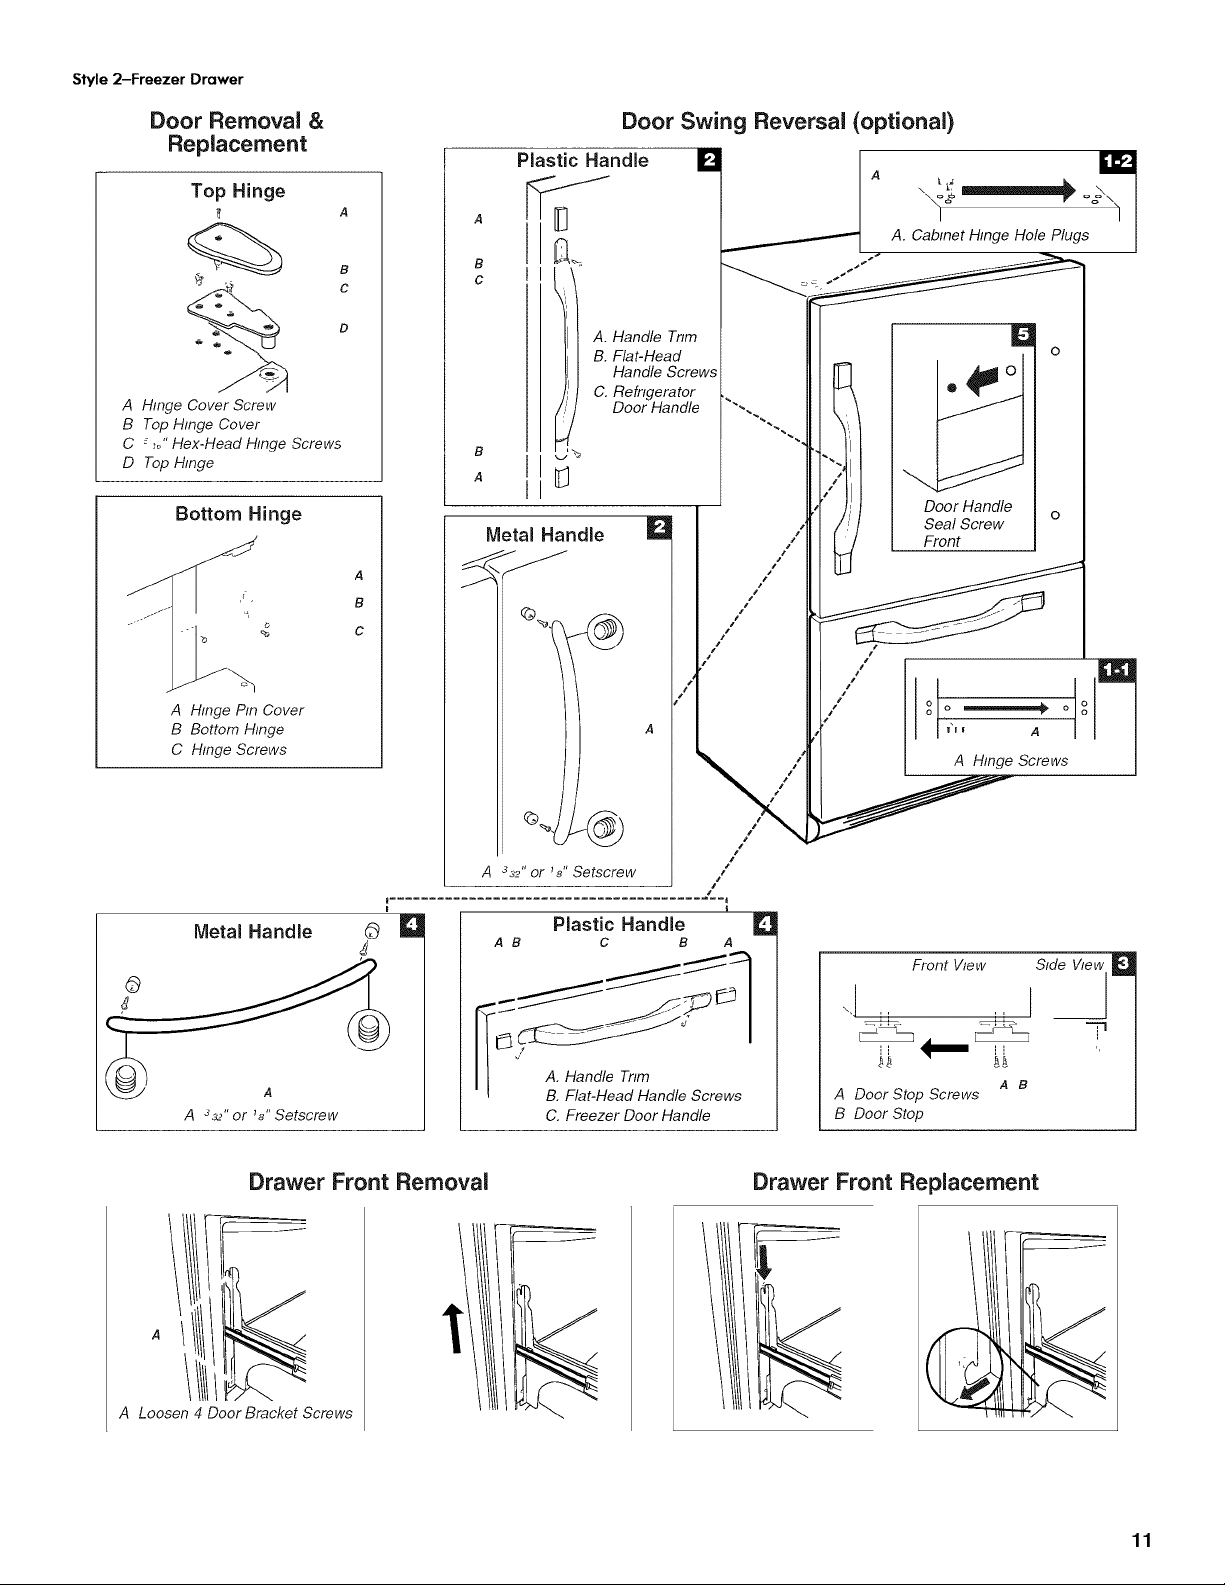
Style 2-Freezer Drawer
Door Removal &
Replacement
Top Hinge
A Hinge Cover Screw
B Top Hinge Cover
C _ _J' Hex-Head Hinge Screws
D Top Hinge
Bottom Hinge
A Hinge Pin Cover
B Bottom Hinge
C Hinge Screws
A
B
C
Metal Handle
J
A
A 3_,, or _a"Setscrew
Door Swing Reversal (optional)
A
B
C
B
A
Metal Handle
Q
A. Handle Trim
B. Flat-Head
Handle Screws
C. Refrigerator
Door Handle
/
A %__"or _8" Setscrew /
s
Plastic Handle
A B C B A
II A: /_tn_;aT_,Handle Screws
C. Freezer Door Handle
Q
Door Handle
Seal Screw
Front
Front View
S,deV,e_]_
il
A B
A Door Stop Screws
B Door Stop
Drawer Front Removal
i ====_=,__._._
A Loosen 4 Door Bracket Screws
Drawer Front Replacement
11
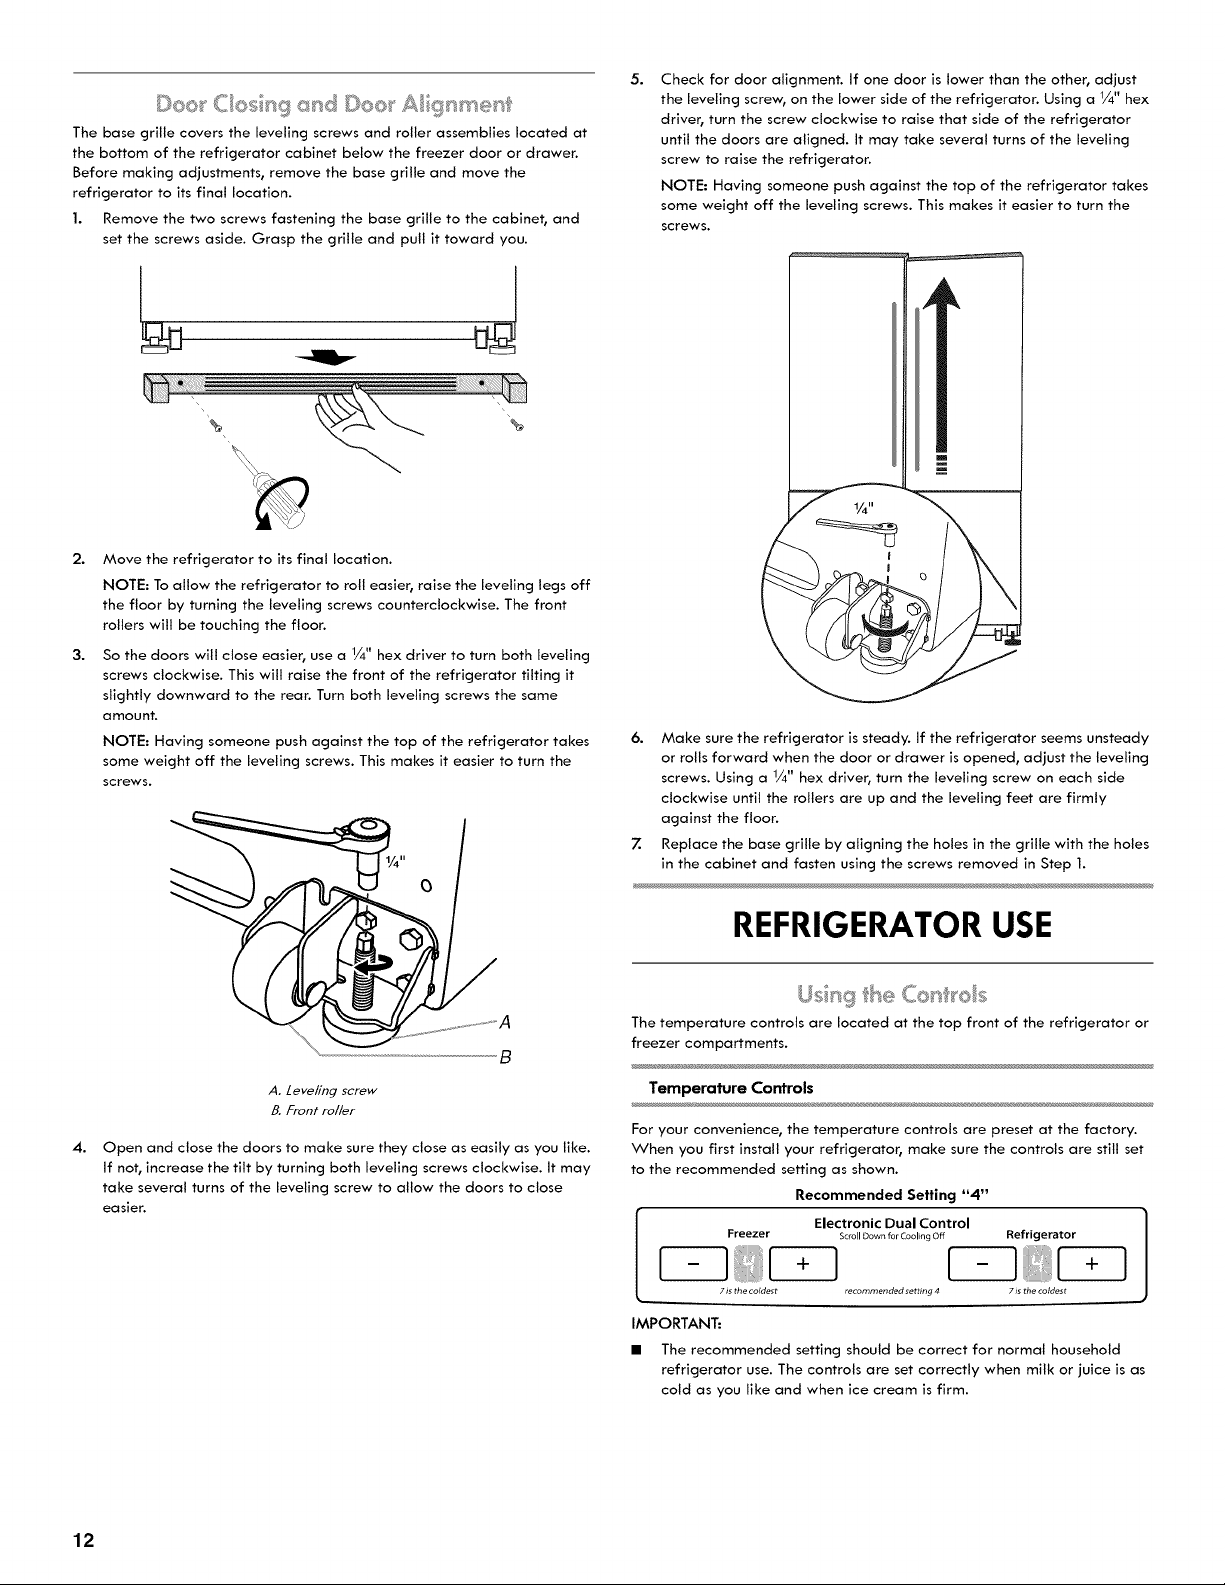
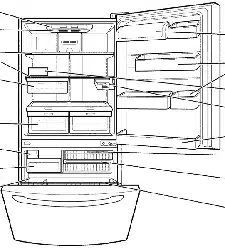
The base grille covers the leveling screws and roller assemblies located at
the bottom of the refrigerator cabinet below the freezer door or drawer
Before making adjustments, remove the base grille and move the
refrigerator to its final location
1. Remove the two screws fastening the base grille to the cabinet, and
set the screws aside Grasp the grille and pull it toward you
2.
3.
4.
%
Move the refrigerator to its final location.
NOTE: To allow the refrigerator to roll easier, raise the leveling legs off
the floor by turning the leveling screws counterclockwise. The front
rollers will be touching the floor.
So the doors will close easier, use a 1/4" hex driver to turn both leveling
screws clockwise. This will raise the front of the refrigerator tilting it
slightly downward to the rear. Turn both leveling screws the same
amount.
NOTE: Having someone push against the top of the refrigerator takes
some weight off the leveling screws. This makes it easier to turn the
screws.
A. Zeve/ing screw
B. Front ro//er
Open and close the doors to make sure they close as easily as you like.
If not, increase the tilt by turning both leveling screws clockwise. It may
take several turns of the leveling screw to allow the doors to close
easier.
5.
Check for door alignment. If one door is lower than the other, adjust
the leveling screw° on the lower side of the refrigerator. Using a 1/4" hex
driver, turn the screw clockwise to raise that side of the refrigerator
until the doors are aligned. It may take several turns of the leveling
screw to raise the refrigerator.
NOTE: Having someone push against the top of the refrigerator takes
some weight off the leveling screws. This makes it easier to turn the
screws.
6. Make sure the refrigerator is steady. If the refrigerator seems unsteady
or rolls forward when the door or drawer is opened, adjust the leveling
screws. Using a 1/4" hex driver, turn the leveling screw on each side
clockwise until the rollers are up and the leveling feet are firmly
against the floor.
Z Replace the base grille by aligning the holes in the grille with the holes
in the cabinet and fasten using the screws removed in Step 1.
REFRIGERATOR USE
Usng he Co _'_'e s
The temperature controls are located at the top front of the refrigerator or
freezer compartments.
Temperature Controls
For your convenience, the temperature controls are preset at the factory.
When you first install your refrigerator, make sure the controls are still set
to the recommended setting as shown.
Recommended Setting "4"
Electronic Dual Control
Freezer Scroll Down for Cooling Off Refrigerator
• is the coldest recommended setting 4 • is the coldest
IMPORTANT:
• The recommended setting should be correct for normal household
refrigerator use. The controls are set correctly when milk or juice is as
cold as you like and when ice cream is firm.
12
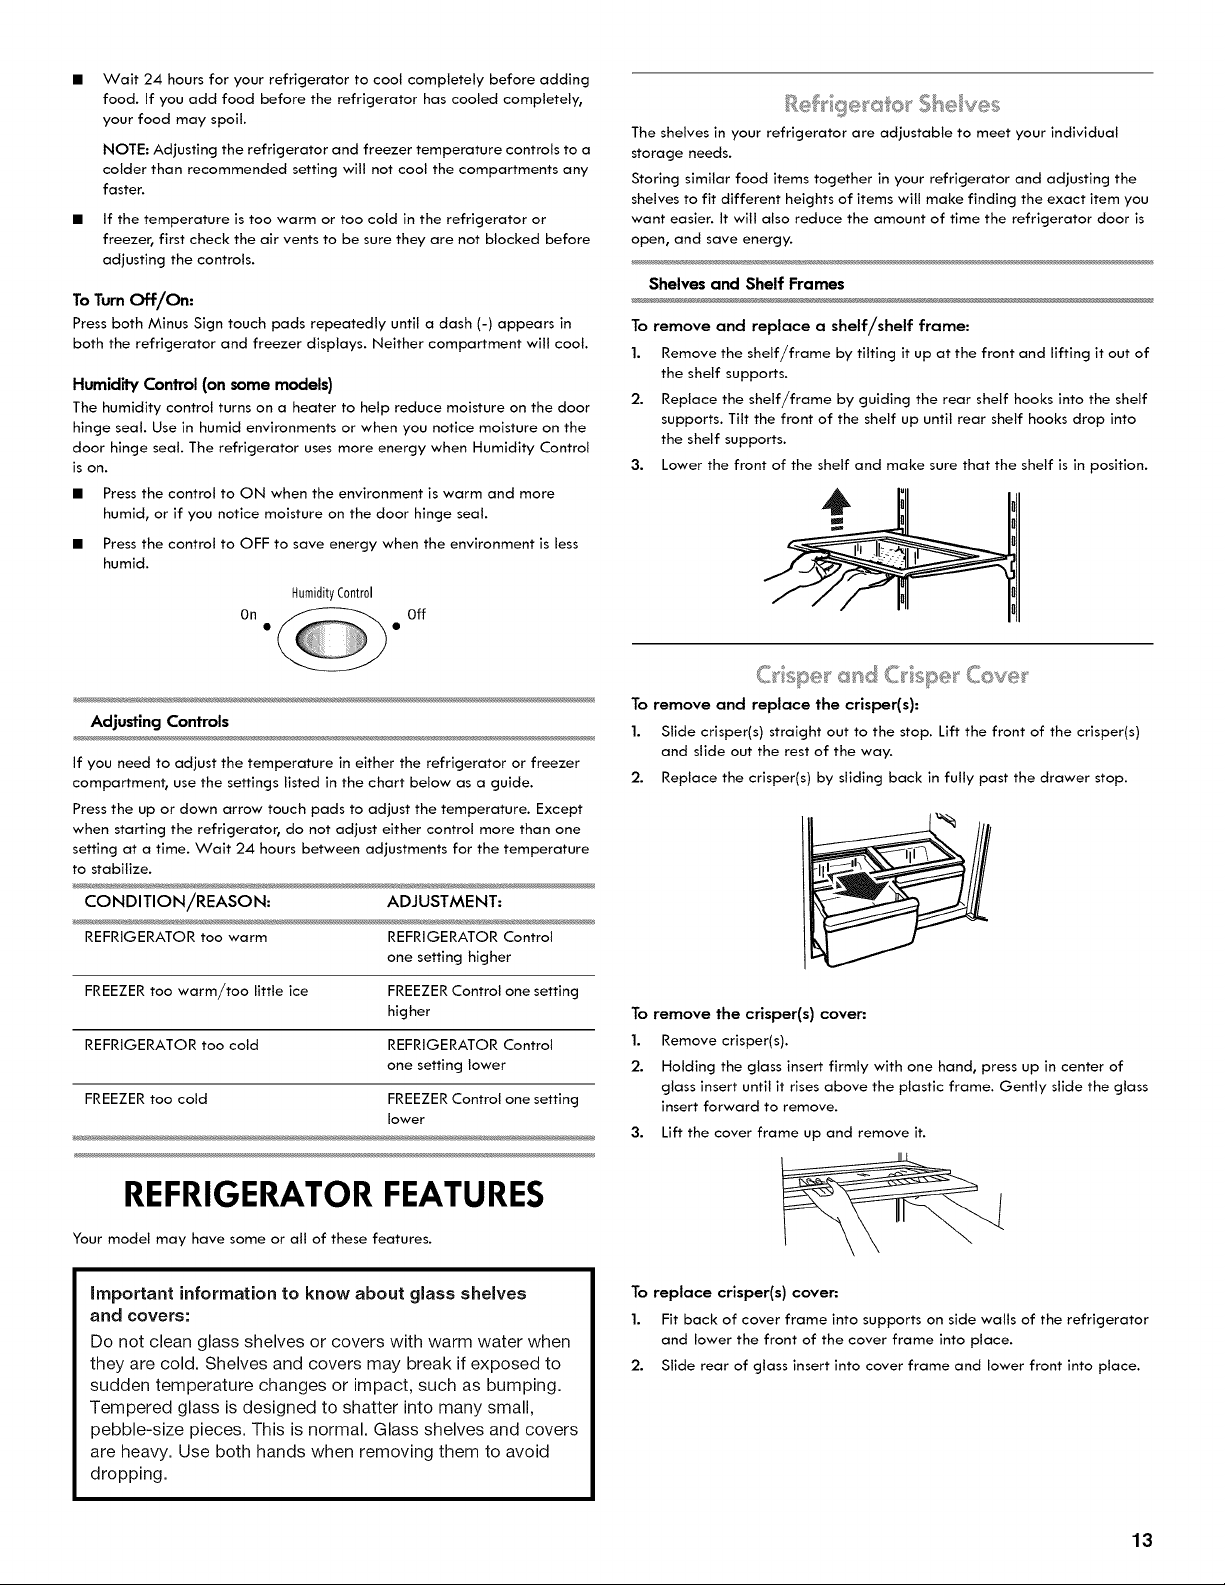
Wait 24 hours for your refrigerator to cool completely before adding
food. If you add food before the refrigerator has cooled completely,
your food may spoil.
NOTE: Adjusting the refrigerator and freezer temperature controls to a
colder than recommended setting will not cool the compartments any
faster.
If the temperature is too warm or too cold in the refrigerator or
freezer, first check the air vents to be sure they are not blocked before
adjusting the controls.
To Turn Off/On:
Press both Minus Sign touch pads repeatedly until a dash (-) appears in
both the refrigerator and freezer displays. Neither compartment will cool.
Humidity Control (on some models)
The humidity control turns on a heater to help reduce moisture on the door
hinge seal. Use in humid environments or when you notice moisture on the
door hinge seal. The refrigerator uses more energy when Humidity Control
iS on.
• Press the control to ON when the environment is warm and more
humid, or if you notice moisture on the door hinge seal.
• Press the control to OFF to save energy when the environment is less
humid.
HumidityControl
On Off
Adjusting Controls
If you need to adjust the temperature in either the refrigerator or freezer
compartment, use the settings listed in the chart below as a guide.
Press the up or down arrow touch pads to adjust the temperature. Except
when starting the refrigerator, do not adjust either control more than one
setting at a time. Wait 24 hours between adjustments for the temperature
to stabilize.
CONDITION/REASON= ADJUSTMENT=
REFRIGERATOR too warm REFRIGERATOR Control
one setting higher
FREEZER too warm/too little ice FREEZER Control one setting
higher
REFRIGERATOR too cold REFRIGERATOR Control
one setting lower
FREEZER too cold FREEZER Control one setting
lower
_i:e 9e_x:_x_,She_ves
The shelves in your refrigerator are adjustable to meet your individual
storage needs.
Storing similar food items together in your refrigerator and adjusting the
shelves to fit different heights of items will make finding the exact item you
want easier. It will also reduce the amount of time the refrigerator door is
open, and save energy.
Shelves and Shelf Frames
To remove and replace a shelf/shelf frame:
1. Remove the shelf/frame by tilting it up at the front and lifting it out of
the shelf supports.
2. Replace the shelf/frame by guiding the rear shelf hooks into the shelf
supports. Tilt the front of the shelf up until rear shelf hooks drop into
the shelf supports.
3. Lower the front of the shelf and make sure that the shelf is in position.
4
To remove and replace the crisper(s):
1. Slide crisper(s) straight out to the stop. Lift the front of the crisper(s)
and slide out the rest of the way.
2. Replace the crisper(s) by sliding back in fully past the drawer stop.
To remove the crisper(s) cover:
1. Remove crisper(s).
2. Holding the glass insert firmly with one hand, press up in center of
glass insert until it rises above the plastic frame. Gently slide the glass
insert forward to remove.
3. Lift the cover frame up and remove it.
REFRIGERATOR FEATURES
Your model may have some or all of these features.
important information to know about glass shelves
and covers:
Do not clean glass shelves or covers with warm water when
they are cold. Shelves and covers may break if exposed to
sudden temperature changes or impact, such as bumping.
Tempered glass is designed to shatter into many small,
pebble-size pieces. This is normal. Glass shelves and covers
are heavy. Use both hands when removing them to avoid
dropping.
To replace crisper(s) cover.-
1. Fit back of cover frame into supports on side walls of the refrigerator
and lower the front of the cover frame into place.
2. Slide rear of glass insert into cover frame and lower front into place.
13
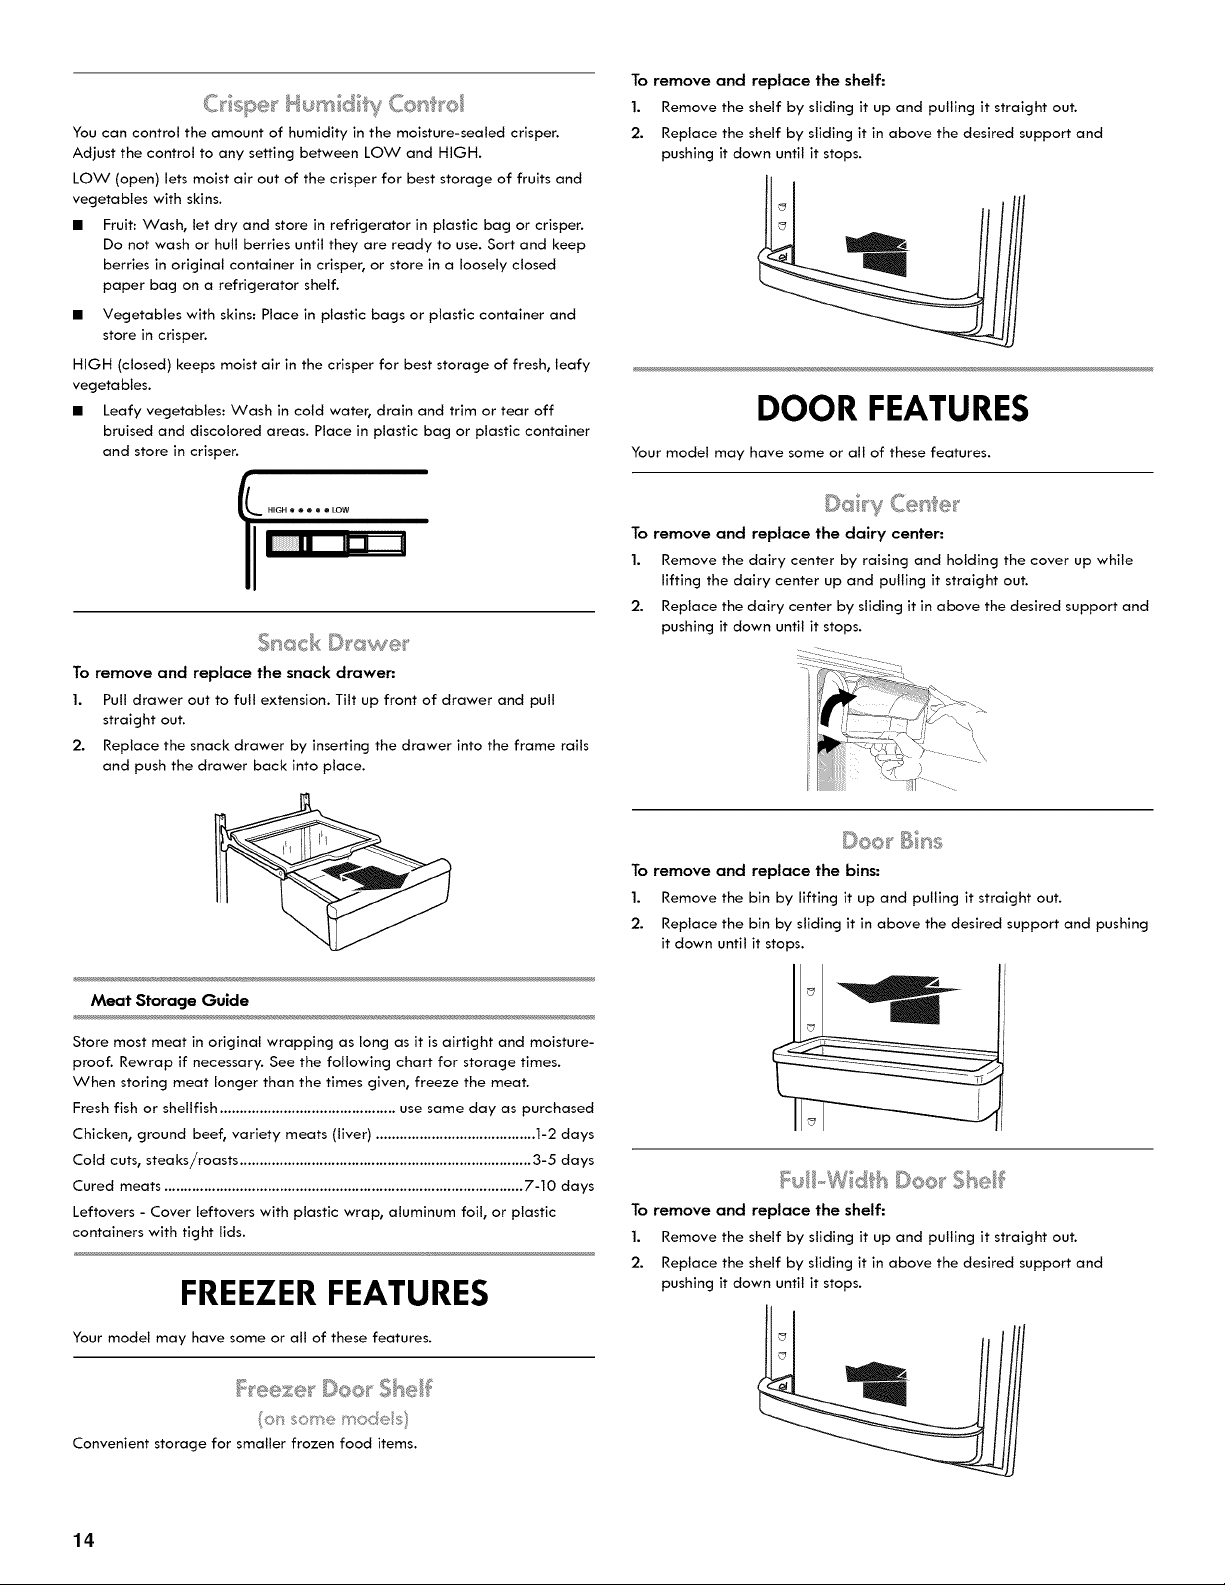
Q spe_umd y Co "o)
You can control the amount of humidity in the moisture-sealed crisper.
Adjust the control to any setting between LOW and HIGH.
LOW (open) lets moist air out of the crisper for best storage of fruits and
vegetables with skins.
• Fruit: Wash, let dry and store in refrigerator in plastic bag or crisper.
Do not wash or hull berries until they are ready to use. Sort and keep
berries in original container in crisper, or store in a loosely closed
paper bag on a refrigerator shelf.
• Vegetables with skins: Place in plastic bags or plastic container and
store in crisper.
HIGH (closed) keeps moist air in the crisper for best storage of fresh, leafy
vegetables.
• Leafy vegetables: Wash in cold water, drain and trim or tear off
bruised and discolored areas. Place in plastic bag or plastic container
and store in crisper.
fi HIGH e e e ® e LOW
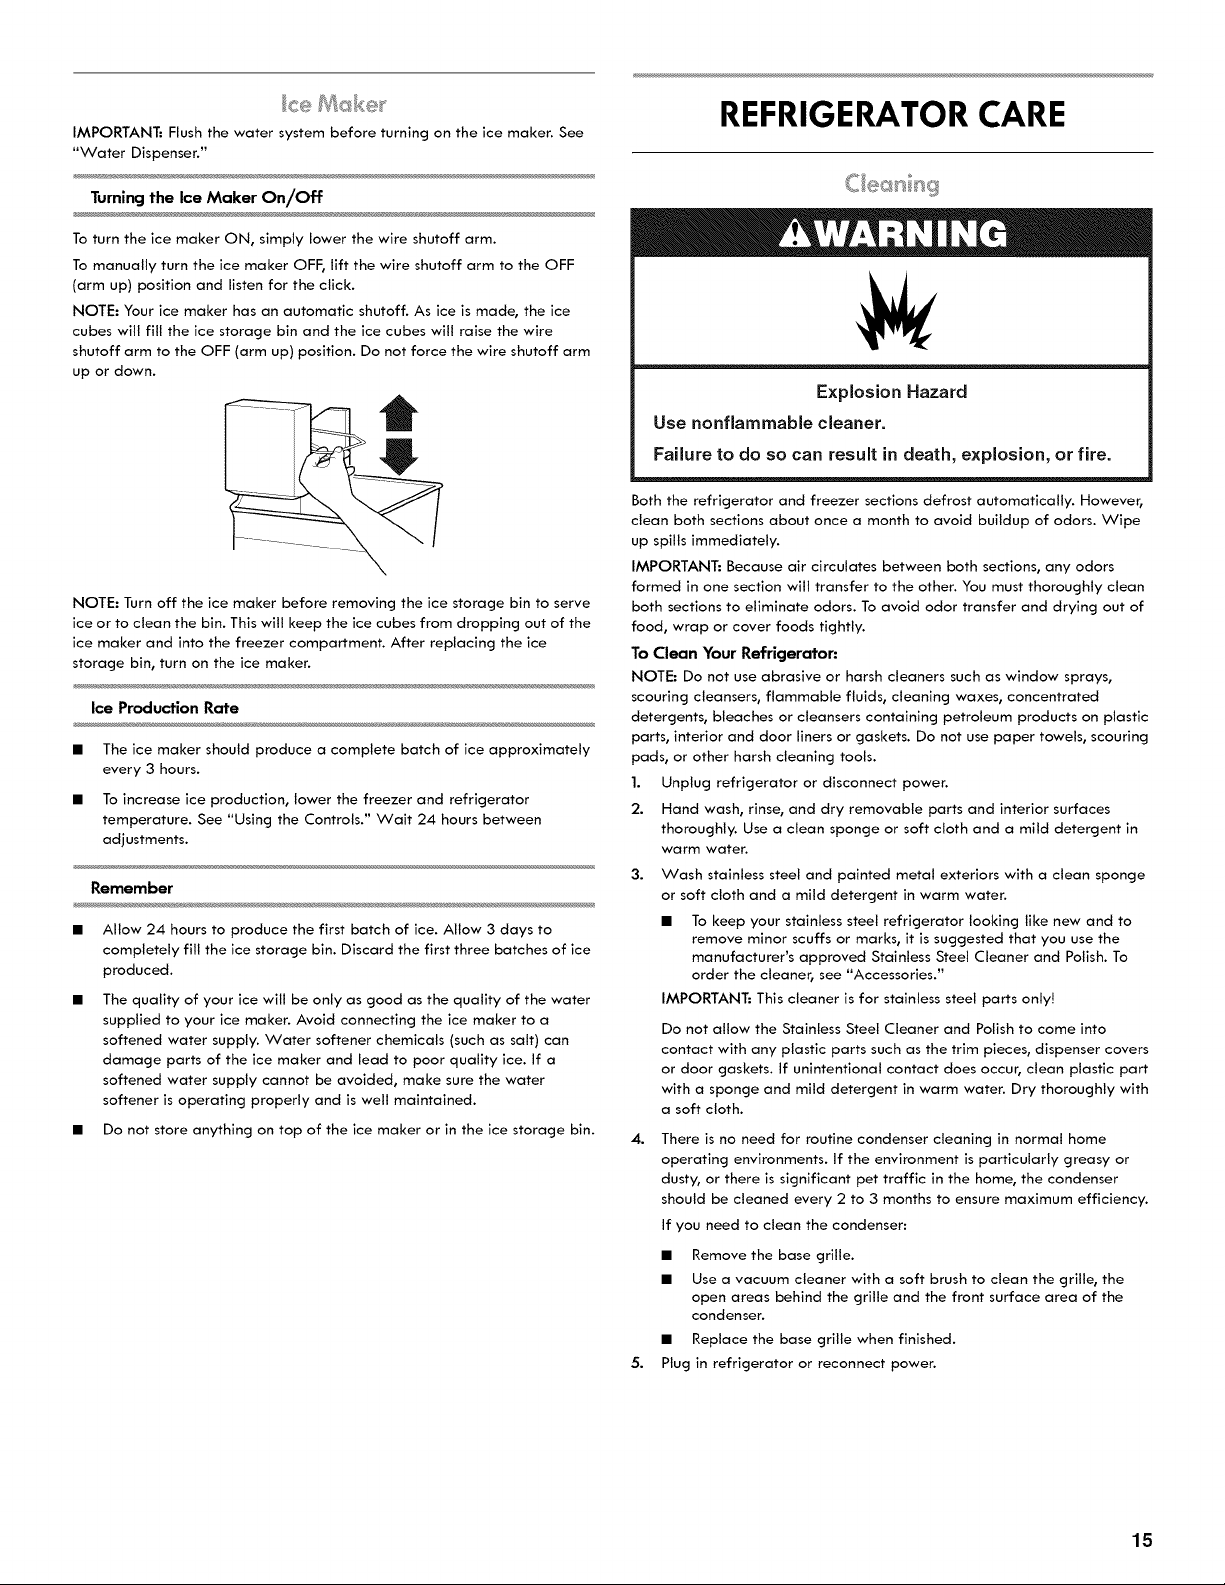
To remove and replace the snack drawer:
1.
2.
Pull drawer out to full extension. Tilt up front of drawer and pull
straight out.
Replace the snack drawer by inserting the drawer into the frame rails
and push the drawer back into place.
To remove and replace the shelf:
1. Remove the shelf by sliding it up and pulling it straight out.
2. Replace the shelf by sliding it in above the desired support and
pushing it down until it stops.
DOOR FEATURES
Your model may have some or all of these features.
To remove and replace the dairy center:
1. Remove the dairy center by raising and holding the cover up while
lifting the dairy center up and pulling it straight out.
2. Replace the dairy center by sliding it in above the desired support and
pushing it down until it stops.
Dee_' Bns
To remove and replace the bins:
1. Remove the bin by lifting it up and pulling it straight out.
2. Replace the bin by sliding it in above the desired support and pushing
it down until it stops.
Meat Storage Guide
Store most meat in original wrapping as long as it is airtight and moisture-
proof. Rewrap if necessary. See the following chart for storage times.
When storing meat longer than the times given, freeze the meat.
Fresh fish or shellfish ............................................ use same day as purchased
Chicken, ground beef, variety meats (liver) ........................................ 1-2 days
Cold cuts, steaks/roasts ......................................................................... 3-5 days
Cured meats .......................................................................................... 7-10 days
Leftovers - Cover leftovers with plastic wrap, aluminum foil, or plastic
containers with tight lids.
FREEZER FEATURES
Your model may have some or all of these features.
On some models
Convenient storage for smaller frozen food items.
Fu) _W d(_hDeos _She_f
To remove and replace the shelf:
1. Remove the shelf by sliding it up and pulling it straight out.
2. Replace the shelf by sliding it in above the desired support and
pushing it down until it stops.
14
IMPORTANT: Flush the water system before turning on the ice maker. See
"Water Dispenser."
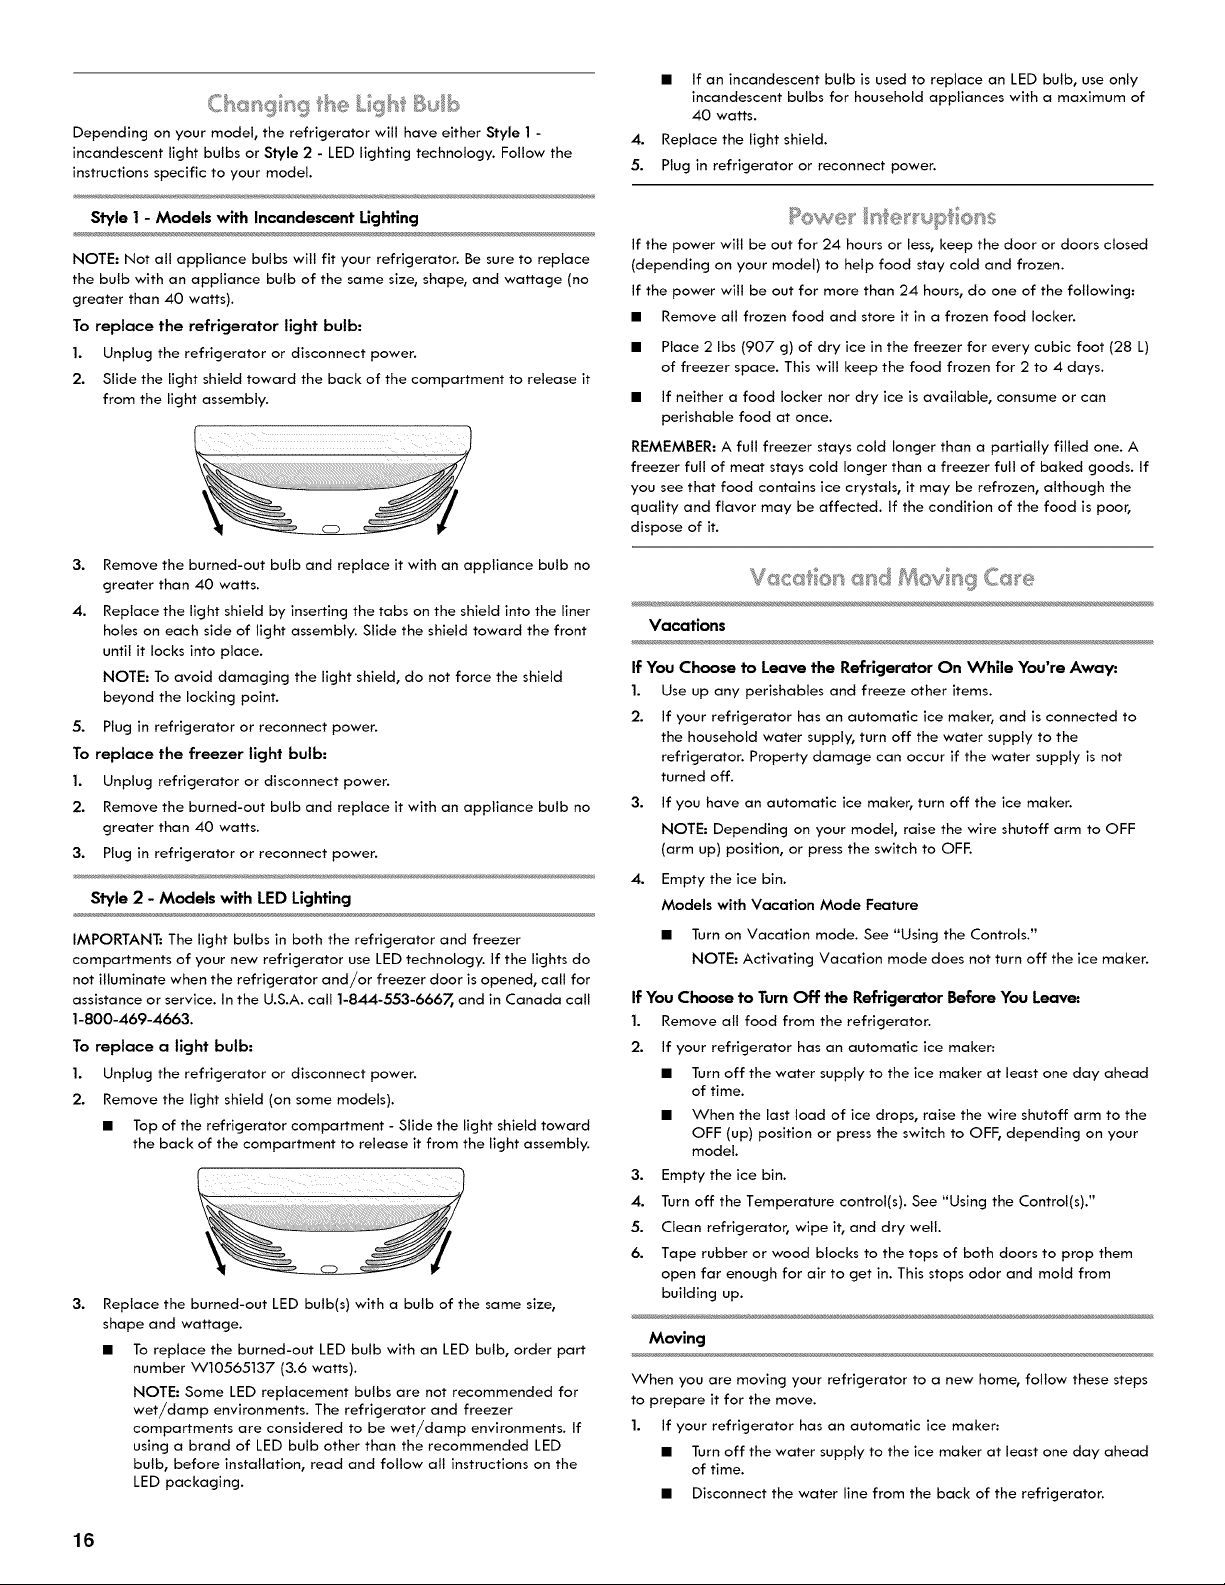
Turning the Ice Maker On/Off
To turn the ice maker ON, simply lower the wire shutoff arm.
To manually turn the ice maker OFF, lift the wire shutoff arm to the OFF
(arm up) position and listen for the click.
NOTE: Your ice maker has an automatic shutoff. As ice is made, the ice
cubes will fill the ice storage bin and the ice cubes will raise the wire
shutoff arm to the OFF (arm up) position. Do not force the wire shutoff arm
up or down.
NOTE: Turn off the ice maker before removing the ice storage bin to serve
ice or to clean the bin. This will keep the ice cubes from dropping out of the
ice maker and into the freezer compartment. After replacing the ice
storage bin, turn on the ice maker.
Ice Production Rate
The ice maker should produce a complete batch of ice approximately
every 3 hours.
To increase ice production, lower the freezer and refrigerator
temperature. See "Using the Controls." Wait 24 hours between
adjustments.
Remember
• Allow 24 hours to produce the first batch of ice. Allow 3 days to
completely fill the ice storage bin. Discard the first three batches of ice
produced.
The quality of your ice will be only as good as the quality of the water
supplied to your ice maker. Avoid connecting the ice maker to a
softened water supply. Water softener chemicals (such as salt) can
damage parts of the ice maker and lead to poor quality ice. If a
softened water supply cannot be avoided, make sure the water
softener is operating properly and is well maintained.
• Do not store anything on top of the ice maker or in the ice storage bin.
REFRIGERATORCARE
Explosion Hazard
Use nonflammable cleaner.
Failure to do so can result in death, explosion, or fire.
Both the refrigerator and freezer sections defrost automatically. However,
clean both sections about once a month to avoid buildup of odors. Wipe
up spills immediately.
IMPORTANT: Because air circulates between both sections, any odors
formed in one section will transfer to the other. You must thoroughly clean
both sections to eliminate odors. To avoid odor transfer and drying out of
food, wrap or cover foods tightly.
To Clean Your Refrigerator:
NOTE: Do not use abrasive or harsh cleaners such as window sprays,
scouring cleansers, flammable fluids, cleaning waxes, concentrated
detergents, bleaches or cleansers containing petroleum products on plastic
parts, interior and door liners or gaskets. Do not use paper towels, scouring
pads, or other harsh cleaning tools.
1. Unplug refrigerator or disconnect power.
2. Hand wash, rinse, and dry removable parts and interior surfaces
thoroughly. Use a clean sponge or soft cloth and a mild detergent in
warm water.
3.
Wash stainless steel and painted metal exteriors with a clean sponge
or soft cloth and a mild detergent in warm water.
• To keep your stainless steel refrigerator looking like new and to
remove minor scuffs or marks, it is suggested that you use the
manufacturePs approved Stainless Steel Cleaner and Polish. To
order the cleaner, see "Accessories."
IMPORTANT: This cleaner is for stainless steel parts only!
Do not allow the Stainless Steel Cleaner and Polish to come into
contact with any plastic parts such as the trim pieces, dispenser covers
or door gaskets. If unintentional contact does occur, clean plastic part
with a sponge and mild detergent in warm water. Dry thoroughly with
a soft cloth.
4.
5.
There is no need for routine condenser cleaning in normal home
operating environments. If the environment is particularly greasy or
dusty, or there is significant pet traffic in the home, the condenser
should be cleaned every 2 to 3 months to ensure maximum efficiency.
If you need to clean the condenser:
• Remove the base grille.
• Use a vacuum cleaner with a soft brush to clean the grille, the
open areas behind the grille and the front surface area of the
condenser.
• Replace the base grille when finished.
Plug in refrigerator or reconnect power.
15
Depending on your model, the refrigerator will have either Style 1 -
incandescent light bulbs or Style 2 - LED lighting technology. Follow the
instructions specific to your model.
Style 1 - Models with Incandescent Lighting
NOTE: Not all appliance bulbs will fit your refrigerator. Be sure to replace
the bulb with an appliance bulb of the same size, shape, and wattage (no
greater than 40 watts).
To replace the refrigerator light bulb:
1. Unplug the refrigerator or disconnect power.
2. Slide the light shield toward the back of the compartment to release it
from the light assembly.
3. Remove the burned-out bulb and replace it with an appliance bulb no
greater than 40 watts.
4. Replace the light shield by inserting the tabs on the shield into the liner
holes on each side of light assembly. Slide the shield toward the front
until it locks into place.
NOTE: To avoid damaging the light shield, do not force the shield
beyond the locking point.
5. Plug in refrigerator or reconnect power.
To replace the freezer light bulb:
1. Unplug refrigerator or disconnect power.
2. Remove the burned-out bulb and replace it with an appliance bulb no
greater than 40 watts.
3. Plug in refrigerator or reconnect power.
Style 2 - Models with LED Lighting
IMPORTANT: The light bulbs in both the refrigerator and freezer
compartments of your new refrigerator use LED technology. If the lights do
not illuminate when the refrigerator and/or freezer door is opened, call for
assistance or service. In the U.S.A. call 1-844-553-6667, and in Canada call
1-800-469-4663.
To replace a light bulb:
1. Unplug the refrigerator or disconnect power.
2. Remove the light shield (on some models).
• Top of the refrigerator compartment - Slide the light shield toward
the back of the compartment to release it from the light assembly.
3.
Replace the burned-out LED bulb(s) with a bulb of the same size,
shape and wattage.
• To replace the burned-out LED bulb with an LED bulb, order part
number W10565137 (3.6 watts).
NOTE: Some LED replacement bulbs are not recommended for
wet/damp environments. The refrigerator and freezer
compartments are considered to be wet/damp environments. If
using a brand of LED bulb other than the recommended LED
bulb, before installation, read and follow all instructions on the
LED packaging.
4.
5.
• If an incandescent bulb is used to replace an LED bulb, use only
incandescent bulbs for household appliances with a maximum of
40 watts.
Replace the light shield.
Plug in refrigerator or reconnect power.
P_s}we__ _t_e_<up ens
If the power will be out for 24 hours or less, keep the door or doors closed
(depending on your model) to help food stay cold and frozen.
If the power will be out for more than 24 hours, do one of the following:
• Remove all frozen food and store it in a frozen food locker.
• Place 2 Ibs (907 g) of dry ice in the freezer for every cubic foot (28 L)
of freezer space. This will keep the food frozen for 2 to 4 days.
• If neither a food locker nor dry ice is available, consume or can
perishable food at once.
REMEMBER: A full freezer stays cold longer than a partially filled one. A
freezer full of meat stays cold longer than a freezer full of baked goods. If
you see that food contains ice crystals, it may be refrozen, although the
quality and flavor may be affected. If the condition of the food is poor,
dispose of it.
Vacations
If You Choose to Leave the Refrigerator On While You're Away:
1. Use up any perishables and freeze other items.
2. If your refrigerator has an automatic ice maker, and is connected to
the household water supply, turn off the water supply to the
refrigerator. Property damage can occur if the water supply is not
turned off.
3.
4.
If you have an automatic ice maker, turn off the ice maker.
NOTE: Depending on your model, raise the wire shutoff arm to OFF
(arm up) position, or press the switch to OFF.
Empty the ice bin.
Models with Vacation Mode Feature
• Turn on Vacation mode. See "Using the Controls."
NOTE: Activating Vacation mode does not turn off the ice maker.
If You Choose to Turn Off the Refrigerator Before You Leave:
1. Remove all food from the refrigerator.
2. If your refrigerator has an automatic ice maker:
• Turn off the water supply to the ice maker at least one day ahead
of time.
• When the last load of ice drops, raise the wire shutoff arm to the
OFF (up) position or press the switch to OFF, depending on your
model.
3. Empty the ice bin.
4. Turn off the Temperature control(s). See "Using the Control(s)."
5. Clean refrigerator, wipe it, and dry well.
6. Tape rubber or wood blocks to the tops of both doors to prop them
open far enough for air to get in. This stops odor and mold from
building up.
Moving
When you are moving your refrigerator to a new home, follow these steps
to prepare it for the move.
1. If your refrigerator has an automatic ice maker:
• Turn off the water supply to the ice maker at least one day ahead
of time.
• Disconnect the water line from the back of the refrigerator.
16
• When the last load of ice drops, raise the wire shutoff arm to the
OFF (up) position or press the switch to OFF, depending on your
model.
2. Remove all food from the refrigerator and pack all frozen food in dry
ice.
3. Empty the ice bin.
4. Turn off the Temperature control(s). See "Using the Control(s)."
5. Unplug refrigerator.
6. Clean, wipe, and dry thoroughly.
7. Take out all removable parts, wrap them well, and tape them together
so they don't shift and rattle during the move.
8. Depending on the model, raise the front of the refrigerator so it rolls
mare easily OR raise the leveling screws so they don't scrape the floor.
See "Adjust the Door(s)" or "Door Closing and Door Alignment."
9. Tape the doors closed and tape the power cord to the back of the
refrigerator.
When you get to your new home, put everything back and refer to the
"Installation Instructions" section for preparation instructions. Also, if your
refrigerator has an automatic ice maker, remember to reconnect the water
supply to the refrigerator.
TROUBLESHOOTING
Try the solutions suggested here first before calling for assistance.
The refrigerator will not operate
Electrical Shock Hazard
Plug into a grounded 3 prong outlet.
Do not remove ground prong.
Do not use an adapter.
Do not use an extension cord.
Failure to follow these instructions can result in death,
fire, or electrical shock.
• Power cord unplugged? Plug into a grounded 3 prong outlet.
• Is outlet working? Plug in a lamp to see if the outlet is working.
• Household fuse blown or circuit breaker tripped? Replace the fuse or
reset the circuit breaker. If the problem continues, call an electrician.
• Is control on? Make sure the refrigerator control is on. See "Using the
Control(s)."
• New installation? Allow 24 hours following installation for the
refrigerator to cool completely.
NOTE: Adjusting the temperature control to coldest setting will not
cool the refrigerator more quickly.
The motor seems to run too much
Your new refrigerator may run longer than your old one due to its high-
efficiency compressor and fans. The unit may run even longer if the room is
warm, a large food load is added, the door is opened often, or if the door
has been left open.
The refrigerator seems noisy
Refrigerator noise has been reduced over the years. Due to this reduction,
you may hear intermittent noises from your new refrigerator that you did
not notice from your old model. Below are listed some normal sounds with
explanations.
• Pulsating - fans/compressor adjusting to optimize performance.
• Hissing/Rattling - flow of refrigerant or from items placed on top of
the refrigerator.
• Popping - contraction/expansion of inside walls, especially during
initial cool-down.
• Water running/dripping - may be heard when water melts during
defrosting and runs into the drain pan.
The door will not close completely
• Door blocked open? Move food packages away from door.
• Bin or shelf in the way? Push bin or shelf back in the correct position.
• Crisper cover in the way? Make sure the crisper cover is fully pushed
in, so that the back rests on the supports.
The door is difficult to open
Explosion Hazard
Use nonflarnrnable cleaner.
Failure to do so can result in death, explosion, or fire.
• Gaskets dirty or sticky? Clean gaskets and contact surfaces with mild
soap and warm water. Rinse and dry with soft cloth.
17
Temperature is too warm
• New installation? Allow 24 hours following installation for the
refrigerator to cool completely.
• Door opened often or left open? Allows warm air to enter refrigerator.
Minimize door openings and keep door fully closed.
• Large load of food added? Allow several hours for refrigerator to
return to normal temperature.
• Control set correctly for the surrounding conditions? Adjust the control
a setting colder. Check temperature in 24 hours. See "Using the
Control(s)."
There is interior moisture buildup
NOTE: Some moisture buildup is normal.
• Humid room? Contributes to moisture buildup.
• Door opened often or left open? Allows humid air to enter refrigerator.
Minimize door openings and keep door fully closed.
The ice maker is not producing ice or not enough ice
• Refrigerator connected to a water supply and the supply shutoff valve
turned on? Connect refrigerator to water supply and turn water shutoff
valve fully open.
• Kink in the water source line? A kink in the line can reduce water flow.
Straighten the water source line.
• Ice maker turned on? Make sure wire shutoff arm or switch (depending
on model) is in the ON position.
• New installation? Wait 24 hours after ice maker installation for ice
production to begin. Wait 72 hours for full ice production.
• Freezer door closed completely? Firmly close the freezer compartment
door. If the freezer compartment door will not close all the way, see
"The doors will not close completely," earlier in this section.
• Large amount of ice recently removed? Allow 24 hours for ice maker
to produce more ice.
• Ice cube jammed in the ice maker ejector arm?
Remove ice from the ejector arm with a plastic utensil.
• Water filter installed on the refrigerator? Remove filter and operate
ice maker. If ice volume improves, then the filter may be clogged or
incorrectly installed. Replace filter or reinstall it correctly.
• Reverse osmosis water filtration system connected to your cold water
supply? This can decrease water pressure. See "Water Supply
Requirements."
The ice cubes are hollow or small
NOTE: This is an indication of low water pressure.
• Water shutoff valve not fully open? Turn the water shutoff valve fully
open.
• Kink in the water source line? A kink in the line can reduce water flow.
Straighten the water source line.
• Water filter installed on the refrigerator? Remove filter and operate
ice maker. If ice quality improves, then the filter may be clogged or
incorrectly installed. Replace filter or reinstall it correctly.
Reverse osmosis water filtration system connected to your cold water
supply? This can decrease water pressure. See '"Water Supply
Requirements."
Questions remain regarding water pressure? Call a licensed, qualified
plumber.
Off-taste, odor or gray color in the ice
• New plumbing connections? New plumbing connections can cause
discolored or off-flavored ice.
• Ice stored too long? Discard ice. Wash ice bin. Allow 24 hours for ice
maker to make new ice.
• Odor transfer from food? Use airtight, moisture proof packaging to
store food.
• Are there minerals (such as sulfur) in the water? A water filter may
need to be installed to remove the minerals.
Water filter installed on the refrigerator? Gray or dark discoloration in
ice indicates that the water filtration system needs additional flushing.
Flush the water system before using a new water filter. Replace water
filter when indicated. See "Water Filtration System."
The water dispenser will not operate properly
Refrigerator connected to a water supply and the supply shutoff valve
turned on? Connect refrigerator to water supply and turn water shutoff
valve fully open.
Kink in the water source line? Straighten the water source line.
New installation? Flush and fill the water system. See "Water
Dispenser."
Is the water pressure at least 35 psi (241 kPo)? The water pressure to
the home determines the flow from the dispenser. See "Water Supply
Requirements."
Water filter installed on the refrigerator? Remove filter and operate
dispenser. If water flow increases, the filter may be clogged or
incorrectly installed. Replace filter or reinstall it correctly.
Refrigerator door closed completely? Close the door firmly. If it does
not close completely, see "The doors will not close completely," earlier
in this section.
Recently removed the doors? Make sure the water dispenser wire/tube
assembly has been properly reconnected. See "Refrigerator Door(s)
and Drawer."
Reverse osmosis water filtration system connected to your cold water
supply? This can decrease water pressure. See "Water Supply
Requirements."
Water is leaking from the dispenser system
NOTE: One or two drops of water after dispensing is normal.
• Glass not being held under the dispenser long enough? Hold the glass
under the dispenser 2 to 3 seconds after releasing the dispenser lever.
• New installation? Flush the water system. See "Water Dispenser."
• Recently changed water filter? Flush the water system. See "Water
Dispenser."
• Water on the floor near the base grille? Make sure the water
dispenser tube connections are fully tightened. See "Refrigerator
Door(s) and Drawer."
18

Water from the dispenser is warm
NOTE: Water from the dispenser is only chilled to 50°F (10°C).
• New installation? Allow 24 hours after installation for the water supply
to cool completely.
• Recently dispensed large amount of water? Allow 24 hours for water
supply to cool completely.
• Water not been recently dispensed? The first glass of water may not
be cool. Discard the first glass of water.
• Refrigerator connected to a cold water pipe? Make sure the
refrigerator is connected to a cold water pipe. See "Water Supply
Requirements."
Replacement Parts:
To order stainless steel cleaner or replacement filters, in the U.S.A. call
1-844-553-6667, and in Canada call 1-800-469-4663. Ask for the
appropriate part number or contact your authorized Kenmore dealer.
Stainless Steel Cleaner and Polish:
Order Part #D22 M40083 R
Water Filter:
Order Part #46-9924 (P6RFWB2)
Air Filter."
Order Part #W10335147A
Produce Preserver:
Order Part #W10335145A
lg
JNDICE
CONTRATOS DE PROTECCION .............................................................. 20
GARANTJA ............................................................................................. 21
SEGURIDAD DEL REFRIGERADOR .......................................................... 22
Como deshacerse adecuadamente de su refrigerador viejo....23
INSTRUCCIONES DE INSTALACION ...................................................... 23
Desempaque el refrigerador ............................................................................ 23
Requisitos de ubicaci6n ..................................................................................... 24
Requisitos del suministro de agua ................................................................... 24
Conexi6n del suministro de agua .................................................................... 24
Requisitos el_ctricos ........................................................................................... 26
Puerta(s) y caj6n del refrigerador ................................................................... 26
Cierre y alineamiento de la puerta ................................................................. 31
USO DE SU REFRIGERADOR ................................................................... 31
Uso de los controles ............................................................................................ 31
CARACTERJSTICAS DEL REFRIGERADOR ............................................... 32
Estantes del refrigerador .................................................................................. 32
Caj6n para verduras y tapa ............................................................................ 32
Control de humedad del caj6n para verduras ............................................. 33
Caj6n para bocadillos ...................................................................................... 33
CARACTERJSTICAS DEL CONGELADOR ................................................ 33
Estante de la puerta del congelador ............................................................. 33
CARACTERJSTICAS DE LA PUERTA ........................................................ 33
Centro de productos 16cteos ........................................................................... 33
Recipientes de la puerta ................................................................................... 34
Estante de ancho completo de la puerta ...................................................... 34
F6brica de hielo ................................................................................................. 34
CUIDADO DE SU REFRIGERADOR ......................................................... 34
Limpieza .............................................................................................................. 34
C6mo cambiar el foco ...................................................................................... 35
Cortes de corriente ............................................................................................ 35
Cuidado durante las vacaciones y mudanzas ............................................. 36
SOLUCION DE PROBLEMAS ................................................................... 37
Funcionamiento del refrigerador .................................................................... 37
Temperatura y humedad ................................................................................. 37
Hielo y agua ....................................................................................................... 38
Accesorios ........................................................................................................... 39
NOMEROS DE SERVICIO ............................................. CONTRAPORTADA
CONTRATOS DE PROTECCION
Contratos maestros de protecci6n
iFe/icitaciones por su inteligente adcluisiei6n! Su nuevo producto Kenmore ®
est6 dise_ado y fabricado para proporcionarle a_os de funcionamiento
confiable. Pero al igual que todos los productos, puede necesitar
mantenimiento preventivo o reparaci6n de vez en cuando. Es allf donde el
Contrato maestro de protecci6n puede ahorrarle dinero e inconvenientes.
El Contrato maestro de protecci6n tambi_n ayuda a prolongar la vida de
su nuevo producto. He aquf Io que se incluye en el Contrato_:
I/Piezas y mano de obra necesarias para ayudar a mantener los
productos funcionando correctamente bajo uso normal, no s61o en
caso de defectos. Nuestra cobertura va mucho m6s all6 de la garantla
del producto. No existen deducibles ni fallas de funcionamiento que
est_n excluidas de la cobertura -- protecci6n verdadera.
I/Servicio experto a cargo de un personal de m6s de 10.000 t_cnicos de
servicio autorizados por Sears, Io que significa que su producto ser6
reparado por alguien en quien usted puede confiar.
Llamadas de servicio ilimitadas y servicio en todo el pals, con la
frecuencia que usted desee, cuando usted desee.
I/GaranHa "sin disgustos" - reemplazo de su producto protegido si
ocurren cuatro fallas o m6s del producto en el transcurso de doce
meses.
I/Reemplazo del producto si su producto protegido no puede ser
reparado.
Revisi6n anual de mantenimiento preventivo a solicitud suya - sin costo
adicional.
I/Ayuda r6pida por tel&fono - Io que nosotros Ilamamos Soluci6n r6pida
- apoyo por tel6fono a cargo de un representante de Sears para todos
los productos. Piense en nosotros como si fu6ramos un "manual
parlante para el propietario'.
IJ Protecci6n de sobrevoltaje contra da_os el&ctricos debido a
ftuctuaciones de electricidad.
Protecci6n por p_rdida de comida, por un valor anual de $250, por
cualquier p_rdida de comida que sea como resultado de fallas
mec6nicas de cualquier refrigerador o congelador cubierto bajo la
garanffa.
Reembolso de la renta si la reparaci6n de su producto protegido tarda
m6s de Io prometido.
25% de descuento sobre el precio com0n por el servicio de reparaci6n
que no est& bajo protecci6n, ad como las piezas relacionadas con el
mismo que se hayan instalado.
Una vez adquirido el Contrato, tan s61o tiene que Ilamar para fijar la visita
de servicio t&cnico. Usted puede Ilamar a cualquier hora, de dfa o de
noche, o fijar una visita t_cnica en Internet.
El Contrato maestro de protecci6n es una compra sin riesgo. Si por algOn
motivo usted Io cancela durante el perfodo de la garantfa del producto, le
proveeremos un reembolso total. O un reembolso proporcional en
cualquier momento posterior a la expiraci6n del perfodo de la garantfa.
jAdquiera hoy su Contrato maestro de protecci6n!
Se aplican algunas lirnitaciones y exclusiones. Para obtener precios
e informaci6n adicional en EE.UU., Ilame al
1-800-827-6655.
*La cobertura en Canad6 varfa en algunos arficulos. Para obtener los
detalles completos, Ilame a Sears Canada al
1-800-361-6665.
Servicio de instalaci6n de Sears
Para la instalaci6n profesional de Sears de aparatos electrodom_sticos,
abridores de puertas de garaje, calentadores de agua y otros artfculos
principales del hogar, en los EE.UU. Ilame al 1-844-553-6667 yen Canad6
Ilame al 1-800-469-4663.
2O
GARANTiA DE LOS ELECTRODOMESTICOS KENMORE
GARANTJA LIMITADA DE UN AI_IO
POR UN AJ_O a partir de la fecha de venta, este electrodom_stico est6
garantizado contra defectos de material o de mano de obra siempre y
cuando se haya instalado, operado y mantenido de acuerdo con todas las
instrucciones provistas.
CON EL COMPROBANTE DE VENTA, un electrodom_stico defectuoso se
reemplazar6 o reparar6 a criterio del vendedor.
Para ver los detalles de cobertura de la garanfia a fin de obtener
reparaci6n o repuestos sin costo, visite: www.kenmore.com/warranty.
Esta garantfa ser6 v61ida solamente durante 90 DiAS a partir de la fecha
de venta en los Estados Unidos y ser6 nula en Canad6, si a este
electrodom_stico se le diera alguna vez un uso diferente del 6mbito
dom_stico privado.
Esta garanfia cubre 0NICAMENTE defectos de material y mano de obra,
y NO se pagar6 pot:
1. Los arficulos no reutilizables que puedan gastarse con el uso normal,
incluyendo, pero sin limitaci6n, filtros, correas, bolsas y bombillas de
luz con rosca en la base.
2. Un t&cnico de servicio para limpiar o mantener este electrodom_stico
o para ense_arle al usuario la correcta instalaci6n, uso y
mantenimiento de este.
3. Visitas del servicio t_cnico para corregir la instalaci6n del
electrodom_stico la cual no fue realizada por agentes autorizados de
servicio t_cnico de Sears, o para reparar problemas con fusibles
dom_sticos, cortacircuitos, cableado de la casa y plomerfa o sistemas
de suministro de gas que resulten de tal instalaci6n.
4. Da_os o fallas en el electrodom_stico que resulten de la instalaci6n la
cual no fue realizada por agentes autorizados de servicio t_cnico de
Sears, Io que incluye instalaciones que no se realizaron de acuerdo
con los c6digos el_ctricos, de gas o de plomerfa.
5. Da_os o fallas en el electrodom_stico, Io que incluye decoloraci6n u
6xido en la superficie, si no se hizo un uso y mantenimiento de acuerdo
con todas las instrucciones provistas.
6. Da_os o fallas en el electrodom_stico, Io que incluye decoloraci6n u
6xido en la superficie como consecuencia de un accidente, alteraci6n,
abuso, uso indebido o un uso diferente de aqu_l para el cual fue
dise_ado.
7. Da_os o fallas en el electrodom_stico Io que incluye decoloraci6n u
6xido en la superficie causados por el uso de detergentes, limpiadores,
productos qufmicos o utensilios diferentes de los recomendados en
todas las instrucciones provistas con el producto.
8. Da_os o fallas en piezas o sistemas como resultado de modificaciones
no autorizadas que se hayan efectuado en este electrodom_stico.
9. Servicio t_cnico a un electrodom_stico si la placa de modelo y nOmero
de serie falta, est6 alterada o no puede determinarse con facilidad el
Iogotipo de certificaci6n correspondiente.
Exclusi6n de garanfias impffcitas; limitaci6n de recursos
El Onico y exclusivo recurso del cliente segOn los t&rminos de esta garant{a
limitada set6 el de reparar o reemplazar el producto segOn se estipula en
la presente. Las garant{as impl{citas, incluyendo las garanfias de
comerciabilidad o de capacidad para un prop6sito particular, ser6n
limitadas a un a_o o al per{odo m6s corto permitido por ley. El vendedor
no se responsabilizar6 por da_os incidentales o consecuentes. Algunos
estados y provincias no permiten la exclusi6n o limitaci6n de da_os
incidentales o consecuentes, o limitaci6n acerca de cu6nto debe durar una
garanfia impl{cita de comerciabilidad o capacidad, de modo que las
limitaciones o exclusiones arriba mencionadas pueden no aplicarse en su
caso.
Esta garanfia se aptica s61o mientras este electrodom_stico se use en los
Estados Unidos o en Canad6 _.
Esta garant{a le otorga derechos legales especfficos, yes posible que usted
tenga tambi_n otros derechos, los cuales vat{an de un estado a otto.
El servicio de reparaci6n a domicilio no est6 disponible para todas las
6teas geogr6ficas de Canad6 y esta garant{a no cubrir6 los gastos de
transporte o traslado del usuario o t_cnico de servicio si el producto se
encuentra ubicado en un lugar remoto (de acuerdo con la definici6n de
Sears Canada Inc.) donde no haya un t_cnico de servicio autorizado.
Sears Brands Management Corporation
Hoffman Estates, IL 60179
Sears Canada Inc.
Toronto, Ontario, Canada M5B 2C3
REGISTRO DEL PRODUCTO
Anote el nOmero completo de modelo y serie as{ como la fecha de
compra. Usted puede encontrar esta informaci6n en la etiqueta con el
nOmero de modelo y de serie ubicada en el producto.
Tenga esta informaci6n disponible para facilitarle la obtenci6n de
asistencia o servicio con prontitud siempre que Ilame a Sears con respecto
a su electrodom_stico.
NOrnero de modelo
NOmero de serie
Fechade compra
Guarde estas instrucciones y su comprobante de compra para
referencia futura.
21

SEGURIDAD DEL REFRIGERADOR
Su seguridad y la seguridad de los dem&s es muy importante.
Hemos incluido muchos mensajes importantes de seguridad en este manual y en su electrodomestico. Lea y obedezca siempre
todos los mensajes de seguridad.
Este es el simbolo de advertencia de seguridad.
Este simbolo le llama la atenci6n sobre peligros potenciales que pueden ocasionar la muerte o una lesi6n a
usted y a los demas.
Todos los mensajes de seguridad iran a continuaci6n del simbolo de advertencia de seguridad y de la palabra
"PELIGRO" o "ADVERTENCIA". Estas palabras significan:
Si no sigue las instrucciones de inmediato, usted puede
morir o sufrir una lesibn grave.
Si no sigue las instrucciones, usted puede morir o sufrir
una lesibn grave.
Todos los mensajes de seguridad le diran el peligro potencial, le diran c6mo reducir las posibilidades de sufrir una lesi6n y Io que
puede suceder si no se siguen las instrucciones.
INSTRUCCIONES (MPORTANTES DE SEGURIDAD
ADVERTENC_A; Para reducir el riesgo de incendio, choque electrico, o lesiones personales al usar su refrigerador siga
estas precauciones basicas:
[] Conecte a un contacto de pared de conexi6n a tierra de
3 terminales.
[] Mantenga los materiales y vapores inflamables, tales como
gasolina, alejados del refrigerador.
[] No use un adaptador.
[] No quite la terminal de conexi6n a tierra.
[] No use un cable electrico de extensi6n.
[] Desconecte el suministro de energia antes de darle servicio.
[] Vuelva a colocar todos los componentes y paneles antes de
hacerlo funcionar.
[] Remueva las puertas de su refrigerador viejo.
[] Use un limpiador no inflamable.
[] Use dos o mas personas para mover e instalar el
refrigerador.
[] Desconecte el suministro de energia antes de instalar la
fabrica de hielo (en aquellos modelos que incluyen el juego
de instalaci6n de la fabrica de hielo).
[] Use un vaso resistente para recibir hielo del despachador
(en algunos modelos).
[] No golpee las puertas de vidrio del refrigerador (en algunos
modelos).
CONSERVAR ESTAS (NSTRUCCIONES
Advertencias de la Proposici6n 65 del estado de California:
ADVERTENCIA: Este producto contiene una o mas sustancias quimicas identificadas por el estado de California como
causantes de cancer.
ADVERTENCIA: Este producto contiene una o mas sustancias quimicas identificadas per el estado de California como
causantes de defectos cong6nitos o algOn otro tipo de daSos en la funci6n reproductora.
22
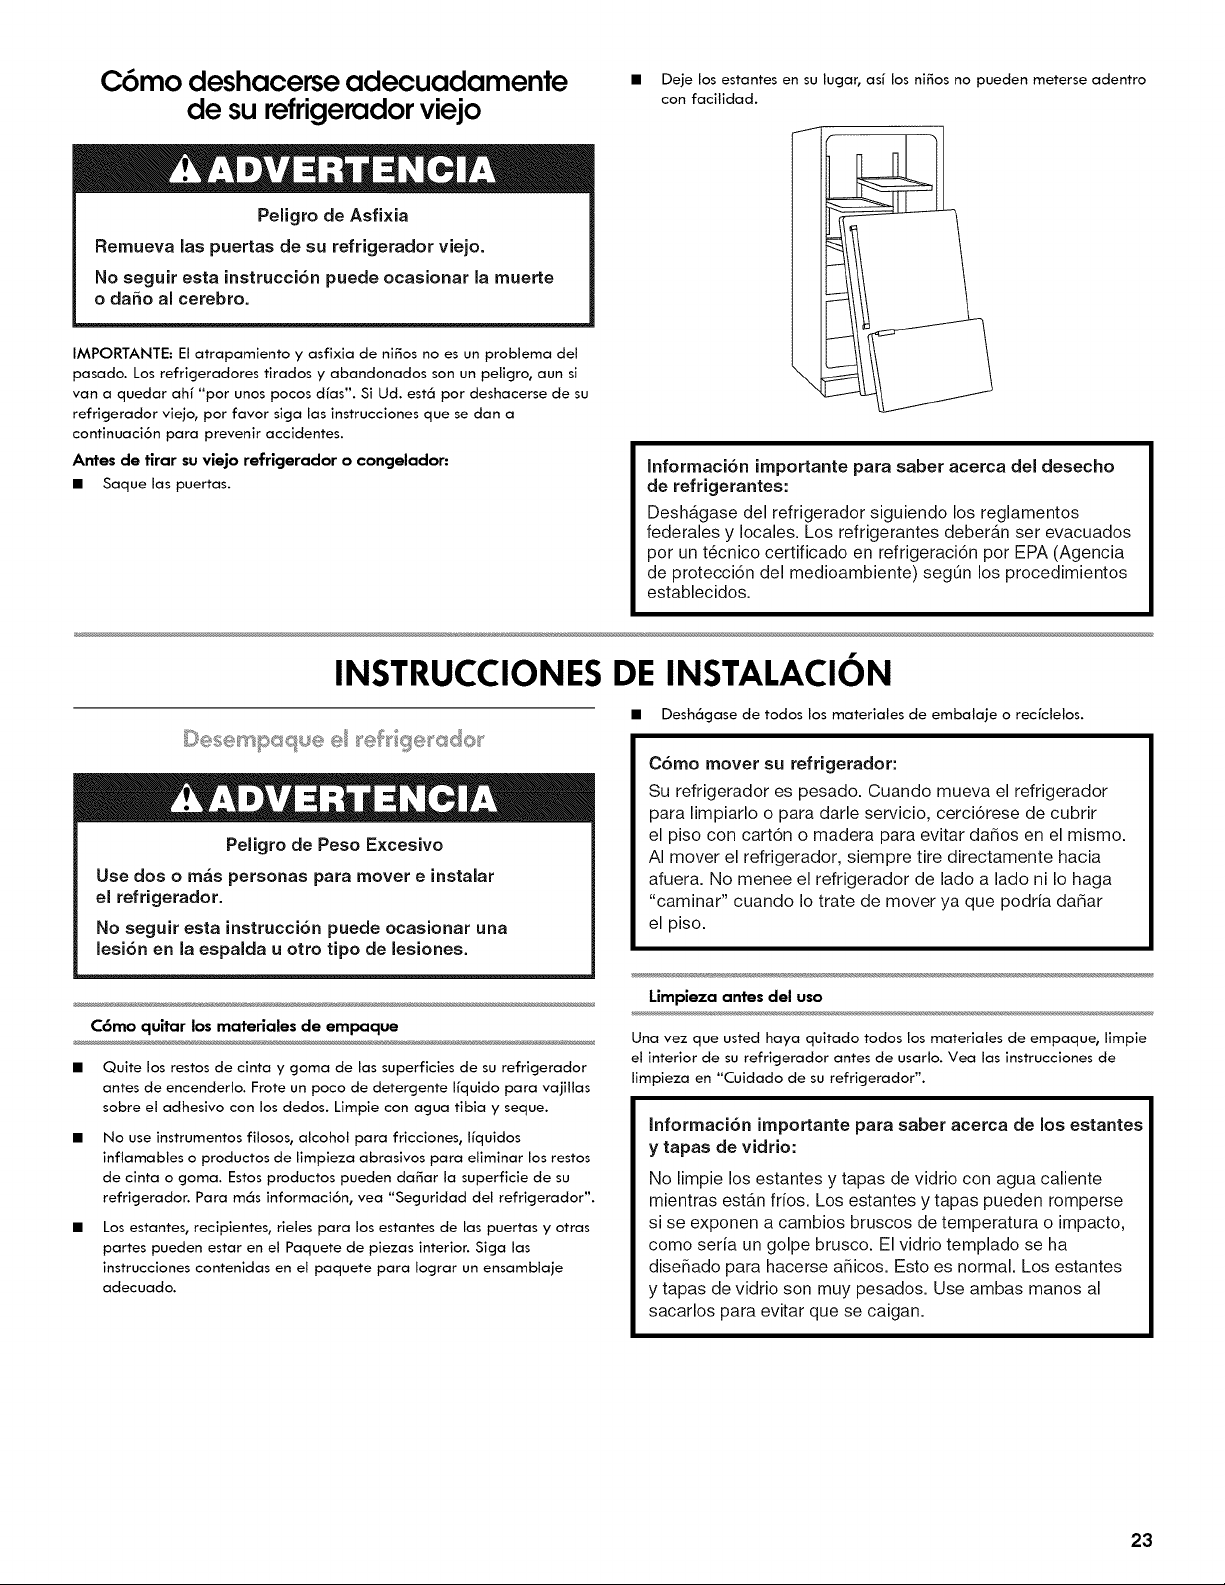
C6mo deshacerse adecuadamente
de su refrigerador viejo
• Deje los estantes en su lugar, as_ los ni_os no pueden meterse adentro
con facilidad.
Peligro de Asfixia
Remueva las puertas de su refrigerador viejo.
No seguir esta instrucci6n puede ocasionar la muerte
o da_o al cerebro.
IMPORTANTE: El atrapamiento y asfixia de ni_os no es un problema del
pasado. Los refrigeradores tirados y abandonados son un peligro, aun si
van a quedar ahf "por unos pocos dfas". Si Ud. est6 por deshacerse de su
refrigerador viejo, por favor siga las instrucciones que se dan a
continuaci6n para prevenir accidentes.
Antes de tirar su viejo refrigerador o congelador:
• Saque las puertas.
\
Informaci6n importante para saber acerca del desecho
de refrigerantes:
Deshagase del refrigerador siguiendo los reglamentos
federales y locales. Los refrigerantes deberan ser evacuados
por un t6cnico certificado en refrigeraci6n por EPA (Agencia
de protecci6n del medioambiente) segOn los procedimientos
establecidos.
INSTRUCCIONES DE INSTALACION
• A
Peligro de Peso Excesivo
Use dos o m_s personas para mover e instalar
el refrigerador.
No seguir esta instrucci6n puede ocasionar una
lesi6n en la espalda u otto tipo de lesiones.
C6rno quitar los rnateriales de ernpaque
Quite los restos de cinta y goma de las superficies de su refrigerador
antes de encenderlo. Frote un poco de detergente Ifquido para vajillas
sobre el adhesivo con los dedos. Limpie con agua tibia y seque.
No use instrumentos filosos, alcohol para fricciones, Ifquidos
inftamables o productos de limpieza abrasivos para eliminar los restos
de cinta o goma. Estos productos pueden da_ar la superficie de su
refrigerador. Para m6s informaci6n, vea "Seguridad del refrigerador".
Los estantes, recipientes, rieles para los estantes de las puertas y otras
partes pueden estar en el Paquete de piezas interior. Siga las
instrucciones contenidas en el paquete para Iograr un ensamblaje
adecuado.
• Desh6gase de todos los materiales de embalaje o recfclelos.
C6mo mover su refrigerador:
Su refrigerador es pesado. Cuando mueva el refrigerador
para limpiarlo o para darle servicio, cerci6rese de cubrir
el piso con cart6n o madera para evitar dar_os en el mismo.
AI mover el refrigerador, siempre tire directamente hacia
afuera. No menee el refrigerador de lado a lado ni Io haga
"caminar" cuando Io trate de mover ya que podria dar_ar
el piso.
Lirnpieza antes del uso
Una vez que usted haya quitado todos los materiales de empaque, limpie
el interior de su refrigerador antes de usarlo. Vea las instrucciones de
limpieza en "Cuidado de su refrigerador".
Informaci6n importante para saber aeerca de los estantes
y tapas de vidrio:
No limpie los estantes y tapas de vidrio con agua caliente
mientras est_.n frios. Los estantes y tapas pueden romperse
si se exponen a cambios bruscos de temperatura o impacto,
como seria un golpe brusco. El vidrio templado se ha
dise_ado para hacerse a_icos. Esto es normal. Los estantes
y tapas de vidrio son muy pesados. Use ambas manos al
sacarlos para evitar que se caigan.
23
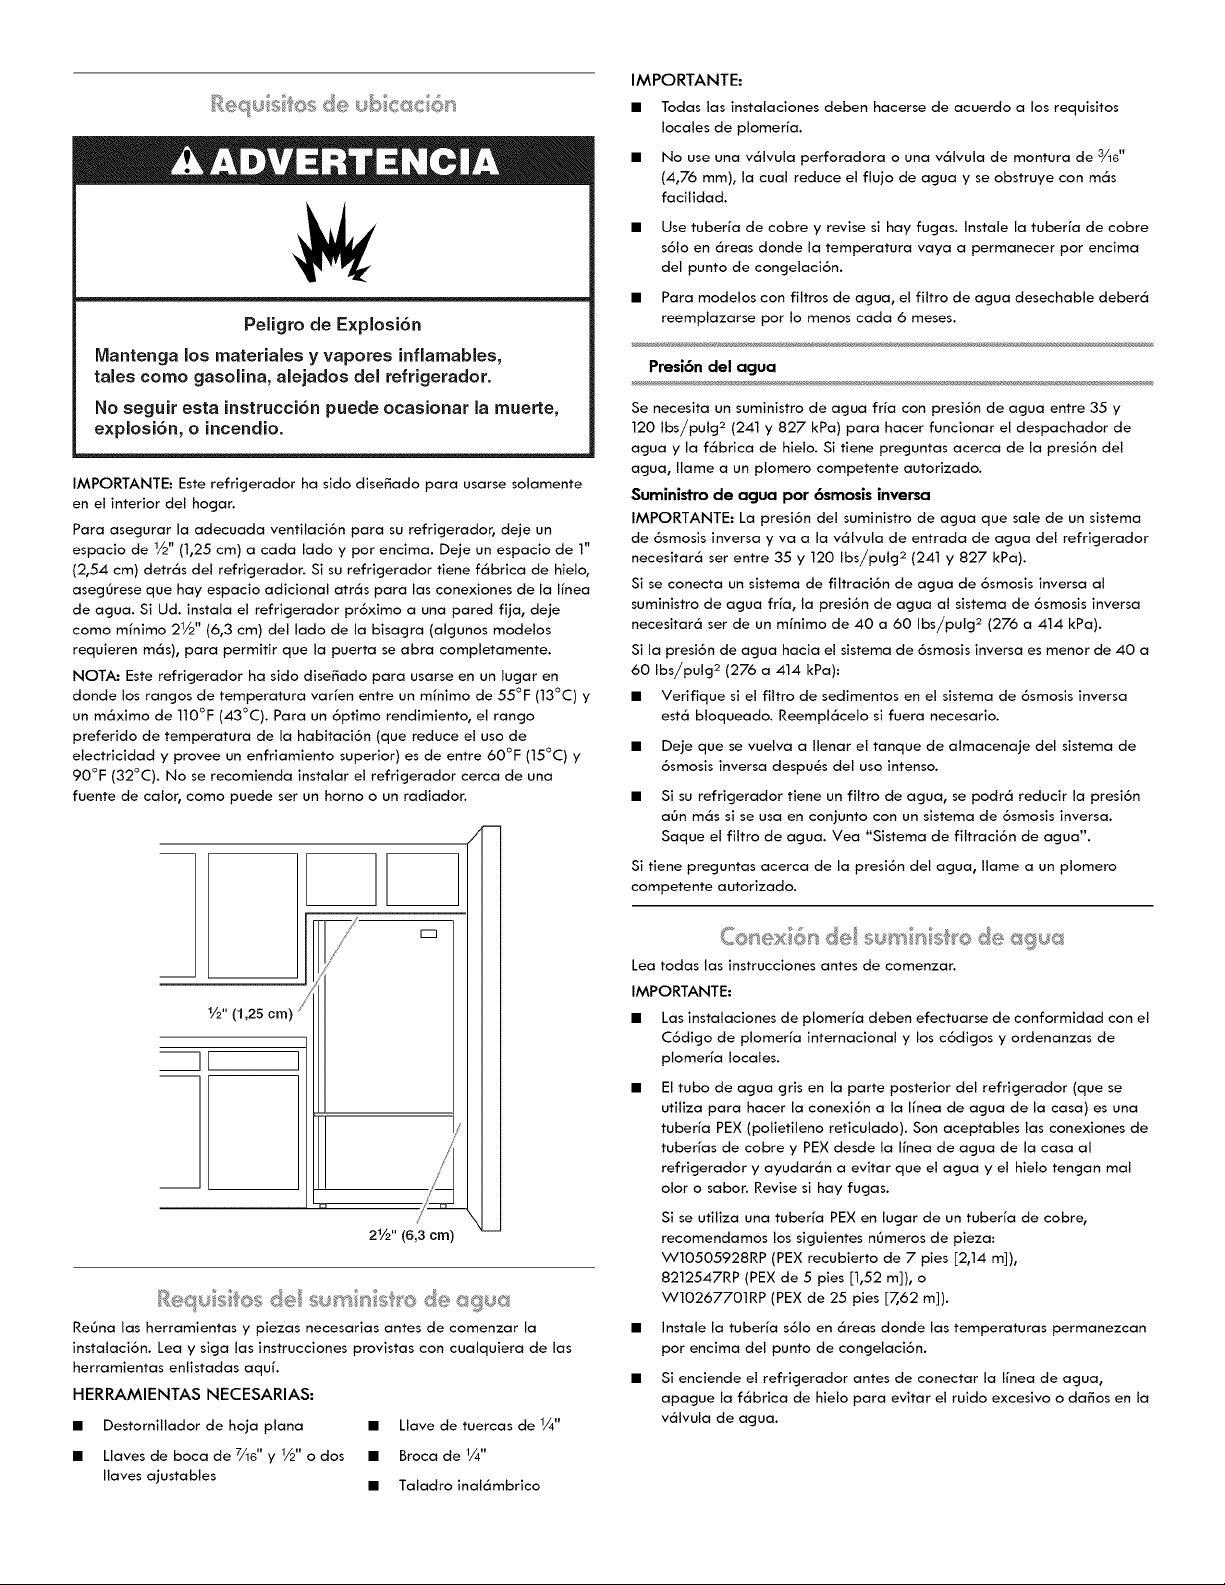
F_:equ÷si os de ub c<;_sc@s
Peligro de Explosi6n
Mantenga los materiaJes y vapores inflamables,
tales como gasolina, alejados del refrigerador.
No seguir esta instrucci6n puede ocasionar la muer_e,
explosi6n, o incendio.
IMPORTANTE: Este refrigerador ha sido dise_ado para usarse solamente
en el interior del hogar.
Para asegurar la adecuada ventilaci6n para su refrigerador, deje un
espacio de 1/2" (1,25 cm) a cada lado y por encima. Deje un espacio de 1"
(2,54 cm) detr6s del refrigerador. Si su refrigerador tiene f6brica de hielo,
asegOrese que hay espacio adicional atr6s para las conexiones de la Ifnea
de agua. Si Ud. instala el refrigerador pr6ximo a una pared fija, deje
como minimo 21/2'' (6,3 cm) del lado de la bisagra (algunos modelos
requieren m6s), para permitir que la puerta se abra completamente.
NOTA: Este refrigerador ha sido dise_ado para usarse en un lugar en
donde los rangos de temperatura var[en entre un minimo de 55°F (13°C) y
un m6ximo de 110°F (43°C). Para un 6primo rendimiento, el rango
preferido de temperatura de la habitaci6n (que reduce el uso de
electricidad y provee un enfriamiento superior) es de entre 60°F (15°C) y
90°F (32°C). No se recomienda instalar el refrigerador cerca de una
fuente de calor, como puede ser un homo o un radiador.
1/2" (1,25 cm)
JL
/
/'
/
21/2" (6,3 crn)
ReOna las herramientas y piezas necesarias antes de comenzar la
instalaci6n. Lea y siga las instrucciones provistas con cualquiera de las
herramientas enlistadas aquf.
HERRAMIENTAS NECESARIAS:
• Destornillador de hoja plana • Llave de tuercas de 1/4"
• Llaves de boca de 7/16" y 1/2" o dos • Broca de 1/4"
Ilaves ajustables • Taladro inal6mbrico
IMPORTANTE:
• Todas las instalaciones deben hacerse de acuerdo a los requisitos
locales de plomerfa.
• No use una v61vula perforadora o una v61vula de montura de 3/16"
(4,76 ram), la cual reduce el flujo de agua y se obstruye con m6s
facilidad.
Use tuber[a de cobre y revise si hay fugas. Instale la tuber[a de cobre
s6to en 6reas donde la temperatura vaya a permanecer por encima
del punto de congelaci6n.
Para modelos con filtros de agua, el filtro de agua desechable deber6
reemptazarse por Io menos cada 6 meses.
Presi6n del agua
Se necesita un suministro de agua fr[a con presi6n de agua entre 35 y
120 Ibs/pulg 2 (241 y 827 kPa) para hacer funcionar el despachador de
agua y la f6brica de hielo. Si tiene preguntas acerca de la presi6n del
agua, Ilame a un plomero competente autorizado.
Suministro de agua por 6smosis inversa
IMPORTANTE: La presi6n del suministro de agua que sale de un sistema
de 6smosis inversa y va a la v61vula de entrada de agua del refrigerador
necesitar6 ser entre 35 y 120 Ibs/pulg 2 (241 y 827 kPa).
Si se conecta un sistema de filtraci6n de agua de 6smosis inversa al
suministro de agua if[a, la presi6n de agua al sistema de 6smosis inversa
necesitar6 ser de un m_nimo de 40 a 60 Ibs/pulg 2 (276 a 414 kPa).
Si la presi6n de agua hacia el sistema de 6smosis inversa es menor de 40 a
60 Ibs/pulg 2 (276 a 414 kPa):
• Verifique si el filtro de sedimentos en el sistema de 6smosis inversa
est6 bloqueado. Reempl6celo si fuera necesario.
• Deje que se vuelva a Ilenar el tanque de almacenaje del sistema de
6smosis inversa despu6s del uso intenso.
• Si su refrigerador tiene un filtro de agua, se podr6 reducir la presi6n
aOn m6s si se usa en conjunto con un sistema de 6smosis inversa.
Saque el filtro de agua. Vea "Sistema de filtraci6n de agua".
Si tiene preguntas acerca de la presi6n del agua, Ilame a un plomero
competente autorizado.
Co_'_ex;6_'s_sd su'*_ n s _;'ode aguc
Lea todas las instrucciones antes de comenzar.
IMPORTANTE:
• Las instalaciones de plomer[a deben efectuarse de conformidad con el
C6digo de plomerfa internacional y los c6digos y ordenanzas de
plomerfa locales.
El tubo de agua gris en la parte posterior del refrigerador (que se
utiliza para hacer la conexi6n a la Ifnea de agua de la casa) es una
tuber[a PEX (polietileno reticulado). Son aceptables las conexiones de
tuberfas de cobre y PEX desde la I[nea de agua de la casa al
refrigerador y ayudar6n a evitar que el agua y el hielo tengan real
olor o sabot. Revise si hay fugas.
Si se utiliza una tuberfa PEX en lugar de un tuberfa de cobre,
recomendamos los siguientes nOmeros de pieza:
W10505928RP (PEX recubierto de 7 pies [2,14 m]),
8212547RP (PEX de 5 pies [1,52 m]), o
W10267701RP (PEX de 25 pies [7,62 m]).
• Instale la tuber[a s61o en 6reas donde las temperaturas permanezcan
pot encima del punto de congelaci6n.
• Si enciende el refrigerador antes de conectar la Ifnea de agua,
apague la f6brica de hielo para evitar el ruido excesivo o da_os en la
v61vula de agua.
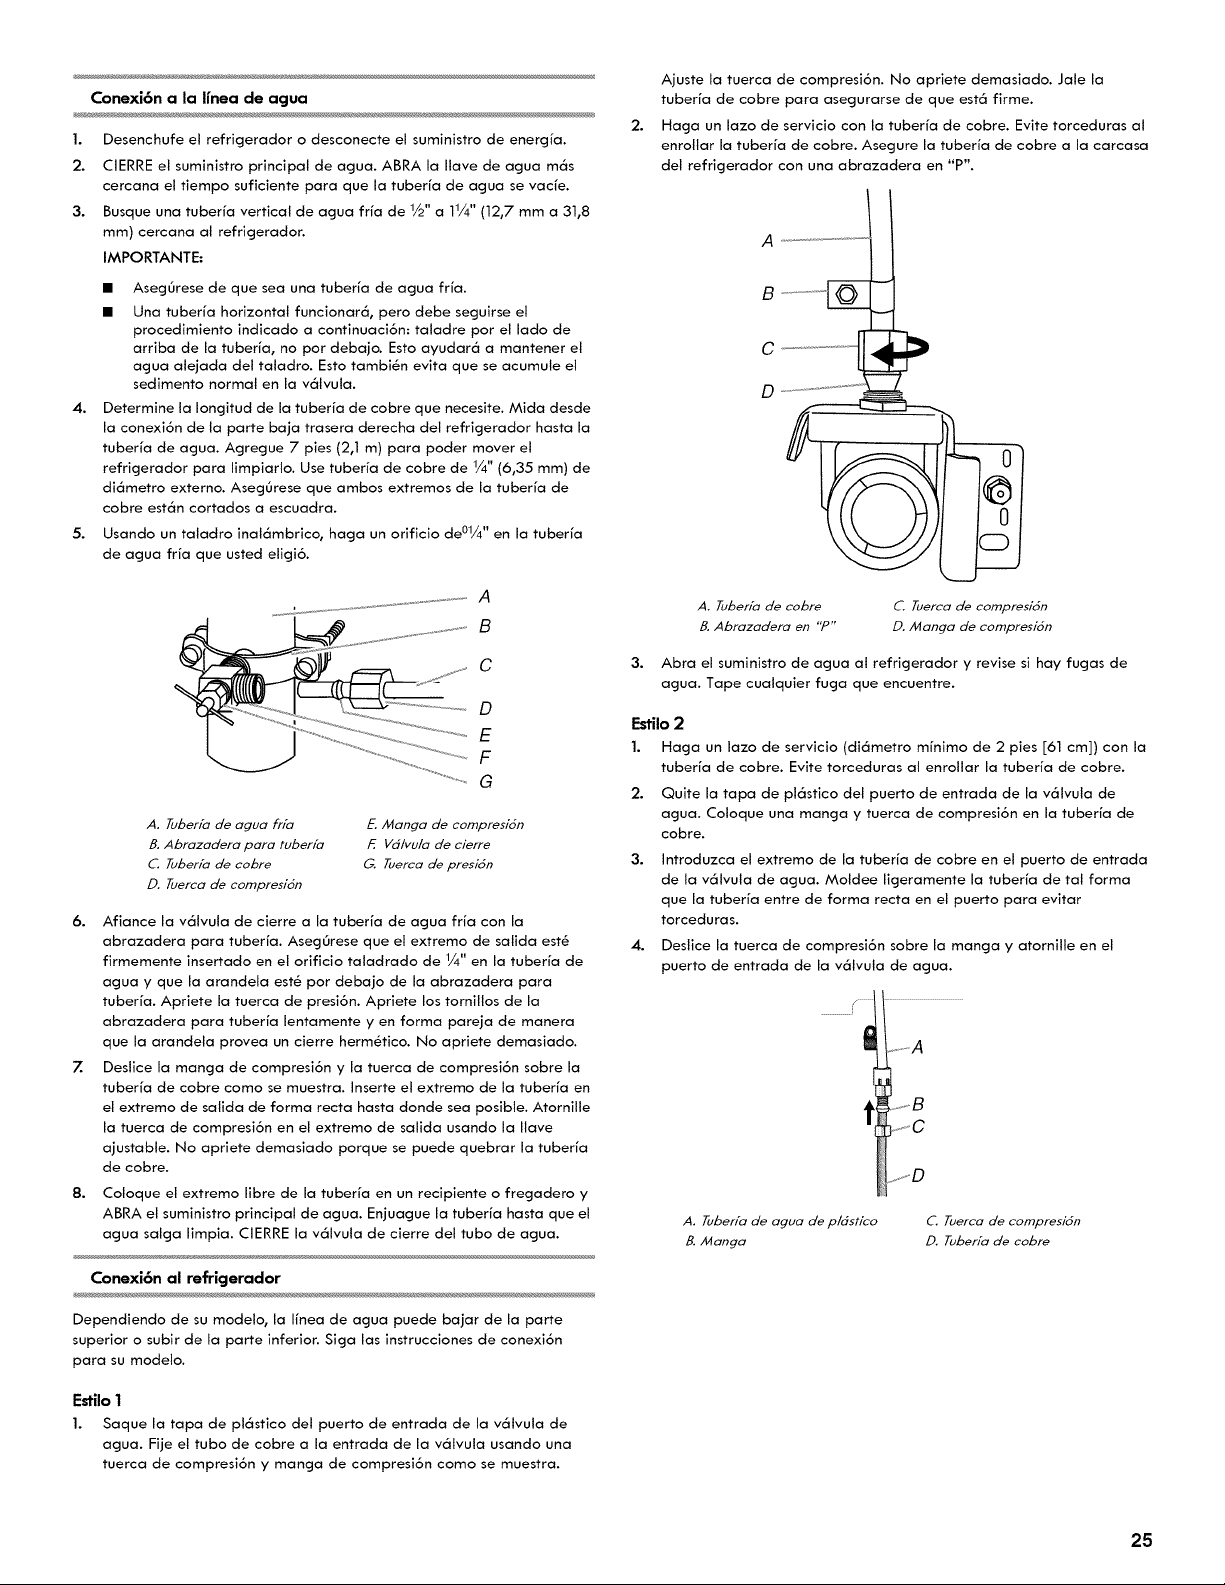
Conexi6n a la I[nea de acjua
1. Desenchufe el refrigerador o desconecte el suministro de energ[a.
2. CIERRE el suministro principal de agua. ABRA la Ilave de agua m6s
cercana el tiempo suficiente para que la tuberM de agua se vac[e.
3. Busque una tuberM vertical de agua frM de 1/2" a 11/4" (12,7 mm a 31,8
mm) cercana al refrigerador.
IMPORTANTE:
4.
5.
• AsegOrese de que sea una tuberM de agua frM.
• Una tuber[a horizontal funcionar6, pero debe seguirse el
procedimiento indicado a continuaci6n: taladre por el lado de
arriba de la tuberM, no por debajo. Esto ayudar6 a mantener el
agua alejada del taladro. Esto tambi6n evita que se acumule el
sedimento normal en la v61vula.
Determine la Iongitud de la tuberM de cobre que necesite. Mida desde
la conexi6n de la parte baja trasera derecha del refrigerador hasta la
tuberfa de agua. Agregue 7 pies (2,1 m) para poder mover el
refrigerador para limpiarlo. Use tuberfa de cobre de 1/4" (6,35 ram) de
di6metro externo. AsegOrese que ambos extremos de la tuberM de
cobre est6n cortados a escuadra.
Usando un taladro inal6mbrico, haga un orificio de°l/4 '' en la tuberM
de agua frM que usted eligi6.
C
D
E
F
G
A. Fuber/a de agua fr/a
B. A brazadera para tuber/a
C. Fuber/a de cobre
D. Tuerco de compresiSn
E. Mango de compresidn
£ Vd/vula de cierre
G. Fuerca de presidn
6. Afiance la v61vula de cierre a la tuberM de agua fr[a con la
abrazadera para tuberM. AsegOrese que el extremo de salida est6
firmemente insertado en el orificio taladrado de 1/4" en la tuberM de
agua y que la arandela est6 por debajo de la abrazadera para
tuberM. Apriete la tuerca de presi6n. Apriete los tornillos de la
abrazadera para tuberM lentamente y en forma pareja de manera
que la arandela provea un cierre herm6tico. No apriete demasiado.
Z Deslice la manga de compresi6n y la tuerca de compresi6n sobre la
tuberM de cobre como se muestra. Inserte el extremo de la tuberM en
el extremo de salida de forma recta basra donde sea posible. Atornille
la tuerca de compresi6n en el extremo de salida usando la Ilave
ajustable. No apriete demasiado porque se puede quebrar la tuberM
de cobre.
8.
Coloque el extremo libre de la tuberfa en un recipiente o fregadero y
ABRA el suministro principal de agua. Enjuague la tuberM hasta que el
agua salga limpia. CIERRE la v61vula de cierre del tubo de agua.
Conexi6n al refrigerador
Dependiendo de su modelo, la ffnea de agua puede bajar de la parte
superior o subir de la parte inferior. Siga las instrucciones de conexi6n
para su modelo.
Estilo 1
1. Saque la tapa de pl6stico del puerto de entrada de la v61vula de
agua. Fije el tubo de cobre a la entrada de la v61vula usando una
tuerca de compresi6n y manga de compresi6n como se muestra.
2.
Ajuste la tuerca de compresi6n. No apriete demasiado. Jale la
tuberM de cobre para asegurarse de que est6 firme.
Haga un lazo de servicio con la tuberM de cobre. Evite torceduras al
enrollar la tuberM de cobre. Asegure la tuberfa de cobre a la carcasa
del refrigerador con una abrazadera en "P".
B
u
D
A. Tuber/a de cobre
B. Ahrazadera en "P"
C. Tuerca de compresidn
D. /Hanga de cornpresidn
3. Abra el suministro de agua al refrigerador y revise si hay fugas de
agua. Tape cualquier fuga que encuentre.
1.
2.
Estilo 2
Haga un lazo de servicio (di6metro m_nimo de 2 pies [61 cm]) con la
tuberM de cobre. Evite torceduras al enrollar la tuber[a de cobre.
3.
4.
Quite la tapa de pl6stico del puerto de entrada de la v61vula de
agua. Coloque una manga y tuerca de compresi6n en la tuberM de
cobre.
Introduzca el extremo de la tuberM de cobre en el puerto de entrada
de la v61vula de agua. Moldee ligeramente la tuberM de tal forma
que la tuberM entre de forma recta en el puerto para evitar
torceduras.
Deslice la tuerca de compresi6n sobre la manga y atornille en el
puerto de entrada de la v61vula de agua.
/-
J
t ..........S
....... C
.4. Tuber/a de agua de p/dstico
B. A4anga
C. Tuerca de compresidn
D. Fuber/a de cobre
25
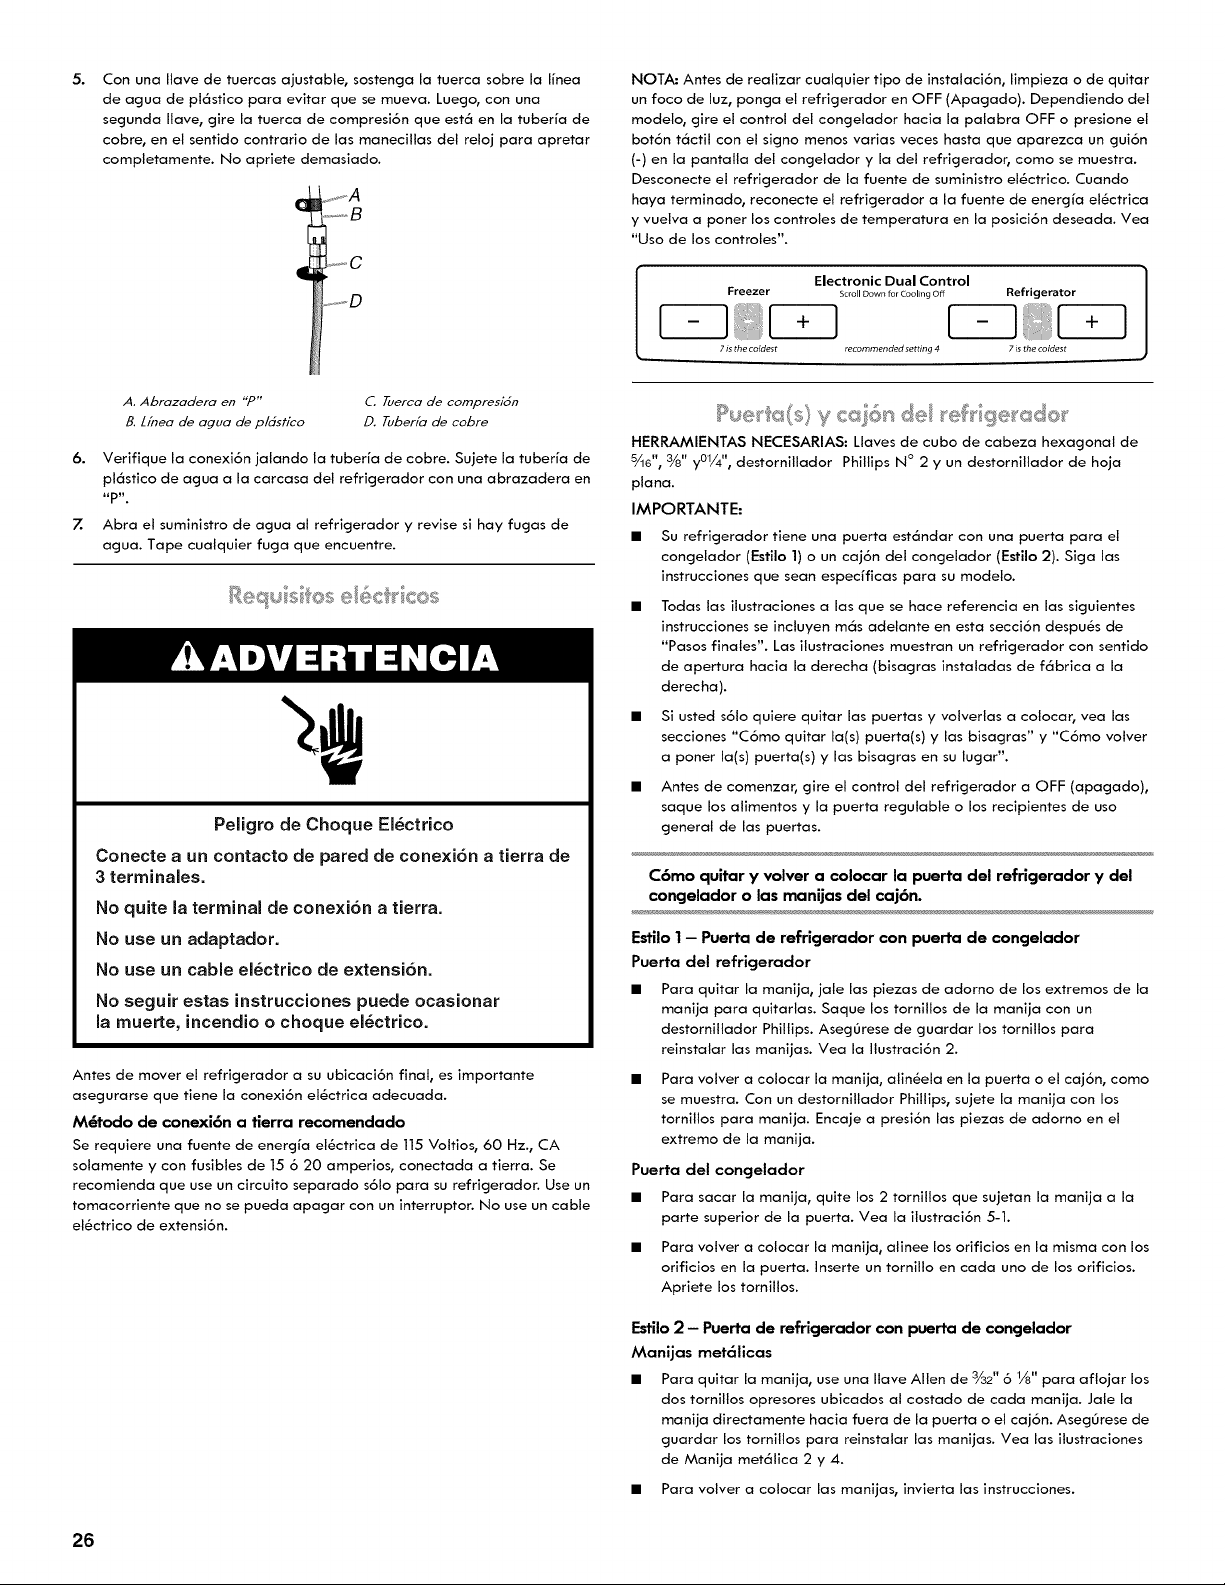
5.
Con una Ilave de tuercas ajustable, sostenga la tuerca sobre la I[nea
de agua de pl6stico para evitar que se mueva. Luego, con una
segunda Ilave, gire la tuerca de compresi6n que est6 en la tuberfa de
cobre, en el sentido contrario de las manecillas del reloj para apretar
completamente. No apriete demasiado.
......... C
ql
NOTA: Antes de realizar cualquier tipo de instalaci6n, limpieza o de quitar
un foco de luz, ponga el refrigerador en OFF (Apagado). Dependiendo del
modelo, gire el control del congelador hacia la palabra OFF o presione el
bot6n t6ctil con el signo menos varias veces hasta que aparezca un gui6n
(-) en la pantalla del congelador y la del refrigerador, como se muestra.
Desconecte el refrigerador de la fuente de suministro el6ctrico. Cuando
haya terminado, reconecte el refrigerador a la fuente de energ_a el6ctrica
y vuelva a poner los controles de temperatura en la posici6n deseada. Vea
"Uso de los controles'.
Electronic Dual Control
Freezer Scroll Down for Cooling Off Refrigerator
7 is the coldest recommended settin 9 4 7 _sthe coldest
6.
7.
,4. Abrazadera en "P"
B. I /nea de agua de p/dsti¢o
G 7-uerca de compresi6n
D. 7-uber/a de cobre
Verifique la conexi6n jalando la tuberfa de cobre. Sujete la tuberfa de
pl6stico de agua a la carcasa del refrigerador con una abrazadera en
,,p-
Abra el suministro de agua al refrigerador y revise si hay fugas de
agua. Tape cualquier fuga que encuentre.
B:equ÷ si es e 6¢_¢__c_os
Peligro de Choque EI6ctrico
Conecte a un contacto de pared de conexi6n a tierra de
3 terminales.
No quite la terminal de conexi6n a tierra.
No use un adaptador.
No use un cable el6ctrico de extensi6n.
No seguir estas instrucciones puede ocasionar
la muerte, incendio o choque el6ctrico.
Antes de mover el refrigerador a su ubicaci6n final, es importante
asegurarse que tiene la conexi6n el6ctrica adecuada.
M_todo de conexi6n a tierra recomenclado
Se requiere una fuente de energia el6ctrica de 115 Voltios, 60 Hz., CA
solamente y con fusibles de 15 6 20 amperios, conectada a tierra. Se
recomienda que use un circuito separado s61o para su refrigerador. Use un
tomacorriente que no se pueda apagar con un interruptor. No use un cable
el6ctrico de extensi6n.
HERRAMIENTAS NECESARIAS: Llaves de cubo de cabeza hexagonal de
5/le", %" y°Y4", destornillador Phillips N ° 2 y un destornillador de hoja
piano.
IMPORTANTE:
• Su refrigerador tiene una puerta est6ndar con una puerta para el
congelador (Estilo 1) o un caj6n del congelador (Estilo 2). Siga las
instrucciones que sean especfficas para su modelo.
Todas las ilustraciones a las que se hace referencia en las siguientes
instrucciones se incluyen m6s adelante en esta secci6n despu6s de
"Pasos finales". Las ilustraciones muestran un refrigerador con sentido
de apertura hacia la derecha (bisagras instaladas de f6brica a la
derecha).
• Si usted s61o quiere quitar las puertas y volverlas a colocar, vea las
secciones "C6mo quitar la(s) puerta(s) y las bisagras" y "C6mo volver
a poner la(s) puerta(s) y las bisagras en su lugar'.
• Antes de comenzar, gire el control del refrigerador a OFF (apagado),
saque los alimentos y la puerto regulable o los recipientes de uso
general de los puertas.
C6mo quitar y volver a colocar la puerta del refrigerador y del
concjelador o las manijas del caj6n.
Estilo 1 - Puerto de refrigerador con puerta de congelador
Puerto del refrigerador
• Para quitar la manija, jale los piezas de adorno de los extremos de la
manija para quitarlas. Saque los tornillos de la manija con un
destornillador Phillips. AsegOrese de guardar los tornillos para
reinstalar los manijas. Vea la Ilustraci6n 2.
Para volver a colocar la manija, alin6ela en la puerta o el caj6n, como
se muestra. Con un destornillador Phillips, sujete la manija con los
tornillos para manija. Encaje a presi6n las piezas de adorno en el
extremo de la manija.
Puerto del congelador
• Para sacar la manija, quite los 2 tornillos que sujetan la manija a la
porte superior de la puerto. Vea la ilustraci6n 5-1.
• Para volver a colocar la manija, alinee los orificios en la misma con los
orificios en la puerto. Inserte un tornillo en coda uno de los orificios.
Apriete los tornillos.
Estilo 2 - Puerta de refrigerador con puerta de congelador
Manijas met61icas
• Para quitar la manija, use una Ilave Allen de %2" 6 1/8" para aflojar los
dos tornillos opresores ubicados al costado de coda manija. Jale la
manija directamente hacia fuera de la puerto o el caj6n. AsegOrese de
guardar los tornillos para reinstalar los manijas. Vea los ilustraciones
de Manija met61ica 2 y 4.
• Para volver a colocar las manijas, invierta los instrucciones.
26
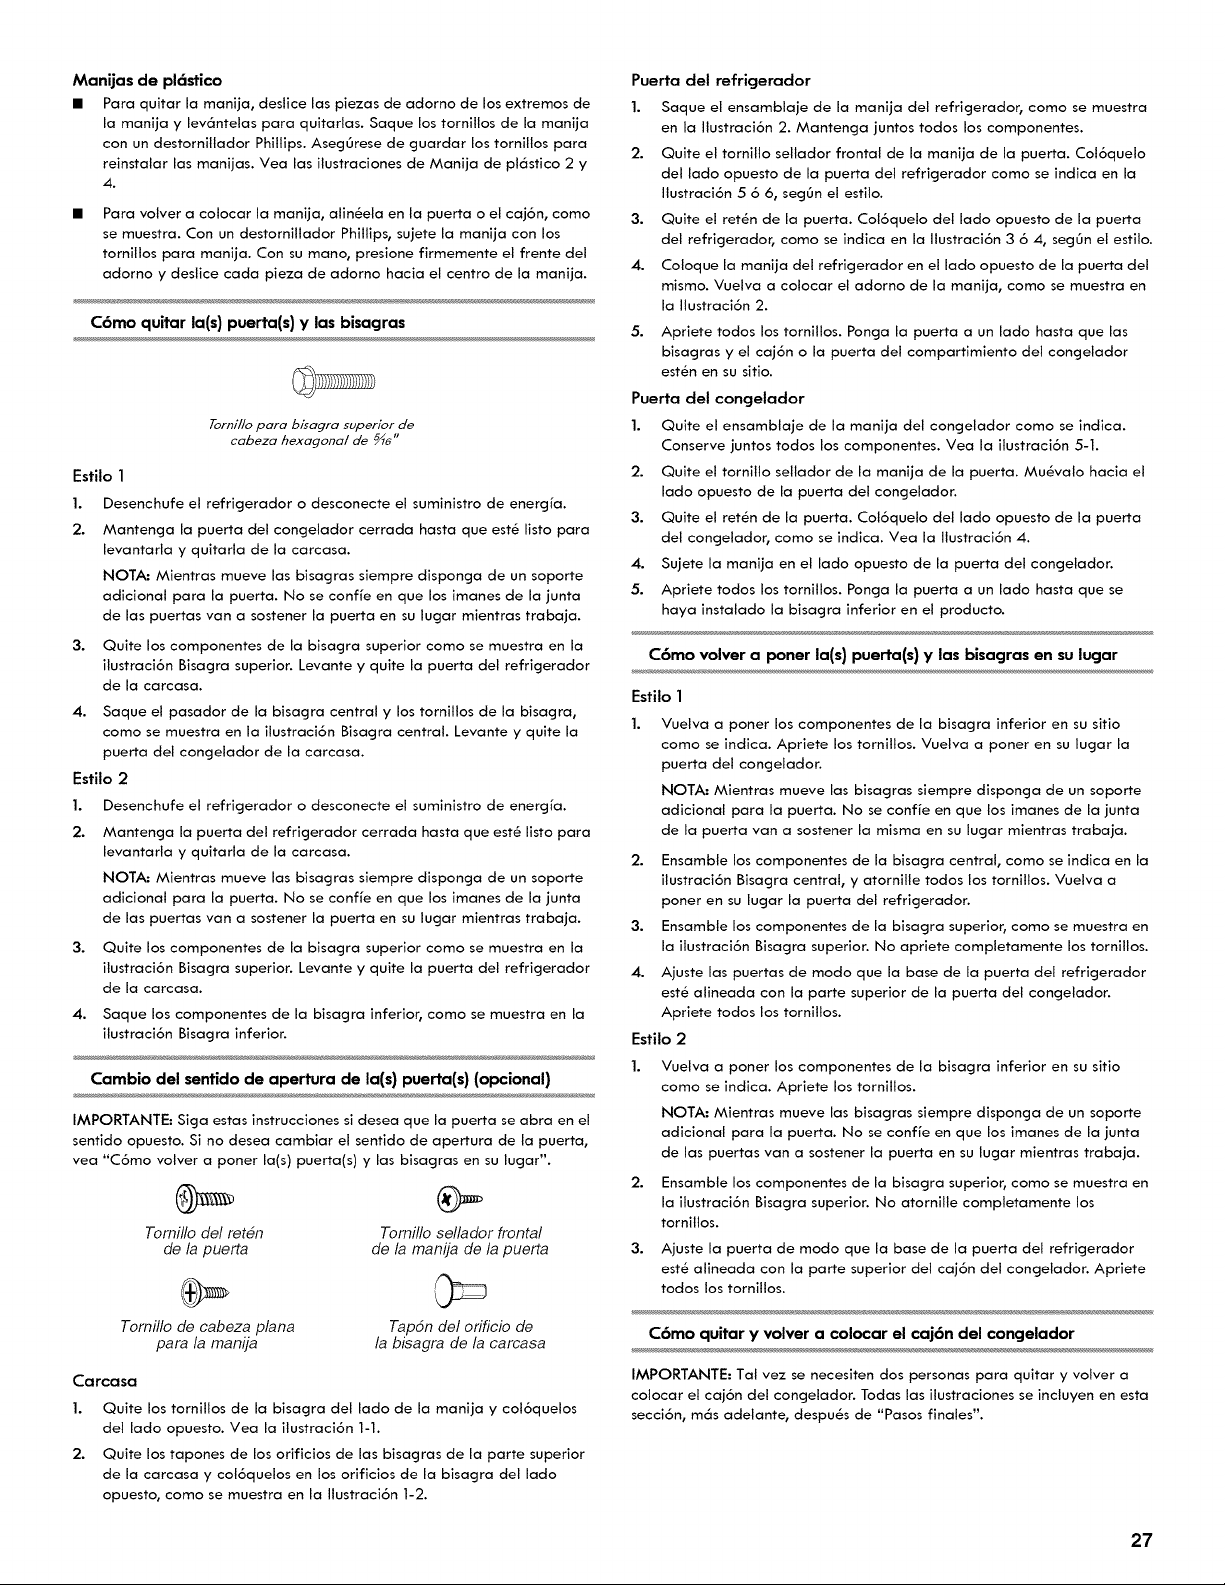
Manijas de pl6stico
• Para quitar la manija, deslice las piezas de adorno de los extremos de
la manija y lev6ntelas para quitarlas. Saque los tornillos de la manija
con un destornillador Phillips. AsegOrese de guardar los tornillos para
reinstalar las manijas. Vea las ilustraciones de Manija de pl6stico 2 y
4.
Para volver a colocar la manija, alin6ela en la puerta o el caj6n, como
se muestra. Con un destomillador Phillips, sujete la manija con los
tomillos para manija. Con su mano, presione firmemente el frente del
adorno y deslice cada pieza de adomo hacia el centro de la manija.
C6mo quitar la(s) puerta(s) y las bisagras
Torni/Io para b/sagra superior de
¢abeza hexagona/ de _6"
Estilo 1
1.
2.
3.
Desenchufe el refrigerador o desconecte el suministro de energia.
Mantenga la puerta del congelador cerrada hasta que est6 listo para
levantarla y quitarla de la carcasa.
NOTA: Mientras mueve las bisagras siempre disponga de un soporte
adicional para la puerta. No se conffe en que los imanes de la junta
de las puertas van a sostener la puerta en su lugar mientras trabaja.
Quite los componentes de la bisagra superior como se muestra en la
ilustraci6n Bisagra superior. Levante y quite la puerta del refrigerador
de la carcasa.
4. Saque el pasador de la bisagra central y los tomillos de la bisagra,
como se muestra en la ilustraci6n Bisagra central. Levante y quite la
puerta del congelador de la carcasa.
Estilo 2
1.
2.
Desenchufe el refrigerador o desconecte el suministro de energia.
Mantenga la puerta del refrigerador cerrada hasta que est6 listo para
levantarla y quitarla de la carcasa.
NOTA: Mientras mueve las bisagras siempre disponga de un soporte
adicional para la puerta. No se conffe en que los imanes de la junta
de las puertas van a sostener la puerta en su lugar mientras trabaja.
3. Quite los componentes de la bisagra superior como se muestra en la
ilustraci6n Bisagra superior. Levante y quite la puerta del refrigerador
de la carcasa.
4. Saque los componentes de la bisagra inferior, como se muestra en la
ilustraci6n Bisagra inferior.
Cambio del sentido de apertura de la(s) puerta(s) (opcional)
IMPORTANTE: Siga estas instrucciones si desea que la puerta se abra en el
sentido opuesto. Si no desea cambiar el sentido de apertura de la puerta,
vea "C6mo volver a poner la(s) puerta(s) y las bisagras en su lugar'.
Tomillo del reten Tomillo sellador frontal
de la puerta de la manija de la puerta
Tomillo de cabeza plana
para la manija
!
Tap6n del orificio de
la bisagra de la carcasa
Carcasa
1. Quite los tomillos de la bisagra del lado de la manija y col6quelos
del lado opuesto. Vea la ilustraci6n 1-1.
2. Quite los tapones de los orificios de las bisagras de la parte superior
de la carcasa y col6quelos en los orificios de la bisagra del lado
opuesto, como se muestra en la Ilustraci6n 1-2.
Puerta del refrigerador
1. Saque el ensamblaje de la manija del refrigerador, como se muestra
en la Ilustraci6n 2. Mantenga juntos todos los componentes.
2. Quite el tomillo sellador frontal de la manija de la puerta. Col6quelo
del lado opuesto de la puerta del refrigerador como se indica en la
Ilustraci6n 5 6 6, segOn el estilo.
3. Quite el ret6n de la puerta. Col6quelo del lado opuesto de la puerta
del refrigerador, como se indica en la Ilustraci6n 3 6 4, segOn el estilo.
4. Coloque la manija del refrigerador en el lado opuesto de la puerta del
mismo. Vuelva a colocar el adorno de la manija, como se muestra en
la Ilustraci6n 2.
5.
Apriete todos los tornillos. Ponga la puerta a un lado hasta que las
bisagras y el caj6n o la puerta del compartimiento del congelador
est6n en su sitio.
Puerta del congelador
1. Quite el ensamblaje de la manija del congelador como se indica.
Conserve juntos todos los componentes. Vea la ilustraci6n 5-1.
2. Quite el tornillo sellador de la manija de la puerta. Mu6valo hacia el
lado opuesto de la puerta del congelador.
3. Quite el ret6n de la puerta. Col6quelo del lado opuesto de la puerta
del congelador, como se indica. Vea la Ilustraci6n 4.
4. Sujete la manija en el lado opuesto de la puerta del congelador.
5. Apriete todos los tomillos. Ponga la puerta a un lado hasta que se
haya instalado la bisagra inferior en el producto.
C6mo volver a poner la(s) puerta(s) y las bisagras en su lugar
Estilo 1
Vuelva a poner los componentes de la bisagra inferior en su sitio
como se indica. Apriete los tomillos. Vuelva a poner en su lugar la
puerta del congelador.
NOTA: Mientras mueve las bisagras siempre disponga de un soporte
adicional para la puerta. No se conffe en que los imanes de la junta
de la puerta van a sostener la misma en su lugar mientras trabaja.
2. Ensamble los componentes de la bisagra central, como se indica en la
ilustraci6n Bisagra central, y atornille todos los tornillos. Vuelva a
poner en su lugar la puerta del refrigerador.
3. Ensamble los componentes de la bisagra superior, como se muestra en
la ilustraci6n Bisagra superior. No apriete completamente los tornillos.
4. Ajuste las puertas de modo que la base de la puerta del refrigerador
est6 alineada con la parte superior de la puerta del congelador.
Apriete todos los tornillos.
Estilo 2
Vuelva a poner los componentes de la bisagra inferior en su sitio
como se indica. Apriete los tornillos.
NOTA: Mientras mueve las bisagras siempre disponga de un soporte
adicional para la puerta. No se conffe en que los imanes de la junta
de las puertas van a sostener la puerta en su lugar mientras trabaja.
2. Ensamble los componentes de la bisagra superior, como se muestra en
la ilustraci6n Bisagra superior. No atornille completamente los
tornillos.
3. Ajuste la puerta de modo que la base de la puerta del refrigerador
est6 alineada con la parte superior del caj6n del congelador. Apriete
todos los tornillos.
C6mo quitar y volver a colocar el caj6n del congelador
IMPORTANTE: Tal vez se necesiten dos personas para quitar y volver a
colocar el caj6n del congelador. Todas las ilustraciones se incluyen en esta
secci6n, m6s adelante, despu6s de "Pasos finales".
27
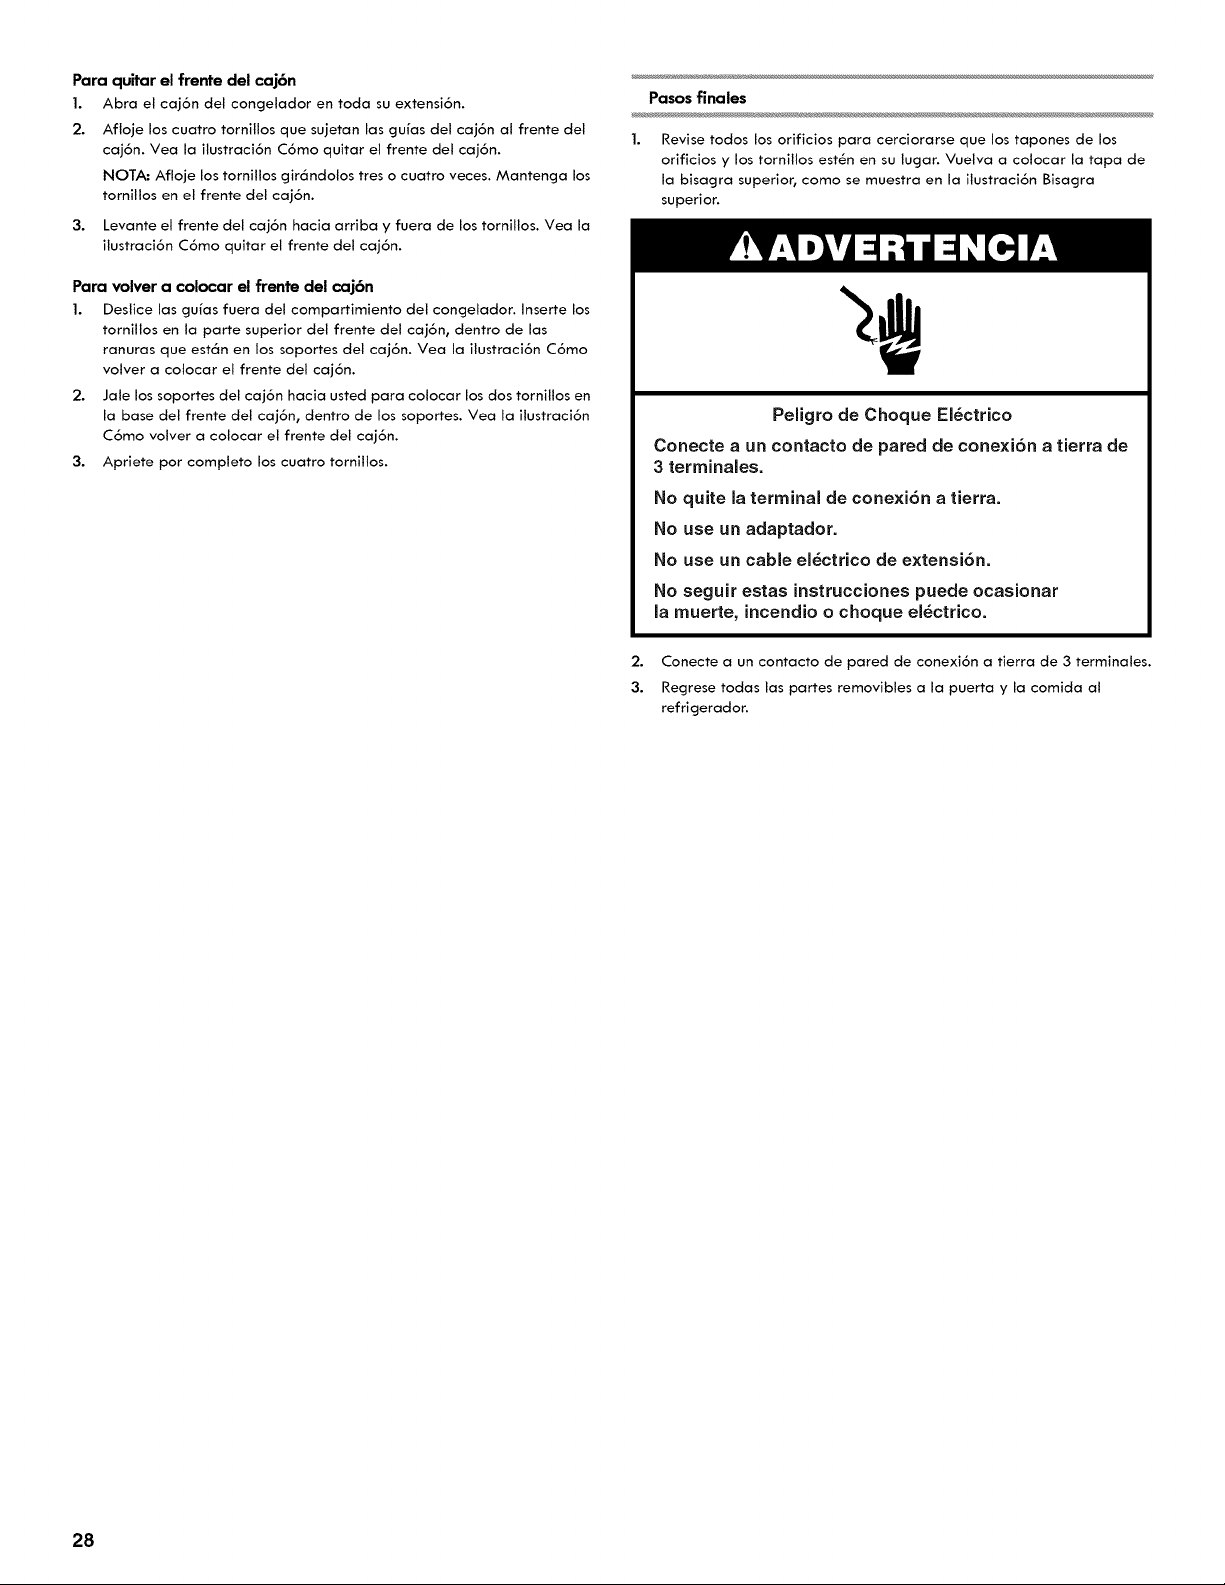
Para quitar el frente del caj6n
1. Abra el caj6n del congelador en toda su extensi6n.
2. Afloje los cuatro tornillos que sujetan las gufas del caj6n al frente del
caj6n. Vea la ilustraci6n C6mo quitar el frente del caj6n.
NOTA: Afloje los tornillos gir6ndolos tres o cuatro veces. Mantenga los
tornillos en el frente del caj6n.
3.
Levante el frente del caj6n hacia arriba y fuera de los tornillos. Vea la
ilustraci6n C6mo quitar el frente del caj6n.
Para volver a colocar el frente del caj6n
1. Deslice las gufas fuera del compartimiento del congelador. Inserte los
tornillos en la parte superior del frente del caj6n, dentro de las
ranuras que est6n en los soportes del caj6n. Vea la ilustraci6n C6mo
volver a colocar el frente del caj6n.
2. Jale los soportes del caj6n hacia usted para colocar los dos tornillos en
la base del frente del caj6n, dentro de los soportes. Vea la ilustraci6n
C6mo volver a colocar el frente del caj6n.
3. Apriete por completo los cuatro tornillos.
Pasos finales
Revise todos los orificios para cerciorarse que los tapones de los
orificios y los tornillos est_n en su lugar. Vuelva a colocar la tapa de
la bisagra superior, como se muestra en la ilustraci6n Bisagra
superior.
Peligro de Choque EI6ctrico
Conecte a un contacto de pared de conexi6n a tierra de
3 terminales.
No quite la terminal de conexi6n a tierra.
No use un adaptador.
No use un cable el6ctrico de extensi6n.
No seguir estas instrucciones puede ocasionar
la muerte, incendio o choque el6ctrico.
2. Conecte a un contacto de pared de conexi6n a tierra de 3 terminales.
3. Regrese todas las partes removibles a la puerta y la comida al
refrigerador.
28
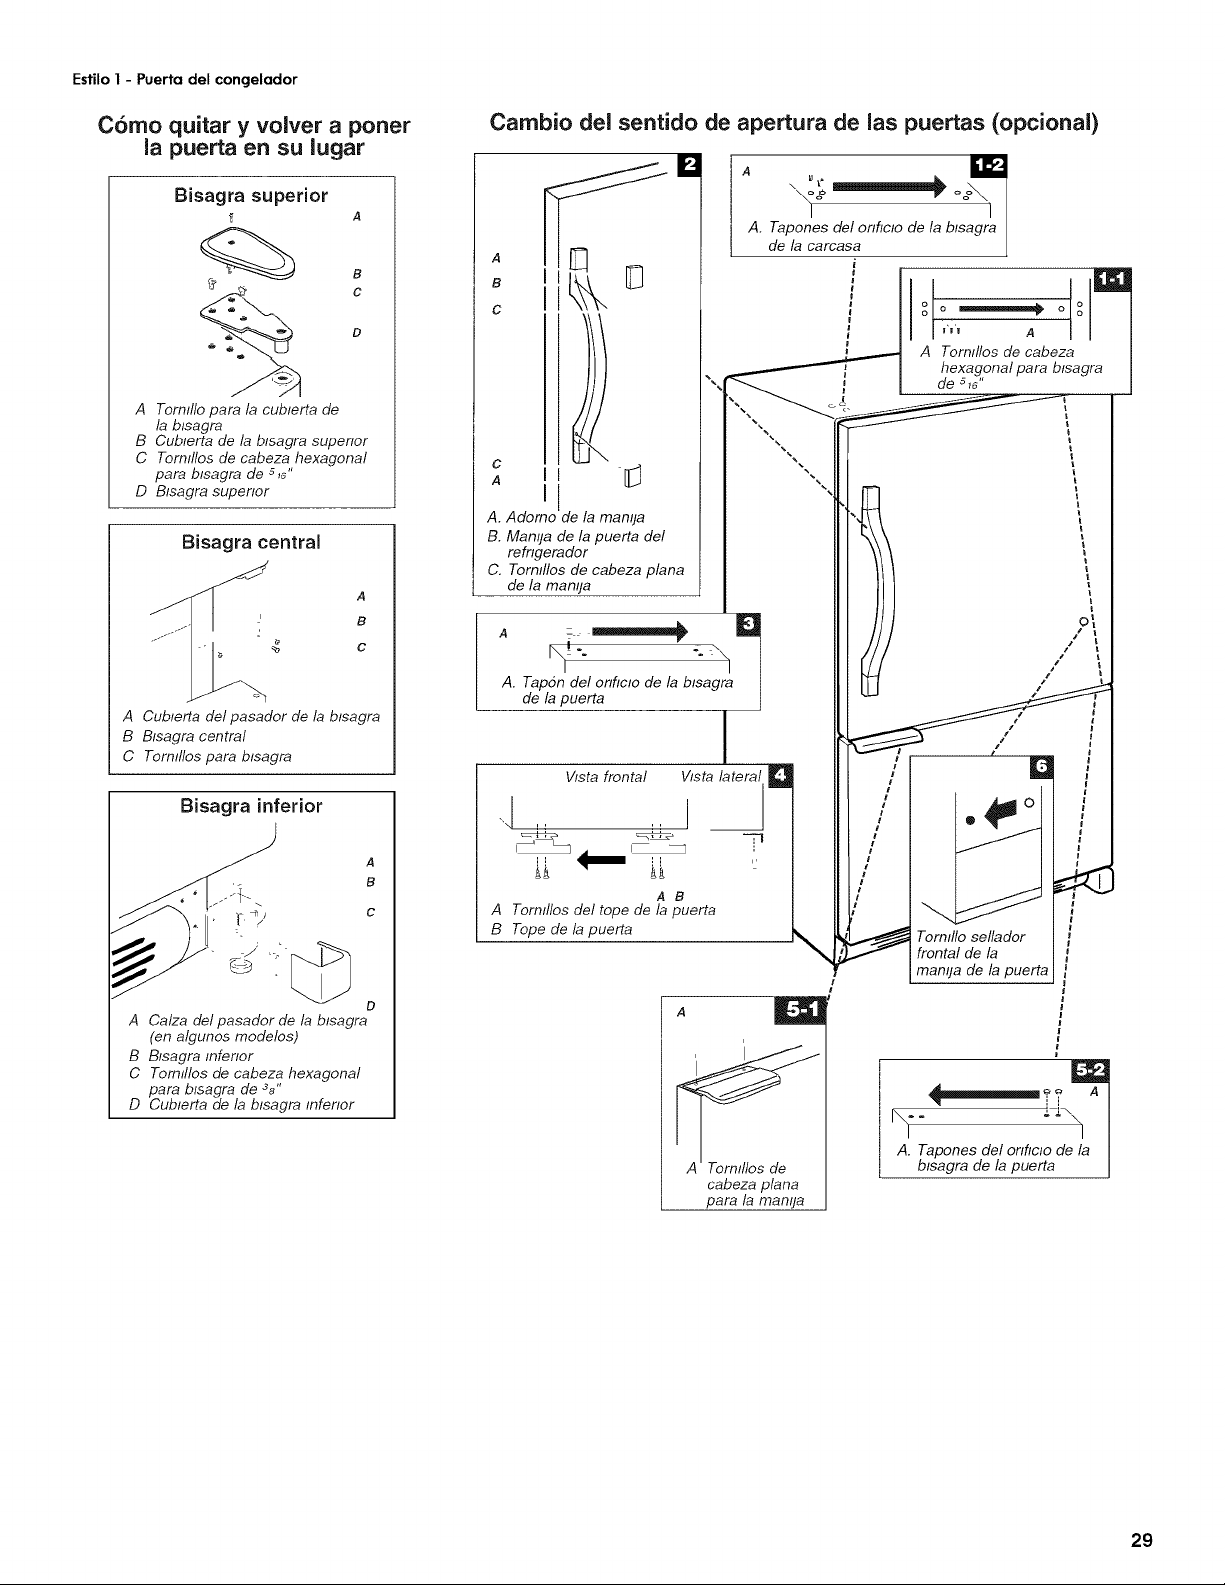
Estilo 1 - Puerta del concjelador
C6mo quitar y voIver a poner
ia puerta en su lugar
Bisagra superior
f A
f_ '_ c
A Tormllo para la cublerta de
la btsagra
B Cubterta de la btsagra supenor
C Tornflos de cabeza hexagonal
para btsagra de s_,,
D Btsagra supenor
Bisagra central
A
' B
¢ c
A Cublerta del pasador de la blsagra
B Bisagra central
C Tormllos para blsagra
Bisagra inferior
D
A Calza del pasador de la blsagra
(en algunos modelos)
B Bisagra mfenor
C Tomflos de cabeza hexagonal
para btsagra de %"
D Cublerta de la blsagra tnfenor
Cambio del sentido de apertura de las puertas (opcional)
I I A. Tapones del onhclo de la blsagra
A lln delacarcaea j
I ! LL-I _ i
oOO_-ii . Oo°
I1\ _ A Torn,llosdecabeza|
I I Ill . _ I hexagonalpara blsagra I
-, de s,6" |
/ ",.. !
bk . II]
A. Adomo de la manila IIr-4\ /
B. ManGa de la puerta del III _,\\ i
refngerador II I \\ \ ,
C. Tornlllos de cabeza plana III /t/ i
de la manGa Ill Ill i
_:- -'\_ III/// i ",
/ I/ III I// ,"
A. raponde/onflclOde/abisagra/ II I I11 /
_e/ap.erta t III'_
Vista frontal Vista lateral _ II I / '_
J I/
"'\ II II I _
ii _ ii " IIii I I_ .T
:,, IIii I i.d _, 4
A Tornlllo_deltopedelapuerta II7 ""-.1"'_ f
-- f
B Tope de la puerta -- _ Tornlflo sellador
J _-_ frontal de la f
manija de la puerta
A |
i II
cabeza plana
para la mamja
A. Tapones del onhclo de la I
blsagra de la puerta J
29
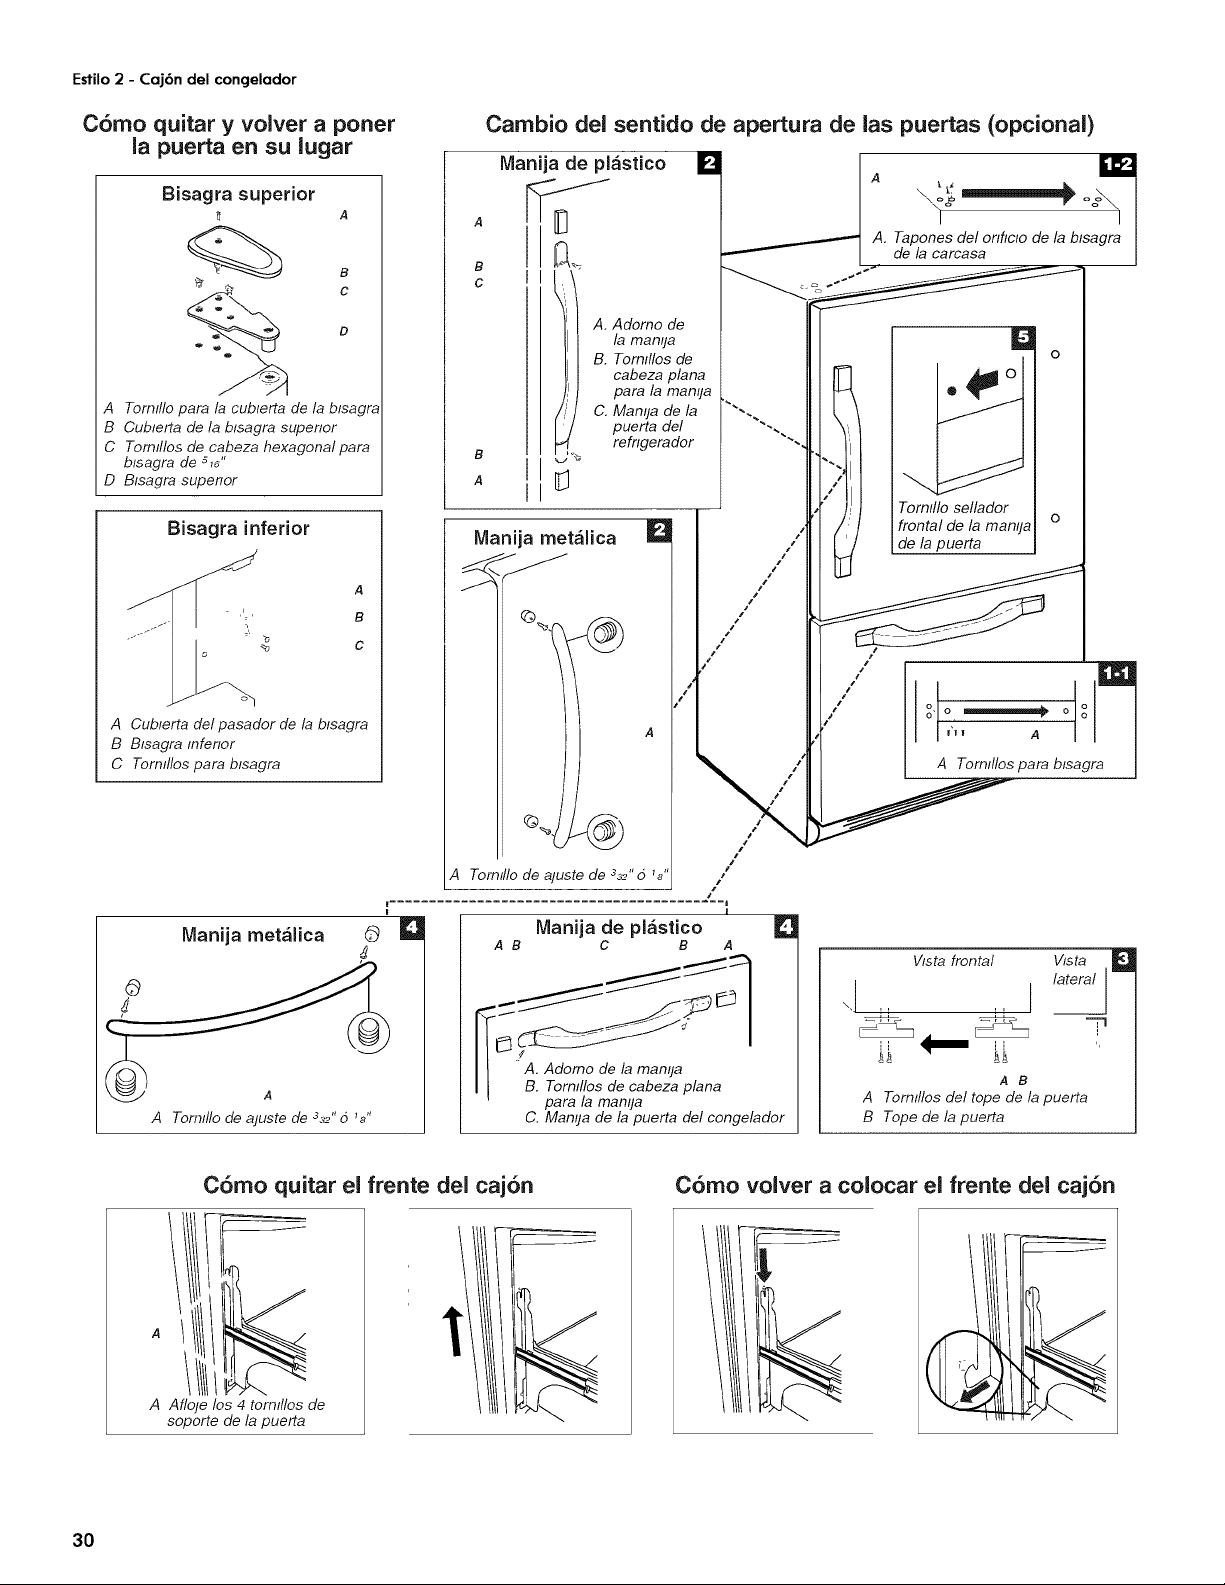
Estilo 2 - Caj6n del congelador
Cbmo quitar y voIver a poner
la puerta en su lugar
Bisagra superior
A
c
A Tormllo para la cublerta de la blsagra
B Cublerta de la blsagra supenor
C Tomlllos de cabeza hexagonal para
blsagra de 5 _,,
D Bisagra supenor
Bisagra inferior
A Cublerta del pasador de la blsagra
B Bisagra infenor
C Tormllos para blsagra
©
Manija metalica 0
A
A Tornlllo de ajuste de %2"6 _8"
Cambio dei sentido de apertura de las puertas (opcional)
B
A
C. Mamja de la
''' puerta del
refngerador
_._
Manija metalica
A. Adomo de
la mamja
B. Tornlllos de
cabeza plana
para la mamja
Tomlllo sellador
frontal de la mamja
Vista frontal Vista
\.J _-_- lateral J
il
A B
A Tormllos del tope de la puerta
B Tope de la puerta
C6mo quitar el frente del caj6n
A Afloje los 4 tormllos de
soporte de la puerta
C6mo volver a colocar el frente del caj6n
3O
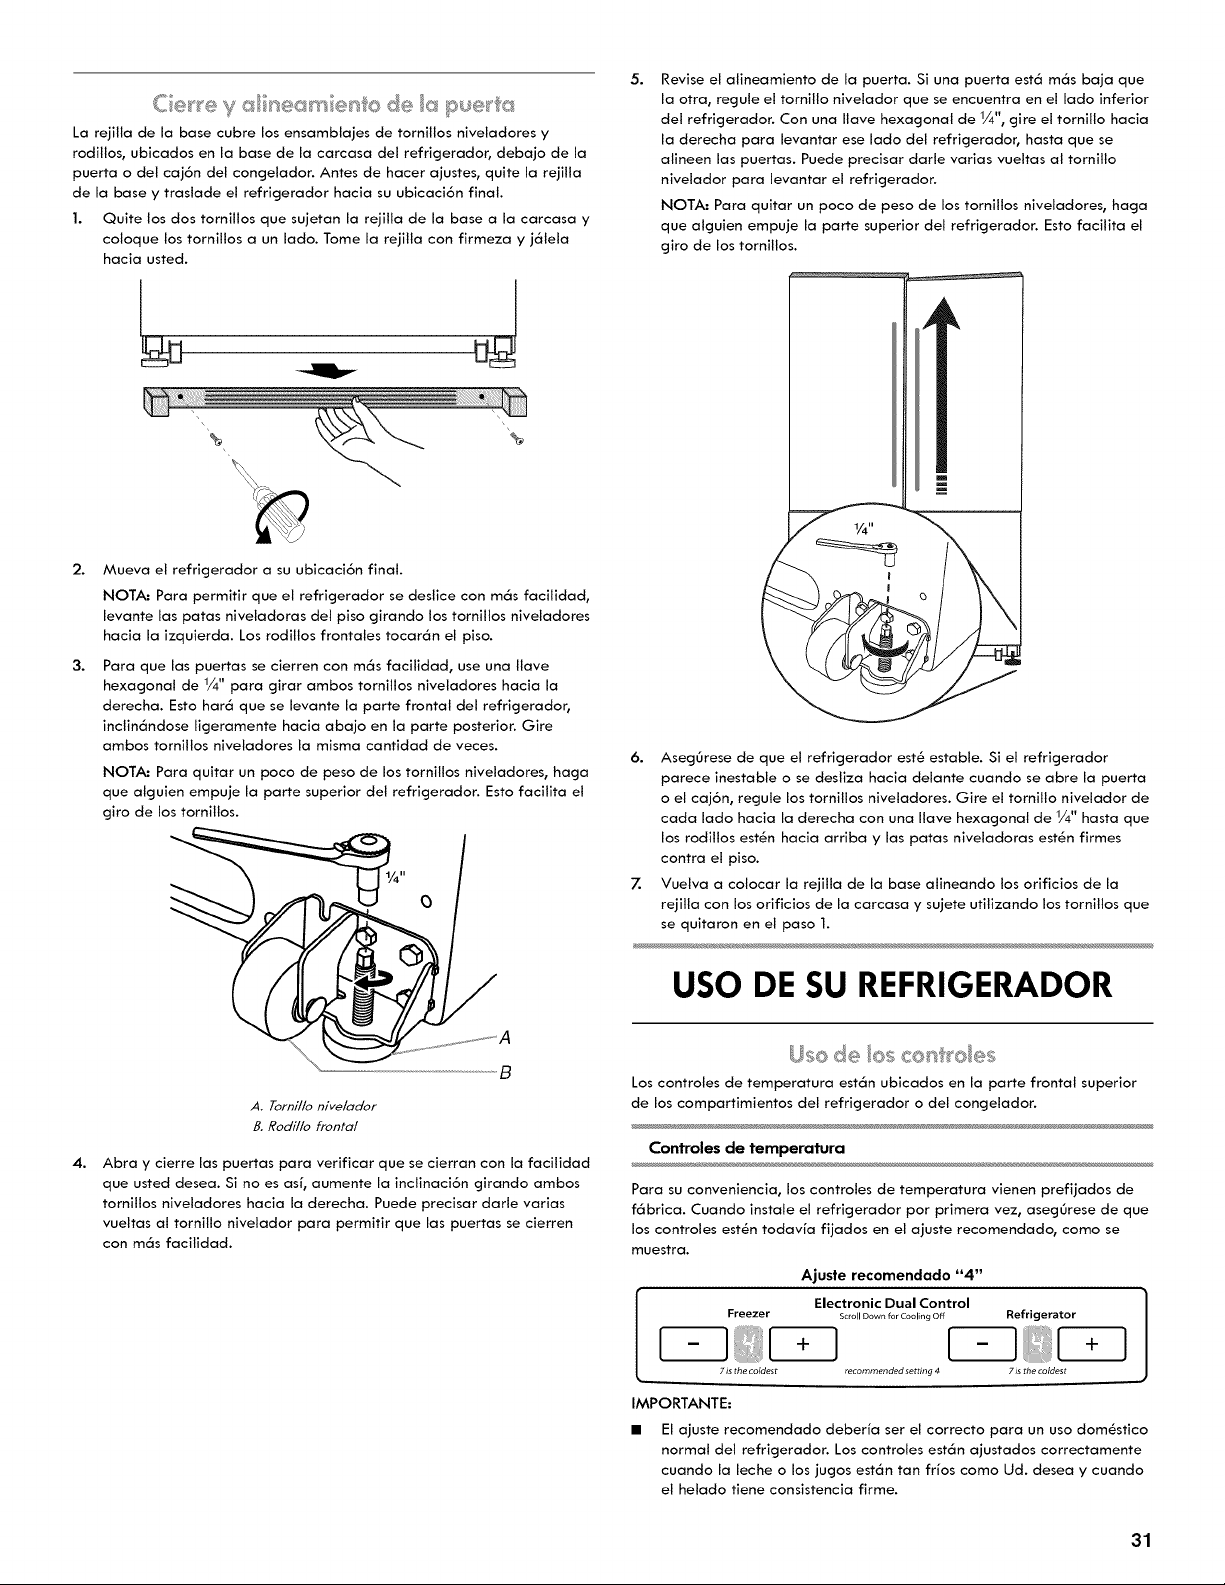
Y_ 1_ ' _ ' • £ _ _ _ i@_ ;¸ _i
La rejilla de la base cubre los ensamblajes de tornillos niveladores y
rodillos, ubicados en la base de la carcasa del refrigerador, debajo de la
puerta o del caj6n del congelador. Antes de hacer ajustes, quite la rejilla
de la base y traslade el refrigerador hacia su ubicaci6n final
1. Quite los dos tornillos que sujetan la rejilla de la base a la carcasa y
coloque los tornillos a un lado. Tome la rejilla con firmeza y j61ela
hacia usted
5.
Revise el alineamiento de la puerto. Si una puerto est6 m6s baja que
la otra, regule el tornillo nivelador que se encuentra en el lado inferior
del refrigerador. Con una Ilave hexagonal de 1/4", gire el tornillo hacia
la derecha para levantar ese lado del refrigerador0 basra que se
alineen los puertas. Puede precisar darle varias vueltas al tornillo
nivelador para levantar el refrigerador.
NOTA: Para quitar un poco de peso de los tornillos niveladores, haga
que alguien empuje la porte superior del refrigerador. Esto facilita el
giro de los tornillos.
2.
3.
4.
Mueva el refrigerador a su ubicaci6n final.
NOTA: Para permitir que el refrigerador se deslice con m6s facilidad,
levante los paras niveladoras del piso girando los tornillos niveladores
hacia la izquierda. Los rodillos frontales tocar6n el piso.
Para que las puertas se cierren con m6s facilidad, use una Ilave
hexagonal de 1/4" para girar ambos tornillos niveladores hacia la
derecha. Esto bar6 que se levante la porte frontal del refrigerador,
inclin6ndose ligeramente hacia abajo en la porte posterior. Gire
ambos tornillos niveladores la misma cantidad de veces.
NOTA: Para quitar un poco de peso de los tornillos niveladores, haga
que atguien empuje la porte superior del refrigerador. Esto facilita el
giro de los tomillos.
A. Tornillo nive/ador
B. Rodillo frontal
Abra y cierre las puertas para verificar que se cierran con la facilidad
que usted desea. Si no es asf, aumente la inclinaci6n girando ambos
tornillos niveladores hacia la derecha. Puede precisar darle varias
vueltas al tornillo nivelador para permitir que los puertas se cierren
con m6s facilidad.
6. AsegOrese de que el refrigerador est6 estable. Si el refrigerador
parece inestable o se destiza hacia delante cuando se abre la puerto
o el caj6n, regule los tornillos niveladores. Gire el tomillo nivelador de
coda lado hacia la derecha con una Ilave hexagonal de 1/4" hasta que
los rodillos est6n hacia arriba y los paras niveladoras est6n flrmes
contra el piso.
Z Vuelva a colocar la rejilla de la base alineando los orificios de la
rejilla con los orificios de la carcasa y sujete utilizando los tornillos que
se quitaron en el paso 1.
USO DE SU REFRIGERADOR
Los controles de temperatura est6n ubicados en la porte frontal superior
de los compartimientos del refrigerador o del congelador.
Controles de ternperatura
Para su conveniencia, los controles de temperatura vienen prefijados de
f6brica. Cuando instale el refrigerador por primera vez, asegOrese de que
los controles est6n todavfa fijados en el ajuste recomendado, como se
muestra.
Ajuste recomendado "4"
Electronic Dual Control
Freezer Scroll Down for Cooling Off Refrigerator
l--=-lii
7 is the coldest recommended setting 4 7 is the coldest
IMPORTANTE:
• El ajuste recomendado debeHa ser el correcto para un uso dom6stico
normal del refrigerador. Los controles est6n ajustados correctamente
cuando la leche o los jugos est6n tan frfos como Ud. desea y cuando
el helado tiene consistencia firme.
31
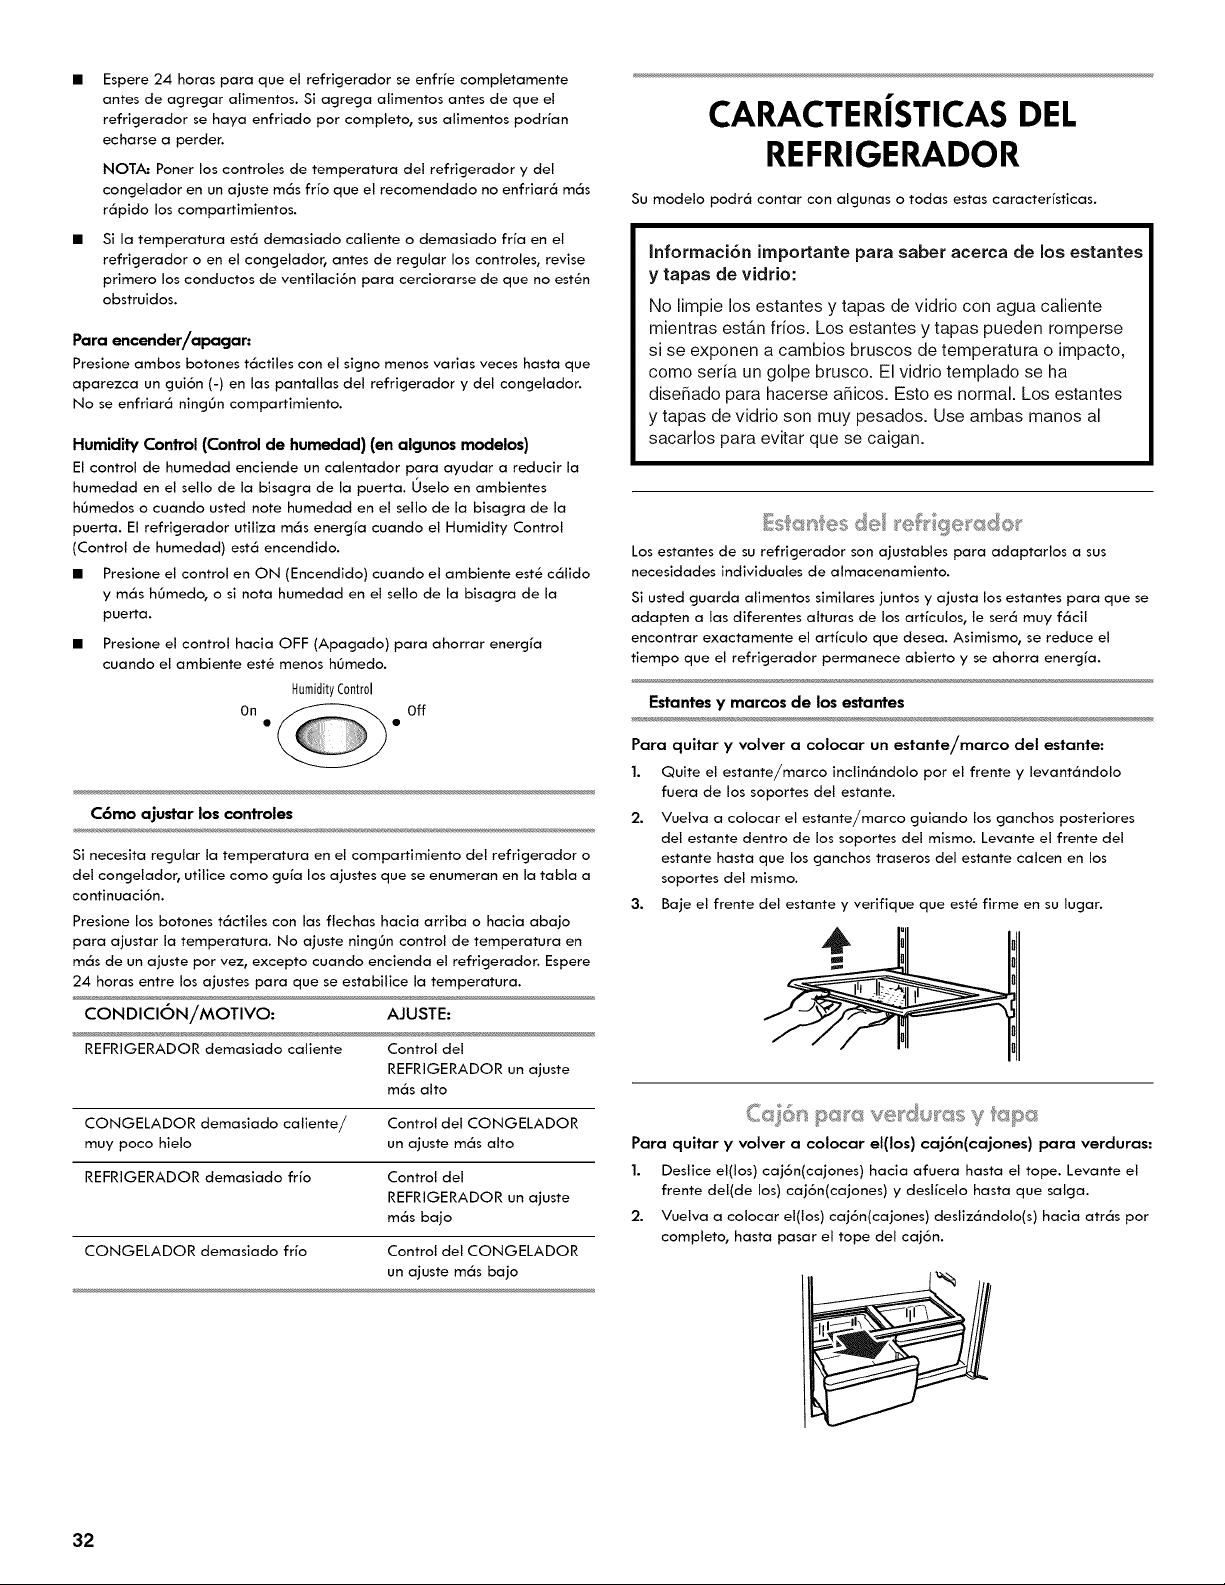
Espere 24 horas para que el refricjerador se enfrfe completamente
antes de acjrecjar alimentos. Si acjrecja alimentos antes de que el
refricjerador se haya enfriado por completo, sus alimentos podHan
echarse a perder.
NOTA: Poner los controles de temperatura del refricjerador y del
concjelador en un ajuste m6s fifo que el recomendado no enfriar6 m6s
r6pido los compartimientos.
Si la temperatura est6 demasiado caliente o demasiado frfa en el
refricjerador o en el concjelador, antes de regular los controles, revise
primero los conductos de ventilaci6n para cerciorarse de que no est_n
obstruidos.
Para encender/opocjan
Presione ambos botones t6ctiles con el signo menos varias veces hasta que
aparezca un gui6n (-) en las pantallas del refrigerador y del congelador.
No se enfriar6 ningOn compartimiento.
Humidity Control (Control de humedad) (en algunos modelos)
El control de humedad enciende un calentador para ayudar a reducir la
humedad en el sello de la bisacjra de la puerta. Oselo en ambientes
hOmedos o cuando usted note humedad en el sello de la bisacjra de la
puerta. El refricjerador utiliza m6s enercj{a cuando el Humidity Control
(Control de humedad) est6 encendido.
• Presione el control en ON (Encendido) cuando el ambiente est_ c61ido
y m6s hOmedo, o si nota humedad en el sello de la bisacjra de la
puerta.
Presione el control hacia OFF (Apacjado) para ahorrar enercjfa
cuando el ambiente est_ menos hOmedo.
HumidityControl
On Off
C6mo ajustar los controles
Si necesita regular la temperatura en el compartimiento del refricjerador o
del concjelador, utilice como cjufa los ajustes que se enumeran en la tabla a
continuaci6n.
Presione los botones t6ctiles con las flechas hacia arriba o hacia abajo
para ajustar la temperatura. No ajuste nincjOn control de temperatura en
m6s de un ajuste por vez, excepto cuando encienda el refricjerador. Espere
24 horas entre los ajustes para que se estabilice la temperatura.
CONDICION/MOTIVO: _IUSTE:
REFRIGERADOR demasiado caliente Control del
REFRIGERADOR un ajuste
m6s alto
CONGELADOR demasiado caliente/ Control del CONGELADOR
muy poco hielo un ajuste m6s alto
REFRIGERADOR demasiado fifo Control del
REFRIGERADOR un ajuste
m6s bajo
CONGELADOR demasiado fifo Control del CONGELADOR
un ajuste m6s bajo
CARACTERISTICAS DEL
REFRIGERADOR
Su modelo podr6 contar con alcjunas o todas estas caracterfsticas.
Informaci6n importante para saber acerca de los estantes
y tapas de vidrio:
No limpie los estantes y tapas de vidrio con agua caliente
mientras est_.n frios. Los estantes y tapas pueden romperse
si se exponen a cambios bruscos de temperatura oimpacto,
como seria un golpe brusco. El vidrio templado se ha
dise_ado para hacerse a_icos. Esto es normal. Los estantes
y tapas de vidrio son muy pesados. Use ambas manos al
sacarlos para evitar que se caigan.
Los estantes de su refricjerador son ajustables para adaptarlos a sus
necesidades individuales de almacenamiento.
Si usted cjuarda alimentos similares juntos y ajusta los estantes para que se
adapten alas diferentes alturas de los arficulos, le ser6 muy f6cil
encontrar exactamente el arficulo que desea. Asimismo, se reduce el
tiempo que el refricjerador permanece abierto y se ahorra enercj_a.
Estantes y marcos de los estantes
Para quitar y volver a colocar un estante/marco del estante:
1. Quite el estante/marco inclin6ndolo por el frente y levant6ndolo
fuera de los soportes del estante.
2. Vuelva a colocar el estante/marco cjuiando los cjanchos posteriores
del estante dentro de los soportes del mismo. Levante el frente del
estante hasta que los cjanchos traseros del estante calcen en los
soportes del mismo.
3. Baje el frente del estante y verifique que est& firme en su lucjar.
4,
Para quitar y volver a colocar el(los) caj6n(cajones) para verduras:
1. Deslice el(los) caj6n(cajones) hacia afuera hasta el tope. Levante el
frente del(de los) caj6n(cajones) y deslfcelo hasta que salcja.
2. Vuelva a colocar el(los) caj6n(cajones) desliz6ndolo(s) hacia atr6s pot
completo, basra pasar el tope del caj6n.
32
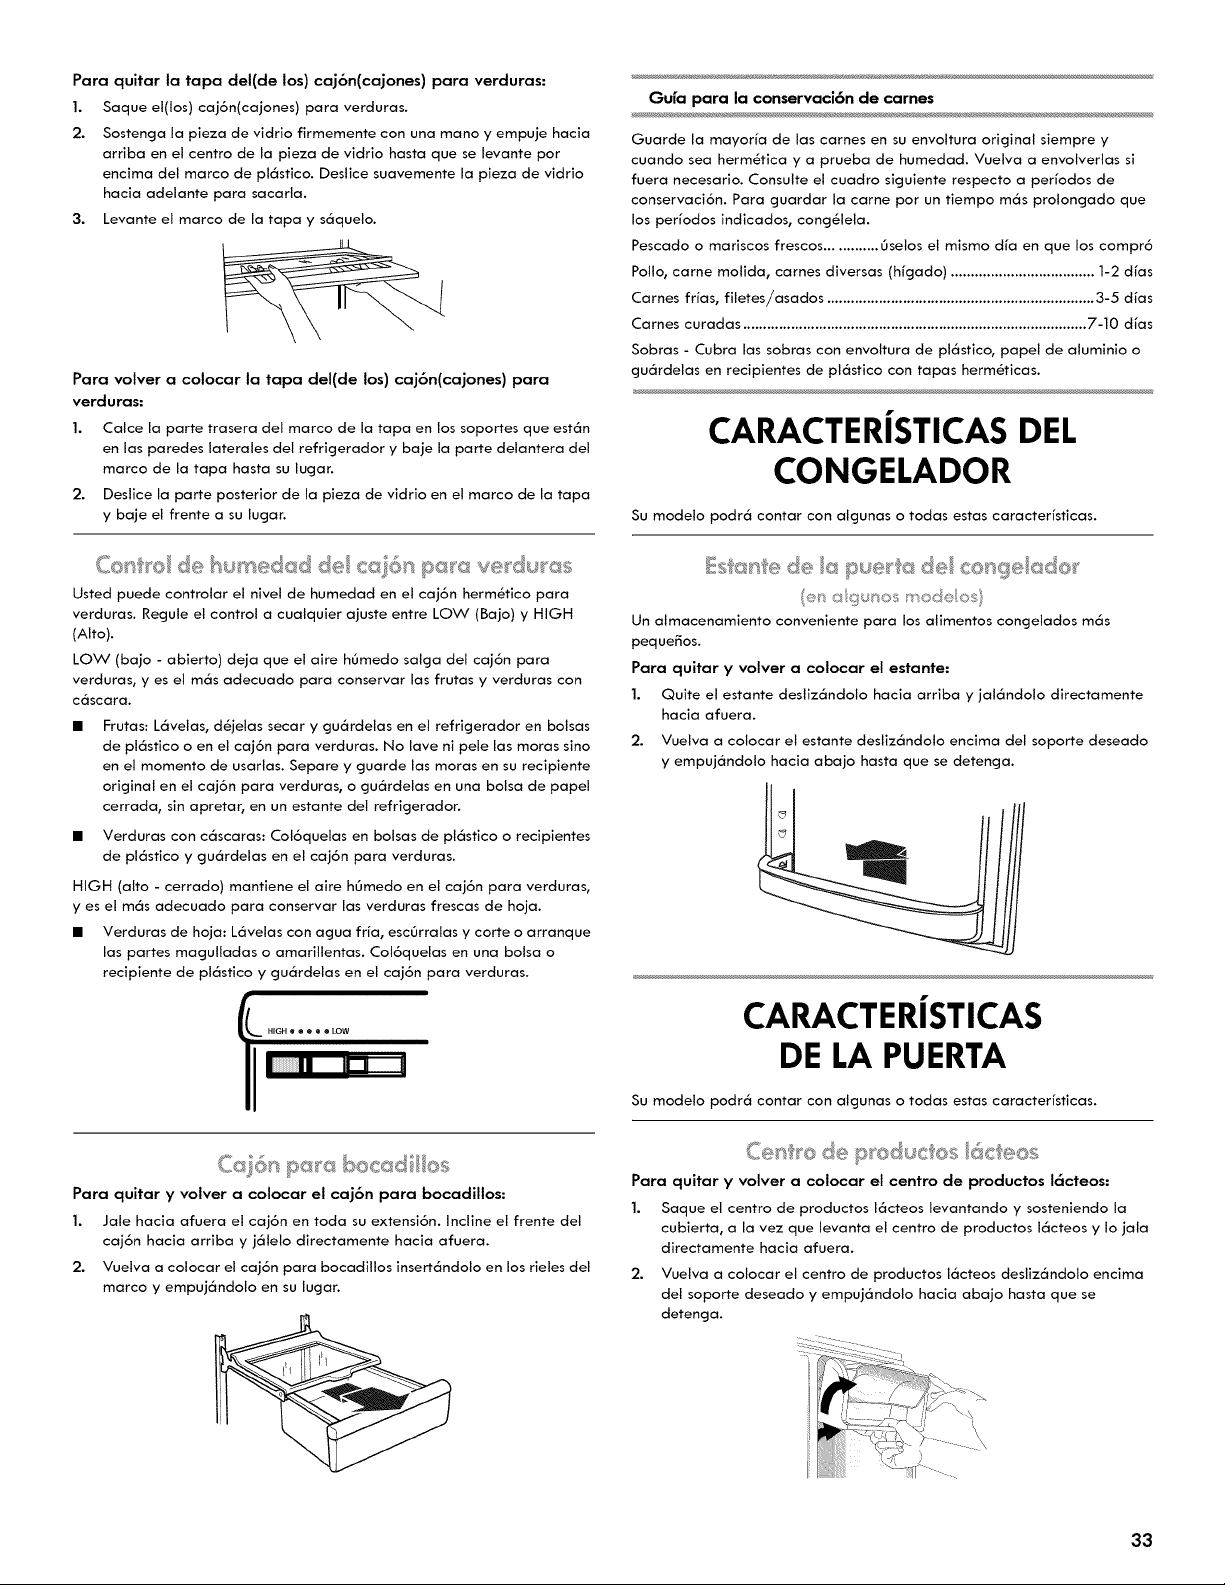
Para quitar la tapa del(de los) caj6n(cajones) para verduras:
1. Saque el(los) caj6n(cajones) para verduras.
2. Sostenga la pieza de vidrio firmemente con una mano y empuje hacia
arriba en el centro de la pieza de vidrio hasta que se levante pot
encima del marco de pl6stico. Deslice suavemente la pieza de vidrio
hacia adelante para sacarla.
3. Levante el marco de la tapa y s6quelo.
Para volver a colocar la tapa del(de los) caj6n(cajones) para
verduras:
1. Calce la parte trasera del marco de la tapa en los soportes que est6n
en las paredes laterales del refrigerador y baje la parte delantera del
marco de la tapa hasta su lugar.
2. Deslice la parte posterior de la pieza de vidrio en el marco de la tapa
y baje el frente a su lugar.
Usted puede controlar el nivel de humedad en el caj6n herm6tico para
verduras. Regule el control a cualquier ajuste entre LOW (Bajo) y HIGH
(Alto).
LOW (bajo - abierto) deja que el aire h6medo salga del caj6n para
verduras, yes el m6s adecuado para conservar las frutas y verduras con
c(_scara.
Frutas: L6velas, d6jelas secar y gu6rdelas en el refrigerador en bolsas
de pl6stico o en el caj6n para verduras. No lave ni pele las moras sino
en el momento de usarlas. Separe y guarde las moras en su recipiente
original en el caj6n para verduras, o gu6rdelas en una bolsa de papel
cerrada, sin apretar, en un estante del refrigerador.
• Verduras con c6scaras: Col6quelas en bolsas de pl6stico o recipientes
de pl6stico y gu6rdelas en el caj6n para verduras.
HIGH (alto - cerrado) mantiene el aire hOmedo en el caj6n para verduras,
y es el m6s adecuado para conservar las verduras frescas de hoja.
• Verduras de hoja: L6velas con agua frM, escOrralas y corte o arranque
las partes magulladas o amarillentas. Col6quelas en una bolsa o
recipiente de pl6stico y gu6rdelas en el caj6n para verduras.
HIGH o • o ® ® LOW
Ca i61, pa_c_boc0_d / os
Para quitar y volver a colocar el caj6n para bocadillos:
1.
2.
Jale hacia afuera el caj6n en toda su extensi6n. Incline el frente del
caj6n hacia arriba y j61elo directamente hacia afuera.
Vuelva a colocar el caj6n para bocadillos insert6ndolo en los rieles del
marco y empuj6ndolo en su lugar.
Gufa para la conservaci6n de carnes
Guarde la mayorM de las carnes en su envoltura original siempre y
cuando sea herm6tica y a prueba de humedad. Vuelva a envolverlas si
fuera necesario. Consulte el cuadro siguiente respecto a perfodos de
conservaci6n. Para guardar la carne pot un tiempo m6s prolongado que
los peHodos indicados, cong61ela.
Pescado o mariscos frescos ............. 6selos el mismo dM en que los compr6
Polio, came molida, carnes diversas (higado) .................................... 1-2 dMs
Carnes frMs, filetes/asados ................................................................... 3-5 dMs
Carnes curadas ...................................................................................... 7-10 dMs
Sobras - Cubra las sobras con envoltura de pl6stico, papel de aluminio o
gu6rdelas en recipientes de pl6stico con tapas herm6ticas.
CARACTERISTICAS DEL
CONGELADOR
Su modelo podr6 contar con algunas o todas estas caracterfsticas.
en a gunos mode os
Un almacenamiento conveniente para los alimentos congelados m6s
pequefios.
Para quitar y volver a colocar el estante:
1. Quite el estante desliz6ndolo hacia arriba y jal6ndolo directamente
hacia afuera.
2. Vuelva a colocar el estante desliz6ndolo encima del soporte deseado
y empuj6ndolo hacia abajo basra que se detenga.
CARACTERISTICAS
DE LA PUERTA
Su modelo podr6 contar con algunas o todas estas caracterfsticas.
_;__,_,_,O_,
Para quitar y volver a colocar el centro de productos lacteos:
1. Saque el centro de productos 16cteos levantando y sosteniendo la
cubierta, a la vez que levanta el centro de productos 16cteos y Io jala
directamente hacia afuera.
2. Vuelva a colocar el centro de productos 16cteos desliz6ndolo encima
del soporte deseado y empuj6ndolo hacia abajo basra que se
detenga.
33
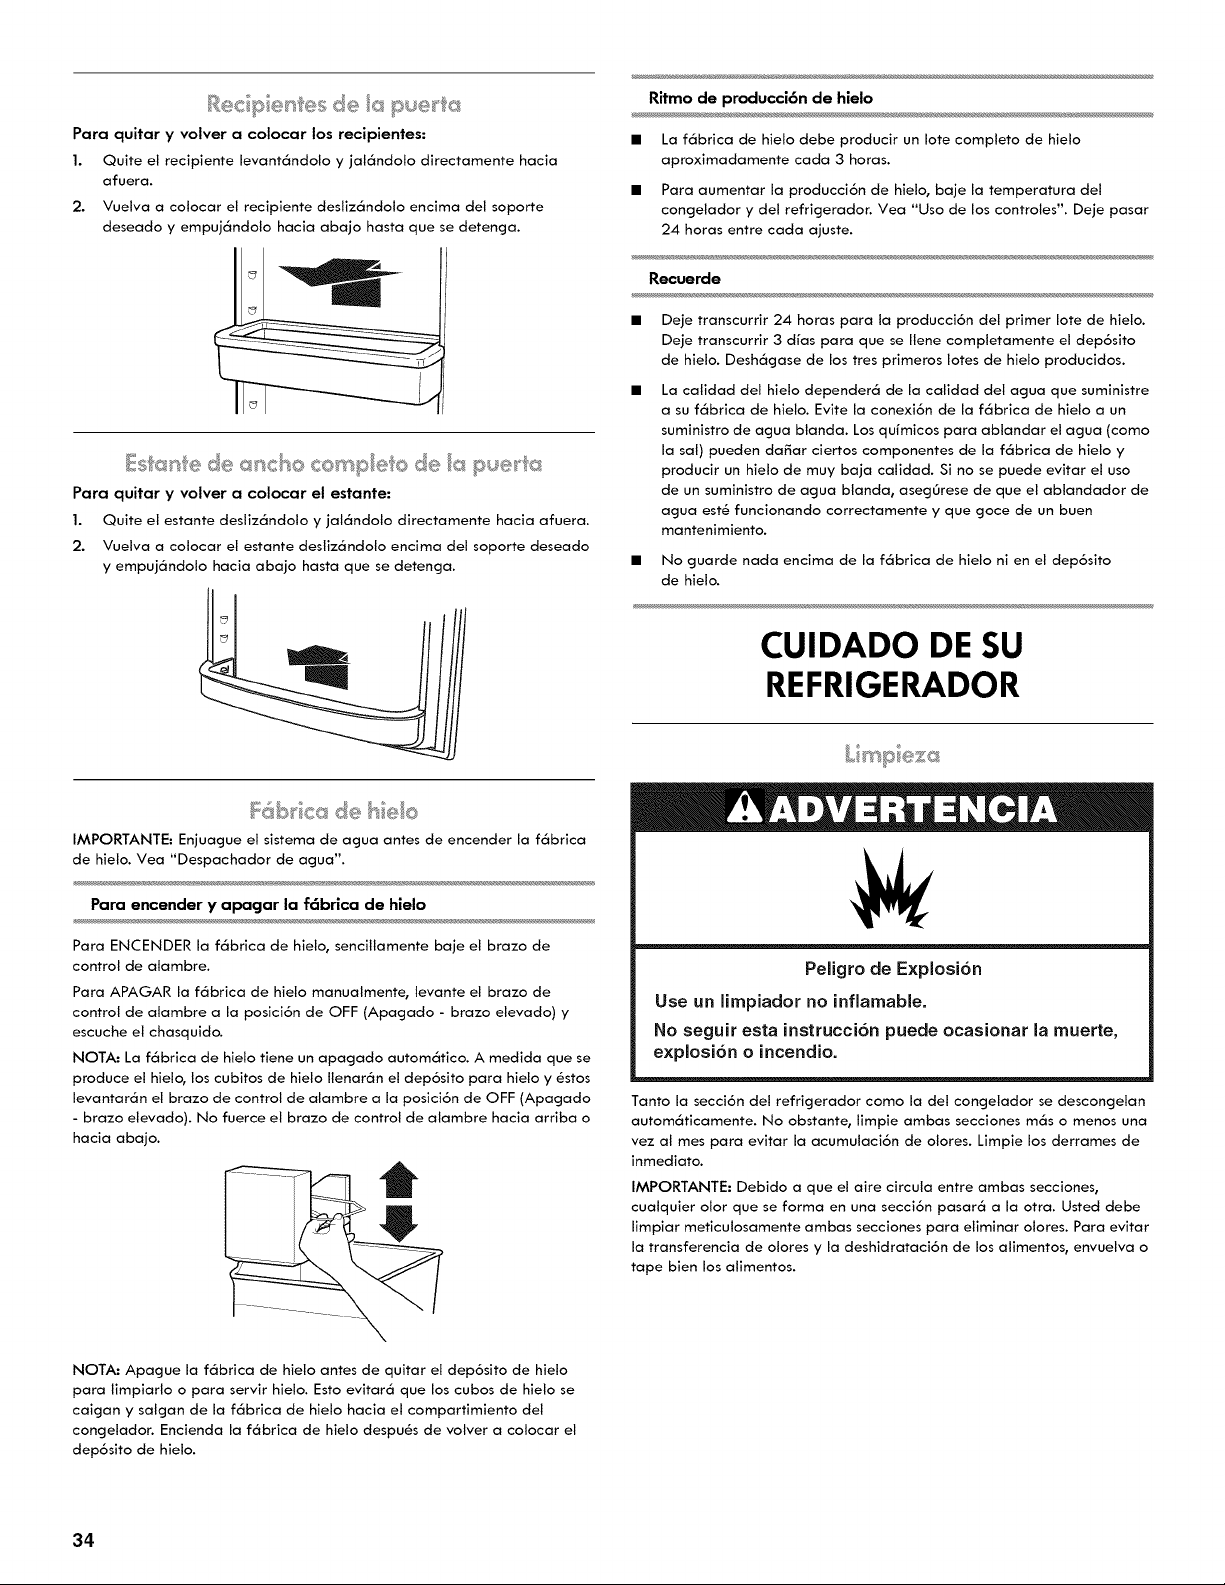
Re€ p e'_ es de {s p_e_4£c}
Para quitar y volver a colocar los recipientes:
1. Quite el recipiente levant6ndolo y jal6ndolo directamente hacia
afuera.
2. Vuelva a colocar el recipiente desliz6ndolo encima del soporte
deseado y empuj6ndolo hacia abajo basra que se detenga.
_iis_a_il'ede c_sdso temple e de _:_pue_£<<:_
Para quitar y volver a colocar el estante:
1. Quite el estante desliz6ndolo y jal6ndolo directamente hacia afuera.
2. Vuelva a colocar el estante desliz6ndolo encima del soporte deseado
y empuj6ndolo hacia abajo basra que se detenga.
Fsdbr ¢c:_de hek_
IMPORTANTE: Enjuague el sistema de agua antes de encender la f6brica
de hielo. Vea "Despachador de agua'.
Para encender y al:_gar la f6brica de hielo
Para ENCENDER la f6brica de hielo, sencillamente baje el brazo de
control de alambre.
Para APAGAR la f6brica de hielo manualmente, levante el brazo de
control de alambre a la posici6n de OFF (Apagado - brazo elevado) y
escuche el chasquido.
NOTA: La f6brica de hielo tiene un apagado autom6tico. A medida que se
produce el hielo, los cubitos de hielo Ilenar6n el dep6sito para hielo y 6stos
levantar6n el brazo de control de alambre a la posici6n de OFF (Apagado
- brazo elevado). No fuerce el brazo de control de alambre hacia arriba o
hacia abajo.
NOTA: Apague la f6brica de hielo antes de quitar el dep6sito de hielo
para limpiarlo o para servir hielo. Esto evitar6 que los cubos de hielo se
caigan y salgan de la f6brica de hielo hacia el compartimiento del
congelador. Encienda la f6brica de hielo despu6s de volver a colocar el
dep6sito de hielo.
Ritmo de producci6n de hielo
• La f6brica de hielo debe producir un Iote completo de hielo
aproximadamente cada 3 horas.
• Para aumentar la producci6n de hielo, baje la temperatura del
congelador y del refrigerador. Vea "Uso de los controles'. Deje pasar
24 horas entre cada ajuste.
Recuerde
Deje transcurrir 24 horas para la producci6n del primer lore de hielo.
Deje transcurrir 3 dias para que se Ilene completamente el dep6sito
de hielo. Desh6gase de los tres primeros Iotes de hielo producidos.
La calidad del hielo depender6 de la calidad del agua que suministre
a su f6brica de hielo. Evite la conexi6n de la f6brica de hielo a un
suministro de agua blanda. Los quimicos para ablandar el agua (como
la sal) pueden da_ar ciertos componentes de la f6brica de hielo y
producir un hielo de muy baja calidad. Si no se puede evitar el uso
de un suministro de agua blanda, asegOrese de que el ablandador de
agua est6 funcionando correctamente y que goce de un buen
mantenimiento.
No guarde nada encima de la f6brica de hielo ni en el dep6sito
de hielo.
CUIDADO DE SU
REFRIGERADOR
Peligro de Explosi6n
Use un limpiador no inflamable.
No seguir esta instrucci6n puede ocasionar la muerte,
explosi6n o incendio.
Tanto la secci6n del refrigerador como la del congelador se descongelan
autom6ticamente. No obstante, limpie ambas secciones m6s o menos una
vez al rues para evitar la acumulaci6n de olores. Limpie los derrames de
inmediato.
IMPORTANTE: Debido a que el aire circula entre ambas secciones,
cualquier olor que se forma en una secci6n pasar6 a la otra. Usted debe
limpiar meticulosamente ambas secciones para eliminar olores. Para evitar
la transferencia de olores y la deshidrataci6n de los alimentos, envuelva o
tape bien los alimentos.
34
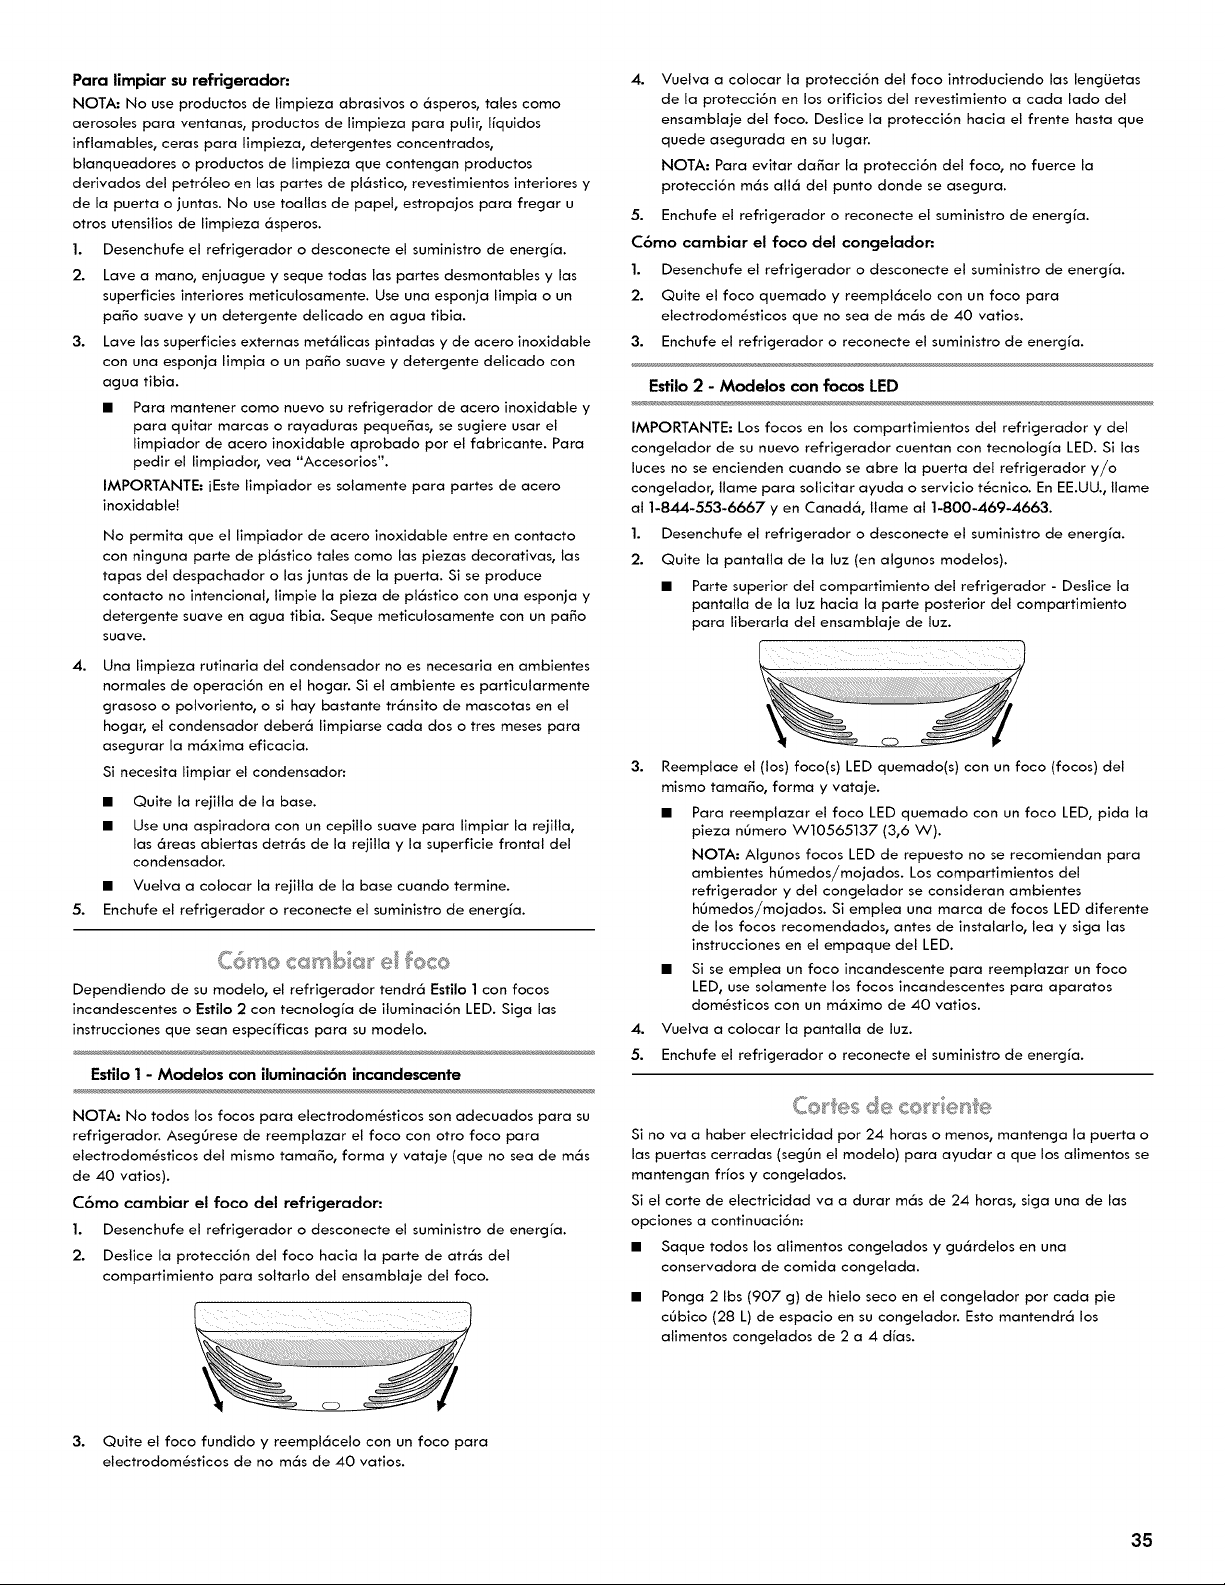
Para limpiar su refricjerador-
NOTA: No use productos de limpieza abrasivos o 6speros, tales como
aerosoles para ventanas, productos de limpieza para pulir, I(quidos
inflamables, ceras para limpieza, detergentes concentrados,
blanqueadores o productos de limpieza que contengan productos
derivados del petr61eo en las partes de pl6stico, revestimientos interiores y
de la puerta o juntas. No use toallas de papel, estropajos para fregar u
otros utensilios de limpieza 6speros.
1. Desenchufe el refrigerador o desconecte el suministro de energ_a.
2. Lave a mano, enjuague y seque todas las partes desmontables y las
superficies interiores meticulosamente. Use una esponja limpia o un
paso suave y un detergente delicado en agua tibia.
3. Lave las superficies externas met61icas pintadas y de acero inoxidable
con una esponja limpia o un paso suave y detergente delicado con
agua tibia.
• Para mantener como nuevo su refrigerador de acero inoxidable y
para quitar marcas o rayaduras peque_as, se sugiere usar el
limpiador de acero inoxidable aprobado pot el fabricante. Para
pedir el limpiador, vea "Accesorios".
IMPORTANTE: jEste limpiador es solamente para partes de acero
inoxidable!
No permita que el limpiador de acero inoxidable entre en contacto
con ninguna parte de pl6stico tales como las piezas decorativas, las
tapas del despachador o las juntas de la puerta. Si se produce
contacto no intencional, limpie la pieza de pl6stico con una esponja y
detergente suave en agua tibia. Seque meticulosamente con un paso
suave.
4.
5.
Una limpieza rutinaria del condensador no es necesaria en ambientes
normales de operaci6n en el hogar. Si el ambiente es particularmente
grasoso o polvoriento, o si hay bastante tr6nsito de mascotas en el
hogar, el condensador deber6 limpiarse cada dos o tres meses para
asegurar la m6xima eficacia.
Si necesita limpiar el condensador:
• Quite la rejilla de la base.
• Use una aspiradora con un cepillo suave para limpiar la rejilla,
las 6reas abiertas detr6s de la rejilla y la superficie frontal del
condensador.
• Vuelva a colocar la rejilla de la base cuando termine.
Enchufe el refrigerador o reconecte el suministro de energ(a.
........ I'@C@
Dependiendo de su modelo, el refrigerador tendr6 Estilo 1 con focos
incandescentes o Estilo 2 con tecnologia de iluminaciBn LED. Siga las
instrucciones que sean espec(ficas para su modelo.
Estilo 1 - Modelos con iluminaci6n incandescente
NOTA: No todos los focos para electrodom6sticos son adecuados para su
refrigerador. AsegOrese de reemplazar el foco con otro foco para
electrodom6sticos del mismo tama_o, forma y vataje (que no sea de m6s
de 40 vatios).
C6mo cambiar el foco del refrigerador:
1. Desenchufe el refrigerador o desconecte el suministro de energ_a.
2. Deslice la protecci6n del foco hacia la parte de atr6s del
compartimiento para soltarlo del ensamblaje del foco.
4.
Vuelva a colocar la protecci6n del foco introduciendo las lengLietas
de la protecci6n en los orificios del revestimiento a cada lado del
ensamblaje del foco. Deslice la protecci6n hacia el frente hasta que
quede asegurada en su lugar.
NOTA: Para evitar da_ar la protecci6n del foco, no fuerce la
protecci6n m6s all6 del punto donde se asegura.
5. Enchufe el refrigerador o reconecte el suministro de energia.
C6mo cambiar el foco del congelador:
1. Desenchufe el refrigerador o desconecte el suministro de energ_a.
2. Quite el foco quemado y reempl6celo con un foco para
electrodom6sticos que no sea de m6s de 40 vatios.
3. Enchufe el refrigerador o reconecte el suministro de energ(a.
Estilo 2 - Modelos con focos LED
IMPORTANTE: Los focos en los compartimientos del refrigerador y del
congelador de su nuevo refrigerador cuentan con tecnologia LED. Si las
luces no se encienden cuando se abre la puerta del refrigerador y/o
congelador, Ilame para solicitar ayuda o servicio t6cnico. En EE.UU., Ilame
al 1-844-553-6667 yen Canad6, Ilame al 1-800-469-4663.
1. Desenchufe el refrigerador o desconecte el suministro de energ_a.
2. Quite la pantalla de la luz (en algunos modelos).
• Parte superior del compartimiento del refrigerador - Deslice la
pantalla de la luz hacia la parte posterior del compartimiento
para liberarta del ensamblaje de luz.
3. Reemplace el (los) foco(s) LED quemado(s) con un foco (focos) del
mismo tamaSo, forma y vataje.
• Para reemplazar el foco LED quemado con un foco LED, pida la
pieza nOmero W10565137 (3,6 W).
NOTA: Algunos focos LED de repuesto no se recomiendan para
ambientes hOmedos/mojados. Los compartimientos del
refrigerador y del congelador se consideran ambientes
hOmedos/mojados. Si emplea una marca de focos LED diferente
de los focos recomendados, antes de instalarlo, lea y siga las
instrucciones en el empaque del LED.
• Si se emplea un foco incandescente para reemplazar un foco
LED, use solamente los focos incandescentes para aparatos
dom6sticos con un m6ximo de 40 vatios.
4. Vuelva a colocar la pantalla de luz.
5. Enchufe el refrigerador o reconecte el suministro de energ_a.
Si no va a haber electricidad por 24 horas o menos, mantenga la puerta o
las puertas cerradas (seg6n el modelo) para ayudar a que los alimentos se
mantengan frfos y congelados.
Si el corte de electricidad va a durar m6s de 24 horas, siga una de las
opciones a continuaci6n:
• Saque todos los alimentos congelados y gu6rdelos en una
conservadora de comida congelada.
• Ponga 2 Ibs (907 g) de hielo seco en el congelador por cada pie
cObico (28 L) de espacio en su congelador. Esto mantendr6 los
alimentos congelados de 2 a 4 dfas.
3. Quite el foco fundido y reempl6celo con un foco para
electrodom6sticos de no m6s de 40 vatios.
35
• Si no tiene conservadora de alimentos ni hielo seco, use todos los
alimentos perecederos o prepare conservas de inmediato.
RECUERDE: Un congelador Ileno se mantiene frfo par m6s tiempo que uno
a medio Ilenar. Un congelador Ileno de came se mantiene fifo por m6s
tiempo que uno Ileno de alimentos horneados. Si Ud. ve que los alimentos
contienen cristales de hielo, se pueden volver a congelar, pero la calidad y
el sabor pueden afectarse. Si el alimento no est6 en buenas condiciones,
desc6rtelo.
Vacaciones
Si Ud. decide dejar el refrigerador funcionando mientras estd
ausente-
1. Use todos los arficulos perecederos y congele el resto.
2. Si su refrigerador tiene una f6brica de hielo autom6tica y est6
conectado al suministro de agua de la casa0 cierre el suministro de
agua al refrigerador. Si no se cierra el suministro de agua, pueden
ocurrir da_os a la propiedad.
3. Si usted tiene una f6brica de hielo autom6tica, ap6guela.
NOTA: SegOn el modelo, levante el brazo de control de alambre a la
posici6n de OFF (Apagado - hacia arriba), o presione el interruptor
hacia OFF (Apagado).
4. Vade el dep6sito de hielo.
Si Ud. decide apagar el refrigerador antes de irse:
1. Saque toda la comida del refrigerador.
2. Si su refrigerador tiene f6brica de hielo autom6tica:
• Cierre el suministro de agua a la f6brica de hielo por Io menos un
dfa antes.
• Cuando el Oltimo lore de hielo caiga, levante el brazo de control
de alambre a la posici6n OFF (Apagado - hacia arriba) o mueva
el interruptor a la posici6n OFF (Apagado), dependiendo del
modelo.
3. Vade el dep6sito de hielo.
4. Apague el (los) control(es) de temperatura. Vea "Uso del (de los)
control(es)".
5. Limpie el refrigerador, p6sele un paso y s6quelo bien.
6. Fije bloques de goma o de madera con cinta adhesiva a la parte
superior de ambas puertas para que queden abiertas y el aire circule.
Esto evita que se formen olores y que crezcan hongos.
Mudanza
Si Ud. muda su refrigerador a una casa nueva, siga los pasos a
continuaci6n para prepararse para la mudanza.
1. Si su refrigerador tiene f6brica de hielo autom6tica:
• Cierre el suministro de agua a la f6brica de hielo por Io menos un
dfa antes.
• Desconecte la tuberfa de agua que est6 atr6s del refrigerador.
• Cuando el Oltimo Iote de hielo caiga, levante el brazo de control
de alambre a la posici6n OFF (Apagado - hacia arriba) o mueva
el interruptor a la posici6n OFF (Apagado), dependiendo del
modelo.
2. Saque toda la comida del refrigerador y empaque todos los alimentos
congelados en hielo seco.
3. Vacfe el dep6sito de hielo.
4. Apague el (los) control(es) de temperatura. Vea "Uso del (de los)
control(es)".
5. Desenchufe el refrigerador.
6. Limpie, p6sele un paso y seque bien.
7. Saque todas las partes desmontables, envu61valas bien y asegOrelas
con cinta adhesiva para que no se muevan ni se sacudan durante la
mudanza.
8. SegOn el modelo, levante la parte delantera del refrigerador para que
ruede con facilidad O BIEN, levante los tornillos niveladores para no
rayar el piso. Vea "Ajuste la(s) puerta(s)" o "Cierre y alineamiento de
las puertas".
9. Sostenga las puertas cerradas y el cable pegado a la parte posterior
del refrigerador con cinta adhesiva.
Cuando Ilegue a la casa nueva, ponga todo de nuevo en su lugar y lea la
secci6n "lnstrucciones de instalaci6n" para obtener instrucciones de
preparaci6n. Adem6s, si su refrigerador tiene una f6brica de hielo
autom6tica, recuerde volver a conectar el suministro de agua al
refrigerador.
36
SOLUCION DE PROBLEMAS
Pruebe primero las soluciones sucjeridas aqui antes de Ilamar para solicitar ayuda.
El refrigerador no funciona
• Estallido - contracci6n/expansi6n de la paredes interiores,
especialmente durante el enfriamiento inicial.
• Acjua corriendo/cjoteando - puede escucharse cuando el hielo se
derrite durante la desconcjelaci6n y corre hacia la bandeja
recolectora.
Peligro de Choque El@ctrico
Conecte a un contacto de pared de conexi6n a tierra de
3 terminales.
No quite la terminal de conexi6n a tierra.
No use un adaptador.
No use un cable el@ctrico de extensi6n.
No seguir estas instrucciones puede ocasionar
la muerte, incendio o choque el@ctrico.
_Est6 desenchufado el cable el_ctrico? Conecte a un contacto de
pared de conexi6n a tierra de 3 terminales.
_Funciona el contacto? Enchufe una 16mpara para ver si funciona el
contacto.
8Hay un fusible de la casa fundido o se dispar6 el cortacircuitos?
Reemplace el fusible o reposicione el cortacircuitos. Si el problema
contin0a, Ilame a un electricista.
BEst6 encendido el control? Asecj0rese de que el control del
refricjerador est_ encendido. Vea "Uso de los controles".
8Es nueva la instalaci6n? Deje transcurrir 24 horas despu_s de la
instalaci6n para que el refricjerador se enfrfe pot completo.
NOTA: El ajustar el control de temperatura en la posici6n m6s frM no
enfrM el refricjerador m6s r6pido.
Parece que el motor funciona excesivamente
Es posible que su nuevo refricjerador funcione pot perfodos m6s larcjos que
su refricjerador anterior debido al compresor y los ventiladores de alto
rendimiento. Es posible que la unidad funcione pot m6s tiempo a6n si la
habitaci6n est6 caliente, si se ha acjrecjado una cjran cantidad de
alimentos, si se abre la puerta con frecuencia o si se ha dejado la misma
abierta.
Parece que el refrigerador es ruidoso
El ruido del refricjerador se ha ido reduciendo a Io largo de los afios.
Debido a esta reducci6n, es posible que escuche ruidos intermitentes en su
nuevo refricjerador que no habM notado en el modem viejo. A
continuaci6n se enumeran alcjunos sonidos normales con explicaciones.
• Sonido pulsante - los ventiladores/el compresor se est6n ajustando
para obtener el m6ximo desempefio.
• Sonido sibilante/vibraciones - ftujo de ffquido refricjerante o artfculos
cjuardados arriba del refricjerador.
La puerta no cierra completamente
BEst6 bloqueada la puerta? Mueva los paquetes de alimentos lejos de
la puerta.
8Hay un recipiente o un estante bloqueando el paso? Empuje el
recipiente o el estante nuevamente a la posici6n correcta.
BEst6 obstruyendo la tapa del compartimiento para verduras?
Asecj0rese de empujar bien la tapa del compartimiento para verduras,
de manera que la parte posterior descanse sobre los soportes.
Es diffcil abrir la puerta
Peligro de Explosi6n
Use un limpiador no inffamable.
No seguir esta instrucci6n puede ocasionar la muerte,
expiosi6n o incendio.
• 8Est6n las empaquetaduras sucias o pecjajosas? Limpie las
empaquetaduras y las superficies de contacto con jab6n suave y acjua
tibia. Enjuacjue y seque con un patio suave.
La temperatura est6 demasiado caliente
8Es una nueva instalaci6n? Deje transcurrir 24 horas despu_s de la
instalaci6n para que el refricjerador se enfrfe pot completo.
8Se abre o se deja la puerta abierta a menudo? Esto hace que entre
aire tibio al refricjerador. Reduzca al m(nimo el n0mero de veces que
abre la puerta y mantencja la puerta completamente cerrada.
8Se ha acjregado una gran cantidad de alimentos? Deje que
transcurran varias horas para que el refricjerador vuelva a la
temperatura normal.
8Se ha ajustado el control correctamente de acuerdo con las
condiciones circundantes? Ajuste el control un ajuste m6s frfo. F(jese en
la temperatura en 24 horas. Vea "Uso de los controles".
Hay acumulaci6n de humedad en el interior
NOTA: Es normal que se acumule un poco de humedad.
• BEst6 h0meda la habitaci6n? Esto contribuye a la acumulaci6n de
humedad.
37
• _Se abre o se deja la puerra abierta a menudo? Esto hace que entre
aire hOmedo al refricjerador. Reduzca al m{nimo el nOmero de veces
que abre la puerta y mantencja la puerta completamente cerrada.
La f6brica de hielo no produce hielo o no produce suficientehielo
• 8Se ha conectado el refrigerador a un suministro de agua y se ha
abierto la v61vula de cierre? Conecte el refrigerador al suministro de
acjua y abra completamente la v61vula de cierre.
• _Hay un estrechamiento en la rubella de suministro de agua? Un
estrechamiento en la tuberfa puede reducir el ftujo de agua. Enderece
la rubella de suministro de agua.
• _Est6 encendida la f6brica de hielo? AsecjOrese de que el brazo de
cierre de alambre o el interruptor (dependiendo del modelo) est_ en la
posici6n de ON (Encendido).
• _Es nueva la instalaci6n? Espere 24 horas despu_s de la instalaci6n de
la f6brica de hielo para que empiece a producir hielo. Deje transcurrir
72 horas para la producci6n total de hielo.
_Est6 completamente cerrada la puerta del congelador? Cierre con
firmeza la puerta del compartimiento del congelador. Si la puerta del
compartimiento del congelador no se cierra comptetamente, vea "Las
puertas no cierran completamente', anteriormente en esta secci6n.
• _Se acaba de sacar una gran cantidad de hielo? Deje transcurrir 24
horas para que la f6brica de hielo produzca m6s hielo.
• _Se trab6 un cubo de hielo en el brazo eyector de la f6brica de hielo?
Saque el hielo del brazo eyector con un utensilio de pl6stico.
_Tiene un filtro de agua instalado en el refrigerador? Saque el filtro y
ponga a funcionar la f6brica de hielo. Si el volumen de hielo aumenta,
el filtro puede estar obstruido o haberse instalado incorrectamente.
Reemplace el filtro o vuelva a instalarlo correctamente.
• _Se ha conectado un sistema de filtraci6n de agua de 6smosis inversa
al suministro de agua fHa? Esto puede hacer que disminuya la presi6n
de acjua. Vea "Requisitos del suministro de acjua'.
Los cubos de hielo son huecos o pequefios
NOTA: Esto es una indicaci6n de baja presi6n de acjua.
• _No est6 abierta pot completo la v61vula de cierre de agua? Abra
completamente la v61vula de cierre de acjua.
• 8Hay un estrechamiento en la tuber(a de suministro de agua? Un
estrechamiento en la rubella puede reducir el ftujo de acjua. Enderece
la rubella de suministro de acjua.
_Tiene un filtro de agua instalado en el refrigerador? Saque el filtro y
poncja a funcionar la f6brica de hielo. Si mejora la calidad de hielo, el
filtro puede estar obstruido o haberse instalado incorrectamente.
Reemplace el filtro o vuelva a instalarlo correctamente.
• 8Se ha conectado un sistema de filtraci6n de agua de 6smosis inversa
al suministro de agua fHa? Esto puede hacer que disminuya la presi6n
de acjua. Vea "Requisitos del suministro de acjua".
• _On tiene preguntas acerca de la presi6n de agua? Llame a un
plomero competente autorizado.
El hielo tiene mal sabort mal olor o un color grisdceo
• _Son nuevas las conexiones de plomeHa? Las conexiones nuevas de
plomeHa pueden producir un hielo descolorido o de mal sabot.
• 8Se han guardado los cubos de hielo por mucho tiempo? Deseche ese
hielo. Lave el recipiente de hielo. Deje transcurrir 24 horas para que la
f6brica de hielo hacja hielo nuevo.
• _Ha habldo una transferencia de olor de los alimentos? Use empaques
herm_ticos contra humedad para almacenar comida.
• _Contiene el agua minerales (como el azufre)? Podrfa ser necesario
instalar un filtro de agua para eliminar los minerales.
_Tiene un filtro de agua instalado en el refrigerador? Un
oscurecimiento o un color gris del hielo indica que el sistema de
filtraci6n de agua necesita enjuagarse m6s. Enjuague el sistema de
agua antes de usar un nuevo filtro. Reemplace el filtro de agua
cuando se indique. Vea "Sistema de filtraci6n de agua".
El despachador de agua no funciona debidamente
8Se ha conectado el refrigerador a un suministro de agua y se ha
abierto la v61vula de cierre? Conecte el refrigerador al suministro de
acjua y abra completamente la v61vula de cierre.
8Hay un estrechamiento en la tuberfa de suministro de agua?
Enderece la tuberfa de suministro de acjua.
8Es nueva la instalaci6n? Enjuague y Ilene el sistema de agua. Vea
"Despachador de agua'.
_Est6 la presi6n de agua a por Io menos 35 Ibs/pulg 2 (241 kPa)? La
presi6n de agua de la casa determina el ftujo del despachador. Vea
"Requisitos del suministro de agua'.
_Tiene un filtro de agua instalado en el refrigerador? Saque el filtro y
poncja a funcionar el despachador. Si aumenta el flujo de acjua, el
filtro puede estar obstruido o haberse instalado incorrectamente.
Reemplace el filtro o vuelva a instalarlo correctamente.
_Est6 completamente cerrada la puerta del refrigerador? Cierre la
puerta con firmeza. Si no se cierra completamente, vea "Las puertas
no cierran completamente", anteriormente en esta secci6n.
8Se han quitado las puertas recientemente g. AsecjOrese de que el
conjunto de tubeHa/alambre del despachador de agua se haya
vuelto a conectar correctamente. Vea "Puerta(s) y caj6n del
refricjerador".
8Se ha conectado un sistema de filtraci6n de agua de 6smosis inversa
al suminlstro de agua fHa? Esto puede hacer que disminuya la presi6n
de agua. Vea "Requisitos del suministro de agua".
El agua gotea del sistema del despachador
NOTA: Es normal que caigan una o dos gotas de agua despu_s de
despachar agua.
• _No se ha puesto el vaso debaio del despachador el tiempo
suficiente? Sostenga el vaso debajo del despachador de 2 a
3 segundos despu_s de soltar la palanca del despachador.
_Es nueva la instalaci6n? Enjuacjue el sistema de acjua. Vea
"Despachador de acjua'.
_Ha camblado recientemente el filtro de agua? Enjuacjue el sistema de
acjua. Vea "Despachador de acjua".
_Hay agua en el piso cerca de la re iilla de la base? AsecjOrese de que
las conexiones de la tuberfa del despachador de agua est_n bien
ajustadas. Vea "Puerta(s) y caj6n del refricjerador".
38
El agua del despachador est6 tibia
NOTA: El agua del despachador se enfHa solamente a 50°F (10°C).
_Es nueva la instalaci6n? Deje transcurrir 24 horas despu6s de la
instalaci6n para que el suministro de agua se enfrfe completamente.
_Se ha despachado recientemente una gran cantidad de agua? Deje
transcurrir 24 horas para que el suministro de agua se enfrfe
completamente.
_No se ha usado el despachador de agua recientemente? Puede ser
que el primer vaso de agua no est6 frfo. Descarte el agua del primer
vaso.
• _Se ha conectado el refrigerador a una tubeHa de agua fHa?
AsegOrese de que el refrigerador est6 conectado a una tuberfa de
agua frfa. Vea "Requisitos del suministro de agua".
Refacciones:
Si necesita pedir limpiador para acero inoxidable o filtros de
reemptazo, en EE.UU. Ilame al 1-844-553-6667 yen Canad6, Ilame
al 1-800-469-4663.
Limpiador de acero inoxidable:
Pida la pieza No. D22 M40083 R
Filtro de agua:
Pida la pieza No. 46-9924 (P6RFWB2)
Filtro de aire:
Pida la pieza No. W10335147A
Preservador de alimentos frescos:
Pida la pieza No. W10335145A
3g
TABLE DES MATIERES
CONTRATS DE PROTECTION ................................................................ 40
GARANTIE .............................................................................................. 41
SI_CURITI_ DU RI_FRIGI_RATEUR ............................................................. 42
Mise au rebut adequate de v0tre vieux refrig6rateur ................ 43
INSTRUCTIONS D'INSTALLATION ........................................................ 43
D_ballage du r&frig&rateur .............................................................................. 43
Exigences d'emplacement ............................................................................... 44
Sp&cifications de I'alimentation en eau ........................................................ 44
Raccordement de la canalisation d'eau ....................................................... 44
Sp6cifications &lectriques ................................................................................ 46
Porte(s) et tiroir du r&frig6rateur .................................................................... 46
Fermeture et alignement de la porte .............................................................. 51
UTILISATION DU RI_FRIGI_RATEUR ......................................................... 51
Utilisation des commandes ................................................................................ 51
CARACTI_RISTIQUES DU RI_FRIGI_RATEUR ............................................. 52
Tablettes du r_frig&rateur ................................................................................. 52
Bac & I&gumes et couvercle ............................................................................. 53
R>age de I'humidit& dans le bac & I_gumes ............................................. 53
Tiroir & collations ................................................................................................ 53
CARACTI_RISTIQUES DU CONGI_LATEUR .............................................. 53
Tablette de porte du cong61ateur ................................................................... 53
CARACTI_RISTIQUES DE LA PORTE ........................................................ 54
Compartiment & produits laitiers .................................................................... 54
Balconnets de la porte ...................................................................................... 54
Tablette de porte de pleine largeur ............................................................... 54
Machine & glac;ons ............................................................................................ 54
ENTRETIEN DU RI_FRIGI_RATEUR ........................................................... 55
Nettoyage ........................................................................................................... 55
Remplacement de I'ampoule d'_clairage ..................................................... 55
Pannes de courant ............................................................................................. 56
Entretien avant les vacances ou Iors d'un d&m&nagement ........................ 56
DI_PAN NAGE .......................................................................................... 57
Fonctionnement du r_frig&rateur .................................................................... 57
Temperature et humidit& .................................................................................. 57
Gla_:ons et eau ................................................................................................... 58
Accessoires .......................................................................................................... 59
NUMI_ROS DE SERVICE ........................................ COUVERTURE ARRIERE
CONTRATS DE PROTECTION
Contrats principaux de protection
Nous vous fBIicitons c/'avoir fair un achat juc/icieux. Votre nouvel appareil
Kenmore ® est congu et fabriqu6 pour vous procurer des ann&es de
fonctionnement fiable. Mais comme pour tousles produits, il pourra &
I'occasion n&cessiter un entretien pr&ventif ou une r¶tion. Le cas
&ch&ant, un Contrat principal de protection peut vous &pargner de I'argent
et des soucis.
Le Contrat principal de protection contribue aussi & prolonger la vie utile
de votre nouvel appareil m6nager. Le Contrat _ inclut :
I/Pi6ces et main-d'oeuvre n&cessaires pour conserver les appareils en
6tat de fonctionnement correct pendant une utilisation normale, pas
uniquement les d&faillances. Notre couverture va bien au-dela de la
garantie du produit. Aucune franchise, aucune anomalie de
fonctionnement ne sont exclues de ce contrat - protection r_elle.
II' Un service d'expert propos& par plus de 10 000 techniciens d'entretien
Sears autoris6s, ce qui signifie que quelqu'un de confiance prendra soin
de votre produit.
II' Appels de service illirnit_s et service national, aussi souvent que vous en
avez besoin et quand vous en avez besoin.
I_' Garantie "Sans soucis" - remplacement de votre produit couvert si plus
de quatre pannes se produisent en dec;& de douze mois.
t/Remplacement du produit si votre produit couvert ne peut 6tre r6par&
V&rification annuelle d'entretien pr&ventif sur demande - sans frais
suppt6mentaires.
I/Aide rapide par t_l_phone - nous appelons cela R_solution rapide -
soutien t&16phonique d'un agent de Sears sur tousles produits.
Consid&rez-nous comme un "manuel d'utilisateur parlant".
II' Protection contre les sautes de puissance pour pr6venir les dommages
61ectriques attribuables aux fluctuations de courant.
I_' Couverture pour la perte de nourriture de 250 $ par an sur tout aliment
alt6r6 en raison d'une d6faillance m6canique sur tout r6frig6rateur ou
cong61ateur couvert.
I/Remboursement de location si la r6paration du produit couvert prend
plus de temps que promis.
I/25 % de r_duction sur le prix courant de route intervention de
r6paration non couverte et pi6ces de rechange.
D6s que vous achetez le Contrat, il suffit d'un appel t616phonique pour
obtenir un rendez-vous de service. Vous pouvez appeler en tout temps jour
et nuit ou prendre un rendez-vous de service en ligne.
Le Contrat principal de protection constitue un investissement sans risque.
Si vous annulez pour une quelconque raison pendant la p&riode de
garantie du produit, nous vous rembourserons int&gralement ou nous vous
verserons un remboursement au prorata apr6s I'expiration de la p6riode de
garantie. Achetez votre Contrat principal de protection aujourd'hui m6me!
Certaines limitations et exclusions s'appliquent. Pour des prix et
renseignements suppl6mentaires aux I_tats-Unis, composez le
1-800-827-6655.
*Le contrat de couverture au Canada varie pour certains articles. Pour
des informations d_taill_es_ appelez Sears Canada au 1-800-361-6665.
Service d'installafion Sears
Pour I'installation professionnelle garantie par Sears d'appareils m6nagers
et d'articles tels que les ouvre-portes de garage, chauffe-eau, et autres
gros appareils m6nagers, aux I_.-U, composez le 1-844-553-6667 et au
Canada, composez le 1-800-469-4663.
4O

GARANTIE DES APPAREILS MF:NAGERS KENMORE
GARANTIE LIMITEE KENMORE
PENDANT UN AN & compter de la date d'achat, cet appareil est garanti
contre tout vice de mat_riau ou de fabrication dans le cas d'une
installation, d'une utilisation et d'un entretien conformSment & toutes les
instructions fournies.
SUR PREUVE DE VENTE, un appareil d_fectueux sera r_par_ ou remplac_
gratuitement & la discretion du vendeur.
Pour connaTtre les d_tails sur la couverture de la garantie afin d'obtenir un
d_pannage gratuit ou un remplacement, visiter : www.kenmore.com/
warranty.
La pr_sente garantie ne s'applique que pendant 90 JOURS & compter de
la date d'achat aux I_tats-Unis et est nulle au Canada sicet appareil
m_nager est utilis_ & d'autres fins que pour un usage priv_ et domestique
Cette garantie couvre UNIQUEMENT les vices de matSriaux et de
fabrication, et ne couvre PAS :
1. Les pi@ces courantes pouvant s'user suite & une utilisation normale,
notamment les flltres, courroies, sacs et les ampoules d'_clairage &
culot & vis.
2. L'intervention d'un technicien de r_paration pour montrer & rutilisateur
comment installer, utiliser et entretenir correctement le produit.
3. Les interventions de d&pannage pour rectifier I'installation de
rappareil non r&alis&e par des agents d'entretien autoris&s de Sears,
ou pour intervenir sur des probl&mes concernant les fusibles du
domicile, les disjoncteurs, et les syst_mes de plomberie ou
d'alimentation de gaz r&sultant de rinstallation.
4. L'endommagement ou I'&tat d_fectueux de cet appareil imputable &
rinstallation non r&alis&e par des agents d'entretien autoris&s de Sears,
y compris une installation non conforme aux codes d'_lectricit_, de
gazet de plomberie.
5. L'endommagement ou I'&tat d&fectueux de cet appareil, notamment
une d&coloration ou I'apparition de rouille sur la surface, dans le cas
oO I'utilisation ou I'entretien ne sont pas conformes & toutes les
instructions fournies.
6. L'endommagement ou I'&tat d&fectueux de cet appareil, notamment
une d_coloration ou I'apparition de rouille sur la surface, r&sultant d'un
accident, d'une modification, d'un usage impropre ou abusif ou d'une
utilisation autre que celle & laquelle il est destin_.
7. L'endommagement ou I'&tat d&fectueux de cet appareil, notamment
une d&coloration ou I'apparition de rouille sur la surface, caus& par
rutilisation de d_tergents, nettoyants, produits chimiques ou ustensiles
autres que ceux recommand_s dans toutes les instructions fournies
avec le produit.
8. L'endommagement ou I'&tat d_fectueux de pi&ces ou syst_mes
r_sultant d'une modification non autoris&e faite & cet appareil.
9. L'intervention sur I'appareil si la plaque signal&tique indiquant le
num&ro de module et de s&rie est manquante, a subi une modification,
ou s'il est difficile de d_terminer si rappareil porte le logo de
certification appropri_.
Clause d'exon&ration de responsabilit_ au titre des garanties
implicites; limitation des recours
Le seul et exclusif recours du client dans le cadre de la pr_sente garantie
limit&e consiste en la r¶tion ou le remplacement pr&vu aux pr&sentes.
Les garanties impticites, y compris les garanties applicables de qualit_
marchande ou d'aptitude & un usage particulier, sont limit&es & un an ou &
la plus courte p&riode autoris_e par la Ioi. Le vendeur n'assume aucune
responsabilit_ pour les dommages fortuits ou indirects. Certains I_tats ou
certaines provinces ne permettent pas I'exclusion ou la limitation des
dommages fortuits ou indirects, ou la limitation de la dur&e des garanties
implicites de qualit& marchande ou d'aptitude & un usage particulier, de
sorte que ces exclusions ou limitations peuvent ne pas _tre applicables
dans votre cas.
Cette garantie s'applique seulement Iorsque cet appareil est utilis_ aux
I_tats-Unis ou au Canada _.
Cette garantie vous conf_re des droits juridiques sp_cifiques et vous pouvez
_galement jouir d'autres droits qui peuvent varlet d'un I_tat & rautre.
_Le service de r_paration & domicile n'est pas disponible dans routes les
zones g_ographiques du Canada; cette garantie ne couvrira pas non
plus les frais de d_placement et de transport de I'utilisateur ou du
d_panneur si ce produit se trouve dans une r_gion _loign_e (tel que d_fini
par Sears Canada Inc.) oO aucun d_panneur autoris_ n'est disponible.
Sears Brands Management Corporation
Hoffman Estates, IL 60179
Sears Canada Inc.
Toronto, Ontario, Canada M5B 2C3
ENREGISTREMENT DU PRODUIT
Inscrivez les num&ros de module et de s&rie comptets et la dote d'achat.
Vous trouverez ces renseignements sur I'_tiquette des num_ros de module et
de s_rie situ&e sur le produit.
Gardez ces renseignements & disposition pour obtenir plus rapidement
assistance ou service Iorsque vous communiquez avec Sears au sujet de
votre appareil m_nager.
Nurn_ro de rnod_le __ __ __
Nurn_ro de s_rie
Date d'achat
Conservez ces instructions et votre re_u de vente pour rc_fc_rence
ult&rieure.
41
SF:CURITF:DU RF:FRIGF:RATEUR
Votre securite et celle des autres est tres importante.
Nous donnons de nombreux messages de s_curit_ importants dans ce manuel et sur votre appareil m_nager. Assurez-vous de
toujours lire tousles messages de s_curit_ et de vous y conformer.
Voici le symbole d'alerte de s_curit&
Ce symbole d'alerte de s_curit_ vous signale les dangers potentiels de d_c_s et de blessures graves & vous
et & d'autres.
Tous les messages de s_curit_ suivront le symbole d'alerte de s_curit_ et le mot "DANGER" ou
"AVERTISSEMENT". Ces mots signifient •
Risque possible de d_cbs ou de blessure grave si vous ne
suivez pas imm_diatement les instructions.
Risque possible de d_cbs ou de blessure grave si vous
ne suivez pas les instructions.
Tousles messages de s_curit_ vous diront quel est le danger potentiel et vous disent comment r_duire le risque de blessure et
ce qui peut se produire en cas de non-respect des instructions.
IMPORTANTES INSTRUCTIONS DE SI_CURITI_
AVERTISSEMENT : Pour reduire les risques d'incendie, de choc electrique ou des blessures Iors de I'utilisation du
refrig6rateur, prendre quelques precautions fondamentales, y compris les suivantes :
• Brancher I'appareil sur une prise & 3 alveoles reliee a la terre. • Garder les materiaux et les vapeurs inflammables, telle
• Ne pas enlever la broche de liaison & la terre.
• Ne pas utiliser un adaptateur.
• Ne pas utiliser un c&ble de rallonge.
• Debrancher la source de courant electrique avant I'entretien.
• Replacer pieces et panneaux avant de faire la remise en marche.
• Enlever les portes de votre vieux r6frigerateur.
• Utiliser un produit de nettoyage ininflammable.
que I'essence, loin du r6frigerateur.
• Utiliser deux ou plus de personnes pour deplacer et
installer le refrig6rateur.
• Debrancher le r6frig6rateur avant I'installation de la
machine a gla£ons (seulement pour modeles pr_ts
recevoir une machine a gla£_ons).
• Utiliser un verre robuste pour prendre des glagons (sur
certains modeles).
• Ne pas heurter les portes en verre du refrig6rateur (sur
certains modeles).
CONSERVEZ CES INSTRUCTIONS
Avertissements de la proposition 65 de I'¢:tat de Californie :
AVERTISSEMENT : Ce produit contient au moins un produit chimique connu par I'¢:tat de Californie pour 6tre & I'origine de
cancers.
AVERTISSEMENT : Ce produit contient au moins un produit chimique connu par I'¢:tat de Californie pour 6tre & I'origine de
malformations et autres d6ficiences de naissance.
42

Mise au rebut ad cjuate de
votre vieux r6frigerateur
• Laisser les tablettes en place de sorte que les enfants ne puissent pas y
p_n_trer facilement.
Risque de suffoquer
Eniever Jes portes de votre vieux r6frig6rateur.
Le non=respect de cette instruction peut causer
un d6c_s ou des 16sions c6r6brales.
IMPORTANT : L'emprisonnement et r_touffement des enfants ne sont pas
un probl_me du passe. Les r_frig_rateurs jet, s ou abandonn_s sont encore
dangereux, m6me s'ils sont laiss_s abandonn_s pendant "quelques jours
seulement". Si vous vous d_barrassez de votre vieux r_frig_rateur, veuillez
suivre les instructions suivantes pour aider & _viter les accidents.
Avant de jeter votre vieux r6fricj6rateur ou concj61ateur •
• Enlever les portes.
\
Renseignements importants apropos de la raise au
rebut des fJuides r_frig6rants :
Mettre le r6frig6rateur au rebut conform6ment & la
r6glementation f6cl6rale et locale. Les fluides r6frig6rants
doivent 6tre 6vacu6s par un technicien certifi6 et agr66 par
I'EPA conform6ment aux proc6dures 6tablies.
INSTRUCTIONS D'INSTALLATION
Risque du poids e×cessif
Utiliser deux ou plus de personnes pour d6placer et
installer le r6frig6rateur.
Le non=respect de cette instruction peut causer
une blessure au dos ou d'autre blessure.
• Jeter ou recycler tousles mat_riaux d'emballage.
D6placement de votre r6frig6rateur :
Votre refrig6rateur est Iourd. Lors du deplacement de votre
refrig6rateur pour le nettoyage ou un entretien ou reparation,
veiller & recouvrir le plancher avec du carton ou un panneau
de fibres dures pour eviter qu'il ne subisse tout dommage.
Toujours tirer le refrig6rateur tout droit Iors de son
deplacement. Ne pas incliner le refrig6rateur d'un c6te ou de
I'autre ni le "faire marcher" en essayant de le deplacer car le
plancher pourrait 6tre endommage.
Enl&vement des rnat6riaux d'ernballacje
Enlever le ruban adh_sif et la colle des surfaces du r_frig_rateur avant
de le mettre en marche. Frotter une petite quantit_ de savon liquide
pour la vaisselle sur I'adh_sif avec les doigts. Rincer & I'eau tilde et
essuyer.
Ne pas utiliser d'instruments coupants, d'alcool & friction, de liquides
inflammables ou de nettoyants abrasifs pour enlever le ruban adh_sif
ou la colle. Ces produits peuvent endommager la surface de votre
r_frig_rateur. Pour plus de renseignements, voir "S_curit_ du
r_frig_rateur".
Des tablettes, bacs, glissi_res de tablettes dans la porte et autres
pi_ces peuvent 6tre emball_s dans la trousse FeaturePak. Suivre les
instructions contenues dans I'emballage pour le montage appropri_.
Nettoyacje avant rutilisation
Apr_s avoir enlev_ tousles mat_riaux d'emballage, nettoyer I'int_rieur du
r_frig_rateur avant de I'utiliser. Voir les instructions de nettoyage dans
"Entretien du r_frig_rateur".
Jmportants renseignements a savoir au sujet des tablettes
et des couvercles en verre :
Ne pas nettoyer les tablettes ou couvercles en verre avec de
I'eau tilde quand ils sont froids. Les tablettes et les
couvercles peuvent se briser s'ils sont expos6s & des
changements soudains de temp6rature ou & un impact tel
que coup brusque. Le verre tremp6 est con_u pour 6clater
en d'innombrables pieces minuscules. Ceci est normal. Les
tablettes et les couvercles en verre sont Iourds. Les saisir &
deux mains Iors de leur d6pose afin d'6viter de les faire
tomber.
43
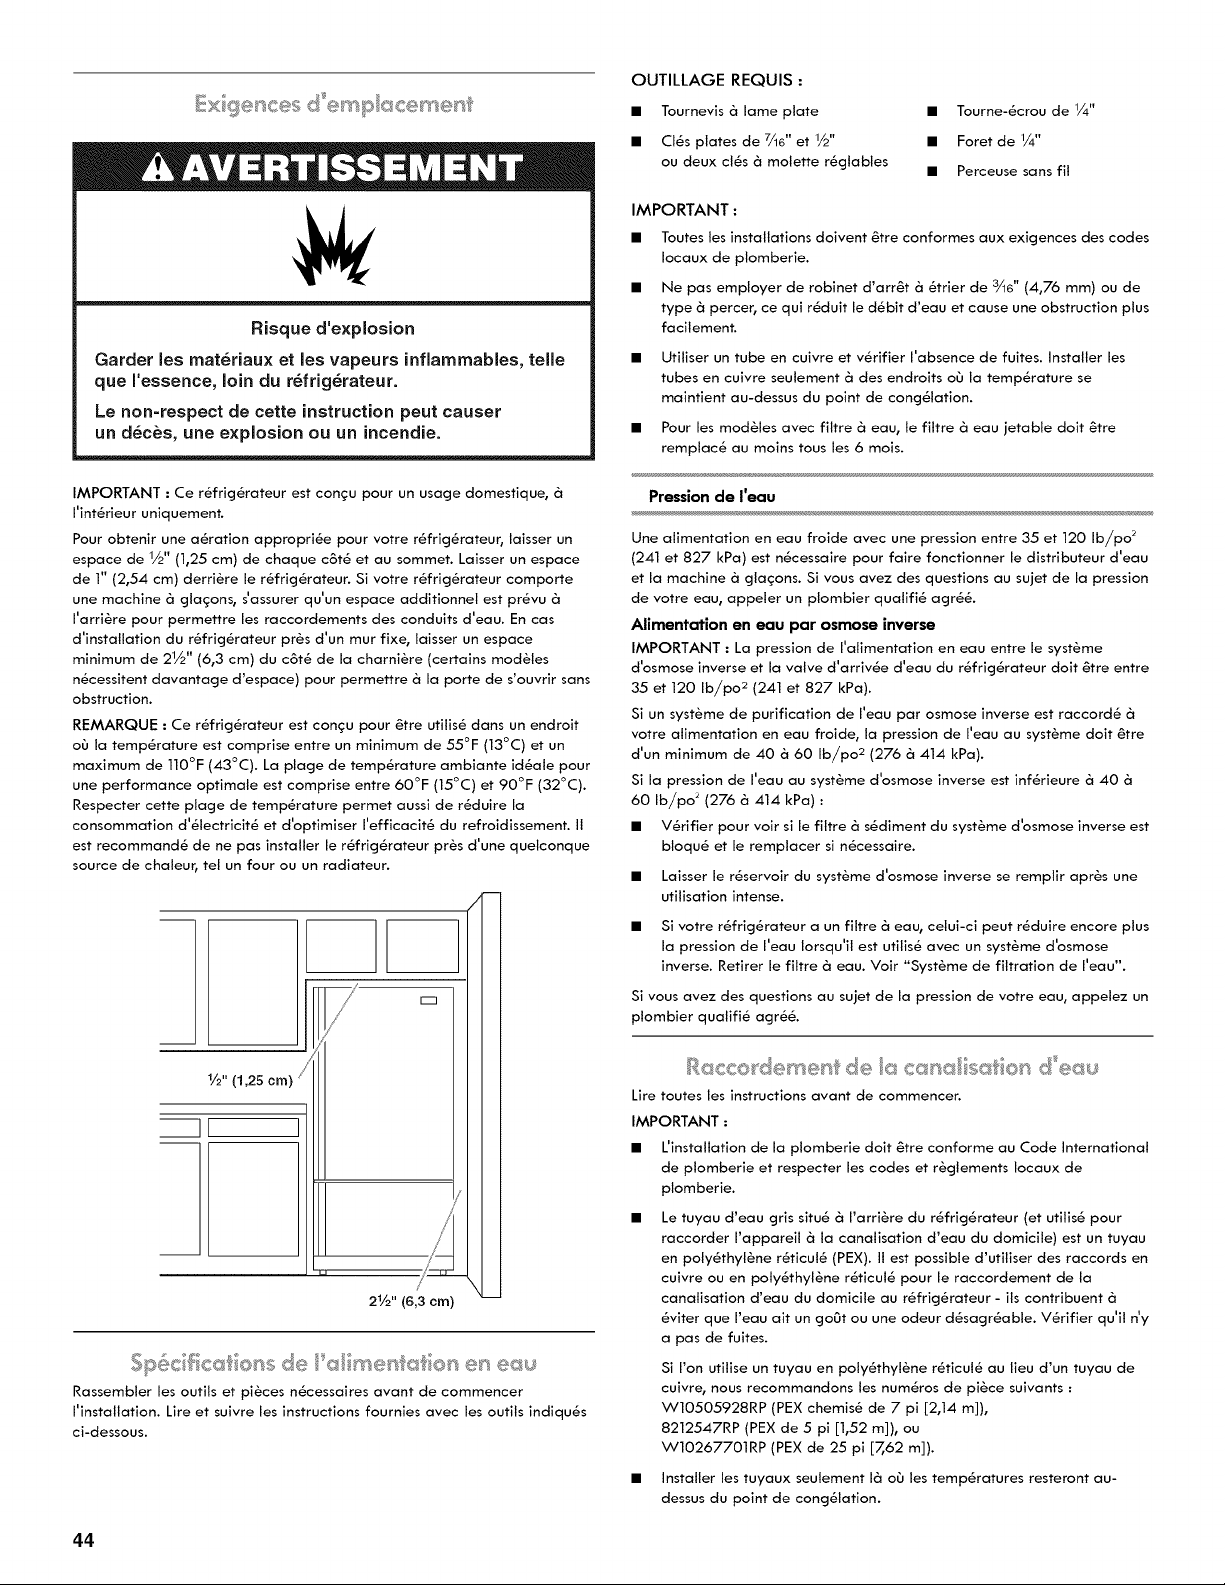
Risque d'explosion
Garder les rnat_riaux et les vapeurs inflammables, telle
que I'essence, Join du r_frig_rateur.
Le non=respect de cette instruction peut causer
un d_c_s, une explosion ou un incendie.
OUTILLAGE REQUIS :
• Tournevis & lame plate • Tourne-_crou de 1/4"
• Cl_s plates de 7/16" et 1/2" • Foret de 1/4"
ou deux cl_s & molette r_gtables • Perceuse sans fil
IMPORTANT :
• Toutes les installations doivent _tre conformes aux exigences des codes
Iocaux de plomberie.
• Ne pas employer de robinet d'arr6t & _trier de 3_6" (4,76 mm) ou de
type & percer, ce qui r_duit le d_bit d'eau et cause une obstruction plus
facilement.
• Utiliser un tube en cuivre et v_rifier I'absence de fuites. Installer les
tubes en cuivre seulement & des endroits oO la temperature se
maintient au-dessus du point de cong_lation.
• Pour les modules avec filtre & eau, le filtre & eau jetable doit _tre
remplac_ au moins tousles 6 mois.
IMPORTANT : Ce r_frig_rateur est congu pour un usage domestique, &
I'int_rieur uniquement.
Pour obtenir une a_ration appropri_e pour votre r_frig_rateur, laisser un
espace de 1/2" (1,25 cm) de chaque c6t_ et au sommet. Laisser un espace
de 1" (2,54 cm) derriere le r_frig_rateur. Si votre r_frig_rateur comporte
une machine & glagons, s'assurer qu'un espace additionnel est pr_vu &
I'arri_re pour permettre les raccordements des conduits d'eau. En cas
d'installation du r_frig_rateur pros d'un mur fixe, laisser un espace
minimum de 21/2'' (6,3 cm) du c6t_ de la charni_re (certains modules
n_cessitent davantage d'espace) pour permettre & la porte de s'ouvrir sans
obstruction.
REMARQUE : Ce r_frig_rateur est congu pour _tre utilis_ dans un endroit
oO la temperature est comprise entre un minimum de 55°F (13°C) et un
maximum de 110°F (43°C). La plage de temperature ambiante id_ale pour
une performance optimale est comprise entre 60°F (15°C) et 90°F (32°C).
Respecter cette plage de temperature permet aussi de r_duire la
consommation d'_lectricit_ et d'optimiser I'efficacit_ du refroidissement. I1
est recommand_ de ne pas installer le r_frig_rateur pros d'une quelconque
source de chaleur, tel un four ou un radiateur.
1/=. (1,25 cm)
]k
Rassembler les outils et pi@ces n_cessaires avant de commencer
I'installation. Lire et suivre les instructions fournies avec les outils indiqu_s
ci-dessous.
Pression de I'eau
Une alimentation en eau froide avec une pression entre 35 et 120 Ib/po _
(241 et 827 kPa) est n6cessaire pour faire fonctionner le distributeur d'eau
et la machine & glagons. Si vous avez des questions au sujet de la pression
de votre eau, appeler un plombier qualifi& agr66.
Alirnentation en eau par osrnose inverse
IMPORTANT : La pression de I'alimentation en eau entre le syst6me
d'osmose inverse et la valve d'arriv6e d'eau du r6frig6rateur doit 6tre entre
35 et 120 Ib/po 2 (241 et 827 kPa).
Si un syst6me de purification de I'eau par osmose inverse est raccord& &
votre alimentation en eau froide, la pression de I'eau au syst6me doit 6tre
d'un minimum de 40 & 60 Ib/po 2 (276 & 414 kPa).
Si la pression de I'eau au syst6me d'osmose inverse est inf6rieure & 40 &
60 Ib/po 2 (276 & 414 kPa) :
• V6rifier pour voir si le filtre & s&diment du syst6me d'osmose inverse est
bloqu& et le remplacer si n6cessaire.
• Laisser le r6servoir du syst6me d'osmose inverse se remplir apr6s une
utilisation intense.
• Si votre r_frig_rateur a un filtre _ eau0 celui-ci peut r_duire encore plus
la pression de I'eau Iorsqu'il est utilis_ avec un syst_me d'osmose
inverse. Retirer le filtre & eau. Voir "Syst_me de filtration de I'eau".
Si vous avez des questions au sujet de la pression de votre eau, appelez un
plombier qualifi_ agree.
Lire toutes les instructions avant de commencer.
IMPORTANT :
• L'installation de la plomberie doit _tre conforme au Code International
de plomberie et respecter les codes et r_gtements Iocaux de
plomberie.
Le tuyau d'eau gris situ_ & I'arri_re du r_frig_rateur (et utilis_ pour
raccorder I'appareil & la canalisation d'eau du domicile) est un tuyau
en polyethylene r_ticul_ (PEX). I1 est possible d'utiliser des raccords en
cuivre ou en poly_thyl@ne r_ticul_ pour le raccordement de la
canalisation d'eau du domicile au r_frig_rateur - ils contribuent &
_viter que I'eau air un goOt ou une odeur d_sagr_able. V_rifier qu'il n'y
a pas de fuites.
Si ron utilise un tuyau en poly_thyl6ne r_ticul_ au lieu d'un tuyau de
cuivre, nous recommandons les num_ros de pi@ce suivants :
W10505928RP (PEX chemis_ de 7 pi [2,14 m]),
8212547RP (PEX de 5 pi [1,52 m]), ou
W10267701RP (PEX de 25 pi [7,62 m]).
• Installer les tuyaux seulement 14 oO les temperatures resteront au-
dessus du point de cong_lation.
44
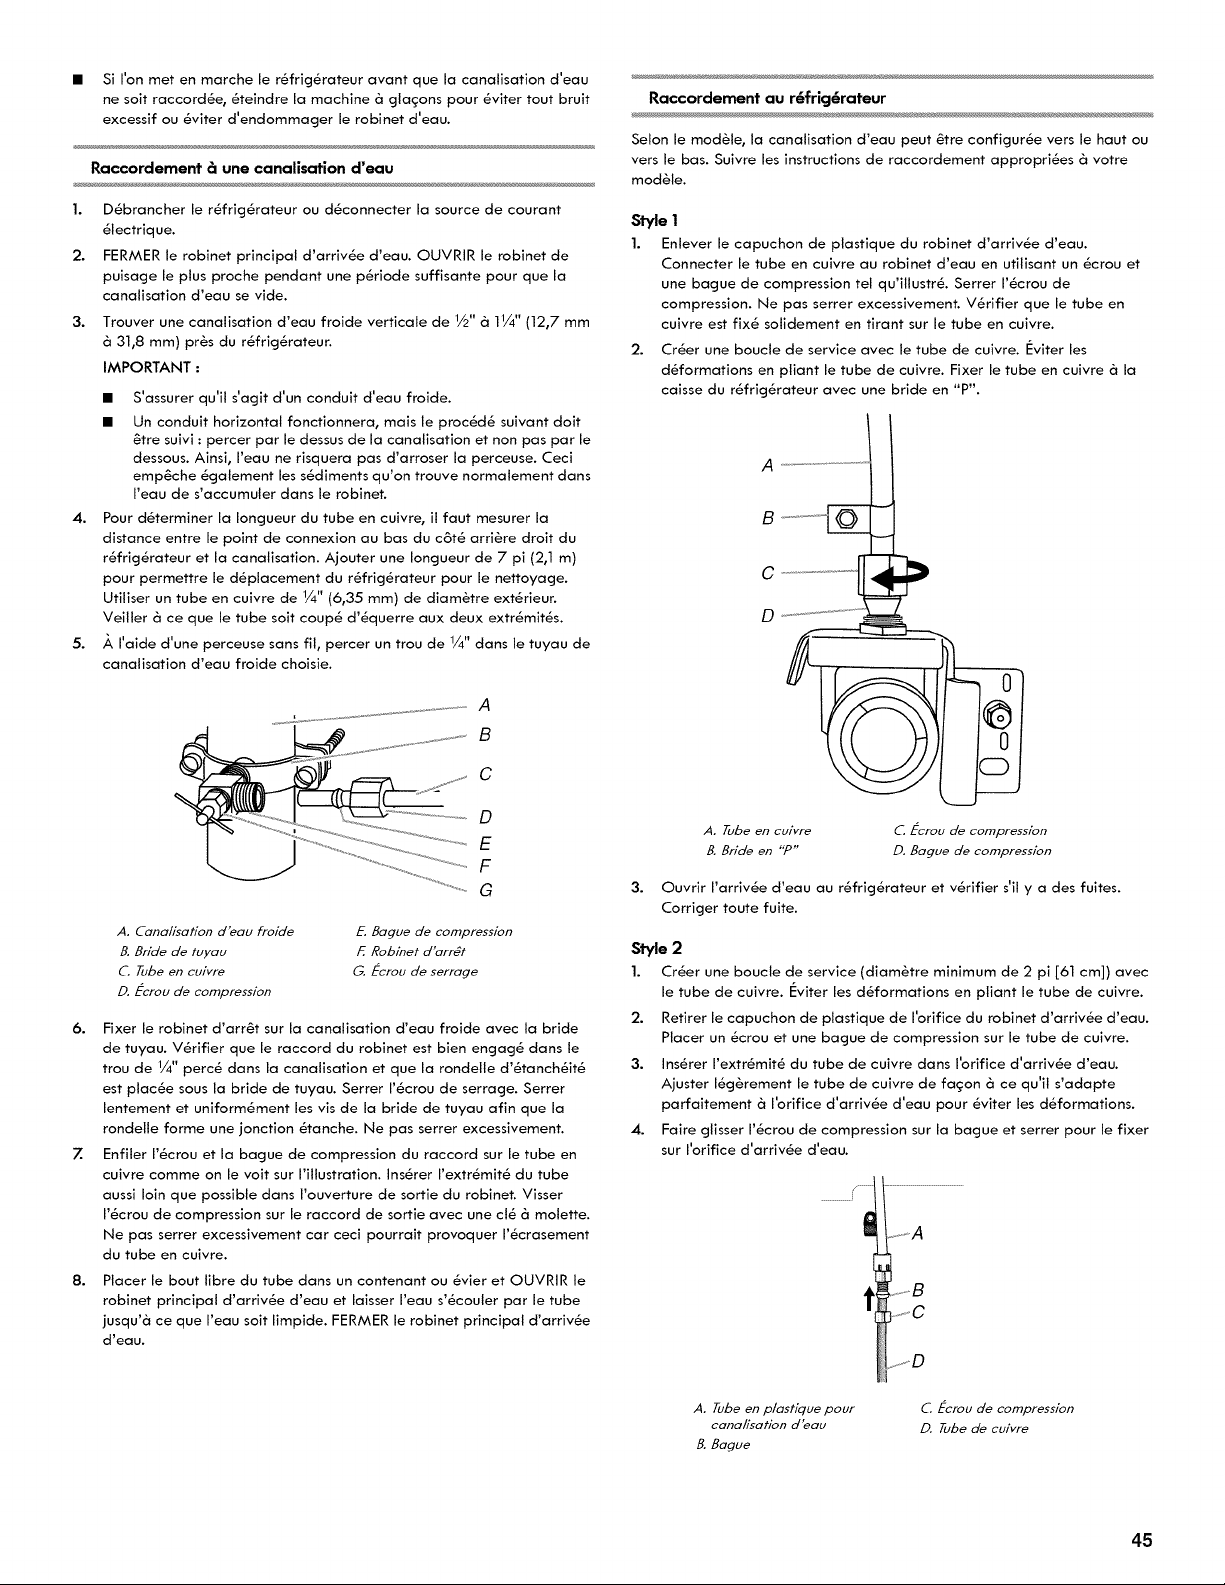
Si I'on met en marche le r_frig_rateur avant que la canalisation d'eau
ne soit raccord_e, _teindre la machine & gla_:ons pour _viter tout bruit
excessif ou _viter d'endommager le robinet d'eau.
Raccordement 6 une canalisation d'eau
1. D6brancher le r6frig6rateur ou d6connecter la source de courant
61ectrique.
2. FERMER le robinet principal d'arriv6e d'eau. OUVRIR le robinet de
puisage le plus proche pendant une p6riode suffisante pour que la
canalisation d'eau se vide.
3. Trouver une canalisation d'eau froide verticale de 1/2" & 11/4" (12,7 mm
& 31,8 ram) pr6s du r6frig6rateur.
IMPORTANT :
4.
5.
• S'assurer qu'il s'agit d'un conduit d'eau froide.
• Un conduit horizontal fonctionnera, mais le proc&d& suivant doit
6tre suivi : percer par le dessus de la canalisation et non pas par le
dessous. Ainsi, I'eau ne risquera pas d'arroser la perceuse. Ceci
emp6che 6galement les s&diments qu'on trouve normalement dans
I'eau de s'accumuler dans le robinet.
Pour d&terminer la Iongueur du tube en cuivre, il Taut mesurer la
distance entre le point de connexion au bas du c6t& arri&re droit du
r6frig6rateur et la canalisation. Ajouter une Iongueur de 7 pi (2,1 m)
pour permettre le d_placement du r_frig_rateur pour le nettoyage.
Utiliser un tube en cuivre de 1/4" (6,35 ram) de diam&tre ext_rieur.
Veiller & ce que le tube soit coup_ d'_querre aux deux extr_mit_s.
/_, I'aide d'une perceuse sans fil, percer un trou de 1/4" dans le tuyau de
canalisation d'eau froide choisie.
A
B
C
D
E
F
G
A. Cana/isation dbau froide
B. Bride de tuyau
C. Tube en euivre
D. Ecrou de compression
E. Bague de compression
F. Robinet d'arr_t
G. E-erou de serrage
6. Fixer le robinet d'arr@t sur la canalisation d'eau froide avec la bride
de tuyau. V_rifier que le raccord du robinet est bien engag8 dans le
trou de 1/4" perc_ dans la canalisation et que la rondelle d'_tanch_it_
est plac_e sous la bride de tuyau. Serrer I'_crou de serrage. Serrer
lentement et uniformSment les vis de la bride de tuyau afin que la
rondelle forme une jonction _tanche. Ne pas serrer excessivement.
Z Enfiler I'_crou et la bague de compression du raccord sur le tube en
cuivre comme on le voit sur I'illustration. InsUrer I'extr_mit_ du tube
aussi loin que possible dans I'ouverture de sortie du robinet. Visser
I'_crou de compression sur le raccord de sortie avec une cl_ 8 molette.
Ne pas serrer excessivement car ceci pourrait provoquer I'_crasement
du tube en cuivre.
8. Placer le bout libre du tube dans un contenant ou _vier et OUVRIR le
robinet principal d'arriv_e d'eau et laisser I'eau s'_couler par le tube
jusqu'8 ce que I'eau soit limpide. FERMER le robinet principal d'arriv_e
d'eau.
Raccordement au r6frig6rateur
Selon le mod&le, la canalisation d'eau peut &tre configur_e vers le haut ou
vers le bas. Suivre les instructions de raccordement appropri_es & votre
mod&le.
Style I
1. Enlever le capuchon de plastique du robinet d'arriv_e d'eau.
Connecter le tube en cuivre au robinet d'eau en utilisant un _crou et
une bague de compression tel qu'illustr_. Serrer I'_crou de
compression. Ne pas serrer excessivement. V_rifier que le tube en
cuivre est fix_ solidement en tirant sur le tube en cuivre.
2. Crier une boucle de service avec le tube de cuivre. I_viter les
d_formations en pliant le tube de cuivre. Fixer le tube en cuivre & la
caisse du r_frig_rateur avec une bride en "P".
B
u
D
3.
A. Tube en cuivre
B. Bride en "P"
C. Ecrou de compression
D. Bague de compression
Ouvrir I'arriv_e d'eau au r_frig_rateur et v_rifier s'il y a des fuites.
Corriger route fuite.
Style 2
1. Crier une boucle de service (diam&tre minimum de 2 pi [61 cm]) avec
le tube de cuivre. I_viter les d_formations en pliant le tube de cuivre.
2. Retirer le capuchon de plastique de I'orifice du robinet d'arriv_e d'eau.
Placer un _crou et une bague de compression sur le tube de cuivre.
3. InsUrer I'extr_mit_ du tube de cuivre dans I'orifice d'arriv_e d'eau.
Ajuster I_g&rement le tube de cuivre de fa_:on & ce qu'il s'adapte
parfaitement & I'orifice d'arriv_e d'eau pour _viter les d_formations.
4. Faire glisser I'_crou de compression sur la bague et serrer pour le fixer
sur I'orifice d'arriv_e d'eau.
/
.......A
..........g
....... C
A. Tube en p/astique pour
eana/isation dbau
B. Bague
C. Ecrou de compression
O. Tube de euivre
45
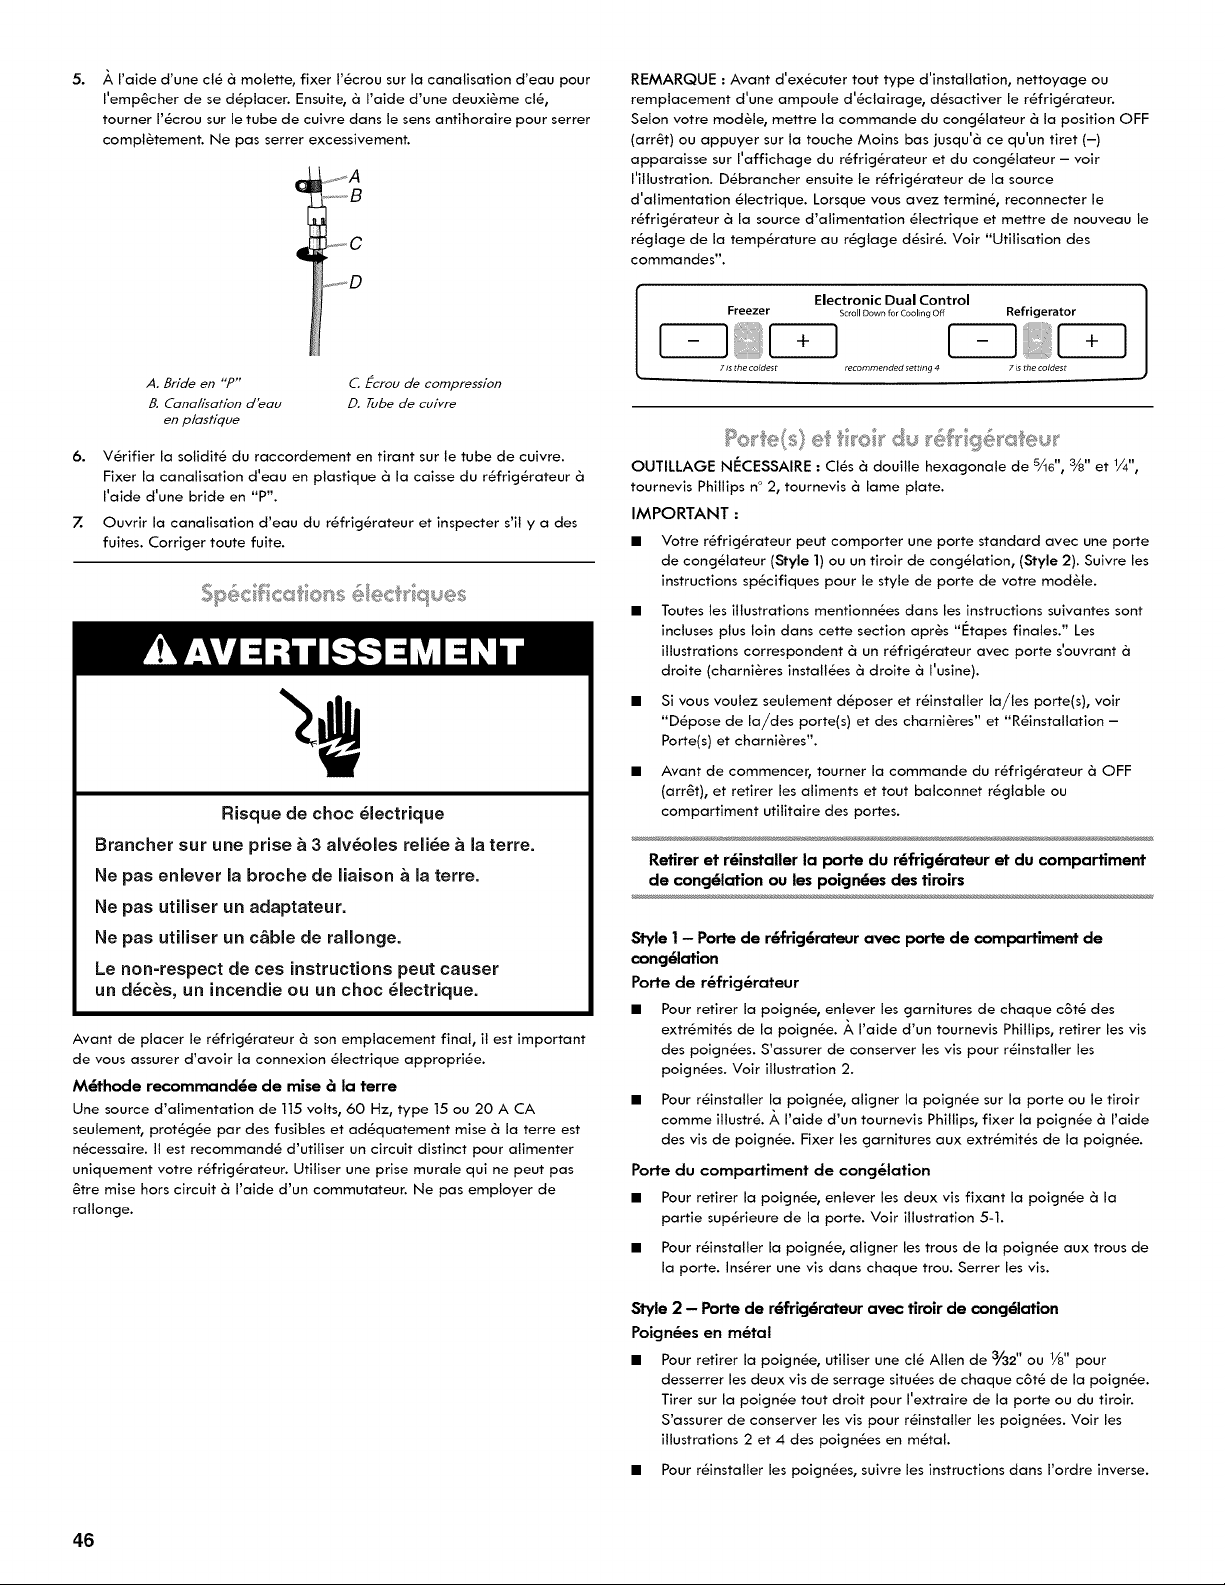
5.
,a, I'aide d'une cl_ & molette, fixer I'_crou sur la canalisation d'eau pour
I'emp_cher de se d_placer. Ensuite, & I'aide d'une deuxi_me cl_,
tourner I'_crou sur le tube de cuivre darts le sens antihoraire pour serrer
compl_tement. Ne pas serrer excessivement.
_--C
q
6.
7.
A. Bride en "P"
B. Cana/isation d'eau
en p/astique
C. E-crou de compression
D. Tube de cuivre
V_rifier la solidit_ du raccordement en tirant sur le tube de cuivre.
Fixer la canalisation d'eau en plastique & la caisse du r_frig_rateur &
I'aide d'une bride en "P".
Ouvrir la canalisation d'eau du r@frig@rateur et inspecter s'il y a des
fuites. Corriger toute fuite.
Risque de choc 61ectrique
Brancher sur une prise a 3 alv_oles reli6e a la terre.
Ne pas enlever la broche de liaison a la terre.
Ne pas utiliser un adaptateur.
Ne pas utiliser un cable de rallonge.
Le non=respect de ces instructions peut causer
un d6c_s, un incendie ou un choc 61ectrique.
Avant de placer le r_frig_rateur & son emplacement final, il est important
de vous assurer d'avoir la connexion @lectrique appropri_e.
M6thode recommand6e de mise 6 la terre
Une source d'alimentation de 115 volts, 60 Hz, type 15 ou 20 A CA
seulement, prot@g_e par des fusibles et ad@quatement mise & la terre est
n@cessaire. II est recommand@ d'utiliser un circuit distinct pour alimenter
uniquement votre r@frig_rateur. Utiliser une prise murale qui ne peut pas
@tre mise hors circuit & I'aide d'un commutateur. Ne pas employer de
rallonge.
REMARQUE : Avant d'ex_cuter tout type d'installation, nettoyage ou
remplacement d'une ampoule d'_clairage, d_sactiver le r_frig_rateur.
Selon votre module, mettre la commande du cong_lateur & la position OFF
(arr6t) ou appuyer sur la touche Moins bas jusqu'& ce qu'un tiret (-)
apparaisse sur I'affichage du r_frig_rateur et du cong_lateur - voir
I'illustration. D_brancher ensuite le r_frig_rateur de la source
d'alimentation _lectrique. Lorsque vous avez terming, reconnecter le
r_frig_rateur & la source d'alimentation _lectrique et mettre de nouveau le
r_glage de la temperature au r_glage d_sir_. Voir "Utilisation des
commandes".
Electronic Dual Control
Freezer Scroll Down for Cooling Off Refrigerator
7 is _he coldest recommended setting 4 7 is the coldest
OUTILLAGE NI_CESSAIRE ." CI6s a douille hexagonale de 8/16", 3/8" et 1/4",
tournevis Phillips n ° 2, tournevis a lame plate.
IMPORTANT :
• Votre r_frig_rateur peut comporter une porte standard avec une porte
de cong_lateur (Style 1) ou un tiroir de cong_lation, (Style 2). Suivre les
instructions sp_cifiques pour le style de porte de votre module.
• Toutes les illustrations mentionn_es darts les instructions suivantes sont
incluses plus loin dans cette section apr_s "l_tapes finales." Les
illustrations correspondent 6 un r_frig_rateur avec porte s'ouvrant &
droite (charni_res install_es & droite & I'usine).
• Si vous voulez seulement d_poser et r_installer la/les porte(s), voir
"D_pose de la/des porte(s) et des charni_res" et "R_installation -
Porte(s) et charni_res".
• Avant de commencer, tourner la commande du r_frig_rateur & OFF
(arr6t), et retirer les aliments et tout balconnet r6glable ou
compartiment utilitaire des portes.
Retirer et r6installer la porte du r6frig6rateur et du compartiment
de cong61ation ou les poign6es des tiroirs
Style 1 - Porte de r6frig6rateur avec porte de compartiment de
cong61ation
Porte de r_frig_rateur
• Pour retirer la poign_e, enlever les garnitures de chaque c6t_ des
extr_mit_s de la poign_e. A I'aide d'un tournevis Phillips, retirer les vis
des poign_es. S'assurer de conserver les vis pour r_installer les
poign_es. Voir illustration 2.
Pour r_installer la poign_e, aligner la poign_e sur la porte ou le tiroir
comme illustr_. A I'aide d'un tournevis Phillips, fixer la poign_e & I'aide
des vis de poign_e. Fixer les garnitures aux extr_mit_s de la poign_e.
Porte du compartiment de cong&lation
• Pour retirer la poign_e, enlever les deux vis fixant la poign_e & la
partie sup_rieure de la porte. Voir illustration 5-1.
• Pour r_installer la poign_e, aligner les trous de la poign_e aux trous de
la porte. InsUrer une vis dans chaque trou. Serrer les vis.
Style 2 - Porte de r6frig6rateur avec tiroir de cong61ation
Poign&es en m&tal
• Pour retirer la poign_e, utiliser une cl_ Allen de 3/32" ou 1/8" pour
desserrer les deux vis de serrage situ_es de chaque c6t_ de la poign_e.
Tirer sur la poign_e tout droit pour I'extraire de la porte ou du tiroir.
S'assurer de conserver les vis pour r_installer les poign_es. Voir les
illustrations 2 et 4 des poign_es en m_tal.
• Pour r_installer les poign_es, suivre les instructions dans I'ordre inverse.
46
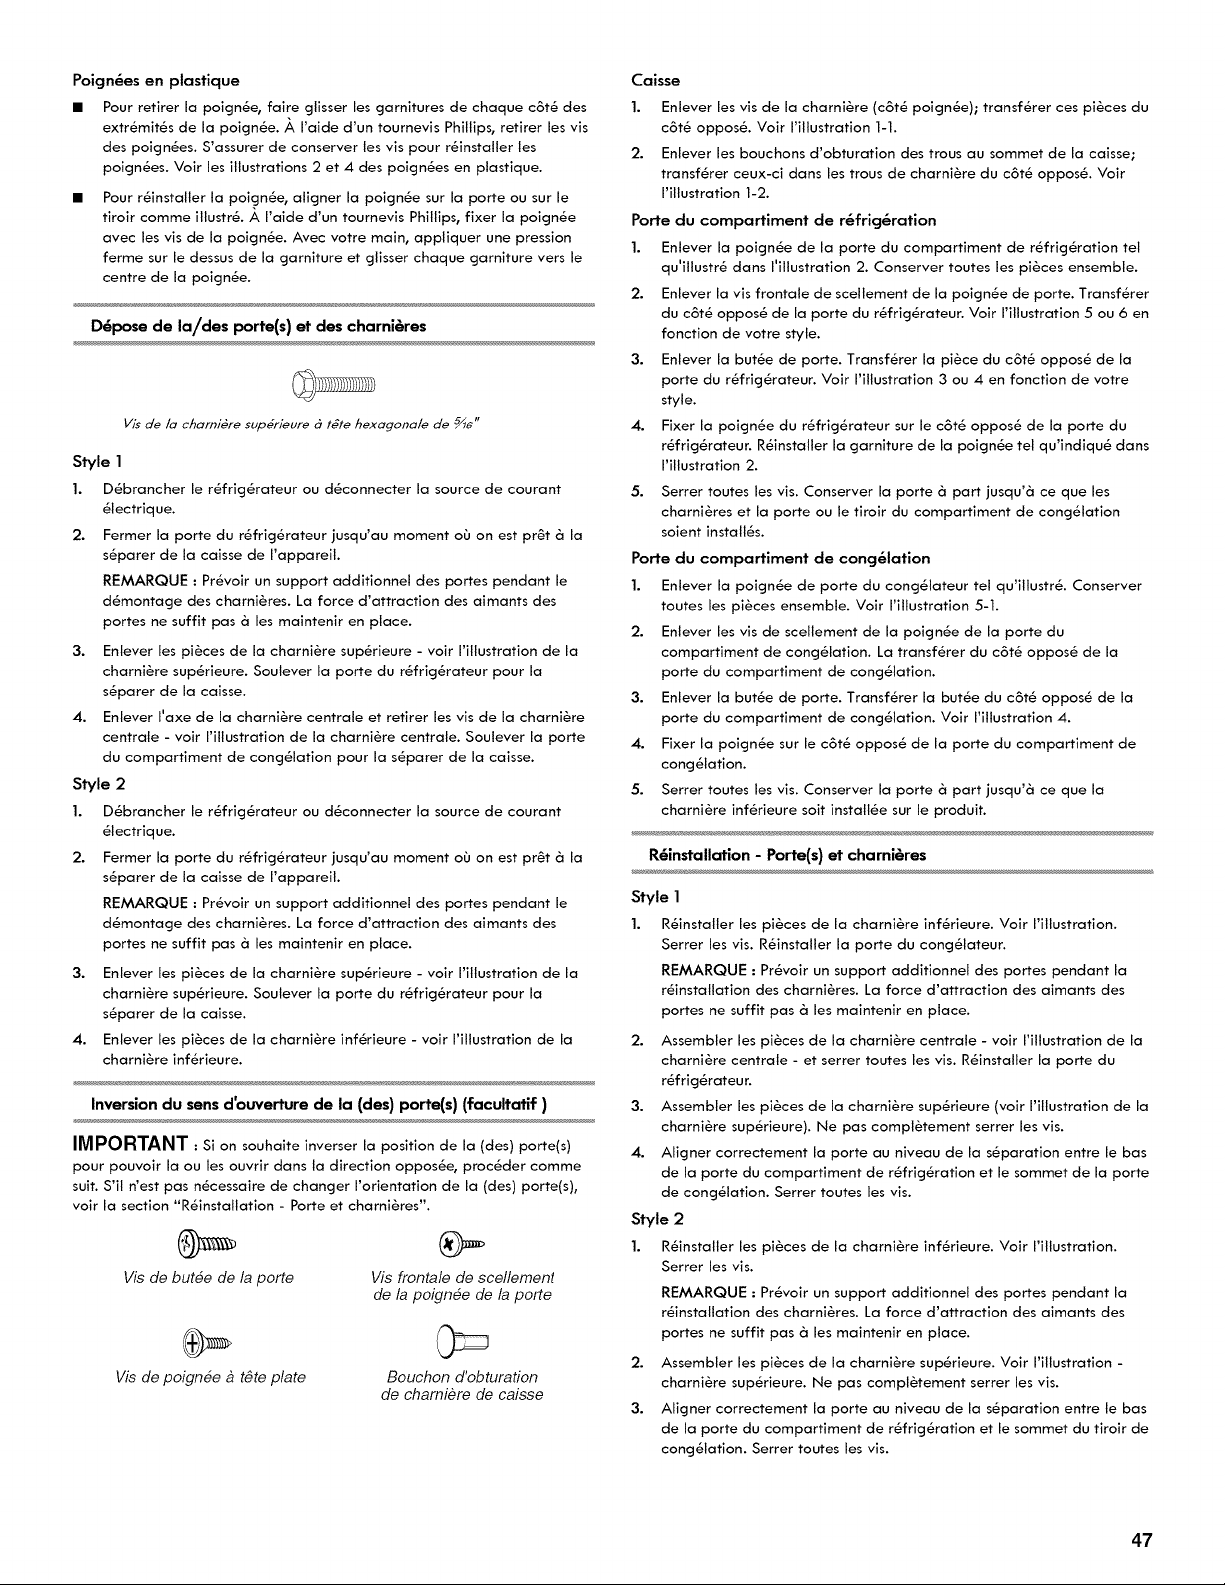
Poign_es en plastique
• Pour retirer la poign&e, faire glisser les garnitures de chaque c6t_ des
extr_mit_s de la poign_e./_, I'aide d'un tournevis Phillips, retirer les vis
des poign_es. S'assurer de conserver tes vis pour r_installer les
poign_es. Voir les illustrations 2 et 4 des poign_es en plastique.
Pour r_installer la poi.gn_e, aligner la poign_e sur la porte ou sur le
tiroir comme illustr_. A I'aide d'un toumevis Phillips, fixer la poign_e
avec les vis de la poign_e. Avec votre main, appliquer une pression
ferme sur le dessus de la garniture et glisser chaque garniture vers le
centre de la poign_e.
D6pose de la/des porte(s) et des charni6res
Vis de/a charni_re sup_rieure 6 t_te hexagona/e de 5/16"
Style 1
1. D_brancher le r_frig_rateur ou d_connecter la source de courant
_lectrique.
2. Fermer la porte du r_frig_rateur jusqu'au moment oO on est pr_t & la
s_parer de la caisse de I'appareil.
REMARQUE : Pr_voir un support additionnel des portes pendant le
d_montage des charni_res. La force d'attraction des aimants des
portes ne suffit pas & les maintenir en place.
3. Enlever les pi_ces de la charni&re sup_rieure - voir I'illustration de la
charni_re sup_rieure. Soulever la porte du r_frig_rateur pour la
s_parer de la caisse.
4. Enlever I'axe de la charni&re centrale et retirer les vis de la charni&re
centrale - voir I'illustration de la charni_re centrale. Soulever la porte
du compartiment de cong_lation pour la s_parer de la caisse.
Style 2
1. D_brancher le r_frig_rateur ou d_connecter la source de courant
_lectrique.
2. Fermer la porte du r_frig_rateur jusqu'au moment oO on est pr_t & la
s_parer de la caisse de I'appareil.
REMARQUE : Pr_voir un support additionnel des portes pendant le
d_montage des charni_res. La force d'attraction des aimants des
portes ne suffit pas & les maintenir en place.
3. Enlever les pi_ces de la charni&re sup_rieure - voir I'illustration de la
charni_re sup_rieure. Soulever la porte du r_frig_rateur pour la
s_parer de la caisse.
4. Enlever les pi_ces de la charni&re inf_rieure - voir I'illustration de la
charni_re inf_rieure.
Inversion du sens d'ouverture de la (des) porte(s) (facultatif)
IMPORTANT : si on souhaite inverser la position de la (des) porte(s)
pour pouvoir la ou les ouvrir dans la direction oppos_e, proc_der comme
suit. S'il n'est pas n_cessaire de changer I'orientation de la (des) porte(s),
voir la section "R_installation - Porte et charni&res".
Vis de butee de la porte
Vis frontale de scellemenl
de la poignee de la porte
Vis de poignee 9 t#te plate
Bouchon d'obturation
de chamiere de caisse
Caisse
1. Enlever les vis de la charni&re (c6t_ poign_e); transf_rer ces pi&ces du
c6t_ oppose. Voir I'illustration 1-1.
2. Enlever les bouchons d'obturation des trous au sommet de la caisse;
transf_rer ceux-ci dans les trous de charni&re du c6t_ oppose. Voir
I'illustration 1-2.
Porte du compartiment de r_frig&ration
1. Enlever la poign_e de la porte du compartiment de r_frig_ration tel
qu'illustr_ dans I'illustration 2. Conserver routes les pi&ces ensemble.
2. Enlever la vis frontale de scellement de la poign_e de porte. Transf_rer
du c6t_ oppos_ de la porte du r_frig_rateur. Voir I'illustration 5 ou 6 en
fonction de votre style.
3. Enlever la butte de porte. Transf_rer la pi&ce du c6t_ oppos_ de la
porte du r_frig_rateur. Voir I'illustration 3 ou 4 en fonction de votre
style.
4. Fixer la poign_e du r_frig_rateur sur le c6t_ oppos_ de la porte du
r_frig_rateur. R_installer la garniture de la poign_e tel qu'indiqu_ dans
I'illustration 2.
5.
Serrer toutes les vis. Conserver la porte & part jusqu'& ce que les
charni&res et la porte ou le tiroir du compartiment de cong_lation
soient install_s.
Porte du compartiment de cong_lation
1. Enlever la poign_e de porte du cong_lateur tel qu'illustr_. Conserver
routes les pi&ces ensemble. Voir I'illustration 5-1.
2. Enlever les vis de scellement de la poign_e de la porte du
compartiment de cong_lation. La transf_rer du c6t_ oppos_ de la
porte du compartiment de cong_lation.
3. Enlever la butte de porte. Transf_rer la butte du c6t_ oppos_ de la
porte du compartiment de cong_lation. Voir I'illustration 4.
4. Fixer la poign_e sur le c6t_ oppos_ de la porte du compartiment de
cong_lation.
5. Setter routes les vis. Conserver la porte & part jusqu'& ce que la
charni_re inf_rieure soit install_e sur le produit.
R6installation - Porte(s) et charni6res
Style 1
1. R_installer les pi_ces de la charni&re inf_rieure. Voir I'illustration.
Serrer les vis. R_installer la porte du cong_lateur.
REMARQUE : Pr_voir un support additionnel des portes pendant la
r_installation des charni_res. La force d'attraction des aimants des
portes ne suffit pas & les maintenir en place.
2. Assembler les pi@ces de la charni@re centrale - voir I'illustration de la
charni&re centrale - et serrer toutes les vis. R@installer la porte du
r@frig@rateur.
3. Assembler les pi@ces de la charni&re sup@rieure (voir I'illustration de la
charni@re sup@rieure). Ne pas compl&tement serrer les vis.
4. Aligner correctement la porte au niveau de la s@paration entre le bas
de la porte du compartiment de r@frig@ration et le sommet de la porte
de cong@lation. Serrer toutes les vis.
Style 2
1. R@installer les pi&ces de la charni&re inf@rieure. Voir I'illustration.
Serrer les vis.
REMARQUE : Pr@voir un support additionnel des portes pendant la
r@installation des charni@res. La force d'attraction des aimants des
portes ne suffit pas & les maintenir en place.
2. Assembler les pi&ces de la charni&re sup_rieure. Voir I'illustration -
charni&re sup_rieure. Ne pas compl&tement serrer les vis.
3. Aligner correctement la porte au niveau de la s_paration entre le bas
de la porte du compartiment de r_frig_ration et le sommet du tiroir de
cong_lation. Serrer toutes les vis.
47
Enl@vement et r6installation du tiroir de cong61ation
IMPORTANT : Deux personnes peuvent 6tre n&cessaires pour retirer et
r6installer le tiroir de cong61ation. Les illustrations sont incluses plus loin
dans cette section, apr6s "l_tapes finales".
D6pose de la fa_:ade du tiroir
1. Ouvrir le tiroir du cong&lateur compl6tement.
2. D6visser les quatre vis maintenant les glissi6res du tiroir avec sa
fa_:ade. Voir rillustration de d6pose de I'avant du tiroir.
REMARQUE : D6visser les vis de trois & quatre tours. Laisser les vis sur
la fa_:ade du tiroir.
3.
Soulever la fa_:ade du tiroir vers le haut et hors des vis. Voir
Hllustration de d_pose de ravant du tiroir.
R6installation de la fa_:ade du tiroir
1. Faire glisser les glissi_res du tiroir hors du compartiment de
cong_lation. InsUrer les vis de la partie sup_rieure de la fa_:ade du
tiroir dans les trous des brides du tiroir. Voir rillustration de
r_installation de I'avant du tiroir.
2.
Tirer les brides du tiroir vers soi pour mettre en place les deux vis de la
pattie inf_rieure de la fa_:ade du tiroir dans les brides. Voir rillustration
de r_installation de I'avant du tiroir.
3. Serrer compl_tement les quatre vis.
Etapes finales
1. Inspecter tous les trous. V_rifier que tousles bouchons d'obturation et
vis sont en place. R_installer la plaque de la charni_re sup_rieure.
Voir rillustration - charni_re sup_rieure.
Risque de choc 61ectrique
Brancher sur une prise a 3 alv6oles reli6e a la terre.
hie pas enlever la broche de liaison a la terre.
hie pas utiliser un adaptateur.
hie pas utiliser un c&ble de rallonge.
Le non=respect de ces instructions peut causer
un d6c_s, un incendie ou un choc 61ectrique.
2. Brancher sur une prise & 3 alv6oles reli6e & la terre.
3. R6installer toutes les pi&ces amovibles dans les portes et les aliments
dans le r6frig6rateur.
48
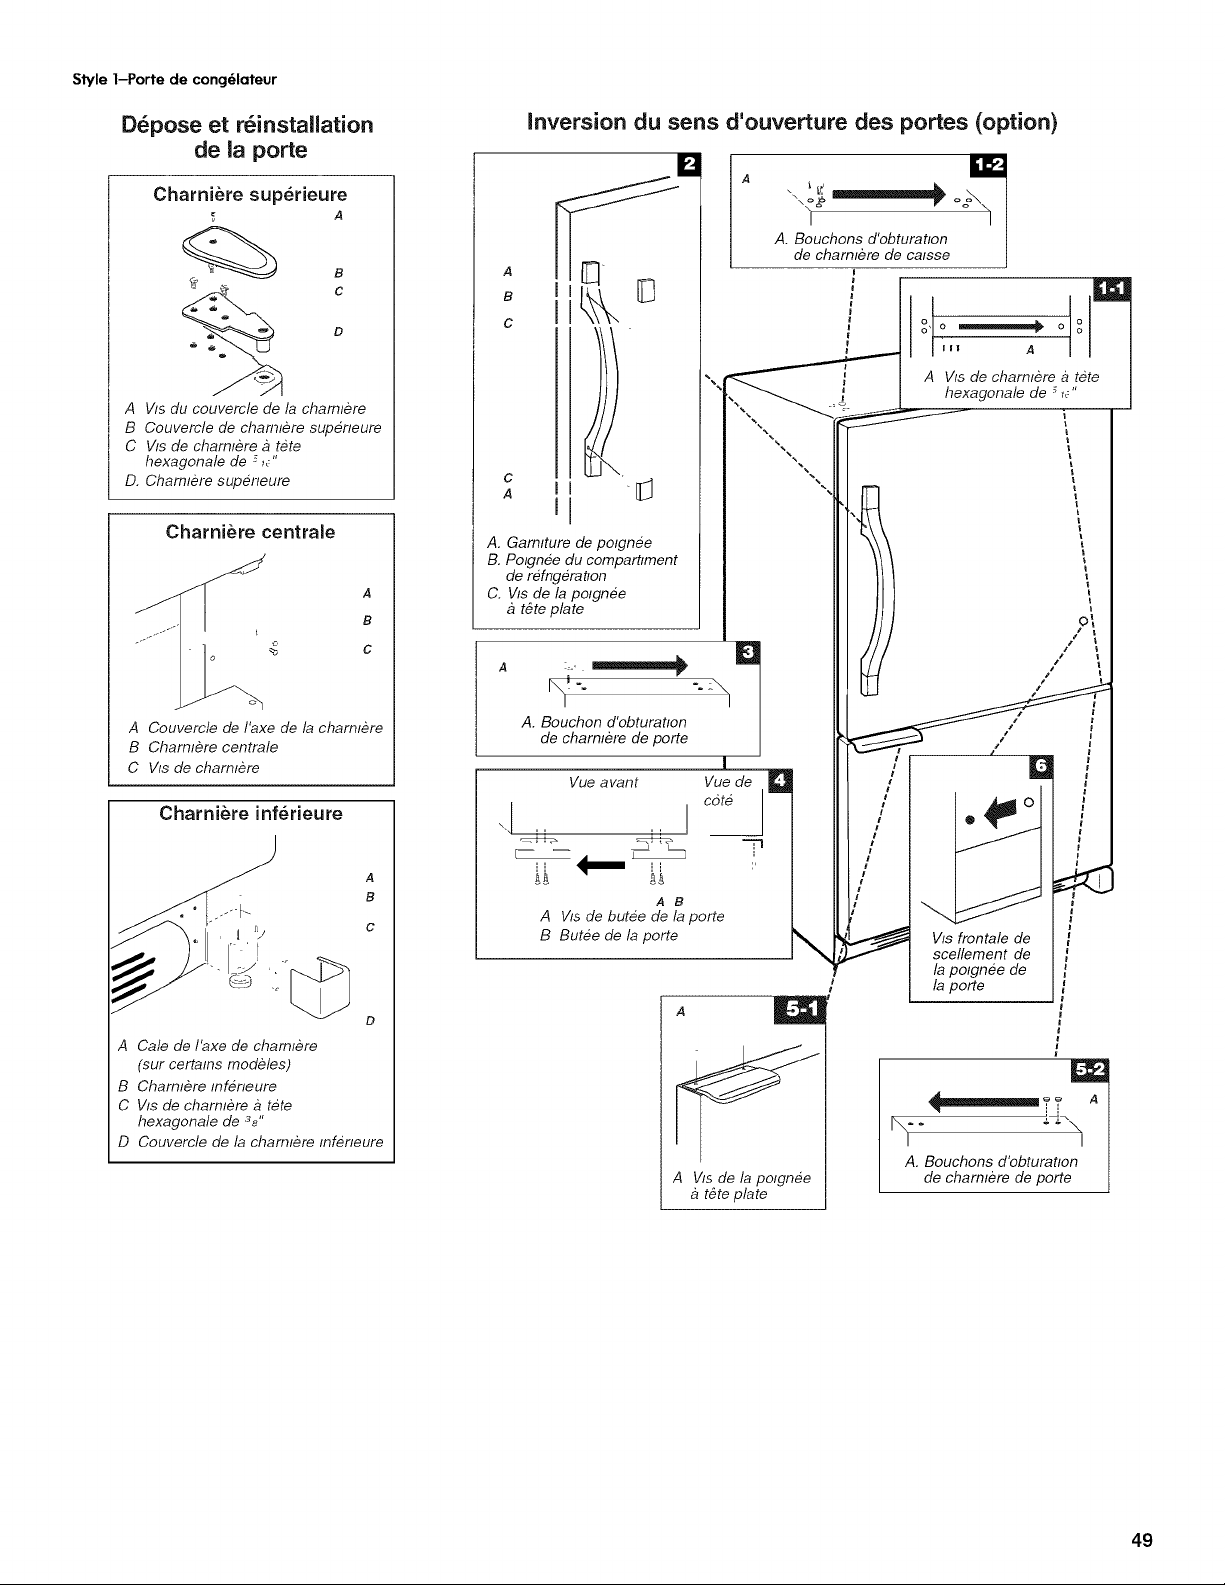
Style 1-Porte de cong61ateur
D_pose et r_installation
de la porte
Chamiere superieure
A
c
AVls du couvercle de la chamlere
B Couvercle de charmere supeneure
C Vis de charmere a tete
hexagonale de =-_"
D. Chaml&re supeneure
Charniere centrale
A
B
c,
,_ C
A Couvercle de I'axe de la charnlere
B Charnlere centrale
C Vis de charmere
Charniere inferieure
D
A Cale de I'axe de chamlere
(sur certalns modeles)
B Charmere infeneure
C Vls de charmere a tete
hexagonale de %"
D Couvercle de la charmere inf6neure
inversion du sens d'ouverture des portes (option)
A !!l::l _ _ m
c i , I olol
o o/
IlJ ", _ _ I A Vls de charnlere b tete I
I I Ill ".. _ _,i I hexagonalede_,_"|
,I 11" i
A. Gamlture de polgnee II I "x,\k ,
g.Po,gnee du compart, ment I III \//
de refngeratlon t
A .... _ ,/" i
A. Bouchon d'obturat, on J III _," f
de chamlere de porte I I_ /
I i #
, , _ot_--_- III / _ _ol
IIii I //_ _ "_
B Butee de la porte _ _ V_s frontale de
_'- scellement de
_r la po_gnee de
la porte
A
A Ws de la potgnee
t#te plate
_.%_o:,_'o.%r_otr,tOnj
49
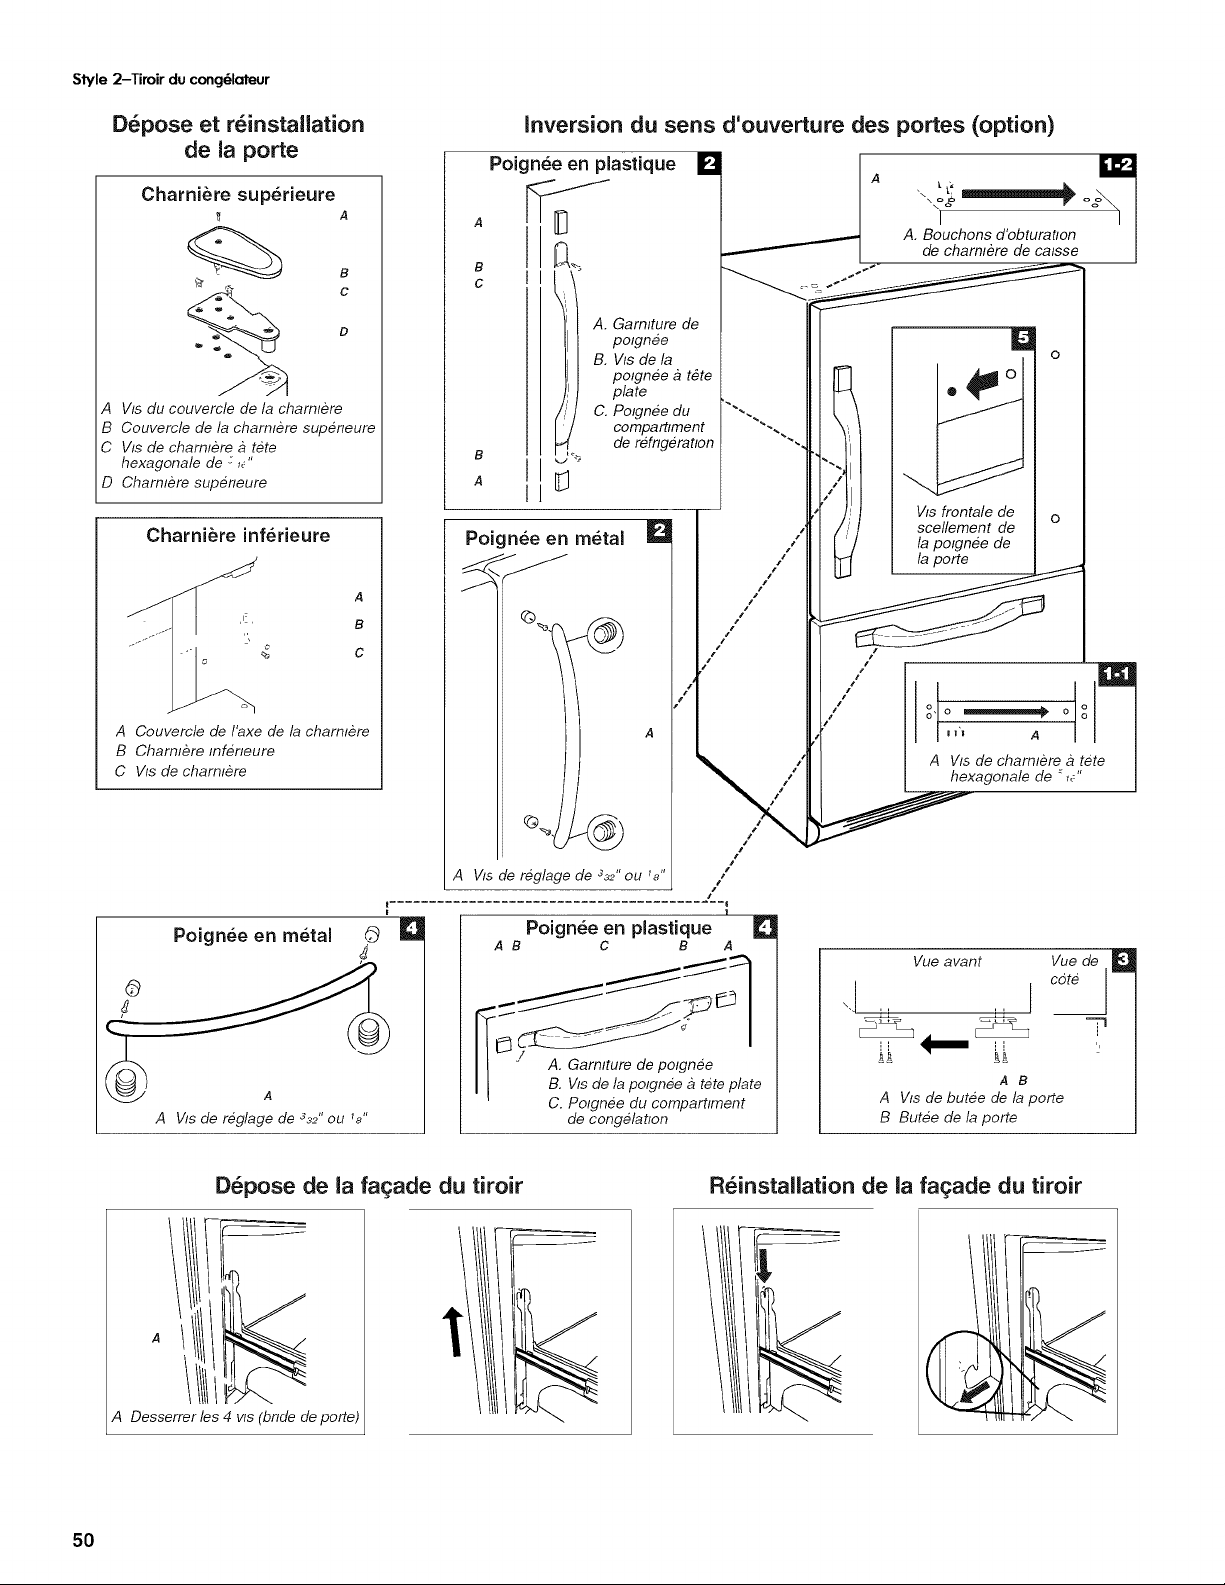
Style 2-Tiroir du cong61aleur
D_pose et r_installation
de la porte
Charniere superieure
A
,)
D
AVls du couvercle de la charmere
B Couvercle de la charmere supeneure
C Vls de charmere a tete
hexagonale de : _"
D Charmere supeneure
Charni_re inf6rieure
A Couvercle de I'axe de la charmere
B Charnlere infeneure
C Vis de charmere
Poign6e en m6tal t_
A
AVls de reglage de %J ou _8"
Inversion du sens d'ouverture des portes (option)
Poignee en plastique []
A. Garniture de
polgnee
B. Vls de la
polgnee a t#te
plate
C. Polgnee du
comparhment
de refngerahon
[]
A t '
-\ tf - -,_
"'7
A. Bouchons d'obturatlon |
_'- I de charnlere de calsse |
/
/
#J
/
A Vls de reglage de 332" ou la" /
Poign6e en plastique _J
A B C B A
I] " " e polgnee
II B. Vls de la potgn6e a tete plate
C. Potgn6e du comparttment
de congelatton
[]
o
\
".41
Vls frontale de o
scellement de
la polgnee de
/
jf _,o -------._ o _
_'_ A
A VIs de charnlere a tete ]
hexagonale de : _" J
Vue avant
\'J L k
Vue de
cote l
A B
AVls de butee de la porte
B Butee de la porte
D_pose de la fagade du tiroir
A Desserrer les
vls (bnde de porte)
R_installation de ia fagade du tiroir
5O
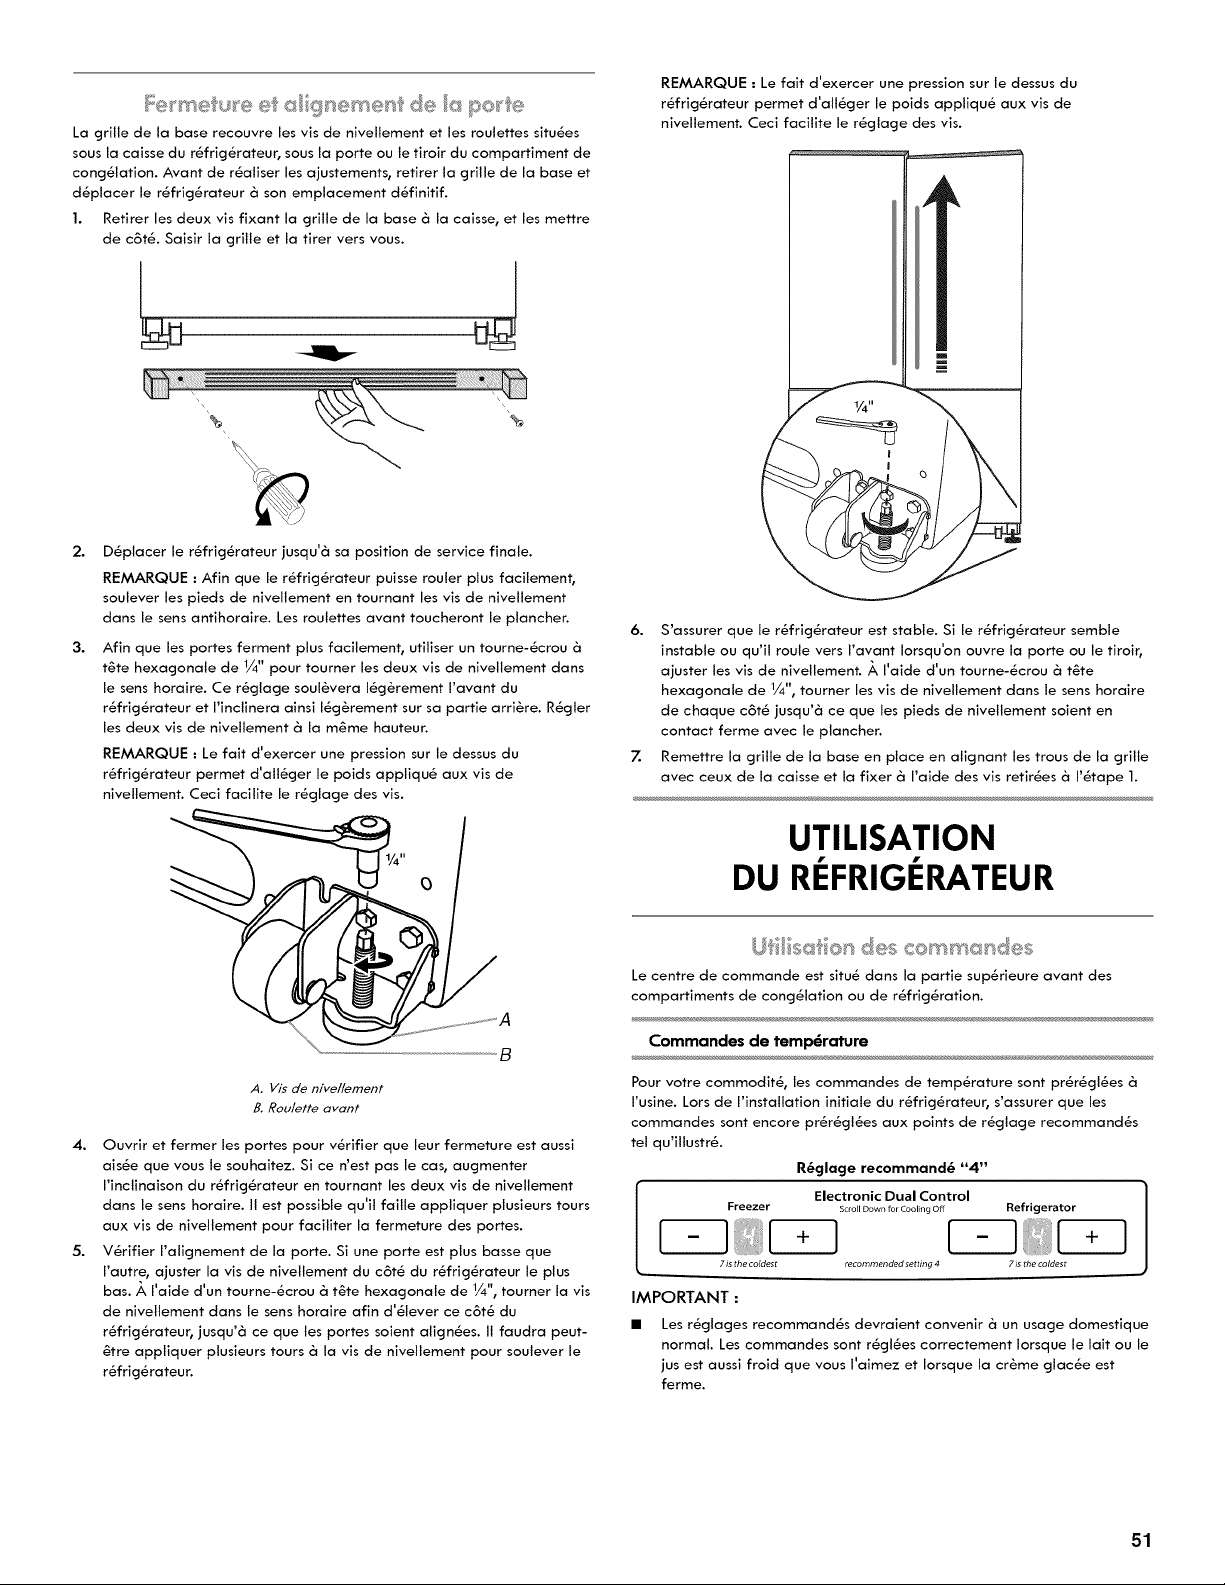
La grille de la base recouvre les vis de nivellement et les roulettes situ6es
sous la caisse du r_frig_rateur, sous la porte ou le tiroir du compartiment de
cong_lation. Avant de r_aliser les ajustements, retirer la grille de la base et
d&placer le r_frig6rateur & son emplacement d6finitif.
1. Retirer les deux vis fixant la grille de la base & la caisse, et les mettre
de c6t& Saisir la grille et la tirer vers vous.
REMARQUE ." Le fait d'exercer une pression sur le dessus du
r_frig_rateur permet d'all_ger le poids appliqu6 aux vis de
nivellement. Ceci facilite le r_glage des vis.
m
m
2.
3.
4.
5.
D_placer le r&frig_rateur jusqu'& sa position de service finale.
REMARQUE : Afin que le r_frig_rateur puisse rouler plus facilement,
soulever les pieds de nivellement en tournant les vis de nivellement
dans le sens antihoraire. Les roulettes avant toucheront le plancher.
Afin que les portes ferment plus facilement, utiliser un tourne-&crou &
t6te hexagonale de 1/4" pour tourner les deux vis de nivellement dans
le sens horaire. Ce r6glage soul6vera 16g6rement I'avant du
r6frig6rateur et I'inclinera ainsi 16g&rement sur sa partie arri&re. R6gler
les deux vis de nivellement & la m6me hauteur.
REMARQUE : Le fait d'exercer une pression sur le dessus du
r6frig6rateur permet d'all6ger le poids appliqu6 aux vis de
nivellement. Ceci facilite le r6glage des vis.
A. Vis de nive/lement
B. Roulette avant
Ouvrir et fermer les portes pour v_rifier que leur fermeture est aussi
aisle que vous le souhaitez. Si ce n'est pas le cas, augmenter
I'inclinaison du r_frig_rateur en tournant les deux vis de nivellement
dans le sens horaire. II est possible qu'il faille appliquer plusieurs tours
aux vis de nivellement pour faciliter la fermeture des portes.
V_rifier I'alignement de la porte. Si une porte est plus basse que
I'autre0 ajuster la vis de nivellement du c6t_ du r_frig_rateur le plus
bas. A I'aide d'un tourne-_crou & t6te hexagonale de 1/4", tourner la vis
de nivellement dans le sens horaire afin d'_lever ce c6t_ du
r_frig_rateur, jusqu'& ce que les portes soient align&es. II faudra peut-
6tre appliquer plusieurs tours & la vis de nivellement pour soulever le
r_frig_rateur.
6. S'assurer que le r_frig&rateur est stable. Si le r_frig_rateur semble
instable ou qu'il roule vers I'avant Iorsqu'on ouvre la porte ou le tiroir,
ajuster les vis de nivellement. A I'aide d'un tourne-_crou & t6te
hexagonale de 1/4"0tourner les vis de nivellement dans le sens horaire
de chaque c6t_ jusqu'& ce que les pieds de nivellement soient en
contact ferme avec le plancher.
7. Remettre la grille de la base en place en alignant les trous de la grille
avec ceux de la caisse et la fixer & I'aide des vis retirees & I'_tape 1.
UTILISATION
DU REFRIGERATEUR
U! s_x_e_:_8es ¢emm_cs_des
Le centre de commande est situ6 darts la partie sup6rieure avant des
compartiments de cong_lation ou de r_frig_ration.
Commandes de temperature
Pour votre commodit&, les commandes de temp&rature sont pr_r&gl_es &
I'usine. Lors de I'installation initiale du r&frig_rateur, s'assurer que les
commandes sont encore pr_r_gt_es aux points de r_glage recommand6s
tel qu'illustr&
R_glage recommand_ "4"
Electronic Dual Control
Freezer Scroll Down for Cooling Off Refrigerator
7 is the coldest recommended setting 4 7 is d_e coldest
IMPORTANT :
Les r_glages recommand&s devraient convenir & un usage domestique
normal. Les commandes sont r_gl_es correctement Iorsque le lait ou le
jus est aussi froid que vous I'aimez et Iorsque la cr&me gtac6e est
ferme.
51
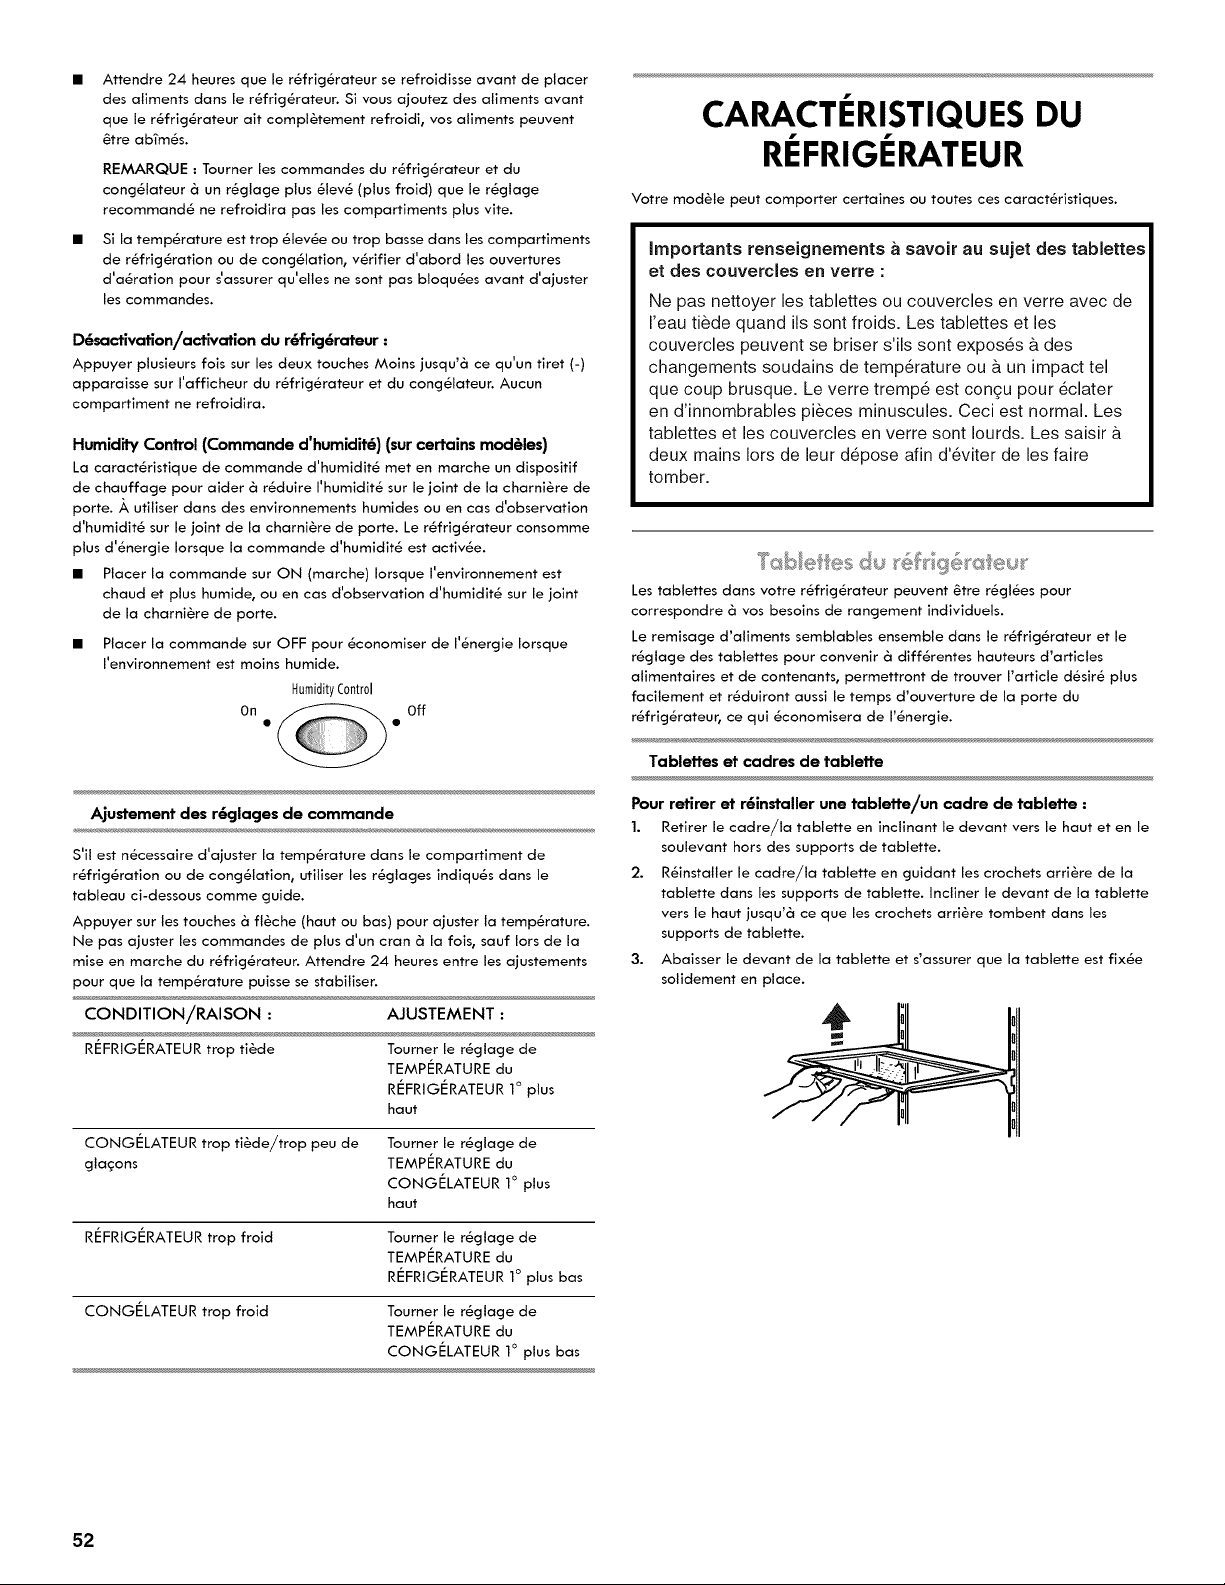
Attendre 24 heures que le r_fricj_rateur se refroidisse avant de placer
des aliments darts le r_fricj_rateur. Si vous ajoutez des aliments avant
que le r_fricj_rateur ait compl&tement refroidi, vos aliments peuvent
_tre abTm_s.
REMARQUE : Tourner les commandes du r_fricj_rateur et du
concjSlateur & un r_glacje plus _lev_ (plus froid) que le r_gtacje
recommand_ ne refroidira pas les compartiments plus vite.
Si la temperature est trop _lev_e ou trop basse dans les compartiments
de r_fricj_ration ou de concj_lation, v_rifier d'abord les ouvertures
d'a_ration pour s'assurer qu'elles ne sont pas bloqu_es avant d'ajuster
les commandes.
D6sactivation/activation du r6frig6rateur :
Appuyer plusieurs fois sur les deux touches Moins jusqu'& ce qu'un tiret (-)
apparaisse sur I'afficheur du r_fricj_rateur et du concj_lateur. Aucun
compartiment ne refroidira.
Humidity Control (Commande d'humidit6) (sur certains mod@les)
La caract_ristique de commande d'humidit_ met en marche un dispositif
de chauffacje pour alder & r_duire I'humidit_ sur le joint de la charni&re de
porte. A utiliser dans des environnements humides ou en cas d'observation
d'humidit_ sur le joint de la charni_re de porte. Le r_fricj_rateur consomme
plus d'_nercjie Iorsque la commande d'humidit_ est activ_e.
• Placer la commande sur ON (marche) Iorsque I'environnement est
chaud et plus humide, ou en cas d'observation d'humidit_ sur le joint
de la charni&re de porte.
• Placer la commande sur OFF pour _conomiser de I'_nercjie Iorsque
I'environnement est moins humide.
HumidityControl
On Off
Ajustement des r6glages de commande
S'il est n_cessaire d'ajuster la temperature dans le compartiment de
r_fricj_ration ou de concj_lation, utiliser les r_gtacjes indiqu_s dans le
tableau ci-dessous comme guide.
Appuyer sur les touches & fl&che (haut ou bas) pour ajuster la temperature.
Ne pas ajuster les commandes de plus d'un cran & la fois, sauf Iors de la
mise en marche du r_fricj_rateur. Attendre 24 heures entre les ajustements
pour que la temperature puisse se stabiliser.
CONDITION/RAISON : AJUSTEMENT :
REFRIGERATEUR trop tilde Toumer le r_glacje de
TEMPI_RATURE du
RI_FRIGI_RATEUR 1° plus
haut
CONGI_LATEUR trop ti&de/trop peu de
cjtagons
Toumer le r_cjlacje de
TEMPI_RATURE du
CONGI_LATEUR 1° plus
haut
RI_FRIGI_RATEUR trop froid Tourner le r_cjlacje de
TEMPI_RATURE du
RI_FRIGI_RATEUR 1° plus bas
CONGI_LATEUR trop froid Tourner le r_cjlacje de
TEMPI_RATURE du
CONGI_LATEUR 1° plus has
CARACTERISTIQUES DU
REFRIGERATEUR
Votre mod&le peut comporter certaines ou toutes ces caract_ristiques.
Importants renseignements a savoir au sujet des tablettes
et des couvercles en verre :
Ne pas nettoyer les tablettes ou couvercles en verre avec de
I'eau tilde quand ils sont froids, Les tablettes et les
couvercles peuvent se briser s'ils sont expos6s a des
changements soudains de temp6rature ou & un impact tel
que coup brusque. Le verre tremp6 est congu pour 6clater
en d'innombrables pieces minuscules, Ceci est normal. Les
tablettes et les couvercles en verre sont Iourds, Les saisir
deux mains Iors de leur d6pose afin d'6viter de les faire
tomber,
Les tabJettes dans votre r6frig6rateur peuvent 6tre r6gJ6es pour
correspondre & vos besoins de rancjement individuels.
Le remisacje d'aliments semblables ensemble dans le r_fricjSrateur et le
r_glacje des tablettes pour convenir & diff_rentes hauteurs d'articles
alimentaires et de contenants, permettront de trouver rarticle d_sir_ plus
facilement et r_duiront aussi le temps d'ouverture de la porte du
r_fricj_rateur , ce qui _conomisera de I'_nercjie.
Tablettes et cadres de tablette
Pour retirer et r6instalJer une tablette/un cadre de tablette :
1. Retirer le cadre/la tablette en inclinant le devant vers le haut et en le
soulevant hors des supports de tablette.
2. R_installer le cadre/la tablette en cjuidant les crochets arri&re de la
tablette darts les supports de tablette. Incliner le devant de la tablette
vers le haut jusqu'& ce que les crochets arri&re tombent dans les
supports de tablette.
3. Abaisser le devant de la tablette et s'assurer que la tablette est fix_e
solidement en place.
52
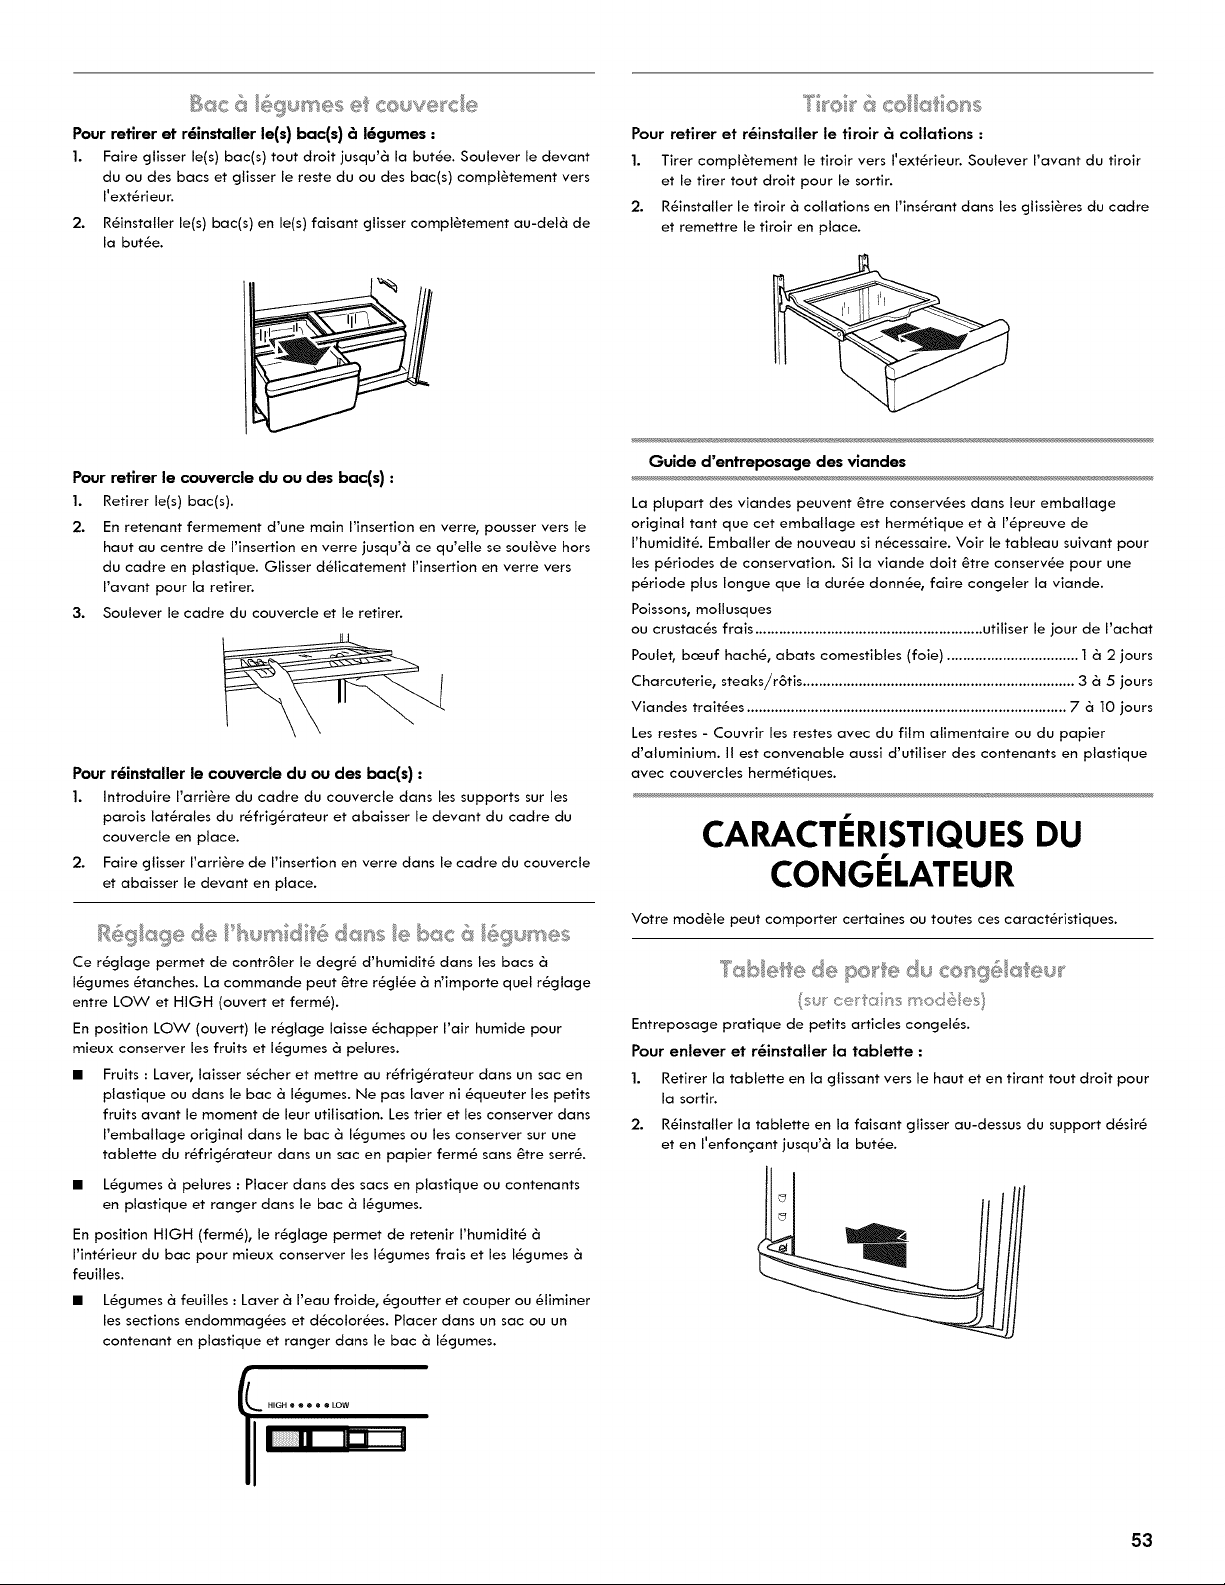
Pour retirer et r6installer le(s) bac(s) b 16gumes •
1. Faire glisser le(s) bac(s) tout droit jusqu'& la butte. Soulever le devant
du ou des bacs et gtisser le reste du ou des bac(s) compl_tement vers
I'ext_rieur.
2. R_installer le(s) bac(s) en le(s) faisant gtisser compl_tement au-del& de
la butte.
Pour retirer le couvercle du ou des bac(s) •
1. Retirer le(s) bat(s).
2. En retenant fermement d'une main I'insertion en verre, pousser vers le
haut au centre de I'insertion en verre jusqu'& ce qu'elle se soul_ve hors
du cadre en plastique. Glisser d_licatement I'insertion en verre vers
I'avant pour la retirer.
3. Soulever le cadre du couvercle et le retirer.
Pour r6installer le couvercle du ou des bac(s) :
1. Introdulre I'arri_re du cadre du couvercle dans les supports sur les
parois lat_rales du r_frig_rateur et abaisser le devant du cadre du
couvercle en place.
2. Faire glisser I'arri_re de I'insertion en verre dans le cadre du couvercle
et abaisser le devant en place.
R6gagede humd@6da_s ebac_ 69u_'es
Ce r6glage permet de contr61er le degr6 d'humidit6 dans les bacs&
16gumes 6tanches. La commande peut _tre r6gt6e & n'importe quel r6glage
entre LOW et HIGH (ouvert et ferm6).
En position LOW (ouvert) le r6glage laisse 6chapper Fair humide pour
mieux conserver les fruits et 16gumes & pelures.
• Fruits : Laver, laisser s6cher et mettre au r_frig_rateur dans un sac en
plastique ou darts le bac & I_gumes. Ne pas laver ni _queuter les petits
fruits avant le moment de leur utilisation. Les trier et les conserver darts
I'emballage original darts le bac & I_gumes ou les conserver sur une
tablette du r_frig_rateur darts un sac en papier ferm_ sans _tre serr_.
• L_gumes & pelures : Placer darts des sacs en plastique ou contenants
en ptastique et ranger dans le bac & I_gumes.
En position HIGH (fermi), le r_glage permet de retenir I'humidit_
I'int_rieur du bac pour mieux conserver les I_gumes frais et les I_gumes &
feuilles.
• L_gumes _ feuilles : Laver & I'eau froide, _goutter et couper ou _liminer
les sections endommag_es et d_color_es. Placer dans un sac ou un
contenant en plastique et ranger dans le bac & I_gumes.
fi HIGH e ® e e e LOW
co/(si_ e_ss
Pour retirer et r&installer le tiroir 6 collations :
1.
2.
Tirer compl_tement le tiroir vers I'ext_rieur. Soulever I'avant du tiroir
et le tirer tout droit pour le sortir.
R_installer le tiroir & collations en I'ins_rant dans les gtissi_res du cadre
et remettre le tiroir en place.
Guide d'entreposacje des viandes
La plupart des viandes peuvent 6tre conserv_es dans leur emballage
original tant que cet emballage est herm_tique et & I'_preuve de
I'humidit_. Emballer de nouveau si n_cessaire. Voir le tableau suivant pour
les p_riodes de conservation. Si la viande doit 6tre conserv_e pour une
p_riode plus Iongue que la dur_e donn_e, faire congeler la viande.
Poissons, mollusques
ou crustac_s frais ......................................................... utiliser le jour de I'achat
Poulet, bceuf hach_, abats comestibles (foie) ................................. 1 & 2 jours
Charcuterie, steaks/r6tis .................................................................... 3 & 5 jours
Viandes trait_es ................................................................................ 7 & 10 jours
Les testes - Couvrir les testes avec du film alimentaire ou du papier
d'aluminium. II est convenable aussi d'utiliser des contenants en plastique
avec couvercles herm_tiques.
CARACTERISTIQUES DU
CONGELATEUR
Votre module peut comporter certaines ou toutes ces caract_ristiques.
su_ce a'ssmod_},tes)
Entreposage pratique de petits articles congel6s.
Pour enlever et r_installer la tablette :
1. Retirer la tablette en la glissant vers le haut et en tirant tout droit pour
la sortir.
2. R_installer la tablette en la faisant glisser au-dessus du support d_sir_
et en I'enfoncFant jusqu'& la butte.
53
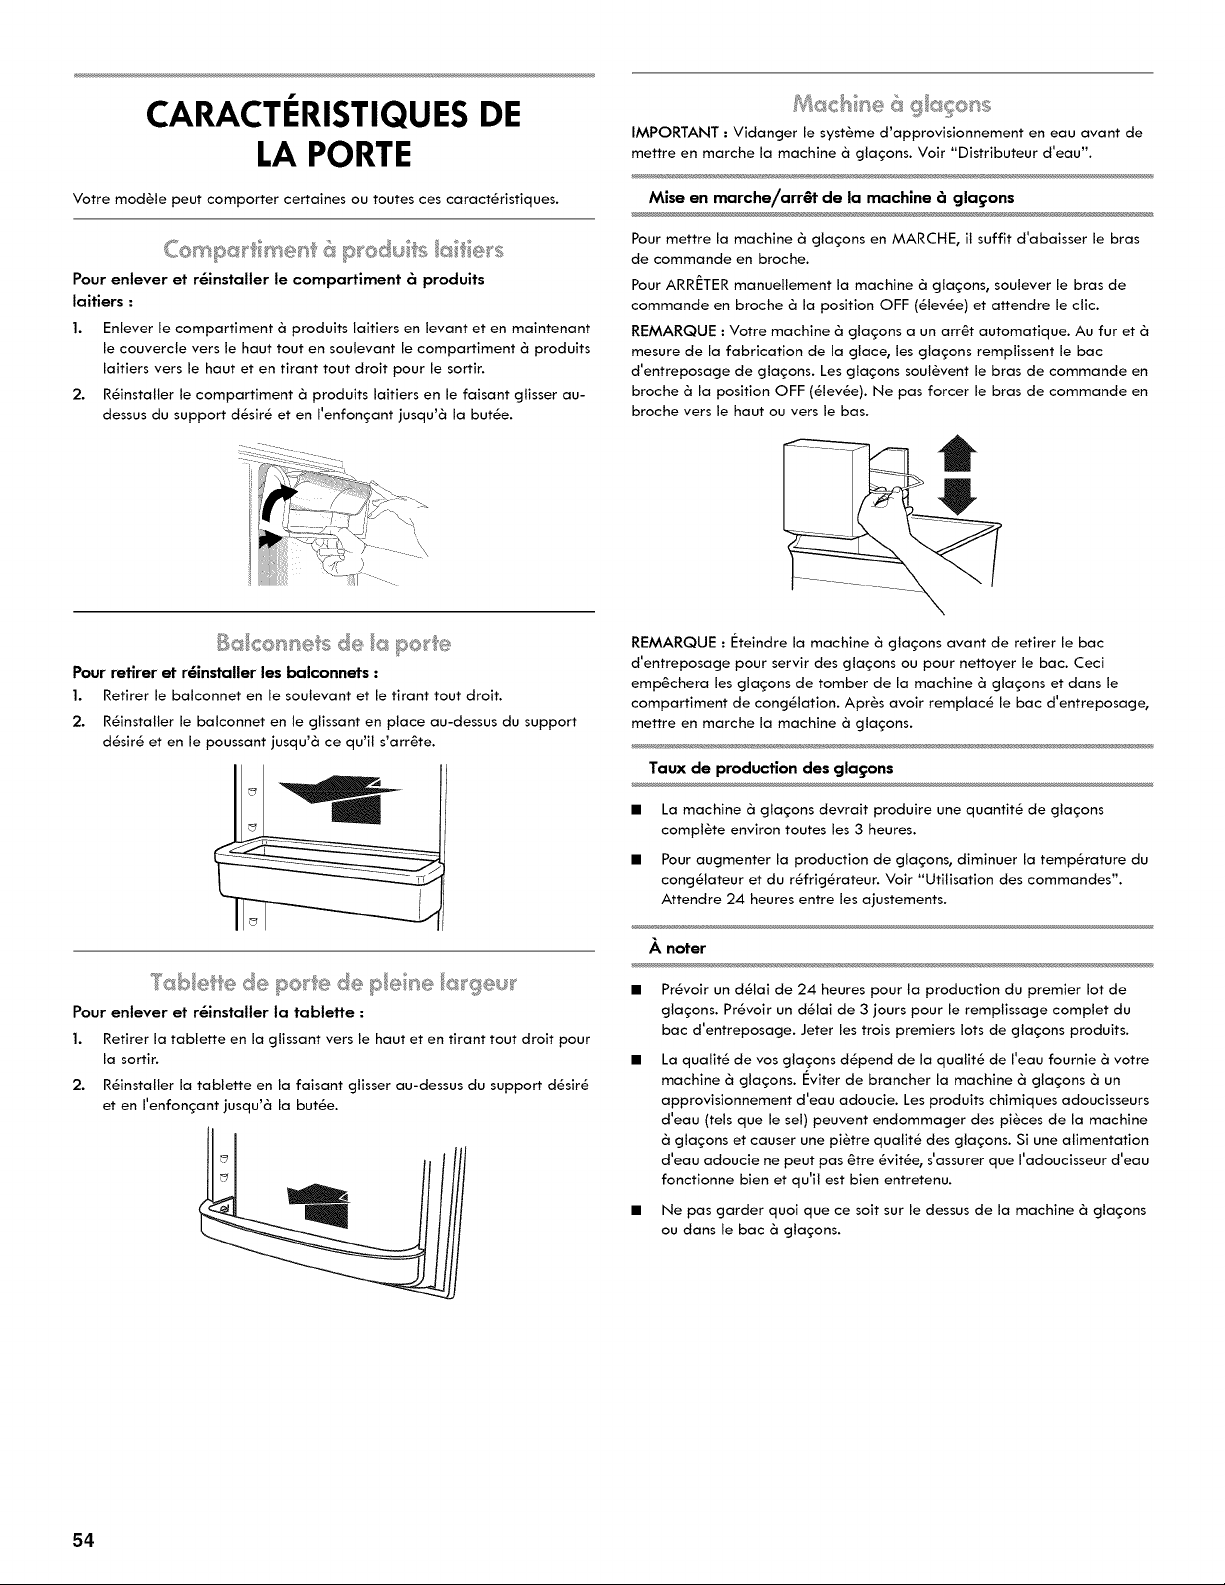
CARACTI:RISTIQUES DE
LA PORTE
Votre module peut comporter certaines ou toutes ces caract_ristiques.
Pour enlever ef r_insfaller le compartimenf & produifs
laitiers :
1. Enlever le compartiment & produits laitiers en levant et en maintenant
le couvercle vers le haut tout en soulevant le compartiment & produits
laitiers vers le haut et en tirant tout droit pour le sortir.
2. R_installer le compartiment & produits laitiers en le faisant cjlisser au-
dessus du support d_sir_ et en I'enfongant jusqu'& la butte.
Pour retirer et r6installer les balconnets :
1. Retirer le balconnet en le soulevant et le tirant tout droit.
2. R_installer le balconnet en le cjlissant en place au-dessus du support
d_sir_ et en le poussant jusqu'& ce qu'il s'arr@te.
Pour enlever et r&installer la tablette :
1. Retirer la tablette en la cjlissant vers le haut et en tirant tout droit pour
la sortir.
2. R_installer la tablette en la faisant gtisser au-dessus du support d_sir_
et en I'enfoncFant jusqu'& la butte.
IMPORTANT : Vidancjer le syst_me d'approvisionnement en eau avant de
mettre en marche la machine & cjlagons. Voir "Distributeur d'eau".
Mise en marche/arr_t de la machine 6 cjla_ons
Pour mettre la machine & cjla_Fons en MARCHE, il suffit d'abaisser le bras
de commande en broche.
Pour ARRF:TER manuellement la machine & cjlagons, soulever le bras de
commande en broche & la position OFF (_lev_e) et attendre le clic.
REMARQUE : Votre machine & cjlagons a un arr@t automatique. Au fur et &
mesure de la fabrication de la cjlace, les cjlagons remplissent le bac
d'entreposacje de cjlagons. Les cjlagons soul,vent le bras de commande en
broche & la position OFF (_lev_e). Ne pas forcer le bras de commande en
broche vers le haut ou vers le bas.
REMARQUE : I_teindre la machine & cjlas:ons avant de retirer le bac
d'entreposacje pour servir des cjlas:ons ou pour nettoyer le bac. Ceci
emp6chera les cjlagons de tomber de la machine & cjlagons et dans le
compartiment de concj_lation. Apr_s avoir remplac_ le bac d'entreposacje,
mettre en marche la machine & cjlas:ons.
Taux de production des gla_ons
La machine & cjlas:ons devrait produire une quantit_ de cjtas:ons
compl@te environ toutes les 3 heures.
Pour aucjmenter la production de cjlas:ons, diminuer la temperature du
concj_lateur et du r_fricj_rateur. Voir "Utilisation des commandes'.
Attendre 24 heures entre les ajustements.
•_ noter
Pr_voir un d_lai de 24 heures pour la production du premier lot de
cjlas:ons. Pr_voir un d_lai de 3 jours pour le remplissacje complet du
bac d'entreposacje. Jeter les trois premiers lots de cjlas:ons produits.
La qualit_ de vos cjlagons d_pend de la qualit_ de I'eau fournie & votre
machine & cjlas:ons. I_viter de brancher la machine & cjlagons & un
approvisionnement d'eau adoucie. Les produits chimiques adoucisseurs
d'eau (tels que le sel) peuvent endommacjer des pi_ces de la machine
& cjlagons et causer une pi_tre qualit_ des cjlas:ons. Si une alimentation
d'eau adoucie ne peut pas 6tre _vit_e, s'assurer que I'adoucisseur d'eau
fonctionne bien et qu'il est bien entretenu.
• Ne pas cjarder quoi que ce soit sur le dessus de la machine & cjtas:ons
ou dans le bac & cjtas:ons.
54
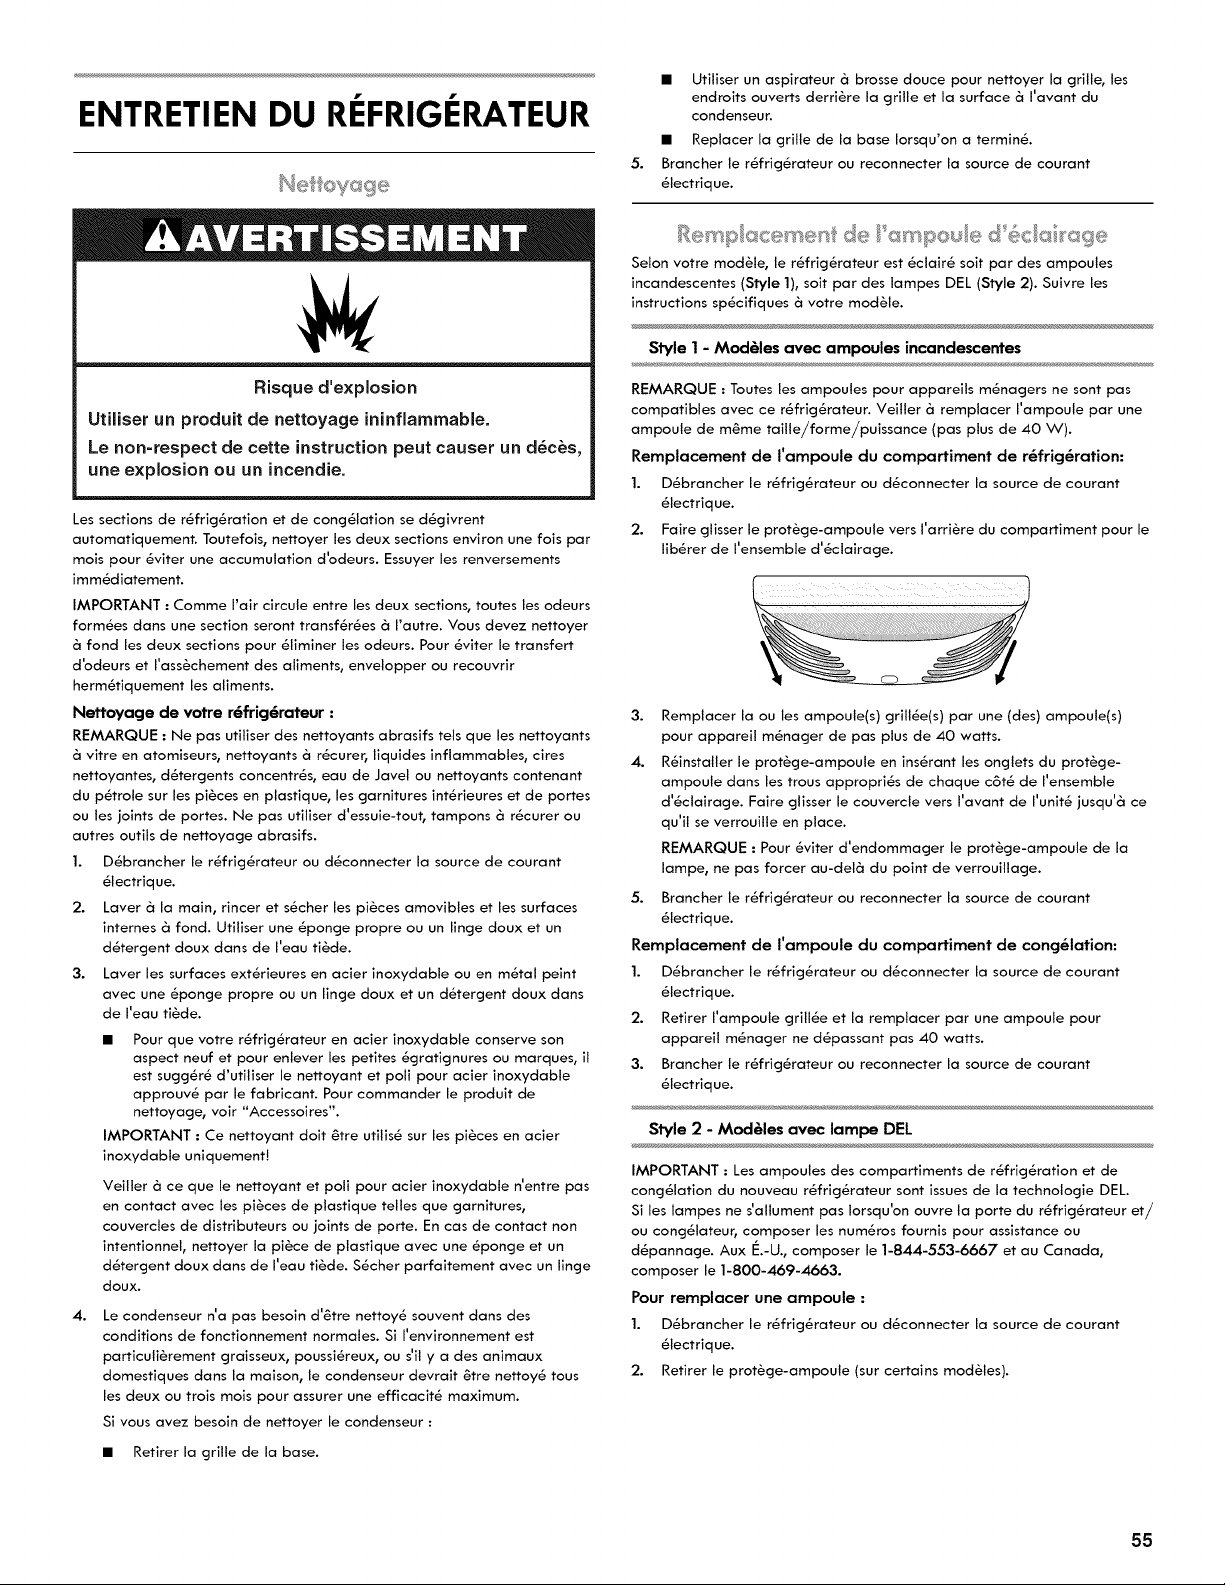
ENTRETIEN DU REFRIGERATEUR
Risque d'explosion
Utiliser un procluit de nettoyage ininflammable.
Le non=respect de cette instruction peut causer un d6c_s,
une explosion ou un incendie.
Les sections de rLfrig6ration et de cong61ation se d&givrent
automatiquement. Toutefois, nettoyer les deux sections environ une fois par
mois pour 6viter une accumulation d'odeurs. Essuyer les renversements
imm6diatement.
IMPORTANT : Comme rair circule entre les deux sections, toutes les odeurs
form_es dans une section seront transferees & rautre. Vous devez nettoyer
& fond les deux sections pour _liminer les odeurs. Pour _viter le transfert
d'odeurs et I'assLchement des aliments, envelopper ou recouvrir
herm_tiquement les aliments.
Nettoyage de votre r6frig6rateur :
REMARQUE : Ne pas utiliser des nettoyants abrasifs tels que les nettoyants
& vitre en atomiseurs, nettoyants & r6curer, liquides inflammables, cites
nettoyantes, d&tergents concentr&s, eau de Javel ou nettoyants contenant
du p&trole sur les piLces en plastique, les garnitures int&rieures et de portes
ou les joints de portes. Ne pas utiliser d'essuie-tout, tampons & r6curer ou
autres outils de nettoyage abrasifs.
1. D6brancher le r6frig6rateur ou d6connecter la source de courant
61ectrique.
2. Laver & la main, rincer et s6cher les piLces amovibles et les surfaces
internes & fond. Utiliser une 6ponge propre ou un linge doux et un
d&tergent doux dans de I'eau tilde.
3. Laver les surfaces ext6rieures en acier inoxydable ou en m6tal peint
avec une &ponge propre ou un linge doux et un d6tergent doux dans
de I'eau tilde.
• Pour que votre r_frig_rateur en acier inoxydable conserve son
aspect neuf et pour enlever les petites _gratignures ou marques, il
est sugg_r_ d'utiliser le nettoyant et poli pour acier inoxydable
approuv_ par le fabricant. Pour commander le produit de
nettoyage, voir "Accessoires".
IMPORTANT : Ce nettoyant doit _tre utilis_ sur les piLces en acier
inoxydable uniquement!
Veiller & ce que le nettoyant et poli pour acier inoxydable n'entre pas
en contact avec les piLces de plastique telles que garnitures,
couvercles de distributeurs ou joints de porte. En cas de contact non
intentionnel, nettoyer la piLce de plastique avec une _ponge et un
d_tergent doux dans de I'eau tilde. S_cher parfaitement avec un linge
doux.
4.
Le condenseur n'a pas besoin d'etre nettoy_ souvent dans des
conditions de fonctionnement normales. Si I'environnement est
particuliLrement graisseux, poussi_reux, ou s'il y a des animaux
domestiques dans la maison, le condenseur devrait 6tre nettoy_ tous
les deux ou trois mois pour assurer une efficacit_ maximum.
Si vous avez besoin de nettoyer le condenseur :
• Retirer la grille de la base.
5.
• Utiliser un aspirateur & brosse douce pour nettoyer la grille, les
endroits ouverts derriLre la grille et la surface & I'avant du
condenseur.
• Replacer la grille de la base Iorsqu'on a terming.
Brancher le r_frig_rateur ou reconnecter la source de courant
_lectriq ue.
_i_eK_(_e_::_!"he __e
Selon votre modLle, le r6frig_rateur est _cJaJr_ soit par des ampoules
incandescentes (Style 1), soit par des lampes DEL (Style 2). Suivre les
instructions sp_cifiques & votre modLle.
Style 1 - Mod61es avec ampoules incandescentes
REMARQUE : Toutes les ampoules pour appareils m_nagers ne sont pas
compatibles avec ce r_frig_rateur. Veiller & remplacer I'ampoule par une
ampoule de m6me taille/forme/puissance (pas plus de 40 W).
Remplacement de I'ampoule du compartiment de r_frig_ration:
1. D_brancher le r_frig_rateur ou d_connecter la source de courant
_lectrique.
2. Fake gtisser le protLge-ampoule vers I'arriLre du compartiment pour le
lib_rer de I'ensemble d'_clairage.
3.
4.
Remplacer la ou les ampoule(s) grill_e(s) par une (des) ampoule(s)
pour appareil m_nager de pas plus de 40 watts.
R_installer le protLge-ampoule en ins_rant les onglets du protLge-
ampoule dans les trous appropri_s de chaque c6t_ de I'ensemble
d'_clairage. Faire glisser le couvercle vers I'avant de I'unit_ jusqu'& ce
qu'il se verrouille en place.
REMARQUE : Pour _viter d'endommager le protLge-ampoule de la
lampe, ne pas forcer au-del& du point de verrouillage.
5. Brancher le r_frig_rateur ou reconnecter la source de courant
_lectriq ue.
Remplacement de I'ampoule du compartiment de cong_lation:
1. D_brancher le r_frig_rateur ou d_connecter la source de courant
_lectrique.
2. Retirer I'ampoule grill_e et la remplacer par une ampoule pour
appareil m_nager ne d_passant pas 40 watts.
3. Brancher le r_frig_rateur ou reconnecter la source de courant
_lectriq ue.
Style 2 - Mod&les avec lampe DEL
IMPORTANT : Les ampoules des compartiments de r_frig_ration et de
cong_lation du nouveau r_frig_rateur sont issues de la technologie DEL.
Si les lampes ne s'allument pas Iorsqu'on ouvre la porte du r_frig_rateur et/
ou cong_lateur, composer les num_ros fournis pour assistance ou
d_pannage. Aux I_.-U., composer le 1-844-553-6667 et au Canada,
composer le 1-800-469-4663.
Pour remplacer une ampoule :
1. D6brancher le r6frig6rateur ou d6connecter la source de courant
61ectrique.
2. Retirer le protLge-ampoule (sur certains modLles).
55
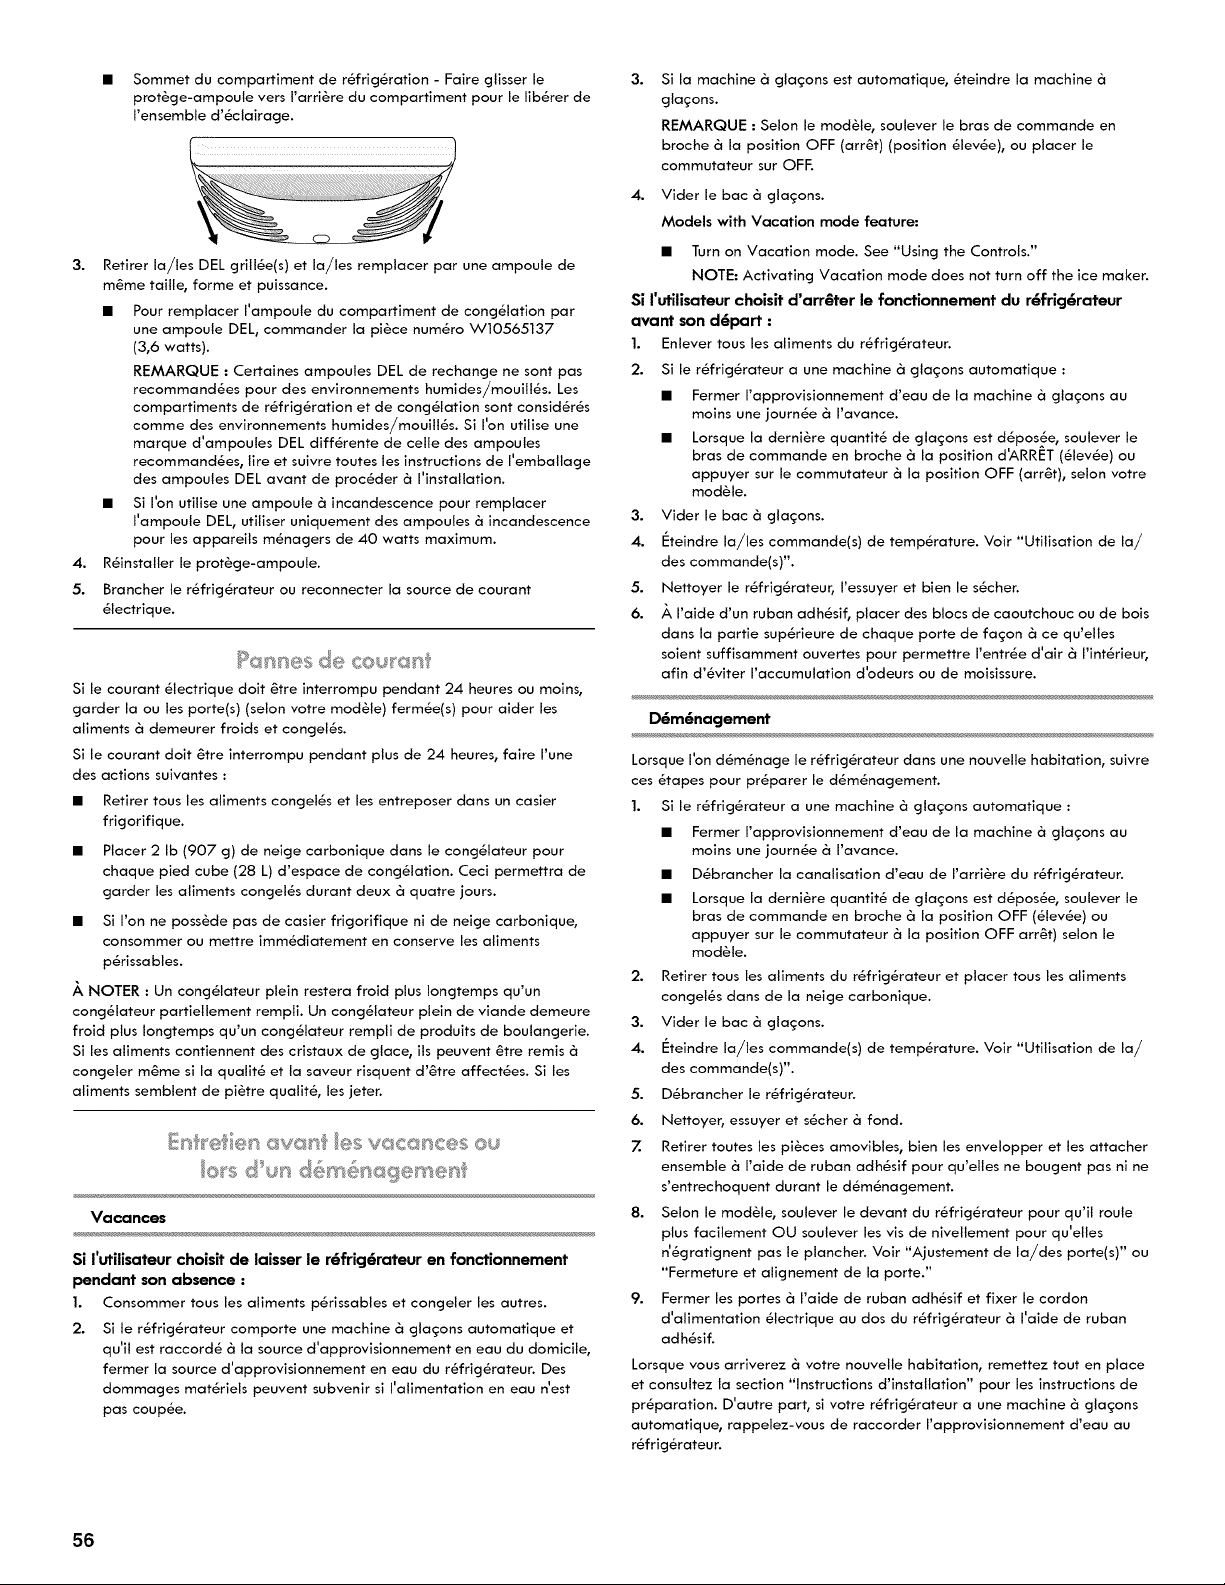
• Sommet du compartiment de r_fricj_ration - Faire cjlisser le
prot_cje-ampoule vers I'arri_re du compartiment pour le lib_rer de
I'ensemble d'6clairacje.
3.
4.
5.
Retirer la/les DEL cjrill_e(s) et la/les remplacer par une ampoule de
m6me taille, forme et puissance.
• Pour remplacer I'ampoule du compartiment de concj_lation par
une ampoule DEL, commander la pi6ce num6ro W10565137
(3,6 watts).
REMARQUE : Certaines ampoules DEL de rechancje ne sont pas
recommand&es pour des environnements humides/mouill_s. Les
compartiments de r_fricj_ration et de concj_lation sont consid&r_s
comme des environnements humides/mouill_s. Si I'on utilise une
marque d'ampoules DEL diff&rente de celle des ampoules
recommand&es, tire et suivre toutes les instructions de I'emballacje
des ampoules DEL avant de proc6der & I'installation.
• Si I'on utilise une ampoule & incandescence pour remplacer
I'ampoule DEL, utiliser uniquement des ampoules & incandescence
pour les appareils m6nacjers de 40 watts maximum.
R6installer le prot_cje-ampoule.
Brancher le r_fricj&rateur ou reconnecter la source de courant
_lectrique.
Si le courant &lectrique dolt 6tre interrompu pendant 24 heures ou moins,
cjarder la ou les porte(s) (selon votre module) ferm&e(s) pour aider les
aliments & demeurer froids et concjel6s.
Si le courant doit 6tre interrompu pendant plus de 24 heures, faire I'une
des actions suivantes :
• Retirer tous les aliments congel_s et les entreposer dans un casier
frigorifique.
• Placer 2 Ib (907 g) de neige carbonique dans le cong_lateur pour
chaque pied cube (28 L) d'espace de cong61ation. Ceci permettra de
garder les aliments congel_s durant deux & quatre jours.
• Si I'on ne poss6de pas de casier fricjorifique ni de neicje carbonique,
consommer ou mettre imm6diatement en conserve les aliments
p6rissables.
,_ NOTER : Un concj61ateur ptein restera froid plus Ioncjtemps qu'un
concj61ateur partiellement rempli. Un concj61ateur plein de viande demeure
froid plus Ioncjtemps qu'un concj61ateur rempli de produits de boulancjerie.
Si les aliments contiennent des cristaux de cjlace, ils peuvent 6tre remis &
concjeler m6me si la qualit6 et la saveur risquent d'6tre affect6es. Si les
aliments semblent de pi6tre qualit6, les jeter.
o_s dss '_
Vacances
Si l'utilisateur choisit de laisser le r6frig6rateur en fonctionnement
pendant son absence :
1. Consommer tous les aliments p6rissables et concjeler les autres.
2. Si le r&fricj&rateur comporte une machine & cjlagons automatique et
qu'il est raccord& & la source d'approvisionnement en eau du domicile,
fermer la source d'approvisionnement en eau du r6fricj6rateur. Des
dommacjes mat&riels peuvent subvenir si I'alimentation en eau n'est
pas couple.
3.
Si la machine & glagons est automatique, &teindre la machine &
cjlagons.
REMARQUE : Selon le mod61e, soulever le bras de commande en
broche & la position OFF (arr6t) (position 61ev6e), ou placer le
commutateur sur OFF.
4. Vider le bac & glagons.
Models with Vacation mode feature:
• Turn on Vacation mode. See "Using the Controls."
NOTE: Activating Vacation mode does not turn off the ice maker.
Si I'utilisateur choisit d'arr6ter le fonctionnernent du r6frig6rateur
avant son d6pert :
1. Enlever tousles aliments du r6fricj6rateur.
2. Si le r6fricj6rateur a une machine & cjlagons automatique :
• Fermer I'approvisionnement d'eau de la machine & cjtagons au
moins une journ6e 6 I'avance.
• Lorsque la derni6re quantit& de cjlagons est d&pos&e, soulever le
bras de commande en broche & la position d'ARRET (&lev6e) ou
appuyer sur le commutateur & la position OFF (arr6t), selon votre
mod61e.
3. Vider le bac & cjlagons.
4. I_teindre la/les commande(s) de temp6rature. Voir "Utilisation de la/
des commande(s)".
5. Nettoyer le r6fricj6rateur , I'essuyer et bien le s6cher.
6. _, I'aide d'un ruban adh6sif, placer des blocs de caoutchouc ou de bois
dans la pattie sup&rieure de chaque porte de fagon & ce qu'elles
soient sufflsamment ouvertes pour permettre I'entr&e d'air & I'int&rieur,
afin d'&viter I'accumulation d'odeurs ou de moisissure.
D6m6nageme_
Lorsque I'on d6m6nacje le r_fricj_rateur dans une nouvelle habitation, suivre
ces _tapes pour preparer le d6m6nacjement.
1. Si le r_fricj6rateur a une machine & cjlagons automatique :
• Fermer I'approvisionnement d'eau de la machine & cjtagons au
moins une journ6e 6 I'avance.
• D_brancher la canalisation d'eau de I'arri6re du r_fricj_rateur.
• Lorsque la derni_re quantit& de cjlagons est d&pos&e, soulever le
bras de commande en broche & la position OFF (&levee) ou
appuyer sur le commutateur & la position OFF arr6t) selon le
module.
2. Retirer tousles aliments du r_fricj6rateur et placer tousles aliments
concjel_s dans de la neicje carbonique.
3. Vider le bac & cjlagons.
4. I_teindre la/les commande(s) de temperature. Voir "Utilisation de la/
des commande(s)".
5. D&brancher le r&fricj6rateur.
6. Nettoyer, essuyer et s&cher & fond.
7. Retirer toutes les pi6ces amovibles, bien les envelopper et les attacher
ensemble & I'aide de ruban adh6sif pour qu'elles ne boucjent pas ni ne
s'entrechoquent durant le d&m&nacjement.
8. Selon le mod61e, soulever le devant du r&fricj&rateur pour qu'il roule
plus facilement OU soulever les vis de nivellement pour qu'elles
n'6cjraticjnent pas le plancher. Voir "Ajustement de la/des porte(s)" ou
"Fermeture et alicjnement de la porte."
9. Fermer les portes & I'aide de ruban adh&sif et fixer le cordon
d'alimentation 61ectrique au dos du r6fricj6rateur & I'aide de ruban
adh6sif.
Lorsque vous arriverez & votre nouvelle habitation, remettez tout en place
et consultez la section "Instructions d'installation" pour les instructions de
pr6paration. D'autre part, si votre r6fricj6rateur a une machine 6 cjlagons
automatique, rappelez-vous de raccorder I'approvisionnement d'eau au
r6fricj6rateur.
56
DEPANNAGE
Essayez les solutions sucjcj6r6es ici avant de demander de I'aide par t616phone.
Le r6frig6rateur ne fonctionne pas
Bruit d'_clatement - contraction/expansion des parois internes,
particuli_rement Iors du refroidissement initial.
Bruit d'_coulement d'eau - peut _tre entendu Iorsque la cjlace fond Iors
du programme de d_givracje et que I'eau s'_coule dans le plateau de
d_givracje.
Risque de choc 61ectrique
Brancher sur une prise a 3 alv6oles reli6e a la terre.
Ne pas enlever la broche de liaison a la terre.
Ne pas utiliser un adaptateur.
Ne pas utiiiser un cable de rallonge.
Le non=respect de ces instructions peut causer
un d6c_s, un incendie ou un choc 61ectrique.
Le cordon d'alimentation _lectrique est-il d_branch_? Brancher sur une
prise & 3 alv_oles reli_e & la terre.
La prise _lectrique fonctionne-t-elle? Brancher une lampe pour voir si
la prise fonctionne.
Un fusible est-il grill_ ou un disjoncteur s'est-il ouvert? Remplacer le
fusible ou r_enclencher le disjoncteur. Si le probl_me persiste, appeler
un _lectricien.
• La commande est-elle en marche? S'assurer que la commande du
r_fricj_rateur est bien en marche. Voir "Utilisation de la(des)
commande(s)".
• S'agit-il d'une nouvelle installation? Accorder 24 heures apr_s
I'installation pour que le r_fricj_rateur se refroidisse compl_tement.
REMARQUE : R_cjler la commande de temperature sur la position la
plus froide ne fera pas refroidir le r_fricj_rateur plus rapidement.
Le moteur semble trap tourner
II se peut que votre nouveau r&fricj&rateur fonctionne plus Ioncjtemps que
I'ancien grace a son compresseur a haute efficacit& et ses ventilateurs.
L'appareil peut fonctionner plus Ioncjtemps encore si la temp6rature de la
pi6ce est chaude, si une importante quantit6 de nourriture y est ajout&e, si
la porte est fr6quemment ouverte ou si elle a 6t& laiss&e ouverte.
Le r6frig6rateur semble bruyant
Le bruit des r_fricj_rateurs a _t_ r_duit au cours des armies. Du fait de
cette r_duction, il est possible d'entendre des bruits intermittents venant de
votre nouveau r_fricj_rateur qui n'avaient pas _t_ d_cel_s avec votre ancien
module. Voici une liste des sons normaux accompacjn_s d'explications.
• Pulsation - les ventilateurs/le compresseur se r_cjlent afin d'optimiser la
performance.
• Sifflement/cliquetis - _coulement de liquide r_fricj_rant ou d'objets
pos_s sur le dessus du r_fricj_rateur.
La porte ne se ferme pas compl6tement
La porte est-elle bloqu_e en position ouverte? D_placer les emballacjes
d'aliments pour lib_rer la porte.
Un compartiment ou une tablette bloquent-ils le passage? Replacer le
compartiment ou la tablette en position correcte.
Le couvercle du bac a I_gumes fait-il obstruction? V_rifier que le
couvercle du bac a I_cjumes est enfonc_ compl_tement de sorte que
I'arri_re repose sur les supports.
La porte est difficile 6 ouvrir
Risque d'explosion
Utiiiser un produit de nettoyage ininflarnrnable.
Le non=respect de cette instruction peut causer un d6c_s,
une explosion ou un incendie.
• Les joints d'_tanch_it_ sont-ils sales ou collants? Nettoyer les joints et
les surfaces de contact au savon doux et a I'eau tilde. Rincer et s_cher
avec un lincje doux.
La temp6rature est trap 61ev6e
• S'agit-il d'une nouvelle installation? Accorder 24 heures apr_s
I'installation pour que le r_fricj_rateur se refroidisse compl_tement.
• La porte est ouverte fr_quemment ou a _t_ laiss_e ouverte? Ceci
permet a I'air chaud de p_n_trer dans le r_fricj_rateur. R_duire le
nombre d'ouvertures de la porte et la maintenir compl_tement ferm_e.
• Une importante quantit_ d'aliments a-t-elle _t_ ajout_e? Accorder
quelques heures pour que le r_fricj_rateur revienne a sa temperature
normale.
La(Les) commande(s) est(sont)-elle(s) correcte(s) pour les conditions
existantes? Ajuster les commandes a un r_glacje plus froid. V_rifier la
temp&rature au bout de 24 heures. Voir "Utilisation de la(des)
commande(s)".
57
II y a une accumulation d'humidit6 (_ l'int6rieur
REMARQUE : Une certaine accumulation d'humidit_ est normale.
• La piece est-elle humide? Ceci contribue & I'accumulation de
I'humidit_.
• La porte est ouverte fr_quemment ou a _t_ laiss_e ouverte? Ceci
permet & I'air humide de p_n_trer dans le r_frig_rateur. R_duire le
nombre d'ouvertures de la porte et la maintenir compl&tement ferrule.
G/o_!i,o_'_set ecru
La machine 6 gla_ons ne produit pas ou pas suffisamment de
gla_ons
• Le r($frig($rateur est-il connect($ & I'alimentation en eau et le robinet
d'arr_t d'eau est-il ouvert? Brancher le r_frig_rateur & I'alimentation en
eau et ouvrir le robinet d'arr_t d'eau compl_tement.
La canalisation de la source d'eau du domicile comporte-t-elle une
d_formation? Une d_formation dans la canalisation peut r_duire
I'_coulement d'eau. Redresser la canalisation d'eau.
• La machine _ glagons est-elle allum6e? S'assurer que le bras de
commande en broche ou I'interrupteur (selon le mod&le) est en position
ON (marche).
• S'agit-il d'une nouvelle installation? Attendre 24 heures apr_s
I'installation pour le commencement de la production de glagons.
Attendre 72 heures pour la production complete de glagons.
La porte du cong_lateur est-elle compl_tement ferm_e? Bien fermer la
porte du compartiment de cong_lation. Si la porte du compartiment
de cong_lation ne ferme pas compl&tement, voir "Les portes ne
ferment pas compl_tement" pr_c_demment dans cette section.
Une grande quantit_ de glagons vient-elle d'etre enlev_e? Attendre 24
heures pour que la machine & glagons produise plus de gtagons.
Un glagon est-il coinc_ dans le bras _jecteur? Enlever le glagon du
bras _jecteur avec un ustensile en ptastique.
Un filtre 6 eau est-il install6 sur le r_frig_rateur? Enlever le filtre et
faire fonctionner la machine 8 glagons. Si le volume de glace
augmente, le filtre est probablement obstru_ ou real installS.
Remplacer le filtre ou le r_installer correctement.
Un syst&me de filtration de I'eau 6 osmose inverse est-il connect_
votre canalisation d'eau froide? Ceci peut diminuer la pression de
I'eau. Voir "Specifications de I'alimentation en eau".
Les glagons sont creux ou I:_tits
REMARQUE : Cela indique une faible pression de I'eau.
• La valve de la canalisation d'eau est-elle compl&tement ouverte?
Ouvrir la valve d'eau compt&tement.
• La canalisation de la source d'eau du domicile comporte-t-elle une
d_formation? Une d_formation dans la canalisation peut r_duire
I'_coulement d'eau. Redresser la canalisation d'eau.
• Un filtre _ eau est-il install6 sur le r_frig_rateur? Enlever le filtre et
faire fonctionner la machine 8 glagons. Si la qualit_ des glagons
augmente, le filtre est probablement obstru_ ou real installS.
Remplacer le filtre ou le r_installer correctement.
• Un syst&me de filtration de I'eau 6 osmose inverse est-il connect_
votre canalisation d'eau froide? Ceci peut diminuer la pression de
I'eau. Voir "Specifications de I'alimentation en eau".
• Reste-t-il des questions concernant la pression de I'eau? Appeler un
plombier agr_ et qualifi_.
Mauvais goOt, odeur ou couleur grise des glagons
• Les raccords de plomberie sont-ils neufs? Des raccords de plomberie
neufs peuvent causer une d_coloration et un mauvais goOt des
gtagons.
• Les gla_;ons ont-ils _t_ gard_s trop Iongtemps? Jeter les glagons. Laver
le compartiment & glagons. Accorder 24 heures pour la fabrication de
nouveaux glagons.
• Y a-t-il un transfert d'odeurs de nourriture? Utiliser des emballages
_tanches & I'air et & I'humidit_ pour conserver les aliments.
• L'eau contient-elle des min_raux (tels que le soufre)? L'installation d'un
filtre peut @tre requise afin d'enlever les min_raux.
Un filtre 6 eau est-il install6 sur le r_frig_rateur? Une d_coloration grise
ou fonc_e de la glace indique que le syst&me de filtration de I'eau a
besoin d'un ringage additionnel. Rincer le syst&me de filtration d'eau
avant d'utiliser un nouveau filtre. Remptacer le filtre 8 eau 8 la date
indiqu_e. Voir "Syst&me de filtration de I'eau".
Le distributeur d'eau ne (onctionne pas correctement
Le r_frig_rateur est-il connect_ _ I'alimentation en eau et le robinet
d'arr_t d'eau est-il ouvert? Brancher le r_frig_rateur 6 I'alimentation en
eau et ouvrir le robinet d'arr_t d'eau compl&tement.
La canalisation de la source d'eau du domicile comporte-t-elle une
d_formation? Redresser la canalisation d'eau.
S'agit-il d'une nouvelle installation? Rincer et remplir le syst&me de
distribution d'eau. Voir "Distributeur d'eau".
La pression de I'eau est-elle d'au moins 35 Ib/po 2 (241 kPa)? La
pression de I'eau du domicile d_termine I'_coulement d'eau du
distributeur. Voir "Specifications de I'alimentation en eau'.
Un filtre _ eau est-il install6 sur le r6frig6rateur? Enlever le filtre et
faire fonctionner le distributeur. Si I'_coulement d'eau augmente, le
filtre est probablement obstru_ ou real installS. Remplacer le filtre ou
le r_installer correctement.
• La porte du r6frig6rateur est-elle bien ferm_e? Bien fermer la porte.
Si elle ne ferme pas compl&tement, voir "Les portes ne ferment pas
compl&tement" pr_c_demment dans cette section.
• Les portes ont-elles _t_ r_cemment enlev_es? S'assurer que
I'assemblage c6ble/tuyau du distributeur d'eau a _t_ correctement
reconnectS. Voir "Porte(s) et tiroir du r_frig_rateur".
• Un syst&me de filtration de I'eau 6 osmose inverse est-il connect_
votre canalisation d'eau froide? Ceci peut diminuer la pression de
I'eau. Voir "Specifications de I'alimentation en eau".
L'eau coule du syst&me de distribution
REMARQUE : II est normal de constater une ou deux gouttes d'eau apr&s
la distribution d'eau.
• Le verre n'a pas _t_ maintenu sous le distributeur assez Iongtemps?
Maintenir le verre sous le distributeur 2 & 3 secondes apr&s avoir
relach_ le levier du distributeur.
S'agit-il d'une nouvelle installation? Rincer le syst&me de distribution
d'eau. Voir "Distributeur d'eau".
Le filtre 6 eau a-t-il _t_ r_cemment change? Rincer le syst&me de
distribution d'eau. Voir "Distributeur d'eau'.
Trouve-t-on de I'eau sur le sol pr&s de la grille de la base? S'assurer
que les connexions du tuyau du distributeur d'eau sont compl&tement
serr_es. Voir "Porte(s) et tiroir du r_frig_rateur".
58
L'eau du distributeur est ti6de
REMARQUE : L'eau du distributeur est seulement r_frig_r_e & 50°F (10°C).
• S'agit-il d'une nouvelle installation? Attendre 24 heures apr_s
I'installation pour que I'alimentation d'eau refroidisse compl_tement.
• Une grande quantit_ d'eau a-t-elle r_cernrnent _t_ distribute?
Attendre 24 heures pour que I'alimentation d'eau refroidisse
compl_tement.
• N'a-t-on pas r_cernrnent distribu_ de I'eau? Le premier verre d'eau
peut ne pas _tre froid. Jeter le premier verre d'eau.
• Le r_frig_rateur est-il branch_ & I'arriv_e d'eau froide? S'assurer que le
r_frig_rateur est branch_ & I'arriv_e d'eau froide. Voir "Specifications
de I'alimentation en eau".
Pi6ces de rechange :
Pour commander le nettoyant pour acier inoxydable ou les filtres de
remplacement aux I'---tats-Unis, composer le 1-844-553-6667 et au Canada,
composer le 1-800-469-4663.
Nettoyant et poli pour acier inoxydable :
Commander la piece N ° D22 M40083 R
Filtre 21eau :
Commander la piece N ° 46-9924 (P6RFWB2)
Filtre 6 air :
Commander la piece N ° W10335147A
Conservateur pour produits frais :
Commander la piece N ° W10335145A
5g

For Sears Home Services in-home repair
of all Kenmore major appliances.
For the replacement parts, accessories and
Use & Care Guides that you need to do-it-yourself.
For professional installation of major home appliances
and items like air conditioners and water heaters.
1-844-553-6667
wwwokenmoreocom
in Canada 1-800-469-4663
www.sears.ca
W10797150B
© 2015 KCD IP, LLC
. TM
®Regtstered Trademark / Trademark of KCD IP, LLC in the United States, or Sears Brands, LLC in other countries
. TM
® Marca regtstrada / Marca de comercto de KCD IP, LLC en Estados Unidos, o Sears Brands, LLC en otros paises
MC MD
Marque de commerce / Marque deposee de Sears Brands, LLC
4/15
Printed in U.S.A.
Impreso en EE.UU.
Imprime aux E.-U.