SEARS
OWNER'S
MANUAL
MODELNO.
390.269151
CAUTION:
Read and Follow
All Safety Rulesand
Operating Instructions
BeforeFirstUseof
ThisProduct.
Save ThisManual For
FutureReference.
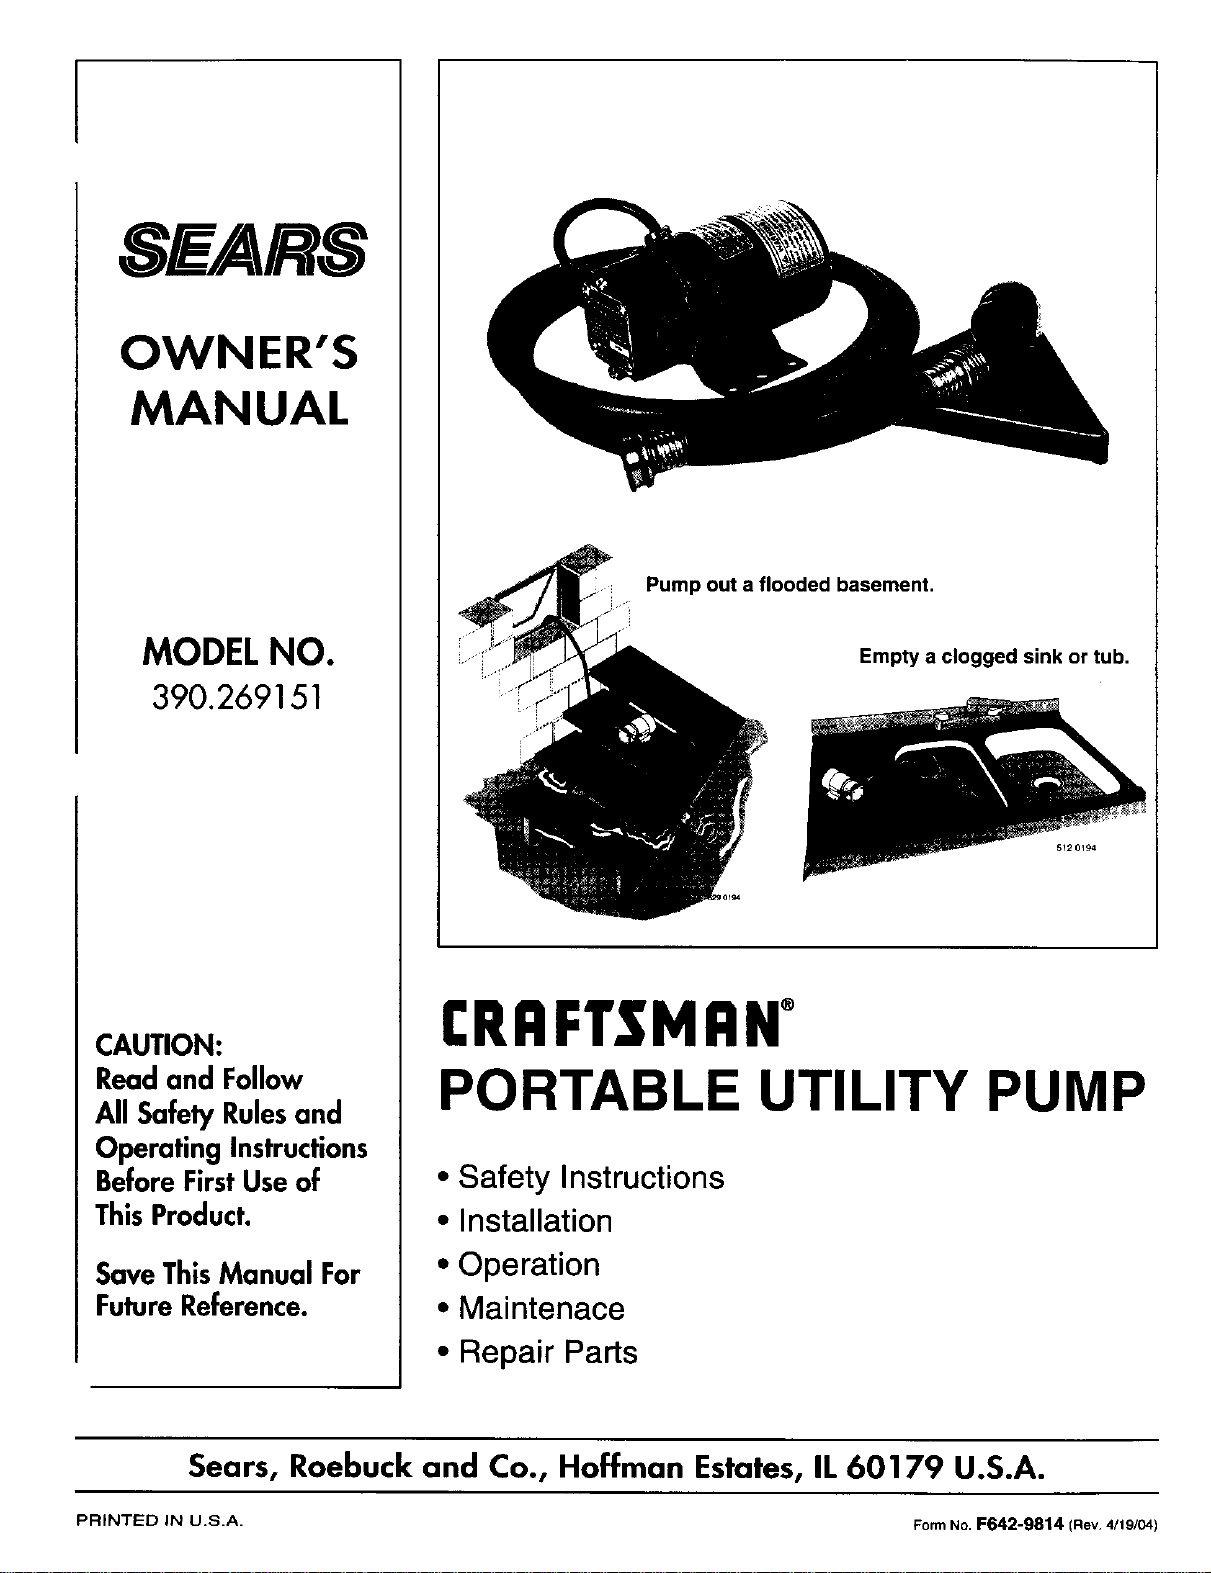
Pump out a flooded basement.
Empty a clogged sink or tub.
I:RRFTSMRN°
PORTABLE UTILITY PUMP
• Safety Instructions
• Installation
• Operation
• Maintenace
• Repair Parts
Sears, Roebuck and Co., Hoffman Estates, IL 60179 U.S.A.
PRINTED IN U.S.A. Form No. F642-9814 (Rev. 4/19/04)
CONTENTS
[NTRO I)UCT10 N,,%VARRANTY 2
SAFETY 2
INSTAl I._TION +,-4
t)I_I-P, \ I l( )N +
MkINIINkNt I. t-q
P _RTS "3
INTRODUCTION
Please read our mstrocmms before xou install and use \ our
new pump, this wdl help xou obtain full value and good ser-
x'lce lrom It It wdl alsu help )ou avmd needless secx ice u _st,
that result i-rOIll ,AtLSC', V+ e l,ltlll(It contrl>] alld Lannot co\ tF
I11 _ )tit \k .lrra[lt\
FULL ONE YEAR WARRANTY ON CRAFTSMAN ® 1112 HP PORTABLE UTILITY PUMP
For one year from the date of purchase, Sears mall repair or replace this pump, free of charge, ff defective m material or
workmanship
This warrant)' does not cover repairs or replacement parts necessary because of abuse or neghgence including fadure to install,
adjust and operate thas pump according to the mstrucuons in the owner's manual
LIMITATION OF LIABILITY
SEARS WILL NOT BE LIABLE FOR LOSS OR DAMAGE TO PROPERTY OR ANY INCIDENTAL OR CONSEQUENTIAL LOSS OR
EXPENSE FROM PROPERTY DAMAGE DUE DIRECTLY OR INDIRECTLY FROM THE USE OF THIS PRODUCT
Some states do not allow the exclusion or hrnttation of mcldeotal or consequential damages, so the above limitation or exclusion
may not apply to you.
WARRANTY SERVICE IS AVAILABLE BY SIMPLY CONTACTING THE NEAREST SEARS SERVICE CENTER/DEPARTMENT IN THE
UNITED STATES.
Tills warrant 3, applies only while the product is m use m the Umted States
This warranty gives you specific legal tights, and you may also have other rights which vary from state to state
Sears, Roebuck and Co., DepL 817 WA, Hof_aan Estates, IL 60179
READ AND FOLLOW
SAFETY INSTRUCTIONSt
Carefully read and follow all safety instructions in
this manual or on pump.
This is the safety alert symbol. _en ,_ou see tins
symbol on your pump or m tins manual, look for une of tim
following signal words and be alert to the potentml for per-
sonal mlurY t
_warns about hazards that will cause serious
personal injury, death or ntalor property damage d-ignored
J 'ares about hazards that ill o can c u, e e-
q
_WARNING x_ w r a s s
nous personal mlury, death or major property damage ff tg-
nored
[_ CAUTION_ warns about hazards that will or can cause
mmor personal talus" or property damage ff ignored
The word NOTICE indicates special instructions winch are
tmportaut but not related to hazards
1 To avoid nsk of serious bodily mlu _' and property dam-
age, read safet,, UlStructtons carefull) betore mstalhng
ptlmp
2 Follow local and/or natmnal plumbing and electrical
codes when mstallmg pump
INSPECTION
Tins pump was thoroughly mspeeted, tested, and packaged
before sinpment Report an)' damage tmmedmtely to the
store where tt was purchased
INSTALLATION
1 Locate pump a.s close as posmble to water being pumped
Pump must be less than 10 feet (3m) above rese_mr and
less than 25 feet (7 6m) to one side of reservoir
2 To help prtming, pour contents of one mineral oil packet
(supphed with pump) m inlet port ff packets are all gone,
cooking od may be substttuted
3 Mount pump sohdly on a stable platform
NOTICE: Protect motor from ram or washdown, ttts en-
closed but not waterproof
4 Make sure washer m inlet fitting ts clean and m good con-
dition ff tlns iomt leaks atr, pump will not operate
5 Install stramer to protect pump from large solids
6 Attach inlet and dtscharge hoses to pump Mtmmum dt-
ameter of inlet hose ts 1/2"(12 7ram) Be sure inlet hose
ts atrttght and that both hoses are free of kinks and re-
strictions
7 When pumping from a well or stream, place suction end
of inlet hose a few inches above the bottom to prevent
the pump from sucking sand, silt or pebbles
INSTALLATION / OPERATION / MAINTENANCE
8. Plugmotorcordintoa3-wiregrounded ll5voltA.C, out-
let 60 Hz., protected by a 15 amp fuse.
Use this pump only on 115 volt circuit.
Pump is equipped with an approved 3-
Hazardous . "
vNoal_aa_°°us conductor cord and 3-prong, grounding-
- type plug. To reduce the risk of electric
shock, be certain that it is connected to a properly
grounded, groundm.g-tyl_" receptacle.
Where a 2-prong wail receptacle is encountered, it must be
replaced witb a properly grounded 3-prong receptacle in-
stalled in accordance with the National Electrical Code and
local codes and ordinances.
NOTICE: Pump depends on water being pumped for lubri-
cation. DO NOT RUN PUMP DRY!
9. Pump should prime within 30 seconds. If not, disconnect
motor and do the following:
a. Disconnect inlet hose at pump. Pour contents of an-
other mineral oil packet into inlet port.
b. Check washers in inlet hose and make sure inlet line is
airtight.
c. Make sure inlet and discharge line are free of kinks and
restrictions.
d. Make sure pump is less than 10' (3m) above and 25'
(7.6m) to one side of water source.
lO.On older pumps that do not prime within 30 seconds,
check step 9 above. If pump still fails to prime, do the fol-
lowing:
a. If impeller is worn, replace it.
b. If pump head is internally worn, replace it.
[_, CAUTION Risk of burns from motor case during
normal operation. Do not much motor when it is operat-
ing or when it is hot. Plug nlotor cord into 3-wire grounded
I 15 voh AC. outlet 60 Hz.
[ _.WARNING ]Risk of fire or exph)sk)n if used to pump
flammable liquids or if used in explosive atmo-
spheres. Pump is designed to pump water at temperatures
between 32°-77 ° F (00-25 ° C) only. Pump water only with
this pump!
MAINTENANCE INSTRUCTIONS
[_WARNING]Hazardous voltage. Can shock, burn, or
cause death. Unplug pump before servicing.
BRUSH REPLACEMENT
Replace brushes after 150-200 hours of motor operation.
Check brush condition if motor shows signs of running
slowly or erratically after pump has been in service for ape-
riod of time.
NOTICE: Brushes are spring loaded. Hold on to covers,
brushes, etc., so that nothing gets lost.
l.Unserew brush covers on sides of motor. Slide brush
springs and brushes out of motor.
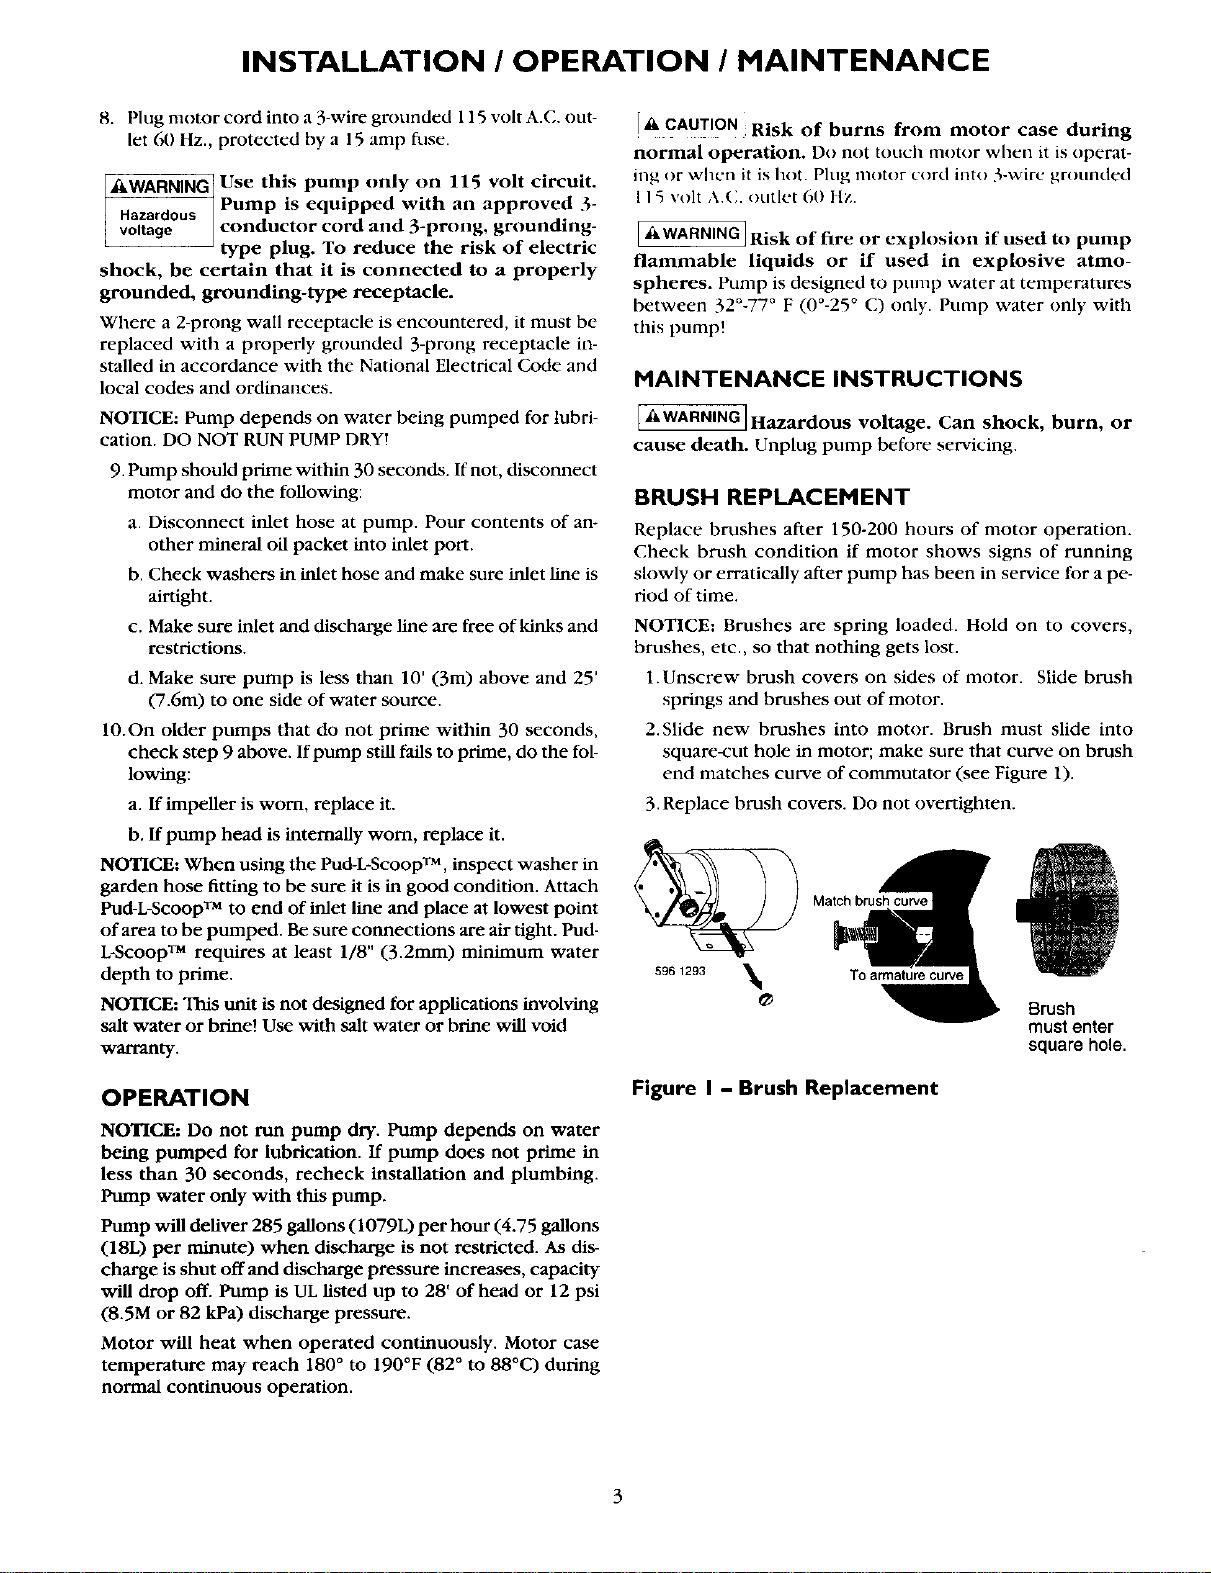
2. Slide new brushes into motor. Brush must slide into
square-cut hole in motor; make sure that curve on brush
end matches curve of commutator (see Figure 1).
3. Replace brush covers. Do not overtighten.
NOTICE: When using the Pud-L-Scoop TM, inspect washer in /'_k_ \ \
garden hose fitting to be sure it is in good condition. Attach
Pud-L-Scoop TM to end of inlet line and place at lowest point
of area to be pumped. Be sure connections are air tight. Pud-
L-Scoop TM requires at least 1/8" (3.2mm) minimum water
depth to prime. 5931293
NOTICE: This unit is not designed for applications involving
salt water or brine! Use with salt water or brine vdll void
warranty.
OPERATION
NOTICE." Do not run pump dry. Pump depends on water
being pumped for lubrication. If pump does not prime in
less than 30 seconds, recheck installation and plumbing.
Pump water only with this pump.
Pttmp will deliver 285 gallons (1079L) per hour (4.75 gallons
(18L) per minute) when discharge is not restricted. As dis-
charge is shut off and discharge pressure increases, capacity
will drop off. Pump is UL listed up to 28' of head or 12 psi
(8.5M or 82 kPa) discharge pressure.
Motor will heat when operated continuously. Motor case
temperature may reach 180 ° to 190°F (82 ° to 88°C) during
normal continuous operation.
Match brush curve
TO armature curve
Brush
must enter
square hole.
Figure I - Brush Replacement
MAINTENANCE
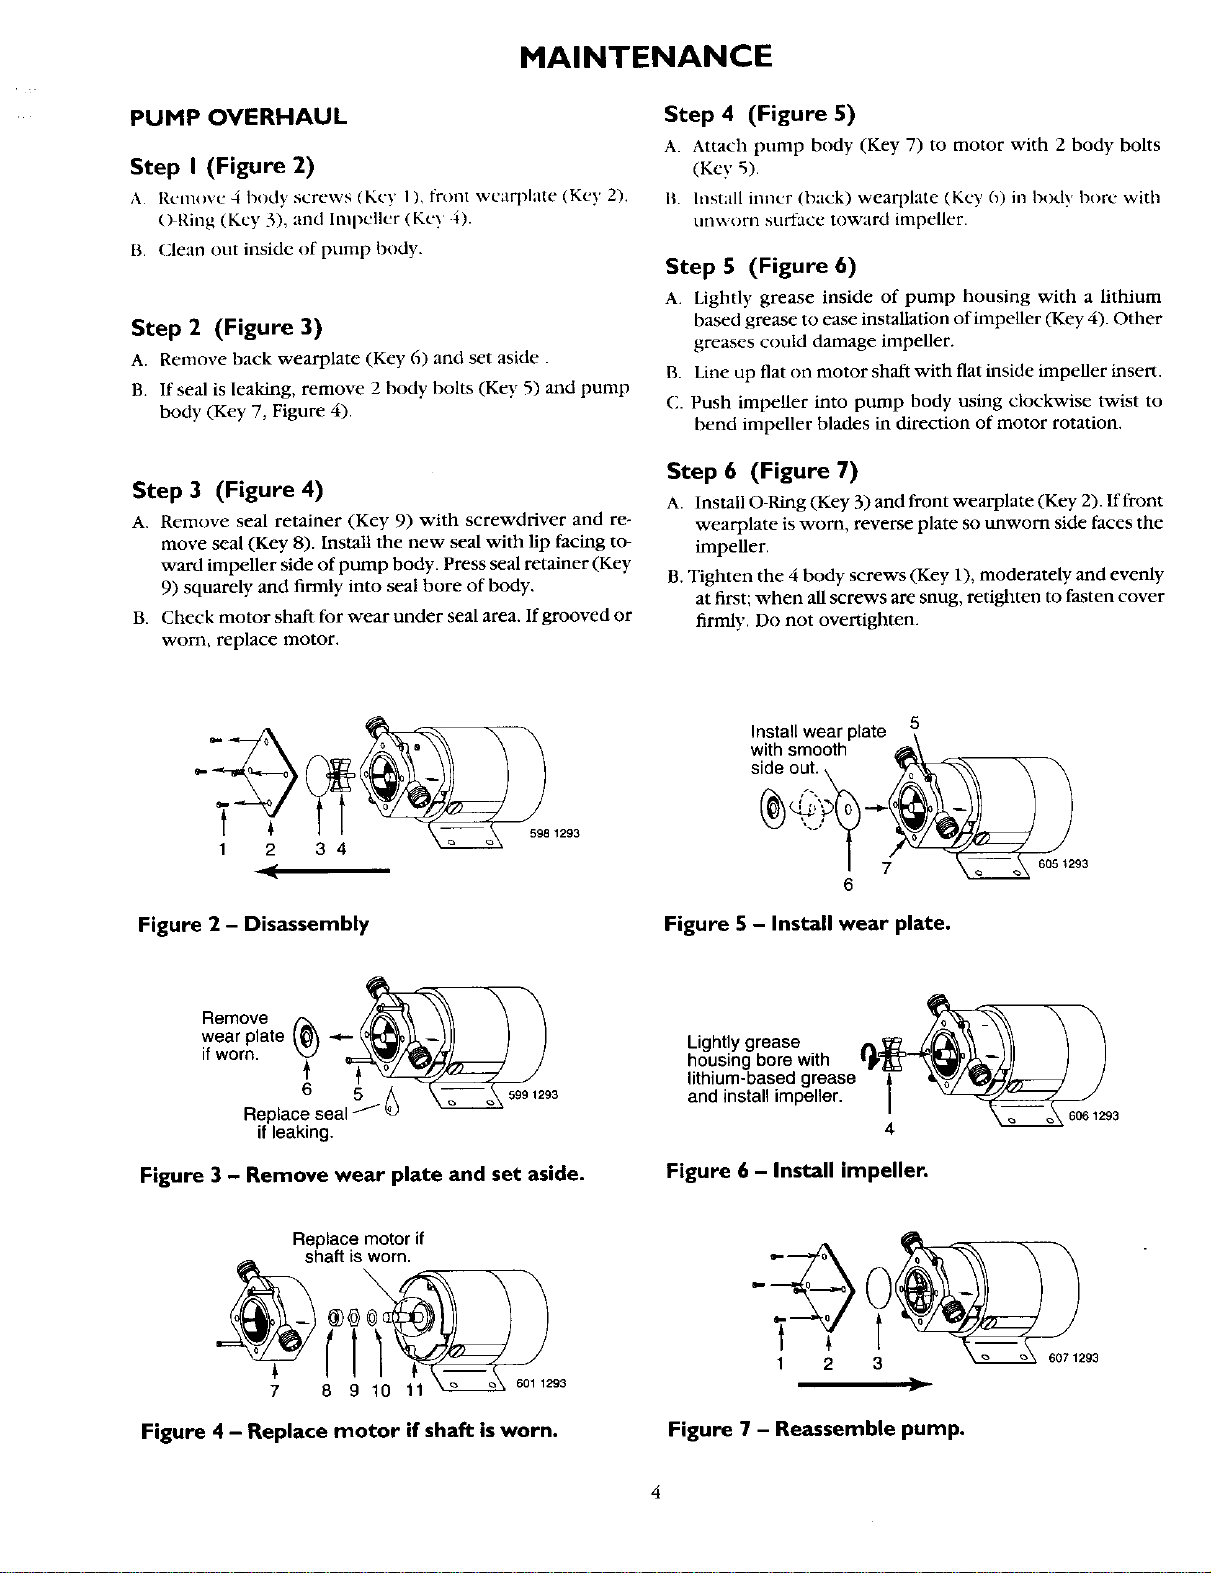
PUMP OVERHAUL
Step I (Figure 2)
A l_,cmo\c 4 body screws (Key I), front wcarplate (Key 2),
O Ring (Key 3), and Impeller (Ke) i).
B. Clean out inside of pump budy.
Step 2 (Figure 3)
A. Remove back wear'plate (Key 6) and set aside.
B. If seal is leaking, remove 2 body bolts (Key 5) and pump
body (Key 7, Figure 4).
Step 3 (Figure 4)
A. Rcmuve seal retainer (Key 9) with screwdriver and re-
move seal (Key 8). Install the new seal with lip facing to-
ward impeller side of pump body. Press seal retainer (Key
9) squarely and firmly into seal bore of body.
B. Check motor shaft for wear under sealarea. Ifgroovedor
worn, replace motor.
Step 4 (Figure 5)
A. Attach pump body (Key 7) to motor with 2 body bolts
(Key 5).
B Install inner (back) wearplate (Key (0 in body bor¢. with
unworn surface toward impeller.
Step 5 (Figure 6)
A. Lightly grease inside of pump housing with a lithium
based grease to ease installation of impeller (Key 4). Other
greases could damage impeller.
B. Line up flat on motor shaft with flat inside impeller insert.
C. Push impeller into pump body using clockwise twist to
bend impeller blades in direction of motor rotation.
Step 6 (Figure 7)
A. Install O-Ring (Key 3) and front wearplate (Key 2). If front
wearplate is worn, reverse plate so unworn side faces the
impeller.
B. Tighten the 4 body screws (Key 1), moderately and evenly
at first; when all screws are snug, retighten to fasten cover
firmly. Do not overtighten.
1 2 34
Figure 2 - Disassembly
Install wear plate '_
with smooth _\
side °_!" k_ _ _ "_
-- '--/ -_ 7_293
6
Figure 5 - Install wear plate.
Remove (-_
wear plate _f_ _ _)!! I !
if worn. x:,, ._X_//_/_/ J /
, 6 _93
Heplace seal _ ',_
if leaking.
Figure 3 - Remove wear plate and set aside.
Lightly grease
housing bore with
lithium-based grease 1and install impeller.
4
Figure 6 - Install impeller.
Replace motor if
shaft is worn.
Figure 4 - Replace motor if shaft is worn.
1 2 3 93
Figure 7 - Reassemble pump.
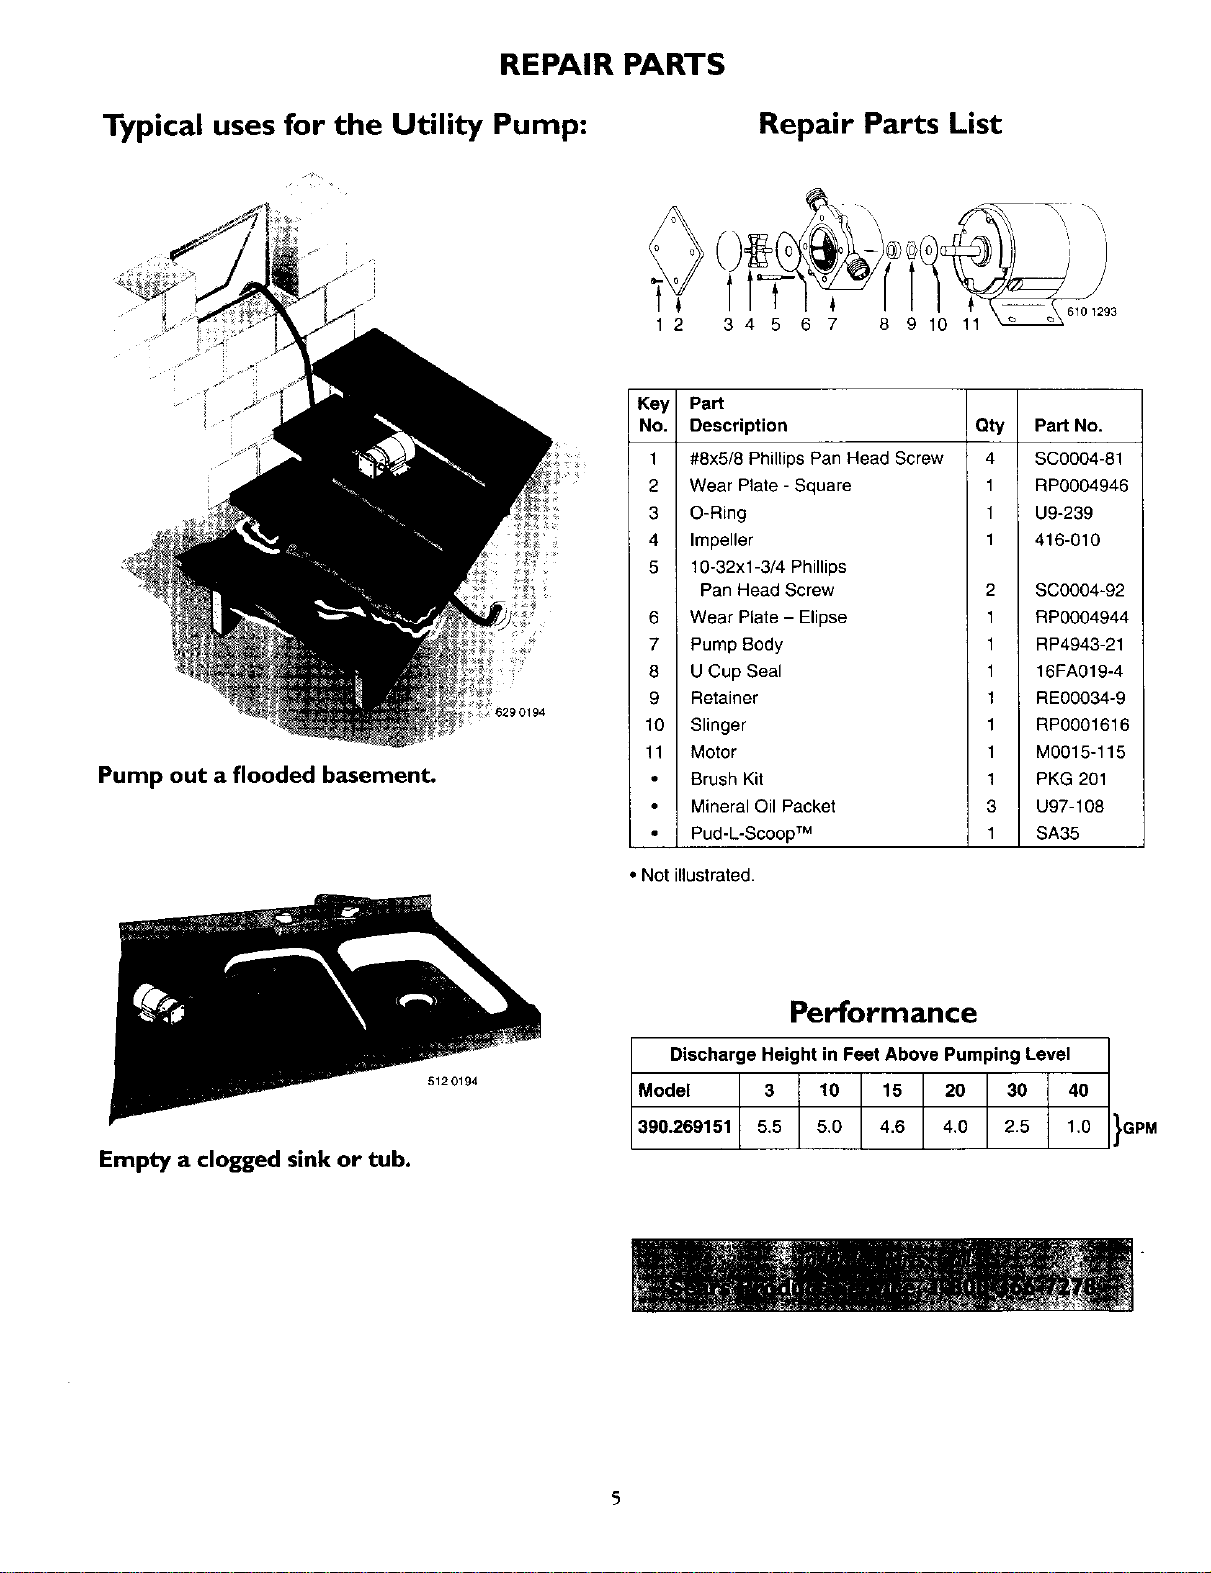
REPAIR PARTS
Typical uses for the Utility Pump:
Pump out a flooded basement.
Key
No.
1
2
3
4
5
6
7
8
Repair Parts List
\
1 2 3 4 5 6 7 8 9 10 11
6101293
9
10
11
Part
Description
#8x5/8 Phillips Pan Head Screw
Wear Plate - Square
O-Ring
Impeller
10-32xl -3/4 Phillips
Pan Head Screw
Wear Plate - Elipse
Pump Body
U Cup Seal
Retainer
Slinger
Motor
Brush Kit
Mineral Oil Packet
Pud-L-Scoop TM
Qty Part No.
4 SC0004-81
1 RP0004946
1 U9-239
1 416-010
2 SC0064-92
1 RP0004944
1 RP4943-21
1 16FA019-4
1 RE00034-9
1 RP0001616
1 M0015-115
1 PKG 201
3 U97-108
1 SA35
• Not illustrated.
Empty a clogged sink or tub.
5120194
Performance
Discharge Height in Feet Above Pumping Level
Model 3 10 15 20 30 40
390.269151 5.6 5,0 4,6 4,0 2.5 1,0 }GPM

6

SEARS
OWNER'S
MANUAL
Model No.
390.269151
Themodel number of
your Portable Utility
Pumpwill be found on
the pump label.
When requesting service
or ordering parts, always
give the following
information:
• ProductType
• Model Number
• Part Number
• Part Description
I:RRFTSMRW
PORTABLE
UTILITY PUMP
Fortherepairorreplacementpartsyouneed
Call7am- 7 pm, 7 daysa week
1-800-36B-PART
(1-800-306-7278)
Forin-homemajorbrandrepairservice
Call24hoursa day,7 daysa week
1-800-4-REPAIR
(1-800-473-7247)
Forthelocation of a
SearsRepairServiceCenterin yourarea
Call24hours aday,7 daysa week
1-800-488-1222
ForInformationonpurchasinga Sears
MaintenanceAgreementor toinquire
aboutanexistingAgreement
call9 am- 5 pm, Monday-Saturday
1-800-827-6655
SEARS
A
tt_l',l:rlt[,l:l;irJ[el=
America'sRepair Specialists
Sears, Roebuck and Co., Hoffman Estates, IL 60179 U.S.A.