Seamless Wi-Fi System
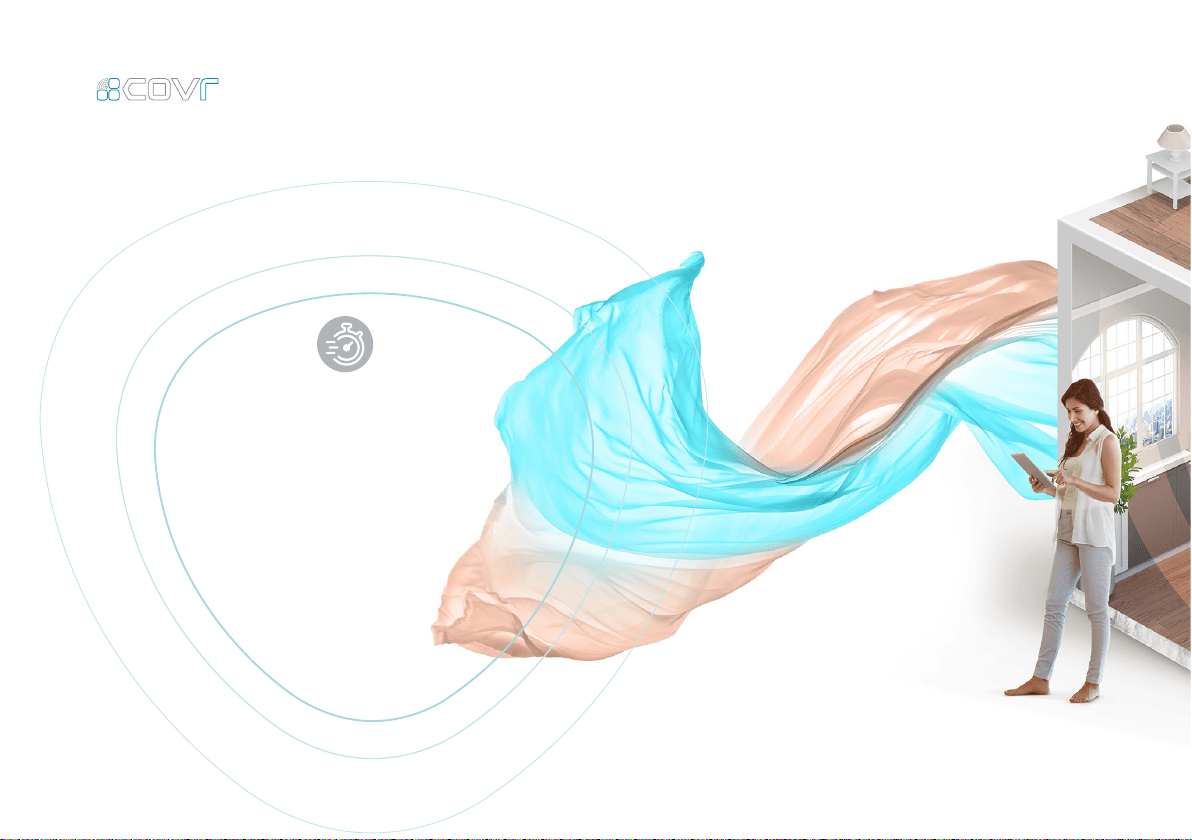
Introducing COVR, the mesh solution that blankets your entire home in
stable, consistent, and truly seamless Wi-Fi.
HIGH PERFORMANCE
With 1,200 Mbps Wi-Fi, MU-MIMO
technologies, and 2x3 (Rx) antenna
at its core, Covr provides enough
speed to support multiple devices
undertaking data-intensive tasks
simultaneously no matter where
they are in the house.
Experience the future of Seamless Wi-Fi
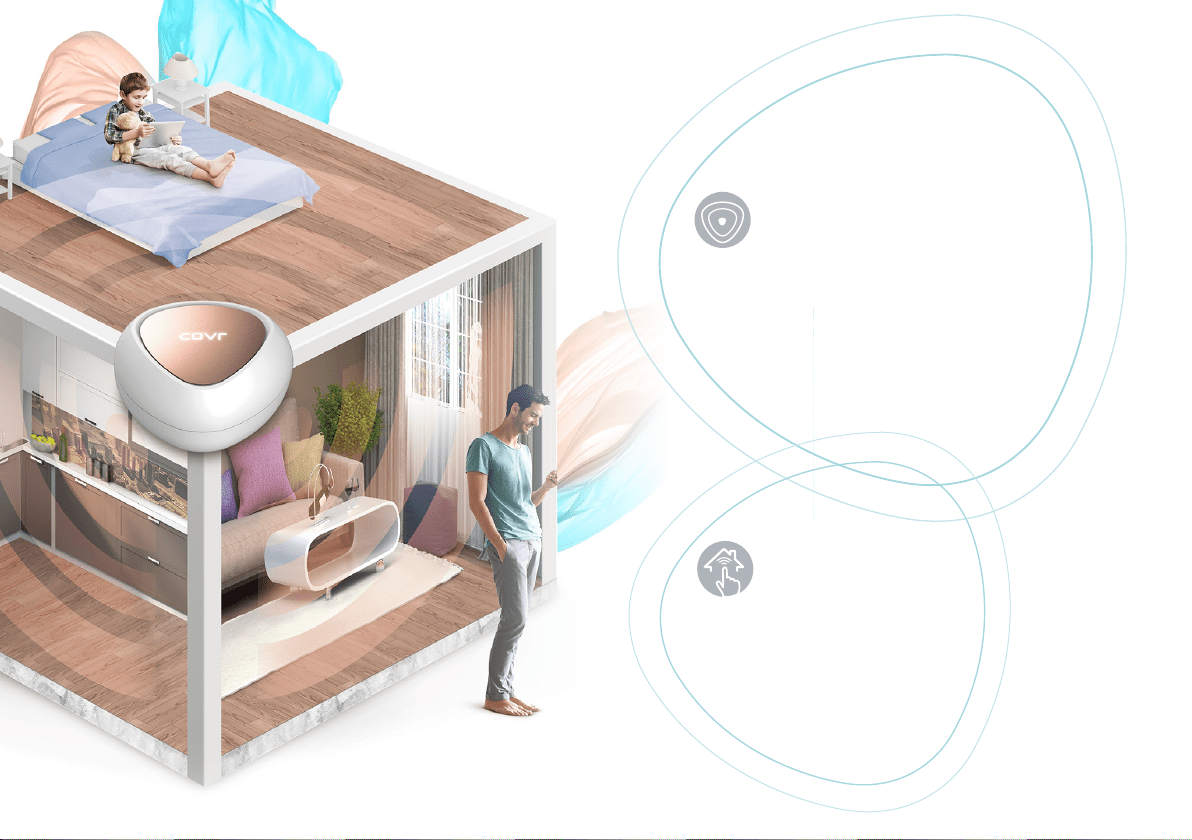
MORE COVERAGE
ONE SEAMLESS
NETWORK
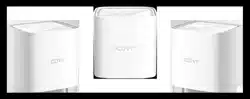
Covr’s three discreet Covr Points
cover up to 465 sqm – enough
seamless Wi-Fi coverage for a
wide variety of housing sizes and
congurations. Wi-Fi dead zones
are now a thing of the past.
With Covr, there’s just
one wireless network
name (SSID) for your
entire home.

0303
Smart Roaming
Gone are the days of only being able to
use Wi-Fi in certain areas of your home:
Smart roaming lets you move around
the house while always being connected
to the strongest signal available. Forget
about traditional Wi-Fi extenders which
require you to connect to different
networks as you move around, Covr
ensures your entire home is covered by a
single, seamless network.
Having one Wi-Fi name (SSID) means
once you connect, your connection is
seamlessly maintained as you and your
wireless devices roam around your home.
As you move from room to room and oor
to oor you’ll experience uninterrupted
Wi-Fi. Buffering, drop-outs and deadspots
are now a thing of the past.

0404
Multiple Networks
As you move about your home,
your Wi-Fi drops out as it disconnects
and reconnects to different networks.
Single Network Name
There’s just one Wi-Fi Name (SSID)
for your home, keeping you connected
to the strongest signal at all times.
Other Home Wi-Fi
05
05
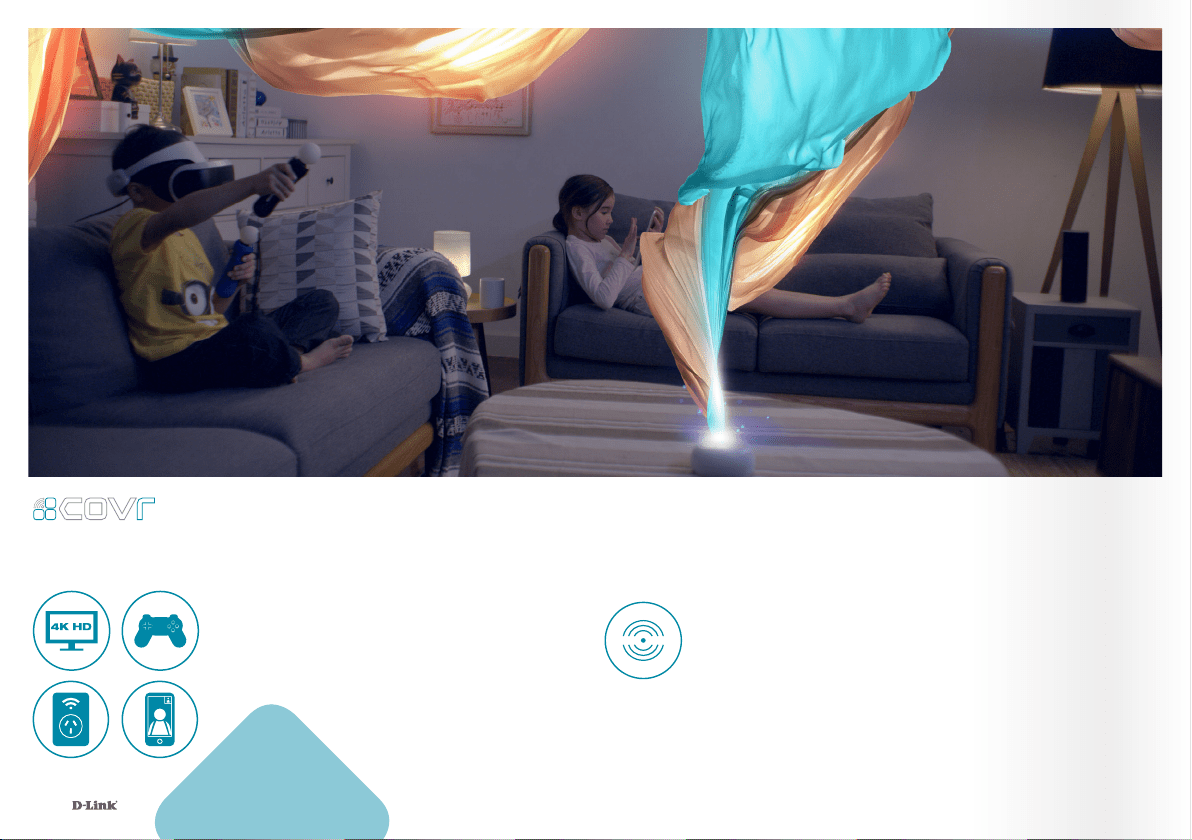
Wi-Fi that Meets Your Needs
Whether it’s HD video streaming,
video chats, or smart home devices,
Covr responds to the need for
speed in the modern home as
consumers perform more data-
intensive tasks on their Wi-Fi
connected devices.
Seamless Wi-Fi in Every Corner
Unlike other Mesh Wi-Fi systems that
use only 2 receiving antennas, Covr
has 3 receiving antennas to detect and
receive more data from all your devices.
You enjoy seamless connectivity no
matter where you are in the house.
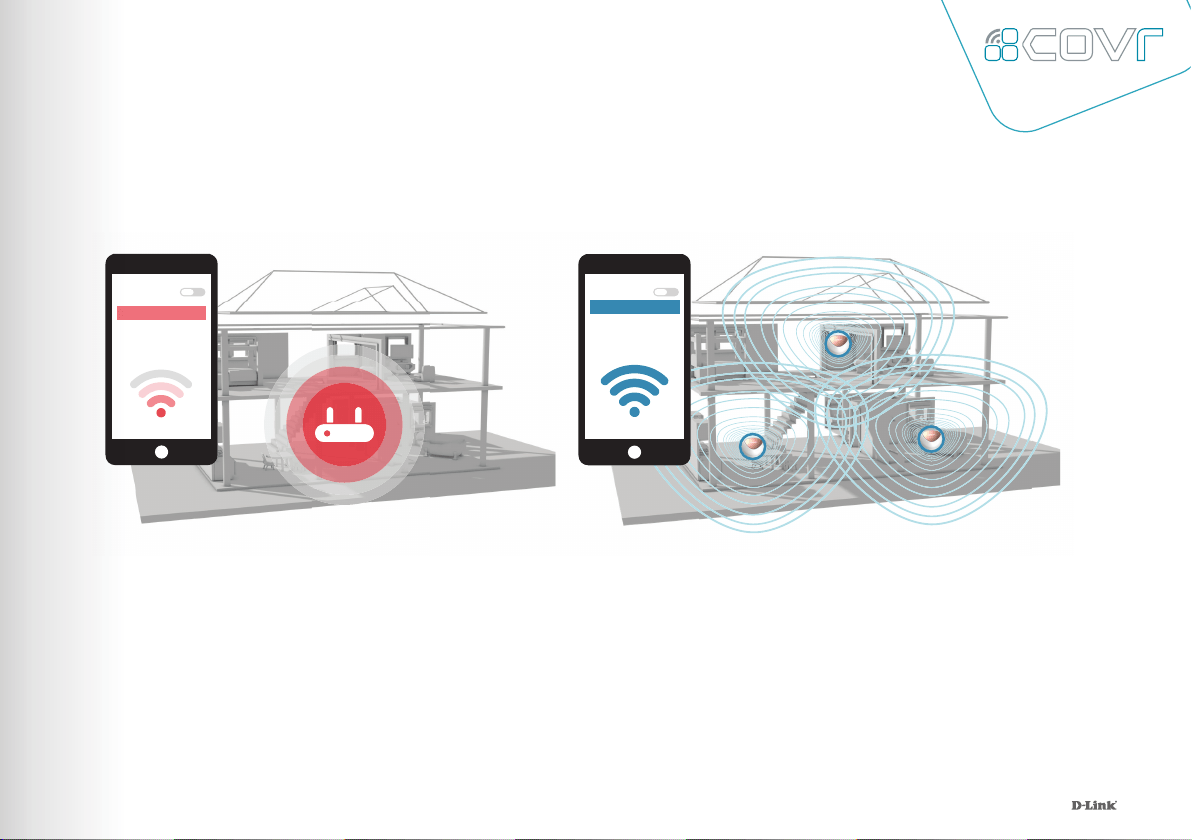
06
Traditional Wi-Fi Routers
Covr Seamless Wi-Fi System
Wi-Fi Network 1
Covr Wi-Fi

07
MU-MIMO Technology
Traditional Wi-Fi Covr with MU-MIMO
Like having multiple routers in your home, Multi-User MIMO (MU-MIMO) sends data to multiple
devices simultaneously to increase speed and efciency. Your laptop, tablet, media player and
game console can all receive data at the same time, with no need to wait in turn. You get more
out of your home Wi-Fi network than ever before.
0808
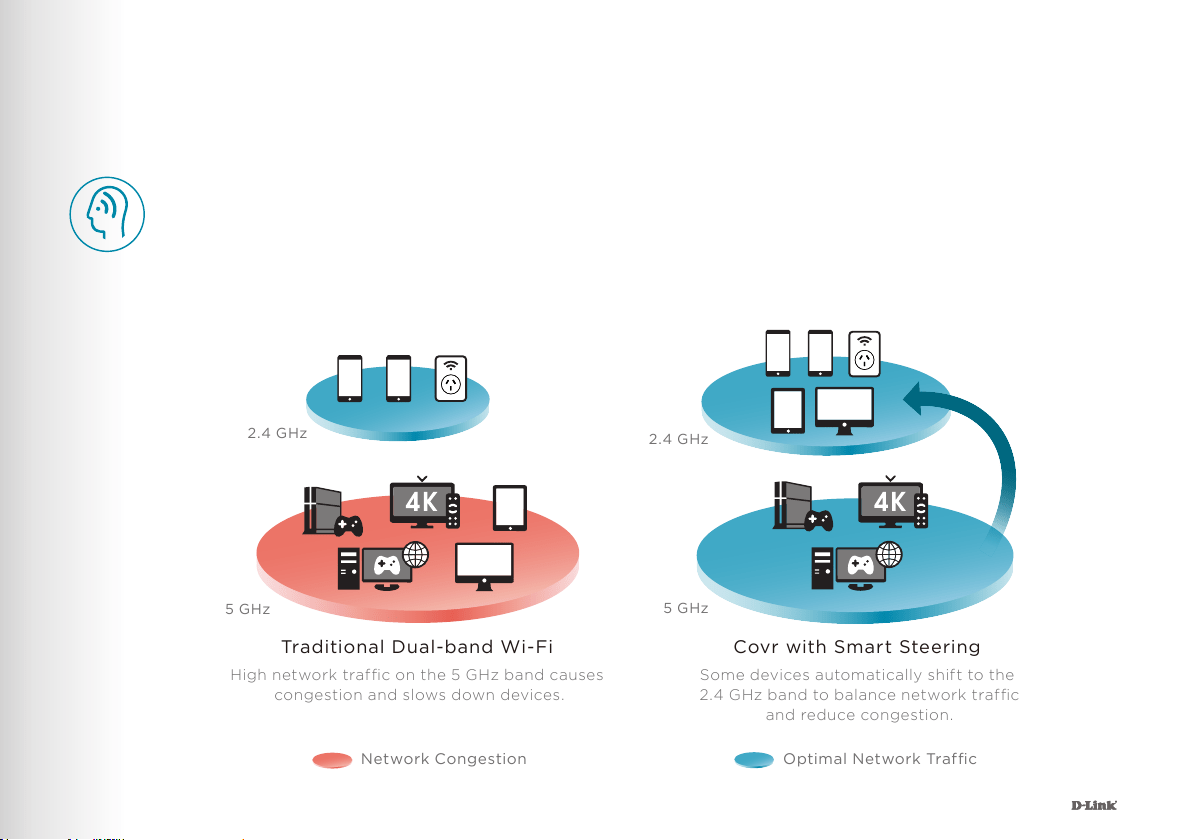
Optimal Network Traffic
Network Congestion
Traditional Dual-band Wi-Fi
High network trafc on the 5 GHz band causes
congestion and slows down devices.
Covr with Smart Steering
Some devices automatically shift to the
2.4 GHz band to balance network trafc
and reduce congestion.
2.4 GHz
5 GHz
2.4 GHz
5 GHz
Smart Steering
If you don’t know your 2.4’s from your 5’s, don’t worry. Smart steering selects the best band for
your device so that you get the best performance possible – all the time. With smart steering,
Covr will automatically connect devices to the optimal Wi-Fi band and even move devices between
Wi-Fi bands when the network experiences congestion. All this without dropouts, lag or any
interruption to your wireless connection; and most importantly without you lifting a nger.
09
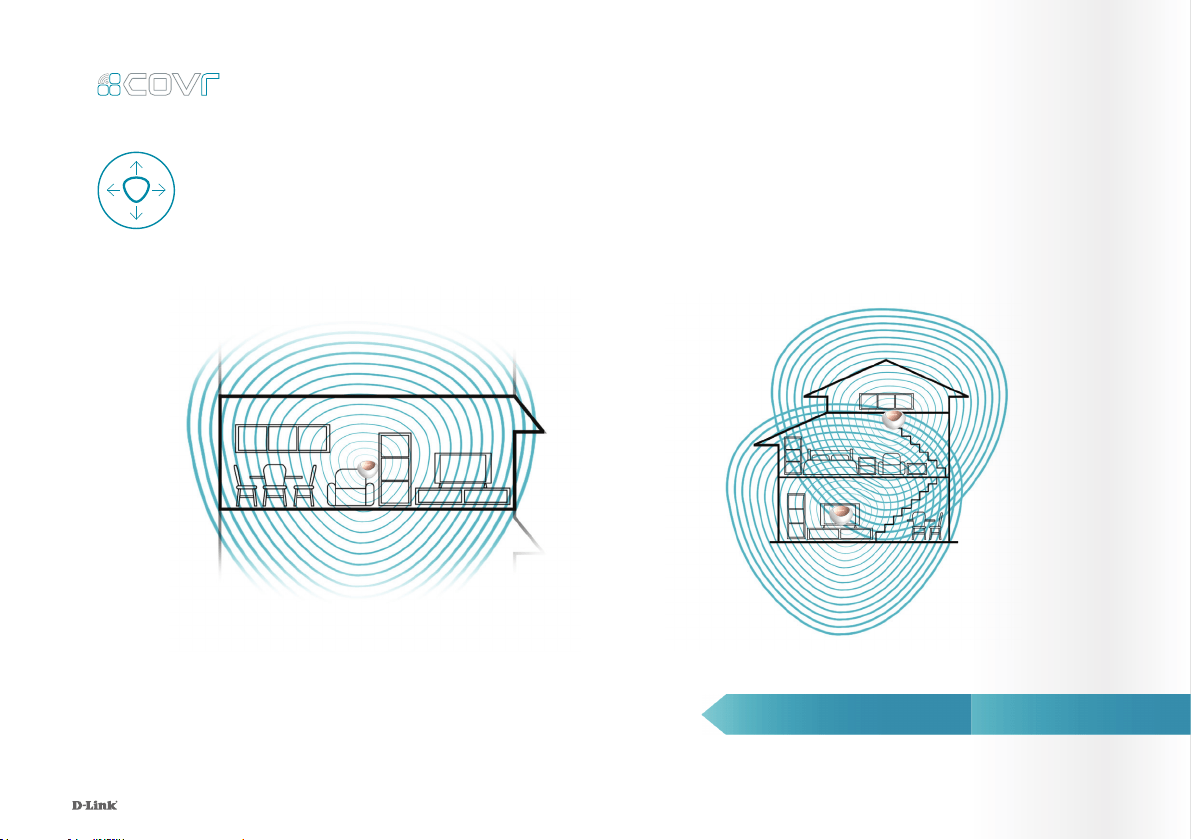
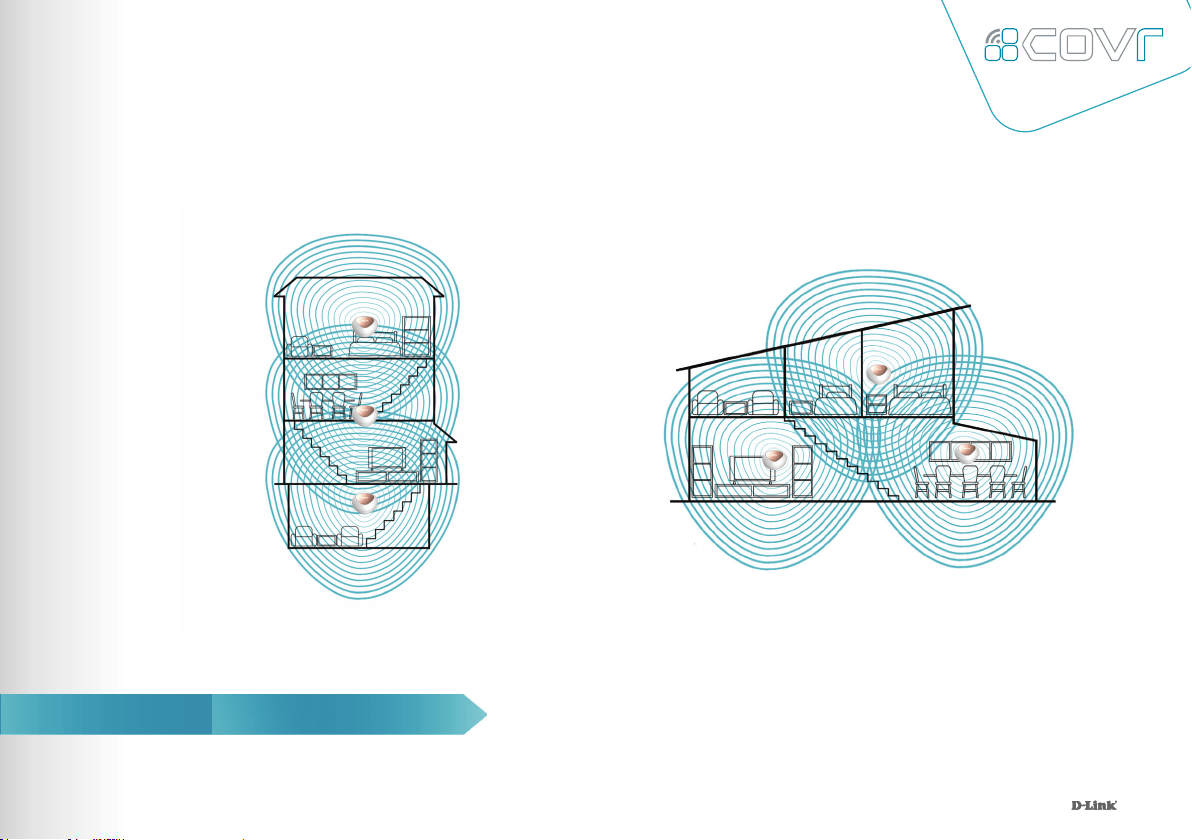
Simple. Yet Flexible.
APARTMENT
APARTMENT 200 m
2
300 m
2
The Covr Seamless Wi-Fi System comes pre-paired and works straight out of the box, so
you just need to plug in the Covr Points and get started. The best part? It’s exible enough
to cover most housing types. From single-storey apartments to multi-storey houses, and
front yards to back decks, Covr’s got you covered.
DUPLEX
1010
LARGER HOUSE
LARGER HOUSE400 m
2
500 m
2
TOWNHOUSE

11
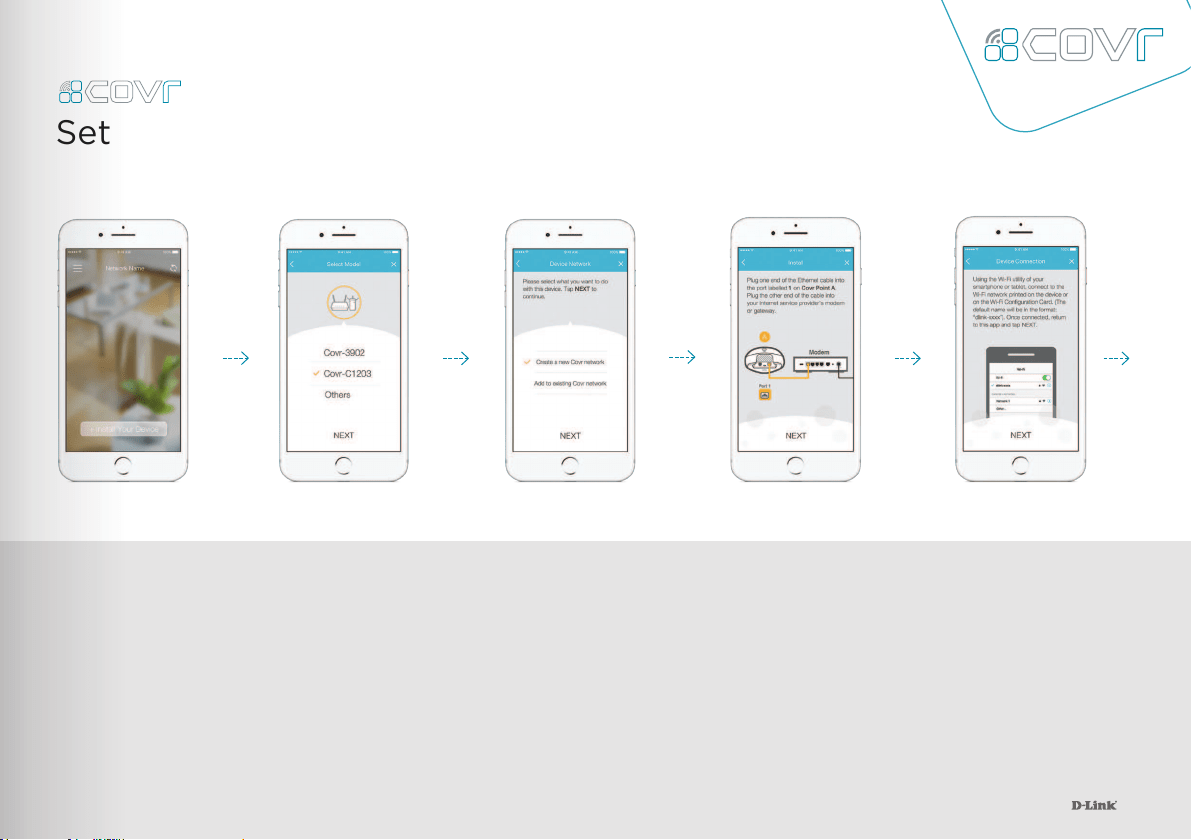
Simple Setup
Before You Start
There are two easy ways to congure your Covr Seamless Wi-Fi System –
Use the free D-Link Wi-Fi app for iOS and Android devices, or the intuitive
web-based setup wizard on your computer. Please see the following pages
for further details on how to set up your Covr Seamless Wi-Fi System using
these two methods.
Check the contents of your
Covr Seamless Wi-Fi System
with the list on the right.
3 x COVR-C1200
Covr Points
3 x USB-C
Power Adapters
Ethernet
Cable
12
2
Select COVR-C1203 from
the model menu and tap
NEXT
3
As this is the rst time
you are setting up a
Covr network, select
Create a new Covr
network from the
menu and tap NEXT
4
Follow the instructions
to plug in the rst Covr
Point and connect it to
your existing modem*.
Be sure to begin with the
Covr Point marked “A”.
Tap
NEXT
*You may need to enable
bridge mode on your ISP-
provided modem/router.
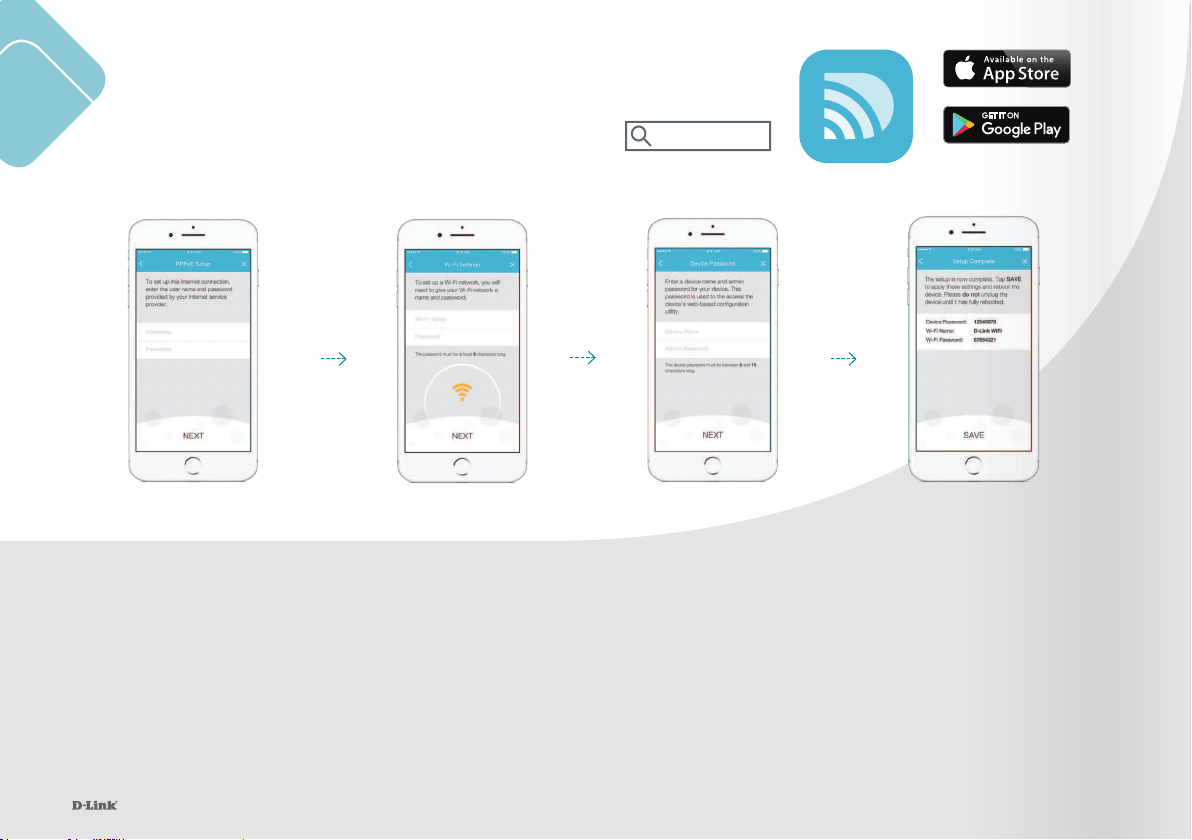
Set Up Using the D-Link Wi-Fi App
5
On your mobile device, go
to Settings and use the
Wi-Fi utility to connect
to the Wi-Fi name (SSID)
printed on the back of the
device. Once connected,
return to the D-Link Wi-Fi
app and tap
NEXT
1.
Open the app and tap
Install Your Device.
12
13
Download the free D-Link Wi-Fi app
from the App Store or Google Play.
D-Link Wi-Fi
7
Set a Wi-Fi network
name (SSID) and
password by entering
them in the elds
provided. You should
try to choose a strong
password which is
difcult for others to
guess. Tap NEXT to
continue.
8
Set a device (admin) password
for your Covr network. This
password is used to access
your Covr network’s settings
through the D-Link Wi-Fi app
or web-based interface. This
password should be different
from the Wi-Fi password
specied in the previous step.
Tap NEXT to continue.
13
6
D-Link Wi-Fi will attempt to detect
your internet connection type. If your
internet uses a PPPoE connection,
enter the details provided by
your service provider in the elds
provided. Tap NEXT to continue.
9
A summary of your Covr
network settings will be
shown on the screen. Tap
Save to conrm these
settings. The Covr Point
will reboot, do not power
off the Covr Point until it
has fully rebooted.

14
Placing the Covr Points
After you have completed the setup process, place the remaining Covr Points around
your home. Follow these simple steps to nd the optimal location for your Covr Points.
It is recommended that you keep all Covr Points close to one another when rst
powering them up in order to allow for trouble-free pairing.
1.
Plug in the remaining
Covr Points and wait for
the light on the top of the
devices to blink amber. This
indicates that the devices are
automatically pairing.
2.
Wait for the lights on the
top of the Covr Points
to turn solid white. This
indicates that pairing as
been completed and your
Seamless Wi-Fi System is
set up.
3.
Move the Covr Points to the areas
of your home where you want
to extend Wi-Fi coverage. Plug
them in and wait for them to
boot up. When the light on top of
the device turns solid white, this
indicates a strong connection to
your whole home network.
4.
A ashing white light indicates
a weak connection. Move the
Covr Point closer to the other
Covr Points to improve signal
strength.
15
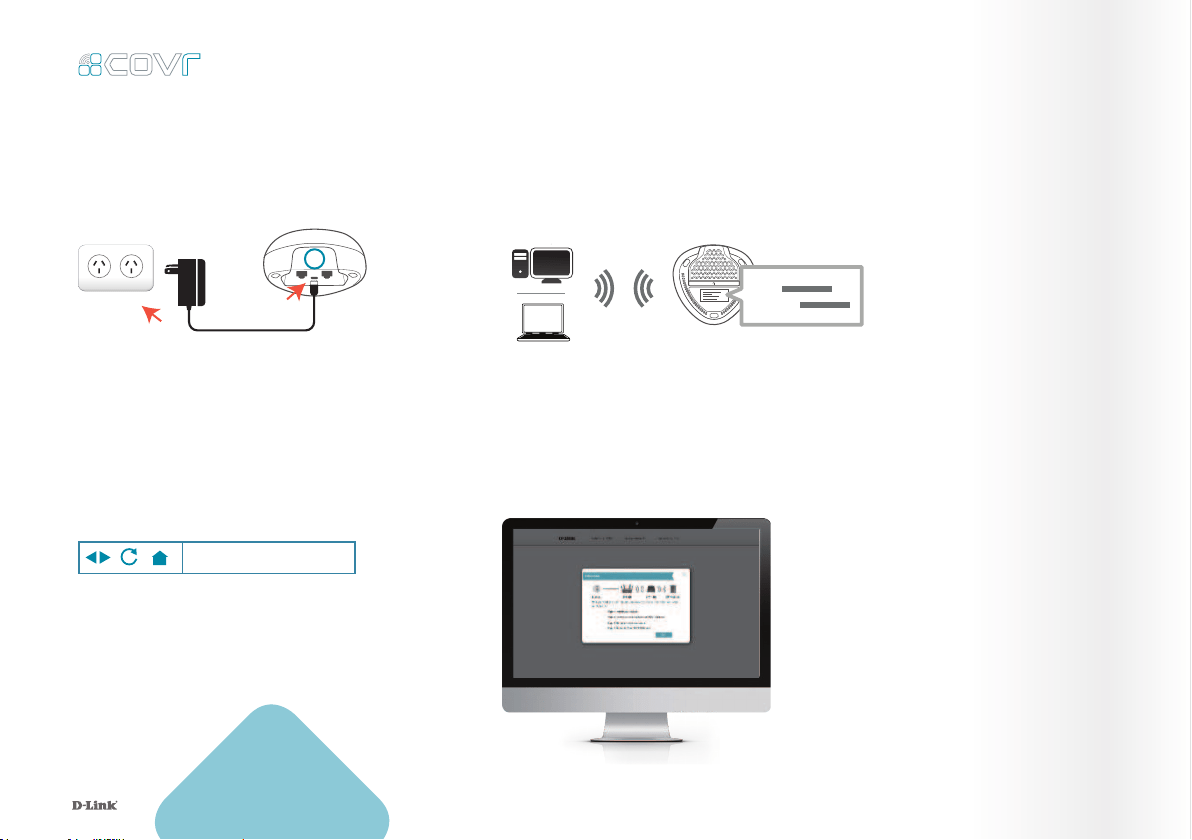
1.
Connect the power adapter and plug in
the Covr Point labeled A.
3.
Type http://covr.local./ into a web browser
and follow the instructions to complete the
setup.
2.
When the Covr LED is blinking amber,
connect your PC or laptop to the Wi-Fi name
(SSID) printed on the back of the device.
Set Up Using
Web Browser
Covr’s intuitive setup wizard will guide you through the setup process
and have your home network up and running in no time.
Wi-Fi
Wi-Fi
SSID:
Password:
A
4.
The wizard will guide you through
the setup process. Click or tap NEXT
to get started and follow the simple
instructions.
http://covr.local./
16
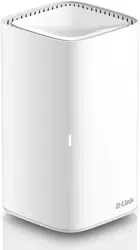
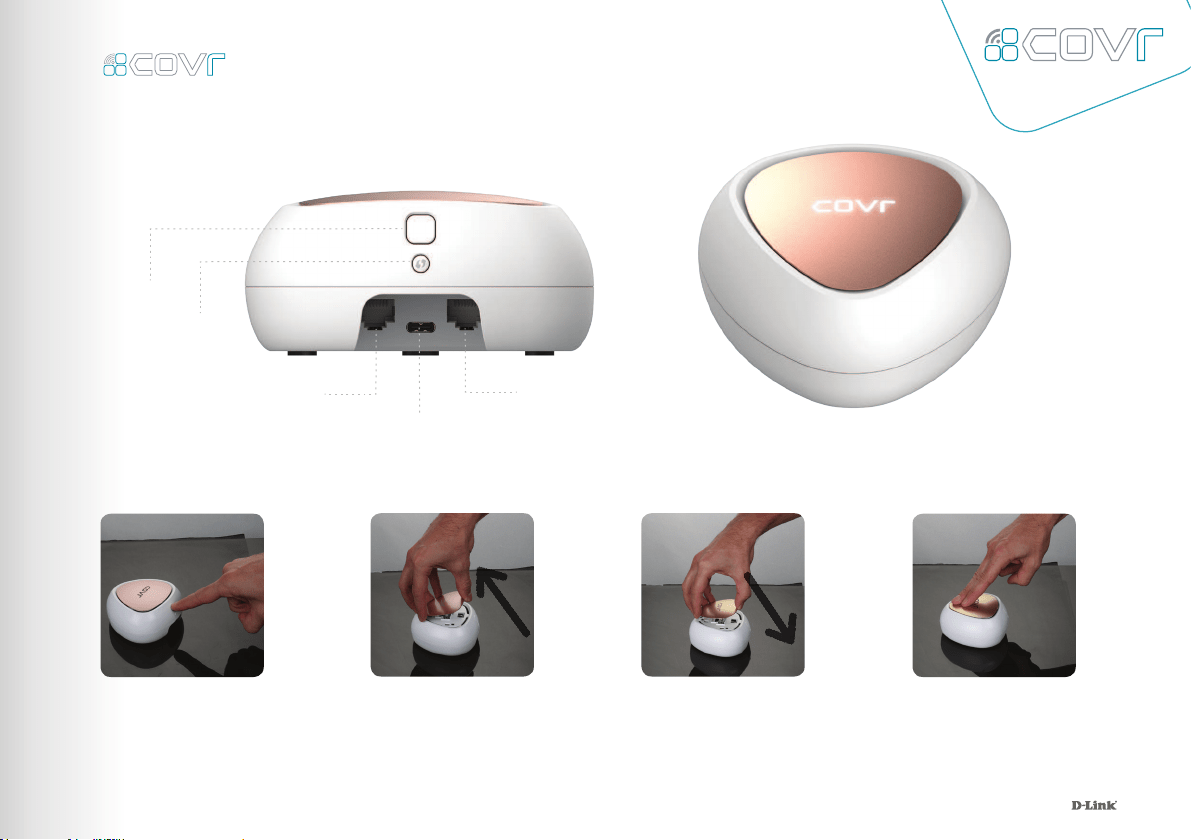
How to change the coloured plates
Get to Know Your
Covr Points
Top Plate
Release
WPS
Button
LAN/Internet Port LAN/Internet Port
USB-C Connector
Place the new coloured
plate on the top of the
Covr Point, aligning the
guide pins on the plate
with the holes in the
Covr Point
Slide the plate in the
direction of the release
button until you hear it
click into place
Press the button on the
back of the Covr Point
to release the plate
Lift the plate up and
away from the Covr
Point
1717
Network
Management
The Covr Seamless Wi-Fi System
provides you with a home network
solution that is quick and easy to set up.
The Covr Points work straight out of the
box - just plug them in to get started.
Congure your network in no time using
the intuitive web-based interface or with
the free D-Link Wi-Fi app for your
Android or iOS mobile device. Adding
new wireless devices to your Covr
network is a snap thanks to the Wi-Fi
Protected Setup (WPS) button, which
establishes an instant connection to new
devices without the need to enter
settings or create passwords. Expand
your network with the touch of a button.
Network Status
Click on the Covr Point icon to get a
snapshot of your network, including
device IP address, IPv6 address, and
Wi-Fi network status, Wi-Fi Name, and
Password.

1818
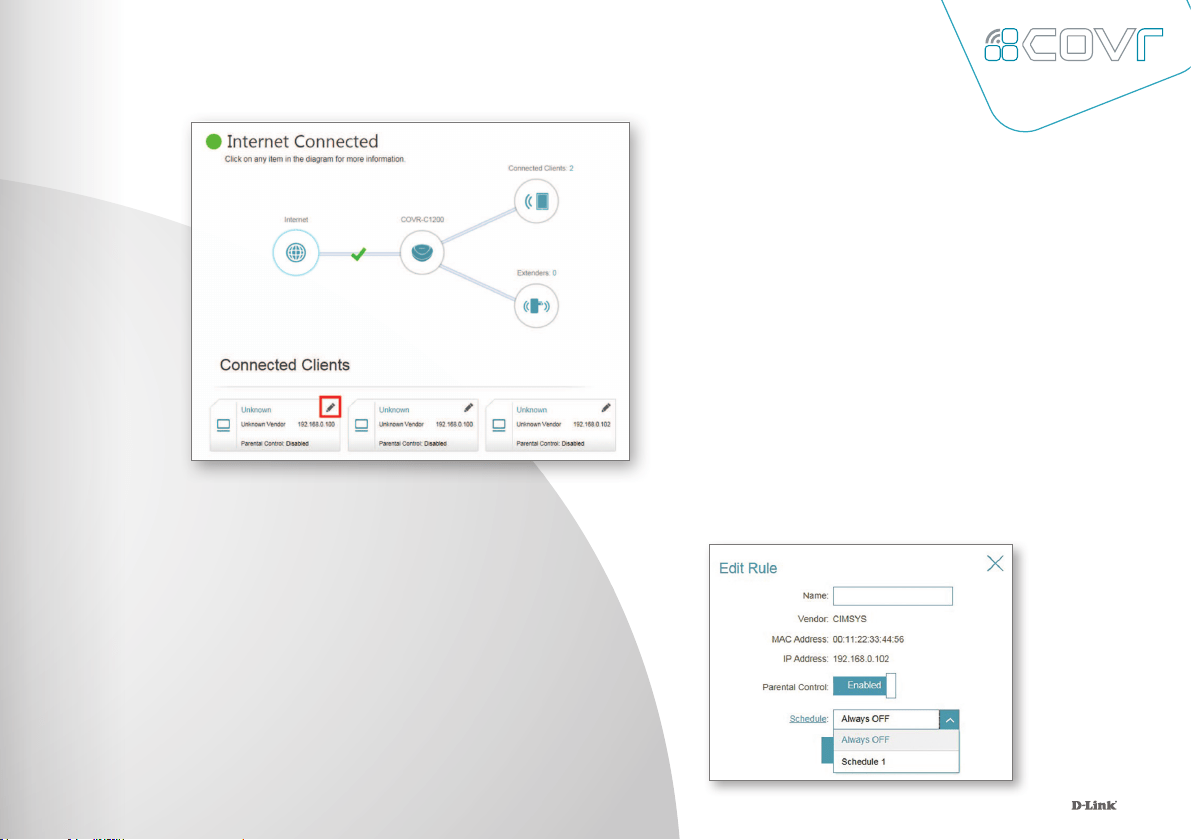
Connected Clients
Check the status of individual devices
connected to your Covr network by
clicking on this icon. The name and IP
address of each device will be displayed
in the panel at the bottom of the screen.
Click on the edit icon in the top
right-hand corner of each device tile
to manage that specic device.
Extenders
You can check the status of each Covr
Point by clicking this icon. Click on the
edit icon for each Covr Point to change
its display name. Clients connected to
Covr Points will also be displayed here.
19
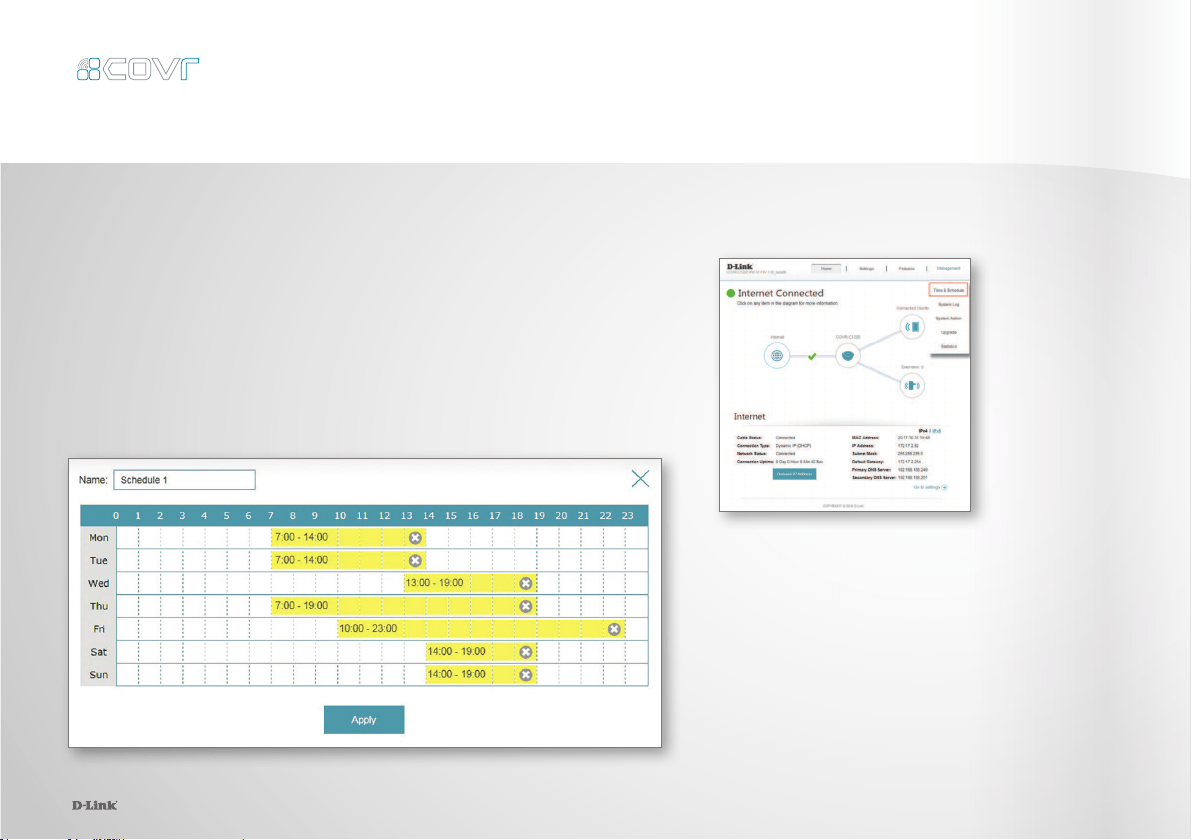
1.
First, set up a schedule which can be applied to client devices.
From the menu at the top of the home screen click Management
and then Time & Schedule. From the Time & Schedule page, click
on the Schedule hyperlink to access the scheduling function.
The Parental Control feature can be used to restrict network access to client
devices. Schedules can also be set to give client devices access to the whole
home network at certain times.
Parental Control and Scheduling
19
2.
Click on Add Device to create a new schedule.
Enter a name for the new schedule in the
Name eld. Click on a square in the grid to
include that time and day combination in
the schedule. Click and drag to select a time
range. When the desired schedule has been
selected, click
Apply to return to the schedule
page. Click the Save hyperlink to save the
schedule conguration.
20
3.
Return to the home screen and click
on the Connected Clients icon in
the network map. Select the client
device which you wish to apply the
schedule to by clicking on the pencil
icon in the top right-hand corner of
the device tile at the bottom of the
screen.
4.
In the Edit Rule screen, click the Parental
Control slider to enable scheduling, and
then select the desired schedule from the
drop-down menu. Click
Save to save the
schedule settings for that device.

21

2222
22
COVR-C1200
Specifications
Ethernet Ports
Antennas
Wi-Fi Radios
Wi-Fi Standard
Dimensions
WPS
Coverage Area
Features
•
Powered by Qualcomm® Mesh Networking Platform
•
802.11ac Wave 2 dual-band wireless
•
Combined speeds of up to AC1200
2 x Gigabit (Auto WAN/LAN)
2 x 3 (Tx/Rx) Internal
Up to 866 Mbps (5 GHz) / Up to 300 Mbps (2.4 GHz)
802.11ac/n/g/b
107.5 x 108 x 51 mm
Yes
Up to 465 sqm / 5000 sq. ft. ( 3-pack )
•
MU-MIMO
•
Two Gigabit ports per device with auto WAN/LAN
•
USB Type-C powered
High Performance
More Coverage
One Seamless Network
For more information, visit dlink.com.au/COVR-C1203
Copyright © 2018 D-Link Corporation/D-Link Systems, Inc. All rights reserved. D-Link, the D-Link logo and Covr are trademarks or registered trademarks of D-Link Corporation
or its subsidiaries in the United States and/or other countries. Other trademarks or registered trademarks are the property of their respective owners.