

AV-H557135A11 55" Class

Warning and precautions…………….…………….....…………………...………..……2
Important safety instructions ……………………………….....…….........………..……3
Warnings and cautions…………………………………………………………….…..….5
Technical specifcations…………………………………………………….……...……....6
Installation………………………………………………………………………....….…….7
Remote control………………………………………………………………….…...……12
Operation………………………………………………………………………...……..…13
Troubleshooting ………………………………………………………………..……...…22
Table of Contents
The terms HDMI High-Definition Multimedia Interface, and the HDMI Logo are trademarks or
registered trademarks of HDMI Licensing Administrator, Inc. in the United States and other countries.
-2-
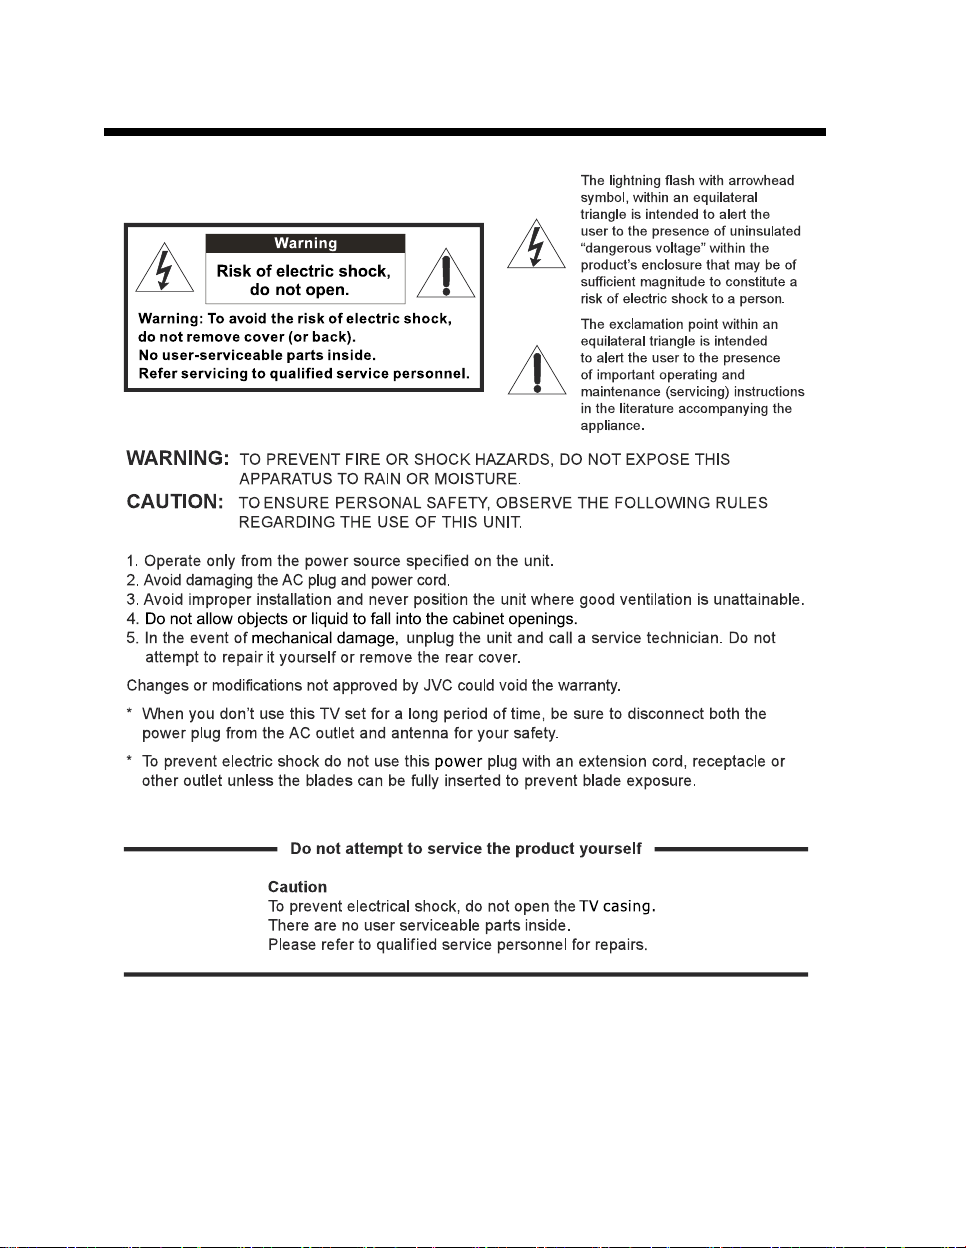
WARNING AND PRECAUTIONS

IMPORTANT SAFETY INSTRUCTIONS
-3-
IMPORTANT SAFETY INSTRUCTIONS
-4-
WARNINGS AND CAUTIONS
Warning
High voltages are used in the operation
of this television receiver. Do not remove
the cabinet back from your set. Refer
servicing to qualified service personnel.
Warning
To prevent fire or electrical shock
hazard, do not expose the television
receiver to rain or moisture.
Warning
Do not drop or push objects into the
television cabinet slots or openings.
Never spill any kind of liquid on the
television receiver.
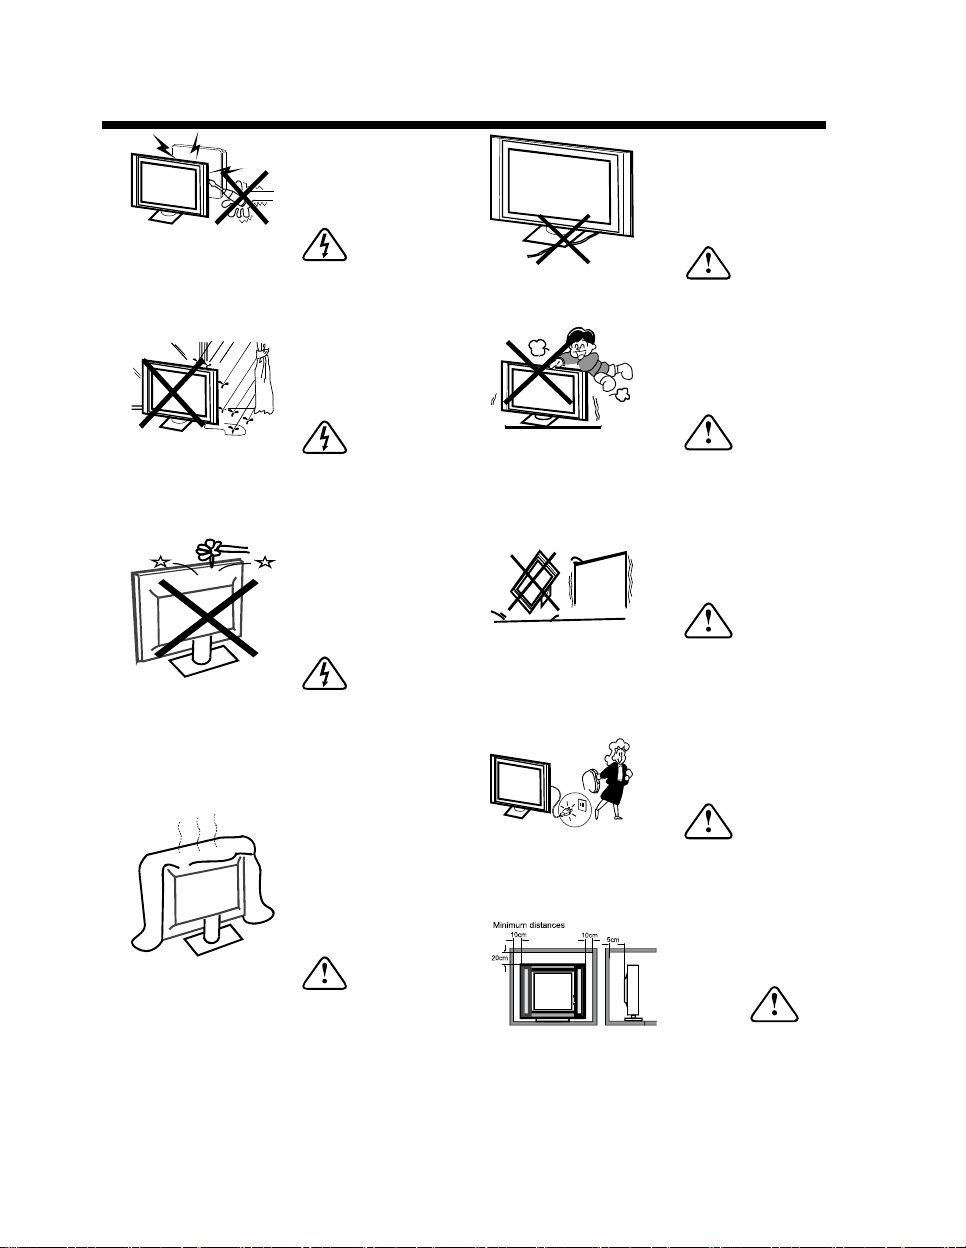
Caution
Do not block the ventilation holes in the
back cover. Adequate ventilation is
essential to prevent failure of electrical
components.
Caution
Do not trap the power supply cord under
the television receiver.
Caution
Never stand on, lean on, or suddenly push
the television or its stand. You should pay
special attention to children. Serious injury
may result if the television should fall.
Caution
Do not place your television on an unstable
cart, stand, shelf or table. Serious injury to
an individual , and damage to the
television, may result if the television should fall.
Caution
When the television receiver is not
used for an extended period of time, it
is advisable to disconnect the AC power
cord from the AC outlet.
Caution
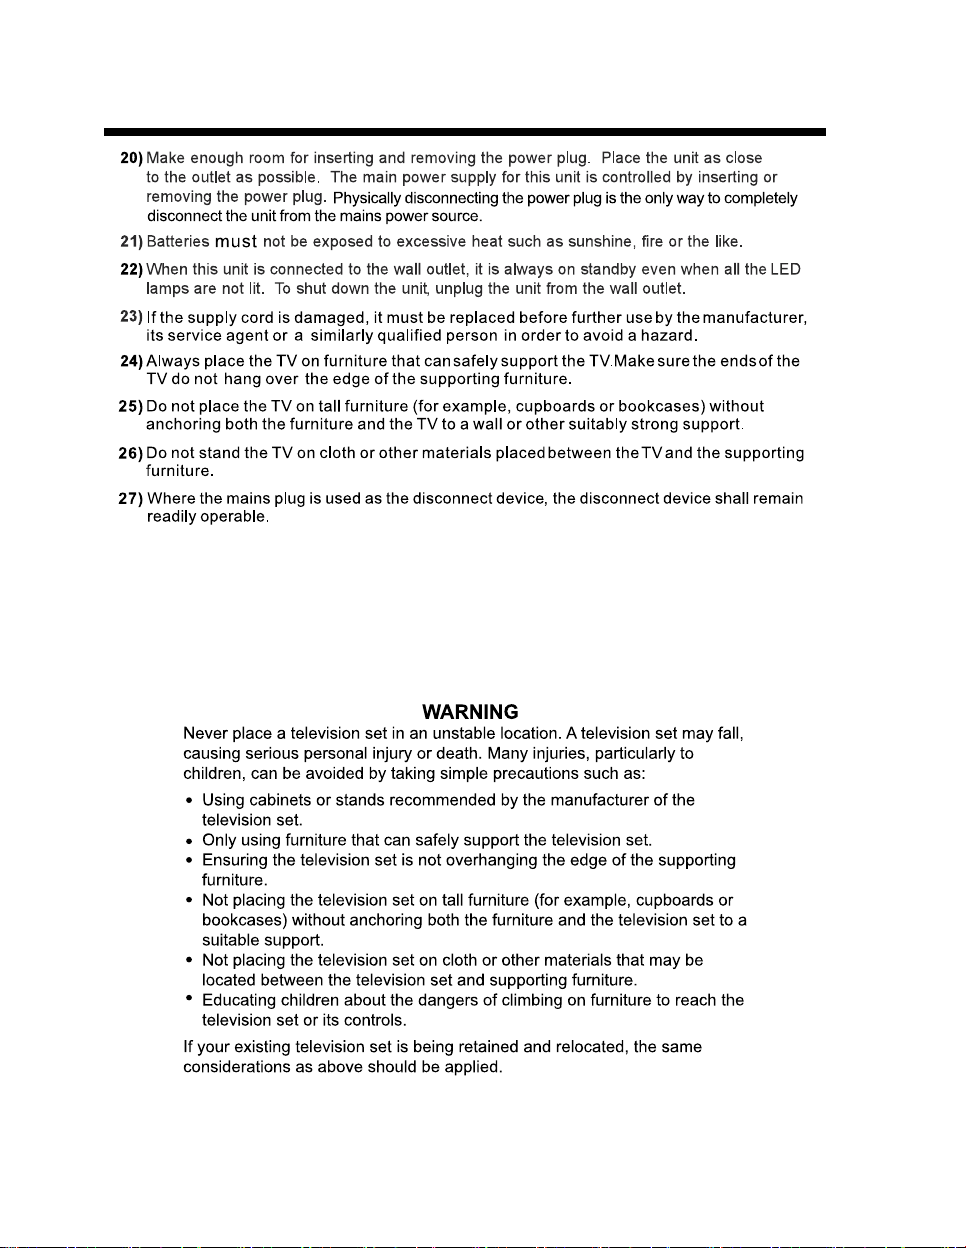
If the television is to be built into a
compartment or similar enclosure, the
minimum distances must be maintained.
Heat build-up can reduce the service life of
your television, and can also be
dangerous.
-5-

TECHNICAL SPECIFICATIONS
55"
Viewing Picture Size (Diagonal)
Resolution
Aspect Ratio
TV System
Power Consumption
Signal Input
Input Power Voltage
3840 x 2160
16 : 9
Brightness
35
6000:1
0cd/m²
C
Refresh Rate
Memory+Storage
60Hz
2G DDR +8G EMMC
ontrast Ratio
Unit Size
1231x265x774mm
1231x82x720mm
Unit Size (Without Stand)
Net Weight
11KG
Audio Output Power
THD 10%
2x10W
High-Definition Multimedia Interface HDMI) x 4
AV IN x 1
RJ45 x 1
USB x 2
ANT x 1
150W
AC 100-240V 50/60Hz
PAL-B/G, I, D/K
SECAM-B/G , D/K , L
DVB-T, DVB-T2
Signal Output
HEADPHONE x 1
OPTICAL x 1
-6-

INSTALLATION
BASE STAND ASSEMBLY INSTRUCTION
Place the TV with the display side down on a flat surface. Ensure the table or desk you use
provides a flat, totally clean surface and use a soft cloth between the face of the TV and the table to
protect the TV's screen.
M4x15mm M4x15mm
1. Place the TV face down on a cloth or towel on a flat surface. Insert the stands into the grooves
on the bottom of the TV, then align the screw holes on the bottom of the TV and the stands.
2. Use the 4 provided screws to attach the stands to the TV.
-7-
INSTALLATION
* Locate the TV where light does not shine onto the screen.
* Total darkness or reflection on the screen can cause eye strain. A soft lighting environment is recommended for
comfortable viewing.
* Allow ample space between the TV and wall for proper ventilation.
* Do not locate the TV in a damp or hot environment to prevent damage.
* To prevent damage whilst in use, do not cover ventilation openings.
980mm
INSTALLATION
-8-
VESA 400*300
HDMI2 (4K)
AV INPUT
ANT. IN
HDMI3 (4K)
HDMI4 (4K)
OPTICAL
USB
5V 500mA
ETHERNET
HDMI1 4K (eARC)
HEADPHONE
USB
5V 500mA
INSTALLATION
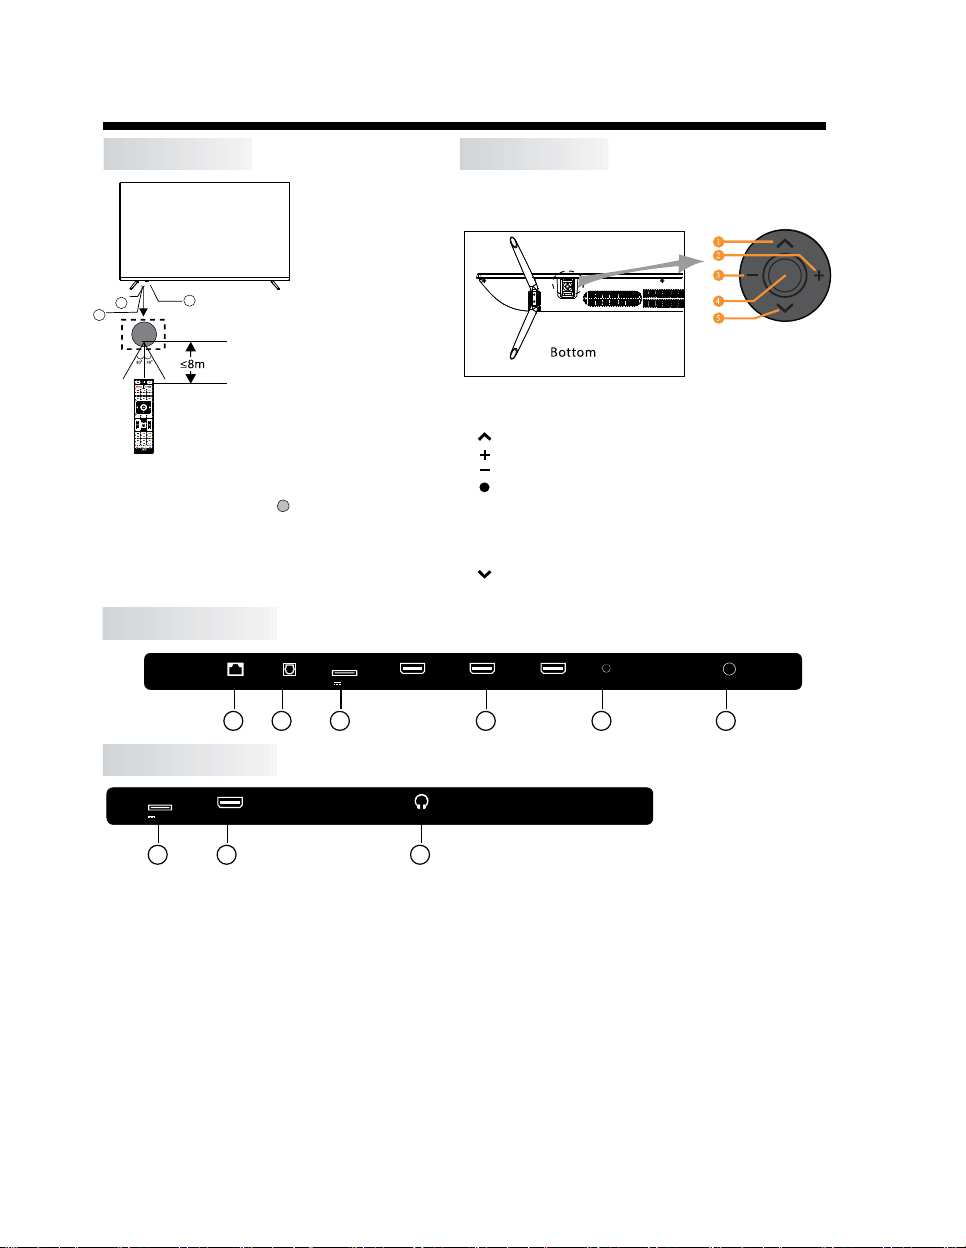
FRONT PANEL
REAR AV CONNECTIONS
1
REAR AV CONNECTIONS (SIDE)
1: Remote control sensor
1, ETHERNET: Connect the Network Interface.
2, OPTICAL: Optical Digital Audio ouput.
3, USB: Plug in your USB memory device (eg. USB stick) for PVR recording or to play compatible files that are
stored in it.
4, HDMI: Connect to the HDMI ouput jack of up to 4 external video sources (eg. DVD player / games console /
bluray player).
5, AV INPUT: Connect to the AV OUT jack of your external video source device(eg. DVD player)*
6, ANT.IN: Connect the antenna or 75 Ohm coaxial cable to receive TV signal.
7, HEADPHONE: Connect headphones here. Note that connecting headphones will mute the sound from
the TVs built-in speakers.
* Use the connector cable provided to convert the mini AV port to RCA inputs.
2: Indicator LED: RED STANDBY
3: Keyboard
3
2
1
-9-
RM-C 340 9
The control buttons on the TV are located on the bottom
of the TV near the LED indicator.
KEYBOARD
Control Key
1. : Select the next channel or move up.
2. : Increase the volume level or move right.
3. : Decrease the volume level or move left.
5. : Select the previous channel or move down.
4. : When TV is on standby, press to turn on.
When TV is on, press to enter the menu.
Use the joystick to navigate around the interface
and press to enter the highlighted item.
When TV is on, press and hold to put TV on standby.
3 4 7
2 3 4 5 6

INSTALLATION
ANTENNA
PRESET MODE (HDMI)
-10-
Please note:
Aerial connections:IEC(female).
Connect the ANT terminal on the back of the TV to a good quality outdoor antenna.
Input impendance:75 unbalanced.

HDMI2 (4K)
AV INPUT
ANT. IN
HDMI3 (4K)
HDMI4 (4K)
OPTICAL
USB
5V 500mA
ETHERNET
HDMI1 4K (eARC)
HEADPHONE
USB
5V 500mA
You can use the input terminals on TV set rear as follows:
AV EQUIPMENT
It can be connected to the following appliances: VCR, multi disc player, DVD, camcorder, video game, stereo
system, etc.
/
A
u
d
d
i
i
o
o
R
R
e
e
c
c
e
i
v
e
r
Y
WR
VIDEO EQUIP MENT
Y
W R
INSTALLATION
-11-

REMOTE CONTROL
REMOTE CONTROL
-12-
The remote control uses 2 x 'AAA' batteries (included)
.
Please ensure correct polarities when inserting batteries.
This is a Bluetooth remote control. In order to use all its features including voice control, please pair it with the
TV as explained in 'Initial Setup' in the next page.
1 2
5
3
4
76
9
8
10
12
11
13 14
15
16 17
18
19 20
21
23
22
25
27
31
26
28
30
24
29
OPERATION
-13-
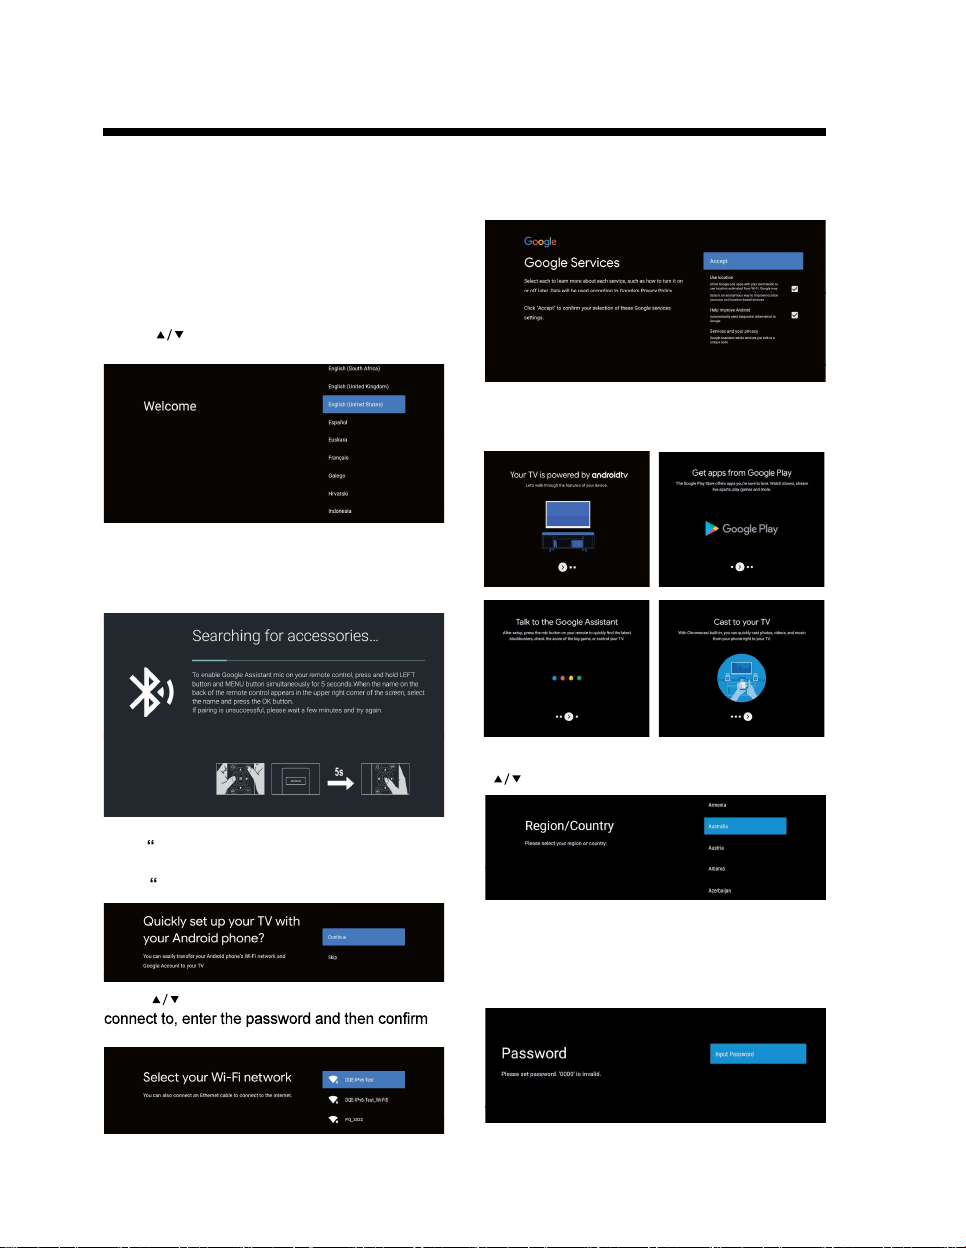
INITIAL SETUP
For the first initial setup, on screen setup wizard will
guide you through setting up your TV.
Please follow the on-screen instructions to setup your
TV correctly.
Remote Control Pairing
Be sure to follow the below prompts to pair your
Bluetooth remote control. After the pairing is successful,
you can now operate the TV.
If you just want to use your TV normally, please
select
“
S
KI
P”
To connect your Android™ smartphone to your TV,
Select
“
C
on
t
inue
”.
Press to select your Wi-Fi you wish to
to connect.
Accept the Google Terms of Service to improve the
product experience, Select “ACCEPT” to proceed
with this condition.
Use the buttons to select system language, then
press OK/SELECT to confirm.
Informational screens will now appear, you can scroll
through steps by pressing “RIGHT” directional button
to continue.
Select the country you are using the device in with the
directional buttons.
Set a password of your TV for security purposes.
NOTE: make sure to note down or remember the
password, as you can then refer to password when
required.
Press LEFT + MENU (down) buttons for 3 seconds
until red light starts to blink. Select and click OK when
the remote control code 'BT_VoiceRC_20_2' appears
on the screen. Once connected, you can use the
Bluetooth remote control to operate the TV.
If using the Ethernet connection, you can skip this
step.
OPERATION
-14-
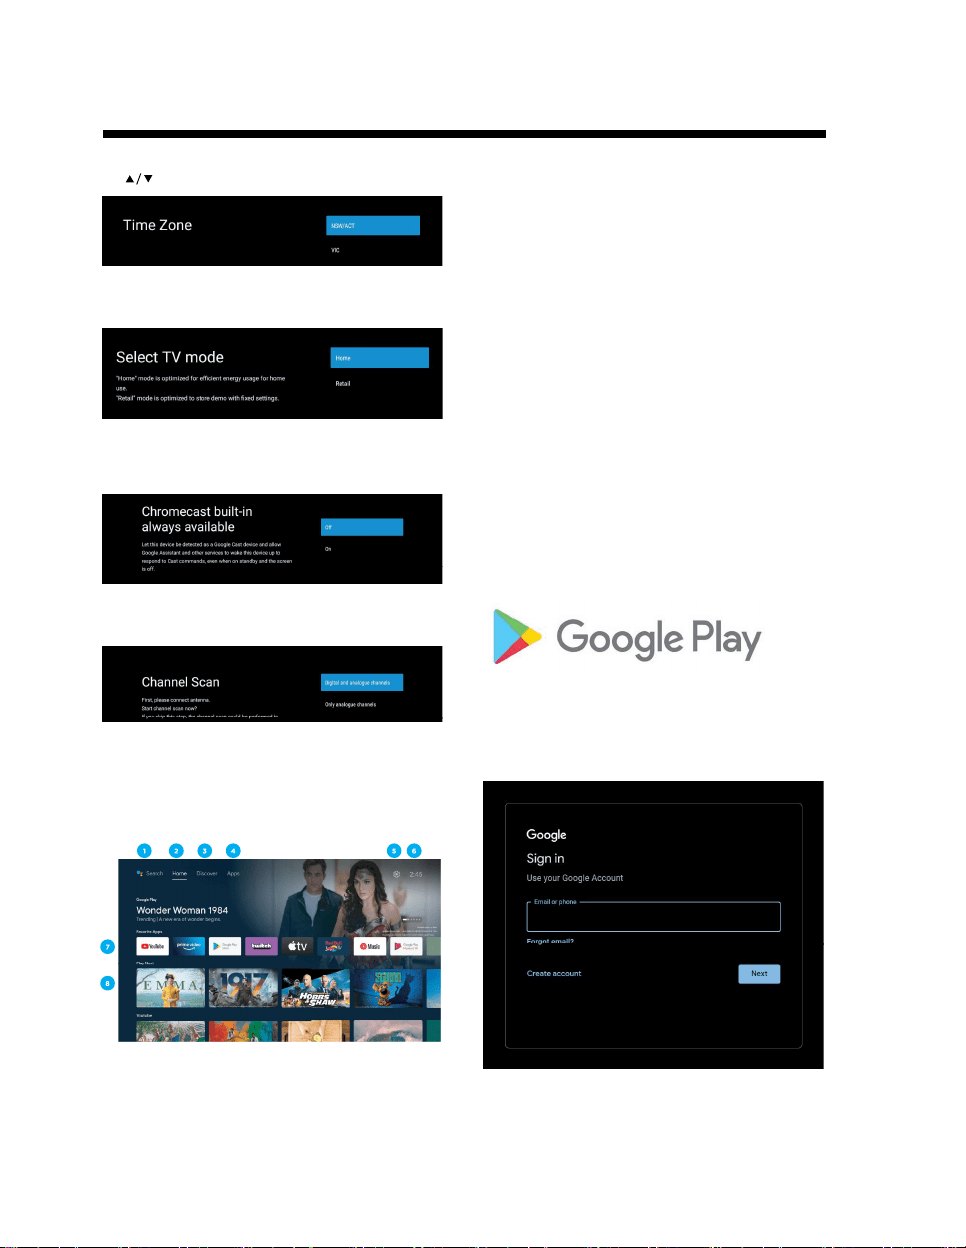
Select the TimeZone you are using the device in with
the directional buttons.
Please be sure in this step, select “HOME” if you are
using this TV for use at home.
Make sure to confirm once you have selected “HOME”.
Make sure to set Chromecast built-in™ to ON, so you
can cast all your favorite movies,
shows, apps, games, and more directly to your TV.
Make sure to select “DIGITAL” to auto tune your TV to
search for local DTV channels.
Note: Only digital channels are available in Australia.
NOTE: Please make sure Antenna (RF) cable is
plugged into the ANT. IN port located on back of TV.
Android TV™ - HOME SCREEN
Once you have completed initial setup, you will now
enter the Android TV home screen.
1. Press the Google Assistant button on your remote to
do more on your TV with your voice.
2. HOME - Main page to enter Live TV, view your
pre-installed and downloaded applications.
3. DISCOVER - Sign into your Google Account to get
recommendations from your streaming services -
organized into topics and genres based on what you
watch.
Go to Page 15 to learn more.
4. APPS - Apps you have downloaded and apps you
can search for to install.
5. SETTINGS: Select this if you want to access TV
settings.
6. TIME: Displaying current time.
7. Each row past this point will display recommended
content from the apps you already have installed.
Add Apps
At the end of this row of apps, Select the + box and
add your app that you have downloaded and installed
to the home screen of your Android TV.
8. Movies or Shows available to play next.
GOOGLE PLAY
To have access and to download applications from
Google Play, you must sign in with a Google Account.
Once you open Google Play, you will be prompted to
sign in or create a new account.

OPERATION
-15-
Once you have signed in, you will be brought to the
below page, scroll through the list of applications
available for download OR go to the search button,
and search via entering text or pressing the Google
Assistant button on the remote control.
GOOGLE ASSISTANT
Do more on your TV with your voice. Press the Google
Assistant button on your remote to quickly search
400,000+ movies and shows, get recommendations to
match your mood, control smart home devices, and more.
Ask Google to search for the latest blockbuster, stream
shows, or open multiplayer games.
Have it dim the lights by connecting smart home devices.
Manage tasks and see your calendar.
Or ask it questions and see the answers on your TV.
“What’s the
weather today?”
If you havent already signed into Google Play using your
Google Account. When selecting DISCOVER tab on the
top of home page, you will be prompted to sign in.
Note: if already signed in, your Google Account will
already appear.
1. Once signed into Google, you can select the apps you
want recommendations for within the DISCOVERY
section of Android TV.
2. Select (Tick) the apps you would like
recommendations for.
3. Allow up to 10 seconds for Android TV to gather
recommendations.
4. DISCOVER section will now display Movies or TV
Shows recommended for you to watch.
DISCOVER
Discover new movies and shows from the services you
already have access to. Suggestions based on what
you’ve watched and what interests you make it easier to
find your next favorite.
INPUT MENU
To access INPUT menu, press the INPUT button
on your remote control to have quick access to INPUT
menu.
The options that are AVAILABLE will be highlighted,
You will not be able to access INPUTS/PORTS that are
not in use.

OPERATION
-16-
SETTINGS
To access SETTINGS menu, select SETTINGS (#5 on
page 14) via the HOME screen or press the Settings
button on your remote control.
NETWORK & INTERNET
To access NETWORK menu, select Settings (#5 on
page 14) menu and go down and select Network &
Internet.
CHANNEL MENU
To access CHANNEL menu, select SETTING icon (#5
on page 14) via the HOME screen.
Then go down and select “CHANNEL”.
1. Scanning Channels
- Select Channels sub-menu --> Channel Scan to
perform a channel scan.
- When you select Channel Scan, it enters the ATV
and DTV automatic search for available channels.
- Update Scan: Automatically search for frequency
points outside the station.
- Single RF scan: DTV manual search where you
select an RF channel and it will search for DTV
channels near that frequency.
Auto Update Channel -
Enable or disable, allows your TV to automatically
update if any changes made to scanned DTV channels.

OPERATION
-17-
FAVOURITE CHANNELS
Once Channel Scan is completed, press the OK/Enter
Button at any time when watching TV to access the
channel information and to add channels to favourite
list.
Note: This adjustment can be done only when
watching live TV.
Add Favorite
When the Channel List is displayed, press the Blue
Button on your remote control to add the selected
channel to the favorites list.
View favorites list
When the Channel List is displayed, press the Yellow
Button on the remote control to select Type of Channels.
Here scroll down and select Favorites to view the
channels added to the Favorite list.

OPERATION
-18-
DEVICE PREFERENCES - ABOUT
To access ABOUT menu,
1. Select SETTING icon (#5 on page 14) via the
HOME screen.
2. Select “Device Preferences”
3. Then go down and select “ABOUT”.
TIME
1. To access DATE & TIME menu, select SETTING
icon (#5 on page 14) via the HOME screen.
2. Select “Device Preferences”
3. Then go down and select “DATE & TIME”.
INPUT SETTINGS MENU
To access INPUT SETTINGS menu,
1. Select SETTING icon (#5 on page 14) via the
HOME screen.
2. Select “Device Preferences”
3. Then go down and select “INPUTS”.
Factory Reset
Select “Factory reset” The system will be restored
to factory settings, and the current system data will
be cleared.
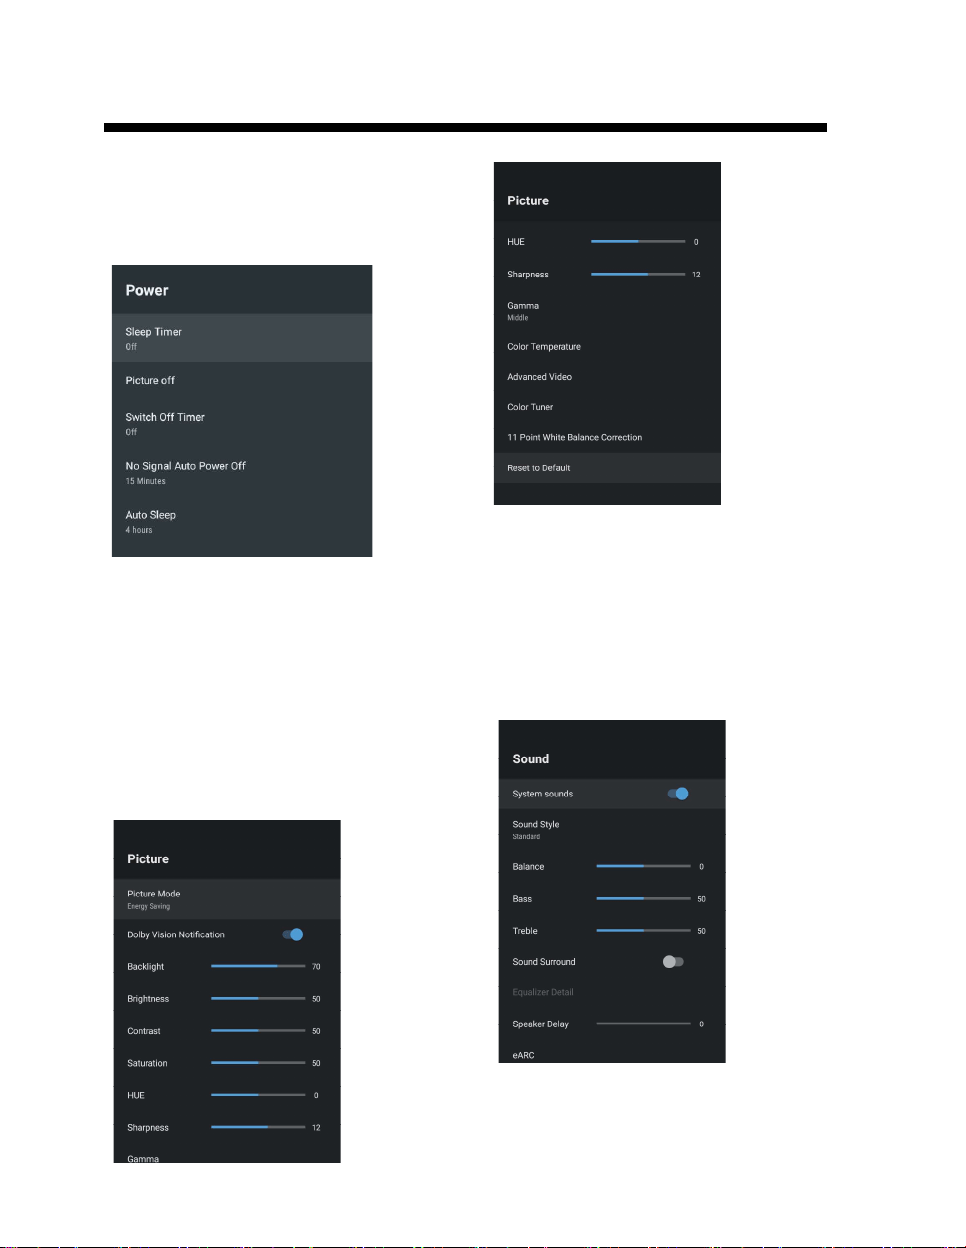
POWER SETTINGS MENU
To access POWER SETTINGS menu,
1. Select SETTING icon (5) via the HOME screen.
2. Select “Device Preferences”
3. Then go down and select “POWER”.
Sleep Timer - Options of Off, 10 mins, 20 mins,
30 mins, 40 mins 50 mins, 60 mins, 90 mins and
120 mins to auto turn off your TV.
Picture Off - Turn off your display (recommended
not to select this option.)
No Signal Auto Power Off - Turns your TV off if no
signal is detected.
PICTURE SETTINGS MENU
To access PICTURE SETTINGS menu,
1. Select SETTING icon (5) via the HOME screen.
2. Select “Device Preferences”
3. Then go down and select “PICTURE”.
Picture Mode - Options to choose from - Standard,
Vivid, Sport, Movie, Game, Energy Saving, User.
SOUND SETTINGS MENU
To access SOUND SETTINGS menu,
1. Select SETTING icon (5) via the HOME screen.
2. Select “Device Preferences”
3. Then go down and select “SOUND”.
OPERATION
-19-

Sound Style - Options to choose from - Standard,
Vivid, Sports, Movie, Music, News, User.
Digital Output - Auto, Bypass, PCM, Dolby Digital
Plus, Dolby Digital.
(It is recommended to select AUTO, as this will
automatically detect quality of sound being produced
by content).
OPERATION
-20-
HOME SCREEN
To access HOME SCREEN menu,
1. select SETTING icon (#5 on page 14) via the HOME
screen.
2. Select “Device Preferences”
3. Then go down and select “HOME SCREEN”.
SCREEN SAVER
To access SCREEN SAVER menu,
1. select SETTING icon (#5 on page 14 via the HOME
screen.
2. Select “Device Preferences”
3. Then go down and select “SCREENSAVER”.
GOOGLE ASSISTANT
To access Google Assistant in the Settings menu
1. Select SETTING icon (#5 on page 14) via the HOME
screen.
2. Select “Device Preferences”
3. Then go down and select “Google Assistant”.
Accounts will only be accessible if you have connected
a Gmail account on Google Play.
A Gmail account is needed in order to download and
install applications on Google Play.

OPERATION
-21-
PARENTAL CONTROL
To access PARENTAL CONTROL menu,
1. Select SETTING icon (#5 on page 14) via the
HOME screen.
2. Then go down and select “CHANNEL”.
3. Select “Parental Control”
From here you have the option to select and create a
new password to lock the channels you want to lock.
Note: please make sure to store/save password
somewhere you can access at a later date.
If you forget the password, you will need to factory
reset TV to use again.
Channels Blocked - Block specific channels to
restrict use.
Program Restrictions - You can restrict specific
programs on a TV channel to be blocked
Inputs Blocked - Block a TV port input to restrict use.
Change PIN - Change existing PIN selected when first
entering this menu.
PVR (PERSONAL VIDEO RECORDER)
To access RECORDING menu, (PVR)
1. While watching Live TV, press “MENU” on remote
control.
2. “TV Options” will appears, Press “DOWN” arrow on
remote control to go to “RECORD” menu (as image
shown below)
IMPORTANT - You must have a USB Drive inserted
into the USB Port of the TV to in order to use any of
these “RECORD” functions. (Must be FAT32 format)
Start record- press the remote Record button
(#25 on page 12)
Multimedia Formats
For DTV PVR
USB stick: Format: FAT32, max 64G
HDD: Format: FAT32, max 2T
For media playback
Format: FAT32, max 2T
Photo format JPEG JPG PNG BMP GIF
Text format TXT
Music format MP3 AC3 AAC WAV OGG
FLAC M4A AMR
Movie format AVI MKV MP4 MOV VOB
DAT FLV MPG WMV TP
TRP M2T M2V M4V
MPEG 3GP MJPEG TS
GUIDE/EPG
- When watching live TV, press GUIDE button on the
remote control to open EPG interface.
- Program information will be displayed, and you can
operate the EPG menu using the colour buttons.
- Press PVR button to set up a recording schedule.
Stop record-press the remote Stop button
(#26 on page 12)
Record List - Select “Record List” to view all previous
recordings.
Device Info - Select “Device Info” to view information
about your storage device.
Schedule List - Select “Schedule List” to see future
programs you have scheduled to record.

TROUBLESHOOTING
-22-

Register your product at jvctv.com.au/warranty-registration
