Owner's Manual
Manual del
®
I
Model, Modelo 580. 75251
V
Distribut_ by Sears, Roebuck and Co., Hoffman Estates, IL 60179
www.sears.com
TABLE OF CONTENTS ........................2
WARRANTY ..............................................2
SAFETY ..................................................... 3
Important Safety Instructions ...................... 3
ELECTRICAL REQUIREMENTS .......4
INSTALLING THE POWER CORD ....4
INSTALLATION ........................................5
Installation Requirements ......................... 5
Installation ................................................ 6
How to Install ............................................ 6
Removal from Window ................................. 8
OPERATION .............................................9
How and Why ........................................... 9
Normal Sounds ........................................ 9
Capacity and Running Time ..................... 9
Features ................................................. 10
Using the Air Conditioner ....................... 10
Display ................................................... 11
Remote Control ...................................... 12
MAINTENANCE .....................................13
Air Filter Cleaning ................................... 13
Air Conditioner Cleaning ........................ 13
How to Remove the Front Grille .................. 13
How to Replace the Front Grille .................. 13
TROU B LES HOOTI NG .........................14
Before Calling for Service ...................... 14
ESPANOL ................................................15
MASTER PROTECTION
AGREEMENTS ......................................31
SERVICE NUMBERS ............ Back Cover
FULL ONE YEAR WARRANTY ON
ROOM AIR CONDITIONER
For one year from the date of purchase, when this
air conditioner is operated and maintained for
normal room cooling according to the instructions in
this owner's manual, Sears will repair this air
conditioner, free of charge, if defective in material or
workmanship.
FULL FIVE-YEAR WARRANTY ON
SEALED REFRIGERATION SYSTEM
For five years from the date of purchase, when this
air conditioner is operated and maintained for
normal room cooling according to the instructions in
this owner's manual, Sears will repair the sealed
refrigeration system (consisting of refrigerant,
connecting tubing, and compressor), free of charge,
if defective in material or workmanship.
WARRANTY SERVICE IS AVAILABLE BY
CONTACTING SEARS SERVICE AT
1-800-4-MY-HOME ®.
Warranty coverage applies only to air conditioners
used for non-commercial, private household
purposes.
This warranty applies only while this product is in
use in the United States.
This warranty gives you specific legal rights, and
you may also have other right which vary from state
to state.
Distributed by Sears, Roebuck and
Co., Hoffman Estates, IL 60179
-2-
IMPORTANT SAFETY INSTRUCTIONS
The safety instructions below will tell you how to use your room air conditioner to avoid harm to yourself or
damage to your ROOM AIR CONDITIONER.
FOR YOUR SAFETY
Do not store or use gasoline or other flammable
vapors and liquids in the vicinity of this or any other
appliance. Read product labels for flammability and
other warnings.
PREVENT ACCIDENTS
To reduce the risk of fire, electrical shock, or injury
to persons when using your air conditioner, follow
basic precautions, including the following:
• Be sure the electrical service is adequate for the
model you have chosen.
• If the air conditioner is to be installed in a window,
you will probably want to clean both sides of the
glass first. If the window is a triple-track type with a
screen panel included, you may want to remove
the screen completely before installation.
• Be sure the air conditioner has been securely and
correctly installed according to the separate
installation instructions provided with this manual.
Save this manual and installation instructions for
possible future use in removing or reinstalling this
unit.
• Use gloves when handling the air conditioner.
Be careful to avoid cuts from sharp metal fins on
front and rear coils.
ELECTRICAL INFORMATION
The complete electrical rating of your new room air
conditioner is stated on the serial plate. Refer to the
rating when checking the electrical requirements.
• Be sure the air conditioner is properly grounded.
To minimize shock and fire hazards, proper
grounding is important. The power cord is
equipped with a three-prong grounding plug for
protection against shock hazards.
• Your air conditioner must be plugged into in a
properly grounded wall receptacle. If the wall
receptacle you intend to use is not adequately
grounded or protected by a time delay fuse or
circuit breaker, have a qualified electrician install
the proper receptacle.
• Do not run air conditioner with a protective
covering. This could result in mechanical damage
within the air conditioner.
• Do not use an extension cord or an adapter
plug.
_ Avoid fire hazard or electric shock.
Do not use an extension cord or an adapter plug.
Do not remove any prong from the power cord.
3-prong
grounding
plug
Reset_
"_ Ground
Power_ t prong
supply /f
cord II
--3-prong
grounding
type wall
receptacle
ENERGY SAVING IDEAS
• The capacity of the room air conditioner must fit
the room size for efficient and satisfactory
operation.
• Install the room air conditioner on the shady side
of your home. A window that faces north is best
because it is shaded most of the day.
• Do not block air conditioner flow inside with blinds,
curtains, or furniture, or outside with shrubs,
enclosures, or other buildings.
• Close the floor and wall registers and the fireplace
damper so cool air does not escape up the
chimney or into the duct work.
• Keep blinds and drapes in other windows closed
during the sunniest part of the day.
• Clean the air filter as recommended in the
MAINTENANCE section of this manual.
• Proper insulation and weather stripping in your
home will help keep warm air out and cool air in.
• External house shading with trees, plants or
awnings will help reduce the air conditioner's work
load.
Operate heat producing appliances such as
ranges, washers, dryers, and dishwashers during
the coolest part of the day.
-3-
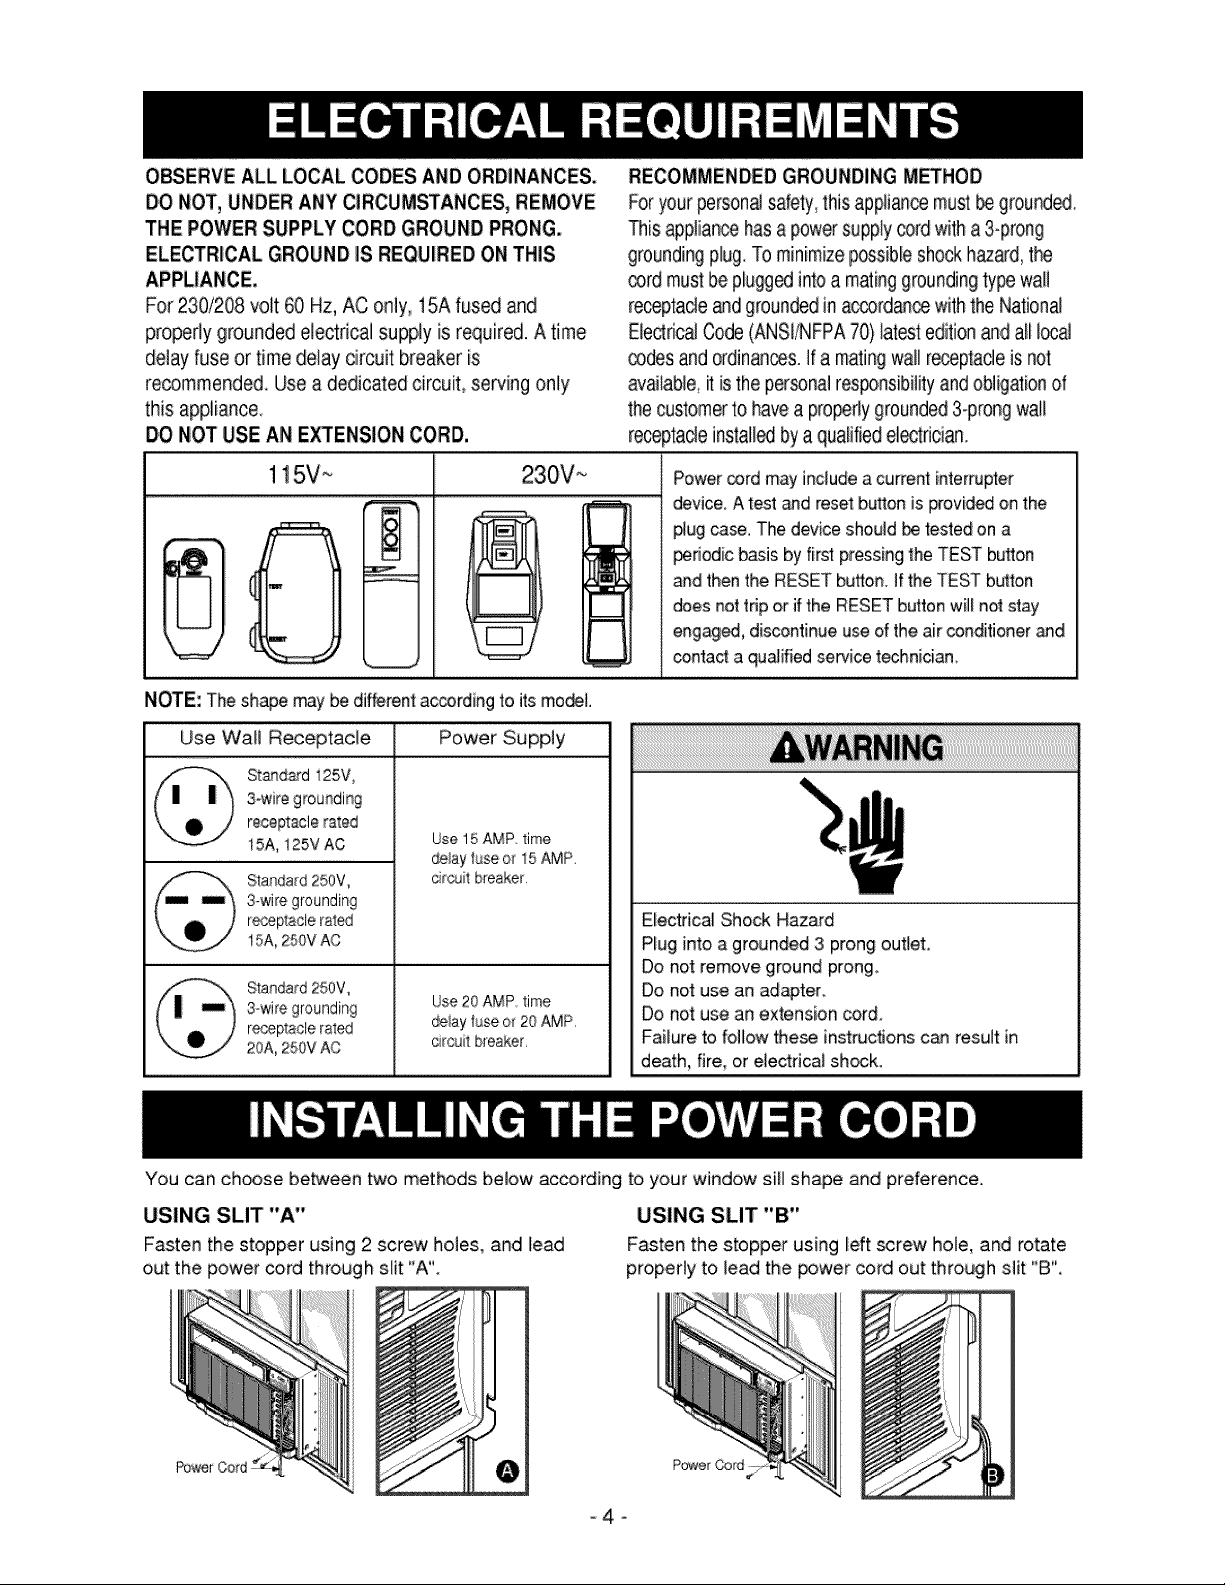
OBSERVEALL LOCAL CODES AND ORDINANCES,
DO NOT_UNDER ANY CIRCUMSTANCE& REMOVE
THE POWER SUPPLY CORD GROUND PRONG.
ELECTRICAL GROUND iS REQUIRED ON THIS
APPLIANCE.
For 230/208 volt 60 Hz, AC only, 15A fused and
properly grounded dectrica] supply is required. A time
delay fuse or time delay circuit breaker is
recommended Use a dedicated circuit, sewing only
this appliance_
DO NOT USE AN E_ENSION CORD.
115V_ 230V _
i,
RECOMMENDED GROUNDING M_HOD
For your persona]safety,thisapCance must _ grounded
This app]ian_ has a powersupply cord with a 3-prong
groundingplug. To minimizepossibleshock hazard,the
®rd must be pluggedintoa matinggroundingtype wall
receptade andgroundedin acoord_ce withthe National
ElectricalCode (ANS[CNFPA70} latestedition andall local
codes and ordinals. If a mating wall receptade is not
available, _is the personalres_nsibility and obiigalionof
the customerto have a properlygrounded3-prong wali
rece)tade instail_ by a qualifiedd_dciaq.
Power _rd may include a current interrupter
device. A test _d reset button is provided on the
#ug case. The device shodd be tested on a
periodicbasis by first pressingthe TEST button
_d then the RESETbutton.If the TESTbu_ton
does not trip or ifthe RESETbuttonwill not stay
engaged, discontinue use ofthe airconditionerand
contacta qualified servicet_hn[cian
NOTE: The shape may be different accordhg to its mo_].
Use Wall Receptacle Power Supply
St_ds_d 125V,
3-wire grounding
receptacle rated
15A, 125V AC Use 15 AMP time
delay fuse or 15 AMP,
Standard 250V, citcuil b[eaker,
3-wire grounding
r_placle ral_]
15A, 250V AC
Standard 250V,
3-wire grounding Use 20 AMP time
r÷_placle raled deiay fuse or 20 AMP,
20A, 250V AC c _cuit breaker,
Electrical Shock Hazard
Plug into a grounded 3 prong outbt.
Do not remove ground prong
Do not use an adapter,
Do not use an extension cor&
Failure to follow the_ instructions c_ result in
death, fire, or electrical sh_k.
You can choose between two methods bdow according to your window sill shape and preference.
USING SLIT "A"
Fasten the stopper using 2 screw holes, and lead
out the power _rd through siit "A'_
_f
-4-
USING SLIT "B"
Fasten the stopper using left _rew hole, and rotate
properly to lead the _wer cord out through silt "B".
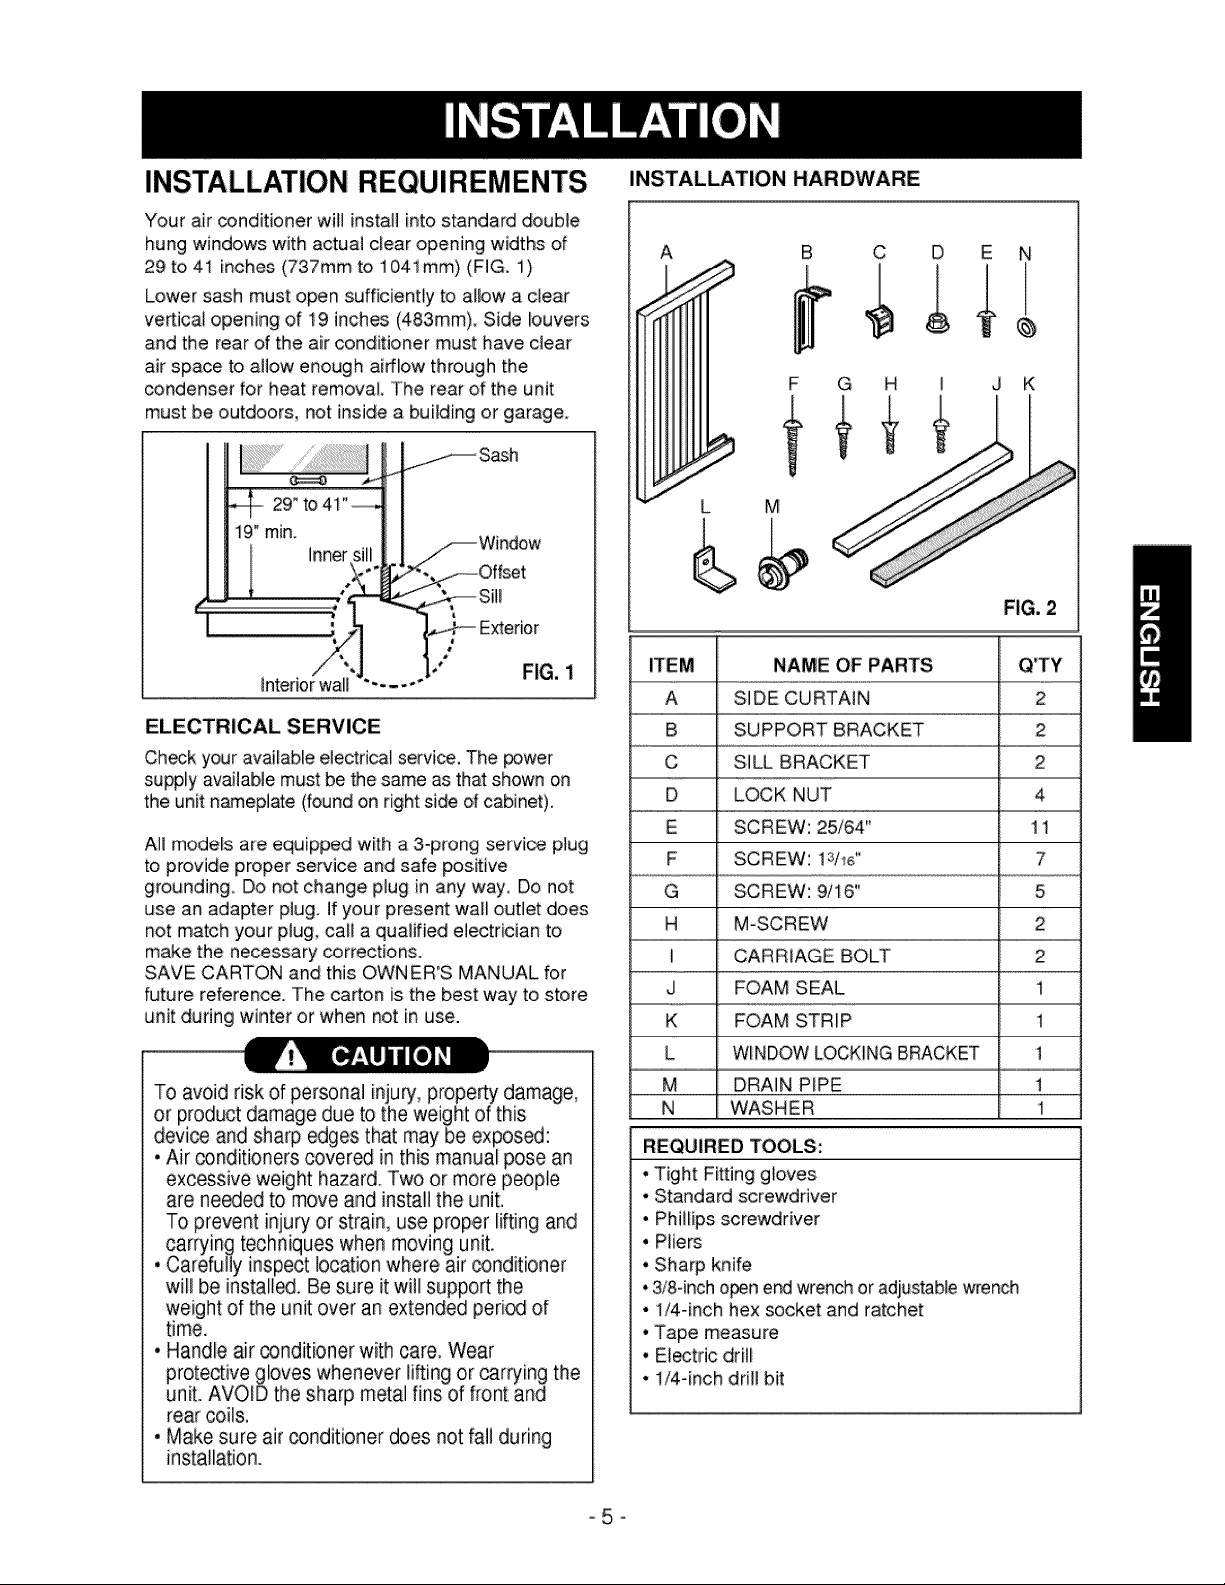
INSTALLATION REQUIREMENTS
Your air conditioner will install into standard double
hung windows with actual clear opening widths of
29 to 41 inches (737mm to 1041mm) (FIG. 1)
Lower sash must open sufficiently to albw a clear
vertical opening of 19 inches (483mm). Side louvers
and the rear of the air conditioner must have clear
air space to allow enough airflow through the
_ndenser for heat removal. The rear of the unit
must be outdoors, not inside a buiiding or garage.
19" rain.
Inner
Interiorwall
Exterior
FIG, 1
ELECTRICAL SERVICE
Check your available electrical service. The power
supply available must be the same as that shown on
the unit n_eplate (found on right: side of cabinet).
AH mode_s are equipped with a 3-prong service plug
to provide proper service and safe positive
grounding_ Do not change plug in any way, Do not
use an adapter plug. If your present wall outlet does
not match your plug, call a qualified electrician to
make the necessary corrections.
SAVE CARTON and this OWNER'S MANUAL for
future reference. The carton is the best way to store
unit during winter or when not in use.
To avoid risk of personal injury, property damage,
or product damage due to the weight of this
device and sharp edges that may be exposed:
• Air _nditioners covered in this manual pose an
excessive weight hazard. Two or more people
are ne_ed to move and install the unit.
To prevent injury or strain, use proper li_ing and
carrying techniques when moving unit.
• Carefully inspect location where air _nditioner
will be installS. Be sure it will support the
weight of the unit over an extended peri_ of
time.
• Handle air _nditioner with care. Wear
protective gloves whenever lifting or car_ing the
unit. AVOID the sharp metal fins of front and
rear coils.
• Make sure air conditioner does not fali during
installation.
INSTALLATION HARDWARE
A
B C D E N
F G H I J K
FIG. 2
ITEM NAME OF PARTS Q'TY
A SIDE CURTAIN 2
B SUPPORT BRACKET 2
C SILL BRACKET 2
D LOCK NUT 4
E SCREW: 25/64" 11
F SCREW: 13/16" 7
G SCREW: 9/16" 5
H M-SCREW 2
I CARRIAGE BOLT 2
J FOAM SEAL 1
K FOAM STRIP 1
L WINDOW LOCKINGBRACKET 1
M DRAIN PiPE 1
N WASHER 1
REQUIRED TOOLS:
• Tight Fi_ing gloves
• Standard screwdriver
• Phillips screwdriver
• Pliers
• Sharp knife
° 3/8-incho_n end wrench or adjustablewrench
• 1/4-inch hex socket and ratchet
• Tape measure
° Electric drill
° 1/4-inch drill bit
-5-
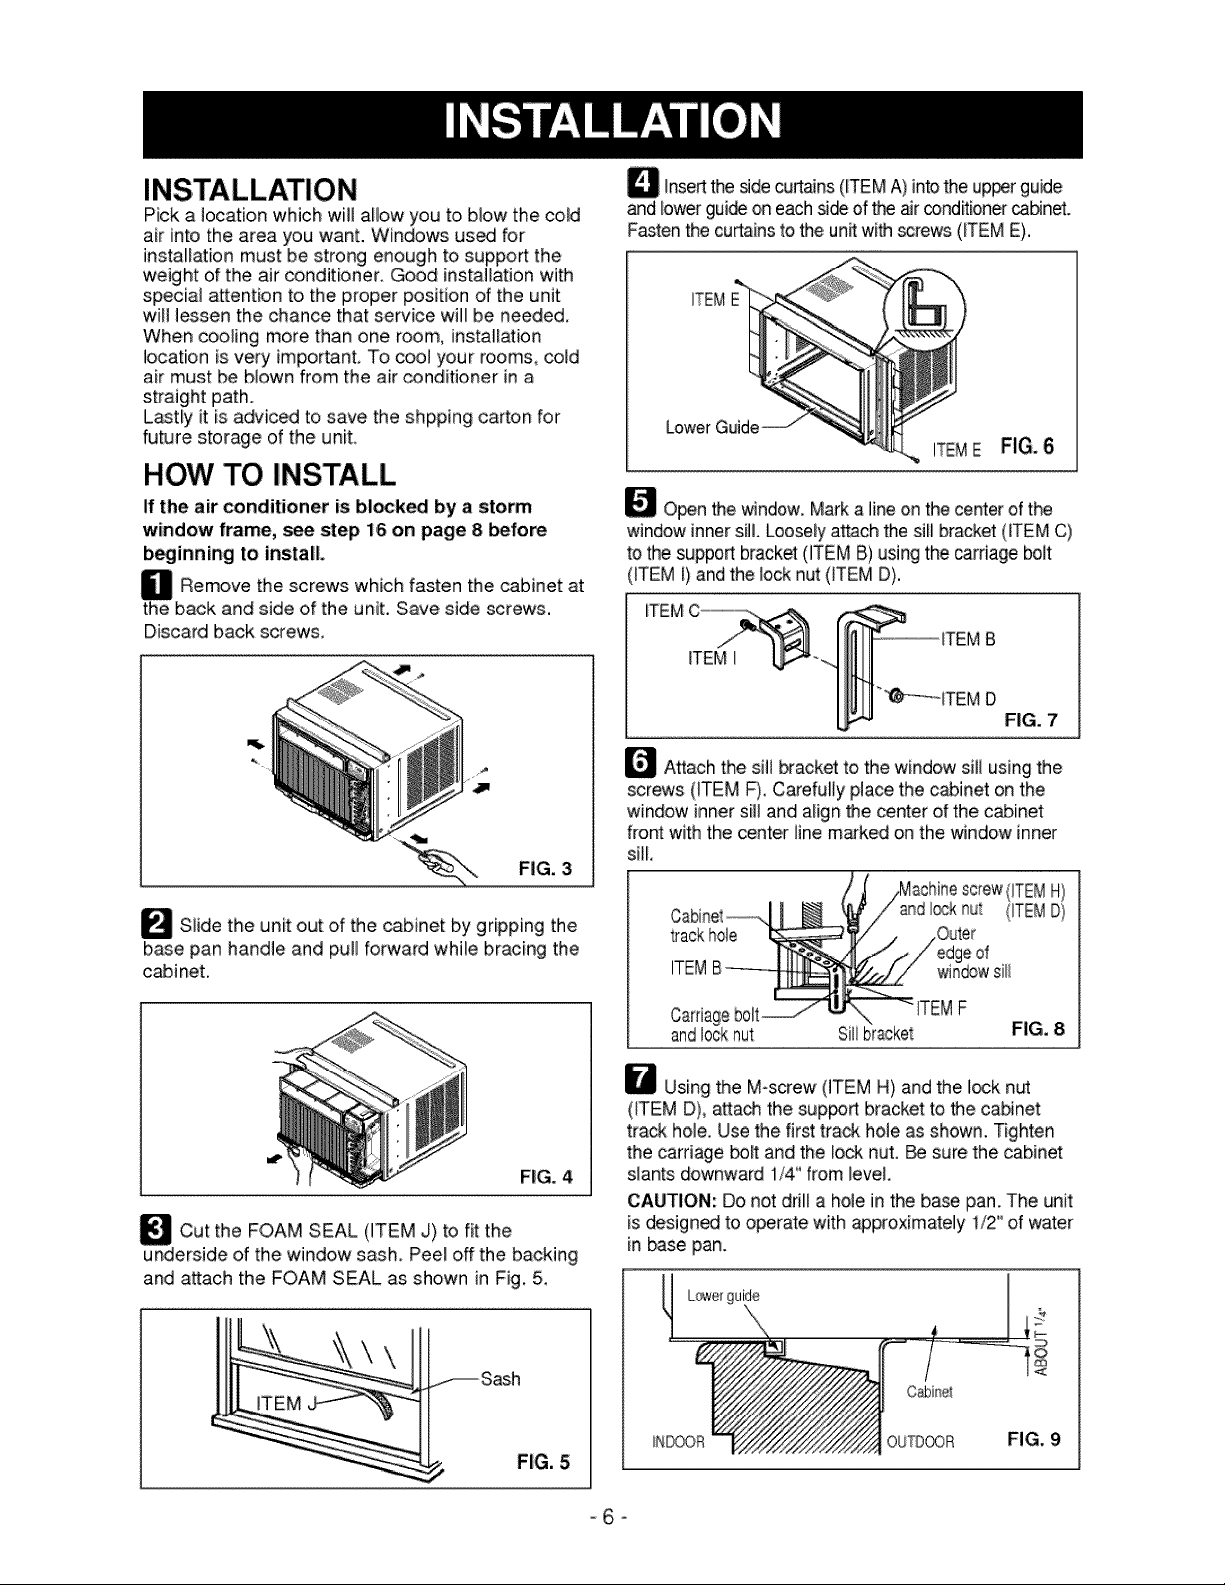
Pick a location which will allow you to blow the cold
air into the area you want. Windows used for
installation must be strong enough to support: the
weight of the air conditioner. Good installation with
special attention to the proper position of the unit
will lessen the chance that service will be needed,
When cooling more than one room, installation
location is very important. To cool your rooms, cold
air must be blown from the air conditioner in a
straight path.
L_tly it is adviced to save the shpping carton for
future storage of the unit.
HOW TO INSTALL
If the air conditioner is bilked by a storm
window frame, see step 16 on page 8 before
b_inning to install.
_ Rernove the which fasten the cabinet
screws at
the back and side of the unit. Save side screws.
Discard back screws,
FIG. 3
_ Slide the unit out of the cabinet by gripping the
base pan handle and pull forward while bracing the
cab inet.
FIG. 4
Cut the FOAM SEAL (ITEM J) to fit the
underside of the window sash. Peel off the backing
and attach the FOAM SEAL as shown in Fig, 5,
Sash
FIG. 5
D Insertthe side curtains(_TEMA) into the upperguide
and bwer gui@ on each si@ of the airconditionerca_net.
Fasten the curtainsto the unRwith_rews (ITEM E).
ITEME FIG. 6
_O_n the window. Marka line on the center of the
windowinnersi& Loosely attach the sill bracket (iTEM C)
to the support bracket (ITEM B) using the carriage bolt
(iTEM i) and the Iock nut (iTEM D).
ITEM
ITEM I
_ Attach the sill bracket to the window sill using the
screws (ITEM F). Carefully place the cabinet on the
window inner sill and align the center of the cabinet
front with the center line marked on the window inner
sill.
jMachine screw<!TEMH)
d [l_k nut {ITEMD)
andlocknut
ITEMF
\
Silibracket
FIG. 8
W Using the M-screw (ITEM H) and the I_k nut
(iTEM D}, atta@ the sup_rt bracket to the cabinet:
track hole, Use the first track hole as shown. Tighten
the carriage bolt and the Iod_nut. _ sure the cabinet
slants downward 1/4" from level,
CAUTION: Do not drill a hole in the base pan. The unit
is designed to operate with approximately 1/2" of water
in base pan.
Cabinet
OUTOOOR
FIG. 9
-6-
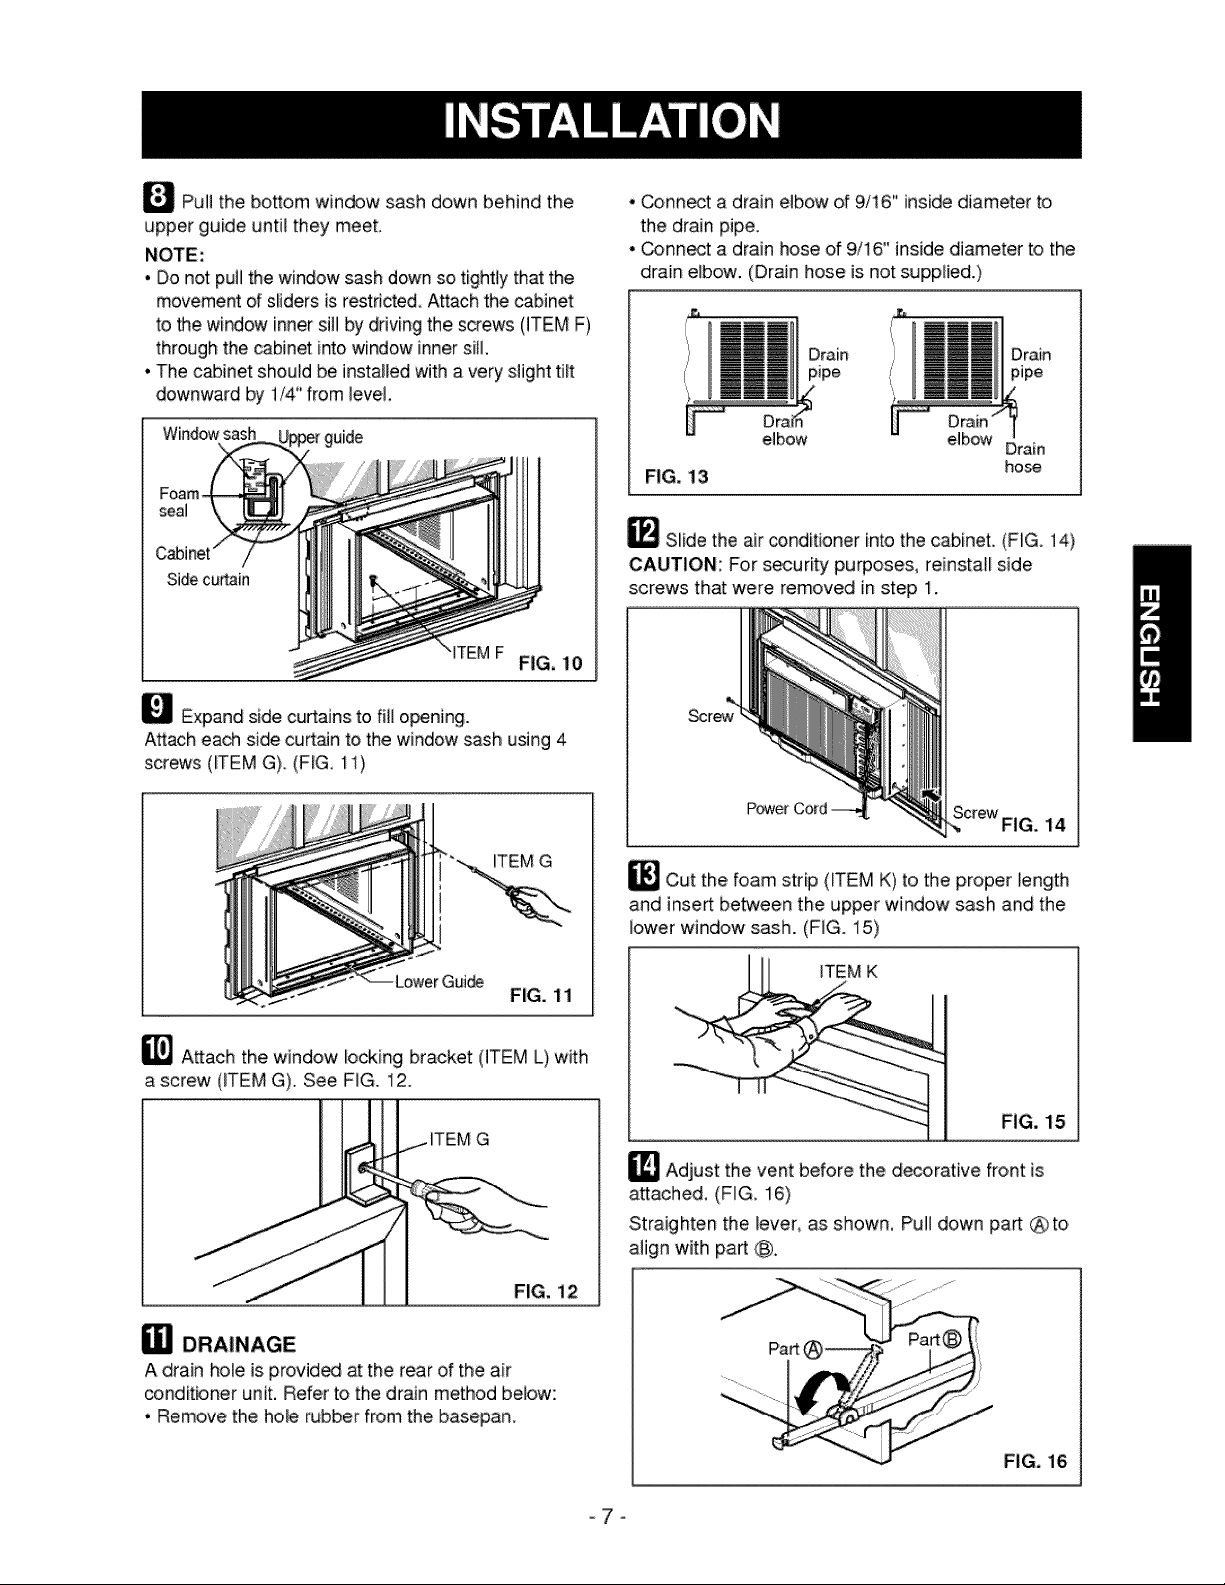
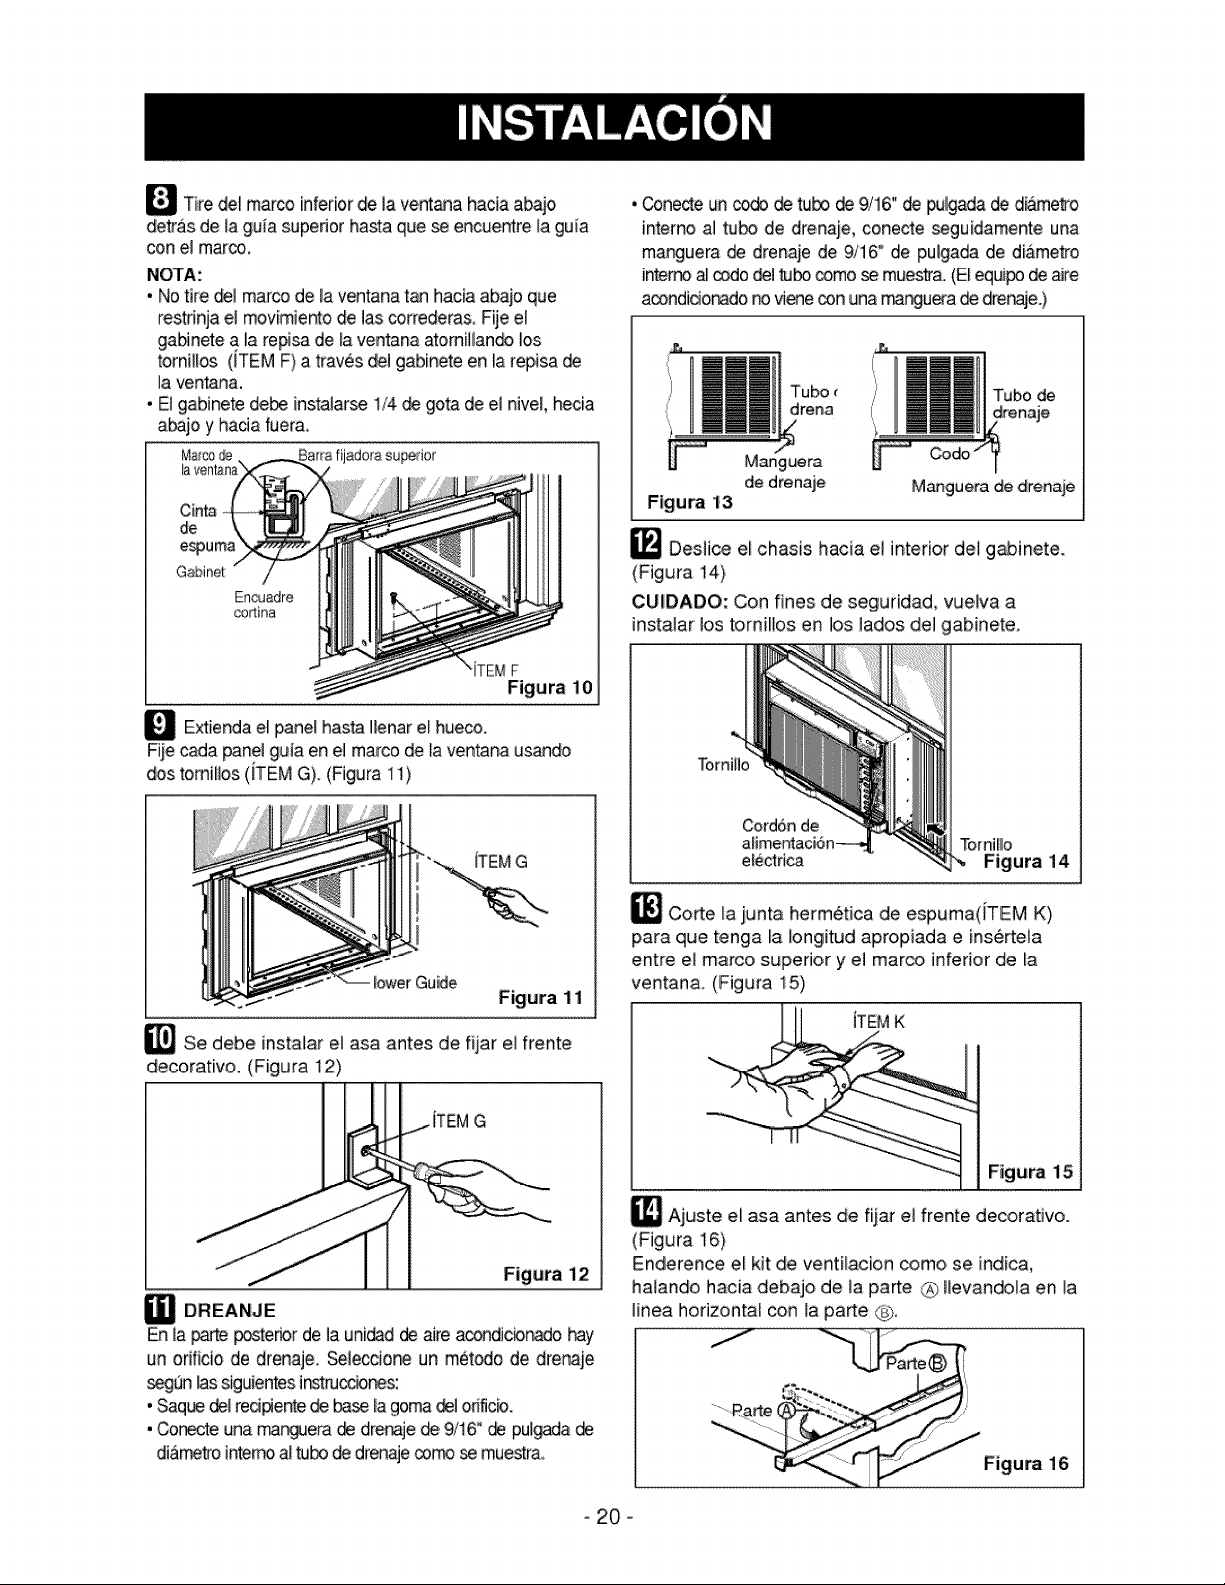
_PuH the bottom window sash down behind the
upper guide until they meet,
NOTE:
• Do not pull the window sash down so tightly that the
movement of sliders is restricted, Attach the cabinet
to the window inner sill by drMng the screws 0TEM F)
through the cabinet into window innersill.
• The c_inet should be installed with a very slight ti_t
downward by 1/4" from ]eve],
Window sash
_TEMF FIG, 10
_ Expand side curtains to fill opening.
Attach each side curt:_n to the window sash using 4
screws (_TEM G) (F_G, 1i)
• _nnect a drain elbow of 9/16" inside diameter to
the drain pipe,
• _nnect a drain hose of 9/16" inside diameter to the
drain elbow. (Drain hose is not supplied.)
Drain
pipe
FIG. 13
e_bow eMbow
Drain
hose
_ Slide the air conditioner intothe cabinet. (FIG. 14)
CAUTION: For security purposes, reinstall side
screws that were removed in step I.
ITEM G
_] Attach the window locking bracket (ITEM L) with
a screw (ITEM G). See FIG. 12.
ITEM G
FIG. 12
a] DRAINAGE
A drain hole is provide, at the rear of the air
conditbner unit. Refer to the drain method below::
• Remove the hole wbber from the basepan.
_Cut the,foam strip (_TEM K) to the proper _ength
and inse_ between the upper window sash and the
lower window sash.. (FIG. 15)
FiG. 15
_ Adjust the vent before the decorative front is
attached, (FIG, 16)
Straighten the lever, as shown. Pull down part @to
align with part C_
!'%ili
F_G, 16
-7=
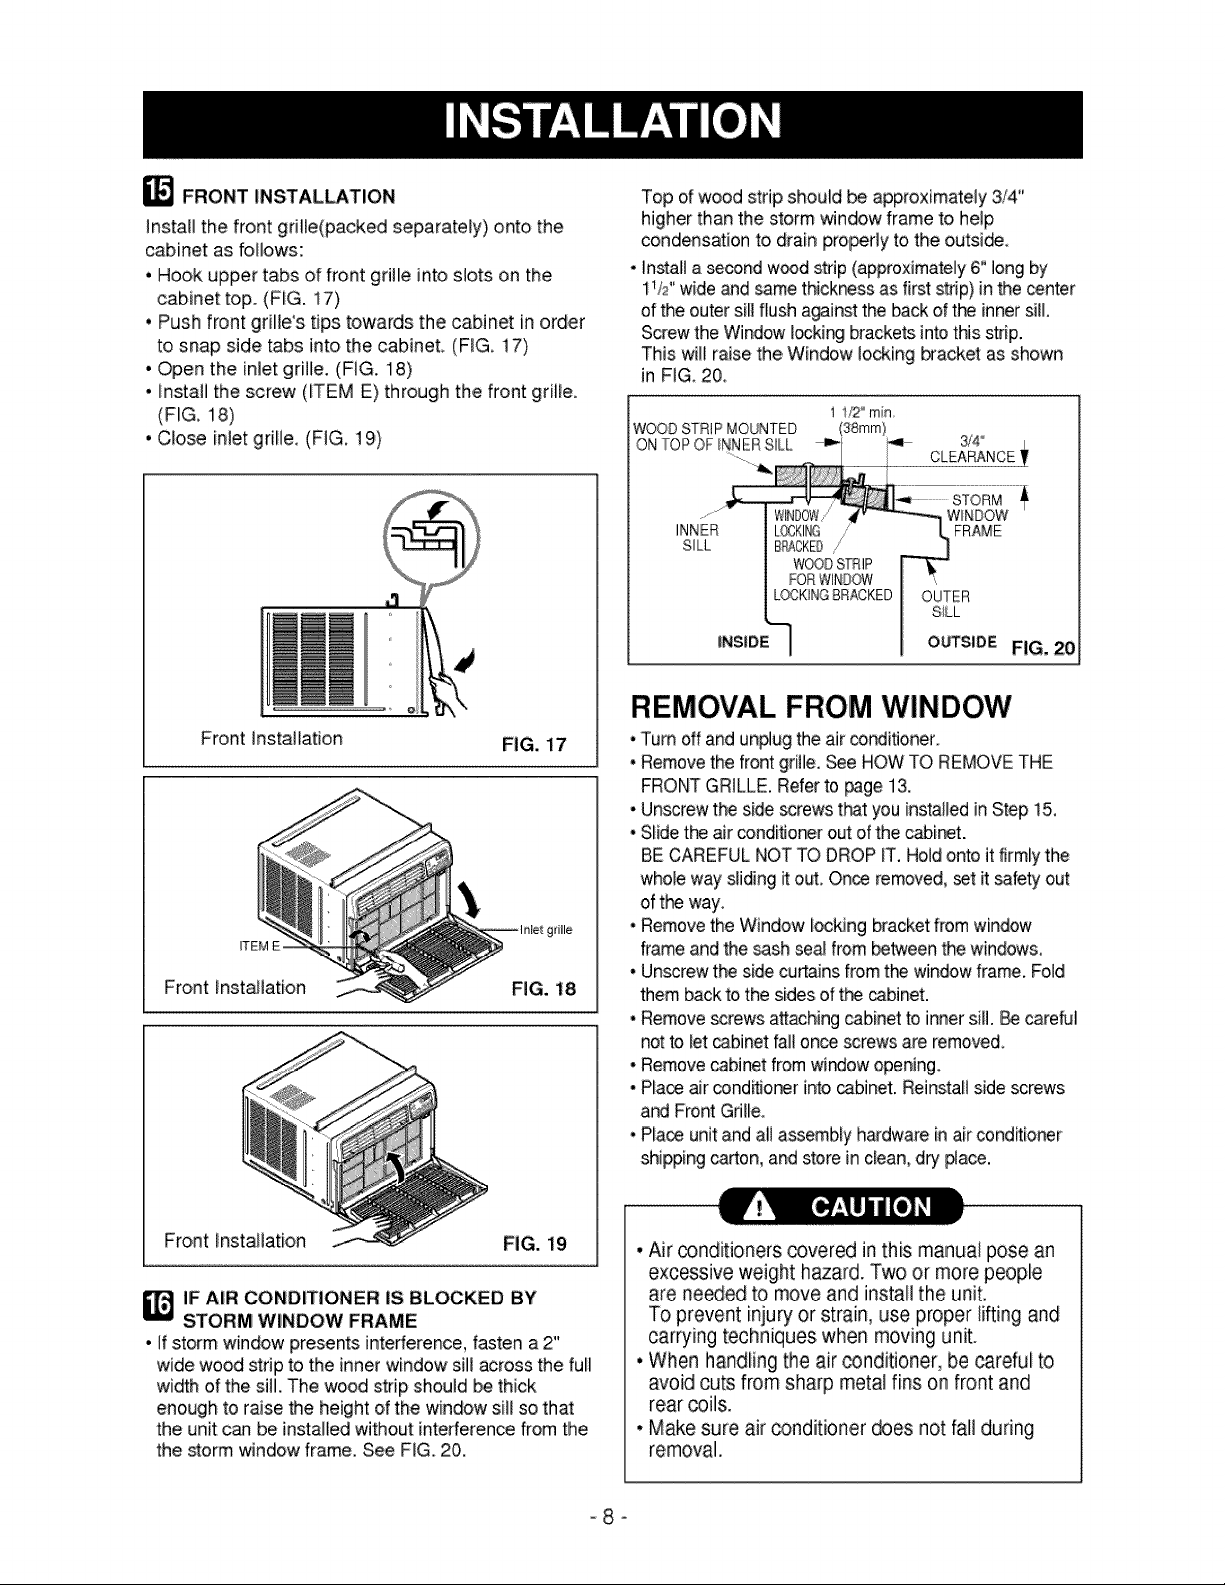
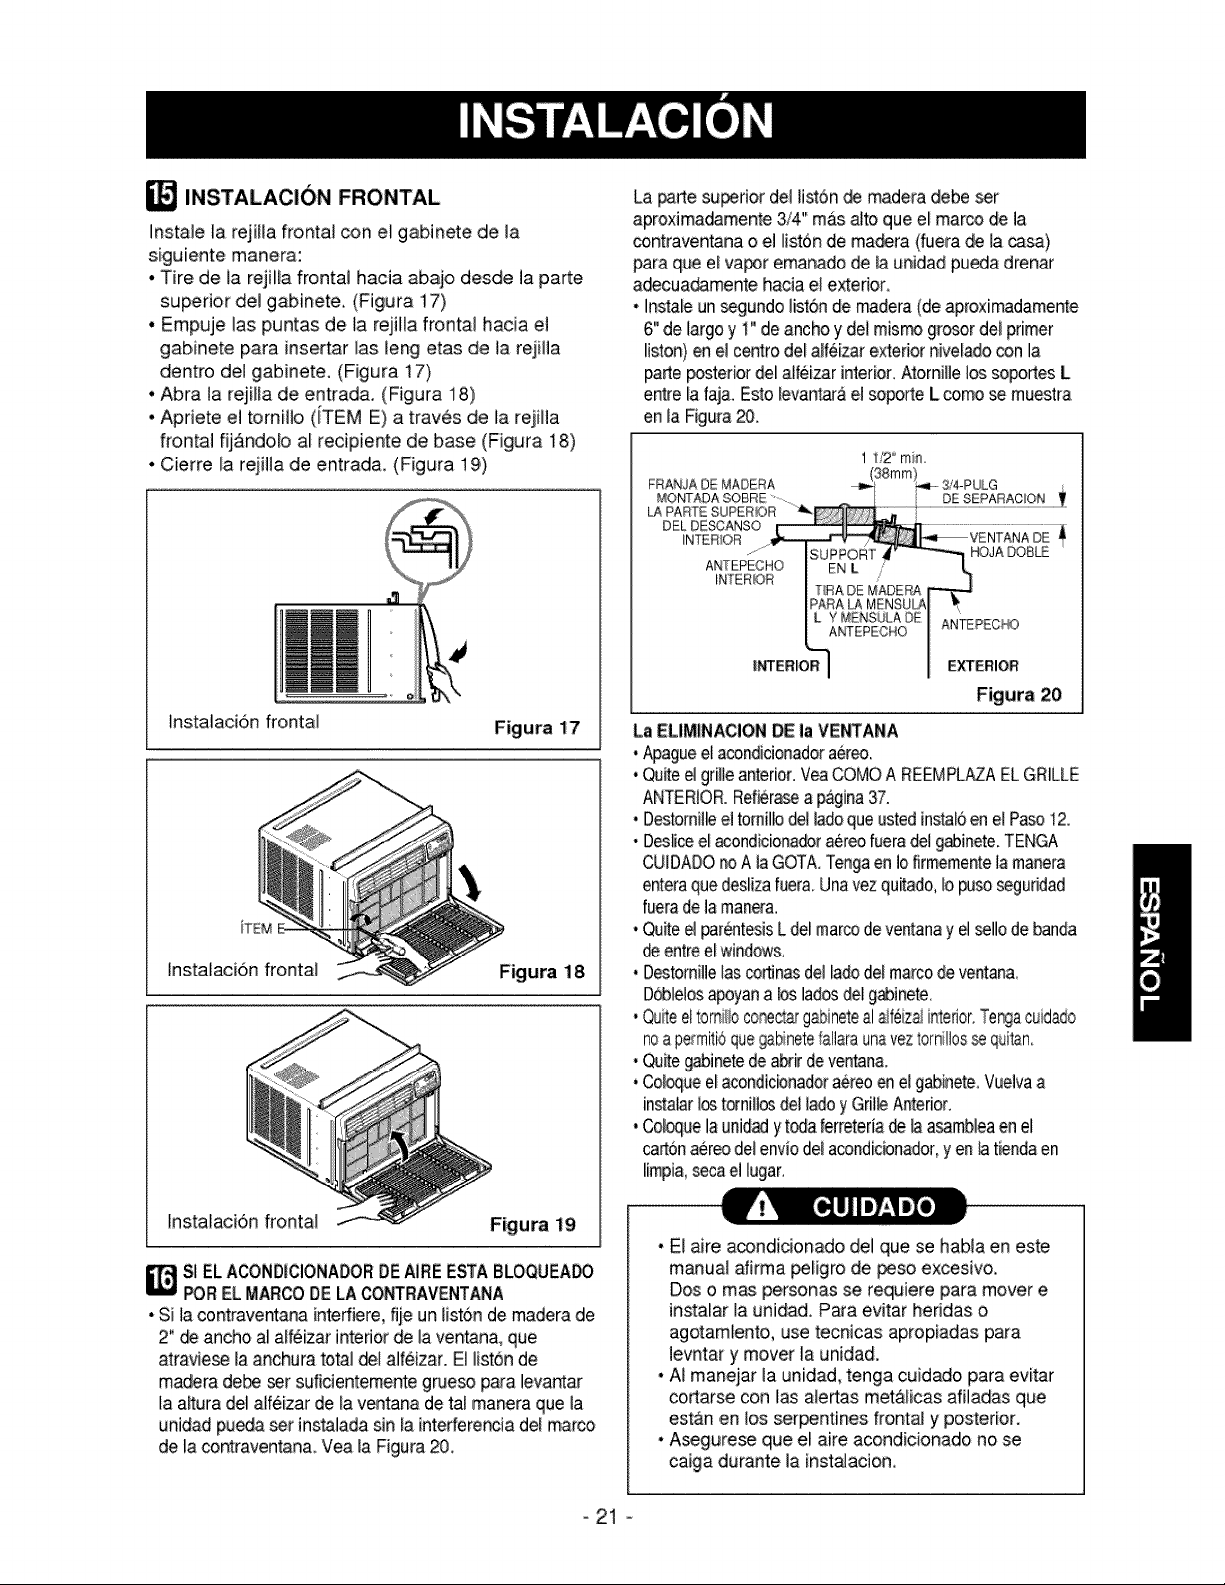
_ FRONT INSTALLATION
Install the front grille(packed separately) onto the
cabinet as foNows:
• Hook upper tabs of front gritle into slots on the
cabinet top. (FIG. 17)
• Push front griIWs tips towards the cabinet in order
to snap side tabs into the cabinet, (FIG, 17)
• Open the inlet grille. (FIG. 18)
• Install the screw (_TEM E) through the front grille.
(FIG. 18)
• Close inlet grille, (FIG, t9)
Front Installation
FiG. 17
_EM E
Front Installation
FIG. 18
Front Installation FIG. 19
IF AIR CONDITIONER IS BLOCKED BY
STORM WINDOW FRAME
• If storm window presents interference, fasten a 2"
wide wood strip to the inner window s]l! across the full
width of the sill. The wood strip should be thick
enough to raise the height of the window sill so that
the unit can be installed without interference from the
the storm window frame. See FIG. 20.
Top d wood strip should be approximately 3/4"
higher than the storm window frame to help
condensation to drain properly to the outside,
• _nstal_a _nd w_d strip (approximately6" long by
11/2"wide and samethickr_ss as first strip) in the center
of the outer sill flush a_inst: the back of the inner sill,
Screwthe Window I_king brackets into this strip.
This will raise the, Window locking bracket as shown
in FIG 20,
WOOD STRIP MOUNTED
ON TOP OF INNER SILl,,
3/4
CLEARANCE
SILL
LOCKIt@
BPACKEO,'
WOODSTRIP
FORWINDOW
LOCK!NGBRACKED
WINDOW
FRAME
SiLL
OUTSlOE FIG, 20
REMOVAL FROM WINDOW
• Turn off and un#ug the air conditJonero
• Removethe front grille. See HOW TO REMOVETHE
FRONTGRILLE. Referto _ge 13.
• Undrew the side screwsthat you installed in Step 15,
• Slidetie air condiflo_r out of the cabinet.
BE CAREFUL NOT TO DROP IT. Holdonto it firmlythe
who_eway sliding it old, Once removed, set it safetyout
of the way,
• Removethe Window locking bracketfrom window
frameand the sash sea! from betweenthe windows,
° Unscrewthe side curtains from the window frame, Fold
them back to the sides of the cabinet.
• Removescrews attaching cabinetto inner sill. Be careDl
not to let _bJnet fail on_ screws are removed,
• Removecabinet from windowopening.
• Place air conditionerinto _bJnet. Reinstall side screws
and Front Grii_e,
° Place unit and all assembly h_dware inair conditioner
shipping carton, and store in clean, dry #ace.
• Air _nditioners covered in this manual pose an
excessive weight hazard. Two or more people
are ne_ed to move and install the unit.
To prevent injury or strain, use proper lifting and
carrying techniques when moving unit.
° When handling the air conditioner, be careful to
avoid cuts from sharp metal fins on front and
rear coils.
• Make sure air conditioner does not fall during
removal.
-8-
HOW AND WHY
Your room air conditioner provides the following
functions to make hot weather iiv[ng more
comfo_able:
• Coo_sand circulates room air
* Lowers humidity by removing excess moisture.
, Filters out summertime dust, diR. and some
airborne impurities.
The air conditioner performs these functions by
drawing room air through a filter which traps dust
and dirt particles. The air then passes over a
cooling coil which refrigerates the air and removes
excess moisture. The same air is then returned to
the room- coo_er, drier, and cleaner. Moisture
removed from the room air is carried to the outside
and evaporated.
'(our air conditioner is designed to be easy to
operate and to provide pienty of cooling power.
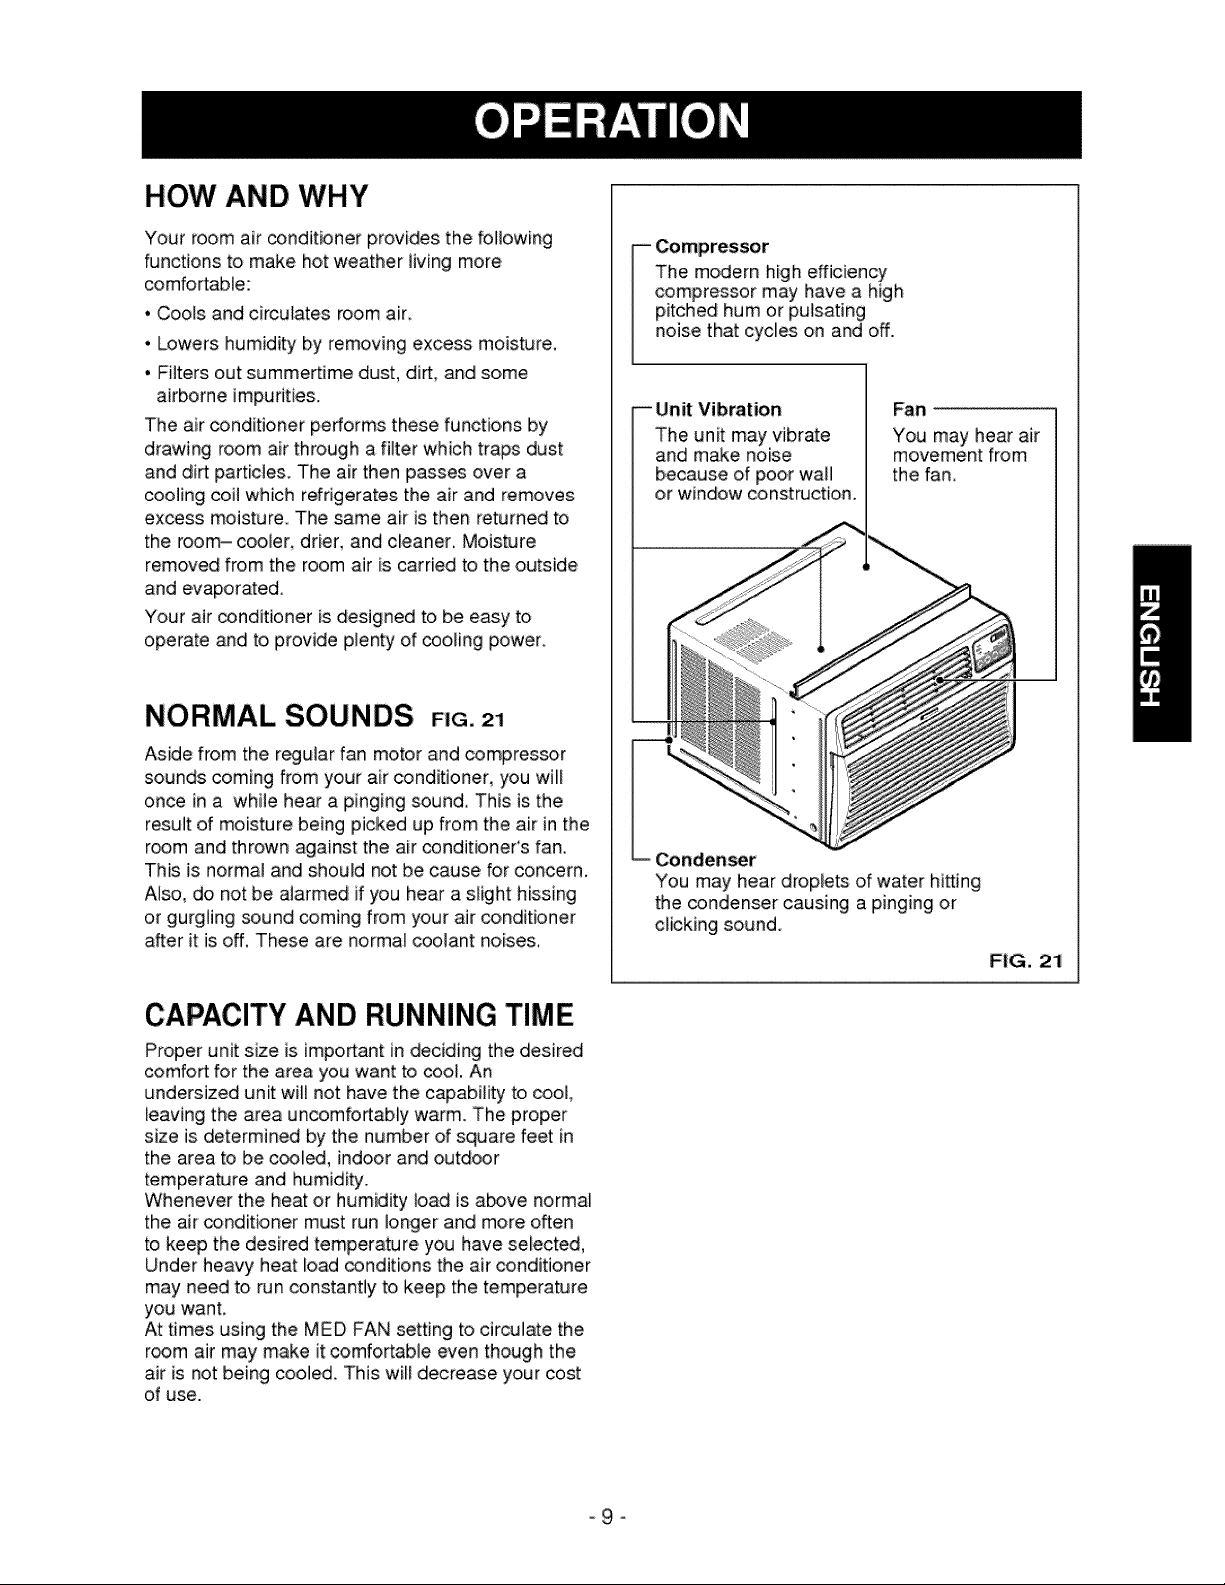
NORMAL SOUNDS F G.21
Aside from the r_ular fan motor and compressor
sounds coming from your air conditioner, you will
once in a while hear a pinging sound This is the
result of moisture being picked up from the air in the
room and thrown against the air conditioner's fan.
This is norma! and should not be cause for concern.
Also, do not:be alarmed if you hear a slight hissing
or gurgling sound coming from your air conditioner
after it is off. These are normal coolant noises,
The modern high efficiency
compressor may have a high
pitched hum or pulsating
noise that cycles on and off.
Unit Vibration
The unit may vibrate
and make noise
because of poor wall
or window const_ction.
Fan
You may hear air
movement from
the fan.
_en_r
You may hear droplets of water hitting
the condenser causing a pinging or
clicking sound.
FIG. 21
CAPACITY AND RUNNING TIME
Proper unit size is impo_ant in deciding the desired
comfort for the area you want to cool. An
undersized unit will not have the capability to cool,
_eaving the area uncomfortably warm. The proper
size is determined by the number of square feet in
the area to be _l_, indoor and outdoor
temperature and humidity.
Whenever the heat or humidity load is a_ve normal
the air _nditioner must run longer and more often
to keep the desired temperature you have selected
Under heavy heat load conditions the air conditioner
may need to run constantly to keep the temperature
you want,
At times using the MED FAN setting to circulate the
r_m air may make it comfortable even though Lhe
air is not being cooled. This will decre_e your cost
of use.
-9-
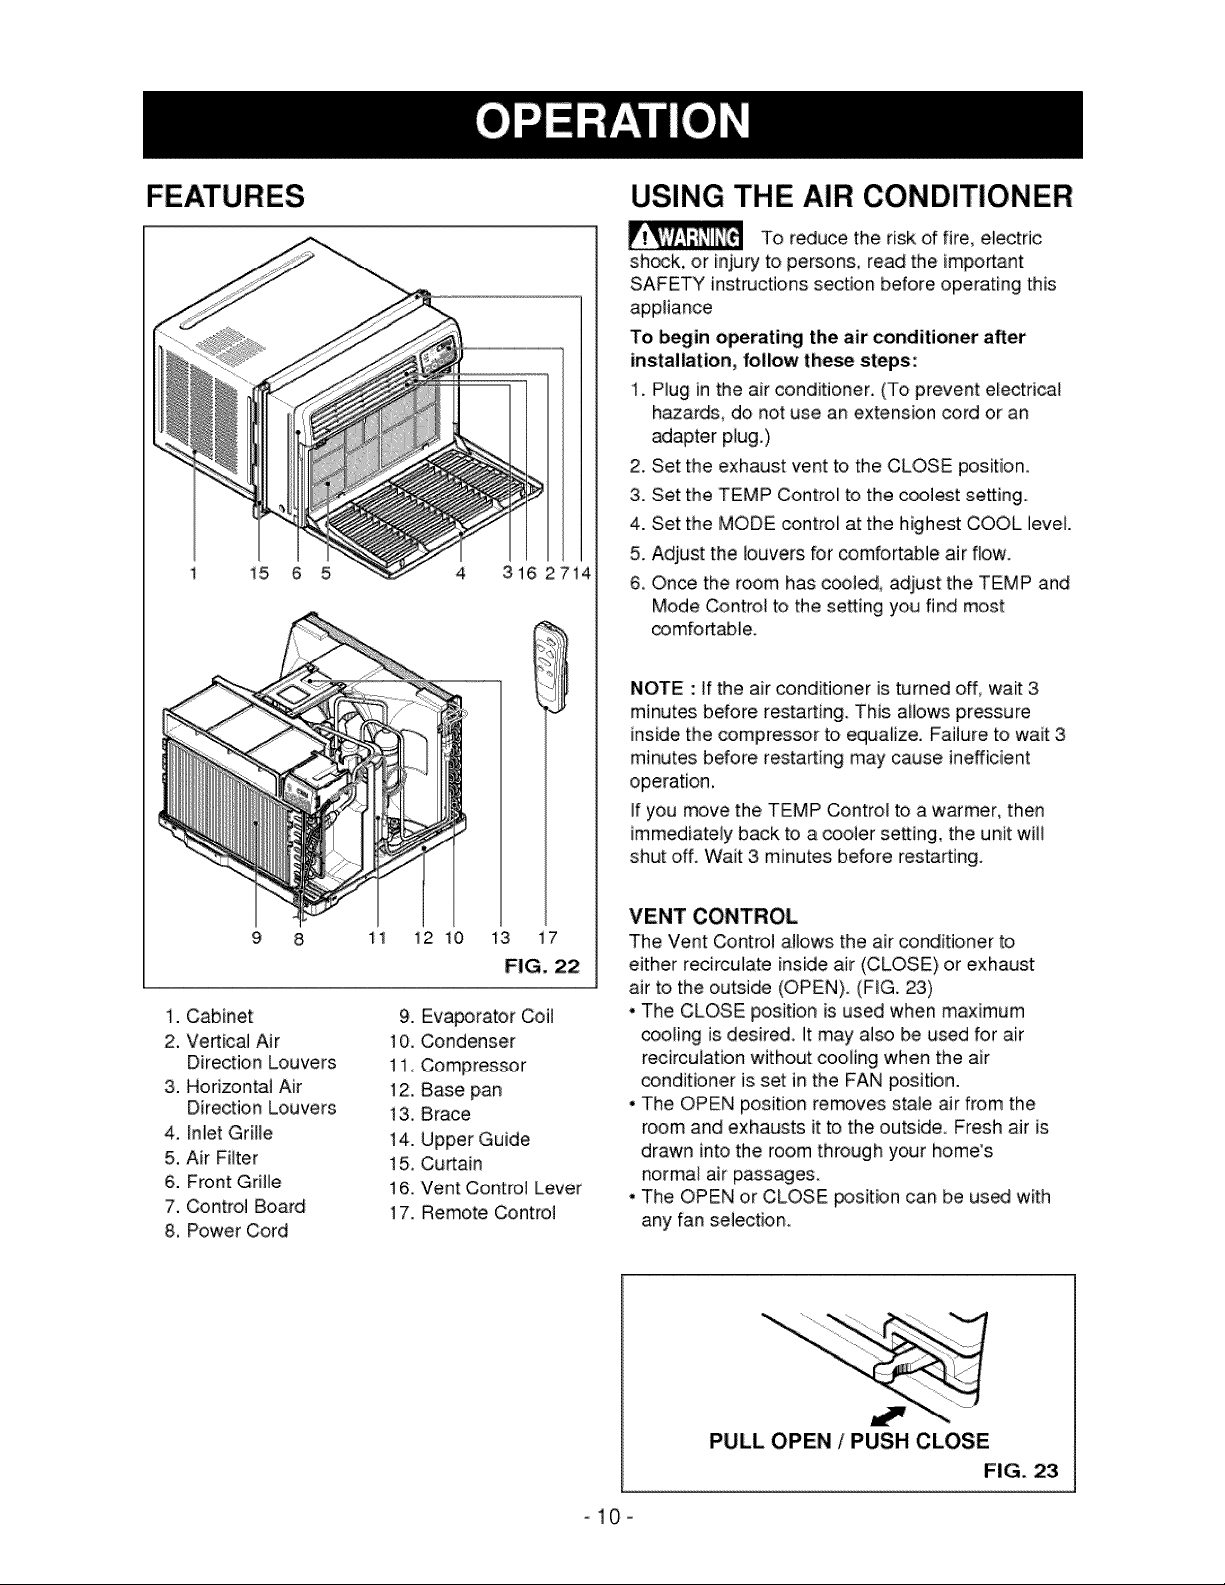
1 15 6 5 4 316 2714
_ILT#
tltl
11 i2 10 13 i7
FIG. 22
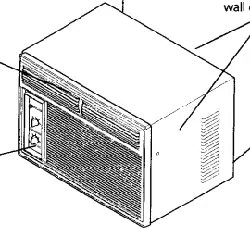
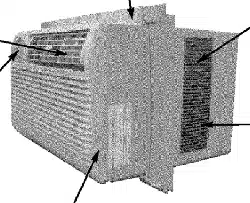
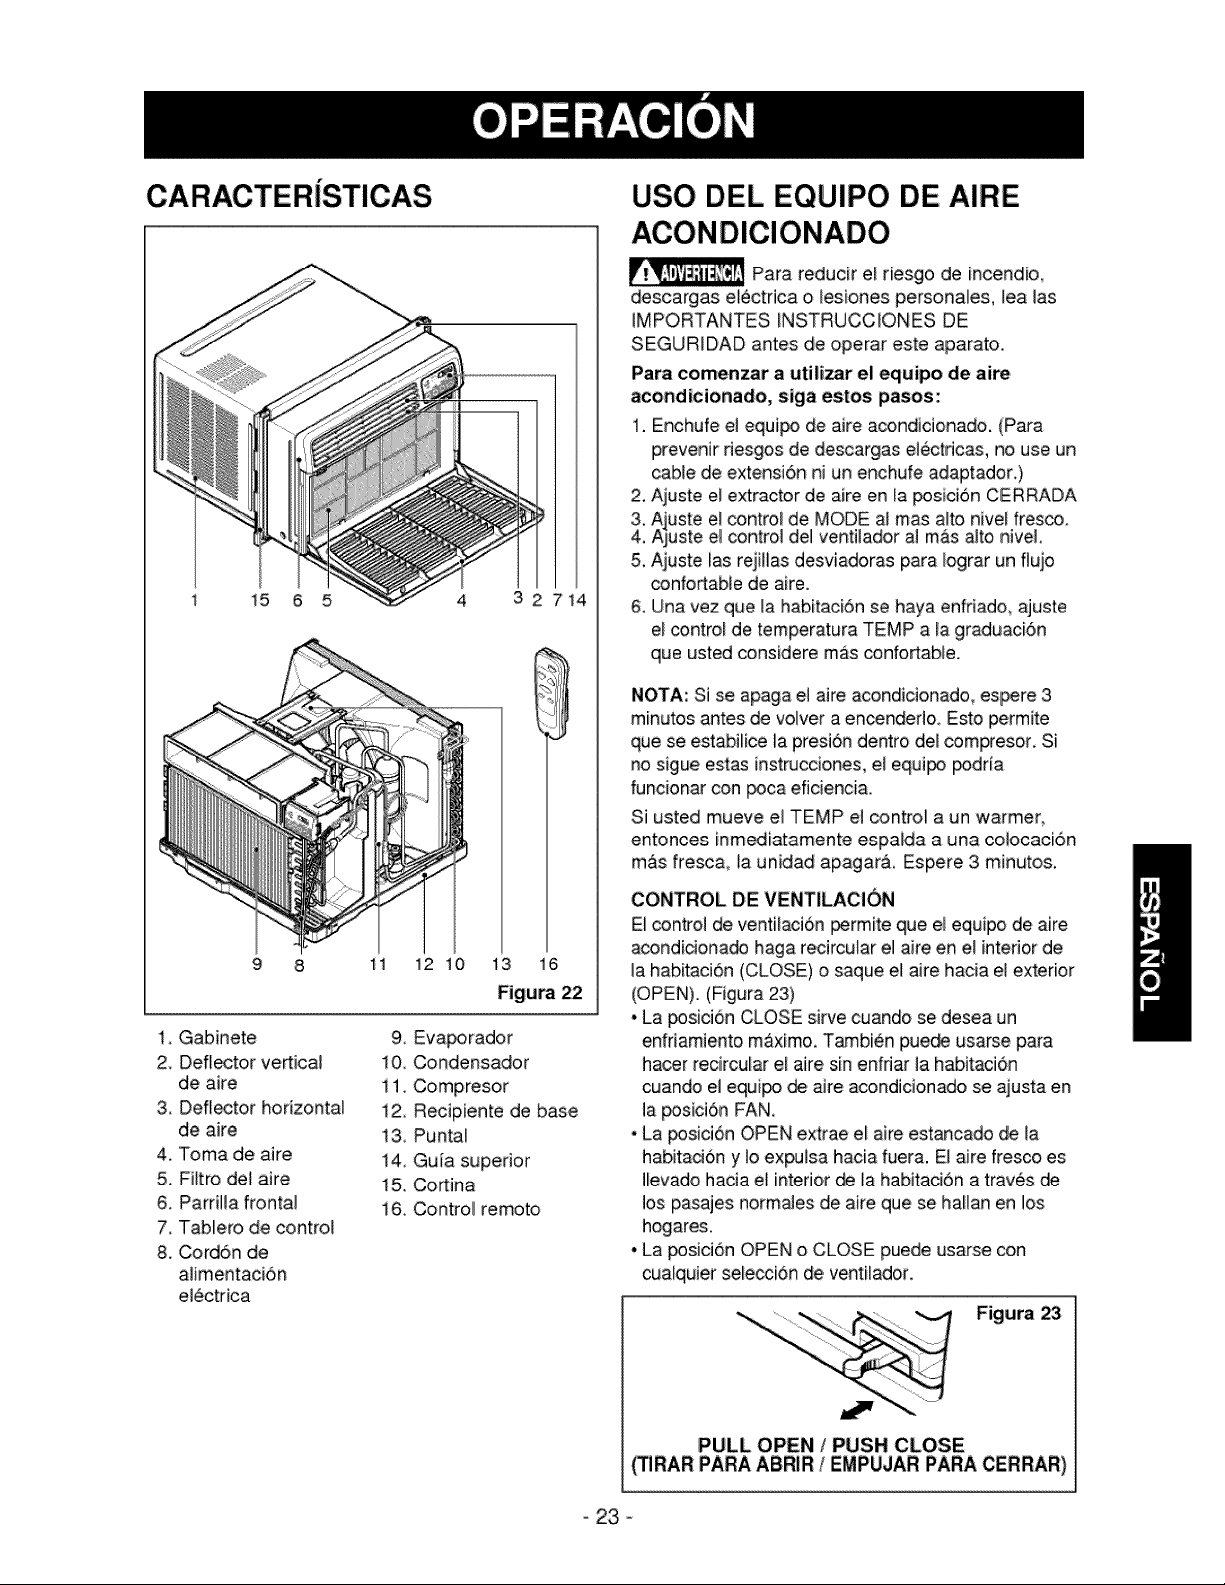
1. Cabinet
2. Vertical Air
Direction Louvers
3. Horizontal Air
Direction Louvers
4. In_et Grille
5. Air Filter
6. Front Grille
7. Control Board
8. Power Cord
9. Evaporator Coil
10. Condenser
11, Compressor
12. Base pan
t 3.8race
14. Upper Guide
15, Curtain
16. Vent Control Lever
17. Remote Control
USING THE AIR CONDITIONER
To reduce the risk of fire, electric
shock, or injury to persons, re_ the important
SAFETY instructions section before operating this
appliance
To begin operating the air conditioner after
installation, follow these steps:
1. Plug in the air conditioner. (To prevent electrical
hazards, do not use an extension cord or an
adapter plug.)
2. Set the exhaust vent to the CLOSE position,
3. Set the TEMP Control to the coolest setting.
4. Set the MODE control at the highest COOL level
5, A_ust the louvers for comfortable air flow.
6, Once the room has cooled, adjust the TEMP end
Mode Contro_ to the setting you find most
comfortable.
NOTE : if the air conditioner is turned off, wait 3
minutes before restarting. This allows pressure
inside the compres_r to equalize. Failure to wait 3
minutes before restarting may cause inefficient
operation,
if you move the TEMP Contro_ to a warmer, then
immediately back to a cooler setting, the unit will
shut off. Wait 3 minutes before restarting.
VENT CONTROL
The Vent Control allows the air conditioner to
either recirculate inside air (CLOSE) or exhaust
air to the outside (OPEN). (FIG. 23)
• The CLOSE position is used when maximum
cooling is desired It may also be used for air
recirculation without cooling when the air
conditioner is set in the FAN position.
• The OPEN position removes stale air from the
room and exhausts it to the outside. Fresh air is
drawn into the room through your home's
normal air passages
• The OPEN or CLOSE _sition can be used with
any fan selection.
PULL OPEN ! PUSH CLOSE
FiG. 23
-10-
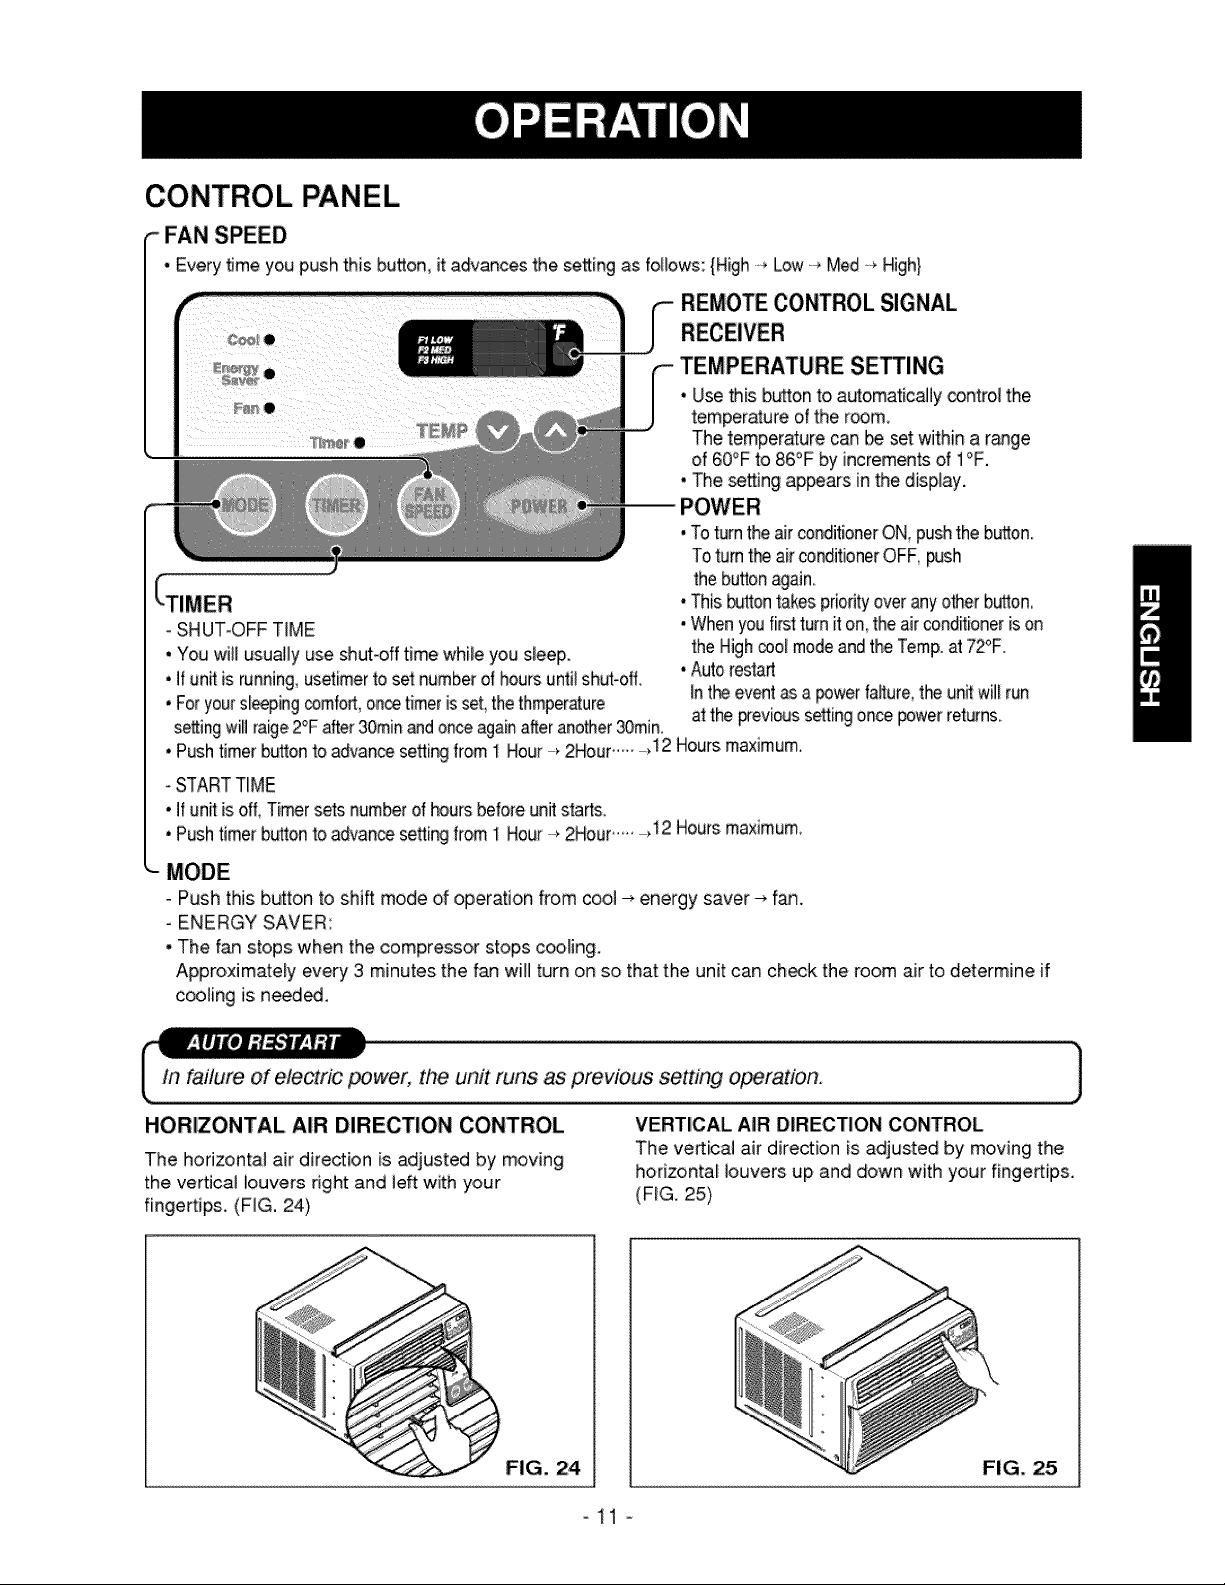
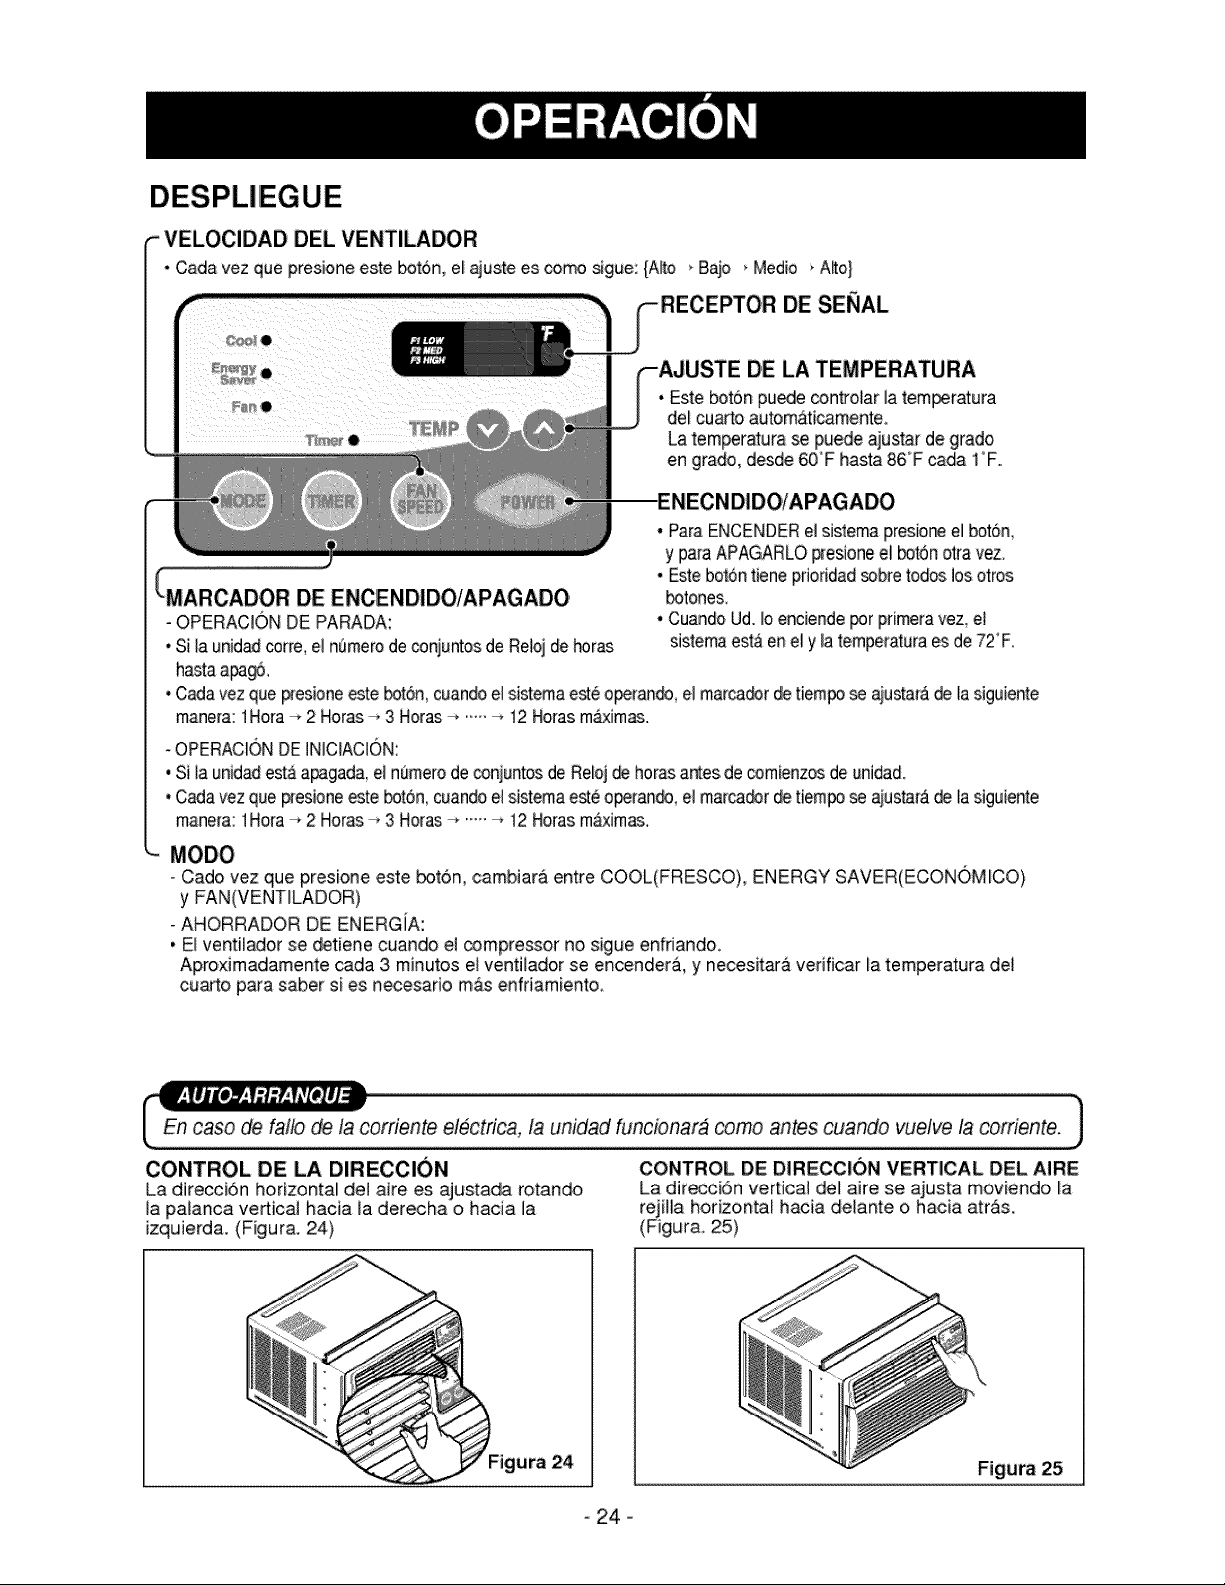
CONTROL PANEL
FAN SPEED
• Every time you push this button, it advances the setting as follows: {High _ Low _ Med High}
REMOTE OONTROL SIGNAL
• Usethis button to automatically control the
temperature of the room.
The temperature can be set within a range
of 60_Fto 86°F by increments of 1°F.
•.The _tting appears in the display.
- SHUT-OFF TiME
• "Youwill usually use shut-off time while you sleep.
• If un_is running,usetimerto set numberof hoursuntil shut-off,
• Toturn the airconditionerON,pushthe button.
To turnthe air_nditioner OFF,_sh
the buttonagain.
• Thisbuttontakes priodtyover anyotherhuron,
• Whenyou firstturn it on, the aircondH:ionerison
the Highcool modeand the Temp.at 72°F.
• Autorestart
• Foryoursleepingcomfort,oncetimeris set,thethmperature Int_ eventas a _wer failure,t_ un_will run
settingwillraige2°F after30rainandonceagainafteranother30rain. at the p_eviousse_ingoncepowerreturns.
• Pushtimer buttonto advancesettingfrom t Hour _2Hour.... _12Hoursmaximum,
oSTARTTIME
• If unitis off, Timersets numberof hoursbeforeunit starts.
• Pushtimer buttonto advancesettingfrom 1 Hour , 2Hour..... _12Hoursmaximum.
_- MODE
- Push this button to shi_ mode of operation from cool -* energy saver _ fan.
- ENERGY SAVER:
- The fan stops when the compressor stops c_ling.
Approximately every 3 minutes the fan will turn on so that the unit can check the room air to determine if
cooling is need_,
[ In _lt°lo_t_elefcl[_cmpower, the unit runs as previous settir_g operation. }
HORIZONTAL AIR DIRECTION CONTROL
The horizontal air direction is adjusted by moving
the vertical _ouvers right and left with your
fingertips. (FIG. 24)
VERTICAL AIR DiRECTiON CONTROL
The vertical air direction is adjusted by moving the
horizontaE louvers up and down with your fingertips.
(FIG. 25),
FIG. 24 FIG. 25
-1t -
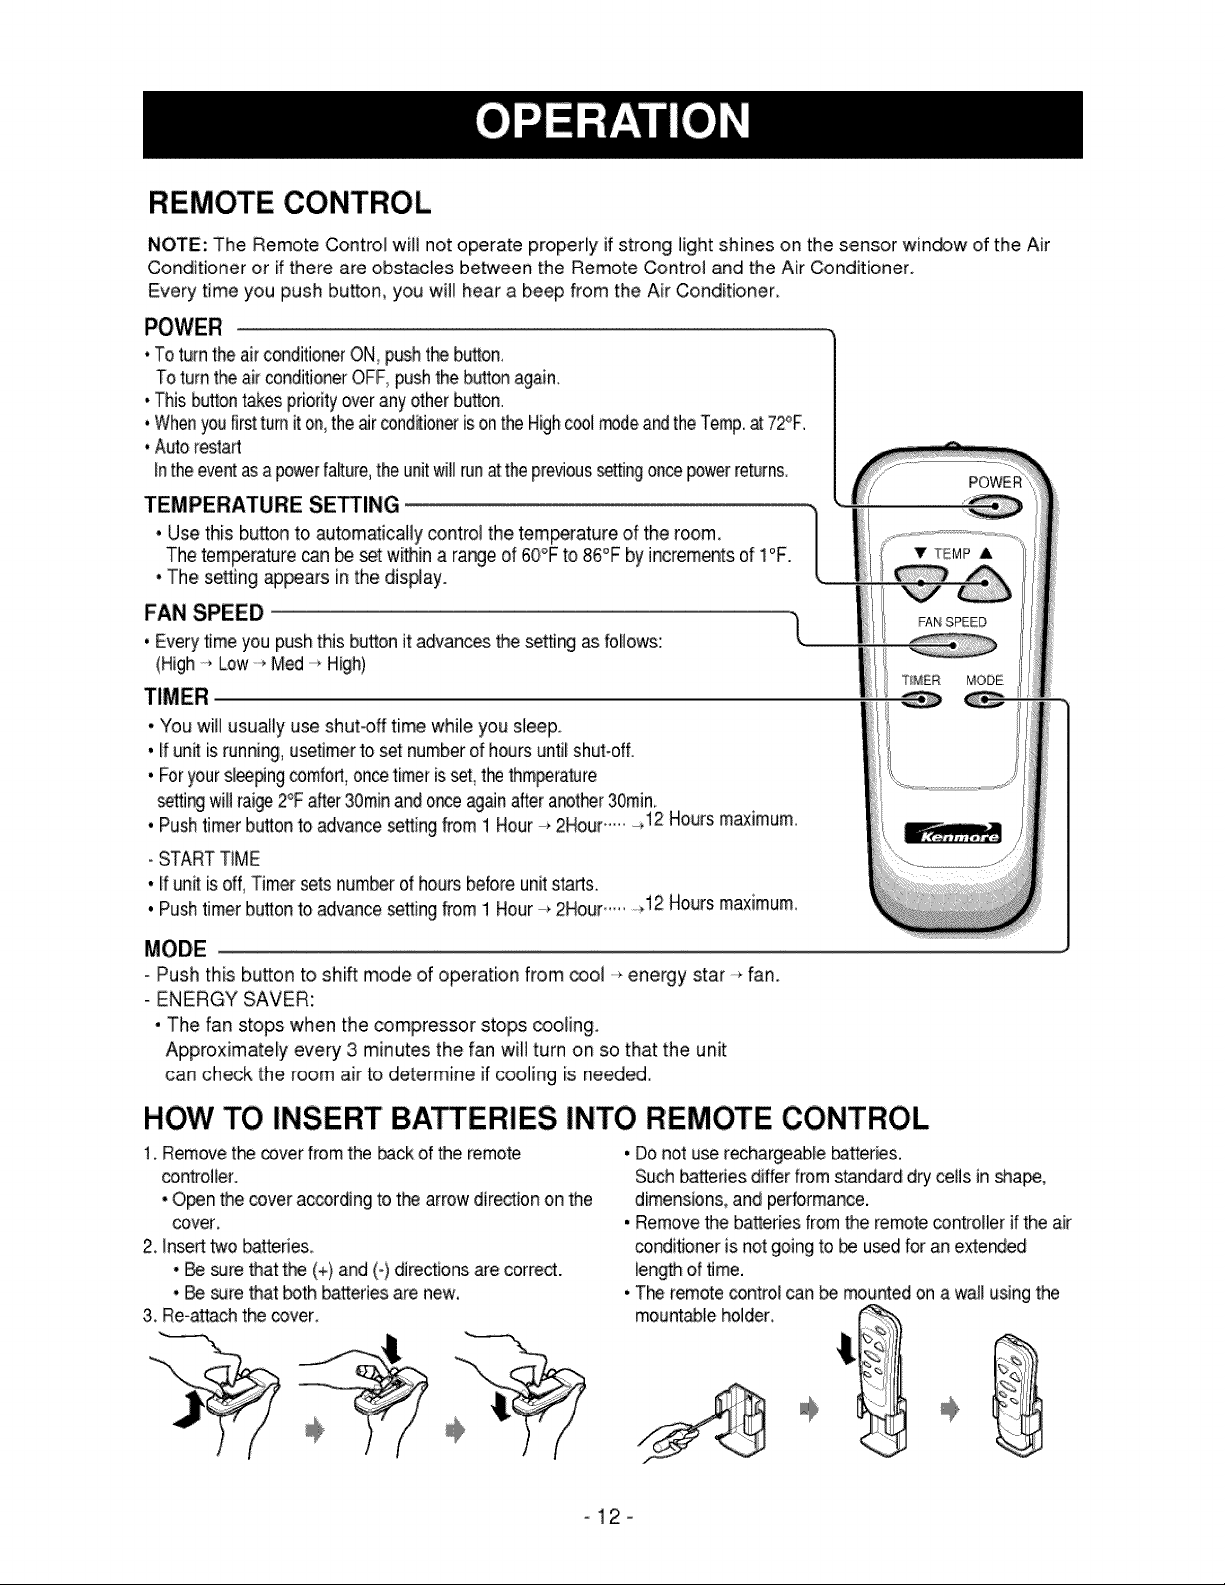
REMOTE CONTROL
NOTE: The Remote Control will not operate properly if strong light shines on the sensor window of the Air
Conditioner or if there are obstacles between the Remote Control and the Air Conditioner.
Every time you push button, you will hear a beep from the Air Conditioner
• To turnthe airconditionerON_pushthe button,
Toturn the air conditionerOFF_pushthe buttonagain.
, This buttontakes priorityover any other button.
, Whenyoufirstturnit on,the aircz)nd_ioneris onthe HighcoolmodeandtheTemp.at 72°R
, Autorestart
Inthe eventas a powerfa_ure,the unitwill _unat theprevioussettingon_ powerreturns.
TEMPERATURE SETTING
• Use this button to automatically control the tem_rature of;the room.
The tem_rature can bo set within a rangeof 60°F to 86°F by incrementsof 1°F.
• The setting appears in the display.
FAN SPEED
• Every"time you push this button it advancesthesetting as follows:
(High`Low Med High)
!
* You will usually use shut-off time while you sleep.
, If unit is running,usetimerto set numberof hours until shut-off.
. Foryour siccing _mfort, oncetimerisset,tie thmperature
settingwill raige2°Fafter30minandonceag_n aftera_t_r 30rain
. Push timerbutton to advance setting from 1 Hour -, 2Hour......_12 Hoursmaximum,,
oSTARTTIME
. If unH:is off, Timer sets numberof hours before unitstarts.
. Push timerbutton to advance settingfrom 1 Hour _2Hour........J2 Hours maximum,
POWER
- Push this button to shift mode of operation from _ol ........energy star, fan.
- ENERGY SAVER:
• The fan stops when the compressor stops cooling.
Approximately every 3 minutes the fan will turn on so that the unit
can check the room air to determine if cooling is needed.
HOW TO INSERT BAKERIES INTO REMOTE CONTROL
1. Removet_ _ver from the _ck of the remote
controller.
• Openthe cover accordingto the arrow directionon the
cover.
2. inserttwo battedes.
• _ sure thatthe (+) and (o)directionsare correct.
• Be _re that both batteriesare new.
3. Re-attachthe cover.
, Do not use rechargeable batteries,
Such batteries differfrom standard dry cells in _ape,
dimensions,and performance.
, Removethe batteries from the remote controller if the air
conditioneris not going to be used for an e_erded
length of time.
• TEeremote controlcan be mountedon a wall using the
mount_le holder.
-12-
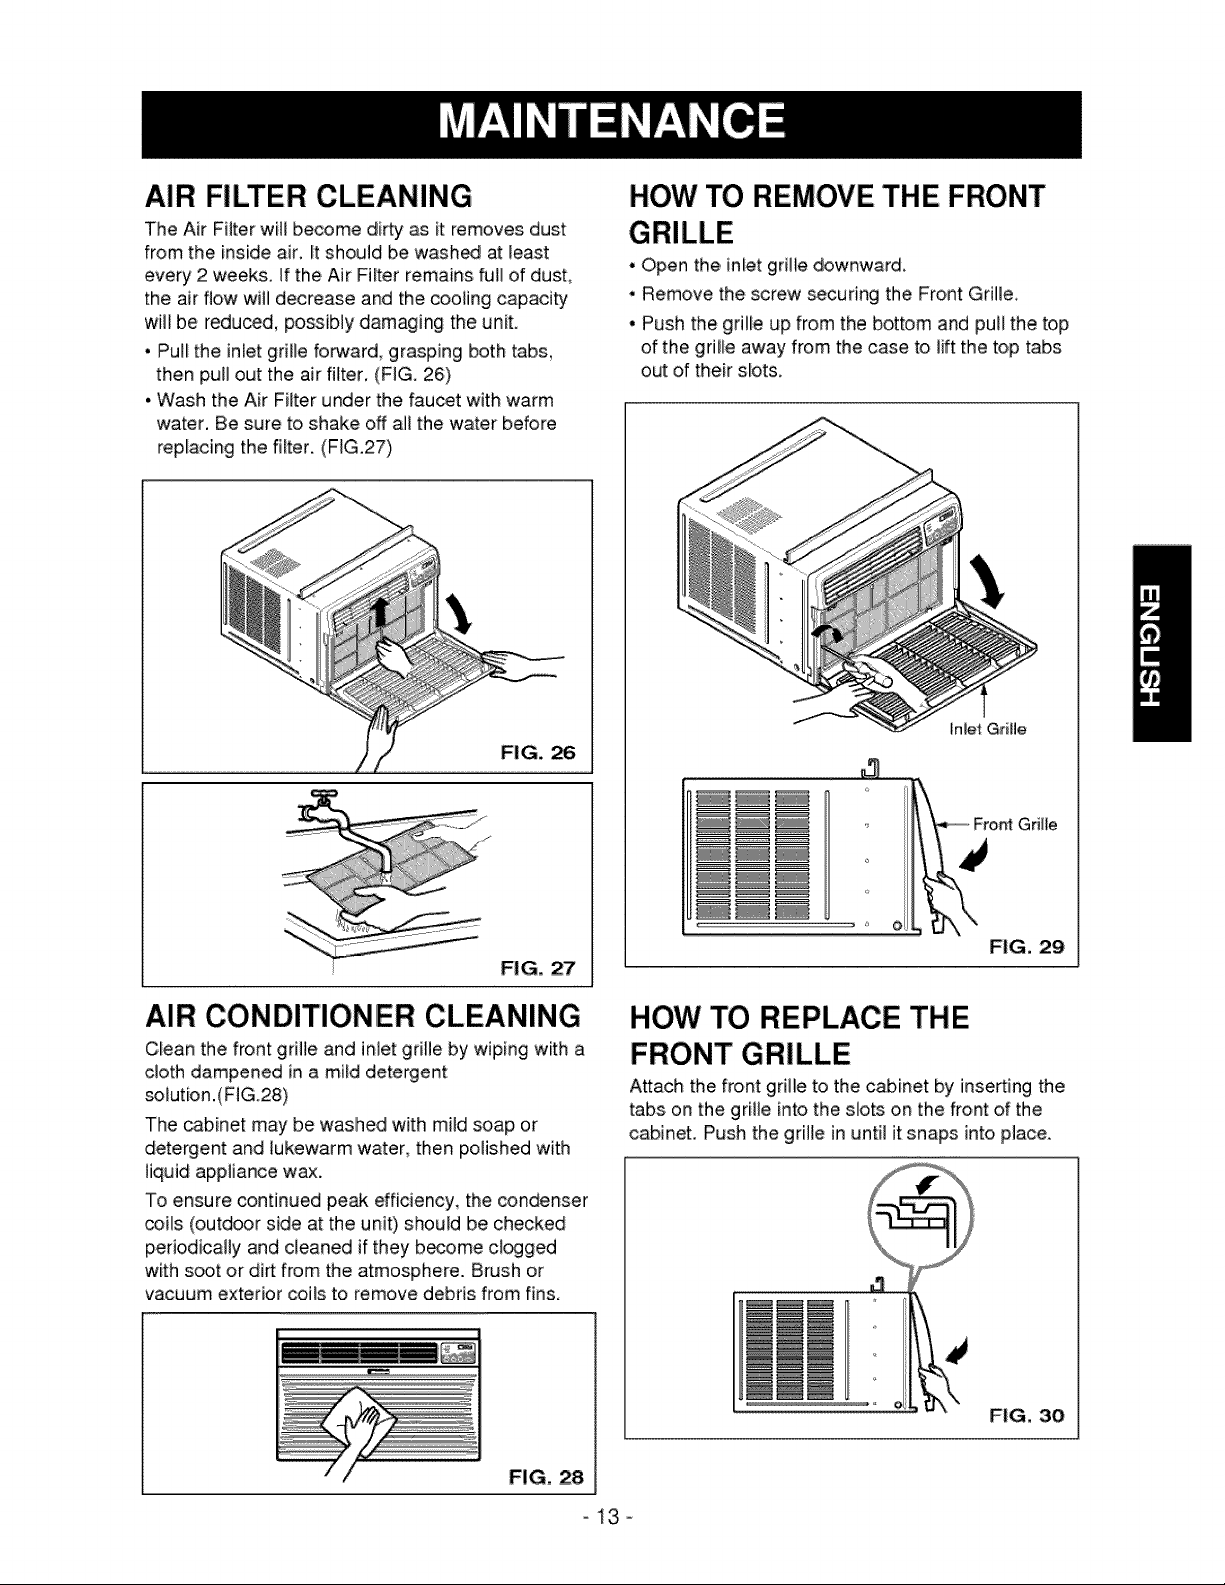
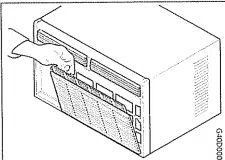
AIR FILTER CLEANING
The Air FHter will become dirty as it removes dust
from the inside air, ft should be washed at _east
every 2 weeks. If the Air Fi_ter remains futl of dust,
the air flow will decrease and the cooling capacity
will be redu_d, possibmydamaging the unit.
• Pull the inlet gdHe forward, grasping both tabs,
then pull out the air filter, (FIG. 26)
• Wash the Air Fi_terunder the faucet with warm
water. Be sure to shake off ai! the water before
replacing the filter. (FIG.27)
FIG.
FIG, 27
AIR CONDITIONER CLEANING
Clean the front grille and inlet grille by wiping with a
cloth dampened in a mi_ddetergent
solution.(FIG.28)
The cabinet may be washed with mild soap or
detergent and lukewarm water, then polished with
liquid appliance wax.
To ensure continued peak efficiency, the condenser
coils (outdoor side at the unit) should be checked
periodically and cleaned if they b_ome clogged
with soot or dirt from the atmosphere. Brush or
vacuum exterior coils to remove debris from fins.
FIG. 28
HOW TO REMOVE THE FRONT
• Open the, in_et grille downward.
• Remove the screw securing the Front GdHe,
• Push the grille up from the bottom and pull the top
of the grille away from the case to lift the top tabs
out of their slots.
Gdlle
FIG. 29
HOW TO REPLACE THE
FRONT GRILLE
Attach the front grille to the cabinet by inserting the
tabs on the grille into the slots on the front of the
cabinet. Push the grille in until it snaps into pJace.
0
FIG, 30
- 3-
BEFORE CALLING FOR SERVICE
Check the following list to be sure a service call is really necessary. A quick reference to this manual may
help you avoid an unneeded service call.
THE AIR CONDITIONER WILL NOT OPERATE
Check if... Then...
Wall plug disconnected.
House fuse blownor circuitbreaker tripped.
Power is OFF.
Unit wasturned off and then on too quickly.
TEMP Control set warmer than room temperature.
The current interrupter device is triped
Push plug firmly intowall outlet.
Replace fuse with time delay type or reset circuit breaker.
Pushthe power button.
Set unitoff and wait 3 minutesbefore restarting.
Set TEMP Control to cooler temperature.
Press the RESET button located on the power cord plug
If the RESET button will not stay engaged, discontinue use of the
air conditioner and contact a qualified service technician.
AIR FROM UNIT DOES NOT FEEL COLD ENOUGH.
Check if... Then...
FAN SPEED set at LOW. Push FAN SPEED button to set at HIGH.
TEMP Control set too warm. Set TEMP Controlto a cooler temperature.
Room temperature below 70 °F (21°C). Coolingmay not occur until room temperature rises above 70 °F (21'C).
Temperature sensing tube touching evaporatorcoil, Removethe front grille then
located behind front grille, straightentube away from evaporator coil.
THE AIR CONDITIONERCOOLING,BUT ROOMISTOO WARM-ICE FORMINGON COOLINGCOIL BEHINDFRONTGRILLE.
Check if... Then...
Outdoor temperaturebelow 70°F (21°C). To defrost the coil, set the MODE to FAN.
Air filter may be dirty. Clean air filter. Referto Maintenance section of owner's manual.
TEMP Control set too cold for night-timecooling. Todefrostthecoil,set the MODE to FAN speed to "HIGH" withthe
TEMPcontrolto warmertemperature.
THE AIRCONDITIONERCOOLING,BUT ROOMISTOOWARM.
Check if...
Dirty air filter- air restricted.
TEMP Control set too warm.
Front of unit is blocked by drapes, blinds,furniture, etc.
Air distribution is restricted.
Doors, windows, registers, etc. open. Coldair escapes.
Unit recently turned on in hot room.
Then...
Clean air filter. Referto Maintenance section of owner's manual.
Set TEMP Control to cooler temperature.
Clear blockage in front of unit.
Close doors, windows, registers, etc.
Allowadditionaltimeto removestoredheatfromwalls,ceiling,floor,andfurniture.
THE AIR CONDITIONER TURNS ON AND OFF RAPIDLY.
Check if... Then...
I Outsidetemperatureisextremelyhot. I SetFANSPEEDon HIGHto bringairpastcoolingcoilsfaster.
NOISE WHEN UNIT IS COOLING.
Check if... Then...
Soundof fanhittingwaterfromthemoistureremovalsystem. Thisisnormalwhenhumidityishigh.Closedoors,windows,and registers.
Windowvibration- poorinstallation. Referto installationinstructionsorcheckwithinstaller.
WATER DRIPPING INSIDE ROOM WHEN UNIT IS COOLING.
Check if... Then...
Theair conditioneris improperlyinstalled. Tiltairconditionerslightlytothe outsidetoallowwaterdrainage.Referto
installationinstructionsor checkwithinstaller.
WATER DRIPPING OUTSIDE WHEN UNIT IS COOLING.
Check if... Then...
Theunitis removinglargequantitiesof moisture Thisis normalduringexcessivelyhumiddays.
fromhumidroom.
-14-
INDICE DE MATERIAS ............................. 15
GARANTiA ................................................ 15
SEGURIDAD .............................................. 16
Importantes instrucciones de seguridad ..... 16
REQUERIMIENTOS ELECTRICOS ......... 17
INSTALACION DEL CABLE ELECTRICA ...1 7
INSTALACION ........................................... 18
Requerimientos para instalaci6n .......... 18
Installaci6n ............................................ 19
C6mo instalarlo ..................................... 19
La eliminacion de la ventana ................. 21
OPERACION .............................................. 22
C6mo y por que ..................................... 22
Sonidos normales .................................. 22
Capacidad y tiempo de funcionamiento .--22
Caractedsticas ..................................... 23
Uso del equipo de aire acondicionado ..23
Despliegue ............................................ 24
Control remoto ....................................... 24
MANTENIMIENTO .................................... 26
Limpieza del filtro del aire ...................... 26
Limpieza del equipo de aire acondicionado ....26
C6mo sacar la rejilla frontal ................... 26
Como a reemplaza el grille anterior ...... 26
CORRECCION DE FALLAS ...................... 27
Antes de Llamar para Sewicio ...................... 27
ACUERDOS DE PROTECClON
ESPEClALIZADA ...................................... 31
PARA PEDIR SERVlClO .... Cubierta Trasera
GARANTIA DE UN ANO POR EL
EQUlPO DE AIRE ACONDIClONADO
DE HABITAClON
Durante un afio completo a partir de la fecha de
compra, si este equipo de aire acondicionado recibe
mantenimiento y se utiliza para el enfriamiento
normal de habitacion segt3n las instrucciones
indicadas en este manual del propietario, Sears
reparara, gratuitamente este equipo de aire
acondicionado, si tiene algt3n defecto en materiales
o fabricaci6n.
GARANTIA TOTAL DE ClNCO ANOS
POR EL SlSTEMA DE REFRIGERAClON
HERMI_TICAMENTE SELLADO
Durante cinco afios a partir de la fecha de compra,
si este equipo de aire acondicionado recibe
mantenimiento y se utiliza para el enfriamiento
normal de habitaci6n segen las instrucciones
indicadas en este manual del propietario, Sears
reparar& gratuitamente el sistema de refrigeraci6n
hermeticamente sellado (que consiste en el agente
refrigerante, los tubos de conexion y el compresor),
si tiene algL_ndefecto en materiales o fabricacion.
EL SERVICIO DE GARANTiA ES
DISPONIBLE CONTACTANDO AL SERVIClO
SEARS AL 1-800-4-MY-HOME e
La proteccion de garant[a cubre unicamente a
los equipos de aire acondicionado usados para
uso domestico y no para uso comercial.
Esta garantfa solo tiene validez mientras el
producto se este usando en los Estados
Unidos.
Esta garantfa le da derechos legales
especfficos y usted puede tener otros
derechos que varian de estado en estado.
Distributed by Sears, Roebuck and
Co., Hoffman Estates, IL 60179
-15-
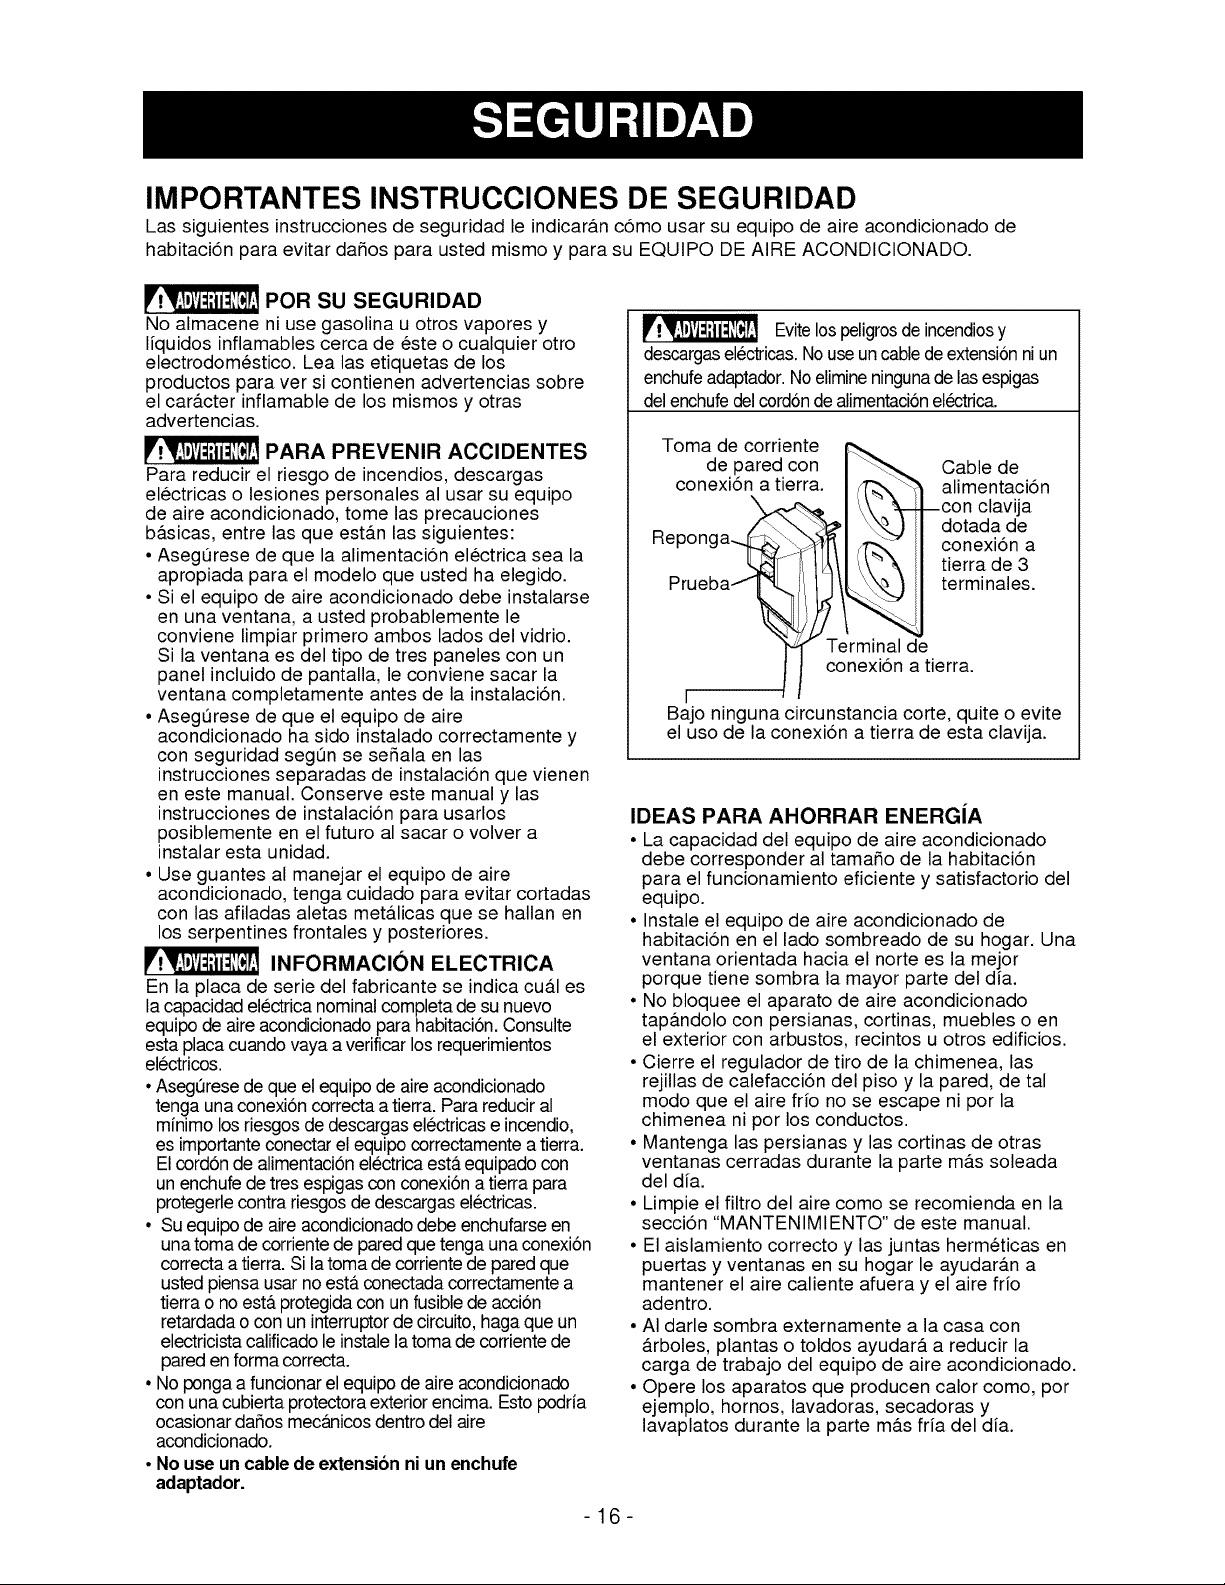
IMPORTANTES INSTRUCCIONES DE SEGURIDAD
Las siguientes instrucciones de seguridad le indicaran c6mo usar su equipo de aire acondicionado de
habitaci6n para evitar daSos para usted mismo y para su EQUIPO DE AIRE ACONDIClONADO.
POR SU SEGURIDAD
No almacene ni use gasolina u otros vapores y
liquidos inflamables cerca de este o cualquier otro
electrodomestico. Lea las etiquetas de los
productos para ver si contienen advertencias sobre
el cargtcter inflamable de los mismos y otras
advertencias.
PARA PREVENIR ACCIDENTES
Para reducir el riesgo de incendios, descargas
electricas o lesiones personales al usar su equipo
de aire acondicionado, tome las precauciones
basicas, entre las que estan las siguientes:
• AsegQrese de que la alimentacion electrica sea la
apropiada para el modelo que usted ha elegido.
• Si el equipo de aire acondicionado debe instalarse
en una ventana, a usted probablemente le
conviene limpiar primero ambos lados del vidrio.
Si la ventana es del tipo de tres paneles con un
panel incluido de pantalla, le conviene sacar la
ventana completamente antes de la instalaci6n.
• AsegQrese de que el equipo de aire
acondicionado ha sido instalado correctamente y
con seguridad segOn se sefiala en las
instrucciones separadas de instalacion que vienen
en este manual. Conserve este manual y las
instrucciones de instalaci6n para usarlos
posiblemente en el futuro al sacar o volver a
instalar esta unidad.
• Use guantes al manejar el equipo de aire
acondicionado, tenga cuidado para evitar cortadas
con las afiladas aletas metalicas que se hallan en
los serpentines frontales y posteriores.
INFORMACI(_N ELECTRICA
En la placa de serie del fabricante se indica cu&l es
la capacidadelectrica nominalcompleta de su nuevo
equipo de aire acondicionadopara habitaci6n.Consulte
esta placa cuando vaya a verificar los requerimientos
electricos.
• AsegQresede que el equipode aireacondicionado
tenga unaconexi6n correcta a tierra. Para reduciral
minimo los riesgos de descargaselectricas e incendio,
es importanteconectar elequipo correctamentea tierra.
Elcord6n de alimentaci6nelectricaesta equipado con
un enchufe de tres espigas con conexi6n a tierra para
protegerlecontra riesgos de descargaselectricas.
• Su equipode aire acondicionadodebe enchufarseen
unatoma de corrientede pared que tenga una conexi6n
correcta a tierra. Si la toma de corrientede paredque
usted piensa usar no esta conectadacorrectamentea
tierra o no esta protegidacon un fusiblede accion
retardadao con un interruptorde circuito, hagaque un
electricistacalificadole instalelatoma de corriente de
pareden forma correcta.
• No ponga a funcionarel equipo de aire acondicionado
con una cubierta protectoraexterior encima. Esto podria
ocasionardafios mec&nicosdentro del aire
acondicionado.
• No use un cable de extensi6n ni un enchufe
adaptador.
Evitelos peligrosde incendiosy
descargaselectricas.Nouse un cablede extensionni un
enchufeadaptador.Noelimineningunade lasespigas
delenchufedelcordonde alimentacionel6ctrica.
Toma de corriente
de pared con I "'_-._. Cable de
conexi6n a tierra. I /T2,,,"_ alimentacidn
I \-l lLconclavija
/_,.\ ?__1 '\_. III dotada de
Hep°nga"[m_,_l'_ I #_X-" II conexi6n a
_-_I[ i/ tL_/I _'_'k II tierrade3
Prueba__ l_ _ terminales.
"1_ Terminal de
I I conexidn a tierra.
[ _ I
Bajo ninguna circunstancia core, quite o evite
el uso de la conexidn a tierra de esta clavija.
IDEAS PARA AHORRAR ENERGiA
• La capacidad del equipo de aire acondicionado
debe corresponder al tamafio de la habitaci6n
para el funcionamiento eficiente y satisfactorio del
equipo.
• Instale el equipo de aire acondicionado de
habitacion en el lado sombreado de su hogar. Una
ventana orientada hacia el norte es la mejor
porque tiene sombra la mayor parte del dia.
• No bloquee el aparato de aire acondicionado
tap&ndolo con persianas, cortinas, muebles o en
el exterior con arbustos, recintos u otros edificios.
• Cierre el regulador de tiro de la chimenea, las
rejillas de calefacci6n del piso y la pared, de tal
modo que el aire fdo no se escape ni por la
chimenea ni por los conductos.
• Mantenga las persianas y las cortinas de otras
ventanas cerradas durante la parte m&s soleada
del alia.
• Limpie el filtro del aire como se recomienda en la
secci6n "MANTENIMIENTO" de este manual.
• El aislamiento correcto y las juntas hermeticas en
puertas y ventanas en su hogar le ayudar&n a
mantener el aire caliente afuera y el aire frio
adentro.
• AI darle sombra externamente a la casa con
&rboles, plantas o toldos ayudar& a reducir la
carga de trabajo del equipo de aire acondicionado.
• Opere los aparatos que producen calor como, por
ejemplo, hornos, lavadoras, secadoras y
lavaplatos durante la parte mas fria del dia.
-16-
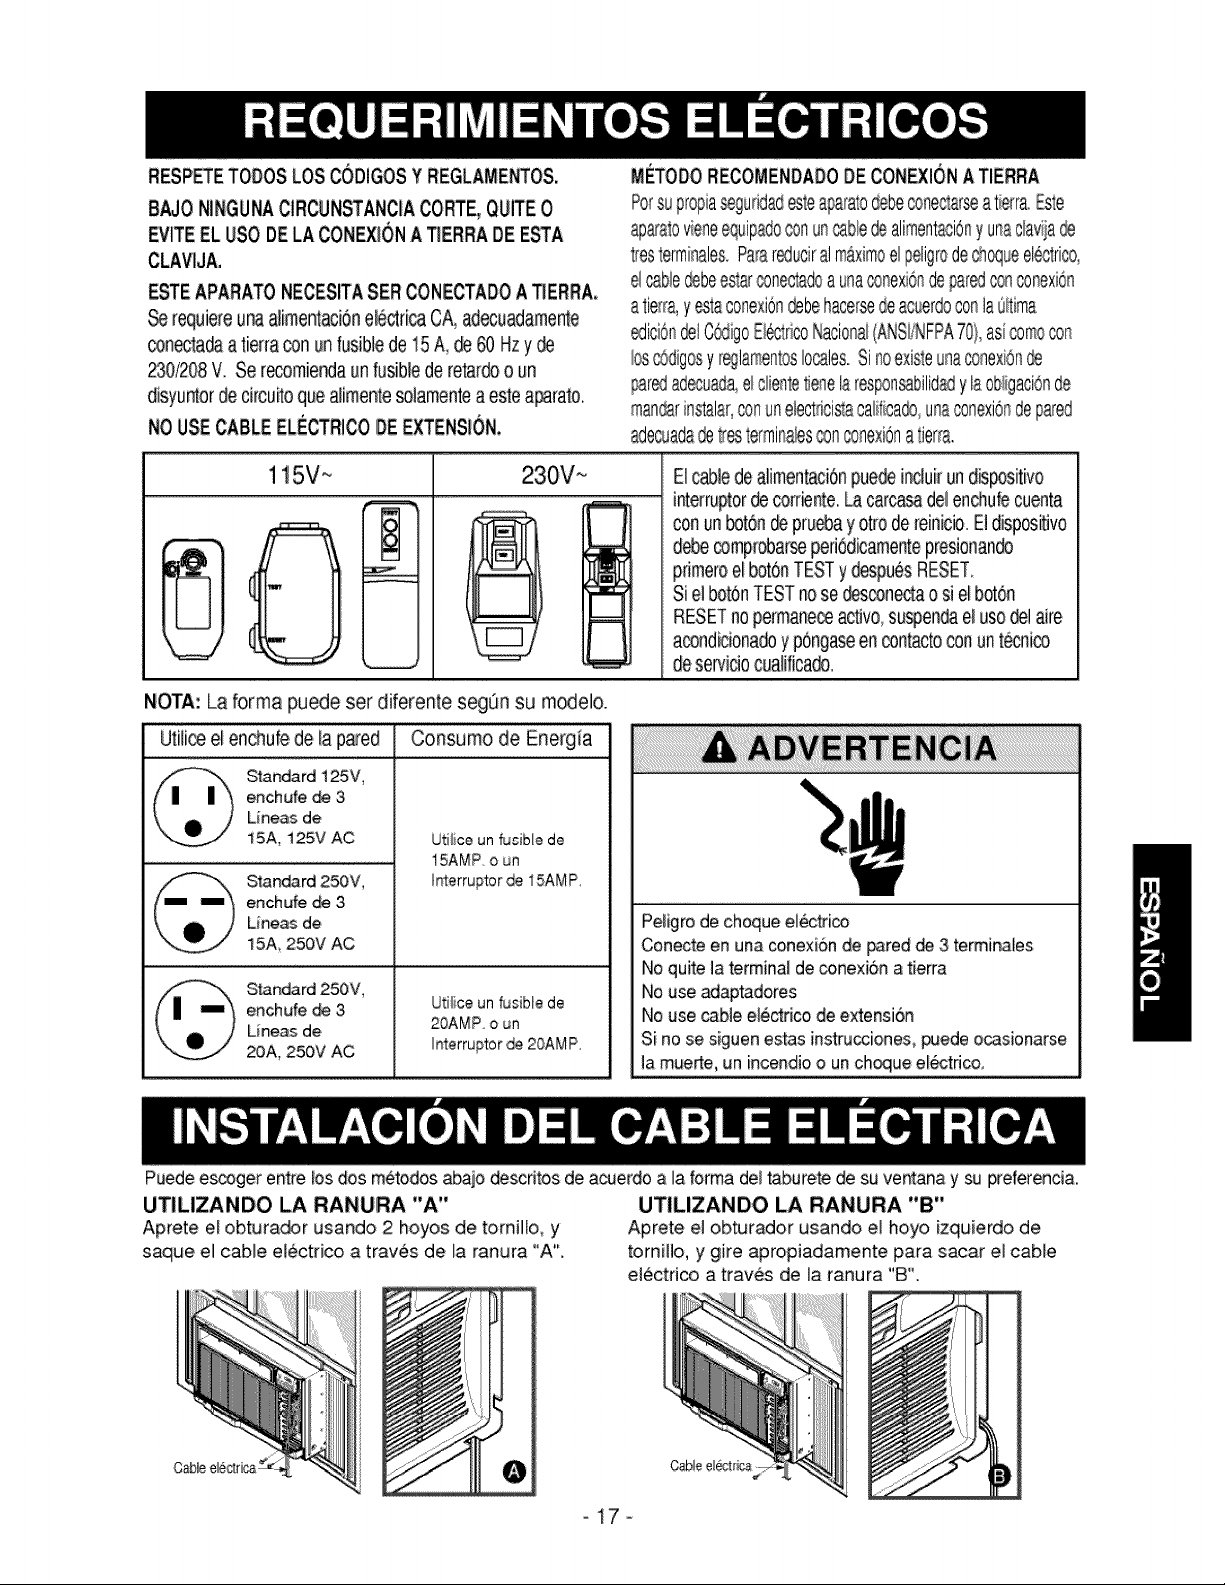
RESP_ETODOSLOS CODIGOSY REGLAME_OS,
8AJO NINGUNAClRCUN_ANCIA CORTE,QUITE0
EVITEEL USODELACONF_ONA TIERRADEESTA
CLAVIJA.
ESTEAPARATONECESiTASERCONECTADOA _ERRA,
Se requiereuna_imentaci0nelectricaCA, adecuadamente
_necta_ a tierracon un fusiblede 15 A, _ 60 Hzy
230/208V. Se r_mie_a unfusiblederetardoo un
disyuntorde circuitoque_imente_lamente a esteaparato.
NOUSECABLE ELEC_RICODE EXTENSION,
MF.TODORECOMENDADODE CONEXIONA TERRA
Persupropiasegaddsdesteacetatedebeconectarseatierr&Esle
apa_alovieneequipado®_qun_bte dealirnentaci6_y unaclaviia
tresterminales.ParareduciralmAximoelpeligrodechequeele_rico,
el_b/e _be eslarcor_ectadoauna®r_exbr_dep_red®n ®nexi6n
atier& y estaconexion_be h£cersedeacuerdoco_laaltim8
ediciSn€_ICSdigoB_rico Nacior_(AN%NFPA701_,asi®mecon
los_digosy r_lamentoslocales.Si_oexisleunaconexbn
pared8_:_ec#_da,e/c/iente_enelaresponsabilidsdy laobligacbnde
m_n®rins_£1ar,conanelectricisl£caiifica®,un£conexbndep£_ed
adecuadede_ termi_lesconconexiona tierr&
1i5V ~ 230W
EIcablede alimentaciOnpuedeJnduirun dis_sitivo
interrupterdecorrode. Lacarcasadel enchufecuenta
con_n_tdn _ pr_abay otto de reinicb. B dJspositJvo
dabe®mprobarseperiOdicamentepresionan@
primeroel botonTESTy d_pues RESET_
Siel boronTESTnose @sconectao si el bot6n
RESETno permane_ act_vo,su_enda el _so@1aire
acondiciona@y p6ngaseencon_ctocon unt@nico
deservidocualificado.
NOTA: La forma puede set diferente segt_msu m_elo.
Utili_ el enchufe de la pared Consume de Energ_a
Standard 125V,
enchufe _ 3
Uneas de
15A_ 125V AC Uti/ice un fusible de
15AMP. o un
Slandard 250V, r_terruptor de 15AMP.
enchufe de 3
Lineas de
15A 250V AC
Standard 250V,
ench_fe de 3 UtHice un f_sible de
Lineas de 20AMP o un
20A, 250V AC I_terruptor de, 20AMP,
Peligro de cheque el_ctri_
Conecte en una c_nexi6n de pared _ 3 terminales
No quite _aterminal de _exi6n a tierra
No use adaptadores
No use _b_e e_ectrico de extension
Si no se siguen estas instrucciones, puede ocasienarse
_am_erte, un ince_dio o un cheque e_tnco,
Puedee_ger e_re los dos metodos abajo descntos de a_erdo a la forma del taburete de su ventanay su #-eferencia,
UTILIZANDO LA RANURA "A"
Aprete el obtura_r usando 2 hoyos de torniHo, y
saque el cable el_ctrico a traves de la ranura "A".
UTILiZANDO LA RANURA "B"
Aprete el obturador usando el hoyo izquierdo de
torniilo, y gire apropiadamente para sacar el cable
el¢ctrico a traves de la ranura "B".
-17-
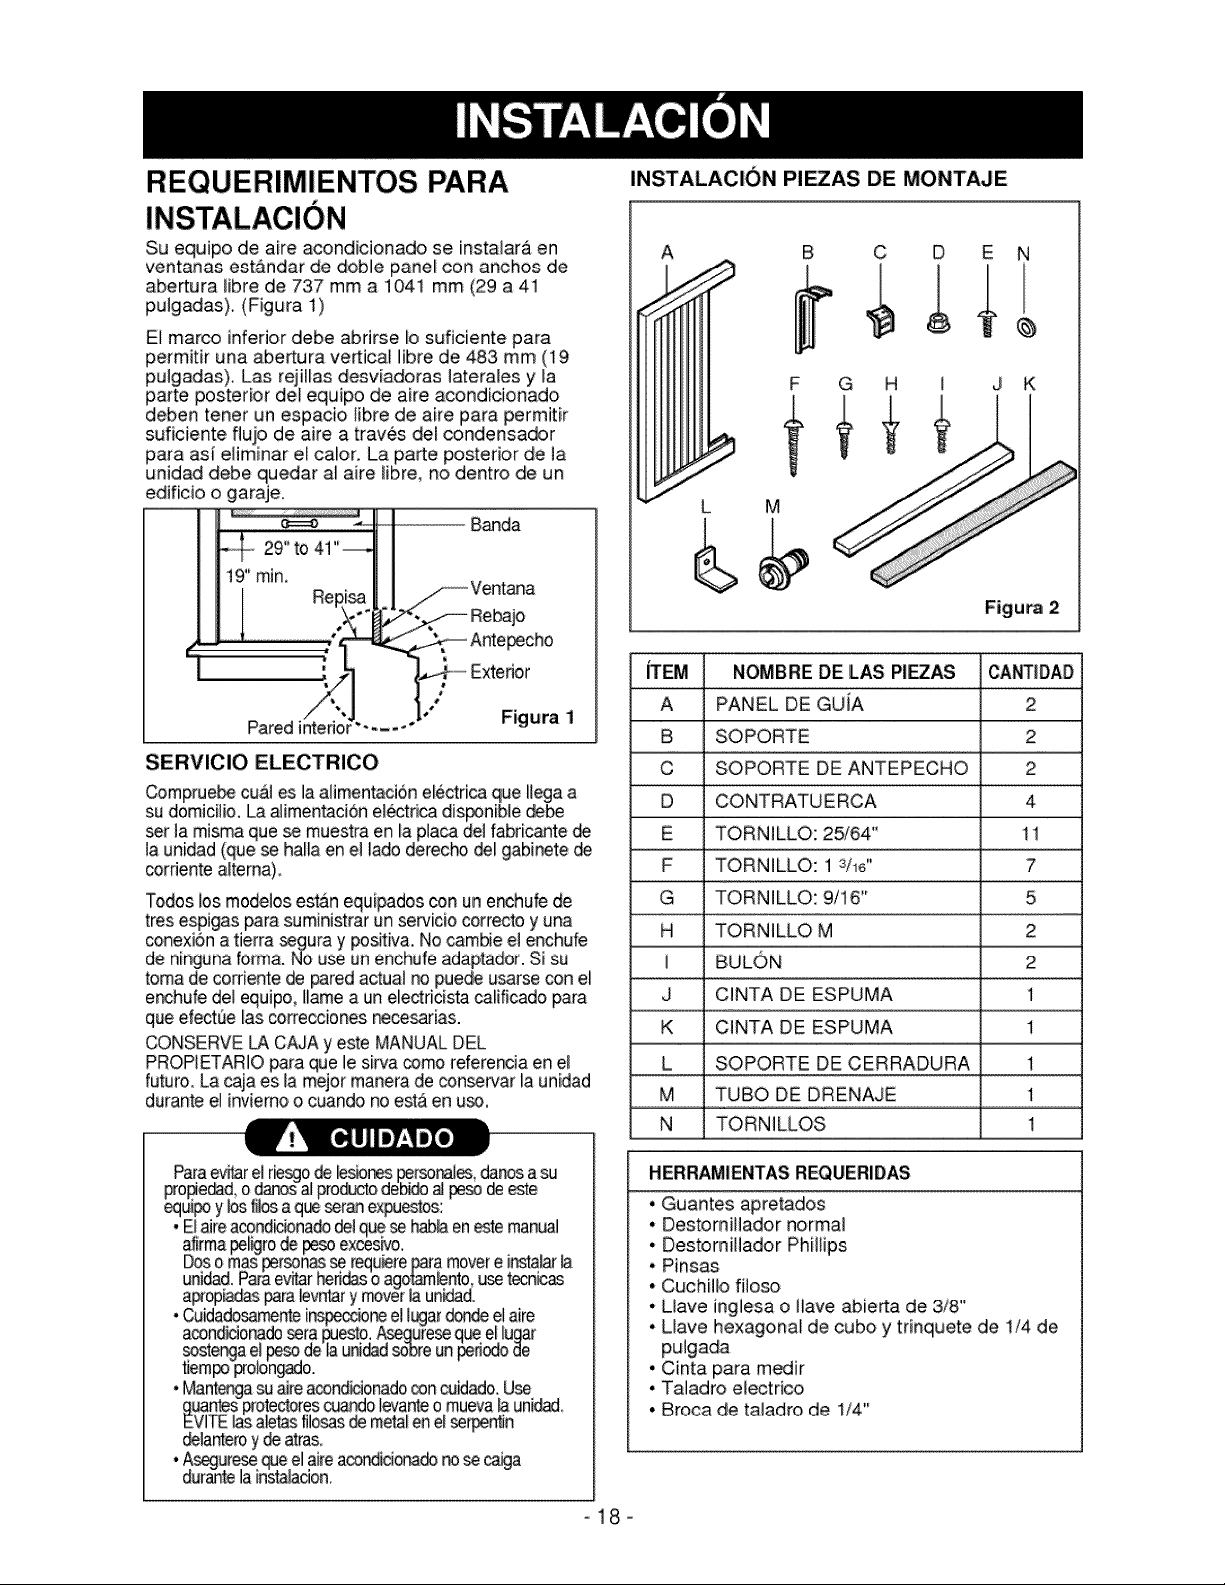
REQUERIMIENTOS PARA INSTALACION PI_AS DE MONTAJE
Su equipo de aire acondicionado se instalara en
ventanas estandar de doble panel con anchos de
abertura libre de 737 mm a 1041 mm (29 a 41
pulgadas). (Figura 1)
El marco inferior debe abdrse _osuficiente para
permitir una abertura vertical libre de 483 mm (19
pulgadas). Las rejillas desviadoras laterales y _a
parte posterior del equipo de aire acondicionado
deben tenet un espacio libre de aire para perrnitir
suficiente flujo de aire a traves del condensador
para asi eliminar el calor. La parte posterior de la
unidad debe quedar al aire libre, no dentro de un
edificio o garaje.
Banda
_cho
Figura 1
SERVIClO ELECTRICO
Comprue_ cu_iJes la alimentacJ6nel6ctri_ que Hegaa
su domicilio. La a_imentacJ6nelectricadisponiMe _
_r la misma que _ muestraen _apla_ del fabricate
la unidad(que se halla en el ladoderecho del gabinete
cornentea_tema),
Todos los modelos estan equipados con un e_hufe de
tres espigas para suministrar un servicio correcto y una
conexi6na tierra _gura y positiva. Nocambie el enchufe
de ninguna forrna. No use un enchufe adap_ador.Si su
toma de cordente de pared actual no puede u_rse con el
er_hufe deI equipo, llame a un electricistacalificado para
que efectue _ascorrecciones_rias.
CONSERVE LA CAJA y este MANUAL DEL
PROPIETARIOpara que le sirra comorefere_ia en el
futuro, Lacaja es la mejor manerade con_war la unidad
durante el inviemo o cuando no estaen u_.
Paraevilarel r_sgode _sbn_ ._r_rral_, danosa sJ
pro#e_d o d_s ,_prodL_ode_d_ al _so _ este
_u poy os tiosa q_ seranexpu_:
• El_reacondkJonado_1 que_ habhenestemanual
afirma_ligro de _so exces_vo.
D_ o mas_rsor_s se require _a movere ir_talajla
unidad.Paraever her_ o ago_arn_nto,u_ tecn_
aFrOs para_v_r y trover Jaun_ad.
• Cuidado_menteins_cbre el I_ar do_e el aire
acon_ionadosera_o, A_ure_ q_ el_u_
soster_ael_ de _ unidadso'breunpenodode
flempo_olon_o.
• Manl_a _ _re acond_onadocon_Mado. U_
,quan_s_otecloresc_r_o le_a,_eo mueva_ uni_.
EVITElasa_tasfilo_ demealen el se_n
_la_ero y _ arras,
• Aseguresequeelaireaco_Jciona_ _ se_a
durantelain_adon.
A B N
F
C D E
K
_EM NOMBRE DE LAS PIEZAS CANq'IDAD
A PANEL DE GUIA 2
B SOPORTE 2
C SOPORTE DE ANTEPECHO 2
D CONTRATUERCA 4
E TORNILLO: 25/64" 11
F TORNILLO: 1 3h6" 7
G TORNILLO: 9/16" 5
H TORNILLO M 2
I BULON 2
J ClNTA DE ESPUMA 1
K ClNTA DE ESPUMA 1
L SOPORTE DE CERRADURA 1
M TUBO DE DRENAJE 1
N TORNILLOS 1
HERRAMIENTASREQUERIDAS
• Guantes apretados
, Destomillador normal
• Destornillador Phillips
- Pinsas
• Cuchillo filoso
, Uave inglesa o Ilave abierta de 3/8"
, Uave hexagonal de cubo y trinquete de 114 de
pulgada
• Cinta para medir
• Taladro electrico
• Broca de taladro de 1/4"
- 8-
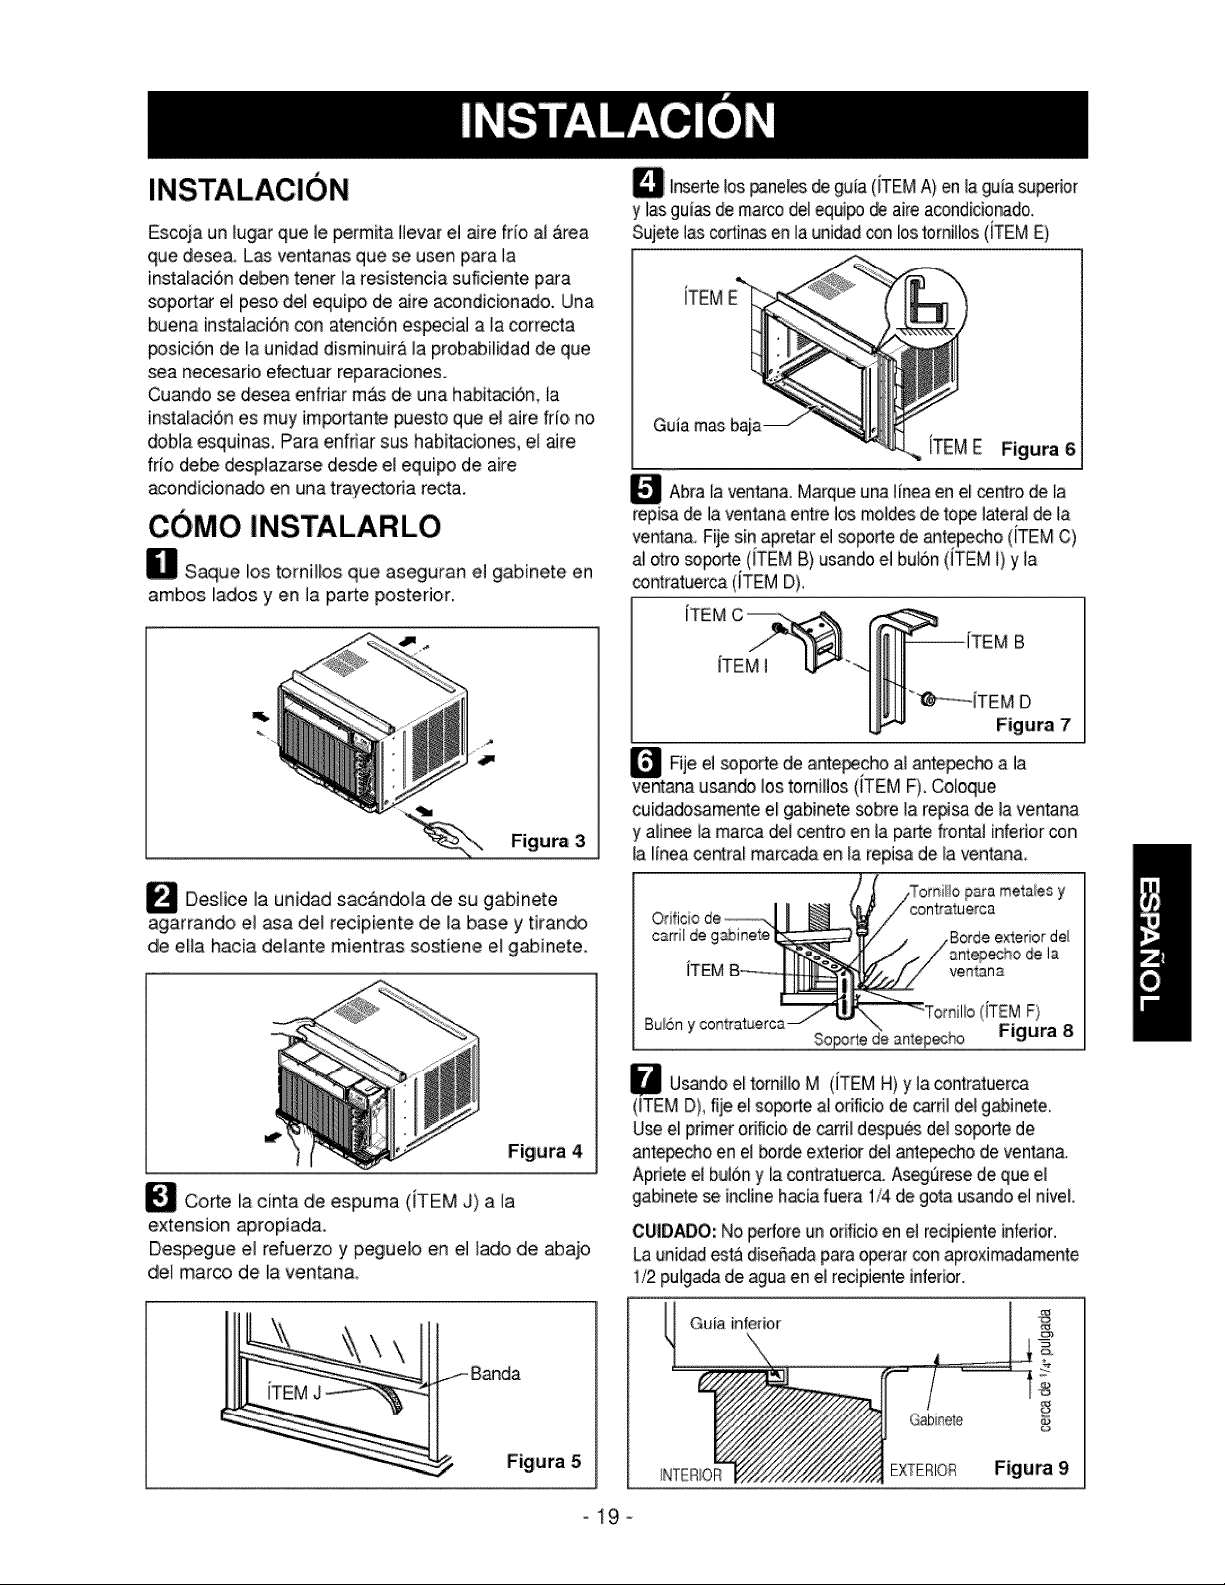
Escoja un _ugarque le permita Ilevar e] aire frio a_area
que dese& Las ventanas que se usen para la
instalad6n deben tener Jares[stenc[a suficiente para
soport_ el peso del equipo de _re acondicionado. Una
buena [nstalad6ncon atend6n es_cia] a la correcta
posici6n de la unidad dismJnuir&]a probab[lidad de que
sea necesario efectuar reparadones.
Cuando se desea enfdar mas de una habitad6m Ia
insta_aci6nes muy im_rtante puesto que el aire fr[o no
dobla esquin_. Para enffiar sus habitaciones, el aJre
fifo debe despiazarse desde eEequipo de aire
acond[cionado en una trayectoda recta.
COMO INSTALARLO
_ Saque los tornillos que aseguran el gabinete en
ambos lados yen la parte posterior.
_ DesHce ]a un[dad sacgndoIa de su gabinete
agarrando e] asa del recip[ente de _abase y tirando
de ella hacia deIante mientras sostiene el g_inete.
_ Corte la cinta de espuma (ITEM J) a ]a
extension _ropiada.
Despegue e] refuerzo y pegueb en el _ado de _aio
del marco de la ventan&
Figura 5
Q Inseitelos _nel_ deguia (ITEMA) en laguia supedor
y las gutasde marco del equi_ _ aire acondicionado.
Sujetelas cortinasen la unidad_n lostomillos(iTEM E)
ITEM
Guiamas baja-
iTEME Figura 6
_Abra la ventana.Marqueuna tinea en e[ centrode ia
rep[sede la ventanaentre I_ moldesde tope lateral de la
ventana. Fijesin apretarel soporte de _tepecho (iTEMC)
al otro sopode (ITEMB) usandoel bulon (ITEM l) y la
_ntratuerca (iTEM D),
ITEM
ITEM I
Rje el soporte de ante_clho al ante_c_ a la
ventana usando los tomillos (ITEM F). Coloque
cu[dadosamente e_gabinete _bt_ la re_ de la ventana
y alinee la marca de__ntro en la parte frontal infedor con
_alfnea central marcada en la repisa de la ventan&
para metales y
t'atuerca
de/
antep_ho de la
ventana
(iTEM F)
Bul6nycontratuerca ' Figura 8
So_rte de antepecho
U Usando e_tornillo M (iTEM H) y la contratuerca
(ITEM D), fije el soporte al or[f[c[o de _rfil del gabinete,
Use el primer orificio de earth despu_ del so_orte de
ante_cho en el _rde exterior del antepecho de ventana.
Apriete el bulon y ia contratuerca. Aseg_rese de que.e_
gabinete se incline hacia fuera '1/4de gota usando el nivel.
CUIDADO:No perforeun orificioen el recip[enteinferior.
Laun[dad_ta diseSadaparaoperar_n aproximadamente
1/2 pulgadade aguaen el recipienteinferior.
8
Gabin_e
iNTERIOR EXTERIOR Figura 9
-19-
_Tire del marco inferiorde ]ave_ana hacia abajo
detras de la gu[a supedor hasta que se encuentre[a guia
con el marc4),
NOTA:
• Notire de] marco de la ventanatan hacia abajoque
restHnjael mov[mientode ]ascorredera& Fije el
ga_nete a la rep[sa de [a ventana atomi]landebs
torni]los (iTEM F) a traves del gabinete en [arepisa de
]a ventana.
• Elgabinete de_ instalarse1/4 de gota de el nivel, hecia
abajo y hacia fuera,
de
e_um_
Gabinet
En_adre
_rtina
ITEMF
Figura 10
_ Extienda el panel hasta ]]enar eEhueco.
Fije cada panel guJa en el marco de la ventana usando
dos tomiHos (iTEM G). (Figura 11)
ITEMG
Guide
Figura 11
_Se debe instalar el asa antes de fijar el ffente
decorativo. (Figura 12)
G
Figura 12
DREANJE
En la p,_te posterbr de la unidadde Nre ac_dicbnado hay
un orificio de drenaje. _le_[o_ un metodo de drenaje
seg_nlassiguientesi_truc-cb_s:
• Saq_ de_red#ente de base_agomadelorificb.
•Conecte una rra_era de drenajede 9/16° de pulgadade
diametroi_rr.e a_tubo dedren_e_m<) _ mue_r&
• Conecteun _ de tu_ de 9/16"de _Jlgadade d_metro
interne al tubo de drenaje, conecte _guidamente una
manguera de dren_e de 9/16" de pulgada de d[ametro
intemoal _do del _bo como se mues_a.(Elequipodeare
acondidor_donovienecon unarrar_uera de dre_e.)
' I
Tubo _ _ Tubo de
drena
!,
Manguera
de drenaje Manguera de drenaje
Figura i3
_ Des]ice el chasis hacia el interior del gabinete.
(Figura 14)
CUIDADO: Con fines de seguridad vue,_vaa
instalar los tornHlos en los ]ados del gab[nete,
Tornilb
Cord6n de
Tomi[llo
el_ctri_ Figura 14
Corte _a junta herm6tica de espuma([TEM K)
para que tenga la iongitud apropiada e inserteia
entre emmarco superior y el mar_ inferior de _a
ventana. (Figura i5)
Figura 15
Ajuste el asa antes de fijar el frente decorativo.
(Figura 16)
Enderence el kit de ventiLacion _mo se indica,
halando hacia debajo de la parte <_:_.I_evando]a en ]a
linea horizontal _n ]apa_e @,
- 20 -
INSTALAC|ON FRONTAL
Instale Ia rejil_afrontal con el gabinete de la
siguiente manera:
• Tire de ia rejilla frontaJ hacia abajo desde la parte
superior demgabinete, (Figura 17)
• Empuje las puntas de la rejilta frontal hacia el
gabinete para insertar las Fengetas de ta rejilla
dentro de1gabinete, (Figura 17)
• Abra la rejHlade entrad& (Figura 18)
° Apriete el tomillo (iTEM E) a traves de la rejilla
frontal fij&ndolo al recipiente de base (Figura 18)
° Cierre la rejilla de entrada, (Figura 19)
Instalaci6n frontal
Figura 17
ITEM
Instalaci6n frontal
Figura 18
Instalaci6n frontal
Figura 19
SI EL ACONDIClONADORDEAIREESTABLOQUEADO
POREL MARCOOELACONq"RAVENTANA
* Si la contraventanainterflere,fiie unlistsn de madera de
2" _ ancho al alfeizarinterior de laventan& que
atravie_ _aanchura total _1 allfeizar.El list6nde
madera debe _r suficientementegrue_ paa levar_ar
la a_ura del alfeizar de la ventana de tal manera que la
unidad pueda set instalada sin fa interfereneiadel marco
de la contraventana. Yea _aFigura20,
La _rte su_rior del listdn _ madera debe ser
aproximadamente 3/4" mas alto que e_marco de la
contraventana o el list6n de madera (flJera de la casa}
para que el 'vapor emanado de la unidad pueda drenar
adecuadamente hacia el exterior,
• Insta_eun _undo liston de madera (de aproximadamente
6" de largo y 1" de ancho y del misn'e grosor del primer
Iiston) en el centro de_alfeizar exterior nivelado con la
parte _terior del a_feizar interior, Atornitle los soportes L
entre _afaj& Esto levanta_ el soporte L como _ rnuestra
en la Figura 20,
1 1/2_ rain
La ELIMINACION DE la VEI'#T'ANA
• Apague el acondicionador aereo.
• _ffe e_grille anterior. VeaCOMO A REEMP_A EL GRILLE
ANTERIOR. Refierasea _gina 37.
• Destomil_ el tomilb de_iado que usted instal6 en el Paso 12.
• Oesliceel _ondicionador a6reo fuera del g_inete, TEN_
CUJDADOno A la GOTA, Tenga en Io firmemente la malera
entera que desHzafuera Una vez quRado,Io paso seguddad
fuera de la manera.
• @JReel par_tesis L del marco de ventana y el se_lode banda
entre eEwindow&
• DestomiHelas oortJnasdel lado del marco de ventana,
D_lelos apoyan a los ladosdel g_inete,
• _ite eltomiliocor_d_r gabinetealaifeizaiinterionTengacuidado
no a perrnitb que_b;nete tallara unaveztornillossequitan,
• _ite gabinete de a_ir de ventan&
• Col_ue el acondicbnador aereo en el gabinete Vuelva a
instahr los tornillos del lado y Gril_ Anterior,
, Col_ue la unidad y t_a fer[eteria de h a_mblea en el
cartonaereo del envio del acondicbnador, y en h tienda en
limpia,seca el lugar.
• El aire acondicionado del que se habla en este
manual afirma _ligro de peso excesivo,
Dos o m_ personas se requiere para mover e
insta_arla unidad. Para evitar heridas o
agotamlento, use tecnicas apropiadas para
levntar y mover la unidad.
° N manejar la unidad_tenga cuidado para evitar
cortarse con las alertas met&licas afiladas que
est_n ,enlos serpentines frontal y posterior.
° A_gurese que el aire acondicionado no se
caiga durante _ainsta_acion.
-21 -

COMO Y POR QUE
Su equipo de aire acondicionado de habitaci6n
brinda _assiguientes funciones para hacer que ia
vida en climas c&iidos sea m,is confoRabie:
• Enfda y hace circular e_aire por la habitacidn
• Disminuye _ahum_ad eHminando la humedad
excesiva.
• Filtra el polvo, el sucio y algunas impurez:as
transportadas en el aire de] clima veraniego.
El equipo de aire acondicionado reaiiza estas
funciones haciendo pasar el aire de] medio
ambiente a traves de un fi_tro que atrapa las
particu[as de polvo y sucio. E] aire pasa entonces
por un serpentin de enfdamiento que refrigera el
aire y elimina el exceso de humedad. El mismo aire
regresa entonces al enfria_r, secador y limpiador
demaire del ambiente. La humedad extraida del aire
ambiente es Iievada al exterior y evaporada.
Su aire acondicionado est& dise_ado para operar y
suministrar una enorme potencia de enfriamiento.
SONIDOS NORMALES Figura 21
Adem&s de ios sonidos regulates del motor del
ventilador y el compresor que sa]en de su equilpo
de aire acondicionado, usted escuchar& de vez en
cuando un sonido meL_lico. Este sonido es
producido por la humedad que es r_ogida deL aire
en e_ambiente yes ]anzada contra el venti_ador del
equipo de aire acondicionado. Esto es algo normal
que no debe ser motivo de preocupaci6n. De igual
modo, no se alarme si usted escucha un ]igero
sonido de silbido o borboteo proveniente de su
equilpo de aire acondicionado despu_.s que Io
apag& Estos son ruidos normales del refrigerante.
CAPACIDAD Y TIEMPO DE
FUNCIONAMIENTO
A_decidir cu&l debe ser _acomodidad deseada para el
area que usted quiere enfriar, es im_rtante
determinar el tamaSo correcto de ]a unidad, El tamaSo
adecJaadoes determinado _r el nQmero de metros
cuadrados que tiene el &rea que se desea enfriar, asi
como pot la temperatura interior y exterior y pot la
humedad.
Siempre que la _rga termica del vent#ador este _r
encima de Io normal el equipo de aire acondicionado
de_ funcionar mas tiem_ para mantener ]a
temperatura deseada que u_ed ha seleocionado Bajo
condiciones de una carga termica muy _sada, puede
set necesario que el equipo de aire acondicionado
fundone constantemente para mantener la
temperatura deseada.
En ocasiones, e[ uso de H_GH FAN para hacer circular
el aire pot la habitaci6n hace que el amb[ente sea m&s
confortab_e aun cuando el equipo no este enfdan® el
aire. Mientras m&s tiem_ y con mayor frecuencia
funcione el equi_ de aire acondicionado, m&s
electricidad consumira y mayores ser&n los costos de
SU USO.
El modemo compresor de gran efidencia puede
producir un ruido agudo de murmuHoo un ruido
de pulsaci6n que viene y se va.
-Vibraciones de
la unidad
La unidad puede
vibrar y hacer ruido
debido a la deficiente
construcd6n de la
par_ o Ia ventana.
Usted puede
escuchar el
movimiento del aire
proveniente del
ventilador
Usted puede escuchar gotas de agua que caen
sobre el condensador causando un sonido
metalico o un sonido de cha_uido.
Figura 21
- 22 -
USO DEL EQUIPO DE AIRE
1 15 6 5
4 32 714
11 I2 !0 13 16
Figura 22
1, Gabinete
2 Deflator veRical
de aire
3, Deflector horizontal
de aire
4, Toma de aire
5. Filtro del aire
6,,ParriHa frontal
7, Tablero de control
8, Corddn de
alimentac[dn
el6ctdca
9, Evap_rador
10, Condensador
11, Compresor
12, Recipiente de base
13, Puntal
14, Guia superior
15. Cortina
16, Control remoto
Para reducir el riesgo de incendio,
descargas el6ctrica o lesiones personales, _ealas
IMPORTANTES INSTRUCCIONES DE
SEGURIDAD antes de operar este aparato.
Para comen_r a utili_r el equipo de aire
acondicionado, siga estos pasos:
1. Enchufe el equipo de aire acondicionade. (Para
prevenir riesgos de descargas electficas, no use un
cable de extensidn ni un enchufe adaptador,)
2, Ajuste el extractor de aire en [a _sici6n CERRADA
3, Ajus!e ei control de MODE al mas aito nivel fresh,
, Ajuste el control del ventiladera] mas alto niveL
5, Ajuste las rejillas desviadoras para Iograr un flujo
confortable de aire.
6. Una vez que la hab[taci6n se haya enfriado_ajuste
el control de temperatura TEMP a _agraduaci6n
que usted considere mas c_nfortaHe.
NOTA: Si se apaga emaire acondicionado, espere 3
m[nutos antes de volver a encendeflo. Esto permite
que se estabiiice la presiSn dentro dem_mFesor, Si
no sigue estas instrucciones, el equipo _dria
funcionar con _ca eficiencia.
Si usted mueve el TEMP el control a un warmer,
entonces inm_iatamente espa]da a una colocaci6n
m&s fresca, la unidad apagar&, Espere 3 minutos,
CONTROL DE VENTILACION
El control de ventilaci6n permite que el equipo de aire
acondidonade haga recircular e] aire en el interiorde
la habitaci6n (CLOSE) o saque el aire hacia el exterior
(OPEN). (Figura 23)
• La posici6n CLOSE sirve cuando se desea un
enfr[amiento m&ximo, Tambi@npue_ usarse para
hair recircular el aire sin enffiar ]a habitaci6n
cuando el equi!:g de aire acondicionado se ajusta en
la _sici6n FAN,
• La _sici6n OPEN extrae el aire estancado de la
hab[taci6n y Io expu]sa hacia fuera. El aire fresco es
Hevadohacia el interior _ la habitaci6n a traves de
_ospasajes normales de aire que se haHanen los
hogares.
• La p,osici6n OPEN o CLOSE puede usarse con
cualquier se_ecci6nde ventilador,
PULL OPEN / PUSH CLOSE
(TIRAR PARA ABRIR / EMPUJAR PARA CERRAR)
- 23 -
;iDAD DEL VENTiLADOR
- Carla vez que presione este bot6n, el ajuste es como sigue: {Alto _Baio _Medio _A_o}
DE SEI;IAL
D,E LA TEMPERATURA
• Este boronpuede controlar ]a tem_ratura
de_cuarto autom&ticamente,
La temperatura _ puede ajustar de grado
en grado, desde60°F hasta 86°Fcada 1°F.
(MARCADoR DE ENCENDIDO/APAGADO'
- OPERACION DE PARADA:
, Si la unidad corre, el n_mero de conjuntos de Re]oj de heras
hasta a_,
• ParaENCENDERe]sistemapresio_ el bot6n,
y paraAPAGARLOpresioneel boronotravez.
• Estebo16ntieneprior[dadsobretodoslos otros
_tones,
• CuandoUd,Ioenciende_r pdmeravez, el
sistemaest_en el y la temperaturaes de 7ZF.
. Cada vez que _esione este bx)t6n_cuando e] s[stema eke operant, e] marca_r de tiempo_ _usta_ de la siguiente
manera: 1Hora -_ 2 Horas -_ 3 Horas ......... 12 Horas maxim_.
- OPERACION DE IN]C]ACION:
, Si la unidad est& a_gad& el numero de conjuntos de Re[oj @ horas antes de comienzos de unidad.
, Cada vez que Fesione este _6n, cuando e] sistema este operant, e] ma[cador de tiempo se ajustar_ de la siguiente
manera: 1Hera -, 2 Horas -_ 3 Horas ......... 12 Horas m_imas.
MODO
- Cado vez que presione este boron, cambiara entre COOL(FRESCO), ENERGY SAVER(ECON6M_CO)
y FAN(VENTILADOR)
- AHORRADOR DE ENERGiA:
• E[ ventiiador se detiene cuando el compressor no sigue enfriando.
Aproximadamente _da 3 minutos el ventilador se encender&, y necesit_a vedficar la temperatura del
cuarto para saber si es necesario m_s enffiamiento.
CONTROL DE LA DIRECCION
La direcciOn horizontal del aire es ajustada rotando
[a pa]anca vertical hacia la derecha o hacia ]a
izquierda. (Figura. 24)
CONTROL DE DIRECCION VERTICAL DEL AIRE
La direcci6n vertical de] aire se ajusta moviendo la
reji_la horizontaE hacia delante o hacia atr&s
(Figur& 25)
-igura 24
Figura 25
- 24 -
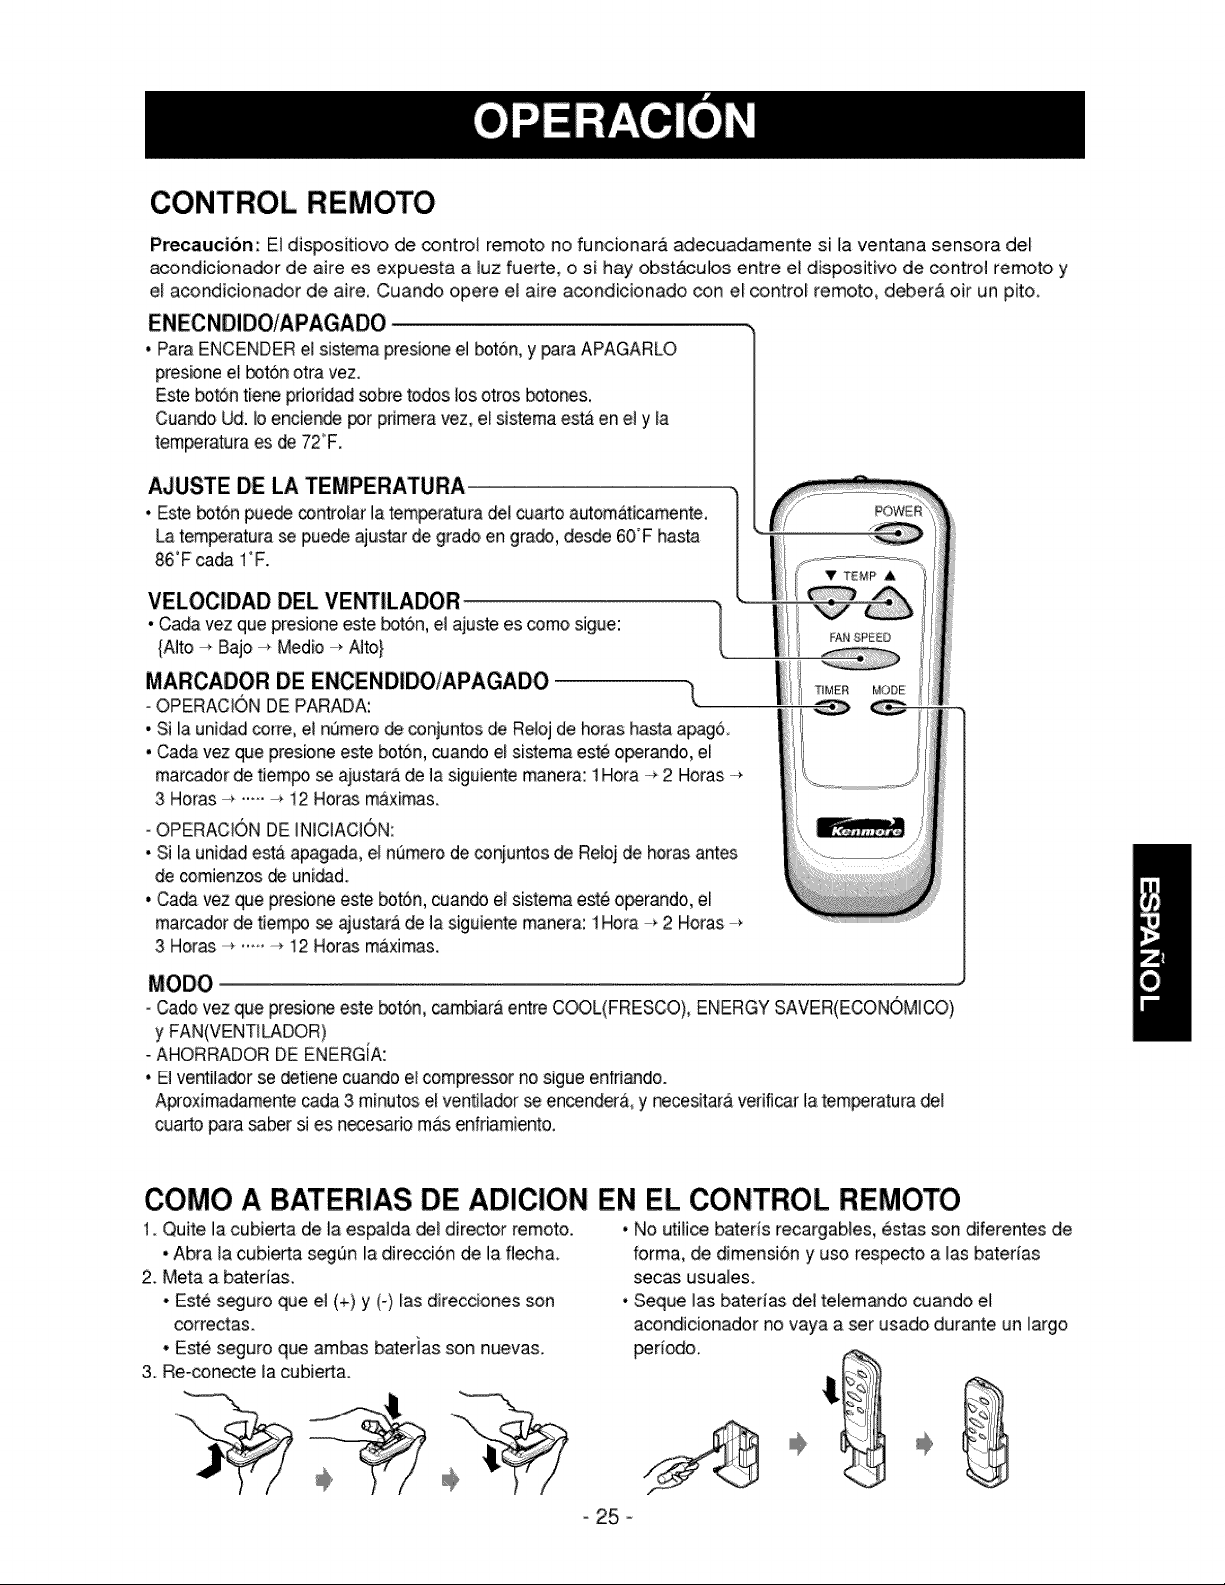
CONTROL REMOTO
Precaucibn: El dispositiovo de _ntrol remoto no funcionar& adecuadamente si ta ventana sensora del
a_ndicionador de 8ire es expuesta a luz fiJerte, o si hay obst&culos entre el dispositivo de control remoto y
eJacondicionador de aire. Cuando opere e_aire acondicionado con e_contro_ remoto, deber_ oir un pito.
ENECNDIDO/APAGADO
,i Para ENCENDER,eJsistema presioneel bot6n, y para APAGARLO
presione et _t6n otra vez.
Esteboton tiene pdondad sobre todos los otros botones.
Cuando Ud. moenciende por primera vez, e_sistemaest&en el y ta
temperaturaes de 72'F.
AJUSTE DE LA TEMPERATURA
"1
• Este _tSn pue_ _ntro_ar la tem_ratura deL_arto a_omaticamente.
Latem_ratura se puede _ustar de grado en gracb, desde 60°Fhasta
[
86°F_da I"F.
VELOClDAD DEL VENTILADOR
• Cada vez que presioneeste botsn, el ajuste es como sigue:
{Nto -, Bajo-, Medio -_ ARo}
MARCADOR DE ENCENDIDO/APAGADO -1
=OPERAC!ONDE PARADA:
•.Si la unidad corre,el nt_mero_ conjuntos de Reloj de horas hasta apag&
• Coda vez que presione este boton, cuando el sistema esteo_rando, e_
marcadorde tiempose aiust.ar,_de la siguiente manem: 1Hora 2 Horas
3 Horas-_ ....... 12 Horas m&ximas.
- OPERACIONDE INICIAC!0N:
• Si la unidad estAapagada, eLnumero de conjuntos de Reloj de hor_ antes
de comienzos _ unidad.
• Ca_ vez que presione este bot6n,cuando el sistema est6 o_rando, el
marcadorde tiempo _ ajustan_de la siguiente manera:1Hora _2 Horas
3 Horas ...... ,12 Horas maximas.
- Cado vez que presio_ este bot6n,camHar_ entre C_L(FRESCO), ENERGYSAVER(ECONOMICO)
y FAN(VENTILADOR)
AHORRADORDE ENERGiA:
• El ventila_r se detiene cuando el compressor no sigue entrJando.
AFoximadamente _da 3 minutos el ventilador se encender& y necesitar&vedficar la tem_ratura del
cuarto para saber si es n_esario m_ enfriamiento.
COMO A BATERIAS DE ADICION EN EL CONTROL REMOTO
1. Quite la cubie_a de la espaida _l director remoto.
• Abra ia cubierta seg@nla direcci6n de la fi_h&
2 Meta a bater/as,
• Este s_uro que el (+) y (-) los direcciones son
correctas.
• Este seguro que ambas borer)as son nuevas.
3. Reoconecte _acubie_a.
• No u_[Hicebateris recargables, estas son diferentes de
forma, de dimensi6n y uso respecto a las baterlas
secas usuales,
- Seque ias bateri_ del teJem_do cuando el
acondicionador no vaya a ser usado durante un largo
_riodo.
- 25 -
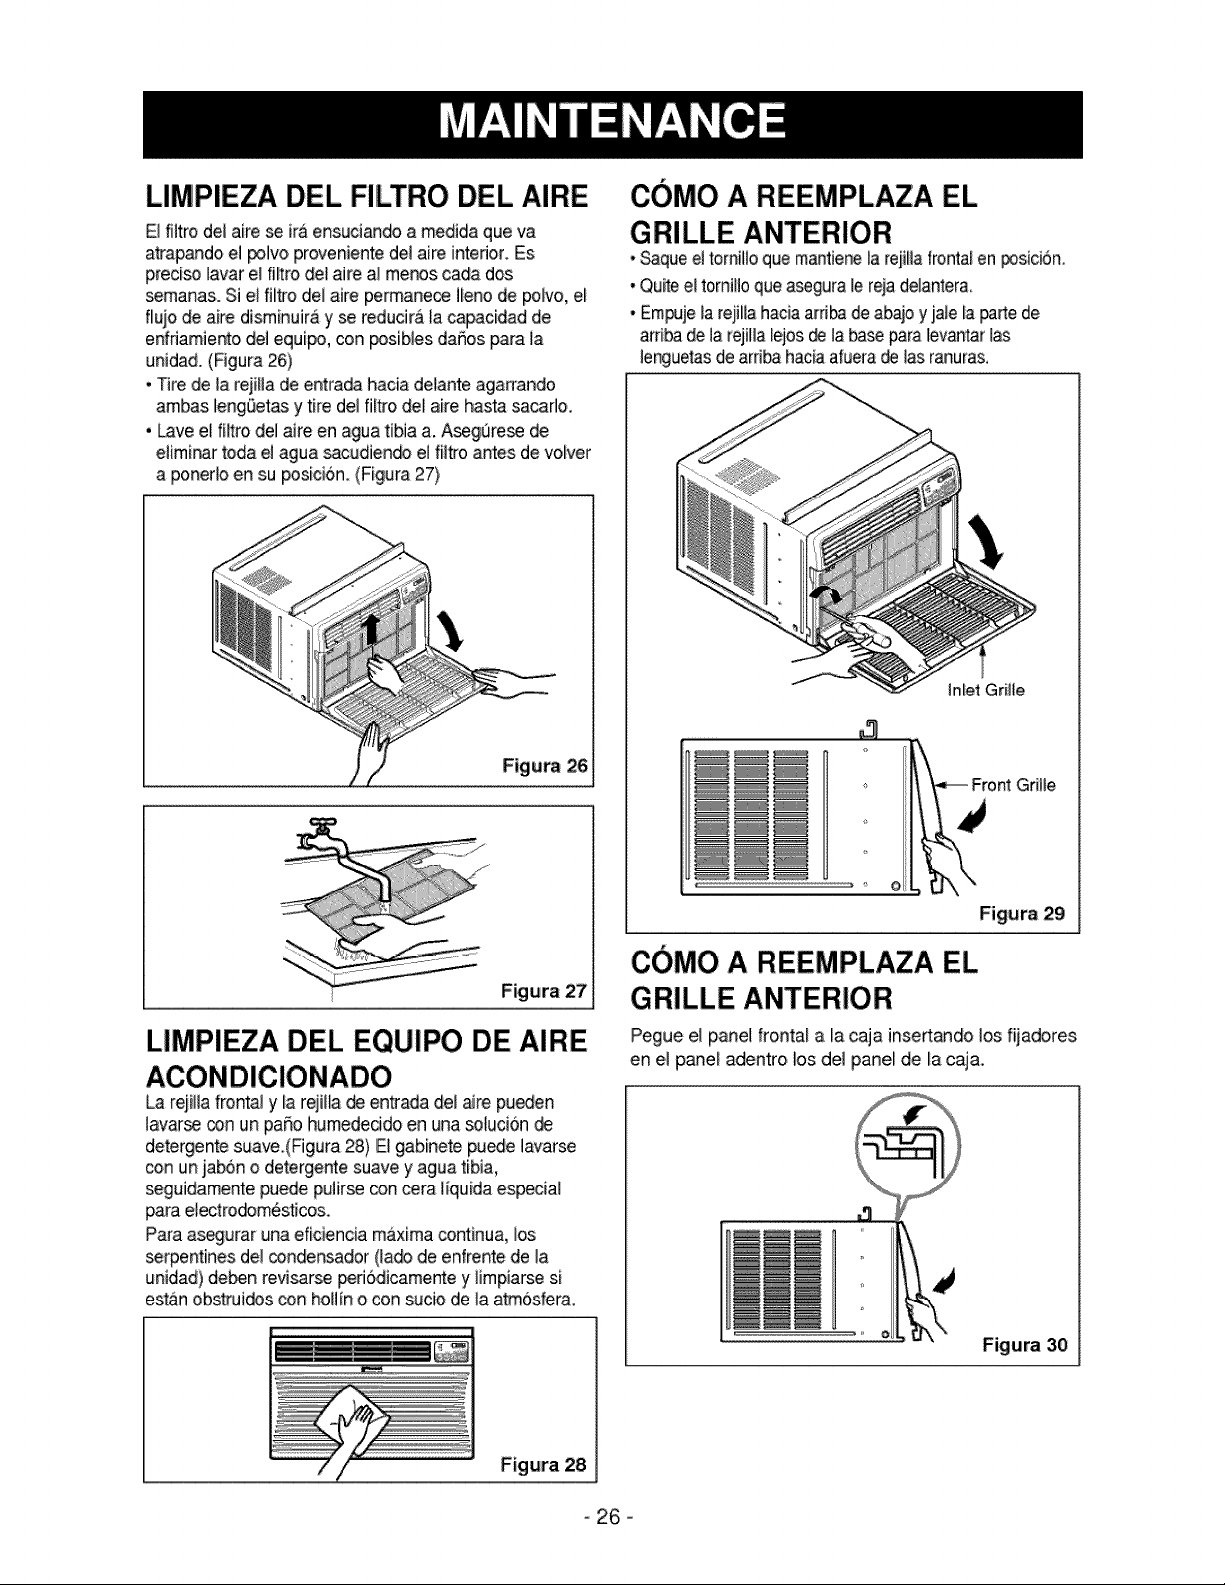
LIMPiEZA DEL FILTRO DEL AIRE
E1fi[tro del aire se ira ensuciandoa medida que va
atrapando el po]vo provenientede1a[re interior. Es
preciso lavarel fi/tro de[ aire al menoscarla dos
semanas. Si e[ filtro de[ aire permane_ N_enode po[vo,eL
flujo de aire disminuir,] y se redudr,] [a capacidad de
enfdamientodol equipo, con pos[blesdaffos para [a
unidad. (Figura26)
• Tire de la reji[lade entrada hacia deiante agarrando
ambasJengSetasy tire dol fi[trode[ aire hasta sacaflo.
• Lave e[ fi_ro do[ aire en agua tibia a. A_gOrese de
elimi_r toda el agua sacudJen_ el filtro antes de vo[ver
a ponerlo en su posici6n. (Figura 27)
Figu_ 26
.............. .j
I,
Figura 27
LIMPIEZA DEL EQUIPO DE AIRE
La rejilla frontal y la rejilla do entrada dol Ere pu_en
lavarse _n un paffo humedecido en una seluci6n do
detergente suave (Figura 28) El gabinete pu_e lavarse
con un jabon o detergente suave y agua tibia,
_guidamente puede pu[irse con cera tiquida especial
para e_ectrodom6sticos.
Para a_urar una eficiencia ma×ima continua, los
serpentines del _ndonsador ([ado de enfrente de la
unidad) dean revi_rse _ri6dicamente y iimpiarse si
estan obstruidos con hoHin o con sucio de [a atm6sfera.
COMO A REEMPLAZA EL
GRILLE ANTERIOR
• Saqueel tomilloque mantiene_arejiHafrontalen posici6n.
• Quitee_tomilloqueaseguralerejadelantera,
• EmpujelarejiHahaciaarribadea_o y jale la _rte de
auiba de la rejilla[ejos _ la ba_ paralevantarI_
lenguetasde arri_ haciaafuera_ las ranuras,
Front Grille
CO'MO A REEMPLAZA EL
GRILLE ANTERIOR
Pegue e[ panel fronta_ a la caja inse_do los fijadores
en el panel adentro los del pane_de la caja.
Figura 30
- 26 -
ANTES DE LLAMAR PARA SERVICIO
Cheque la siguiente lista para asegurarse si en realidad es necesario Ilamar para servicio. Una referencia rapida a
este manual puede evitar una Ilamada para servicio innecesaria.
EL EQUIPO DE AIRE ACONDICIONADO NO FUNCIONA.
Elenchufe no esta.conectadoen la toma de corrientede pared. Conecteel enchufefirmementeen latomade corrientede pared.
Elfusibleesta.quemadoo el Jnterruptorde circuito seha disparado. Reemplacee!fusibledaSadocon unfusible deacoi6nretardadao reajusteel
Jnterruptorde circuito.
Elselectordel ventiladorMODE esta_en la posici6nde OFF. Pongaelselectoren laposicionde COOL.
La unidad se apag6y se volvi6 a encenderdemasiador_ido. Apague launidady espere3 minutosantes de volvera encenderla.
Elcontrol de temperaturaTEMP se ajust6 m&sca.lidoque la Ajusteel Controlde la TEMPa unatemperaturamasfria
temperatura ambiente.
El dispositivo interruptor de corriente est& desconectado. Presione el botSn RESET situado en el enchufe del cable de alimentaci6n
Si el bot6n RESET no permanece activo, suspenda el uso del aire
acondicionado y p6ngase en contacto con un tecnico de servicio
cualificado.
EL AIRE DE LA UNIDAD NO SALE BASTANTE FRJO.
El selectora una posici6nm&s LOW COOL.
Coloque el control de TEMPERATURA en un numero m&s alto.
La temperatura ambiente esta por debajo de los 70° F (21°C)
Eltubo sensor de temperatura est&tocando el serpentin frio que est&
situado detr&sdel filtro del aire.
ELAJREACONDICIONADOENFRJA,PEROLAHABITACIONSESIENTEDEMASIADOCALIDA;SEFORMAHIELOENELSERPEN_'NDEENFRIAMIENTO
DETRASDELPANELDECORATIVOFRONTAL.
Latemperaturaambienteen elexteriores_ pordebajode los700F(21°C).
Gireel selector a una posici6n HIGHCOOL.
Ajusteel Controlde laTEMP a unatemperatura m&s fria.
No puede producirseel enfriamiento hasta que latemperatura ambiente suba
por encima de los 70° F (21°C).
Enderece el tubo aleja.ndolodel serpentin.
El filtrodel aire puede estar sucio.
Elcontrol de temperatura se ajust6 demasiado frio para el
enfriamiento nocturno.
Para descongelarel serpentin Ileveel selectora la posicionFAN.
Seguidamente,gireel controlde temperaturaTEMPen el sentidode lasagujas
delreloj paraIlevarlohasta una9raduaci6nm&scalida.
Umpieel filtro. Consultela secci6n "Mantenimiento".Para descongelar,Ileve el
selectora la posicion FAN.
Para descongelarla bobina, ajusteel MODO a FAN (Ventilador)o "Frio alto"
conel control TEMPa una temperatura m_.scaJida.
ELAIREACONDICIONADOENFRJA,PEROLAHABITACIONSESIENTEDEMASIADOCALIDA;NOSEFORMAHIELOENELSERPENTINDE
ENFRIAMIENTODETRASDELPANELDECORATIVOFRONTAL..
Elfiltrodelaireest,.sucioconIo quese restringeelflujo del aire. Limpieel fi_rodel aire.Consultela secci6n"Mantenimiento".
Elcontrolde temperaturaTEMPsegradu6en posici6ndemasiadodtlida. Ajustee! Controlde la TEMP a unatemperaturam&sfria.
La partefrontalde la unidadest,. bloqueadaporcortinas,persianas, Elimineel bloqueoenfrentede la unidad.
mueblesetc.que restringenla distribuciondel aire.
Laspuertas,ventanas,rejillasde calefaccion,etcetera,esta.nabiertascon Cierrelas puertas,ventanas,rejillasde calefaccion,etcetera.
Io quese permiteelescapedel airefrio.
La unidadacabade encenderseen una habitaci6ncaliente. Permitaquetranscurraun poco m&sdetiempo paraeliminarel "caloralmacenado"
en las paredes,eltecho, el pisoy los muebles.
EL EQUlPO DE AIRE ACONDICIONADO SE APAGA Y SE ENCIENDE R.&PIDAMENTE.
I Latemperaturaexteriores extremadamentecaliente. I Ajusteel MODOen lavelocidadALTApara hacerqueel aire pase por labobina
I
de refrigeraci6nm&sr@ido.
SE ESCUCHAN RUIDOS CUANDO LA UNIDAD EST.& ENFRIANDO.
t El s°nid° delventilad°r alch°car contrael aguade' sistemadeeliminacionde humedad. [ Est° es n°rmalcuand° la humedadesalta' Cierrelas puertas'ventanasyrejillasdecalefacoion.
Vibraci6nde la ventana;instalaci6ndeficiente. Lealas instruccionesde instalaci6no consulteal instalador.
EL AGUA GOTEA DENTRO DE LA HABITACION CUANDO LA UNIDAD EST.& ENFRIANDO.
I Instalaci6ninadecuada. I Inclineligeramenteelequipodeaireacondicionadohacialaparteexteriorparapermitirel
drenajede agua.Lea as nstrucconesde nstaJacbno consuteal nstaJador.
EL AGUA GOTEA AFUERA CUANDO LA UNIDAD EST.& ENFRIANDO.
La unidadesta extrayendograndescantidadesde humedadde una I Estoes algo normaldurantelos diss excesivamentehOmedos.
habitaci6nhomed&
I
- 27 -

- 28 -

- 29 -

- 30 -
Master Protection Agreements
Congratulations on making a smart purchase. Your new
Kenmore _ product is designed and manufactured for
years of dependable operation. But like all products, it
may require preventive maintenance or repair from time
to time. That's when having a Master Protection
Agreement can save you money and aggravation.
The Master Protection Agreement also helps extend the
life of your new product. Here's what the Agreement*
includes:
[] Parts and labor needed to help keep products
operating properly under normal use, not just
defects. Our coverage goes well beyond the
product warranty. No deductibles, no functional
failure excluded from coverage--- real protection.
[] Expert service by a force of more than 10,000
authorized Sears service technicians, which
means someone you can trust will be working on
your product.
[] Unlimited service calls and nationwide service,
as often as you want us, whenever you want us.
[] "No-lemon" guarantee - replacement of your
covered product if four or more product failures
occur within twelve months.
[] Product replacement if your covered product can't
be fixed.
[] Annual Preventive Maintenance Check at your
request - no extra charge.
[] Fast help by phone- we call it Rapid Resolution
- phone support from a Sears representative on all
products. Think of us as a "talking owner's manual."
[] Power surge protection against electrical damage
due to power fluctuations.
[] $250 Food Loss Protection annually for any food
spoilage that is the result of mechanical failure of
any covered refrigerator or freezer.
[] Rental reimbursement if repair of your covered
product takes longer than promised.
[] 10% discount off the regular price of any non-
covered repair service and related installed parts.
Once you purchase the Agreement, a simple phone
call is all that it takes for you to schedule service.
You can call anytime day or night, or schedule a service
appointment online.
The Master Protection Agreement is a risk free purchase.
If you cancel for any reason during the product warranty
period, we will provide a full refund. Or, a prorated refund
anytime after the product warranty period expires.
Purchase your Master Protection Agreement today!
Some limitations and exclusions apply.
For prices and additional information in the U.S.A.
call 1-800-827-6655.
* Coverage in Canada varies on some items. For
full details call Sears Canada at 1-800-361-6665.
Sears Installation Service
For Sears professional installation of home appliances,
garage door openers, water heaters, and other major
home items, in the U.S.A. or Canada call
1-800-4-MY-HOME ®.
Contratos de proteccibn maestra
Felicitaciones por su compra inteligente. Su nuevo producto
KenmoreC_est_ disefiado y fabricado para muchos afios de
operaci6n confiable. Sin embargo, al igual que todos los
puede requerir de mantenimiento o reparaci6n productos,
preventivas de vez en cuando. Es ahi cuando el contrato de
protecci6n maestra le puede ahorrar dinero y molestias.
El Contrato de protecci6n maestra tambi_n le ayuda a ampliar
la vida de su nuevo producto. Lo siguiente es Io que se incluye
en el oontrato*:
[] Piezas y mano de obra necesaria para ayudar a mantener
los productos en funcionamiento adecuado bajo un uso
normal, no s61odefectos. Nuestra cobertura va mucho
mas alia de la garantia del producto. Sin franquicia, ni
falla funcional excluidos de la cobertura-- proteccibn real.
[] Servicio experto otorgado por un grupo de m_s de 10,000
t_cnicos de reparaci6n autorizados de Sears, Io que significa
que alguien en quien usted conffa trabajar_ con su producto.
[] Servicio ilimitado a domicilio en toda la nacion, cuantas
veces quiera, cuando Io necesite.
[] Garantfa contra productos defectuosos reposici6n de su
producto cubierto si ocurren cuatro o m_s fallas del producto
dentro de doce meses.
[] Reposici6n del producto si el producto cubierto no puede
repararse.
[] Revisibn anual de mantenimiento preventivo a su
solicitud - sin cargo adicional.
[] Ayuda telefbnica r_pida- Io Ilamamos resolucibn r_pida
- asistencia telef6nica de parte de un t_cnico Sears sobre
todos los productos. Piense en nosotros como un "manual
de usuario que habla".
[] Proteccibn contra descargas el_ctricas para dafios
debido a fluctuacionesel_ctricas.
[] Proteccibn por p_rdida de alimentos de $250 anualmente
por alimentosque se han echado a perder por un mal
funcionamientode refrigeradores o freezers cubiertos por la
garantia.
[] Reembolso por alquiler si la reparaci6n del producto
cubierto toma m_s tiempo del prometido.
[] 10% de descuento del precio comSn de cualquier
reparaci6n no cubierta y piezas instaladasrelacionadas.
Una vez que adquiera el contrato, s61onecesita realizar una
Ilamada telef6nica para programar el servicio. Puede Ilamar a
cualquier hora del dfa o de la noche, o programar la citadel
servicio por Intemet.
El Contrato de protecci6n maestra es una compra libre de riesgo.
Si la cancela por cualquier raz6n durante el periodo de garantfa
del producto, le reintegraremos el dinero en su totalidad.
O un reintegro prorrateado despu_s de que expire la garantfa
del producto, iAdquiera el Contrato de protecci6n maestra hoy
mismo!
Existen ciertas limitaciones y exclusiones.
Para precios e informacibn adicional,llame
al 1-800-827-6655.
* La cobertura en Canada es diferente en algunos
items. Para mas detalles Ilame a Sears Canada al
1-800-361-6665.
Servicio de instalacibn de Sears
Para la instalaci6n profesional garantizada de Sears de
electrodomesticos, dispositivos para abrir puertas de garaje,
calentadores de agua y otros aparatos importantes para el
hogar, en los EE.UU. o Canad_ Ilame al
1-800-4-MY-HOM E_.
-31 -

Your Home
For repair - in your home - of all major brand appliances,
lawn and garden equipment, or heating and cooling systems,
no matter who made it, no matter who sold it!
For the replacement parts, accessories and
owner's manuals that you need to do-it-yourself.
For Sears professional installation of home appliances
and items like garage door openers and water heaters.
Call anytime, day or night (U.S.A. and Canada)
www,sears,com www,sears,ca
For expert home solutions advice: www.managemyhome.com
Our Home
For repair of carry-in items like vacuums, lawn equipment,
and electronics, call or go on-line for the location of your nearest
Sears Parts & Repair Service Center
1-800-488-1222 (U.S.A.) 1-800-469-4663 (Canada)
Call anytime, day or night
www,sears,com _w,sears.ca
To purchase a protection agreement on a product sewiced by Sears:
i -800-827-6655 (U.S.A.) 1-800-36i -6665 (Canada)
Para pedir servicio de reparaciSn
a domicilio, y para ordenar piezas:
1-8_-SU-HOGAR ®
(1-888-784°6427)
Au Canada pour service en frangais:
1-800-LE-FOYER Mc
(1-800-533-6937)
www.sears.ca
/ TM
® Registered "[ra®m_k, 'Trademark / _ Set€ice Mark of Sears Brands, LLC
M
® Mar_ Reg_trada /rM Marca de Fabrica / s Mar_ de Servicie de Sears Brands, LLC
MO
_c M_que de commerce _ Marque d6_s_e de Se_s B_lds, LLC
© Sears Brands, LLC
Part No,: 3828A21007P