Owner's Guide
ManualClean
Gas Range
with ElectronicControl
For Freestanding and Slide-in Ranges
IMPORTANT SAFETY INSTRUCTIONS ......... 1-4
CLOCK AND OVEN CONTROL .................. 5
TABLE OF CONTENTS |
|
Preheating .................................. 11
Oven racks .................................. 12
Common baking problems .................... 13
Broiling and chart ............................ 14
USING THE COOKTOP ....................... 6-9
Pilotless ignitionsystem ....................... 6
About the surface flame ........................ 6
Conventional surface burners, if equipped ........ 7
Sealed surface burners, if equipped ............. 7
Lightingsurface burners ....................... 8
Adjusting the flame ............................ 8
Selecting flame size ........................... 9
Canning ..................................... 9
Cookware considerations ...................... 9
USING THE OVEN .......................... 10-14
Oven characteristics .......................... 10
Pilotless ignition ............................. 10
Oven vent ................................... 10
Oven burner ................................. 10
Cooling fan, if equipped ....................... 10
Use of aluminum foil .......................... 10
How to set oven ............................. 11
CARE AND CLEANING CHART .............. 15-17
MAINTENANCE ............................ 18-19
Cooktop .................................... 18
Burner grates ................................ 18
Oven light, if equipped ........................ 18
Oven door .................................. 19
Oven window ................................ 19
Oven bottom ................................ 19
SERVICE INFORMATION .................... 20-22
Storage drawer .............................. 20
Leveling legs ................................ 20
Proportionalvalve adjustment ................. 20
Electrical connection ......................... 20
Troubleshooting chart ..................... 21-22
How to remove range for cleaning and servicing . 22
WARRANTY .................................. 23
INSTALLER Please leave
this manual with this appliance.
and keep this manual for,future
reference.
Model Number:
Serial Number:
DateofPurchase'.
FOR CUSTOMER ASSISTANCE CALL 1-800-688-1120 8113P196-6(
(10-98-00
Read all instructions before using this appliance.
Thank You for purchasing our cooking
appliance. To help you obtain the maximum in cooking
satisfaction, we offer these suggestions:
Read this manual before using the appliance.
[]_=Review all safety and caution instructions.
0_= Review the Troubleshooting Chart on
pages 21 and 22 if service becomes necessary.
Include the model and serial numbers of your
appliance when requesting service.
° Proof of purchase such as sales receipt
will be needed for warranty service.
{]Z3_You can contact us at:
Maytag Appliances Sales Company
Attn: CAIR Center
P. O. Box 2370
Cleveland, TN 37320-2370
1-800-688-1120
In our continuing effort to improve the quality and
performance of our cooking appliances, it may be
necessary to make changes to the appliance without
revising this manual.
WARNING: If the information in this
manual is not followed exactly, a fire or
explosion may result causing property
damage, personal injury or death.
- Do not store or use gasoline or other
flammable vapors and liquids in the
vicinity of this or any other appliance.
- WHAT TO DO IF YOU SMELL GAS:
• Do not try to light any appliance.
. Do not touch any electrical switch; do
not use any phone in your building.
• Immediately call your gas supplier
from a neighbor's phone. Follow the
gas supplier's instructions.
• If you cannot reach your gas supplier,
call the fire department.
- Installation and service must be
performed by a qualified installer, service
agency or the gas supplier.
WARNING
• ALL RANGES CAN TIP AND
CAUSE INJURIES TO PERSONS.
INSTALL ANTI-TIP DEVICES
PACKED WITH RANGE.
FOLLOW ALL INSTALLATION
INSTRUCTIONS.
WARNING: To reduce the risk of tipping of the
appliance from abnormal usage or by excessive loading
of the oven door, the appliance must be secured by a
properly installed anti-tip device.
If the range is moved from the wall, be sure the anti-tip
device is engaged when the range is replaced. Look
underneath range to verify that one of the rear leveling
legs is properly engaged in the bracket slot.
The anti-tip device secures the rear leveling leg to the
floor when properly engaged. Also, be sure the range is
properly re-installed.
IMPORTANT SAF_ INS_UC_S
The following instructions are based on safety
considerations and must be strictly followed to eliminate
the potential risks of fire, electric shock, or personal injury.
Have your appliance installed and properly grounded by a
qualified installer according to the installation instructions.
Have the installer show you the location of the gas shut off
valve and how to shut it off in an emergency.
Always disconnect power to appliance before servicing.
To ensure proper operation and avoid possible injury or
damage to unit do not attempt to adjust, repair, service, or
replace any part of your appliance unless it is specifically
recommended in this book. All other servicing should be
referred to a qualified installer or servicer,
Be sure all packing materials are removed from the
appliance before operating it.
Keep area around appliance clear and free from
combustible materials, gasoline, and other flammable
vapors and materials.
If appliance is installed near a window, proper precautions
should be taken to prevent curtains from blowing over
burners.
NEVER leave any items on the cooktop. The hot air from
the vent may ignite flammable items and may increase
pressure in closed containers which may cause them to
burst.
Many plastics are vulnerable to heat. Keep plastics away
from parts of the appliance that may become warm or hot.
Do not leave plastic items on the cooktop as they may
melt or soften if left too close to the vent or a lighted
surface burner.
Many aerosol-type spray cans are EXPLOSIVE when
exposed to heat and may be highly flammable. Avoid their
use or storage near an appliance.
To eliminate the hazard of reaching over hot surface
burners, cabinet storage should not be provided directly
above a unit. If such storage is provided, it should be
limited to items which are used infrequently and which are
safely stored in an area subjected to heat from an
appliance. Temperatures may be unsafe for some items,
such as volatile liquids, cleaners or aerosol sprays.
IN CASE OF :FIRE :
Turn off appliance and ventilating hood to avoid spreading
the flame. Extinguish flame then turn on hood to remove
smoke and odor.
Use dry chemical or foam-type extinguisher or baking
soda to smother fire or flame. Never use water on a
grease fire.
If fire is in the oven or broiler pan, smother by closing
oven door.
If fire is in a pan on the surface burner, cover pan. Never
attempt to pick up or move a flaming pan.
NEVER leave children alone or unsupervised near the
appliance when it is in use or is still hot. NEVER allow
children to sit or stand on any part of the appliance.
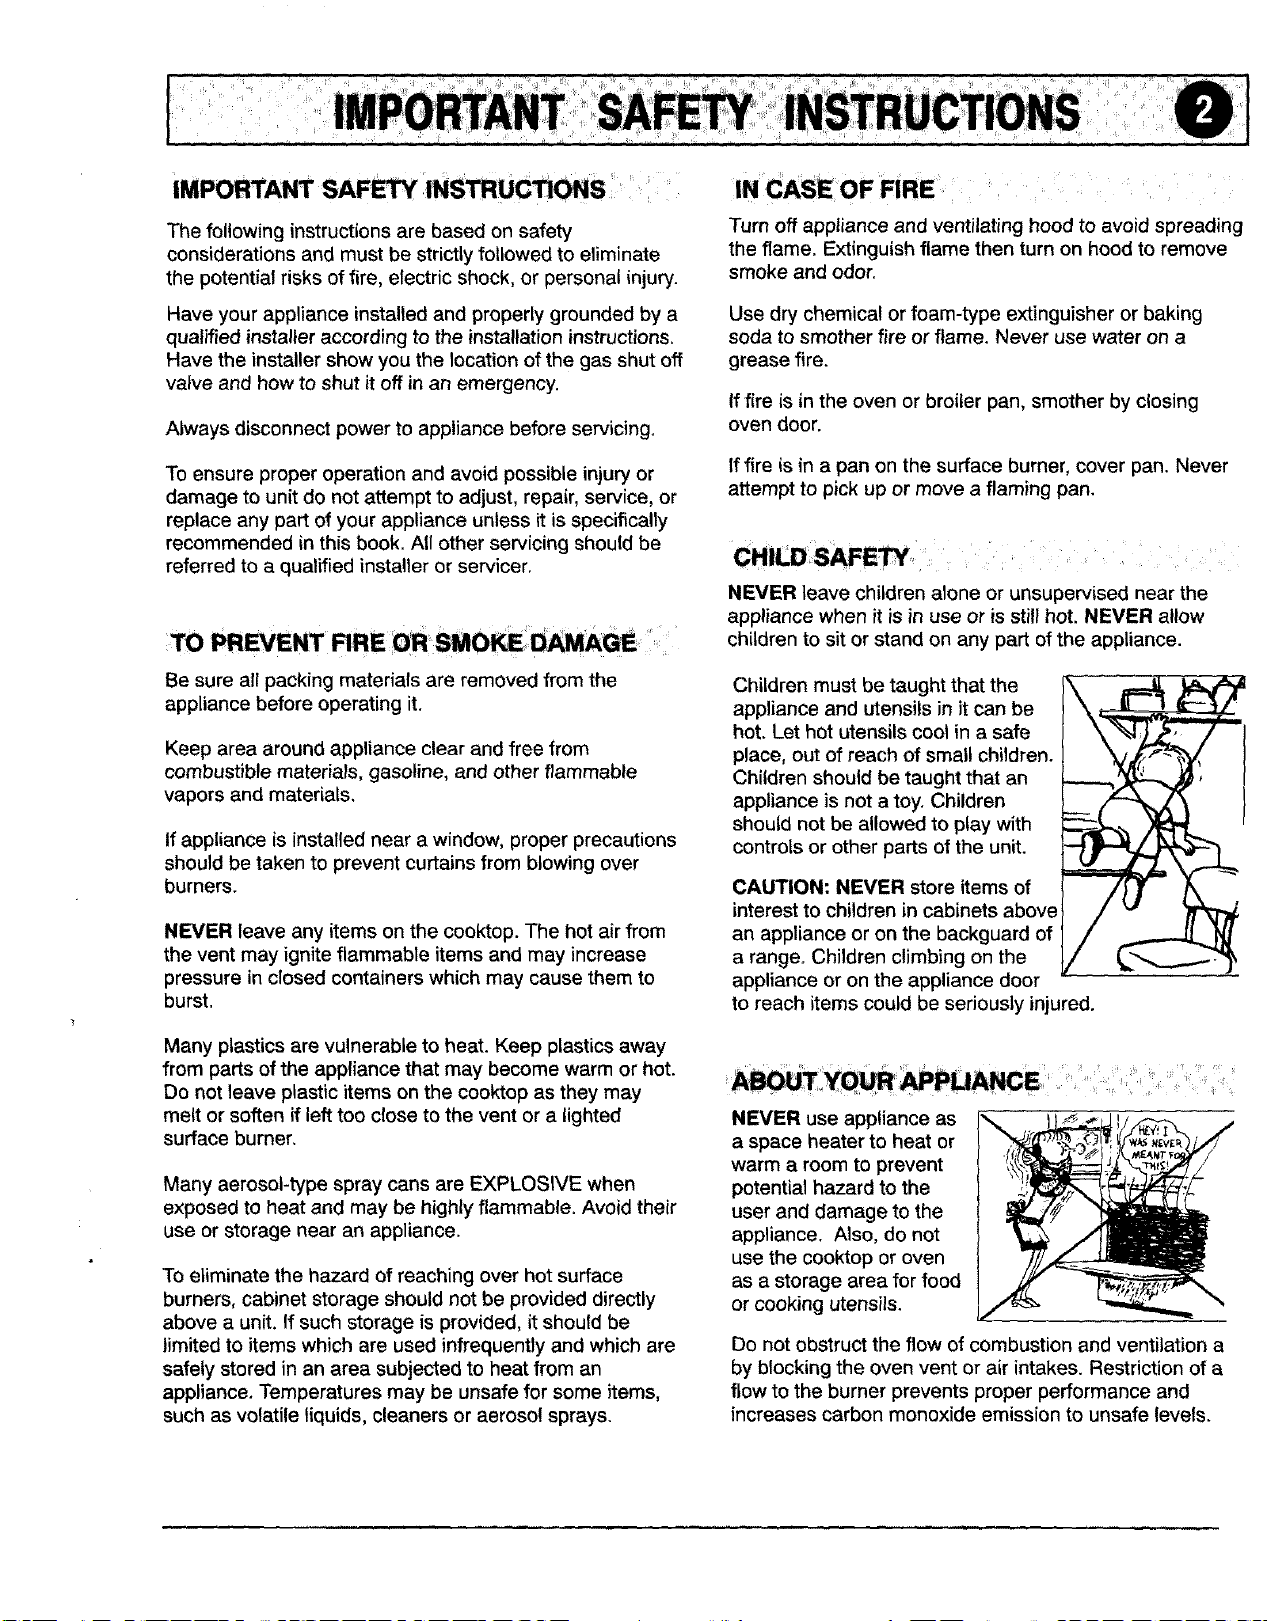
Children must be taught that the
appliance and utensils in it can be
hot. Let hot utensils cool in a safe
place, out of reach of small children.
Children should be taught that an
appliance is not a toy. Children
should not be allowed to play with
controls or other parts of the unit.
CAUTION: NEVER store items of
interest to children in cabinets above
an appliance or on the backguard of
a range. Children climbing on the
appliance or on the appliance door
to reach items could be seriously injured.
NEVER use appliance as
a space heater to heat or
warm a room to prevent
potential hazard to the
user and damage to the
appliance. Also, do not
use the cooktop or oven
as a storage area for food
or cooking utensils.
Do not obstruct the flow of combustion and ventilation a
by blocking the oven vent or air intakes. Restriction of a
flow to the burner prevents proper performance and
increases carbon monoxide emission to unsafe levels.
Avoidtouchingovenventareawhile oven is on and for
several minutes after oven is turned off. Some parts of the
vent and surrounding area become hot enough to cause
burns. After oven is turned off, do not touch the oven vent
or surrounding areas until they have had sufficient time to
cool.
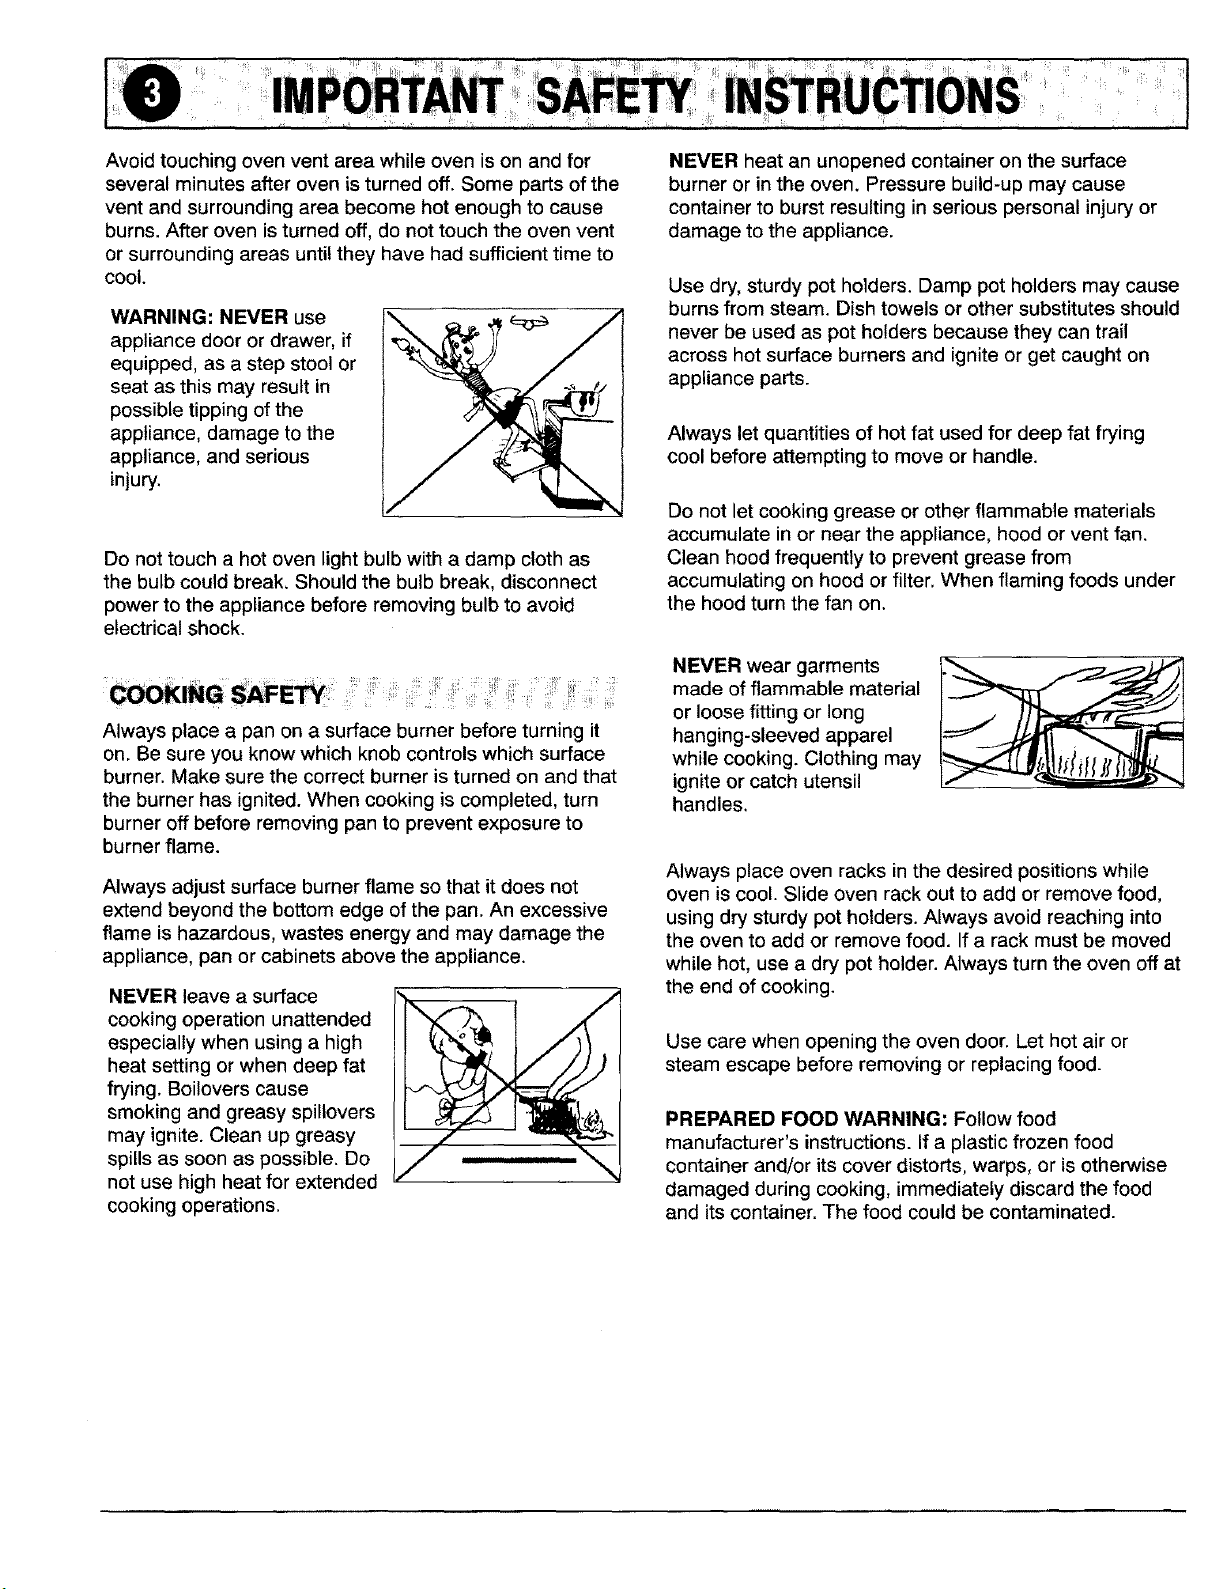
WARNING: NEVER use
appliance door or drawer, if
equipped, as a step stool or
seat as this may result in
possible tipping of the
appliance, damage to the
appliance, and serious
injury.
Do not touch a hot oven light bulb with a damp cloth as
the bulb could break. Should the bulb break, disconnect
power to the appliance before removing bulb to avoid
electrical shock.
Always place a pan on a surface burner before turning it
on. Be sure you know which knob controls which surface
burner. Make sure the correct burner is turned on and that
the burner has ignited. When cooking is completed, turn
burner off before removing pan to prevent exposure to
burner flame.
Always adjust surface burner flame so that it does not
extend beyond the bottom edge of the pan. An excessive
flame is hazardous, wastes energy and may damage the
appliance, pan or cabinets above the appliance.
NEVER leave a surface
cooking operation unattended
especially when using a high
heat setting or when deep fat
frying. Boilovers cause
smoking and greasy spillovers
may ignite. Clean up greasy
spills as soon as possible. Do
not use high heat for extended
cooking operations.
NEVER heat an unopened container on the surface
burner or in the oven. Pressure build-up may cause
container to burst resulting in serious personal injury or
damage to the appliance.
Use dry, sturdy pot holders. Damp pot holders may cause
burns from steam. Dish towels or other substitutes should
never be used as pot holders because they can trail
across hot surface burners and ignite or get caught on
appliance parts.
Always let quantities of hot fat used for deep fat frying
cool before attempting to move or handle.
Do not let cooking grease or other flammable materials
accumulate in or near the appliance, hood or vent fan.
Clean hood frequently to prevent grease from
accumulating on hood or filter. When flaming foods under
the hood turn the fan on.
NEVER wear garments
made of flammable material
or loose fitting or long
hanging-sleeved apparel
while cooking. Clothing may
ignite or catch utensil
handles.
Always place oven racks in the desired positions while
oven is cool. Slide oven rack out to add or remove food,
using dry sturdy pot holders. Always avoid reaching into
the oven to add or remove food. If a rack must be moved
while hot, use a dry pot holder. Always turn the oven off at
the end of cooking.
Use care when opening the oven door. Let hot air or
steam escape before removing or replacing food.
PREPARED FOOD WARNING: Follow food
manufacturer's instructions. If a plastic frozen food
container and/or its cover distorts, warps, or is otherwise
damaged during cooking, immediately discard the food
and its container. The food could be contaminated.
ISAFETYPRECAUTIONSi
7. IN CASEOFFIRE.DO:
a. Turn off heat source and ventila-
tion hood.
b. Smother flames by:
1. Chemical fire extinguisher.
2. Baking soda.
3. Lid cover or cookie sheet.
NOTE:NEVERusewater ona grease fire.
c. Leave burning utensil where it is
sitting. Trying to carry it couldcause
spillage and fire in other areas of
your home or could cause serious
burns.
N
8. DONOTLEAVECHILDREN:
a. Unattended while range or cooktop is in
use,
bo Playing on or near range or cooktop.
Teach children not to play with range
controls. CAUTION:Keepitems of interest
such as toys or treats stored away from
range, backguard, or shelving above
range so a child will not be tempted to
climb upon range to reach such items.
c. Within reach of hot range, hotcooktop or
hot pans.
IMPORTANTPRECAUTIONS
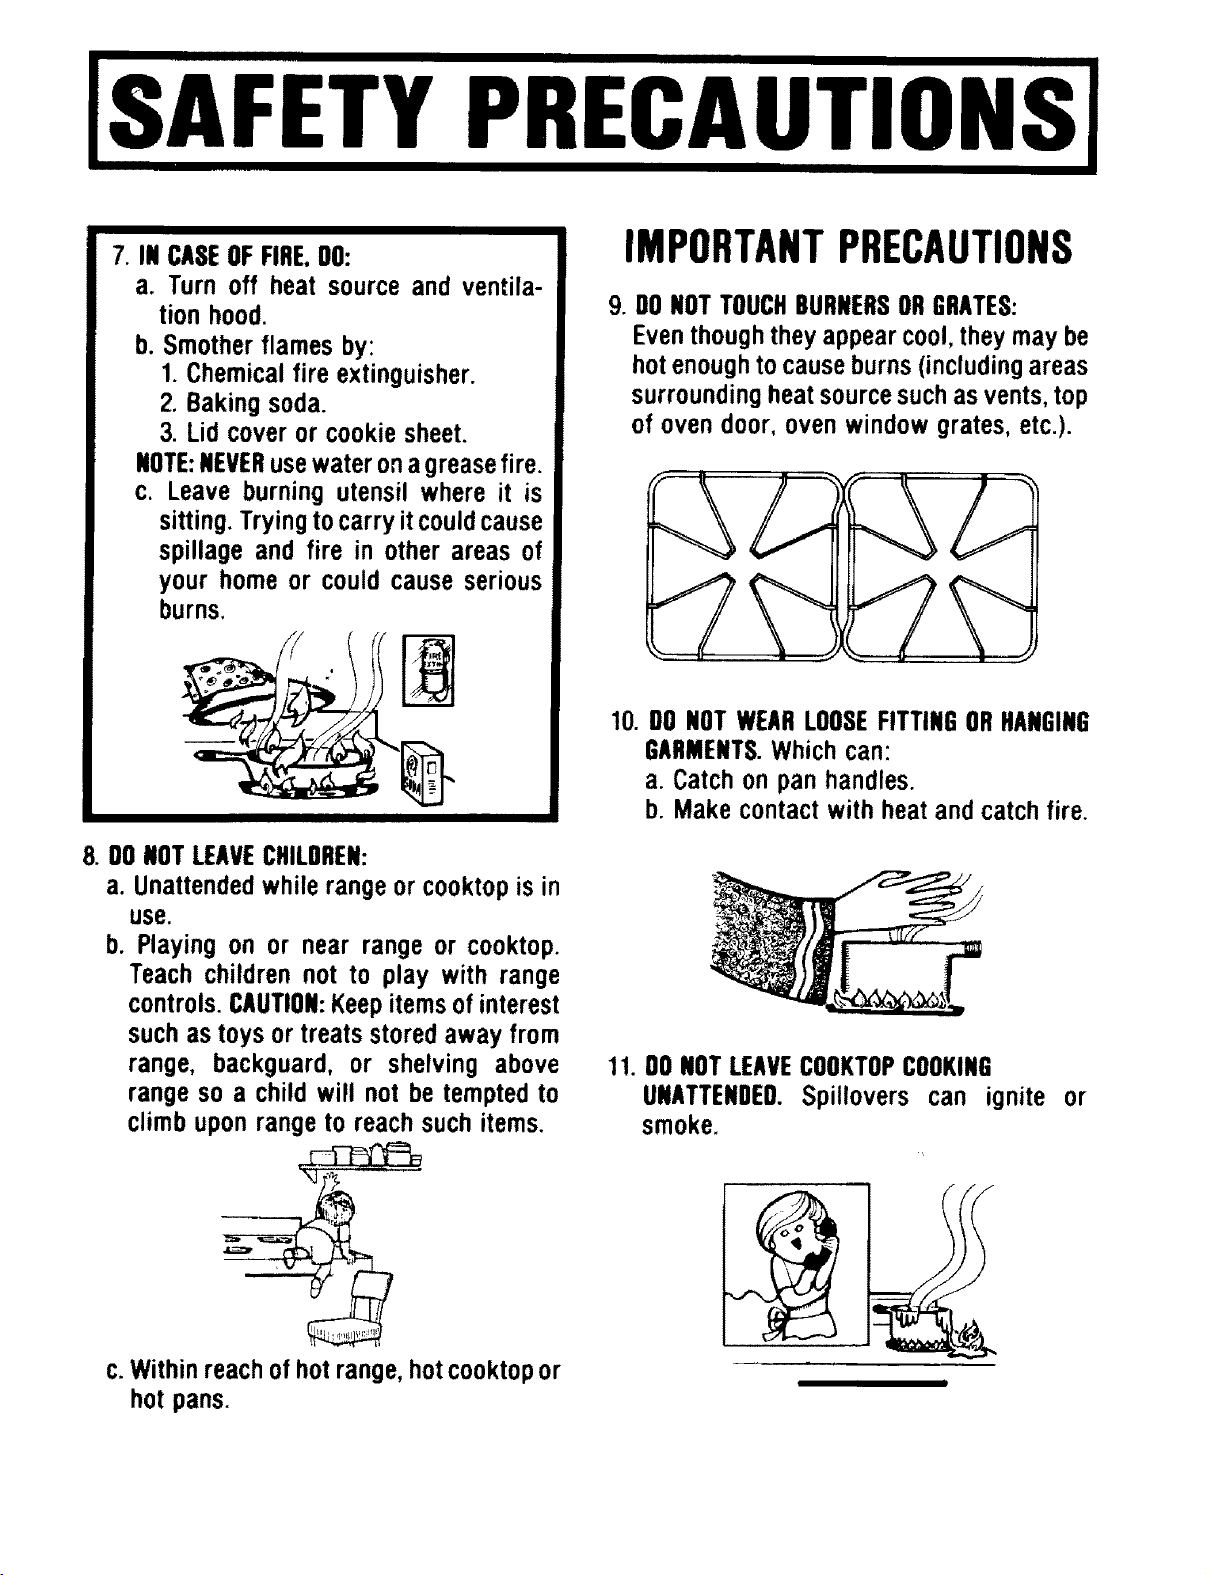
9. DONOTTOUCHBURNERSORGRATES:
Eventhough they appear cool, they may be
hot enoughto cause burns (including areas
surrounding heat sourcesuch as vents, top
of oven door, oven window grates, etc.).
10. 00 NOTWEARLOOSEFITTINGORHANGING
GARMENTS.Which can:
a. Catch on pan handles.
b. Make contact with heat and catch fire.
11. DONOTLEAVECOOKTOPCOOKING
UNATTENDED.Spillovers can ignite or
smoke.
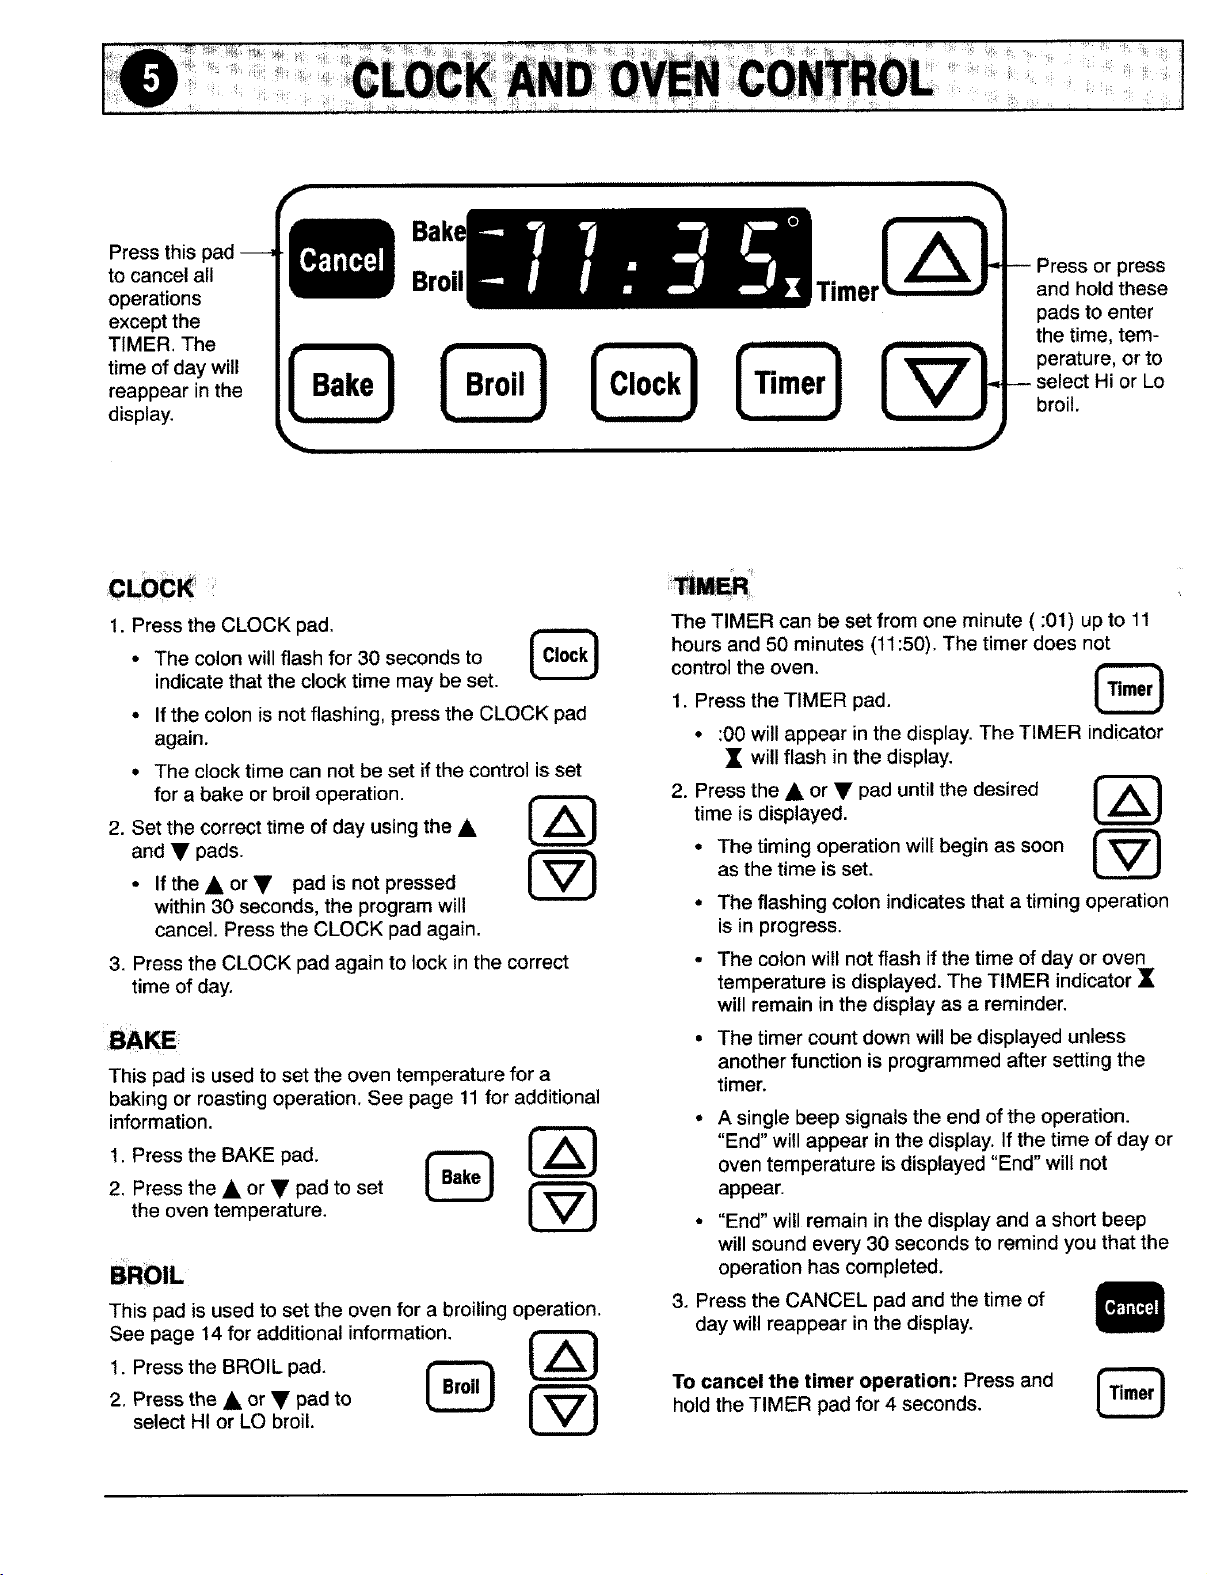
Press this pad
to cancel all
operations
except the
TIMER, The
time of day will
reappear in the
display.
[Bake] [Broil] [Clock] ['Timer]
Press or press
and hold these
pads to enter
the time, tem-
perature, or to
-- select Hi or Lo
broil.
1. Press the CLOCK pad.
• The colon will flash for 30 seconds to I Clock_
indicate that the clock time may be set.
• If the colon is not flashing, press the CLOCK pad
again.
• The clock time can not be set if the control is set
for a bake or broil operation.
2. Set the correct time of day using the A
and • pads.
L
• If the • or • pad is not pressed
within 30 seconds, the program will
cancel. Press the CLOCK pad again.
3. Press the CLOCK pad again to lock in the correct
time of day.
This pad is used to set the oven temperature for a
baking or roasting operation. See page 11 for additional
information.
!. Press the BAKE pad. {_ {_}
2. Press the • or • pad to set
the oven temperature.
BROIL
This pad is used to set the oven for a broiling operation.
See page 14 for additional information.
1. Press the BROIL pad. {_ _
2. Press the • or • pad to
select HI or LO broil.
The TIMER can be set from one minute (:01) up to 11
hours and 50 minutes (11:50). The timer does not
control the oven.
1. Press the TIMER pad.
• :00 will appear in the display. The TIMER indicator
• will flash in the display.
2. Press the • or V pad until the desired
time is displayed.
• The timing operation will begin as soon
as the time is set.
The flashing colon indicates that a timing operation
is in progress.
• The colon will not flash if the time of day or oven
temperature is displayed. The TIMER indicator •
will remain in the display as a reminder.
• The timer count down will be displayed unless
another function is programmed after setting the
timer.
• A single beep signals the end of the operation.
"End" will appear in the display. If the time of day or
oven temperature is displayed "End" will not
appear.
• "End" will remain in the display and a short beep
will sound every 30 seconds to remind you that the
operation has completed.
3. Press the CANCEL pad and the time of
day will reappear in the display.
To cancel the timer operation: Press and |
hold the TIMER pad for 4 seconds.
|
..PORTANT
• Be sure all surface burner controls are set in the OFF
position prior to supplying gas to the appliance.
When the appliance is first installed, the surface
burners may be difficult to light due to air in the gas
line. This may also occur ffthe appliance has been
disconnected from the main gas supply or if it has not
been used for several days or weeks.
To remove the air in the gas line, hold a lighted match
next to the burner head and turn the knob on. When the
burner lights, either adjust the knob to the desired
flame size or turn the burner off.
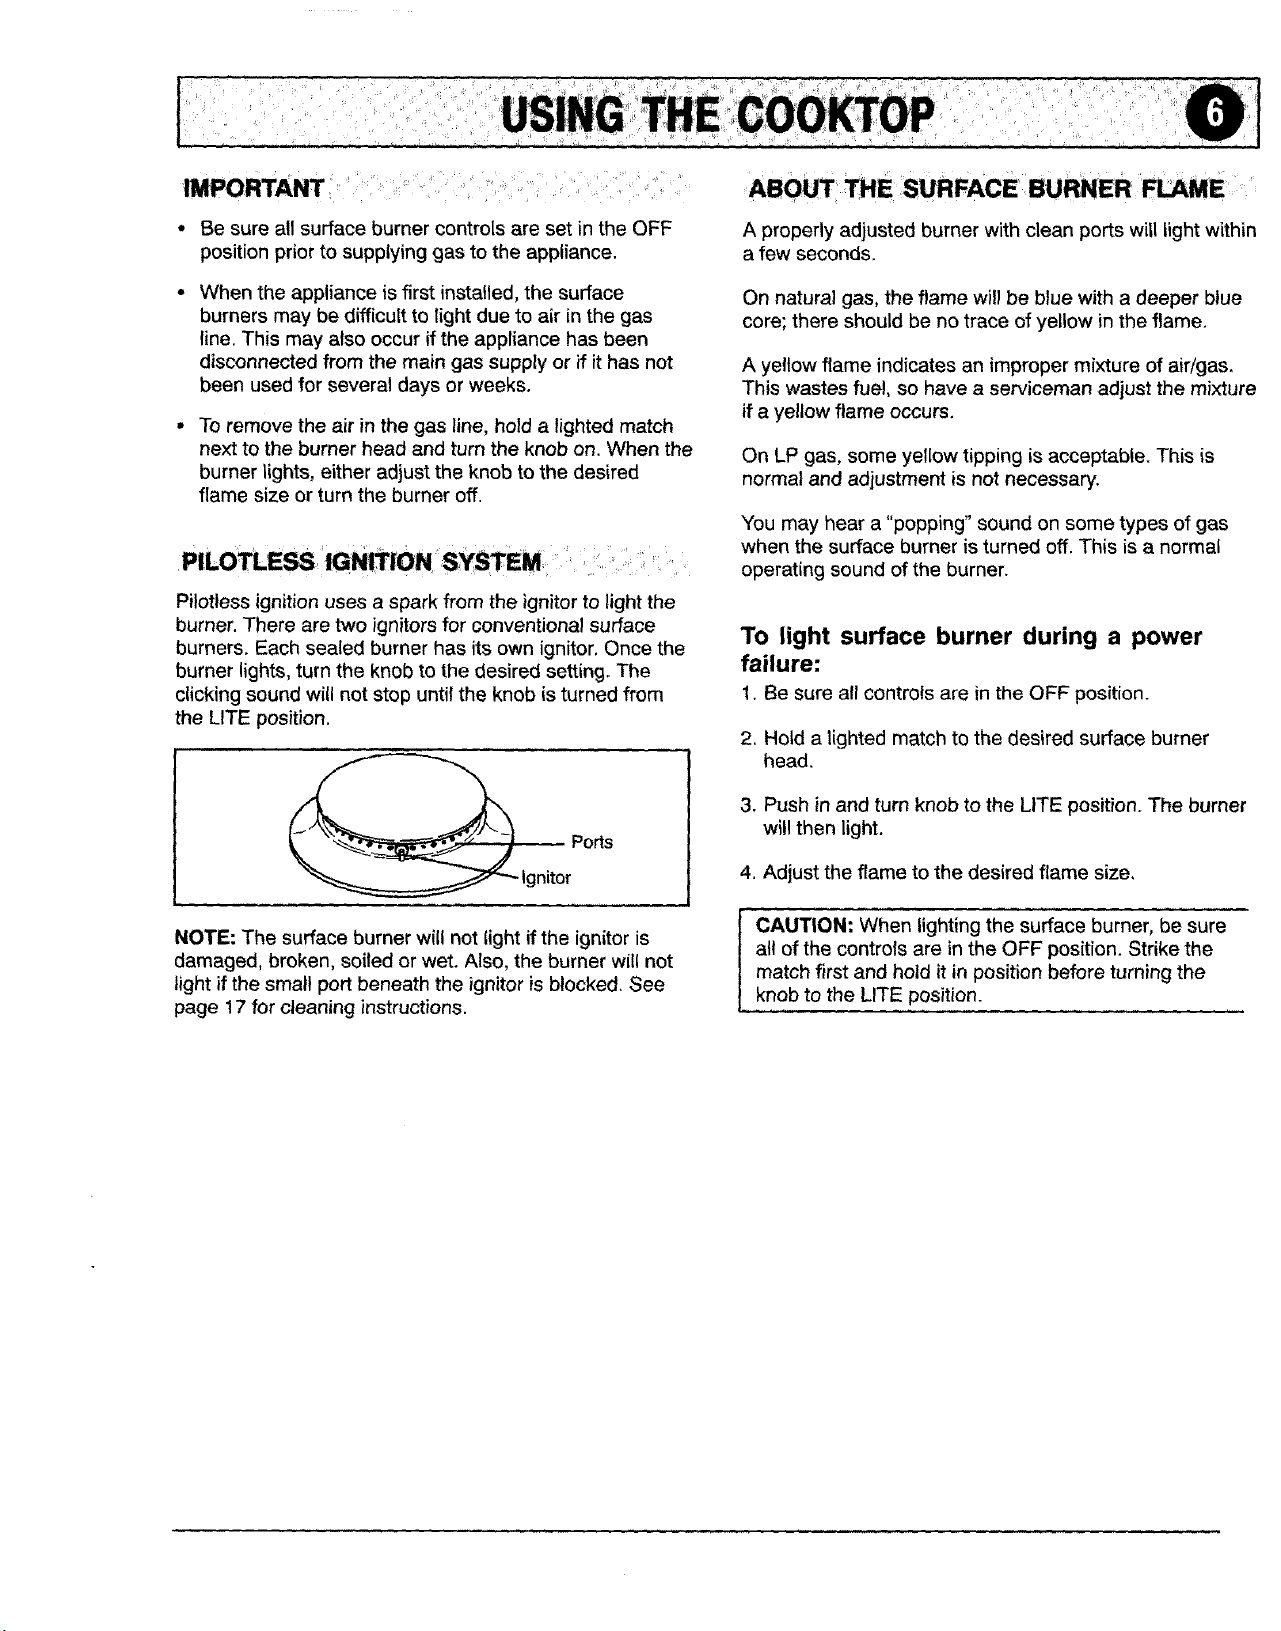
Pilotless ignition uses a spark from the ignitor to light the
burner. There are two ignitors for conventional surface
burners. Each sealed burner has its own ignitor. Once the
burner lights, turn the knob to the desired setting. The
clicking sound will not stop until the knob isturned from
the LITE position.
_lgnitor P°rts
NOTE: The surface burner will not light if the ignitor is
damaged, broken, soiled or wet. Also, the burner will not
light if the small port beneath the ignitor is blocked. See
page 17 for cleaning instructions.
A properly adjusted burner with clean ports will light within
a few seconds.
On natural gas, the flame will be blue with a deeper blue
core; there should be no trace of yellow in the flame.
A yellow flame indicates an improper mixture of air/gas.
This wastes fuel, so have a serviceman adjust the mixture
if a yellow flame occurs.
On LP gas, some yellow tipping is acceptable. This is
normal and adjustment is not necessary.
You may hear a "popping" sound on some types of gas
when the surface burner is turned off. This is a normal
operating sound of the burner.
To light surface burner during a power
failure:
1. Be sure all controls are in the OFF position.
2. Hold a lighted match to the desired surface burner
head.
3. Push in and turn knob to the LITE position. The burner
will then light.
4. Adjust the flame to the desired flame size,
CAUTION: When lightingthe surface burner, be sure
all of the controls are in the OFF position. Strike the
match first and hold it in position before turning the
knob to the LITE position.
Undernocircumstancesarethesurfaceburner
assembliestobetakenapartforcleaning.Thesurface
burnerassemblycanberemovedtocleantheburnerbox
area.
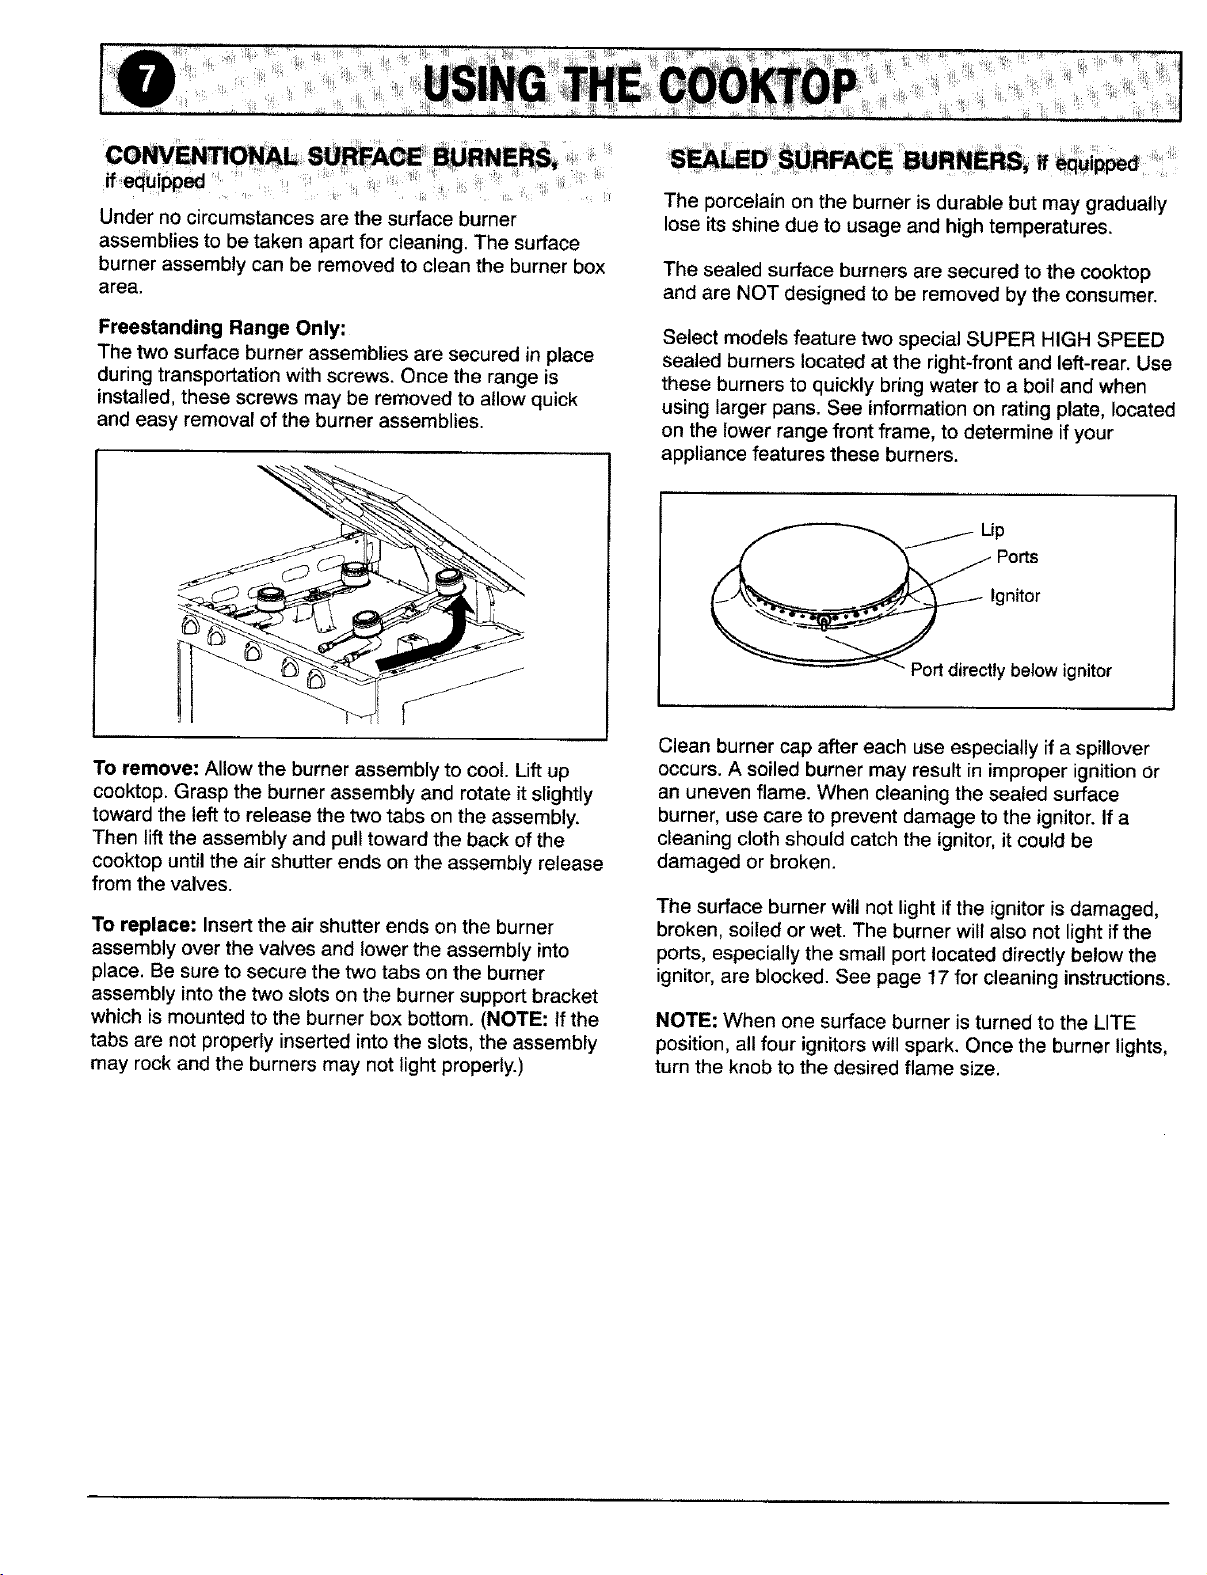
Freestanding Range Only:
The two surface burner assemblies are secured in place
during transportation with screws. Once the range is
installed, these screws may be removed to allow quick
and easy removal of the burner assemblies.
The porcelain on the burner is durable but may gradually
lose its shine due to usage and high temperatures.
The sealed surface burners are secured to the cooktop
and are NOT designed to be removed by the consumer.
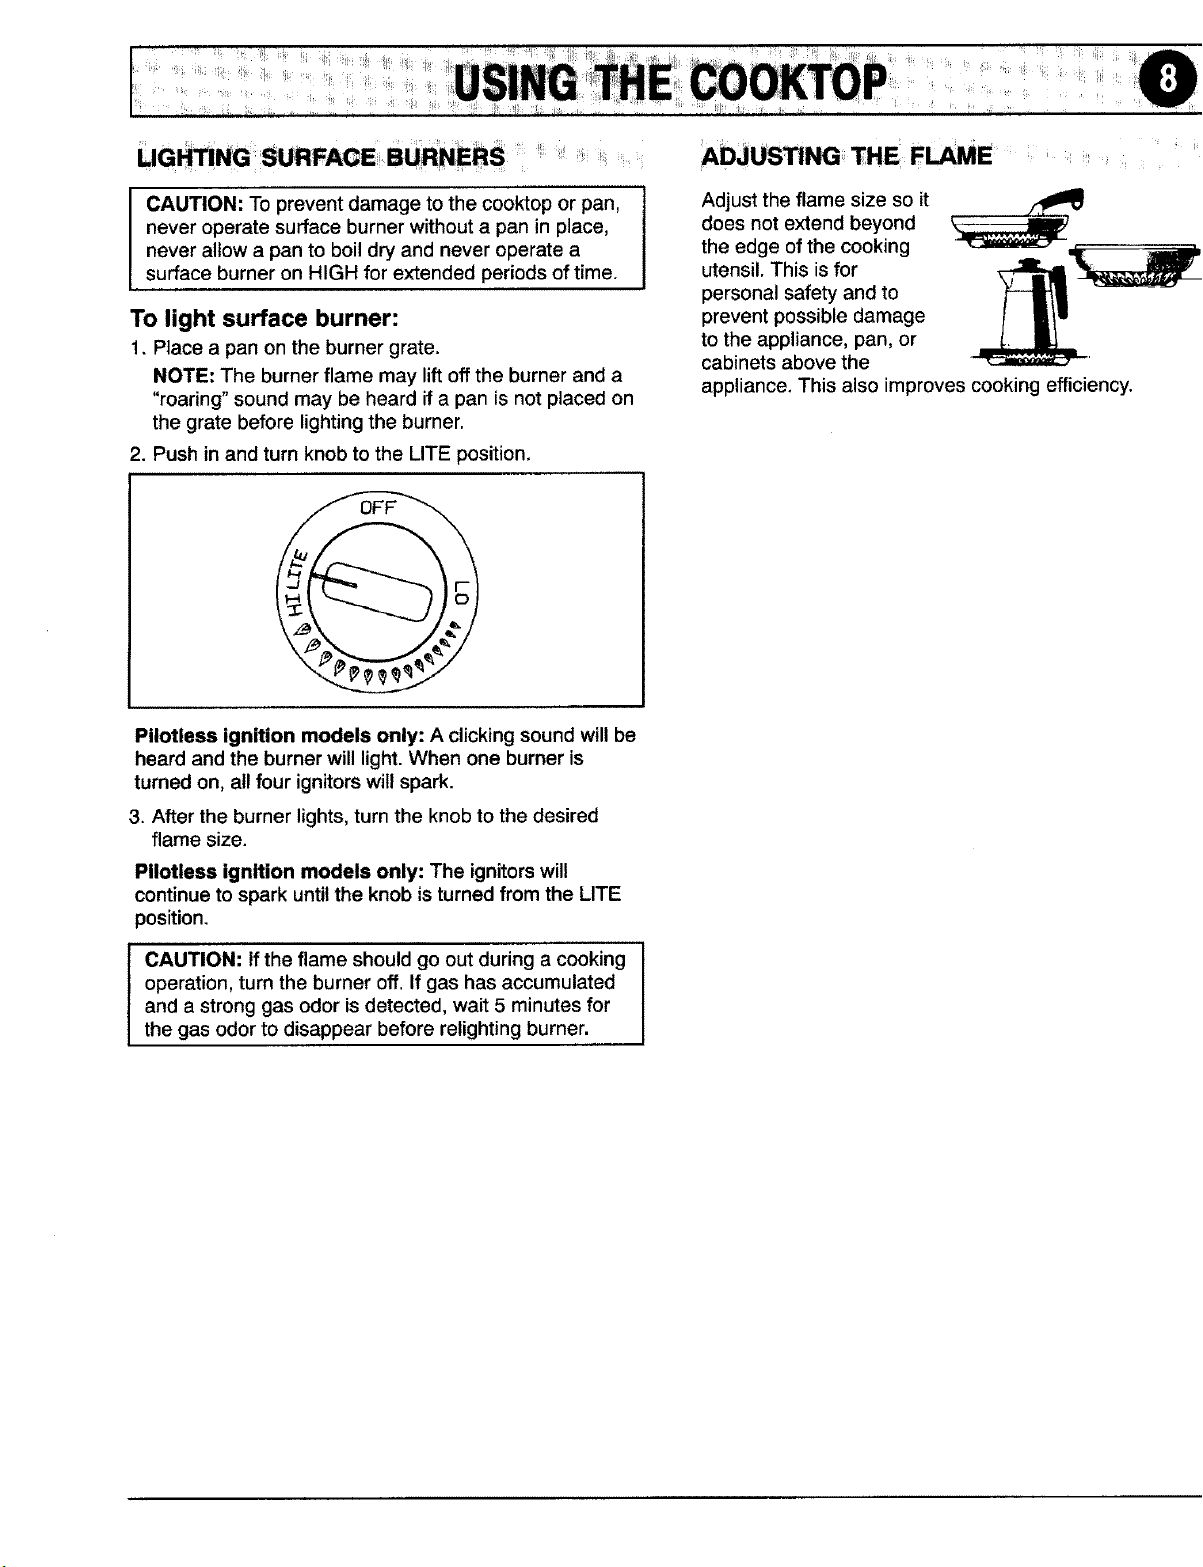
Select models feature two special SUPER HIGH SPEED
sealed burners located at the right-front and left-rear. Use
these burners to quickly bring water to a boil and when
using larger pans. See information on rating plate, located
on the lower range front frame, to determine if your
appliance features these burners.
To remove: Allow the burner assembly to cool. Liftup
cooktop. Grasp the burner assembly and rotate it slightly
toward the leftto release the two tabs on the assembly.
Then liftthe assembly and pull toward the back of the
cooktop until the air shutter ends on the assembly release
from the valves.
To replace: Insert the air shutter ends on the burner
assembly over the valves and lower the assembly into
place. Be sure to secure the two tabs on the burner
assembly intothe two slots on the burner support bracket
which is mounted to the burner box bottom. (NOTE: If the
tabs are not properly inserted intothe slots, the assembly
may rock and the burners may not light properly.)
Lip
Ports
Ignitor
ly below ignitor
Clean burner cap after each use especially if a spillover
occurs. A soiled burner may result in improper ignition or
an uneven flame. When cleaning the sealed surface
burner, use care to prevent damage to the ignitor. If a
cleaning cloth should catch the ignitor, it could be
damaged or broken.
The surface burner will not light if the ignitor is damaged,
broken, soiled or wet. The burner will also not light ifthe
ports, especially the small port located directly below the
ignitor, are blocked. See page 17 for cleaning instructions.
NOTE: When one surface burner is turned to the LITE
position, all four ignitors will spark. Once the burner lights,
turn the knob to the desired flame size.
MGHnNG _FACE BURNERS
CAUTION: To prevent damage to the cooktop or pan,
never operate surface burner without a pan in place,
never allow a pan to boil dry and never operate a
surface burner on HIGH for extended periods of time.
To light surface burner:
1. Place a pan on the burner grate.
NOTE: The burner flame may lift offthe burner and a
"roaring" sound may be heard if a pan is not placed on
the grate before lightingthe burner.
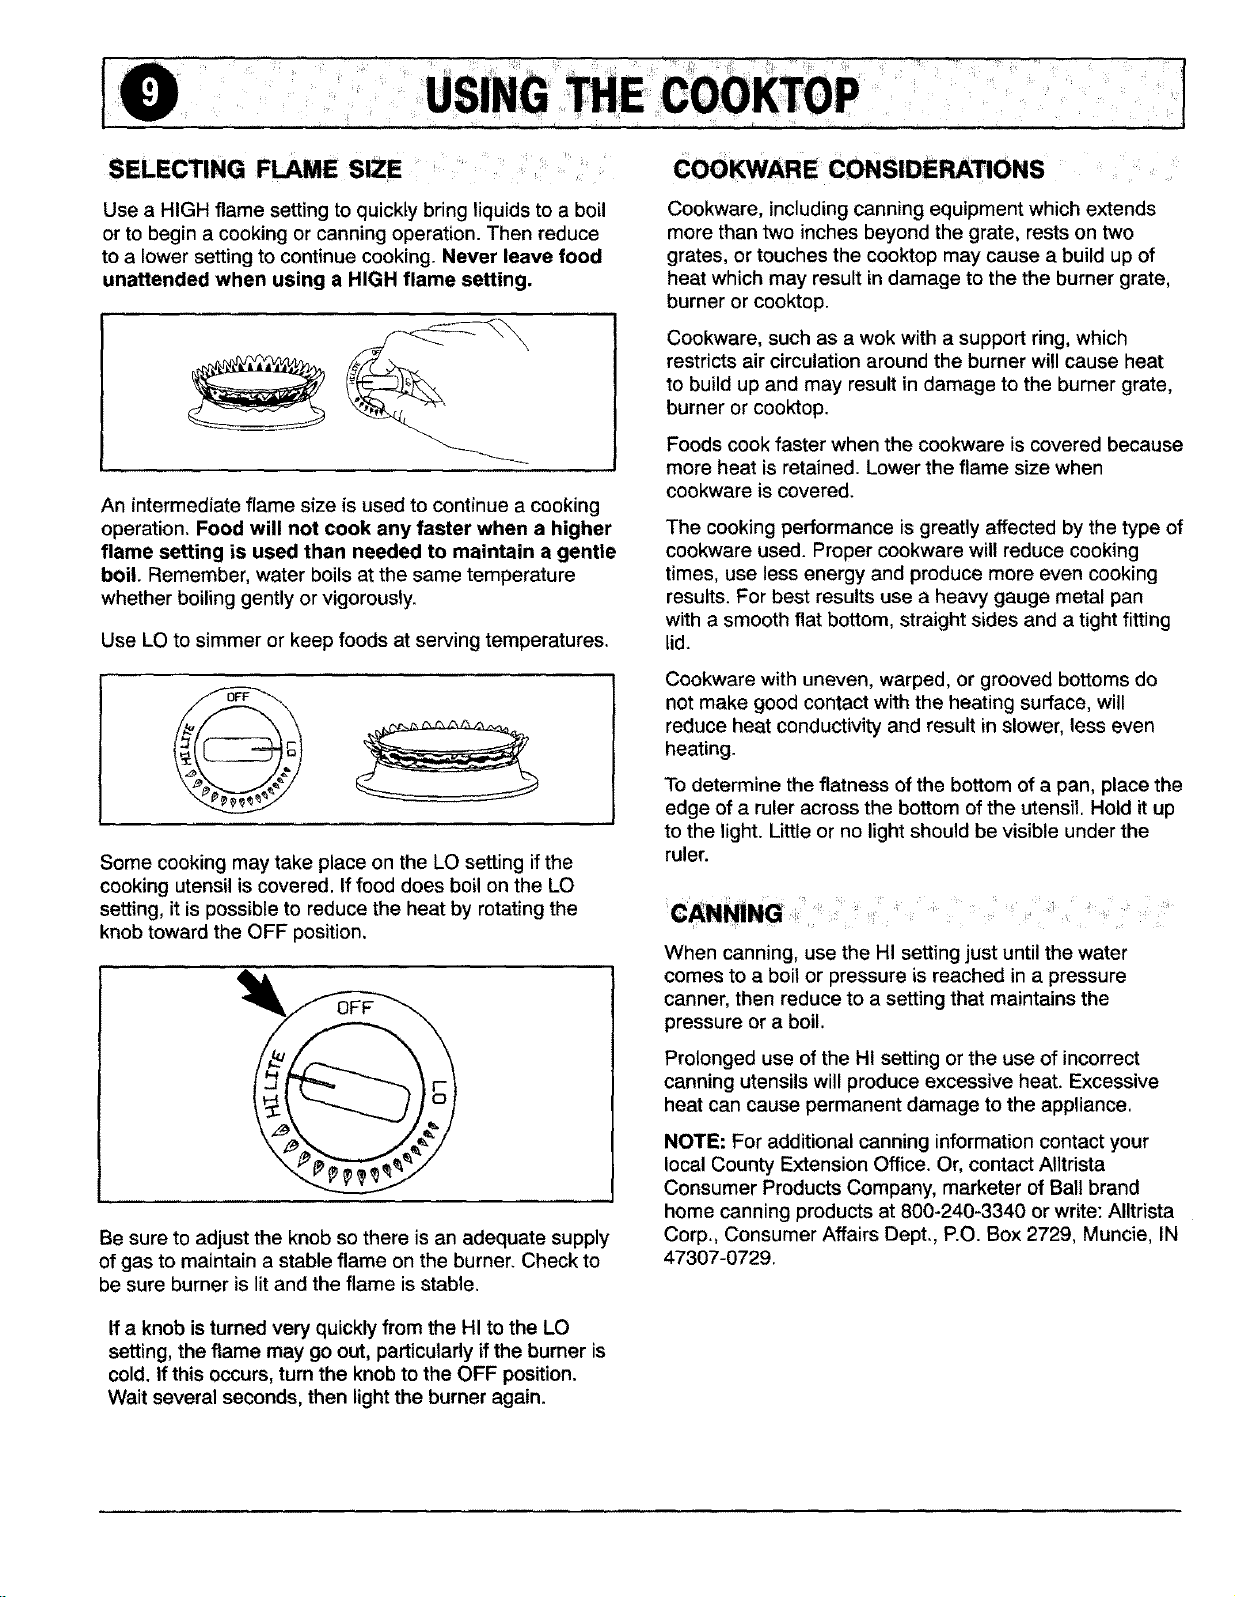
2. Push in and turn knob to the LITE position.
Pilotless ignition models only: A clicking sound will be
heard and the burner will light. When one burner is
turned on, all four ignitorswill spark.
3. After the burner lights, turn the knob to the desired
flame size.
Pilotless ignition models only: The ignitors will
continue to spark until the knob isturned from the LITE
position.
CAUTION: If the flame should go out during a cooking
operation, turn the burner off. If gas has accumulated
and a strong gas odor isdetected, wait 5 minutes for
the gas odor to disappear before relighting burner.
ADJUSTING THE F_E
Adjust the flame size so it
does not extend beyond
the edge of the cooking
utensil. This is for
personal safety and to
prevent possible damage
to the appliance, pan, or
cabinets above the
appliance. This also improves cooking efficiency.
SELECTING SIZEF_E
Use a HIGH flame setting to quickly bring liquidsto a boil
or to begin a cooking or canning operation. Then reduce
to a lower setting to continue cooking. Never leave food
unattended when using a HIGH flame setting.
An intermediate flame size is used to continue a cooking
operation. Food will not cook any faster when a higher
flame setting is used than needed to maintain a gentle
boil. Remember, water boils at the same temperature
whether boiling gently or vigorously.
Use LO to simmer or keep foods at serving temperatures.
COOKWARE CONSIDERATIONS
Cookware, including canning equipment which extends
more than two inches beyond the grate, rests on two
grates, or touches the cooktop may cause a build up of
heat which may result in damage to the the burner grate,
burner or cooktop.
Cookware, such as a wok with a support ring, which
restricts air circulation around the burner will cause heat
to build up and may result in damage to the burner grate,
burner or cooktop.
Foods cook faster when the cookware is covered because
more heat is retained. Lower the flame size when
cookware is covered.
The cooking performance is greatly affected by the type of
cookware used. Proper cookware will reduce cooking
times, use less energy and produce more even cooking
results. For best results use a heavy gauge metal pan
with a smooth flat bottom, straight sides and a tight fitting
lid.
Some cooking may take place on the LO setting if the
cooking utensil is covered. If food does boil on the LO
setting, it is possible to reduce the heat by rotating the
knob toward the OFF position.
Be sure to adjust the knob so there is an adequate supply
of gas to maintain a stable flame on the burner. Check to
be sure burner is lit and the flame is stable.
Cookware with uneven, warped, or grooved bottoms do
not make good contact with the heating surface, will
reduce heat conductivity and result in slower, less even
heating.
To determine the flatness of the bottom of a pan, place the
edge of a ruler across the bottom of the utensil. Hold it up
to the light. Little or no light should be visible under the
ruler.
CA _NG' :
When canning, use the HI setting just until the water
comes to a boil or pressure is reached in a pressure
canner, then reduce to a setting that maintains the
pressure or a boil.
Prolonged use of the HI setting or the use of incorrect
canning utensils will produce excessive heat. Excessive
heat can cause permanent damage to the appliance.
NOTE: For additional canning information contact your
local County Extension Office. Or, contact Alltrista
Consumer Products Company, marketer of Ball brand
home canning products at 800-240-3340 or write: AIItfista
Corp., Consumer Affairs Dept., P.O. Box 2729, Muncie, IN
47307-0729.
If a knob isturned very quickly from the HI to the LO
setting, the flame may go out, particulady if the burner is
cold. If this occurs, turn the knob to the OFF position.
Wait several seconds, then light the burner again.
Y iill¸'II I:/Ii¸¸
Every oven has its own characteristics. You may find that
the cooking times and temperatures you were
accustomed to with your previous oven may need to be
altered slightly with your new oven. It is normal to notice
some differences between this oven and your previous
oven.
PILOTLESS IGNITION SYSTEM •
With this type of ignition system, a glo bar will light the
oven burner. The oven will not operate during a power
failure or ff the oven is disconnected from the wall outlet.
No attempt should be made to operate oven during a
power failure.
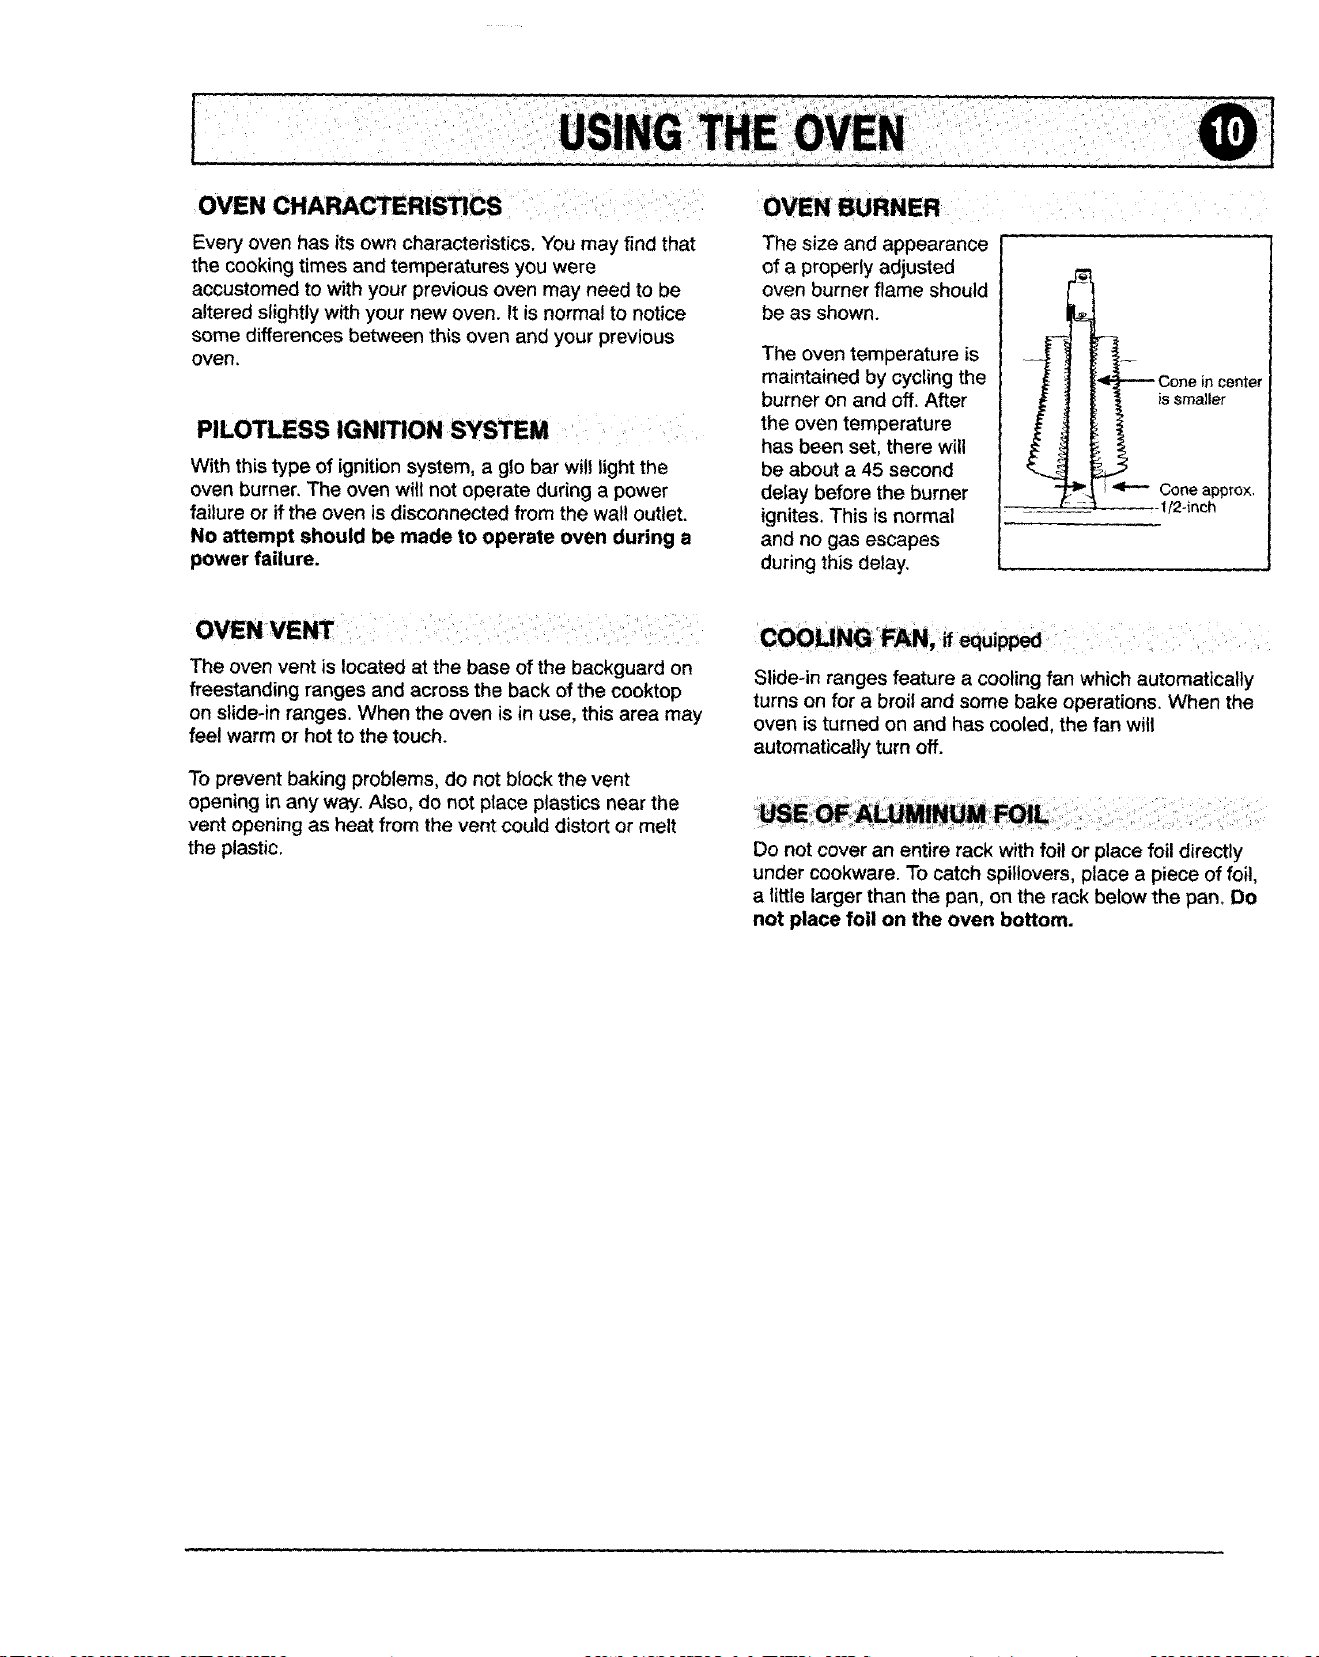
OVENBURNER
The size and appearance
of a properly adjusted
oven burner flame should
be as shown.
The oven temperature is
maintained by cycling the
burner on and off. After
the oven temperature
has been set, there will
be about a 45 second
delay before the burner
ignites. This is normal
and no gas escapes
during this delay,
is smaller
Cone app_ox,
lf2-inch
OVEN VENT'
• ,_ _ , ' _ _' '_ _ , __ ', _'i,_ i _ii,_ '- _
The oven vent is located at the base of the backguard on
freestanding ranges and across the back of the cooktop
on slide-in ranges. When the oven is in use, this area may
feel warm or hot to the touch.
To prevent baking problems, do not block the vent
opening in any way. Also, do not place plastics near the
vent opening as heat from the vent could distort or melt
the plastic.
Slide-in ranges feature a cooling fan which automatically
turns on for a broil and some bake operations. When the
oven is turned on and has cooled, the fan will
automatically turn off.
Do not cover an entire rack with foil or place foil directly
under cookware. To catch spillovers, place a piece of foil,
a little larger than the pan, on the rack below the pan. Do
not place foil on the oven bottom.
HOW TO SET OVEN
1. Press the BAKE pad.
• 000 ° will appear in the display.
• BAKE indicator will flash in the display.
2. Press the J, or • pad. Then press either pad until the
desired oven temperature isdisplayed.
o 350 ° will appear in the display when either pad is
pressed once.
• The oven temperature can be set from 170 ° to 550 °.
• The BAKE indicator and 75° or the actual oven
temperature, whichever is higher, will appear in the
display.
• The temperature in the display will increase in 1°
increments until the oven reaches the preset
temperature.
• Allow 10 to 15 minutes for the oven to preheat.
• A single beep will sound when the oven is
preheated.
3. Place the food in the center of the oven allowing a
minimum of 1 to 2-inches between the pan and the
oven walls.
4. Check food for doneness at the minimum cooking time.
Cook longer as needed. Cooking time may vary from
oven to oven.
5. At the end of cooking, press the CANCEL pad and
remove the food from the oven.
• The current time of day will reappear in the display.
ADDITI0_L INFORMATION
If you press the BAKE pad and do not set an oven
temperature within 30 seconds, the program will
automatically cancel and the time of day will reappear
in the display.
• To recall the preset temperature during preheat, press
the BAKE pad. The temperature will be displayed for 30
seconds.
• To change the oven temperature during cooking, press
the BAKE pad then press the J, or • pad until the
desired temperature is displayed.
The oven features an automatic shut-off. If the oven is
left on for 12 hours it will automatically turn off and 000
will appear in the display. Press the CANCEL pad and
the time of day will reappear in the display.
PREHEATING
Preheating is necessary for baking. Allow about 10 to 15
minutes for the oven to preheat, A single beep will
indicate that the oven is preheated. It is not necessary to
preheat for roasting.
Selecting a temperature higher than desired will NOT
preheat the oven any faster, and may have a negative
effect on baking results.
iiiii , iiii!
OVEN RACKS
The oven rack is designed with a safety lock-stop position
to keep the rack from accidently coming completely out of
the oven when pulling the rack out to add or remove food.
CAUTION: Do not attempt to change the rack positions I
when the oven is hot.
I
To remove: Be sure the rack is cool. Pull the rack straight
out until it stops at the lock-stop position. Tilt the front end
of the rack up and continue pulling the rack out of the
oven.
To replace: Place the rack on the rack supports and tilt
the front end of the rack up slightly. Slide it back until it
clears the lock-stop position. Lower the front and slide the
rack straight in. Pull the rack out to the lock-stop position
to be sure it is positioned correctly and then return it to its
normal position.
It is important that air can circulate freely within the oven
and around the food. To help ensure this, place food on
the center of the oven rack. Allow two inches between the
edge of the utensil(s) and the oven walls.
For optimum baking results of cakes, cookies or biscuits,
use one rack. Position the rack so the food is in the center of
the oven. Use either rack position 2 or 3.
If cooking on two racks, use rack positions 2 and 4 for
cakes and rack positions 1 and 4 when using cookie
sheets. Never place two cookie sheets on one rack.
RACK PoSITIoN CHART
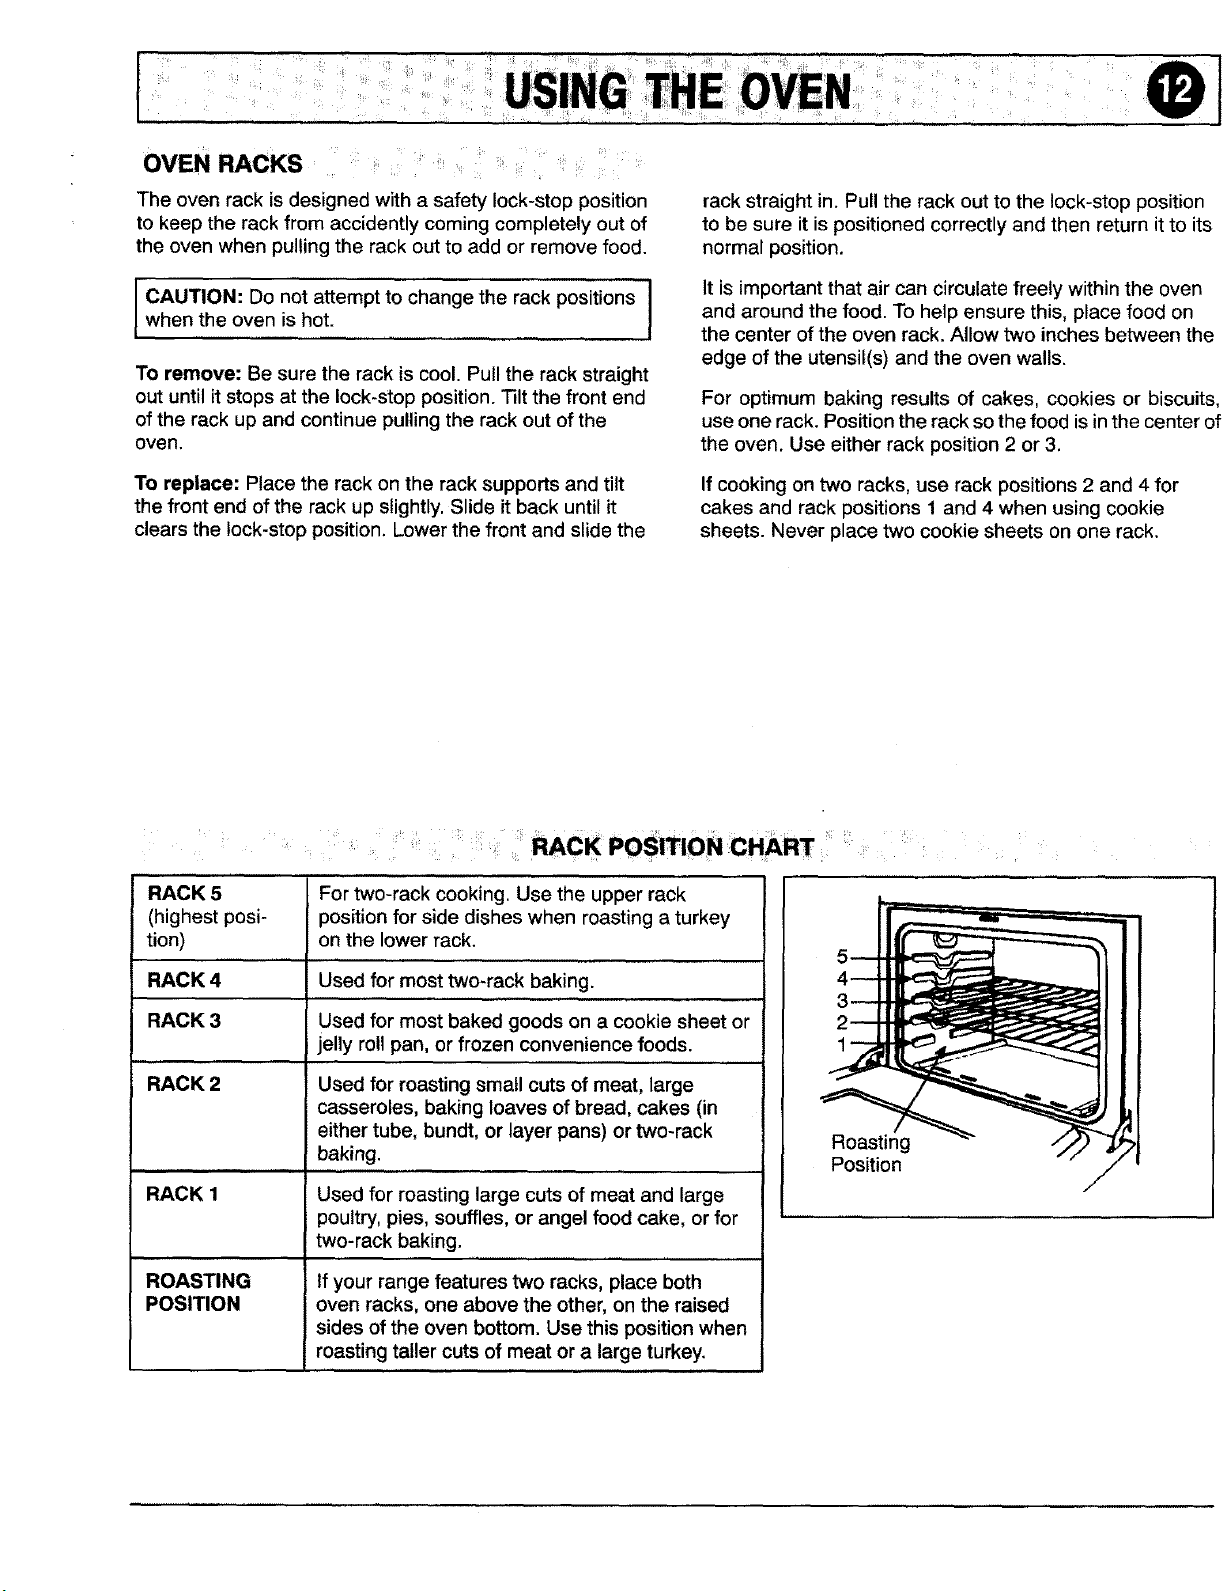
RACK5
(highest posi-
tion)
RACK4
RACK3
RACK2
For two-rack cooking. Use the upper rack
position for side dishes when roasting a turkey
on the lower rack.
Used for most two-rack baking.
Used for most baked goods on a cookie sheet or
jelly roll pan, or frozen convenience foods.
Used for roasting small cuts of meat, large
casseroles, baking loaves of bread, cakes (in
either tube, bundt, or layer pans) or two-rack
baking.
RACK 1 Used for roasting large cuts of meat and large
poultry, pies, souffles, or angel food cake, or for
two-rack baking.
ROASTING If your range features two racks, place both
POSITION oven racks, one above the other, on the raised
sides of the oven bottom. Use this position when
roasting taller cuts of meat or a large turkey.
Roasting
Position
' COliIIMON BAK|NG PROBLEMS _ND _ _,tEYH_
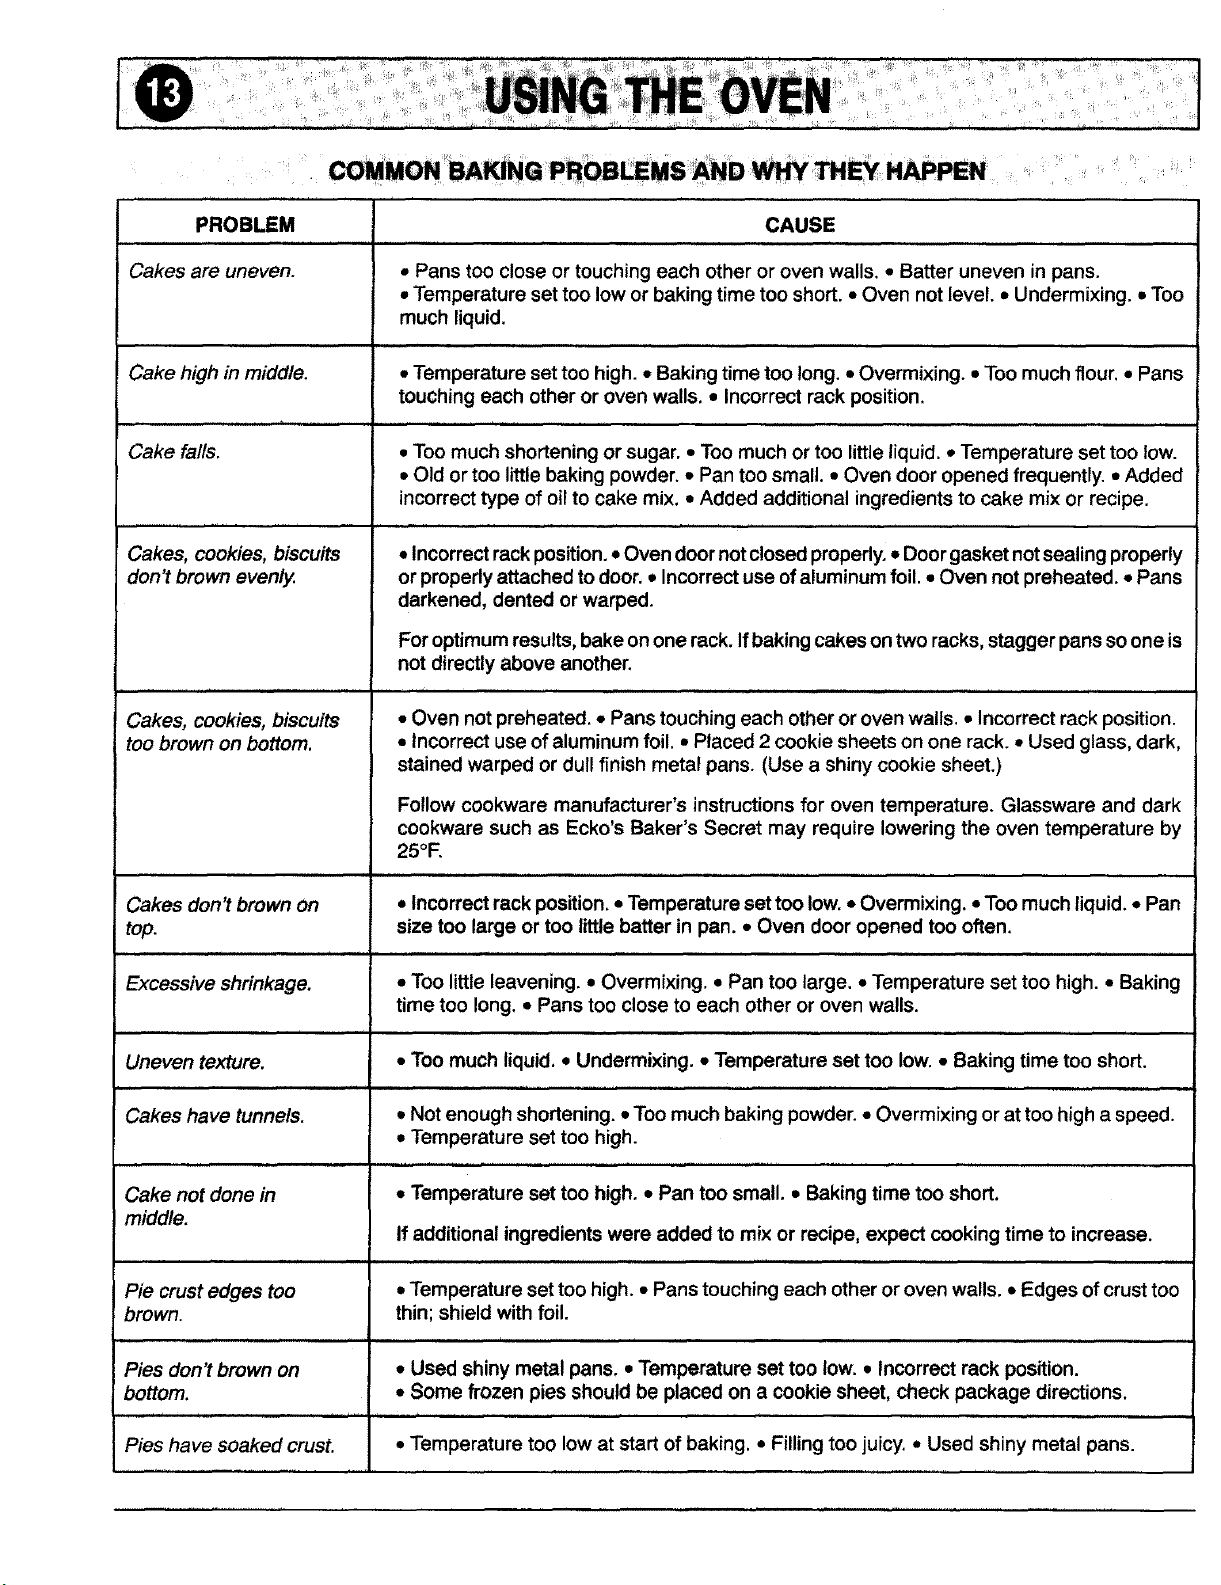
PROBLEM CAUSE
Cakes are uneven. • Pans too close or touching each other or oven walls. • Batter uneven in pans.
• Temperature set too low or baking time too short. • Oven not level. • Undermixing. • Too
much liquid.
,,,, ,,, , ,,,,,...............
Cake high in middle. • Temperature set too high. • Baking time too long. • Overmixing. • Too much flour. • Pans
touching each other or oven walls. • Incorrect rack position.
,, , ,,,,,,,, ,,,, ,, i i ,,, i i i ,, ........,,,, ,, , ,, ,,, ........ ,, ,, ,,
Cake falls. • Too much shortening or sugar. • Too much or too little liquid., Temperature set too low.
• Old or too little baking powder. • Pan too small. • Oven door opened frequently. • Added
incorrect type of oil to cake mix. • Added additional ingredients to cake mix or recipe.
,,, , , , ,,, ,,
Cakes, cookies, biscuits • Incorrectrack position. • Oven door notclosed properly.• Door gasket notsealing properly
don't brown evenly, or properly attached todoor. =Incorrectuse of aluminum foil. • Oven not preheated. • Pans
darkened, dented or warped.
For optimum results, bake on one rack. Ifbaking cakes on two racks, stagger pans so one is
not directly above another.
....... ,, , i , ,, ,,,,,,,,,,,,,, ,, ,, ,, i, ,
Cakes, cookies, biscuits • Oven not preheated. • Pans touching each other or oven walls. • Incorrect rack position.
too brown on bottom. =Incorrect use of aluminum foil. • Placed 2 cookie sheets on one rack. * Used glass, dark,
stained warped or dull finish metal pans. (Use a shiny cookie sheet.)
Follow cookware manufacturer's instructions for oven temperature. Glassware and dark
cookware such as Ecko's Baker's Secret may require lowering the oven temperature by
25°F.
, , ,,, , , , , ,,
Cakes don't brown On • Incorrect rack position. • Temperature set too low.• Overmixing. • Too much liquid. • Pan
top. size too large or too little batter in pan. • Oven door opened too often.
, , i ,,,,,,,,,,,,....................................................... ,,
Excessive shrinkage. • TOOlittle leavening. • Overmixing. • Pan too large. • Temperature set too high. • Baking
time too long. • Pans too close to each other or oven walls.
,, , , ,
Uneven texture. • Too much liquid. ,, Undermixing. • Temperature set too low. • Baking time too short.
Cakes have tunnels. . Not enough shortening. • Too much baking powder. • Overmixing or at too high a speed.
• Temperature set too high.
Cake not done in • Temperature set too high. • Pan too small. • Baking time too short.
middle.
If additional ingredients were added to mix or recipe, expect cooking time to increase.
, , , , , , .................., , ,
Pie crust edges too ,,,Temperature set too high. • Pans touching each other or oven walls. • Edges of crust too
brown, thin; shield with foil.
, , , , , , , ,, , ,,
Pies don't brown on • Used shiny metal pans. • Temperature set too low. • Incorrect rack position.
bottom. • Some frozen pies should be placed on a cookie sheet, check package directions.
i i i i J, , i , ,,,, i ,,, ,, , , , , , , ,,,
Pies have soaked crust. • Temperature too low at start of baking. • Fillingtoo juicy. • Used shiny metal pans.
I ¸ i i !ii!ii!!!/
BROILING .......
Broiling is a method of cooking tender meats by direct
heat, The cooking time is determined by the distance
between the meat and the oven burner, the desired
degree of doneness and the thickness of the meat.
Broiling Tips
Broiling requires the use of the broiler pan and insert. The
broiler insert must be in place to allow fat and liquid to
drain to the pan below to prevent spatters, smoke and
flare-ups, Improper use may cause grease fires.
For easier clean up, line the broiler pan with foil and spray
the insert with a non-stick vegetable spray. Do not cover
the broiler insert with aluminum foil as this prevents fat
from draining into pan below,
Trim excess fat and slash remaining fat to help keep meat
from curling and to reduce smoking and spattering,
Season meat after cooking.
Place oven rack in the correct rack position when oven is
coo!. For darker browning, place meat closer to the oven
burner, Place meat further down if you wish meat to be
well done or ff excessive smoking or flaring occurs.
To Set Oven To Broil:
1. Press the BROIL pad.
• 000 will appear in the display.
• BROIL indicator will flash in the display.
2. Press the • pad to select HI BROIL for normal
broiling or press the _!r pad to select LO BROIL for low
temperature broiling,
3. Follow the suggested times in the chart below.
• Turn meat once about half way through cooking.
• Check for doneness by cutting a slit in the meat near
the center for desired color.
4. At the end of cooking, remove the broiler pan and press
the CANCEL pad.
° The current time of day will reappear in the display.
Use HI BROIL for most broil operations.
Select LO BROIL when broiling longer cooking foods such
as poultry. The lower temperature allows food to cook to
the well done stage without excessive browning. Cooking
time will increase if LO BROIL is selected.
See Care and Cleaning Chart on page 15 for instructions
on cleaning the broiler pan and insert.
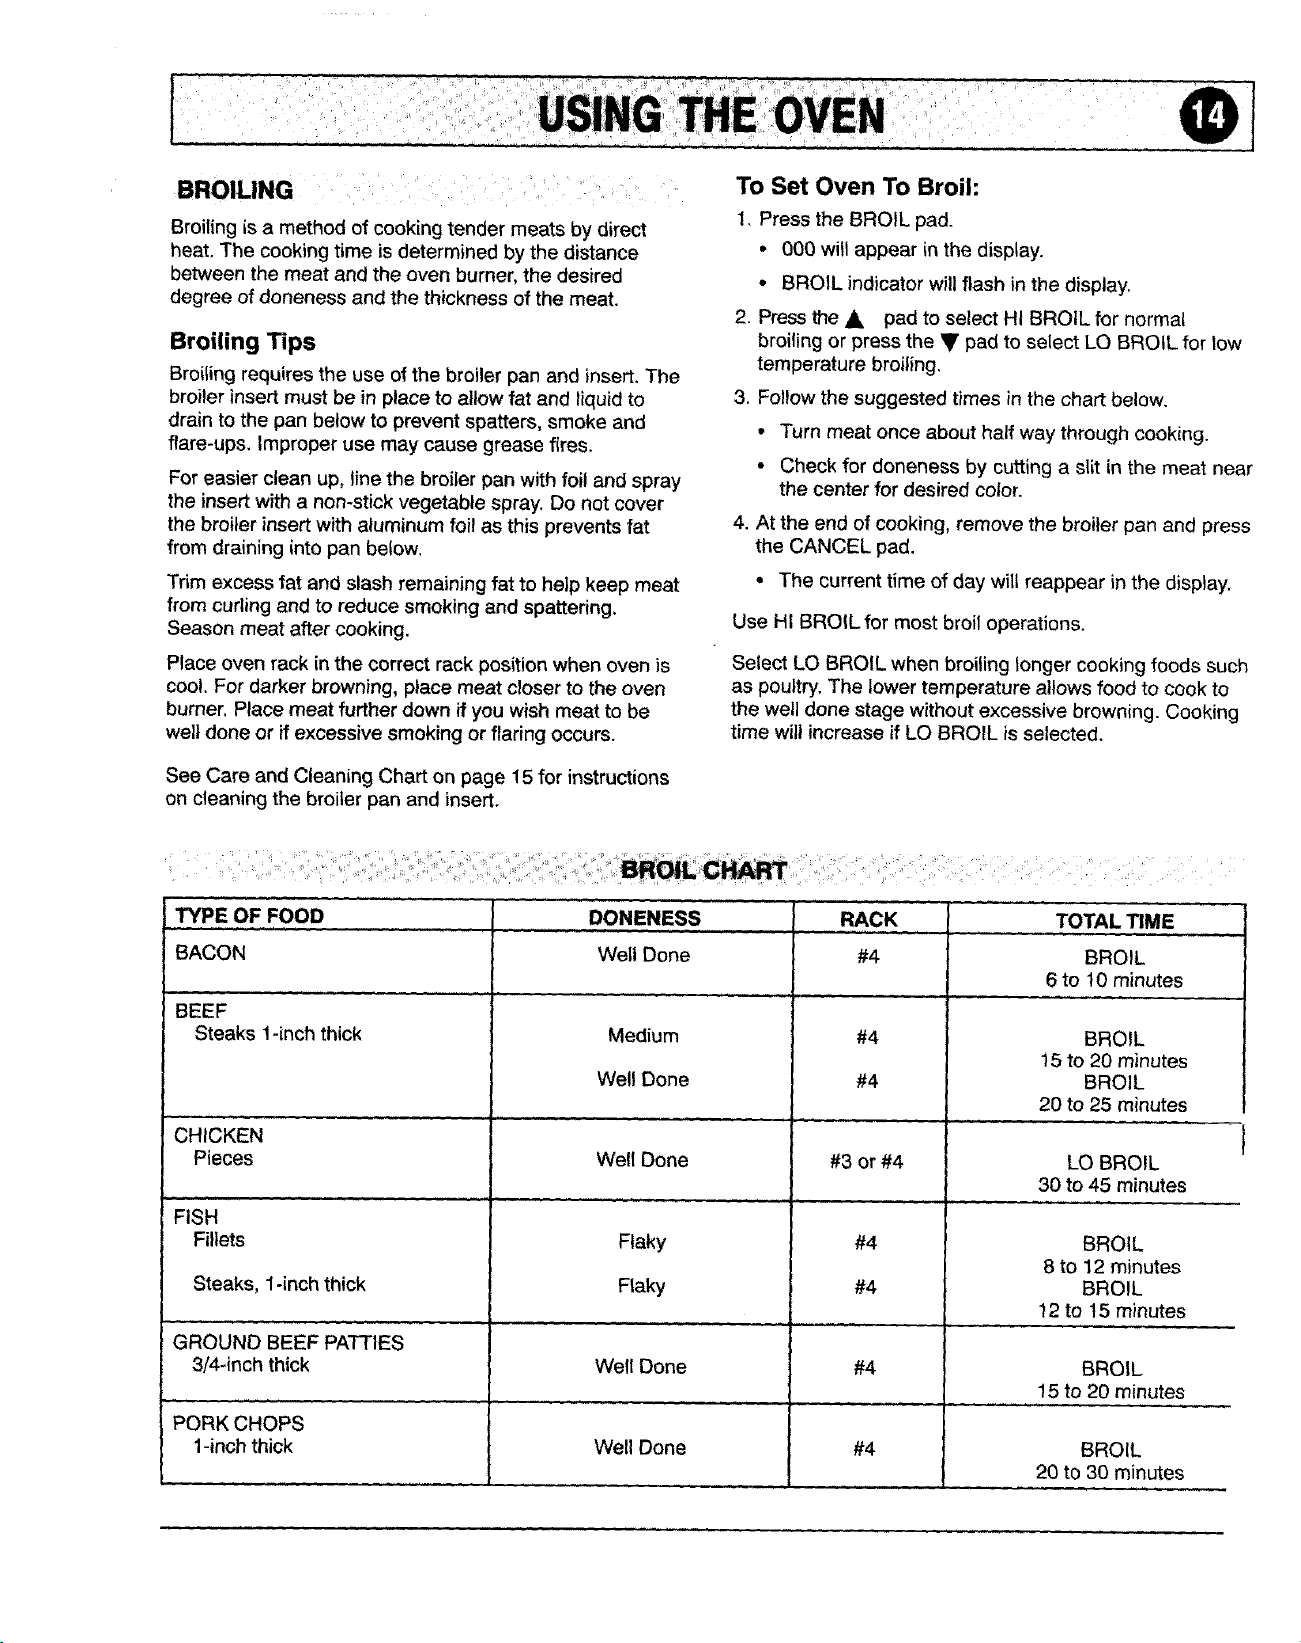
TYPE OF FOOD
, ,,,,,........... ,, ,, ,
BACON
BEEF
Steaks 1-inch thick
CHICKEN
Pieces
FISH
Fillets
.... = ......
DONENESS
Well Done
Medium
Well Done
Well Done
Flaky
Flaky
Well Done
RACK
#4
#4
#4
#3 or #4
#4
#4
#4
Steaks, 1-inch thick
GROUND BEEF PATTIES
3/4-inch thick
PORK CHOPS
1-inch thick
TOTAL TIME
BROIL
6 to 10 minutes
BROIL
15 to 20 minutes
BROIL
20 to 25 minutes
LO BROIL
30 to 45 minutes
BROIL
8 to 12 minutes
BROIL
12 to 15 minutes
BROIL
15 to 20 minutes
Well Done
....... | ......
#4
BROIL
20 to 30 minutes
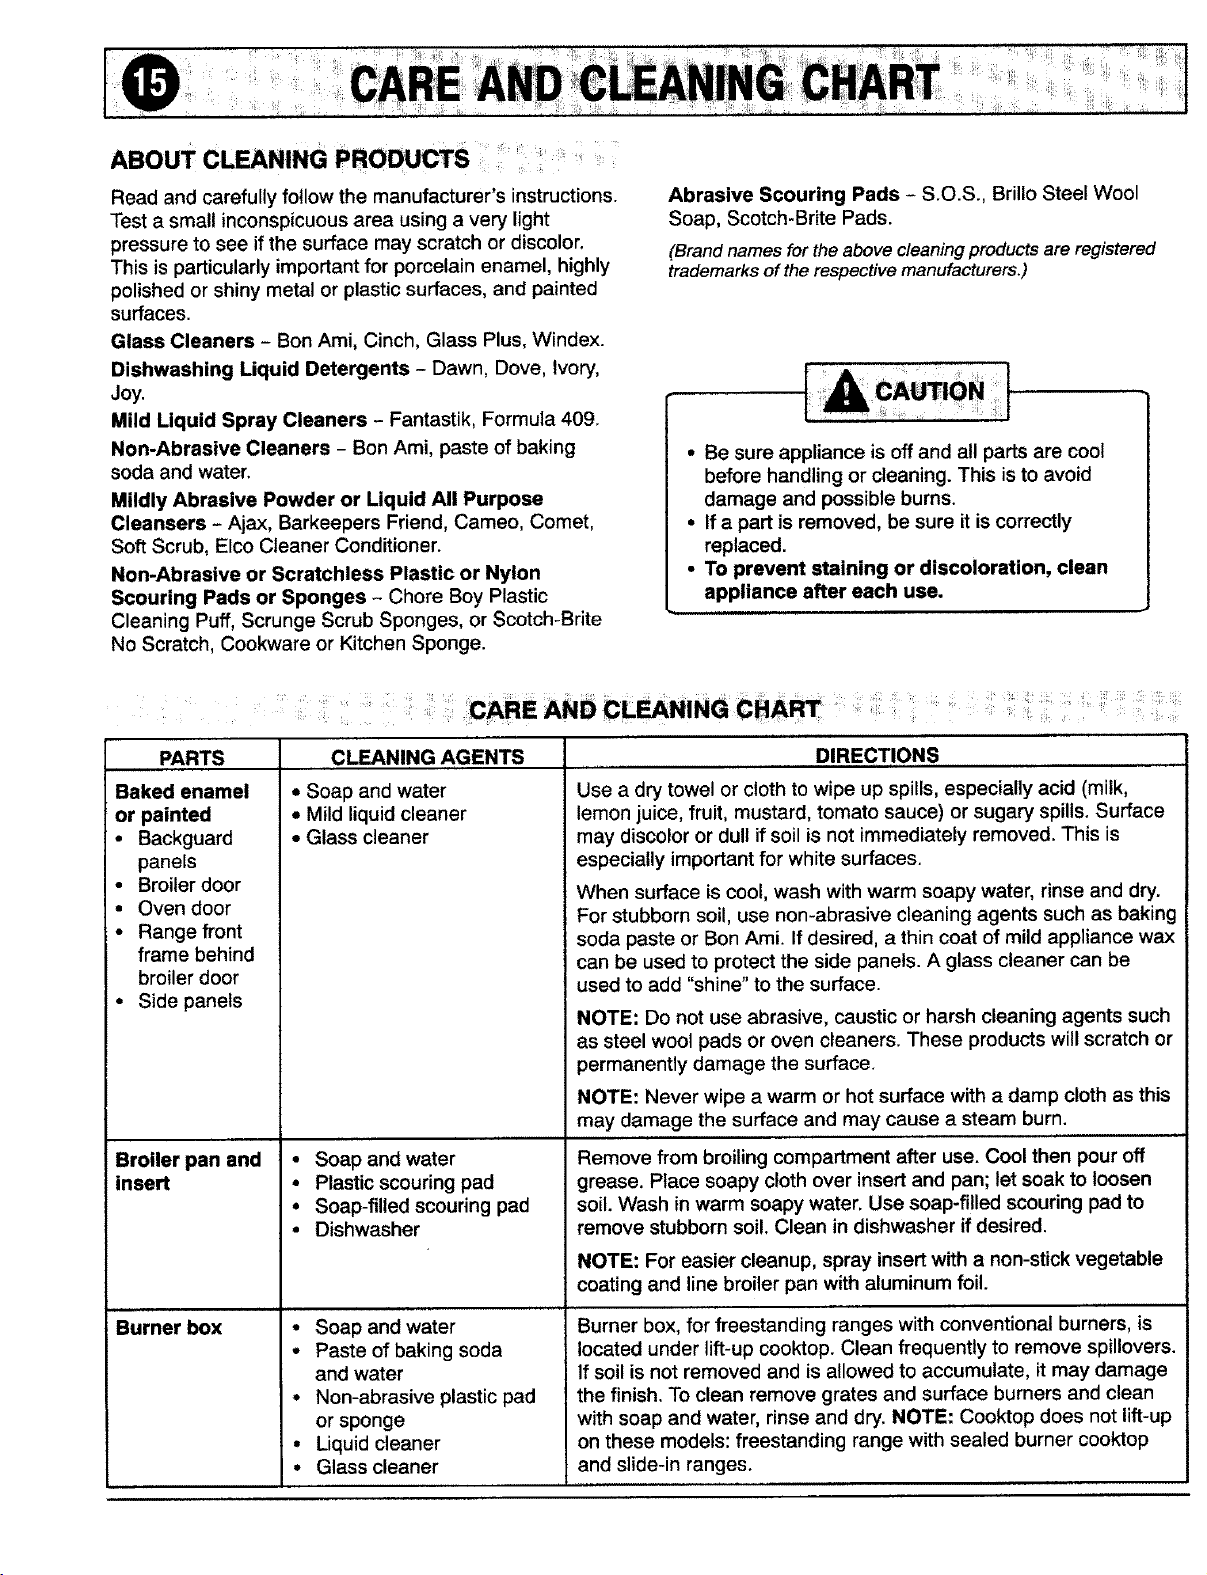
ABOUT CLEANING PRODUCTS ......
Read and carefully follow the manufacturer's instructions.
Test a small inconspicuous area using a very light
pressure to see if the surface may scratch or discolor.
This is particularly important for porcelain enamel, highly
polished or shiny metal or plastic surfaces, and painted
surfaces.
Glass Cleaners - Ben Ami, Cinch, Glass Plus, Windex.
Dishwashing Liquid Detergents - Dawn, Dove, Ivory,
Joy.
Mild Liquid Spray Cleaners - Fantastik, Formula 409.
Non-Abrasive Cleaners - Bon Ami, paste of baking
soda and water.
Mildly Abrasive Powder or Liquid All Purpose
Cleansers - Ajax, Barkeepers Friend, Cameo, Comet,
Soft Scrub, Elco Cleaner Conditioner.
Non-Abrasive or Scratchless Plastic or Nylon
Scouring Pads or Sponges - Chore Boy Plastic
Cleaning Puff, Scrunge Scrub Sponges, or Scotch-Brite
No Scratch, Cookware or Kitchen Sponge.
Abrasive Scouring Pads - S.O.S., Brillo Steel Wool
Soap, Scotch-Brite Pads.
(Brand names fortheabovecleaning productsareregistered
trademarksof therespectivemanufacturers.)
• Be sure appliance is off and all parts are cool
before handling or cleaning. This is to avoid
damage and possible burns.
• If a part is removed, be sure it is correctly
replaced.
• To prevent staining or discoloration, clean
appliance after each use.
' cARE AND CLONING CAA_'
PARTS
Baked enamel
or painted
• Backguard
panels
• Broiler door
• Oven door
• Range front
frame behind
broiler door
• Side panels
Broiler pan and •
insert
CLEANING AGENTS
o Soap and water
• Mild liquid cleaner
• Glass cleaner
Soap and water
Plastic scouring pad
Soap-filled scouring pad
Dishwasher
Burner box
• Soap and water
• Paste of baking soda
and water
• Non-abrasive plastic pad
or sponge
• Liquid cleaner
• Glass cleaner
, ,, DIRECT!ONS ..............
Use a dry towel or cloth to wipe up spills, especially acid (milk,
lemon juice, fruit, mustard, tomato sauce) or sugary spills. Surface
may discolor or dull ifsoil is not immediately removed. This is
especially important for white surfaces.
When surface is cool, wash with warm soapy water, rinse and dry.
For stubborn soil, use non-abrasive cleaning agents such as baking
soda paste or Bon Ami. If desired, a thin coat of mild appliance wax
can be used to protect the side panels. A glass cleaner can be
used to add "shine" to the surface.
NOTE: Do not use abrasive, caustic or harsh cleaning agents such
as steel wool pads or oven cleaners. These products will scratch or
permanently damage the surface.
NOTE: Never wipe a warm or hot surface with a damp cloth as this
may damage the surface and may cause a steam burn.
Remove from broiling compartment after use. Cool then pour off
grease. Place soapy cloth over insert and pan; let soak to loosen
soil. Wash in warm soapy water. Use soap-filled scouring pad to
remove stubborn soil. Clean in dishwasher if desired.
NOTE: For easier cleanup, spray insertwith a non-stick vegetable
coating and line broiler pan with aluminum foil.
Burner box, for freestanding ranges with conventional burners, is
located under lift-up cooktop. Clean frequently to remove spillovers.
If soil is not removed and is allowed to accumulate, it may damage
the finish. To clean remove grates and surface burners and clean
with soap and water, rinse and dry. NOTE: Cooktop does not lift-up
on these models: freestanding range with sealed burner cooktop
and slide-in ranges.
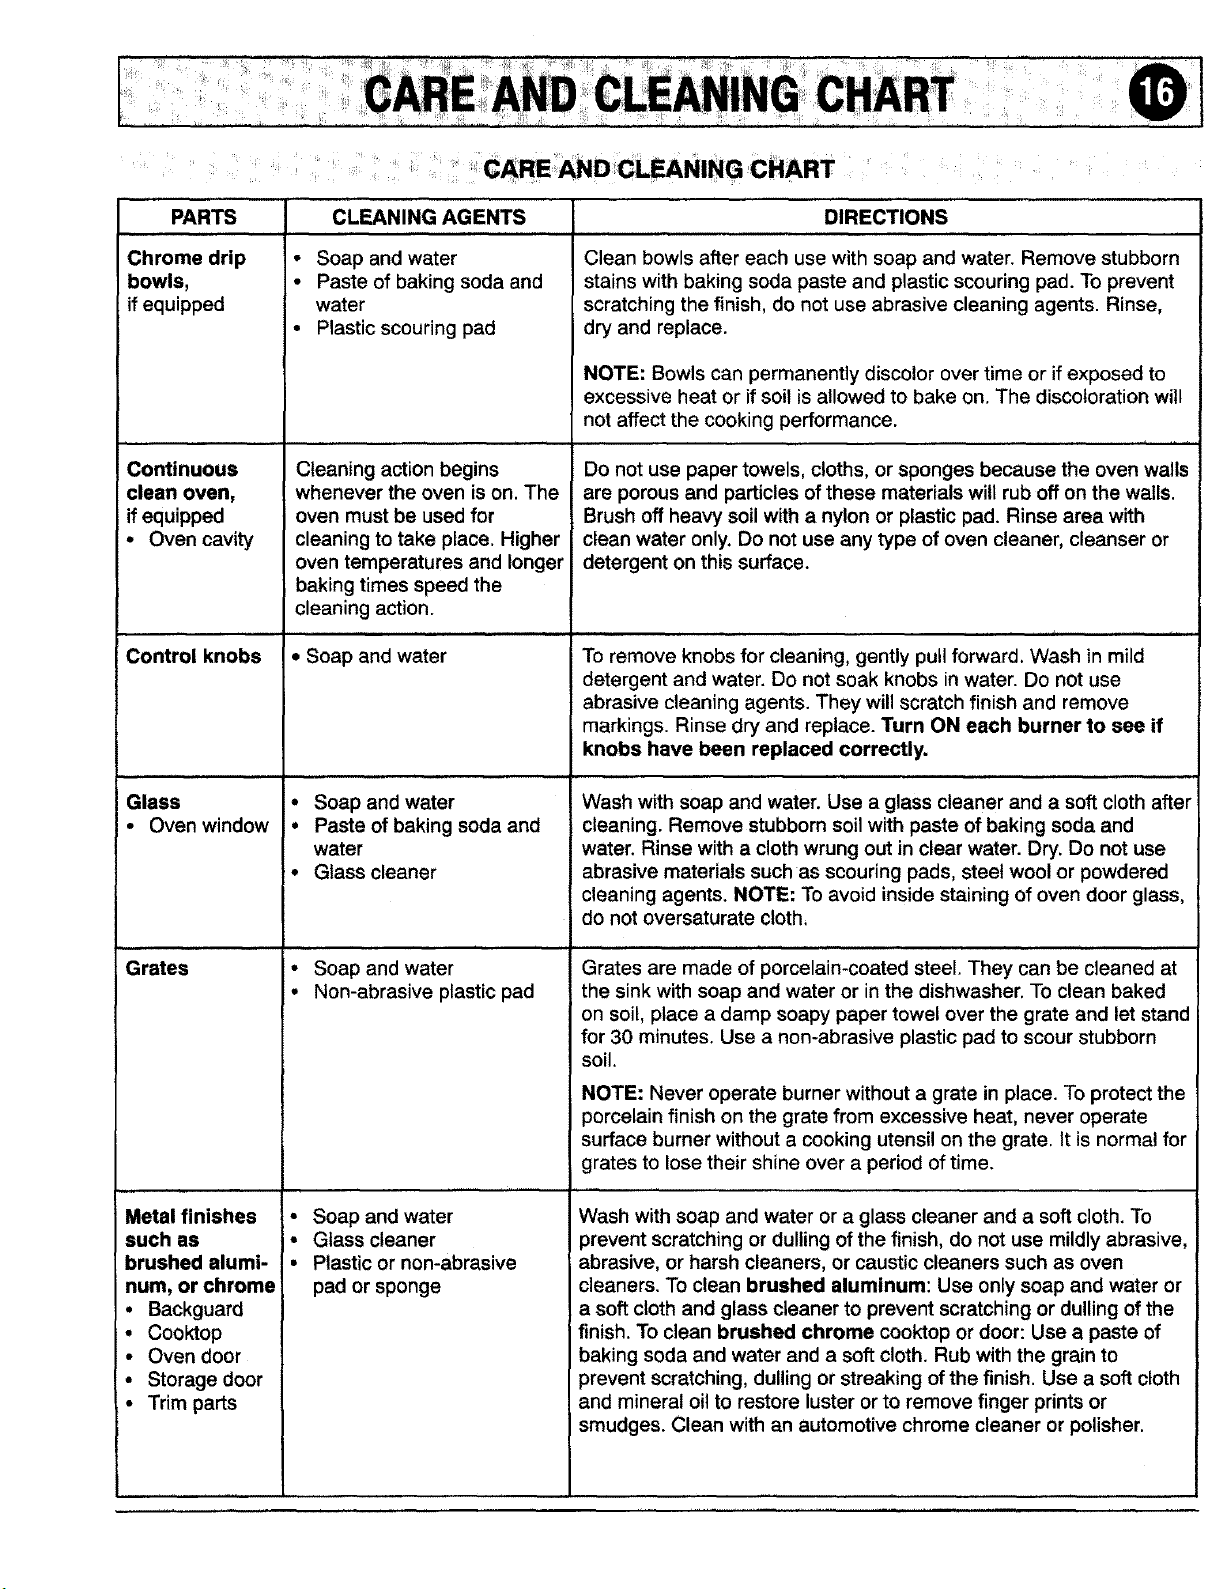
/,iiiii¸¸ iiiii!ii
' _ CARE AND CLEANING _CHART
PARTS DIRECTIONS
, ,,,,.....
Chrome drip
bowls,
if equipped
Continuous
clean oven,
if equipped
• Oven cavity
Control knobs
Glass
• Oven window
CLEANING AGENTS
, , ,.......... , ,,,,,,,,,,,,,,, ,, , ,,,.....
• Soap and water
• Paste of baking soda and
Grates
water
• Plastic scouring pad
Cleaning action begins
whenever the oven is on. The
oven must be used for
cleaning to take place. Higher
oven temperatures and longer
baking times speed the
cleaning action.
,, , ,,,,,,,,,,,,
• Soap and water
• Soap and water
• Paste of baking soda and
water
• Glass cleaner
• Soap and water
• Non-abrasive plastic pad
,,,,, ....... , ...............
• Soap and water
• Glass cleaner
• Plastic or non-abrasive
pad or sponge
Metal finishes
such as
brushed alumi-
num, or chrome
• Backguard
• Cooktop
• Oven door
• Storage door
• Trim parts
Clean bowls after each use with soap and water. Remove stubborn
stains with baking soda paste and plastic scouring pad. To prevent
scratching the finish, do not use abrasive cleaning agents. Rinse,
dry and replace.
NOTE: Bowls can permanently discolor over time or if exposed to
excessive heat or if soil is allowed to bake on. The discoloration will
not affect the cooking performance.
Do not use paper towels, cloths, or sponges because the oven walls
are porous and particles of these materials will rub off on the walls.
Brush off heavy soil with a nylon or plastic pad. Rinse area with
clean water only. Do not use any type of oven cleaner, cleanser or
detergent on this surface.
,,,_ i, , ,,,i,, ,
To remove knobs for cleaning, gently pull forward. Wash in mild
detergent and water. Do not soak knobs in water. Do not use
abrasive cleaning agents. They will scratch finish and remove
markings. Rinse dry and replace. Turn ON each burner to see if
knobs have been replaced correctly.
Wash with soap and water. Use a glass cleaner and a soft cloth after
cleaning. Remove stubborn soil with paste of baking soda and
water. Rinse with a cloth wrung out in clear water. Dry. Do not use
abrasive materials such as scouring pads, steel wool or powdered
cleaning agents. NOTE: To avoid inside staining of oven door glass,
do not oversaturate cloth,
, ,, | ............. , , ,,,,,,,,,,,,,,,,,,,,, ,,,,, ,i,,,,,,,,,,,,, ,, ,,, ,
Grates are made of porcelain-coated steel. They can be cleaned at
the sink with soap and water or in the dishwasher. To clean baked
on soil, place a damp soapy paper towel over the grate and let stand
for 30 minutes. Use a non-abrasive plastic pad to scour stubborn
soil.
NOTE: Never operate burner without a grate in place. To protect the
porcelain finish on the grate from excessive heat, never operate
surface burner without a cooking utensil on the grate. It is normal for
grates to lose their shine over a period of time.
Wash with soap and water or a glass cleaner and a soft cloth. To
prevent scratching or dulling of the finish, do not use mildly abrasive,
abrasive, or harsh cleaners, or caustic cleaners such as oven
cleaners. To clean brushed aluminum: Use only soap and water or
a soft cloth and glass cleaner to prevent scratching or dulling of the
finish. To clean brushed chrome cooktop or door: Use a paste of
baking soda and water and a soft cloth. Rub with the grain to
prevent scratching, dulling or streaking of the finish. Use a soft cloth
and mineral oil to restore luster or to remove finger prints or
smudges. Clean with an automotive chrome cleaner or polisher.
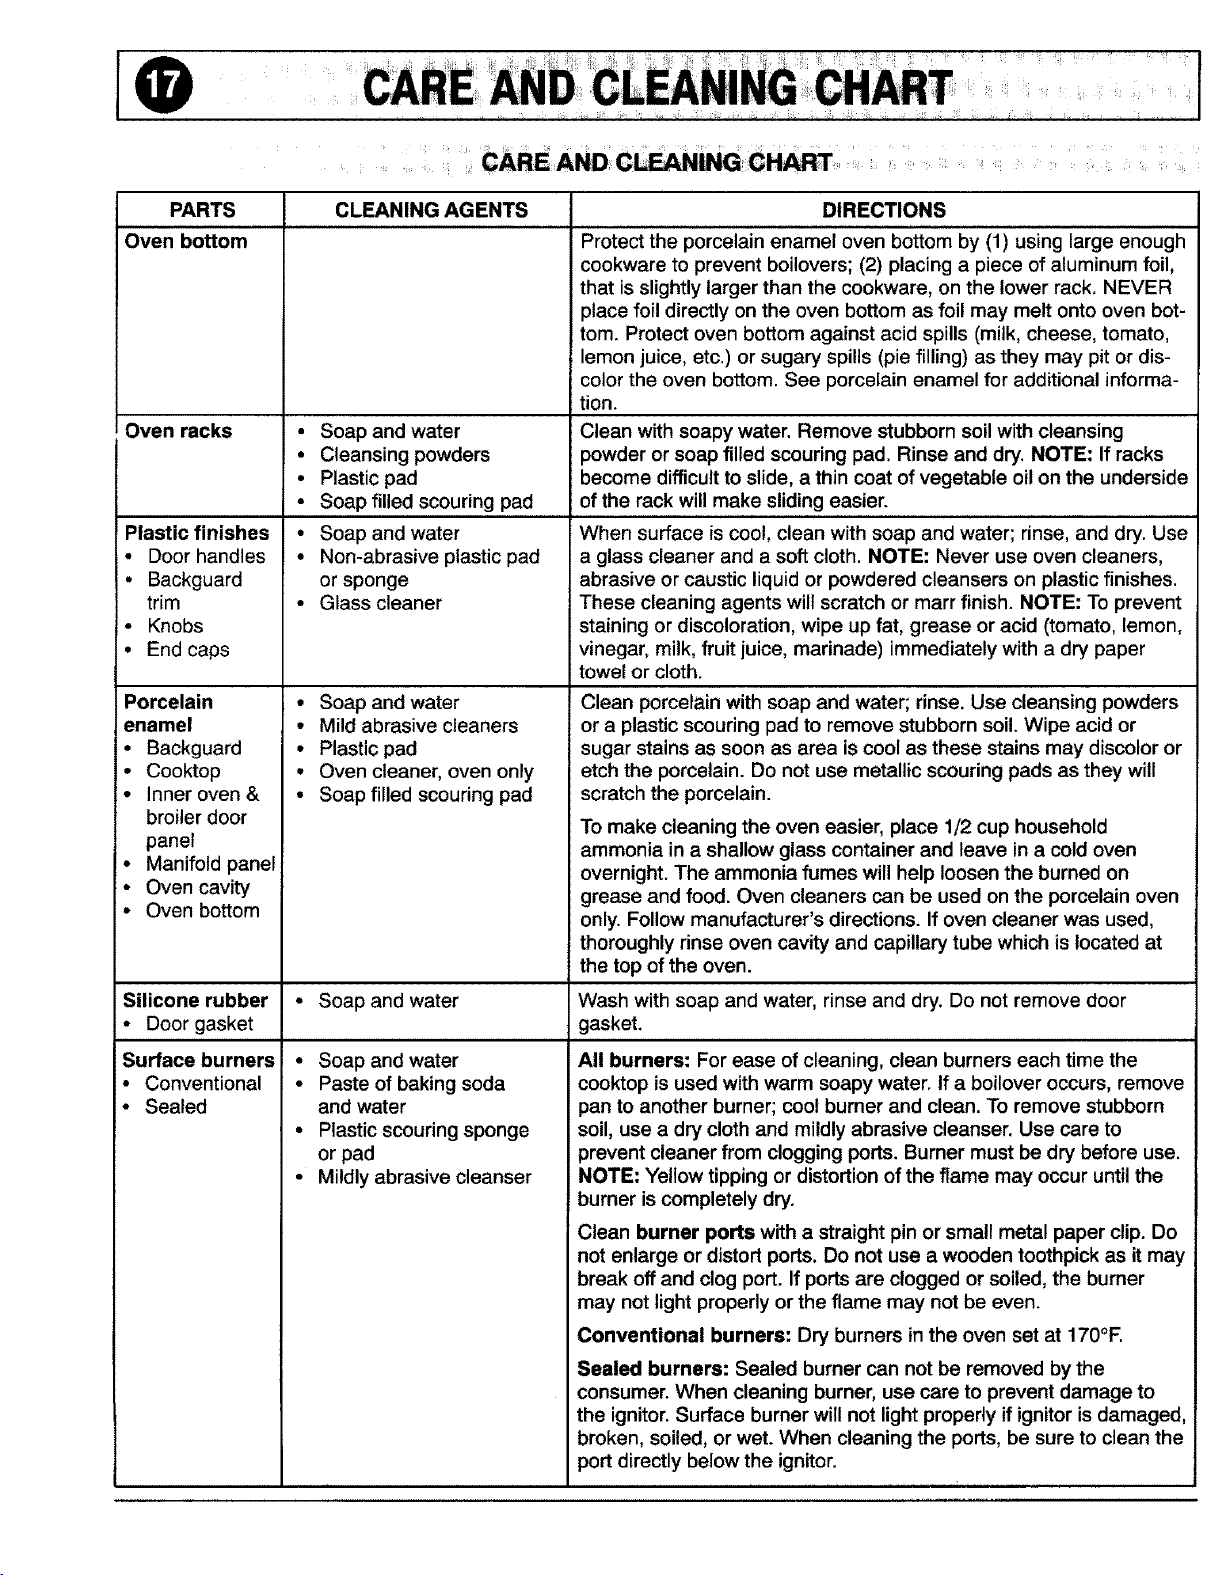
CARE AND C_N_ CHART
PARTS CLEANING AGENTS
Oven bottom
Oven racks
Plastic finishes
• Door handles
• Backguard
trim
• Knobs
• End caps
Porcelain
enamel
• Backguard
• Cooktop
• Inner oven &
broiler door
panel
• Manifold panel
• Oven cavity
• Oven bottom
Silicone rubber
• Door gasket
Surface burners
• Conventional
• Sealed
• Soap and water
• Cleansing powders
• Plastic pad
• Soap filled scouring pad
• Soap and water
• Non-abrasive plastic pad
or sponge
• Glass cleaner
• Soap and water
• Mild abrasive cleaners
• Plastic pad
• Oven cleaner, oven only
• Soap filled scouring pad
DIRECTIONS
Proiect the p0'rcelain enamel oven bosom by (1) using large enough
cookware to prevent boilovers; (2) placing a piece of aluminum foil,
that is slightly larger than the cookware, on the lower rack. NEVER
place foil directly on the oven bottom as foil may melt onto oven bot-
tom. Protect oven bottom against acid spills (milk, cheese, tomato,
lemon juice, etc.) or sugary spills (pie filling) as they may pit or dis-
color the oven bottom. See porcelain enamel for additional informa-
tion.
Clean with soapy water. Remove stubborn soil with cleansing
powder or soap filled scouring pad. Rinse and dry. NOTE: If racks
become difficult to slide, a thin coat of vegetable oil on the underside
of the rack will make sliding easier.
When surface iscool, clean with soap and water; rinse, and dry. Use
a glass cleaner and a soft cloth. NOTE: Never use oven cleaners,
abrasive or caustic liquid or powdered cleansers on plastic finishes.
These cleaning agents will scratch or marr finish. NOTE: To prevent
staining or discoloration, wipe up fat, grease or acid (tomato, lemon,
vinegar, milk,fruit juice, marinade) immediately with a dry paper
towel or cloth.
Clean porcelain with soap and water; rinse. Use cleansing powders
or a plastic scouring pad to remove stubborn soil. Wipe acid or
sugar stains as soon as area is cool as these stains may discolor or
etch the porcelain. Do not use metallic scouring pads as they will
scratch the porcelain.
To make cleaning the oven easier, place 1/2 cup household
ammonia in a shallow glass container and leave in a cold oven
overnight. The ammonia fumes will help loosen the burned on
grease and food. Oven cleaners can be used on the porcelain oven
only. Follow manufacturer's directions. If oven cleaner was used,
thoroughly rinse oven cavity and capillary tube which is located at
the top of the oven.
• Soap and water Wash with soap and water, rinse and dry. Do not remove door
gasket.
• Soap and water
• Paste of baking soda
and water
• Plastic scoudng sponge
or pad
• Mildly abrasive cleanser
All burners: For ease of cleaning, clean burners each time the
cooktop is used with warm soapy water. If a boilover occurs, remove
pan to another burner; cool burner and clean. To remove stubborn
soil, use a dry cloth and mildly abrasive cleanser. Use care to
prevent cleaner from clogging ports. Burner must be dry before use.
NOTE: Yellow tipping or distortion of the flame may occur untilthe
burner iscompletely dry.
Clean burner ports with a straight pin or small metal paper clip. Do
not enlarge or distort ports. Do not use a wooden toothpick as it may
break off and clog port. If portsare clogged or soiled, the burner
may not light properly or the flame may not be even.
Conventional burners: Dry burners in the oven set at 170°1=.
Sealed burners: Sealed burner can not be removed by the
consumer. When cleaning burner, use care to prevent damage to
the ignitor.Surface burner will not light properly if ignitor is damaged,
broken, soiled, or wet. When cleaning the ports, be sure to clean the
port directly below the ignitor.
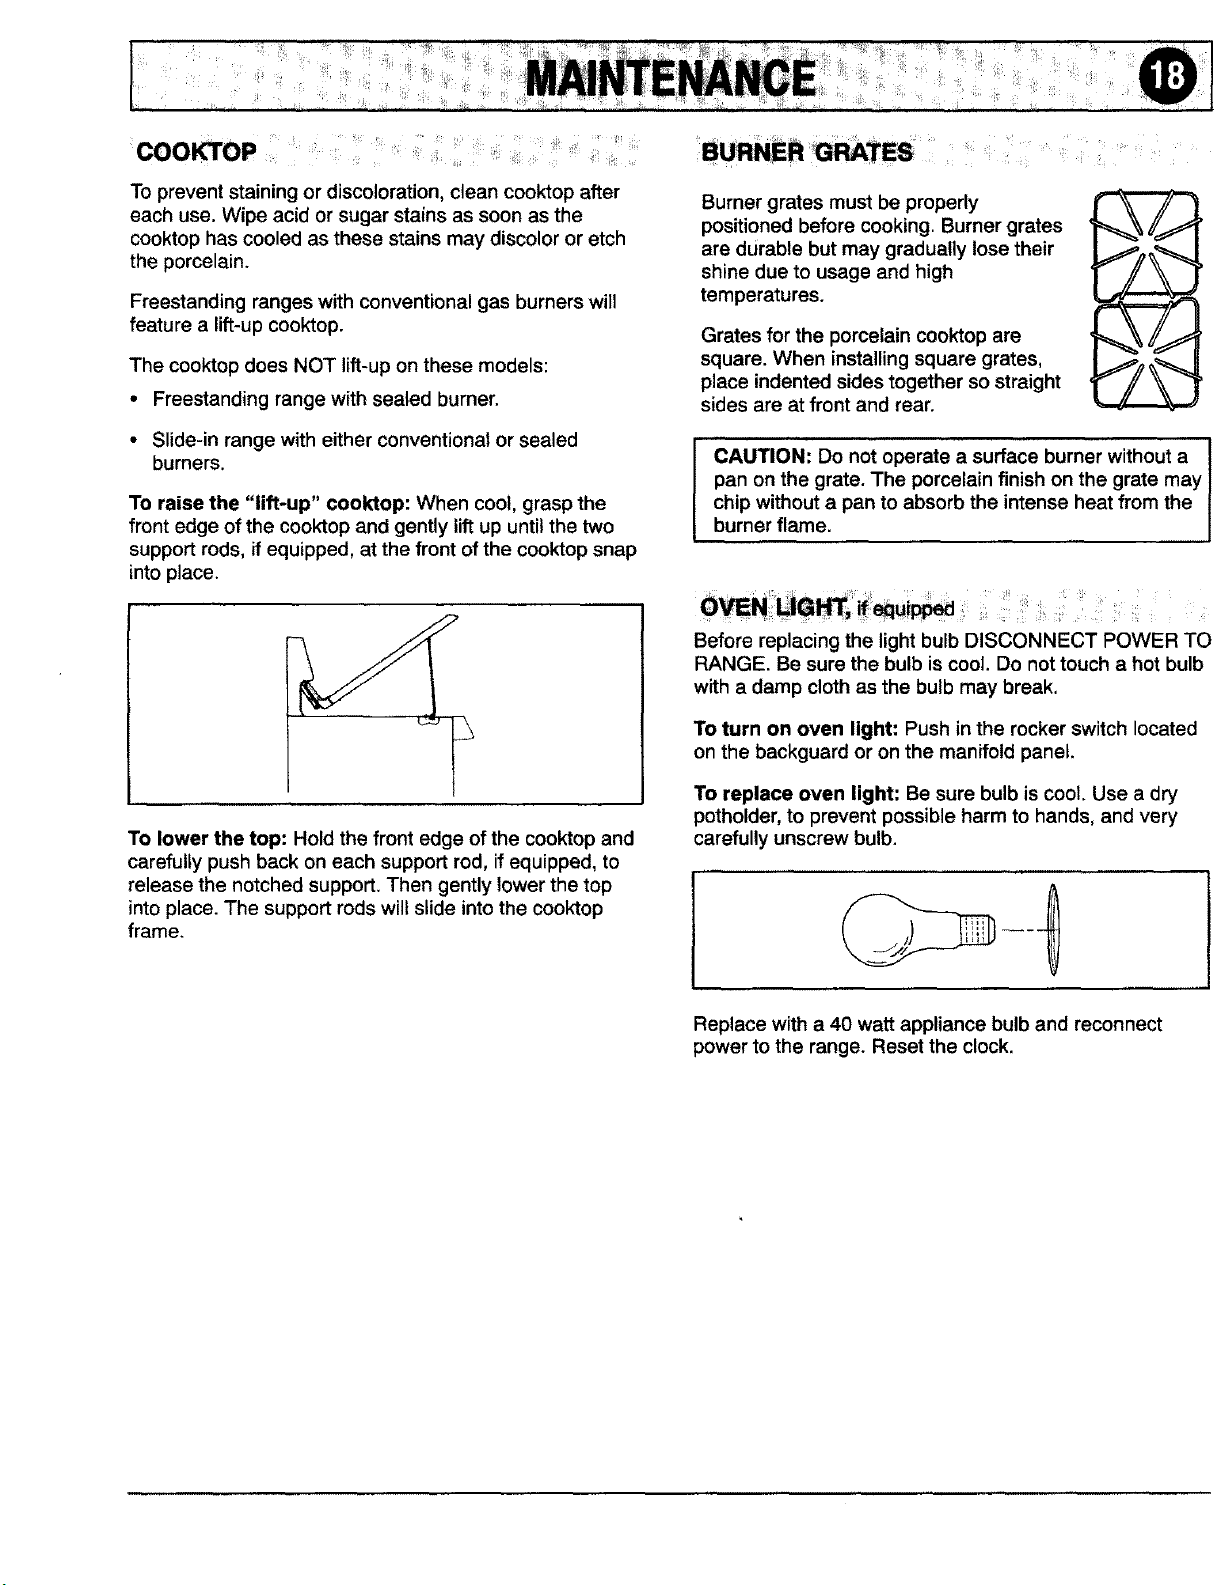
COOKTOP
To prevent staining or discoloration, clean cooktop after
each use. Wipe acid or sugar stains as soon as the
cooktop has cooled as these stains may discolor or etch
the porcelain.
Freestanding ranges with conventional gas burners will
feature a lift-up cooktop.
The cooktop does NOT lift-up on these models:
• Freestanding range with sealed burner.
• Slide-in range with either conventional or sealed
burners.
To raise the "lift-up" cooktop: When cool, grasp the
front edge ofthe cooktop and gently lift up untilthe two
support rods, ff equipped, at the front of the cooktop snap
into place.
To lower the top: Hold the front edge of the cooktop and
carefully push back on each support rod, ifequipped, to
release the notched support. Then gently lower the top
into place. The support rods will slide into the cooktop
frame.
eU ,B
Burner grates must be properly
positioned before cooking. Burner grates
are durable but may gradually lose their
shine due to usage and high
temperatures.
Grates for the porcelain cooktop are
square. When installing square grates,
place indented sides together so straight
sides are at front and rear.
CAUTION: Do not operate a surface burner without a
pan on the grate. The porcelain finish on the grate may
chip without a pan to absorb the intense heat from the
burner flame.
UGh%if u!pp
Before replacing the light bulb DISCONNECT POWER TO
RANGE. Be sure the bulb is cool. Do not touch a hot bulb
with a damp cloth as the bulb may break.
To turn on oven light: Push in the rocker switch located
on the backguard or on the manifold panel.
To replace oven light: Be sure bulb is cool. Use a dry
potholder, to prevent possible harm to hands, and very
carefully unscrew bulb.
Replace with a 40 watt appliance bulb and reconnect
power to the range. Reset the clock.
OVEN DOOR '
Do not place excessive weight on an open oven door or
stand on an open oven door as, in some cases, it could
cause the range to tip over, break the door or cause
serious injuryto the user.
When opening the oven door, allow steam and hot air to
escape before reaching in oven to check, add or remove
food.
Do not attempt to open or close door untilthe door is
completely seated on the hinge arms. Never turn on the
oven unless door is properly in place. When baking, be
sure the door is completely closed. Baking results will be
affected if the door is not securely closed.
OVEN WINDOW
To protect the oven door window:
1. Do not use abrasive cleaning agents such as steel
wool scouring pads or powdered cleansers as they
may scratch the glass.
2. Do not hit the glass with pots, pans, furniture, toys, or
other objects.
3. Do not close the oven door until the oven racks are in
place.
Scratching, hitting, jarring or stressing the glass may
weaken its structure causing an increased risk of
breakage at a later date.
When the range is new the door may feel "spongy" when
you close the door. This is normal and will become less
"spongy" with use.
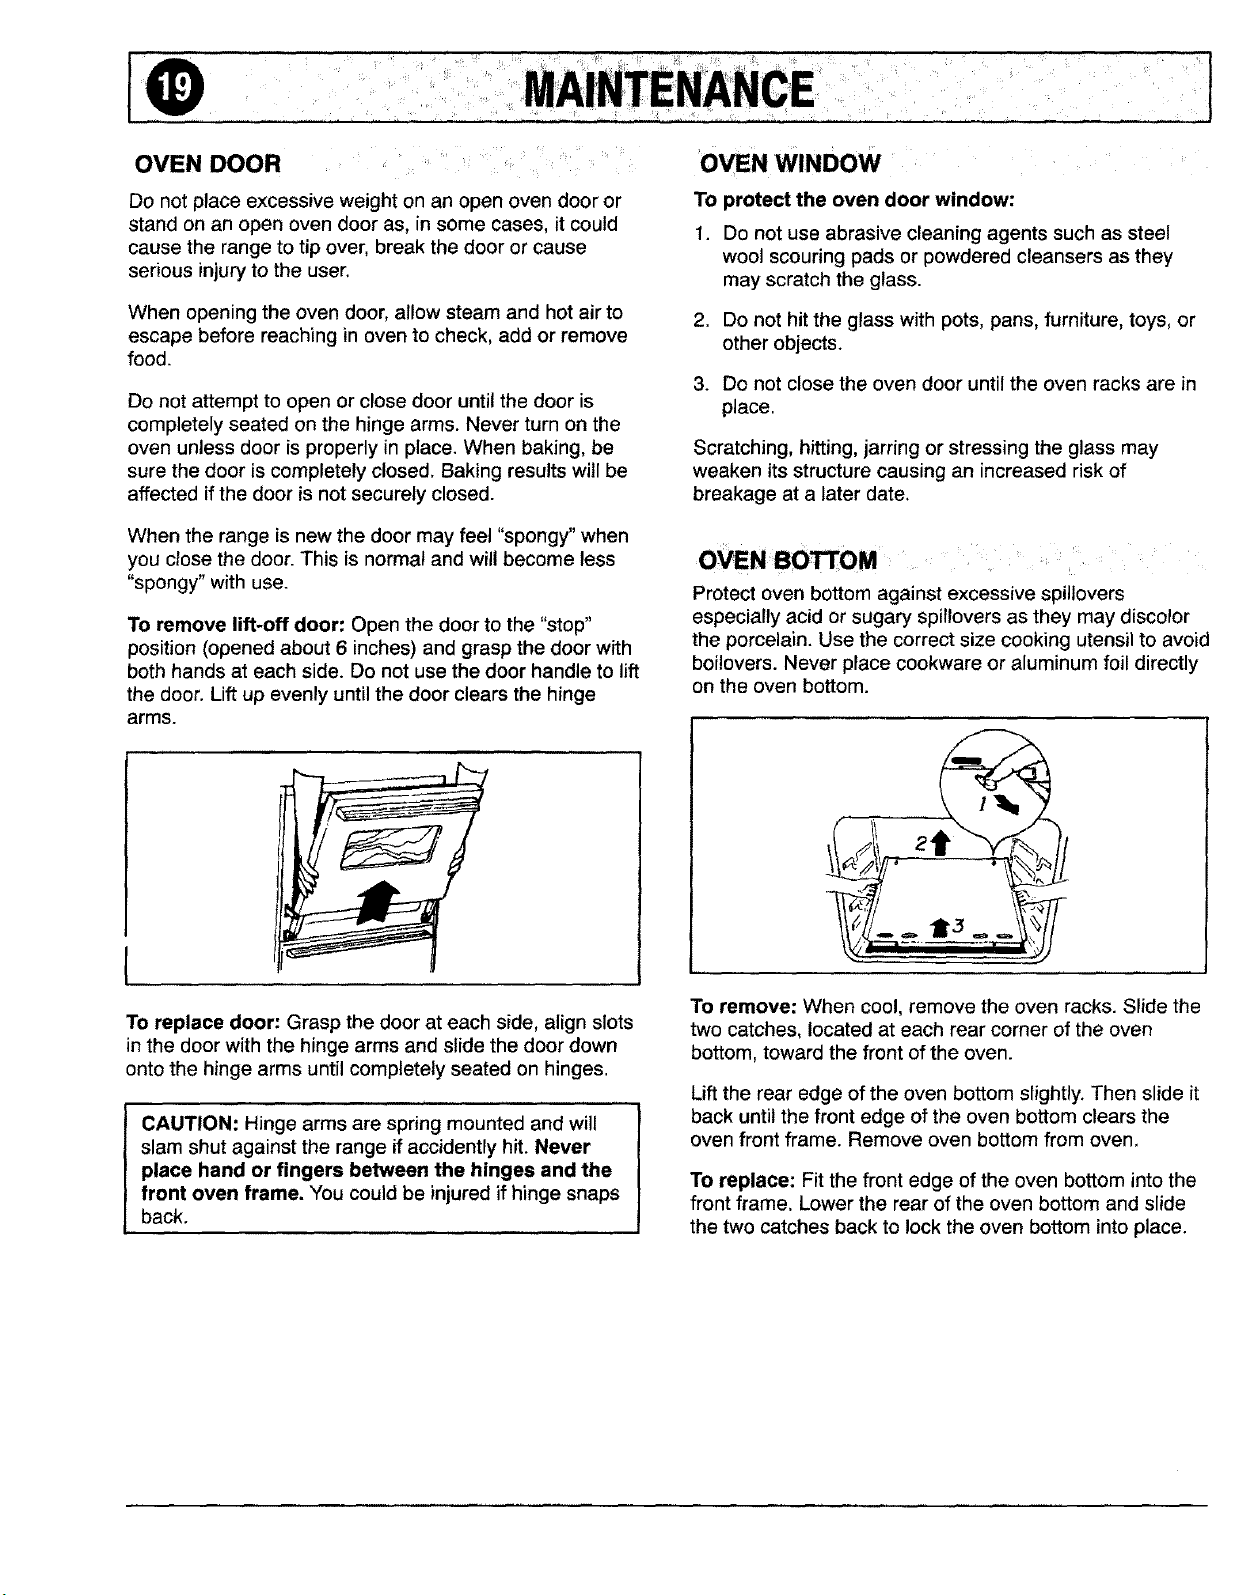
To remove lift-off door: Open the door to the "stop"
position (opened about 6 inches) and grasp the door with
both hands at each side. Do not use the door handle to lift
the door. Lift up evenly until the door clears the hinge
arms.
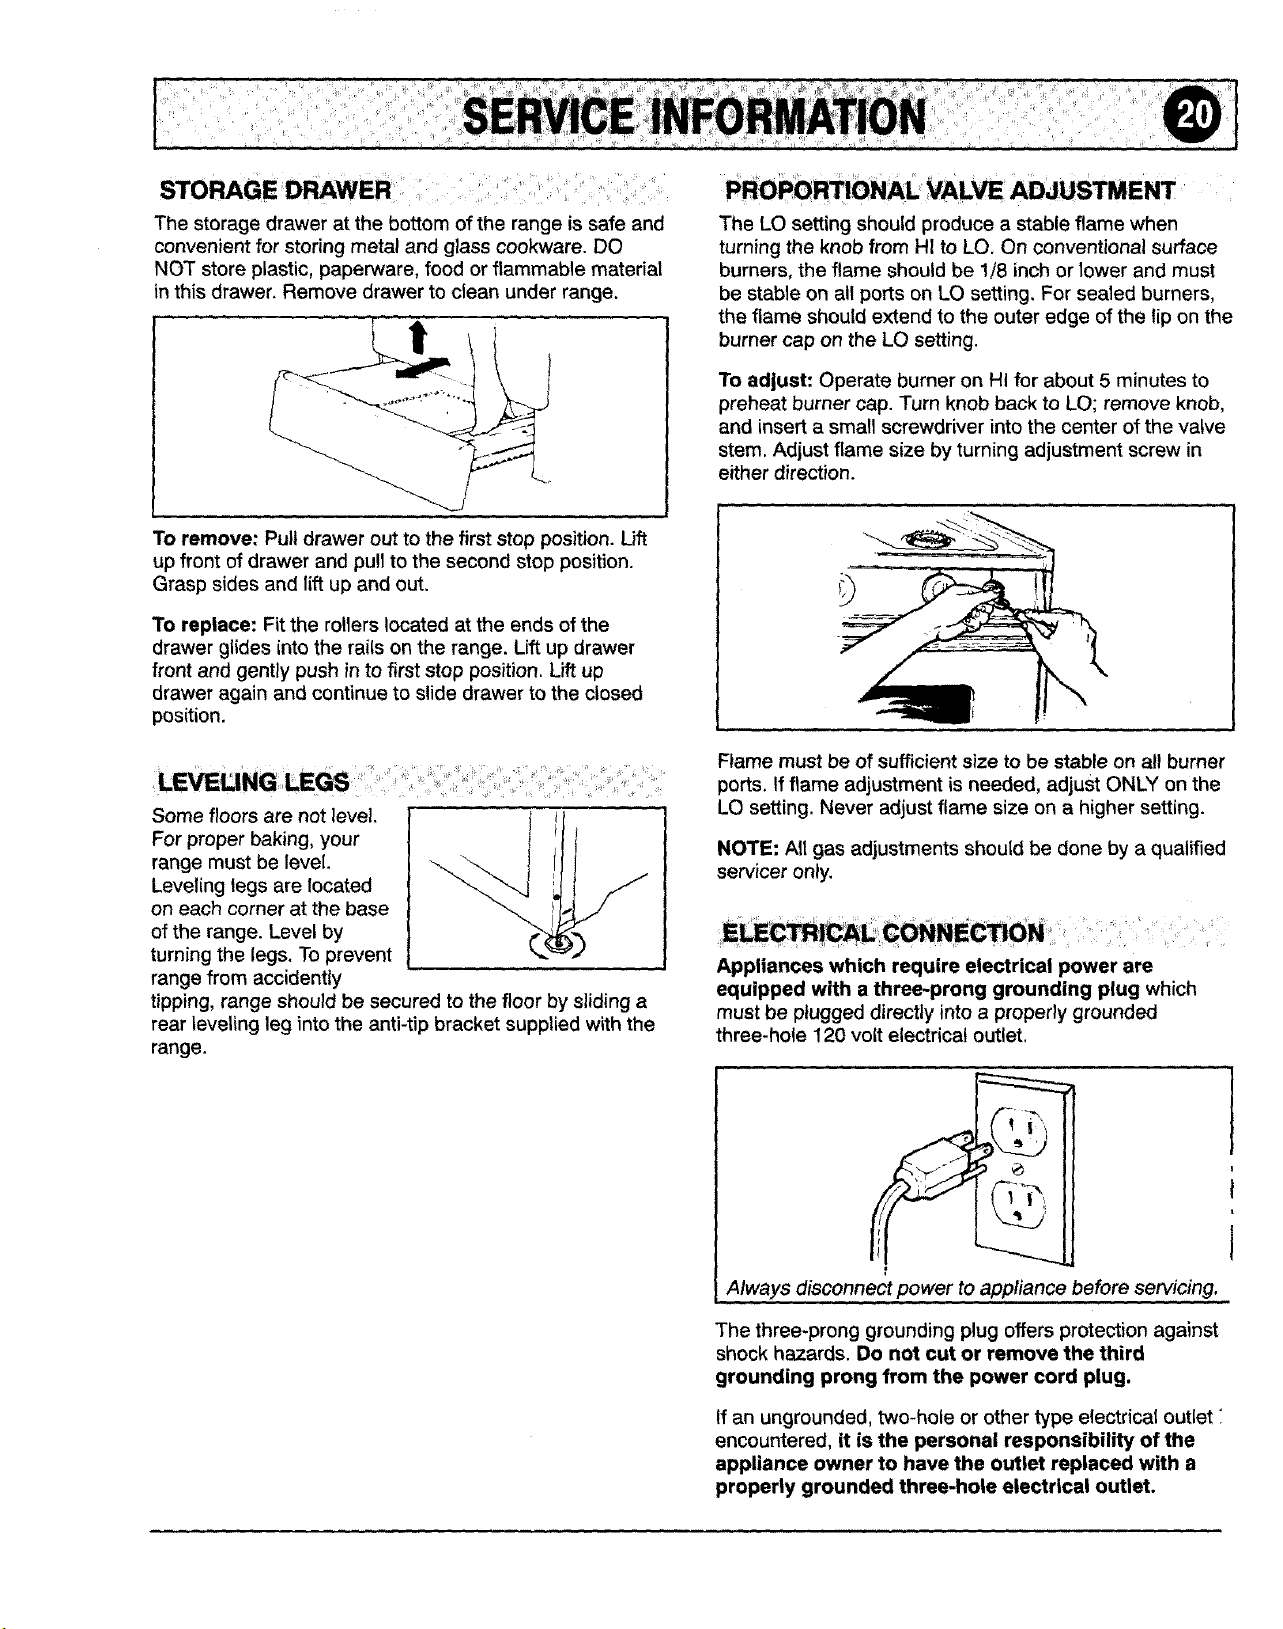
OVEN BOTTOM
Protect oven bottom against excessive spillovers
especially acid or sugary spitlovers as they may discolor
the porcelain. Use the correct size cooking utensil to avoid
boi!overs. Never place cookware or aluminum foil directly
on the oven bottom.
To replace door: Grasp the door at each side, align slots
in the door with the hinge arms and slide the door down
ontothe hinge arms until completely seated on hinges.
CAUTION: Hinge arms are spring mounted and will
slam shut against the range if accidently hit. Never
place hand or fingers between the hinges and the
front oven frame. You could be injured if hinge snaps
back.
To remove: When cool, remove the oven racks. Slide the
two catches, located at each rear corner of the oven
bottom, toward the front of the oven.
Lift the rear edge of the oven bottom slightly. Then slide it
back until the front edge of the oven bottom clears the
oven front frame. Remove oven bottom from oven,
To replace: Fit the front edge of the oven bottom into the
front frame. Lower the rear of the oven bottom and slide
the two catches back to lock the oven bottom into place.
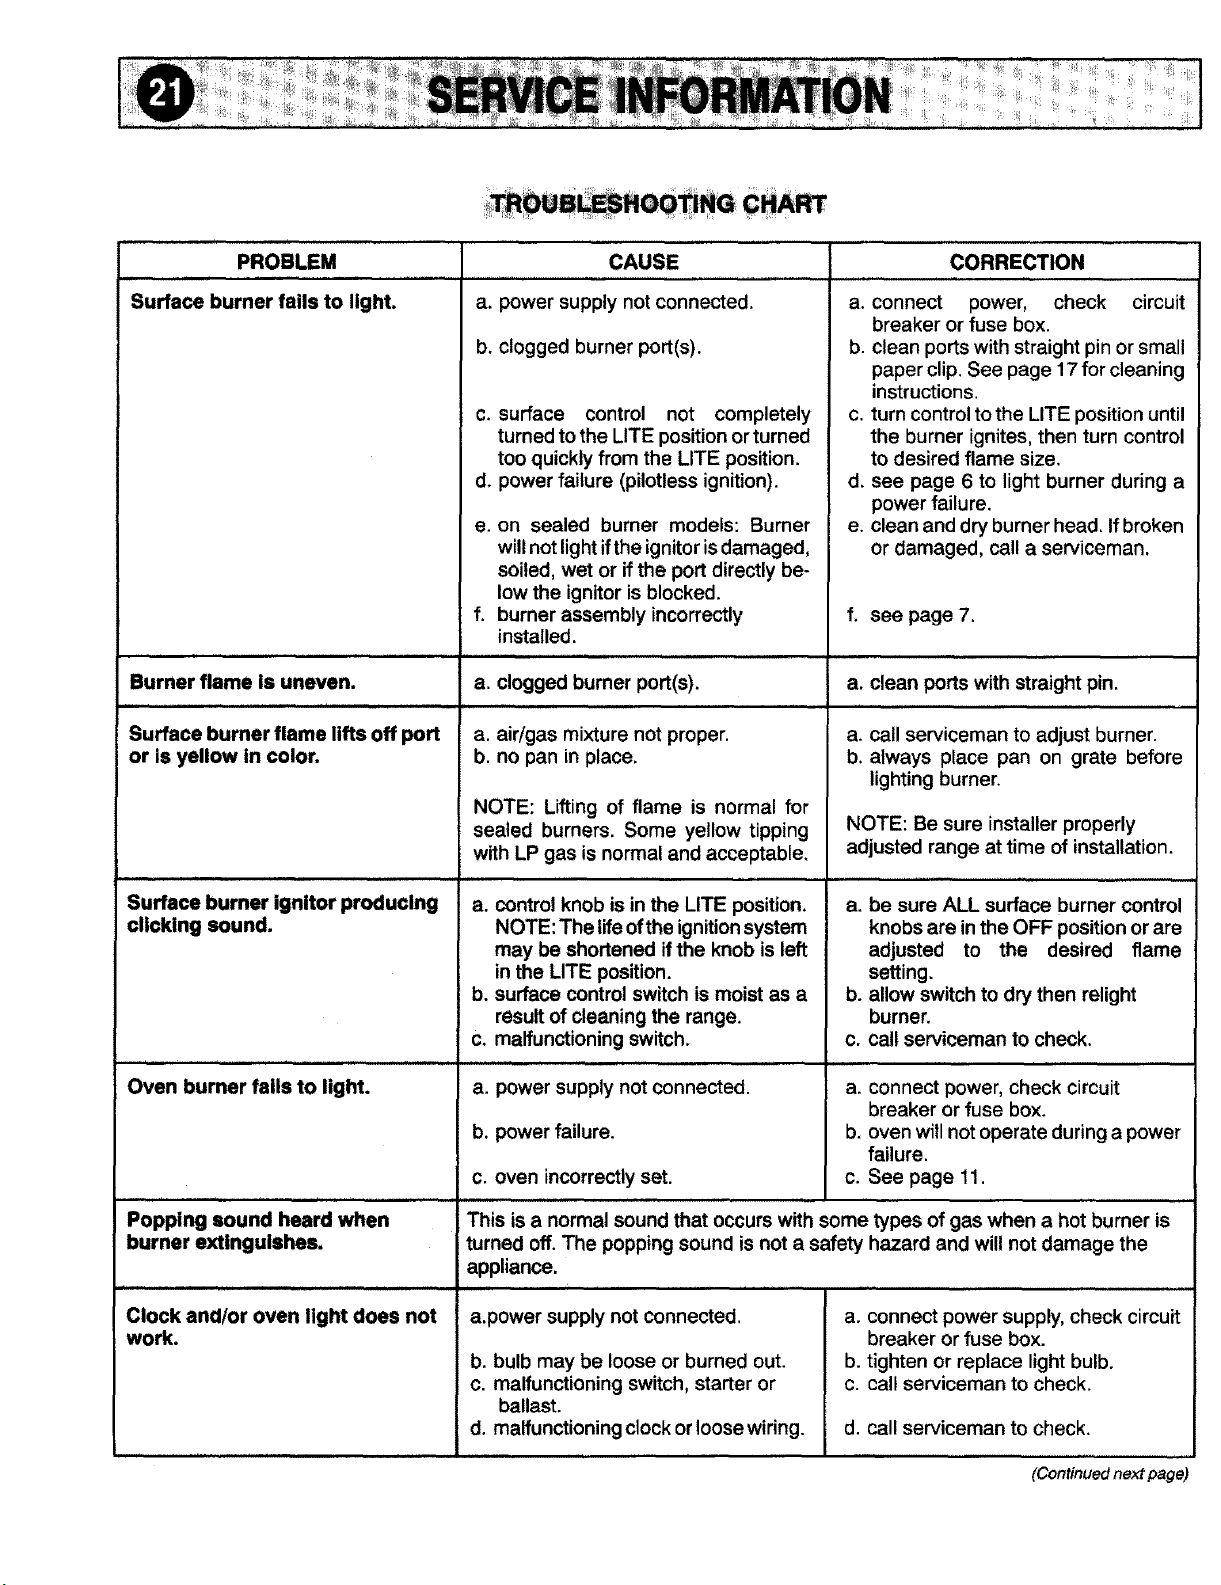
STORAGE DRAWER':
The storage drawer at the bottom of the range is safe and
convenient for storing metal and glass cookware. DO
NOT store plastic, paperware, food or flammable material
in this drawer. Remove drawer to clean under range.
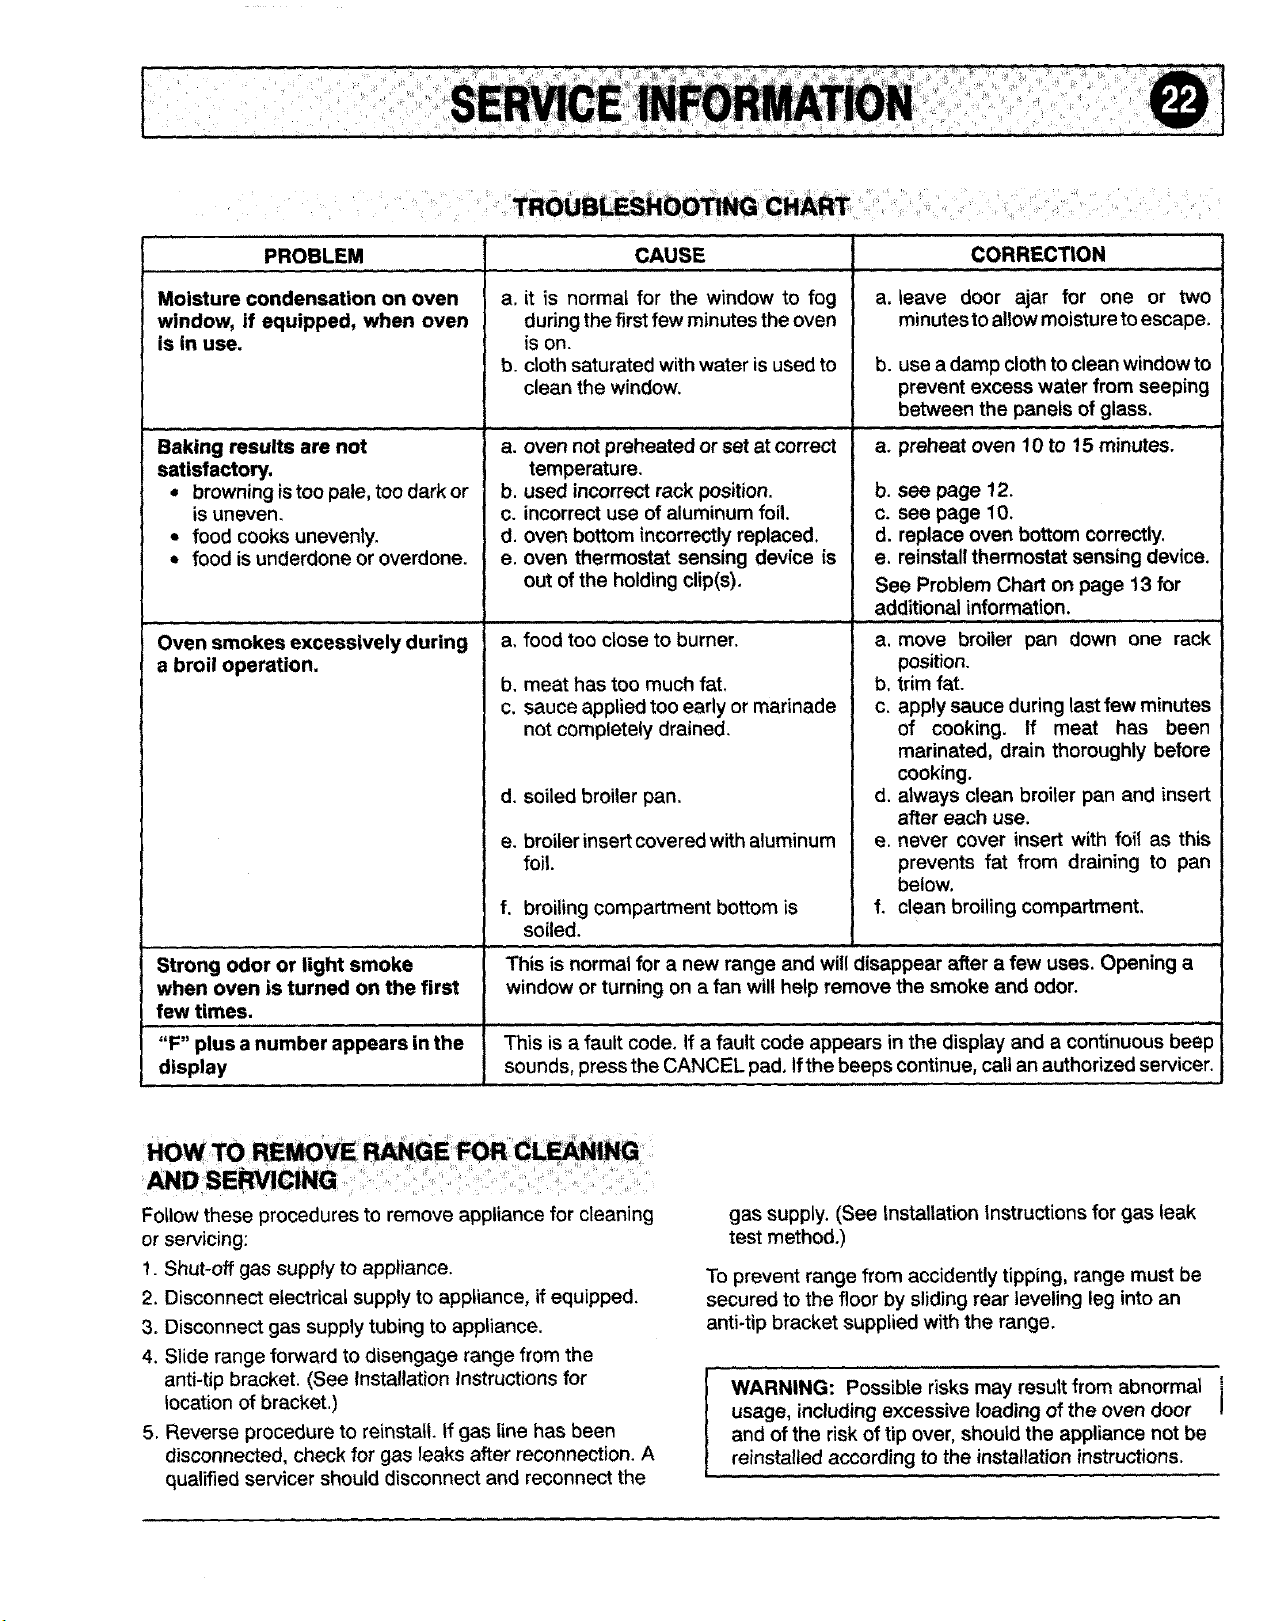
PROPORTIONAL VALVE ADJUSTMENT
The LO setting should produce a stable flame when
turning the knob from HI to LO. On conventional surface
burners, the flame should be 1/8 inch or lower and must
be stable on all ports on LO setting. For sealed burners,
the flame should extend to the outer edge of the lip on the
burner cap on the LO setting.
To adjust: Operate burner on HI for about 5 minutes to
preheat burner cap. Turn knob back to LO; remove knob,
and insert a small screwdriver into the center of the valve
stem. Adjust flame size by turning adjustment screw in
either direction.
To remove: Pull drawer out to the first stop position. Lift
up front of drawer and pull to the second stop position.
Grasp sides and lift up and out.
To replace: Fit the rollers located at the ends of the
drawer glides into the rails on the range. Lift up drawer
front and gently push in to first stop position. Lift up
drawer again and continue to slide drawer to the closed
position.
Some floors are not level.
For proper baking, your
range must be level.
Leveling legs are located
on each corner at the base
of the range. Level by
turning the legs. To prevent
range from accidently
tipping, range should be secured to the floor by sliding a
rear leveling leg into the anti-tip bracket supplied with the
range.
Flame must be of sufficient size to be stable on all burner
ports. If flame adjustment is needed, adjust ONLY on the
LO setting. Never adjust flame size on a higher setting.
NOTE: All gas adjustments should be done by a qualified
servicer only.
Appliances which require electrical power are
equipped with a three-prong grounding plug which
must be plugged directly into a properly grounded
three-hole 120 volt electrical outlet.
Always disconnect power to appliance before servicing,
The three-prong grounding plug offers protection against
shock hazards. Do not cut or remove the third
grounding prong from the power cord plug.
If an ungrounded, two-hole or other type electrical outlet
encountered, it is the personal responsibility of the
appliance owner to have the outlet replaced with a
properly grounded three-hole electrical outlet.
i
i
I
!
I
i i i, i ! , ,
PROBLEM
,, ,, ,,,,,,,,,,,,,,,,,
Surface burner fails to light.
CAUSE
, r ,,, , , , , , ,,,,,
a. power supply not connected.
b. clogged burner port(s).
c. surface control not completely
turned to the LITE position or turned
too quickly from the LITE position.
d. power failure (pilotless ignition).
e,
f.
i, ,, i, , ,, ,i , ,,,,,
Burner flame is uneven, a.
Surface burner flame lifts off port
or is yellow in color.
Surface burner ignitor producing a.
clicking sound.
b.
C.
.................................... ,u , ,, , i
Oven burner falls to light, a.
b.
c.
..... ,, i ,,,
Popping sound heard when
burner extinguishes.
Clock and/or oven light does not
work.
on sealed burner models: Burner
willnot light if the ignitor isdamaged,
soiled, wet or if the port directly be-
low the ignitor is blocked.
burner assembly incorrectly
installed.
,, r, ,,,,,,,,,, , , ,, ,
CORRECTION
a. connect power, check circuit
breaker or fuse box.
b. clean ports with straight pin or small
paper clip. See page 17 for cleaning
instructions.
c. turn control to the LITE position until
the burner ignites, then turn control
to desired flame size.
d. see page 6 to light burner during a
power failure.
e. clean and dry burner head. If broken
or damaged, call a serviceman.
f. see page 7.
clogged burner port(s), a. clean ports with straightpin.
, ,, ,, ,,..... ,, ,,
a. air/gas mixture not proper.
b. no pan in place.
NOTE: Lifting of flame is normal for
sealed burners. Some yellow tipping
with LP gas is normal and acceptable.
control knob is in the LITE position.
NOTE: The life ofthe ignition system
may be shortened ifthe knob is left
in the LITE position.
surface control switch is moist as a
result of cleaning the range.
malfunctioning switch.
power supply not connected.
power failure.
oven incorrectly set.
a. call serviceman to adjust burner.
b. always place pan on grate before
lighting burner.
NOTE: Be sure installer properly
adjusted range at time of installation.
a. be sure ALL surface burner control
knobs are in the OFF position or are
adjusted to the desired flame
setting.
b. allow switch to dry then relight
burner.
c. call serviceman to check.
a. connect power, check circuit
breaker or fuse box.
b. oven will not operate during a power
failure,
c. See page 11.
This is a normal sound that occurs with some types of gas when a hot burner is
turned off. The popping sound isnot a safety hazard and will not damage the
appliance.
, , ,,, , , , , ,, , , ,, ......... ,,,..........
a.power supply not connected.
b. bulb may be loose or burned out.
c. malfunctioning switch, starter or
ballast.
d. malfunctioning clock orloosewiring.
a. connect power supply, check circuit
breaker or fuse box.
b. tighten or replace light bulb.
c. call serviceman to check.
d. call serviceman to check.
(Continued next page)
, TRouB HOOT -IG CHART
PROBLEM CAUSE
Moisture condensation on oven
window, if equipped, when oven
is in use.
Baking results are not
satisfactory.
• browning istoo pale, too dark or
is uneven.
• food cooks unevenly.
• food is underdone or overdone,
Oven smokes excessively during
a broil operation.
a. it is normal for the window to fog
during the first few minutes the oven
is on.
b. cloth saturated with water is used to
clean the window.
a. oven not preheated or set at correct
temperature.
b. used incorrect rack position.
c. incorrect use of aluminum foil.
d. oven bottom incorrectly replaced.
e. oven thermostat sensing device is
out ofthe holdingclip(s).
a, food too close to burner.
b, meat has too much fat.
c. sauce applied too early or marinade
not completely drained,
d.
e.
f,
soiled broiler pan,
broiler insert covered with aluminum
foil,
broiling compartment bottom is
soiled.
CORRECTION
,.,,,,, .,,,,,, .,,,,,.,,,,,
a. leave door ajar for one or two
minutesto allowmoisture toescape.
b, use a damp cloth to clean window to
prevent excess water from seeping
between the panels of glass.
a. preheat oven 10 to 15 minutes.
b. see page 12.
c. see page 10.
d. replace oven bottom correctly.
e. reinstallthermostat sensing device.
See Problem Chart on page 13 for
additional information.
,, ,,,,, ,, ,,,, , ,,, ,
a. move broiler pan down one rack
position.
b. trim fat.
c. apply sauce during last few minutes
of cooking, If meat has been
marinated, drain thoroughly before
cooking.
d. always clean broiler pan and insert
after each use.
e. never cover insert with foil as this
prevents fat from draining to pan
below.
f. clean broiling compartment,
Strong odor or light smoke This is normal for a new range and will disappear after a few uses. Opening a
when oven is turned on the first window or turning on a fan will help remove the smoke and odor.
few times.
, , ,, . , , , , ,,,,, ,,,, ,,,,, ,,,,, ,,...... ,,, ,,, ,,, ,,,, ,, ,,,, ,,,,, ,,,L ,,,, ,,,,,,
"F" plus a number appears in the This is a fault code. If a fault code appears in the display and a continuous beep
display sounds, press the CANCEL pad, Ifthe beeps continue, call an authorized servicer.
Follow these procedures to remove appliance for cleaning
or servicing:
1. Shut-off gas supply to appliance.
2. Disconnect electrical supply to appliance, if equipped.
3, Disconnect gas supply tubing to appliance.
4. Slide range forward to disengage range from the
anti-tip bracket. (See Installation Instructions for
location of bracket.)
5. Reverse procedure to reinstall. If gas line has been
disconnected, check for gas leaks after reconnection. A
qualified servicer should disconnect and reconnect the
gas supply. (See Installation Instructions for gas leak
test method,)
To prevent range from accidently tipping, range must be
secured to the floor by sliding rear leveling leg into an
anti-tip bracket supplied with the range.
WARNING: Possible risks may resultfrom abnormal i'
usage, including excessive loading of the oven door I
and of the risk of tip over, should the appliance not be
reinstalled according to the installation instructions.
COOKING APPLIANCE WARRANTY
FULL WARRANTY - Partsand Labor
For one (1) year from the date of original purchase date, any part which fails in normal home use will be
repaired or replaced free of charge,
LIMITED WARRANTY - Partsonly
For an additional four (4) years beyond the first year of the full warranty period - Parts listed below will be
repaired or replaced free of charge for the part itself, with the owner paying all other costs, including labor,
mileage, and transportation,
Gas sealed surface burner which fails in normal home use
Canadian Residents: The above warranties only cover an appliance installed in Canada that has been certified or
listed by appropriate test agencies for compliance to a National Standard of Canada unless the appliance was
brought into Canada due to transfer of residence from the United States to Canada.
The specificwarrantiesexpressedabove are theonly warrantiesprovidedby themanufacturer.These warrantiesgiveyouspecificlegal rights,and
you mayalsohaveotherrightswhichvaryfromstatetostate.
WHAT IS NOT COVERED BY THESE WARRANTIES:
1. Conditions and damages resulting from any of the
following:
a. Improper installation, delivery, or maintenance.
b. Any repair, modification, alteration or adjustment
not authorized by the manufacturer or an
authorized servicer.
c, Misuse, abuse, accidents or unreasonable use.
d. Incorrect electrical current, voltage or supply.
e. Improper setting of any control.
2. Warranties are void if the original serial numbers have
been removed, altered, or cannot be readily
determined.
3. Light bulbs.
4. Products purchased for commercial or industrial use.
5. The cost of service or service call to:
a. Correct installation errors.
b. Instruct the user on the proper use of the product.
c. Transport the appliance to a servicer.
6. Consequential or incidental damages sustained by
any person as a result of any breach of these
warranties.
Some states do not allow the exclusion or limitation of
consequential or incidental damages, so the above
exclusion may not apply to you.
HOW TO RECEIVE WARRANTY SERVICE:
1. For authorized service, contact the dealer from whom
you purchased the appliance, or call Maytag
Appliances Sales Company at: 1-800-688-1120.
2. If you are not able to satisfactorily resolve the
complaint with local response, call or write to:
Maytag Appliances Sales Company
Attn. CAIR Center
P.O. Box 2370
Cleveland, TN 37320-2370
1-800-688-1120
3. When requesting service, the following information
will be needed:
a. Your name, address and telephone number.
b. Model and serial numbers (found onthe data plate).
c. Name and address of dealer or servicer.
d. Proof of purchase date (sales receipt).
e. A clear description of the problem and service
history.
Warranty Part No.: 8109P087-60
(09-97-00)

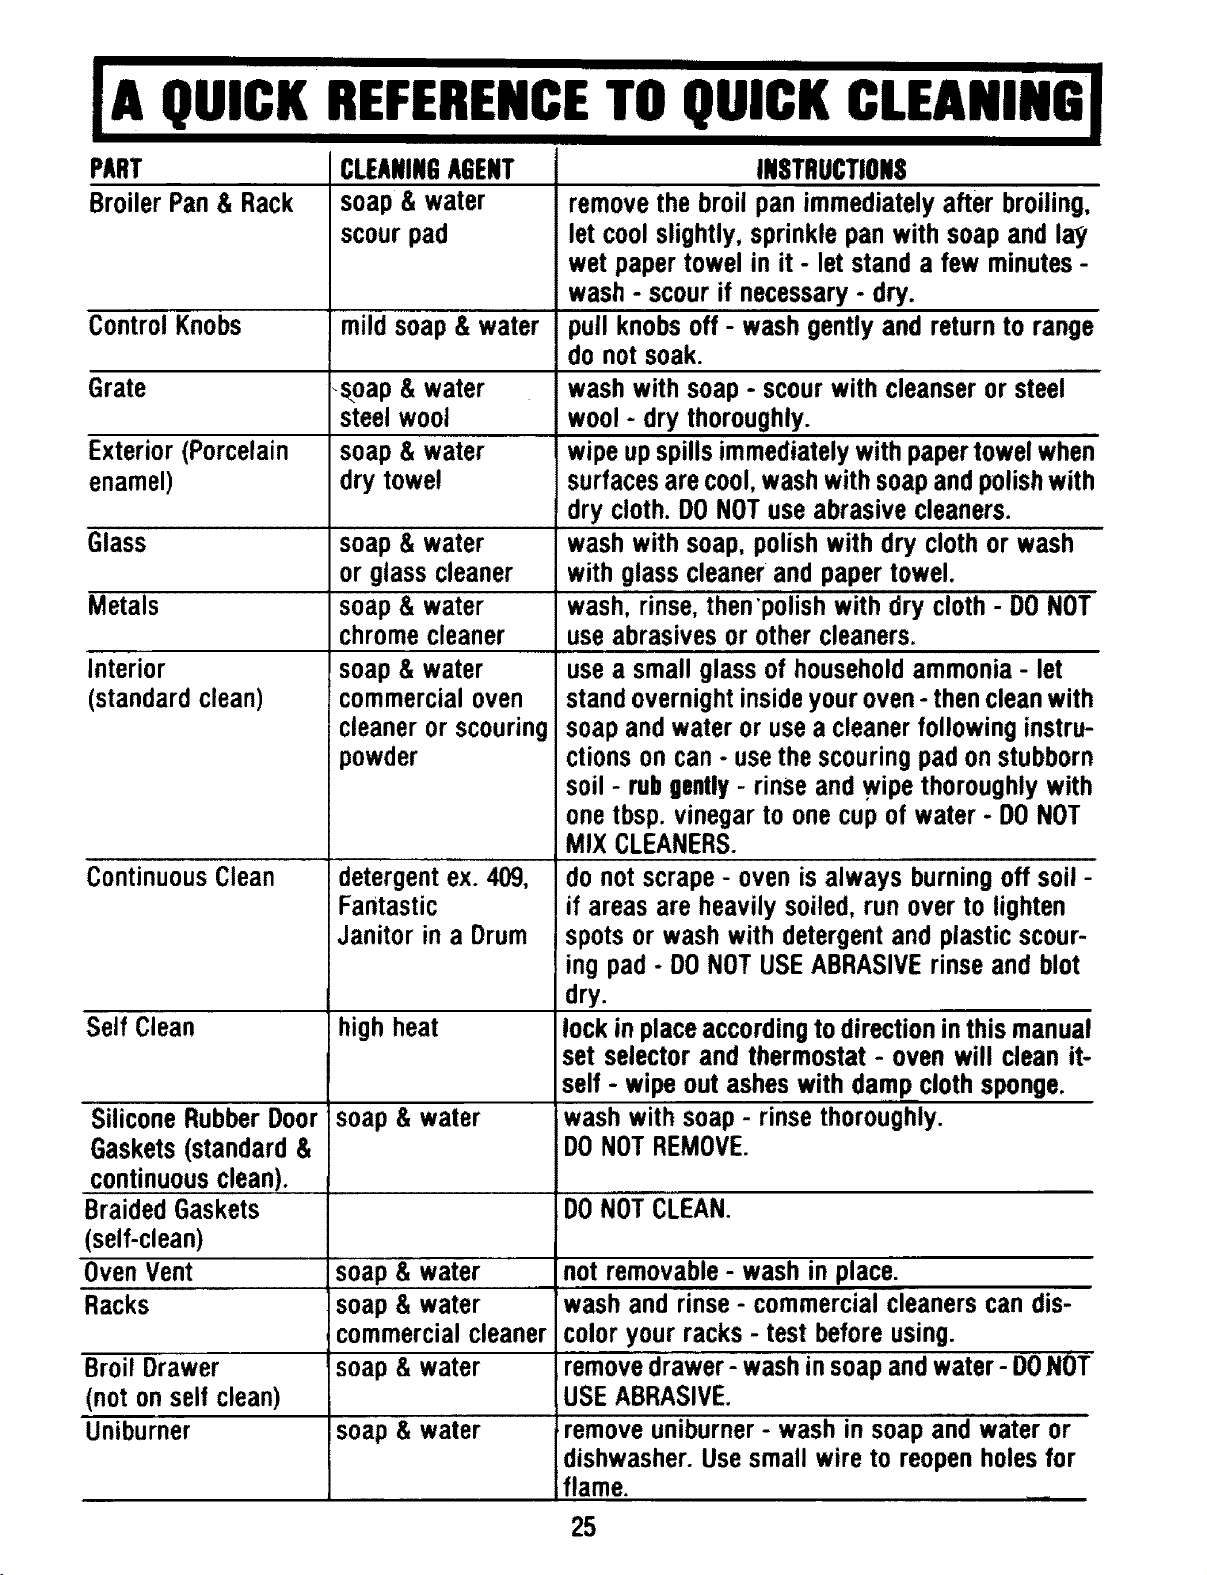
PART
BroilerPan& Rack
Control Knobs
Grate
Exterior(Porcelain
enamel)
Glass
Metals
Interior
(standardclean)
Continuous Clean
Self Clean
SiliconeRubberDoor
Gaskets(standard&
continuousclean).
BraidedGaskets
CLEANINGAGENT
soap& water
scourpad
mildsoap& water
_spap& water
steelwool
soap& water
drytowel
soap &water
or glasscleaner
soap& water
chromecleaner
soap& water
commercialoven
cleaneror scouring
powder
detergentex. 409,
Fantastic
Janitor in a Drum
high heat
soap& water
INSTRUCTIONS
remove the broil pan immediately after broiling,
let cool slightly, sprinkle pan with soap and lay
wet paper towel in it - let stand a few minutes -
wash - scour if necessary - dry.
pull knobs off - wash gently and return to range
do not soak.
wash with soap - scour with cleanser or steel
wool - dry thoroughly.
wipe up spills immediately with paper towel when
surfaces are cool, wash with soap and polish with
dry cloth. DO NOT use abrasive cleaners.
wash with soap, polish with dry cloth or wash
with glass cleaner and paper towel.
wash, rinse, then'polish with dry cloth - DO NOT
use abrasives or other cleaners.
use a small glass of household ammonia - let
stand overnight inside your oven - then clean with
soap and water or use a cleaner following instru-
ctions on can - use the scouring pad on stubborn
soil - rub gently- rinse and wipe thoroughly with
one tbsp. vinegar to one cup of water - DONOT
MIX CLEANERS.
do not scrape - oven is always burning off soil -
if areas are heavily soiled, run over to lighten
spots or wash with detergent and plastic scour-
ing pad - DO NOT USEABRASIVE rinse and blot
dry.
lock in place according to direction in this manual
set selector and thermostat - oven will clean it-
self - wipe out ashes with damp cloth sponge.
wash with soap - rinse thoroughly.
DO NOT REMOVE.
DONOT CLEAN.
(self-clean)
OvenVent soap& water not removable- wash in place.
Racks soap& water wash and rinse- commercialcleanerscan dis-
commercialcleaner color your racks- test beforeusing.
Broil Drawer soap& water removedrawer- washinsoapandwater- DONOT
(noton self clean) USE ABRASIVE.
Uniburner soap& water ;removeuniburner- wash in soapandwater or
dishwasher.Usesmall wire to reopenholesfor
flame. _
25
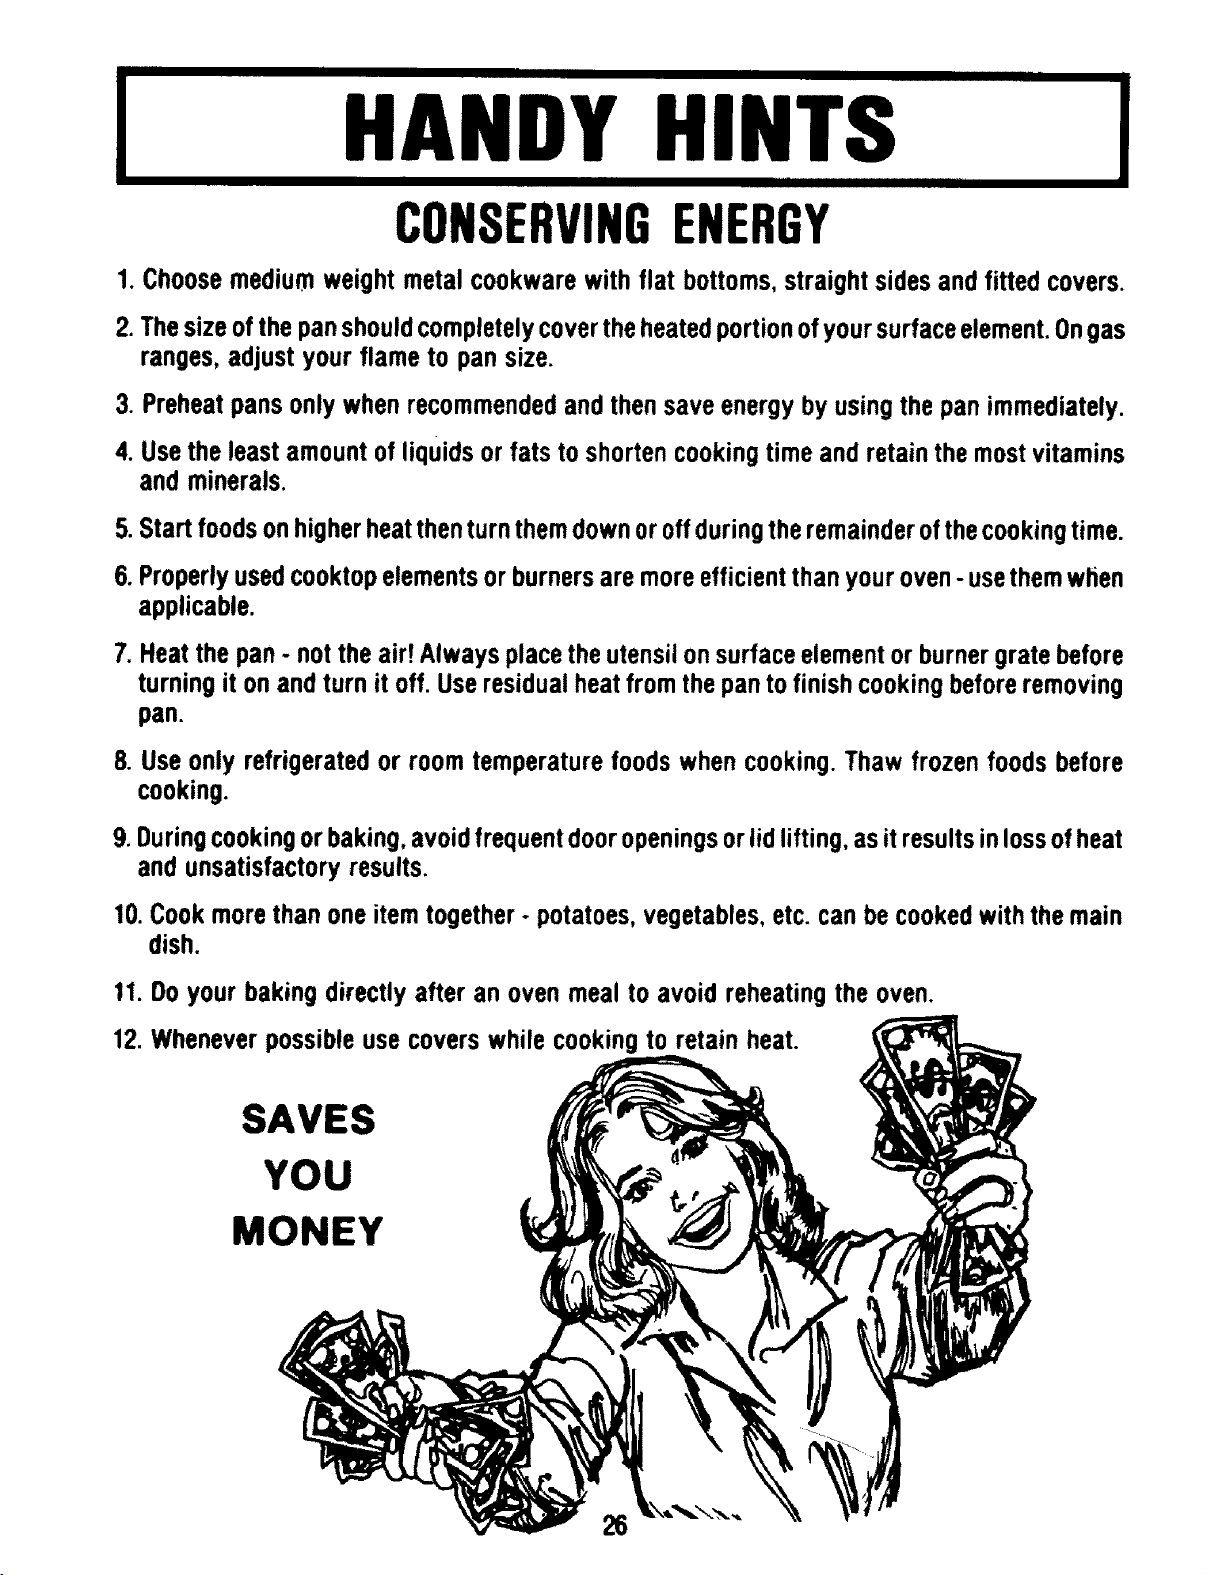
CONSERVINGENERGY
1.Choosemediumweight metalcookwarewith flat bottoms,straightsidesandfitted covers.
2. Thesizeofthepanshouldcompletelycovertheheatedportionofyoursurfaceelement.Ongas
ranges,adjustyour flameto pansize.
3. Preheatpansonlywhenrecommendedandthensaveenergybyusingthepan immediately.
4. Usethe leastamountof liquidsor fats to shortencookingtimeandretainthemostvitamins
and minerals.
5.Start foodsonhigherheatthenturnthemdownoroffduringtheremainderofthecookingtime.
6.Properlyusedcooktopelementsorburnersaremoreefficientthan youroven-usethemwhen
applicable.
7. Heatthe pan- not theairTAlwaysplacetheutensilonsurfaceelementor burnergratebefore
turningit onandturn it off. Useresidualheatfromthepantofinishcookingbeforeremoving
pan.
8. Useonly refrigeratedor roomtemperaturefoodswhencooking.Thawfrozenfoods before
cooking.
9.Duringcookingorbaking,avoidfrequentdooropeningsorlidlifting,asitresultsinlossofheat
and unsatisfactoryresults.
10.Cookmorethan oneitemtogether- potatoes,vegetables,etc.canbecookedwiththemain
dish.
11.Doyour bakingdirectlyafter an ovenmeal to avoid reheatingthe oven.
12.Wheneverpossibleusecoverswhile cookingto retain heat.
SAVES
YOU
MONEY
IMPROVE COOKINGPERFORMANC
I II
SURFACECOOKING
I
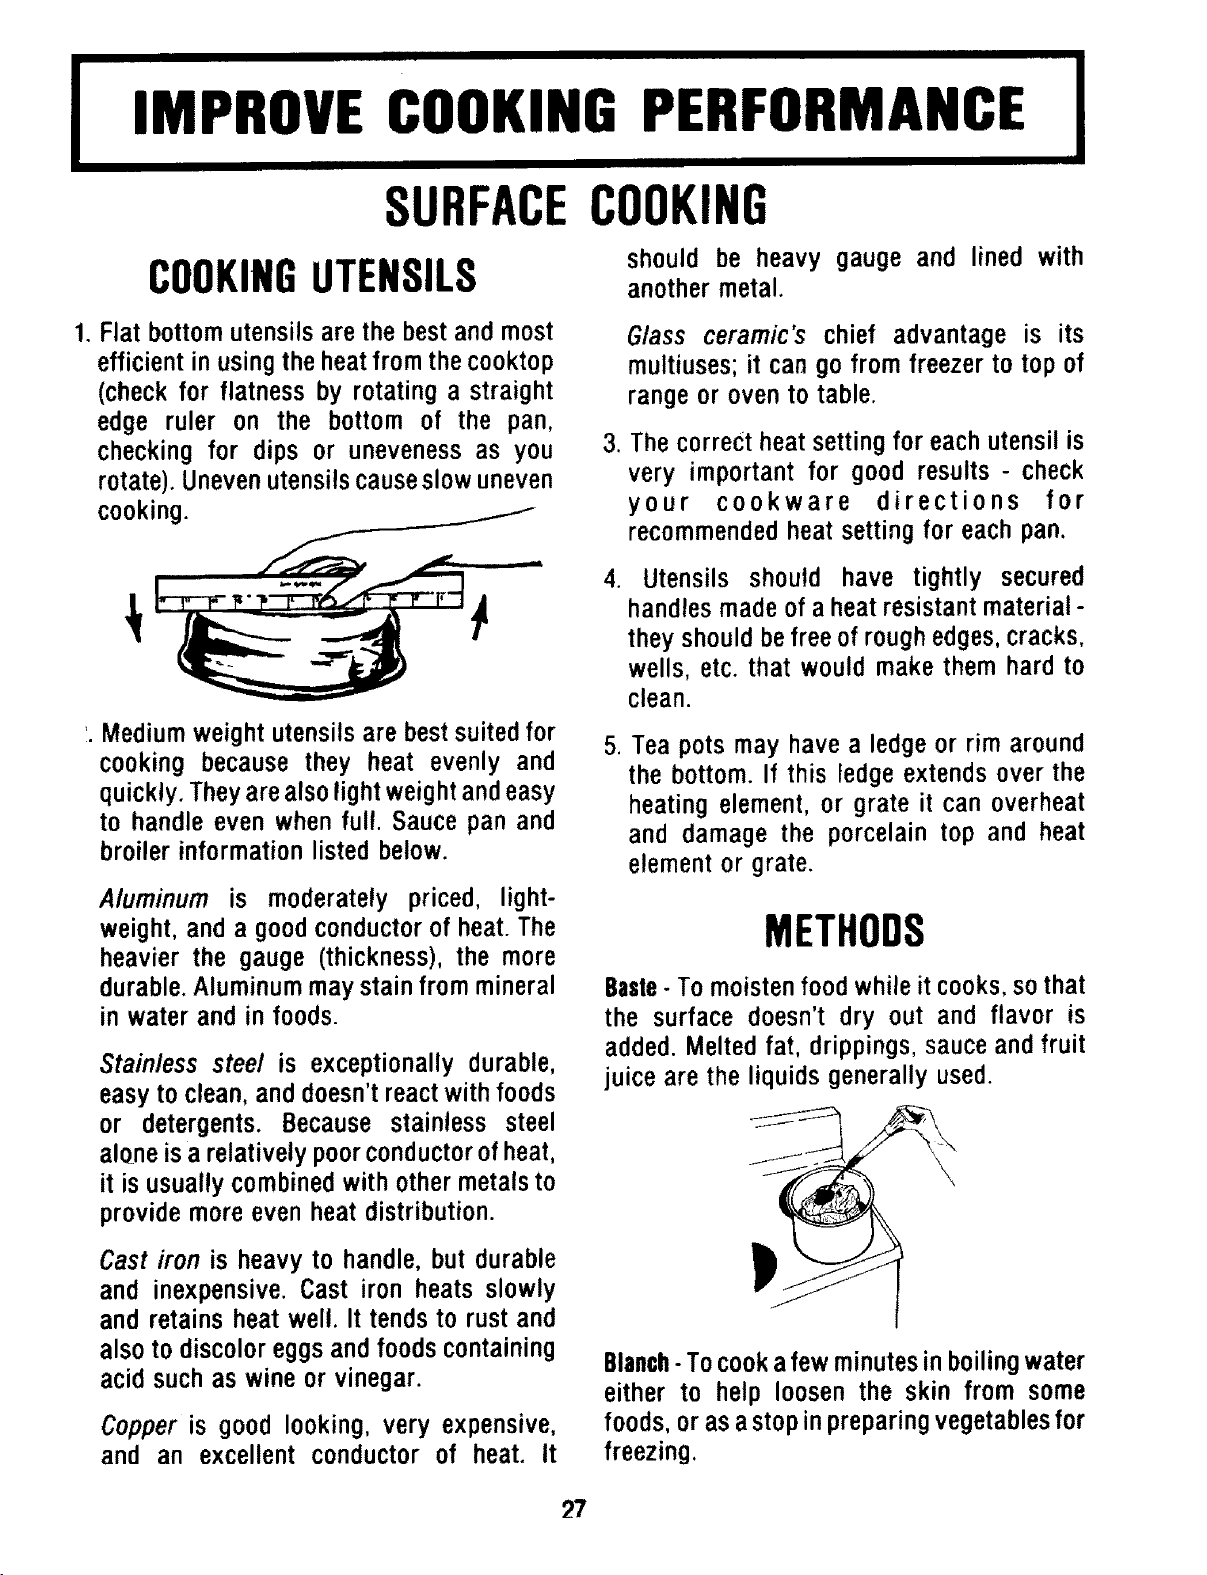
COOKINGUTENSILS
should be heavy gauge and lined with
anothermetal.
1. Flat bottomutensils are the best and most
efficient in using theheatfrom the cooktop
(checkfor flatness by rotating a straight
edge ruler on the bottom of the pan,
checking for dips or unevenessas you
rotate).Unevenutensilscauseslowuneven
cooking.
,
G/ass ceramic's chief advantage is its
multiuses; it can go from freezer to top of
range or oven to table.
The correct heat setting for each utensil is
very important for good results - check
your cookware directions for
recommended heat setting for each pan.
'. Mediumweightutensilsare bestsuitedfor
cooking because they heat evenly and
quickly. Theyarealsolightweightandeasy
to handle even when full. Sauce pan and
broilerinformationlisted below.
A/uminum is moderately priced, light-
weight,and a goodconductorof heat.The
heavier the gauge (thickness), the more
durable.Aluminummaystainfrom mineral
in water and in foods.
Stain/ess stee/ is exceptionally durable,
easyto clean,anddoesn'treactwithfoods
or detergents. Because stainless steel
alQneisa relativelypoorconductorofheat,
it isusuallycombinedwith othermetalsto
provide moreeven heat distribution.
Castiron is heavy to handle, butdurable
and inexpensive.Cast iron heats slowly
and retains heat well. It tendsto rust and
alsoto discoloreggsand foods containing
acidsuchas wine or vinegar.
Copper is good looking, very expensive,
and an excellent conductor of heat. It
.
,
Utensils should have tightly secured
handlesmadeof a heat resistant material -
theyshouldbefree ofroughedges,cracks,
wells, etc. that would make them hard to
clean.
Tea pots may have a ledge or rim around
the bottom. If this ledge extends over the
heating element, or grate it can overheat
and damage the porcelain top and heat
element or grate.
METHODS
Baste- To moisten food while it cooks,so that
the surface doesn't dry out and flavor is
added. Melted fat, drippings, sauce and fruit
juice are the liquids generally used.
Blanch-To cook afew minutes inboiling water
either to help loosen the skin from some
foods, or as astop in preparing vegetables for
freezing.
27
SURFACECOOKING
Bell- Tocookfoodoverhighheat in liquidin
which bubblesrise constantlyto thesurface
and break.
Braise-Tocookfoodover lowheatina small
amountof liquidinacoveredpan.(Foodmay
ormaynotbebrownedfirst inasmallamount
of fat).
C|ramllize - Tostir inskillet over low heat until
it melts and develops characteristic flavor
and golden-brown color.
Deep-fry- To cook food in hotfat deep enough
for food to float on it.
Fry- To cookfood over highheat in a small
amount of fat. See also deep-fry, pan-fry,
saute.
Pan- To cook, covered, in very small amount
of liquid.
Pan-broil-To cook food, uncovered, over high
heat on ungreased or lightly greased hot
surface, pouring off accumulating fat.
Panfry- Tocookfoodoverhighheatinasmall
amountof fat.
Parboil- To boil until partially cooked, usually
before completing cooking by another
method.
Poach - To cook food over low heat in
simmering liquid.
Preesure-uok- To cook in steam underhigh
pressure,usinga specialsaucepan.
Saute-Tobrownquicklyinasmallamountof
fat, with frequent turning. Used as a verb
meaningto fry in a small amountof fat.
Sear - To brown the surface of meat by the
short application of intense heat. Meat is
seared for the purpose of developing flavor
and improving appearance.
Scald- To heat liquid just to below the boiling
point.
Simmer-To cook food over low heat in aliquid
just below the boiling point in which bubbles
form slowly and collapse just below the
surface.
Steam-Tocookfoodonarackorina colander
in a coveredpan over steaminghotwater.
Stew - To cook food over low heat in a
simmeringliquid.
Stir-fry- To cook sliced food quickly Chinese-
style in a skillet or wok.
28
!
UTENSILS
BAKING
I
I
1. Use the size utensilrecommendedin the
recipe- DONOToverorunderfilltheutensil.
Always allow for expansionof foodsor
liquids.
HOWTOMEASUREPANS
Be sure your pans are the kind and size
specified in the recipe.The size of some
cookware is expressedin liquidmeasure-
mentat its levelfull capacity.
Measure hip inside of bake- Sizes for skillets ar frypans
wartfar length,widther andGriddlesarestatedas the
diameter;,measure perpendl- top wtside dimensions,ox-
cuiar inside far depth, cluslvt of handles,
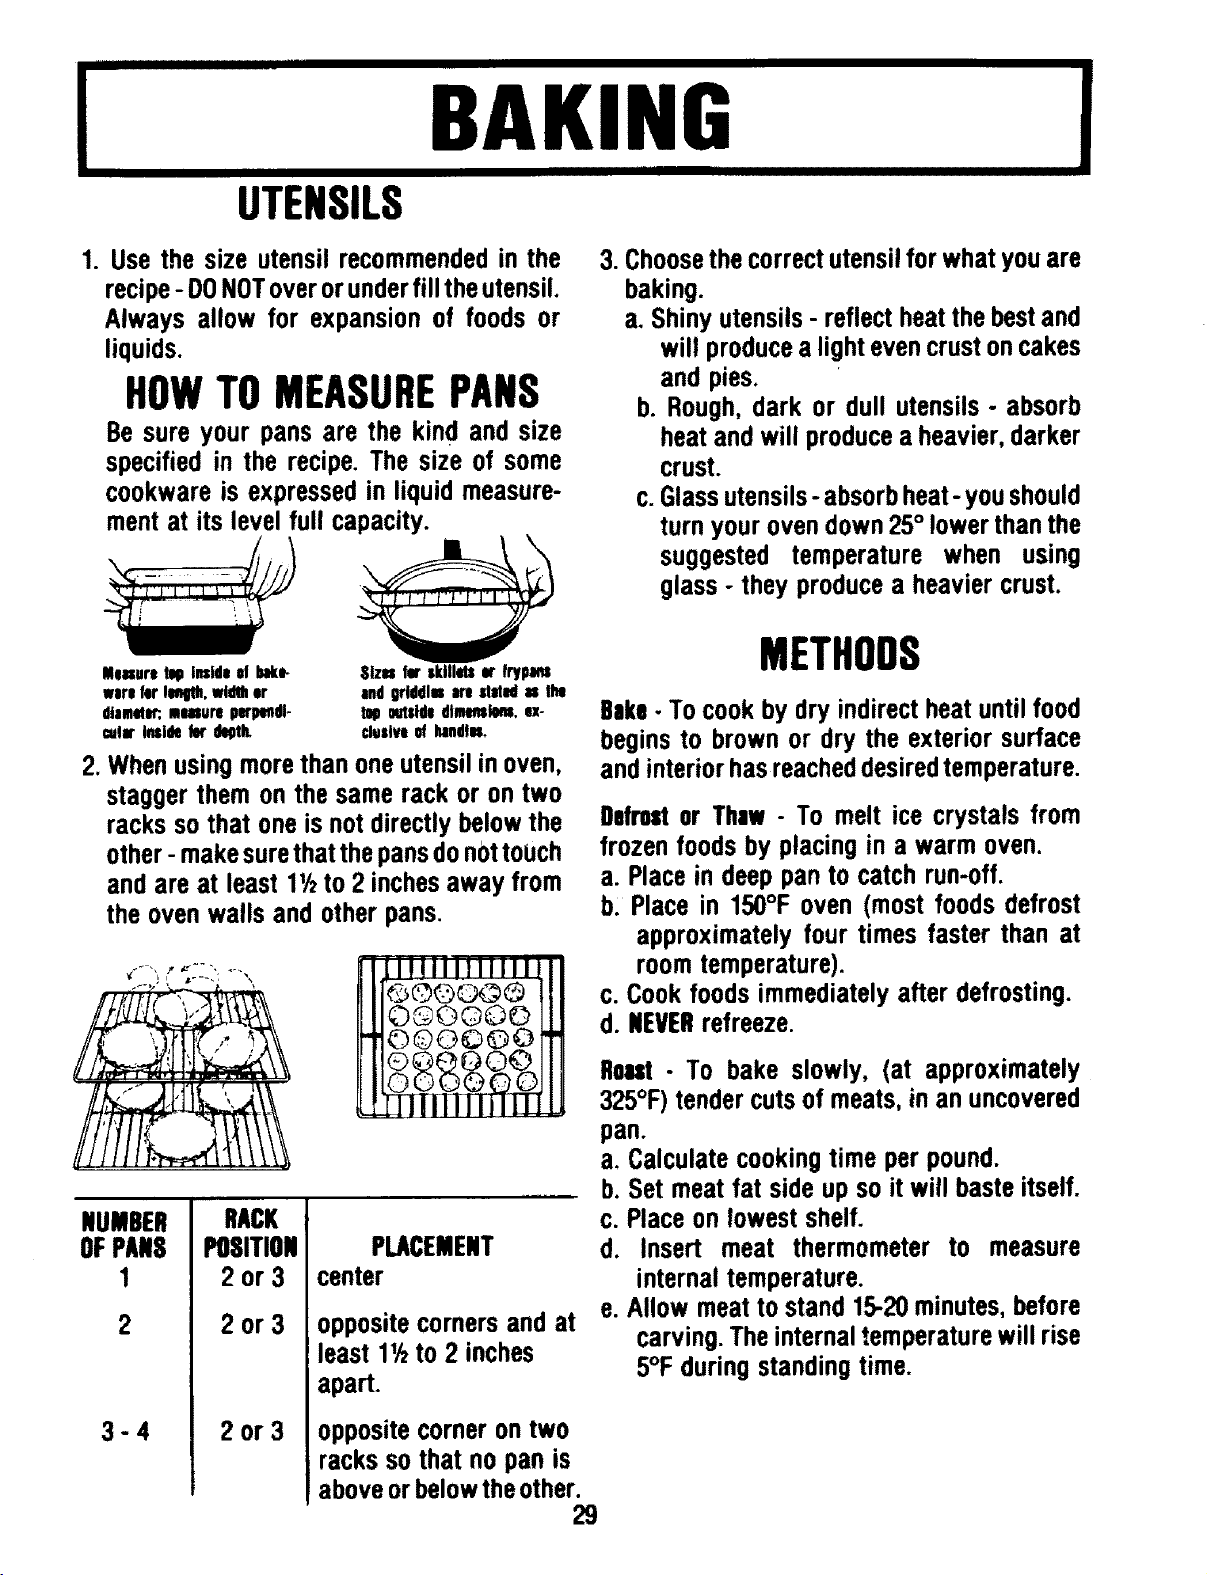
2. Whenusingmorethanoneutensilinoven,
staggerthem on the samerack or ontwo
racks sothat oneis notdirectlybelowthe
other- makesurethatthepansdonottouch
and are at least 11hto 2 inchesaway from
the ovenwalls and otherpans.
NUMBER
OFPANS
1
2
3-4
RACK
POSITION
2or3
2or3
2or3
PLACEMENT
center
oppositecornersand at
least 11hto 2 inches
apart.
oppositecorneron two
racks sothat no pan is
aboveorbelowtheother.
29
3. Choosethecorrectutensilforwhat youare
baking.
a. Shinyutensils- reflectheatthebestand
will producea lightevencrustoncakes
and pies.
b. Rough,dark or dull utensils- absorb
heatandwill produceaheavier,darker
crust.
c.Glassutensils-absorbheat- youshould
turnyourovendown25° lowerthanthe
suggested temperature when using
glass- they producea heaviercrust.
METHODS
Bake- To cook by dry indirect heat until food
begins to brown or dry the exterior surface
and interior hasreacheddesired temperature.
Defrostor Thaw - To melt ice crystals from
frozenfoodsby placingin a warm oven.
a. Placein deeppanto catch run-off.
b. Place in 150°F oven (most foods defrost
approximately four times faster than at
roomtemperature).
c. Cookfoodsimmediatelyafter defrosting.
d. NEVERrefreeze.
Rout - To bake slowly, (at approximately
325°F) tender cuts of meats, in an uncovered
pan.
a. Calculate cooking time per pound.
b. Set meat fat side up so it will baste itself.
c. Place on lowest shelf.
d. Insert meat thermometer to measure
internal temperature.
e. Allow meat to stand 15-20minutes, before
carving. The internal temperature will rise
5°F during standing time.
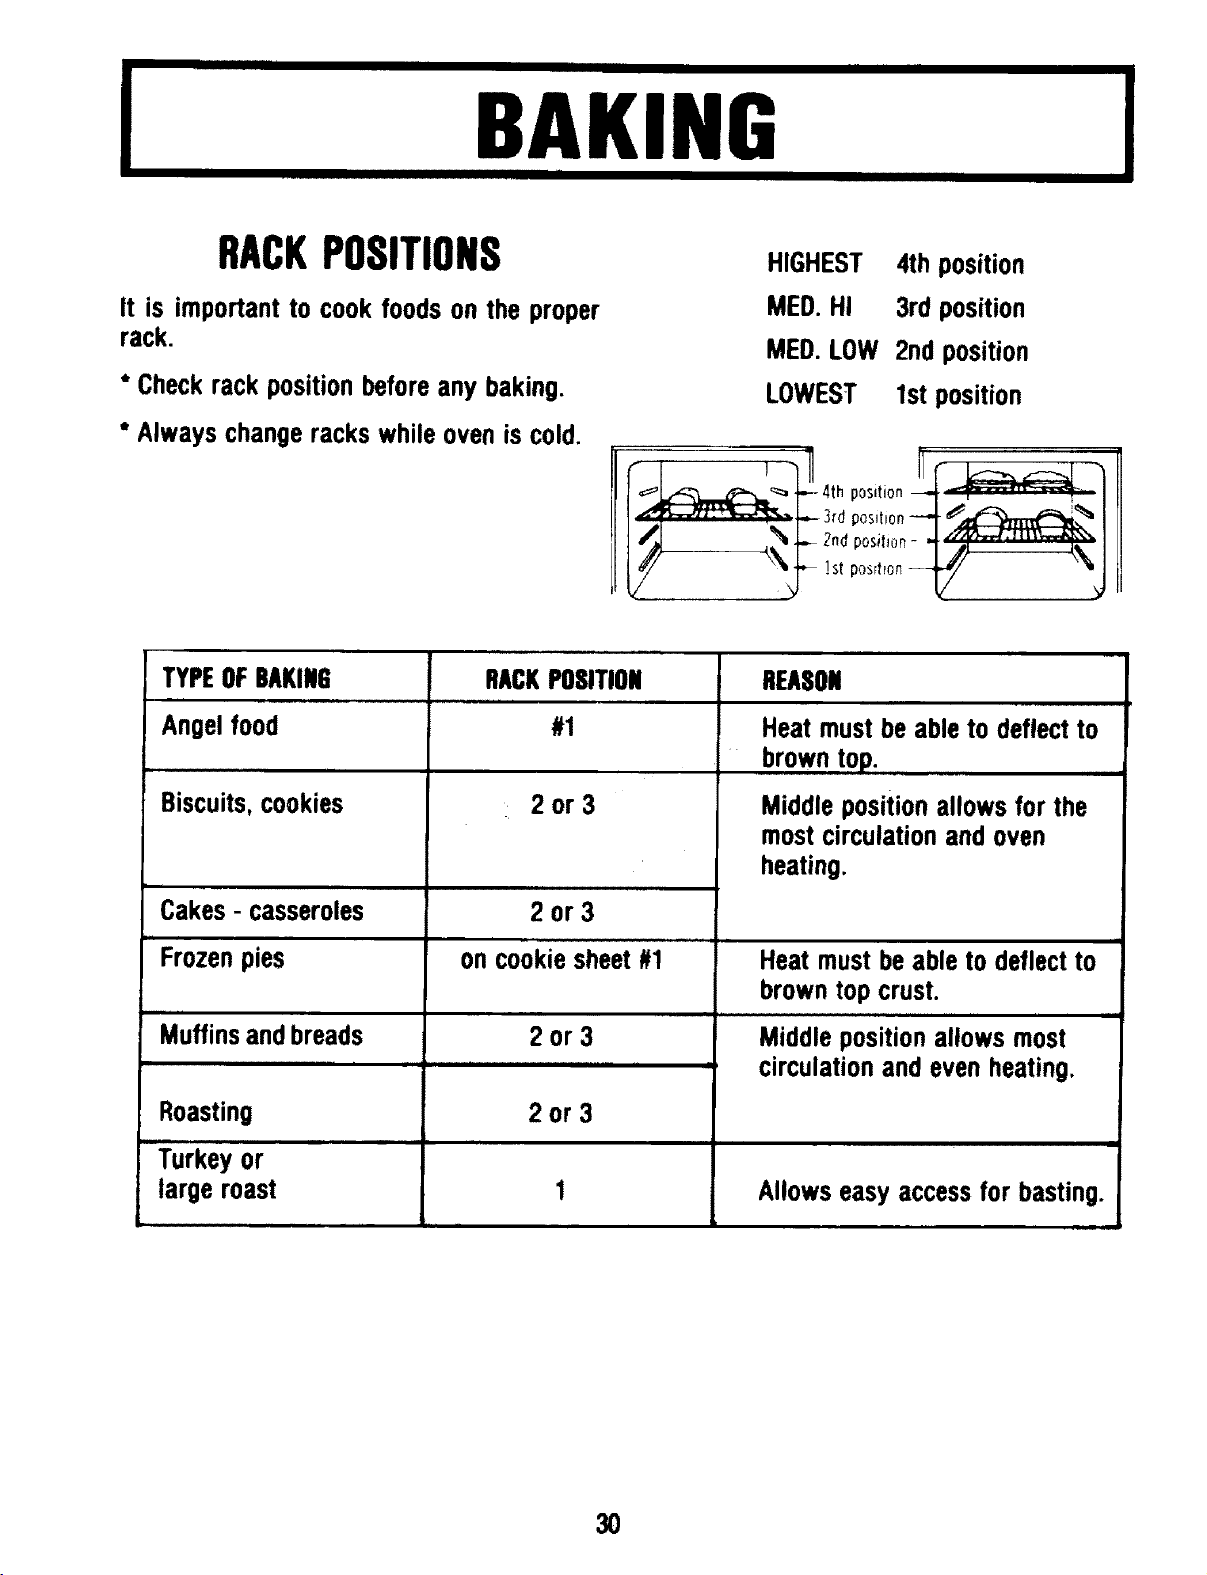
I
BAKING
II
RACKPOSITIONS
It is importantto cookfoods on the proper
rack.
* Checkrack positionbeforeany baking.
* Always changeracks while ovenis cold,
HIGHEST
MED.HI
MED.LOW
LOWEST
4th position
3rd position
2nd position
1st position
i , i {1
I"__ 3,4pos,t,o_-4 __._ I
TYPEOFBAKIN6 RACKPOSITION REASON
Angelfood #1
Biscuits,cookies 2 or 3
Cakes- casseroles
Frozenpies
,11,,,,i i ii
Muffinsandbreads
2or3
oncookiesheet#1
2or3
i ,,,i ii
Heat mustbe ableto deflect to
browntop.
Middlepositionallows for the
mostcirculationand oven
heating.
Heat mustbeable to deflectto
browntop crust.
Middlepositionallows most
circulationand even heating.
Roasting
Turkeyor
largeroast
h........
2or3
Allowseasyaccessfor basting.
3O
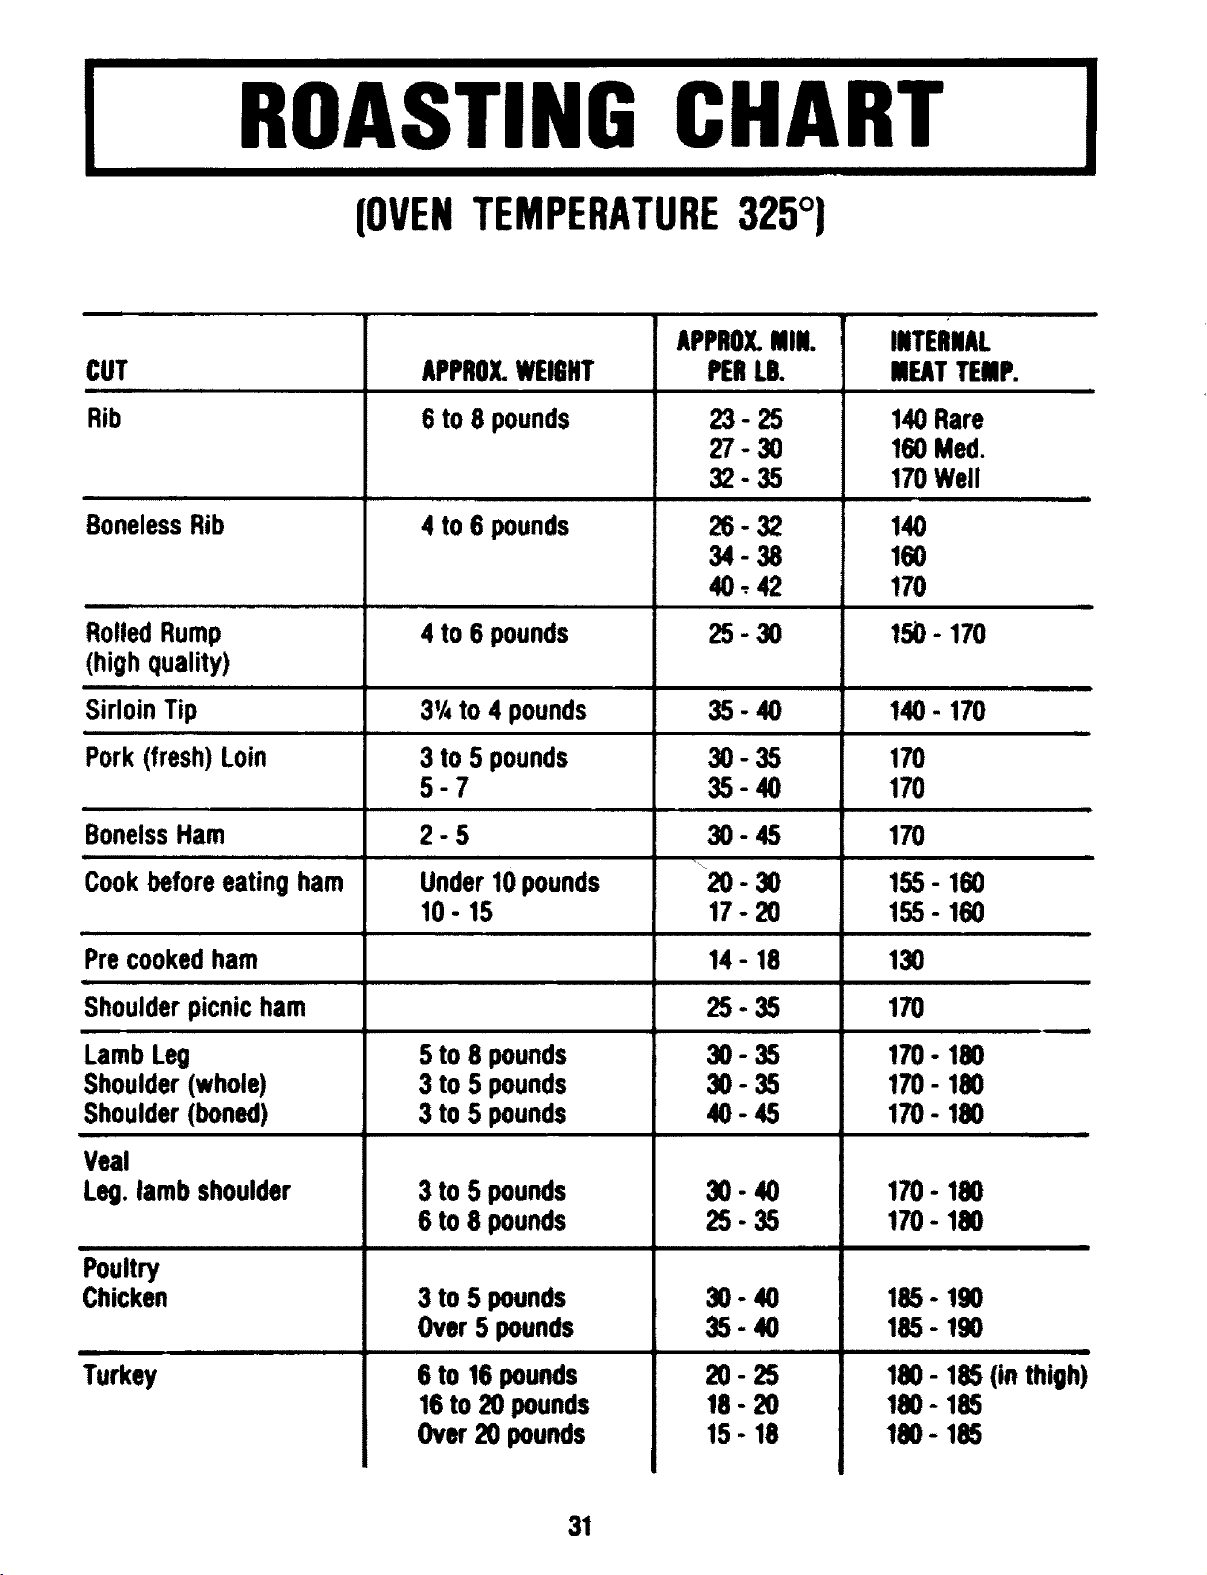
I I
IIIII
I II IIIIIIII IIIII I II I I II
ROASTINGCHARI
IIIHIIIIII II IIIIIIII II _ I
(OVENTEMPERATURE325°)
!
CUT
,,,,,
Rib
Boneless Rib
RolledRump
(highquality)
,,, i iii1,11 ,i iii i, , i iii
Sirloin Tip
Pork(fresh)Loin
BonelssHam
Cookbeforeeatingham
Precookedham
i
Shoulderpicnicham
Lamb Leg
Shoulder (whole)
Shoulder (boned)
Veal
Leg.lamb shoulder
Poultry
Chicken
Turkey
APPROX.WEIGHT
6to 8 pounds
APPROX.MIN.
PERLB.
23-25
27-30
32-35
26-32
34-38
40,42
25-30
35-40
30-35
35-40
-45
-30
-20
14- 18
25-35
INTERNAL
MEATTEMP.
140Rare
160Med.
170Well
140
160
170
150- 170
4 to 6 pounds
4 to 6 pounds
3'/4to 4 pounds
3 to 5 pounds
5-7
2-5 30
H i
Under10pounds 20
10- 15 17
5 to 8 pounds
3 to 5 pounds
3 to 5 pounds
3 to 5 pounds
6 to 8 pounds
3 to 5 pounds
Over5 pounds
30-35
30-35
40-45
30-40
25-35
140- 170
170
170
170
155- 160
155- 160
130
170
170- 180
170- 180
170-190
170- 180
170- 180
6 to 16pounds
16to 20 pounds
Over20 pounds
30-40
35-40
20-25
18 - 20
15- 18
185- 190
185- 190
100- 185
100- 185
180- 185
,tt
(inthigh)
31
I ill I
BROILING
!
UTENSILS- Broilingpanandgrid (includedin
oven)and deepmetal pan with rack.
BROILINGMETHOD- Broiling is a method of
cooking tender foods by direct heat under the
burner. Generally, the distance between the
meat and the burner and broiling time
regulates degree of doneness.
Any steak for broilingshouldbe at least _
inchthick. Thinnercuts will be donebefore
they are brown and should be pan broiled
instead.
Veal and Pork should not be broiled;veal
becauseit is too lean; and pork because it
requires long, slow cooking to be eaten
safely.
Fish needsto be brushed in oil before broiling
and placed skin side down in greased broiler
pan.
Chickenneeds to be less than 3 lbs. and
occassionallybasted with fat (will need a
lower racksetting).
a. Prepare meat - remove excessfat from
meat and slash remaining fat being
carefulnotto cutintomeat- thiswill help
excessfat to drain and keepsmeatfrom
curling.
b. Positionracksothat meatwill beapproxi-
matelyI inchfromthebroiler.Ifyounotice
C*
do
e.
g.
an excessiveamountof smoke,the rack
has beenplacedtoo closeto the broiler.
Turnselectordialto broil,turnthermostat
dial to broil - preheat is not necessary
except for charcoal exterior with rare
interior(steaks)preheat5 - 10 minutes.
Broilingshouldbedonewiththeovendoor
openonelectricovensanddoorshutongas
ovens.
Follow suggestedtimes on broil chart-
meat should be turned once about half
way throughbroilingtime.
Checkthe donenessbycuttingslit in meat
near centerfor desiredcolor.
Remove broiler pan immediately after
broilingso that drippingwill not bake on
and causemessyclean up.
EASYCLEANING
Allow to cool slightly then:
1. Remove broiler pan immediately after
broiling.
2. Drain drippings.
3. Sprinkle with soap and cover bottom with
wet paper towel - this will soften baked on
foods and make clean up easy.
32
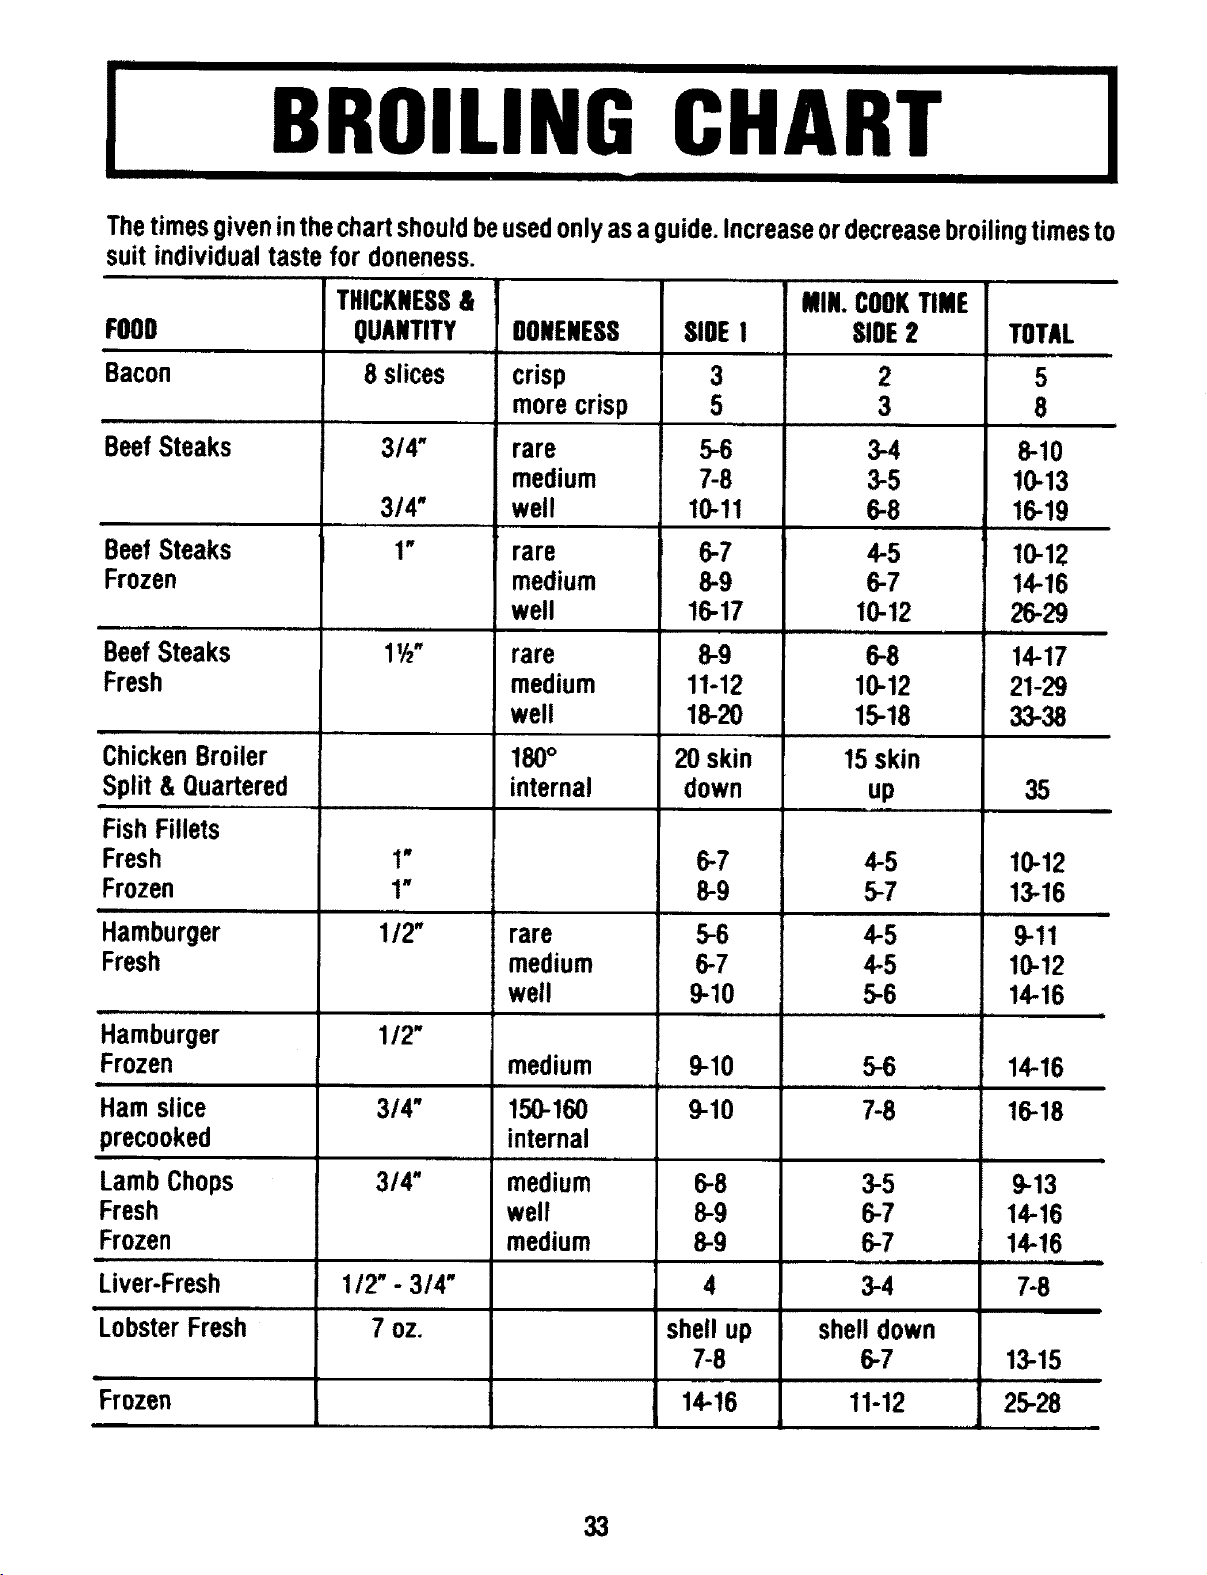
BROILINGCHART
I
Thetimesgiveninthechartshouldbeusedonlyasa guide.Increaseordecreasebroilingtimesto
suit individualtastefor aloneness.
FOOD
, i,,i ,,
BeefSteaks
BeefSteaks
Frozen
BeefSteaks
Fresh
ChickenBroiler
Split &Quartered
FishFillets
Fresh
Frozen
i .i
Hamburger
Fresh
,unlm,
Hamburger
Frozen
|1
Hamslice
precooked
Lamb Chops
Fresh
Frozen
Liver-Fresh
=l ,,
Lobster Fresh
ii
Frozen
THICKNESS&
QUANTITY
8 slices
3/4"
3/4"
,,i
1"
i,i
.
1"
HHHI
1/2"
OONENESS
crisp
more crisp
rare
medium
well
rare
medium
well
rare
medium
well
180°
internal
rare
medium
well
SlOE
3
5
5-6
7-8
10-11
6-7
8-9
16-17
8-9
11-12
18-20
20 skin
down
6-7
8-9
5-6
6-7
9-10
MIN.COOKTIME
SlOE2
3
3-4
3-5
6-8
4-5
6-7
10-12
6-8
10-12
15-18
15skin
up
i,imm
4-5
5-7
1/2"
3/4"
3/4"
112"- 3/4"
7 oz.
medium
150-160
internal
medium
well
medium
9-10
9-10
6-8
8-9
8-9
4
shell up
7-8
14-16
4-5
4-5
5-6
5-6
3-5
6-7
6-7
3-4
shelldown
6-7
11-12
TOTAL
5
8
8-10
10-13
16-19
10-12
14-16
26-29
14-17
21-20
33-38
35
10-12
13-16
9-11
10-12
14-16
iH ,i
14-16
16-18
9-13
14-16
14-16
7-8
13-15
25-28
33
II I
COOKINGTERMS
i
BAKINGPOWDER- A leavening agent which.
makes foods rise when they are baked. It is a
combination of baking soda, a dry acid or
acid salt and starch or flour. The acid
ingredient reacts with the baking soda to
produce gas bubbles in the mixture. Double-
acting baking powder produces gas bubbles
twice: first during mixing and second during
baking.
BAKINGSODA - An essential ingredient of
baking powder, may be used alone as a
leavening agent in mixtures containing an
acid ingredient such as buttermilk or in
combination with baking powder. Mixtures
containing baking soda should be baked as
soon as mixed, since the soda starts to react
as soon as it comes in contact with the liquid.
BARBECUE.To roast or broil food on a rack or
spit over coals, or under a heat unit. The food
is usually brushed with a highly seasoned
sauce during the last of the cooking time.
BRUSHWITH- To use a pastry brush to spread
food lightly with liquid such as salad oil,
melted fat, milk, heavy cream or beaten egg.
CHOP- To cut food into small pieces with a
knife, blender or food processor.
COAT- To sprinkle food with, or dip it into,
flour, sauce, etc., until covered.
CUBE-
1. To cut food into small cubes(about _hinch).
2. Tocut surface of meat incheckered pattern
to increase tenderness by breaking tough
meat fibers.
CUTIN - To distribute solid fat in flour or flour
mixture byusingpastry blender ortwo knives
scissor-fashion until flour-coated fat
particles are of desired size.
DICE- To cut food into very small pieces
(about1/4 inch).
BATTER- A mixture of fairly thin consistency,
made of flour, liquid and other ingredients.
BEAT- To make a mixture smooth with rapid,
regular motion using a wire whisk, spoon,
hand beater or mixer. When using a spoon,
the mixture should be lifted up and over with
each stroke.
BLEND- To mix thoroughly two or more
ingredients;or to preparefood inblender until
pureed, chopped, etc., as desired.
BREAD- To coat with breadcrumbs,cracker
crumbs or cornmeal. Food may first be
floured,then dipped in beatenegg or other
liquidto helpcrumbsto adhere.
DICINGANONION-Cutonionin half lengthwise,
with cut sidedown, cutonion crosswise in1/4
inch thick slices.
Hold onionfirmly and give quarter turn;cut in
1/4 inch pieces. Repeatwith other onionhalf.
BROIL- To cook food by direct heat on a rack
or spit.
34
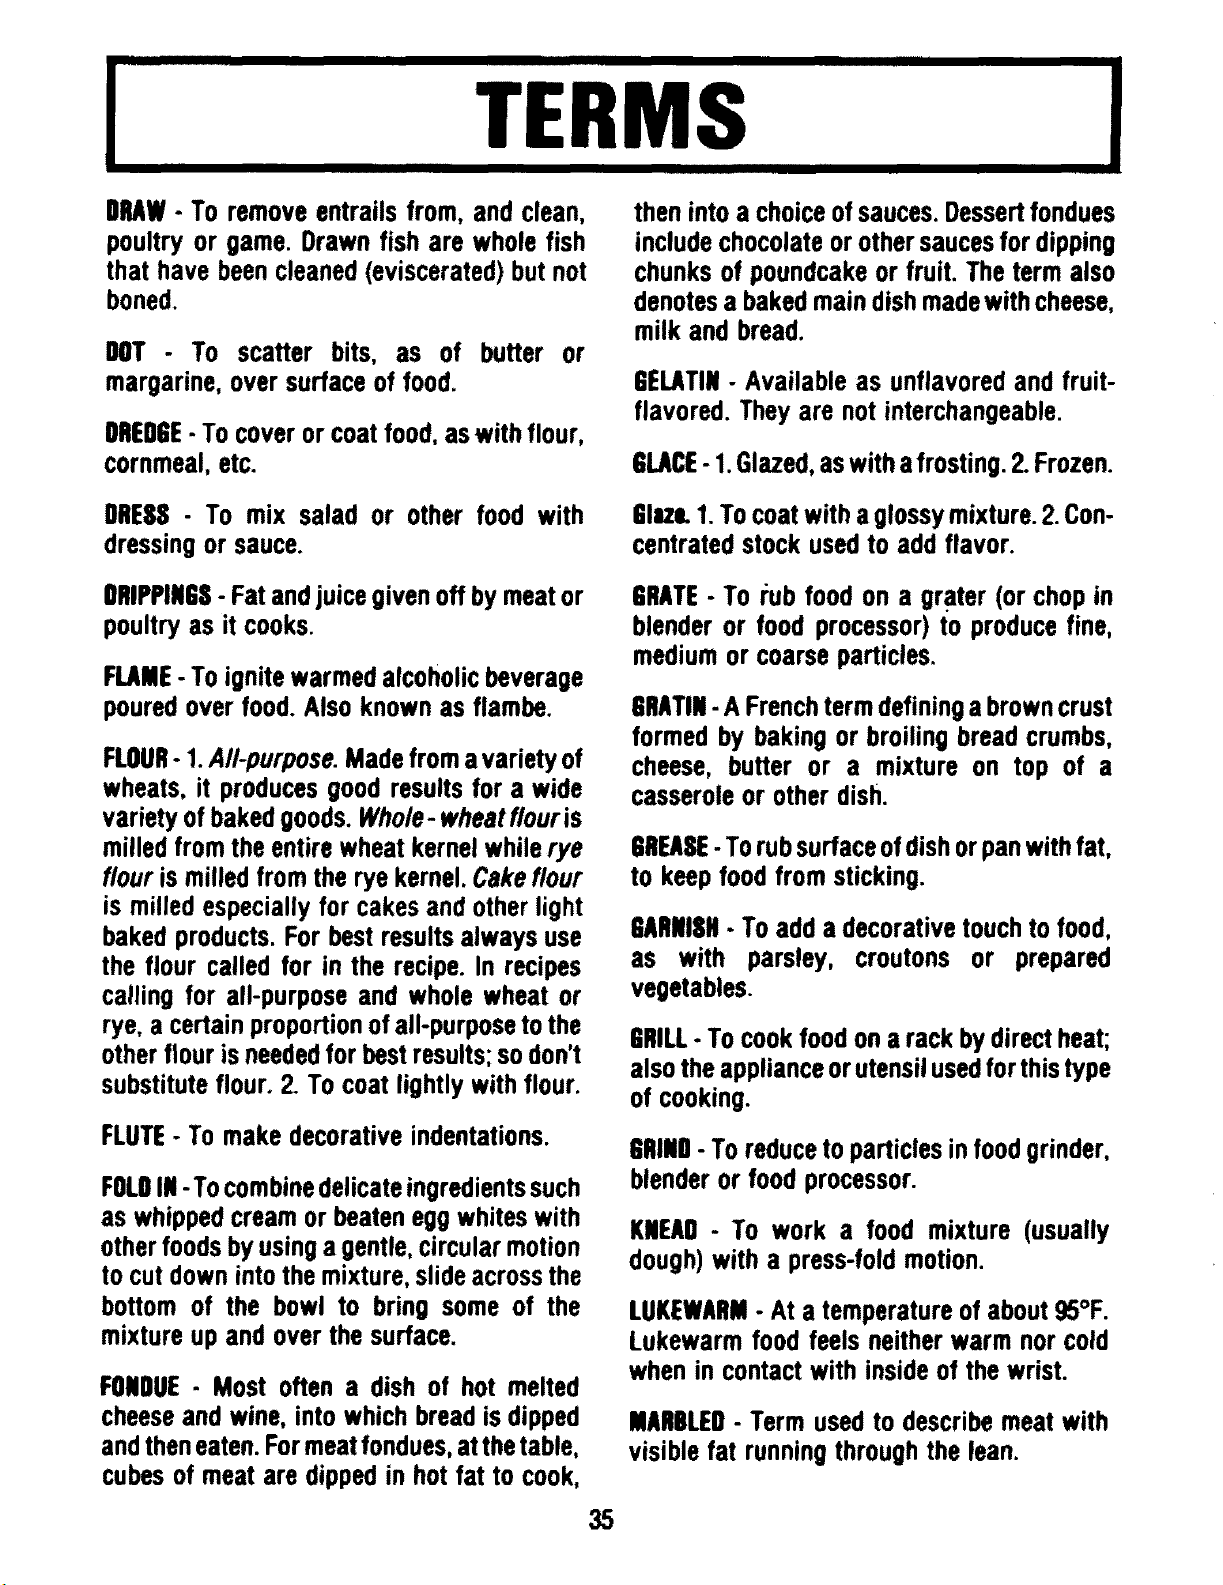
I
TERMS
IIIIIIIIIIIIIIII
J
DRAW- To removeentrailsfrom, and clean,
poultry or game. Drawn fish are wholefish
that have beencleaned(eviscerated)butnot
boned.
DOT - To scatter bits, as of butter or
margarine,oversurfaceof food.
DREDGE- Tocoverorcoatfood,aswithflour,
cornmeal,etc.
then intoa choiceofsauces.Dessertfondues
includechocolateorothersaucesfordipping
chunksof poundcakeor fruit. The termalso
denotesa bakedmaindishmadewithcheese,
milk and bread.
GELATIN- Available as unflavoredand fruit-
flavored.Theyare not interchangeable.
GLACE-1.Glazed,aswithafrosting.2.Frozen.
DRESS- To mix salad or other food with
dressingor sauce.
GIWL1.TOcoatwitha glossymixture.2.Con-
centratedstock usedto add flavor.
DRIPPINGS- Fat andjuicegivenoffbymeator
poultryas it cooks.
FLAME- To ignite warmed alcoholic beverage
poured over food. Also known as flambe.
FLOUR- 1.All-purpose.Madefromavarietyof
wheats, it producesgood resultsfor a wide
varietyof bakedgoods.Whole-wheatflouris
milledfromtheentirewheatkernelwhilerye
flourismilledfromthe ryekernel.Cakeflour
is milledespeciallyfor cakesand otherlight
bakedproducts.For bestresultsalways use
the flour called for in the recipe.In recipes
calling for all-purposeand whole wheat or
rye, acertainproportionofall-purposetothe
otherflourisneededfor bestresults;sodon't
substituteflour. 2. To coatlightlywithflour.
FLUTE- To makedecorativeindentations.
FOLDIN-To combinedelicateingredientssuch
as whippedcreamor beateneggwhiteswith
otherfoodsbyusinga gentle,circularmotion
to cutdownintothemixture,slideacrossthe
bottom of the bowl to bring some of the
mixtureup and over the surface.
FONDUE- Most often a dish of hot melted
cheese and wine, into which bread is dipped
and theneaten. For meat fondues, at thetable,
cubes of meat are dipped in hot fat to cook,
GRATE- To rub food on a grater (or chopin
blenderor food processor)to producefine,
mediumor coarseparticles.
6RATIN-A Frenchtermdefininga browncrust
formed by bakingor broilingbreadcrumbs,
cheese, butter or a mixture on top of a
casseroleor otherdish.
GREASE- To rub surface ofdish orpan with fat,
to keep food from sticking.
GARNISH- Toadd a decorativetouchtofood,
as with parsley, croutons or prepared
vegetables.
GRILL- To cook food on a rack by direct heat;
also the appliance orutensil usedfor this type
of cooking.
GRIND- Toreduceto particlesinfoodgrinder,
blenderor food processor.
KNEAD- To work a food mixture (usually
dough) with a press-fold motion.
LUKEWARM- At a temperature of about 95°F.
Lukewarm food feels neither warm nor cold
when in contact with inside of the wrist.
MARBLED- Term used to describe meat with
visible fat running through the lean.
35
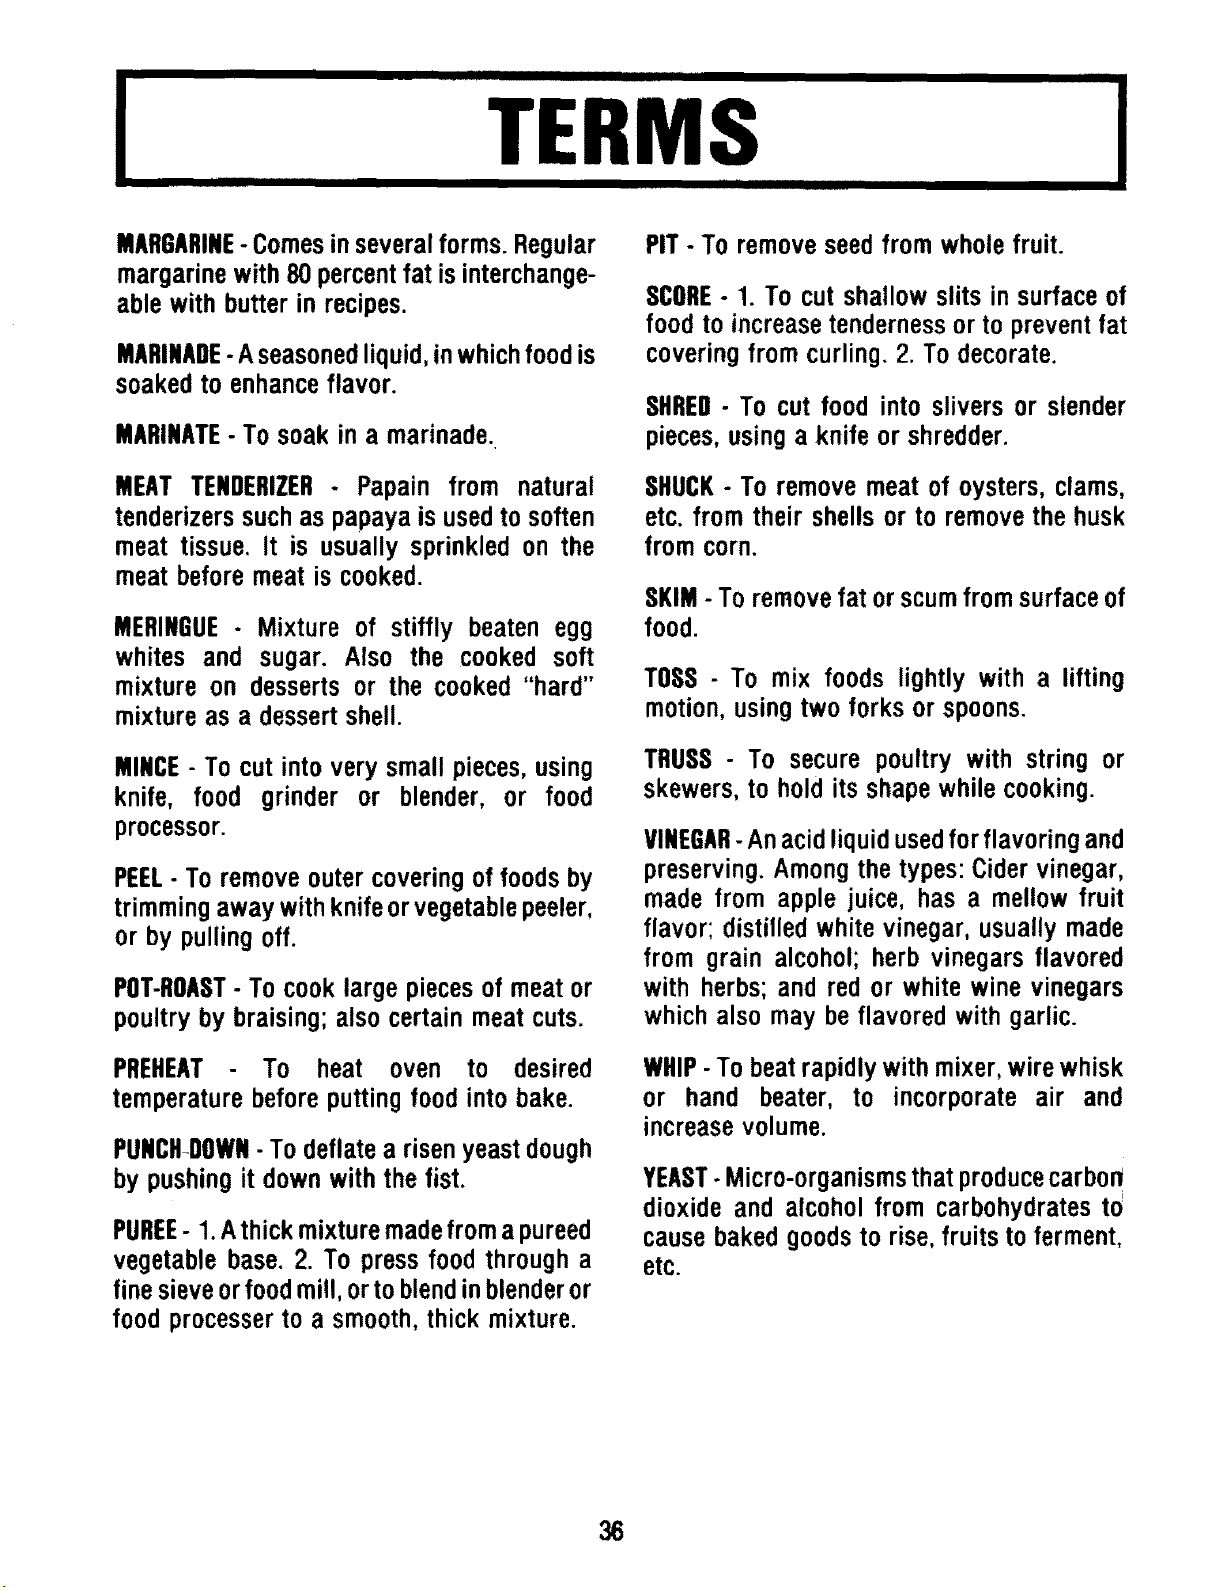
I
I
I I IIIIIJllIIIIIIIIIIIIII III
TERMS
HI III
IIIIIIIIIIIIIIIIIIIIIIIII
MARGARINE- Comes in several forms. Regular
margarine with 80 percent fat is interchange-
able with butter in recipes.
MARINADE-A seasonedliquid,inwhichfoodis
soakedto enhanceflavor.
MARINATE- To soak in a marinade.
MEAT TENDERIZER- Papain from natural
tenderizerssuchas papayaisusedto soften
meat tissue. It is usually sprinkled on the
meatbeforemeat is cooked.
MERINGUE- Mixture of stiffly beaten egg
whites and sugar. Also the cooked soft
mixture on desserts or the cooked "hard"
mixtureas a dessertshell.
MINCE- Tocut intovery small pieces,using
knife, food grinder or blender, or food
processor.
PEEL-To removeoutercoveringoffoodsby
trimmingawaywithknifeorvegetablepeeler,
or by pullingoff.
POT-ROAST- Tocooklarge piecesof meator
poultry by braising;alsocertain meatcuts.
PREHEAT- To heat oven to desired
temperaturebeforeputting foodinto bake.
PUNCHDOWN-Todeflatea risenyeastdough
by pushingit downwith the fist.
PUREE- 1.Athickmixturemadefromapureed
vegetable base.2. To pressfood througha
finesieveorfoodmill,orto blendin blenderor
foodprocesserto a smooth,thick mixture.
PIT - To remove seed from whole fruit.
SCORE- 1. To cut shallow slits in surface of
food to increase tenderness or to prevent fat
covering from curling. 2. To decorate.
SHRED- To cut food into slivers or slender
pieces, usinga knife or shredder.
SHUCK- To removemeat of oysters,clams,
etc. from their shellsor to removethe husk
fromcorn.
SKIM-To removefat orscumfromsurfaceof
food.
TOSS - To mix foods lightly with a lifting
motion, using two forks or spoons.
TRUSS- To secure poultry with string or
skewers,to hold its shapewhilecooking.
VINEGAR- An acid liquid usedfor flavoring and
preserving. Among the types: Cider vinegar,
made from apple juice, has a mellow fruit
flavor; distilled white vinegar, usually made
from grain alcohol; herb vinegars flavored
with herbs; and red or white wine vinegars
which also may be flavored with garlic.
WHIP-To beatrapidlywithmixer,wirewhisk
or hand beater, to incorporate air and
increasevolume.
YEAST-Micro-organismsthatproducecarbon
dioxide and alcoholfrom carbohydratesto
causebakedgoodsto rise,fruitsto ferment,
etc.
36
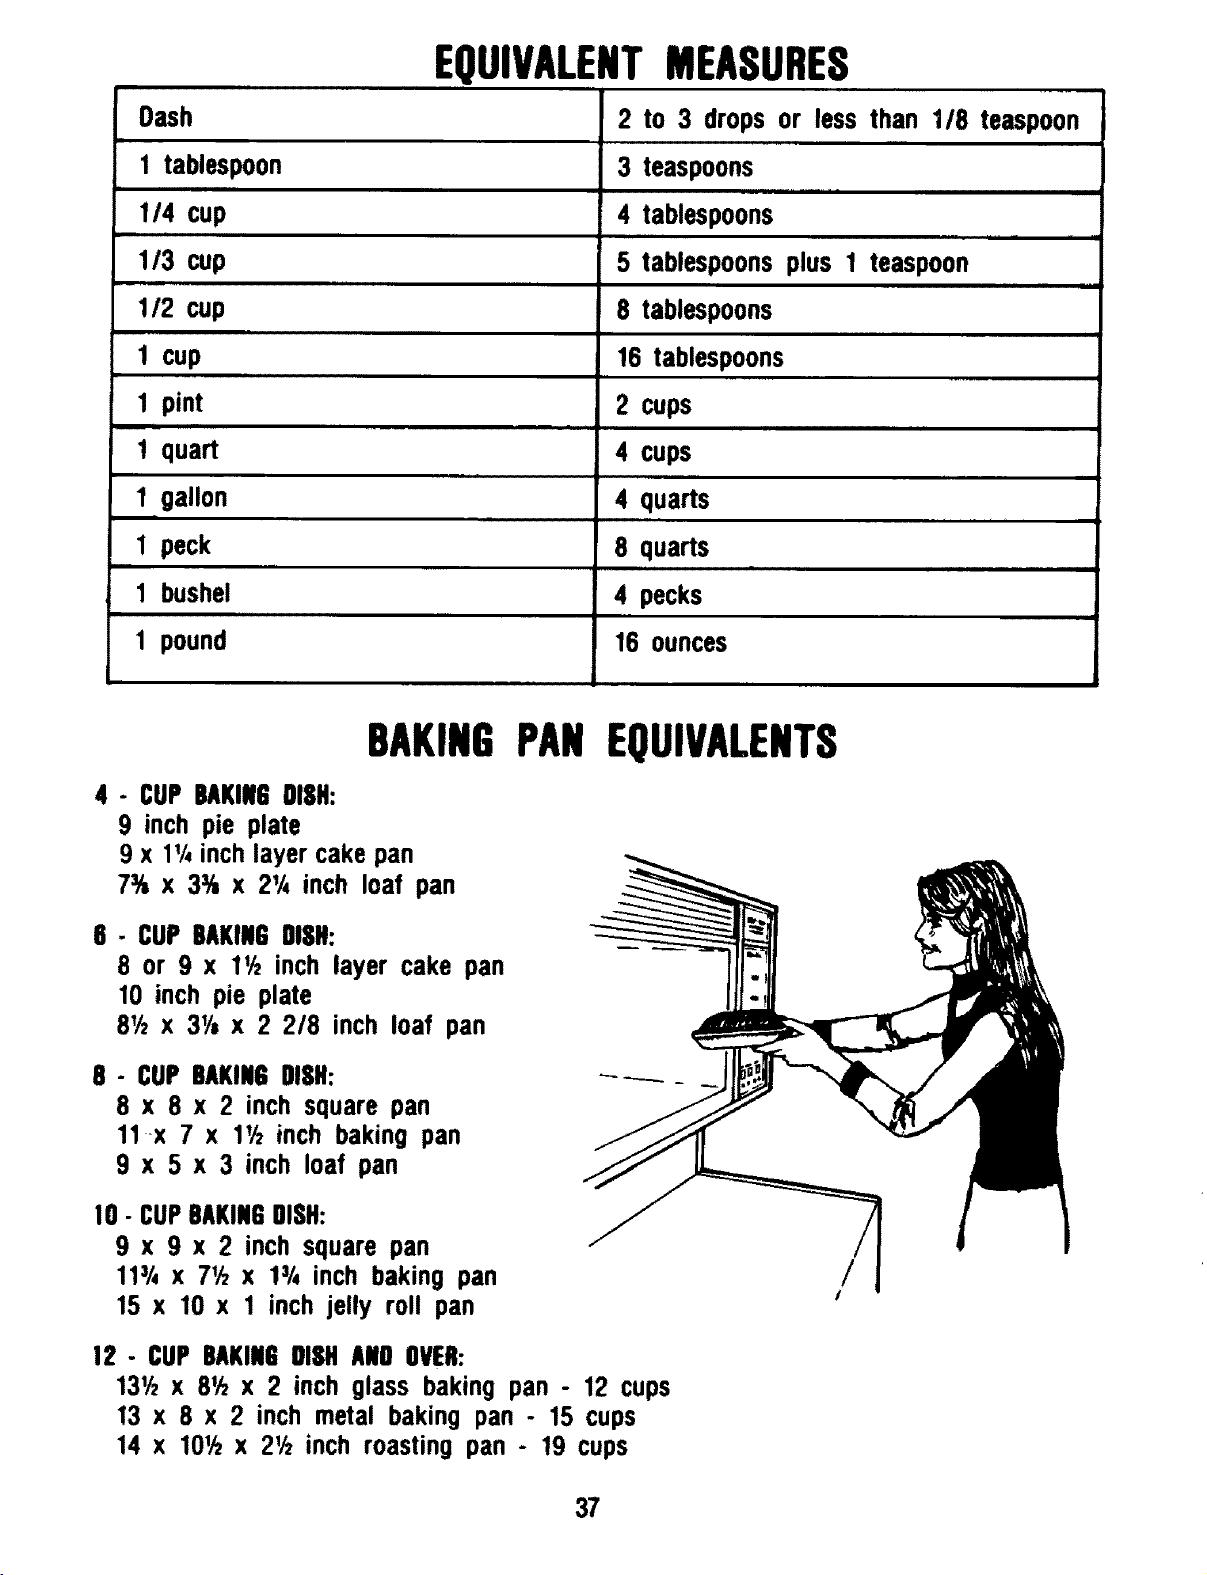
Dash
1 tablespoon
i
1/4 cup
1/3 cup
1/2 cup
1 cup
ii,
1 pint
! quart
1 gallon
I peck
,,,,,,,,,,,,,,
1 bushel
1 pound
EQUIVALENTMEASURES
2 to 3 drops or less than 1/8 teaspoon
3 teaspoons
4 tablespoons
5 tablespoonsplus 1 teaspoon
8 tablespoons
16 tablespoons
2 cups
4 cups
4 quarts
8 quarts
4 pecks
16 ounces
BAKINGPAN EQUIVALENTS
4 - CUP BAKINGDISH:
9 inch pie plate
9 x 1¼ inch layer cake pan
7% x 3% x 21/, inch loaf pan
6 - CUPBAKINGDISH:
8 or 9 x 11hinch layer cake pan
10 inch pie plate
81hx 31/tx 2 2/8 inch loaf pan
8 - CUPBAKINGDISH:
8 x 8 x 2 inch square pan
11x 7 x 11/2inch baking pan
9 x 5 x 3 inch loaf pan
10- CUPBAKINGDISH:
9 x 9 x 2 inch square pan
11_/_x 71h x 13/4inch baking pan
15 x 10 x 1 inch jelly roll pan
/
/
12 - CUPBAKINGDISHANDOVER:
131hx 81hx 2 inch glass baking pan - 12 cups
13 x 8 x 2 inch metal baking pan - 15 cups
14 x lO_hx 2% inch roasting pan - 19 cups
37
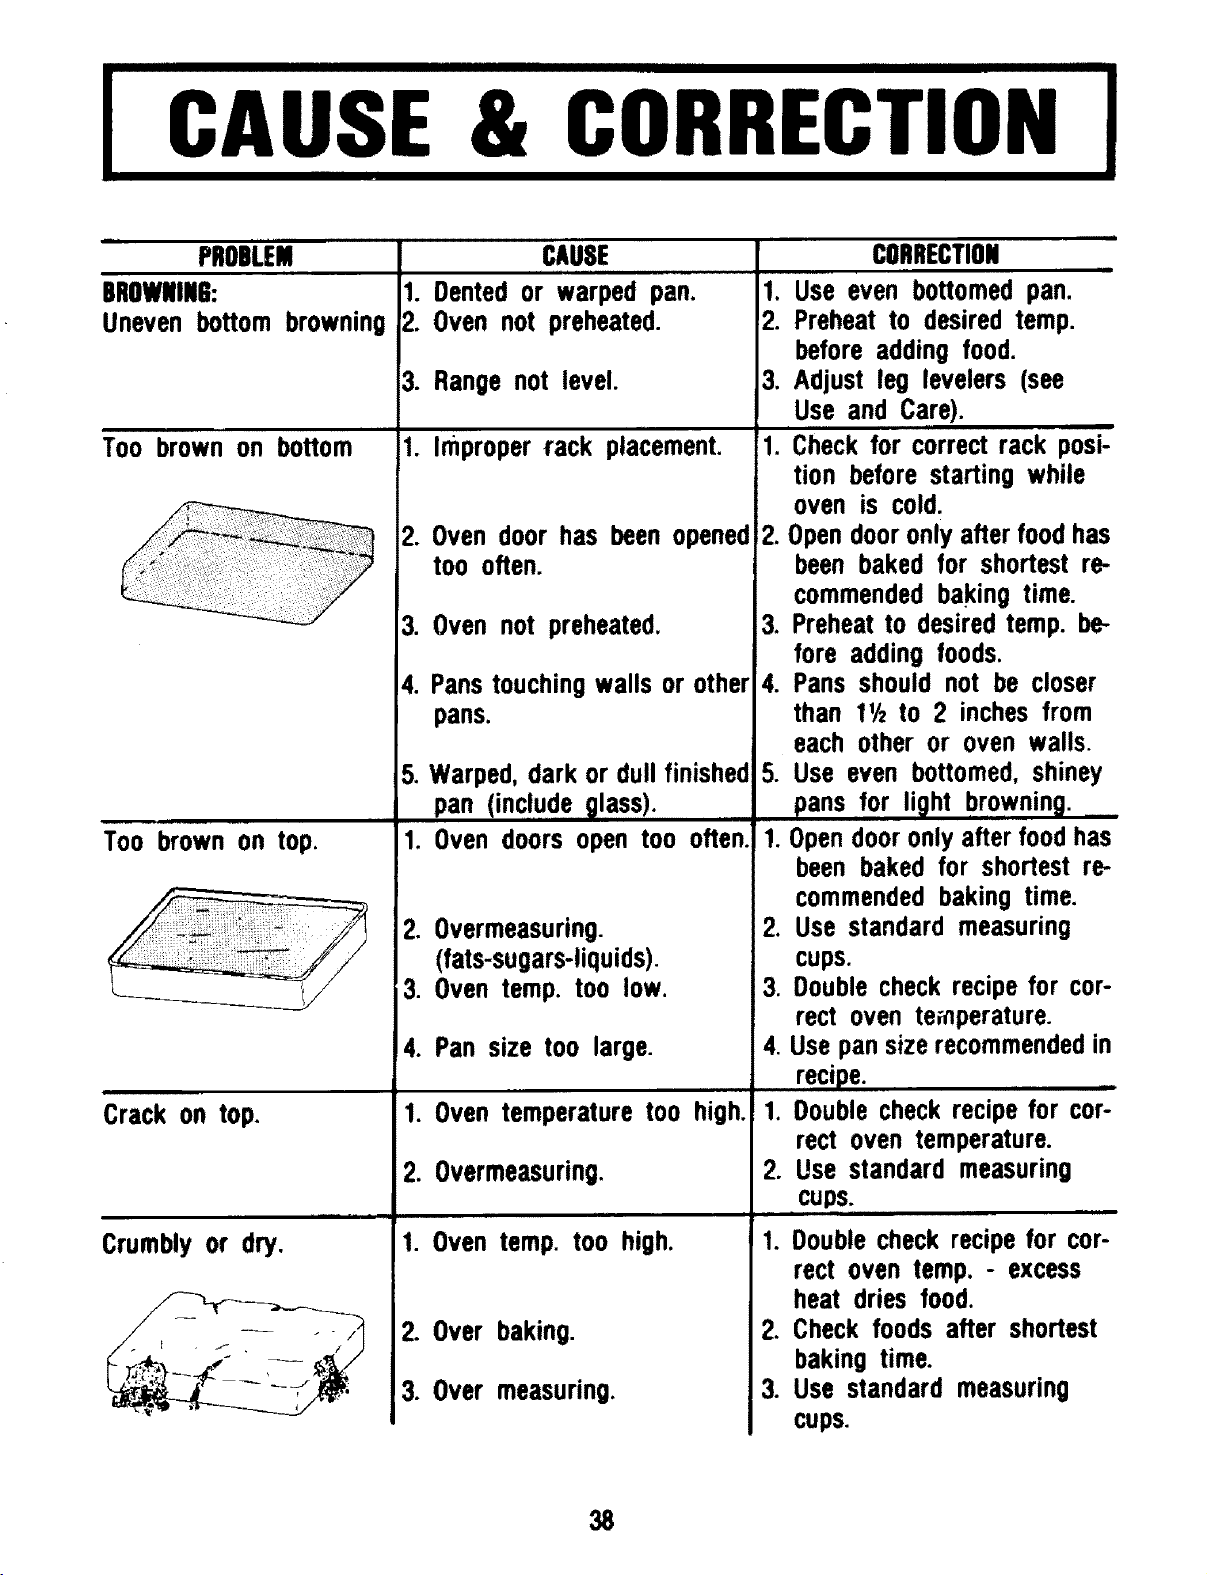
I IIIIIIIIIIIIII IIIIIIIIII IIIIIIII IIIIIII I II
I CAUSE & CORRECTION
iiiiiiii
PROBLEM
BROWNIN6:
Uneven bottom browning
CAUSE
1. Dented or warped pan.
2. Oven not preheated.
Too brown on bottom
Too brown on top.
Crack on top.
Crumbly or dry.
3. Range not level.
1. Improper rack placement.
2. Oven door has been opened
too often.
3. Oven not preheated.
4. Panstouchingwalls or other
pans.
5. Warped, dark or dull finished
pan (include glass).
1. Oven doors open too often.
2. 0vermeasuring.
(fats-sugars-liquids).
3. Oven temp. too low.
4. Pan size too large.
1. Oven temperature too high.
2. 0vermeasuring.
i i ii
1. Oven temp. too high.
2. Over baking.
3. Over measuring.
i
CORRECTION
iiii,,,z
1. Use even bottomed pan.
2. Preheat to desired temp.
before adding food.
3. Adjust leg levelers (see
Use and Care).
1. Check for correct rack posi-
tion before starting while
oven is cold.
2. Opendooronly afterfoodhas
been baked for shortest re-
commendedbaking time.
3. Preheatto desiredtemp. be-
fore adding foods.
4. Pans should not be closer
than 11hto 2 inches from
each other or oven walls.
5. Use even bottomed,shiney
pans for light browning.
1. opendooronlyafterfoodhas
been baked for shortest re-
commendedbaking time.
2. Use standard measuring
cups.
3. Doublecheckrecipe for cor-
rect oven temperature.
4. Usepan sizerecommendedin
recipe. ..............
1. Doublecheckrecipe for cor-
rect oven temperature.
2. Use standard measuring
Cups.
N,H II mll I
1. Doublecheck recipefor cor-
rect oven temp. - excess
heat dries food.
2. Check foods after shortest
baking time.
3. Use standard measuring
cups.
38
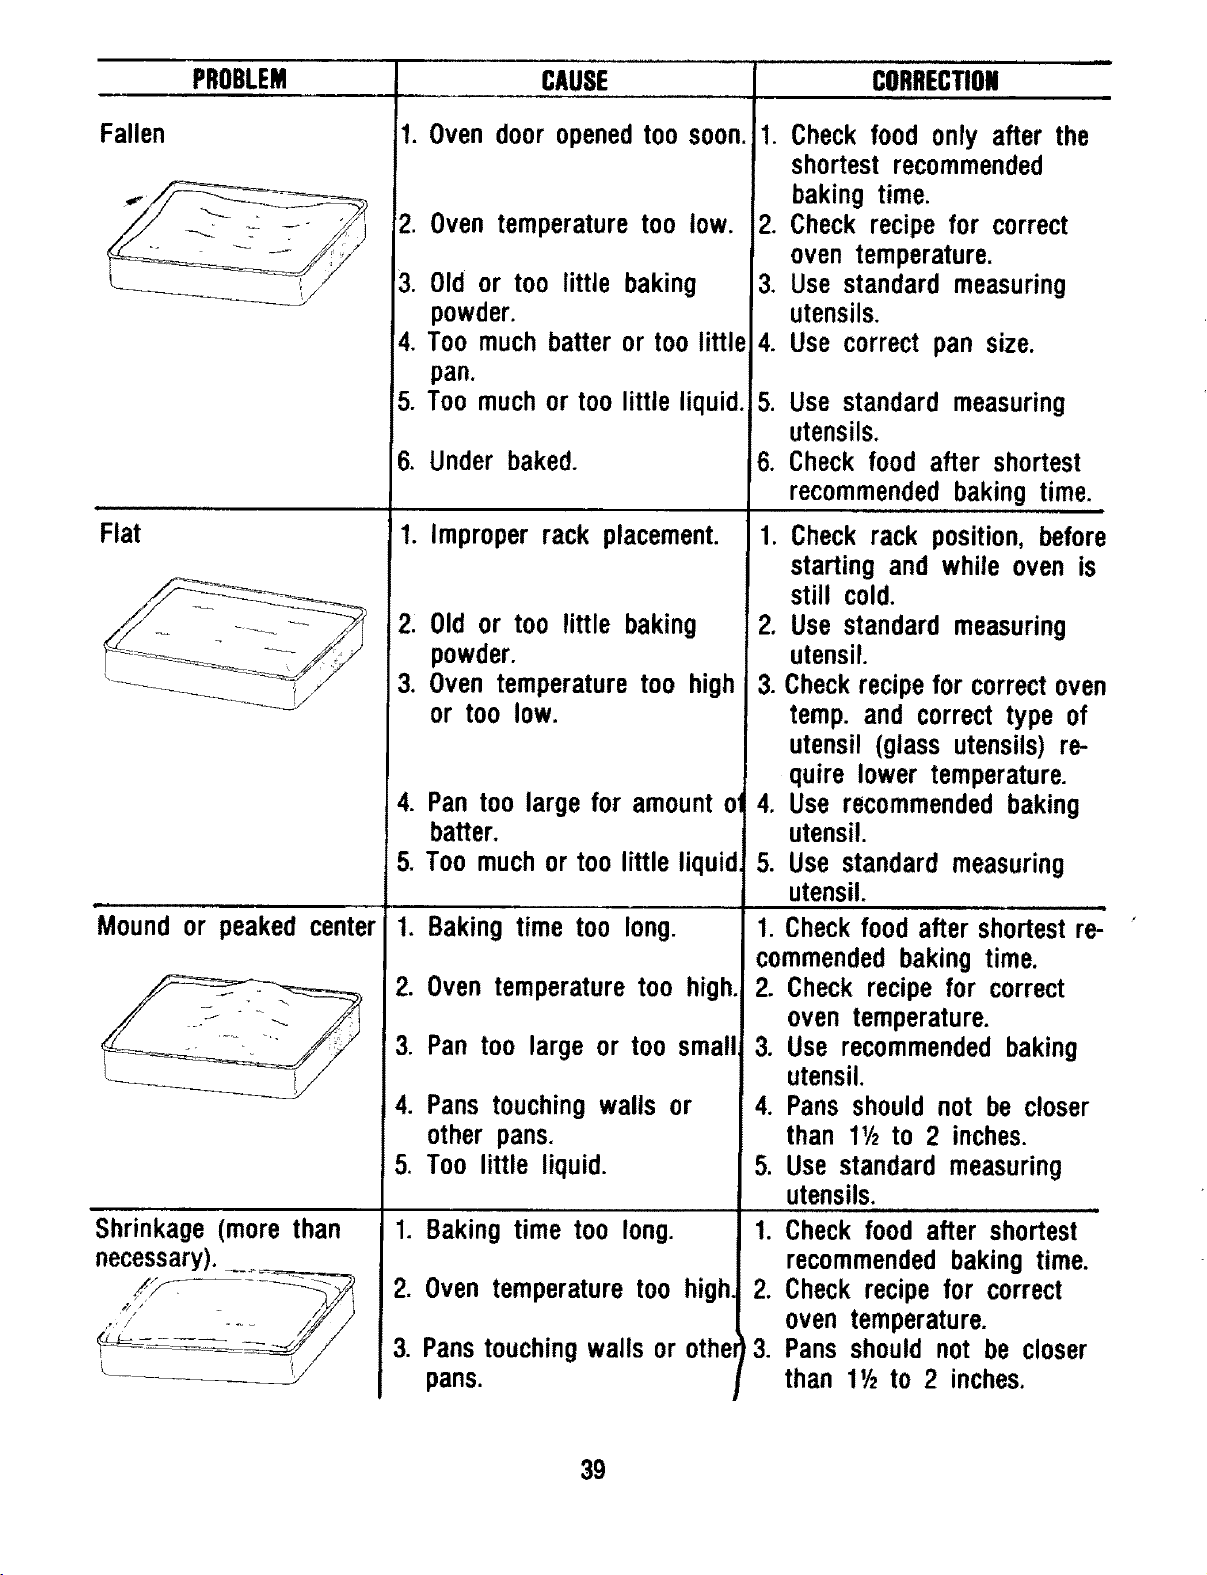
PROBLEM
Fallen
i, ,,,,
Flat
un i ill l ii i
Mound or peaked center
Shrinkage (more than
necessary).---=_
CAUSE
1. Ovendooropenedtoo soon.
,
.
4.
5.
6.
Oven temperaturetoo low.
Old or too little baking
powder.
Too much batter or too little
pan.
Too muchor too little liquid.
Under baked.
1. Improper rack placement.
2, Old or too little baking
powder.
3. Oven temperature too high
or too low.
4. Pan too large for amount ol
batter.
5. Too muchor too little liquid.
1. Baking time too long.
2. Oven temperature too high.
3. Pan too large or too small
4. Pans touching walls or
other pans.
5. Too little liquid.
1. Baking time too long.
2. Oven temperature too high
3. Panstouchingwalls or othe
pans.
CORRECTION
1. Check food only after the
shortest recommended
baking time.
2. Check recipe for correct
oven temperature.
3. Use standard measuring
utensils.
4. Use correct pan size.
5. Use standard measuring
utensils.
6. Check food after shortest
recommendedbaking time.
1. Check rack position, before
starting and while oven is
still cold.
2. Use standard measuring
utensil.
3. Checkrecipefor correctoven
temp. and correct type of
utensil (glass utensils) re-
quire lower temperature.
4. Use recommendedbaking
utensil.
5. Use standard measuring
utensil.
1. Check food after shortestre-
commendedbaking time.
2. Check recipe for correct
oven temperature.
3. Use recommendedbaking
utensil.
4. Pans should not be closer
than 11/2to 2 inches.
5. Use standard measuring
utensils.
1. Check food after shortest
recommendedbaking time.
2. Check recipe for correct
oven temperature.
3. Pans should not be closer
than 11/2to 2 inches.
39
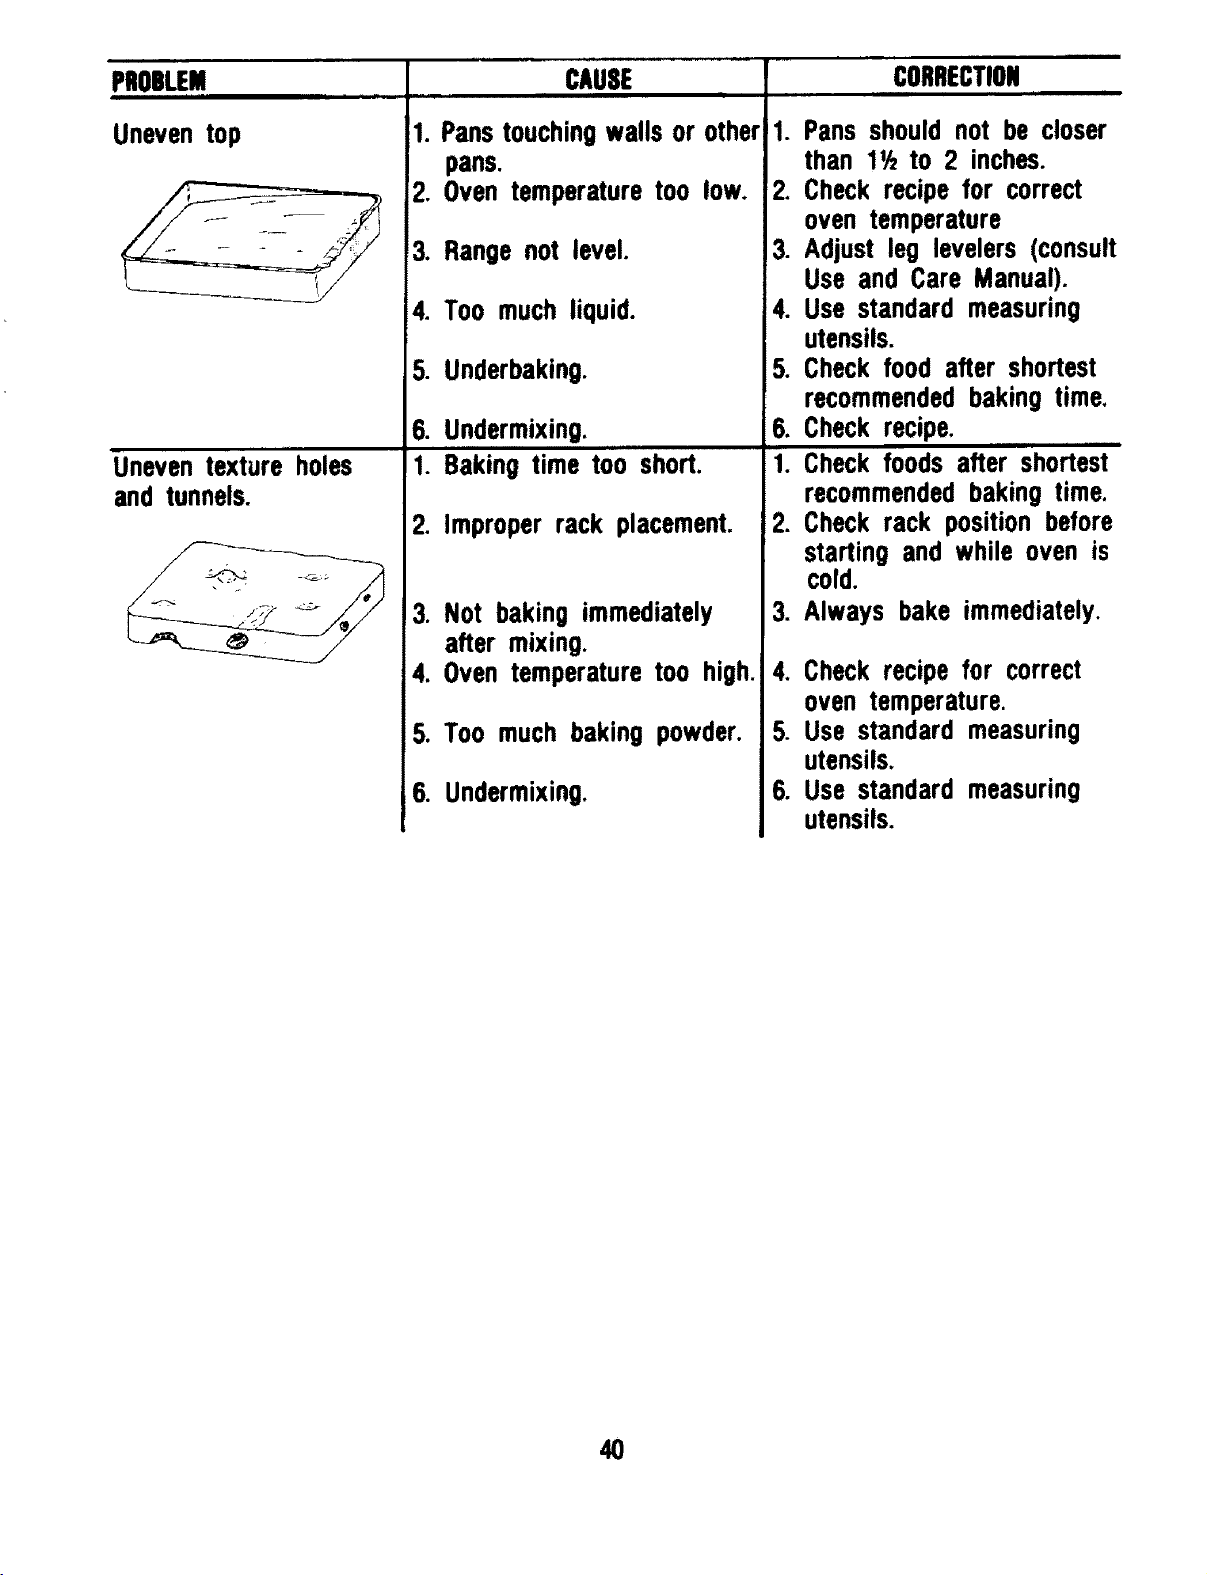
PROeLEM
Uneven top
Uneventexture holes
and tunnels.
CAUSE
roll IW ill
1. Pans touchingwails or other
pans.
2. Oven temperature too low,
3, Range not level.
4. Too much liquid.
5. Underbaking.
6. Undermixing.
1. Baking time too short,
2. Improper rack placement.
3. Not baking immediately
after mixing.
4. Oven temperature too high.
5. Too much baking powder.
6. Undermixing.
CORRECTION
1. Pans should not be closer
than 11hto 2 inches.
2, Check recipe for correct
oven temperature
3. Adjust leg levelers (consult
Use and Care Manual).
4. Use standard measuring
utensils.
5. Check food after shortest
recommendedbaking time,
6. Check recipe.
i i
1. Check foods after shortest
recommendedbaking time.
2. Check rack position before
starting and while oven is
cold.
3. Always bake immediately,
4, Check recipe for correct
oven temperature.
5. Use standard measuring
utensils,
6. Use standard measuring
utensils.
40
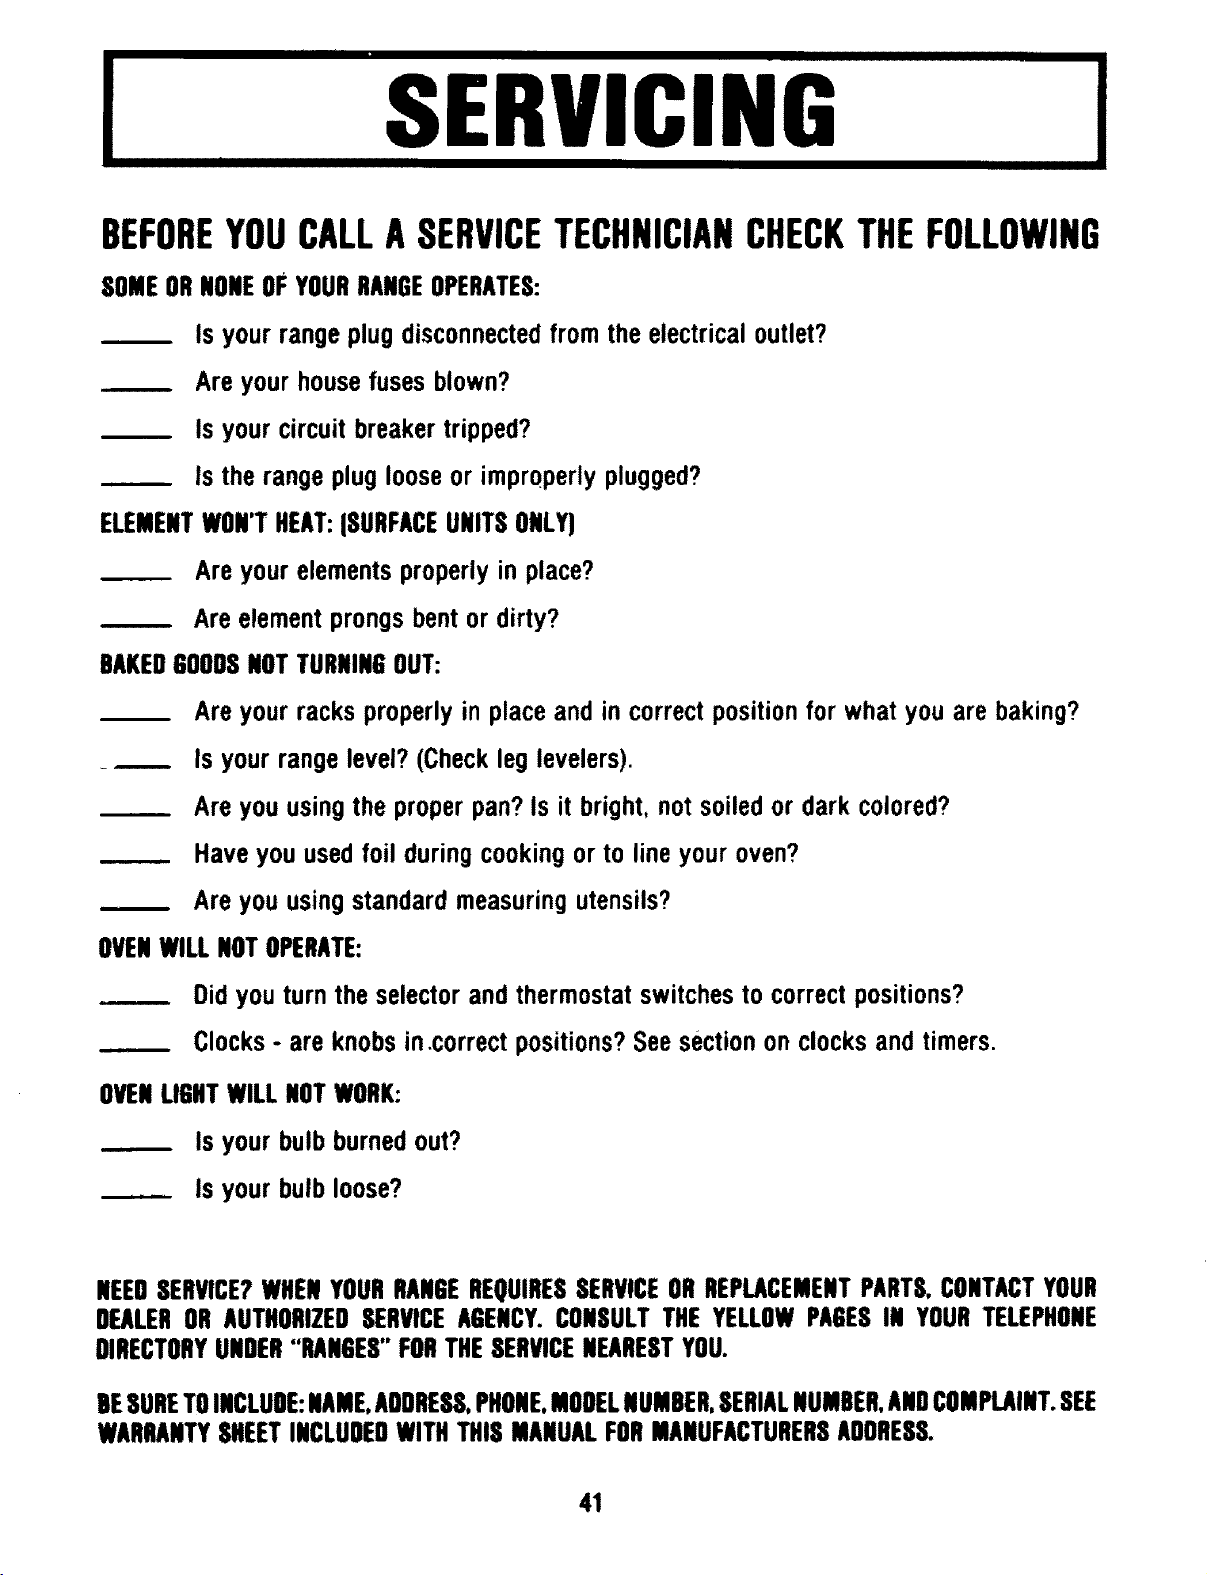
SERVICING
BEFOREYOUCALLA SERVICETECHNICIANCHECKTHEFOLLOWING
SOMEORNONEOFYOURRANGEOPERATES:
Is your range plug disconnected from the electrical outlet?
Are your house fuses blown?
Is your circuit breaker tripped?
is the range plug loose or improperly plugged?
ELEMENTWON'THEAT:ISURFACEUNITS ONLY)
Are your elements properly in place?
Are element prongs bent or dirty?
BAKED600DS NOTTURNINGOUT:
Are your racks properly in place and in correct position for what you are baking?
Is your range level? (Check leg levelers).
Are you using the proper pan? is it bright, not soiled or dark colored?
Have you used foil during cooking or to line your oven?
Are you using standard measuring utensils?
OVENWILL NOTOPERATE:
Did you turn the selector and thermostat switches to correct positions?
Clocks - are knobs in,correct positions? See section on clocks and timers.
OVENLIGNTWILL NOTWORK:
Is your bulb burned out?
is your bulb loose?
NEEDSERVICE?WHENYOURRANGEREQUIRESSERVICEORREPLACEMENTPARTS,CONTACTYOUR
DEALEROR AUTHORIZEDSERVICEAGENCY.CONSULTTHE YELLOWPAGESIN YOURTELEPHONE
DIRECTORYUNDER"RANGES"FORTHESERVICENEARESTYOU.
DESURETOINCLUDE:NAME,ADDRESS,PHONE.MODELNUMBER,SERIALNUMBER,ANDCOMPLAINT.SEE
WARRANTYSHEETINCLUDEDWITHTHIS MANUALFORMANUFACTURERSADORESS.
41