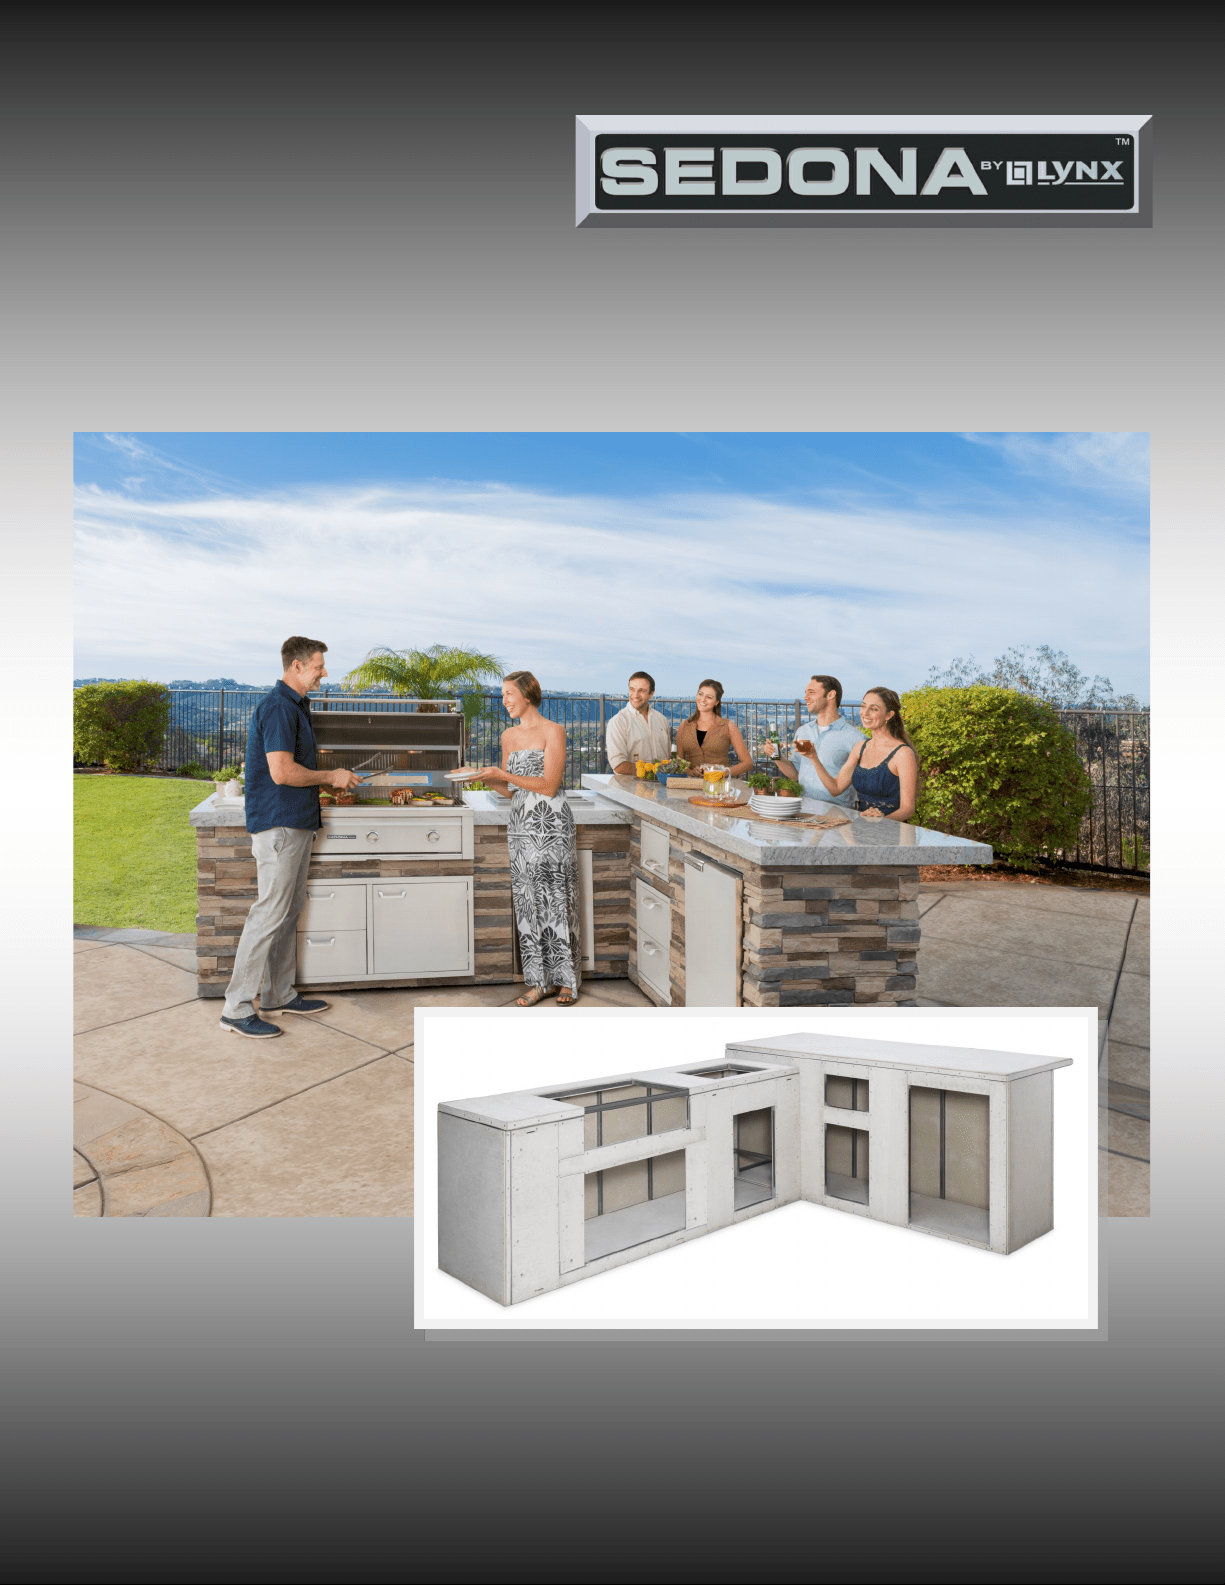
SEDONA READY TO FINISH ISLAND ASSEMBLY
INSTRUCTIONS
Island shown with oponal nishes and products
SEDONA by LYNX™ READY TO FINISH ISLAND ASSEMBLY INSTRUCTIONS
2 SEDONA by LYNX™ Ready to Finish Island Assembly Instrucons
IMPORTANT SAFEGUARDS
CAUTION
Never aempt to li the island by the counter top as serious damage may occur.
Plan your island locaon prior to beginning any set up. The island must be installed and leveled in its nal locaon.
Moving the island once complete is not advised as damage may occur.
WARNING
Two to three people are needed to set up the island. Failure to do so may result in injury.
WARNING
Do not store or use gasoline or other ammable liquids in the vicinity of this or any other appliance.
Do not store an extra LP bole in the interior of the island.
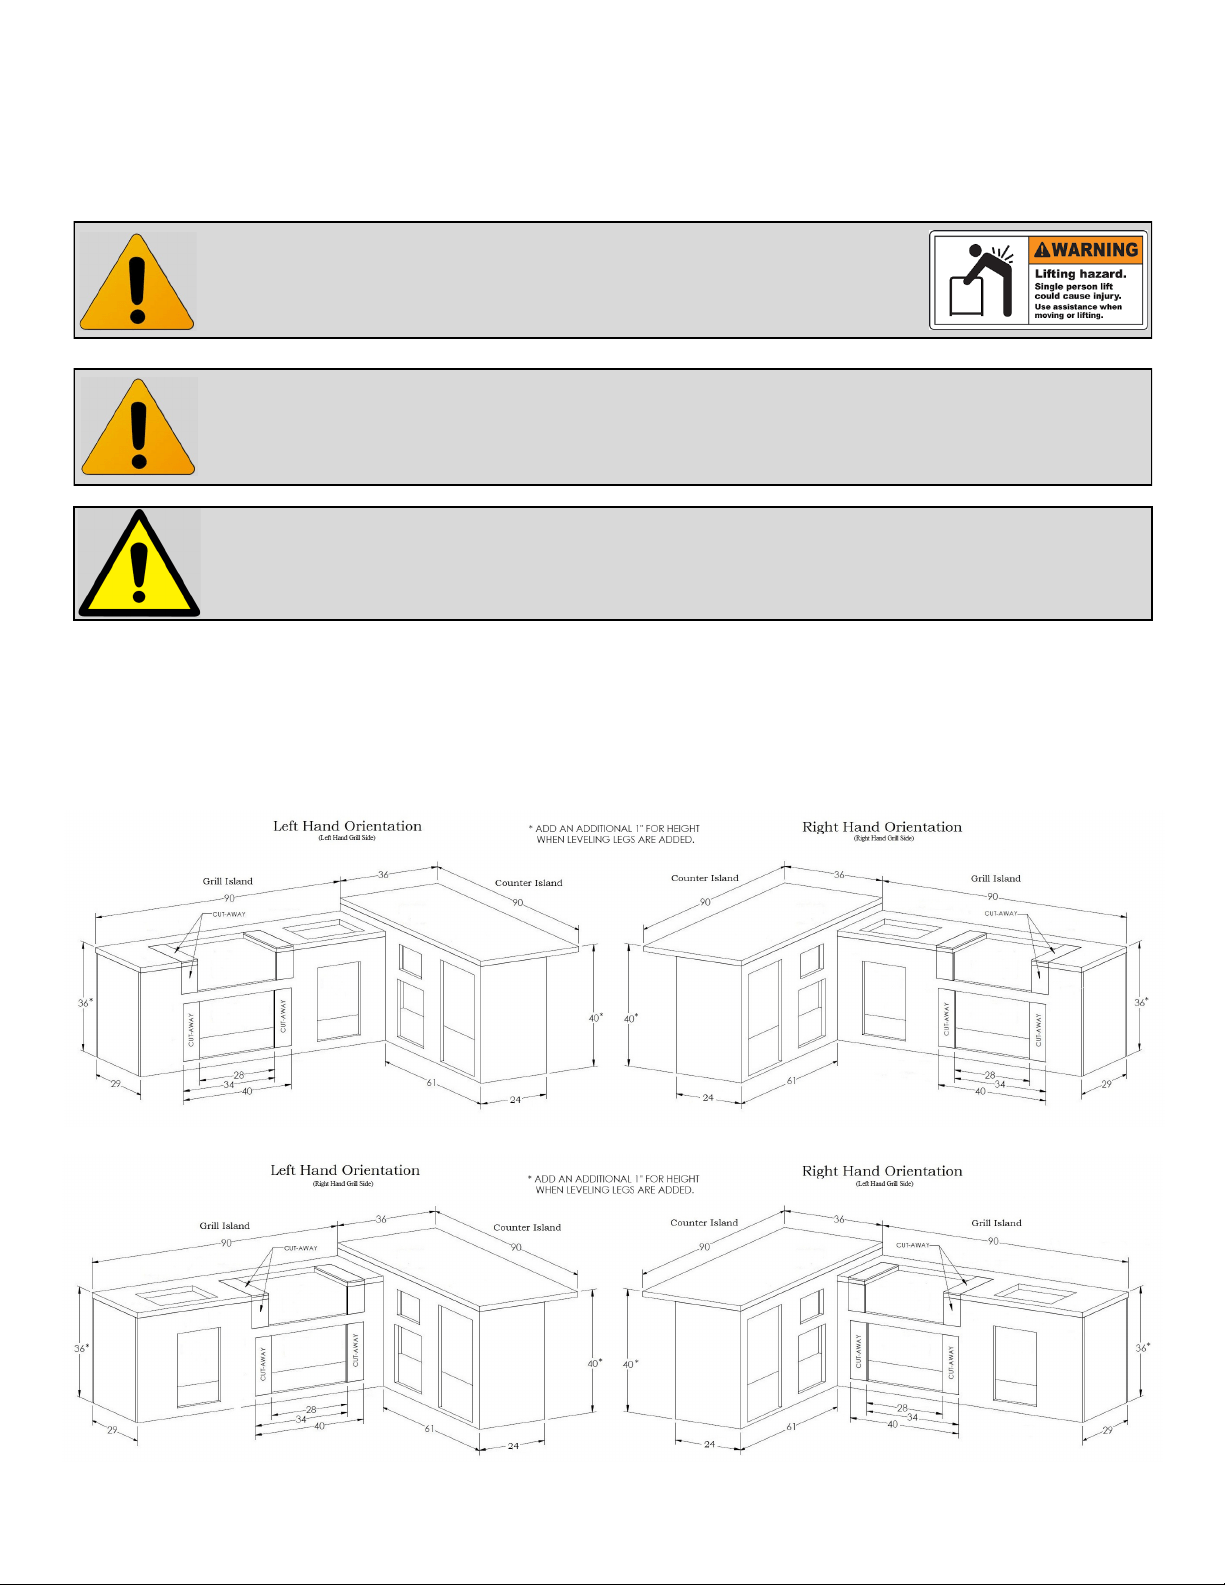
Ready to Finish Island Orientaon Conguraons
3 SEDONA by LYNX™ Ready to Finish Island Assembly Instrucons
SEDONA by LYNX™ READY TO FINISH ISLAND ASSEMBLY INSTRUCTIONS
Congratulaons on your purchase of the SEDONA by LYNX™ Ready to Finish Island. The
prefabricated unnished island can be assembled in no me at all. No tools are necessary
for island assembly, but a Philips head screwdriver and a reciprocang saw are required
for adjustments. The island comes ready for you to add your own personal touch in
components, nishes and countertops. Mulple openings are provided for a variety of
SEDONA by LYNX™ accessories.
Before you begin the island installaon you will need to plan ahead. Some things to consider:
Power Supply and Venng:
The Ready to Finish Island is not pre drilled or cut for power and venng access. You will have to cut through the
rear panel to create access points where required. When venng, cut vents in your grill island that are at least
4” x 14” every 4-6’ of island. The vents should be near the top for natural gas: closer to the boom if using LP gas.
Cover vents with louvered stainless steel covers if desired.
Island Orientaon:
While you have the opon of a le hand or right hand orientaon, it is important for proper operaon that wind
does not blow directly into the rear of the grill. Consider posioning the island to take advantage of natural wind
breaks.
Leveling the Island:
If the base is not level, adjust the legs before any of the panels are installed. If the island is not leveled correctly
the panels could be misaligned and cannot be adjusted once assembly is complete. Once fully assembled, the
island is dicult to move.
Assembling the Island:
You will need assistance holding panels in place while assembling. The panels are large and heavy, therefore we
recommend two people to avoid any injuries during assembly.
If you have any quesons or comments please
contact Lynx Customer Care:
Lynx Professional Grills
7300 Flores Street.
Downey CA 90242
Lynx Customer Care 888.289.5969
SEDONA by LYNX™ READY TO FINISH ISLAND ASSEMBLY INSTRUCTIONS
4 SEDONA by LYNX™ Ready to Finish Island Assembly Instrucons
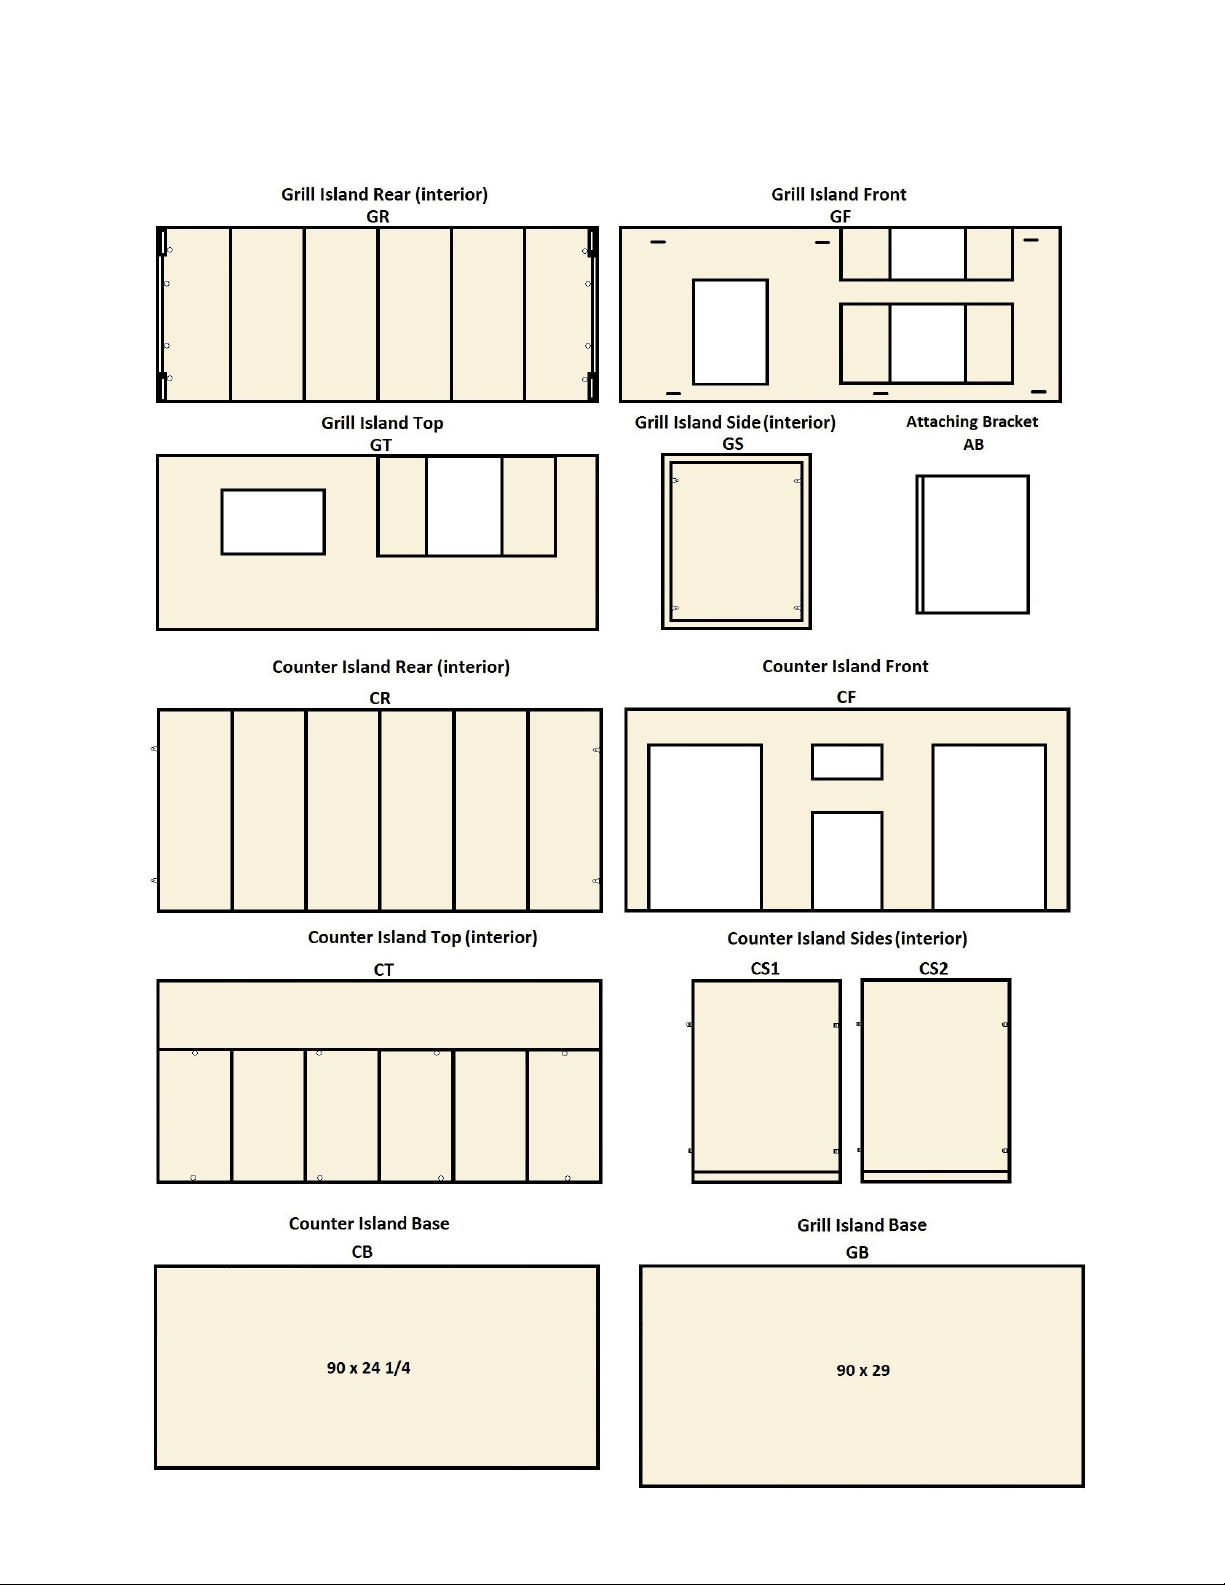
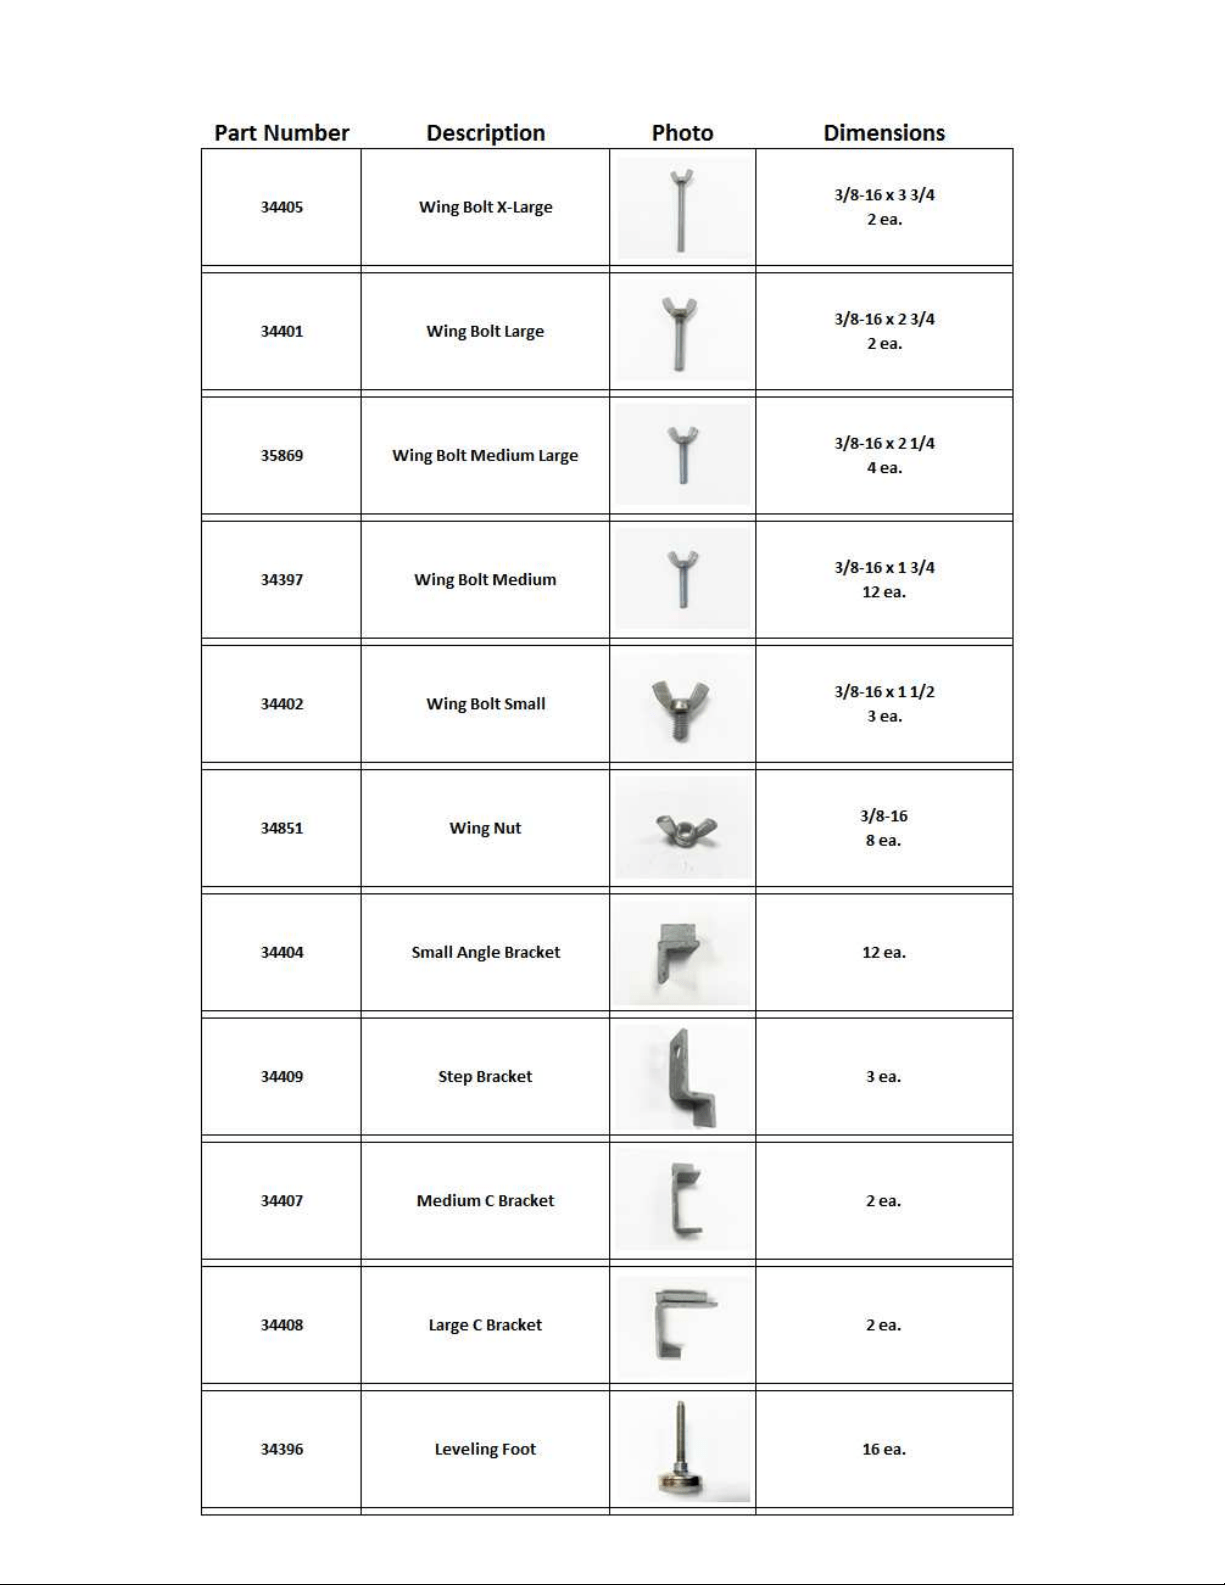
Ready to Finish Island Components
5 SEDONA by LYNX™ Ready to Finish Island Assembly Instrucons
SEDONA by LYNX™ READY TO FINISH ISLAND ASSEMBLY INSTRUCTIONS
Parts List

SEDONA by LYNX™ READY TO FINISH ISLAND ASSEMBLY INSTRUCTIONS
6 SEDONA by LYNX™ Ready to Finish Island Assembly Instrucons
Step 1
Unpacking the Box
Remove the staples and binding straps from the outside of the box. From inside the box, remove the foam and
packing materials. Separate the island components from the box by Grill Island and Counter Island.
Counter Island: 2 end panels, 1 back panel, 1 base panel, and 1 counter top panel (see component list on pg.4)
Grill Island: 1 end panels, 1 back panel, 1 base panel, and 1 counter top panel (see component list on pg.4)
We recommend 2 to 3 people perform setup operaons.
Step 2
Posion and Level the Base
Place the island base on a level surface in its nal locaon and proceed to verify the
island base is level it in all direcons. The boom panel has adjustable feet for this
purpose. DO NOT OMIT THIS STEP. If the base is not leveled correctly the island
will be misaligned. The base cannot be leveled and the island cannot be moved
once the assembly complete. If you need to reposion the island you will have to
disassemble the island and reassemble.
Island Base
Remember to situate the base panels in relaon to the orientaon you have chosen for the island.
(Level is not included)
Leveling Foot

7 SEDONA by LYNX™ Ready to Finish Island Assembly Instrucons
SEDONA by LYNX™ READY TO FINISH ISLAND ASSEMBLY INSTRUCTIONS
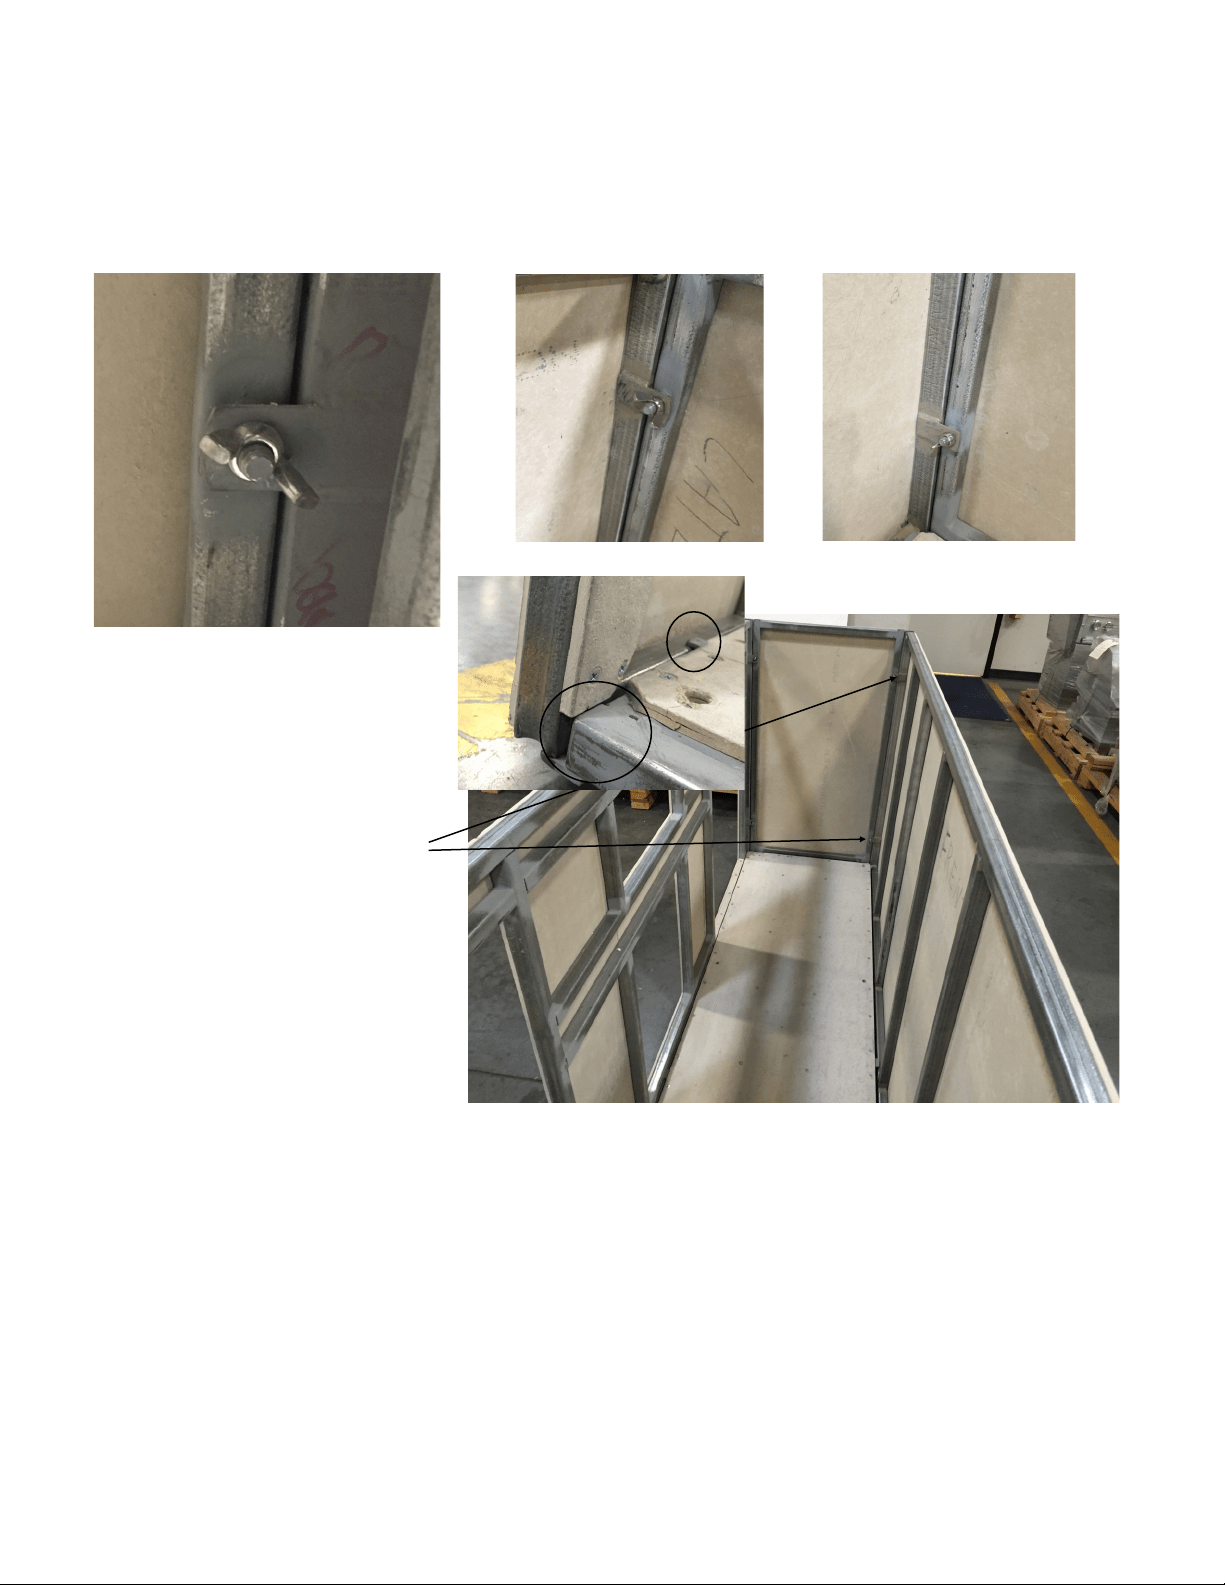
Step 3
Assembling the Front, Rear and Side Panels of the Grill Island (Parts GF, GR, GB, GS)
The grill island base panel (GB) is equipped with tabs which correspond to cut slits on the front panel (GF). Line up
the 3 slit openings on the front panel (GF) with the 3 corresponding tabs on the base panel (GB).
Assemble side (GS) and front panels (GF) together using 4 medium
wing bolts to secure to the panels . Depending on your orientaon
(le or right side) you will aach the side panel (GS) on the grill is-
land on the end that will be exposed.
Slit
Tab
Turn unl ght

SEDONA by LYNX™ READY TO FINISH ISLAND ASSEMBLY INSTRUCTIONS
8 SEDONA by LYNX™ Ready to Finish Island Assembly Instrucons
The rear panel (GR) has a notch on each edge and also slides under the tabs on the oor base (GB). Once in
place aach rear panel (GR) to side panel with 4 medium wing bolts.
Floor size of the grill island is 29x89 ½.
Step 4
Assembling the Front, Rear and Side Panels of the Counter Island (Parts CF, CR, CB, CS1, CS2)
To assemble the counter island slide the front panel (CF) under the tabs on the base panel (CB). The side panel
(CS1) has pre-aached bolts to t into the pre-aached brackets on the front panel (CF).
Step 3
Assembling the Front, Rear and Side Panels of the Grill Island (Parts GF, GR, GB, GS) - connued
Notch
Tab
Turn unl ght
9 SEDONA by LYNX™ Ready to Finish Island Assembly Instrucons
SEDONA by LYNX™ READY TO FINISH ISLAND ASSEMBLY INSTRUCTIONS
Step 4
Assembling the Front, Rear and Side Panels of the Counter Island (Parts CF, CR, CB, CS1, CS2) - Connued
Secure the side panel (CS1) and front panel (CF) using 2 wing nuts on the bolts.
The rear panel (CR) has a notch on each
edge and also slides under the tabs on
the oor base (CB).
Once in place aach to rear panel (CR)
with 2 wing nuts on the bolts of the side
panel (CS1).
Assemble the second side panel
(CS2) to the front panel (CF) and
the back panel (CR) using 2 wing
nuts on each side.
Base panel size of the counter
island is 24 ¼ x 90
Step 5
Aaching the Grill and Counter Islands Together
Secure the grill island to the counter island with the
supplied aaching bracket (AB).
Aach the bracket (AB) to the counter island frame by
securing the medium wing bolts using 4 small hook
brackets on the interior opening.
Notch
Tab

SEDONA by LYNX™ READY TO FINISH ISLAND ASSEMBLY INSTRUCTIONS
10 SEDONA by LYNX™ Ready to Finish Island Assembly Instrucons
Step 5
Aaching the Grill and Counter Islands Together - connued
Connect the bracket to the front panel using 2 large “C” brackets with large wing bolts. To secure the bracket to
the rear panel use 2 medium “C” brackets with Large wing bolts.
Large “C” Bracket (top)
Large “C” Bracket (boom)
Medium “C” Bracket (top)
Medium “C” Bracket (boom)
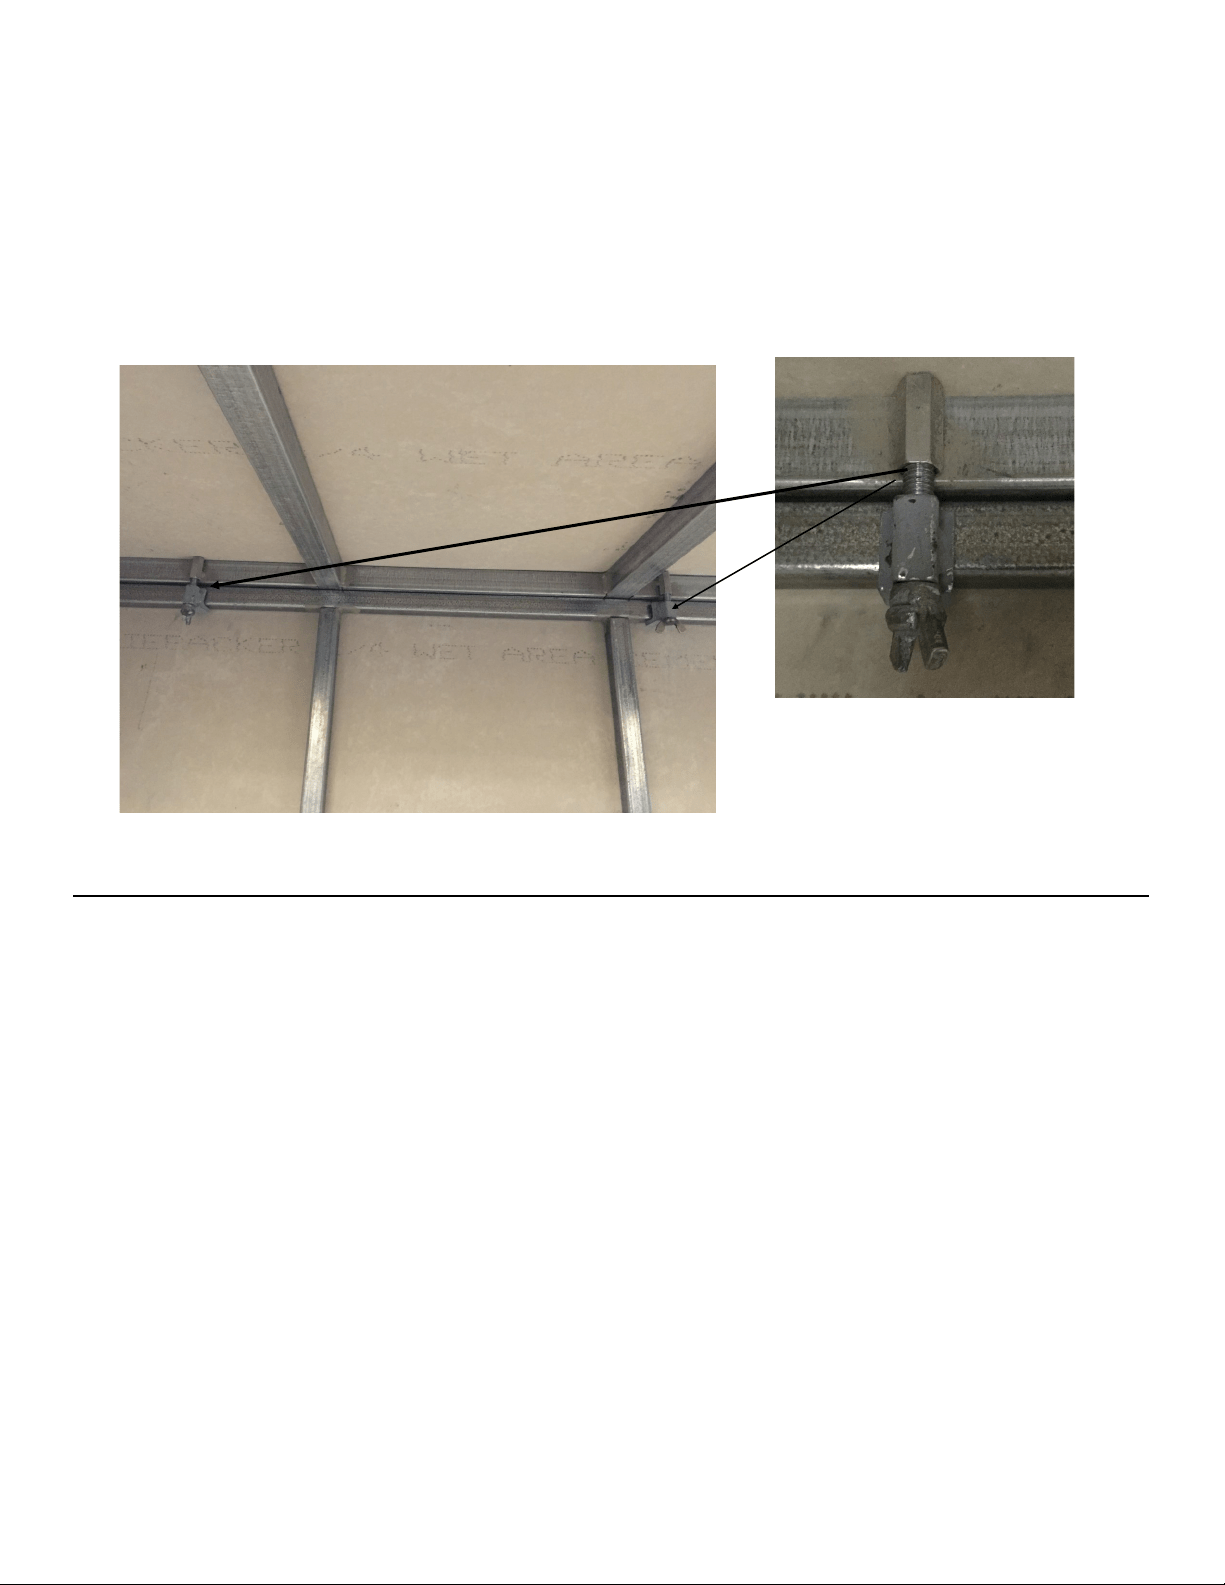
Step 6
Aaching the Grill Island Top
To secure top panel to the front panel (GT)
use 3 step brackets with small wing nuts.
Secure the top panel (GT) to the rear
panel (GR) in 4 places using small angle
brackets with Medium Large wing
11 SEDONA by LYNX™ Ready to Finish Island Assembly Instrucons
SEDONA by LYNX™ READY TO FINISH ISLAND ASSEMBLY INSTRUCTIONS
Step 5
Aaching the Counter Island Top
Aach the top counter (CT) to the front panel (CF) and rear panel (CR) using 8 small an-
gle brackets with medium wing bolts.
Grill island hardware:
4 small angles
3 step brackets
3 small wing bolts
4 Medium Large wing bolts
Connector bracket hardware:
2 large C brackets
2 medium C brackets
2 X-large wing bolts
2 Large wing bolts
Counter island hardware:
8 small angles
8 medium wing bolts
8 wing nuts
SEDONA by LYNX™ READY TO FINISH ISLAND ASSEMBLY INSTRUCTIONS
12 SEDONA by LYNX™ Ready to Finish Island Assembly Instrucons
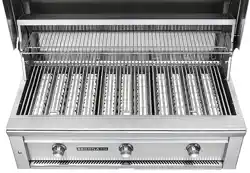
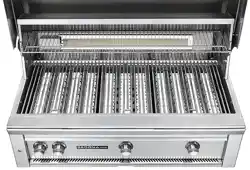
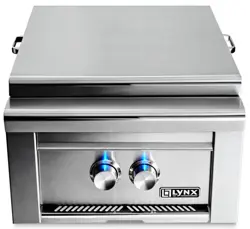
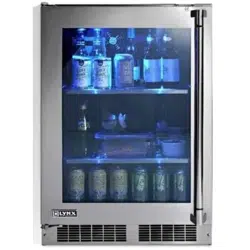
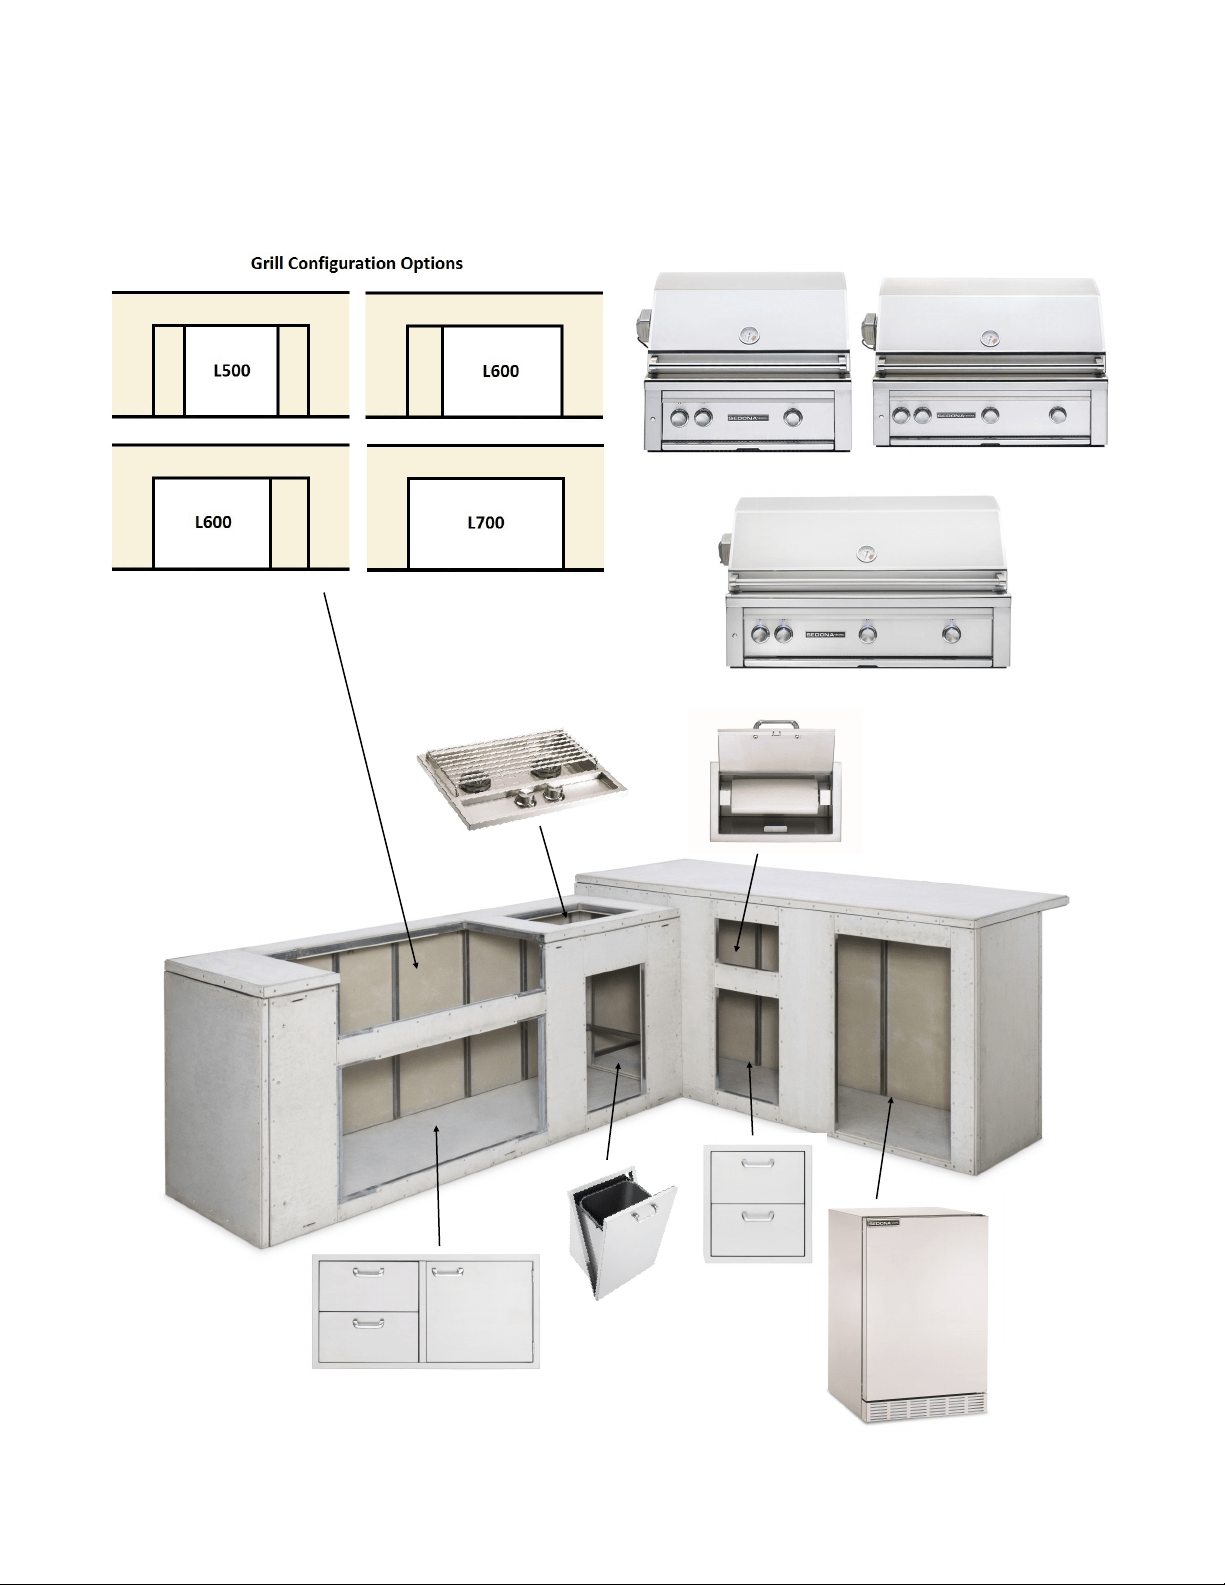
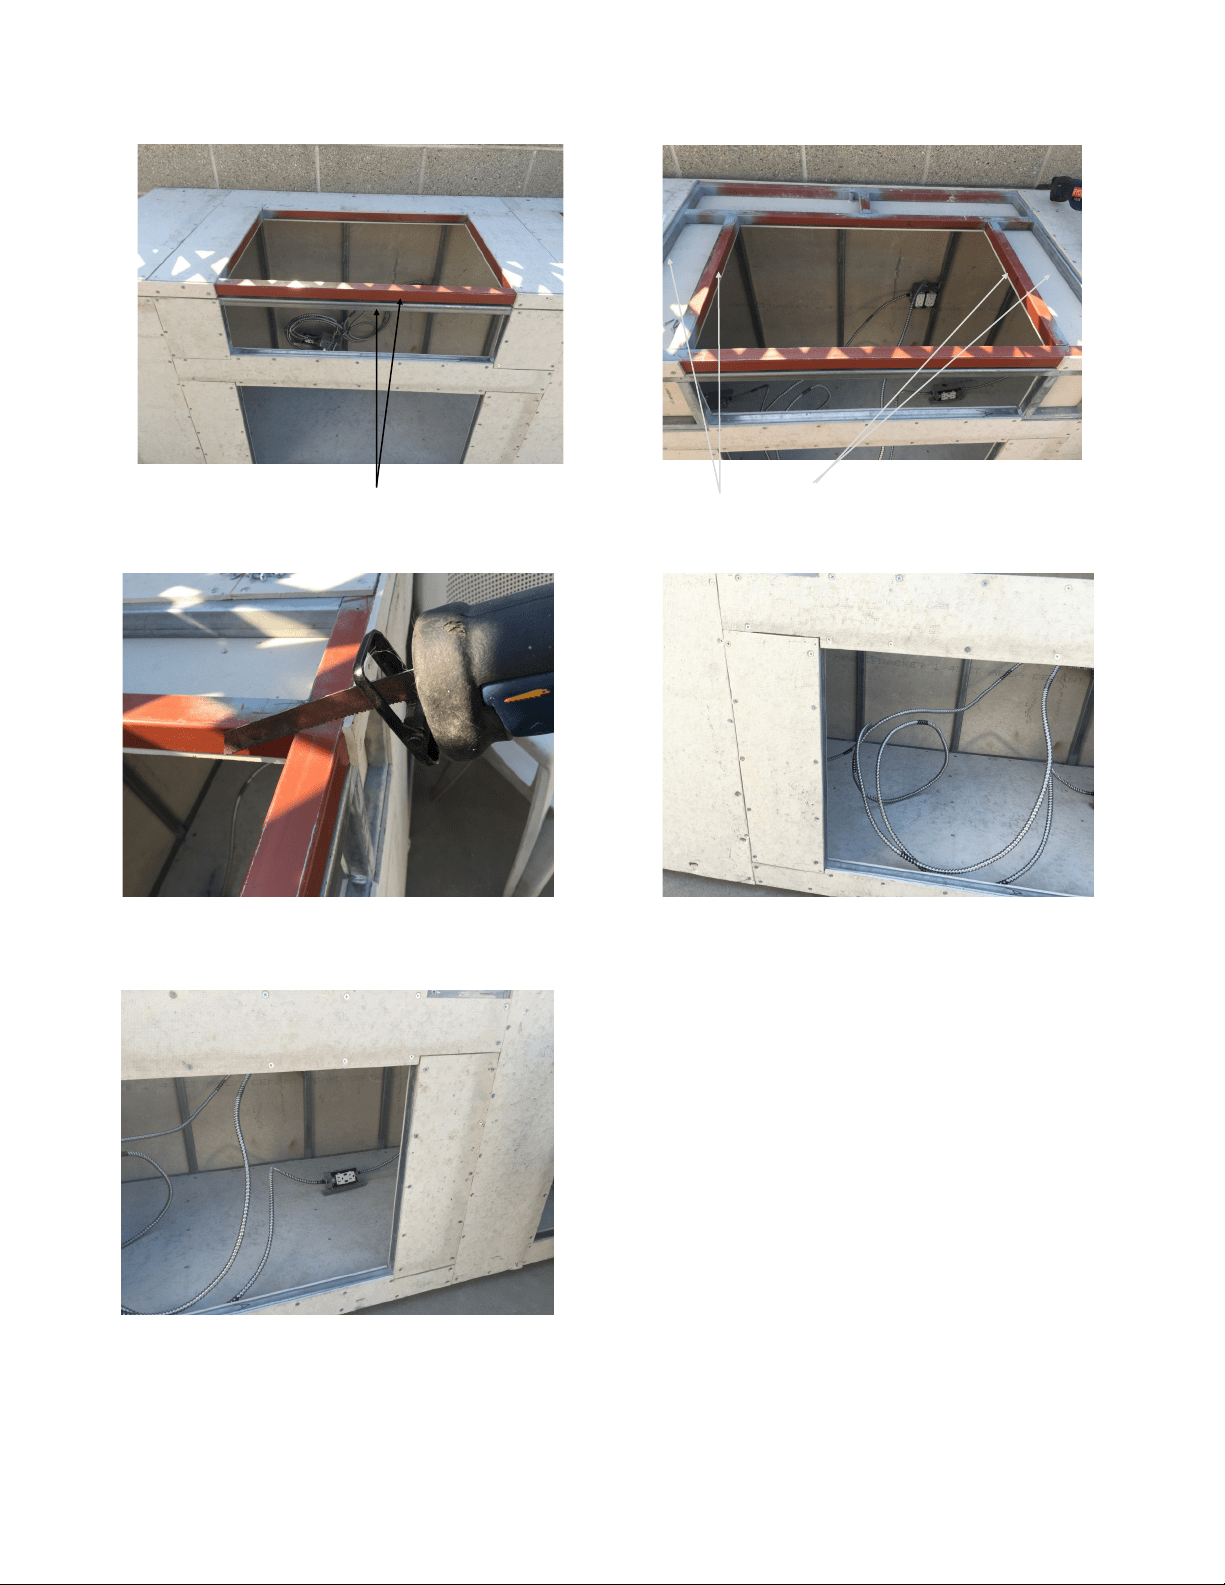
LSB502
L16TWL
LUD519
L18TC
LSA530
LSA636
LSA742
L500REF
TM
Sedona by Lynx
Ready to Finish Island Grill and Accessory Package
L500 L600
L700
Shown cut for a L700 grill
and LSA742 cabinet.
13 SEDONA by LYNX™ Ready to Finish Island Assembly Instrucons
SEDONA by LYNX™ READY TO FINISH ISLAND ASSEMBLY INSTRUCTIONS
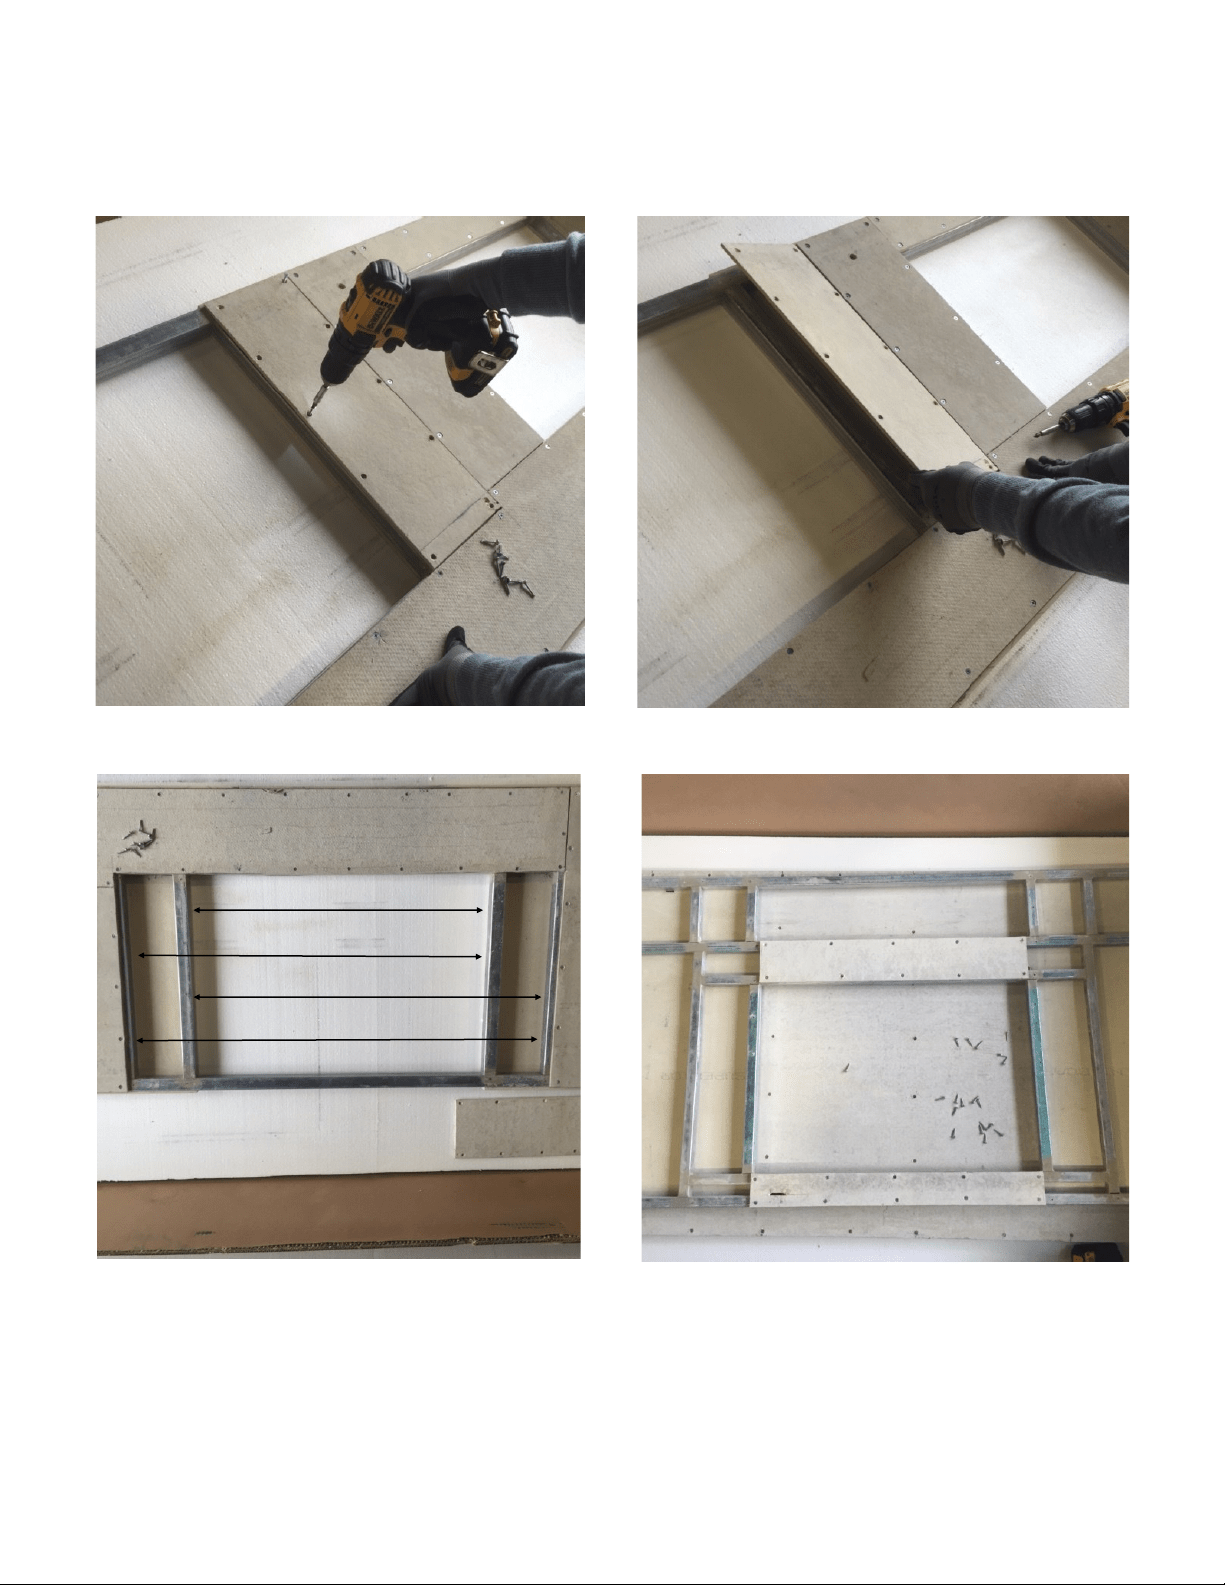
Converng the Counter Island Top
Depending on your grill and cabinet size conguraon, you may need to have panels and support bars removed for
installaon.
Remove the screws on the side panels
Grill top with the side panels removed
(grill opons labeled)
Front grill panel with side panels removed
L500
L600 (LH)
L600 (RH)
L700
SEDONA by LYNX™ READY TO FINISH ISLAND ASSEMBLY INSTRUCTIONS
14 SEDONA by LYNX™ Ready to Finish Island Assembly Instrucons
Front and Grill top panel prior to cung. These front
bars will always need to be cut regardless of grill size.
Dependent on the size of grill, some bars will
need to be cut.
The front panel will need cuts due to
accessory choice as well. Again, removing
panels as needed.
Front le
Front right
*Power outlets shown in pictures, not included.
Use of a reciprocang saw is recommended.
Please Note:
On the L600 grill, you will need to remove either
the right hand panel and bar, or the le hand pan-
el and bar. This depends on which way you choose
to install, right side or le side.
*Power outlets shown in pictures, not included.

15 SEDONA by LYNX™ Ready to Finish Island Assembly Instrucons
SEDONA by LYNX™ READY TO FINISH ISLAND ASSEMBLY INSTRUCTIONS
I. Limited Warranty – Grill, Side-Burner, Doors, Drawers, and
Refrigerator
For the warranty on the individual stainless steel island components, please
see the warranes in their product Care & Use Manuals.
II. Limited Lifeme Warranty – Island Frame Panels
The base, sides and counter-top of the island are warranted to be free from
defects in material and workmanship, when subjected to normal domesc
use and service, for a Lifeme. This warranty is limited to the repair or
replacement of the defecve parts.
III. Limitaons & Exclusions
1.This Warranty shall apply to products purchased and located in the United
States and Canada. Products must be purchased in the country where
service is requested.
2. Warranty applies only to the original purchaser and may not be
transferred.
3. Warranty is in lieu of all other warranes expressed or implied and all
other obligaons or liabilies related to the sale or use of its grill products.
4. Warranty shall not apply and Lynx is not responsible for damage resulng
from misuse, abuse, alteraon of or tampering with the appliance, accident,
hosle environment, are-up res, improper installaon, or installaon not
in accordance with the instrucons contained in this manual, or the local
codes.
5. Lynx shall not be liable for incidental, consequenal, special or conngent
damages resulng from its breach of this wrien warranty or any implied
warranty.
6. Some states do not allow limitaons on how long an implied warranty
lasts, or the exclusions of or limitaons on consequenal damages. This
warranty gives you specic legal rights and you may have other rights which
vary from state to state.
7. No one has the authority to add to or vary Lynx’s warranty, or to create
for Lynx any other obligaon or liability in connecon with the sale or use of
its products.
8. Limited to the replacement of defecve parts with the owner paying all
other costs including labor.
IV. What is not covered: Lynx shall not be responsible
for and shall not pay for the following:
1. Installaon or start-up, damages or problems caused by
improper installaon or use;
2. Service by an unauthorized service provider;
3. Damage or repair due to service by an unauthorized service
provider or use of unauthorized parts;
4. Warranty does not apply to products installed in any
commercial or non-residenal applicaon. Examples of excluded
applicaons include, but are not limited to day care centers,
schools, bed and breakfast centers, churches, private clubs, re
staons, club houses, common areas in mul-family dwellings,
restaurants, hotels, nursing homes, food service locaons and
instuonal food service locaons.
5. To correct normal adjustments or sengs, due to improper
installaon, commissioning or local gas supply properes;
6. Shipping and handling costs, export dues, installaon, removal,
or re-installaon cost.
7. Display models are generally sold “as is.” If you have purchased
a display model, please be advised that it is sold “as is” and that it
is subject to the following warranty exclusions: any exterior or
cosmec damage is non-warrantable; any missing components will
be replaced at consumers expense; major handling damage to
manifold, valve and ignion system will be serviced at consumer’s
expense; all other warranty’s (standard warranty) will remain in
eect.
8. The cost of a service call to diagnose trouble.
TM
SEDONA by LYNX Ready to Finish Island Limited Warranty

P/N: 35870
The best outdoor kitchen products come from:
Lynx Grills, Inc 7300 Flores Street Downey, CA 90242
Service: (888)-289-5969 Fax: (562)-299-6789
www.lynxgrills.com