KWK884520M
KWE884520M
KWK884520B
KWK884520T
USER
MANUAL
EN User Manual 2
Wine Cellar
FR Manuel Utilisateur 16
Cave à vin
DE Bedienungsanleitung 30
Weinkeller
IT Manuale dell’utente 44
Cantina per vini

2
CONTENTS
CUSTOMER CARE AND SERVICE
1. SAFETY INFORMATION .............................................................................................3
2. SAFETY INSTRUCTIONS ...........................................................................................5
3. PRODUCT DESCRIPTION ..........................................................................................7
4. CONTROL PANEL .......................................................................................................8
5. USE ................................................................................................................................9
6. HINTS AND TIPS ........................................................................................................ 11
7. INSTALLATION ..........................................................................................................12
8. CARE AND MAINTENANCE .....................................................................................13
9. TROUBLE SHOOTING GUIDE .................................................................................14
10. TECHNICAL INFORMATION ....................................................................................15
11. INFORMATION FOR TEST INSTITUTES ................................................................15
12. ENVIRONMENTAL CONCERNS ..............................................................................15
www.aeg.com
Thank you for choosing this AEG product. We have created it to give you impeccable per-
formance for many years, with innovative technologies that help make life simpler – features
you might not nd on ordinary appliances. Please spend a few minutes reading to get the
very best from it.
Visit our website for:
Get usage advice, brochures, trouble shooter, service information:
www.aeg.com
Register your product for better service:
www.registeraeg.com
Buy Accessories, Consumables and Original spare parts for your appliance:
www.aeg.com/shop
FOR PERFECT RESULTS
We recommend the use of original spare parts.
When contacting Service, ensure that you have the following data available.
The information can be found on the rating plate. Model, PNC, Serial Number.
Warning / Caution-Safety information.
General information and tips.
Environmental information.
Subject to change without notice.

3ENGLISH
Before the installation and use of the appliance, carefully
read the supplied instructions. The manufacturer is not
responsible if an incorrect installation and use causes
injuries and damages. Always keep the instructions with
the appliance for future reference.
1.1 Children and vulnerable people safety
• This appliance can be used by children aged from 8
years and above and persons with reduced physical,
sensory or mental capabilities or lack of experience and
knowledge if they have been given supervision or in-
struction concerning use of the appliance in a safe way
and understand the hazards involved.
• This appliance may be used by children between 3 and
8 years of age and persons with very extensive and
complex disabilities, if they have been properly instruct-
ed.
• Children of less than 3 years of age should be kept away
from the appliance unless continuously supervised.
• Do not let children play with the appliance.
• Children shall not carry out cleaning and user mainte-
nance of the appliance without supervision.
• Keep all packaging away from children and dispose of it
appropriately.
1.2 General Safety
• This appliance is intended to be used in household and
similar applications such as:
- Farm houses; sta kitchen areas in shops, oces
and other working environments
- By clients in hotels, motels, bed and breakfast and
other residential type environments
• Use this appliance for storage of wine only.
• WARNING: Keep ventilation openings, in the appliance
enclosure or in the built-in structure, clear of obstruction.
1. SAFETY INFORMATION

4
• WARNING: Do not use mechanical devices or other
means to accelerate the defrosting process, other than
those recommended by the manufacturer.
• WARNING: Do not damage the refrigerant circuit.
• WARNING: Do not use electrical appliances inside the
food storage compartments of the appliance, unless
they are of the type recommended by the manufacturer.
• Do not use water spray and steam to clean the appli-
ance.
• Clean the appliance with a moist soft cloth. Only use
neutral detergents. Do not use abrasive products, abra-
sive cleaning pads, solvents or metal objects.
• Do not store explosive substances such as aerosol
cans with a ammable propellant in this appliance.
• If the supply cord is damaged, it must be replaced by
the manufacturer, its service agent or similarly qualied
persons in order to avoid a hazard.
• This appliance is not intended for professional and
commercial use
www.aeg.com

5ENGLISH
2. SAFETY INSTRUCTIONS
2.1 Service
• To repair the appliance contact an Au-
thorised Service Centre. Use original
spare parts only.
• Please note that self-repair or non-pro-
fessional repair can have safety con-
sequences and might void the guaran-
tee.
• The following spare parts will be
available for 7 years after the model
has been discontinued: thermostats,
temperature sensors, printed circuit
boards, light sources, door handles,
door hinges, trays and baskets. Please
note that some of these spare parts
are only available to professional re-
pairers, and that not all spare parts are
relevant for all models.
• Door gaskets will be available for 10
years after the model has been discon-
tinued.
2.2 Installation
WARNING! Only a qualied per-
son must install this appliance.
• Remove all the packaging.
• Do not install or use a damaged appli-
ance.
• Obey the installation instruction sup-
plied with the appliance.
• Always be careful when you move the
appliance because it is heavy. Always
wear safety gloves.
• Make sure the air can circulate around
the appliance.
• Wait at least 4 hours before connect-
ing the appliance to the power supply.
This is to allow the oil to ow back in the
compressor.
• Do not install the appliance close to ra-
diators or cookers, oven or hobs.
• The rear of the appliance must stand
against the wall.
• Do not install the appliance where there
is direct sunlight.
• Do not install this appliance in areas
that are too humid or too colds, such as
the construction appendices, garages
or wine cellars.
• When you move the appliance, lift it by
the front edge to avoid scratching the
oor.
2.3 Electrical connection
WARNING! Risk of re and electri-
cal shock.
WARNING! When positioning the
appliance, ensure the supply cord
is not trapped or damaged.
WARNING! Do not use multi-plug
adapters and extension cables.
• The appliance must be earthed.
• All electrical connections should be
made by a qualied electrician.
• Make sure that the electrical informa-
tion on the rating plate agrees with the
power supply. If not, contact an elec-
trician.
• Always use a correctly installed shock-
proof socket.
• Do not use multi-plug adapters and ex-
tension cables.
• Make sure not to cause damage to
the electrical components (e.g. mains
plug, mains cable, compressor). Con-
tact the Service or an electrician to
change the electrical components.
• The mains cable must stay below the
level of the mains plug.
• Connect the mains plug to the mains
socket only at the end of the installa-
tion. Make sure that there is access to
the mains plug after the installation.
• Do not pull the mains cable to discon-
nect the appliance. Always pull the
mains plug.
• When positioning the appliance, en-
sure the supply cord is not trapped or
damaged.
• Do not locate multiple portable sock-
etoutlets or portable power supplies at
the rear of the appliance.

6
2.4 Use
WARNING! Risk of injury, burns,
electrical shock or re.
The appliance contains ammable
gas, isobutane (R600a), a natural
gas with a high level of environmen-
tal compatibility. Be careful not to
cause damage to the refrigerant cir-
cuit containing isobutane.
• Do not change the specication of this
• appliance.
• Do not put electrical appliances (e.g.
ice cream makers) in the appliance un-
less they are stated applicable by the
manufacturer.
• If damage occurs to the refrigerant
circuit, make sure that there are no
ames and sources of ignition in the
room. Ventilate the room.
• Do not let hot items to touch the plastic
parts of the appliance.
• Do not put soft drinks in the freezer
compartment. This will create pressure
on the drink container.
• Do not store ammable gas and liquid
in the appliance.
• Do not put ammable products or items
that are wet with ammable products
in, near or on the appliance.
• Do not touch the compressor or the
condenser. They are hot.
2.5 Internal light
WARNING! Risk of electric shock
• Concerning the lamp(s) inside this
product and spare part lamps sold
separately: These lamps are intended
to withstand extreme physical condi-
tions in household appliances, such as
temperature, vibration, humidity, or are
intended to signal information about
the operational status of the appliance.
They are not intended to be used in
other applications and are not suitable
for household room illumination.
2.6 Care and cleaning
WARNING! Risk of injury or dam-
age to the appliance.
• Before maintenance, deactivate the
appliance and disconnect the mains
plug from the mains socket.
• This appliance contains hydrocarbons
in the cooling unit. Only a qualied per-
son must do the maintenance and the
recharging of the unit.
• Regularly examine the drain of the ap-
pliance and if necessary, clean it. If the
drain is blocked, defrosted water col-
lects in the bottom of the appliance.
• Dusts behind the wine cellar and on
the ground shall be timely cleaned to
improve the cooling eect and energy
saving.
• The interior of the wine cellar should
be cleaned regularly to avoid odor.
• Check the door gasket regularly to
make sure there are no debris.
• Please turn o the power before clean-
ing, remove all food, shelves, drawers,
etc.
• Clean the door gasket with mild soap
and water.
• Use a soft cloth or sponge to clean the
inside of the wine cellar, with two table-
spoons of baking soda and a quart of
warm water. Then rinse with water and
wipe clean, and open the door and dry
it naturally before the power is turned
on.
• For areas that are dicult to clean in
the wine cellar(such as narrow sand-
wiches, gaps or corners), it is recom-
mended to wipe them regularly with a
soft rag, soft brush, etc. and when nec-
essary, combined with some auxiliary
tools (such as thin sticks) to ensure
no contaminant accumulation in these
areas.
• Do not use soap, detergent, scrub
powder, spray cleaner, etc., as these
may cause odors in the interior of the
wine cellar.
• Clean the bottle frame, shelves and
drawers with a mild detergent and dry
with a soft cloth.
www.aeg.com
7ENGLISH
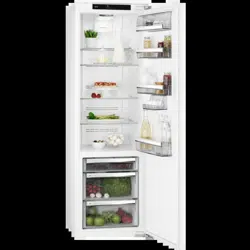
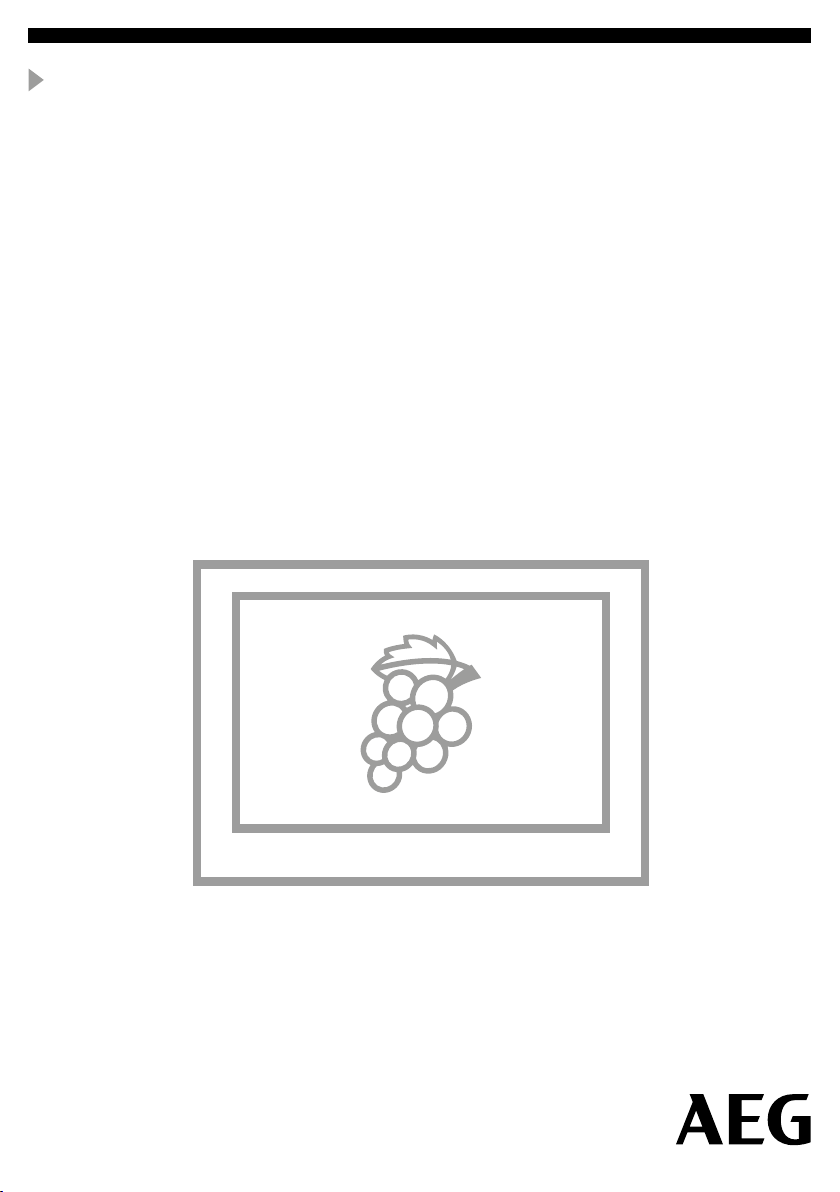
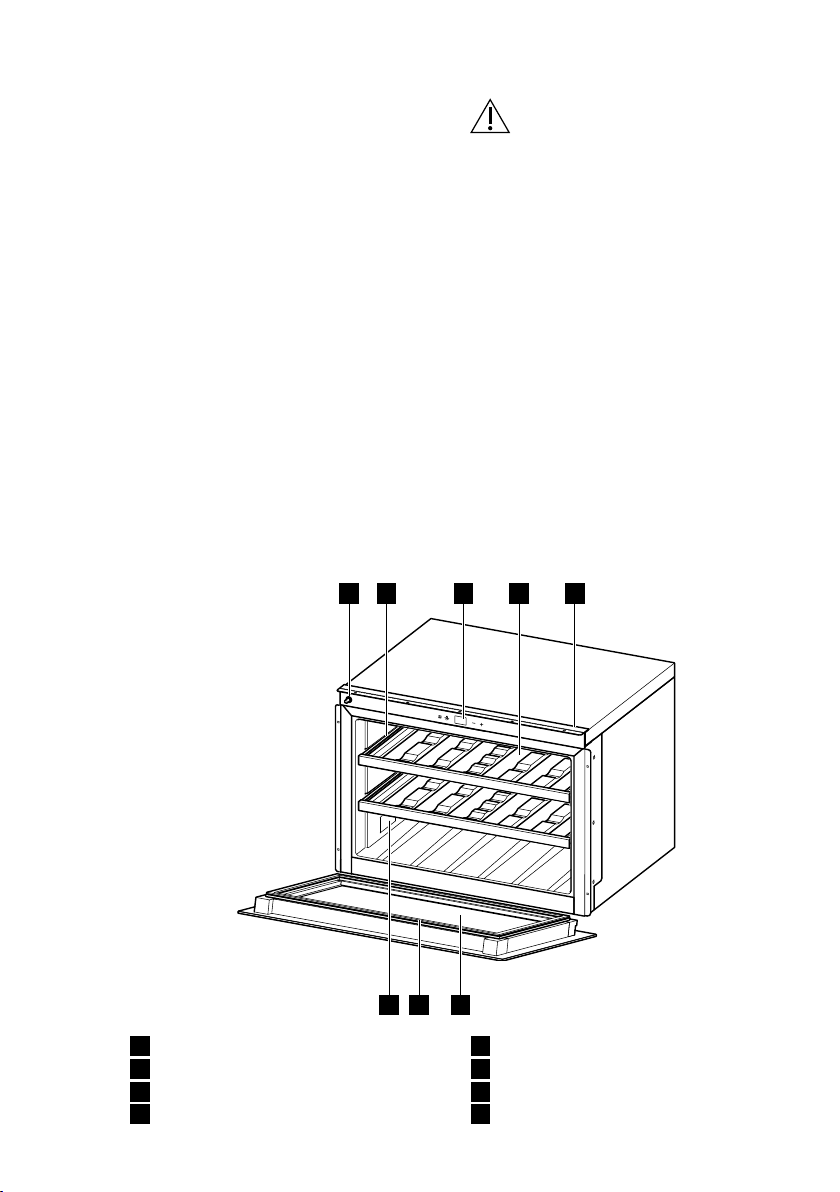
3. PRODUCT DESCRIPTION
1
Door Release Mechanism
2
Telescopic runners
3
Control panel
4
Shelves
5
Fastening bar
6
Door
7
Gasket
8
Rating plate
1 2 3 4 5
678
• Wipe the outer surface of the wine
cellar with a soft cloth dampened with
soapy water, detergent, etc., and then
wipe dry.
• Do not use hard brushes, clean steel-
balls, wire brushes, abrasives, such as
toothpastes, organic solvents (such
as alcohol, acetone, banana oil, etc.),
boiling water, acid or alkaline items
clean wine cellar considering that this
may damage the fridge surface and in-
terior. Boiling water and benzene may
deform or damage plastic parts.
• Do not rinse with water so as not to af-
fect the electrical insulation properties.
2.7 Disposal
WARNING! Risk of injury or suo-
cation.
• Disconnect the appliance from the
mains supply.
• Cut o the mains cable and discard it.
• Remove the lid to prevent children and
pets to be closed inside of the appli-
ance.
• The refrigerant circuit and the insu-
lation materials of this appliance are
ozone-friendly.
• The insulation foam contains am-
mable gas. Contact your municipal
authority for information on how to dis-
card the appliance correctly.
• Do not cause damage to the part of
the cooling unit that is near the heat
exchanger.

8
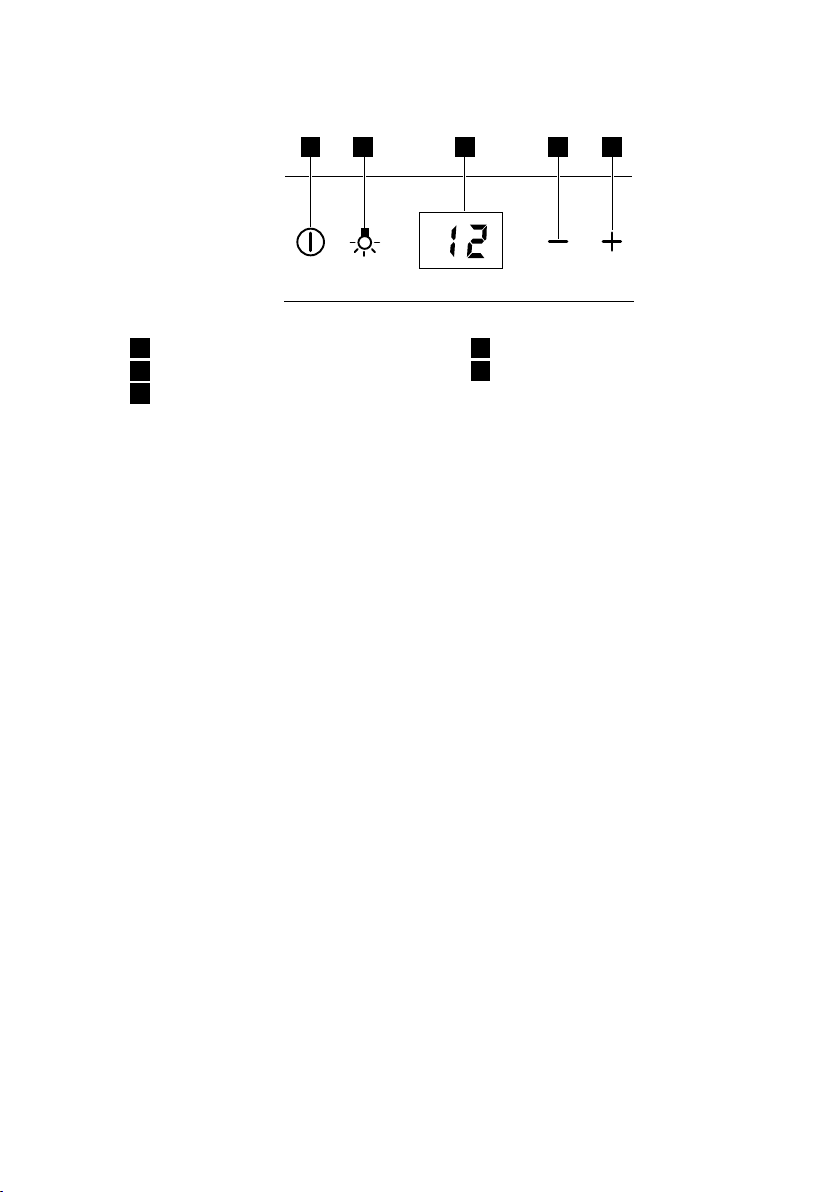
4. CONTROL PANEL
1
ON/OFF key
2
Light key
3
Display
4
Temperature colder key
5
Temperature warmer key
4.1 On/Oswitchand
temperature setting
To switch on the appliance press the ON/
OFF key.
The display shows the set default tem-
perature (12°C).
The temperature can be adjusted from 5°
to 20°C (with steps of 1°C) by touching
the -/+ key.
To switch o the appliance press the ON/
OFF key for 5 seconds.
4.2 Light Key
When the door is opened, the LED light is
on, when closed is o. If you want to keep
the light on with the door closed, open the
door, and press the light key.
If you want to restore the standard condi-
tions, press the light key again.
4.3 Display
The display shows the temperature set,
the error messages, if the demo mode is
selected, if the keys are locked.
4.4 Lock keys mode
Press the + key and the light key for 3
seconds to activate the lock keys mode.
The appliance will continue to work with
the last settings.
To deactivate the lock keys mode, do the
same procedure.
By selecting this function, the message
“bl” appears on display touching any key.
4.5 Demo Mode
DEMO MODE has been created for exhi-
bitions and showroom purposes.
The display will be ON with possibility to
change the temperatures but the Cooling
motor will be OFF.
To activate or deactivate the DEMO
MODE, Press + and – simultaneously for
3 seconds.
Display will show the ON for 5 seconds,
then the temperature will be showed
again.
It Is possible to keep the inner led light
turned ON also when the door is closed.
Press the Light key to activate the light
ON mode.
1 2 3 4 5
www.aeg.com

9ENGLISH
5. USE
5.1 Daily Use
This appliance is intended to be
used exclusively for the storage of
wine
Wine storage compartment is the
one marked
(on rating plate) with
Cleaning
Before using the appliance for the rst
time, wash the interior and all internal
accessories with lukewarm water and
some neutral soap in order to remove
the typical smell of a brand-new product,
then dry thoroughly.
• Opening the door for long periods can
cause a signicant increase of the
temperature in the compartments of
the appliance.
• Clean regularly surfaces that can
come in contact with food and acces-
sible drainage systems.
• Store raw meat and sh in suitable
containers in the wine cellar, so that it
is not in contact with or drip onto other
food.
• If the refrigerating appliance is left
empty for long periods, switch o, de-
frost, clean, dry, and leave the door
open to prevent mould developing
within the appliance.
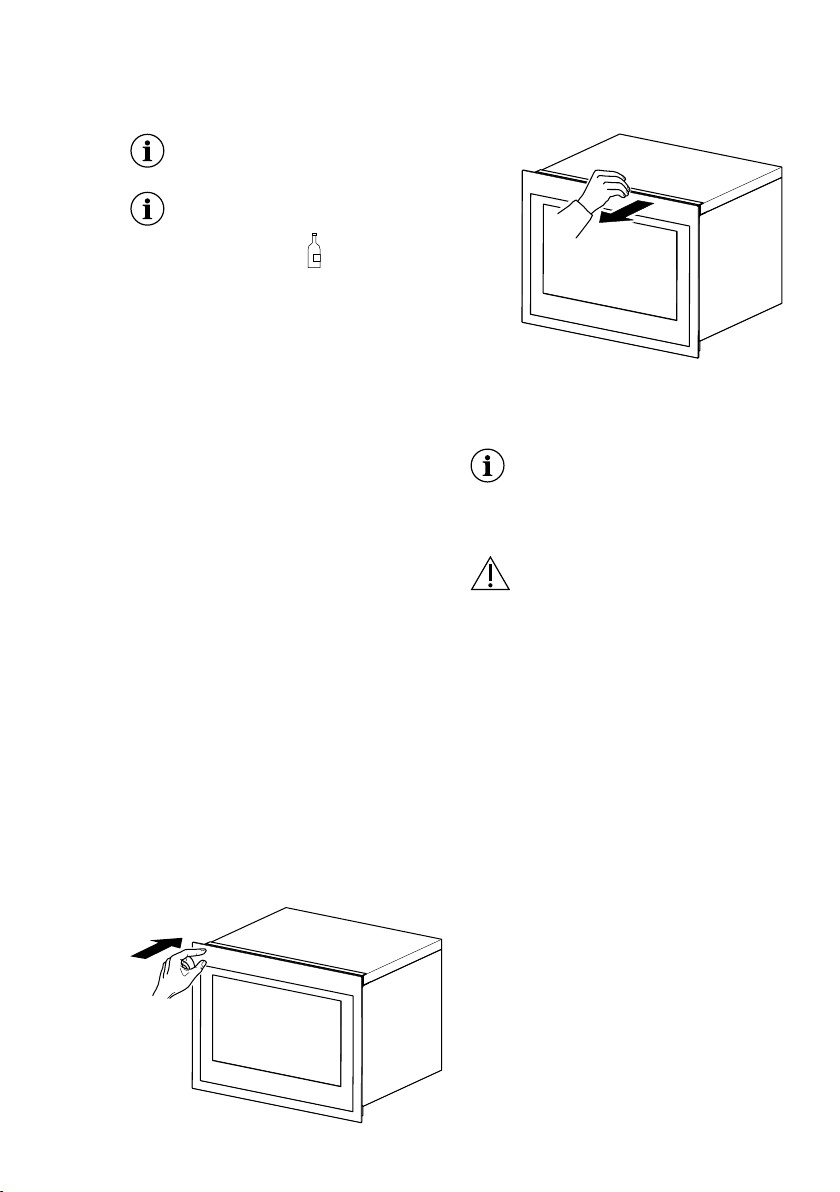
5.2 Door Opening
To open the door:
- push in the left side of the door panel, to
open the door
- or pull it
5.3 First Use
Before using the appliance for
the rst time, wash the interior
and all internal accessories with
lukewarm water and some neutral
soap, then dry thoroughly.
Do not use detergents or abra-
sive powders, as these will dam-
age the nishing.
To turn on the appliance, press ON/OFF
key and adjust temperature according to
the wine stored.
5.4 Temperature Recol-
lection Function
In the event of a power cut, the wine cellar
can remember the previous temperature
setting, and when power is recovered, the
temperature will go back to the original.
10
5.5 Wine Storage
The storage time for wine depends on
ageing, the type of grapes, alcoholic con-
tent and level of fructose and tannin con-
tained in it. At the time of purchase,check
if the wine is already aged or if it will im-
prove over time.
Preservation temperature suggested:
- Champagne/Prosecco and Sparkling
wines +6 to +8°C
- White Wines +10 to +12°C
- Rosé wines +12 to +16°C
- Red Wines +14 to +18°C
(for 750 ml Bordeaux bottles)
Total: 18 bottles
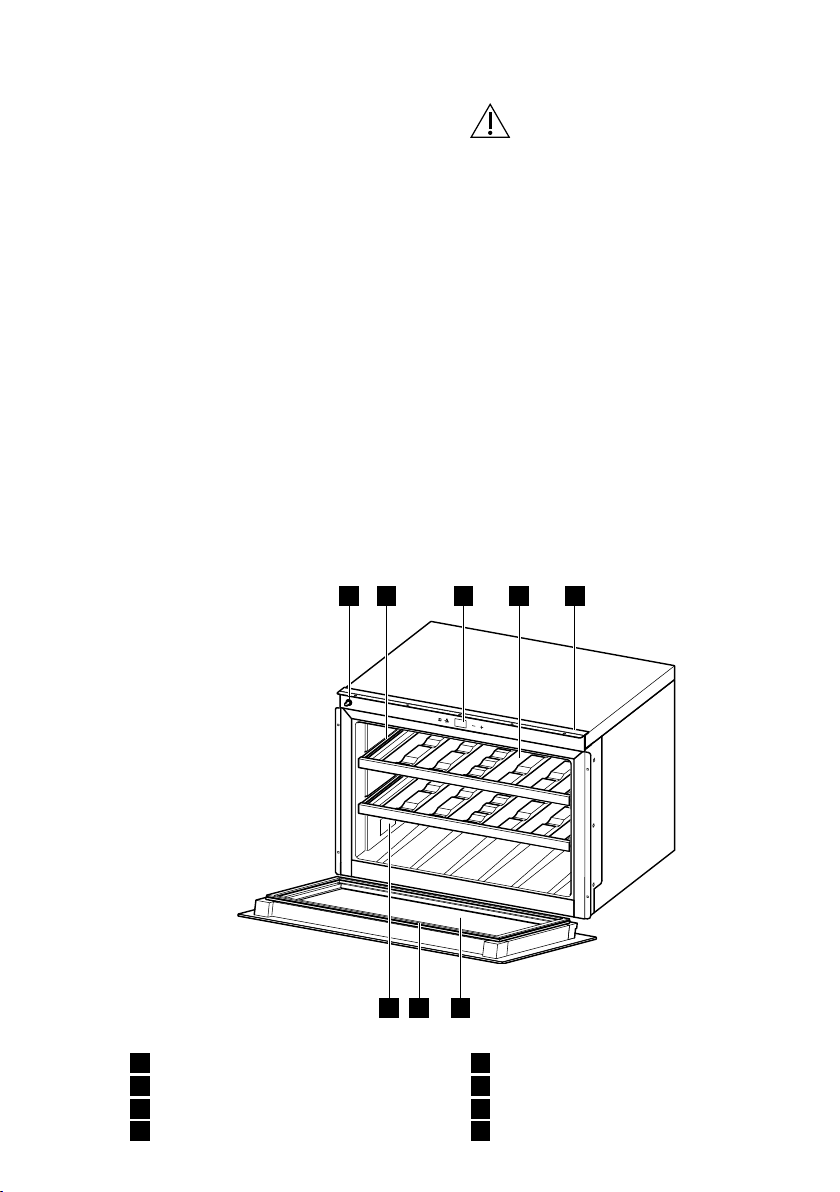
5.6 Wine Shelves
• To remove or t the wooden shelves lift
or push the shelf.
• For easy access to the bottles, pull the
shelves out of the rail compartment.
To prevent damaging the door,
make sure that the door is fully
opened when pulling shelves out.
www.aeg.com
11ENGLISH
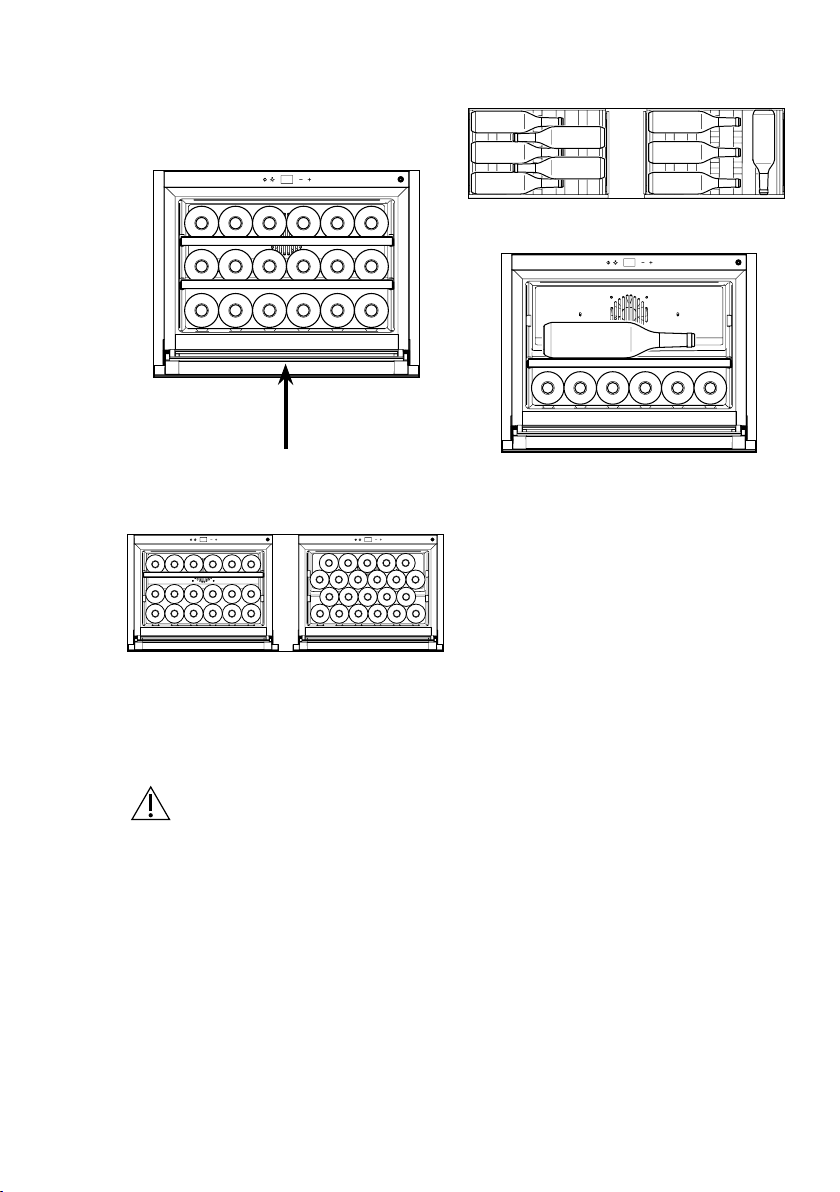
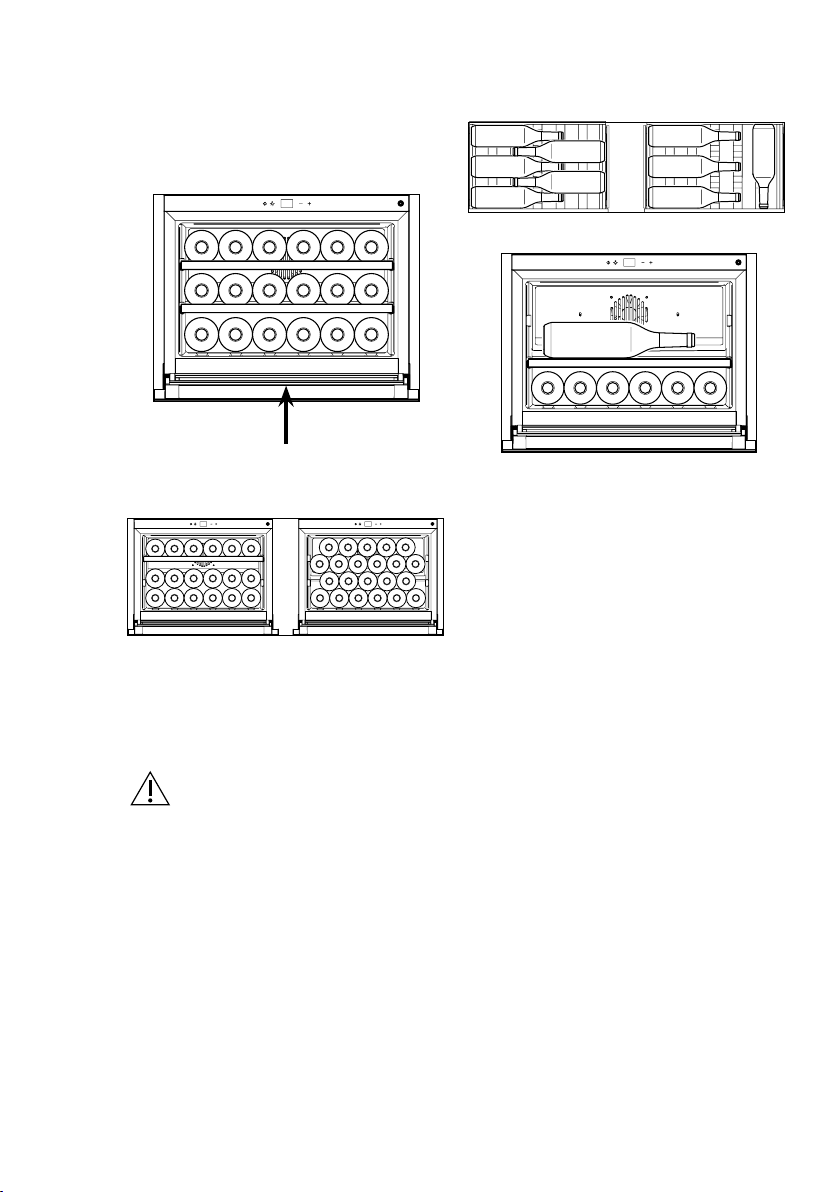
• Standard conguration
To store up to 18 bordeaux bottles placing
6 bottles each level.
• Horizontal conguration
Suitable for large and tall bottles.
To easily store large and tall bottles on the
second shelf, can be removed the upper
shelf as showed in the picture.
The rst level has been designed to acco-
modate larger and taller bottles.
By removing the shelves is possible to
increase the capacity as showed in the
pictures.
WARNING! Please ensure in
this case that the bottles do not
come in contact with the backwall
of the cavity.
6. HINTS AND TIPS
Normal operating sounds
The following sounds are normal during
operation:
• A faint gurgling and bubbling sound
from coils sound when refrigerant is
pumped.
• A whirring and pulsating sound from
the compressor when refrigerant is
pumped.
• A sudden cracking noise from inside
appliance caused by thermic dila-
tation (a natural and not dangerous
physical phenomenon).
• A faint click noise from the tempera-
ture regulator when the compressor
switches on or o.
Hints for energy saving
• Do not open the door frequently or
leave it open longer than absolutely
necessary.

12
7. INSTALLATION
7.1 Positioning
Adequate air ventilation should be around
the appliance, to prevent overheating. To
achieve sucient ventilation follow the in-
stallation instructions.
Install this appliance at a location where
the ambient temperature corresponds to
the climate class indicated on the rating
plate of the appliance:
Climate class Ambient
temperature
SN +10 °C to +32 °C
N +16 °C to +32 °C
ST +16 °C to +38 °C
T +16 °C to +43 °C
D1
W1
Overall
dimensions
H1
455
W1
596
D1 566
Space required
in use
H2
455
W2
596
D2 571
Overall space
required in use
H3
455
W3
596
D3 1026
Overall dimensions
Space required in use
Overall space required in use
H1 / H2 / H3
D2
W2
D3
W3
www.aeg.com
13ENGLISH
8. CARE AND MAINTENANCE
8.2 Periods of non-opera-
tion
When the appliance is not in use for long
periods, take the following precautions:
• disconnect the appliance from electric-
ity supply.
• remove all items.
• clean the appliance and all accesso-
ries.
• leave the door open to prevent un-
pleasant smells.
CAUTION! Unplug the appliance
before carrying out any mainte-
nance operation.
This appliance contains hydro-
carbons in its cooling unit; main-
tenance and recharging must
therefore only be carried out by
authorized technicians.
8.1 Periodic cleaning
The equipment has to be cleaned regu-
larly:
Do not pull, move or damage any
pipes and/or cables inside the
cabinet.
Never use detergents, abrasive
powders, highly perfumed clean-
ing products or wax polishes
to clean the interior as this will
damage the surface and leave a
strong odour.
• Clean the inside surfaces with a warm
water and baking soda solution. The
solution should be about 2 tablespoons
of baking soda to a quart of water.
• Clean the shelves with a mild deter-
gent solution.
• Wring excess water out of the sponge
or cloth when cleaning area of the con-
trols, or any electrical parts.
• Clean the inside and accessories with
lukewarm water and some neutral
soap.
• Regularly check the door seals and
wipe clean to ensure they are clean
and free from debris.
• Rinse and dry thoroughly.
14
9. TROUBLE SHOOTING GUIDE
You can solve many common Wine cellar
problems easily, saving you the cost of a
possible service call. Try the suggestions.
Problem Possible cause Solution
Wine cellar
does not
operate.
• Not plugged in.
• The appliance is turned o.
• The circuit breaker tripped.
• Demo Mode is active.
• Please connect the appliance.
• Please turn ON the appliance.
• Turn on the circuit breaker.
• Deactivate the Demo mode (press +/- for 3sec.).
Wine cellar
is not cool
enough.
• Check the temperature control setting.
• The door is not completely closed.
• The door gasket does not seal properly.
• Verify the set temperature.
• Verify the closure of the door.
• Clean the door gasket with a humid sponge
using neutral detergent and water.
The
compressor
operates
continuously.
• The room temperature is hotter than
normal.
• The door is opened too often.
• The door is not completely closed.
• The door gasket does not seal properly.
• Verify the room temperature.
• Do not keep the door open longer than necessary.
• Verify that the door is completely closed.
• Verify the gasket condition and in case clean it with
a humid sponge using neutral detergent and water.
The light
does not work.
• Not plugged in.
• The circuit breaker tripped.
• The LED has burned out.
• The light button is not operating.
• Please connnect the appliance.
• Turn on the circuit breaker.
• Contact the service.
• Contact the service.
Too much
vibration.
• Check that the wine cellar is levelled. • Level the appliance.
Too much
noise.
• The rattling noise may co me from the ow
of the refrigerant, which is normal.
•
Contraction and expansion of the inside walls
may cause popping and crackling noises.
• The wine cellar is not level.
• Fan is dirty.
• Level the appliance.
• Clean the fan from powder.
• If the noises become louder contact the
service.
The door does
not close
properly.
• The wine cellar is not level.
• The door was xed not properly.
• The gasket is dirty.
• Level the appliance.
• Verify the closure of the door.
• Clean the door gasket with a humid sponge
using neutral detergent and water.
Acoustic alarm
• The door is not closed (the alarm lasts
30 min).
• Close the door.
E3 is displayed
• The door was left open for more than
30 min.
• Door reed switch is broken.
• Close the door.
• Contact the service.
E1 is displayed
and an acoustic
alarm will sound
every 5 minutes.
• The temperature inside the wine cellar
is outside the range of -20°C +60°C
• The temperature sensor is out of order
or disconnected.
• Verify absence of heating from nearest
appliances.
• Contact the service.
E2 is displayed
• Warm coming from nearest appliances.
• Ambient temperature is out of the
product climate class Range.
• Compressor or fan are out of order.
• Verify absence of heating from nearest appliances.
• Verify if the product is installed in a place with
ambient temperature within declared product
climate class.
• Contact the service.
www.aeg.com
15ENGLISH
10. TECHNICAL INFORMATION
11. INFORMATION FOR TEST INSTITUTES
12. ENVIRONMENTAL CONCERNS
Technical data
The technical information is situated in
the rating plate on the internal side of the
appliance and on the energy label.
The QR code on the energy label sup-
plied with the appliance provides a web
link to the information related to the
performance of the appliance in the EU
EPREL database. Keep the energy label
for reference together with the user ma-
nual and all other documents provided
with this appliance.
Installation and preparation of the ap-
pliance for any EcoDesign verication
shall be compliant with EN 62552.
Ventilation requirements, recess dimen-
sions and minimum rear clearances shall
be as stated in this User Manual at Chap-
ter 6. Please contact the manufacturer for
any other further information, including
loading plans.
It is also possible to nd the same infor-
mation in EPREL using the link https://
eprel.ec.europa.eu and the model name
and product number that you nd on the
rating plate of the appliance. See the link
www.theenergylabel.eu for detailed infor-
mation about the energy label.
The technical information are situated in
the rating plate, on the external or internal
side of the appliance and in the energy
label.
The symbol
on the product or on its
packaging indicates that this product may
not be treated as household waste.
Instead it should be taken to the appro-
priate collection point for the recycling of
electrical and electronic equipment.
By ensuring this product is disposed of
correctly, you will help prevent potential
negative consequences for the environ-
ment and human health, which could
otherwise be caused by inappropriate wa-
ste handling of this product.
For more detailed information about
recycling of this product, please contact
your local council, your household waste
disposal service or the shop where you
purchased the product.
Packaging materials
The materials with the symbol
are
recyclable. Dispose of the packaging in
suitable collection containers to recycle it.

16
TABLE DES MATIÈRES
SOIN ET ENTRETIEN DE LA PART DU CLIENT
1. INFORMATIONS DE SÉCURITÉ ..............................................................................17
2. CONSIGNES DE SÉCURITÉ ....................................................................................19
3. DESCRIPTION DU DISPOSITIF ...............................................................................21
4. PANNEAU DE CONTRÔLE .......................................................................................22
5. UTILISATION ..............................................................................................................23
6. HITS AND TIPS ..........................................................................................................25
7. INSTALLATION ..........................................................................................................26
8. SOIN ET ENTRETIEN ................................................................................................27
9. GUIDE POUR LA RÉSOLUTION DES PROBLÈMES ............................................28
10. CARACTÉRISTIQUES TECHNIQUES .....................................................................29
11. INFORMATIONS POUR LES INSTITUTS DE TEST ...............................................29
12. EN MATIÈRE DE PROTECTION DE L’ENVIRONNEMENT ...................................29
www.aeg.com
Nous vous remercions d’avoir choisi un produit AEG. Le produit a été conçu pour garantir
de hautes performances pendant de nombreuses années, grâce à des technologies inno-
vantes qui simplient la vie, caractéristiques que ne garantissent pas tous les dispositifs or-
dinaires. Quelques minutes susent pour lire les instructions et obtenir un fonctionnement
optimal du dispositif.
Visiter le site du fabricant pour :
Obtenir conseils utiles, brochures, guides de résolution des problèmes et informa-
tions sur les services :
www.aeg.com
Enregistrer le produit pour une meilleure assistance :
www.registeraeg.com
Acheter des accessoires, des consommables et des pièces détachées d’origine
pour le dispositif :
www.aeg.com/shop
Il est recommandé d’utiliser des pièces détachées d’origine.
Avant de contacter l’assistance, veiller à disposer des données suivantes.
Sur la plaque, gurent les informations suivantes : modèle, code article et numéro de série.
Avertissement / Attention - Informations de sécurité.
Informations générales et conseils.
Informations écologiques.
Sujet à modications sans préavis.
POUR DES RÉSULTATS PARFAITS

17FRANÇAIS
Avant d’installer et d’utiliser cet appareil, lisez soigneuse-
ment les instructions fournies. Le fabricant ne pourra être
tenu pour responsable en cas de dommages dus à une
installation incorrecte ou une utilisation non conforme.
Conservez toujours cette notice avec votre appareil pour
vous y référer ultérieurement.
1.1 Sécurité des enfants et des personnes vulné-
rables
• Cet appareil n’est pas destiné à être utilisé par des en-
fants ou des personnes dont les capacités physiques,
sensorielles ou mentales, ou le manque d’expérience et
de connaissance les empêchent d’utiliser l’appareil sans
risque lorsqu’ils sont sans surveillance ouen l’absence
d’instruction d’une personne responsable qui puisse leur
assurer une utilisation de l’appareil sans danger.
• Cet appareil peut être utilisé par des enfants entre 3
et 8 ans et des personnes ayant un handicap très im-
portant et complexe à condition d’avoir reçu de bonnes
instructions.
• Les enfants de moins de 3 ans doivent être tenus à l’écart
de l’appareil, à moins d’être surveillés en permanence.
• Les enfants ne doivent pas jouer avec l’appareil.
• Les enfants ne doivent pas nettoyer ni entreprendre une
opération de maintenance sur l’appareil sans surveillance.
• Ne laissez pas les emballages à la portée des enfants
et jetez-les convenablement.
1.2 Sécurité générale
• Cet appareil est conçu pour un usage domestique et
des applications équivalentes, telles que:
- Dans des fermes, des coins cuisines réservés au
personnel dans des magasins, bureaux et autres
- L’utilisation par les clients des hôtels, motels, des en-
vironnements du type chambres d’hôtes et autres en-
1. INFORMATIONS DE SÉCURITÉ

18
vironnements à caractère résidentiel
• AVERTISSEMENT : Veillez à ce que les orices de
ventilation, situés dans l’enceinte de l’appareil ou la
structure intégrée, ne soient pas obstrués.
• AVERTISSEMENT : N’utilisez aucun autre dispositif
mécanique ou autre pour accélérer le processus de dé-
givrage que ceux recommandés par le fabricant.
• AVERTISSEMENT : N’endommagez pas le circuit de
réfrigération.
• AVERTISSEMENT : N’utilisez pas d’appareils élec-
triques à l’intérieur des compartiments de conservation
des aliments de l’appareil, sauf s’ils sont du type re-
commandé par le fabricant.
• Ne pulvérisez pas d’eau ni de vapeur pour nettoyer
l’appareil.
• Nettoyez l’appareil avec un chion doux humide. Utili-
sez uniquement un détergent neutre. N’utilisez pas de
produits abrasifs, de tampons à récurer, de solvants ni
d’objets métalliques.
• Ne pas stocker dans cet appareil des substances ex-
plosives telles que des aérosols contenant des gaz pro-
pulseurs inammables.
• Si le câble d’alimentation est endommagé, il doit être
remplacé par le fabricant, son atelier d’entretien ou un
technicien qualié an d’éviter tout danger.
• Ce dispositif n’est prévu ni pour un usage professionnel
ni pour un usage commercial
www.aeg.com
19FRANÇAIS
2. CONSIGNES DE SÉCURITÉ
2.1 Maintenance
• Pour réparer l’appareil, contactez un ser-
vice après-vente agréé. Utilisez exclusive-
ment des pièces d’origine.
• Veuillez noter qu’une autoréparation
ou une réparation non professionnelle
peuvent avoir des conséquences sur la
sécurité et annuler la garantie.
• Les pièces d’origine suivantes seront dis-
ponibles pendant 7 ans après l’arrêt du
modèle : thermostats, capteurs de tempé-
rature, cartes circuits imprimées, sources
lumineuses, poignées de portes, char-
nières de portes, plaques et balconnets.
Veuillez noter que certaines de ces pièces
de rechange ne sont disponibles qu’au-
près de réparateurs professionnels et que
toutes les pièces de rechange ne sont pas
adaptées à tous les modèles.
• Les joints de portes seront disponibles
pendant 10 ans après l’arrêt du modèle.
2.2 Instructions d’installation
ATTENTION! L’appareil doit être
installé uniquement par un profes-
sionnel qualié.
• Retirez l’intégralité de l’emballage.
• N’installez pas et ne branchez pas un
appareil endommagé.
• Suivez scrupuleusement les instructions
d’installation fournies avec l’appareil.
• L’appareil est lourd, soyez toujours
prudent lorsque vous le déplacez. Por-
tez toujours des gants de sécurité.
• Assurez-vous que l’air circule autour
de l’appareil.
• Attendez au moins 4 heures avant de
raccorder l’appareil à l’alimentation
électrique. Ceci permet à l’huile de re-
venir dans le compresseur.
• N’installez pas l’appareil à proximité
des radiateurs, des cuisinières, des
fours ou des plaques de cuisson.
• L’arrière de l’appareil doit s’appuyer
contre le mur.
• N’installez pas l’appareil dans un endroit
exposé à la lumière directe du soleil.
• N’installez pas cet appareil dans des
zones trop humides ou trop froides,
telles que les cabines de chantier, les
garages ou les celliers à vin.
• Lorsque vous déplacez l’appareil, veil-
lez à le soulever par l’avant pour éviter
de rayer le sol.
2.3 Connexion électrique
ATTENTION! Risque d’incendie
ou d’électrocution.
ATTENTION! Lorsque vous instal-
lez l’appareil, assurez-vous que le
câble d’alimentation n’est pas coin-
cé ou endommagé.
ATTENTION! L’appareil ne doit
pas être raccordé à l’aide d’une ral-
longe ou d’une prise multiple.
• L’appareil doit être relié à la terre.
• L’ensemble des branchements élec-
triques doit être eectué par un tech-
nicien qualié.
• Vériez que les données électriques -
gurant sur la plaque signalétique corres-
pondent à celles de votre réseau. Si ce
n’est pas le cas, contactez un électricien.
• Branchez toujours la prise principale
dans une prise correctement installée,
protégée contre les chocs.
• N’utilisez pas d’adaptateurs multi-
prises ni de rallonges.
• Veillez à ne pas endommager les com-
posants électriques tels que la che
secteur, le câble d’alimentation ou le
compresseur. Contactez le service
après-vente ou un électricien pour
changer les composants électriques.
• Le câble d’alimentation doit rester en
dessous du niveau de la che secteur.
• Ne branchez la che d’alimentation à la
prise de courant qu’à la n de l’installation.
Assurez-vous que la prise de courant est
accessible une fois l’appareil installé.
• Pour débrancher l’appareil, ne tirez
jamais sur le câble d’alimentation élec-
trique. Tirez toujours sur la che pour
la débrancher de la prise secteur.
• Lorsque vous installez l’appareil, as-
surez-vous que le câble d’alimentation
n’est pas coincé ou endommagé.
• Ne placez pas des multiprises por-
tables or ou des prises d’alimentation
portables à l’arrière de l’appareil.
20
2.4 Utilisation
ATTENTION! Risque de bles-
sures, de brûlures, d’électrocution
ou d’incendie.
L’appareil contient du gaz inam-
mable, l’isobutane (R600a), un gaz
naturel très respectueux de l’envi-
ronnement. Veillez à ne pas en-
dommager le circuit de réfrigération
contenant de l’isobutane.
• Ne modiez pas les caractéristiques
de cet appareil.
• Ne placez aucun appareil électrique
(sorbetière, etc.) dans l’appareil, en
l’absence d’indications du fabricant.
• Si le circuit frigorique est endom-
magé, assurez-vous de l’absence de
ammes et de sources d’ignition dans
la pièce. Aérez la pièce.
• Évitez tout contact d’éléments chauds
avec les parties en plastique de l’appareil.
• Ne placez jamais de boissons ga-
zeuses dans le congélateur. Cela
engendrerait une pression sur le réci-
pient de la boisson.
• Ne stockez jamais de gaz ou de liquide
inammable dans l’appareil.
• Ne placez pas de produits inam-
mables ou d’éléments imbibés de pro-
duits inammables à l’intérieur ou à
proximité de l’appareil, ni sur celui-ci.
• Ne touchez pas le compresseur ni le
condenseur. Ils sont chauds.
2.5 Éclairage interne
AVERTISSEMENT!
Risque d’électrocution !
• Concernant la/les lampe(s) à l’inté-
rieur de ce produit et les lampes de
rechange vendues séparément : Ces
lampes sont conçues pour résister à
des conditions physiques extrêmes
dans les appareils électroménagers,
telles que la température, les vibra-
tions, l’humidité, ou sont conçues
pour signaler des informations sur le
statut opérationnel de l’appareil. Elles
ne sont pas prévues pour être utili-
sées dans d’autres applications et ne
conviennent pas pour l’éclairage des
pièces d’une maison.
2.6 Entretien et nettoyage
ATTENTION! Risque de blessure
corporelle ou de dommages maté-
riels.
• Avant toute opération d’entretien, étei-
gnez l’appareil et débranchez la prise
secteur.
• Cet appareil contient des hydrocar-
bures dans son circuit de réfrigération.
L’entretien et la recharge du circuit de
réfrigération doivent être eectués par
un professionnel qualié.
• Examinez régulièrement l’écoulement
de l’appareil et si nécessaire, net-
toyez-le. Si l’orice est bouché, l’eau
provenant du dégivrage s’écoulera en
bas de l’appareil.
• La poussière présente derrière le réfri-
gérateur et sur le sol doit être régulière-
ment nettoyée pour améliorer l’eet de la
réfrigération et les économies d’énergie.
• L’intérieur de la cave à vin doit être net-
toyé régulièrement pour éviter les odeurs.
• Vériez régulièrement le joint d’étan-
chéité de la porte pour contrôler l’ab-
sence de débris.
• Avant de procéder au nettoyage, veuil-
lez débrancher l’alimentation, retirer tous
les aliments, les étagères, les bacs, etc.
• Nettoyez le joint d’étanchéité de la
porte avec un savon doux et de l’eau.
• Utilisez un tissu doux ou une éponge
pour nettoyer l’intérieur de la cave à vin
avec deux cuillères à soupe de bicarbo-
nate de soude et un litre d’eau chaude.
Rincez ensuite à l’eau et essuyez. Ou-
vrez la porte et laissez sécher à l’air
libre avant de rebrancher l’alimentation.
• Pour les zones de la cave à vin qui
sont diciles à nettoyer (comme les
espaces, les sandwiches étroits ou
les coins), il est recommandé de les
essuyer régulièrement avec un chion
doux, une brosse souple, etc. et, si né-
cessaire, d’y associer certains outils
auxiliaires (comme des tiges nes) pour
s’assurer de l’absence d’accumulation
de contaminants dans ces zones.
• N’utilisez pas de savon, de détergent,
de poudre à récurer, d’agent nettoyant
en spray, etc., car ils peuvent provo-
quer l’apparition d’odeurs à l’intérieur
de la cave à vin.
www.aeg.com
21FRANÇAIS
3. DESCRIPTION DU DISPOSITIF
1
Mécanisme relâchement porte
2
Guides télescopiques
3
Panneau de contrôle
4
Étagères
5
Barre de xation
6
Porte
7
Garniture
8
Plaque
1 2 3 4 5
678
• Nettoyez le porte-bouteilles, les éta-
gères et les bacs avec un détergent
doux et séchez-les avec un tissu doux.
• Essuyez la surface extérieure de la
cave à vin avec un tissu doux imbibé
d’eau savonneuse, de détergent, etc.,
puis séchez-la.
• N’utilisez pas des brosses dures, des
billes d’acier, des brosses métalliques,
des abrasifs comme les dentifrices, des
solvants organiques (comme l’alcool,
l’acétone, l’huile de banane, etc.), de
l’eau bouillante, des solutions acides
ou alcalines pour nettoyer la cave à vin
car ils sont susceptibles d’endommager
la surface et l’intérieur du réfrigérateur.
L’eau bouillante et le benzène sont sus-
ceptibles de déformer ou d’endomma-
ger les pièces en plastique.
• Ne rincez pas avec de l’eau an de ne
pas aecter les propriétés en matière
d’isolation électrique.
2.7 Mise au rebut
ATTENTION! Risque de blessure
ou d’asphyxie.
• Débranchez l’appareil de l’alimenta-
tion électrique.
• Coupez le câble d’alimentation et met-
tez-le au rebut.
• Retirez la porte pour empêcher les en-
fants et les animaux de se retrouver
enfermés dans l’appareil.
• Le circuit frigorique et les matériaux
d’isolation de cet appareil préservent
la couche d’ozone.
• La mousse isolante contient un gaz
inammable. Contactez votre ser-
vice municipal pour obtenir des infor-
mations sur la marche à suivre pour
mettre l’appareil au rebut.
• N’endommagez pas la partie du circuit
de réfrigération située à proximité du
condenseur thermique.
22
4. PANNEAU DE CONTRÔLE
1
Touche ON/OFF
2
Touche éclairage
3
Écran
4
Touche température plus froide
5
Touche température plus chaude
4.1 Interrupteur on/
o et réglage de la
température
Pour allumer le dispositif, appuyer sur la
touche ON/OFF.
L’écran ache la température prédénie
(12°C).
En appuyant sur la touche -/+, il est pos-
sible de régler la température de 5 à 20°C
(par unité de 1°C).
Pour éteindre le dispositif, appuyer sur la
touche ON/OFF pendant 5 secondes.
4.2 Touche éclairage
Quand la porte est ouverte, la lumière à
LED est allumée, quand la porte est fer-
mée, elle est éteinte. Pour maintenir la
lumière allumée alors que la porte est
fermée, ouvrir celle-ci et appuyer sur la
touche éclairage.
Pour rétablir les conditions standard, ap-
puyer à nouveau sur la touche éclairage.
4.3 Écran
L’écran ache la température program-
mée et les messages d’erreur, si la mo-
dalité Démo est sélectionnée et si les
touches sont bloquées.
4.4 Modalité Blocage
touches
Pour activer la modalité Blocage touches,
appuyer sur la touche + et sur la touche
éclairage pendant 3 secondes.
Le dispositif continue de fonctionner
conformément aux derniers réglages.
Pour désactiver la modalité Blocage
touches, eectuer la même opération.
En sélectionnant cette fonction, si une
quelconque touche est enfoncée, l’écran
ache le message « bl ».
4.5 Modalité Démo
La MODALITÉ DÉMO a été prévue pour
le fonctionnement à l’occasion de salons
et dans les showrooms.
L’écran est ALLUMÉ, il est possible de
modier les température mais le moteur
de refroidissement est ÉTEINT.
Pour activer ou désactiver la MODALITÉ
DÉMO, appuyer simultanément sur les
touches + et - pendant 3 secondes.
Il est possible de maintenir la lumière à
LED interne allumée y compris quand la
porte est fermée.
Pour activer la modalité lumière ALLU-
MÉE, appuyer sur la touche éclairage.
1 2 3 4 5
www.aeg.com
23FRANÇAIS
5. UTILISATION
5.1 Utilisation quotidienne
Cet appareil est spéciquement
conçu pour le stockage du vin.
Le conservation du vin est celui
marqué (sur la plaque sig-
nalétique) avec
Nettoyage
Avant d’utiliser l’appareil pour la première
fois, nettoyez l’intérieur et tous les acces-
soires avec de l’eau tiède savonneuse
(pour supprimer toute odeur de neuf),
puis séchez-les soigneusement.
• L’ouverture prolongée de la porte peut
entraîner une élévation de température
importante dans les compartiments de
l’appareil.
• Lavez régulièrement les surfaces pou-
vant entrer en contact avec les ali-
ments, ainsi que les systèmes d’éva-
cuation accessibles.
• Conservez les viandes et poissons
crus dans le réfrigérateur dans des
récipients appropriés, de manière à
ce qu’ils ne soient pas en contact avec
d’autres aliments et ne s’égouttent sur
ces derniers.
• Si vous laissez un appareil de réfri-
gération vide pendant de longues pé-
riodes, éteignez-le, dégivrez-le, net-
toyez-le, séchez-le et laissez la porte
ouverte pour empêcher la moisissure
de se développer à l’intérieur.
5.2 Ouverture de la porte
Pour ouvrir la porte :
- pousser le côté gauche de la porte
- ou le tirer
5.3 Première utilisation
Avant la première utilisation du
dispositif, laver l’intérieur et tous
les accessoires internes à l’aide
d’eau tiède et d’un peu de savon
neutre, puis bien essuyer.
Ne pas utiliser de détergents ni
de poudres abrasives pour ne
pas endommager les nitions.
Pour allumer le dispositif, appuyer sur la
touche ON/OFF et régler la température
en fonction du vin à conserver.
5.4 Fonction mémoire tem-
pérature
En cas de coupure de courant, la cave à
vin est en mesure de conserver en mé-
moire le réglage précédemment eectué
de la température et après retour de l’ali-
mentation électrique, cette température
est rétablie.

24
5.4 Conservation du vin
Le temps de conservation du vin dépend
du vieillissement, du type de cépage, du
degré d’alcool et de la teneur en fructose
et tannins. Au moment de l’achat, établir
si le vin a déjà vieilli ou s’il peut encore se
bonier avec le temps.
Température de conservation recomman-
dée :
- Champagne/Crémant et vins pétil-
lants : de +6 à +8°C
- Vins blancs : de +10 à +12°C
- Vins rosés : de +12 à +16°C
- Vins rouges : de +14 à +18°C
(pour bouteilles de Bordeaux de 750 ml)
Total : 18 bouteilles
5.5 Étagères pour le vin
• pour accéder facilement aux bouteilles,
extraire les étagères du compartiment.
Pour éviter d’endommager la
porte, s’assurer qu’elle est entiè-
rement ouverte avant d’extraire
les étagères.
• Pour retirer ou monter les étagères en
bois, les soulever ou les pousser.
www.aeg.com
25FRANÇAIS
• Conguration standard
Pour conserver jusqu’à 18 bouteilles de
Bordeaux, placer 6 bouteilles sur chaque
niveau.
• Conguration horizontale
Pour conserver facilement des bouteilles
grandes et hautes sur la deuxième éta-
gère, il est possible de retirer l’étagère
supérieure comme indiqué sur la gure.
Le premier niveau est prévu pour y placer
les bouteilles les plus grandes et les plus
hautes.
Pour bouteilles grandes et hautes
En retirant les étagères, il est possible
d’augmenter la capacité comme indiqué
sur les gures.
AVERTISSEMENT! Dans ce
cas, s’assurer que les bouteilles
ne sont pas au contact de la paroi
postérieure du compartiment.
6. HITS AND TIPS
Bruits normaux de fonctionnement
Les bruits suivants sont normaux lorsque
l’appareil est en cours de fonctionnement:
• Un léger gargouillis lorsque le liquide
réfrigérant est pompé.
• Un ronronnement et un bruit de pulsa-
tion provenant du compresseur lorsque
le liquide réfrigérant est pompé.
• Un bruit de craquement soudain pro-
venant de l’intérieur de l’appareil pro-
voqué par une dilatation thermique (un
phénomène naturel et inoensif).
• Un léger cliquetis du thermostat
lorsque le compresseur s’active ou se
désactive.
Conseils d’économie d’énergie
• Évitez d’ouvrir trop souvent la porte du
congélateur et ne la laissez ouverte
que le temps nécessaire.

26
7. INSTALLATION
7.1 Positionnement
Autour du dispositif, une bonne ventila-
tion d’air doit être garantie pour éviter la
surchaue. Pour obtenir une ventilation
susante, suivre les instructions d’instal-
lation.
Installer le dispositif dans une position où
la température ambiante correspond à la
classe climatique indiquée sur la plaque
du dispositif :
Classe
climatique
Température
ambiante
SN de +10°C à +32°C
N de +16 °C à +32°C
ST de +16 °C à +38 °C
T de +16 °C à +43 °C
Dimensions hors tout
D1
W1
Dimensions
hors tout
H1
455
W1
596
D1 566
Espace requis
lors de l’utili-
sation
H2
455
W2
596
D2 571
Espace global
requis lors de
l’utilisation
H3
455
W3
596
D3 1026
Espace requis lors de l’utilisation
Espace global requis lors de
l’utilisation
H1 / H2 / H3
D2
W2
D3
W3
www.aeg.com

27FRANÇAIS
8. SOIN ET ENTRETIEN
8.2 Période d'arrêt
En cas d'arrêt prolongé du dispositif, veil-
ler à respecter les précautions suivantes :
• Débrancher le dispositif de l’alimenta-
tion.
• Retirer tous les éléments.
• Nettoyer le dispositif et tous les acces-
soires.
• Laisser la porte ouverte pour prévenir
la formation de mauvaises odeurs.
ATTENTION! Avant d’eectuer
toute intervention d’entretien, dé-
brancher le dispositif.
Le dispositif contient des hydro-
carbures, dans l’unité de refroi-
dissement ; aussi, l’entretien et
la recharge doit être conés à un
technicien agréé.
8.1 Nettoyage périodique
Le dispositif doit être régulièrement net-
toyé.
Ne pas tirer ni déplacer les
tuyaux ni les câbles à l’intérieur
de l’unité et veiller à ne pas les
endommager.
Pour nettoyer l’intérieur, ne ja-
mais utiliser de détergents, de
poudres abrasives, de produits
de nettoyage particulièrement
parfumés, ni de cires : de tels
produits peuvent endommager
les surfaces et laisser une forte
odeur.
• Laver les surfaces internes avec une
solution d’eau tiède et de bicarbonate
de soude. La solution doit être consti-
tuée d’environ 2 cuillères de bicarbo-
nate de soude pour un litre d’eau.
• Laver les étagères avec une solution
détergente délicate.
• Essorer l’éponge ou le chion pour
nettoyer la zone des commandes ou
toute partie électrique.
• Nettoyer l’intérieur et les accessoires
à l’eau tiède et avec un peu de savon
neutre.
• Contrôler et nettoyer régulièrement les
joints de la porte pour s’assurer de leur
propreté et en éliminer les éventuels
résidus.
• Rincer et bien essuyer.

28
9. GUIDE POUR LA RÉSOLUTION DES PROBLÈMES
Il est possible de résoudre facilement par
soi-même de nombreux problèmes qui
peuvent se présenter sur la cave à vin et
éviter ainsi le coût d’un appel d’assistance
technique. Suivre les conseils suivants.
Problème Cause possible Solution
La cave à vin ne
fonctionne pas.
• Câble d’alimentation non branché.
• Le dispositif est éteint.
• L’interrupteur est sur OFF.
• La modalité démo est active.
• Brancher le dispositif.
• Allumer le dispositif.
• Placer l’interrupteur sur ON.
• Désactiver la modalité démo (appuyer sur +/-
pendant 3 secondes).
La cave à vin n’est
pas susamment
froide.
• Contrôler le réglage de contrôle tempé-
rature.
• La porte est mal fermée.
• Le joint de la porte ne garantit pas la
bonne isolation.
• Contrôler la température programmée.
• S’assurer que la porte est fermée.
• Nettoyer le joint de la porte avec une éponge
humidiée de détergent neutre et d’eau.
Le compresseur
fonctionne sans
arrêt.
• La température ambiante est supérieure
à la normale.
• La porte est trop souvent ouverte.
• La porte est mal fermée.
• Le joint de la porte ne garantit pas la
bonne isolation.
• Contrôler la température ambiante.
• Ne pas laisser la porte ouverte plus que
nécessaire.
• S’assurer que la porte est parfaitement fermée.
• Contrôler l’état du joint et, au besoin, le nettoyer
avec une éponge humidiée de détergent neutre
et d’eau.
La lumière ne
fonctionne pas.
• Câble d’alimentation non branché.
• L’interrupteur est sur OFF.
• La LED est grillée.
•
Le bouton de la lumière ne fonctionne pas.
• Brancher le dispositif.
• Placer l’interrupteur sur ON.
• Contacter l’assistance.
• Contacter l’assistance.
Vibrations
excessives.
• S’assurer que la cave à vin est parfaite-
ment à l’horizontale.
• Mettre la cave à vin parfaitement à l’horizontale.
Bruit excessif.
• Le bruit mécanique peut être dû au ux de
réfrigérant ; ce bruit est normal.
• La contraction et l’expansion des parois
internes peuvent produire des bruits secs et
des craquements.
• La cave à vin n’est pas parfaitement à
l’horizontale.
• Le ventilateur est sale.
• Mettre la cave à vin parfaitement à l’horizontale.
• Éliminer la poussière du ventilateur.
• Si le bruit augmente, contacter l’assistance.
La porte est mal
fermée.
• La cave à vin n’est pas parfaitement à
l’horizontale.
• La porte a été mal xée.
• Le joint est sale.
• Mettre la cave à vin parfaitement à l’horizontale.
• S’assurer que la porte est fermée.
• Nettoyer le joint de la porte avec une éponge
humidiée de détergent neutre et d’eau.
Alarme sonore.
• La porte est mal fermée (l’alarme dure
30 min.).
• Fermer la porte,
E3 s’ache.
• La porte a été laissée ouverte pendant
plus de 30 min.
•
Rupture de l’interrupteur reed de la porte.
• Fermer la porte,
• Contacter l’assistance.
E1 s’ache et
un signal sonore
d’alarme est émis
toutes les 5 minutes.
• La température interne de la cave à vin
n’est pas comprise entre -20°C et +60°C.
• Le capteur de température est hors
d’usage ou débranché.
• S’assurer qu’aucun dispositif situé à proximité
n’émet de la chaleur.
• Contacter l’assistance.
E2 s’ache.
• Les dispositifs situés à proximité émettent
de la chaleur.
• La température ambiante n’est pas com-
prise dans l’intervalle de la classe climatique
du dispositif.
• Le compresseur ou le ventilateur est hors
d’usage.
• S’assurer qu’aucun dispositif situé à proximité
n’émet de la chaleur.
• S’assurer que la cave à vin est installée à un
endroit où la température ambiante est comprise
dans l’intervalle de la classe climatique du
dispositif.
• Contacter l’assistance.
www.aeg.com
29FRANÇAIS
10. CARACTÉRISTIQUES TECHNIQUES
11. INFORMATIONS POUR LES INSTITUTS DE TEST
12. EN MATIÈRE DE PROTECTION DE L’ENVIRON-
NEMENT
Le symbole . qui gure sur le produit
ou son emballage indique que ce produit
ne peut être traité comme déchet ména-
ger. Il doit être remis à un point de collecte
et de recyclage du matériel électrique et
électronique.
En éliminant l’appareil comme il se doit,
l’utilisateur contribue à atténuer les
conséquences négatives qu’une mau-
vaise gestion des déchets de ce produit
peut avoir sur l’environnement et la santé.
CARACTÉRISTIQUES TECHNIQUES
Les informations techniques gurent sur
la plaque signalétique sur le côté intérieur
de l’appareil et sur l’étiquette énergétique.
Le code QR présent sur l’étiquette éner-
gétique fournie avec l’appareil contient
un lien Web vers les informations re-
latives aux performances de l’appareil
dans la base de données EPREL de l’UE.
Conservez l’étiquette énergétique à titre
de référence avec le manuel d’utilisation
et tous les autres documents fournis avec
cet appareil.
L’installation et la préparation de l’appareil
pour une vérication EcoDesign doivent
être conformes à la norme EN 62552.
Les exigences de ventilation, les dimen-
sions des évidements et les dégagements
arrière minimum doivent correspondre
aux indications du chapitre 6 de cette no-
tice d’utilisation. Veuillez contacter le fa-
bricant pour de plus amples informations,
notamment les plans de chargement.
Il est également possible de trouver les
mêmes informations dans EPREL à l’aide
du lien https://eprel.ec.europa.eu avec le
nom du modèle et le numéro de produit
se trouvant sur la plaque signalétique de
l’appareil. Consultez le lien www.theener-
gylabel. eu pour obtenir des informations
détaillées sur l’étiquette énergétique.
Les caractéristiques techniques gurent
sur la plaque signalétique située sur le
côté intérieur ou extérieur de l’appareil et
sur l’étiquette énergétique.
Pour obtenir plus de détails sur le re-
cyclage de ce produit, veuillez prendre
contact avec les services de votre com-
mune ou le magasin où vous avez eec-
tué votre achat.
Matériaux d’emballage
Tous les matériaux marqués du symbole
sont recyclables. Jetez les emballages
dans les conteneurs prévus à cet eet
pour qu’ils puissent être recyclés.

30
INHALT
KUNDENBETREUUNG UND -DIENST
1. SICHERHEITSINFORMATIONEN ............................................................................31
2. SICHERHEITSHINWEISE .........................................................................................33
3. PRODUKTBESCHREIBUNG ....................................................................................35
4. BEDIENFELD .............................................................................................................36
5. GEBRAUCH ................................................................................................................37
6. HINWEISE UND TIPPS ..............................................................................................39
7. INSTALLATION ..........................................................................................................40
8. PFLEGE UND WARTUNG .........................................................................................41
9. ANLEITUNG ZUR FEHLERSUCHE .........................................................................42
10. TECHNISCHE INFORMATIONEN ............................................................................43
11. INFORMATIONEN FÜR PRÜFINSTITUTE ..............................................................43
12. UMWELTANLIEGEN ..................................................................................................43
www.aeg.com
Vielen Dank, dass Sie dieses AEG-Produkt gewählt haben. Wir haben es hergestellt, um
Ihnen viele Jahre eine optimale Leistung zu liefern, mit innovativen Technologien, die das
Leben einfacher machen und Funktionen, die Sie bei gewöhnlichen Geräten vielleicht nicht
nden. Nehmen Sie sich zum Lesen ein paar Minuten Zeit, um das Produkt optimal zu
nutzen.
Besuchen Sie unsere Webseite, um:
Anwendungsberatung, Broschüren, Troubleshooter, Serviceinformationen zu er-
halten:
www.aeg.com
Ihr Produkt für besseren Service zu registrieren:
www.registeraeg.com
Zubehör, Verbrauchsmaterialien und Originalersatzteile für Ihr Gerät zu kaufen:
www.aeg.com/shop
Wir empfehlen, Originalersatzteile zu verwenden.
Wenn Sie den Service kontaktieren, sorgen Sie dafür, dass Sie folgende Informationen
bereithalten.
Die Informationen nden Sie auf dem Typenschild. Modell, PNC, Seriennummer.
Warn- / Vorsichts-Sicherheitshinweise.
Allgemeine Informationen und Tipps.
Umgebungsinformationen.
Technische Änderungen vorbehalten.
FÜR PERFEKTE ERGEBNISSE

31DEUTSCH
Lesen Sie vor der Installation und Verwendung des Ge-
räts die mitgelieferte Anleitung sorgfältig durch. Der Her-
steller ist nicht verantwortlich, wenn eine falsche Instal-
lation und Verwendung zu Verletzungen und Schäden
führt. Bewahren Sie die Anleitung immer zusammen mit
dem Gerät auf, um bei Bedarf nachschlagen zu können.
1.1 Sicherheit für Kinder und gefährdete Personen
• Dieses Gerät kann von Kindern ab 8 Jahren und dar-
über sowie von Personen mit verringerten physischen,
sensorischen oder mentalen Fähigkeiten oder Mangel
an Erfahrung und Wissen benutzt werden, wenn sie be-
aufsichtigt oder bezüglich des sicheren Gebrauchs des
Geräts unterwiesen wurden und die daraus resultieren-
den Gefahren verstehen.
• Dieses Gerät kann von Kindern zwischen 3 und 8 Jah-
ren sowie von Personen mit sehr weitreichenden und
komplexen Behinderungen verwendet werden, wenn
sie ordnungsgemäß eingewiesen wurden.
• Kinder unter 3 Jahren sollten vom Gerät ferngehalten
werden, wenn sie nicht ständig beaufsichtigt werden.
• Lassen Sie Kinder nicht mit dem Gerät spielen.
• Kinder dürfen die Reinigung und Benutzerwartung des
Geräts nicht ohne Aufsicht durchführen.
• Halten Sie alle Verpackungen von Kindern fern und
entsorgen Sie sie ordnungsgemäß zu entsorgen.
1.2 Allgemeine Sicherheit
• Dieses Gerät ist für die Verwendung in Haushalten und
ähnlichen Anwendungen vorgesehen, wie z. B.:
- In Bauernhäusern; in Personalküchen in Geschäften,
Büros und anderen Arbeitsumgebungen
- von Kunden in Hotels, Motels, Pensionen und ande-
ren Wohnbereichen
1. SICHERHEITSINFORMATIONEN

32
• Verwenden Sie dieses Gerät nur zur Lagerung von
Wein.
• ACHTUNG: Halten Sie Lüftungsönungen im Geräte-
gehäuse oder in der Einbaustruktur frei von Hindernis-
sen.
• ACHTUNG: Verwenden Sie keine mechanischen Vor-
richtungen oder andere Mittel, um den Abtauprozess
zu beschleunigen, die nicht vom Hersteller empfohlen
werden.
• ACHTUNG: Beschädigen Sie nicht den Kältemittel-
kreislauf.
• ACHTUNG: Verwenden Sie keine Elektrogeräte in den
Staufächern des Geräts, es sei denn, sie gehören zu
dem vom Hersteller empfohlenen Typ.
• Verwenden Sie zum Reinigen des Geräts kein
Spritzwasser und keinen Dampf.
• Reinigen Sie das Gerät mit einem feuchten, weichen
Tuch. Verwenden Sie nur neutrale Reinigungsmittel.
Verwenden Sie keine Scheuermittel, scheuernde Rei-
nigungspads, Lösungsmittel oder Metallgegenstände.
• Lagern Sie in diesem Gerät keine explosiven Stoe wie
z.B. Aerosoldosen mit einem brennbaren Treibmittel.
• Wenn das Netzkabel beschädigt ist, muss es durch den
Hersteller, seinen Kundendienst oder ähnlich quali-
zierte Personen ersetzt werden, um eine Gefährdung
zu vermeiden.
• Dieses Gerät ist nicht für den professionellen oder ge-
werblichen Einsatz bestimmt.
www.aeg.com
33DEUTSCH
2. SICHERHEITSHINWEISE
2.1 Wartung
• Wenden Sie sich zur Reparatur des Ge-
räts an ein autorisiertes Servicezentrum.
Verwenden Sie nur Original-Ersatzteile.
• Beachten Sie, dass eine Selbstrepara-
tur oder eine nicht fachmännische Re-
paratur sicherheitstechnische Folgen
haben kann und zum Erlöschen der
Garantie führen kann.
• Die folgenden Ersatzteile sind noch
7 Jahre nach dem Auslaufen des
Modells erhältlich: Thermostate,
Temperatursensoren, Leiterplatten,
Leuchtmittel, Türgrie, Türscharniere,
Ablagen und Körbe. Bitte beachten
Sie, dass einige dieser Ersatzteile nur
für professionelle Reparateure erhält-
lich sind, und dass nicht alle Ersatztei-
le für alle Modelle relevant sind.
• Türdichtungen sind noch 10 Jahre
nach Auslauf des Modells erhältlich.
2.2 Installation
ACHTUNG! Die Installation dieses
Geräts darf nur von einer qualizier-
ten Person durchgeführt werden.
• Die Verpackung vollständig entfernen.
• Ein beschädigtes Gerät darf nicht ins-
talliert oder verwendet werden.
• Beachten Sie die mit dem Gerät gelie-
ferte Installationsanleitung.
• Seien Sie immer vorsichtig, wenn Sie
das Gerät bewegen, da es schwer ist.
Tragen Sie immer Schutzhandschuhe.
• Stellen Sie sicher, dass die Luft um
das Gerät herum zirkulieren kann.
• Warten Sie mindestens 4 Stunden, be-
vor Sie das Gerät an das Stromnetz
anschließen. Dies dient dazu, dass das
Öl im Kompressor zurückießen kann.
• Stellen Sie das Gerät nicht in der Nähe
von Heizkörpern oder Herden, Backö-
fen oder Kochfeldern auf.
• Die Rückseite des Geräts muss an der
Wand stehen.
• Installieren Sie das Gerät nicht an Or-
ten, an denen es direkter Sonnenein-
strahlung ausgesetzt ist.
• Stellen Sie das Gerät nicht in zu feuch-
ten oder zu kalten Räumen auf, wie
z. B. in Bauanhängern, Garagen oder
Weinkellern.
• Wenn Sie das Gerät bewegen, heben
Sie es an der Vorderkante an, um Krat-
zer auf dem Boden zu vermeiden.
2.3 Elektrischer Anschluss
ACHTUNG! Brandgefahr und Ge-
fahr eines elektrischen Schlages.
ACHTUNG! Achten Sie beim Auf-
stellen des Geräts darauf, dass das
Netzkabel nicht eingeklemmt oder
beschädigt wird.
ACHTUNG! Verwenden Sie keine
Mehrfachstecker-Adapter und Ver-
längerungskabel.
• Das Gerät muss geerdet sein.
• Alle elektrischen Anschlüsse sollten
von einer qualizierten Elektrofach-
kraft vorgenommen werden.
• Vergewissern Sie sich, dass die elekt-
rischen Angaben auf dem Typenschild
mit dem Stromnetz übereinstimmen.
Wenn nicht, wenden Sie sich an einen
Elektriker.
• Verwenden Sie immer eine korrekt ins-
tallierte Schutzkontaktsteckdose.
• Verwenden Sie keine Mehrfachste-
cker-Adapter und Verlängerungskabel.
• Achten Sie darauf, keine Schäden an
den elektrischen Komponenten (z. B.
Netzstecker, Netzkabel, Kompressor)
zu verursachen. Wenden Sie sich zum
Austausch der elektrischen Komponen-
ten an den Service oder einen Elektriker.
• Das Netzkabel muss unterhalb der
Höhe des Netzsteckers bleiben.
• Stecken Sie den Netzstecker erst
am Ende der Installation in die Netz-
steckdose. Stellen Sie sicher, dass der
Netzstecker nach der Installation zu-
gänglich ist.
• Ziehen Sie nicht am Netzkabel, um
das Gerät auszustecken. Ziehen Sie
immer am Netzstecker.
• Achten Sie beim Aufstellen des Geräts
darauf, dass das Netzkabel nicht ein-
geklemmt oder beschädigt wird.
• Bringen Sie keine Mehrfachsteckdo-
sen oder tragbare Netzteile an der
Rückseite des Geräts an.
34
2.4 Verwendung
ACHTUNG! Verletzungsgefahr,
Verbrennungsgefahr, Stromschlag
oder Brandgefahr.
Das Gerät enthält brennbares Gas,
Isobutan (R600a), ein Erdgas mit
hoher Umweltverträglichkeit. Ach-
ten Sie darauf, dass der Kältemittel-
kreislauf, der Isobutan enthält, nicht
beschädigt wird.
• Ändern Sie nicht die Spezikation dieses
Geräts.
• Stellen Sie keine elektrischen Geräte (z.
B. Eismaschinen) in das Gerät, es sei
denn, sie sind vom Hersteller als geeig-
net angegeben.
• Wenn der Kältemittelkreislauf beschädigt
ist, stellen Sie sicher, dass sich keine
Flammen und Zündquellen im Raum be-
nden. Belüften Sie den Raum.
• Lassen Sie keine heißen Gegenstände
die Kunststoteile des Gerätes berühren.
• Stellen Sie keine Softdrinks in das Ge-
frierfach. Dadurch wird Druck auf den
Getränkebehälter erzeugt.
• Lagern Sie keine brennbaren Gase und
Flüssigkeiten im Gerät.
• Legen Sie keine brennbaren Produkte
oder Gegenstände, die mit brennbaren
Produkten benetzt sind, in, neben oder
auf das Gerät.
• Berühren Sie nicht den Kompressor oder
den Kondensator. Sie sind heiß.
2.5 Innenlicht
ACHTUNG! Gefahr eines elektri-
schen Schlages
• Betrit die Lampe(n) im Inneren die-
ses Produkts und separat erhältliche
Ersatzteillampen: Diese Lampen sind
dafür vorgesehen, extremen physika-
lischen Bedingungen in Haushaltsge-
räten standzuhalten, wie z. B. Tempe-
ratur, Vibration, Feuchtigkeit, oder sie
sollen Informationen über den Betrieb-
szustand des Geräts signalisieren. Sie
sind nicht für andere Anwendungen
vorgesehen und nicht für die Raumbe-
leuchtung im Haushalt geeignet.
2.6 PegeundReinigung
ACHTUNG! Verletzungsgefahr
und Gefahr der Beschädigung des
Geräts.
• Schalten Sie das Gerät vor der War-
tung aus und ziehen Sie den Netzste-
cker aus der Netzsteckdose.
• Dieses Gerät enthält Kohlenwasser-
stoe in der Kühleinheit. Nur eine qua-
lizierte Person darf die Wartung und
das Auaden des Geräts durchführen.
• Überprüfen Sie regelmäßig den Abuss
des Geräts und reinigen Sie ihn bei Bedarf.
Wenn der Abuss verstopft ist, sammelt
sich Tauwasser im Boden des Geräts.
• Der Staub hinter dem Weinkeller und
auf dem Boden sollte rechtzeitig ge-
reinigt werden, um die Kühlwirkung zu
verbessern und Energie zu sparen.
• Der Innenraum des Weinkühlschranks
sollte regelmäßig gereinigt werden,
um Geruchsbildung zu vermeiden.
• Prüfen Sie die Türdichtung regelmä-
ßig, um sicherzustellen, dass keine
Ablagerungen vorhanden sind.
• Bitte schalten Sie vor der Reinigung den
Strom aus, entfernen Sie alle Lebens-
mittel, Einlegeböden, Schubladen usw.
• Reinigen Sie die Türdichtung mit mil-
der Seife und Wasser.
• Verwenden Sie ein weiches Tuch oder
einen Schwamm, um die Innenseite
des Weinkühlschranks mit zwei Esslöf-
feln Backpulver und einem Liter war-
mem Wasser zu reinigen. Spülen Sie
dann mit Wasser nach und wischen
Sie den Weinkühlschranks sauber.
Önen Sie die Tür und trocknen Sie
sie auf natürliche Weise, bevor Sie den
Strom wieder einschalten.
• Bei schwer zu reinigenden Stellen
im Weinkühlschranks (z. B. schmale
Zwischenräume, Spalten oder Ecken)
empehlt es sich, diese regelmäßig mit
einem weichen Lappen, einer weichen
Bürste usw. abzuwischen, ggf. in Kom-
bination mit einigen Hilfsmitteln (z. B.
dünnen Stöcken), um sicherzustellen,
dass sich in diesen Bereichen keine
Verunreinigungen ansammeln.
• Verwenden Sie keine Seife, Reini-
gungsmittel, Scheuerpulver, Sprüh-
reiniger usw., da diese Gerüche im
Inneren des Weinkühlschranks verur-
sachen können.
• Reinigen Sie den Flaschenrahmen, die
www.aeg.com

35DEUTSCH
3. PRODUKTBESCHREIBUNG
1
Türfreigabemechanismus
2
Teleskop-Läufer
3
Bedienfeld
4
Regale
5
Befestigungsleiste
6
Tür
7
Dichtung
8
Typenschild
1 2 3 4 5
678
Einlegeböden und Schubladen mit ei-
nem milden Reinigungsmittel und trock-
nen Sie sie mit einem weichen Tuch.
• Wischen Sie die Außenächen des
Weinkühlschranks mit einem weichen,
mit Seifenwasser, Spülmittel usw. be-
feuchteten Tuch ab und wischen Sie
anschließend trocken.
• Verwenden Sie zum Reinigen des
Weinkühlschranks keine harten Bürs-
ten, Reinigungsstahlkugeln, Draht-
bürsten, Scheuermittel wie Zahnpas-
ta, organische Lösungsmittel (wie
Alkohol, Aceton, Bananenöl usw.),
kochendes Wasser, Säuren oder Lau-
gen, da dies die Oberäche und das
Innere des Kühlschranks beschädigen
kann. Kochendes Wasser und Benzol
können Kunststoteile verformen oder
beschädigen.
• Spülen Sie nicht mit Wasser nach, um
die elektrischen Isolationseigenschaf-
ten nicht zu beeinträchtigen.
2.7 Entsorgung
WARNHINWEIS! Verletzungs-
oder Erstickungsgefahr
• Trennen Sie das Gerät von der Netz-
versorgung.
• Schneiden Sie das Netzkabel ab und
entsorgen Sie es.
• Entfernen Sie den Deckel, um zu ver-
hindern, dass Kinder und Haustiere in
das Innere des Geräts gelangen.
• Der Kältemittelkreislauf und die Isolier-
materialien dieses Geräts sind ozon-
freundlich.
• Der Isolierschaum enthält brennbares
Gas. Wenden Sie sich an Ihre Ge-
meindeverwaltung, um Informationen
über die korrekte Entsorgung des Ge-
räts zu erhalten.
• Beschädigen Sie nicht den Teil des
Kühlgeräts, der sich in der Nähe des
Wärmetauschers bendet.

36
4. BEDIENFELD
1
EIN-/AUS-TASTE
2
Lichttaste
3
Anzeige
4
Taste kältere Temperatur
5
Taste wärmere Temperatur
4.1 Ein-/Aus-Schalter und
Temperatureinstellung
Um das Gerät einzuschalten, drücken Sie
die EIN-/AUS-Taste.
Die Anzeige zeigt die eingestellte Stan-
dardtemperatur an (12°C).
Die Temperatur kann von 5° bis 20°C (mit
Schritten von 1°C) durch Berühren der
Taste -/+ eingestellt werden.
Um das Gerät abzuschalten, drücken Sie
die EIN-/AUS-Taste 5 Sekunden lang.
4.2 Lichttaste
Wenn die Tür geönet ist, leuchtet die
LED-Anzeige, wenn sie geschlossen ist,
ist sie aus. Wenn Sie das Licht mit ge-
schlossener Tür eingeschaltet haben wol-
len, önen Sie die Tür und drücken die
Lichttaste.
Wenn Sie die Standardbedingungen wie-
der herstellen möchten, drücken Sie die
Lichttaste erneut.
4.3 Anzeige
Die Anzeige zeigt die eingestellte Tempe-
ratur und die Fehlermeldungen an, wenn
der Demo-Modus gewählt ist und die Tas-
ten gesperrt sind.
4.4 Tastenverriegelungs-
Modus
Drücken Sie die Taste + und die Lichttaste
3 Sekunden lang, um den Tastenverriege-
lungs-Modus zu aktivieren.
Das Gerät arbeitet mit den letzten Einstel-
lungen weiter.
Zur Deaktivierung des Tastenverriege-
lungs-Modus führen Sie dasselbe Verfah-
ren durch.
Durch Auswahl dieser Funktion erscheint
die Nachricht „bl“ auf der Anzeige, wenn
Sie eine Taste berühren.
4.5 Demo-Modus
DEMO-MODUS wurde für Ausstellungen
und Ausstellungsraum angelegt.
Die Anzeige ist EIN, mit der Möglichkeit,
die Temperaturen zu ändern, der Kühlmo-
tor ist aber AUS.
Zur Aktivierung oder Deaktivierung des
DEMO-MODUS drücken Sie 3 Sekunden
lang gleichzeitig + und -.
Die innere LED-Leuchte kann auch EIN-
GESCHALTET bleiben, wenn die Tür ge-
schlossen ist.
Drücken Sie die Lichttaste zur Aktivierung
des Licht EIN-Modus.
1 2 3 4 5
www.aeg.com
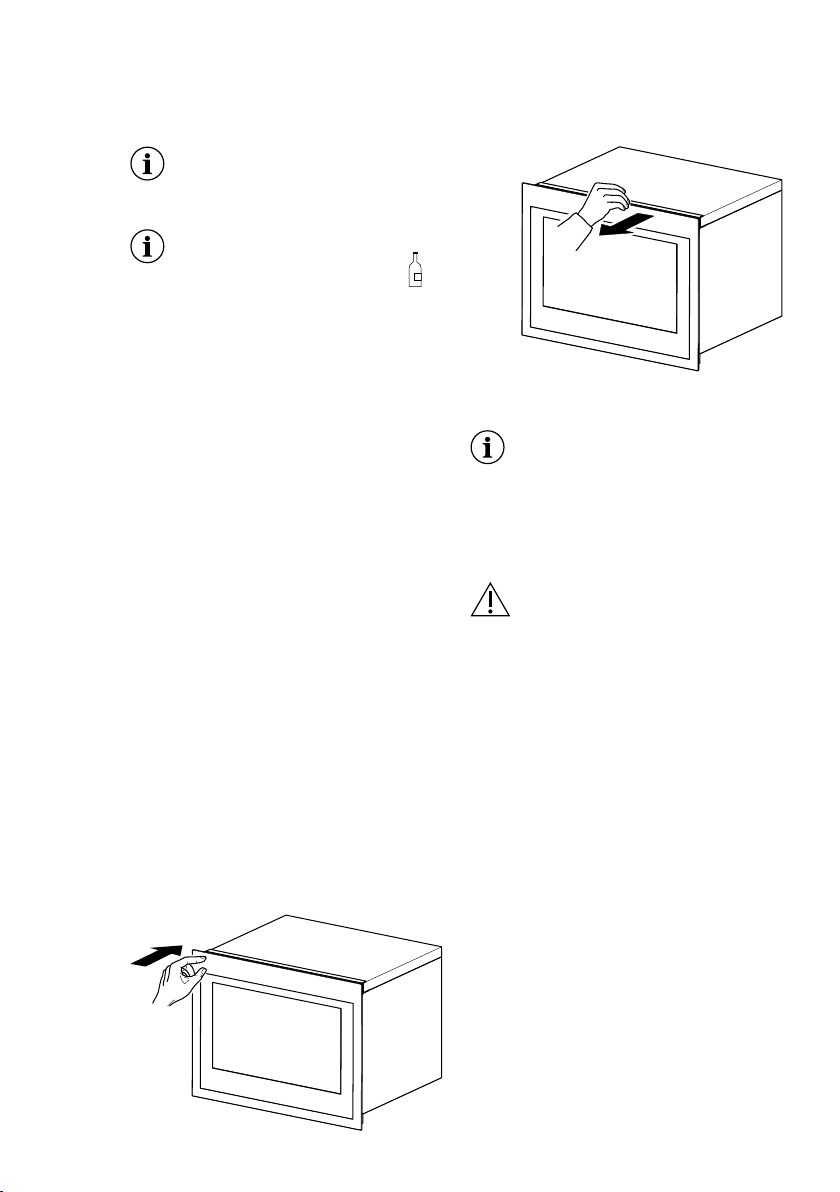
37DEUTSCH
5. GEBRAUCH
5.2 Türönung
Önen der Tür:
- um die Tür zu önen, drücken Sie gegen
das linke Türblatt.
- oder ziehen Sie an ihr.
5.4 Funktion Temperature-
rinnerung
Im Falle eines Stromausfalls kann sich
der Weinkeller an die vorherige Tempe-
ratureinstellung erinnern, und wenn die
Stromversorgung wiederhergestellt ist,
geht die Temperatur wieder auf die ur-
sprüngliche zurück.
5.3 Erste Benutzung
Bevor Sie das Gerät zum ersten Mal
benutzen, waschen Sie den Innenraum
und alle inneren Zubehörteile mit lauwar-
mem Wasser und etwas neutraler Seife
und trocknen dann gründlich.
Verwenden Sie keine Reini-
gungs- oder Scheuermittel, da
diese die Oberäche beschädi-
gen.
Um das Gerät einzuschalten, drücken Sie
die EIN-/AUS-Taste und stellen die Tem-
peratur nach dem gelagerten Wein ein.
5.1 Tägliche Verwendung
Dieses Gerät ist ausschließlich
für die Lagerung von Wein be-
stimmt
Das Weinlagerfach ist dasjenige,
das (auf dem
Typenschild) mit markiert ist
Reinigung
Bevor Sie das Gerät zum ersten Mal be-
nutzen reinigen Sie den Innenraum und
alle inneren Zubehörteile mit lauwarmem
Wasser und etwas Neutralseife, um den
typischen Geruch eines fabrikneuen Pro-
dukts zu entfernen, trocknen Sie es an-
schließend gründlich ab.
• Längeres Önen der Tür kann zu ei-
nem deutlichen Anstieg der Tempera-
tur in den Fächern des Geräts führen.
• Reinigen Sie regelmäßig Oberächen,
die mit Lebensmitteln in Berührung
kommen können, und zugängliche
Abusssysteme.
• Lagern Sie rohes Fleisch und Fisch in
geeigneten Behältern im Weinkeller,
so dass es nicht mit anderen Leben-
smitteln in Berührung kommt oder auf
diese tropft.
• Wenn das Kühlgerät längere Zeit nicht
benutzt wird, schalten Sie es aus, tauen
Sie es ab, reinigen und trocknen Sie es
und lassen Sie die Tür oen, um Schim-
melbildung im Gerät zu vermeiden.
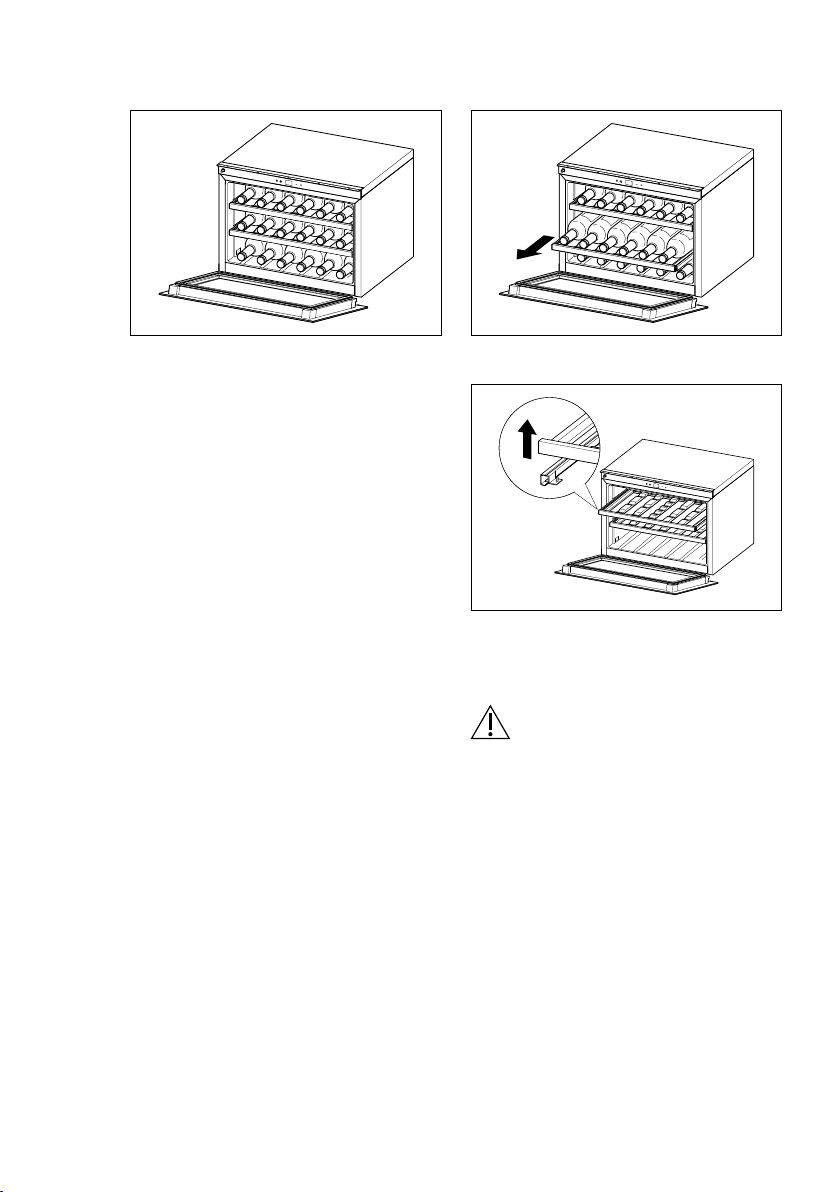
38
5.5 Weinlagerung
Die Lagerungszeit für Wein hängt von der
Alterung, der Traubenart, dem Alkohol-
gehalt und dem Gehalt an Fruktose und
Tannin ab. Prüfen Sie beim Kauf, ob der
Wein bereits gealtert ist oder im Laufe der
Zeit besser wird.
Empfohlene Aufbewahrungstemperatur:
- Champagner/Prosecco und Schaum-
weine +6 bis + 8°C
- Weißweine +10 bis +12°C
- Rosé-Weine +12 bis +16°C
- Rotweine +14 bis +18°C
(für 750 ml Bordeaux-Flaschen)
Gesamt: 18 Flaschen
5.6 Weinregale
• Für einen leichten Zugang zu den Fla-
schen ziehen Sie die Regale aus dem
Schienenfach.
Um die Tür nicht zu beschädi-
gen, sorgen Sie dafür, dass sie
vollständig geönet ist, wenn Sie
Regale herausziehen.
• Um die Holzregale zu entfernen oder
zu montieren, heben oder schieben
Sie das Regal.
www.aeg.com
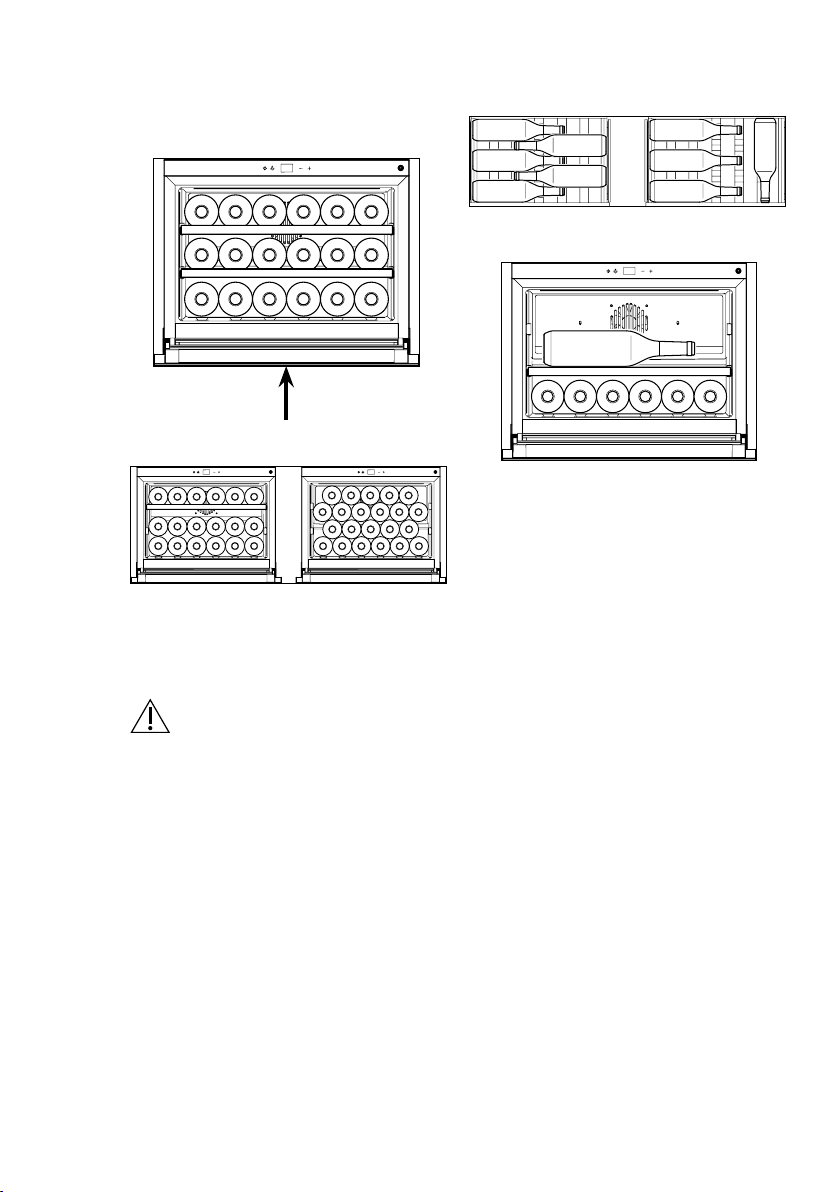
39DEUTSCH
• Standardkonguration
Lagerung von bis zu 18 Bordeaux-Fla-
schen mit 6 Flaschen auf jeder Ebene.
• Horizontale Konguration
Geeignet für große und hohe Flaschen.
Um große und hohe Flaschen auf dem
zweiten Regal einfach zu lagern, kann
das obere Regal wie in der Abbildung ge-
zeigt herausgenommen werden.
Die erste Ebene dient zur Lagerung grö-
ßerer und höherer Flaschen.
6. HINWEISE UND TIPPS
Normale Betriebsgeräusche
Die folgenden Geräusche sind während
des Betriebs normal:
• Ein schwaches gurgelndes und blub-
berndes Geräusch aus den Spulen,
wenn Kältemittel gepumpt wird.
• Ein surrendes und pulsierendes
Geräusch aus dem Kompressor, wenn
Kältemittel gepumpt wird.
• Ein plötzliches knackendes Geräusch
aus dem Inneren des Geräts, das dur-
ch thermische Ausdehnung verursacht
wird (ein natürliches und nicht gefährl-
iches physikalisches Phänomen).
• Ein schwaches Klickgeräusch vom
Temperaturregler, wenn der Kompres-
sor ein- oder ausgeschaltet wird.
Hinweise zum Energiesparen
• Önen Sie die Tür nicht häug und las-
sen Sie sie nicht länger als unbedingt
nötig oen.
Durch Entfernen der Regale kann das
Fassungsvermögen wie in der Abbildung
gezeigt vergrößert werden.
WARNUNG! Bitte stellen Sie
in diesem Fall sicher, dass die Flaschen
nicht mit der Rückwand der Kammer in
Berührung kommen.

40
7. INSTALLATION
7.1 Positionierung
Um das Gerät herum sollte genügend
Belüftung sein, um Überhitzung zu ver-
meiden. Befolgen Sie die Installationsan-
leitung, um eine ausreichende Belüftung
zu erhalten.
Installieren Sie dieses Gerät an einem
Ort, an dem die Umgebungstemperatur
der Klimaklasse entspricht, die auf dem
Typenschild des Gerätes angegeben ist:
Klimaklasse Umgebungstempe-
ratur
SN +10 °C bis +32 °C
N +16 °C bis +32 °C
ST +16 °C bis +38 °C
T +16 °C bis +43 °C
Gesamt-maße
D1
W1
Ge-
samt-maße
H1
455
W1
596
D1 566
Platzbedarf im
Einsatz
H2
455
W2
596
D2 571
Gesamter
Platzbedarf im
Einsatz
H3
455
W3
596
D3 1026
Platzbedarf im Einsatz
Gesamter Platzbedarf im
Einsatz
H1 / H2 / H3
D2
W2
D3
W3
www.aeg.com
41DEUTSCH
8. PFLEGE UND WARTUNG
• Reinigen Sie das Innere und Zube-
hörteile mit lauwarmem Wasser und
etwas Neutralseife.
• Überprüfen Sie regelmäßig die Tür-
dichtungen und wischen Sie sie ab,
um sicherzustellen, dass sie sauber
und schmutzfrei sind.
• Gründlich spülen und trocknen.
8.2 Stillstandszeiten
Wenn das Gerät lange nicht benutzt wird,
ergreifen Sie folgende Vorsichtsmaßnah-
men:
• Stecken Sie das Gerät aus.
• Entfernen Sie alle Gegenstände.
• Reinigen Sie das Gerät und alles Zu-
behör.
• Lassen Sie die Tür oen, um unange-
nehme Gerüche zu vermeiden.
VORSICHT! Stecken Sie vor
Wartungsarbeiten das Gerät aus.
Dieses Gerät enthält Kohlenwas-
serstoe in seiner Kühleinheit;
Wartung und Wiederauadung
dürfen daher nur von autorisier-
ten Technikern durchgeführt wer-
den.
8.1 Regelmäßige Reinigung
Die Anlage muss regelmäßig gereinigt
werden.
Ziehen, bewegen oder beschä-
digen Sie keine Rohre und/oder
Kabel im Schrank.
Verwenden Sie niemals Rei-
nigungsmittel, Scheuerpulver,
stark parfümierte Reinigungsmit-
tel oder Wachspolituren, um das
Innere zu reinigen, da dies die
Oberäche beschädigt und einen
starken Geruch hinterlässt.
• Waschen Sie die Innenächen mit ei-
ner Warmwasser- und Backpulverlö-
sung. In einem Quart Wasser sollten
etwa 2 Esslöel Backpulver sein.
• Waschen Sie die Regale mit einer mil-
den Reinigungslösung.
• Wringen Sie überschüssiges Wasser
aus dem Schwamm oder Tuch, wenn
Sie den Bereich mit den Steuerungen
oder irgendwelche elektrischen Teile
reinigen.
42
9. ANLEITUNG ZUR FEHLERSUCHE
Sie können viele gängige Weinkeller-Pro-
bleme einfach lösen und sich die Kosten
eines möglichen Serviceabrufs sparen.
Probieren Sie die Vorschläge aus.
Problem Mögliche Ursache Lösung
Weinkeller
funktioniert nicht.
• Nicht eingesteckt.
• Das Gerät ist abgeschaltet.
• Der Leistungsschalter wurde betätigt.
• Demomodus ist aktiv.
• Bitte das Gerät anschließen.
• Bitte das Gerät EINSCHALTEN.
• Den Leistungsschalter einschalten.
• Den Demomodus deaktivieren (+/- 3 Sek. lang
drücken).
Weinkeller ist nicht
kühl genug.
• Die Einstellung der Temperaturregelung
prüfen.
• Die Tür ist nicht vollständig geschlossen.
• Die Türdichtung dichtet nicht richtig ab.
• Die eingestellte Temperatur überprüfen.
• Die Schließung der Tür überprüfen.
• Die Türdichtung mit einem feuchten Schwamm
mit Neutral - Reinigungsmittel und Wasser
reinigen.
Der Kompressor
arbeitet ständig.
• Die Raumtemperatur ist
höher als sonst.
• Die Tür wird zu oft geönet.
• Die Tür ist nicht vollständig geschlossen.
• Die Türdichtung dichtet nicht richtig ab.
• Die Raumtemperatur überprüfen.
• Die Tür nicht länger als nötig oen lassen.
• Überprüfen, ob die Tür vollständig geschlossen
ist.
• Den Zustand der Dichtung überprüfen und sie
gegebenenfalls mit einem feuchten Schwamm
mit Neutral-Reinigungsmittel und Wasser
reinigen.
Das Licht
funktioniert nicht.
• Nicht eingesteckt.
• Der Leistungsschalter wurde betätigt.
• Die LED ist ausgebrannt.
• Die Lichttaste funktioniert nicht.
• Bitte das Gerät anschließen.
• Den Leistungsschalter einschalten.
• Den Service kontaktieren.
• Den Service kontaktieren.
Übermäßige
Vibration.
• Überprüfen, ob der Weinkeller eben ist. • Das Gerät ausgleichen.
Übermäßiges
Geräusch.
• Das ratternde Geräusch kommt
vielleicht von dem Durchuss des Kältemit-
tels. Das ist normal.
• Zusammenziehen und Ausdehnung der
Innenwände können zu knallenden und
knisternden Geräuschen führen.
• Der Weinkeller ist nicht ausgeglichen.
• Der Lüfter ist schmutzig.
• Das Gerät ausgleichen.
• Den Staub vom Lüfter entfernen.
• Sollten die Geräusche lauter werden, wenden
Sie sich an den Service.
Die Tür schließt
nicht richtig.
• Der Weinkeller ist nicht ausgeglichen.
• Die Tür war nicht richtig fest.
• Die Dichtung ist schmutzig.
• Das Gerät ausgleichen.
• Die Schließung der Tür überprüfen.
• Die Türdichtung mit einem feuchten Schwamm
mit Neutral-Reinigungsmittel und Wasser
reinigen.
Akustischer Alarm
• Die Tür ist nicht geschlossen (der Alarm
dauert 30 Min).
• Die Tür schließen.
E3 wird angezeigt
• Die Tür wurde über 30 Min. oen gelas-
sen.
• Tür-Reedschalter ist kaputt.
• Die Tür schließen.
• Den Service kontaktieren.
E1 wird angezeigt
und akustischer
Alarm ertönt alle 5
Minuten.
•
Die Temperatur im Weinkeller bendet sich
außerhalb des Bereichs von -20°C +60°C
• Der Temperatursensor ist außer Betrieb
oder ausgesteckt.
• Fehlende Wärme von den nächsten Geräten
überprüfen.
• Den Service kontaktieren.
E2 wird angezeigt
• Die nächsten Geräte strahlen Wärme aus.
• Die Umgebungstemperatur bendet sich
außerhalb des Bereichs der Produkt-Kli-
maklasse.
• Kompressor oder Lüfter nicht in Betrieb.
• Fehlende Wärme von den nächsten Geräten
überprüfen.
• Überprüfen, ob das Produkt an einem Ort mit
einer Umgebungstemperatur installiert ist, die
innerhalb der erklärten Produkt-Klimaklasse liegt.
• Den Service kontaktieren.
www.aeg.com

43DEUTSCH
10. TECHNISCHE INFORMATIONEN
11. INFORMATIONEN FÜR PRÜFINSTITUTE
12. UMWELTANLIEGEN
Das Symbol auf dem Produkt oder
auf der Verpackung weist darauf hin, dass
dieses Produkt nicht als Hausmüll behan-
delt werden darf.
Stattdessen sollte es zu einer entspre-
chenden Sammelstelle für das Recycling
von elektrischen und elektronischen Ge-
räten gebracht werden.
Indem Sie sicherstellen, dass dieses Pro-
dukt ordnungsgemäß entsorgt wird, tragen
Sie dazu bei, mögliche negative Folgen für
die Umwelt und die menschliche Gesund-
heit zu vermeiden, die andernfalls durch
unsachgemäße Abfallbehandlung dieses
Produkts verursacht werden könnten.
Nähere Informationen zum Recycling
dieses Produkts erhalten Sie bei Ihrer
Gemeindeverwaltung, Ihrem Hausmül-
lentsorgungsdienst oder dem Geschäft,
in dem Sie das Produkt gekauft haben.
Verpackungsmaterialien
Die Materialien mit dem Symbol
sind recycelbar. Entsorgen Sie die Ver-
packung in geeigneten Sammelbehältern,
um sie zu recyceln.
Technische Daten
Die technischen Informationen benden
sich auf dem Typenschild an der Innen-
seite des Geräts und auf dem Energiela-
bel.
Der QR-Code auf dem mit dem Gerät
gelieferten Energieetikett bietet ei-
nen Weblink zu den Informationen
über die Leistung des Geräts in der EU
EPREL-Datenbank. Bewahren Sie das
Energieetikett zusammen mit dem Benut-
zerhandbuch und allen anderen mit dem
Gerät gelieferten Dokumenten als Refe-
renz auf.
Es ist auch möglich, die gleichen Informa-
tionen in EPREL zu nden, indem Sie den
Link https://eprel.ec.europa.eu und den
Modellnamen und die Produktnummer,
die Sie auf dem Typenschild des Geräts
nden, verwenden. Unter dem Link www.
theenergylabel.eu nden Sie detaillierte
Informationen zum Energielabel.
Die technischen informationen benden
sich auf dem typenschild, auf der aussen-
oder innenseite des geräts und auf dem
energielabel.
Die Installation und Vorbereitung des
Geräts für eine EcoDesign-Prüfung muss
der EN 62552 entsprechen.
Belüftungsanforderungen, Einbaumaße
und rückseitige Mindestabstände müssen
den Angaben in dieser Bedienungsanlei-
tung in Kapitel 6 entsprechen. Für weitere
Informationen, einschließlich Beladun-
gsplänen, wenden Sie sich bitte an den
Hersteller.
44
SOMMARIO
CURA E MANUTENZIONE DA PARTE DEL CLIENTE
1. INFORMAZIONI SULLA SICUREZZA ......................................................................45
2. ISTRUZIONI PER LA SICUREZZA ...........................................................................47
3. DESCRIZIONE DEL PRODOTTO .............................................................................49
4. PANNELLO DI CONTROLLO ...................................................................................50
5. UTILIZZO ....................................................................................................................51
6. SUGGERIMENTI E CONSIGLI .................................................................................53
7. INSTALLAZIONE .......................................................................................................54
8. CURA E MANUTENZIONE ........................................................................................55
9. GUIDA PER LA RISOLUZIONE DEI PROBLEMI ...................................................56
10. INFORMAZIONI TECNICHE .....................................................................................57
11. INFORMAZIONI PER GLI ISTITUTI DI VERIFICA .................................................57
12. PROBLEMI AMBIENTALI..........................................................................................57
www.aeg.com
Grazie per aver scelto questo prodotto AEG. Lo abbiamo creato per orirvi prestazioni im-
peccabili per molti anni, grazie a tecnologie innovative che semplicano la vita, caratteris-
tiche che potreste non trovare nei dispositivi comuni. Bastano pochi minuti per leggere e
ottenere il massimo da questo dispositivo.
Visitare il nostro sito web per:
Ottenere consigli sull'utilizzo, brochure, guide per la risoluzione dei problemi, in-
formazioni sui servizi:
www.aeg.com
Registrare il prodotto per una migliore assistenza:
www.registeraeg.com
Acquistare accessori, consumabili e parti di ricambio originali per il dispositivo:
www.aeg.com/shop
PER RISULTATI PERFETTI
Si raccomanda di utilizzare parti di ricambio originali.
Quando si contatta l’assistenza, avere a portata di mano i seguenti dati.
Le informazioni sono reperibili sulla targhetta: modello, codice articolo, numero di serie.
Avvertenza / Attenzione - Informazioni sulla sicurezza.
Informazioni generali e consigli.
Informazioni ambientali.
Soggetto a modiche senza preavviso.

45ITALIANO
Prima di installare e usare il dispositivo, leggere attenta-
mente le istruzioni fornite. Il produttore non ha alcuna res-
ponsabilità se installazioni o utilizzi errati causano lesioni
e danni. Conservare le istruzioni sempre con il dispositivo
per riferimenti futuri.
1.1
Sicurezza dei bambini e delle persone vulnerabili
• Questo dispositivo può essere usato dai bambini da-
gli 8 anni in su e dalle persone con ridotte capacità
siche, sensoriali o cognitive o prive di esperienza e
conoscenze a condizione che siano soggette a sor-
veglianza o siano state dotate delle istruzioni relative
all’uso del dispositivo in modo sicuro e comprendano
i pericoli coinvolti.
• Questo dispositivo può essere usato dai bambini di
età compresa tra 3 e 8 anni e da persone con disabi-
lità molto estese e complesse, purché correttamente
istruite.
• I bambini di età inferiore a 3 anni devono essere tenuti
lontano dal dispositivo a meno che non vengano cos-
tantemente sorvegliati.
• Non lasciare che i bambini giochino con il dispositivo.
• I bambini non devono eseguire operazioni di pulizia e
manutenzione sul dispositivo senza sorveglianza.
• Tenere tutto il materiale di imballaggio lontano dai
bambini e smaltirlo correttamente.
1.2 Sicurezza generali
• Questo dispositivo deve essere usato nelle applica-
zioni domestiche e di natura simile come:
- Casolari, cucine per il personale di negozi, uci e
altri ambienti di lavoro
1. INFORMAZIONI SULLA SICUREZZA

46
- Hotel, motel, bed & breakfast e altri ambienti di tipo
residenziale
• Usare questo dispositivo esclusivamente per la
conservazione di vino.
• AVVERTENZA: mantenere completamente libere le
aperture di ventilazione nell’unità del dispositivo o nel-
la struttura integrata.
• AVVERTENZA: non utilizzare dispositivi meccanici o
altri mezzi per accelerare il processo di scongelamen-
to, se non quelli raccomandati dal produttore.
• AVVERTENZA: non danneggiare il circuito refrige-
rante.
• AVVERTENZA: non usare dispositivi elettrici all’inter-
no dei vani di conservazione alimenti del dispositivo,
a meno che non siano del tipo raccomandato dal pro-
duttore.
• Non spruzzare acqua né vapore per pulire il disposi-
tivo.
• Pulire il dispositivo con un panno morbido e umido.
Usare solo detergenti neutri. Non usare prodotti abra-
sivi, spugne abrasive, solventi o oggetti di metallo.
• In questo dispositivo non conservare sostanze esplo-
sive come bombolette spray con propellente inam-
mabile.
• Se il cavo di alimentazione è danneggiato, deve es-
sere sostituito dal produttore, un suo agente di as-
sistenza o da personale analogamente qualicato al
ne di evitare pericoli.
• Questo dispositivo non è previsto per usi professionali
né commerciali
www.aeg.com
47ITALIANO
2. ISTRUZIONI PER LA SICUREZZA
2.1 Assistenza
• Per riparare il dispositivo contattare
un centro di assistenza autorizzato.
Usare solo parti di ricambio originali.
• Nota: riparazioni fatte in autonomia o
non professionali possono avere delle
conseguenze sulla sicurezza e potreb-
bero annullare la garanzia.
• Le seguenti parti di ricambio saranno
disponibili per 7 anni dopo la dismis-
sione del modello: termostati, sensori di
temperatura, schede di circuito stampa-
to, fonti di luce, maniglie per sportello,
cerniere per sportello, ripiani e cestelli.
Nota: alcune di queste parti di ricambio
sono disponibili solo per i riparatori pro-
fessionisti e non tutte le parti di ricambio
sono rilevanti per tutti i modelli.
• Le guarnizioni per sportello saranno
disponibili per 10 anni dopo la dismis-
sione del modello.
2.2 Installazione
AVVERTENZA! Solo una persona
qualicata deve installare questo
dispositivo.
• Rimuovere tutto il materiale di imballo.
• Non installare né usare un dispositivo
danneggiato.
• Seguire le istruzioni di installazione for
-
nite con il dispositivo.
• Prestare sempre attenzione quando si
sposta il dispositivo perché è pesante.
Indossare sempre i guanti di sicurezza.
• Vericare che l’aria possa circolare at
-
torno al dispositivo.
• Attendere almeno 4 ore prima di collegare
il dispositivo all’alimentazione. In questo
modo l’olio può reuire nel compressore.
• Non installare il dispositivo vicino a ra
-
diatori o fornelli, forni o piani cottura.
• La parte posteriore del dispositivo deve
rimanere posizionata contro la parete.
• Non installare il dispositivo in un punto
raggiunto dalla luce solare diretta.
• Non installare questo dispositivo in zone
troppo umide o troppo fredde, come edi
-
ci di servizio, garage o cantine.
• Quando si sposta il dispositivo, solle
-
varlo dal bordo anteriore al ne di non
graare il pavimento.
2.3 Collegamento elettrico
AVVERTENZA! Rischio di incen-
dio o scosse elettriche.
AVVERTENZA! Quando si posi-
ziona il dispositivo, vericare che il
cavo di alimentazione non sia in-
trappolato o danneggiato.
AVVERTENZA! Non usare adatta-
tori multi-presa né cavi di prolunga.
• Il dispositivo deve essere collegato a
terra.
• Tutti i collegamenti elettrici devono es-
sere realizzati da un elettricista quali-
cato.
• Vericare che i dati elettrici riportati
sulla targhetta corrispondano all’ali-
mentazione. Se no, contattare un elet-
tricista.
• Usare sempre una presa resistente
agli urti, correttamente installata.
• Non usare adattatori multi-presa né
cavi di prolunga.
• Accertarsi di non causare danni ai
componenti elettrici (ad es. spina di
alimentazione, cavo di alimentazione,
compressore). Contattare l’assistenza
o un elettricista per cambiare i compo-
nenti elettrici.
• Il cavo di alimentazione deve rimanere
sotto il livello della spina di alimenta-
zione.
• Collegare la spina di alimentazione
alla presa di alimentazione solamente
al termine dell’installazione. Dopo
l’installazione vericare che si possa
accedere alla spina di alimentazione.
• Non tirare il cavo di alimentazione per
scollegare il dispositivo. Tirare sempre
la spina di alimentazione.
• Quando si posizione il dispositivo, veri-
care che il cavo di alimentazione non
sia intrappolato o danneggiato.
• Non posizionare più prese multiple né
generatori portatili sul retro del dispo-
sitivo.

48
2.4 Utilizzo
AVVERTENZA! Rischio di lesioni,
ustioni, scosse elettriche o incen-
dio.
Il dispositivo contiene gas inam-
mabile, isobutano (R600a), un gas
naturale con un elevato livello di
compatibilità ambientale. Prestare
attenzione a non causare danni al
circuito refrigerante contenente
l’isobutano.
• Non cambiare le speciche di questo-
dispositivo.
• Non mettere dispositivi elettrici (ad es.
gelatiere) all’interno del dispositivo a
meno che non sia esplicitamente indi-
cato dal produttore.
• Se il circuito refrigerante si danneggia,
vericare che non vi siano amme o
fonti di ignizione nella stanza. Ventilare
la stanza.
• Non mettere a contatto elementi caldi
con le parti plastiche del dispositivo.
• Non inserire bibite nel vano freezer.
Ciò aumenterà la pressione all’interno
del contenitore della bevanda.
• Non conservare gas o liquidi inamma-
bili nel dispositivo.
• Non posizionare prodotti inammabi-
li o elementi bagnati che contengono
prodotti inammabili vicino o sul dispo-
sitivo.
• Non toccare il compressore o il
condensatore perché sono caldi.
2.5 Luce interna
AVVERTENZA! Rischio di scosse
elettriche.
• Informazioni sulle luci all’interno di
questo prodotto e sulle luci di ricambio
vendute separatamente: queste luci
devono resistere a condizioni siche
estreme all’interno degli elettrodome-
stici, come temperatura, vibrazione,
umidità oppure devono segnalare in-
formazioni sullo stato operativo del di-
spositivo. Non sono previste per l’uso
in altri dispositivi né sono adatte all’il-
luminazione degli ambienti domestici.
2.6 Pulizia e cura
AVVERTENZA! Rischio di lesioni
o danni al dispositivo.
• Prima della manutenzione, disattivare
il dispositivo e scollegare la spina di ali-
mentazione dalla presa di alimentazione.
• Questo dispositivo contiene degli idro-
carburi nell’unità rinfrescante. Solo il
personale qualicato deve eseguire le
operazioni di manutenzione e la ricari-
ca dell’unità.
• Esaminare regolarmente il drenaggio
del dispositivo e, se necessario, pulir-
lo. Se il drenaggio è bloccato, l’acqua
scongelata si raccoglie nel fondo del
dispositivo.
• Pulire regolarmente la polvere for-
matasi dietro la cantina per vini e sul
pavimento al ne di migliorare l’eetto
rinfrescante e aumentare il risparmio
energetico.
• La parte interna della cantina per vini
deve essere pulita regolarmente per
evitare la formazione di odori.
• Controllare regolarmente la guarni-
zione dello sportello per vericare che
non vi siano detriti.
• Spegnere il dispositivo prima della
pulizia, rimuovere tutti i cibi, i ripiani, i
cassetti, ecc.
• Pulire la guarnizione dello sportello
con acqua e sapone delicato.
• Usare un panno morbido o una spu-
gna per pulire l’interno della cantina
per vini, usando due cucchiai di bi-
carbonato e un quarto di acqua calda.
Dopodiché, risciacquare con acqua e
pulire, aprire lo sportello e lasciare as-
ciugare naturalmente prima di riaccen-
dere il dispositivo.
• Per le aree della cantina per vini dici-
li da pulire (come interstizi, rientranze
o angoli), si consiglia di pulirle rego-
larmente con un panno morbido, uno
scovolino morbido, ecc. e quando ne-
cessario, in combinazione con alcuni
strumenti aggiuntivi (come bastoncini
sottili) al ne di garantire nessun ac-
cumulo di contaminanti all’interno di
queste aree.
• Non usare sapone, detergente, polvere
abrasiva, detergente spray, ecc., poi-
ché potrebbero causare la formazione
www.aeg.com

49ITALIANO
3. DESCRIZIONE DEL PRODOTTO
1
Meccanismo rilascio porta
2
Guide telescopiche
3
Pannello di controllo
4
Ripiani
5
Barra di ssaggio
6
Porta
7
Guarnizione
8
Targhetta
1 2 3 4 5
678
di odori all’interno della cantina per vini.
• Pulire la struttura per bottiglie, i ripiani
e i cassetti con un detergente delicato
e asciugare con un panno morbido.
• Pulire la supercie esterna della can-
tina per vini con un panno morbido
inumidito con acqua e sapone, de-
tergente, ecc., quindi asciugare.
• Per pulire la cantina per vini, non usare
scovolini con setole dure, sfere metal-
liche di pulizia, spazzole di ferro, abra-
sivi, come dentifricio, solventi organici
(ad esempio alcol, acetone, olio di ba-
nana, ecc.), acqua bollente, elementi
acidi o alcalini poiché potrebbero dan-
neggiare la supercie esterna ed inter-
na del frigorifero. L’acqua bollente e il
benzene potrebbero deformare o dan-
neggiare le parti di plastica.
• Non risciacquare con acqua in modo
da non alterare le proprietà di isola-
mento elettrico.
2.7 Smaltimento
AVVERTENZA! Rischio di lesioni
o soocamento.
• Scollegare il dispositivo dall’alimenta-
zione.
• Rimuovere il cavo di alimentazione ed
eliminarlo.
• Rimuovere il coperchio per evitare che
bambini e animali rimangano chiusi
all’interno del dispositivo.
• Il circuito refrigerante e i materiali di
isolamento di questo dispositivo ris-
pettano l’ambiente.
• La schiuma di isolamento contiene
gas inammabile. Contattare l’autorità
municipale per informazioni su come
eliminare correttamente il dispositivo.
• Non causare danni alla parte dell’unità
rinfrescante vicina allo scambiatore di
calore.

50
4. PANNELLO DI CONTROLLO
1
Tasto ON/OFF
2
Tasto luce
3
Display
4
Tasto temperatura più fredda
5
Tasto temperatura più calda
4.1 Interruttoreon/oe
impostazione della
temperatura
Per accendere il dispositivo premere il
tasto ON/OFF.
Il display visualizza la temperatura prede-
nita impostata (12 °C).
Premendo il tasto -/+ è possibile regolare
la temperatura da 5 a 20 °C (con incre-
menti di 1 °C).
Per spegnere il dispositivo premere il
tasto ON/OFF per 5 secondi.
4.2 Tasto luce
Quando la porta è aperta, la luce a LED è
accesa, quando è chiusa, la luce è spen-
ta. Se si vuole mantenere la luce accesa
con la porta chiusa, aprire la porta e pre-
mere il tasto luce.
Per ripristinare le condizioni standard,
premere nuovamente il tasto luce.
4.3 Display
Il display visualizza la temperatura impos-
tata, i messaggi di errore, se è selezio-
nata la modalità demo e se i tasti sono
bloccati.
4.4 Modalità Blocco tasti
Per attivare la modalità Blocco tasti, pre-
mere il tasto + e il tasto luce per 3 secondi.
Il dispositivo continuerà a funzionare con
le ultime impostazioni.
Per disattivare la modalità Blocco tasti,
eseguire la stessa procedura.
Selezionando questa funzione, quando si
tocca qualsiasi tasto, sul display appare il
messaggio “bl”.
4.5 Modalità Demo
La MODALITÀ DEMO è stata creata per il
funzionamento durante ere e showroom.
Il display è ACCESO, con la possibilità di
modicare le temperature, ma il motore di
rareddamento è SPENTO.
Per attivare o disattivare la MODALITÀ
DEMO, premere contemporaneamente i
tasti + e – per 3 secondi.
È possibile mantenere ACCESA la luce
a LED interna anche quando la porta è
chiusa.
Per attivare la modalità luce ACCESA,
premere il tasto luce.
1 2 3 4 5
www.aeg.com
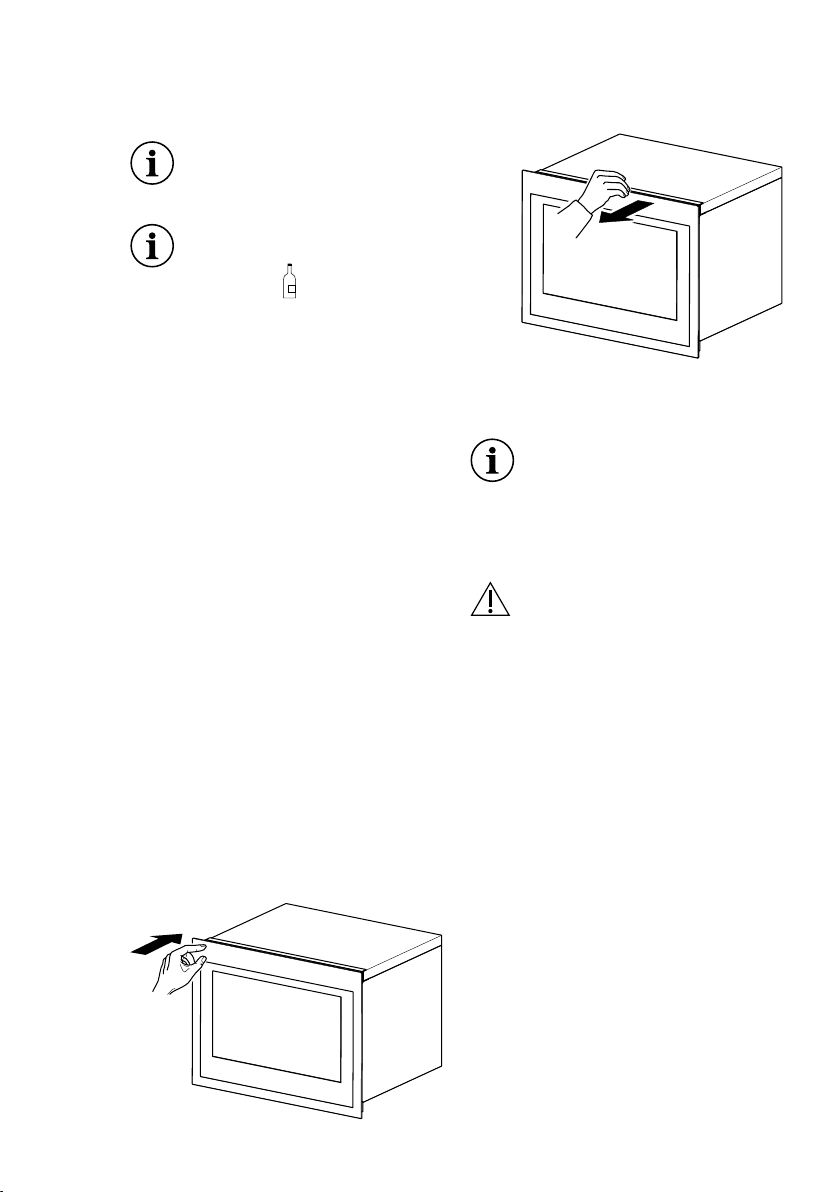
51ITALIANO
5. UTILIZZO
5.2 Apertura porta
Per aprire la porta:
- spingere il lato sinistro della porta
- oppure tirarlo
5.4 Funzione memoria tem-
peratura
Il caso di interruzione di corrente, la can-
tina per vino può ricordare l'impostazione
di temperatura precedente e, quando la
corrente viene ripristinata, la temperatura
torna a quella originale.
5.3 Primo utilizzo
Prima di utilizzare il dispositivo
per la prima volta, pulire l'inter-
no e tutti gli accessori interni con
acqua tiepida e un po' di sapone
neutro, quindi asciugare comple-
tamente.
Non utilizzare detergenti o polveri
abrasive, poiché possono danne-
ggiare le riniture.
Per accendere il dispositivo, premere il
tasto ON/OFF e regolare la temperatura
in base al vino da conservare.
5.1 Utilizzo giornaliero
Questo dispositivo deve essere
usato esclusivamente per la
conservazione del vino.
Il vano di conservazione vino è
quello contrassegnato (sulla tar-
ghetta) con
Pulizia
Prima di usare il dispositivo per la prima
volta, lavare la supercie interna e tutti gli
accessori interni con acqua tiepida e un
po’ di sapone neutro al ne di rimuovere il
tipico odore dei prodotti nuovi, quindi as-
ciugare bene.
• L’apertura dello sportello per lunghi
periodi di tempo può causare un au-
mento signicativo della temperatura
nei vani del dispositivo.
• Pulire regolarmente le superci che
possono entrare a contatto con cibo e
sistemi di drenaggio accessibili.
• Conservare la carne e il pesce cru-
di nella cantina per vino all’interno di
contenitori idonei, in modo che non
vengano a contatto con altri cibi o
sgocciolino su di essi.
• Se il dispositivo refrigerante viene las-
ciato vuoto per lunghi periodi di tempo,
spegnere, scongelare, pulire, asciu-
gare e lasciare aperto lo sportello per
evitare che si sviluppino mue all’inter-
no del dispositivo.
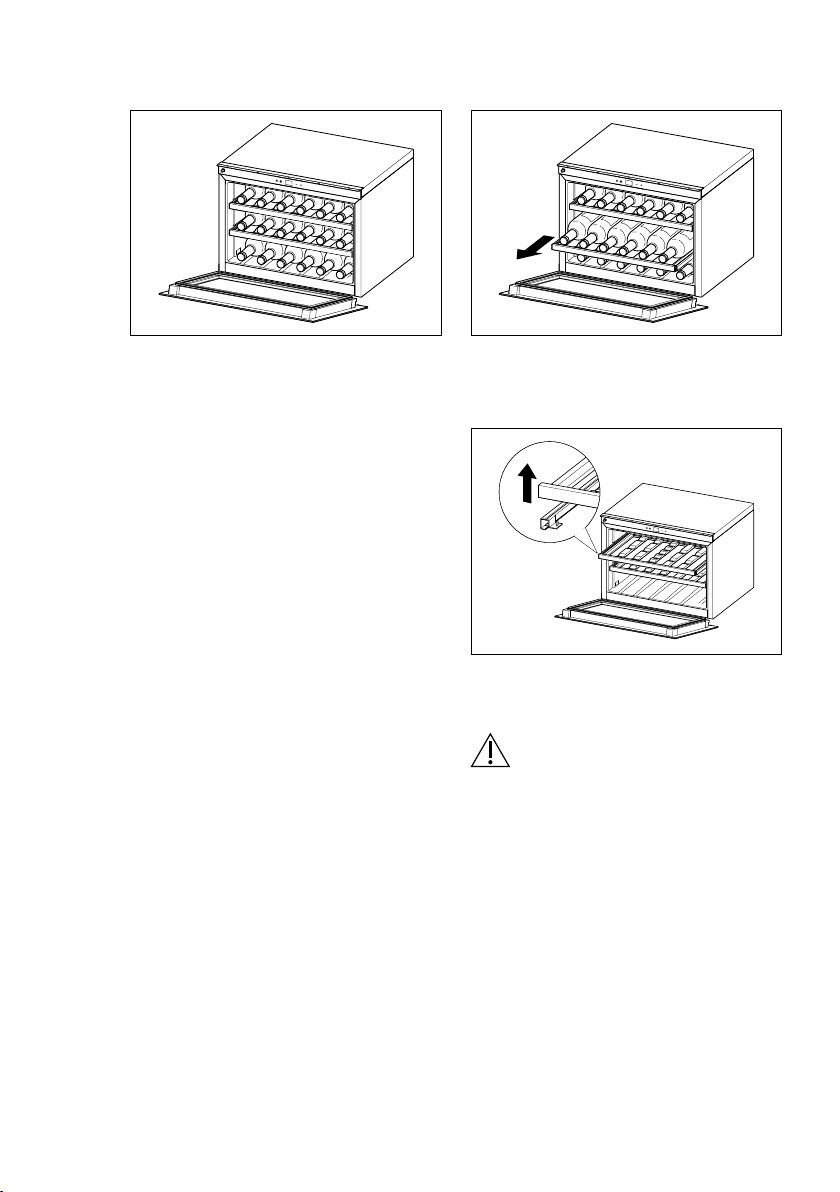
52
5.5 Conservazione del vino
Il tempo di conservazione del vino di-
pende dall'invecchiamento, dal tipo di
uve, dal contenuto alcolico e dal livello
di fruttosio e di tannino contenuti. Al mo-
mento dell'acquisto, vericare se il vino è
già invecchiato o se migliora con il tempo.
Temperatura di conservazione consiglia-
ta:
- Champagne/Prosecco e vini frizzanti:
da +6 a +8 °C
- Vini bianchi: da +10 a +12 °C
- Vini rosé: da +12 a +16 °C
- Vini rossi: da +14 a +18 °C
5.6 Ripiani per il vino
• Per rimuovere o montare i ripiani in le-
gno, sollevare o spingere il ripiano.
(per bottiglie di Bordeaux da 750 ml)
Totale: 18 bottiglie
• Per accedere facilmente alle bottiglie,
estrarre i ripiani dal vano.
Per evitare di danneggiare la
porta, vericare che sia comple-
tamente aperta quando si estrag-
gono i ripiani.
www.aeg.com
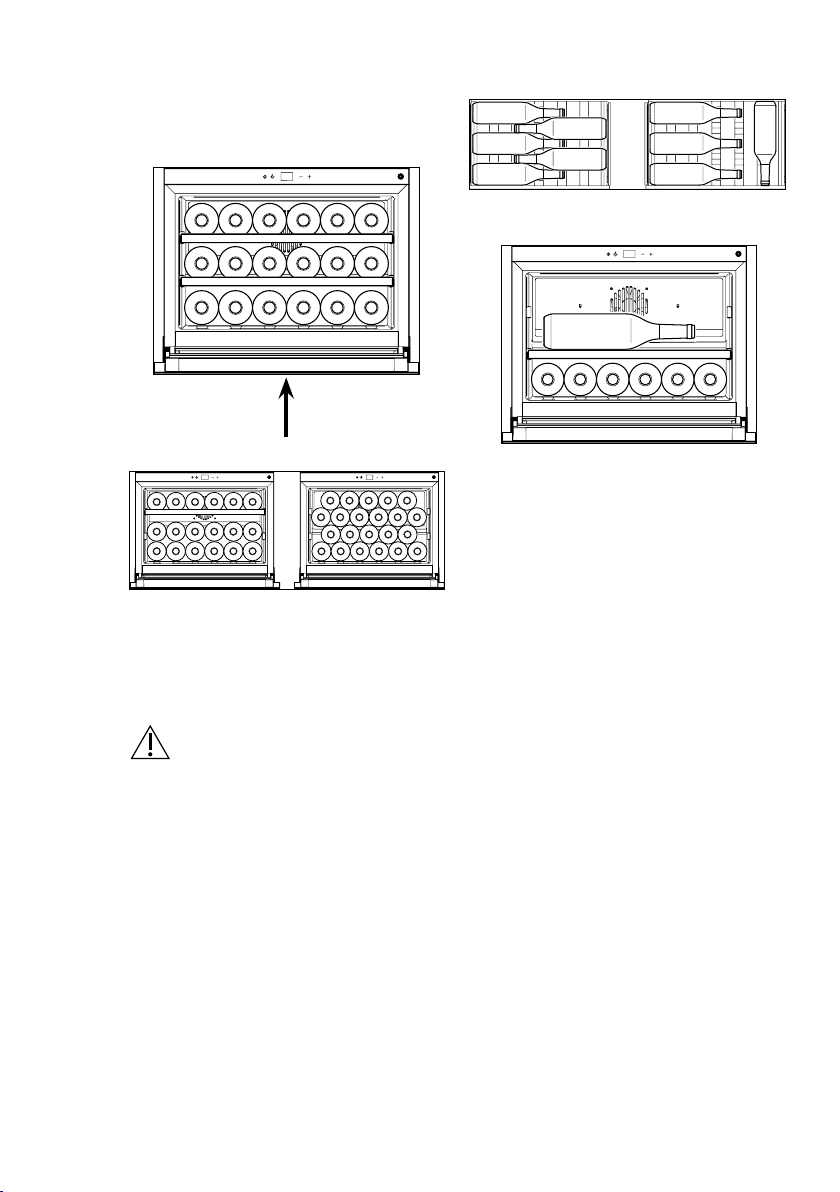
53ITALIANO
• Congurazione standard
Per conservare no a 18 bottiglie di Bor-
deaux, posizionare 6 bottiglie su ogni li-
vello.
• Congurazione orizzontale
Per conservare facilmente bottiglie gran-
di e alte nel secondo ripiano, è possibile
rimuovere il ripiano superiore, come mos-
trato nella gura.
Il primo livello è stato progettato per ospi-
tare le bottiglie più grandi e alte.
Adatta per bottiglie grandi e alte.
Rimuovendo i ripiani, è possibile aumen-
tare la capacità, come mostrato nelle -
gure.
AVVERTENZA! In questo caso
vericare che le bottiglie non sia-
no a contatto con la parete poste-
riore della cavità.
6. SUGGERIMENTI E CONSIGLI
Normali rumori di funzionamento
I seguenti rumori sono normali durante il
funzionamento:
• Un leggero gorgoglio nelle serpentine
quando viene pompato il refrigerante.
• Un ronzio e un rumore pulsante dal
compressore quando viene pompato il
refrigerante.
• Un rumore di rottura improvvisa dall’in-
terno del dispositivo causato dalla di-
latazione termica (un fenomeno sico
naturale e non pericoloso).
• Un leggero clic dal regolatore di tem-
peratura quando il compressore si ac-
cende o si spegne.
Suggerimenti per il risparmio energe-
tico
• Non aprire frequentemente lo sportello
né lasciarlo aperto più di quanto asso-
lutamente necessario.

54
7. INSTALLAZIONE
7.1 Posizionamento
Attorno al dispositivo deve essere pre-
sente un'adeguata ventilazione d'aria,
al ne di evitare il surriscaldamento. Per
ottenere una ventilazione suciente, se-
guire le istruzioni di installazione.
Installare questo dispositivo in una po-
sizione in cui la temperatura ambiente
corrisponde alla classe climatica indicata
sulla targhetta del dispositivo:
Classe climatica
Temperatura
ambiente
SN da +10 °C a +32 °C
N da +16 °C a +32 °C
ST da +16 °C a +38 °C
T da +16 °C a +43 °C
D1
W1
Dimensioni
comples-
sive
H1
455
W1
596
D1 566
Spazio neces-
sario per l’uso
H2
455
W2
596
D2 571
Spazio gene-
rale necessario
per l’uso
H3
455
W3
596
D3 1026
Dimensioni complessive
Spazio necessario per l’uso
Spazio generale necessario
per l’uso
H1 / H2 / H3
D2
W2
D3
W3
www.aeg.com

55ITALIANO
8. CURA E MANUTENZIONE
ATTENZIONE! Prima di ese-
guire qualunque operazione di
manutenzione, scollegare il dis-
positivo.
Questo dispositivo contiene idro-
carburi nella sua unità di rared-
damento; pertanto, la manuten-
zione e la ricarica devono essere
eseguite da tecnici autorizzati.
8.1 Pulizia periodica
Il dispositivo deve essere pulito regolar-
mente.
Non tirare, spostare o danneg-
giare i tubi e/o i cavi all'interno
dell'unità
Per pulire l'interno non usare mai
detergenti, polveri abrasive, pro-
dotti di pulizia particolarmente
profumati o cere lucidanti, poiché
danneggerebbero le superci e
lascerebbero un forte odore.
• Pulire le superci interne con una solu-
zione di acqua tiepida e bicarbonato di
sodio. La soluzione deve essere com-
posta da circa 2 cucchiai di bicarbona-
to di sodio per ogni litro di acqua.
• Pulire i ripiani con un soluzione de-
tergente delicata.
• Eliminare l'acqua in eccesso dalla
spugna o dal panno quando si pulisce
l'area dei comandi o qualunque parte
elettrica.
• Pulire l'interno e gli accessori con ac-
qua tiepida e un po' di sapone neutro.
• Controllare e pulire regolarmente le
guarnizioni della porta, per garantire
che siano pulite e prive di residui.
• Risciacquare e asciugare completa-
mente.
8.2 Periodi di non funziona-
mento
Quando il dispositivo non viene utilizzato
per lunghi periodi, rispettare le seguenti
precauzioni:
• Scollegare il dispositivo dall'alimenta-
zione.
• Rimuovere tutti gli elementi.
• Pulire il dispositivo e tutti gli accessori.
• Lasciare aperta la porta per evitare
odori sgradevoli.
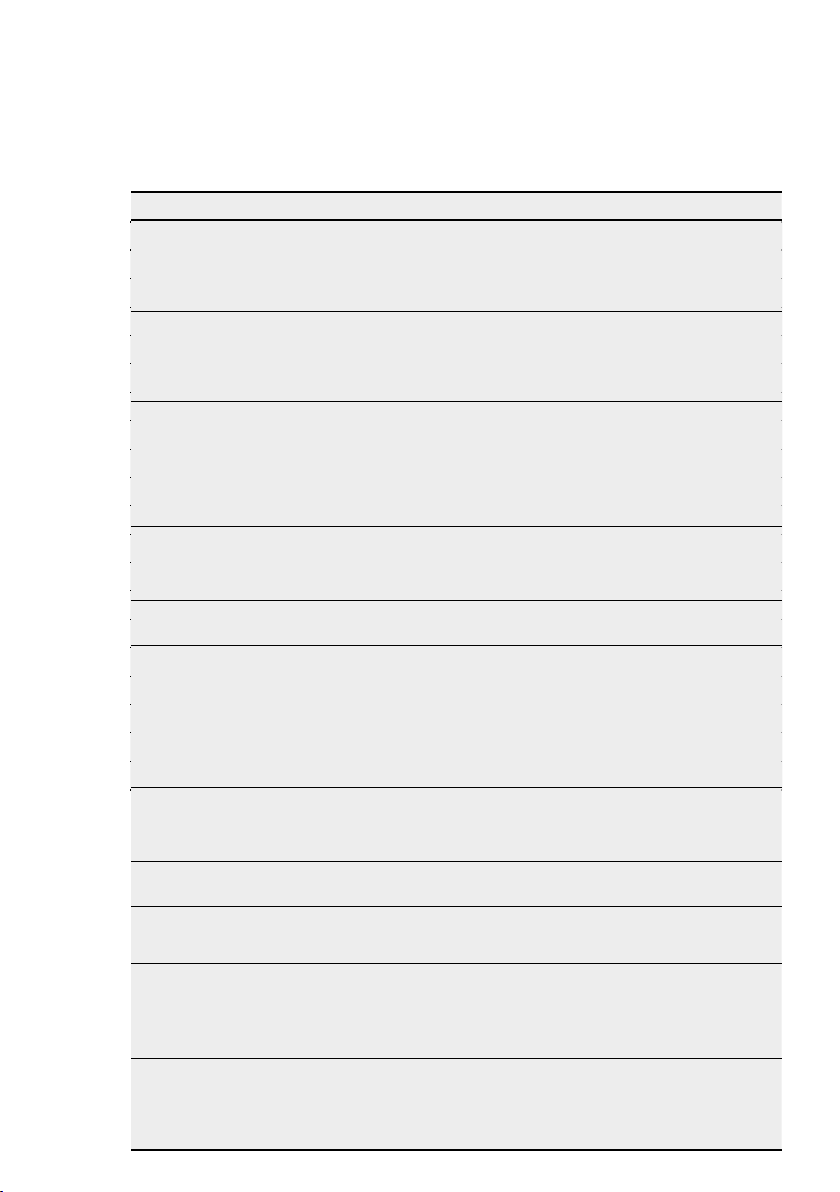
56
9. GUIDA PER LA RISOLUZIONE DEI PROBLEMI
È possibile risolvere facilmente molti pro-
blemi comuni della cantina, risparmiando
il costo di una chiamata per l'assistenza
tecnica. Provare i seguenti suggerimenti.
Problema Possibile causa Soluzione
Problema Possibile causa Soluzione
La cantina
per vino non
funziona.
• Cavo di alimentazione non collegato.
• Il dispositivo è spento.
• È scattato l'interruttore.
• È attiva la modalità demo.
• Collegare il dispositivo.
• Accendere il dispositivo.
• Accendere l'interruttore.
• Disattivare la modalità demo (premere +/-
per 3 sec.).
La cantina
per vino non
è abbastanza
fredda.
• Controllare l'impostazione di controllo
temperatura.
•
La porta non è chiusa completamente.
• La guarnizione della porta non sigilla
correttamente.
• Vericare la temperatura impostata.
• Vericare che la porta sia chiusa.
• Pulire la guarnizione della porta con una spu
-
gna inumidita con detergente neutro e acqua.
Il compressore
è sempre in
funzione.
• La temperatura ambiente è più calda
del solito.
•
La porta
viene aperta troppo spesso.
•
La porta
non è chiusa completamente.
• La guarnizione della porta non sigilla
correttamente.
• Vericare la temperatura ambiente.
•
Non tenere aperto la porta più del necessario.
• Vericare che la porta sia completamente
chiusa.
• Vericare la condizione della guarnizione e,
se necessario, pulirla con una spugna inumidi
-
ta con detergente neutro e acqua.
La luce non
funziona.
• Cavo di alimentazione non collegato.
• È scattato l'interruttore.
• Il LED si è bruciato.
• Il pulsante della luce non funziona.
• Collegare il dispositivo.
• Accendere l'interruttore.
• Contattare l'assistenza.
• Contattare l'assistenza.
Vibrazione
eccessiva.
• Controllare che la cantina per vino sia
perfettamente orizzontale.
• Mettere il dispositivo perfettamente orizzon-
tale.
Rumore
eccessivo.
• Il rumore meccanico potrebbe derivare dal us-
so del refrigerante; è una condizione normale.
• La contrazione e l'espansione delle
pareti interne possono causare rumori di
botti e scricchiolii.
• La cantina per vino non è perfettamente
orizzontale.
• La ventola è sporca.
• Mettere il dispositivo perfettamente orizzon
-
tale.
• Rimuovere la polvere dalla ventola.
• Se i rumori aumentano, contattare l'as
-
sistenza.
La porta non
è chiusa
correttamente.
• La cantina per vino non è perfettamente
orizzontale.
•
La porta non è stata ssata correttamente.
• La guarnizione è sporca.
•
Mettere il dispositivo perfettamente orizzontale.
• Vericare che la porta sia chiusa.
•
Pulire la guarnizione del
la porta
con una spu-
gna inumidita con detergente neutro e acqua.
Allarme
acustico.
•
La porta
non è chiusa (l'allarme dura
30 min).
• Chiudere la porta.
È visualizzato
E3.
•
La porta
è stata lasciata aperta per più
di 30 min.
• Il sensore porta è rotto.
• Chiudere la porta.
• Contattare l'assistenza.
È visualizzato
E1 e viene
emesso un
allarme acustico
ogni 5 minuti.
• La temperatura interna della cantina per
vino non rientra nell'intervallo compreso
tra -20 °C e +60 °C.
• Il sensore di temperatura è fuori uso o
scollegato.
• Vericare che i dispositivi vicini non emettano
calore.
• Contattare l'assistenza.
È visualizzato
E2.
• I dispositivi più vicini emettono calore.
• La temperatura ambiente non rientra nel
range della classe climatica del prodotto.
• Il compressore o la ventola sono fuori
uso.
•
Vericare che i dispositivi vicini non emettano calore.
•
Vericare se il prodotto è installato in una posi-
zione con una temperatura ambiente che rientra
nella classe climatica dichiarata del prodotto.
• Contattare l'assistenza.
www.aeg.com

57ITALIANO
10. INFORMAZIONI TECNICHE
11. INFORMAZIONI PER GLI ISTITUTI DI VERIFICA
12. PROBLEMI AMBIENTALI
Il simbolo . riportato sul prodotto o
sulla sua confezione indica che questo
prodotto non può essere trattato come un
riuto domestico.
Deve essere invece portato al punto di
raccolta appropriata per il riciclo di appa-
recchiature elettriche ed elettroniche.
Garantendo il corretto smaltimento di
questo prodotto, si aiuterà a prevenire
potenziali conseguenze negative per
l’ambiente e la salute dell’uomo, che po-
trebbero diversamente essere causate
da una gestione inappropriata dei riuti di
questo prodotto.
Per ulteriori informazioni dettagliate sul
riciclo di questo prodotto, contattare il
comune della zona, il servizio di smalti-
mento riuti domestici o il negozio dove è
stato acquistato il prodotto.
Materiali d’imballo
I materiali che riportano il simbolo
.
sono riciclabili. Smaltire il materiale di im-
ballo nei contenitori di raccolta idonei al
ne di riciclarlo.
Dati tecnici
Le informazioni tecniche sono riportate
nella targhetta sul lato interno del dispo-
sitivo e sull’etichetta della classe energe-
tica.
Il QR code riportato sull’etichetta della
classe energetica fornito con il disposi-
tivo fornisce un link web alle informazioni
correlate alle prestazioni del dispositivo
nel database EU EPREL. Conservare
l’etichetta della classe energetica per ri-
ferimenti insieme al manuale utente e a
tutti gli altri documenti forniti con questo
dispositivo.
È possibile anche trovare le stesse infor-
mazioni in EPREL sul sito https://eprel.
ec.europa.eu e tramite il nome modello
e il numero di prodotto riportato sulla tar-
ghetta del dispositivo. Vedere il sito www.
theenergylabel.eu per informazioni detta-
gliate sull’etichetta della classe energeti-
ca.
Le informazioni tecniche sono riportate
sulla targhetta, sul lato esterno o interno
del dispositivo e nell’etichetta della classe
energetica.
L’installazione e la preparazione del dis-
positivo per qualsiasi verica EcoDesign
devono essere conformi alla norma EN
62552.
I requisiti di ventilazione, le dimensioni del
vano e lo spazio libero posteriore minimo
devono rispettare le indicazioni del pre-
sente manuale utente riportate al capitolo
6. Contattare il produttore per qualsiasi
ulteriore informazione, compresi i piani di
carico.


111222333-A-362013
www.aeg.com/shop