Loading ...
Loading ...
Loading ...
EN - 7
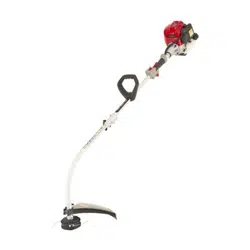
• the cutting line head can eliminate tall
grass and non-woody vegetation near
fences, walls, foundations, pavements,
around trees, etc. or to completely clean
a particular area of the garden;
• the 3-point, 4-point and 8-point blades
are suitable for cutting brushwood and
small shrubs up to 2 cm in diameter;
•
allows small woody parts to be cut
and small trees to be felled.
IMPORTANT When the cutting
means has to be changed, dismantle
all the elements of the device.
4.4 FITTING THE GUARD ON
THE CUTTING MEANS
Wear protective gloves.
4.4.1 Fitting the guard on the cutting
IMPORTANT Every time this guard
is used, check that the drive tube plate
(Fig. 5.B, Fig. 5.E) has been tted.
1. Remove the screws (Fig. 5.A).
2. Position the guard (Fig. 5.C) on the holes of
the plate (Fig. 5.B) of the drive tube (Fig. 5.D)
3. Secure the guard (Fig. 5.C) fully
tightening the screws (Fig. 5.A).
NOTE The following symbol (Fig. 1.E)
there is the following symbol:
Indicates the rotation direction
of the cutting means.
4.4.2 Fitting the guard on the cutting
This guard must not be used
for other cutting means.
1. Remove the guards that may have
been used for other cutting means.
2. Position the guard (Fig. 6.B) on the
holes of the transmission (Fig. 6.A).
3. Secure the guard (Fig. 6.B) fully
tightening the screws (Fig. 6.C).
4.5
CUTTING MEANS
Wear protective gloves.
4.5.1 Fitting cutting line head
1.a Type I: With the spacer (Fig. 7.A.1)
correctly inserted on the shaft, t
the inner ring-nut (Fig. 7.A) and the
external ring (Fig. 7.D) in the indicated
direction, making sure that the
grooves match perfectly with those of
the angle transmission (Fig. 7.B).
1.b Type Il: With the spacer (Fig. 8.A.1)
correctly inserted on the shaft, t
the inner ring-nut (Fig. 8.A) in the
indicated direction, making sure that
the grooves match perfectly with those
of the angle transmission (Fig. 8.B).
2. Insert the supplied wrench (Fig. 7.C, Fig.
8.C) in the relative inner ring-nut hole (Fig.
7.A, Fig. 8.A) and manually rotate the ring-
nut pushing the wrench (Fig. 7.C, Fig. 8.C)
until it ts securely in the angle transmission
hole (Fig. 7.B, Fig. 8.B), blocking rotation.
3. Fit the cutting line head (Fig. 7.H, Fig.
8.H) screwing it in counter-clockwise.
4. Remove the wrench (Fig. 7.C,
Fig. 8.C) to restore rotation.
Adjusting the cutting means guard:
5. Fit the additional guard (Fig. 7.E, Fig.
8.E), inserting the couplers into the
respective seats in the cutting means
guard (Fig. 7.F, Fig. 8.F) and pressing
until a click is heard; then fasten in place
using the screw (Fig. 7.G, Fig. 8.G).
IMPORTANT When using the cutting
line head, the additional guard must
always be installed (Fig. 7.E, Fig. 8.E),
with the line cutting knife (Fig. 25.A).
4.5.2
1. Insert the supplied wrench (Fig. 7.C, Fig. 8.C)
in the relative inner ring-nut hole (Fig. 7.A,
Fig. 8.A) and manually rotate the ring-nut
pushing the wrench (Fig. 7.C, Fig. 8.C) until
it ts securely in the angle transmission
hole (Fig. 7.B, Fig. 8.B), blocking rotation.
2. Remove the cutting line head (Fig. 7.H,
Fig. 8.H) unscrewing it clockwise, being
careful not to remove the spacer
(Fig. 7.A.1, Fig. 8.A.1) from the shaft.
Loading ...
Loading ...
Loading ...