OW "S MAN UAL
MANUEL D'INSTR UCTIONS
MANUALDEINSTRUCCIONES
SEWING MACHIN
MA CHINE A CO UDRE
:: MAQUINA DE COSER
I'll I II II I'llllqll I I II
OPERATING INSTRUCTIONS
"For appliances with a polarized plug (one blade wider than the other).
To reduce the risk of electric shock, this ptug is intended to fit in a
polarized outtet only one way. If the plug does not fit fulty in the outlet,
reverse the plug, If it stiil does not fit, contac! a qualified eJectrician to install
the proper outlet, Do not modify the plug in any way."
"Foot Controller Model YC-482P or YC-530 for use w_th Sewing Machine Models
385.177Bxxx, 385.1684×xx, 385.1584xxx, 385o1664xxx_ 385,1754×xx, 385.17526xxx,
385.1764x x x, 385.1884× x x, 385.17928x x x, 385.17924x x ×, 385.18836x x x,
385.17922x x x, 385.16816x x x, 385,17822x × ×, 385.17828x x ×, 385.18830 × × x and
385.17026× x x.
xxx -represents numbers 000 through 999."
{For U.S.A. market only)
SEARS, ROEBUCK ANDCO.
Dear Customer:
You have just invested in a very fine zigzag sewing machine. Before using your new Kenmore machine,
please pause for a moment and careluliy read this booklet which contains instructions on how to operate
and care for your machine.
Specific instructions are given on threading, tension adjustments, cleaning, oiting, etc. This will help you
obtain the best sewing results and avoid unnecessary service expense tor conditions beyond our control.
Advice on the operation and care ot your machine is always available at your nearest Sears Retail Store.
Please remember, if you have questions about your machine or need parts and service, always mention
the model number and serial number when you inquire+
Kenmore Sewing Machine
Record in space provided below the model number and serial
number of this appliance. The model number and serial number
are located on the nomenclature plate, as identified on Page 4 ot
this booklet.
Model No. 385. Serial No.
Retain these numbers for tuture reference.
THiS MODEL IS A CENTER NEEDLE, LOW BAR SEWING MACHINE.

IMPORTANT SAFETY
INSTRUCTIONS
Your sewing machine is designed and constructed only |or HOUSEHOLD use.
Read all instructions before using this sewing machine.
DANGER --To reduce the risk of electric shock:
1. A sewing machine should never be left unattended when plugged in. Always
unplug this sewing machine from the electric outlet immediately after using
and before cleaning.
2. Always unplug before replacing sewing machine bulb. Replace bulb with
same type rated 15 Watts.
3. Do not reach tor a sewing machine that has tallen into water. Unplug
immediately
4. Do not place or store sewing machine where it can tali or be pulled into a tub
or sink. Do not place or drop into water or other liquid.
WARNING --To redoce the risk of burns, fire, electric shock, or injury
to persons.
1.
2_
3.
Do not allow to be used as a toy. Close attention is necessary when this
sewing machine is used by or near children.
Use this sewing machine onlyfor itsintended use as described inthis manual.
Use only attachments recommended by the manufacturer as contained in
this manual
Never operate this sewing machine if it has a damaged cord or plug, ifit is not
working properly, if it has been dropped or damaged, or dropped into water.
Return the sewing machine to the nearest authonzed dealer or service center for
examination, repair, electrical or mechanicaf adjustment.
4. Never operate the sewing machine with any a_ropening b_ocked.Keep ventilation
openings of the sewing machine and foot controller free from accumulation
of lint, dust, and loose cloth.
5. Never drop or insert any object into any opening.
6. Do not use outdoors.
7. Do not operate where aerosot (spray) products are being used or where
oxygen ksbeing administered.
8. To disconnect, turn all controls to the off ("0-) position, then remove piug
from outlet.
9. Do not unplug by pulling on cord. To unplug, grasp the ptug, not the cord.
10. Keep fingers away trom all moving parts. Special care is required around
the sewing machine needle.
11. Always use the proper needle plate. The wrong plate can cause the needle
to break.
I2. Do not use bent needles.
13. Do not pull or push fabric while stitching. It may deflect the needle causing it
to break.
14. Switch the sewing machine off (°'0-) when making any adjustment in the
needle area, such as threading needle, changing needle, threading bobbin,
or changing presser loot, and the like.
15. Always unplug the sewing machine from the electrical outlet when
removing covers, lubricating, or when making any other adjustments
mentioned in the instruction manual.
SAVE THESE INSTRUCTIONS
SEARS, ROEBUCK AND CO.
Chbre Cliente,
Vous m,ez fatt nn mvestissement judicieux en achetaut cette superbe machine h coudre _t POint zigzag.
Avant de votts servtr de votre nouvelle machine dt eoudre Kemuore, prenez te temps de Hre attentivement
ce manuel d'instructions, qui a dt_ rddige de fagon claire et concise. Vons profiterez ainsi de routes les
comntodit_s qu'apporte cette machine et vous saurez comment en prendre soin.
Les diverses opdrations pour passer les ills, rdgler la tension, uettoyer ta navette, huller le mouvement,
etc, sont traitdes en ddtaiL Vous obtiendrez ainst d' excellents rdsuitats et vous vous dviterez Jes frats de
ddpiaeement d'ltn rdparatettr, pour des raisons minettres dont notts ne pouvons pas assttnler la responsabi-
litd.
Si vous ddstrez notts poser des questions partiealiOres, eoncernaut l'emplot ou l'entretten de votre
machine, n'hesitez pas [7 te fatre en vous adressant i_ votre magasm Sears habitttel. Dans route communi-
cation dcrtte otl parlde, soyez toujottrs en mesure de noas donner les mmldros de modOle et de sdrie de
votre machine it coudre.
Machine h cottdre Kenmore
Marquez dans les espaces ct-dessous, ies numOros de modOle et de
sdrie de votre machine, lls sont iuscrits sttr ta plaque stgnal_tiq ue,
dont remplacement sur la machine est mdique 1_la page 4 de ce
mamteL
N_ de modOle: 385. _ de s_rie:
Vous poarrez avotr besoin de ces num_ros pius tard,
MACHINE A AIGU1LLE CENTRALE ETBARRE BASSE NORMALE.
1II
Consignes de S#curit Importantes
Votre machine i_coudre est con_ae uniquement pour f usage m_nager. Pri_re de
lire routes Ies consignes avant de I' utitiser,
DANGER-roar rOdutre te risque de la commotion _tectrtque.
t. Ne )amais iatsser ta machine branch_e. D_brancher la machine aprbs
chaqae utilisatton et avant chaque ne nettoyage.
2+ Ne pas manquer a d_brancher la machine avant le remptacement de
fampes, Remptacer l'ampolde par un nouveau atnpouie dtt mbne type {t 15
Watts.
3, Ne pas tendre la math pour prendre ia machine, torsqtte celle-ct est
tombOe dans I eaa. La dObrancher tout de state.
4+ Ne pas placer ou d_poser la machh_e a l' endrott oft elle rtsqtte de tomber
oa renlrer dons Jtn tube Olt all _vJer.
Ne mettre ou falre tomber la tnachble ni dans l'eau nt dans d" autres liquides.
A VERTISSE MENT--Po,,rrOd,,,reler,++,,ede'.l,r 't,re,to
mtse en fett, fa comntotion dlectrtque, art la blessltre aa corps htanatn.
L Ne pas pennettre de taisser utiliser la machine comme jouet d'enfant+ II
faut payer l'attention particulier, torsque ta machine est utilisde h ta
portOe des enfants.
2. Utiliser la machine uniquentent pour !'usage prevtt dons ]e present
manuel N'utiliser que Ies accessotres recomntandds par le fabricant clans
ce ntanaeL
3+ ge jamms mettre la machbte en service, st son cordon oa sa prise de cou
rant est en Otat endomntag_, ou si elle ne fonclionne pas correctement, art
encore st elle est tombee par terre, endommagde, ou tombOe dans t'eau.
Renvoyer la ntachhte au distribatetw ou art centre de servtce atttorts6 te
plus proche de votre ntatson pour faire effectaer eventuellement la
vdrification, ?a r_paratton, et l' ajustement dtectrtque oa mdcantque.
4. Ne jamals mettre la machine en service avec ses ouvertttres d'a_rage
IV
bloquees. Mamtemr fes ouvertures d'adras de la machine et fa pddate de
commande en 6tat exempt de ia pehtche, de ia poussikre et des piOces
d' toffe.
5. Ne jamats latsser tomber ou tntrodtttre ttn objet qaelcottqtte dans tes
OllVerlllres,
6+ Ne pas ntiliser ia machMe en plein atr.
7. Ne pas mettre la machine en servtce i_ ]' endroit oh des produtts en aerosot
(bombe a_rosol) sont utitisds, oa l' oxygene est mampald,
8+ Pour ddconnecter la tnachine, tourner tons les contrOleurs h ta position
OFF (" 0 "'), et puis fa ddbrancher.
9. Ne pas d_braacher la machine, en ttrant tale cordon. Pour ia d_brancller,
tenir ia prtse de courant i_ia mare, mats paste cordon,
10. Ecarter vos doits de tous ies parttes en ntouvement, lt faut payer t'attentton
notamment atttottr de l'aigtdlle de fa machine.
It. Utiliser toujoars ta plaque d'a_guille appropri_e+ La plaque inappropri_
rtsque de casser l'atguille.
12+ Ne pas utiliser l'atguille fldchie+
13. Ne pas ttrer ou pousser l'_toffe pendant ]'op_ratton de ptqgtres. Cela rtsque
de fl_chir t'atguilte, fimssant par fa casser.
J4. Mettre te comnnttatetlr de ia machine iz la postgion OFF (" 0 "), lorsqtte
vous procedez, dans la zone d aigaille, aux oodrations relies que l'enfilage
de l'aiguille, te remplacement des atguilles, l' et_lage de fa bobine,
remplacement des presseurs, etc..
I5. D_brancher la machine sans faute, avant d'eniever les coavertures, de
htbrifier la machine, ou de proceder h d'autres ajustentents ntentionnes
dans le atanuel d' ittsD'ltcl]on.
Respecter Ces Consignes
SEARS, ROEBUCK AND CO.
Estimado Cliente:
Usted ha mvemdo en una muy buena mfiquma de coser con puntada tie zigzag. Antes de usar su nueva
maquma Kenmore, pot favor detimgase pot un momemo y lea cuidadosamente este manual ei cual
cont_ene mstruccmnes de eomo manejar y cmdar su m_quina.
Aqui encontrra-fi instmceiOnes especificas sobre enhebrado, ajuste de ia tensi6n, limpleza, engrase, etc.
Esto Ie permitirfi obtener me.lores resuitados en la costura y evttar eostos de servicio innecesarios por
condic_ones fuera de nuestro controt.
En su almac4n Sears mils eercano slempre hay disponibles consejos para el manejo y cmdado de su
m_quma. Por favor recuerde, si tiene preguntas acerca de su m_tquma o necesita panes o serviem,
mempre mencmne el n,Smero del modelo y eI nfimero de sene cuando pregunte.
MAQUINA DE COSER KENMORE
Anote en el espaclo inferior los nfimeros de modelo y serie
de esta mfiquma. Los mameros de modelo y sene es_n
loealizados en la ptaca de nomenclatura como se indiea en
Ia p_igina 4 de este manual.
Modelo No. 385. Sene No.
Recuerde estos n'fimeros para futuras referenclas.
ESTE MODELO ES UNA MAQUINA DE COSER CON AGUJA CENTRAL Y BARRA CORTA
V
INSTRUCCIONES DE SEGURIDAD
IMPORTANTES
Su maquma de coser esta disefiada y construida solo para uso casero.
Lea todas las mstmcclones antes de usar esta m_,qumade coser.
PELI GR O - redoc,re,nesgodeehoqoeel ctr, o.
I. La maquma nunca se debe desatender cuando se ha conectado.
Siempre debe ctesconectarla de la toma el6ctnca tan pronto termme de
usarla y antes de limplarla.
2. Siempre aebe desconectarla antes de carnbiar la bombilla.
Reemplazar la bombilla con una del m_smo t_po de 15 vatios.
3. No debe recogerla sl se ha caido al agua. Inmediatamente desconcctela.
4. No coioque o guarde la maqmna donde pueda caer o set urada dentro de
una bafiera o sumidero. No colocar o tiejar caer en agua u otto iiqmdo.
ADVERTENCIA- Para reducer el nesgo de quemaduras,
incendio, choqut tlfctrico o dafio a tas personas:
i. No perm_ta que su maquma de coser sea usada cored Juguete.
Preste mucna atenci6n 'cuanOola utilice cerca de nifios.
2. Utilice este mfNuma solo papa el uso que se le ha destinado cored se de
scribe en el manual. Use solamente aditamtntos recomendados por el
productor como los contenldos en este manual.
3. Nunca opere esta maquma sl hay un cable o tap6n da_ados, s_ no esta
trabajando apropmdamente, s_se ha caldo o dafiado o si ha caido en agua.
Devueiva ia m'aquina al centro de serv,elo o punto de venta autonzado mils
cercano para exammar, reparar, o realizar ajuste mtcanico o el6cmco.
4. Nunca opere ta maquina con cualqumr salida de mm bloqueada.
Mantenga las aberturas de ventilaci6n de la m_iquma de coser y el control
de pedal libms de acumulaci6n de pelusa, polvo y rtslduos de tela.
5. Nunca deje caer o mtroduzca objetos en nmguna abertura de ia mfiquma.
6. No ia utilice en txtenores.
7. No opere donde se utilizan atrosotes o Studs de administraci6n cte
oxigeno.
8. Para desconectar, cotoque todos los controles en poslci6n de apagaOo,
entonces retwe eI enchufe de la toma elO.ctnca.
9. No desconecter halan0o dei cable. Para desconectar, hale del enchufe, no
det cane.
10. Mantenga los dedos fuem de las partes en movlmiento. St mqmere espe
cml cutdado alredtdor de. la aguja de ta maquina de coser.
11. Siempre utilice |a placa de aguja adecuada, l,a placa equivocada puede
causar que se rompa la aguda.
12. No utilize agujas dobiadas.
13. No hale o empuje la teia mientras cose. Esto puede desviar la aguja
ocas_onando que se rompa.
i4. Carnbie ta maquma de coser a apagado cuando haya cualquier ajuste en el
area de la aguja, cored enhebrar la aguja, cambmr _a aguja, ensartar el
carrtte, o cambiar el pit de presidn.
i'5. Siemprt desconecte la m:aquma de coser tie la toma el_ctnca cuando
rtmueva las cubiertas, al engrasar, o cuando hact otros ajustes
menc_onados en el manual de mstrucciones.
CONSERVE ESTAS INSTRUCCIONES.
v!
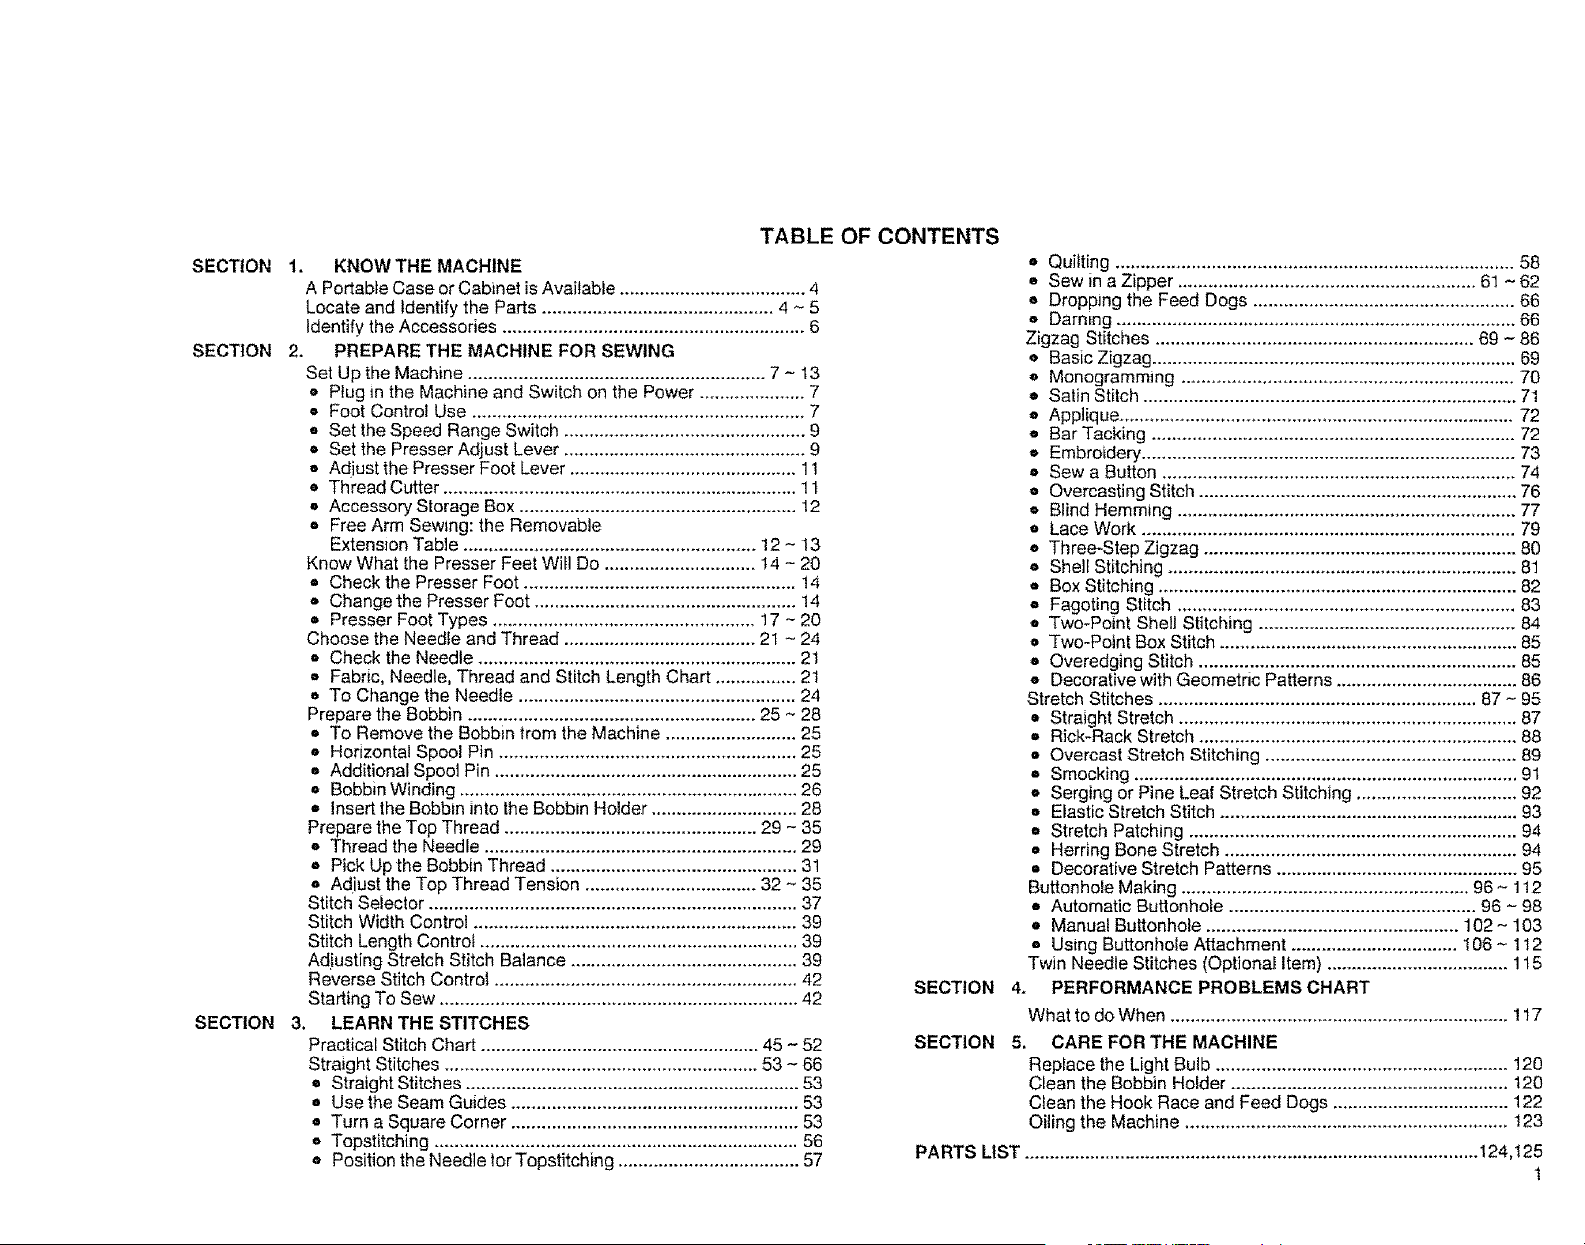
TABLE OF CONTENTS
SECTION 1. KNOW THE MACHINE
A Portable Case or Cabinet is Available ..................................... 4
Locate and Identify the Parts .............................................. 4 ~ 5
Identify the Accessories ............................................................ 6
SECTION 2. PREPARE THE MACHINE FOR SEWING
Set Up the Machine ........................................................... 7 - 13
o Plug in the Machine and Switch on the Power ..................... 7
o Foot Control Use .................................................................. 7
e Set the Speed Range Switch ................................................ 9
o Set the Presser Adjust Lever ................................................ 9
• Adiust the Presser Foot Lever ............................................. 1t
• Thread Cutter ...................................................................... 1t
e Accessory Storage Box ....................................................... 12
e Free Arm Sewing: the Removable
Extension Table .......................................................... 12- 13
Know What the Presser Feet Will Do .............................. 14 - 20
• Check the Presser Foot ...................................................... 14
o Change the Presser Foot .................................................... 14
o Presser Foot Types .................................................... 17 - 20
Choose the Needle and Thread ...................................... 2t - 24
a Check the Needle ............................................................... 21
o Fabric, Needle, Thread and Stitch Length Chart ................ 2t
• To Change the Needle ....................................................... 24
Prepare the Bobbin ......................................................... 25 ~ 28
• To Remove the Bobbin from the Machine .......................... 25
o Horizontal Spool Pin ........................................................... 25
e Additional Spool Pin ............................................................ 25
o Bobbin Winding ................................................................... 26
• Insert the Bobbin into the Bobbin Holder ............................. 28
Prepare the Top Thread .................................................. 29 - 35
e Thread the Needle .............................................................. 29
• Pick Up the Bobbin Thread ................................................. 31
a Adjust the Top Thread Tension .................................. 32 ~ 35
Stitch Selector ......................................................................... 37
Stitch Width Control ................................................................ 39
Stitch Length Control ............................................................... 39
Adjusting Stretch Stitch Balance ............................................. 39
Reverse Stitch Control ............................................................ 42
Starting To Sew ....................................................................... 42
SECTION 3. LEARN THE STITCHES
Practical Stitch Chart ....................................................... 45 - 52
Straight Stitches .............................................................. 53 - 66
• Straight Stitches .................................................................. 53
• Use the Seam Guides ......................................................... 53
• Turn a Square Corner ......................................................... 53
• Topstitching ........................................................................ 56
o Position the Needle for Topstitching .................................... 57
e Quilting ............................................................................... 58
e Sew in a Zipper ........................................................... 61 ~ 62
• Dropping the Feed Dogs .................................................... 66
o Darning ............................................................................... 66
Zigzag Stitches ............................................................... 69 - 86
o Basic Zigzag ........................................................................ 69
e Monogramming .................................................................. 70
• Satin Stitch .......................................................................... 71
• Applique .............................................................................. 72
e Bar Tacking ........................................................................ 72
• Embroidery .......................................................................... 73
o Sew a Button ...................................................................... 74
o Overcasting Stitch ............................................................... 76
e Blind Hemming ................................................................... 77
e Lace Work .......................................................................... 79
• Three-Step Zigzag .............................................................. 80
o Shell Stitching ..................................................................... 81
e Box Stitching ....................................................................... 82
a Fagoting Stitch ................................................................... 83
o Two-Point Shell Stitching ................................................... 84
o Two-Point Box Stitch ........................................................... 85
e Overedging Stitch ............................................................... 85
o Decorative with Geometric Patterns .................................... 86
Stretch Stitches ............................................................... 87 - 95
,* Straight Stretch ................................................................... 87
o Rick-Rack Stretch ............................................................... 88
• Overcast Stretch Stitching .................................................. 89
o Smocking ............................................................................ 91
• Serging or Pine Leaf Stretch Stitching ................................ 92
e Elastic Stretch Stitch ........................................................... 93
e Stretch Patching ................................................................. 94
• Herring Bone Stretch .......................................................... 94
• Decorative Stretch Patterns ................................................ 95
Buttonhole Making ......................................................... 96 ~ 112
• Automatic Buttonhole ................................................. 96 - 98
• Manual Buttonhole .................................................. 102- 103
o Using Buttonhole Attachment ................................. 106 ~ 1t2
Twin Needle Stitches (Optional Item) .................................... 115
SECTION 4. PERFORMANCE PROBLEMS CHART
What to do When ................................................................... 117
SECTION 5. CARE FOR THE MACHINE
Replace the Light Bulb .......................................................... 120
Clean the Bobbin Holder ....................................................... 120
Clean the Hook Race and Feed Dogs ................................... 122
Oiling the Machine ................................................................ 123
PARTS LIST .......................................................................................... 124,125
1
TABLEDES MATIERES
SECTION 1. CONNA1SSEZ VOTRE MACHINE
Mallette de transport et meuble a machine .................................. 4
Identification des piOces .......................................................... 4 ~ 5
Prdsentation des accessoires ........................................................ 6
SECTION 2. PREPARATION DE LA MACHINE A COUDRE
lnstalIatton de ta maelzbze ...................................................... 7- I3
• Branchement et raise sous tension de ia ntachbw .................... 7
• Pddale de vitesse ....................................................................... 7
• R_glagetemterrt(pteurganmwdevitesse ................................. 9
o Rdglagedu Ievterd'ajustementdepresston ............................ 9
Relevage du pied-de-biche ...................................................... / 1
Coupe-fit ................................................................................. 11
• Logement des accessotres ...................................................... I2
o Utilisatlon du bras libre .................................................. 12 - !3
Fonctions des pieds-de-biche ............................................. 15 ~ 20
o Chotsissez le pied presseur .................................................... 15
Changement de pied presseur ................................................ 15
Vons avez divers pieds-de-biche .................................... 17 ~ 20
ChoLr du fit et de l'diguille .................................................. 22 - 24
• E,xannnez votre atgnille .......................................................... 22
o Tableau des (toffes, aiguilles,fils et iongueur
du points .................................................................................. 22
e Changement d'atgnille ........................................................... 24
Enfilage de ta canette .......................................................... 25 ~ 28
• Entever ta bobine .................................................................... 25
• Broche a bobbte horizontate ................................................... 25
o Broche g_bobine suppldmentaire ............................................ 25
o Bobinage d'une canette .......................................................... 26
o Pose de la canette darts le porte-cane ................................... 28
Enfilage dn fil d'aiguille ..................................................... 29 - 35
o Gutdage dufil de dessus ......................................................... 29
e Remonte dufit de dessous ....................................................... 31
• Rdgiage de tension dufil de dessus ................................ 33 ~ 35
Sdlecteur de point ......................................................................... 37
R_gfage de targeur du point ....................................................... 40
Rdgiage de tongueur du point ..................................................... 40
Equilibrage des points extensibles ............................................. 40
Piquage en arri_re ....................................................................... 43
A rant de commencer .................................................................... 43
SECTION 3. CONNAISSEZ LES POINTS
GnMe pratique des points ................................................... 45 ~ 52
Points drotts ......................................................................... 54 - 67
• CotttTtres ordinatres ................................................................ 54
e Lignes de guidage ................................................................... 54
• Piquage d'un coin ................................................................... 54
• Snrpiqnage .............................................................................. 56
e Positionnetnentdel'aiguillepoursu_piquage ........................ 57
• Piqud ....................................................................................... 59
e Pose desfermetures gzgtissikre ...................................... 6l - 62
• Re'glage des griffes d'entra_)wment ........................................ 67
• Reprisage ................................................................................. 67
Points zigzags ....................................................................... 69 - 86
• Point zigzag smzpte ................................................................. 69
• Monogrammes ........................................................................ 70
• Point tance ............................................................................... 71
• Appliques ................................................................................. 72
• Brides de renfort ..................................................................... 72
• Broderie ................................................................................... 73
• Pose des boutons ..................................................................... 74
o Surfitage .................................................................................. 76
• Outlet invisible ........................................................................ 77
• Dentelle ................................................................................... 79
• Zigzag trois temps ................................................................... 80
• Point coquille .......................................................................... 81
• Point de crgneau ..................................................................... 82
• Coutrlre ajourde ...................................................................... 83
e Point eoquille deltx temps ....................................................... 84
• Point de cr_neatc_ a detLrpoints ............................................. 85
• Point de bordage ..................................................................... 85
• Potntsddcoratifsg_omOtrtques ............................................... 86
Points extensibles ................................................................. 87 - 95
o Point drott extensible .............................................................. 87
o Croquet _tensibte .................................................................. 88
• Point de surfilage _\'tensible ................................................... 89
• Smocks ..................................................................................... 9!
• Point de surjet .......................................................................... 92
• Pomtextensibtepourbandesdtast_ques ................................. 9.?
• Point i_rapidcer extensible ..................................................... 94
• Point d'epine extensibte .......................................................... 94
• Motifsddcora_fsitpointextensibles ....................................... 95
Confection des boutonniOres ............................................. 96- 113
• Boutonniere automanqne ............................................... 96 - 98
• Boutonnibremamlelle ................................................. 102 ~ t03
• Utilisation du grade &boutonniOres ............................ 106-1 t3
Aiguilles jameldes ...................................................................... 115
SECTION 4. CONSEILS EX CAS DE DIFF1CULTES
Quoifatre et quand ..................................................................... 118
SECTION 5. ENTRETIEN DE LA MACHINE
Remptacement de l'ampoule ..................................................... 120
Nettoyage du porte-canette ........................................................ 120
Chemin de navette et griffes d'entrafnement ............................ 122
Huilage de Ia machine ............................................................... 123
NOMENCLATURE DES PIECES ............................................. 124 t26
TABEL OF CONTENTS
SECCION I. CONOZCASU MAQUINA
Gabinete O Estuche Porrtfitil pare Maquina De Coser ............. 4
Localice e Identifique las Panes ............................................ 4 - 5
tdentifique los Accesonos ........................................................... 6
SECCION 2. PREPARE SU MAQUINAPARA COSER
Instaiaci6n y Conexi6n de ia Maquma ........................................ 8
o Conecte ia M_quina y Enci_.ndala .......................................... 8
o Control del Pedal ..................................................................... 8
o A_uste el Conmutador de Margen de Velocidad .................. 10
o Ajuste la Palanca de Ajuste de Presi6n ................................ 10
o Ajuste de la Paianca del Pie Prensatelas ............................... ! 1
a Cortahilos .............................................................................. 1I
o Caja para Guardar Accesor)os .............................................. 12
Cosmra con Brazo Libre: La Mesa de
Extensi6n removible ..................................................... 12- 13
Aprenda koque Hacen los Pies Prensatetas ...................... 16 ~ 20
e Revise su Pie Prensatelas ...................................................... 16
o Cambie et Pie Prensateias ..................................................... i 6
o Tipos de Pies Prensatelas .............................................. 17 - 20
Seleccidn de Aquja e Hflo ................................................ 23 - 24
• Inspecclone la AqNa ............................................................. 23
o Tabla para Coordinar la Acmja,el Hilo y la Tela ................. 23
o Para Cambiar su Aquja .......................................................... 24
Prepare ia Bobina .............................................................. 25 - 28
Para Renmrla Bobina de su Maquma .................................. 25
o Pasador de Bobma Horizontal .............................................. 25
•, Sopone de Bobina Adic_onat ................................................ 25
o Pare devanar la Bobina ......................................................... 27
o Colocaci6n de la Bobina en ia Caja de ta Bobina ................ 28
Prepare el Hilo Superior .................................................... 30 - 36
•, Enhebrado de la A0uja ......................................................... 30
o Tomando la Hebra de ia Bobina ........................................... 31
o Ajuste la Tensi6n de! Hilo Superior ............................ 34 ~ 36
Selector de Puntada ................................................................... 38
Control del Largo de la Puntada ................................................ 41
Control del Ancho de ia Puntada .............................................. 41
Ajuste del Equilibno de la Puntada Elfistica ............................. 41
Control de PuntMa de Retroceso .............................................. 44
Iniciando la Cosmra ................................................................. 44
SECCION 3. APRENDA LAS PUNTADAS
Cuadro Prfictleo de Puntadas ............................................ 45 ~ 52
Puntadas Rectas ................................................................ 55 - 68
• Puntada Recta ....................................................................... 55
o Uso las Guias de Costura ...................................................... 55
o Para dar la Vuelta en una Esquina ........................................ 55
• Puntada Sobrepuesta ............................................................. 56
e Poslc on ta aguja para topst_tchmt, ..................................... 57
* Tomillo de Ia guia de acolchar .............................................. 60
Colocacidn de Cremallera ............................................ 63 _65
,, Bajada del Tnnquete de Avance .......................................... 68
e Zurcido .................................................................................. 68
Puntadas en Zigzag ............................................................ 69 - 86
o Zigzag Biisico ....................................................................... 69
o
Monogramas ......................................................................... 70
o Puntada de Reatce ................................................................. 7 !
o Aplieaclones ......................................................................... 72
e Puntada de Refuerzo ............................................................. 72
e Bordado ................................................................................. 73
e Preqado de Bontones ............................................................ 75
* Fileteado ................................................................................ 76
o Puntada Ciega de Dobladilto de Ojo .................................... 78
* Trabajo de Encaje ................................................................. 79
e Zigzag en Tres Pasos ............................................................. 80
* Puntadade Concha ................................................................ 81
* Puntada de Ca3a ..................................................................... 82
o PuntadaDecorativaparaUnircon"Patade Cabra'. ............ 83
e Puntada de Concha de Dos Puntos ...................................... 84
e Puntada de Caja de Dos Puntos ............................................ 85
o Puntada de Sobrehilado ........................................................ 85
. Decoraci6n con Patrones Geometncos ................................ 86
Puntadas Elfistica ............................................................... 87 - 95
o Elfisuea Recta ....................................................................... 87
o Puntada Elfistiea de Zigzag Acordonado ............................. 87
,
PuntaOa Elfistica de Filleteado .............................................. 90
Puntada de Avispero (Colmena) ........................................... 91
Puntada Elfistica de Sobrehilado o de hoja de Pina ............. 92
o Puntada Elfistica en Caucho ................................................. 93
o Parchado Elfstica .................................................................. 94
* Pumada Elhstiea pata de Cffbra ............................................ 9_,
* Patrones Elfisticos Decorativos ............................................. 95
Instmcciones del Estilo de Ojales ................................... 99 ~ i 14
o Ojales Automfiticos ..................................................... 99 - 10!
o Ojal Manual .............................................................. 104 ~ 105
o Cdmo Haeer Ojales con el Abitamento Ojalador .... 106 - I 14
e Puntada de Aguja Gemeia ................................................... 116
SECCION 4. CUADRO DE PROBLEMAS DE FUNCIONAMIENTO
Qud Hacer y Cuand ................................................................. 119
SECCION 5. EL CUIDADO DE SU MAQUINA
Reemptaza del Bomillo ........................................................... 121
L_mpmza deI Sujetador de la Bobina ...................................... 121
Limpieza dei carril del Gancho e Impelente de Dientes ........ 122
Lubricaci6n de |a Mfiquina ...................................................... 123
LISTA DE PARTES ................................................................................. 124,127
3
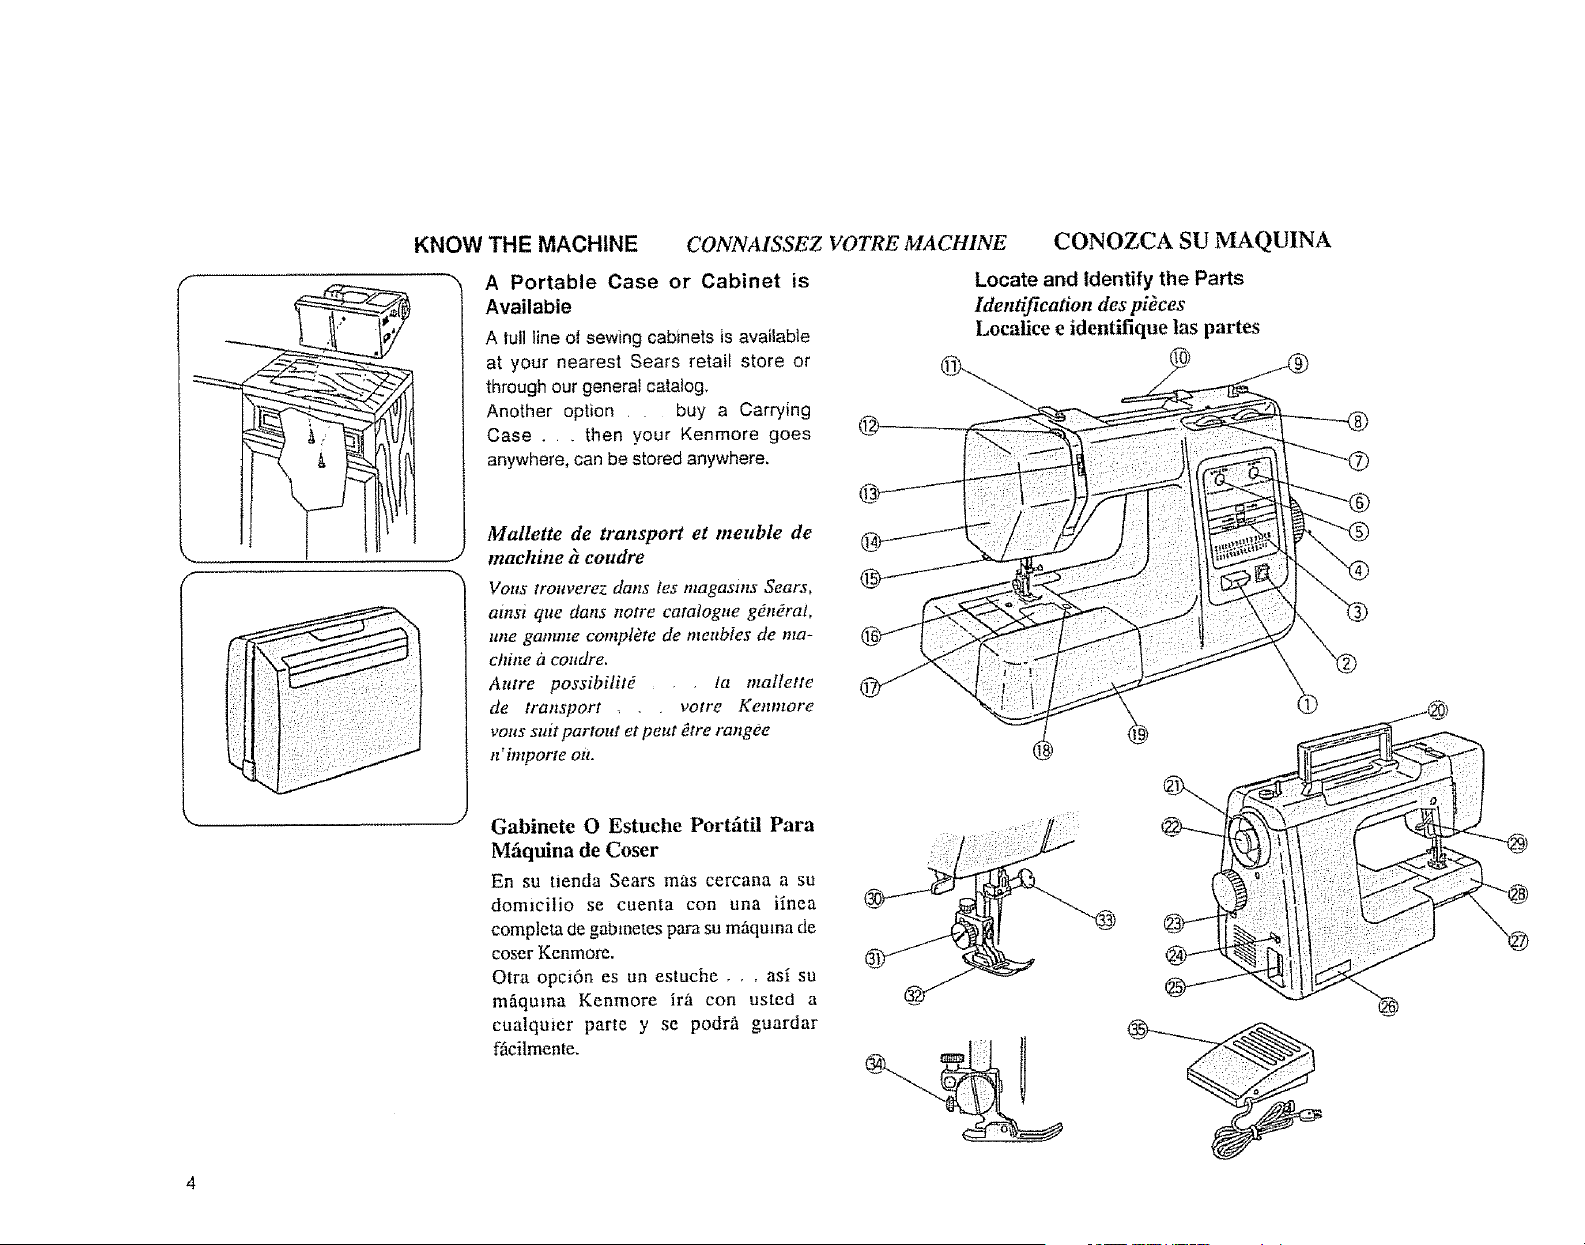
KNOW THE MACHINE CONNAISSEZ VOTRE MACHINE CONOZCA SU IVlAQUINA
f
A Portable Case or Cabinet is
Available
A lull line o_ sewing cabinets is available
at your nearest Sears retail store or
through our general catalog,
Another option . buy a Carrying
Case _ . then your Kenmore goes
anywhere, can be stored anywhere,
Matlette de transport et meuble de
machine _t coudre
Volts troltverez clans les magasms Sears,
ainsi que clans notre catalogue gdn_rat,
tt#te gamme complete de meubies de ma-
chine a coudre.
Autre possibilit_ • ta mallette
de transport , . votre Kenmore
vous suit partout et peut Otre rangee
n'intpogte ou.
Gabinete 0 Estuche Portfitil Para
Mfiquina de Coser
En su tienda Sears mas cercana a su
domicilio se cuenta con una iinea
completa de gabmetes para su m_iquma de
coser Kenmore.
Otra opci6n es un estuche. , , asi su
m_quma Kenmore ir'h con usted a
cualquier parte y se podr& guardar
f_icilmente.
Locate and Identify the Parts
Identification des pi_ces
Localice e identifique las partes
! Reverse Stitch Control
2 Speed Range Switch
3 Guide Message Window
4 Stitch Selector
5 Stitch Length Setting Window
6 Stitch Width Setting Window
7 Stitch Length Control
8 Stitch Width Control
9 Bobbin Winding Spindle
10 Thread Spoof Pin
11 Upper Thread Guide
12 Take-up Lever
13 Top Thread Tension Controt
14 FaceCover Piate
15 Thread Cutter
16 Needle Plate
17 Hook Cover P_ate
18 Hook Cover Plate Release Button
19 Extension Table (Accessory storage box)
20 Carrying Handle
2! Hand Wheel
22 Push-Pull Clutch
23 Stretch Stitch Adiuster
24 Light and Power Switch
25 Plug Connector
26 Nomenclature Plate
27 Drop Feed Lever
28 Free Arm
29 Presser Foot Lever
30 Buttonhole Lever
31 Presser Foot Thumb Screw
32 Presser Foot
33 Needle Clamp
34, Snap-on Button
35 Foot Control
1 Piquage en arriEre
2 ]alerfl(pteltr gamme tie vnesse
3 Fen_tre-gmde
4 Sdlecteur de point
5 Rdglage de tongeur d_tpoint
6 R_gtage de largettr du point
7 R@lage tie iargear tilt potnt
8 R6giage de tong_e_r du point
9 Bobineuse de mani#re
10 Broche b bobine
11 Disque de renston de bobinage
12 Reteveur-tendear de fit
13 Tension du fit de dessus
14 Couvercle de t#te
15 Coupe-ill
16 Planne d' atguille
17 Couvercle de navette
18 Boltton de d#gagement du coltvercle de navette
19 Rallonge de pfateau(Botte a accessoires)
20 Poignee tie transport
21 Volant gzmam
22 Embrayage axmi
23 Boaton d'#quilibrage
24 lnterrttptear dclairage el aloteltr
25 Logemem de fiehe
26 Plaque signaldtique
27 Commande des griffes d" entrainement
28 Bras libre
29 Relevage du pied-de biche
30 Levlere ?Iboutonni#res Seconde dtape
31 Vis de pled-de-biche
32 Pied normal a point zigzag
33 Ph_ce aiguille
34 Bouton de dderochage
35 P_dale de wtesse
l Control puntada de reverso
2 Interruptor de margen de velomdad
3 Ventanilla de mensaje de guia
4 Selector de puntada
5 Ventanilla de ajuste del largo de la puntada
6 Ventanilla de ajuste det ancho de la puntada
7 Control largo de puntada
8 Control ancho de puntada
9 Husillo del devanador
10 Porta earrete de hilo
11 Guta hilo superior
12 Palanca Tirahilo
13 Control 0e tensi6n del hilo superior
14 Plancha cubierla frontal
15 Cortador de hilo
16 P|ancha de agu_a
17 Plata cubierta de gaucho
18 Bont6n de desenganche de la placa cubierta de gancl_o
19 Mesa de extensi6n (Caja pava guardar accesono)
20 Manija trasportadora
21 Volante manual
22 Embrague Optima-hale
23 Ajustador de la puntada elfistica
24 tnterruptor Encendido/Apagado
25 Enchu fe conector
26 Plata de identificaci6n
27 Mando de tnnquete de avance
28 Braze suetto
29 Palanca del pie prensatelas
30 Patanca de ojales
31 Tomi|lo de mano del pie prensatelas
32 Pie prensate]as
33 Sujetador de la agu3a
34 Bot6n a presi6n
35 Pedal
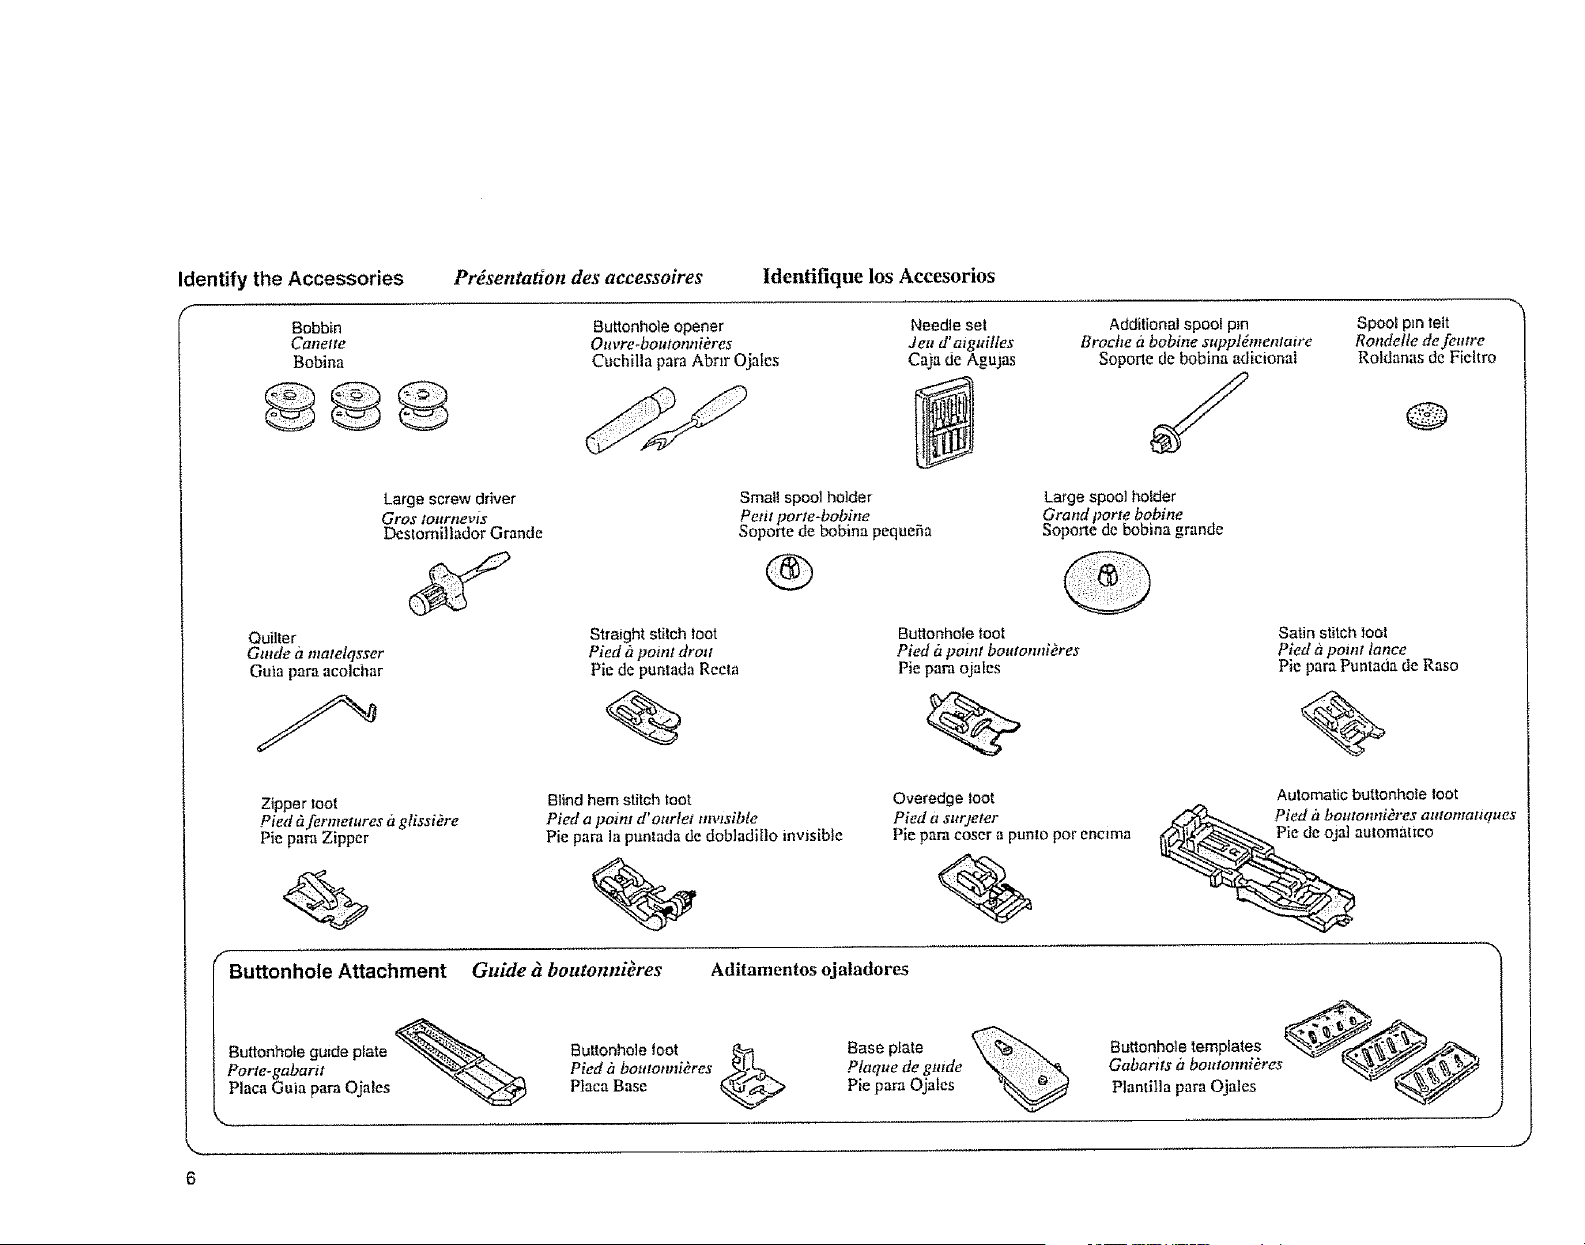
Identify the Accessories Presentation des accessoires ldentifique los Accesorios
Bobbin Buttonhole opener Needle set
Canette Ou vre-boutoanibres dea d'aiguilfes
Bobina Cuchilla para Abnr Ojales Caja de Agujas
Quilter
Guide a matelqsser
Gala pare acolchar
Large screw driver
Gros loartlevt3
Destomillador Grande
Straight stitch toot
Pied h point droJt
Pie de puntada Recta
%
Small spool holder
Petit porte-bobine
Sopohe de bobina pequefia
®
Additional spool p_n
Broehe h bobine suppl&nentaire
Soporte de bobina adicional
J
Spoo[ p_ntell
Rondelle de feutre
Roldanas de Fieltro
Q
Large spool hoider
Grand porte bobine
SopoJ!'e de bobina grande
@
ButlonhoIe toot
Pied &point bou¢onni_res
Pie para ojales
Satin stitch toot
Pied &point lance
Pie pare Puntada de Raso
%
Zipper loot
Pied dfermetures h glissiOre
Pie pare Zipper
f .....
Buttonhole Attachment
Blind hem stitch toot
Pied a poim d' ourlet invisible
Pie Faro la pantada de dobladitto invisible
%,
Guide _ boutonnieres Aditamentos ojaladores
Overedge toot
Pied a sur)eter
Pie pare coser a punlo par encJma
%
Automatic buttonhole toot
Base plate %
Plaque de guide
Pie para Ojales
Buttonhole templates
Gabartts h boutonniO'es
Plantilla para Ojales
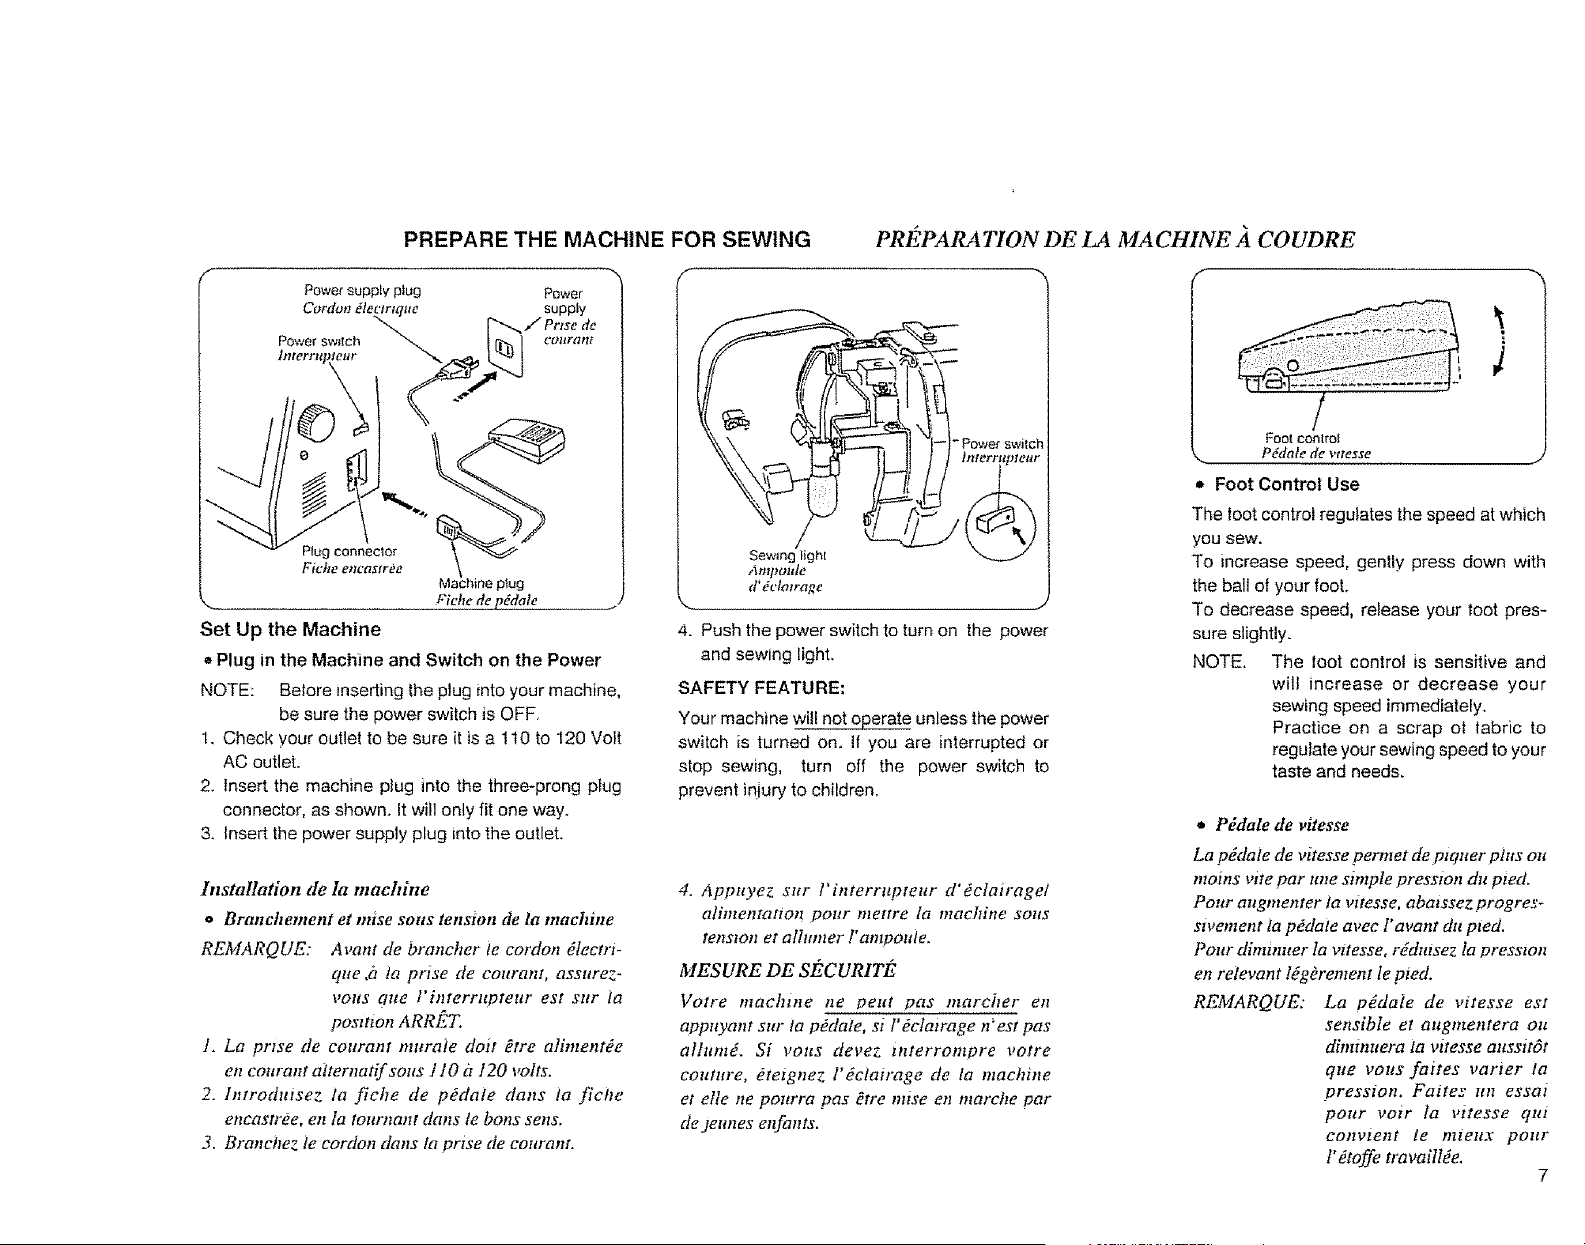
PREPARE THE MACHINE FOR SEWING PRI_PARATION DE LA MACHINE.4 COUDRE
Power sw_lch
Interrttp_
Power
supply
t'OltfatII
Plug connector
Fiche encaswee
Machine plug
,,,. Fiche de pddale
Set Up the Machine
a Plug in the Machine and Switch on the Power
NOTE: Before inseding the plug into your machine,
be sure the power switch is OFF
t, Check your outlet to be sure it is a 110 to 120 Volt
AC outlet.
2. Insert the machine plug into the three-prong p[ug
connector, as shown, it will only fit one way.
3. Insert the power supply plug into the outlet.
Installation de la machine
o Brnnchement et raise soas tenswn de la machine
REMARQUE: Avnnt de brnncher ie cordon _lectri-
que ,;7 ia prise de courant, assttrez-
vous clue l'interrttpteur est stir tn
positron ARR_
L La prise de cournnt murnie doit _tre alimentOe
en cournnt a_ternatif sous 110 it !20 volts.
2_ lntrodutsez ta fiche de p_dale dans ta fiche
encnstree, en In tournnnt dans le bnns sens.
3. Branchez ie cordon dttns ta prise de courant.
Sewing light
Ampoule
tr_cla_rage
- Power switch
t_lerrltpteur
.J
4. Push the power switch to turn on the power
and sewing light.
SAFETY FEATURE:
Your machine will not operate unless the power
switch is turned on. 11you are interrupted or
stop sewing, turn off the power switch to
prevent iniury to children.
4. Appuyez sur Pinterrupteur d'Eclnirage/
alimentatto_t .OOllr ntettre fa machine sous
tettston et alhtmer !'ampouie.
MESURE DE SECURITE'
Wotre mnchtne ne petit pns marcher en
appuynnt sur ia p#daie, si l' #clatrage n'est pns
alhtm& Si vous devez tttterrompre votre
couture, #tetgnez rdeiatrage de la machine
et elle ne pourrn pns _tre mtse en marche par
de jeunes enfnnts.
/
Fool control
P_date de vtte_se
Foot Control Use
The toot control regulates the speed at which
you sew.
To increase speed, gently press down with
the ball at your foot.
To decrease speed, release your toot pres-
sure slightly.
NOTE. The toot control is sensitive and
wilt increase or decrease your
sewing speed immediately.
Practice on a scrap at tabric to
regulate your sewing speed to your
taste and needs.
Pddale de vitesse
La pddaie de vitesse perntet de ptquer pius art
mains rite par une sintple presstnn du pied,
Pour nugnlenter In vttesse, abatssez progre.'-
stvement tn p_date avec l'avant du pied.
Pour dimmtter la vttesse, r_dutsez la presston
en relevant ldgOrement le pied.
REMARQUE: La p_date de vitesse est
sensible et nltgntentern ou
dbnmuera la vitesse attssitOt
que vous faites varier tn
presston. Fattes 1in essal
pour voir la vttesse qui
convzent le mteux pour
t' dtoffe travail!_e.
7
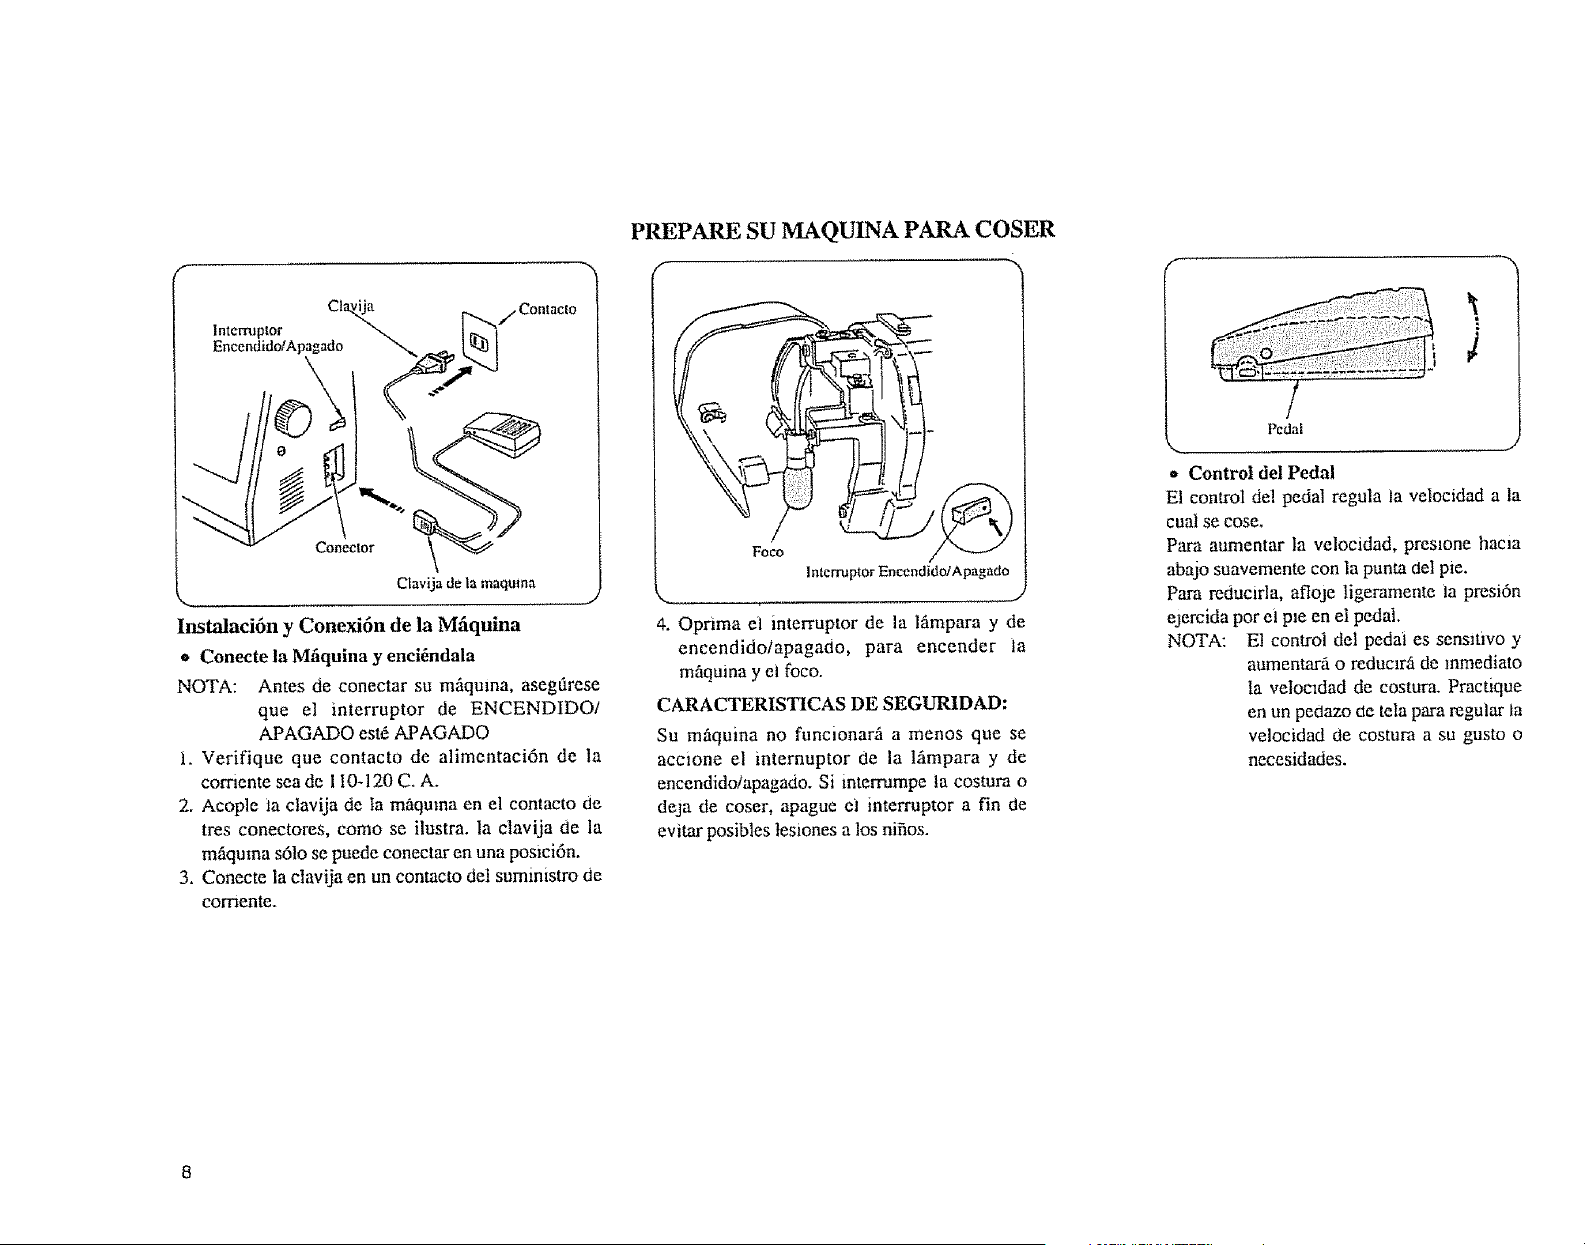
Clavija de ta maquma
Instalaci6n y Conexi6n de la Mfiquina
• Conecte la Mfiquina y enei6ndala
NOTA: Antes de conectar su mfiquma, asegdrese
que el interruptor de ENCENDIDOi
APAGADO est,: APAGADO
i. Verifique que contacto de alimentaci6n de la
comente sea de 1I0-120 C. A.
2. Acople ia clavija de Ia maquma en el contacto de
tres conectores, como se ilustra, la clavija de la
mfiquma s61ose puede conectar en una posici6n.
3. Conecte la clavija en un contacto dei suministro de
comente.
PREPARE SU MAQUINA PARA COSER
lnterruptOr Encendido/Apagado
,,............... J
4. Oprima el interruptor de la himpara y de
encendido/apagado, para encender ia
m_tquina y ei foco.
CARACTERISTICAS DE SEGL_IDAD:
Su m_,quina no funcionar_ amenos que se
accione el internuptor de la l_,mpara y de
encendido/apagado. Si mterPampe la costura o
deja de coser, apague el interruptor a fin de
evitar posibles tesiones a los nifios.
J
Peda[
J
o Control del Pedal
El control del pedal regula la velocidad a la
cual se cose.
Para aumentar Ia velocidad, preslone hacla
abajo suavemente con la punta del pie.
Para reducifla, afloje ligeramente ia presi6n
ejercida pot el pmen el pedal.
NOTA: El control del pedal es sensltivo y
aumentarfi o reduclrfi de mmediato
la veloc_dad de costura. Practique
en un pedazo de tela para regular la
velocidad de costura a su gusto o
necesidades.
k ..... J
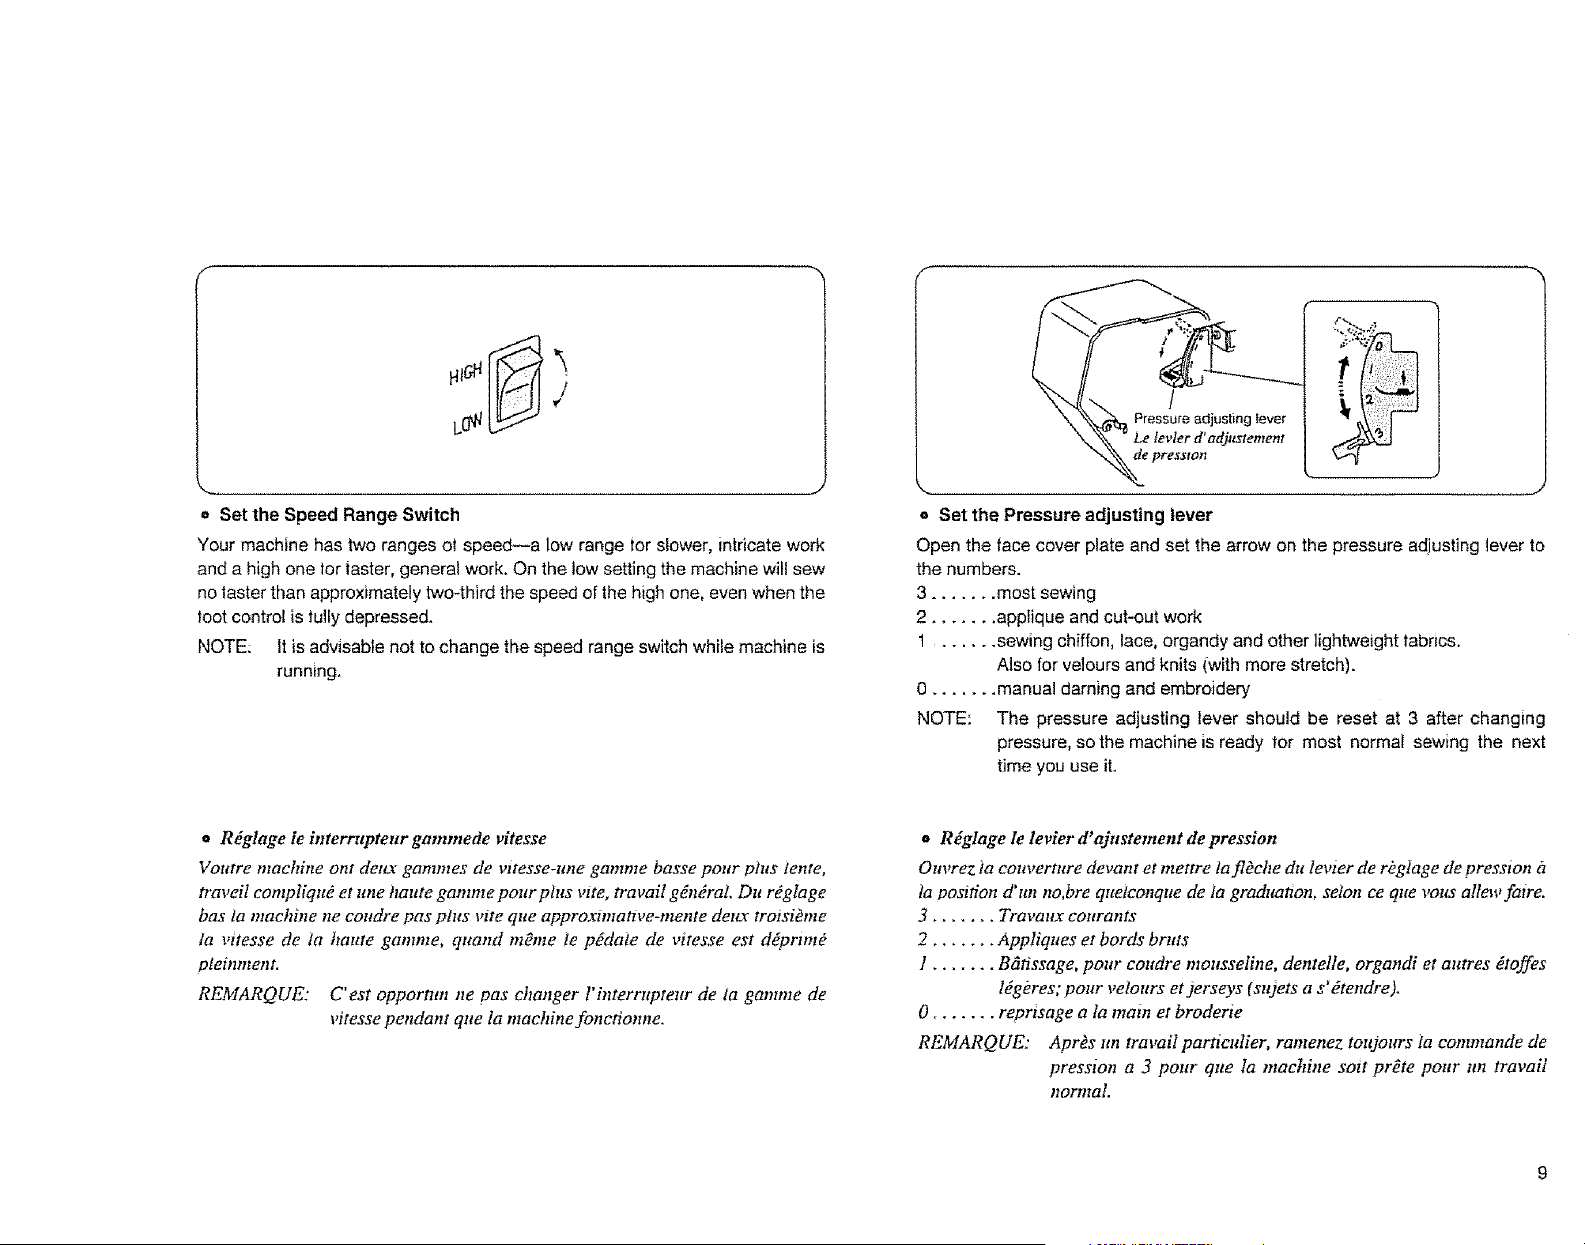
a Set the Speed Range Switch
Your machine has two ranges ot speed--a low range tor slower, intricate work
and a high one tor iaster, general work. On the tow setting the machine will sew
no taster than approximately two-third the speed o[ the high one, even when the
toot control is tully depressed.
NOTE: It is advisable not to change the speed range switch while machine is
running.
o RdgIage ie interrupteur gammede vitesse
Voutre machine onr dettx gammes de vitesse-ane gamme basse pour ph_s tente,
traveit eomptiqn_ et une haute gamme pour plus wte, travail g_ndraL Du r_glage
has la machine tie eondre pas pills rite que approximanve-mente deiLv troisi_me
la vttesse de ta haute ganmte, quand m#me /e pddale de vitesse est d_prmtO
pteinmenL
REMARQUE: C' est opportun ne pas changer l'interrupteur de la gamme de
vitesse pendant que la machine fonct_onne.
g'%,
a Set the Pressure adjusting lever
Open the face cover plate and set the arrow on the pressure adjusting lever to
the numbers.
3 ....... most sewing
2 ....... applique and cut-out work
1 ....... sewing chiffon, lace, organdy and other lightweight fabrics.
Also for velours and knits (,with more stretch).
0 ....... manual darning and embroidery
NOTE: The pressure adjusting lever should be reset at 3 after changing
pressure, so the machine is ready tor most normal sewing the next
time you use it.
*_ Rdglage le levier d'ajustement de pression
Ouvrez ta couverture devant et mettre ta flOche du levter de rkglage de pression iz
ta post#on d'an no,bre quelconque de la graduattono seton ee que vous allew faire.
3 ....... Travaux cottrants
2 ....... Appliques et bords bruts
] ....... B6tissage, pour coudre mousseline, dentelle, organdi et autres dtoffes
l_gkres; pour velours et jerseys (sujets a s'dtendre).
0 ....... reprlsage a la mare et broderie
REMARQUE: Aprks ltn travail partieulier, ramenez toujours ia commande de
presslon a 3 pour que ta machine sort prate pour un travail
normal.
o Ajuste ei conmutador de margen de velocidad
Su m_quma tiene dos mfirgenes de velocidad, o sea un margen" low " para un
trabajo mas despacio y complieado, y el otto" high" para un trabajo general y
mils rfipido. Cuando ajuste a" low " la m_tquina coser_ a una velocidad no mAs
rfipido que aproximadamente dos tercios de ta velocidad de '"high "'..aun cuando
apriete al mlixlmo el pedal.
NOTA: Es aconsejable que no cambie el conmutator de margen de velocidad
m_entras ia m_quina estfi en marcha.
La palanca controladora
de presi6n
e Ajuste la palanca de ajuste de presi6n
Abra la ptancha cubterta frontal y ponga ia flecha de ia plancha de ajuste de
presi6n en la escala.
3....... la mayoria de las costuras
2 ....... aplicac_ones y labrados para cortar
t ....... hilvanar, costura en chif6n, encaje, organza, y otros matermles
livianos.
o ....... Zurcido y bordado manual
NOTA: Se debe volver a fijar el disco de presi6n en 3 despues de algfin camblo
de la presi6n, en forma tal que ia mfiquina se encuentre lista para
trabajar en la costura normal la or0xima vez que la use.
l0
r { "
Narrnal up _ H{oh
position [ position
Position de _ "7" Position
relevape I1 _ _ haute
High _\ _J _ ." Normal up Position
\ ,,, L ! Po.,i.. d.
rvstnon hauls \ _ "¢' ,_ Posmi6n superior •
po,,,,oo
_-_ Presser ioot
t _ Lewerderele_,age I
" Pa)anea del p_eprensa'_elas
= Adjust the Presser Foot Lever
The Presser Foot Lever raises and lowers your
presser toot,
You can raise it about t/4"" higher than the normal
up position for easy removal ot the presser toot or
to help you place heavy fabrics under the presser
toot.
o Relevage dtt pie-de-biche
Le levler de relevage serf a rentonter le pted-de-
biche et iz te descendre.
Vous pouvez le remonter de 1/4 po. phts haut que la
positron de refevage normale pour changer plus
facilement le pted presseur Olt fatre passer dessotts
une forte _paissettr de ttssu.
,) Ajuste de la palanca del pie prensatelas
La patanca del p_e prensatelas sube y baja el pie
prensatelas.
Lo puede levantar cerca de 0.6 cm pot enclma de
la poslci6n superior normal para poder retirar fficil-
mente et pie prensatelas, o pare ayudarle a colocar
telas pesadas debajo del pie prensatelas.
J
,, Thread Cutter
You don't need a pair of scissors to cut the
thread after you finish sewing. Just use the
handy thread cutter.
Pull several inches ol thread out betore
starting the next seam.
= Conpe-fil
Vous pouvez cotLper lef!! sans vons servir de
cisealt._q ]orsqtte votts avez tertntn_ tlne
couture. Utitisez simplement le cottpe-fiL
• Cortahilos
No necesita tijeras para cortar el hilo despu6s
de coser.
$61o neceslta el pr_ctico cortahilos.
1!
\
• Accessory Storage Box
The lid of the accessory storage box lifts open toward
you,
Sewing accessories are conveniently located in the
box.
• Logementdesaceessoires
Le couvercle du logement des accessoires s' ouvre en le
sotttevattt vers votts.
$
Les accessoires de cotttttre se trouvent toils daus cette
boite.
e Caja para guardar accesorlos
La tapa de ta caja de accesonos se abre laacia amba y
llacia usted.
Los accesonos de costura se encuentran ubicados en
forma convemente dentro de esta caja.
12
• Free-Arm Sewing: the Removable Extension Table
The extension table provides added sewing surface and can be
easily removed for free arm sewing.
• UtlTisafion du bras libre
La table d' extension fourni de Ia surface de courture additionnde
et peut _tre enlevde facilement pour courture de bras livre.
o Costura con brazo libre: La mesa de extensi6n removible
La mesa de extensi6n provee de superficie adicionai para la
costura y se puede remover f_cilmente para la costura con brazo
libre.
f
For |ree arm sewing.
Pull the end o| the extension table away from the machine, as
illustrated.
To attach the table, push the extension table until it snaps into
the machine.
Pour courture de bras livre.
Tirez le bout de la table d'extenston dtt cote opposd de ta
machine, comnte Slttt ilhtstrd.
Pour attactzement de/a tabie.
Poussez ta table d'extension dusqu' gt ses oreilles ajust_es dans ta
machine.
Para ta costura con brazo librc.
Hale el extremo de ta mesa de extensi6n de la mfiquina, como
indica la ilustraci6n.
Para poner Ia mesa.
Empuje ta mesa de extensi6n hasta que la patilla de sujeci6n
ajuste a la maquina.
Your sewing machine can do tree arm sewing.
This feature makes sewing easy |or:
Votre machhw iz coudre est transformable en
machine a bras Iibre.
Cette caract_rtstique facilite bien des travaux:
Su m_quina de coser puede realizar costura de
brazo fibre.
Este dispos_lavo ie facilita la costura de:
* Bar tacking to reinforce pockets, p}ackets
and waistlines on ready-made or home-
made garments to avoid |abric bunching
around the needle.
* points d'arrOt pour renforcer }es coins de
poche, passants de eemture, toltr de taiIle
sur habits de confection ou faits f ia malson.
Refuerzos en los bolsillos, pretmas y
aperturas en los vestxdos en prendas
compradas hechas o en ias elaboradas en
casa, evitando asi que ia tela se amontone
alrededor de la aguja.
Stitching sleeves, waistbands, pants legs,
or any circular garment area.
* Darning socks or mending knees, elbows,
or areas of wear in children:s clothes.
* Sewing buttons on sleeves, waistbands,
etc.
pour cottdr¢ ais#ment ies parties cirett-
latres, emmanchttres, gros gram atttour de
la taitle, jambes de pantalons el atttres.
" reprisage des chattssettes ott raccomntodage
des genott:¢, cottdes et autres endrozts it
forte ttsure des v_tements d'enfants,
pose des boutons sur poignets de manche,
ceirttttre, etc.
* Costura de mangas, pretmas, botas de
pantalones, o cualquier otra firea circular de
las prendas.
" Zurcido de medias o remlendos en rodillas,
codes o fireas de mayor desgaste en las
prendas tnfantiles.
* Postura de botones en mangas, pretinas, etc.
13
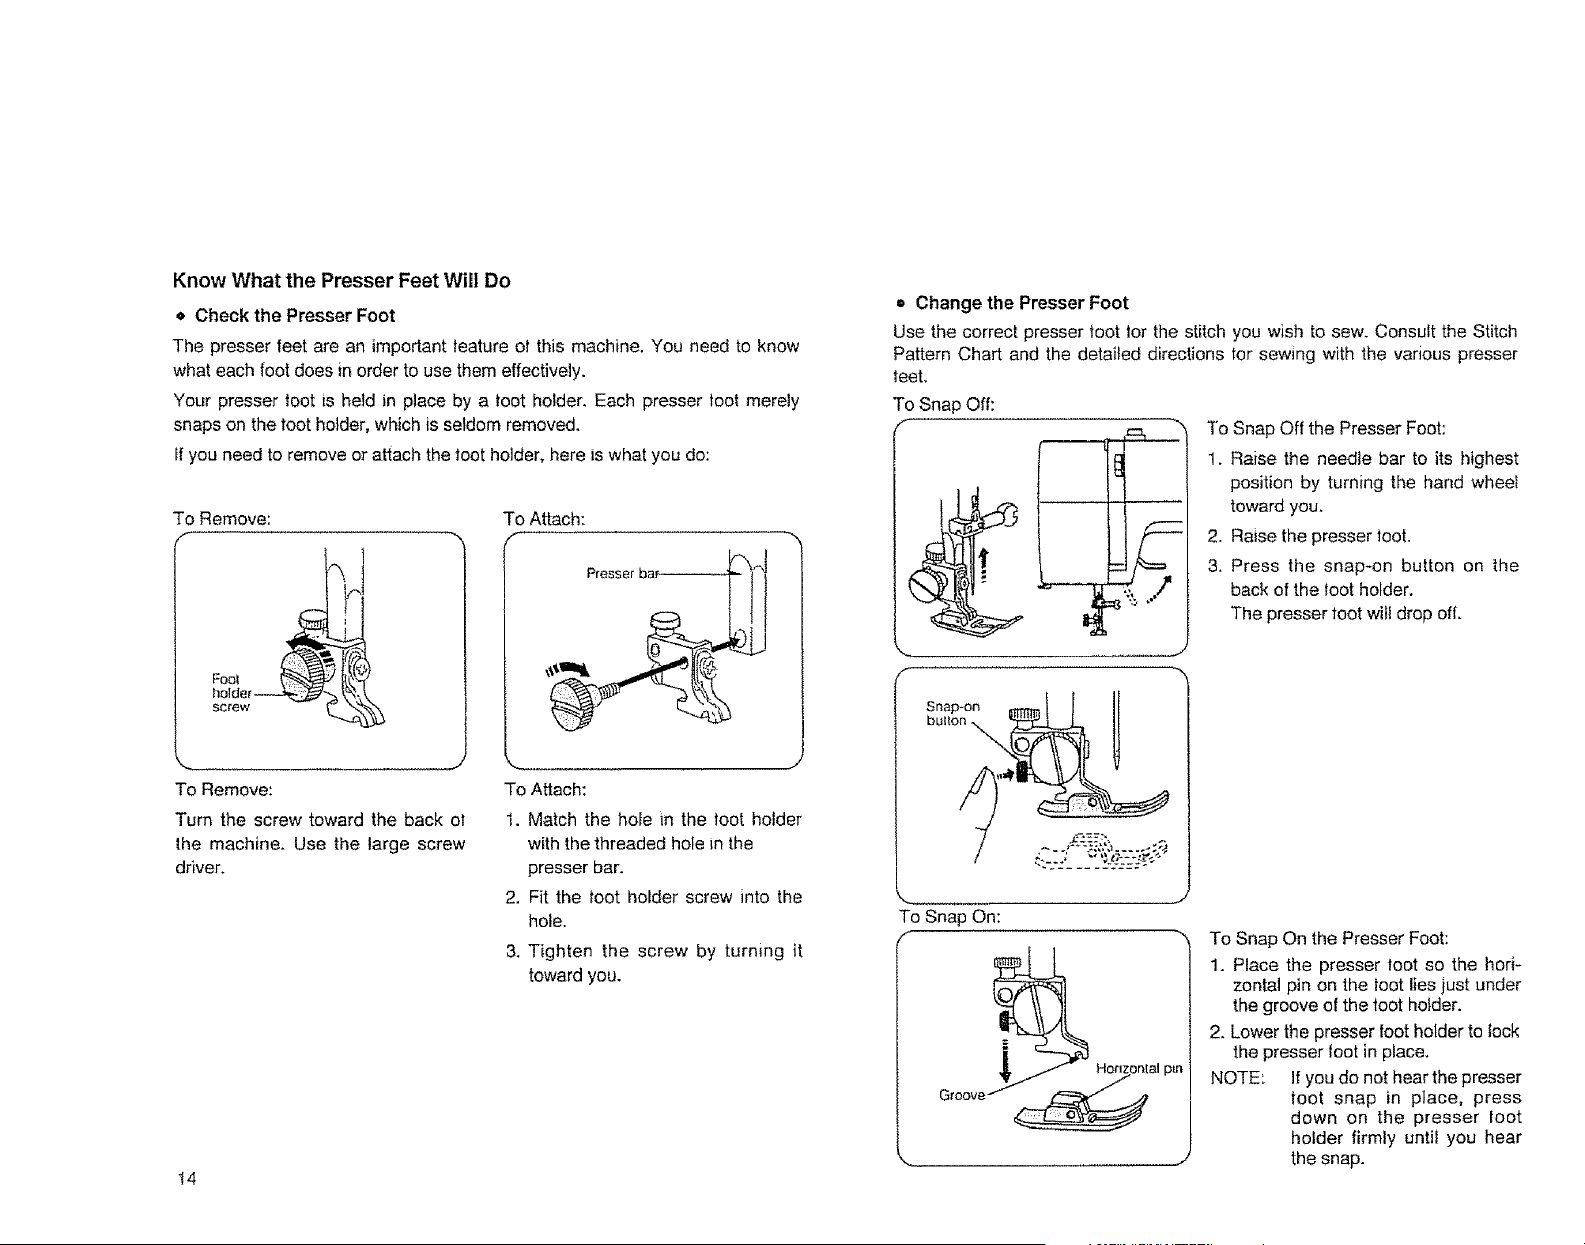
Know What the Presser Feet Will Do
• Check the Presser Foot
The presser feet are an important feature ot this machine. You need to know
what each foot does in order to use them effectively.
Your presser toot is held in place by a toot holder. Each presser toot merely
snaps on the toot holder, which is seldom removed.
If you need to remove or attach the toot holder, here is what you do:
To Remove:
J
To Remove:
Turn the screw toward the back ol
the machine. Use the large screw
driver.
To Attach:
,f
_ J
To Attach:
1. Match the hole in the toot holder
with the threaded hole in the
presser bar.
2. Fit the toot holder screw into the
hole.
3. Tighten the screw by turning it
toward you.
14
• Change the Presser Foot
Use the correct presser toot tot the stitch you wish to sew. Consult the Stitch
Pattern Chart and the detailed directions for sewing with the various presser
feet.
To Snap Off:
f
To Snap Off the Presser Foot:
1. Raise the needle bar to its highest
position by turning the hand wheel
toward you.
2. Raise the presser loot.
3. Press the snap-on button on the
back of the toot holder.
The presser loot will drop off.
Snap-on !
bulton
To Snap On:
f--
To Snap On the Presser Foot:
1. Place the presser toot so the hod-
zontal pin on the toot lles just under
the groove of the toot hotder.
2. Lower the presser foot holder to lock
the presser loot in place.
NOTE: If you do not hear the presser
toot snap in place, press
down on the presser toot
holder firmly until you hear
the snap.
Fonctions des pieds-de-biche
o Choisissez le pied presseur
Les pteds-de-biehe de cette machine jouent an r6le mzportant.
Vous devez conna_tre les fonenons tie ehacun d'etLr, pour les 1ttiliser efficacement.
Le pied-de-biche oule pted presseur est maintenu pat" te porte-pted, hn-m_me
dtant visse h la barre it pted pressenr, il ue s'enlOve que rarement.
Volct comment proc_der pour euiever te porte-pted:
Depose:
#
Depose du porte-pied:
A raide du gros tournevis, desserrez
favts eu ta tournant it gauche,
Pose:
w
Barre a plet__I
presseltr !I1
Pose du porte-pied:
1. Passez la vts de fixatton clans le
trou du portezpied, comnte montrd.
2. Vissez ensttlte ia vis clans le trou
taraudd de ia barre.
3, Serrez bien ta visen la tournanl a
drotte.
o Changementdepiedpresseur
Ufilisez toujours le pied qui convient pour ie point que vous altez piquet.
Ell cas de doute, reportez-vous all Tableau synoptique des points ou it leur
description ddtaillde a la fin de ce manuel
DOcroehage:
C
Pour d_crocller le pied presseur:
1. Remontez !'atguille le plus haul
possible en tottrnant le volant a main
pers _olls.
2. Relevez le pied presseur.
3, Appuyez sur le bottton rouge, qui est
it l'arriOre dtt porte-pied et ie p_ed
presseur tombera.
Aecrochage:
Pour accrocher un pted presseur;
1. Placez ia broche du pied directe-
ment sons la rainure du porteted_
2. Abaissez le levter de reIevage pour
qtte ia ramure du portepled enserre
let broche du pied.
REMARQUE: Si vous n "entendez pas
l' accrochage se faire,
appuyez fermement sur
la vis de porte-pied
)usqu'a ce que volts
entendiez un clic, 15
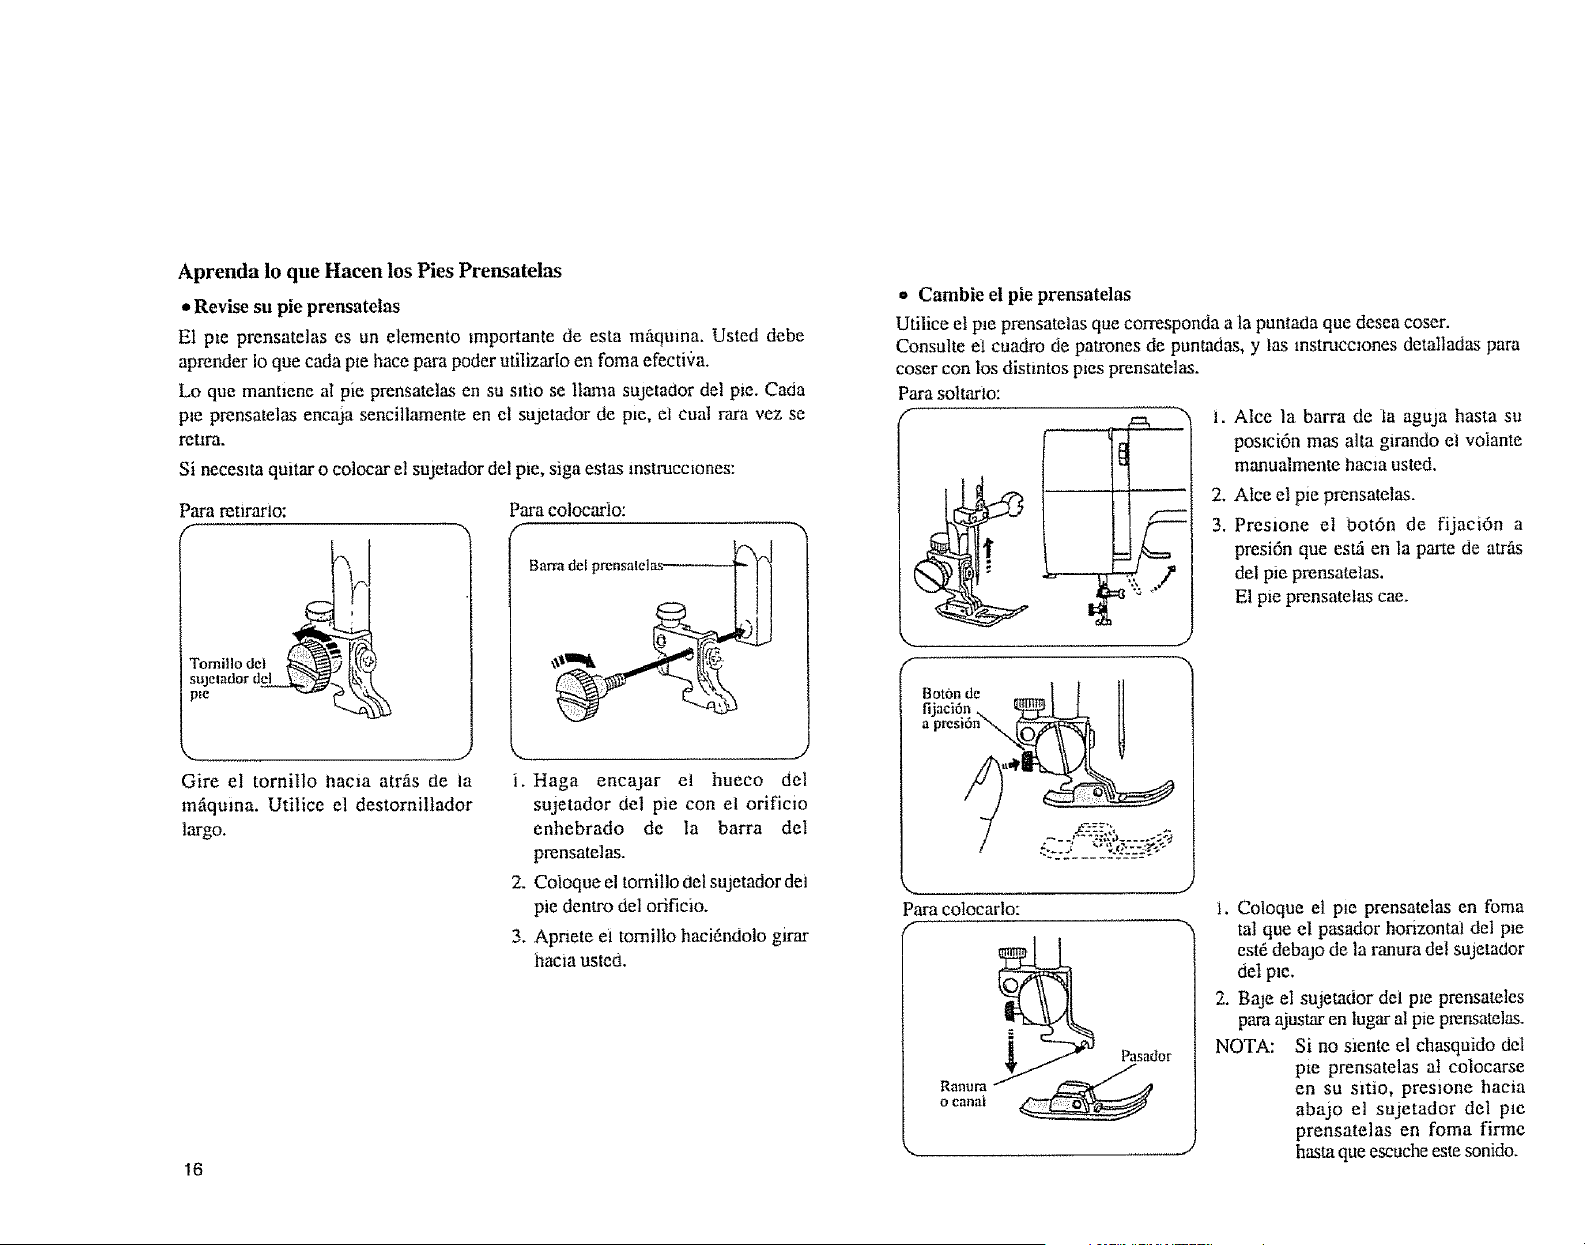
Aprenda 1o que Hacen los Pies Prensatelas
* Revise su pie prensatdas
El pm prensatelas es un elemento lmportante de esta m_quina. Usted debe
aprender io que cada pie lace para poder utilizarlo en foma efectb)a.
Lo que mantiene a! pie prensatelas en su sJtio se llama sujetador del pie. Cada
pie prensatelas encaja sencillamente en el sujetador de p_e, el cual ram vez se
retlra.
Si neceslta quitar o colocar el sujetador del p_e,siga estas mstmcc_ones:
Para retirarlo:
l'ornillo de_
sujelador del
pte
Para colocario:
Barm del prcnsalelas
Gire el tornillo rmcm amis 0e )a
maquina. Utilice el destornillador
largo.
'-, j
i, Haga enca3ar el bueco del
sujetador del pie con el orificio
enhebrado de la barra del
prensatelas.
2. Co|oque el tomillo oelsujetador dei
pie dentro del orificio.
3. Apnete el tomillo haci6ndolo glrar
hacia ustcO.
16
o Cambie el pie prensatelas
Utilice el pie prensatelas que corresponda a la punta0a que desea coser.
Consulte el cuadro de patrones de puntadas, y las mstrucc_ones detatladas para
coser con los distintos pros prensatelas.
Para soltarlo:
F
...,
".5 _*
t. Alce la barra de ta aguja hasta su
posmi6n mas alta glrando ei voiante
manualmente hacm usted.
2. Atce el pie prensatelas.
3. Presione el bot6n de fijaci6n a
presi6n que esui en la parte de atrfis
det pie prensatetas.
El pie prensatetas cae.
H
Botbnde II
fijaci6n
U
Para cotocarto:
f
o canai
Pasador
i. Coloque el pie prensatelas en/'bma
tal que el pasador horizontal del p_e
est6 debajo de la ranura de| sujeta(tor
det pzc.
2. Baje el sujetador det pie prensateles
pare ajustar en lugar al pie prensatelas.
NOTA: Si no siente el chasquido del
pte prensatelas at colocarse
en su sitio, presione hacia
abajo el sujetador del pie
prensatelas en foma firme
hasta que escuche este sonido.
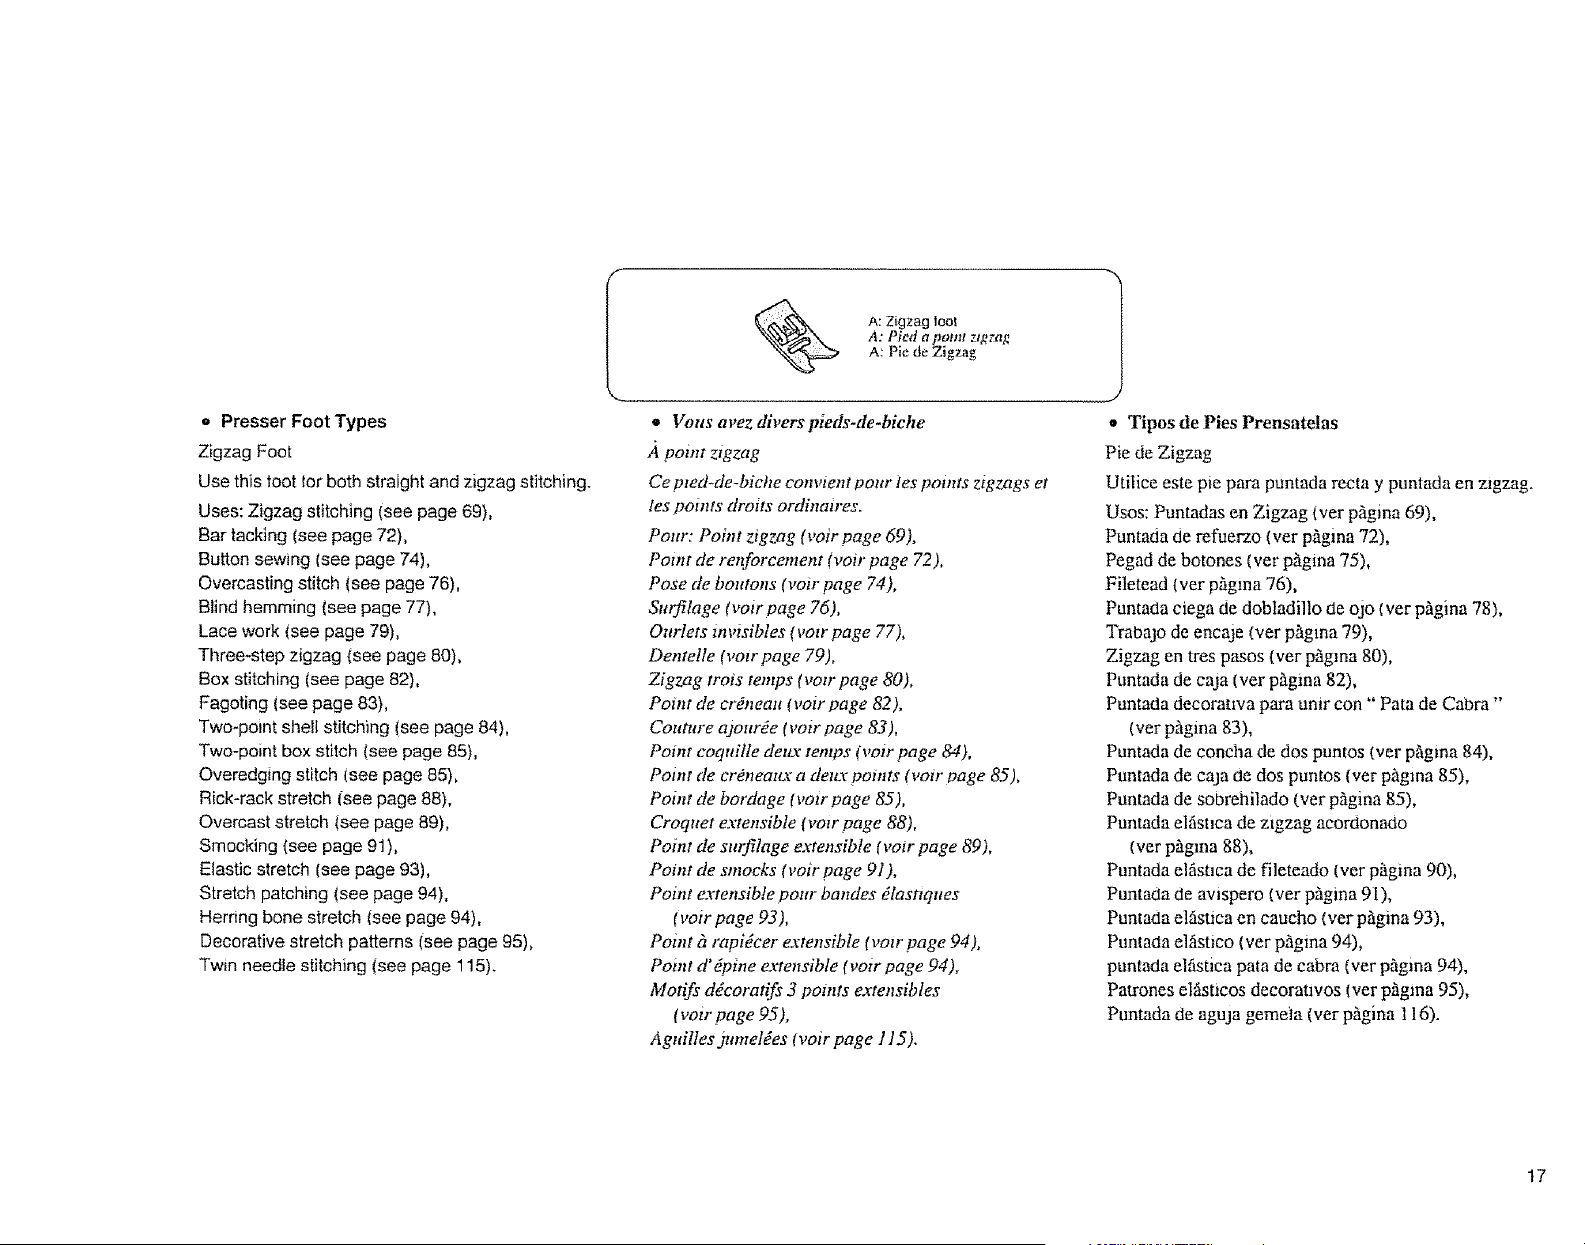
• Presser Foot Types
Zigzag Foot
Use this toot tar both straight and zigzag stitching.
Uses: Zigzag stitching (see page 695,
Bar tacking (see page 725,
Button sewing (see page 74),
Overcasting stitch (see page 76),
Blind hemming (see page 77),
Lace work (see page 795,
Three*step zigzag (see page 805,
Box stitching (see page 825,
Fagoting (see page 83),
Two.point shell stitching (see page 845,
Two-point box stltch (see page 85),
Overedging stitch (see page 855,
Rick-rack stretch (see page 88),
Overcast stretch (see page 89),
Smocking {see page 915,
Elastic stretch [see page 93),
Stretch patching (see page g4),
Herring bone stretch (see page 94),
Decorative stretch patterns (see page 955,
Twin needle stitching {see page 115).
A: Zigzag loot
A: Pied a potnt zigzag
A: Pie de Zigzag
• Vousavezdiverspieds-de-biche
point ztgzag
Ce pted_de-biche com_ienl pour fes points zigzags et
les points droits ordinaires,
Pour: Point zigzag (voir page 69).
Point de renforcement (vow page 72).
Pose de boutons (vow page 74),
Surfilage (voir page 76).
Outlets invisibles {vow page 77),
Dentelle (votr page 79),
Zigzag trois temps (vozr page 80),
Point de crdneau (voir page 82),
Couture o3ourde Ivow page 83),
Point coqttille deux temps (volt page 84),
Point de crOneaux a detLr points (voir page 85),
Point de bordage (vow page 85),
Croquet extensible lvolr page 88),
Point de sutfilage exrensible (voir page 89),
Point de smocks (voir page 91),
Point extensible pour bandes dlasttqttes
(voir page 93),
Point fi rapi_cer extensible fvow page 94),
Point d' dpine extensible (vow page 94).
Motifs dYeoratif_ 3 potnts extensibles
fvoir page 95),
Aguilles jumel£es (voir page 115).
• Tipes de Pies Prensatelas
Pie de Zigzag
Utilice este pie para puntada recta y puntada en zigzag.
Uses: Puntadas en Zigzag (vet pggina 69),
Puntada de refuerzo (ver pfg:ina 72),
Pegad de botones (ver p&gina75),
Filetead (ver phgma 76),
Punta_a mega de dobladillo de 030 (ver p.Sgina 78),
Trabalo de encaje (ver phgma 79),
Zigzag en tres poses (ver pSgma 80),
Puntada de caja (ver phgma 82),
Puntac'ta decorauva para umr con" Pata de C_ra "'
(vet pilgina 83),
Puntada de conc.ha de dos puntos (vet pfigma 84),
Puntada de cain de dos puntos (vet phgma 85),
Puntada de sobre_ailado (vet p_gina 85),
Puntada elfist_cade zigzag acorOonado
(ver pfigma 88),
Puntada e!fisUca de fileteado (ver p_gina 90),
PuntaOa de awspero t'Jer pggina 91),
Puntada elfistica en caucho (vet phgina 93),
Puntada el,Sstico (vet p5gina 94),
puntada elfisuca pata de cabra (ver p_gina 94),
Patrones elfistlcos decomtivos l vet piagma 95),
Puntada de aguja gemdla (ver p_.gina 116).
17
I _ H: Stralghl 1oo1 1
H: Pied a point dro_
H: Pie recto
Know What the Presser Feet Will Do
(Continued)
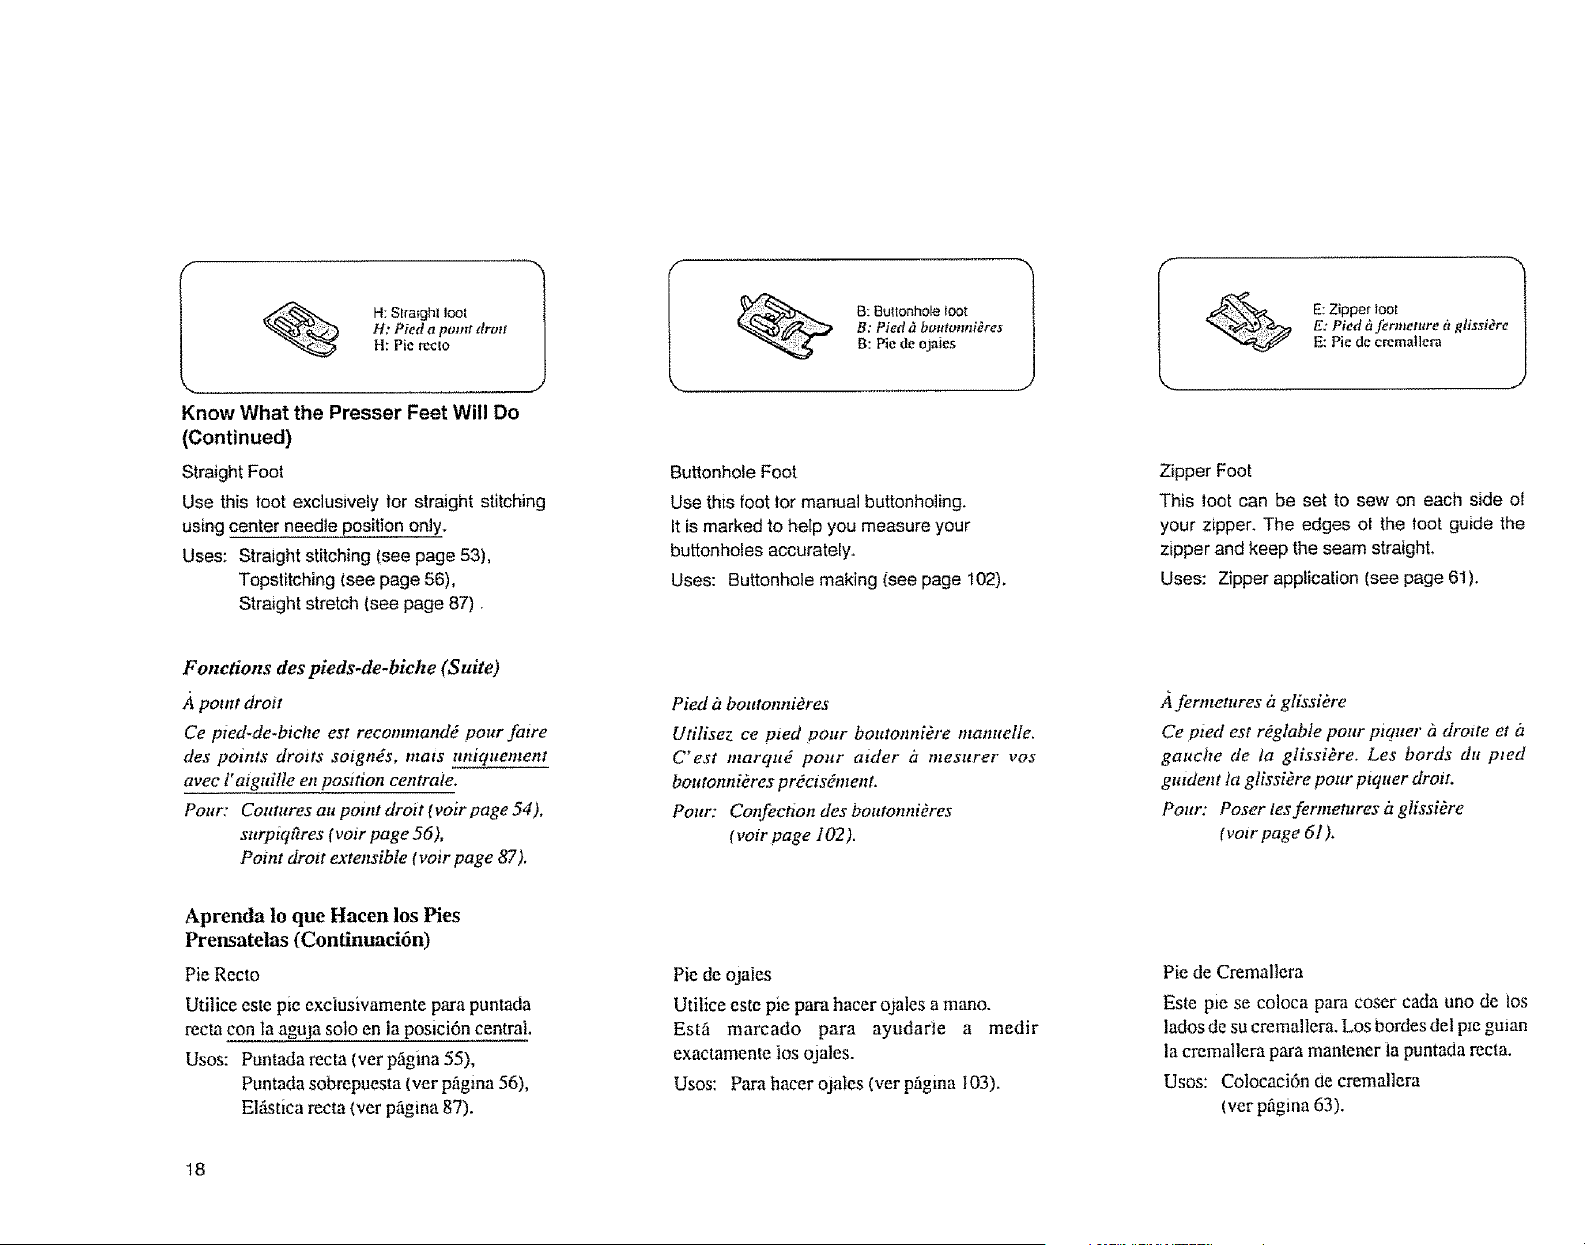
Straight Foot
Use this toot exclusively for straight stitching
using center needle position only.
Uses: Straight stitching (see page 53),
Topstitching (see page 56),
Straight stretch (see page 87) •
B: Pied h bvutvnnidres E: Pied fifermentre 6 glissidre
B: Piede ojaies E: Pie de crcmallera
Buttonhole Foot
Use this foot for manual buttonholing.
It is marked to help you measure your
buttonholes accurately.
Uses: Buttonhole making (see page 102).
Zipper Foot
This loot can be set to sew on each side ol
your zipper. The edges ot the toot guide the
zipper and keep the seam straight.
Uses: Zipper application (see page 6I).
Fonctions des pieds-de-biche (Suite)
point droit
Ce pted-de-biche est reeommand# pour faire
des points drotts soign_s, mats uniquement
avec t'aiguille en position centrale.
Pottr: Coutttres au potnt drott (voir page 54),
surpiq£tres (voir page 56),
Point drott extensible (volr page 87).
Pied i_boutonnikres
Ufilisez ce pted pour boutonniOre manuelle.
C'est marqud pour atder i_ mesurer vos
boutonniOres prOcis_ment.
Pour: Confection des boutonniOres
(vow page 102).
A fermetures d glissikre
Ce pled est r_glabfe pour piquer h drotte et i_
gauche de ta glissiOre. Les bords du pted
gutdent ta glissi_re pour ptquer droit.
Pour: Poser les fermetures h glissiOre
(vow page 61).
Aprenda Io que Hacen los Pies
Prensatelas (Continuaci6n)
Pie Recto
Utilice este pie exciusivamente para puntada
recta con Ia aguja solo en la posici6n central.
Usos: Puntada recta (ver pfigina 55),
Puntada sobrepuesta (vet pfigina 56),
El_tica recta (vet p_gina 87).
Pie de ojaies
Utflice este pie para hacer ojales a mano.
Estfi marcado para ayudarte a medir
exactamente los ojales.
Usos: Para hacer ojales (ver pfigina t03).
Pie de Cremallera
Este pie se coloca para coser cada uno de los
lados de su cremallera. Los hordes del p_eguian
la cremallera para mantener la punta0a recta.
Usos: Colocaci6n de cremallera
(ver p_gina 63).
t8
F: Satin stitch foot 1
r.:Pied_ prom_nce
F: Pie para punlada
resahada _Satinada)
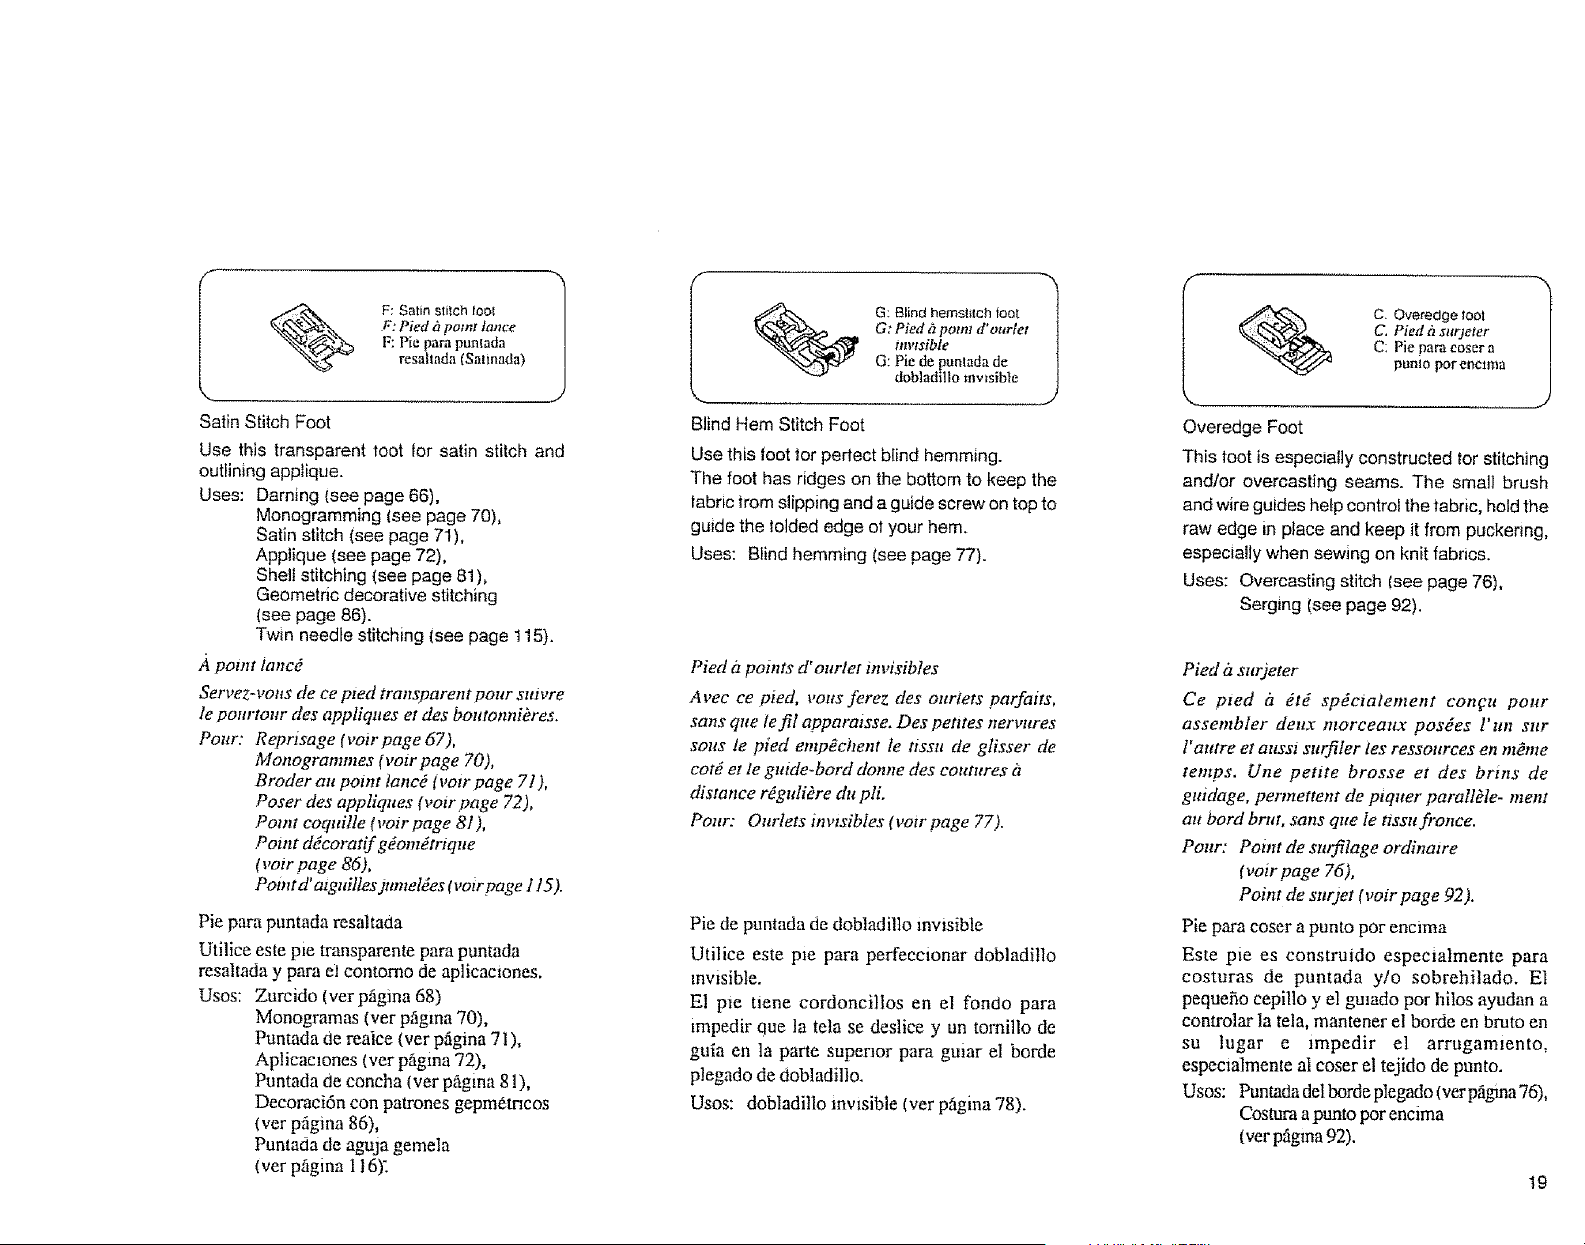
Satin Stitch Foot
Use this transparent toot [or satin stitch and
outlining applique.
Uses: Darning (see page 66),
Monogramming (see page 70),
Satin stitch (see page 71),
Applique (see page 72),
Shell stitching (see page 81),
Geometric decorative stitching
(see page 86).
Twin needle stitching (see page 115).
potnt iancd
Servez-vous de ce pzed transparent pour suivre
le pottrtour des appliques et des bmttonnikres.
Pour: Reprisage (voir page 67),
Monogrammes (vow page 70),
Broder aa point tancd Wotr page 71),
Poser des appliques (voir page 72),
Pore t coqtd]le (votr page 81),
Point ddcoratif gdomdtrique
(voir page 86),
Point d' azguilles jumeldes (votr pa g e 115).
Pie para puntada resaltada
Utilice este p_etransparente para puntada
resaltada y para el contomo de aplicaclones.
Usos: Zurcido (vet p,Sgina 68)
Monogramas (vet pfigma 70),
Puntada de reaice (ver p_gina 7 ! ),
Aplicaclones (ver p_gina 72),
Puntada de concha (vet p_gina 81),
Decoraci6n con patrones gepm6tncos
(ver pfigina 86),
Puntada de aguja gemela
(ver phgina 116)_
I _ G: Blind hernshlch foot 1
G: Pied h potm d'ourlet
invisible
G: Pie de puntada de
dobladil[o mv_siMe
Blind Hem Stitch Foot
Use this toot for perfect blind hemming.
The foot has ridges on the bottom to keep the
labric trom slipping and a guide screw on top to
guide the folded edge ol your hem.
Uses: Blind hemming (see page 77).
Pied il points d' ourlet invisibles
Avec ce pied, vons ferez des ourtets parfaits,
sans que left1 apparmsse. Des petttes nervures
sous fe pied emp#chent Ie tissu de glisser de
COldet te guide-bord donne des coutures i_
distance r@uliOre du pli.
Pour: Ourlets invtsibIes (votr page 77).
Pie de puntada de dobladilto invisible
Utilice este pie para pcffeccionar dobladfllo
invisible.
E1 pie tiene cordonciHos en el rondo para
impedir que la tela se deslice y un tomillo de
guia en la parte superior para guiar el borde
plegado de dobladilto.
Usos: dobladillo invisible (ver pSgina 78).
r
% C. Overedge tool
C. Pied fisttueter
C: Pie para coser a
punlo por enclma
Overedge Foot
This loot is especially constructed lor stitching
and/or overcasting seams. The small brush
and wire guides help control the fabric, hold the
raw edge in place and keep it from puckenng,
especially when sewing on knit fabrics.
Uses: Overcasting stitch lsee page 76),
Serging (see page 92).
Pied it surjeter
Ce pted b dtd spdcmlement con¢u pour
assembler deux morceattx posdes l'ttn sur
l' atttre et attsst surfiler ies ressources en re#me
temps. Une petite brosse et des buns de
guidage, permettent de piqtter parallOle- ment
au bord brut, sans que & ttssu fronee.
Pour: Point de surfitage ordinatre
(voir page 76),
Point de sttr.]et (voir page 92).
Pie para coser a punto pot encima
Este pie es constrmdo especialmente para
costuras de puntada y!o sobrehilado. E1
pequefio cepilto y el gumdo por hilos ayudan a
controlar la tela, mantener el borde en bruto en
su lugar e _mpedir el arrugam_ento,
espcctalmente aI coser el tejido de punto.
Usos: Puntada del horde plegado (ver p;agma 76),
Costura a punto por encima
(ver pfigma92).
I9
I _ Quilter 1
Guide il mazetasxer
Guia para acolchar
Presser Foot Types (Continued)
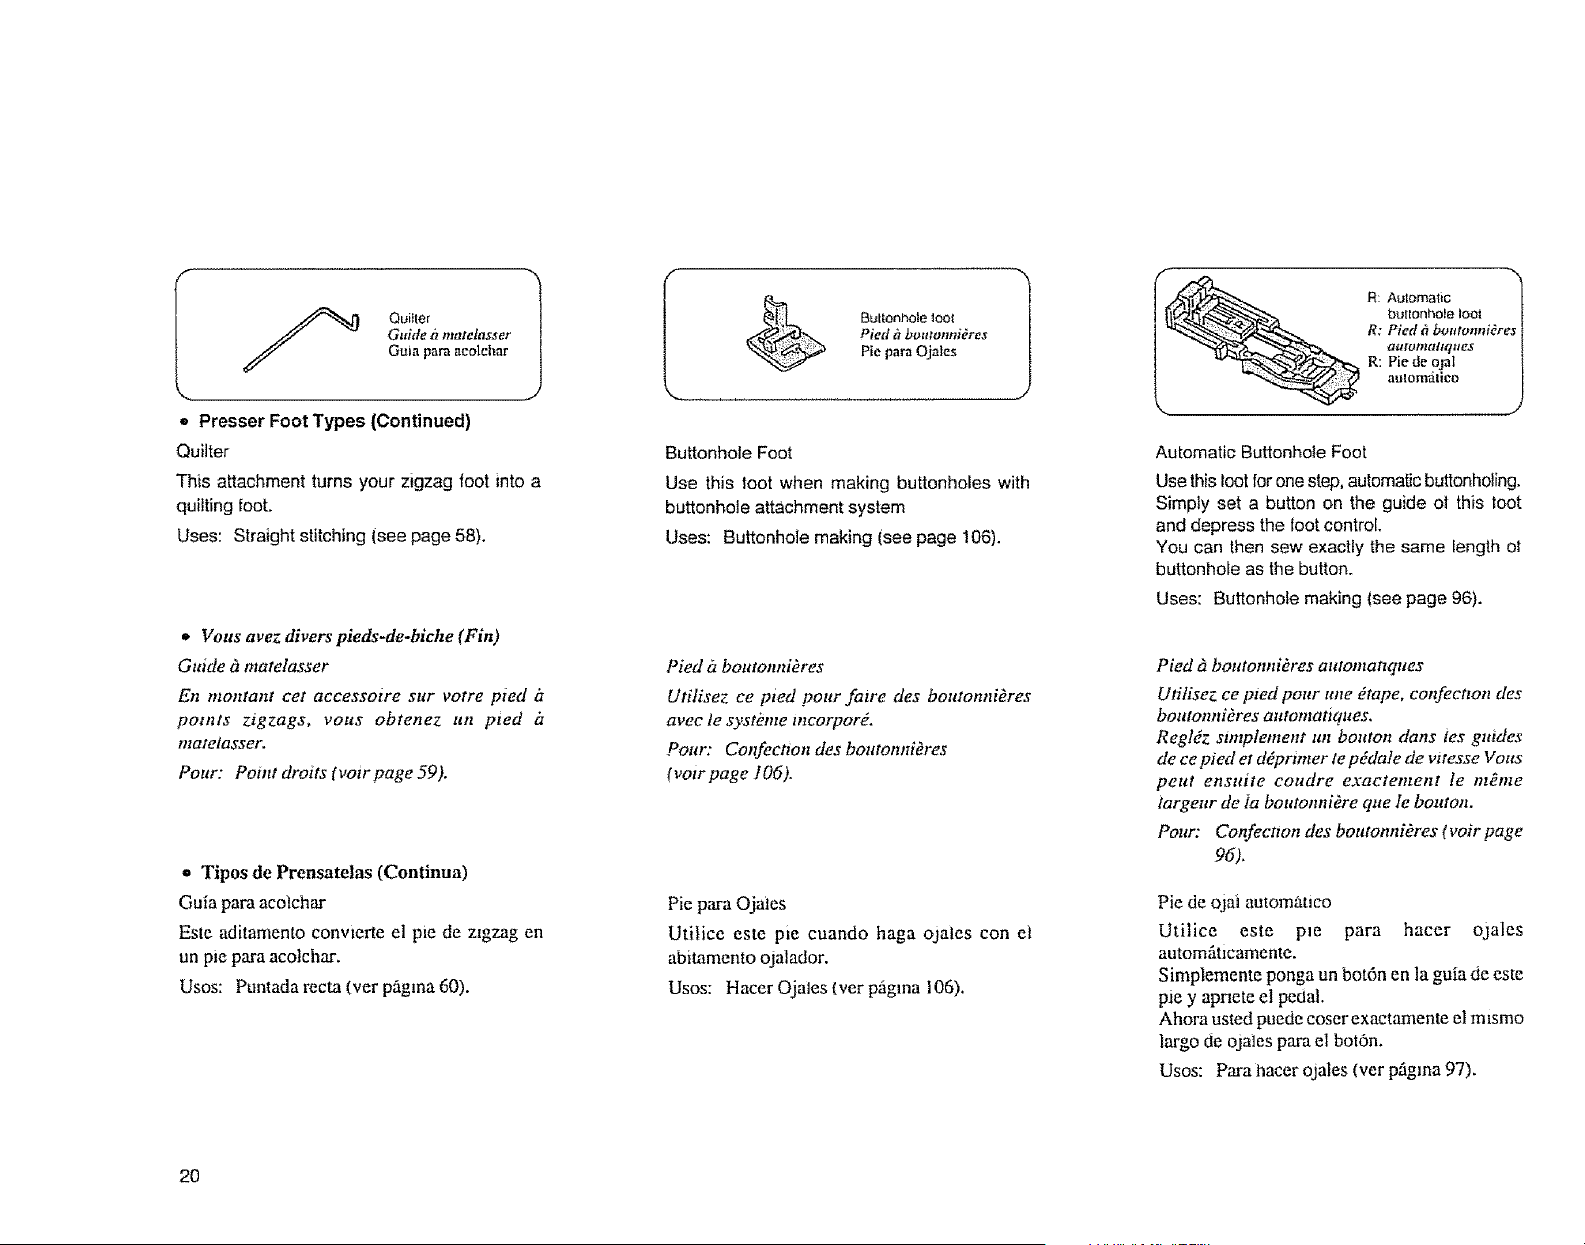
Quilter
This attachment turns your zigzag foot into a
quilting foot.
Uses: Straight stitching (see page 58),
o Vous avez divers pieds-de-biche (Fin)
Guide ?t matelasser
En montant cet accessoire sur votre pied i_
polnts zigzags, vous obtenez un pied h
matelasser.
Pour: Point droits (votr page 59),
= Tipos de Prensatelas (Continua)
Guia para acotchar
Este aditamento eonvlerte el pie de zzgzag en
un pie para acolchar.
Usos: Puntada recta (vet pfigma 60).
I _ BL_ttonholetoot 1
Pied h boutonnieres
Pie para Ojales
Buttonhole Foot
Use this toot when making buttonholes with
buttonhole attachment system
Uses: Buttonhole making (see page 106).
Pied &boutonniOres
Utilisez ce pied pour fatre des boutonnidres
avec te syst&ne tncorpor_.
Pour: Confection des boutonniOres
(votr page 106).
Pie para Ojates
Utitice este pm cuando haga ojales con et
abitamento ojalador.
Usos: Hacer Oja|es (ver p_agma 106),
R: Auloma{ic
bullonhole loot |
R: Pied ?tbo,tonni_res _
CllllOl_tttltqtle$ |
R: Pie de ojal |
aulomalico J
Automatic Buttonhole Foot
Use this loot for one step, automatic buttonholing.
Simply set a button on the guide o| this foot
and depress the foot control.
You can then sew exactly the same length ol
buttonhole as the button.
Uses: Buttonhole making (see page 96).
Pied _ boutomfiOres atttomattques
Ufilisez ce pted pour une drape, confection des
boutonniOres automattques.
Regldz smtplement un bouton dans ies guides
de ce pied et ddprtmer te pddale de vtresse Vous
peut ensuite coudre exactement le m&ne
largeur de la botttonnidre que le bouton.
Pour: Confectton des boutonnidres (voir page
96).
Pie de ojaJ autom_ttico
Utilice este pm para hacer ojales
autom_iticamente.
Simplememe ponga un bot6n en la guia de este
pie y apnete el pedal.
Ahora usted puede coser exactamente el m_smo
largo de ojafes para el bot6n.
Usos: Para llacer o lales (ver p_igma 97).
20
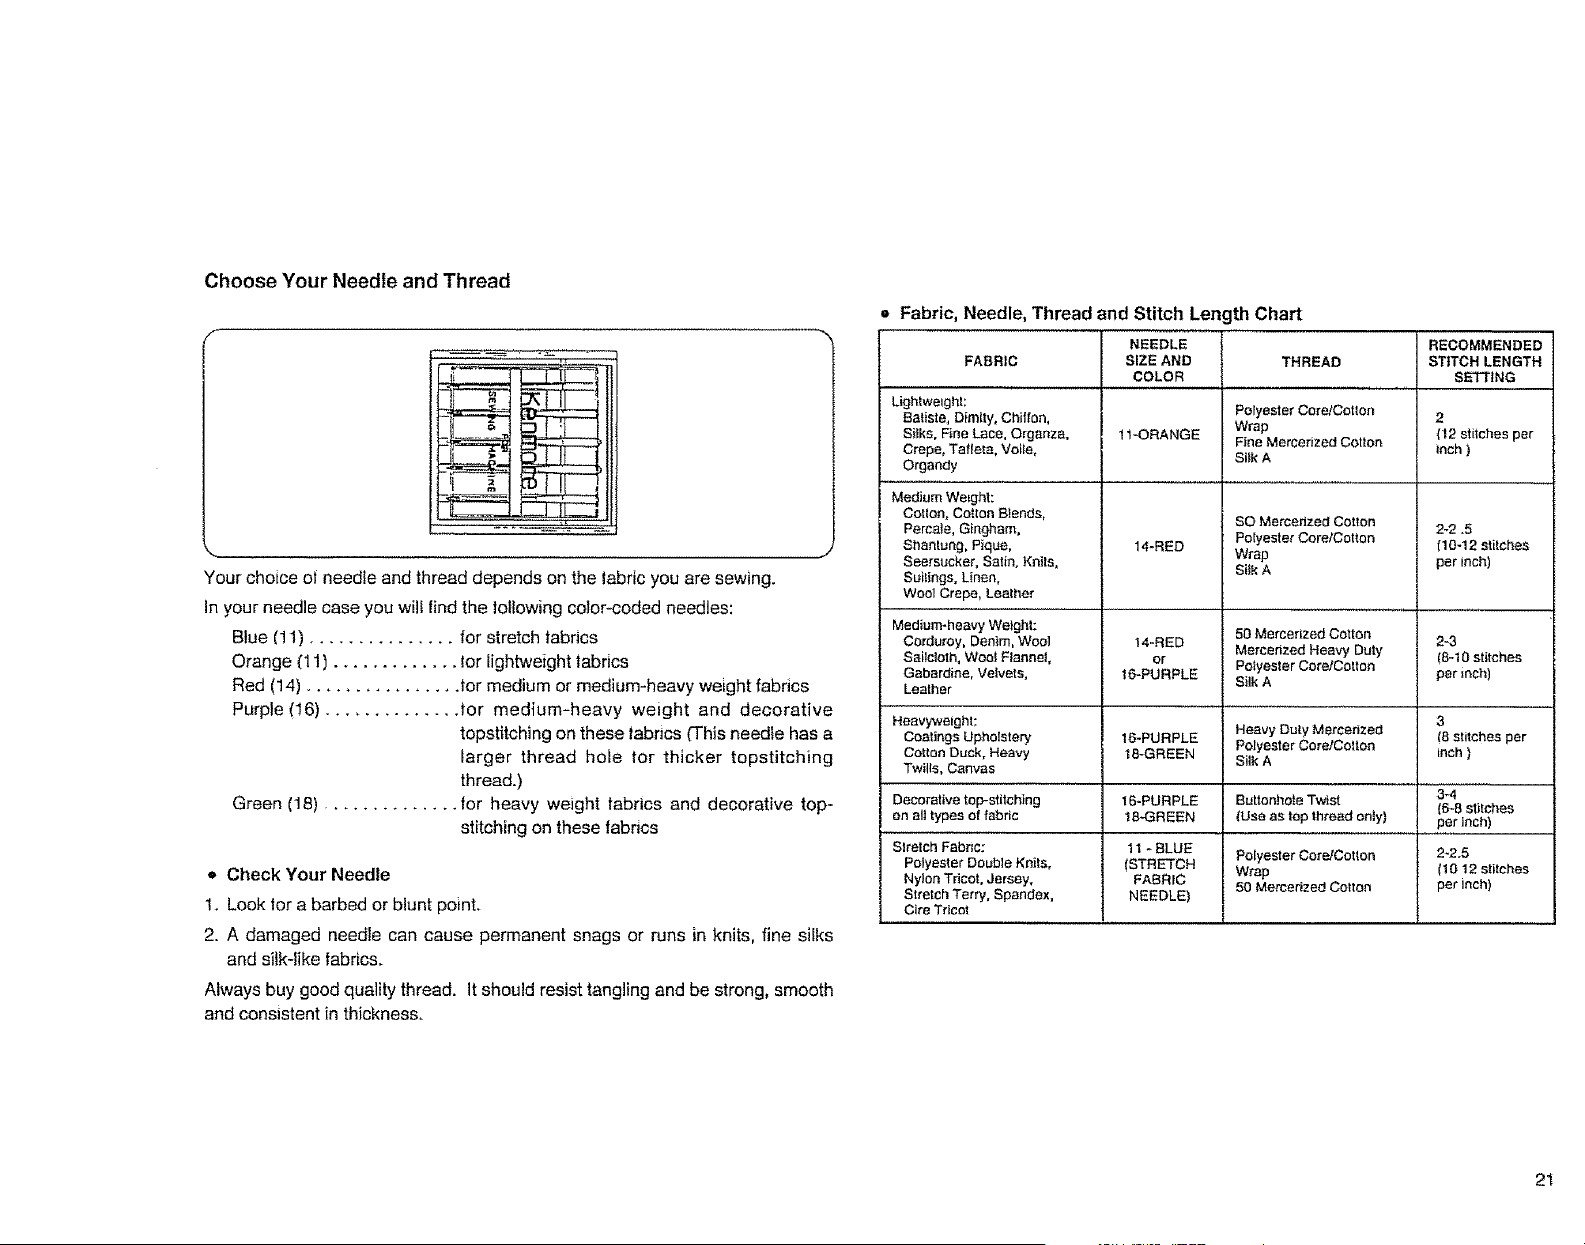
Choose Your Needle and Thread
%. ..+
Your choice of needie and thread depends on the Iabric you are sewing.
In your needle case you wilt lind the lollowing color-coded needles:
Blue (11) ............... for stretch fabrics
Orange {11 ) ............. tor lightweight tabrics
Red (14) ................ for medium or medium-heavy weight fabrics
Purple (16) .............. for medium-heavy weight and decorative
topstitching on these tabdcs (q'h]s needle has a
larger thread hole tor thicker topstitching
thread.)
Green (18) .............. for heavy weight fabrics and decorative top-
stitching on these fabrics
• Check Your Needle
1. Look lora barbed or blunt point.
2. A damaged needle can cause permanent snags or runs in knits, fine silks
and silk-like fabrics.
Always buy good quality thread. It should resist tangling and be strong, smooth
and consistent in thickness.
Fabric, Needle, Thread and Stitch Length Chart
NEEDLE
FABRIC
Lightweight:
Batiste, Dimity, Chiffon,
Sitka, Fine Lace. Organza.
Crepe, Tafleta, Voile,
Organdy
Medium Weight:
Cotlon, Cotton Btends,
Percale. Gingham,
Shantung, Pique,
Seersucker, Satin, Knils,
Suifings, Linen,
Wool Crepe, Leather
Medium-heavy Weight:
Corduroy. Denim, Wool
Sailcloth, Wool Flannel,
Gabardine, Velvets,
Leather
Heavyweight;
Coatings Upholstery
Cotton Duck, Heavy
Twills, Canvas
Decorative top-stitching
on eli types of fabric
Stretch Fabric:
Polyester Double Knits,
Nylon Tdcot, Jersey,
Stretch Tern/, Spandex,
Cite Tricot
I
SIZE AND
COLOR
11-ORANGE
14-RED
14-RED
or
16-PURPLE
16-PURPLE
IS-GREEN
16-PURPLE
1843REEN
11 _ BLUE
(STRETCH
FABRIC
NEEDLE)
THREAD
Polyester Core!Cotton
Wrap
Fine Mercerized Cotton
Silk A
SO Mercerized Cotton
Polyester Core/Cotton
Wrap
Silk A
50 Mercerized Cotton
Mercerized Heavy Duty
Polyester Core/Cotton
Silk A
Heavy Duty Mercerized
Polyester Core!Cotton
Silk A
Buttonhole Twist
(Use as top thread only)
Polyester Core/Cotton
W_'ap
50 Mercerized Cotton
RECOMMENDED
STITCH LENGTH
SETTING
2
(12 stitches per
Inch )
2-2,5
[10-12 stitches
per inch)
2-3
(8-10 stitches
per inch)
3
f8 stitches per
Inch )
34
{6-8 stitches
per inch)
2-2.5
(10 12 stitches
per inch)
21
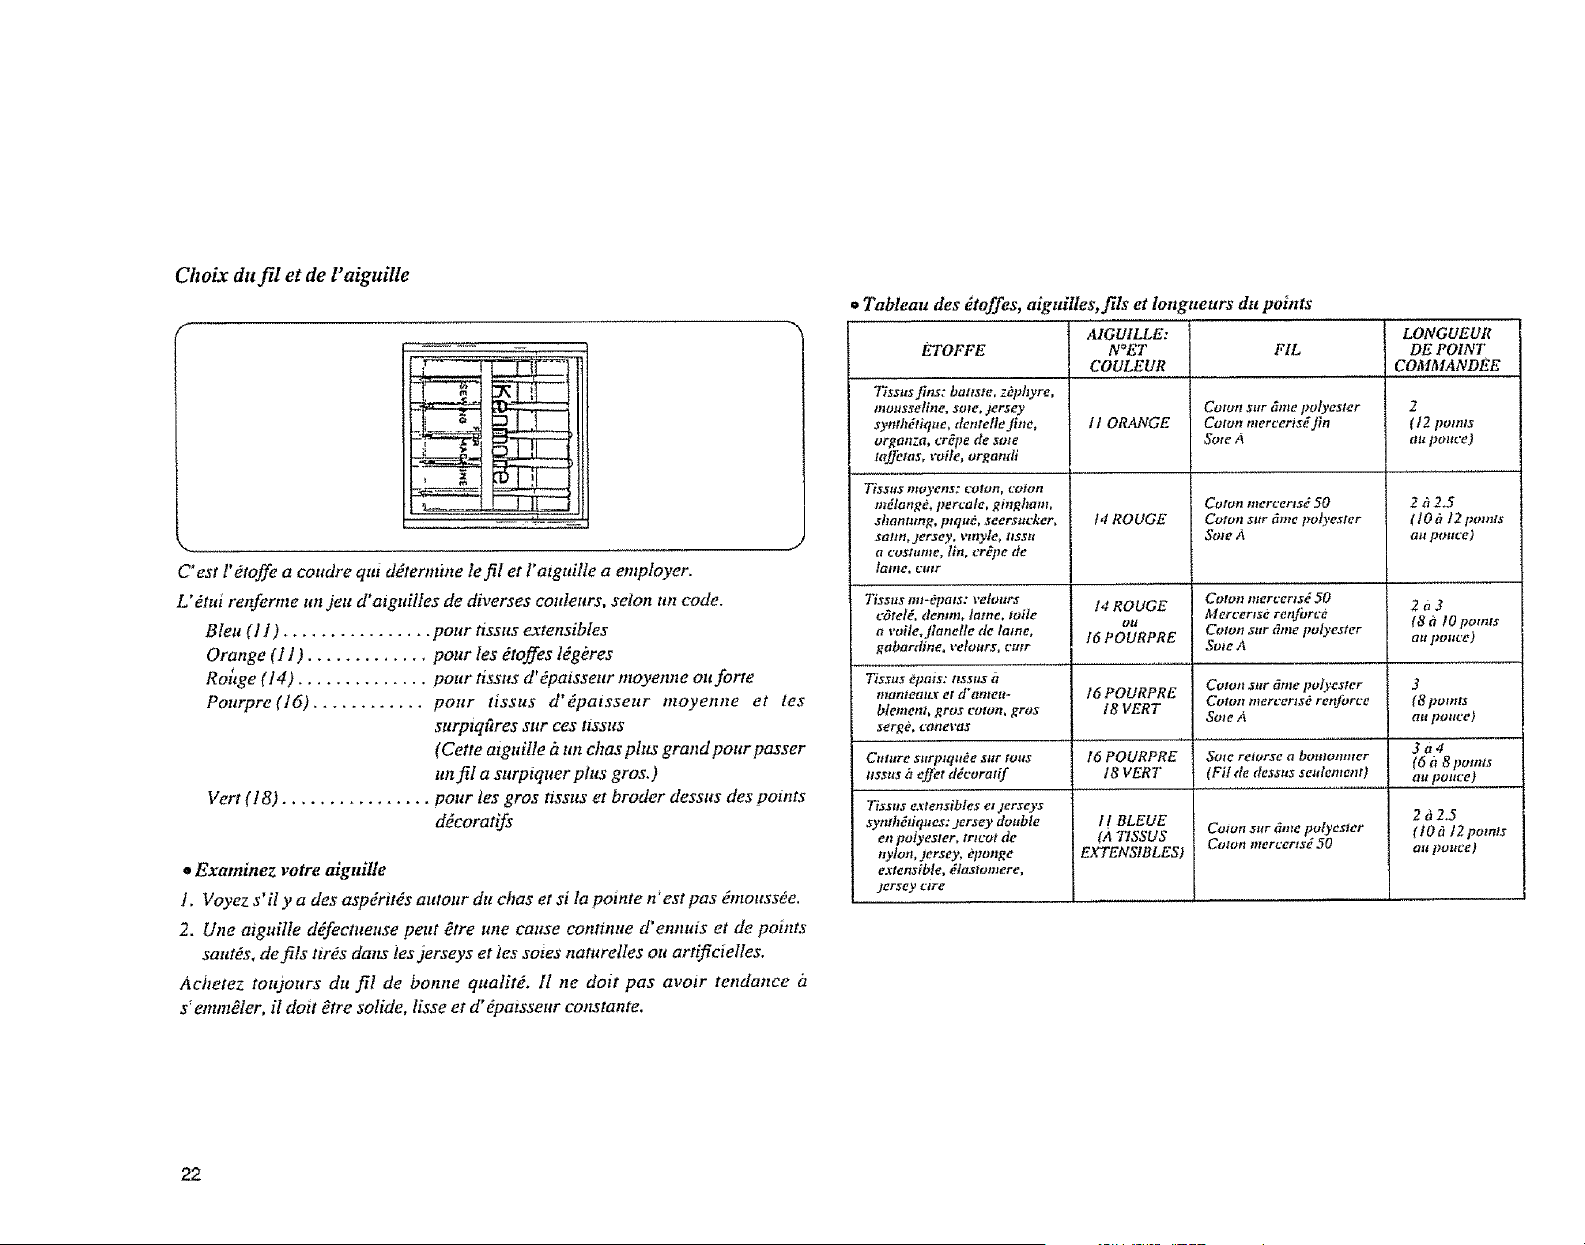
Choix du fil et de l"aiguille
F ¸
C'est l'Otoffe a coudre qut ddtermme Ie fiI et Fatguille a employer.
L'_tul renferme un jets d'a_guilles de diverses eoldetlrs, seton un code.
Bleu (1 I) ................ pour tissus extensibles
Orange (11) ............. pour les dtoffes ldgOres
Rohge (14) .............. pour t_ssus d'6paisseur moyenne ou forte
Pourpre(16) ............ pour tissus d'_paisseur moyenne et tes
surptqfires sur ees ttssus
(Cette atguille it un chas plus grand pour passer
until a surpiquer plus gros.)
Vert (18) ................ pour les gros t[sstts el broder dessus des points
ddcoratifs
• Examinez votre aiguille
f. Voyez s'it y a des aspdrit_s autour du chas et si Ia pointe n'est pas dmottssOe.
2. Une aiguille d(fectueuse peut £tre une cause continue d'ennuis et de points
sautOs, de fils tiros dons les jerseys et ies soles naturelles ou artificielles.
Achetez toudours du fil de bonne qualitOo 1l ne dolt pas avow tendance it
s_emm&'er, iI doit Ytre solide, lisse et d'dpatsseur constante.
,, Tableau des dtoffes, aiguilles, fils et !ongueurs du points
ETOFFE
Tiss_ts fins: batlste, zephyre,
moltssefine, sole, Jersey
synthdtique, dentelle fine,
organ-a, cr_pe de sole
] taffems, _ile, t_rgandi
Tisstl$ moyens; eotolt_ Colon
mdlangd, percale, gingham,
shantung, ptqu_, seersucker,
satin,jersey, vmyle, ttssu
a coslunt¢, lin, cr_pe de
tgtine, elll, _
Tissus tin-Opals: velours
t°Oteld, denmh lame, toite
a vuile, flanelte de lame,
gabardine, velours, cmr
Tissus epais: assus it
manteau.r et d'ameu-
blemenL gros colon, gros
sergd, caneras
Colttre $ltrplqtt_e Sift tolls
ussus b EJ]btd_coratif
AIGUILLE:
N_ET
COULEUR
l t ORANGE
t4 ROUGE
t4 ROUGE
otl
16 POURPRE
FIL ........
Colon sur _me polyester
Colon mercertsg fin
Sole A
Colon mercerts6 50
Colon sur _me polyester
SO_EA
Colon mercerts_ 50
Mercertsd reaJbrce
Colon _;ttr _'_mepolyester
Sote A
LONGUEUR
DEPOINT
COh_NDEE
2
(12 points
ttlt po_tce)
2ti2.5
( t0 fi 12points
au pouce)
2a3
(8 gt IO pomts
au poItee)
Cotott sttr 6me polyester 3
16 POURPRE Coton mercertse renforce (8 points
18 VERT Sow A au pouce)
t6 POURPRE SOlE retorse a boutonmer 3 a 4
(6 h 8 pomps
18 VERT (Fil de dessus seutement) au pouce)
TisattsextensiblEset jerseys
syttthddques:dersey double f I BLEUE Colon s.r a,.e polyester 2 d 2.5
" (lOt'_]2points
en polyester, tricot de (.4 TISSUS Colon mercertsd 50 au pouee)
nylon, jersey, epongE EXTENSIBLES)
e.rtensible, dtastomere,
jersey clre
22
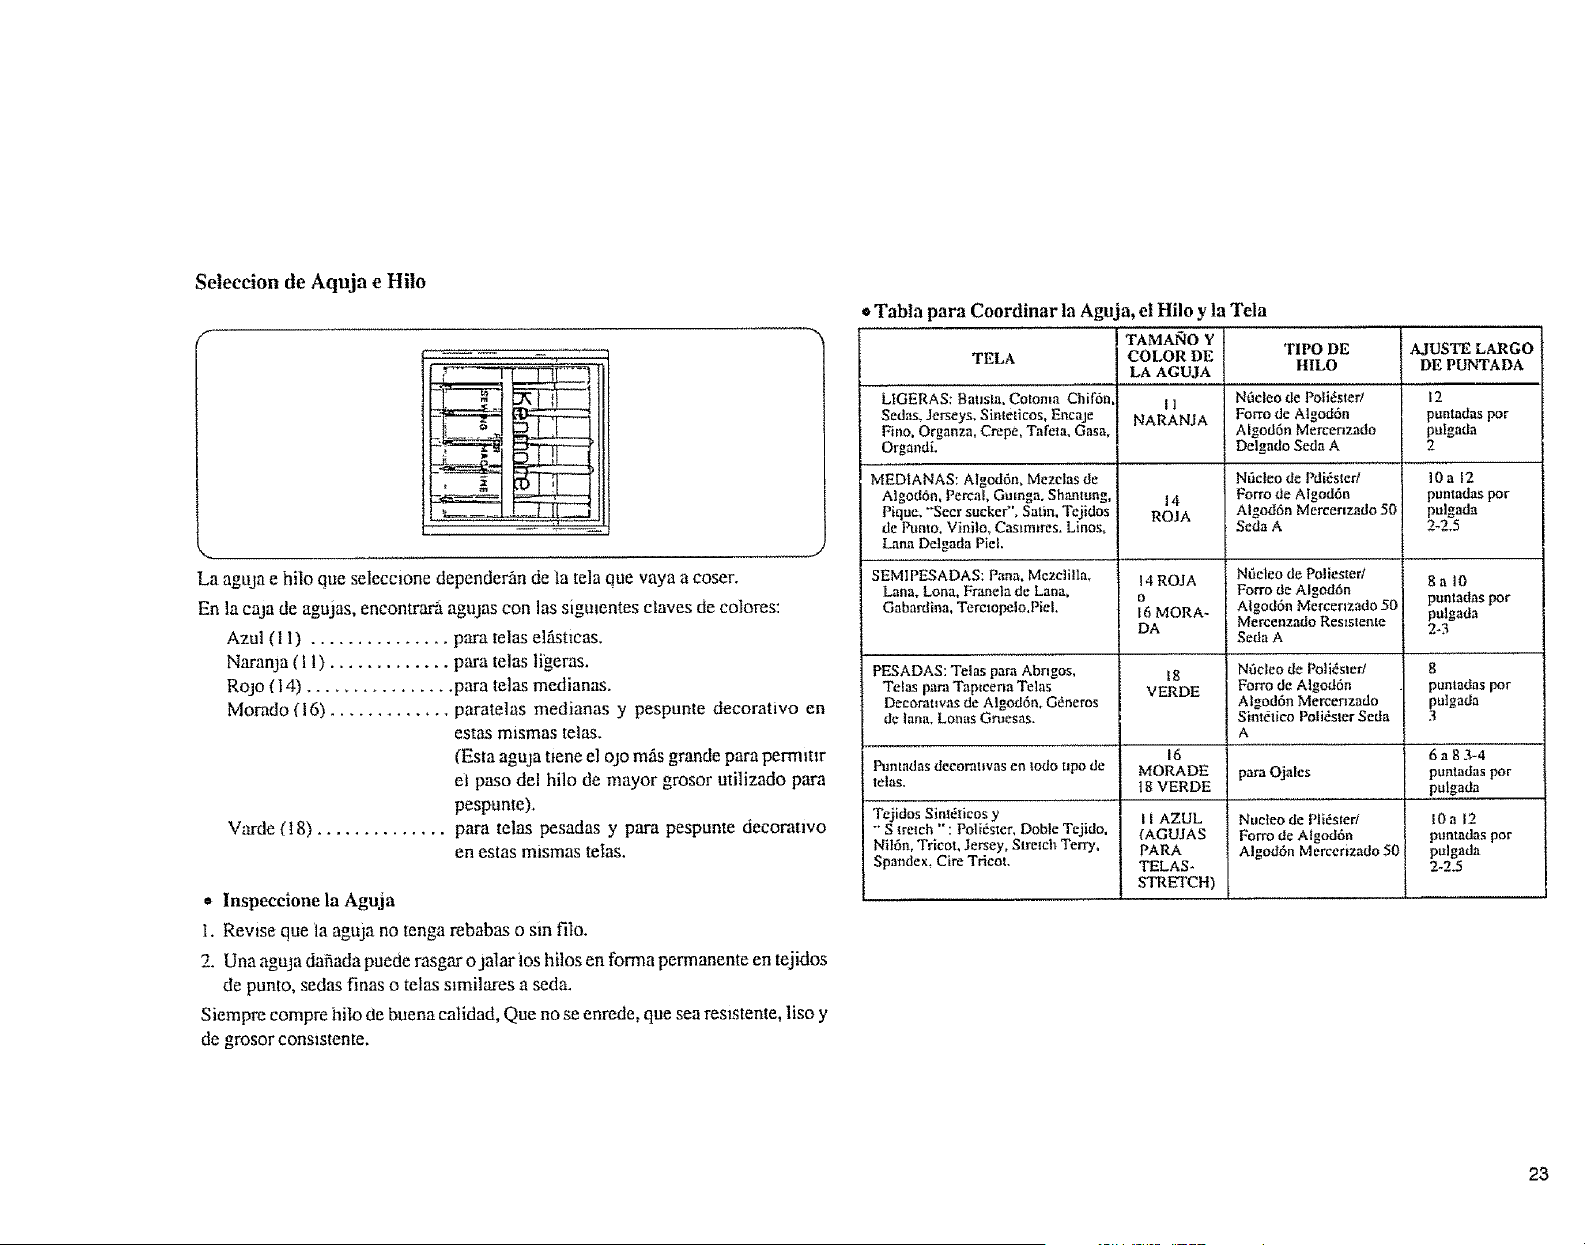
Seteccionde Aquja e Hi|o
La aguja e hilo que seleccione dependeran de la tela clue vaya a coser.
En la caja de agujas, encontram agujas con las sigmentes claves de colores:
Azul (11) ............... para telas elfisttcas.
Naranja (11) ............. para telas ligeras.
RoJo (14) ................ para telas medianas.
Morado (16) ............. paratelas medianas y pespunte decorativo en
estas mismas telas.
(Esta aguja tJene el ojo mils grande para perm_ttr
el paso del hilo de mayor grosor utilizado para
pespunte)+
Varde (I8) .............. para telas pesadas y para pespunte decoratwo
en estas mismas telas.
* Inspect|one la Aguja
1. Revise que la aguja no tenga rebabas o sin filo.
2. Una aguja dafiada puecle rasgar ojalarios hilos en forma permanente en tejidos
de punto, sedas finas o telas s_milares a seda.
Siempre compre hilo de buena ealidad, Que no se enrede, que sea reslstente, liso y
de grosor cons_stente.
o Tabla para Coordinar la Aguja, el Hilo y la Tela
TELA
LIGERAS: BalJsta, Cotoma Chifdn
Sedas. Jerseys. Sinteticos, Encaje
Fino. Organza, Crepe. Tafeta, Gasa,
OrgandL
MEDIANAS: Algod6n, Mezelas de
Algoddn, Percah Gumga. Shantung,
Pique. "Seer sucker". Satin, Tejidos
de Pumo. Vinilo, C_lm_res. Linos.
Lana Delgada Piek
SEMIPESADAS: Pana. Mezcli!la.
Lana. Lona, Fmne|a de Lana_
Gabardina, Terelopelo,Piel.
PESADAS: Telas para Abngos.
Telas para Tap_cena Telas
Decorauvas de Algod6n. Gdneros
de lana. Lonas Gmesas.
Puntadas deeoratwas en lodo t_po de
lelas.
Tejldus Sintd6cos y
"'S lreleh "': Polidster, Doble Tejido,
Nil6n, Trleot, Jersey, SlremhTerry,
Spandex_ CireTdcot.
TAMANO Y
COLOR DE
LA AGUJA
I1
NARANJA
14
ROJA
14 ROJA
o
l 6 MORA-
DA
18
VERDE
16
MORADE
t 8 VERDE
I 1 AZUL
(AGUJAS
PARA
TELAS-
SW<ETCH)
TIPO DE
ItlLO
Nt_cleo de Polit_ster/
Forro de Algod6n
Algod6n Mercenzado
Delgado Seda A
Ntic|eo de Pdi,Sster/
Forro de A god6n
Algod6n Mercerlzado 50
Seda A
Nfie|eo de Poliester;
Forro de Algod6n
Algod6n Mercerlzado 50
Mer_2enzado Reaff;lertte
Seda A
Nt]cleo de Polk3s_er/
Forro de Algod6n
Algod6n Mercenzado
Sint61[co Polid:ster Seda
A
pare Ojales
Nucteo de Pl_6ster/
Forro de Algod6n
Algod6n Mercerizado 50
AJUSTE LARGO
DE PUNTADA
12
puntadas pot
pulgada
10a 12
puntadas por
pulgada
2-2.5
8a10
puntadas por
pulgada
2-3
8
punladas por
pulgada
3
6ag3-4
puntadas pot
pulgada
IOa [2
puntadaa por
pulgada
2-2.5
23
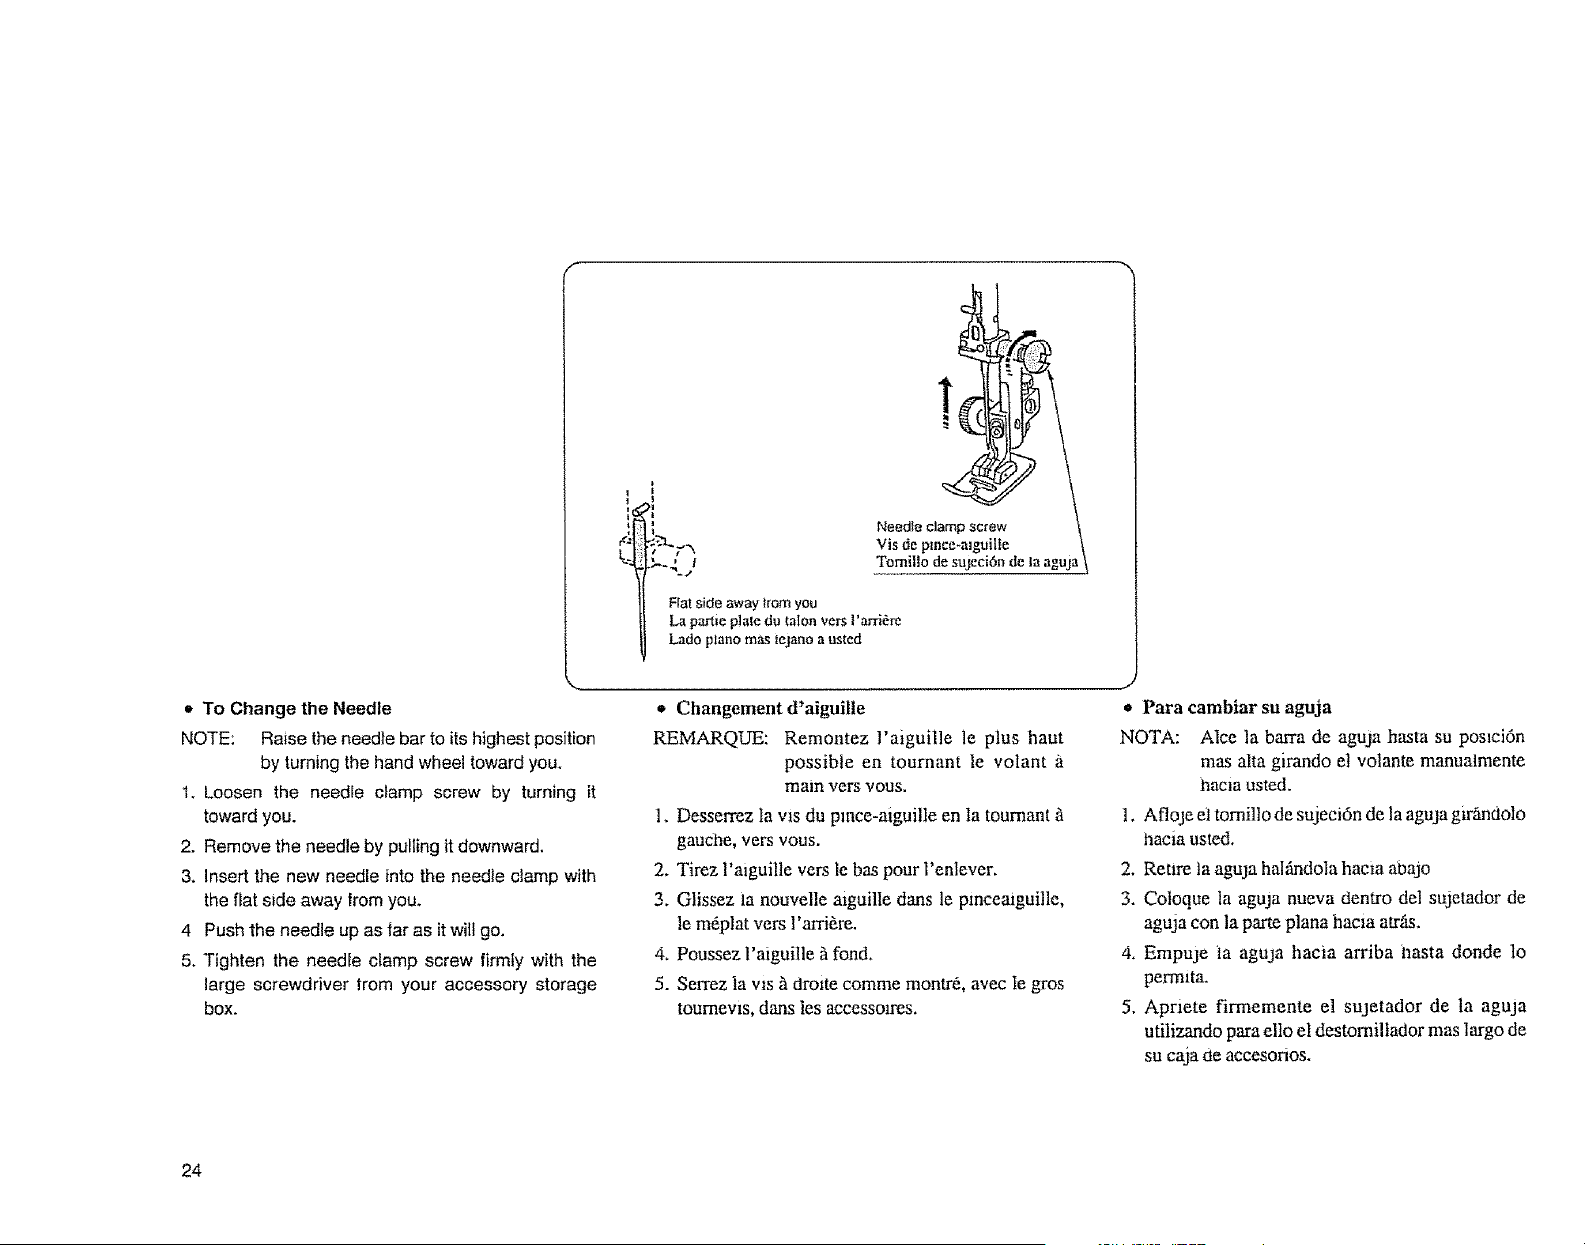
Flat side away trorn you
La pattie plate du talon vers ]'artiSte
Lado piano mas mjano a usted
e To Change the Needle
NOTE: Raise the needte bar to its highest position
by turning the hand wheel toward you.
1, Loosen the needle clamp screw by turning it
toward you.
2. Remove the needle by pulling it downward.
3. Insert the new needle into the needle clamp with
the fiat side away from you.
4 Push the needle up as far as it will go.
5. Tighten the needle clamp screw firmly with the
large screwdriver from your accessory storage
box.
. Changement d'aiguille
REMARQL_: Remontez ]'aiguille le plus haut
possible en tournant le volant
main vers vous.
1. Desserrez Ia vls du pmce-alguille en la toumant
gauche, vers vous.
2. Tirez l'aiguille vers le bas pour l'enlever.
3. Glissez ia nouvelle aiguille darts le pmceaiguille,
le m_plat vers l'arri_re.
4. Poussez l'aiguille _ fond.
5. Serrez laws _ drotte comme montr_, avec Ie gros
toumevls, darts tes accessolres.
• Para eambiar su aguja
NOTA: Alce la barra de aguja hasta su poslci6n
mas alta girando el volante manualmente
hacm usted.
1. Afloje el tomil]o de sujeci6n de la aguja gtr_dolo
hacia usted.
2. Retire la aguja hal_.ndola hama abajo
3. Cotoque la aguja nueva dentro del sujetador de
aguja con la parte plana haeia arras.
4, Empuje ia aguja hacia arriba hasta donde lo
permita.
5. Apnete firmemente el sujetador de la aguja
ufilizando para ello el destorniltador mas largo de
su caja de aeeesorios.
24
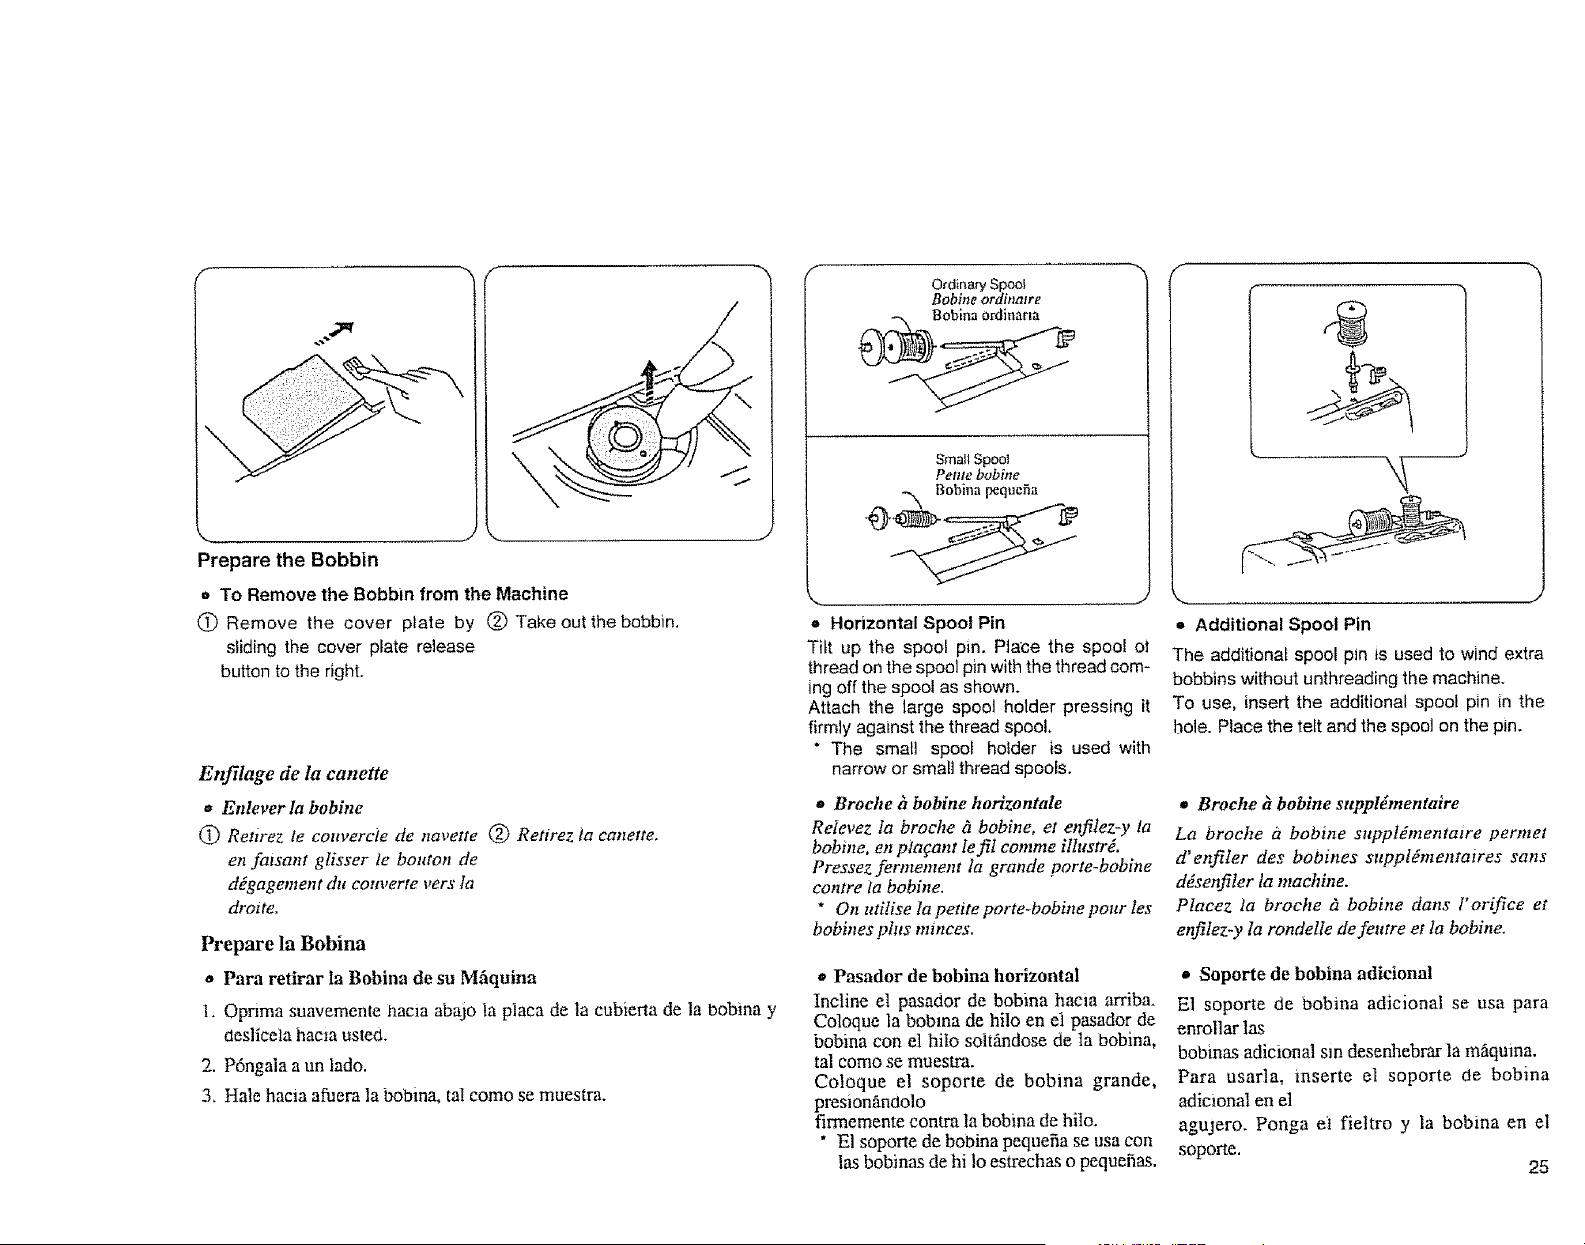
J
Prepare the Bobbin
o To Remove the Bobbin from the Machine
(_ Remove the cover plate by (_) Take out the bobbin.
stiding the cover plate release
button to the right.
/
Enfilage de la canette
6 Enlever la bobine
(_ Retwez le couvercie de navette @ Retirez ia canette.
en fatsant glisser le bonton de
d_gagement du eom,erte vers la
droite.
Prepare la Bobina
o Para retirar la Bobina de su Mfiquina
1. Opnma suavemente hacia abajo la placa de la cubierta de la bobina y
deslicela hama usted.
2. P6ngala aun lado.
3. Hale hacia afuera la bobina, tal como se muestra.
Ocdina_ Spoo!
Bobine ordinalre
Boblna ordinarla
Small Spool
Petite bobhte
Bobina pequefia
- Horizontal Spoor Pin
Tilt up the spool pin. Place the spool ot
thread on the spool pin with the thread com-
ing off the spool as shown.
Attach the large spool holder pressing it
firmly against the thread spool
* The small spoo! hotder is used with
narrow or small thread spools.
• Broehe h bobine horizontale
Reievez la broehe & bobine, et enfilez-y la
bobme, en plafant le fit eomme ilIustr_.
Pressez fermemem la grande porte-bobine
eontre ta bobine.
• On utilise la petite porte-bobine pour les
bobines phts minces.
€, Pasador de bobina horizontal
Incline el pasador de bobina hacia arriba.
Coloque la bobma de hilo en el pasador de
bobina con el hilo solt_dose de la bobina,
tal como se muestra.
Coloque el soporte de bobina grande,
pres_on_mdolo
firmemente contra la bebina de hito.
* E1soporte de bobina pequefia se usa con
las bobinas de hi 1oestrechas o pequefias.
= Additional Spool Pin
The additiona_ spool pin is used to wind extra
bobbins without unthreading the machine.
To use, insert the additional spool pin in the
bole. Place the teIt and the spool on the pin.
** Broche _tbobine sttppl_mentalre
La broehe h bobine supptdmentatre permet
d'enfiler des bobines suppldmentaires sans
d_senfiler la machine.
Placez la broche fi bobine dans l'orifice et
enfiIez-y la rondelle de feutre et Ia bobine.
• Soporte de bobina adicionat
El soporte de bobina adicional se usa para
enrollar las
bobinas adicional sin desenhebrar la m_quma,
Pard usarla, inserte el soporte de bobina
adicional en el
agujero, Ponga et fieltro y la bobina en el
soporte.
25
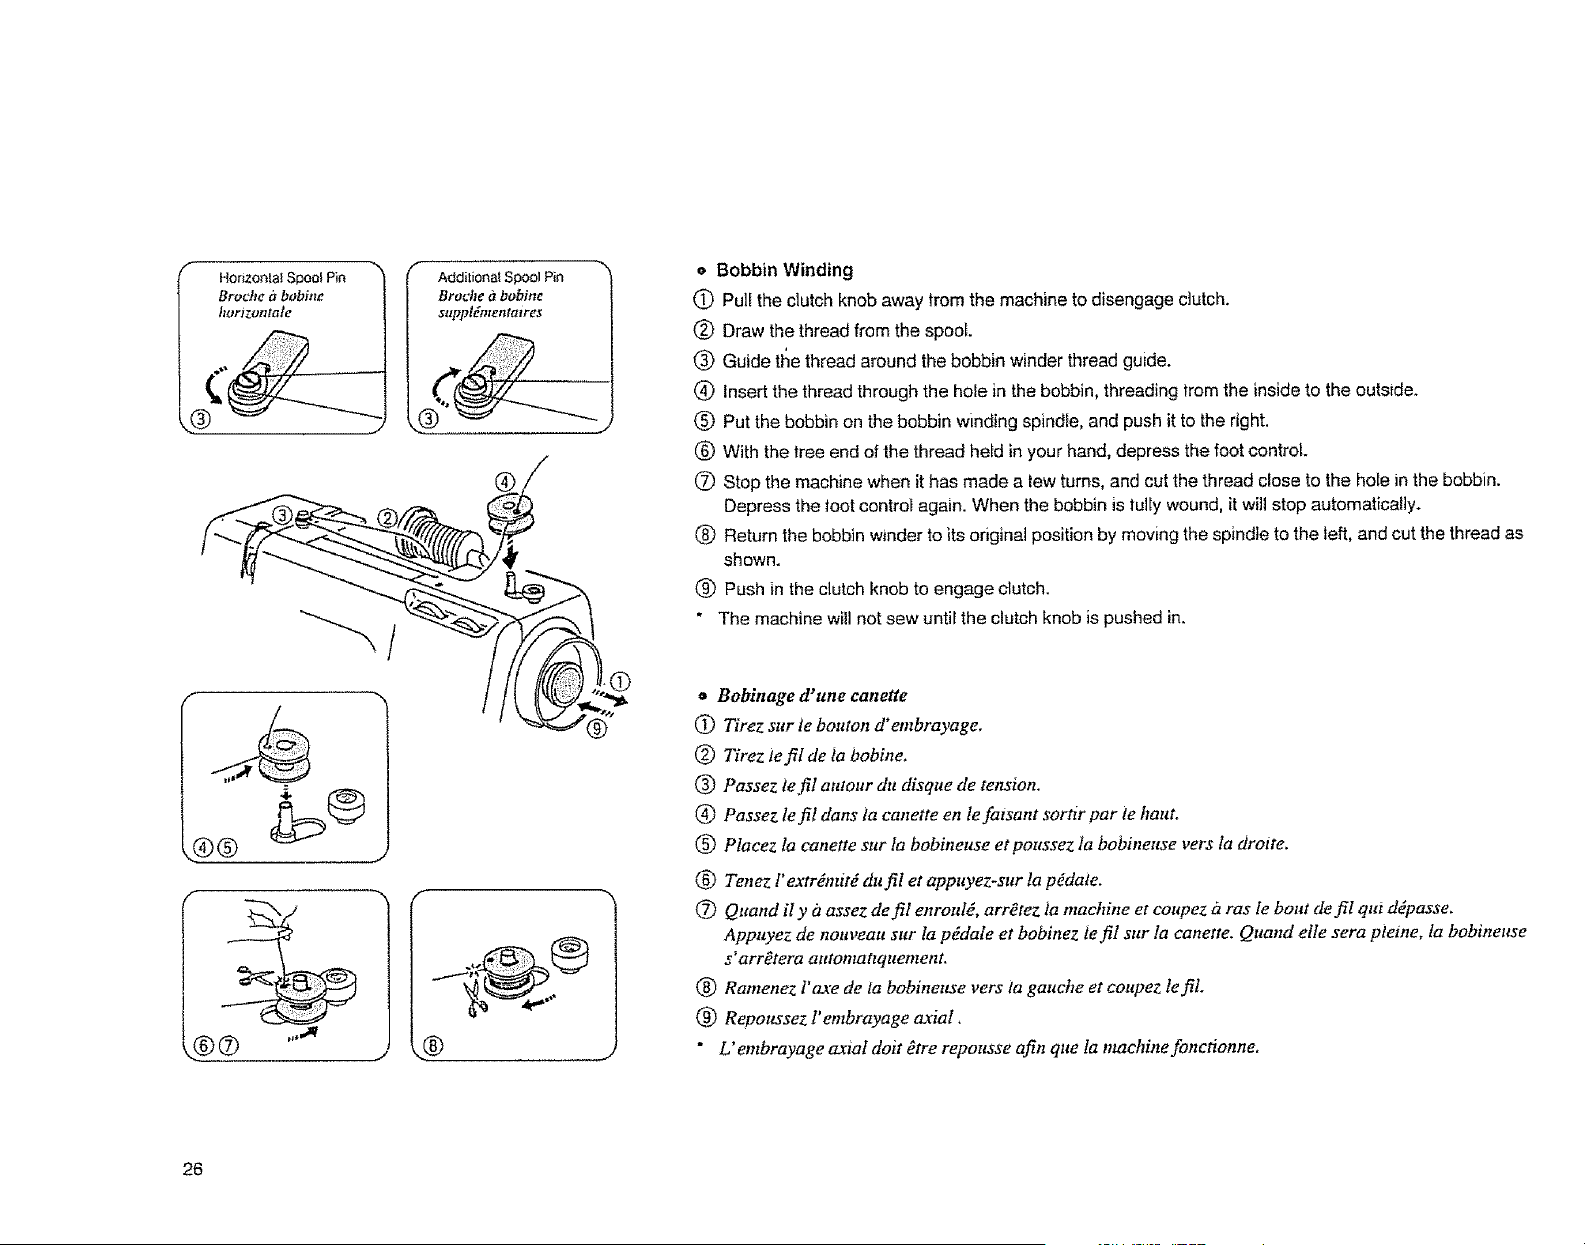
I Horizontal Spool Pin 1
Broche it bobfne
hortT.onlale
b©
r
Addiliona! Spool Pin
Brod_e it bobine
sttppl_mentaires
., ,.® .,
• Bobbin Winding
(_) Pu]I the clutch knob away trom the machine to disengage clutch.
® Draw the thread from the spool.
(_ Guide the thread around the bobbin winder thread guide.
(_ Insert the thread through the hole in the bobbin, threading trom the inside to the outside.
® Put the bobbin on the bobbin wLnding spindie, and push it to the right.
(_ With the tree end of the thread heid in your hand, depress the foot control.
(_ Stop the machine when it has made a |ew turns, and cut the thread close to the hole in the bobbin.
Depress the toot control again. When the bobbin is tully wound, it will stop automatlcal]y.
(_ Return the bobbin wtnder to its original position by moving the spindle to the left, and cut the thread as
shown.
(_) Push in the clutch knob to engage clutch.
" The machine will not sew until the clutch knob is pushed in.
* Bobinage d'une canette
(_) Tirez sur te bouton d°embrayage.
(_ Tirez te fiI de ia bobbte.
(_) Passez le fil autour du disque de tension.
(_ Passez le fil dans ta canette en le fatsant sortir par te haut.
® Placez la canette sur Ia bobineuse et poussez, la bobineuse vers ta drotte.
(_) Tenez l'extrdmitd du fiI et appuyez-sur la pddale.
(_ Quand il y a assez de fil enroul_, arr_tez ta machine et coupez &ras le bout de fil qui d#passe,
Appuyez de nouveau sur la pddale et bobinez ie fil sur la canette. Quand elle sera pleine, la bobineuse
s'arr_tera atttomattquement,
® Ramenez I'ax'e de la bobineuse vers la gauche et coupez lefiL
(_) Repoussez l' embrayage cL_:ial,
" L'embrayageaxtaldoit_trerepousseafinqueIamachinefoncffonne,
26
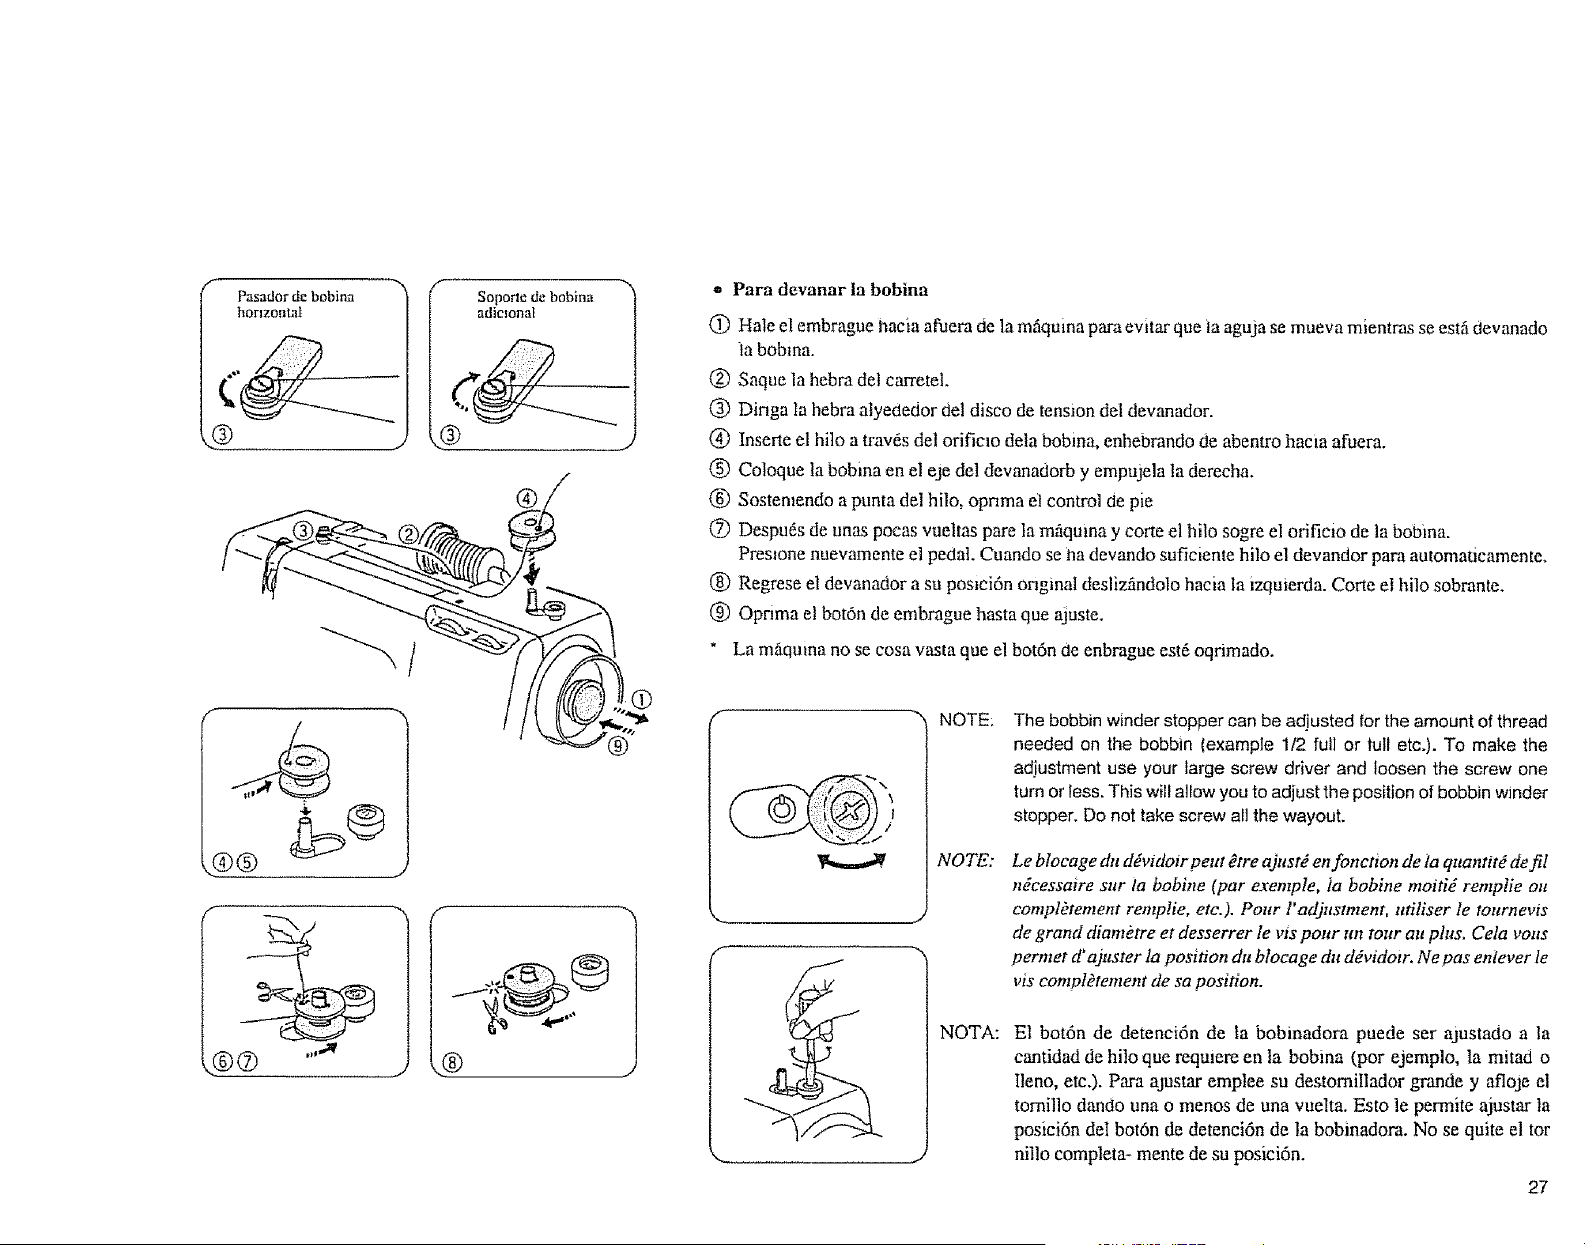
Pasador de bobina
horizontal
®
.._)@ "_'
Sopone de boMna
adiclonal
®
w Para devanar la bobina
@ Hale el embrague hacia afuera de la mfiquina para evitar que ia aguja se mueva mientras se estfi devanado
ia bobma.
@ Saque la hebm del carretel.
@ Dinga Ia hebra alyededor del disco de tension del devanador.
@ Inserte el bile a trav(_sdel orificlo dela bobina, enhebrando de abentro hacia afuera.
(_) Coloque la bobina en el eje del devanadorb y empujela la derecha,
(_) Sostemende a punta del hilo, opnma el control de pie
(_) Despufis de unas pocas vuehas pare la m_quma y eerie el hilo sogre el orificio de la bobina.
Preslone nuevamente el pedal. Cuando se ha devando suficiente hilo el devandor para automaticamente,
(_) Regrese el devanador a su peslci6n onginat deslizfindolo hacia la izquierda. Corte el hilo sobrante.
(_ Optima el bet6n de embrague hasta que ajuste.
" La mfiquma no se cosa vasta que el bot6n de enbrague est_ oqnmado,
}
f
6
%
" NOTE:
NOTE:
J
NOTA:
The bobbin winder stopper can be adjusted for the amount of thread
needed on the bobbin (example 1/2 ful] or lull etc.). To make the
adjustment use your large screw driver and loosen the screw one
turn or less. This will allow you to adjust the position of bobbin winder
stopper. Do net take screw all the wayout.
Le blocage du ddvtdoir peut _tre ajustd en fonction de ta quantitO de fil
ndcessawe snr ta bobine (par exemple, ia bobine moitid remplie ou
compl_tement remplie, etc.). Pour l'adjustment, ufih'ser le tournevis
de grand diamktre et desserrer levts pour un tour au plus, Cela volts
permet d'ajuster la position du blocage du ddvidom Ne pas enlever le
vis complktement de sa position.
El bot6n de detenei6n de ta bobinadora puede ser ajustado a la
cantidad de hilo que requiere en ta bobina (por ejemplo, la mitad o
Ileno, etc.). Para ajustar emplee su destomillador grande y afloje el
tomillo dando una o mends de una vuelta. Esto le permite ajustar la
posiei6n de! bot6n de detenci6n de la bobinadom. No se quite el tor
nillo completa- mente de su posici6n.
27
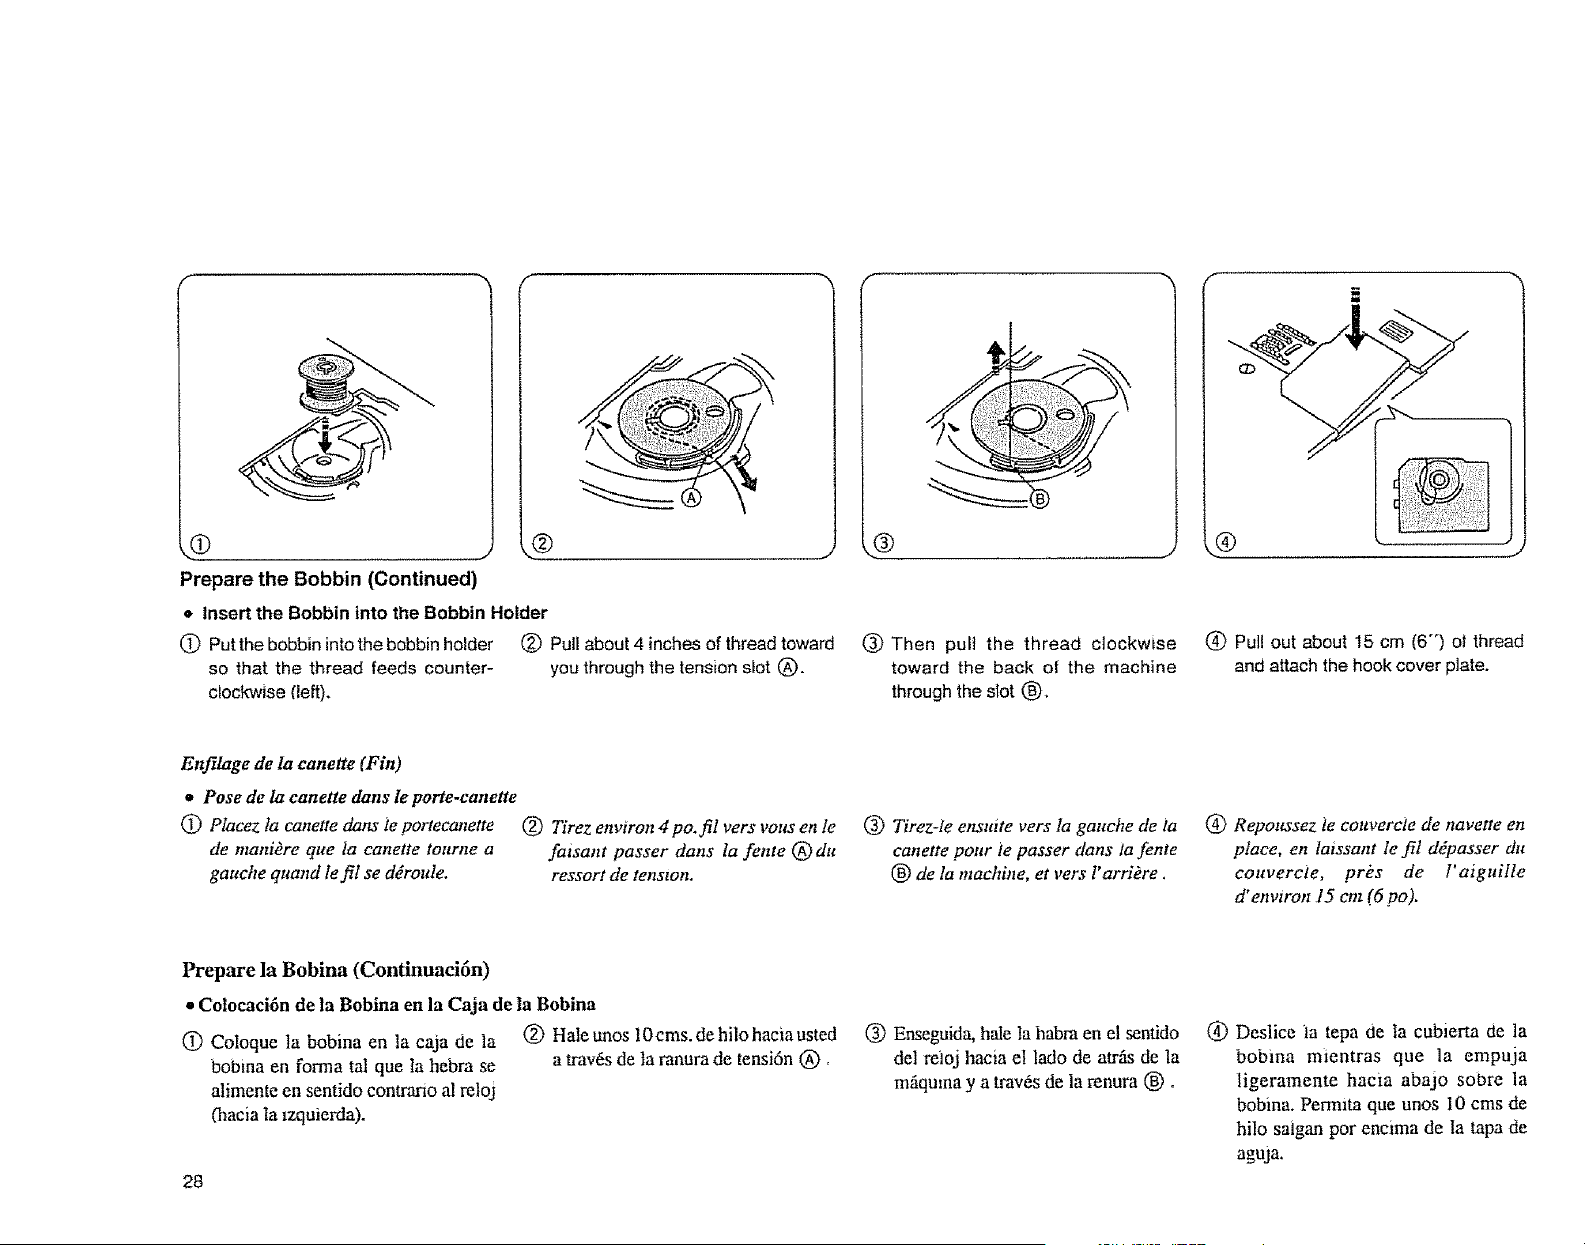
O
Prepare the Bobbin (Continued)
• Insert the Bobbin into the Bobbin Holder
(_ Put the bobb[n intothe bobbin holder
so that the thread feeds counter-
c_ockwJse Oeft).
(_) Pull about 4 inches of thread toward
you through the tension slot (_).
(_ Then pull the thread clockwise (_ Pull out about 15 cm (6-) ot thread
toward the back of the machine and attach the hook cover plate.
through the slot (_,
Enfilage de la canette (Fin)
o Pose de la canette dens le parte-canette
OD Placez la canette dans ie portecanette (2) Tirez environ 4 po. f!l vers vous en le
de mani_re que ia canette tourne a faisant passer clans ta fente (_)du
gauche quand le fil se ddroule, ressort de tenston.
(_ Tirez-te ensuite vers la gauche de ia
canette pottr ie passer dens la fente
(_ de la mactnne," et _,ers t'arrtere .'"
(_) Repottssez te eouvercle de navette en
place, en latssant [e fil ddpasser du
couvercie, prks de t'aigttille
d" envirozz 15 cm (6 po).
Prepare la Bobina (Continuaci6n)
• Colocaci6n de la Bobina en la Caja de la Bobina
(!) Coloque la bobina en la caja de la (_) Hale unos 10cms. de hilo hacia usted
bobina en forma tel que la hebm se a tray,s de la ranura de tensi6n @
alimente en sentido contr_aao al reloj
(hacia la lzquierda).
28
(_) Enseguida, hale la habm en el senfido
del reioj hacia el lade de arras de ]a
mfiquma y a tray,s de ia renura (_) °
Deslice ta tepa de la cubierta de la
bobina mientras que la empuja
ligeramente hacia abajo sobre la
bobina. Pennlta que unos I0 cms de
hilo saigan per encima de Ia tape de
aguja.
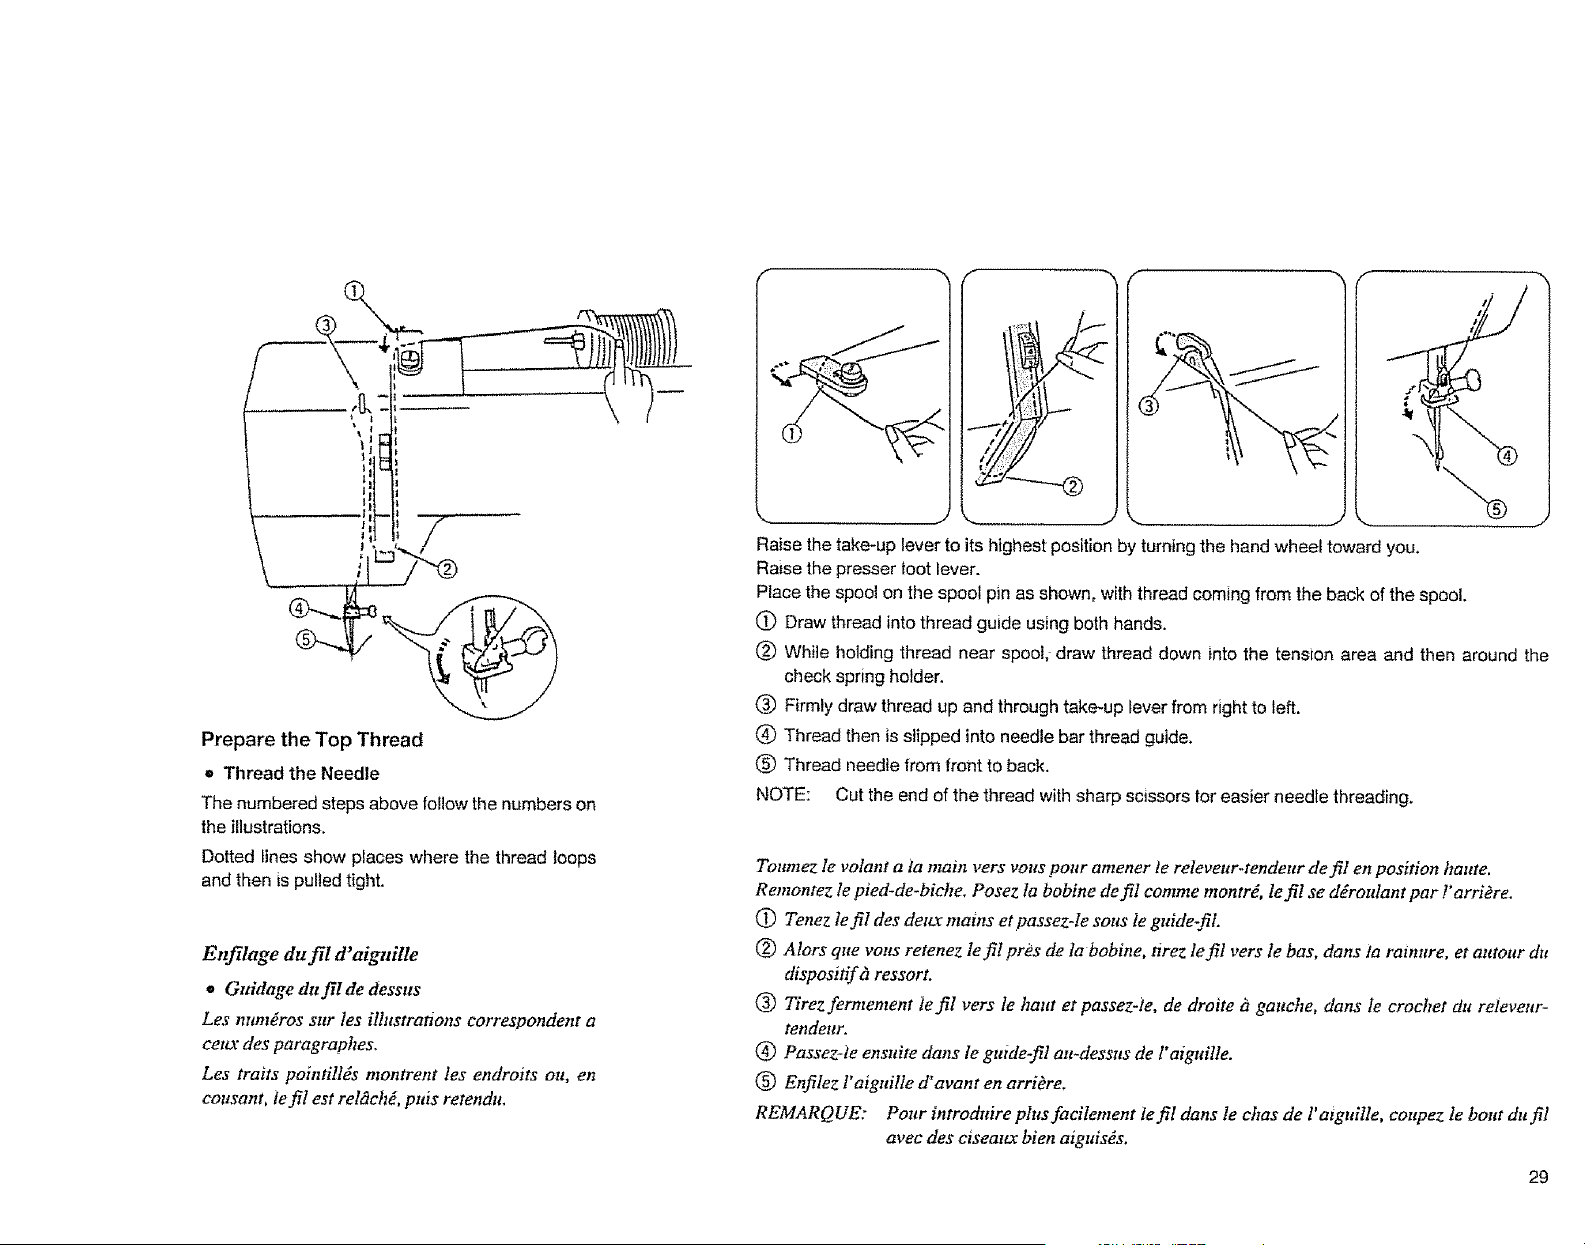
Prepare the Top Thread
• Thread the Needle
The numbered steps above follow the numbers on
the illustrations.
Dotted lines show places where the thread loops
and then is pulted t{ght,
Enjfflage du fil d' aigTlille
Guidage du fil de dessus
Les num_ros sur les illastrations correspondent a
eettx des paragraphes+
Les traits pointillEs montrent les endroits ou, en
cousant, te fil est rel_ch_, puis retendu+
yz
Raise the take-up lever to its highest position by turning the hand wheel toward you+
Raise the presser toot lever.
Place the spool on the spool pin as shown= with thread coming from the back of the spool.
(_) Draw thread into thread guide using both hands.
(_ While holding thread near spool, draw thread down into the tension area and then around the
check spring holder,
_) Firmly draw thread up and through take-up lever from right to left.
(_ Thread then is slipped into needle bar thread guide,
(_ Thread needle from front to back,
NOTE: Cut the end of the thread with sharp scissors |or easier needle threading,
Toumez le volant a la main vers vous pour amener te releveur-tendeur de fil en position haute.
Remontez le pied-de-biehe. Posez la bobine de fil comme montrE, le fil se dEroulant par !'arriOre+
(_ Tenez le fil des deux mains et passez-te sous le guide-ilL
_) Alors qtte vous retenez Ie fil prks de la bobineo tirez le fil vers le bas. clans la rainure, et autour du
disposifif gtressort.
(_ Tirez fermement le fil vers le haut et passez-ie, de droite i_ gauche, dans Ie crochet du releveur-
tendeur.
(_) Passez-?e ensuite dans le guide-ill att-dessas de l'aiguille.
(_) Enfilez l' aiguille d'avant en arribre+
REMARQUE: Pour introduire plus facilement fe fil dans le chas de l' atguille, coupez le bout du fil
avec des ciseato: bien aiguisds+
29
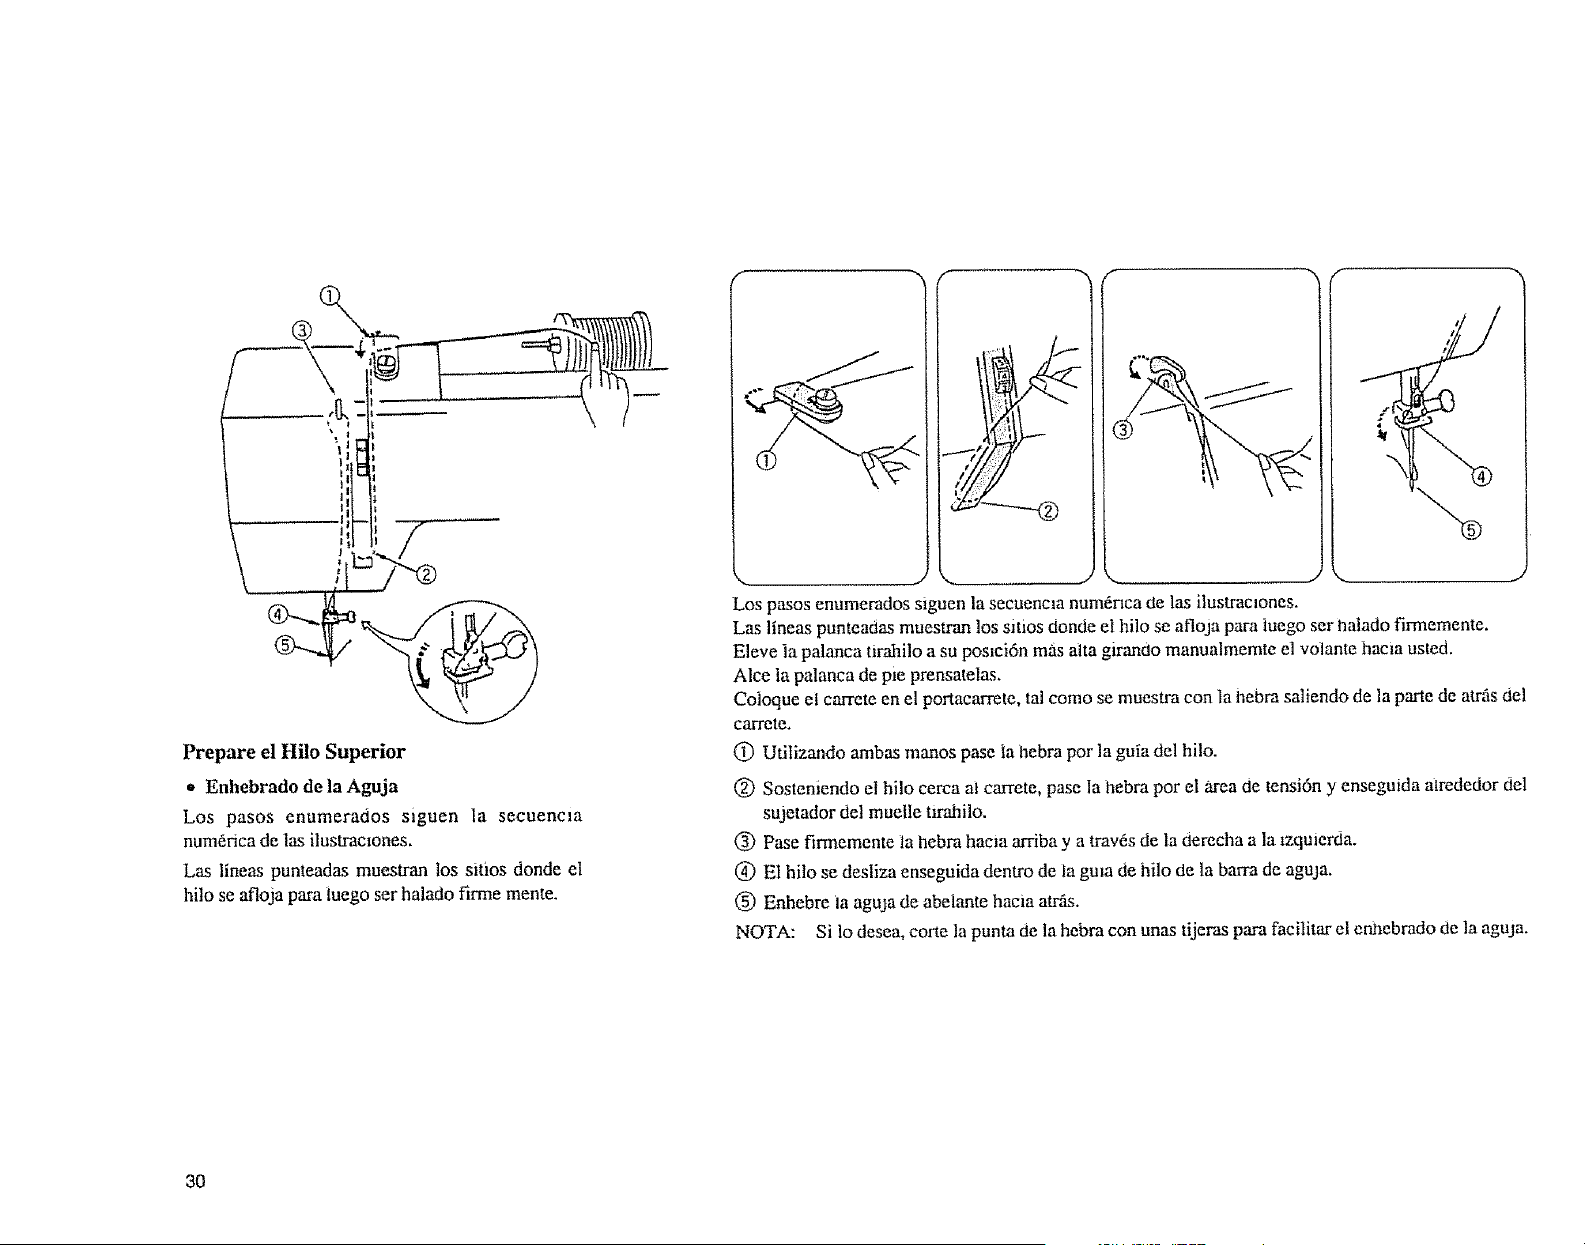
Prepareel Hiio Superior
• Enhebrado de la Aguja
Los pasos enumerados siguen la secuencia
num_ricade las ilustractones.
Las lineas punteadas muestran los sitios donde el
hilo se afloja para Juego ser halado firme mente.
J
f
f
Los pasos enumerados slguen la secuertcia num_nca de ]as ilustmc_ones.
Las lineas punteadas muestrnn los sitios donde el hilo st afloja para ]uego ser riaiado firmemente.
Eleve la palanca tira.hiloa su posici6n m'as alta girando manualmemte el voiante hacia usted.
Alce la palanca de ple prensatel_s.
Coloque el carrete en el portacarrete, tal como st muestra con la hebm saliendo de la parte de atrfis del
carl_te.
@ Utilizando ambas manes past |a hebra per la guia del hilo.
(_ Sosteniendo el hilo cerca a! carrete, pase la hebra por el area de tensi6n y enseguida atrededor del
sujetador del muelle t_rahilo.
(_) Pase firmemente ta hebra hacia arriba y a tray,s de la derecha a la lzquierda.
@ EI hilo se destiza enseguida dentro de fa gma de hilo de la barra de aguja.
@ Enhebre ia aguJa de abelante hacia atrfis.
NOTA: Si 1o desea, corte la punta de la hebra con unas tijeras para facilitar el enlaebrado de la aguja.
30
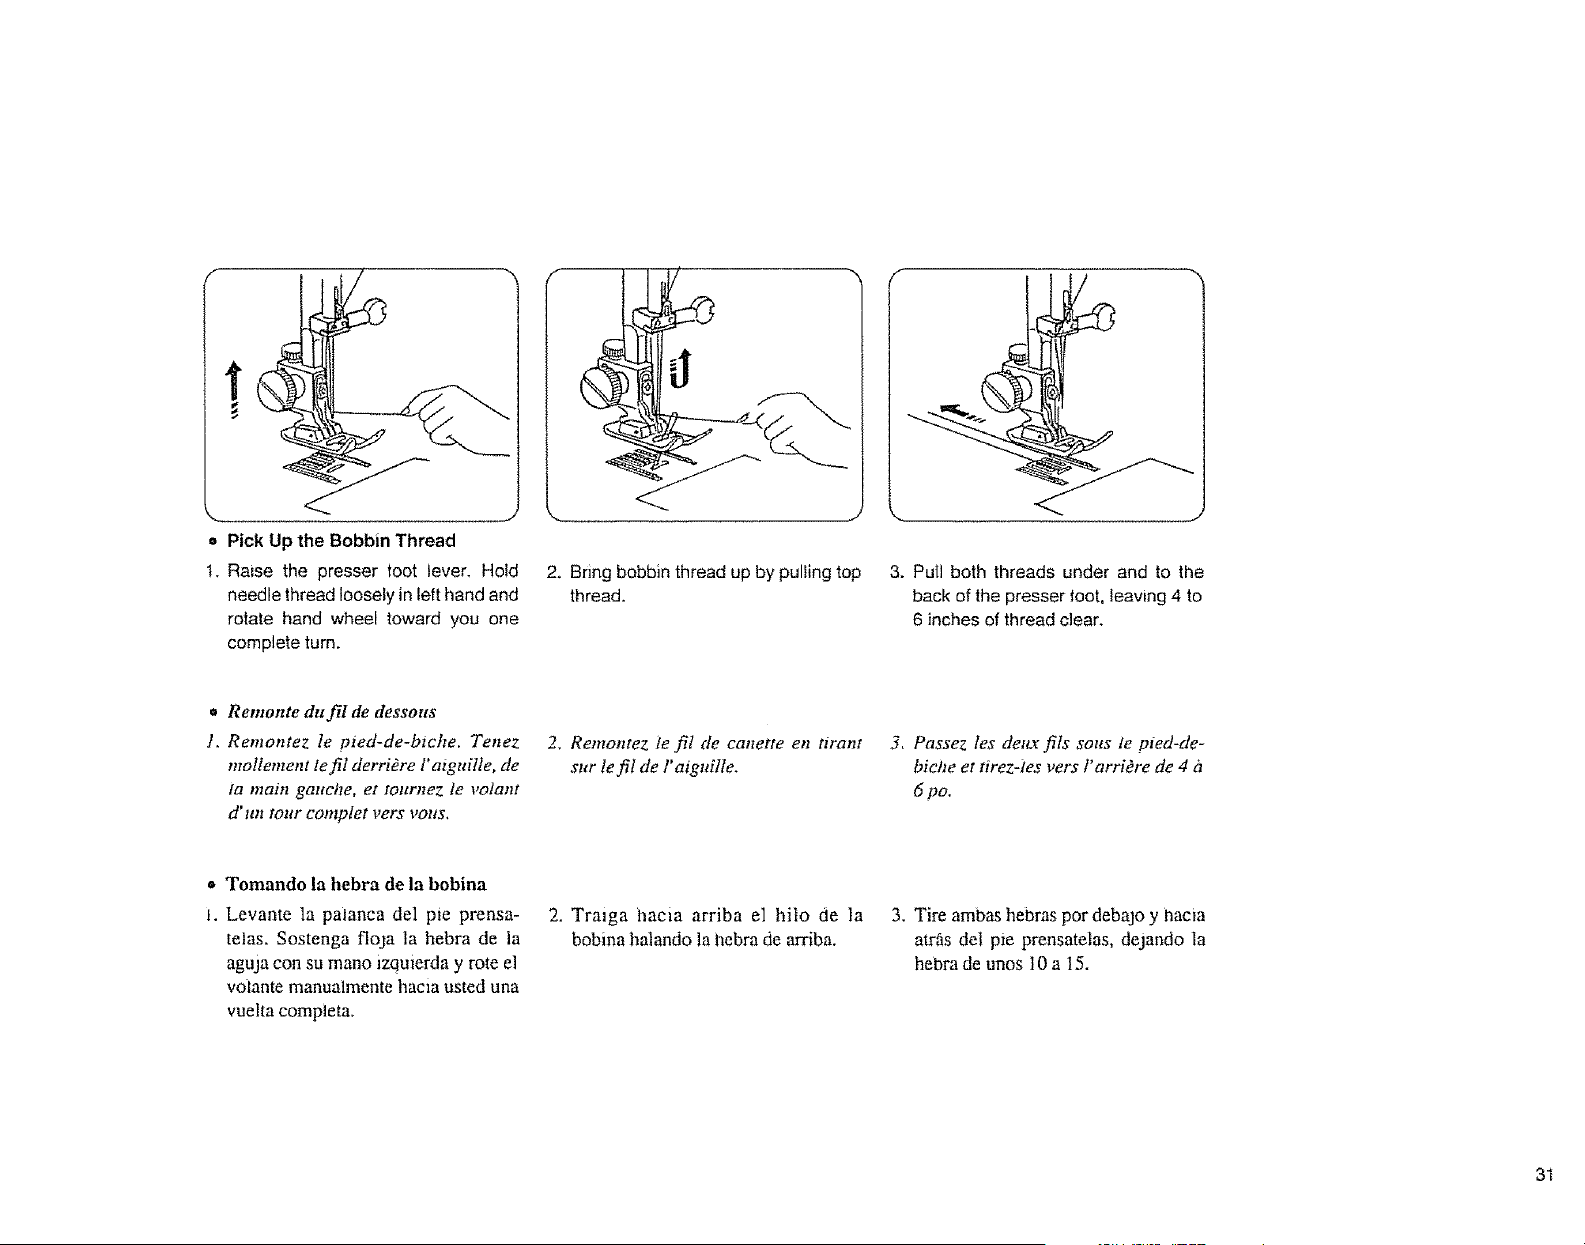
o Pick Up the Bobbin Thread
1. Raise the presser toot lever. Hold
needle thread loosely in left hand and
rotate hand wheel toward you one
complete turn.
2. Bnng bobbin thread up by pulling top
thread.
3. Putl both threads under and to the
back of the presser toot, leaving 4 to
6 inches of thread clear.
• Remontedufilde dessous
1. Remontez te pied-de-btche. Tenez
motlement le f!l derriere l'atguille, de
la main gauche, et tottrnez te volant
d'tttt tottr compfet vers votts.
2, Remontez ie fit de canette en tirant
sur lefit de l'aiguille.
3, Passez Ies deiLr fits sous le pied-de-
biche et tirez-tes vers l'arriOre de 4 h
6 po.
• Tomando la hebra de la bobina
t. Levante la paianca de] pie prensa-
telas. Sostenga floja la hebra de ia
aguja con su rnano izquierda y rote el
vo/ante manualmente hacia usted una
vuelta completa.
2. Traiga hacia arriba el hi|o de Ia
bobina halando la hebra de arriba.
3. Tire ambas hebras por debajo y hacia
atrfis det pie prensatelas, dejando la
hebra de unos l 0 a 15.
31
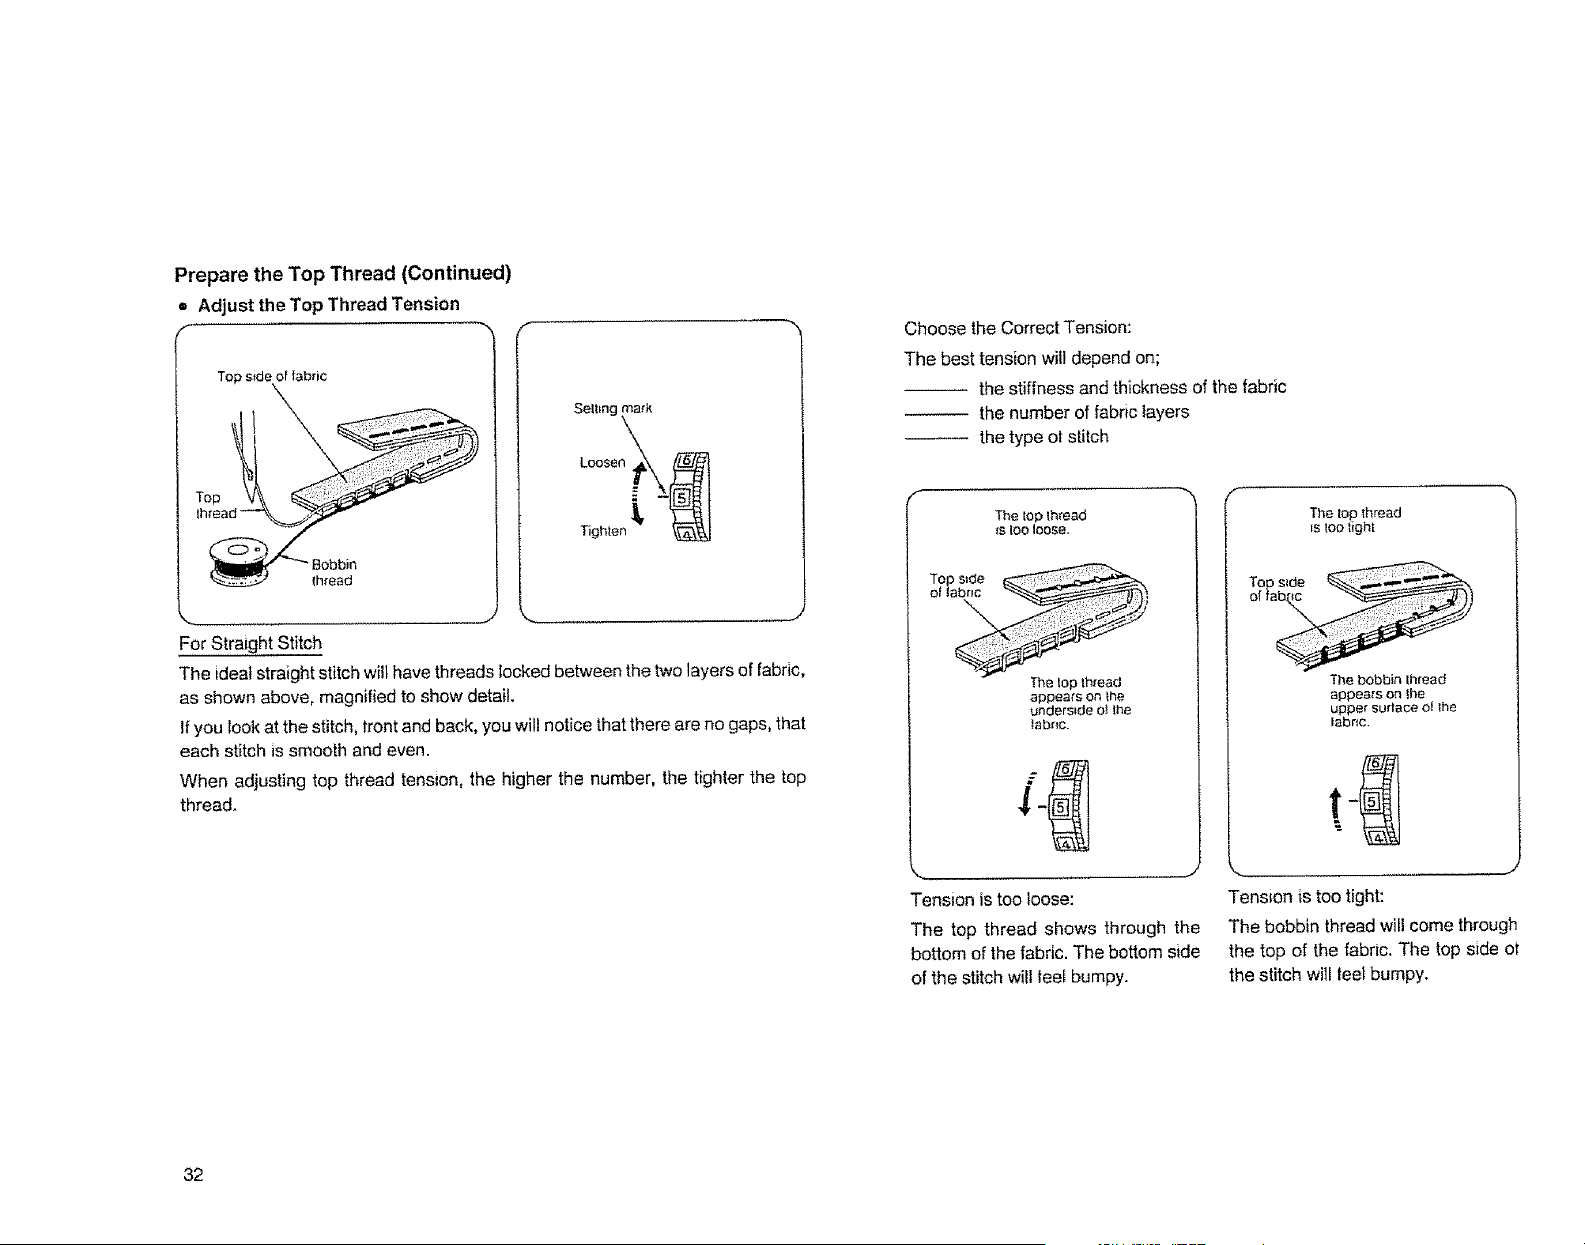
Prepare the Top Thread (Continued)
= Adjust theTop ThreadTension
Top side of fabric
Top
-. _ _.. ,,_,
For Straight Stitch
The ideal straight stitch wilt have threads locked between the two layers of fabric,
as shown above, magnified to show detail.
If you look at the stitch, trent and back, you will notice that there are no gaps, that
each stitch is smooth and even.
When adjusting top thread tension, the higher the number, the tighter the top
thread.
Choose the Correct Tension:
The best tension will depend on;
-- the stiffness and thickness of the fabric
the number of fabric layers
-- the type ot stitch
f
The top thread
_sleo loose.
The lop lh_ead
appears on the
underside raJthe
labnc.
Tension is too loose:
The top thread shows through the
bottom of the fabric. The bottom side
of the stitch wilt feet bumpy.
The top thread
_stoe tight
The bobbin thread
appears on the
upper senate oJ Ihe
labr{c,
Tension is too tight:
The bobbin thread will come through
the top of the fabric. The top side et
the stitch wilt fee_bumpy.
32
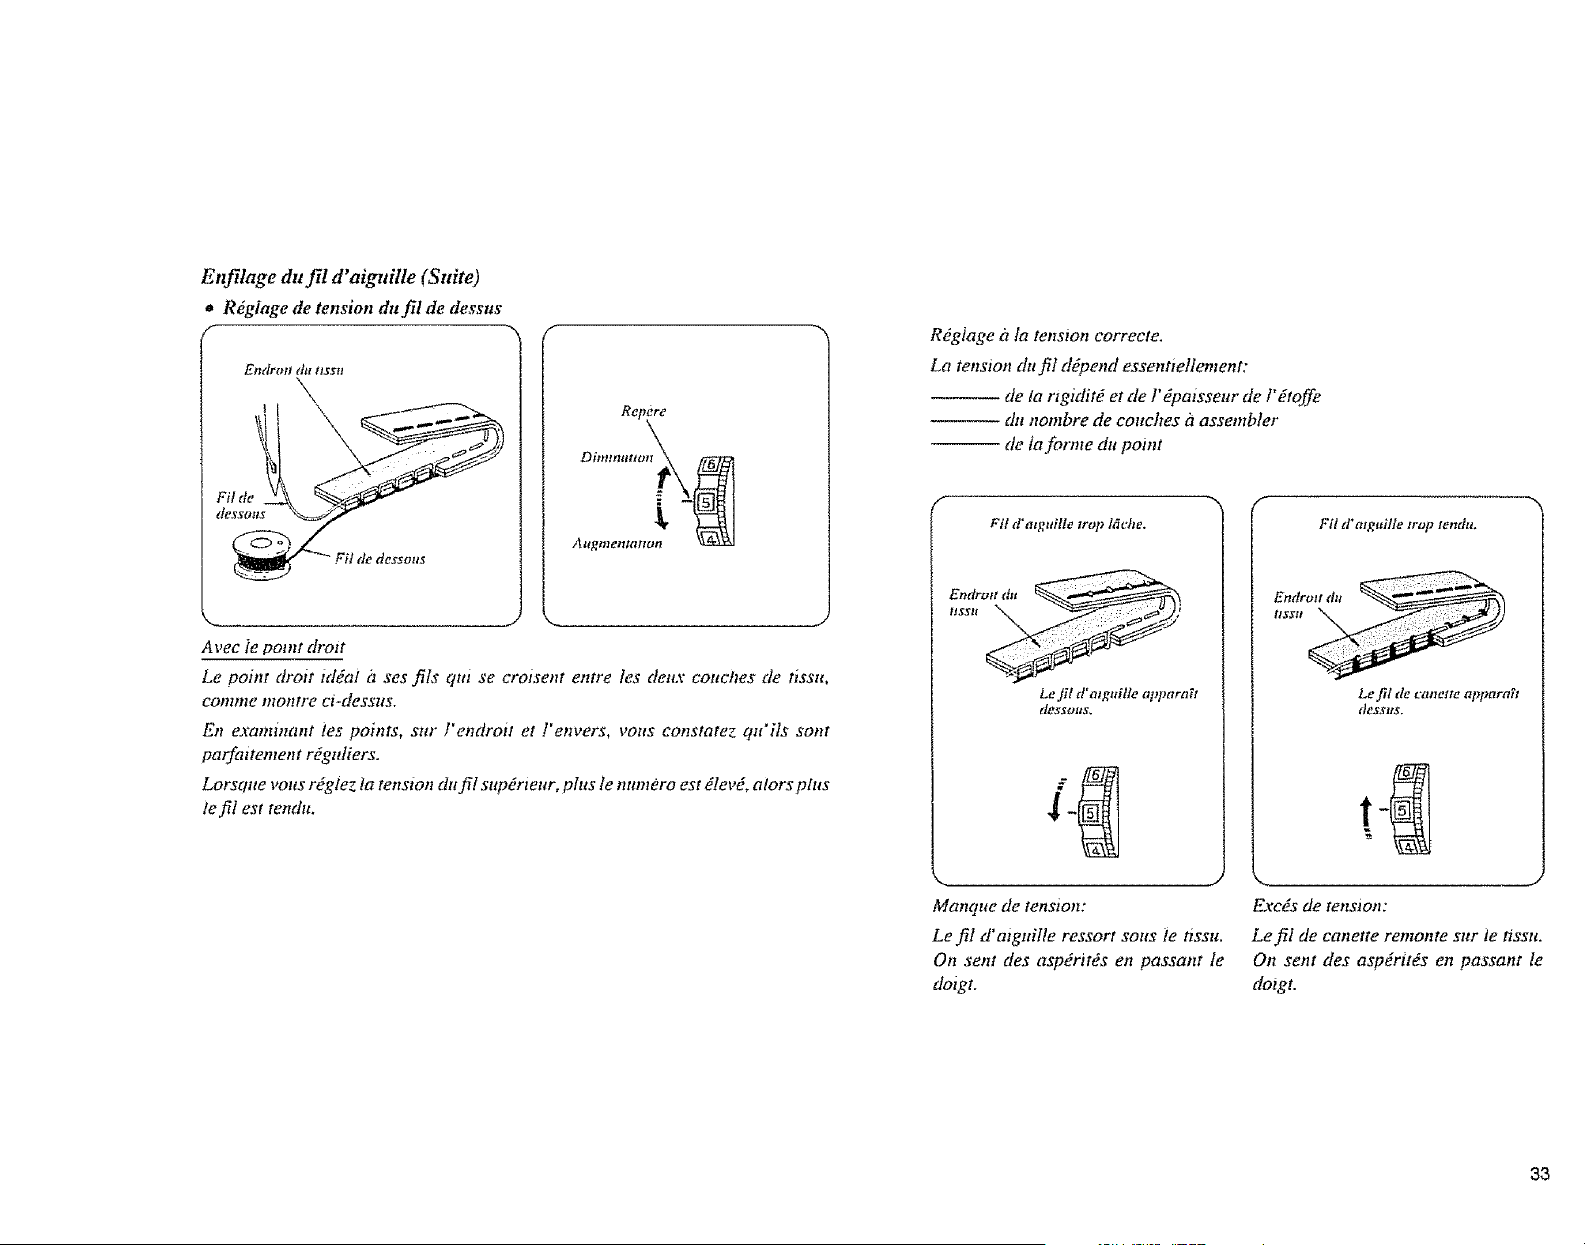
Enfilage du f!l d'aignille (Suite)
o R6glage de tension dufil de desstts
f --.,
Fil de
dessotts
Repere
AttRmel_tolton
k-_ J
Avec le point drott
Le point droit td6ai fi ses ills qui se crolsent entre les deux cottches de tissu,
comme montre ci-desstts.
En examinant tes points, sttr ]'e_Tctroil et ]'envers, vozts constotez qtt'ils sont
parfattement r_gtdiers.
Lorscltte votts r_glez la tenston dtt fil sttpb'tettr, phts le nttmero est _lev_, alors pttts
le fil est rendtt.
R_giage it la tenston correcte.
La tension du fil d_pend essetmeltement:
de la rlgidit_ et de l'gpatsseur de l'_toffe
du hombre de couches ii assembler
de taforme du point
#
Fit d'a g ille trop 1_cf e
Ertdroil _ttt
Le fil tt'rttguille appara_t
d_sSo_tS.
Manque de tension:
Le fil d'atgnille ressort sous le nssu.
On sent des aspdrttds en passant le
doigt.
Fil d' alguille trop tet_du.
Left[ de cttnette appara_t
dessus.
J
Excds de tension:
Le fil de canette remonte stir ie tissu.
On sent des asp6rit_s en passant te
dotgt.
33
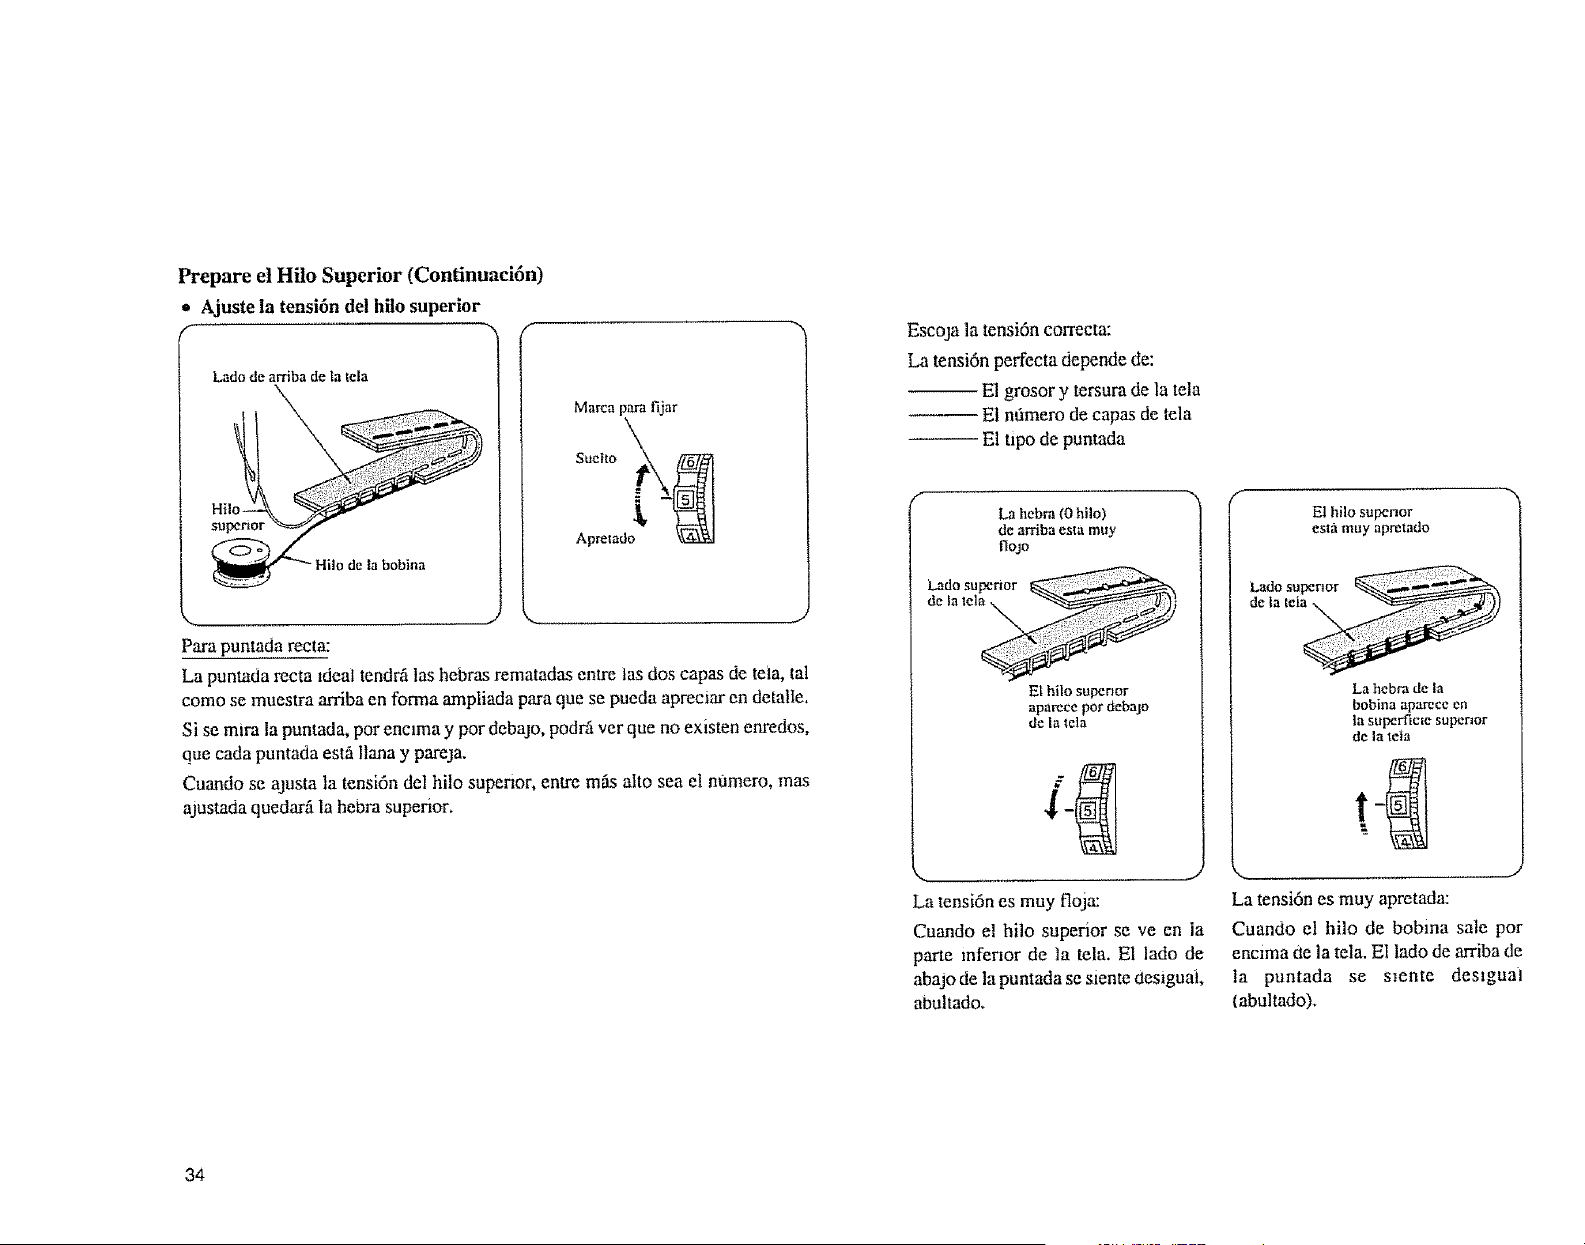
Prepare el Hilo Superior (Continuaci6n)
Ajuste la tensi6n del hilo superior
f
[.adode arribade la _ela
Hil
, de la bobina
Marca para fijar
Suelto _
Apretad;'_[
Para puntada recta:
La puntada recta ldeat tendril las hebras rematadas entre las dos capas de teia, tal
como st muestra arriba en forma ampliada para que se pueda apreciar en detalle.
Si st mira la puntada, pot enclma y pot debajo, podrfi ver que no existen enredos,
que cada puntada esth llana y pareja.
Cuando se ajusta la tensi6n del hilo superior, entre mils alto sea el n0mero, mas
ajustada quedarfi la hebra superior.
Escoja la tensi6n correcta:
La tensi6n peffecta depende de:
El grosor y tersura de la tela
-- E1nOmem de capas de tela
-- El tipo de puntada
f
La hebra COhilo)
de arriba esia muy
flojo
Lado superior
de )a lel
ELhi|o superior
aparece pot debajo
de |a lela
La tensi6n es muy floja:
Cuando el hilo superior se ve en la
parte inferior de la tela. Et lado de
abajo de la puntada se slente desigual,
abultado.
El hilo superior
es_a muy apmtado
La hcbm de la
bobina aparecc cn
]a stfpcrliclc supcrmr
de la teia
La tensi6n es muy aprttada:
Cuando el hilo de bobma sale por
encima ae la tela. El lado de arriba de
la puntada se smnte des|gua!
{abultado).
34
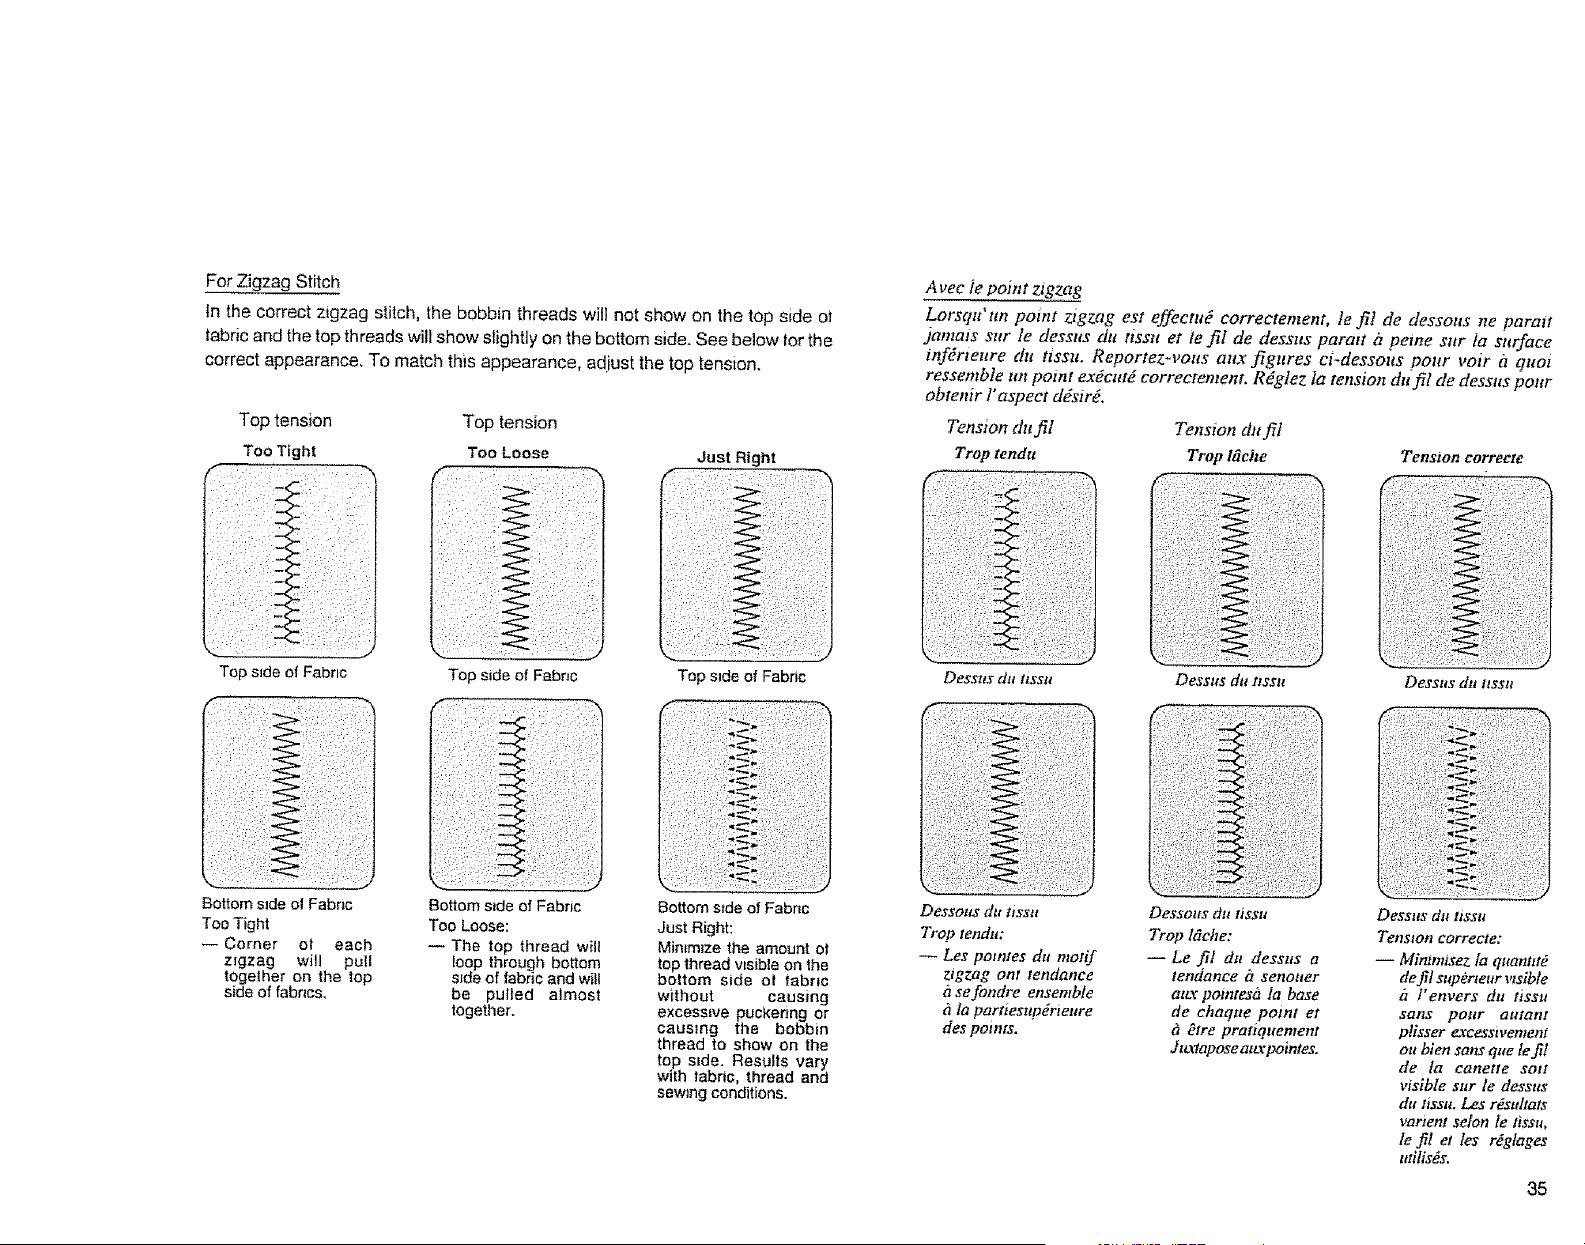
For Zigzag Stitch
in the correct zigzag stitch, the bobbin threads will not show on the top side ot
tabnc and the top threads will show slightly on the bottom side. See below lor the
correct appearance, To match this appearance, adiust the top tension.
A vec ie point zigzag
Lorsqtt'tm point zigzag est effectu_ correctentent, te fil de dessolts ne parait
Jamais stir le dessus dtt tisstt et ie fil de dessus paratt ?t peme stir 1a surface
infErieure du ttsstto Reportez-vous altx figures ci-dessous pottr voir h quoi
ressemble tin point e:t'_ctttE correctement. R_glez Ia tension dtt jql de desstts pour
obtenir l"aspect dEszr_.
Top tensbn Top tension Tension dn fil Tension dlt f!t
Too Tight Too Loose Just Right Trop tendu Trop l_che
_en$1oll corre£te
Top side of Fabric
Top side of Fabric
Bottom side o! Fabnc Bottom side of Fabric
Too Tight Too Loose:
-- Corner ot each -- The top thread w:41
z_gzag will pull loop through bottom
together on the top s_de of fabric and will
side of fabrics, be pulled almost
together.
Top side of Fabric Dessus da ttsstl Dessns du t_ssn Oessus dtt ttssu
Bottom side of Fabnc
Just Right:
Minimize the amount ot
top thread wsible on the
bottom side el tabnc
without causing
excessBve puckenng or
causing the bobbin
thread to show on the
top s=de. Results vary
with tabric, thread and
sewing conditions.
Dessotls du tissa
Trop tendu:
-- Les poimes du motif
zigzag ont tendance
h sefondre ensemble
fi la par_tes_p_rie_lre
des points.
i
Dessolts dtt lisstt
Trop l_cbe:
--Le fi! dzl dessus a
tendance iz senotler
attx potntes& fa base
de chaq_le point et
& _tre pratiquement
.l i_alapose attr pointes.
Desslts ell llssll
Tensioa correcte:
-- Mintmisez la quantttb
de fil supOrteur visible
iz !'envers du tisstt
sans pour aarant
plisser _reessivement
ou bien sans que left!
de la canetle sort
visible stir le dessus
dtt tisst_. Les rdstdtats
vartent selon te tissu,
le filet les rdgtages
utilis_s.
35
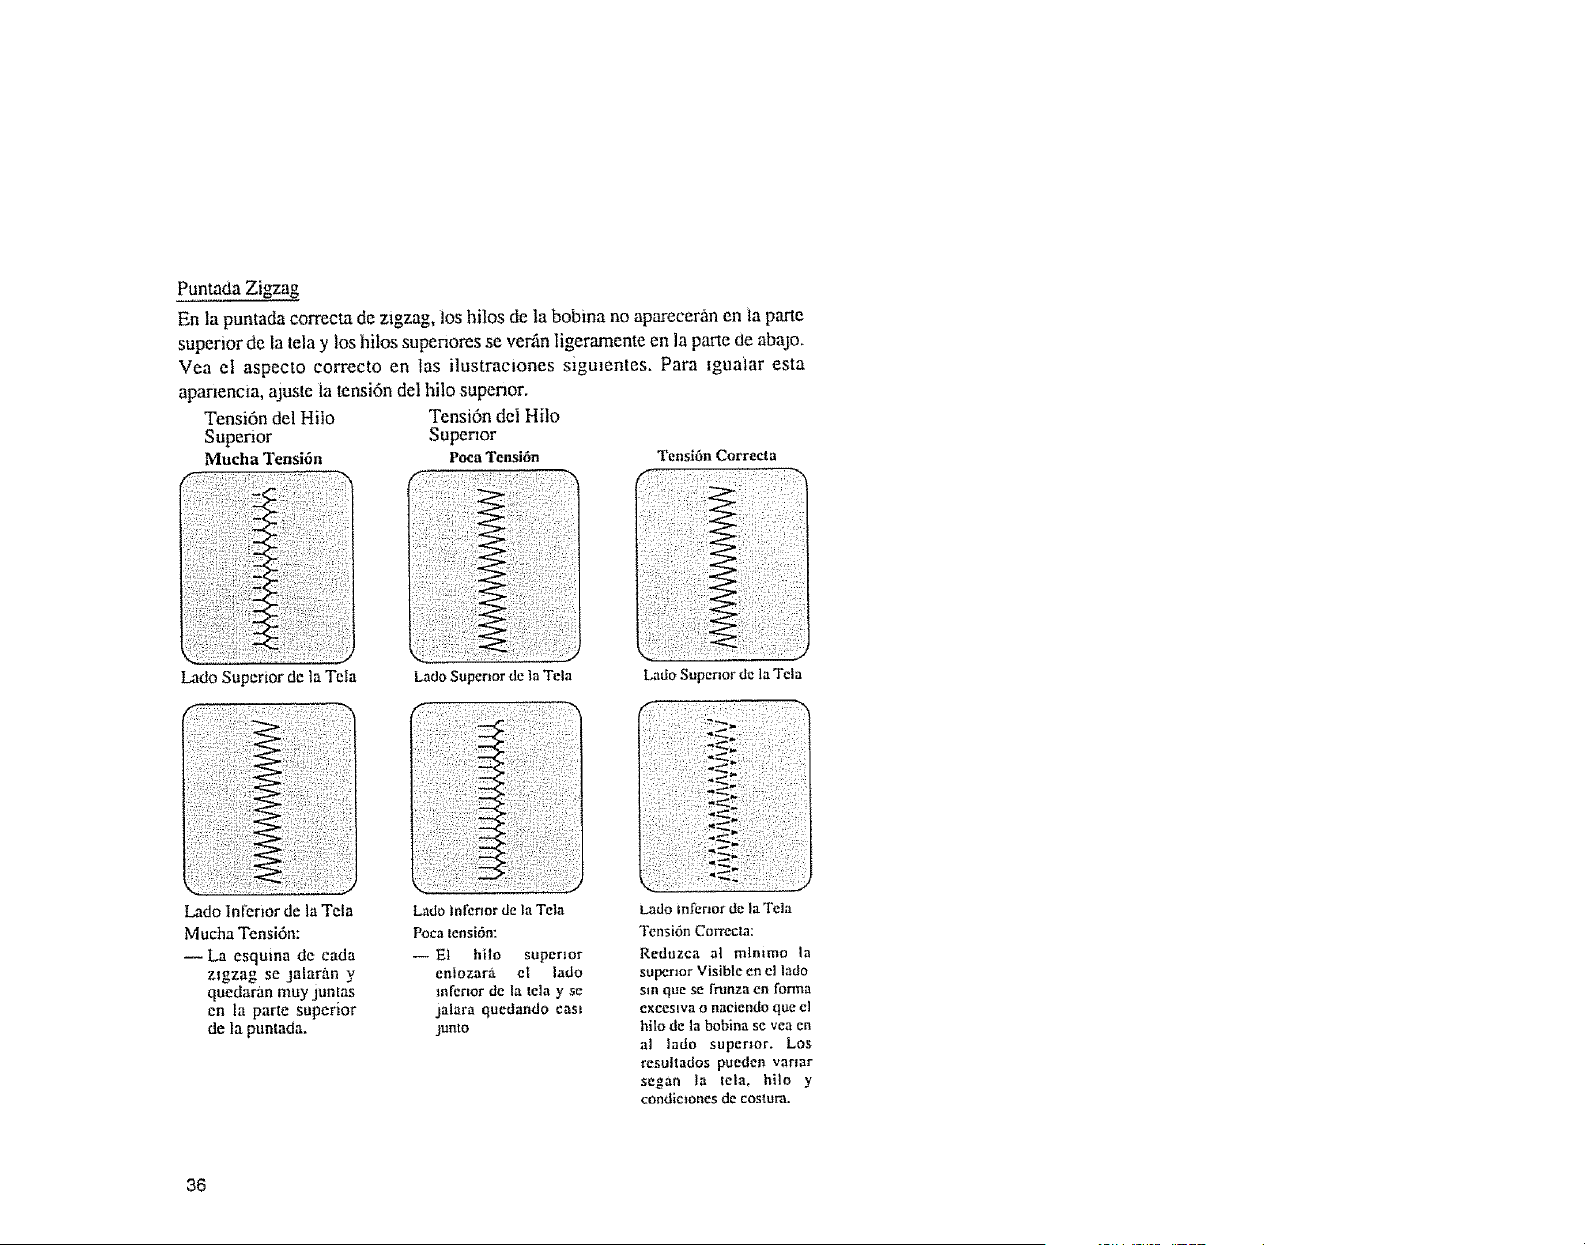
Puntada Zigzag
En la puntada correcta de zigzag, los hilos de la bobina no apareceran en la pane
superior de la telay los hilos supenores se vet,in ligeramente en la pane de abajo.
Vea el aspecto correcto en las ilustraciones sigmentes. Para igualar esta
apanencm, ajuste ia tensi6n del hilo superior.
Tensi6n del Hiio Tensi6n del Hilo
Superior Supenor
Mucha Tensifn Pc.ca Tensihn Tensi6n Correeta
Lade Superior de la TeIa Lade Supermr de la Tela
Lade In[crier de la Tela Lade tnfenor de Ia Tela
Muctla Tensi6n: Poca tensi6n:
-- La esquma de cada -- El hilo superior
zigzag se jaiar_.n y enlozara et lade
quedaran muy juntas inferior de la telay se
en la parle superior jalara quedando eas_
de la punlada, junto
Lade Superior de la Tela
Lade |nfener de In Tela
Tensi6n Correcta:
Reduzca at mlnimo In
superior Visible en el lade
sm que se rrunza en forma
exeesEva o naciendo que el
bile de la bobina se yea en
al fade supermr. Los
resultados pueden var_ar
segan la tela. bile y
condimones de cesium.
36
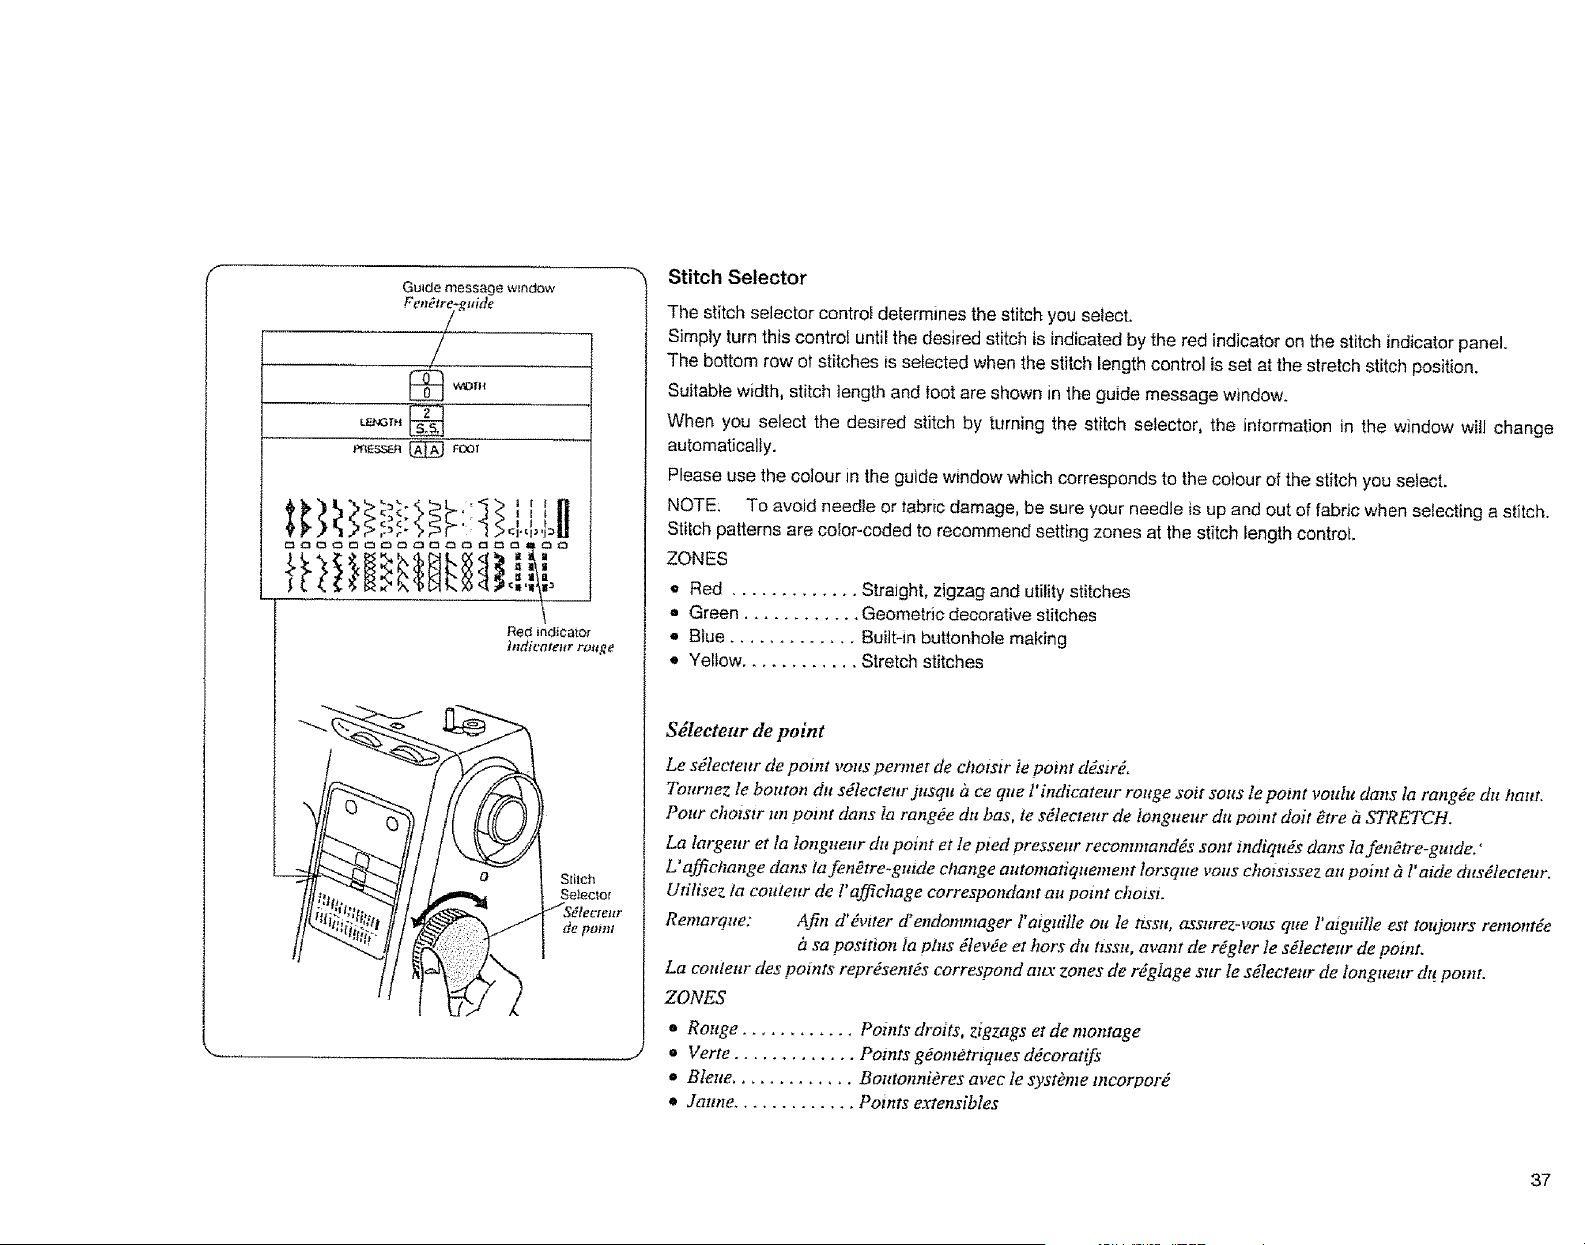
Pauld(_ message w_ndow
f:e_tr_uide
/
LEt_GYH
Pnt_S,.qS,q t_ _OOr
Stilch
SeJector
de pomt
Stitch Selector
The stitch selector contro_ determines the stitch you selecL
Simply turn this controi until the desired stitch is indicated by the red indicator on the stitch indicator panel.
The bottom row ot stitches is seiected when the stitch length control is sat at the stretch stitch position.
Suitable width, stitch length and loot are shown in the guide message window.
When you select the desired stitch by turning the stitch selector, the information in the window will change
automatically.
Please use the colour in the guide window which corresponds to the colour of the stitch you select.
NOTE: To avoid needle or 1abric damage, be sure your needle is up and out of fabric when selecting a stitch.
Stitch patterns are color-coded to recommend setting zones at the stitch Iength control.
ZONES
e Red ............. Straight, zigzag and utility stitches
,_ Green ............ Geometric decorative stitches
Blue ............. Built-in buttonhole making
* Yellow ............ Stretch stitches
Sdleeteur de point
Le sdlecteur de point vous permet de chols_r ie point ddsird,
Tournez le bouton dn sdlecteur jusqu b ce que l' indicateur rouge spit sous le potnt votdu dans la rangde du haur.
Pour chotstr un potnt dans Ia rangde du has, le sdlecteur de 1ongueur dtt point dolt £tre fi STRETCH.
La largeur et la ]ongttettr dlt point et le pied pressetn" recommandds sont indiquds clans ]a fenOtre-gutde."
L' affichange dans ia fen_tre-gutde change atttomatiquement lorsque vous chotszssez an point _ l'atde dusdlecreur.
Utilisez ta couteur de !'affichage correspondant au point choisL
Remarque: Atilt d'dvtter d'endonunager l'asgtdtle oule tissu, assurez-vous que l'atguilte est tottjoltrs remontde
h sa position 1a phts _levde er hors dtt tissu, avant de rdgler le sdlectear de point.
La cottieltt" des points reprdsentds correspond attx zones de rdgtage stir le sdlecteur de longueur dtt potnL
ZONES
o Rouge ............ Points droits, zigzags et de montage
o Verte ............. Points gdomotrtques ddcoratifs
• Blene ............. Boutonnieres avec le systkme tncorpord
• Jaztne ............. Points extensibles
37
Vemanilla de mensaje de guia
/
LF..NG'_H _
c_C ', I I I
tndicadorRojo
de
pumada
Selector de Puntada
E1control selector de puntadas detemlina Ia puntadaque se elige.
Simpiemente gire este control hasta que la puntadadeseada se encienda con el indicadorrojo en el panel indicador
de puntadas.
La hilera inferior de puntadas se selecc_ona cuando el control del largo de la puntada se coioda en ta poslci6n de
puntada el',istlca.
El ancho, el largo de la puntada y el pie apropiadosestfin mdicados en la ventanilla de mensaje de guia.
A1 seiecclonar la puntada deseable, glran0o el selector de puntada, la mfonnaci6n en [a ventanilla se cambm
autom0.ticamente.
Sirvase usar et color en la ventanilla de guia que corresponde al color de la puntacla que se elige.
NOTA: Para evltar que la aguja o la tela se darien, asegfirese que la aguja estd arriba y fuera de ia tela cuando
opere este control.
Los patrones de puntada tienen claves de color para reeomen dar zonas de ajuste en et control del largo de ia
puntada.
ZONAS
,' Rolo.............. Puntaclas Recta, Zigzag y General.
I, Verde ............. Puntada Decortiva Geom_tnca.
a, Azul .............. Ojalador Interconstruido.
,_ Amarillo .......... Puntada Elfistica.
38
Stitch Length Control
f
_ Stitch Length
Setting Window
ST_T_
The stitch tength control regulates the length
ol stitch, and also has a stretch stitch setting.
The higher the number, the longer the stitch.
0 means no leed.
the stretch stitches, set this control
To select
at "" '_ ""
NOTE:
When you select decorative
stitches l.green) or buttonhole
(blue), make sure that you do not
set the stitch length control at
"" Stretch Stitch "'.
Study the red, green, yellow and
blue sections around this control.
These are recommended zones ot
stitch length and are color-coded
to the stitches pictured on the stitch
indicator panel
Stitch Width Control
-, f
Slitch Width
" Setting Window
O-- t --2--3=4=5=6
The stitch width control regulates the width of
the stitch you select.
The higher the number, the wider the stitch.
The "" _ "" is the maximum width for twin
needle stitches.
The blue zone is the adjustable area for
button hole stitches.
Adjusting Stretch Stitch Balance
+
+
In stretch stitch sewing, the stretch stitch
adjuster should usually be in a neutral
position tp or between "" + "" and °'--"
position. When sewing some labrics, you
may need to adjust this control to
balance the stitches for appearance
sake.
if the design seems open like the illust-
rations to the left, adjust the control
slightly toward "" -- "" until it looks like
the center design.
if the design appears to be closed as in
the right hand illustrations, turn the
control toward "" + "' until stitching is as
you desire.
39
Rdglage de longueur du point
Le s_lecteur de longuear de poznt perntet de
ehoistr la longueur du point voufu. Ce
s_lecteur est dgatement dotd d'un rOglage
pour poOtt extensibIe.
Phtse le chiffre est grand, phts te point est
long. Jt O, l'avance est nulIe.
Pour coudre des points extensibles, il suffit de
rdgIer ce sglecteur it la position " "f" "
REMARQUE:
Quand vous choisissez uu potnt d_coratif
(vert) ou pour border une boutonniere
(bleue), assurez-vous que le s_lecteur de
longueur du point n'est pas r_glg pour un
poUlt extensible d STRETCH.
Vous remarquerez q:d autour du s_lecteur de
tongueur du point iI y fi des zones rouge,
verte, jaune et bleue. Elles tndiquent tes
longueures de potnts recommanddes pour ]es
points de m_me couleur que sur le tableau
mdicateur.
Rgglage de Iargeur du point
l_quilibrage des points extensibles
Rdglage de largeur
_ dtt point
O--_ --2_3=4=5=6
J
Le rdglage de largeur du point sert & r_gter le
point h la largeur voulue,
Plus le chiffre est grand, ph_s le point est
large.
Avec Ies atguilles jumeldes ne pas choisw une
largeur de potnt sup_rteure it la marque ]_.
La zone bhte est la plage r_glab/e pour des
points de boutonnikre. Point de smocks
Potni _'rottttet
+
Pour ta phtpart des tissus, le rdgiage du
boutou d' dquilibrage dott _tre fazt face iz
ta pointe ( _. ), postRon #tterm_diatre
entre " + '" et "'--"= Onand votts cottsez
avec un potnt extensibte, donc avec
piquage avant et artiste, il se peut que
tes points ne soient pas identtques dans
Ies deux sens; ia forme du point s' en
trouve alors modifi_e. Pour obtemr ult
point conforme au ntoddle, tournez
Idgkrement [e bouton vers "-- " pour
resserrer 1e point, vet's " + " pour
l' allonger.
40
Control del Largo de la
Puntada
f
Control del Ancho de la
Puntada
f
Ajuste del Equilibrio de la Puntada Elfistica
Venlan[t[a de ajuste
dd largo de puntada
T__ 0 -..,"w'.i _"_.2_ 3 _ 4
E1 control del largo de la puntada reguta el
largo de la puntada y cuenta, abemfis, con
control para puntadas eh_sticas.
Entre mas grande sea e! nfimero mas larga es
la puntada.
0 significa pue no alimente.
Para seleccionar las puntadas elfistmas, ponga
el control en" '_' "
NOTA: Cuando se seleccionan puntadas
decoratwas u ojales de los que trae
el sistema, aseg'arese de que el con
trol del largo de ia puntada no estg
en" Puntada Elfistica'L
Estudie las secclones roja, verde,
amarijja y azul cerca de este
control. Estas son las zonas de largo
de puntada recomendable color
cifrado alas puntadas ilustradas en
el panel indicador de puntadas.
Ventanilla de ajuste
_D'n,t / del ancho de pumada
t--- |---_.
J
Este control regula el ancho de la puntada que
haya escogido.
Entre mils alto es el nfimero, m_ ancha es la
puntada.
La marca " ]'] " es el aneho mfiximo para
puntadas con aguja-doble.
La zona azul es el _ireaajustable para puntadas
de oja.
+
Puntada elfistiea de
awspero Ismoeklng)
Puntada elfisl_ca de
z_gzag acordonado
+
Cuandose cose puntada elfistica, el
abjustador de ta puntada el_stma
generalmente debe estar en Ia posici6n
neutral (Entre '" + " y " -- ", o en la
posici6n 1_).
AI coser algunos materiaies, y por
cuestiones de presentaci6n podr_ tener
que ajustar este control para balaneear las
punmdas.
Si el disefio se ve abierto como en las
ilustraclones de la izquierda, ajnste
ligeramente el control hacia "--" hasta
que el disefio tenga una apanencia similar
a la de la mitad.
Si el disefio seve cerrado como en las
ilustraciones de ia derecha, gire el control
hacia " + " hasta que la puntada sea la
deseada.
41
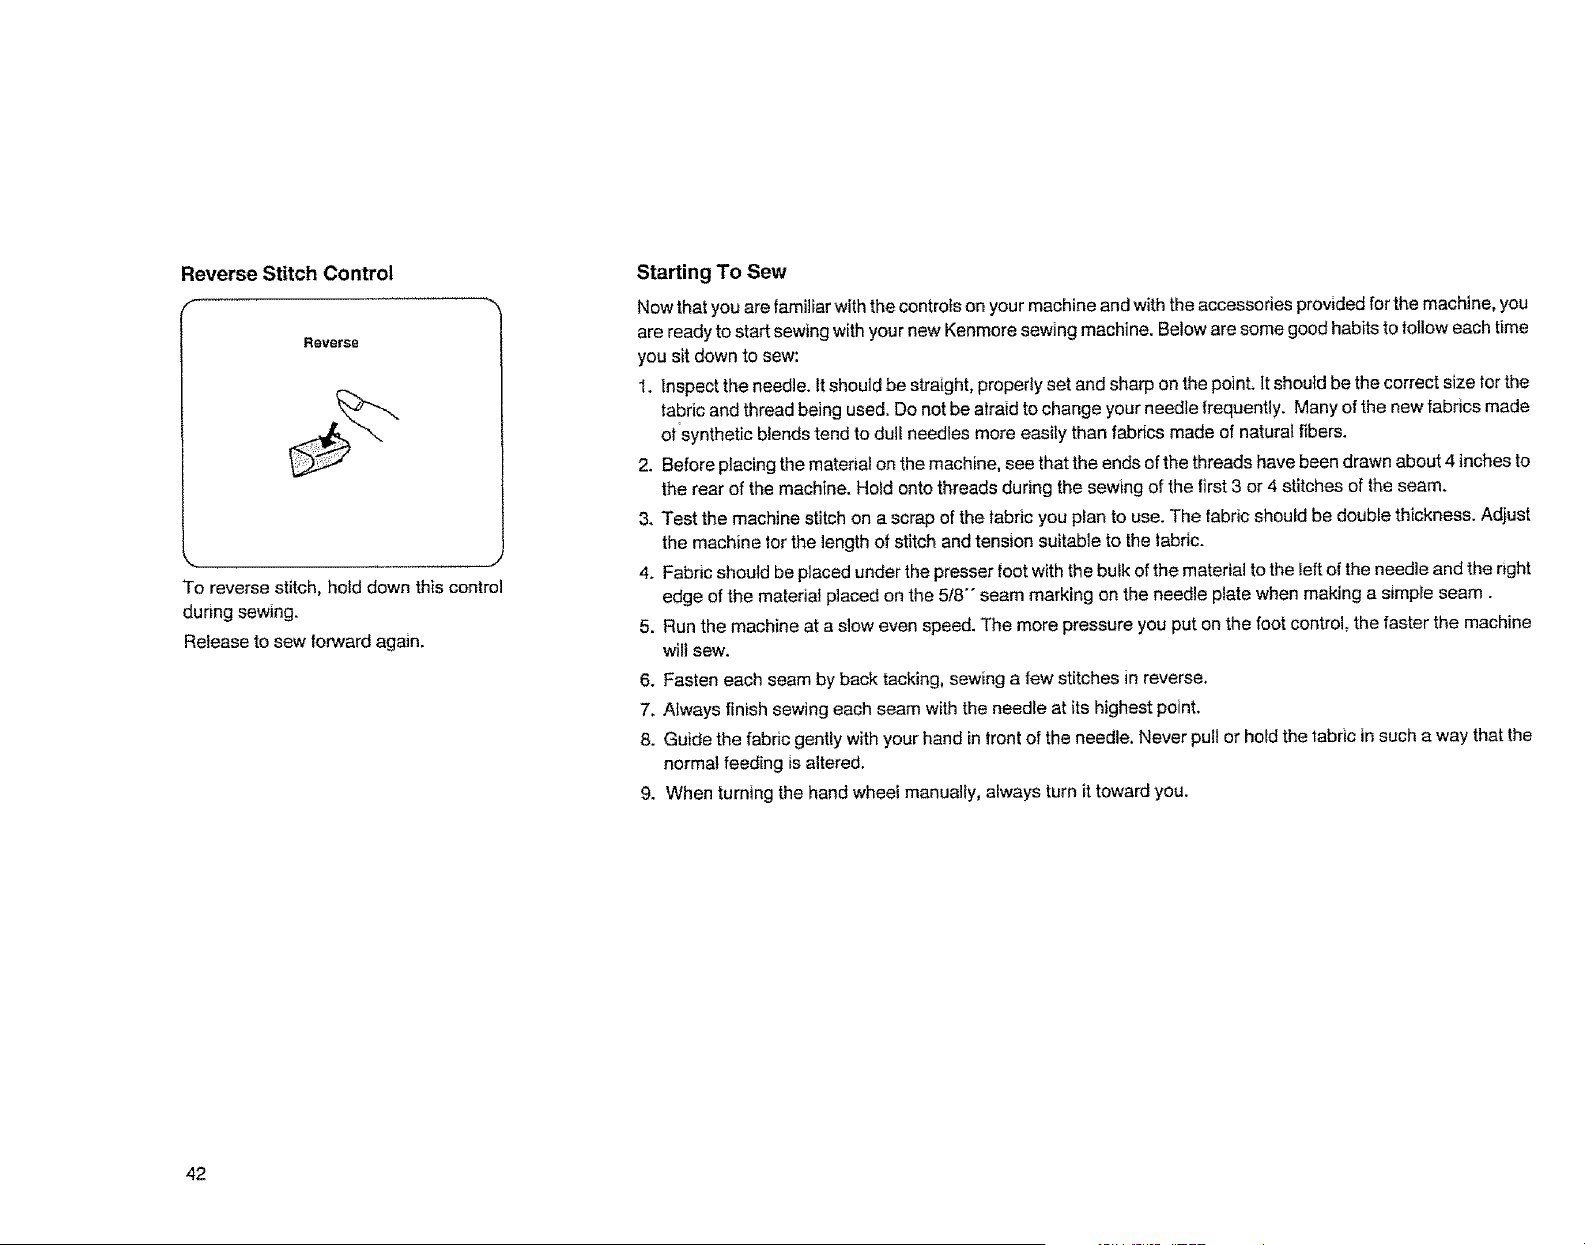
Reverse Stitch Control
R_v_tSe
J
To reverse stitch, hold down this control
dunng sewing.
Release to sew forward again.
Starting To Sew
Now that you are familiar with the controls on your machine and with the accessories provided for the machine, you
are ready to start sewing with your new Kenmore sewing machine. Below are some good habits to tollow each time
you sit down to sew:
1. inspect the needle. It should be straight, properly set and sharp on the point, it should be the correct size for the
tabric and thread being used. Do not be afraid to change your needle frequenfiy. Many of the new fabrics made
ot'synthetlc blends tend to dull needles more easily than fabrics made of natural fibers.
2. Before placing the material on the machine, see that the ends of the threads have been drawn about 4 inches to
the rear of the machine. Hold onto threads during the sewing of the first 3 or 4 stitches of the seam.
3. Test the machine stitch on a scrap of the fabric you plan to use. The fabric should be double thickness. Adjust
the machine ior the length of stitch and tension suitable to the tabric.
4. Fabric shoutd be placed under the presser foot with the bulk of the material to the teft of the needle and the right
edge of the material placed on the 5t8"" seam marking on the needle plate when making a simpie seam.
5. Run the machine at a slow even speed. The more pressure you put on the foot control: the faster the machine
will sew.
6. Fasten each seam by back tacking, sewing a few stitches in reverse.
7. Atways finish sewing each seam with the needle at its highest point.
8. Guide the fabric gently with your hand in front ol the needle, Never pull or hold the tabric in such a way that the
normal feeding is altered.
9. When turning the hand wheei manually, always turn it toward you.
42
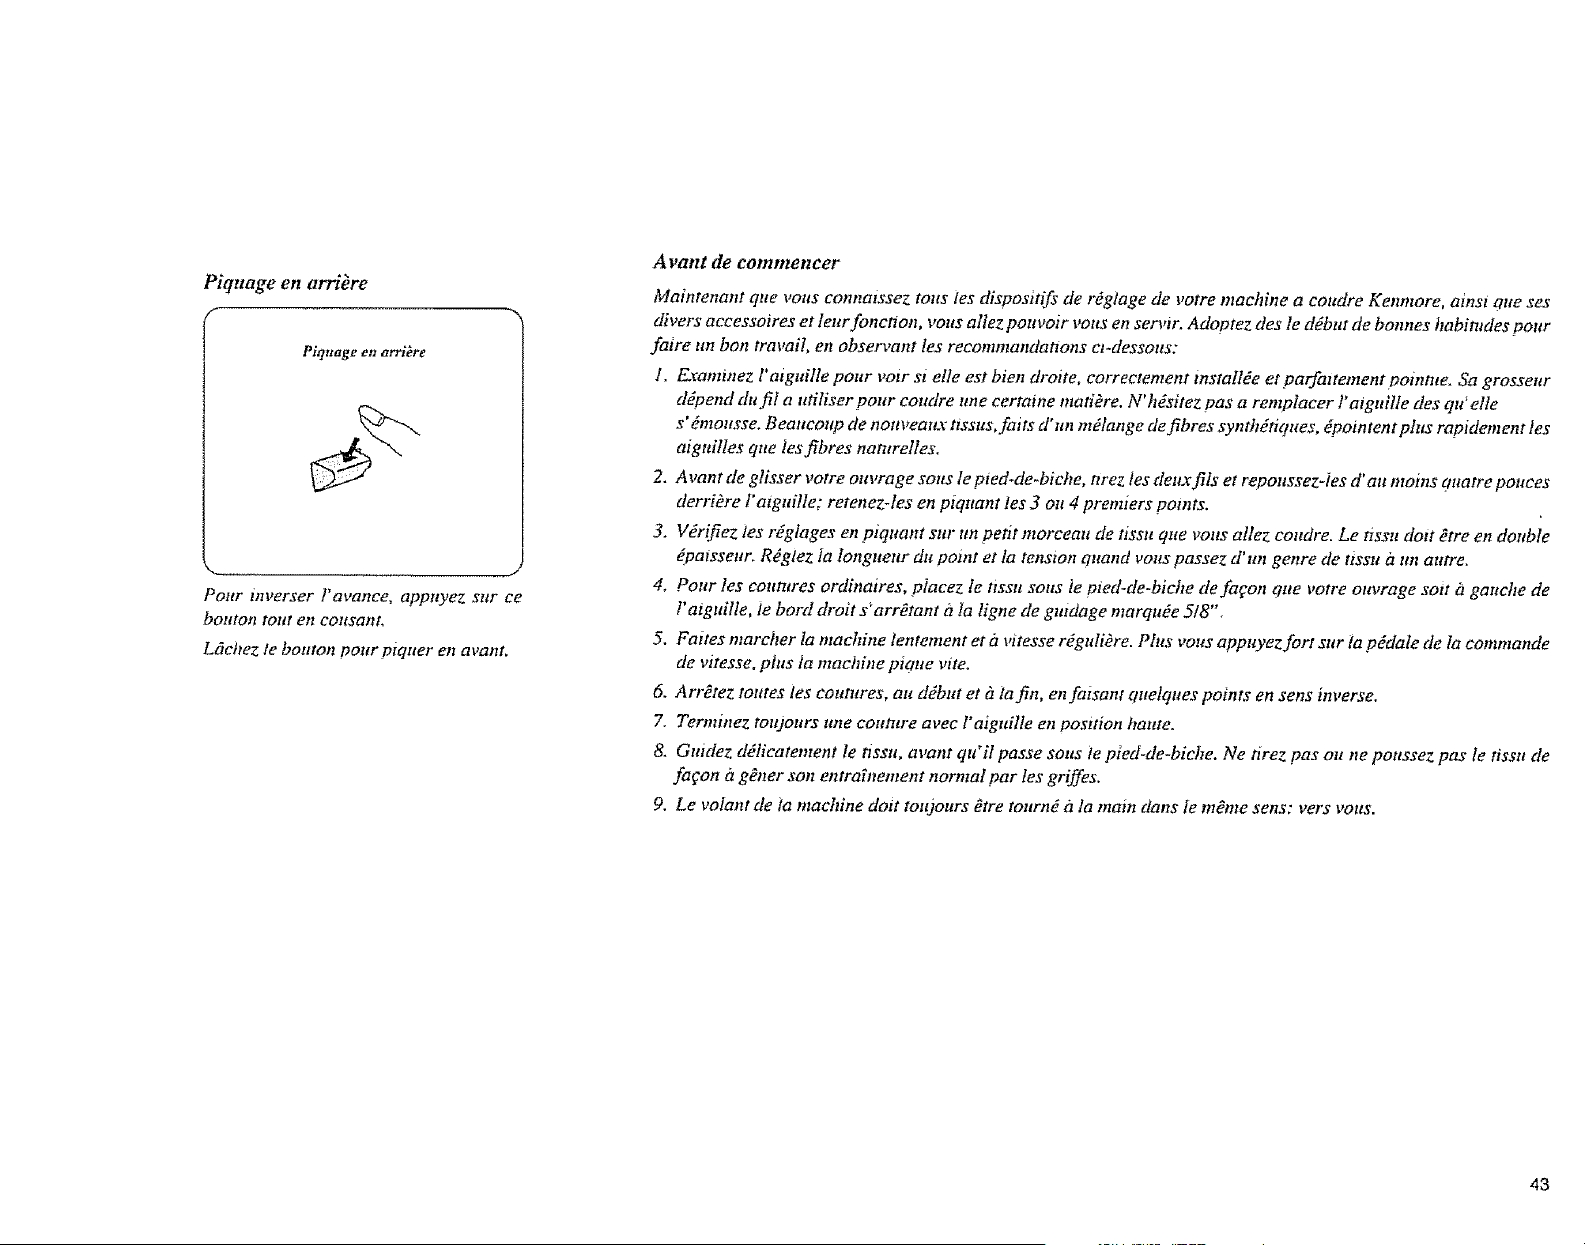
Piquage en arri_re
f
Piquage en arri_re
Poltr inverser ]'avarice, appltyez Sttf £e
bottton tont en cousant,
L_tehez le bottto_t pottr piquer en avant.
Avant de commencer
Maintenant que vans connalssez tons les dispositifs de rOgiage de votre machine a eoudre Kenmore, amst qtte ses
divers accessotres et leur fonction, votts allez pouvoir vans en sen,W. Adootez des le d_but de bonnes habitudes pour
faire tm ban travail, en observant les reeommandat]ons ct-dessons:
1. Eraminez l' aiguille pour voir si elle est bien droite, correctement mstallde et parfattement pointue. Sa grossenr
ddpend du fit a ntiliser pour coudre une certaine matiOre. N'h_sitez pas a remolacer l'aiguille des qu' elle
s' dmonsse. Beaucoup de nonveatL_ tissus, faits d'un mdlange de fibres syntbdtiques, _pointent phts rapidement tes
aiguilles que ]estibres natTtrelles,
2. A rant tie glisser votre ouvrage softs le pied-de.biche, nrez tes deuxtils et reoonssez-ies d'au mains auatre pouces
derriOre l'aFguille; retenez-les en piquant les 3 OFt4 premiers points.
3. Vdritiez ies rdgtages en piquant sltr un petit morceau de tissu que vous allez condre. Le tissu dart _tre en double
_patssettr_ Rdglez la longueur du point et la tension qnand vous passez d'un genre de tissu i_ un autre.
4. Pour les eoutztres ordinaires, piacez le ttssu sons ie pied-de-biche de fagon que votre ouvrage sort i_ gattche de
l' aiguille, le bard droit s'arr_tant h la ligne de gutdage marquee 5/8".
5, Faites marcher la machine lentement et ?t vitesse r_guliOre. Phts vans appuyez fort sur ta p_dale de la eommande
de vitesse, plus ta machine piaue rite.
6. Arr#tez routes les coutTtres, au dYbut et _ latin, en fatsant quelques points en sens inverse,
7. Terminez tottjottrs Fate coutttre avec l'aiguilte en position haute.
8, Gnidez d_licatement le tissu, avant qu'il passe sorts le pied-de-bicbe. Ne tirez pas nit ne poussez pas le tissu de
fa£on {zgoner son entrahFement normal par les griffes.
9. Le volant de ia machine doit toujours _tre tonrnd it la main dans le mYme sens: vers vous.
43
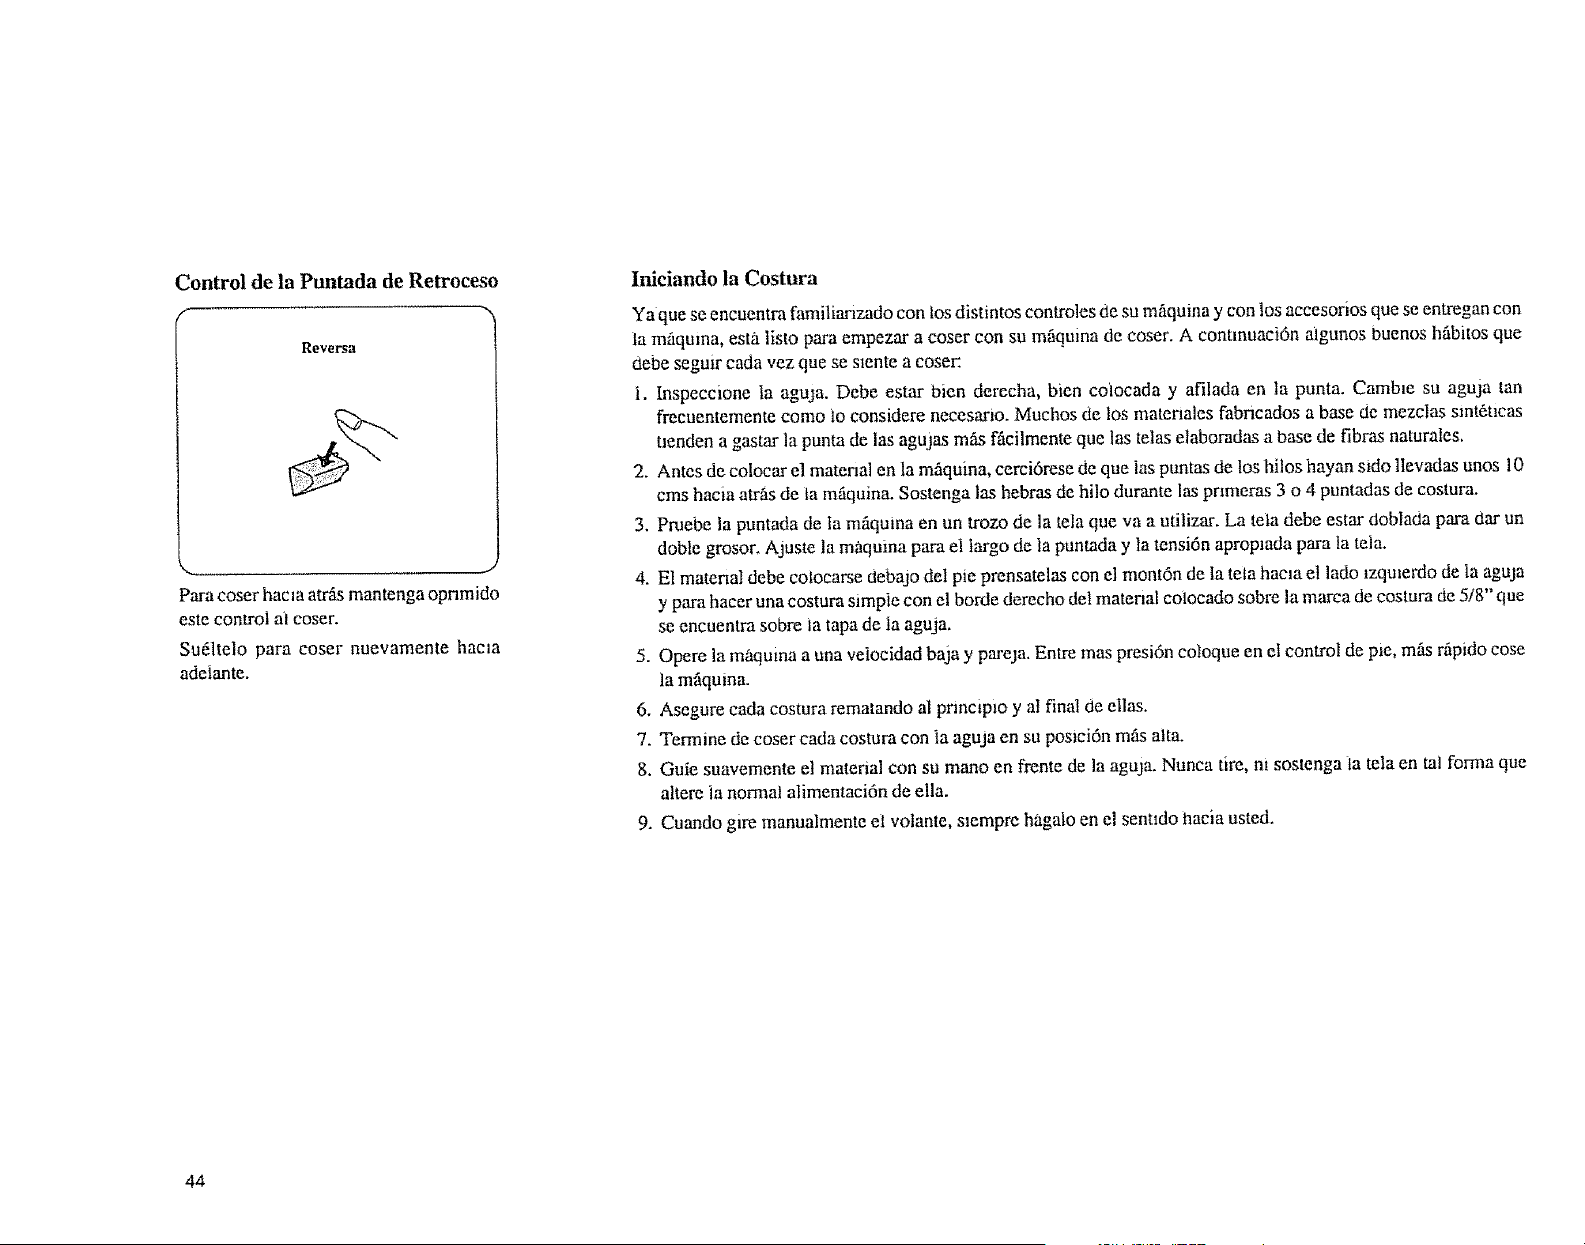
Control de la Puntada de Retroceso
f -.,
R_v_i'$a
J
Para coser hacla atrfis mantenga opnmido
este control ai coser.
Su6ltelo para coser nuevamente hacla
adeiante.
Iniciando la Costura
Ya que se encuentra familianzado con los distintos controles de su mfiquina y con los accesorios que se entregan con
la mfiquina, esta listo para empezar a coser con su mfiquina de coser. A contmuaci6n 021gunosbuenos hfibitos que
Oebe seguir cada vez que se smnte a cosec.
i. Inspeccione Ia aguja. Debe estar bien derecha, bien coiocada y afilada en la punta. Camb_e su aguja tan
frecuentemente como lo considere necesano. Muchos de los matenales fabncados a base de mezclas sint_tlcas
nenden a gastar la punta de las agujas mils fficilmente clue las telas elaboradas a base de fibras naturates,
2. Antes de colocar el material en la m_quina, cerci6rese de que ias puntas de los hilos hayan s_dollevadas unos 10
cms hacia atrfis de ta mfiquina. Sostenga las hebras de hilo durante las pnmeras 3 o 4 puntadas de costura.
3. Pmebe la puntada de la mfiquina en un trozo de la tela que va a utilizar. La teta debe estar cloblada para dar un
done grosor. Ajuste la maquina para el largo de la puntada y la tensi6n aproplada pm,'ala tela.
4. E! material debe cotocarse debajo del pie prensatelas con el mont6n de la teia hacla et lado _zqmerdo de la aguja
y para hacer una costura simple con el borde derecho del material coiocado sobre la marca de costura de 5/8" que
se encuentra sobre ia tapa de la aguja.
5. Opere la m'aquma a una veiocidad baja y pareja. Entre mas presi6n eoloque en el control de pie, mils r_pido cose
la mfiquina.
6. Asegure cada costura rematando al pnnciplo y at final de ellas.
7. Termine de coser cada costura con ia aguja en su posici6n mils alta.
8. Guie suavemente el material con su mano en frente de la aguja. Nunca tire, m sostenga la tela en tal forma que
altere la normal alimentaci6n de ella.
9. Cuando gire manualmente el volante, slempre hagalo en el sentIdo laacia usted.
44
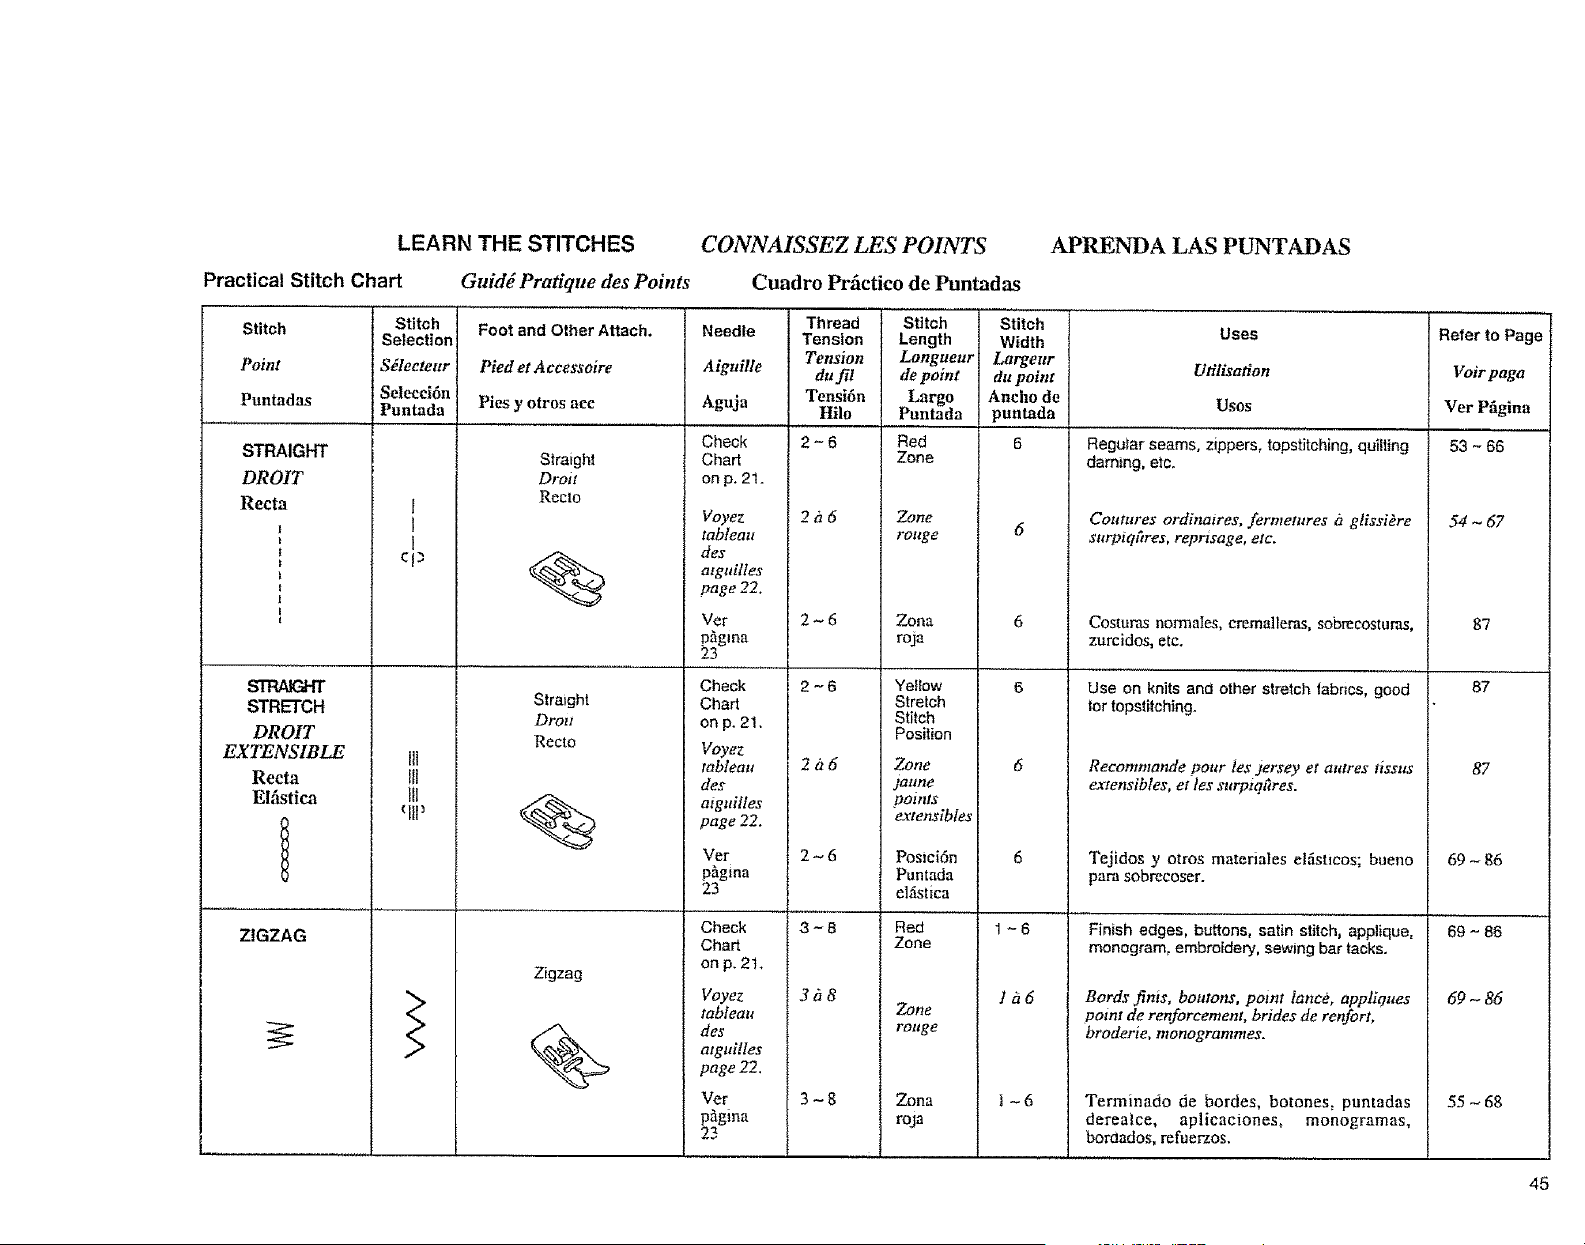
LEARN THE STITCHES CONNAISSEZ LES POINTS APRENDA LAS PUNTADAS
Practical Stitch Chart Guid_ Pratique des Points Cuadro Prfictico de Puntadas
Stitch
Point
STRAIGHT
DROIT
Recta
t
1
I
t
STRETCH
DROIT
EXTENSIBLE
Recta
Elfistica
,)
'l
)
ZIGZAG
Stitch
Selection
Sglectenr
Setc-cci6n
Puntada
I
t
1
C[3
Ill
Ill
Foot and Other Attach.
Pied et A ccessoire
Pies y otros aec
Straight
Droit
Recto
Straight
Drou
Recto
Zigzag
%
Needle
Aiguille
Aguja
Check
Chart
on p. 2t.
Voyez
tableau
des
mgu[ltes
page 22.
Vet
p_tgma
23
Check
Chart
on p. 21.
Voyez
tableau
des
atgttilles
page 22.
Vet
p_gina
23
Check
Chad
on p. 2t.
Voyez
tableau
des
atgui!les
page 22.
Vet
p_gina
23
Thread
Tension
Tension
du_l
Tensi6n
lille
2-6
2a6
2~6
2-6
2iz6
2~6
3-8
3fi8
3-8
Stitch
Length
Longueur
de point
Largo
Puntada
Red
Zone
Zone
rouge
Zoaa
roja
Yellow
Stretch
Stitch
Position
Zone
jallne
points
extensibles
Posici6n
Puntada
ehSstica
Red
Zone
Zone
rouge
7_ona
roja
Stitch
Width
Largeur
du point
Aneho de
puntada
1-6
lh6
I-6
Uses
Utilisation
Uses
Regular seams, zippers, topstitching, quilting
darning, etc.
Coutures ordinatres, ferme/ures a glissiOre
surpiqftres, reprtsage, etc.
Costuras normales, cremalleras, sobrecosturas,
zurcidos, etc.
Use on knits and other strelch tabncs, good
tar topstitching.
Recommande pear los jersey et attires tissus
extensibles, ettes surptqtlres.
Tejidos y arras materiates elfisUeos; buena
para sobrecoser.
Finish edges, buttons, satin stitch, applique,
monogram, embroidery, sewing bar tacks.
Bards" finis, boutons, point lance, appliques
point de renforcement, brides de renfort,
broderie, monogrammes.
Terminado de bordes, botones, puntadas
derea|ce, aplicaciones, monogramas,
boraados, refuerzos.
Refer to Page
Voir paga
Vet Pfigina
53 - 66
54 _ 67
87
87
87
69- 86
69 - 86
69-86
55 ~ 68
45
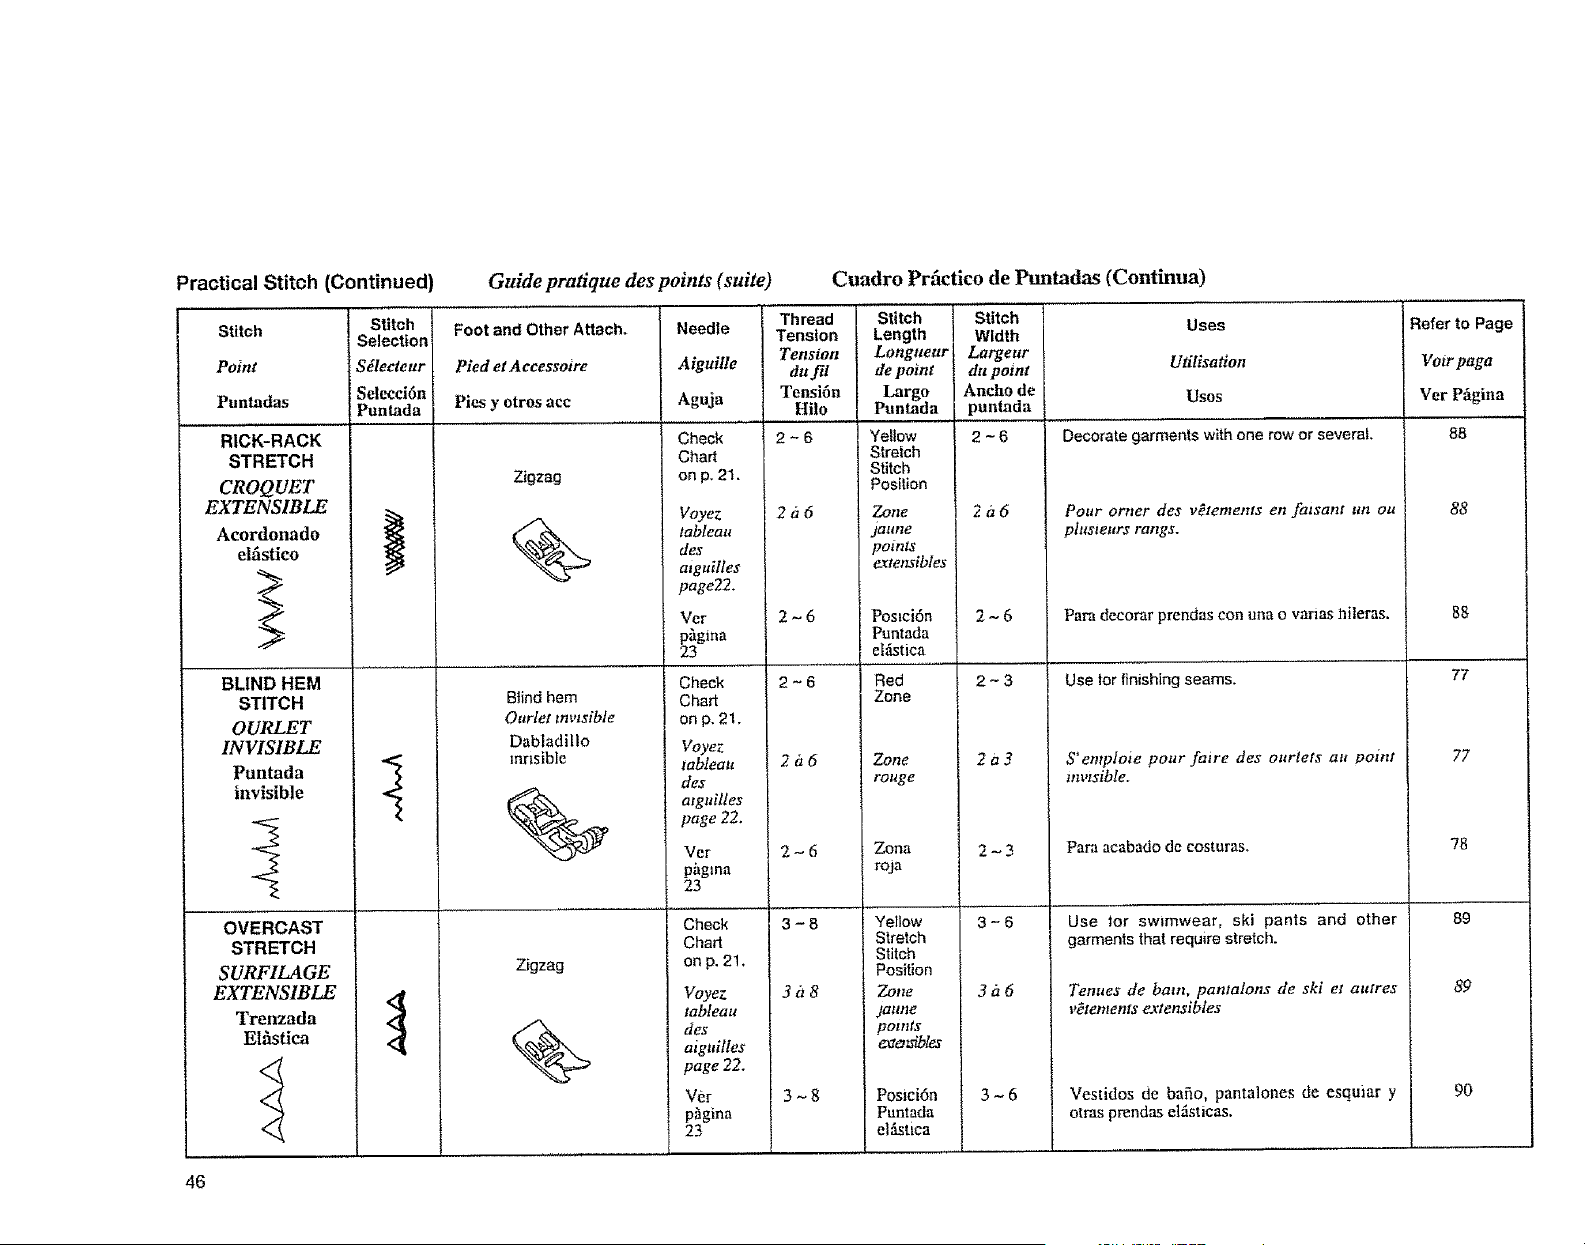
Practical Stitch (Continued)
Stitch
Point
Puntadas
RICK-RACK
STRETCH
CROQUET
EXTENSIBLE
Acordonado
elfistico
BLIND HEM
STITCH
OURLET
INVISIBLE
Puntada
invisible
OVERCAST
STRETCH
SURF1LAGE
EXTENS1BLE
Trenzada
Elhstica
Stitch
Selection
Sdleeteur
Selecci6a
Puntada
4
Guide pratique des points (suite)
Foot and Other Attach.
Pied et Accessoire
Pies y otros ace
Zigzag
%
Blind hem
Outlet invisible
Dabladillo
lmnsible
Zigzag
%
Needte
Aiguille
Aguja
Check
Chart
on p. 21.
Voyez
tableau
des
atguiHes
page22.
Ver
p_lgina
23
Check
Chart
on p, 21.
Voyez
tableau
des
atguiltes
page 22.
Vcr
phgma
23
Chock
Chart
on p. 2t.
Voyez
tableau
des
aiguilles
page 22.
Vet
p'_glna
23
Thread
Tension
Tension
du fil
Tensi6n
Hilo
2-6
2116
2-6
2~6
2_6
2-6
3-8
3_8
3~8
Cuadro Prfictico de Puntadas (Continua)
Stitch Stitch Uses
Length Width
Longueur Largeur Utitisatlon
de point da point
Largo Ancho de Uses
Puntada punlada
Yetlow
Stretch
Stitch
Position
Zone
jGllne
pomts
_xtensibles
Postci6n
Puntada
e|_tica
Red
Zone
Zone
rouge
Zona
roja
Yellow
Stretch
Stitch
Position
Zotle
jatlne
points
_e_btes
Posmi6n
Puntada
elAstica
2-6
2i16
2-6
2-3
2a3
2-3
3-6
3a6
3-6
Decorate garments with one row or several
Pour orner des v_tements en fatsant un ou
pfusteurs tangs.
Para decorar prendas con una o vanas hi|eras.
Use for finishing seams.
S'empfote poor faire des ourlets au point
mvtsible.
Pare acabado de costuras.
Use for sw_mwear, ski pants and other
garments that require stretch.
Tenues de barn, pantalons de ski el atttres
v_tements e_vtensibles
Vestidos de bafio, pantalones de esquiar y
otras prendas elfisticas,
Refer to Page
Vow paga
Vet P&gina
88
88
88
77
77
78
89
89
90
46
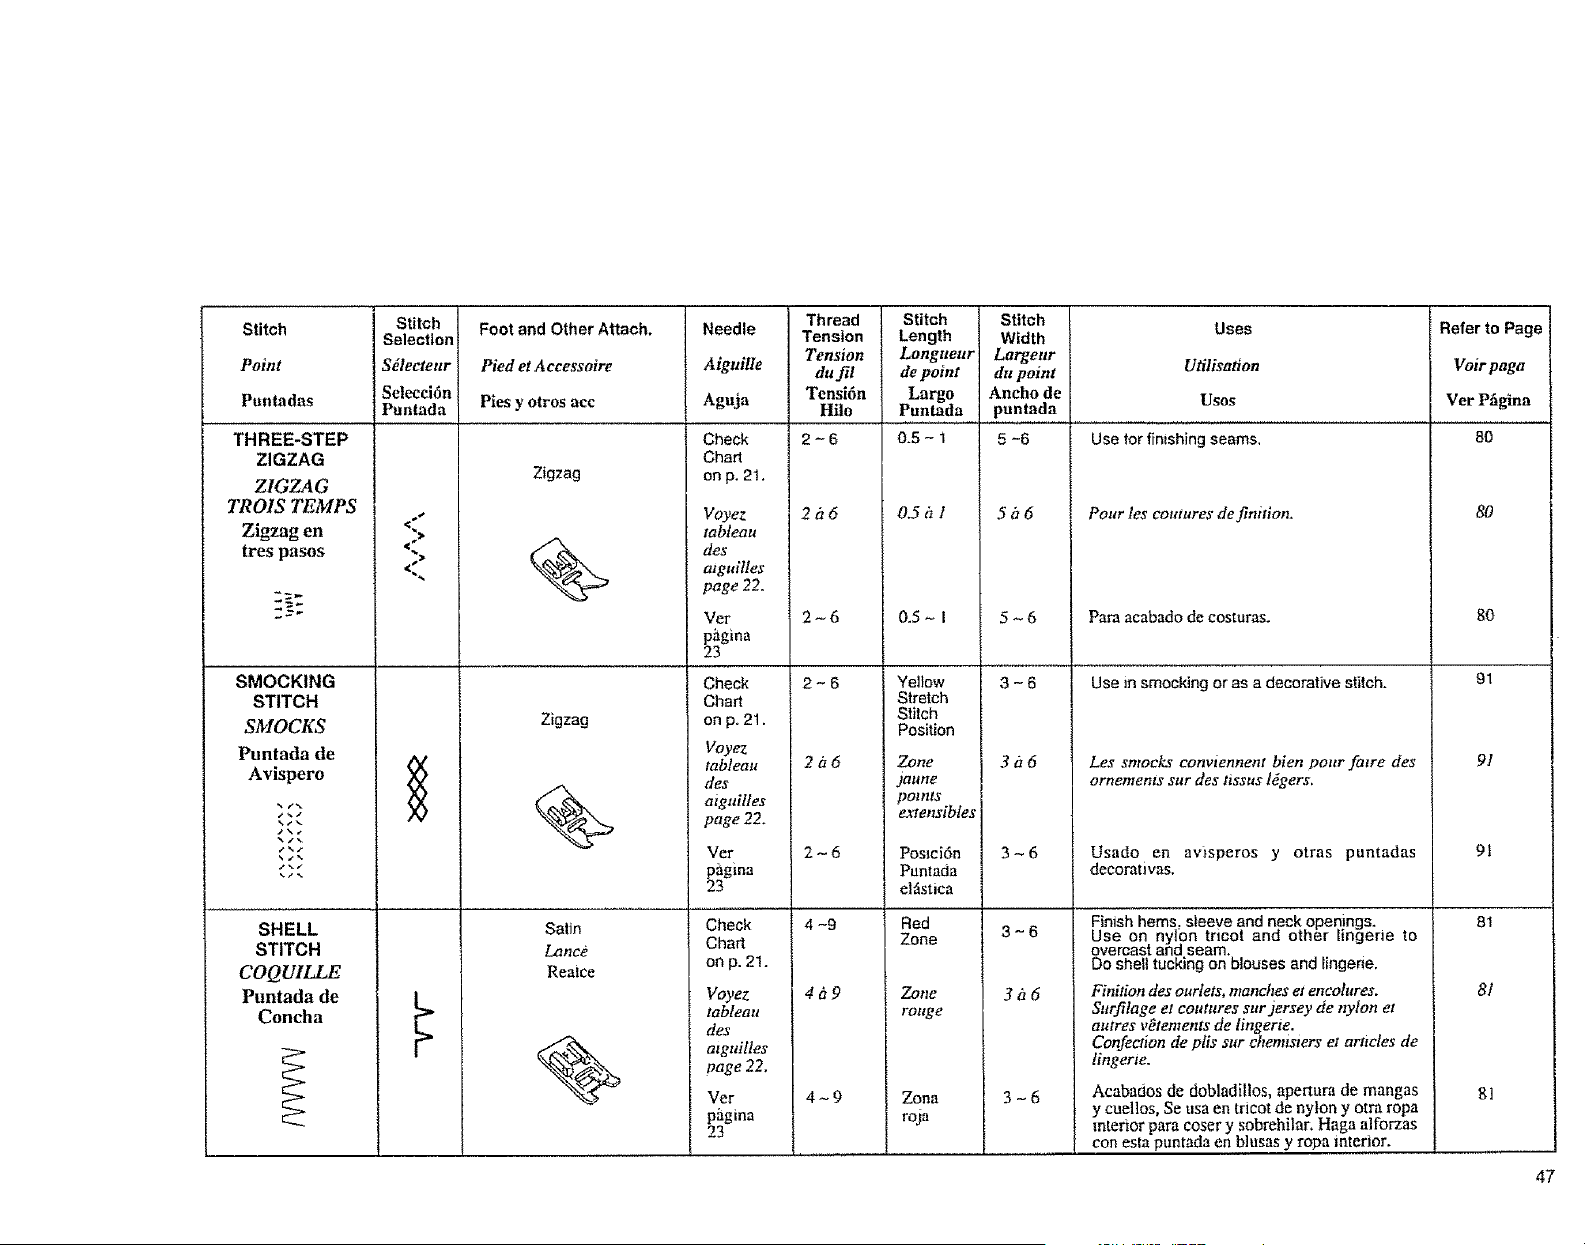
Stitch
Point
Pontadas
THREE-STEP
ZIGZAG
ZIGZAG
TROIS TEMPS
Zigzag en
tres pases
SMOCKING
STITCH
SMOCKS
Puntada de
Avispero
SHELL
STITCH
COQU1LLE
Puntada de
Concha
Stitch
Selection
S_lecteur
Selecci6n
Pantada
Foot and Other Attach.
Pied et Aceessoire
Pies y otros acc
Zigzag
%
Zigzag
%
Satin
L,anee
Reaice
Needle
AiguiIle
Aguja
Check
Chad
on p. 2t.
Voyez
tableau
des
atguilles
page 22.
Ver
p&gina
23
Check
Chad
on p, 21.
Voyez
_bleau
des
aiguiHes
page22.
Vet
vagina
23
Check
Chad
on p. 21.
Voyez
tableau
des
atguiltes
page 22.
Vet
pagina
23
Thread
Tension
Tension
aunt
Tensi6n
Hito
2-6
2h6
2-6
2-6
21t6
2_6
4-9
4_9
4-9
Stitch
Length
Longueur
de point
Largo
Puntada
0.5- 1
&5h I
0.5~ I
Yellow
Stretch
Stilch
Position
Zone
jaline
points
extensibtes
Posmi6n
Puntada
elfistica
Red
Zone
Zone
rouge
Zona
ro2a
Stitch
Width
Largeur
du point
Ancho de
puntada
5-6
5h6
5~6
3-6
366
3-6
3-6
3i16
3-6
Uses
U_lisa#on
Usos
Use torfinishing seams.
Pour les coutures definition.
Pard acabado de eosturas.
Use in smocking or as a decorative stitch,
Les smocks conviennent bien pour falre des
ornements sur des l_sstts ldgers.
Usado en av_speros y otras puntadas
decoratwas.
Finish hems. sleeve and neck openings.
Use on nylon tricot and other fingerie to
overcast and seam.
Do shell tucking on blouses and lingerie.
Fin#ion des ourlets, manches el eneohlres.
Surfilage et coutures sur jersey de nylon et
autres v_tements de lingerie.
Confection de plis sur chemisters et articles de
lingerie.
Acabados de dobladillos, apertura de mangas
y cuellos, Se usa en tricot de nylon y otra ropa
interior para coser y sobrehilar. Haga alforzas
con esta puntada en blusas y rol_a interior.
Refer to Page
Voir paga
Ver Pfigina
8O
8O
8O
91
91
91
81
81
81
47
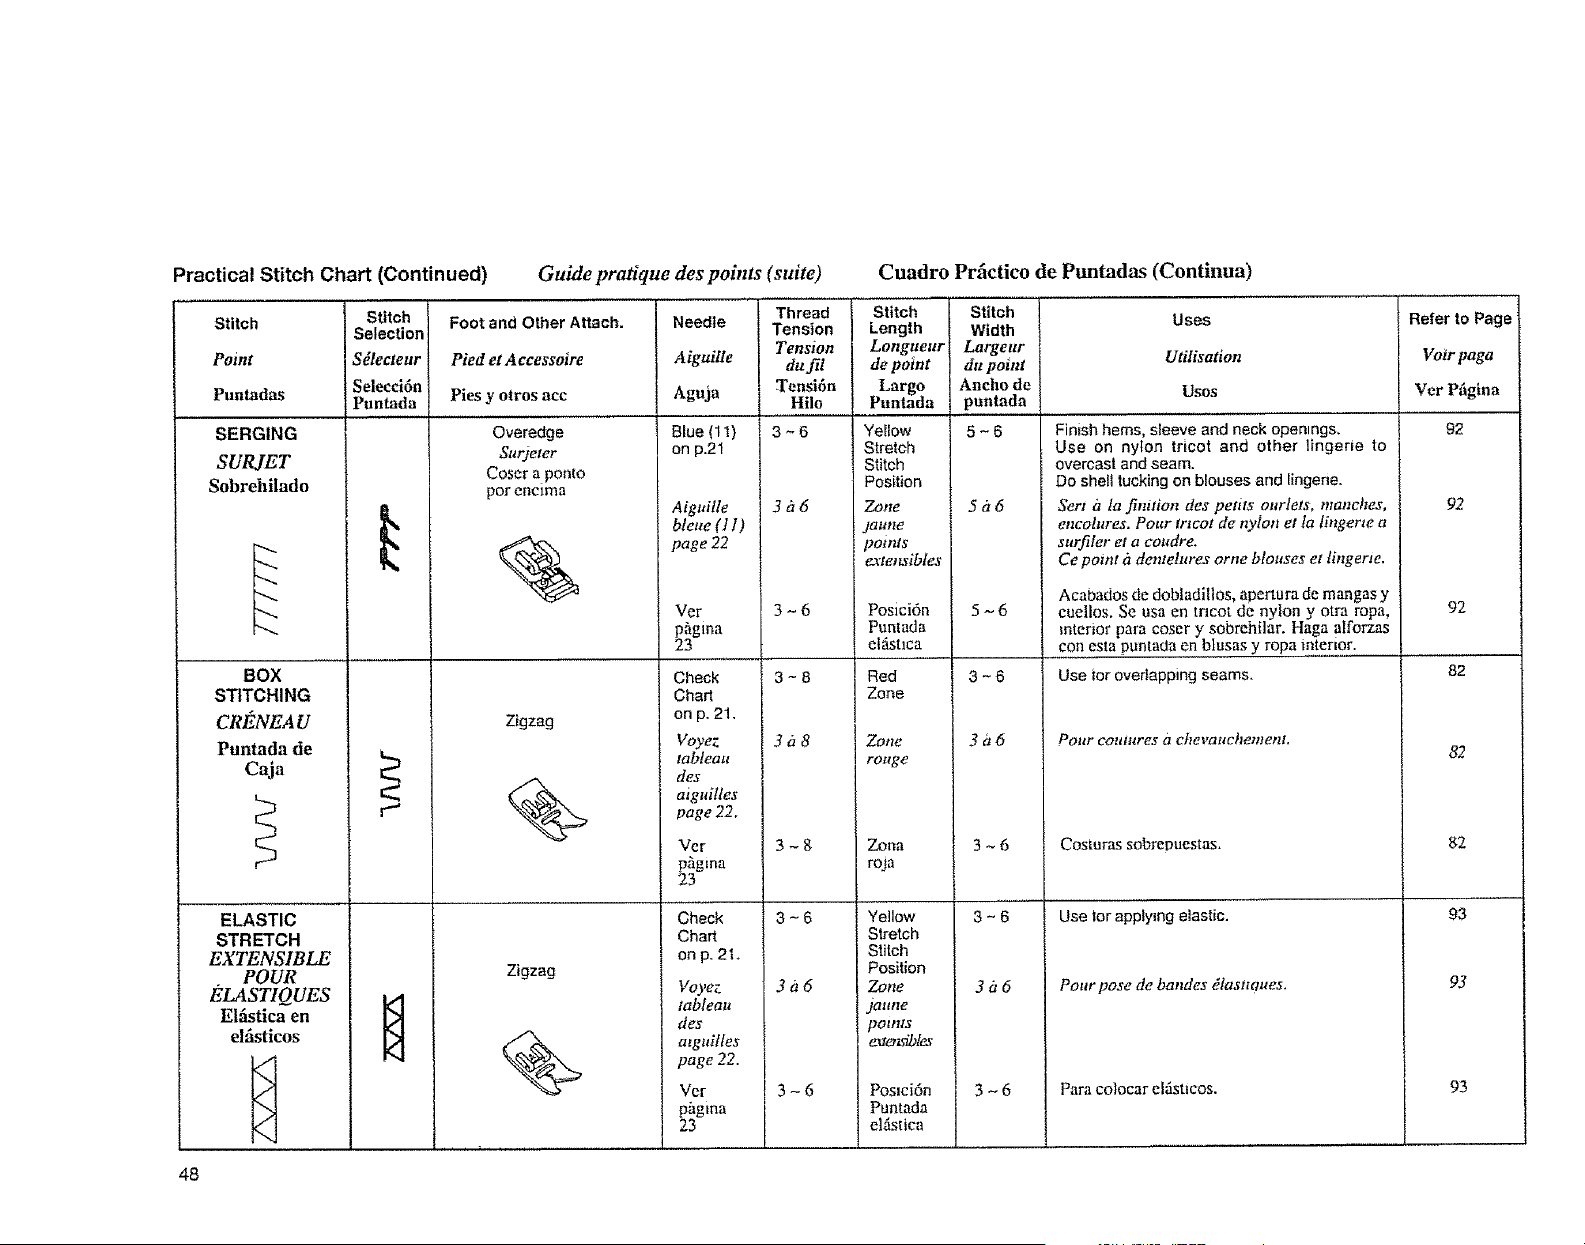
PracticalStitchChart(Continued)
Stitch
Point
Puntadas
SERGtNG
SURJET
Sobrehilado
I"
BOX
STITCHING
CRENEAU
Puntada de
Caja
ELASTIC
STRETCH
EXTENSIBLE
POUR
ELASTIQUES
Elfistica en
elfisticos
<
<
<
Stitch
Selection
S_lecteur
Selecci6n
Puntada
Ik
Foot and Other Attach.
Pied et Accessoire
Pies y otros acc
Overedge
Sur)eler
Coser a ponto
per enclma
Guide pratique des poblts (suite)
Needle
Aiguille
Aguja
Blue {1!)
on p.21
%
Zigzag
%
Zigzag
%
Aiguilte
bteae (1 t)
page 22
VeF
pSgma
23
Check
Cha_
on p. 21.
Voyez
tableau
des
aiguilles
page 22,
Wcr
phgma
23
Check
Cha_
on p. 2t÷
Voyez
tableau
des
atguil&s
page 22.
Ver
pagma
23
Thread
Tension
Tension
dufil
Tensi6n
Hilo
3-6
3h6
3-6
3-8
3il8
3-8
3-6
3i_6
3-6
Stitch
Length
Longueur
de point
Largo
Puntada
Yel!ow
Stretch
Stitch
Position
Zone
I£11ltte
9ofnls
e:t'teltsibles
Cuadro Prfictico de Puntadas (Continua)
Uses
Udlisa_on
Uses
Posici6n
Puntada
clLstlca
Red
Zone
Zone
rouge
Zona
roja
Yellow
Stretch
Stitch
Position
Zone
)aune
points
e_o_'ibles
Stitch
Width
Largeur
dn point
Aneho de
puntada
5-6
566
5-6
3-6
3ii6
3~6
3-6
356
3~6
Finish hems, sleeve and neck openings.
Use on nylon tricot and other lingerie to
overcast and seam.
Do shell tucking on blouses and [ingene.
Sere il la fimtion des pettts ourfets, manches,
encotures. Pour trteol de nylon et la lingerie a
surfiler eta eoudre.
Ce point d dentehwes orne blouses et lingerie.
Acabados de dobtadiilos, apertura de mangas y
cuellos. Se usa en tricot de nylon y otra ropa,
interior para coser y sobrehilar. Haga alforzas
con esta puntada en blusas y ropa tntenor.
Use tor overlapping seams.
Pour coutures i7 ehevauchement.
Costuras sobrepuestas,
Use for applying elastic.
Pour pose de bandes dtasnques.
Para colocar eifisticos.
Posmi6n
Puntada
elfistica
48
Refer to Page
Voir paga
Vet Pfigina
92
92
92
82
82
93
93
93
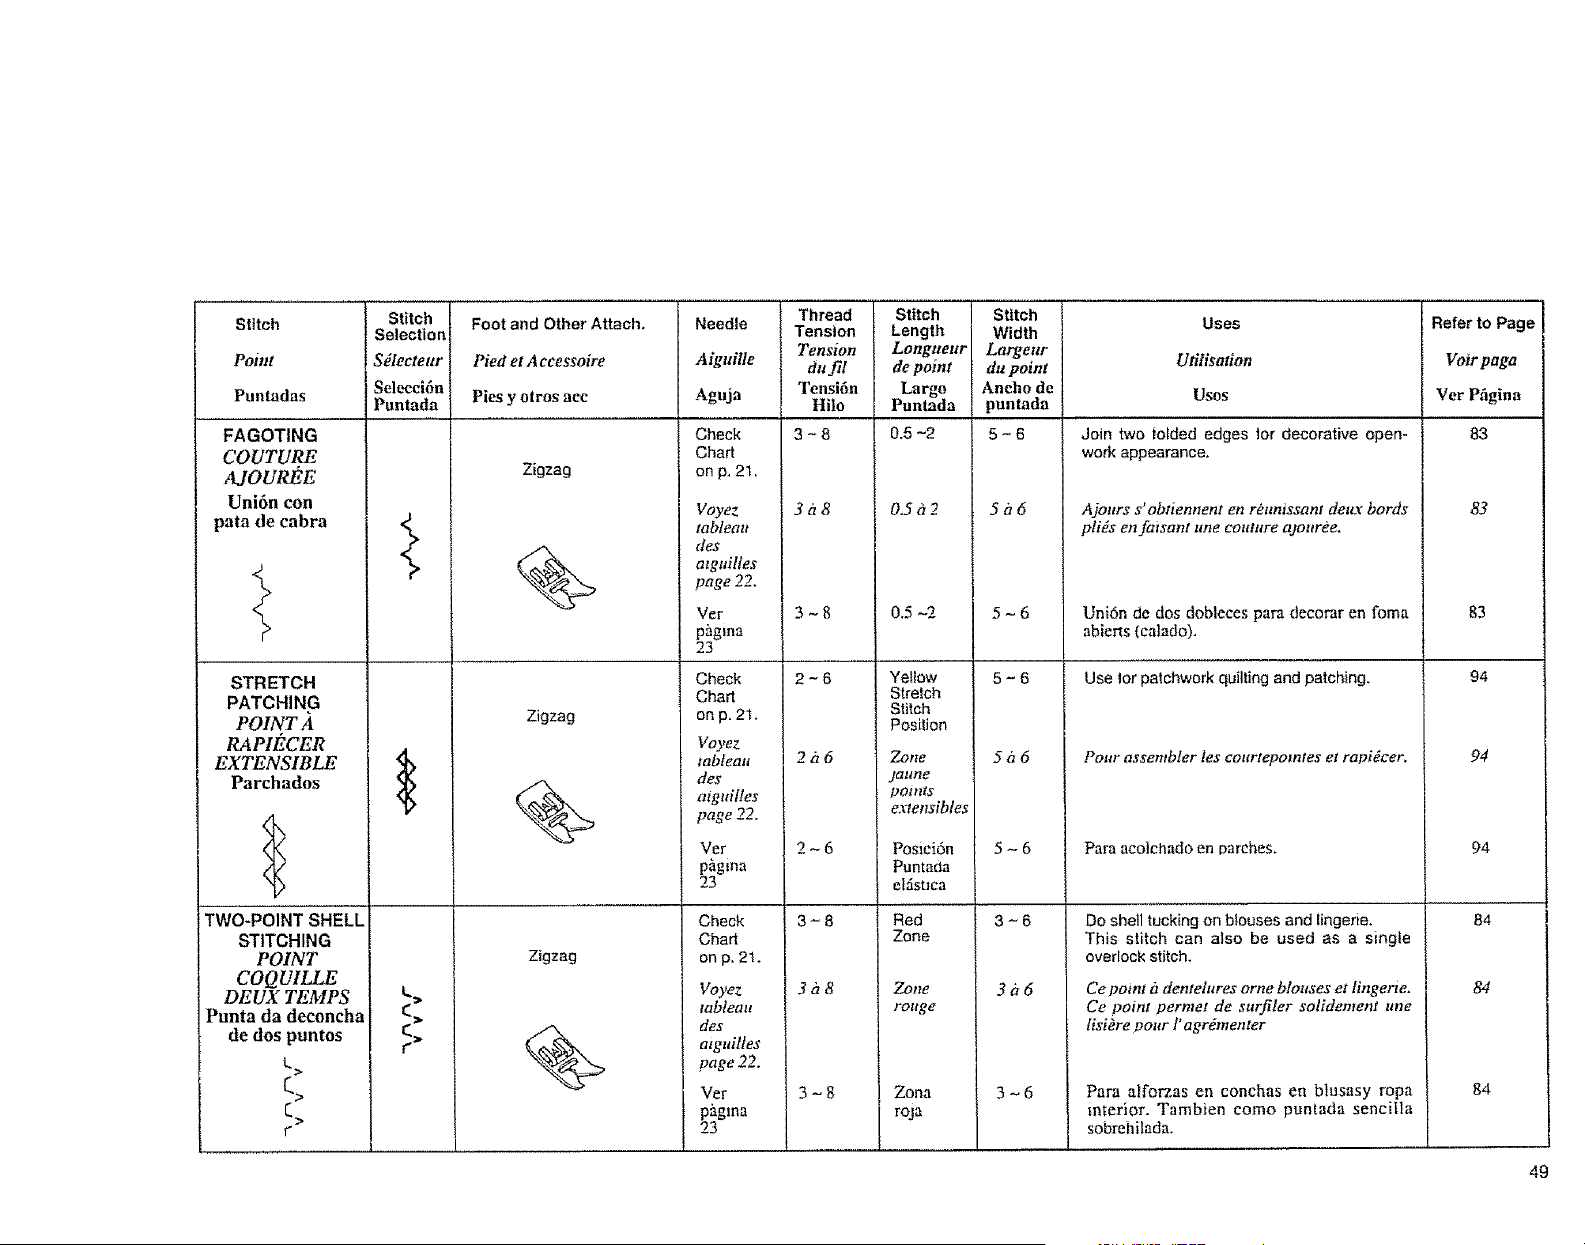
Stitch
Point
Puntadas
FAGOTING
COUTURE
MOUSE
Uni6n con
path de eabra
STRETCH
PATCHING
POINTA
RAPIECER
EXTENSIBLE
Parchados
<>
<,,
</
>
Two-POiN " HELL
STITCHING
POINT
COQU/LLS
DEUX TEMPS
Punta da deconcha
de dos puntos
L>
r.>
C>
r
Stitch
Selection
Sglecteur
Selecci6n
Puntada
<
)
<
>
<
>
Foot and Other Attach,
Pied et A ccessoire
Pies y otros acc
Zigzag
%
Zigzag
%
Zigzag
%
Needle
Aiguille
Aguja
Check
Chart
on p, 21.
Voyez
lableau
ttes
atguiltes
page 22.
Ver
p_gma
23
Check
Chart
on p, 2t.
Voyez
tabfea.
des
atguilles
page 22.
Vcr
p_gina
23
Check
Chart
on p, 2l.
Voyez
mblea,t
des
alguilles
page 22.
Vet
pflgma
9_3
Thread Stitch
Tenston Length
Tension Longueur
du fil de point
Tensi6n Largo
Hilo Puntada
3 ~ 8 0,5 -2
3i18 0.5h2
3-8 0.5 ,--9-
2 - 6 Yellow
Stretch
Stitch
Position
2 h 6 Zone
jatme
l)OflltS
extensibtes
2 ~ 6 Posiei6n
Puntada
el_istma
3 - 8 Red
Zone
3 h 8 Zone
rouge
3 - 8 Zona
roja
Stitch
Width
Largeur
du point
Ancho de
puntada
5-6
5a6
5-6
5-6
5i_6
5-6
3-6
3116
3~6
Uses
Utitisation
Uses
Join two to[ded edges for decorative open-
work appearance.
Ajours s'obtiennent en reunissant deux bords
pliJs en faisant une couture ajonree.
Uni6n de dos dobleces pare decorar en foma
abierts (calado).
Use tor patchwork quilting and patching.
Pour assembler les courtepomtes et rapidcer.
Para acolchad0 en parehes_
Do shell tucking on blouses and lingerie.
This stitch can also be used as a single
ovedock stitch.
Ce poim gtdentehtres orne blouses et lingerie.
Ce point permet de surfiler solidement une
lisibre pour I'agrdmenter
Para alforzas en conchas en blusasy ropa
interior. Tambien come puntada sencitla
sobrehilada.
Refer to Page
Voir paga
Vet P_gina
83
83
83
94
94
94
l
!
84
84
84
49
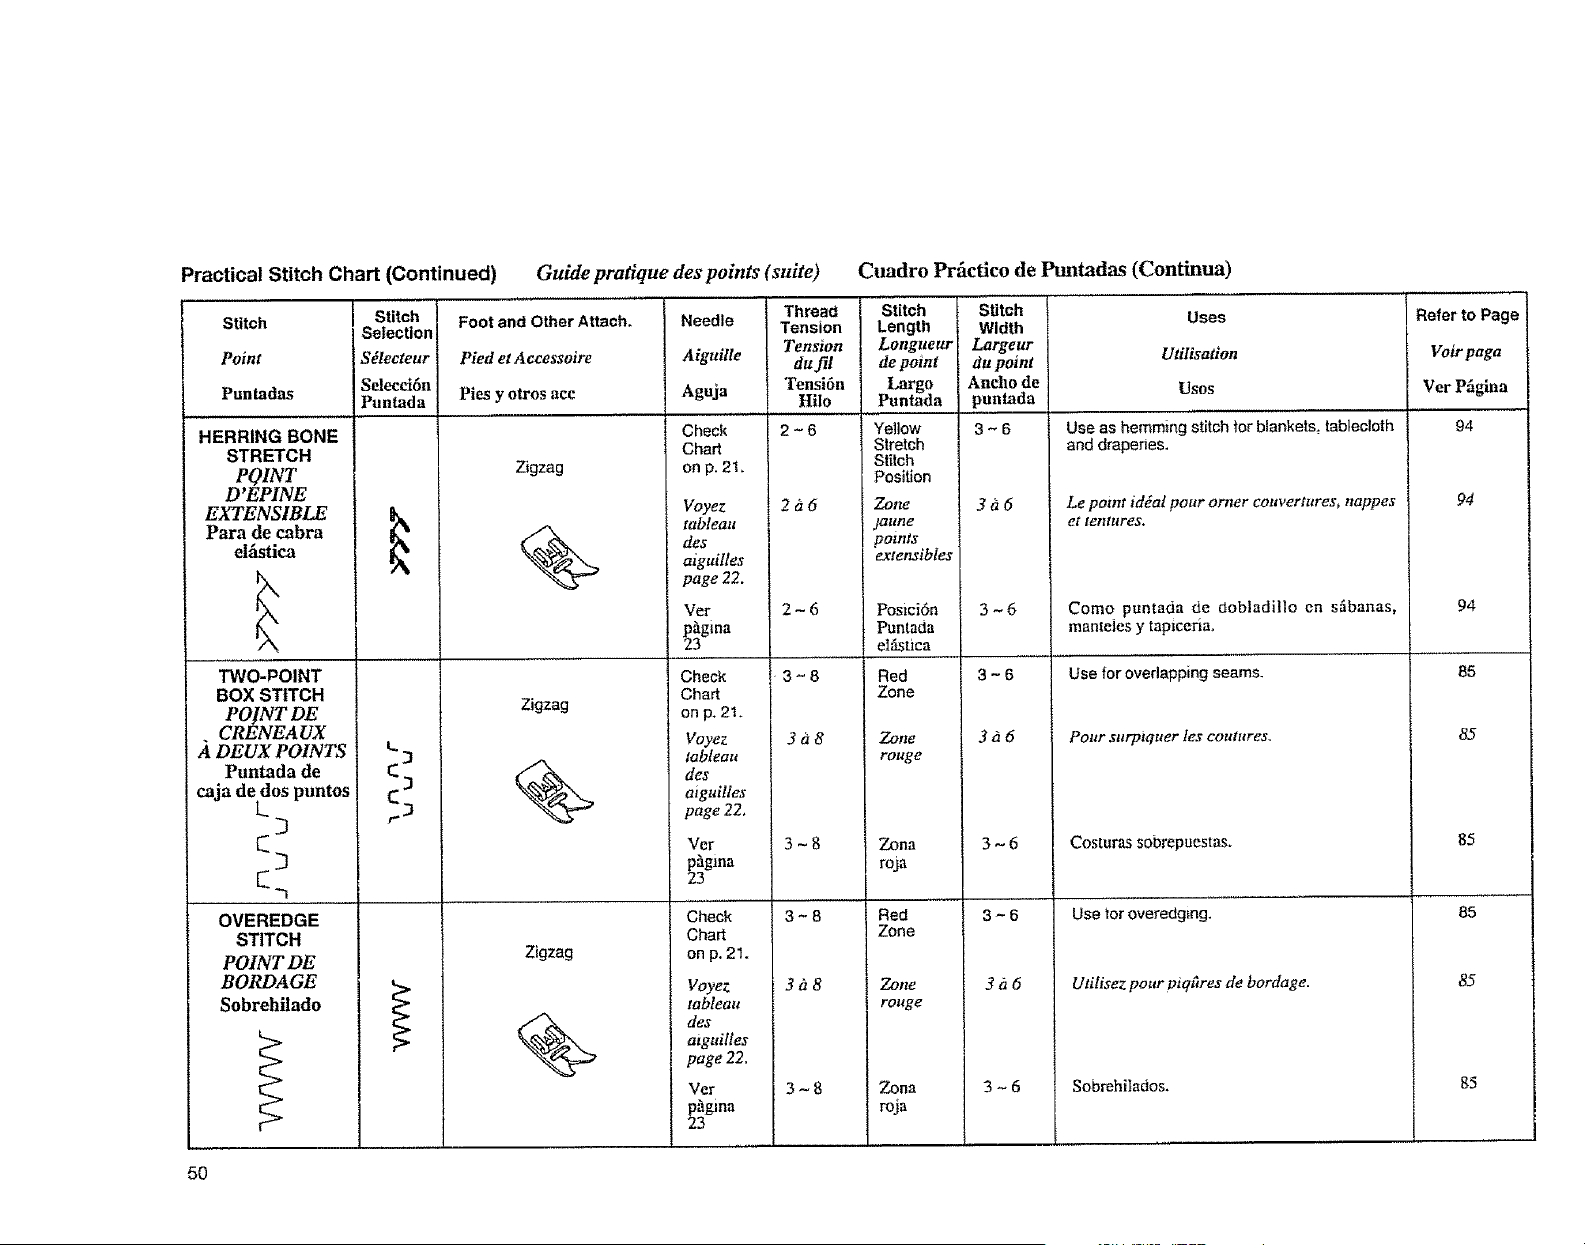
Practical Stitch Chart (Continued) Guide pratique des points (suite)
Stitch Stitch Foot and Other Attach. Needle Threact
Selection Tension
Point Sdlecteur Pied et Accessoire Aiguille Tension
du fil
Puntadas Sdecci6n Aguja Tensi6n
Puntada Pies y otros ace Hilo
HERRING BONE Check 2 - 6
STRETCH Chart
POINT Zigzag on p. 21,
D'EPINE
EXTENSIBLE _ _ Voyez 2 ?_6
Para de cabra tableau
elfistica _ des
aiguilles
page 22.
Ver 2 - 6
_gina
TWO-POINT Check 3 ~ 8
BOX STITCH Chart
POINT DE Zigzag on p. 2t.
CRENEA UX Voyez 3 a 8
DEUX POINTS t. 3 tableau
PuntadaL. de _ % des
caja de.dos puntos 3 aiguilles
r_ _ page 22,
Vet 3 - 8
phgina
23
OVEREDGE Check 3 ~ 8
STITCH Chart
POINTDE Zigzag on p, 21.
BORDAGE Voyez 3 a 8
Sobrehilado tableau
des
atgaiftes
page 22.
Ver 3 - 8
p_gina
23
Cuadro Prfictico de Puntadas (Continua)
Stitch Uses Refer to Page
Width
Largeur
du point Utilisation Voir paga
Ancho de Uses Ver Pfigiaa
punlada
3 ~ 6 Use as hemming stitch for blankets_ tablecloth 94
and draperies.
Stitch
Length
Longneur
de pomt
Largo
Puntada
Yellow
Stretch
Stitch
Position
Zone
taune
_oints
extensibles
Posici6n
Puntada
el_tica
Red
Zone
Zone
range
Zona
roja
Red
Zone
Z,otte
rouge
Zona
' roja
3iz6
3_6
3-6
3d6
3~6
3-6
3&6
!
3~6
Le point iddal pour orner couvertures, nappes
et tentures.
Como puntada de Oobladillo en sfibanas,
mantcies y tapiceria.
i ......
Use for overlapping seams.
Pour surptqaer fes coutures.
Costuras sobrepuestas.
Use for overedgmg.
Utilisez pour piq£wes de bordage.
Sobrehitados.
94
94
85
85
85
85
85
85
5O
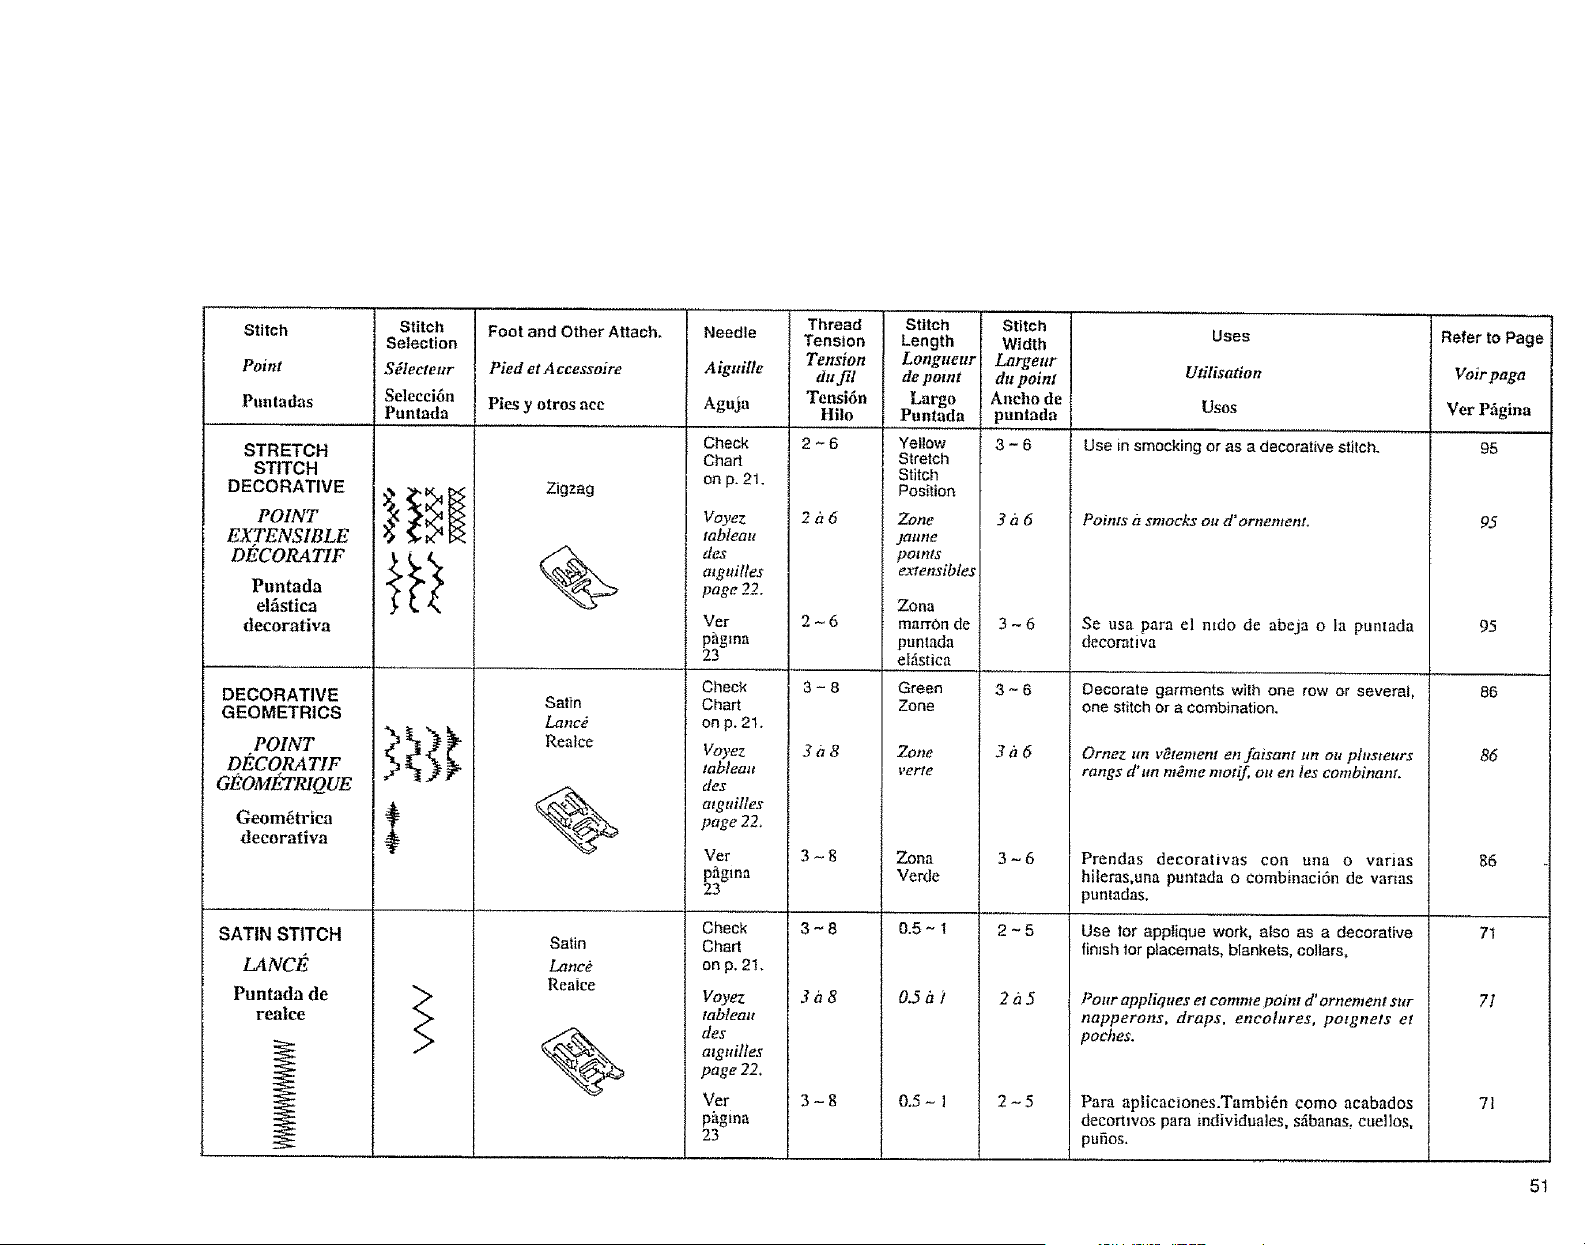
Stitch Stitch Foot and Other Attach, Needle Thread
Selection Tension Uses Refer to Page
Point Sdlecteur Pied et Accessoire Aiguille Tension
dn fil Utitisation Voir paga
Puntadas Selecci6n Pies y otros ace Aguja Tensi6n
Puntada Hito Usos Ver P_gina
2 - 6 Use in smocking or as a decorative stitch. 95
STRETCH
I STITCH
DECORATIVE
POINT
EX.TENSIBLE
DECORAT1F
Puntada
el_stica
decorativa
DECORATIVE
GEOMETRtCS
POINT
DE'CORATIF
GEOM[H'RIQUE
Geom6trica
decorativa
SATIN STITCH
LaNC
Puntada de
realce
Zigzag
%
Satin
Lanc_
Realce
%
Satin
Lance
Reaice
%
Check
Cha_
on p. 21.
Voyez
tableau
des
alguilles
page 22.
Vet
pagma
23
Check
Chart
on p. 21.
Voyez
tableau
des
atguilles
page 22,
Ver
Check
Chart
on p. 21.
Voyez
tableau
des
atguiltes
page 22,
Ver
pagma
23
2h6
2-6
3-8
3a8
3_8
3-8
3a8
3-8
Stitch Stitch
Length Width
Longueur Largeur
de point da point
Largo Aneho de
Puntada puntada
Yellow 3 - 6
Stretch
Stitch
Position
Zone 3 h 6
jaltne
points
extensibles
Zona
mort'On de 3 - 6
puntada
elfistica
Green 3 - 6
Zone
Zone 3 i_ 6
retie
Zona 3 - 6
Verde
0.5- 1 2-5
0.5a1 2g_5
0.5- I 2-5
Points gtsmocks on d'ornement.
Se usa para el ntdo de abeja o la puntada
decomtiva
Decorate garments with one row or several,
one stitch or a combination.
Ornez un v_tement en faisant tm ou plusteurs
rangs d'un m_me motif ou en tes combinant.
Prendas decorativas con una o varias
hilems,una puntada o combinaci6n de vanas
puntadas,
Use for applique work, also as a decorative
finish for ptacemats, blankets, collars,
Pour appliques el eomme point d' ornement sur
napperons, drops, eneolures, potgnets et
poehes.
Para ap|icaciones.Tambi6n como acabados
deconwos para individuales, s_ibanas, cuellos,
pufios.
95
95
86
86
86
71
71
71
5t
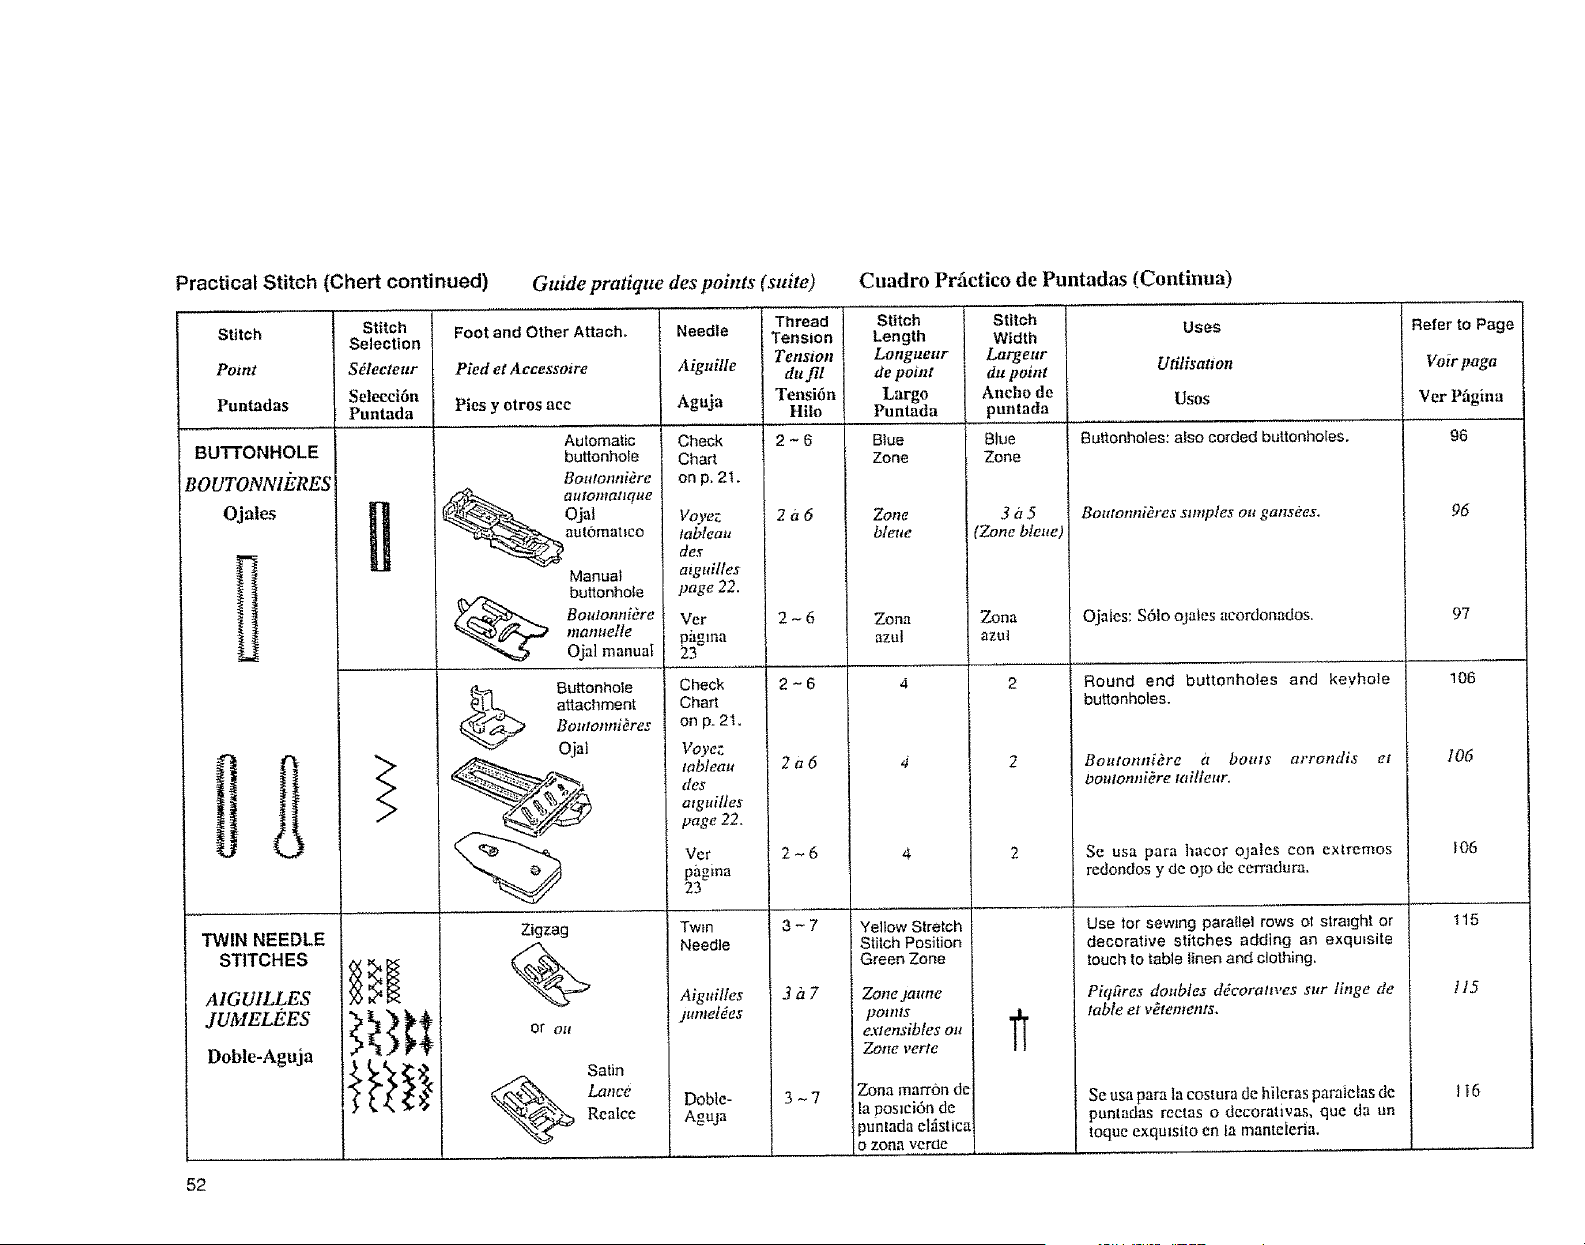
Practical Stitch (Chert continued)
Stitch
Point
Puntadas
BUTTONHOLE
BOUTONNIE, RES
Ojales
Stitch
Selection
S#lecteur
Seleeci6n
Puntada
Guide pratique des points (suite)
Foot and Other Attach, ] Needle
Pied et Accessowe Aiguille
Pies y otros ace Aguja
Automatic
J buttonhofe
Boutonniere
automallque
Ojal
aut0matme
Manual
buttonhole
Boutoaai_.re
ntant_elle
Ojal manuat
Buttonhole
attachment
Bolnonni_res
Ojal
Check
Chart
on p. 21.
Voyez
tableau
des
atguilles
page 22.
Ver
pi_gma
23
I Check
Chart
on p. 2t.
Voyez
tableau
des
atguifles
page 22.
Vcr
pagina
23
Thread
Tension
Tension
aufit
Tensi6n
Hilo
2-6
2a6
2-6
2-6
2a6
Cuadro Prfictico de Puntadas (Continua)
Stitch Stitch Uses
Length Width
Longueur Largeur Utilisatmn
de point du point
Largo Ancho de Uses
Puntada puntada
Blue
Zone
ZoRe
bleue
Zon,q
azut
Blue
Zone
3a5
'Zone bleue)
Zona
azul
2
Buttonholes: also corded buttonhotes.
BoutonniOres smtples ou gansees.
Ojales: S6to ojates acordonados.
Round end buttonholes and keyhole
buttonholes.
BoutonniOre a bouts arroodis el
boutonniere tailleur.
2~6 Se usa para hacor oodles con extremes
redondos y de ojo de eerradura,
TWIN NEEDLE
STITCHES
AIGU1LLES
JUMELI_"ES
Doble-Aguja
Zigzag
%
or o,_t
Satin
Lance
Realce
Twin
Needle
Aiguilfes
fltmef_es
DoNe-
AguJa
3-7
3a7
3_7
Yellow Stretch
Stitch Position
Green Zone
Zotte jaltne
points
extensibles ou
Zotte "b_erle
Zona man'on de
la posmi6n de
puntada elfistica
o zona verde
Use for sewing paraltel rows ot straight or
decorative stitches adding an exquisite
touch to table linen and clothing,
Piq#res doubles ddeoram,es sur finge de
fable el v_tements.
Seusapara lacostura de hileras paraieiasde
pantadas rectas o decorativas, que da un
toque exqmsito en la manteterla.
Refer to Page
Voir paga
Ver Pfigina
96
96
97
106
106
I06
t15
!t5
_t6
52
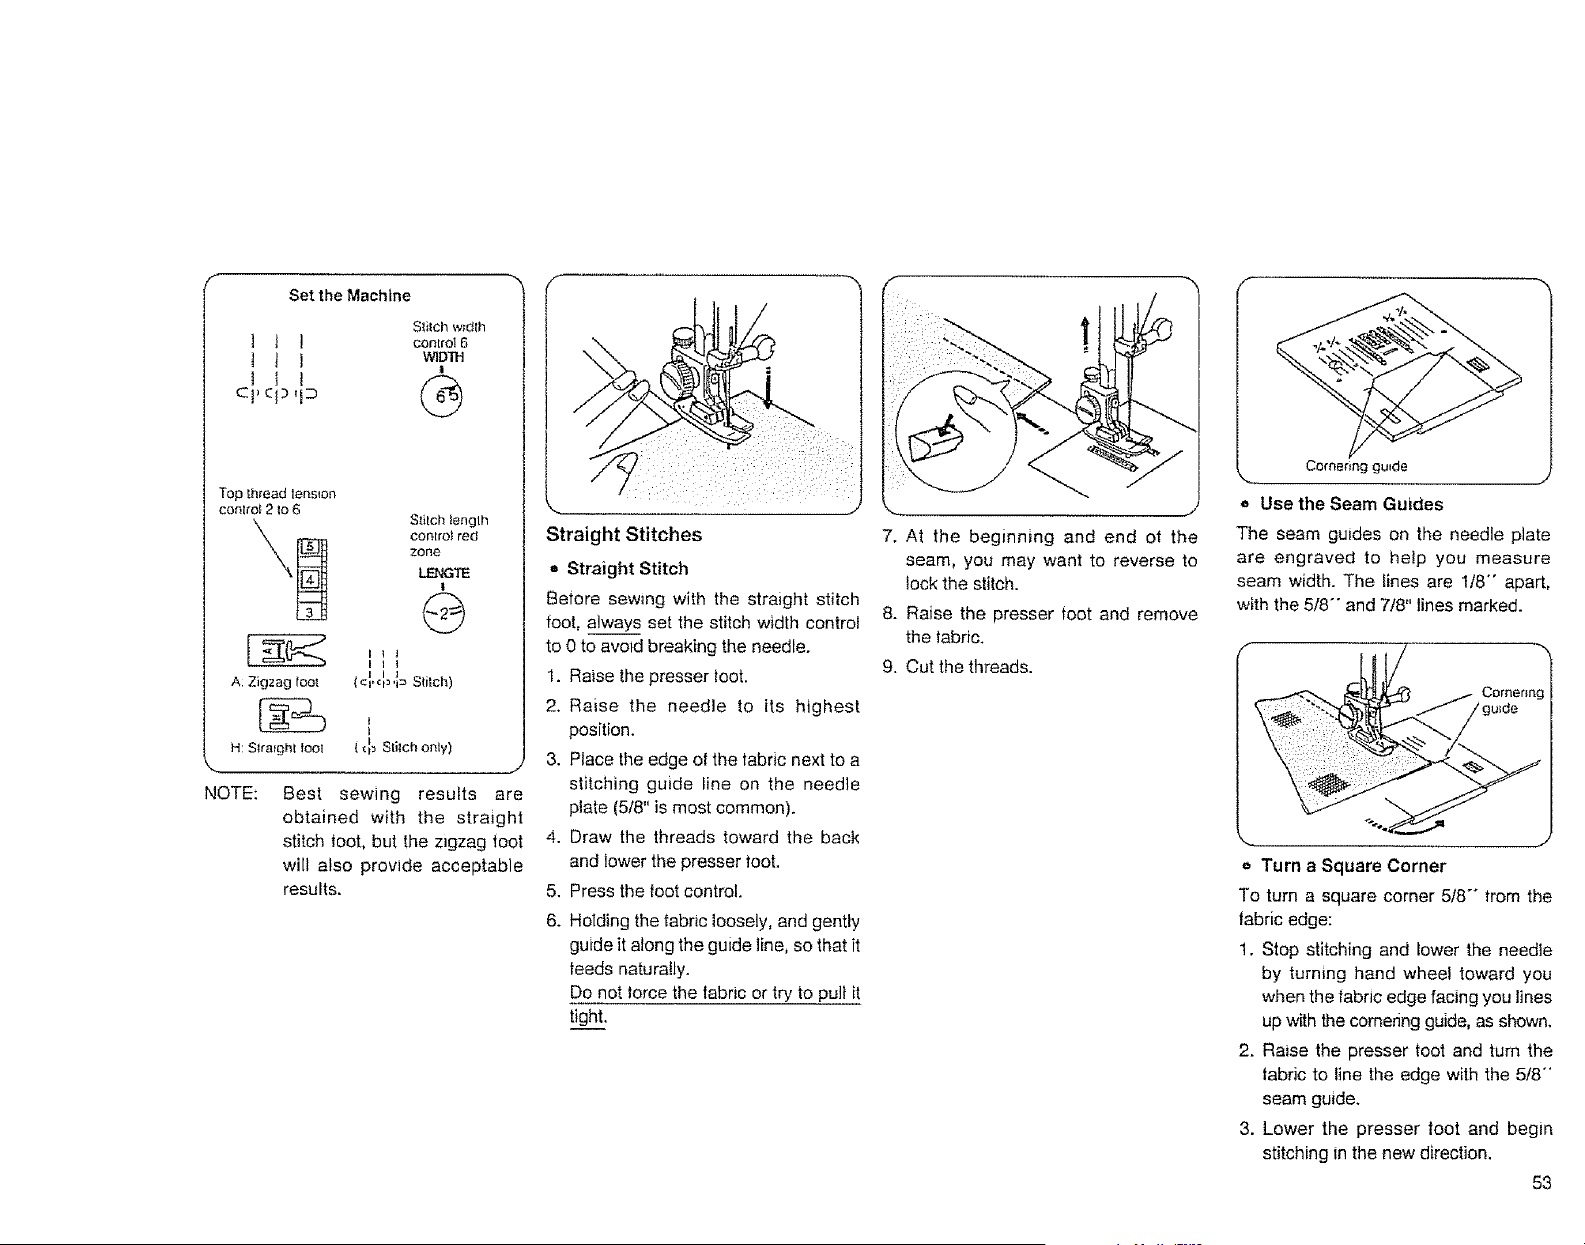
Set the Machine
CpCI_4D
S_ilch;wdlh
conlroI 6
WIDTH
i
G
Top thread tens{on
cenl_o_ 2 to 6
A; Zigzag foot
H: S_ralght tooi
S_itch lenglh
comro_ red
zone
LSNGT£
!
@
I t l
I t I
I i I
( cp Cl_*ID Stitch)
t
{ _I_ Stllch only)
NOTE: Best sewing results are
obtained with the straight
stitch toot, but the mgzag toot
will also provide acceptable
results.
Straight Stitches
= Straight Stitch
Before sewing with the straight stitch
foot, always set the stitch width control
to 0 to avoid breaking the needle.
1. Raise the presser toot.
2. Raise the needle to its highest
position.
3. Place lhe edge of the fabric next to a
stitching guide line on the needle
plate (5/8" is most common).
4. Draw the threads toward the back
and lower the presser toot.
5. Press the toot control.
6. Holding the fabric loosely, and gently
guide it along the guide line, so that it
leeds naturally.
Do not lorce the tabric or try to pull it
tight.
%., J
7. At the beginning and end ot the
seam, you may want to reverse to
tock the stitch.
8. Raise the presser toot and remove
the fabric.
9. Cut the threads.
Cofeenng guide
= Use the Seam Guides
The seam guides on the needle plate
are engraved to help you measure
seam width. The lines are 1/8 °, apart,
with the 5/8"" and 7/8" lines marked.
....... J
= Turn a Square Corner
To turn a square corner 518- trom the
fabric edge:
1. Stop stitching and lower the needle
by turning hand wheel toward you
when the fabric edge facing you lines
up with the comenng guide, as shown,
2. Raise the presser toot and turn the
fabric to line the edge with the 5/8"
seam guide.
3. Lower the presser foot and begin
stitching in the new direction,
53
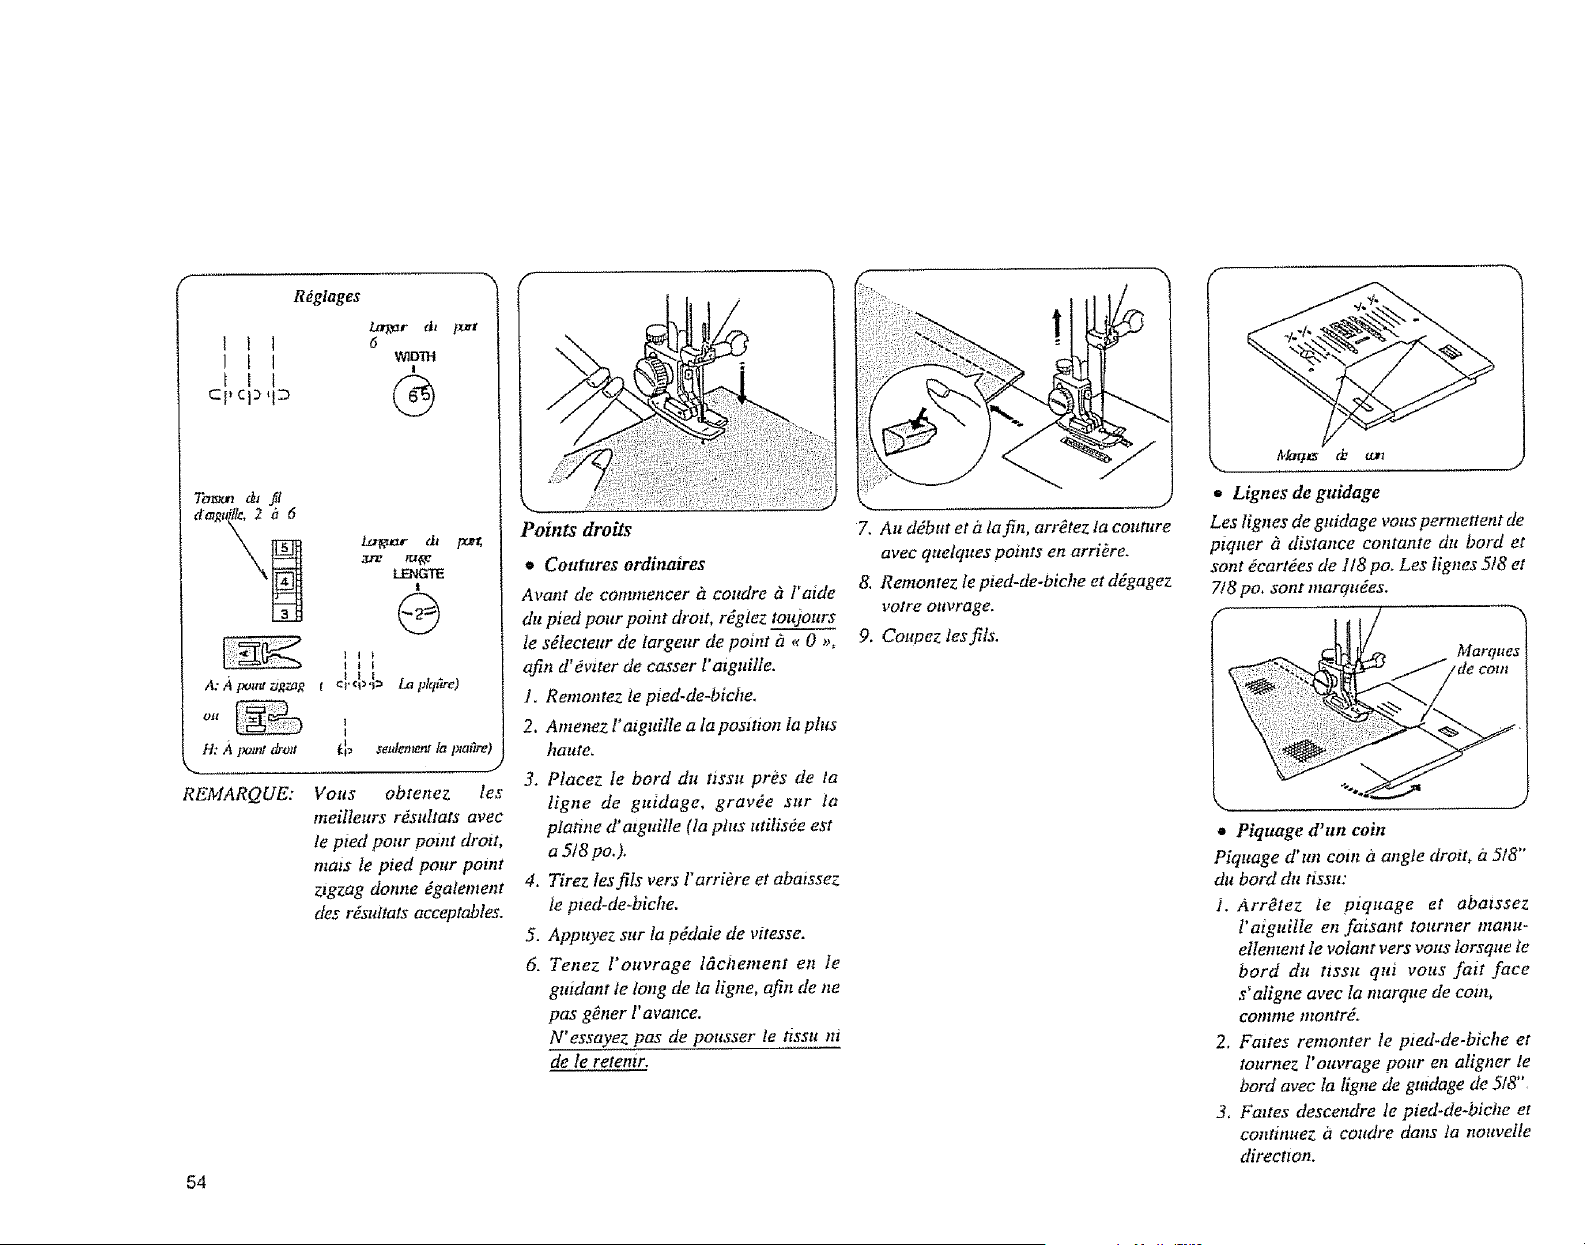
Rdglages
Ill
1 1 I
Cl_Ct:_q_
_r dt
6
_DTH
!
d'_guflle, 2 i_ 6
A: A poutt zigzag
0fl
H: m l_a_nt drt)_t
REMARQUE:
t
I I I
f ¢l'q_'l_ Laplqrtre)
1
I
_I_ setdementla p_aare)
/
Vous oblenez les
meillettrs r_stdlals avec
le pied pour poinl drott,
mats le pied pour point
zigzag donne dgatement
des r_sutlats acceplables.
54
Points droits
• Coutures ordinaires
Avant de commencer ii coudre d l'alde
du pied pour point drott, rdglez lottjonrs
Je sdlectenr de iargeur de point h ,¢ 0 _,_
afin d' 6vtter de casser l' aiguille.
l. Remontez le pied-de-biche.
2. Antenez r atguille a ta posttion la plus
haute.
3. Placez le bord du tissu pres de ta
ligne de gttidage, grav6e sur la
platine d'atguille (la pins utilisOe est
a 5/8 po.)°
4, Tirez les fils vers l'arriOre et abaissez
te pted-de-biche.
5. Appuyez sur la pddaie de vltesse.
6. Tenez l'ouvrage 16chemenl en le
guidant le long de ia ligne, afin de ne
pas g_ner l' avance.
N'essayez pas de pousser le ttssu ni
de le retenir.
1
/
_.J
7. Au ddbul et it latin, arrOtez la couture
avec quetques points en arriOre.
8, Remonlez le pied-de-biche et d@agez
votre ouvroge.
9. Coupez tes fils.
Marfes tb ux_
• Lignes de guidage
Les lignes de guidage vous permettent de
piquer f distance contante du bord el
sont dcart_es de 1t8 po. Les lignes 5t8 et
7/8 po. sont marqudes.
f
Marqne
/de corn
• Piquage d'un coin
Piquage d' un coin o angle droit, iz 518"
du bord du lisstt:
J. Arr_tez le piquage el abaissez
t'aiguilIe en faisant tourner manu-
elIement le volant vers roils lorsque te
bord du tlSSU qui volts fall face
s'aligne avec Ia marque de coin,
eomme tnonll'_,
2. Fortes remonter le pted-de.biche el
lottrnez l' ottvrage pour en aligner le
bord avec ta ligne de gmdage de 518"
3, Fortes descendre le pied-de-biche et
continuez i_ coudre dons ta nouvelle
directlon.
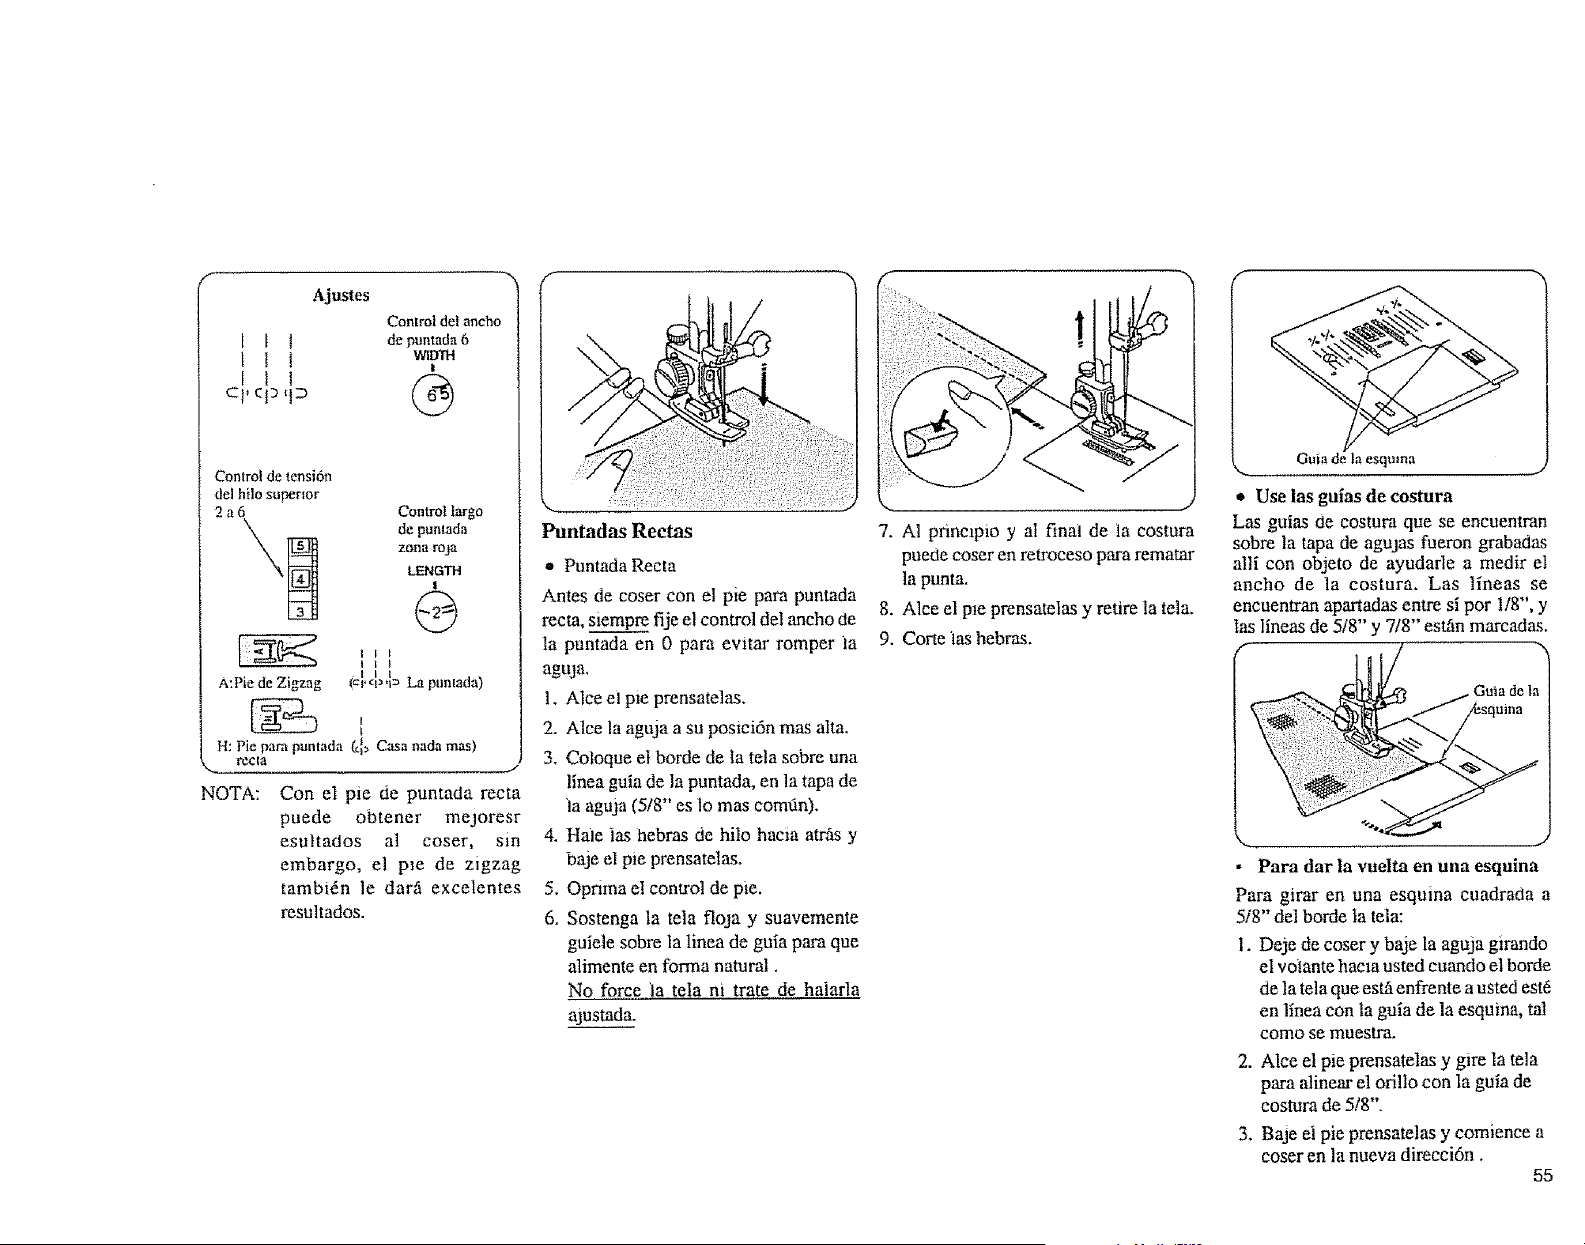
Ajustes
Control delaocho
I f t depuntada6
!
I f ! r-'-_
Control de tensi6n
del hilo sur_rlor
2a6
Control largo
de punlada
zona roja
LENGTH
I
1 l +
AtPie de Zigzag _cr q_*l_ La puntada)
l
H: Pie pare puntada (_I_ Casa nada mas)
r¢_la
J
NOTA: Con el pie de puntada recta
puede obtener mejoresr
esultados al coser, sm
embargo, el p_e de zigzag
tambidn le dar,5 excelentes
resultados.
: "N
. :"": ii!i!il !i!ili!
Puntadas Rectas
- Puntada Recta
Antes de coser con el pie para puntada
recta, slempre fije el control del ancho de
la puntada en 0 pare evitar romper ta
aguja.
1. Alce el pie prensatelas.
2. Alce la aguja a su posici6n mas alta.
3, Coloque el borde de Ia tela sobre una
linea guia de la puntada, en la tapa de
ia aguja (5t8"' es lo mas comt_n).
4. Hale ias laebras de hilo hacia atrfis y
baje el pie prensatelas.
5. Opnma el control de pie.
6. Sostenga ta tela floja y suavemente
guiele sobre la linea de guia para que
alimente en forma natural,
No force }a tela ni trate de halarla
ajustada,
f
i!ii i
7. A1 prinmpio y aI final de ta costum
puede coser en retroceso para rematar
la punta.
8. Alce el pie prensatelas y retire la tela,
9. Cone ias hebras.
Guia de la esquma
M /'
* Use ias guias de costura
Las guias de costura que se encuentran
sobre la tapa de agujas fueron grabadas
alli con objeto de ayudarle a medir el
ancho de la costura, Las tlneas se
encuentran apartadas entre si por 1/8", y
las lineas de 5/8" y 7/8" est,Sn marcadas.
_Guia de t_
• Para dar la vudta en una esquina
Para girar en una esquina cuadrada a
5/8" del borde Ia tela:
1, De3e de coser y baje la aguja girando
el vc_tantehacm usted cuando el borde
de la tela que es_ enfrente a usted est6
en llnea con la gula de la esquina, tal
como se muestra,
2. Alce el pie prensatelas y gire la tela
para alinear el orillo con la guia de
costura de 5/8".
3. Baje el pie prensatelas y comience a
coser en la nueva direcci6n.
55
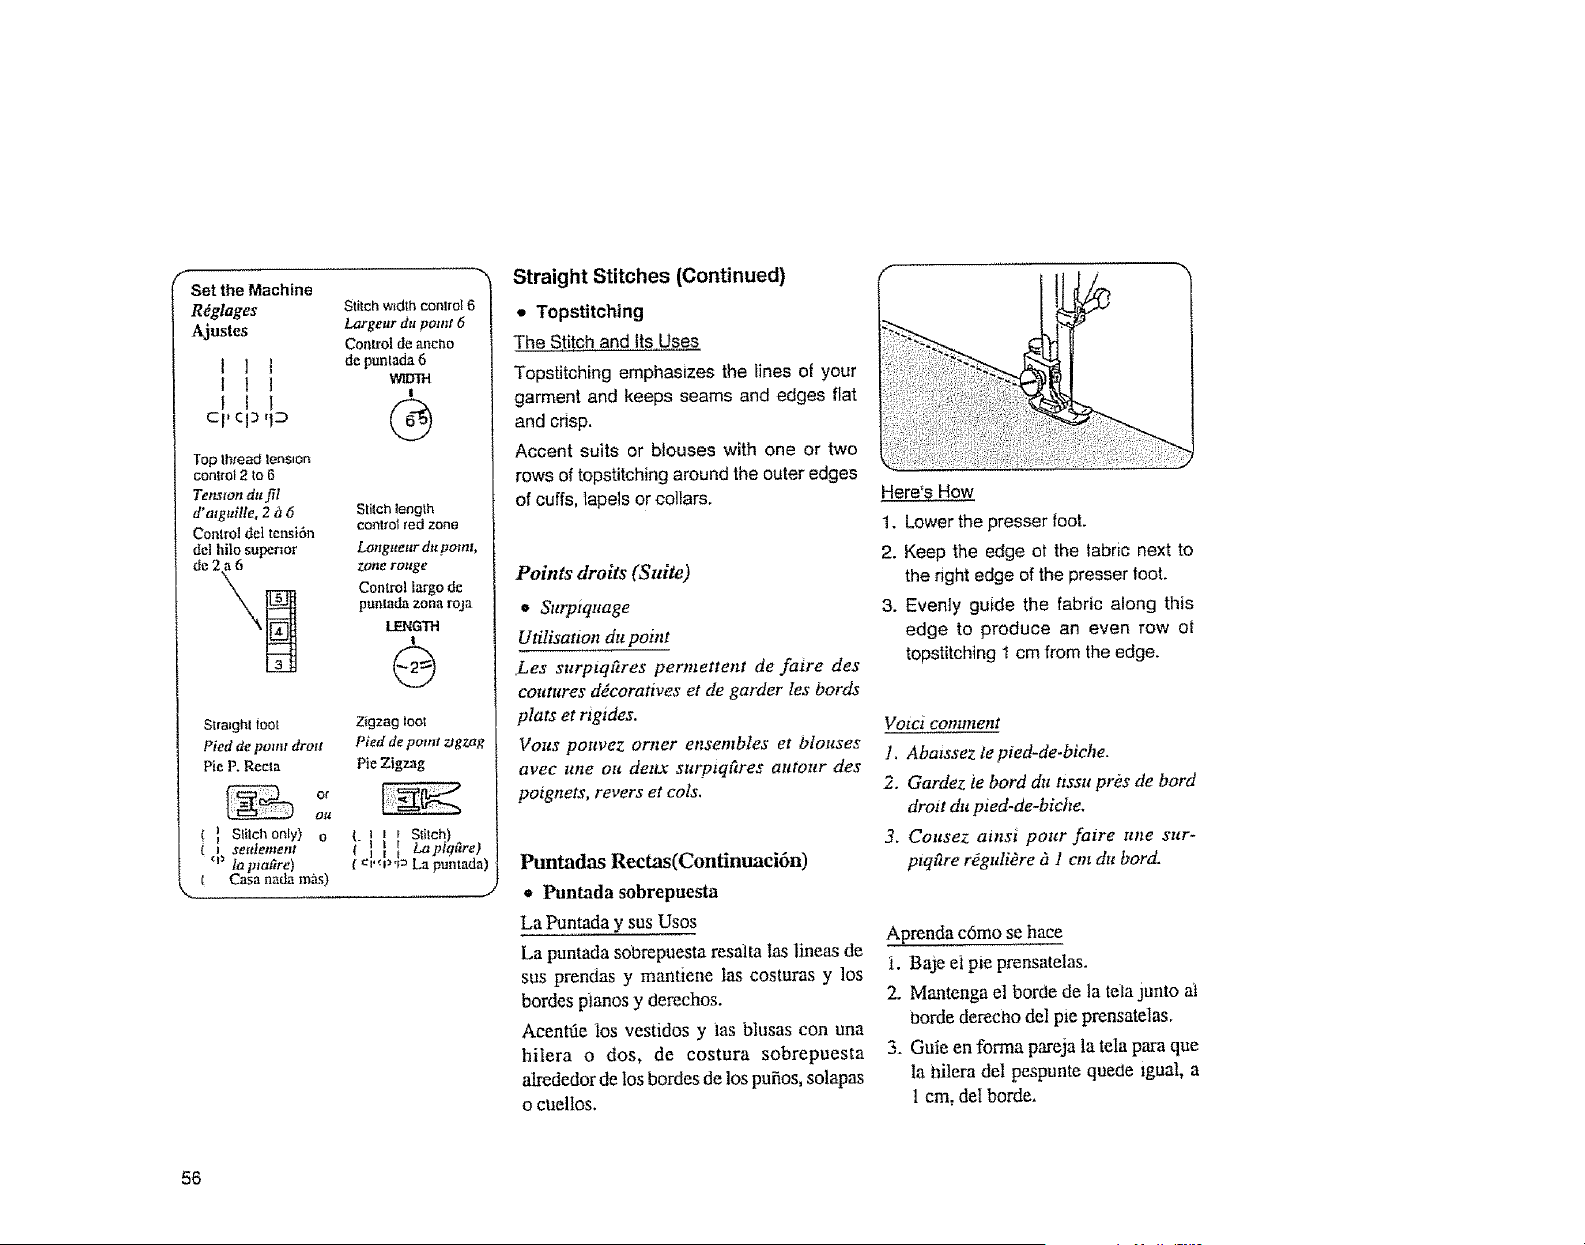
( Set the Machine
Rdglages
Ajustes
I ] t
I I l
! I t
C I' el:) qD
Top thread tension
control 2 to 6
Tensron du fit
d' mgailfe, 2 ii 6
Control det tensi6n
de] hi]o superior
de 2 a_ _
Stitch w_dth control 6
Largeur du point 6
Controldeancho
de puntada6
IAqOTrt
!
Stitch length
control red zone
La_rg_teur dr: poml,
zone rouge
Control largo de
puntada zone roja
LENGTH
!
@
Stra*ght loot
Pied de point drmt
PieP. Recta
I Stitch Only) O
} $eeJement
q_ la ptat_re)
Casa nada ma._)
Zigzag toot
Pied de pmnt ugzag
Pie Zigzag
( I _ S oh)
fell I Laplql_re)
( v"f_€_La puntada)
Straight Stitches (Continued)
• Topstitching
The Stitch and Its Uses
Topstitching emphasizes the lines at your
garment and keeps seams and edges flat
and crisp.
Accent suits or blouses with one or two
rows of topstitchlng around the outer edges
of cuffs, lapels or collars.
Points droits (Suite)
• Surpiquage
Utilisanon du point
Les surptqares permettent de faire des
coutures ddcoratives et de garder les bords
plats et ngides.
Vous pouvez cater ensembles et blouses
avec une ou deu.x sttrptq£tres autour des
potgnets, revers et cots.
Ptmtadas Rectas(Continuaci6n)
• Puntada sobrepuesta
La Puntada y sus Usos
La puntada s0brepuesta resalta Ins linens de
sus prendas y mamiene Ins costuras y los
hordes pianos y derechos.
Acentf_e ios vestidos y ias blusas con una
hilera o dos, de costura sobrepuesta
alrededor de los bordes de los pufios, solapas
o cuellos.
Here% How
1. Lower the presser toot.
2. Keep the edge ot the fabric next to
the right edge of the presser toot.
3. Evenly guide the fabric along this
edge to produce an even row ot
topstitching 1 cm from the edge.
Votci comment
1, Abmssez le pted-de-biche.
2. Gardez te bord du ttssa pros de bord
droit du pied-de-biche.
3. Cousez ainsi pour fatre une sur-
ptqtlre r_guli#re g_l cm du bord.
Aprenda c6mo se hace
f. Bale el pm prensatelas.
2. Manteaga el borde de ta tela junto at
horde dereclao del pie prensatelas.
3. Guie en forma pareja la tela para que
la tailera del pespunte quede lgual, a
1 cm, det horde,
56
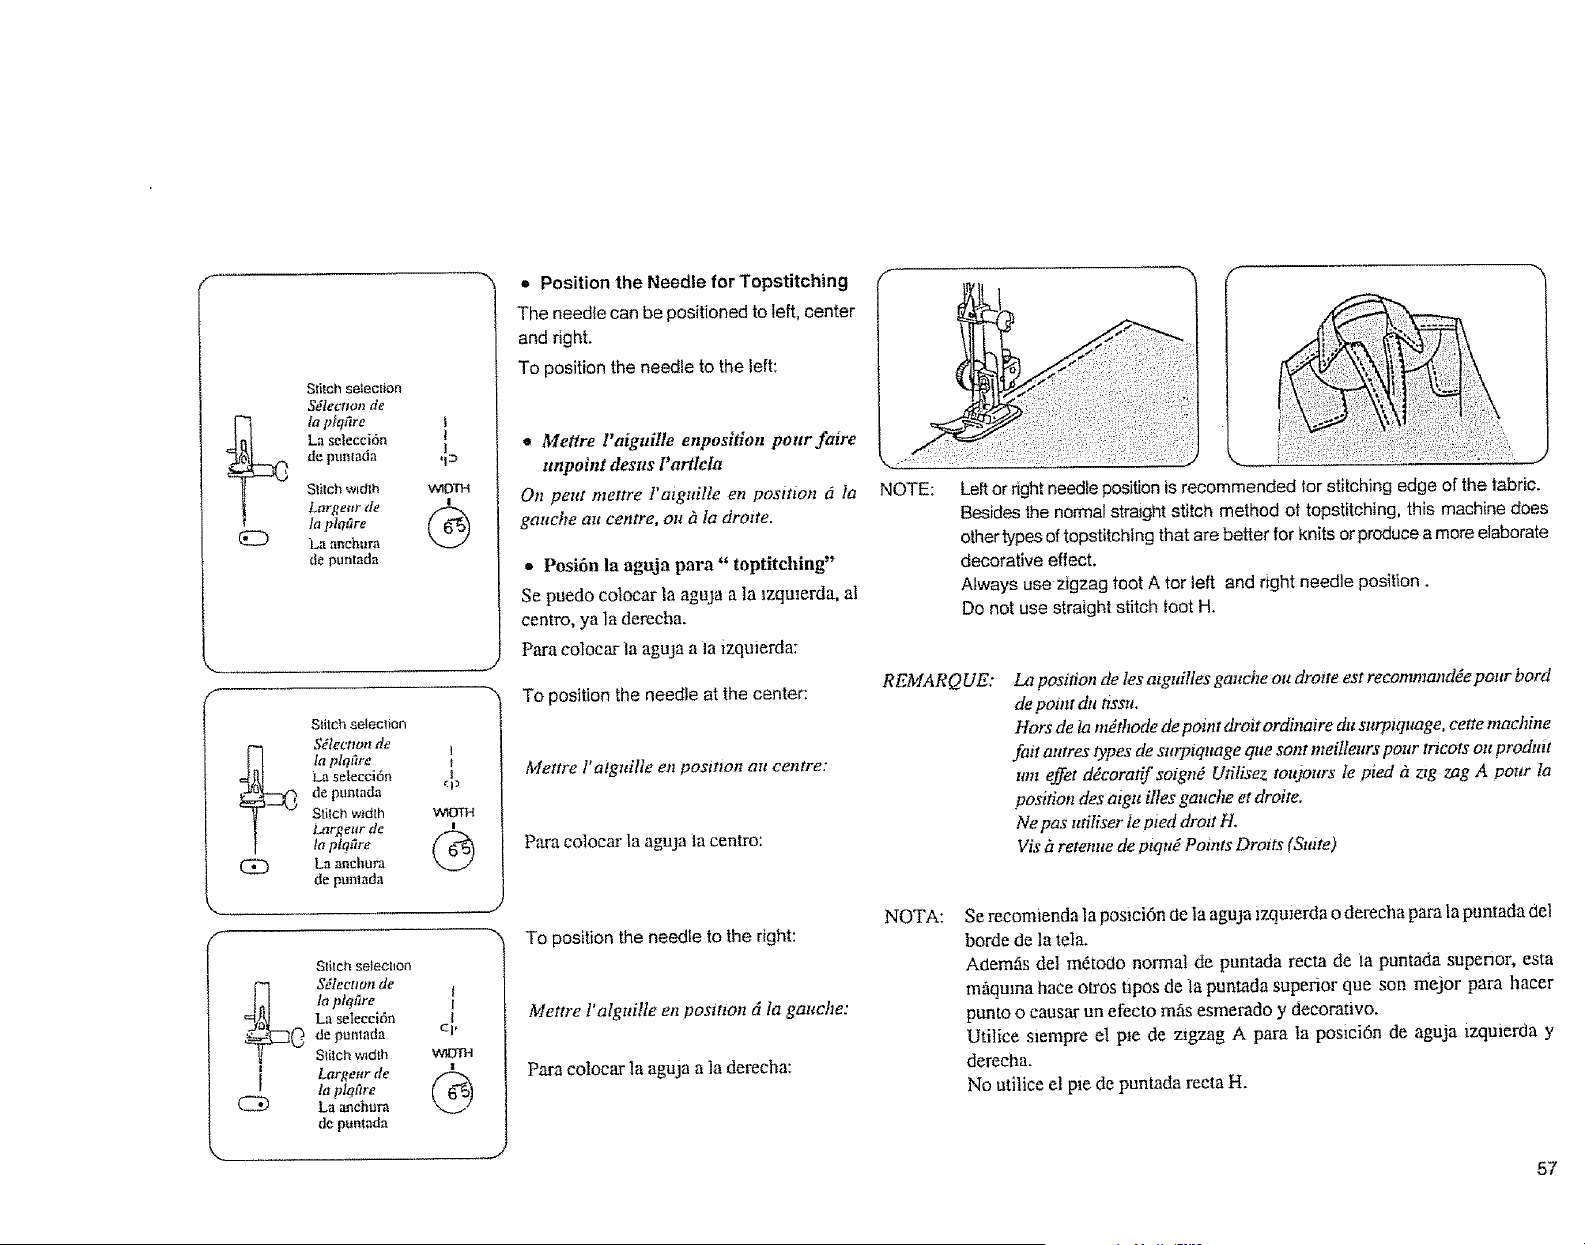
l
oK)
Sdtectton de
fa pIq6re
La se_ecci6n
de pumada
S_tch wfdth
Larget_r de
ta ploOre
La anehura
de puntada
I
I
I
VClO'rH
Stitch selecliOn
S_le_londe
ta plo_re
La selecci6n
de pumada
Stilchw_dth
Largeur de
ta plq_tre
La anchura
de p_marJa
I
I
I
<19
I
E
f
c_
Sfilchselecllotl
Sd&ctwn de
la ptqare
La selecci6n
de puntada
Stilch w_dth
Largeur de
la ph#_re
La anehura
de puntnda
I
I
c],
W',UTH
I
G
• Position the Needle for Topstitching
The need{e can be positioned to left, center
and right.
To position the needle to the left:
* Mettre l'aiguille enposition pourfaire
ttnpoint desus l' artlcla
On pout mettre I'aignille en posttton (t ia
gat_ehe au centre, ou ?_ta drotte.
* Posi6n la aguja para" toptitehing"
Se puedo colocar la aguja a la lzqmerda, al
centro, ya la derecha.
Para colocar ta aguja a la izquierda:
To position the needle at the center:
Mettre l'aiguille en positron art centre:
Para colocar la aguja la centro:
To position the needle to the right:
Mettre Falguille en posmon d la gauche:
Para colocar la aguja a la derecha:
NOTE:
'-, f
Left or right needle position is recommended lor stitching edge of the tabric.
Besides lhe normal straight stitch method ot topstitching, this machine does
other types of topstitching that are better for knits or produce a more elaborate
decorative effect.
Always use zigzag toot A tor left and right needle position.
Do not use straight stitch toot H.
REMARQUE:
NOTA:
La position de los atguilles gauche ou drotte est recommandde pour bord
de pohtt du tissu,
Hors de ta nt&hode de point droit ordinatre du su_tquage, eette machine
foit autres types de sttrpiqltage qtte sont meilleurs pour ttTcots ott prodtttt
trot effet ddeoratif sotgnd Utilisez tottjottrs le pied d ztg tag A pottr la
posttion des atgu illes gauche et drolte.
Ne pas utiliser Ie pied drott 1:t,
Vis h retenue de piqttd Points Droits (State)
Se recomienda la posici6n de la aguja lzqmerda o derecha para la puntada del
borde de la tela.
Ademfis del m&odo normal de puntada recta de ia puntada supenor, esta
rn_quma hate otros tipos de la puntada supenor que son mejor para hater
punto o causar un efecto mils esmerado y decoratwo.
Utilice siempre el pie de mgzag A para la posici6n de aguja izquier0a y
dereeha.
No utilice el pie de puntada recta H.
57
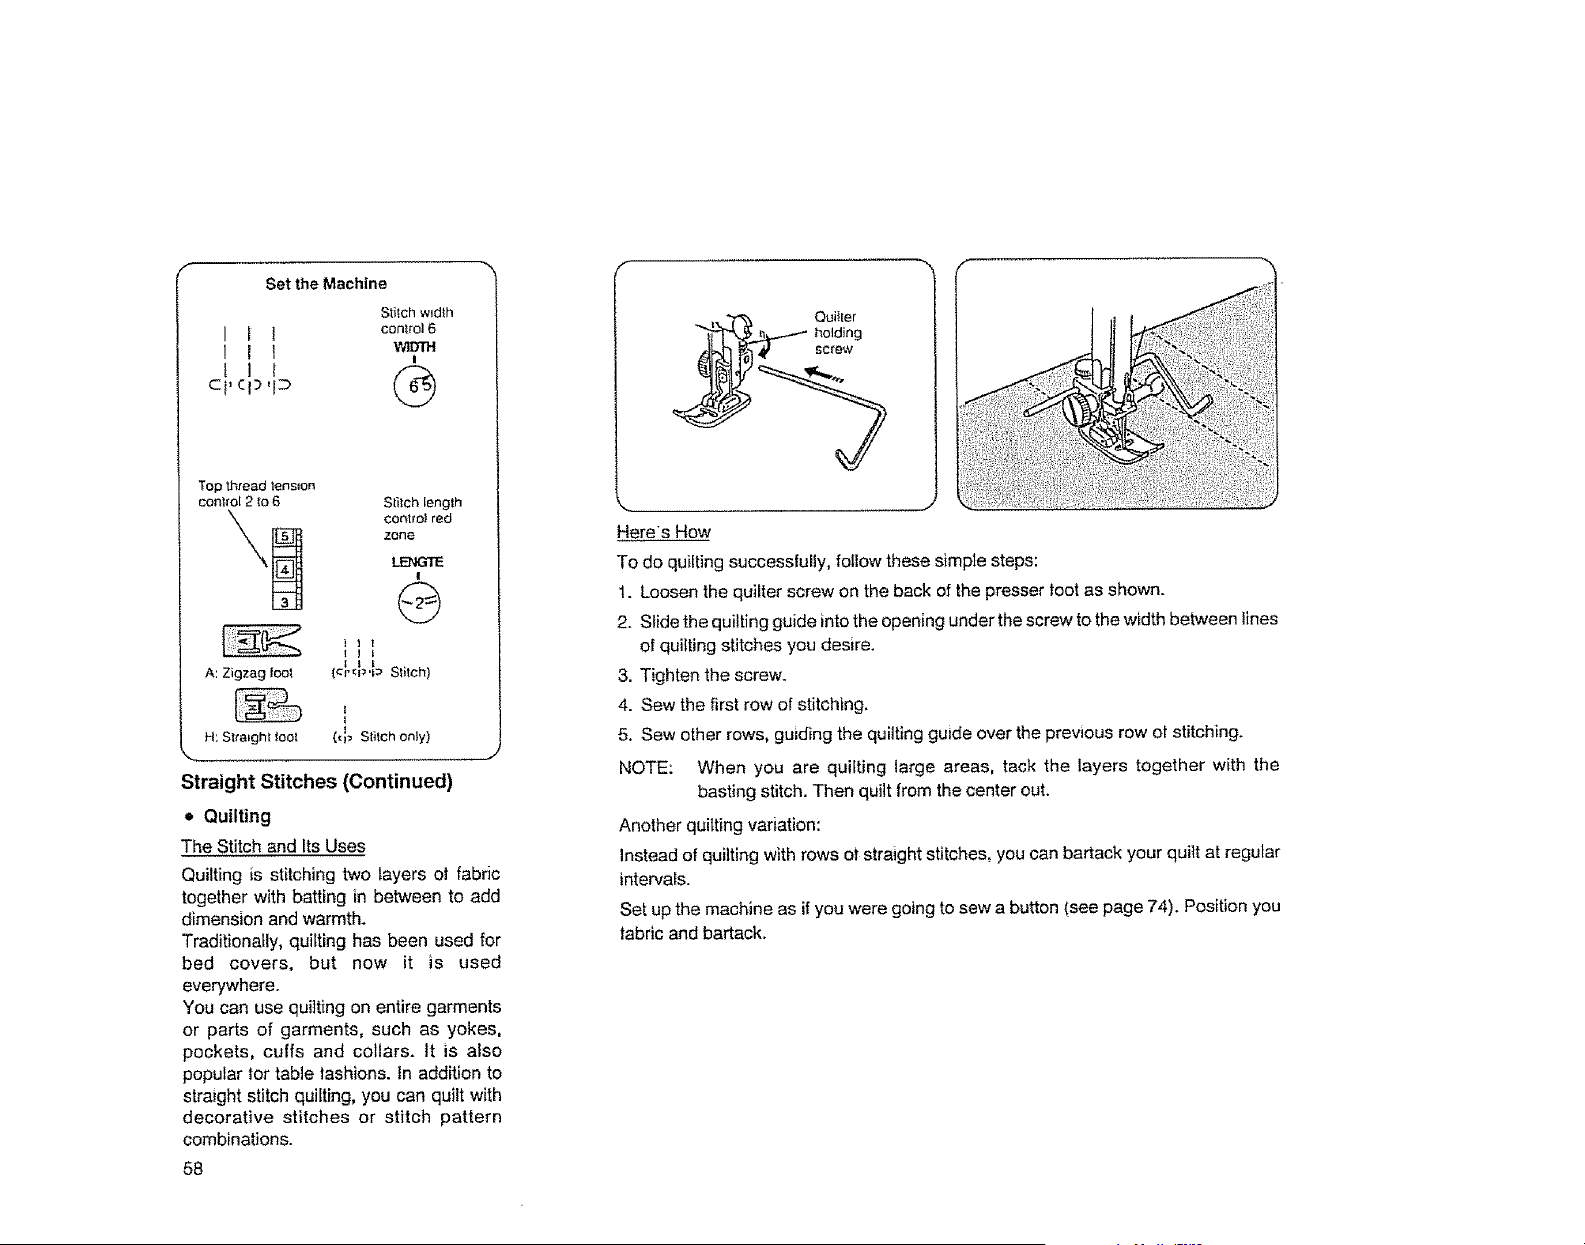
Set the Machine
I I t
! I I
t l I
Stitch width
control 6
WIDTH
I
Top thread tension
coal(el 2 Io 6
I I 1
I ! I
Stitch length
centre! red
ZOne
I
G
I I I
A: Zigzag toot (¢rq_'_ Stitch)
l
1
H: St_alghl tool ({I_ Stitch only)
%
Straight Stitches (Continued)
Quilting
The Stitch and Its Uses
Quilting is stitching two layers oi fabric
together with batting in between to add
dimension and warmth.
Traditionally, quilting has been used for
bed covers, but now it is used
everywhere.
You can use quilting on entire garments
or parts of garments, such as yokes,
pockets, cuffs and collars. It is afso
popular for table lashions. In addition to
straight stitch quitting, you can quilt with
decorative stitches or stitch pattern
combinations.
58
Quitter
holding
SCreW
Heres How
To do quilting successfully, follow these simple steps:
1. Loosen the quilter screw on the back of the presser loot as shown.
2. Slide the quiltlng guide into the opening under the screw to the width between lines
of quilting stitches you desire.
3. Tighten the screw.
4. Sew the first row of stitching.
5. Sew other rows, guiding the quilting guide over the previous row of stitching.
NOTE: When you are quilting large areas, tack the layers together with the
basting stitch. Then quilt from the center out.
Another quilting variation:
Instead of quilting with rows ot straight stitches_ you can bartack your quilt at regular
intervals.
Set up the machine as if you were going to sew a button {see page 74). Position you
labric and barrack.

Rdglages
Largeur du point
L I [ 6
[ I [ _Dm
C l, ClZ,,l_
Tenssonduf!l
d'aiguille, 2 it 6
Longuettr du potnto
ZOtle rO t,_e
LEt4G'CE
I
@
t I 1
A: A point zigzag f ct. rls ,l_ La ptq_re)
OIl _ J
1
H: A point droit ( _11,seulement la pta_re)
Points droits (Suitr)
• Piqud
Utilisation du Point
Le piqtld est b coudre tes deice cottehes du
ttssu em m_me tentps que h battre dons
entre pour addittomter ta dimension et ia
chaleur.
Traditionnellement, le piqud h _tre utilisd
pour couvertttres de lit, reals
actuellement c'est utilis_ partout.
Vons peut utitiser ie piqtt_ dons les habits
entters ott pikces des habits, teis que
jottgs, poches, manchettes et eols. C'est
aussi populaire pour style de ia table.
En Plus du piqud b points droits, vous
peut piquer avec les points ddeoratifs oil
combinaisons des modOles de point.
Voici Comment
Pottr fair le piqud heureusement, suivez ces dtapes sin(oles:
). Desserrez la vis b piqud dons l'arridre do pied.de- biche comme illustrd.
2. Glissez te guide b ptqud dons l' ouverture att-dessous de ta vis i_ Ia Iargeur entre les
lignes des pomts &pitlud vous ddside,
3. Serrez ia vis.
4. Cottsez Ia prtmiOre file des points.
5. Cousez atttres files, guidant fa grade gtatt-dessus ta file prdeddente des points.
REMARQUE: Lorsque vous ptque les aires grandes, ctouer ies couches em re#me
temps que te point i2faufilure. Ensuite, piquer da centre dehors.
Autre variation de ptqud:
iapIace &t piqud avec les files des points droits, vous peut fair points des
botttonniOres pour votre ptqud h intervail-les regulaires,
lnstallez ta machine comme st votts va & coudre tin bottton (votr page 74). Position-
nez votre tissue et brides de renfort.
59
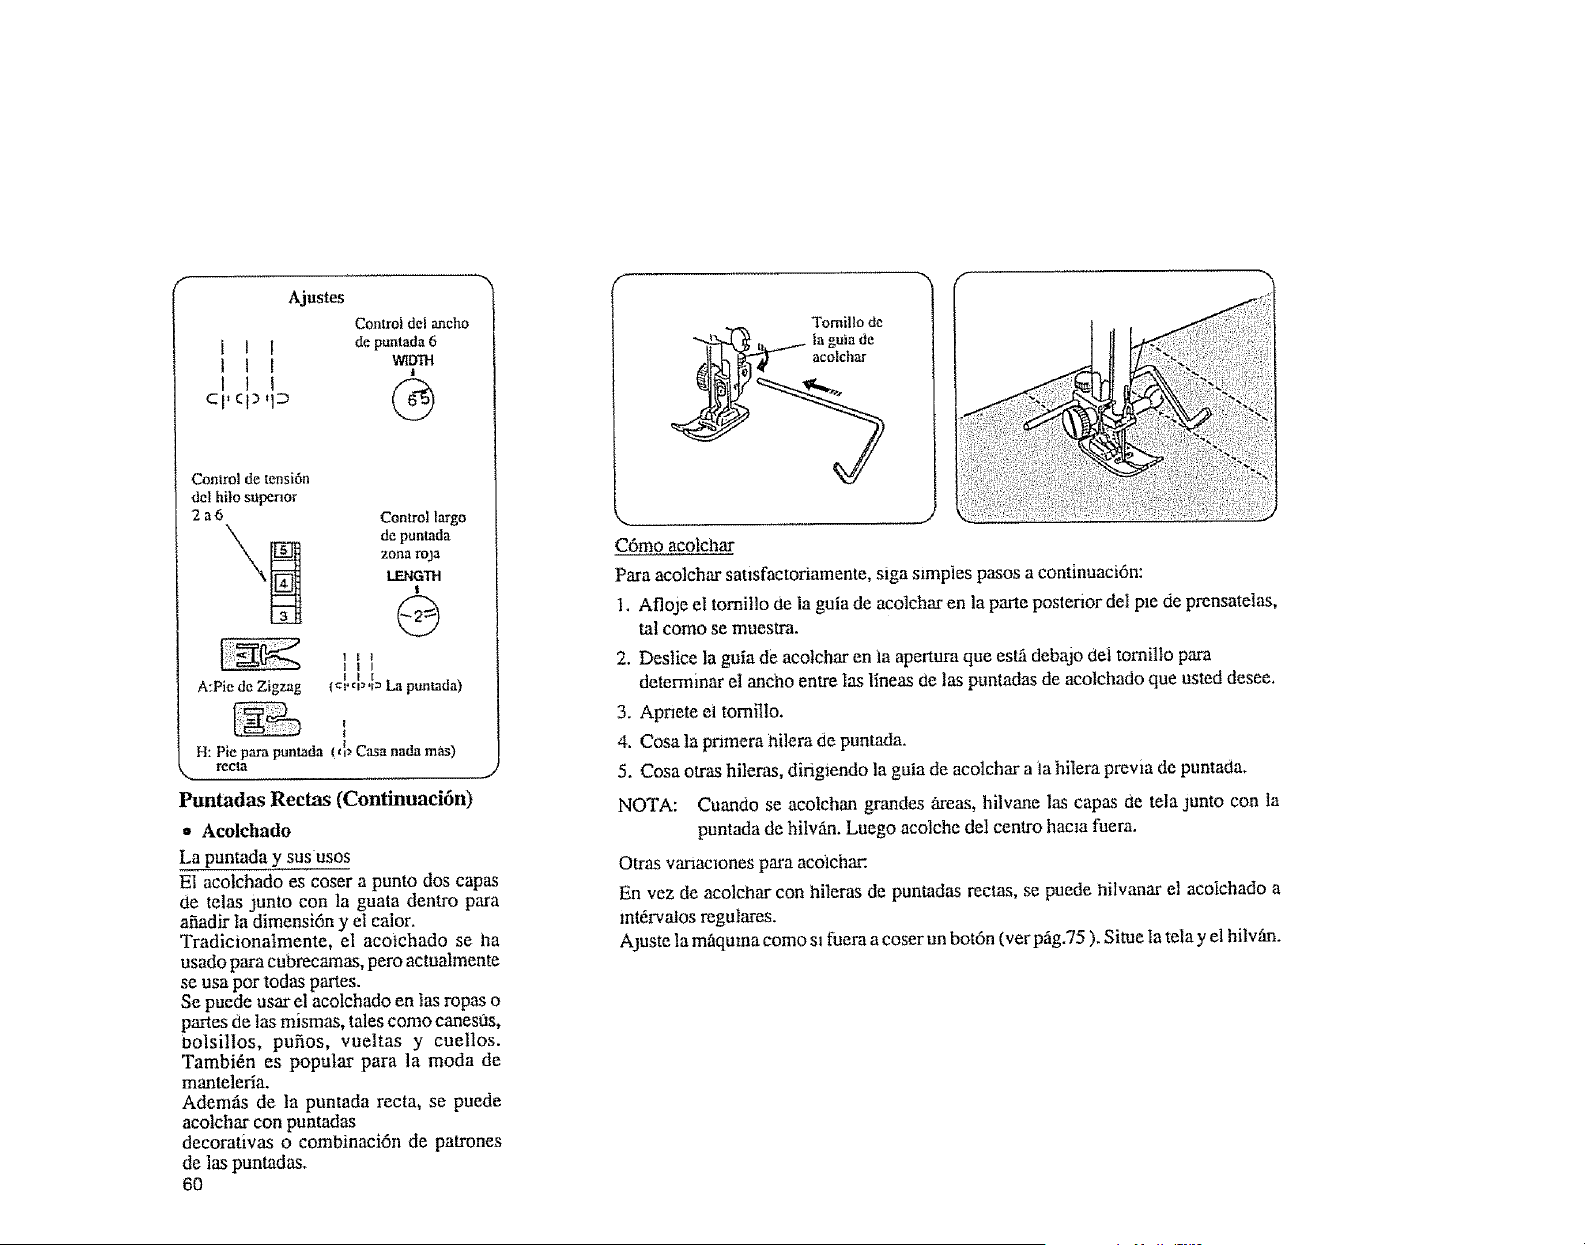
Ajustes
Coniroi deJ macho
l I [ depuntada6
t I ! wtym
1
Cl'(I)q_
Comrol de tensi6n
del hilo superior
2a6
Control largo
de pnntada
zonamja
t,ENG'I'H
!
Q
lit
A:Pie de Zigzag (¢_,q_,_= La puntada)
t
H: Pie para puntada tq> Casa nada mas)
recla
Puntadas Rectas (Contlnuaei6n)
* Acolchado
La puntada y sus usos
E1 acolehado es coser a punto dos capas
de telas junto con la guata dentro para
a_adir la dimensi6n y el calor.
Tradicmnalmente, el acoichado se ha
usado para cubrecamas, pero actualmente
se usa pot todas panes.
Se puede usar el acolchado en las ropas o
partes de las mismas, tales como eanesus,
bolsiltos, pu_los, vueltas y cuellos.
Tambi_n es popular para la moda de
manteleria.
Ademfis de la puntada recta, se puede
acolchar con puntadas
decorativas o combinaci6n de patrones
de |as puntadas.
60
Tomillo de
C6mo acolchar
Para acolchar sattsfactoriamente, siga stmpies pasos a continuaci6n:
I. Afloje el tornillo de la guia de acolchar en la pane posterior del pte de prensatelas,
tal como se muestra.
2. Deslice la guia de acolchar en ia apertura que estfi debajo de l tomilto para
determinar el ancho entre |as lineas de las puntadas de acolchado que usted desee.
3. Aprlete el tomitlo.
4. Cosa la primera hilera de puntada.
5. Cosa otras hileras, diriglendo la guia de acotchar a ia hilera previa de punta(la.
NOTA: Cuando se acolchan grandes areas, hilvane las capas (le tela junto con ta
puntada de hilv_,n. Luego acolche del centro hacm fuera.
Otras vm,aactones para acolchar:
En vez de acolchar con hileras de puntadas rectas, se puede lailvanar el acoichado a
intdrvalos regulares.
Ajuste la m_quma como sl fuera a coser un bot6n (ver p_tg.75). Situe la tela y el hilvfin.
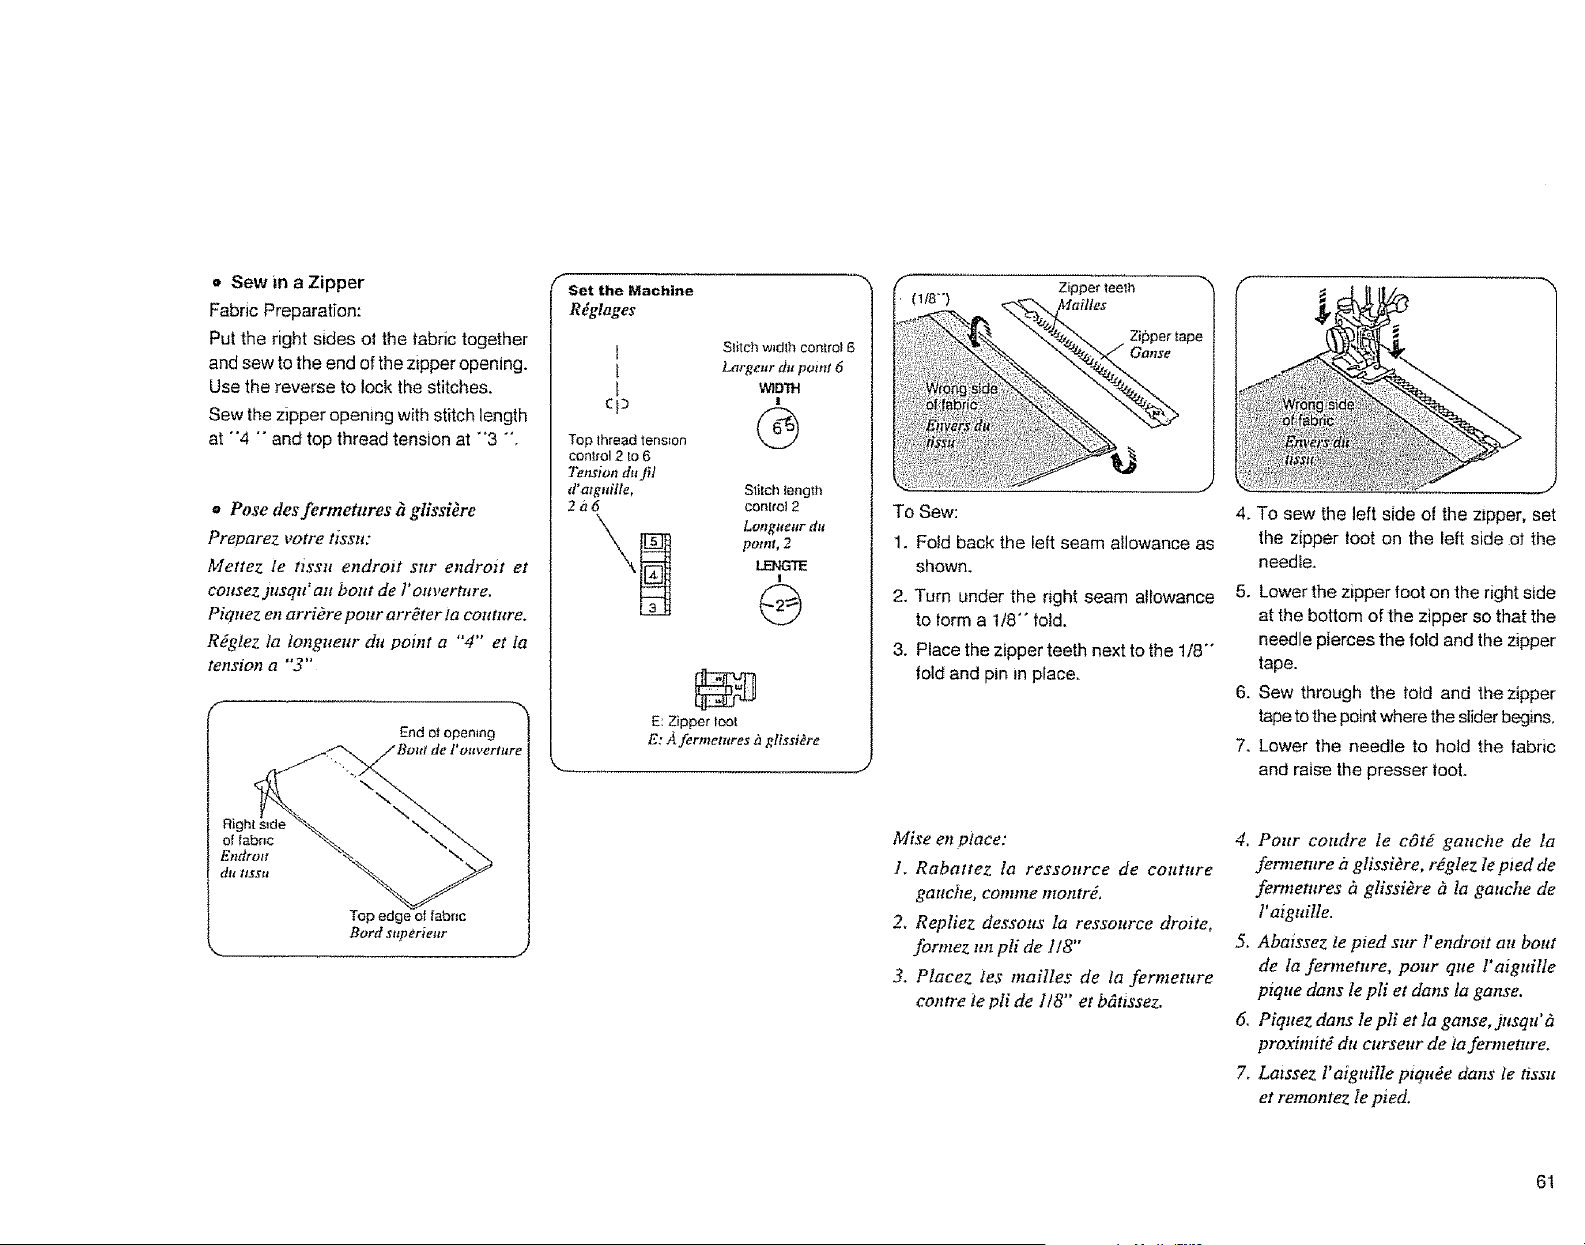
• Sew in a Zipper
Fabric Preparation:
Put the right sides el the fabric together
and sew to the end of the zipper opening.
Use the reverse to lock the stitches.
Sew the zipper opening with stitch length
at "'4 "" and top thread tension at -3 "'.
a Pose desfermetltres h glissi_re
Preparez votre tlssu:
Mettez le tissu endrott sur endroit et
eousez jttsqtt _au boltt de l'ouverture,
Piquez en arri#re pour arr_ter la coltture.
Rdgtez ta tongneur du point a "4" et fa
tension a "3"
End el openang
"\. \
Bord superieur
N
F
Set the Machine
Rdglages
I
t
Top threadtension
conlrol 2 to 6
Tension du fil
d' atguille,
2a6
Slitch w_dlh control 6
Largeur du point 6
WIDTH
1
Stitch length
control 2
Lottgftettr du
point,2
I
E:Zipperloot
E: A fermetures h glissi_re
Zipper teeth "%
Zi;bper _ape
Ganse
........ J
To Sew:
1. Fold back the left seam allowance as
shown.
2. Turn under the right seam allowance
to lorm a 1t8"" fold.
3. Place the zipper teeth next to the 1/8""
told and pin in place.
Mise en place:
1. Rabattez la ressouree de couture
gattehe, comme motttr_.
2. Repliez dessous la ressource droiteo
fonnez .n pli de 1/8"
3. Placez ies mailles de la fermeture
centre ie pIi de 1/8" eg b_ttssez.
J
4. To sew the left side of the zipper, set
the zipper loot on the left side of the
needte.
5. Lower the zipper foot on the right side
at the bottom of the zipper so that the
needle pierces the fold and the zipper
tape.
6. Sew through the fold and the zipper
tape to the point where the slider begins.
7. Lower the needle to hold the tabric
and raise the presser foot.
4, Pour coudre le cot# gauche de la
fermemre b gtissiOre, rdglez le pied de
fermetures h glissiOre h la gauche de
l' aiguille.
5. Abmssez le pied sur l' endrott au bout
de la fermeture, pour que l'aiguille
pique dans le pff et dons la ganse,
6, Piquez clans le pliet la ganse, jusqu'h
proximitd du curseur de ia fermeture.
7, Latssez l' aiguille ptquEe dans te tissu
et remontez Ie pied,
61
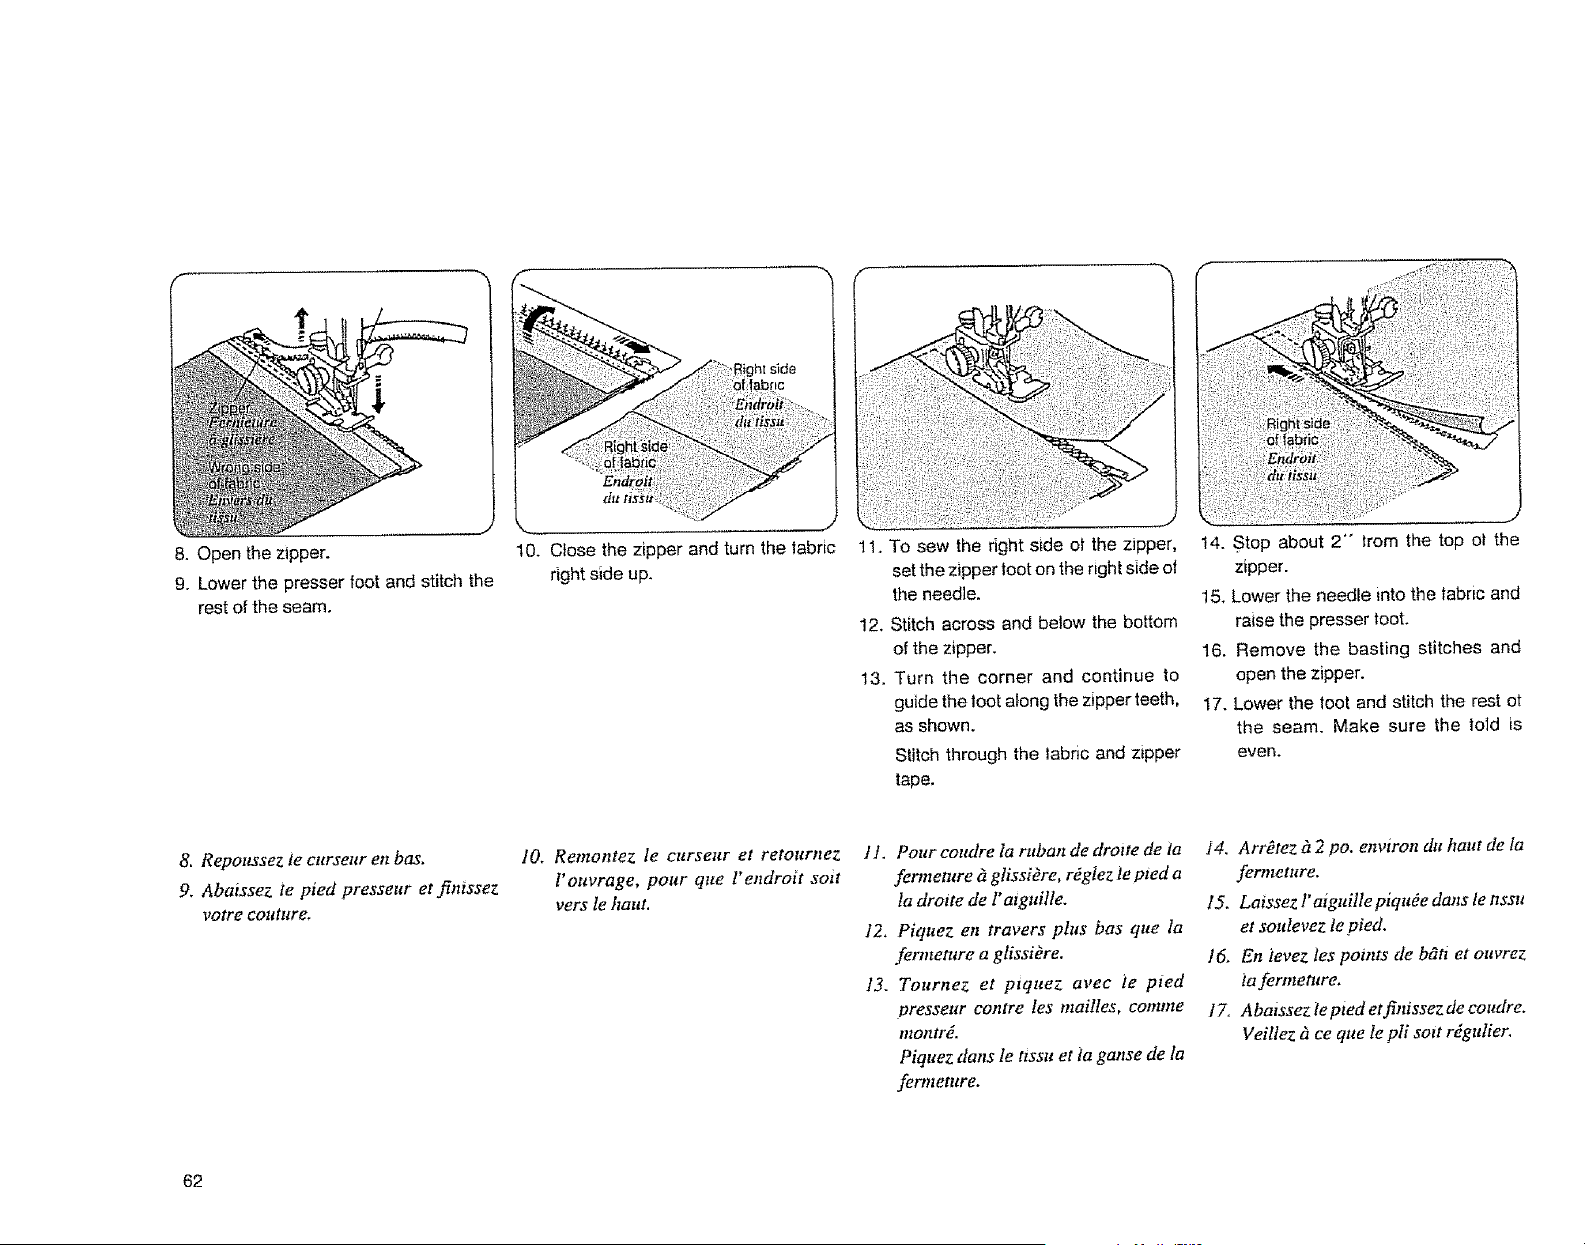
8. Open the zipper.
9. Lower the presser foot and stitch the
rest of the seam.
k,._ j
10. Close the zipper and turn the tabric
right side up.
J
11. To sew the fight side o| the zipper,
set the zipper loot on the right side ol
the needle.
12. Stitch across and below the botiom
of the zipper.
13. Turn the corner and continue to
guide the toot along the zipper teeth,
as shown.
Stitch through the labnc and zipper
tape,
:dr iabii_
J
14. Stop about 2- _rom the top ot the
zipper.
15, Lower the needle into the fabric and
raise the presser toot.
16. Remove the basting stitches and
open the zipper.
17. Lower the toot and stitch the rest ot
the seam. Make sure the told is
even.
8. Repoussez ie curseur en bas.
9, Abaissez ie pied presseur et finissez
votre couture,
lO, Remontez le curseur et retournez
l'ouvrage, pour que l'endroit soit
vers le haut.
11. Pour coudre Ia ruban de drotte de ia
fermeture d glissiOre, rdglez le pied a
ta droite de l"aiguille.
12, Piquez en travers plus basque la
fermeture a glissiOre,
13. Tournez et ptquez avec te pted
presseur eoJItre les maitles, comme
montre.
Piquez clans le ttssu et la ganse de la
fermeture,
i4. ArrOtez ?z2 po, environ du haut de Ia
fermeture,
15. Latssez t'aiguille piquOe dans le tlssu
et soulevez le pied.
16. En tevez tes points de bati et ouvrez
_afernzeture.
17. Abatssez te pied et finissez de coudre,
Veillez h ce que fe pli sort r_gulier,
62
o Coloeaei6n de Cremallera
Preparaci6n de la teia:
Coloque los lados de arriba de ta tela uno
.junto al otto y cosa hasta el final de la
apertura de la cremallera. Utilice ta
puntada en reversa para rematar las
puntadas.
Cosa la apertura de la cremaltera con el
largo de puntaOa en "4" y In tensi6n de!
hilo superior en "3",
-...
Fin de Apertura
Lado de
arriba de
la lela
"x
Borde superior de
la leta
.......... J
l
}
I
Aj ustes
Control de tensi6n
del hilo superior
de2a6
Control det ancho
de In puntada 6
'0VID'tlt
I
Q
Control del largo
de puntada 2
I
@
E: Pie de crematlera
Para cosec.
Dientes de cremallem
Cima de
Cremallem
---, f
.J
!. Vuelva a fijar el largo de puntada en 2
y la tensi6n de la hebra de arriba de 2 a
6.
Dobie hacia atr_is el margen de la
costura ,zquierOa, tal como se muestra.
2. Voltee por debajo 0el margen de la
costura derecha para formal-un dobtez
de 0.2 a 0.3 cms.
3. Coloque los dientes de ta cremallera
pegados al doblez de los 0.2 a 0.3 cms
y col6quela en el sitlo con alfileres.
4. Coloque la barra prensatelas en los
pasadores de la derecha del pie de
cremallem.
5. Baje el pie de cremallem sobre el laOo
superior en la parte de abajo de la
cremallera de modo que la aguja cola
el doblez y la cinta de la cremallera.
6. Cosa a tray,sdel doblez y de ta cmta
de la cremallera hasta et punto en
donde empieza la corredera.
7. Bale la aguja para que coja la teta y
suba el pie prensatelas.
63
8. Abra la cmmallera
9. Baje el pie prensatelas y puntee el
resto de ia costum.
10. Cierre la cremallera y voltee hacm
m,-ribael derecho de ta tela.
1I. Retire el pie de la cremallera y
coloque ta barra prensatelas a los
pasafiores de |a lzquierda del pie de
cremallera.
12. Puntee a tray,s y por debajo del tado
inferior de ta cremallera.
13. Gire en la esquina y contin_ae
gmando el pie a trav{Ssde los dientes
de la cremallera, tal como se
muestra. Puntee a trav4s de ia tela y
de la cmta de ia cremallera.
_!_!_i__ .... I
14. Pare unos 5 cms. antes de la punta
superior de ia cremallera.
15. Bale la aguja dentro de la telay suba
el p)e prensatelas+
16. Retire las puntadas basteadas y abra
la cremallera.
17. Bale el pie y puntee el resto de ta
costura. Asegtirese que el doblez estfi
parejo.
64
he pin on the
nghI hand s_de
Montage du ptcd
_t drotte
Et pas_dor en el
tado derecho
To attach the zipper toot:
e To sew on the left side of the zipper, attach
the presser bar to the right pins on the
zipper toot.
The pm on lhe
felt hand s_de
Montage du pted
h galwhe
_..f lpasadorenel
lado Izquterdo
o To sew on the right side ot the zipper,
attach the presser bar to the left pins on
the zipper toot.
Fixez te pted fi ia barre:
o Pour coudre te ruban de fermeture i7
gauche de l'aiguille, montez le pied h
drotte sur ta barre,
• Pour coudre fe ntban defermemre 1idroite
de l'atguille, montez ie pted i7gauche sur
fa barre.
Para colocar el pie de cremallera:
o Para coser ea el ]ado _zqmerdo de la
cremallera, conecte la barra prensateias a
los pasadores de la dereclaa del pie de
cremallera.
o Para coser en el lado derecho de la
cremallera, coloque la barra delprensatelas
a los pasadores izqmerdos del pie de la
cremaltera.
65

• Dropping the Feed Dogs
The drop teed lever is located underneath the free arm bed on the back
side of the machine.
(_ To raise the teed dogs, push the (_ To drop the feed dogs, push the
lever in the direction of the arrow, lever Jn the direction of the
as illustrated, arrow, as illustrated.
Then turn the handwheeL
* Feed dogs must always be up for normal sewing.
Set the Machine
Stitch width control 6
i i ! Wm'H
t ! t
Cl_ el? ,]D
Top thread
lens_on
control 2 to 6
Stitch length
control any number
(not necessary to
adjust)
LENGTH
F: Satin stitch _oo_
,,4r*_
Drop feed lever
,, Darning
1. Drop the teed dogs.
2. Place the fabric, with the hole in the center, on
an embroidery hoop, as shown.
3. Lower the presser bar and sew at a slow speed.
4. Move the fabric back and lorth slowly until you
have covered the darning area.
5. Turn the labric 1/4 turn and sew another layer of
stitching over the first layer.
NOTE: If your fabric is thin or badly damaged
use a separate piece ot fabric under the
hole to reinforce it.
6. When you finish darning, return the pressure
adjusting lever to 3.
66
o R_glage des griffes d'entra_nement
La commande des griffes d entrant ement se trouvO sous le bras libre.
(3_ Pour sorter tes griffes (_ Pour rentrer ies griffes
d'entra?nement, pottssez la d'entraDzement, pottssez la
commande dans la direction de commande dans la direction de
ta flOehe, comme illustr_ ct- la fl_che, comme iltustr_ ci-
dessus, dessus.
" Normaiement les griffes d'entra_nement doivent totOours £tre sorties
lorsque vous cousez.
tt_glages
Largeur du potnt, 6
[ ] I WIDTH
I I t
Cp Ct) qD
Tension d. fil
d'at uille, 2 d 6
F: A por!! lance
Longtteurctupoint,
au c'hotx¢pasde
rOgtage obligatoire)
LENt6TE
Contmantle des
griffes d'entrnTnement
. Reprisage
1. Rentrez les griffes d' entrafnement.
2. Tendez le tissu avec un tambour iz broder, en
inerrant le trou ou centre.
3. Abaissez ensuite te levier de retevage du pied
de-biche et piquez lentement.
4.
tambour 1entement d' avant en arriOre.
5. Toumez le tambour d' f/4 de tour et refaites une
sOrle de points sur les premzers.
REMARQUE: Si le ttssu est fin ou ires usg mettez
un morceau de tisstt dessous pour
renforcer l'endroit endommag_.
6. Quand vous avez fini, remettez Ia pression du
pied h 3.
67
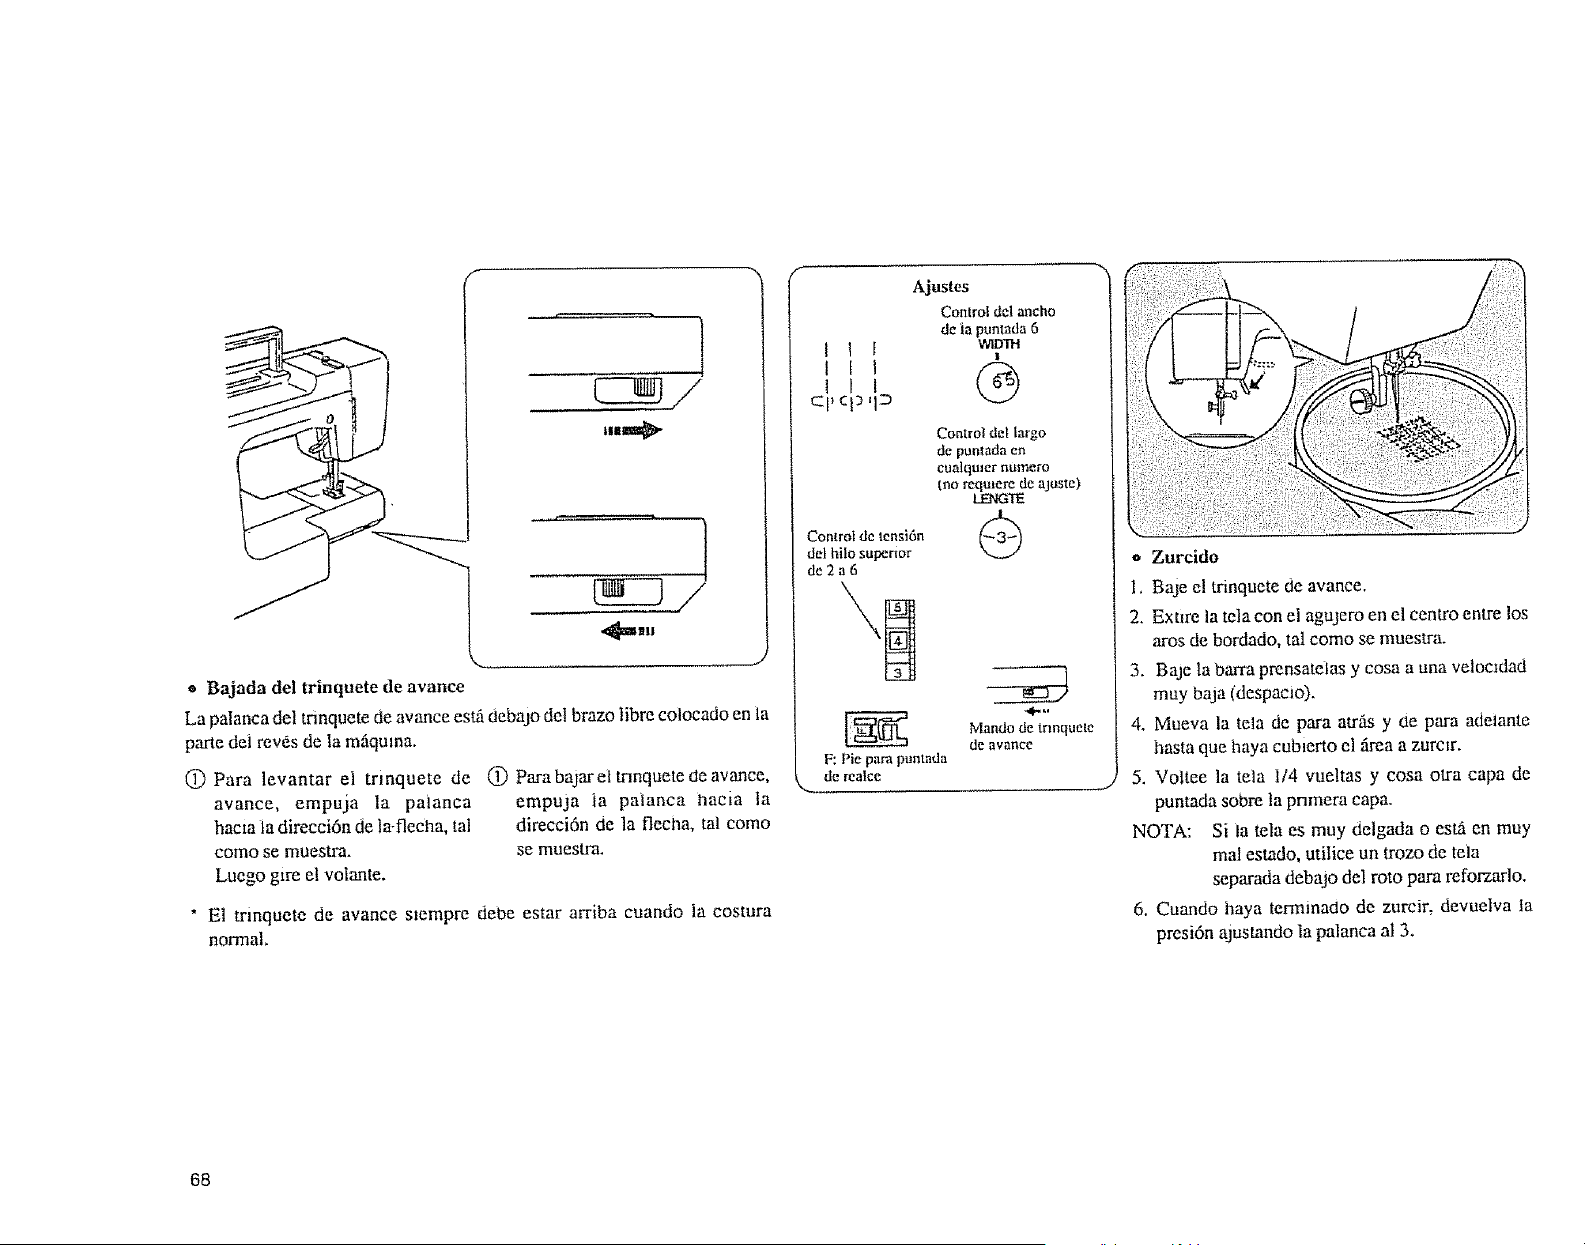
_Llalt llll
o Bajada del trinquete de avarice
La patanca del tranquete de avarice est,5debajo det brazo libra coiocado en ia
parte dei rev_s de la m_quma.
(!) Para levantar el trinquete de (_ Parabajarettmnquete de avarice,
avance, empuja la paianca empuja _a paianca ilacia la
hacza ia 6irecci6n de la-fleclaa, tal direcci6n de la flecha, tal como
como se muestm, se muestra.
Luego gire el volante.
* El trinquete de avance s_empre debe estar arriba cuando la costura
normal.
I I f
1 t 1
I I I
cp ¢i) ,1_
Control de lensi6n
de} hilo supertor
de2a6
Ajustes
Control del ancho
de ia puntada 6
WU3q'H
!
G
Control det largo
de punlada en
cualqmer numero
cno reqmere de ajuste)
LEN.G'IE
F: Pie para puntada
de realcc:
-,q/,. u
Mando de trmquete
de avarice
* Zurcido
1, Baje el trinquete de avance.
2. Extire la tela con el agujero en el centro entre los
aros de bordado, tal como se muestra.
3. Baje la basra prensateLas y cosa a una veloc_dad
muy baja (despacio).
4. Mueva la tela de para atrfis y de para adelante
basra que haya cubierto el firea a zurctr.
5. Voltee la tela 1/4 vueltas y cosa otra capa de
puntada sobre la pnmera capa.
NOTA: Si la tela es muy delgada o est_ en muy
real estado, utilice un trozo de tela
separada debajo del roto para refor'zarlo.
6. Cuando haya temninado de zurcir, devuelva ta
prcsi6n ajustancto la palanca a! 3.
68
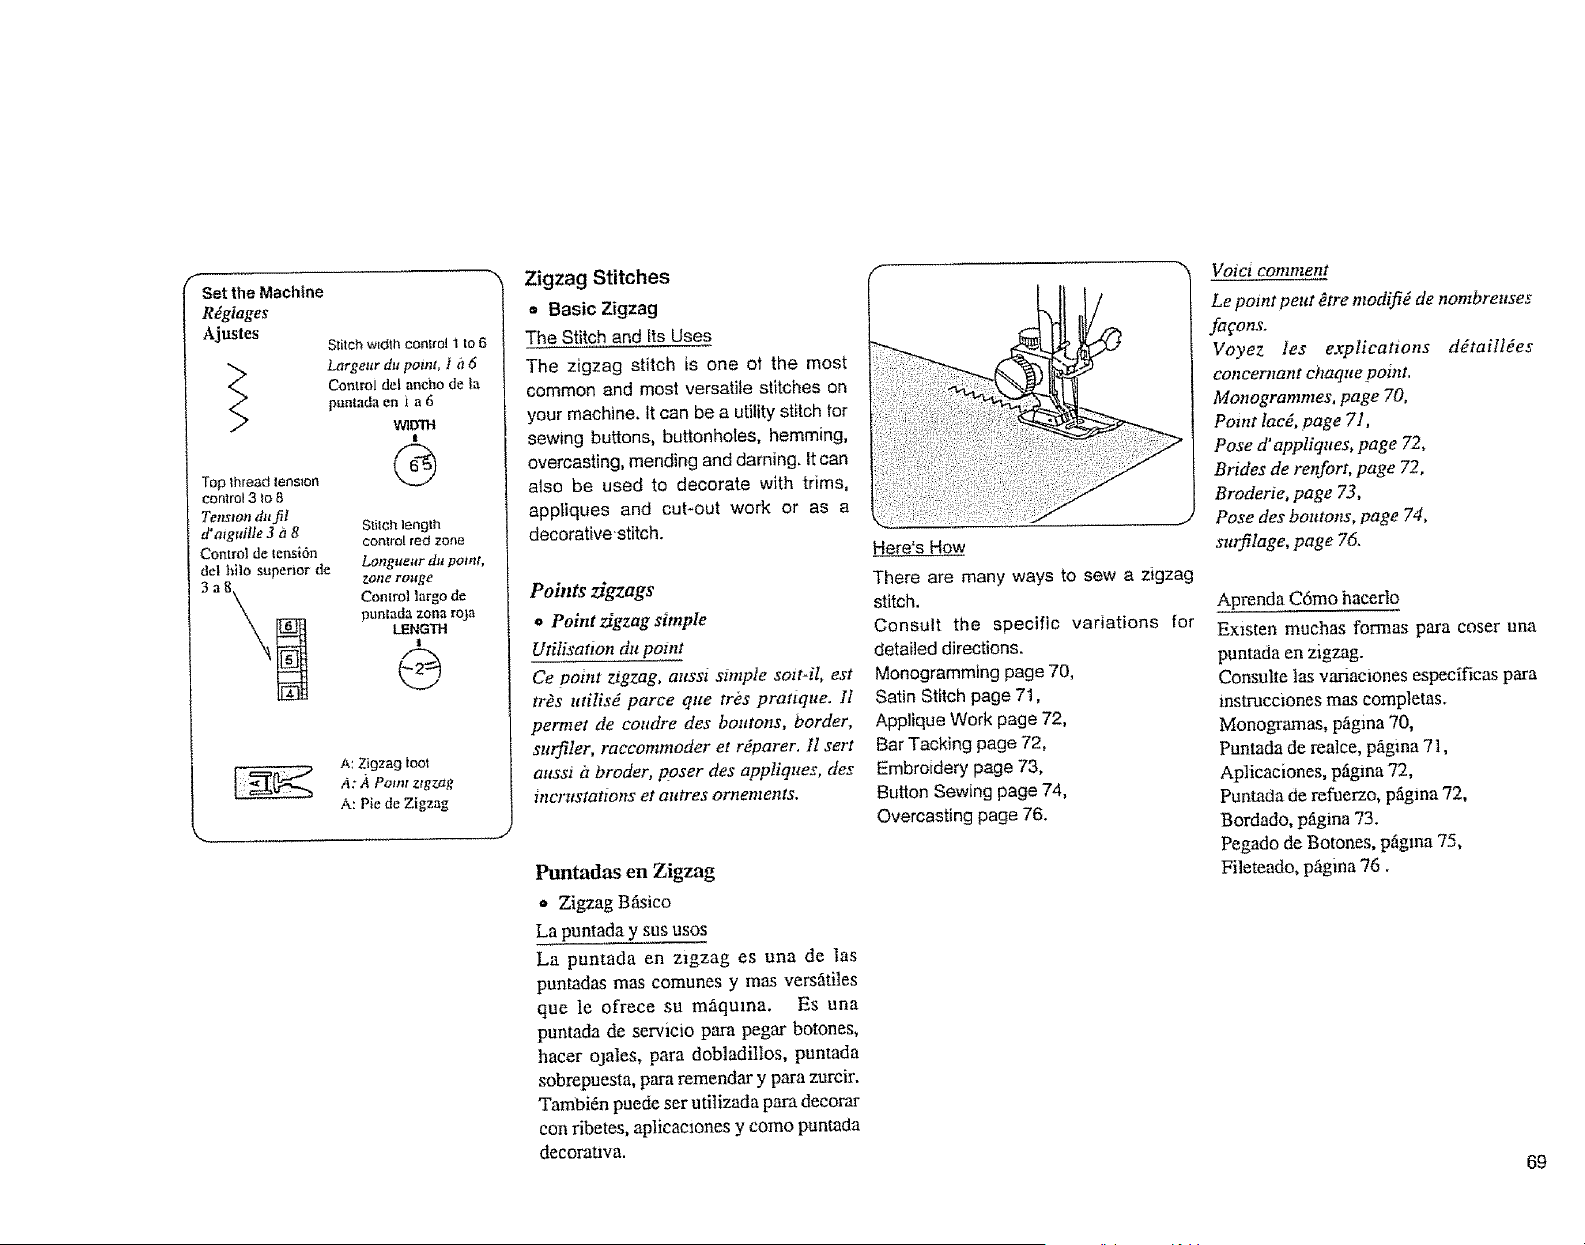
Rdgiages
Ajus/es
Top thread lens_on
control 3 to 8
Tension du fit
d°aiguille 3 a 8
Control de teosi6n
dot bile superior de
Stitch w_dlh control 1 to 6
Largeur du point, I h 6
Control del ancho de la
puntada en i a 6
WlD'n'I
II
G
SlilCh length
Control rod 2one
Longueur du point,
ZOtle roHge
Control largo de
rmntada zona roka
t.ENG'rH
1
@
A: Zigzag loot
A: A Point zigzag
A: Pie de Zigzag
Zigzag Stitches
= Basic Zigzag
The Stitch and Its Uses
The zigzag stitch is one ot the most
common and most versatile stitches on
your machine. It can be a utility stitch tor
sewing buttons, buttonholes, hemming,
overcasting, mending and darning. It can
also be used to decorate with trims,
appliques and cut-out work or as a
decorative 'stitch.
Points zigzags
. Point zigzag simple
Utilisanon dlt point
Ce point zigzag, attssi simple sott-il, est
tr_s lttilis_ parce que ires pratique. II
permet de coudre des boutons, border,
sttrfiler, raeeommoder et rdparer. 11 ser!
attssi iz broder, poser des appliques, des
incrttstattolls et attires ornements.
Puntadas en Zigzag
€, Zigzag B_ico
La puntada y sus uses
La puntada en z_gzag es una de ias
puntadas mas comunes y mas versfitiles
que le ofrece su m_iquma. Es una
puntada de servicio pars pegar botones,
hacer ojales, para dobladillos, puntada
sobrepuesta, para remendar y pars zurcir.
Tam bi6n puede set utilizada pars decorar
con ribetes, aplicacmnes y come puntada
decoratwa,
Here'sHow
There are many ways to sew a zigzag
stitch.
Consult the specific variations for
detailed directions.
Monogramming page 70,
Satin Stitch page 71,
Applique Work page 72,
Bar Tacking page 72,
Embroidery page 73,
Button Sewing page 74,
Overcasting page 76.
Voiei comment
Le point peut _tre modifid de nombreuses
fa¢ons.
Voyez los explications ddtailldes
concernant ct_aque point,
Monogrammes, page 70,
Point lac_, page 71,
Pose d' appliques, page 72,
Brides de renfort, page 72,
Broderie, page 73,
Pose des boutons, page 74,
smfilage, page 76.
Aprenda C6mo hacerlo
Exlsten muchag formas para coser una
puntada en zigzag.
Consulte Ias vanaciones especifieas para
instrucciones mas comp/etas.
Menogramas, p,Sgma70,
Puntada de realce, pfigma 71,
Aplicaciones, p_igma72,
Puntada de refuerzo, pfigina 72,
Bordado, p,Sgina 73.
Pegado de Botones, p_gma 75,
Fi/eteado, phgina 76.
69
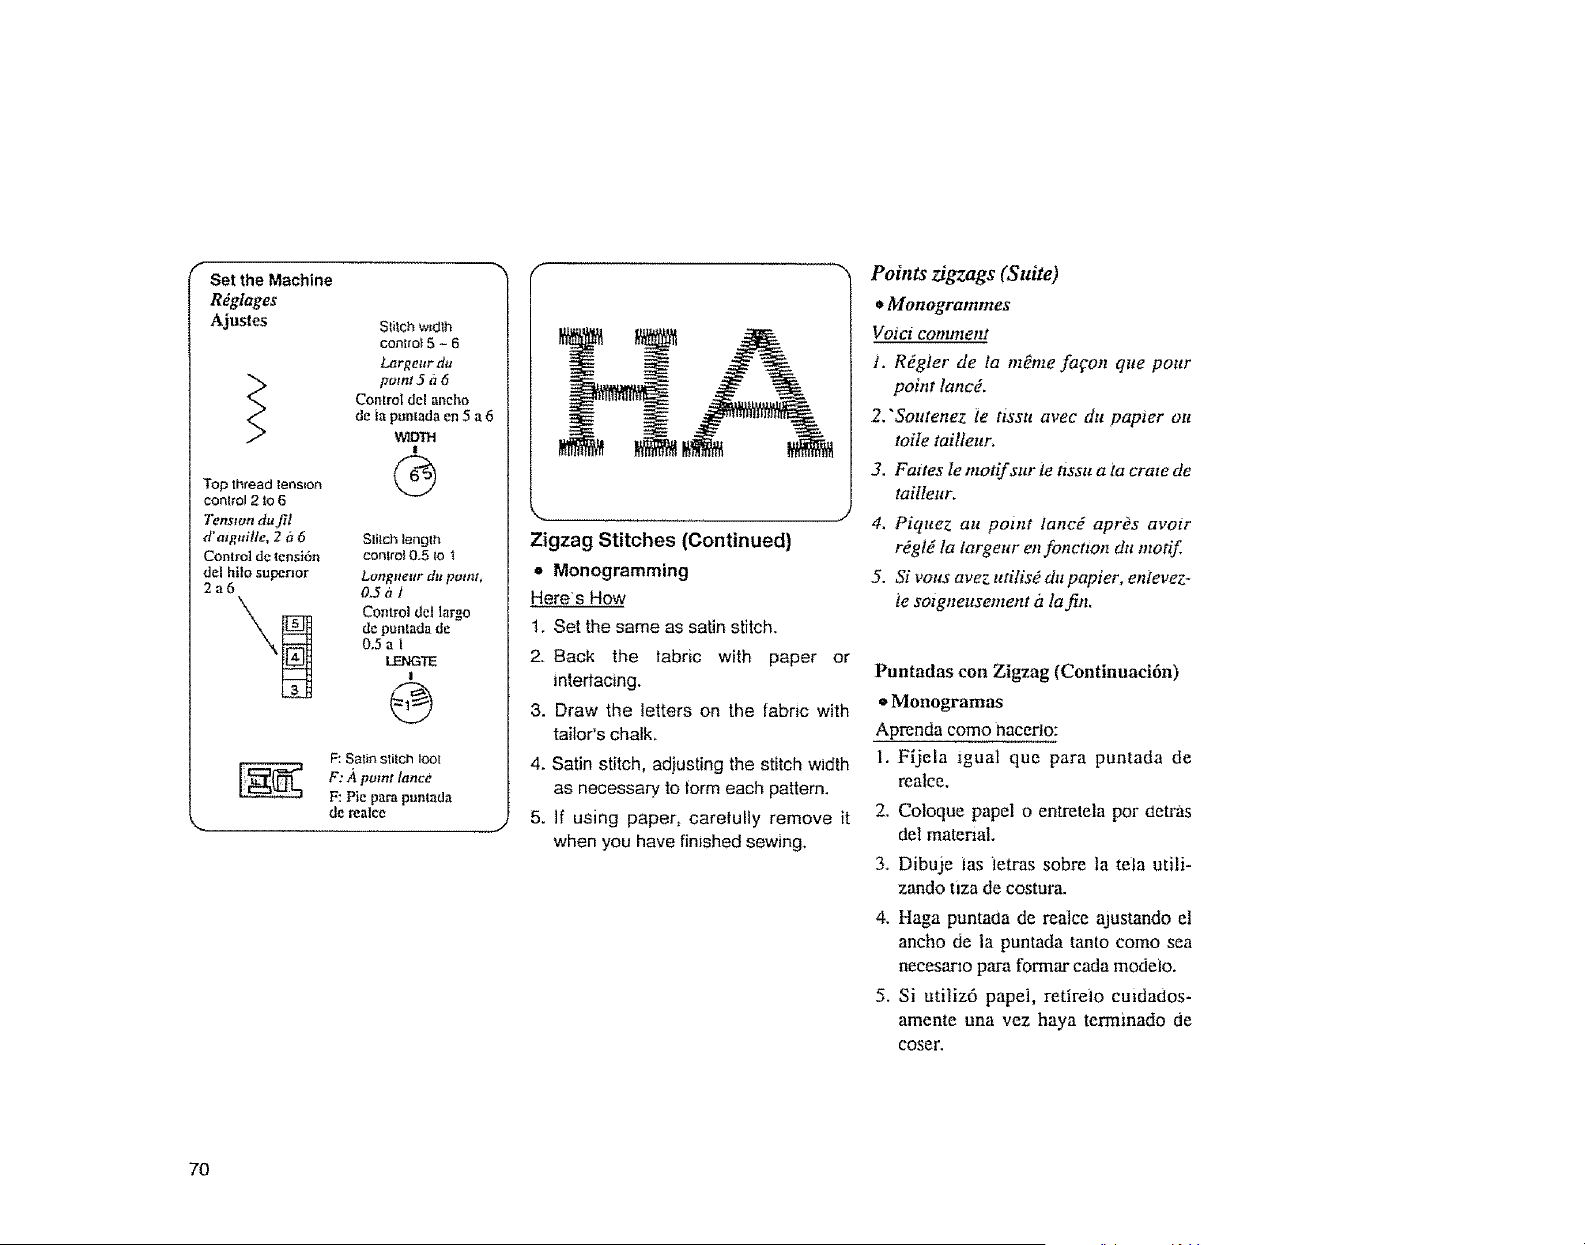
Set the Machine
R_gtages
Ajastes
Top thread lens_on
control 2 to 6
Tenslon du fil
d'atg.ilte, 2 iJ 6
Conlrol de lensi6n
del hito superior
2a6
Stitch w=cllh
control5 - 6
Largeur du
point 5 iz6
Control del ancho
de tapuntada en 5 a 6
V_qD'fH
I
Q
Slilch length
control 0.51o "i
Longueur du purer,
O.SaI
Control del largo
de puntada de
0,5a |
I.ENGTE
I
@
@
F: Satin stitch 1oo[
F: .4 point tancd
F: Pie para puntada
de realce
Zigzag Stitches (Continued)
= Monogramming
Heres How
1. Set the same as satin stitch.
2. Back the tabdc with paper or
interlacing.
3. Draw the letters on the fabric with
tailor's chalk,
4. Satin stitch, adjusting the stitch width
as necessary, to form each pattern,
5. If using paper, carefully remove it
when you have finished sewing.
Pohtts zigzags (Suite)
• Monogrammes
Voiet comment
i, R_gler de ta m_me fafon que pour
point tancd.
2,'Soutenez fe ti3"stt avee du papter ou
toile tailleur.
3. Faites Ie motif sur le ttsstt a la craze de
taiIIeur,
4. Piquez au point lancd apr_s avoir
rdgtd la targeur ea fonctton du motif
5. Si vous avez tt_ilisO dtt papier, enlevez-
te sotgneusement iz latin.
Puntadas con Zigzag (Continuaci6n)
o Monogramas
Aprenda como _acerlo:
I. Fijela _guat que para puntada de
reaice.
2, Coloque papel o entretela per detras
del material.
3, Dibuje las ietras sobre la tela utili-
zando tiza de costura.
4. Haga puntacla de rea|ce ajustando el
ancho de la puntada tanto cored sea
necesarto para format cada modeio.
5, Si utiliz6 papei, retireio cuidados-
amente una vez haya terminado de
COSeF.
7O
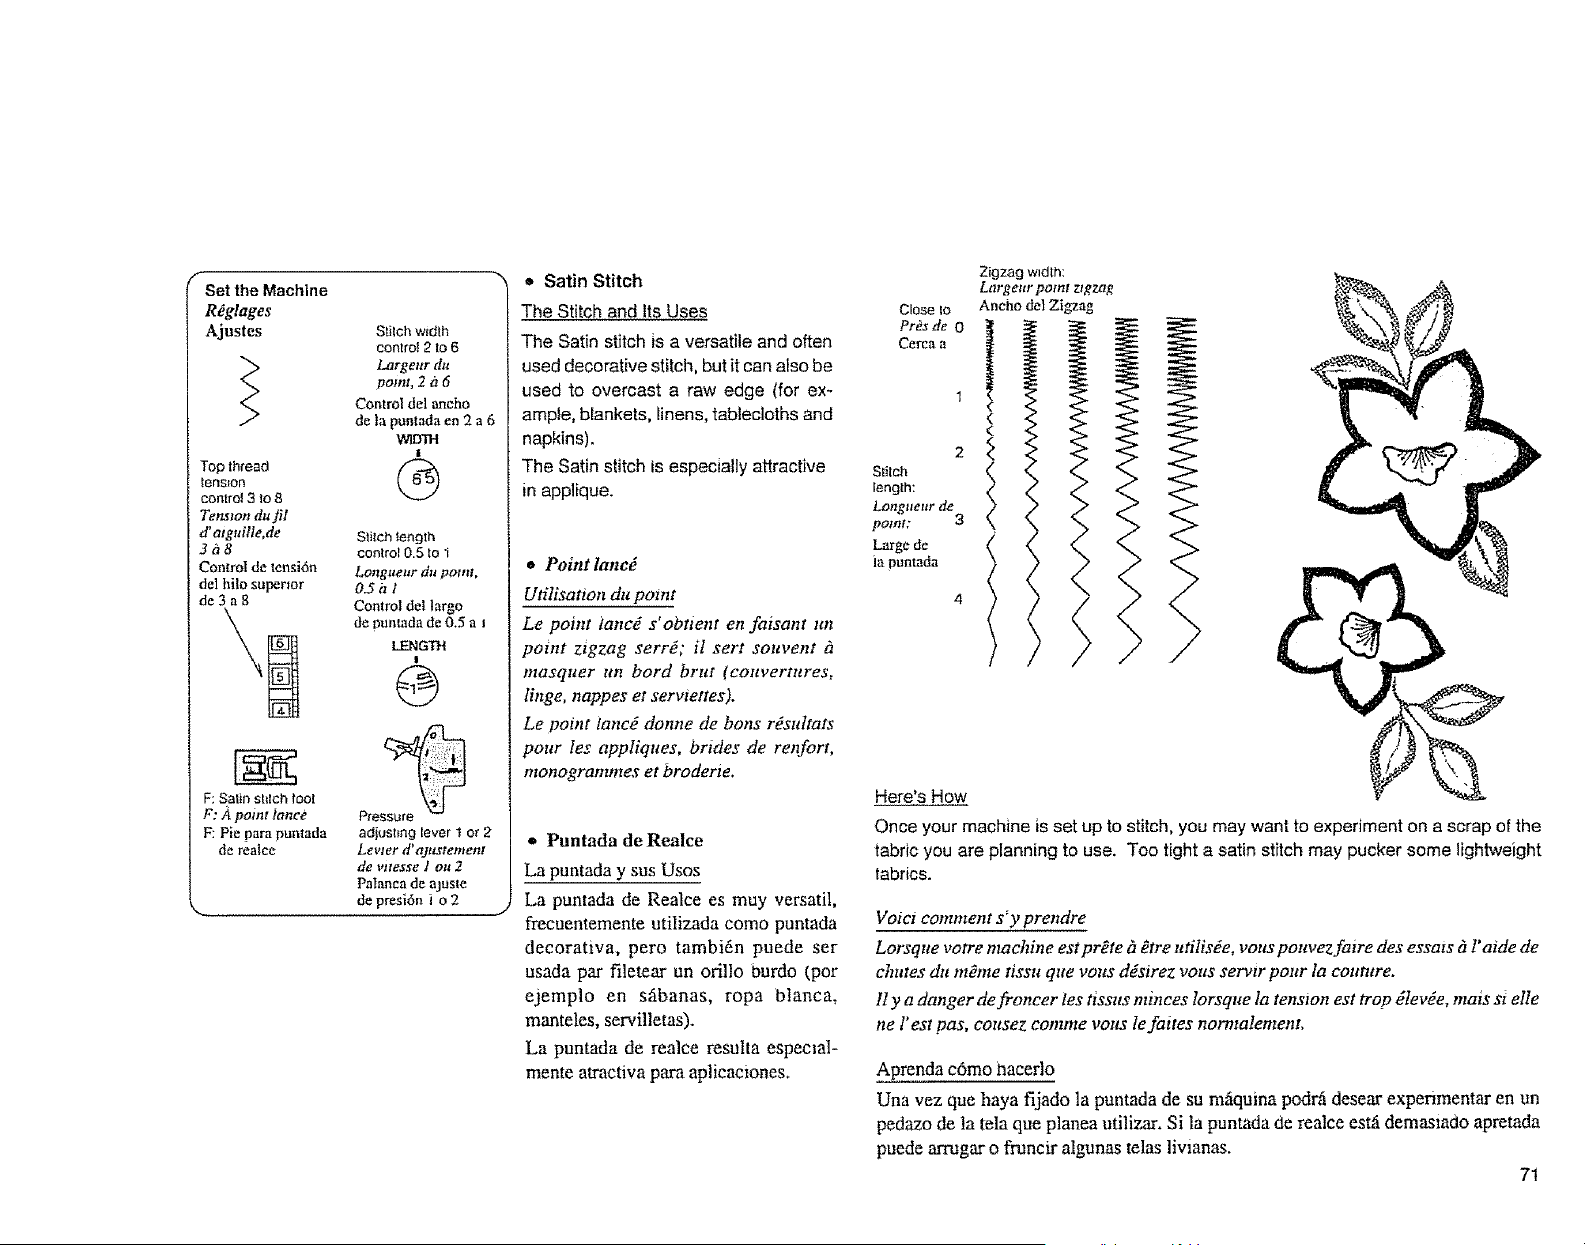
Set the Machine
R_glages
Ajustes
Top thread
tension
control 3 to 8
Te_wn duf!!
d'atgnille,de
3h8
Coatrol de lensi6n
del hilo superior
de3a8
F: Satin shteh loot
F: A point lance
F: Pie para pun_ada
de rea|ee
Stilch width
control 2 to 6
l_rgenr du
point, 2 it6
Control del aneho
de la puntada eo 2 a 6
WID'fH
i
G
Stitch length
control 0,5 to 1
Longueur du potnL
O.Sa 1
Control del largo
de puntada de 0.5 a t
LENGTH
!
@
adjusting lever I or 2
Levter d' ajRxtetltffnl
de vttesse I ou 2
Pah-mcade ajaste
de presi6n i o 2
• Satin Stitch
The Stitch and Its Uses
The Satin stitch is a versatile and often
used decorative stitch, but it can also be
used to overcast a raw edge (for ex-
ample, blankets, iinens, tablecloths and
napkins).
The Satin stitch is especially attractive
in applique.
o Point lanc_
Utilisation du point
Le point iancd s'obtient en faisant un
point ztgzag serf#; il sert souvent h
masquer un bord brut (couvertures,
thtge, nappes et servtettes).
Le point lancd donne de boas r#stdtats
pour Ies appliques, brides de renfort,
monogrammes et broderle.
* Puntada deRealce
La puntada y sus Usos
La puntada de Realce es muy versatil,
frecuentemente utilizada come puntada
decorativa, pero tambidn puede ser
usada par filetear an orillo burdo (par
ejemplo en s_ibanas, ropa blanca,
manteles, servilletas).
La puntada de realce resulta especml-
mente atractiva para aplicaciones.
Close Io
PrOs de 0
Cenza a
2
Stitch
length:
Longueur de
point: 3
Large de
la puntada
Zigzag w_dth:
Largear point ztgzag
Aneho de1Zi_ag
<
2>"
>
Here's How
Once your machine is set up to stitch, you may want to experiment on a scrap of the
tabric you are planning to use. Too tight a satin stitch may pucker some lightweight
fabrics.
Votct eommept s'y prendre
Lorsque votre machine est pr_te d Ytre utiIis_e, vous pouvez faire des essats fi l'aide de
chutes dlt m_me tissu qtte volts ddsirez VOltS servtr pour la couture.
1ly a danger de froneer tes ttssus minces lorsque la tenston est trop _Ievde, mais st elle
ne Pest pas, cousez eomme vous le faites normalement.
Aprenda c6mo laacerlo
Una vez que haya fijado la puntada de su mftquina podr_ desear experimentar en un
pedazo de la tela que planea ufilizar. Si la puntada de realce est,-fdemasmdo apretada
puede arrugar o fruncir algunas telas livianas.
71
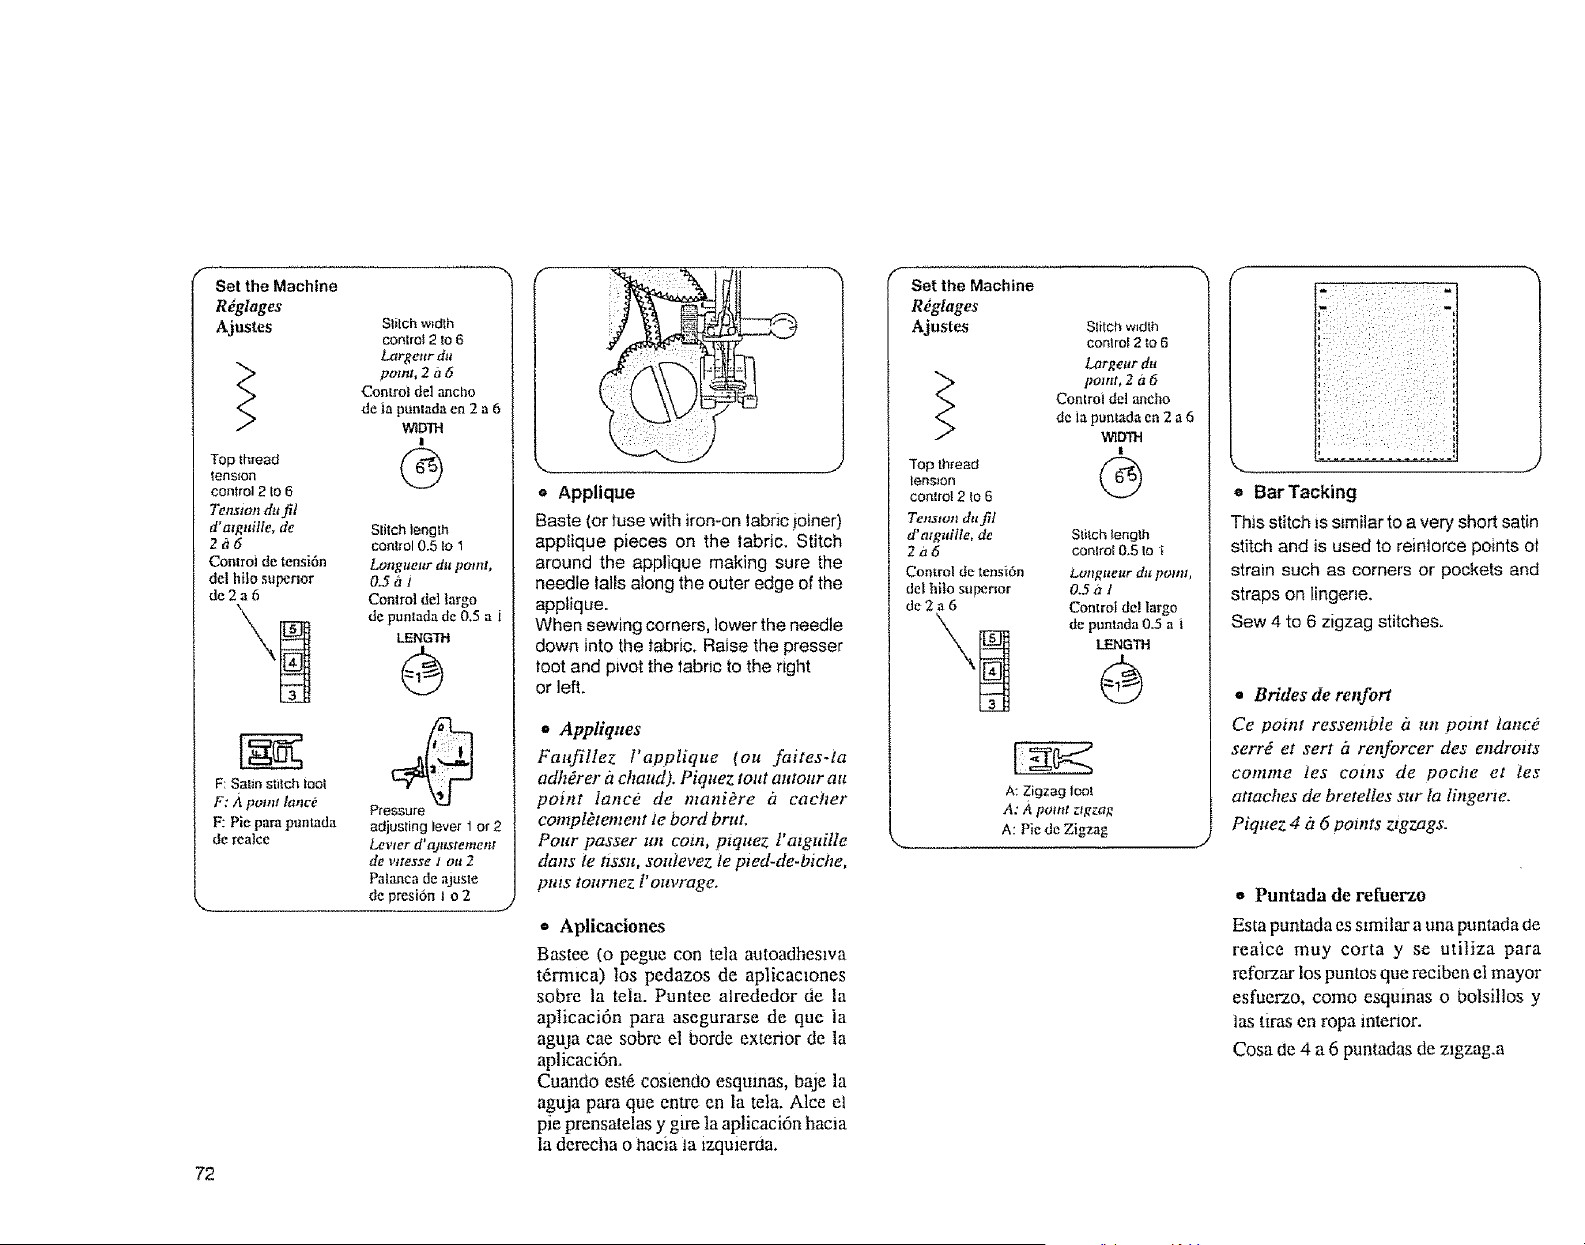
Set the Machine
R_glages
Ajustes
Top thread
(charon
con_rol 2 tO6
Tension duff!
d" atguille, de
2i_6
ControJ de tensi6n
del bite superior
de2a6
Stitch w_dth
Control 2 tO 6
Largeurdu
potnl, 2 h 6
Control del ancho
de ia puntadaen 2 a 6
WIDTH
I
@
Stitch length
control 0.5 to 1
Longueur du point,
0.56 l
Control del largo
de puntada de 0.5 a i
LENGTH
F:Satinstitchtooi
F: A point lance Pressure
IF.-Pie pare puntada adjustinglever1or2
de realcc Levter d'ajttstement
de vttesse Iott 2
Paianca de ajuste
de presi6n I o 2
72
J
o Applique
Baste (or ruse with iron-on tabric ioiner)
applique pieces on the fabric. Stitch
around the applique making sure the
needle tails aiong the outer edge of the
applique.
When sewing corners, lower the needle
down into the fabric. Raise the presser
loot and pivot the _abric to the right
or left.
* Appliques
Faufillez t'applique (ou faites-ia
adh_rer h chaud). Piquez tout atttour au
point lance de mani&e i_ caclwr
compl_tentent ie bord brut.
Pour passer tat coin, ptquez l'atguille
dolts le ttsslt, sottlevez te pied-de-biche,
puts tournez l' ouvrage.
= Aplieaciones
Bastee (o pegue con tela autoadheswa
t6rmma) los pedazos de aplicaclones
sobre la tela. Puntee alrededor de la
aplicaci6n pare asegurarse de que ia
aguja cae sobre el borde exterior de la
aplicaci6n.
Cuando est6 cosiendo esqumas, baje la
aguja pare que entre en la tela. Alce el
pie prensatelas y gu:e la aplicaci6n hacia
la derecha o hacia la izquierda.
Set the Machine
R_glages
Ajustes
Top thread
tension
contro_2 to 6
Tens, on du fil
d'atguitle, de
2i16
Control de tensi6n
del hito supermr
de2a6
Slitch width
controf 2 tO 6
Largeor du
point, 2 i_6
Controi del ancho
de ixpuntada en 2 a 6
WIDTH
I
G
Stitch length
conlroI 0,5 Io i
t_ongaeur dt_ pO/ltt,
O.Sa 1
Controf de! largo
de pumada0.5 a i
LENGTH
A: Zigzag |oo!
A: A potnt zigzag
A: Piede Zigzag
l
e Bar Tacking
This stitch is similar to a very short satin
stitch and is used to rein|orce points of
strain such as corners or pockets and
straps on lingene.
Sew 4 to 6 zigzag stitches.
, Brides de renfort
Ce point ressemble _un poznt tancO
serr_ et sert h renforcer des endrotts
comme tes coins de poct_e et les
attaches de bretelles sur la IiJtgerte.
Piquez 4 it 6 poUzts zigzags.
o Puntada de refuerzo
Esta puntada es szmilar a una puntada de
reaicc muy corta y se utiliza para
reforzar los puntos que reciben el mayor
esfuerzo, come esquinas o bolsillos y
los urns en ropa interior.
Cosa de 4 a 6 puntadas de ztgzag.a
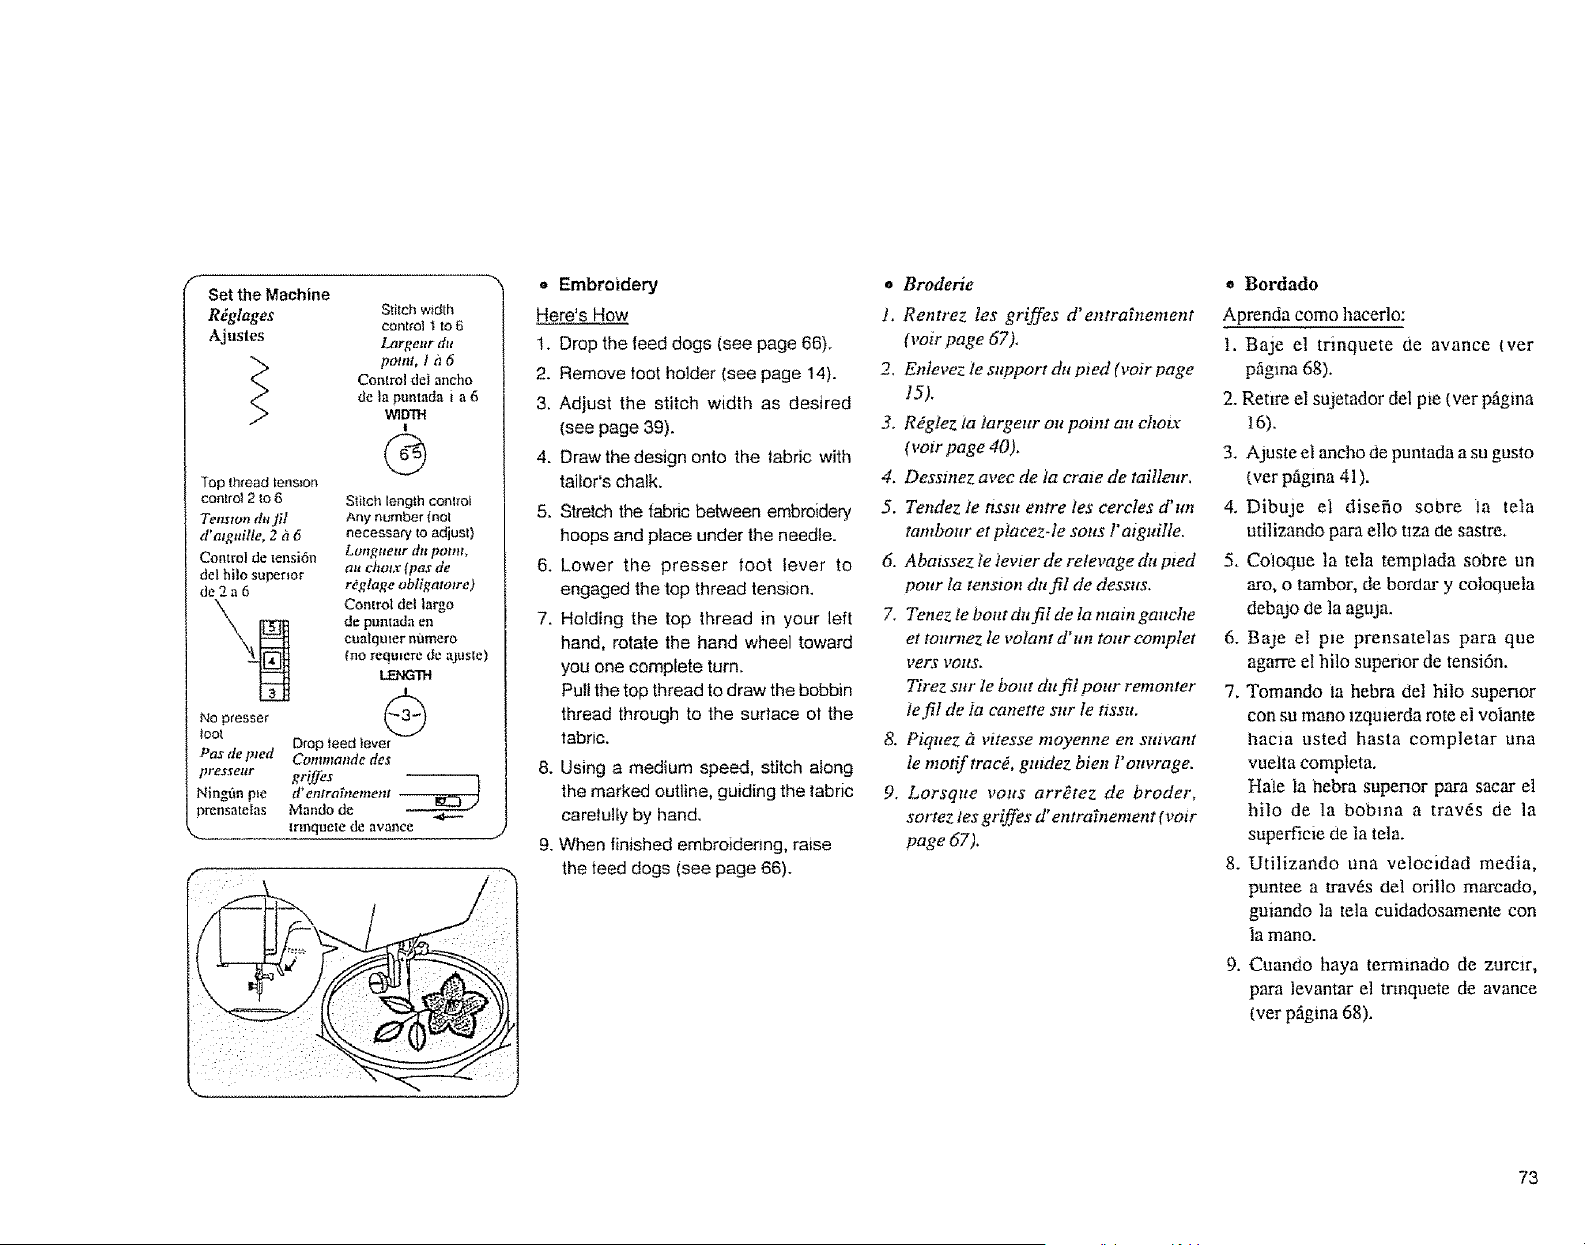
f
Set the Machine
R@lages Stitchw}dth
control "t to 6
Aj ustes l_rgeur du
palm, 1h 6
Control de] ancho
de la puntada i a 6
W1DTH
I
@
Top thread tension
control 2 to 6 Stitch length conlml
Temwn dnf!t Any number {not
d' atgnitle, 2 h 6 necessary to adjust)
Control de mnsi6n Longueur du pater,
del hflo supermr au chotx (pas de
de 2 a 6 rOglage obligato¢re)
Control del largo
de puntada en
cuatqmer n'amero
(no requmre de ajuste)
No presser
loot
Drop (eed }ever
Pas de p_ed Commande des
_resseur griffes
Ning'6n pm d*entrabwment
13reesate[as Mando de -,a.---
_.._ lnnquete de avance
a Embroidery
Here's How
1. Drop the feed dogs (see page 66).
2. Remove loot holder (see page 14).
3, Adjust the stitch width as desired
(see page 39).
4. Draw the design onto the tabric with
tailor's chalk.
5. Strelch the fabnc between embroidery.
hoops and place under the needle.
6. Lower the presser foot lever to
engaged the top thread tension.
7. Holding the top thread in your left
hand, rotate the hand wheel toward
you one complete turn.
Pull the top thread to draw the bobbin
thread through to the surlace at the
fabric.
8. Using a medium speed, stitch Nong
the marked outtine, guiding the |abric
caretu![y by hand.
9. When finished embroidenng, raise
the feed dogs (see page 66).
o Broderie
t. Rentrez les griffes d'entra_nement
(voir page 67),
2, Enlevez te st_pport dtt pied (voir page
]5).
3. Rggtez ia largeur art point au chotx
(voir page 40).
4. Dessmez avec de ta craw de taillenr.
5. Tendez le nssu entre tes ceretes d'un
tamboltr et ptaeez-le salts l"atguille.
6. Abatssez ie ievler de retevage du pted
pour ta te/_stott dtt fil de dessus,
7. Tenez te bour du fil de la mam gattche
et tottrnez le voIant d'an tour complet
vers POllS.
Tirez sur te bout du fil pour remonter
te fiI fie ia canette sltr /e ttssu,
8. Piquez & vitesse moyenne en smvant
le mofif trac& gutdez bien l'ottvrage.
9. Lorsque rafts arr6tez de broder,
sortez les griffes d' entra?nement (vow
page 67).
,, Bordado
Aprenda coma hacerlo:
!. Baje el trinquete de avance tver
pfigma 68).
2. Retire el sujetador del pie (ver p_igina
16).
3. Ajuste el ancho de puntada a su gusto
(ver pgtgma 41).
4. Dibuje el disefio sabre la tela
udlizando para ella tiza de sastre.
5. Coioque la tela templada sabre un
aro, o tambor, de bordar y eoloquela
debajo de la aguja.
6. Baje el pm prensatelas para que
agarre el hilo superior de tensi6n.
7, Tomando la hebra del hilo superior
con su mano 1zqulerda rote el volante
hacm usted hasta eompletar una
vuelta eompleta.
Hale la hebra superior para sacar el
hilo de la bobma a tray,s de la
superficm de ia tela.
8. Utilizando una velocidad media,
puntee a trav6s del orillo marcado,
guiando la tela cuidadosamente con
la mano.
9. Cuando haya termmado de zurmr,
para levantar el tnnquete de avance
(ver p,Sgina68).
73
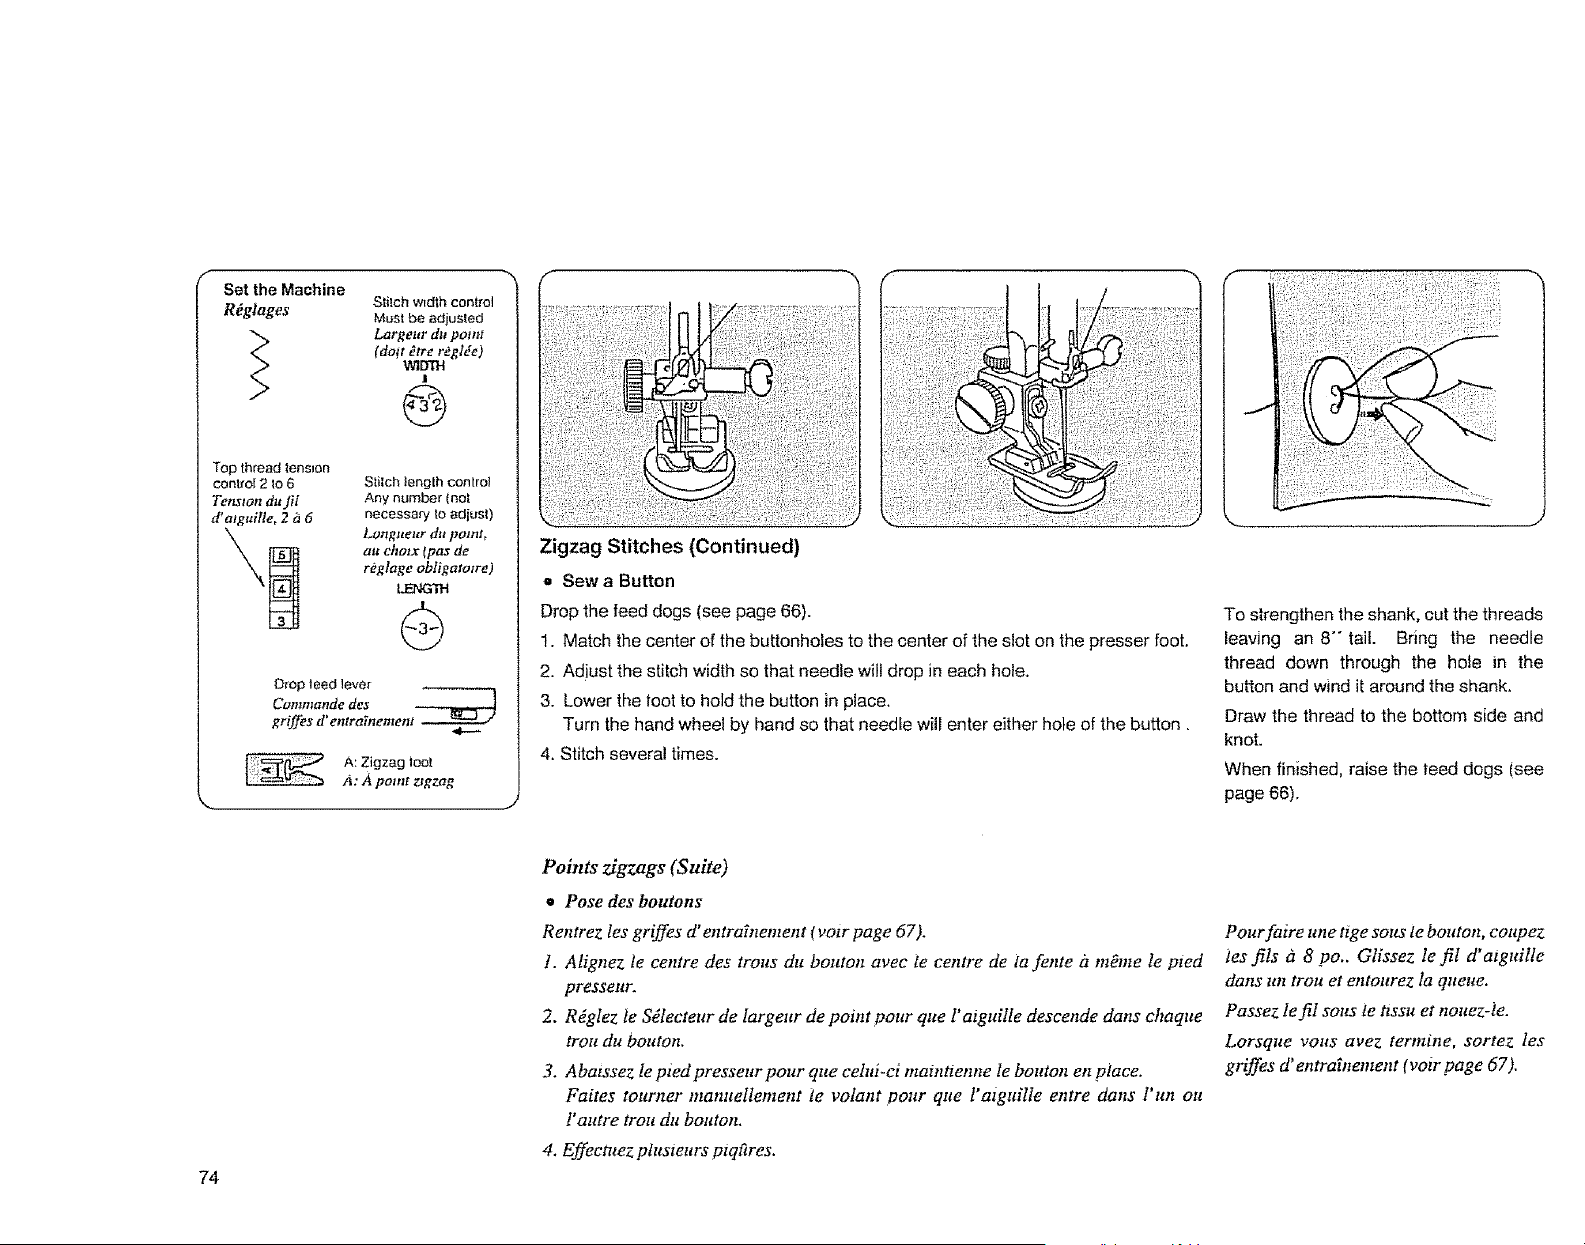
Set the Machine
R_glages
Stilch wtdth control
Must be adjusted
Largeur du potm
(dolt atrer_gl_e)
W1DTH
!
G
Top thread tension
control 2 Io 6
Tenston du fil
d' atguilte, 2 i_ 6
Stilch length control
Any number (not
necessary to adius1)
Longueur du point,
al_ chotx Ipas de
reglage obligatotre)
Orop feed leve_
Cammande des
griffes d' entra_nement
A: Zigzag 1oo[
A:A pomt zzgzag
Zigzag Stitches (Continued)
Q Sew a Button
Drop the feed dogs (see page 66).
1. Match the center of the buttonholes to the center of the slot on the presser foot.
2. Adjust the stitch width so that needle will drop in each hole.
3. Lower the toot to hold the button in place,
Turn the hand wheel by hand so that needle will enter either hole of the button,
4. Stitch several times.
To strengthen the shank, cut the threads
leaving an 8-tail. Bring the needle
thread down through the hole in the
button and wind it around the shank.
Draw the thread to the bottom side and
knot.
When finished, raise the teed dogs (see
page 66).
74
Points zigzags (Suite)
• Pose des boutons
Rentrez tes griffes d' entrabzement (votr page 67).
t. Alignez te centre des trous du bouton avee ie centre de ia fente i_ mYme le pzed
presseur.
2. R_glez le S_lecteur de Iargeur de point pour que l'atguille descende dans ehaque
trou du botttotL
3. Abatssez le pied presseur pour que celtti-ci maintienne le bonton en place.
Faites tourner manueItement te volant pour qne l' atguille entre dans l'un ou
l'autre trou da bouton,
4. Effectuez phtsteurs mqares.
Pourfaire un e tige sous le bouton, coupez
ies ills d 8 po.. Glissez le fiI d'atguille
dans ttn trou et entourez la queue.
Passez 1efil sous le t_ssu et nouez-le.
Zorsque volts avez termine, sortez, les
griffes d' entrabtement ( voir page 67).
Ajustes
Comrol de tensi6n
del hito sur',enor
de2a6
Debe ajustarse el
Control del ancho
de la puntada
V_ml-I
t
G
Control del largo de
pumada en cua|qmer
numero _no reqmere
de ajuste)
LENG"fl-I
Mando de lrmquele
t_ avanc_
A: pm de Zigzag
Puntadas en Zigzag (Continuaci6n)
• Pegado de Botones
Baje el trinquete de avance (ver pfigma 68).
I. Haga que eI centro de los huecos de los botones concuerden con el centro de la
ranura clelpie prensatelas.
2. Ajuste el anclao de puntada en forma tal que la aguja caiga en cada hueco.
3. Baje el p_e para que mantenga en bot6n ensu sitio. Gire el volante con la mano para
que la aguja entre en cualquiem de los huecos del bot6n.
4. tZ_tmtee varias veceg.
Para reforzar el bot6n corte las hebras del
hilo dejando una cola de 20 cms.
Traiga hacla abajo el hilo de ta aguja a
trav6s del hueco del botdn y enr6delo
alrededor dei asa. Saque ei hilo a la parte
inferior y anude.
75

Set the Machine
R_glages
Ajustes Stitch width
control 5 to 6
Largeur du
po;nt, 5 _ 6
Controi del ancho
de la puntada en 5 a 6
WlDIH
!
Top thread tenston //-_-_
control 3 to 8
',CY
Tenston du fit
d' agguifte, 3 i_ 8
Control de teasi6n Stitchlength
del hilo superior contro! red zone
de 3 a 8 Longueur du point,
Control largo
de puntada
zoea _j_
LENGTH
|
C: Overedge tool
C: Pied &suqeter
C: Pie para coser a punto por enclma
o Overcasting Stitch
The Stitch and Its Uses
This zigzag variation is very useful in
garment construction and in finishing
raw edges ot any sewing project.
o Surfilage
Utitisatzon du point
Cette variante du point zigzag est trks
emptoy_e pour tes v_tements et finir tes
bords.
o Fileteado
La puntada y sus Usos
Esta vanaci6n del zigzag resulta muy
t_til en ta elaboraci6n de ropa y en el
acabado de extremos burdos de ia teta en
cualquier proyecto de costura.
Helplul Hints
Start overcasting about 1/8- inside the
raw corner of your seam. If you start
right at the edge, the labric will bunch
up and the stitches will become
tangled.
Conseil pratique
Faites votre surfilage & environ 118 po,
du bord brut. Si vous piquez h ras bord,
votre ttssu pourra froncer et tes ills
s' emm _ler.
Sugerencias Utiles
Comlence a filetear mas o menos a 0.3
cms. bacm adentro de la esquina burda
de su costura. Si comtenza en todo et
eritlo de ia tela, _sta se amontonar'b, y las
puntadas se enredan.
76
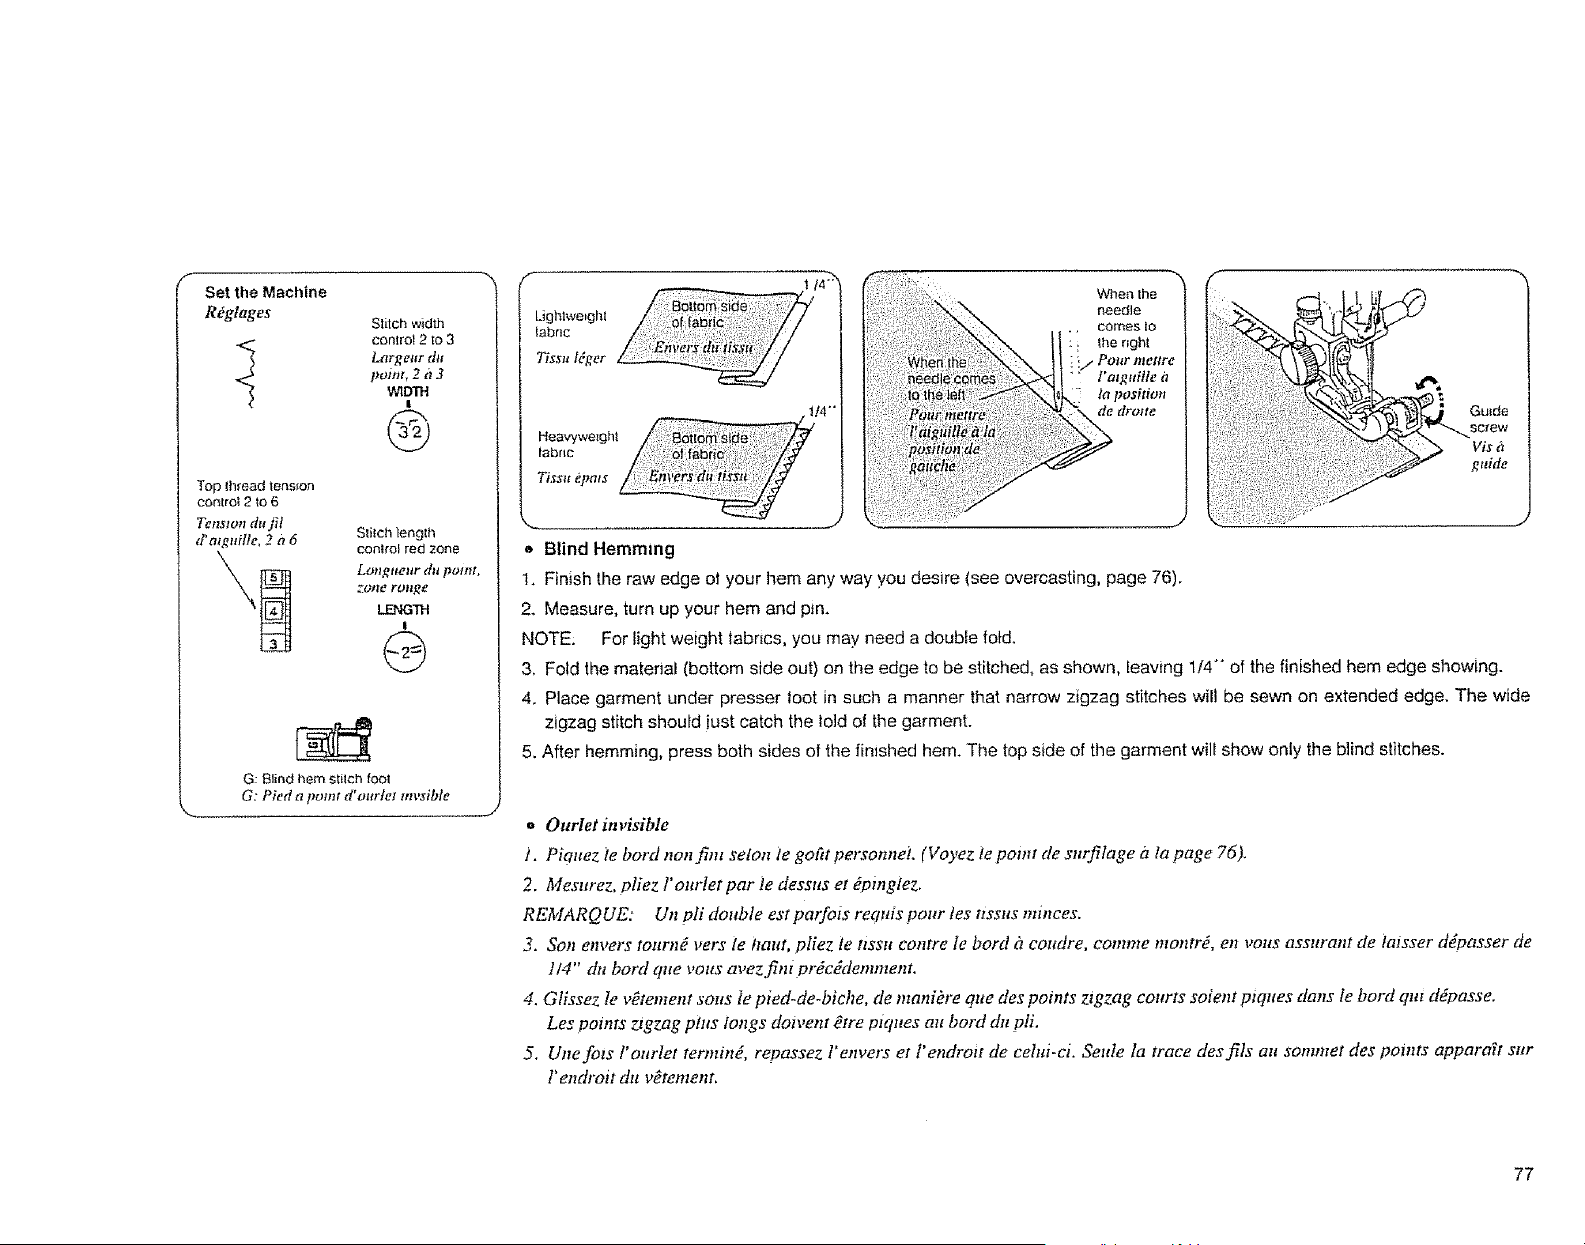
Set the Machine
R_gtages
Top thread tension
control 2 to 6
Tenswn du fit
d'mguitte, 2 a 6
Stitch width
control 2 to 3
Largeur du
pm,,.,t, 2 a 3
WtDIH
|
G
Stitch }ength
control red zone
Longueur du point,
Zotre roNg_
LENG"fl-I
!
G: Blind hem stilch foot
G: Pied a point d" ourtet mvsible
f
Ughlwe_ghl
fabric
Tissu l_ger
Heavyweight
tabnc
TiS$:lt _pGt$
Wllen the
needle
comes Io
[t'_enght
Guide
Vixiz
guide
,, Blind Hemming
1. Finish the raw edge el your hem any way you desire (see overcasting, page 76).
2. Measure, turn up your hem and pin.
NOTE: For tight weight tabrics, you may need a double fold.
3. Fold the material (bottom side out) on the edge to be stitched, as shown, leaving l/4- of the finished hem edge showing.
4. Place garment under presser toot in such a manner that narrow zigzag stitches will be sewn on extended edge. The wide
zigzag stitch should iust catch the told o! the garment.
5. After hemming, press both sides of the finished hem. The top side of the garment will show only the blind stitches.
= Ourlet invisible
1. Picmez ie bord non fim selon te goFtt personnel (Voyez te POint de surfilage iz la page 76).
2. Mesurez, pliez r ottrlet par }e dessus el 6pingtez.
REMARQUE: Un pit double est pmfozs requis pour tes nssus minces.
3. Son envers tourn# vers te haut, pliez fe nssu eontre ]e bord 3 coudre, comme montr#, en vous assurant de lmsser ddpasser de
1/4" du bord que vous avez fini pr_cddemmenr
4. Gtissez Ie v_tement sous ie pied-de-biche, de maniOre qtte des points zigzag courts soient ptqttes dans le bord qut d_passe.
Les pmnrs ztgzag plus longs dotvent _tre piques att bord du pli.
5. Une fozs l' ourlet termin_, repassez l'envers et J'endroit de cehu-ci. Settle la trace des fi]s au sommet des points appara_t sur
l'endroit du v_tement.
77
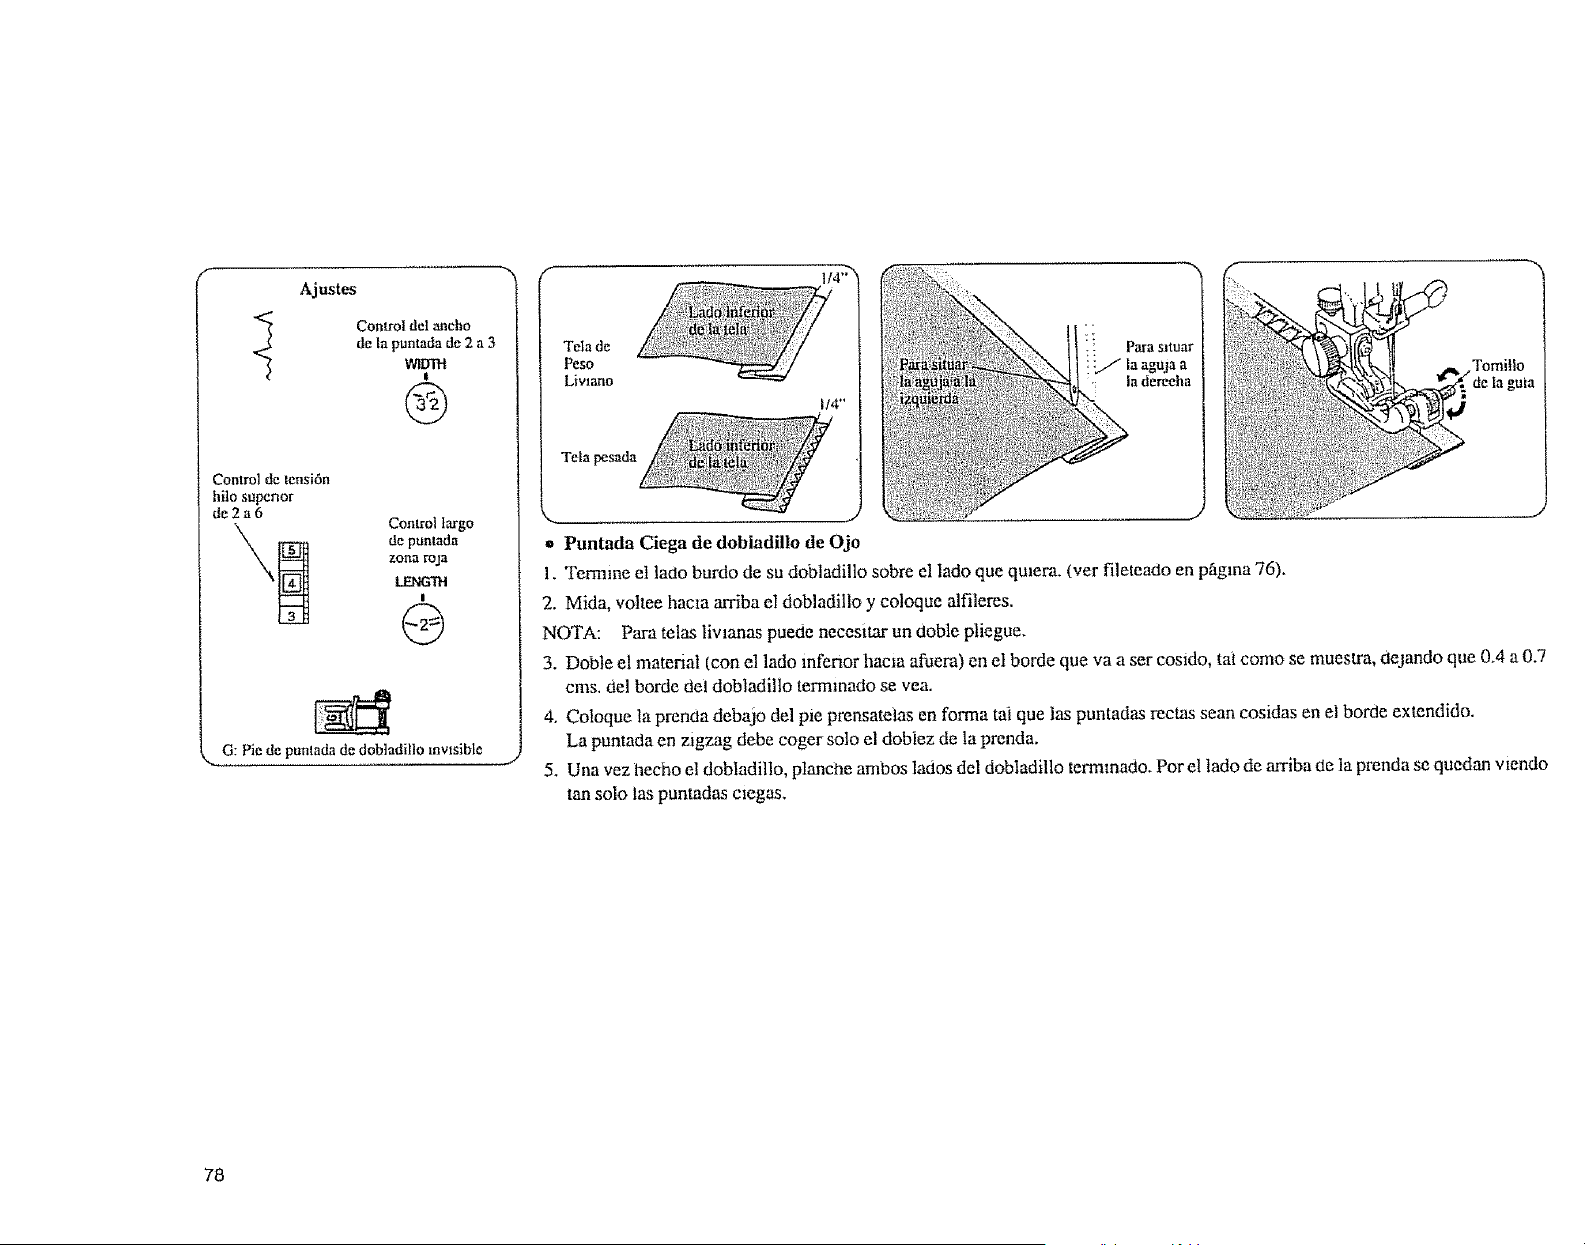
Ajustes
Controldelancho
de [apuntada de 2 a 3
WilD'IH
I
®
Control de tcnsi6n
hilo supenor
de2a6
Comrol largo
de puntada
zona roja
LENG'fi-t
!
_, G: Pie de punlada de dobladillo lavtsible
Tetade
Peso
Livlano
114,_
f14"
o Puntada Ciega de dobladillo de Ojo
la dereeha
_'_
1. Termine el lado burdo de su dobladillo sobre el lado que qmem. (ver fileteado en pfigma 76).
2. Mida, voltee hacIa arriba eI dobladitlo y coloque alfileres.
NOTA: Para telas livlanas puede necesltar un doble pliegue.
3. Doble el material (con el lado inferior hacla afuem) en eI borde que va a set cosido, tai como se muestra, dejando que 0.4 a 0.7
cms. del borde dei dobladillo termmado se yea.
4. Coloque la prenda debajo del pie prensatetas en forma tai que las puntadas rectas sean cosidas en el borde extendido.
La puntada en zigzag debe coger solo el dob|ez de la prenda.
5. Una vez hecho el dobladillo, plancile ambos lados del dobladillo termmado. Pot el lado de arriba de la prenda se quedan viendo
tan solo las puntadas ctegas.
78
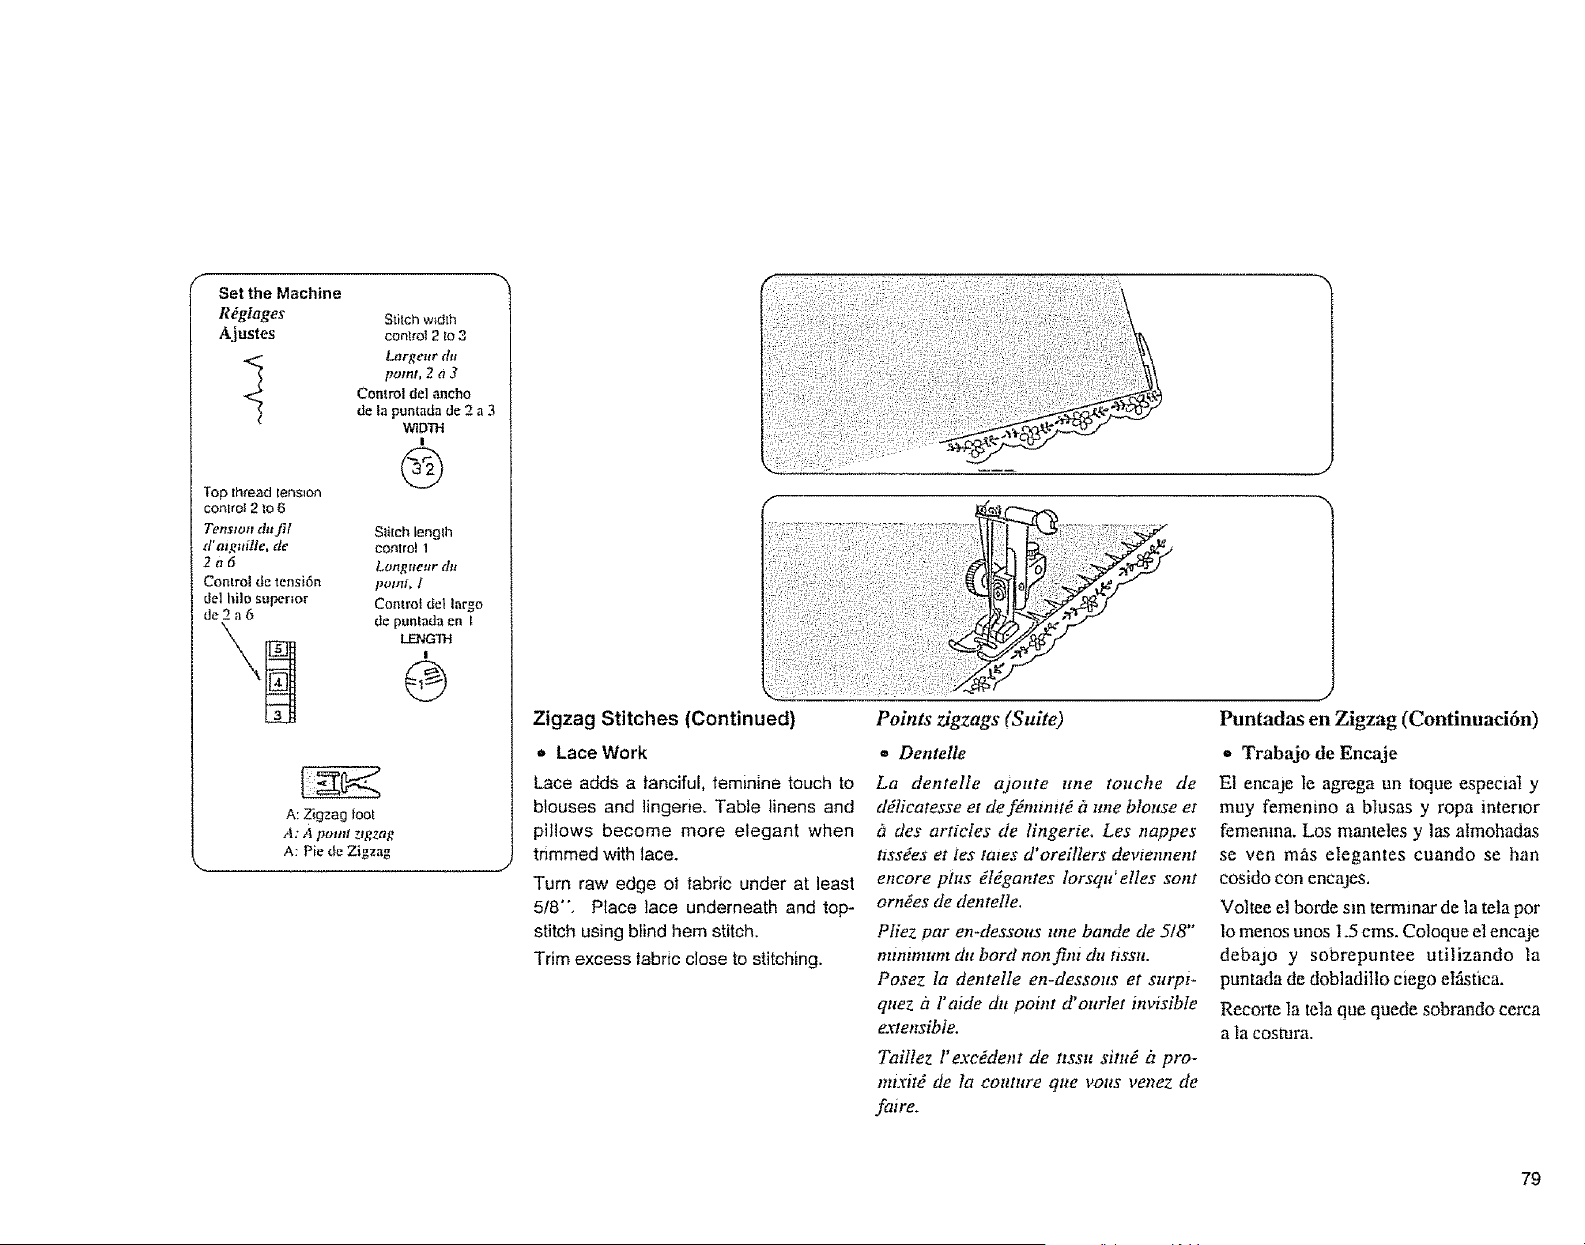
f
Set the Machine
R_glages
Ajustes
Top lhteadtension
control2 Io6
Tensw. d. fit
d'ai guitte, de
206
Control de lensi6n
del hito superior
de2a6
Stilch w_dlh
cont{ol 2 to 3
Largeurdu
point, 2 a 3
Control de] ancho
de ta puntada de 2 a 3
WIDTH
!
®
Slilch lenglh
control 1
Longlteur du
pomt, l
Conlrol del largo
de puntada ent
LENGTH
I
@
A: Zigzag lool
A: A potnt zigzag
A: Pie de Zigzag
!iiii!il
Zigzag Stitches (Continued)
• Lace Work
Lace adds a fanciful, teminlne touch to
blouses and lingerie, Table linens and
pillows become more elegant when
tnmmed with lace.
Turn raw edge ot |abrlc under at least
5/8-, Place lace underneath and top-
stitch using blind hem stitch.
Trim excess labric close to stitching.
Points zigzags (Sure)
• Dentelle
La dentelle ajoute tree
touche de
d_ticatesse et de fdmmitd a une blouse et
h des artmles de lingerte, Les nappes
t_ssdes et ies tares d' oreillers devtennent
encore plus gl_gantes torsqu'e!les sore
orn_es de dentelle.
Pliez par en-dessous une bande de 518"
nttnimtmt dtt bord notl fim dtt ttsst_.
Posez Ia dentelle en-dessolts et surpi-
quez B r aide du point d'ourlet invzsibte
extensible.
Taillez l'exeOdent de ttssu situE h pro-
mtxtt_ de la couture qtte vous venez de
fawe.
J
Puntadas en Zigzag (Continuaci6n)
= Trabajo de Eneaje
El enca_le le agrega un toque especial y
muy femenino a blusas y ropa interior
femenma. Los manteles y las almohadas
se yen mas elegantes cuando se han
cosido con encajes.
Voltee el borde sin terminar de la teta pot
lo menos unos ! .5 cms, Coloque et encaje
debajo y sobrepuntee utilizando la
puntada de dobladiIlo ciego etfistica.
Recorte Ia tela que quede sobrando cerca
a la costura.
79
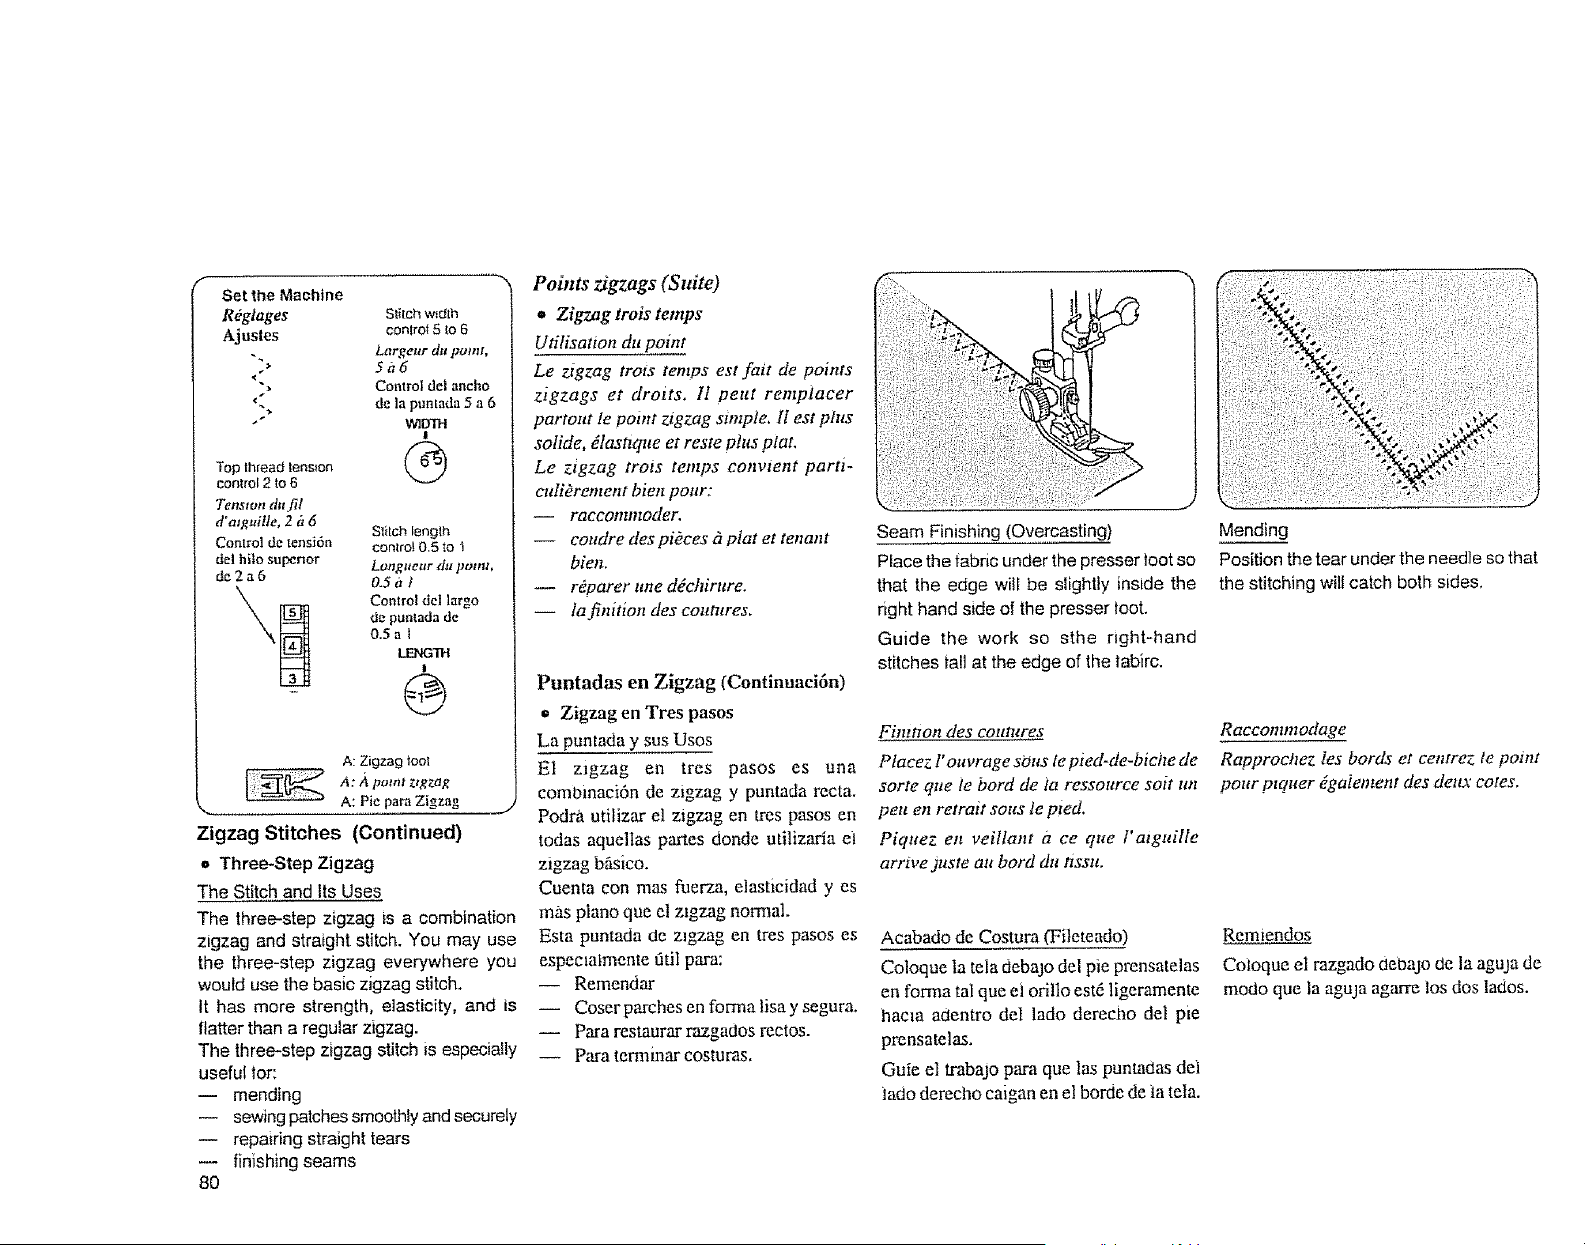
Set the Machine
R_gtages StitchwaJm
Ajustes control5 to 6
. Largeur du point,
._ 5it6
", Control del ancho
'_ de ta pontada 5 a 6
-" WIDTH
!
TOp thread |ens_on (6"_
control 2 to 6
Tension du fil
d'alguitle, 2 h 6
Conlro] de tensidn
del hi|o superior
de2a6
SlltCh leng]h
contro_ 0,5 to 1
Lengueur du potnt,
O.Sat
Control del largo
de puolada de
0.5a I
LENGTH
I
@
A: Zigzag tool
A: A point z_gzag
A: Pie para Zigzag
Zigzag Stitches (Continued)
. Three-Step Zigzag
The Stitch and Its Uses
The three-step zigzag is a combination
zigzag and straight stitch. You may use
the three-step zigzag everywhere you
would use the basic zigzag stitch.
It has more strength, elasticity, and is
flatter than a regular zigzag.
The three-step zigzag stitch is especia!ly
useful tot:
-- mending
-- sewing patches smoothly and securely
-- repairing straight tears
-- finishing seams
8O
Points zigzags (Suite)
• Zigzag trois temps
Utilisatton du point
Le zigzag trois temps est fait de points
zigzags et droits. 1l peut remplacer
partout le point zigzag simple. 1l est plus
solide, dlastzque et reste plus plot,
Le zigzag trots temps convtent pard-
culikrement bien pour:
-- raccomntoder.
-- coudre des piOces g7plat et tenant
bien.
-- rdparer une dgchirure.
-- la finition des coutures.
Puntadas en Zigzag (Continuaci6n)
* Zigzag en Tres pasos
La puntada y sus Uses
El z_gzag en tres pasos es una
combinaci6n de zigzag y puntada recta.
Podra utilizar el zigzag en ires pasos en
todas aqueltas partes donde utilizaria et
zigzag bhsico.
Cuenta con mas fuerza, eiasticidad yes
mas piano que el zigzag normal.
Esta puntada de z_gzag en tres pasos es
espectatmente tatil para:
-- Remendar
-- Coser parches en forma lisa y segura,
-- Para restaurar razgades rectos.
-- Para terminar costuras.
Seam Finishing (Overcasting)
Place the fabric under the presser _oot so
that the edge will be slightly inside the
right hand side of the presser toot.
Guide the work so sthe right-hand
stitches tall at the edge of the tabirc.
Fimnon des countres
Placez l'ouwage sOus le pied-de-biche de
sorte qtte te bord de fa ressottrce sort tin
peu en retrait sous le pied,
Piquez en veillant ace que ratguille
arrive duste au bord du tissu,
Acabado de Costura (Fileteado)
Coloque Ia tela deba3o del pie prensatelas
en forma tal que et orillo est4 ligeramente
hacm adentro deI lado derecho del pie
prensatelas.
Guie el trabajo para que las puntadas del
iado derecho caigan en el borde de ia tela.
Mending
Position the tear under the needle so that
the stitching will caich both sides.
Racconvnodage
Rapprocttez les bords et centrez te point
pour ptquer dgalement des deux cotes.
Remiendos
Coioque el razgado debajo de la aguja de
mood que la aguja agarre los dos iados.
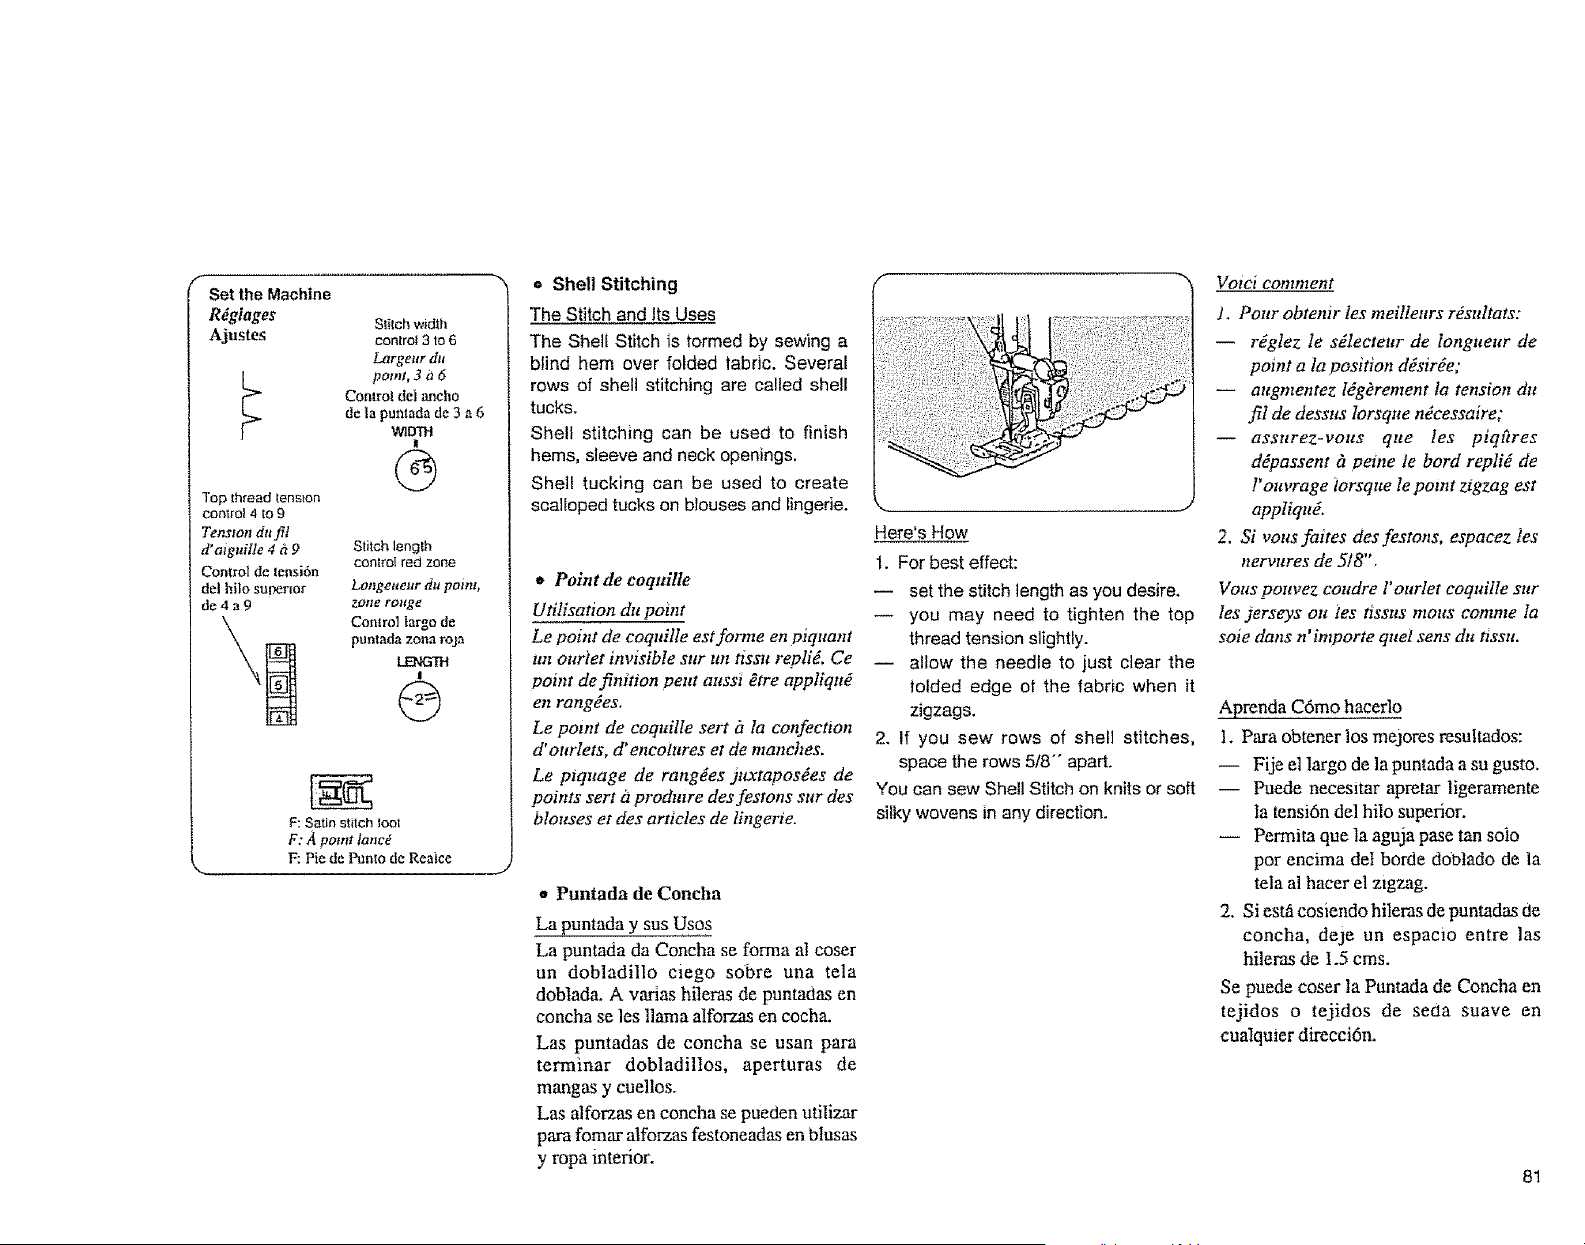
Set the Machine
R_giages
Ajustes
Top threadtension
Control 4 tO 9
Tension du fit
d' aigtdfle 4 _ 9
Control de tensi6n
del hito superior
de4a9
Stitchwidth
control3 to 6
Large_r du
pomt, 3 i_6
Control dot ancho
de la puntada de 3 a 6
WIDTH
I
Q
Stitch length
control red zone
Longeueur du poim,
Zone rottge
Control largo de
pumada zona roja
LENGTH
!
F: Satin stitch toot
F: _ potttt lanc#
F: Pie de Punto de Refflce
= Shell Stitching
The Stitch and Its Uses
The Shell Stitch is termed by sewing a
blind hem over folded fabric. Several
rows of shell stitching are called shell
tucks.
Shell stitching can be used to finish
hems, sleeve and neck openings,
Shell tucking can be used to create
scalloped tucks on blouses and lingerie.
e Point de coquille
Ufilisation du point
Le point de eoquille est forme en piquant
tin our_et invisible sur un tissu repli_. Ce
point definition peut attssi _tre appliquO
en rangdes.
Le point de coquille serf h Ia confection
d' ourlets, d' encolures et de manches.
Le piquage de tangles juxtapos_es de
points sort &prodmre des festons sur des
blouses et des articles de lingerie.
o Puntada de Concha
La puntada y sus Usos
La puntada da Concha se forma a] coser
un dobladillo mego sobre una tela
dobtada. A varias hileras de puntadas en
concha se los llama alforzas en cocha.
Las puntadas de concha se usan para
terminar dobladillos, aperturas de
mangas y cuellos.
Las alforzas en concha se pueden utilizar
para fomar alforzas festoneadas en blusas
y ropa interior.
k. j
Here's How
1. For best effect:
-- set the stitch length as you desire.
you may need to tighten the top
thread tension slightly.
-- allow the needle to just clear the
tolded edge ot the fabric when it
zigzags.
2. If you sew rows of shell stitches,
space the rows 5/8"" apart.
You can sew Shell Stitch on knits or soft
silky wovens in any direction.
Void comment
i. Pour obtenir les meilleurs r_sultats:
-- rEglez le s_lecteur de Iongueur de
point a la position dYsir_e;
-- attgmentez l_gOrement la tension du
fil de dessus lorsque n_cessaire;
-- assnrez-vons que Ies piq£tres
dYpassent h t_eine le bord repli_ de
l' ouvrage torsqne le point zigzag est
applique.
2. Si vous faites des festons, espacez tes
nervures de 5/8",
Vous pouvez condre l' ourlet coquille sur
Ies jerseys Oil los llSSIIS moRs comme la
sole dans n ' importe quel sons du tlssu.
Aprenda C6m0 hacerlo
1. Para obtener los mejores resultados:
-- Fije el largo de la puntada a su gusto.
-- Puede necesitar apretar ligemmente
Ia tensi6n del hilo superior.
-- Permita que la aguja pase tan solo
pot encima deI borde ddt_tado de la
tela al hacer el ztgzag.
2. Si est,5cosiendo hilems de puntadas de
concha, deje un espacio entre las
hileras de 1.5 cms.
Se puede coser ta Puntada de Concha en
tejidos o tejidos de seaa suave en
cualqmer direcci6n.
81
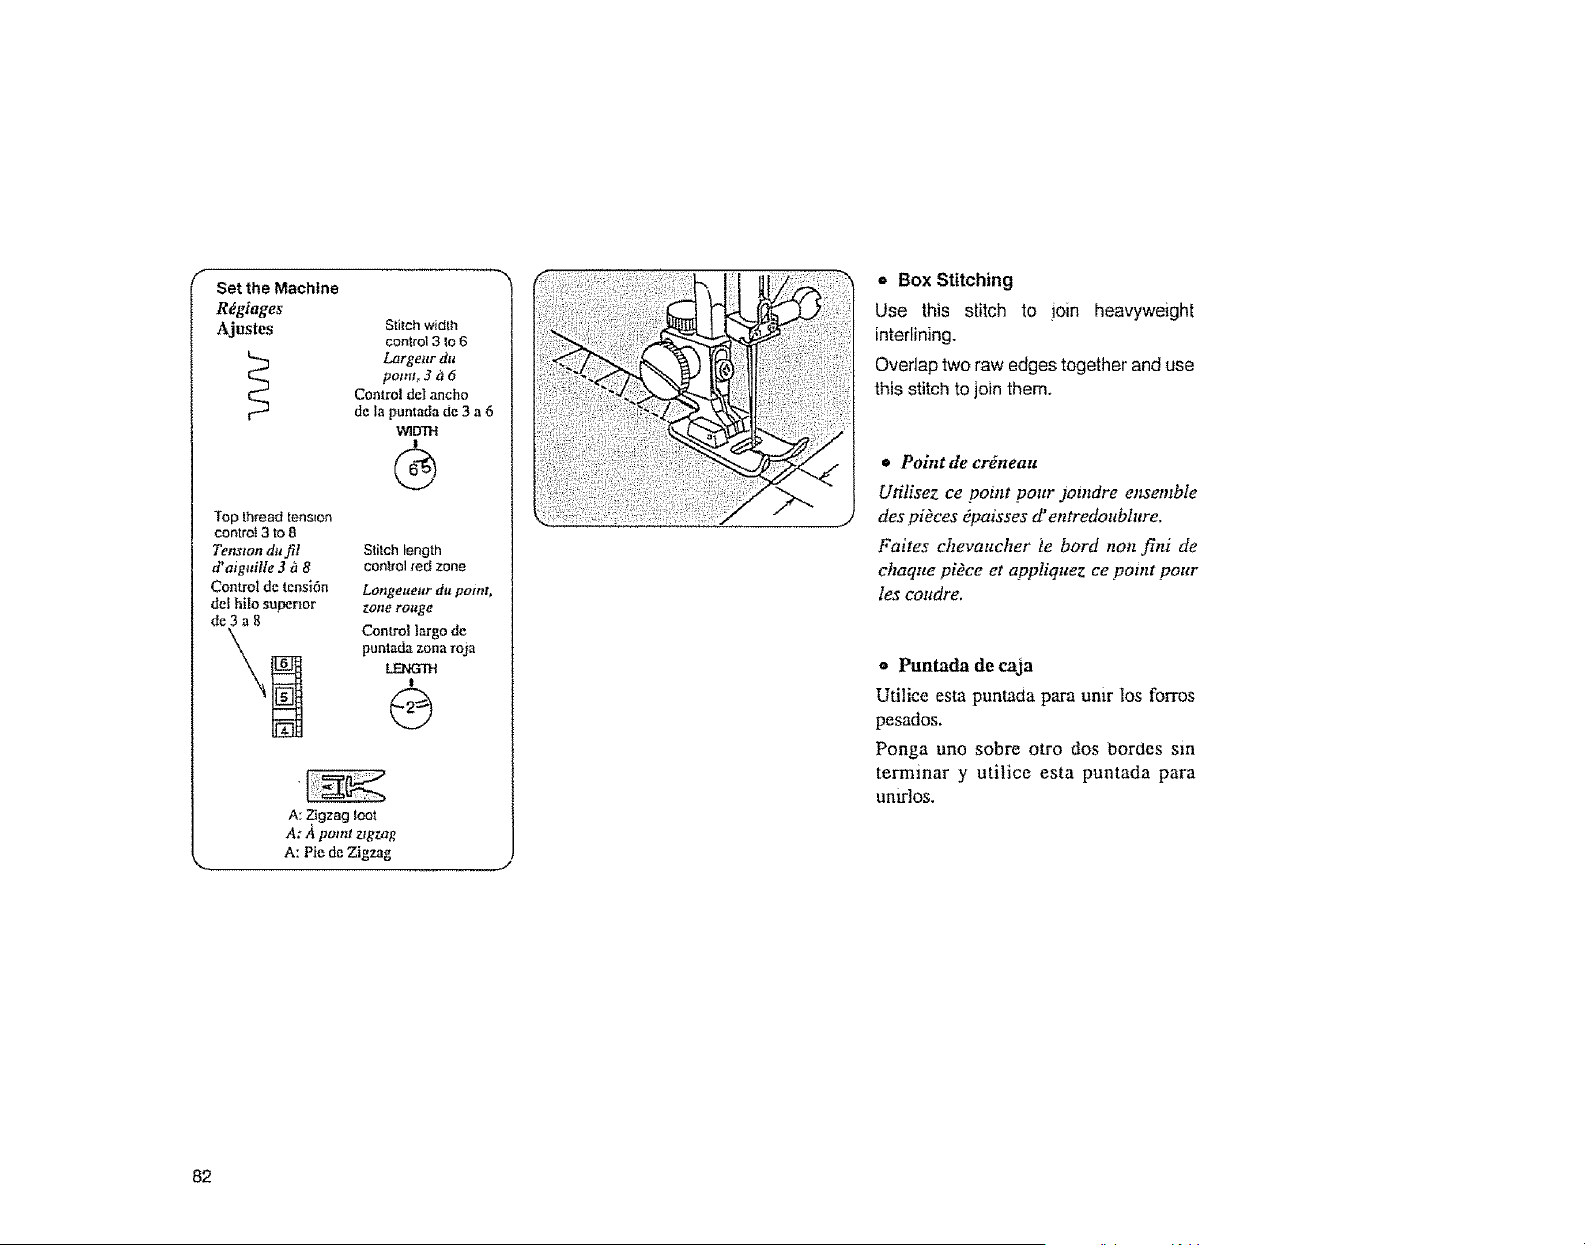
f
Set the Machine
R_glages
Ajustes
Top Ihread tension
control 3 to 8
Te_slon du f!l
d'aiguille 3 d 8
Control de tensi6n
de| hilo superior
de3a8
Stitch width
control 3 to 6
Largetw du
potm, 3 _ 6
Control del ancho
de la puntada de 3 a 6
WIDTH
I
®
Stitch length
control red zone
Longeuettr du point,
zone rouge
Conlrol largo de
pumada zona roja
1
@
A: Zigzag loot
A: A point zigzag
A: Pie de Zigzag
k_,
82
o Box Stitching
Use this stitch to join heavyweight
interlining.
Overlap two raw edges together and use
this stitch to join them.
• Polntde cr#neau
Utilisez ce point pour .totndre ensemble
des pi#ces _paisses d' entredoubhwe.
Faites chevaucher te bord non fini de
chaque piece et appliquez ce potnt pour
les coudre.
o Puntada de eaja
Utilice esta puntada para umr los forros
pesados.
Ponga uno sobre otro dos bordes sm
terminar y utilice esta puntada para
unu-los.
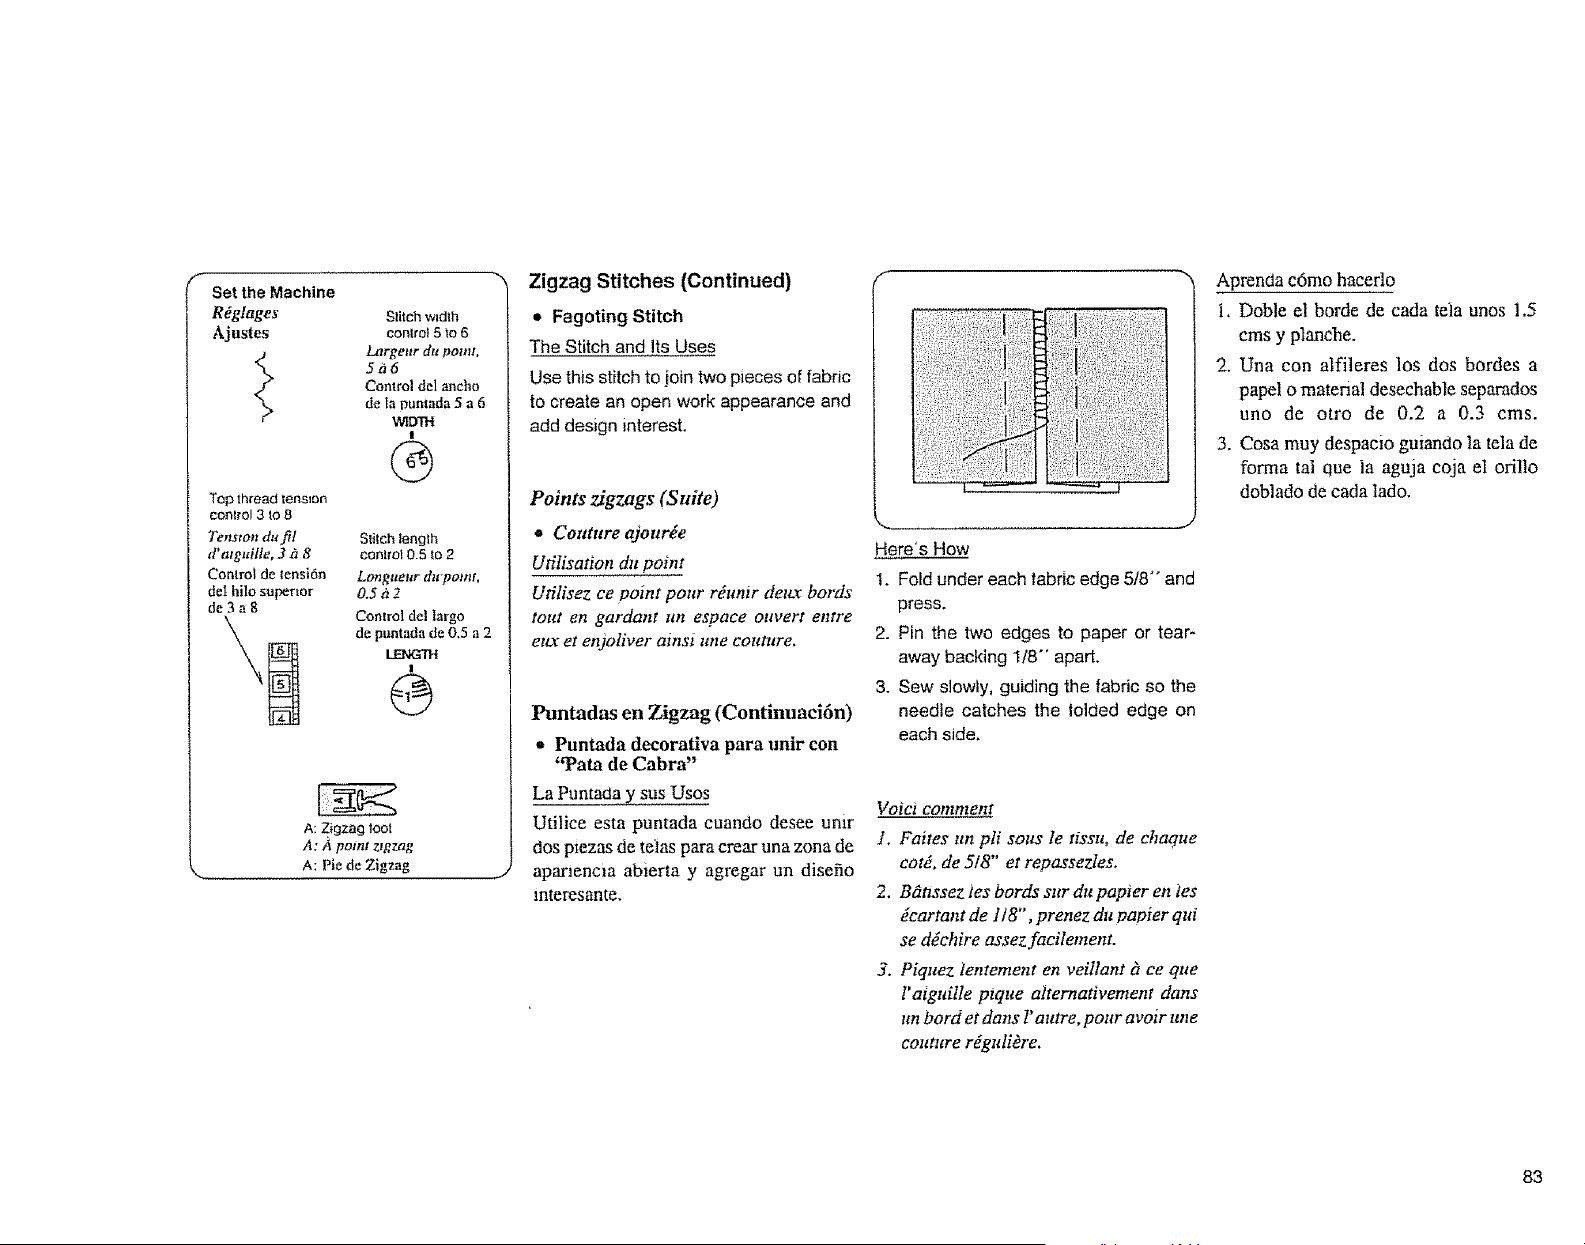
Set the Machine
R_gl_ges Stitch w=dih
Ajustes controt 5 to 6
Lttrget_r d_t point,
5a6
Control de] ancho
de [apuntada 5 a 6
WIm'H
|
®
Top thread tension
control 3 to 8
Tension du f!l
d' atguifle, 3 g_ 8
Control de tensi6n
del hilo supermr
de3ag
Siitch length
conlro! 0.5 to 2
Longueur du'pomt,
0.5{12
Control del largo
de puntada de 0.5 a 2
I
A: Zigzag toot
A: it point ztgzag
A: Pie de Zigzag
Zigzag Stitches (Continued)
• Fagoting Stitch
The Stitch and Its Uses
Use this stitch to join two pieces of fabric
to create an open work appearance and
add design interest.
Points zigzags (Suite)
• Couture ajour_e
UtiIisation dtt point
Ufilisez ee point pour rdunir detoc bords
tout en gardant un espQce ottpert entre
etLv et enjoliver ainsl ttne cotttltre.
Puntadas en Zigzag (Continuaei6n)
o Puntada decorativa para unir con
"Pata de Cabra"
La Puntada y sus Uses
Utilice esta puntada cuando desee umr
dos ptezas de telas para clear una zona de
apanencta abierta y agregar un disefio
mteresante.
?:
J
Here's How
1. Fold under each |abric edge 5/8" and
press.
2. Pin the two edges to paper or tear-
away backing 1/8 °. apart.
3. Sew slow_y, guiding the fabdc so the
needle catches the |olcled edge on
each side,
Voicl comntent
]. Faites nn pli sorts le tissu, de chaqtte
cotd, de 5/8" et repassezles.
2. Bfnssez ies bords stw du papier en tes
dcartant de 1/8", prenez du papier qui
se ddchire assez faeilement.
3. Piquez tentement en veiltant h ce que
!'aiguille ptque atternativement dans
un herd et dans I'attlre, pour avoir une
couture r@uIikre.
Aprenda c6mo haceflo
i, DoNe el borde de cada tela unos 1,5
cms y planche.
2, Una con alfileres los dos bordes a
papel o material desechable separados
uno de otro de 0.2 a 0.3 cms.
3. Cosa muy despacio guiando la tela de
forma ta_ que ia aguja coja el orillo
doblado de cada lade.
83
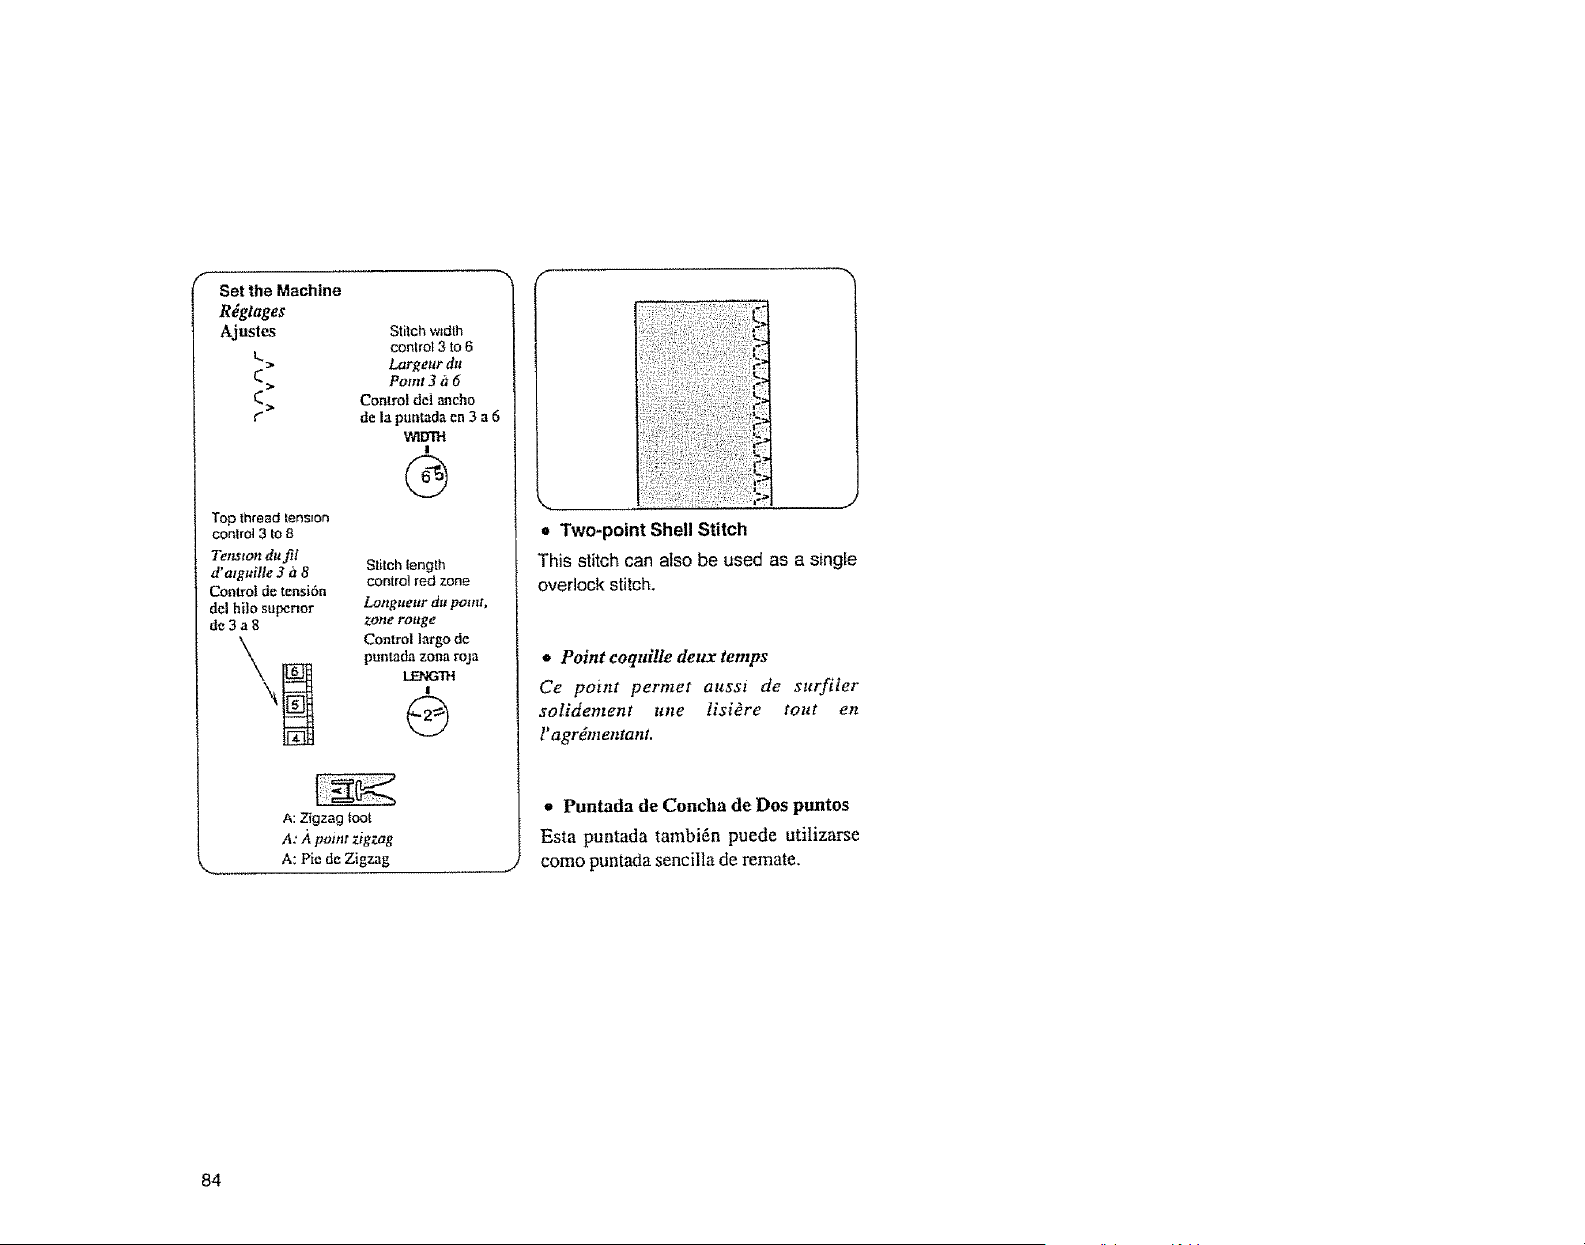
Set the Machine
R_glages
Ajustes
C
(>
Top thread tension
control 3 to8
Tenswn du fil
d' arguilte 3 _ 8
Control de tensi6n
del hilo superior
de3a8
Stitch w_dth
control 3 to 6
Largeur du
Pomt 3 a 6
Control del m_cho
de la puotada en 3 a 6
WIDTH
I
G
Stitch tength
control red zone
Longueur du point,
Zo,'le ro_tge
Control largo de
pontada zona ro]a
LENGTH
1
@
A: Zigzag |oot
A: ._ pomt zigzag
A: Pie de Zigzag
): ;::: ¢"
t
£ ' ,:[I
t Two-point Shell Stitch
This stitch can also be used as a singie
overlock stitch.
• Point coqui!le deux temps
Ce point permet aussi de surfiler
solidement une lisi#re tout en
l'agrdntentant.
= Puntada de Concha de Dos puntos
Esta puntada tambi6n puede utilizarse
como puntada sencilla de remate.
84
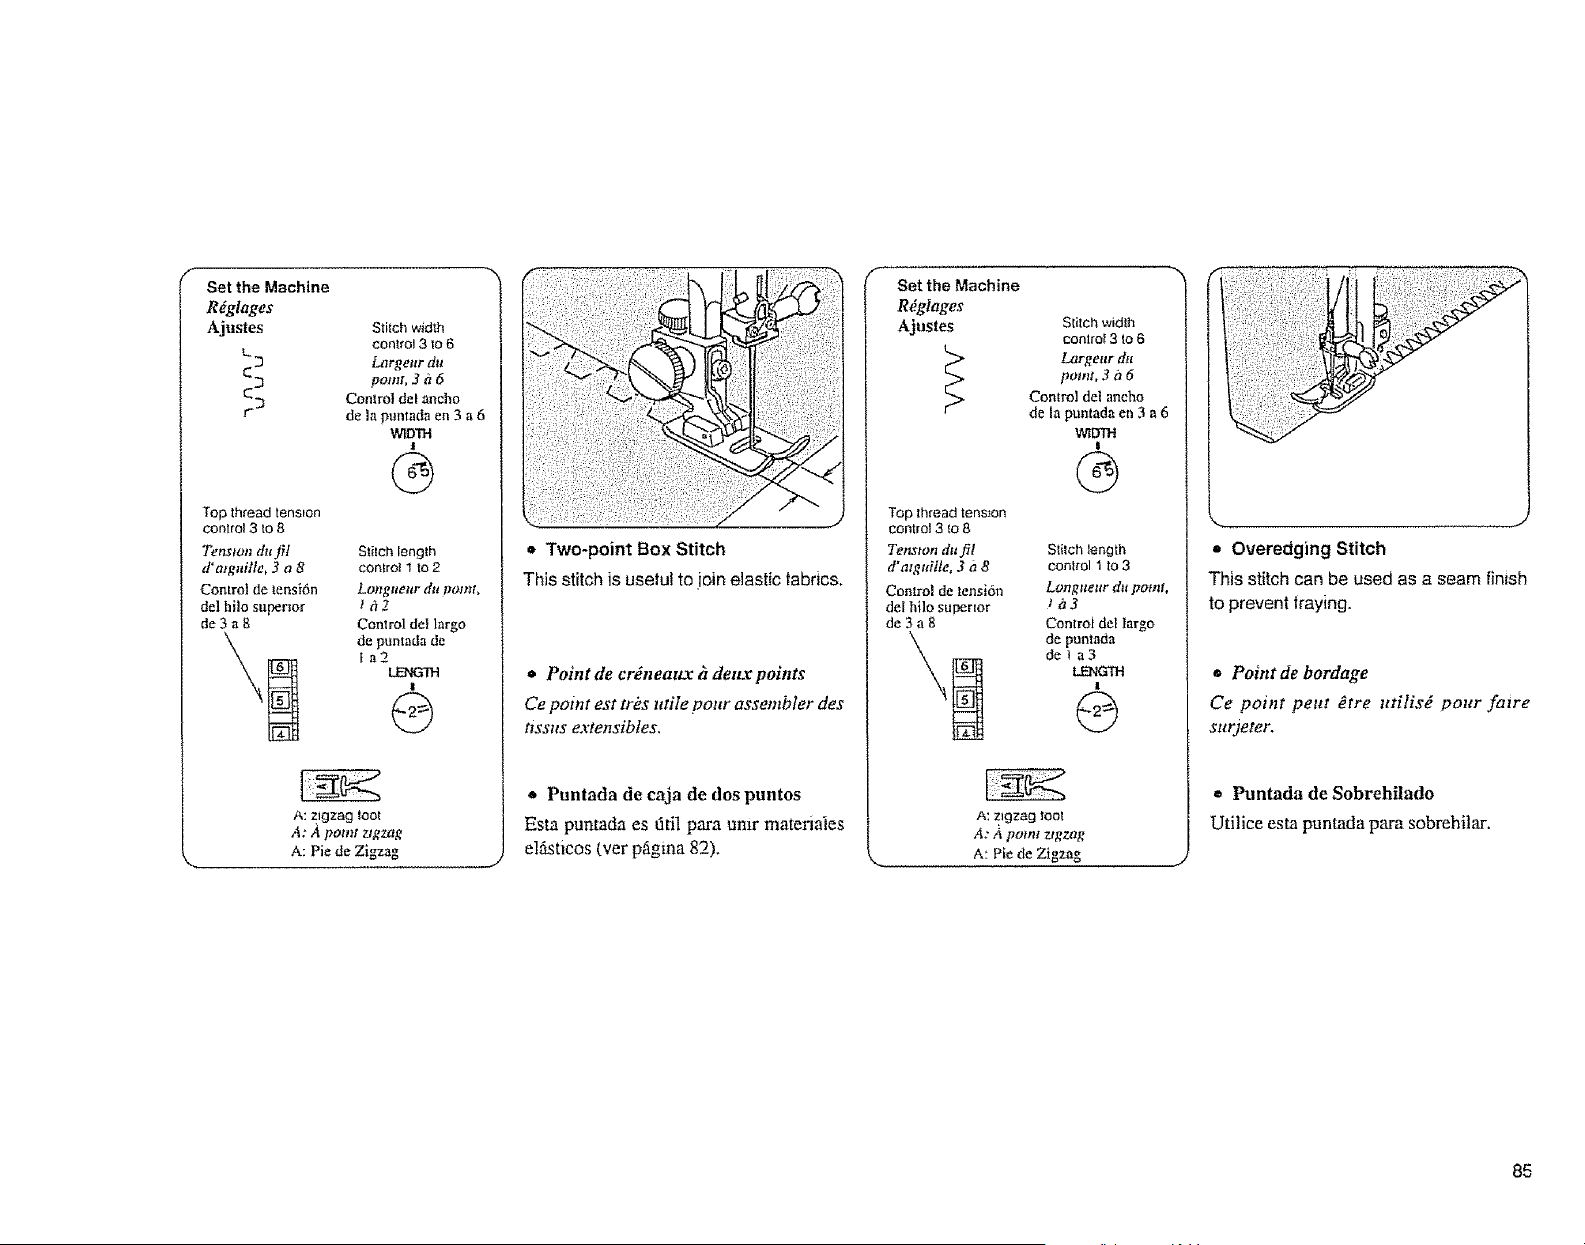
Set the Machine
R_glages
Ajllstes
C 3
c
r.2_
Top thread tens=on
control 3 to 8
Tensten dufit
d'mguifte, 3 a 8
Control de tensi6n
del hilo supermr
de3a8
Stitch width
control 3 to 6
Largenr da
point, 3 ii 6
Control dO aneho
de la puntada en 3 a 6
WIDTH
l
(3
Stitch length
control 1 to 2
Longueur du point,
lh2
Control del largo
de puntada de
[a2
I
Q
A: zigzag toot
A: J_point ztgzag
'-. A: Pie de Zigzag
" Two-point Box Stitch
This stitch is usetui to join elastic fabrics.
* Pointde cr&zearLrhdeuxpoints
Ce point est trbs utile pour assembler des
tisstts extensibles,
6 Puntada de caja de dos puntos
Esta puntada es dtil para umr materia]es
elgsticos (ver pfigina 82).
Set the Machine
R#glages
hjustes
Top Ihread tension
Control3 to 8
Tenswn du fil
d'atgtdtle, 3 a 8
Control de tensidn
de[ hilo supermr
de3a8
Stilch width
centre[ 3 to 6
Largeur du
point, 3 &6
Controldelancho
de la puntada en 3 a 6
WIDTH
I
Stilch length
control 1 to 3
Longueur du point,
_g73
Conifer deI largo
de puotada
del a3
LENGTH
i
@
A: zigzag loot
A: A potnt ztgzag
,. ............. A: Pie de Zigzag
% ...... J
Overedging Stitch
This stitch can be used as a seam finish
to prevent fraying.
• Point de bordage
Ce point peru Otre utilisd pour falre
sttrjeter.
= Puntada de Sobrehilado
Utilice esta puntada para sobrehilar.
85
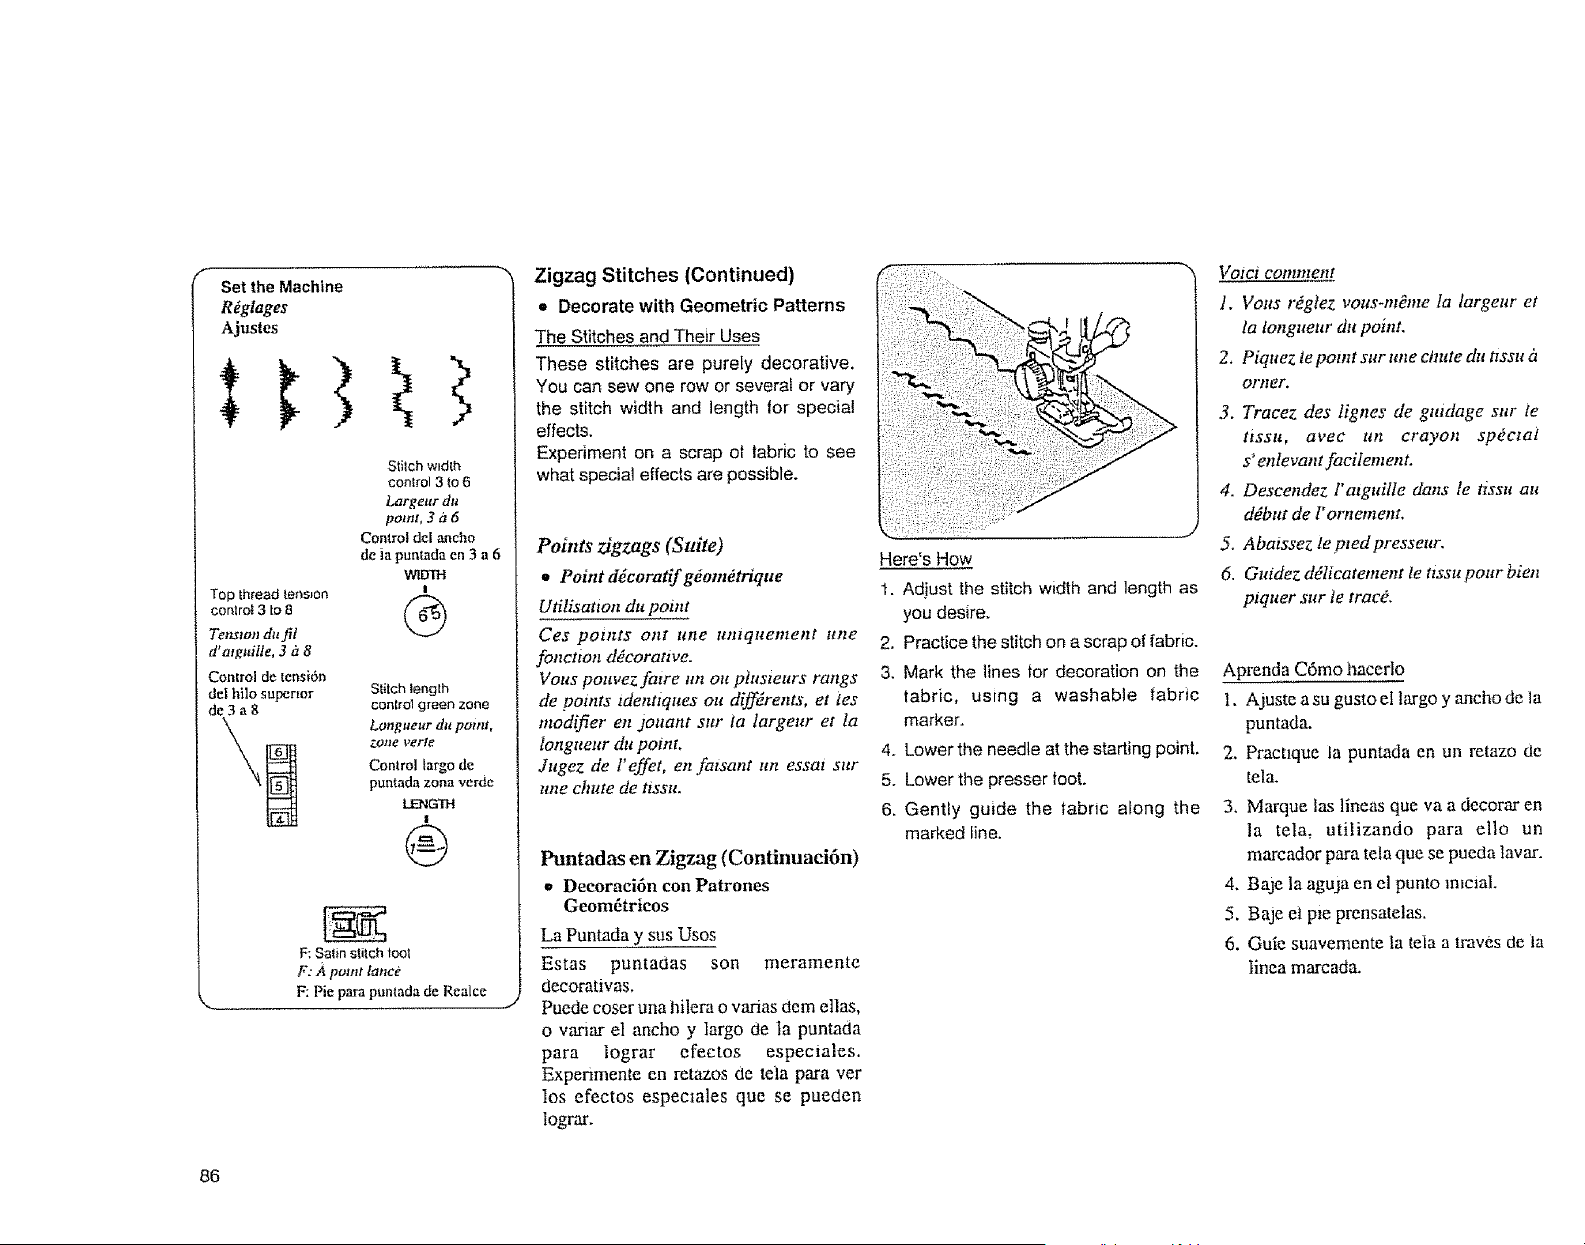
Set the Machine
R_gtages
Ajustes
Top thread tension
control 3 to 8
Tenston du f!t
d' algMlfe, 3 h 8
Control de tensi6n
del hilo supertor
de3a8
Stitch width
comml 3 to 6
Largeur du
point, 3 it 6
Control de[ aneho
de ia puntada en 3 a 6
W1D1H
!
Stitch tength
cont,01 green zone
Longueur du pottlt,
?.otle v£rle
Contro{ _argo de
puntada zona verde
LENGTH
!
®
F: Satin stileh toot
F: A point lane#
F: Pie para pumada de Realee
Zigzag Stitches (Continued)
= Decorate with Geometric Patterns
The Stitches and Their Uses
These stitches are purely decorative,
You can sew one row or several or vary
the stitch width and length tor special
effects.
Experiment on a scrap ot fabric to see
what specla] effects are possible.
Points zigzags (Suite)
= Pointd&oratifg#om#trique
Ufilisation du point
Ces points ont une umquement une
fonctzon ddcorattve.
Vous pouvez faw¢ un ou plusleurs tangs
de points tdentiques oR diffdrents, et les
modifier en jouant sur ta largeur et ta
longueur du point,
Jugez de t'effet, en falsant un essat sur
une chute de tissu.
Puntadas en Zigzag (Continuaci6n)
e Decoraci6n con Patrones
Geom6tricos
La Puntada y sus Usos
Estas punta(las son meramente
decoratwas.
Puede coser una hilera o varias dem elias,
o vanar el ancho y largo de la puntada
para iograr efectos especiales.
Expenmente en retazos de tela paraver
los efectos espectales que se pueden
iograr.
Here's How
t. Adjust the stRch width and length as
you desire.
2. Practice the stitch on a scrap of fabric.
3. Mark the lines for decoration on the
fabric, using a washable fabric
marker.
4. Lower the needle at the starting point,
5. Lower the presser foot.
6, Gently guide the fabric along the
marked fine,
Volci co#ltnenI
1. Volts r#gtez vous-nt&ne la largeur et
ta longueur du point.
2. Piqttez te point sur lttle chute du ttsstt &
orner.
3. Tracez des lignes de guidage sur te
ttssu, avec un crayon spOcmi
s'enlevant facilement.
4. Descendez ratguUle darts le tissu au
ddbut de l' ornement.
5. Abatssez le pted presseur.
6. Guidez ddlicatement te ttssu pour bien
piquet sur le trac&
Aprenda C6mo hacerlo
l, Ajuste a su gusto el largo y ancho de ]a
puntada.
2, Practlque la puntada en un retazo dE
tela.
3. Marque las lineas que va a decorar en
la tela, utilizando para ello un
marcador para tela que se pueda lavar.
4. Baje la aguja en el punto mmial.
5, Baje el pm pmnsatelas.
6. Guie suavemente la teia a traves de ia
tinea marcada,
86
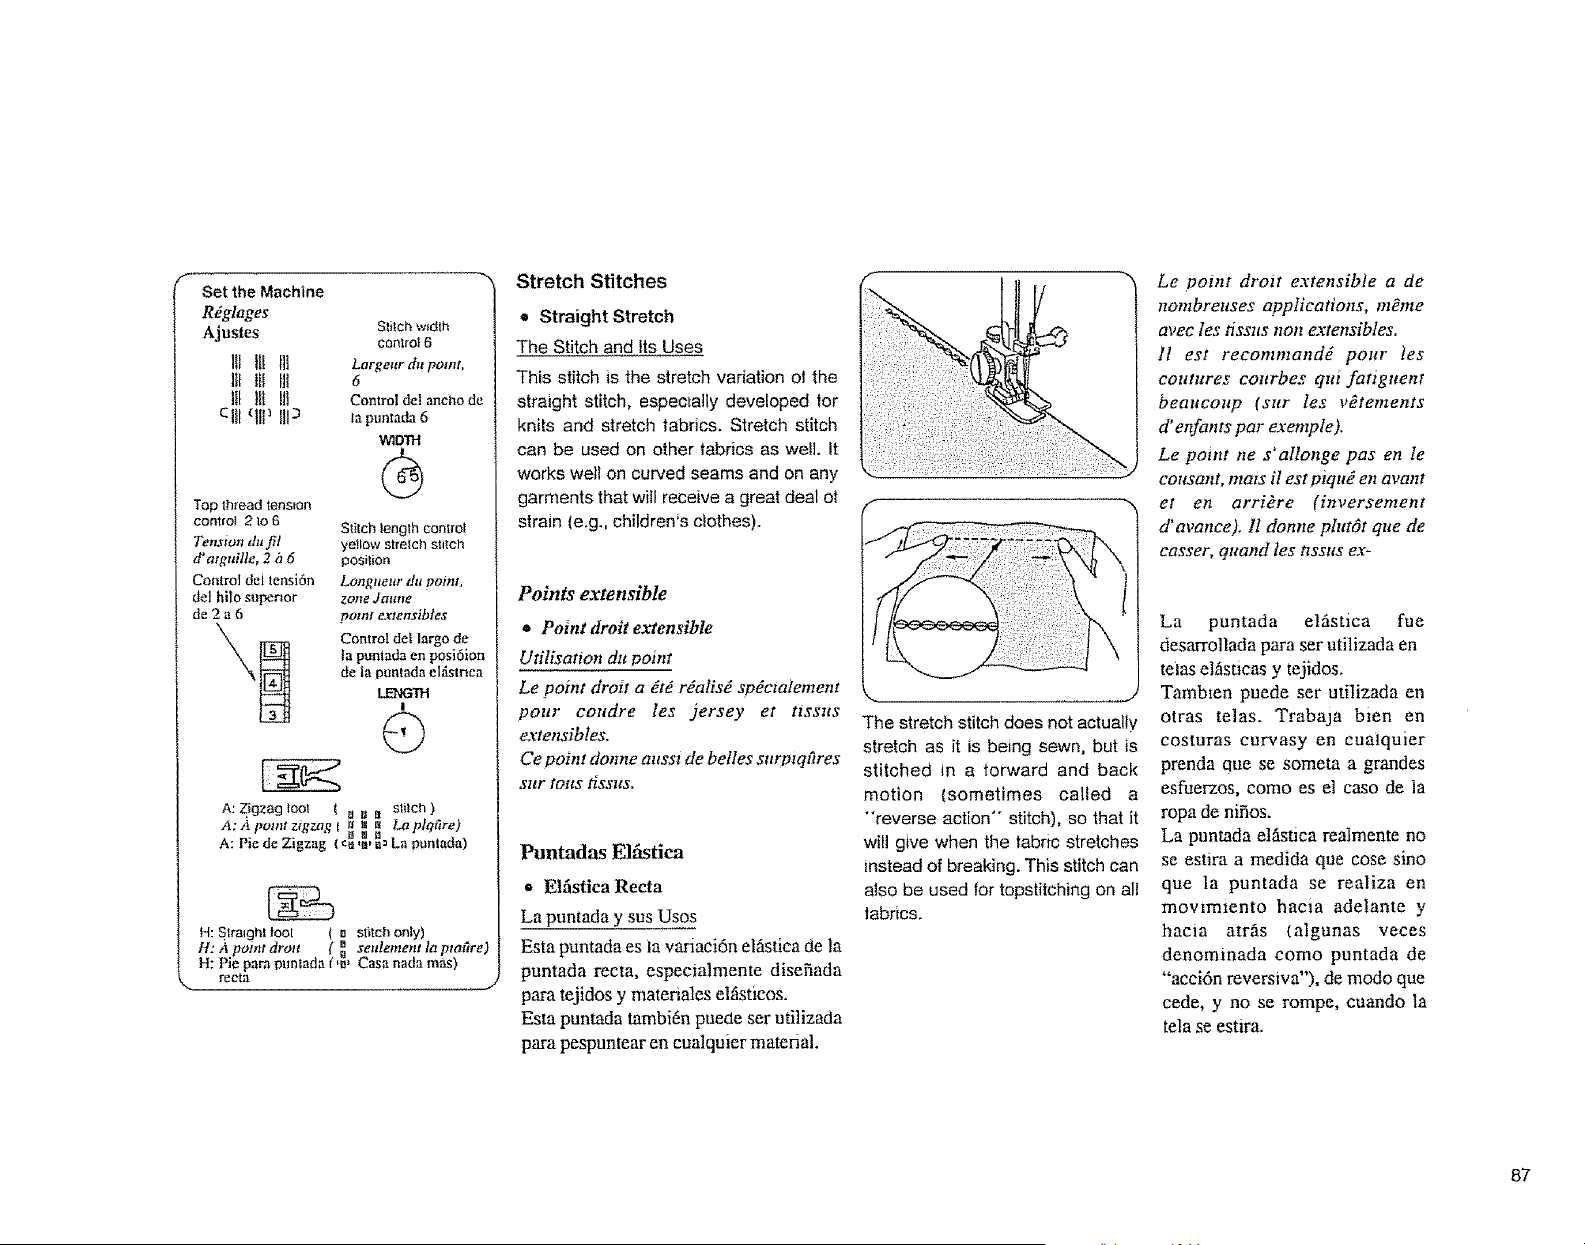
Set the Machine
Rdglages
AJustes Stitchw_dth
control6
Ill Ill lit Largeur du point.
lit Ill tll 5
Ill Ill [11 Control de! anchode
cl[[ qlP 111_ ta puntada 6
Wlffrtl
Top thread tension
control 2 to 6
Tension du fil
d'arguille, 2 fi 6
ContrN dei tensi6n
del hito supenor
de2a6
Stitch length control
yellow strelch stitch
position
Longueur tlt_ point,
Zolte JaHtle
por!! e.rtensibles
Control de!Ilargo de
la puntada en posi6ion
de ia lmmada elfismea
I
A: Z.igzag toot ( _ _ tl slilch )
A: A potnt z_gzag [ rJ _ _ La plqrtre)
A: P=ede Zigzag (qa,m__a_Lapuntada)
H: Straight loot ( a stitch only)
H: A poim dro_t ( _ seulement Io lna_re)
H: Pie para t)untada(,_' Casa nada mas)
recta
Stretch Stitches
• Straight Stretch
The Stitch and Its Uses
This stitch is the stretch variation o1 the
straight stitch, especially developed for
knits and stretch fabrics. Stretch stitch
can be used on other fabrics as well. [t
works well on curved seams and on any
garments that will receive a great deal ot
strain (e.g., children's clothes).
Points extensible
• Point droit extensible
Utilisation du point
Le point droll a gt( rdalisd spdclatement
pour cottdre les jersey et ttssus
extensibtes,
Ce point donne ansst de belles surptqFtres
snF lOllS l_S,¥11S,
Puntadas Elfistica
o Etfistica Recta
La puntada y sus Usos
Esta puntada es ia vanaci6n elfistica de }a
puntada recta, especmlmente disefiada
para tejidos y matenales el_isticos.
Esta puntada tambi6n puede ser utilizada
para pespuntear en cualquier matenal.
The stretch stitch does not actually
stretch as it is being sewn, but is
stitched in a torward and back
motion (sometimes called a
"'reverse action" stitch), so that it
will give when the fabric stretches
instead of breaking. This stitch can
also be used tor topstltching on all
labrics.
Le polnt droll extensibte a de
nombreuses applications, m_me
avec les hssns non extensibles.
II est recommandd pour les
coutures conrbes qut fatiguent
beattcottp (sur les v_tements
d' enfants par example).
Le point ne s_aHonge pas en le
cousant, mais il est piqnd en avant
et en artiste (inversement
d'avance), ll donne phtt6t que de
cosset, quand les nssus ex-
La puntada elfistica fue
desarrollada para ser utilizada en
teias elfisticas y tejidos.
Tambmn puede ser utilizada en
otras telas. Trabaja bien en
costuras curvasy en cuaiquier
prenda que se someta a grandes
esfuerzos, como es el case de ia
ropa de nifios.
La puntada elfistica reatmente no
se estira a medida que cose sino
que la puntada se realiza en
movtm_ento hacia adelante y
hacm atrfis (algunas veces
denorninada como puntada de
"acci6n reverswa"), de mode que
cede, y no se rompe, cuando ta
tela se estira.
87
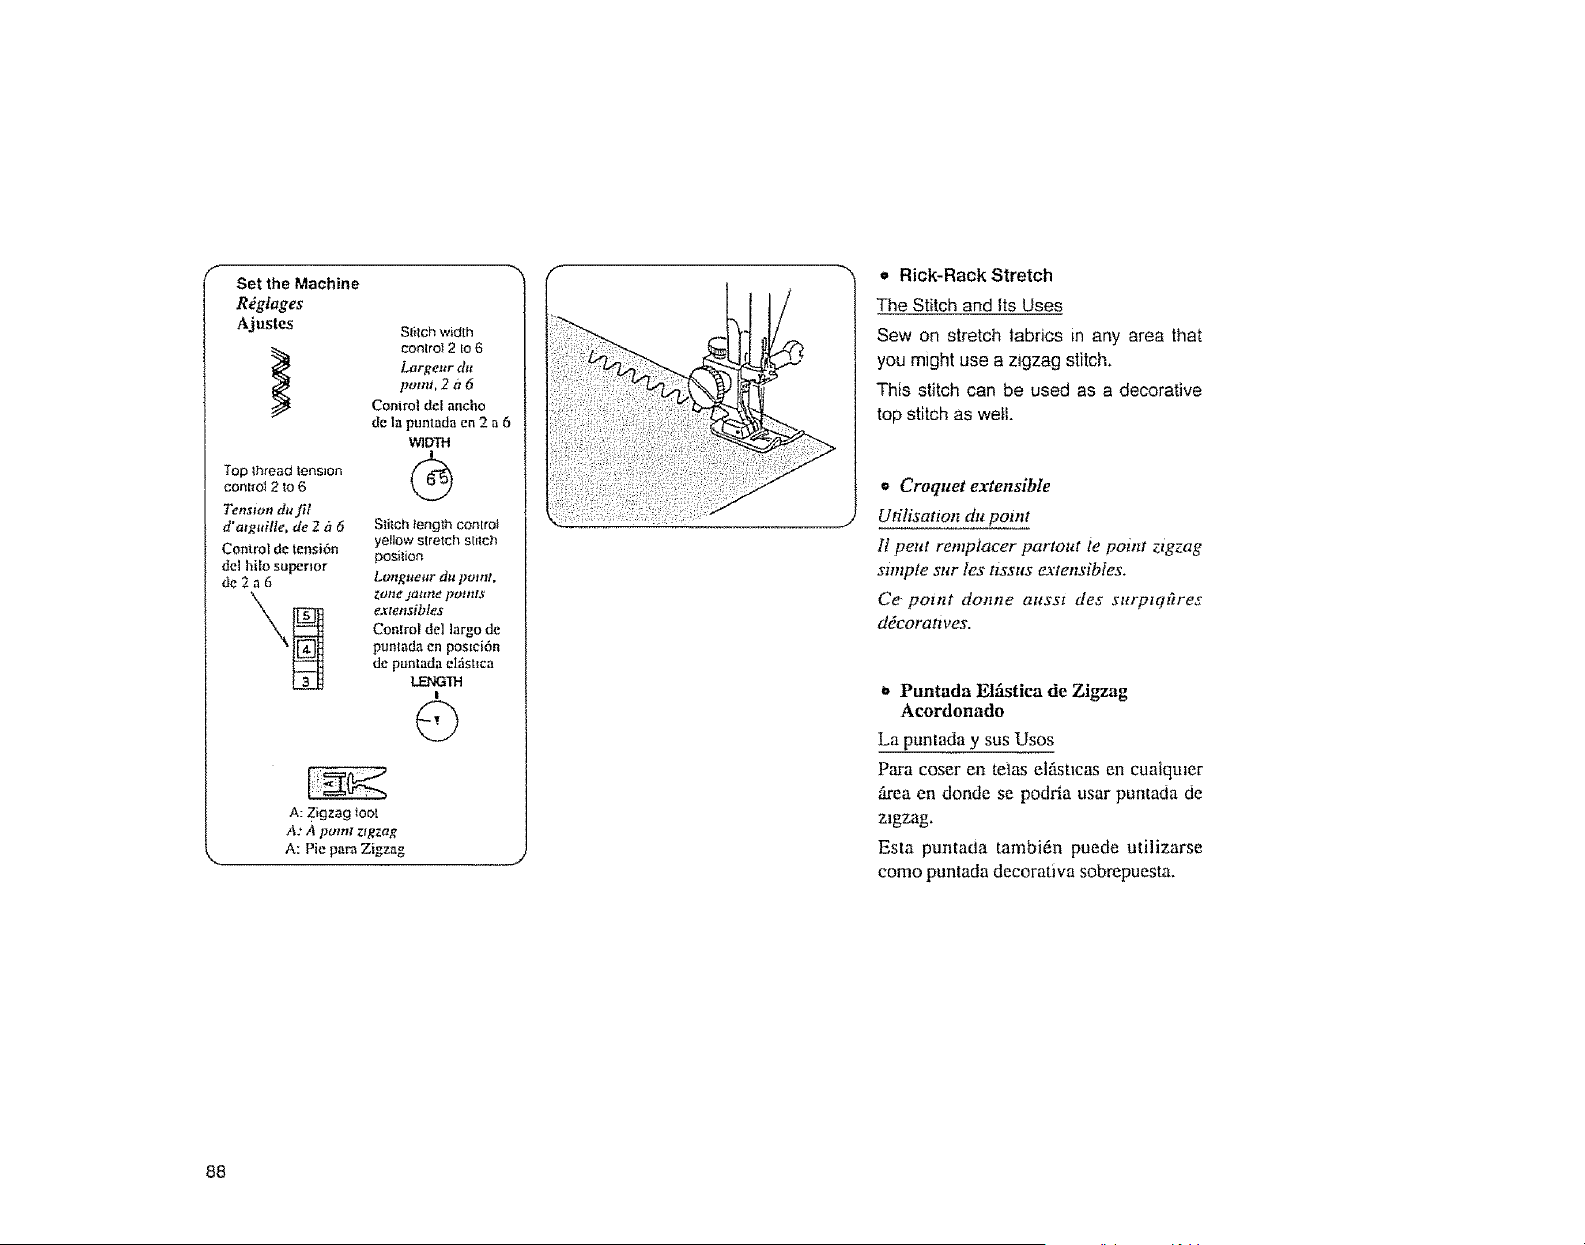
f
Set the Machine
R_gfages
Ajustes
Topthreadtension
con[fol2:to6
Tension du fit
d'atguille, de 2 h 6
Control de tensi6n
del hito superior
de2a6
Stftch width
conlro] 2 to 6
Largeur &t
petal, 2 il 6
Control de[ ancho
de la puntada en 2 a 6
WIDTH
Stitch length control
yellow stretch stitch
posilion
Lt_ttgt_ear d_t petal,
zoae dattnd polrns
extensibles
Control del largo de
puntada en postci6n
de panlada elfist_ca
LENGTH
I
©
©
A: Zigzag ioot
A: A point ztgzag
A: Pie para Zigzag
f
ili!iliiii!ii!ii!
o Rick-Rack Stretch
The Stitch and its Uses
Sew on stretch iabrics in any area that
you might use a zigzag stitch.
This stitch can be used as a decorative
top stitch as well
n Croquet extensible
Ufilisatton du point
It peat remptaeer partout le point ztgzag
sm_ple sur fes ttssus e_rtensibtes.
Ce point donne attsst des st_rptqi_res
ddcoratt yes.
b Puntada Etfistiea de Zigzag
Acordonado
La puntada y sus Uses
Para coser en tetas elfist_cas cn cuaiqmer
firea en donde se podria usar puntada de
zigzag.
Esta puntada tambi6n puede utilizarse
come puntada decorativa sobrepuesta,
88
Set the Machine
R_glages
Top thread tens+on
control2 to 6
Tension du fil
d'mguitte 2 fi 6
Stitch wldlh
control 3 Io 6
Largeur du
pomt, 3 _ 6
WIDTH
Stitch length
con!rof
yeIIow sirelch
st+tch position
Longueor du point,
_Ot}e Jtttme points+
exlensibles
!
Q
A: Zigzag foot
A: i_ point ztflzag
.............J
Stretch Stitches (Continued)
o Overcast Stretch Stitching
The Stitch and its Uses
This stitch can be used lor sewing a
seam with an overcast fin+sh.
The seam is termed and finished in one
operation. It can be used when you are
making swtmwear, ski pants end other
garments that require stretch.
Points extensibles (Suite)
Point de snrfilage extensible
UtiIisarton du potnt
Ce point petit #Ire tttilis_ pour fatre des
coutttres stuf!l(es, tl fornte et tintt 1es
coutures en one settle drape, ll est em-
ploy# clans tn confection de maittors de
barn, de pantalons de ski, atnsi que de
v_tements n_cessltanr line certotne
dlostmtt#.
Here+s How
Place the raw edge of the tabric to the
LEFT of the needle as shown.
Stitch so the needle pierces the fabric
just short of the outs+de edge.
Or, place your fabric to allow a 5!8-
seam, then trim seam allowance
after.
Raw or worn edges ot older garments
can be overcast to prevent further
raveling.
NOTE: Use a blue stretch fabric
needle, which effectively
prevents skipped stitches.
Voter comntenr
Alignez Ie bord non tint du nssu pour
qu'il se trouve ,_ LA GAUCHE de
!'atguille, comme monrrd.
Fatres Ies eotttttres en VOltS assurant que
!+azguille pique ie tisstt juste event le
bord extOrieur de ce dermer.
Ott bien aligner votre ottvrage pour
obtemr ttne couture de 5/8", pttts taillez
!'exces de ttssu.
Les bords non tints ou uses de vteux
v#tentents pettvent #tre sttrtil_s, afin
d' empYcher
davantage.
REMARQUE:
tltt ' ils s" eff!loehent
Servez-volts d' ttne
atguiIle fi talon bleu
pour tissus extensibles,
afin de vous
89
Ajustes
Control del ancho
de ia puntada en 3 a 6
Control de tensi6n
det hito superior
de2a6
Control del largo
de puntada en
posici6n de puntada
el_slma
I.ENGq'H
I
©
A: Pie paraZigzag
J
Puntadas en Zigzag
(Continuaci6n)
o Puntada Elfistica de fileteado
La puntada y sus Usos
Se puede utitizar esta puntada pard coser
una costura con temainado de fileteado.
La costura se reatiza y se le da eI
termmado en una soia operaci6n. Se
puede utilizar cuando est_ elaborando
vesttdos de OaSo, pantatones pard
esquiar, y otras prendas que recmieren
de matenai elfistmo.
i
J
Aprenda como tmcerlo
Coloque el lado burdo de la tela a la
IZQUIERDA de laaguja, tai como se
muestra.
Puntee en forma tat que la aguja
traspase ta teia bien cerca del borde
exterior.
O sl no, cotoque ia tela en forma que
permlla una costura de 1.5 cms, y tuego
recorte 1oclue sobreo
Los orillos barrios, o los ya gasta_ios en
prendas usadas, pueden ser fileteados
pard prevemr desftecaoos futuros.
NOTA: Utilice una aguja azul (o
punto dorado) para telas
eIfisticas, que es espectal para
prevemr que se salten las
puntadas.
9O
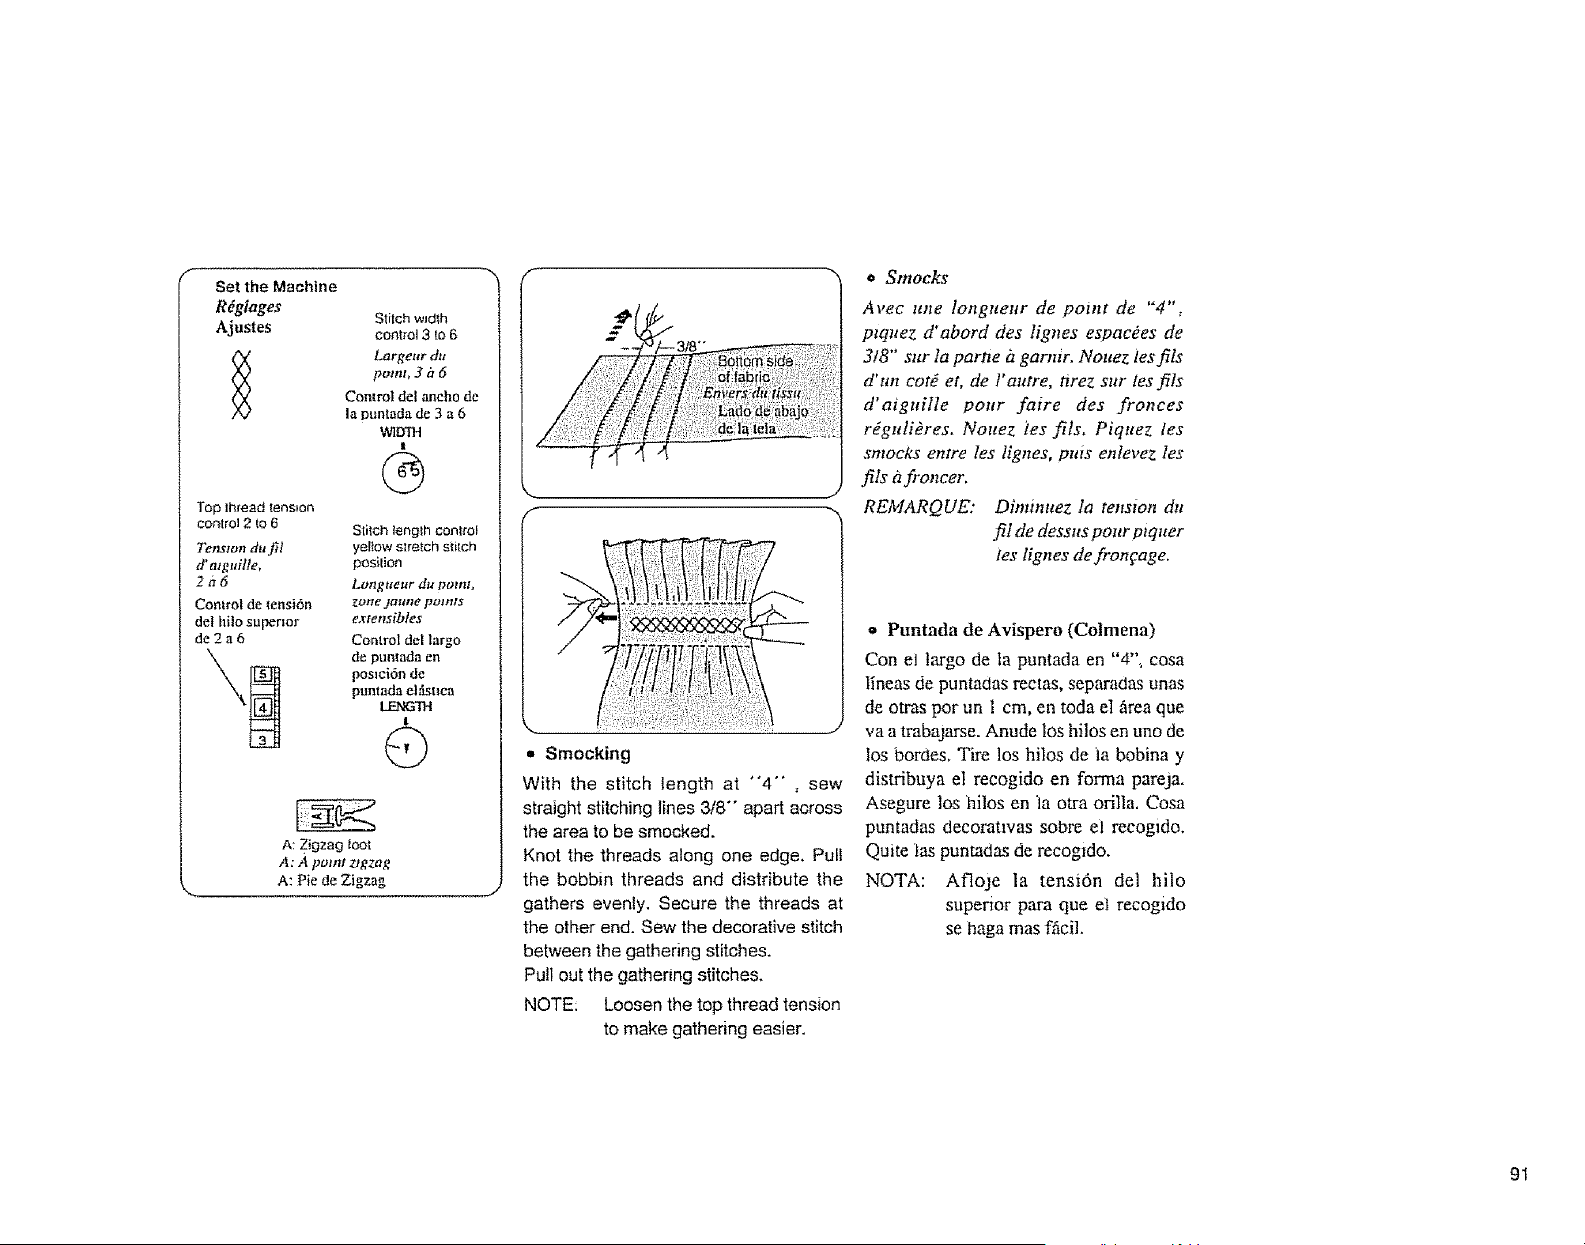
Set the Machine
R@iages
Ajustes
Top lhread tension
control 2 to 6
Tens_un du fil
d'alguitte,
2a6
Control de tensi6n
del hilo supermr
de2a6
Stitch wJdth
control 3 to 6
Largeur du
point, 3 is 6
Control deeancho de
la puntada de 3 a 6
WlDTH
i
Stitch length cont{'ol
yeltow slretch stitch
position
Longtteur du potnt,
zotte jantte points
extensibles
Control de| largo
de puntada en
pomci6n de
puntada clOt+ca
lENGTH
!
G
A:Zigzag _oot
A: A point zigzag
A: Pie de Zigzag
f
f
L
iiiii ++!!iiili! ifill¸i!ii iii !i!+iii!iiii!!!ii
,, Smocking
With the stitch length at °°4"" , sew
straight stitching lines 3/8"" apart across
the area to be smocked.
Knot the threads along one edge. Pull
the bobbin threads and distribute the
gathers evenly. Secure the threads at
the other end. Sew the decorative stitch
between the gathering stitches.
Pull out the gathering stitches.
NOTE: Loosen the top thread tension
to make gathering easier.
,, Smocks
Avec une longueur de point de "4",
ptquez d'abord des lignes espac#es de
3!8" sur la parne it garnir. Nouez ies fils
d' un cor_ et, de l' autre, nrez sur les fils
d'aiguilte pour faire des fronces
r@uli_res. Nouez ies fits+ Piquez les
smocks entre les lignes, puts entevez les
ills it froncer.
REMARQUE: Diminuez IN tension du
fil de dessus pour ptquer
tes lignes de frongage.
* Puntada de Avispero (Colmena)
Con el largo de ta puntada en "4"+ cosa
iineas de puntadas rectas, separadas unas
de otras pot un i cm, en toda el firea que
va a trabajarse. Anude los hilos en uno de
los hordes, Tire los hi|os de la bobina y
distribuya el recogido en forma pareja.
Asegure los hilos en la otra orilla. Cosa
puntadas decorattvas sobre el reeogido.
Quite ias puntadas de recog+do.
NOTA: Afloje la tensi6n del hilo
superior para que et recogido
se haga mas f_cil.
91
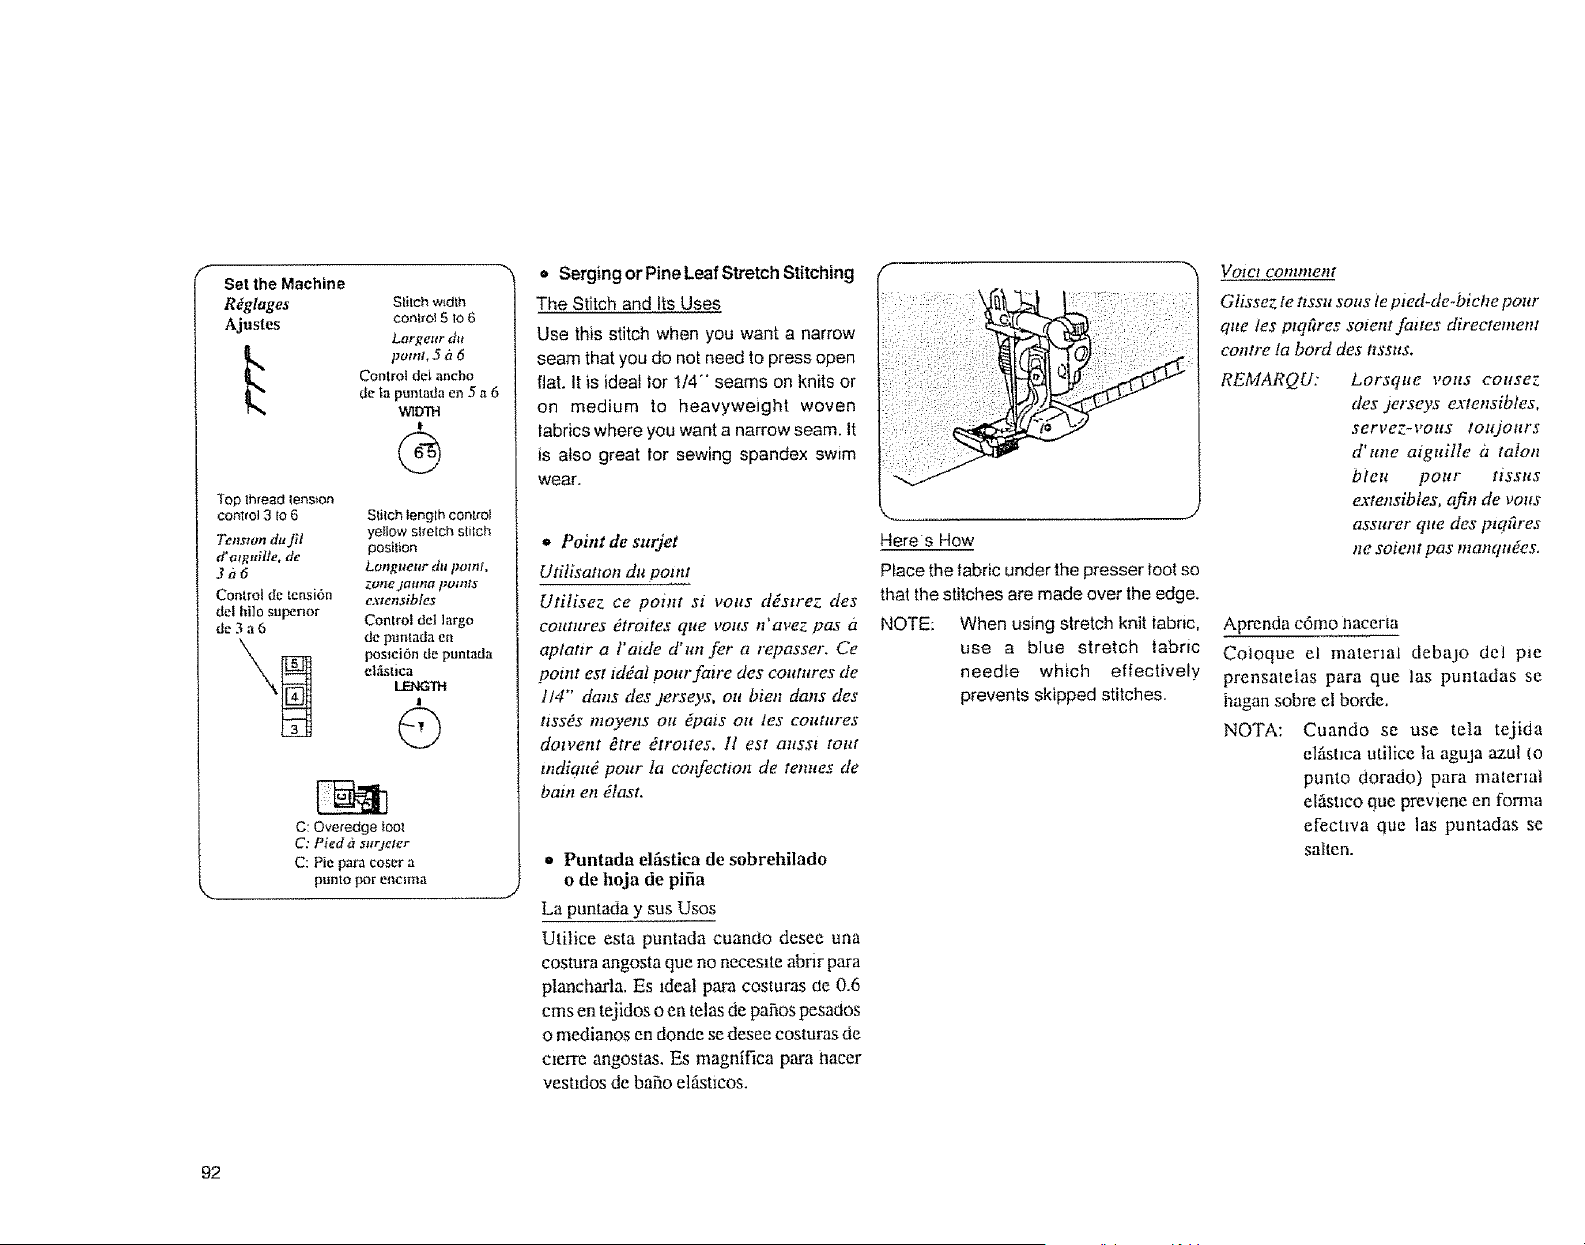
Set the Machine
R_glages
Ajustes
L
TOp thread lenB_on
conlrol 3 to 6
Tensmn du fil
d'atguitle, de
3a6
Control de tensi6n
del hi]o superior
de3a6
Stilch width
control 5 to 6
Lorgeur du
patttt, 5 _l 6
Control dei ancho
de ta puntada en 5 a 6
WIDqH
It
@
Stilch length control
yeIlOW sl;re[ch slitch
position
LO/I,_ncitF (hi ]]OIItI,
Zotte jttltna pottlls
extenMbles
Control del largo
de pumada en
posmi6n de puntada
el,Sstica
LENGTH
I
©
C:Overedge tool
C: Pied _ sltueter
C: Pie para coser a
punto pot enc3ma
o Serging or Pine Leaf Stretch Stitching
The Stitch and Its Uses
Use this stitch when you want a narrow
seam that you do not need to press open
flat. it is ideal for 1/4"" seams on knits or
on medium to heavyweight woven
fabrics where you want a narrow seam. it
is also great for sewing spandex sw_m
wear.
• Point de surjet
Utitisatton du potnt
Utitisez ce point st volts d_strez des
coutures _trottes que vous n'avez pas f
aptattr a fame d'un fer a repasser. Ce
potnt est tddat pour fair¢ des coutures de
1/4" clans des jerseys, ou bien clans des
ttssds moye/ts ott dpois ott les coutures
dotvent Otre _trottes. II est attsst tour
tndiqu_ pour la confection de temtes de
bain en dlast.
o Puntada elhstica de sobrehilado
o de hoja de pifia
La puntada y sus Usos
Utilice esta puntada cuando desee una
costura angosta que no neces_te abnr para
plancharla. Es tdeal para costuras de 0.6
cms en tejidos o cn telas de pahos pesados
o medianos en donde se desee costuras de
cterre angostas, Es magnifica para tracer
vestldos de bafio elfistlcos.
Heres How
P}ace the tabric under the presser toot so
that the stitches are made over the edge.
NOTE: When using stretch knit iabnc,
use a blue stretch fabric
needle which effectively
prevents skipped stitches.
Votct comment
Glissez. le ttssu sous te pJed-de-biche pour
que tes ptq_res sotent fattes directement
contre ta bord des tlsstts.
REMARQU: Lorsqtte vous cousez
des jerseys extensibles,
$ervez-vous toujours
d'une aiguilte it talon
bleu pour tissus
extensibtes, afin de vous
assurer que des p_qhres
/re soie/tt ]9as mgttlqtt_es.
Aprenda c6mo hacerta
Coioque el material debajo dcl ptc
prensateias para que los puntadas se
hogan sobre el borde.
NOTA: Cuando sc use teta tejida
el_stma utilice la aguja azul (o
punto dorado) para materml
el_sttco que prev_ene en fonna
efectwa que los puntadas se
satten.
92
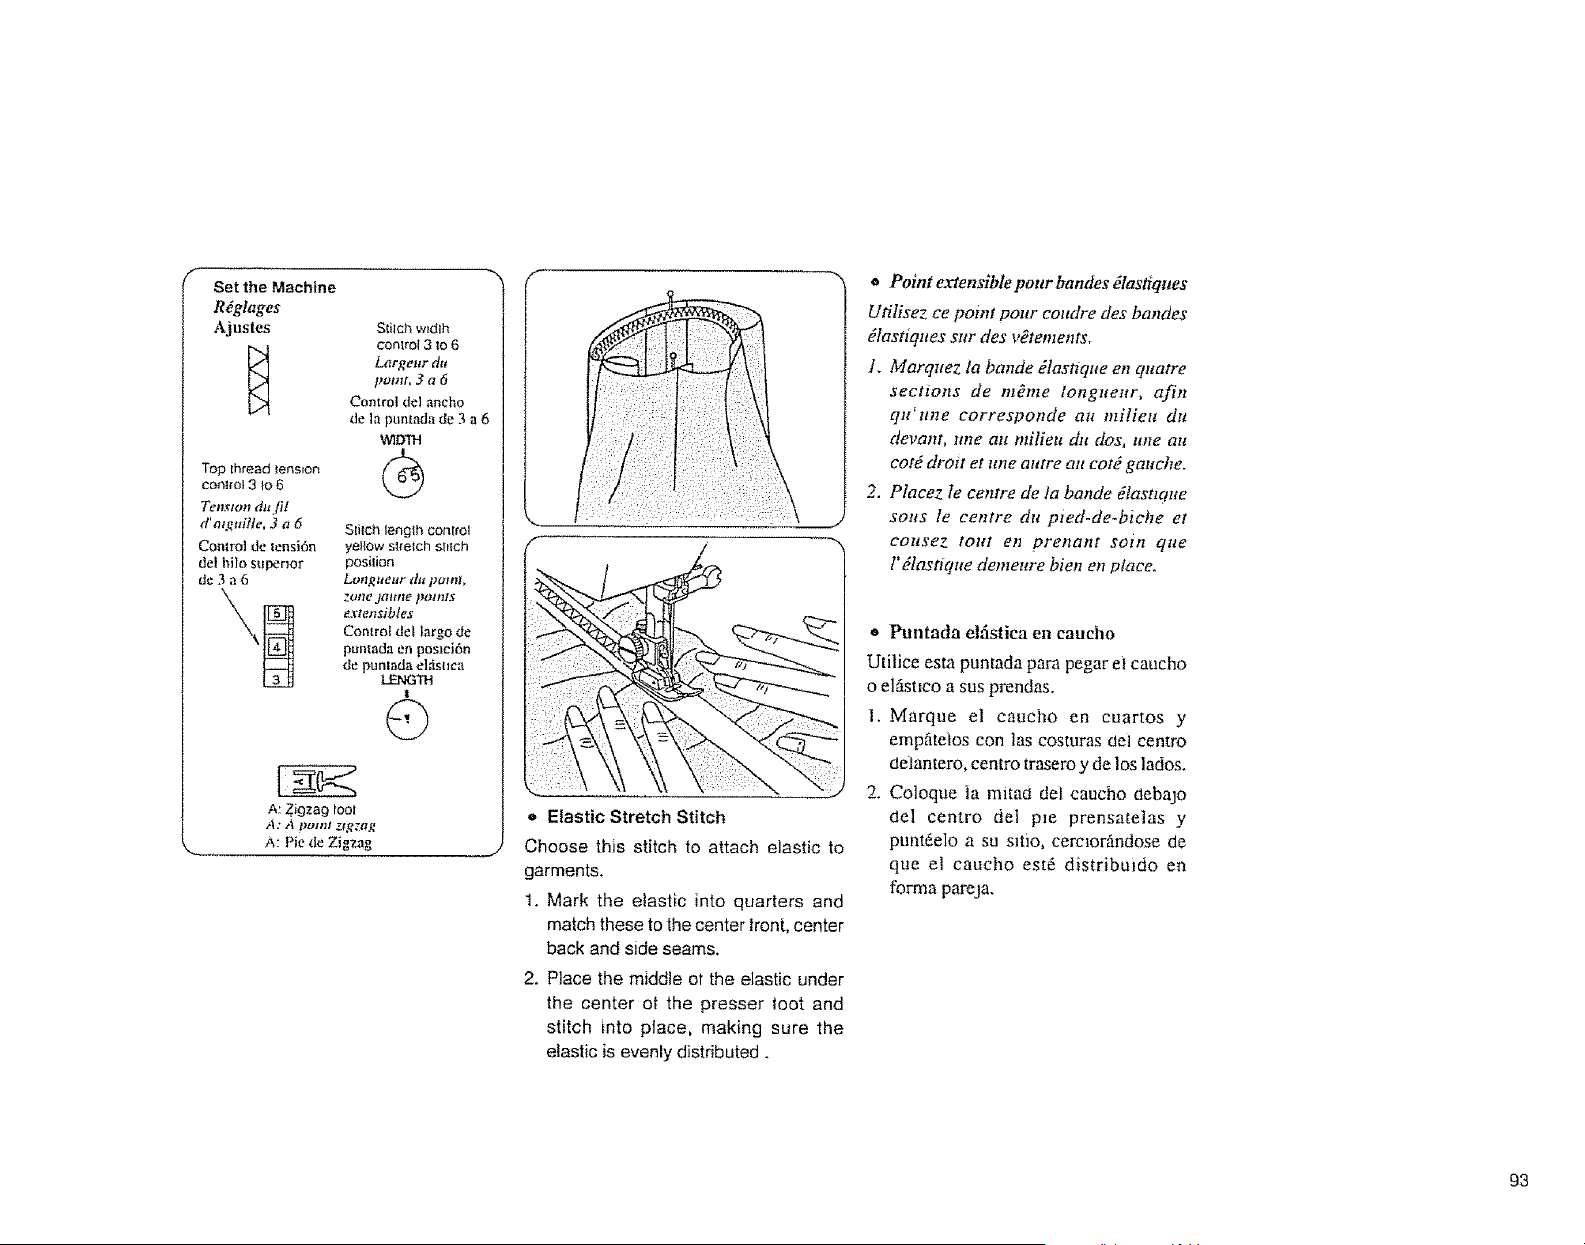
f
set the Machine
R_glages
Ajustes
Top thread tens=on
control 3 _o6
Ten,vlon r!_ffil
d'alguitfe, 3 a 6
Control de tensi6n
del hi]o stEper_or
de3a6
Stilch w_dlh
cOr=lrol 3 to 6
Largeur du
point, 3 a 6
Control de] ancho
de ta puntada de 3 a 6
WIDYH
Stitch length control
yellow st_elch stllch
position
Lotlgtteztr dl_ potnl,
zot_e 3a_rt_epotnts
extensibles
Control det largo de
puntada en posmi6n
de punlndael,'isllca
LENGTH
I
©
A: Zigzagtool
l'_; Z I}otIll ZlgZlt_
A: Pie de Zigzag
J
Elastic Stretch Stitch
Choose this stitch to attach elastic to
garments.
1. Mark the elastic into quarters and
match these to the center front, center
back and side seams.
2. Place the middle ot the elastic under
the center of the presser toot and
stitch into place, making sure the
elastic is evenly distributed.
a Point extensiblepottr bandes _lastiqttes
Utilisez ce point pour cottdre des bandes
dlasttqttes sttr des v_tements.
1. Marqttez la bande dla.rttque en quatre
sections de m_me longueur, afin
qzt_ttne corresponde au milieu dtt
devant, line au milieu dtt dos, ttne art
cord droit et ttne attrre art cord gauche.
Placez 16centre de ta baz_de _tastzqtte
sorts le centre dt¢ pied-de-biche et
eoltsez iOltt en pre/gant soin qtte
t' dlastiqtte demeure bien en place.
* Puntada elfistica en caueho
Utilice esta puntada parapegar e] caucho
o el_ist_coa sus prendas.
1. Marque el caucho en cuartos y
empfiteios con las costuras Uel centro
oeiantero, centro trasero y de los lados.
2. Cotoque la mired del caucho oebajo
clel centro del p_e prensatelas y
punt6elo a su s_t_o, cerc_orfindose cie
que el caucho est(_ distribuido en
forma pareja.
93
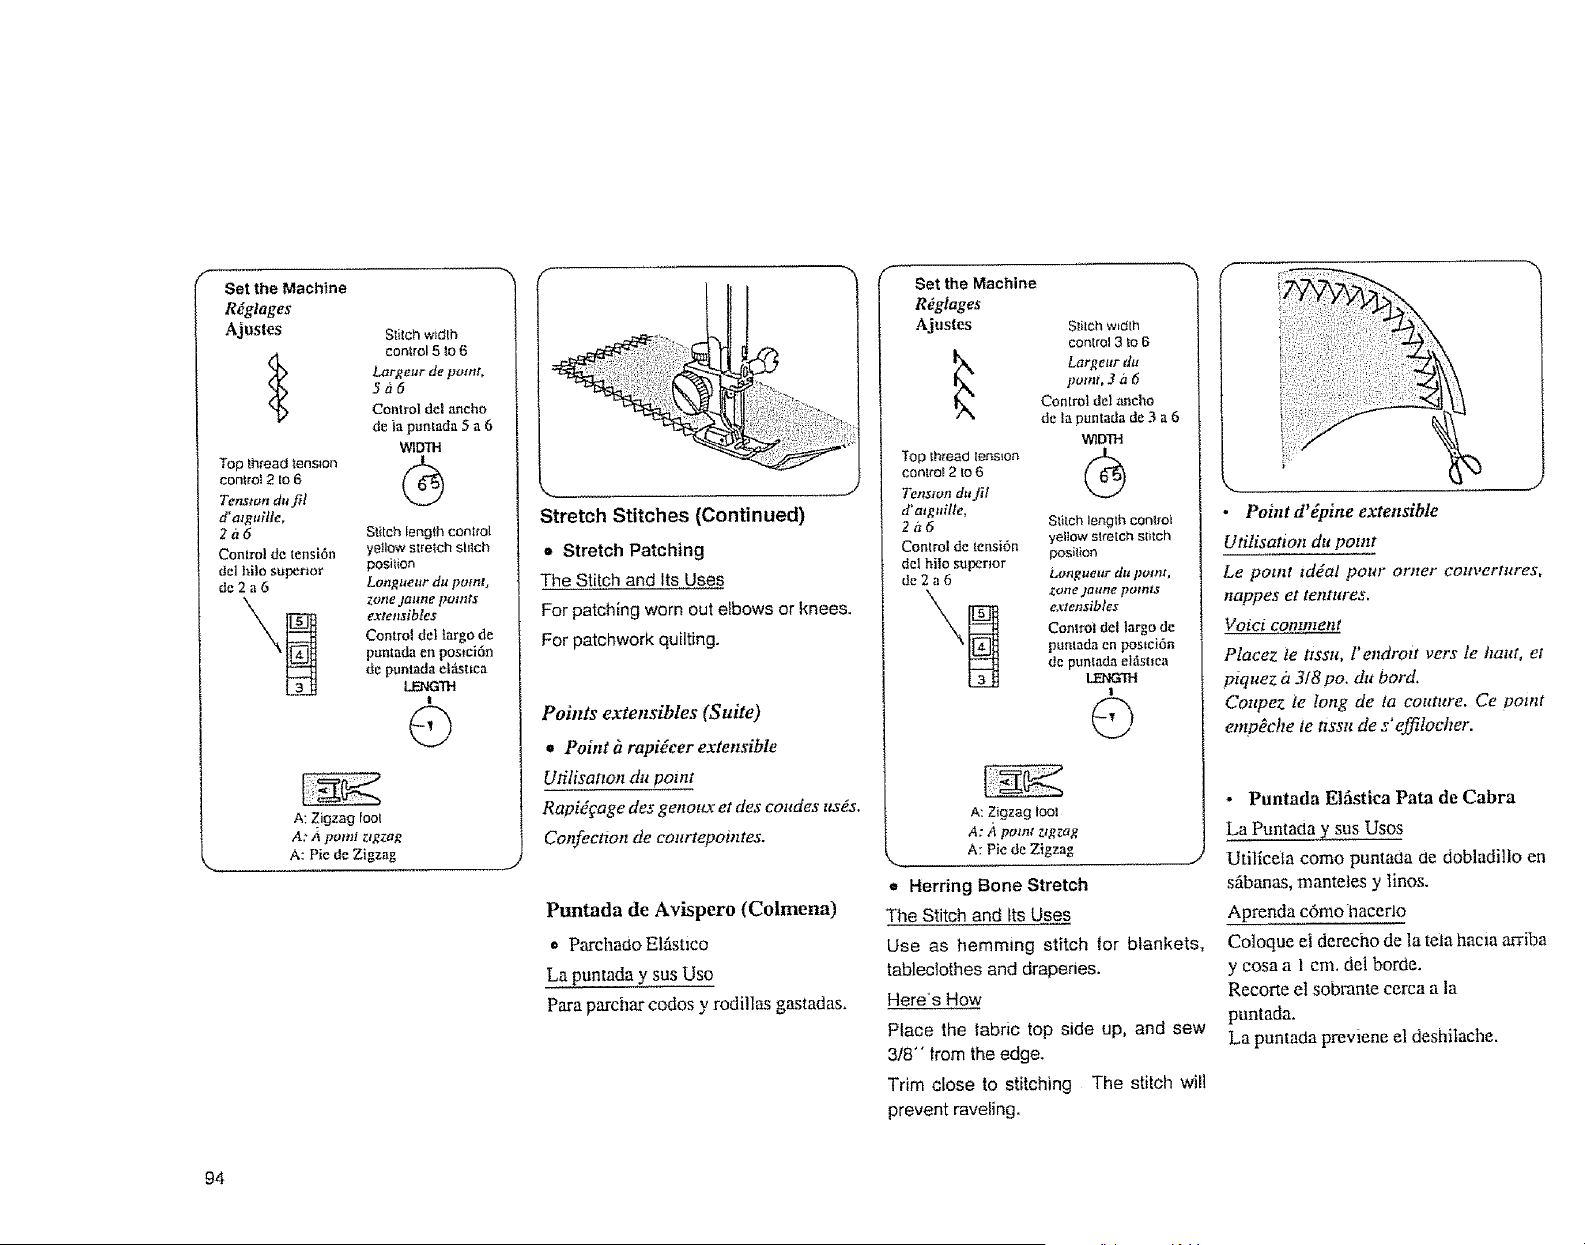
Set the Machine
R_glages
Ajustes
Top thread tension
control 2 to6
Tcnmon du fil
d'azguitle,
2iz6
Control de tcnsi6n
delhilo superior
de2a6
Stitch width
control 5 to6
Largeur de point,
5h6
Control det ancho
de la puntada 5 a 6
WIDTH
Stitch length control
yellow stretch shtch
position
Longueur du point,
zone jaitlle potnls
extensibtes
Control del largo de
puntadaen posmi6n
de puntada ehistma
LEt_TH
!
@
A: Zigzag loot
A:" Jt point ztgzag
A: Pie de Zigzag
k._
F
Stretch Stitches {Continued)
• Stretch Patching
The Stitch and Its Uses
For patching worn out elbows or knees.
For patchwork quilting.
Points extensibles (Suite)
* Point &rapidcer extensible
Ufilisatton du point
Rapt@age des genoux et des coudes uses.
Confectwn de courtepomtes.
Puntada de Avispero (Colmena)
o Parchado El_,stico
La puntada y sus Uso
Para parchar codos y rodillas gastadas,
Set the Machine
R#glages
Ajustes
TOpthread lens{on
conlml2 to 6
Tension du f!l
d'atguille,
2a6
Control de tensi6n
del hilo sulxenor
de2a6
Stilch w_dth
control3 to6
Largeur du
point, 3 i_6
Control del aneho
de 12puntadade 3 a 6
WIDTH
Stitch length, cOnl[ol
yellow slretch stitch
posit_on
Longueur du point,
Zone Jaune poHT_3
extensibles
Comroi del largo de
pumada en posmifn
de puntada elfistma
!
G
A: Zigzag loci
A: A point ztgzag
A: Pie de Zigzag
= Herring Bone Stretch
The Stitch and tts Uses
Use as hemming stitch for blankets,
tableclothes and drapenes.
Here's How
Place the fabric top side up, and sew
3/8"" lrom the edge,
Trim close to stitching The stitch will
prevent raveling.
• Point d'@ine extensible
Ufilisation du point
Le point zddal pour orner couvertures,
nappes et tentures,
Voici comment
Placez le ttssu, l'endroit vers le hant, et
piquez it 3/8 pc, du bord.
Coupez le long de ta couture. Ce point
emp#che ie tzssu de s'effilocher.
- Puntada Etfistica Pata de Cabra
La Puntada y sus Uses
Utiliceta come puntada de dobladitlo en
sftbanas, manteles y Iinos.
Aprenda c6mo hacerlo
Coloque el derecho de la te_ahacta arriba
y cosa a 1 cm. dei borde.
Recorte el sobmnte cerca a la
puntada.
La puntaOa previene el deshitache.
94
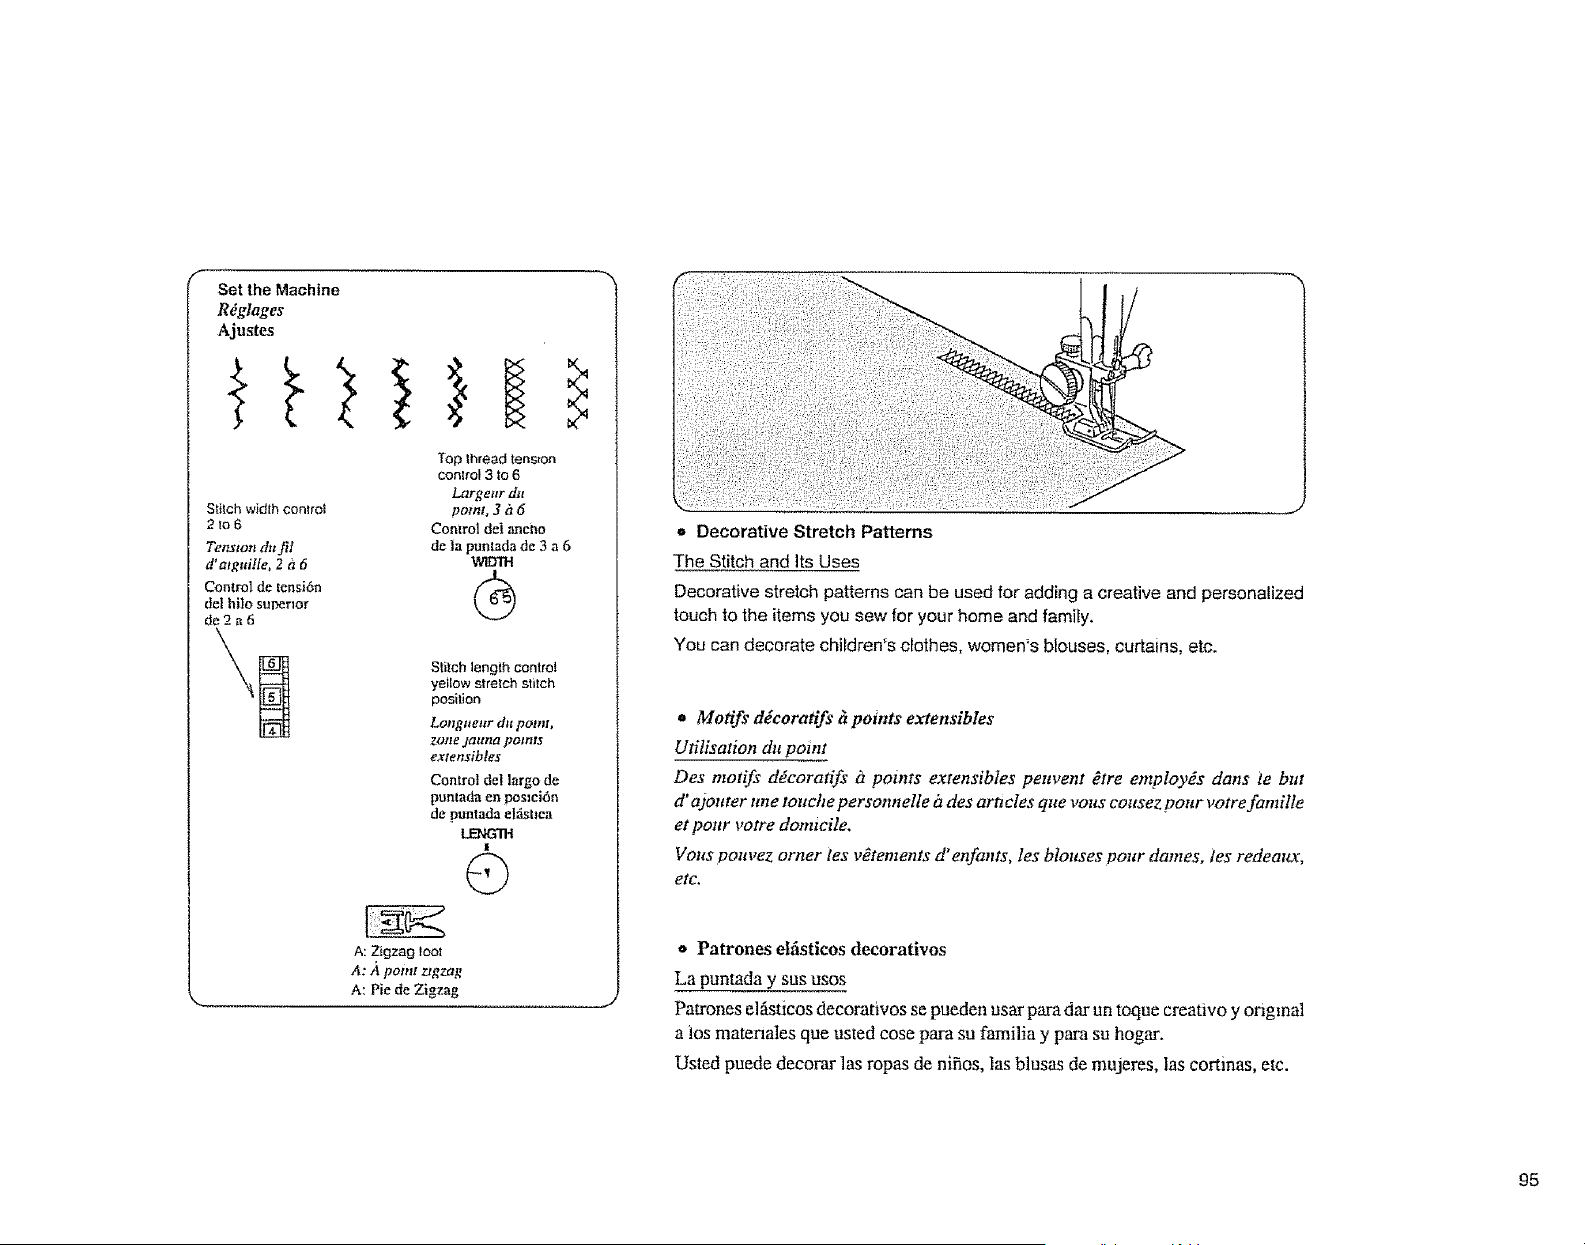
F
Set the Machine
Rdglages
Ajustes
Stitch widthconlfol
21o6
Tenston da fil
d' atgui!fe, 2 i_6
Control de tensi6n
del hilo sur,enor
de2a6
Top thread tension
convol 3 to 6
Largeur du
potato 3 iz6
Control de_ancho
de la pumada de 3 a 6
WIDTH
@
Stitch length control
yellow strelch stitch
position
Lottguear dtt potnl,
zone jattna points
extensibles
Control del largo de
puntada en poslci6n
de puntada el_t_ca
|
@
A: Zigzag lool
A:/4 point ztgzag
A: Pie de Zigzag
= Decorative Stretch Patterns
The Stitch and Its Uses
Decorative stretch patterns can be used for adding a creative and personalized
touch to the items you sew for your home and family.
You can decorate children's clothes, women's blouses, curtains, etc.
a Motifs dEcorafifs h points extensibles
Ufilisation du point
Des motifs ddcoratifs ?t points extensibles peuvent _tre employds dans ie but
d' &outer une touche personnelle izdes artt des que vous cousez pour votre famille
et pour votre domicile,
Vous lgottvez orner ies v_tements d"enfants, les blottses pottr dames, tes redeaux,
etc.
* Patrones elfisticos decorativos
La puntada y sus usos
Patrones el_ticos decorativos se pueden usar para dar un toque creativo y original
a los matenales que usted cose para su familia y para su hogar.
Usted puede decorar las ropas de nifios, las blusas de mujeres, las cortinas, etc.
95
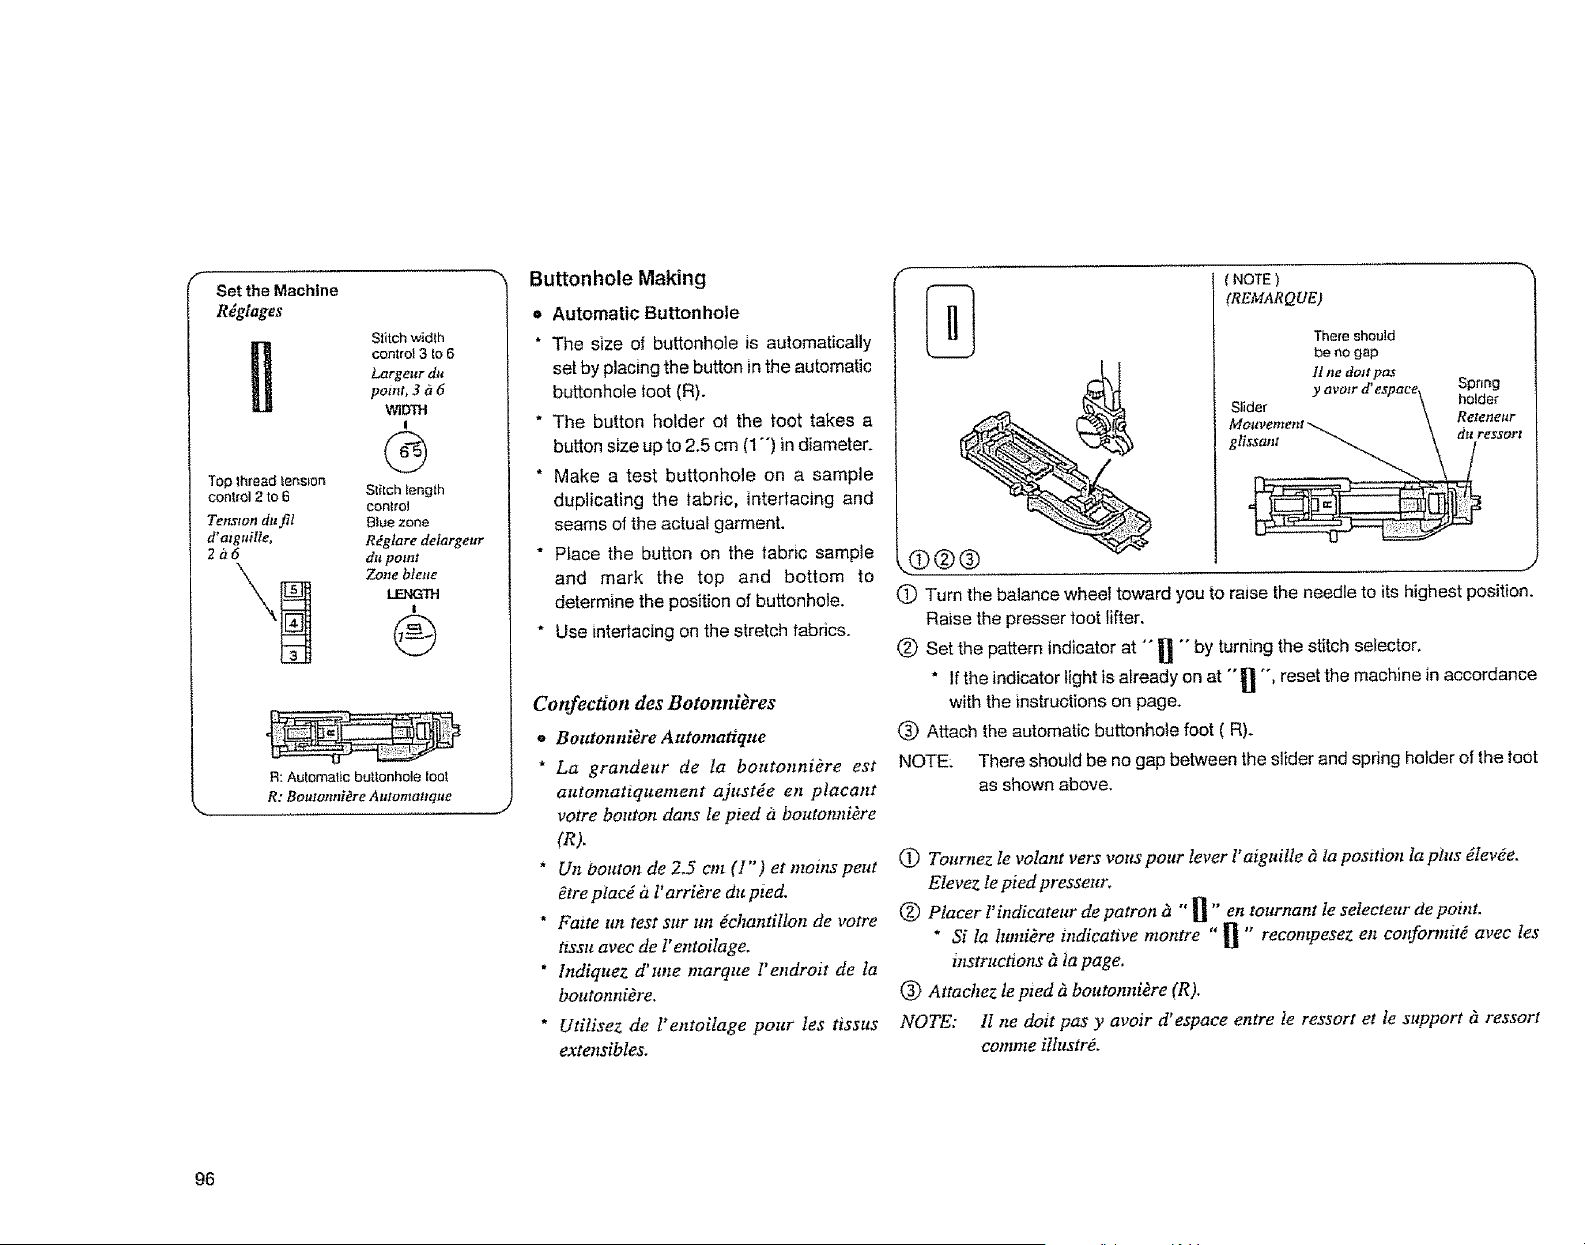
Set the Machine
Rdglages
Top thread tension
control 2 to 6
Te_r_on duff!
d' azguille,
2a6
Stitch width
control3 to 6
Largeur du
point, 3 _ 6
WIDTH
!
G
Slitch length
conltol
Blue zone
Rdgtare delargeur
dtt point
Zone bteue
_TH
!
®
R: Automatic buttonhole loot
R: 13outonnidre Automattque
Buttonhole Making
• Automatic Buttonhole
• The size of buttonhole is automatically
set by placing the button in the automatic
buttonhole toot (R).
• The button holder el the toot takes a
button size up to 2.5 cm (1"') indiameter.
• Make a test buttonhole on a sample
duplicating the labric, interfacing and
seams of the actual garment.
• Place the button on the fabric sample
and mark the top and bottom to
determine the position of buttonhole.
• Use interlacing on the stretch fabrics.
Confection des Botonnt_res
o Boutonniere Atttomatique
* La grandeur de to boutonniere est
automatiquement ajustde en ptacant
votre bouton dans le pied d boutonniere
(R),
" Un bouton de 2.5 cm (1") et moins peut
_tre ptacd it I' arri_re du pied.
* Faite un test sur un @hantillon de votre
tzssu avec de l' entoilage.
" lndiquez d'une marque l'endroit de la
boutonni&e.
* Utilisez de l'entoiIage pour los tissus
extensibles.
.......
NOTE )
(REMARQUE)
Them should
be no gap
1t ne dott pas
Slider
glissant
C) Turn the balance wheel toward you to raise the needle to its highest position.
Raise the presser toot lifter.
(_) Set the pattern indicator at °° _ "" by turning the stitch selector.
* If the indicator light is already on at ""_] "', reset the machine in accordance
with the instructions on page.
(_) Attach the automatic buttonhole foot (R).
NOTE; There should be no gap between the slider and spring holder of the loot
as shown above.
(_) Tournez le volant vers vous pour lever l"aiguille &la position Ia phts dlev_e.
Elevez le pied presseur,
(_ Placer l'indicateur de patron & "' _ "' en tournant le selecteur de point.
* Si la htmi_re indicative montre "_ " recompesez en conformitd avec los
tnstructions ?z ta page.
(_) Attachez le pied _ boutonniere (R).
NOTE: ll ne doit pas y avoir d' espace entre le ressort et te support 7t ressort
comme ilhtstr&
96
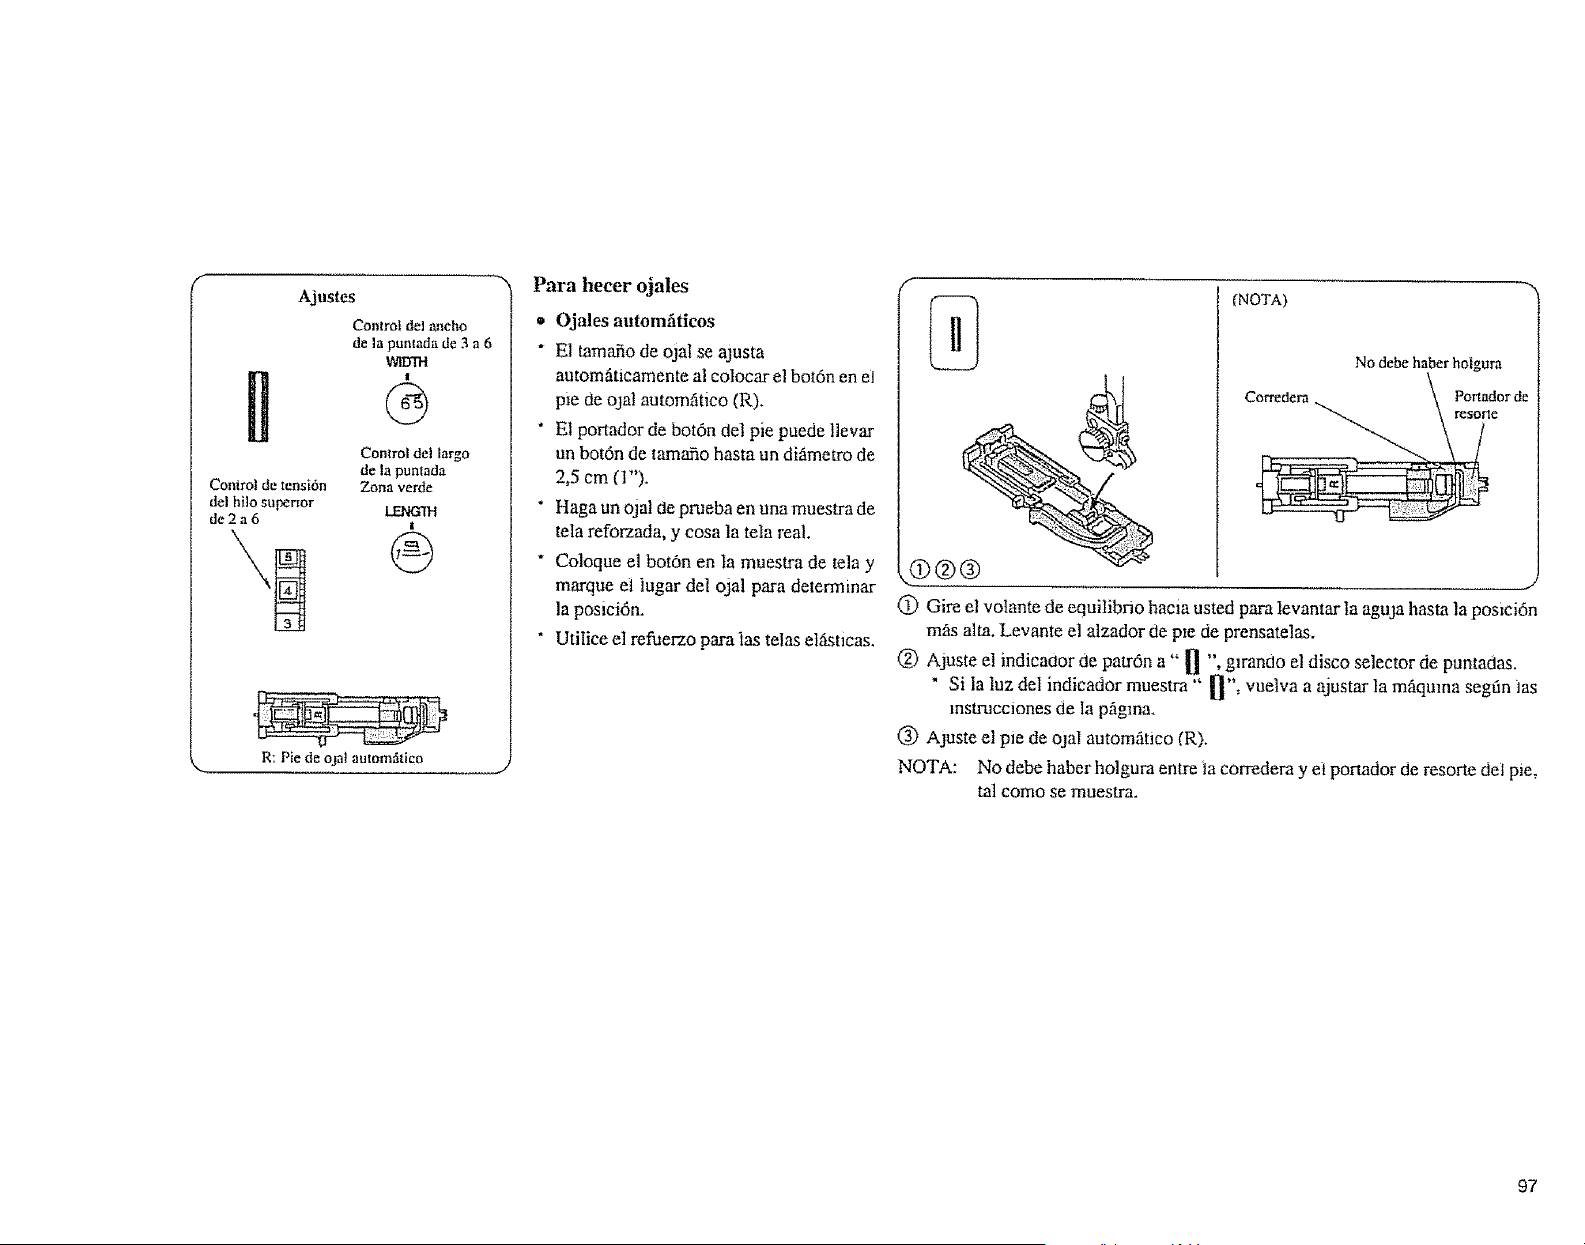
Ajus|es
ControldeJ ancho
de la punmda de 3 a 6
W_D'rd
!
@
Comrol de tensi6n
del hi]o superior
de2a6
Control del largo
de h puntnda
Zona verde
I
®
R: Pie de ojal autom_tico
Para heeer ojales
o Ojales automfiticos
" El tammSode ojaI se ajusta
automfiticamente al colocar el bot6n en e]
pie dieojal automfitico (R).
" Et portador de bot6n 0el pie puede llevar
un bot6n de tamaSo hasta un di_metro de
2,5 cm (1").
" Haga un ojal de pmeba en una muestra de
tela reforzada, y cosa ]a tela real.
* Coloque el bot6n en la muestra de telay
marque et ]ugar de! ojal para delerminar
la posici6n.
* Utilice el refuerzo para las telas el_ticas.
(NOTA)
No debe haber hoJgum
............... J
(!) Gire el volante de equitibno hacia usted para Ievantar la aguja hasta la posici6n
mas alto. Levante el alzador de pie de prensatelas.
(_) Ajuste el indicador de patr6n a" _ ", glrando el disco selector de puntaOas.
" Si la luz del indicador muestra" _", vuelva a ajustar la mfiquma segdn las
mstmcciones de la pfigma.
(_) Ajuste el pie de ojal automfitico (R).
NOTA: No debe haber holgura entre la corredera y el portador de resorte del pie,
tal como se muestra.
97
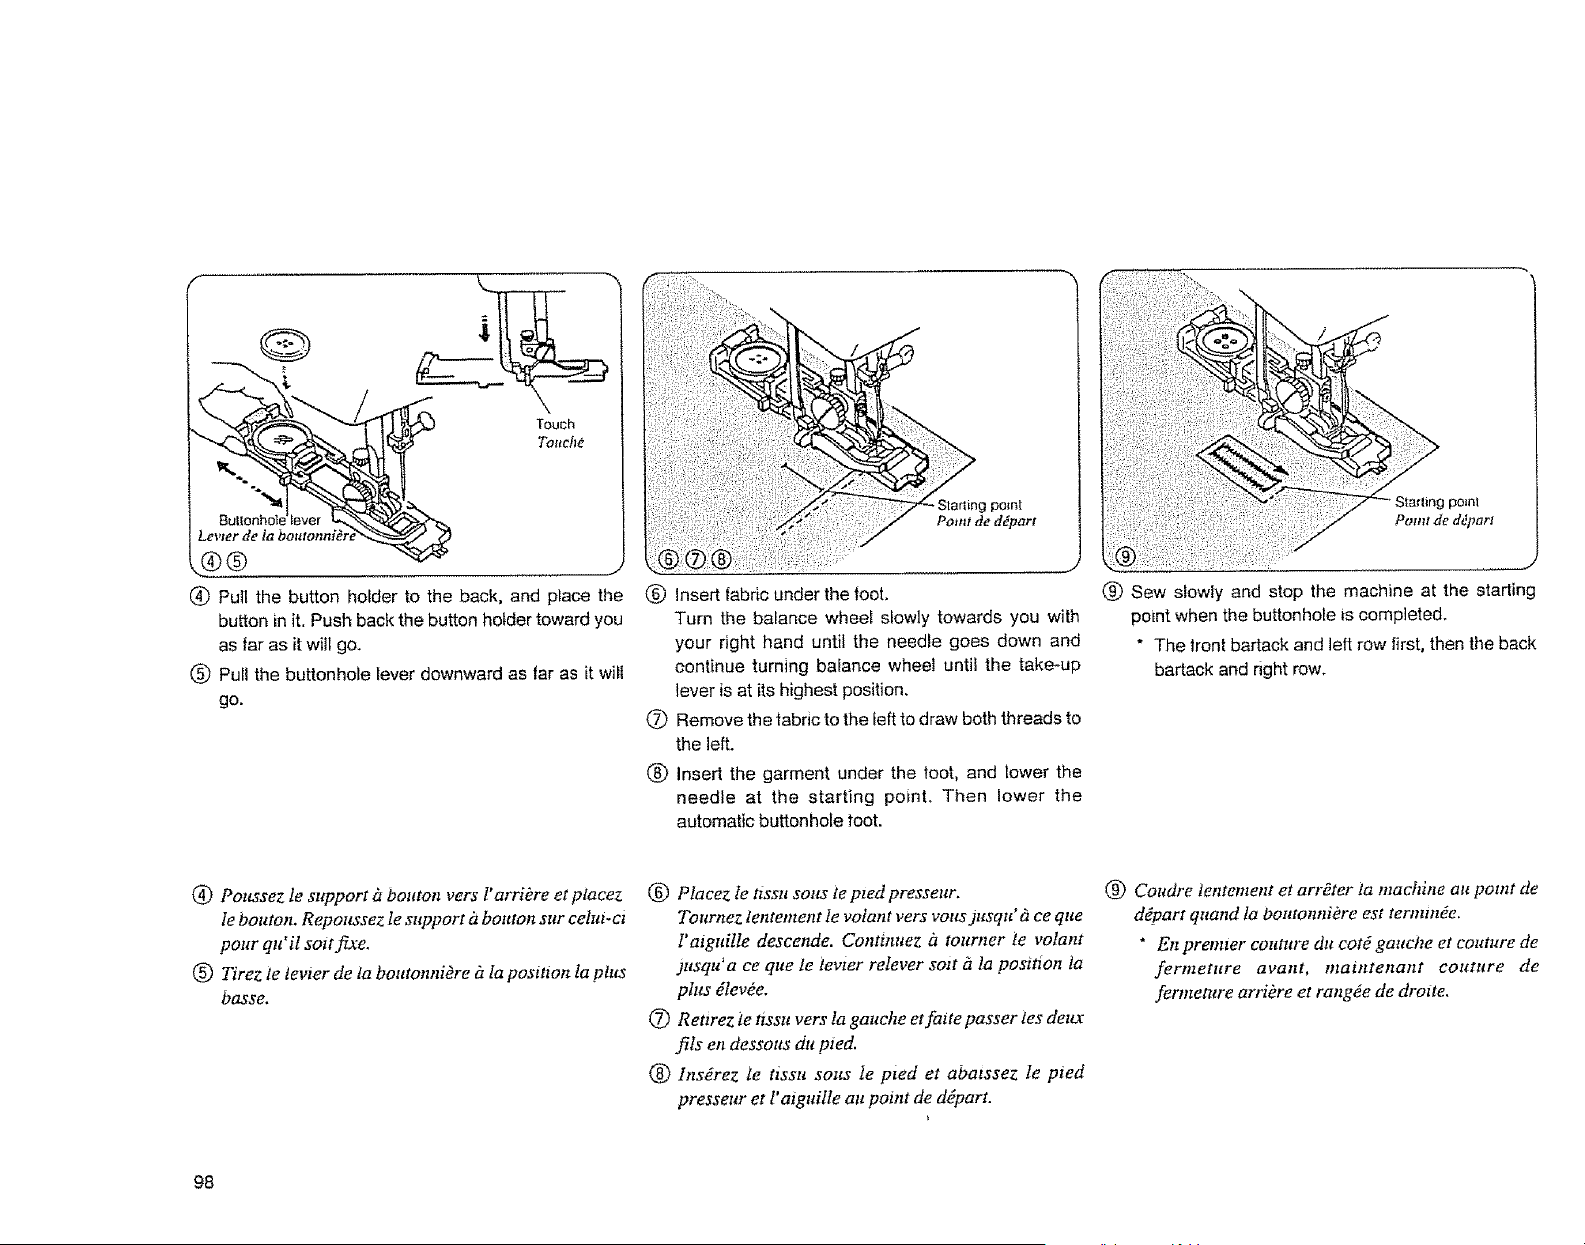
j
4(4(QPull the button hotder to the back, and place the
button in it. Push back the button holder toward you
as far as it will go.
(_ Pull the buttonhole lever downward as lar as it will
go.
........ J
(_) Insert fabric under the foot.
Turn the balance wheel slowly towards you with
your right hand until the needle goes down and
continue turning baiance wheel until the take-up
lever is at its highest position.
(_) Remove the fabric to the felt to draw both threads to
the left.
(_) Insert the garment under the toot, and lower the
needle at the starting point. Then lower the
automatic buttonhole foot.
!iiii!i!i!!ii!ii ii!il ii!iii!i iiii ,
Point de d_part
(_) Sew stowly and stop the machine at the starting
point when the buttonhole is completed,
" The front bartack and left row first, then the back
barrack and right row.
@ Poussez le support a bouton vers l'arrikre et placez
le bouton. Repoussez le support b bouton sur celuz-cz
pour qu'il sozt fixe.
@ Tirez ie levier de la boutonniere ?zla position la plus
basse.
(_) Placez le ttssu sous le pted presseur,
Tournez tentement te volant vers votts jusqu ' b ce que
l'aiguiUe descende. Continuez h tourner le volant
3usqu ' a ce que le ievter relever sort f la position ta
plus _lev_e.
7(_Retirez _letissu vers la gauche et fatte passer ies dercc
ills en dessous du pied.
(_) lns_rez le tissu sous Ie pied et abatssez le pied
presseur et l' aiguille art point de d_part.
(_) Coudre tentement et arrYter ia machine art point de
d(part quand la boutontriOre est termttt_e.
* En premter coutttre du eot_ gauche et couture de
fermeture avant, maintenant couture de
fermemre arriOre et rang6e de drorte,
98
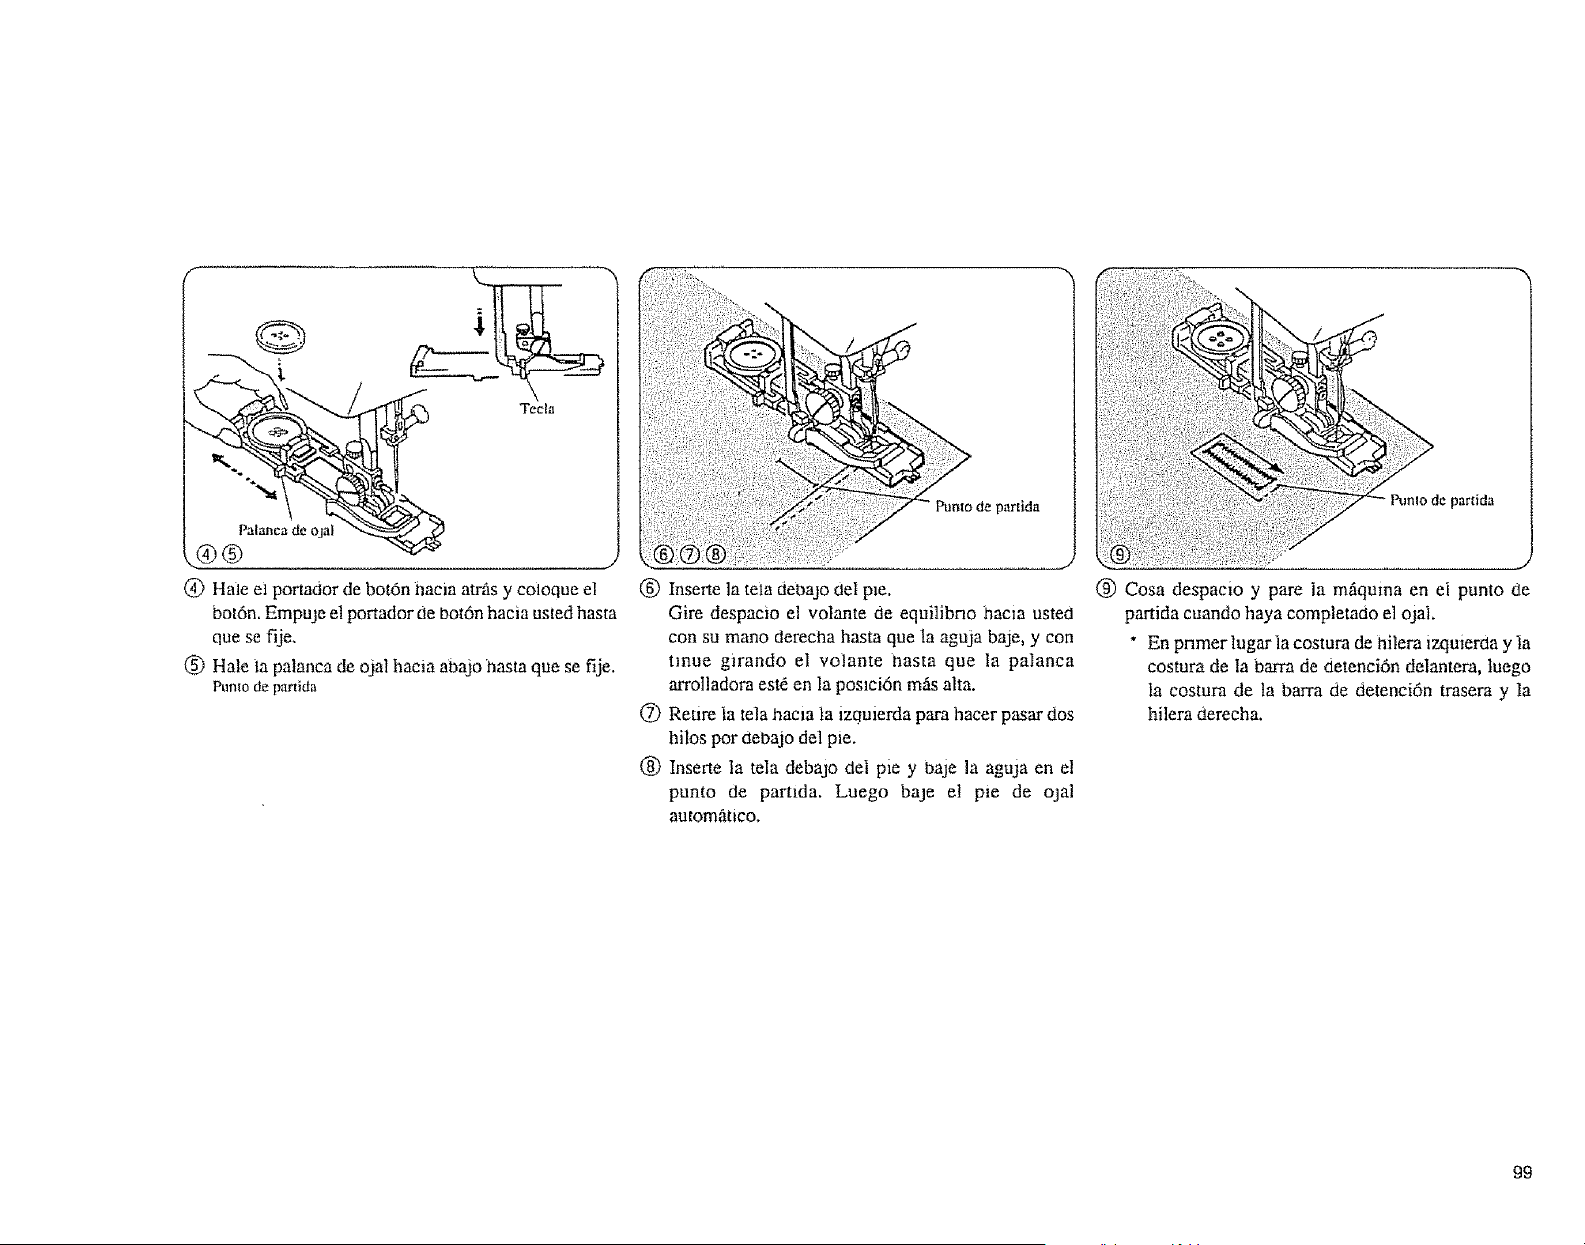
f
.q)® ..............................
Tecla
)
@ Hale el portador de botOn hacia atras y coloque el
botdn. Empule el portador cte bot6n hacia usted hasta
qtle Se _je.
® Hale ta palanea de ojal haeia abajo t_asm que se fije.
Punto de partida
Ptlnlo de partida
(g) Inserte ta teia debajo 0el pro.
Gire despacio el volante de equilibno haeia usted
con su mano dereena hasta que la aguja baje, y con
tmue g_rando el volante _asta que la palanca
arrolladora est6 en la poslei6n mils alta.
(2) Retire Ia tela haeia ta izquierda para hacer pasar dos
hilos pot ctebajo del pie.
@ Inserte la tela debajo del pie y baje la aguja en el
punto de partlda. Luego baje el pie de ojal
autom_itico,
(_) Cosa despacio y pare ia mgquma en ei punto de
partida cuando haya completado el ojal.
" En primer lugar la costura de hilera izquiema y Ia
costura de Ia barra de cletenci6n delantera, luego
la costura de la barra de detenei6n trasera y la
hilera dereeha.
99
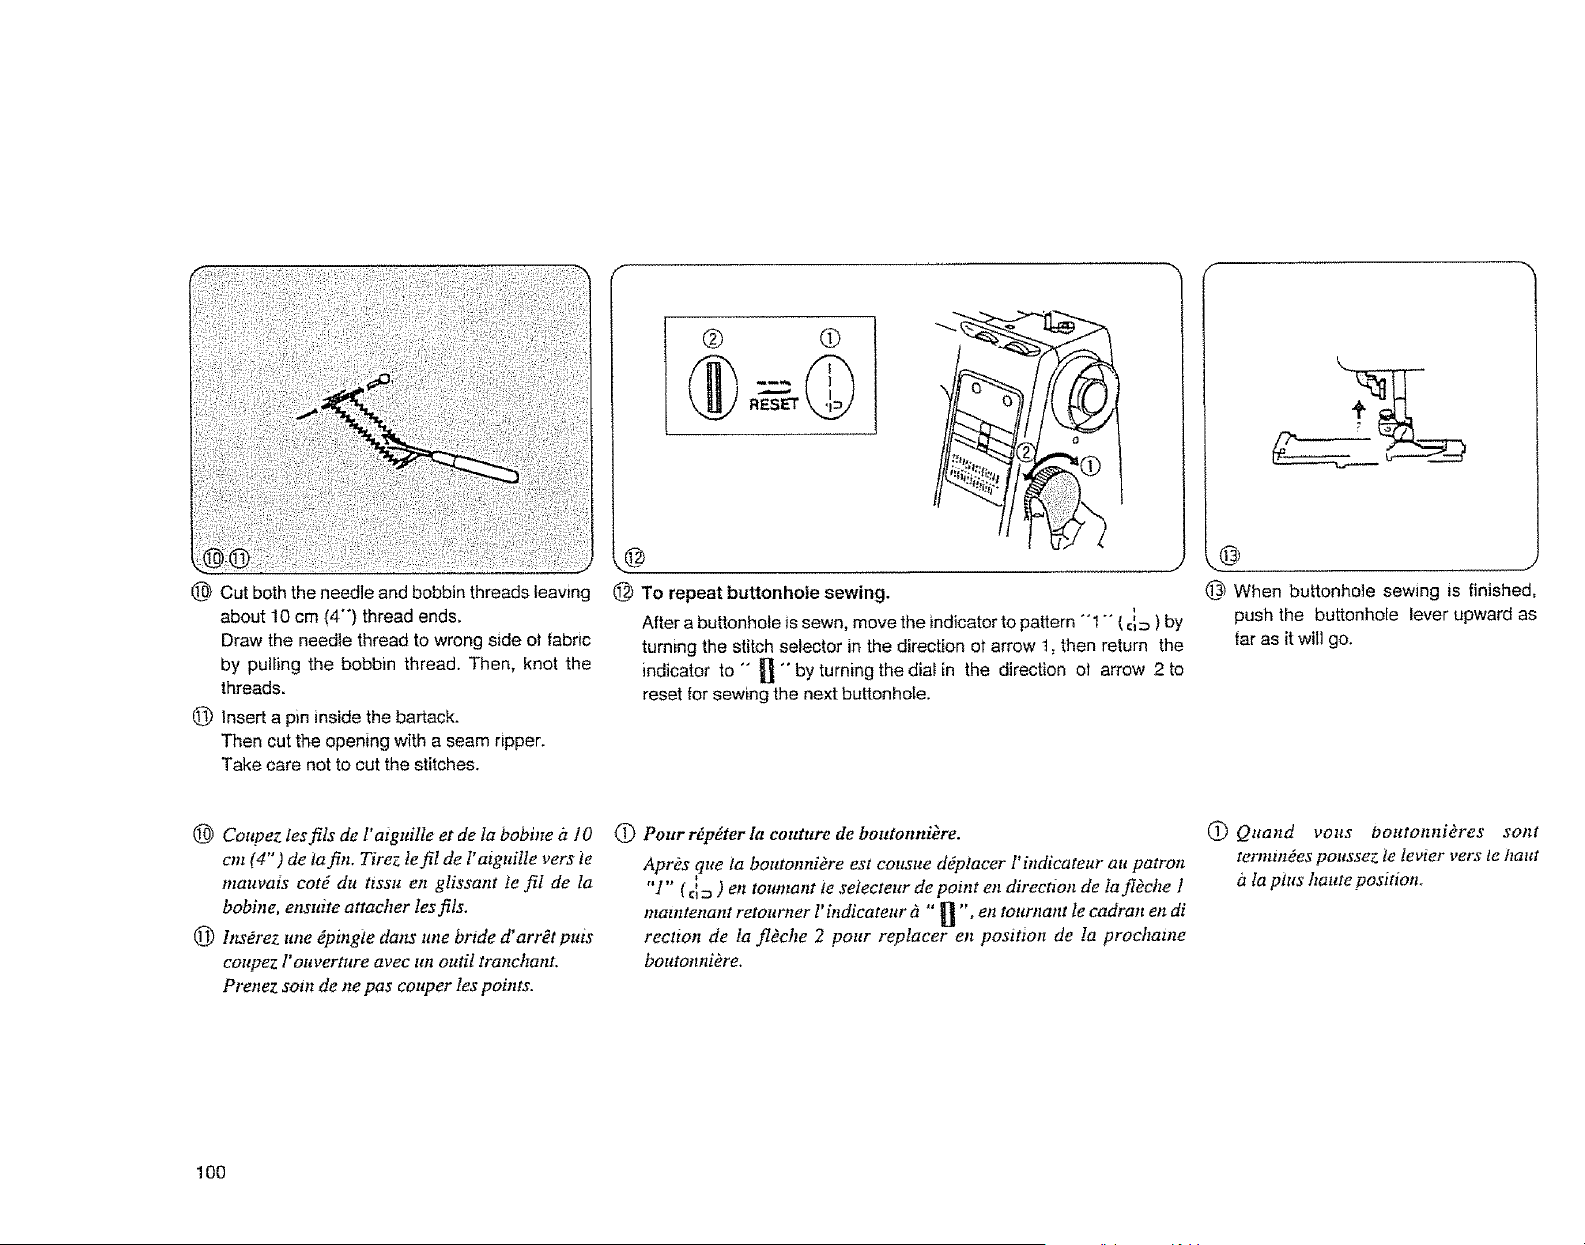
0 Cut both the needle and bobbin threads leaving
about 10 cm (4-) thread ends,
Draw the needle thread to wrong side ot tabric
by pulling the bobbin thread. Then, knot the
threads.
@ Insert a pin inside the bartack.
Then cut the opening with a seam ripper.
Take care not to cut the stitches.
@ To repeat buttonhole sewing.
After a buttonhole is sewn, move the indicator to pattern - t"" { ci_ ) by
turning the stitch selector in the direction ot arrow t, then return the
indicator to "" _ "" by turning the dia! in the direction ol arrow 2 to
reset for sewing the next buttonhole.
@ When buttonhole sewing ts finished,
push the buttonhoEe lever upward as
far as it will go.
10 Coupez les fils de l'aiguiIle et de Ia bobine iz 10
cm (4") de latin. Tirez le fil de !'atguille vers te
mauvais cotd du tissu en gtissant te fil de la
bobine, ensuite attacher tes fils.
(_) htsOrez une _pingle darts une bride d" arr_t puis
cot(pez l' ouverture avec un outil tranchant,
Prenez soin de ne pas couper Ies points.
C) Pour r#p_ter la couture de boutonniere.
Apt'ks que ia boutonniere est cousue d#placer l' htdicateur au patron
"1'" ( ci= ) en toumant te setecteur de potnt en direction de la fldche 1
matntenant retourner l' indicateur f "' _] ", en toltrnattt le cadran en di
rection de ia fl_che 2 pour replacer en positron de la prochatne
boutonnikre.
(2) Quand vous boutonnikres sont
termindes poussez te Ievier vers te hattt
d la pius haute position,
100
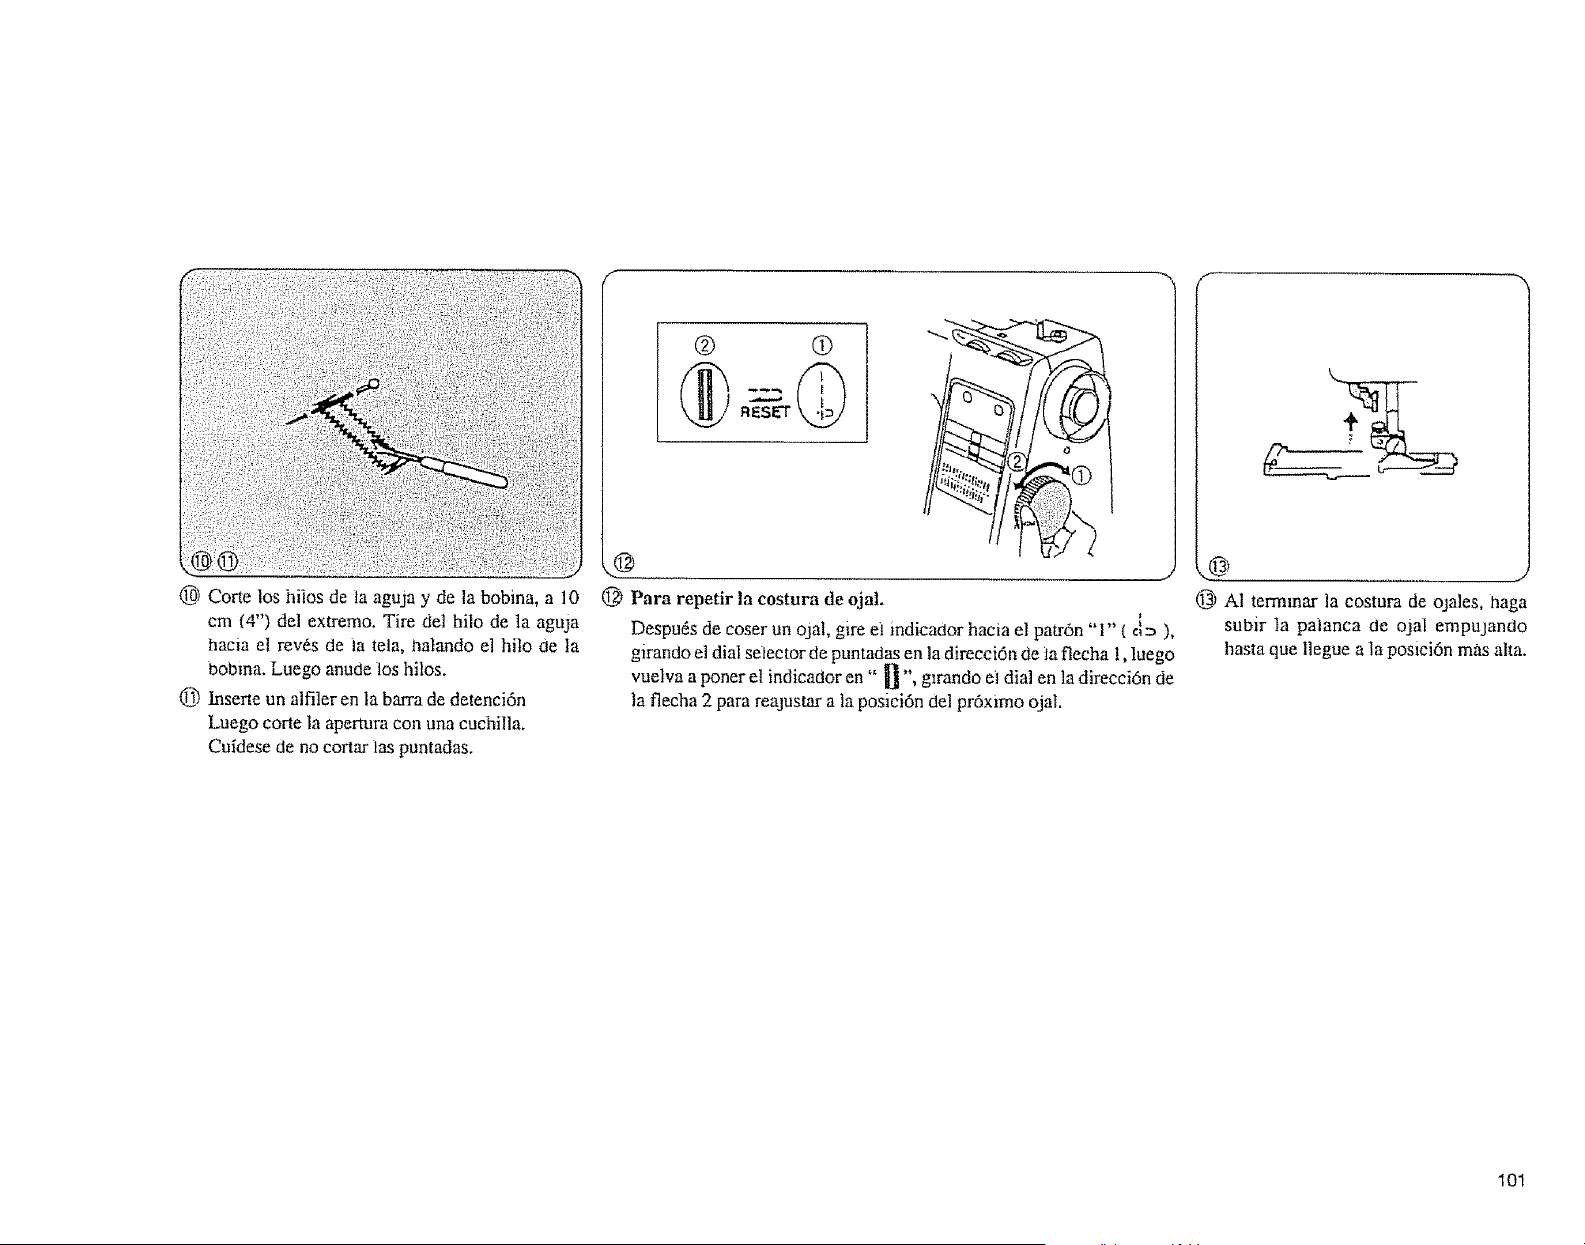
1@ Corte los hi|os de ta aguja y de la bobina, a 10
cm (4") del extremo. Tire del hilo de la aguja
hacia et rev_s de la teta, hatando el hito Oe la
bobma. Luego anude los hilos.
@ Inserte un alfiler en la barra de detenci6n
Luego cone la apermra con una cuchilla.
Cuidese de no cortar las puntadas.
t@ Para repetir la costura de dial.
Despuds de coser un dial, glre e} indicador hacia el patr6n "r' ( ci= ),
girando el dial seiector de puntadas en la direcci6n de ia fiecha !, luego
vuelva a poner el indicador en" !} ", g_rando ei dial en la direcci6n de
la flecha 2 para reajustar a la posici6n del pr6ximo ojat.
@ A1 termmar la costura de ojales, haga
subir Ia paianca de dial empujando
hasta que llegue a la posicidn mas aita.
101
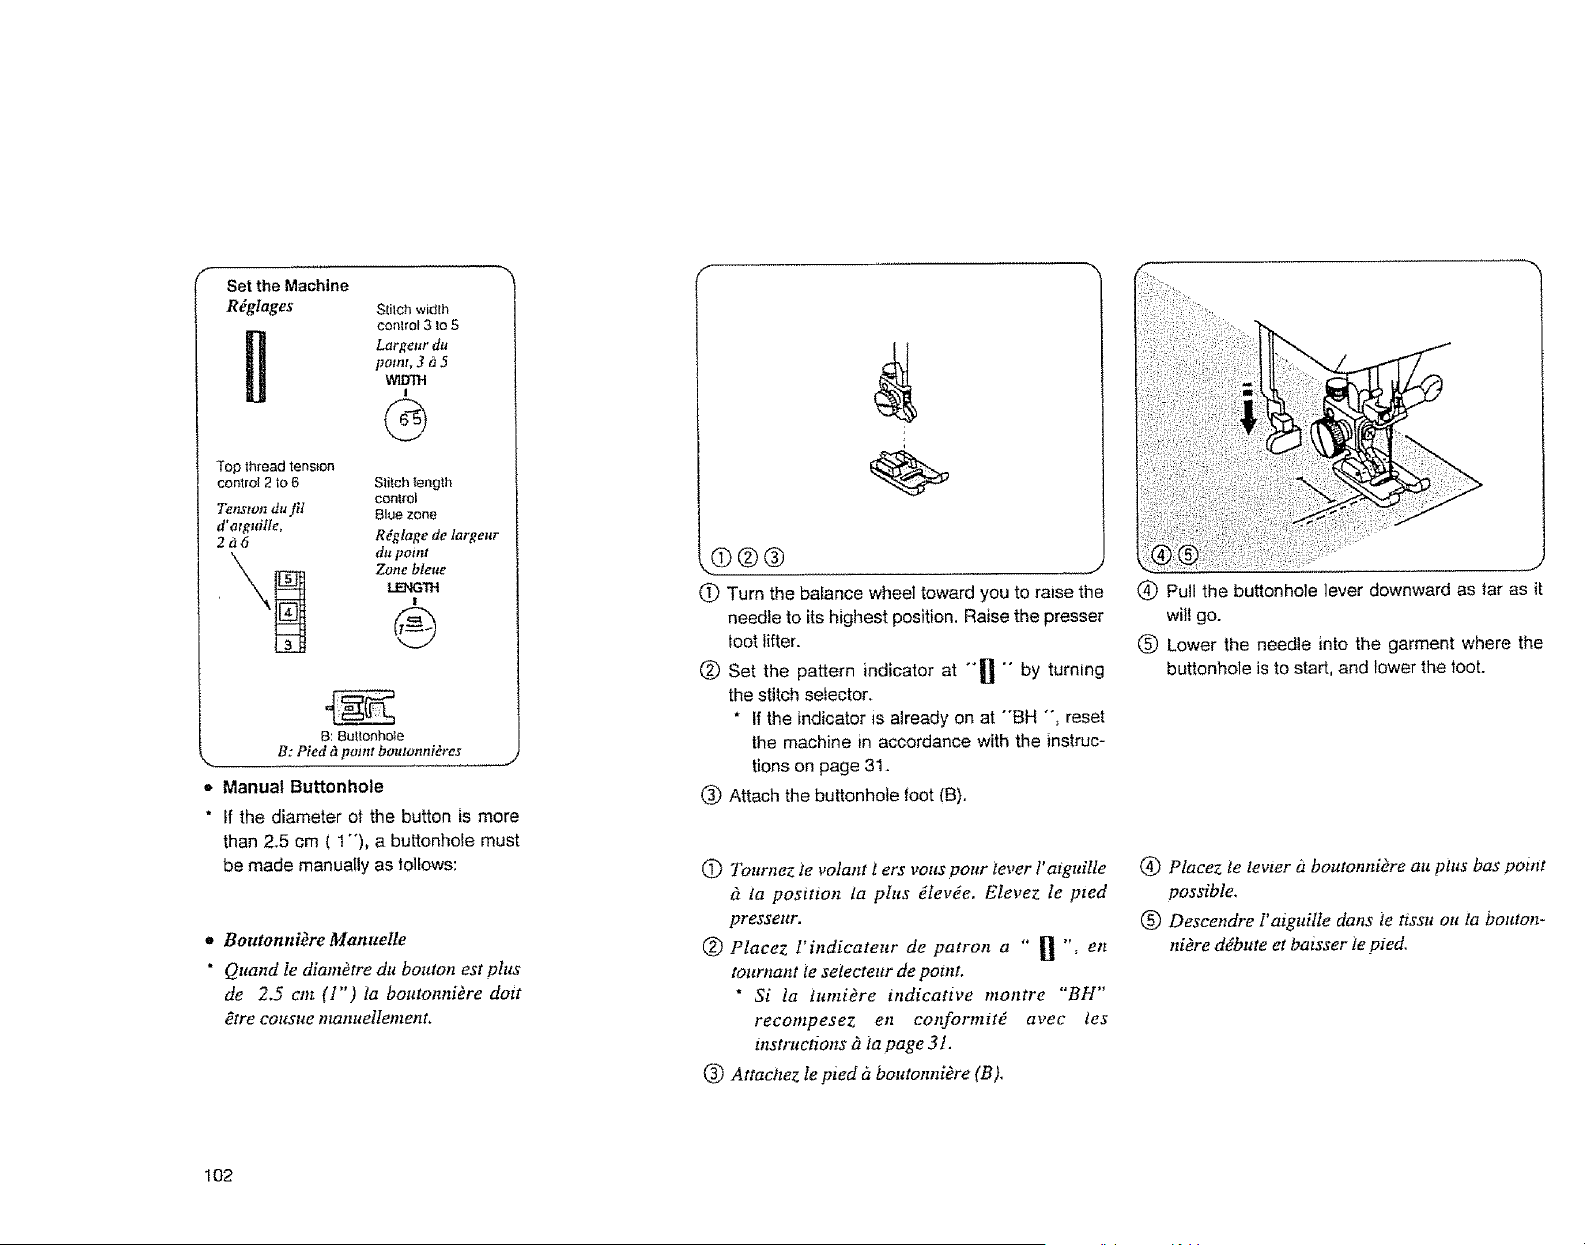
Set the Machine
R_'glages
Top thread tension
control 2 tO 15
Tenston du fil
d'atguifle,
2d6
StilCh width
conlrol 3 to 5
Largettr du
point, 3 i_5
I
@
Sli_ch length
centroJ
Blue zone
R_gtage de largeur
du point
Zone bleue
_'rd
I
@
B: Bullonhole
_, B: Pied d point boutonnieres ..................
o Manual Buttonhole
" If the diameter of the button is more
than 2,5 cm ( 1"'), a buttonhole must
be made manuaily as follows:
• Boutonniere Manuelle
" Quand Ie diam_tre du bouton estphts
de 2.5 cm (1") la boutonnikre dott
_tre cot_sue manuellement.
@®®
(_ Turn the balance wheel toward you to raise the
needle to its highest position. Raise the presser
toot lifter.
(_) Set the pattern indicator at "1] '" by turning
the stitch selector.
* If the indicator is already on at "'BH "', reset
the machine in accordance with the instruc-
tions on page 31.
(_) Attach the buttonhole foot (B).
(_) Tournez te volant t ers vous pour lever t"aiguille
& fa position la plus glevde, Elevez le pted
presseur.
(_ Placez l'indieateur de patron a "' _ ", en
tournant te seleetettr de potnL
* Si la iumiOre indieattve montre "BH"
reeompesez en cotzformtt_ avec les
U_strttettons _1la page 31.
(_) Attaehez Ie pied ?zboutonniOre (B),
(_) Pull the buttonhole lever downward as far as it
wil! go.
Lower the needle into the garment where the
buttonhole is to start, and lower the toot.
(_) Placez te levter i_ boutonniOre au pitts has point
possible.
(_ Descendre I' aiguitie clans le tissu ou la bouton-
niere d¢_bute et Oaisser ie p*ed.
102
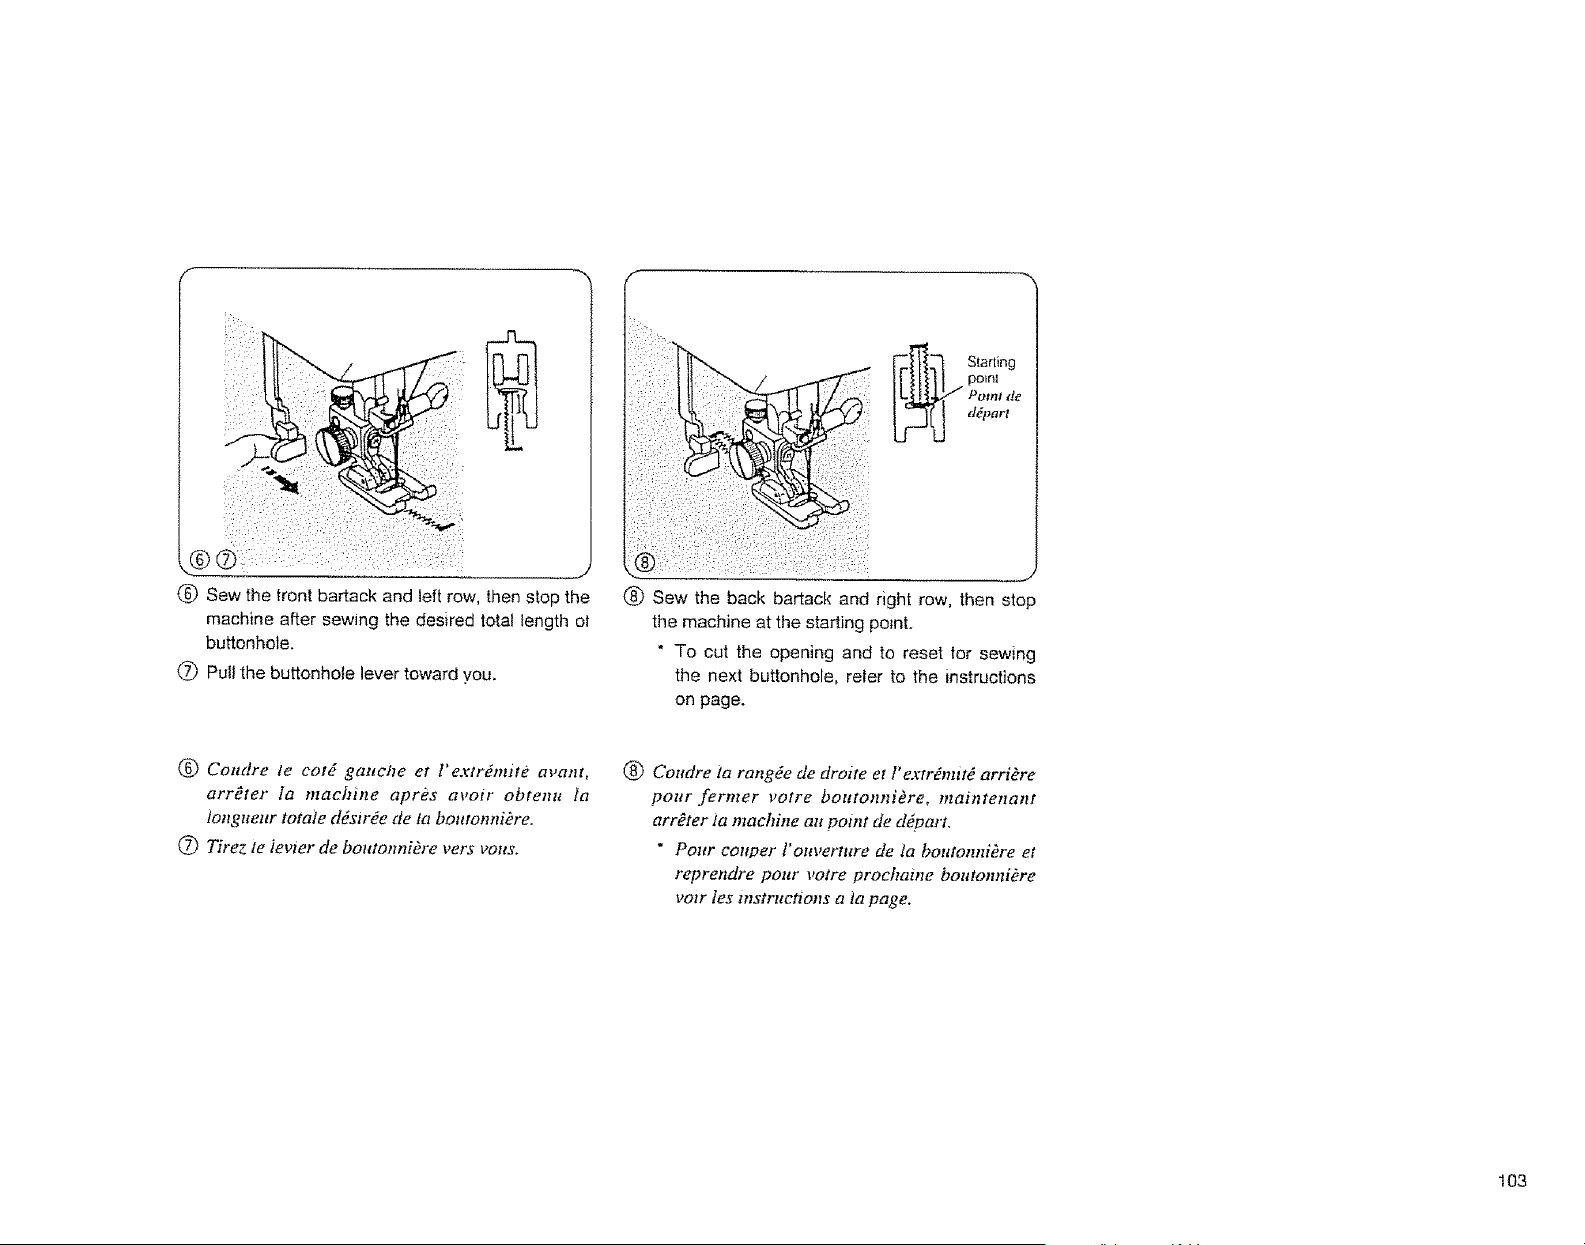
, J
(_ Sew the tront bartack and left row, then stop the
machine after sewing the desired total length oJ
buttonhole.
(_ PuIJthe buttonhole lever toward you.
__d latting
po_nI
Point t!e
ddparl
M
(_ Sew the back bartack and right row, then stop
the machine at the starting point.
* To cut the opening and to reset tor sewing
the next buttonhole, refer to the instructions
on page.
(_) Coudre le cord gatlche et l'e.rtrdmitd avant,
arr_ter la nlachine apr#s avoir obtenu fa
longuear rotate ddsirde de ta boutomli_re.
(_ Tirez te ievier de boutonnibre vers vous.
@ Cot_dre ta rangde de droite et l'extr_mit_ arriOre
pour felwler votre boutonnibre, maintenant
arr_ter ia maehhle all point de ddpart,
• Pour eottper ro1_vertt_re de ta botttonni_re et
reprendre pour votre prochaine bozttomlibre
VOlt Ies instructions a ia page.
103
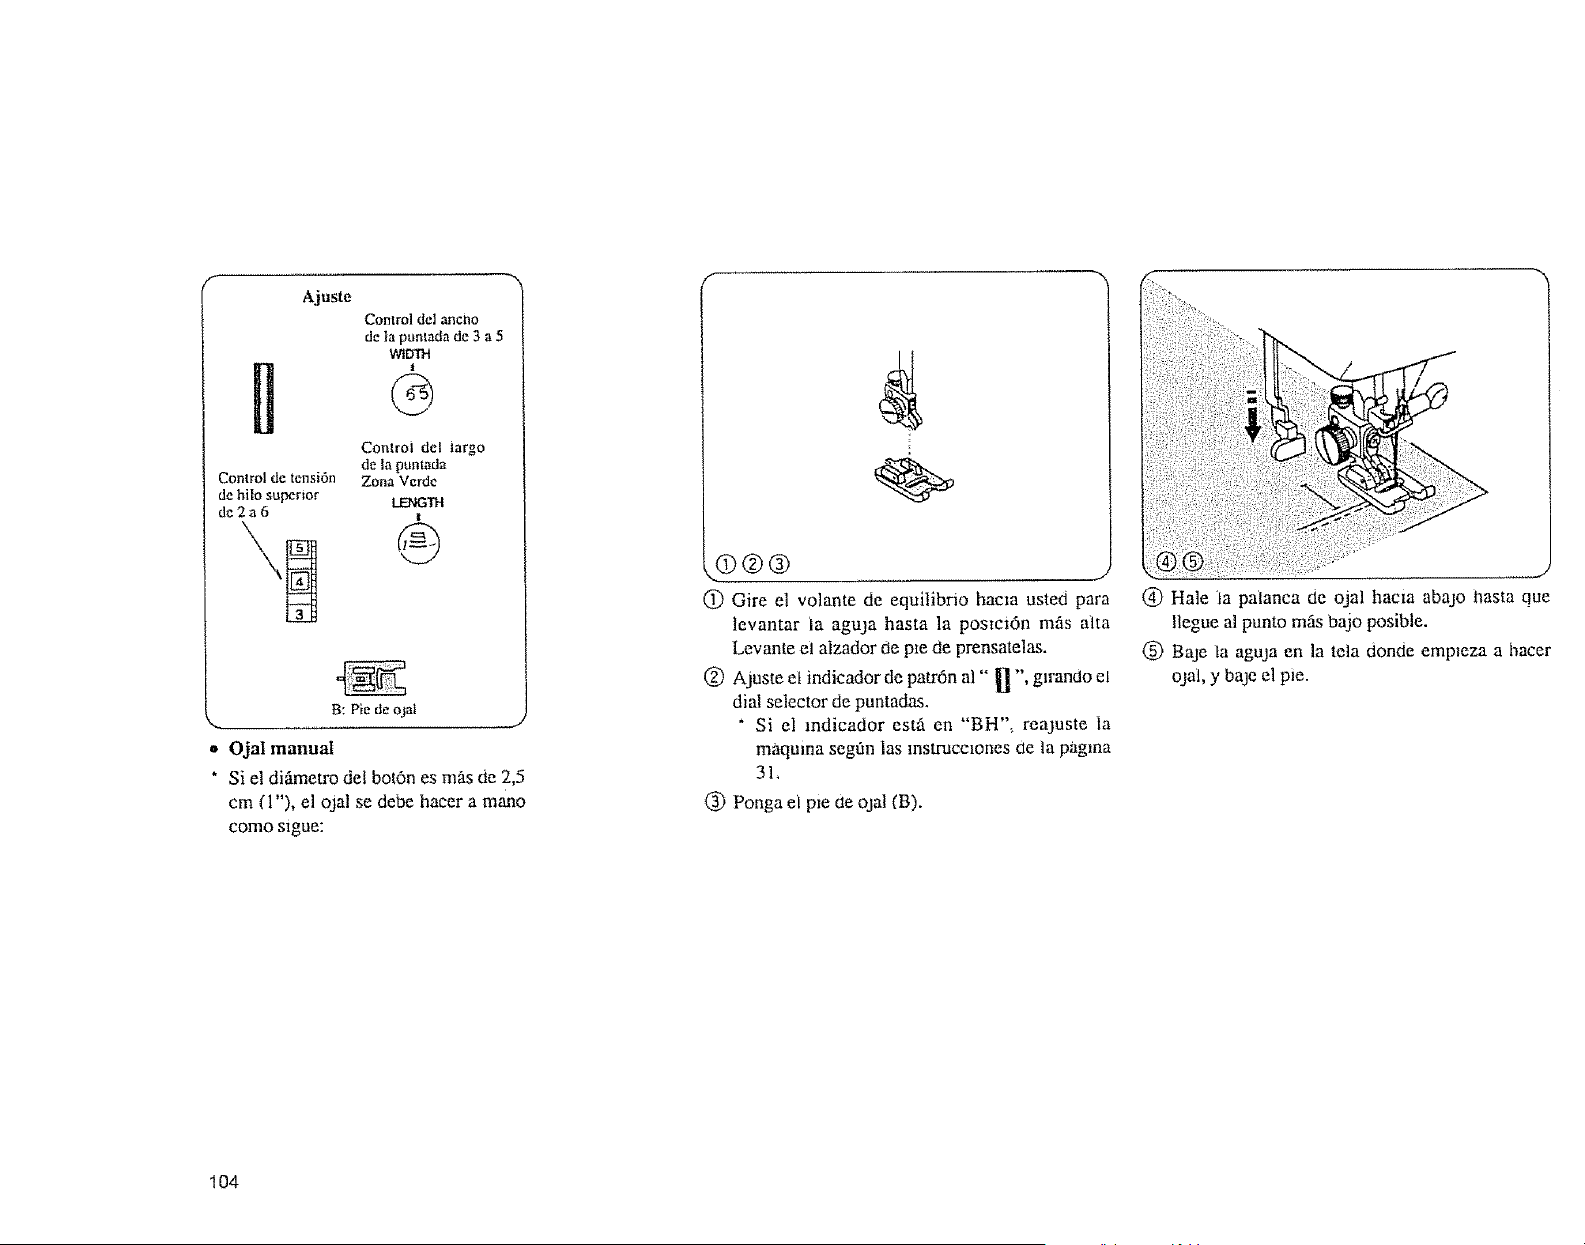
Ajuste
Control de] aneno
de ta punlada de 3 a 5
WtUFrl
il +
Control del iargo
de la puntada
Control de tensidn Zona Verde
de hilo superior I,.ENGTH
de2a6 I
B: P_e de ojai
%. ...................... ,/
• Ojal manual
" Si el diimetro del bot6n es mas de 2,5
cm (1"), el o]al se debe hacer a mano
como sigue:
®@@
(D Gire el volante de equilibrio hacia usted para
levantar ia aguja hasta la postci6n mils atta
Levante el aizador de pm de prensatelas.
(_) Ajuste et indicador de patr6n al '" _ % glrando el
dial selector de puntadas.
" Si el mdicador esti en "'BH", reajuste Ia
maqutna seg_anlas mstruccmnes de ta pagma
31,
(_ Ponga ei pie de ojal (B).
@ Hale ia palanca tie ojal hacta abajo llasta clue
llegue al punto mils bajo posible.
@ Baje ta aguja en la tela donde empteza a hacer
ojal, y bale el pie.
104
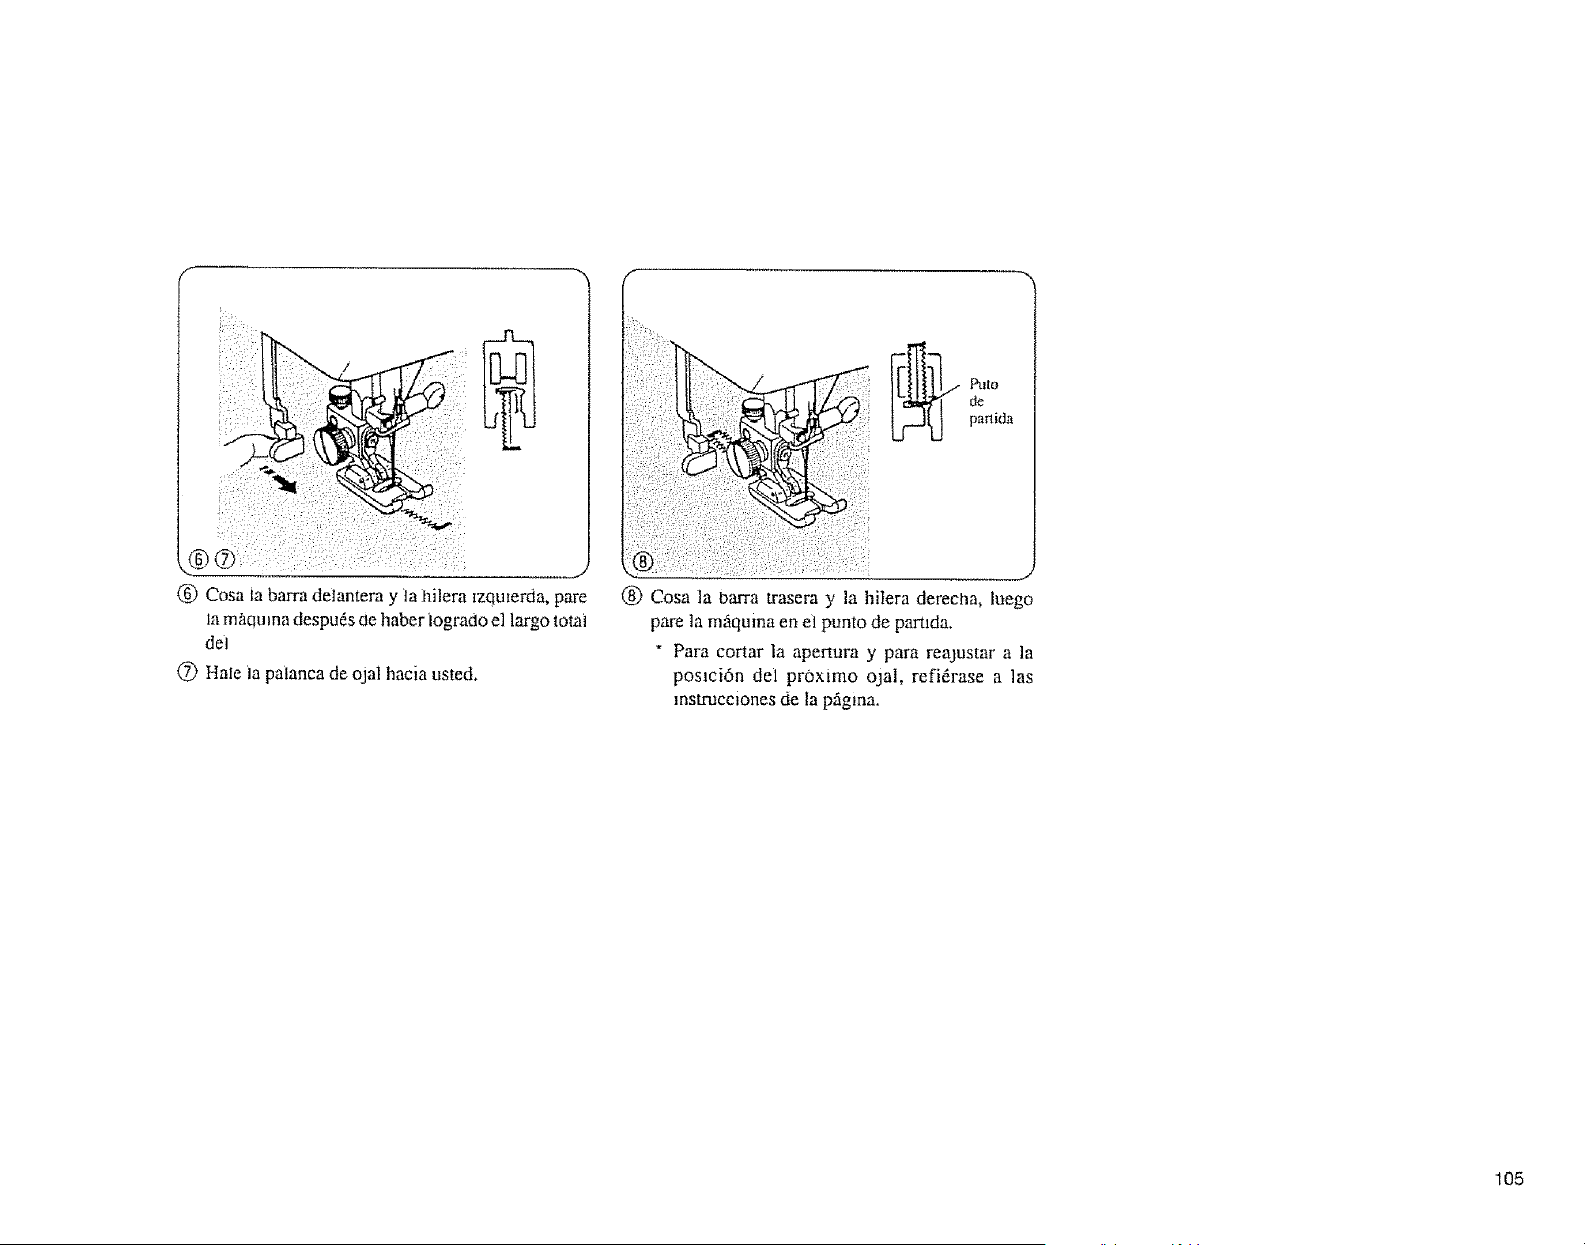
@ .j
@ Cosa ia barra delantera y ta hilera izqmema, pare
la maclu)na despu_s dehaber togrado el largo lotai
del
(2) Hale la palanca de oJal hacia usted.
_ Pulo
de
pariida
@ Cosa la barra trasera y la hitera derecha, luego
pare la m,_quina en el pumo de partlda.
" Para cortar la apertura y para reajustar a la
posmi6n del proximo ojal, refifirase alas
mstmcciones de la pfigma.
105
• UsingButtonholeAttachment
ButtonholeAttachmentSystem
Formorevaried and accurate buttonholes, you wi!l enjoy using the buttonhole
attachment and templates. Know the parts and careiully read how to set up your
machine properly. You wilt need these items for the buttonhole attachment
system.
NOTE: The snap-in buttonhole attachment is an optional item.
• Ufilisafion du guide h boutonnieres
Guide &boutonnikres automattque & enctencher
Avec ce guide, c'est avec ptmsir que vous ferez des boutonniOres de diffeS-ents
genres et exactement ate" dimensions voutttes. Voter une description des pi_ces, it
suffit de ies reenter exaetement comme mdiqu#.
REMARQUE: Le guide ?zboutonniOres ?zencIencher est vendu sOpar#ment pour
l' artzcle.
* C6mo Hacer Ojales con el Aditamento Ojalador
Sistema de Aditamento Ojalador
Para lograr ojales mils vanados y exactos, podrfi utitizar el aditamento ojatador y
las plantillas correspondientes. Familiaricese con los componentes, lea con
cuidado c6me deben colocarse en fa mfiquina. Pard emplear el sistema de
aditamento ojalador necesitarfi los accesorios siruientes.
Nota: El aditamento ojaiador de resorte es utilizable y se vende aparte come
articuio opcionat.
106
Guide slot
Fenlede guidage
Ranura Gula
l Measurement
I marking
.._.,I Marques de herd
Buttonhole guide plate
Porle.gabarit
Placa- Guia paid Hacer Ojales
Guide block
DuJgt de guidage
ue Gula
Lever
Levter
Pi Palanea
Er
Pe Gear
Hook _ Pignon
Crochet Engrane
Gaucho
Base plate
Plaque de guide
Ptaea Base
Buttonhole templates
Gabarits iz boutonnibres
PlantiUa pard Ojate_
Buttonhole foot
Pied _ boutonnieres
Pie para Ojales
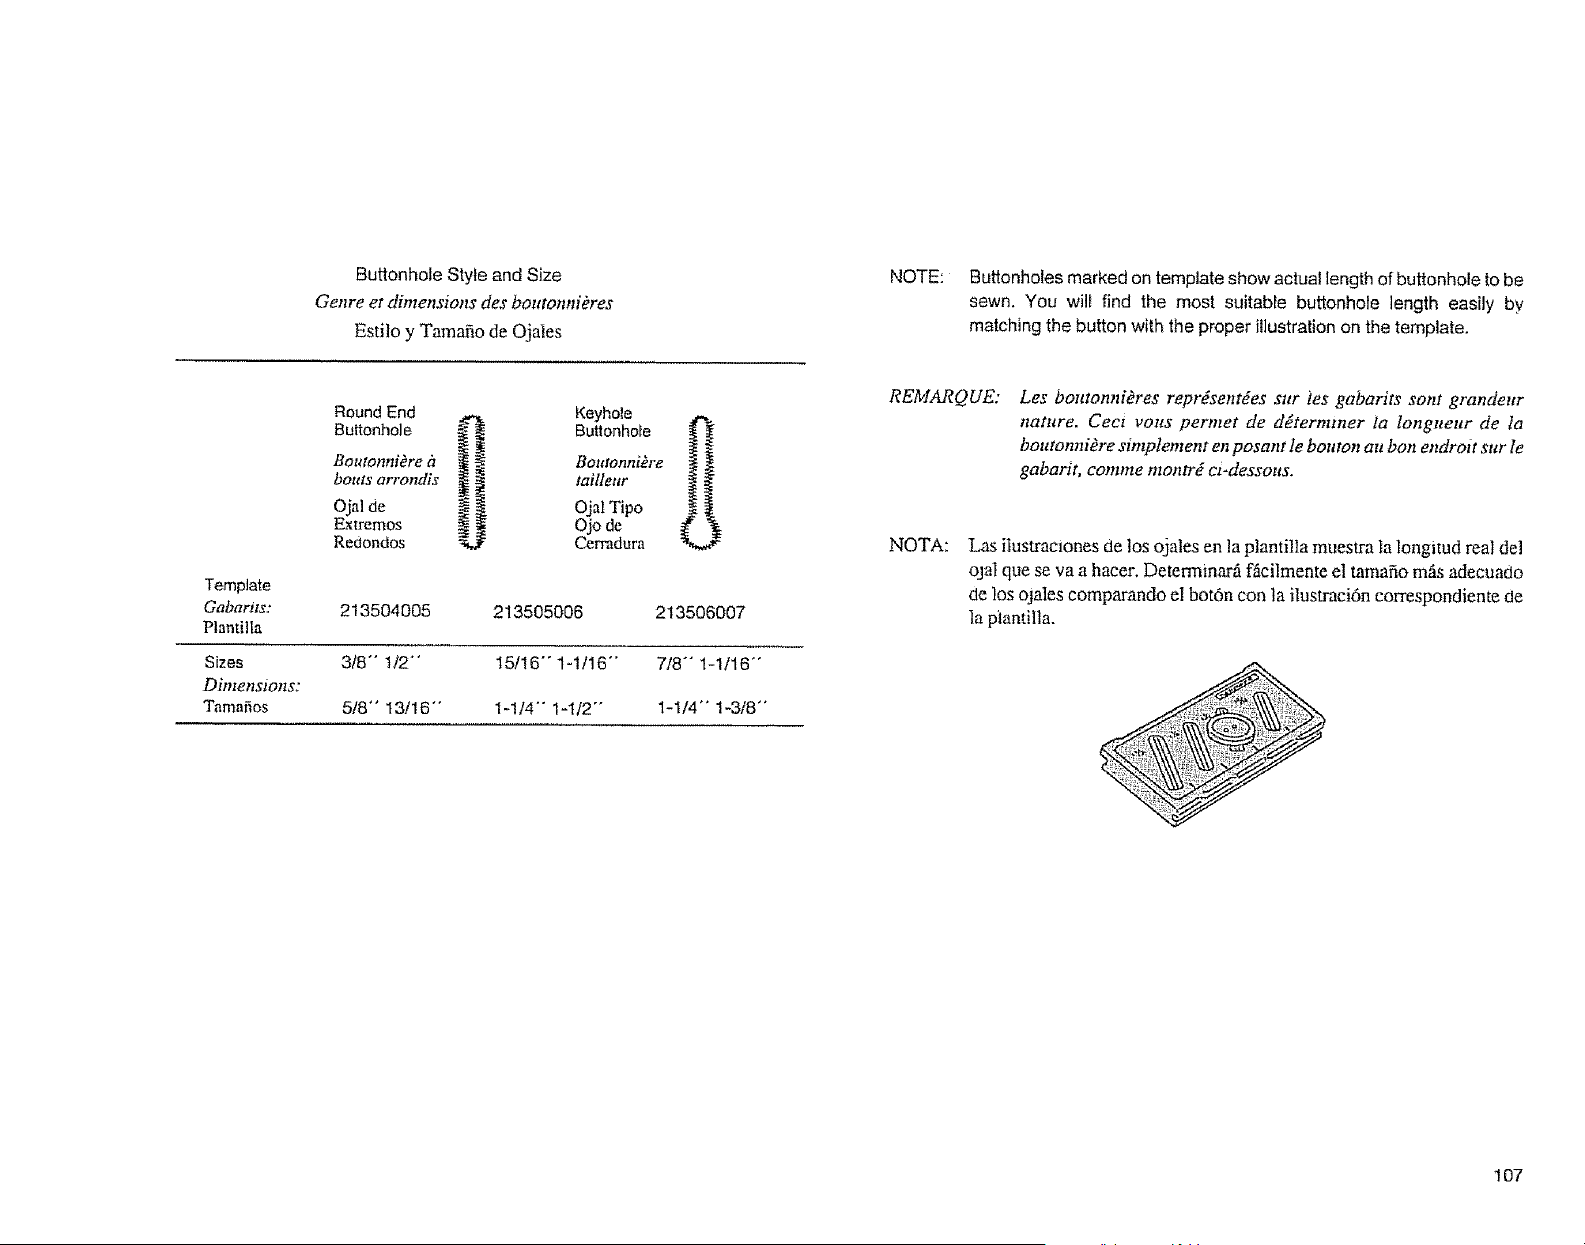
Buttonhole Style and Size
Genre et dimensions des boutonni#res
Estile y Tamafio de Ojaies
NOTE: Buttonholes marked on template show actual length of buttonhole to be
sewn. You wil_ find the most suitable buttonhole length easily by
matching the button with the proper illustration on the template.
Round End Keyhole
Bultonhole Buflonhole
Boutonnidre fi
bouts arrondis
Ojal de
Extremes
Redondos
Boutonnikre
tailleur
Ojat Tipo
Ojo de
Cerradura
Template
Gabarits: 213504005 213505006 213506007
Plantilla
Sizes 318"" t/2 °' 15/16- 1-1116"' 7t8"" 1-1116""
Dhnenstons:
Tamafios 5!8" 13/16- 1-1/4"" 1-112"" 1-114"" 1-3/8""
REMARQUE:
Les boutonni#res reprYsent#es sur ies gabarits sont grandeur
nature. Cect vous permet de determiner la longueur de Io
boutonni#re simplement en posant le bottton au bon endrott stir le
gabarit, comme montr# ci-dessous.
NOTA:
Las iIustractones de los ojales en la plantilla muestra )a longitud real de]
ojal que se va a haeer. Determinarfi fficilmente el tamaSo mils adecuado
de los ojates comparando el bot6n con la ilustraei6n correspondiente de
ta piantilla.
107

Set the Machine
R,_gtages
Stitch width
control 2
Largeur du point, 2
WIDTH
I
@
Top thread tension
control 2 to 6
Tensfon du fiI
d'atguille, 2 i_ 6
Stitch lenglh
control 3 to 4
Longueur du
pomt, 3 a 4
I..ENG'£H
I
Q
Butlonhole loot
Pied _ botdonnidres
Buttonhole Making (Continued)
Helplul Hints
Best resuJts are obtained by using #60
#80 ]ight weight threads as bobbin
thread.
NOTE: It is advisable to use a blue
stretch tabric needle when
sewing knits and synthetic
fabrics.
You can obtain buttonholes
with a w_der cutting space by
setting the stitch width control
at 1.5 instead ol 2.
Confection des boutonniOres (Suite)
Quelques conseils
On obt_ent g_n#raiement de meilleurs
resuttats en utilisant un fil de canette
l_ger, n _ 60 h 80.
REMARQUE:
Ii est conseil!d d'ufiliser
une aiguille h queue
bteue pour ttsst_s
extensibles pour ia
couture des jerseys et
des ttssue synth_tiques.
Pour des boutonnibres
plus larges, it suffit de
regler ia targeur de
point _t1.5 au lieu de 2.
Top thread
Fii de dessus
Bobbin
thread
Fit de
dessus
Round
holes (B)
Trous
rtmds ¢B)
Pins (A)
Lever
Levfer
Hook
Crochet
Base plate
Plaque tit; grade
1, a, Remove the extension table.
b. Raise the needle to its highest position.
c. Remove the loot holder,
d, Pull bobbin thread out about 3" straight back toward rear of machine.
e. Insert hook of base plate into rectangular hole ot needle plate.
L Pull laver back to align the hook with the rectangular hole.
g. Snap base plate down to fit two pins (A) at the back o! base plate into two
round holes (B) on needle plate.
Release lever.
1. a. Retwez ia boite h aecessoWes.
b. Remontez t'atguille en posttton haute.
c. Retirez le porte-accessotre.
d. Tirez Iefit de dessous d' envtron 3" vers l'arriOre de ia machine.
e, lntroduisez le crochet de ta plaque de guide clans te trott rectangulaire.
f Tirez sur le tevter pour aligner te crochet avec te trou rectangutaire
g. Appuyez sur la ptaque de guide pour que ies ergots (A ), sous ta plaque, entrent
clans les trous ronds (B) de la platine; L&chez le tevter.
108

Ajustes
Control de
tensi6n del
hi]o superior
2a6
Control de Ancho
de Punlada 2
Vv_DTH
@
ConltoTde
largode
Puntada3 a 4
I
@
Pie pam OjMes
Instrucciones dei Estilo de
Ojales (Continuaci6n)
Consejos Utiies
Podra obtener mejores resultados si usa
hito ligero #60 -#80 en la bobina.
NOTA: Cuando eosa telas telas de
tejido de punto o sint_ticas es
convemente emp]ear una
aguta azut para telas el_sncas.
Pemos (A)
Redondos (B)
Patanca
Hi}ode
la Bobina
\ Placa Base
Gancho
Rarlora
Rectangular
1. a. Quite laextensi6n.
b. Levante la aguja a su posmi6n m_ alta.
c. Qmte el soporte del preasateias.
d. Jale y saclue aproximadameme 7 cms. de hito de la boDina en llnea recta hacia
atrfis de |a mfiquma.
e. Meta el gaucho de ta plaea base en la ranum rectangular de la piaca para la aguja.
f. Jale la palanea hama atras para alinear el gaucho con ia ranura reetangul_.
g. Presione ia placa base hacla abajo para meter los dos pemos (A) de su pane
trasera en los dos orifieios redonOos (B) de la plaea para la aguja.
Suelte la paianea.
109
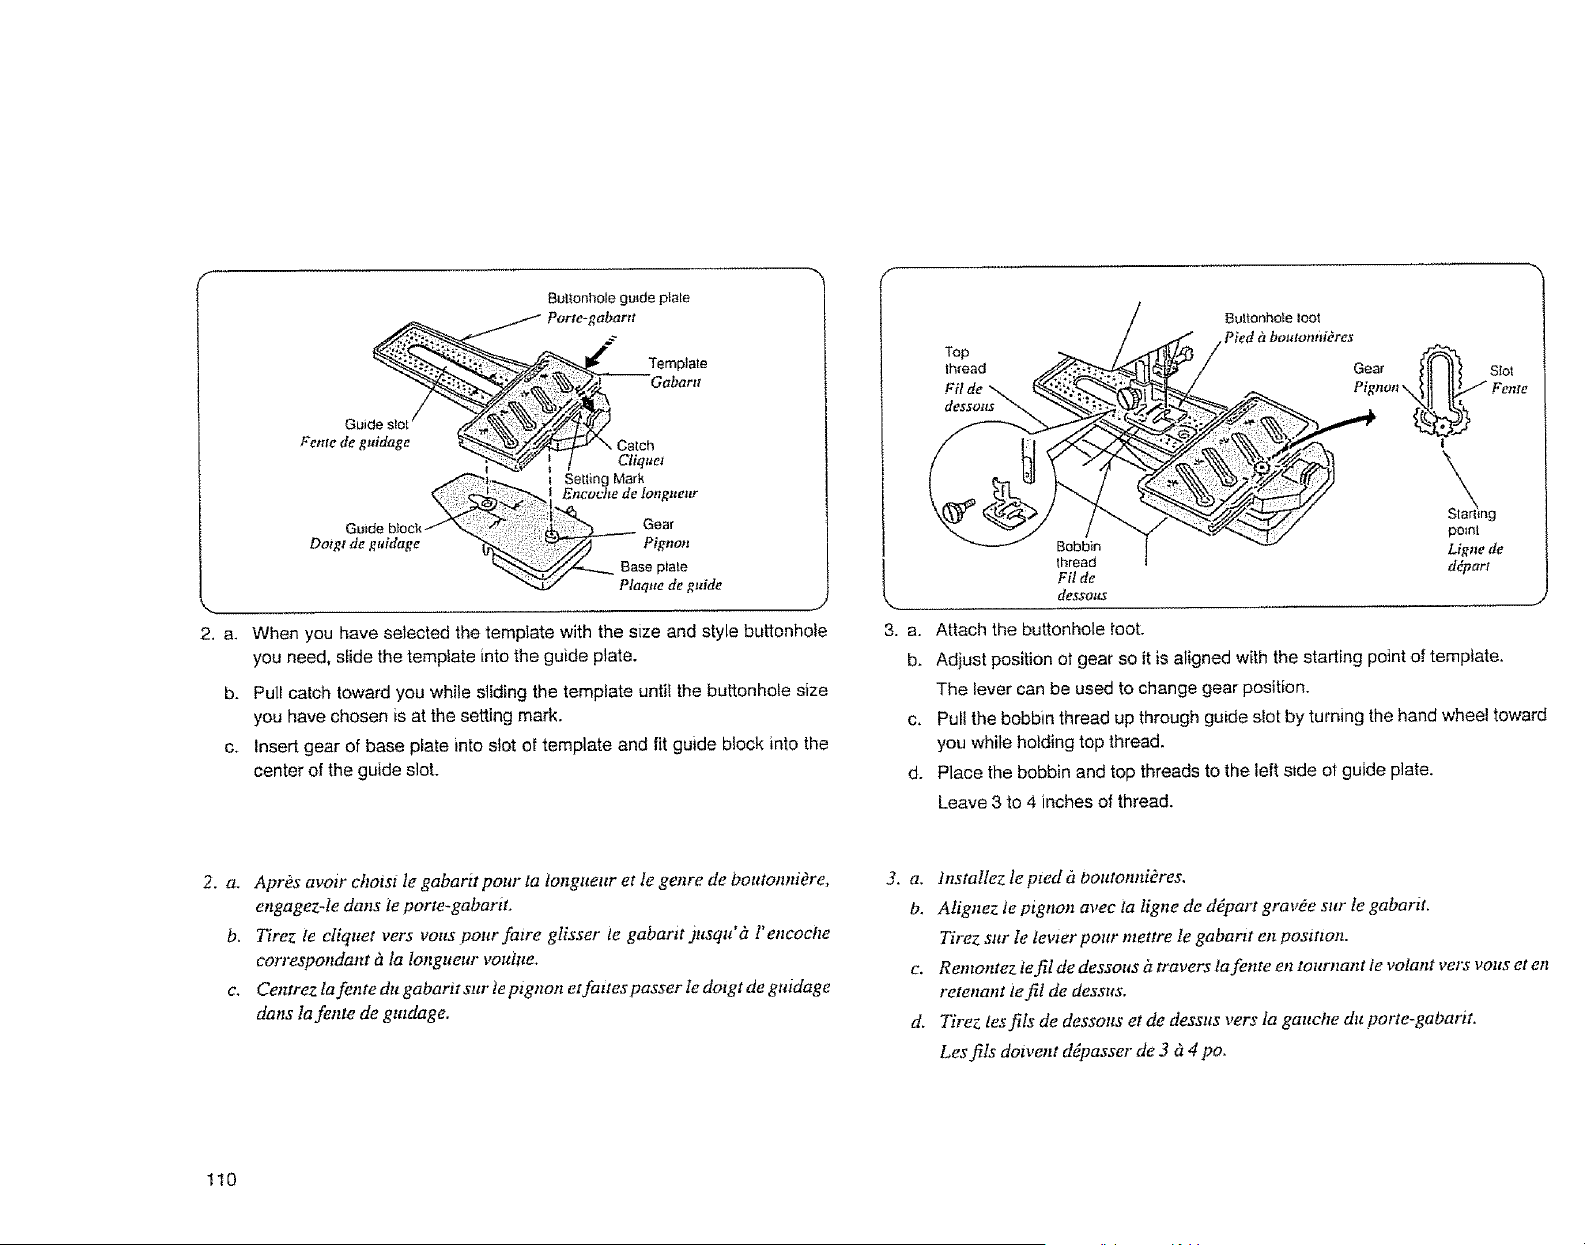
BuP,onbole gutde plale
Temp}ate
Guide
Feme de guidage
Clique1
_,._._ I Setting Mark
t Eneocl e de lengaear
Doigt de guidage Pignon
""-,S../ Plaque de guide
2. a. When you have selected the template with the size and styte buttonhole
you need, slide the template into the guide plate.
b. Pull catch toward you while sliding the template until the buttonhole size
you have chosen is at the setting mark.
c. Insert gear of base plate into slot of template and fit guide block into the
center of the guide slot.
3. a.
b.
C.
Top
lh_ead
Fil de
dessous
Bobbin
thread
Fit de
des$otts
Attach the buttonhole toot.
Adjust position ot gear so it is aligned with the starting point of template.
The lever can be used to change gear position.
Pull the bobbin thread up through guide slot by turning the hand wheel toward
you while holding top thread.
Place the bobbin and top threads to the left side ot guide plate.
Leave 3 to 4 inches of thread.
2. a. AprOs avoir chotst le gabarit pour la tonguear et le geare de boutonniOre,
engagez-Ie clans le porte-gabarit.
b, Tirez te cliquet vers vous pour fatre glisser ie gabarit jusqu'd l'encoche
correspondant h la longueur vouiue.
c. Centrezlafentedugabaritsurteptgnonetfaltespasserledotgtdegutdage
clans Ia fente de gutdage.
3. a. h_stallez le pted a boutonniOres.
b. Alignez le ptgnon avec ta tigne de ddpart gravOe sur le gabar#.
Zirez sur le tevter pour mettre le gabartt en posttton.
c. Remontez te fil de dessous lztravers ta fente en tounzant te votant vers vous et en
retenant le fil de dessus.
d. Tirez tes fits de dessous et de dessus vers la gauche du porte-gabarit.
Les fils dotvent ddpasser de 3 d 4 po.
ti0

Placa gum para ojales
PlantiHa
Ranum Guia
[ "Reten
I Marca de Ajusles
: l
1;
moq_e zng_e
Gum
"_/ -""--- Placa Base
j
2. a. Cuando haya selecclonado la pJantilla del tamafio y estilo de oja] que
neces_te, deslice la,plantilla en ia p|aca-gu_a.
b. Jale el retSn hacla usted mlentras desliza la plantilla hasta que la medida de
ojai seleccionada quede en la marca de ajuste.
c. Acople el engrane de la plaea base en la mnura de la plantilla y meta el
bloque guia en el centro de centro de ia ranura guia,
H}lo Supe_x._ <
ilo de la
BobJrm
Pie para Ojales
Engrane _ Ranum
3. a. Instale el De para hacer ojales.
t3. Ajuste la posici6n del engrane de modo que quede alineado con el punto imcla]
de la plantilla.
Se puede utilizar la palanca para cambiar la posici6n del engrane.
c. Jale el hilo de |a bobina hacm arriba a tray,s de la ranura guia girando el volante
hacia usted mientras sujeta el hiio superior.
d. Coloque los hilos de |a bobina y superior en el Iado lzquierdo de la placa guia.
Deje de 7 a 10 cms. de hilo.
111
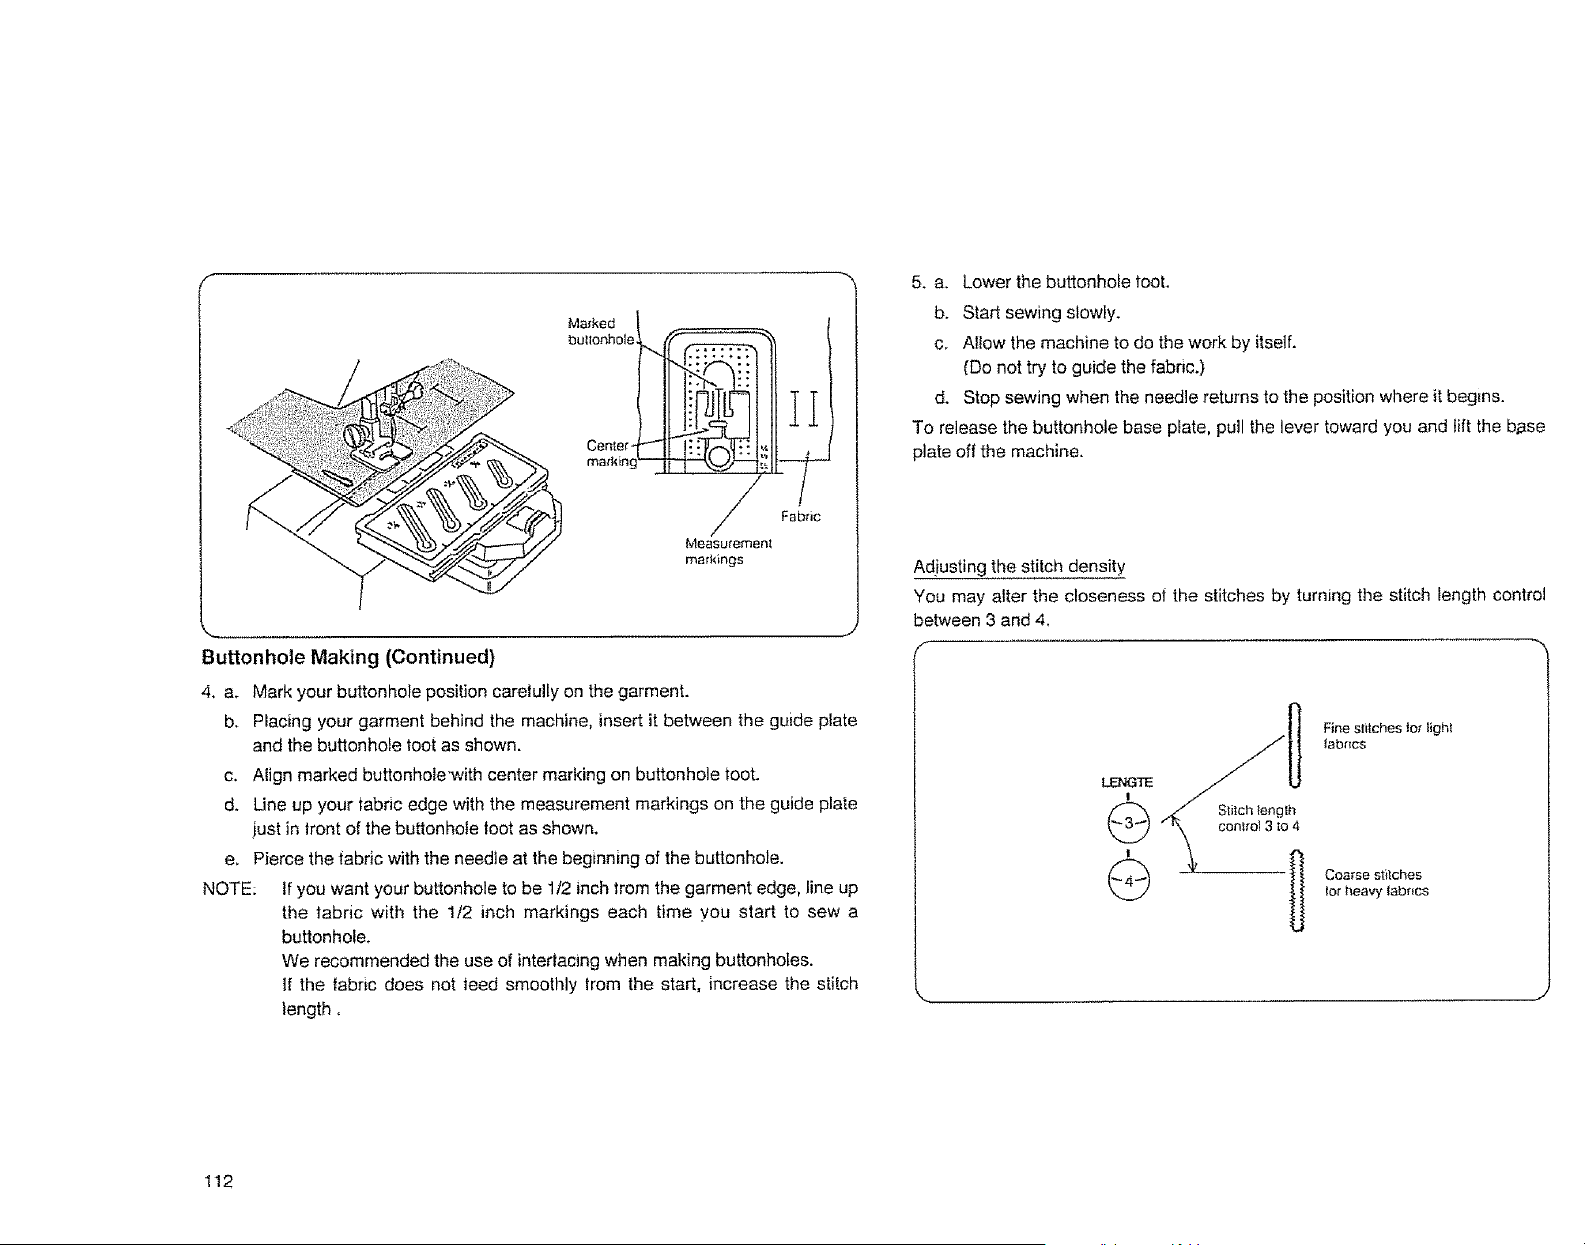
ma_king_'_JL_-
Fabric
Measurernen_
markings
.#
Buttonhole Making (Continued)
4. am Mark your buttonhe]e position carelully on the garment.
b. Placing your garment behind the machine, insert it between the guide plate
and the buttonhole toot as shown.
c. Align marked buttonhole'with center marking on buttonhole toot.
d. Line up your tablic edge with the measurement markings on the guide plate
just in lront of the buttonhole toot as shown.
e_ Pierce the fabdc with the needle at the beginning of the buttonhole.
NOTE: If you want your buttonhole to be 1/2 inch from the garment edge, line up
the fabric with the 112 inch markings each time you start to sew a
buttonhole,
We recommended the use of interlacing when making buttonholes.
If the fabric does not teed smoothly lrom the start, increase the stitch
length,
5. a. Lower the buttonhole toot.
b. Start sewing slowly.
c. Allow the machine to do the work by itself.
(Do not try to guide the fabric.)
d. Stop sewing when the needle returns to the position where it beg{ns.
To release the buttonhole base plate, pull the lever toward you and lift the base
plate off the machine.
Adiusting the stitch density
You may alter the closeness of the stitches by turning the stitch length control
between 3 and 4.
/-
LENGTE
I
Fine slitches lot light
{abr_cs
Coarse at}robes
for heavy tabr{cs
112
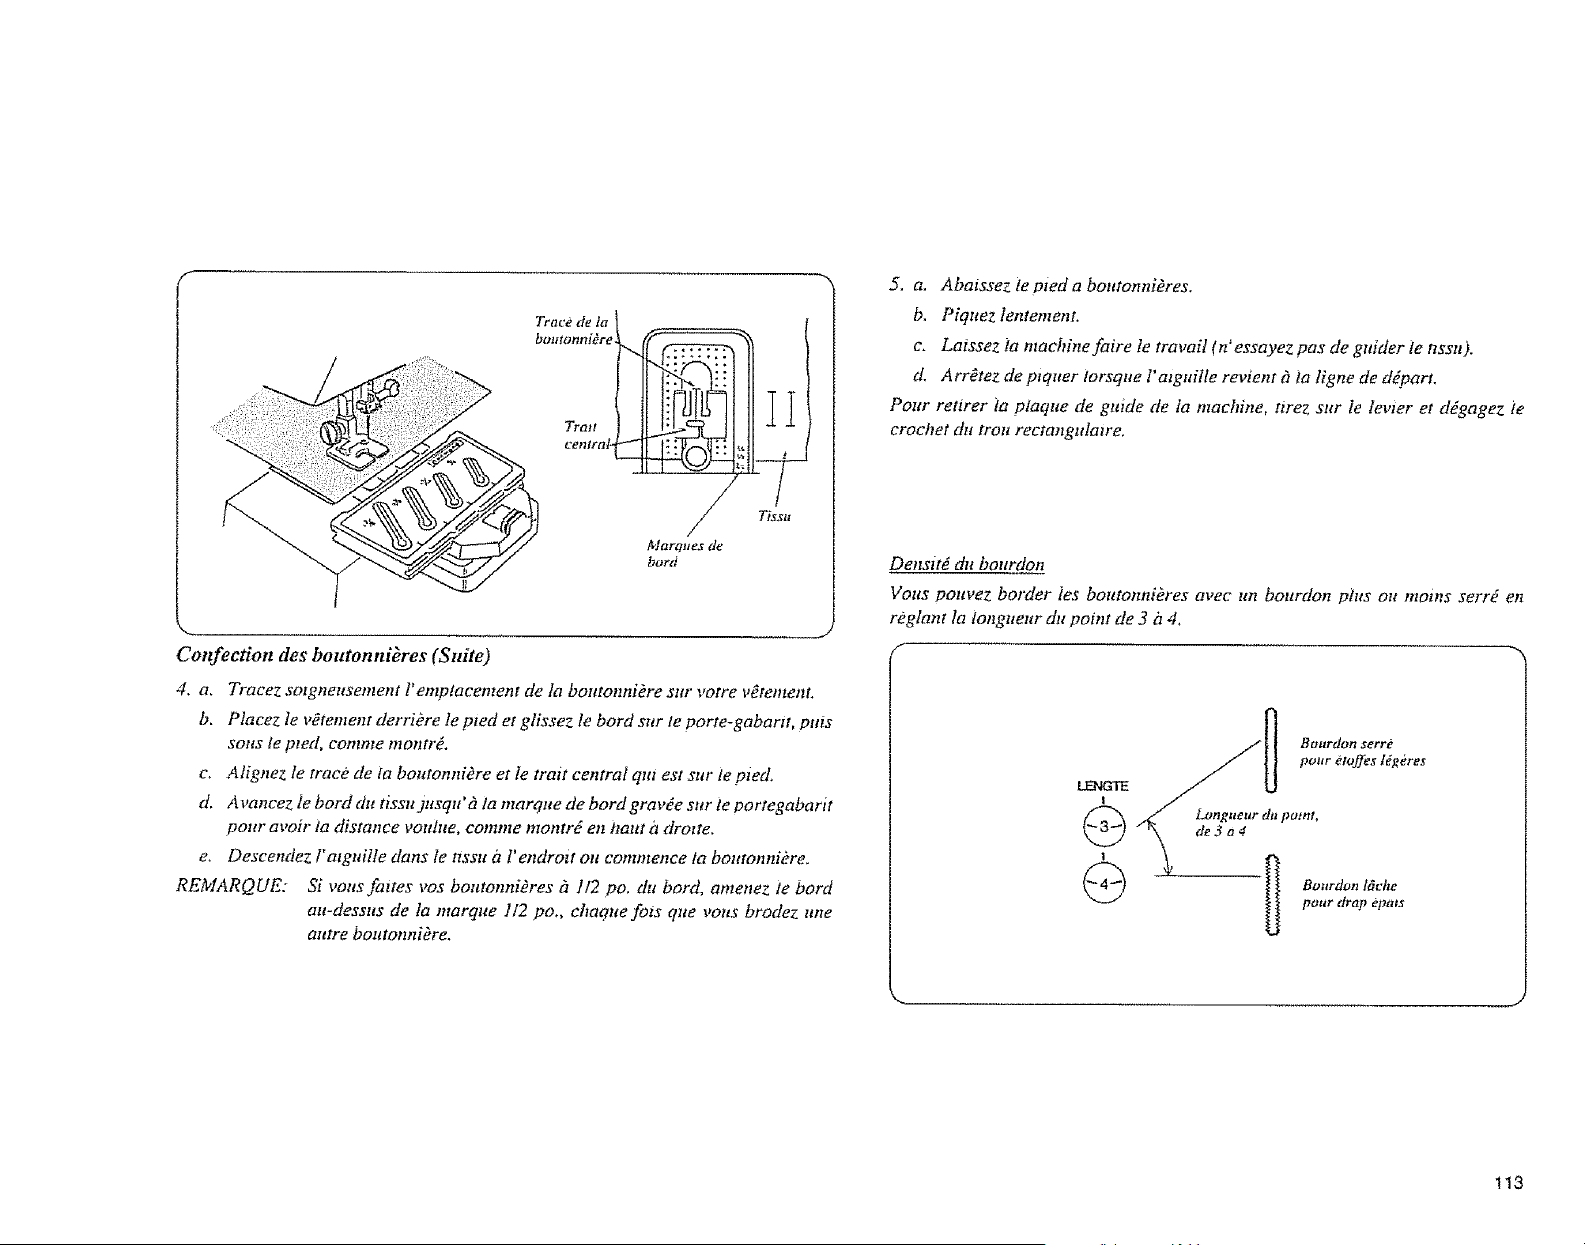
Trace de ta _ f
boutonni_r__Treai_a
Tissu
Maraues de
bord
CotbCection des boutonnieres (Suite)
4. a. Tracez solgnensement l'emptacement de la boutonniere sttr votre v_te_tent.
b. Ptacez le v@tement derri&e le pied et glissez le bord sur te porte-gabartt, pttts
sorts te pied, comme montFe,
c. Al@nez le trace de ia boutonnidre et le trait central qm est snr le pied.
d. Avancez Ie bord du tissujnsqu'h la marque de bord grav_e sur te portegabarit
pour avoir ta distance voutne, comme montrd en haut h drotte.
e. Descendez l'algnille dans le tlsstt h r endroit on continence ta boutonniere.
REMARQUE: Si votts fattes vos boutonni@res fi 112 po. du bord, amenez te bord
au-desstts de la marqlte 1t2 po., chaqne fots qlte volts brodez une
antre botltonni@re.
5. a. Abaissez ie pxed a boutonnieres.
b. Piqltez lentement.
c. Laissez ta machine faire le travail (n' essayez pas de gnider ie nssn).
d. Arr@tez de ptquer iorsque l'atguitle revient h ia ligne de d#part.
Pour retwer la plaque de guide de Ia machine, ttrez sur le levler et d_gagez ie
crochet du trou recta,gnlawe.
Densitd du bourdon
Volts pottvez border les boutonnikres avec ttn bonrdon ptus ou moins serr_ en
reglant la iongueur du point de 3 d 4,
LEN6qE
!
G
!
G
Bourdon serre
po_r etoJfes Hgbres
Bourdon f6che
pour drap epats
!13
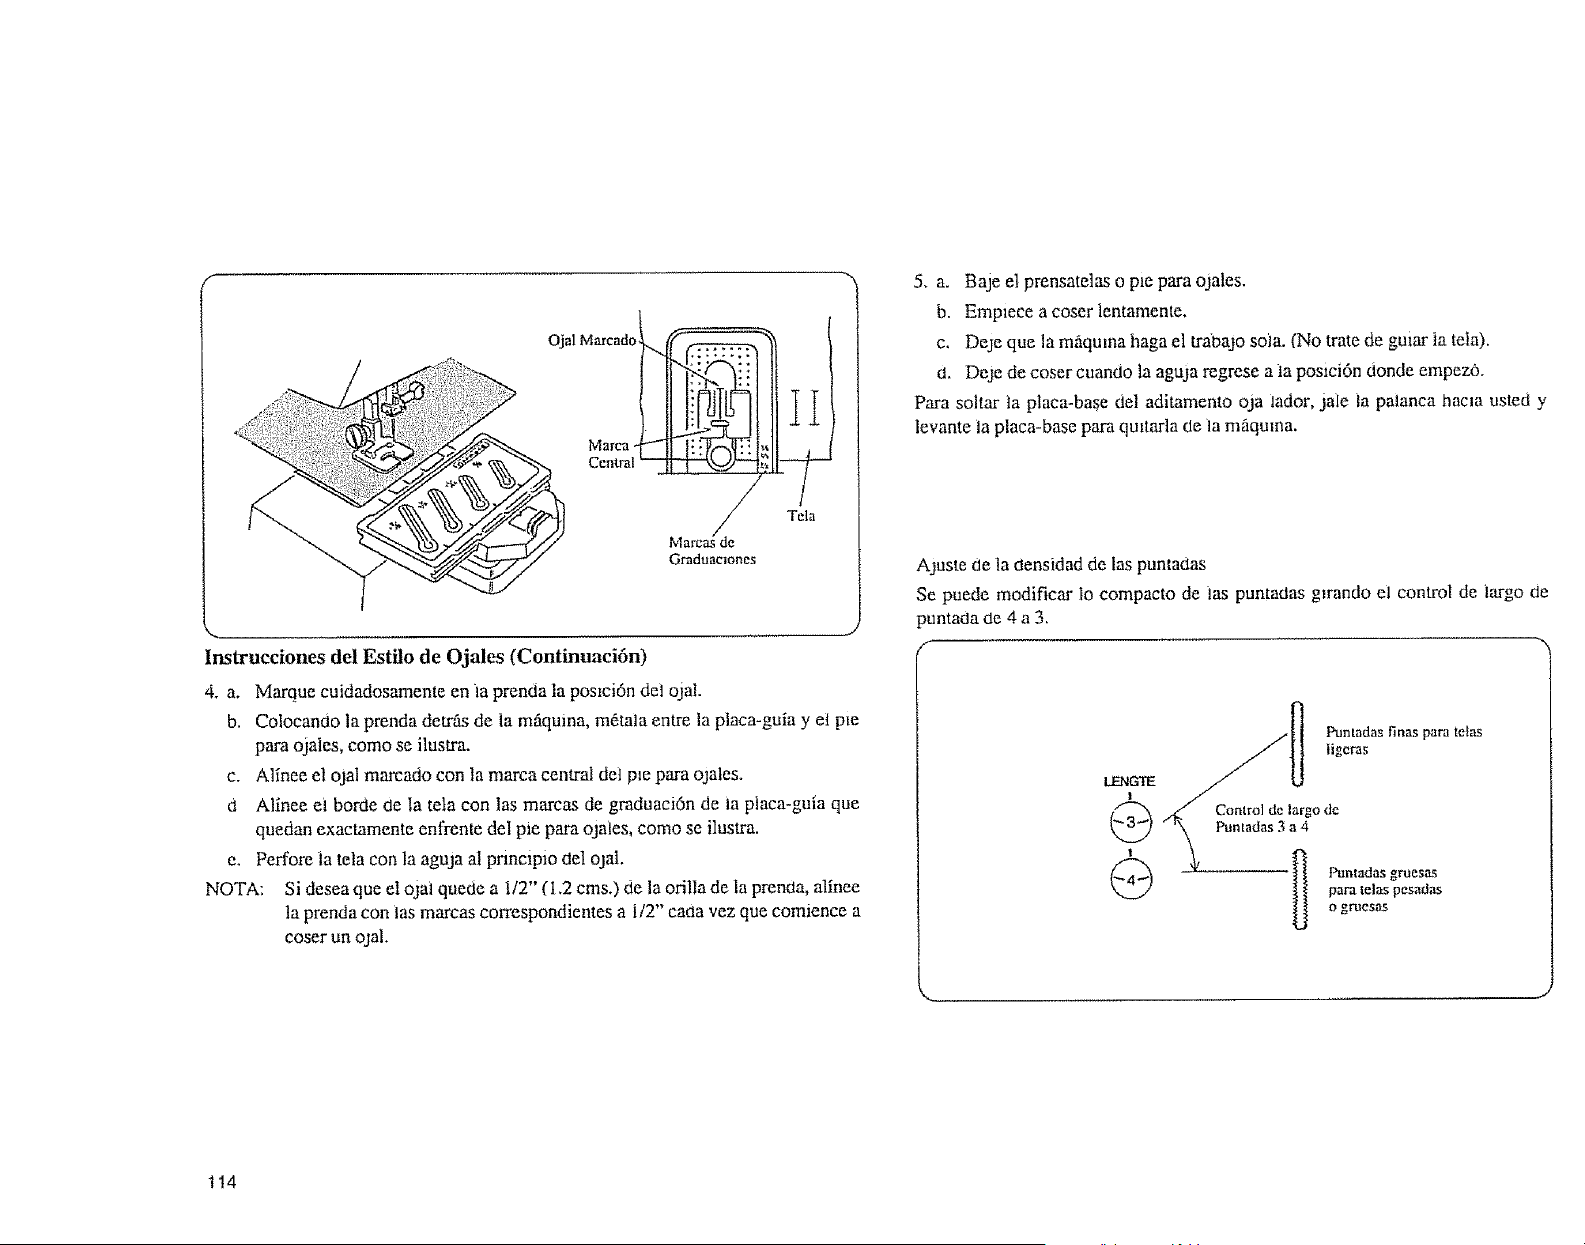
Ojal Marcado_
Marc //dde Tela
Graduacmnes
Instrucciones del Estilo de Ojales (Continuaci6n)
4. a.
b.
C,
d
NOTA:
Marque cuidadosamente en la prenda la posmi6n dei ojal.
Colocando la prenda detr_ de la mfiquina, m_tala entre la placa-guia yet p_e
para ojales, como se ilustra.
Alinee el ojal marcado con la marca central det pie para ojales.
Allnee el borde de la tela con las marcas de gcaduaci6n de ia ptaca-gula que
quedan exactamente enfrente del pm para ojates, como se ilustra.
Peffore la tela con la aguja al pnncipio del ojat.
Si desea que el ojai quede a t/2" (I.2 cms.) de la orilla de |a prencia, alinee
la prenda con ias marcas correspondientes a i/2" caaa vez que commnce a
coser un ojaL
5. a. Baje et prensatetas o pie para ojales.
b. Emplece a coser lentamente+
c. Deje que la m_quma haga et trabajo soia. (No trate de guiar la tela),
d. Deje de coser cuando la aguja regrese a la posmi6n donde empezO.
Para soltar la placa-base del aditamento oja iador, jaie |a palanca hama usted y
levante la placa-base para qmtarla de la m_quma.
Ajuste de la clensidad de Ias puntadas
Se puede modificar Io compacto de las puntadas g)rando el control de largo de
puntada de 4 a 3,
Puntada_ finas para telas
iigeras
t.ENGTE
I
(_ ig Conlro] de largo de
"'\ Puntadas 3 a 4
_'l t_untadas gmesas
!
_ para telas pesatlas
o gruesas
114
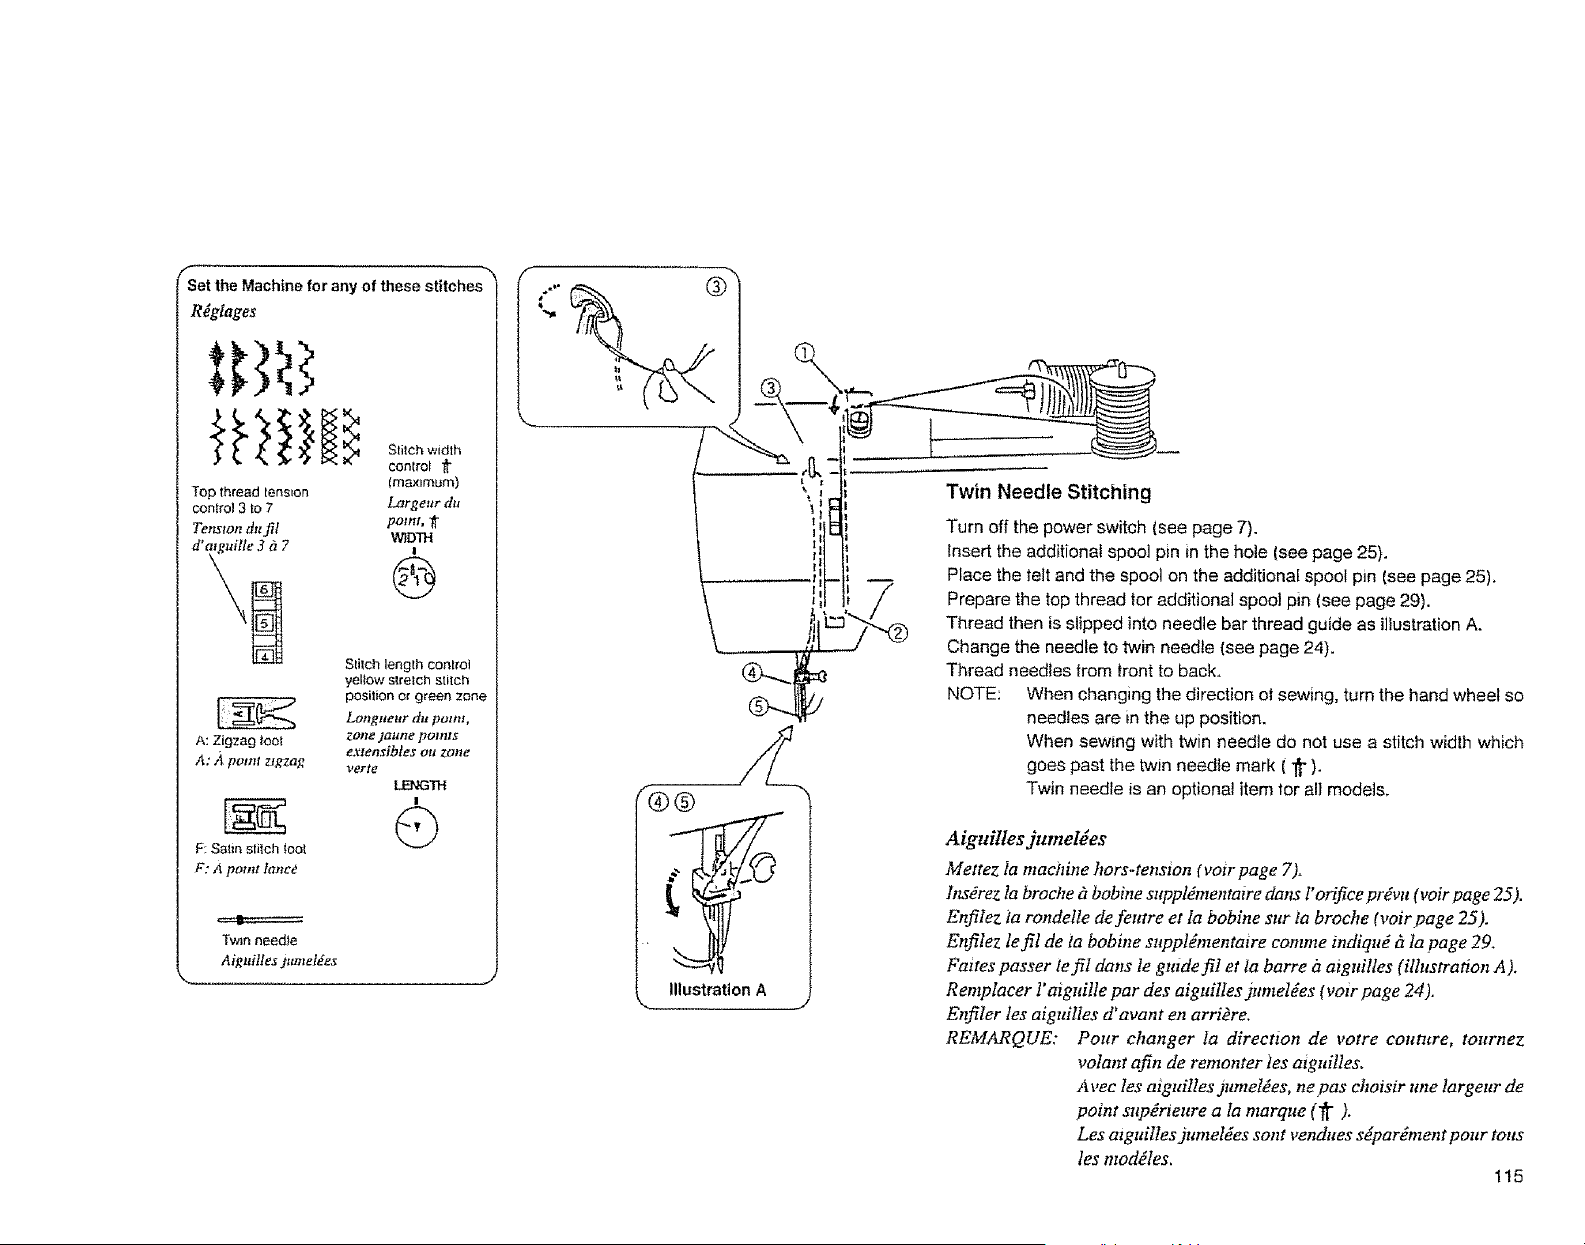
f --..,
Set the Machine for any of these stitches
R_giages
(maximum)
Top thread tens=on
control3to 7 Largeur du
Tenstondu fil point, _f
WlDIH
d'atguitle 3 _ 7 a
yellow sirelch Stitch
position or green zone
Lottglleltf dl1 pOlttt ,
A: Zigzagtoot zonejattne points
extensibfes ou zone
A: 1_ point ztgzag verte
LENGTH
I
! C)
F: Satin stitch Iool
F: A point l_ned
,==#a=======
Twin needle
Aignitles Jumetdes
®®
Illustration A
7
Twin Needle Stitching
Turn off the power switch (see page 7).
Insert the additional spool pin in the hole (see page 25).
Place the feit and the spool on the additional spool pin (see page 25).
Prepare the top thread for additional spool pin Isee page 29).
Thread then is slipped into needle bar thread guide as illustration A.
Change the needle to twin needle (see page 24).
Thread needles from |font to back.
NOTE: When changing the direction of sewing, turn the hand wheel so
needles are in the up position.
When sewing with twin needle do not use a stitch widlh which
goes past the twin needie mark ( _ ).
Twin needle is an optional item tot all models,
Aigui!tes jumeldes
Mettez fa machine hors-tension (votr page 7).
lns#rez la broche ?zbobine suppldmentatre dans l' orifice pr_vu (voir page 25).
Enfilez la rondelle de feutre et la bobine sur ta broche (voir page 25).
Enfilez le fil de la bobine suppldmentaire comme indiquY h la page 29.
Faites passer le fil clans le grade f!l et la barre i_aiguilles (illustration A ).
Remplacer l' aigui!le par des aiguilles jumel_es (voir page 24).
Enfiter tes aiguilIes d' avant en arrikre,
REMARQUE: Pour changer Ia directton de votre coutl_re, tournez
volant afin de remonter les aiguilles.
Avec les aiguilles jumeldes, ne pas choisir une largeur de
point supErieure a It: marque (_r ).
Les azguillesjumel_es sont vendttes sdpar_ment pour torts
les modEles,
115
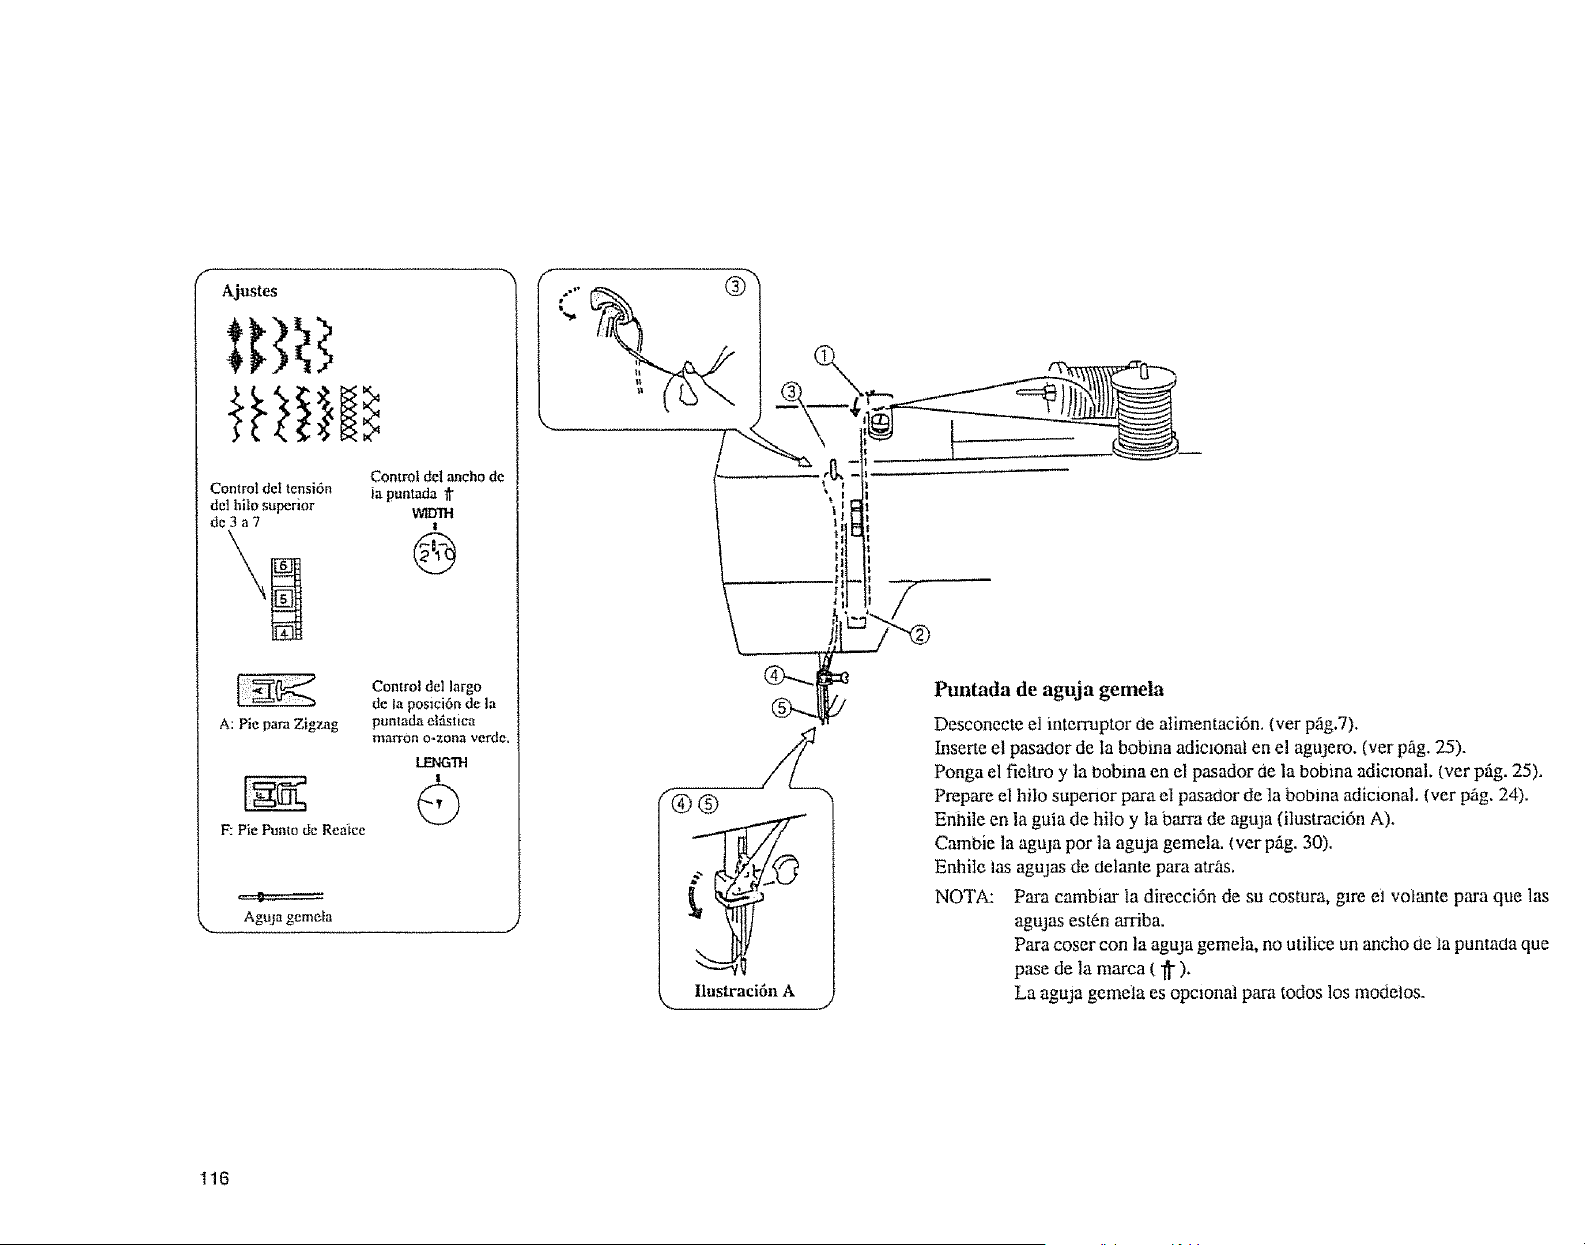
Ajustes
Controldeltension
de] hilo superior
dc3a7
Control del ancho de
Ja puntada It
NI1JIH
!
@
@
A: Pie para Zigzag
Control del largo
de ta posicidn de ta
pumada el_istica
matron o-zona verde.
F: Pie Pumo de ReaJce
LENGTH
i
G
,==11=:==:===:
AguJa geme|a
®
Ilustraci6nA
Puntada de aguja gemela
Desconecte et intermptor cle aIimentaci6n. (vet prig.7).
Inserte el pasador de Ia bobina adictonal en el agujero. (ver prig. 25).
Ponga el fieltro y la bobma en el pasador de la bobina adicional. (ver prig. 25).
Prepare el hilo superior para el pasador de ta bobina adicional. (ver p_g. 24).
Enlaile en ia guia de hilo y la barra de aguja (ilustraci6n A).
Cambie la aguja pot la aguja gemela. (ver prig. 30).
Enhile las agujas de ctelante para atr_s.
NOTA: Para cambiar Ia direcci6n de su costura, gtre el votante para que las
agujas est6n arriba.
Para coser con la aguja gemela, no utilice un ancho de fa puntacla que
pase de la marca ( It ).
La aguja gemela es opmonal para todos los modeios.
116
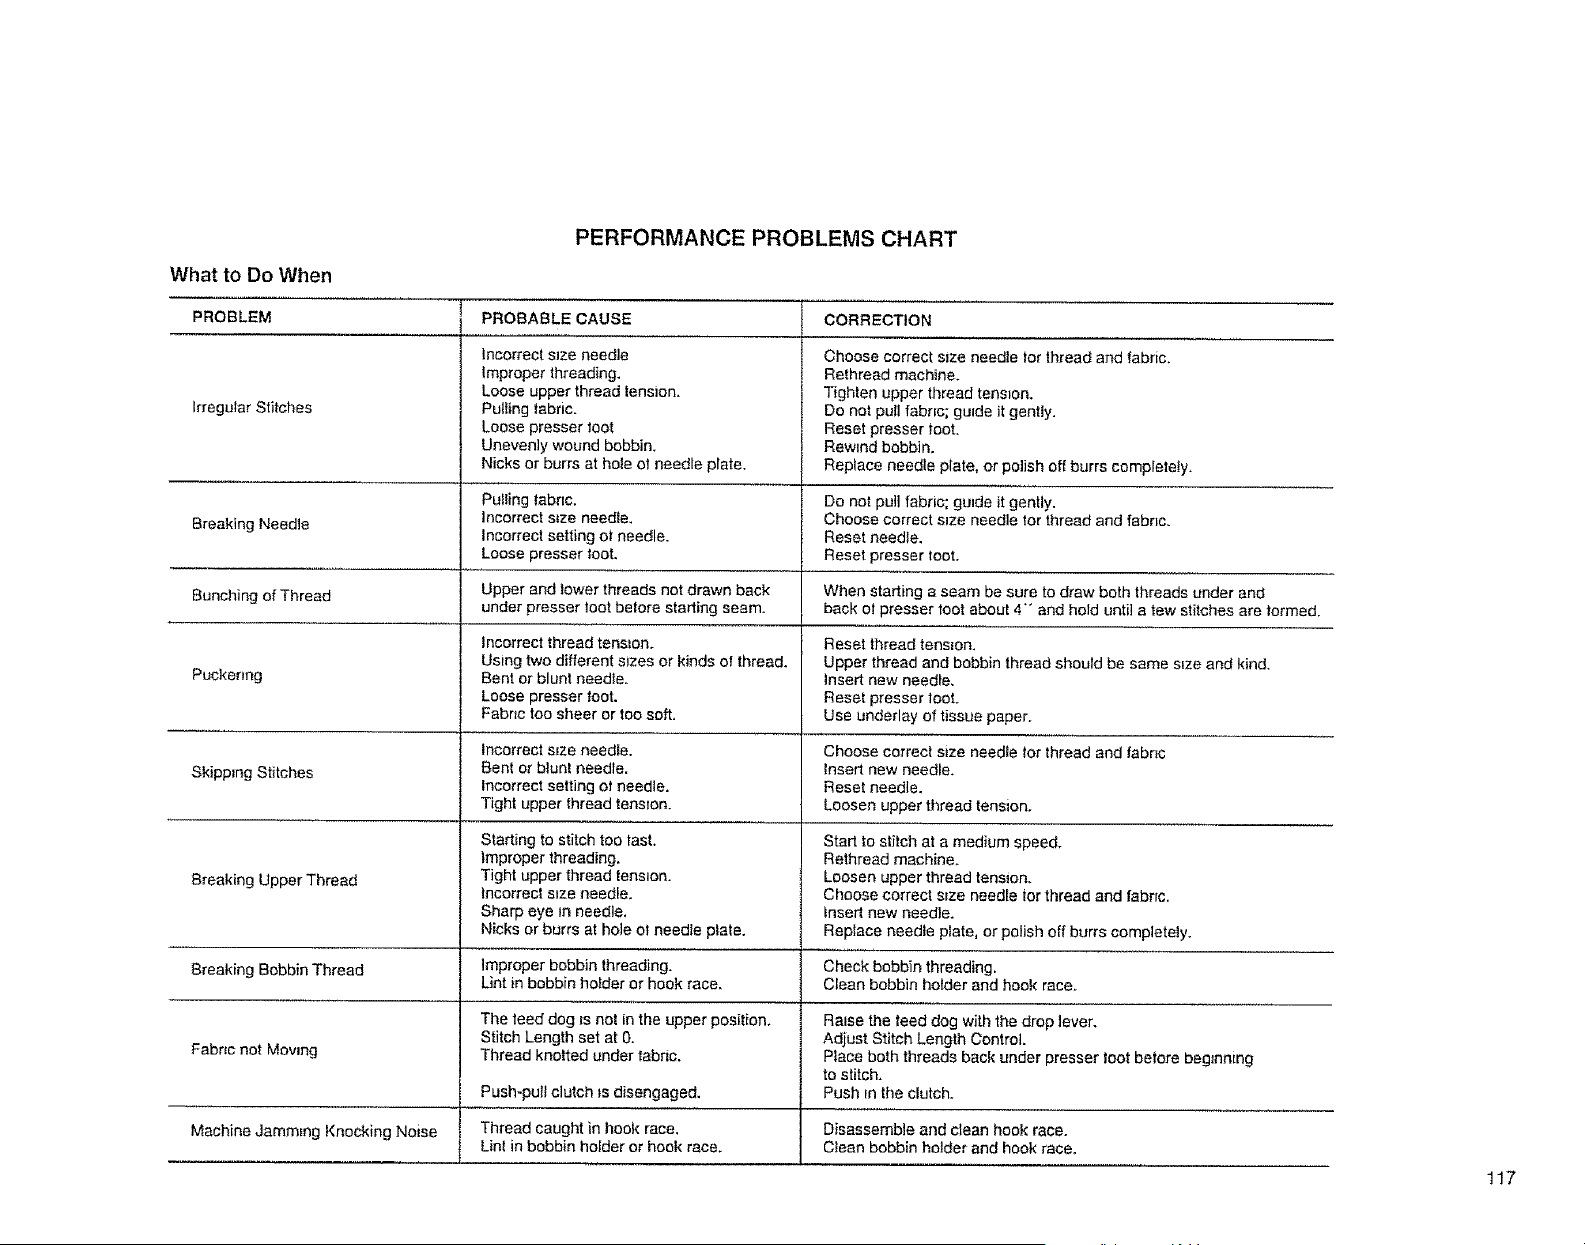
PERFORMANCE PROBLEMS CHART
What to Do When
PROBLEM PROBABLE CAUSE CORRECTION
Irregular Stitches
incorrect s_ze needle
Improper threading.
Loose upper thread tension.
Pulling tabnc.
Loose presser toot
Unevenly wound bobbin.
Nicks or burrs at hole ot needle plate.
Choose correct size needle |or thread and fabric.
Rethread machine.
Tighten upper thread tension.
Do not pull fabric; guide it gently.
Reset presser toot.
Rewind bobbin.
Replace needle plate, or polish off burrs completely.
Puiling tabnc. Do not pull fabric; guide it gently.
Breaking Needle Incorrect s_ze needle. Choose correct size needle tot thread and fabnc.
Incorrect setting ot needle. Reset needle,
Loose presser toot. Reset presser toot.
Bunching of Thread Upper and lower threads not drawn back When starting a seam be sure to draw both threads under and
under presser toot betore starting seam. back el presser toot about 4"' and hold until a tow stitches are termed.
incorrect thread tension. Reset thread tension.
Using two different sizes or kinds of thread. Upper thread and bobbin thread should be same size and kind.
Puckering Bent or blunt needle. Insert new needle,
Loose presser toot. Reset presser toot.
Fabric too sheer or too soft. Use underlay of tissue paper.
Incorrect s_ze needle. Choose correct size needle for thread and tabnc
Skipping Stitches Bent or blunt needle. Insert new needle.
Incorrect setting el needle. Reset needle.
Tight upper thread tenston. Loosen upper thread tension.
Starting to stitch too test.
improper threading,
Tight upper thread tension.
incorrect s_ze needle.
Sharp eye Jnneedle,
Nicks or burrs at hole ot needle plate.
Breaking Upper Thread
Breaking Bobbin Thread Improper bobbin threading.
Lint in bobbin holder or hook race.
The teed dog is not in the upper position.
Stitch Length set at 0.
Thread knotted under tabric.
Fabnc not Moving
Start to stitch at a medium speed.
Rethread machine.
Loosen upper thread tension.
Choose correct seze needle tot thread and fabric.
insert new needle.
Replace needte plate, or polish off burrs completeJy.
Check bobbin threading.
Clean bobbin holder and hook race.
Push-pull clutch Is disengaged,
Machine Jamming Knocking Noise Thread caught in hook race, Disassemble and clean hook race.
Lint in bobbin holder or hook race. Ctean bobbin holder and hook race.
Raise the teed dog with the drop lever.
Adjust Stitch Length Control.
Place both threads back under presser toot betore beg_nmng
to stitch.
Push in the dutch.
117
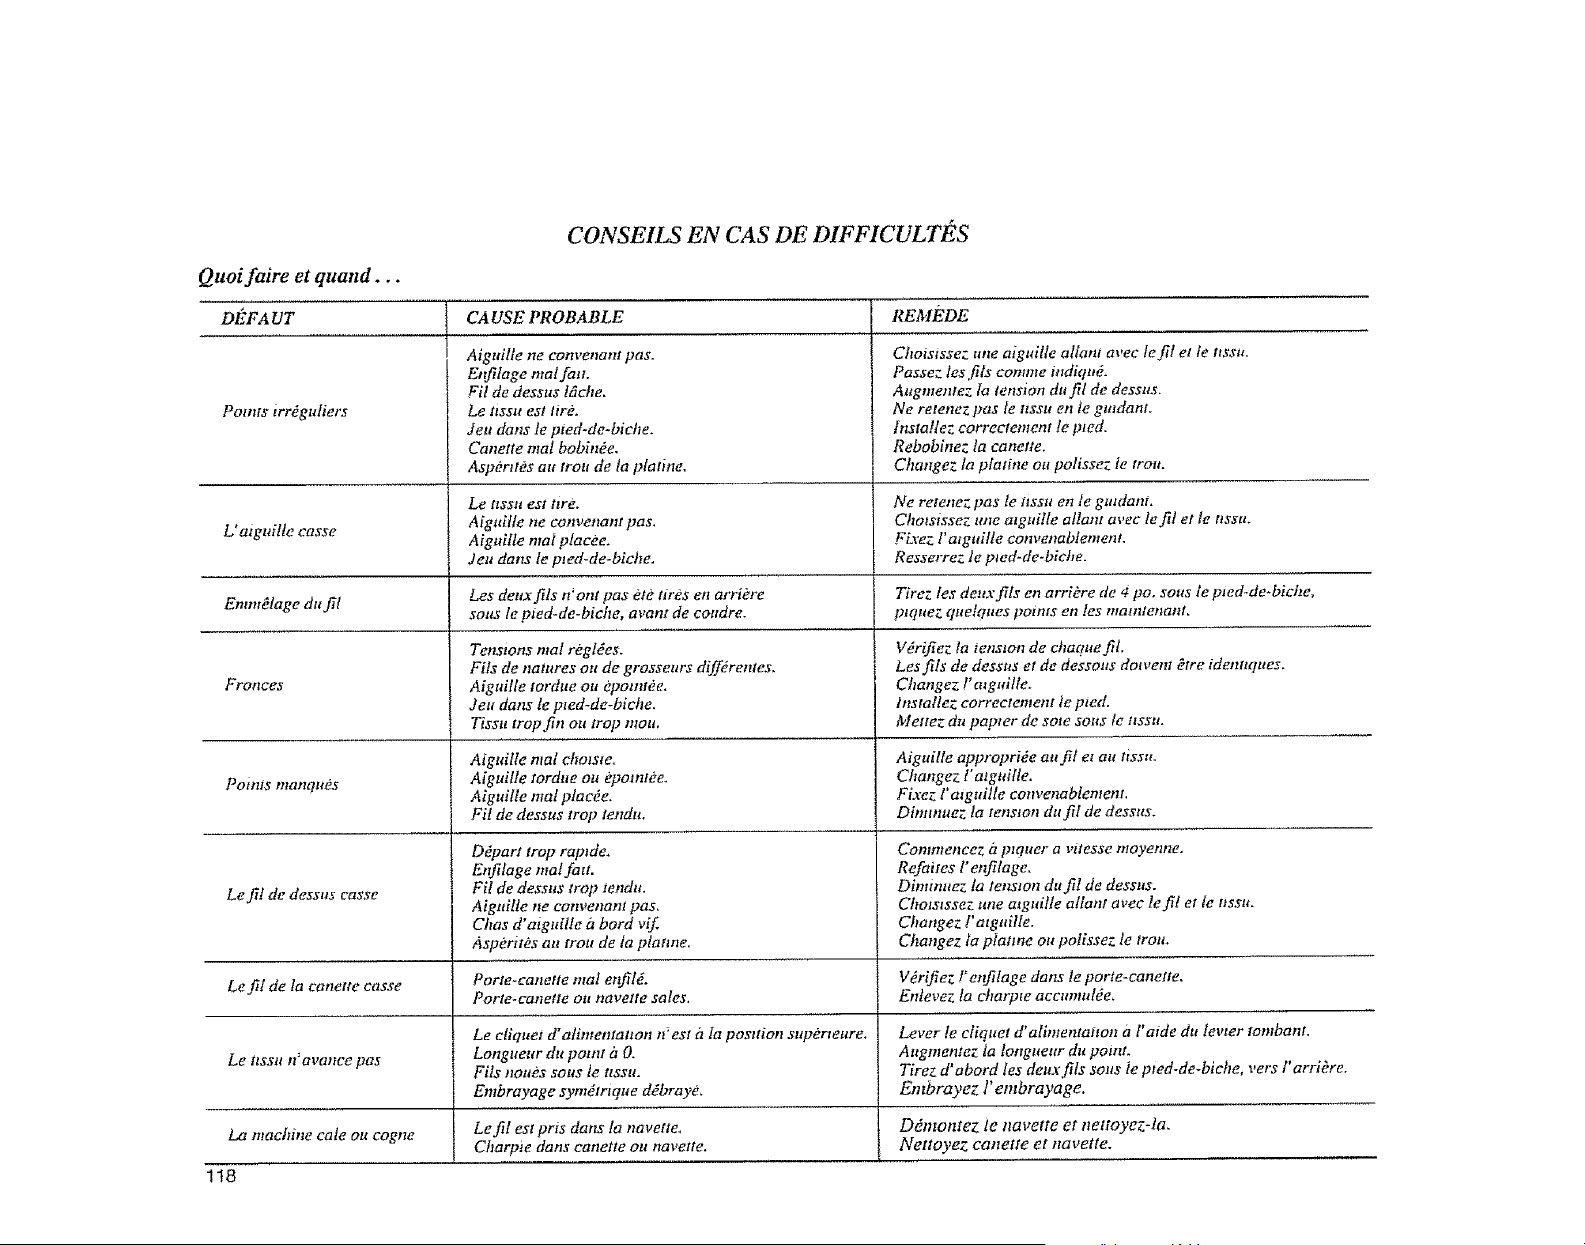
CONSEILS EN CAS DE DIFFICULTIES
Quoi faire et quand. . ,
DE, FA UT
Points irrdguliers
L' aiguilte casse
Emm_lage du ftl
CAUSE PROBABLE
Aiguilfe ne convenant pas.
Et_tage maf fatt.
Fil de dessus l_che.
Le tissu est lit&
Jett duns te pied-de-biche.
Canette ntal bob/nee.
AspOrttes au trou de la plat/he.
Le nssu est tire,
Aigaifle tte eonvenant pas.
Aiguifte ntat ptacee,
3eu dans fe pied-de-biche.
Les dertx fils n _oat pas ere tires ea art/Ore
seas le pted-de-biche, avant de eoadre.
Tenstons real regldes,
Fils de natures art de grossetlrs diffdrentes.
Alga/fie tordtte ou dpotntde.
3ea dans le pted-de-biche,
Tissu trop ftn ou trap mou.
XrEirti_OE
Choisisse:. une aiguille allant avee le ftt et le ttssu.
Passez les fils comme mdiquO.
Aagmetltez la tension du ftl de desslts,
Ne retenez pas le ttssu en te gtadant,
lnstalfez correctemeat te pred.
Rebobinez ta eanette,
Changez la platine ou polissez le trou,
Arc reteneZ, pas le tissa en le gtadant.
Cho_sissez _me aiguifte atlant avee teftl et te t_ssu.
Fixez l'atguitte eonvenabfement.
Resserrez le p_ed-de-blche.
Tirez les dertx ftls en arridre de 4 po. seas le pied-de-biehe,
ptquez quelqaes points en tes maratenant.
Vdriftez la tension de chaque ftL
Les ftts de dessus et de dessous dotvent Otre identtques.
Changez !' atguitle_
lnsta/lez correetement te pied.
Mettez. da papter de sore seas le ttssu.
Froaees
Aiguille real choisie. Aiguille appropride att fit er aa tissu.
Points manques Aiguille tordue ou epotntee. Changez t'atgailte.
Aiguitle real plac@. Fixez l' a_guille coavenablement.
Fil de dessus trop tendu. Dimmuez ta tension da f!l de dessus,
Ddpart trap raptde, Comnteneez it ptqaer a vaesse moyenne,
Eafifage mat fau. Refaites l"enfitage.
Left1 de dessus casse Ell de dessus trop tendu. Diminuez fa tenstoa du fil de dessus.
Alga/tie ne convenant pas, Chotstssez ane algtd!te atlant avee le f/ et le tissu.
Chas d'aiguitle it herd vif Changez 1'alga/lie,
Asperites aa trou de la platme. Changez fa ptatme ou polissez te troa,
Left/de ta canette casse Porte-eanette maf eafitd, Vdrifiez l"et_lage dons le porte-canette.
Porte, eanette o_t navette sales, Enlevez ta eharpte aecumutde,
Le ctiquet d'atimentatton n_est it ta posttion strpertettre, Lever fe eliquet d'alimentatton a l'aide dtr levter tontbant.
Le ttsstt n'avanee pas Loagueur du point it O, Augmentez la tonguettr du point.
F/Is noues sous le ttssu. Tirez d'abord les deux fils sorts ie pted-de-biehe, vers l' arribre.
Embrayage sym_trtque ddbraye, Embrayez l'embrayage,
La machine eate oa cogne Le fit est pros clans la navette, D6monteZ le navette et tlettoyez-ta,
Charpie dans canette ou navette. Nettoyez canette et navette.
118
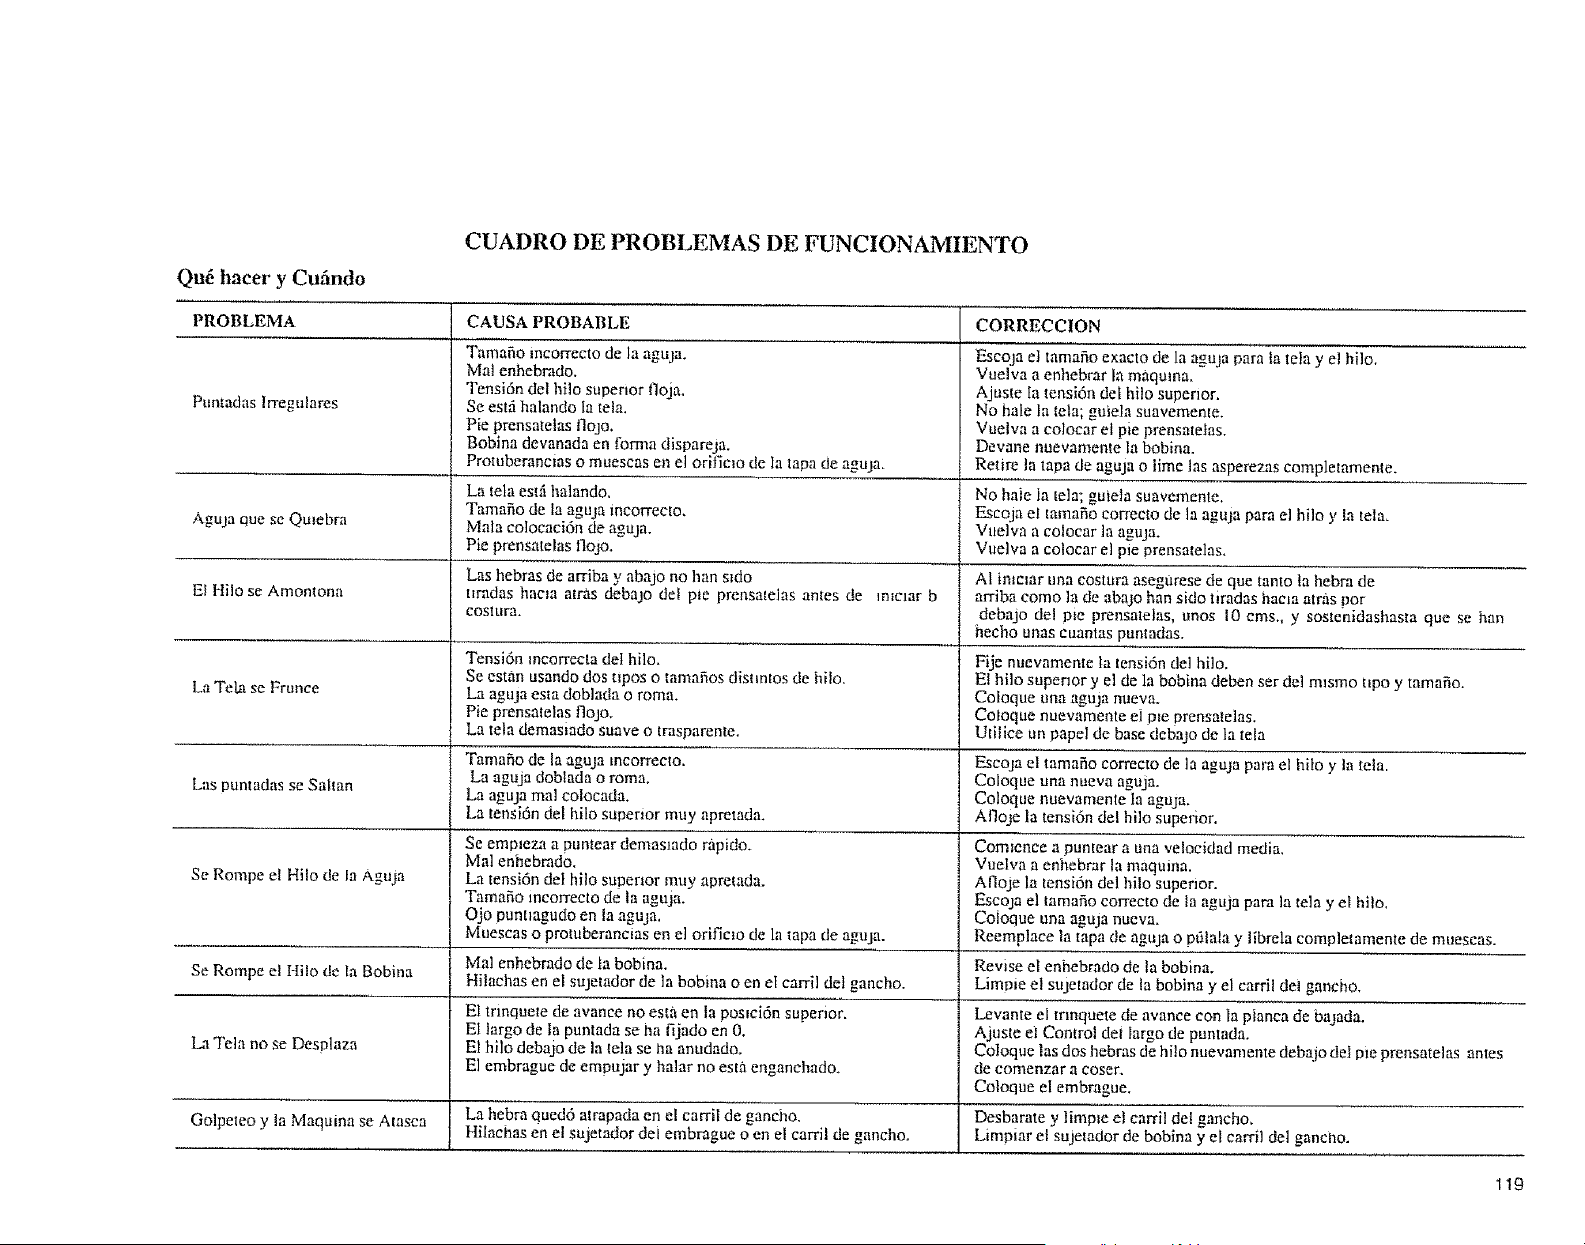
Qu6hatery Cufindo
CUADRO DE PROBLEMAS DE FUNCIONAMIENTO
PROBLEMA
Puntadas lrregulares
CAUSA PROBABLE
Tamafio tncorrecto de la aguja.
Mat enhebmdo.
Tensidn del hilo superior floja.
Se estfi halando la tela.
Pie prensatetas flo.lo.
Bobina devanada en forma dispareja.
Protuberancms o muescas en el orifiem de la tapa de aguja+
La tela estfi halando.
Tamsfio de la aguja mcorrecto+
Mala colocaei6n de aguja.
Pie prensatelas llojo.
Los hebras de arriba y absjo no han redo
uradas hae+a atr_,sdebajo del pte prensatelas antes de m+clar b
coslura.
CORRECCION
Escoja el tamafio exacto de la aguja para la telay e! hilo.
Vuelva a enhebrar [a mttquma.
Ajuste la tensidn de[ hilo superior,
No hale la teta; guieIa suavememe.
Vuelvs a cNocar el pie prensatetas.
Devane nuevamente la bobina+
Retire la tapa de aguja o time tas asperezas completamente.
No hale Ia tela; guie]a suavemente.
F.seoja el tamafio correcto de la aguja para el hila y [a tela.
Vuelva a cotocar la aguja.
Vuelva a coloear et pie prensarelas+
Aguja que se Qulebra
AI imelar una eosmra asegarese de que tanto la hebm de
E[ Hilo se Amontona arriba como la de abajo han sido tiradss haem arras i0or
debajo del p+e prensatetas, unos 10 eros., y sostenidashasts que se hart
hecho unas cuantas pumadas.
Tensi6n mcorrecta del hilo. Fije nuevamente la tensi6n del hilo.
Se estan usando dos tipos O tamafios dis!taros de hilo, El hito superior y el de la bobina (.lebenser del mlsmo tLpo y tsmaglO.
LaTela se Frunce La aguja esta doblada o roma. Coloque una aguja naeva.
Pie prensatelas flOlO. Co_oque nuevamente el p_e Drensatelas.
La tela demasiado suave o traspsrente. Utiliee un pape] de base deba3o de la teta
Tamafio de la aguja meorreeto. Escoja el tamafio eorrecto de la aguja para el hito y ta teta.
La aguja dobtada o roma. Coloque una nueva aguja.
Las puntadas se Sa[tan La aguja real colocada. Coloque nuevamente la aguja.
La tensi6n de[ hilo superior muy apretada. Aflote la tension de! hilo superior,
Se emp_eza a puntear demaslado r_ipido+ Comienee a tJuntear a una velocidad media.
Mal enhebmdo. Vuelva a enhebrar la maquina.
Se Rompe el Hi[o de la Aguja La tensidn det hilo su!0ermr muy apretada. Afloje la tensidn del hilo superior.
Tamafio incorreclo de la agujs. Escoja el tamafio correcto de la aguja para ta telay eI hilo.
Ojo puntmgudo en la aguja. Coioque una aguja nueva.
Muescas o promberaneias en el orific_o de la tapa de agNa. Reemplace la tapa de aguja o pfilaLa y Iibrela comNelamente de muescas.
Se Rompe et Hito de la Bobina Mal enhebmdo de Labobina. Revise el enhebrado de la bobina.
Hiiaehas en eI sujetsdor de ]a bobina o en eI carril del gancho. Limme el sujetador de ta bobina y el carril dei ganeho.
E1trinquete de avance no esta en la posmidn superior. Levante el mnquete de avarice con |a ptanca de bajada.
El largo de la puntada se ha fijado en 0. Ajuste eLControl dei Iargo de puntada.
L-t Teta no se Desplaza E1 hilo debsjo de la tela se lla anudado+ CoLoque los dos hebras de hilo nuevamente debajo deLple prensatelas antes
E1 embrague de empujsr y hoist no est,. enganehado, de comenzar a coser.
CNoque el embrague,
Gotpeleo y Is Maquina se Atasea La hebra qued6 atrapada en el carril de ganeho. Desbarate y limp_e el carril de[ ganeho+
Hilachas en el sujetador dei embmgue o en et carril de gancho. Limpisr el sujetaclor de bobina y el earril del ganclao.
119
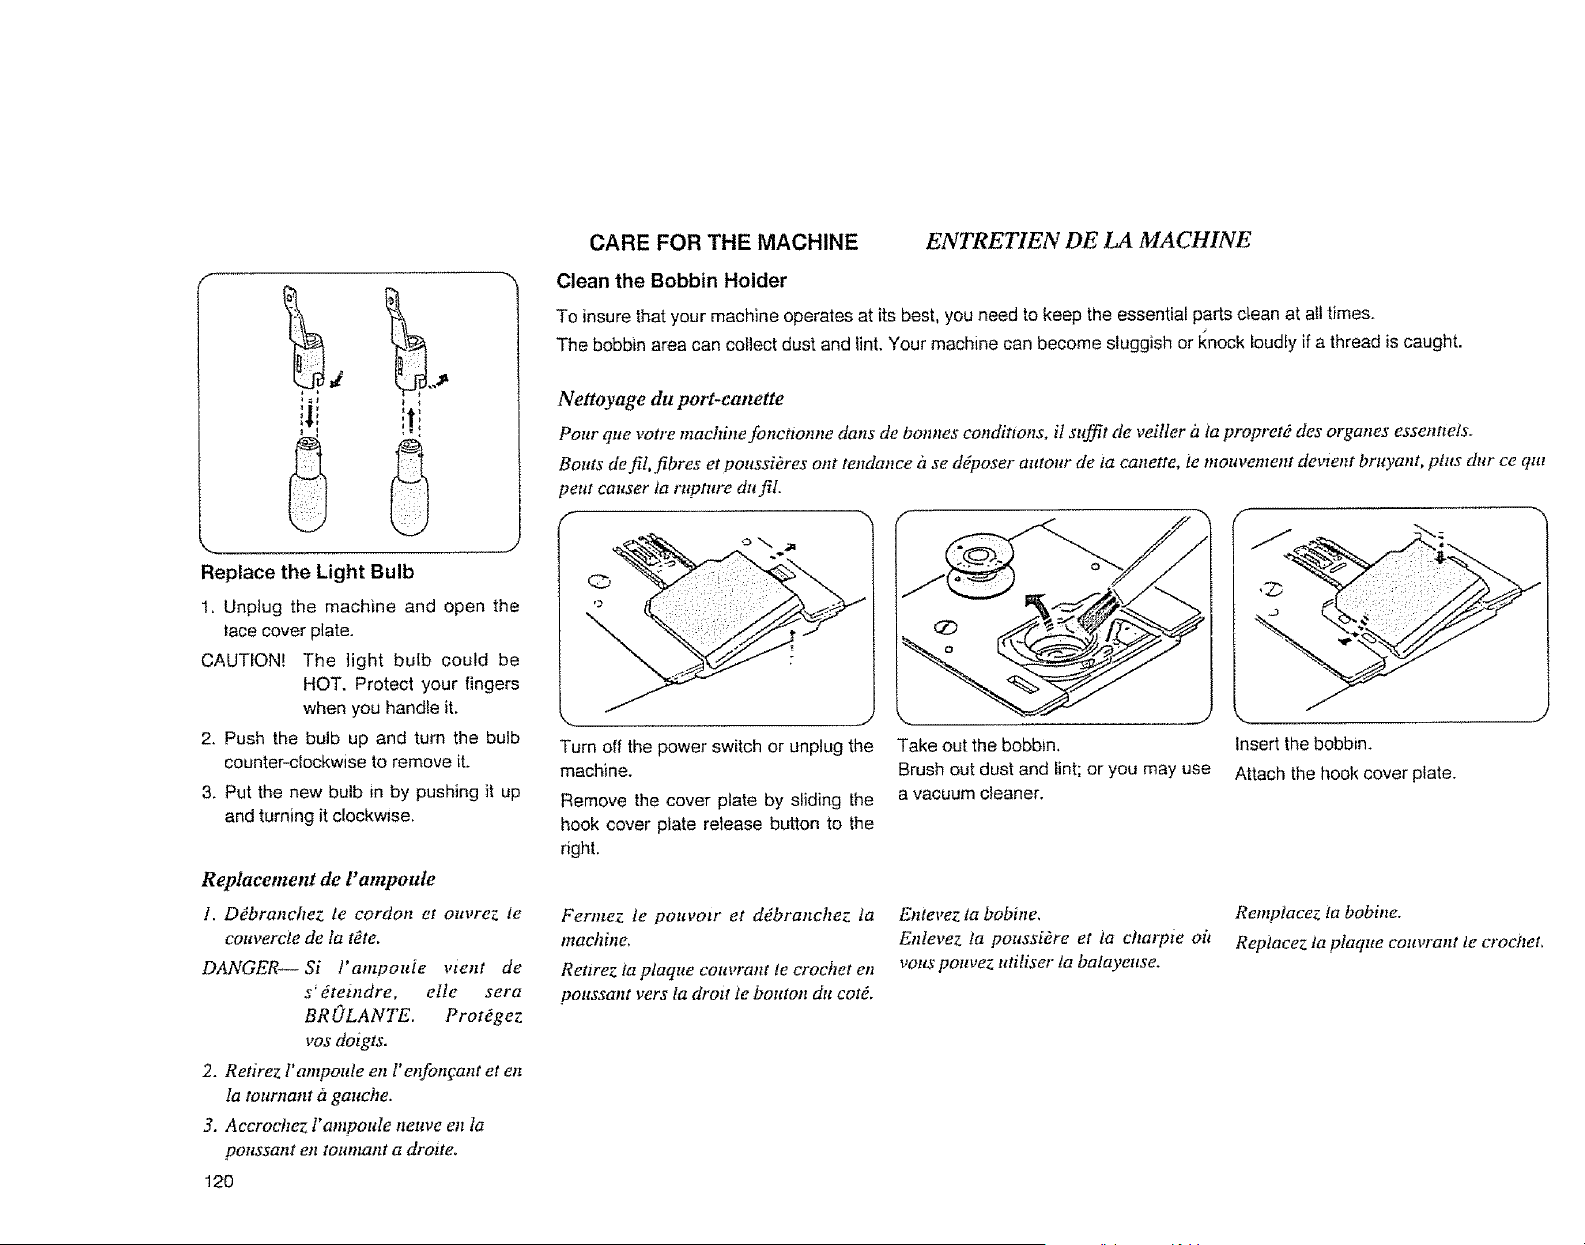
#
T '!'
........ J
Replace the Light Bulb
1. Unplug the machine and open the
lace cover plate.
CAUTION! The light bulb could be
HOT. Protect your fingers
when you handle it.
2. Push the bulb up and turn the bulb
counter-clockwise to remove it.
3. Put the new bulb in by pushing it up
and turning it clockwise.
Replacement de l' ampoute
1. DObranchez fe cordon et ouvrez le
couvercle de la tote.
DANGER-- Si t'ampouie Went de
s __tetndre, elle sera
BR OLANTE. Prot#gez
vos dotgts.
2. Retirez l'ampoule en l'etfon_ant et en
la tournant f gauche.
3. Accrochez l' ampoule neuve en Ia
poassant en toumant a drotte.
120
CARE FOR THE MACHINE ENTRETIEN DE LA MACHINE
Clean the Bobbin Holder
To insure that your machine operates at its best, you need to keep the essential parts clean at alltimes.
The bobbin area can collect dust and lint. Your machine can become sluggish or I_nockloudly if a thread is caught.
Nettoyage du port-canette
Pour que votre machine fonctionne clans de bonnes conditions, il suffit de veiller 11la propretO des organes essenttels.
Bouts de fil, fibres et poassi_res ont tendance &se d_poser atttoltr de ia eanette, ie mouvement devient bruyant, plus dttr ce qut
peut causer la rupture du fil.
f
Turn off the power switch or unplug the
machine.
Remove the cover plate by sliding the
hook cover plate release button to the
right.
Take out the bobbin.
Brush out dust and lint; or you may use
a vacuum cleaner.
(
I
\
Insert the bobbin.
Attach the hook cover plate.
Fermez le pottvotr et d_branehez la
machine,
Rettrez la plaque couw'ant le crochet en
poussant vers la droll le bouton da cot#.
Enlevez ta bobine,
Enlevez ta poussiOre et ia chmpie oh
volts pouvez uti!iser ta batayeuse.
Remptacez ia bobine.
Repiaeez ia plaque cottvrant te crochet,
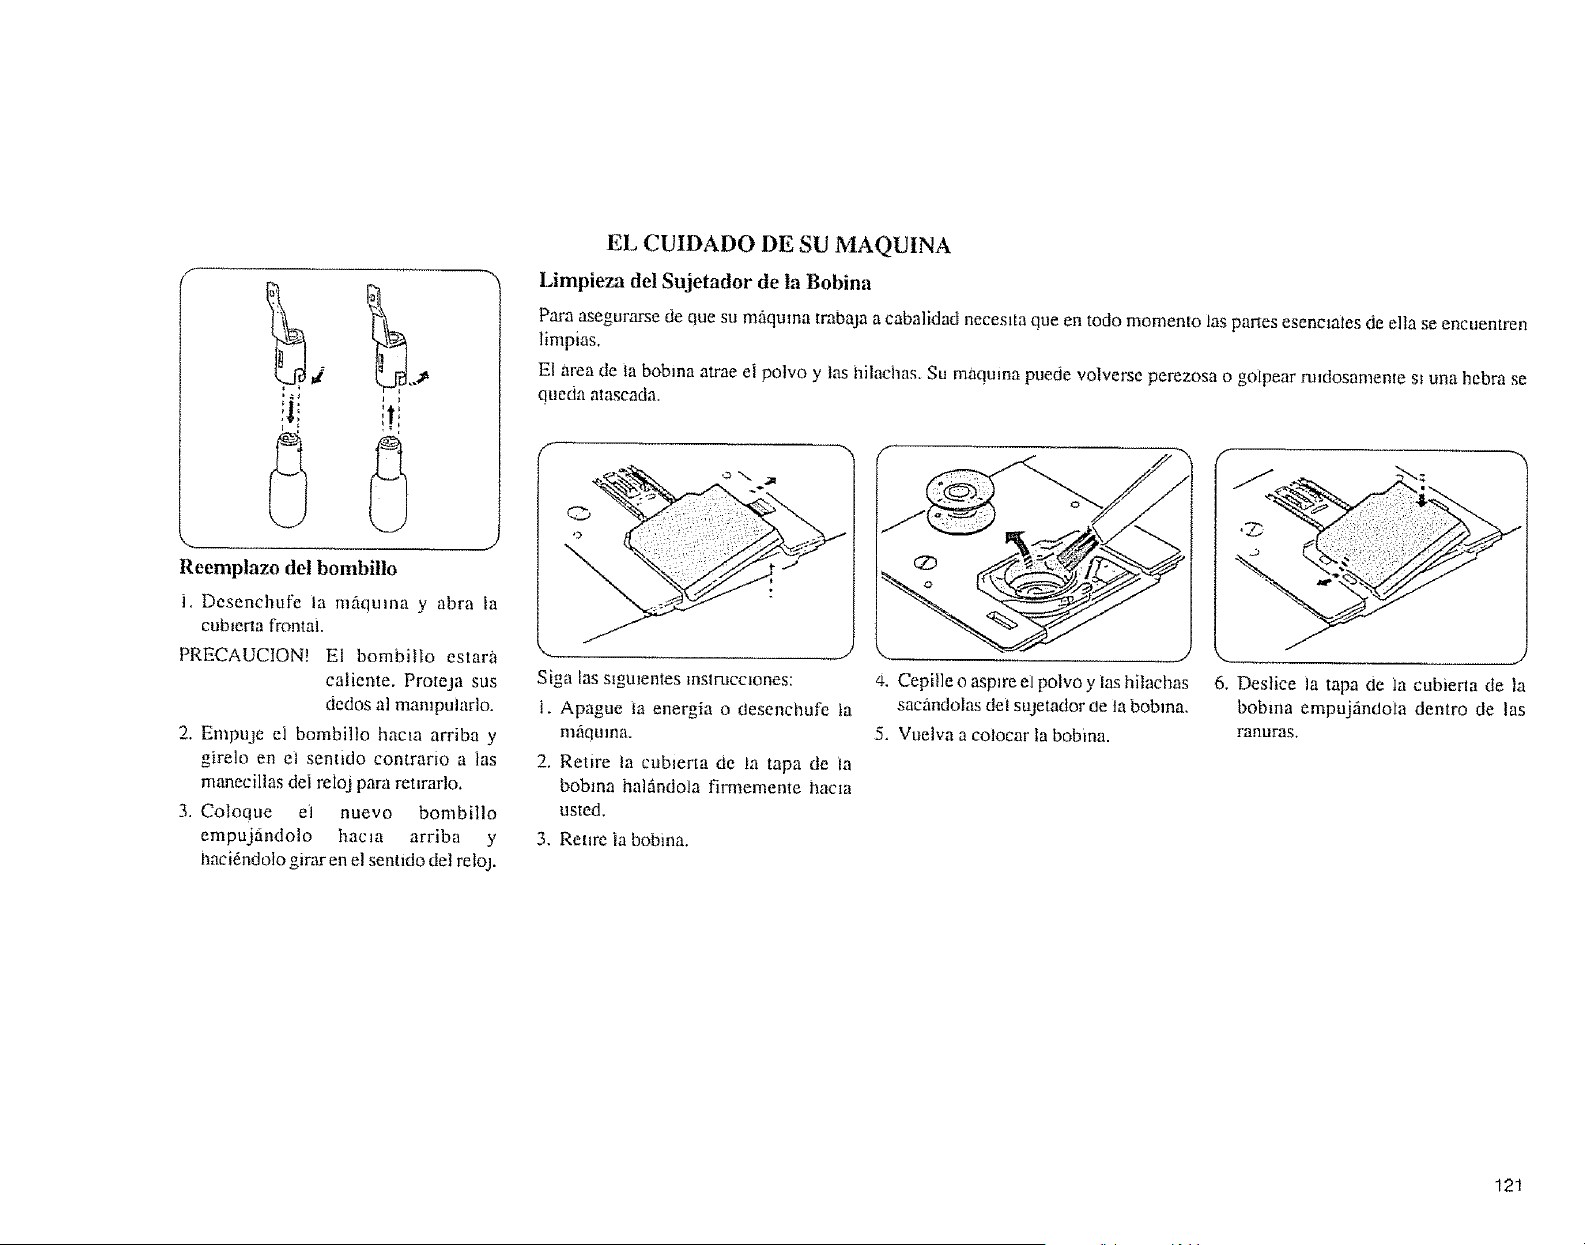
r
Reemplazo det bombillo
i. Desenehufe ia mfiquma y abra [a
cubmna frontal.
PRECAUC1ON! El bombillo estara
caliente. Proteja sus
6edos al mampularlo.
2. Empu3e el bombillo hama arriba y
glrelo en el sentido contrario a tas
manecillas del reiol para renrarlo.
3. Coloque el nuevo bombillo
empujfindolo hacla arriba y
haci6ndolo girar en el sentido del reloj.
EL CUIDADO DE SU MAQUINA
Limpieza del Sujetador de ia Bobina
Paraasegur,'trse de que su m_quma _rabaja a cabalidad neces_ta queen todo momento las partes esencmles de ella se encuemren
limpias.
El area de ia bobina atrae el polvo y las hilachas. Su maquma puede volverse perezosa o golpear rmdosamenm s_ una hebm se
queda alascada.
Siga [as s_gmentes mslmcc_ones:
i. Apague la energia o desenchufe ta
mfiQuma.
2. Retire la cubmrta de ta tapa de la
bobma halfindola fi_nemente hacla
usted,
3. Retire ia bobina.
\
4. Cepi[le o aspve el polvo y las hilachas
sac,'_ndolasdel sujetador oe la bobma.
5. Vuelva a colocar la bobina.
6. Deslice la tapa de ia cubierla de la
bobma empujfincioia dentro de las
ranuras.
121
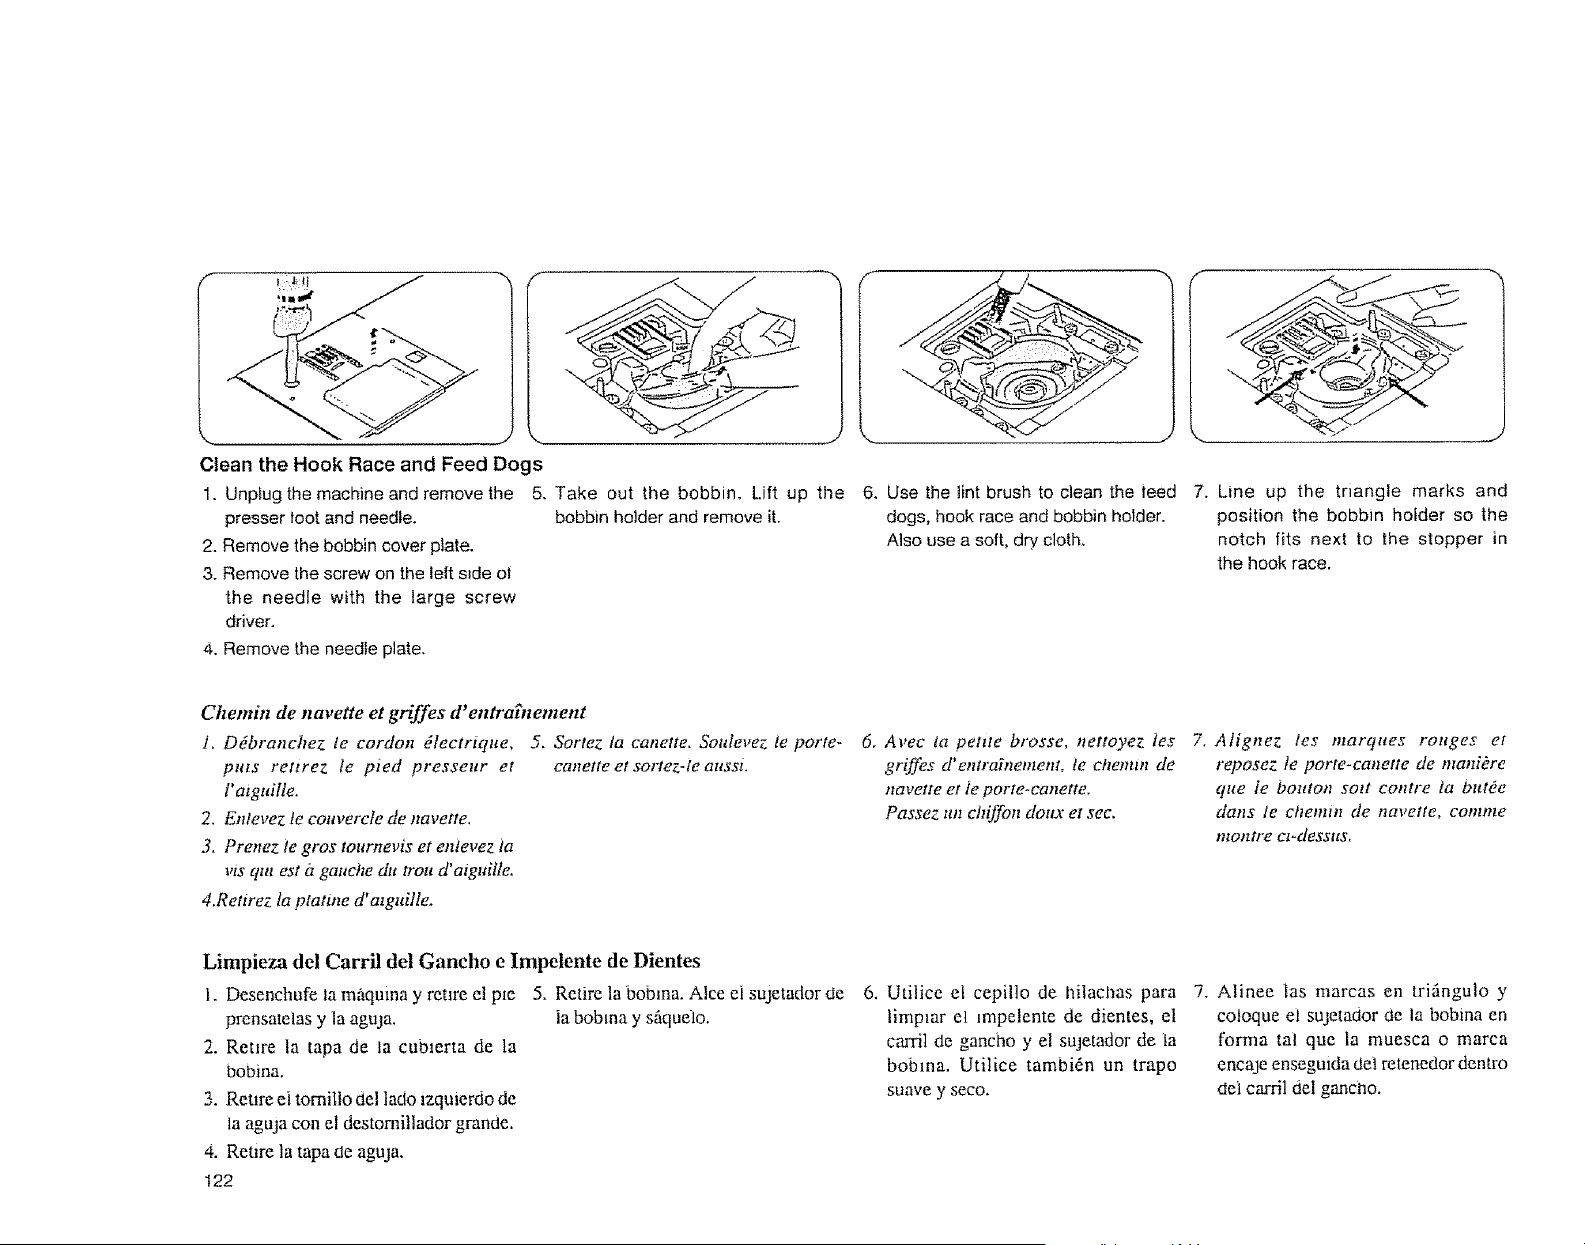
CleantheHookRaceandFeedDogs
1.Unplugthemachineandremovethe 5.Takeoutthebobbin.Lift up the
presserlootandneedle, bobbinholderandremoveit.
2.Removethebobbincoverplate.
3.RemovethescrewontheleRs_deot
the needlewiththelargescrew
driver.
4. Remove the needle plate.
6. Use the tint brush to clean the teed
dogs, hook race and bobbin holder.
Also use a soft, dry cloth.
f
7. Line up the triangle marks and
position the bobbin holder so the
notch fits next to the stopper in
the hook race.
Chemin de navette et griffes d'entrabtentent
J. Ddbranchez te cordon dtectrique, 5. Sortez ta canette. Soutevez le porte-
pros rettrez ie pied presseur et canetteetsortez-teaussL
ratguiIle.
2_ Enlevez te couverele de navette.
3. Prenez le gros tournevis et enievez ta
vls qttt est i_gattche dtt tt'ott d'atguille.
4.Retirez ta plattne d' atguille.
6. Avec la pettte brosse, nettoyez tes
griffes d'entrab ement, te etwmm de
navette etie porte-canette.
Passez un chiffon doux et sec.
7. Alignez les marques rouges et
reposez le porte-canette de manibre
que te bouton sort contre ta btttde
clans te cllelllitr de navette, Cotllttle
montre ez-desstts.
Limpieza del Carril del Gancho e Impelente de Dientes
1. Desenchufe ta mfiquina y retire el pie 5. Retire la boblna. Alce ei sujetador de
prensatelas y la aguJa, ia bobma y s_quelo.
2. Retire la tapa de la cublerta de la
bobina.
3. Retire ei tomitto del lade izqmerdo de
la aguja con el destomillador grande.
4. Retire la tapa de aguja.
!22
6. Utilice el cepilto de t_ilacl_aspara
limpmr el Jmpelente de dientes, el
carrit de gancho y el sujetador de la
bobma. Utilice tambi6n un trapo
suave y seco.
7. Alinee |as marcas en trifingulo y
coloque el sujetador de la bobina en
forma tat que la muesca o marca
encaje enseguida det retenedor dentro
dei carril del gancho.
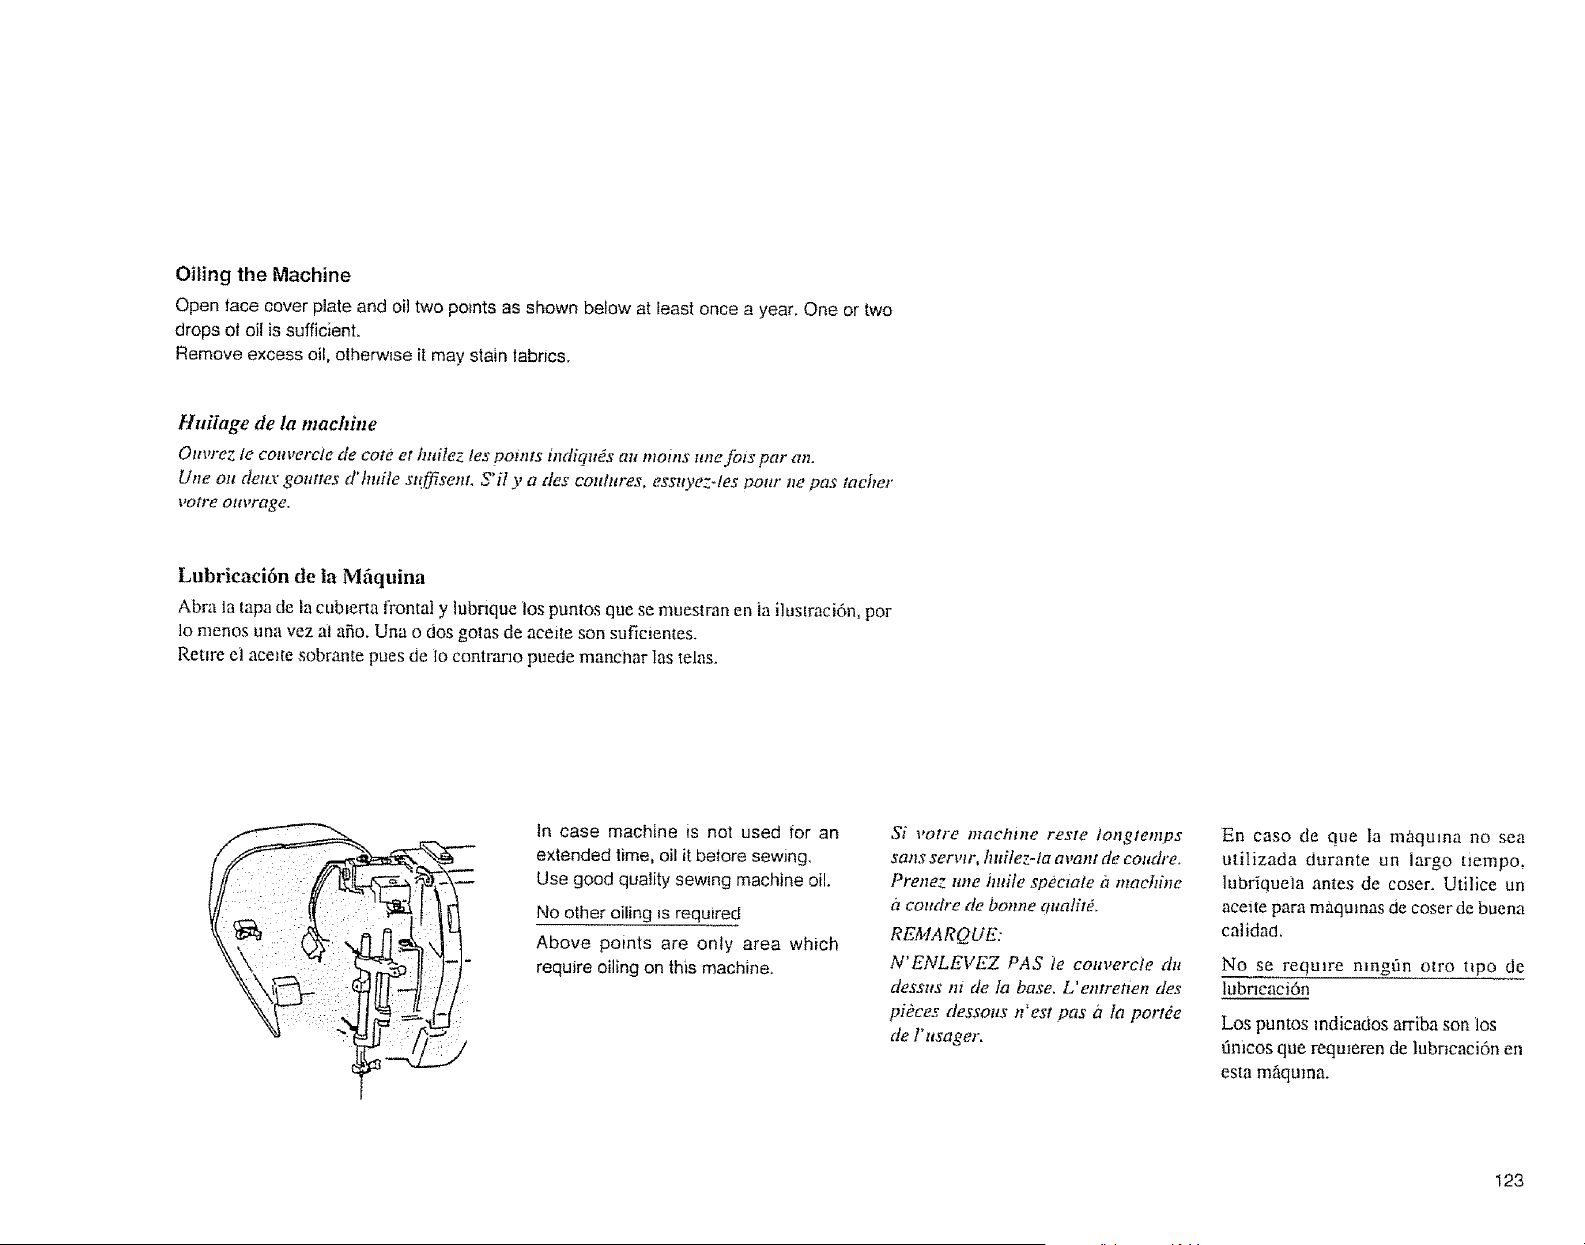
Oiling the Machine
Open |ace cover Nate and oil two points as shown below at [east once a year. One or two
drops of oil is sufficient.
Remove excess oil, otherwise it may stain |abrics.
lluilage de la machine
Ore,fez le com,ercie de cote et hnilez les points indiqu_s art morns zme fots par an.
Une ott deu.r gouttes d'htdle sttffisettt. S'il y a des cozthtres, essto,ez.les pottr 1repas taeher
votre otlvrage.
Lubricaci6n de la Mfiquina
Abra la tapa de la cub_erta frontal y lubrique los puntos que se roues|ran en ia ilustraci6n, por
1omenos una vez al ago, Una o dos gotas de aceile son suficientes.
Retire et acette sobrante pues de io contrarlo puede mancnar Ias telas.
In case macNne is not used for an
extended time, o11it before sewing.
Use good quality sewing machine oil.
No other oiling _srequired
Above points are only area which
require oiling on this machine.
Si votre machine reste iongtenzps
sans serwr, kttitez-la avant de coudre.
Prene: tree huile spectate b maehhw
b cottdre tie bom_e ottatit#.
REMARQUE:
N'ENLEVEZ PAS le com,ercle du
desstts nt de ]a base. L'entreOen des
pi#ces dessous n'est pas a la potTde
de l'usager.
En caso de que la maquma no sea
utilizada durante un largo tlempo,
lubriqueia antes de coser. Utilice un
aceite para maqumas de coser de buena
calidad,
No se require nlngfin otro t|po de
lubncaci6n
Los puntos mdicados arriba son los
Onicos que reqmeren de Iubncaci6n en
esta mfiqmna.
123
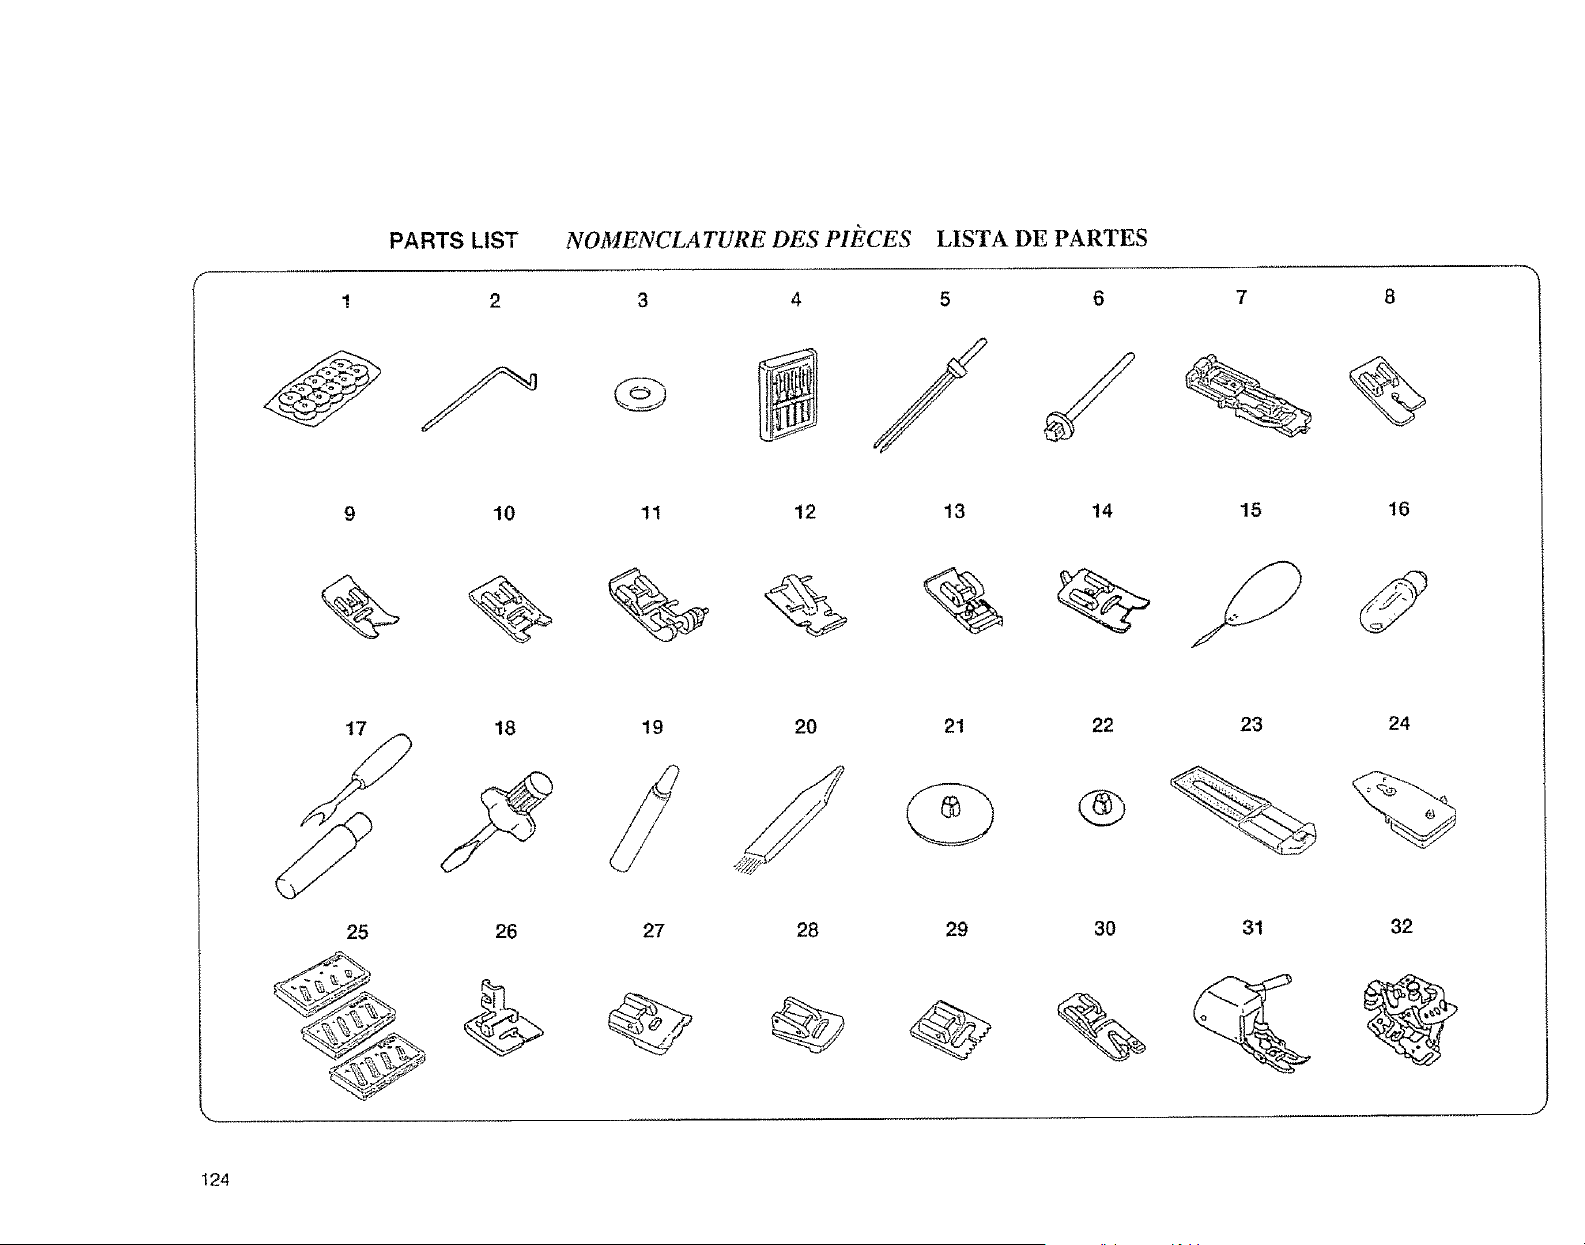
PARTS LIST
2
NOMENCLATURE DES PI[_CES
3 4
LISTA DE PARTES
6
9 10 11 12 13 14
7 8
15 16
17 18
S
19
21 22 23 24
25 26 27 28 29 30 31
32
124
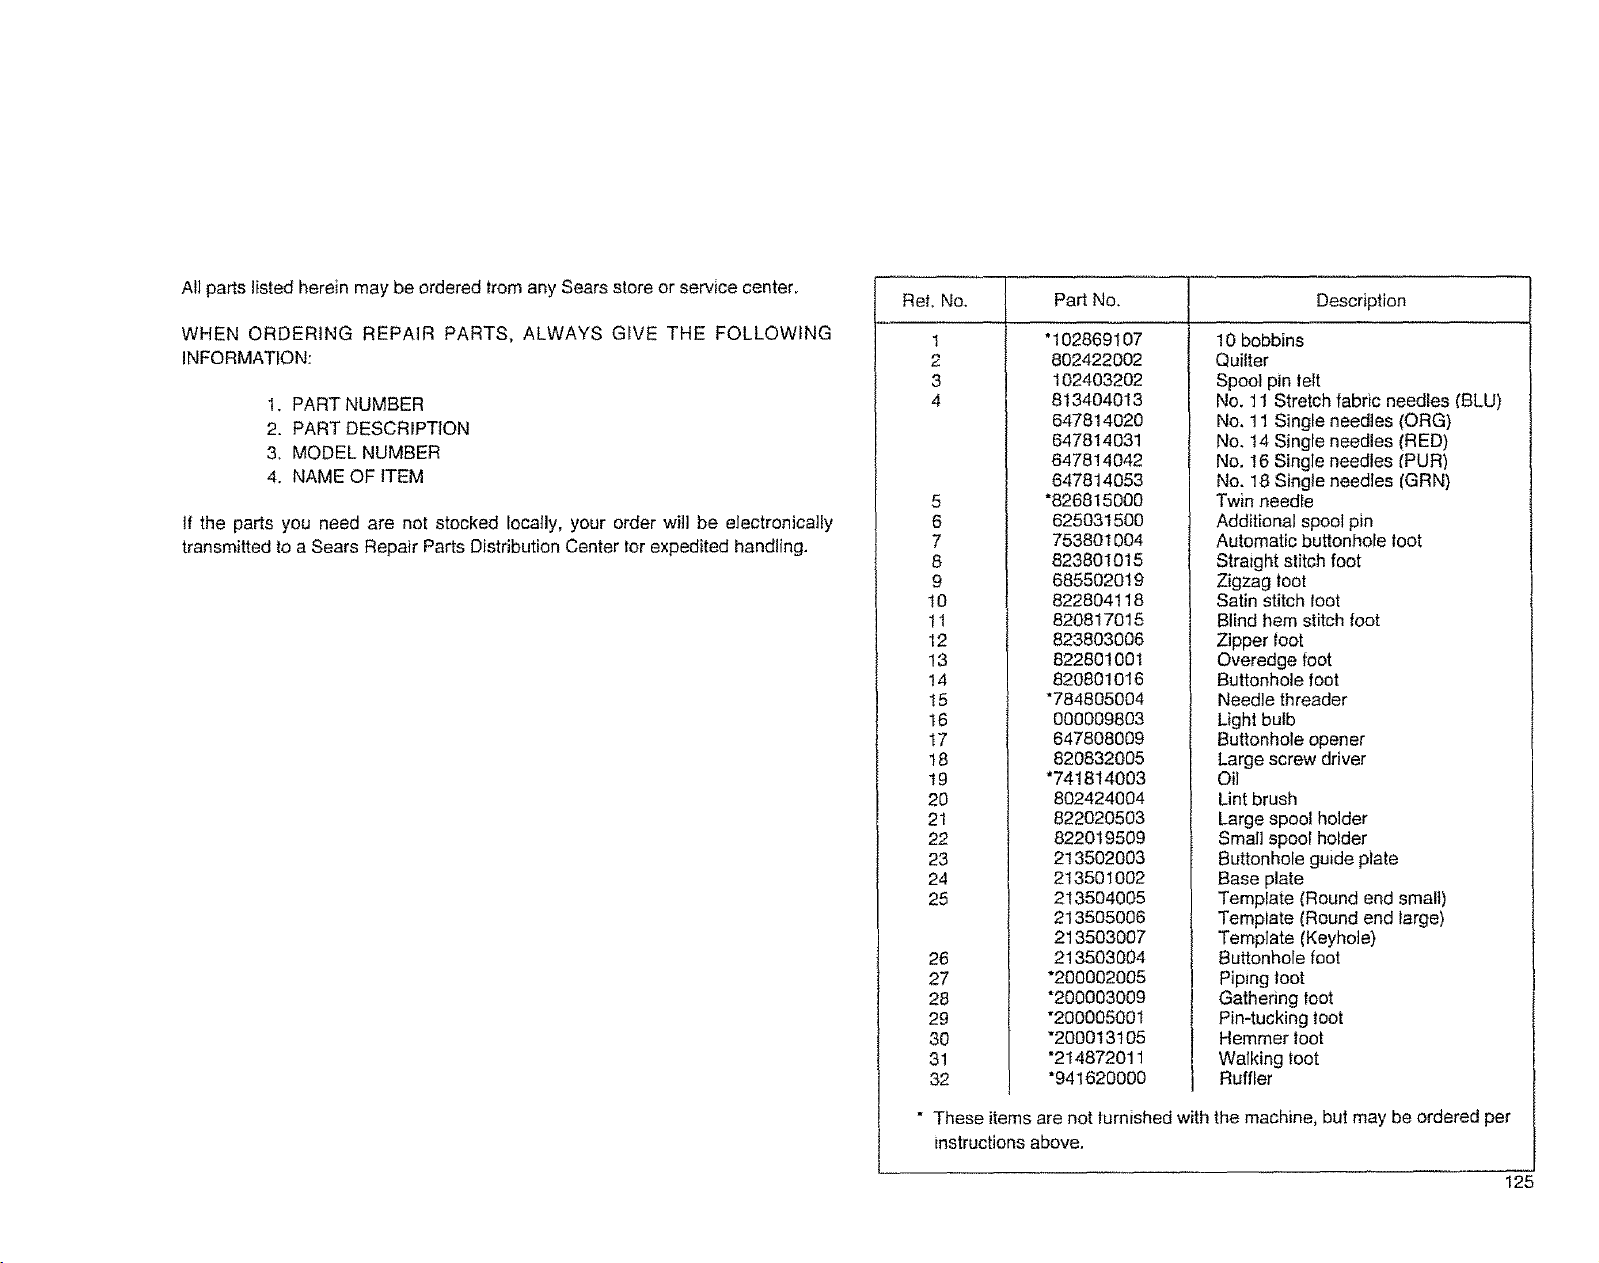
Allpartslistedhereinmaybeordered from any Sears store or service center.
WHEN ORDERING REPAIR PARTS, ALWAYS GIVE THE FOLLOWING
INFORMATION:
1. PART NUMBER
2. PART DESCRIPTION
3, MODEL NUMBER
4. NAME OF 1TEM
If the parts you need are not stocked iocatly, your order will be electronically
transmitted to a Sears Repair Parts Distribution Center for expedited handling.
Ref. No. Part No, Description
1
2
3
4
5
6
7
8
9
10
11
12
13
14
!5
16
t7
18
t9
20
21
22
23
24
25
28
27
28
29
30
31
32
"102869107
802422002
102403202
813404013
647814020
647814031
647814042
647814053
*826815000
625031500
753801004
823801015
685502019
822804118
820817015
823803006
822801001
820801016
*784805004
000009803
647808009
820832005
*741814003
802424004
822020503
822019509
213502003
213501002
213504005
213505006
213503007
213503004
*200002005
*200003009
"200005001
"200013t05
"214872011
*941620000
10 bobbins
Quilter
Spool pin felt
No. 11 Stretch fabric needles (BLU)
No, 11 Single needles (ORG)
No, 14 Single needles (RED)
No, 16 Single needles fPUR)
No. 18 Single needles (GRN)
Twin needie
Additional spool pin
Automatic buttonhole toot
Straight stitch foot
Zigzag foot
Satin stitch toot
Blind hem stitch foot
Zipper foot
Overedge foot
Buttonhole foot
Needle threader
Light bulb
Buttonhole opener
Large screw driver
Oil
Lint brush
Large spool holder
Small spool holder
Buttonhole guide plate
Base plate
Template _Round end small)
Tempiate (Round end large)
Template (Keyhole)
Buttonhole foot
Piping foot
Gathering foot
Pin-tucking foot
Hemmer foot
Walking foot
RuffLer
• These items are not furnished with the machine, but may be ordered per
instructions above.
125
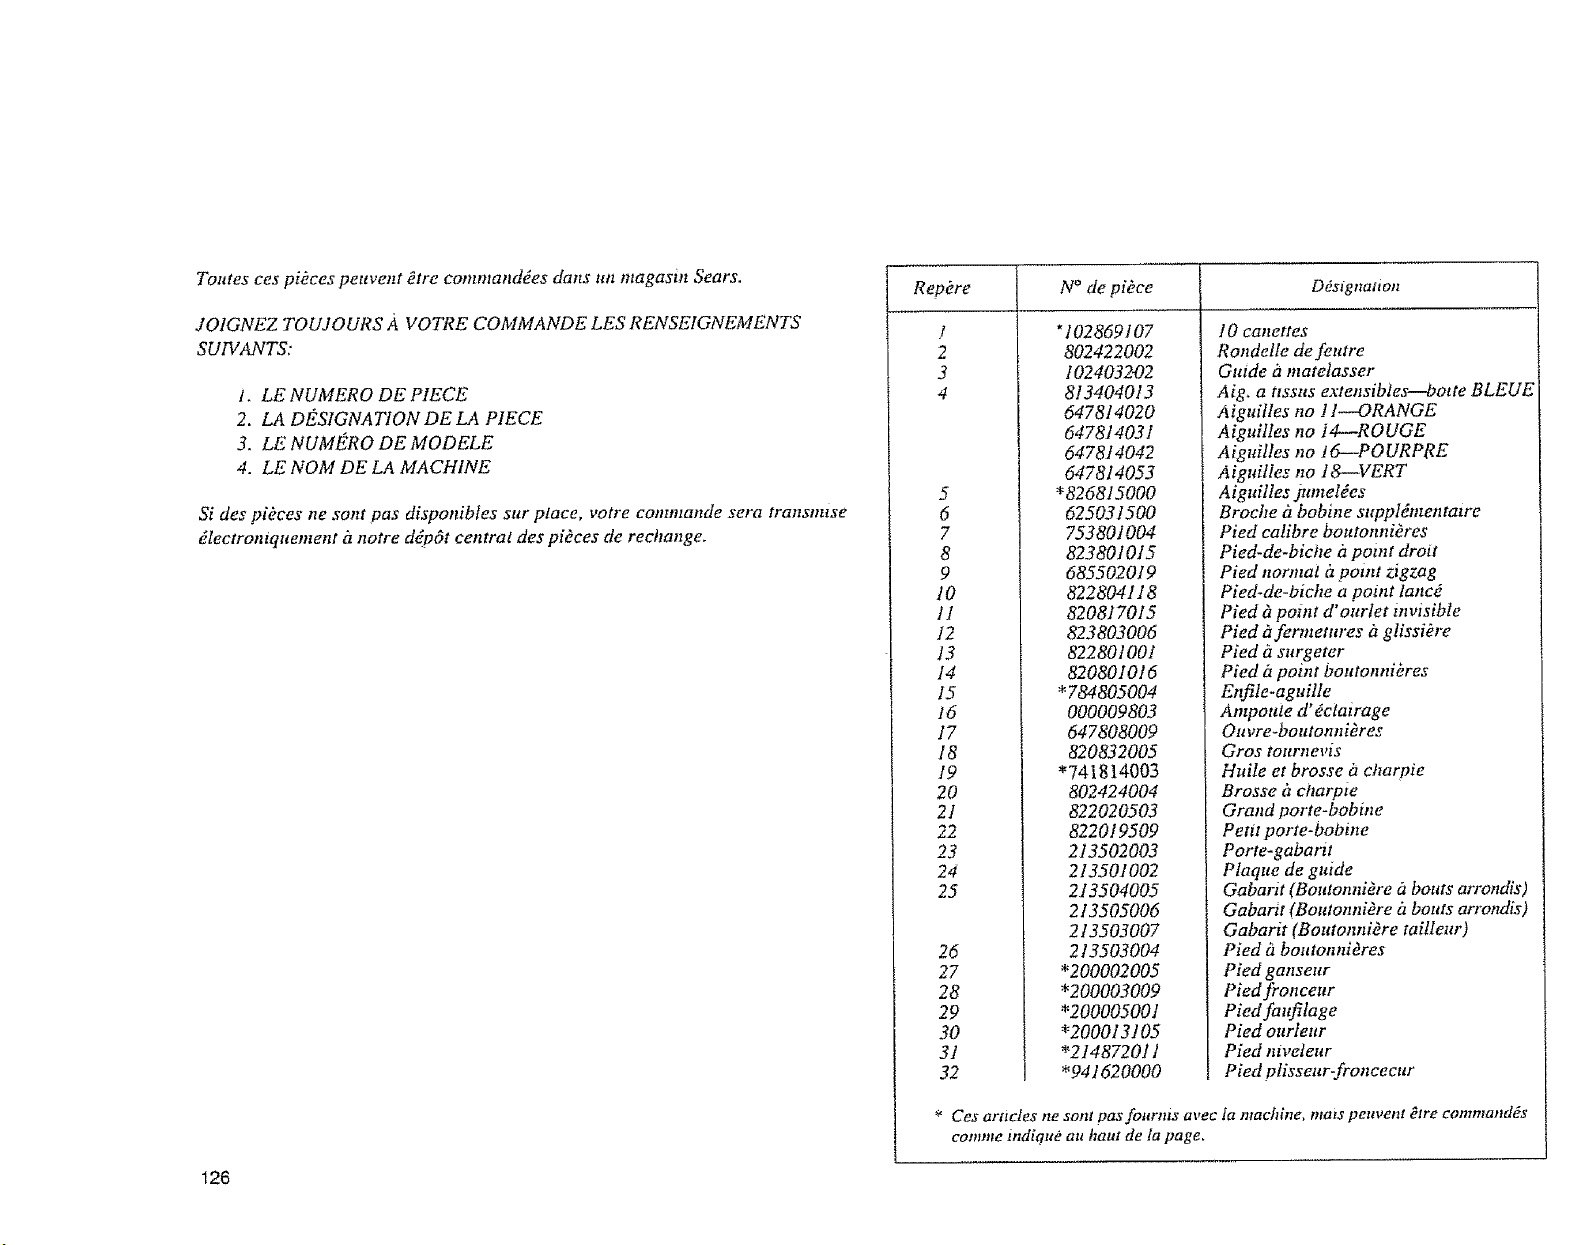
Toutes ces pi_ces peuvent _tre commandoes clans un magasin Sears.
JO1GNEZ TOUJOURS A VOTRE COMMANDE LES RENSEIGNEMENTS
SUIVANTS:
1. LE NUMERO DE PIECE
2. LA DES1GNATION DE LA PIECE
3. LE NUMI_RO DE MODELE
4. LE NOM DE LA MACHINE
Si des pikces ne sont pas disponibles sat place, votre eommande sera transnuse
dlectron_quement it notre ddp_t central des pi_ces de rechange.
126
Repkre N ° de pikce DOs,gnation
]
2
3
4
5
6
7
8
9
10
1t
12
13
14
15
t6
17
18
I9
20
21
22
23
24
25
26
27
28
29
30
31
32
*102869107
802422002
102403202
813404013
647814020
] 0 cat_ettes
Rondelle de feutre
Gttide it matelasser
Aig. a ttssus extensibles--botte BLEUE
Aiguilles no ! I--ORANGE
647814031
647814042
647814053
*826815000
625031500
75380t004
823801015
685502019
822804118
820817015
823803006
822801001
820801016
*784805004
000009803
647808009
820832005
"741814003
802424004
822020503
822019509
213502003
213501002
213504005
213505006
213503007
213503004
*200002005
*200003009
*200005001
*200013105
"214872011
*941620000
AiguilIes 71oI4--ROUGE
Aiguifles no 16--POURPRE
Aiguilles no 18--VERT
Aiguiltes jumel_es
Brocbe h bobine sttppl_mentau'e
Pied calibre boutonnikres
Pied-de-biche it potnt droit
Pied norntat [lpotnt zigzag
Pied-de-biche a point lanc_
Pied _ potnt d' ourlet invisible
Pied g_fermetures it glissiOre
Pied d surgeter
Pied fipoint boutonnikres
Et_le-aguille
Antpouie d"dctairage
Ouvre-boutonnidres
Gros tournevis
Huile et brosse it charpie
Brosse it cl_arpte
Grand porte-bobine
Pettt porte-Oobine
Porte-gabarit
Plaque de guide
Gabarit (Botaonni_re it bouts arrondis)
Gabartt (Boutonniere it bouts arrondis)
Gabarit (Boutonnidre tai!leur)
Pied it boutonnidres
Pied ganseur
Pied fronceur
Pied faufilage
Pied ourleur
Pied mveleur
Pied plisseur-fronceeur
* Ces articles ne sprit pasfoarnts avec ta machine, ma_s peuvent Otre commandos
comme tndiqu_ au haul de la page.
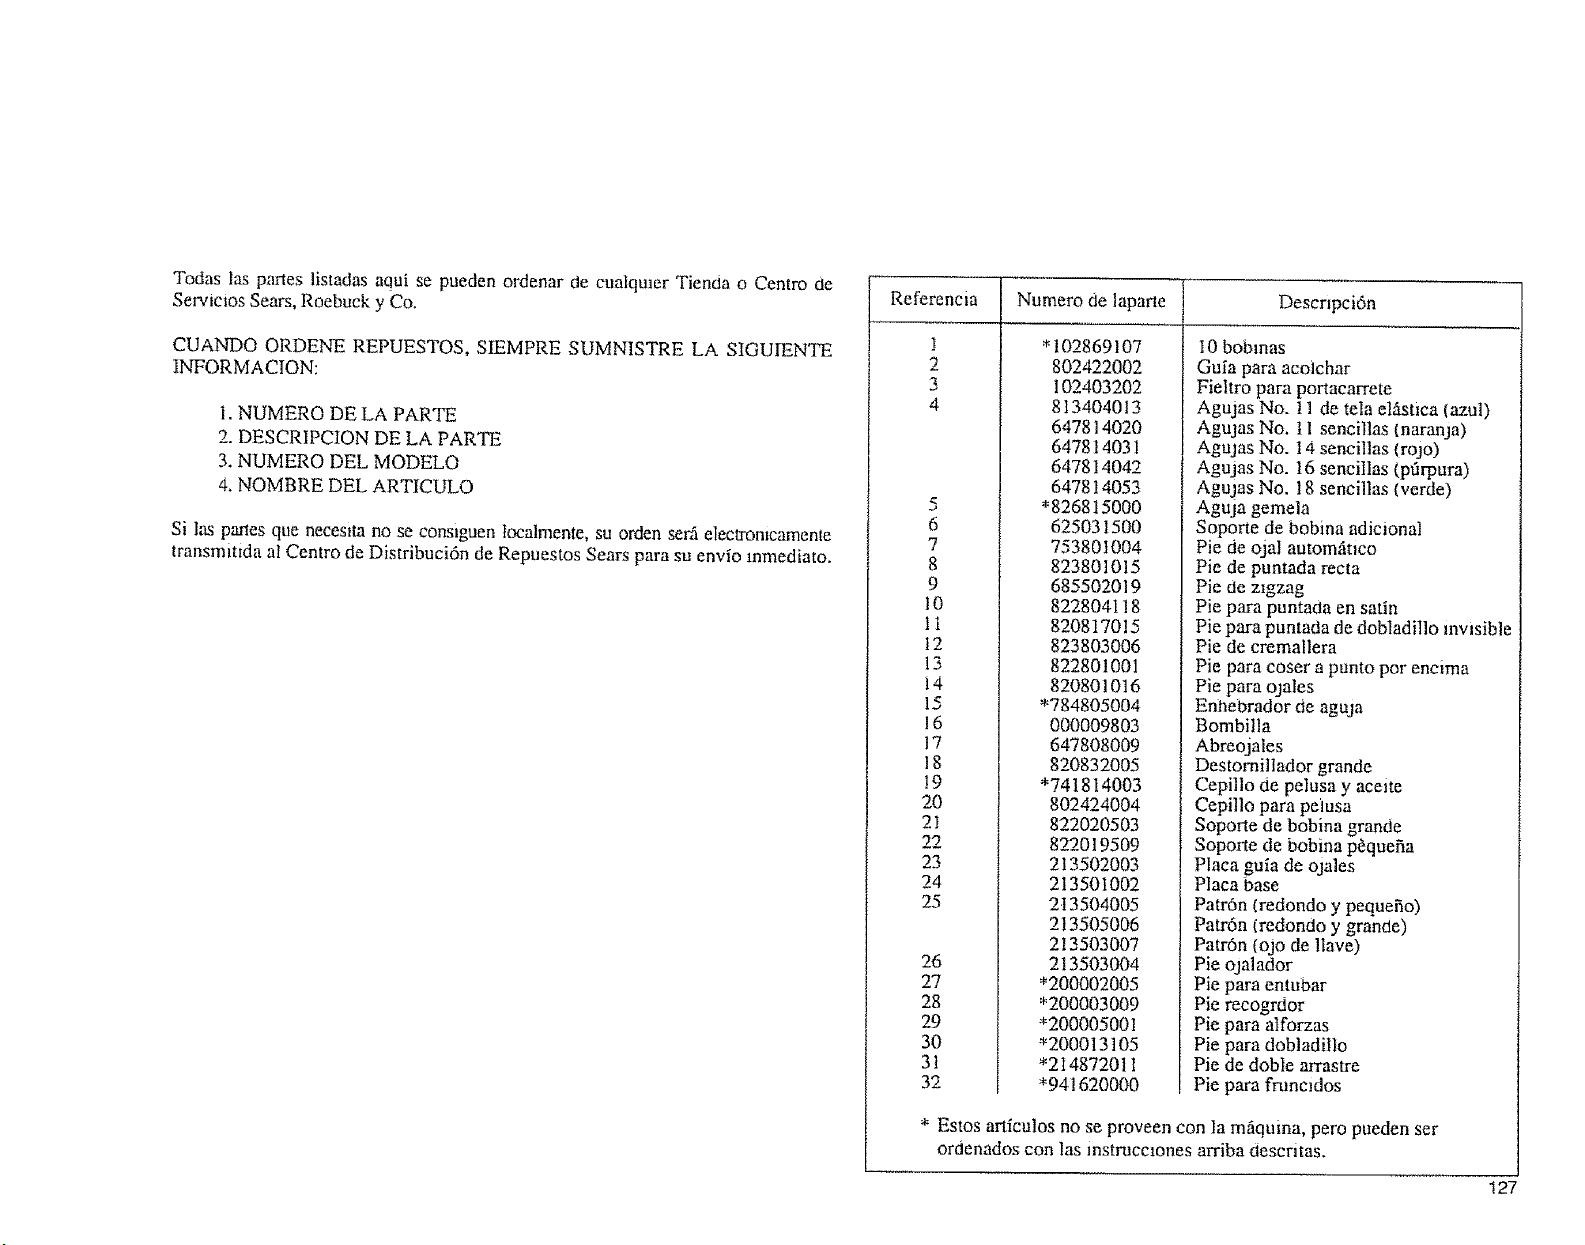
Todas las partes listadas actui se pueden ordenar de cualqmer Tienda o Centre de
Servmios Sears, Roebuck y Co.
CUANDO ORDENE REPUESTOS, SIEMPRE SUMNISTRE LA SIGUIENTE
INFORMACION:
i. NUMERO DE LA PARTE
2. DESCRIPCION DE LA PARTE
3. NUMERO DEL MODELO
4. NOMBRE DEL ARTICULO
Si l_ partes que neces_ta no se cons_guen localmente, su orden ser_ eledromcamente
transmitida al Centro de Distribucidn de Repuestos Sears para su envio mmediato.
Refereneia Numero de laparte Descnpci6n
!
2
3
4
5
6
7
8
9
10
1I
12
13
i4
15
16
17
18
!9
20
21
22
23
24
25
26
27
28
29
30
31
32
*102869107
802422002
I02403202
813404013
647814020
647814031
647814042
647814053
*826815000
625031500
753801004
823801015
685502019
822804118
820817015
823803006
822801001
820801016
*784805004
000009803
647808009
820832005
*741814003
802424004
822020503
822019509
213502003
213501002
213504005
213505006
213503007
213503004
*200002005
*200003009
*200005001
*200013105
*214872011
*941620000
I0 bobmas
Guia para acotchar
Fieltro para portacarrete
Agujas No. ! 1 de tela elfistica (azul)
Agujas No. t I sencillas {naranja)
Agujas No. 14 senciIlas (rojo)
Agujas No. 16 sencillas (pfirpura)
Agujas No. 18 seneillas (verde)
Aguja gemela
Soporte de bobina adicional
Pie de ojal automfitmo
Pie de puntada recta
Pie de mgzag
Pie pm'a puntada en satin
Pie para puntada de dobladillo invisible
Pie de cremallera
Pie para coser a punto pot encima
Pie para ojales
Enl_ebrador de aguja
Bombilla
Abreojales
Destornillador grande
Cepillo de pelusa y aceite
Cepillo para peiusa
Soporte de bobina grande
Soporte de bobina p_quefia
Placa guia de ojales
Placa base
Patr6n (redondo y pequefio)
Patr6n (redondo y grande)
Patr6n (ojo de llave)
Pie ojalador
Pie para entubar
Pie reeogrdor
Pie para alforzas
Pie para dobladillo
Pie de doble arrastre
Pie pare fruncidos
* Estos articutos no se proveen con Ia mfiquina, pero pueden ser
ordenados con las mstrucclones arriba descritas.
127
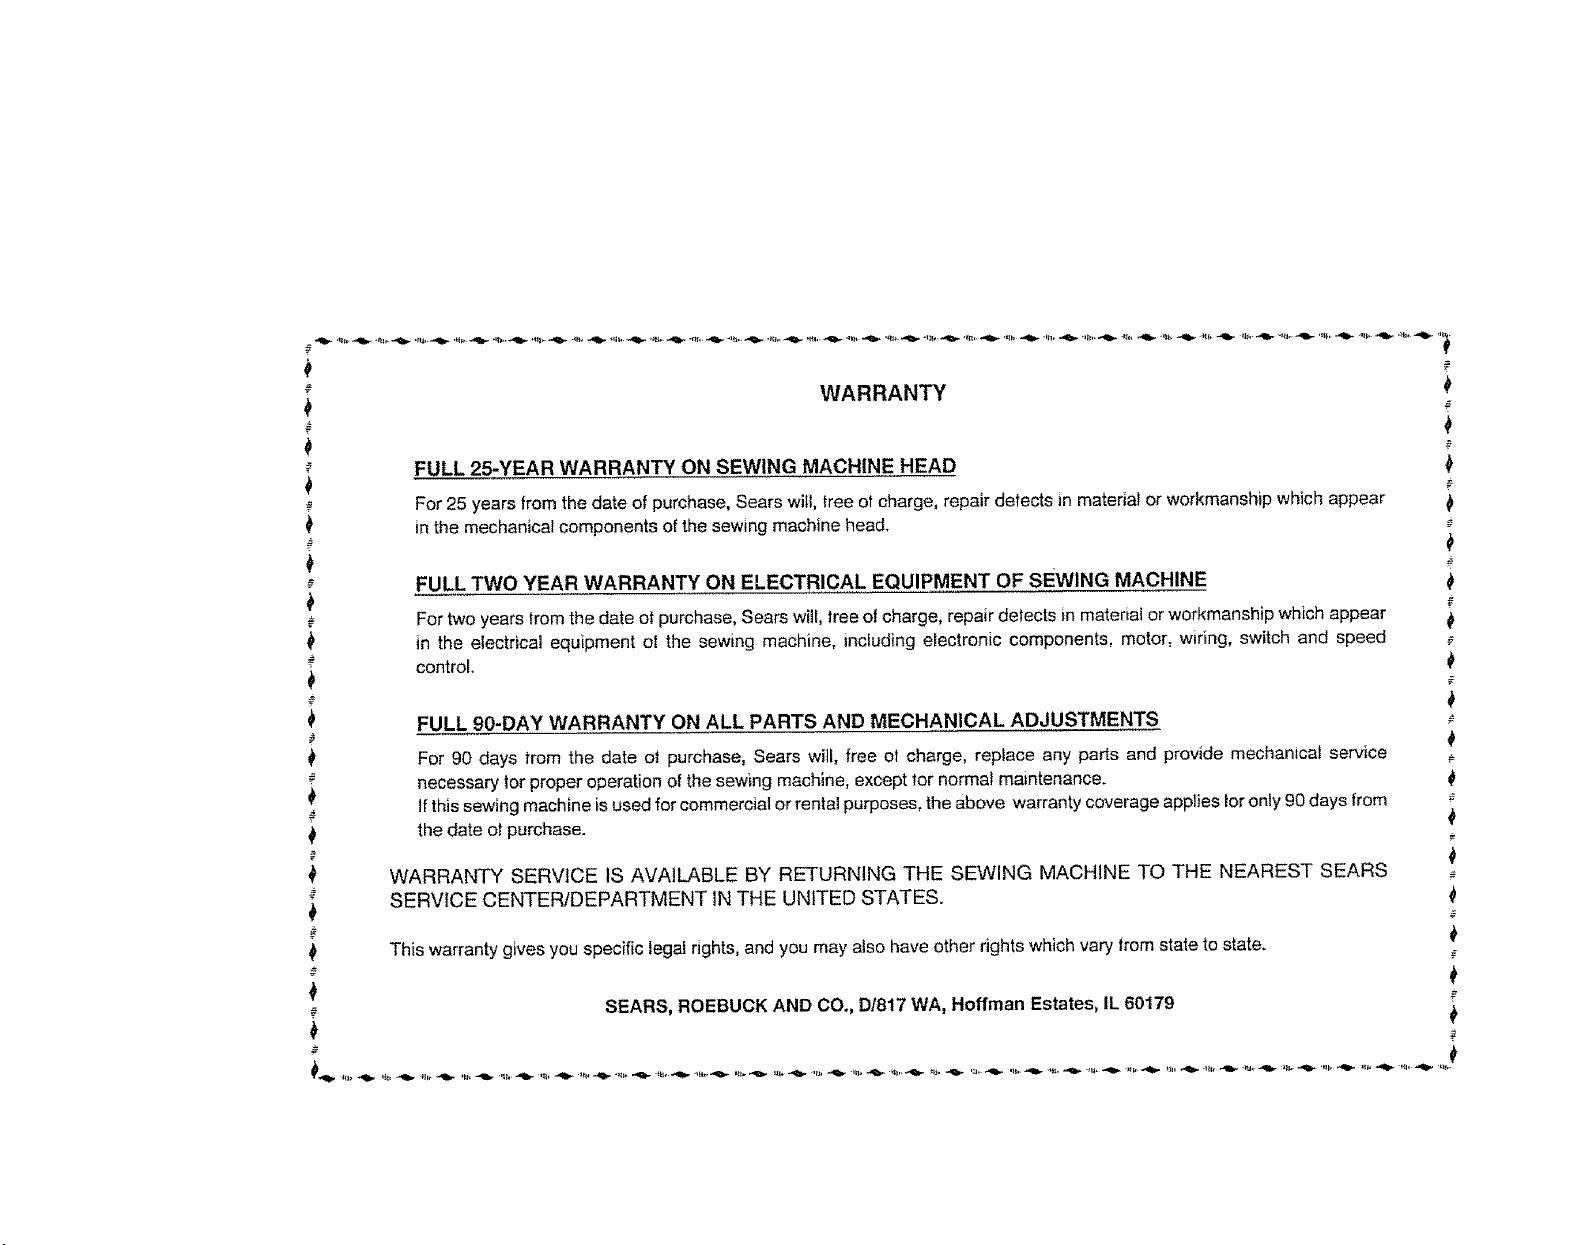
WARRANTY
FULL 25-YEAR WARRANTY ON SEWING MACHINE HEAD _)
For 25 years from the date of purchase, Sears will, tree of charge, repair detects in material or workmanship which appear ii
in the mechanical components of the sewing machine head.
FULL TWO YEAR WARRANTY ON ELECTRICAL EQUIPMENT OF SEWING MACHINE
._ For two years from the date ot purchase, Sears will, free oi charge, repair detects in material or workmanship which appear
in the electrical equipment el the sewing machine, including electronic components, motor, wiring, switch and speed
# control.
FULL 90-DAY WARRANTY ON ALL PARTS AND MECHANICAL ADJUSTMENTS
For 90 days from the date of purchase, Sears will, free ot charge, replace any parts and provide mechanical service
necessary lot proper operation of the sewing machine, except for normal maintenance. €
if this sewing machine is used for commercial or rental purposes, the above warranty coverage applies _oronly 90 days from
the date of purchase.
WARRANTY SERVICE IS AVAILABLE BY RETURNING THE SEWING MACHINE TO THE NEAREST SEARS
SERVICE CENTERIDEPARTMENT IN THE UNITED STATES.
This warranty gives you specific legai rights, and you may also have other rights which vary from state to state.
SEARS, ROEBUCK AND CO., DI817 WA, Hoffman Estates, IL 60179 _)
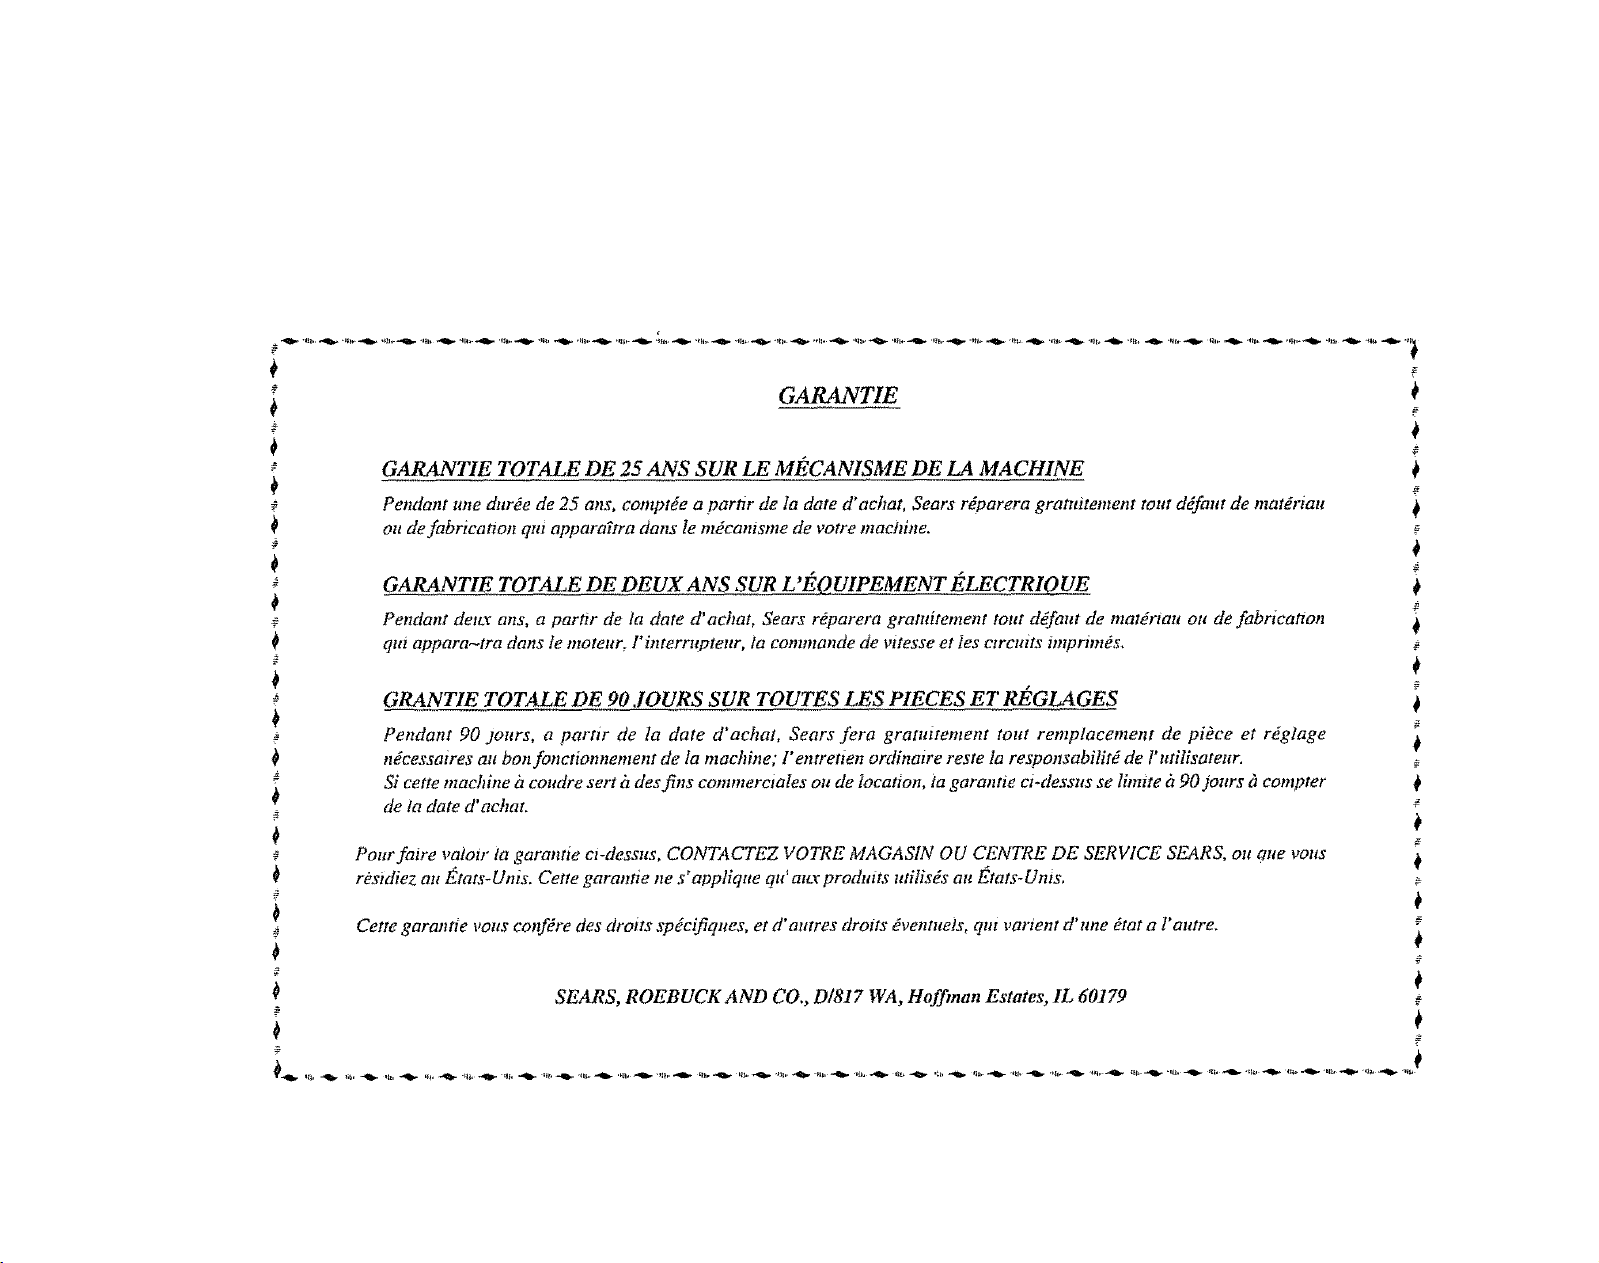
_ ._ _ .,_ _ ,_j_ _ _l_, _ _ll_ _ ,4_1__ .Jl_, _ _l_, _ _l_, _ ._ _ ,_., _ ,_ _ *._, _ ,,_. _ ,,_, _ _t_ _ ,_ _ ._ .,lb. r_ _ ,j_ _ .l_E, _ "_1_ _ _. _ 4_1, _ ._, _ ,_,-_ .l_ .,.lb. ,_. _ ,_
GARANTIE _
GARANTIE TOTALE DE 25 ANS SUR LE MECANISME DE LA MACHINE
Pendant une durde de 25 ans, compile a part_r de la date d'achat, Sears r_parera grataitement tout d_fattt de mat_riaa
ott de fabricatton qat appara?tra dans le mdcanJsnte de votre maelfine.
GARANTIE TOTALE DE DEUX ANS SUR L'EOUIPEMENT ELECTRIOUE #
._ Pendant detL_: ans, a partir de ta date d' achat, Sears rdparera gratuitement tout ddfaat de matdriau ou de fabrication
qta appara_tra dans le ntoteur, l'interruptear, la eommande de _,itesse et ies ctrcttits imprtmds.
GRANTIE TOTALE DE 90.IOURS SUR TOUTES LES PIECES ET RE, GLAGES _}
Pendant 90 jours, a partir de la date d'achat, Sears fera gratuitement tout remplacement de piece et rdglage
n_cessaires au bon fonctionnentent de la machine; l'entretien ordinaire reste la responsabilit_ de l'utilisateur.
Si cette maehh_e it coltdre sert it des fins eommerc_ales olt de location, ia garantie ci-dessus se lhnite it 90 )ours &compter
de ia date d' achat.
Pour faire vaiotr ta garantie ct-dessus, CONTACTEZ VOTRE MAGASIN OU CENTRE DE SERVICE SEARS, ou olte votts
rds_diez au Etats-Unis. Cette garantie ne s_appliqtte qu' aax produits utilis_s au E'tats-Unis.
Cette garantie I,OllSconfdre des droits spdeifiques, et d'autres droits dventueis, qm varient d' une dtat a !' autre.
#
€} SEARS, ROEBUCK AND CO., D/817 WA, Hoffinan Estates, IL 60179

€
€
€
÷
:4
÷
#
÷
GARANTIA
GARANTIA COMPLETA POR 25 AlqOS EN LA CABEZA DE LA MAQUINA DE COSER
Durante 25 afios desde ]a fecha de ta compra, Sears ofrece, libre de costo, reparar los defectos en material o de
manufactura que puedan presentarse en los componentes mecimicos de la cabeza de la maquma cle coser.
GARANTIA COMPLETA POR 2 ANOS EN EQUIPO ELECTRICO DE LA MAQU1NA DE COSER
Durante 2 afios desde la fecha de la compm, Sears ofrece, libre de costo, reparar los defectos en matenai o de manufactura
que puedan presentarse en el equipo el6ctnco de la mfNuina de coser, lnciuyendo componentes el6ctricos, motor, alambrado,
mten-uptor y control de velocidad.
GARANTIA COMPLETA POR 90 DIAS SOBRE TODAS LAS PARTES Y AJUSTES MECANICOS
Durante 90 dias desOe la fecha de la compra, Sears ofrece, libre de costo, reemplazar cualqmer parte y proveer el servic_o
mecfinico necesano para la apropmda operaci6n de la m_quina de coser, excepto para mantemm_ento normal.
Siesta m_quma de coser se utiiiza para prop6sitos comerciales o de atquiler, ta cobertura de garantia c_tada mhs arriba es
vfitida timcamente clurante 90 dias a partir de ta fecha de compra.
EL SERVICIO DE GARANTIA SE PUEDE OBTENER ENVIANDO LA MAQUINA DE COSER AL
CENTROiDEPARTAMENTO DE SERVICIOS SEARS MAS CERCANO EN LOS ESTADOS UNIDOS.
Esta garanfia le da a usted derechos tegales especificos, pero usted puede tener tambifin otros derechos los cuaies varian de estado
a estado.
SEARS, ROEBUCK AND CO., D/817 WA, HOFFMAN ESTATES, IL 60179
÷
÷
÷
#
€
SEWING MACHINE
Now that you have purchased your Kenmore Sewing Machine, shouId a need ever exist tor repair parts or service, simpiy contact your nearest Sears Service
Center. Be sure to provide ait pertinent facts when you call or visit.
The modeFhumber wili be shown on the nomenclature plate on the back o! your sewing machine. See page 4 for location.
WHEN ORDERING REPAIR PARTS, ALWAYS GfVE THE FOLLOWING [NFORMATION:
* MODEL NUMBER * NAME OF ITEM * PART DESCRIPTION
If the parts you need are not stocked locally, your order wit[ be electronically transmitted to a Sears Repair Parts Distribution Center for handling.
ENTRETIEN DE LA MACHINE
La machine iz coudre Kenmore, que vous possddez maintenant ne devrait pas vous causer de soucis, Toutefois, il se peut qu' un jour il soit n_cessaire de
remplacer des pidces d' usure. Adressez-vous alors au Service au client Sears. Si vous appetez or, passez notts voir, soyez en mesure de nous fournir tes
renseignements dont nous avons besoin.
Le ntmtgro de moddle de votre rnachine h coudre est marqu# sur ta plaque stgnaHtique, qui est & I'arri_re
de la machine, comme montre page 4.
QUAND VOUS COMMANDEZ DES PIE'CES DE RECHANGE, FOURNISSEZ TOUJOURS LES RENSE IGNEMENTS SUIVANTS:
N ° DE PIECE DESIGNATION DE LA PtECE
N ° DE MODELE MACHINE.4 COUDRE
Si des pi&ces lie sont pas disponibies sttr place, votre comnzande sera tra/ismise _lectrontquentet t iz notre D_pOt central Sears des piOces de rechange.
SU MAQUINA DE COSER
Ahom que usted ha compmdo su Mfiquina de Coser Kenmore, si se presenta la necesidad de repuestos o ser¢icio, mmptemente contacte su Centro de Serviclos Sears mils
cercano. AsegOrese de pmveer toda ]a infomaaci6n pertinente cuando nos llame o visite.
E1 nOmem de mode}o de su m_quma de coser se puede ver en la placa de nomenclatura, en la parte posterior de su m,Squina de coser- Vea la p_gina 4 para su iocalizaci6n.
CUANDO ORDENE REPUESTOS, StEMPRE SUMINISTRE LA SIGUIENTE INFORMACION:
* NO. MODELO, * NOMBERE DEL ITEM, * DESCRIPCION DE LA PARTE
Si las par_s que necesita no se le consiguen localmente, su orden serfi electnSnicamente transmitida al Centro de Distribuci6n de Repuestos Sears para su envio.
SEARS, ROEBUCK AND CO., HOFFMAN ESTATES, IL 60179
S-385 Printed inTaiwan Imprimd en Tahvan Impreso en Taiwan 752-800-022(_) (_)