
CAMERA
QUICKSTART GUIDE
w
w
w
.
p
a
n
o
n
o
.
c
o
m
/
g
o
/
m
a
n
u
a
l
DOWNLOAD
LATEST VERSION
OF THE MANUAL
4 5For more information visit support.panono.comFor more information visit support.panono.com
ENEN
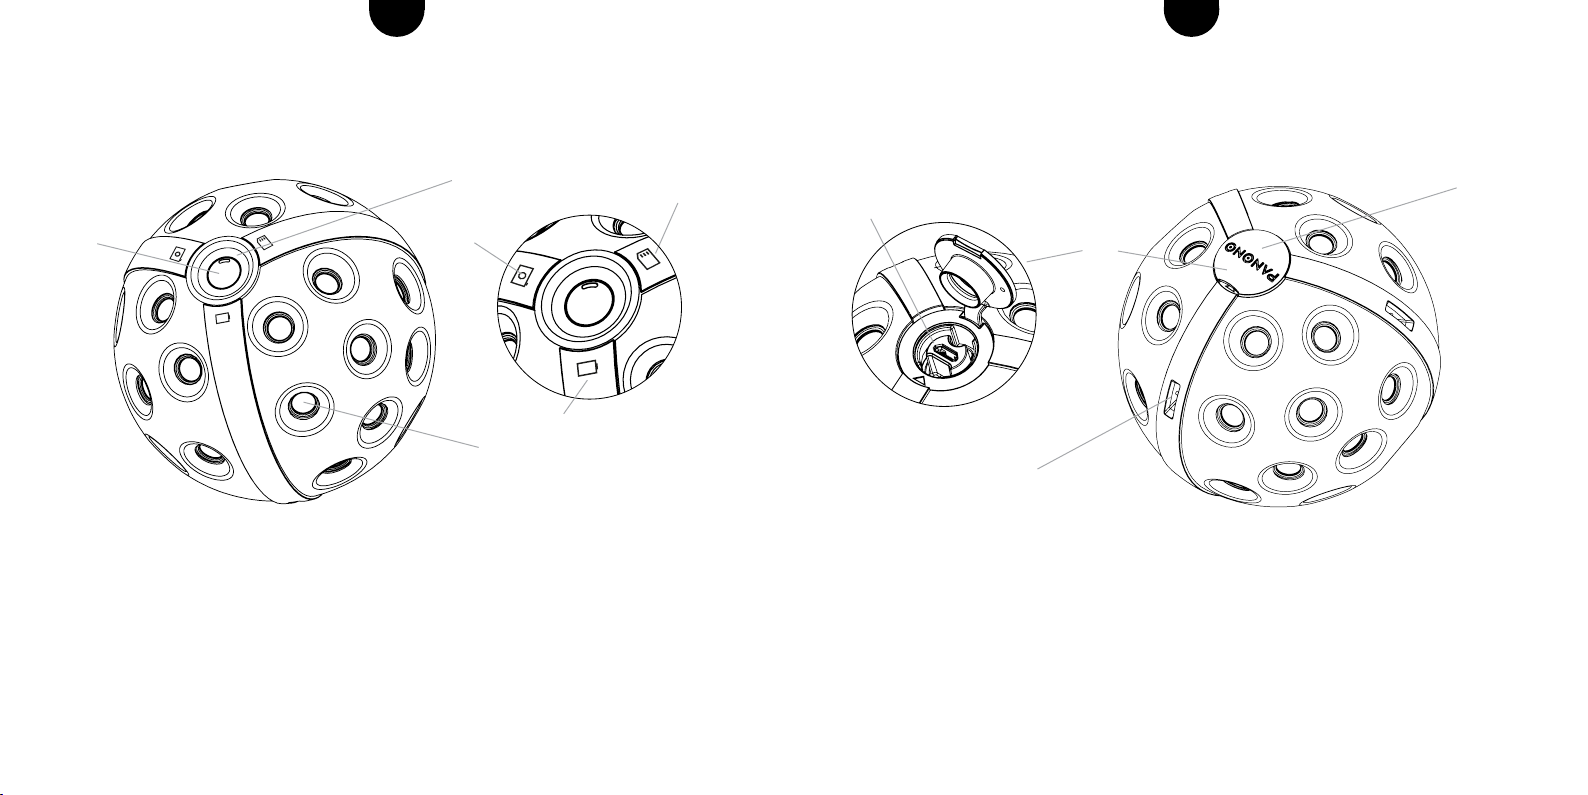
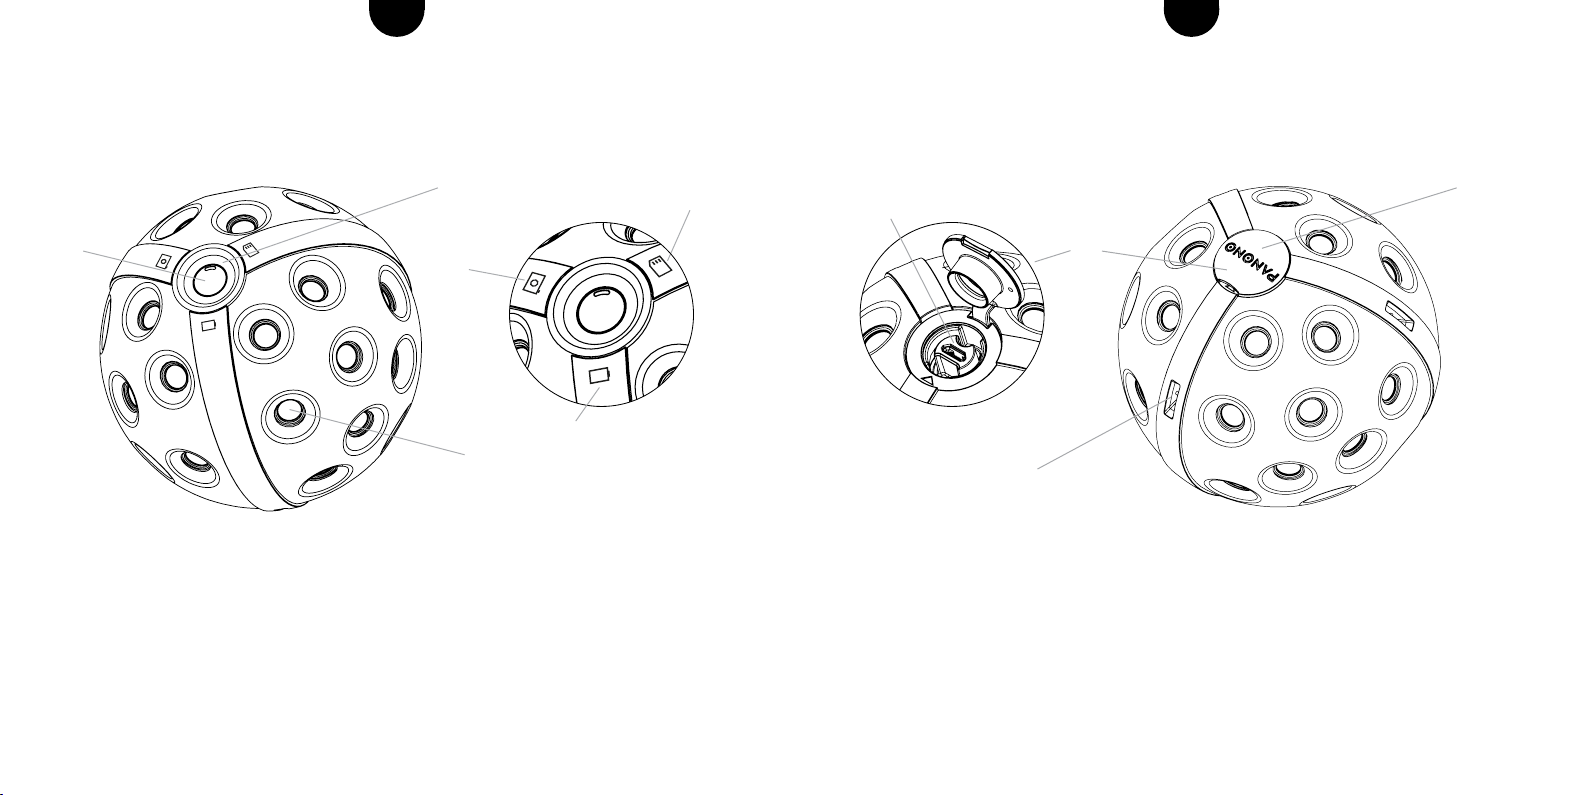
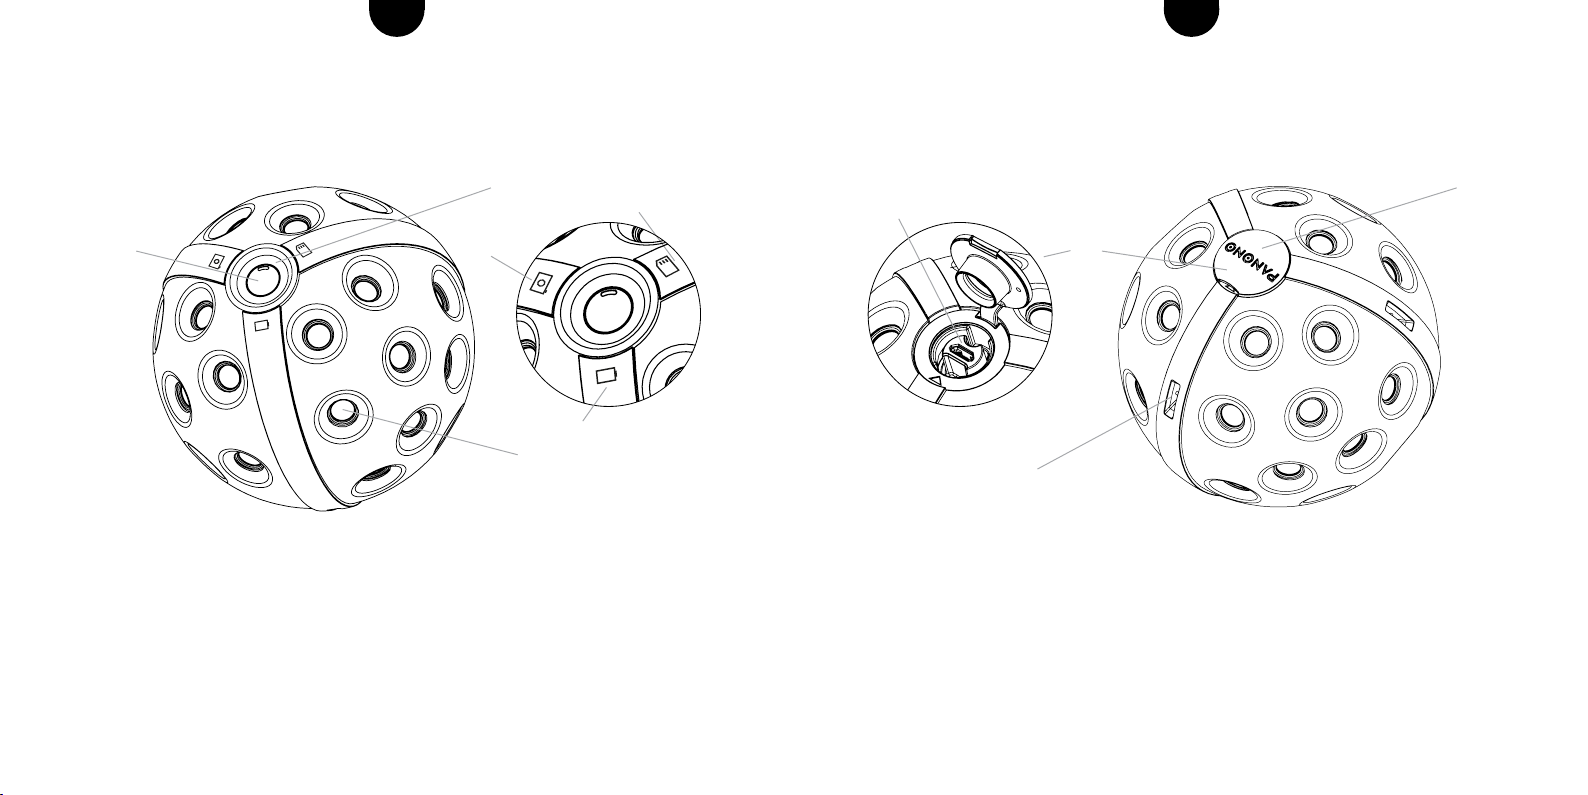
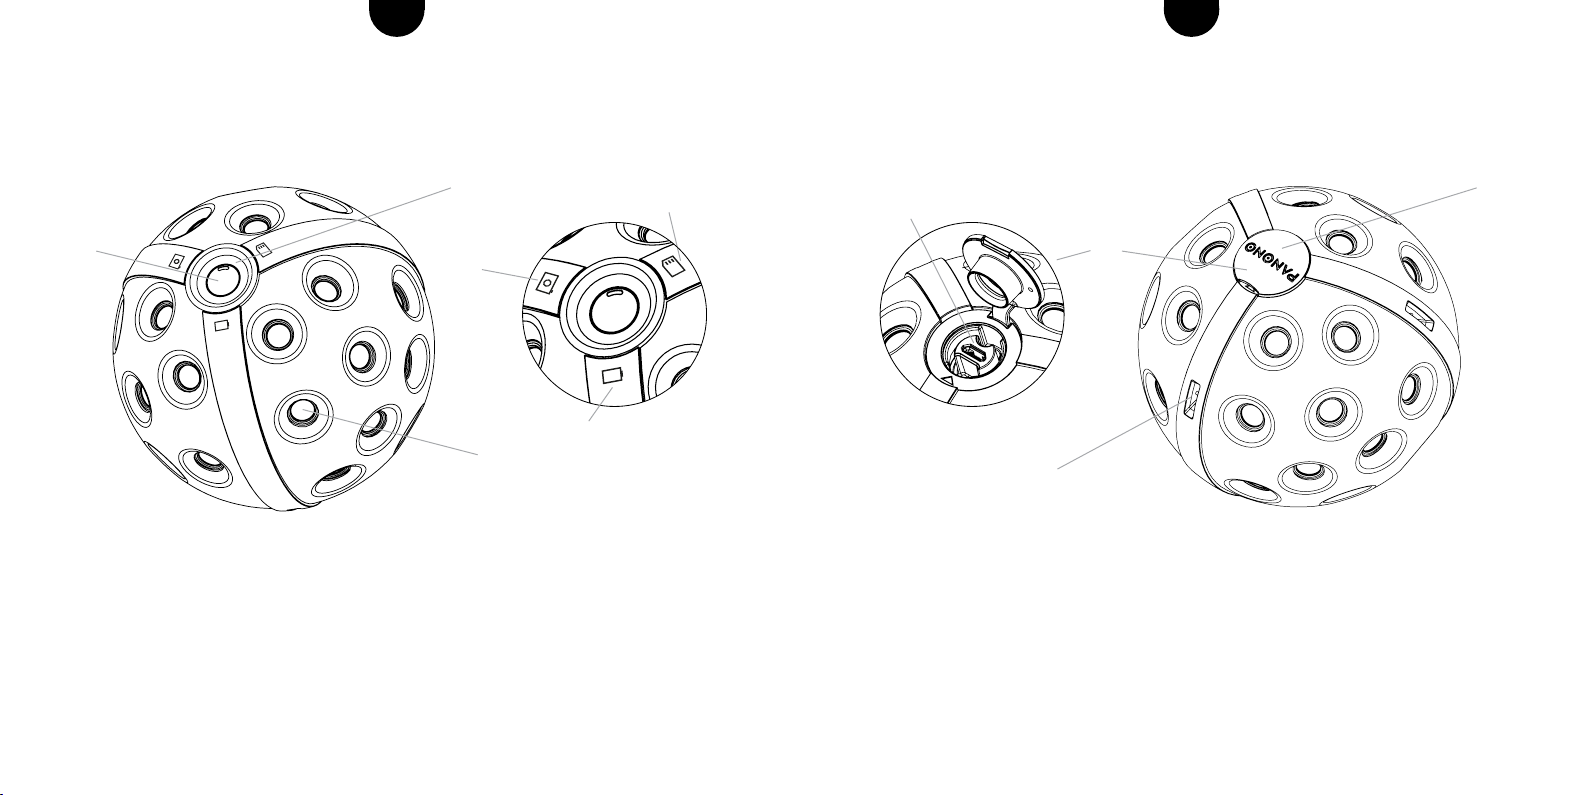
4 Cap to protect against dirt
5 Loop attachment for secure suspension of the camera
6 Micro-USB port for charging the camera and connecting the Panono Stick and
Panono tripod adapter
5
USB port
6
4
4 For more information visit support.panono.com
YOUR PANONO CAMERA AT A GLANCE
1 ON/OFF button, trigger button
2 LED display indicating battery level, memory usage and trigger button
3 36 individual cameras for taking 360° x 360° panorama pictures
Battery level
Memory usage
Trigger indicator
1
2
3

6 7For more information visit support.panono.comFor more information visit support.panono.com
ENEN
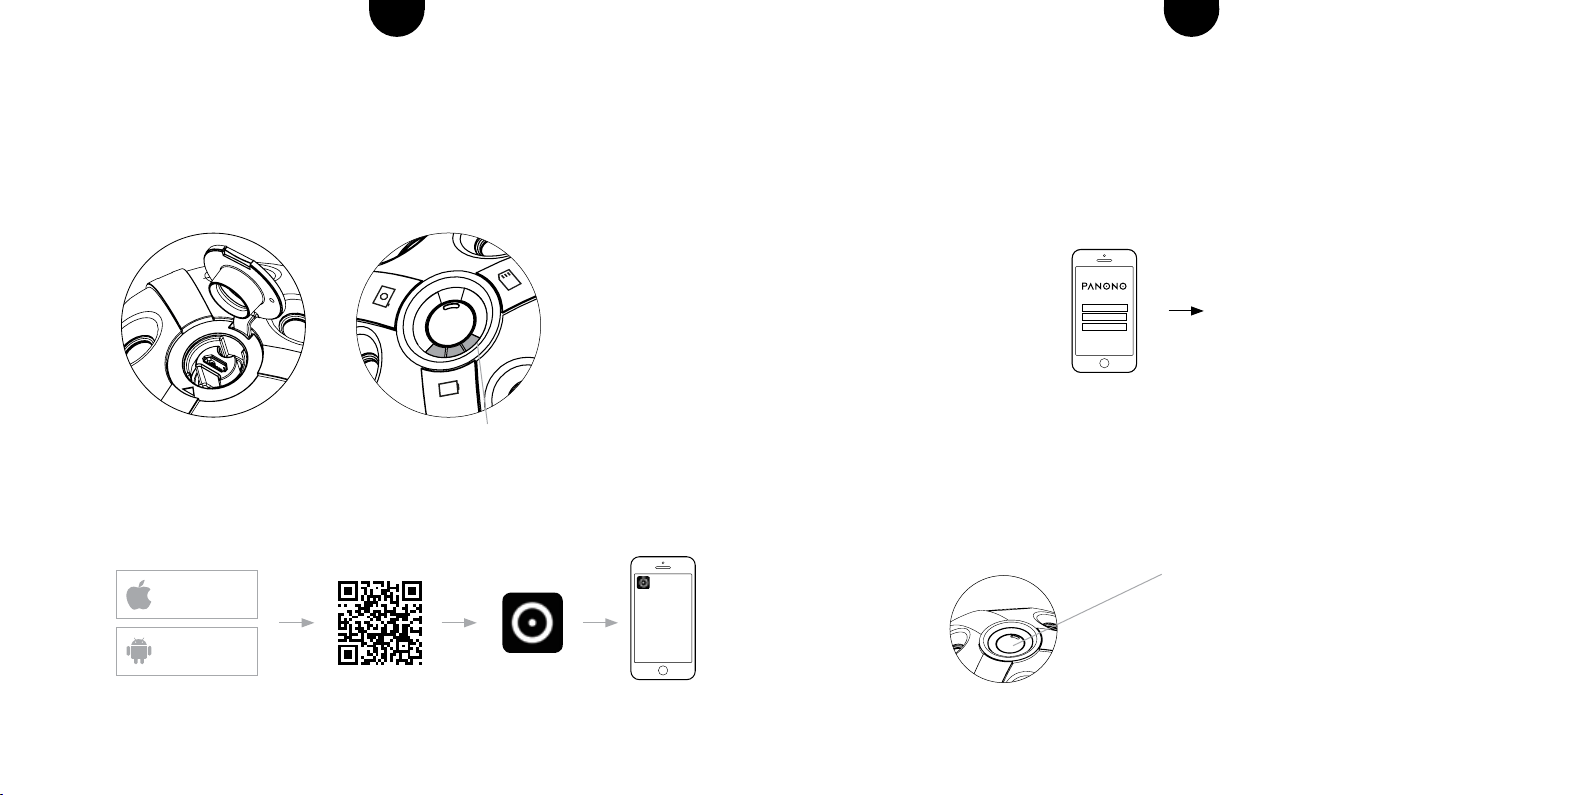
3 SETTING UP YOUR PANONO ACCOUNT
1. To create a Panono account, follow the instructions in the app.
2.Conrmyoure-mailaddresstocompletetheregistrationprocess.
4 SWITCHING THE CAMERA ON AND OFF
Press the ON/OFF button for one second. The LED display will start blinking. Once it
continuously lights up in white, the camera is ready for use. To switch off the camera,
hold down the ON/OFF button for four seconds.
To switch on: press the ON/OFF button for one second
To switch off: press the ON/OFF button for four seconds
SIGN UP
NAME
REGISTER
EMAIL
PASSWORD
CANCEL SIGN UP
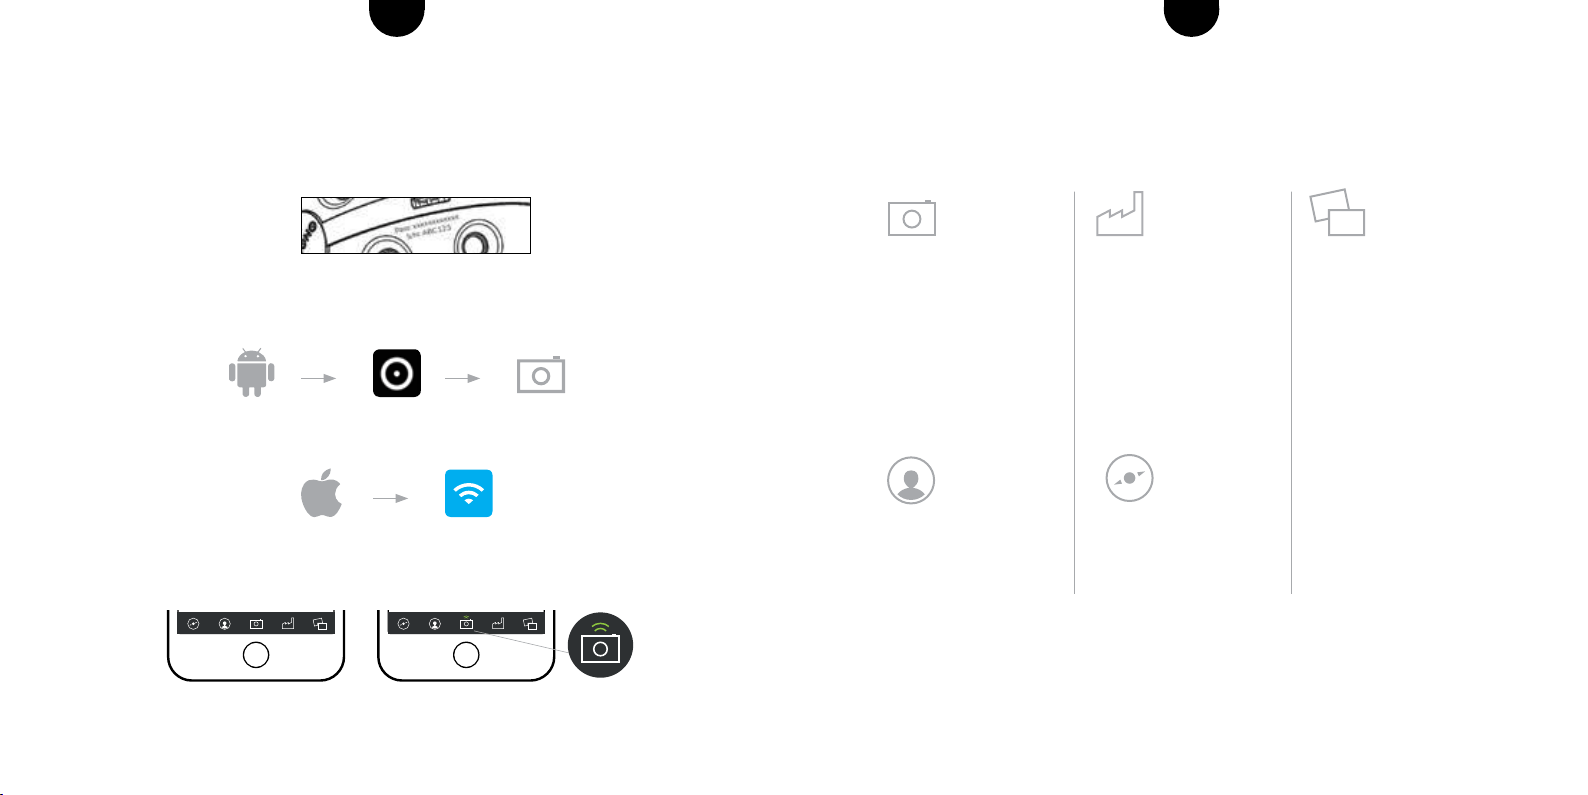
GETTING STARTED
1 CHARGING THE CAMERA
To charge the camera, use the USB cable provided and connect to a free USB port
(notebook, etc.).
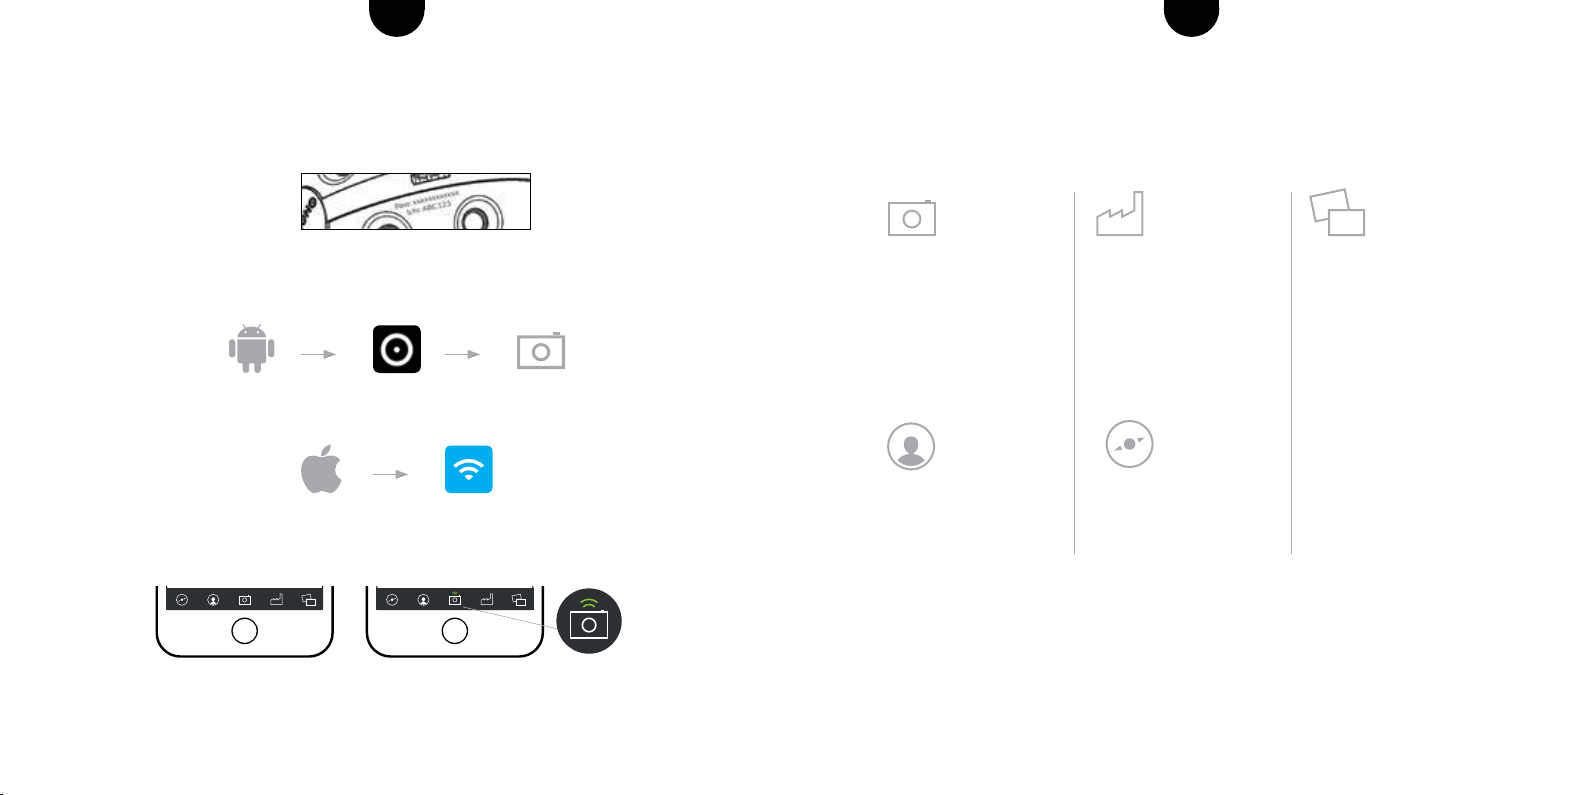
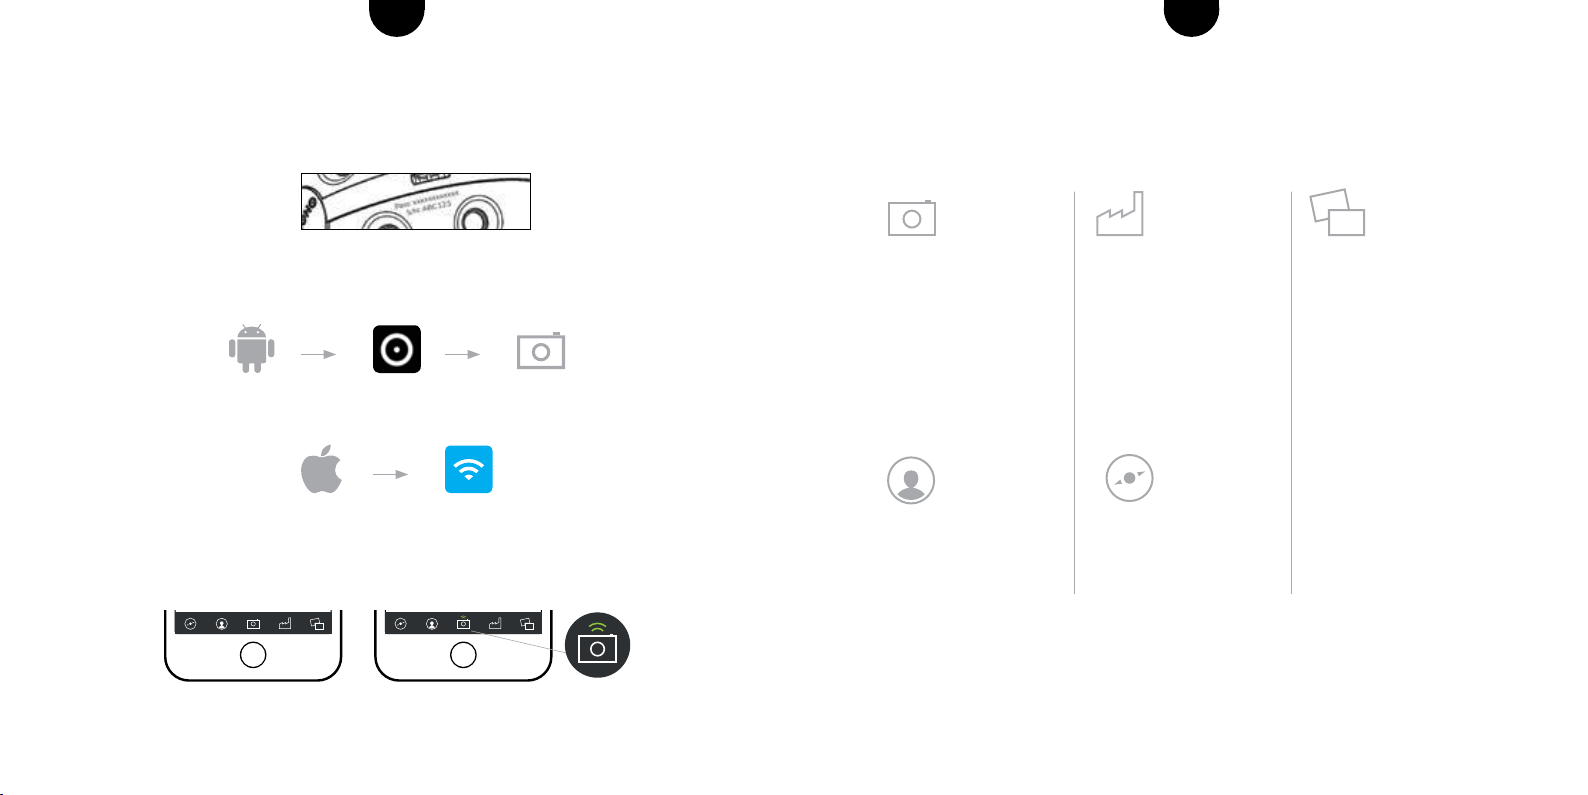
2 DOWNLOAD THE PANONO APP
Download the Panono App on your smartphone and install.
AVAILABLE ON THE
GOOGLE PLAY STORE
AVAILABLE ON THE
APP STORE
Flashing LED: battery is charging
LED indicator lit up continuously:
battery is charged
8 9For more information visit support.panono.comFor more information visit support.panono.com
ENEN
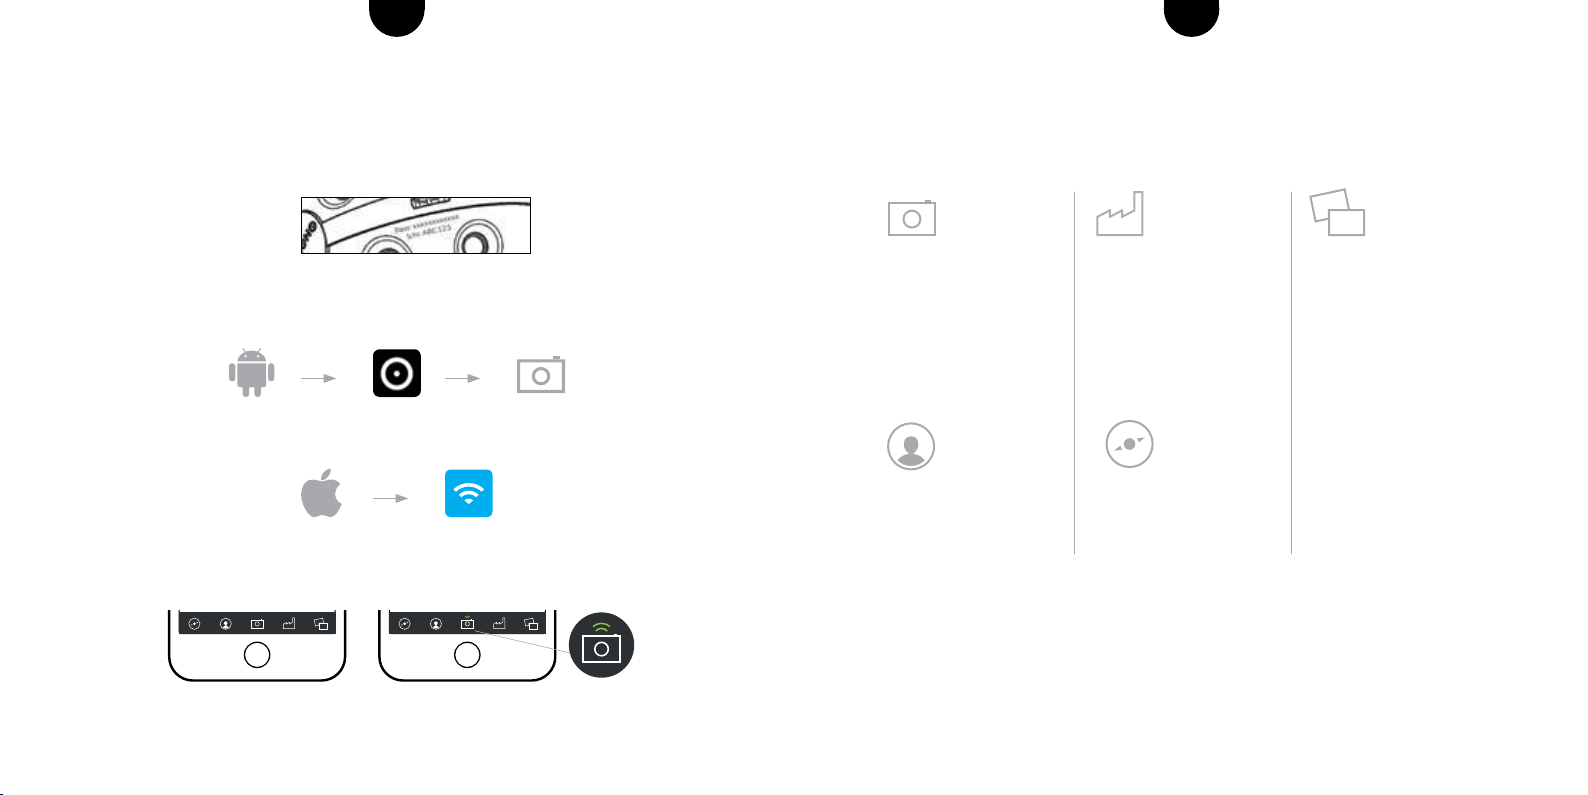
THE PANONO APP AT A GLANCE
CAMERA
- Camera settings
(exposure time, etc.)
- Picture preview
MY PANORAMAS
- View and manage your
nishedpanoramas
TASKLIST
- Upload to the cloud
- Processing status of
panoramas in the cloud
EXPLORE
- The most exciting panora-
mas of other users
MY PROFILE
-Prolesettings
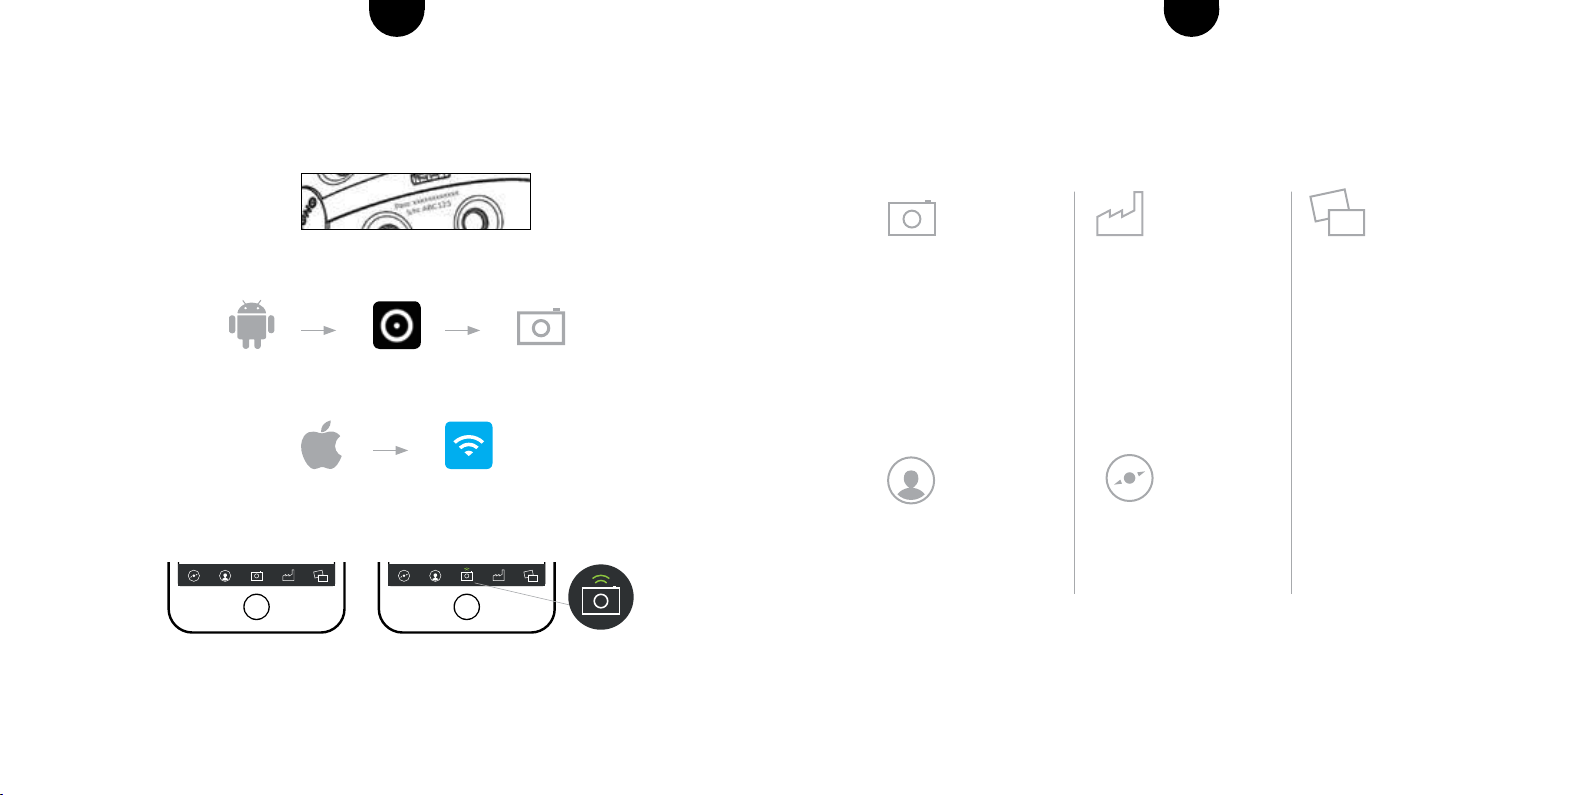
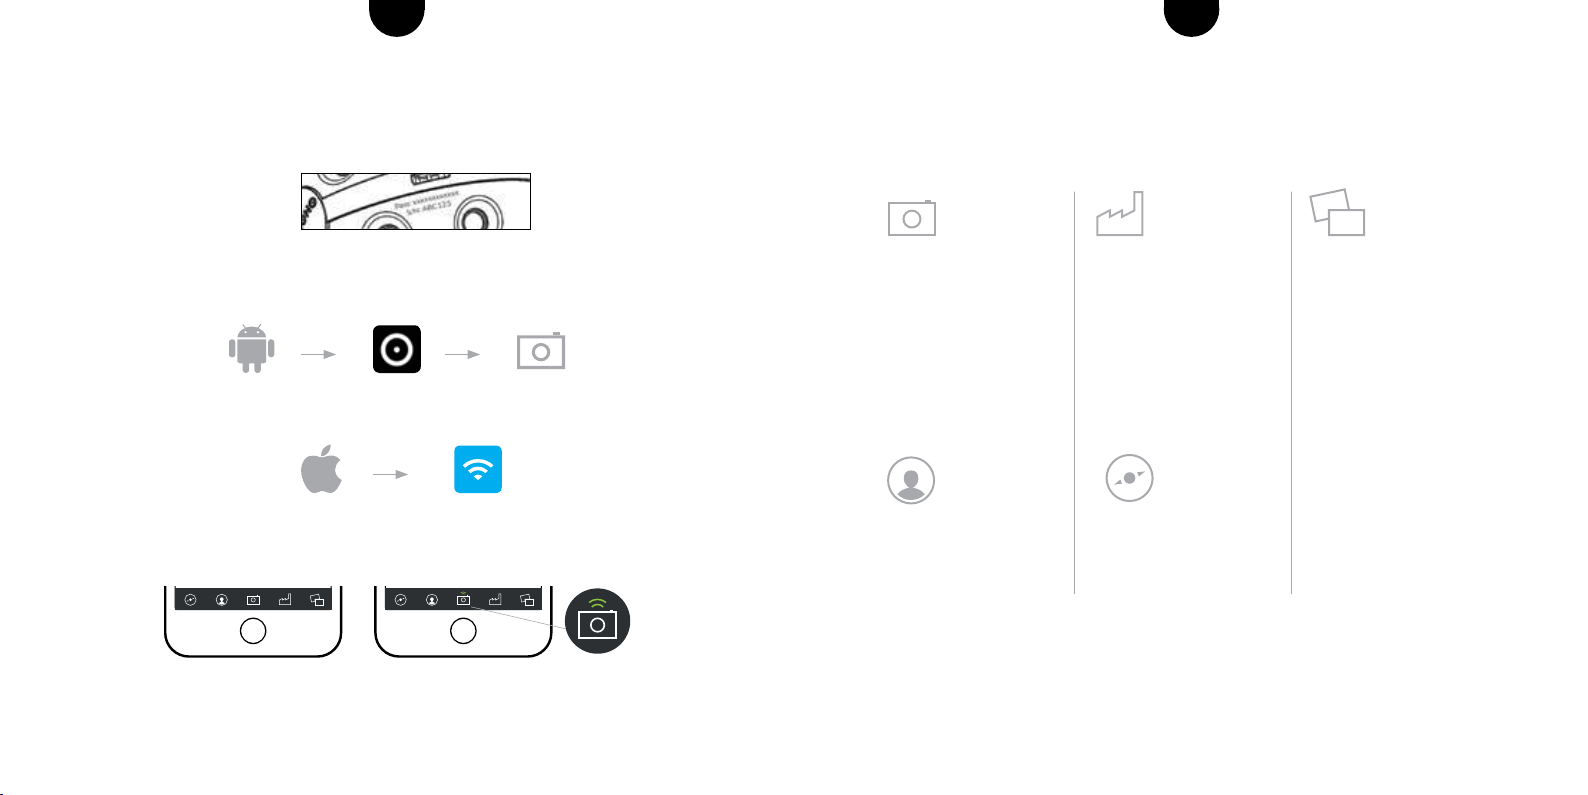
5 CONNECTING THE CAMERA WITH THE APP
The network name of the camera looks like this: Panono-<serial number>
The serial number and password can be found on the camera.
If you are using Android, the connection is managed from the Panono app. Click on the
camera icon. You will then be prompted to choose a network.
If you are using iOS, the connection is managed from the WIFI settings on your device.
Select the network belonging to your camera, and enter the password to start the
connection. The camera icon indicates whether the camera and app are connected.
For more information and help with connection problems go to
www.panono.com/go/support/connecting
10 11For more information visit support.panono.comFor more information visit support.panono.com
ENEN
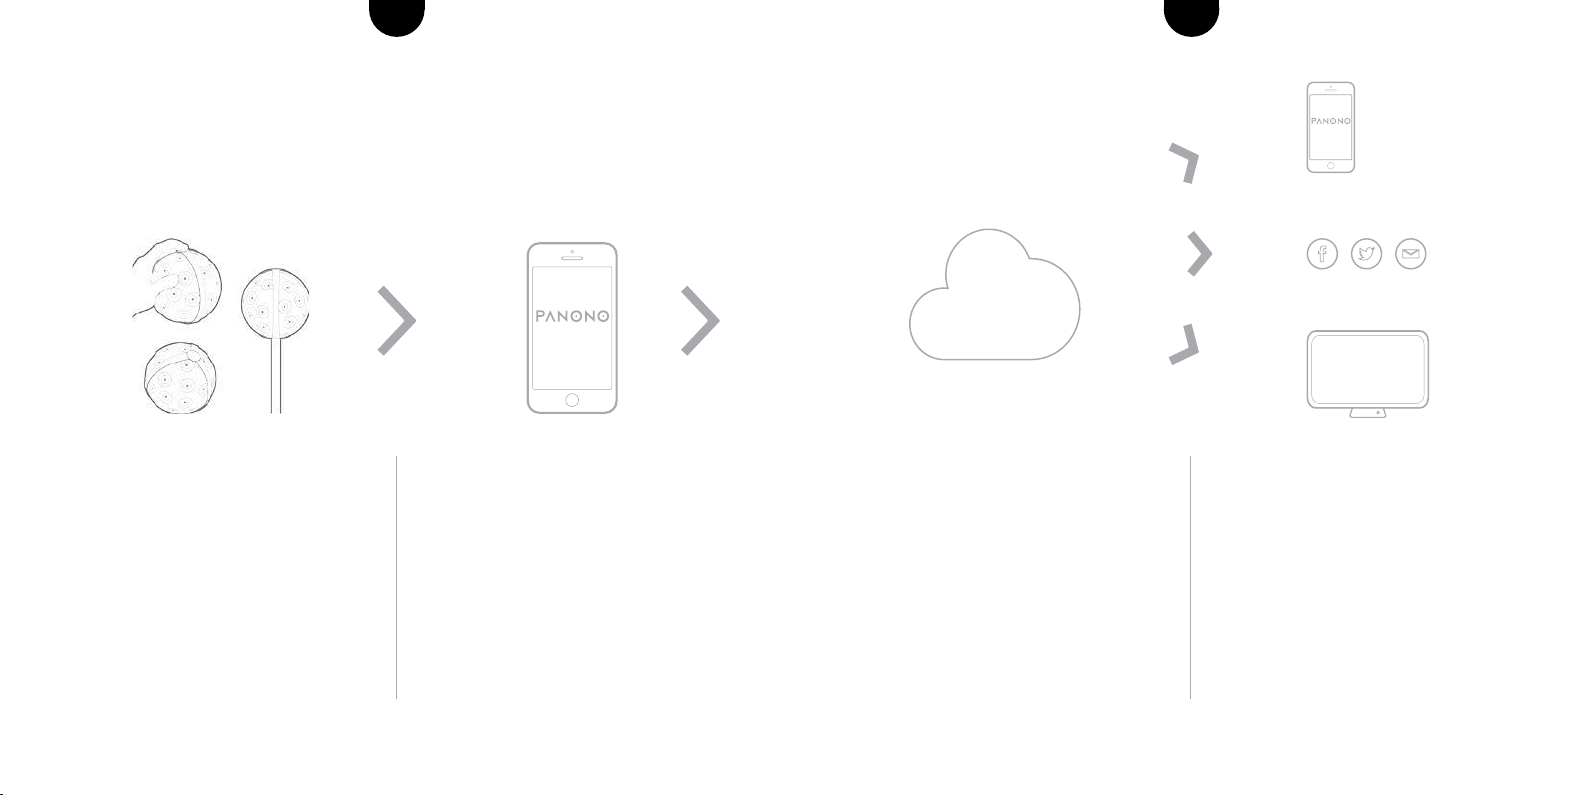
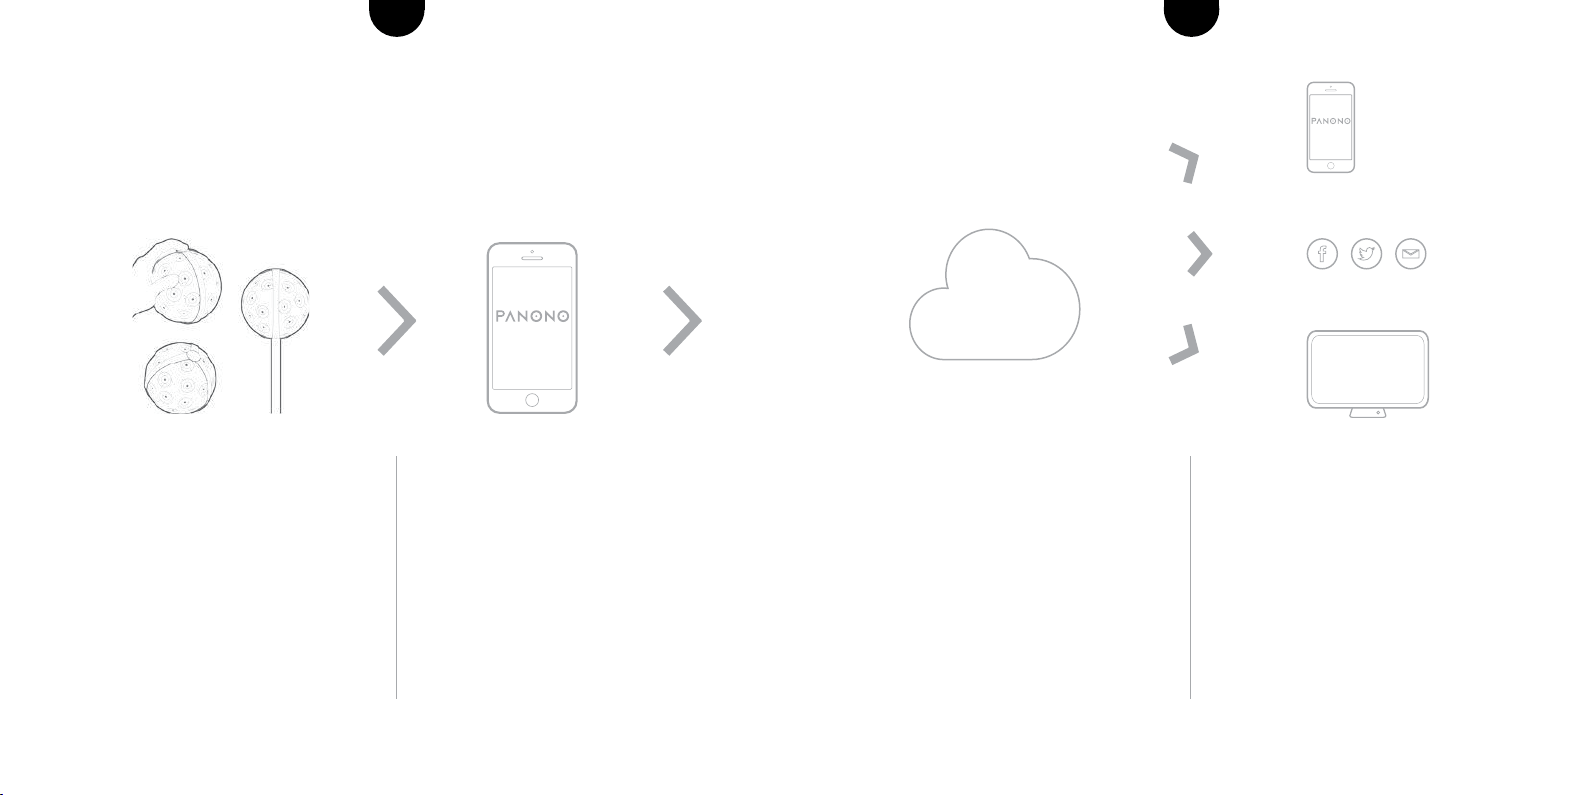
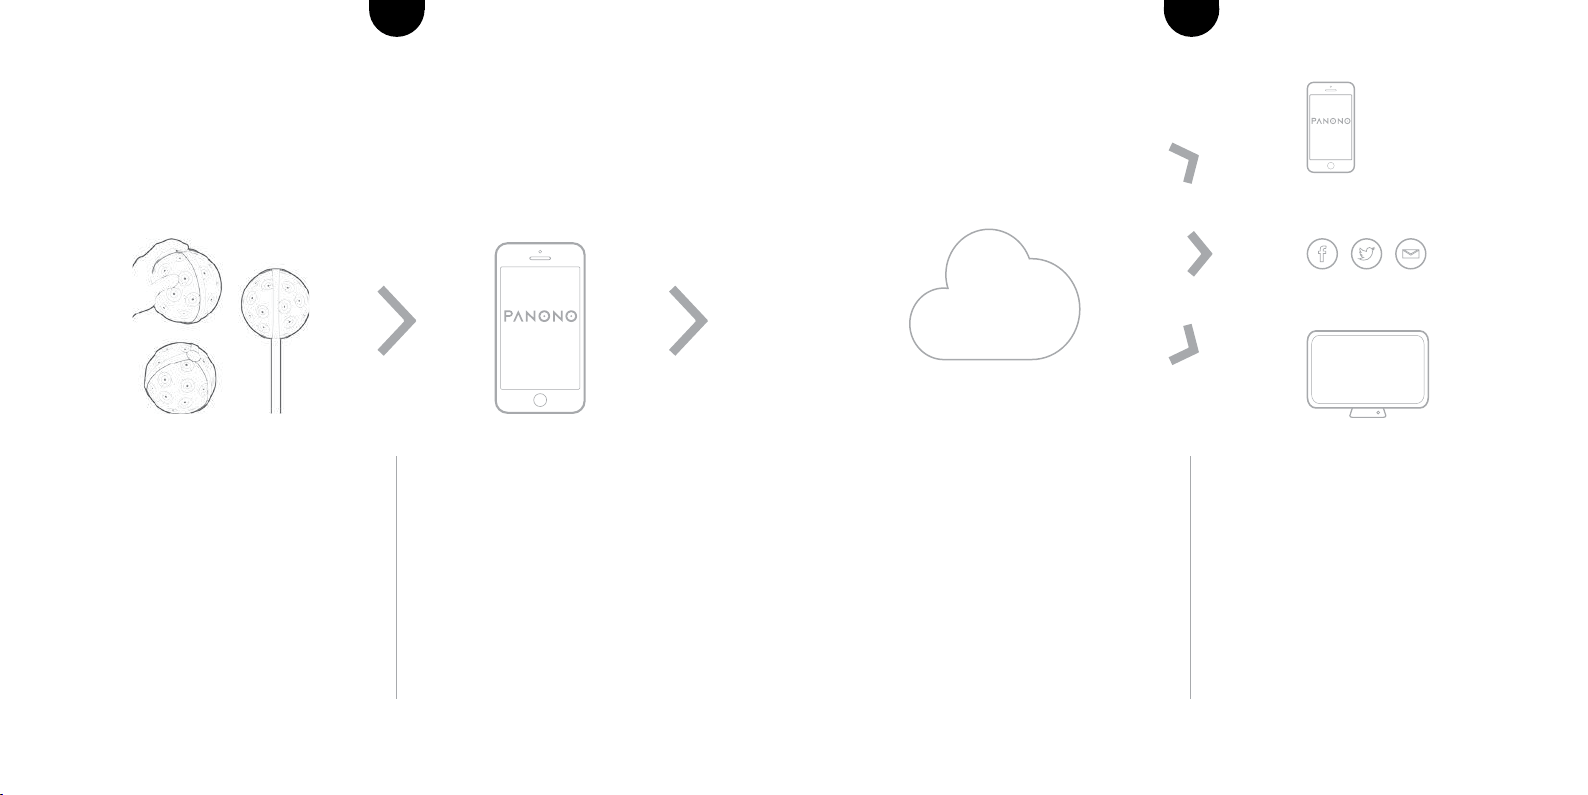
Your smartphone is used to upload the
image data to the Panono Cloud, auto-
matically stitch the pictures together
and archive them. The cloud provides
exibleaccessto:panoramasandraw
image data, which you can download
from there at any time.
The panoramas can be accessed from
the Panono App and from your web
browser. You can embed your pictures
in your website or Facebook page, share
them on Twitter or via an e-mail link.
CLOUD
TAKING PICTURES AND CREATING
360° X 360°PANORAMAS
There are several ways to capture pano-
rama images:
- Using the stick
- Using the tripod
- Throwing the camera in the air
- Holding the camera in your hand
When you take the photo, the 36
individual cameras inside your Panono
Camera capture a complete, instanta-
neous picture of the surroundings.
Your smartphone is used as temporary
storageforthepictureles.Whenthe
camera and Panono App are connected,
you can use the app to see a
preview and select the pictures you
want to use for the stitching process.

12 13For more information visit support.panono.comFor more information visit support.panono.com
ENEN
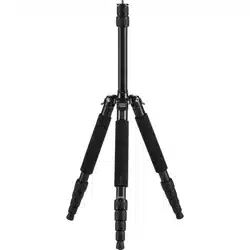
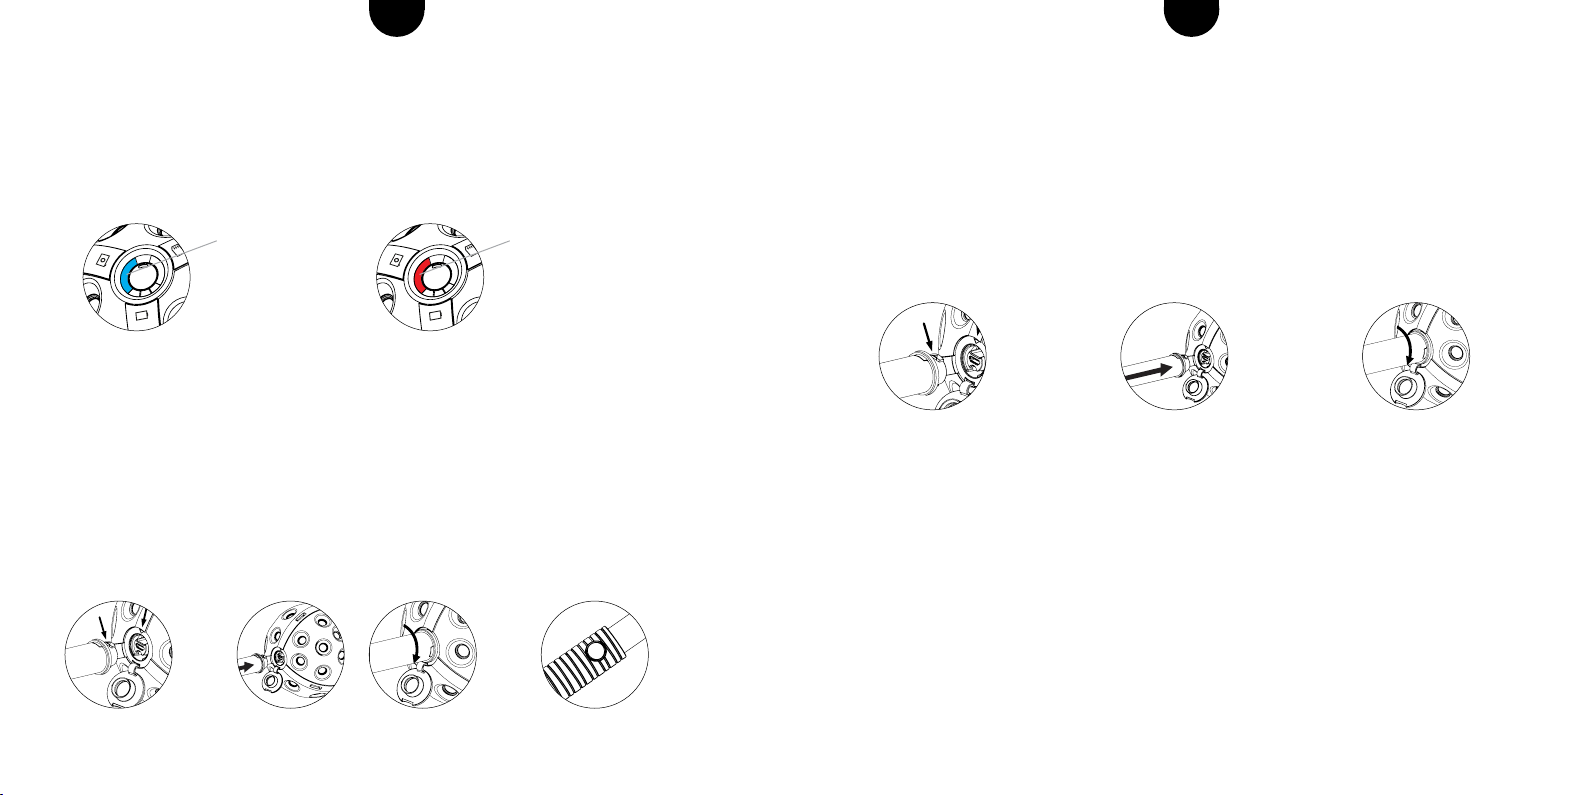
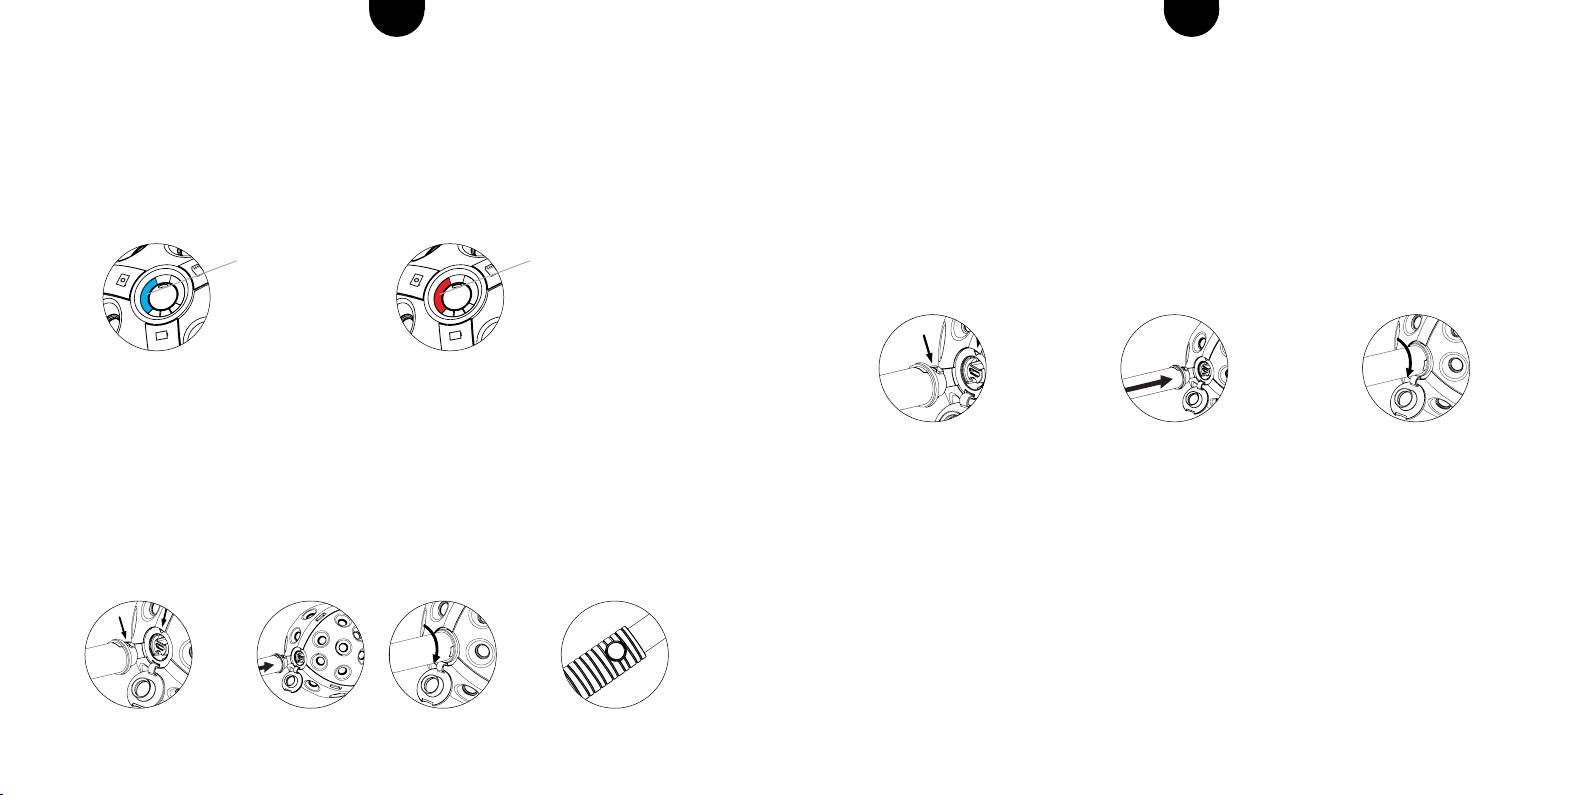
USING THE TRIPOD TO TAKE PICTURES
1. Attach the Panono Tripod Adapter to the camera in the same way as the Panono Stick.
Then tighten it on your tripod.
2. Connect your camera with the Panono App (see page 16).
3. Adjust to the desired picture settings and press the trigger button.
TAKING PICTURES BY THROWING IN THE AIR
1. With two hands, throw the camera 1,5–4 meters into the air.
2. Make sure that it does not rotate too much in order to avoid blurring.
3. Catch the camera again with both hands.
To prevent damage, you should always catch the camera. Tips for throwing the camera can be
found on panono.com/go/support/throwing
TAKING PICTURES BY PRESSING THE TRIGGER BUTTON
Holdtheballinyourhandandbrieypressthetriggerbutton.
1.
TAKING PANORAMA PICTURES
Make sure that the camera is switched on. Select the capture mode appropriate for the
situation:
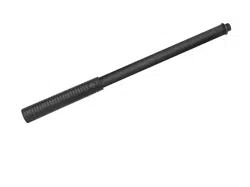
USING THE PANONO STICK TO TAKE PICTURES
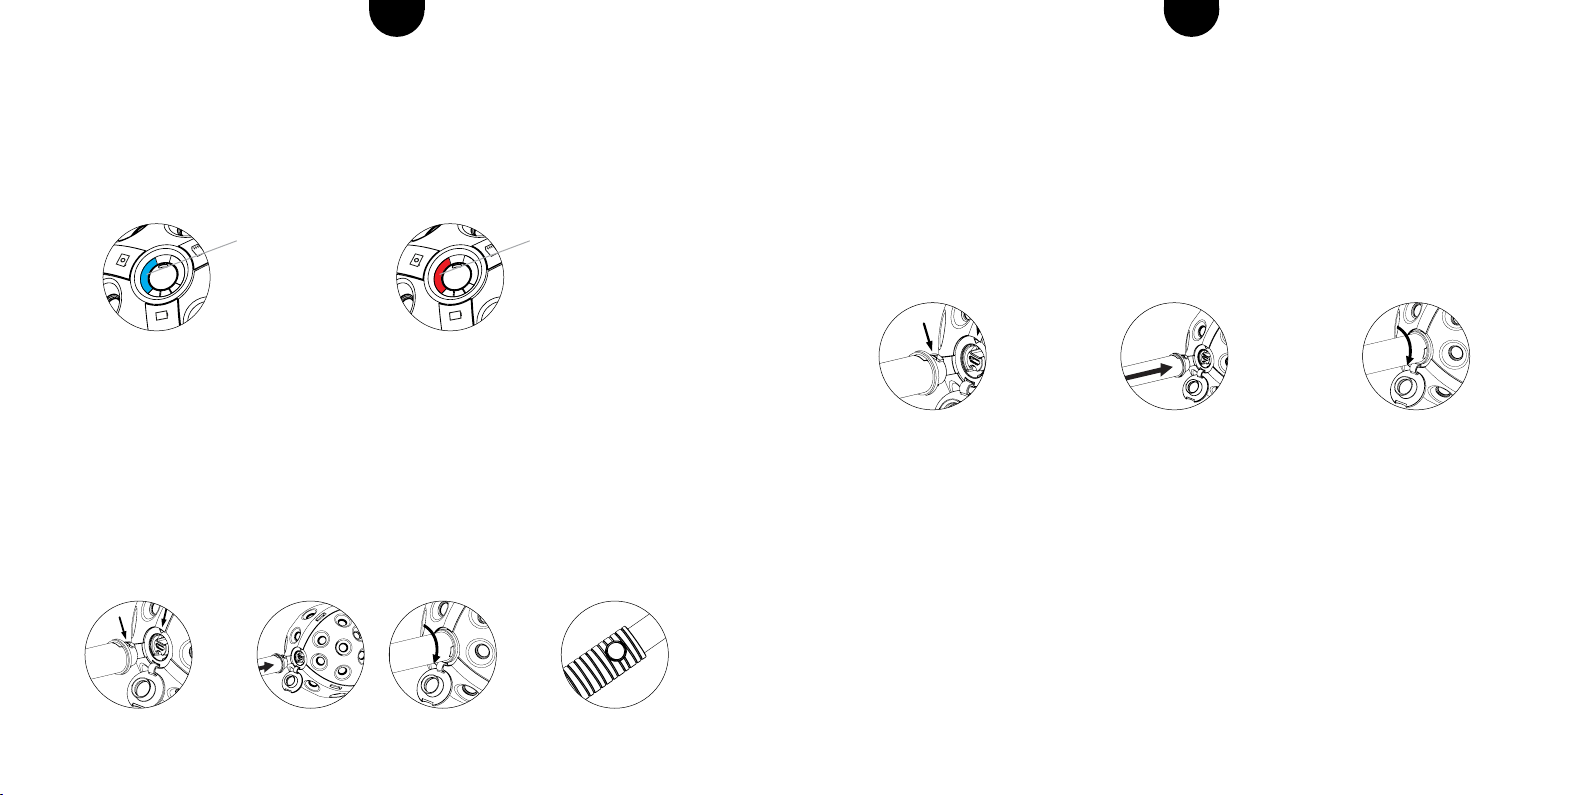
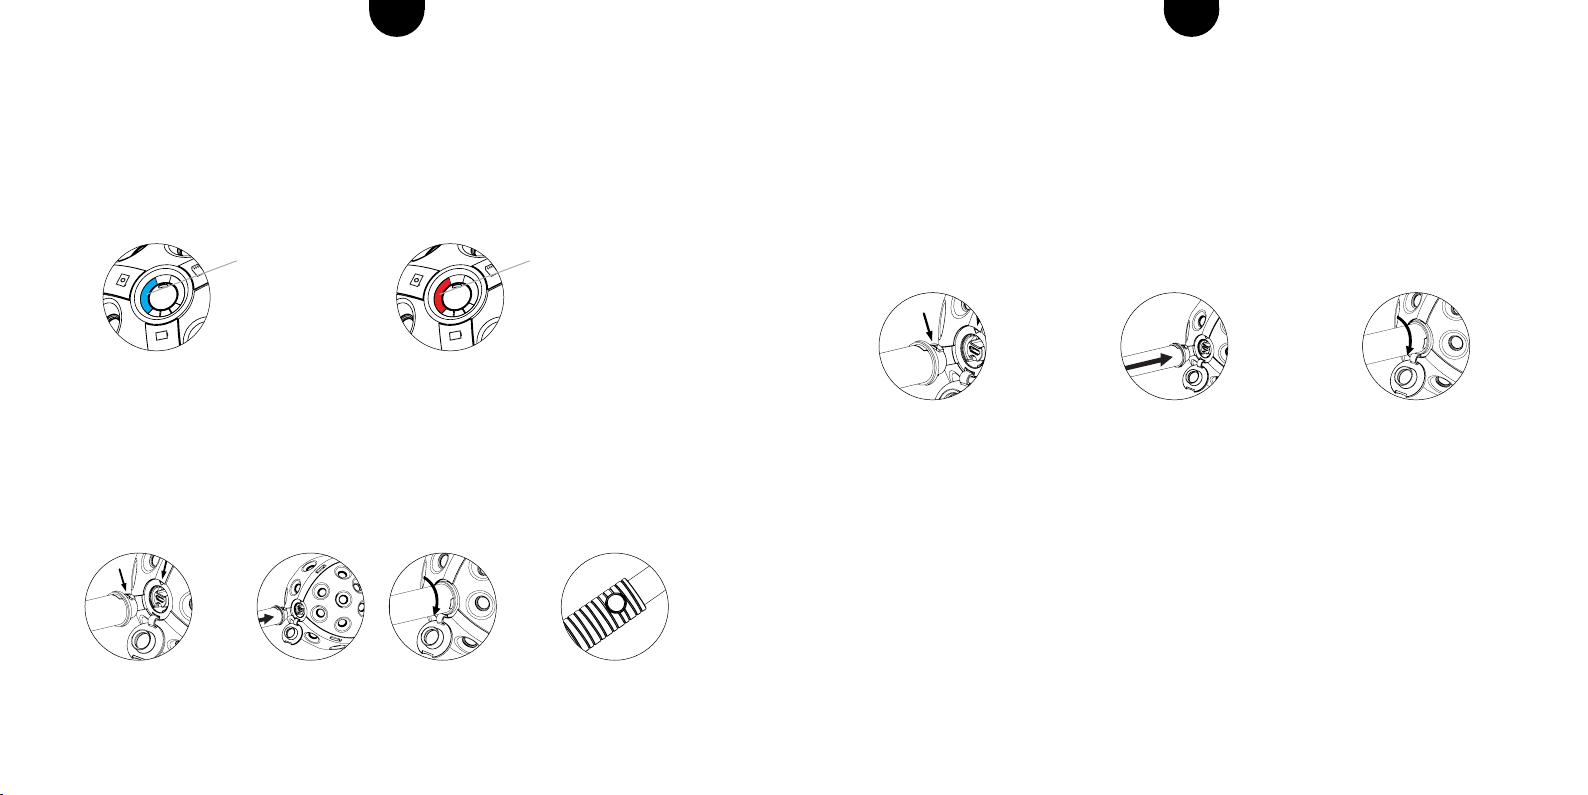
1. Open the camera cover and position the stick onto the threading so that the markings face
each other.
2. Push the stick into the threading and gently turn it clockwise.
3. Hold the stick in the air and release the trigger by pressing the button on the handle.
1. 2. 3.
PICTURE CAPTURE SUCCESSFUL
The LED display with the camera icon indicates whether the camera took the picture. If the
picture was captured successfully, it will light up once in blue. If the picture was not taken, it
will light up in red.
Picture capture successful Picture capture failed
14 15WeitereInformationenndenSieaufsupport.panono.comWeitereInformationenndenSieaufsupport.panono.com
DEDE
4 Verschlusskappe zum Schutz vor Schmutz
5 Befestigungsösen zur sicheren Aufhängung der Kamera
6 Micro-USB-AnschlusszumAuadenderKamerasowiezurBefestigungvonPanono
Stick und Panono Stativadapter
6
4
5
USB-Anschluss
DIE PANONO CAMERA IM ÜBERBLICK
1 ON/OFF Taste, Auslösetaste
2 LED-Anzeige zur Visualisierung des Akkustands, der Speicherauslastung und
des Auslösers
3 36 Einzelkameras zur Aufnahme von 360° x 360°-Panoramen
Akkustand
Speicherstatus
Auslöseranzeige
1
2
3

16 17WeitereInformationenndenSieaufsupport.panono.comWeitereInformationenndenSieaufsupport.panono.com
DEDE
DIE ERSTEN SCHRITTE
1 AUFLADEN DER KAMERA
Zum Laden schließen Sie die Kamera über das mitgelieferte USB-Kabel an einen USB-
Port an (Notebook, etc.).
2 DOWNLOAD DER PANONO APP
Laden Sie die Panono App auf Ihr Smartphone und starten Sie die Installation.
IM GOOGLE PLAY
STORE VERFÜGBAR
IM APP STORE
VERFÜGBAR
LED-Anzeige blinkt: Akku lädt
LED-Anzeige leuchtet permanent:
Akku ist geladen
3 ERSTELLUNG IHRES PANONO ACCOUNTS
1. Folgen Sie den Anweisungen in der App, um Ihren Panono Nutzeraccount zu erstellen.
2. Bestätigen Sie Ihre E-Mailadresse, um die Registrierung abzuschließen.
4 EIN- UND AUSSCHALTEN DER KAMERA
Drücken Sie die ON/OFF-Taste für 1 Sekunde. Die LED-Anzeige beginnt zu blinken.
Sobald sie dauerhaft weiß leuchtet, ist die Kamera einsatzbereit. Zum Ausschalten
halten Sie die ON/OFF-Taste für 4 Sekunden gedrückt.
Einschalten: ON/OFF-Taste 1 Sekunde drücken
Ausschalten: ON/OFF-Taste 4 Sekunden drücken
NAME
REGISTER
EMAIL
PASSWORD
CANCEL SIGN UP
ANMELDEN
18 19WeitereInformationenndenSieaufsupport.panono.comWeitereInformationenndenSieaufsupport.panono.com
DEDE
5 VERBINDEN DER KAMERA MIT DER APP
Der Netzwerkname der Kamera setzt sich wie folgt zusammen: Panono-<Seriennummer>
DieSeriennummerunddasPasswortndenSieaufderKamera.
Für Android erfolgt die Verbindung über die Panono App. Klicken Sie auf das
Kamerasymbol. Sie werden aufgefordert, ein Netzwerk auszuwählen.
Für iOS erfolgt die Verbindung über die WLAN-Einstellungen Ihres Smartphones.
Wählen Sie das Netzwerk Ihrer Kamera aus und geben Sie das Passwort ein, um die Ver-
bindung herzustellen. Ob Kamera und App verbunden sind, erkennen Sie am Camera Icon.
WeitereInformationenundHilfebeiVerbindungsproblemenndenSieauf:
www.panono.com/go/support/connecting
DIE PANONO APP IM ÜBERBLICK
CAMERA
- Kameraeinstellungen
(Belichtungszeit, etc.)
- Bildvorschau
MY PANORAMAS
- Ansicht und Verwaltung
Ihrer fertigen Panoramen
TASKLIST
- Upload in die Cloud
- Bearbeitungsstatus für
Panoramen in der Cloud
EXPLORE
- Die spannendsten Panora-
men anderer Nutzer
MY PROFILE
-Proleinstellungen

20 21WeitereInformationenndenSieaufsupport.panono.comWeitereInformationenndenSieaufsupport.panono.com
DEDE
VON DER AUFNAHME ZUM
360° X 360°PANORAMA
Es gibt verschiedene Möglichkeiten,
Panoramen aufzunehmen:
- Aufnahme mit Stick
- Aufnahme mit Stativ
- Kamerawurf
- Aufnahme in der Hand
BeimAuslösenfotograerendie36
Einzelkameras simultan und vollständig
die Umgebung der Panono Camera.
Ihr Smartphone dient als Zwischenspei-
cher für die Bilddateien. Sind Kamera
und Panono App verbunden, können
über die App Vorschauen angezeigt
und eine Vorauswahl für das Stitching
getroffen werden.
Über Ihr Smartphone werden die Bild-
daten in die Panono Cloud gesendet,
automatisch gestitcht und archiviert.
DieCloudermöglichtIhnenexiblen
Zugriff: Panoramen und Rohdaten
können von dort jederzeit heruntergela-
den werden.
Die Panoramen können über die Panono
App sowie in Ihrem Webbrowser abge-
rufen und angesehen werden.
Sie können sie in Ihre Website oder
Facebook einbetten, über Twitter
teilen, oder einen Bildlink per E-Mail
verschicken.
CLOUD
22 23WeitereInformationenndenSieaufsupport.panono.comWeitereInformationenndenSieaufsupport.panono.com
DEDE
PANORAMEN AUFNEHMEN
Vergewissern Sie sich, dass die Kamera angeschaltet ist. Wählen Sie eine Aufnahmeart je
nach Aufnahmesituation aus:
AUFNAHME MIT DEM PANONO STICK
1. Öffnen Sie die Verschlusskappe an der Kamera und setzen Sie den Stick so auf das
Gewinde, dass die Markierungen aufeinander zeigen.
2. Drücken Sie den Stick in das Gewinde und drehen Sie ihn behutsam im Uhrzeigersinn
3. Halten Sie den Stick in die Höhe und lösen Sie über den Knopf am Griff aus.
1. 2. 3.
ERFOLGREICHE AUFNAHME
Die LED-Anzeige mit dem Kamera-Symbol zeigt an, ob die Kamera ausgelöst hat. Bei einer
erfolgreichen Aufnahme leuchtet sie einmal blau auf. Wurde nicht ausgelöst, leuchtet sie rot.
Aufnahme erfolgreich Aufnahme nicht erfolgreich
AUFNAHME MIT DEM STATIV
1. Montieren Sie den Panono Stativadapter auf gleiche Weise wie den Panono Stick an die
Kamera und befestigen Sie ihn dann auf Ihrem Stativ.
2. Verbinden Sie Ihre Kamera mit der Panono App (siehe Seite 6).
3. Nehmen Sie die gewünschten Aufnahmeeinstellungen vor und klicken Sie auf die Auslösetaste.
AUFNAHME PER KAMERAWURF
1. Werfen Sie die Kamera mit beiden Händen 1,5-4 Meter in die Höhe.
2. Achten Sie darauf, dass sie dabei nicht zu stark rotiert, um Verwacklungen zu vermeiden.
3. Fangen Sie die Kamera mit beiden Händen auf.
Um Schäden vorzubeugen, sollte die Kamera stets gefangen werden. Tipps zum Kamerawurf
ndenSieaufpanono.com/go/support/throwing
AUFNAHME ÜBER DIE AUSLÖSETASTE
Halten Sie den Ball in Ihrer Hand und drücken Sie kurz auf die Auslösetaste.
1.
24 25Vous trouverez de plus amples informations sur support.panono.comVous trouverez de plus amples informations sur support.panono.com
FRFR
APERÇU DU PANONO CAMERA
1 Touche ON/OFF, déclencheur
2 AfchageLEDdel’étatdechargedelabatterie,del’espacedisponiblesurlamémoire
et du déclencheur
3 36 objectifs pour réaliser des panoramas à 360° x 360°
Etat de charge de
la batterie
Statut de la
mémoire
Afchagedu
déclencheur
1
2
3
4 Couvercle de protection contre la poussière
5 Œilletsdexationpourunesuspensiondel’appareilentoutesécurité
6 PortmicroUSBpourlechargementdel’appareil,pourlaxationdustickPanonoet
del’adaptateurpourtrépied
5
Port USB
6
4

26 27Vous trouverez de plus amples informations sur support.panono.comVous trouverez de plus amples informations sur support.panono.com
FRFR
LES PREMIERS PAS
1 CHARGERL’APPAREILPHOTO
Pourchargerl’appareilphoto,raccordez-leàunportUSB(ordinateurportable,etc.)à
l’aideducâbleUSBfourni.
2 TÉLÉCHARGERL’APPLICATIONPANONO
Téléchargezl’applicationPanonosurvotresmartphoneetlancezl’installation.
DISPONIBLE SUR LE
GOOGLE PLAY STORE
DISPONIBLE SUR
L’APP STORE
L’afchageLEDclignote:
la batterie est en charge
L’afchageLEDestalluméen
continu : la batterie est chargée
NAME
REGISTER
EMAIL
PASSWORD
CANCEL SIGN UP
3 CRÉER UN COMPTE PANONO
1.Suivezlesinstructionsdel’applicationandecréervotrecompteutilisateurPanono.
2.Conrmezvotreadressee-mailpournaliservotreinscription.
4 ALLUMERETÉTEINDREL’APPAREILPHOTO
AppuyezsurlatoucheON/OFFpendant1seconde.L’afchageLEDcommenceà
clignoter.Dèsqu’unelumièreblancheapparaît,l’appareilphotoestprêtàêtreutilisé.
Pourl’éteindre,appuyezsurlatoucheON/OFFpendant4secondes.
Allumer : appuyer sur la touche ON/OFF pendant 1 seconde
Eteindre : appuyer sur la touche ON/OFF pendant 4 secondes
S’INSCRIRE
28 29Vous trouverez de plus amples informations sur support.panono.comVous trouverez de plus amples informations sur support.panono.com
FRFR
5 CONNECTERL’APPAREILPHOTOÀL’APPLICATION
Lenomderéseaudel’appareilphotosecomposeainsi:Panono-<Numéro de série>
Voustrouverezlenumérodesérieetlemotdepassesurl’appareilphoto.
PourAndroid,laconnexionsefaitparlebiaisdel’applicationPanono.Cliquezsurl’icône
del’appareilphoto,ilvousseraensuitedemandédesélectionnerunréseau.
PouriOS,laconnexionsefaitparlebiaisdesparamètresduréseausansldevotre
smartphone.
Sélectionnezleréseaudevotreappareilphotoetsaisissezlemotdepasseand’établirla
connexion.Vousverrezquel’appareilphotoetl’applicationsontconnectésgrâceàl’icône
del’appareilphoto.
Pour de plus amples informations et une aide en cas de problèmes de connexion,
rendez-vous sur : www.panono.com/go/support/connecting
APERÇUDEL’APPLICATIONPANONO
APPAREIL PHOTO
-Réglagesdel’appareil
photo(tempsd’exposition,
etc.)
- Aperçu des photos
MES PANORAMAS
-Afchageetgestiondevos
panoramasnaux
TASKLIST
- Téléchargement sur le
Cloud
- Statut de traitement des
panoramas dans le Cloud
DÉCOUVRIR
- Les meilleurs panoramas
des autres utilisateurs
MON PROFIL
-Paramètresduprol
30 31Vous trouverez de plus amples informations sur support.panono.comVous trouverez de plus amples informations sur support.panono.com
FRFR
DE LA PRISE DE VUE AU PANORAMA
À360°X360°
Il existe différentes possibilités de faire
des panoramas :
- photo avec la tige
- photo avec le trépied
-lancementdel’appareilphoto
- photo appareil en main
Lorsqu’ilssedéclenchent,les36ob-
jectifs photographient simultanément
l’intégralitédesenvironsduPanono
Camera.
Votresmartphonefaitofcedemé-
moire temporaire pour les photos. Si
l’appareilphotoetl’applicationPanono
sont connectés, il est possible de visua-
liserdesaperçussurl’applicationetde
faireuneprésélectionpourl’assemblage
des photos.
Les données photo sont ensuite
envoyées vers le Cloud Panono depuis
votre smartphone, où elles sont automa-
tiquement assemblées et archivées. Le
Cloudpermetunaccèsexible,puisque
vous pouvez télécharger à tout moment
les panoramas et les données brutes.
Vous pouvez charger et visualiser les
panoramasparlebiaisdel’application
Panono ou de votre navigateur Web.
Vous pouvez les intégrer à votre site
Internet ou votre page Facebook, les
partager sur Twitter, ou envoyer un lien
image par e-mail.
CLOUD
32 33Vous trouverez de plus amples informations sur support.panono.comVous trouverez de plus amples informations sur support.panono.com
FRFR
RÉALISER DES PANORAMAS
Assurez-vousquel’appareilphotoestbienallumé.Sélectionnezuntypedeprisedevueen
fonction de la situation :
PHOTO AVEC LE STICK PANONO
1.Ouvrezlecouverclesurl’appareilphotoetplacezlestickfaceauletagedemanièreàceque
les marquages correspondent.
2.Insérezlestickdansleletageettournez-laavecprécautiondanslesensdesaiguilles.
3. Maintenez le stick à la verticale et ajustez-la avec le bouton situé sur la poignée.
1. 2. 3.
UNE PRISE DE VUE RÉUSSIE
L’afchageLEDavecl’icônedel’appareilphotoindiquesil’appareilabiendéclenché.Encas
deprisedevueréussie,ils’allumeunefoisenbleu.Danslecascontraire,ils’allumeenrouge.
Photo réussie Echec de la photo
PHOTO AVEC LE TRÉPIED
1.Fixezl’adaptateurpourtrépiedPanonodelamêmemanièrequelatigePanonoetraccordez-le
ensuite à votre trépied.
2.Connectezl’appareilphotoàl’applicationPanono(voirpage26).
3. Effectuez les réglages de prise de vue souhaités et appuyez sur le déclencheur.
PHOTOENLANÇANTL’APPAREILPHOTO
1.Lancezl’appareilàdeuxmains,de1,5à4mètresdehauteur.
2.Veillezàcequ’ilnetournepastroppouréviterleseffetsdeou.
3.Rattrapezl’appareilphotoàdeuxmains.And’évitertoutdommage,l’appareilphotodoit
toujoursêtrerattrapé.Voustrouverezdesconseilspourlancerl’appareilsur
panono.com/go/support/throwing
PHOTO AVEC LE DÉCLENCHEUR
Tenez le Panono Camera dans votre main et appuyez brièvement sur le déclencheur.
1.
34 35Encontrará más información en support.panono.comEncontrará más información en support.panono.com
ESES
VISTA GENERAL DE LA CÁMARA PANONO
1 Botón ON/OFF, botón de disparo
2 Indicador LED para visualizar el estado de la batería y avisar de que la memoria
disponible es reducida o la última fotografía no se ha podido captar correctamente
3 36Cámarasindividualesparafotograarpanoramasde360°x360°
Estado de la
batería
Estado de la
memoria
Indicador de
disparo
1
2
3
4 Tapa protectora contra la suciedad
5 Ojalesdejaciónparacolgarlacámaradeformasegura
6 PuertomicroUSBparacargarlacámarayjarelbastónyeladaptadordel
trípode Panono
5
Puerto USB
6
4

36 37Encontrará más información en support.panono.comEncontrará más información en support.panono.com
ESES
PRIMEROS PASOS
1 CARGA DE LA CÁMARA
Para cargar la cámara, conéctela a un puerto USB (de un ordenador portátil, por
ejemplo) con el cable USB proporcionado.
2 DESCARGA DE LA APP PANONO
Descargue la app Panono a su smartphone y comience la instalación.
DISPONIBLE EN
GOOGLE PLAY STORE
DISPONIBLE EN
APP STORE
El indicador LED parpadea:
la batería está cargando
El indicador LED brilla de forma
continua: la batería está cargada
3 CREACIÓN DE UNA CUENTA PERSONAL PANONO
1. Para crear una cuenta de usuario Panono, siga las indicaciones de la app.
2.Paranalizarelprocesoderegistro,conrmesudireccióndecorreoelectrónico.
4 ENCENDIDO Y APAGADO DE LA CÁMARA
Pulse el botón ON/OFF durante 1 segundo. El indicador LED comenzará a parpadear.
Una vez que el indicador brille constantemente con luz blanca, la cámara estará lista
para su uso. Para apagar la cámara, presione el botón ON/OFF durante 4 segundos.
Encender: pulse el botón ON/OFF durante 1 segundo
Apagar: pulse el botón ON/OFF durante 4 segundos
INICIAR SESIÓN
NAME
REGISTER
EMAIL
PASSWORD
CANCEL SIGN UP
38 39Encontrará más información en support.panono.comEncontrará más información en support.panono.com
ESES
5 CONEXIÓN DE LA CÁMARA CON LA APP
El nombre de red de la cámara se forma de la siguiente manera:
Panono-<Número de serie>
Encontrará el número de serie y la contraseña respectiva en la cámara.
Para Android la conexión se realiza a través de la app Panono. Haga clic en el símbolo
de la cámara. A continuación se le solicitará que seleccione una red.
EnelcasodeiOS,laconexiónsellevaacabomediantelaconguraciónWLANdesu
smartphone.
Seleccione la red de su cámara e introduzca la contraseña para establecer la conexión.
En el icono de la cámara podrá ver si el dispositivo está conectado o no con la app.
Encontrará más información y ayuda sobre problemas de conexión en
www.panono.com/go/support/connecting
SINOPSIS DE LA APP PANONO
CÁMARA
-Conguracióndela
cámara (tiempo de exposi-
ción, etc.)
- Vista previa de la imagen
MIS PANORAMAS
- Vista y gestión de los
panoramasnales
LISTA DE TAREAS
- Carga en la nube
- Estado de los panoramas
en la nube
EXPLORAR
- Los panoramas más fasci-
nantes de otros usuarios
MI PERFIL
-Conguracióndelperl

40 41Encontrará más información en support.panono.comEncontrará más información en support.panono.com
ESES
DESDE LA TOMA HASTA EL PANORAMA
EN 360° X 360°
Posibilidades para hacer una fotografía
panorámica:
- Tomar la foto con el bastón
- Tomar la foto con el trípode
- Tomarla foto lanzando la cámara al aire
- Tomar la foto con la cámara en la mano
En el momento de realizar el disparo,
las 36 cámaras individuales se activarán
de forma simultánea para hacer una
fotografía completa de todo el entorno
de la cámara Panono.
Su smartphone actúa como un espacio
de almacenamiento intermedio de los
archivos de imágenes. Si la cámara y la
app Panono están conectadas podrá
previsualizar y preseleccionar los pano-
ramas a través de la app para combinar y
fusionar la imagen (stitching).
Los datos de la imagen se envían a la
nube Panono, donde se fusionan y se
archivan a través de su smartphone. Una
vez los datos estén en la nube, podrá
acceder a ellos cuando lo desee: usted
puede descargar en cualquier momento
los panoramas y los datos sin procesar.
A través de la app Panono, podrá
cargar y visualizar los panoramas en
su navegador de Internet. Además,
podrá colgarlos en su página web o en
Facebook, o bien compartirlos en Twit-
ter o enviarlos por correo electrónico
mediante un enlace con la imagen.
CLOUD
42 43Encontrará más información en support.panono.comEncontrará más información en support.panono.com
ESES
FOTOGRAFIAR PANORAMAS
Asegúrese de que la cámara está encendida. Seleccione el tipo de toma según la situación:
FOTOGRAFÍA CON EL BASTÓN PANONO
1. Abra la tapa protectora de la cámara y coloque el bastón en la rosca de forma que las
marcas queden una sobre la otra.
2. Presione el bastón contra la rosca y atorníllelo en el sentido de las agujas del reloj hasta que
estéjo.
3. Sostenga el bastón en alto y presione el botón ubicado en el mango.
1. 2. 3.
FOTOGRAFÍA REALIZADA CON ÉXITO
El indicador LED con el símbolo de la cámara indica si esta ha sido accionada. Si la fotografía
se ha realizado con éxito, este indicador emitirá un destello azul. Si no se ha disparado, el
indicador brillará con luz roja.
Fotografía realizada
con éxito
Fotografía fallida
FOTOGRAFÍA CON TRÍPODE
1. Monte el adaptador del trípode Panono en la cámara de la misma forma que el bastón Panono y
fíjelo luego al trípode.
2. Conecte su cámara con la app Panono (véase la página 36).
3.Ajustelaconguraciónyaccioneelbotóndedisparo.
FOTOGRAFÍA MEDIANTE LANZAMIENTO DE LA CÁMARA
1. Lance la cámara hacia arriba con las dos manos a 1,5 - 4 m de altura.
2. Procure que esta no gire demasiado rápido para evitar que se tambalee.
3. Coja la cámara con las dos manos. Para evitar daños, coja siempre la cámara antes de que
llegue al suelo. En panono.com/go/support/throwing encontrará consejos sobre cómo
lanzar la cámara.
FOTOGRAFÍA CON EL BOTÓN DE DISPARO
Sostenga la pelota en su mano y pulse brevemente el botón de disparo.
1.

44 45更多信息请点击support.panono.com更多信息请点击support.panono.com
CN CN
PANONO相机一览
1 开/关键,快门按钮
2 电池状态、内存使用和快门按钮的LED指示灯
3 36个摄像头可拍摄360°x360°的全景图像
电池状态
内存状态
快门按钮显示
1
2
3
4 可防止脏污的密封盖
5 用于安全挂住相机的固定孔
6 用于给相机充电和固定Panono杆子和Panono三脚架适配器的微型USB接口
5
USB 接口
6
4
46 47更多信息请点击support.panono.com更多信息请点击support.panono.com
CN CN
第一步
1 给相机充电
通过随附的USB电线将相机连接至一个USB端口上(笔记本等)。
2 下载PANONO应用程序
在您的智能手机上下载Panono应用程序并启动安装。
在GOOGLE PLAY
STORE中可用
在APP STORE中可用
LED指示灯闪烁:电池正在充电
LED指示灯常亮:电池已充满
3 创建您的PANONO账户
1. 按照应用程序中的指示创建您的Panono用户账户。
2. 确认您的电子邮件地址完成注册。
4 打开和关闭相机
按下开/关键1秒钟。LED指示灯开始闪烁。一旦白光短暂亮起,则相机可以使用。
按下开/关键4秒钟则关闭相机。
打开:按下开/关键1秒钟
关闭:按下开/关键4秒钟
注册
NAME
REGISTER
EMAIL
PASSWORD
CANCEL SIGN UP
48 49更多信息请点击support.panono.com更多信息请点击support.panono.com
CN CN
5 将相机连接到应用程序
相机的网络名称如下:Panono-<序列号>
您可以在相机上找到序列号和密码。
安卓用户通过Panono应用程序连接。请您点击相机符号。会要求您选择一个网络。
iOS用户通过您智能手机上的WLAN设置连接。
选择您相机的网络并输入密码从而创建连接。可以在相机图标上识别相机和应用程序
是否已连接。
欲知更多信息以及在连接方面有任何疑问请点击:
www.panono.com/go/support/connecting
PANONO应用程序一览
相机
-相机设置
(曝光时间等)
-图片预览
我的全景照片
-查看和管理
您完成的全景照片
任务列表
-上传至云端
-云端上全景照片的
编辑状态
发现
-其他用户
有趣的全景照片
我的资料
-资料设置
50 51更多信息请点击support.panono.com更多信息请点击support.panono.com
CN CN
从拍摄到360° X 360°全景照片
有几种不同的全景照片拍摄方法:
-通过杆子拍摄
-通过三脚架拍摄
-抛掷相机
-拿在手中拍摄
在按下快门后,36个摄像头会同时完
整地拍摄Panono相机的周边环境。
您的智能手机用于缓存图片文件。通过
应用程序预览可以显示相机和Panono
应用程序是否连接,并且可以为拼接
进行预选。
通过您的智能手机可以将图片数据发送
至Panono云端、自动拼接并存档。您
可灵活访问云端:可随时从那里下载全
景图片和原始数据。
可通过Panono应用程序以及您的网
页浏览器调取和查看全景照片。您可
将它插入您的网站或Facebook、通过
Twitter分享或通过电子邮件发送一个
图片链接。
CLOUD
52 53更多信息请点击support.panono.com更多信息请点击support.panono.com
CN CN
拍摄全景照片
确定相机已打开。根据拍摄情况选择拍摄方式:
通过PANONO杆子拍摄
1. 打开相机上的密封盖,根据相互指示的标记将杆子放在螺纹上。
2. 将杆子按入螺纹中并小心地顺时针拧紧。
3. 将杆子举在高处并通过手柄上的按钮按下快门。
1. 2. 3.
成功拍摄
带相机符号的LED指示灯显示相机是否已触发。成功拍摄时,它会显示一次蓝光。如果未
触发,则显示红光。
拍摄成功 拍摄不成功
通过三脚架拍摄
1. 使用与Panono杆子相同的方法将Panono三脚架适配器安装在相机上,随后将其
在三脚架上固定。
2. 将您的相机与Panono应用程序相连接(参见第46页)。
3. 进行所需的拍摄设置并点击快门按钮。
通过抛掷相机拍摄
1. 双手将相机抛向空中1,5-4米高。
2. 为避免相机抖动,应注意不要使其强力旋转。
3. 双手接住相机。为了防止损坏,应始终抓住相机。
关于抛掷相机的小建议请参见
panono.com/go/support/throwing
通过快门按钮拍摄
将球形相机拿在您的手中并短按快门按钮。
1.

54 55詳しい情報はsupport.panono.com でご確認下さい。詳しい情報はsupport.panono.com でご確認下さい。
JP JP
PANONO CAMERA概要
1 電源スイッチ、シャッター
2 バッテリー状態・メモリー保存・シャッター時のLED表示
3 360° x 360°パノラマ撮影のための36個のカメラ内臓
バッテリー状態
保存状態
シャッター表示
1
2
3
4 埃から守るための密閉式キャップ
5 カメラを安全に持ち運ぶための取っ手
6 カメラ充電、Panonoスティック、アダプター装着のためのMicro-USB接続
5
USB接続
6
4

56 57詳しい情報はsupport.panono.com でご確認下さい。詳しい情報はsupport.panono.com でご確認下さい。
JP JP
第1ステップ
1 カメラの充電
カメラを充電するには付属のUSBケーブルをノートパソコンなどのUSBポートに挿
入して下さい。
2 PANONOアプリのダウンロード
お持ちのスマートフォンにPanonoアプリをダウンロードしてからインストールし
て下さい。
GOOGLE PLAY STORE
で入手可能
APP STORE
で入手可能
LED表示が点滅:
バッテリー充電中
バッテリーが点灯:
バッテリー充電済
3 PANONOアカウントの設定
1. アプリの手順に従ってPanonoユーザーアカウントを作成して下さい。
2. メールを認証し、登録を完了して下さい。
4 カメラの電源のオン・オフ
電源スイッチを1秒間押してください。LED表示が点滅します。短い間白く点灯す
れば、使用できます。電源を切るには電源スイッチを4秒間押して下さい。
電源オン:電源スイッチを1秒間押す
電源オフ:電源スイッチを4秒間押す
サインアップ
NAME
REGISTER
EMAIL
PASSWORD
CANCEL SIGN UP
58 59詳しい情報はsupport.panono.com でご確認下さい。詳しい情報はsupport.panono.com でご確認下さい。
JP JP
5 カメラをアプリに接続する
カメラのネットワーク名は次のようになります:Panono-<シリアル番号>
シリアル番号とパスワードはカメラに記されています。
Androidを利用する場合はPanonoアプリで接続して下さい。カメラのシンボルをク
リックし、ネットワーク接続を選択して下さい。
iOSの場合はお使いのスマートフォンのWIFI設定に従って接続して下さい。
お使いのカメラのネットワークを選択し、パスワードを入力して下さい。カメラと
アプリが接続したかどうかは、カメラのアイコンで確認できます。
接続に関する情報と問題解決策はこちらのサイトを参照してください
www.panono.com/go/support/connecting
PANONOアプリ概要
カメラ
-カメラ設定
(発光時間など)
-写真プレビュー
マイ・パノラマ
-撮影済みパノラマの閲覧
と管理
タスク・リスト
-クラウドにアップロ
ード
-クラウドにおけるパノラ
マの編集ステータス
エクスプローラ
-他のユーザーの最もス
リリングなパノラマ
マイ・プロフィール
-プロフィール設定
60 61詳しい情報はsupport.panono.com でご確認下さい。詳しい情報はsupport.panono.com でご確認下さい。
JP JP
360° X 360°パノラマの撮影
パノラマ撮影をするにはいくつかの方
法があります:
-スティックを使った撮影
-三脚を使った撮影
-カメラを投げる
-手に取って撮影
シャッターを押せばPanono Cameraに
搭載されている36個のカメラが同時
かつ完全に周囲を撮影します。
スマートフォンは撮影データの一時保
管場所となります。カメラをPanono
アプリと接続すればアプリでプレビュ
ーが表示され、スティッチングの選択
範囲を狭めます。
お使いのスマートフォンが撮影データ
をPanono Cloudに送信し、自動的にス
ティッチング、アーカイブ化します。
クラウドはフレキシブルなアクセスを
可能にします:パノラマと撮影データ
はいつでもクラウドにダウンロード
できます。
パノラマはPanonoアプリまたはお使
いのウェブブラウザで読み込み、閲
覧することができます。個人的サイ
ト、Facebook、Twitterなどで共有し
たり、メールで送信したりできます。
CLOUD

62 63詳しい情報はsupport.panono.com でご確認下さい。詳しい情報はsupport.panono.com でご確認下さい。
JP JP
パノラマ撮影
カメラの電源が入っていることを確認してください。撮影状況に応じて撮影方法を選
んで下さい。
スティックを使って撮影
1.
カメラの密閉式キャップを開き、スティックをマークのある箇所に装着して下さい。
2.スティックをネジ穴に押し込み、時計回りにゆっくりと回して固定して下さい。
3.スティックを持ち上げたまま、取っ手の部分のシャッターを押して下さい。
1. 2. 3.
撮影するには
カメラシンボルのLED表示を見るとシャッターが押されたかどうかが分かります。シャ
ッターが押された場合は一度青く点滅します。シャッターが押されていなければ赤く
点滅します。
撮影に成功
撮影に失敗
三脚を使って撮影
1. スティックの場合と同じように、Panono三脚アダプターを使って三脚をカメラに取り
付け、しっかり装着されていることを確認して下さい。
2.カメラをPanonoアプリに接続して下さい。(56ページ参照)
3. ご希望の撮影設定を選び、シャッターを押して下さい。
カメラを投げて撮影
1. カメラを両手で持って、1,5~4メートルの高さに投げて下さい。
2.ブレを防ぐため、投げる際はあまり強く回転させないように注意して下さい。
3. カメラを両手で受け止めて下さい。傷つけないために、必ずカメラを受け止めて下さ
い。カメラを投げるテクニックについては、 panono.com/go/support/throwing を参照し
て下さい。
シャッターを押して撮影
ボールを手に持ってシャッターを短めに押して下さい。
1.

NOTES

MVP15, PAN000412, R01.05
CAMERA
PANONO GMBH | FRANZÖSISCHE STRASSE 9 | 10117 BERLIN
+49 (0)30 220 128 990 |
SUPPORT@PANONO.COM
WWW.PANONO.COM