GS
Panasonic Corporation
Web Site: http://panasonic.net
C Panasonic Corporation 2014
RQT9961-G
F0814SB0
中文 (简体)
ENGLISH
Operating Instructions
使用说明书
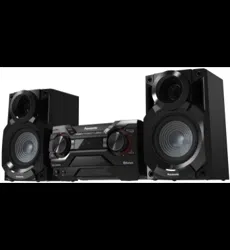
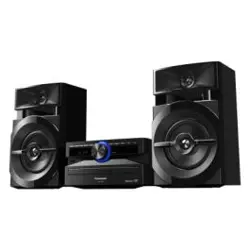
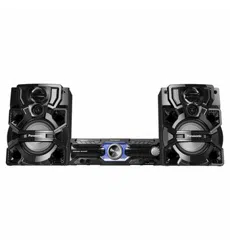
Active Speaker System
有源扬声器系统
Thank you for purchasing this product.
Please read these instructions carefully before using this product,
and save this manual for future use.
感谢您购买本产品。
请于使用前仔细阅读操作使用说明书 , 并将说明书妥善保管,以备将来使用。
Model No./ 型号 SC-CMAX5
SC-CMAX5_GS~RQT9961-G.book 1 ページ 2014年8月22日 金曜日 午後7時8分
2
RQT9961
2
Safety precautions
Unit
≥ To reduce the risk of fire, electric shock or product damage,
– Do not expose this unit to rain, moisture, dripping or
splashing.
– Do not place objects filled with liquids, such as vases, on
this unit.
– Use only the recommended accessories.
– Do not remove covers.
– Do not repair this unit by yourself. Refer servicing to
qualified service personnel.
≥ Do not let metal objects fall inside this unit.
AC mains lead
≥ The mains plug is the disconnecting device. Install this unit
so that the mains plug can be unplugged from the socket
outlet immediately.
Unit
≥ To reduce the risk of fire, electric shock or product damage,
– Do not install or place this unit in a bookcase, built-in
cabinet or in another confined space. Ensure this unit is
well ventilated.
– Do not obstruct this unit’s ventilation openings with
newspapers, tablecloths, curtains, and similar items.
– Do not place sources of naked flames, such as lighted
candles, on this unit.
– Do not expose this unit to direct sunlight, high
temperatures, high humidity, and excessive vibration.
≥ This unit is intended for use in tropical climates.
≥ This unit may receive radio interference caused by mobile
telephones during use. If such interference occurs, please
increase separation between this unit and the mobile
telephone.
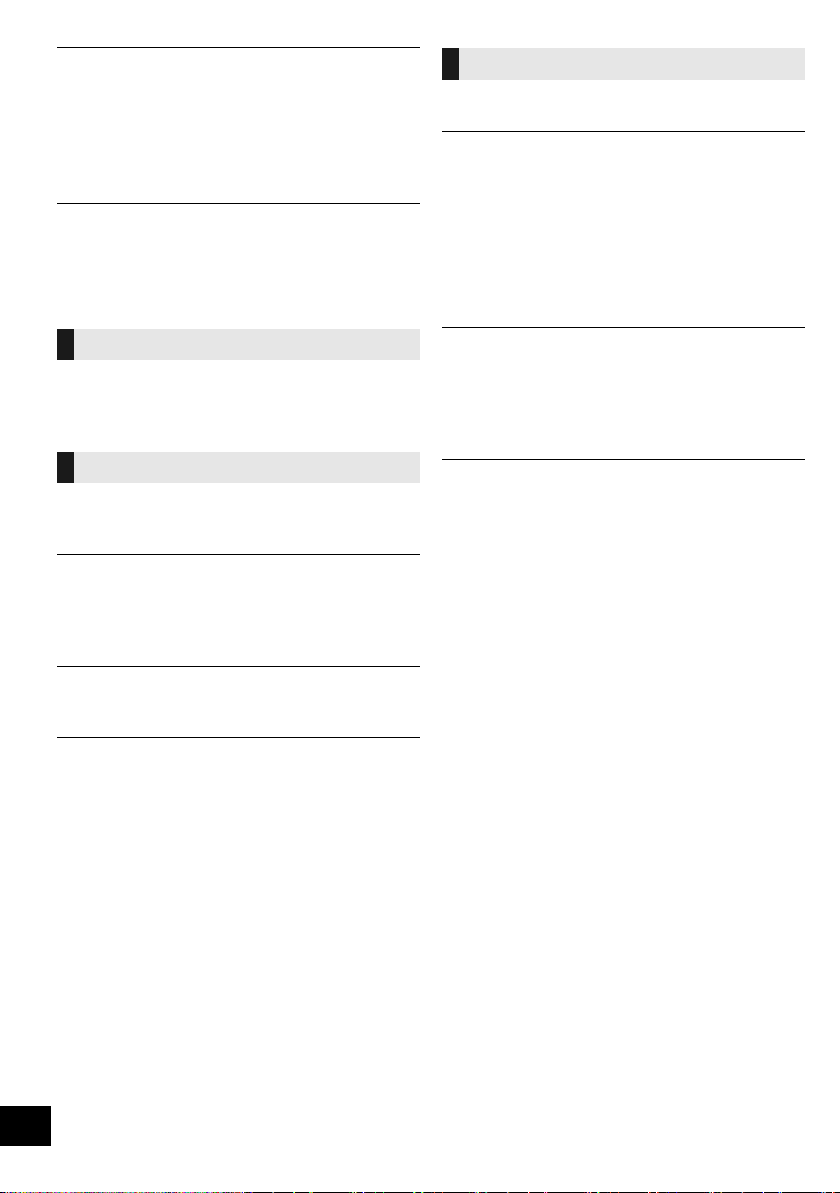
≥ Do not allow children to climb on this unit.
≥ Do not stack anything on this unit.
≥ Place this unit on an even surface.
≥ Use caution when lifting the unit.
– Lift it with more than one person if necessary.
≥ Do not touch the speaker cone’s reverberating surfaces:
– This may damage the speaker cone.
– The speaker cone may be hot.
≥ Do not place your feet under the unit, or at its wheels’ areas.
≥ Improper handling or transportation manner may cause the
unit to fall, etc., resulting in damage and/or personal injury.
≥ Be careful when babies or children are near.
Battery
≥ Danger of explosion if battery is incorrectly replaced.
Replace only with the type recommended by the
manufacturer.
≥ When disposing of the batteries, please contact your local
authorities or dealer and ask for the correct method of
disposal.
≥ Do not heat or expose to flame.
≥
Do not leave the battery(ies) in a car exposed to direct sunlight
for a long period of time with doors and windows closed.
≥ Do not take apart or short circuit.
≥ Do not recharge alkaline or manganese batteries.
≥ Do not use the battery if the cover has peeled off.
≥ Remove the battery if you do not use the remote control for a
long period of time. Keep in a cool, dark area.
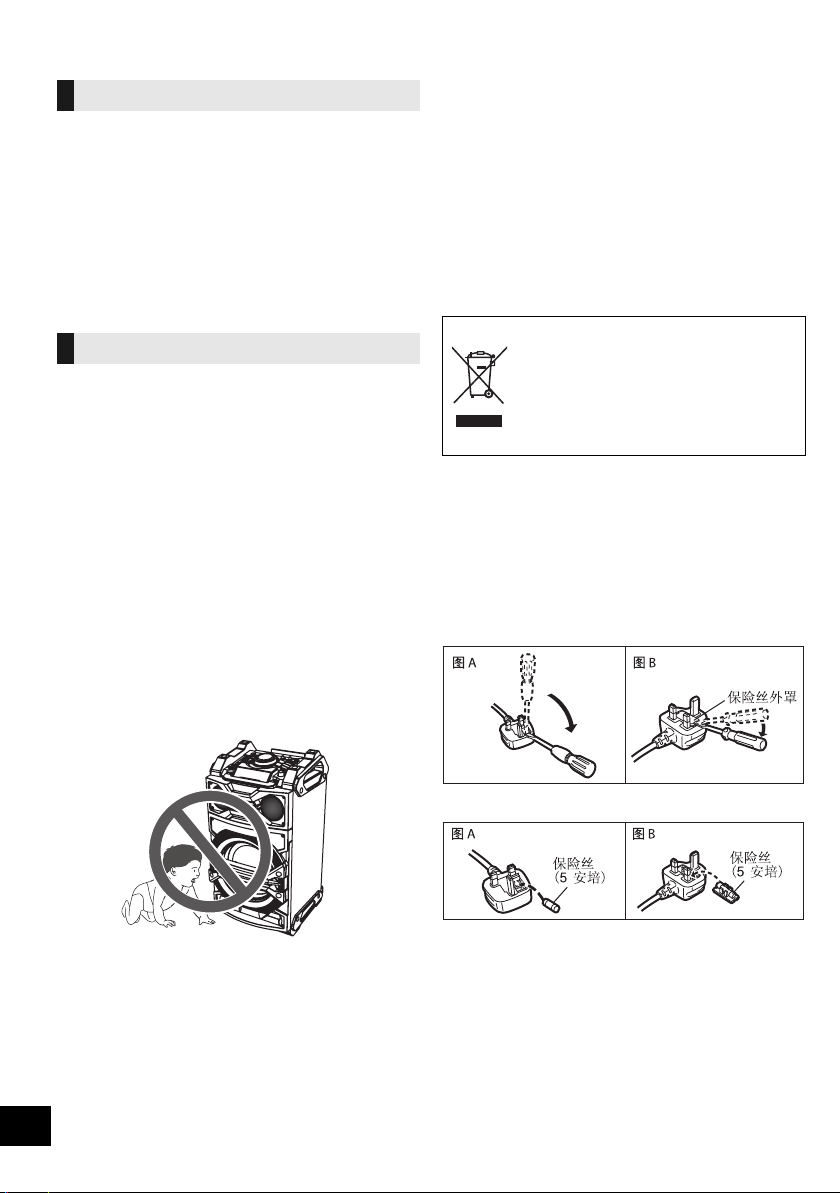
-If you see this symbol-
(For the AC mains plug of three pins)
How to replace the fuse
The location of the fuse differ according to the type of
AC mains plug (figures A and B). Confirm the AC
mains plug fitted and follow the instructions below.
Illustrations may differ from actual AC mains plug.
1. Open the fuse cover with a screwdriver.
2. Replace the fuse and close or attach the fuse
cover.
WARNING
CAUTION
Information on Disposal in other Countries
outside the European Union
This symbol is only valid in the
European Union.
If you wish to discard this product,
please contact your local authorities or
dealer and ask for the correct method of
disposal.
Figure A Figure B
Fuse cover
Figure A
Fuse
(5 ampere)
Figure B
Fuse
(5 ampere)
SC-CMAX5_GS~RQT9961-G.book 2 ページ 2014年8月22日 金曜日 午後7時8分
3
RQT9961
3
ENGLISH
Table of contents
Safety precautions............................................ 2
Accessories....................................................... 3
Audio sources...................................................3
Licenses ............................................................ 3
Unit care ............................................................ 4
About Bluetooth
®
.............................................. 4
Moving this unit ................................................5
Control reference guide ................................... 6
Connecting to AC power supply ..................... 7
Connecting a USB device ................................ 8
Bluetooth
®
operations ...................................... 8
Media playback controls .................................. 9
Sound and illumination effects...................... 11
Recording (
[USB], [AUX]) .................................. 11
Clock and Timers............................................ 13
External equipment ........................................ 14
Using a microphone or guitar........................ 15
Others .............................................................. 16
Troubleshooting.............................................. 17
Specifications..................................................20
Limited Warranty (ONLY FOR AUSTRALIA)... 21
Accessories
Check the supplied accessories before using this
unit.
≥ Do not use AC mains lead with other equipment.
≥ Product numbers provided in these operating instructions are
correct as of August 2014. These may be subject to change.
≥ Please use the supplied AC mains lead suitable for the
household mains socket.
In Saudi Arabia, please use the moulded three pin mains
plug.
Audio sources
The following marks indicate the availability of the
feature.
∫ Compatible USB devices
≥ This unit does not guarantee connection with all
USB devices.
≥ FAT12, FAT16 and FAT32 file systems are
supported.
≥ This unit supports USB 2.0 full speed.
≥ This unit can support USB devices of up to
32 GB.
≥ Only one memory card will be selected when
connecting a multiport USB card reader, typically
the first memory card inserted.
∫ Compatible MP3 files
≥ Supported format:
Files with the extension “.mp3” or “.MP3”.
≥ Depending on how you create the MP3 files, they
may not play in the order you numbered them or
may not play at all.
≥ Files are defined as tracks and folders are
defined as albums.
≥ This system can play or record up to 800 albums
(maximum 999 tracks in an album) or a total of
8000 tracks, depending on the available storage
capacity.
Licenses
About descriptions in these operating
instructions
≥ Pages to be referred to are indicated as “l ±±”.
≥ Unless otherwise indicated, operations are described using
the remote control.
4 x AC mains lead
1 x Battery for remote control
1 x Remote control
(N2QAYB001000)
[USB]: USB devices containing MP3 files
(l below)
[Bluetooth]: Connected Bluetooth
®
device (l 8)
[AUX]: External equipment connected to the
AUX IN 1 or AUX IN 2 terminal (l 14)
MPEG Layer-3 audio coding technology licensed from Fraunhofer
IIS and Thomson.
The Bluetooth
®
word mark and logos are registered trademarks
owned by Bluetooth SIG, Inc. and any use of such marks by
Panasonic Corporation is under license.
Other trademarks and trade names are those of their respective
owners.
Google Play and Android are trademarks of Google Inc.
SC-CMAX5_GS~RQT9961-G.book 3 ページ 2014年8月22日 金曜日 午後7時8分

4
RQT9961
4
Unit care
≥ When you play at high levels for a long period, it
can cause damage to the speakers and decrease
the life of the speakers.
≥ Decrease the volume in these conditions to
prevent damage:
– When the sound is distorted.
– When you adjust the sound quality.
Pull out the AC mains lead from the outlet before
maintenance.
≥ When dirt is heavy, wring a wet cloth tightly to
wipe the dirt, and then wipe it with a dry cloth.
≥ Never use alcohol, paint thinner or benzine to
clean this unit.
≥ Before using chemically treated cloth, carefully
read the cloth’s instructions.
∫ To dispose or transfer this unit
The unit may keep the user settings information in
the unit. If you discard this unit either by disposal or
transfer, then follow the procedure to return all the
settings to the factory defaults to delete the user
settings.
(l 17, “To return all settings to the factory
defaults”)
≥ The operation history may be recorded in the
memory of this unit.
About Bluetooth
®
∫ Frequency band used
≥ This system uses the 2.4 GHz frequency band.
∫ Certification of this device
≥ This system conforms to frequency restrictions
and has received certification based on
frequency laws. Thus, a wireless permit is not
necessary.
≥ The actions below are punishable by law in some
countries:
– Taking apart or modifying the system.
– Removing specification indications.
∫ Restrictions of use
≥ Wireless transmission and/or usage with all
Bluetooth
®
equipped devices is not guaranteed.
≥ All devices must conform to standards set by
Bluetooth SIG, Inc.
≥ Depending on the specifications and settings of a
device, it can fail to connect or some operations
can be different.
≥ This system supports Bluetooth
®
security
features. But depending on the operating
environment and/or settings, this security is
possibly not sufficient. Transmit data wirelessly to
this system with caution.
≥ This system cannot transmit data to a Bluetooth
®
device.
∫ Range of use
≥ Use this device at a maximum range of 10 m.
The range can decrease depending on the
environment, obstacles or interference.
∫ Interference from other devices
≥ This system may not function properly and
troubles such as noise and sound jumps may
arise due to radio wave interference if this system
is located too close to other Bluetooth
®
devices or
the devices that use the 2.4 GHz band.
≥ This system may not function properly if radio
waves from a nearby broadcasting station, etc. is
too strong.
∫ Intended usage
≥ This system is for normal, general use only.
≥ Do not use this system near an equipment or in
an environment that is sensitive to radio
frequency interference (e.g.: airports, hospitals,
laboratories, etc.).
To prevent speaker damage
Clean this unit with a soft, dry
cloth
Panasonic bears no responsibility for data
and/or information that is compromised
during a wireless transmission.
SC-CMAX5_GS~RQT9961-G.book 4 ページ 2014年8月22日 金曜日 午後7時8分
5
RQT9961
5
ENGLISH
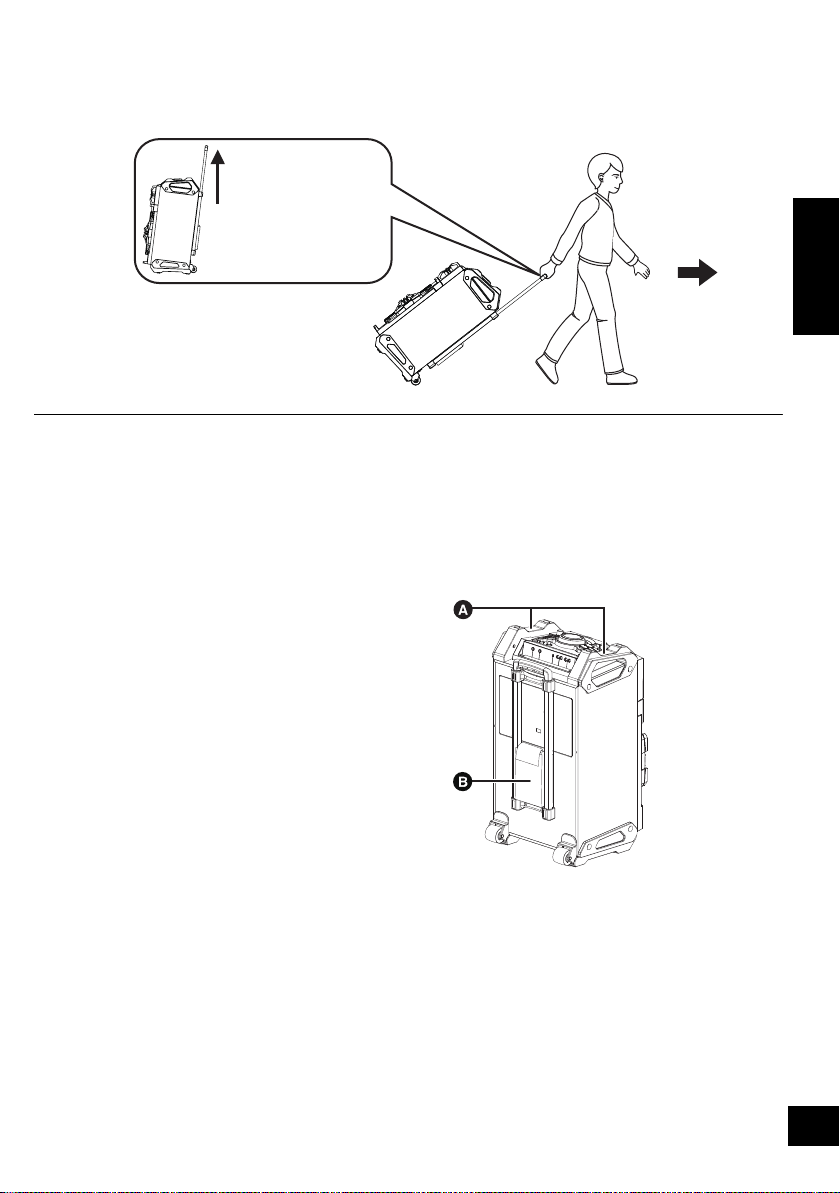
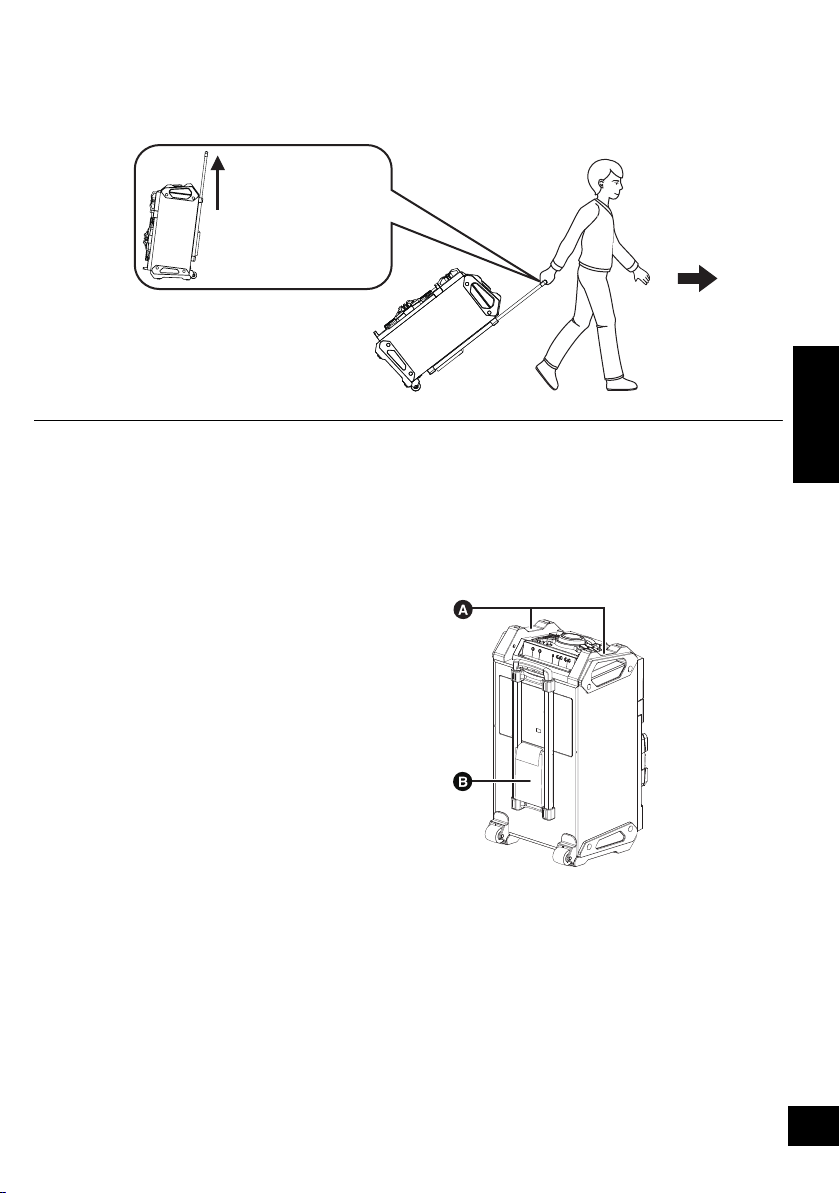
Moving this unit
You can move this unit with ease by its wheels.
Preparation
≥ Be sure to remove all connected devices and cables from this unit.
≥ Take care when pulling on steep slope.
≥ Avoid pulling over surfaces which are rough or uneven.
≥ Do not pull over stairs.
≥ Lift the unit when transporting over obstacles.
≥ Always push the trolley handle down fully after transportation.
≥ This speaker system does not have magnetic shielding. Do not place it near a TV, PC or other magnetic
devices.
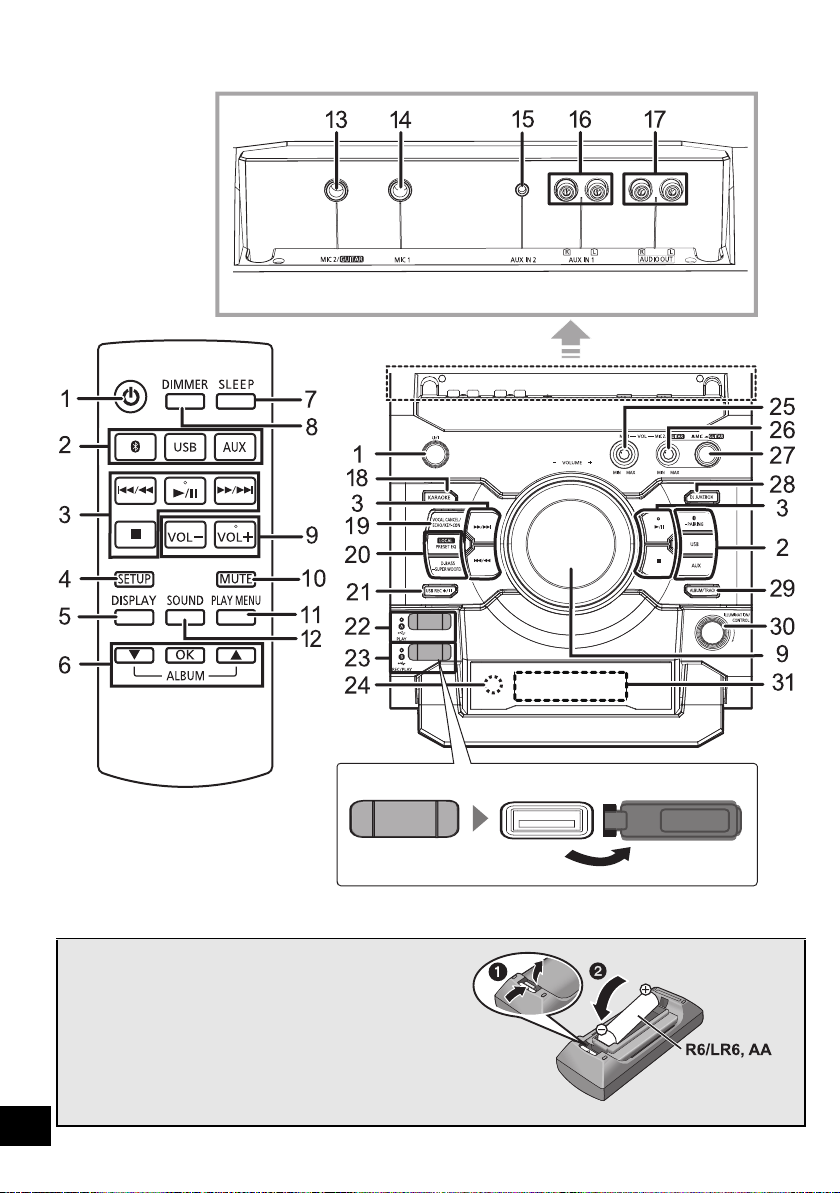
Lifting the unit
Grip the top handles (A) to lift the unit.
Using the accessory pocket (
B)
You may like to put some accessories in this pocket for
your convenience during transportation.
Trolley handle
Extend fully until it
clicks.
SC-CMAX5_GS~RQT9961-G.book 5 ページ 2014年8月22日 金曜日 午後7時8分
6
RQT9961
6
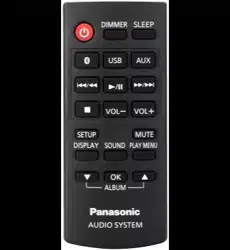
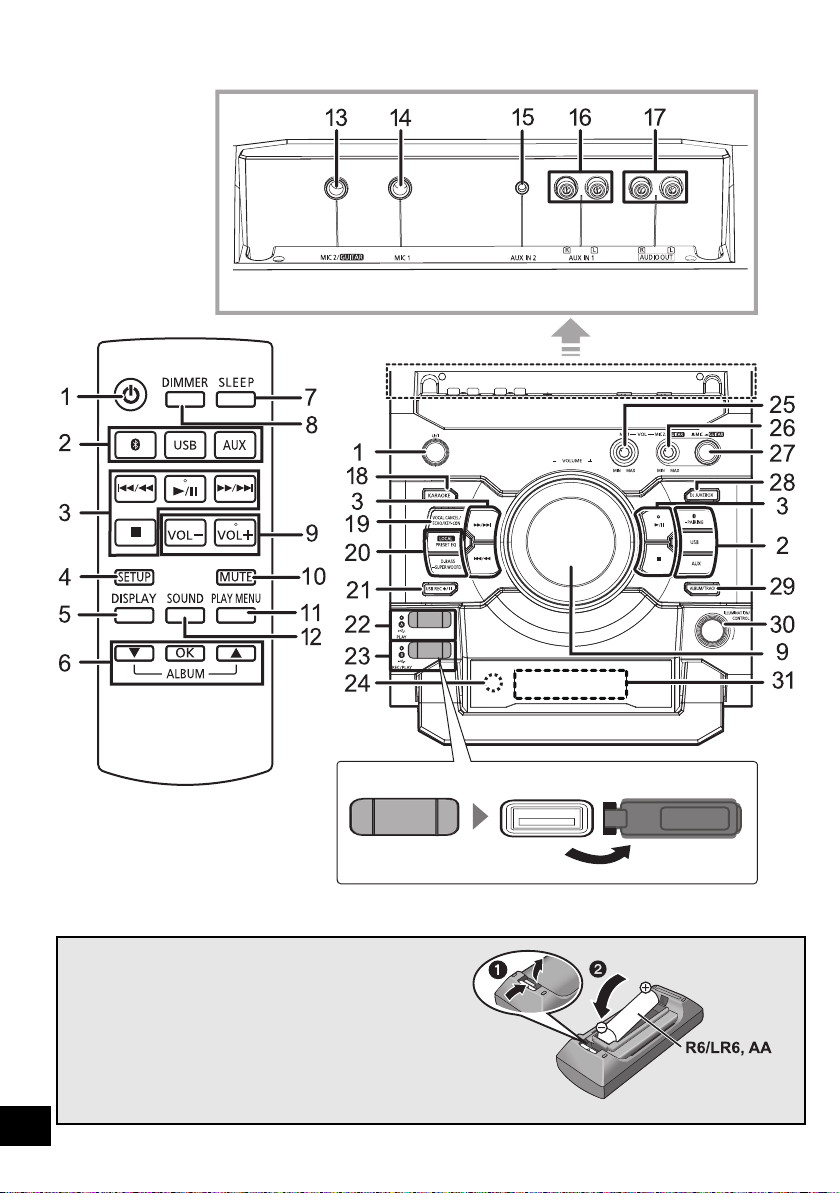
Control reference guide
∫ Using the remote control
Insert the battery so the terminals (i and j) match
those in the remote control.
Point it at the remote control signal sensor on this
unit.
≥ To avoid interference, please do not put any objects in front of
signal sensor.
Remote control
Rear view
Top view
(Alkaline or
manganese battery)
SC-CMAX5_GS~RQT9961-G.book 6 ページ 2014年8月22日 金曜日 午後7時8分

7
RQT9961
7
ENGLISH
1 Standby/on switch [Í], [Í/I]
Press to switch the unit from on to standby
mode or vice versa. In standby mode, the unit
is still consuming a small amount of power.
2 Select audio source
On the unit:
To start Bluetooth
®
pairing, press and hold
[ -PAIRING] when you are in Bluetooth
®
source.
3 Basic playback control buttons
4 Enter setup menu
5 Change the displayed information
6 Selection/OK
7 Set the sleep timer
8 Dim the display panel and turn off the
illumination
Press again to cancel.
9 Adjust the volume (0 (min.) to 50 (max.))
10 Mute the sound
Press again to cancel. “MUTE” is also cancelled when
the volume is adjusted or the unit is turned off.
11 Set the play menu item
12 Enter sound menu
13 Microphone jack 2/Guitar input jack
14 Microphone jack 1
15 AUX IN 2 terminal
16 AUX IN 1 terminal
17 AUDIO OUT terminal
18 Enter KARAOKE mode
19 Select vocal cancel, echo or key control
20 Select the sound effects
21 Recording operation control
22 [USB\A]
USB port for playback
USB status indicator
23 [USB\B]
USB port for recording/playback
USB status indicator
24 Remote control signal sensor
Distance: Within approx. 7 m directly in front
Angle: Approximately 20° up and down, 30° left and right
25 Adjust the volume of microphone 1
26 Adjust the volume of microphone 2 or guitar
27 Microphone 2 or guitar switch (l 15)
28 Select the DJ jukebox (l 10)
29 Select MP3 album or track browsing mode
(l 9)
30 Change the illumination setting (l 11)
Browse MP3 tracks or albums (l 9)
Change DJ jukebox playback mode (l 10)
31 Display panel
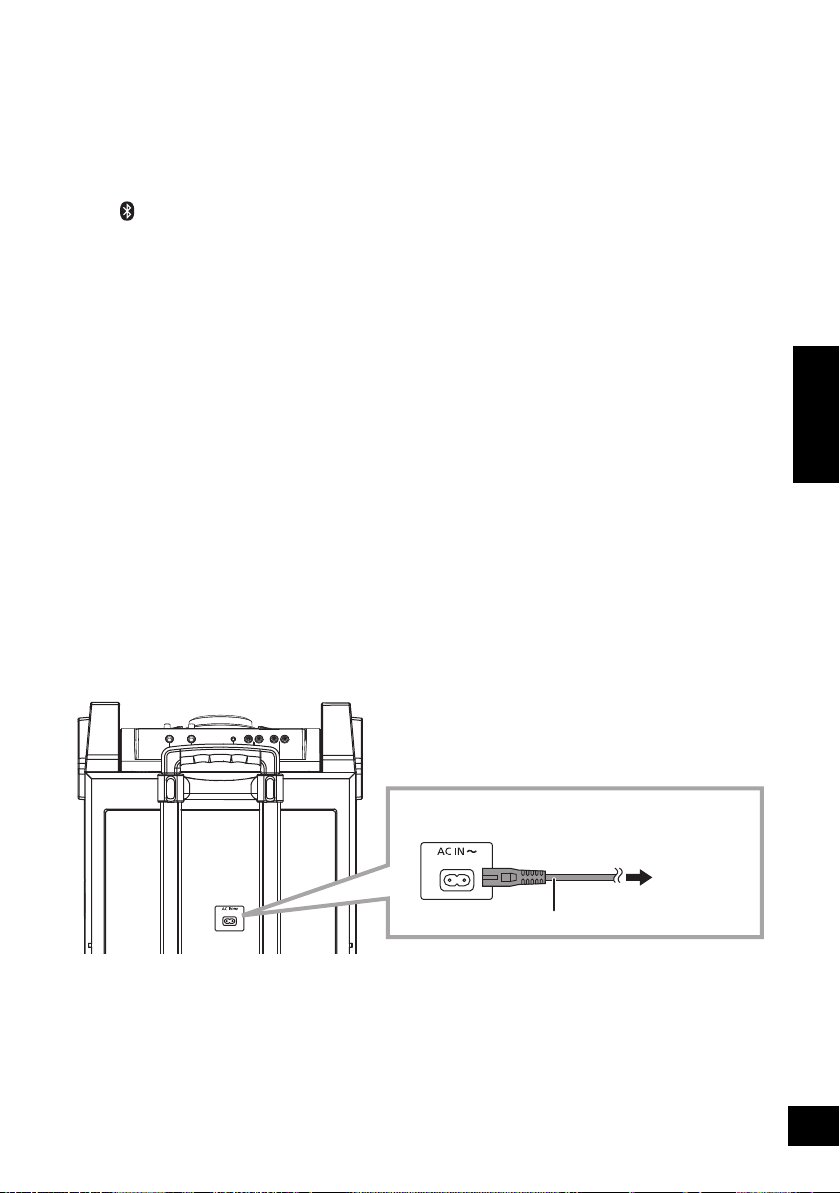
Connecting to AC power supply
Conserving power
The system consumes a small amount of power (l 20) even when it is in standby mode. Disconnect the power
supply if you do not use the system.
Some settings will be lost after you disconnect the system. You have to set them again.
To household
mains socket
AC mains lead (supplied)
This unit (rear)
Connect the AC mains lead.
SC-CMAX5_GS~RQT9961-G.book 7 ページ 2014年8月22日 金曜日 午後7時8分
8
RQT9961
8
Connecting a USB device
Preparation
≥ Before you connect a USB device to the unit,
make sure you do a backup of the data.
1 Decrease the volume and connect the USB
device to the USB port.
2 Press [USB] to select “USB A” or “USB B”.
The corresponding USB status indicator lights
green when selected.
≥ Insert the USB device directly. Do not use any USB
extension cable.
≥ Please disconnect the USB device if you finish using.
≥ Stop the USB operation before disconnecting the USB
device.
Bluetooth
®
operations
You can listen to the sound from the Bluetooth
®
audio device from this unit wirelessly.
≥ Refer to the operating instructions of the
Bluetooth
®
device for details.
Preparation
≥ Turn on the Bluetooth
®
feature of the device and
place the device near this unit.
∫ Pairing with Bluetooth
®
devices
1 Press [ ] to select “BLUETOOTH”.
{. If “PAIRING” is indicated on the display, go to step 4.
To enter pairing mode
§
2 Press [PLAY MENU] to select “PAIRING”.
3 Press [3, 4] to select “OK? YES” and then
press [OK].
To pair with a device
4 Select “SC-CMAX5” from the Bluetooth
®
device’s Bluetooth
®
menu.
{. The name of the connected device is indicated on the
display for a few seconds.
5 Start playback on the Bluetooth
®
device.
§You can also enter pairing mode by pressing and holding
[ -PAIRING] on the unit.
∫ Connecting a paired Bluetooth
®
device
1 Press [ ] to select “BLUETOOTH”.
{. “BLUETOOTH READY” is indicated on the display.
2 Select “SC-CMAX5” from the Bluetooth
®
device’s Bluetooth
®
menu.
{. The name of the connected device is indicated on the
display for a few seconds.
3 Start playback on the Bluetooth
®
device.
≥ If prompted for the passkey, input “0000”.
≥ You can register up to 8 devices with this unit. If a 9th device
is paired, the device that has not been used the longest will
be replaced.
≥ This unit can only be connected to one device at a time.
≥ When “BLUETOOTH” is selected as the source, this unit will
automatically try and connect to the last connected
Bluetooth
®
device. (“LINKING” is indicated on the display
during this process.)
USB device
(not supplied)
This unit (top)
Connecting via Bluetooth
®
menu
SC-CMAX5_GS~RQT9961-G.book 8 ページ 2014年8月22日 金曜日 午後7時8分
9
RQT9961
9
ENGLISH
You can change the transmission mode to prioritise
transmission quality or sound quality.
Preparation
≥ Press [ ] to select “BLUETOOTH”.
≥ If a Bluetooth
®
device is already connected,
disconnect it.
1 Press [PLAY MENU] repeatedly to select
“LINK MODE”.
2 Press [3, 4] to select the mode and then
press [OK].
MODE 1: Emphasis on connectivity
MODE 2: Emphasis on sound quality
≥ Select “MODE 1” if the sound is interrupted.
≥ The factory default is “MODE 2”.
1 While a Bluetooth
®
device is connected:
Press [PLAY MENU] repeatedly to select
“DISCONNECT?”.
2 Press [3, 4] to select “OK? YES” and then
press [OK].
≥ You can also disconnect the Bluetooth
®
device by pressing
and holding [ -PAIRING] on the unit.
≥ The Bluetooth
®
device will be disconnected if a different
audio source (e.g., “USB A”) is selected.
Media playback controls
Preparation
≥ Turn the unit on.
≥ Insert the USB device or connect the Bluetooth
®
device.
≥ Press [USB] or [ ] to select the audio source.
∫
To browse MP3 tracks or albums (
[USB]
)
By the unit only
1 Press [ALBUM/TRACK] to select album or
track browsing mode.
2 While “ ”(album) or “ ”(track) is blinking, turn
[ILLUMINATION/CONTROL] to browse.
∫ To display information
Press [DISPLAY] repeatedly.
≥ To use this unit’s remote control with a Bluetooth
®
device, the
Bluetooth
®
device must support AVRCP (Audio Video
Remote Control Profile).
Depending on the status of the device, some controls may
not work.
≥ Maximum characters that can be indicated:
[USB]: approximately 32
[Bluetooth]: approximately 16
≥ This unit supports ver. 1 and 2 ID3 tags. Text data that is not
supported will not be displayed or will be shown differently.
≥ Album and track indication for MP3 files.
Bluetooth
®
transmission mode
Disconnecting a Bluetooth
®
device
Basic controls ([USB], [Bluetooth])
Play Press [1/;].
Stop
Press [∫].
≥ [USB] The position is memorised and
“RESUME” is displayed.
– Press [1/;] to resume.
– Press [∫] again to clear the position.
Pause
Press [1/;].
Press again to restart play.
Skip
Press [:/6] or [5/9] to
skip track.
[USB] Press [3] or [4] to skip the
MP3 album.
Search
During play or pause, press and
hold [:/6] or [5/9].
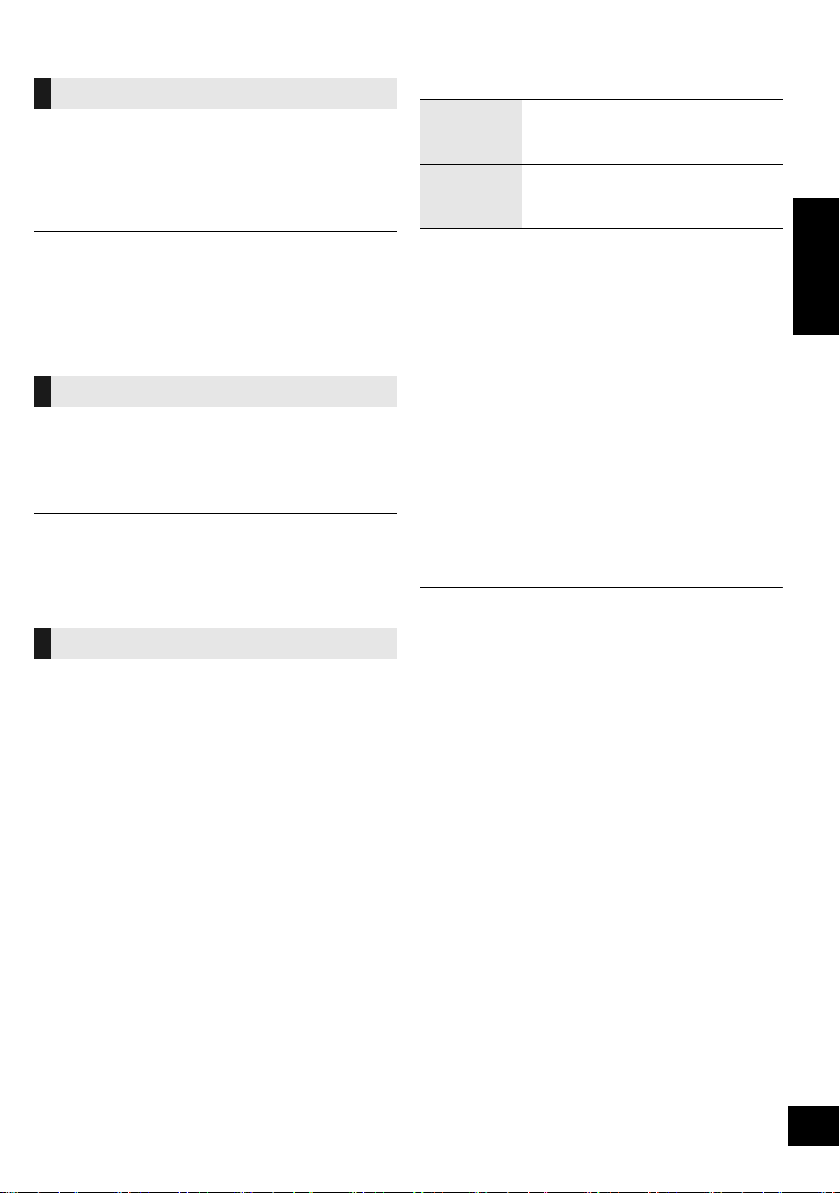
Album number Track number
e.g.
SC-CMAX5_GS~RQT9961-G.book 9 ページ 2014年8月22日 金曜日 午後7時8分
10
RQT9961
10
You can use DJ jukebox to add cross-fading effect
between songs. You can also use additional
features with the “Panasonic MAX Juke” app
(l below).
1 Press [PLAY MENU] repeatedly to select
“JUKEBOX”.
2 Press [3, 4] to select the setting and then
press [OK].
Using the unit
Press [DJ JUKEBOX] repeatedly to select the
setting.
∫ DJ jukebox playback mode
When the DJ jukebox is on, the playback mode
switches to repeat mode automatically.
To select your desired repeat settings
1 Press [PLAY MENU] repeatedly to select
“PLAYMODE”.
2 Press [3, 4] to select the setting and then
press [OK].
Using the unit
In the stop mode, turn [ILLUMINATION/CONTROL].
≥ DJ jukebox effect is cancelled when you switch off the
system, change to another source, or turn on the Karaoke
mode.
≥ DJ jukebox does not work with recording.
Select the playback mode.
Preparation
≥ Set the DJ jukebox to “OFF”.
1 Press [PLAY MENU] repeatedly to select
“PLAYMODE” or “REPEAT”.
2 Press [3, 4] to select the setting and then
press [OK].
§
You can also perform recording with this setting.
Make the setting before you start recording.
≥ During random play, you cannot skip to the previous track.
≥ You cannot do recording when you are using random
playback mode.
≥ Repeat playback mode is off during recording.
DJ jukebox ([USB])
OFF
CROSSFADE
Turn on DJ jukebox without
cross-fading effect.
ON
CROSSFADE
Turn on DJ jukebox with
cross-fading effect.
OFF Turn off DJ jukebox.
RANDOM
REPEAT
Play all tracks randomly and repeat
all tracks.
≥ “` RND” is displayed.
ALL TITLE
REPEAT
Repeat all tracks.
≥ “`” is displayed.
Using the “Panasonic MAX Juke” app
You can download and install the free Android
TM
app “Panasonic MAX Juke” on Google Play
TM
for
additional features, such as to request song
playback from multiple devices simultaneously.
Playback modes ([USB])
PLAYMODE
OFF
PLAYMODE
§
Cancels the play mode setting.
1-TRACK
§
Only plays the selected track.
≥ “1-TR” is displayed.
(Skip to the desired track.)
1-ALBUM
§
Only plays the selected MP3
album.
≥ “1-ALB” is displayed.
RANDOM
Plays the contents randomly.
≥ “RND” is displayed.
1-ALBUM
RANDOM
Plays the tracks in the selected
MP3 album randomly.
≥ Press [3] or [4] to select the MP3
album.
≥ “1-ALB”, “RND” are displayed.
REPEAT
ON
REPEAT
Turns on repeat mode.
≥ “`” is displayed.
OFF
REPEAT
Turns off repeat mode.
OFF
PLAYMODE:
To record all tracks.
1-TRACK: To record the selected track.
1-ALBUM: To record the selected album.
SC-CMAX5_GS~RQT9961-G.book 10 ページ 2014年8月22日 金曜日 午後7時8分
11
RQT9961
11
ENGLISH
Sound and illumination
effects
The following sound effects can be added to the
audio output.
1 Press [SOUND] repeatedly to select the sound
effect.
2 Press [3, 4] to select the setting and then
press [OK].
≥ You may experience a reduction in sound quality when these
effects are used with some sources. If this occurs, turn the
sound effects off.
By the unit only
You can change the illumination colour on the unit.
Turn [ILLUMINATION/CONTROL].
To cancel, select “OFF”.
Recording (
[USB], [AUX])
You can record:
≥ MP3 tracks via [USB\A] to [USB\B].
≥ audio via AUX IN 1 or AUX IN 2 to [USB\B].
Preparation
≥ Connect a USB device to [USB\B] for storing
recordings.
≥ Prepare the source you want to record.
– Connect a USB device to [USB\A] or connect the
external equipment.
1 Select the source you want to record.
(“USB A”, “AUX 1” or “AUX 2”).
2 Press [USB REC ¥/;] on the unit to start
recording.
≥ [AUX] Start playback on the external equipment.
e.g.: Recording from
[USB\A]
[USB]
≥ If you stop recording before the end of a track, the affected
track will not be stored. Only fully recorded tracks will be
stored.
(“NO FILE RECORDED” is indicated if no track is recorded.)
≥ You can record in selected playback modes (except random
and repeat modes). (l 10)
[AUX]
≥ A track mark is added every time recording is paused. You
can also add track marks in other ways. (l 12)
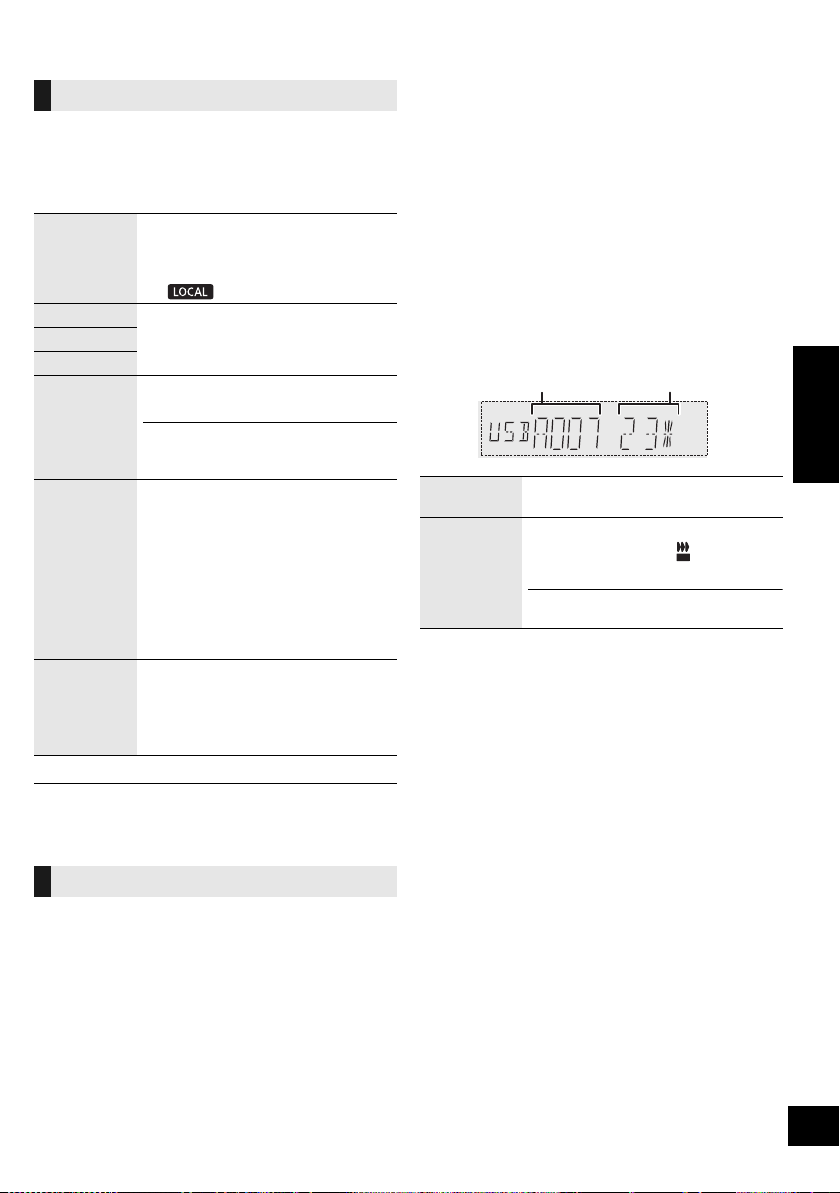
∫ To check storage capacity
In the stop mode, press [DISPLAY] once.
The available storage space or the remaining
recording time of the USB device in [USB\B] will be
indicated.
≥ “UPDATE” is indicated when the unit is reading the device.
≥ If there is no USB device in [USB\B], “NODEVICE” is
indicated for a few seconds.
Sound effects
PRESET EQ
Select the desired preset EQ
setting.
≥ Select “FLAT” to turn preset EQ off.
Using the unit
Press [ PRESET EQ].
BASS
-4 to +4MID
TREBLE
INPUT
LEVEL
(For “AUX 2”
source)
“NORMAL” or “HIGH”
≥ Select “NORMAL” if the sound is distorted
during “HIGH” input level.
SUPER
WOOFER
“SW1”, “SW2”, “SW3” or “OFF”
Using the unit
1 Press and hold
[D.BASS, -SUPER WOOFER]
to show the current setting.
2Press [:/6] or [5/9]
to adjust the setting.
D.BASS
“D.BASS BEAT”, “D.BASS OFF” or
“D.BASS ON”
Using the unit
Press [D.BASS, -SUPER WOOFER].
Illumination settings
Stop
recording
Press [∫].
≥ “WRITING” is indicated.
Pause
recording
([AUX])
Press [USB REC ¥/;] on the unit
during recording. (
“ ” blinks.)
Press again to continue recording.
You cannot do this in “SYNCHRO” mode.
(l 12)
Album being
recorded
Percentage of the
recording process
REC
SC-CMAX5_GS~RQT9961-G.book 11 ページ 2014年8月22日 金曜日 午後7時8分

12
RQT9961
12
≥ All recordings are in “.mp3” format.
≥ A new album is added each time you do a recording.
≥ The sequence of album can change after the recording.
≥ The recordings are kept in a folder named “REC_DATA” in
the USB device.
≥ [USB\B] status indicator blinks in red during recording.
≥ Some tracks may take a longer time to record.
≥ Some tracks cannot be recorded because of the condition of
the source.
≥ The recorded folder name may be different from the original
folder because of the auto rename function.
≥ There will be no sound output during recording from [USB\A]
to [USB\B].
When recording from external equipment, you can
divide tracks using various modes.
Before recording
1 Press [SETUP] repeatedly to select “REC
MODE”.
2 Press [3, 4] to select the setting and then
press [OK].
§
To add a track mark manually
(except in “SYNCHRO” mode)
Press [OK] at desired marking point during
recording.
Track length limit
MANUAL: 60 minutes
TIME MARK: 5 minutes
When a track reaches its maximum length, a track mark will be
added while recording continues.
(The track length limit counter is reset when a track mark is
added manually or when recording pauses.)
1 Press [USB] to select “USB B”.
2 Press [3, 4] to select the album.
3 Press [:/6] or [5/9] to select the
track.
4 Press [SETUP] repeatedly to select “EDIT
MODE”.
5 Press [3, 4] to select the mode.
6 Press [OK].
The selected item to be deleted is indicated.
7 Press [OK].
“SURE? NO” is indicated.
≥ To cancel, press [OK] again.
8 Press [3, 4] to select “SURE? YES” and then
press [OK].
“WRITING” is indicated.
Panasonic cannot be held responsible on the
action of consumer to record copyrighted contents
which can cause copyright infringement.
Adding track marks ([AUX])
MANUAL Add a track mark manually.
§
SYNCHRO
Recording starts automatically when
the other equipment starts to play.
Recording pauses when it detects
silence for 3 seconds.
TIME MARK
A track is automatically divided at
5-minute intervals.
≥ You can also add track marks manually.
§
Deleting recorded tracks ([USB])
TRK DEL Delete a single track.
ALB DEL Delete one album.
FORMAT Format the USB device.
SC-CMAX5_GS~RQT9961-G.book 12 ページ 2014年8月22日 金曜日 午後7時8分
13
RQT9961
13
ENGLISH
Clock and Timers
This is a 24-hour clock.
1 Press [SETUP] repeatedly to select “CLOCK”.
2 Press [3, 4] to set the time and then press
[OK].
≥ To check the time, press [SETUP] repeatedly to select
“CLOCK” and then press [OK] once.
(During standby, press [DISPLAY] once.)
≥ The clock is reset when there is a power failure or when the
AC mains lead is removed.
≥ Reset the clock regularly to maintain accuracy.
The sleep timer can turn the unit off after a set time.
Press [SLEEP] to set the time (in minutes).
SLEEP 30 --. SLEEP 60 --. SLEEP 90 --. SLEEP120
^--------------------- OFF (Cancel) (----------------b
≥ To confirm the remaining time, press [SLEEP] once.
≥ The play timer and sleep timer or the record timer and sleep
timer can be used together. The sleep timer is always the
main timer on the unit.
You can set the timer to come on at a certain time to:
– wake you up (play timer)
– record from the external equipment (record timer)
Play timer and record timer cannot be used together.
Preparation
Set the clock.
1 Press [SETUP] repeatedly to select “TIMER
ADJ”.
2 Press [3, 4] to select “FPLAY” or “FREC”
and then press [OK].
3 Press [3, 4] to set the starting time and then
press [OK].
4 Press [3, 4] to set the finishing time and then
press [OK].
5 Press [3, 4] to select the music source
§
you
want to play or record and then press [OK].
Turning the timer on
1 Prepare the selected music source.
2 Press [SETUP] repeatedly to select “TIMER
SET”.
3 Press [3, 4] to select “PLAY ON” or “REC
ON” and then press [OK].
≥ “FPLAY” or “FREC” is selected.
≥ To turn the timer off, press [3, 4] to clear “FPLAY” and
“FREC”, and then press [OK].
4 Press [Í] to turn the unit to standby mode.
(For the timer to operate, the unit must be turned off
before the timer start time.)
To check the setting
1 Press [SETUP] repeatedly to select “TIMER
ADJ”.
2 Press [3, 4] to select “FPLAY” or “FREC”
and then press [OK].
(During standby, press [DISPLAY] twice.)
≥ The play timer starts at a low volume and increases gradually
to the preset level.
≥ The record timer starts 30 seconds before the set time with
the volume muted.
≥ The timer comes on at the set time every day if the timer is
on.
≥ If you switch off the system and switch on again while a timer
is in operation, the timer will not stop at the end time.
Setting the clock
Sleep timer
Play and record timer
Play timer
Prepare the music source you want
to listen to (USB or external
equipment) and set the volume.
Record timer
Connect the USB device to [USB\B]
and prepare the external
equipment.
§ The following can be set as the music source.
For play timer: “AUX 1”, “AUX 2”, “USB A”, “USB B”
For record timer: “AUX 1”, “AUX 2”
SC-CMAX5_GS~RQT9961-G.book 13 ページ 2014年8月22日 金曜日 午後7時8分
14
RQT9961
14
External equipment
Preparation
≥ Disconnect the AC mains lead.
≥ Switch off all equipment and read the appropriate
operating instructions.
You can connect a VCR and DVD player etc. and
listen to the audio through this system.
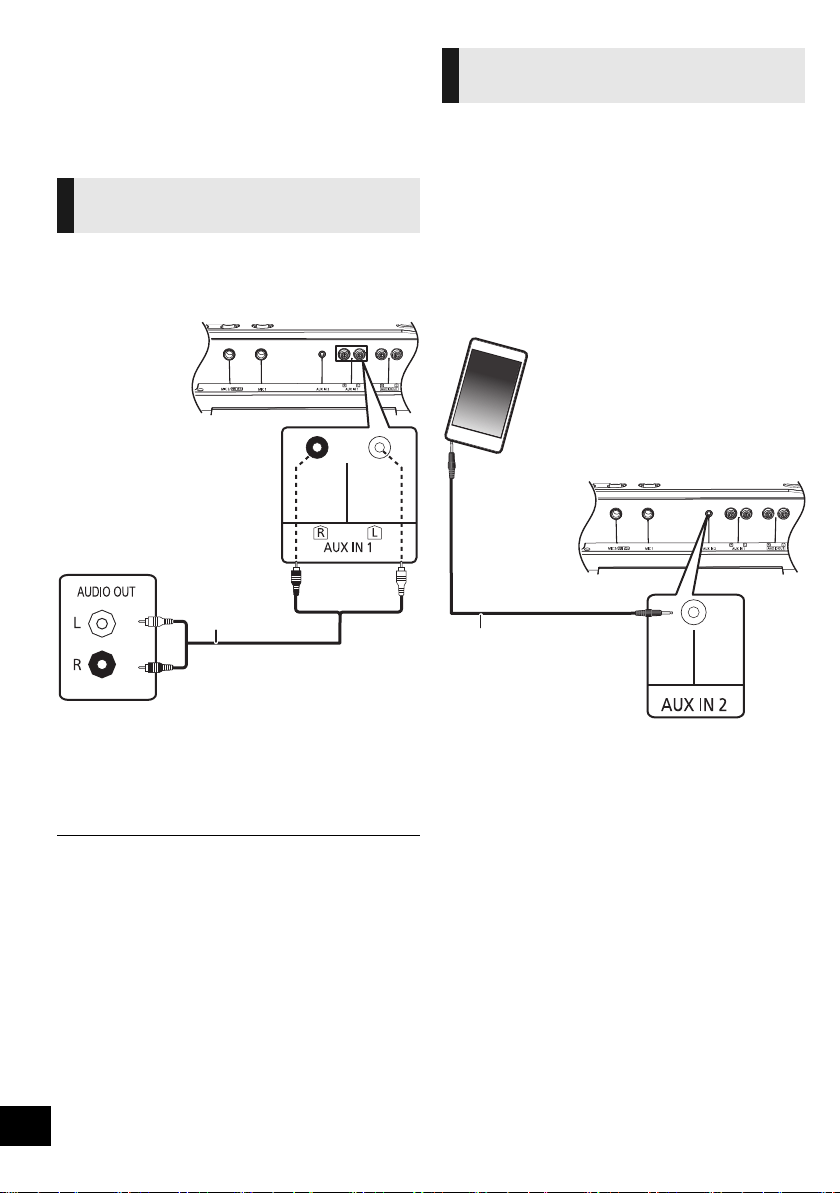
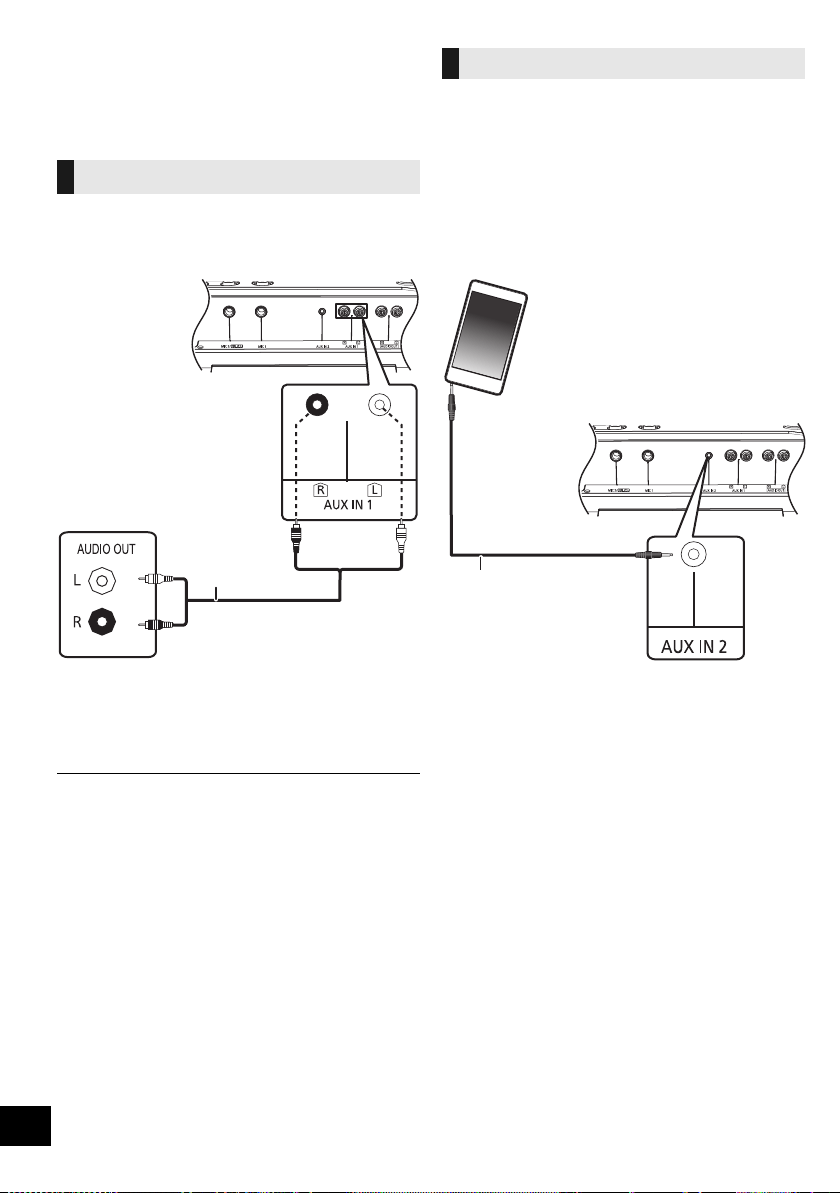
1 Connect an external equipment using an audio
cable (not supplied).
2 Press [AUX] to select “AUX 1” and start
playback on the connected device.
≥ If you want to connect equipment other than those described,
refer to the audio dealer.
≥ Sound distortion can occur when you use an adaptor.
You can play music from a portable audio
equipment.
Preparation
≥ Switch off the equaliser (if any) of the portable
audio equipment to prevent sound distortion.
≥ Decrease the volume of the system and the
portable audio equipment before you connect or
disconnect the portable audio equipment.
1 Connect the portable audio equipment using an
audio cable (not supplied).
≥ Plug type: ‰ 3.5 mm stereo (not supplied)
2 Press [AUX] to select “AUX 2” and start
playback on the connected device.
Using a VCR and DVD player
etc.
DVD player (not
supplied)
Audio cable
(not supplied)
This unit (rear)
e.g.
Using the portable audio
equipment
Audio cable
(not supplied)
Portable audio equipment
(not supplied)
This unit (rear)
e.g.
SC-CMAX5_GS~RQT9961-G.book 14 ページ 2014年8月22日 金曜日 午後7時8分
15
RQT9961
15
ENGLISH
You can connect to play sound from this unit to an
additional SC-CMAX5 unit.
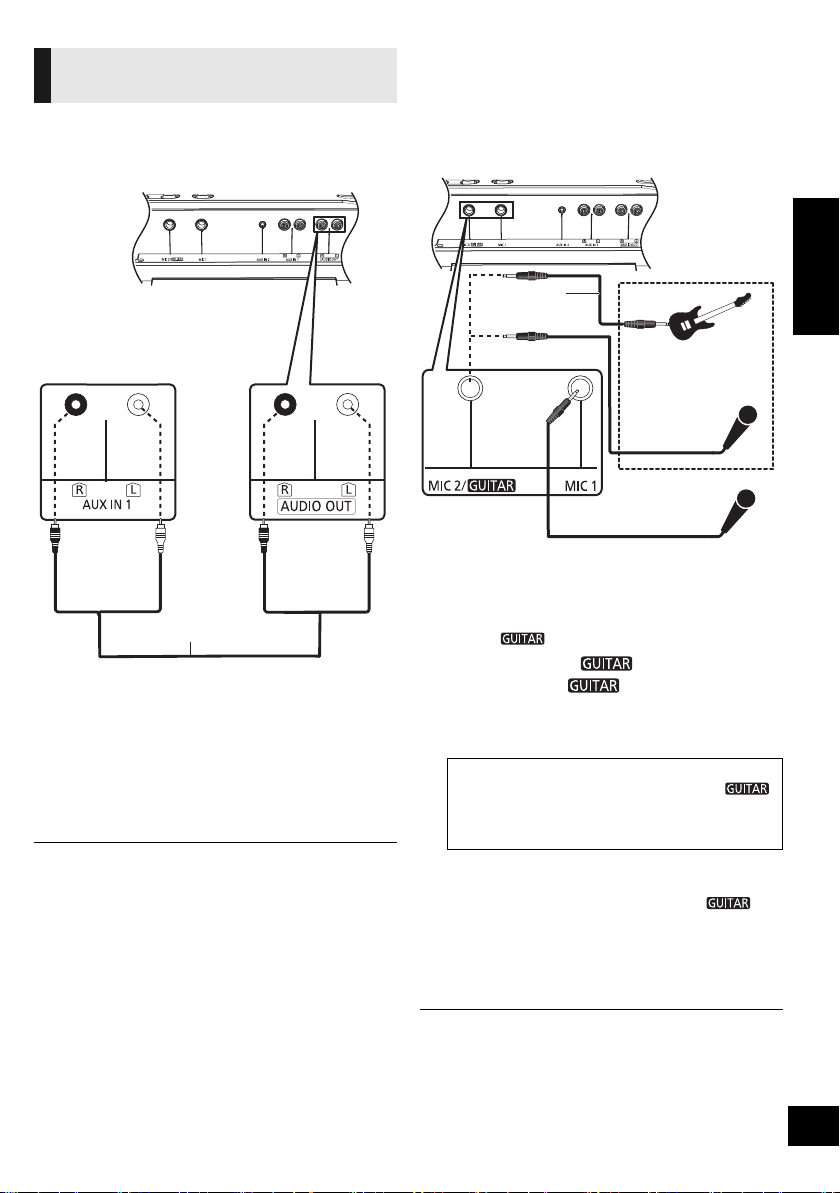
1 Connect the additional SC-CMAX5 using an
audio cable (not supplied).
2 On the additional SC-CMAX5 unit:
Press [AUX] to select “AUX 1”.
3 On this unit:
Start your desired playback.
≥ The sound effect will be controlled separately by each unit.
Make the same sound settings on the additional unit if
necessary.
Using a microphone or guitar
Preparation
≥ Decrease the volume of the system to its
minimum before you connect or disconnect a
microphone or guitar.
By the unit only
1 Connect a microphone or guitar.
≥ Plug type: ‰ 6.3 mm monaural
≥ When connecting a guitar, ensure to connect it to
MIC 2/ jack.
2 (Only when MIC 2/ jack is connected)
Push [B MIC C ] to select the correct
input setting.
Each time you push the button, the button position will
switch between pushed-down and released positions.
3 Adjust the volume of the microphone or guitar.
For microphone 1: Turn [MIC1-VOL].
For microphone 2 or guitar: Turn [VOL-MIC2/ ].
4 If you want to sing with the background music:
Play the music source and adjust the volume of
the system.
≥
To sing along with the Karaoke features, refer to “Karaoke”. (
l
16)
≥
If a strange noise (howling) is emitted, move the microphone/guitar away
from the speakers, or decrease the volume of the microphone/guitar.
≥ Set the microphone/guitar volume to “MIN”, and disconnect
the microphone/guitar after use.
≥ This system cannot record from microphone or guitar.
Connecting to an additional
SC-CMAX5 unit
Additional
SC-CMAX5 (rear)
Audio cable
(not supplied)
This unit (rear)
≥
When a guitar is connected:
Ensure the button is at pushed-down position. (
C
)
≥ When a microphone is connected:
Ensure the button is at released position. (B MIC)
Incorrect setting may cause the sound to be too loud or too soft.
This unit (rear)
Microphone
(not supplied)
Microphone
or guitar
(not supplied)
e.g.
Audio cable
(not supplied)
SC-CMAX5_GS~RQT9961-G.book 15 ページ 2014年8月22日 金曜日 午後7時8分
16
RQT9961
16
You can use Karaoke features such as vocal
cancel, echo or key control.
Preparation
≥ Get your microphone(s) and music source ready
for singing along. (l 15)
By the unit only
1 Set [B MIC C ] to the released position
(B MIC).
Each time you push the button, the button position will
switch between pushed-down and released positions.
2 Turn on the Karaoke mode by pressing
[KARAOKE] to select “ON KARAOKE”.
≥ To cancel, select “OFF KARAOKE”.
3 Press [VOCAL CANCEL/ECHO/KEY-CON]
repeatedly to show the current setting of vocal
cancel, echo or key control.
4 (While the current setting is shown)
Press [:/6] or [5/9] to adjust the
setting.
5 Start your Karaoke performance.
≥ The Karaoke function will be cancelled when:
– you perform recording.
– you turn on DJ jukebox.
– you set [B MIC C ] to the pushed-down position
(C ).
– you switch off the system.
Others
This function automatically switches off the system
when you do not use it for approximately
20 minutes.
1 Press [SETUP] repeatedly to select “AUTO
OFF”.
2 Press [3, 4] to select “ON” and then press
[OK].
≥ To turn the function off, select “OFF” in step 2.
≥ When connected to a Bluetooth
®
device, the function does
not work.
When “SC-CMAX5” is selected from a paired
Bluetooth
®
device’s Bluetooth
®
menu, this unit will
turn on automatically from standby mode and
establish a Bluetooth
®
connection.
1 Press [SETUP] repeatedly to select
“BLUETOOTH STANDBY”.
2 Press [3, 4] to select “ON” and then press
[OK].
≥ To turn the function off, select “OFF” in step 2.
Karaoke
Vocal cancel
“OFF VOCAL CANCEL”, “VOCAL
CANCEL”, “L” or “R”
Echo
“ECHO OFF”, “ECHO 1”, “ECHO 2”
or “ECHO 3”
Key control
“KEYCON-6” to “KEYCON+6”
≥ The setting will return to “KEYCON 0”
when you change to another source.
Auto off function
Bluetooth
®
standby
SC-CMAX5_GS~RQT9961-G.book 16 ページ 2014年8月22日 金曜日 午後7時8分
17
RQT9961
17
ENGLISH
Occasionally, Panasonic may release updated
software for this unit that may add or improve the
way a feature operates. These updates are
available free of charge.
For more details, refer to the following website.
http://panasonic.jp/support/global/cs/
(This site is in English only.)
∫ Checking the software version
The version of the installed software is displayed.
Press [SETUP] repeatedly to select “SW VER.” and
then press [OK].
≥ Press [OK] to exit.
When other Panasonic equipment responds to the
supplied remote control, change the remote control
code.
Preparation
Press [AUX] to select “AUX 1” or “AUX 2”.
∫ To set the code to “REMOTE 2”
1 While pressing and holding [USB] on the unit,
press and hold [AUX] on the remote control
until the unit’s display shows “REMOTE 2”.
2 Press and hold [OK] and [USB] on the remote
control for at least 4 seconds.
∫ To set the code to “REMOTE 1”
1 While pressing and holding [USB] on the unit,
press and hold [USB] on the remote control
until the unit’s display shows “REMOTE 1”.
2 Press and hold [OK] and [ ] on the remote
control for at least 4 seconds.
Troubleshooting
Before requesting service, make the following
checks. If you are uncertain about some of the
check points, or if the solutions indicated in the
following guide does not resolve the issue, then
consult your dealer for instructions.
Humming heard during playback.
≥ If an AC mains lead or fluorescent lights are near
the cords, then keep other appliances and cords
away from the cables.
The unit does not work.
≥ One of the unit’s safety devices may have been
activated.
Reset the unit as follows:
1 Press [Í/I] on the unit to switch the unit to
standby.
≥ If the unit does not switch to standby, press
[Í/I] on the unit for approximately
10 seconds. The unit is forcibly switched to
standby. Alternatively, disconnect the AC
mains lead, wait for at least 3 minutes, then
reconnect it.
2 Press [Í/I] on the unit to switch it on. If the
unit still cannot be operated, consult the
dealer.
The display panel lights up and changes
continuously in standby mode.
≥ Press and hold [∫] on the unit to select “DEMO
OFF”.
Software update
Remote control code
To return all settings to the factory defaults
When the following situations occur, reset the
memory:
≥ There is no response when buttons are pressed.
≥ You want to clear and reset the memory contents.
1 Disconnect the AC mains lead. (Wait for at least
3 minutes before proceeding to step 2.)
2 While pressing and holding down [Í/I] on the
unit, reconnect the AC mains lead.
≥ Keep holding down [Í/I] until “--------” appears on the
display.
3 Release [Í/I].
≥ All the settings are returned to the factory defaults. You will
need to reset the memory items.
General
SC-CMAX5_GS~RQT9961-G.book 17 ページ 2014年8月22日 金曜日 午後7時8分
18
RQT9961
18
Sound is distorted or no sound.
≥ Adjust the volume of the system.
≥ Switch off the system, determine and correct the
cause, then switch the system on again. It can be
caused by straining of the speakers through
excessive volume or power, and when using the
system in a hot environment.
The sound level reduces.
≥ The protection circuit has been activated due to
the continuous use at high volume output. This is
to protect the system and maintain the sound
quality.
The remote control does not work properly.
≥ The battery is depleted or inserted incorrectly.
(l 6)
No response when [
1/;] is pressed.
≥ Disconnect the USB device and then reconnect
it. Alternatively, turn the unit off and on again.
The USB device or its contents cannot be read.
≥ The USB device format or its contents is/are not
compatible with the unit (l 3).
≥ The USB host function of this product may not
work with some USB devices.
Slow operation of the USB device.
≥ Large file size or high memory USB device takes
longer time to read.
The elapsed time displayed is different from the
actual play time.
≥ Copy the data to another USB device or backup
the data and reformat the USB device.
Pairing cannot be completed.
≥ Check the Bluetooth
®
device condition.
The device cannot be connected.
≥ The pairing of the device was unsuccessful or the
registration has been replaced. Try re-pairing the
device. (l 8)
≥ This unit might be connected to a different
device. Disconnect the other device and try
re-pairing the device. (l 8)
≥ If the problem persists, turn the unit off and on,
then try again.
The device is connected, but audio cannot be
heard through this unit.
≥ For some built-in Bluetooth
®
devices, you have to
set the audio output to “SC-CMAX5” manually.
Read the operating instructions for the device for
details.
The sound is interrupted.
≥ The device is out of the 10 m communication
range. Place the Bluetooth
®
device closer to this
unit.
≥ Remove any interference between this unit and
the device.
≥ Other devices that use the 2.4 GHz frequency
band, such as wireless routers, microwaves,
cordless phones, etc. are interfering. Place the
Bluetooth
®
device closer to this unit and distance
it from the other devices.
≥ Select “MODE 1” for stable communication. (l 9)
Remote control
USB
Bluetooth
®
SC-CMAX5_GS~RQT9961-G.book 18 ページ 2014年8月22日 金曜日 午後7時8分

19
RQT9961
19
ENGLISH
The following messages or service numbers
may appear on the unit’s display.
“A NO DEV”
“B NO DEV”
≥ The USB device is not inserted correctly. Read
the instructions and try again (l 8).
“ADJUST CLOCK”
≥ Clock is not set. Adjust the clock accordingly.
“ADJUST TIMER”
≥ The play and/or record timer is not set. Adjust the
play and/or record timer accordingly.
“AUTO OFF” (blinks)
≥ The unit has been left unused for about 20
minutes and will shut down within a minute. Press
any button to cancel it.
“CAN’T REC”
≥ You cannot do recording when the USB device is
locked. Unlock the USB device and try again.
“DEVICE FULL”
≥ You cannot do recording because the remaining
recording time of the USB device is less than the
total time of the music source. Change to a USB
device which has enough recording time and do
the recording again.
“ERROR”
≥ Incorrect operation is performed. Read the
instructions and try again.
“ERROR” (during recording)
≥ You cannot select other playback source
(e.g.: USB etc.) or press [:/6] or [5/9]
during recording. Stop the recording function.
“F ” (“ ” stands for a number.)
≥ There is a problem with this unit.
≥ Write down the displayed number, disconnect the
AC mains lead and consult your dealer.
“GUITAR SWITCH ON”
≥
You cannot use the Karaoke function when
[
B
MIC
C
] is at the pushed-down position.
Change it to the released position. (
l
16)
“INVALID”
≥ You cannot select the vocal cancel, echo and key
control when the Karaoke mode is off.
Press [KARAOKE] on the unit to select “ON
KARAOKE”.
(
l
16
)
“NO PLAY”
“UNSUPPORT”
≥ Examine the content. You can only play
supported format. (l 3)
≥ The files in the USB device can be corrupted.
Format the USB device and try again.
≥ The unit may have a problem. Turn the unit off
and then on again.
“NO TRACK”
≥ There is no album or track in the USB device.
“PLAYERROR”
≥ You played an unsupported MP3 file. The system
will skip that track and play the next one.
“REC ERROR”
≥ You disconnected the USB device while
recording. Connect the USB device and do
recording again.
“REMOTE ” (“ ” stands for a number.)
≥ The remote control and this unit are using
different codes. Change the code on the remote
control.
– When “REMOTE 1” is displayed, press and hold
[OK] and [ ] on the remote control for at least
4 seconds.
– When “REMOTE 2” is displayed, press and hold
[OK] and [USB] on the remote control for at least
4 seconds.
“TEMP NG”
≥ The temperature protection circuit has been
activated, and the system will switch off. Let the
unit cool down before switching it on again.
≥ Check that the ventilation opening of the unit is
not obstructed.
≥ Ensure this unit is well ventilated.
“USB OVER CURRENT ERROR”
≥ The USB device is drawing too much power.
Remove the USB device and turn the unit off.
“VBR”
≥ The system cannot show the remaining play time
for variable bit rate (VBR) tracks.
Messages
SC-CMAX5_GS~RQT9961-G.book 19 ページ 2014年8月22日 金曜日 午後7時8分

20
RQT9961
20
Specifications
≥ Specifications are subject to change without notice.
≥ Mass and dimensions are approximate.
≥ Total harmonic distortion is measured by a digital spectrum
analyzer.
§ Trolley handle at fully pushed-down position
∫ GENERAL
Power consumption 92 W
Power consumption in standby mode
Approx. 0.4 W
(When “BLUETOOTH STANDBY” is “ON”)
Approx. 0.6 W
Power supply
AC 220 V to 240 V, 50/60 Hz
Dimension (WkHkD)
§
378 mmk724 mmk436 mm
Mass Approx. 19.8 kg
Operating temperature range
0 oC to r40 oC
Operating humidity range
35 % to 80 % RH (no condensation)
∫ AMPLIFIER SECTION
Output power
RMS Output Power Mono mode
Front High ch
300 W per channel (3 ≠), 10 kHz, 30 % THD
Front Mid ch
300 W per channel (3 ≠), 1 kHz, 30 % THD
Subwoofer Ch
400 W per channel (2 ≠), 100 Hz, 30 % THD
Total RMS Mono mode power
1000 W (30 % THD)
∫ TERMINAL SECTION
USB Port
USB Standard USB 2.0 full speed
Media file format support
MP3 (¢.mp3)
USB device file system
FAT12, FAT16, FAT32
USB port power 500 mA (max)
USB Recording
Bit rate 128 kbps
USB recording speed 1k
Recording file format MP3 (¢.mp3)
Microphone jack/Guitar jack (2 systems)
Mic 1
Mono, 6.3 mm jack
Mic 2/Guitar
Mono, 6.3 mm jack
Audio Input
AUX IN 1 Stereo, Pin jack (1 system)
AUX IN 2 Stereo, 3.5 mm jack
Audio Output (Line Out)
AUDIO OUT Stereo, Pin jack (1 system)
∫ BLUETOOTH SECTION
Version Bluetooth
®
Ver.2.1+EDR
Class Class 2
Supported Profiles
A2DP, AVRCP, SPP
Operating Frequency
2.4 GHz band FH-SS
Operation Distance
10 m Line of sight
∫ SPEAKER SECTION
Front High
Speaker unit(s)
Tweeter 6 cm Cone type
Front Mid
Speaker unit(s)
Woofer 10 cm Cone type k 2
Subwoofer
Speaker unit(s)
Superwoofer 25 cm Cone type
SC-CMAX5_GS~RQT9961-G.book 20 ページ 2014年8月22日 金曜日 午後7時8分

21
RQT9961
21
ENGLISH
Limited Warranty (ONLY FOR AUSTRALIA)
Panasonic Warranty
1. The product is warranted for 12 months from the date of purchase. Subject to the conditions of this warranty Panasonic or its
Authorised Service Centre will perform necessary service on the product without charge for parts or labour, if in the opinion of
Panasonic, the product is found to be faulty within the warranty period.
2. This warranty only applies to Panasonic products purchased in Australia and sold by Panasonic Australia or its Authorised
Distributors or Dealers and only where the products are used and serviced within Australia or it's territories. Warranty cover only
applies to service carried out by a Panasonic Authorised Service Centre and only if valid proof of purchase is presented when
warranty service is requested.
3. This warranty only applies if the product has been installed and used in accordance with the manufacturer’s recommendations (as
noted in the operating instructions) under normal use and reasonable care (in the opinion of Panasonic). The warranty covers normal
domestic use only and does not cover damage, malfunction or failure resulting from use of incorrect voltages, incorrect installation,
accident, misuse, neglect, build-up of dirt or dust, abuse, maladjustment of customer controls, mains supply problems, thunderstorm
activity, infestation by insects or vermin, tampering or repair by unauthorised persons (including unauthorised alterations),
introduction of sand, humidity or liquids, commercial use such as hotel, office, restaurant, or other business or rental use of the
product, exposure to abnormally corrosive conditions or any foreign object or matter having entered the product.
5. Some products may be supplied with Ethernet connection hardware. The warranty is limited on such products and will not cover
6. To claim warranty service, when required, you should:
7. The warranties hereby conferred do not extend to, and exclude, any costs associated with the installation, de-installation or
re-installation of a product, including costs related to the mounting, de-mounting or remounting of any screen, (and any other
ancillary activities), delivery, handling, freighting, transportation or insurance of the product or any part thereof or replacement of and
do not extend to, and exclude, any damage or loss occurring by reason of, during, associated with, or related to such installation,
de-installation, re-installation or transit.
Panasonic Authorised Service Centres are located in major metropolitan areas and most regional centres of Australia, however,
coverage will vary dependant on product. For advice on exact Authorised Service Centre locations for your product, please telephone
our Customer Care Centre on 132600 or visit our website and use the Service Centre Locator.
In addition to your rights under this warranty, Panasonic products come with consumer guarantees that cannot be excluded under the
Australian Consumer Law. If there is a major failure with the product, you can reject the product and elect to have a refund or to have
the product replaced or if you wish you may elect to keep the goods and be compensated for the drop in value of the goods. You are
also entitled to have the product repaired or replaced if the product fails to be of acceptable quality and the failure does not amount to a
major failure.
If there is a major failure in regard to the product which cannot be remedied then you must notify us within a reasonable period by
contacting the Panasonic Customer Care Centre. If the failure in the product is not a major failure then Panasonic may choose to repair
or replace the product and will do so in a reasonable period of time from receiving notice from you.
If you require assistance regarding warranty conditions or any other enquiries, please visit the
Panasonic Australia
website www.panasonic.com.au or contact by phone on 132 600
If phoning in, please ensure you have your operating instructions available.
(a) Internet and or DLNA connection / setup related problems
(b) Access fees and or charges incurred for internet connection
(c) The use of incompatible software or software not specifically stipulated in the product operations manual;
and
(d) Any indirect or consequential costs associated with the incorrect use or misuse of the hardware, its connection to the internet or
any other device.
4. This warranty does not cover the following items unless the fault or defect existed at the time of purchase:
(a) Cabinet Part(s) (e) DVD, Blu-ray or Recordable Discs
(b) Video or Audio Tapes (f) Video / Audio Heads from wear and tear in normal use
(c) SD cards or USB devices (g) Information stored on Hard Disk Drive, USB stick or SD card
(d) User replaceable Batteries (h) DTV reception issues caused by TV Aerial / Cabling / Wall socket(s)
etc
Telephone Panasonic’s Customer Care Centre on 132600 or visit our website referred to below and use the Service Centre
Locator for the name/address of the nearest Authorised Service Centre.
Send or take the product to a Panasonic Authorised Service Centre together with your proof of purchase receipt as a proof of
purchase date. Please note that freight and insurance to and / or from your nearest Authorised Service Centre must be arranged
by you.
Note that home or pick-up/delivery service is available for the following products in the major metropolitan areas of Australia or the
normal operating areas of the nearest Authorised Service Centres:
Plasma/LCD televisions / displays (screen size greater than 103 cm)
THIS WARRANTY CARD AND THE PURCHASE DOCKET (OR SIMILAR PROOF OF PURCHASE)
SHOULD BE RETAINED BY THE CUSTOMER AT ALL TIMES
Panasonic Australia Pty. Limited
ACN 001 592 187 ABN 83 001 592 187
1 Innovation Road, Macquarie Park NSW 2113
PRO-031-F11 Issue: 4.0 01-01-2011
SC-CMAX5_GS~RQT9961-G.book 21 ページ 2014年8月22日 金曜日 午後7時8分
22
RQT9961
22
安全注意事项
本机
≥ 为了减少火灾,触电或产品损坏的危险,
j 请勿让本机遭受雨淋、受潮、滴上或溅上水。
j 请勿将花瓶等盛满液体的物品置于本机上。
j 请仅使用推荐的附件。
j 请勿卸下盖子。
j 请勿自行维修本机。 请向有资格的维修人员请求维修。
≥ 请勿让金属物品掉落到本机内。
AC
电源线
≥ 电源插头为断开装置。请安装本机,以便可以立即从电源插
座上拔下电源插头。
本机
≥ 为了减少火灾、触电或产品损坏的危险,
j 请勿将本机安装或置于书柜、壁橱或其他密闭的空间里。
请确保本机通风良好。
j
请勿让报纸、桌布、窗帘等类似物品堵塞住本机的通风孔。
j 请勿将点燃的蜡烛等明火火源置于本机上。
j 请勿将本机放置在会受到阳光直射、高温、多湿及过度震
动之处。
≥ 本机被设计为在热带气候地区使用。
≥ 本机在使用过程中,可能会受到移动电话的无线电波干扰。
如果发生这种干扰,请将移动电话远离本机使用。
≥ 请勿让儿童在本机上攀爬。
≥ 请勿在本机上堆放任何物品。
≥ 请将本机放置在平稳的平面上。
≥ 搬动本机时,请务必小心。
j 如有必要,请用 1 人以上进行搬动。
≥ 请勿触摸扬声器纸盆的振动面 :
j 这可能会损坏扬声器纸盆。
j 扬声器纸盆可能很热。
≥ 请勿将您的脚放在本机下,或者放在轮子区域。
≥ 不正确的使用或搬运方式可能会导致本机掉落等,从而导致
损坏和 / 或身体受伤。
≥ 婴幼儿或儿童在附近时,请务必小心。
电池
≥ 如果电池更换得不正确,会有发生爆炸的危险。 请仅用制造
商建议使用的类型的电池进行更换。
≥ 废弃电池时,请与当地机构或经销商联系,询问正确的废弃
方法。
≥ 请勿加热或接触明火。
≥ 请勿将电池长时间放置在门窗紧闭受阳光直射的汽车内。
≥ 请勿拆卸或造成短路。
≥ 请勿给碱性电池或锰电池充电。
≥ 请勿使用外皮已经剥离的电池。
≥
若长期不使用遥控器,请取出电池。储存于凉快、阴暗之处。
-
如果看到此符号的话 -
(对于 3 针的 AC 电源插头)
如何更换保险丝
保险丝的位置会根据 AC 电源插头的类型不同而有
所不同 (图 A 与图 B)。 请确认安装的 AC 电源
插头,并按照下面的指示进行操作。
插图可能与实际的 AC 电源插头有所不同。
1. 用螺丝刀打开保险丝盖。
2. 更换保险丝,关闭或安上保险丝盖。
警告
注意
在欧盟以外其它国家的废物处置信息
此符号仅在欧盟有效。
如果要废弃此产品,请与当地机构或经
销商联系,获取正确的废弃方法。
SC-CMAX5_GS~RQT9961-G.book 22 ページ 2014年8月22日 金曜日 午後7時8分

23
RQT9961
23
中文 (简体)
目录
安全注意事项 .................................................... 22
附件................................................................... 23
音源................................................................... 23
许可................................................................... 23
本机的维护保养................................................. 24
关于 Bluetooth
®
............................................... 24
移动本机 ........................................................... 25
控制器参考指南................................................. 26
连接到 AC 电源................................................. 27
连接 USB 设备 .................................................. 28
Bluetooth
®
操作 ............................................... 28
媒体播放控制 .................................................... 29
声音及照明效果................................................. 31
录制 ([USB], [AUX])............................................. 31
时钟和定时器 .................................................... 33
外部设备 ........................................................... 34
使用麦克风或吉他............................................. 35
其他................................................................... 36
故障排除 ........................................................... 37
规格................................................................... 40
附件
使用本机前,请确认提供的附件。
≥ 请勿将 AC 电源线用于其他设备。
≥ 本使用说明书中记述的产品号码截至 2014 年 8 月为准。此后
可能会有变更。
≥ 请使用提供的适合于家用电源插座的 AC 电源线。
在沙特阿拉伯,请使用模制 3 针电源插头。
音源
以下标记表示功能的可用性。
∫ 兼容的 USB 设备
≥ 本机不保证与所有 USB 设备的连接。
≥ 支持 FAT12、 FAT16 和 FAT32 文件系统。
≥ 本机支持 USB 2.0 full speed。
≥ 本机可以支持最大 32 GB 的 USB 设备。
≥ 连接多端口 USB 读卡器时,只会选择 1 张记忆卡,
通常为插入的第 1 张记忆卡。
∫ 兼容的 MP3 文件
≥ 支持的格 :
带扩展名 “.mp3”或 “.MP3”的文件。
≥ 根据您创建 MP3 文件的方法不同,可能无法按照
您编号的顺序播放,或者可能根本无法播放。
≥ 文件被定义为曲目,文件夹被定义为专辑。
≥ 视可用的存储容量而定,本系统可以播放或录制
最多 800 个专辑 (1 张专辑中最多 999 首曲目)
或总计 8000 首曲目。
许可
关于本使用说明书的说明
≥ 参照页表示为 “l ±±”。
≥ 除非另作说明,否则操作是以使用遥控器的操作记载着说
明。
4x
AC 电源线
1x
遥控器用电池
1x
遥控器
(N2QAYB001000)
[USB]:
含有 MP3 文件的 USB 设备 (l 下 )
[Bluetooth]:
连接的 Bluetooth
®
设备 (l 28)
[AUX]:
连接到 AUX IN 1 或 AUX IN 2 端子的外
部设备 (l 34)
MPEG Layer-3
音频编码技术经
Fraunhofer IIS
及
Thomson
许可。
Bluetooth
®
文字商标和徽标是
Bluetooth SIG, Inc.
所有的注册商标,
且
Panasonic Corporation
在授权下使用任何该等商标。
其他商标和商名为各自所有者的商标和商名。
Google Play 和 Android 是 Google Inc. 的商标。
SC-CMAX5_GS~RQT9961-G.book 23 ページ 2014年8月22日 金曜日 午後7時8分

24
RQT9961
24
本机的维护保养
≥ 长时间以大音量播放时,可能会对扬声器造成损
坏并缩短扬声器的使用寿命。
≥ 为了防止损坏,在这些情况下请降低音量 :
– 声音失真时。
– 调整音质时。
维护保养前,请先从电源插座上拔下 AC 电源线。
≥
当被弄得非常脏时,请先用拧干的湿布擦去污垢,
然后再用干布擦拭。
≥ 切勿使用酒精,涂料稀释剂或汽油来清洁本机。
≥ 使用经化学处理的布之前,请仔细阅读该布的说
明。
∫ 要废弃或转让本机
本机可能会将用户设置信息保留在本机中。 如果要
放弃本机,不论是废弃还是转让,请按照将所有设
置恢复为出厂时的初始设置的步骤操作,以删除用
户设置。
(l 37, “ 要将所有设置恢复为出厂时的初始设置 ”)
≥ 操作历史记录可能会被记录在本机的内存中。
关于 Bluetooth
®
∫ 使用的频段
≥ 本系统使用 2.4 GHz 频段。
∫ 本设备的认证
≥ 本系统符合频率限制并且接受了基于频率法的认
证。 因此,不需要无线许可。
≥ 在某些国家,下述行为会受法律处罚 :
– 拆卸或改装本系统。
– 取下规格指示。
∫ 使用的限制
≥
不保证与所有具有
Bluetooth
®
的设备的无线传输和
/
或使用。
≥ 所有设备都必须符合由 Bluetooth SIG, Inc. 制定的
标准。
≥ 根据设备的规格和设置内容,可能会无法连接或
者某些操作可能会不同。
≥ 本系统支持 Bluetooth
®
安全性功能。 但根据使用
环境和 / 或设置内容,该安全性可能不足。 将数
据无线传输到本系统时,请注意。
≥ 本系统无法将数据传输到 Bluetooth
®
设备。
∫ 使用的范围
≥ 本设备的最大使用范围是 10 m。 根据环境、障碍
物或干扰,范围可能会减小。
∫ 来自其他设备的干扰
≥ 如果将本系统放置得太靠近其他Bluetooth
®
设备或
使用 2.4 GHz 频段的设备,由于无线电波干扰,
本系统可能无法正确工作和可能会发生噪音和跳
音等异常。
≥ 如果来自附近的广播电台等的无线电波太强,本
系统可能无法正确工作。
∫ 预期的用途
≥ 本系统只用于正常、一般用途。
≥ 请勿在易于受到无线电频率干扰的设备附近或环
境中 (例如 : 飞机场、医院、实验室等)使用本系
统。
为了防止扬声器损坏
用柔软的干布清洁本机
对于无线传输时发生的数据和 / 或信息的泄漏,
Panasonic
公司不承担任何责任。
SC-CMAX5_GS~RQT9961-G.book 24 ページ 2014年8月22日 金曜日 午後7時8分
25
RQT9961
25
中文 (简体)
移动本机
可以通过轮子轻松地移动本机。
准备
≥ 请务必从本机上取下所有连接的设备和电缆。
≥ 在陡坡上拉动时,请务必小心。
≥ 请避免在粗糙的或不平的表面上拉动。
≥ 请勿在楼梯上拉动。
≥ 要越过障碍物搬运时,请抬起本机。
≥ 搬运后,请务必将台车手柄完全按下。
≥ 本扬声器系统不具有磁屏蔽功能。 请勿将其放置在电视机、 PC 或其他磁性设备附近。
抬起本机
抓住顶部手柄 (A) 抬起本机。
使用附件袋 (B)
搬运时,为了方便,您可能喜欢将某些附件放在该袋中。
台车手柄
完全拉出,直到发
出喀哒声为止。
SC-CMAX5_GS~RQT9961-G.book 25 ページ 2014年8月22日 金曜日 午後7時8分
26
RQT9961
26
控制器参考指南
∫ 使用遥控器
插入电池,使端极 (i 和 j)与遥控器中的相符。
将其对准本机上的遥控信号感应器。
≥ 为了避免干扰,请勿在信号传感器前面放置任何物体。
遥控器
后视图
顶视图
(碱性电池或锰电池)
SC-CMAX5_GS~RQT9961-G.book 26 ページ 2014年8月22日 金曜日 午後7時8分
27
RQT9961
27
中文 (简体)
1 待机 / 开机开关 [Í], [Í/I]
按下此开关可以将本机从开机模式切换到待机
模式,或与之相反。
在待机模式下,本机仍会消耗少量电量。
2 选择音源
在本机上 :
Bluetooth
®
讯源时,要开始 Bluetooth
®
配对,
请按住 [ -PAIRING]。
3 基本播放控制按钮
4 进入设置菜单
5 更改显示的信息
6 选择 /OK
7 设定睡眠定时器
8 使显示屏变暗和使照明熄灭
再次按可以取消。
9 调节音量 (0(最小)至 50(最大))
10 静音
再次按可以取消。 调节音量或关闭本机时,
“MUTE”也会被取消。
11 设置播放菜单项
12 进入声音菜单
13 麦克风插孔 2/ 吉他输入插孔
14 麦克风插孔 1
15 AUX IN 2 端子
16 AUX IN 1 端子
17 AUDIO OUT 端子
18 进入 KARAOKE 模式
19 选择原歌声消除、回声或音调控制
20 选择音效
21 录制操作控制
22 [USB\A]
播放用 USB 端口
USB 状态指示灯
23 [USB\B]
录制 / 播放用 USB 端口
USB 状态指示灯
24 遥控信号传感器
距离 : 正前方约 7m以内
角度 : 约 20°上下, 30°左右
25 调节麦克风 1 的音量
26 调节麦克风 2 或吉他的音量
27 麦克风 2 或吉他切换 (l 35)
28 选择 DJ 点唱机 (l 30)
29 选择 MP3 专辑或曲目浏览模式 (l 29)
30 更改照明设置 (l 31)
浏览 MP3 曲目或专辑 (l 29)
更改 DJ 点唱机播放模式 (l 30)
31 显示屏
连接到 AC 电源
省电
即使处于待机模式,本系统也会消耗少量电力 (l 40)。 如果不使用系统,请拔开电源。
拔开系统后,某些设置会丢失。 必须重新进行设置。
至家用交流
电源插座
AC 电源线 (提供)
本机 (后面)
连接 AC 电源线。
SC-CMAX5_GS~RQT9961-G.book 27 ページ 2014年8月22日 金曜日 午後7時8分

28
RQT9961
28
连接 USB 设备
准备
≥ 将 USB 设备连接到本机前,请务必进行数据的备
份。
1 降低音量,并将 USB 设备连接至 USB 端口。
2 按 [USB] 选择 “USB A”或 “USB B”。
选中了时,相应的
USB
状态指示灯以绿色点亮。
≥ 请将 USB 设备直接插入。 请勿使用任何 USB 延长电缆。
≥ 如果结束使用,请拔下 USB 设备。
≥ 拔下 USB 设备前,请停止 USB 操作。
Bluetooth
®
操作
可以从本机无线地聆听来自 Bluetooth
®
音频设备的
声音。
≥
有关详情,请参阅
Bluetooth
®
设备的使用说明书。
准备
≥ 开启设备的 Bluetooth
®
功能,将设备放置在本机附
近。
∫ 与 Bluetooth
®
设备配对
1 按 []选择 “BLUETOOTH”。
{. 如果显示屏上显示 “PAIRING”,请进入到步骤 4。
要进入到配对模式
§
2 按 [PLAY MENU] 选择 “PAIRING”。
3 按 [3, 4] 选择 “OK? YES”, 然 后 按 [OK]。
要与设备配对
4 从 Bluetooth
®
设备的 Bluetooth
®
菜单中选择
“SC-CMAX5”。
{. 所连接的设备的名称在显示屏上显示数秒。
5 在 Bluetooth
®
设备上开始播放。
§ 也可以通过按住本机上的 [ -PAIRING] 进入到配对模式。
∫ 连接配对的 Bluetooth
®
设备
1 按 []选择 “BLUETOOTH”。
{. 显示屏上显示 “BLUETOOTH READY”。
2 从 Bluetooth
®
设备的 Bluetooth
®
菜单选择
“SC-CMAX5”。
{. 所连接的设备的名称在显示屏上显示数秒。
3 在 Bluetooth
®
设备上开始播放。
≥ 如果提示需要密钥,请输入 “0000”。
≥ 本机可以登录最多 8 个设备。 如果与第 9 个设备配对,最长时
间没有使用的设备会被替换。
≥ 本机 1 次仅可以连接到 1 个设备。
≥ 选择 “BLUETOOTH”作为讯源时,本机会自动试着连接到
上次连接的 Bluetooth
®
设备。 (此过程中,显示屏上显示
“LINKING” 。)
USB 设备
(不提供)
本机 (顶部)
通过 Bluetooth
®
菜单连接
SC-CMAX5_GS~RQT9961-G.book 28 ページ 2014年8月22日 金曜日 午後7時8分
29
RQT9961
29
中文 (简体)
可以更改传输模式以优先传输品质或音质。
准备
≥ 按 []选择 “BLUETOOTH”。
≥ 如果已经连接了 Bluetooth
®
设备,请断开。
1 重复按 [PLAY MENU] 选择 “LINK MODE”。
2 按 [3, 4] 选择模式,然后按 [OK]。
MODE 1: 强调连通性
MODE 2: 强调音质
≥ 如果声音中断,请选择 “MODE 1”。
≥ 出厂时的初始设置为 “MODE 2”。
1
连接了
Bluetooth
®
设备时
:
重复按
[PLAY MENU]
选择 “
DISCONNECT?
”。
2 按 [3, 4] 选择 “OK? YES”,然后按 [OK]。
≥
也可以通过按住本机上的
[-PAIRING]
断开
Bluetooth
®
设备。
≥ 如果选择了其他音源 (例如, “USB A”), Bluetooth
®
设备会
被断开。
媒体播放控制
准备
≥ 开启本机。
≥ 插入 USB 设备或者连接 Bluetooth
®
设备。
≥ 按 [USB] 或 []选择音源。
∫ 要浏览 MP3 曲目或专辑 ([USB])
仅通过本机
1 按
[ALBUM/TRACK]
选择专辑或曲目浏览模式。
2 在 “ ”(专辑)或 “ ”(曲目)闪烁时,
转动 [ILLUMINATION/CONTROL] 浏览。
∫ 要显示信息
重复按 [DISPLAY]。
≥ 要将本机的遥控器用于 Bluetooth
®
设备,Bluetooth
®
设备必须
支持 AVRCP (音频视频远程控制配置文件)。
根据设备的状态,某些控制可能不工作。
≥ 可以显示的最多字符数 :
[USB]: 约 32 个
[Bluetooth]: 约 16 个
≥ 本机支持 1 和 2 版本的 ID3 标签。不被支持的文字数据不会显
示或者会以不同的方式显示。
≥ MP3 文件的专辑及曲目指示。
Bluetooth
®
传输模式
断开 Bluetooth
®
设备
基本控制 ([USB], [Bluetooth])
播放 按 [1/;]。
停止
按 [∫]。
≥ [USB]: 停止的位置会被记住,并会显示
“RESUME”。
j 按 [1/;] 会恢复播放。
j 再次按 [∫] 会清除停止的位置。
暂停
按 [1/;]。
再次按可以再开始播放。
跳越
按 [:/6] 或 [5/9] 跳越曲
目。
[USB]
按
[
3
]
或
[
4
]
跳越
MP3
专辑。
搜索
在播放或暂停过程中,按住
[:/6] 或 [5/9]。
专辑号 曲目号
例如 :
SC-CMAX5_GS~RQT9961-G.book 29 ページ 2014年8月22日 金曜日 午後7時8分
30
RQT9961
30
可以使用 DJ 点唱机在歌曲之间添加同时淡入淡出
的效果。 也可以通过 “Panasonic MAX Juke”应
用程序使用追加的功能 (l 下 )。
1 重复按 [PLAY MENU] 选择 “JUKEBOX”。
2 按 [3, 4] 选择设置,然后按 [OK]。
使用本机
重复按 [DJ JUKEBOX] 选择设置。
∫ DJ 点唱机播放模式
DJ 点唱机为开启时,播放模式会自动切换到重复模
式。
要选择所需的重复设置
1 重复按 [PLAY MENU] 选择 “PLAYMODE”。
2 按 [3, 4] 选择设置,然后按 [OK]。
使用本机
在停止模式下,转动
[ILLUMINATION/CONTROL]
。
≥ 关闭本系统、切换到其他讯源、或者开启卡拉 OK 模式时,会
取消 DJ 点唱机效果。
≥ 录制时, DJ 点唱机不工作。
选择播放模式。
准备
≥ 将 DJ 点唱机设为 “OFF”。
1 重复按 [PLAY MENU] 选择 “PLAYMODE”
或“REPEAT”。
2 按 [3, 4] 选择设置,然后按 [OK]。
§ 也可以以此设置进行录制。 请在开始录制前进行
设置。
≥ 在随机播放过程中,无法跳越至上一个曲目。
≥ 正在使用随机播放模式时,无法进行录制。
≥ 录制过程中,重复播放模式是关闭的。
DJ 点唱机 ([USB])
OFF
CROSSFADE
开启 DJ 点唱机,不带同时淡入淡出
效果。
ON
CROSSFADE
开启 DJ 点唱机,带同时淡入淡出效
果。
OFF
关闭 DJ 点唱机。
RANDOM
REPEAT
随机播放全部曲目并重复全部曲目。
≥ 会显示 “` RND”。
ALL TITLE
REPEAT
重复全部曲目。
≥ 会显示 “`”。
使用 “Panasonic MAX Juke”应用程序
如果从 Google Play
TM
下载并安装免费的
Android
TM
应用程序 “Panasonic MAX Juke”,
就可以使用同时从多台设备要求歌曲播放那样的追
加功能。
播放模式 ([USB])
PLAYMODE
OFF
PLAYMODE
§
取消播放模式设置。
1-TRACK
§
仅播放所选择的曲目。
≥ 会显示 “1-TR”。
(跳到所需的曲目。)
1-ALBUM
§
仅播放所选择的 MP3 专辑。
≥ 会显示 “1-ALB”。
RANDOM
随机播放内容。
≥ 会显示 “RND”。
1-ALBUM
RANDOM
随机播放所选择的 MP3 专辑中的
曲目。
≥ 按 [3] 或 [4] 选择 MP3 专辑。
≥ 会显示 “1-ALB”、“RND”。
REPEAT
ON
REPEAT
开启重复模式。
≥ 会显示 “`”。
OFF
REPEAT
关闭重复模式。
OFF
PLAYMODE:
要录制所有曲目。
1-TRACK:
要录制所选择的曲目。
1-ALBUM:
要录制所选择的专辑。
SC-CMAX5_GS~RQT9961-G.book 30 ページ 2014年8月22日 金曜日 午後7時8分
31
RQT9961
31
中文 (简体)
声音及照明效果
以下音效可以被添加到音频输出中。
1 重复按 [SOUND] 选择音效。
2 按 [3, 4] 选择设置,然后按 [OK]。
≥ 对某些音源使用这些效果时,音质可能会变差。 如果出现这
种情况,请关闭音效。
仅通过本机
可以更改本机的照明颜色。
转动 [ILLUMINATION/CONTROL]。
欲取消,选择 “OFF”。
录制 ([USB], [AUX])
可以录制 :
≥ 从 [USB\A] 至 [USB\B] 的 MP3 曲目。
≥ 从 AUX IN 1 或 AUX IN 2 至 [USB\B] 的音频。
准备
≥ 将 USB 设备连接到 [USB\B] 以用于存储录制内容。
≥ 准备想要录制的讯源。
– 将 USB 设备连接到 [USB\A] 或者连接外部设备。
1 选择想要录制的讯源。
(“ USB A”、“ AUX 1”或 “AUX 2”)
2 按本机上的 [USB REC ¥/;] 开始录制。
≥ [AUX] 在外部设备上开始播放。
例如 : 从 [USB\A] 录制
[USB]
≥
如果在曲目的中途停止录制,该曲目不会被存储。
仅完整录制的
曲目会被存储。
(如果没有曲目被录制,会显示 “
NO FILE RECORDED
”。)
≥ 可以以所选择的播放模式 (随机和重复模式除外)录制。
(l 30)
[AUX]
≥ 每次暂停录制,会添加曲目标记。 也可以以其他方式添加曲
目标记。 (l 32)
∫ 要确认存储容量
在停止模式下,按一次 [DISPLAY]。
会显示 [USB\B] 的 USB 设备的可用存储空间或剩余
录制时间。
≥ 本机正在读取设备时,显示 “UPDATE”。
≥ 如果没有 [USB\B] 的 USB 设备,会显示“NODEVICE”数秒。
音效
PRESET EQ
选择所需的预设 EQ 设置。
≥ 选择 “FLAT”会关闭预设 EQ。
使用本机
按 [PRESET EQ]。
BASS
-4 至 +4
MID
TREBLE
INPUT
LEVEL
(对于
“AUX 2”
讯源)
“
NORMAL
”
(
正常
)
或“
HIGH
”
(
高
)
≥ “HIGH”输入电平时,如果声音失真,
请选择 “NORMAL”。
SUPER
WOOFER
“SW1”、“ SW2”、“ SW3” 或
“OFF”
使用本机
1 按住
[D.BASS, -SUPER WOOFER]
显示当前的设置。
2 按 [:/6] 或 [5/9] 调
整设置。
D.BASS
“D.BASS BEAT”、“ D.BASS
OFF”或 “D.BASS ON”
使用本机
按 [D.BASS, -SUPER WOOFER]。
照明设置
停止录制
按 [∫]。
≥ 会显示 “WRITING”。
暂停录制
([AUX])
录制过程中,按本机上的
[USB REC
¥
/
;
]
。(“ ”闪烁。)
再按一次按钮以继续录制。
在“
SYNCHRO
”模式下,无法进行此操作。
(
l
32)
正在录制的专辑
录制过程的百分率
REC
SC-CMAX5_GS~RQT9961-G.book 31 ページ 2014年8月22日 金曜日 午後7時8分

32
RQT9961
32
≥ 所有录制是以 “.mp3”格式进行。
≥ 每次进行录制,就会添加 1 张新专辑。
≥ 录制后,可以更改专辑的顺序。
≥ 录制内容会被保存在 USB 设备中名字为 “REC_DATA”的文
件夹中。
≥ 在录制过程中, [USB\B] 状态指示灯以红色闪烁。
≥ 某些曲目可能会花费较长的时间录制。
≥ 由于讯源的状态,无法录制某些曲目。
≥ 由于自动重命名功能,录制的文件夹名可能与原来的文件夹
名不同。
≥ 在从 [USB\A] 至 [USB\B] 录制过程中,不会有声音输出。
从外部设备录制时,可以用各种方法区分曲目。
录制前
1 重复按 [SETUP] 选择 “REC MODE”。
2 按 [3, 4] 选择设置,然后按 [OK]。
§ 要手动添加曲目标记
(在 “SYNCHRO”模式下除外)
录制过程中,在所需的标记点处按 [OK]。
曲目长度限制
MANUAL: 60 分钟
TIME MARK: 5 分钟
曲目达到其最大长度时,会添加曲目标记而录制继续。
(手动添加了曲目标记时或者录制暂停时,会重设曲目长度限
制计数器。)
1 按 [USB] 选择 “USB B”。
2 按 [3, 4] 选择专辑。
3 按 [:/6] 或 [5/9] 选择曲目。
4 重复按 [SETUP] 选择 “EDIT MODE”。
5 按 [3, 4] 选择模式。
6 按 [OK]。
显示所选择的要删除的项目。
7 按 [OK]。
会显示 “SURE? NO”。
≥ 要取消,请再次按 [OK]。
8 按
[
3
,
4
]
选择 “
SURE? YES
”,然后按
[OK]
。
会显示 “WRITING”。
对于消费者录制受版权保护的内容这一会导致侵犯
版权的行为, Panasonic 公司不承担任何责任。
添加曲目标记 ([AUX])
MANUAL
手动添加曲目标记。
§
SYNCHRO
当其它设备开始播放时,录制将自
动开始。
若录制功能检测到至少 3 秒钟的寂
静,录制将暂停。
TIME MARK
每隔 5 分钟,曲目将自动划分。
≥ 也可以手动添加曲目标记。
§
删除录制的曲目 ([USB])
TRK DEL
删除一首曲目。
ALB DEL
删除一张专辑。
FORMAT
格式化 USB 设备。
SC-CMAX5_GS~RQT9961-G.book 32 ページ 2014年8月22日 金曜日 午後7時8分

33
RQT9961
33
中文 (简体)
时钟和定时器
本机的时钟为 24 小时显示。
1 重复按 [SETUP] 选择 “CLOCK”。
2 按 [3, 4] 设置时间,然后按 [OK]。
≥ 要确认时间,请重复按 [SETUP] 选择 “CLOCK”,然后按一
次 [OK]。
(待机过程中,请按一次 [DISPLAY]。)
≥ 停电时或拔下 AC 电源线时,请重设时钟。
≥ 请定期重设时钟以保持时间的准确性。
睡眠定时器可以在到达设置的时间后将本机关闭。
按 [SLEEP] 设置时间 (以分钟为单位)。
SLEEP 30 --. SLEEP 60 --. SLEEP 90 --. SLEEP120
^--------------------- OFF (取消) (----------------b
≥ 要确认剩余时间,按一次 [SLEEP]。
≥ 播放定时器和睡眠定时器或录制定时器和睡眠定时器可以同
时使用。 睡眠定时器总是本机的主定时器。
您可以设定定时器在特定的时间 :
– 唤醒 (播放定时器)
– 从外部设备录制 (录制定时器)
播放定时器和录制定时器不能同时使用。
准备
设置时钟。
1 重复按 [SETUP] 选择 “TIMER ADJ”。
2 按 [3, 4] 选择“FPLAY”或 “FREC”, 然 后
按 [OK]。
3 按 [3, 4] 设置开始时间,然后按 [OK]。
4 按 [3, 4] 设置结束时间,然后按 [OK]。
5 按 [3, 4] 选择想要播放或录制的音源
§
,然后按
[OK]。
开启定时器
1 准备选择的音源。
2 重复按 [SETUP] 选择 “TIMER SET”。
3 按 [3, 4] 选择 “PLAY ON”或 “REC ON”,
然后按 [OK]。
≥ “FPLAY”或 “FREC”被选定。
≥ 要关闭定时器,请按
[
3
,
4
]
清除 “
F
PLAY
”和 “
F
REC
”,
然后按
[OK]
。
4 按 [Í] 使本机进入到待机模式。
(为了操作定时器,必须在定时器的开始时间前关闭
本机。)
要确认设置
1 重复按 [SETUP] 选择 “TIMER ADJ”。
2 按 [3, 4] 选择 “FPLAY”或 “FREC”,
然后按 [OK]。
(待机过程中,按两次 [DISPLAY]。)
≥ 播放定时器将在预设时间启动,其音量将逐渐增加至预设水
平。
≥ 录制定时器将在所设置时间的 30 秒前在音量静音的状态下开
始。
≥ 定时器若被设定,将在每日预设时间启动。
≥ 如果在定时器工作中关闭本系统然后再重新开启,在结束时
间定时器不会停止。
设置时钟
睡眠定时器
播放和录制定时器
播放定时器
准备想要听的音源 (USB 或外部设
备),设置音量。
录制定时器
将 USB 设备连接到 [USB\B],准备
外部设备。
§ 可以将以下设为音源。
对于播放定时器
:
“
AUX 1
”、“
AUX 2
”、“
USB A
”、
“
USB B
”
对于录制定时器 : “AUX 1”、“ AUX 2”
SC-CMAX5_GS~RQT9961-G.book 33 ページ 2014年8月22日 金曜日 午後7時8分
34
RQT9961
34
外部设备
准备
≥ 拔下 AC 电源线。
≥ 关闭所有设备,并参阅有关说明书。
可以连接 VCR 和 DVD 播放机等,通过本系统听音
频。
1 使用音频电缆 (不提供)连接外部设备。
2 按 [AUX] 选择 “AUX 1”,在所连接的设备上开
始播放。
≥ 若您想要连接此处没有描述的设备,请向当地经销商咨询。
≥ 使用转接器时,可发生声音失真。
您可从便携式音频设备播放音乐。
准备
≥ 关闭便携式设备的音频平衡器功能 ( 若有 ),以避
免声音失真。
≥ 连接或断开便携式设备前,降低本系统和便携式
设备的音量。
1 使用音频电缆 (不提供)连接便携式音频设备。
≥ 插头类型 : ‰3.5 mm 立体声 ( 不提供 )
2 按 [AUX] 选择 “AUX 2”,在所连接的设备上开
始播放。
使用 VCR 和 DVD 播放机等
DVD 播放机
( 不提供 )
音频电线
( 不提供 )
本机 (后面)
例如 :
使用便携式音频设备
音频电线 ( 不提供 )
便携式音频设备
( 不提供 )
本机 (后面)
例如 :
SC-CMAX5_GS~RQT9961-G.book 34 ページ 2014年8月22日 金曜日 午後7時8分

35
RQT9961
35
中文 (简体)
将追加的 SC-CMAX5 装置连接到本机,可以播放来
自本机的声音。
1 使用音频电缆 (不提供)连接追加的
SC-CMAX5。
2 在追加的 SC-CMAX5 装置上 :
按 [AUX] 选择 “AUX 1”。
3 在本机上 :
开始所需的播放。
≥ 音效会被各装置分别控制。 如有必要,请在追加的装置上进
行相同的声音设置。
使用麦克风或吉他
准备
≥ 连接或拔下麦克风或吉他前,请将本系统的音量
调到最低。
仅通过本机
1 连接麦克风或吉他。
≥ 插头类型 : ‰ 6.3 mm 单声道
≥ 连接吉他时,请务必将其连接到 MIC 2/ 插孔。
2 (仅当连接了 MIC 2/ 插孔时)
按 [B MIC C ] 选择正确的输入设置。
每次按该按钮,按钮位置会在按下位置和松开位置之间进
行切换。
3 调节麦克风或吉他的音量。
对于麦克风 1: 转动 [MIC1-VOL]。
对于麦克风 2 或吉他 : 转动 [VOL-MIC2/ ]。
4 如果想要伴着背景音乐唱 :
播放音源,调节本系统的音量。
≥ 要和卡拉 OK 功能一起唱,请参阅 “卡拉 OK”。 (l 36)
≥ 如果发出奇怪的杂音 (蜂鸣声),请将麦克风 / 吉他远离扬声
器,或者调低麦克风 / 吉他的音量。
≥ 使用后,请将麦克风 / 吉他的音量设为 “MIN”,然后拔下麦
克风 / 吉他。
≥ 本系统不能从麦克风或吉他录制。
连接到追加的 SC-CMAX5 装置
追加的 SC-CMAX5
(后面)
音频电线
( 不提供 )
本机 (后面)
≥ 连接了吉他时 :
请确保该按钮在按下位置。
(
C
)
≥ 连接了麦克风时 :
请确保该按钮在松开位置。 (B MIC)
不正确的设置可能会导致声音太大声或太小声。
本机 (后面)
麦克风
(不提供)
麦克风或吉他
(不提供)
例如 :
音频电线
( 不提供 )
SC-CMAX5_GS~RQT9961-G.book 35 ページ 2014年8月22日 金曜日 午後7時8分
36
RQT9961
36
可以使用原歌声消除、回声或音调控制等卡拉 OK
功能。
准备
≥ 将唱歌用的麦克风和音源一起准备好。 (l 35)
仅通过本机
1 将 [B MIC C ] 设到松开位置 (B MIC)。
每次按该按钮,按钮位置会在按下位置和松开位置之间进
行切换。
2 通过按 [KARAOKE] 选择 “ON KARAOKE”来
开启卡拉 OK 模式。
≥ 要取消,请选择 “OFF KARAOKE”。
3 重复按 [VOCAL CANCEL/ECHO/KEY-CON] 显
示原歌声消除、回声或音调控制的当前设置。
4 (显示当前设置时)
按 [:/6] 或 [5/9] 调整设置。
5 开始卡拉 OK 表演。
≥ 进行以下操作时,会取消卡拉 OK 功能 :
j 进行录制。
j 开启 DJ 点唱机。
j 将 [B MIC C ] 设到按下位置 (C )。
j 关闭本系统。
其他
约 20 分钟不使用本系统时,本功能会自动关闭本系
统。
1 重复按 [SETUP] 选择 “AUTO OFF”。
2 按 [3, 4] 选择 “ON”, 然 后 按 [OK]。
≥ 要关闭本功能,请在步骤 2 中选择 “OFF”。
≥ 连接到了 Bluetooth
®
设备时,本功能不工作。
从配对的 Bluetooth
®
设备的 Bluetooth
®
菜单中选择
了“SC-CMAX5”时,本机会从待机模式自动开启
并建立 Bluetooth
®
连接。
1 重复按 [SETUP] 选择 “BLUETOOTH
STANDBY”。
2 按 [3, 4] 选择 “ON”, 然 后 按 [OK]。
≥ 要关闭本功能,请在步骤 2 中选择 “OFF”。
卡拉 OK
原歌声消除
“OFF VOCAL CANCEL”、
“VOCAL CANCEL”、“ L”或
“R”
回声
“ECHO OFF”、“ ECHO 1”、
“ECHO 2”或 “ECHO 3”
音调控制
“
KEYCON-6
”至 “
KEYCON+6
”
≥ 切换到其他讯源时,设置会返回到
“KEYCON 0”。
自动关闭功能
Bluetooth
®
待机
SC-CMAX5_GS~RQT9961-G.book 36 ページ 2014年8月22日 金曜日 午後7時8分
37
RQT9961
37
中文 (简体)
为了追加功能或改善工作, Panasonic 可能会不定
期发布本机的更新软件。 这些更新免费提供。
有关更多详情,请参阅下面的网站。
http://panasonic.jp/support/global/cs/
(本网站为英文网站。)
∫ 确认软件版本
显示安装的软件的版本。
重复按
[SETUP]
选择 “
SW VER.
”,然后按
[OK]
。
≥ 按 [OK] 退出。
其他 Panasonic 设备对提供的遥控器作出响应时,
请更改遥控器代码。
准备
按 [AUX] 选择 “AUX 1”或 “AUX 2”。
∫ 欲切换到 “REMOTE 2”
1 按住本机上的 [USB] 的同时,按住遥控器上的
[AUX],直到本机的显示屏上显示
“REMOTE 2”为止。
2 按住遥控器上的 [OK] 和 [USB] 至少 4 秒。
∫ 欲切换到 “REMOTE 1”
1 按住本机上的 [USB] 的同时,按住遥控器上的
[USB],直到本机的显示屏上显示
“REMOTE 1”为止。
2 按住遥控器上的 [OK] 和 []至少 4 秒。
故障排除
在请求维修之前,请进行以下确认。 如果您对一些
确认点不确定,或者以下指南中所指示的解决方法
没有解决问题,则请向经销商咨询以获取指导。
播放时听到嗡嗡声。
≥ 如果缆线附近有 AC 电源线或荧光灯,则请将其他
设备和缆线远离电缆。
本机不工作。
≥ 本机的某个安全装置可能已被启动。
按以下步骤重设本机 :
1 按本机上的 [Í/I] 将本机切换到待机状态。
≥
如果本机没有切换到待机状态,请按本机上的
[
Í
/I]
约
10
秒。
本机被强制切换到待机状态。
或者,断开
AC
电源线,等待至少
3
分钟,然
后重新连接。
2 按本机上的 [Í/I] 将其开启。 如果仍然无法操
作本机,请向经销商咨询。
显示幕在待机状态下亮起并持续改变。
≥ 按住本机上的 [∫] 选择 “DEMO OFF”。
软件更新
遥控器代码
要将所有设置恢复为出厂时的初始设置
出现以下情形时,请重设记忆 :
≥ 按下按钮时无任何反应。
≥ 您想要清除并重设记忆内容。
1 拔下 AC 电源线。 (在进入到步骤 2 前,请等
候至少 3 分钟。)
2 按住本机上的 [Í/I] 时,重新连接 AC 电源线。
≥ 按住 [Í/I],直到显示屏上显示 “--------”为止。
3 松开 [Í/I]。
≥ 所有设置被恢复为出厂时的初始设置。 您需要重设记忆项
目。
综合
SC-CMAX5_GS~RQT9961-G.book 37 ページ 2014年8月22日 金曜日 午後7時8分
38
RQT9961
38
声音失真或无声。
≥ 调整系统音量。
≥
关闭本系统,检查并修正导因,然后再次开机。这
可能是由于扬声器受压于过大音量或功率,或在炎
热环境中使用本系统所导致。
音量降低。
≥ 由于本系统持续使用大音量输出,电路保护机制
已启动以保护本系统,并保持其音质。
遥控器不正常工作。
≥ 电池电量耗尽或者电池被不正确插入。 (l 26)
按 [1/;] 时没有反应。
≥ 请拔下 USB 设备,然后重新连接。 或者,关闭本
机后再重新开启。
无法读取 USB 设备或其内容。
≥ USB 设备的格式或其内容与本机不兼容 (l 23)。
≥ 对于某些 USB 设备,本产品的 USB host 功能可能
不工作。
USB 设备操作缓慢。
≥ 读取大型文件或存储量大的 USB 设备要花费较长
的时间。
所显示的经过的时间与实际播放时间不同。
≥ 将数据复制到其他 USB 设备或者备份数据,然后
重新格式化此 USB 设备。
无法完成配对。
≥ 请确认 Bluetooth
®
设备状态。
无法连接设备。
≥ 设备的配对不成功或者登录已被替换。 请试着重
新配对设备。 (l 28)
≥ 本机可能连接到了其他设备。 请断开其他设备,
试着重新配对设备。 (l 28)
≥ 如果问题仍然存在,请关闭本机后再重新开启,
然后重试。
连接了设备,但无法通过本机听到声音。
≥ 对于某些内置 Bluetooth
®
设备,必须手动将音频输
出设为 “SC-CMAX5”。 有关详情,请阅读设
备的使用说明书。
声音中断。
≥ 设备在 10 m 通信范围之外。 请将 Bluetooth
®
设备
放置得更靠近本机。
≥ 请移走本机与设备之间的任何障碍物。
≥ 正在受到无线路由器、微波炉、无绳电话等使用
2.4 GHz 频段的其他设备的干扰。 请将
Bluetooth
®
设备放置得更靠近本机,使其远离其他
设备。
≥ 要获得稳定的通信,请选择 “MODE 1”。
(l 29)
遥控器
USB
Bluetooth
®
SC-CMAX5_GS~RQT9961-G.book 38 ページ 2014年8月22日 金曜日 午後7時8分
39
RQT9961
39
中文 (简体)
本机的显示屏上可能会出现以下信息或维修号码。
“A NO DEV”
“B NO DEV”
≥ USB 设备未被正确插入。 请阅读说明后再重试
(l 28)。
“ADJUST CLOCK”
≥ 未设置时钟。 请调整时钟。
“ADJUST TIMER”
≥ 未设置播放和 / 或录制定时器。 请相应地调整播放
和 / 或录制定时器。
“AUTO OFF”(闪烁)
≥ 约 20 分钟没有使用本机,会在 1 分钟以内关闭。
按任意一个按钮可取消。
“CAN’T REC”
≥ USB 设备被锁定时,无法进行录制。 请将 USB 设
备解除锁定后再重试。
“DEVICE FULL”
≥
由于
USB
设备的剩余录制时间少于音源的总时间,
因此无法进行录制。请更改为有足够录制时间的
USB
设备,然后重新进行录制。
“ERROR”
≥ 进行了不正确的操作。 请阅读使用说明书,然后
重试。
“ERROR”(录制时)
≥
录制过程中,无法选择其他播放源 (例如
: USB
等)
或者按
[
:
/
6
]
或
[
5
/
9
]
。请停止录制功能。
“F ”(“ ”代表数字。)
≥ 本机有问题。
≥ 请记下显示的数字,拔下 AC 电源线并向您的经销
商咨询。
“GUITAR SWITCH ON”
≥ [B MIC C ] 在按下位置时,无法使用卡拉
OK 功能。 将其改到松开位置。 (l 36)
“INVALID”
≥ 卡拉 OK 模式为关闭时,无法选择原歌声消除、回
声和音调控制。按本机上的 [KARAOKE] 选择
“ON KARAOKE”。 (l 36)
“NO PLAY”
“UNSUPPORT”
≥ 请检查内容。 仅可以播放支持的格式。 (l 23)
≥ USB 设备中的文件可能已损坏。 请格式化 USB 设
备后再重试。
≥
本机可能出了问题。
关闭本机,然后再重新开启。
“NO TRACK”
≥ USB 设备中没有专辑或曲目。
“PLAYERROR”
≥
播放了不支持的
MP3
文件。
本系统会跳过该曲目,
播放下一首曲目。
“REC ERROR”
≥
在录制过程中拔下了
USB
设备。
请连接
USB
设备,
并重新进行录制。
“REMOTE ”(“ ”代表数字。)
≥ 遥控器和本机使用不同的代码。 请更改遥控器上
的代码。
– 显示 “REMOTE 1”时,按住遥控器上的 [OK] 和
[]至少 4 秒。
– 显示 “REMOTE 2”时,按住遥控器上的 [OK] 和
[USB] 至少 4 秒。
“TEMP NG”
≥ 温度电路保护机制已启动。本系统将关闭。等主
机冷却后再开机。
≥ 检查通风孔是否受堵塞。
≥ 确保主机通风良好。
“USB OVER CURRENT ERROR”
≥ USB 设备用着过多的电。 请取下 USB 设备,关闭
本机。
“VBR”
≥
本系统无法显示
VBR
格式曲目剩余的播放时间。
信息
SC-CMAX5_GS~RQT9961-G.book 39 ページ 2014年8月22日 金曜日 午後7時8分

40
RQT9961
40
规格
≥ 规格如有变更,恕不另行通知。
≥ 重量和尺寸皆为概数。
≥ 全谐波失真是使用数码频谱分析仪测量的。
§ 台车手柄在完全按下位置
∫ 综合
功耗
92 W
待机模式下的功耗
约 0.4 W
(“
BLUETOOTH STANDBY
”为 “
ON
”时)
约 0.6 W
电源
AC 220 V 至 240 V, 50/60 Hz
尺寸 (宽 k 高 k 深)
§
378 mmk724 mmk436 mm
重量 约 19.8 kg
工作温度范围
0 oC 至 r40 oC
工作湿度范围
35 % 至 80 % RH (无水汽凝结)
∫ 放大器部分
输出功率
RMS
输出功率单声道模式
前置高声道
每声道
300 W (3
≠
)
,
10 kHz
,
30 %
全谐波失真
前置中声道
每声道
300 W (3
≠
)
,
1kHz
,
30 %
全谐波失真
亚低音声道
每声道
400 W (2
≠
)
,
100 Hz
,
30 %
全谐波失真
总 RMS 单声道模式功率
1000 W (30 % 全谐波失真)
∫ 端子部分
USB 端口
USB
标准
USB 2.0 full speed
支持的媒体文件格式
MP3 (¢.mp3)
USB
设备文件系统
FAT12, FAT16, FAT32
USB
端口电源 500 mA (最大)
USB
录制
比特率
128 kbps
USB
录制速度
1k
录制文件格式
MP3 (¢.mp3)
麦克风插孔 / 吉他插孔 (2 系统)
麦克风 1 单声道, 6.3 mm 插孔
麦克风 2/ 吉他 单声道, 6.3 mm 插孔
音频输入
AUX IN 1
立体声,针式插孔 (1 系统)
AUX IN 2
立体声, 3.5 mm 插孔
音频输出 (线路输出)
AUDIO OUT
立体声,针式插孔 (1 系统)
∫ 蓝牙部分
版本 Bluetooth
®
版本 2.1 +EDR
等级 2 级
支持的协议
A2DP, AVRCP, SPP
工作频率
2.4 GHz 频段 FH-SS
工作距离
10 m 视线
∫ 扬声器部分
前置高
扬声器单元
高音扩音器 6cm锥型
前置中
扬声器单元
低音扩音器 10 cm 锥型 k 2
亚低音
扬声器单元
超低音扩音器 25 cm 锥型
ѝ᮷˄
ﻲﺑﺮﻋ
ѝ
ѝ᮷˄ㆰփ˅
SC-CMAX5_GS~RQT9961-G.book 40 ページ 2014年8月22日 金曜日 午後7時8分

RQT9961
20
ﺕﺎﻔﺻﺍﻮﻤﻟﺍ
ﻡﺎﻋ
ﺔﻗﺎﻄﻟﺍ ﻙﻼﻬﺘﺳﺍﺕﺍﻭ 92
ﺩﺍﺪﻌﺘﺳﻻﺍ ﻊﺿﻭ ﻲﻓ ﺔﻗﺎﻄﻟﺍ ﻙﻼﻬﺘﺳﺍ
ﺎ
ً
ﺒﻳﺮﻘﺗ ﺕﺍﻭ 0.4
ﺎ
ً
ﻃﻮﺒﻀﻣ "BLUETOOTH STANDBY" ﻊﺿﻭ ﻥﻮﻜﻳ ﺎﻣﺪﻨﻋ)
("ON" ﻰﻠﻋ
ﺎ
ً
ﺒﻳﺮﻘﺗ ﺕﺍﻭ 0.6
ﺔﻗﺎﻄﻟﺎﺑ ﺩﺍﺪﻣﻹﺍ
ﺰﺗﺮﻫ 50/60 ،ﺩﺩﺮﺘﻣ ﺭﺎﻴﺗ ﺖﻟﻮﻓ 240 ﻰﻟﺇ ﺖﻟﻮﻓ 220 ﻦﻣ
(ﻚﻤ
ُ
ﺴﻟﺍﻉﺎﻔﺗﺭﻻﺍﺽﺮﻌﻟﺍ) ﺩﺎﻌﺑﻷﺍ
ﻢﻣ 436ﻢﻣ 724ﻢﻣ 378
ﻥﺯﻮﻟﺍﺎ
ً
ﺒﻳﺮﻘﺗ ﻢﺠﻛ 19.8
ﻞﻴﻐﺸﺘﻠﻟ ﺔﻤﺋﻼﻤﻟﺍ ﺓﺭﺍﺮﺤﻟﺍ ﺔﺟﺭﺩ ﻕﺎﻄﻧ
ﺔﻳﻮﺌﻣ ﺔﺟﺭﺩ 40 ﻰﻟﺇ ﺔﻳﻮﺌﻣ ﺔﺟﺭﺩ 0 ﻦﻣ
ﻞﻴﻐﺸﺘﻠﻟ ﺔﻤﺋﻼﻤﻟﺍ ﺔﺑﻮﻃﺮﻟﺍ ﻕﺎﻄﻧ
(ﻒﺜﻜﺗ ﻥﻭﺪﺑ) 80 % ﻭ 35 % ﻦﻴﺑ ﺔﻴﺒﺴﻨﻟﺍ ﺔﺑﻮﻃﺮﻟﺍ ﻊﻘﺗ
ﺕﻮﺼﻟﺍ ﺮﺒﻜﻣ ﻢﺴﻗ
ﺔﻗﺎﻄﻟﺍ ﺝﺍﺮﺧﺇ
RMS ﺝﺍﺮﺧﺃ ﺔﻗﺎﻄﻟ ﻱﺩﺎﺣﻷﺍ ﻊﺿﻮﻟﺍ
ﺎﻴﻠﻌﻟﺍ ﺔﻴﻣﺎﻣﻷﺍ ﺓﺎﻨﻘﻟﺍ
ﻦﻣ 30 % ،ﺰﺗﺮﻫ ﻮﻠﻴﻛ 10 ،(3 ) ﺓﺎﻨﻗ ﻞﻜﻟ ﺕﺍﻭ 300
(THD) ﻲﻘﻓﺍﻮﺘﻟﺍ ﺐﻴﻛﺮﺘﻠﻟ ﻲﻠﻜﻟﺍ ﻩﻮﺸﺘﻟﺍ
ﻰﻄﺳﻮﻟﺍ ﺔﻴﻣﺎﻣﻷﺍ ﺓﺎﻨﻘﻟﺍ
ﻩﻮﺸﺘﻟﺍ ﻦﻣ 30 % ،ﺰﺗﺮﻫ ﻮﻠﻴﻛ 1 ،(3 ) ﺓﺎﻨﻗ ﻞﻜﻟ ﺕﺍﻭ 300
(THD) ﻲﻘﻓﺍﻮﺘﻟﺍ ﺐﻴﻛﺮﺘﻠﻟ ﻲﻠﻜﻟﺍ
ﺔﻀﻔﺨﻨﻤﻟﺍ ﺕﺎﺑﺬﺑﺬﻟﺍ ﺓﺎﻨﻗ
ﻩﻮﺸﺘﻟﺍ ﻦﻣ 30 % ،ﺰﺗﺮﻫ 100 ،(2 ) ﺓﺎﻨﻗ ﻞﻜﻟ ﺕﺍﻭ 400
(THD) ﻲﻘﻓﺍﻮﺘﻟﺍ ﺐﻴﻛﺮﺘﻠﻟ ﻲﻠﻜﻟﺍ
RMS ﻱﺩﺎﺣﻷﺍ ﻊﺿﻮﻠﻟ ﺔﻴﻟﺎﻤﺟﻹﺍ ﺔﻗﺎﻄﻟﺍ
ﻲﻠﻜﻟﺍ ﻩﻮﺸﺘﻟﺍ ﻦﻣ 30 %) ﺕﺍﻭ 1000
((THD) ﻲﻘﻓﺍﻮﺘﻟﺍ ﺐﻴﻛﺮﺘﻠﻟ
ﻞﻴﺻﻮﺘﻟﺍ ﻑﺍﺮﻃﺃ ﻢﺴﻗ
USB ﺬﻔﻨﻣ
USB ﺭﺎﻴﻌﻣﺔﻋﺮﺴﻟﺍ ﻞﻣﺎﻛ USB 2.0 ﺬﻔﻨﻣ
ﻂﺋﺎﺳﻮﻟﺍ ﺕﺎﻔﻠﻣ ﻖﻴﺴﻨﺗ ﻢﻋﺩ
(.mp3) MP3
USB ﺓﺰﻬﺟﺃ ﺕﺎﻔﻠﻣ ﻡﺎﻈﻧ
FAT32 ،FAT16 ،FAT12
USB ﺬﻔﻨﻣ ﺔﻗﺎﻃ(ﻰﺼﻗﺃ ﺪﺤﺑ) ﺮﻴﺒﻣﺃ ﻲﻠﻣ 500
USB ﺮﺒﻋ ﻞﻴﺠﺴﺘﻟﺍ
ﺖﺒﻟﺍ ﻝﺪﻌﻣﺔﻴﻧﺎﺜﻟﺍ ﻲﻓ ﺖﺑ ﻮﻠﻴﻛ 128
USB ﺮﺒﻋ ﻞﻴﺠﺴﺘﻟﺍ ﺔﻋﺮﺳ
1
ﻞﻴﺠﺴﺘﻟﺍ ﻒﻠﻣ ﻖﻴﺴﻨﺗ
(.mp3) MP3
(ﻥﺎﻣﺎﻈﻧ) ﺭﺎﺘﻴﺟ ﺲﺒﻘﻣ/ﻥﻮﻓﻭﺮﻜﻴﻣ ﺲﺒﻘﻣ
1 ﻥﻮﻓﻭﺮﻜﻴﻣﻢﻣ 6.3 ﺱﺎﻘﻣ ﺲﺒﻘﻣ ،ﻱﺩﺎﺣﺃ
ﺭﺎﺘﻴﺟ/2 ﻥﻮﻓﻭﺮﻜﻴﻣﻢﻣ 6.3 ﺱﺎﻘﻣ ﺲﺒﻘﻣ ،ﻱﺩﺎﺣﺃ
ﺕﻮﺼﻟﺍ ﻞﺧﺩ
AUX IN 1(ﻡﺎﻈﻨﻟﺍ ﻱﺩﺎﺣﺃ) ﻦﻨﺴﻣ ﺲﺒﻘﻣ ،ﻮﻳﺮﺘﺳﺍ
AUX IN 2ﻢﻣ 3.5 ﺱﺎﻘﻣ ﺲﺒﻘﻣ ،ﻮﻳﺮﺘﺳﺍ
(Line Out) ﺕﻮﺼﻟﺍ ﺝﺮﺨﻣ
AUDIO OUT(ﻡﺎﻈﻨﻟﺍ ﻱﺩﺎﺣﺃ) ﻦﻨﺴﻣ ﺲﺒﻘﻣ ،ﻮﻳﺮﺘﺳﺍ
BLUETOOTH ﻢﺴﻗ
ﺭﺍﺪﺻﻹﺍ2.1+EDR ﺭﺍﺪﺻﺇ Bluetooth
®
ﺔﺌﻔﻟﺍ2 ﺔﺌﻔﻟﺍ
ﺔﻣﻮﻋﺪﻤﻟﺍ ﻒﻳﺮﻌﺘﻟﺍ ﺕﺎﻔﻠﻣ
SPP ،AVRCP ،A2DP
ﻞﻴﻐﺸﺘﻟﺍ ﺩﺩﺮﺗ
FH-SS ﺰﺗﺮﻫ ﺎﺠﻴﺟ 2.4 ﺩﺩﺮﺘﻟﺍ ﻕﺎﻄﻧ
ﻞﻴﻐﺸﺘﻟﺍ ﺔﻓﺎﺴﻣ
ﺮﺼﺒﻟﺍ ﻰﻣﺮﻣ ﻰﻠﻋ ﺭﺎﺘﻣﺃ 10
ﺕﺎﻋﺎﻤﺴﻟﺍ ﻢﺴﻗ
ﺎﻴﻠﻋ ﺔﻴﻣﺎﻣﺃ
ﺕﺎﻋﺎﻤﺴﻟﺍ (ﺕﺍﺪﺣﻭ) ﺓﺪﺣﻭ
ﺩﺩﺮﺘﻟﺍ ﺔﻴﻟﺎﻋ ﺔﻋﺎﻤﺳﻢﺳ 6 ﺱﺎﻘﻣ ﻉﻮﻨﻟﺍ ﺔﻴﻃﻭﺮﺨﻣ
ﻰﻄﺳﻭ ﺔﻴﻣﺎﻣﺃ
ﺕﺎﻋﺎﻤﺴﻟﺍ (ﺕﺍﺪﺣﻭ) ﺓﺪﺣﻭ
ﺩﺩﺮﺘﻟﺍ ﺔﻀﻔﺨﻨﻣ ﺔﻋﺎﻤﺳ
2 ﻢﺳ 10 ﺱﺎﻘﻣ ﻞﻜﺸﻟﺍ ﺔﻴﻃﻭﺮﺨﻣ
ﺔﻀﻔﺨﻨﻤﻟﺍ ﺕﺎﺑﺬﺑﺬﻟﺍ ﺔﻋﺎﻤﺳ
ﺕﺎﻋﺎﻤﺴﻟﺍ (ﺕﺍﺪﺣﻭ) ﺓﺪﺣﻭ
ﺩﺩﺮﺘﻟﺍ ﺔﻀﻔﺨﻨﻣ ﺔﻋﺎﻤﺳﻢﺳ 25 ﺱﺎﻘﻣ ﻉﻮﻨﻟﺍ ﺔﻴﻃﻭﺮﺨﻣ
.ﺭﺎﻌﺷﺇ ﻥﻭﺪﺑ ﺮﻴﻴﻐﺘﻠﻟ ﺔﺿﺮﻋ ﺕﺎﻔﺻﺍﻮﻤﻟﺍ
.ﺔﻴﺒﻳﺮﻘﺗ ﺩﺎﻌﺑﻷﺍﻭ ﻥﺯﻮﻟﺍ
.ﻲﻤﻗﺮﻟﺍ ﻒﻴﻄﻟﺍ ﻞﻠﺤﻣ ﺔﻄﺳﺍﻮﺑ ﻲﻘﻓﺍﻮﺘﻟﺍ ﺐﻴﻛﺮﺘﻠﻟ ﻲﻠﻜﻟﺍ ﻩﻮﺸﺘﻟﺍ ﺔﺒﺴﻧ ﺭﺪﻘ
ُ
ﺗ
ﻞﻣﺎﻜﻟﺍ ﻂﻐﻀﻟﺍ ﻊﺿﻭ ﻲﻓ ﺐﺤﺴﻟﺍ ﺾﺒﻘﻣ
41
中文(简体)
ﻲﺑﺮﻋ
19
RQT9961
ﻲﺑﺮﻋ
ﻞﺋﺎﺳﺮﻟﺍ
.ﺓﺪﺣﻮﻟﺍ ﺔﺷﺎﺷ ﻰﻠﻋ ﺔﻴﻟﺎﺘﻟﺍ ﺔﻣﺪﺨﻟﺍ ﻡﺎﻗﺭﺃ ﻭﺃ ﻞﺋﺎﺳﺮﻟﺍ ﺮﻬﻈﺗ ﺪﻗ
“A NO DEV”
“B NO DEV”
ﻝﻭﺎﺣ ﻢﺛ ،ﺕﺎﻤﻴﻠﻌﺘﻟﺍ ﺃﺮﻗﺍ .ﺢﻴﺤﺻ ﻮﺤﻧ ﻰﻠﻋ USB ﺯﺎﻬﺟ ﻝﺎﺧﺩﺇ ﻢﺘﻳ ﻢﻟ
.(8 R) ﻯﺮﺧﺃ ﺓﺮﻣ
"ADJUST CLOCK"
.ﺎﻬﻄﺒﺿﺎﻓ ؛ﺔﻃﻮﺒﻀﻣ ﺮﻴﻏ ﺔﻋﺎﺴﻟﺍ
“ADJUST TIMER”
ﺖﻗﺆﻣ ﻂﺒﺿﺎﻓ .ﻦﻴﻃﻮﺒﻀﻣ ﺮﻴﻏ ﻞﻴﺠﺴﺘﻟﺍ ﺖﻗﺆﻣ ﻭﺃ/ﻭ ﻞﻴﻐﺸﺘﻟﺍ ﺖﻗﺆﻣ
.ﻞﻴﺠﺴﺘﻟﺍ ﻭﺃ/ﻭ ﻞﻴﻐﺸﺘﻟﺍ
(ﺾﻴﻣﻭ) "AUTO OFF"
ﻥﻮﻀﻏ
ﻲﻓ ﺎﻬﻠﻴﻐﺸﺗ ﻒﻗﻮﺘﻴﺳﻭ ،ﺎ
ً
ﺒﻳﺮﻘﺗ ﺔﻘﻴﻗﺩ 20 ﺓﺪﻤﻟ ﺓﺪﺣﻮﻟﺍ ﻡﺪﺨ
َ
ﺘﺴ
ُ
ﺗ ﻢﻟ
.ءﺍﺮﺟﻹﺍ ﺍﺬﻫ ءﺎﻐﻟﻹ ﺭﺯ ﻱﺃ ﻰﻠﻋ ﻂﻐﺿﺎﻓ .ﺓﺪﺣﺍﻭ ﺔﻘﻴﻗﺩ
“CAN’T REC”
ﺯﺎﻬﺟ ﻞﻔﻗ ءﺎﻐﻟﺈﺑ ﻚﻴﻠﻌﻓ . USB ﺯﺎﻬﺟ ﻞﻔﻗ ﺪﻨﻋ ﻞﻴﺠﺴﺘﻟﺍ ءﺍﺮﺟﺇ ﻚﻨﻜﻤﻳ ﻻ
.ﻯﺮﺧﺃ ﺓﺮﻣ ﻝﻭﺎﺣ ﻢﺛ ،USB
“DEVICE FULL”
ﻞﻗﺃ USB ﺯﺎﻬﺠﻟ ﻲﻘﺒﺘﻤﻟﺍ ﻞﻴﺠﺴﺘﻟﺍ ﺖﻗﻭ ﻥﻷ ؛ﻞﻴﺠﺴﺘﻟﺍ ءﺍﺮﺟﺇ ﻦﻜﻤﻳ ﻻ
.ﻰﻘﻴﺳﻮﻤﻟﺍ ﺭﺪﺼﻣ ﻰﻠﻋ ﺡﺎﺘﻤﻟﺍ ﺖﻗﻮﻟﺍ ﻲﻟﺎﻤﺟﺇ ﻦﻣ
ِ
ﺮﺟﺃ ﻢﺛ ،
ٍ
ﻑﺎﻛ ﻞﻴﺠﺴﺗ ﺖﻗﻭ ﺢﻴﺘﻳ USB ﺯﺎﻬﺠﺑ ﻚﻳﺪﻟ ﺯﺎﻬﺠﻟﺍ ﻝﺪﺒﺘﺳﺍ
.ﻯﺮﺧﺃ ﺓﺮﻣ ﻞﻴﺠﺴﺘﻟﺍ
"ERROR"
.ﻯﺮﺧﺃ ﺓﺮﻣ ﻝﻭﺎﺣ ﻢﺛ ،ﺕﺎﻤﻴﻠﻌﺘﻟﺍ ﺃﺮﻗﺍ .ﺔﺤﻴﺤﺻ ﺮﻴﻏ ﺔﻴﻠﻤﻋ ءﺍﺮﺟﺇ ﻢﺗ
(ﻞﻴﺠﺴﺘﻟﺍ ءﺎﻨﺛﺃ) "ERROR"
.ﺮﺧﺁ ﺕﻮﺻ ﺭﺪﺼﻣ ﺭﺎﻴﺘﺧﺍ ﻚﻨﻜﻤﻳ ﻻ
ﻭﺃ [/] ﻰﻠﻋ ﻂﻐﺿﺍ ﻭﺃ (ﺎﻫﺮﻴﻏﻭ USB ﺯﺎﻬﺟ :ﻝﺎﺜﻣ)
.ﻞﻴﺠﺴﺘﻟﺍ ﺔﻔﻴﻇﻭ ﻒﻗﻭﺄﻓ .ﻞﻴﺠﺴﺘﻟﺍ ءﺎﻨﺛﺃ [/]
(.ﻢﻗﺭ ﻦﻋ ﺎ
ً
ﺒﺋﺎﻧ ﺍ
ً
ﺮﺼﻨﻋ " " ﻊﺑﺮﻤﻟﺍ ﺮﺒﺘﻌﻳ) "F"
.ﺓﺪﺣﻮﻟﺎﺑ ﺔﻠﻜﺸﻣ ﺪﺟﻮﻳ
ﺮﺸﺘﺳﺍﻭ ،ﺩﺩﺮﺘﻤﻟﺍ ﻲﺋﺎﺑﺮﻬﻜﻟﺍ ﺭﺎﻴﺘﻟﺍ ﺲﺑﺎﻗ ﻞﺼﻓﺍﻭ ،ﺽﻭﺮﻌﻤﻟﺍ ﻢﻗﺮﻟﺍ ﻥ
ﱢ
ﻭﺩ
.ﻪﻌﻣ ﻞﻣﺎﻌﺘﺗ ﻱﺬﻟﺍ ﻉﺯﻮﻤﻟﺍ
"GUITAR SWITCH ON"
ﺭﺯ ﻥﻮﻜﻳ ﺎﻣﺪﻨﻋ Karaoke ﺮﻴﺛﺄﺗ ﺔﻔﻴﻇﻭ ﻡﺍﺪﺨﺘﺳﺍ ﻦﻜﻤﻳ ﻻ
.ﺮﻳﺮﺤﺘﻟﺍ ﻊﺿﻭ ﻰﻟﺇ ﻩﺮﻴﻴﻐﺘﺑ ﻚﻴﻠﻌﻓ .ﺎ
ً
ﻃﻮﻐﻀﻣ [
MIC
]
(16 R)
"INVALID"
ﺢﻴﺗﺎﻔﻤﻟﺍ ﺔﻄﺳﺍﻮﺑ ﻢﻜﺤﺘﻟﺍﻭ ﻯﺪﺼﻟﺍﻭ ﺔﻴﺋﺎﻨﻐﻟﺍ ﺔﻤﻐﻨﻟﺍ ءﺎﻐﻟﺇ ﺭﺎﻴﺘﺧﺍ ﻚﻨﻜﻤﻳ ﻻ
.ﻞﻤﻌﻟﺍ ﻦﻋ ﺎ
ً
ﻔﻗﻮﺘﻣ Karaoke ﺮﻴﺛﺄﺗ ﻊﺿﻭ ﻥﻮﻜﻳ ﺎﻣﺪﻨﻋ
ﺭﺎﻴﺘﺧﻻ ﺓﺪﺣﻮﻟﺎﺑ [KARAOKE] ﻰﻠﻋ ﻂﻐﺿﺍ
(16 R
)
."ON KARAOKE"
“NO PLAY”
“UNSUPPORT”
( 3 R) .ﻂﻘﻓ ﻡﻮﻋﺪﻤﻟﺍ ﻖﻴﺴﻨﺘﻟﺍ ﻞﻴﻐﺸﺗ ﻚﻨﻜﻤﻳ ﺚﻴﺣ ؛ﻯﻮﺘﺤﻤﻟﺍ ﺺﺤﻓﺍ
ﺯﺎﻬﺟ ﺔﺌﻴﻬﺘﺑ ﻢﻘﻓ ؛ﻒﻠﺘﻠﻟ USB ﺯﺎﻬﺟ ﻰﻠﻋ ﺔﻧﺰﺨﻤﻟﺍ ﺕﺎﻔﻠﻤﻟﺍ ﺽﺮﻌﺘﺗ ﺪﻗ
.ﻯﺮﺧﺃ ﺓﺮﻣ ﻝﻭﺎﺣ ﻢﺛ ،USB
.ﺎﻬﻠﻴﻐﺸﺗ ﺪﻋﺃ ﻢﺛ ،ﺓﺪﺣﻮﻟﺍ ﻞﻴﻐﺸﺗ ﻒﻗﻭﺃ .ﺓﺪﺣﻮﻟﺎﺑ ﺔﻠﻜﺸﻣ ﺪﺟﻮﺗ ﺪﻗ
“NO TRACK”
. USB ﺯﺎﻬﺟ ﻲﻓ ﺭﺎﺴﻣ ﻭﺃ ﻡﻮﺒﻟﺃ ﺪﺟﻮﻳ ﻻ
“PLAYERROR”
ﻞ
ﱢ
ﻐﺸﻳﻭ ،ﺭﺎﺴﻤﻟﺍ ﺍﺬﻫ ﻡﺎﻈﻨﻟﺍ ﻰﻄﺨﺘﻴﺴﻓ .ﻡﻮﻋﺪﻣ ﺮﻴﻏ MP3 ﻒﻠﻣ ﺖﻠ
ﱠ
ﻐﺷ
.ﻲﻟﺎﺘﻟﺍ ﺭﺎﺴﻤﻟﺍ
“REC ERROR”
ِ
ﺮﺟﺃ ﻢﺛ ، USB ﺯﺎﻬﺟ ﻞ
ﱢ
ﺻﻮﻓ .ﻞﻴﺠﺴﺘﻟﺍ ءﺎﻨﺛﺃ USB ﺯﺎﻬﺟ ﻞﺼﻓ ﻯﺮﺟ
.ﻯﺮﺧﺃ ﺓﺮﻣ ﻞﻴﺠﺴﺘﻟﺍ
(.ﻢﻗﺭ ﻦﻋ ﺎ
ً
ﺒﺋﺎﻧ ﺍ
ً
ﺮﺼﻨﻋ " " ﻊﺑﺮﻤﻟﺍ ﺮﺒﺘﻌﻳ) "REMOTE "
ﺮ
ّ
ﻴﻏ .ﺔﻔﻠﺘﺨﻣ ﺯﻮﻣﺭ ﺔﻴﺴﻴﺋﺮﻟﺍ ﺓﺪﺣﻮﻟﺍﻭ ﺪﻌﺑ ﻦﻋ ﻢﻜﺤﺘﻟﺍ ﺯﺎﻬﺟ
ﻡﺪﺨﺘﺴﻳ
.ﺪﻌﺑ ﻦﻋ ﻢﻜﺤﺘﻟﺍ ﺯﺎﻬﺠﺑ ﺰﻣﺮﻟﺍ
ﻭ [ –OK] ﻰﻠﻋ
ً
ﻻﻮﻄﻣ ﺎ
ً
ﻄﻐﺿ ﻂﻐﺿﺍ ،"REMOTE 1" ﺽﺮﻋ ﺪﻨﻋ
.ﻞﻗﻷﺍ ﻰﻠﻋ
ٍ
ﻥﺍﻮﺛ
4 ﺓﺪﻤﻟ ﺪﻌﺑ ﻦﻋ ﻢﻜﺤﺘﻟﺍ ﺯﺎﻬﺠﺑ [
]
[ –OK] ﻰﻠﻋ
ً
ﻻﻮﻄﻣ ﺎ
ً
ﻄﻐﺿ ﻂﻐﺿﺍ ،"REMOTE 2" ﺽﺮﻋ ﺪﻨﻋ
.ﻞﻗﻷﺍ ﻰﻠﻋ
ٍ
ﻥﺍﻮﺛ
4 ﺓﺪﻤﻟ ﺪﻌﺑ ﻦﻋ ﻢﻜﺤﺘﻟﺍ ﺯﺎﻬﺠﺑ [USB]ﻭ
“TEMP NG”
ﻱﺮﺠﻴﺳﻭ ،ﺓﺭﺍﺮﺤﻟﺍ ﺔﺟﺭﺩ ﻉﺎﻔﺗﺭﺍ ﻦﻣ ﺔﻳﺎﻤﺤﻟﺍ ﺓﺮﺋﺍﺩ ﻂﻴﺸﻨﺗ ﻯﺮﺟ ﺪﻗ
.ﻯﺮﺧﺃ ﺓﺮﻣ ﻡﺎﻈﻨﻟﺍ ﻞﻴﻐﺸﺗ ﻞﺒﻗ ﺩﺮﺒﺘﻟ ﺓﺪﺣﻮﻟﺍ ﻙﺮﺗﺎﻓ .ﻡﺎﻈﻨﻟﺍ ﻞﻴﻐﺸﺗ ﻑﺎﻘﻳﺇ
.ﺓﺪﺣﻮﻟﺎﺑ ﺔﻳﻮﻬﺘﻟﺍ ﺔﺤﺘﻓ ﻡﺎﻣﺃ ﻖﺋﺍﻮﻋ ﺩﻮﺟﻭ ﻡﺪﻋ ﻦﻣ ﻖﻘﺤﺗ
.ﺓﺪﺣﻮﻠﻟ ﺓﺪﻴﺟ ﺔﻳﻮﻬﺗ ﺮﻴﻓﻮﺗ ﻦﻣ ﺪﻛﺄﺗﻭ
“USB OVER CURRENT ERROR”
ﻢﺛ ، USB ﺯﺎﻬﺟ ﻞﺼﻓﺍ .ﺔﻗﺎﻄﻟﺍ ﻦﻣ
ً
ﻼﺋﺎﻫ ﺍ
ً
ﺭﺪﻗ USB ﺯﺎﻬﺟ ﻚﻠﻬﺘﺴﻳ
.ﺓﺪﺣﻮﻟﺍ ﻞﻴﻐﺸﺗ ﻒﻗﻭﺃ
"VBR"
ﺖﺒﻟﺍ ﻝﺪﻌﻣ ﺕﺍﺫ ﺕﺍﺭﺎﺴﻤﻠﻟ ﻲﻘﺒﺘﻤﻟﺍ ﻞﻴﻐﺸﺘﻟﺍ ﺖﻗﻭ ﻡﺎﻈﻨﻟﺍ ﺽﺮﻌﻳ ﻻ
.(VBR) ﺮﻴﻐﺘﻤﻟﺍ
42
RQT9961
18
.ﺱﺎﺳﻷﺍ ﻦﻣ ﺕﻮﺻ ﺭﺪﺼﻳ ﻻ ﻭﺃ ،ﺵﻮﺸﻣ ﺕﻮﺼﻟﺍ
.ﻡﺎﻈﻨﻟﺎﺑ ﺕﻮﺼﻟﺍ ﻯﻮﺘﺴﻣ ﻂﺒﺿﺍ
ﺓﺮﻣ ﻡﺎﻈﻨﻟﺍ ﻞﻐﺷ ﻢﺛ ،ﺎﻬﺠﻟﺎﻋﻭ ﺔﻠﻜﺸﻤﻟﺍ ﺐﺒﺳ ﺩﺪﺣﻭ ،ﻡﺎﻈﻨﻟﺍ ﻞﻴﻐﺸﺗ ﻒﻗﻭﺃ
ﻉﺎﻔﺗﺭﺍ ﺐﺒﺴﺑ ﺕﺎﻋﺎﻤﺴﻟﺍ ﺩﺎﻬﺟﻹ ﺔﺠﻴﺘﻧ ﻚﻟﺫ ﺙﺪﺤﻳ ﻥﺃ ﻦﻜﻤﻳﻭ .ﻯﺮﺧﺃ
ﺔﺌﻴﺑ ﻲﻓ ﻡﺎﻈﻨﻟﺍ ﻡﺍﺪﺨﺘﺳﺍ ﺔﻟﺎﺣ ﻲﻓﻭ ،ﺔﻃﺮﻔﻤﻟﺍ ﺔﻗﺎﻄﻟﺍ ﻭﺃ ،ﻁﺮﻔﻤﻟﺍ ﺕﻮﺼﻟﺍ
.ﺓﺭﺎﺣ
.ﺽﺎﻔﺨﻧﻼﻟ ﺕﻮﺼﻟﺍ ﻯﻮﺘﺴﻣ ﺽﺮﻌﺘﻳ
ﻯﻮﺘﺴﻤﺑ ﻞﺻﺍﻮﺘﻤﻟﺍ ﻡﺍﺪﺨﺘﺳﻻﺍ ﺐﺒﺴﺑ ﺔﻳﺎﻤﺤﻟﺍ ﺓﺮﺋﺍﺩ ﻂﻴﺸﻨﺗ ﻯﺮﺟ ﺪﻗ
ﺓﺩﻮﺟ ﺔﻧﺎﻴﺻﻭ ،ﻡﺎﻈﻨﻟﺍ ﺔﻳﺎﻤﺣ ﻰﻟﺇ ﺓﺮﺋﺍﺪﻟﺍ ﻩﺬﻫ ﻑﺪﻬﺗﻭ .ﻊﻔﺗﺮﻣ ﺕﻮﺻ
.ﺕﻮﺼﻟﺍ
ﺪﻌﺑ ﻦﻋ ﻢﻜﺤﺘﻟﺍ ﺯﺎﻬﺟ
.ﺍ
ً
ﺪﻴﺟ ﻞﻤﻌﻳ ﻻ ﺪﻌﺑ ﻦﻋ ﻢﻜﺤﺘﻟﺍ ﺯﺎﻬﺟ
.ﺢﻴﺤﺻ ﺮﻴﻏ ﻮﺤﻧ ﻰﻠﻋ ﺎﻬﻟﺎﺧﺩﺇ ﻯﺮﺟ ﻭﺃ ،ﺓﺪﻔﻨ
َ
ﺘﺴ
ُ
ﻣ ﺔﻳﺭﺎﻄﺒﻟﺍ ﺔﻗﺎﻃ
(6 R)
USB
.[/] ﺭﺯ ﻰﻠﻋ ﻂﻐﻀﻟﺍ ﺪﻨﻋ ﺔﺑﺎﺠﺘﺳﺍ ﺪﺟﻮﺗ ﻻ
ﻞﻴﻐﺸﺗ ﻒﻗﻭﺃ ،ﻚﻟﺫ ﻦﻣ
ً
ﻻﺪﺑ ﻭﺃ .ﻪﻠﻴﺻﻮﺗ ﺪﻋﺃ ﻢﺛ ، USB ﺯﺎﻬﺟ ﻞﺼﻓﺍ
.ﺎﻬﻠﻴﻐﺸﺗ ﺪﻋﺃ ﻢﺛ ،ﺓﺪﺣﻮﻟﺍ
.ﻪﻴﻠﻋ ﺓﺩﻮﺟﻮﻤﻟﺍ ﺕﺎﻳﻮﺘﺤﻤﻟﺍ ﻭﺃ USB ﺯﺎﻬﺟ ﺓءﺍﺮﻗ ﺭﺬﻌﺘﻳ
ﺓﺪﺣﻮﻟﺍ ﻊﻣ ﻪﻴﻠﻋ ﺓﺩﻮﺟﻮﻤﻟﺍ ﺕﺎﻳﻮﺘﺤﻤﻟﺍ ﻭﺃ USB ﺯﺎﻬﺟ ﻖﻴﺴﻨﺗ ﻖﻓﺍﻮﺘﻳ ﻻ
.(3 R)
. USB ﺓﺰﻬﺟﺃ ﺾﻌﺑ ﻊﻣ ﺞﺘﻨﻤﻟﺍ ﺍﺬﻬﻟ USB ﻒﻴﻀﻣ ﺔﻔﻴﻇﻭ ﻞﻤﻌﺗ ﻻ ﺪﻗ
.ءﻂﺒﺑ USB ﺯﺎﻬﺟ ﻞﻤﻌﻳ
ﺓﺮﻛﺍﺬﻟﺍ ﻭﺫ USB ﺯﺎﻬﺟ ﻭﺃ ﺓﺮﻴﺒﻜﻟﺍ ﻡﺎﺠﺣﻷﺍ ﺕﺍﺫ ﺕﺎﻔﻠﻤﻟﺍ ﺓءﺍﺮﻗ ﻕﺮﻐﺘﺴﺗ
.ﻝﻮﻃﺃ ﺎ
ً
ﺘﻗﻭ ﺔﻴﻟﺎﻌﻟﺍ
.ﻲﻠﻌﻔﻟﺍ ﻞﻴﻐﺸﺘﻟﺍ ﺖﻗﻭ ﻦﻋ ﺽﻭﺮﻌﻤﻟﺍ ﻲﻀﻘﻨﻤﻟﺍ ﺖﻗﻮﻟﺍ ﻒﻠﺘﺨﻳ
،ﺎ
ً
ﻴﻃﺎﻴﺘﺣﺍ ﺎ
ً
ﺨﺴﻧ ﺕﺎﻧﺎﻴﺒﻟﺍ ﺦﺴﻧﺍ ﻭﺃ ،ﺮﺧﺁ USB ﺯﺎﻬﺟ ﻰﻠﻋ ﺕﺎﻧﺎﻴﺒﻟﺍ ﺦﺴﻧﺍ
.USB ﺯﺎﻬﺟ ﺔﺌﻴﻬﺗ ﺪﻋﺃ ﻢﺛ
Bluetooth
®
ﺔﻴﻨﻘﺗ
.ﻥﺍﺮﺘﻗﻻﺍ ﻡﺎﻤﺗﺇ ﻦﻜﻤﻳ ﻻ
. Bluetooth
®
ﺯﺎﻬﺟ ﺔﻟﺎﺣ ﻦﻣ ﻖﻘﺤﺗ
.ﺯﺎﻬﺠﻟﺎﺑ ﻝﺎﺼﺗﻻﺍ ﻦﻜﻤﻳ ﻻ
ﻥﺮﻘ
ُ
ﺗ ﻥﺃ ﻝﻭﺎﺣ .ﻞﻴﺠﺴﺘﻟﺍ ﻝﺍﺪﺒﺘﺳﺍ ﻯﺮﺟ ﺪﻗ ﻭﺃ ،ﺯﺎﻬﺠﻟﺎﺑ ﻝﺎﺼﺗﻻﺍ ﺢﺠﻨﻳ ﻢﻟ
(8 R) .ﻯﺮﺧﺃ ﺓﺮﻣ ﺯﺎﻬﺠﻟﺍ
ﺯﺎﻬﺠﻟﺎﺑ ﻝﺎﺼﺗﻻﺍ ﻊﻄﻗﺎﻓ .ﻒﻠﺘﺨﻣ ﺯﺎﻬﺠﺑ ﺔﻠﺼﺘﻣ ﺓﺪﺣﻮﻟﺍ ﻩﺬﻫ ﻥﻮﻜﺗ ﺪﻗ
(8 R) .ﺔﻠﺼﻟﺍ ﻱﺫ ﺯﺎﻬﺠﻟﺎﺑ ﻥﺍﺮﺘﻗﻻﺍ ﺓﺩﺎﻋﺇ ﻝﻭﺎﺣ ﻢﺛ ،ﺮﺧﻵﺍ
.ﻯﺮﺧﺃ ﺓﺮﻣ ﻝﻭﺎﺣ ﻢﺛ ،ﺓﺪﺣﻮﻟﺍ ﻞﻴﻐﺸﺗ ﻒﻗﻭﺄﻓ ،ﺔﻠﻜﺸﻤﻟﺍ ﺕﺮﻤﺘﺳﺍ ﺍﺫﺇ
.ﺓﺪﺣﻮﻟﺍ ﻩﺬﻫ ﺮﺒﻋ ﺕﻮﺼﻟﺍ ﻉﺎﻤﺳ ﺭﺬﻌﺘﻳ ﻦﻜﻟﻭ ،ﻞﺼﺘﻣ ﺯﺎﻬﺠﻟﺍ
ﻦﻴﻌﺘﻳ ،ﺔﻴﻠﺧﺍﺩ Bluetooth
®
ﺔﻴﻨﻘﺘﺑ ﺓﺩﻭﺰﻤﻟﺍ ﺓﺰﻬﺟﻷﺍ ﺾﻌﺒﺑ ﻖﻠﻌﺘﻳ ﺎﻤﻴﻓ
ﺕﺎﻤﻴﻠﻌﺗ ﺃﺮﻗﺍ .ﺎ
ً
ﻳﻭﺪﻳ "SC-CMAX5" ﻰﻠﻋ ﺕﻮﺼﻟﺍ ﺝﺮﺧ ﻂﺒﺿ ﻚﻴﻠﻋ
.ﻞﻴﺻﺎﻔﺗ ﻰﻠﻋ ﻝﻮﺼﺤﻠﻟ ﺯﺎﻬﺠﻟﺎﺑ ﺔﺻﺎﺨﻟﺍ ﻞﻴﻐﺸﺘﻟﺍ
.ﻊﻄﻘﺘﻣ ﺕﻮﺼﻟﺍ
ﺏﺭﺎﻘﻓ .ﺭﺎﺘﻣﺃ 10 ﺎﻫﺭﺪﻗ ﺔﻓﺎﺴﻣ ﺪﺘﻤﻳ ﻱﺬﻟﺍ ﻝﺎﺼﺗﻻﺍ ﻕﺎﻄﻧ ﺝﺭﺎﺧ ﺯﺎﻬﺠﻟﺍ
.ﺓﺪﺣﻮﻟﺍﻭ Bluetooth
®
ﺯﺎﻬﺟ ﻦﻴﺑ
.ﺯﺎﻬﺠﻟﺍﻭ ﺓﺪﺣﻮﻟﺍ ﻦﻴﺑ ﺶﻳﻮﺸﺗ ﻱﺃ ﻝ
ِ
ﺯﺃ
2.4 ﻩﺭﺪﻗ ﺩﺩﺮﺗ ﻕﺎﻄﻧ ﻡﺪﺨﺘﺴﺗ ﻲﺘﻟﺍ ﻯﺮﺧﻷﺍ ﺓﺰﻬﺟﻷﺍ ﻦﻣ ﻞﺧﺍﺪﺗ ﺙﺪﺤﻳ
ﺔﻴﻜﻠﺳﻼﻟﺍ ﻒﺗﺍﻮﻬﻟﺍﻭ ﻒﻳﻭﻭﺮﻜﻴﻤﻟﺍ ﻥﺍﺮﻓﺃﻭ ﻲﻜﻠﺳﻼﻟﺍ ﻪﺟﻮﻤﻟﺎﻛ ﺰﺗﺮﻫ ﺎﺠﻴﺟ
ﻪﻨﻴﺑ ﺪﻋﺎﺑﻭ ،ﺓﺪﺣﻮﻟﺍﻭ Bluetooth
®
ﺯﺎﻬﺟ ﻦﻴﺑ ﺏﺭﺎﻘﻓ .ﻚﻟﺫ ﻰﻟﺇ ﺎﻣﻭ
.ﻯﺮﺧﻷﺍ ﺓﺰﻬﺟﻷﺍ ﻦﻴﺑﻭ
( 9 R) .ﺖﺑﺎﺛ ﻝﺎﺼﺗﺍ ءﺍﺮﺟﻹ "MODE 1" ﺮﺘﺧﺍ
43
17
RQT9961
ﻲﺑﺮﻋ
44
ﺞﻣﺎﻧﺮﺒﻟﺍ ﺚﻳﺪﺤﺗ
ﻩﺬﻬﺑ ﺹﺎﺨﻟﺍ ﺞﻣﺎﻧﺮﺒﻠﻟ ﺎ
ً
ﺜﻳﺪﺤﺗ ﺮﺧﻵ ﻥﺁ ﻦﻣ Panasonic ﺔﻛﺮﺷ ﺭﺪﺼﺗ ﺪﻗ
ﺕﺍﺰﻴﻤﻟﺍ ﻞﻤﻋ ﺔﻘﻳﺮﻃ ﻦﻴﺴﺤﺗ ﻭﺃ ،ﺓﺪﻳﺪﺟ ﺕﺍﺰﻴﻣ ﺔﻓﺎﺿﺇ ﻪﻧﺄﺷ ﻦﻣ ؛ﺓﺪﺣﻮﻟﺍ
.ﺎ
ً
ﻧﺎﺠﻣ ﺔﺣﺎﺘﻣ ﺕﺎﺜﻳﺪﺤﺘﻟﺍ ﻩﺬﻫﻭ .ﻞﻌﻔﻟﺎﺑ ﺓﺩﻮﺟﻮﻤﻟﺍ
.ﻲﻟﺎﺘﻟﺍ ﺐﻳﻮﻟﺍ ﻊﻗﻮﻣ ﻊﺟﺍﺭ ،ﻞﻴﺻﺎﻔﺘﻟﺍ ﻦﻣ ﺪﻳﺰﻣ ﻰﻠﻋ ﻝﻮﺼﺤﻠﻟ
http://panasonic.jp/support/global/cs/
(.ﻂﻘﻓ ﺔﻳﺰﻴﻠﺠﻧﻹﺍ ﺔﻐﻠﻟﺎﺑ ﺡﺎﺘﻣ ﻊﻗﻮﻤﻟﺍ ﺍﺬﻫ)
ﺞﻣﺎﻧﺮﺒﻟﺍ ﺭﺍﺪﺻﺇ ﻦﻣ ﻖﻘﺤﺘﻟﺍ
.ﺖﺒﺜﻤﻟﺍ ﺞﻣﺎﻧﺮﺒﻟﺍ ﺭﺍﺪﺻﺇ ﺽﺮﻌ
ُ
ﻳ
ﻢﺛ ،"SW VER." ﺭﺎﻴﺘﺧﻻ ﺭﺮﻜﺘﻣ ﻞﻜﺸﺑ [SETUP] ﻰﻠﻋ ﻂﻐﺿﺍ
.[OK] ﻰﻠﻋ ﻂﻐﺿﺍ
.ءﺎﻬﻧﻺﻟ [ OK] ﻰﻠﻋ ﻂﻐﺿﺍ
ﺪﻌﺑ ﻦﻋ ﻢﻜﺤﺘﻟﺍ ﺯﺎﻬﺟ ﺰﻣﺭ
،ﻖﺤﻠﻤﻟﺍ ﺪﻌﺑ ﻦﻋ ﻢﻜﺤﺘﻟﺍ ﺯﺎﻬﺠﻟ ﻯﺮﺧﻷﺍ Panasonic ﺓﺰﻬﺟﺃ ﺐﻴﺠﺘﺴﺗ ﺎﻣﺪﻨﻋ
.ﺪﻌﺑ ﻦﻋ ﻢﻜﺤﺘﻟﺍ ﺯﺎﻬﺟ ﺰﻣﺭ ﺮﻴﻴﻐﺘﺑ ﻚﻴﻠﻋ
ﺩﺍﺪﻌﺘﺳﻻﺍ
."AUX 2" ﻭﺃ "AUX 1" ﺭﺎﻴﺘﺧﻻ [AUX] ﻰﻠﻋ ﻂﻐﺿﺍ
" REMOTE 2" ﻰﻠﻋ ﺰﻣﺮﻟﺍ ﻂﺒﻀﻟ
ً
ﻻﻮﻄﻣ ﺎ
ً
ﻄﻐﺿ ﻂﻐﺿﺍ ،ﺓﺪﺣﻮﻟﺎﺑ [USB] ﻰﻠﻋ
ً
ﻻﻮﻄﻣ ﻂﻐﻀﻟﺍ ءﺎﻨﺛﺃ
1
ﺔﻟﺎﺳﺭ ﺮﻬﻈﺗ ﻥﺃ ﻰﻟﺇ ﺪﻌﺑ ﻦﻋ ﻢﻜﺤﺘﻟﺍ ﺯﺎﻬﺠﺑ [AUX] ﻰﻠﻋ
.ﺓﺪﺣﻮﻟﺎﺑ ﺽﺮﻌﻟﺍ ﺔﺷﺎﺷ ﻰﻠﻋ "REMOTE 2"
ﺓﺪﻤﻟ ﺪﻌﺑ ﻦﻋ ﻢﻜﺤﺘﻟﺍ ﺯﺎﻬﺠﺑ [USB]ﻭ [OK] ﻰﻠﻋ
ً
ﻻﻮﻄﻣ ﻂﻐﺿﺍ 2
.ﻞﻗﻷﺍ ﻰﻠﻋ
ٍ
ﻥﺍﻮﺛ
4
" REMOTE 1" ﻰﻠﻋ ﺰﻣﺮﻟﺍ ﻂﺒﻀﻟ
ً
ﻻﻮﻄﻣ ﺎ
ً
ﻄﻐﺿ ﻂﻐﺿﺍ ،ﺓﺪﺣﻮﻟﺎﺑ [USB] ﻰﻠﻋ
ً
ﻻﻮﻄﻣ ﻂﻐﻀﻟﺍ ءﺎﻨﺛﺃ
1
ﺔﻟﺎﺳﺭ ﺮﻬﻈﺗ ﻥﺃ ﻰﻟﺇ ﺪﻌﺑ ﻦﻋ ﻢﻜﺤﺘﻟﺍ ﺯﺎﻬﺠﺑ [USB] ﻰﻠﻋ
.ﺓﺪﺣﻮﻟﺎﺑ ﺽﺮﻌﻟﺍ ﺔﺷﺎﺷ ﻰﻠﻋ "REMOTE 1"
ﺓﺪﻤﻟ ﺪﻌﺑ ﻦﻋ ﻢﻜﺤﺘﻟﺍ ﺯﺎﻬﺠﺑ [
]ﻭ [OK] ﻰﻠﻋ
ً
ﻻﻮﻄﻣ ﻂﻐﺿﺍ 2
.ﻞﻗﻷﺍ ﻰﻠﻋ
ٍ
ﻥﺍﻮﺛ 4
ﺎﻬﺣﻼﺻﺇﻭ ﻝﺎﻄﻋﻷﺍ ﻑﺎﺸﻜﺘﺳﺍ
ﺎﻤﻴﻓ ﻚﺸﻟﺍ ﻙﺭﻭﺎﺳ ﺍﺫﺇ .ﺔﻴﻟﺎﺘﻟﺍ ﺺﺤﻔﻟﺍ ﺕﺍءﺍﺮﺟﺈﺑ ﻢﻗ ،ﺔﻧﺎﻴﺼﻟﺍ ﺐﻠﻃ ﻞﺒﻗ
ﻞﻴﻟﺪﻟﺍ ﻲﻓ ﺔﺣﺮﺘﻘﻤﻟﺍ ﻝﻮﻠﺤﻟﺍ ﺪﻋﺎﺴﺗ ﻢﻟ ﺍﺫﺇ ﻭﺃ ،ﺺﺤﻔﻟﺍ ﻁﺎﻘﻧ ﺾﻌﺒﺑ ﻖﻠﻌﺘﻳ
ﻰﻠﻋ ﻝﻮﺼﺤﻠﻟ ﻪﻌﻣ ﻞﻣﺎﻌﺘﺗ ﻱﺬﻟﺍ ﻉﺯﻮﻤﻟﺍ ﺮﺸﺘﺳﺎﻓ ،ﺔﻠﻜﺸﻤﻟﺍ ﻞﺣ ﻰﻠﻋ ﻲﻟﺎﺘﻟﺍ
.ﺕﺍﺩﺎﺷﺭﺇ
ﻊﻨﺼﻤﻟﺎﺑ ﻲﺿﺍﺮﺘﻓﻻﺍ ﻂﺒﻀﻟﺍ ﻰﻟﺇ ﺕﺍﺩﺍﺪﻋﻹﺍ ﻊﻴﻤﺟ ﺓﺩﺎﻋﻹ
:ﺓﺮﻛﺍﺬﻟﺍ ﻂﺒﺿ ﺪﻋﺃ ،ﺔﻴﻟﺎﺘﻟﺍ ﻒﻗﺍﻮﻤﻟﺍ ﺙﻭﺪﺣ ﺪﻨﻋ
.ﺭﺍﺭﺯﺃ ﻰﻠﻋ ﻂﻐﻀﻟﺍ ﺪﻨﻋ ﺔﺑﺎﺠﺘﺳﺍ ﺩﻮﺟﻭ ﻡﺪﻋ
.ﺎﻬﻄﺒﺿ ﺓﺩﺎﻋﺇﻭ ﺓﺮﻛﺍﺬﻟﺍ ﺕﺎﻳﻮﺘﺤﻣ ﺢﺴﻣ ﻲﻓ ﺔﺒﻏﺮﻟﺍ
ﻦﻋ ﻞﻘﺗ ﻻ ﺓﺪﻤﻟ ﺮﻈﺘﻧﺍ) .ﺩﺩﺮﺘﻤﻟﺍ ﻲﺋﺎﺑﺮﻬﻜﻟﺍ ﺭﺎﻴﺘﻟﺍ ﺲﺑﺎﻗ ﻞﺼﻓﺍ
(. ﺓﻮﻄﺨﻟﺍ ﻰﻟﺇ ﺔﻌﺑﺎﺘﻤﻟﺍ ﻞﺒﻗ ﻖﺋﺎﻗﺩ 3
ﻞﻴﺻﻮﺗ ﺪﻋﺃ ،ﺓﺪﺣﻮﻟﺍ ﻰﻠﻋ [/I] ﺭﺯ ﻰﻠﻋ
ً
ﻻﻮﻄﻣ ﻂﻐﻀﻟﺍ ءﺎﻨﺛﺃ
.ﺩﺩﺮﺘﻤﻟﺍ ﻲﺋﺎﺑﺮﻬﻜﻟﺍ ﺭﺎﻴﺘﻟﺍ ﺲﺑﺎﻗ
ﺔﺷﺎﺷ ﻰﻠﻋ "--------" ﺮﻬﻈﻳ ﻥﺃ ﻰﻟﺇ [ /I] ﺭﺯ ﻰﻠﻋ ﻂﻐﻀﻟﺍ ﻲﻓ ﺮﻤﺘﺳﺍ
.ﺽﺮﻌﻟﺍ
.[/I] ﺭﺯ ﺭﺮﺣ
ﻂﺒﺿ ﺓﺩﺎﻋﺇ ﻰﻟﺇ ﺝﺎﺘﺤﺘﺳ .ﻊﻨﺼﻤﻟﺎﺑ ﻲﺿﺍﺮﺘﻓﻻﺍ ﻂﺒﻀﻟﺍ ﻰﻟﺇ ﺕﺍﺩﺍﺪﻋﻹﺍ ﻊﻴﻤﺟ ﺩﻮﻌﺗ
.ﺓﺮﻛﺍﺬﻟﺎﺑ ﺔﻧﺰﺨﻤﻟﺍ ﺮﺻﺎﻨﻌﻟﺍ
ﻡﺎﻋ
.ﻞﻴﻐﺸﺘﻟﺍ ءﺎﻨﺛﺃ ﻦﻴﻨﻃ ﺕﻮﺻ ﺭﺪﺼﻳ
ﺔﺑﺮﻘﻣ ﻰﻠﻋ ﺖﻨﺳﺭﻮﻠﻓ ﺢﻴﺑﺎﺼﻣ ﻭﺃ ﺩﺩﺮﺘﻤﻟﺍ ﻲﺋﺎﺑﺮﻬﻜﻟﺍ ﺭﺎﻴﺘﻟﺍ ﺲﺑﺎﻗ ﻥﺎﻛ ﺍﺫﺇ
.ﺕﻼﺒﻜﻟﺍ ﻦﻴﺑﻭ ﻙﻼﺳﻷﺍﻭ ﻯﺮﺧﻷﺍ ﺓﺰﻬﺟﻷﺍ ﻦﻴﺑ ﺪﻋﺎﺒﻓ ،ﻙﻼﺳﻷﺍ ﻦﻣ
.ﻞﻤﻌﺗ ﻻ ﺓﺪﺣﻮﻟﺍ
.ﺓﺪﺣﻮﻟﺎﺑ ﻥﺎﻣﻷﺍ ﺓﺰﻬﺟﺃ ﺪﺣﺃ ﻂﻴﺸﻨﺗ ﻯﺮﺟ ﺪﻗ ﺎﻤﺑﺭ
:ﻲﻠﻳ ﺎﻤﻛ ﺓﺪﺣﻮﻟﺍ ﻂﺒﺿ ﺪﻋﺃ
.ﺩﺍﺪﻌﺘﺳﻻﺍ ﻊﺿﻭ ﻰﻟﺇ ﺎﻬﻠﻳﻮﺤﺘﻟ ﺓﺪﺣﻮﻟﺎﺑ [/I]
ﻰﻠﻋ ﻂﻐﺿﺍ
[ /I] ﻰﻠﻋ ﻂﻐﺿﺍ ،ﺩﺍﺪﻌﺘﺳﻻﺍ ﻊﺿﻭ ﻰﻟﺇ ﺓﺪﺣﻮﻟﺍ ﻝﻮﺤﺘﺗ ﻢﻟ ﺍﺫﺇ
ﻰﻠﻋ ﺽﺮﻔ
ُ
ﻳ .ﺎ
ً
ﺒﻳﺮﻘﺗ
ٍ
ﻥﺍﻮﺛ 10 ﺓﺪﻤﻟ
ً
ﻻﻮﻄﻣ ﺎ
ً
ﻄﻐﺿ ﺓﺪﺣﻮﻟﺎﺑ
ﻚﻠﺳ ﻞﺼﻓﺍ ،ﻞﻳﺪﺑ ءﺍﺮﺟﺈﻛ .ﺩﺍﺪﻌﺘﺳﻻﺍ ﻊﺿﻭ ﻰﻟﺇ ﻝﺎﻘﺘﻧﻻﺍ ﺓﺪﺣﻮﻟﺍ
ﺪﻋﺃ ﻢﺛ ،ﻖﺋﺎﻗﺩ 3 ﺓﺪﻤﻟ ﺮﻈﺘﻧﺍﻭ ،ﺩﺩﺮﺘﻤﻟﺍ ﻲﺋﺎﺑﺮﻬﻜﻟﺍ ﺭﺎﻴﺘﻟﺍ
.ﻪﻠﻴﺻﻮﺗ
ﺭﺬﻌﺘﳌﺍ ﻦﻣ ﻝﺍﺰﻳ ﻻ ﻥﺎﻛ ﺍﺫﻭ .ﺎﻬﻠﻴﻐﺸﺘﻟ ﺓﺪﺣﻮﻟﺎﺑ [/I] ﻰﻠﻋ ﻂﻐﺿﺍ
.ﻉﺯﻮﳌﺍ ﺮﺸﺘﺳﺎﻓ ،ﺓﺪﺣﻮﻟﺍ ﻞﻴﻐﺸﺗ
.ﺩﺍﺪﻌﺘﺳﻻﺍ ﻊﺿﻭ ﻲﻓ ﺍ
ً
ﺮﻤﺘﺴﻣ ﺍ
ً
ﺮﻴﻐﺗ ﺮﻴﻐﺘﺗﻭ ،ﺽﺮﻌﻟﺍ ﺔﺷﺎﺷ ءﻲﻀﺗ
." DEMO OFF" ﺭﺎﻴﺘﺧﻻ ﺓﺪﺣﻮﻟﺎﺑ [] ﻰﻠﻋ
ً
ﻻﻮﻄﻣ ﺎ
ً
ﻄﻐﺿ ﻂﻐﺿﺍ
RQT9961
16
Karaoke ﺮﻴﺛﺄﺗ
ﻯﺪﺼﻟﺍ ﻭﺃ ﺔﻴﺋﺎﻨﻐﻟﺍ ﺔﻤﻐﻨﻟﺍ ءﺎﻐﻟﺈﻛ ،Karaoke ﺮﻴﺛﺄﺗ ﺕﺍﺰﻴﻣ ﻡﺍﺪﺨﺘﺳﺍ ﻚﻨﻜﻤﻳ
.ﺢﻴﺗﺎﻔﻤﻟﺍ ﺔﻄﺳﺍﻮﺑ ﻢﻜﺤﺘﻟﺍ ﻭﺃ
ﺩﺍﺪﻌﺘﺳﻻﺍ
.ءﺎﻨﻐﻠﻟ ﻚﻳﺪﻟ ﻰﻘﻴﺳﻮﻤﻟﺍ ﺭﺪﺼﻣﻭ (ﺕﺎﻧﻮﻓﻭﺮﻜﻴﻤﻟﺍ) ﻥﻮﻓﻭﺮﻜﻴﻤﻟﺍ ﺰ
ﱢ
ﻬﺟ
(15 R)
ﻂﻘﻓ ﺓﺪﺣﻮﻟﺍ ﺔﻄﺳﺍﻮﺑ
ﺮﻳﺮﺤﺘﻟﺍ ﻊﺿﻭ ﻰﻠﻋ [MIC
] ﻂﺒﺿﺍ 1
.( MIC)
.ﺮﻳﺮﺤﺘﻟﺍﻭ ﻂﻐﻀﻟﺍ ﻲﻌﺿﻭ ﻦﻴﺑ ﺭﺰﻟﺍ ﻊﺿﻭ ﺮﻴﻐﺘﻴﺳ ،ﺭﺰﻟﺍ ﻰﻠﻋ ﺖﻄﻐﺿ ﺎﻤﻠﻛ
ﺭﺎﻴﺘﺧﻻ [KARAOKE] ﻰﻠﻋ ﻂﻐﻀﻟﺎﺑ Karaoke ﺮﻴﺛﺄﺗ ﻂﻤﻧ ﻞ
ﱢ
ﻐﺷ 2
."ON KARAOKE"
." OFF KARAOKE" ﺮﺘﺧﺍ ،ءﺎﻐﻟﻺﻟ
[VOCAL CANCEL/ECHO/KEY-CON] ﻰﻠﻋ ﻂﻐﺿﺍ 3
ﻯﺪﺼﻟﺍ ﻭﺃ ﺔﻴﺋﺎﻨﻐﻟﺍ ﺔﻤﻐﻨﻟﺍ ءﺎﻐﻟﻹ ﻲﻟﺎﺤﻟﺍ ﺩﺍﺪﻋﻹﺍ ﺽﺮﻌﻟ ﺭﺮﻜﺘﻣ ﻞﻜﺸﺑ
.ﺢﻴﺗﺎﻔﻤﻟﺍ ﺔﻄﺳﺍﻮﺑ ﻢﻜﺤﺘﻟﺍ ﻭﺃ
(ﻲﻟﺎﺤﻟﺍ ﺩﺍﺪﻋﻹﺍ ﺽﺮﻋ ءﺎﻨﺛﺃ) 4
.ﺩﺍﺪﻋﻹﺍ ﻂﺒﻀﻟ [/] ﻭﺃ [/] ﻰﻠﻋ ﻂﻐﺿﺍ
ﺔﻤﻐﻨﻟﺍ ءﺎﻐﻟﺇ
ﺔﻴﺋﺎﻨﻐﻟﺍ
VOCAL" ﻭﺃ "OFF VOCAL CANCEL"
"R" ﻭﺃ "L" ﻭﺃ "CANCEL
ﻯﺪﺼﻟﺍ
ﻭﺃ "ECHO 1" ﻭﺃ "ECHO OFF"
"ECHO 3" ﻭﺃ "ECHO 2"
ﺔﻄﺳﺍﻮﺑ ﻢﻜﺤﺘﻟﺍ
ﺢﻴﺗﺎﻔﻤﻟﺍ
"KEYCON+6" ﻰﻟﺇ "KEYCON-6"
ﻰﻟﺇ ﻞﻘﺘﻨﺗ ﺎﻣﺪﻨﻋ " KEYCON 0" ﻰﻟﺇ ﺩﺍﺪﻋﻹﺍ ﺩﻮﻌﻴﺳ
.ﺮﺧﺁ ﺭﺪﺼﻣ
.ﻚﻳﺪﻟ Karaoke ﺮﻴﺛﺄﺗ ءﺍﺩﺃ ﺃﺪﺑﺍ 5
:ﺔﻟﺎﺣ ﻲﻓ Karaoke ﺔﻔﻴﻇﻭ ﻰﻐﻠ
ُ
ﺘﺳ
.ﻞﻴﺠﺴﺘﻟﺍ ءﺍﺮﺟﺇ –
. –DJ jukebox ﺮﻴﺛﺄﺗ ﻞﻴﻐﺸﺗ
.( – ) ﻂﻐﻀﻟﺍ ﻊﺿﻭ ﻰﻠﻋ [MIC ] ﻂﺒﺿ
.ﻡﺎﻈﻨﻟﺍ ﻞﻴﻐﺸﺗ ﻑﺎﻘﻳﺇ –
ﻯﺮﺧﺃ
ﻲﺋﺎﻘﻠﺘﻟﺍ ﻑﺎﻘﻳﻹﺍ ﺔﻔﻴﻇﻭ
ﻪﻣﺍﺪﺨﺘﺳﺍ ﻒﻗﻮﺘﺗ ﺎﻣﺪﻨﻋ ،ﻡﺎﻈﻨﻟﺍ ﻞﻴﻐﺸﺗ ﻑﺎﻘﻳﺇ ﻰﻠﻋ ﺎ
ً
ﻴﺋﺎﻘﻠﺗ ﺔﻔﻴﻇﻮﻟﺍ ﻩﺬﻫ ﻞﻤﻌﺗ
.ﺎ
ً
ﺒﻳﺮﻘﺗ ﺔﻘﻴﻗﺩ 20 ﺓﺪﻤﻟ
."AUTO OFF" ﺭﺎﻴﺘﺧﻻ ﺭﺮﻜﺘﻣ ﻞﻜﺸﺑ [SETUP] ﻰﻠﻋ ﻂﻐﺿﺍ 1
.[OK] ﻰﻠﻋ ﻂﻐﺿﺍ ﻢﺛ ،"ON" ﺭﺎﻴﺘﺧﻻ [،] ﻰﻠﻋ ﻂﻐﺿﺍ 2
. 2 ﺓﻮﻄﺨﻟﺍ ﻲﻓ "OFF" ﺮﺘﺧﺍ ،ﺔﻔﻴﻇﻮﻟﺍ ﻑﺎﻘﻳﻹ
.ﺔﻔﻴﻇﻮﻟﺍ ﻩﺬﻫ ﻞﻤﻌﺗ ﻻ ، Bluetooth
®
ﺯﺎﻬﺠﺑ ﻝﺎﺼﺗﻻﺍ ﺪﻨﻋ
Bluetooth
®
ﺯﺎﻬﺠﻟ ﺩﺍﺪﻌﺘﺳﻻﺍ ﻊﺿﻭ
ﺯﺎﻬﺠﺑ Bluetooth
®
ﺔﻤﺋﺎﻗ ﻦﻣ "SC-CMAX5" ﺭﺎﻴﺘﺧﺍ ﻱﺮﺠﻳ ﺎﻣﺪﻨﻋ
ﻊﺿﻭ ﻦﻣ ﺎ
ً
ﻴﺋﺎﻘﻠﺗ ﺓﺪﺣﻮﻟﺍ ﻩﺬﻫ ﻞﻴﻐﺸﺗ ﻱﺮﺠﻴﺳ ،ﻥﺮﺘﻘﻣ Bluetooth
®
.Bluetooth
®
ﻝﺎﺼﺗﺍ ءﺎﺸﻧﺇﻭ ،ﺩﺍﺪﻌﺘﺳﻻﺍ
ﺭﺎﻴﺘﺧﻻ ﺭﺮﻜﺘﻣ ﻞﻜﺸﺑ [SETUP] ﻰﻠﻋ ﻂﻐﺿﺍ 1
."BLUETOOTH STANDBY"
.[OK] ﻰﻠﻋ ﻂﻐﺿﺍ ﻢﺛ ،"ON" ﺭﺎﻴﺘﺧﻻ [،] ﻰﻠﻋ ﻂﻐﺿﺍ 2
. 2 ﺓﻮﻄﺨﻟﺍ ﻲﻓ "OFF" ﺮﺘﺧﺍ ،ﺔﻔﻴﻇﻮﻟﺍ ﻑﺎﻘﻳﻹ
45
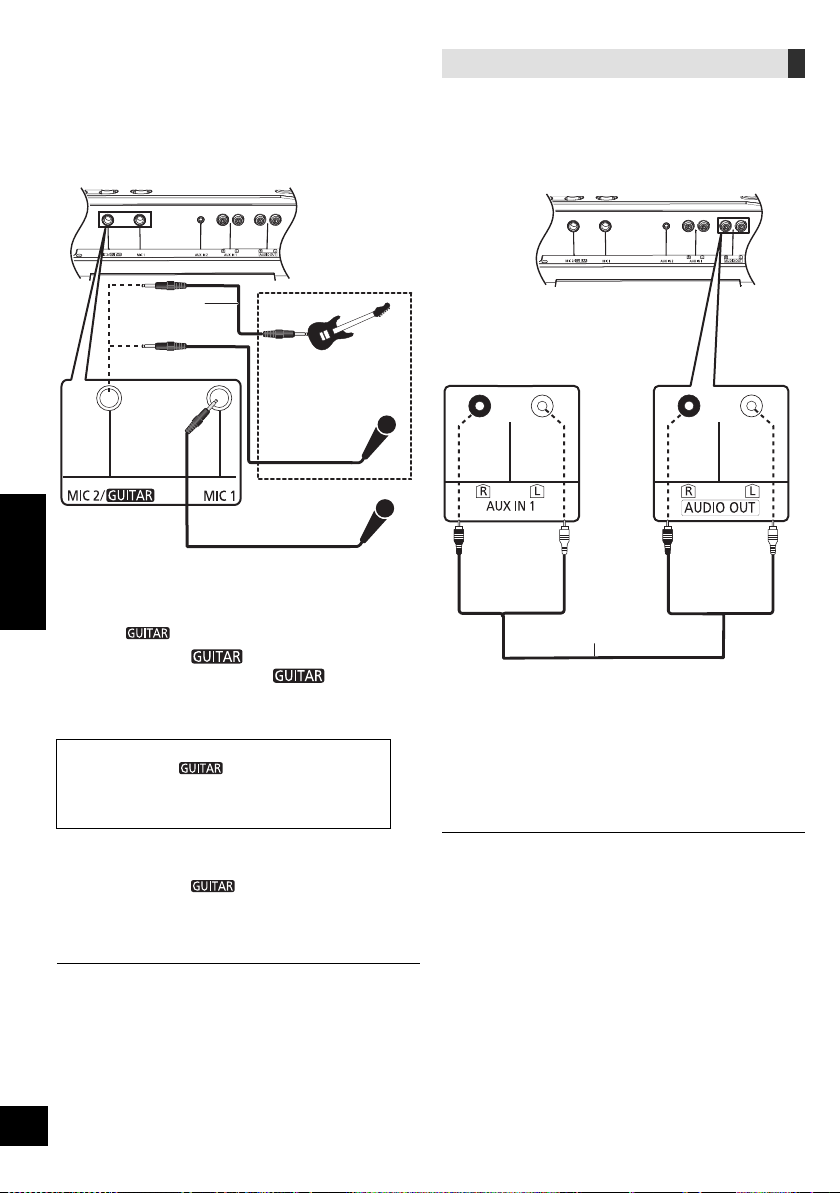
15
RQT9961
ﻲﺑﺮﻋ
ﺔﻴﻓﺎﺿﺇ SC-CMAX5 ﺓﺪﺣﻮﺑ ﻞﻴﺻﻮﺘﻟﺍ
ﺓﺪﺣﻭ ﺮﺒﻋ ﺓﺪﺣﻮﻟﺍ ﻩﺬﻫ ﻦﻣ ﺕﻮﺻ ﻞﻴﻐﺸﺘﻟ ﻞﻴﺻﻮﺘﻟﺍ ءﺍﺮﺟﺇ ﻚﻨﻜﻤﻳ
.ﺔﻴﻓﺎﺿﺇ SC-CMAX5
ﺮﻴﻏ) ﺕﻮﺻ ﻞﺒﻛ ﺔﻄﺳﺍﻮﺑ ﻲﻓﺎﺿﺇ SC-CMAX5 ﺯﺎﻬﺟ ﻞ
ﱢ
ﺻﻭ 1
.(ﻖﺤﻠﻣ
:ﺔﻴﻓﺎﺿﻹﺍ SC-CMAX5 ﺓﺪﺣﻭ ﻰﻠﻋ 2
."AUX 1" ﺭﺎﻴﺘﺧﻻ [AUX] ﻰﻠﻋ ﻂﻐﺿﺍ
:ﺓﺪﺣﻮﻟﺍ ﻰﻠﻋ 3
.ﺏﻮﻠﻄﻤﻟﺍ ﺽﺮﻌﻟﺍ ﺮﺘﺧﺍ
ﺕﻮﺼﻟﺍ ﺕﺍﺩﺍﺪﻋﺇ ﻂﺒﺿﺎﻓ .ﺓﺪﺣ ﻰﻠﻋ ﺓﺪﺣﻭ ﻞﻛ ﺔﻄﺳﺍﻮﺑ ﺕﻮﺼﻟﺍ ﺮﻴﺛﺄﺗ ﻲﻓ ﻢﻜﺤﺘﻟﺍ ﻱﺮﺠﻴﺳ
.ﺮﻣﻷﺍ ﻡﺰﻟ ﺍﺫﺇ ،ﺔﻴﻓﺎﺿﻹﺍ ﺓﺪﺣﻮﻟﺍ ﻰﻠﻋ ﺎﻬﺗﺍﺫ
ﺭﺎﺘﻴﺟ ﻭﺃ ﻥﻮﻓﻭﺮﻜﻴﻣ ﻡﺍﺪﺨﺘﺳﺍ
ﺩﺍﺪﻌﺘﺳﻻﺍ
ﻞﻴﺻﻮﺗ ﻞﺒﻗ ﻪﻟ ﺪﺣ ﻰﻧﺩﺃ ﻰﺘﺣ ﻡﺎﻈﻨﻟﺎﺑ ﺕﻮﺼﻟﺍ ﻯﻮﺘﺴﻣ ﺾﻔﺧﺍ
.ﺎﻤﻬﻠﺼﻓ ﻭﺃ ﺭﺎﺘﻴﺟ ﻭﺃ ﻥﻮﻓﻭﺮﻜﻴﻤﻟﺍ
ﻂﻘﻓ ﺓﺪﺣﻮﻟﺍ ﺔﻄﺳﺍﻮﺑ
.ﺍ
ً
ﺭﺎﺘﻴﺟ ﻭﺃ ﺎ
ً
ﻧﻮﻓﻭﺮﻜﻴﻣ ﻞ
ﱢ
ﺻﻭ 1
ﻢﻣ 6.3 ﺱﺎﻘﻣ ﻱﺩﺎﺣﺃ :ﺲﺑﺎﻘﻟﺍ ﻉﻮﻧ
. MIC 2 /
ﺲﺒﻘﻣ ﺮﺒﻋ ﻪﻠﻴﺻﻮﺗ ﻦﻣ ﺪﻛﺄﺗ ،ﺭﺎﺘﻴﺟ ﻞﻴﺻﻮﺗ ﺔﻟﺎﺣ ﻲﻓ
( MIC 2 / ﺲﺒﻘﻣ ﺮﺒﻋ ﻞﻴﺻﻮﺘﻟﺍ ﺔﻟﺎﺣ ﻲﻓ) 2
ﻞﺧﺪﻟﺍ ﺩﺍﺪﻋﺇ ﺭﺎﻴﺘﺧﻻ [MIC ] ﻰﻠﻋ ﻂﻐﺿﺍ
.ﺢﻴﺤﺼﻟﺍ
.ﺮﻳﺮﺤﺘﻟﺍﻭ ﻂﻐﻀﻟﺍ ﻲﻌﺿﻭ ﻦﻴﺑ ﺭﺰﻟﺍ ﻊﺿﻭ ﺮﻴﻐﺘﻴﺳ ،ﺭﺰﻟﺍ ﻰﻠﻋ ﺖﻄﻐﺿ ﺎﻤﻠﻛ
:ﺭﺎﺘﻴﺟ ﻞﻴﺻﻮﺗ ﺔﻟﺎﺣ ﻲﻓ
(
) .ﻂﻐﻀﻟﺍ ﻊﺿﻭ ﻲﻓ ﺭﺰﻟﺍ ﻥﺃ ﻦﻣ ﺪﻛﺄﺗ
:ﻥﻮﻓﻭﺮﻜﻴﻣ ﻞﻴﺻﻮﺗ ﺔﻟﺎﺣ ﻲﻓ
( MIC) .ﺮﻳﺮﺤﺘﻟﺍ ﻊﺿﻭ ﻲﻓ ﺭﺰﻟﺍ ﻥﺃ ﻦﻣ ﺪﻛﺄﺗ
.ﺕﻮﺼﻠﻟ ﺪﻳﺪﺸﻟﺍ ﺽﺎﻔﺨﻧﻻﺍ ﻭﺃ ﺪﻳﺪﺸﻟﺍ ﻉﺎﻔﺗﺭﻻﺍ ﻰﻟﺇ ﺢﻴﺤﺼﻟﺍ ﺮﻴﻏ ﻂﺒﻀﻟﺍ ﻱﺩﺆﻳ ﺪﻗ
.ﺭﺎﺘﻴﺠﻟﺍ ﻭﺃ ﻥﻮﻓﻭﺮﻜﻴﻤﻟﺍ ﺕﻮﺻ ﻯﻮﺘﺴﻣ ﻂﺒﺿ 3
.[MIC1-VOL] ﺭ
ِ
ﺩﺃ :1 ﻥﻮﻓﻭﺮﻜﻴﻤﻠﻟ ﺔﺒﺴﻨﻟﺎﺑ
.[VOL-MIC2/
] ﺭ
ِ
ﺩﺃ :ﺭﺎﺘﻴﺠﻟﺍ ﻭﺃ 2 ﻥﻮﻓﻭﺮﻜﻴﻤﻠﻟ ﺔﺒﺴﻨﻟﺎﺑ
:ﺔﻴﻔﻠﺨﻟﺍ ﻲﻓ ﻰﻘﻴﺳﻮﻣ ﻡﺎﻐﻧﺃ ﻰﻠﻋ ءﺎﻨﻐﻟﺍ ﻲﻓ ﺐﻏﺮﺗ ﺖﻨﻛ ﺍﺫﺇ 4
.ﻡﺎﻈﻨﻠﻟ ﺕﻮﺼﻟﺍ ﻯﻮﺘﺴﻣ ﻂﺒﺿﺍ ﻢﺛ ،ﻰﻘﻴﺳﻮﻤﻟﺍ ﺭﺪﺼﻣ ﻞ
ﱢ
ﻐﺷ
(16 R) ."Karaoke ﺮﻴﺛﺄﺗ" ﻊﺟﺍﺭ ،"Karaoke" ﺕﺍﺰﻴﻣ ﻡﺍﺪﺨﺘﺳﺎﺑ ءﺎﻨﻐﻠﻟ
ﻭﺃ ،ﺕﺎﻋﺎﻤﺴﻟﺍ ﻦﻋ ﺍ
ً
ﺪﻴﻌﺑ ﺭﺎﺘﻴﺠﻟﺍ/ﻥﻮﻓﻭﺮﻜﻴﻤﻟﺍ ﻞﻘﻧﺎﻓ ،(ﺶﻳﻮﺸﺗ) ﺐﻳﺮﻏ ﺞﻴﺠﺿ ﺭﺪﺻ ﺍﺫﺇ
.ﺭﺎﺘﻴﺠﻟﺍ/ﻥﻮﻓﻭﺮﻜﻴﻤﻠﻟ ﺕﻮﺼﻟﺍ ﻯﻮﺘﺴﻣ ﺾﻔﺧﺍ
ﺭﺎﺘﻴﺠﻟﺍ/ﻥﻮﻓﻭﺮﻜﻴﻤﻟﺍ ﻞﺼﻓﺍ ﻢﺛ ،" MIN" ﻰﻠﻋ ﺭﺎﺘﻴﺠﻟﺍ/ﻥﻮﻓﻭﺮﻜﻴﻤﻟﺍ ﺕﻮﺻ ﻯﻮﺘﺴﻣ ﻂﺒﺿﺍ
.ﻡﺍﺪﺨﺘﺳﻻﺍ ﺪﻌﺑ
.ﺭﺎﺘﻴﺠﻟﺍ ﻭﺃ ﻥﻮﻓﻭﺮﻜﻴﻤﻟﺍ ﺮﺒﻋ ﻞﻴﺠﺴﺘﻟﺍ ﻡﺎﻈﻨﻟﺍ ﺍﺬﻬﻟ ﻦﻜﻤﻳ ﻻ
46
ﺕﻮﺻ ﻞﺒﻛ
(ﻖﺤﻠﻣ ﺮﻴﻏ)
ﺕﻮﺻ ﻞﺒﻛ
(ﻖﺤﻠﻣ ﺮﻴﻏ)
(ﻒﻠﺨﻟﺍ ﻦﻣ) ﺓﺪﺣﻮﻟﺍ
SC-CMAX5 ﺓﺪﺣﻭ
(ﻒﻠﺨﻟﺍ ﻦﻣ) ﺔﻴﻓﺎﺿﺇ
(ﻒﻠﺨﻟﺍ ﻦﻣ) ﺓﺪﺣﻮﻟﺍ
ﻝﺎﺜﻣ
ﺭﺎﺘﻴﺟ ﻭﺃ ﻥﻮﻓﻭﺮﻜﻴﻣ
(ﻖﺤﻠﻣ ﺮﻴﻏ)
ﻥﻮﻓﻭﺮﻜﻴﻣ
(ﻖﺤﻠﻣ ﺮﻴﻏ)

RQT9961
14
ﺔﻴﺟﺭﺎﺨﻟﺍ ﺓﺰﻬﺟﻷﺍ
ﺩﺍﺪﻌﺘﺳﻻﺍ
.ﺩﺩﺮﺘﻤﻟﺍ ﻲﺋﺎﺑﺮﻬﻜﻟﺍ ﺭﺎﻴﺘﻟﺍ ﺲﺑﺎﻗ ﻞﺼﻓﺍ
.ﺔﻠﺼﻟﺍ ﺕﺍﺫ ﻞﻴﻐﺸﺘﻟﺍ ﺕﺎﻤﻴﻠﻌﺗ ﺃﺮﻗﺍﻭ ،ﺓﺰﻬﺟﻷﺍ ﻊﻴﻤﺟ ﻞﻴﻐﺸﺗ ﻒﻗﻭﺃ
VCR ﺖﻴﺳﺎﻛ ﻮﻳﺪﻴﻓ ﺔﻃﺮﺷﺃ ﻞﺠﺴﻣ ﻡﺍﺪﺨﺘﺳﺍ
ﺎﻫﺮﻴﻏﻭ DVD ﺹﺍﺮﻗﺃ ﻞﻐﺸﻣﻭ
ﺹﺍﺮﻗﺃ ﻞﻐﺸﻣ ﻭﺃ VCR ﺖﻴﺳﺎﻛ ﻮﻳﺪﻴﻓ ﺔﻃﺮﺷﺃ ﻞﺠﺴﻣ ﻞﻴﺻﻮﺗ ﻚﻨﻜﻤﻳ
.ﻡﺎﻈﻨﻟﺍ ﺍﺬﻫ ﻦﻣ ﺭﺩﺎﺼﻟﺍ ﺕﻮﺼﻟﺍ ﻰﻟﺇ ﻉﺎﻤﺘﺳﻻﺍﻭ ،ﻪﺑﺎﺷ ﺎﻣ ﻭﺃ DVD
.(ﻖﺤﻠﻣ ﺮﻴﻏ) ﺕﻮﺻ ﻞﺒﻛ ﺔﻄﺳﺍﻮﺑ ﻲﺟﺭﺎﺧ ﺯﺎﻬﺟ ﻞ
ﱢ
ﺻﻭ 1
ﻰﻠﻋ ﺽﺮﻌﻟﺍ ﺃﺪﺑﺍ ﻢﺛ ،"AUX 1" ﺭﺎﻴﺘﺧﻻ [AUX] ﻰﻠﻋ ﻂﻐﺿﺍ 2
.ﻞﺼﺘﻤﻟﺍ ﺯﺎﻬﺠﻟﺍ
ﺓﺰﻬﺟﻷﺍ ﻉﺯﻮﻣ ﻊﺟﺍﺮﻓ ،ﺓﺭﻮﻛﺬﻤﻟﺍ ﺓﺰﻬﺟﻷﺍ ﻑﻼﺨﺑ ﺮﺧﺁ ﺯﺎﻬﺟ ﻞﻴﺻﻮﺗ ﻲﻓ ﺐﻏﺮﺗ ﺖﻨﻛ ﺍﺫﺇ
.ﺔﻴﺗﻮﺼﻟﺍ
.ﺎ
ً
ﺌﻳﺎﻬﻣ ﻡﺪﺨﺘﺴﺗ ﺎﻣﺪﻨﻋ ﺕﻮﺼﻟﺍ ﻲﻓ ﺶﻳﻮﺸﺗ ﺙﻭﺪﺣ ﻦﻜﻤﻳ
.ﻝﻮﻤﺤﻤﻟﺍ ﻲﺗﻮﺼﻟﺍ ﺯﺎﻬﺠﻟﺍ ﻞ
ﱢ
ﻐﺷ
.ﻝﻮﻤﺤﻣ ﺕﻮﺻ ﺯﺎﻬﺟ ﻦﻣ ﻰﻘﻴﺳﻮﻤﻟﺍ ﻞﻴﻐﺸﺗ ﻚﻨﻜﻤﻳ
ﺩﺍﺪﻌﺘﺳﻻﺍ
ﻦﻣ ﺔﻳﺎﻗﻮﻠﻟ ﻝﻮﻤﺤﻤﻟﺍ ﻲﺗﻮﺼﻟﺍ ﺯﺎﻬﺠﻠﻟ (ﺪﺟﻭ ﻥﺇ) ﻝﺩﺎﻌﻤﻟﺍ ﻞﻴﻐﺸﺗ ﻒﻗﻭﺃ
.ﺕﻮﺼﻟﺍ ﺶﻳﻮﺸﺗ
ءﺍﺮﺟﺇ ﻞﺒﻗ ﻝﻮﻤﺤﻤﻟﺍ ﻲﺗﻮﺼﻟﺍ ﺯﺎﻬﺠﻟﺍﻭ ،ﻡﺎﻈﻨﻠﻟ ﺕﻮﺼﻟﺍ ﻯﻮﺘﺴﻣ ﺾﻔﺧﺍ
.ﻝﻮﻤﺤﻤﻟﺍ ﻲﺗﻮﺼﻟﺍ ﺯﺎﻬﺠﻟﺍ ﻞﺼﻓﺍ ﻭﺃ ،ﻞﻴﺻﻮﺘﻟﺍ
.(ﻖﺤﻠﻣ ﺮﻴﻏ) ﺕﻮﺻ ﻞﺒﻛ ﺔﻄﺳﺍﻮﺑ ﻝﻮﻤﺤﻤﻟﺍ ﺕﻮﺼﻟﺍ ﺯﺎﻬﺟ ﻞ
ﱢ
ﺻﻭ 1
(ﻖﺤﻠﻣ ﺮﻴﻏ) ﻢﻣ 3.5 ﺱﺎﻘﻣ ﻮﻳﺮﺘﺳﺍ :ﺲﺑﺎﻘﻟﺍ ﻉﻮﻧ
ﻰﻠﻋ ﺽﺮﻌﻟﺍ ﺃﺪﺑﺍ ﻢﺛ ،"AUX 2" ﺭﺎﻴﺘﺧﻻ [AUX] ﻰﻠﻋ ﻂﻐﺿﺍ 2
.ﻞﺼﺘﻤﻟﺍ ﺯﺎﻬﺠﻟﺍ
47
ﺕﻮﺻ ﻞﺒﻛ
(ﻖﺤﻠﻣ ﺮﻴﻏ)
ﺕﻮﺻ ﻞﺒﻛ
(ﻖﺤﻠﻣ ﺮﻴﻏ)
ﻝﺎﺜﻣ
(ﻒﻠﺨﻟﺍ ﻦﻣ) ﺓﺪﺣﻮﻟﺍ
ﺹﺍﺮﻗﺃ ﻞﻐﺸﻣ
(ﻖﺤﻠﻣ ﺮﻴﻏ) DVD
ﻝﻮﻤﺤﻤﻟﺍ ﺕﻮﺼﻟﺍ ﺯﺎﻬﺟ
(ﻖﺤﻠﻣ ﺮﻴﻏ)
(ﻒﻠﺨﻟﺍ ﻦﻣ) ﺓﺪﺣﻮﻟﺍ
ﻝﺎﺜﻣ

13
RQT9961
ﻲﺑﺮﻋ
ﺖﻗﺆﻤﻟﺍﻭ ﺔﻋﺎﺴﻟﺍ
ﺔﻋﺎﺴﻟﺍ ﻂﺒﺿ
.ﺔﻋﺎﺳ 24 ﺔﻐﻴﺼﺑ ﺔﻋﺎﺴﻟﺍ ﻩﺬﻫ
."CLOCK" ﺭﺎﻴﺘﺧﻻ ﺭﺮﻜﺘﻣ ﻮﺤﻧ ﻰﻠﻋ [SETUP] ﻰﻠﻋ ﻂﻐﺿﺍ 1
.[OK] ﻰﻠﻋ ﻂﻐﺿﺍ ﻢﺛ ،ﺖﻗﻮﻟﺍ ﻂﺒﻀﻟ [،] ﻰﻠﻋ ﻂﻐﺿﺍ 2
ﻂﻐﺿﺍ ﻢﺛ ،" CLOCK" ﺭﺎﻴﺘﺧﻻ ﺭﺮﻜﺘﻣ ﻞﻜﺸﺑ [SETUP] ﻰﻠﻋ ﻂﻐﺿﺍ ،ﺖﻗﻮﻟﺍ ﺔﻓﺮﻌﻤﻟ
.ﺓﺪﺣﺍﻭ ﺓﺮﻣ [OK] ﻰﻠﻋ
(.ﺓﺪﺣﺍﻭ ﺓﺮﻣ [DISPLAY] ﻰﻠﻋ ﻂﻐﺿﺍ ،ﺩﺍﺪﻌﺘﺳﻻﺍ ءﺎﻨﺛﺃ)
ﻲﺋﺎﺑﺮﻬﻜﻟﺍ ﺭﺎﻴﺘﻟﺍ ﺲﺑﺎﻗ ﻞﺼﻓ ﺪﻨﻋ ﻭﺃ ،ﺔﻗﺎﻄﻟﺍ ﻲﻓ ﻞﻄﻋ ﺪﺟﻮﻳ ﺎﻣﺪﻨﻋ ﺔﻋﺎﺴﻟﺍ ﻂﺒﺿ ﺩﺎﻌ
ُ
ﻳ
.ﺩﺩﺮﺘﻤﻟﺍ
.ﺎﻬﺘﻗﺪﺑ ﻅﺎﻔﺘﺣﻼﻟ ﻡﺎﻈﺘﻧﺎﺑ ﺔﻋﺎﺴﻟﺍ ﻂﺒﺿ ﺪﻋﺃ
ﻡﻮﻨﻟﺍ ﺖﻗﺆﻣ
.ﻪﻄﺒﻀﺗ ﺖﻗﻭ ﺪﻌﺑ ﺓﺪﺣﻮﻟﺍ ﻞﻴﻐﺸﺗ ﻑﺎﻘﻳﺇ ﻰﻠﻋ ﻡﻮﻨﻟﺍ ﺖﻗﺆﻣ ﻞﻤﻌﻳ ﻥﺃ ﻦﻜﻤﻳ
.(ﻖﺋﺎﻗﺪﻟﺎﺑ) ﺖﻗﻮﻟﺍ ﻂﺒﻀﻟ [SLEEP] ﻰﻠﻋ ﻂﻐﺿﺍ
SLEEP120 SLEEP 90 SLEEP 60 SLEEP 30
(ءﺎﻐﻟﺇ) OFF
.ﻯﺮﺧﺃ ﺓﺮﻣ [ SLEEP] ﺭﺰﻟﺍ ﻰﻠﻋ ﻂﻐﺿﺍ ،ﻲﻘﺒﺘﻤﻟﺍ ﺖﻗﻮﻟﺍ ﺪﻴﻛﺄﺘﻟ
ﺎﻣ ﺎ
ً
ﻤﺋﺍﺩﻭ .
ٍ
ﺪﺣﺍﻭ
ٍ
ﻥﺁ ﻲﻓ ﻡﻮﻨﻟﺍﻭ ﻞﻴﺠﺴﺘﻟﺍ ﻲﺘﻗﺆﻣ ﻭﺃ ،ﻡﻮﻨﻟﺍﻭ ﻞﻴﻐﺸﺘﻟﺍ ﻲﺘﻗﺆﻣ ﻡﺍﺪﺨﺘﺳﺍ ﻦﻜﻤﻳ
.ﺓﺪﺣﻮﻠﻟ ﻲﺴﻴﺋﺮﻟﺍ ﺖﻗﺆﻤﻟﺍ ﻡﻮﻨﻟﺍ ﺖﻗﺆﻣ ﺪﻌﻳ
ﻞﻴﺠﺴﺘﻟﺍﻭ ﻞﻴﻐﺸﺘﻟﺍ ﺖﻗﺆﻣ
:ﻦﻴﻌﻣ ﺖﻗﻭ ﻲﻓ ﻪﻠﻴﻐﺸﺗ ﻱﺮﺠﻳ ﺚﻴﺤﺑ ﺖﻗﺆﻤﻟﺍ ﻂﺒﺿ ﻚﻨﻜﻤﻳ
(ﻞﻴﻐﺸﺘﻟﺍ ﺖﻗﺆﻣ) ﻅﺎﻘﻴﺘﺳﻻﺍ –
(ﻞﻴﺠﺴﺘﻟﺍ ﺖﻗﺆﻣ) ﻲﺟﺭﺎﺨﻟﺍ ﺯﺎﻬﺠﻟﺍ ﻦﻣ ﻞﻴﺠﺴﺘﻟﺍ –
.
ٍ
ﺪﺣﺍﻭ
ٍ
ﻥﺁ ﻲﻓ ﻞﻴﺠﺴﺘﻟﺍ ﺖﻗﺆﻣﻭ ﻞﻴﻐﺸﺘﻟﺍ ﺖﻗﺆﻣ ﻡﺍﺪﺨﺘﺳﺍ ﻦﻜﻤﻳ ﻻ
ﺩﺍﺪﻌﺘﺳﻻﺍ
.ﺔﻋﺎﺴﻟﺍ ﻂﺒﺿﺍ
."TIMER ADJ" ﺭﺎﻴﺘﺧﻻ ﺭﺮﻜﺘﻣ ﻞﻜﺸﺑ [SETUP] ﻰﻠﻋ ﻂﻐﺿﺍ 1
ﻂﻐﺿﺍ ﻢﺛ ،"REC" ﻭﺃ "PLAY" ﺭﺎﻴﺘﺧﻻ [،] ﻰﻠﻋ ﻂﻐﺿﺍ 2
.[OK] ﻰﻠﻋ
.[OK] ﻰﻠﻋ ﻂﻐﺿﺍ ﻢﺛ ،ءﺪﺒﻟﺍ ﺖﻗﻭ ﻂﺒﻀﻟ [،] ﻰﻠﻋ ﻂﻐﺿﺍ 3
.[OK] ﻰﻠﻋ ﻂﻐﺿﺍ ﻢﺛ ،ءﺎﻬﺘﻧﻻﺍ ﻂﺒﻀﻟ [،] ﻰﻠﻋ ﻂﻐﺿﺍ 4
ﻲﻓ ﺐﻏﺮﺗ ﻱﺬﻟﺍ
ﻰﻘﻴﺳﻮﻤﻟﺍ ﺭﺪﺼﻣ ﺭﺎﻴﺘﺧﻻ [،] ﻰﻠﻋ ﻂﻐﺿﺍ 5
.[OK] ﻰﻠﻋ ﻂﻐﺿﺍ ﻢﺛ ،ﻪﻘﻳﺮﻃ ﻦﻋ ﻞﻴﺠﺴﺘﻟﺍ ﻭﺃ ﻞﻴﻐﺸﺘﻟﺍ
ﺖﻗﺆﻤﻟﺍ ﻞﻴﻐﺸﺗ
.ﺩﺪﺤﻤﻟﺍ ﻰﻘﻴﺳﻮﻤﻟﺍ ﺭﺪﺼﻣ ﺰ
ﱢ
ﻬﺟ 1
ﻞﻴﻐﺸﺘﻟﺍ ﺖﻗﺆﻣ
ﻉﺎﻤﺘﺳﻻﺍ ﻲﻓ ﺐﻏﺮﺗ ﻱﺬﻟﺍ ﻰﻘﻴﺳﻮﻤﻟﺍ ﺭﺪﺼﻣ ﺰ
ﱢ
ﻬﺟ
ﻂﺒﺿﺍ ﻢﺛ ،(ﻲﺟﺭﺎﺧ ﺯﺎﻬﺟ ﻭﺃ USB ﺯﺎﻬﺟ) ﻪﻴﻟﺇ
.ﺕﻮﺼﻟﺍ ﻯﻮﺘﺴﻣ
ﻞﻴﺠﺴﺘﻟﺍ ﺖﻗﺆﻣ
ﺩﺍﺪﻋﺈﺑ ﻢﻗﻭ ،[USB\\B] ﺬﻔﻨﻤﺑ USB ﺯﺎﻬﺟ ﻞ
ﱢ
ﺻﻭ
.ﻲﺟﺭﺎﺨﻟﺍ ﺯﺎﻬﺠﻟﺍ
."TIMER SET" ﺭﺎﻴﺘﺧﻻ ﺭﺮﻜﺘﻣ ﻞﻜﺸﺑ [SETUP] ﻰﻠﻋ ﻂﻐﺿﺍ 2
ﻢﺛ ،"REC ON" ﻭﺃ "PLAY ON" ﺪﻳﺪﺤﺘﻟ [،] ﻰﻠﻋ ﻂﻐﺿﺍ 3
.[OK] ﻰﻠﻋ ﻂﻐﺿﺍ
." REC" ﻭﺃ "PLAY" ﺭﺎﻴﺘﺧﺍ ﻱﺮﺠﻳ
" PLAY" ﺢﺴﻤﻟ [،] ﻰﻠﻋ ﻂﻐﺿﺍ ،ﺖﻗﺆﻤﻟﺍ ﻞﻴﻐﺸﺗ ﻑﺎﻘﻳﻹ
.[OK] ﻰﻠﻋ ﻂﻐﺿﺍ ﻢﺛ ،"REC"ﻭ
.ﺩﺍﺪﻌﺘﺳﻻﺍ ﻊﺿﻭ ﻰﻠﻋ ﺓﺪﺣﻮﻟﺍ ﻂﺒﻀﻟ [] ﻰﻠﻋ ﻂﻐﺿﺍ 4
(.ﺖﻗﺆﻤﻟﺍ ﻞﻴﻐﺸﺗ ءﺪﺑ ﻞﺒﻗ ،ﺓﺪﺣﻮﻟﺍ ﻞﻴﻐﺸﺗ ﻑﺎﻘﻳﺇ ﺐﺠﻳ ،ﺖﻗﺆﻤﻟﺍ ﻞﻴﻐﺸﺘﻟ)
ﺩﺍﺪﻋﻹﺍ ﻦﻣ ﻖﻘﺤﺘﻠﻟ
."TIMER ADJ" ﺭﺎﻴﺘﺧﻻ ﺭﺮﻜﺘﻣ ﻞﻜﺸﺑ [SETUP] ﻰﻠﻋ ﻂﻐﺿﺍ 1
ﻢﺛ ،"REC" ﻭﺃ "PLAY" ﺭﺎﻴﺘﺧﻻ [،] ﻰﻠﻋ ﻂﻐﺿﺍ 2
.[OK] ﻰﻠﻋ ﻂﻐﺿﺍ
(.ﻦﻴﺗﺮﻣ [DISPLAY] ﻰﻠﻋ ﻂﻐﺿﺍ ،ﺩﺍﺪﻌﺘﺳﻻﺍ ءﺎﻨﺛﺃ)
ﻯﻮﺘﺴﻤﻟﺍ ﻰﻟﺇ ﻞﺼﻴﻟ ﺎ
ً
ﻴﺠﻳﺭﺪﺗ ﺩﺍﺩﺰﻳﻭ ،ﺾﻔﺨﻨﻣ ﺕﻮﺻ ﻯﻮﺘﺴﻤﺑ ﻞﻴﻐﺸﺘﻟﺍ ﺖﻗﺆﻣ ﺃﺪﺒﻳ
.ﻂﺒﻀﻟﺍ ﻖﺒﺴﻤﻟﺍ
.ﺎ
ً
ﻣﻮﺘﻜﻣ ﺕﻮﺼﻟﺍ ﻥﻮﻜﻳ ﻥﺃ ﻰﻠﻋ ﺔﻴﻧﺎﺛ 30 ﺓﺪﻤﺑ ﻁﻮﺒﻀﻤﻟﺍ ﺖﻗﻮﻟﺍ ﻞﺒﻗ ﻞﻴﺠﺴﺘﻟﺍ ﺖﻗﺆﻣ ﺃﺪﺒﻳ
.ﻞﻴﻐﺸﺘﻟﺍ ﻊﺿﻭ ﻰﻠﻋ ﺎ
ً
ﻃﻮﺒﻀﻣ ﻥﺎﻛ ﺍﺫﺇ ،ﺎ
ً
ﻴﻣﻮﻳ ﻁﻮﺒﻀﻤﻟﺍ ﺖﻗﻮﻟﺍ ﻲﻓ ﺖﻗﺆﻤﻟﺍ ﻞﻤﻌﻳ
ﺪﻨﻋ ﺖﻗﺆﻤﻟﺍ ﻒﻗﻮﺘﻳ ﻦﻠﻓ ،ﺖﻗﺆﻤﻟﺍ
ﻞﻤﻋ ءﺎﻨﺛﺃ ﻯﺮﺧﺃ ﺓﺮﻣ ﻪﺘﻠ
ّ
ﻐﺷ ﻢﺛ ،ﻡﺎﻈﻨﻟﺍ ﻞﻴﻐﺸﺗ ﺖﻔﻗﻭﺃ ﺍﺫﺇ
.ءﺎﻬﺘﻧﻻﺍ ﺖﻗﻭ ﻍﻮﻠﺑ
.ﻰﻘﻴﺳﻮﻤﻠﻟ ﺭﺪﺼﻤﻛ ﻲﻠﻳ ﺎﻣ ﻂﺒﺿ ﻦﻜﻤﻳ
"USB B" ،"USB A" ،"AUX 2" ،"AUX 1" :ﻞﻴﻐﺸﺘﻟﺍ ﺖﻗﺆﻤﻟ
"AUX 2" ،"AUX 1" :ﻞﻴﺠﺴﺘﻟﺍ ﺖﻗﺆﻤﻟ
48
RQT9961
12
.". mp3" ﻖﻴﺴﻨﺘﺑ ﺔﻠﺠﺴﻣ ﺕﻼﻴﺠﺴﺘﻟﺍ ﻊﻴﻤﺟ
.
ً
ﻼﻴﺠﺴﺗ ﺖﻳﺮﺟﺃ ﺎﻤﻠﻛ ﺪﻳﺪﺟ ﻡﻮﺒﻟﺃ ﻑﺎﻀ
ُ
ﻳ
.ﻞﻴﺠﺴﺘﻟﺍ ﻦﻣ ءﺎﻬﺘﻧﻻﺍ ﺪﻌﺑ ﻡﻮﺒﻟﻸﻟ ﻲﻟﺎﺘﺘﻤﻟﺍ ﺐﻴﺗﺮﺘﻟﺍ ﺮﻴﻐﺘﻳ ﺪﻗ
. USB ﺯﺎﻬﺟ ﻲﻓ "REC_DATA" ﻢﺳﺎﺑ ﺪﻠﺠﻣ ﻲﻓ ﺕﻼﻴﺠﺴﺘﻟﺍ ﻆﻔﺤ
ُ
ﺗ
.ﻞﻴﺠﺴﺘﻟﺍ ءﺍﺮﺟﺇ ءﺎﻨﺛﺃ ﺍ
ً
ﺮﻤﺣﺃ ﺎ
ً
ﻀﻴﻣﻭ [USB\\B] ﺔﻟﺎﺣ ﺮﺷﺆﻣ ﺭﺪﺼﻳ
.ﻝﻮﻃﺃ ﺎ
ً
ﺘﻗﻭ ﺕﺍﺭﺎﺴﻤﻟﺍ ﺾﻌﺑ
ﻞﻴﺠﺴﺗ ﻕﺮﻐﺘﺴﻳ ﺪﻗ
.ﺭﺪﺼﻤﻟﺍ ﺔﻟﺎﺣ ﺐﺒﺴﺑ ﺕﺍﺭﺎﺴﻤﻟﺍ ﺾﻌﺑ ﻞﻴﺠﺴﺗ ﻦﻜﻤﻳ ﻻ
.ﺔﻴﺋﺎﻘﻠﺘﻟﺍ ﺔﻴﻤﺴﺘﻟﺍ ﺓﺩﺎﻋﺇ ﺔﻔﻴﻇﻭ ﺐﺒﺴﺑ ﻲﻠﺻﻷﺍ ﺪﻠﺠﻤﻟﺍ ﻦﻋ ﺎ
ً
ﻔﻠﺘﺨﻣ ﻞﺠﺴﻤﻟﺍ ﺪﻠﺠﻤﻟﺍ ﻭﺪﺒﻳ ﺪﻗ
. [USB\\B] ﻰﻟﺇ [USB\\A] ﻦﻣ ﻞﻴﺠﺴﺘﻟﺍ ءﺎﻨﺛﺃ ﺕﻮﺻ ﺝﺍﺮﺧﺇ ﺪﺟﻮﻳ ﻦﻟ
ﻞﻴﺠﺴﺘﺑ ﻚﻠﻬﺘﺴﻤﻟﺍ ﻡﺎﻴﻗ ﻦﻋ ﺔﻟﻭﺆﺴﻣ Panasonic ﺔﻛﺮﺷ ﺪﻌﺗ ﻻ
ﻰﻠﻋ ﻱﺪﻌﺘﻟﺍ ﻲﻓ ﺐﺒﺴﺘﻳ ﺪﻗ ﺎﻤﻣ ؛ﺮﺸﻨﻟﺍﻭ ﻊﺒﻄﻟﺍ ﻕﻮﻘﺤﻟ ﺔﻌﺿﺎﺧ ﺕﺎﻳﻮﺘﺤﻣ
.ﺮﺸﻨﻟﺍﻭ ﻊﺒﻄﻟﺍ ﻕﻮﻘﺣ
([AUX]) ﺭﺎﺴﻣ ﺕﺎﻣﻼﻋ ﺔﻓﺎﺿﺇ
ﻡﺍﺪﺨﺘﺳﺎﺑ ﺕﺍﺭﺎﺴﻤﻟﺍ ﻢﻴﺴﻘﺗ ﻚﻨﻜﻤﻳ ،ﻲﺟﺭﺎﺧ ﺯﺎﻬﺟ ﻦﻣ ﻞﻴﺠﺴﺘﻟﺍ ﺔﻟﺎﺣ ﻲﻓ
.ﺔﻋﻮﻨﺘﻣ ﻉﺎﺿﻭﺃ
ﻞﻴﺠﺴﺘﻟﺍ ﻞﺒﻗ
."REC MODE" ﺭﺎﻴﺘﺧﻻ ﺭﺮﻜﺘﻣ ﻞﻜﺸﺑ [SETUP] ﻰﻠﻋ ﻂﻐﺿﺍ 1
.[OK] ﻰﻠﻋ ﻂﻐﺿﺍ ﻢﺛ ،ﺩﺍﺪﻋﻹﺍ ﺭﺎﻴﺘﺧﻻ [،] ﻰﻠﻋ ﻂﻐﺿﺍ 2
MANUAL
.ﺎ
ً
ﻳﻭﺪﻳ ﺭﺎﺴﻣ ﺔﻣﻼﻋ ﺔﻓﺎﺿﺇ
SYNCHRO
ﻲﻓ ﻯﺮﺧﻷﺍ ﺓﺰﻬﺟﻷﺍ ﺃﺪﺒﺗ ﺎﻣﺪﻨﻋ ﺎ
ً
ﻴﺋﺎﻘﻠﺗ ﻞﻴﺠﺴﺘﻟﺍ ﺃﺪﺒﻳ
.ﻞﻴﻐﺸﺘﻟﺍ
ﺓﺪﻤﻟ ﺖﻤﺼﻟﺍ ﺩﻮﺴﻳ ﺎﻣﺪﻨﻋ ﺎ
ً
ﺘﻗﺆﻣ ﻞﻴﺠﺴﺘﻟﺍ ﻒﻗﻮﺘﻳ
.
ٍ
ﻥﺍﻮﺛ 3
TIME MARK
ﻩﺭﺪﻗ ﻲﻨﻣﺯ ﻞﺻﺎﻔﺑ ﺎ
ً
ﻴﺋﺎﻘﻠﺗ ﺎ
ً
ﻤﻴﺴﻘﺗ ﺭﺎﺴﻣ ﻢﻴﺴﻘﺗ ﻱﺮﺠﻳ
.ﻖﺋﺎﻗﺩ 5
.ﺎ
ً
ﻳﻭﺪﻳ ﺕﺍﺭﺎﺴﻣ ﺕﺎﻣﻼﻋ ﺔﻓﺎﺿﺇ ﺎ
ً
ﻀﻳﺃ ﻚﻨﻜﻤﻳ
ﺎ
ً
ﻳﻭﺪﻳ ﺭﺎﺴﻣ ﺔﻣﻼﻋ ﺔﻓﺎﺿﻹ
("SYNCHRO" ﻊﺿﻭ ءﺎﻨﺜﺘﺳﺎﺑ)
.ﻞﻴﺠﺴﺘﻟﺍ ءﺎﻨﺛﺃ ﺔﺑﻮﻠﻄﻤﻟﺍ ﺪﻳﺪﺤﺘﻟﺍ ﺔﻄﻘﻧ ﺪﻨﻋ [OK] ﻰﻠﻋ ﻂﻐﺿﺍ
ﺭﺎﺴﻤﻟﺍ ﻝﻮﻄﻟ ﻰﺼﻗﻷﺍ ﺪﺤﻟﺍ
:MANUALﺔﻘﻴﻗﺩ 60
:TIME MARKﺔﻘﻴﻗﺩ 5
.ﻞﻴﺠﺴﺘﻟﺍ ﺔﻌﺑﺎﺘﻣ ﻊﻣ ﺭﺎﺴﻣ ﺔﻣﻼﻋ ﻑﺎﻀ
ُ
ﺘﺳ ،ﻪﻟ ﻝﻮﻃ ﻰﺼﻗﺃ ﻰﻟﺇ ﺭﺎﺴﻤﻟﺍ ﻞﺼﻳ ﺎﻣﺪﻨﻋ
ﺎﻣﺪﻨﻋ ﻭﺃ ،ﺎ
ً
ﻳﻭﺪﻳ ﺭﺎﺴﻣ ﺔﻣﻼﻋ ﻑﺎﻀ
ُ
ﺗ ﺎﻣﺪﻨﻋ ﺭﺎﺴﻤﻟﺍ ﻝﻮﻄﻟ ﻰﺼﻗﻷﺍ ﺪﺤﻟﺍ ﺩﺍﺪﻋ ﻂﺒﺿ ﺩﺎﻌ
ُ
ﻳ)
(.ﺎ
ً
ﺘﻗﺆﻣ ﻞﻴﺠﺴﺘﻟﺍ ﻒﻗﻮﺘﻳ
([USB]) ﺔﻠﺠﺴﻤﻟﺍ ﺕﺍﺭﺎﺴﻤﻟﺍ ﻑﺬﺣ
."USB B" ﺭﺎﻴﺘﺧﻻ [USB] ﻰﻠﻋ ﻂﻐﺿﺍ 1
.ﻡﻮﺒﻟﻷﺍ ﺭﺎﻴﺘﺧﻻ [،] ﻰﻠﻋ ﻂﻐﺿﺍ 2
.ﺭﺎﺴﻤﻟﺍ ﺭﺎﻴﺘﺧﻻ [/] ﻭﺃ [/] ﻰﻠﻋ ﻂﻐﺿﺍ 3
ﺭﺎﻴﺘﺧﻻ ﺭﺮﻜﺘﻣ ﻞﻜﺸﺑ [SETUP] ﻰﻠﻋ ﻂﻐﺿﺍ 4
."EDIT MODE"
.ﻊﺿﻮﻟﺍ ﺭﺎﻴﺘﺧﻻ [،] ﻰﻠﻋ ﻂﻐﺿﺍ 5
TRK DEL.ﺪﺣﺍﻭ ﺭﺎﺴﻣ ﻑﺬﺣ
ALB DEL.ﺪﺣﺍﻭ ﻡﻮﺒﻟﺃ ﻑﺬﺣ
FORMAT.USB ﺯﺎﻬﺟ ﺔﺌﻴﻬﺗ
.[OK] ﻰﻠﻋ ﻂﻐﺿﺍ 6
.ﻪﻓﺬﺣ ﺩﺍﺮﻤﻟﺍ ﺩﺪﺤﻤﻟﺍ ﺮﺼﻨﻌﻟﺍ ﺽﺮﻌ
ُ
ﻳ
.[OK] ﻰﻠﻋ ﻂﻐﺿﺍ 7
."SURE? NO" ﺔﻟﺎﺳﺭ ﺽﺮﻌ
ُ
ﺗ
.ﻯﺮﺧﺃ ﺓﺮﻣ [ OK] ﻰﻠﻋ ﻂﻐﺿﺍ ،ءﺎﻐﻟﻺﻟ
ﻰﻠﻋ ﻂﻐﺿﺍ ﻢﺛ ،"SURE? YES" ﺭﺎﻴﺘﺧﻻ [،] ﻰﻠﻋ ﻂﻐﺿﺍ 8
.[OK]
."WRITING" ﺔﻟﺎﺳﺭ ﺮﻬﻈﺗ
49
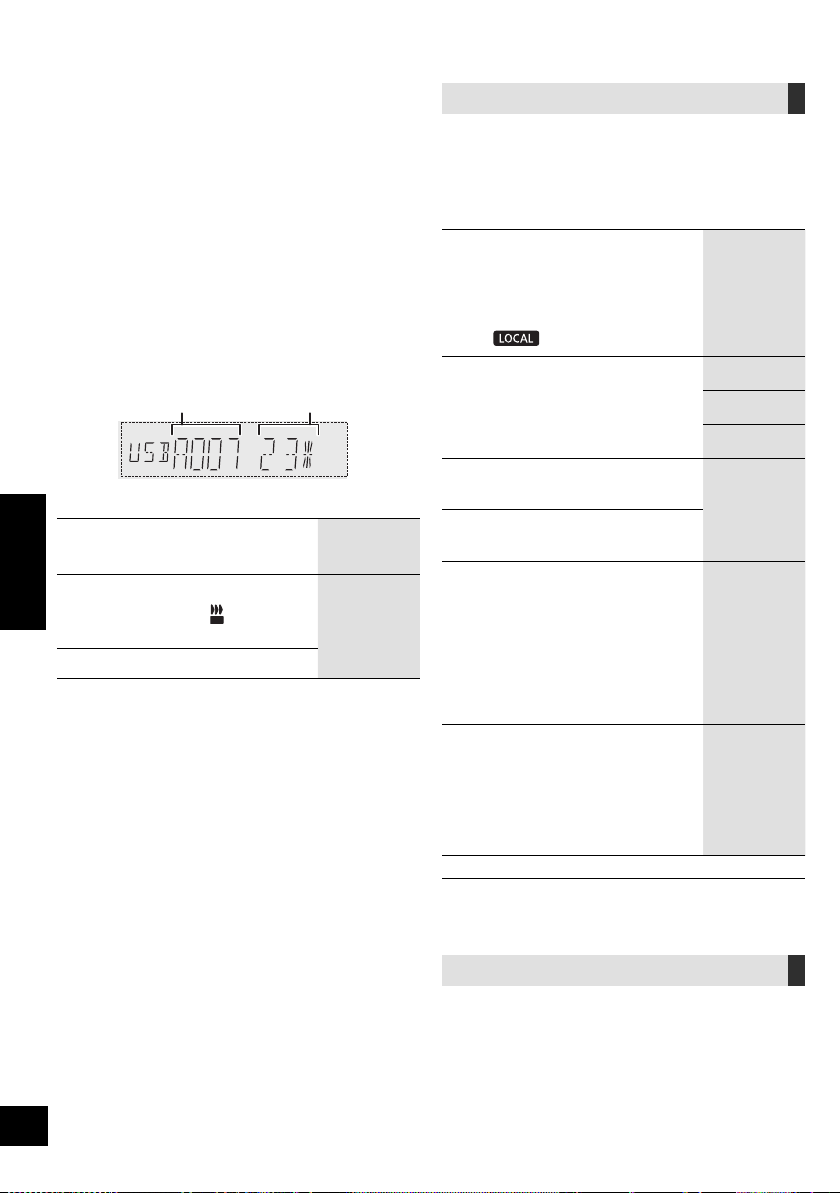
11
RQT9961
ﻲﺑﺮﻋ
ﺓءﺎﺿﻹﺍﻭ ﺕﻮﺼﻟﺍ ﺕﺍﺮﻴﺛﺄﺗ
ﺕﻮﺼﻟﺍ ﺕﺍﺮﻴﺛﺄﺗ
.ﺕﻮﺼﻟﺍ ﺝﺍﺮﺧﺇ ﻰﻟﺇ ﺔﻴﻟﺎﺘﻟﺍ ﺕﻮﺼﻟﺍ ﺕﺍﺮﻴﺛﺄﺗ ﺔﻓﺎﺿﺇ ﻦﻜﻤﻳ
.ﺕﻮﺼﻟﺍ ﺮﻴﺛﺄﺗ ﺭﺎﻴﺘﺧﻻ ﺭﺮﻜﺘﻣ ﻮﺤﻧ ﻰﻠﻋ [SOUND] ﻰﻠﻋ ﻂﻐﺿﺍ 1
.[OK] ﻰﻠﻋ ﻂﻐﺿﺍ ﻢﺛ ،ﺩﺍﺪﻋﻹﺍ ﺭﺎﻴﺘﺧﻻ [،] ﻰﻠﻋ ﻂﻐﺿﺍ 2
PRESET
EQ
ﻝﺩﺎﻌﻤﻠﻟ ﻖﺒﺴﻤﻟﺍ ﻂﺒﻀﻠﻟ ﻞﻀﻔﻤﻟﺍ ﺩﺍﺪﻋﻹﺍ ﺮﺘﺧﺍ
.(preset EQ)
. preset EQ ﺩﺍﺪﻋﺇ ﻞﻴﻐﺸﺗ ﻑﺎﻘﻳﻹ "FLAT" ﺮﺘﺧﺍ
ﺓﺪﺣﻮﻟﺍ ﻡﺍﺪﺨﺘﺳﺍ
.[ PRESET EQ] ﻰﻠﻋ ﻂﻐﺿﺍ
BASS
4+ ﻰﻟﺇ 4- ﻦﻣ
MID
TREBLE
INPUT
LEVEL
ﺭﺪﺼﻤﺑ ﺹﺎﺧ)
("AUX 2"
"HIGH" ﻭﺃ "NORMAL"
ﻂﺒﺿ ءﺎﻨﺛﺃ ﺎ
ً
ﺷﻮﺸﻣ ﺕﻮﺼﻟﺍ ﻥﺎﻛ ﺍﺫﺇ ،"NORMAL" ﺮﺘﺧﺍ
."HIGH" ﻞﺧﺪﻟﺍ ﻯﻮﺘﺴﻣ
SUPER
WOOFER
"OFF" ﻭﺃ "SW3" ﻭﺃ "SW2" ﻭﺃ "SW1"
ﺓﺪﺣﻮﻟﺍ ﻡﺍﺪﺨﺘﺳﺍ
ﻰﻠﻋ
ً
ﻻﻮﻄﻣ ﻂﻐﺿﺍ 1
[D.BASS, -SUPER WOOFER]
.ﻲﻟﺎﺤﻟﺍ ﺩﺍﺪﻋﻹﺍ ﺽﺮﻌﻟ
ﻭﺃ [/] ﻰﻠﻋ ﻂﻐﺿﺍ 2
.ﺩﺍﺪﻋﻹﺍ ﻂﺒﻀﻟ [/]
D.BASS
ﻭﺃ “D.BASS OFF” ﻭﺃ “D.BASS BEAT”
“D.BASS ON”
ﺓﺪﺣﻮﻟﺍ ﻡﺍﺪﺨﺘﺳﺍ
ﻰﻠﻋ ﻂﻐﺿﺍ
.[D.BASS, -SUPER WOOFER]
.ﺭﺩﺎﺼﻤﻟﺍ ﺾﻌﺑ ﻊﻣ ﺕﺍﺮﻴﺛﺄﺘﻟﺍ ﻩﺬﻫ ﻡﺍﺪﺨﺘﺳﺍ ﺪﻨﻋ ﺕﻮﺼﻟﺍ ﺓﺩﻮﺟ ﻲﻓ ﺽﺎﻔﺨﻧﺎﺑ ﺮﻌﺸﺗ ﺪﻗ
.ﺕﻮﺼﻟﺍ ﺕﺍﺮﻴﺛﺄﺗ ﻞﻴﻐﺸﺗ ﻒﻗﻭﺄﻓ ،ﻚﻟﺫ ﺙﺪﺣ ﻥﺈﻓ
ﺓءﺎﺿﻹﺍ ﺕﺍﺩﺍﺪﻋﺇ
ﻂﻘﻓ ﺓﺪﺣﻮﻟﺍ ﺔﻄﺳﺍﻮﺑ
.ﺓﺪﺣﻮﻟﺎﺑ ﺓءﺎﺿﻹﺍ ﻥﻮﻟ ﺮﻴﻴﻐﺗ ﻚﻨﻜﻤﻳ
.[ILLUMINATION/CONTROL] ﺡﺎﺘﻔﻣ ﺭ
ِ
ﺩﺃ
."OFF" ﺮﺘﺧﺍ ،ءﺎﻐﻟﻺﻟ
([AUX] ،[USB]) ﻞﻴﺠﺴﺘﻟﺍ
:ﻞﻴﺠﺴﺗ ﻚﻨﻜﻤﻳ
. [USB\\B] ﻰﻟﺇ [USB\\A] ﺮﺒﻋ MP3 ﺕﺍﺭﺎﺴﻣ
ﻰﻟﺇ AUX IN 2 ﻑﺮﻃ ﻭﺃ AUX IN 1 ﻑﺮﻃ ﺮﺒﻋ ﺕﻮﺼﻟﺍ
.[USB\\B]
ﺩﺍﺪﻌﺘﺳﻻﺍ
.ﺔﻠﺠﺴﻤﻟﺍ ﻊﻃﺎﻘﻤﻟﺍ ﻦﻳﺰﺨﺘﻟ [USB\\B] ﺬﻔﻨﻤﺑ USB ﺯﺎﻬﺟ ﻞ
ﱢ
ﺻﻭ
.ﻪﻴﻠﻋ ﻞﻴﺠﺴﺘﻟﺍ ﻲﻓ ﺐﻏﺮﺗ ﻱﺬﻟﺍ ﺭﺪﺼﻤﻟﺍ ﺰ
ﱢ
ﻬﺟ
.ﻲﺟﺭﺎﺨﻟﺍ ﺯﺎﻬﺠﻟﺍ ﻞ
ﱢ
ﺻﻭ ﻭﺃ ، –[USB\\A] ﺬﻔﻨﻤﺑ USB ﺯﺎﻬﺟ ﻞ
ﱢ
ﺻﻭ
.ﻪﻨﻣ ﻞﻴﺠﺴﺘﻟﺍ ﺪﻳﺮﺗ ﻱﺬﻟﺍ ﺭﺪﺼﻤﻟﺍ ﺩﺪﺣ 1
.("AUX 2" ﻭﺃ "AUX 1" ﻭﺃ "USB A")
.ﻞﻴﺠﺴﺘﻟﺍ ءﺪﺑ ﻞﺟﺃ ﻦﻣ [USB REC /] ﻰﻠﻋ ﻂﻐﺿﺍ 2
.ﻲﺟﺭﺎﺨﻟﺍ ﺯﺎﻬﺠﻟﺍ ﻰﻠﻋ ﻞﻴﻐﺸﺘﻟﺍ ﺃﺪﺑﺍ [AUX]
[USB\\A] ﻦﻣ ﻞﻴﺠﺴﺘﻟﺍ :ﻝﺎﺜﻣ
ﻞﻴﺠﺴﺘﻟﺍ ﻑﺎﻘﻳﺇ
.[] ﻰﻠﻋ ﻂﻐﺿﺍ
." WRITING" ﺔﻟﺎﺳﺭ ﺮﻬﻈﺗ
ﺖﻗﺆﻤﻟﺍ ﻒﻗﻮﺘﻟﺍ
ﻞﻴﺠﺴﺘﻠﻟ
([AUX])
ءﺎﻨﺛﺃ ﺓﺪﺣﻮﻟﺎﺑ [USB REC /] ﻰﻠﻋ ﻂﻐﺿﺍ
(.ﺎ
ً
ﻀﻴﻣﻭ "
REC
" ﺭﺪﺼﻳ) .ﻞﻴﺠﺴﺘﻟﺍ
.ﻞﻴﺠﺴﺘﻟﺍ ﺔﻌﺑﺎﺘﻤﻟ ﻯﺮﺧﺃ ﺓﺮﻣ ﺭﺰﻟﺍ ﺍﺬﻫ ﻰﻠﻋ ﻂﻐﺿﺍ
(12 R) ."SYNCHRO" ﻊﺿﻭ ﻲﻓ ﺍﺬﻫ ءﺍﺮﺟﺇ ﻚﻨﻜﻤﻳ ﻻ
[USB]
ﻦﻳﺰﺨﺗ ﻱﺮﺠﻳ ﺚﻴﺣ .ﺭﺎﺴﻤﻟﺍ ﺍﺬﻫ ﻥ
ّ
ﺰﺨ
ُ
ﻳ ﻦﻠﻓ ،ﺎﻣ ﺭﺎﺴﻣ ءﺎﻬﺘﻧﺍ ﻞﺒﻗ ﻞﻴﺠﺴﺘﻟﺍ ﺖﻔﻗﻭﺃ ﺍﺫﺇ
.ﻂﻘﻓ ﻞﻣﺎﻜﻟﺎﺑ ﺔﻠﺠﺴﻤﻟﺍ ﺕﺍﺭﺎﺴﻤﻟﺍ
(.ﺭﺎﺴﻣ ﻱﺃ ﻞﻴﺠﺴﺗ ﻡﺪﻋ ﺔﻟﺎﺣ ﻲﻓ ،"NO FILE RECORDED" ﺔﻟﺎﺳﺭ ﺽﺮﻌ
ُ
ﺗ)
.(ﺭﺍﺮﻜﺗﻭ ﻲﺋﺍﻮﺸﻋ ﻲﻌﺿﻭ ءﺎﻨﺜﺘﺳﺎﺑ) ﺓﺩﺪﺤﻤﻟﺍ ﻞﻴﻐﺸﺘﻟﺍ ﻉﺎﺿﻭﺃ ﻲﻓ ﻞﻴﺠﺴﺘﻟﺍ ءﺍﺮﺟﺇ ﻚﻨﻜﻤﻳ
(10 R)
[AUX]
ﺭﺎﺴﻣ ﺕﺎﻣﻼﻋ ﺔﻓﺎﺿﺇ ﺎ
ً
ﻀﻳﺃ ﻚﻨﻜﻤﻳ ﺎﻤﻛ .ﺎ
ً
ﺘﻗﺆﻣ ﻞﻴﺠﺴﺘﻟﺍ ﻒﻗﻮﺗ ﺎﻤﻠﻛ ﺭﺎﺴﻣ ﺔﻣﻼﻋ ﻑﺎﻀ
ُ
ﺗ
(12 R) .ﻯﺮﺧﺃ ﻕﺮﻄﺑ
ﻦﻳﺰﺨﺘﻟﺍ ﺔﻌﺳ ﻦﻣ ﻖﻘﺤﺘﻠﻟ
.ﻑﺎﻘﻳﻹﺍ ﻊﺿﻭ ﻲﻓ ﺓﺪﺣﺍﻭ ﺓﺮﻣ [DISPLAY] ﻰﻠﻋ ﻂﻐﺿﺍ
USB ﺯﺎﻬﺠﻟ ﻲﻘﺒﺘﻤﻟﺍ ﻞﻴﺠﺴﺘﻟﺍ ﺖﻗﻭ ﻭﺃ ﺔﺣﺎﺘﻤﻟﺍ ﻦﻳﺰﺨﺘﻟﺍ ﺔﺣﺎﺴﻣ ﺽﺮﻌ
ُ
ﺘﺳ
.[USB\\B] ﻲﻓ
.ﺓﺪﺣﻮﻟﺍ ﺔﻄﺳﺍﻮﺑ ﺯﺎﻬﺠﻟﺍ ﺓءﺍﺮﻗ ﻱﺭﺎﺟ ﻥﻮﻜﻳ ﺎﻣﺪﻨﻋ " UPDATE" ﺔﻤﻠﻛ ﺮﻬﻈﺗ
ﻊﻀﺒﻟ " NODEVICE" ﺔﻤﻠﻛ ﺮﻬﻈﺗ ،[USB\\B] ﻲﻓ USB ﺯﺎﻬﺟ ﺩﻮﺟﻭ ﻡﺪﻋ ﺔﻟﺎﺣ ﻲﻓ
.
ٍ
ﻥﺍﻮﺛ
ﻱﺭﺎﺠﻟﺍ ﻡﻮﺒﻟﻷﺍ
ﻪﻠﻴﺠﺴﺗ
ﺔﻴﻠﻤﻌﻟ ﺔﻳﻮﺌﻤﻟﺍ ﺔﺒﺴﻨﻟﺍ
ﻞﻴﺠﺴﺘﻟﺍ
50
RQT9961
10
([USB]) DJ jukebox ﺔﻴﺻﺎﺧ
ﻲﺠﻳﺭﺪﺘﻟﺍ ﻞﺧﺍﺪﺘﻟﺍ ﺮﻴﺛﺄﺗ ﺔﻓﺎﺿﻹ DJ jukebox ﺔﻴﺻﺎﺧ ﻡﺍﺪﺨﺘﺳﺍ ﻚﻨﻜﻤﻳ
ﺕﺍﺰﻴﻤﻟﺍ ﻡﺍﺪﺨﺘﺳﺍ ﺎ
ً
ﻀﻳﺃ ﻚﻨﻜﻤﻳ ﺎﻤﻛ .ﻲﻧﺎﻏﻷﺍ ﻦﻴﺑ (cross-fading)
.(ﻲﻠﻳ ﺎﻤﻴﻓ R) "Panasonic MAX Juke" ﻖﻴﺒﻄﺗ ﺔﻄﺳﺍﻮﺑ ﻯﺮﺧﻷﺍ
ﺭﺎﻴﺘﺧﻻ ﺭﺮﻜﺘﻣ ﻞﻜﺸﺑ [PLAY MENU] ﻰﻠﻋ ﻂﻐﺿﺍ 1
."JUKEBOX"
.[OK] ﻰﻠﻋ ﻂﻐﺿﺍ ﻢﺛ ،ﺩﺍﺪﻋﻹﺍ ﺭﺎﻴﺘﺧﻻ [،] ﻰﻠﻋ ﻂﻐﺿﺍ 2
OFF
CROSSFADE
ﻞﺧﺍﺪﺘﻟﺍ ﺮﻴﺛﺄﺗ ﻥﻭﺩ DJ jukebox ﺔﻴﺻﺎﺧ ﻞﻴﻐﺸﺗ
.(cross-fading) ﻲﺠﻳﺭﺪﺘﻟﺍ
ON
CROSSFADE
ﻞﺧﺍﺪﺘﻟﺍ ﺮﻴﺛﺄﺗ ﻊﻣ DJ jukebox ﺔﻴﺻﺎﺧ ﻞﻴﻐﺸﺗ
.(cross-fading) ﻲﺠﻳﺭﺪﺘﻟﺍ
OFF.DJ jukebox ﺔﻴﺻﺎﺧ ﻞﻴﻐﺸﺗ ﻑﺎﻘﻳﺇ
ﺓﺪﺣﻮﻟﺍ ﻡﺍﺪﺨﺘﺳﺍ
.ﺩﺍﺪﻋﻹﺍ ﺭﺎﻴﺘﺧﻻ ﺭﺮﻜﺘﻣ ﻮﺤﻧ ﻰﻠﻋ [DJ JUKEBOX] ﻰﻠﻋ ﻂﻐﺿﺍ
DJ jukebox ﺔﻴﺻﺎﺧ ﻞﻴﻐﺸﺗ ﻊﺿﻭ
ﻞﻴﻐﺸﺘﻟﺍ ﻊﺿﻭ ﻝﻮﺤﺘﻳ ،ﻞﻴﻐﺸﺘﻟﺍ ﺪﻴﻗ DJ jukebox ﺔﻴﺻﺎﺧ ﻥﻮﻜﺗ ﺎﻣﺪﻨﻋ
.ﺎ
ً
ﻴﺋﺎﻘﻠﺗ ﺭﺍﺮﻜﺘﻟﺍ ﻊﺿﻭ ﻰﻟﺇ
ﺔﻠﻀﻔﻤﻟﺍ ﺭﺍﺮﻜﺘﻟﺍ ﺕﺍﺩﺍﺪﻋﺇ ﺭﺎﻴﺘﺧﻻ
ﺭﺎﻴﺘﺧﻻ ﺭﺮﻜﺘﻣ ﻞﻜﺸﺑ [PLAY MENU] ﻰﻠﻋ ﻂﻐﺿﺍ 1
."PLAYMODE"
.[OK] ﻰﻠﻋ ﻂﻐﺿﺍ ﻢﺛ ،ﺩﺍﺪﻋﻹﺍ ﺭﺎﻴﺘﺧﻻ [،] ﻰﻠﻋ ﻂﻐﺿﺍ 2
RANDOM
REPEAT
.ﺎﻫﺭﺍﺮﻜﺗﻭ ﺎ
ً
ﻴﺋﺍﻮﺸﻋ ﺕﺍﺭﺎﺴﻤﻟﺍ ﻊﻴﻤﺟ ﻞﻴﻐﺸﺗ
." RND" ﺽﺮﻋ ﻱﺮﺠﻳ
ALL TITLE
REPEAT
.ﺕﺍﺭﺎﺴﻤﻟﺍ ﻊﻴﻤﺟ ﺭﺍﺮﻜﺗ
." " ﺽﺮﻌ
ُ
ﻳ
ﺓﺪﺣﻮﻟﺍ ﻡﺍﺪﺨﺘﺳﺍ
.[ILLUMINATION/CONTROL] ﺡﺎﺘﻔﻣ ﺭ
ِ
ﺩﺃ ،ﻑﺎﻘﻳﻹﺍ ﻊﺿﻭ ﻲﻓ
ﻭﺃ ،ﺮﺧﺁ ﺭﺪﺼﻣ ﻰﻟﺇ ﻞﻘﺘﻨﺗ ﻭﺃ ،ﻡﺎﻈﻨﻟﺍ ﻞﻴﻐﺸﺗ ﻒﻗﻮﺗ ﺎﻣﺪﻨﻋ DJ jukebox ﺮﻴﺛﺄﺗ ﻰﻠﻐ
ُ
ﻳ
.Karaoke ﻊﺿﻭ ﻞ
ﱢ
ﻐﺸﺗ
.ﻞﻴﺠﺴﺘﻟﺍ ﻊﺿﻭ ﻊﻣ DJ jukebox ﺮﻴﺛﺄﺗ ﻞﻤﻌﻳ ﻻ
"Panasonic MAX Juke" ﻖﻴﺒﻄﺗ ﻡﺍﺪﺨﺘﺳﺍ
ﻡﺎﻈﻨﻟ ﺺﺼﺨﻤﻟﺍ "Panasonic MAX Juke" ﻖﻴﺒﻄﺗ ﻞﻳﺰﻨﺗ ﻦﻜﻤﻳ
ﻝﻮﺼﺤﻠﻟ Google Play
TM
ﺮﺠﺘﻣ ﺮﺒﻋ ﺎ
ً
ﻧﺎﺠﻣ Android
TM
ﻞﻴﻐﺸﺘﻟﺍ
ٍ
ﻥﺁ ﻲﻓ ﺓﺩﺪﻌﺘﻣ ﺓﺰﻬﺟﺃ ﺮﺒﻋ ﺔﻴﻨﻏﺃ ﻞﻴﻐﺸﺗ ﺐﻠﻄﻛ ،ﺔﻴﻓﺎﺿﺇ ﺕﺍﺰﻴﻣ ﻰﻠﻋ
.
ٍ
ﺪﺣﺍﻭ
([USB]) ﻞﻴﻐﺸﺘﻟﺍ ﻉﺎﺿﻭﺃ
.ﻞﻴﻐﺸﺘﻟﺍ ﻊﺿﻭ ﺮﺘﺧﺍ
ﺩﺍﺪﻌﺘﺳﻻﺍ
." OFF" ﻰﻠﻋ DJ jukebox ﺔﻴﺻﺎﺧ ﻂﺒﺿﺍ
ﺭﺎﻴﺘﺧﻻ ﺭﺮﻜﺘﻣ ﻞﻜﺸﺑ [PLAY MENU] ﻰﻠﻋ ﻂﻐﺿﺍ 1
."REPEAT" ﻭﺃ "PLAYMODE"
.[OK] ﻰﻠﻋ ﻂﻐﺿﺍ ﻢﺛ ،ﺩﺍﺪﻋﻹﺍ ﺭﺎﻴﺘﺧﻻ [،] ﻰﻠﻋ ﻂﻐﺿﺍ 2
PLAYMODE
OFF
PLAYMODE
.ﻞﻴﻐﺸﺘﻟﺍ ﻊﺿﻭ ﺩﺍﺪﻋﺇ ءﺎﻐﻟﺇ
1-TRACK
.ﻂﻘﻓ ﺩﺪﺤﻤﻟﺍ ﺭﺎﺴﻤﻟﺍ ﻞﻴﻐﺸﺗ ﻱﺮﺠﻳ
." 1-TR" ﺽﺮﻋ ﻢﺘﻳ
(.ﺏﻮﻠﻄﻤﻟﺍ ﺭﺎﺴﻤﻟﺍ ﻰﻟﺇ ﻲﻄﺨﺘﻟﺍ)
1-ALBUM
.ﻂﻘﻓ ﺩﺪﺤﻤﻟﺍ MP3 ﻡﻮﺒﻟﺃ ﻞﻴﻐﺸﺗ ﻱﺮﺠﻳ
." 1-ALB" ﺽﺮﻋ ﻢﺘﻳ
RANDOM
.ﺔﻴﺋﺍﻮﺸﻋ ﺔﻘﻳﺮﻄﺑ ﺕﺎﻳﻮﺘﺤﻤﻟﺍ ﻞﻴﻐﺸﺗ ﻱﺮﺠﻳ
." RND" ﺽﺮﻌ
ُ
ﻳ
1-ALBUM
RANDOM
MP3 ﻡﻮﺒﻟﺃ ﻲﻓ ﺕﺍﺭﺎﺴﻤﻟﺍ ﻞﻴﻐﺸﺗ ﻱﺮﺠﻳ
.ﻲﺋﺍﻮﺸﻋ ﻮﺤﻧ ﻰﻠﻋ ﺩﺪﺤﻤﻟﺍ
. MP3 ﻡﻮﺒﻟﺃ ﺭﺎﻴﺘﺧﻻ [] ﻭﺃ [] ﻰﻠﻋ ﻂﻐﺿﺍ
." RND"ﻭ "1-ALB" ﺽﺮﻋ ﻢﺘﻳ
REPEAT
ON REPEAT
.ﺭﺍﺮﻜﺘﻟﺍ ﻂﻤﻧ ﻞﻴﻐﺸﺗ ﻱﺮﺠﻳ
." " ﺽﺮﻌ
ُ
ﻳ
OFF REPEAT
ﻂﻤﻧ ﻞﻴﻐﺸﺗ ﻑﺎﻘﻳﺇ ﻰﻠﻋ ﺩﺍﺪﻋﻹﺍ ﺍﺬﻫ ﻞﻤﻌﻳ
.ﺭﺍﺮﻜﺘﻟﺍ
ﻉﻭﺮﺸﻟﺍ ﻞﺒﻗ ﻪﻄﺒﺿﺎﻓ .ﺩﺍﺪﻋﻹﺍ ﺍﺬﻫ ﺔﻄﺳﺍﻮﺑ ﻞﻴﺠﺴﺘﻟﺍ ءﺍﺮﺟﺇ ﺎ
ً
ﻀﻳﺃ ﻚﻨﻜﻤﻳ
.ﻞﻴﺠﺴﺘﻟﺍ ﻲﻓ
OFF
:PLAYMODE
.ﺕﺍﺭﺎﺴﻤﻟﺍ ﻊﻴﻤﺟ ﻞﻴﺠﺴﺘﻟ
:1-TRACK.ﺩﺪﺤﻤﻟﺍ ﺭﺎﺴﻤﻟﺍ ﻞﻴﺠﺴﺘﻟ
:1-ALBUM.ﺩﺪﺤﻤﻟﺍ ﻡﻮﺒﻟﻷﺍ ﻞﻴﺠﺴﺘﻟ
.ﻖﺑﺎﺴﻟﺍ ﺭﺎﺴﻤﻟﺍ ﻰﻟﺇ ﻲﻄﺨﺘﻟﺍ ﻚﻨﻜﻤﻳ ﻻ ،ﻲﺋﺍﻮﺸﻌﻟﺍ ﻞﻴﻐﺸﺘﻟﺍ ءﺎﻨﺛﺃ
.ﻡﺍﺪﺨﺘﺳﻻﺍ ﺪﻴﻗ ﻲﺋﺍﻮﺸﻌﻟﺍ ﻞﻴﻐﺸﺘﻟﺍ ﻊﺿﻭ ﻥﻮﻜﻳ ﺎﻣﺪﻨﻋ ﻞﻴﺠﺴﺘﻟﺍ ءﺍﺮﺟﺇ ﻚﻨﻜﻤﻳ ﻻ
.ﻞﻴﺠﺴﺘﻟﺍ ءﺎﻨﺛﺃ ﻑﺎﻘﻳﻹﺍ ﻊﺿﻭ ﻲﻓ ﺭﺮﻜﺘﻤﻟﺍ ﻞﻴﻐﺸﺘﻟﺍ ﻂﻤﻧ ﻥﻮﻜﻳ
51
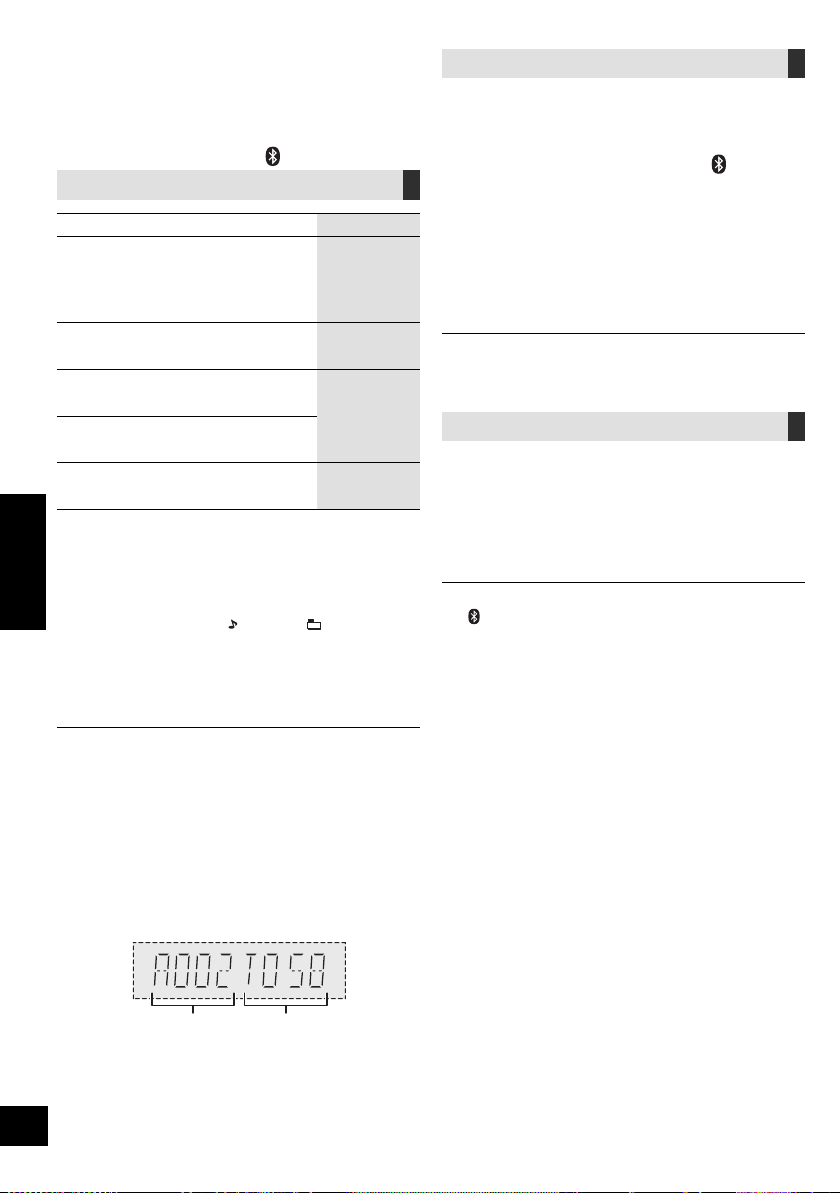
9
RQT9961
ﻲﺑﺮﻋ
Bluetooth
®
ﻝﺎﺳﺭﺇ ﻂﻤﻧ
ﺓﺩﻮﺟ ﻭﺃ ﻝﺎﺳﺭﻹﺍ ﺓﺩﻮﺠﻟ ﺔﻳﻮﻟﻭﻷﺍ ﺢﻨﻤﻟ ﻝﺎﺳﺭﻹﺍ ﻊﺿﻭ ﺮﻴﻴﻐﺗ ﻚﻨﻜﻤﻳ
.ﺕﻮﺼﻟﺍ
ﺩﺍﺪﻌﺘﺳﻻﺍ
." BLUETOOTH" ﺭﺎﻴﺘﺧﻻ [
] ﻰﻠﻋ ﻂﻐﺿﺍ
.ﻪﻠﺼﻓﺎﻓ ،ﻞﻌﻔﻟﺎﺑ
ً
ﻼﺼﺘﻣ Bluetooth
®
ﺯﺎﻬﺟ ﻥﺎﻛ ﺍﺫﺇ
ﺭﺎﻴﺘﺧﻻ ﺭﺮﻜﺘﻣ ﻞﻜﺸﺑ [PLAY MENU] ﻰﻠﻋ ﻂﻐﺿﺍ 1
."LINK MODE"
.[OK] ﻰﻠﻋ ﻂﻐﺿﺍ ﻢﺛ ،ﻂﻤﻨﻟﺍ ﺭﺎﻴﺘﺧﻻ [،] ﻰﻠﻋ ﻂﻐﺿﺍ 2
ﻝﺎﺼﺗﻻﺍ ﻰﻠﻋ ﺰﻴﻛﺮﺘﻟﺍ :MODE 1
ﺕﻮﺼﻟﺍ ﺓﺩﻮﺟ ﻰﻠﻋ ﺰﻴﻛﺮﺘﻟﺍ :MODE 2
.ﺎ
ً
ﻌﻄﻘﻨﻣ ﺕﻮﺼﻟﺍ ﻥﺎﻛ ﺍﺫﺇ ،" MODE 1" ﺮﺘﺧﺍ
." MODE 2" ﻮﻫ ﻊﻨﺼﻤﻠﻟ ﻲﺿﺍﺮﺘﻓﻻﺍ ﻂﺒﻀﻟﺍ
Bluetooth
®
ﺯﺎﻬﺠﺑ ﻝﺎﺼﺗﻻﺍ ﻊﻄﻗ
:Bluetooth
®
ﺔﻣﺪﺨﺑ ﻝﺎﺼﺗﻻﺍ ءﺎﻨﺛﺃ 1
ﺭﺎﻴﺘﺧﻻ ﺍ
ً
ﺭﺮﻜﺘﻣ ﺎ
ً
ﻄﻐﺿ [PLAY MENU] ﻰﻠﻋ ﻂﻐﺿﺍ
."DISCONNECT?"
ﻰﻠﻋ ﻂﻐﺿﺍ ﻢﺛ ،"OK? YES" ﺭﺎﻴﺘﺧﻻ [،] ﻰﻠﻋ ﻂﻐﺿﺍ
2
.[OK]
[ -PAIRING] ﻰﻠﻋ
ً
ﻻﻮﻄﻣ ﻂﻐﻀﻟﺎﺑ Bluetooth
®
ﺯﺎﻬﺟ ﻞﺼﻓ ﺎ
ً
ﻀﻳﺃ ﻚﻨﻜﻤﻳ
.ﺓﺪﺣﻮﻟﺎﺑ
ﻒﻠﺘﺨﻣ ﺕﻮﺻ ﺭﺪﺼﻣ ﻰﻠﻋ ﺭﺎﻴﺘﺧﻻﺍ ﻊﻗﻭ ﺍﺫﺇ ، Bluetooth
®
ﺯﺎﻬﺟ ﻝﺎﺼﺗﺍ ﻊﻄﻘﻨﻴﺳ
.("USB A" ﻝﺎﺜﻣ)
ﻂﺋﺎﺳﻮﻟﺍ ﻞﻴﻐﺸﺗ ﻲﻓ ﻢﻜﺤﺘﻟﺍ ﺮﺻﺎﻨﻋ
ﺩﺍﺪﻌﺘﺳﻻﺍ
.ﺓﺪﺣﻮﻟﺍ ﻞ
ﱢ
ﻐﺷ
. Bluetooth
®
ﺯﺎﻬﺟ ﻞ
ﱢ
ﺻﻭ ﻭﺃ ،USB ﺯﺎﻬﺟ ﻞﺧﺩﺃ
.ﺕﻮﺼﻟﺍ ﺭﺪﺼﻣ ﺪﻳﺪﺤﺘﻟ [
] ﻭﺃ [USB] ﻰﻠﻋ ﻂﻐﺿﺍ
([Bluetooth] ،[USB]) ﺔﻴﺳﺎﺳﻷﺍ ﻢﻜﺤﺘﻟﺍ ﺕﺍﻭﺩﺃ
ﻞﻴﻐﺸﺗ
.[/] ﻰﻠﻋ ﻂﻐﺿﺍ
ﻑﺎﻘﻳﺇ
.[] ﻰﻠﻋ ﻂﻐﺿﺍ
ﺔﻤﻠﻛ ﺽﺮﻌ
ُ
ﺗﻭ ،ﻞﻴﻐﺸﺘﻟﺍ ﻊﺿﻮﻣ ﻆﻔﺤ
ُ
ﻳ [USB]
."RESUME"
.ﻞﻴﻐﺸﺘﻟﺍ ﻑﺎﻨﺌﺘﺳﻻ [ –/] ﻰﻠﻋ ﻂﻐﺿﺍ
.ﻊﺿﻮﻤﻟﺍ ﺢﺴﻤﻟ ﻯﺮﺧﺃ ﺓﺮﻣ [ –] ﻰﻠﻋ ﻂﻐﺿﺍ
ﺖﻗﺆﻣ ﻑﺎﻘﻳﺇ
.[/] ﻰﻠﻋ ﻂﻐﺿﺍ
.ﻞﻴﻐﺸﺘﻟﺍ ءﺪﺑ ﺓﺩﺎﻋﻹ ﻯﺮﺧﺃ ﺓﺮﻣ ﻂﻐﺿﺍ
ﻲﻄﺨﺗ
[/] ﻭﺃ [/] ﻰﻠﻋ ﻂﻐﺿﺍ
.ﺭﺎﺴﻤﻟﺍ ﻲﻄﺨﺘﻟ
ﻡﻮﺒﻟﺃ ﻲﻄﺨﺘﻟ [] ﻭﺃ [] ﻰﻠﻋ ﻂﻐﺿﺍ [USB]
.MP3
ﺚﺤﺑ
ﺎ
ً
ﻄﻐﺿ ﻂﻐﺿﺍ ،ﺖﻗﺆﻤﻟﺍ ﻒﻗﻮﺘﻟﺍ ﻭﺃ ﻞﻴﻐﺸﺘﻟﺍ ءﺎﻨﺛﺃ
.[/] ﻭﺃ [/] ﻰﻠﻋ
ً
ﻻﻮﻄﻣ
( [USB]) MP3 ﺕﺎﻣﻮﺒﻟﺃ ﻭﺃ ﺕﺍﺭﺎﺴﻣ ﺽﺍﺮﻌﺘﺳﻻ
ﻂﻘﻓ ﺓﺪﺣﻮﻟﺍ ﺔﻄﺳﺍﻮﺑ
ﻊﺿﻭ ﻭﺃ ﻡﻮﺒﻟﻷﺍ ﺭﺎﻴﺘﺧﻻ [ALBUM/TRACK] ﻰﻠﻋ ﻂﻐﺿﺍ 1
.ﺕﺍﺭﺎﺴﻤﻟﺍ ﺽﺍﺮﻌﺘﺳﺍ
ﺡﺎﺘﻔﻣ
ِ
ﺭﺩﺃ ،(ﺭﺎﺴﻣ) " " ﻭﺃ (ﻡﻮﺒﻟﺃ) " " ﺾﻴﻣﻭ ءﺎﻨﺛﺃ 2
.ﺽﺍﺮﻌﺘﺳﻼﻟ [ILLUMINATION/CONTROL]
ﺕﺎﻣﻮﻠﻌﻤﻟﺍ ﺽﺮﻌﻟ
.ﺭﺮﻜﺘﻣ ﻮﺤﻧ ﻰﻠﻋ [DISPLAY] ﻰﻠﻋ ﻂﻐﺿﺍ
ﻥﺃ ﺐﺠﻳ ، Bluetooth
®
ﺯﺎﻬﺟ ﺔﻄﺳﺍﻮﺑ ﺓﺪﺣﻮﻟﺎﺑ ﺹﺎﺨﻟﺍ ﺪﻌﺑ ﻦﻋ ﻢﻜﺤﺘﻟﺍ ﺯﺎﻬﺟ ﻡﺍﺪﺨﺘﺳﻻ
ﺯﺎﻬﺠﻟ ﺓﺭﻮﺼﻟﺍﻭ ﺕﻮﺼﻟﺍ ﻒﻳﺮﻌﺗ ﻒﻠﻣ) AVRCP ﻖﻴﺴﻨﺗ Bluetooth
®
ﺯﺎﻬﺟ ﻢﻋﺪﻳ
.(ﺪﻌﺑ ﻦﻋ ﻢﻜﺤﺘﻟﺍ
.ﺯﺎﻬﺠﻟﺍ ﺔﻟﺎﺣ ﺐﺴﺣ ﻚﻟﺫﻭ ،ﻢﻜﺤﺘﻟﺍ ﺮﺻﺎﻨﻋ ﺾﻌﺑ ﻞﻤﻌﺗ ﻻ ﺪﻗ
:ﺎﻫﺭﺎﻬﻇﺇ ﻦﻜﻤﻳ ﻲﺘﻟﺍ ﺯﻮﻣﺮﻠﻟ ﻰﺼﻗﻷﺍ ﺪﺤﻟﺍ
ﺎ
ً
ﺒﻳﺮﻘﺗ 32 :[USB]
ﺎ
ً
ﺒﻳﺮﻘﺗ 16 :[Bluetooth]
ﺮﻴﻏ ﺹﻮﺼﻨﻟﺍ ﺕﺎﻧﺎﻴﺑ ﺽﺮﻌ
ُ
ﺗ ﻦﻟﻭ ، 2 ﻭ 1 ﺭﺍﺪﺻﺇ ID3 ﺕﺎﻣﻼﻋ ﺓﺪﺣﻮﻟﺍ ﻩﺬﻫ ﻢﻋﺪﺗ
.ﺔﻔﻠﺘﺨﻣ ﺔﻘﻳﺮﻄﺑ ﺮﻬﻈﺘﺳ ﻭﺃ ،ﺔﻣﻮﻋﺪﻤﻟﺍ
. MP3 ﺕﺎﻔﻠﻤﻟ ﺭﺎﺴﻤﻟﺍﻭ ﻡﻮﺒﻟﻷﺍ
ﺓﺭﺎﺷﺇ
ﻡﻮﺒﻟﻷﺍ ﻢﻗﺭ ﺭﺎﺴﻤﻟﺍ ﻢﻗﺭ
ﻝﺎﺜﻣ
52
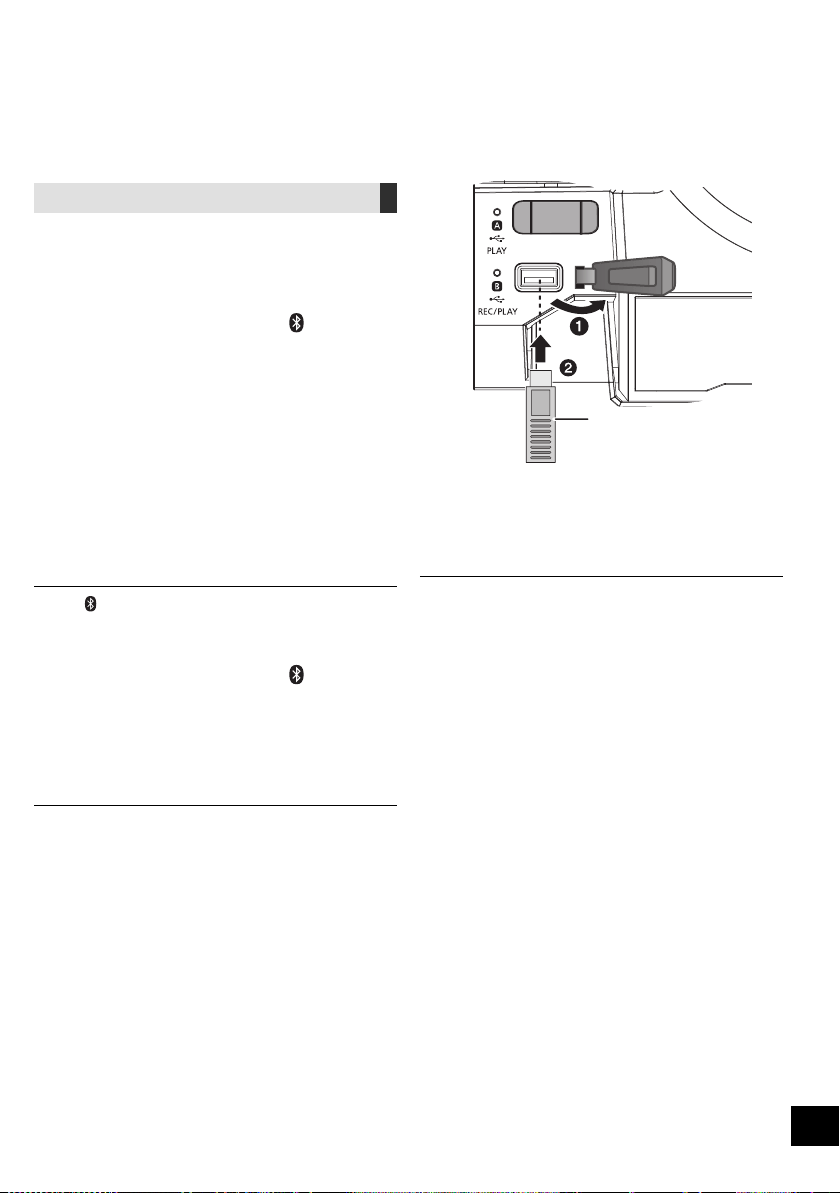
RQT9961
8
53
USB ﺯﺎﻬﺟ ﻞﻴﺻﻮﺗ
ﺩﺍﺪﻌﺘﺳﻻﺍ
ﺔﻴﻃﺎﻴﺘﺣﺍ ﺔﺨﺴﻨﺑ ﻅﺎﻔﺘﺣﻻﺍ ﻦﻣ ﺪﻛﺄﺗ ،ﺓﺪﺣﻮﻟﺎﺑ USB ﺯﺎﻬﺟ ﻞﻴﺻﻮﺗ ﻞﺒﻗ
.ﺕﺎﻧﺎﻴﺒﻟﺍ ﻦﻣ
.USB ﺬﻔﻨﻤﺑ USB ﺯﺎﻬﺟ ﻞ
ﱢ
ﺻﻭ ،ﺕﻮﺼﻟﺍ ﻯﻮﺘﺴﻣ ﺾﻔﺧﺍ
1
."USB B" ﻭﺃ "USB A" ﺭﺎﻴﺘﺧﻻ [USB] ﻰﻠﻋ ﻂﻐﺿﺍ 2
ءﺍﺮﺟﺇ ﺪﻨﻋ ﺮﻀﺧﻷﺍ ﻥﻮﻠﻟﺎﺑ ﻖﻓﺍﻮﺘﻤﻟﺍ USB ﺔﻟﺎﺣ ﺮﺷﺆﻣ ءﻲﻀﻳ
.ﺭﺎﻴﺘﺧﻻﺍ
. USB ﻞﻳﻮﻄﺗ ﺕﻼﺒﻛ ﻱﺃ ﻡﺪﺨﺘﺴﺗ ﻻﻭ .
ً
ﺓﺮﺷﺎﺒﻣ USB ﺯﺎﻬﺟ ﻞﺧﺩﺃ
.ﻪﻣﺍﺪﺨﺘﺳﺍ ﻦﻣ ﺖﻴﻬﺘﻧﺍ ﺖﻨﻛ ﺍﺫﺇ ، USB ﺯﺎﻬﺟ ﻞﺼﻓ ﻰﺟﺮﻳ
. USB ﺯﺎﻬﺟ ﻞﺼﻓ ﻞﺒﻗ USB ﻊﺿﻭ ﻞﻴﻐﺸﺗ ﻒﻗﻭﺃ
Bluetooth
®
ﺕﺎﻴﻠﻤﻋ
Bluetooth
®
ﺕﻮﺼﻟﺍ ﺯﺎﻬﺟ ﻦﻣ ﺭﺩﺎﺼﻟﺍ ﺕﻮﺼﻟﺍ ﻰﻟﺇ ﻉﺎﻤﺘﺳﻻﺍ ﻚﻨﻜﻤﻳ
.ﺎ
ً
ﻴﻜﻠﺳﻻ ﺓﺪﺣﻮﻟﺍ ﺮﺒﻋ
ﻰﻠﻋ ﻝﻮﺼﺤﻠﻟ Bluetooth
®
ﺯﺎﻬﺠﺑ ﺔﺻﺎﺨﻟﺍ ﻞﻴﻐﺸﺘﻟﺍ ﺕﺎﻤﻴﻠﻌﺗ ﻊﺟﺍﺭ
.ﻞﻴﺻﺎﻔﺗ
Bluetooth
®
ﺔﻤﺋﺎﻗ ﺮﺒﻋ ﻝﺎﺼﺗﻻﺍ ءﺍﺮﺟﺇ
ﺩﺍﺪﻌﺘﺳﻻﺍ
.ﺓﺪﺣﻮﻟﺍ ﻦﻣ ﺏﺮﻘﻟﺎﺑ ﻪﻌﺿ ﻢﺛ ،ﺯﺎﻬﺠﻟﺎﺑ Bluetooth
®
ﺔﻴﺻﺎﺧ ﻞ
ﱢ
ﻐﺷ
Bluetooth
®
ﺓﺰﻬﺟﺃ ﻥﺍﺮﺘﻗﺍ
."BLUETOOTH" ﺭﺎﻴﺘﺧﻻ [ ] ﻰﻠﻋ ﻂﻐﺿﺍ 1
.4 ﺓﻮﻄﺨﻟﺍ ﻰﻟﺇ ﻞﻘﺘﻧﺎﻓ ،ﺽﺮﻌﻟﺍ ﺔﺷﺎﺷ ﻰﻠﻋ "PAIRING" ﺔﻟﺎﺳﺭ ﺕﺮﻬﻇ ﺍﺫﺇ
ﻥﺍﺮﺘﻗﻻﺍ ﻊﺿﻭ ﻝﻮﺧﺪﻟ
."PAIRING" ﺭﺎﻴﺘﺧﻻ [PLAY MENU] ﻰﻠﻋ ﻂﻐﺿﺍ 2
ﻰﻠﻋ ﻂﻐﺿﺍ ﻢﺛ ،"OK? YES" ﺭﺎﻴﺘﺧﻻ [،] ﻰﻠﻋ ﻂﻐﺿﺍ 3
.[OK]
ﺯﺎﻬﺠﺑ ﻥﺍﺮﺘﻗﺍ ءﺍﺮﺟﻹ
ﺯﺎﻬﺠﺑ Bluetooth
®
ﺔﻤﺋﺎﻗ ﻦﻣ "SC-CMAX5" ﺮﺘﺧﺍ 4
.Bluetooth
®
.
ٍ
ﻥﺍﻮﺛ ﻊﻀﺒﻟ ﺽﺮﻌﻟﺍ ﺔﺷﺎﺷ ﻰﻠﻋ ﻞﺼﺘﻤﻟﺍ ﺯﺎﻬﺠﻟﺍ ﻢﺳﺍ ﺮﻬﻈﻳ
.Bluetooth
®
ﺯﺎﻬﺟ ﻰﻠﻋ ﻞﻴﻐﺸﺘﻟﺍ ﺃﺪﺑﺍ 5
.ﺓﺪﺣﻮﻟﺎﺑ [
-PAIRING] ﻰﻠﻋ
ً
ﻻﻮﻄﻣ ﻂﻐﻀﻟﺎﺑ ﻥﺍﺮﺘﻗﻻﺍ ﻊﺿﻭ ﻝﻮﺧﺩ ﺎ
ً
ﻀﻳﺃ ﻚﻨﻜﻤﻳ
ﻥﺮﺘﻘﻣ Bluetooth
®
ﺯﺎﻬﺠﺑ ﻝﺎﺼﺗﻻﺍ
."BLUETOOTH" ﺭﺎﻴﺘﺧﻻ [ ] ﻰﻠﻋ ﻂﻐﺿﺍ 1
.ﺽﺮﻌﻟﺍ ﺔﺷﺎﺷ ﻰﻠﻋ "BLUETOOTH READY" ﺔﻟﺎﺳﺭ ﺮﻬﻈﺗ
ﺯﺎﻬﺠﺑ Bluetooth
®
ﺔﻤﺋﺎﻗ ﻦﻣ "SC-CMAX5" ﺮﺘﺧﺍ 2
.Bluetooth
®
.
ٍ
ﻥﺍﻮﺛ ﻊﻀﺒﻟ ﺽﺮﻌﻟﺍ ﺔﺷﺎﺷ ﻰﻠﻋ ﻞﺼﺘﻤﻟﺍ ﺯﺎﻬﺠﻟﺍ ﻢﺳﺍ ﺮﻬﻈﻳ
.Bluetooth
®
ﺯﺎﻬﺟ ﻰﻠﻋ ﻞﻴﻐﺸﺘﻟﺍ ﺃﺪﺑﺍ 3
." 0000" ﻞﺧﺩﺄﻓ ،ﺭﻭﺮﻣ ﺡﺎﺘﻔﻤﺑ ﺔﺒﻟﺎﻄﻤﻟﺍ ﺕﺮﺟ ﺍﺫﺇ
ﺯﺎﻬﺠﻟﺎﺑ ﻥﺍﺮﺘﻗﻻﺍ ﻯﺮﺟ ﺍﺫﺇﻭ .ﺓﺪﺣﻮﻟﺍ ﻩﺬﻫ ﺔﻄﺳﺍﻮﺑ ﺓﺰﻬﺟﺃ 8 ﻰﻟﺇ ﻞﺼﻳ ﺎﻣ ﻞﻴﺠﺴﺗ ﻚﻨﻜﻤﻳ
.ﺔﻴﻨﻣﺯ ﺓﺪﻣ ﻝﻮﻃﺃ ﻪﻣﺪﺨﺘﺳﺍ ﻡﺪﻋ ﻰﻠﻋ ﻰﻀﻣ ﻱﺬﻟﺍ ﺯﺎﻬﺠﻟﺍ ﻝﺍﺪﺒﺘﺳﺍ ﻱﺮﺠﻴﺴﻓ ،ﻊﺳﺎﺘﻟﺍ
.ﻪﺗﺍﺫ ﺖﻗﻮﻟﺍ ﻲﻓ ﻂﻘﻓ ﺪﺣﺍﻭ ﺯﺎﻬﺠﺑ ﻝﺎﺼﺗﻻﺍ ﺓﺪﺣﻮﻠﻟ ﻦﻜﻤﻳ
ﻝﺎﺼﺗﻻﺍ ﺎ
ً
ﻴﺋﺎﻘﻠﺗ ﺓﺪﺣﻮﻟﺍ ﻝﻭﺎﺤﺘﺳ ،ﺍ
ً
ﺭﺪﺼﻣ ﻩﺭﺎﺒﺘﻋﺎﺑ " BLUETOOTH" ﺭﺎﻴﺘﺧﺍ ﺪﻨﻋ
ﺔﺷﺎﺸﻟﺍ ﻰﻠﻋ "LINKING" ﺔﻤﻠﻛ ﺮﻬﻈﺗ) .ﻪﺑ ﻝﺎﺼﺗﻻﺍ ﻯﺮﺟ Bluetooth
®
ﺯﺎﻬﺟ ﺮﺧﺂﺑ
(.ﺔﻴﻠﻤﻌﻟﺍ ﻩﺬﻫ ءﺎﻨﺛﺃ
USB ﺯﺎﻬﺟ
(ﻖﺤﻠﻣ ﺮﻴﻏ)
(ﻰﻠﻋﺃ ﻦﻣ) ﺓﺪﺣﻮﻟﺍ
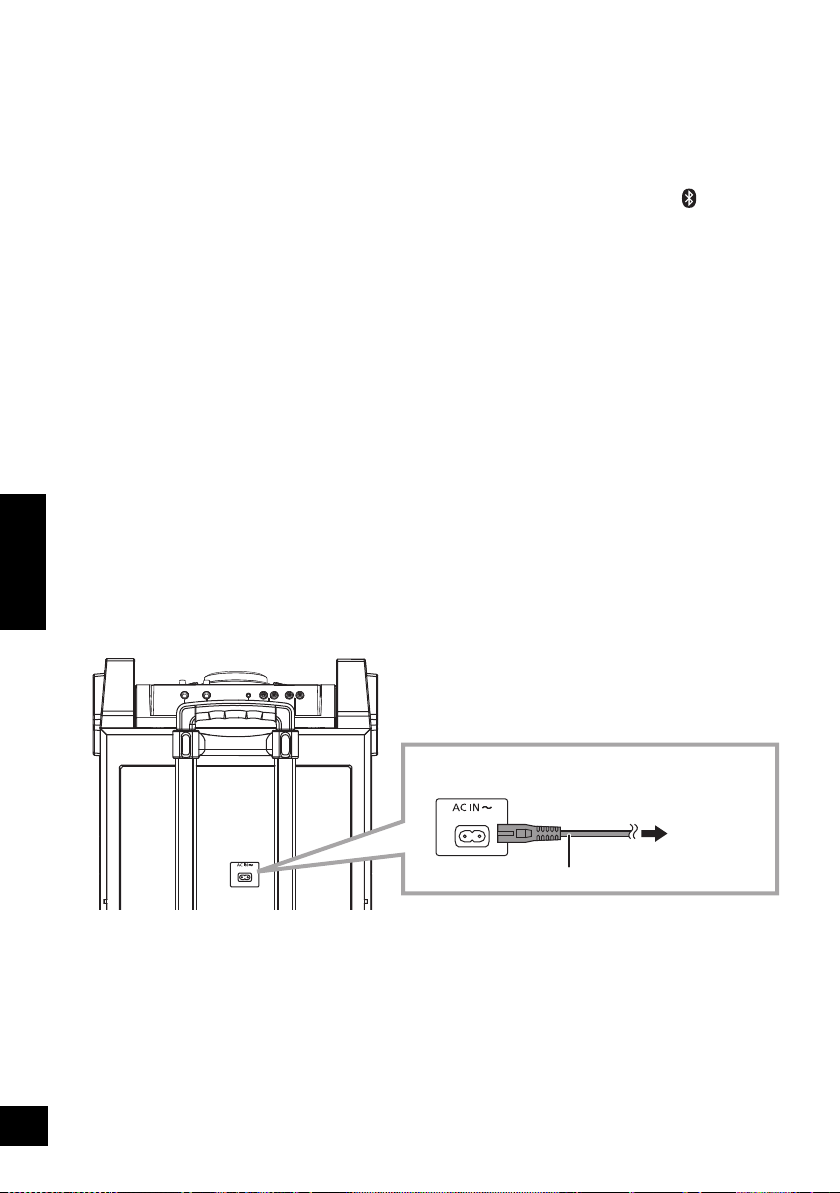
7
RQT9961
ﻲﺑﺮﻋ
54
[I/] ،[] ﻞﻴﻐﺸﺘﻟﺍ/ﺩﺍﺪﻌﺘﺳﻻﺍ ﺡﺎﺘﻔﻣ 1
ﻰﻟﺇ ﻞﻴﻐﺸﺘﻟﺍ ﻦﻣ ﺓﺪﺣﻮﻟﺍ ﻊﺿﻭ ﻞﻳﺪﺒﺘﻟ ﺡﺎﺘﻔﻤﻟﺍ ﺍﺬﻫ ﻰﻠﻋ ﻂﻐﺿﺍ
.ﺲﻜﻌﻟﺍ ﻭﺃ ﺩﺍﺪﻌﺘﺳﻻﺍ
.ﺔﻗﺎﻄﻟﺍ ﻦﻣ
ً
ﻼﻴﺌﺿ ﺍ
ً
ﺭﺪﻗ ﻚﻠﻬﺘﺴﺗ ﺓﺪﺣﻮﻟﺍ ﻞﻈﺗ ،ﺩﺍﺪﻌﺘﺳﻻﺍ ﻊﺿﻭ ﻲﻓ
ﺕﻮﺼﻟﺍ ﺭﺪﺼﻣ ﺭﺎﻴﺘﺧﺍ 2
:ﺓﺪﺣﻮﻟﺎﺑ
ﻰﻠﻋ
ً
ﻻﻮﻄﻣ ﻂﻐﺿﺍ ،Bluetooth
®
ﻥﺍﺮﺘﻗﺍ ءﺪﺒﻟ
.Bluetooth
®
ﺭﺪﺼﻣ ﻲﻓ ﻥﻮﻜﺗ ﺎﻣﺪﻨﻋ [
-PAIRING]
ﻞﻴﻐﺸﺘﻟﺍ ﻲﻓ ﻢﻜﺤﺘﻠﻟ ﺔﻴﺳﺎﺳﻷﺍ ﺭﺍﺭﺯﻷﺍ 3
ﺩﺍﺪﻋﻹﺍ ﺔﻤﺋﺎﻗ ﻝﻮﺧﺩ 4
ﺔﺿﻭﺮﻌﻤﻟﺍ ﺕﺎﻣﻮﻠﻌﻤﻟﺍ ﺮﻴﻴﻐﺗ 5
ﻖﻓﺍﻮﻣ/ﺭﺎﻴﺘﺧﻻﺍ 6
ﻡﻮﻨﻟﺍ ﺖﻗﺆﻣ ﻂﺒﺿ 7
.ﺓءﺎﺿﻹﺍ ﺊﻔﻃﺃ ﻢﺛ ،ﺽﺮﻌﻟﺍ ﺔﺷﺎﺷ ﻢﻴﺘﻌﺘﺑ ﻢﻗ 8
.ءﺎﻐﻟﻺﻟ ﻯﺮﺧﺃ ﺓﺮﻣ ﺭﺰﻟﺍ ﺍﺬﻫ ﻞﻋ ﻂﻐﺿﺍ
((ﻰﺼﻗﻷﺍ ﺪﺤﻟﺍ) 50 ﻰﻟﺇ (ﻰﻧﺩﻷﺍ ﺪﺤﻟﺍ) 0) ﺕﻮﺼﻟﺍ ﻯﻮﺘﺴﻣ ﻂﺒﺿ 9
ﺕﻮﺼﻟﺍ ﻢﺘﻛ 10
"MUTE" ﺖﻣﺎﺼﻟﺍ ﻊﺿﻮﻟﺍ ﺎ
ً
ﻀﻳﺃ ﻰﻐﻠ
ُ
ﻴﺳﻭ .ءﺎﻐﻟﻺﻟ ﻯﺮﺧﺃ ﺓﺮﻣ ﺭﺰﻟﺍ ﺍﺬﻫ ﻞﻋ ﻂﻐﺿﺍ
.ﺓﺪﺣﻮﻟﺍ ﻞﻴﻐﺸﺗ ﻑﺎﻘﻳﺇ ﻭﺃ ،ﺕﻮﺼﻟﺍ ﻯﻮﺘﺴﻣ ﻞﻳﺪﻌﺗ ﺪﻨﻋ
ﻞﻴﻐﺸﺘﻟﺍ ﺔﻤﺋﺎﻗ ﺮﺼﻨﻋ ﻂﺒﺿ 11
ﺕﻮﺼﻟﺍ ﺔﻤﺋﺎﻗ ﻝﻮﺧﺩ 12
ﺭﺎﺘﻴﺠﻟﺍ ﻝﺎﺧﺩﺇ ﺲﺒﻘﻣ / 2 ﻥﻮﻓﻭﺮﻜﻴﻣ ﺲﺒﻘﻣ 13
1 ﻥﻮﻓﻭﺮﻜﻴﻣ ﺲﺒﻘﻣ 14
AUX IN 2 ﻑﺮﻃ 15
AUX IN 1 ﻑﺮﻃ 16
AUDIO OUT ﻑﺮﻃ 17
KARAOKE ﻊﺿﻭ ﻝﻮﺧﺩ 18
ﺢﻴﺗﺎﻔﻤﻟﺍ ﺔﻄﺳﺍﻮﺑ ﻢﻜﺤﺘﻟﺍ ﻭﺃ ﻯﺪﺼﻟﺍ ﻭﺃ ﺔﻴﺋﺎﻨﻐﻟﺍ ﺔﻤﻐﻨﻟﺍ ءﺎﻐﻟﺇ ﺮﺘﺧﺍ 19
ﺕﻮﺼﻟﺍ ﺕﺍﺮﻴﺛﺄﺗ ﺭﺎﻴﺘﺧﺍ 20
ﻞﻴﺠﺴﺘﻟﺍ ﺔﻴﻠﻤﻋ ﻲﻓ ﻢﻜﺤﺘﻟﺍ 21
[USB\\A] 22
ﻞﻴﻐﺸﺘﻠﻟ ﺺﺼﺨﻤﻟﺍ USB ﺬﻔﻨﻣ
USB ﺔﻟﺎﺤﻟﺍ ﺮﺷﺆﻣ
[USB\\B] 23
ﻞﻴﻐﺸﺘﻟﺍ/ﻞﻴﺠﺴﺘﻠﻟ ﺺﺼﺨﻤﻟﺍ USB ﺬﻔﻨﻣ
USB ﺔﻟﺎﺤﻟﺍ ﺮﺷﺆﻣ
ﺪﻌﺑ ﻦﻋ ﻢﻜﺤﺘﻟﺍ ﺯﺎﻬﺟ ﺓﺭﺎﺷﺇ ﺮﻌﺸﺘﺴﻣ 24
ً
ﺓﺮﺷﺎﺒﻣ ﻡﺎﻣﻷﺍ ﻦﻣ ﺎ
ً
ﺒﻳﺮﻘﺗ ﻡ 7 ﻕﺎﻄﻧ ﻲﻓ :ﺔﻓﺎﺴﻤﻟﺍ
ﺔﻴﺣﺎﻧﻭ ﺭﺎﺴﻴﻟﺍ ﺔﻴﺣﺎﻧ ﺔﺟﺭﺩ 30 ،ﻞﻔﺳﻷﻭ ﻰﻠﻋﻷ ﺔﺟﺭﺩ 20 :ﺔﻳﻭﺍﺰﻟﺍ
ﺎ
ً
ﺒﻳﺮﻘﺗ ﻦﻴﻤﻴﻟﺍ
1 ﻥﻮﻓﻭﺮﻜﻴﻤﻟﺍ ﺕﻮﺻ ﻯﻮﺘﺴﻣ ﻂﺒﺿ 25
ﺭﺎﺘﻴﺠﻟﺍ ﻭﺃ 2 ﻥﻮﻓﻭﺮﻜﻴﻤﻟﺍ ﺕﻮﺻ ﻯﻮﺘﺴﻣ ﻂﺒﺿ 26
(15 R) ﺭﺎﺘﻴﺠﻟﺍ ﻭﺃ 2 ﻥﻮﻓﺮﻜﻴﻤﻟﺍ ﺡﺎﺘﻔﻣ 27
(10 R) DJ jukebox ﺭﺎﻴﺘﺧﺍ 28
(9 R) ﺕﺍﺭﺎﺴﻤﻟﺍ ﺽﺍﺮﻌﺘﺳﺍ ﻊﺿﻭ ﻭﺃ MP3 ﻡﻮﺒﻟﺃ ﺭﺎﻴﺘﺧﺍ 29
(11 R) ﺓءﺎﺿﻹﺍ ﺩﺍﺪﻋﺇ ﺮﻴﻴﻐﺗ 30
(9 R) MP3 ﺕﺎﻣﻮﺒﻟﺃ ﻭﺃ ﺕﺍﺭﺎﺴﻣ ﺽﺍﺮﻌﺘﺳﺍ
(10 R) DJ jukebox ﻞﻴﻐﺸﺗ ﻊﺿﻭ ﺮﻴﻴﻐﺗ
ﺽﺮﻌﻟﺍ ﺔﺷﺎﺷ 31
ﺩﺩﺮﺘﻤﻟﺍ ﻲﺋﺎﺑﺮﻬﻜﻟﺍ ﺭﺎﻴﺘﻠﻟ ﺭﺪﺼﻤﺑ ﻞﻴﺻﻮﺘﻟﺍ
ﺔﻗﺎﻄﻟﺍ ﺮﻴﻓﻮﺗ
.ﻡﺍﺪﺨﺘﺳﻻﺍ ﺪﻴﻗ ﻡﺎﻈﻨﻟﺍ ﻥﻮﻜﻳ ﻻ ﺎﻣﺪﻨﻋ ،ﻲﺋﺎﺑﺮﻬﻜﻟﺍ ﺭﺎﻴﺘﻟﺍ ﺲﺑﺎﻗ ﻞﺼﻓﺎﻓ .ﻞﻴﻐﺸﺘﻟﺍ ﻑﺎﻘﻳﺇ ﺔﻟﺎﺣ ﻲﻓ ﻰﺘﺣ (20 R) ﺔﻗﺎﻄﻟﺍ ﻦﻣ
ً
ﻼﻴﺌﺿ ﺍ
ً
ﺭﺪﻗ ﻡﺎﻈﻨﻟﺍ ﻚﻠﻬﺘﺴﻳ
.ﻯﺮﺧﺃ ﺓﺮﻣ ﺎﻬﻄﺒﺿ ﻚﻴﻠﻋ ﻦﻴﻌﺘﻳﻭ .ﻡﺎﻈﻨﻟﺍ ﻞﺼﻔﺗ ﺎﻣﺪﻌﺑ ﻥﺍﺪﻘﻔﻠﻟ ﺕﺍﺩﺍﺪﻋﻹﺍ ﺾﻌﺑ ﺽﺮﻌﺘﺘﺳ
(ﻒﻠﺨﻟﺍ ﻦﻣ) ﺓﺪﺣﻮﻟﺍ
.ﺩﺩﺮﺘﻤﻟﺍ ﻲﺋﺎﺑﺮﻬﻜﻟﺍ ﺭﺎﻴﺘﻟﺍ ﻚﻠﺳ ﻞ
ﱢ
ﺻﻭ
ﺭﺎﻴﺘﻟﺍ ﺝﺮﺨﻣ ﻰﻟﺇ
ﻝﺰﻨﻤﻟﺎﺑ ﻲﺋﺎﺑﺮﻬﻜﻟﺍ
(ﻖﺤﻠﻣ) ﺩﺩﺮﺘﻤﻟﺍ ﻲﺋﺎﺑﺮﻬﻜﻟﺍ ﺭﺎﻴﺘﻟﺍ ﺲﺑﺎﻗ
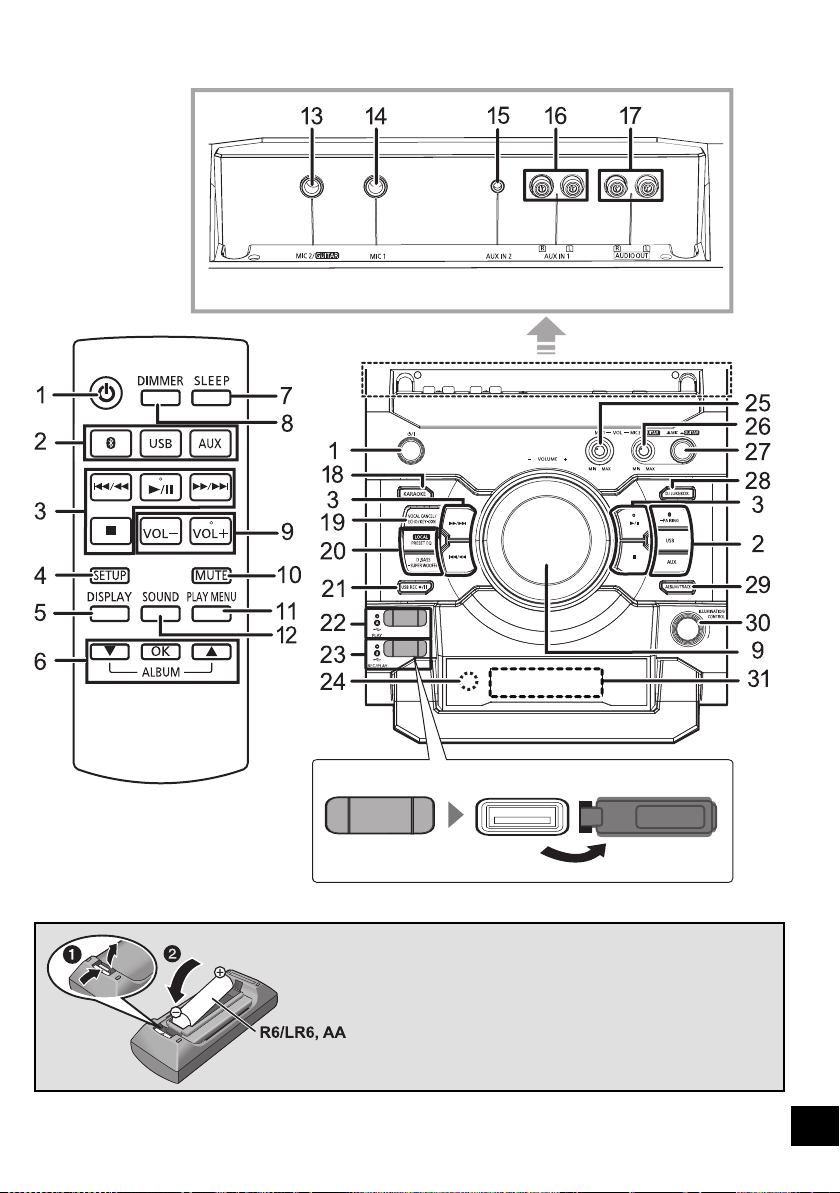
RQT9961
6
55
ﻢﻜﺤﺘﻠﻟ ﻲﻌﺟﺮﻤﻟﺍ ﻞﻴﻟﺪﻟﺍ
ﻲﻔﻠﺧ ﺮﻈﻨﻣ
ﺪﻌﺑ ﻦﻋ ﻢﻜﺤﺗ ﺯﺎﻬﺟ
ﻱﻮﻠﻋ ﺮﻈﻨﻣ
ﺪﻌﺑ ﻦﻋ ﻢﻜﺤﺘﻟﺍ ﺯﺎﻬﺟ ﻡﺍﺪﺨﺘﺳﺍ
ﻦﻳﺩﻮﺟﻮﻤﻟﺍ ﻦﻴﺒﻄﻘﻟﺍ ﻊﻣ (ﻭ ) ﻥﺎﺒﻄﻘﻟﺍ ﻖﺑﺎﻄﺘﻳ ﺚﻴﺤﺑ ﺔﻳﺭﺎﻄﺒﻟﺍ ﻞﺧﺩﺃ
.ﺪﻌﺑ ﻦﻋ ﻢﻜﺤﺘﻟﺍ ﺯﺎﻬﺠﺑ
ﻦﻋ ﻢﻜﺤﺘﻟﺍ ﺯﺎﻬﺠﺑ ﺔﺻﺎﺨﻟﺍ ﺓﺭﺎﺷﻹﺍ ﺮﻌﺸﺘﺴﻣ ﻮﺤﻧ ﺪﻌﺑ ﻦﻋ ﻢﻜﺤﺘﻟﺍ ﺯﺎﻬﺟ ﻪ
ﱢ
ﺟﻭ
.ﺓﺪﺣﻮﻟﺎﺑ ﺩﻭﺰﻤﻟﺍ ﺪﻌﺑ
.ﺕﺍﺭﺎﺷﻹﺍ ﺮﻌﺸﺘﺴﻣ ﻡﺎﻣﺃ ءﻲﺷ ﻱﺃ ﻊﺿﻭ ﻡﺪﻋ ﻰﺟﺮﻳ ،ﻞﺧﺍﺪﺘﻟﺍ ﺐﻨﺠﺘﻟ
(ﺔﻳﺰﻴﻨﺠﻨﻣ ﻭﺃ ﺔﻳﻮﻠﻗ ﺔﻳﺭﺎﻄﺑ)
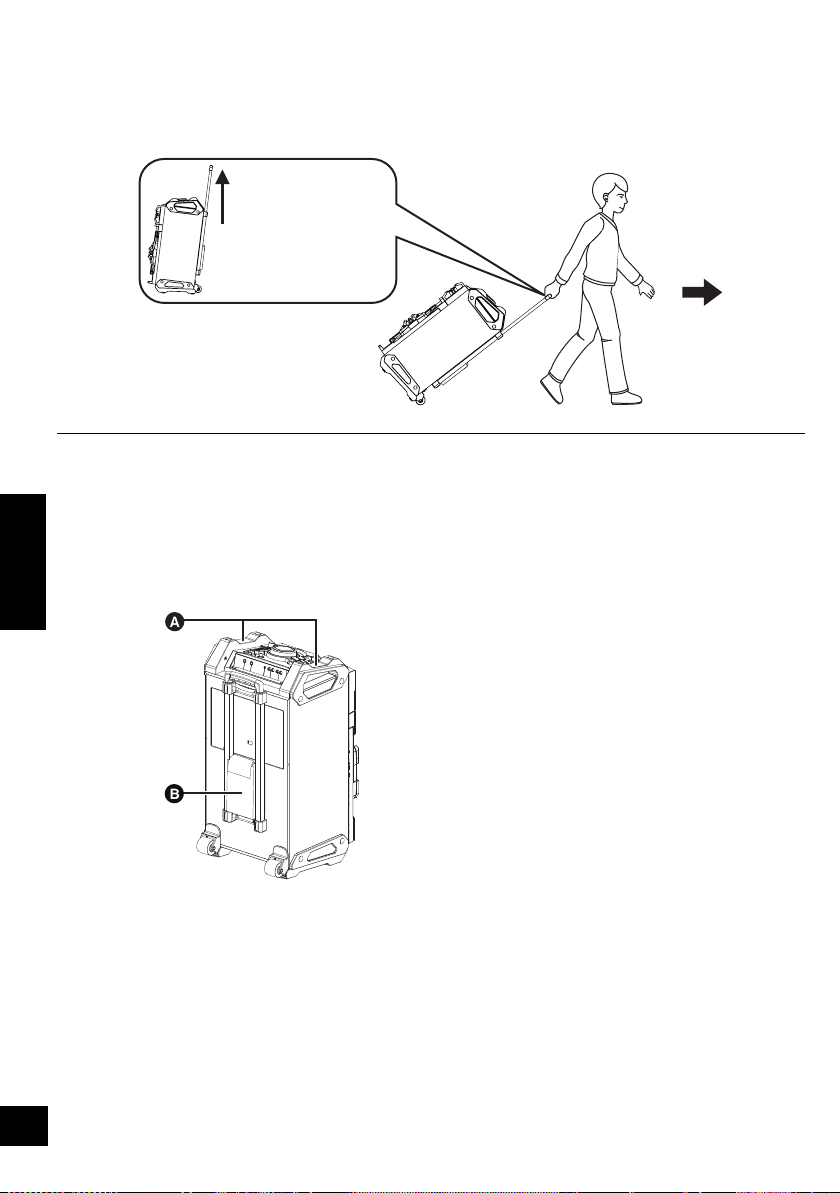
5
RQT9961
ﻲﺑﺮﻋ
ﺓﺪﺣﻮﻟﺍ ﻞﻘﻧ
.ﺎﻬﺑ ﺓﺩﻭﺰﻤﻟﺍ ﺕﻼﺠﻌﻟﺍ ﺔﻄﺳﺍﻮﺑ ﺔﻟﻮﻬﺴﺑ ﺓﺪﺣﻮﻟﺍ ﻩﺬﻫ ﻞﻘﻧ ﻚﻨﻜﻤﻳ
ﺩﺍﺪﻌﺘﺳﻻﺍ
.ﺎﻬﺑ ﺔﻠﺻﻮﻤﻟﺍ ﺕﻼﺒﻜﻟﺍﻭ ﺓﺰﻬﺟﻷﺍ ﻊﻴﻤﺟ ﻚﻓ ﻦﻣ ﺓﺪﺣﻮﻟﺍ ﻩﺬﻫ ﻞﻘﻧ ﺪﻨﻋ ﺪﻛﺄﺗ
.ﺪﻳﺪﺷ ﺭﺪﺤﻨﻣ ﻰﻠﻋ ﺓﺪﺣﻮﻟﺍ ﺐﺤﺳ ﺪﻨﻋ ﺭﺬﺤﻟﺍ
ﱠ
ﺥﻮﺗ
.ﺔﻳﻮﺘﺴﻤﻟﺍ ﺮﻴﻏ ﻭﺃ ﺓﺮﻋﻮﻟﺍ ﺢﻄﺳﻷﺍ ﻕﻮﻓ ﺓﺪﺣﻮﻟﺍ ﺐﺤﺳ ﺐﻨﺠﺗ
.ﻢﻠﺴﻟﺍ ﻰﻠﻋ ﺓﺪﺣﻮﻟﺍ ﺐﺤﺴﺗ ﻻ
.ﺰﺟﺍﻮﺣ ﺩﻮﺟﻭ ﺔﻟﺎﺣ ﻲﻓ ﺎﻬﻠﻘﻧ ﺪﻨﻋ ﺓﺪﺤﻟﺍ ﻊﻓﺭﺍ
.ﻞﻘﻨﻟﺍ ﻦﻣ ءﺎﻬﺘﻧﻻﺍ ﺪﻌﺑ ﺎ
ً
ﻣﺎﻤﺗ ﻪﻌﺿﻮﻣ ﻰﻟﺇ ﺐﺤﺴﻟﺍ ﺾﺒﻘﻣ ﺓﺩﺎﻋﺇ ﻰﻠﻋ ﺎ
ً
ﻣﻭﺩ ﺹﺮﺣﺍ
.ﻯﺮﺧﻷﺍ ﺔﻴﺴﻴﻃﺎﻨﻐﻤﻟﺍ ﺓﺰﻬﺟﻷﺍ ﻭﺃ ﻲﺼﺨﺷ ﺮﺗﻮﻴﺒﻤﻛ ﻭﺃ ﻥﻮﻳﺰﻔﻠﺗ ﻦﻣ ﺏﺮﻘﻟﺎﺑ ﻪﻌﻀﺗ ﻼﻓ ؛ﻲﺴﻴﻃﺎﻨﻐﻤﻟﺍ ﻝﺎﺠﻤﻟﺍ ﻦﻣ ﺔﻳﺎﻤﺤﺑ ﺍﺬﻫ ﺕﺎﻋﺎﻤﺴﻟﺍ ﻡﺎﻈﻧ ﻰﻈﺤﻳ ﻻ
ﺓﺪﺣﻮﻟﺍ ﻊﻓﺭ
.ﺓﺪﺣﻮﻟﺍ ﻊﻓﺮﻟ () ﻦﻴﻳﻮﻠﻌﻟﺍ ﻦﻴﻀﺒﻘﻤﻟﺍ ﻚﺴﻣﺃ
() ﻲﻓﺎﺿﻹﺍ ﺐﻴﺠﻟﺍ ﻡﺍﺪﺨﺘﺳﺍ
.ﻞﻘﻨﻟﺍ ءﺎﻨﺛﺃ ﺐﻴﺠﻟﺍ ﺍﺬﻫ ﻲﻓ ﺎﻬﻴﻟﺇ ﺔﺟﺎﺤﺑ ﻥﻮﻜﺗ ﺪﻗ ﻲﺘﻟﺍ ﺕﺎﻘﺤﻠﻤﻟﺍ ﺾﻌﺑ ﻊﺿﻭ ﻲﻓ ﺐﻏﺮﺗ ﺪﻗ
56
ﺐﺤﺴﻟﺍ ﺾﺒﻘﻣ
ﻥﺃ ﻰﻟﺇ ﺎ
ً
ﻣﺎﻤﺗ ﺾﺒﻘﻤﻟﺍ ﺐﺤﺳﺍ
ﻰﻟﺇ ﺮﻴﺸﻳ ﺎ
ً
ﺗﻮﺻ ﺭﺪﺼﻳ
.ﻪﻔﻗﻮﺗ

RQT9961
4
57
ﺓﺪﺣﻮﻟﺎﺑ ﺔﻳﺎﻨﻌﻟﺍ
ﻒﻠﺘﻠﻟ ﺔﻋﺎﻤﺴﻟﺍ ﺽﺮﻌﺗ ﻊﻨﻤﻟ
ﻱﺩﺆﻳ ﺪﻗ ،ﺔﻠﻳﻮﻃ ﺔﻴﻨﻣﺯ ﺓﺪﻤﻟ ﺔﻴﻟﺎﻋ ﺕﺎﻳﻮﺘﺴﻣ ﻰﻠﻋ ﺕﻮﺼﻟﺍ ﻞﻐﺸﺗ ﺎﻣﺪﻨﻋ
.ﺕﺎﻋﺎﻤﺴﻠﻟ ﻲﺿﺍﺮﺘﻓﻻﺍ ﺮﻤﻌﻟﺍ ﺮﺼﻗﻭ ،ﺕﺎﻋﺎﻤﺴﻟﺍ ﻒﻠﺗ ﻰﻟﺇ ﻚﻟﺫ
:ﺔﻴﻟﺎﺘﻟﺍ ﺕﻻﺎﺤﻟﺍ ﻲﻓ ﻝﺎﻄﻋﻷﺍ ﻱﺩﺎﻔﺘﻟ ﺕﻮﺼﻟﺍ ﻯﻮﺘﺴﻣ ﺾﻔﺧﺍ
.ﺶﻳﻮﺸﺘﻠﻟ ﺕﻮﺼﻟﺍ ﺽﺮﻌﺗ ﺪﻨﻋ
.ﺕﻮﺼﻟﺍ ﺓﺩﻮﺟ ﻞﻳﺪﻌﺗ ﺪﻨﻋ
ﺓﺪﺣﻮﻟﺍ ﻒﻴﻈﻨﺘﻟ ﺔﻓﺎﺟﻭ ﺔﻤﻋﺎﻧ ﺵﺎﻤﻗ ﺔﻌﻄﻗ ﻡﺪﺨﺘﺳﺍ
.ﺔﻧﺎﻴﺼﻟﺍ ءﺍﺮﺟﺇ ﻞﺒﻗ ﺲﺒﻘﻤﻟﺍ ﻦﻣ ﺩﺩﺮﺘﻤﻟﺍ ﻲﺋﺎﺑﺮﻬﻜﻟﺍ ﺭﺎﻴﺘﻟﺍ ﺲﺑﺎﻗ ﻉﺰﻧﺍ
ﺢﺴﻤﻟ ﺍ
ً
ﺪﻴﺟ ﺔﻠﻠﺒﻣ ﺵﺎﻤﻗ ﺔﻌﻄﻗ ﺮﺼﻋﺍ ،ﺥﺎﺴﺗﻻﺍ ﺓﺪﻳﺪﺷ ﺓﺪﺣﻮﻟﺍ ﻥﻮﻜﺗ ﺎﻣﺪﻨﻋ
.ﺔﻓﺎﺟ ﺵﺎﻤﻗ ﺔﻌﻄﻘﺑ ﺓﺪﺣﻮﻟﺍ ﺢﺴﻣﺍ ﻢﺛ ،ﺥﺎﺴﺗﻻﺍ
.ﺎ
ً
ﻘﻠﻄﻣ ﺓﺪﺣﻮﻟﺍ ﻩﺬﻫ ﻒﻴﻈﻨﺘﻟ ﻦﻳﺰﻨﺒﻟﺍ ﻭﺃ ﺮﻨﺘﻟﺍ ﻭﺃ ﻝﻮﺤﻜﻟﺍ ﻡﺪﺨﺘﺴﺗ ﻻ
ﺎﻬﻟ ﺔﺼﺼﺨﻤﻟﺍ ﺕﺎﻤﻴﻠﻌﺘﻟﺍ ﺃﺮﻗﺍ ،ﺎ
ً
ﻴﺋﺎﻴﻤﻴﻛ ﺔﺠﻟﺎﻌﻣ ﺵﺎﻤﻗ ﺔﻌﻄﻗ ﻡﺍﺪﺨﺘﺳﺍ ﻞﺒﻗ
.ﺔﻳﺎﻨﻌﺑ
ﺎﻬﻨﻋ ﻝﺯﺎﻨﺘﻟﺍ ﻭﺃ ﺓﺪﺣﻮﻟﺍ ﺍﺬﻫ ﻦﻣ ﺺﻠﺨﺘﻠﻟ
.ﺎﻬﺑ ﺔﻨﻴﻌﻤﻟﺍ ﻡﺪﺨﺘﺴﻤﻟﺍ ﺕﺍﺩﺍﺪﻋﺈﺑ ﺔﺻﺎﺨﻟﺍ ﺕﺎﻣﻮﻠﻌﻤﻟﺎﺑ ﺓﺪﺣﻮﻟﺍ ﻩﺬﻫ ﻆﻔﺘﺤﺗ ﺪﻗ
ﻊﺒﺗﺎﻓ ،ﺎﻬﻨﻋ ﻝﺯﺎﻨﺘﻟﺍ ﻭﺃ ،ﺎﻬﻨﻣ ﺺﻠﺨﺘﻟﺎﺑ ﺓﺪﺣﻮﻟﺍ ﻩﺬﻫ ﻦﻋ ﻲﻠﺨﺘﻟﺍ ﺕﺩﺭﺃ ﺍﺫﺈﻓ
ﻲﺿﺍﺮﺘﻓﻻﺍ ﻂﺒﻀﻟﺍ ﻰﻟﺇ ﺕﺍﺩﺍﺪﻋﻹﺍ ﻊﻴﻤﺟ ﺓﺩﺎﻋﺈﺑ ﺔﺻﺎﺨﻟﺍ ﺕﺍءﺍﺮﺟﻹﺍ
.ﺔﻠﺠﺴﻤﻟﺍ ﺕﺎﻣﻮﻠﻌﻤﻟﺍ ﺢﺴﻣ ﻞﺟﺃ ﻦﻣ ﻊﻨﺼﻤﻟﺎﺑ
("ﻊﻨﺼﻤﻟﺎﺑ ﻲﺿﺍﺮﺘﻓﻻﺍ ﻂﺒﻀﻟﺍ ﻰﻟﺇ ﺕﺍﺩﺍﺪﻋﻹﺍ ﻊﻴﻤﺟ ﺓﺩﺎﻋﻹ" ،17 R)
.ﺓﺪﺣﻮﻟﺍ ﺓﺮﻛﺍﺫ ﻲﻓ ﻞﻴﻐﺸﺘﻟﺍ ﻞﺠﺳ ﻆﻔﺤ
ُ
ﻳ ﺪﻗ
Bluetooth
®
ﺔﻴﻨﻘﺗ ﻝﻮﺣ
ﻭﺃ/ﻭ ﺕﺎﻧﺎﻴﺒﻟﺍ ﻦﻋ ﺔﻴﻟﻭﺆﺴﻣ ﻱﺃ Panasonic ﺔﻛﺮﺷ ﻞﻤﺤﺘﺗ ﻻ
.ﻲﻜﻠﺳﻼﻟﺍ ﻝﺎﺳﺭﻹﺍ ءﺎﻨﺛﺃ ﺎﻬﻨﻋ ﻒﺸﻜﻟﺍ ﻱﺮﺠﻳ ﻲﺘﻟﺍ ﺕﺎﻣﻮﻠﻌﻤﻟﺍ
ﻡﺪﺨﺘﺴﻤﻟﺍ ﺩﺩﺮﺘﻟﺍ ﻕﺎﻄﻧ
.ﺰﺗﺮﻫ ﺎﺠﻴﺟ 2.4 ﻩﺭﺪﻗ ﺩﺩﺮﺗ ﻕﺎﻄﻧ ﻡﺎﻈﻨﻟﺍ ﺍﺬﻫ ﻡﺪﺨﺘﺴﻳ
ﺯﺎﻬﺠﻟﺍ ﺍﺬﻫ ﺩﺎﻤﺘﻋﺍ
ﻰﻠﻋ
ً
ءﺎﻨﺑ ﺩﺎﻤﺘﻋﺍ ﻰﻠﻋ ﻞﺼﺣ ﺪﻗﻭ ،ﺩﺩﺮﺘﻟﺍ ﺕﺍﺪﻴﻴﻘﺗ ﻊﻣ ﻡﺎﻈﻨﻟﺍ ﺍﺬﻫ ﻖﻓﺍﻮﺘﻳ
ﺺﻴﺧﺮﺗ ﻢﻳﺪﻘﺗ ﻱﺭﻭﺮﻀﻟﺍ ﻦﻣ ﺲﻴﻟ ،ﻪﻴﻠﻋ
ً
ءﺎﻨﺑﻭ .ﺩﺩﺮﺘﻟﺎﺑ ﺔﻴﻨﻌﻤﻟﺍ ﻦﻴﻧﺍﻮﻘﻟﺍ
.ﻲﻜﻠﺳﻻ ﺚﺑ
:ﺔﻴﻟﺎﺘﻟﺍ ﺕﺍءﺍﺮﺟﻹﺍ ﻰﻠﻋ ﻥﺍﺪﻠﺒﻟﺍ ﺾﻌﺑ ﻲﻓ ﻥﻮﻧﺎﻘﻟﺍ ﺐﻗﺎﻌﻳ
.ﻪﻠﻳﺪﻌﺗ ﻭﺃ ﻡﺎﻈﻨﻟﺍ ﻚﻴﻜﻔﺗ –
.ﺕﺎﻔﺻﺍﻮﻤﻟﺍ ﺕﺎﻘﺼﻠﻣ ﺔﻟﺍﺯﺇ –
ﻡﺍﺪﺨﺘﺳﻻﺍ ﺕﺍﺪﻴﻴﻘﺗ
ﺔﻴﻨﻘﺘﺑ ﺓﺩﻭﺰﻤﻟﺍ ﺓﺰﻬﺟﻷﺍ ﻊﻴﻤﺠﻟ ﻲﻜﻠﺳﻼﻟﺍ ﻡﺍﺪﺨﺘﺳﻻﺍ ﻭﺃ/ﻭ ﻝﺎﺳﺭﻹﺍ
.ﻦﻴﻧﻮﻤﻀﻣ ﺮﻴﻏ Bluetooth
®
ﺔﻛﺮﺷ ﻞﺒ
ِ
ﻗ ﻦﻣ ﺔﻋﻮﺿﻮﻤﻟﺍ ﺮﻴﻳﺎﻌﻤﻟﺎﺑ ﺓﺰﻬﺟﻷﺍ ﻊﻴﻤﺟ ﻡﺰﺘﻠﺗ ﻥﺃ ﺐﺠﻳ
.Bluetooth SIG, Inc.
ﺪﻗ ﻭﺃ ،ﻝﺎﺼﺗﻻﺍ ﻲﻓ ﻞﺸﻔﻳ ﺪﻗ ،ﻪﺗﺍﺩﺍﺪﻋﺇﻭ ﺯﺎﻬﺠﻟﺍ ﺕﺎﻔﺻﺍﻮﻣ ﻰﻠﻋ ﺍ
ً
ﺩﺎﻤﺘﻋﺍ
.ﺔﻔﻠﺘﺨﻣ ﺕﺎﻴﻠﻤﻌﻟﺍ ﺾﻌﺑ ﻥﻮﻜﺗ
ﻰﻠﻋ
ً
ءﺎﻨﺑ ﻦﻜﻟﻭ . Bluetooth
®
ﺔﻴﻨﻘﺘﻟ ﻥﺎﻣﻷﺍ ﺕﺍﺰﻴﻣ ﻡﺎﻈﻨﻟﺍ ﺍﺬﻫ ﻢﻋﺪﻳ
ﺭﺬﺤﻟﺍ
ﱠ
ﺥﻮﺘﻓ .
ٍ
ﻑﺎﻛ ﺮﻴﻏ ﻥﺎﻣﻷﺍ ﺍﺬﻫ ﻥﻮﻜﻳ ﺪﻗ ،ﻞﻴﻐﺸﺘﻟﺍ ﺕﺍﺩﺍﺪﻋﺇ ﻭﺃ/ﻭ ﺔﺌﻴﺑ
.ﻡﺎﻈﻨﻟﺍ ﺍﺬﻫ ﻰﻟﺇ ﺎ
ً
ﻴﻜﻠﺳﻻ ﺕﺎﻧﺎﻴﺒﻟﺍ ﻞﻘﻧ ءﺎﻨﺛﺃ
. Bluetooth
®
ﺔﻴﻨﻘﺘﺑ ﺩﻭﺰﻣ ﺯﺎﻬﺟ ﻰﻟﺇ ﺕﺎﻧﺎﻴﺑ ﻞﻘﻧ ﻡﺎﻈﻨﻟﺍ ﺍﺬﻬﻟ ﻦﻜﻤﻳ ﻻ
ﻡﺍﺪﺨﺘﺳﻻﺍ ﻕﺎﻄﻧ
ﺍﺬﻫ ﻞﻘﻳ ﻥﺃ ﻦﻜﻤﻳﻭ ،ﻰﺼﻗﺃ ﺪﺤﺑ ﺭﺎﺘﻣﺃ 10 ﻕﺎﻄﻧ ﻲﻓ ﺯﺎﻬﺠﻟﺍ ﺍﺬﻫ ﻡﺪﺨﺘﺳﺍ
.ﻞﺧﺍﺪﺘﻟﺍ ﻭﺃ ﻖﺋﺍﻮﻌﻟﺍ ﻭﺃ ﺔﺌﻴﺒﻟﺍ ﺐﺴﺤﺑ ﻕﺎﻄﻨﻟﺍ
ﻯﺮﺧﺃ ﺓﺰﻬﺟﺃ ﻦﻣ ﻞﺧﺍﺪﺘﻟﺍ
ﺶﻳﻮﺸﺘﻟﺎﻛ ،ﺕﻼﻜﺸﻣ ﺄﺸﻨﺗ ﺪﻘﻓ ؛ﻢﻴﻠﺳ ﻮﺤﻧ ﻰﻠﻋ ﻡﺎﻈﻨﻟﺍ ﺍﺬﻫ ﻞﻤﻌﻳ ﻻ ﺪﻗ
ﻡﺎﻈﻨﻟﺍ ﻥﺎﻛ ﺍﺫﺇ ﻚﻟﺫﻭ ،ﺔﻴﻜﻠﺳﻼﻟﺍ ﺕﺎﺟﻮﻤﻟﺍ ﻞﺧﺍﺪﺗ ﺐﺒﺴﺑ ﺕﻮﺼﻟﺍ ﻊﻄﻘﺗﻭ
ﻡﺪﺨﺘﺴﺗ ﺓﺰﻬﺟﺃ ﻭﺃ ،Bluetooth
®
ﺔﻴﻨﻘﺘﺑ ﺓﺩﻭﺰﻣ ﻯﺮﺧﺃ ﺓﺰﻬﺟﻷ ﺎ
ً
ﻘﺻﻼﻣ
.ﺰﺗﺮﻫ ﺎﺠﻴﺟ 2.4 ﻩﺭﺪﻗ ﺩﺩﺮﺗ ﻕﺎﻄﻧ
ﺔﻳﻮﻗ ﺔﻴﻜﻠﺳﻻ ﺕﺎﺟﻮﻣ ﺙﺎﻌﺒﻧﺍ ﺔﻟﺎﺣ ﻲﻓ ،ﻲﻐﺒﻨﻳ ﺎﻤﻛ ﻡﺎﻈﻨﻟﺍ ﺍﺬﻫ ﻞﻤﻌﻳ ﻻ ﺪﻗ
.ﻚﻟﺫ ﻰﻟﺇ ﺎﻣ ﻭﺃ ﺔﺒﻳﺮﻗ ﺚﺑ ﺔﻄﺤﻣ ﻦﻣ ﺔﻳﺎﻐﻠﻟ
ﺩﻮﺸﻨﻤﻟﺍ ﻡﺍﺪﺨﺘﺳﻻﺍ
.ﻂﻘﻓ ﻡﺎﻌﻟﺍ ﻱﺩﺎﻌﻟﺍ ﻡﺍﺪﺨﺘﺳﻼﻟ ﺺﺼﺨﻣ ﻡﺎﻈﻨﻟﺍ ﺍﺬﻫ
ﻞﺧﺍﺪﺘﻟ ﺔﺳﺎﺴﺣ ﺔﺌﻴﺑ ﻲﻓ ﻭﺃ ،ﺓﺰﻬﺟﺃ ﻦﻣ ﺏﺮﻘﻟﺎﺑ ﻡﺎﻈﻨﻟﺍ ﺍﺬﻫ ﻡﺪﺨﺘﺴﺗ ﻻ
ﺎﻣﻭ ﻞﻣﺎﻌﻤﻟﺍﻭ ﺕﺎﻴﻔﺸﺘﺴﻤﻟﺍﻭ ﺕﺍﺭﺎﻄﻤﻟﺍ :ﻝﺎﺜﻣ) ﺔﻴﻜﻠﺳﻼﻟﺍ ﺕﺍﺩﺩﺮﺘﻟﺍ
.(ﻪﺑﺎﺷ
3
RQT9961
ﻲﺑﺮﻋ
ﺕﺎﻳﻮﺘﺤﻤﻟﺍ ﻝﻭﺪﺟ
2 .......................................................... ﻥﺎﻣﻷﺍ ﺕﺎﻃﺎﻴﺘﺣﺍ
3 .................................................................. ﺕﺎﻘﺤﻠﻤﻟﺍ
3 ............................................................ ﺕﻮﺼﻟﺍ ﺭﺪﺼﻣ
3 .................................................................ﺺﻴﺧﺍﺮﺘﻟﺍ
4 ............................................................ﺓﺪﺣﻮﻟﺎﺑ ﺔﻳﺎﻨﻌﻟﺍ
4 ..............................................Bluetooth
®
ﺔﻴﻨﻘﺗ ﻝﻮﺣ
5 ................................................................ ﺓﺪﺣﻮﻟﺍ ﻞﻘﻧ
6 ................................................... ﻢﻜﺤﺘﻠﻟ ﻲﻌﺟﺮﻤﻟﺍ ﻞﻴﻟﺪﻟﺍ
7 .............................. ﺩﺩﺮﺘﻤﻟﺍ ﻲﺋﺎﺑﺮﻬﻜﻟﺍ ﺭﺎﻴﺘﻠﻟ ﺭﺪﺼﻤﺑ ﻞﻴﺻﻮﺘﻟﺍ
8 ..................................................... USB ﺯﺎﻬﺟ ﻞﻴﺻﻮﺗ
8 .................................................Bluetooth
®
ﺕﺎﻴﻠﻤﻋ
9 ...................................... ﻂﺋﺎﺳﻮﻟﺍ ﻞﻴﻐﺸﺗ ﻲﻓ ﻢﻜﺤﺘﻟﺍ ﺮﺻﺎﻨﻋ
11 ............................................. ﺓءﺎﺿﻹﺍﻭ ﺕﻮﺼﻟﺍ ﺕﺍﺮﻴﺛﺄﺗ
11 ........................................... ([AUX] ،[USB]) ﻞﻴﺠﺴﺘﻟﺍ
13 ....................................................... ﺖﻗﺆﻤﻟﺍﻭ ﺔﻋﺎﺴﻟﺍ
14 ...................................................... ﺔﻴﺟﺭﺎﺨﻟﺍ ﺓﺰﻬﺟﻷﺍ
15 .......................................... ﺭﺎﺘﻴﺟ ﻭﺃ ﻥﻮﻓﻭﺮﻜﻴﻣ ﻡﺍﺪﺨﺘﺳﺍ
16 ....................................................................ﻯﺮﺧﺃ
17 ......................................... ﺎﻬﺣﻼﺻﺇﻭ ﻝﺎﻄﻋﻷﺍ ﻑﺎﺸﻜﺘﺳﺍ
20 ..............................................................ﺕﺎﻔﺻﺍﻮﻤﻟﺍ
ﻩﺬﻫ ﻞﻴﻐﺸﺘﻟﺍ ﺕﺎﻤﻴﻠﻌﺗ ﻲﻓ ﺓﺩﺭﺍﻮﻟﺍ ﺕﺎﻔﺻﺍﻮﻤﻟﺍ ﻝﻮﺣ
." R" ﺍﺬﻜﻫ ﻪﻴﻟﺇ ﻉﻮﺟﺮﻟﺍ ﻲﻐﺒﻨﻳ ﻲﺘﻟﺍ ﺕﺎﺤﻔﺼﻟﺍ ﻰﻟﺇ ﺭﺎﺸ
ُ
ﻳ
ﻰﻟﺇ ﺓﺭﺎﺷﺇ ﺩﺮﺗ ﻢﻟ ﺎﻣ ،ﺪﻌﺑ ﻦﻋ ﻢﻜﺤﺘﻟﺍ ﺯﺎﻬﺟ ﻰﻟﺇ ﻉﻮﺟﺮﻟﺎﺑ ﻞﻴﻐﺸﺘﻟﺍ ﺕﺎﻴﻠﻤﻋ ﻒ
َ
ﺻﻮ
ُ
ﺗ
.ﻚﻟﺫ ﻑﻼﺧ
ﺕﺎﻘﺤﻠﻤﻟﺍ
.ﺓﺪﺣﻮﻟﺍ ﻩﺬﻫ ﻡﺍﺪﺨﺘﺳﺍ ﻞﺒﻗ ﺔﻘﻓﺮﻤﻟﺍ ﺕﺎﻘﺤﻠﻤﻟﺍ ﺺﺤﻓﺍ
ﺩﺩﺮﺘﻤﻟﺍ ﻲﺋﺎﺑﺮﻬﻜﻟﺍ ﺭﺎﻴﺘﻠﻟ ﺲﺑﺎﻗ x 4
ﺪﻌﺑ ﻦﻋ ﻢﻜﺤﺘﻟﺍ ﺯﺎﻬﺠﻟ ﺔﻳﺭﺎﻄﺑ x 1
ﺪﻌﺑ ﻦﻋ ﻢﻜﺤﺗ ﺯﺎﻬﺟ x 1
(N2QAYB001000)
.ﻯﺮﺧﺃ ﺓﺰﻬﺟﺃ ﻊﻣ ﺩﺩﺮﺘﻤﻟﺍ ﻲﺋﺎﺑﺮﻬﻜﻟﺍ ﺭﺎﻴﺘﻟﺍ ﺲﺑﺎﻗ ﻡﺪﺨﺘﺴﺗ ﻻ
، 2014 ﺲﻄﺴﻏﺃ ﻦﻣ
ً
ءﺍﺪﺘﺑﺍ ﺔﺤﻴﺤﺻ ﻩﺬﻫ ﻞﻴﻐﺸﺘﻟﺍ ﺕﺎﻤﻴﻠﻌﺗ ﻲﻓ ﺓﺩﺭﺍﻮﻟﺍ ﺕﺎﺠﺘﻨﻤﻟﺍ ﻡﺎﻗﺭﺃ
.ﺮﻴﻴﻐﺘﻠﻟ ﺔﺿﺮ
ُ
ﻋ ﺎﻬﻧﺃ ﻻﺇ
.ﻝﺰﻨﻤﻟﺎﺑ ءﺎﺑﺮﻬﻜﻟﺍ ﺲﺒﻘﻤﻟ ﺐﺳﺎﻨﻣ ﺩﺩﺮﺘﻣ ﻲﺋﺎﺑﺮﻬﻛ ﺭﺎﻴﺗ ﺲﺑﺎﻗ ﻡﺍﺪﺨﺘﺳﺍ ﻰﺟﺮﻳ
.ﻥﺎﻨﺳﻷﺍ ﻲﺛﻼﺛ ﺐﻟﻮﻘﻣ ءﺎﺑﺮﻬﻛ ﺲﺑﺎﻘﺑ ﻡﺍﺪﺨﺘﺳﺍ ﻰﺟﺮﻳ ،ﺔﻳﺩﻮﻌﺴﻟﺍ ﺔﻴﺑﺮﻌﻟﺍ ﺔﻜﻠﻤﻤﻟﺍ ﻲﻓ
ﺕﻮﺼﻟﺍ ﺭﺪﺼﻣ
.ﺓﺰﻴﻤﻟﺍ ﺮﻓﻮﺗ ﻰﻟﺇ ﺔﻴﻟﺎﺘﻟﺍ ﺕﺎﻣﻼﻌﻟﺍ ﺮﻴﺸﺗ
:[USB]
(ﻲﻠﻳ ﺎﻤﻴﻓ R) MP3 ﺕﺎﻔﻠﻣ ﻦﻤﻀﺘﺗ ﻲﺘﻟﺍ USB ﺓﺰﻬﺟﺃ
:[Bluetooth]
(8 R) ﻞﺼﺘﻤﻟﺍ Bluetooth
®
ﺯﺎﻬﺟ
:[AUX]
ﻭﺃ AUX IN 1 ﻑﺮﻄﺑ ﺔﻠﺼﺘﻤﻟﺍ ﺔﻴﺟﺭﺎﺨﻟﺍ ﺓﺰﻬﺟﻷﺍ
(14 R) AUX IN 2 ﻑﺮﻃ
ﺔﻘﻓﺍﻮﺘﻤﻟﺍ USB ﺓﺰﻬﺟﺃ
.ﻥﻮﻤﻀﻣ ﺮﻴﻏ USB ﺓﺰﻬﺟﺃ ﻊﻴﻤﺠﺑ ﺓﺪﺣﻮﻟﺍ ﻩﺬﻫ ﻞﻴﺻﻮﺗ
. FAT32ﻭ FAT16ﻭ FAT12 ﺕﺎﻔﻠﻤﻟﺍ ﺔﻤﻈﻧﻷ ﻢﻋﺪﻟﺍ ﺮﻓﻮﺘﻳ
.ﺔﻋﺮﺴﻟﺍ ﻞﻣﺎﻛ USB 2.0 ﻞﻐﺸﻤﻟﺍ ﺍﺬﻫ ﻢﻋﺪﻳ
.ﺖﻳﺎﺑﺎﺠﻴﺟ 32 ﻰﻟﺇ ﻞﺼﺗ ﺔﻌﺳ ﺕﺍﺫ USB ﺓﺰﻬﺟﺃ ﻢﻋﺩ ﺓﺪﺣﻮﻠﻟ ﻦﻜﻤﻳ
ﺕﺎﻗﺎﻄﺑ ﺉﺭﺎﻗ ﻞﻴﺻﻮﺗ ﺪﻨﻋ ﻂﻘﻓ ﺓﺪﺣﺍﻭ ﺓﺮﻛﺍﺫ ﺔﻗﺎﻄﺑ ﺭﺎﻴﺘﺧﺍ ﻱﺮﺠﻴﺳ
.ﺎﻬﻟﺎﺧﺩﺇ ﻢﺘﻳ ﺓﺮﻛﺍﺫ ﺔﻗﺎﻄﺑ ﻝﻭﺃ ﻥﻮﻜﺗ ﺓﺩﺎﻋﻭ ،ﻁﺎﻘﻨﻟﺍ ﺩﺪﻌﺘﻣ USB
ﺔﻘﻓﺍﻮﺘﻤﻟﺍ MP3 ﺕﺎﻔﻠﻣ
:ﺔﻣﻮﻋﺪﻤﻟﺍ ﺕﺎﻘﻴﺴﻨﺘﻟﺍ
" .MP3" ﻭﺃ ،" .mp3" ﺩﺍﺪﺘﻣﻻﺍ ﺕﺍﺫ ﺕﺎﻔﻠﻤﻟﺍ
ﻞﻴﻐﺸﺗ ﻱﺮﺠﻳ ﻻ ﺪﻗ ، MP3 ﺕﺎﻔﻠﻣ ﺎﻬﺑ ﺕﺄﺸﻧﺃ ﻲﺘﻟﺍ ﺔﻘﻳﺮﻄﻟﺍ ﻰﻠﻋ ﺍ
ً
ﺩﺎﻤﺘﻋﺍ
ﻱﺮﺠﻳ ﻻ ﺎﻤﺑﺭﻭ ،ﻪﺒﺴﺣ ﺎﻬﺘﻤ
ّ
ﻗﺭ ﻱﺬﻟﺍ ﺐﻴﺗﺮﺘﻟﺎﺑ ﺕﺍﺪﻠﺠﻤﻟﺍﻭ ﺕﺎﻔﻠﻤﻟﺍ
.ﺎ
ً
ﻗﻼﻃﺇ ﺎﻬﻠﻴﻐﺸﺗ
.ﺕﺎﻣﻮﺒﻟﺃ ﺕﺍﺪﻠﺠﻤﻟﺍ ﺪﻌ
ُ
ﺗ ﻦﻴﺣ ﻲﻓ ،ﺕﺍﺭﺎﺴﻣ ﺎﻫﺭﺎﺒﺘﻋﺎﺑ ﺕﺎﻔﻠﻤﻟﺍ ﻞﻣﺎﻌ
ُ
ﺗ
999) ﻢﻬﻠﻴﺠﺴﺗ ﻭﺃ ﻡﻮﺒﻟﺃ 800 ﻪﻴﻟﺇ ﻞﺼﻳ ﺎﻣ ﻞﻴﻐﺸﺗ ﻡﺎﻈﻨﻟﺍ ﺍﺬﻬﻟ ﻦﻜﻤﻳ
ﻚﻟﺫﻭ ،ﺭﺎﺴﻣ 8000 ﻲﻟﺎﻤﺟﺇ ﻭﺃ ،(ﻰﺼﻗﺃ ﺪﺤﺑ ﺪﺣﺍﻮﻟﺍ ﻡﻮﺒﻟﻷﺍ ﻲﻓ ﺭﺎﺴﻣ
.ﺔﺣﺎﺘﻤﻟﺍ ﻦﻳﺰﺨﺘﻟﺍ ﺔﻌﺳ ﻰﻠﻋ ﺍ
ً
ﺩﺎﻤﺘﻋﺍ
ﺺﻴﺧﺍﺮﺘﻟﺍ
ﺔﻛﻮﻠﻤﻣﻭ ﺔﻠﺠﺴﻣ ﺔﻳﺭﺎﺠﺗ ﺕﺎﻣﻼﻋ Bluetooth
®
ﺔﻴﻨﻘﺘﻟ ﺔﻳﺰﻣﺮﻟﺍ ﺕﺍﺭﺎﻌﺸﻟﺍﻭ ﺔﻴﺼﻨﻟﺍ ﺔﻣﻼﻌﻟﺍ ﺪﻌﺗ
Panasonic ﺔﻛﺮﺷ ﻞﺒ
ِ
ﻗ ﻦﻣ ﺕﺎﻣﻼﻌﻟﺍ ﻩﺬﻬﻟ ﻡﺍﺪﺨﺘﺳﺍ ﻱﺃﻭ Bluetooth SIG, Inc. ﺔﻛﺮﺸﻟ
.ﺺﻴﺧﺮﺗ ﺐﺟﻮﻤﺑ ﻢﺘﻳ Corporation
.ﺔﻠﺼﻟﺍ ﻱﻭﺫ ﺎﻬﺑﺎﺤﺻﻷ ﺔﺻﺎﺧ ﺔﻴﻜﻠﻣ ﻯﺮﺧﻷﺍ ﺔﻳﺭﺎﺠﺘﻟﺍ ءﺎﻤﺳﻷﺍﻭ ﺔﻳﺭﺎﺠﺘﻟﺍ ﺕﺎﻣﻼﻌﻟﺍ ﻞﺜﻤﺗ
58
RQT9961
2
ﻥﺎﻣﻷﺍ ﺕﺎﻃﺎﻴﺘﺣﺍ
ﺮﻳﺬﺤﺗ
ﺓﺪﺣﻮﻟﺍ
،ﻒﻠﺘﻠﻟ ﺞﺘﻨﻤﻟﺍ ﺽﺮﻌﺗ ﻭﺃ ﺔﻴﺋﺎﺑﺮﻬﻛ ﺔﻣﺪﺻ ﺙﻭﺪﺣ ﻭﺃ ﻖﻳﺮﺣ ﺏﻮﺸﻧ ﺮﻄﺧ ﻞﻴﻠﻘﺘﻟ
.ﻩﺮﻳﺎﻄﺗ ﻭﺃ ءﺎﻤﻟﺍ ﻂﻗﺎﺴﺗ ﻭﺃ ﺔﺑﻮﻃﺮﻟﺍ ﻭﺃ ﺮﻄﻤﻠﻟ ﺓﺪﺣﻮﻟﺍ ﻩﺬﻫ ﺽﺮﻌﺗ ﻻ –
.ﺓﺪﺣﻮﻟﺍ ﻰﻠﻋ ﺕﺎﻳﺮﻫﺰﻟﺎﻛ ،ﻞﺋﺍﻮﺴﻟﺎﺑ ﺓءﻮﻠﻤﻣ ءﺎﻴﺷﺃ ﻊﻀﺗ ﻻ –
.ﻂﻘﻓ ﺎﻬﺑ ﻰﺻﻮﻤﻟﺍ ﺕﺎﻘﺤﻠﻤﻟﺍ ﻡﺪﺨﺘﺳﺍ –
.ﺔﻴﻄﻏﻷﺍ ﻉﺰﻨﺗ ﻻ –
.ﺔﻧﺎﻴﺼﻟﺍ ءﺍﺮﺟﻹ ؛ﻦﻴﻠﻫﺆﻣ ﺔﻧﺎﻴﺻ ﻲﻴﻨﻔﺑ ﻦﻌﺘﺳﺍﻭ ،ﻚﺴﻔﻨﺑ ﺓﺪﺣﻮﻟﺍ ﻩﺬﻫ ﺡﻼﺻﺇ ﻝﻭﺎﺤﺗ ﻻ –
.ﺓﺪﺣﻮﻟﺍ ﻞﺧﺍﺩ ﻰﻟﺇ ﺬﻔﻨﺗ ﺔﻴﻧﺪﻌﻣ ﻡﺎﺴﺟﺃ ﻉﺪﺗ ﻻ
ﺩﺩﺮﺘﻤﻟﺍ ﻲﺋﺎﺑﺮﻬﻜﻟﺍ ﺭﺎﻴﺘﻟﺍ ﺲﺑﺎﻗ
.ﻲﺋﺎﺑﺮﻬﻜﻟﺍ ﺭﺎﻴﺘﻟﺍ ﺲﺒﻘﻣ ﻖﻳﺮﻃ ﻦﻋ ﻞﻐﺸﻤﻟﺍ ﻞﺼﻓ ﻦﻜﻤﻳ
.ﻝﺎﺤﻟﺍ ﻲﻓ ءﺎﺑﺮﻬﻜﻟﺍ ﺲﺒﻘﻣ ﻦﻣ ﻲﺋﺎﺑﺮﻬﻜﻟﺍ ﺭﺎﻴﺘﻟﺍ ﺲﺑﺎﻗ ﻞﺼﻓ ﻦﻜﻤﻳ ﺚﻴﺤﺑ ﻞﻐﺸﻤﻟﺍ ﻊﺿ
ﻪﻴﺒﻨﺗ
ﺓﺪﺣﻮﻟﺍ
،ﻒﻠﺘﻠﻟ ﺞﺘﻨﻤﻟﺍ ﺽﺮﻌﺗ ﻭﺃ ﺔﻴﺋﺎﺑﺮﻬﻛ ﺔﻣﺪﺻ ﺙﻭﺪﺣ ﻭﺃ ﻖﻳﺮﺣ ﺏﻮﺸﻧ ﺮﻄﺧ ﻞﻴﻠﻘﺘﻟ
.ﻯﺮﺧﺃ ﺔﻘﻴﺿ ﻦﻛﺎﻣﺃ ﻱﺃ ﻭﺃ ﺔﻴﻠﺧﺍﺩ ﺔﻧﺍﺰﺧ ﻭﺃ ﺔﺒﺘﻜﻣ ﻰﻠﻋ ﺎﻬﻌﻀﺗ ﻭﺃ ﺓﺪﺣﻮﻟﺍ ﺖﺒﺜﺗ ﻻ –
.ﺓﺪﺣﻮﻠﻟ ﺓﺪﻴﺟ ﺔﻳﻮﻬﺗ ﺮﻴﻓﻮﺗ ﻦﻣ ﺪﻛﺄﺗﻭ
ﺮﺋﺎﺘﺴﻟﺍﻭ ﺓﺪﻀﻨﻤﻟﺍ ﺵﺭﺎﻔﻣﻭ ﺪﺋﺍﺮﺠﻟﺍ ﻕﺍﺭﻭﺃ ﻞﻌﻔﺑ ﺓﺪﺣﻮﻟﺎﺑ ﺔﻳﻮﻬﺘﻟﺍ ﺕﺎﺤﺘﻓ ﺩﺍﺪﺴﻧﺍ ﺐﻨﺠﺗ –
.ﻪﺑﺎﺷ ﺎﻣﻭ
.ﺓﺪﺣﻮﻟﺍ ﻰﻠﻋ ﺔﺌﻴﻀﻤﻟﺍ ﻉﻮﻤﺸﻟﺎﻛ ،ﺔﻓﻮﺸﻜﻣ ﺐﻬﻟ ﺭﺩﺎﺼﻣ ﻊﻀﺗ ﻻ –
ﺔﺑﻮﻃﺮﻟﺍ ﺕﻻﺪﻌﻣﻭ ﺔﻴﻟﺎﻌﻟﺍ ﺓﺭﺍﺮﺤﻟﺍ ﺕﺎﺟﺭﺩﻭ ﺮﺷﺎﺒﻤﻟﺍ ﺲﻤﺸﻟﺍ ءﻮﻀﻟ ﺓﺪﺣﻮﻟﺍ ﺽﺮﻌﺗ ﻻ –
.ﺓﺪﻳﺪﺸﻟﺍ ﺕﺍﺯﺍﺰﺘﻫﻻﺍﻭ ﺔﻌﻔﺗﺮﻤﻟﺍ
.ﺔﻴﺋﺍﻮﺘﺳﺍ ﺔﻴﺧﺎﻨﻣ ءﺍﻮﺟﺃ ﻲﻓ ﻡﺍﺪﺨﺘﺳﻼﻟ ﺓﺪﻌﻣ ﺓﺪﺣﻮﻟﺍ ﻩﺬﻫ
ﺙﺪﺣ ﺍﺫﺈﻓ .ﺎﻬﻣﺍﺪﺨﺘﺳﺍ ءﺎﻨﺛﺃ ﺔﻟﻮﻤﺤﻤﻟﺍ ﻒﺗﺍﻮﻬﻟﺍ ﻦﻣ ﻲﻜﻠﺳﻻ ﻞﺧﺍﺪﺗ ﺓﺪﺣﻮﻟﺍ ﻩﺬﻫ ﻞﺒﻘﺘﺴﺗ ﺪﻗ
.ﻝﻮﻤﺤﻤﻟﺍ ﻒﺗﺎﻬﻟﺍﻭ ﺓﺪﺣﻮﻟﺍ ﻦﻴﺑ ﺔﻠﺻﺎﻔﻟﺍ ﺔﻓﺎﺴﻤﻟﺍ
ﺓﺩﺎﻳﺯ ءﺎﺟﺮﻟﺎﻓ ،ﻞﺧﺍﺪﺘﻟﺍ ﺍﺬﻫ
.ﺓﺪﺣﻮﻟﺍ ﻥﻮﻠﺘﻌﻳ ﻝﺎﻔﻃﻷﺍ ﻉﺪﺗ ﻻ
.ﺓﺪﺣﻮﻟﺍ ﻕﻮﻓ ءﻲﺷ ﻱﺃ ﻊﻀﺗ ﻻ
.
ٍ
ﻮﺘﺴﻣ ﺢﻄﺳ ﻰﻠﻋ ﺓﺪﺣﻮﻟﺍ ﻊﺿ
.ﺓﺪﺣﻮﻟﺍ ﻊﻓﺭ ﺪﻨﻋ ﺭﺬﺤﻟﺍ
ﱠ
ﺥﻮﺗ
.ﺮﻣﻷﺍ ﻡﺰﻟ ﺍﺫﺇ ،ﺎﻬﻌﻓﺮﻟ ﺺﺨﺷ ﻦﻣ ﺮﺜﻛﺄﺑ ﻦﻌﺘﺳﺍ –
.ﺔﻋﺎﻤﺴﻟﺎﺑ ﺔﻴﻃﻭﺮﺨﻤﻟﺍ ءﺍﺰﺟﻸﻟ ﺕﻮﺼﻟﺍ ﺩﺍﺪﺗﺭﺍ ﺢﻄﺳﺃ ﺲﻤﻠﺗ ﻻ
.ﺔﻋﺎﻤﺴﻟﺎﺑ ﺔﻴﻃﻭﺮﺨﻤﻟﺍ ءﺍﺰﺟﻷﺍ
ﻑﻼﺗﺇ ﻰﻟﺇ ﺢﻄﺳﻷﺍ ﻩﺬﻫ ﺲﻤﻟ ﻱﺩﺆﻳ ﺪﻗ –
.ﺔﻌﻔﺗﺮﻣ ﺔﻋﺎﻤﺴﻟﺎﺑ ﻲﻃﻭﺮﺨﻤﻟﺍ ءﺰﺠﻟﺍ ﺓﺭﺍﺮﺣ ﺔﺟﺭﺩ ﻥ ﻮﻜﺗ ﺪﻗ –
.ﺎﻬﺗﻼﺠﻌﻟ ﺺﺼﺨﻤﻟﺍ ءﺰﺠﻟﺍ ﻲﻓ ﻭﺃ ،ﺓﺪﺣﻮﻟﺍ ﻞﻔﺳﺃ ﻚﻴﻣﺪﻗ ﻊﻀﺗ ﻻ
ﺎﻤﻣ ؛ﻚﻟﺫ ﻰﻟﺇ ﺎﻣ ﻭﺃ ﺎﻬﻃﻮﻘﺳ ﻰﻟﺇ ﺢﻴﺤﺻ ﺮﻴﻏ ﻮﺤﻧ ﻰﻠﻋ ﺎﻬﻠﻘﻧ ﻭﺃ ﺓﺪﺣﻮﻟﺍ ﻝﺎﻤﻌﺘﺳﺍ ﻱﺩﺆﻳ ﺪﻗ
.ﺔﻳﺪﺴﺟ ﺔﺑﺎﺻﺇ ﻭﺃ/ﻭ ﺭﺮﺿ
ﻪﻨﻋ ﺞﺘﻨﻳ
.ﺭﺎﻐﺻ ﻝﺎﻔﻃﺃ ﻭﺃ ﻊ
ّ
ﺿ
ُ
ﺭ ﻝﺎﻔﻃﺃ ﻚﻨﻣ ﺏﺮﻘﻟﺎﺑ ﻥﻮﻜﻳ ﺎﻣﺪﻨﻋ ﺭﺬﺤﻟﺍ
ﱠ
ﺥﻮﺗ
ﺔﻳﺭﺎﻄﺒﻟﺍ
ﻰﺻﻮﻤﻟﺍ ﻉﻮﻨﻟﺎﺑ ﺎﻬﻟﺪﺒﺘﺳﺎﻓ .ﺢﻴﺤﺻ ﺮﻴﻏ ﻞﻜﺸﺑ ﺔﻳﺭﺎﻄﺒﻟﺍ ﻝﺍﺪﺒﺘﺳﺍ ﺔﻟﺎﺣ ﻲﻓ ﺭﺎﺠﻔﻧﺍ ﺙﺪﺤﻳ ﺪﻗ
.ﺔﻌﻨﺼﻤﻟﺍ ﺔﻬﺠﻟﺍ ﻞﺒ
ِ
ﻗ ﻦﻣ ﻪﺑ
ﻉﺯﻮﻤﻟﺍ ﻭﺃ ،ﻚﺘﻘﻄﻨﻣ ﻲﻓ ﺔﻴﻠﺤﻤﻟﺍ ﺕﺎﻬﺠﻟﺎﺑ ﻝﺎﺼﺗﻻﺍ ﻰﺟﺮﻳ ،ﺕﺎﻳﺭﺎﻄﺒﻟﺍ ﻦﻣ ﺺﻠﺨﺘﻟﺍ ﺪﻨﻋ
.ﺎﻬﻨﻣ ﺺﻠﺨﺘﻠﻟ ﺔﺤﻴﺤﺼﻟﺍ ﺔﻘﻳﺮﻄﻟﺍ ﻦﻋ ﺭﺎﺴﻔﺘﺳﻼﻟ ﻪﻌﻣ ﻞﻣﺎﻌﺘﺗ ﻱﺬﻟﺍ
.ﺐﻬﻠﻟ ﺎﻬﺿﺮﻌﺗ ﻭﺃ ،ﺕﺎﻳﺭﺎﻄﺒﻟﺍ ﻦ
ﱢ
ﺨﺴﺗ ﻻ
ﺔﻴﻨﻣﺯ ﺓﺮﺘﻔﻟ ﺮﺷﺎﺒﻤﻟﺍ ﺲﻤﺸﻟﺍ ءﻮﻀﻟ ﺔﺿﺮﻌﻣ ﺓﺭﺎﻴﺳ ﻲﻓ ﺕﺎﻳﺭﺎﻄﺒﻟﺍ/ﺔﻳﺭﺎﻄﺒﻟﺍ ﻙﺮﺘﺗ ﻻ
.ﺬﻓﺍﻮﻨﻟﺍﻭ ﺏﺍﻮﺑﻷﺍ ﻕﻼﻏﺇ ﻊﻣ ﺔﻠﻳﻮﻃ
.ﺓﺮﻴﺼﻗ ﺮﺋﺍﻭﺩ ﻦﻳﻮﻜﺘﺑ ﻢﻘﺗ ﻭﺃ ،ﺎﻫءﺍﺰﺟﺃ ﻚﻔﺗ ﻻ
.ﺰﻴﻨﺠﻨﻤﻟﺍ ﺕﺎﻳﺭﺎﻄﺑ ﻭﺃ ﺔﻳﻮﻠﻘﻟﺍ ﺕﺎﻳﺭﺎﻄﺒﻟﺍ ﻦﺤﺷ ﺪﻌﺗ ﻻ
.ﻑﻼﻐﻟﺍ ﺔﻋﻭﺰﻨﻣ ﺕﺎﻳﺭﺎﻄﺑ ﻡﺪﺨﺘﺴﺗ ﻻ
.ﺔﻠﻳﻮﻃ ﺔﻴﻨﻣﺯ ﺓﺪﻤﻟ ﺪﻌﺑ ﻦﻋ ﻢﻜﺤﺘﻟﺍ ﺯﺎﻬﺟ ﻡﺍﺪﺨﺘﺳﺍ ﻡﺰﺘﻌﺗ
ﻻ ﺖﻨﻛ ﺍﺫﺇ ،ﺔﻳﺭﺎﻄﺒﻟﺍ ﺝﺮﺧﺃ
.ﻢﻠﻈﻣ ﺩﺭﺎﺑ ﻥﺎﻜﻣ ﻲﻓ ﺎﻬﺑ ﻆﻔﺘﺣﺍ ﻢﺛ
-ﺭﺎﻌﺸﻟﺍ ﺍﺬﻫ ﺖﻳﺃﺭ ﺍﺫﺇ -
ﻕﺎﻄﻧ ﺝﺭﺎﺧ ﻯﺮﺧﺃ ﻥﺍﺪﻠﺑ ﻲﻓ ﺕﺎﻔﻠﺨﻤﻟﺍ ﻦﻣ ﺺﻠﺨﺘﻟﺍ ﻝﻮﺣ ﺕﺎﻣﻮﻠﻌﻣ
ﻲﺑﻭﺭﻭﻷﺍ ﺩﺎﺤﺗﻻﺍ
.ﻲﺑﻭﺭﻭﻷﺍ ﺩﺎﺤﺗﻻﺍ ﻕﺎﻄﻧ ﻞﺧﺍﺩ ﻂﻘﻓ ﻱﺭﺎﺳ ﺰﻣﺮﻟﺍ ﺍﺬﻫ
ﻝﺎﺼﺗﻻﺍ ﻰﺟﺮﻳ ،ﺞﺘﻨﻤﻟﺍ ﺍﺬﻫ ﻦﻣ ﺺﻠﺨﺘﻟﺍ ﻲﻓ ﺖﺒﻏﺭ ﺍﺫﺈﻓ
؛ﻪﻌﻣ ﻞﻣﺎﻌﺘﺗ ﻱﺬﻟﺍ ﻉﺯﻮﻤﻟﺍ ﻭﺃ ،ﻚﻳﺪﻟ ﺔﻴﻠﺤﻤﻟﺍ ﺕﺎﻬﺠﻟﺎﺑ
.ﺔﺤﻴﺤﺼﻟﺍ ﺺﻠﺨﺘﻟﺍ ﺔﻘﻳﺮﻃ ﻦﻋ ﺭﺎﺴﻔﺘﺳﻼﻟ
(ﻥﺎﻨﺳﻷﺍ ﻲﺛﻼﺜﻟﺍ ﺩﺩﺮﺘﻤﻟﺍ ﻲﺋﺎﺑﺮﻬﻜﻟﺍ ﺭﺎﻴﺘﻟﺍ ﺲﺑﺎﻘﺑ ﻖﻠﻌﺘﻳ ﺎﻤﻴﻓ)
ﺮﻬﺼﻤﻟﺍ ﻝﺍﺪﺒﺘﺳﺍ ﺔﻴﻔﻴﻛ
ﺩﺩﺮﺘﻤﻟﺍ ﻲﺋﺎﺑﺮﻬﻜﻟﺍ ﺭﺎﻴﺘﻟﺍ ﺲﺑﺎﻗ ﻉﻮﻧ ﻑﻼﺘﺧﺎﺑ ﺮﻬﺼﻤﻟﺍ ﻊﺿﻮﻣ ﻒﻠﺘﺨﻳ
ﻉﺎﺒﺗﺍﻭ ،ﻡﺪﺨﺘﺴﻤﻟﺍ ﺩﺩﺮﺘﻤﻟﺍ ﻲﺋﺎﺑﺮﻬﻜﻟﺍ ﺭﺎﻴﺘﻟﺍ ﺲﺑﺎﻗ ﻦﻣ ﺪﻛﺄﺗ .(Bﻭ A ﻞﻜﺷ)
.ﺔﻴﻟﺎﺘﻟﺍ ﺕﺎﻤﻴﻠﻌﺘﻟﺍ
ﺩﺩﺮﺘﻤﻟﺍ ﻲﺋﺎﺑﺮﻬﻜﻟﺍ ﺭﺎﻴﺘﻟﺍ ﺲﺑﺎﻗ ﻦﻋ ﺔﻴﺤﻴﺿﻮﺘﻟﺍ ﺕﺎﻣﻮﺳﺮﻟﺍ ﻒﻠﺘﺨﺗ ﺪﻗ
.ﻲﻠﻌﻔﻟﺍ
.ﻚﻔﻤﺑ ﺔﻤﺻﺎﻔﻟﺍ ءﺎﻄﻏ ﺢﺘﻓﺍ .1
.ﺎﻬﺒﻛﺭ ﻭﺃ ،ﺔﻤﺻﺎﻔﻟﺍ ءﺎﻄﻏ ﻖﻠﻏﺃﻭ ،ﺔﻤﺻﺎﻔﻟﺍ ﻝﺪﺒﺘﺳﺍ .2
A ﻞﻜﺸﻟﺍ
ﺔﻤﺻﺎﻔﻟﺍ ءﺎﻄﻏ
B ﻞﻜﺸﻟﺍ
B ﻞﻜﺸﻟﺍ
ﺔﻤﺻﺎﻓ
(ﺮﻴﺒﻣﺍ 5)
A ﻞﻜﺸﻟﺍ
ﺔﻤﺻﺎﻓ
(ﺮﻴﺒﻣﺍ 5)
59
GS
ﻲﺑﺮﻋ
.ﺞﺘﻨﻤﻟﺍ ﺍﺬﻫ ﻚﺋﺍﺮﺷ ﻰﻠﻋ ﺍ
ً
ﺮﻜﺷ
،ﺞﺘﻨﻤﻟﺍ ﺍﺬﻫ ﻡﺍﺪﺨﺘﺳﺍ ﻞﺒﻗ ﺔﻳﺎﻨﻌﺑ ﺕﺎﻤﻴﻠﻌﺘﻟﺍ ﻩﺬﻫ ﺓءﺍﺮﻗ ﻰﺟﺮﻳ
.
ً
ﻼﺒﻘﺘﺴﻣ ﻪﻣﺍﺪﺨﺘﺳﻻ ﻞﻴﻟﺪﻟﺍ ﺍﺬﻫ ﻆﻔﺣﻭ
Panasonic Corporation
Web Site: http://panasonic.net
Ar
RQT9961-G
Panasonic Corporation 2014
F0814SB0
ﻞﻴﻐﺸﺘﻟﺍ ﺕﺎﻤﻴﻠﻌﺗ
ﺔﻄﺸﻨﻟﺍ ﺕﺎﻋﺎﻤﺴﻟﺍ ﻡﺎﻈﻧ
SC-CMAX5 ﻢﻗﺭ ﺯﺍﺮﻃ