Loading ...
Loading ...
Loading ...
17
OPERATIONS MANUAL
REFRIGERATED BASES & PIZZA PREP TABLES
If the drawer fronts need adjustment (once all drawers are
installed and closed), loosen the five screws that hold the drawer
front to the drawer body. Move the drawer front into position
desired and re-tighten all screws.
INSTALLING DRAWER CAGE
To convert your cabinet from doors to drawers, you will need a
drill with a 1/8” bit, a Phillips bit (or a Phillips-Head screwdriver
(or drill/driver with Phillips bit), and a rubber mallet. Take the
door off the section you want to convert, by following instruc-
tions in the “Removal of Doors” section of this manual. Take the
drawers out of the mounting cage, by following instructions in
the “Removal of Drawers” section of this manual.
Position the drawer mounting cage in front of the cabinet open-
ing as shown (see Figure 13). Lift the cage above the trim along
the bottom of the opening, so it is aligned to go straight into the
cabinet. Carefully slide the drawer cage into the unit opening. It
is a snug fit and some pressure may be need to be applied at
the corners, to clear the breaker around the opening. A rubber
mallet can be used to gently tap on the ends of the drawer cage
cross mullion, to force the fasteners past the side breakers. The
straighter the cage is pushed in, the easier it will be to install.
When the cage is in as far as it will go, the notches at the front
of the cage should surround the breaker corners at the bottom.
The face of the drawer cross mullion should be relatively flush
with the front face of the cabinet, to provide an even surface for
the drawer gaskets to seal properly around the openings. The
cage should sit relatively flat on the floor and against the back
wall step inside the cabinet.
2. All refrigerant should be removed from the system by a
qualified technician and disposed of properly, or reclaimed.
(Intentional venting of many refrigerants into the air is harm-
ful and prohibited; violators are subject to fines). All refriger-
ant oil should be drained from the compressor and discarded
appropriately.
3. Properly dispose of the cabinet and refrigeration system
components. The majority of the metal in your unit (stainless
steel or aluminum cabinet shell and doors, steel shelving and
compressor, copper refrigerant lines, etc.) can be recycled.
Many recycling facilities will dispose of the unit free of
charge, or pay you for scrap value of the material content.
OPTIONAL ACCESSORIES
Continental offers a variety of accessories for your unit.
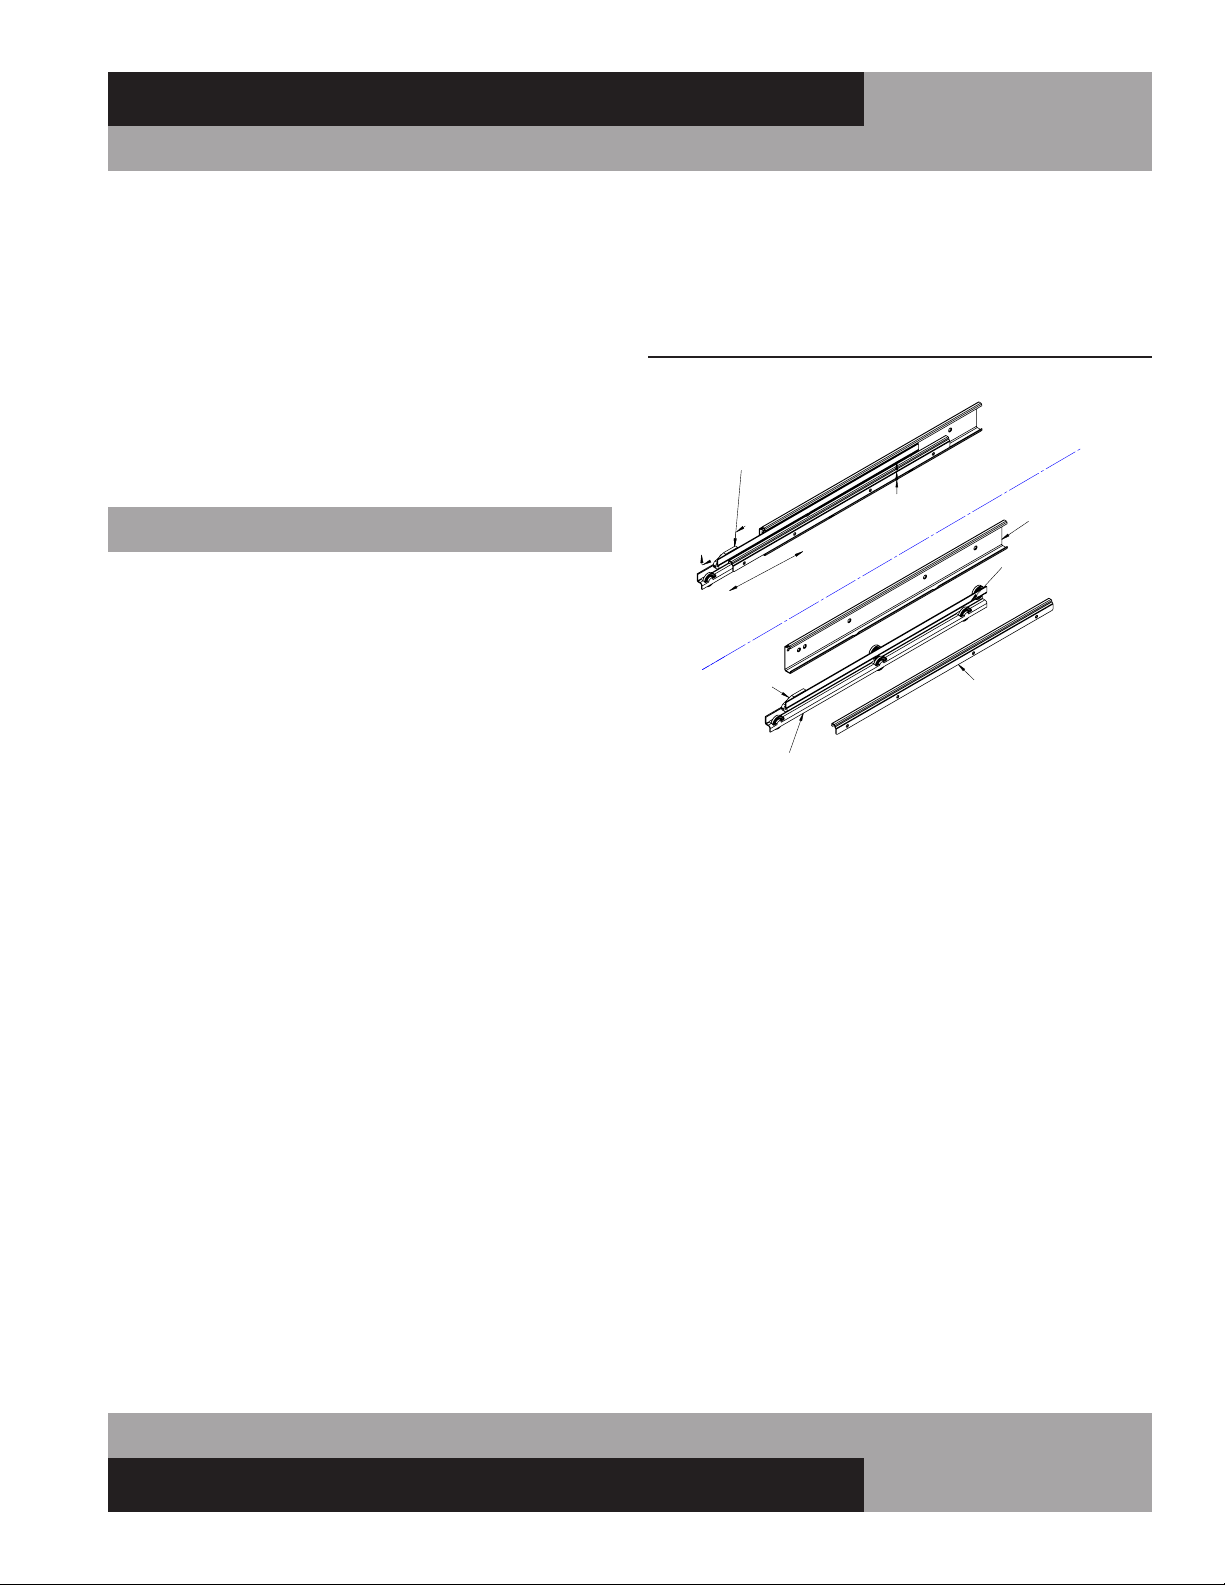
DRAWERS: REMOVAL AND ADJUSTMENTS
To remove the drawers from the cabinet, slide each drawer out
until it stops. Unhook the stop clip at the front of the left and
right-hand drawer slide (see Figure 12) by pushing the clip
forward and pressing down on the top back edge as shown.
Lift the drawer slightly as you pull it the rest of the way out.
The center member, with the wheels attached, will remain in
the cabinet. To remove a drawer center member for cleaning or
maintenance, pull it out and push up on the release lever at the
back, as shown.
To install a drawer, identify the correct parts and orient the
center members so the plastic clips are in the front and at the
top. Insert one of the center members into the front of the cor-
rect cabinet member (which is permanently attached to the
inside of the cabinet) and slide it in, until it stops. Push up on
the release lever (located toward the rear and top of the center
member) to allow the center member roll the rest of the way
into the cabinet member, in the “drawer closed” position. Repeat
for the opposite side center member. Pull each center member
out a few inches, press down on the rear of each stop clip, and
pull forward so the hook on the front of the clip rotates up, into
the “unlocked” position. Lift the drawer body into place, resting
the drawer members (the channels welded to the sides of the
drawers) on the front wheels of the center member, and slide
the drawer into the cabinet. Once the drawer goes in all the way
and slides smoothly, open it enough to access the stop clips.
Lift the back of each clip and push in at the front, so the hook
portion snaps into the “locked” position. The drawers are now
secured, so they cannot accidentally be lifted out of the cabinet.
Check that the drawer is properly aligned, rolls smoothly and the
drawer gasket seals firmly.
FIGURE 12: Drawer Slide
SLIDE CLIP FORWARD
& PRESS HERE
TO DISENGAGE
PUSH UP ON
LEVER TO
DISENGAGE
DRAWER MEMBER
CABINET MEMBER
CENTER MEMBER
STOP CLIP
(EXPLODED VIEW)
RELEASE LEVER
LEFT-HAND SHOWN (RIGHT-HAND OPPOSITE)
Loading ...
Loading ...
Loading ...