

en Safety
2
Table of contents
INFORMATION FOR USE
1 Safety....................................................................2
2 Preventing material damage ...............................5
3 Environmental protection and saving en-
ergy .......................................................................6
4 Familiarising yourself with your appliance ........7
5 Accessories..........................................................8
6 Before using for the first time .............................8
7 Basic operation ....................................................9
8 Grill .....................................................................10
9 Memory...............................................................11
10 Programmes.......................................................11
11 Basic settings.....................................................13
12 Cleaning and servicing......................................14
13 Troubleshooting.................................................15
14 Disposal..............................................................16
15 Customer Service...............................................16
16 How it works.......................................................17
17 INSTALLATION INSTRUCTIONS .......................23
17.1 Safe installation ..............................................
...23
1 Safety
Observe the following safety instructions.
1.1 General information
¡ Read this instruction manual carefully.
¡ Keep the instruction manual and the
product information safe for future refer-
ence or for the next owner.
¡ Do not connect the appliance if it has been
damaged in transit.
1.2 Intended use
Only a licensed professional may connect ap-
pliances without plugs. Damage caused by in-
correct connection is not covered under the
warranty.
The appliance can only be used safely if it is
correctly installed according to the safety in-
structions. The installer is responsible for en-
suring that the appliance works perfectly at its
installation location.
Only use this appliance:
¡ To prepare meals and drinks.
¡ Under supervision. Never leave the appli-
ance unattended when cooking for short
periods.
¡ For household use and similar applications,
such as: In kitchens for employees in
shops, offices and other commercial sec-
tors; in agriculture; by customers in hotels
and other residential facilities; in bed and
breakfasts.
¡ Up to an altitude of max. 4000m above
sea level.
This appliance complies with the standards
EN 55011 and CISPR 11. It is a group 2,
class B product. Group 2 means that mi-
crowaves are produced for the purpose of
heating food. Class B means that the appli-
ance is suitable for private households.
1.3 Restriction on user group
This appliance may be used by children aged
8 or over and by people who have reduced
physical, sensory or mental abilities or inad-
equate experience and/or knowledge,
provided that they are supervised or have
been instructed on how to use the appliance
safely and have understood the resulting
dangers.
Do not let children play with the appliance.
Children must not perform cleaning or user
maintenance unless they are at least 15 years
old and are being supervised.
Keep children under the age of 8 years away
from the appliance and power cable.

Safety en
3
1.4 Safe use
WARNING‒Risk of fire!
Combustible objects that are left in the cook-
ing compartment may catch fire.
▶ Never store combustible objects in the
cooking compartment.
▶ If smoke is emitted, the appliance must be
switched off or the plug must be pulled out
and the door must be held closed in order
to stifle any flames.
Loose food remnants, fat and meat juices
may catch fire.
▶ Before using the appliance, remove the
worst of the food residues and remnants
from the cooking compartment, heating ele-
ments and accessories.
Overheating of the appliance may cause a
fire.
▶ Never install the appliance behind a decor-
ative door or unit door.
WARNING‒Risk of burns!
The appliance and its parts that can be
touched become hot during use.
▶ Caution should be exercised here in order
to avoid touching heating elements.
▶ Young children under 8 years of age must
be kept away from the appliance.
Accessories and cookware get very hot.
▶ Always use oven gloves to remove ac-
cessories or cookware from the cooking
compartment.
When the cooking compartment is hot, any al-
coholic vapours inside may catch fire.
▶ Only use small quantities of drinks with a
high alcohol content in food.
▶ Open the appliance door carefully.
WARNING‒Risk of scalding!
The accessible parts of the appliance become
hot during operation.
▶ Never touch these hot parts.
▶ Keep children at a safe distance.
Hot steam may escape when you open the
appliance door. Steam may not be visible, de-
pending on the temperature.
▶ Open the appliance door carefully.
▶ Keep children at a safe distance.
If there is water in the cooking compartment
when it is hot, this may create hot steam.
▶ Never pour water into the cooking compart-
ment when the cooking compartment is
hot.
WARNING‒Risk of injury!
Scratched glass in the appliance door may
develop into a crack.
▶ Do not use any harsh or abrasive cleaners
or sharp metal scrapers to clean the glass
on the appliance door, as they may scratch
the surface.
The hinges on the appliance door move when
the door is opened and closed, which could
trap your fingers.
▶ Keep your hands away from the hinges.
Cracks, splinters or breaks in the glass
turntable are dangerous.
▶ Never allow hard objects to strike the
turntable.
▶ Handle the turntable with care.
WARNING‒Risk of electric shock!
If the insulation of the power cord is dam-
aged, this is dangerous.
▶ Never let the power cord come into contact
with hot appliance parts or heat sources.
▶ Never let the power cord come into contact
with sharp points or edges.
▶ Never kink, crush or modify the power
cord.
WARNING‒Risk of suffocation!
Children may put packaging material over
their heads or wrap themselves up in it and
suffocate.
▶ Keep packaging material away from chil-
dren.
▶ Do not let children play with packaging ma-
terial.
Children may breathe in or swallow small
parts, causing them to suffocate.
▶ Keep small parts away from children.
▶ Do not let children play with small parts.

en Safety
4
1.5 Microwave
CAREFULLY READ THE IMPORTANT SAFETY
INSTRUCTIONS AND KEEP THEM SAFE FOR
FUTURE USE
WARNING‒Risk of fire!
Using the appliance for anything other than its
intended purpose is dangerous and may
cause damage. For example, heated slippers
and pillows filled with grain or cereal may
catch fire, even several hours later.
▶ Never dry food or clothing with the appli-
ance.
▶ Never heat up slippers, pillows filled with
grain or cereal, sponges, damp cleaning
cloths or similar with the appliance.
▶ The appliance must only be used to pre-
pare food and drink.
Food and its packaging and containers may
catch fire.
▶ Never heat food in heat-retaining pack-
aging.
▶ Do not leave food unattended while it is
heating in containers made of plastic, pa-
per or other combustible materials.
▶ Never set the microwave power too high or
the cooking time too long. Follow the in-
structions provided in this user manual.
▶ Never use the microwave to dry food.
▶ Never defrost or heat food with a low water
content, such as bread, at too high a mi-
crowave power or for too long.
Cooking oil may catch fire.
▶ Never use the microwave to heat cooking
oil on its own.
WARNING‒Risk of explosion!
Liquids and other food may easily explode
when in containers that have been tightly
sealed.
▶ Never heat liquids or other food in contain-
ers that have been tightly sealed.
WARNING‒Risk of burns!
Foods with peel or skin may burst or explode
during heating, or even afterwards.
▶ Never cook eggs in their shell or heat hard-
boiled eggs in their shell.
▶ Never cook shellfish or crustaceans.
▶ Always prick the yolk of eggs before mi-
crowaving.
▶ The skin of foods that have a peel or skin,
such as apples, tomatoes, potatoes and
sausages, may burst. Before heating, prick
the peel or skin.
Heat is not distributed evenly through baby
food.
▶ Never heat baby food in closed containers.
▶ Always remove the lid or teat.
▶ Stir or shake well after heating.
▶ Check the temperature before giving the
food or drink to a child.
Heated food gives off heat. The cookware
may become hot.
▶ Always use oven gloves to remove cook-
ware or accessories from the cooking com-
partment.
Airtight packaging may burst when food is
heated.
▶ Always follow the instructions on the pack-
aging.
▶ Always use oven gloves to remove the
dishes from the cooking compartment.
The accessible parts of the appliance become
hot during operation.
▶ Never touch these hot parts.
▶ Keep children at a safe distance.
Using the appliance for anything other than its
intended purpose is dangerous. This is be-
cause, for instance, overheated slippers, pil-
lows filled with grain or cereal, sponges and
damp cleaning cloths, etc., may cause burns
to the skin.
▶ Never dry food or clothing with the appli-
ance.
▶ Never heat up slippers, pillows filled with
grain or cereal, sponges, damp cleaning
cloths or similar with the appliance.
▶ The appliance must only be used to pre-
pare food and drink.
Preventing material damage en
5
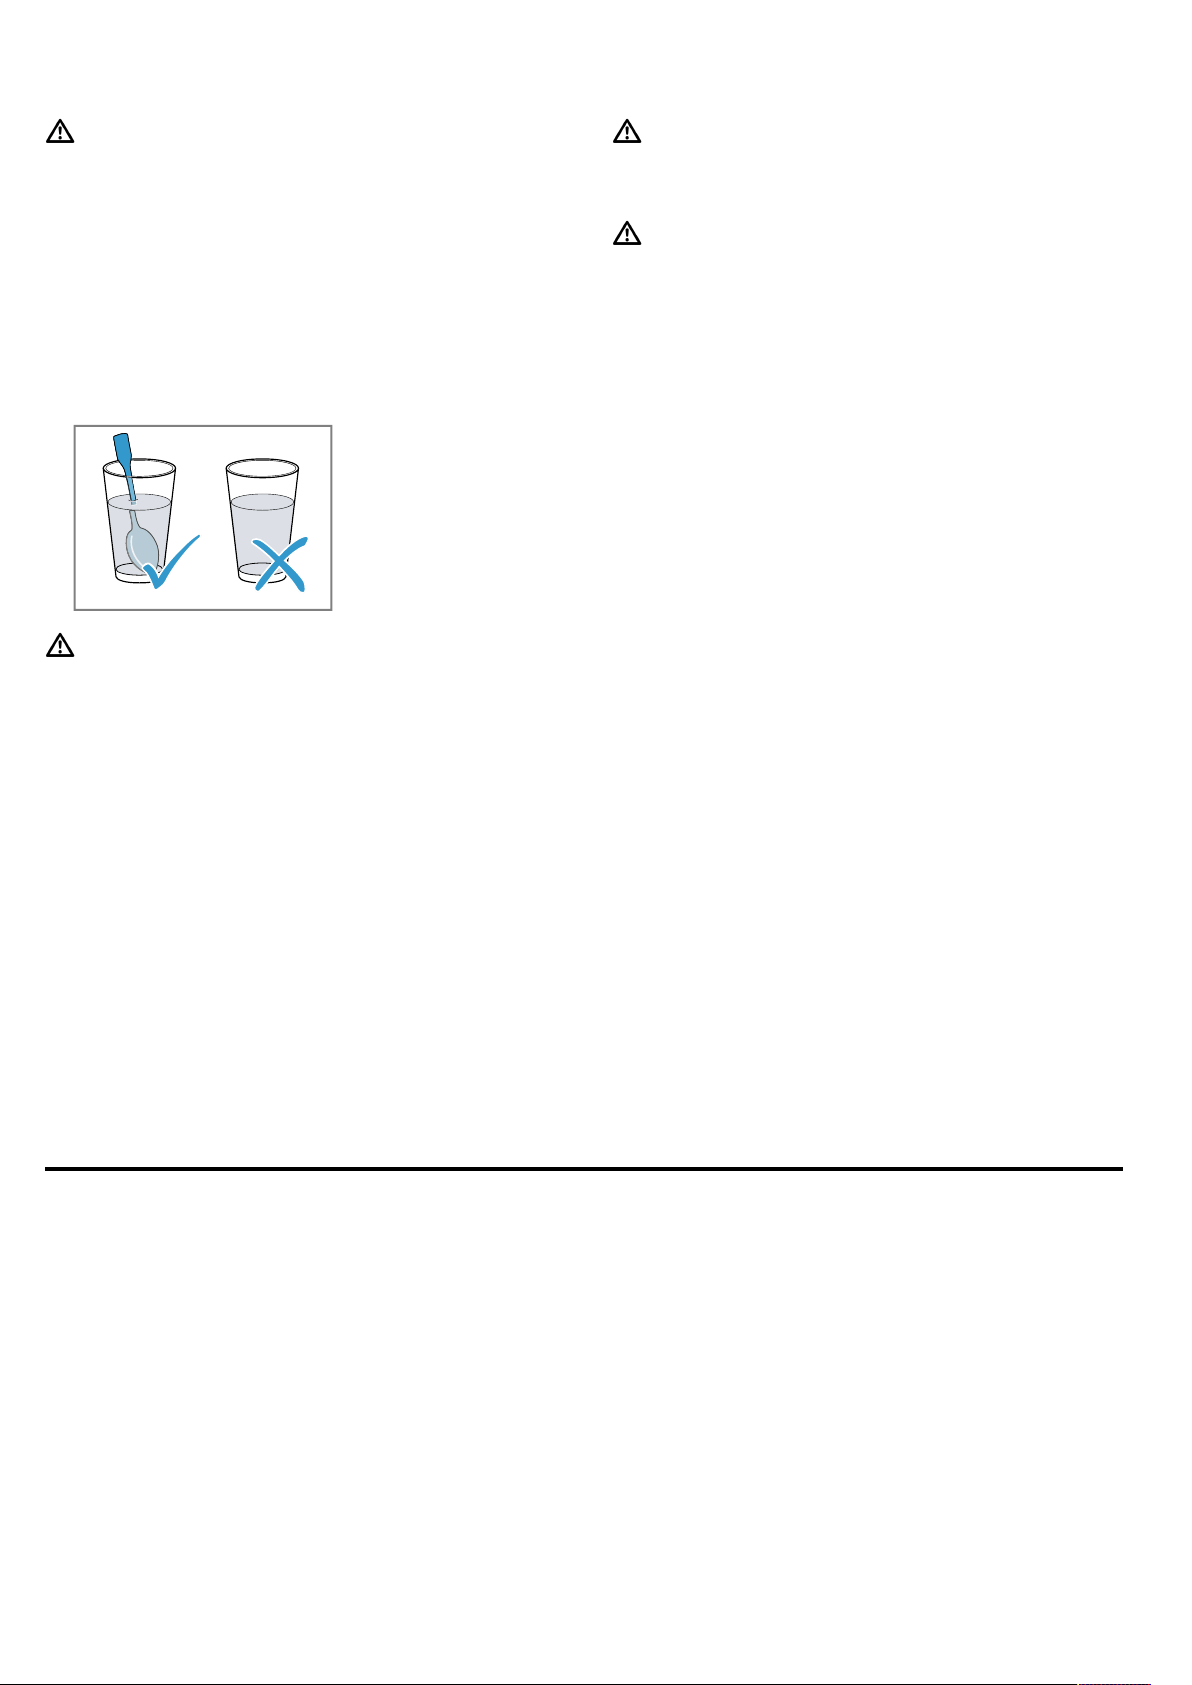
WARNING‒Risk of scalding!
There is a possibility of delayed boiling when
a liquid is heated. This means that the liquid
reaches the boiling temperature without the
usual steam bubbles rising to the surface. Ex-
ercise caution even when only gently shaking
the container. The hot liquid may suddenly
boil over and splatter.
▶ Always place a spoon in the container
when heating liquids. This prevents delayed
boiling.
WARNING‒Risk of injury!
Unsuitable cookware may crack. Porcelain or
ceramic cookware can have small perfora-
tions in the handles and lid. These perfora-
tions conceal a cavity below. If moisture pen-
etrates this cavity, it could cause the cook-
ware to crack.
▶ Only use microwave-safe cookware.
Cookware and containers made from metal or
cookware with metal edging may lead to
sparks being formed during simple mi-
crowave operation. The appliance is dam-
aged.
▶ Never use metal containers during mi-
crowave-only operation.
▶ Only use microwave-safe cookware or use
the microwave in combination with a type
of heating.
WARNING‒Risk of electric shock!
The appliance uses a high voltage.
▶ Never remove the casing.
WARNING‒Risk of serious harm to
health!
Inadequate cleaning may destroy the surface
of the appliance, reduce its service life, and
lead to dangerous situations, such as escap-
ing microwave energy.
▶ Clean the appliance on a regular basis,
and remove any food residue immediately.
▶ Always keep the cooking compartment,
door and door stop clean.
→"Cleaning and servicing", Page14
Never operate the appliance if the cooking
compartment door is damaged. Microwave
energy may escape.
▶ Never use the appliance if the cooking
compartment door or the plastic door
frame is damaged.
▶ Any repair work must only be carried out
by the after-sales service.
Microwave energy will escape from appli-
ances that do not have any casing.
▶ Never remove the casing.
▶ Contact our after-sales service if mainten-
ance or repair work is needed.
2 Preventing material damage
2.1 General
ATTENTION!
When the cooking compartment is hot, any water in-
side it will create steam. The change in temperature
may cause damage.
▶ Never pour water into the cooking compartment
when it is still hot.
The prolonged presence of moisture in the cooking
compartment leads to corrosion.
▶ Always wipe away the condensation after cooking.
▶ Do not keep moist food in the cooking compartment
for a long time with the door closed.
▶ Do not store food in the cooking compartment.
Leaving the appliance to cool down with the door open
will damage the front of neighbouring kitchen units over
time.
▶ Always allow the cooking compartment to cool
down with the door closed after cooking at high
temperatures.
▶ Take care not to trap anything in the appliance
door.
▶ Only leave the cooking compartment to dry with the
door open if a lot of moisture was produced during
operation.
Sitting or placing objects on the appliance door may
damage it.
▶ Do not place, hang or support objects on the appli-
ance door.
en Environmental protection and saving energy
6
2.2 Microwave
Follow these instructions when using the microwave.
ATTENTION!
Metal touching the wall of the cooking compartment
will cause sparks, which may damage the appliance or
the inner door pane.
▶ Metal (e.g. a spoon in a glass) must be kept at least
2cm from the cooking compartment walls and the
inside of the door.
Placing aluminium containers in the appliance may
cause sparks, which will damage the appliance.
▶ Do not use aluminium containers in the appliance.
Operating the appliance without food in the cooking
compartment may lead to overloading.
▶ Do not switch on the microwave unless there is food
inside. The only exception to this rule is when per-
forming a short cookware test.
If you prepare several bags of microwave popcorn in
immediate succession at a microwave power level that
is too high, the cooking compartment may be dam-
aged.
▶ Leave the appliance to cool down for several
minutes between each use.
▶ Never set a microwave power level that is too high.
▶ Use a maximum microwave output of 600 watts.
▶ Always place the popcorn bag on a glass plate.
The microwave feed is damaged by the removal of the
cover.
▶ Never remove the cover of the microwave feed in
the cooking compartment.
Removing the transparent film from the inside of the
door damages the appliance door.
▶ Never remove the transparent film on the inside of
the door.
Liquid that penetrates the interior of the appliance may
damage the turntable drive.
▶ Monitor the cooking process.
▶ Set a shorter cooking time first and, if necessary, in-
crease the cooking time.
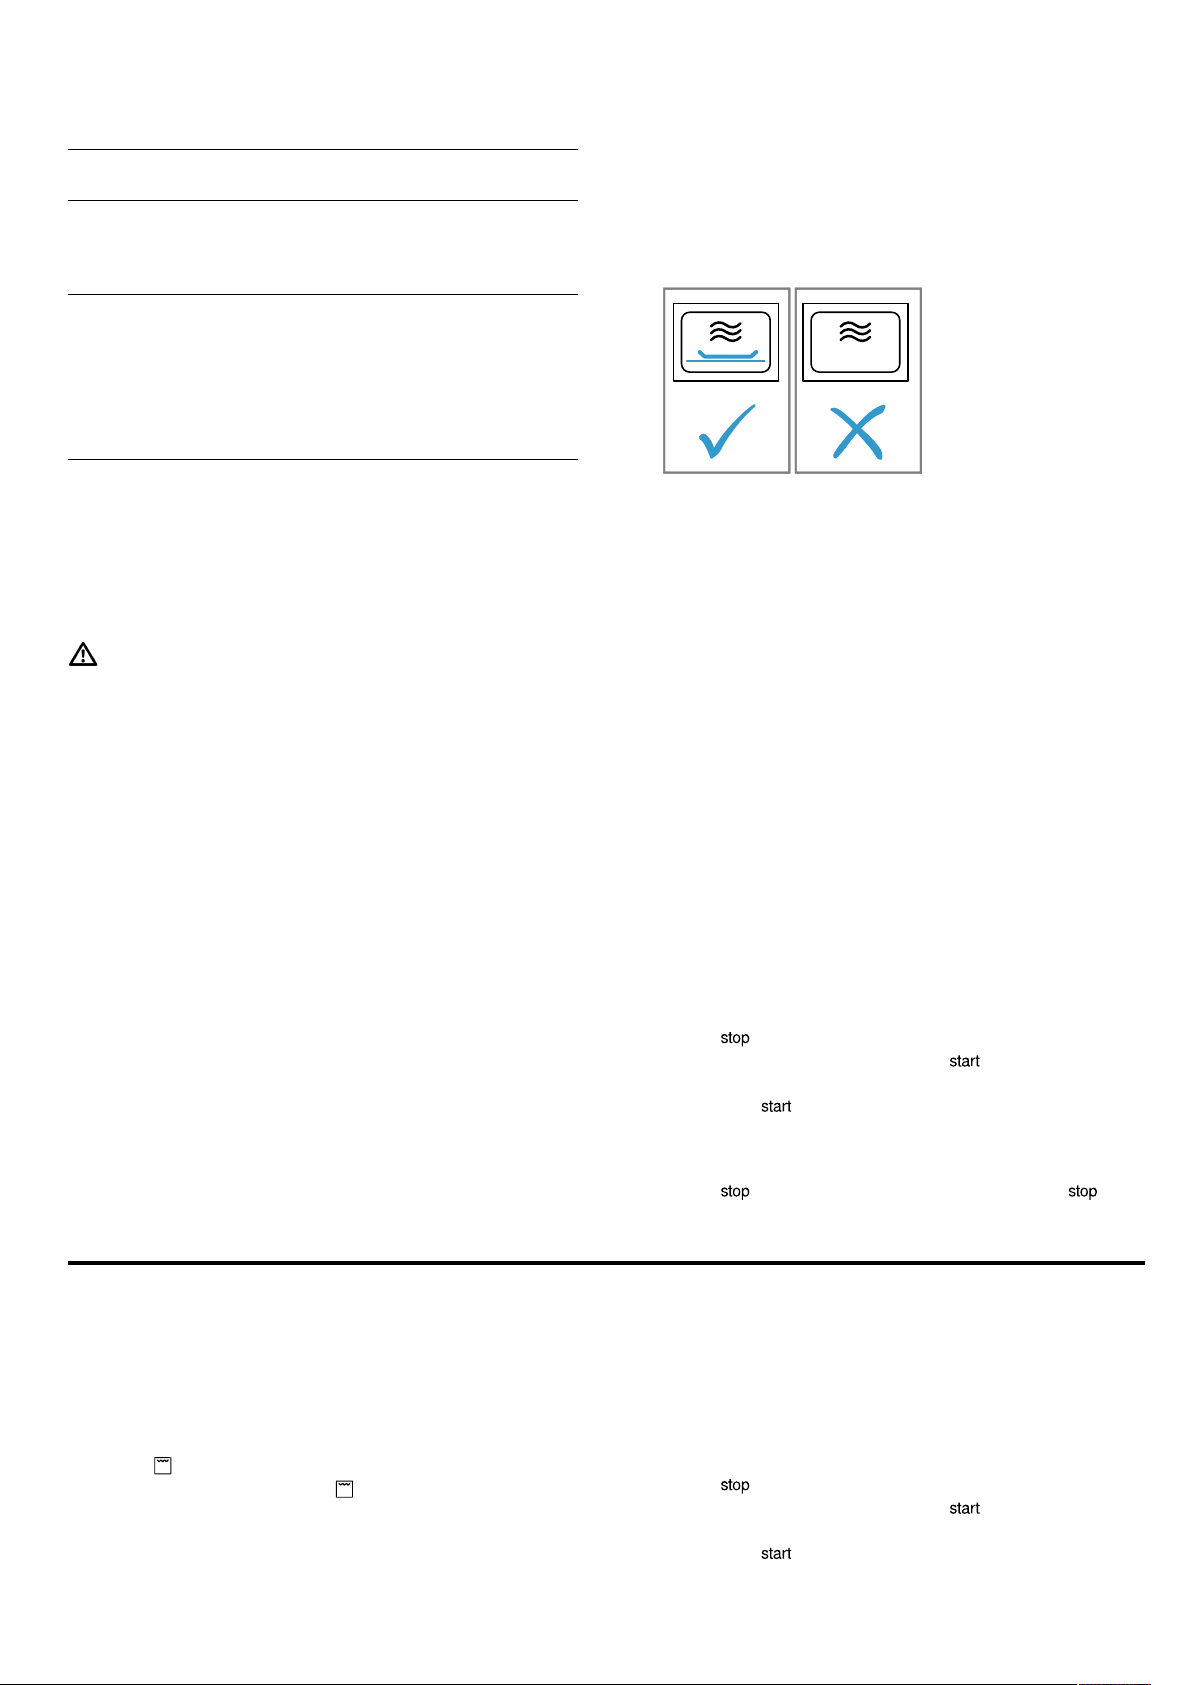
▶ Never use the appliance without the turntable.
Using unsuitable cookware may result in damage.
▶ When using the grill or the microwave combined op-
eration, only use cookware that can withstand high
temperatures.
3 Environmental protection and saving energy
3.1 Disposing of packaging
The packaging materials are environmentally compat-
ible and can be recycled.
▶
Sort the individual components by type and dispose
of them separately.
3.2 Saving energy
If you follow these instructions, your appliance will use
less power.
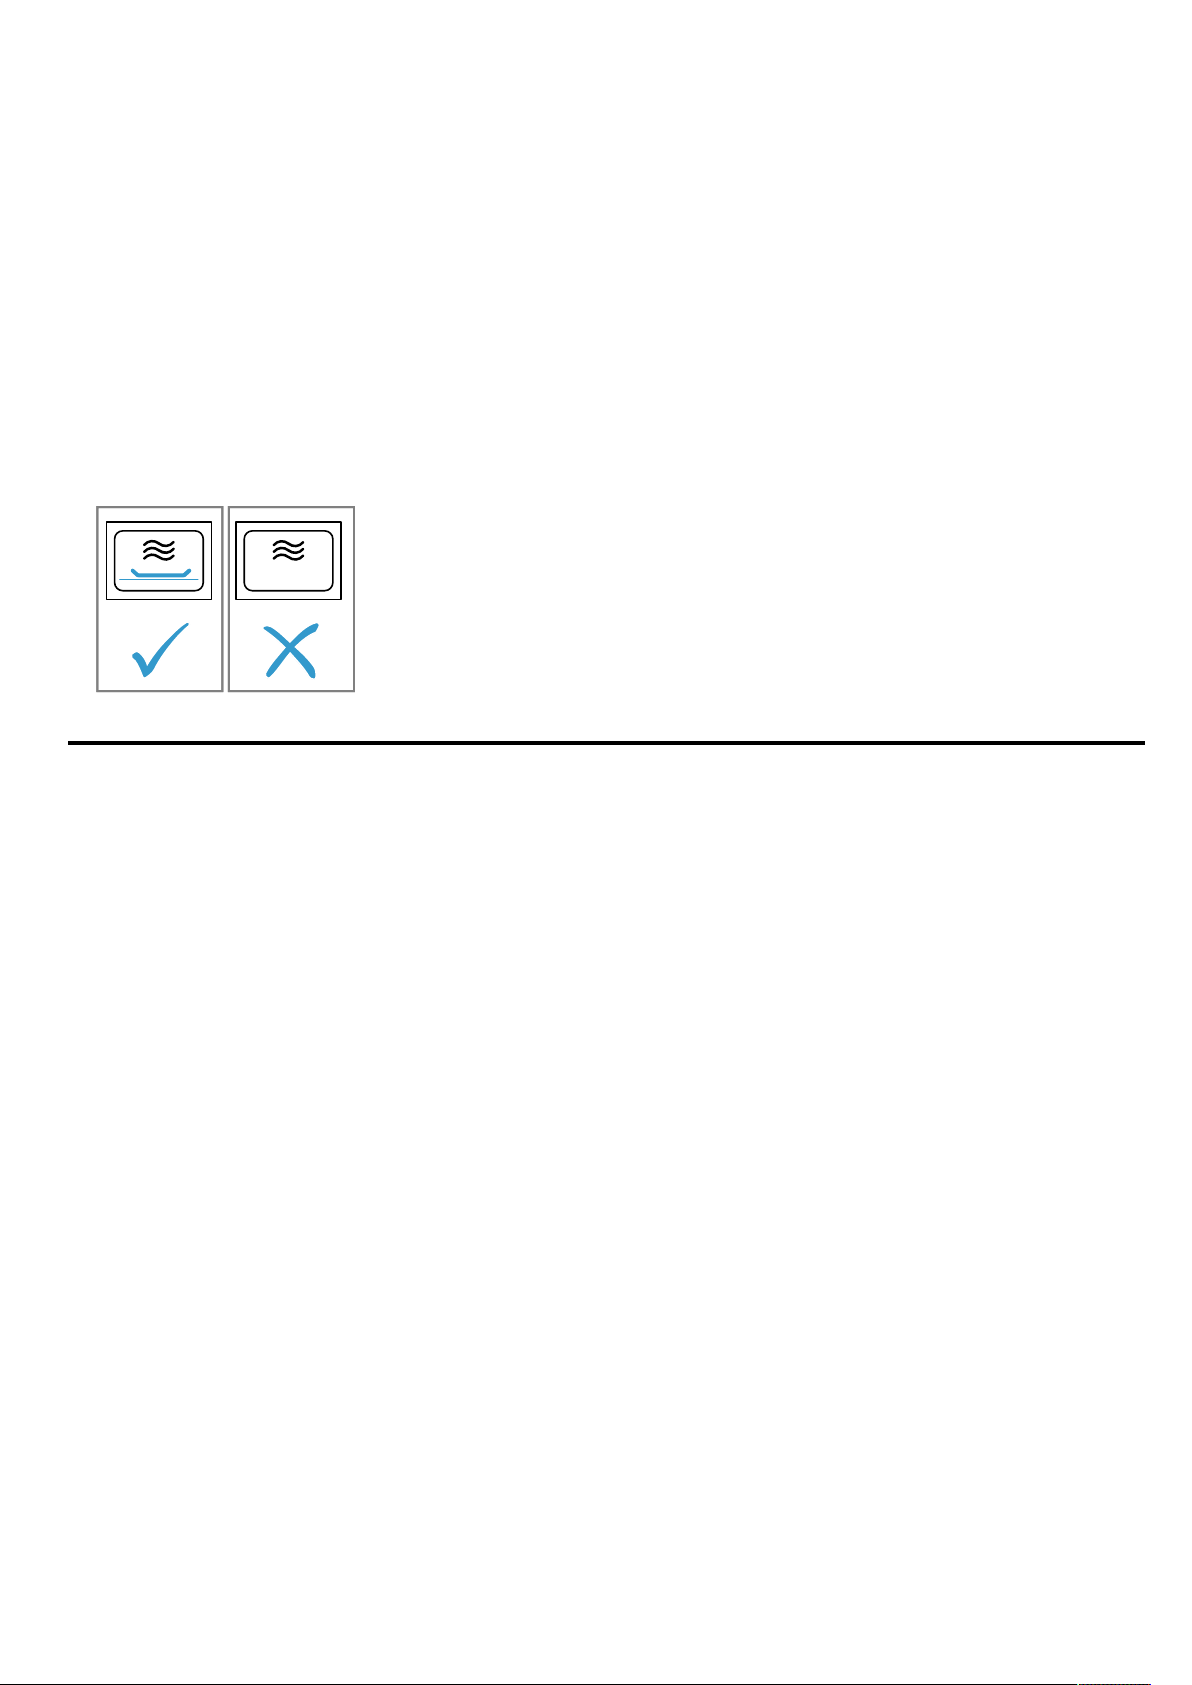
Open the appliance door as little as possible during
operation.
¡
This will maintain the temperature in the cooking
compartment and eliminate the need for the appli-
ance to reheat.
Hide the clock in standby mode.
¡
The appliance saves energy in standby mode.
Note:
The appliance requires:
¡ A maximum of 1W when the appliance is in opera-
tion with the display switched on
¡ A maximum of 0.5W when the appliance is in oper-
ation with the display switched off
Familiarising yourself with your appliance en
7
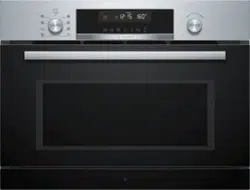
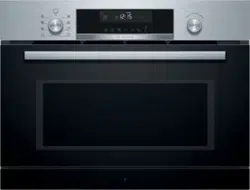
4 Familiarising yourself with your appliance
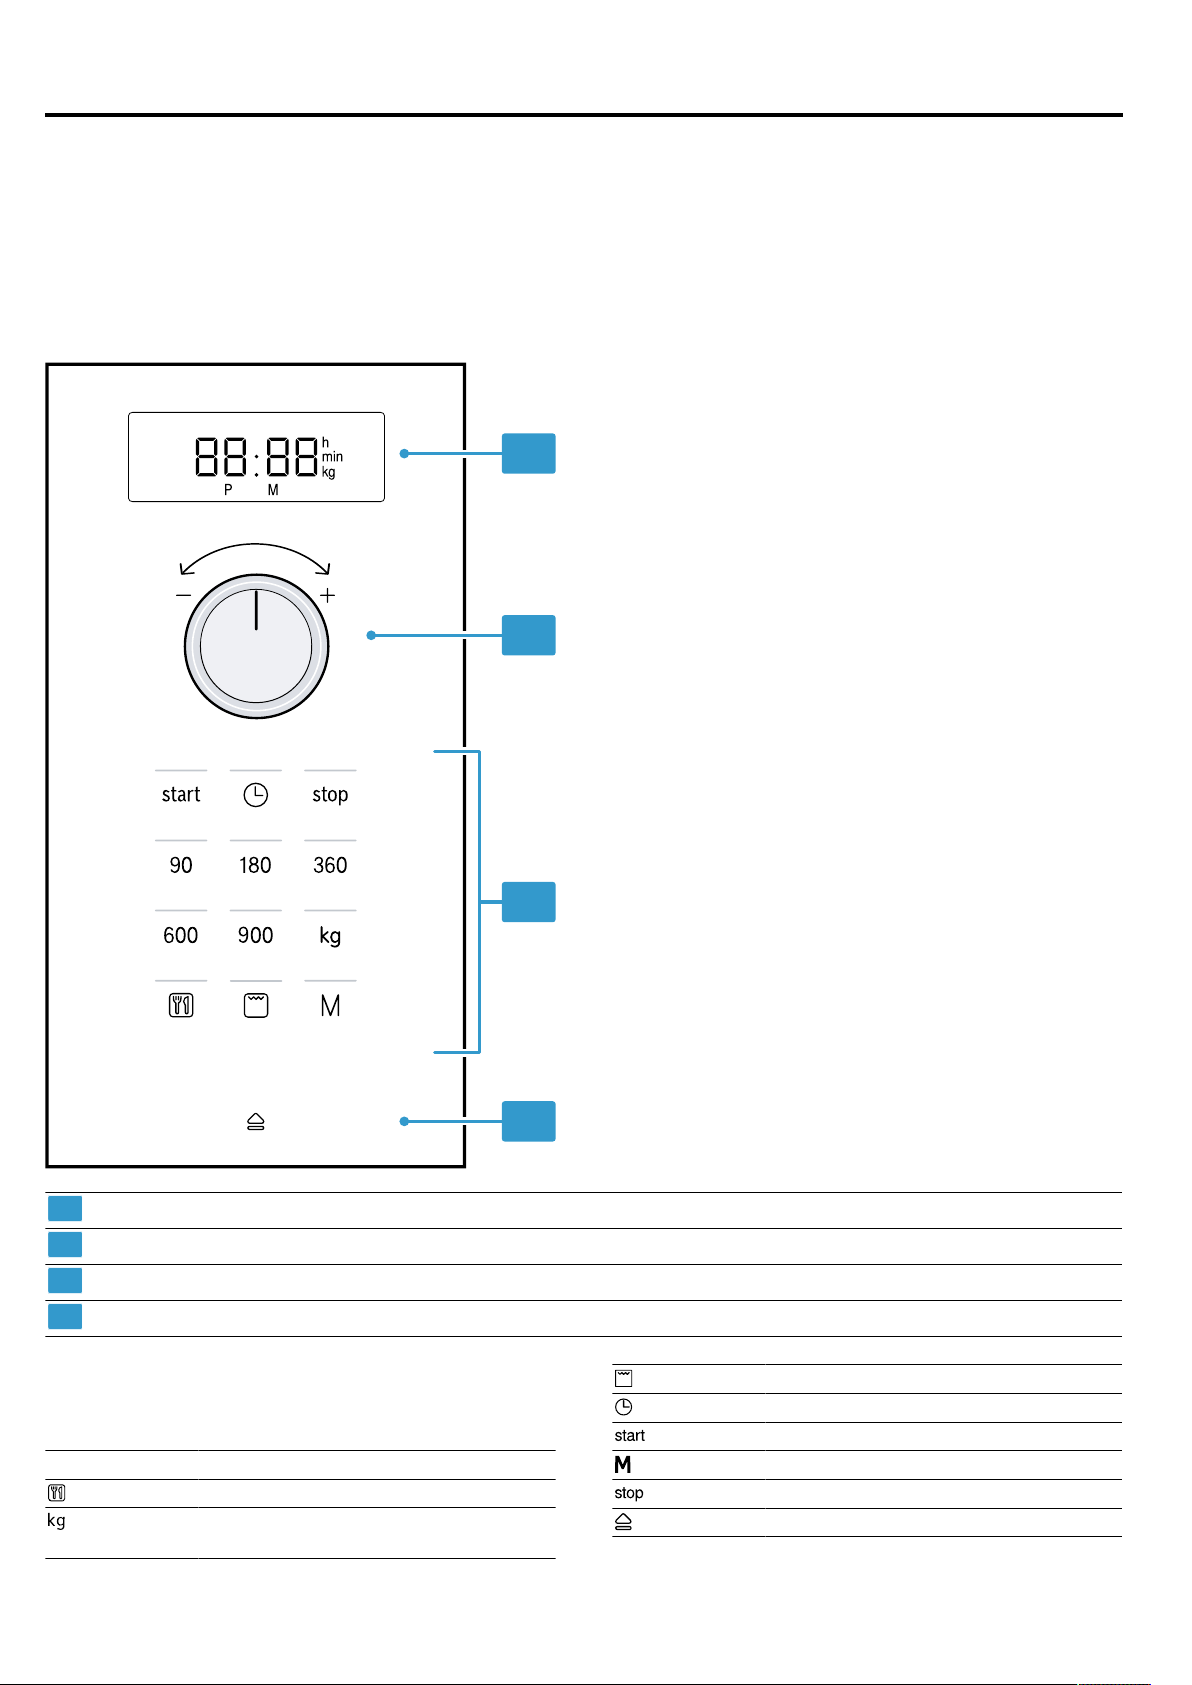
4.1 Control panel
You can use the control panel to configure all functions
of your appliance and to obtain information about the
operating status.
Note:On certain models, specific details such as col-
our and shape may differ from those pictured.
1
2
54
3
1
Automatic door opener Open the door automatically.
2
Touch fields Select functions.
3
Rotary selector Set the time, cooking time or automatic programmes.
4
Display Display clock or cooking time.
Touch fields
Touch fields are touch-sensitive surfaces. To select a
function, touch the relevant field.
90–900 Select the microwave power in watts.
Select the automatic programmes.
Select the weight for the pro-
grammes.
Select the grill.
Set or display the time.
Start the operation.
Select "Memory".
Stop or pause the operation.
Open the appliance door.
en Accessories
8
Rotary selector
Use the rotary selector to change the setting values
that are shown on the display.
The rotary selector can be pushed in. To engage or re-
lease the rotary selector, push the rotary selector.
Automatic door opener
When you press the automatic door opener, the appli-
ance door springs open. You can fully open the appli-
ance door manually.
Notes
¡ In the event of a power cut, the automatic door
opener does not work. You can open the door
manually.
¡ If you open the appliance door during operation,
this pauses the operation.
¡ When you close the appliance door, the operation
does not continue automatically. You must restart
the operation.
¡ If the appliance is switched off for an extended
period of time, the appliance door opens with a time
delay.
4.2 Types of heating
Here you can find an overview of the types of heating. You can find recommendations on using the types of heating.
Symbol Name Use
90–900 Microwave Defrosting, cooking or heating food and liquids.
Grill Gratinate food.
Microwave combined
operation
¡ Bake bakes and gratins.
¡ Brown dishes.
4.3 Cooling fan
The cooling fan switches on and off as required.
The cooking compartment remains cold during mi-
crowave operation. Despite this, the cooling fan will still
switch on.
Note:The cooling fan may run on even if the oven has
been switched off.
4.4 Condensation
Condensation can occur in the cooking compartment
and on the appliance door when cooking. Condensa-
tion is normal and does not adversely affect appliance
operation. Wipe away the condensation after cooking.
5 Accessories
Use original accessories. These have been made espe-
cially for your appliance.
Accessories Use
Wire rack ¡ Wire rack for grilling
and browning
¡ Use the wire rack and
place the cookware on
it
6 Before using for the first time
Configure the settings for initial start-up. Clean the ap-
pliance and accessories.
6.1 Initial configuration
Configure the settings for initial start-up. Clean the ap-
pliance and accessories.
Note:After connecting the appliance to the power or
following a power cut, a signal sounds and several
zeros are shown on the display. It may take a few
seconds until a signal sounds and you can set the
time.
1.
Press .
a 12:00 is shown on the display. The indicator light
lights up via .
2.
Set the clock using the rotary selector.
3.
Press .
6.2 Heating up the cooking compartment
1.
Press .
a The indicator lamp above lights up and the dis-
play shows 10:00 min.
2.
Press .
3.
Once the cooking compartment has cooled down,
clean the smooth surfaces with soapy water and a
dish cloth.
Basic operation en
9
6.3 Cleaning the accessories
▶
Clean the accessory thoroughly with soapy water
and a soft dish cloth.
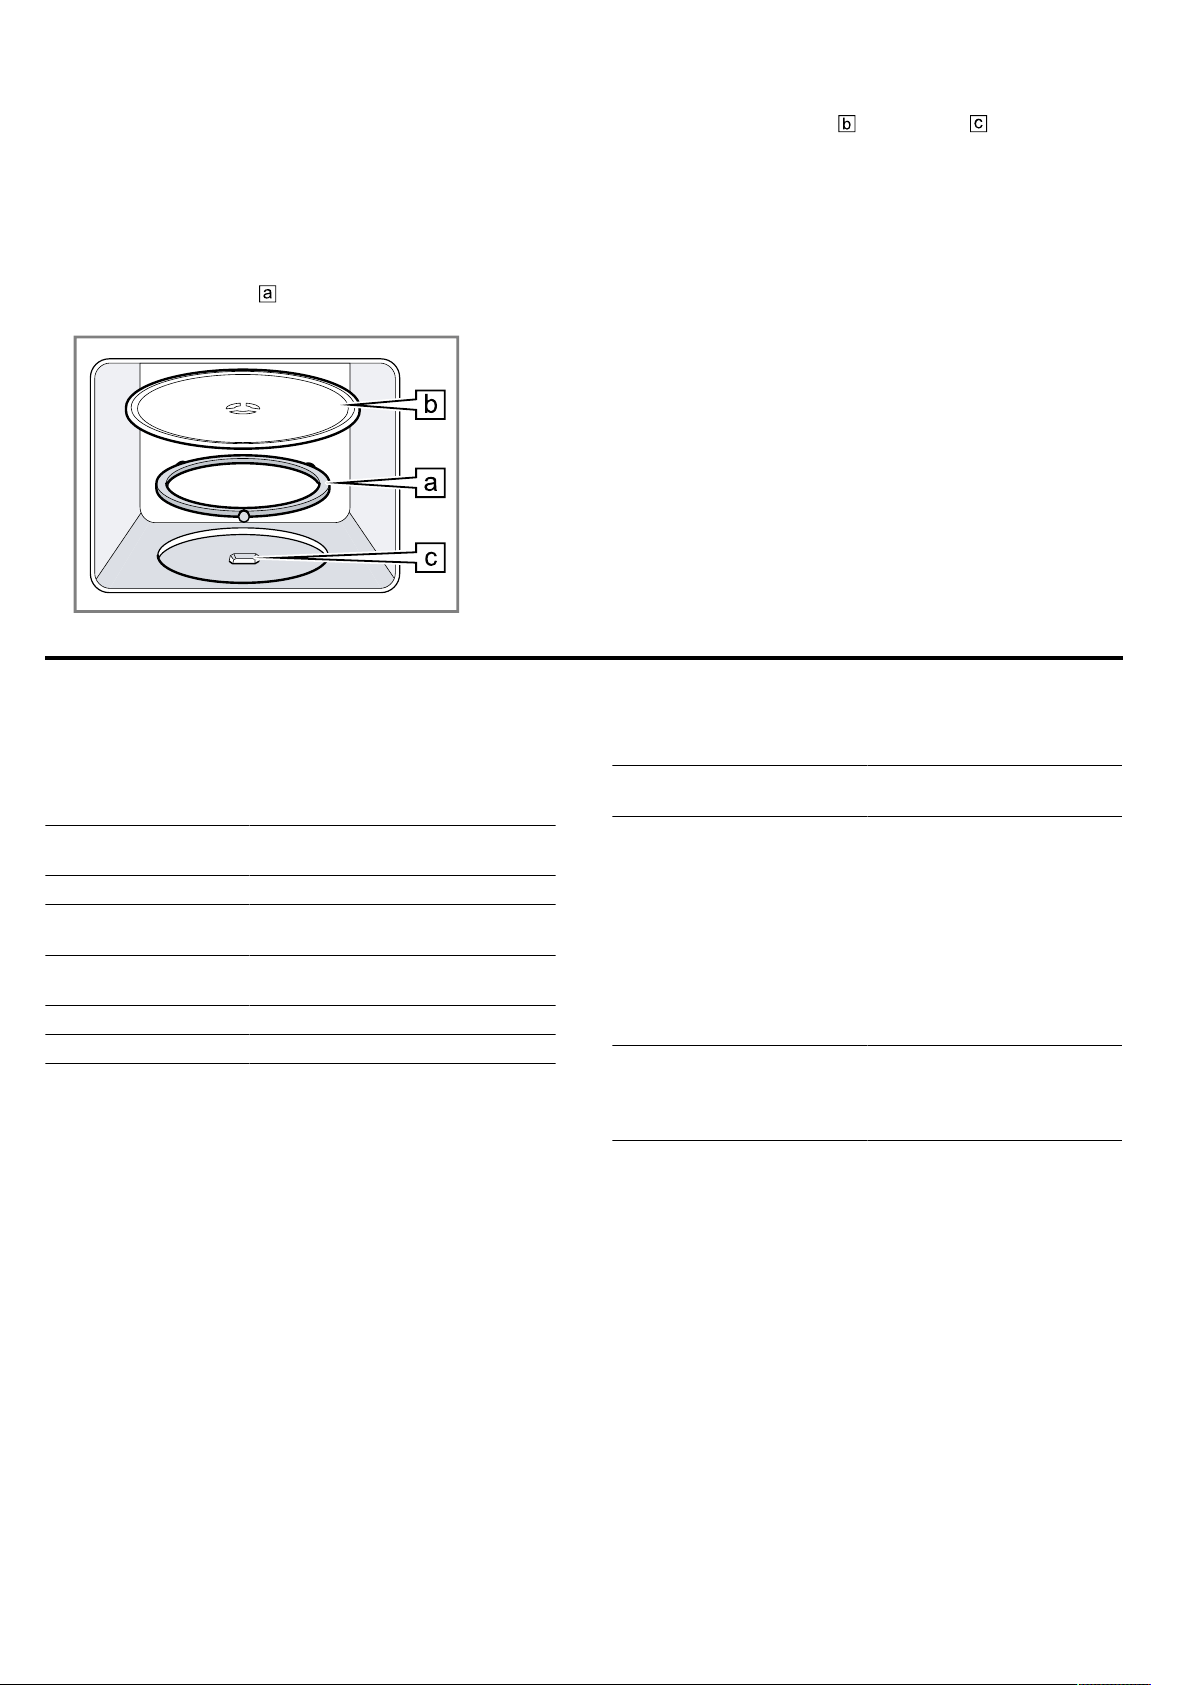
6.4 Fitting the turntable
Never use the appliance without the turntable.
1.
Place the roller ring into the recess in the cooking
compartment.
2.
Engage the turntable in the drive in the centre
of the cooking compartment floor.
3.
Check whether the turntable is correctly engaged.
Note:The turntable can turn anti-clockwise or clock-
wise.
7 Basic operation
7.1 Microwave power settings
This is where you can find an overview of the different
microwave power settings and when to use them.
Microwave power
setting in watts
Use
90 Defrost delicate foods.
180 Defrost food and continue
cooking.
360 Cooking meat and fish or heat-
ing delicate foods.
600 Heat and cook food.
900 Heat liquids.
Note:
You can set the microwave power settings for a
particular cooking time:
¡ 900W for 30minutes
¡ 600W for 60minutes
¡ 90W, 360W, 180W for 99minutes
7.2 Microwave-safe cookware and
accessories
To heat food evenly and avoid damaging your appli-
ance, it is important to use the right cookware and ac-
cessories.
Note:Read the manufacturer's instructions before us-
ing any cookware in the microwave. If in doubt, carry
out a cookware test.
Microwave-safe
Cookware and accessor-
ies
Reason
Cookware made from
heat-resistant, microwave-
safe material:
¡ Glass
¡ Glass ceramic
¡ Porcelain
¡ Temperature-resistant
plastic
¡ Fully glazed ceramic
without cracks
These materials allow mi-
crowaves to pass
through. Microwaves do
not damage heat-resistant
cookware.
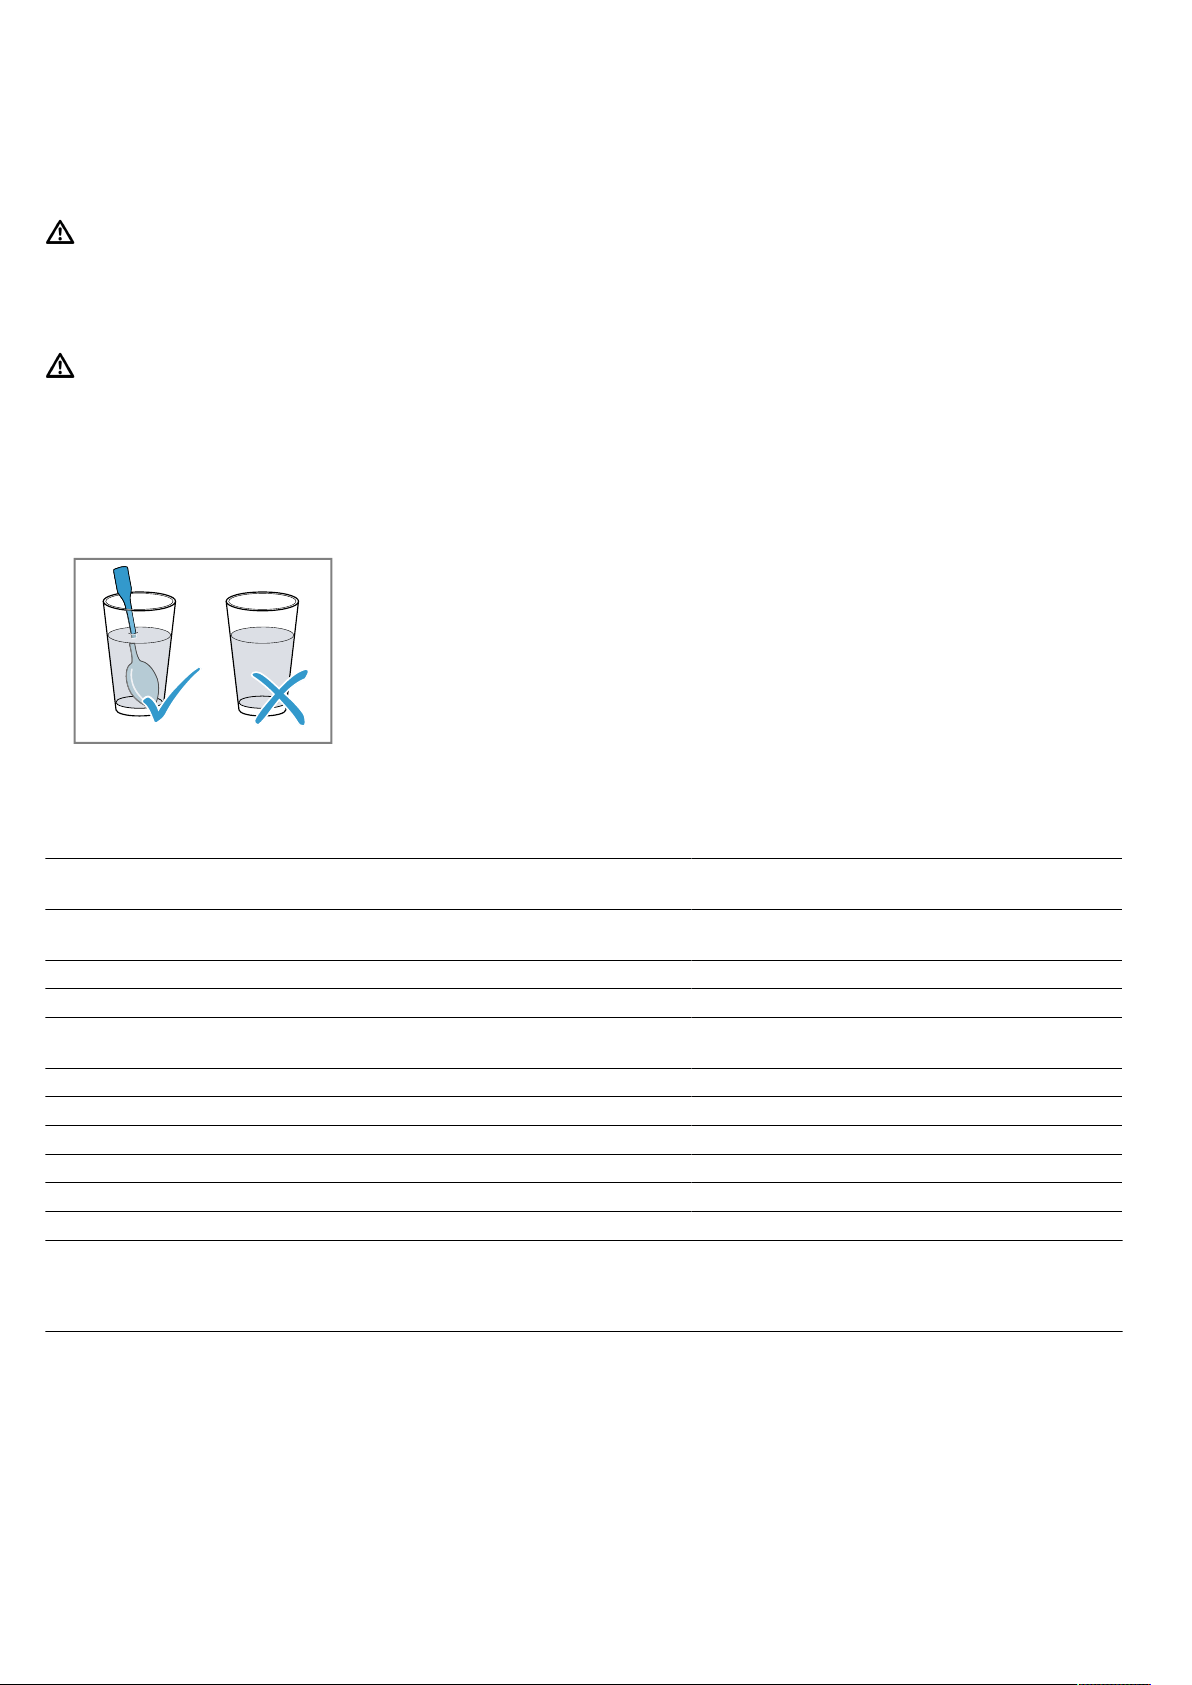
Metal cutlery Note:You can use metal
cutlery, e.g. place a
spoon in a glass, to pre-
vent delayed boiling.
ATTENTION!
Metal touching the wall of the cooking compartment
will cause sparks, which may damage the appliance or
the inner door pane.
▶ Metal (e.g. a spoon in a glass) must be kept at least
2cm from the cooking compartment walls and the
inside of the door.
en Grill
10
Not microwave-safe
Cookware and accessor-
ies
Reason
Metal cookware Metal does not allow mi-
crowaves to pass
through. The food hardly
heats up.
Cookware with gold or sil-
ver decoration
Microwaves can damage
gold and silver decora-
tion.
Tip:You can only use this
kind of cookware if the
manufacturer guarantees
that it is microwave-safe.
7.3 Testing cookware for microwave
suitability
Test cookware to see whether it is suitable for mi-
crowave use. Testing cookware is the only time the ap-
pliance should be operated in microwave mode without
any food inside.
WARNING‒Risk of scalding!
The accessible parts of the appliance become hot dur-
ing operation.
▶ Never touch these hot parts.
▶ Keep children at a safe distance.
1.
Place the empty cookware in the cooking compart-
ment.
2.
Set the appliance to the maximum microwave power
setting for 30 seconds to 1 minute.
3.
Start the operation.
4.
Check the cookware several times:
– If the cookware is cold or warm to the touch, it is
suitable for microwave use.
– If the cookware becomes hot or sparks are cre-
ated, stop the cookware test. The cookware is
not microwave-safe.
7.4 Configuring the microwave settings
ATTENTION!
Operating the appliance without food in the cooking
compartment may lead to overloading.
▶ Do not switch on the microwave unless there is food
inside. The only exception to this rule is when per-
forming a short cookware test.
Tip:To ensure optimum use of your appliance, you can
refer to the information in the recommended settings.
→"How it works", Page17
1.
Follow the safety instructions. →Page4
2.
Read the safety instructions and the section on how
to prevent material damage. →Page6
3.
Read the information on microwave-safe cookware
and accessories. →Page9
4.
Use the buttons to set the required microwave
power setting.
5.
Use the rotary selector to set the required duration.
Note:If you open the cooking compartment door dur-
ing operation, the microwave interrupts the operation
and pauses the set time that is counting down. When
you close the cooking compartment door, the opera-
tion continues.
7.5 Changing the cooking time
You can change the cooking time at any time.
▶
Use the rotary selector to set the required duration.
7.6 Pausing operation
1.
Press or open the appliance door.
a The indicator light lights up via .
2.
To continue the operation, close the appliance door
and press .
7.7 Cancelling the operation
▶
Press twice or open the door and press
once.
8 Grill
You can brown or gratinate your food using the grill.
You can use the grill on its own or in combination with
the microwave.
8.1 Setting the grill
1.
Press .
a The indicator lamp above lights up and the dis-
play shows 10:00 min.
2.
Use the rotary selector to set the required duration.
8.2 Changing the cooking time
You can change the cooking time at any time.
▶
Use the rotary selector to set the required duration.
8.3 Pausing operation
1.
Press or open the appliance door.
a The indicator light lights up via .
2.
To continue the operation, close the appliance door
and press .

Memory en
11
8.4 Cancelling the operation
▶
Press twice or open the door and press
once.
8.5 MicroCombi
To reduce the cooking time, you can use the grill in
combination with microwave mode.
Setting MicroCombi
1.
Press the microwave power setting 90, 180 or 360.
a The indicator lamp above the pressed button lights
up and the display shows 1:00min.
2.
Press .
3.
Use the rotary selector to set the required duration.
Note:If you open the cooking compartment door dur-
ing operation, the microwave interrupts the operation
and pauses the set time that is counting down. When
you close the cooking compartment door, the opera-
tion continues.
9 Memory
You can use the memory function to save the setting
for a dish and call it up again at any time.
Tip:If you prepare one dish often, use the memory
function.
9.1 Saving memory settings
Note:
¡ You cannot save several microwave power settings
in succession.
¡ You cannot save any automatic programmes.
1.
Press .
a The indicator light lights up via .
2.
Use the buttons to set the required microwave
power setting.
a The indicator lamp above the button lights up and
the display shows 1:00 min.
3.
Use the rotary selector to set the required duration.
4.
If required, select one of the options:
‒ To save the memory and immediately start, press
.
‒ To save the memory and not start, press .
a If the appliance does not start, the time appears on
the display and the appliance saves the setting.
9.2 Starting the memory
It is very easy to start the saved programme. Place
your dish in the appliance and close the appliance
door.
1.
Press .
a The saved settings are displayed.
2.
Press .
9.3 Pausing operation
1.
Press or open the appliance door.
a The indicator light lights up via .
2.
To continue the operation, close the appliance door
and press .
9.4 Cancelling the operation
▶
Press twice or open the door and press
once.
10 Programmes
The programmes help you to use your appliance to
prepare different dishes by selecting the optimum set-
tings automatically.
10.1 Setting a programme
1.
Select a programme.
2.
Press repeatedly until the display shows the re-
quired programme number.
a The indicator light lights up via .
3.
Press .
a The indicator lamp above lights up and the dis-
play shows a suggested value for the weight.
4.
Turn the rotary selector to specify the weight of the
dish.
If it is not possible to enter the exact weight, round
the weight up or down.
5.
Press to start the operation.
a The cooking time visibly counts down.
6.
If an audible signal sounds during the programme,
open the appliance door.
‒ Break up, stir or turn the food.
‒ Close the appliance door.
‒ Press .
10.2 Pausing operation
1.
Press or open the appliance door.
a The indicator light lights up via .
2.
To continue the operation, close the appliance door
and press .
10.3 Cancelling the operation
▶
Press twice or open the door and press
once.

en Programmes
12
10.4 Defrosting with the automatic programmes
You can use the four defrosting programmes to defrost meat, poultry and bread.
Programme Food Cookware Weight range inkg
P01 Minced meat Open 0.20–1.00
P02 Pieces of meat Open 0.20–1.00
P03 Chicken, chicken pieces Open 0.40–1.80
P04 Bread Open 0.20–1.00
Defrosting food using the automatic
programmes
1.
Take the food out of its packaging.
Use food that is stored flat and in portion-sized
quantities at -18°C.
2.
Weigh the food.
You require the weight in order to set the pro-
gramme.
3.
Place the food in a microwaveable shallow dish, e.g.
a glass plate or porcelain plate.
Do not put the cover on.
4.
Set the programme. →Page11
5.
Note:Liquid is produced when you defrost meat
and poultry.
Drain off any liquid when turning and under no cir-
cumstances use it for other purposes or allow it to
come into contact with other foods.
6.
Flat pieces of meat and items made from minced
meat should be separated from each other before
leaving to stand.
7.
The defrosted food should be left to stand for an ad-
ditional 10 to 30minutes until it reaches an even
temperature.
Large pieces of meat require a longer standing time
than smaller pieces. For poultry, remove the giblets
after the resting time.
8.
Continue to prepare the food, even though thick
pieces of meat may still be frozen in the middle.
10.5 Cooking with the automatic programmes
With the three cooking programmes, you can cook rice, potatoes or vegetables.
Programme Food Cookware Weight range
inkg
Information
P05 Rice With lid 0.05–0.20 ¡ For rice, use a large, deep dish.
¡ Do not use any boil-in-the-bag rice.
¡ For every 100g rice, add twice to three times the
amount of water.
P06 Potatoes With lid 0.15–1.00 ¡ For boiled potatoes, cut fresh potatoes into small,
equally sized pieces.
¡ Add one tablespoon of water and a little salt for every
100g boiled potatoes.
P07 Vegetables With lid 0.15–1.00 ¡ Weigh fresh, washed vegetables scales.
¡ Cut the vegetables into small, uniform pieces.
¡ Add one tablespoon of water for every 100g boiled
potatoes.
Cooking food with the automatic programmes
1.
Weigh the food.
You require the weight in order to set the pro-
gramme.
2.
Place the food on microwave-safe cookware and
cover with a lid.
3.
Add the volume of water in accordance with the
manufacturer's instructions on the packaging.
4.
Set the programme. →Page11
5.
Once the programme has finished, stir the food
again.
6.
The food should be left to stand for an additional 5
to 10minutes until it reaches a uniform temperature.
The cooking results are dependent on the food
quality and consistency of the food.
10.6 Combi-cooking programme
With the combi cooking programme, you combine microwave and grill.
Programme Food Cookware Weight range inkg
P08 Frozen bake, up to 3cm deep Open 0.40–0.90
Basic settings en
13
Cooking food using the combi cooking
programme
1.
Take the food out of its packaging.
2.
Weigh the food.
You require the weight in order to set the pro-
gramme.
3.
Place the food in microwave-safe, heat-resistant
cookware that is not too big.
4.
Set the programme. →Page11
5.
Once the programme has finished, leave the food to
rest for another 5–10 minutes to allow the temperat-
ure to even out.
11 Basic settings
You can configure the basic settings for your appliance to meet your needs.
11.1 Overview of the basic settings
Here you can find an overview of the basic settings and factory settings. The basic settings depend on the features
of your appliance.
Setting Selection Meaning
Button tone ¡
1
¡
Switch the button tone on and off.
Note:The button tone remains active for and .
Demo mode Activate or deactivate demo mode.
Note:The appliance is switched off. You can use the buttons and the display; the but-
tons do not work. Demo mode is mainly useful for dealers.
1
Factory setting (may vary according to model)
11.2 Changing basic settings
Requirement:The appliance is switched off.
1.
Press and hold and for a few seconds.
a The display shows the first basic setting.
2.
Press .
a The current value flashes on the display.
3.
Set the desired value with the rotary selector.
4.
To accept the basic setting, press .
5.
To exit the basic setting, press .
6.
Use the rotary selector to change to the basic set-
ting .
7.
To edit the basic setting, press .
a The selected setting lights up on the display.
8.
Set the desired value with the rotary selector.
9.
To accept the basic setting, press .
10.
To exit the basic setting, press .
11.
To exit the basic settings menu, press again.
Tip:The setting can be changed at any time.
11.3 Changing the signal duration
When your appliance is switched off, you hear an aud-
ible signal. You can change the duration of the signal.
▶
Press and hold for approx. sixseconds.
a The signal duration switches between short and
long.
a The appliance applies the signal duration and dis-
plays the time.
11.4 Setting the time
Note:After connecting the appliance to the power or
following a power cut, a signal sounds and several
zeros are shown on the display. It may take a few
seconds until a signal sounds and you can set the
time.
1.
Press .
a 12:00 is shown on the display. The indicator light
lights up via .
2.
Set the clock using the rotary selector.
3.
Press .
11.5 Hiding the clock
To reduce the standby consumption of your appliance,
you can hide the clock.
1.
Press .
2.
Press .
To view the clock, press again.

en Cleaning and servicing
14
12 Cleaning and servicing
To keep your appliance working efficiently for a long
time, it is important to clean and maintain it carefully.
12.1 Cleaning products
Only use suitable cleaning agents.
WARNING‒Risk of electric shock!
An ingress of moisture can cause an electric shock.
▶ Do not use steam- or high-pressure cleaners to
clean the appliance.
ATTENTION!
Unsuitable cleaning agents damage the surfaces of the
appliance.
▶ Do not use harsh or abrasive cleaning products.
▶ Do not use cleaning products with a high alcohol
content.
▶ Do not use hard scouring pads or cleaning
sponges.
▶ Do not use any special cleaners for cleaning the ap-
pliance while it is hot.
▶ Only use glass cleaners, glass scrapers or stainless
steel care products if recommended in the cleaning
instructions for the relevant part.
New sponge cloths contain residues from production.
▶ Wash new sponge cloths thoroughly before use.
You can find out which cleaning products are suitable
for each surface or part of the appliance in the indi-
vidual cleaning instructions.
12.2 Cleaning the appliance
Clean the appliance as specified. This will ensure that
the different parts and surfaces of the appliance are
not damaged by incorrect cleaning or unsuitable clean-
ing products.
WARNING‒Risk of burns!
The appliance and its parts that can be touched be-
come hot during use.
▶ Caution should be exercised here in order to avoid
touching heating elements.
▶ Young children under 8 years of age must be kept
away from the appliance.
WARNING‒Risk of fire!
Loose food remnants, fat and meat juices may catch
fire.
▶ Before using the appliance, remove the worst of the
food residues and remnants from the cooking com-
partment, heating elements and accessories.
WARNING‒Risk of injury!
Scratched glass in the appliance door may develop
into a crack.
▶ Do not use any harsh or abrasive cleaners or sharp
metal scrapers to clean the glass on the appliance
door, as they may scratch the surface.
1.
Read the information on cleaning products.
→Page14
2.
Observe the information on cleaning the appliance
components or surfaces.
3.
Unless otherwise specified:
‒ Clean the components of the appliance with hot
soapy water and a dish cloth.
‒ Dry with a soft cloth.
12.3 Cleaning the cooking compartment
ATTENTION!
Incorrect cleaning may damage the cooking compart-
ment.
▶ Do not use oven spray, abrasive materials or other
aggressive oven cleaners.
1.
Read the information on cleaning products.
→Page14
2.
Clean with hot soapy water or a vinegar solution.
3.
Use oven cleaner to remove very heavy soiling.
Only use oven cleaner when the cooking compart-
ment is cold.
Tip:To eliminate unpleasant odours, heat up a cup
of water with a few drops of lemon juice for 1 to
2minutes at maximum microwave power setting. Al-
ways place a spoon in the container to prevent
delayed boiling.
4.
Wipe out the cooking compartment with a soft cloth.
5.
Leave the cooking compartment to dry with the door
open.
Cleaning the turntable
1.
Read the information on cleaning products.
→Page14
2.
Remove the turntable.
3.
Clean the turntable with hot soapy water and a soft
dish cloth.
4.
Dry with a soft cloth.
5.
Reinsert the turntable.
Ensure that the turntable engages correctly.
12.4 Cleaning the front of the appliance
ATTENTION!
Incorrect cleaning may damage the front of the appli-
ance.
▶ Do not use glass cleaner, metal scrapers or glass
scrapers for cleaning.
▶ To prevent corrosion on stainless steel fronts, re-
move any limescale, grease, starch and albumin
(e.g. egg white) stains immediately.
▶ On stainless steel surfaces, use special stainless
steel cleaning products suitable for hot surfaces.
1.
Read the information on cleaning products.
→Page14
2.
Clean the front of the appliance using hot soapy wa-
ter and a dish cloth.
Note:Slight differences in colour on the front of the
appliance are caused by the use of different materi-
als, such as glass, plastic and metal.
3.
For stainless steel appliance fronts, apply a thin
layer of the stainless steel cleaning product with a
soft cloth.
You can obtain the stainless steel cleaning products
from the after-sales service or the online shop.
4.
Dry with a soft cloth.
Troubleshooting en
15
12.5 Cleaning the control panel
ATTENTION!
Incorrect cleaning may damage the control panel.
▶ Never wipe the control panel with a wet cloth.
1.
Read the information on cleaning products.
→Page14
2.
Clean the control panel using a microfibre cloth or a
soft, damp cloth.
3.
Dry with a soft cloth.
12.6 Cleaning the accessories
1.
Read the information on cleaning products.
→Page14
2.
Soften baked-on food remnants with a damp dish
cloth and hot soapy water.
3.
Clean the accessory with hot soapy water and a soft
dish cloth or a scrubbing brush.
4.
Clean the wire rack with stainless steel cleaner or in
the dishwasher.
Use steel wool or oven cleaner to remove very
heavy soiling.
5.
Dry with a soft cloth.
12.7 Cleaning the door panels
ATTENTION!
Incorrect cleaning may damage the door panes.
▶ Do not use a glass scraper.
1.
Read the information on cleaning products.
→Page14
2.
Clean the door panels with a soft dish cloth and
glass cleaner.
Note:Shadows on the door panels, which look like
streaks, are caused by reflections made by the in-
terior lighting.
3.
Dry with a soft cloth.
12.8 Cleaning aid
The cleaning aid is a quick alternative for occasionally
cleaning the cooking compartment. The cleaning aid
softens dirt by vaporising the soapy water. The dirt can
then be removed more easily.
Setting the cleaning function
1.
Add a few drops of washing-up liquid to a cup of
water.
2.
Place a spoon in the cup to prevent delayed boiling.
3.
Place the cup in the centre of the cooking compart-
ment.
4.
Set the microwave power setting to 600W.
5.
Set the cooking time to 3minutes.
6.
Start the microwave.
7.
Once the duration has elapsed, keep the door
closed for a further threeminutes.
8.
Wipe out the cooking compartment with a soft cloth.
9.
Leave the cooking compartment to dry with the door
open.
13 Troubleshooting
You can rectify minor faults on your appliance yourself.
Read the troubleshooting information before contacting
after-sales service. This will avoid unnecessary costs.
WARNING‒Risk of injury!
Improper repairs are dangerous.
▶ Repairs to the appliance should only be carried out
by trained specialist staff.
▶ If the appliance is defective, call Customer Service.
13.1 Malfunctions
Fault Cause and troubleshooting
The appliance is not
working.
The mains plug of the power cord is not plugged in.
▶
Connect the appliance to the power supply.
The circuit breaker in the fuse box has tripped.
▶
Check the circuit breaker in the fuse box.
There has been a power cut.
▶
Check whether the lighting in your kitchen or other appliances are working.
Malfunction
1.
Switch off the fuse in the fuse box.
2.
Switch the fuse back on after approx. 10seconds.
a If the fault was a one-off, the message disappears.
3.
If the message appears again, call the after-sales service. Please specify the exact error
message when calling.
→"Customer Service", Page16
en Disposal
16
Fault Cause and troubleshooting
The appliance is not
working.
Door is not fully closed.
▶
Check whether food remains or foreign material are trapped in the door.
Food takes longer
than usual to heat up.
The microwave power setting is set too low.
▶
Set a higher microwave power setting. →Page10
You have placed a larger amount of food than normal in the appliance.
▶
Set a longer cooking time.
You need double the time when you have double the amount.
The food is colder than usual.
▶
Turn or stir the food from time to time during cooking.
Turntable grates or
grinds.
There is dirt or foreign objects in the area of the turntable drive.
▶
Clean the roller ring and recess in the cooking compartment.
Microwave mode is
cancelled.
Appliance has a fault.
▶
If this fault recurs, call the after-sales service.
The appliance is not
in operation. A cook-
ing time is shown in
the display.
The settings area has been activated accidentally.
▶
Press .
was not pressed after the setting was implemented.
▶
Press or delete the setting by pressing .
Three zeros flash on
the display.
There has been a power cut.
▶
Reset the time.
→"Initial configuration", Page8
An is shown on the
display.
Demo mode is activated.
▶
Deactivate demo mode.
→"Basic settings", Page13
The message ap-
pears on the display.
Fault in the automatic door opening system.
1.
Switch off the appliance.
2.
Wait for 10minutes.
3.
Switch the appliance on again.
▶
If this fault recurs, call the after-sales service.
14 Disposal
14.1 Disposing of old appliance
Valuable raw materials can be reused by recycling.
▶
Dispose of the appliance in an environmentally
friendly manner.
Information about current disposal methods are
available from your specialist dealer or local author-
ity.
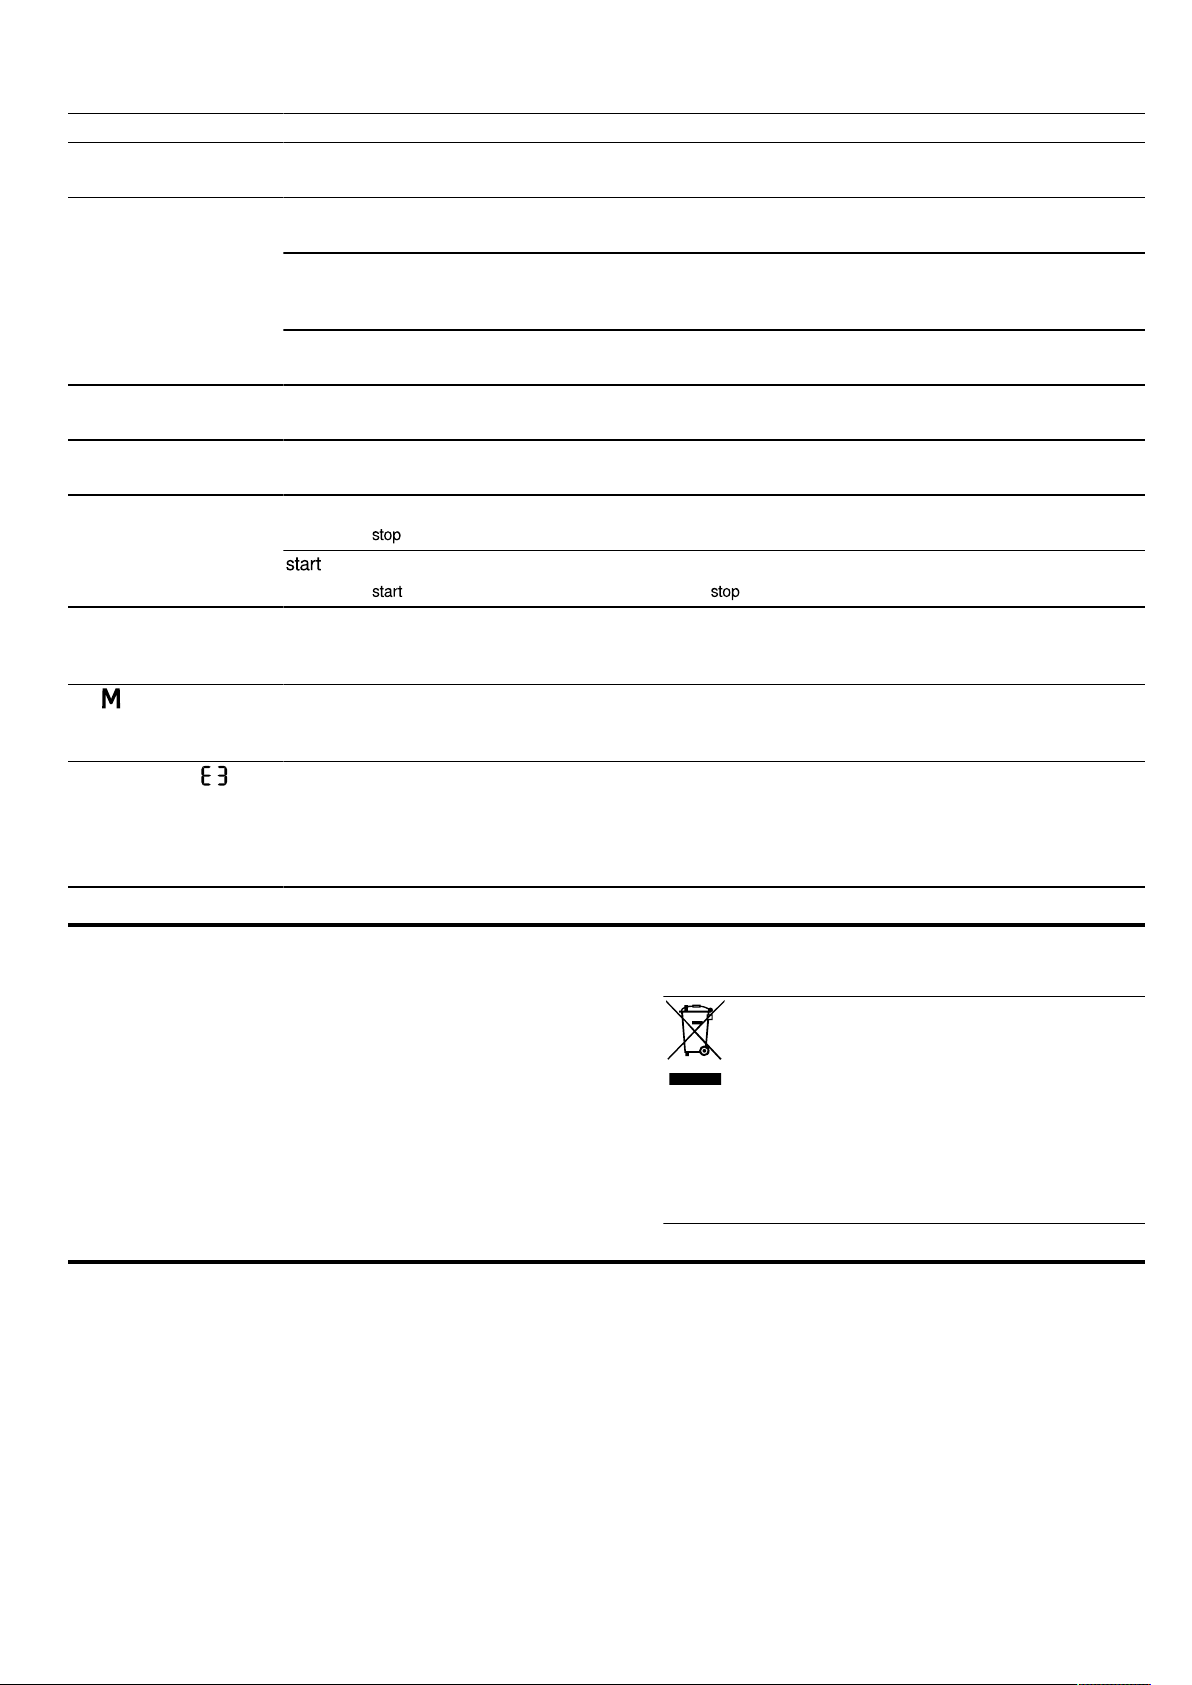
This appliance is labelled in accord-
ance with European Directive
2012/19/EU concerning used elec-
trical and electronic appliances
(waste electrical and electronic equip-
ment - WEEE).
The guideline determines the frame-
work for the return and recycling of
used appliances as applicable
throughout the EU.
15 Customer Service
Detailed information on the warranty period and terms
of warranty in your country is available from our after-
sales service, your retailer or on our website.
If you contact Customer Service, you will require the
product number (E-Nr.) and the production number
(FD) of your appliance.
The contact details for Customer Service can be found
in the enclosed Customer Service directory or on our
website.
This product contains light sources from energy effi-
ciency class G. These light sources are available as a
spare part and should only be replaced by trained spe-
cialist staff.
How it works en
17
15.1 Product number (E-Nr.) and production
number (FD)
You can find the product number (E-Nr.) and the pro-
duction number (FD) on the appliance's rating plate.
You will see the rating plate with these numbers if you
open the appliance door.
Make a note of your appliance's details and the Cus-
tomer Service telephone number to find them again
quickly.
16 How it works
Here, you can find the ideal settings for various dishes
as well as the best accessories and cookware. We
have tailored these recommendations to your appli-
ance.
16.1 What is the best way to proceed?
In this section, you will find out the best way to proceed
step-by-step in order to be able to make optimum use
of the recommended settings. You will get information
on many meals, with details and tips on how to best
use and set your appliance.
WARNING‒Risk of burns!
Heated food gives off heat. The cookware may become
hot.
▶ Always use oven gloves to remove cookware or ac-
cessories from the cooking compartment.
Note:The times given in the tables are guidelines and
depend on the quality, temperature and consistency of
the food.
1.
Before using the appliance, remove all unnecessary
cookware from the cooking compartment.
2.
Select a type of food from the recommended set-
tings.
3.
Add the food to a suitable tableware.
→"Microwave-safe cookware and accessories",
Page9
4.
Always place the cookware on the turntable.
5.
Set the appliance according to the recommended
settings.
Time ranges are often specified in the recommen-
ded settings. Set the shorter cooking time first. If ne-
cessary, increase the cooking time. If two mi-
crowave power settings and times are specified in
the tables, set the first microwave power setting and
cooking time first and, after the signal, set the
second.
Tip:If you want to cook quantities that deviate from
those specified in the tables, set approximately double
the time for double the amount.
16.2 Tips for defrosting and heating
Follow these tips for good results when defrosting and
heating.
Issue Tip
The food should be de-
frosted, hot or cooked
once the time has
elapsed.
Set a longer cooking
time. Larger quantities
and food which is piled
high require longer times.
Issue Tip
Once the time has
elapsed, the food should
not be overheated at the
edge and cooked in the
middle.
¡ Stir the food occasion-
ally.
¡ Set a lower microwave
power setting and a
longer cooking time.
After defrosting, poultry or
meat should not be de-
frosted on the outside
only but still frozen in the
middle.
¡ Set a lower microwave
power setting.
¡ If you are defrosting a
large quantity, turn it
several times.
The food should not be
too dry.
¡ Set a lower microwave
power setting.
¡ Set a shorter cooking
time.
¡ Cover the food.
¡ Add more liquid.
16.3 Defrosting
With your appliance you can defrost frozen food.
Defrosting food
1.
Place the frozen food in an open container on the
turntable.
Delicate parts, such as the legs and wings of
chicken or fatty outer layers of roasts, can be
covered with small pieces of aluminium foil. The foil
must not touch the sides of the cooking compart-
ment.
2.
Start the operation.
You can remove the foil halfway through the defrost-
ing time.
3.
Note:Liquid is produced when you defrost meat
and poultry.
Drain off any liquid when turning and under no cir-
cumstances use it for other purposes or allow it to
come into contact with other foods.
4.
Redistribute the food or turn it once or twice as it
defrosts.
Turn large pieces of food several times.
5.
To even out the temperature, leave the defrosted
food to stand at room temperature for approx. 10–
20 minutes.
You can remove the giblets from poultry at this
point. You can continue to cook the meat even if a
small section of it is still frozen in the centre.

en How it works
18
Defrosting with the microwave
Observe the recommended settings for using the microwave to defrost frozen food.
Food Weight ing Microwave power
setting inW
Cooking time inmins
Whole pieces of beef, veal or pork (on the
bone or boned)
800 1. 180
2. 90
1. 15
2. 10–20
Whole pieces of beef, veal or pork (on the
bone or boned)
1000 1. 180
2. 90
1. 20
2. 15–25
Whole pieces of beef, veal or pork (on the
bone or boned)
1500 1. 180
2. 90
1. 30
2. 20–30
Meat in pieces or slices of beef, veal or pork 200 1. 180
2. 90
1. 2
1
2. 4–6
Meat in pieces or slices of beef, veal or pork 500 1. 180
2. 90
1. 5
1
2. 5–10
Meat in pieces or slices of beef, veal or pork 800 1. 180
2. 90
1. 8
1
2. 10–15
Minced meat, mixed
2, 3
200 90 10
4
Minced meat, mixed
2, 3
500 1. 180
2. 90
1. 5
4
2. 10–15
Minced meat, mixed
2, 3
800 1. 180
2. 90
1. 8
4
2. 10–20
Poultry or poultry portions
5
600 1. 180
2. 90
1. 8
2. 10–20
Poultry or poultry portions
5
1200 1. 180
2. 90
1. 15
2. 10–20
Fish fillet, fish steak or fish slices
5
400 1. 180
2. 90
1. 5
2. 10–15
Vegetables, e.g. peas 300 180 10–15
Fruit, e.g. raspberries
5
300 180 7–10
6
Fruit, e.g. raspberries
5
500 1. 180
2. 90
1. 8
6
2. 5–10
Butter, defrosting
7
125 1. 180
2. 90
1. 1
2. 2–3
Butter, defrosting
7
250 1. 180
2. 90
1. 1
2. 3–4
Loaf of bread 500 1. 180
2. 90
1. 6
2. 5–10
Loaf of bread 1000 1. 180
2. 90
1. 12
2. 10–20
Cakes, plain, e.g. sponge cake
8, 9
500 90 10–15
Cakes, plain, e.g. sponge cake
8, 9
750 1. 180
2. 90
1. 5
2. 10–15
Cakes, moist, e.g. fruit flan, cheesecake
8
500 1. 180
2. 90
1. 5
2. 15–20
Cakes, moist, e.g. fruit flan, cheesecake
8
750 1. 180
2. 90
1. 7
2. 15–20
1
Separate any defrosted parts when turning.
2
Freeze the food flat.
3
Remove any meat that has already defrosted.
4
Turn the food several times.
5
Separate any defrosted parts.
6
Carefully stir the food occasionally.
7
Remove all packaging.
8
Only defrost cakes without icing, whipped cream, gelatine or custard.
9
Separate the pieces of cake.
How it works en
19
16.4 Heating
With your appliance you can heat food.
Heating food
WARNING‒Risk of burns!
Heated food gives off heat. The cookware may become
hot.
▶ Always use oven gloves to remove cookware or ac-
cessories from the cooking compartment.
WARNING‒Risk of scalding!
There is a possibility of delayed boiling when a liquid is
heated. This means that the liquid reaches the boiling
temperature without the usual steam bubbles rising to
the surface. Exercise caution even when only gently
shaking the container. The hot liquid may suddenly boil
over and splatter.
▶ Always place a spoon in the container when heating
liquids. This prevents delayed boiling.
ATTENTION!
Metal touching the wall of the cooking compartment
will cause sparks, which may damage the appliance or
the inner door pane.
▶ Metal (e.g. a spoon in a glass) must be kept at least
2cm from the cooking compartment walls and the
inside of the door.
1.
Take ready meals out of the packaging and place in
microwave-safe cookware.
2.
Distribute the food flat in the cookware.
3.
Cover the food with a suitable lid, a plate or special
microwave foil.
4.
Start the operation.
5.
Turn or stir the food several times during cooking.
The speed at which different components of the
meal heat up may vary.
6.
Check the temperature.
7.
To even out the temperature, leave the heated food
to stand at room temperature for approx. 2–5
minutes.
Heating frozen food in the microwave
Observe the recommended settings for using the microwave to heat frozen food.
Food Weight ing Microwave power
setting inW
Cooking time inmins
Set menu, plated meal, ready meal with 2–3
components
300–400 600 8–11
Soup 400 600 8–10
Stew 500 600 10–13
Slices or pieces of meat in sauce, e.g.
goulash
500 600 12–17
1
Bakes, e.g. lasagne, cannelloni 450 600 10–15
Side dishes, e.g. rice, pasta
2
250 600 2–5
Side dishes, e.g. rice, pasta
2
500 600 8–10
Vegetables, e.g. peas, broccoli, carrots
3
300 600 8–10
Vegetables, e.g. peas, broccoli, carrots
3
600 600 14–17
Creamed spinach
4
450 600 11–16
1
Separate the pieces of meat when stirring.
2
Add a little liquid to the food.
3
Pour water into the dish so that it covers the base.
4
Cook the food without any additional water.

en How it works
20
Heating in the microwave
Observe the recommended settings for using the microwave to heat food.
Food Amount Microwave power
setting inW
Cooking time inmins
Beverages
1
200ml 800 2–3
2, 3
Beverages
1
500ml 800 3–4
2, 3
Baby food, e.g. baby bottles
4
50ml 360 Approx. 0.5
5, 6
Baby food, e.g. baby bottles
4
100ml 360 Approx. 1
5, 6
Baby food, e.g. baby bottles
4
200ml 360 1.5
5, 6
Soup, 1 cup 200g 600 2–3
Soup, 2 cups 400g 600 4–5
Set menu, plated meal, ready meal with 2–3
components
350–500g 600 4–8
Meat in sauce
7
500g 600 8–11
Stew 400g 600 6–8
Stew 800g 600 8–11
Vegetables, 1 portion
8
150g 600 2–3
Vegetables, 2 portions
8
300 g 600 3–5
1
Place a spoon in the glass.
2
Do not overheat alcoholic drinks.
3
Check the food occasionally.
4
Heat up baby food without the teat or lid.
5
Always shake the food well after heating.
6
Always check the temperature.
7
Separate the slices of meat.
8
Add a little liquid to the food.
16.5 Cooking
With your appliance you can cook food.
Cooking food
WARNING‒Risk of burns!
Heated food gives off heat. The cookware may become
hot.
▶ Always use oven gloves to remove cookware or ac-
cessories from the cooking compartment.
1.
Check whether the cookware fits in the cooking
compartment and that the turntable can turn freely.
– For roasting, use a deep dish.
– For bakes or gratins, use large, flat cookware.
2.
Distribute the food flat in the cookware.
3.
When cooking with the microwave, cover the food
with a suitable lid, a plate or special microwave foil.
‒ Do not cover the food when grilling.
‒ Do not cover the food when combining the mi-
crowave and grill.
4.
Always place the cookware on the turntable.
‒ Always place the wire rack on the turntable when
grilling. Do not preheat.
5.
Start the operation.
6.
To even out the temperature, leave the heated food
to stand at room temperature for approx. 2–5
minutes.
‒ Leave the meat to sit for 5–10minutes before
cutting it.
‒ Leave bakes and gratins to stand for five minutes
in the appliance while it is switched off.
Tip:Always use wooden skewers for fish skewers or
vegetable skewers.
Cooking with the microwave
Food Amount Accessories Mi-
crowave
power
setting
inW
Type of
heating
Cooking
time
inmins
Information
Whole chicken, fresh,
without giblets
1200g Cookware with
lid
600 - 25–30 Turn halfway through the
cooking time.
1
Carefully stir the food occasionally.

How it works en
21
Food Amount Accessories Mi-
crowave
power
setting
inW
Type of
heating
Cooking
time
inmins
Information
Chicken pieces, e.g.
chicken quarters
800g Cookware
without lid
+
Wire rack
360 30–40 Place with the skin side up.
Do not turn the food.
Chicken wings, mar-
inated and frozen
800g Cookware
without lid
+
Wire rack
360 15–25 Do not turn the food.
Pork without rind, e.g.
neck
750g Cookware
without lid
360 40–50 Turn the food once or
twice.
Bacon rashers Ap-
prox.8ra
shers
Wire rack 180 10–15 -
Meat loaf 750g Cookware
without lid
1. 600
2. 360
1. -
2.
1. 20–25
2. 25–35
Cook the food uncovered.
The maximum thickness of
the food is 6cm.
Fish, e.g.fillet pieces 400g Cookware
without lid
600 - 10–15 Add a little water, lemon
juice or wine to the food.
Fish fillet, gratinated 400g Cookware
without lid
360 10–15 Defrost frozen fish before
cooking.
Fish skewers 4–
5pieces
Wire rack 180 10–15 Use wooden skewers.
Bake, sweet,
e.g.quark bake with
fruit
1000g Cookware
without lid
360 30–35 The maximum thickness of
the food is 5cm.
Bake, savoury from
raw ingredients,
e.g.pasta bake
1000g Cookware
without lid
360 30–35 Sprinkle cheese over the
food. The maximum thick-
ness of the food is 5cm.
Bake, savoury, made
from cooked ingredi-
ents, e.g.potato
gratin
1000g Cookware
without lid
360 30–40 The maximum thickness of
the food is 4cm.
Soups, gratinated,
e.g.onion soup
2–4cups Cookware
without lid
- 15–20 -
Vegetables, fresh 250g Cookware with
lid
600 - 5–10
1
Cut the ingredients into
equal-sized pieces. Add 1
to 2tbsp water for every
100g. Stir the food occa-
sionally.
Vegetables, fresh 500g Cookware with
lid
600 - 10–15
1
-
Vegetable skewers 4–
5pieces
Wire rack 180 15–20 Use wooden skewers.
Potatoes 250g Cookware with
lid
600 - 8–10
1
Cut the ingredients into
equal-sized pieces. Add 1
to 2tbsp water for every
100g. Stir the food occa-
sionally.
Potatoes 500g Cookware with
lid
600 - 11–14
1
Cut the ingredients into
equal-sized pieces. Add 1
to 2tbsp water for every
100g. Stir the food occa-
sionally.
1
Carefully stir the food occasionally.
en How it works
22
Food Amount Accessories Mi-
crowave
power
setting
inW
Type of
heating
Cooking
time
inmins
Information
Potatoes 750g Cookware with
lid
600 - 15–22
1
Cut the ingredients into
equal-sized pieces. Add 1
to 2tbsp water for every
100g. Stir the food occa-
sionally.
Rice 125g Cookware with
lid
1.
900
2. 180
1. -
2. -
1. 5–7
2. 12–15
Add double the amount of
liquid.
Rice 250g Cookware with
lid
1.
900
2. 180
1. -
2. -
1. 6–8
2. 15–18
Add double the amount of
liquid.
Toasting bread 2–
4slices
Wire rack - 1st side:
2–4
2nd side:
2–4
-
Grilling bread 2–
6slices
Wire rack - 7–10 The cooking time varies de-
pending on the topping.
Fruit, compote 500g Cookware with
lid
600 - 9–12 -
Sweet food, e.g.pud-
ding, instant
500ml Cookware with
lid
600 - 6–8 Stir the pudding two to
three times using the
whisk.
1
Carefully stir the food occasionally.
16.6 Test dishes
These overviews have been produced for test institutes to facilitate appliance testing in accordance with EN
60350-1:2013 or IEC 60350-1:2011 and EN 60705:2012, IEC 60705:2010.
Cooking with the microwave
Food Microwave power
setting inW
Cooking time inmins Note:
Custard, 750g 1. 360
2. 90
1. 12–17
2. 20–25
Place the Pyrex dish 20x25cm
on the turntable.
Biscuit 600 8–10 Place a 22cm diameter Pyrex
dish on the turntable.
Meat loaf 600 20–25 Place a Pyrex dish on the
turntable.
Defrosting with the microwave
Recommended settings for using the microwave to defrost food.
Food Microwave power
setting inW
Cooking time inmins Note:
Meat 1. 180
2. 90
1. 5–7
2. 10–15
Place the Pyrex dish (22cm dia-
meter) on the turntable.
Installation instructions en
23
Cooking in combination with a microwave
Food Microwave
power setting
inW
Type of heating Cooking time
inmins
Note:
Potato gratin 360 35–40 Place a 22cm diameter Pyrex
dish on the turntable.
17 Installation instructions
Observe this information when installing the appliance.
17.1 Safe installation
Follow these safety instructions when in-
stalling the appliance.
¡ The appliance can only be used safely if it
is correctly installed according to the safety
instructions. The installer is responsible for
ensuring that the appliance works perfectly
at its installation location.
¡ Check the appliance for damage after un-
packing it. Do not connect the appliance if
it has been damaged in transit.
¡ Before starting up the appliance, remove
any packaging material and adhesive film
from the cooking compartment and the
door.
¡ Never remove the transparent film on the
inside of the door.
¡ Proceed in accordance with the installation
sheets for installing accessories.
¡ Fitted units must be temperature-resistant
up to 90°C, and adjacent unit fronts up to
65°C.
¡ Do not install the appliance behind a decor-
ative door or the door of a kitchen unit.
There is a risk of overheating.
¡ Cut-out work on the units should be carried
out before installing the appliance. Remove
any shavings. Otherwise, the correct opera-
tion of electrical components may be ad-
versely affected.
¡ Only a licensed professional may connect
appliances without plugs. Damage caused
by incorrect connection is not covered un-
der the warranty.
WARNING‒Risk of injury!
Parts that are accessible during installation
may have sharp edges and may lead to cut-
ting injuries.
▶ Wear protective gloves
WARNING‒Risk of fire!
It is dangerous to use an extended power
cord and non-approved adapters.
▶ Do not use extension cables or multiple
socket strips.
17.2 Electrical connection
In order to safely connect the appliance electrically, fol-
low these instructions.
WARNING‒Risk of electric shock!
Incorrect installation is dangerous.
▶ Only a qualified electrician may route the socket or
replace a power cable while taking into considera-
tion the applicable regulations.
▶ Connect the appliance only to a correctly installed,
earthed socket.
▶ If the plug is no longer accessible following installa-
tion, an all-pole isolating unit with a contact clear-
ance of at least 3mm must be available on the in-
stallation side. Contact protection must be ensured
by the installation.
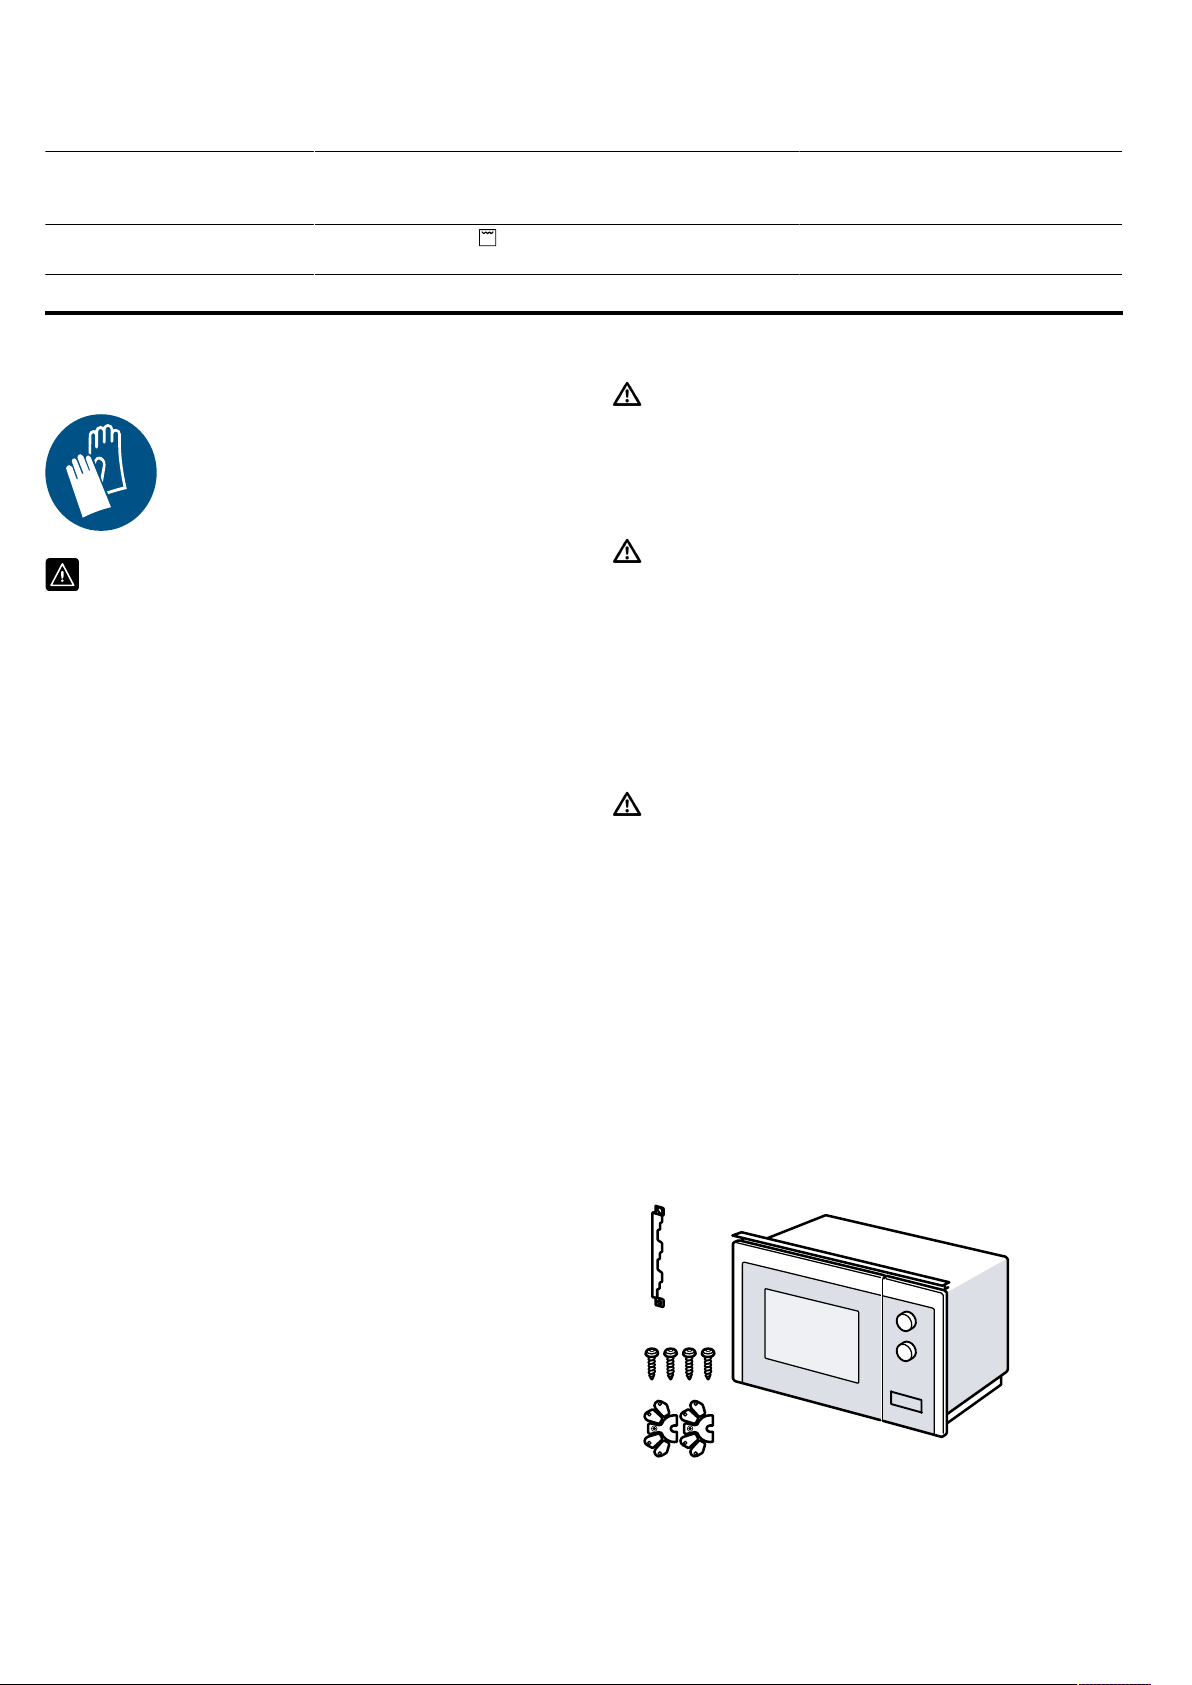
17.3 Scope of delivery
After unpacking all parts, check for any damage in
transit and completeness of the delivery.
en Installation instructions
24
17.4 Fitted units
Here, you can find notes on safe installation.
ATTENTION!
Any shavings may impair the function of electrical com-
ponents.
▶ Carry out cut-out work on the units before installing
the appliance.
▶ Remove the shavings.
¡ The minimum installation height is 850mm.
¡ The installation cabinet must not have a back panel
behind the appliance.
¡ The ventilation slots and intake openings must not
be covered.
¡ Fitted units must be heat-resistant up to 90°C, and
adjacent unit fronts up to 65°C.
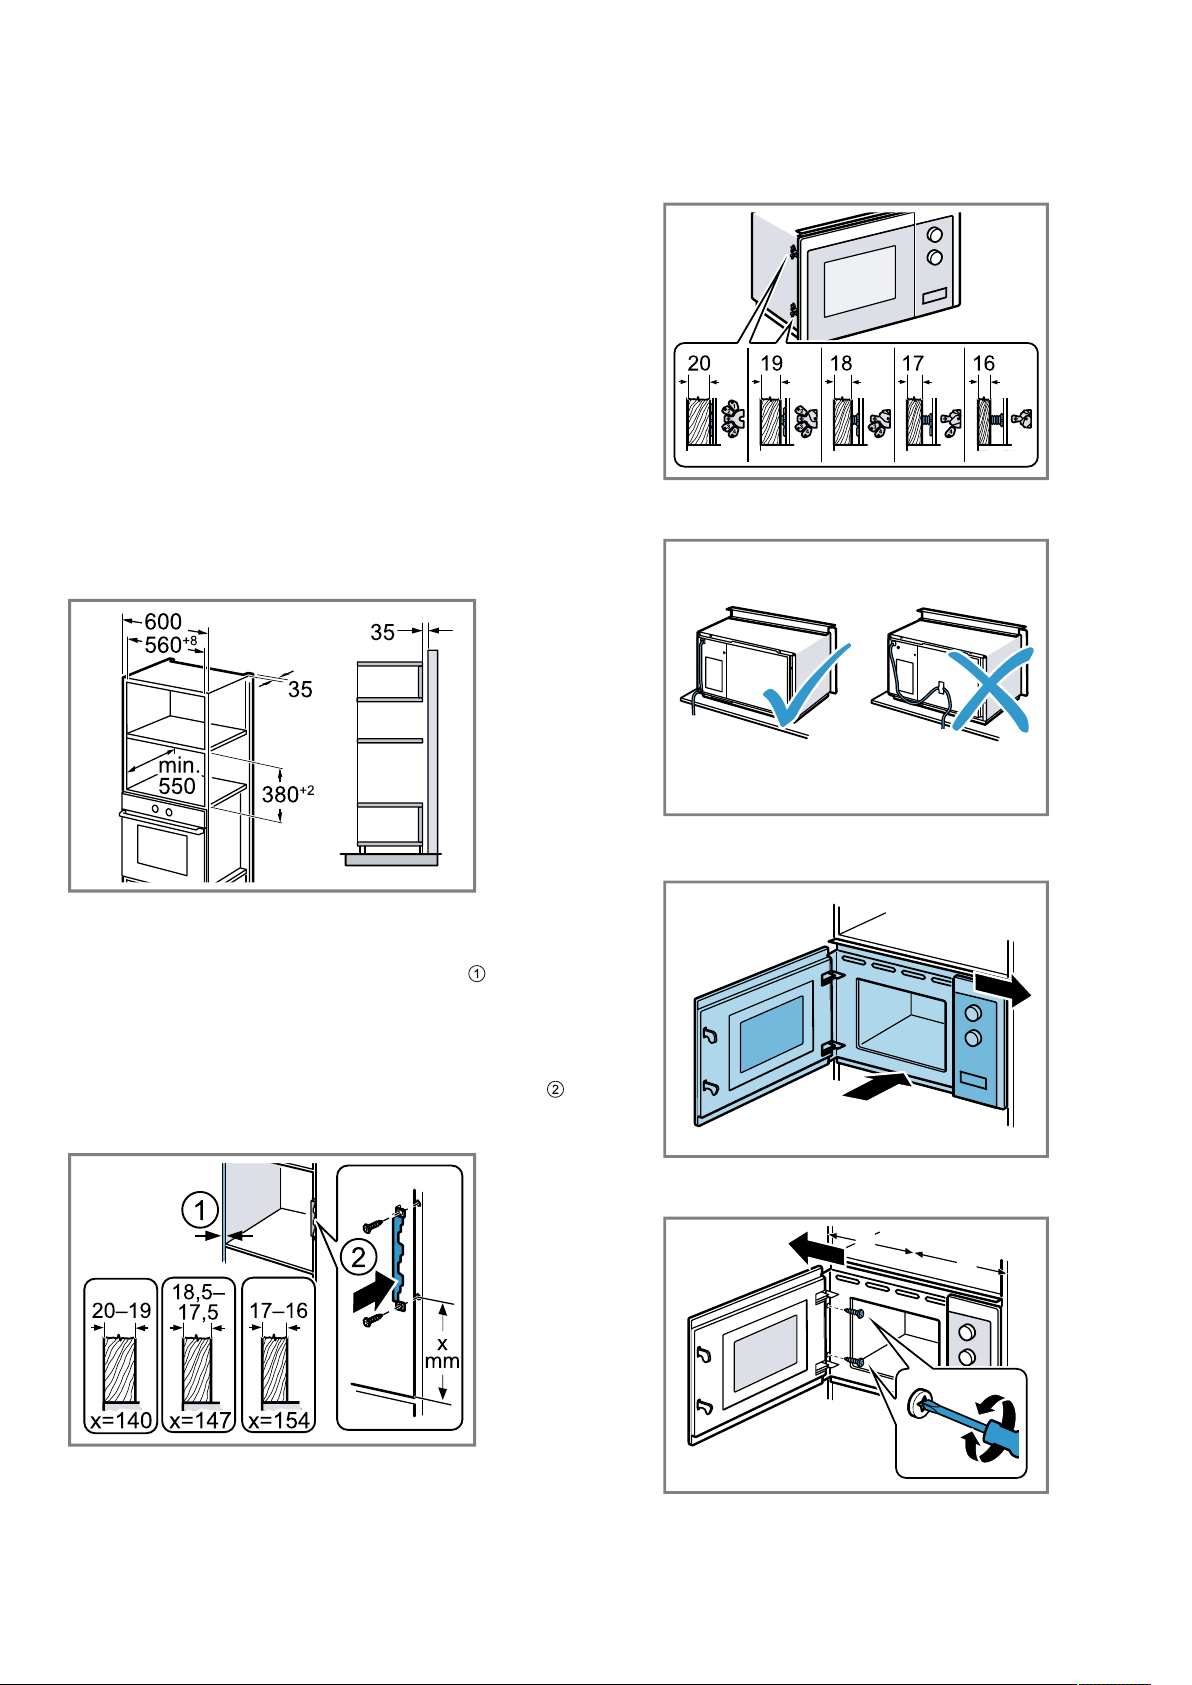
17.5 Installation dimensions in the tall unit
Observe the installation dimensions and the safety
clearances in a tall unit.
17.6 Preparing the tall unit
1.
Determine the wall thickness of the unit.
An x-value is assigned to the wall thickness.
2.
Note:The x-value corresponds to the clearance
between the lower hole on the connection plate and
the bottom of the fitted unit.
Screw the connection plate tightly to the tall unit.
When doing so, observe the x-value that was de-
termined.
17.7 Installing the appliance
1.
Secure the spacers to the appliance in accordance
with the wall thickness.
2.
Note:
Do not trap or kink the power cable.
Insert the appliance into the unit and move it to the
right.
3.
Screw the appliance in until the appliance is cent-
rally aligned.
=
=
Installation instructions en
25
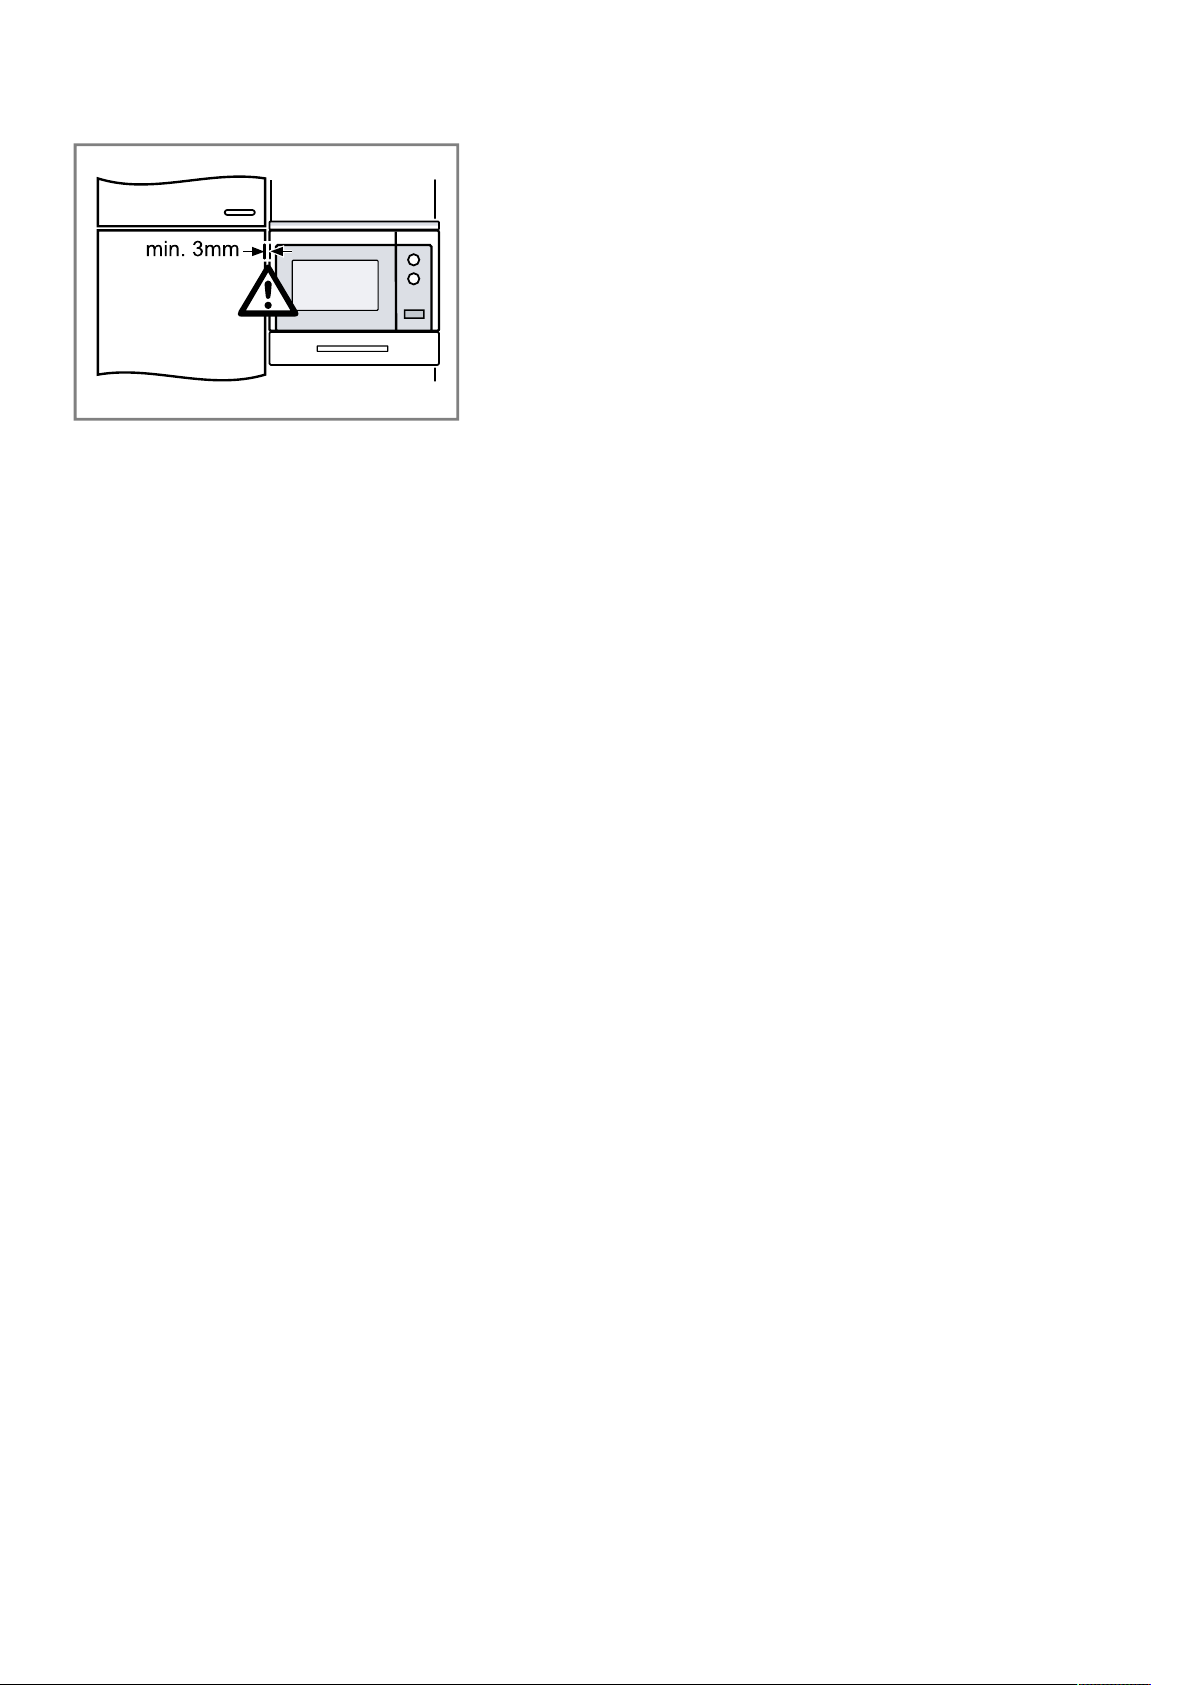
4.
Check the clearance to the adjacent appliances.
The clearance to the adjacent appliances must be
at least 3mm.
5.
Remove any packaging material and adhesive film
from the cooking compartment and the door.

th ความปลอดภัย
26
สารบัญ
คู่มือการใช้งาน
1 ความปลอดภัย ........................................................26
2 การหลีกเลี่ยงความเสียหายที่อาจเกิดขึ้น.....................29
3 การรักษาสิ่งแวดล้อมและการประหยัด .......................29
4 มาทำความรู้จักเกี่ยวกับอุปกรณ์กัน.............................30
5 อุปกรณ์เสริม...........................................................31
6 ก่อนการใช้งานเป็นครั้งแรก ......................................31
7 การใช้งานทั่วไป ......................................................32
8 โหมดปิ้งย่าง ...........................................................33
9 หน่วยความจำ.........................................................34
10 โปรแกรม ...............................................................34
11 การตั้งค่าเบื้องต้น....................................................36
12 การทำความสะอาดและการดูแลรักษา .......................36
13 การแก้ไขข้อขัดข้อง .................................................38
14 การกำจัด...............................................................39
15 ฝ่ายบริการลูกค้า.....................................................39
16 วิธีการทำงาน .........................................................40
17 คู่มือการติดตั้ง.........................................................45
17.1 การติดตั้งอย่างปลอดภัย........................................
...45
1 ความปลอดภัย
โปรดปฏิบัติตามคำแนะนำด้านความปลอดภัยต่อไปนี้
1.1 หมายเหตุทั่วไป
¡ โปรดอ่านคู่มือฉบับนี้อย่างละเอียด
¡ โปรดเก็บรักษาคู่มือและข้อมูลผลิตภัณฑ์สำหรับ
การใช้งานในภายหลังหรือผู้ใช้งานคนถัดไปไว้ให้
ดี
¡ ห้ามเชื่อมต่อเครื่องหากเกิดความเสียหายระหว่าง
การขนส่ง
1.2 การใช้งานที่ตรงตามวัตถุประสงค์
การเชื่อมต่ออุปกรณ์โดยไม่ใช้ปลั๊กไฟจะต้องดำเนิน
การโดยช่างเทคนิคที่ได้รับใบอนุญาตเท่านั้น การรับ
ประกันจะไม่ครอบคลุมหากเกิดความเสียหายจากการ
เชื่อมต่อผิดวิธี
อุปกรณ์จะสามารถใช้งานได้อย่างปลอดภัยต่อเมื่อ
ดำเนินการติดตั้งอย่างเหมาะสมตามคู่มือการประกอบ
ผู้ติดตั้งมีหน้าที่รับผิดชอบให้อุปกรณ์ทำงานได้อย่างมี
ประสิทธิภาพ ณ สถานที่ติดตั้ง
โปรดใช้งานเครื่องเฉพาะในกรณีต่อไปนี้:
¡ เพื่อเตรียมอาหารและเครื่องดื่ม
¡ อยู่ภายใต้การควบคุมดูแล คอยสังเกตกระบวนการ
ปรุงที่เกิดขึ้นเป็นช่วงระยะเวลาสั้นๆ อย่างต่อเนื่อง
¡ สำหรับการใช้งานภายในบ้านหรือการใช้งานใน
ลักษณะใกล้เคียงกัน เช่น: ในห้องครัวสำหรับ
พนักงานประจำร้าน ในสำนักงานและพื้นที่เชิง
พาณิชย์อื่นๆ ในเชิงการเกษตร สำหรับลูกค้าของ
โรงแรมและสถานที่พักอาศัยอื่นๆ ตลอดจนห้อง
รับรองที่มีบริการอาหารเช้า
¡ ที่ความสูงไม่เกิน 4000 ม. เหนือระดับน้ำทะเล
เครื่องนี้ตรงตามมาตรฐาน EN 55011 หรือ CISPR
11 เครื่องล้างจานเป็นผลิตภัณฑ์ของกลุ่ม 2 ประเภท
B กลุ่ม 2 หมายถึงไมโครเวฟที่ผลิตขึ้นเพื่ออุ่นอาหาร
ประเภท B ระบุว่าเครื่องนี้เหมาะสำหรับสภาพแวดล้อม
ภายในบ้าน
1.3 การจำกัดกลุ่มผู้ใช้
เด็กที่มีอายุ 8 ปีขึ้นไปและบุคคลที่ด้อยความสามารถ
ทางร่างกาย ประสาทสัมผัส หรือทางจิต และ/หรือผู้
ขาดประสบการณ์และความรู้สามารถใช้งานเครื่องนี้
ได้ ถ้ามีผู้คอยระวังดูแลหรือได้รับการชี้แจงวิธีใช้งาน
ได้อย่างปลอดภัย และเข้าใจถึงอันตรายที่จะเกิดขึ้น
ได้
ไม่อนุญาตให้เด็กเล่นกับอุปกรณ์เครื่องนี้
ห้ามเด็กทำความสะอาดและทำการบำรุงรักษาทั่วไป
เว้นแต่ว่าเป็นเด็กอายุ 15 ปีขึ้นไปและอยู่ภายใต้การ
ดูแล
ป้องกันเด็กอายุต่ำกว่า 8 ปี ให้อยู่ห่างจากเครื่องและ
สายไฟ
1.4 การใช้งานอย่างปลอดภัย
คำเตือน‒ระวังไฟไหม้!
สิ่งของซึ่งมีคุณสมบัติติดไฟที่วางอยู่ในช่องอบอาหาร
อาจเกิดการลุกไหม้ได้
▶ ห้ามจัดเก็บสิ่งของที่มีคุณสมบัติติดไฟไว้ในช่องอบ
อาหารโดยเด็ดขาด
▶ ในกรณีที่เกิดควันไฟ ให้ปิดใช้งานเครื่องหรือถอด
ปลั๊กออกและปิดฝาเครื่องไว้เพื่อดับเปลวไฟที่อาจ
เกิดการลุกไหม้
เศษอาหารที่หลงเหลืออยู่ คราบไขมัน หรือน้ำซอส
อาจเกิดการติดไฟได้
▶ ขจัดเศษสิ่งสกปรกออกจากช่องอบอาหาร ตัว
กำเนิดความร้อน และอุปกรณ์เสริมก่อนการใช้งาน
ความร้อนที่สูงเกินไปอาจก่อให้เกิดไฟไหม้ได้
▶ ห้ามติดตั้งเครื่องที่บริเวณด้านหลังบานประตู
ตกแต่งหรือประตูเฟอร์นิเจอร์ใดๆ โดยเด็ดขาด

ความปลอดภัย th
27
คำเตือน‒ระวังความร้อน!
เครื่องและชิ้นส่วนตัวเครื่องที่สัมผัสได้จะร้อนขึ้นใน
ระหว่างใช้งาน
▶ ควรใช้ความระมัดระวังเพื่อหลีกเลี่ยงการสัมผัสกับ
ตัวกำเนิดความร้อน
▶ เด็กอายุต่ำกว่า 8 ปีควรอยู่ห่างจากตัวเครื่อง
อุปกรณ์เสริมหรือภาชนะจะร้อนขึ้นมาก
▶ นำอุปกรณ์เสริมหรือภาชนะร้อนออกจากช่องอบ
อาหารโดยใช้ผ้าจับของร้อนเสมอ
แอลกอฮอล์ระเหยในช่องอบอาหารที่มีความร้อนอาจ
เกิดการติดไฟได้
▶ ควรใส่เครื่องดื่มที่มีระดับแอลกอฮอล์สูงลงใน
อาหารเป็นปริมาณเล็กน้อยเท่านั้น
▶ เปิดฝาเครื่องด้วยความระมัดระวัง
คำเตือน‒ระวังความร้อนลวก!
ชิ้นส่วนที่เข้าถึงได้จะร้อนขึ้นในระหว่างใช้งาน
▶ ห้ามสัมผัสชิ้นส่วนที่มีความร้อนโดยเด็ดขาด
▶ ระมัดระวังไม่ให้เด็กเข้าใกล้
การเปิดฝาเครื่องอาจทำให้มีไอน้ำร้อนออกมา ไอน้ำ
อาจไม่สามารถมองเห็นได้ ทั้งนี้ขึ้นอยู่กับอุณหภูมิ
▶ เปิดฝาเครื่องด้วยความระมัดระวัง
▶ ระมัดระวังไม่ให้เด็กเข้าใกล้
น้ำในช่องอบอาหารที่มีความร้อนอาจส่งผลให้เกิดไอ
น้ำร้อนได้
▶ ห้ามเทน้ำลงในช่องอบอาหารที่มีความร้อน
คำเตือน‒ระวังการบาดเจ็บ!
กระจกฝาเครื่องที่มีรอยขีดข่วนอาจแตกร้าวได้
▶ ห้ามใช้น้ำยาทำความสะอาดที่มีฤทธิ์กัดกร่อน
รุนแรงหรือที่ขูดโลหะมีคมในการทำความสะอาด
กระจกฝาเครื่อง เนื่องจากอาจทำให้พื้นผิวเกิดรอย
ขีดข่วน
บานพับฝาเครื่องจะขยับเมื่อเปิดและปิดฝาเครื่อง ซึ่ง
อาจทำให้คุณถูกหนีบได้
▶ ห้ามเอื้อมมือเข้าไปในบริเวณบานพับ
รอยร้าว เศษกระจก หรือรอยแตกหักบริเวณจานหมุน
ที่ทำจากแก้วอาจก่อให้เกิดอันตรายได้
▶ ห้ามไม่ให้จานหมุนกระแทกกับของแข็งโดยเด็ด
ขาด
▶ ดูแลรักษาจานหมุนด้วยความระมัดระวัง
คำเตือน‒ระวังไฟดูด!
ฉนวนหุ้มหรือสายไฟที่ชำรุดเสียหายเป็นอันตราย
▶ ห้ามให้สายไฟสัมผัสกับแหล่งกำเนิดความร้อนหรือ
ชิ้นส่วนเครื่องที่ร้อนเด็ดขาด
▶ ห้ามให้สายเคเบิลเชื่อมต่อแหล่งจ่ายไฟสัมผัสกับ
วัตถุที่มีปลายแหลมหรือขอบคม
▶ ห้ามหักงอ บีบอัด หรือเปลี่ยนสายเคเบิลเชื่อมต่อ
แหล่งจ่ายไฟ
คำเตือน‒ระวังการขาดอากาศหายใจ!
เด็กอาจจะดึงวัสดุหีบห่อมาสวมหัวหรือเอามาพันจน
ขาดอากาศหายใจได้
▶ ห้ามทิ้งวัสดุหีบห่อไว้ใกล้เด็ก
▶ ห้ามเด็กเล่นกับวัสดุหีบห่อ
เด็กอาจจะสูดหรือกลืนชิ้นส่วนขนาดเล็กเข้าไปจน
ขาดอากาศหายใจได้
▶ ห้ามทิ้งชิ้นส่วนขนาดเล็กไว้ใกล้เด็ก
▶ ห้ามเด็กเล่นกับชิ้นส่วนขนาดเล็ก
1.5 ไมโครเวฟ
โปรดอ่านคำแนะนำด้านความปลอดภัยที่สำคัญอย่าง
ละเอียดและจัดเก็บไว้สำหรับการใช้งานในภายหลัง
คำเตือน‒ระวังไฟไหม้!
การใช้งานที่ไม่เป็นไปตามข้อกำหนดของอุปกรณ์อาจ
เป็นอันตรายและก่อให้เกิดความเสียหายได้ เช่น
รองเท้าแตะ หมอนบุเม็ดโฟม หรือหมอนบุธัญพืชที่ถูก
นำมาอุ่นอาจเกิดการลุกไหม้ได้เช่นกันหลังจากเวลา
ผ่านไปเป็นชั่วโมง
▶ ห้ามใช้เครื่องในการอบแห้งอาหารหรือเสื้อผ้าโดย
เด็ดขาด
▶ ห้ามนำรองเท้าแตะ หมอนบุเม็ดโฟม หรือหมอนบุ
ธัญพืช รวมถึงฟองน้ำ ผ้าเช็ดทำความสะอาดที่
เปียกชื้น และวัสดุที่มีลักษณะคล้ายคลึงกันมาอุ่นใน
เครื่องโดยเด็ดขาด
▶ ใช้งานเครื่องเพื่อการประกอบอาหารและเครื่องดื่ม
เท่านั้น
วัตถุดิบและบรรจุภัณฑ์ รวมถึงภาชนะอาจเกิดการลุก
ไหม้ได้
▶ ห้ามอุ่นวัตถุดิบในบรรจุภัณฑ์เก็บรักษาความร้อน
โดยเด็ดขาด
▶ ห้ามอุ่นวัตถุดิบในภาชนะที่ทำจากพลาสติก
กระดาษ หรือวัสดุติดไฟอื่นๆ อย่างไร้การควบคุม
ดูแลโดยเด็ดขาด
▶ ห้ามปรับตั้งไมโครเวฟให้ใช้กำลังไฟสูงหรือนาน
เกินไป ใช้งานเครื่องตามข้อมูลที่ปรากฏในคู่มือ
การใช้งานฉบับนี้
▶ ห้ามใช้ไมโครเวฟในการอบแห้งวัตถุดิบโดยเด็ด
ขาด
▶ ห้ามละลายน้ำแข็งหรืออุ่นวัตถุดิบที่มีน้ำเป็นส่วน
ประกอบในปริมาณน้อย เช่น ขนมปัง ใน
ไมโครเวฟโดยใช้กำลังไฟสูงหรือนานเกินไป
น้ำมันประกอบอาหารอาจเกิดการลุกไหม้ได้
▶ ห้ามอุ่นร้อนน้ำมันประกอบอาหารเพียงอย่างเดียว
ในไมโครเวฟ
คำเตือน‒ระวังการระเบิด!
ของเหลวหรือวัตถุดิบอื่นๆ ในภาชนะที่ปิดล็อคแน่น
อาจเกิดการระเบิดได้ง่าย
▶ ห้ามอุ่นร้อนของเหลวหรือวัตถุดิบอื่นๆ ในภาชนะที่
ปิดล็อคแน่นโดยเด็ดขาด

th ความปลอดภัย
28
คำเตือน‒ระวังความร้อน!
วัตถุดิบที่มีเปลือกหรือผิวหุ้มแน่นอาจเกิดการระเบิด
แตกออกทั้งในระหว่างและหลังการอุ่น
▶ ห้ามใช้อุปกรณ์นี้ประกอบอาหารประเภทไข่ที่ยังอยู่
ในเปลือกหรืออุ่นไข่ต้มสุกที่ยังอยู่ในเปลือก
▶ ห้ามใช้อุปกรณ์นี้ประกอบอาหารประเภทหอยและ
สัตว์ที่มีเปลือกแข็ง
▶ สำหรับไข่ดาวหรือไข่ที่ใส่ในแก้ว ให้เจาะไข่แดง
ให้แตกก่อน
▶ สำหรับวัตถุดิบที่มีเปลือกหรือผิวหุ้มแน่น เช่น แอ
ปเปิ้ล มะเขือเทศ มันฝรั่ง หรือไส้กรอก เปลือกหุ้ม
อาจแตกออกได้ ให้เจาะเปลือกหรือผิวหุ้มก่อนนำ
ไปอุ่น
ความร้อนในอาหารเด็กทารกไม่สามารถกระจายตัว
ได้อย่างทั่วถึง
▶ ห้ามอุ่นอาหารเด็กทารกในภาชนะที่ปิดล็อคโดย
เด็ดขาด
▶ นำฝาปิดหรือจุกป้อนอาหารออกทุกครั้ง
▶ คนหรือเขย่าอาหารให้เข้ากันหลังจากการอุ่น
▶ ตรวจสอบอุณหภูมิก่อนนำอาหารให้เด็กรับประทาน
อาหารที่ผ่านการอุ่นร้อนจะคายความร้อนออกมา
ภาชนะจึงอาจร้อนขึ้น
▶ นำภาชนะหรืออุปกรณ์เสริมออกจากช่องอบอาหาร
โดยใช้ผ้าจับของร้อนเสมอ
สำหรับวัตถุดิบที่ปิดล็อคสุญญากาศ บรรจุภัณฑ์อาจ
แตกได้
▶ ปฏิบัติตามข้อมูลที่ปรากฏบนบรรจุภัณฑ์เสมอ
▶ นำอาหารออกจากช่องอบอาหารโดยใช้ผ้าจับของ
ร้อนเสมอ
ชิ้นส่วนที่เข้าถึงได้จะร้อนขึ้นในระหว่างใช้งาน
▶ ห้ามสัมผัสชิ้นส่วนที่มีความร้อนโดยเด็ดขาด
▶ ระมัดระวังไม่ให้เด็กเข้าใกล้
การใช้งานที่ไม่เป็นไปตามข้อกำหนดของอุปกรณ์อาจ
ก่อให้เกิดอันตรายได้ เช่น รองเท้าแตะ หมอนบุเม็ด
โฟม หรือหมอนบุธัญพืช รวมถึงฟองน้ำ ผ้าเช็ด
ทำความสะอาดที่เปียกชื้น และวัสดุที่มีลักษณะ
คล้ายคลึงกันที่ถูกนำมาอุ่นร้อนอาจเป็นเหตุให้เกิด
เพลิงไหม้ได้
▶ ห้ามใช้เครื่องในการอบแห้งอาหารหรือเสื้อผ้าโดย
เด็ดขาด
▶ ห้ามนำรองเท้าแตะ หมอนบุเม็ดโฟม หรือหมอนบุ
ธัญพืช รวมถึงฟองน้ำ ผ้าเช็ดทำความสะอาดที่
เปียกชื้น และวัสดุที่มีลักษณะคล้ายคลึงกันมาอุ่นใน
เครื่องโดยเด็ดขาด
▶ ใช้งานเครื่องเพื่อการประกอบอาหารและเครื่องดื่ม
เท่านั้น
คำเตือน‒ระวังความร้อนลวก!
การอุ่นร้อนของเหลวอาจส่งผลให้เกิดสภาวะอุณหภูมิ
สูงเกินจุดเดือด ซึ่งหมายความว่าอุณหภูมิจะสูงขึ้นถึง
จุดเดือดโดยไม่มีฟองอากาศลอยขึ้นดังเช่นทั่วไป
โปรดใช้ความระมัดระวัง หากภาชนะเกิดการสั่น
สะเทือนแม้เพียงเล็กน้อย ของเหลวที่มีความร้อนอาจ
เดือดและกระเด็นออกมาอย่างกะทันหันได้
▶ ใส่ช้อนในภาชนะทุกครั้งที่ทำการอุ่นร้อน วิธีการนี้
จะช่วยหลีกเลี่ยงไม่ให้เกิดสภาวะอุณหภูมิสูงเกิน
จุดเดือด
คำเตือน‒ระวังการบาดเจ็บ!
ภาชนะที่ไม่เหมาะสมอาจแตกออกเป็นเสี่ยงๆ ภาชนะที่
ทำจากพอร์ซเลนและเซรามิกอาจมีรูขนาดเล็กที่
บริเวณมือจับและฝาปิด รูเหล่านี้จะมีโพรงช่องว่างอยู่
และของเหลวที่ซึมเข้าไปยังช่องว่างดังกล่าวอาจส่งผล
ให้ภาชนะแตกออกเป็นเสี่ยงได้
▶ ใช้เฉพาะภาชนะที่เหมาะสำหรับใช้ในไมโครเวฟ
เท่านั้น
จานชามและภาชนะที่ทำจากโลหะหรือภาชนะที่มี
โลหะเป็นส่วนประกอบอาจก่อให้เกิดประกายไฟเมื่อ
ใช้งานโหมดไมโครเวฟอย่างเดียว เครื่องอาจได้รับ
ความเสียหาย
▶ ห้ามใช้ภาชนะที่ทำจากโลหะโดยเด็ดขาดเมื่อใช้
งานโหมดไมโครเวฟอย่างเดียว
▶ ใช้เฉพาะภาชนะที่เหมาะสำหรับใช้ในไมโครเวฟ
หรือใช้งานไมโครเวฟร่วมกับประเภทการทำความ
ร้อนอื่นเท่านั้น
คำเตือน‒ระวังไฟดูด!
อุปกรณ์เครื่องนี้ทำงานด้วยไฟฟ้าแรงดันสูง
▶ ห้ามถอดตัวเรือนออกโดยเด็ดขาด
คำเตือน‒ระวังอันตรายร้ายแรงต่อสุขภาพ!
การทำความสะอาดที่ไม่เพียงพออาจทำให้พื้นผิวตัว
เครื่องชำรุดเสียหาย อายุการใช้งานสั้นลง รวมถึงอาจ
ทำให้เกิดสถานการณ์อันตรายได้ เช่น พลังงาน
ไมโครเวฟเล็ดลอดออกมา
▶ ทำความสะอาดเครื่องอย่างสม่ำเสมอและขจัดเศษ
อาหารออกโดยทันที
▶ ดูแลรักษาช่องอบอาหาร ฝาเครื่อง และขอบปิดฝา
เครื่องให้สะอาดอยู่เสมอ
→"
การทำความสะอาดและการดูแลรักษา
",
หน้า
36
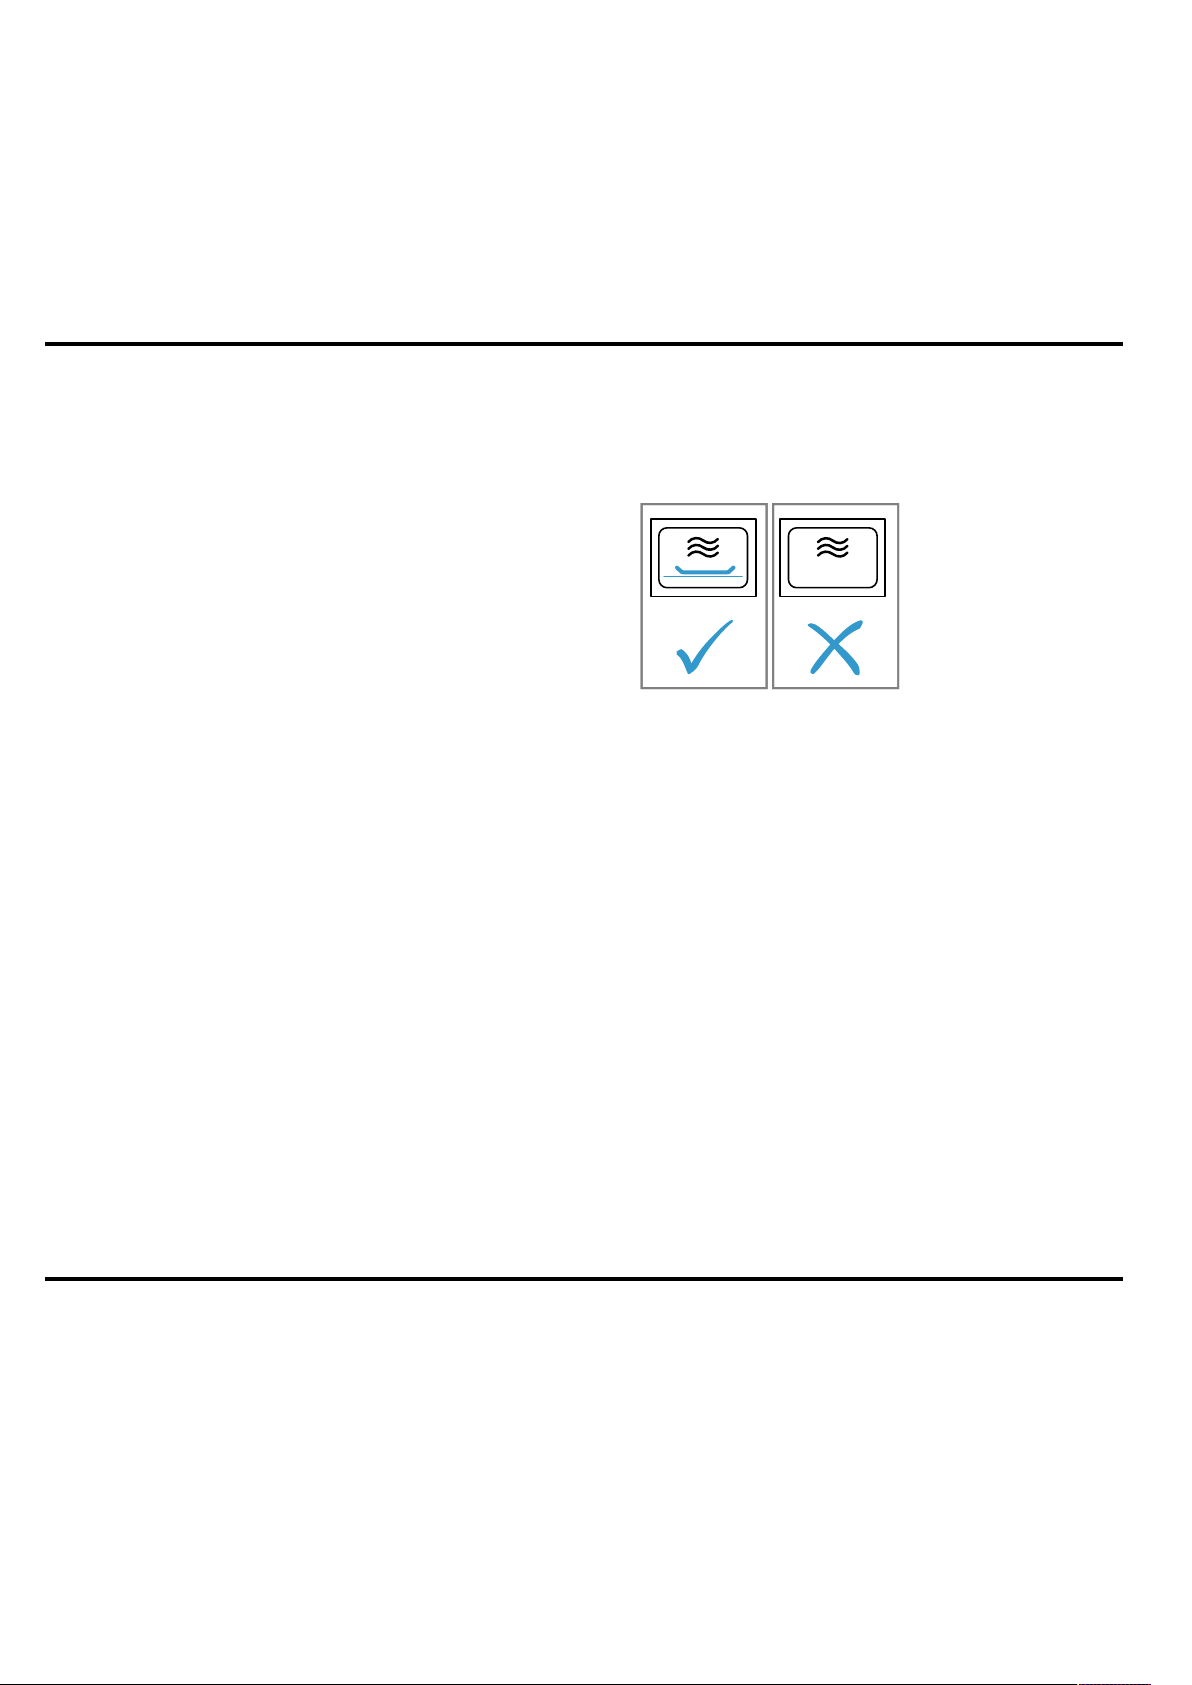
การหลีกเลี่ยงความเสียหายที่อาจเกิดขึ้น th
29
ห้ามใช้งานเครื่องโดยเด็ดขาดหากฝาช่องอบอาหาร
ชำรุดเสียหาย พลังงานไมโครเวฟอาจเล็ดลอดออกมา
ได้
▶ ห้ามใช้งานเครื่องโดยเด็ดขาดหากฝาช่องอบ
อาหารหรือโครงฝาเครื่องที่ทำจากพลาสติกชำรุด
เสียหาย
▶ ดำเนินการซ่อมแซมโดยฝ่ายบริการลูกค้าเท่านั้น
เครื่องที่ไม่มีฝาครอบตัวเรือนอาจทำให้พลังงาน
ไมโครเวฟเล็ดลอดออกมาได้
▶ ห้ามถอดฝาครอบตัวเรือนออกโดยเด็ดขาด
▶ โทรติดต่อฝ่ายบริการลูกค้าในกรณีที่ต้องบำรุง
รักษาหรือซ่อมแซมตัวเครื่อง
2 การหลีกเลี่ยงความเสียหายที่อาจเกิดขึ้น
2.1 ข้อมูลทั่วไป
ข้อควรระวัง!
น้ำในช่องอบอาหารที่มีความร้อนจะทำให้เกิดไอน้ำ การ
เปลี่ยนแปลงอุณหภูมิอาจส่งผลให้เกิดความเสียหายได้
▶ ห้ามเทน้ำลงในช่องอบอาหารที่มีความร้อน
ความชื้นที่สะสมในช่องอบอาหารเป็นเวลานานจะทำให้เกิดสนิม
▶ เช็ดทำความสะอาดน้ำที่เกิดจากการควบแน่นหลังการปรุงสุก
ทุกครั้ง
▶ ห้ามจัดเก็บวัตถุดิบที่มีความชื้นไว้ในช่องอบอาหารที่ปิดอยู่
เป็นเวลานาน
▶ ห้ามจัดเก็บอาหารไว้ในช่องอบอาหาร
การระบายความร้อนโดยการเปิดฝาเครื่องอาจทำให้บริเวณด้าน
หน้าของเฟอร์นิเจอร์ข้างเคียงได้รับความเสียหายเมื่อเวลาผ่าน
ไป
▶ ปล่อยให้ช่องอบอาหารเย็นลงโดยปิดฝาเครื่องไว้หลังจากการ
ใช้งานที่อุณหภูมิสูง
▶ ห้ามยึดหนีบวัตถุใดๆ กับฝาเครื่อง
▶ ปล่อยให้ช่องอบอาหารแห้งโดยเปิดฝาเครื่องเฉพาะหลังจาก
การใช้งานที่มีความชื้นสูงเท่านั้น
การใช้ฝาเครื่องเป็นที่รองนั่งหรือชั้นวางของอาจทำให้ฝาเครื่อง
เกิดความเสียหายได้
▶ ห้ามลงน้ำหนัก นั่ง แขวนสิ่งของ หรือพิงฝาเครื่อง
2.2 ไมโครเวฟ
โปรดปฏิบัติตามคำแนะนำต่อไปนี้ขณะใช้งานไมโครเวฟ
ข้อควรระวัง!
โลหะที่สัมผัสกับผนังช่องอบอาหารจนเกิดประกายไฟอาจทำให้
ตัวเครื่องหรือกระจกฝาเครื่องด้านในได้รับความเสียหาย
▶ โลหะ เช่นช้อนในแก้ว ต้องวางห่างจากผนังช่องอบอาหาร
และด้านในฝาเครื่องอย่างน้อย 2 ซม.
การใช้ถาดอะลูมิเนียมในตัวเครื่องอาจทำให้เกิดประกายไฟ และ
ตัวเครื่องจะได้รับความเสียหายจากการเกิดประกายไฟ
▶ ห้ามใช้ถาดอะลูมิเนียมกับตัวเครื่อง
การใช้งานตัวเครื่องโดยไม่มีอาหารอยู่ในช่องอบอาหารอาจส่ง
ผลให้เครื่องทำงานหนักเกินไป
▶ ห้ามเริ่มใช้งานไมโครเวฟหากไม่มีอาหารในช่องอบอาหาร
ยกเว้นในกรณีที่ดำเนินการทดสอบภาชนะเป็นเวลาสั้นๆ
การเตรียมป็อปคอร์นด้วยไมโครเวฟติดต่อกันทันทีหลายๆ ครั้ง
โดยใช้กำลังไฟไมโครเวฟสูงเกินไปอาจทำให้ช่องอบอาหารได้
รับความเสียหาย
▶ ปล่อยให้ตัวเครื่องเย็นลงเป็นเวลาหลายนาทีในระหว่างการเต
รียม
▶ ห้ามปรับตั้งค่ากำลังไฟไมโครเวฟสูงเกินไป
▶ ใช้กำลังไฟสูงสุดไม่เกิน 600วัตต์
▶ วางถุงป็อปคอร์นลงบนจานแก้วเสมอ
แหล่งจ่ายไฟไมโครเวฟอาจได้รับความเสียหายจากการถอดฝา
ครอบ
▶ ห้ามถอดฝาครอบแหล่งจ่ายไฟไมโครเวฟในช่องอบอาหาร
ออกโดยเด็ดขาด
การลอกฟอยล์โปร่งใสออกจากด้านในฝาเครื่องจะทำให้ฝา
เครื่องได้รับความเสียหาย
▶ ห้ามลอกฟอยล์โปร่งใสบริเวณด้านในฝาเครื่องออก
ของเหลวที่แทรกซึมเข้าไปด้านในตัวเครื่องอาจทำให้เฟืองจาน
หมุนได้รับความเสียหาย
▶ สังเกตกระบวนการปรุงสุก
▶ ให้ปรับตั้งค่าระยะเวลาให้สั้นไว้ก่อน แล้วจึงขยายระยะเวลา
ให้นานขึ้นตามความจำเป็น
▶ ห้ามใช้งานเครื่องโดยไม่มีจานหมุนโดยเด็ดขาด
ภาชนะที่ไม่เหมาะสมอาจก่อให้เกิดความเสียหายได้
▶ ขณะใช้งานโหมดปิ้งย่างหรือโหมดการใช้ฟังก์ชันไมโครเวฟ
ร่วมกัน ให้ใช้เฉพาะภาชนะที่สามารถทนต่ออุณหภูมิสูงได้
เท่านั้น
3 การรักษาสิ่งแวดล้อมและการประหยัด
3.1 กำจัดหีบห่อบรรจุทิ้ง
วัสดุบรรจุภัณฑ์ทั้งหมดไม่เป็นอันตรายต่อสิ่งแวดล้อมและ
สามารถนำกลับมาใช้ใหม่ได้
▶
โปรดกำจัดชิ้นส่วนประกอบแต่ละชิ้นแยกตามประเภท
3.2 ประหยัดพลังงาน
หากคุณดำเนินการตามคำแนะนำเหล่านี้ จะสามารถลดระดับการ
ใช้ไฟของอุปกรณ์นี้ลงได้
ไม่เปิดฝาเครื่องบ่อยครั้งในระหว่างการใช้งาน
¡
อุณหภูมิในช่องอบอาหารจะยังคงเดิมและเครื่องไม่จำเป็น
ต้องทำความร้อนใหม่
ซ่อนนาฬิกาในโหมดสแตนด์บาย
¡
เครื่องจะประหยัดพลังงานในโหมดสแตนด์บาย
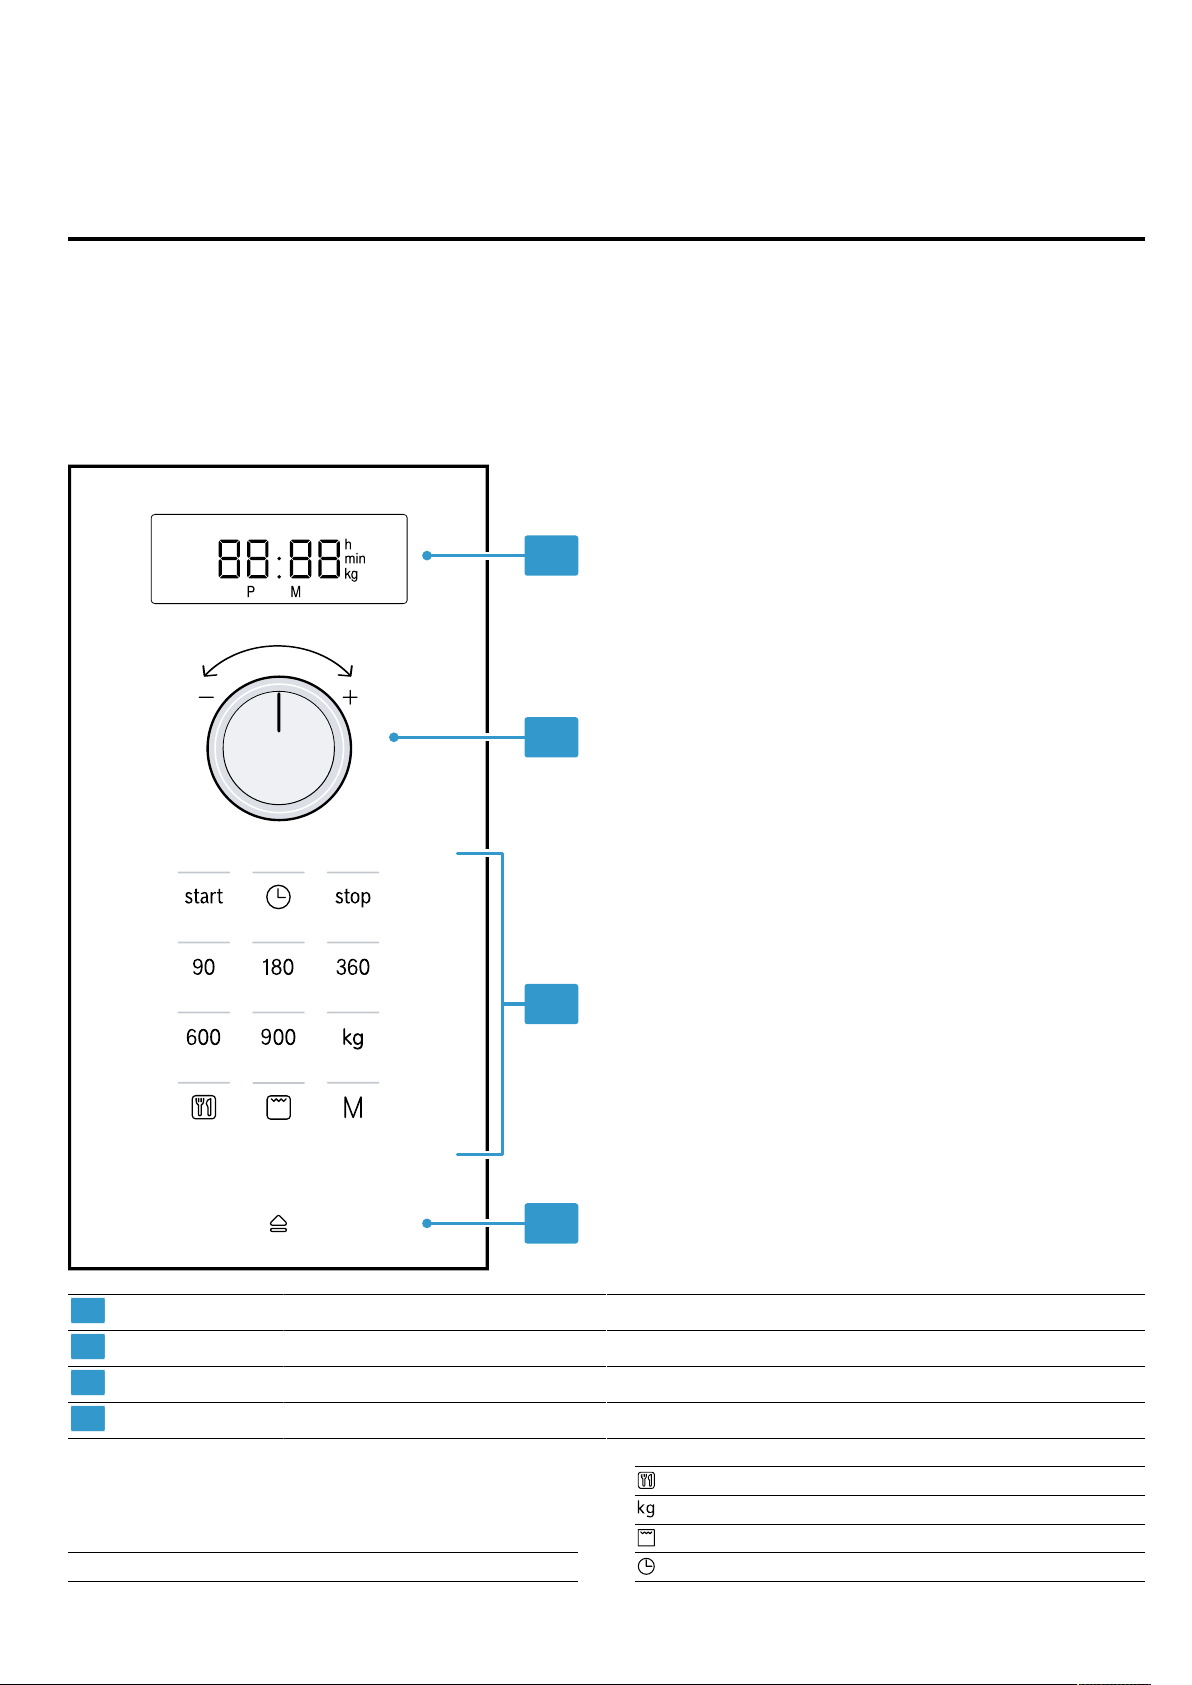
th มาทำความรู้จักเกี่ยวกับอุปกรณ์กัน
30
หมายเหตุ:
เครื่องจำเป็นต้องใช้:
¡ กำลังไฟสูงสุด 1 วัตต์ในโหมดการทำงานที่เปิดใช้งานจอแส
ดงผล
¡ กำลังไฟสูงสุด 0.5 วัตต์ในโหมดการทำงานที่ปิดใช้งาน
จอแสดงผล
4 มาทำความรู้จักเกี่ยวกับอุปกรณ์กัน
4.1 แผงควบคุม
คุณสามารถตั้งค่าฟังก์ชันทั้งหมดของอุปกรณ์และรับข้อมูลเกี่ยว
กับสถานะการใช้งานได้ผ่านแผงควบคุม
หมายเหตุ:รายละเอียดในภาพอาจจะต่างกันไปโดยขึ้นอยู่กับรุ่น
อุปกรณ์ เช่น สีและรูปทรง
1
2
54
3
1
ตัวเปิดฝาเครื่องอัตโนมัติ เปิดฝาเครื่องอัตโนมัติ
2
แป้นสัมผัส เลือกฟังก์ชัน
3
ปุ่มหมุนปรับ ตั้งค่าเวลา ระยะเวลา หรือโหมดโปรแกรมอัตโนมัติ
4
หน้าจอ แสดงเวลาหรือระยะเวลา
แป้นสัมผัส
บริเวณปุ่มสัมผัสเป็นพื้นที่บริเวณที่ไวต่อการสัมผัส แตะตรง
บริเวณที่เกี่ยวข้องเพื่อเลือกหนึ่งฟังก์ชัน
90-900 เลือกกำลังไฟไมโครเวฟในหน่วยวัตต์
เลือกโหมดโปรแกรมอัตโนมัติ
เลือกน้ำหนักสำหรับโปรแกรม
เลือกโหมดปิ้งย่าง
ตั้งค่าหรือแสดงเวลา
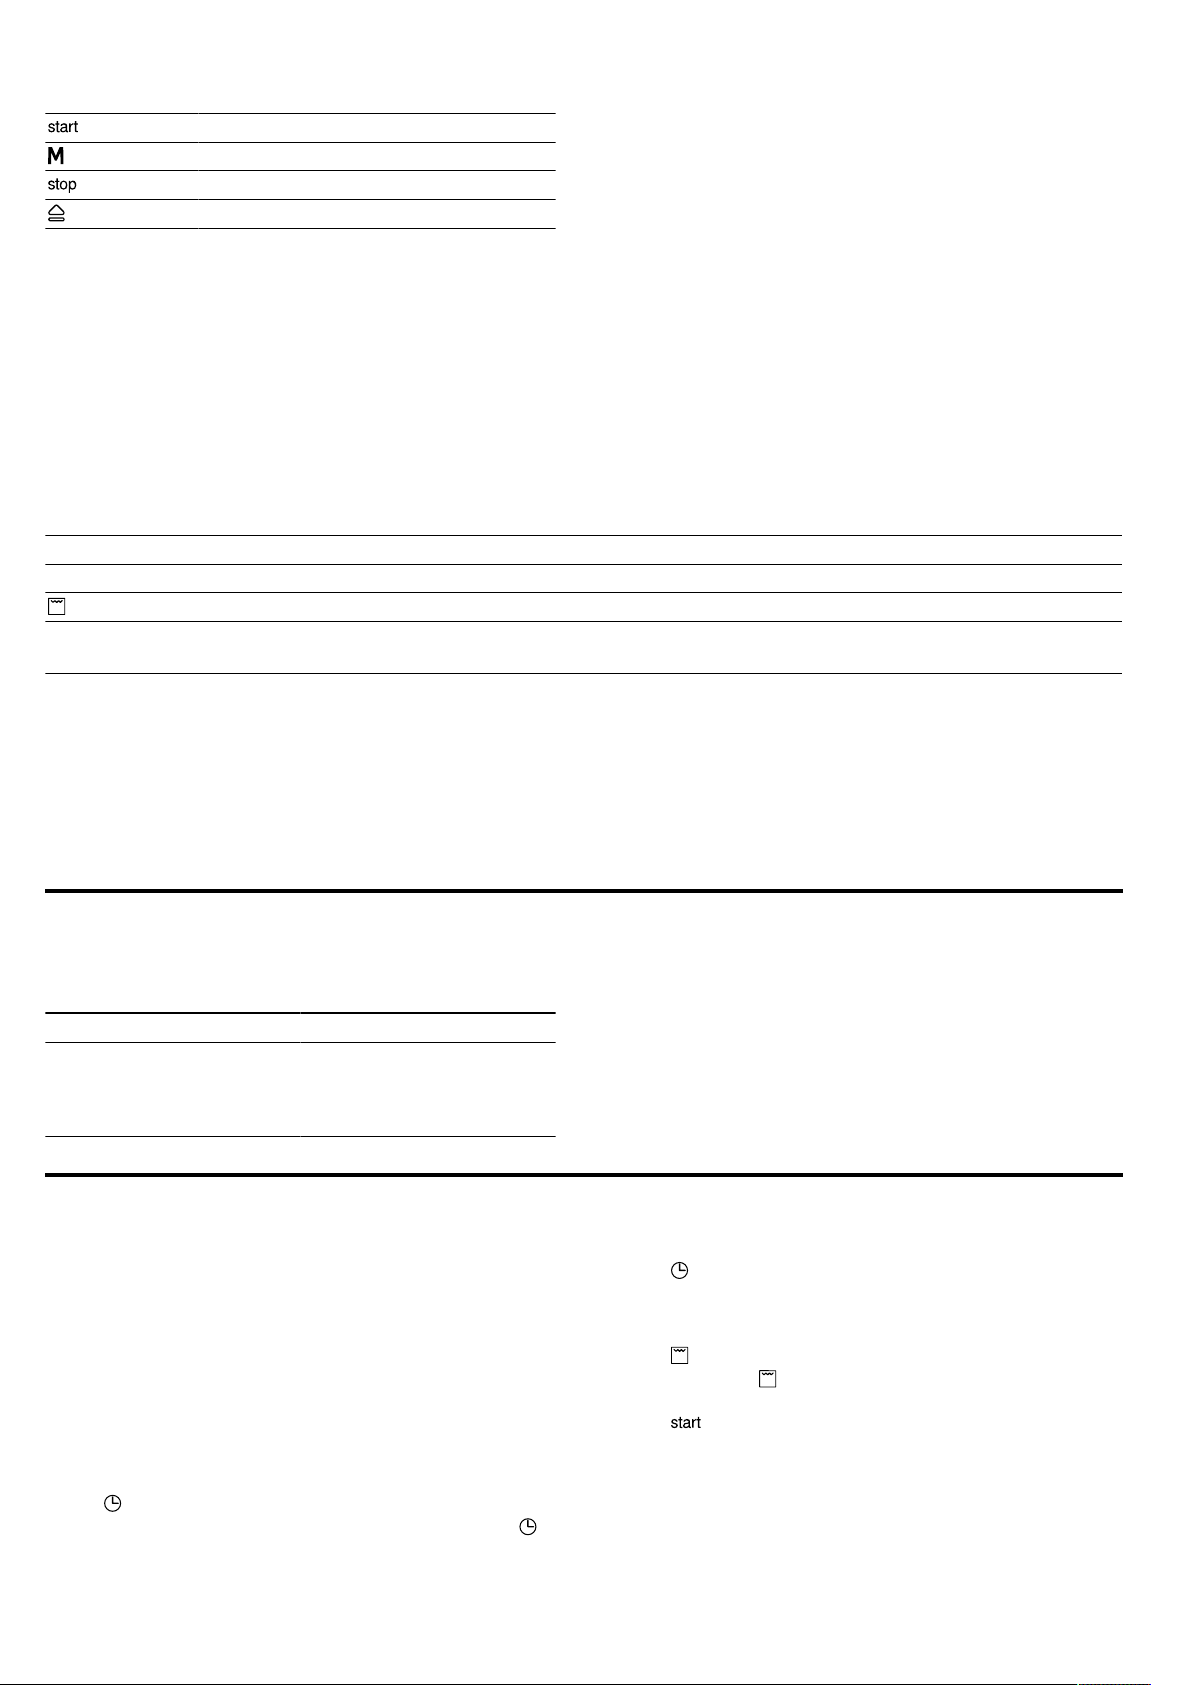
อุปกรณ์เสริม th
31
เริ่มการทำงาน
เลือกหน่วยความจำ
หยุดหรือสิ้นสุดการทำงาน
เปิดฝาเครื่อง
ปุ่มหมุนปรับ
คุณสามารถใช้ปุ่มหมุนปรับเพื่อเปลี่ยนค่าการตั้งค่าที่ปรากฏบน
หน้าจอได้
ปุ่มหมุนปรับสามารถหมุนย้อนกลับได้ หากต้องการล็อคหรือปลด
ล็อคปุ่มหมุนปรับ ให้กดปุ่มหมุนปรับ
ตัวเปิดฝาเครื่องอัตโนมัติ
เมื่อกดตัวเปิดฝาเครื่องอัตโนมัติ ฝาเครื่องจะเปิดออก คุณ
สามารถใช้มือเปิดฝาเครื่องออกจนสุดได้
หมายเหตุ
¡ ในกรณีที่ไฟดับ ตัวเปิดฝาเครื่องอัตโนมัติจะไม่ทำงาน คุณ
สามารถใช้มือเปิดฝาเครื่องได้
¡ หากเปิดฝาเครื่องในระหว่างการใช้งาน เครื่องจะหยุดการ
ทำงาน
¡ เมื่อปิดฝาเครื่อง เครื่องจะไม่ทำงานต่อโดยอัตโนมัติ คุณ
จำเป็นต้องเริ่มการทำงานเครื่อง
¡ ในกรณีที่ปิดใช้งานตัวเครื่องเป็นเวลานาน ฝาเครื่องจะเปิด
ออกอย่างล่าช้า
4.2 ประเภทการทำความร้อน
คุณสามารถดูข้อมูลทั่วไปเกี่ยวกับประเภทการทำความร้อนได้จากส่วนนี้ โดยคุณจะได้รับคำแนะนำเกี่ยวกับการใช้งานการทำความร้อน
ประเภทต่างๆ
สัญลักษณ์ ชื่อ การใช้งาน
90-900 ไมโครเวฟ ละลายน้ำแข็ง ปรุงสุก หรืออุ่นร้อนอาหารและของเหลว
โหมดปิ้งย่าง อบอาหารแบบกราแตง
โหมดการใช้ฟังก์ชัน
ไมโครเวฟร่วมกัน
¡ อบอาหารอบร้อนและกราแตง
¡ อบอาหารให้เหลืองเกรียม
4.3 พัดลมระบายความร้อน
พัดลมระบายความร้อนจะเปิดและปิดการทำงานตามความจำเป็น
ช่องอบอาหารอาจไม่ร้อนขึ้นในระหว่างใช้งานโหมดไมโครเวฟ
แต่พัดลมระบายความร้อนจะยังคงเปิดการทำงาน
หมายเหตุ:พัดลมระบายความร้อนอาจทำงานต่อไปได้แม้ปิดใช้
งานตัวเครื่องแล้ว
4.4 น้ำหยด
ในระหว่างปรุงสุกอาหารอาจเกิดหยดน้ำในช่องอบอาหารและ
บริเวณฝาเครื่องได้ หยดน้ำดังกล่าวถือเป็นเรื่องปกติและไม่ส่ง
ผลกระทบต่อการทำงานของตัวเครื่อง ให้เช็ดทำความสะอาด
หยดน้ำหลังจากการปรุงสุก
5 อุปกรณ์เสริม
ใช้อุปกรณ์เสริมของแท้ ซึ่งได้รับการปรับให้เหมาะสมกับเครื่อง
ของคุณ
อุปกรณ์เสริม การใช้งาน
ตะแกรง ¡ ตะแกรงสำหรับปิ้งย่างและ
อบให้เกรียมเฉพาะส่วนบน
¡ ตะแกรงสำหรับใช้เป็น
พื้นที่ตั้งวางภาชนะ
6 ก่อนการใช้งานเป็นครั้งแรก
ทำการตั้งค่าสำหรับการเริ่มใช้งานครั้งแรก ทำความสะอาด
อุปกรณ์และอุปกรณ์เสริม
6.1 การเริ่มใช้งานเครื่องเป็นครั้งแรก
ทำการตั้งค่าสำหรับการเริ่มใช้งานครั้งแรก ทำความสะอาด
อุปกรณ์และอุปกรณ์เสริม
หมายเหตุ:หลังจากเชื่อมต่อกระแสไฟฟ้าหรือไฟดับ สัญญาณจะ
ดังขึ้นและตัวเลขศูนย์หลายตัวจะปรากฎให้เห็นบนหน้าจอ ซึ่ง
อาจใช้เวลาประมาณ 2-3 วินาทีจนกว่าสัญญาณถัดไปจะดังขึ้น
และสามารถตั้งค่าเวลาได้
1.
กด
a เวลา 12:00 จะปรากฏให้เห็นบนหน้าจอ ไฟแสดงเหนือ
จะติดสว่าง
2.
ปรับตั้งค่าเวลาโดยใช้ปุ่มหมุนปรับ
3.
กด
6.2 การทำความร้อนช่องอบอาหาร
1.
กด
a ไฟแสดงเหนือ จะติดสว่างและหน้าจอจะแสดงเวลา 10:00
นาที
2.
กด
3.
เมื่อช่องอบอาหารเย็นลง ให้ทำความสะอาดพื้นผิวเรียบโดย
ใช้น้ำสบู่และผ้าเช็ด
6.3 การทำความสะอาดอุปกรณ์เสริม
▶
ทำความสะอาดอุปกรณ์เสริมด้วยน้ำสบู่และผ้าเช็ดเนื้อนุ่ม

th การใช้งานทั่วไป
32
6.4 การใส่จานหมุน
ใช้งานเครื่องต่อเมื่อใส่จานหมุนแล้วเท่านั้น
1.
วางวงแหวน ลงในร่องฐานภายในช่องอบอาหาร
2.
ล็อคจานหมุน ให้เข้าที่ในเฟือง บริเวณตรงกลางของ
พื้นช่องอบอาหาร
3.
ตรวจสอบว่าจานหมุนล็อคเข้าที่อย่างถูกต้องหรือไม่
หมายเหตุ:จานหมุนสามารถหมุนไปทางด้านซ้ายหรือขวาได้
7 การใช้งานทั่วไป
7.1 กำลังไฟไมโครเวฟ
คุณสามารถดูข้อมูลทั่วไปเกี่ยวกับกำลังไฟไมโครเวฟรวมถึงการ
ใช้งานได้จากส่วนนี้
กำลังไฟไมโครเวฟ
(วัตต์)
การใช้งาน
90 ละลายน้ำแข็งอาหารที่บอบบางต่อ
ความร้อน
180 ละลายน้ำแข็งอาหาร แล้วปรุงสุกต่อ
360 ปรุงเนื้อสัตว์และเนื้อปลาให้สุก หรือ
อุ่นอาหารที่บอบบางต่อความร้อน
600 อุ่นร้อนหรือปรุงสุกอาหาร
900 อุ่นร้อนของเหลว
หมายเหตุ:
คุณสามารถปรับตั้งค่ากำลังไฟไมโครเวฟสำหรับระยะเวลาดังต่อ
ไปนี้ได้:
¡ 900วัตต์สำหรับระยะเวลา 30นาที
¡ 600วัตต์สำหรับระยะเวลา 60นาที
¡ 90วัตต์, 180วัตต์ และ 360วัตต์สำหรับระยะเวลา
99นาที
7.2 ภาชนะและอุปกรณ์เสริมที่เหมาะสำหรับใช้ใน
ไมโครเวฟ
ใช้ภาชนะและอุปกรณ์เสริมที่เหมาะสมเพื่อให้สามารถอุ่นอาหาร
ได้อย่างทั่วถึงและเพื่อป้องกันเครื่องไมโครเวฟได้รับความเสีย
หาย
หมายเหตุ:ปฏิบัติตามคำแนะนำจากผู้ผลิตก่อนใช้ภาชนะสำหรับ
ไมโครเวฟ หากไม่แน่ใจ ให้ดำเนินการทดสอบภาชนะก่อน
เหมาะสำหรับใช้ในไมโครเวฟ
ภาชนะและอุปกรณ์เสริม เหตุผล
ภาชนะที่ทำจากวัสดุทนความ
ร้อนและเหมาะสำหรับใช้ใน
ไมโครเวฟ:
¡ แก้ว
¡ กลาสเซรามิก
¡ พอร์ซเลน
¡ พลาสติกทนความร้อน
¡ เซรามิกเคลือบทั้งชุดที่ไม่มี
รอยแตก
คลื่นไมโครเวฟสามารถผ่าน
วัสดุเหล่านี้ได้ รวมถึงคลื่น
ไมโครเวฟจะไม่ก่อให้เกิด
ความเสียหายต่อภาชนะทน
ความร้อน
ชุดช้อนส้อมโลหะ หมายเหตุ:คุณสามารถใช้ชุด
ช้อนส้อมโลหะเพื่อป้องกันการ
เกิดสภาวะอุณหภูมิสูงเกิน
จุดเดือด เช่นวางช้อนลงใน
แก้ว
ข้อควรระวัง!
โลหะที่สัมผัสกับผนังช่องอบอาหารจนเกิดประกายไฟอาจทำให้
ตัวเครื่องหรือกระจกฝาเครื่องด้านในได้รับความเสียหาย
▶ โลหะ เช่นช้อนในแก้ว ต้องวางห่างจากผนังช่องอบอาหาร
และด้านในฝาเครื่องอย่างน้อย 2 ซม.
ไม่เหมาะสำหรับใช้ในไมโครเวฟ
ภาชนะและอุปกรณ์เสริม เหตุผล
ภาชนะโลหะ คลื่นไมโครเวฟไม่สามารถ
ผ่านโลหะได้ ดังนั้นจึงแทบไม่
สามารถอุ่นอาหารได้
ภาชนะที่ประดับด้วยทองหรือ
เงิน
คลื่นไมโครเวฟอาจก่อให้เกิด
ความเสียหายต่อลายประดับ
ด้วยทองและเงิน
เคล็ดลับคุณสามารถใช้
ภาชนะดังกล่าวได้หากผู้ผลิต
รับประกันว่าภาชนะดังกล่าว
เหมาะสำหรับใช้ในไมโครเวฟ
โหมดปิ้งย่าง th
33
7.3 การทดสอบความเหมาะสมของภาชนะสำหรับ
การใช้งานในไมโครเวฟ
ทดสอบความเหมาะสมของภาชนะสำหรับการใช้งานใน
ไมโครเวฟโดยใช้การทดสอบภาชนะ คุณสามารถใช้งานเครื่อง
ไมโครเวฟโดยไม่มีอาหารได้ในกรณีที่กำลังทดสอบภาชนะ
เท่านั้น
คำเตือน‒ระวังความร้อนลวก!
ชิ้นส่วนที่เข้าถึงได้จะร้อนขึ้นในระหว่างใช้งาน
▶ ห้ามสัมผัสชิ้นส่วนที่มีความร้อนโดยเด็ดขาด
▶ ระมัดระวังไม่ให้เด็กเข้าใกล้
1.
วางภาชนะเปล่าในช่องอบอาหาร
2.
ปรับตั้งค่ากำลังไฟไมโครเวฟไปที่ระดับสูงสุดเป็นระยะเวลา
½-1นาที
3.
เริ่มการทำงาน
4.
ทดสอบภาชนะหลายๆ ครั้ง:
– หากภาชนะเย็นหรืออุ่นขึ้นแต่ยังสามารถจับต้องได้ แสดง
ว่าภาชนะดังกล่าวเหมาะสำหรับใช้ในไมโครเวฟ
– หากภาชนะร้อนหรือมีประกายไฟเกิดขึ้น ให้ยกเลิกการ
ทดสอบภาชนะ ภาชนะดังกล่าวไม่เหมาะสำหรับใช้ใน
ไมโครเวฟ
7.4 การปรับตั้งค่าไมโครเวฟ
ข้อควรระวัง!
การใช้งานตัวเครื่องโดยไม่มีอาหารอยู่ในช่องอบอาหารอาจส่ง
ผลให้เครื่องทำงานหนักเกินไป
▶ ห้ามเริ่มใช้งานไมโครเวฟหากไม่มีอาหารในช่องอบอาหาร
ยกเว้นในกรณีที่ดำเนินการทดสอบภาชนะเป็นเวลาสั้นๆ
เคล็ดลับปฏิบัติตามข้อมูลที่ปรากฏในข้อแนะนำการตั้งค่าเพื่อให้
สามารถใช้งานเครื่องไมโครเวฟได้อย่างเต็มประสิทธิภาพ
→"
วิธีการทำงาน
",
หน้า
40
1.
ปฏิบัติตามคำแนะนำด้านความปลอดภัย →
หน้า
27
2.
ปฏิบัติตามคำแนะนำเกี่ยวกับการป้องกันการเกิดความเสีย
หายต่อทรัพย์สิน →
หน้า
29
3.
ปฏิบัติตามคำแนะนำเกี่ยวกับภาชนะและอุปกรณ์เสริมที่เหมาะ
สำหรับใช้ในไมโครเวฟ →
หน้า
32
4.
ปรับตั้งค่ากำลังไฟไมโครเวฟตามต้องการโดยใช้ปุ่ม
5.
ปรับตั้งค่าระยะเวลาตามต้องการโดยใช้ปุ่มหมุนปรับ
หมายเหตุ:หากคุณเปิดฝาช่องอบอาหารในระหว่างการทำงาน
เครื่องไมโครเวฟจะหยุดการทำงานและระยะเวลาที่ปรับตั้งไว้จะ
หยุดพัก เมื่อปิดฝาช่องอบอาหาร เครื่องจะทำงานต่อไป
7.5 การเปลี่ยนแปลงระยะเวลา
คุณสามารถเปลี่ยนแปลงระยะเวลาได้ตลอดเวลา
▶
ปรับตั้งค่าระยะเวลาตามต้องการโดยใช้ปุ่มหมุนปรับ
7.6 การหยุดการทำงาน
1.
กด หรือเปิดฝาเครื่อง
a ไฟแสดงเหนือ จะติดสว่าง
2.
ปิดฝาเครื่อง แล้วกด เพื่อให้เครื่องทำงานต่อไป
7.7 การยกเลิกการทำงาน
▶
กด สองครั้งหรือเปิดฝา แล้วกด หนึ่งครั้ง
8 โหมดปิ้งย่าง
คุณสามารถอบอาหารให้เหลืองเกรียมหรืออบให้เกรียมเฉพาะ
ส่วนบนโดยใช้โหมดปิ้งย่าง โดยสามารถเลือกใช้โหมดปิ้งย่าง
เพียงอย่างเดียวหรือใช้ร่วมกับไมโครเวฟได้
8.1 การปรับตั้งค่าโหมดปิ้งย่าง
1.
กด
a ไฟแสดงเหนือ จะติดสว่างและหน้าจอจะแสดงเวลา 10:00
นาที
2.
ปรับตั้งค่าระยะเวลาตามต้องการโดยใช้ปุ่มหมุนปรับ
8.2 การเปลี่ยนแปลงระยะเวลา
คุณสามารถเปลี่ยนแปลงระยะเวลาได้ตลอดเวลา
▶
ปรับตั้งค่าระยะเวลาตามต้องการโดยใช้ปุ่มหมุนปรับ
8.3 การหยุดการทำงาน
1.
กด หรือเปิดฝาเครื่อง
a ไฟแสดงเหนือ จะติดสว่าง
2.
ปิดฝาเครื่อง แล้วกด เพื่อให้เครื่องทำงานต่อไป
8.4 การยกเลิกการทำงาน
▶
กด สองครั้งหรือเปิดฝา แล้วกด หนึ่งครั้ง
8.5 การใช้ฟังก์ชันไมโครเวฟร่วมกัน
คุณสามารถใช้โหมดปิ้งย่างร่วมกับไมโครเวฟเพื่อลดระยะเวลา
ปรุงสุกได้
การปรับตั้งค่าการใช้ฟังก์ชันไมโครเวฟร่วมกัน
1.
กดปุ่มกำลังไฟไมโครเวฟ 90, 180 หรือ 360
a ไฟแสดงเหนือปุ่มที่กดจะติดสว่างและหน้าจอจะแสดงเวลา
1:00นาที
2.
กด
3.
ปรับตั้งค่าระยะเวลาตามต้องการโดยใช้ปุ่มหมุนปรับ
หมายเหตุ:หากคุณเปิดฝาช่องอบอาหารในระหว่างการทำงาน
เครื่องไมโครเวฟจะหยุดการทำงานและระยะเวลาที่ปรับตั้งไว้จะ
หยุดพัก เมื่อปิดฝาช่องอบอาหาร เครื่องจะทำงานต่อไป
th หน่วยความจำ
34
9 หน่วยความจำ
คุณสามารถบันทึกการปรับตั้งค่าสำหรับเมนูอาหารอย่างใดอย่าง
หนึ่งและเรียกใช้การตั้งค่าดังกล่าวอีกครั้งได้ตลอดเวลาโดยใช้
ฟังก์ชันหน่วยความจำ
เคล็ดลับใช้ฟังก์ชันหน่วยความจำเมื่อคุณต้องประกอบอาหาร
เมนูใดเมนูหนึ่งอยู่บ่อยครั้ง
9.1 การบันทึกหน่วยความจำ
หมายเหตุ:
¡ คุณไม่สามารถบันทึกกำลังไฟไมโครเวฟหลายค่าติดต่อกันได้
¡ คุณไม่สามารถบันทึกโปรแกรมอัตโนมัติได้
1.
กด
a ไฟแสดงเหนือ จะติดสว่าง
2.
ปรับตั้งค่ากำลังไฟไมโครเวฟตามต้องการโดยใช้ปุ่ม
a ไฟแสดงเหนือปุ่มจะติดสว่างและหน้าจอจะแสดงผล 1:00
นาที
3.
ปรับตั้งค่าระยะเวลาตามต้องการโดยใช้ปุ่มหมุนปรับ
4.
เลือกตัวเลือกใดตัวเลือกหนึ่งในกรณีที่จำเป็น:
‒ กด เพื่อบันทึกหน่วยความจำและเริ่มการทำงานทันที
‒ กด เพื่อบันทึกหน่วยความจำโดยไม่เริ่มการทำงาน
a หากเครื่องไมโครเวฟไม่เริ่มการทำงาน เวลาจะปรากฏบน
หน้าจอและเครื่องจะบันทึกการตั้งค่า
9.2 การเริ่มใช้หน่วยความจำ
คุณสามารถเริ่มโปรแกรมที่บันทึกไว้ได้อย่าง่ายดาย โดยให้วาง
เมนูอาหารในเครื่องไมโครเวฟ แล้วปิดฝาเครื่อง
1.
กด
a การปรับตั้งค่าที่บันทึกไว้จะปรากฏขึ้น
2.
กด
9.3 การหยุดการทำงาน
1.
กด หรือเปิดฝาเครื่อง
a ไฟแสดงเหนือ จะติดสว่าง
2.
ปิดฝาเครื่อง แล้วกด เพื่อให้เครื่องทำงานต่อไป
9.4 การยกเลิกการทำงาน
▶
กด สองครั้งหรือเปิดฝา แล้วกด หนึ่งครั้ง
10 โปรแกรม
คุณสามารถใช้โปรแกรมของเครื่องไมโครเวฟเพื่อช่วยในการ
ประกอบอาหารหลากหลายชนิดและเลือกการปรับตั้งค่าที่เหมาะ
สมโดยอัตโนมัติได้
10.1 การปรับตั้งค่าโปรแกรม
1.
เลือกโปรแกรม
2.
กด ซ้ำๆ จนกระทั่งหน้าจอแสดงหมายเลขโปรแกรมที่
ต้องการ
a ไฟแสดงเหนือ จะติดสว่าง
3.
กด
a ไฟแสดงเหนือ จะติดสว่างและหน้าจอจะแสดงน้ำหนักที่
แนะนำ
4.
ปรับตั้งค่าน้ำหนักอาหารโดยใช้ปุ่มหมุนปรับ
หากไม่สามารถระบุน้ำหนักที่แน่นอนได้ ให้ปัดค่าน้ำหนักขึ้น
หรือลง
5.
กด เพื่อเริ่มการทำงาน
a คุณจะเห็นระยะเวลานับถอยหลัง
6.
หากมีสัญญาณดังขึ้นระหว่างใช้งานโปรแกรม ให้เปิดฝา
เครื่อง
‒ ตัดแบ่ง คน หรือพลิกอาหารกลับด้าน
‒ ปิดฝาเครื่อง
‒ กด
10.2 การหยุดการทำงาน
1.
กด หรือเปิดฝาเครื่อง
a ไฟแสดงเหนือ จะติดสว่าง
2.
ปิดฝาเครื่อง แล้วกด เพื่อให้เครื่องทำงานต่อไป
10.3 การยกเลิกการทำงาน
▶
กด สองครั้งหรือเปิดฝา แล้วกด หนึ่งครั้ง
10.4 การละลายน้ำแข็งด้วยโหมดโปรแกรมอัตโนมัติ
คุณสามารถละลายน้ำแข็งเนื้อสัตว์ เนื้อไก่ และขนมปังด้วยโปรแกรมละลายน้ำแข็ง 4 โปรแกรมได้
โปรแกรม อาหาร ภาชนะ ช่วงน้ำหนัก (กก.)
P01 เนื้อบด เปิด 0.20-1.00
P02 ชิ้นเนื้อ เปิด 0.20-1.00
P03 เนื้อไก่ ชิ้นไก่ เปิด 0.40-1.80
P04 ขนมปัง เปิด 0.20-1.00
การละลายน้ำแข็งอาหารด้วยโหมดโปรแกรมอัตโนมัติ
1.
นำวัตถุดิบออกจากบรรจุภัณฑ์
ใช้วัตถุดิบที่จัดเก็บไว้ที่อุณหภูมิ -18°C ในแนวราบและมี
ปริมาณเหมาะสำหรับมื้ออาหาร
2.
ชั่งน้ำหนักวัตถุดิบ
คุณจำเป็นต้องทราบน้ำหนักเพื่อใช้ในการปรับตั้งค่า
โปรแกรม
3.
วางวัตถุดิบบนภาชนะทรงแบนที่เหมาะสำหรับใช้ใน
ไมโครเวฟ เช่นจานแก้วหรือจานพอร์ซเลน
ไม่ต้องปิดฝาครอบ
4.
ปรับตั้งค่าโปรแกรม →
หน้า
34

โปรแกรม th
35
5.
หมายเหตุ:การละลายน้ำแข็งเนื้อสัตว์และเนื้อไก่จะทำให้เกิด
ของเหลว
นำของเหลวออกขณะพลิกกลับด้าน และห้ามนำกลับมาใช้
ใหม่หรือปล่อยให้สัมผัสกับวัตถุดิบอื่นๆ โดยเด็ดขาด
6.
แยกเนื้อสัตว์ที่เป็นชิ้นออกจากเนื้อสัตว์ที่บดแล้วก่อนนำไปพัก
7.
พักวัตถุดิบที่ละลายน้ำแข็งแล้วทิ้งไว้อีกประมาณ 10 ถึง
30นาทีเพื่อปรับอุณหภูมิให้สมดุล
ชิ้นเนื้อขนาดใหญ่จำเป็นต้องใช้เวลาพักนานกว่าชิ้นเนื้อ
ขนาดเล็ก สำหรับเนื้อไก่ ให้นำเครื่องในออกหลังจากพักทิ้ง
ไว้แล้ว
8.
ปรุงวัตถุดิบให้สุกต่อไปแม้ว่าชิ้นเนื้อที่มีความหนายังคงมีแกน
ที่เป็นน้ำแข็งอยู่
10.5 การปรุงสุกด้วยโหมดโปรแกรมอัตโนมัติ
คุณสามารถปรุงข้าว มันฝรั่ง หรือผักให้สุกด้วยโปรแกรมปรุงสุก 3 โปรแกรมได้
โปรแกรม อาหาร ภาชนะ ช่วงน้ำหนัก (กก.) คำแนะนำ
P05 ข้าว มีฝาครอบ 0.05-0.20 ¡ ใช้ภาชนะรูปทรงสูงใหญ่สำหรับการหุงข้าว
¡ ห้ามใช้ข้าวบรรจุถุงแบบต้มได้
¡ เติมน้ำเป็นปริมาณ 2-3 เท่าต่อข้าว 100กรัม
P06 มันฝรั่ง มีฝาครอบ 0.15-1.00 ¡ หั่นมันฝรั่งสดเป็นชิ้นเล็กๆ ขนาดเท่ากันสำหรับการต้มมันฝรั่ง
ต้มน้ำเกลือ
¡ เติมน้ำ 1 ช้อนโต๊ะและเกลือเล็กน้อยต่อมันฝรั่งต้ม 100กรัม
P07 ผัก มีฝาครอบ 0.15-1.00 ¡ ชั่งน้ำหนักผักสดที่ล้างสะอาดแล้ว
¡ หั่นผักเป็นชิ้นเล็กๆ ขนาดเท่ากัน
¡ เติมน้ำ 1 ช้อนโต๊ะต่อผัก 100กรัม
การปรุงสุกอาหารด้วยโหมดโปรแกรมอัตโนมัติ
1.
ชั่งน้ำหนักวัตถุดิบ
คุณจำเป็นต้องทราบน้ำหนักเพื่อใช้ในการปรับตั้งค่า
โปรแกรม
2.
วางวัตถุดิบลงในภาชนะที่เหมาะสำหรับใช้ในไมโครเวฟ แล้ว
ปิดฝาครอบ
3.
ใส่ปริมาณน้ำตามคำแนะนำจากผู้ผลิตที่ปรากฏบนบรรจุ
ภัณฑ์
4.
ปรับตั้งค่าโปรแกรม →
หน้า
34
5.
เมื่อโปรแกรมครบกำหนดระยะเวลา ให้คนวัตถุดิบให้เข้ากัน
อีก 1 ครั้ง
6.
พักวัตถุดิบทิ้งไว้อีกประมาณ 5 ถึง 10นาทีเพื่อปรับอุณหภูมิ
ให้สมดุล
ผลลัพธ์ที่ได้จากการปรุงสุกจะขึ้นอยู่กับคุณภาพและ
คุณลักษณะของวัตถุดิบ
10.6 โปรแกรมการปรุงสุกแบบหลายฟังก์ชัน
คุณสามารถเลือกโปรแกรมการปรุงสุกแบบหลายฟังก์ชันเพื่อใช้งานไมโครเวฟร่วมกับโหมดปิ้งย่างได้
โปรแกรม อาหาร ภาชนะ ช่วงน้ำหนัก (กก.)
P08 อาหารอบร้อนแช่แข็งที่มีความสูงไม่เกิน
3ซม.
เปิด 0.40-0.90
การปรุงอาหารให้สุกด้วยโปรแกรมการปรุงสุกแบบหลาย
ฟังก์ชัน
1.
นำวัตถุดิบออกจากบรรจุภัณฑ์
2.
ชั่งน้ำหนักวัตถุดิบ
คุณจำเป็นต้องทราบน้ำหนักเพื่อใช้ในการปรับตั้งค่า
โปรแกรม
3.
วางวัตถุดิบลงในภาชนะที่เหมาะสำหรับใช้ในไมโครเวฟ ทน
ความร้อนได้ และไม่ใหญ่จนเกินไป
4.
ปรับตั้งค่าโปรแกรม →
หน้า
34
5.
เมื่อโปรแกรมครบกำหนดระยะเวลา ให้พักวัตถุดิบทิ้งไว้อีก 5
ถึง 10นาทีเพื่อปรับอุณหภูมิให้สมดุล
th การตั้งค่าเบื้องต้น
36
11 การตั้งค่าเบื้องต้น
คุณสามารถปรับการตั้งค่าพื้นฐานของเครื่องตามความต้องการได้
11.1 ข้อมูลทั่วไปเกี่ยวกับการตั้งค่าพื้นฐาน
รายละเอียดภาพรวมเกี่ยวกับการตั้งค่าเบื้องต้นและการตั้งค่าจากโรงงานอยู่ที่นี่ การตั้งค่าเบื้องต้นขึ้นอยู่กับคุณสมบัติของเครื่อง
การตั้งค่า ตัวเลือก คำอธิบาย
เสียงปุ่ม ¡
1
¡
เปิดและปิดเสียงปุ่ม
หมายเหตุ:เสียงปุ่มจะยังคงทำงานเมื่อกดปุ่ม และ
โหมดสาธิต เปิดหรือปิดใช้งานโหมดสาธิต
หมายเหตุ:เครื่องจะปิดใช้งาน คุณจะสามารถใช้ปุ่มและหน้าจอได้ โดยปุ่มต่างๆ จะไม่ทำงาน โดย
หลักแล้วโหมดสาธิตจะเป็นประโยชน์กับตัวแทนจำหน่าย
1
การตั้งค่าจากโรงงาน (อาจจะต่างกันโดยขึ้นอยู่กับรุ่นอุปกรณ์)
11.2 การเปลี่ยนแปลงการตั้งค่าพื้นฐาน
ข้อกำหนด:เครื่องปิดใช้งานอยู่
1.
กด และ ค้างไว้สองถึงสามวินาที
a จอแสดงผลจะแสดงการตั้งค่าพื้นฐานรายการแรก
2.
กด
a ค่าปัจจุบันจะกะพริบบนจอแสดงผล
3.
ปรับตั้งค่าตามต้องการโดยใช้ปุ่มหมุนปรับ
4.
กด เพื่อเลือกใช้การตั้งค่าพื้นฐาน
5.
กด เพื่อออกจากการตั้งค่าพื้นฐาน
6.
สลับไปยังการตั้งค่าพื้นฐาน โดยใช้ปุ่มหมุนปรับ
7.
กด เพื่อแก้ไขการตั้งค่าพื้นฐาน
a ตัวเลือกที่ตั้งค่าไว้จะติดสว่างบนจอแสดงผล
8.
ปรับตั้งค่าตามต้องการโดยใช้ปุ่มหมุนปรับ
9.
กด เพื่อเลือกใช้การตั้งค่าพื้นฐาน
10.
กด เพื่อออกจากการตั้งค่าพื้นฐาน
11.
กด อีกครั้งเพื่อออกจากเมนูการตั้งค่าพื้นฐาน
เคล็ดลับคุณสามารถเปลี่ยนแปลงการตั้งค่าได้ตลอดเวลา
11.3 การเปลี่ยนแปลงระยะเวลาเสียงเตือน
คุณจะได้ยินเสียงเตือนเมื่อเครื่องปิดการทำงาน โดยสามารถ
เปลี่ยนแปลงระยะเวลาของเสียงเตือนนี้ได้
▶
กด ค้างไว้ประมาณ 6วินาที
a ระยะเวลาเสียงเตือนจะสลับระหว่างแบบสั้นและแบบยาว
a เครื่องจะใช้ระยะเวลาเสียงเตือนดังกล่าวและแสดงเวลา
11.4 การปรับตั้งค่าเวลา
หมายเหตุ:หลังจากเชื่อมต่อกระแสไฟฟ้าหรือไฟดับ สัญญาณจะ
ดังขึ้นและตัวเลขศูนย์หลายตัวจะปรากฎให้เห็นบนหน้าจอ ซึ่ง
อาจใช้เวลาประมาณ 2-3 วินาทีจนกว่าสัญญาณถัดไปจะดังขึ้น
และสามารถตั้งค่าเวลาได้
1.
กด
a เวลา 12:00 จะปรากฏให้เห็นบนหน้าจอ ไฟแสดงเหนือ
จะติดสว่าง
2.
ปรับตั้งค่าเวลาโดยใช้ปุ่มหมุนปรับ
3.
กด
11.5 การซ่อนเวลา
คุณสามารถซ่อนเวลาเพื่อลดการใช้พลังงานในโหมดสแตนด์
บายของเครื่องได้
1.
กด
2.
กด
หากต้องการให้เครื่องแสดงเวลาอีกครั้ง ให้กด ใหม่
12 การทำความสะอาดและการดูแลรักษา
ทำความสะอาดและดูแลรักษาเครื่องอย่างระมัดระวังเพื่อให้ยังคง
ใช้งานเครื่องได้ยาวนาน
12.1 ผลิตภัณฑ์ทำความสะอาด
โปรดใช้เฉพาะผลิตภัณฑ์ทำความสะอาดที่เหมาะสมเท่านั้น
คำเตือน‒ระวังไฟดูด!
ความชื้นที่แทรกซึมเข้าไปอาจเป็นสาเหตุให้เกิดไฟฟ้าดูดได้
▶ ห้ามใช้เครื่องทำความสะอาดไอน้ำหรือเครื่องทำความสะอาด
แรงดันสูงในการทำความสะอาดอุปกรณ์
ข้อควรระวัง!
ผลิตภัณฑ์ทำความสะอาดที่ไม่เหมาะสมอาจทำให้พื้นผิวของ
เครื่องเสียหายได้
▶ ห้ามใช้ผลิตภัณฑ์ทำความสะอาดที่ออกฤทธิ์รุนแรงหรือมีฤทธิ์
กัดกร่อน
▶ ห้ามใช้ผลิตภัณฑ์ทำความสะอาดที่มีแอลกอฮอล์เข้มข้น
▶ ห้ามใช้แผ่นขัดชนิดแข็งหรือฟองน้ำทำความสะอาด
▶ ห้ามใช้น้ำยาทำความสะอาดชนิดพิเศษสำหรับการทำความ
สะอาดด้วยความร้อน
▶ ใช้น้ำยาเช็ดกระจก ที่ขูดกระจก หรือผลิตภัณฑ์ดูแลรักษาส
แตนเลสสตีลต่อเมื่อมีการแนะนำผลิตภัณฑ์ดังกล่าวในคู่มือ
การทำความสะอาดสำหรับชิ้นส่วนที่เกี่ยวข้องเท่านั้น
ผ้าฟองน้ำชิ้นใหม่อาจมีสารตกค้างจากการผลิต
▶ ล้างผ้าฟองน้ำชิ้นใหม่ให้สะอาดก่อนใช้งาน

การทำความสะอาดและการดูแลรักษา th
37
คุณสามารถศึกษาชนิดของผลิตภัณฑ์ทำความสะอาดที่เหมาะกับ
แต่ละพื้นผิวและชิ้นส่วนได้จากคำแนะนำในการทำความสะอาด
แยกตามชิ้นส่วนอุปกรณ์
12.2 การทำความสะอาดเครื่อง
โปรดทำความสะอาดเครื่องตามวิธีการที่ระบุไว้เพื่อป้องกันไม่ให้
ชิ้นส่วนและพื้นผิวต่างๆ ได้รับความเสียหายจากการทำความ
สะอาดที่ผิดวิธีหรือจากการใช้ผลิตภัณฑ์ทำความสะอาดที่ไม่
เหมาะสม
คำเตือน‒ระวังความร้อน!
เครื่องและชิ้นส่วนตัวเครื่องที่สัมผัสได้จะร้อนขึ้นในระหว่างใช้
งาน
▶ ควรใช้ความระมัดระวังเพื่อหลีกเลี่ยงการสัมผัสกับตัวกำเนิด
ความร้อน
▶ เด็กอายุต่ำกว่า 8 ปีควรอยู่ห่างจากตัวเครื่อง
คำเตือน‒ระวังไฟไหม้!
เศษอาหารที่หลงเหลืออยู่ คราบไขมัน หรือน้ำซอสอาจเกิดการ
ติดไฟได้
▶ ขจัดเศษสิ่งสกปรกออกจากช่องอบอาหาร ตัวกำเนิดความ
ร้อน และอุปกรณ์เสริมก่อนการใช้งาน
คำเตือน‒ระวังการบาดเจ็บ!
กระจกฝาเครื่องที่มีรอยขีดข่วนอาจแตกร้าวได้
▶ ห้ามใช้น้ำยาทำความสะอาดที่มีฤทธิ์กัดกร่อนรุนแรงหรือที่ขูด
โลหะมีคมในการทำความสะอาดกระจกฝาเครื่อง เนื่องจาก
อาจทำให้พื้นผิวเกิดรอยขีดข่วน
1.
ปฏิบัติตามคำแนะนำเกี่ยวกับผลิตภัณฑ์ทำความสะอาด
→
หน้า
36
2.
ปฏิบัติตามคำแนะนำเกี่ยวกับการทำความสะอาดส่วนประกอบ
ของเครื่องหรือพื้นผิว
3.
หากไม่มีคำแนะนำอื่นๆ ระบุไว้:
‒ ทำความสะอาดส่วนประกอบของเครื่องโดยใช้น้ำสบู่อุ่น
และผ้าเช็ด
‒ ใช้ผ้านุ่มเช็ดให้แห้งอีกครั้ง
12.3 การทำความสะอาดช่องอบอาหาร
ข้อควรระวัง!
การทำความสะอาดอย่างไม่ถูกวิธีอาจทำให้ช่องอบอาหารได้รับ
ความเสียหาย
▶ ห้ามใช้สเปรย์ทำความสะอาดเตาอบ น้ำยาขัด หรือผลิตภัณฑ์
ทำความสะอาดเตาอบอื่นๆ ที่มีฤทธิ์รุนแรง
1.
ปฏิบัติตามคำแนะนำเกี่ยวกับผลิตภัณฑ์ทำความสะอาด
→
หน้า
36
2.
ทำความสะอาดโดยใช้น้ำสบู่อุ่นหรือน้ำผสมน้ำส้มสายชู
3.
ใช้น้ำยาทำความสะอาดเตาอบหากมีคราบสกปรกมาก
ใช้น้ำยาทำความสะอาดเตาอบในช่องอบอาหารที่เย็นลงแล้ว
เท่านั้น
เคล็ดลับหากต้องการขจัดกลิ่นไม่พึงประสงค์ ให้อุ่นน้ำใน
ถ้วยให้ร้อนพร้อมผสมน้ำมะนาวลงไป 2-3 หยดโดยใช้กำลัง
ไฟไมโครเวฟสูงสุดเป็นเวลา 1 ถึง 2นาที ใส่ช้อนลงใน
ภาชนะเสมอเพื่อป้องกันไม่ให้เกิดสภาวะอุณหภูมิสูงเกิน
จุดเดือด
4.
เช็ดทำความสะอาดช่องอบอาหารโดยใช้ผ้านุ่ม
5.
เปิดฝาเครื่องทิ้งไว้เพื่อปล่อยให้ช่องอบอาหารแห้ง
การทำความสะอาดจานหมุน
1.
ปฏิบัติตามคำแนะนำเกี่ยวกับผลิตภัณฑ์ทำความสะอาด
→
หน้า
36
2.
ถอดจานหมุนออก
3.
ทำความสะอาดจานหมุนโดยใช้น้ำสบู่อุ่นและผ้าเช็ดเนื้อนุ่ม
4.
ใช้ผ้านุ่มเช็ดให้แห้ง
5.
วางจานหมุนกลับเข้าที่
ตรวจเช็คว่าจานหมุนล็อคเข้าที่อย่างถูกต้อง
12.4 การทำความสะอาดส่วนหน้าตัวเครื่อง
ข้อควรระวัง!
การทำความสะอาดอย่างไม่ถูกวิธีอาจทำให้ส่วนหน้าตัวเครื่องได้
รับความเสียหาย
▶ ห้ามใช้น้ำยาเช็ดกระจก ที่ขูดโลหะ หรือที่ขูดกระจกในการ
ทำความสะอาด
▶ เช็ดคราบหินปูน คราบมัน คราบแป้ง และคราบโปรตีนออก
ทันทีเพื่อป้องกันไม่ให้เกิดการกัดกร่อนบริเวณที่เป็นสแตน
เลสสตีลหน้าตัวเครื่อง
▶ ใช้ผลิตภัณฑ์ดูแลรักษาสแตนเลสสตีลโดยเฉพาะสำหรับพื้น
ผิวร้อนในการทำความสะอาดพื้นผิวที่เป็นสแตนเลสสตีล
1.
ปฏิบัติตามคำแนะนำเกี่ยวกับผลิตภัณฑ์ทำความสะอาด
→
หน้า
36
2.
ทำความสะอาดส่วนหน้าตัวเครื่องโดยใช้น้ำสบู่อุ่นและผ้าเช็ด
หมายเหตุ:ส่วนหน้าตัวเครื่องอาจมีสีแตกต่างกันเล็กน้อยอัน
เนื่องมาจากวัสดุที่ต่างกัน เช่นกระจก พลาสติก หรือโลหะ
3.
สำหรับส่วนหน้าตัวเครื่องที่เป็นสแตนเลสสตีล ให้ใช้ผ้านุ่มซับ
ผลิตภัณฑ์ดูแลรักษาสแตนเลสสตีลเช็ดเคลือบบางๆ
ผลิตภัณฑ์ดูแลรักษาสแตนเลสสตีลสามารถสั่งซื้อได้จากฝ่าย
บริการลูกค้าหรือร้านค้าปลีกทั่วไป
4.
ใช้ผ้านุ่มเช็ดให้แห้ง
12.5 การทำความสะอาดแผงควบคุม
ข้อควรระวัง!
การทำความสะอาดอย่างไม่ถูกวิธีอาจทำให้แผงควบคุมได้รับ
ความเสียหาย
▶ ห้ามเช็ดแผงควบคุมจนเปียกโดยเด็ดขาด
1.
ปฏิบัติตามคำแนะนำเกี่ยวกับผลิตภัณฑ์ทำความสะอาด
→
หน้า
36
2.
ทำความสะอาดแผงควบคุมโดยใช้ผ้าไมโครไฟเบอร์หรือผ้า
นุ่มชุบน้ำหมาดๆ
3.
ใช้ผ้านุ่มเช็ดให้แห้ง
12.6 การทำความสะอาดอุปกรณ์เสริม
1.
ปฏิบัติตามคำแนะนำเกี่ยวกับผลิตภัณฑ์ทำความสะอาด
→
หน้า
36
2.
เช็ดเศษอาหารที่ไหม้ติดอยู่โดยใช้ผ้าเช็ดชุบน้ำหมาดๆ และ
น้ำสบู่อุ่น
3.
ทำความสะอาดอุปกรณ์เสริมโดยใช้น้ำสบู่อุ่นและผ้าเช็ดหรือ
แปรงล้างจาน
4.
ทำความสะอาดตะแกรงโดยใช้น้ำยาทําความสะอาดสแตน
เลสสตีลหรือล้างในเครื่องล้างจาน
ใช้ฝอยขัดสแตนเลสสตีลหรือน้ำยาทำความสะอาดเตาอบ
หากมีคราบสกปรกมาก
5.
ใช้ผ้านุ่มเช็ดให้แห้ง
12.7 การทำความสะอาดกระจกฝาเครื่อง
ข้อควรระวัง!
การทำความสะอาดอย่างไม่ถูกวิธีอาจทำให้กระจกฝาเครื่องได้
รับความเสียหาย
▶ ห้ามใช้ที่ขูดกระจก
1.
ปฏิบัติตามคำแนะนำเกี่ยวกับผลิตภัณฑ์ทำความสะอาด
→
หน้า
36
2.
ทำความสะอาดกระจกฝาเครื่องโดยใช้ผ้าเช็ดชุบน้ำหมาดๆ
และน้ำยาเช็ดกระจก
หมายเหตุ:เงาที่กระจกฝาเครื่องซึ่งมีลักษณะเป็นริ้วเกิดขึ้น
จากการสะท้อนของแสงไฟภายในช่องอบอาหาร
th การแก้ไขข้อขัดข้อง
38
3.
ใช้ผ้านุ่มเช็ดให้แห้ง
12.8 การทำความสะอาดเสริม
การทำความสะอาดเสริมคืออีกทางเลือกหนึ่งที่รวดเร็วในการ
ทำความสะอาดช่องอบอาหารเป็นครั้งคราว การทำความสะอาด
เสริมจะช่วยสลายคราบสกปรกโดยอาศัยการระเหยของน้ำผสม
น้ำสบู่ เพื่อให้สามารถเช็ดคราบสกปรกออกได้ง่ายขึ้นหลังจาก
นั้น
ปรับตั้งค่าฟังก์ชันทำความสะอาด
1.
เตรียมถ้วยใส่น้ำและหยดน้ำยาล้างจานลงไป 1-2 หยด
2.
ใส่ช้อนลงในถ้วยเพื่อป้องกันไม่ให้เกิดสภาวะอุณหภูมิสูงเกิน
จุดเดือด
3.
วางถ้วยไว้ตรงกลางช่องอบอาหาร
4.
ปรับตั้งกำลังไฟไมโครเวฟไว้ที่ 600 วัตต์
5.
ปรับตั้งระยะเวลา 3 นาที
6.
เริ่มการทำงานไมโครเวฟ
7.
หลังจากครบกำหนดระยะเวลา ให้ปิดฝาเครื่องทิ้งไว้อีก
3นาที
8.
เช็ดทำความสะอาดช่องอบอาหารโดยใช้ผ้านุ่ม
9.
เปิดฝาเครื่องทิ้งไว้เพื่อปล่อยให้ช่องอบอาหารแห้ง
13 การแก้ไขข้อขัดข้อง
คุณสามารถแก้ไขข้อขัดข้องเล็ก ๆ น้อย ๆ ที่ตัวอุปกรณ์ได้ด้วย
ตัวเอง ใช้ข้อมูลเกี่ยวกับการแก้ไขข้อขัดข้องก่อนที่จะติดตั้งฝ่าย
บริการลูกค้า ด้วยการนี้ คุณสามารถหลีกเลี่ยงค่าใช้จ่ายที่ไม่
จำเป็น
คำเตือน‒ระวังการบาดเจ็บ!
การซ่อมแซมที่ไม่ได้มาตรฐานเป็นอันตราย
▶ อนุญาตให้เฉพาะบุคลากรผู้เชี่ยวชาญที่ผ่านการอบรมดำเนิน
การซ่อมแซมเครื่อง
▶ หากอุปกรณ์ชำรุด ให้ติดต่อฝ่ายบริการลูกค้า
13.1 ฟังก์ชันการทำงานขัดข้อง
ความผิดปกติ สาเหตุและวิธีแก้ปัญหา
อุปกรณ์ไม่ทำงาน ไม่ได้เสียบปลั๊กเสียบของสายเชื่อมต่อเข้ากับแหล่งจ่ายไฟ
▶
ให้เชื่อมต่ออุปกรณ์เข้ากับระบบไฟฟ้า
เบรกเกอร์ในตู้ควบคุมระบบไฟฟ้าถูกกระตุ้นการทำงาน
▶
ตรวจสอบฟิวส์ในกล่องฟิวส์
แหล่งจ่ายกระแสไฟดับ
▶
ตรวจสอบว่าระบบแสงสว่างภายในห้องหรืออุปกรณ์อื่นทำงานหรือไม่
ฟังก์ชันการทำงานขัดข้อง
1.
ปิดเบรกเกอร์ในตู้ควบคุมระบบไฟฟ้า
2.
เปิดเบรกเกอร์อีกครั้งหลังจากเวลาผ่านไปประมาณ 10วินาที
a หากเกิดความผิดปกติครั้งเดียว ข้อความแจ้งเตือนจะดับลง
3.
ถ้าข้อความนี้ยังคงแสดงขึ้นอีก กรุณาติดต่อฝ่ายบริการหลังการขาย เมื่อทำการติดต่อ โปรดระบุ
ข้อความแสดงข้อผิดพลาดอย่างเจาะจง
→"
ฝ่ายบริการลูกค้า
",
หน้า
39
ฝาเครื่องปิดไม่สนิท
▶
ตรวจเช็คว่ามีเศษอาหารหรือสิ่งแปลกปลอมติดอยู่ที่ฝาเครื่องหรือไม่
อาหารร้อนช้ากว่าปกติ ปรับตั้งค่ากำลังไฟไมโครเวฟไว้ต่ำเกินไป
▶
โปรดปรับตั้งค่ากำลังไฟไมโครเวฟให้สูงขึ้น →
หน้า
33
ใส่อาหารเข้าไปในเครื่องเป็นปริมาณมากกว่าปกติ
▶
ปรับตั้งค่าระยะเวลาให้นานขึ้น
ปริมาณที่เพิ่มขึ้นอีกเท่าจำเป็นต้องใช้เวลานานขึ้นเป็นเท่าตัว
อาหารเย็นกว่าปกติ
▶
พลิกอาหารกลับด้านหรือคนให้เข้ากันในระหว่างนั้น
จานหมุนมีรอยแตกหรือ
รอยขีดข่วน
มีคราบสกปรกหรือสิ่งแปลกปลอมในบริเวณเฟืองจานหมุน
▶
โปรดทำความสะอาดวงแหวนและร่องฐานภายในช่องอบอาหาร
โหมดไมโครเวฟหยุดการ
ทำงาน
เครื่องเกิดความขัดข้อง
▶
หากเกิดความขัดข้องดังกล่าวซ้ำอีกครั้ง โปรดโทรติดต่อฝ่ายบริการลูกค้า
เครื่องไม่ทำงาน โดยมี
ระยะเวลาปรากฏบนหน้า
จอ
แผงปรับตั้งถูกสั่งงานโดยไม่ได้ตั้งใจ
▶
กดปุ่ม
การกำจัด th
39
ความผิดปกติ สาเหตุและวิธีแก้ปัญหา
เครื่องไม่ทำงาน โดยมี
ระยะเวลาปรากฏบนหน้า
จอ
ไม่ได้กดปุ่ม หลังการปรับตั้งค่า
▶
กดปุ่ม หรือลบการตั้งค่าโดยกดปุ่ม
เลขศูนย์ 3 ตัวติดสว่าง
บนหน้าจอ
แหล่งจ่ายกระแสไฟดับ
▶
ปรับตั้งค่าเวลาใหม่
→"
การเริ่มใช้งานเครื่องเป็นครั้งแรก
",
หน้า
31
ตัวอักษร ปรากฏบน
หน้าจอ
โหมดสาธิตทำงานอยู่
▶
ปิดใช้งานโหมดสาธิต
→"
การตั้งค่าเบื้องต้น
",
หน้า
36
ข้อความแจ้งเตือน
ปรากฏบนหน้าจอ
เกิดความผิดปกติในระบบเปิดฝาเครื่องอัตโนมัติ
1.
ปิดเครื่อง
2.
รอ 10นาที
3.
เปิดเครื่องใหม่อีกครั้ง
▶
หากเกิดความขัดข้องดังกล่าวซ้ำอีกครั้ง โปรดโทรติดต่อฝ่ายบริการลูกค้า
14 การกำจัด
14.1 กำจัดอุปกรณ์เก่า
สามารถนำวัตถุดิบที่มีมูลค่ากลับมาใช้ซ้ำได้อีกครั้งด้วยการกำจัด
ตามข้อบังคับที่สอดคล้องกับการรักษาสิ่งแวดล้อม
▶
กำจัดเครื่องทิ้งด้วยวิธีที่เป็นมิตรต่อสิ่งแวดล้อม
โปรดสอบถามข้อมูลการกำจัดขยะปัจจุบันจากผู้จัดจำหน่าย
ของคุณหรือจากเทศบาล
อุปกรณ์นี้ได้มาตรฐานตาม European
Guideline 2012/19/EU ว่าด้วยการทำ
เครื่องหมายอุปกรณ์ไฟฟ้า-อิเล็กทรอนิกส์
เก่า (การกำจัดทิ้งอุปกรณ์ไฟฟ้า-
อิเล็กทรอนิกส์ – WEEE)
ซึ่งใช้เป็นแนวทางสำหรับสหภาพยุโรปใน
การยกเลิกการใช้งานและการใช้งาน
อุปกรณ์ไฟฟ้า-อิเล็กทรอนิกส์เก่าอย่างถูก
ต้อง
15 ฝ่ายบริการลูกค้า
คุณสามารถขอรับข้อมูลรายละเอียดเกี่ยวกับระยะเวลาการรับ
ประกันและเงื่อนไขการรับประกันในประเทศของคุณได้จากฝ่าย
บริการลูกค้า ตัวแทนจำหน่าย หรือบนเว็บไซต์ของเรา
เมื่อติดต่อฝ่ายบริการลูกค้า กรุณาแจ้งหมายเลขผลิตภัณฑ์ (E-
Nr.) และหมายเลขการผลิต (FD) ของเครื่องแก่ฝ่ายบริการลูกค้า
ข้อมูลติดต่อฝ่ายบริการลูกค้าอยู่ในไดเร็กทอรี่ฝ่ายบริการลูกค้าที่
แนบมาหรือบนเว็บไซต์ของเรา
ผลิตภัณฑ์นี้มีไฟส่องสว่างระดับชั้นประสิทธิภาพพลังงานระดับ G
สามารถซื้อไฟส่องสว่างเป็นอะไหล่ได้และต้องให้ช่างผู้
เชี่ยวชาญดำเนินการเปลี่ยนเท่านั้น
15.1 หมายเลขผลิตภัณฑ์ (E-Nr.) และหมายเลขการ
ผลิต (FD)
สามารถดูหมายเลขผลิตภัณฑ์ (E-Nr.) และหมายเลขการผลิต
(FD) ได้บนป้ายกำกับรุ่นของเครื่อง
สามารถดูป้ายกำกับรุ่นพร้อมหมายเลขดังกล่าวได้เมื่อเปิดฝาของ
อุปกรณ์ออก
คุณสามารถจดบันทึกข้อมูลไว้เพื่อที่จะหาเจอข้อมูลอุปกรณ์ของ
คุณและหมายเลขโทรศัพท์ของฝ่ายบริการลูกค้าได้อย่างรวดเร็ว
อีกครั้ง

th วิธีการทำงาน
40
16 วิธีการทำงาน
เนื้อหาส่วนนี้จะมีข้อมูลการตั้งค่าที่เหมาะสมที่สุดสำหรับอาหาร
ชนิดต่างๆ รวมถึงอุปกรณ์เสริมและภาชนะที่ดีที่สุด พร้อมคำ
แนะนำที่ปรับแต่งมาให้เหมาะกับเครื่องของคุณโดยเฉพาะ
16.1 วิธีการใช้งานที่เหมาะสม
คุณสามารถศึกษาคำแนะนำแบบทีละขั้นตอนเพื่อให้สามารถใช้
งานข้อแนะนำการตั้งค่าให้เกิดประสิทธิภาพสูงสุดได้จากส่วนนี้
โดยคุณจะได้รับคำแนะนำเกี่ยวกับอาหารหลากหลายเมนูพร้อม
ข้อมูลและเคล็ดลับต่างๆ เพื่อให้สามารถใช้งานและตั้งค่าเครื่อง
ได้อย่างเหมาะสมที่สุด
คำเตือน‒ระวังความร้อน!
อาหารที่ผ่านการอุ่นร้อนจะคายความร้อนออกมา ภาชนะจึงอาจ
ร้อนขึ้น
▶ นำภาชนะหรืออุปกรณ์เสริมออกจากช่องอบอาหารโดยใช้ผ้า
จับของร้อนเสมอ
หมายเหตุ:ข้อมูลเวลาที่ปรากฏในตารางถือเป็นค่าอ้างอิงโดยขึ้น
อยู่กับคุณภาพและคุณลักษณะของวัตถุดิบ
1.
นำภาชนะที่ไม่จำเป็นออกจากช่องอบอาหารก่อนการใช้งาน
2.
เลือกเมนูอาหารจากข้อแนะนำการตั้งค่า
3.
ใส่อาหารในภาชนะที่เหมาะสม
→"
ภาชนะและอุปกรณ์เสริมที่เหมาะสำหรับใช้ใน
ไมโครเวฟ
",
หน้า
32
4.
วางภาชนะลงบนจานหมุน
5.
ตั้งค่าเครื่องให้สอดคล้องตามข้อแนะนำการตั้งค่า
ข้อแนะนำการตั้งค่ามักจะมีช่วงเวลาต่างๆ ระบุไว้ ให้ปรับตั้ง
ค่าโดยเริ่มจากการใช้ระยะเวลาที่สั้นกว่า แล้วจึงขยายระยะ
เวลาให้นานขึ้นตามความจำเป็น หากตารางแสดงค่ากำลังไฟ
ไมโครเวฟและระยะเวลา 2 ส่วน ให้ปรับตั้งค่ากำลังไฟ
ไมโครเวฟและระยะเวลาส่วนแรกก่อน แล้วจึงปรับตั้งค่าส่วน
ที่สองหลังจากสัญญาณปรากฏขึ้น
เคล็ดลับในกรณีที่คุณต้องการประกอบอาหารในปริมาณที่แตก
ต่างจากที่ปรากฏในตาราง ให้ตั้งค่าระยะเวลาให้นานขึ้น
ประมาณสองเท่าสำหรับปริมาณอาหารที่เพิ่มมากขึ้นสองเท่า
16.2 เคล็ดลับในการละลายน้ำแข็งและการอุ่น
โปรดศึกษาเคล็ดลับต่อไปนี้เพื่อผลลัพธ์ที่ดีในการละลายน้ำแข็ง
และการอุ่นอาหาร
ความต้องการ เคล็ดลับ
ต้องการให้น้ำแข็งละลาย
ทำให้อาหารร้อน หรือสุกหลัง
จากระยะเวลาที่ตั้งไว้
ปรับตั้งระยะเวลาให้นานขึ้น
อาหารในปริมาณที่มากขึ้น
และสูงกว่าจำเป็นต้องใช้ระยะ
เวลานานขึ้น
ความต้องการ เคล็ดลับ
ต้องการให้อาหารบริเวณขอบ
ภาชนะไม่ร้อนเกินไปและสุก
ตรงกลางหลังจากระยะเวลาที่
ตั้งไว้
¡ คนอาหารให้เข้ากันใน
ระหว่างนั้น
¡ ปรับตั้งค่ากำลังไฟ
ไมโครเวฟให้ต่ำลงและ
เพิ่มระยะเวลาให้นานขึ้น
ต้องการให้เนื้อไก่หรือเนื้อสัตว์
ไม่เพียงแค่เริ่มสุกด้านนอก
โดยที่ตรงกลางยังเป็นน้ำแข็ง
อยู่หลังจากการละลายน้ำแข็ง
¡ ปรับตั้งค่ากำลังไฟ
ไมโครเวฟให้ต่ำลง
¡ พลิกวัตถุดิบที่นำมาละลาย
น้ำแข็งให้กลับด้านหลายๆ
ครั้งหากมีปริมาณมาก
ต้องการให้อาหารไม่แห้งจน
เกินไป
¡ ปรับตั้งค่ากำลังไฟ
ไมโครเวฟให้ต่ำลง
¡ ปรับตั้งค่าระยะเวลาให้สั้น
ลง
¡ ปิดครอบอาหาร
¡ เพิ่มปริมาณของเหลวลงใน
อาหาร
16.3 การละลายน้ำแข็ง
คุณสามารถใช้อุปกรณ์เครื่องนี้เพื่อละลายน้ำแข็งอาหารแช่แข็ง
ได้
การละลายน้ำแข็งอาหาร
1.
ใส่วัตถุดิบแช่แข็งในภาชนะแบบเปิด แล้ววางลงบนจานหมุน
คุณสามารถใช้แผ่นฟอยล์อะลูมิเนียมขนาดเล็กปิดคลุมส่วนที่
บอบบาง เช่นน่องไก่และปีกไก่ หรือส่วนขอบที่เป็นไขมัน
ของชิ้นเนื้ออบ โดยแผ่นฟอยล์ต้องไม่สัมผัสกับผนังเตาอบ
2.
เริ่มการทำงาน
คุณสามารถนำแผ่นฟอยล์อะลูมิเนียมออกได้หลังจากเวลา
การละลายน้ำแข็งผ่านไปครึ่งหนึ่ง
3.
หมายเหตุ:การละลายน้ำแข็งเนื้อสัตว์และเนื้อไก่จะทำให้เกิด
ของเหลว
นำของเหลวออกขณะพลิกกลับด้าน และห้ามนำกลับมาใช้
ใหม่หรือปล่อยให้สัมผัสกับวัตถุดิบอื่นๆ โดยเด็ดขาด
4.
พลิกอาหารกลับด้านหรือคนให้เข้ากัน 1-2 ครั้งในระหว่าง
นั้น
สำหรับวัตถุดิบชิ้นใหญ่ ให้พลิกกลับด้านหลายๆ ครั้ง
5.
เพื่อให้อุณหภูมิเกิดความสมดุล ให้พักอาหารที่ผ่านการ
ละลายน้ำแข็งทิ้งไว้ที่อุณหภูมิห้องประมาณ 10 ถึง 20นาที
สำหรับเนื้อไก่ คุณสามารถนำเครื่องในออกได้ และสำหรับ
เนื้อสัตว์ คุณสามารถประกอบอาหารต่อได้แม้ส่วนแกนจะยัง
คงเป็นน้ำแข็งอยู่

วิธีการทำงาน th
41
การละลายน้ำแข็งด้วยไมโครเวฟ
โปรดศึกษาข้อแนะนำการตั้งค่าต่อไปนี้สำหรับการละลายน้ำแข็งอาหารแช่แข็งด้วยไมโครเวฟ
อาหาร น้ำหนัก(กรัม) กำลังไฟไมโครเวฟ(วัตต์) ระยะเวลา(นาที)
เนื้อสัตว์เต็มชิ้นไม่ว่าจะเป็นเนื้อวัว เนื้อโค หรือเนื้อ
หมู ทั้งแบบมีและไม่มีกระดูก
800 1. 180
2. 90
1. 15
2. 10-20
เนื้อสัตว์เต็มชิ้นไม่ว่าจะเป็นเนื้อวัว เนื้อโค หรือเนื้อ
หมู ทั้งแบบมีและไม่มีกระดูก
1000 1. 180
2. 90
1. 20
2. 15-25
เนื้อสัตว์เต็มชิ้นไม่ว่าจะเป็นเนื้อวัว เนื้อโค หรือเนื้อ
หมู ทั้งแบบมีและไม่มีกระดูก
1500 1. 180
2. 90
1. 30
2. 20-30
เนื้อสัตว์เป็นชิ้นๆ หรือเป็นแผ่นไม่ว่าจะเป็นเนื้อวัว
เนื้อโค หรือเนื้อหมู
200 1. 180
2. 90
1. 2
1
2. 4-6
เนื้อสัตว์เป็นชิ้นๆ หรือเป็นแผ่นไม่ว่าจะเป็นเนื้อวัว
เนื้อโค หรือเนื้อหมู
500 1. 180
2. 90
1. 5
1
2. 5-10
เนื้อสัตว์เป็นชิ้นๆ หรือเป็นแผ่นไม่ว่าจะเป็นเนื้อวัว
เนื้อโค หรือเนื้อหมู
800 1. 180
2. 90
1. 8
1
2. 10-15
เนื้อบดแบบผสม
2, 3
200 90 10
4
เนื้อบดแบบผสม
2, 3
500 1. 180
2. 90
1. 5
4
2. 10-15
เนื้อบดแบบผสม
2, 3
800 1. 180
2. 90
1. 8
4
2. 10-20
เนื้อไก่หรือชิ้นส่วนของไก่
5
600 1. 180
2. 90
1. 8
2. 10-20
เนื้อไก่หรือชิ้นส่วนของไก่
5
1200 1. 180
2. 90
1. 15
2. 10-20
ฟิเลต์ปลา เนื้อปลาชุบเกล็ดขนมปัง หรือเนื้อปลาชนิด
แผ่น
5
400 1. 180
2. 90
1. 5
2. 10-15
ผัก เช่นถั่วลันเตา 300 180 10-15
ผลไม้ เช่นราสเบอร์รี่
5
300 180 7-10
6
ผลไม้ เช่นราสเบอร์รี่
5
500 1. 180
2. 90
1. 8
6
2. 5-10
ละลายเนย
7
125 1. 180
2. 90
1. 1
2. 2-3
ละลายเนย
7
250 1. 180
2. 90
1. 1
2. 3-4
ขนมปังเต็มชิ้น 500 1. 180
2. 90
1. 6
2. 5-10
ขนมปังเต็มชิ้น 1000 1. 180
2. 90
1. 12
2. 10-20
ขนมเค้กเนื้อแห้ง เช่นสปันจ์เค้ก
8, 9
500 90 10-15
ขนมเค้กเนื้อแห้ง เช่นสปันจ์เค้ก
8, 9
750 1. 180
2. 90
1. 5
2. 10-15
ขนมเค้กเนื้อฉ่ำ เช่นเค้กผลไม้ ชีสเค้ก
8
500 1. 180
2. 90
1. 5
2. 15-20
ขนมเค้กเนื้อฉ่ำ เช่นเค้กผลไม้ ชีสเค้ก
8
750 1. 180
2. 90
1. 7
2. 15-20
1
แยกชิ้นส่วนที่ผ่านการละลายน้ำแข็งออกจากกันขณะพลิกกลับด้าน
2
แช่แข็งอาหารในแนวระนาบ
3
นำเนื้อส่วนที่ละลายแล้วออก
4
พลิกอาหารกลับด้านหลายๆ ครั้ง
5
แยกชิ้นที่ละลายแล้วออกจากกัน
6
คนอาหารให้เข้ากันอย่างระมัดระวังในระหว่างนั้น
7
นำบรรจุภัณฑ์ออกทั้งหมด
8
ละลายเฉพาะเค้กที่ไม่มีน้ำตาลไอซิ่ง วิปครีม เจลาติน หรือคัสตาร์ด
9
แยกชิ้นเค้กออกจากกัน
th วิธีการทำงาน
42
16.4 การอุ่นอาหาร
คุณสามารถใช้อุปกรณ์เครื่องนี้เพื่ออุ่นอาหารได้
การอุ่นอาหาร
คำเตือน‒ระวังความร้อน!
อาหารที่ผ่านการอุ่นร้อนจะคายความร้อนออกมา ภาชนะจึงอาจ
ร้อนขึ้น
▶ นำภาชนะหรืออุปกรณ์เสริมออกจากช่องอบอาหารโดยใช้ผ้า
จับของร้อนเสมอ
คำเตือน‒ระวังความร้อนลวก!
การอุ่นร้อนของเหลวอาจส่งผลให้เกิดสภาวะอุณหภูมิสูงเกิน
จุดเดือด ซึ่งหมายความว่าอุณหภูมิจะสูงขึ้นถึงจุดเดือดโดยไม่มี
ฟองอากาศลอยขึ้นดังเช่นทั่วไป โปรดใช้ความระมัดระวัง หาก
ภาชนะเกิดการสั่นสะเทือนแม้เพียงเล็กน้อย ของเหลวที่มีความ
ร้อนอาจเดือดและกระเด็นออกมาอย่างกะทันหันได้
▶ ใส่ช้อนในภาชนะทุกครั้งที่ทำการอุ่นร้อน วิธีการนี้จะช่วย
หลีกเลี่ยงไม่ให้เกิดสภาวะอุณหภูมิสูงเกินจุดเดือด
ข้อควรระวัง!
โลหะที่สัมผัสกับผนังช่องอบอาหารจนเกิดประกายไฟอาจทำให้
ตัวเครื่องหรือกระจกฝาเครื่องด้านในได้รับความเสียหาย
▶ โลหะ เช่นช้อนในแก้ว ต้องวางห่างจากผนังช่องอบอาหาร
และด้านในฝาเครื่องอย่างน้อย 2 ซม.
1.
นำอาหารสำเร็จรูปออกจากบรรจุภัณฑ์ แล้วใส่ลงในภาชนะที่
เหมาะสำหรับใช้ในไมโครเวฟ
2.
กระจายอาหารในแนวราบให้ทั่วภาชนะ
3.
ปิดคลุมอาหารโดยใช้ฝาครอบที่เข้ากัน จาน หรือฟอยล์
สำหรับใช้กับไมโครเวฟโดยเฉพาะ
4.
เริ่มการทำงาน
5.
พลิกอาหารกลับด้านหรือคนให้เข้ากันหลายๆ ครั้งในระหว่าง
นั้น
ส่วนประกอบอาหารที่แตกต่างกันอาจร้อนขึ้นภายในระยะ
เวลาที่แตกต่างกัน
6.
ตรวจสอบอุณหภูมิ
7.
เพื่อให้อุณหภูมิเกิดความสมดุล ให้พักอาหารที่ผ่านการอุ่นทิ้ง
ไว้ที่อุณหภูมิห้อง 2 ถึง 5นาที
การอุ่นอาหารแช่แข็งด้วยไมโครเวฟ
โปรดศึกษาข้อแนะนำการตั้งค่าต่อไปนี้สำหรับการอุ่นอาหารแช่แข็งด้วยไมโครเวฟ
อาหาร น้ำหนัก(กรัม) กำลังไฟไมโครเวฟ(วัตต์) ระยะเวลา(นาที)
เมนูอาหาร อาหารจานเดียว อาหารสำเร็จรูปที่มีส่วน
ประกอบ 2-3 อย่าง
300-400 600 8-11
ซุป 400 600 8-10
สตู 500 600 10-13
เนื้อแผ่นหรือเนื้อชิ้นในน้ำซอส เช่นกูลาช 500 600 12-17
1
อาหารอบร้อน เช่นลาซานญา คาเนลโลนี 450 600 10-15
เครื่องเคียง เช่นข้าว เส้นพาสต้า
2
250 600 2-5
เครื่องเคียง เช่นข้าว เส้นพาสต้า
2
500 600 8-10
ผัก เช่นถั่วลันเตา บร็อคโคลี แครอท
3
300 600 8-10
ผัก เช่นถั่วลันเตา บร็อคโคลี แครอท
3
600 600 14-17
ครีมผักโขม
4
450 600 11-16
1
แยกชิ้นเนื้อออกจากกันขณะคน
2
เติมน้ำลงในอาหารเล็กน้อย
3
เติมน้ำให้ท่วมก้นภาชนะ
4
ปรุงอาหารให้สุกโดยไม่เติมน้ำ
วิธีการทำงาน th
43
การอุ่นด้วยไมโครเวฟ
โปรดศึกษาข้อแนะนำการตั้งค่าต่อไปนี้สำหรับการอุ่นด้วยไมโครเวฟ
อาหาร ปริมาณ กำลังไฟไมโครเวฟ(วัตต์) ระยะเวลา(นาที)
เครื่องดื่ม
1
200มล. 800 2-3
2, 3
เครื่องดื่ม
1
500มล. 800 3-4
2, 3
อาหารสำหรับทารก เช่นขวดนม
4
50มล. 360 ประมาณ 0.5
5, 6
อาหารสำหรับทารก เช่นขวดนม
4
100มล. 360 ประมาณ 1
5, 6
อาหารสำหรับทารก เช่นขวดนม
4
200มล. 360 1.5
5, 6
ซุป 1 ถ้วย 200กรัม 600 2-3
ซุป 2 ถ้วย 400กรัม 600 4-5
เมนูอาหาร อาหารจานเดียว อาหารสำเร็จรูปที่มีส่วน
ประกอบ 2-3 อย่าง
350-500กรัม 600 4-8
เนื้อสัตว์ในน้ำซอส
7
500กรัม 600 8-11
สตู 400กรัม 600 6-8
สตู 800กรัม 600 8-11
ผักสำหรับรับประทาน 1 คน
8
150กรัม 600 2-3
ผักสำหรับรับประทาน 2 คน
8
300กรัม 600 3-5
1
ใส่ช้อนลงในแก้ว
2
ห้ามไม่ให้เครื่องดื่มแอลกอฮอล์มีความร้อนสูงเกินไป
3
หมั่นตรวจเช็คอาหารในระหว่างนั้น
4
อุ่นอาหารสำหรับเด็กทารกโดยไม่ใส่จุกป้อนอาหารหรือฝาปิด
5
เขย่าอาหารให้เข้ากันหลังจากการอุ่นร้อนเสมอ
6
ตรวจเช็คอุณหภูมิอย่างเคร่งครัด
7
แยกชิ้นเนื้อออกจากกัน
8
เติมน้ำลงในอาหารเล็กน้อย
16.5 การปรุงสุก
คุณสามารถใช้อุปกรณ์เครื่องนี้เพื่อปรุงอาหารให้สุกได้
การปรุงอาหารให้สุก
คำเตือน‒ระวังความร้อน!
อาหารที่ผ่านการอุ่นร้อนจะคายความร้อนออกมา ภาชนะจึงอาจ
ร้อนขึ้น
▶ นำภาชนะหรืออุปกรณ์เสริมออกจากช่องอบอาหารโดยใช้ผ้า
จับของร้อนเสมอ
1.
ตรวจสอบว่าภาชนะสามารถใส่ในช่องอบอาหารและจาน
หมุนสามารถหมุนได้โดยไม่ติดขัด
– ใช้ภาชนะทรงสูงสำหรับชิ้นเนื้ออบ
– ใช้ภาชนะขนาดใหญ่ที่มีรูปทรงแบนสำหรับอาหารอบ
ร้อนหรือกราแตง
2.
กระจายอาหารในแนวราบให้ทั่วภาชนะ
3.
ปิดคลุมอาหารโดยใช้ฝาครอบที่เข้ากัน จาน หรือฟอยล์
สำหรับใช้กับไมโครเวฟโดยเฉพาะเมื่อปรุงอาหารให้สุกด้วย
ไมโครเวฟ
‒ ไม่ควรปิดครอบอาหารเมื่อใช้ฟังก์ชันการย่าง
‒ ไม่ควรปิดครอบอาหารเมื่อใช้ฟังก์ชันไมโครเวฟร่วมกับ
ฟังก์ชันการย่าง
4.
วางภาชนะลงบนจานหมุน
‒ วางตะแกรงลงบนจานหมุนเมื่อใช้ฟังก์ชันการย่าง โดยไม่
ต้องอุ่นเตาล่วงหน้า
5.
เริ่มการทำงาน
6.
เพื่อให้อุณหภูมิเกิดความสมดุล ให้พักอาหารที่ผ่านการอุ่นทิ้ง
ไว้ที่อุณหภูมิห้อง 2 ถึง 5นาที
‒ พักอาหารทิ้งไว้ 5-10นาทีก่อนหั่นชิ้นเนื้อสัตว์
‒ พักอาหารอบร้อนหรือกราแตงทิ้งไว้ 5นาทีในเครื่องที่ปิด
ใช้งานแล้ว
เคล็ดลับสำหรับเนื้อปลาหรือผักแบบเสียบไม้ ให้ใช้อุปกรณ์เสียบ
ที่ทำจากไม้เท่านั้น
การปรุงสุกด้วยไมโครเวฟ
อาหาร ปริมาณ อุปกรณ์เสริม กำลังไฟ
ไมโครเวฟ(
วัตต์)
ประเภทการ
ทำความ
ร้อน
ระยะ
เวลา(นาที)
คำแนะนำ
เนื้อไก่สดเต็มตัวแบบไม่มี
เครื่องใน
1200กรัม ภาชนะแบบปิด 600 - 25-30 พลิกกลับด้านหลังจากเวลาผ่าน
ไปครึ่งหนึ่ง
เนื้อไก่บางส่วน เช่นเนื้อ
ไก่ 1/4 ตัว
800กรัม ภาชนะแบบเปิด
+
ตะแกรง
360 30-40 วางชิ้นเนื้อโดยให้ด้านที่มีหนัง
อยู่ด้านบน ไม่ควรพลิกอาหาร
กลับด้าน
ปีกไก่หมักแช่แข็ง 800กรัม ภาชนะแบบเปิด
+
ตะแกรง
360 15-25 ไม่ควรพลิกอาหารกลับด้าน
1
คนอาหารให้เข้ากันอย่างระมัดระวังในระหว่างนั้น

th วิธีการทำงาน
44
อาหาร ปริมาณ อุปกรณ์เสริม กำลังไฟ
ไมโครเวฟ(
วัตต์)
ประเภทการ
ทำความ
ร้อน
ระยะ
เวลา(นาที)
คำแนะนำ
เนื้อหมูที่ไม่มีหนังติดมัน
เช่นสันคอ
750กรัม ภาชนะแบบเปิด 360 40-50 พลิกกลับด้านอาหาร 1 ถึง 2
ครั้ง
แผ่นเบคอน ประมาณ
8แผ่น
ตะแกรง 180 10-15 -
มีตโลฟ 750กรัม ภาชนะแบบเปิด 1. 600
2. 360
1. -
2.
1. 20-25
2. 25-35
ปรุงอาหารให้สุกโดยไม่ต้องปิด
ครอบ โดยอาหารควรมีความสูง
ไม่เกิน 6ซม.
เนื้อปลา เช่นฟิเลต์ปลา
เป็นชิ้นๆ
400กรัม ภาชนะแบบเปิด 600 - 10-15 เพิ่มน้ำ น้ำมะนาว หรือไวน์ลง
ไปในอาหารเล็กน้อย
อบฟิเลต์ปลาให้เกรียม
เฉพาะส่วนบน
400กรัม ภาชนะแบบเปิด 360 10-15 นำเนื้อปลาแช่แข็งมาละลายน้ำ
แข็งก่อน
เนื้อปลาเสียบไม้ 4-5ชิ้น ตะแกรง 180 10-15 ใช้อุปกรณ์เสียบที่ทำจากไม้
อาหารอบร้อนชนิดของ
หวาน เช่นชีสเค้กอบ
ร้อนที่มีผลไม้
1000กรัม ภาชนะแบบเปิด 360 30-35 อาหารควรมีความสูงไม่เกิน
5ซม.
อาหารอบร้อนรสจัดที่ทำ
จากส่วนประกอบอาหาร
ดิบ เช่นเส้นพาสต้าอบ
ร้อน
1000กรัม ภาชนะแบบเปิด 360 30-35 โรยชีสลงบนอาหาร อาหารควร
มีความสูงไม่เกิน 5ซม.
อาหารอบร้อนรสจัดที่ทำ
จากส่วนประกอบอาหาร
ที่ปรุงสุกแล้ว เช่นกรา
แตงมันฝรั่ง
1000กรัม ภาชนะแบบเปิด 360 30-40 อาหารควรมีความสูงไม่เกิน
4ซม.
อบซุปให้เกรียมเฉพาะ
ส่วนบน เช่นซุปหัวหอม
2-4ถ้วย ภาชนะแบบเปิด - 15-20 -
ผักสด 250กรัม ภาชนะแบบปิด 600 - 5-10
1
หั่นส่วนประกอบอาหารให้เป็น
ชิ้นเท่าๆ กัน ใส่น้ำ 1 ถึง
2ช้อนโต๊ะต่อส่วนประกอบ
อาหาร 100กรัม คนอาหารให้
เข้ากันในระหว่างนั้น
ผักสด 500กรัม ภาชนะแบบปิด 600 - 10-15
1
-
ผักเสียบไม้ 4-5ชิ้น ตะแกรง 180 15-20 ใช้อุปกรณ์เสียบที่ทำจากไม้
มันฝรั่ง 250กรัม ภาชนะแบบปิด 600 - 8-10
1
หั่นส่วนประกอบอาหารให้เป็น
ชิ้นเท่าๆ กัน ใส่น้ำ 1 ถึง
2ช้อนโต๊ะต่อส่วนประกอบ
อาหาร 100กรัม คนอาหารให้
เข้ากันในระหว่างนั้น
มันฝรั่ง 500กรัม ภาชนะแบบปิด 600 - 11-14
1
หั่นส่วนประกอบอาหารให้เป็น
ชิ้นเท่าๆ กัน ใส่น้ำ 1 ถึง
2ช้อนโต๊ะต่อส่วนประกอบ
อาหาร 100กรัม คนอาหารให้
เข้ากันในระหว่างนั้น
มันฝรั่ง 750กรัม ภาชนะแบบปิด 600 - 15-22
1
หั่นส่วนประกอบอาหารให้เป็น
ชิ้นเท่าๆ กัน ใส่น้ำ 1 ถึง
2ช้อนโต๊ะต่อส่วนประกอบ
อาหาร 100กรัม คนอาหารให้
เข้ากันในระหว่างนั้น
ข้าว 125กรัม ภาชนะแบบปิด 1.
900
2. 180
1. -
2. -
1. 5-7
2. 12-15
ใส่น้ำเพิ่มเป็นสองเท่า
ข้าว 250กรัม ภาชนะแบบปิด 1.
900
2. 180
1. -
2. -
1. 6-8
2. 15-18
ใส่น้ำเพิ่มเป็นสองเท่า
1
คนอาหารให้เข้ากันอย่างระมัดระวังในระหว่างนั้น

คู่มือการติดตั้ง th
45
อาหาร ปริมาณ อุปกรณ์เสริม กำลังไฟ
ไมโครเวฟ(
วัตต์)
ประเภทการ
ทำความ
ร้อน
ระยะ
เวลา(นาที)
คำแนะนำ
ปิ้งขนมปังปิ้งล่วงหน้า 2-4แผ่น ตะแกรง - ด้านแรก:
2-4
ด้านที่สอง:
2-4
-
อบขนมปังปิ้งให้เกรียม
เฉพาะส่วนบน
2-6แผ่น ตะแกรง - 7-10 ระยะเวลาจะขึ้นอยู่กับหน้า
ขนมปัง
ผลไม้เชื่อม 500กรัม ภาชนะแบบปิด 600 - 9-12 -
อาหารหวาน เช่นพุดดิ้ง
พร้อมรับประทาน
500มล. ภาชนะแบบปิด 600 - 6-8 คนพุดดิ้งให้เข้ากัน 2 ถึง 3 ครั้ง
ในระหว่างนั้นโดยใช้ตะกร้อมือ
1
คนอาหารให้เข้ากันอย่างระมัดระวังในระหว่างนั้น
16.6 อาหารที่ผ่านการทดสอบ
ข้อมูลทั่วไปต่อไปนี้จัดทำขึ้นสำหรับสถาบันทดสอบเพื่อความสะดวกในการทดสอบเครื่องใช้ไฟฟ้าตามข้อกำหนด EN 60350-1:2013
หรือ IEC 60350-1:2011 และมาตรฐาน EN 60705:2012, IEC 60705:2010
การปรุงสุกด้วยไมโครเวฟ
อาหาร กำลังไฟไมโครเวฟ(วัตต์) ระยะเวลา(นาที) คำแนะนำ
นมไข่ 750กรัม 1. 360
2. 90
1. 12-17
2. 20-25
วางแม่พิมพ์ Pyrex ขนาด
20x25ซม. ลงบนจานหมุน
บิสกิต 600 8-10 วางแม่พิมพ์ Pyrex เส้นผ่านศูนย์กลาง
ขนาด 22ซม. ลงบนจานหมุน
มีตโลฟ 600 20-25 วางแม่พิมพ์ Pyrex ลงบนจานหมุน
การละลายน้ำแข็งด้วยไมโครเวฟ
ข้อแนะนำการตั้งค่าสำหรับการละลายน้ำแข็งด้วยไมโครเวฟ
อาหาร กำลังไฟไมโครเวฟ(วัตต์) ระยะเวลา(นาที) คำแนะนำ
เนื้อสัตว์ 1. 180
2. 90
1. 5-7
2. 10-15
วางแม่พิมพ์ Pyrex เส้นผ่านศูนย์กลาง
ขนาด 22ซม. ลงบนจานหมุน
การปรุงสุกหลายฟังก์ชันด้วยไมโครเวฟ
อาหาร กำลังไฟ
ไมโครเวฟ(วัตต์)
ประเภทการ
ทำความร้อน
ระยะเวลา(นาที) คำแนะนำ
กราแตงมันฝรั่ง 360 35-40 วางแม่พิมพ์ Pyrex เส้นผ่านศูนย์กลาง
ขนาด 22ซม. ลงบนจานหมุน
17 คู่มือการติดตั้ง
โปรดศึกษาข้อมูลเหล่านี้ขณะติดตั้งเครื่องใช้ไฟฟ้า
17.1 การติดตั้งอย่างปลอดภัย
โปรดปฏิบัติตามคำแนะนำด้านความปลอดภัยต่อไปนี้
ขณะติดตั้งเครื่องใช้ไฟฟ้า
¡ อุปกรณ์จะสามารถใช้งานได้อย่างปลอดภัยต่อเมื่อ
ดำเนินการติดตั้งอย่างเหมาะสมตามคู่มือการ
ประกอบ ผู้ติดตั้งมีหน้าที่รับผิดชอบให้อุปกรณ์
ทำงานได้อย่างมีประสิทธิภาพ ณ สถานที่ติดตั้ง
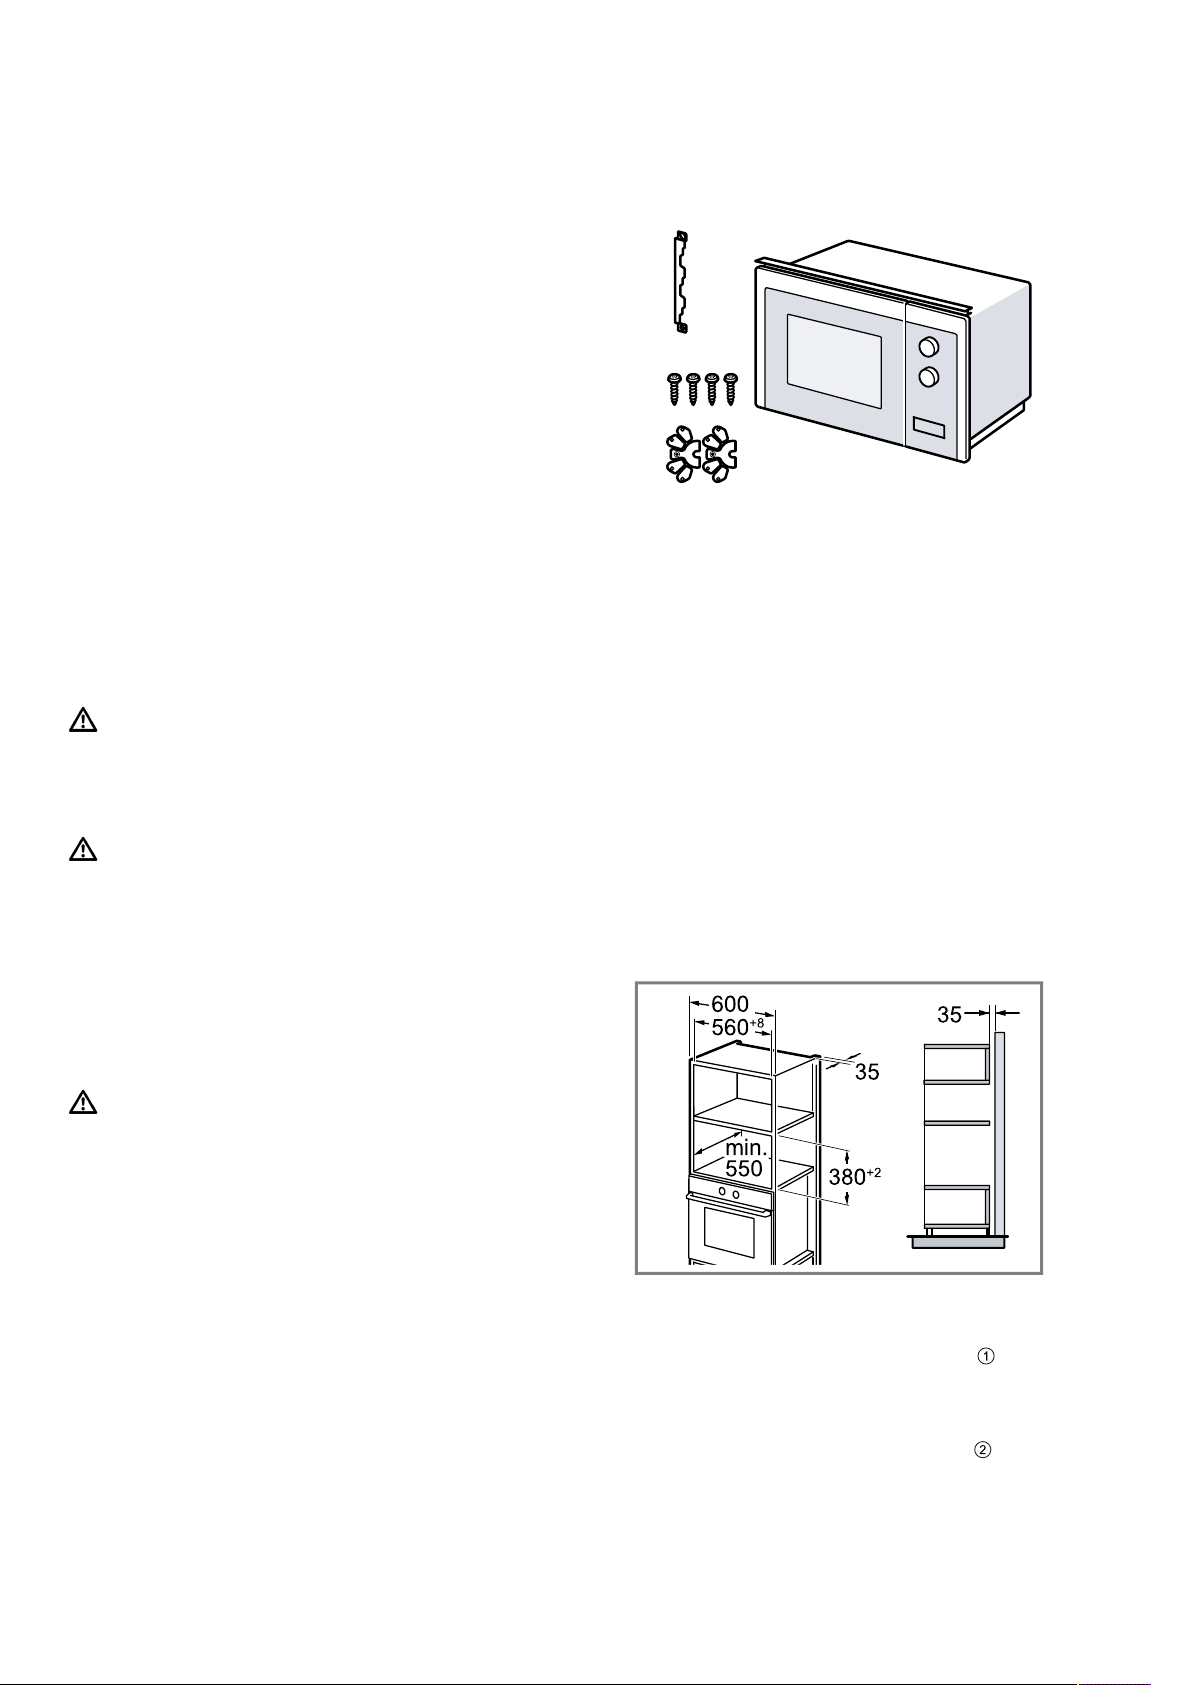
th คู่มือการติดตั้ง
46
¡ ตรวจเช็คเครื่องหลังนำออกจากบรรจุภัณฑ์ ห้าม
เชื่อมต่อเครื่องหากเกิดความเสียหายระหว่างการ
ขนส่ง
¡ นำวัสดุบรรจุภัณฑ์และฟิล์มติดป้องกันออกจากช่อง
อบอาหารและฝาเครื่องก่อนเริ่มใช้งาน
¡ ห้ามลอกฟอยล์โปร่งใสบริเวณด้านในฝาเครื่องออก
¡ โปรดศึกษาเอกสารการประกอบสำหรับการติดตั้ง
ชิ้นส่วนอุปกรณ์เสริม
¡ เฟอร์นิเจอร์แบบบิลด์อินต้องมีคุณสมบัติทนความ
ร้อนถึง 90°C และส่วนหน้าของเฟอร์นิเจอร์ที่อยู่
ติดกันต้องทนความร้อนได้ถึง 65°C
¡ ห้ามติดตั้งเครื่องที่บริเวณด้านหลังบานประตู
ตกแต่งหรือประตูเฟอร์นิเจอร์ใดๆ เนื่องจากอาจก่อ
ให้เกิดอันตรายจากความร้อนที่สูงเกินไป
¡ เจาะช่องที่เฟอร์นิเจอร์ก่อนนำเครื่องเข้าไป แล้ว
กำจัดขี้เลื่อยออก มิฉะนั้น ชิ้นส่วนระบบไฟฟ้าอาจ
ทำงานได้ไม่เต็มประสิทธิภาพ
¡ การเชื่อมต่ออุปกรณ์โดยไม่ใช้ปลั๊กไฟจะต้อง
ดำเนินการโดยช่างเทคนิคที่ได้รับใบอนุญาต
เท่านั้น การรับประกันจะไม่ครอบคลุมหากเกิด
ความเสียหายจากการเชื่อมต่อผิดวิธี
คำเตือน‒ระวังการบาดเจ็บ!
ชิ้นส่วนที่เข้าถึงได้ในระหว่างการประกอบอาจมีขอบ
คมและส่งผลให้เกิดการบาดเจ็บจากการถูกบาดได้
▶ สวมถุงมือป้องกัน
คำเตือน‒ระวังไฟไหม้!
การใช้สายเชื่อมต่อแหล่งจ่ายไฟแบบต่อขยายและอะ
แดปเตอร์ที่ไม่ได้รับอนุญาตอาจก่อให้เกิดอันตรายได้
▶ ห้ามใช้สายไฟต่อขยายหรือสายต่อซ็อคเกตแบบ
หลายตัว
17.2 การเชื่อมต่อระบบไฟฟ้า
โปรดปฏิบัติตามคำแนะนำต่อไปนี้เพื่อให้สามารถเชื่อมต่อเครื่อง
เข้ากับระบบไฟฟ้าได้อย่างปลอดภัย
คำเตือน‒ระวังไฟดูด!
การติดตั้งอย่างไม่ถูกวิธีอาจก่อให้เกิดอันตราย
▶ อนุญาตให้ช่างไฟฟ้าผู้เชี่ยวชาญเท่านั้นเป็นผู้ดำเนินการเดิน
สายช่องเสียบไฟหรือเปลี่ยนสายเชื่อมต่อโดยพิจารณาถึงข้อ
กำหนดที่บังคับใช้
▶ เชื่อมต่อเครื่องเข้ากับช่องเสียบไฟแบบมีหน้าสัมผัสป้องกันที่
ติดตั้งตรงตามข้อกำหนดเท่านั้น
▶ หากไม่สามารถเข้าถึงปลั๊กไฟได้อีกหลังการติดตั้ง คุณจำเป็น
ต้องติดตั้งอุปกรณ์ตัดการเชื่อมต่อสำหรับขั้วไฟฟ้าทั้งหมด
โดยมีระยะห่างหน้าสัมผัสอย่างน้อย 3มม. ตรวจสอบให้
แน่ใจว่ามีการป้องกันการสัมผัสชิ้นส่วนขณะติดตั้ง
17.3 รายการอุปกรณ์ที่จัดส่ง
ตรวจสอบชิ้นส่วนทั้งหมดหลังเปิดหีบห่อแล้ว เพื่อดูว่ามีความเสีย
หายจากการขนส่งและความสมบูรณ์ของสิ่งที่จัดส่งหรือไม่
17.4 เฟอร์นิเจอร์แบบบิลด์อิน
คุณสามารถดูคำแนะนำเกี่ยวกับการติดตั้งอย่างปลอดภัยได้จาก
ส่วนนี้
ข้อควรระวัง!
ขี้เลื่อยอาจส่งผลกระทบต่อฟังก์ชันการทำงานของชิ้นส่วนไฟฟ้า
▶ เจาะช่องที่เฟอร์นิเจอร์ก่อนใส่เครื่องเข้าไป
▶ กำจัดขี้เลื่อยออก
¡ ระดับความสูงขั้นต่ำสำหรับการติดตั้งอยู่ที่ 850มม.
¡ ตู้แบบบิลด์อินจะต้องไม่มีผนังปิดบริเวณด้านหลังตัวเครื่อง
¡ ห้ามปิดช่องระบายอากาศและช่องดูดอากาศ
¡ เฟอร์นิเจอร์แบบบิลด์อินต้องมีคุณสมบัติทนความร้อนถึง
90°C และส่วนหน้าของเฟอร์นิเจอร์ที่อยู่ติดกันต้องทนความ
ร้อนได้ถึง 65°C
17.5 ขนาดสำหรับการติดตั้งในตู้ทรงสูง
โปรดสังเกตขนาดสำหรับการติดตั้งและระยะห่างเพื่อความ
ปลอดภัยในตู้ทรงสูง
17.6 การเตรียมตู้ทรงสูง
1.
ตรวจวัดความหนาของผนังเฟอร์นิเจอร์
ความหนาของผนังถูกกำหนดเป็นค่า x
2.
หมายเหตุ:ค่า x จะสอดคล้องกับระยะห่างจากรูด้านล่างของ
แผงเชื่อมต่อไปยังพื้นของเฟอร์นิเจอร์แบบบิลด์อิน
ขันแผงเชื่อมต่อเข้ากับตู้ทรงสูงให้แน่น
โดยให้สังเกตค่า x ที่ตรวจวัดได้

คู่มือการติดตั้ง th
47
17.7 การติดตั้งเครื่อง
1.
ยึดสเปเซอร์เข้ากับตัวเครื่องตามความหนาของผนัง
2.
หมายเหตุ:
ห้ามหนีบหรือบิดงอสายเชื่อมต่อ
ใส่ตัวเครื่องเข้าไปในตู้ แล้วดันไปทางด้านขวา
3.
ขันสกรูของเครื่องให้แน่นจนกระทั่งตัวเครื่องอยู่ในตำแหน่ง
กึ่งกลาง
=
=
4.
ตรวจเช็คระยะห่างจากตัวเครื่องที่อยู่ติดกัน
เครื่องจะต้องมีระยะห่างจากตัวเครื่องที่อยู่ติดกันอย่างน้อย
3มม.
5.
นำวัสดุบรรจุภัณฑ์และฟิล์มติดป้องกันออกจากช่องอบอาหาร
และฝาเครื่อง
Thank you for buying a
Bosch Home Appliance!
Register your new device on MyBosch now and profit directly from:
• Expert tips & tricks for your appliance
• Warranty extension options
• Discounts for accessories & spare-parts
• Digital manual and all appliance data at hand
• Easy access to Bosch Home Appliances Service
Free and easy registration – also on mobile phones:
www.bosch-home.com/welcome
Looking for help?
You'll find it here.
Expert advice for your Bosch home appliances, help with problems
or a repair from Bosch experts.
Find out everything about the many ways Bosch can support you:
www.bosch-home.com/service
Contact data of all countries are listed in the attached service directory.
*9001610867*
9001610867 (020428)
en, th
BSH Hausgeräte GmbH
Carl-Wery-Straße 34
81739 München, GERMANY
www.bosch-home.com
A Bosch Company
Valid within Great Britain:
Imported to Great Britain by
BSH Home Appliances Ltd.
Grand Union House
Old Wolverton Road
Wolverton, Milton Keynes
MK12 5PT
United Kingdom