Loading ...
Loading ...
Loading ...
Power connection: Please check if the power source correspond to the rating voltage spec, which locates on the rear panel of
unit. If it does not match, please consult to your dealer or service center. Insert the female terminal of power cord into the AC
outlet, and then connect the power plug with the wall-mount socket in order to get the power source.
Battery power charging: the unit built-in rechargeable battery which allow to playback the music without AC power
connection. When the battery is charging, the charging LED will show in red color which locates on the top panel. The charging
LED will turn to green after fully charged. The battery will be also charged even you power off the unit but with available AC
power source. The charging time of battery is 4hours, and 3~5hours for playback time depends on the playing volume level.
The unit will power off automatically in case of lower battery power, please recharge it for playback.
Important notes: In standby mode( short press the power button on top panel or by remote controller), there will start to
charge the unit automatically after 15minutes due to eco design. In case you need urgent charge, please long press the power
button(power off ) the unit. The unit can be charged stantaneously while music playing.
Battery use:
1. When the battery is out of power or the battery is low, please charge it as soon as possible. If it is not charged for a long time,
the battery's internal storage capacity will be reduced, which will make it unable to be fully charged or shortened operation
time.
2. If the battery needs to be replaced, please contact with your local Blaupunkt after sales service.
3. Do not charge the battery for more than 24 hours. Over-discharging or overcharging shortens the life of the battery.
Repeated charging and discharging affect the battery life as well as the playback time. Playing time cannot be guaranteed
under all conditions. Variable battery life cannot be the basis for a warranty claim.
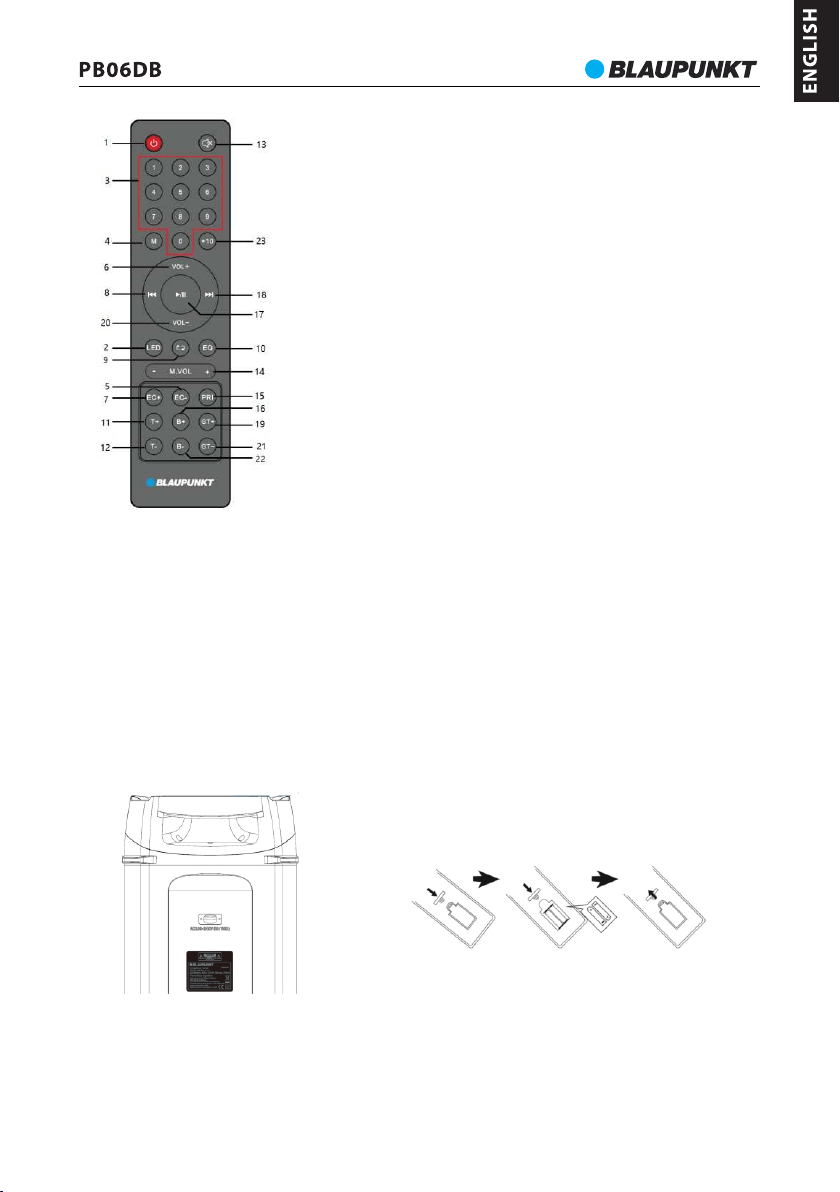
Remote control battery installation
Open up the battery door and insert 2 x AAA dry battery(include) into the compartment; please make sure the polarity of
battery will aim and correspond to the positive and negative silkscreen-printed symbol in the compartment. Then close the
battery door.
5
Remote controller
1- Power button;
2- Disco light button;
3- Digits button;
4- Mode button;
5,7 – Echo +/- button;
6,20- Volume +/- button;
8,18-Previous & next, Channel -/+ button;
9- Repeat button ( repeat one/repeat all/ random);
10 - EQ(flat/POP/Rock/Jazz/Classic)
11, 12- treble+/- button;
13- Mute button;
14- Microphone volume +/- button;
15- Microphone priority button;
16,22- Bass +/- button;
17- Play/pause button;
19, 21 - Guitar +/- button;
23 - +10 button;
Loading ...
Loading ...
Loading ...