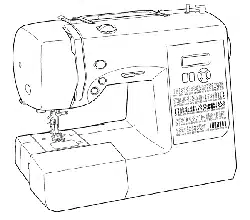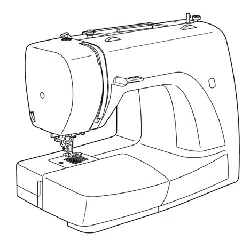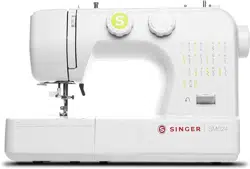

INSTRUCTION MANUAL
SM024

This household sewing machine is designed to comply with IEC/EN/CSA C22.2 No.60335-1 & 60335-2-28 and UL1594.
IMPORTANT SAFETY INSTRUCTIONS
When using an electrical appliance, basic safety precautions should always be followed, including the following: Read all instructions before using
this household sewing machine. Keep the instructions at a suitable place close to the machine. Make sure to hand them over if the machine is given to
a third party.
DANGER - TO REDUCE THE RISK OF ELECTRIC SHOCK:
• A sewing machine should never be left unattended when plugged in. Always unplug this sewing machine from the electric outlet immediately after
using and before cleaning, removing covers, lubricating or when making any other user servicing adjustments mentioned in the instruction manual.
WARNING - TO REDUCE THE RISK OF BURNS, FIRE, ELECTRIC
SHOCK, OR INJURY TO PERSON:
• Do not allow to be used as a toy. Close attention is necessary when this sewing machine is used by or near children.
• Use this sewing machine only for its intended use as described in this manual. Use only attachments recommended by the manufacturer as
contained in this manual.
• Never operate this sewing machine if it has a damaged cord or plug, if it is not working properly, if it has been dropped or damaged, or dropped into
water. Return the sewing machine to the nearest authorized service center for examination, repair, electrical or mechanical adjustment.
• Never operate the sewing machine with any air openings blocked. Keep ventilation openings of the sewing machine and foot control free from the
accumulation of lint, dust, and loose cloth.
• Keep fingers away from all moving parts. Special care is required around the sewing machine needle.
• Always use the proper needle plate. The wrong plate can cause the needle to break.
• Do not use bent needles.
• Do not pull or push fabric while stitching. It may deflect the needle causing it to break.
• Wear safety glasses.
• Switch the sewing machine off ("0") when making any adjustment in the needle area, such as threading needle, changing needle, threading bobbin,
or changing presser foot, etc.
• Never drop or insert any object into any opening.
• Do not use outdoors.
• Do not operate where aerosol (spray) products are being used or where oxygen is being administrated.
• To disconnect, turn all controls to the off ("O") position, then remove plug from outlet.
• Do not unplug by pulling on cord. To unplug, grasp the plug, not the cord.
• The foot control is used to operate the machine. Avoid placing other objects on the foot control.
• Do not use the machine if it is wet.
• If the LED lamp is damaged or broken, it must be replaced by the manufacturer or its service agent or a similarly qualified person, in order to avoid
a hazard.
• If the supply cord connected with the foot control is damaged, it must be replaced by the manufacturer or its service agent or a similarly qualified
person, in order to avoid a hazard.
SAVE THESE INSTRUCTIONS
FOR EUROPE ONLY:
This appliance can be used by children aged from 13 years and above and persons with reduced physical, sensory or mental capabilities or lack of
experience and knowledge if they have been given supervision or instruction concerning use of the appliance in a safe way and understand the hazards
involved. Children shall not play with the appliance. Cleaning and user maintenance shall not be made by children without supervision.
The machine must only be used with foot control of type " HKT72C" manufactured by ZHEJIANG HUAXING ELECTRIC MOTOR CO., LTD.
FOR OUTSIDE EUROPE:
This sewing machine is not intended for use by persons (including children) with reduced physical, sensory or mental capabilities, or lack of
experience and knowledge, unless they have been given supervision or instruction concerning use of the sewing machine by a person responsible for
their safety. Children should be supervised to ensure that they do not play with the sewing machine.
The machine must only be used with foot control of type HKT7 (110-127V Area), HKT72C (220-240V Area), HKT7-2 (220-240V China)
manufactured by ZHEJIANG HUAXING ELECTRIC MOTOR CO., LTD.
INTENDED USE
Optimal use and maintenance are described in these instructions. This product is not intended for industrial use. Additional assistance, by region, may
be found on the web at www.singer.com.

NOTES
________________________________________________________________________________________________
________________________________________________________________________________________________
________________________________________________________________________________________________
________________________________________________________________________________________________
________________________________________________________________________________________________
________________________________________________________________________________________________
________________________________________________________________________________________________
________________________________________________________________________________________________
________________________________________________________________________________________________
________________________________________________________________________________________________
________________________________________________________________________________________________
________________________________________________________________________________________________
________________________________________________________________________________________________
_______________________________________________________________________________________________
________________________________________________________________________________________________
________________________________________________________________________________________________
________________________________________________________________________________________________
________________________________________________________________________________________________
________________________________________________________________________________________________

1
CONTENTS
1. KNOWING YOUR SEWING MACHINE
Main parts ---------------------------------------------------- 2
Accessories --------------------------------------------------- 3
Setting up your machine ------------------------------------ 3
Power line cord, foot control ------------------------------ 3
Power/light switch ------------------------------------------- 3
Converting to free-arm sewing ---------------------------- 4
Presser foot lifter -------------------------------------------- 4
Reverse sewing lever --------------------------------------- 4
Lowering the feed teeth ------------------------------------- 4
Seam guide lines --------------------------------------------- 5
Setting spool pins -------------------------------------------- 5
Winding the bobbin ----------------------------------------- 5
Removing or replacing the bobbin case ------------------ 6
Threading the bobbin case --------------------------------- 6
Changing the presser foot ---------------------------------- 6
Threading the machine ------------------------------------- 7
Using automatic needle threader -------------------------- 8
Drawing up bobbin thread---------------------------------- 9
Balancing top thread tension ------------------------------- 9
Needle, thread and fabric chart -------------------------- 10
Changing the needle -------------------------------------- 10
Pattern selector dial --------------------------------------- 11
Selecting stretch stitch patterns -------------------------- 11
Stitch length dial ------------------------------------------- 11
Useful sewing tips ----------------------------------------- 12
2. UTILITY STITCHES
Straight stitch ----------------------------------------------- 13
Zigzag stitch ------------------------------------------------ 14
Overedge stitch --------------------------------------------- 14
Multi-step zigzag stitch ---------------------------------- 15
Straight stretch stitch -------------------------------------- 15
Sewing buttons --------------------------------------------- 16
Buttonhole stitch ------------------------------------------- 17
Zipper application------------------------------------------ 18
Blind hem stitch -------------------------------------------- 19
3. DECORATIVE STITCHING
Picot hem stitch -------------------------------------------- 20
Stretch stitches --------------------------------------------- 20
Decorative satin stitch ------------------------------------- 21
Honeycomb stitch / smocking ---------------------------- 21
Rampart stitch ---------------------------------------------- 22
4. CARING FOR YOUR MACHINE
Dismantling and assembling shuttle race --------------- 23
Cleaning the feed teeth ------------------------------------ 24
Oiling the machine ----------------------------------------- 25
Oiling the connecting rod --------------------------------- 26
5. TROUBLE SHOOTING --------------------- 27
KNOWING YOUR SEWING MACHINE
2
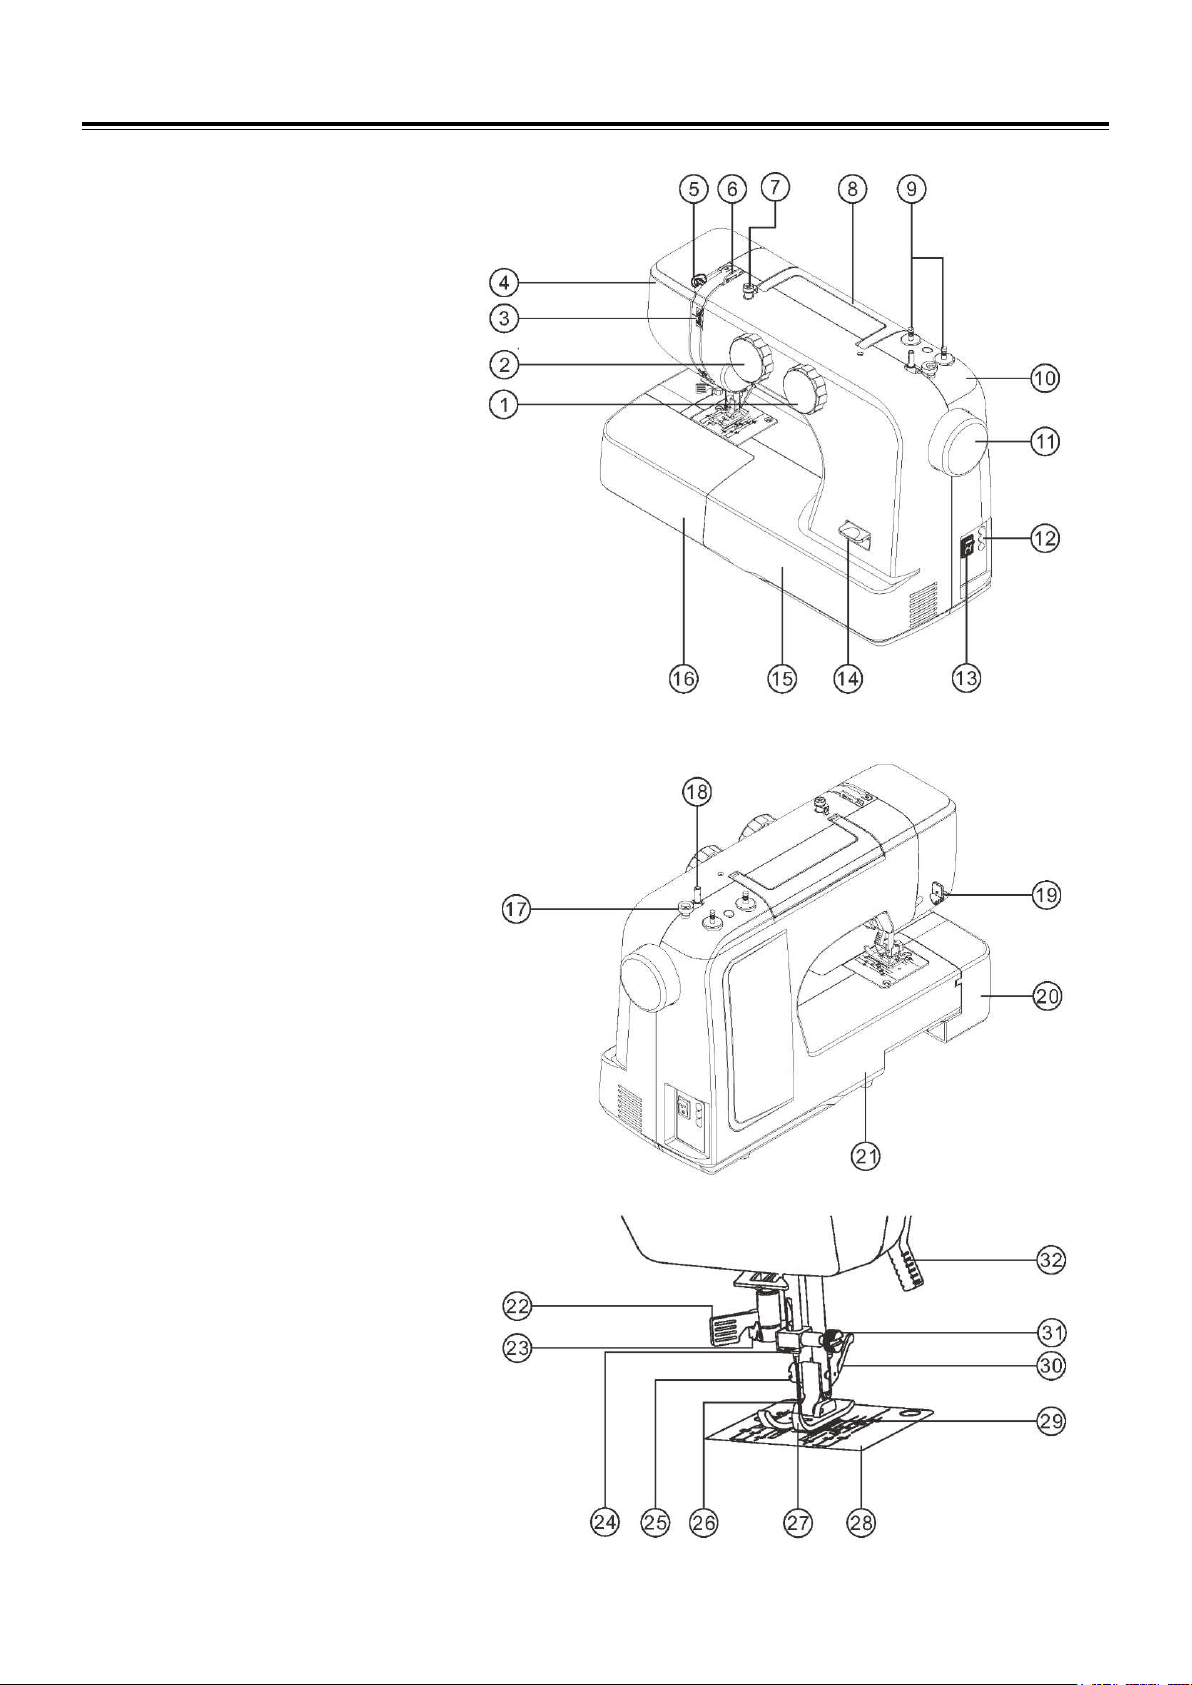
Main parts
1. Stitch length dial
2. Pattern selector dial
3. Thread tension control dial
4. Face cover
5. Thread take-up lever
6. Thread guide
7. Bobbin winding tension disk
8. Carry handle
9. Spool pins
10. Small top cover
11. Hand wheel
12. Power cord inlet
13. Power switch
14. Reverse stitch lever
15. Front cover
16. Removable storage compartment
17. Bobbin winding stopper
18. Bobbin winding spindle
19. Thread knife
20. Removable storage compartment
21. Rear cover
22. Automatic needle threader
23. Needle threader thread guide
24. Needle bar thread guide
25. Presser foot screw
26. Needle
27. Presser foot
28. Needle plate
29. Feed teeth
30. Presser foot holder
31. Needle clamp screw
32. Press foot lifter
KNOWING YOUR SEWING MACHINE
3
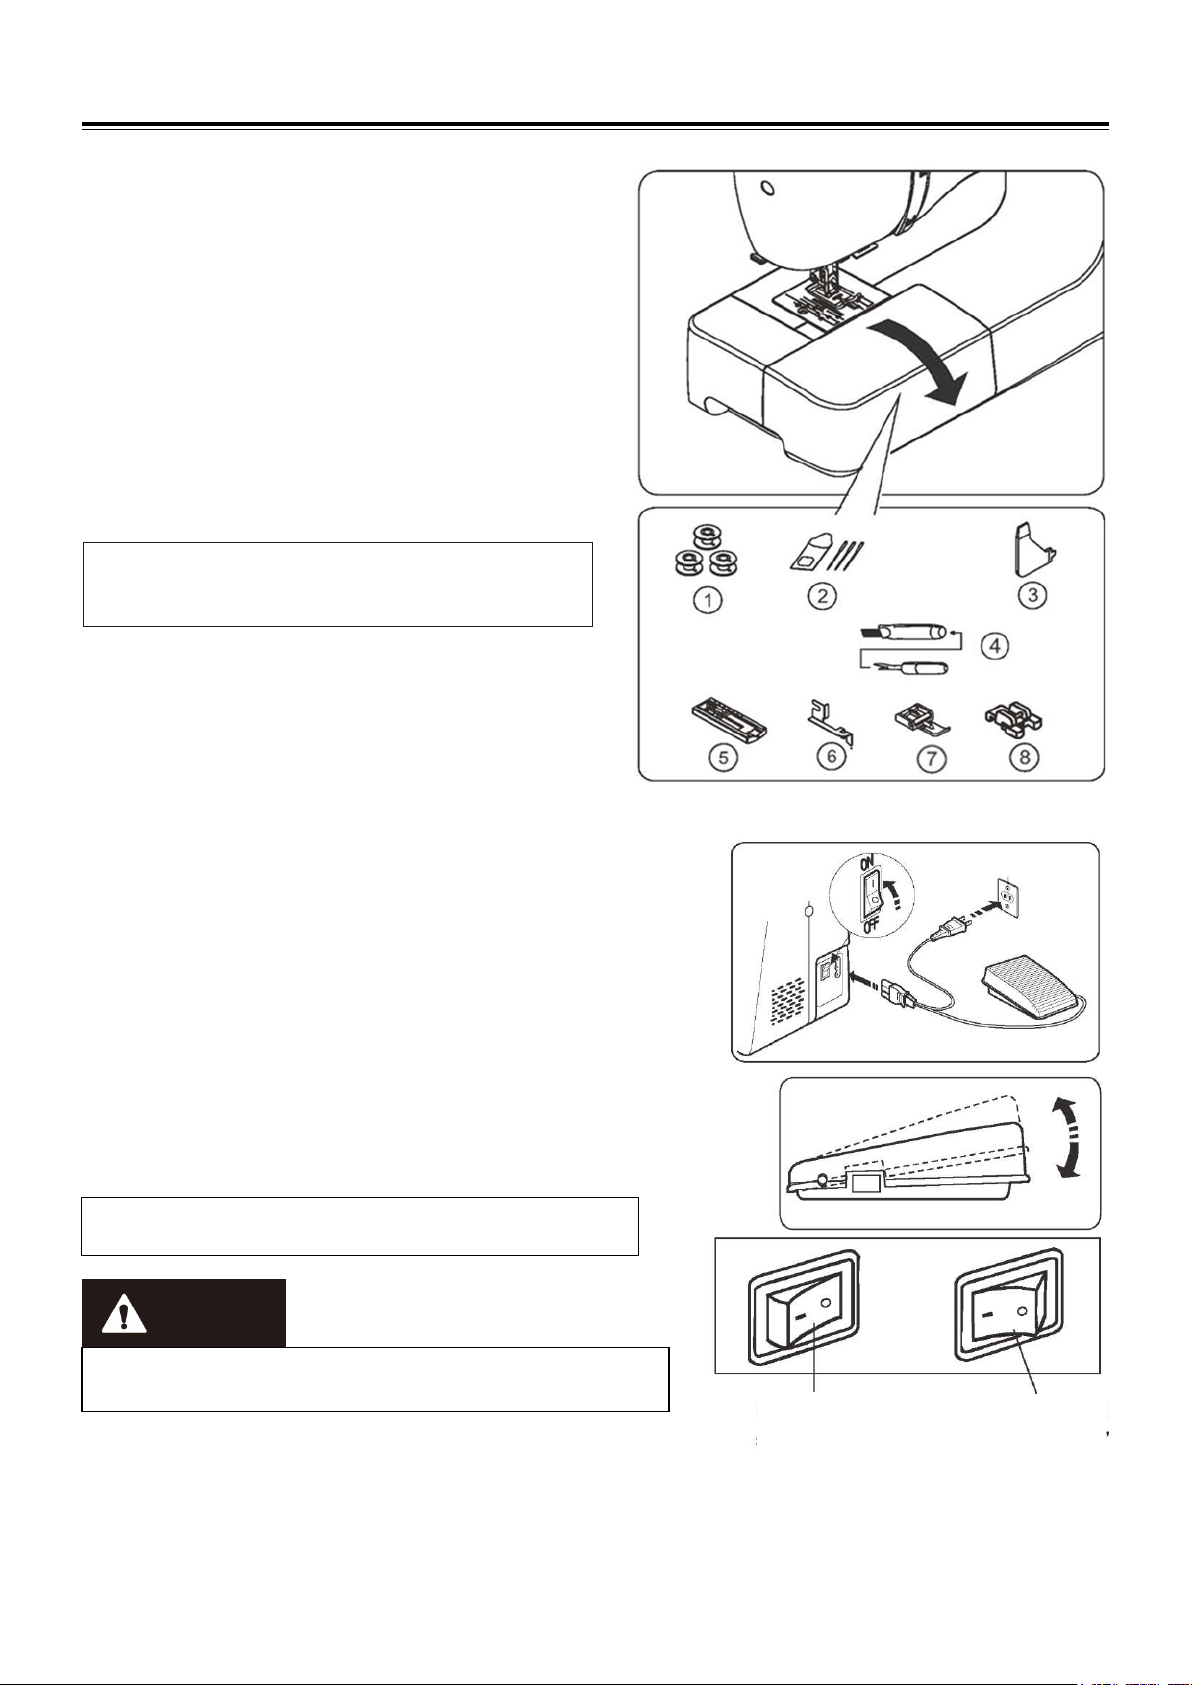
Accessories
1. Bobbins (3pcs) *
2. Needle 3 pcs
3. Multi-function screwdriver
4. Ripper/Brush
5. Buttonhole foot
6. Hem guide for presser foot
7. Zipper foot
8. Button sewing foot
*Your machine uses SINGER® Class 15J transparent
bobbins. Use only this style of bobbin in your machine.
The foot that comes on your sewing machine is called all-
purpose foot and will be used for the majority of your
sewing.
Setting up your machine
Be sure to wipe off any surplus oil from needle plate area
before using your machine the first time.
Power line cord, foot control
Make sure that the sewing machine is turned off (the power switch is set
to “O”), and then connect the plug of the power line and into the power
cord inlet and your wall outlet.
Sewing speed can be varied with the foot control.
The harder you press on the control, the faster machine runs.
This appliance has a polarized plug (one blade wider than the other). To
reduce the risk of electric shock, this plug is intended to fit in a polarized
outlet only one way. If the plug does not fit fully in the outlet, reverse the
plug. If it still does not fit, contact a qualified electrician to install the
proper outlet. Do not modify the plug in any way.
NOTE:
When foot control is disconnected, the machine will
not operate.
CAUTION
Always disconnect the machine from power supply by removing
the plug from the wall-outlet.
Power/light switch
Your machine will not operate until the power/light switch is turned on. The same switch controls both the power and the light.
When servicing the machine or changing needles, etc., machine must be disconnected from the power supply.
Power/light
switch “OFF”
Power/light
switch “ON”
KNOWING YOUR SEWING MACHINE
4
Converting to free-arm sewing
Your machine can be used either as a flat-bed or as a free-arm model.
With the removable storage compartment
in position, it provides a large
working surface as a standard flat-bed model. To take off the
removable storage compartment, hold it firmly with both hands and
pull it off to the left as shown. To replace, slide the removable storage
compartment back into place until it clicks.
With the removable storage compartment off, the machine converts
into a slim free-arm model for sewing children’s clothing, sleeve
cuffs, trouser legs, and other hard-to-reach places.
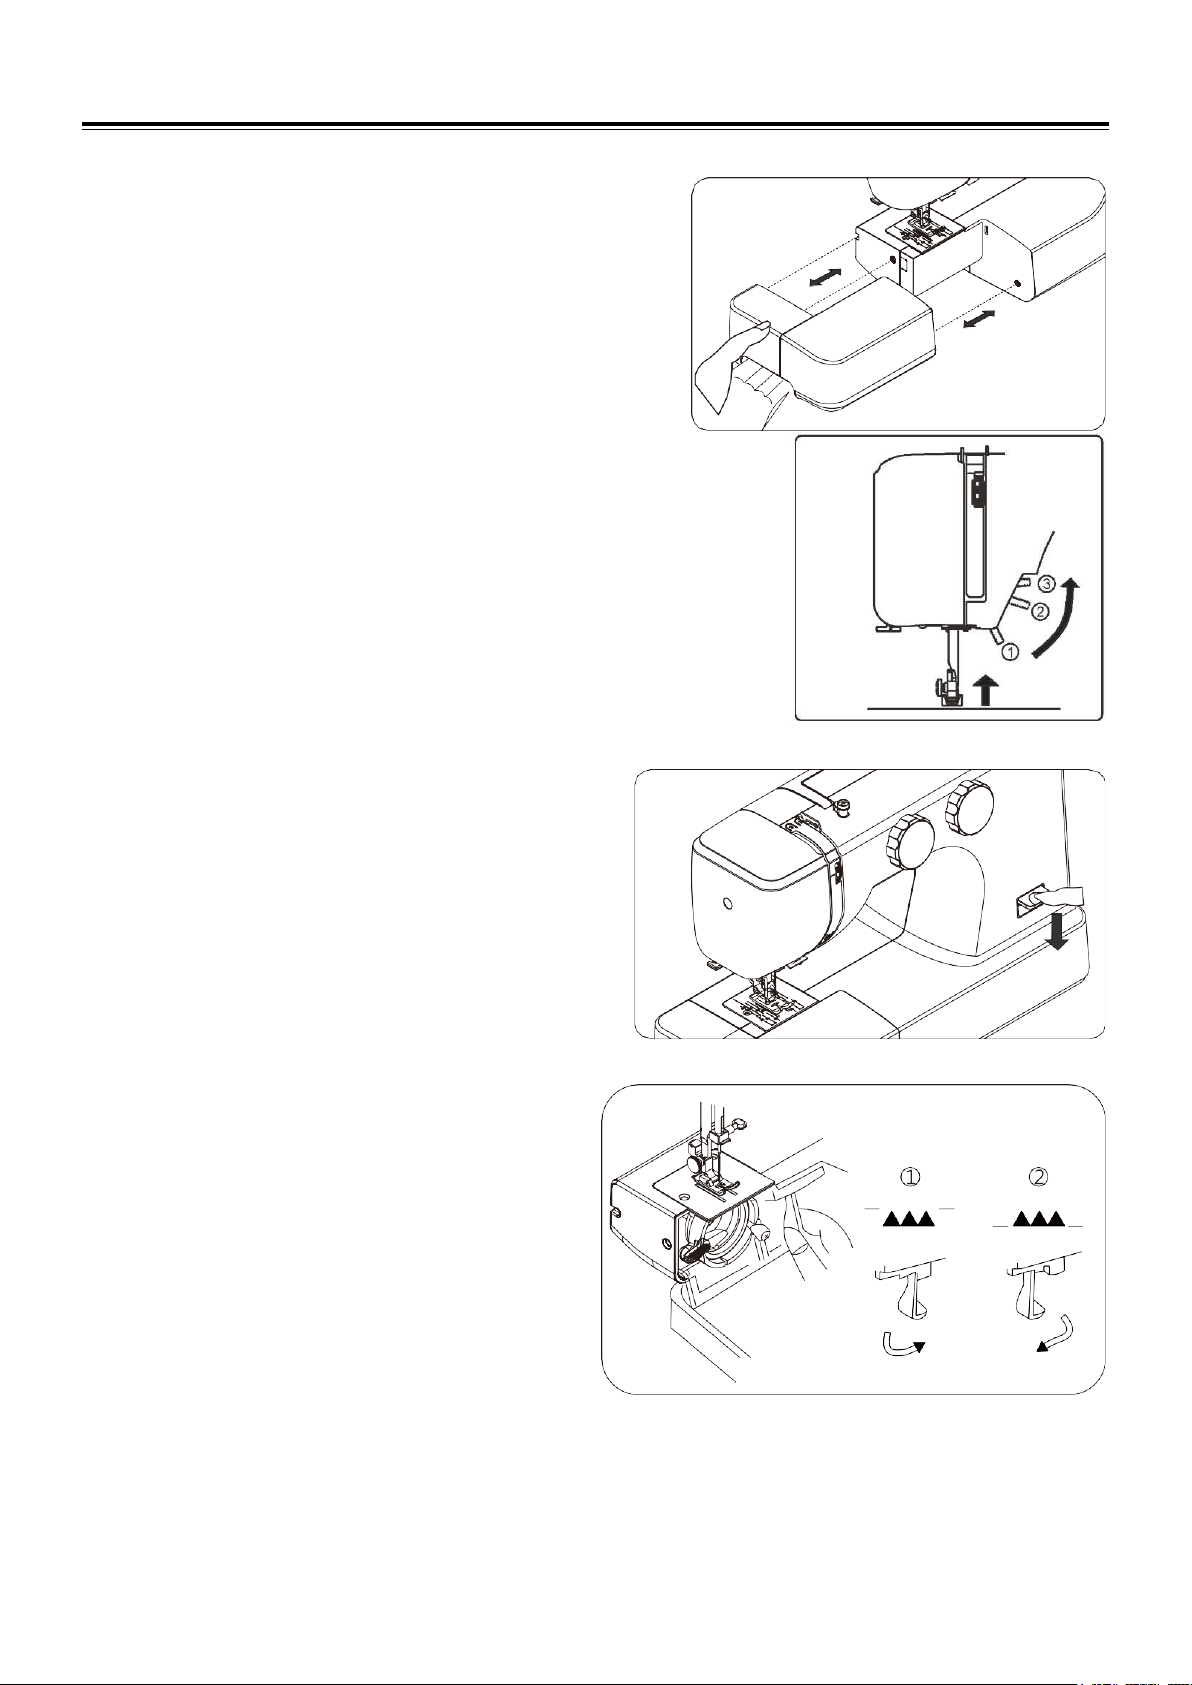
Presser foot lifter
There are three positions for your presser foot.
1. Lower the presser foot to sew.
2. Raise the lifter to the middle position to insert or remove fabric.
3. Lift it to its highest position to change the presser foot or to insert or remove
thick fabrics.
Reverse sewing lever
As long as you are pressing down this lever while
sewing, the machine will feed the fabric backwards.
Lowering the feed teeth
1. For lowering the feed teeth, press down lever and move it
to the direction of arrow as illustrated.
2. To raise the feed teeth, press
down the lever and move it to
the direction or arrow as illustrated. After moving the
lever, turn the hand wheel toward you one full revolution
to completely re-engage the feed teeth.
* Feed teeth must always be up for normal sewing.

KNOWING YOUR SEWING MACHINE
5
Seam guide lines
The numbers on the needle plate indicate the distance
between the center needle position and the various seam
guide lines.
The numbers in the front indicate in millimeters.
The numbers in the back indicate in inches.
Setting spool pins
The spool pins are used for holding the spool of thread in order to feed thread to the
machine.
To use, pull up the spool pin. Push down for storage.
Winding the bobbin
1. Place a spool of thread on the left spool pin. Pull the thread out
from the spool and place it through thread guide as shown in
illustration. Put end of thread through the hole in bobbin as
shown.
2. Push the bobbin winding spindle to far left position, if it is not
already there. Place bobbin onto the bobbin winding spindle with
end of thread coming from top of bobbin. Push bobbin winding
spindle to the right until it clicks. Hold onto end of thread.
3. Start machine. Bobbin will automatically stop turning when
completely filled. Push bobbin winding spindle to the left to
remove bobbin and cut thread.
KNOWING YOUR SEWING MACHINE
6
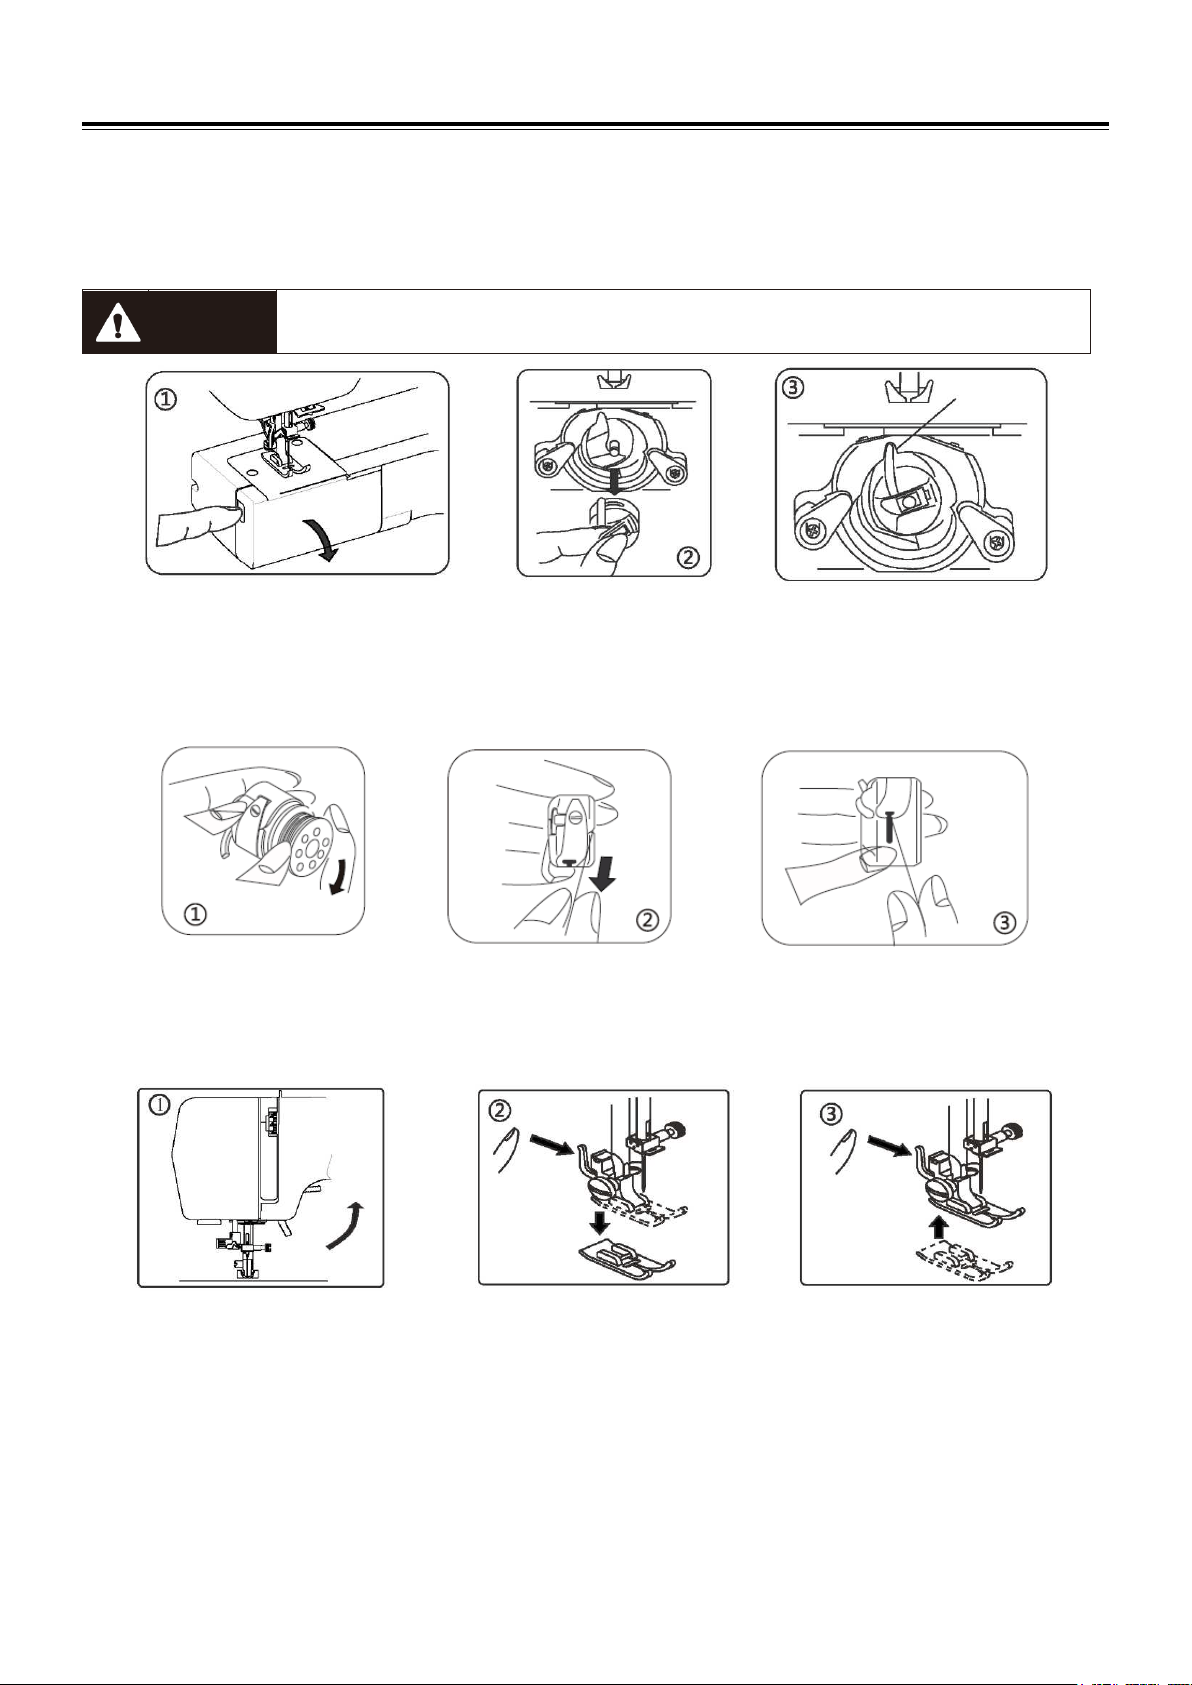
Removing or replace the bobbin case
1. Refer to page 4 to take off the removable storage compartment. Raise the needle by turning the hand wheel toward you, then
open the shuttle cover.
2. Take out bobbin case holding the latch.
3. When installing the bobbin case, the pin on the case should fit into the gap of the shuttle race.
CAUTION
Be sure to disconnect the power supply before operating the machine.
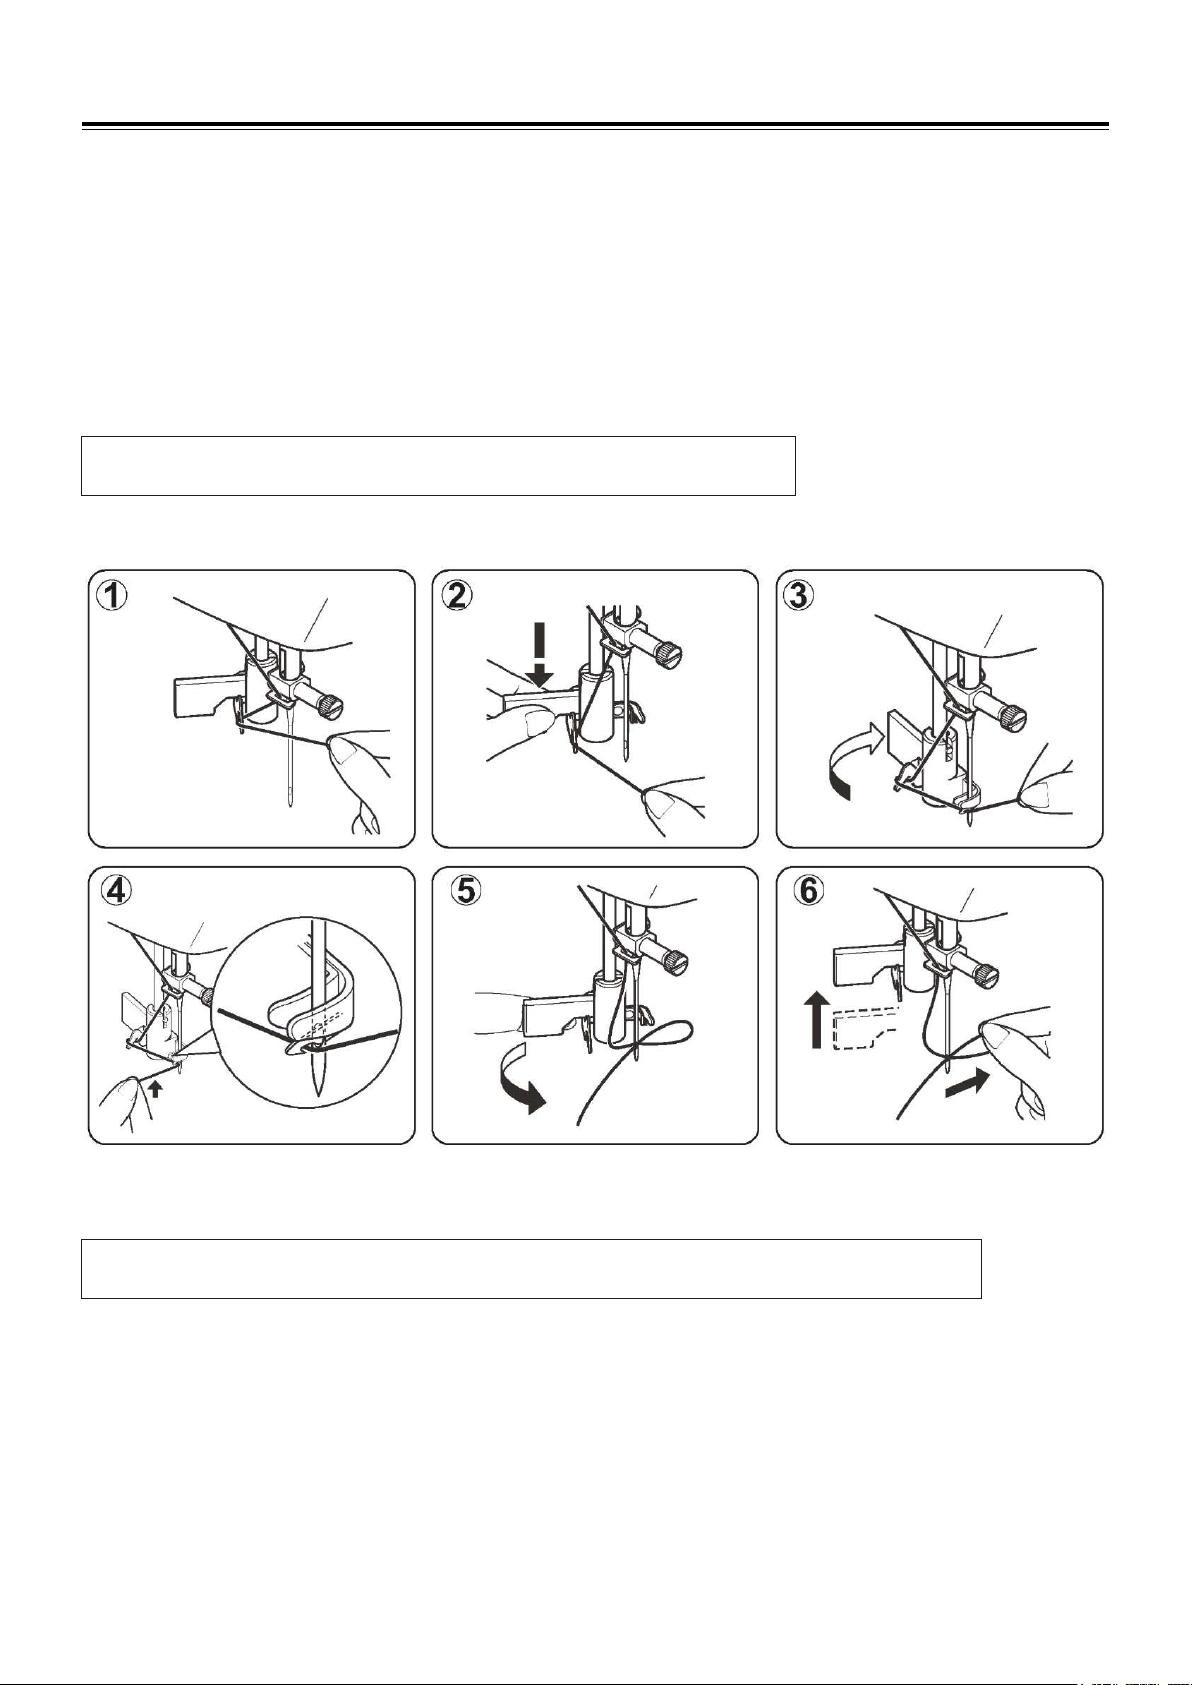
Threading the bobbin case
1. Install the bobbin into bobbin case. Make sure the thread unwinds in the direction of arrow (clockwise).
2. Pull the thread into the groove in the bobbin case slot.
3. Now pull the thread under the tension spring and into the delivery eye.
NOTE: Leave about 10cm (4 inches) of the thread hanging out of the bobbin case. When you pull the thread, the
bobbin should spin clockwise.
Changing the presser foot
1. Turn the hand wheel toward you to raise the needle to its highest position. Raise the presser foot.
2. Press the lever on the back of the presser foot holder. The presser foot will drop off.
3. Place the presser foot so the pin on the foot lies just under the groove of the holder.
Lower the presser foot holder to lock the foot in place.
Gap
KNOWING YOUR SEWING MACHINE
7
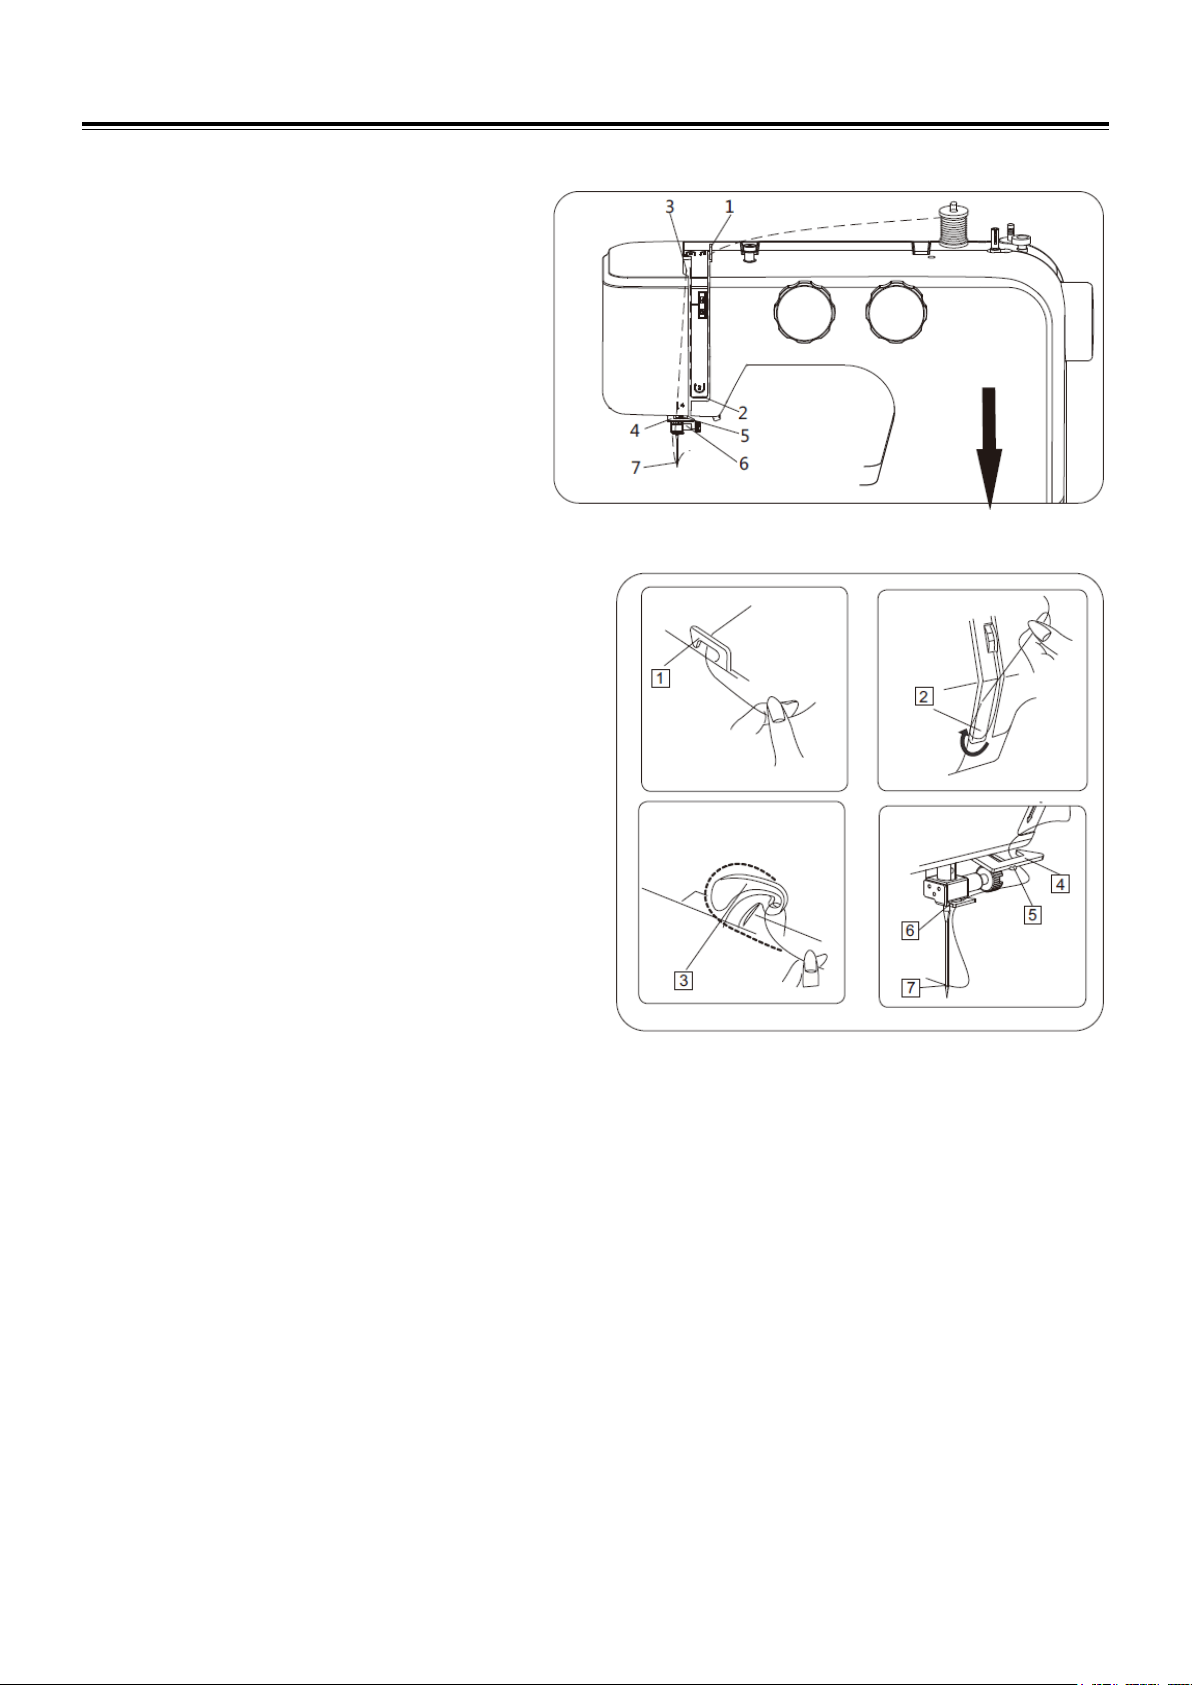
Threading the machine
Raise take-up lever to its highest position by turning
hand wheel toward you.
Raise the presser foot. It is very important to raise
the presser foot before you begin threading, or
correct thread tension cannot be obtained.
Place spool on spool pin as shown, with thread coming
from the back of the spool.
1. Draw thread into thread guide using both hands.
2. Draw the thread down into the tension area and around the
U-turn.
3. Firmly draw thread up and through take-up lever from
right to left.
4. Then draw thread down and slip it into the lower thread
guide.
5. Do not block the thread into double needle spring.
6. Draw thread down and slip it into needle bar thread guide.
7. Thread needle eye from front to back.
Note: Cut the thread end with sharp scissors for easier
needle threading.
KNOWING YOUR SEWING MACHINE
8
Using automatic needle threader
Raise the needle to its highest position by rotating the hand wheel towards you.
1. Hook thread to thread guide, as illustrated.
2. Pull down the lever while holding the end of thread.
3. Rotate the lever to the rear of the machine until the hook pin comes through the eye of the needle.
4. Guide thread into hook pin, in front of the needle, and lightly pull the thread upward.
5. Return the lever and needle will be threaded automatically, forming a small loop.
6. Release the lever and pull thread away from you until the thread tail is completely threaded.
NOTE: For smooth threading it is recommended you select straight stitching
when using the needle threader.
NOTE: Automatic needle threader is only applicable for all-purpose presser foot. Automatic needle
threader cannot be used for twin needles.
KNOWING YOUR SEWING MACHINE
9
Drawing up bobbin thread
Raise the presser foot and hold the needle thread lightly with your left hand.
Turn the hand wheel slowly towards you with your right hand until the
needle goes down and continue turning the hand wheel until the take-up
lever is at its highest position.
Lightly draw up the needle thread, forming a loop of the bobbin thread.
Pull 15cm (6 inches) of both threads back and under the presser foot.
Balancing top thread tension
The top thread and the bobbin thread should interlock in
the center of two layers of fabric in straight seams.
Set the desired number of the thread tension dial at
setting mark.
Tighten the needle thread tension by moving the dial to
a higher number.
Loosen the needle thread tension by moving the dial to
a lower number.
NOTE: In order to obtain better zigzag stitches, the top thread tension should be slightly looser than the bobbin
thread tension. That means the top thread should appear slightly on the reverse side of the fabric, but the
bobbin thread should not appear on the top side of the fabric.
KNOWING YOUR SEWING MACHINE
10
Needle, thread and fabric chart
Your fabric will determine the choice of a needle and thread. The following table is a practical guide to needle and thread
selection.
Always refer to it before a new sewing project. And be sure to use the same size and type of thread in the bobbin as in the top
thread supply.
Kind Fabric Threads Needle size
Light
Weight
Voile, Organza, Organdy,
Chiffon, Tricot
Fine Silk,
Fine Cotton,
Fine Polyester
9 or 12
Medium
Weight
Linen, Cotton,
Rayon, Wool
Double Knit
Cotton, Polyester,
All-Purpose
12 or 14
Heavy
Weight
Denim, Tweed, Gaba
rdine,
Canvas, Upholstery Fabric
Polyester, All-Purpose,
Topstitching
14 or16
CAUTION
Always disconnect the machine from power supply by removing the
plug from the wall-outlet.
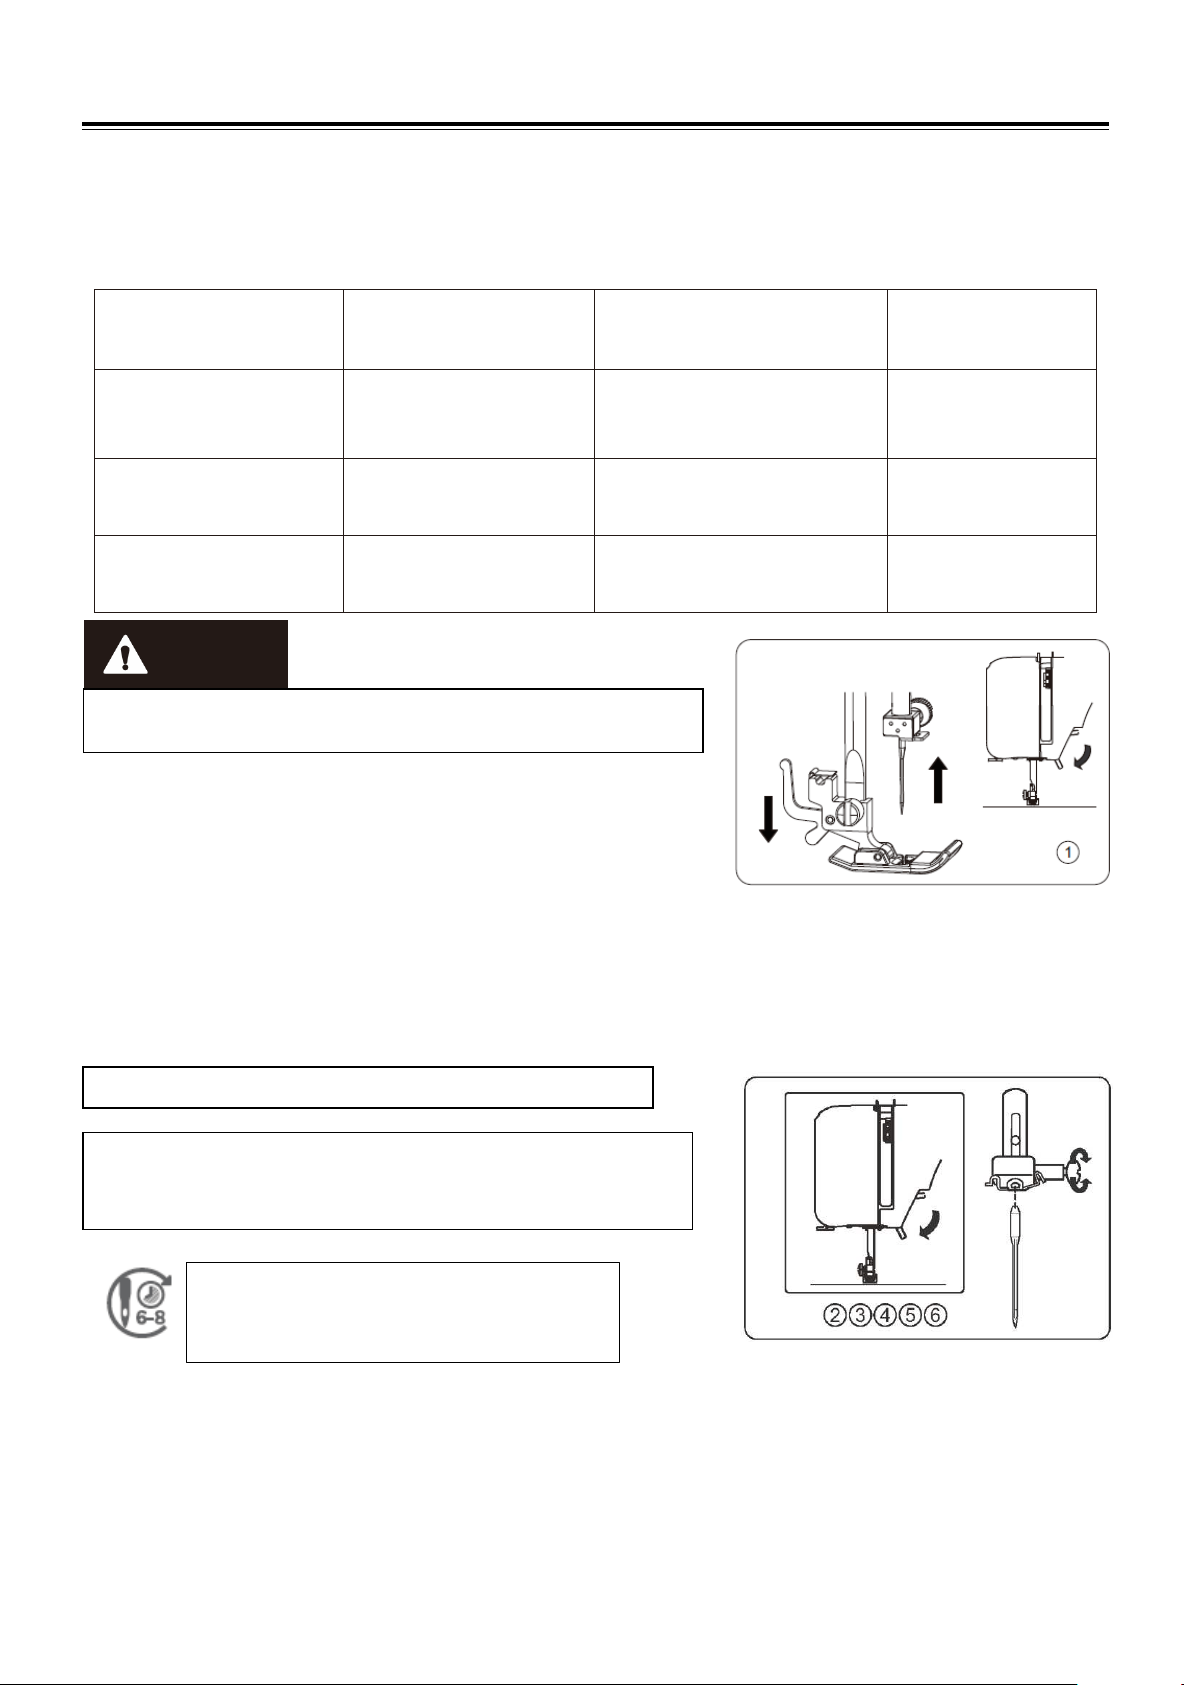
Changing the needle
1. Raise the needle by turning hand wheel toward you and
lower the presser foot.
2. Rotate the needle clamp screw toward you (counter-
clockwise) to loosen the needle.
3. Remove the needle from the clamp.
4. Insert the new needle into the needle clamp with the flat
side away from you.
5. When inserting the needle into the clamp, push it up as far
as it will go.
6. Tighten the clamp screw clockwise firmly with the
screwdriver.
* Check your needles frequently for barbed or
blunted points.
Snags and runs in knits, fine silks and silk-like
fabrics are permanent and are almost always caused
by damaged needle.
NOTE: Tighten snugly, but do not over tighten.
Helpful Hint: Placing a scrap of fabric under the presser foot and
lowering the presser foot makes it easier to change the needle and will
preclude dropping the needle into the needle plate slot.
Change the needle often. As a general rule,
needles, should be changed every 6-8 hours of
actual stitching time.
KNOWING YOUR SEWING MACHINE
11
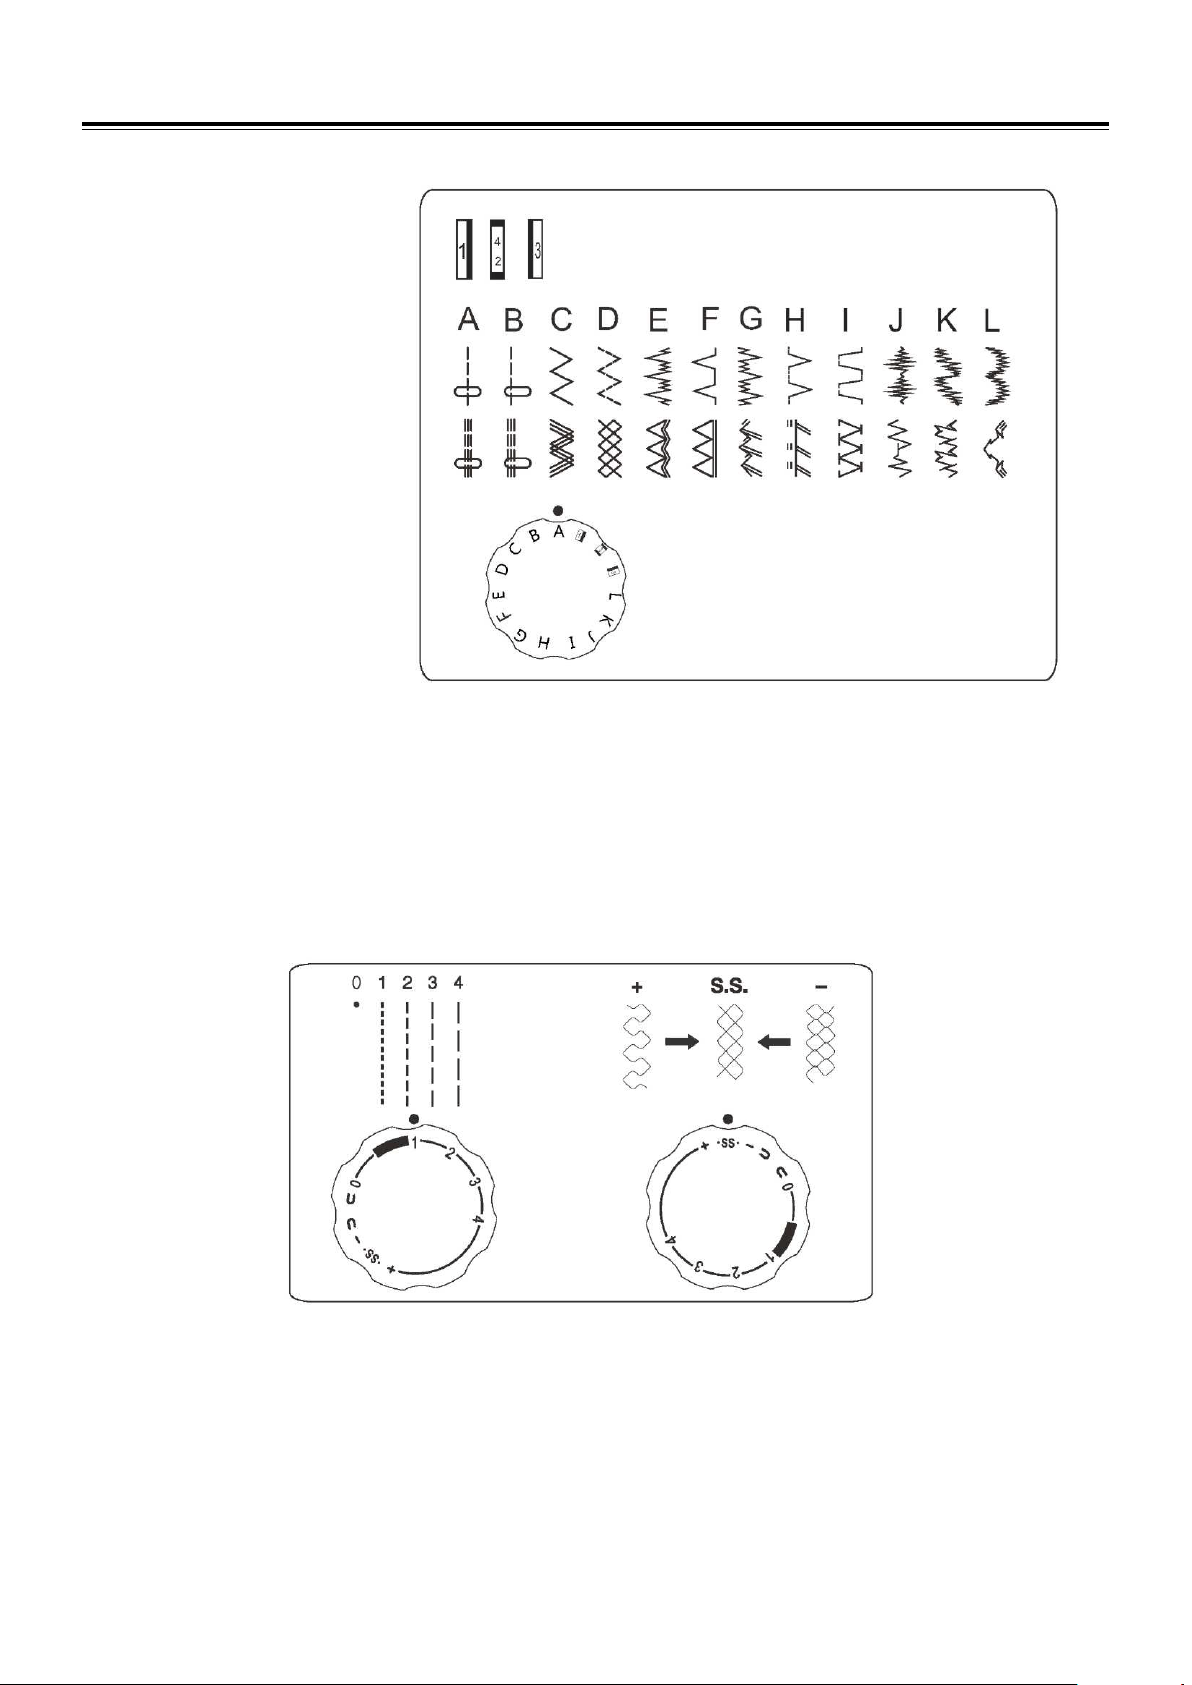
Pattern selector dial
Select the desired pattern at the setting mark by turning the pattern selector dial.
Selecting stretch stitch patterns
When sewing stretch stitches, set the stitch length dial at “SS”.
When forward and reverse feeds become unbalanced depending upon the type of fabric, correct as follows.
When patterns are compressed, correct it by turning the dial toward “+”.
When patterns are drawn out, correct it by turning the dial toward ”-”.
Stitch length dial
The higher the number, the longer the stitch length. Note: when set to “0”, the machine will not feed the fabric.
KNOWING YOUR SEWING MACHINE
12
Useful sewing tips
Various ways to achieve better sewing results are described below. Refer to these tips when sewing.
1. Trial sewing
Use different stitch width and length for trial sewing. When you have finished, select the best looking stitch length for
correct sewing.
For the trial sewing, use a piece of fabric and thread that are the same as those used for your project, and check the thread
tension and stitch length. Since the results differ depending on the type of stitching and the number of fabric layers sewn,
perform the trial sewing under the same conditions that will be used with your project.
2. Changing the sewing direction
Stop the machine and turn the hand wheel toward you to
bring the needle down into the fabric. Raise the presser
foot.
Pivot the fabric around the needle to change sewing
direction as desired. Lower the presser foot and continue
sewing.
3. Sewing curves
1). Stop sewing, and then slightly change the sewing direction to sew around the curve.
2). When sewing along a curve while using a zigzag stitch, select a shorter length in order to obtain a finer stitch.
4. Sewing thick fabrics
If the fabric does not fit under the presser foot
Raise the presser foot even higher to bring the presser foot to its highest position. Then place the fabric under the presser
foot. (See page 4 to raise the presser foot.)
5. Sewing elastic fabric or the fabric that is easy to cause skipping stitches
Use ball point needle and longer stitch length. If necessary, add a layer of stabilizer under the fabric for better sewing.
6. Sewing thin fabric or silk
Some fine fabrics, such as silk, can be slippery and more difficult to handle. It can be helpful to place a lightweight
stabilizer underneath the fabric for easier sewing.
7. Sewing stretch fabrics
First, baste the fabrics together, and then sew without stretching the fabric.
8. Free arm sewing
When sewing trousers, sleeve cuffs or other hard-to-reach areas, use the free-arm sewing function (for details about setting
the machine for free-arm sewing, refer to page 4).

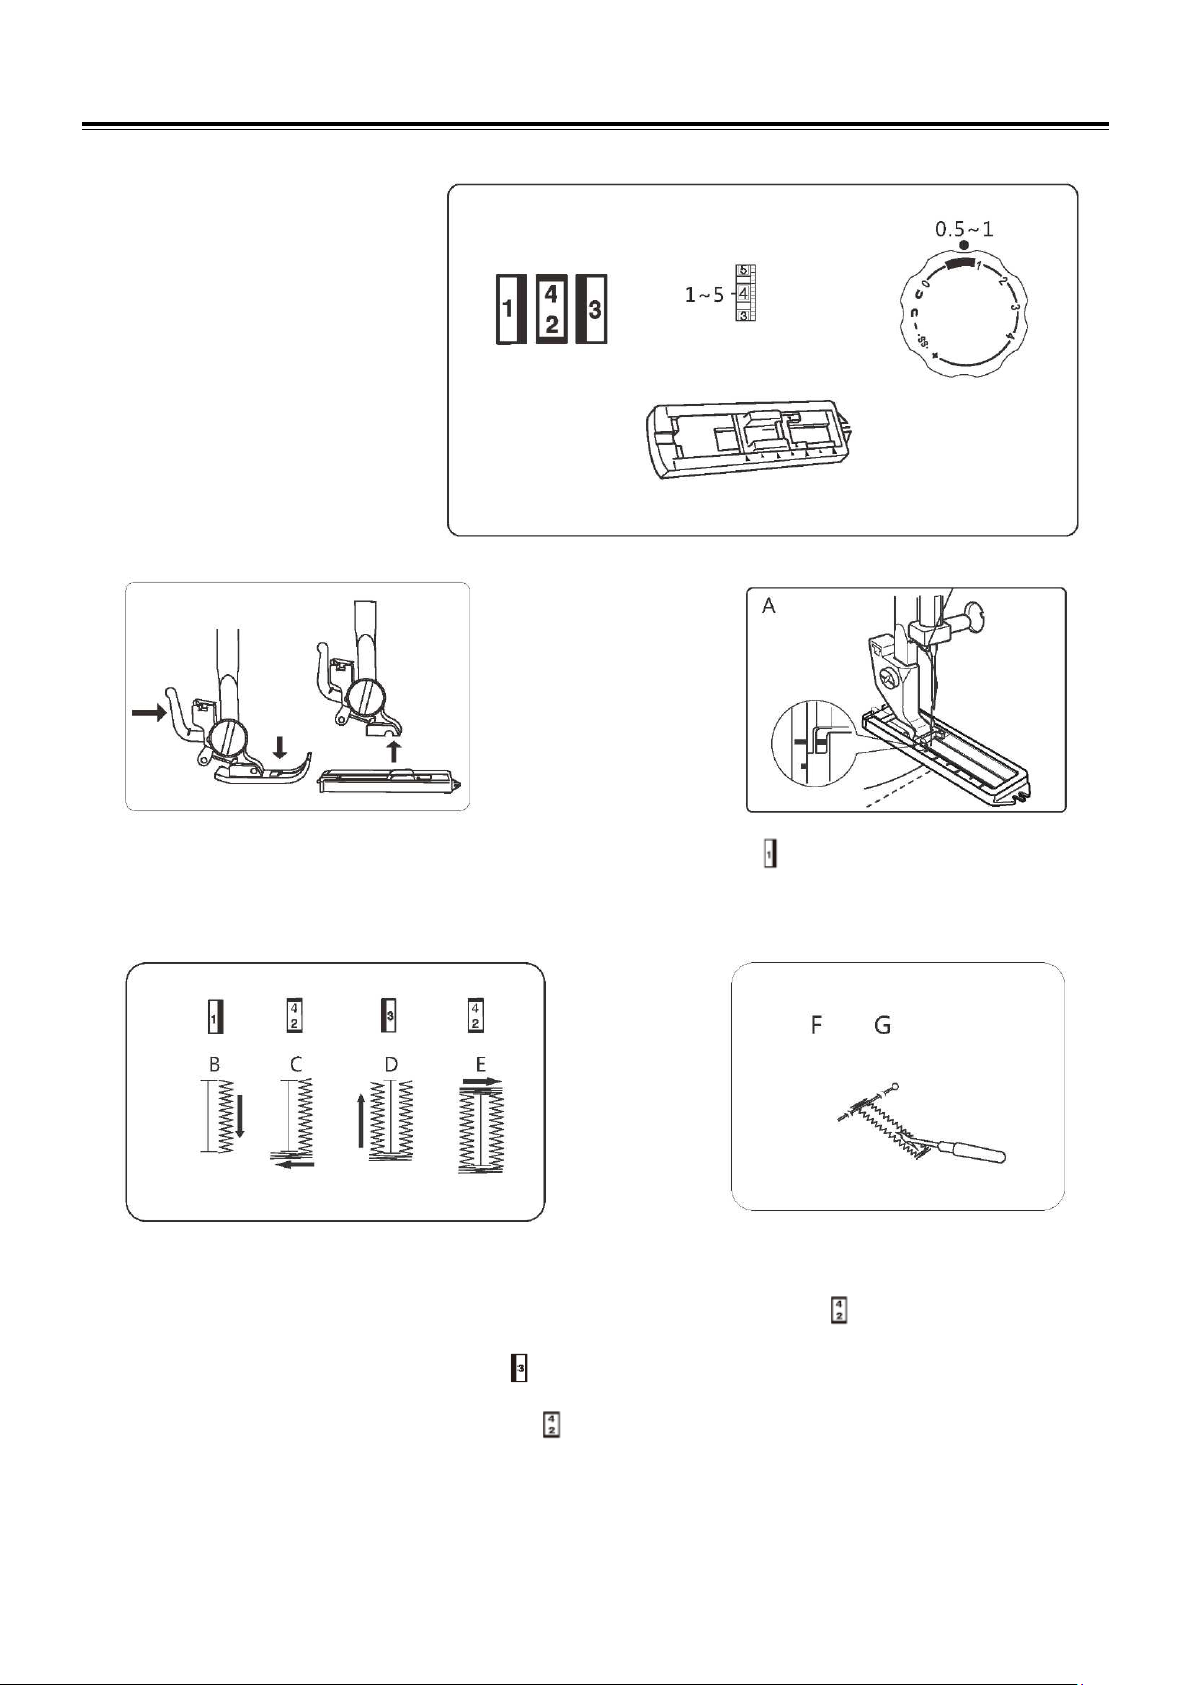
UTILITY STITCHES
13
Straight stitch
Raise the presser foot and position the fabric next to a stitching guide line on
the needle plate.
Lower the needle into the fabric.
Lower the presser foot and smooth the thread towards the back. Depress the
foot control.
Gently guide the fabric along the guide line letting the fabric feed by itself.
For securing the ends of seams, press the reverse stitch lever and sew several
reverse stitches.
Raise the presser foot and remove the fabric, drawing the threads to back.
The threads are cut the proper length for starting the next seam.
Machine Setting
UTILITY STITCHES
14
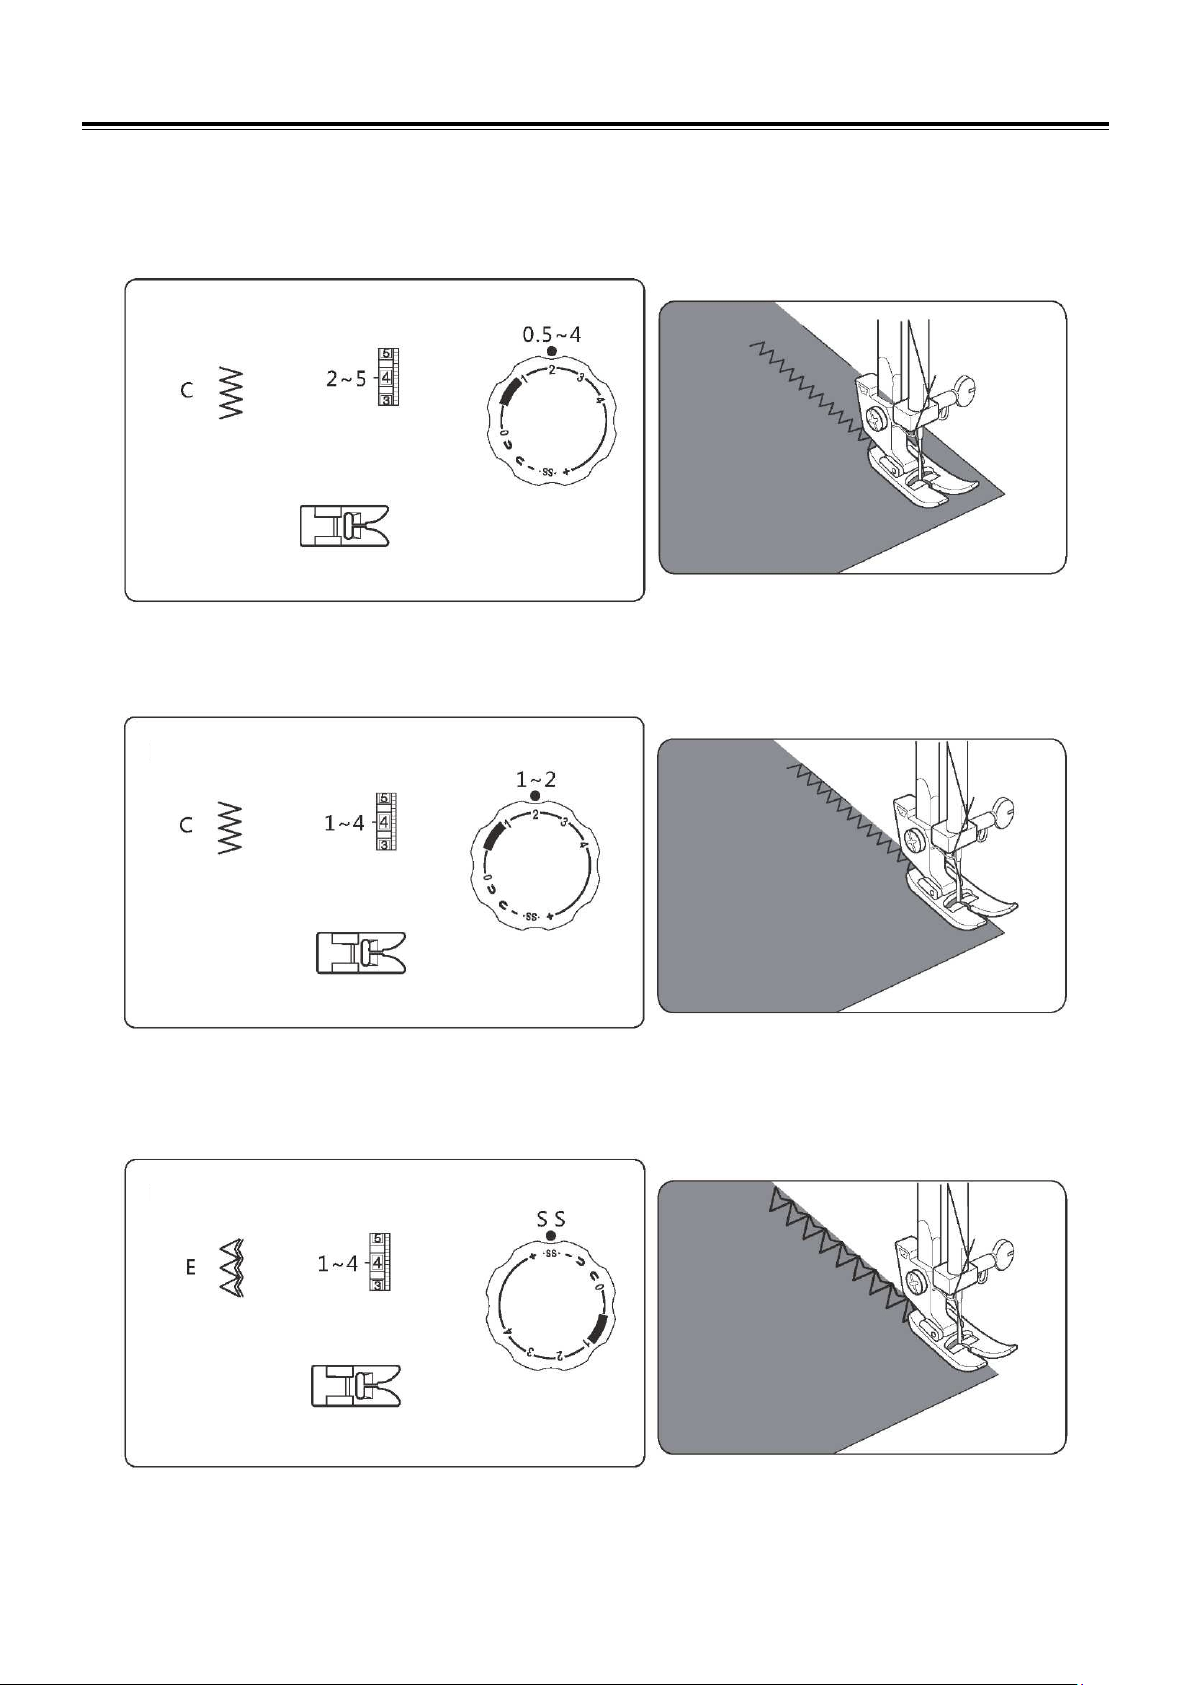
Zigzag stitch
Simple zigzag stitching is widely used for overcasting, sewing on buttons, decorative stitching, etc.
The zigzag stitch can also be used on the seam allowance to prevent fabrics from fraying at raw edges.
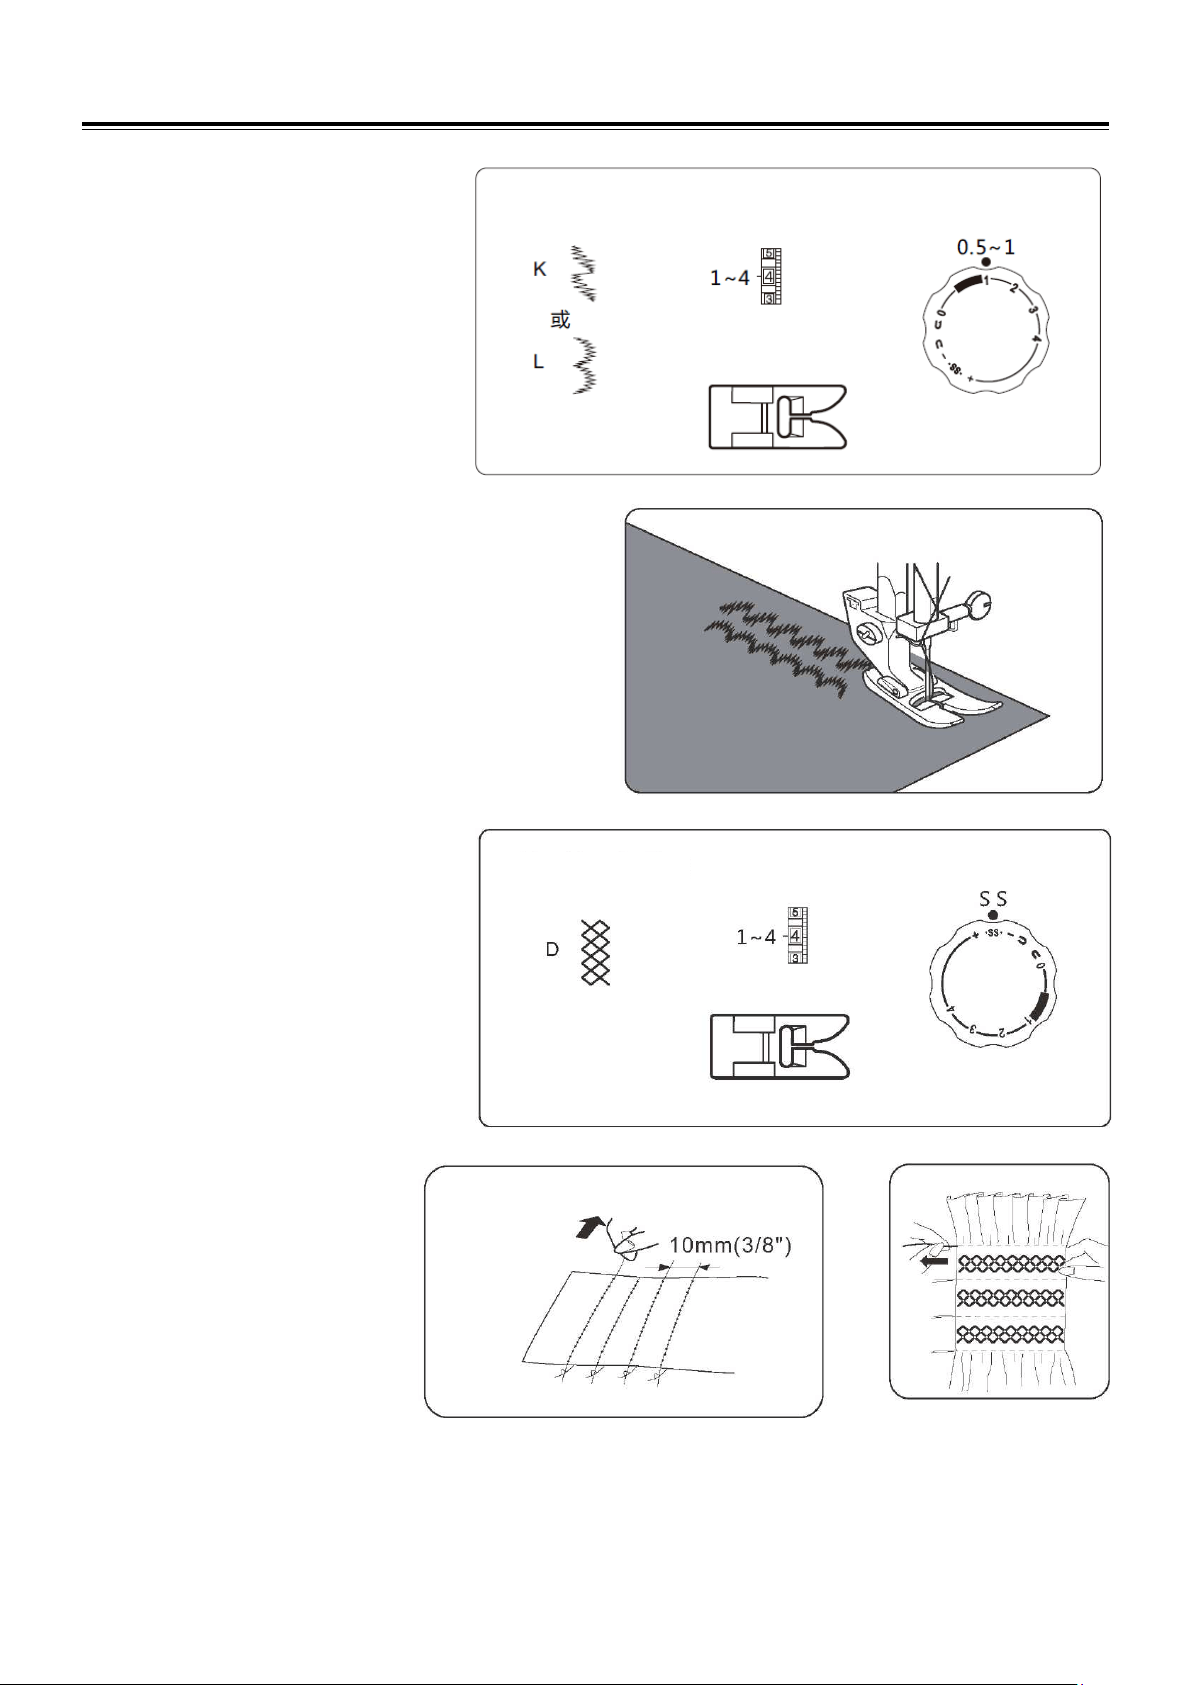
Overedge stitch
Overedge stitch will be done most successfully when the right side stitches of zigzag fall slightly off the edge of the fabric.
Machine Setting
Machine Setting
Machine Setting
UTILITY STITCHES
15
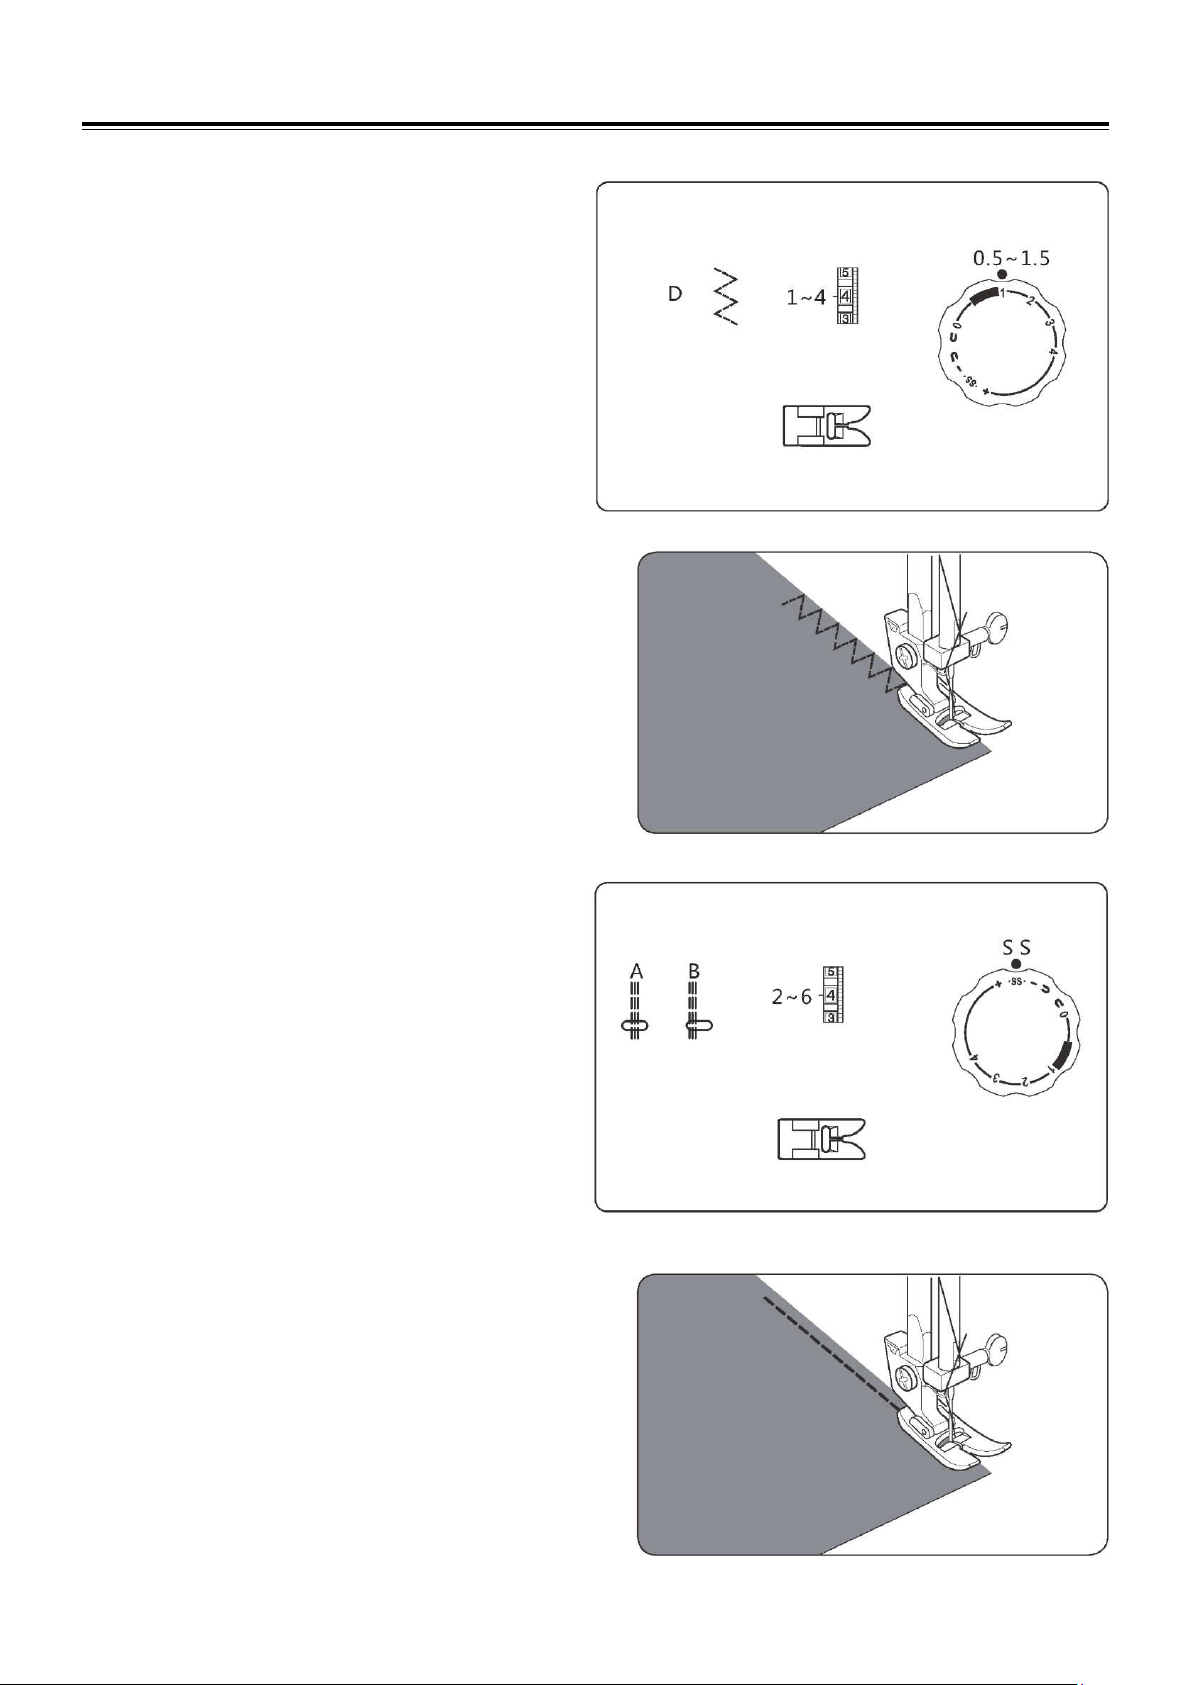
Multi-step zigzag stitch
To help prevent fabrics from unraveling, place the fabric
under the presser foot so the right-hand side of the stitches
falls at the edge of the fabric.
This stitch can also be used for elastic insertion, decorative
stitching, and more.
Straight stretch stitch
The stitch is sewn with two stitches forward and one stitch
backward forming a seam that does not rip easily.
Machine Setting
Machine Setting
UTILITY STITCHES
16
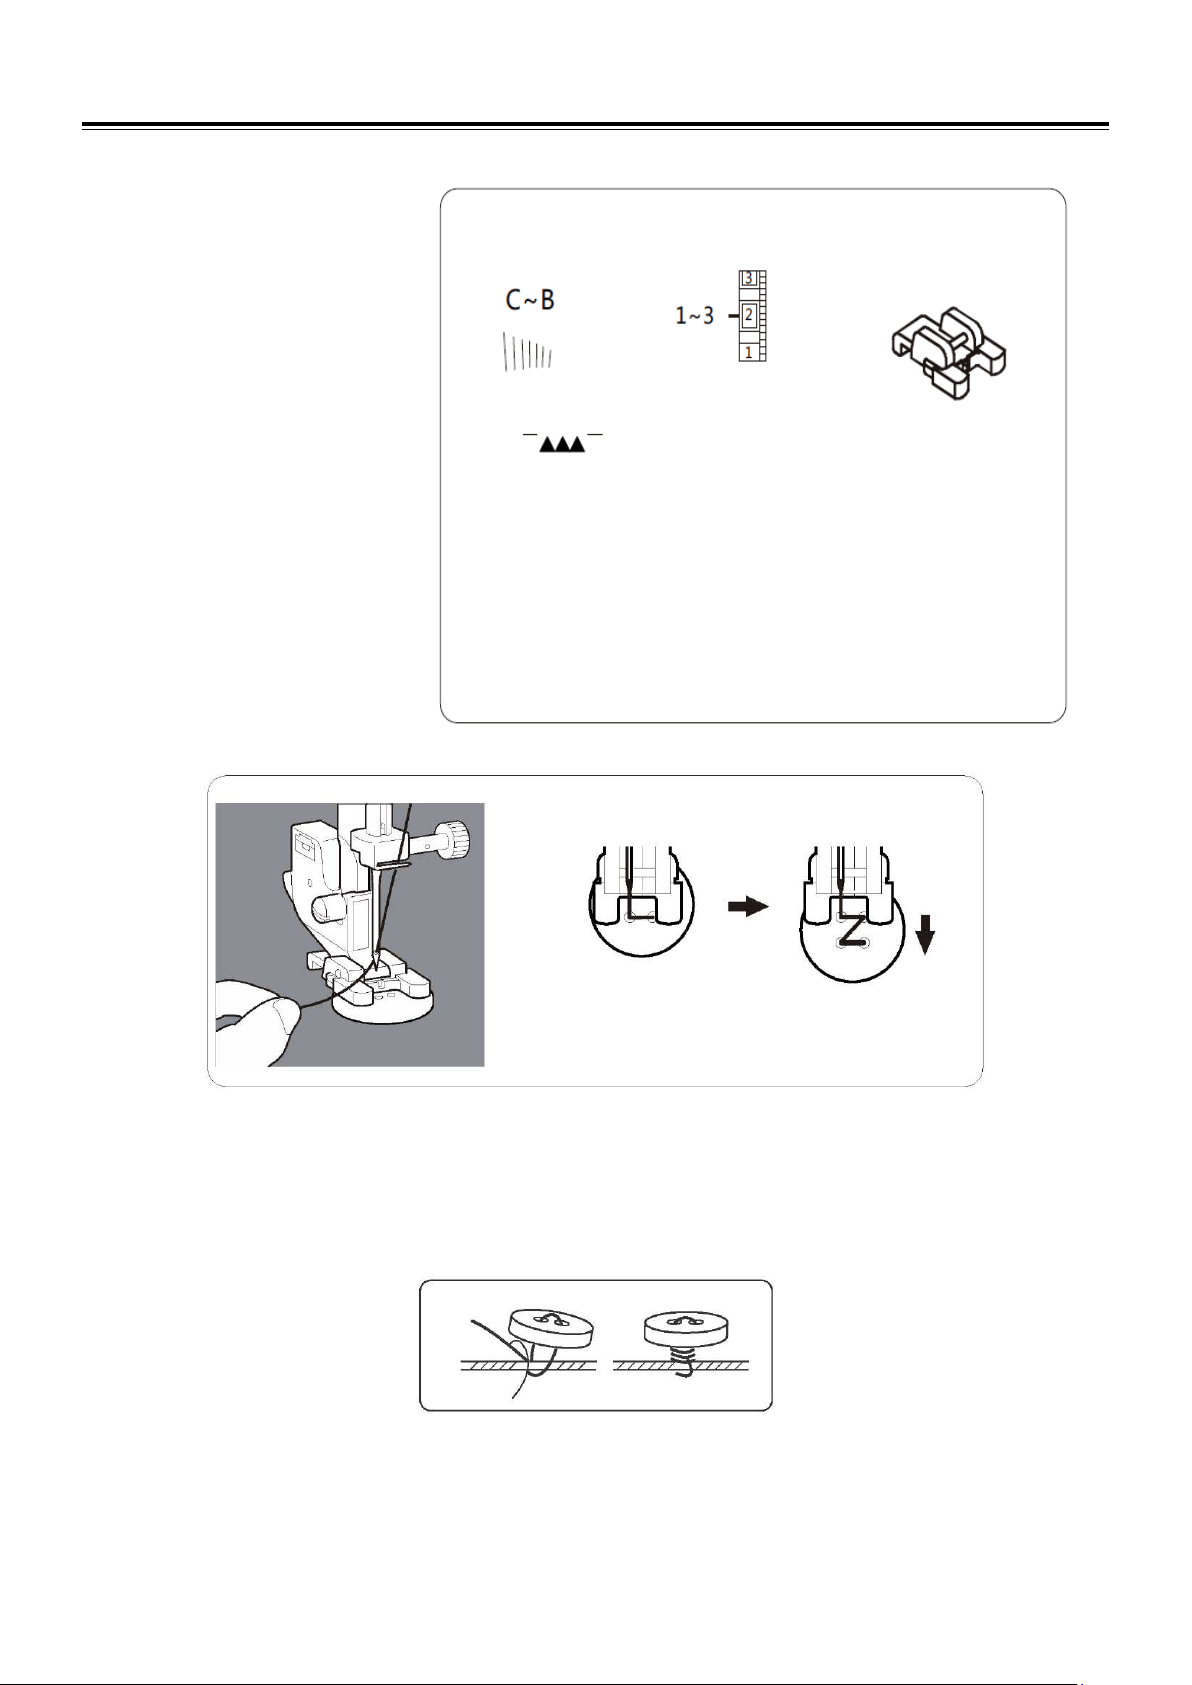
Sewing buttons
Position your fabric and button under the presser foot. Lower presser foot. Turn the handwheel to make sure needle
clears both left and right openings of button. Sew 10 stitches across.
When attaching four-hole buttons, first sew the two holes closest to you. Then, slide the button so that the needle
goes into the two holes toward the rear of the sewing machine, and then sew them in the same way.
To secure thread, cut the upper thread with 25cm of excess, wind it around the thread between
the button and the fabric, and then tie it securely.
Machine Setting
Lower the feed teeth
NOTE: 1. Lower the feed teeth (refer to page 4).
After you finish sewing, set drop feed lever to
original position, and turn the handwheel one full turn
to re-engage feed teeth.
2. You do not have to adjust the stitch length dial.
UTILITY STITCHES
17
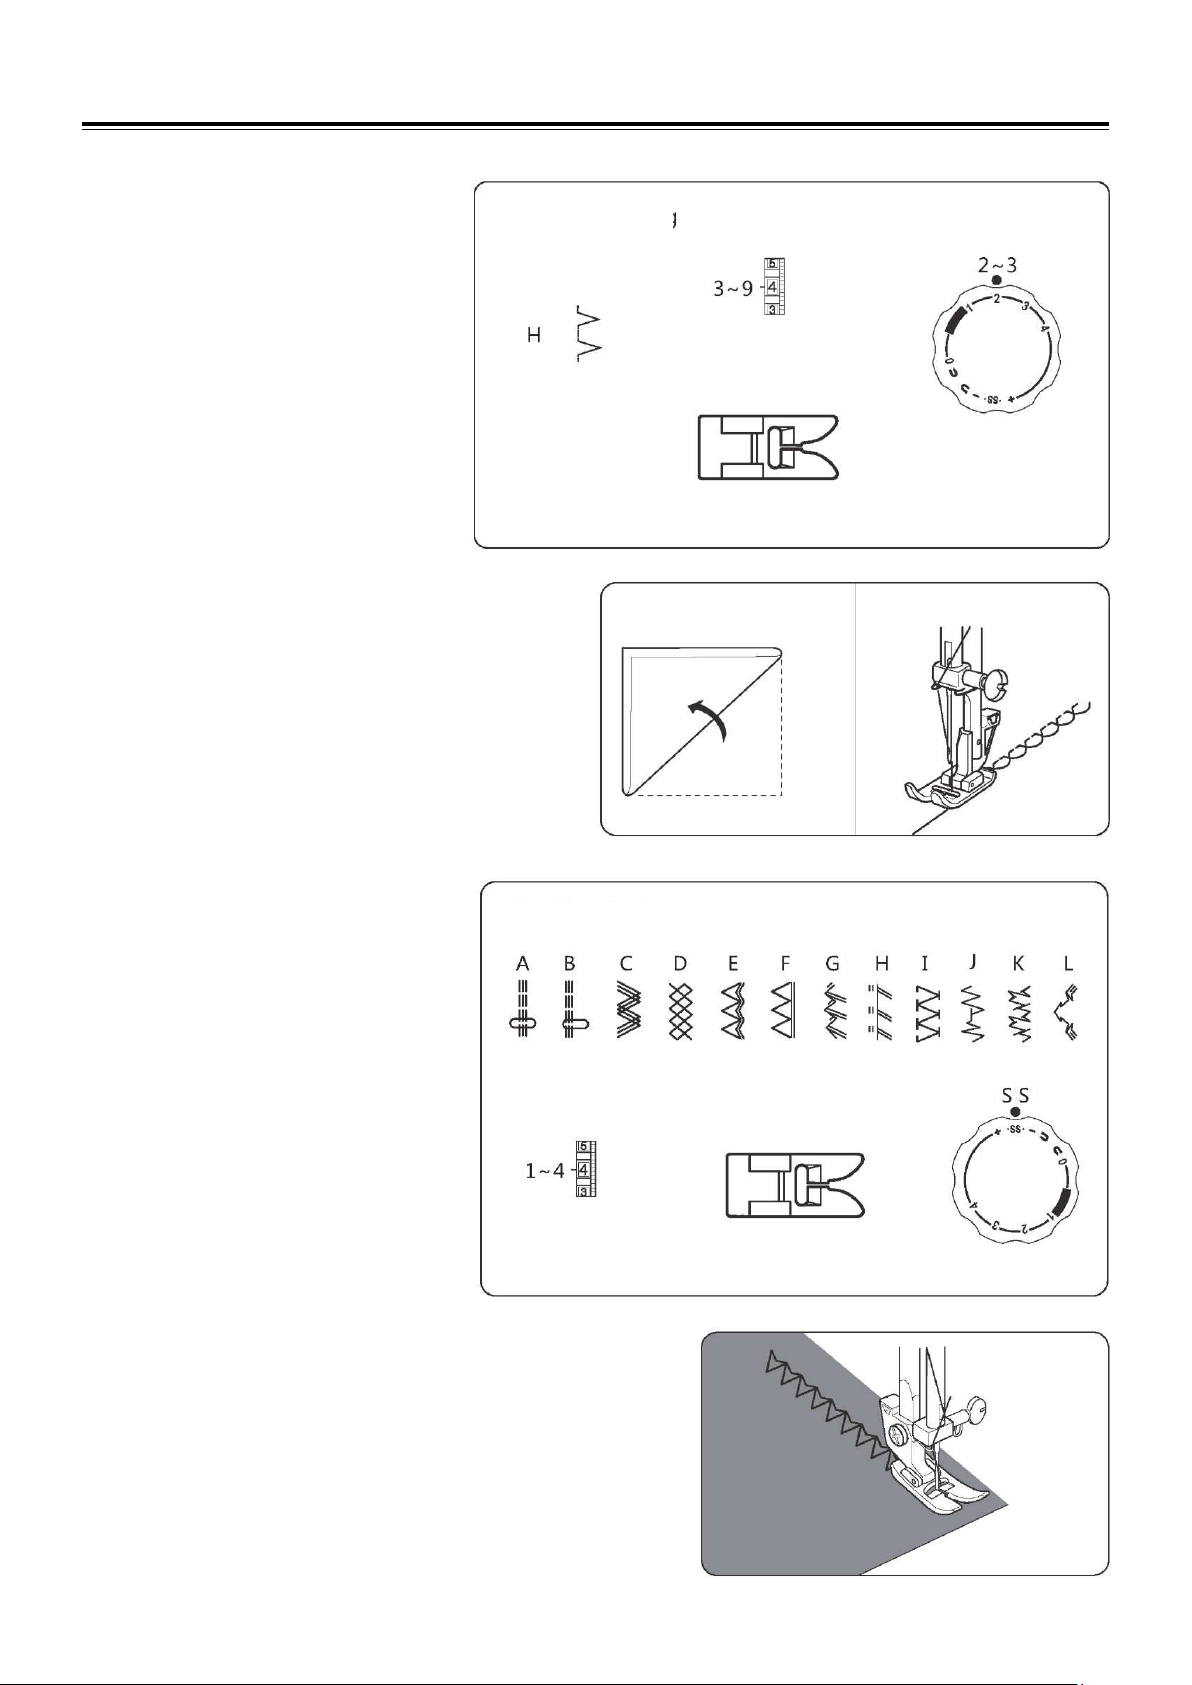
Buttonhole
stitch
Replace the buttonhole foot.
* Before you sew the actual buttonholes on the actual
garment, make several practice buttonholes on a fabric
sample.
* Use interfacing to help prevent fabric from puckering.
A. Select , draw both thread to the left under the
foot.
Insert the garment under the foot.
B. Lower the needle at the starting point. then lower buttonhole foot. Sew the needed length on the right side of buttonhole
and stop the machine.
C. Raise the needle to its highest position by turning the hand wheel toward you, then select . Sew 5-6 bartack stitches at
the bottom of the buttonhole.
D. Raise the needle to its highest position and select , sew the left side of buttonhole the same length as the right side and
stop the machine.
E. Raise the needle by turning the handwheel and select . Sew 5-6 bartack stitches at the top of the buttonhole.
F. Raise the presser foot and draw out the fabric. Cut both top thread and bobbin thread leaving about 10 cm of thread ends.
Use a hand sewing needle to bring the upper thread to the back side of the garment. Tie threads on the wrong side of the
fabric to secure.
G. Cut open the buttonhole with seam ripper.
Machine Setting
UTILITY STITCHES
18
Buttonhole stitch
Tips:
Slightly reduce the upper tension for best results.
Use stabilizer for fine or stretchy materials.
We recommend placing a pin across the end of the
buttonhole as a precaution against cutting the stitches
with the seam ripper.
It is advisable to use gimp cord for stretch or knit
fabrics. The zigzag should sew over the gimp.
The lines on the buttonhole foot can be used guides
when sewing multiple buttonholes.
1. Lift the presser foot, pull the gimp cord and come
round the protruding point on back of the
buttonhole foot.
2. Pull the gimp cord under the foot to the front.
3. Fix the gimp cord to the protruding point on front
of foot.
4. Turn the needle down to the starting position on
fabric, put down the presser foot.
5. Sew the buttonhole according to page 17.
6. Pull the gimp cord straightly.
7. Cut the gimp cord.
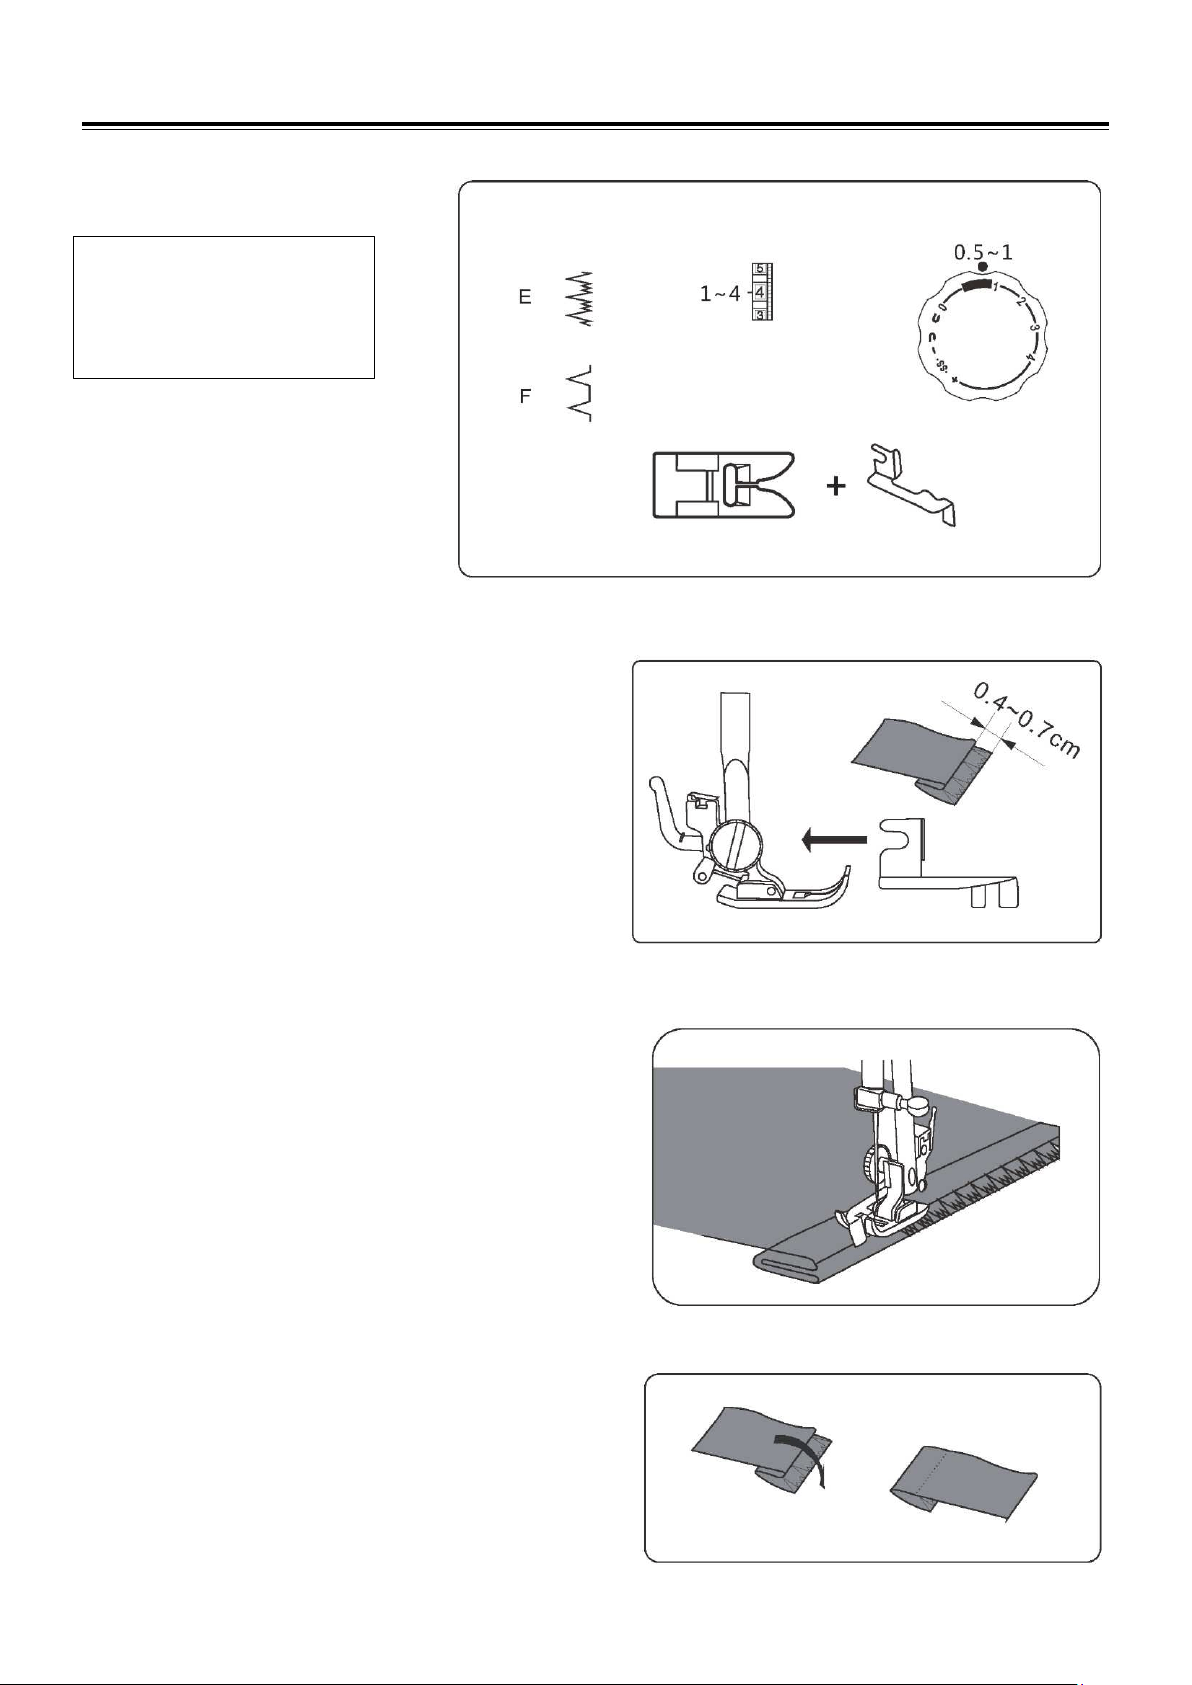
Zipper application
Attach the zipper foot.
When sewing the right side of the zipper, attach the zipper foot as the
illustration in right.
When sewing the left side of the zipper, attach the zipper foot as the
illustration in right.
Helpful hint:
During zipper inserting, ensure that the needle does not
touch the zipper coil. Otherwise, it may cause the needle
break or even cause injury.
Machine Setting
Sew the right side
of the zipper.
Sew the left side
of the zipper.
UTILITY STITCHES
19
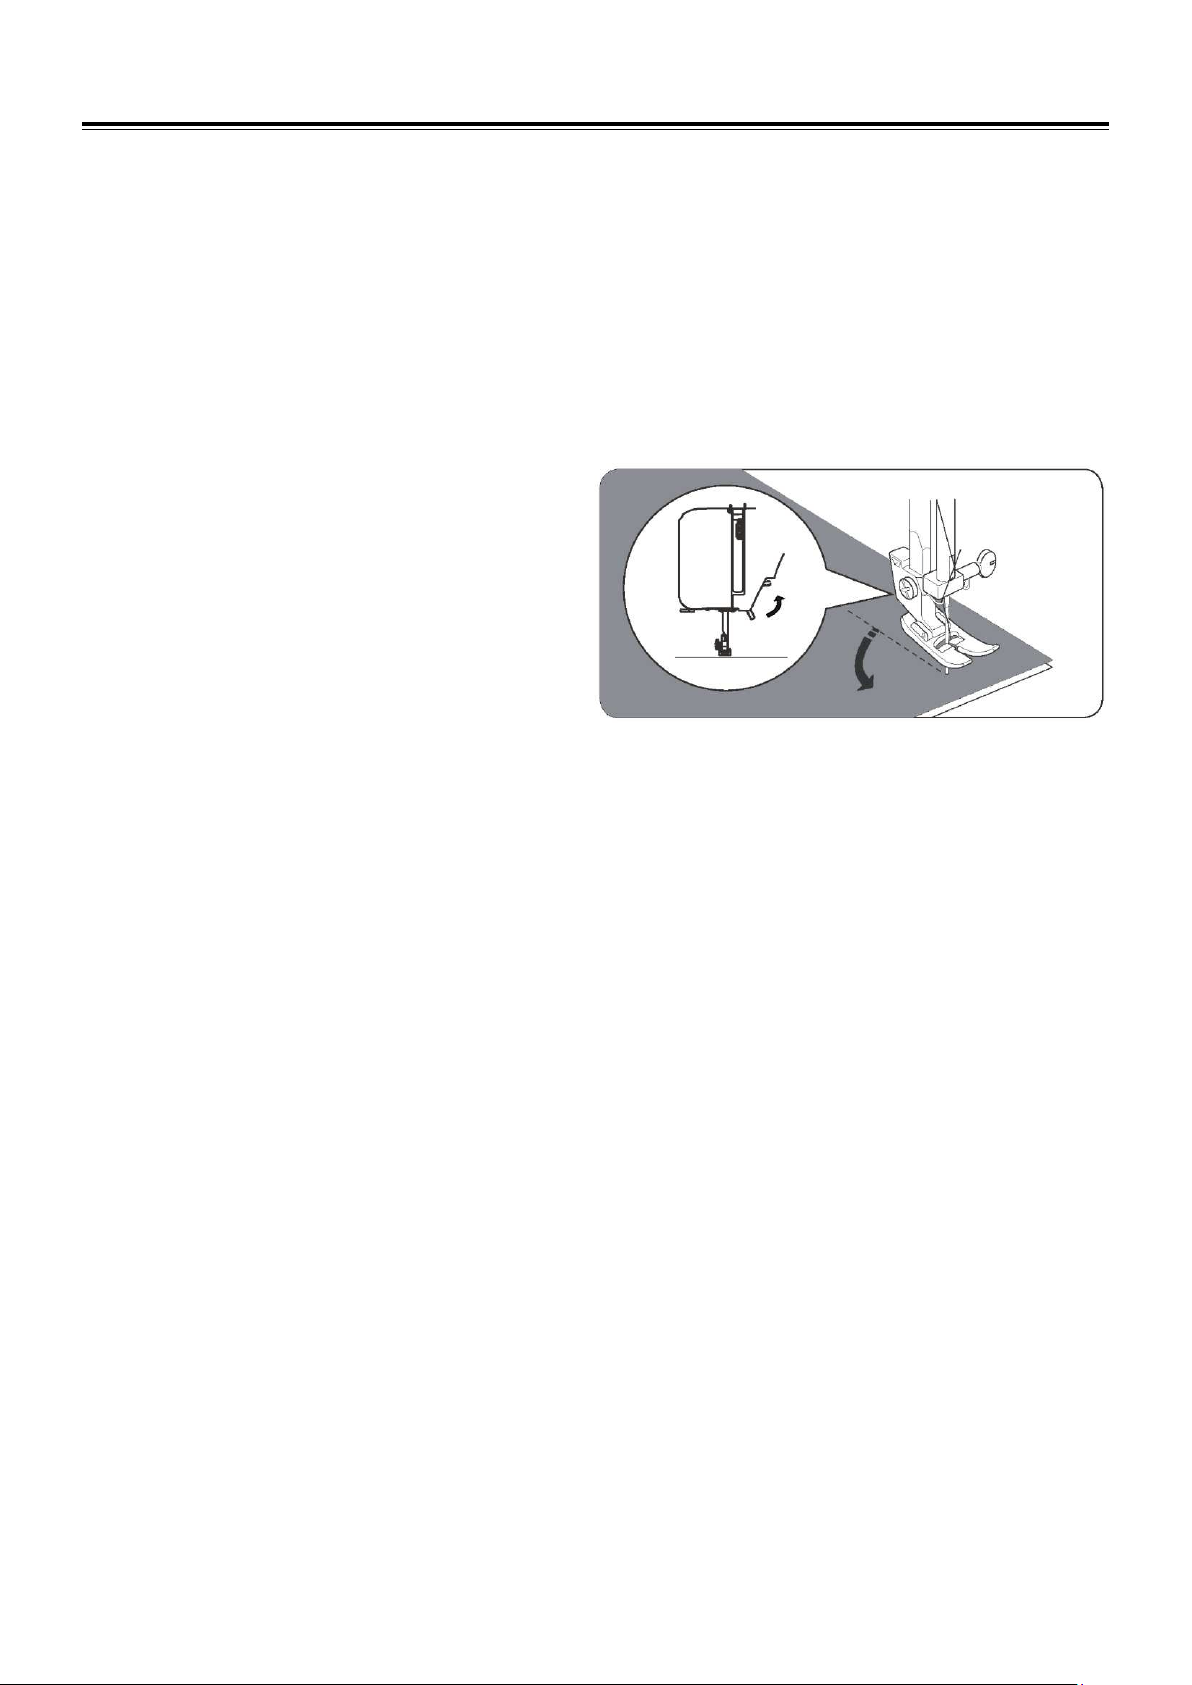
Blind stitch
Fold up the fabric as illustrated.
Lower the presser foot, then loosen the foot holder screw to place
the hem guide between the screw and the shank of foot holder.
Tighten the screw making sure the front wall of hem guide is placed
between the toes of the presser foot.
Raise the presser foot and place the fabric under the foot so that the
soft fold rests against the front wall of the hem guide.
Lower the foot, then stitch slowly for better for better control so that
the zigzag stitches fall on the hen allowance and pierce the soft fold.
While sewing, make sure the soft fold runs along the front wall of
the hem guide.
Spread the fabric flat with the right side facing up.
Machine Setting
Stitch E is for hems on stretch
knit fabrics.
Stitch F is for hems on woven
(non-stretch) fabrics.
DECORATIVE STITCHING
20
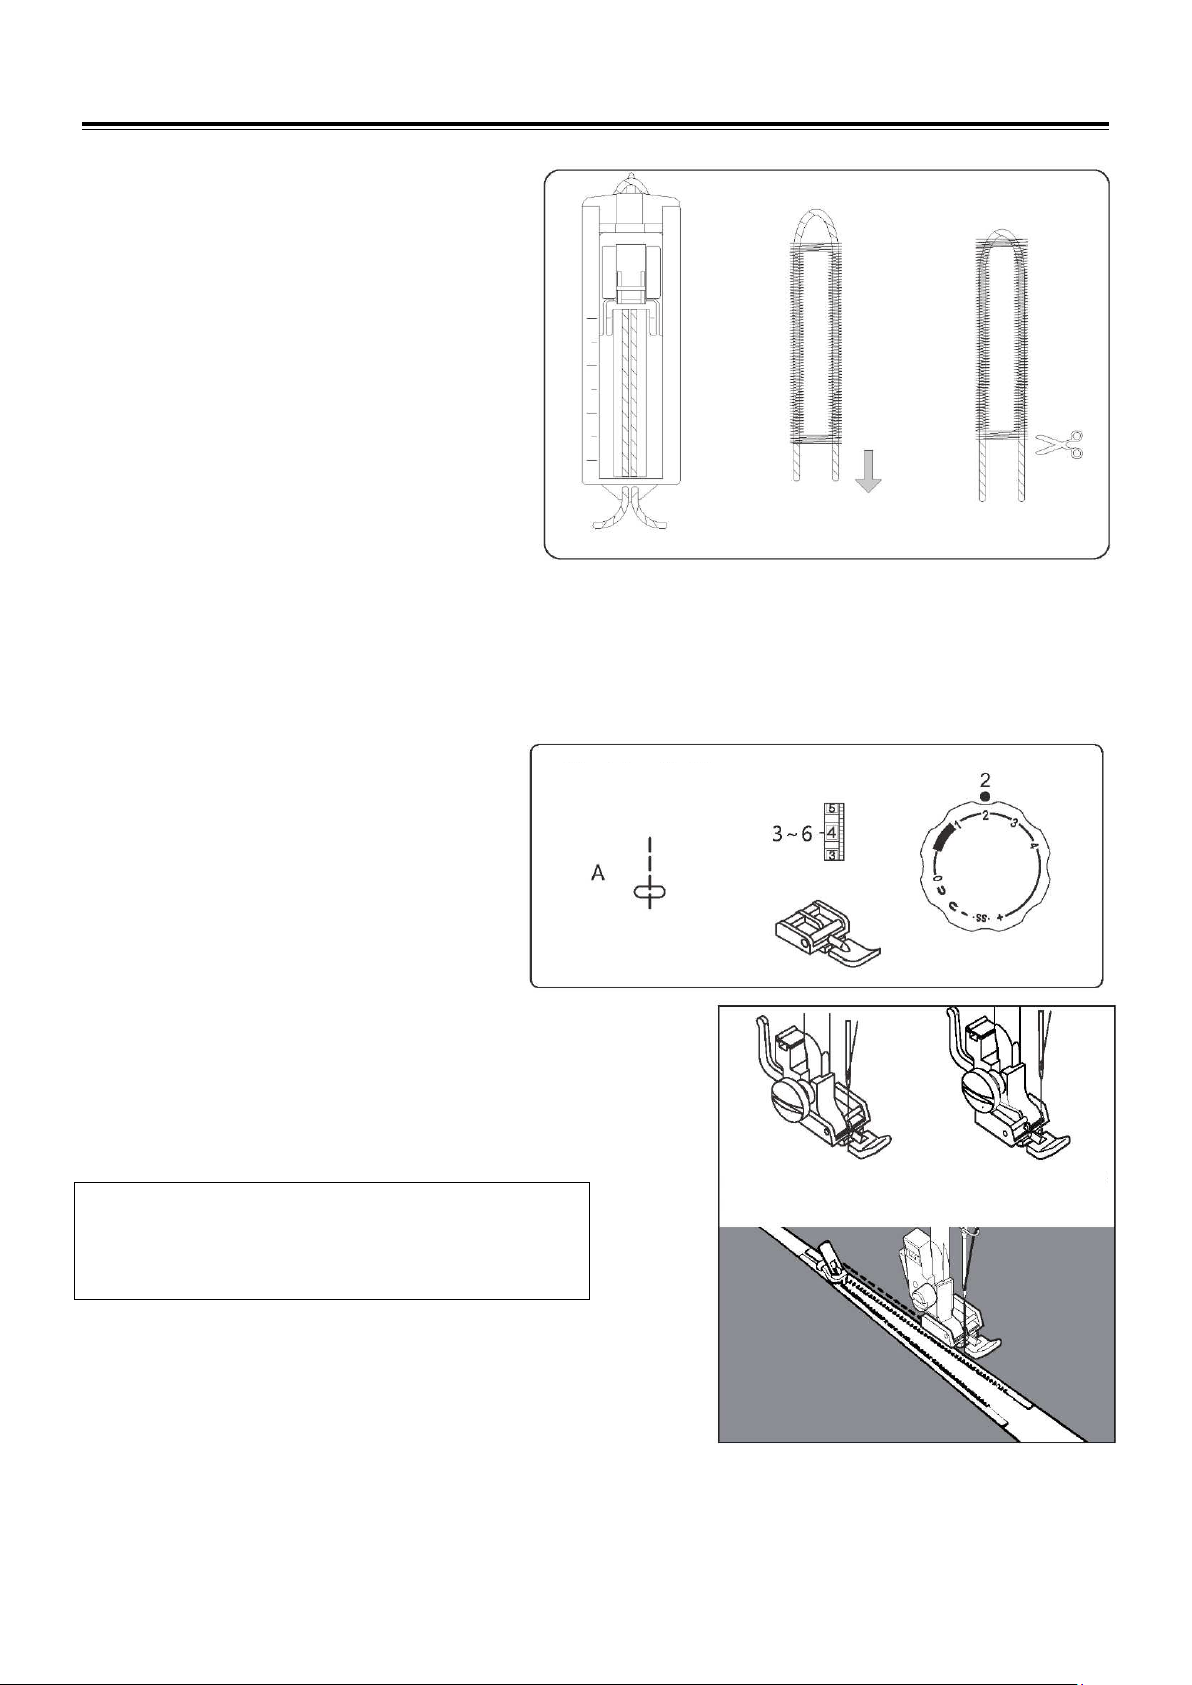
Picot hem stitch
Place the folded edge along the slot of foot. The needle
should fall off the edge of the fabric on the right, forming a
tuck.
Stretch stitches
When forward and reverse feed becomes unbalanced, depending upon the
type of fabric, correct the balance by turning the stitch length dial as
follows:
When patterns are compressed, correct by turning the dial toward “+”.
When patterns are drawn out, correct by turning the dial toward “-”.
Machine Setting
Machine Setting
DECORATIVE STITCHING
21
Decorative satin stitch
Sew a row of stitches and adjust the thread tension so the upper
thread appears slightly on the reverse side of the fabric.
Test the stitch on actual fabric for the best results.
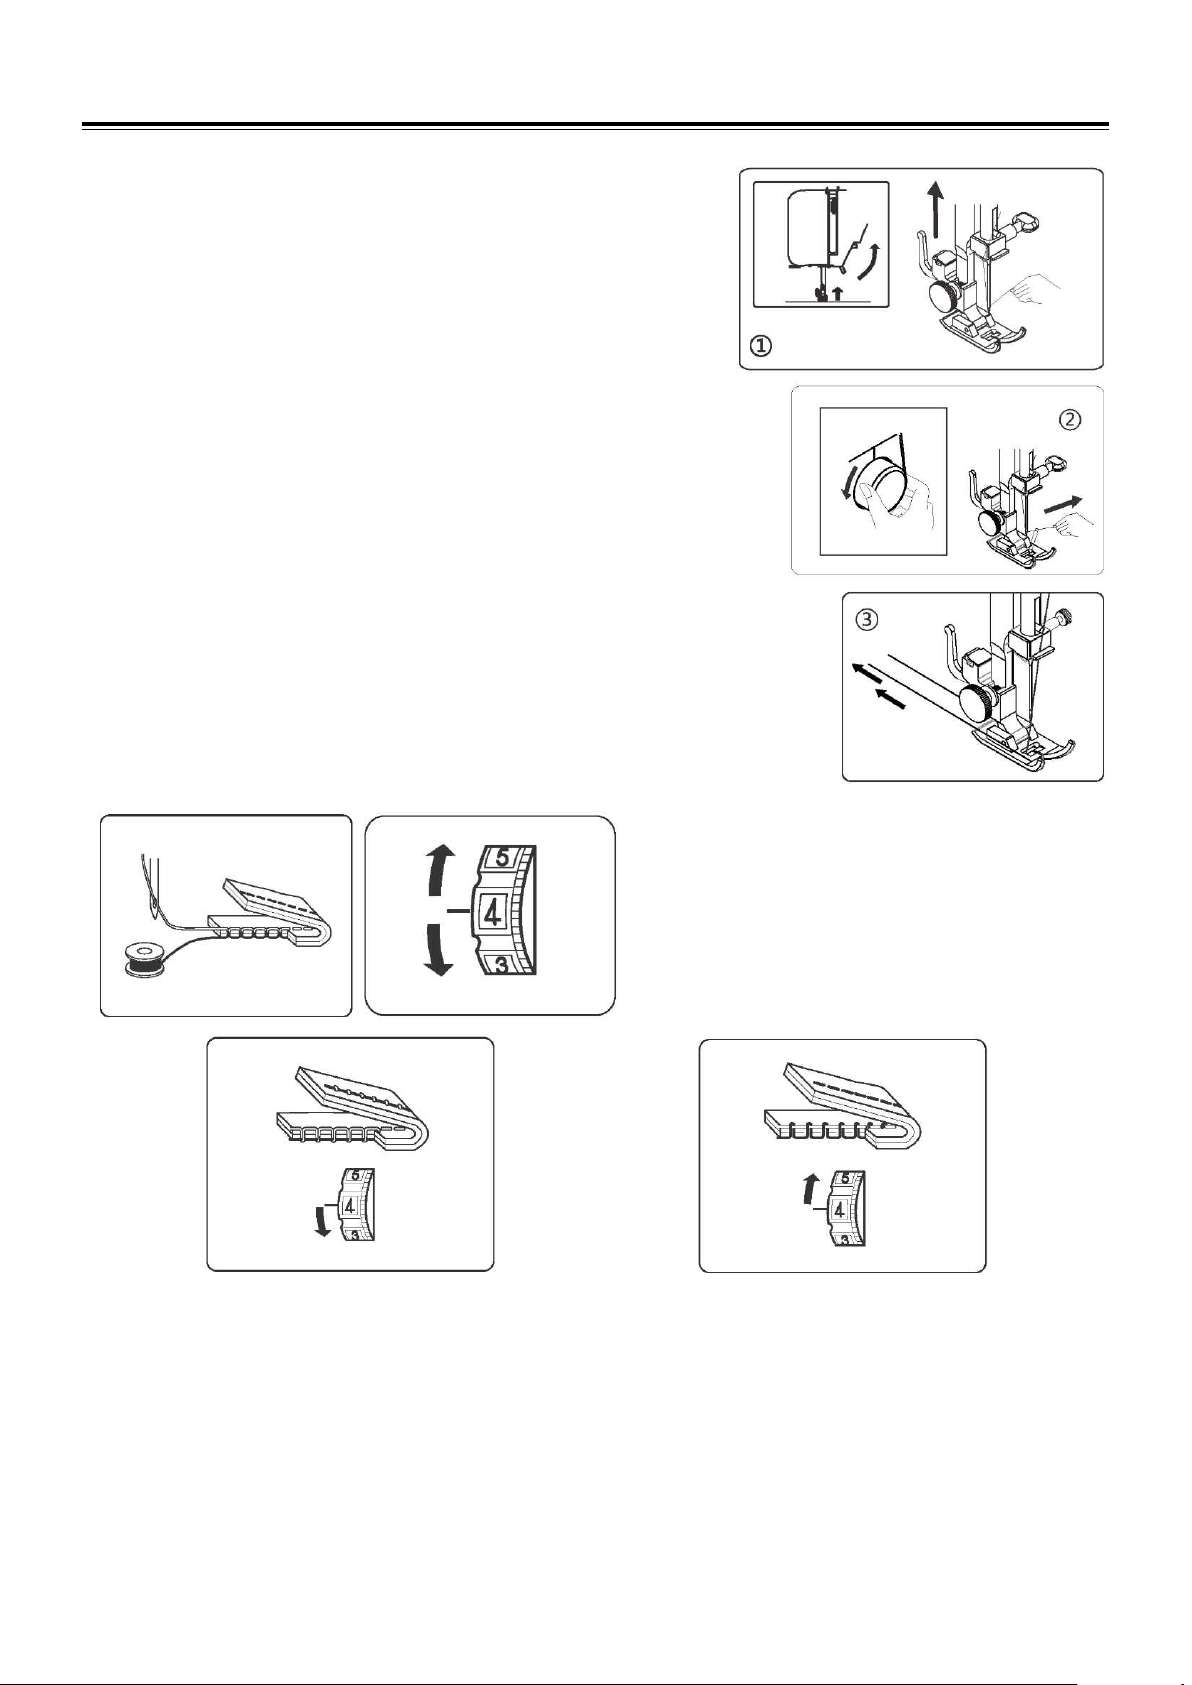
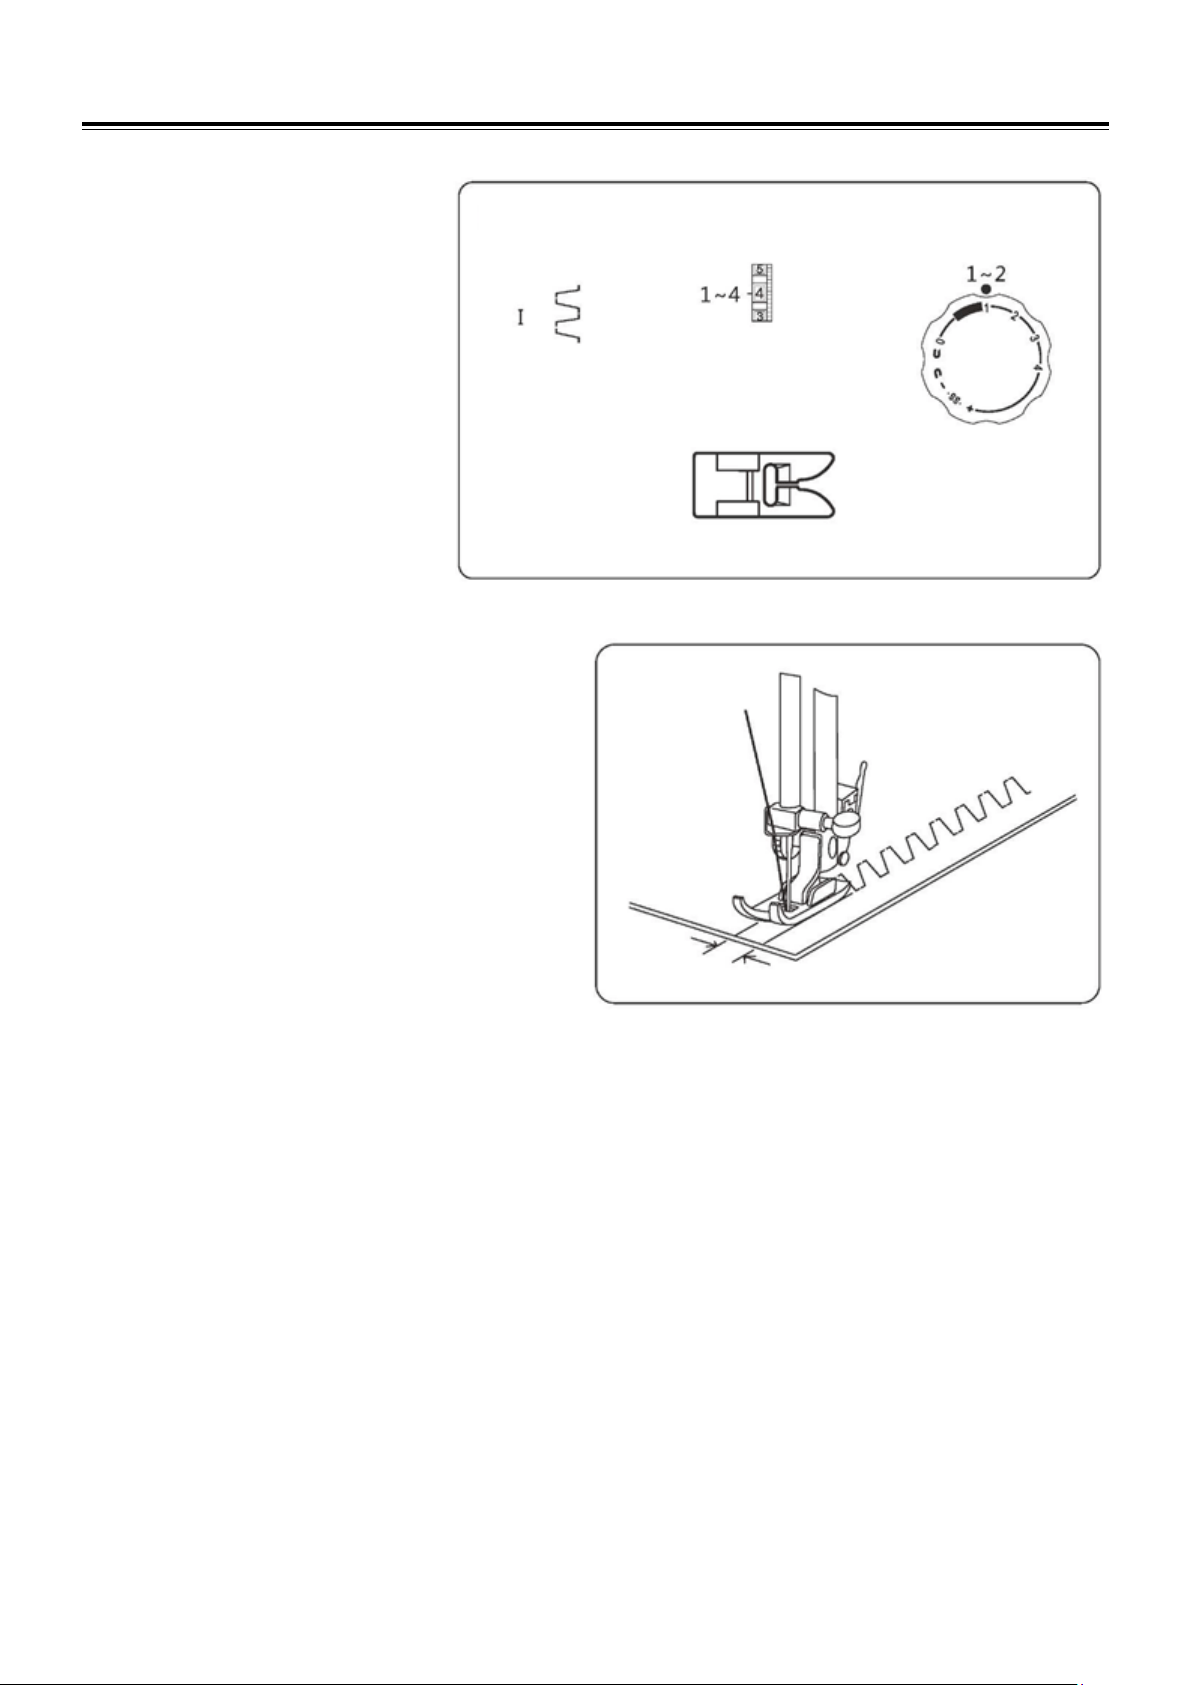
Honeycomb stitch /
Smocking
With the stitch length “4", sew straight stitching; lines 3/8 apart across the area to be smocked. Knot the threads along one edge,
pull the bobbin threads and distribute the gathers evenly. Secure the thread at the other end. Sew the decorative stitch between
the gathering stitches. Pull out the gathering stitches.
NOTE: Loosen the top thread tension to make gathering easier.
Machine Setting
Machine Setting
Wrong side of fabric
DECORATIVE STITCHING
22
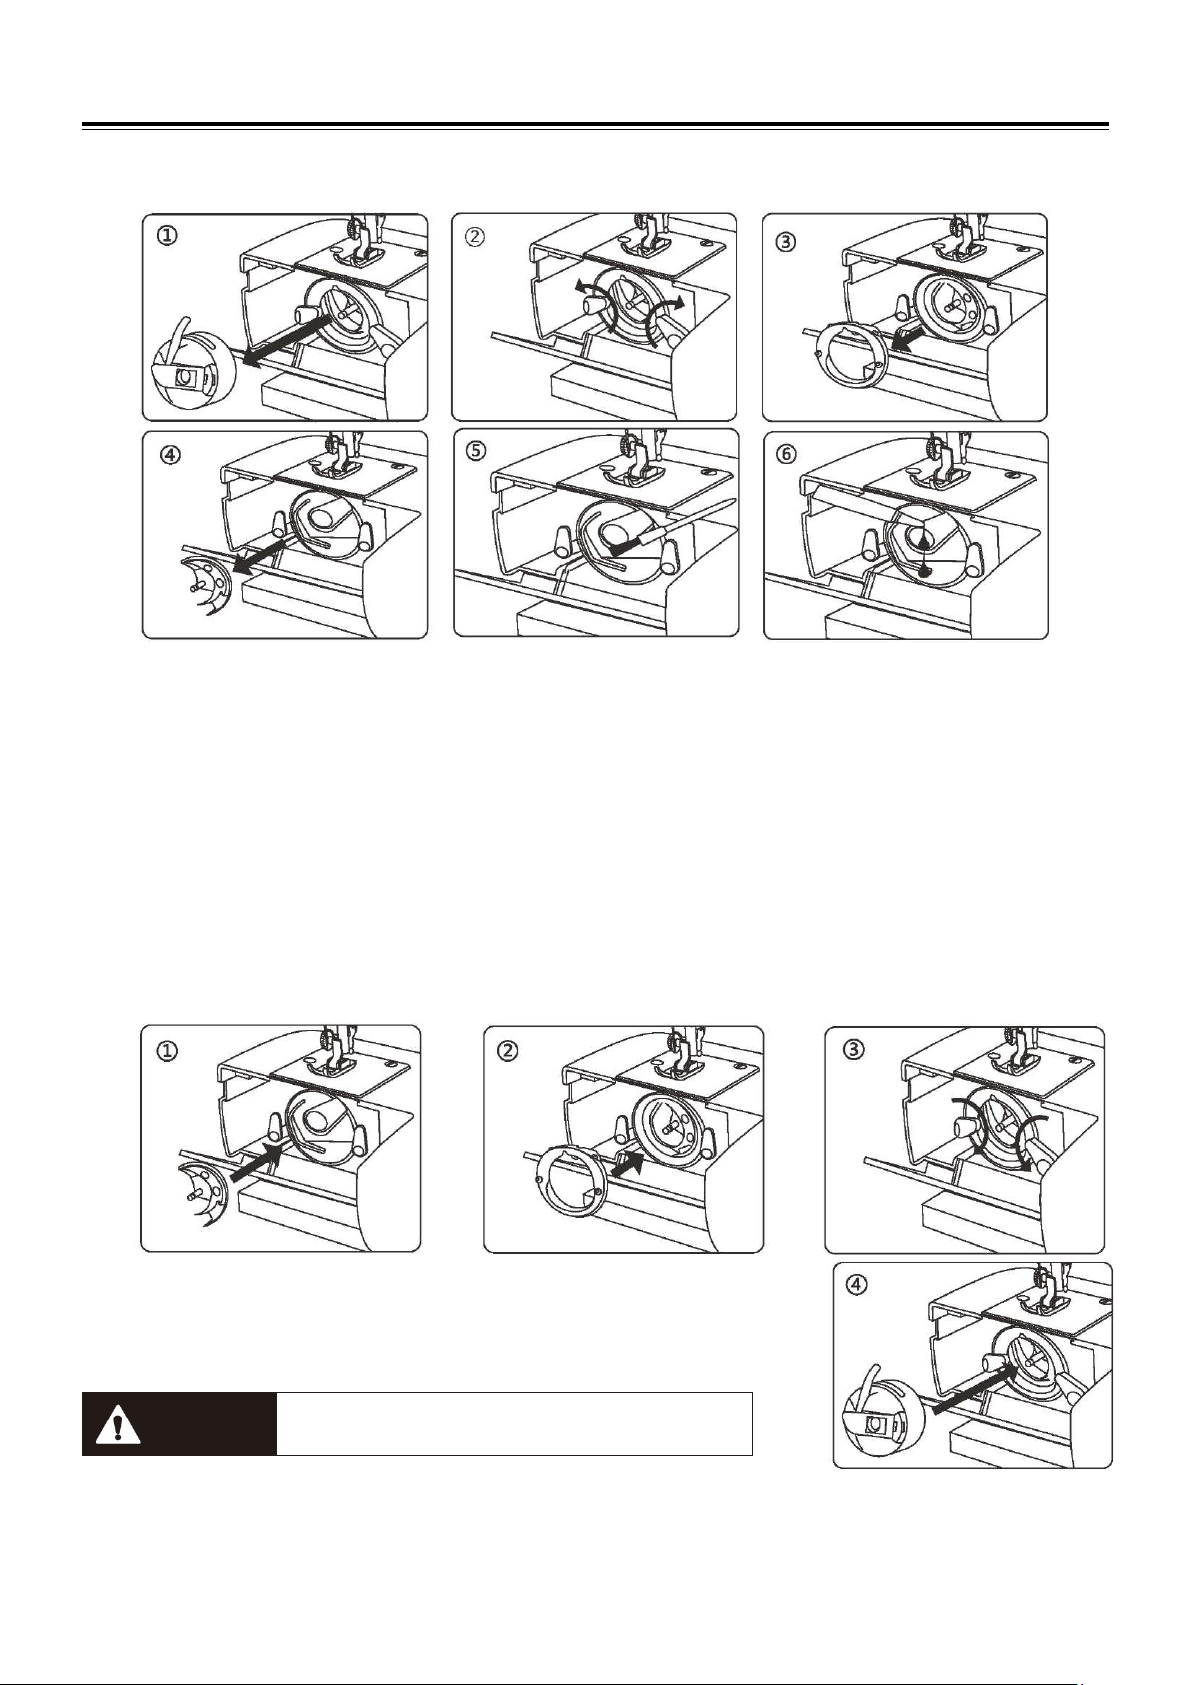
Rampart stitch
Use this stitch to join heavy weight
interlining.
Overlap two raw edges together and
use this stitch to join them.
Machine Setting
CARE OF YOUR MACHINE
23
Dismantling and assembling shuttle race
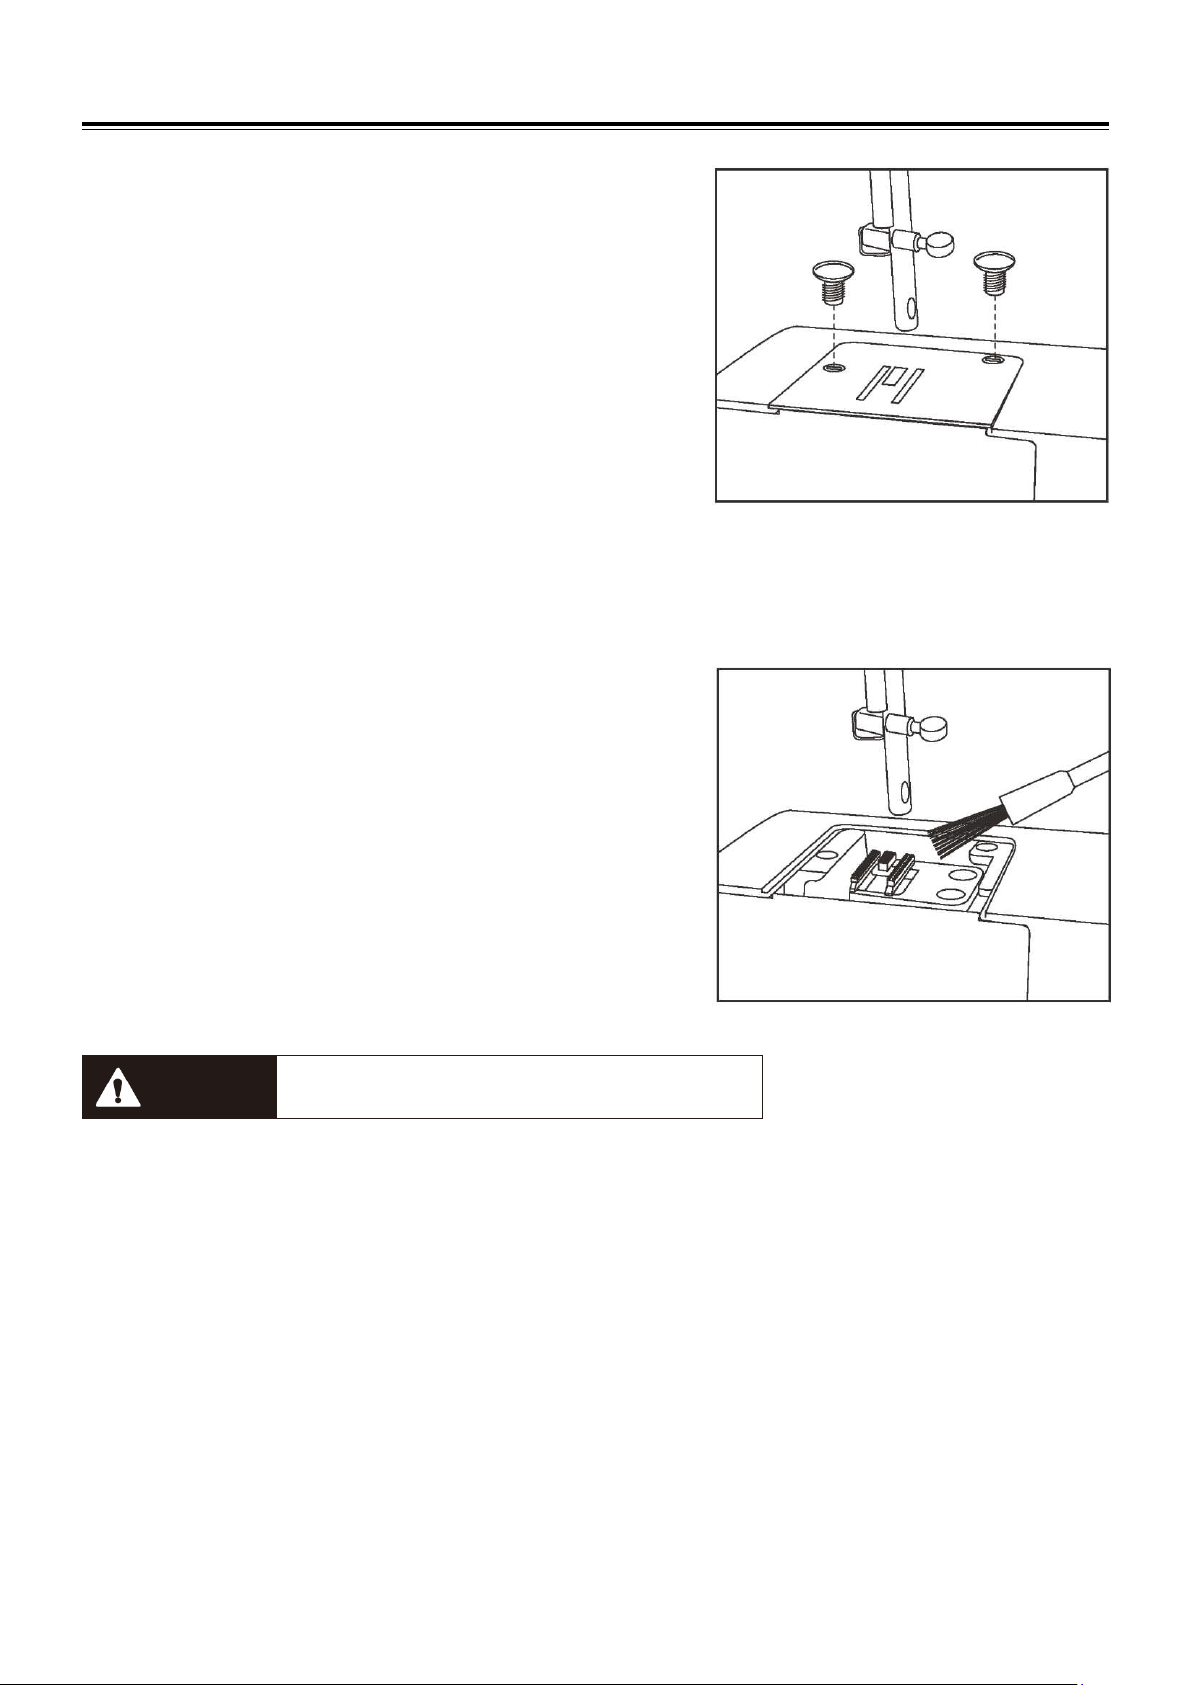
To dismantle the shuttle race and oil the shuttle race
Raise the needle to its highest position and open the shuttle cover.
1. Open the hinged latch of the bobbin case and take it out of the machine.
2. Open the shuttle race cover holders.
3. Remove the shuttle race cover.
4. Remove the shuttle.
5. Clean the shuttle race with a brush and soft dry cloth.
6. Before assembling the shuttle race, oil the shuttle race using a few drops of fine quality sewing machine oil.
Note:
1. Use oil sparingly as over oiling will cause it to leak onto your fabric.
2. In case the machine does not work smoothly due to standing idle for some time, apply a few drops of oil at the oiling
point, and turn the machine rapidly for a minute.
3. When the machine is does working 4-8 hours or there is abnormal noise, apply 2-3 drops of sewing machine oil at
the oiling point.
To assemble the shuttle race
1. Hold the Shuttle by the center pin and fit it carefully back into the shuttle race,
forming a perfect circle with the shuttle driver.
2. Attach the shuttle race cover making sure that the bottom pin fits into the notch.
3. Lock the shuttle race cover holders by turning the holders back into position.
4. Insert the bobbin case.
CAUTION
Be sure to disconnect the power supply
before operating
the machine.
CARE OF YOUR MACHINE
24
Cleaning the feed teeth
Remove the needle and the presser foot.
Remove the needle plate set screws and
remove the needle plate.
With a brush, clean out dust and lint clogging on the feed teeth. Reset
the needle plate.
CAUTION
Be sure to disconnect the power supply before operating
the machine.
CARE OF YOUR MACHINE
25
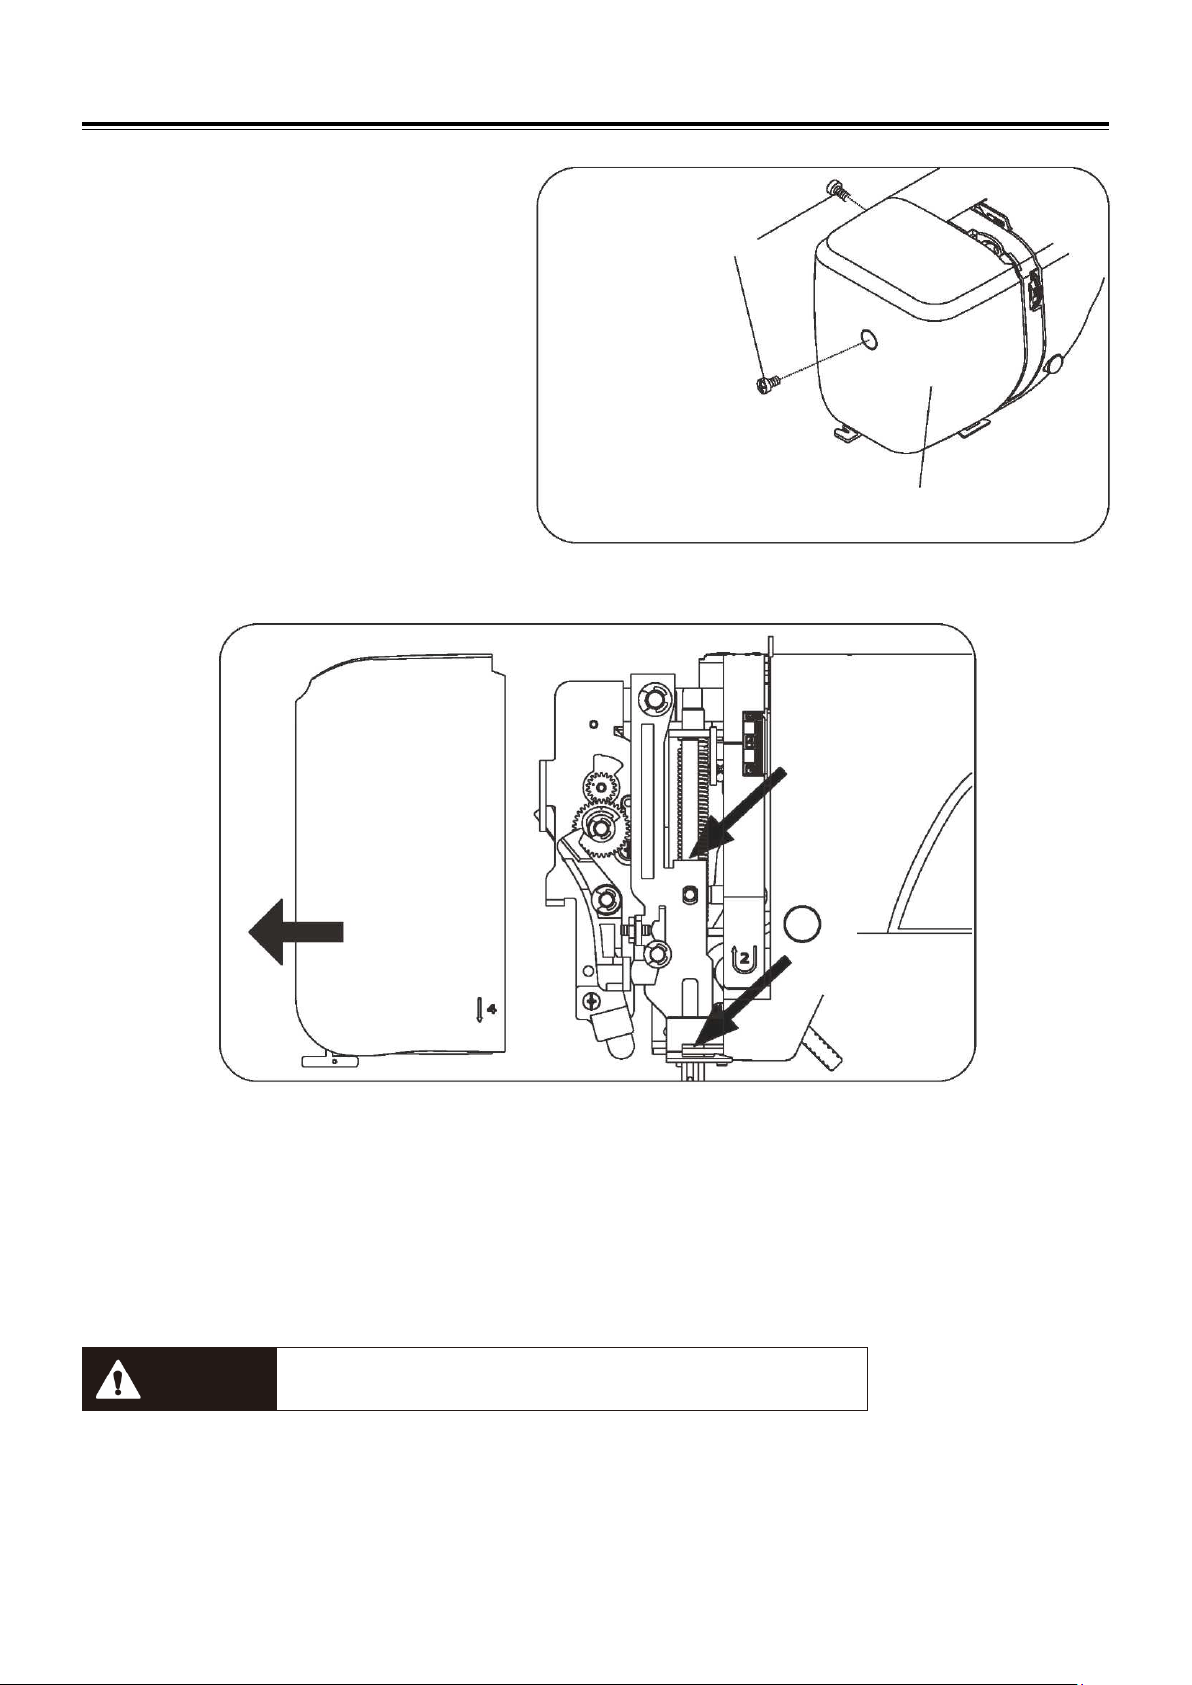
Oiling the machine
1. Loosen the face cover screw and remove the
face cover to left side.
2. Oil the points shown by the arrows.
Apply a few drops of fine quality sewing machine oil to the point indicated by the arrows in the figures. For machine in
constant use, oil two or three times a year.
In case the machine does not work smoothly due to standing idle for some time, apply a few drops of oil at the oiling point, and
turn the machine rapidly for a minute.
Before oiling, wipe off oiling points.
CAUTION Be sure to disconnect the power supply before operating the machine.
Face cover screw
Face cover
Oil point
Oil point
CARE OF YOUR MACHINE
26
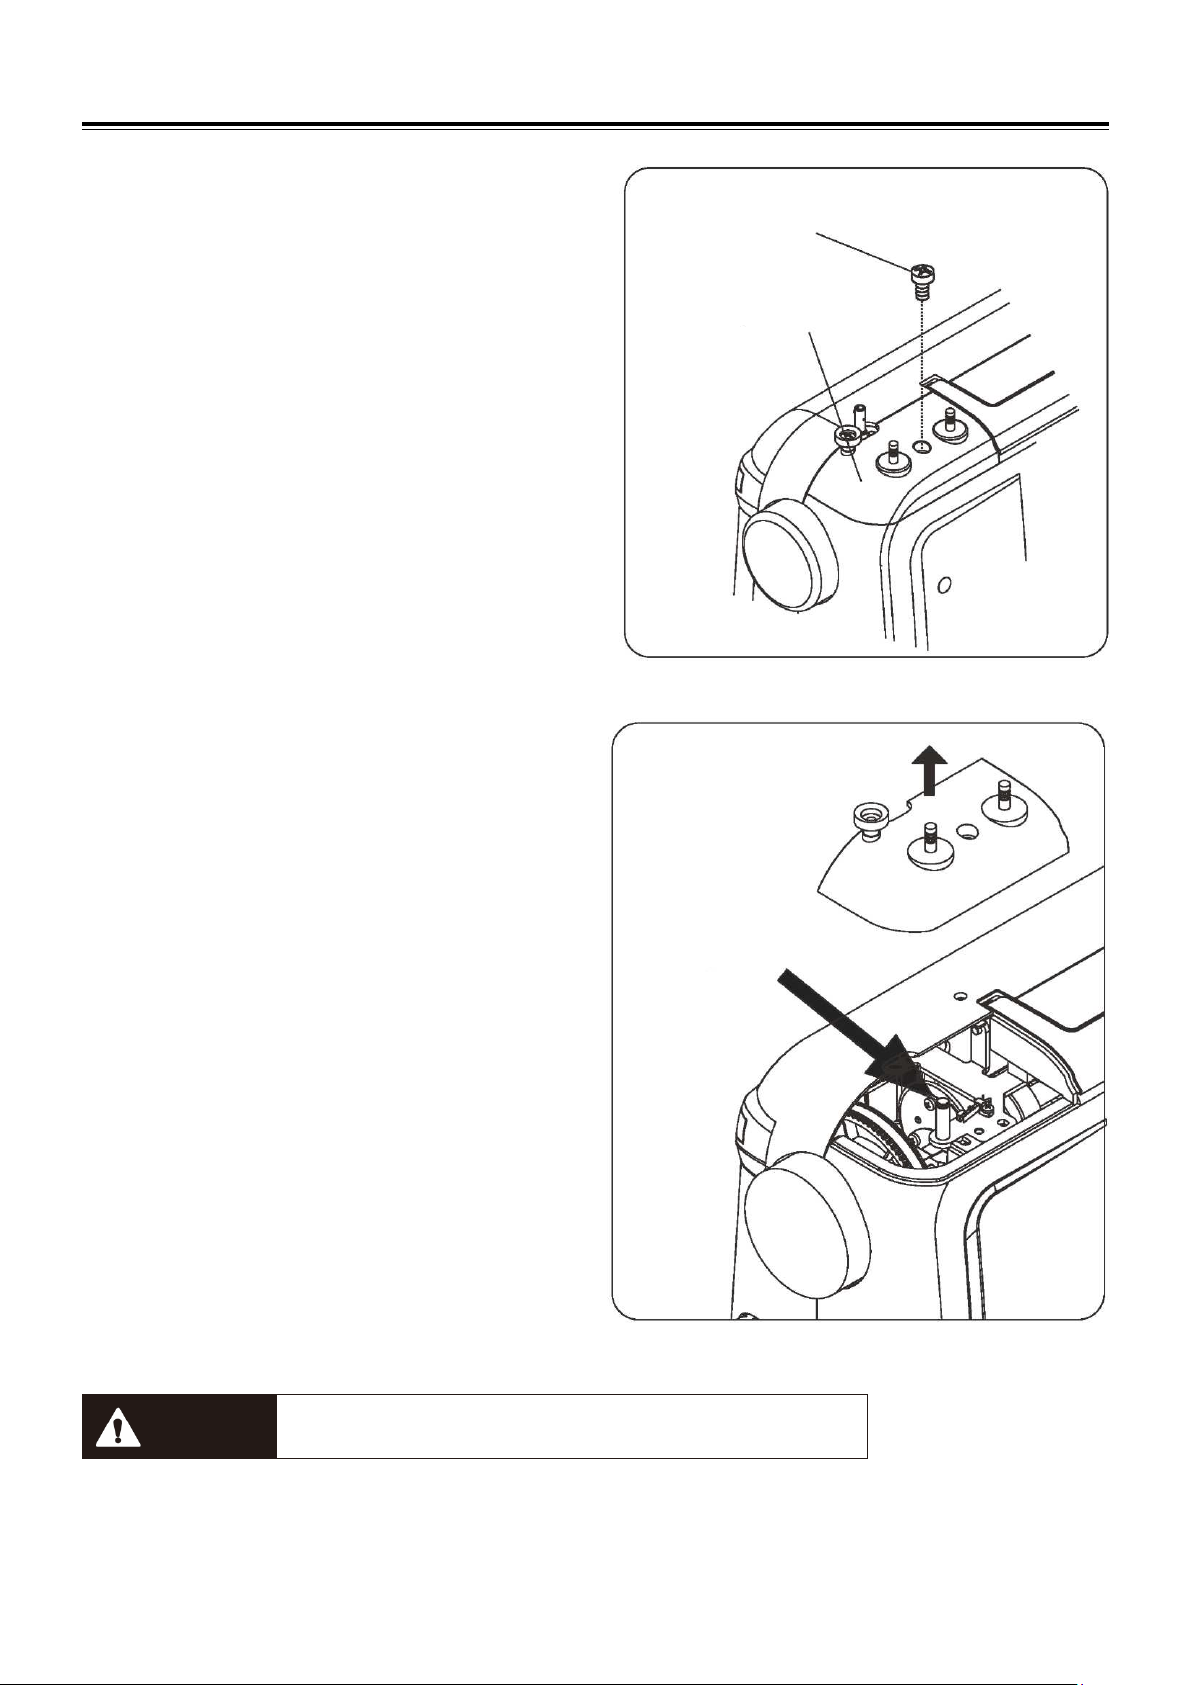
Oiling the connecting rod
1. Loosen the little top cover screw used the screwdriver.
2. Remove the little top cover.
Apply a few drops of fine quality sewing machine oil to the
point indicated by the arrows in the figures.
For machine in constant use, oil two or three times a year.
When there is abnormal noise, apply a few drops of sewing
machine oil at the oiling point.
CAUTION Be sure to disconnect the power supply before operating the machine.
Little top cover screw
Little top cover
Oil point
TROUBLESHOOTING
27
Trouble Causes Solution
Top thread broken
1. Improper top threading.
2. Excessively tight top tension.
3. Blunt or bend needle.
4. Improper fixing of needle.
5. At start of sewing, top thread and bottom
thread are not correctly placed beneath the
presser foot.
6. Thread is unsuitable or poor quality
1. Threading the top thread again. (Refer to page 7.)
2. Adjust the top tension. (Refer to page 9.)
3. Replace the needle. (Refer to page 10.)
4. Reinstall the needle. (Refer to page 10.)
5. Proper operation. (Refer to page 7, 9.)
6. Replace the proper thread. (Refer to page 10.)
Bobbin thread
broken
1. Bobbin not correctly placed into bobbin case.
2. Lint collected on shuttle race.
3. Bobbin is damaged, cannot smoothly rotate.
4. Wrong bobbins being used.
1. Thread bobbin thread again. (Refer to page 9.)
2. Clean the shuttle race. (Refer to page 23.)
3. Replace the bobbin. (Refer to page 6.)
4. Use only recommended style of bobbins (Refer to
page 3.)
Needle broken
1. Improper installation of needle.
2. Blunt or bend needle.
3. Needle clamp screw is loosening.
4. Excessively tight top tension.
5. Needle not correct style/size for fabric.
1. Reinstall the needle. (Refer to page 10.)
2. Replace the needle. (Refer to page 10.)
3. Tight the needle clamp screw.
4. Adjust the top tension. (Refer to page 9.)
5. Replace the proper needle. (Refer to page 10.)
Skipping stitches
1. Improper installation of needle.
2. Blunt or bend needle.
3. Needle and/or thread unsuitable for fabric
being sewn.
4. Improper top threading.
5. Needle is unsuitable for fabric being sewn.
1. Reinstall the needle. (Refer to page 10.)
2. Replace the needle. (Refer to page 10.)
3. Replace the proper needle and thread. (Refer to
page 10.)
4. Threading the top thread again. (Refer to page 7.)
5. Replace the proper needle. (Refer to page 10.)
Seam puckering
1. Excessively tight top tension.
2. Improper top threading.
3. Excessively thick top thread for fabric.
1. Adjust the top tension. (Refer to page 9.)
2. Threading the top thread again. (Refer to page 7.)
3. Replace the proper thread. (Refer to page 10.)
Machine not
feeding fabric
1. Feed teeth are wound by thread.
2. Thread jams.
3. Stitch length is set at “0”
1. Clean the feed teeth. (Refer to page 24.)
2. Clean the clamping thread.
3. Select stitch length setting longer than “0”.
Machine not
running
1. Not surely inserting power plug.
2. Clamping thread at shuttle race.
3. Failure to replace the bobbin winding spindle
to original position after winding bobbin.
1. Check the power connector. (Refer to page 3.)
2. Clean the clamping thread.
3. Push the bobbin winding spindle to original
position. (Refer to page 5.)
Thread jamming
1. The presser foot lifter is not lowered down
when sewing.
2. Improper top threading.
3. Improper bobbin threading.
1. Rethread the machine and then lower the presser
foot lifter before sewing. (Refer to page 4.)
2. Threading the top thread again. (Refer to page 7.)
3. Thread bobbin thread again. (Refer to page 9.)

We reserve the right to change the machine equipment and the assortment of accessories without prior notice, or make
modifications to the performance or design. Such modifications, however, will always be to the benefit of the user and the
product.
INTELLECTUAL PROPERTY
SINGER, and the Cameo "S" Design, are exclusive trademarks of The Singer Company Limited S.a.r.l. or its Affiliates.
Please note that on disposal, this product must be safely recycled in
accordance with relevant National legislation relating to electrical/electronic
products. Do not dispose of electrical appliances as unsorted muncipal waste,
use separate collection facilities. Contact your local government for
information regarding the collection systems available. When replacing old
appliances with new ones, the retailer may be legally obligated to take back
your old appliance for disposal free of charge.
If electrical appliances are disposed of in landfills or dumps, hazardous
substances can leak into the groundwater and get into the food chain,
damaging your health and well-being.
MANUFACTURER
VSM Group AB, SVP Worldwide
Drottninggatan 2, SE-561-84 Huskvarna, SWEDEN

471078196A • English • ®2017 The Singer Company Limited S.à.r.l or its Affiliates • All rights reserved