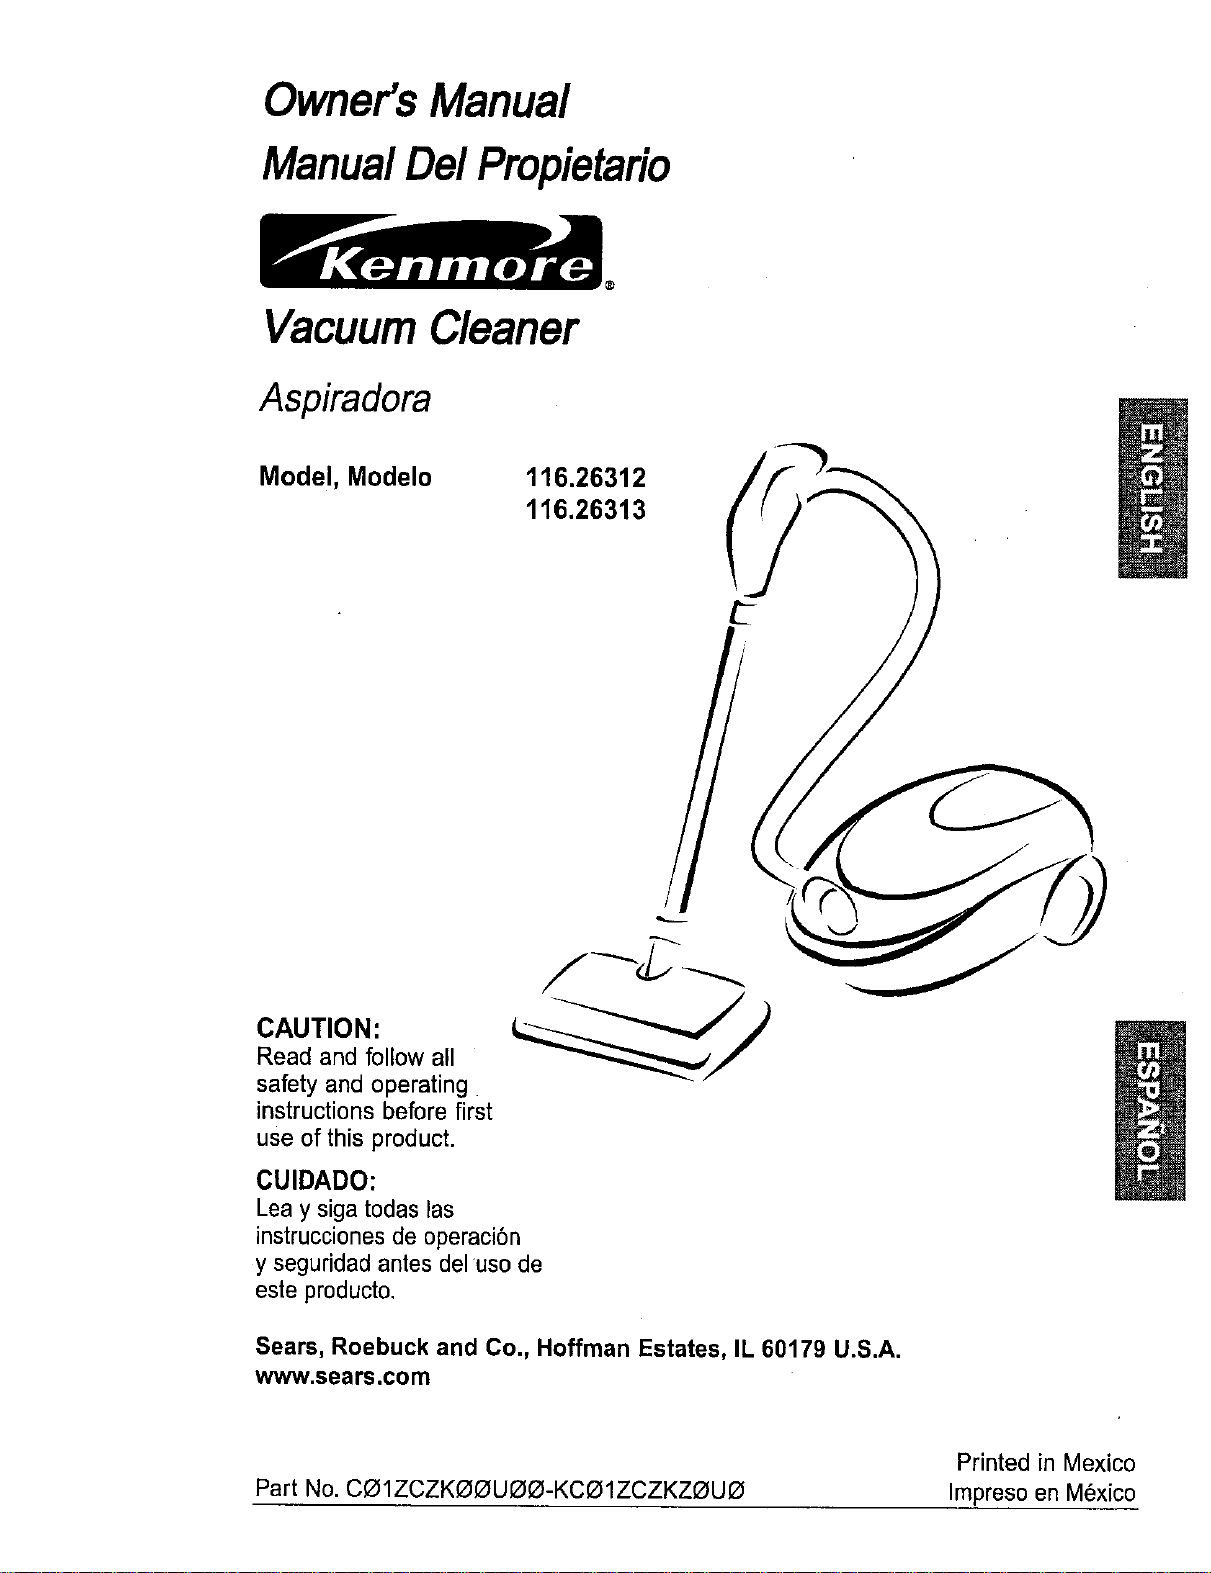
Owner'sManual
ManualDelPropietario
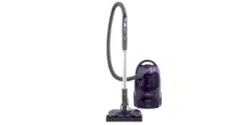
Vacuum Cleaner
Aspiradora
Model, Modelo
116.26312 (//_
116.26313
CAUTION:
Read and follow all
safety and operating
instructionsbefore first
use of this product.
CUIDADO:
Lea y siga todas Pas
instrucciones de operaci6n
y seguridad antes del uso de
este producto,
Sears, Roebuck and Co., Hoffman Estates, IL 60179 U.S.A.
www.sears.com
Printed in Mexico
Part No. CO1ZCZKOOUOO-KCO1ZCZKZOUO Impreso en M6xico
Before Using Your New
Vacuum Cleaner .................... 2
Kenmore Vacuum Cleaner Warranty ... 2
Important Safety Instructions ......... 3
Parts and Features ................. 4-5
Assembly Instructions ............. 6-7
Operating Instructions ............... 8
How to Start ........................ 8
Vacuuming Tips ..................... 9
Suggested Pile Height Settings ........ lg
Attachments ....................... 10
Attachment Use Table ............... 11
Performance Features ............. 11-12
How YourVacuum Cleaner Works ....... 12
Canister Care ...................... 13
Sag Changing ..................... 13
Cleaning Exteriorand Attachments ..... 13
MotorSafety FilterChanging .......... 14
ExhaustFilter Changing .............. 14
Power-Mate ®Care .................. 15
Belt Changing and Agitator Cleaning .. 15-16
Light Bulb Changing ................. 17
Agitator Servicing ................... 17
Troubleshooting .................... 18
Requesting Assistance
Or Service .................. Back Cover
Please read this guide. It will help you assemble and operate your new Kenmore vacuum
cleaner in the safest and most effective way.
For more information about vacuum cleaner care and operation, call your nearest Sears store.
You will need the complete model and serial numbers when requesting information.Your vacu-
um cleaner's model and serial numbers are located on the Model and Serial Number Plate.
Use the space below to record the model number and serial number of your new Kenmore
vacuum cleaner.
Model No.
Serial No.
Date of Purchase
Keep this book and your sales check (receipt) in a safe place for future reference.
LIMITED ONE YEAR WARRANTY ON KENMORE VACUUM CLEANER
This warranty is for one year from the date of purchase, and includes only private household
vacuum cleaner use. During the warranty year, when this vacuum cleaner is operated and
maintained according to the owner's manual instructions, Sears will repair any defects in
material or workmanship free of charge.
This warranty excludes vacuum cleaner bags, belts, light bulbs, and filters, which are
expendable parts and become worn during normal use.
For warranty service, return this vacuum cleaner to the nearest Sears Service Center in
the United States.
This warranty applies only while this product is in use in the United States. This warranty gives
you specific legal rights, and you may also have other rights which vary from state to state.
Sears, Roebuck and Co., D/817WA, Hoffman Estates, IL 60179
2
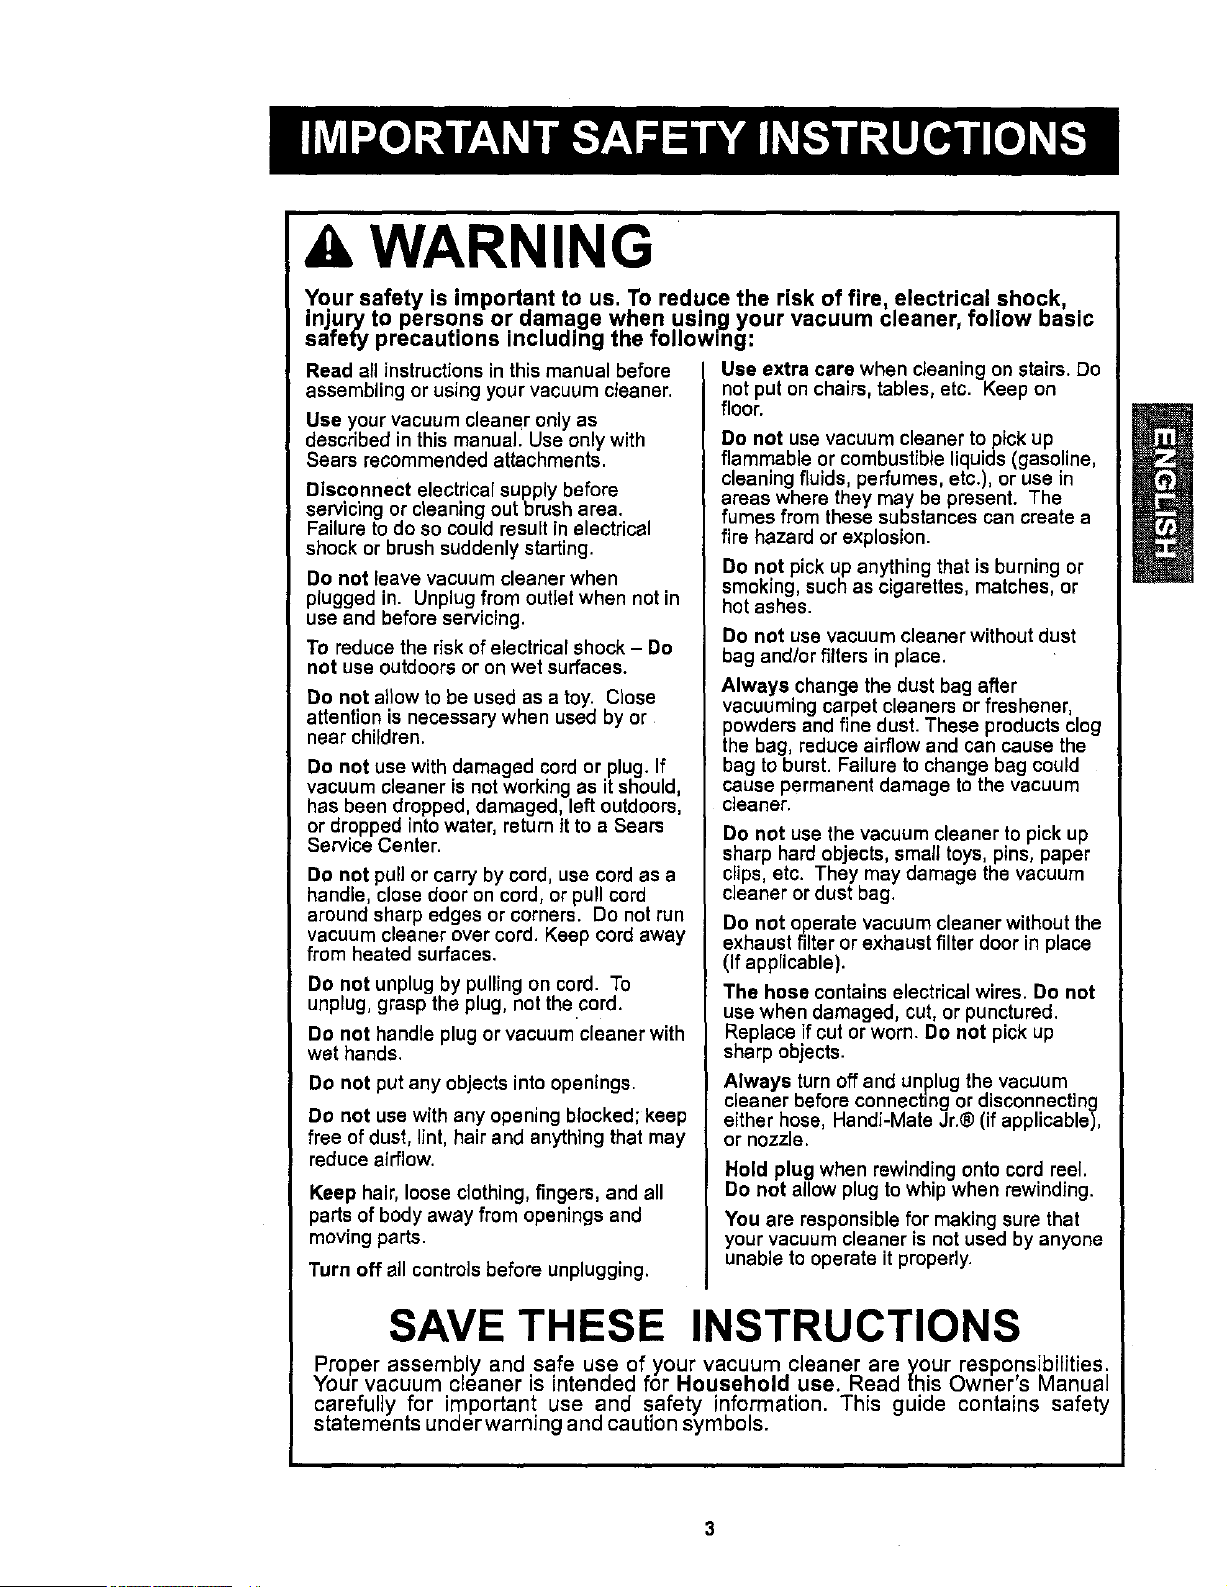
WARNING
Your safety is important to us. To reduce the risk of fire, electrical shock,
injury to persons or damage when us,ng your vacuum cleaner, follow basic
safety precautions including the following:
Read all instructions in this manual before
assembling or using your vacuum cleaner.
Use your vacuum cleaner only as
described in this manual. Use only with
Sears recommended attachments.
Disconnect electrical supply before
servicingor cleaning out brush area.
Failure to do so could result in electrical
shock or brush suddenly starting.
Do not leave vacuum cleaner when
plugged in. Unplug from outlet when not in
use and before servicing.
To reduce the riskof electrical shock - Do
not use outdoorsor on wet surfaces.
Do not allow to be used as a toy. Close
attention is necessary when used by or
near children.
De not use with damaged cord or plug. If
vacuum cleaner isnot working as itshould,
has been dropped, damaged, left outdoors,
or dropped into water, return it to a Sears
Service Center.
Do not pull or carry by cord, use cordas a
handle, close door on cord, or pull cord
around sharp edges or corners. Do not run
vacuum cleaner over cord. Keep cord away
from heated surfaces.
Do not unplug by pulling on cord. To
unplug, grasp the plug, not the cord.
Do not handle plug or vacuum cleaner with
wet hands.
Do not put any objects into openings.
Do not use with any opening blocked; keep
free of dust, lint, hair and anything that may
reduce airflow.
Keep hair, loose clothing, fingers, and all
parts of body away from openings and
moving parts.
Turn off ell controlsbefore unplugging.
Use extra care when cleaning on stairs. Do
not put on chairs, tables, etc. Keep on
floor.
Do not use vacuum cleaner to pick up
flammable or combustible liquids (gasoline,
cleaning fluids, perfumes, etc.), or use in
areas where they may be present. The
fumes from these substances can create a
fire hazard or explosion.
Do not pick up anything that ls burning or
smoking, such as cigarettes, matches, or
hot ashes.
Do not use vacuum cleaner without dust
bag and/or filters in place.
Always change the dust bag after
vacuuming carpet cleaners or freshener,
powders and fine dust. These products clog
the bag, reduce airflowand can cause the
bag to burst. Failure to change bag could
cause permanent damage to the vacuum
cleaner.
Do not use the vacuum cleaner to pick up
sharp hard objects, small toys, pins, paper
clips, etc. They may damage the vacuum
cleaner or dust bag.
Do not operate vacuum cleaner without the
exhaust filter or exhaust filter door in place
(If applicable).
The hose contains electrical wires. Do not
usawhen damaged, cut, or punctured.
Replace if cut or worn. Do not pick up
sharp objects.
Always turn off and unplug the vacuum
cleaner before connecting or disconnecting
either hose, Handi-Mata Jr.® (if applicable),
or nozzle.
Hold plug when rewinding onto cord reel.
Do not allow plug to whip when rewinding.
You are responsible for making sure that
your vacuum cleaner is not used by anyone
unable to operate it properly.
SAVE THESE INSTRUCTIONS
Proper assembly and safe use of your vacuum cleaner are your responsibilities.
Your vacuum cleaner is intended for Household use. Read this Owner's Manual
carefully for important use and safety information. This guide contains safety
statements under warning and caution symbols.
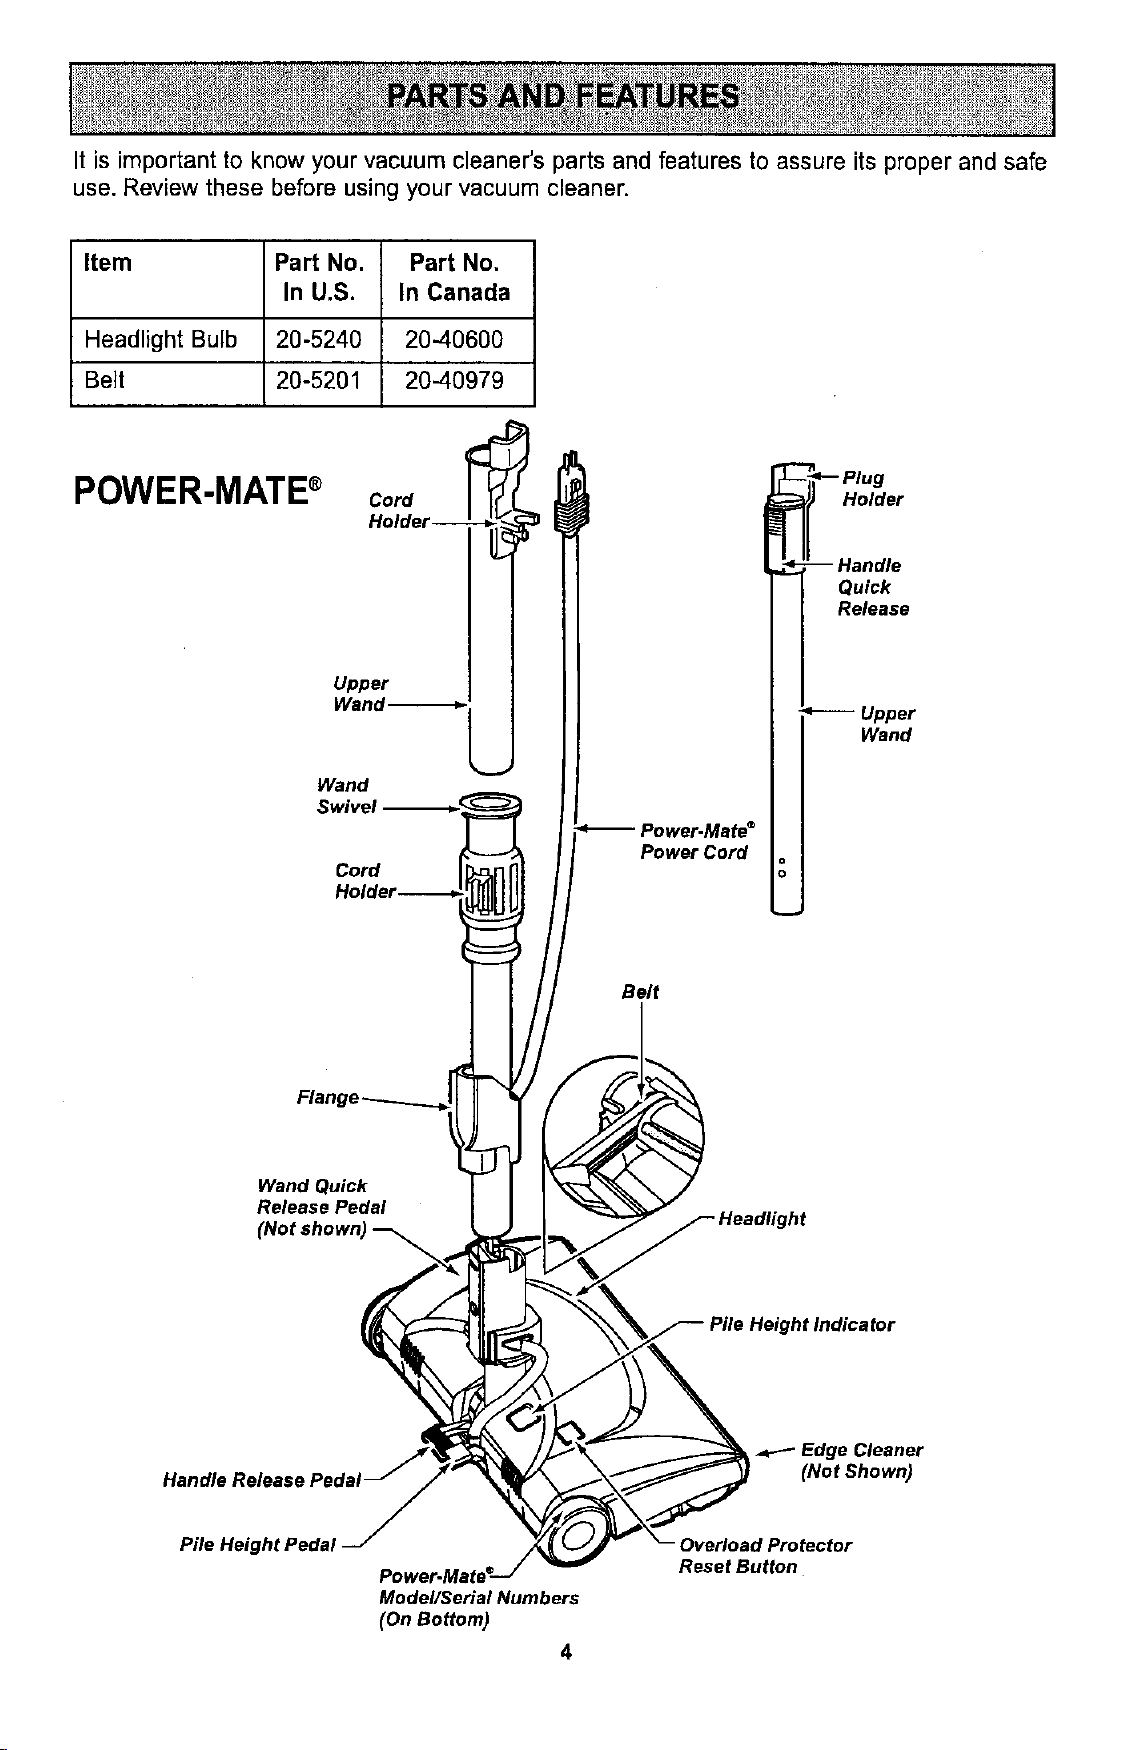
It is important to know your vacuum cleaner's parts and features to assure its proper and safe
use. Review these before using your vacuum cleaner.
Item Part No. Part No.
In U.S. In Canada
Headlight Bulb 20-5240 20-40600
Belt 20-5201 20-40979
POWER-MATE®
Cord
wer.Mate ®
Power Cord
_ _-- Plug
I Holder
_ "_ Handle
Quick
Release
•_ Upper
Wand
o
Belt
Wand Quick
Release Pedal
Pile Height Indicator
Edge Cleaner
(Not Shown)
Pile Height Pedal
Model/Serial Numbers
(On Bottom)
4
Reset Button
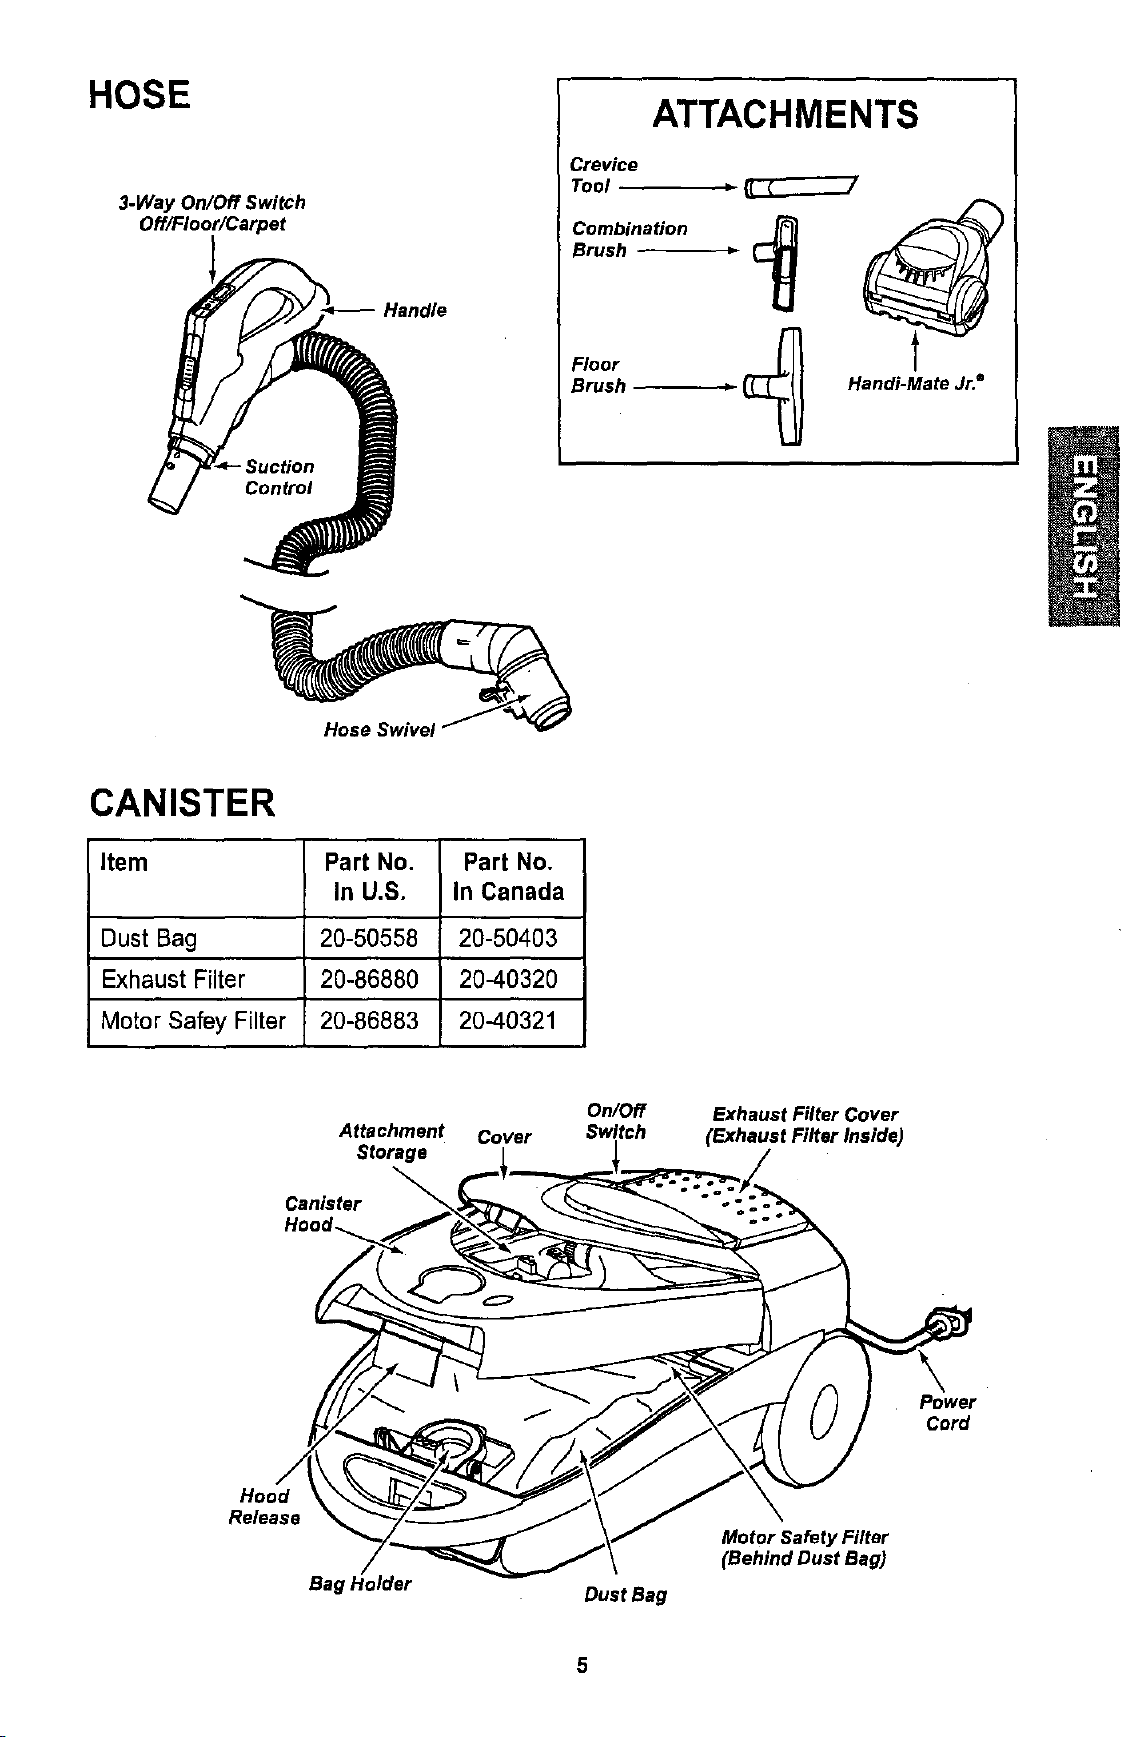
HOSE
3.Way On/Off Switch
Off/Floor/Carpet
Handle
ATTACHMENTS
Crevice
Tool
Combination
Brush
Floor
Brush _
Handi-Mate Jr.®
CANISTER
Item Part No. Part No.
In U.S. In Canada
Dust Bag 20-50558 20-50403
Exhaust Filter 20-86880 2040320
Motor Safey Filter 20-86883 20-40321
Attachment Cover
Storage
Canister
On/Off Exhaust Filter Cover
Switch
Power
Cord
Hood
Release
Bag Holder
Dust Bag
Motor Safety Filter
(Behind Dust Bag)
5
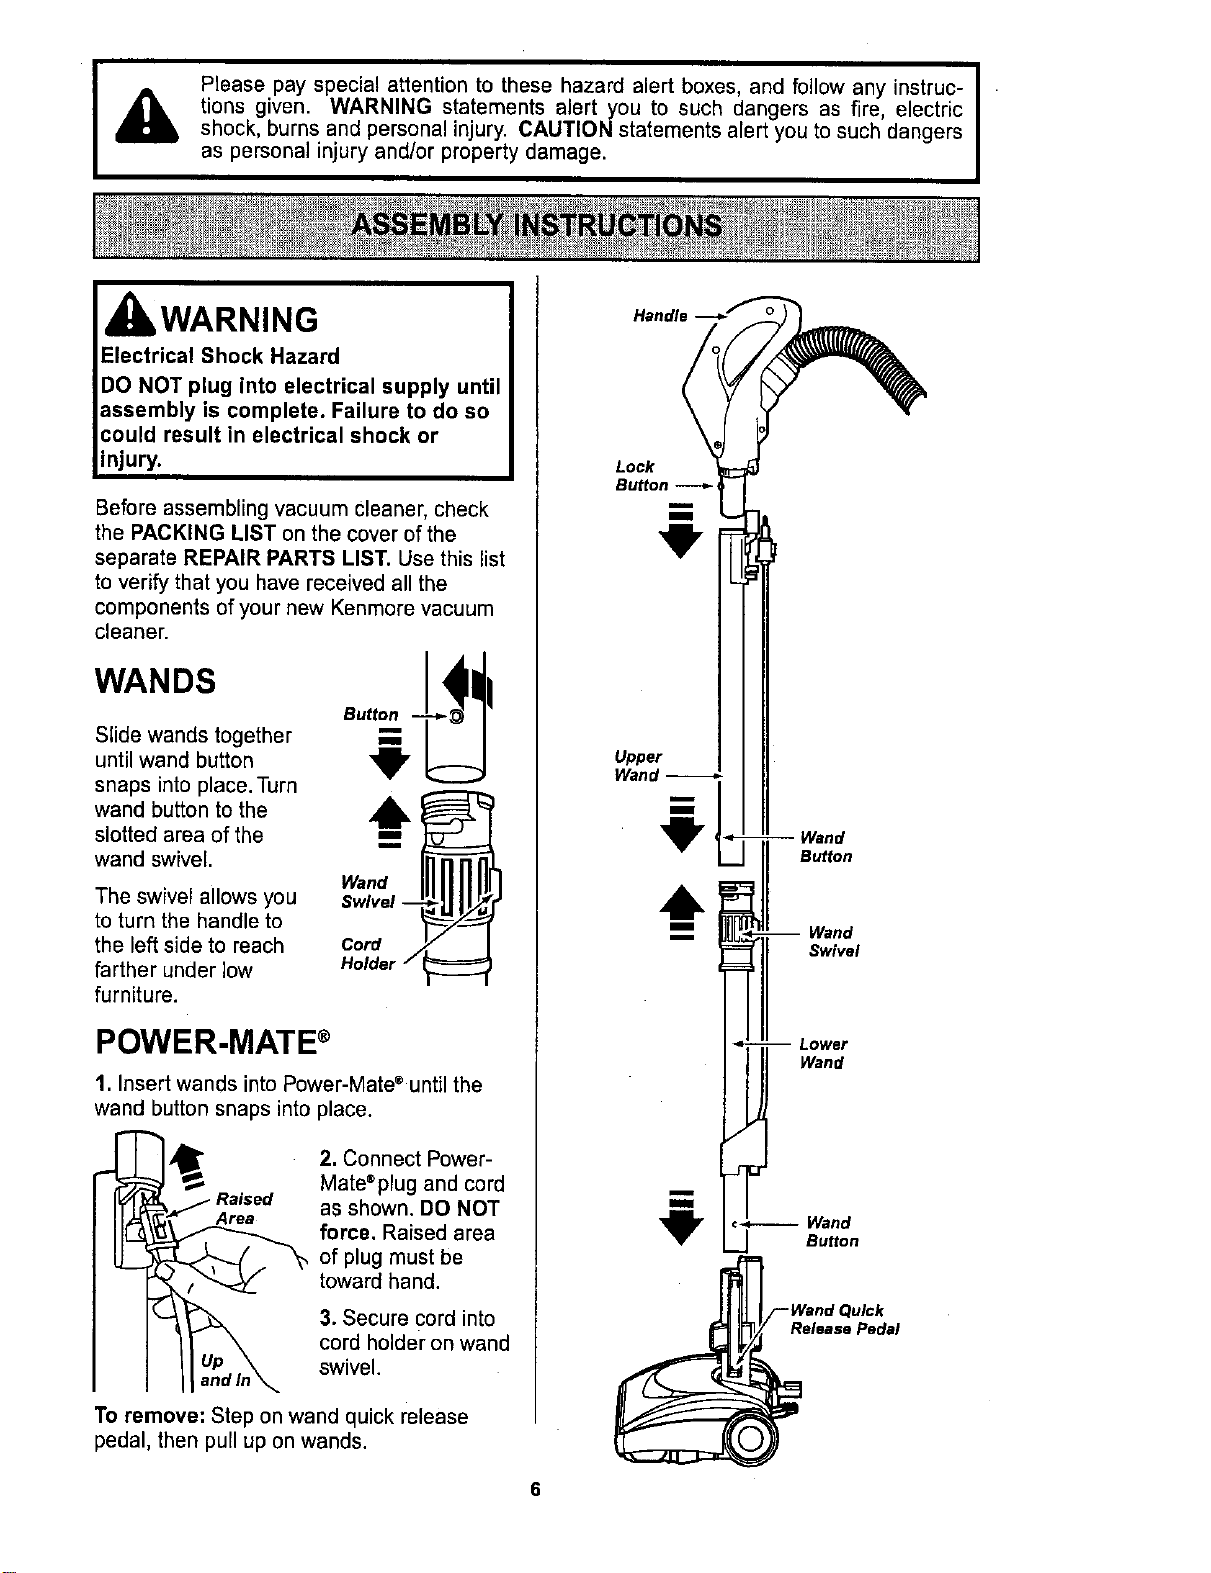
A
I
Please pay special attention to these hazard alert boxes and follow any instruc- I
tions given. WARNING statements alert you to such dangers as fire, electric
I
shock, burns and personal injury. CAUTION statements alert you to such dangers
as persona] injury and/or property damage.
kWARNING
Electrical Shock Hazard
DO NOT plug into electrical supply until
assembly is complete. Failure to do so
could result in electrical shock or
injury.
Before assembling vacuum cleaner, check
the PACKING LIST on the cover of the
separate REPAIR PARTS LIST. Use this list
to verify that you have received all the
components of your new Kenmore vacuum
cleaner.
WANDS
Slide wands together
until wand button
snaps into place.Turn
wand button to the
slotted area of the
wand swivel.
The swivel allows you
to turn the handle to
the left side to reach
farther under low
furniture.
Holder /
POWER-MATE ®
1. Insert wands into Power-Mate ®until the
wand button snaps into place.
Area
2. Connect Power-
Mate*plug and cord
as shown. DO NOT
force. Raised area
of plug must be
toward hand.
3. Secure cord into
cord holder on wand
swivel.
To remove: Step on wand quick release
pedal, then pull up on wands.
Handle
Lock
Button
Upper
Wand
CANISTER
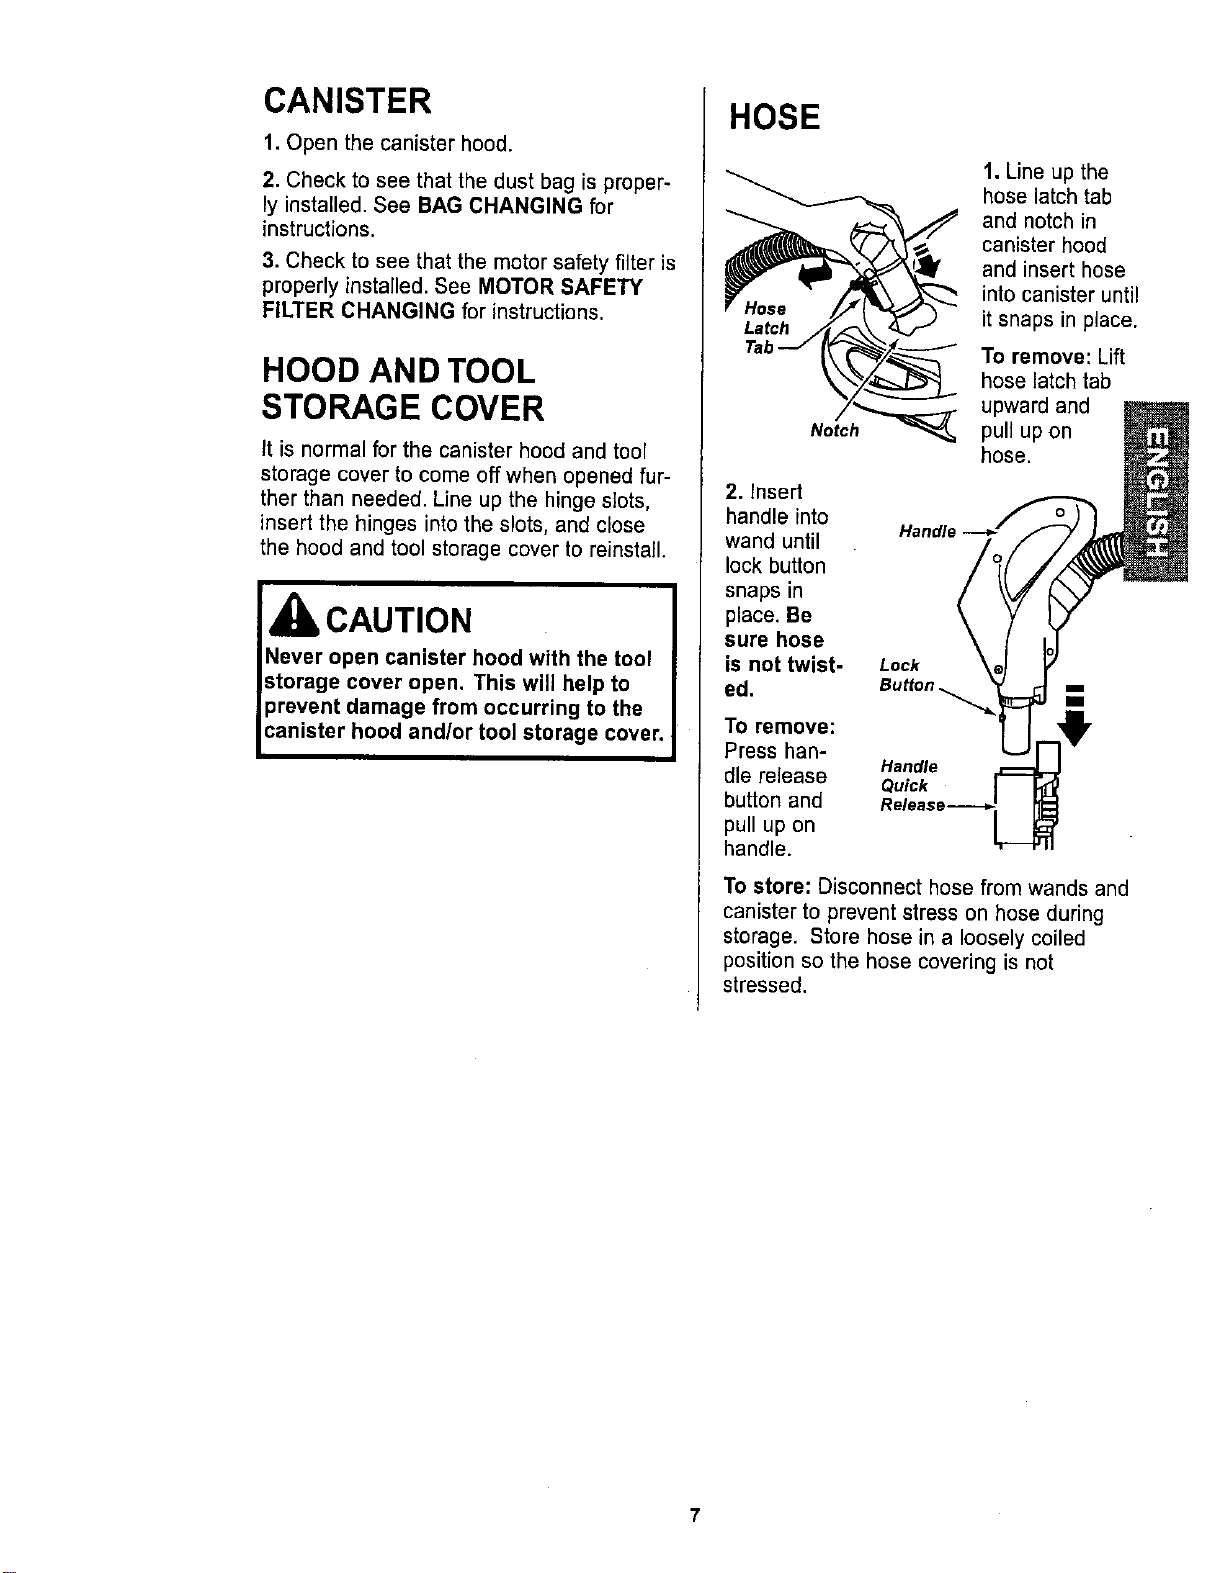
1. Open the canister hood.
2. Check to see that the dust bag is proper-
ly installed. See BAG CHANGING for
instructions.
3. Check to see that the motor safety filter is
properly installed. See MOTOR SAFETY
FILTER CHANGING for instructions.
HOOD AND TOOL
STORAGE COVER
It is normal for the canister hood and tool
storage cover to come offwhen opened fur-
ther than needed. Line up the hinge slots,
insert the hinges into the slots, and close
the hood and tool storage cover to reinstall.
CAUTION
Never open canister hood with the tool
storage cover open. This will help to
prevent damage from occurring to the
canister hood and/or tool storage cover.
HOSE
Latch
Notch
1. Line up the
hose latch tab
and notch in
canister hood
and insert hose
into canister until
it snaps in place.
To remove: Lift
hose latch tab
upward and
pull up on
hose.
2. Insert
handle into
wand until Handle
lock button
snaps in
place. Be
sure hose
is not twist- Lock
ed. Button
To remove:
Press han-
dle release
button and
pull up on
handle.
Handle
Quick
To store: Disconnect hose from wands and
canister to prevent stress on hose during
storage. Store hose in a loosely coiled
position so the hose covering is not
stressed.
7

OPERATING INSTRUCTIONS
kWARNING
Personal Injury and Product Damage
Hazard
DO NOT plug in if switch is in ON
position. Personal injury or property
damage could result.
The cord moves rapidly when
rewinding. Keep children away
and provide a clear path when
rewinding the cord to prevent
personal injury.
DO NOT use outlets above counters.
Damage from cord to items in
surrounding area could occur.
1. Pull cord out of
canister to desired
length.
NOTE: To reduce the risk of electric shock,
this vacuum cleaner has a polarized plug;
one blade is wider than the other. This plug
will fit in a polarized outlet only one way. If
the plug does not fit fully in the outlet,
reverse the plug. If it still does not fit, con-
tact a qualified electrician to install the prop-
er outlet. Do not change the plug in any
way.
2. Plug the polarized power cord into a 120
Volt outlet located near the floor.
To rewind: Unplug the vacuum cleaner.
Hold the plug while rewinding to prevent
damage or injury from the moving cord.
Push cord rewind button.
Pile Height
Indicator
Handle
Release
Pile Height Pedal
3. Lower wand from upright position by
pressing on the handle release pedal.
CAUTION
4. Select a pile height setting by pressing
the small pedal on the rear of the Power-
Mate ®. The pile height setting shows on the
indicator. See SUGGESTED PILE HEIGHT
SETTINGS.
Attention: Refer to your carpet manufac-
turers cleaning recommendations. Some
more delicate carpets may require that they
be vacuumed with the Power-Mate ® agitator
turned off, to prevent carpet damage.
FLOOR
:ARPE_1
5. Select a switch
position on the han-
dle.
OFF
FLOOR - turns on the canister motor only.
CARPET - turns on both the canister and
the Power-Mate" motors.
NOTE - When this switch is in the FLOOR
position, the headlight DOES NOT function
since no electricity flows to the Power-
Mate ®.
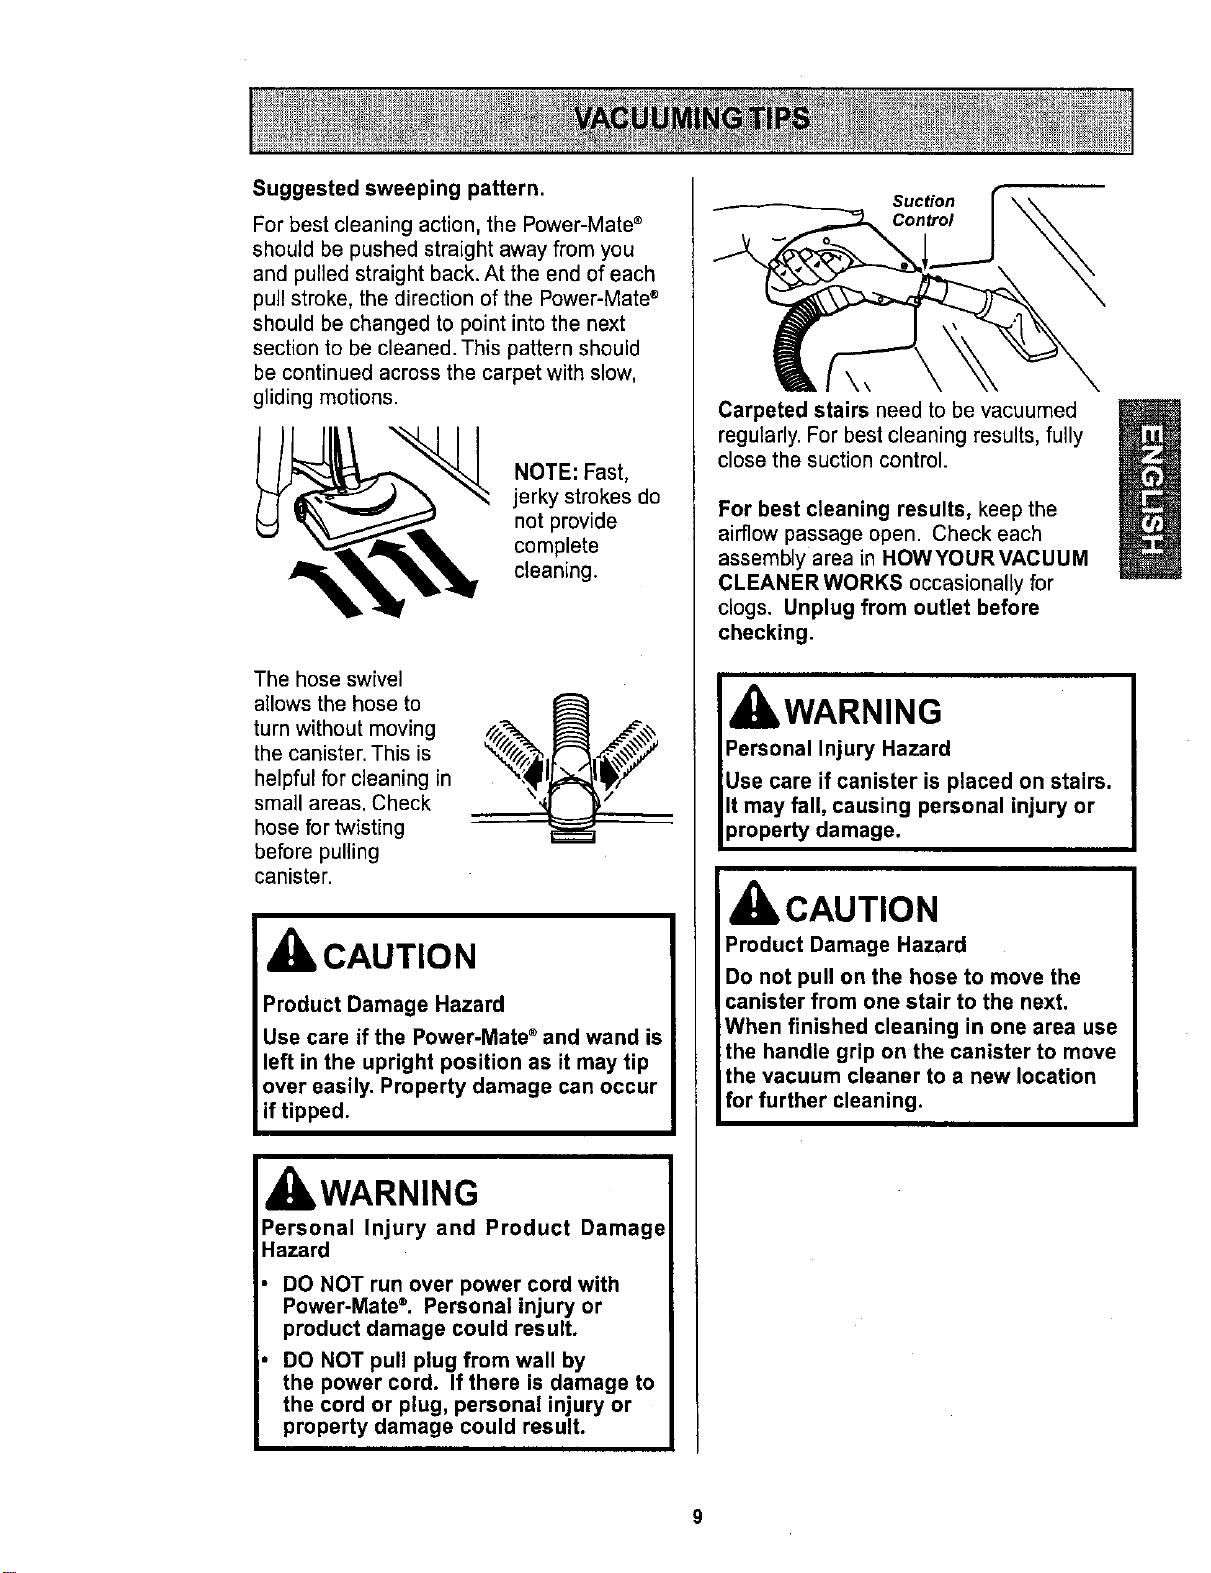
Suggested sweeping pattern.
For best cleaning action, the Power-Mate ®
should be pushed straight away from you
and pulled straight back. At the end of each
pull stroke, the direction of the Power-Mate ®
should be changed to point into the next
section to be cleaned. This pattern should
be continued across the carpet with slow,
gliding motions.
NOTE: Fast,
jerky strokes do
not provide
complete
cleaning.
The hose swivel
allows the hose to
turn without moving
the canister. This is
helpful for cleaning in
small areas. Check
hose for twisting
before pulling
canister.
CAUTION
Product Damage Hazard
Use care if the Power-Mate ®and wand is
left in the upright position as it may tip
over easily. Property damage can occur
if tipped.
kWARNING
Personal Injury and Product Damage
Hazard
DO NOT run over power cord with
Power-Mate'. Personal injury or
product damage could result.
DO NOT pull plug from wall by
the power cord. If there is damage to
the cord or plug, personal injury or
property damage could result.
Suction
Control
Carpeted stairs need to be vacuumed
regularly. For best cleaning results, fully
close the suction control.
For best cleaning results, keep the
airflow passage open. Check each
assembly area in HOWYOURVACUUM
CLEANER WORKS occasionally for
clogs, Unplug from outlet before
checking.
WARNING
IbCAUTION
Product Damage Hazard
Do not pull on the hose to move the
canister from one stair to the next.
When finished cleaning in one area use
the handle grip on the canister to move
the vacuum cleaner to a new location
for further cleaning.
For best deep down cleaning, use the XLO
setting. However, you may need to raise the
height to make some jobs easier, such as
scatter rugs and some deep pile carpets,
and to prevent the vacuum cleaner from
shutting off. Suggested settings are:
HI - Shag, deep pile, or scatter rugs.
MED - Medium to deep pile.
LO - Low to medium pile.
XLO - Most carpets and bare floors.
kCAUTION
DO NOT attach or remove handle or
wands while vacuum cleaner is ON.
This could cause sparking and damage
the electrical contacts.
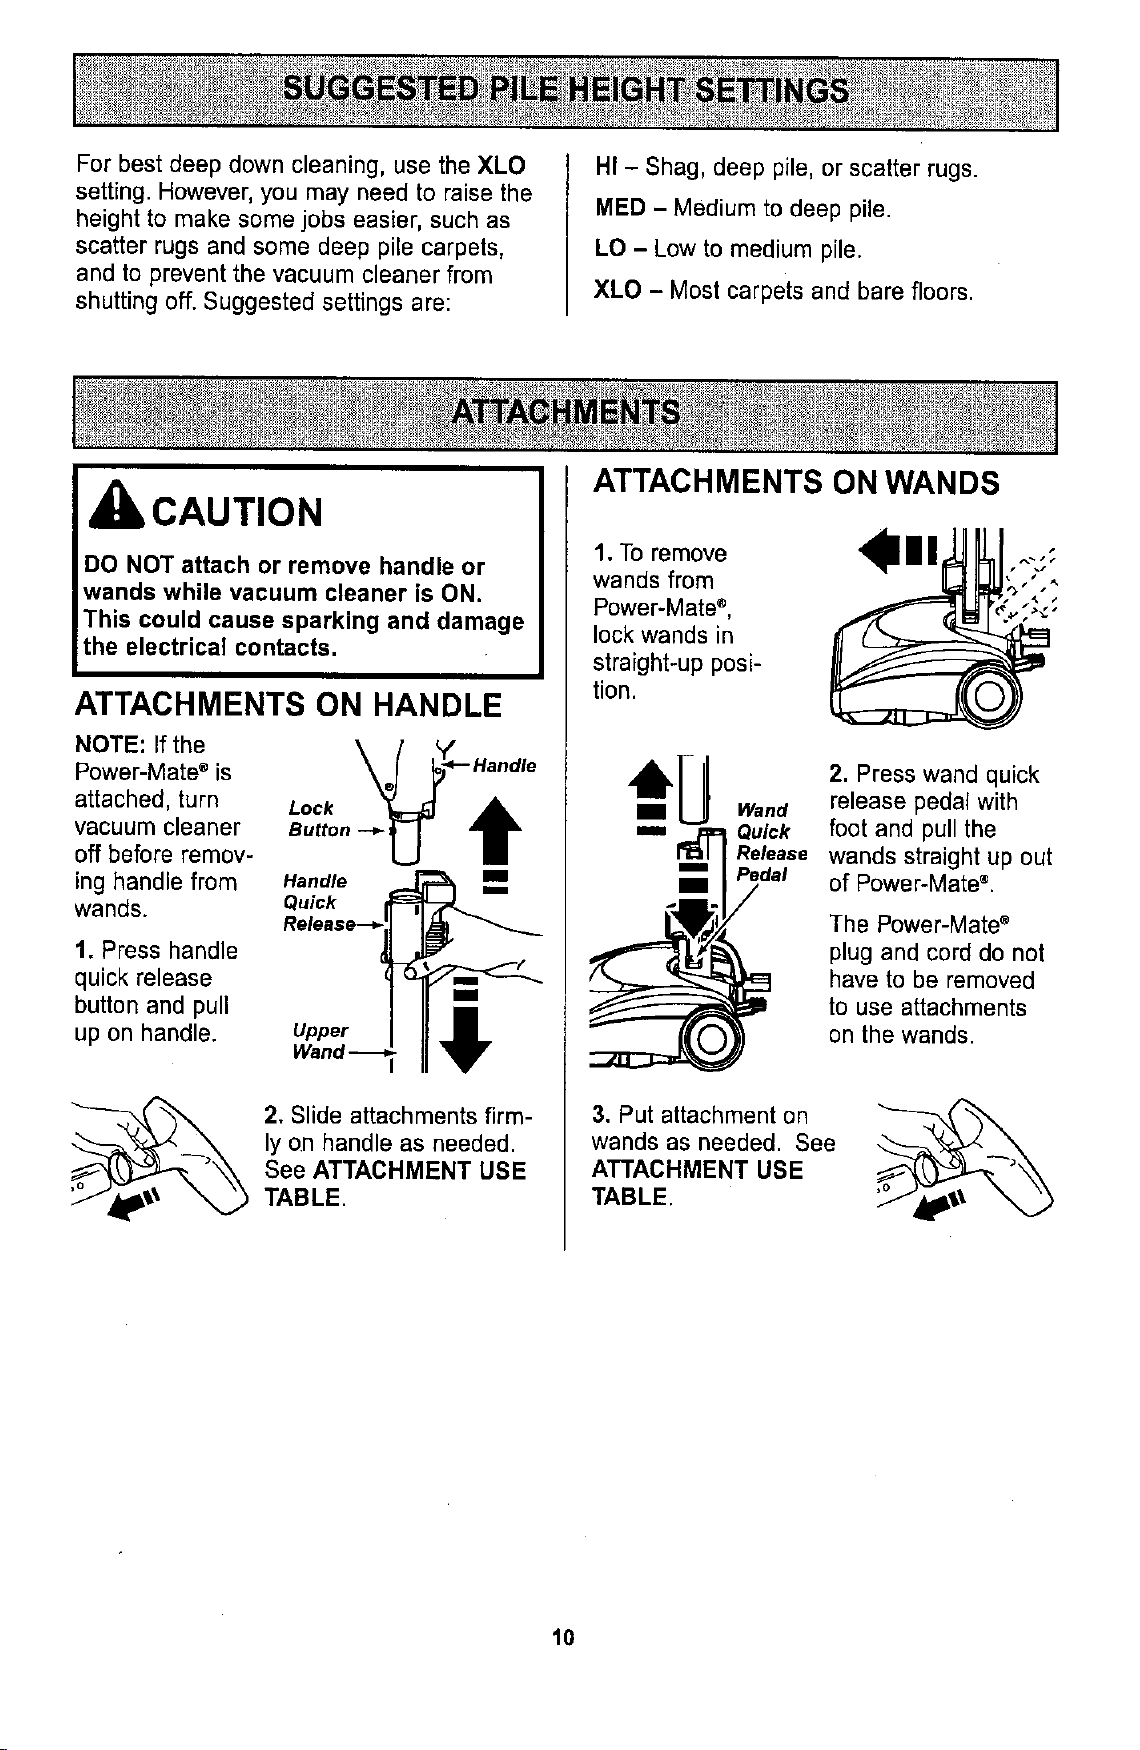
ATTACHMENTS ON HANDLE
NOTE: If the
Power-Mate ®is
attached, turn
vacuum cleaner
off before remov-
ing handle from
wands.
1. Press handle
quick release
button and pull
up on handle.
Handle
Quick = ==
Release--_
Upper
Wand --
2. Slide attachments firm-
ly on handle as needed.
See ATTACHMENT USE
TABLE.
ATTACHMENTS ON WANDS
1. To remove _i!:_"':
wands from ,',,,
Power.Mate ®' ,,,:
lock wands in __
straight-up posi-
tion.
_U Wand
m _ Quick
Release
Pedal
/
2. Press wand quick
release pedal with
foot and pull the
wands straight up out
of Power-Mate ®.
The Power-Mate ®
plug and cord do not
have to be removed
to use attachments
on the wands.
3. Put attachment on
wands as needed. See
ATTACHMENT USE
TABLE.
10

CLEANING AREA
ATTACHMENT Bet*eeo
Cushions* Drapes* Walls
Combination Brush
Crevice Tool
Floor Brush
Power-Mate ®
Handi-Mate Jr._***
Power-Mate Jr._*** _
Furniture*
4
4
4
4 Y
4
/
Bare
Stairs Floors
4
Y
4
4
Carpeted
Floors/Rug_
4
4** #
Always clean attachments before using on fabrics.
** 2-position switch should be in FLOOR position.
*** Some models; Handi-Mate Jr.®and Power-Mate Jr.® attachment instructions are included
with the products.
NOTE: When separating wands, depress lock button completely before pulling wands apart, if
wand lock button is difficult to depress, push the two wands more tightly together to line up
the lock button with the hole. Depress lock button and then pull wands apart.
OVERLOAD PROTECTOR
The Power-Mate ®
has built-in
protection against
motor and belt
damage should the
agitator jam. If the
agitator slows
down or stops, the
overload protector
Overload Protector
Reset Button_
shuts off the Power-Mate ®. The canister
motor will continue to run.
To correct problem: Turn off and unplug
vacuum cleaner, remove obstruction, then
press overload protector reset button.
If the problem persists, have the
vacuum cleaner serviced by a Sears or
other qualified service agent.
WARNING
EDGE CLEANER
Active brush edge
cleaners are on both
sides of the Power-
Mate ®. Guide either side
of the Power-Mate ®along
base-boards or next to
furniture to help remove
dirt trapped at carpet
edges.
SUCTION 'CONTROL
The suction
control allows
you to change
the vacuum
Suction Suction cleaner suction
for different
fabric and carpet weights. Opening the
control decreases suction for draperies and
lightweight rugs, while closing the control
increases suction for upholsteries and
carpets.
11
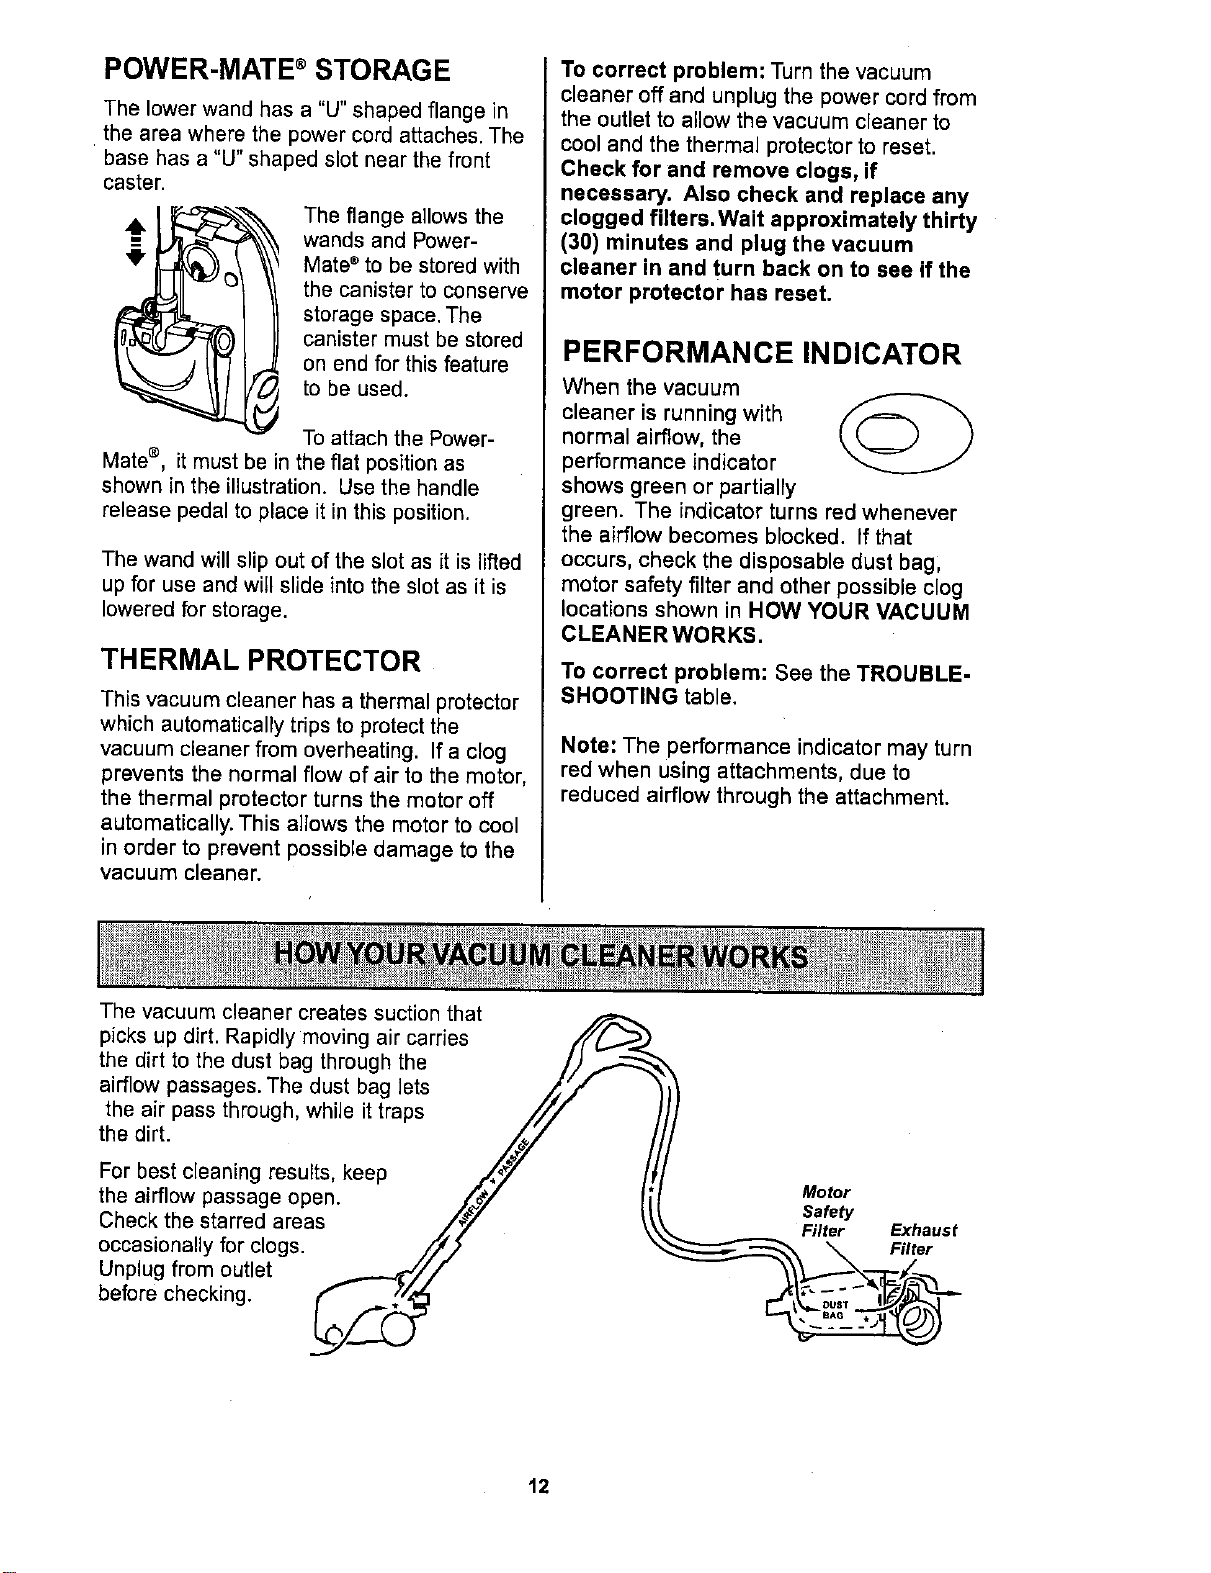
POWER-MATE ®STORAGE
The lower wand has a "U" shaped flange in
the area where the power cord attaches. The
base has a "U" shaped slot near the front
caster.
The flange allows the
wands and Power-
Mate ®to be stored with
the canister to conserve
storage space. The
canister must be stored
on end for this feature
to be used.
To attach the Power-
Mate ®, it must be in the flat position as
shown in the illustration. Use the handle
release pedal to place it in this position.
The wand will slip out of the slot as it is lifted
up for use and will slide into the slot as it is
lowered for storage.
THERMAL PROTECTOR
This vacuum cleaner has a thermal protector
which automatically trips to protect the
vacuum cleaner from overheating. If a clog
prevents the normal flow of air to the motor,
the thermal protector turns the motor off
automatically. This allows the motor to cool
in order to prevent possible damage to the
vacuum cleaner.
The vacuum cleaner creates suction that
To correct problem: Turn the vacuum
cleaner off and unplug the power cord from
the outlet to allow the vacuum cleaner to
cool and the thermal protector to reset.
Check for and remove clogs, if
necessary. Also check and replace any
clogged filters. Wait approximately thirty
(30) minutes and plug the vacuum
cleaner in and turn back on to see if the
motor protector has reset.
PERFORMANCE INDICATOR
When the vacuum
cleaner is running with
normal airflow, the
performance indicator
shows green or partially
green. The indicator turns red whenever
the airflow becomes blocked. If that
occurs, check the disposable dust bag,
motor safety filter and other possible clog
locations shown in HOW YOUR VACUUM
CLEANER WORKS.
To correct problem: See the TROUBLE-
SHOOTING table.
Note: The performance indicator may turn
red when using attachments, due to
reduced airflow through the attachment.
picks up dirt. Rapidly moving air carries //(/_.<)
the dirt to the dust bag through the /)
airflow passages. The dust bag lets ,,_/"
the air pass through, while it traps JfJ ,
the dirt. Z_/ /
For best cleaning results, keep ./_',y /,/
the airflow passage open. ,/_'e'/ li
Check the starred areas _.L,_'*
occasionally for clogs. //'/".,,2 "
Unplug from outlet ...,...._._//
before checking. ._:1
Motor
Safety
Filter Exhaust
_ Filter
12
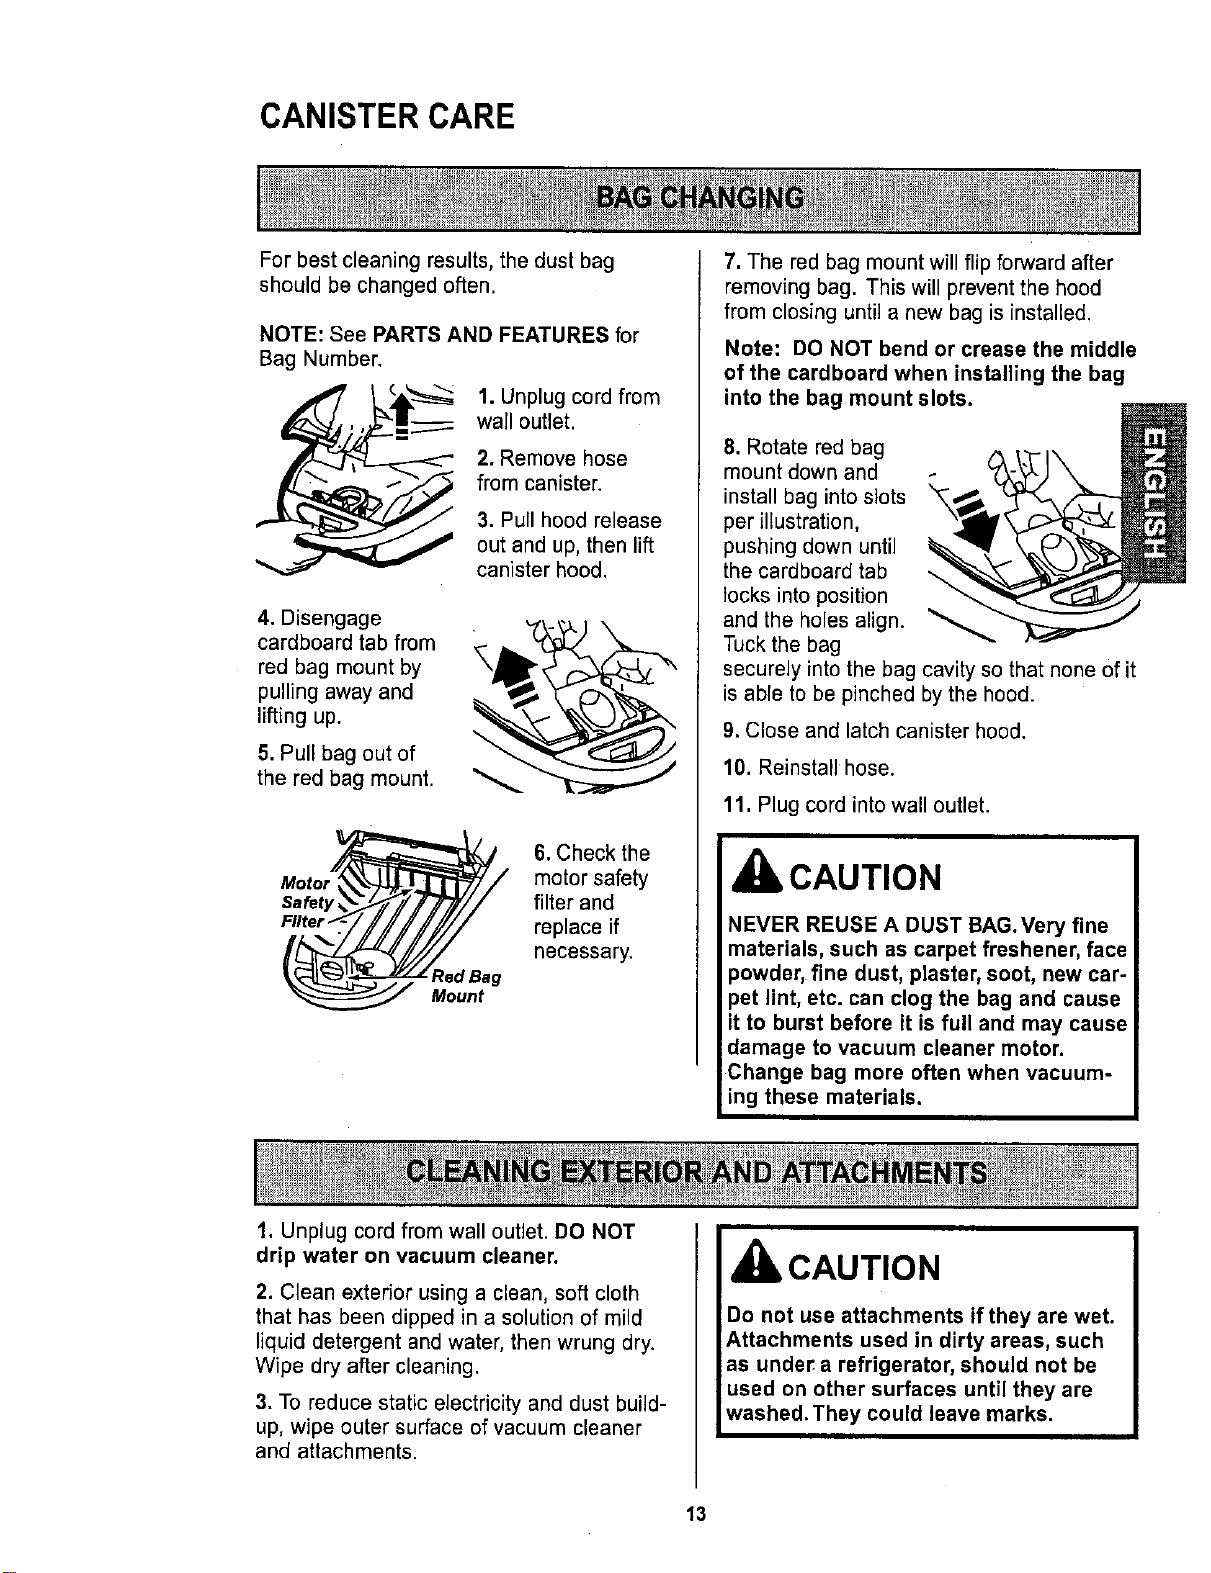
CANISTER CARE
For best cleaning results, the dust bag
should be changed often.
NOTE: See PARTS AND FEATURES for
Bag Number.
1. Unplug cord from
wall outlet.
2. Remove hose
from canister.
3. Pull hood release
out and up, then lift
canister hood.
4. Disengage
cardboard tab from
red bag mount by
pulling away and
lifting up.
5. Pull bag out of
the red bag mount.
Safety
Mount
6. Check the
motor safety
filter and
replace if
necessary.
1, Unplug cord from wall outlet. DO NOT
7. The red bag mount will flip forward after
removing bag. This will prevent the hood
from closing until a new bag is installed,
Note: DO NOT bend or crease the middle
of the cardboard when installing the bag
into the bag mount slots.
8. Rotate red bag
mount down and
install bag into slots
per illustration,
pushing down until
the cardboard tab
locks into position
and the holes align.
Tuck the bag
securely into the bag cavity so that none of it
is able to be pinched by the hood.
9. Close and latch canister hood.
10. Reinstall hose.
11. Plug cord into wall outlet.
CAUTION
NEVER REUSE A DUST BAG.Very fine
materials, such as carpet freshener, face
_owder, fine dust, plaster, soot, new car-
_et lint, etc. can clog the bag and cause
t to burst before it is full and may cause
damage to vacuum cleaner motor.
Change bag more often when vacuum-
ing these materials.
drip water on vacuum cleaner.
2. Clean exterior using a clean, soft cloth
that has been dipped in a solution of mild
liquid detergent and water, then wrung dry.
Wipe dry after cleaning.
3. To reduce static electricity and dust build-
up, wipe outer surface of vacuum cleaner
and attachments.
CAUTION
13
IbWARNING
Electrical Shock Hazard
Unplug power cord from electrical
outlet. Do not operate the vacuum
cleaner without the motor safety filter.
Be sure the filter is dry and properly
installed to prevent motor failure and/or
electrical shock,
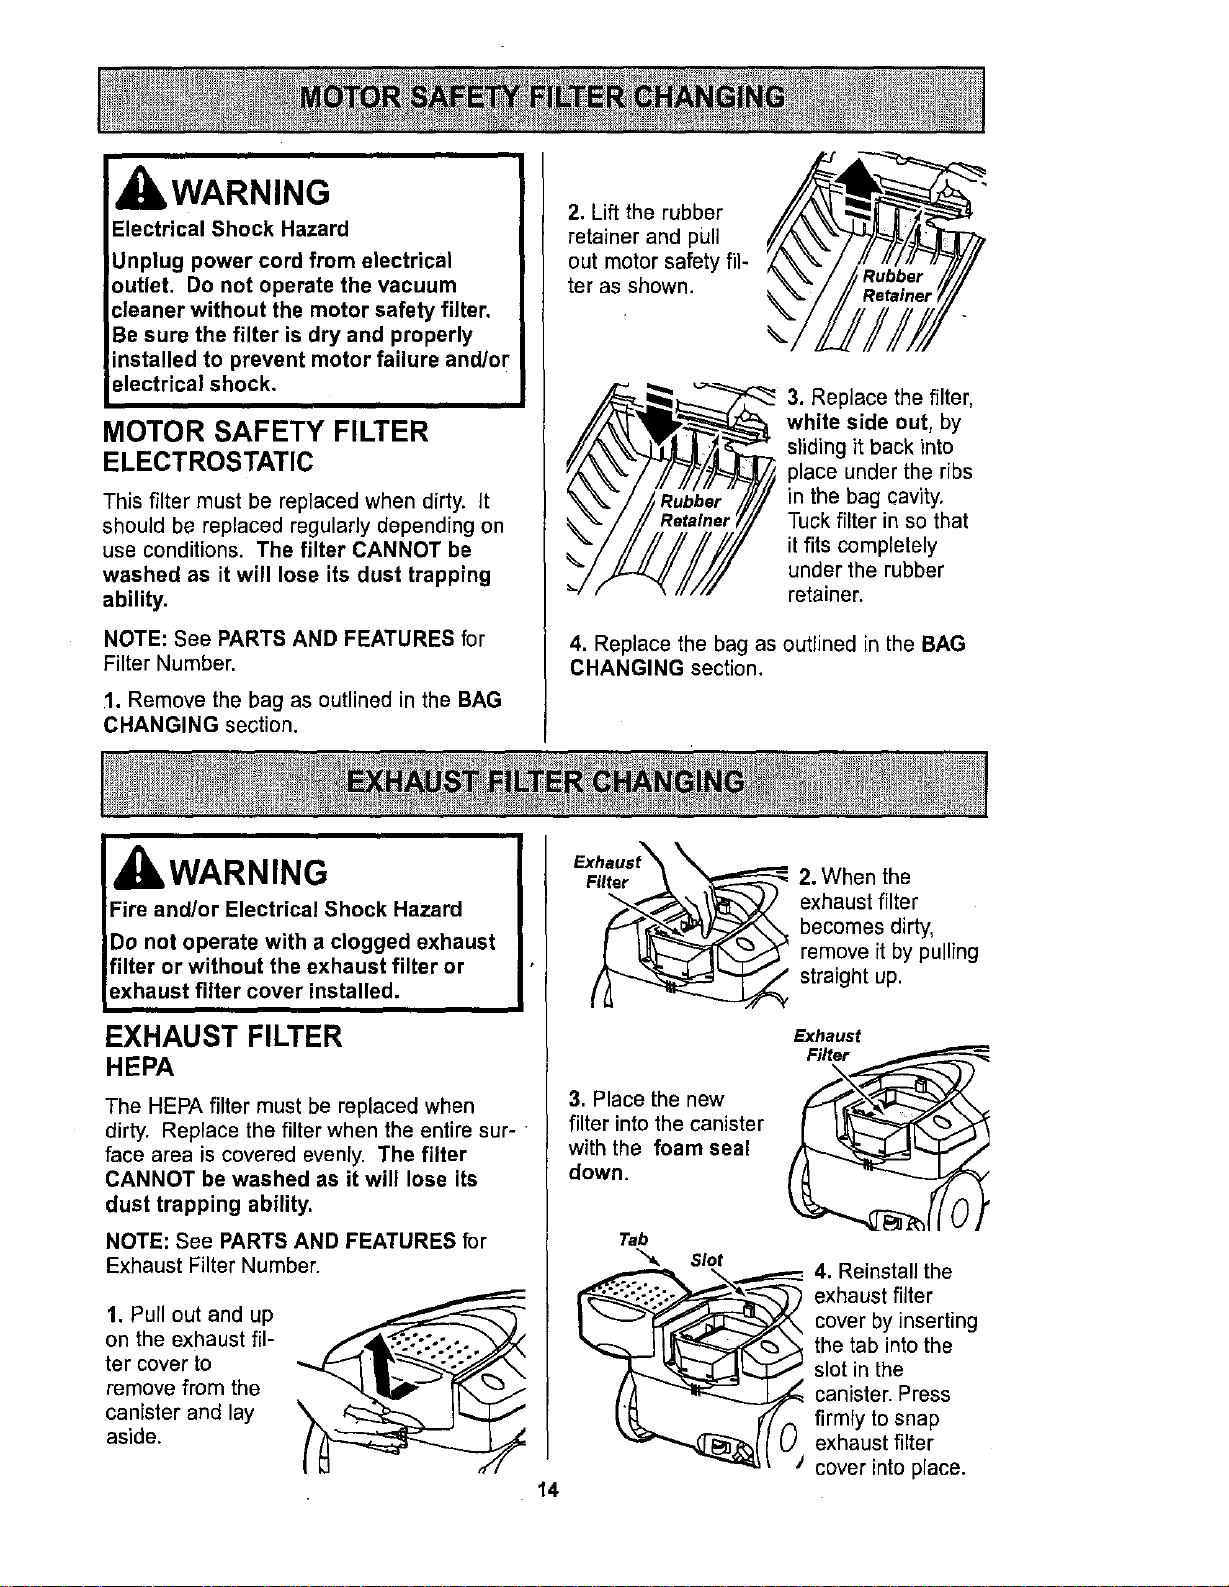
MOTOR SAFETY FILTER
ELECTROSTATIC
This filter must be replaced when dirty. It
should be replaced regularly depending on
use conditions. The filter CANNOT be
washed as it will lose its dust trapping
ability.
NOTE: See PARTS AND FEATURES for
Filter Number.
1. Remove the bag as outlined in the BAG
CHANGING section.
2. Lift the rubber
retainer and pull
out motor safety fil-
ter as shown.
3. Replace the filter,
white side out, by
sliding it back into
place under the ribs
in the bag cavity,
Tuck filter in so that
it fits completely
under the rubber
retainer.
4. Replace the bag as outlined in the BAG
CHANGING section.
WARNING
Fire and/or Electrical Shock Hazard
Do not operate with a clogged exhaust
filter or without the exhaust filter or
exhaust filter cover installed.
EXHAUST FILTER
HEPA
I
The HEPA filter must be replaced when
dirty. Replace the filter when the entire sur-
face area is covered evenly. The filter
CANNOT be washed as it will lose its
dust trapping ability.
NOTE: See PARTS AND FEATURES for
Exhaust Filter Number.
1. Purl out and up
on the exhaust fil-
ter cover to
remove from the
canister and lay
aside.
Exhaust_
Filter ,,,_\ _:::_ 2. When the
_ exhaust filter
becomes dirty,
remove it by pulling
straight up.
3. Place the new
filter into the canister
with the foam seal
down.
Exhaust
Filter
14
Tab
"_ Slot
4. Reinstall the
exhaust filter
cover by inserting
the tab into the
slot in the
canister. Press
firmly to snap
_ exhaust filter
; cover into place.
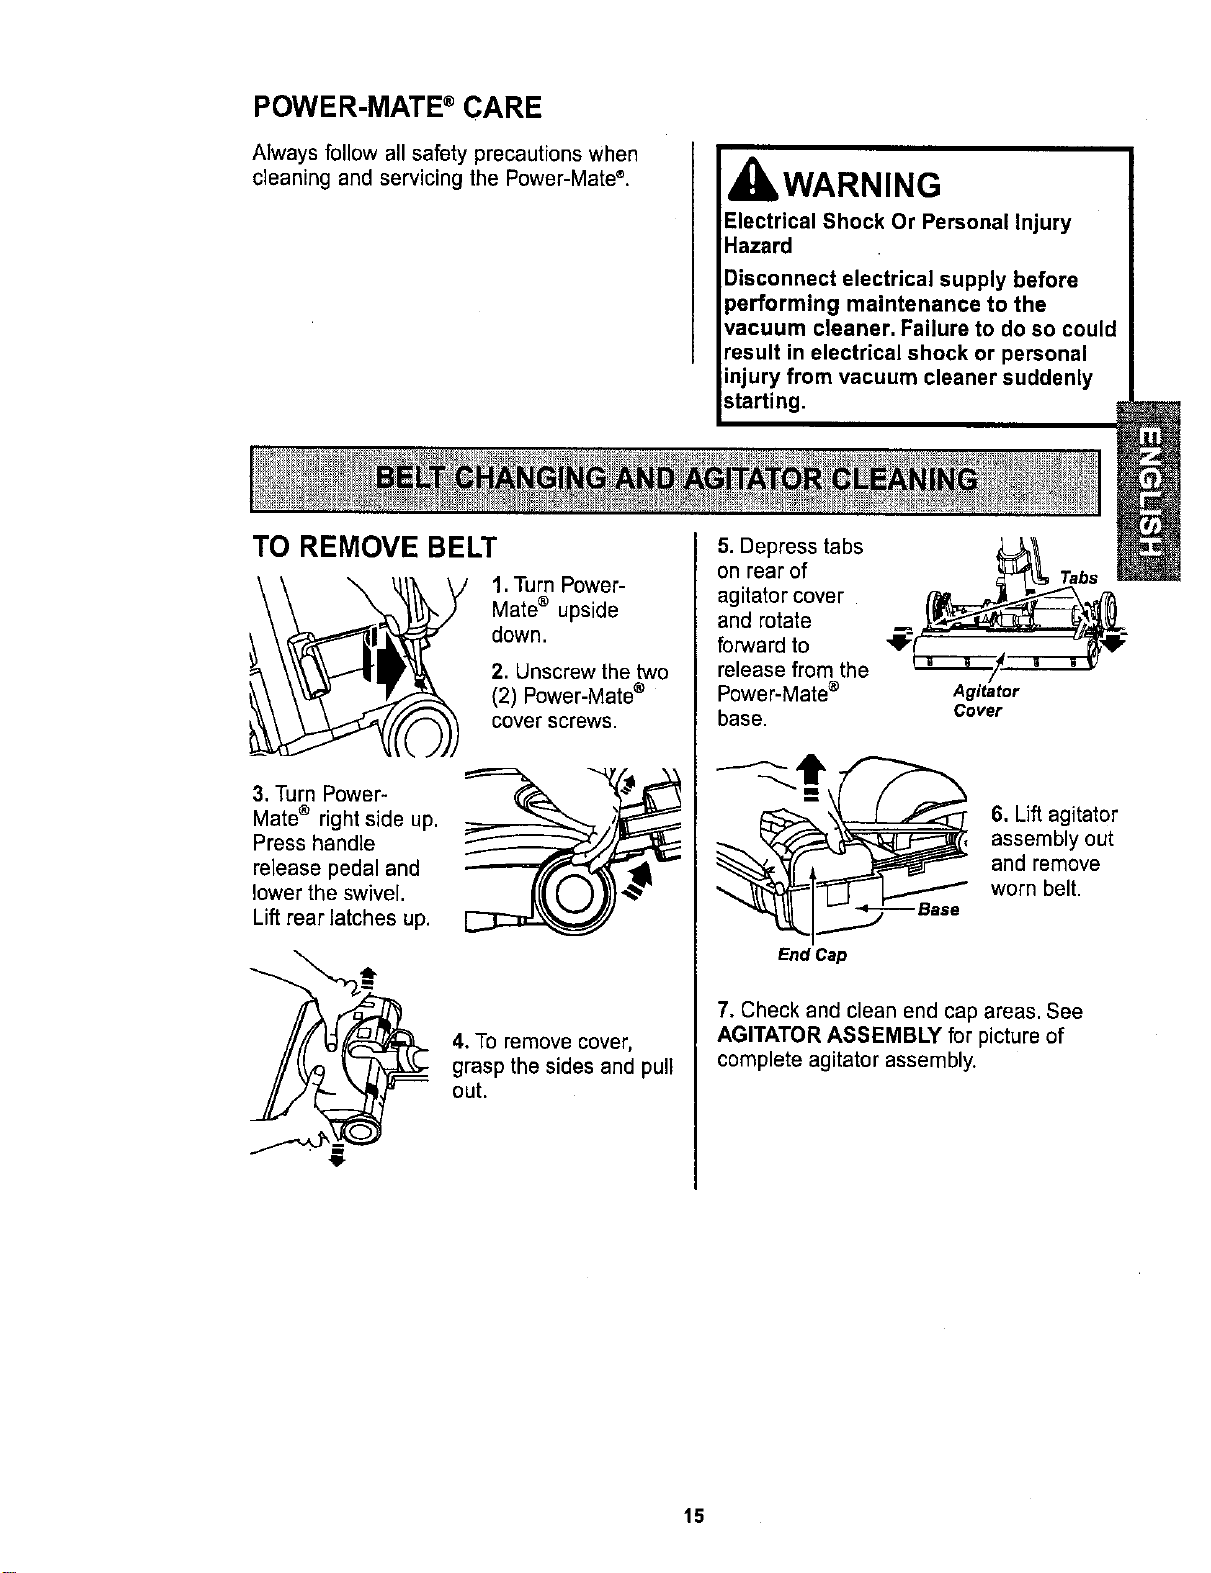
POWER-MATE ®CARE
Always follow all safety precautions when
cleaning and servicing the Power-Mate ®.
IbWARNING
Electrical Shock Or Personal Injury
Hazard
Disconnect electrical supply before
performing maintenance to the
vacuum cleaner, Failure to do so could
result in electrical shock or personal
iinjury from vacuum cleaner suddenly
starting,
TO REMOVE BELT
1, Turn Power-
Mate® upside
down,
2. Unscrew the two
(2) Power-Mate ®
cover screws.
3. Turn Power-
Mate ® right side up.
Press handle
release pedal and
lower the swivel.
Lift rear latches up.
_®
4. TO remove cover,
grasp the sides and pull
out.
5. Depress tabs
on rear of
agitator cover
and rotate
forward to
release from the
Power-Mate ®
base.
Agitator
Cover
Tabs
6. Lift agitator
assembly out
and remove
worn belt.
End Cap
7. Check and clean end cap areas. See
AGITATOR ASSEMBLY for picture of
complete agitator assembly.
15
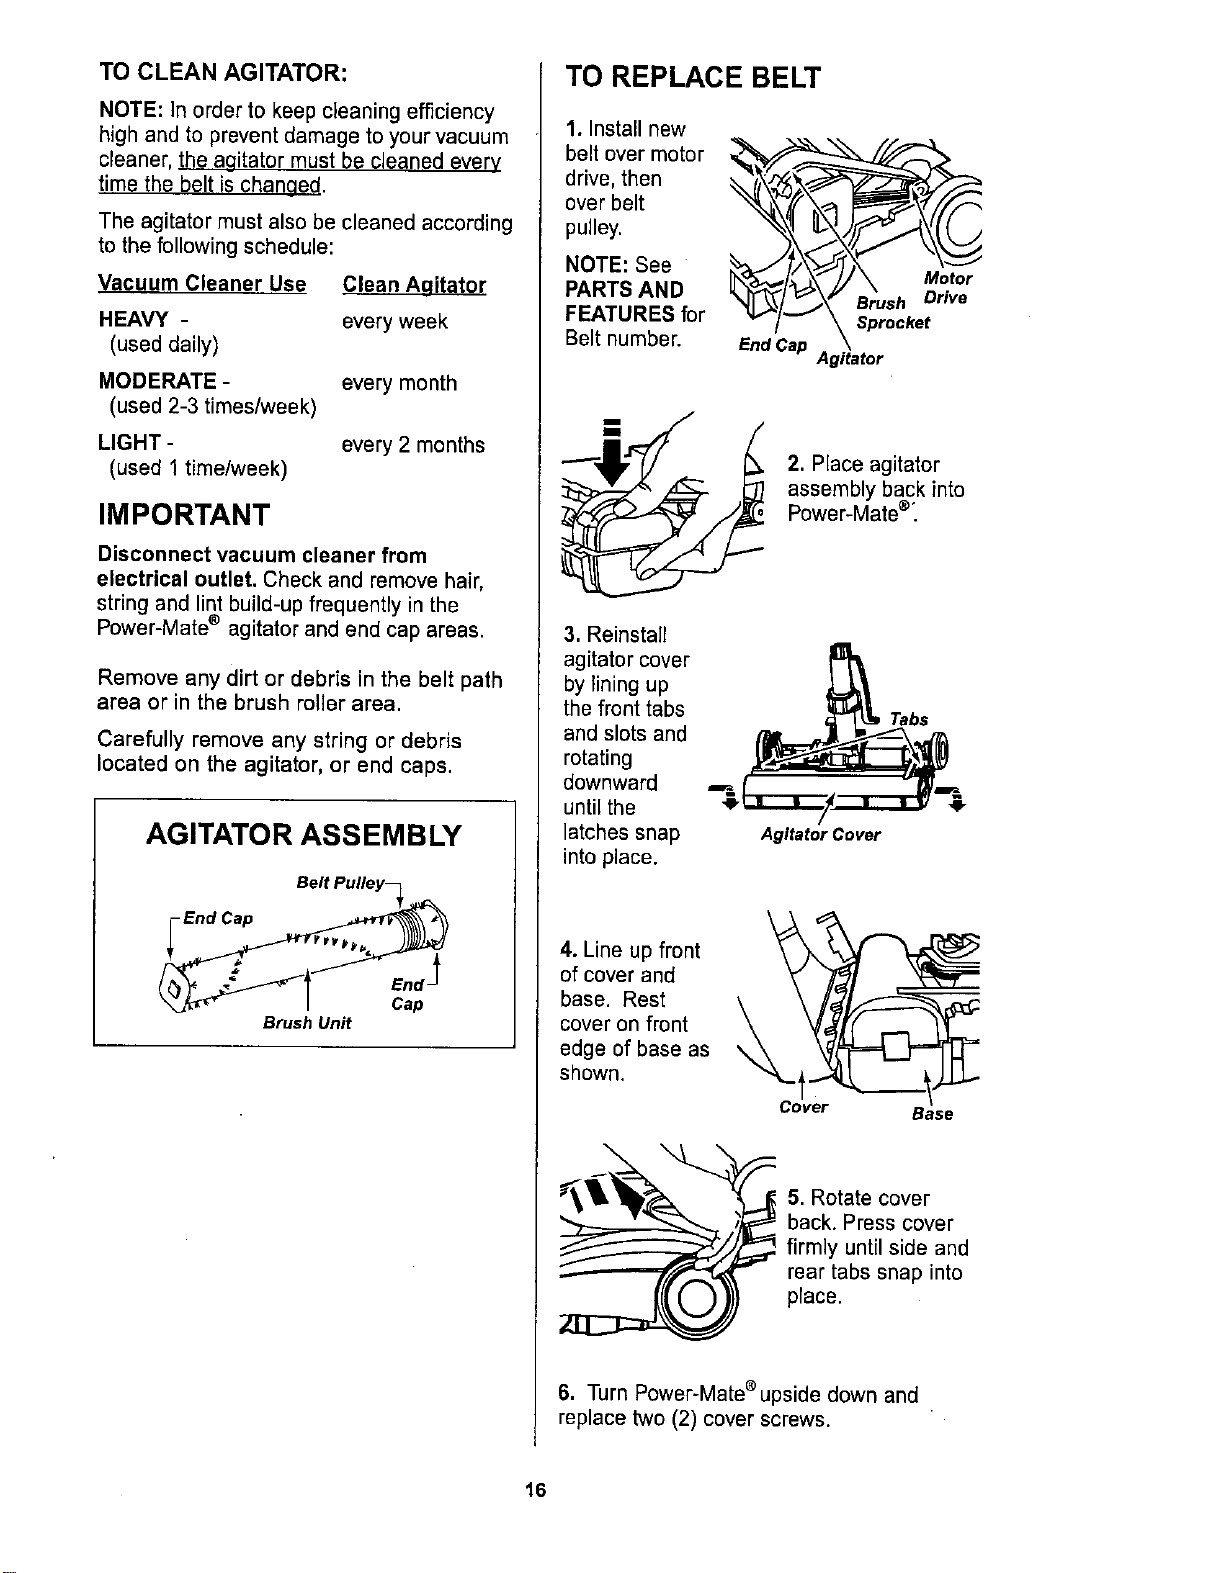
TO CLEAN AGITATOR:
NOTE: In order to keep cleaning efficiency
high and to prevent damage to your vacuum
cleaner, the aqitator must be cleaned every
time the belt is chanaed.
The agitator must also be cleaned according
to the following schedule:
V_!_cuum Cleaner Use
HEAVY -
(used daily)
MODERATE -
(used 2-3 times/week)
LIGHT -
(used 1 time/week)
Clean Aaitator
every week
every month
every 2 months
IMPORTANT
Disconnect vacuum cleaner from
electrical outlet. Check and remove hair,
string and lint build-up frequently in the
Power-Mate _ agitator and end cap areas.
Remove any dirt or debris in the belt path
area or in the brush roller area.
Carefully remove any string or debris
located on the agitator, or end caps.
AGITATOR ASSEMBLY
Belt Pulley_
Brush Unit
TO REPLACE BELT
1, Install new
belt over motor
drive, then
over belt
pulley.
NOTE: See
PARTS AND
FEATURES for
Belt number.
End Cap Agitator
2. Place agitator
assembly back into
Power-Mate®:
3. Reinstall
agitator cover
by lining up
the front tabs
and slots and
rotating
downward
until the
latches snap
into place.
Agitator Cover
Tabs
4. Line up front \ )_,",,_/ _
of cover and
base. Rest
cover on front
edge of base as
shown.
Cover Base
5. Rotate cover
back. Press cover
firmly until side and
rear tabs snap into
place.
6. Turn Power-Mate®upside down and
replace two (2) cover screws.
16
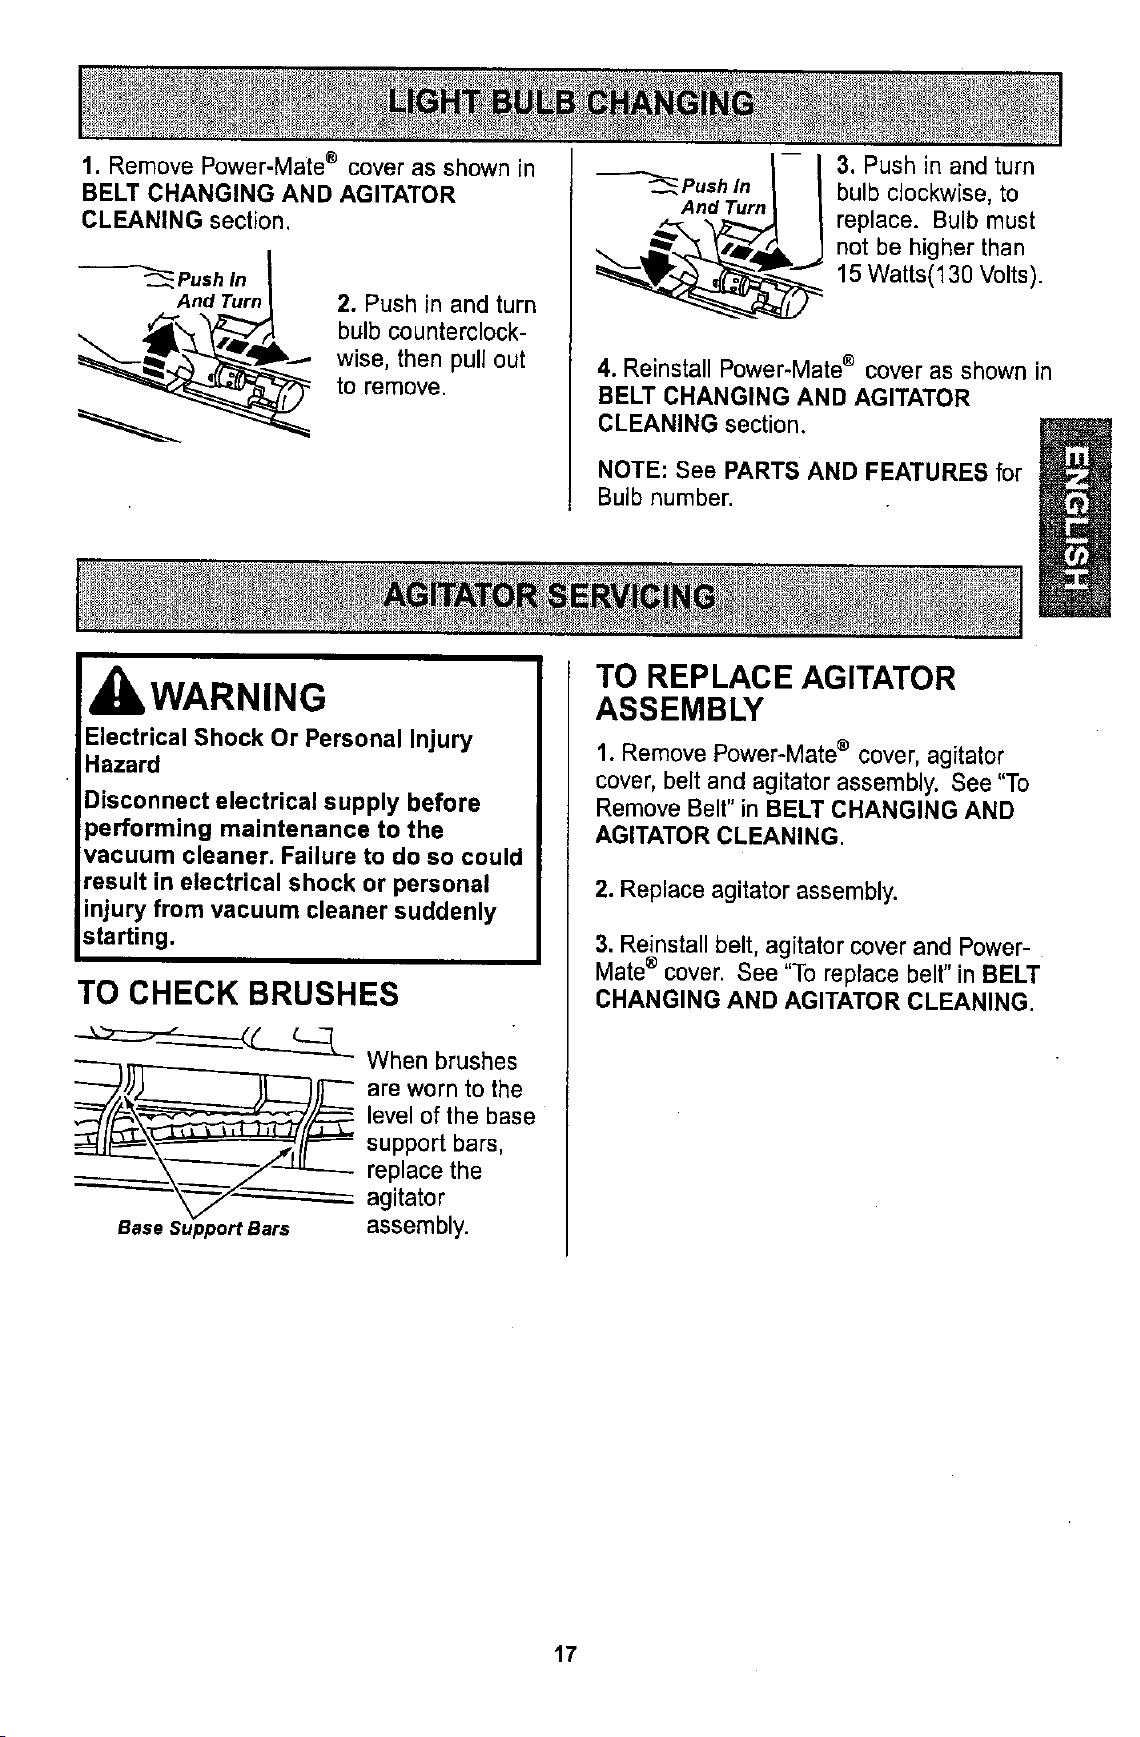
1. Remove Power-Mate ® cover as shown in
BELT CHANGING AND AGITATOR
CLEANING section.
--'_ Push In
And Turn
2. Push in and turn
bulb counterclock-
wise, then pull out
to remove.
"---"_Pushlnl-- I
And Turn _ |
3. Push in and turn
bulb clockwise, to
replace. Bulb must
not be higher than
15 Watts(130 Volts).
4. Reinstall Power-Mate ® cover as shown in
BELT CHANGING AND AGITATOR
CLEANING section.
NOTE: See PARTS AND FEATURES for
Bulb number.
IbWARNING
Electrical Shock Or Personal Injury
Hazard
Disconnect electrical supply before
performing maintenance to the
vacuum cleaner. Failure to do so could
result in electrical shock or personal
injury from vacuum cleaner suddenly
starting.
TO CHECK BRUSHES
When brushes
__._ are worn to the
level of the base
support bars,
replace the
agitator
Base Support Bars assembly.
TO REPLACE AGITATOR
ASSEMBLY
1. Remove Power-Mate ® cover, agitator
cover, belt and agitator assembly. See "To
Remove Belt" in BELT CHANGING AND
AGITATOR CLEANING.
2. Replace agitator assembly.
3. Reinstall belt, agitator cover and Power-
Mate ® cover. See "To replace belt" in BELT
CHANGING AND AGITATOR CLEANING.
17
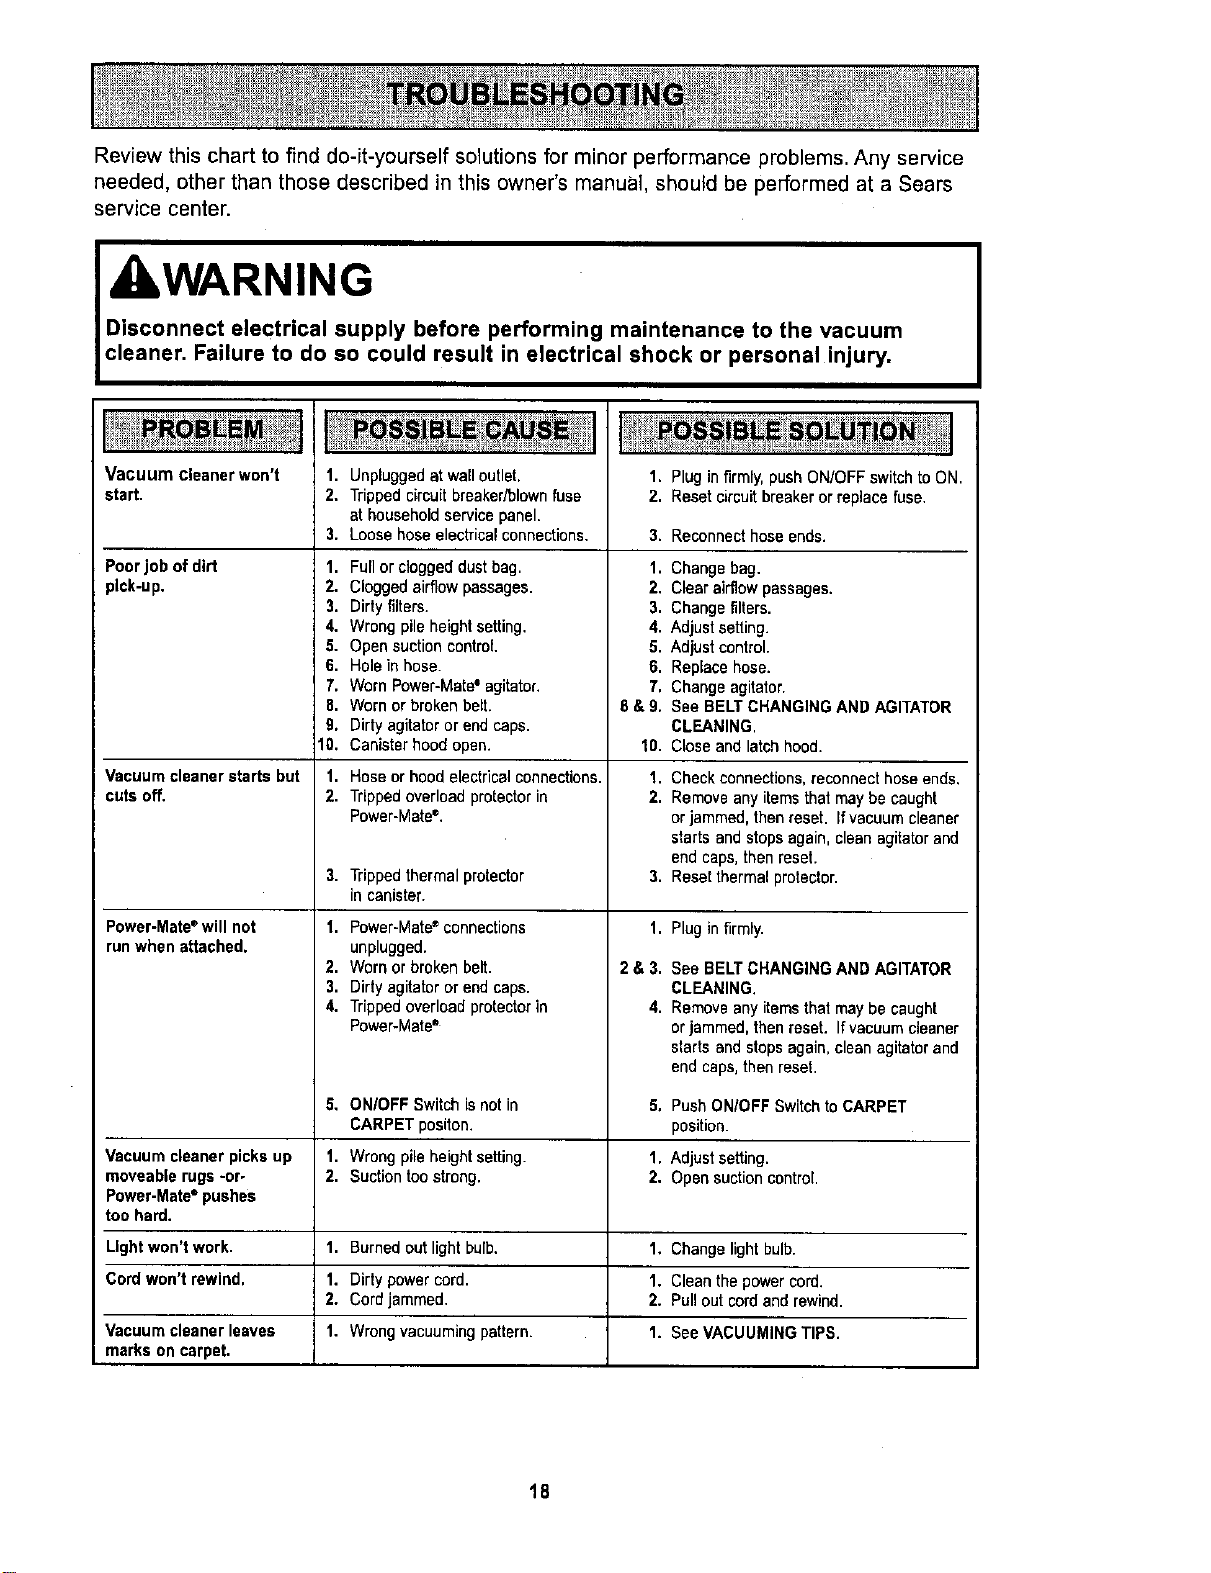
Review this chart to find do-it-yourself solutions for minor performance problems. Any service
needed, other than those described in this owner's manual, should be performed at a Sears
service center.
iLWARNING
Disconnect electrical supply before performing maintenance to the vacuum
cleaner, Failure to do so could result in electrical shock or personal injury,
Vacuum Cleanerwon't 1,
start. 2,
3.
Poorjob of dirt 1.
pick-up, 2,
3.
4.
5.
6.
7.
8.
9,
10.
Vacuumcleaner starts but 1.
cuts off. 2.
3,
Power-Mate®will not 1,
runwhen attached.
2,
3,
4.
5,
Vacuum cleanerpicks up 1,
moveable rugs-or- 2,
Power-Mate=pushes
too hard.
Lightwon't work, 1,
Cordwon't rewind, 1.
2.
Vacuumcleaner leaves 1.
marks on carpet,
Unpluggedat wall outlet,
Tripped circuit breaker/blownfuse
at household service panel.
Loose hose electrical connections.
Fullor cloggeddust bag.
Clogged airflowpassages.
Dirty filters.
Wrong pile height setting.
Open suction control
Hole in hose.
Worn Power-Mate= agitator,
Worn or broken belt.
Dirty agitator or end caps.
Canister hood open.
Hose or hoodelectrical connections.
Trippedoverload protector in
Power-Mate'.
Trippedthermalprotector
incanister.
Power-Mate"connections
unplugged.
Worn or broken belt.
Dirty agitator or end caps.
Trippedoverload protectorin
Power-Mate"
ONIOFF Switch is not in
CARPETpositon.
Wrong pile height setting.
Suction toostrong.
1. Plug in firmly, push ON/OFFswitch to ON.
2. Reset circuitbreakeror repiaca fuse.
3. Reconnecthose ends.
1. Change bag.
2. Clear airflowpassages.
3. Change filters.
4. Adjust setting.
5. Adjust control.
6. Replace hose.
7, Change agitator.
8 & 9. See BELTCHANGINGAND AGITATOR
CLEANING.
10. Close and latch hood.
1.
2.
3,
1,
2&3.
4,
Check connections,reconnect hose ends,
Remove any items that may be caught
or jammed, then reset. Ifvacuum cleaner
starts and stops again, clean agitator and
end caps,then reset.
Resetthermal protector.
Plug in firmly.
See BELTCHANGINGAND AGITATOR
CLEANING.
Removeanyitemsthatmay be caught
or jammed,thenreset. Ifvacuumcleaner
startsand stops again,cleanagitatorand
end caps,thenreset.
5. Push ON/OFF Switch to CARPET
position.
1. Adjust setting.
2. Open suction control.
Burnedout light bulb. 1. Change lightbulb.
Dirty powercord. 1. Cleanthe power cord.
Cord jammed. 2. Pull out cord and rewind.
Wrong vacuuming pattern. 1. See VACUUMINGTIPS.
18
Antes de usar su aspiradora nueva ..... 1
Garantia de la aspiradora de Kenmore ... 1
Instrucciones importantes de
seguridad ............................ 2
Piezas y caracteristicas .............. 3-4
Instrucciones de ensamblado ......... 5-6
Instrucciones de operatibn ............. 7
Para comenzar ....................... 7
Sugerencias para aspirar ............... 6
Sugerencias sobre el ajuste de nivel de
pelo de la alfombra .................... 9
Accesorios ........................... 9
Cuadro d uso de los accesorios .......... 10
Caracteristicas de rendimiento ........ 10-11
Funcionamientode su aspiradora ......... 11
Cuidado del recept_culo .............. 12
Cambio de la balsa ................... 12
Limpiezade]exteriory de losaccesorios... 12
Cambio del filtro de seguridaddel motor ... 13
Cambio del filtro de escape ............. 13
Cuidado de la Power-Mate ® ............ 14
Cambio de la correay limpieza
del cepi]lo........................ 14-15
Cambio de la bombiila ................. 16
Cuidado del agitador .................. 16
Reconocimiento de problemas ......... 17
Informacibn de
assistancia o servicio ..... PosteriorCubierta
Por favorlea estaguia que le ayudara a assemblar y operar su aspiradoranueva de Kenmore en unamanera
m&ssegura y effectiva.
Para mas informaci6n acercadel cuidadoy operaci6nde estaaspirador, Ilame a su tienda Sears mas cercana.
Cuando prequnte por informaci6n usted necisitar&el n_mero completo de serie y modelo de la aspiradora que
est_ Iocado en la placa de los nl_merosde modelo y serie.
Use el espacio de abajopara registrar el ni_merode modelo y serie para su nueva aspiradora de Kenmore.
N_mero de Modelo
Nemero de Serie
Fechade Compra.
Matengaeste libro y su reciboen u lugar seguro para referencias futuras.
GARANTiA LIMITADADE UN ANO DE LA ASPIRADORA KENMORE
Esta garantia es por un afiodesde la facha de compra, e incluyesolamenteel uso de la aspiradora en
hogares privados. Duranteel afio de garantia, cuando la aspiradoraes operada y mantenida de acuerdo al
manual de instrucciones del duefio, Sears reparar_tcualquier defecto en materiales o fabricaci6n libre de cargo.
Estagarantia excluye las bolsas de colecci6n, correas, lamparillas, y flitros,las cuales son partes gastables que
se deterioran con el uso normal
Para elservicio de garantia, retorne esta aepiradoraal Centro de Servicio Sears m&scercano en los
Estados Unidos,
Estagarantia se aplica solamente mientras este producto est',en use en los Estados Unidos. Esta garantia le
claa usted derechos legales especificos, y usted puede tener tambiE_notros derechos los cuales varian de
estado a estado_
Sears, Roebuckand Co., D/617WA, Hoffman Estates, IL 60179
ADVERTENCIA
Su segurldad es muy importante para nosotros. Para reducir el r esgo de ncendio,
choque eldctrico lesibn corporal o dafios al utilizar su asp radora, acttie de acuerdo
con precauciones b=tscas de seguridad, entre elias:
Lea las instrucciones en este manual antes de
armar o usar su aspiradora,
Use su aspiradora I_nicamente en la forma
descrita en este manual. Use t_nicamente con
accesorios recomendados por Sears,
Desconecte el cord6n el_ctrico antes de
componer o limpiar el drea del cepillo. De Io
contrario, el cepillo podria arrancar de form
imprevista o podrla producirse un choque
el6ctrico.
No abandone la aspiradoracuando est6
conectada. Descondctelacuandono la est6
usando y antes de darle servicio.
Para reducir el riesgo de choque eldctrico, no
use suaspiradora al afre IJbreni sobre
superficies mojadas.
No permita qua sea utilizada como juguete.
Se requiere tenet mayor cuidado cuando sea
utilizada en la proximidad de niSos o por
nifios.
No use laaspiradorasi el cord6noel enchufe
estd dafiado. Si la aspiradora no est_
funcionando adecuadamente o si se ha
dejado caer, esta dafiada, se ha dejado
expuesta a la intemperie o se ha dejado caer
en agua, devuelvala a un Centro de servicio
de Sears.
No hale ni transporte la aspiradorapot el
cord6n; no use el cord6n como mango; no
cierre puertassobre el cord6n; no hale el
cord6n sabre rebordes agudos ni esquinas.
No pase la aspiradora sobre el cord6n.
Mantenga el cord6n alejado de superficies
calientes.
No desconecte la aspiradora tirando del
cord6n el_ctrico. Para desconectarla, hale el
enchufe, no el corddn.
No toque la aspiradorani el enchufe con las
mancs mojadas.
No coloque objetos en las aberturas.
No utilice la aspiradora si alguna abertura
est& bloqueada; mant_nga[a libra de polvo,
Apagua todos loscontrolesantes de
desenchufar.
Tenga cuidado especial al utilizarla
aspiradoraen escalones.No la coloquesobre
sillas,mesas,etc. Mantdngalaen el pisc.
No use la aspiradorapara aspirarIIquidos
inflamables o combustibles (gasolina Ifquidos
para Iimpieza, perfumes, etcJ ni la use en
lugares donde dstos poddan estar presentes.
Los vapores de estas sustancias pueden crear
un peligro de incendio o explosibn.
No levante ninguna cosa qua se est_
quemando o emitiendo humo, como
cigarrillos, cerillos o cenizas calientes.
No use la aspiradora sin tener instalada la
bolsa para polvo y/o los filtros.
Camble siempre la bolsa parapolvo despu6s
de aspirar limpiadores de alfombras o
desodorantes, talcos y polvos finos. Estos
productos atascan la bolsa, reducen el flujo de
aire y pueden causar qua _sta se tampa. Si
no cambia la bolsa podria ocasionar dafio
permanente a la aspiradora.
No use la aspiradora para ]evantar objetos
agudos, juguetes pequefios, alfileres,
sujetapapeles, etc. Podrian dafter la
aspiradora o la balsa para polvo.
No opera sin el filtro de escape ni la cubierta
del filtrode escape instalados.
La manguera contiene cables eldctricos. No
la use cuando estd dafiada, cortada, o
perforada. Reemplace si est', cortada o
desgastada. No levante objetos afilados.
Slempra apagu6 y desconecte la aspiradora
antes de conectar o desconectar la manguera,
Handi-Mate Jr.® (si aplicable), o la boquilla.
Sujete el enchufe con la mano al enrollar el
cordbn eldctrico. Para desconectarla, hale en
enchufe, no el cord6n.
Usted es responsable de asegurar que su
asp[radora no sea utilizada pot ninguna
persona que no pueda manejar[a
correctamente.
GUARDE ESTAS INSTRUCCIONES
El armado y uso seguro de su aspiradora son su responsabil dad Esta aspiradora ha sido
disefiada exclusivamente para uso dom_stico. La aspiradora deberd a macenarse en un lugar
seco y en el interior. Lea este Manual del prop etaro detenidamente pues contiene
informacidn importante sobre seguridad y uso. Esta quia contiene inl_ormacbn sobre
seguddaddebajo de simbolos de ad-vertiencia cuidado.
2
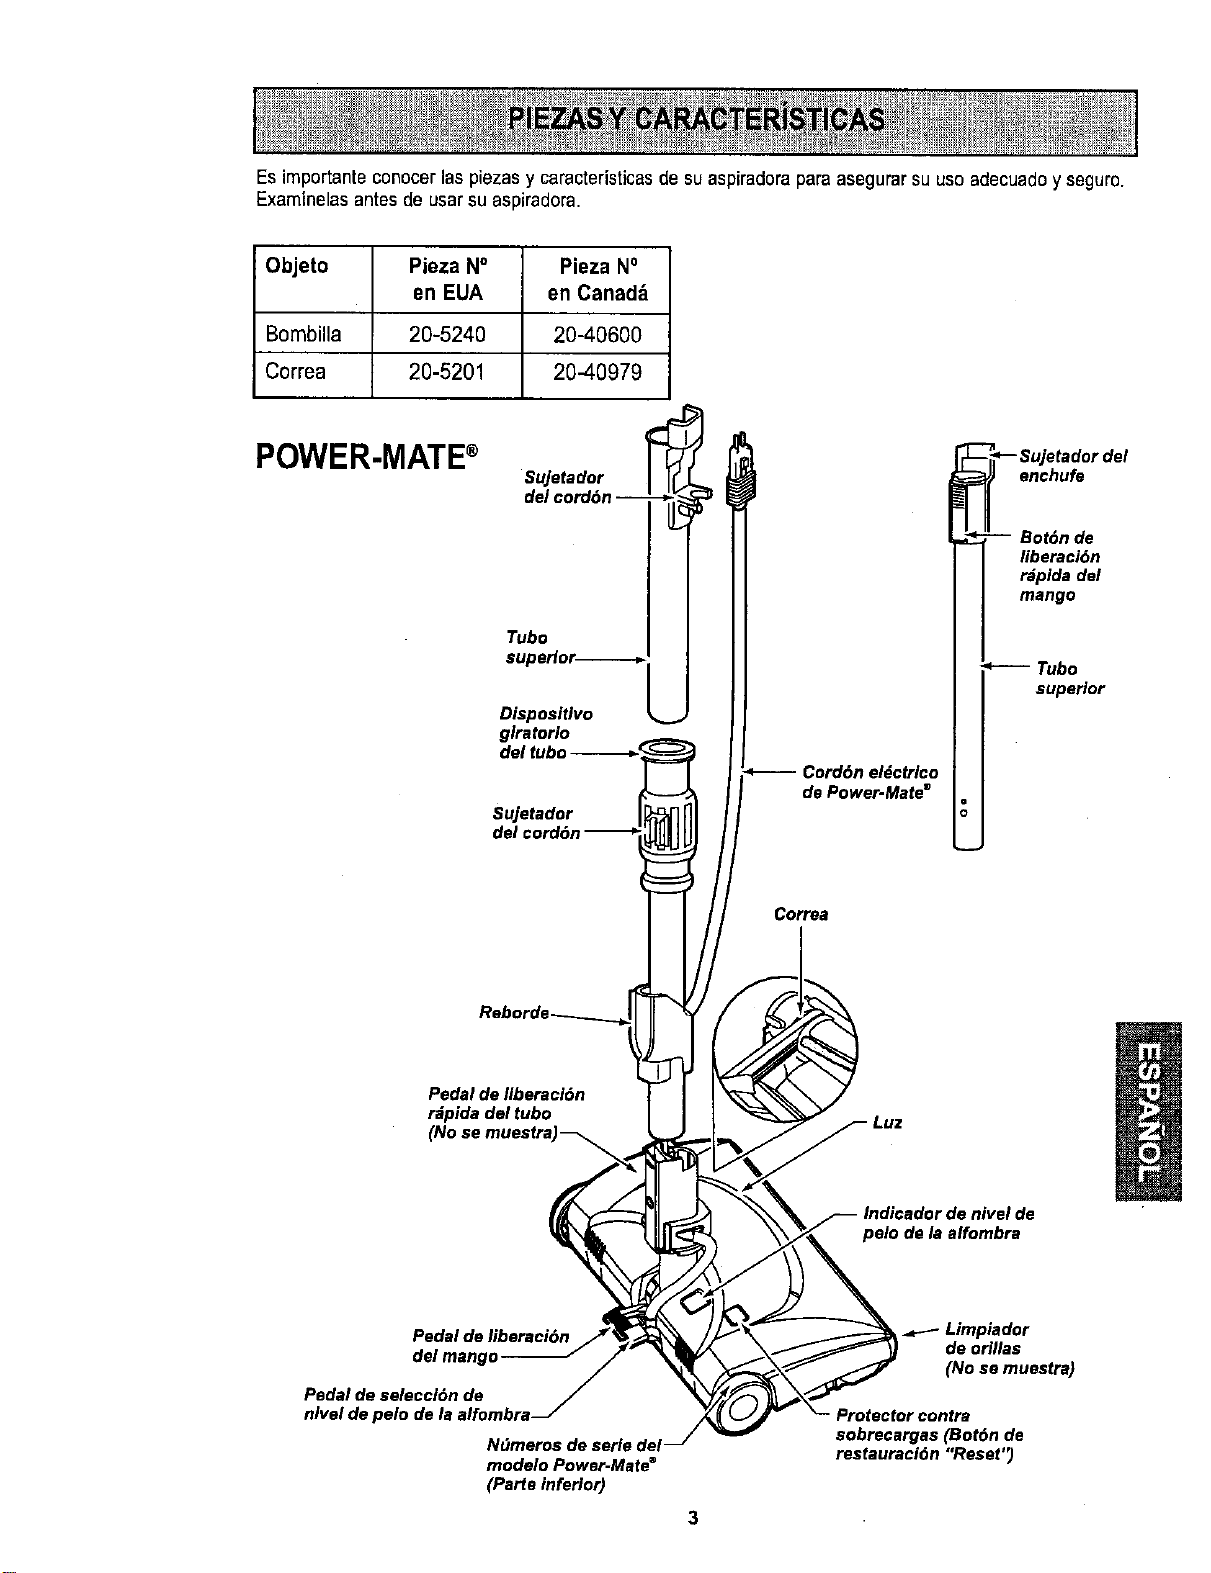
Es importante conocer las piezas y caracteristicas de su aspiradora paraasegurar su usoadecuadoy seguro.
Examinelas antes de usar su aspiradora.
Objeto Pieza N° Pieza No
en EUA en Canad_
Bombilla 20-5240 20-40600
Correa 20-5201 2040979
POWER-MATE®
Sujetador
del cord6n _T
Tuba I J
glratorio
Sujetador
Cord6n el_ctrlco
de Power-Mate ®
.. Sujetador del
l enchufe
Correa
Pedal de liberaci6n
r_pida del tuba
(No se muestra
pelo de la alfombra
delmango
Pedal de seleccl6n de
nlvel de
Ndmeros de serle del
modelo Power-Mate ®
(Parte inferior)
Limpiadar
de orillas
(No se muestra)
Protector contra
sobrecargas (Bot6n de
restauraci6n "Reset")
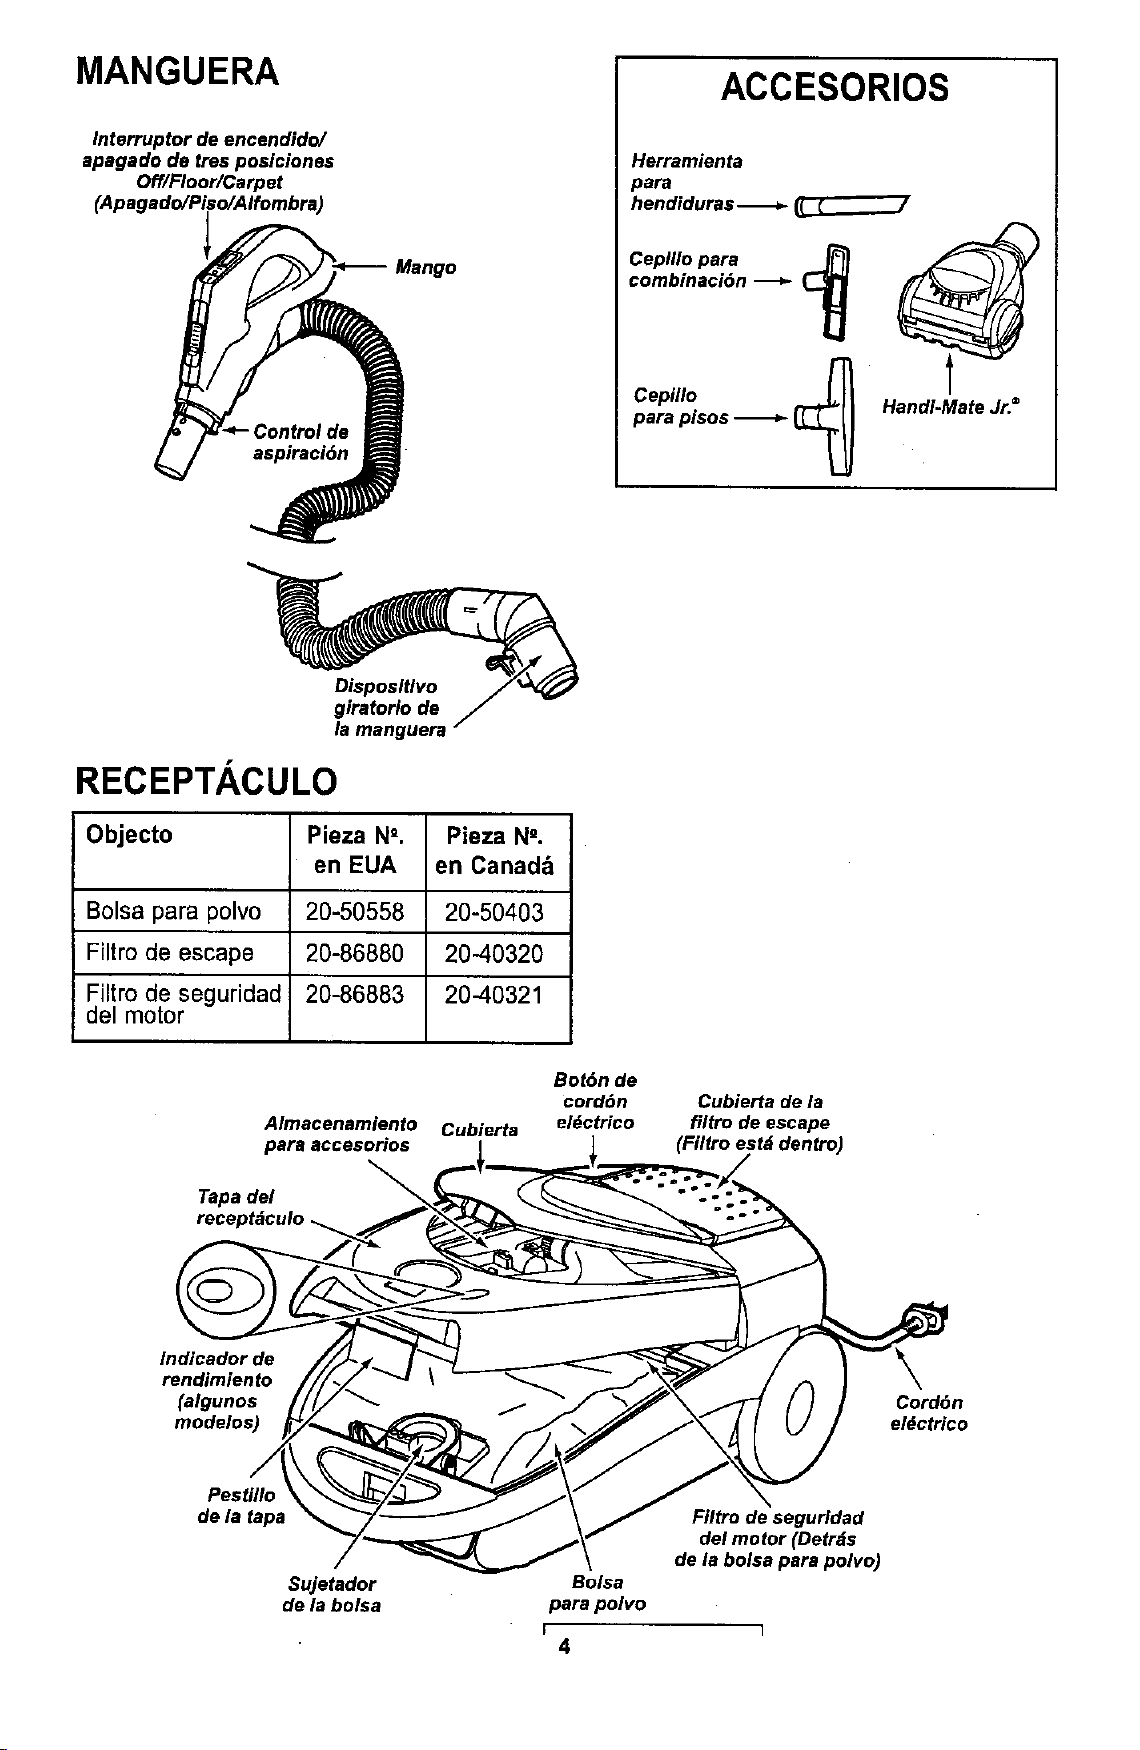
MANGUERA
Interruptor de encendido/
apagado de tres poslciones
Off/Floor/Carpet
(Apagado/Piso/Alfombra)
ACCESORIOS
Herramienta
para
hendiduras _
Ceplllo pare
combinaciOn -_
Cepillo __
para plsos _ L(__ [I
Handi-Mate Jr.=
Disposltlvo
giratorio de
la manguera
RECEPTACULO
Objecto Pieza N_. Piaza N_.
en EUA en Canad_
Bolsa para polvo 20-50558 20-50403
Filtro de escape 20-86880 20-40320
Filtro de seguridad 20-86883 20-40321
del motor
Almacenamiento Cubierta
para accesorios
Tapa del
Bot6n de
cord6n
el_ctrico
Cubierta de la
filtro de escape
(Filtro estd dentro)
Indicador de
rendimiento
(algunos
modelos)
Cord6n
eldctrico
Pestillo
de la tapa
Sujetador
de la bolsa
FIItro de segurldad
del motor (Detrds
de la bolsa pare polvo)
Bolsa
para polvo
J I
4
I
i_ Parfavor pongaespecial atenci6n a _stos recuadros con alerta de riesgo.Advertencia: Este I
informaci6n le alertar&del peligrade fuego, choques electricos, quemadasy lesiones. Cuidado:
I
Este informaciSnle a[ertarade peligros coma lesiones y dafios de propiedad.
ADVERTENCIA
Peligrode choque el_ctrico
No conecte la aspiradora hasta que termine de
armada. De Io contrario podria causarun
choque el_ctrico o lesibn corporal,
Antes de armar la aspiradora,chequee la LISTA
DE EMBALAJE (PACKING LIST)en lacubierta
separadade la Lista de Partes para Raparaci6n
(REPAIRPARTS LIST). Useesta listaparaverificar
que ha recibidotodaslascomponentesde sunueva
aspiradoraKenmore.
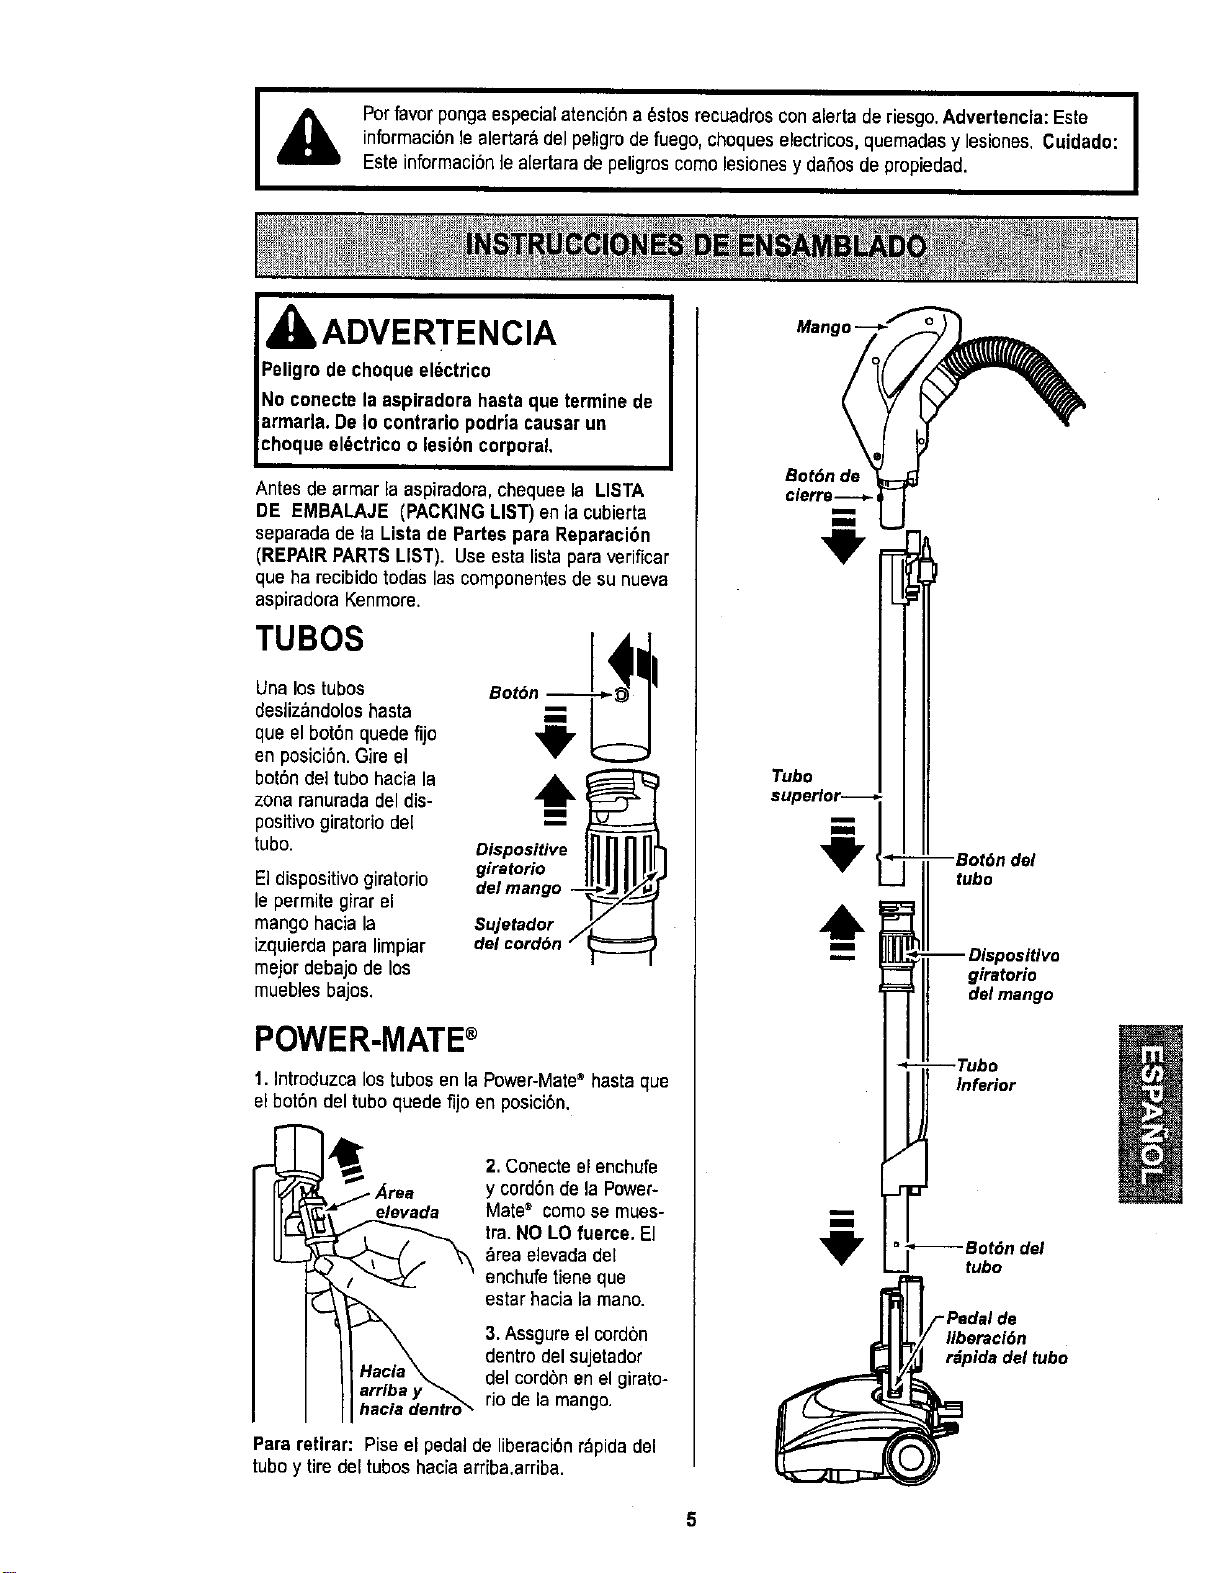
TUBAS
Una los tubes
desliz&ndolos hasta
que elbot6n quede fijo
en posici6n. Gire el
bot6n del tuba hacia la
zona ranurada del dis-
positivo giratorio de[
tuba.
El dispositivo giratorio
le permite girar el
mango hacia la
izquierda para limpiar
mejor debajo de los
muebles bajos.
,o,mongo
Sujetador ._
del cord6n "
POWER-MATE®
1. Introduzcalos tubas en la Power-Mate®hasta que
el bot6n del tuba quede fijo en posici6n.
elevada
2.Conecte el enchufa
y cord6n de la Power-
Mate® comese mues-
tra. NO LO fuerce. El
_rea elevada del
enchufe tiene que
estar hacia la mano.
hacia dentro_"
3. Assgure el cordon
dentro del sujetador
del cordbn en el girato-
rio de la mango.
Para retirar: Pise el pedal de liberaci6n r_ipidadel
tuba y tiredel tubas hacia arriba.arriba.
Mango-- f
"rubo 1
supeH°_l
--Bot,_n del
tuba
,&
m
m
giratorio
del mango
Inferior
tuba
;i_dadcd_n
ida del tuba

RECEPTACULO
1. Abra la tapa del recept_culo.
2. Examine la bolsa para polvo este instalado cor-
rectamante. Consulte las instruccionesde insta-
laci6n en la CAMBIO DE LA BOLSA,
3. Examineel filtro de seguridaddelmotor este
instalado correctamante. Consulta las instrucciones
de instalacibn en LIMPIEZA DEL FILTRO DE
SEGURIDAD DEL MOTOR.
LATAPAY LA CUBIERTA
Es normal que la tapa del recept&culose desprenda
al sar abierta mas de Io necesario. Para colocar
nuevamente la tapa,alinee ias ranuras de la bis-
agra, insertelas y cierre la tapa.
kCUIDADO
Nuncadebe abrir la capucha del contenedor
_stando la tapa abierta. As| se evitar=_da_os a
la capuchadel contenedor y/o a latapa.
MANGUERA
Ranura_
1.Alinee la pestaSa
de sujeci6n de la
manguera y la ranu-
ra de la cubierta del
receptaculo e intro-
duzca la manguera
en el recept_culo
hasta qua quadefija
en posici6n.
Para retirar: levante
el pestillo de la
manguera y tire de
la manguera.
Bot6n del
2. Introduzca el
mango en el tubo
hastaque el
bat6n quede en
posici6n.Aseg_-
rese de que la
manguera no
est_torcida,
Bot6n de Pararetirar:
liberaci6n oprima elbot0n
rdpidadel para liberarel
mango
(A/gunos mango y tiredel
modelos) mango hacia
arriba.
ParaGuardar:Para prevenir la precibn de la
mangua mientras se guarda, desuna la manguade[
tubode la aspiradora. Guarde la magua en una
posici6n enrollada y flojamentede tal manera qua la
tapa de la mangua no se estire.
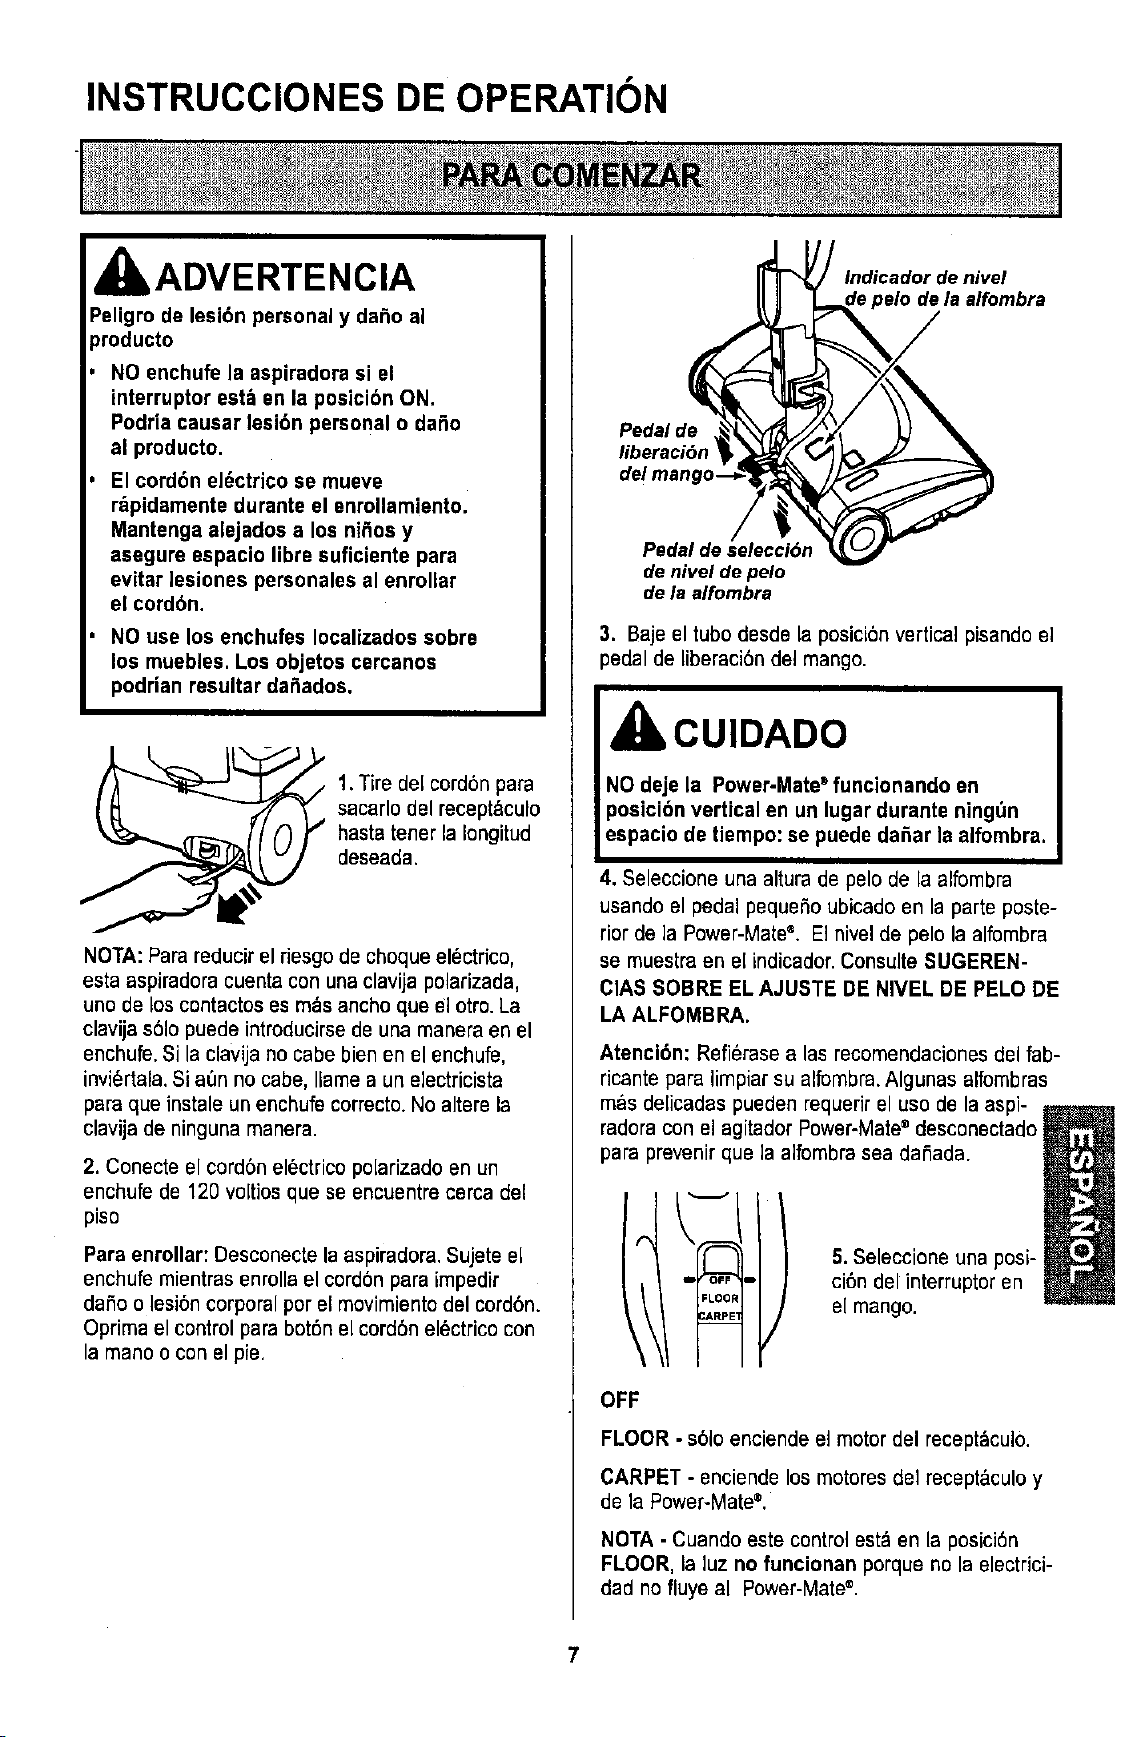
INSTRUCCIONES DE OPERATION
d kADVERTENCIA
Peligrode lesi6n personaly dar_oal
_roducto
NO enchufela aspiradora si el
interruptorest_ en la posicibnON.
Podriacausar lasi6n personalo dafio
al producto.
El cord6n el6ctrico se mueve
r_pidamentedurante el enrollamiento.
Mantengaalejados a los nifiosy
asegure espacio librs suficiente para
evitar lesiones personalesal enrollar
el cordbn.
NO use los enchufes Iocalizadossobre
los muebles. Los objetos cercanos
podrian resultar da_ados.
1.Tire del cordbnpara
sacarlo del recept&culo
hastatener la Iongitud
deseada.
NOTA:Para reducirel riesgo de choque el_ctfico,
esta aspiradora cuentacon unaclavija polarizada,
uno de los contactos es masancho que el otro.La
clavija s61opuede introducirse de una manera en el
enchufe. Si la clavija no cabe bien en el enchufe,
invi_rtala. Si aen no cabe, Ilamea un electricista
paraque instale un enchufecorrecto. No altere la
clavija de ninguna manera.
2, Conecte el cord6n electricopo[arizado en un
enchufe de 120 voltios que se encuentre cerca del
piso
Paraenrollar:Desconecte la aspiradora.Sujete el
enchufe mientras enrolla el cord6n para impedir
dafio o lesi6n corporal por el movimientodel cordbn.
Oprima el control para bot6n el cordSn electrico con
la mano o con el pie,
Indicador de nivel
alfombra
Pedal de
liberaci6n
del mango-
Pedal de selecci6n
de nivel de pelo
de la alfombra
3. Baje el tubodesde la posici6nvertical pisandoel
pedal de liberaci6n del mango.
CUIDADO
NO deje la Power-Mate®funcionando en
posicibnvertical en un lugar durante ningt_n
espaciode tiempo:se puede da_ar la alfombra.
4. Seleccione una altura de pelo de la alfombra
usando el pedal pequefio ubicado en la parte poste-
rior de la Power-Mate®. El nivel de pelo la alfombra
se muestraen el indicador.Consulte SUGEREN-
CIAS SOBRE EL AJUSTE DE NIVEL DE PELODE
LA ALFOMBRA.
Atenci6n: Refierase alas recomendacionesdel fab-
ricante para limpiar su alfombra.Algunas alfombras
mas delicadas pueden requerir el uso de la aspi-
radoracon el agitador Power-Mate®desconectado
para prevenir que la alfombrasea dafiada.
IFLOOR
5.Seleceione una posi-
ci6n del interruptor en
el mango.
OFF
FLOOR - sblo enciende el motor del recept_culo,
CARPET - enciende los motores del recept&culoy
de la Power-Mate®.
NOTA - Cuando estecontrol est',en la posJci6n
FLOOR, la luz no funcionan porque no la electrici-
dad no fluye al Power-Mate®
Estilo de limpiezaeugerido.
Para obtenerla mejor accibn de limpieza se reco-
mienda empujar la Power-Mate®en direcci6n dimc-
tamente opuesta a usted y jalarla en linea recta.AI
final de cada pasada de regreso,cambie la direcci6n
de la Power-Mate®hacia la siguiente secci6n a lim-
plat. ContinUeasia trav_s de toda'la alfombra de
una manera lenta y deslizante.
NOTA:las pasa-
das r_pidas y
jalonadas no
Iogran una lim-
pieza completa.
El dispositivogiratorio de la
manguera permite que
esta gire sin necesidad de
mover el recept&culo.Esto
es muy_til pare limpiar en
_,reaspequeSas.Aseg_-
rese de que la manguera
no est_ torcidaantes de
jalar el recept&culo.
CUIDADO
IADVERTENClA
Peligrode leslbn personal y dafio al
,roducto
No atropelle el cord6n eldctrico con la
Power-Mate®. Hay un peligro de
lesi6n corporal o unos danos de
posesiones.
Notire del cord6n eldctrico de la pared
pare desenchufario. Si hay danos en
el cord6n el_ctrico o el enchufe, hay
un peligm de lesi6n corporal o unos
daSos de posesiones.
Control de
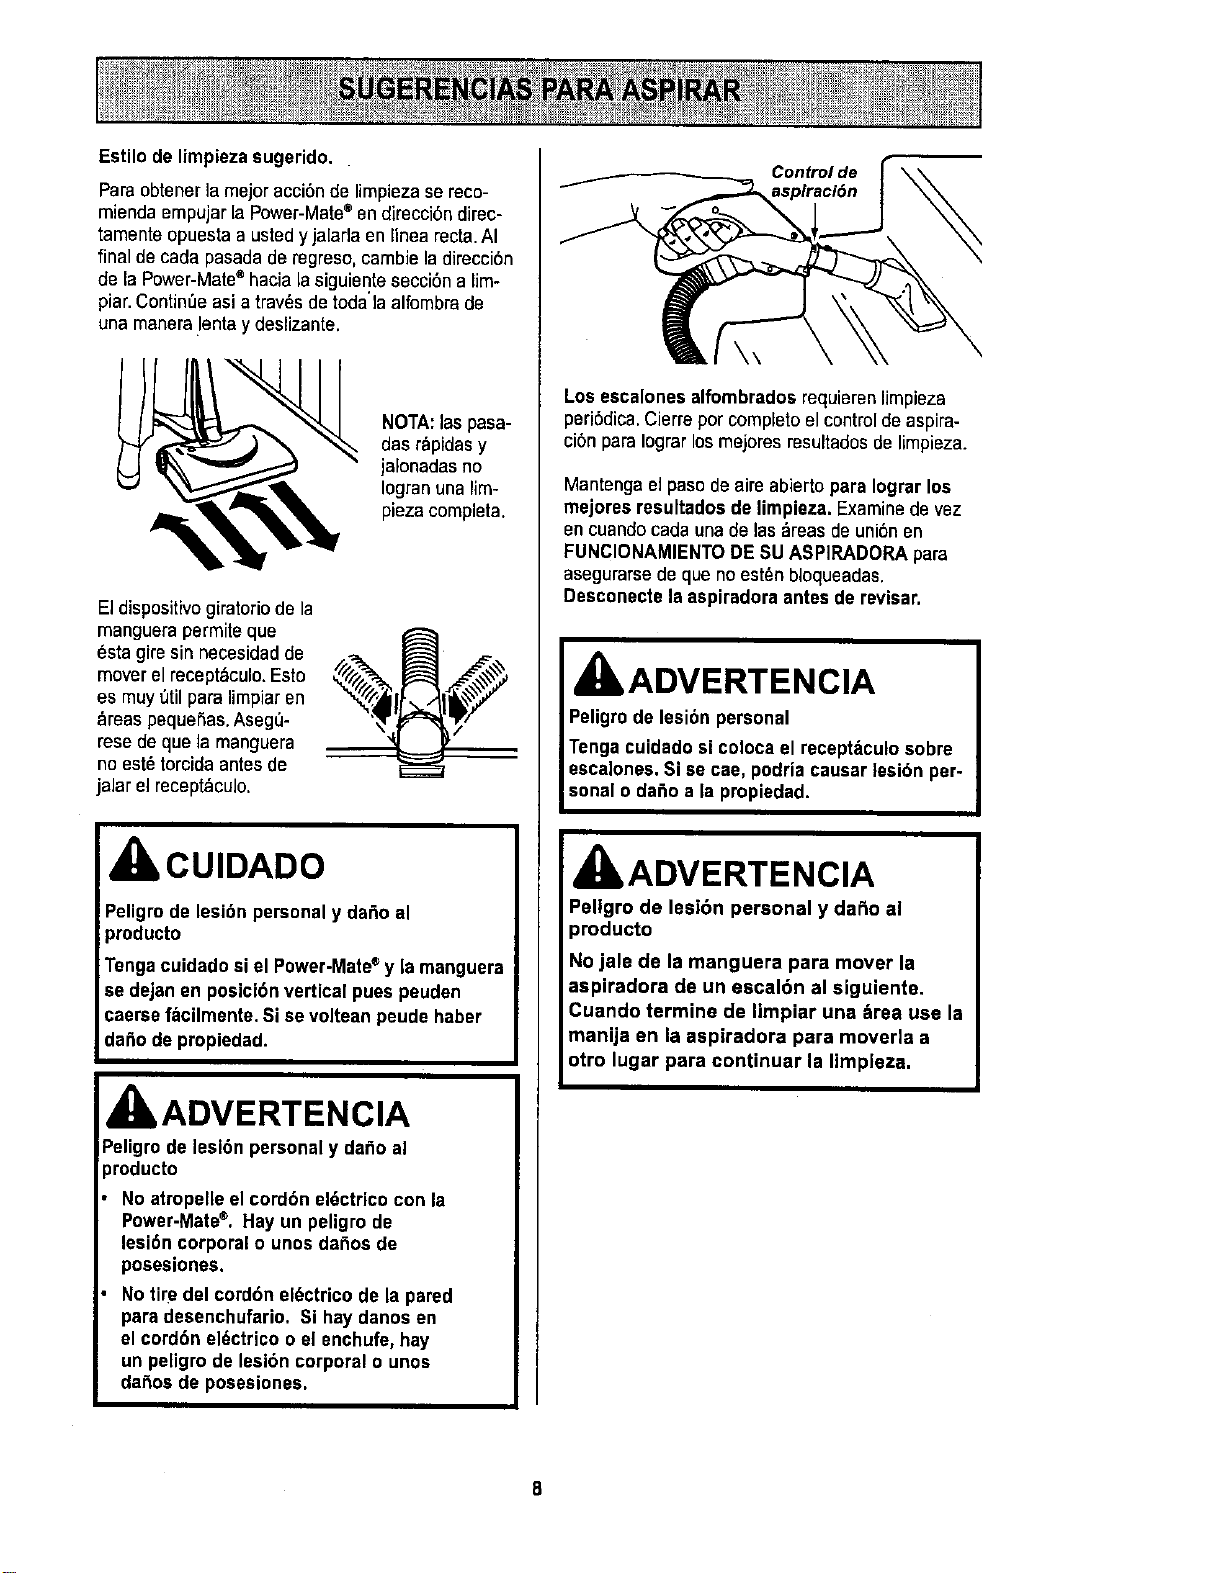
\\
Los escalones elfombrados requierenlimpieza
peri6dica.Cierre por completo el control de aspira-
ci6npara Iograrlosmejeresresultadosde Iimpieza.
Mantenga el paso de aim abierto para Iograr los
mejores resultadosde limpieza. Examinede vez
en cuando cada una de las areas de uniSnen
FUNClONAMIENTO DESU ASPIRADORA para
asegurarse de que no est_n bloqueadas.
Desconecte la aspiradora antes de revisar.
,ADVERTENCIA
Peligrode lesi6n personal
Tengacuidado si celoca el recept_culosobre
escalones.Si se cae, podria causar lesibn per-
sonal e da_o a la pmpiedad.
IADVERTENCIA
Pellgro de lesibn personal y daSo al
producto
No jale de la manguera para mover la
aspiradora de un ascal6n al siguiente.
Cuando termine de limpiar una _rea use la
manija en la aspiradora para moverla a
otro lugar pare continuer la limpleza.
Useei ajuste XLO (bajo) para obtener la mejor lim-
pieza a fondo. Porotra parte, quiz_s se requieraele-
var e[ nivel para faciUtaralgunas tareas,como por
ejemplo cuando se trata de tapetes y algunasalfom-
bras de pelo largo, y para impedirque la aspiradora
se apague. Se sugieren los siguientes ajustes:
HI - Pelomuy largo y suelto, tapetes, alfombras
muy acojinadas.
MED - Pelomediano a largo.
LO - Pelocorto a mediano.
XLO - La mayoria de las alfombras y pisos
descubiertos.
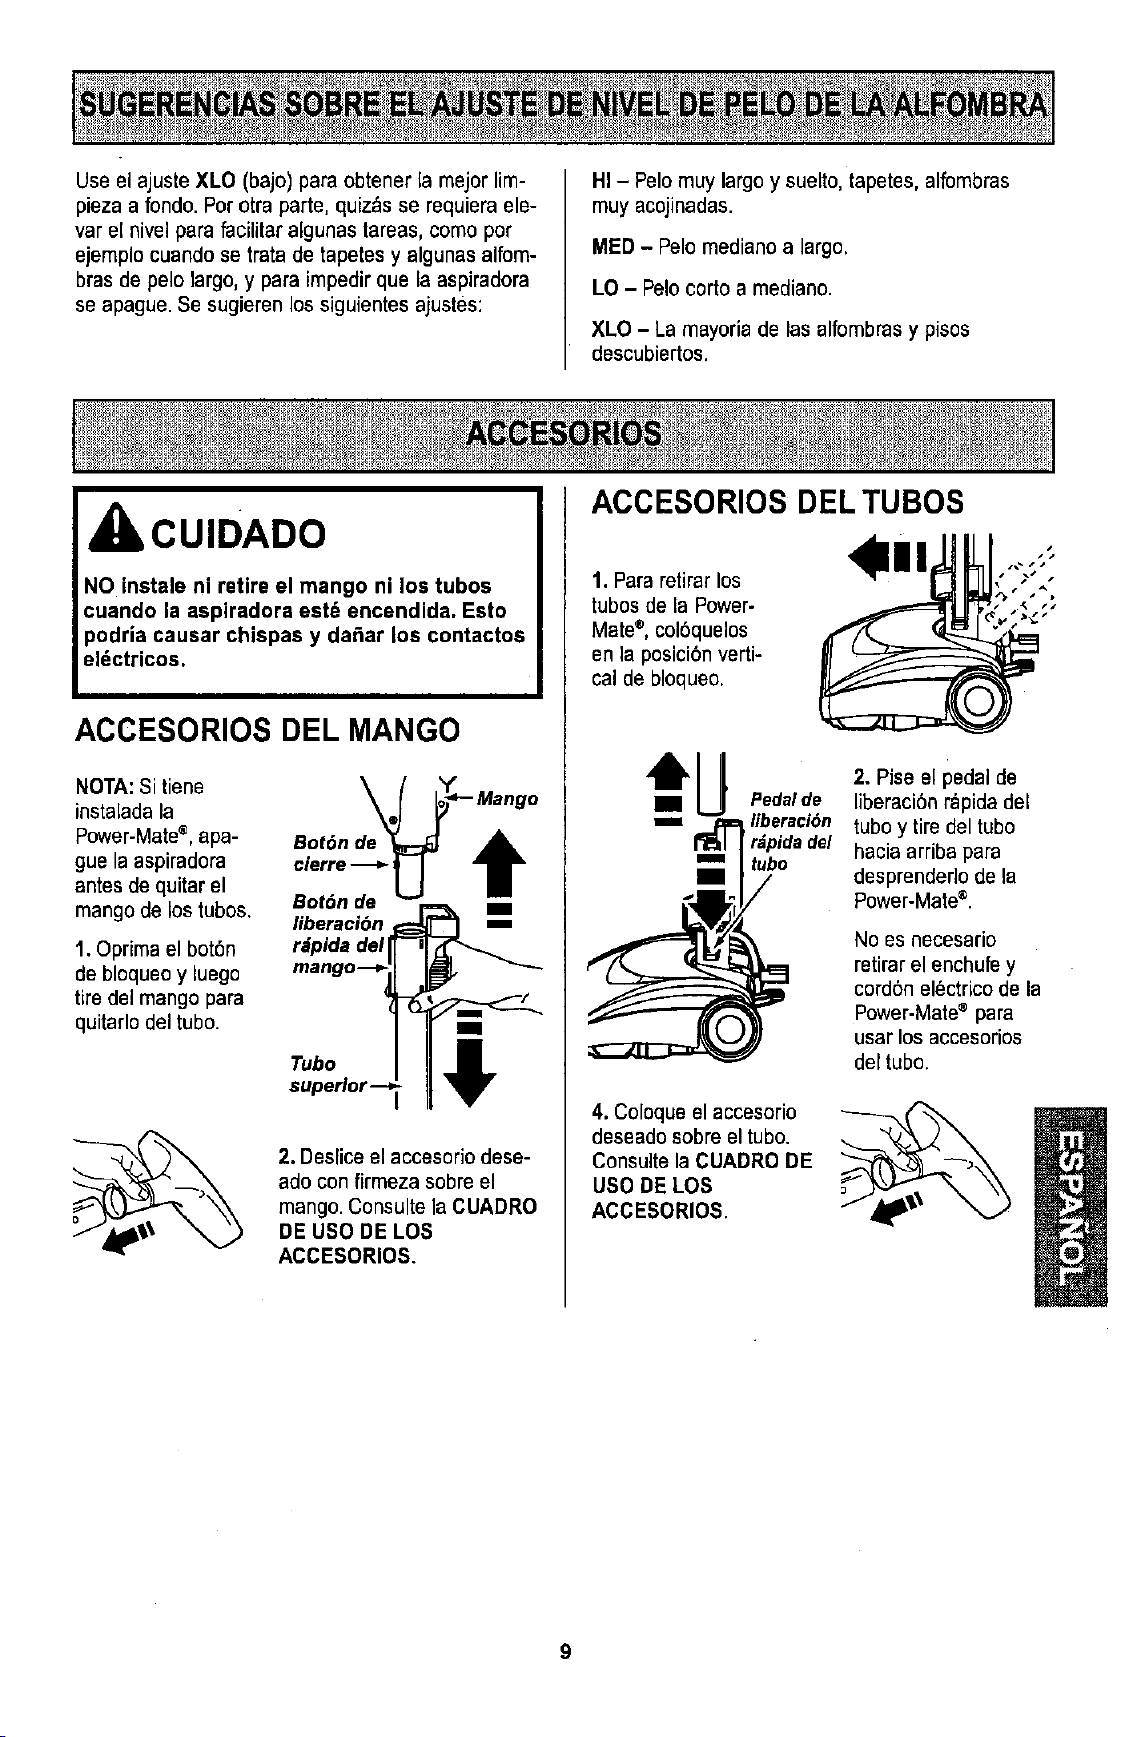
CUIDADO
NO instale ni retire el mango ni los tubos
cuando la aspiradora est_ encendida. Esto
podria causar chispas y dafiar los contactos
eldctricos.
ACCESORIOS DEL MANGO
NOTA:Si tiene
instaladala
Power-Mate®,apa-
gue la aspiradora
antes de quitar el
mango de los tubos.
1.Oprima el bot6n
debloqueoy luego
tire del mango para
quitarlo del tubo.
;-M.n o
eotO.Ue_
°'erre--tI lr
Botbn de _
liberacibn _
r_pida deJ -'1_
mango---, j_
Tubo __ /
superior- II
2. Deslice elaccesoriodese-
adocon firmeza sobre el
mango.Consulte la CUADRO
DE USO DE LOS
ACCESORIOS.
ACCESORIOS DELTUBOS
1. Pararetirar los
tubosde la Power-
Mate®,col6quelos
en la posici6nverti-
cal de bloqueo.
_ U Pedalde
_ liberaci6n
r_l I rdpidadel
_ l tubo
4. Coloque el accesorio
deseado sobre el tubo.
Consulte la CUADRO DE
USODE LOS
ACCESORIOS.
2. Pise el pedal de
liberaciSnrapida del
tubo y tiredel tubo
hacia arriba para
desprender]ode la
Power-Mate_.
No es necesario
retirar el enchufe y
cordbn electnco de la
Power-Mate®para
usar los accesorios
del tubo.
9
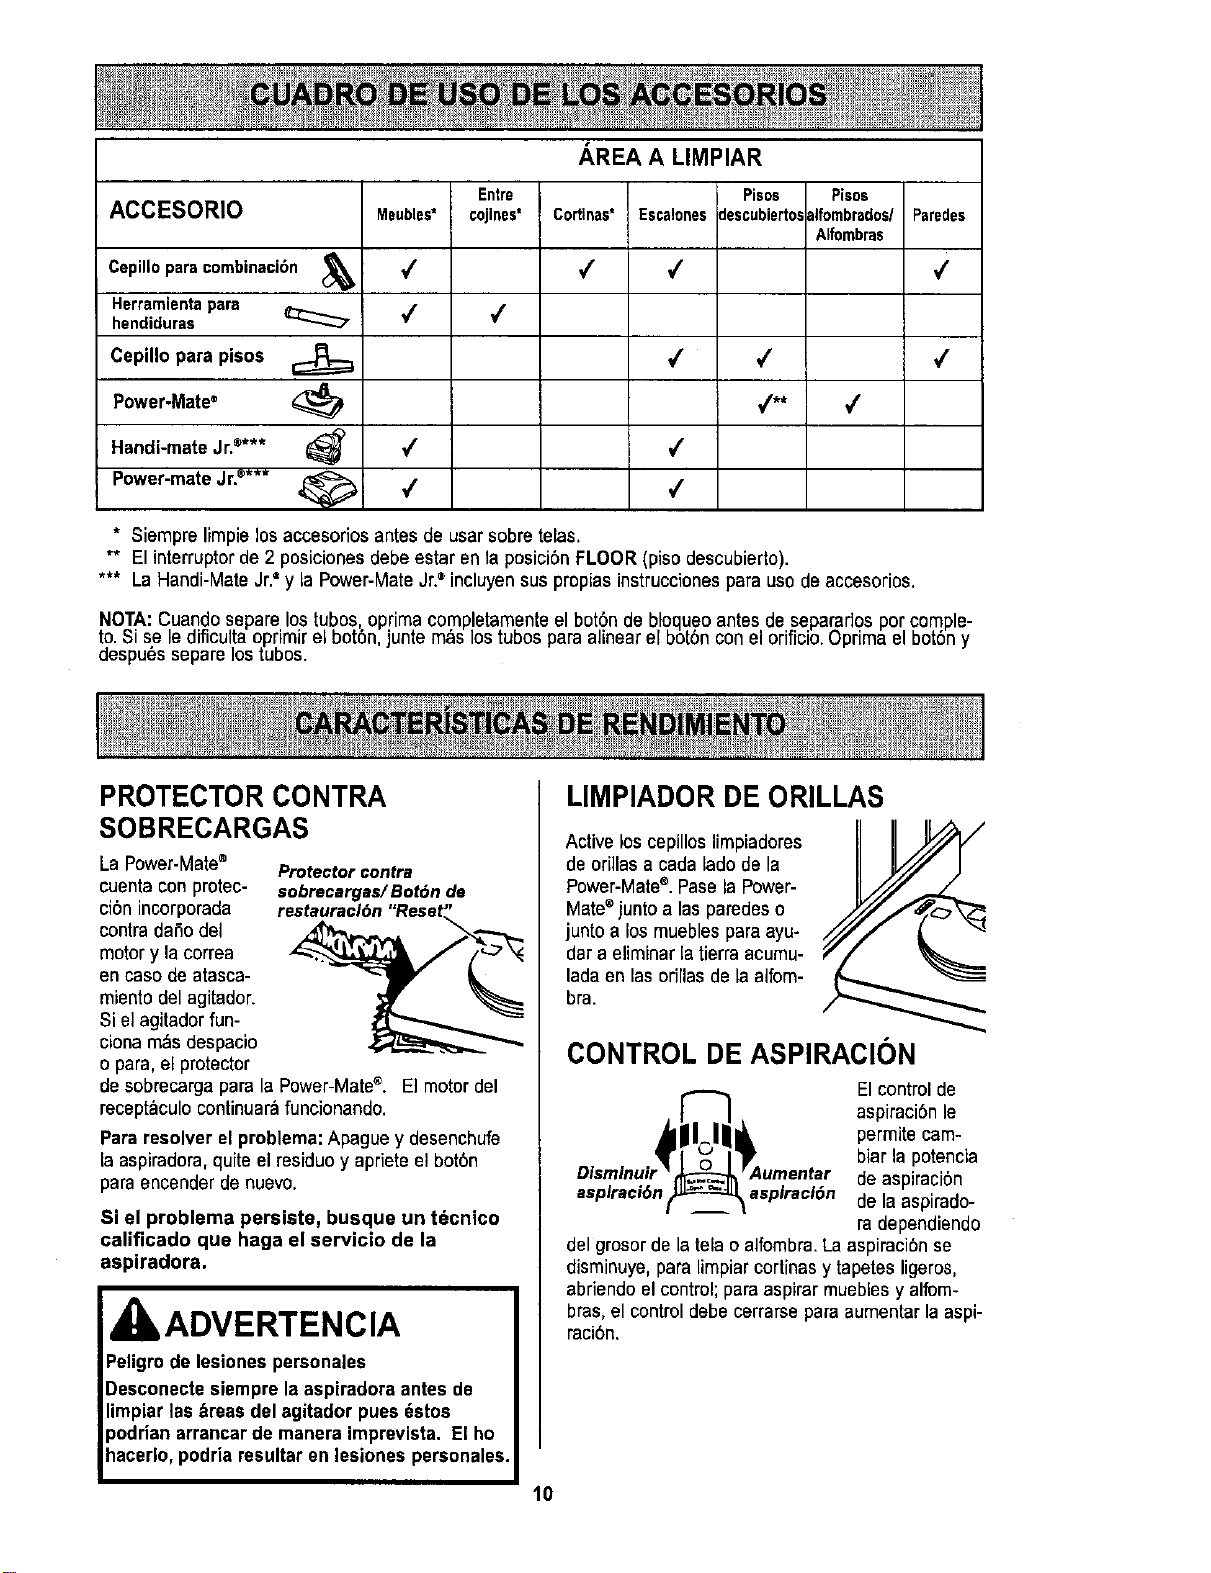
AREA A LIMPIAR
Entre Pieoe Pisos
ACCESORIO Meubles* cojlnes* Cortinae* Escalones:lescubierto.=alfombredoslPeredes
AIfombras
Cepilloparacombinaci6n _ t/ _/ _ V"
Herramientapare
hendiduras _ t/ V"
Cepillo para pisos I_ 4' _/ t/
Power'Mate® _ 4'** _/
Handi-mate Jr.®*** _ V' #"
Power-mate Jr.®*** _ _/ _/
* Siempre limpie losaccesorios antes de usar sobre telas.
** El interruptor de 2 posiciones debe estar en la posici6n FLOOR (piso descubierto).
*** La Handi-Mate Jr."y la Power-Mate Jr.®incluyensus propias instrucciones pare uso de accesorios.
NOTA: Cuando separe los tubos,oprima completamente el bot6n de bloqueo antes de separados por comple-
to. Si sele dificulta oprimir el bot6n, junte m&s los tubos pare alinear el bot6n con el orificio. Oprima el bot6n y
despu6s separe los tubos.
PROTECTOR CONTRA
SOBRECARGAS
La Power-Mate® Protector contra
cuentacon protec- sobrecargaa/Bot6n de
ci6n incorporada
contra daSodel
motory la correa
en caso de atasca-
miento del agitador.
Si el agitador fun-
ciona m_s despacio
opara, el protector
de sobrecarga para la Power-Mate®. E] motor del
recapt_culo continuar_ funcionando.
Pararesolver el problema:Apague y desenchufe
[a aspiradora, quite el residuo y apriete el bot6n
para encender de nuevo.
Si el problema persiste, busque un t6cnico
calificado que haga el servicio de la
aspiradora.
IbADVERTENCIA
Peligrode lesiones personales
Desconecte siempre la aspiradora antes de
limpiarlas &reas del agitador pues _stos
podrian arrancar de manera imprevista. El ho
hacerlo, podria resultar en lesiones personales.
LIMPIADOR DE ORILLAS
II II II/_./
Active los cepillos limpiadores [III ,,Y_
de orillas a cada lado de la
Power-Mate®.Pasela Power-
Mate®junto alas paredeso
junto a los muebles para ayu-
dara eliminar la tierra acumu-
lada en las orfllasde la alfom-
bra.
CONTROL DE ASPIRACION
Disminuir', 0 ,_Aumentar
asplraei6n[_ asplraci6n
El control de
aspiraci6n le
permite cam-
bier la potencLa
deaspiraci6n
de la aspirado-
ra dependiendo
del grosor de la telao alfombra.La aspiraciSnse
disminuye, para limpiar cortinas y tapetes ligeros,
abriendo el control; para aspirar muebles y alfom-
bras, el control deba cerrarse paraaumentar la aspi-
raci6n.
10
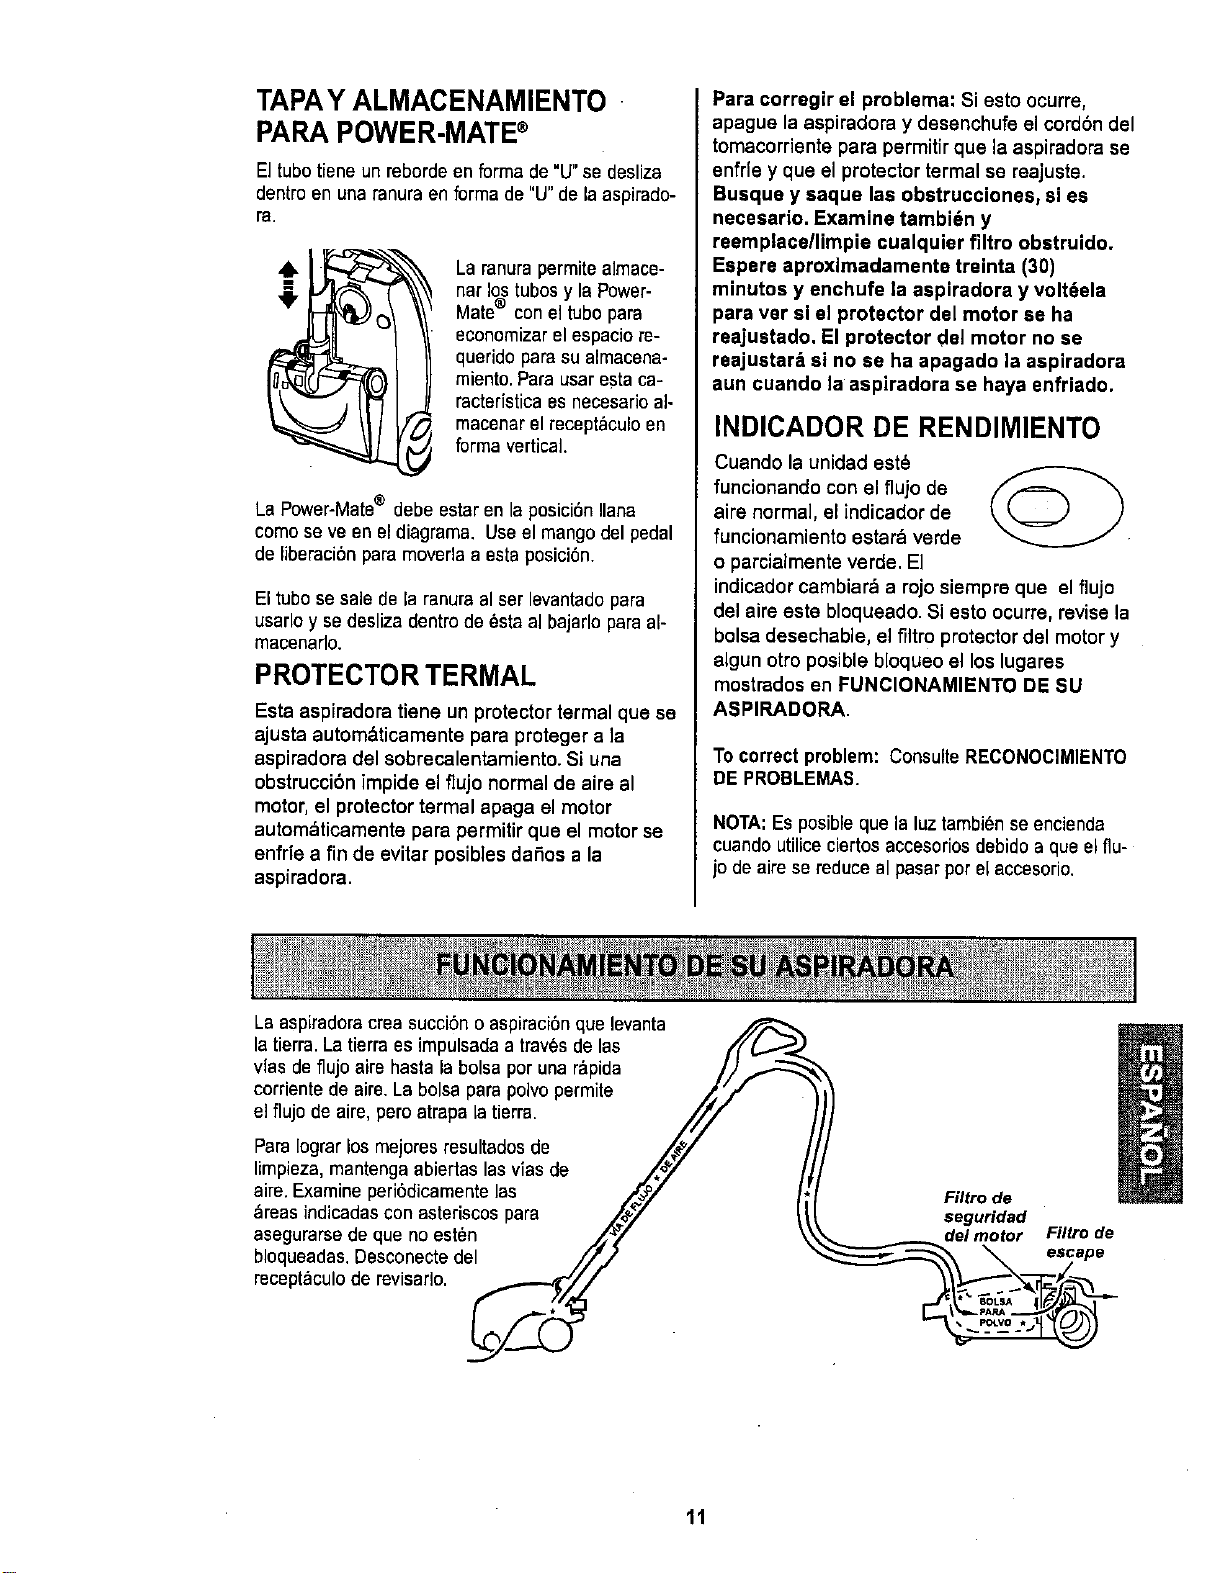
TAPAY ALMACENAMIENTO •
PARA POWER-MATE®
El tube tiene un reborde en forma de "U" se desliza
dentro en una ranura en forma de "U" de la aspirado-
ra.
La ranura permite almace-
nat lostubos y la Power-
Mate® con el tubo para
economizar el espacio re-
querido para su almacena-
miento. Para usar esta ca-
racteristica es necesarioal-
macenar el recept_culo en
forma vertical.
La Power-Mate® debe estar en la posici6nliana
como se ve en el diagrama. Useel mango del pedal
de liberaci6n para moveda a esta posici6n.
El tubo sesale de la ranura al set levantado para
usarlo y se desliza dentro de _sta al bajarlo para al-
macenarlo.
PROTECTOR TERMAL
Esta aspiradora tiene un protector termal que se
ajusta autom&ticamente para proteger a la
aspiradora del sobrecalentamiento. Si una
obstruccibnimpide el flujo normal de aire al
motor, el protectortermal apaga el motor
automdticamente para permitirque el motor se
enfrie a fin de evitar posibiesdafios a la
aspiradora.
Para corregir el problema: Si esto ocurre,
apague la aspiradora y desenchufe el cord6n del
tomacorriente para permitirque la aspiradora se
enfrle y que el protector termal se reajuste.
Busque y saque las obstrucciones, si es
necesario. Examine tambi_n y
reemplace/limpie cualquier filtro obstruido.
Espere aproxlmadamente treinta (30)
minutos y enchufe la aspiradora y volt6ela
para ver si el protector del motor se ha
reajustado. El protector del motor no se
reajustard si no se ha apagado la aspiradora
aun cuando la aspiradora se haya enfriado.
INDICADOR DE RENDIMIENTO
Cuando la unidad est_
funcionando con el flujo de
aire normal, el indicador de
funcionamiento estar& verde
o parcialmente verde. El
indicador cambiar_ a rojo siempre que el flujo
del aire este bloqueado. Si esto ocurre, revise la
bolsa desechable, el filtro protector del motor y
aigun otro posible bloqueo el los lugares
mostrados en FUNCIONAMIENTO DE SU
ASPIRADORA.
To correct problem: Consulte RECONOCIMIENTO
DE PROBLEMAS.
NOTA: Es posible que la luz tambi6n se encienda
cuando utilice ciertos accesorios debido a que el flu-
jo de aire se reduce al pasar por el eccesorio.
La aspiradoracrea succiSn o aspiraci6nque levanta
la tierra.La tierra es impulsada a tray,s de las
vlas de flujo aire hasta la bolsa por una r&pida
corriente de aire. La bolsa para polvo permite
el flujo de aire,pero atrapa la tierra.
Para Iograr los mejores resultados de
limpieza, mantenga abiertas las vias de
aire. Examine peri6dicamente las
_reas indicadas con asteriscos para
asegurarse de que no est_n
bloqueadas.Desconecte del
receptaculo de revisarlo.
Filtro de
seguridad
del motor
Filtro de
escape
11
CUIDADO DEL RECEPTACULO
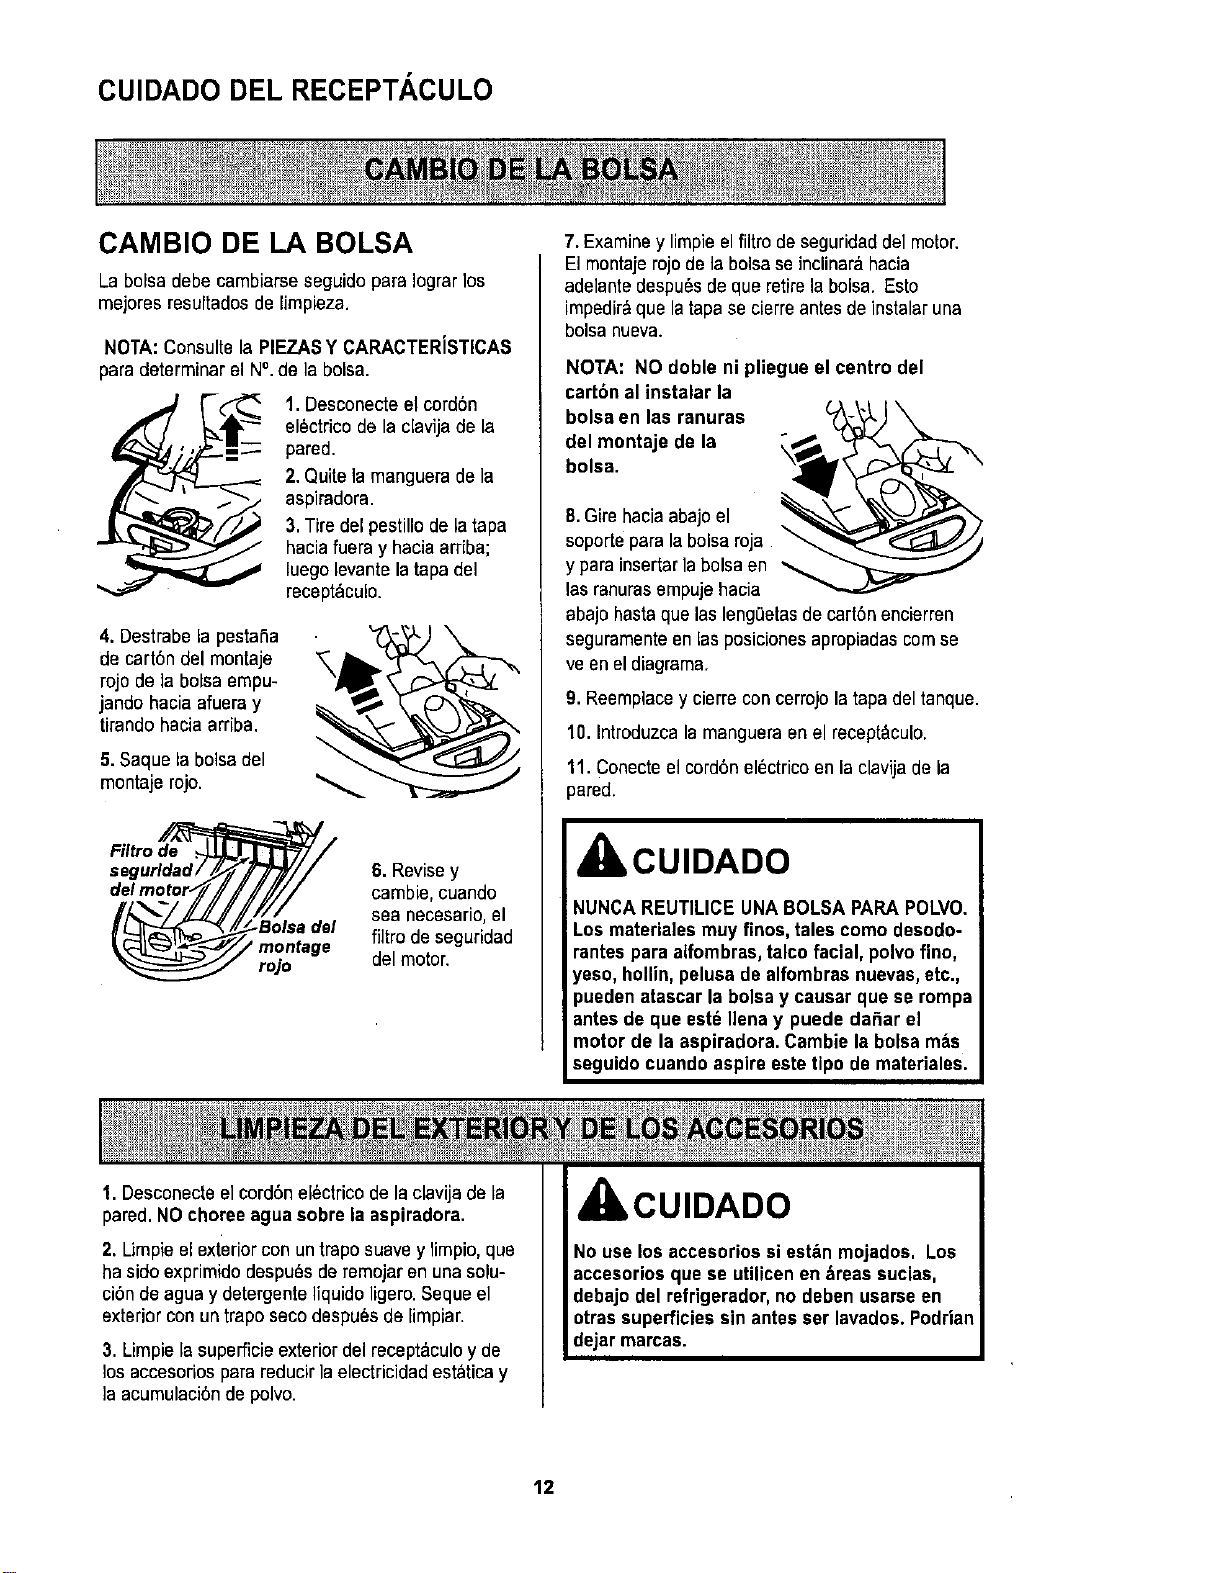
CAMBIO DE LA BOLSA
La bolsa debe cambiarse seguido para Iograr los
mejores resultados de limpieza.
NOTA: Consulte la PIEZASY CARACTERiSTICAS
para determinar el N°.de la balsa.
1. Desconecteel cord6n
electricode la clavijade la
pared.
2. Quite la manguera de la
aspiradora.
3. Tire del pestillode latapa
hacia fuera y hacia arriba;
luego levante la tapa del
recept_culo.
4. Destrabe la pestafia
de cart6ndel montaje
rojo de ]a bolsa empu-
jando hacia afuera y
tirando hacia arriba.
5.Saque la bolsa del
montaje rojo.
Filtro de
seguHdad/
del
rojo
6. Revise y
cambie, cuando
sea necesario,el
filtro de seguridad
del motor.
7.Examiney limpie el filtro deseguridad del motor.
El montajerojode la bolsa se inclinara hacia
adelante despu6sde qua retire la bolsa. Esto
impedir&que la tapa se cierre antes de instalar una
bolsa nueva.
NOTA: NO doble ni pliegue el centro del
cartbn al instalar la
bolsa en las ranuras ;=_.J_
del montaje de la _
bolsa.
8. Gire hacia abajoel
soporte para la bolsa roja -..<
y para insertar la bolsa en
las ranurasempuje hacia
abajo hastaque las leng_etasde cart6n encierren
seguramente en las posicionesapropiadas cornse
ve en el diagrama.
9. Reemplacey cierre con cerrojo la tapa del tanque.
10. Introduzca la manguera en el recept_culo.
11. Conecte el cord6n el_ctrico en la clavijade la
pared.
ICUIDADO
NUNCA REUTILICE UNA BOLSA PARA POLVO.
Los materiaies muy finos, tales como desodo-
rantes para alfombras,talco facial, polvofino,
teso, hellin, pelusa de alfombrasnuevas,etc.,
_ueden atascar la bolsa y causar que se rompa
tntes de que est_ Ilena y puede daSar el
motor de la aspiradora. Cambie la bolsa m_s
seguidocuando aspire este tipo de materiales.
1. Desconecte elcord6n el_ctricode la clavija de la
pared. NO choree agua sobre la aspiradora.
2. Limpie el exteriorcon un trapo suave y limpio, que
ha sido exprimido despuSsde remojar en una solu-
ci6n de agua y detergente liquido ligero. Seque el
exterior con untrapo seco despu_s de limpiar.
3. Limpie la superficie exterior del recept_culo y de
los accesorios para reducir la electricidad estatica y
la acumulaci6n de polvo.
CUIDADO
No uselos accesorios si est_n mojados. Los
accesorios que se utilicen en areas sucias,
debajo del refrigerador,no deben usarse en
otras superficies sin antes set lavados. Podrian
dejar marcas.
12
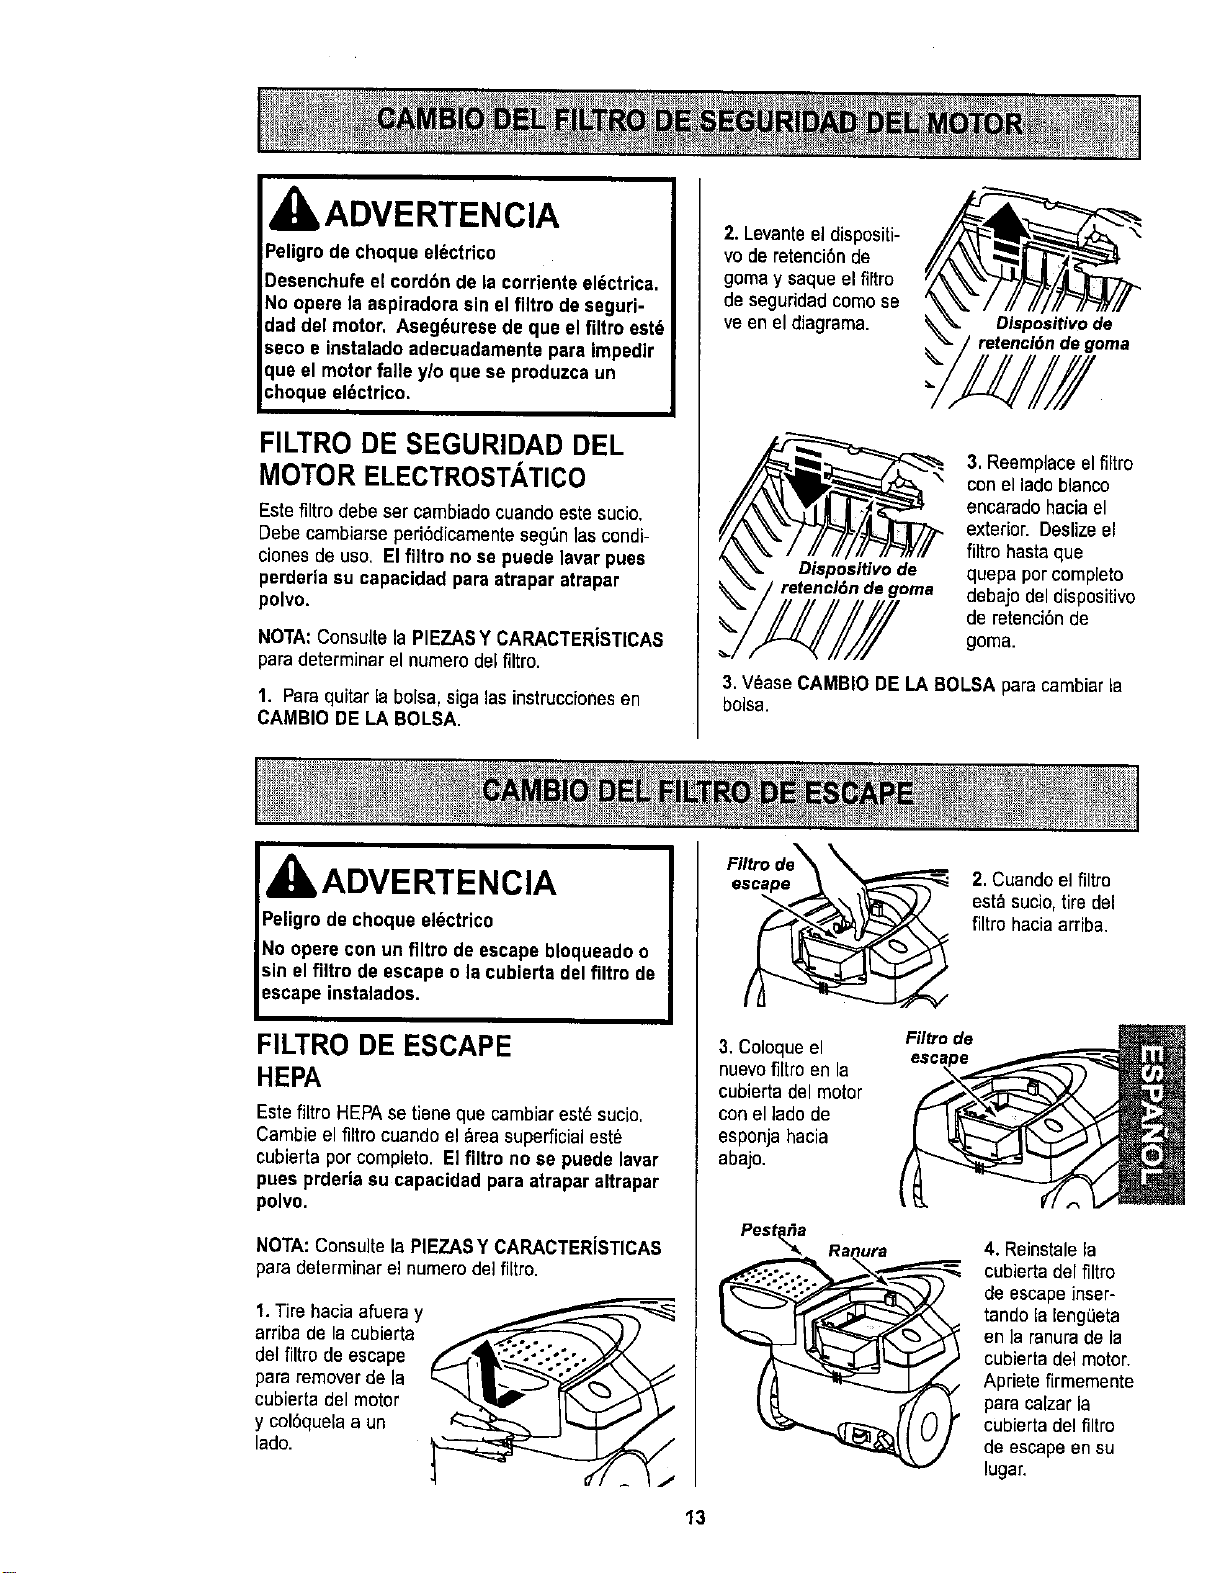
IkADVERTENCIA
Peligrode choque el_ctrico
Desenchufe el cord6n de la corriente eli_ctrica.
No opere la aspiradora sin el filtro de seguri-
dad del motor, Aseg_uresede que el filtro est6
seco e instaladoadecuadamente para impedir
que el motor falle ylo que se produzca un
choque el6ctrico.
FILTRO DE SEGURIDAD DEL
MOTOR ELECTROSTATICO
Este filtro debe ser cambiado cuando este sucio.
Debe cambiarse peri6dicamenteseg0n las condi-
clones de uso, El filtro no se puede lavar puss
perderia su capacidad para atrapar atrapar
polvo.
NOTA:Consulte la PIEZASY CARACTERiSTICAS
para determinar el numero del filtro.
1. Para quitar la bolsa, siga las instruccionesen
CAMBIO DE LA BOLSA.
2. Levanteel dispositi-
vo de retenciOnde
goma y saque el filtro
de seguridad como se
ve en el diagrama. Dispositivo de
_. goma
Dispositivode
/ retenc/6nde goma
3. Reemplace elfiltro
con el ladoblanco
encarado hacia el
exterior. Deslize el
fiitro hasta que
quepa por completo
debajo del dispositivo
de retenci6nde
goma.
3,V_ase CAMBIO DE LA BOLSA para cambiar la
bolsa.
II, ADVERTENCIA
Peligrode choque el_ctrico
No opere con un filtro de escape bloqueadoo
sin el filtro de escape o la cubierta del filtro de
escape instalados.
FILTRO DE ESCAPE
HEPA
Este filtro HEPAse tieneque cambiarest_ sucio,
Cambie el filtro cuando el _rea superficial este
cubierta por completo. El filtro no se puede lavar
pues prderia su capacidad para atrapar altrapar
polvo.
NOTA:Consulte la PIEZASY CARACTERiSTICAS
para determinar el numero del filtro.
1. Tire hacia afueray
arrLbade la cubierta
del filtro de escape
para remover de la
cubierta del motor
y col6quela a un
lado.
escape _
3. Coloque el Filtrode
nuevo filtro enla
cubiertadel motor
con el lado de
esponja hacia
abajo.
Pesta_a
2. Cuando el filtro
est_ sucio, tire del
flltro hacia arriba.
4. Reinstale la
cubierta del filtro
de escape inser-
tando la leng_eta
en la ranurade la
cubierta del motor.
Apriete firmemente
paracalzar la
cubierta del filtro
de escape en su
lugar.
13
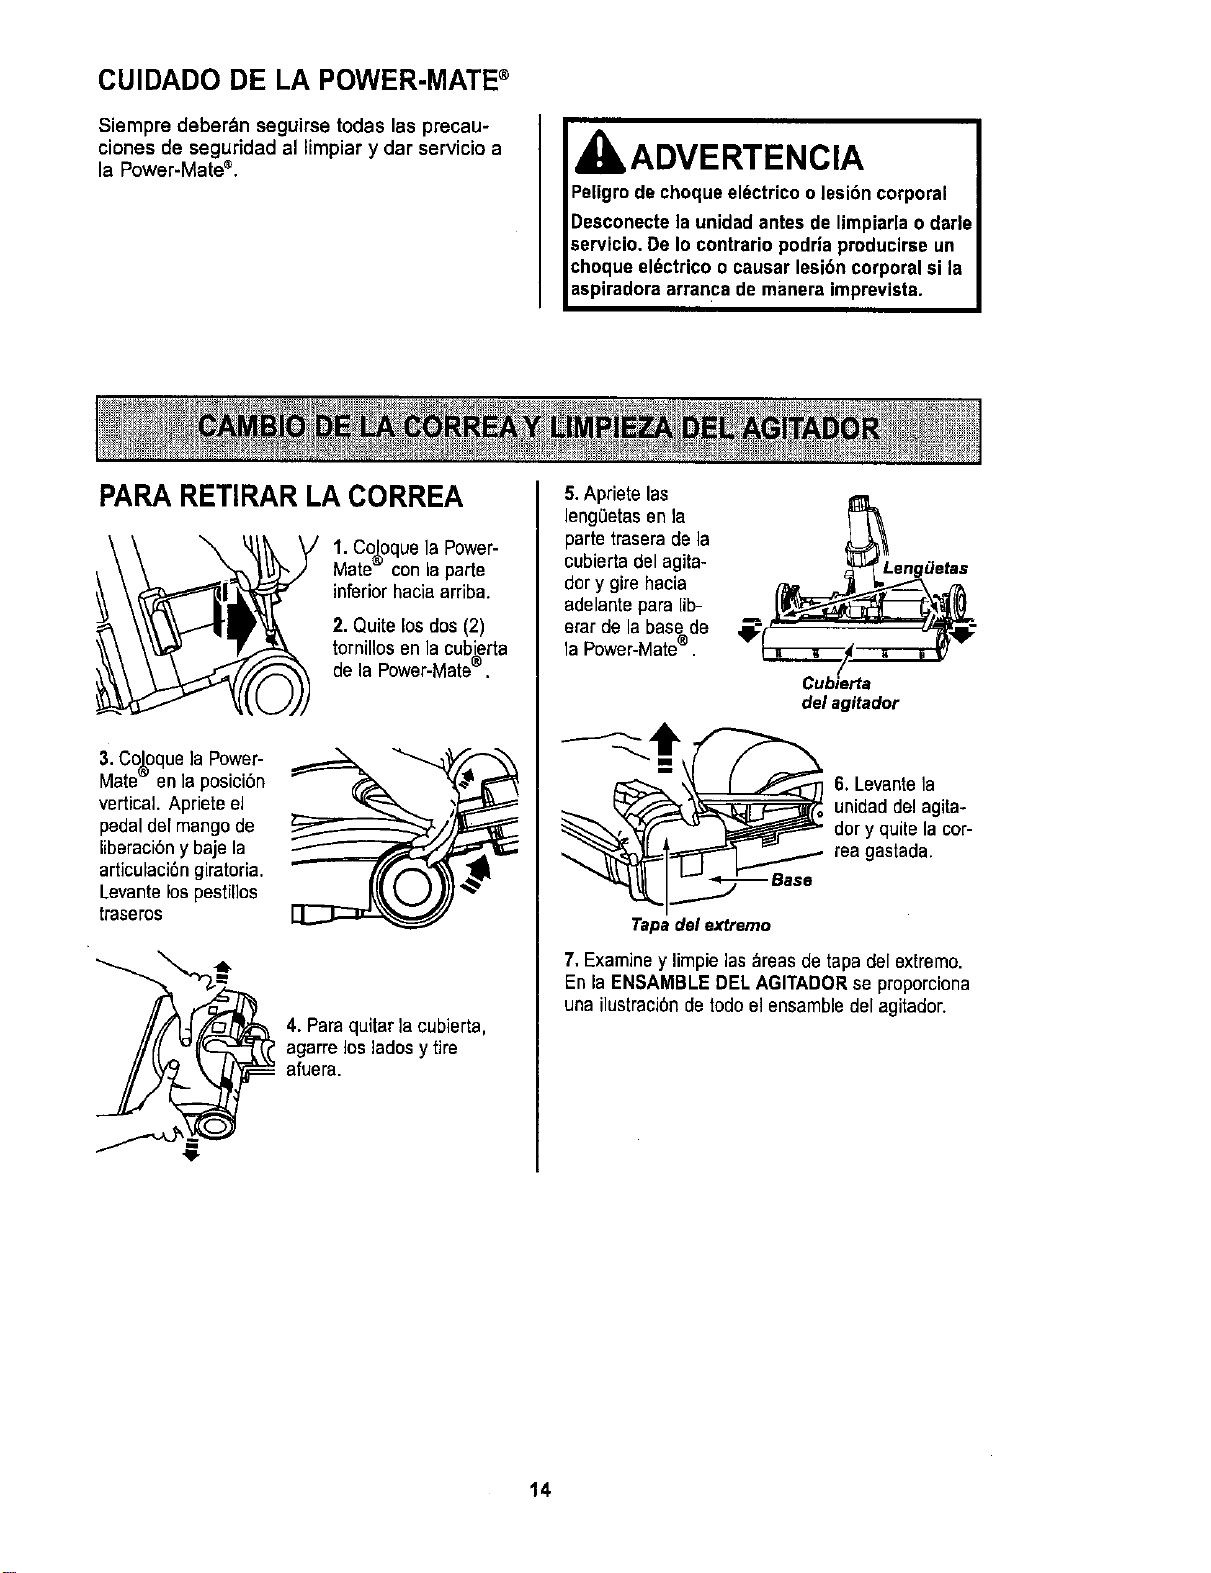
CUIDADO DE LA POWER-MATE®
Siempre deber_n seguirse todas las precau-
ciones de seguridad al limpiar y dar servicio a
la Power-Mate ®.
ADVERTENCIA
PARA RETIRAR LA CORREA
1. CoJ.oquela Power-
Mate con la parle
inferior hacia arriba.
2. Quite los dos (2)
tornillos en la cubierta
de la Power-Mate@.
3. CoJ.oque]a Power-
Mate enia posici6n
vertical. Apriete el
pedalde[ mango de
liberaci6ny baje la
articulaci6n giratoria.
Levantelos pestiflos
traseros
4. Para quitar la cubierta,
agarre los lados y tire
afuera.
5. Apriete las
leng0etas en la
parte traserade la
cubierta del agita-
dory gire hacia
adelante para lib-
erar de la base de
la Power-Mate®
Cubierta
del agitador
6. Levantela
unidad del agita-
dory quite la cor-
tea gastada.
Tapadel extremo
7. Examiney limpie las areas de tapa del extremo.
En la ENSAMBLE DEL AGITADOR se proporciona
una ilustraci6n de rode el ensambledel agitador.
14
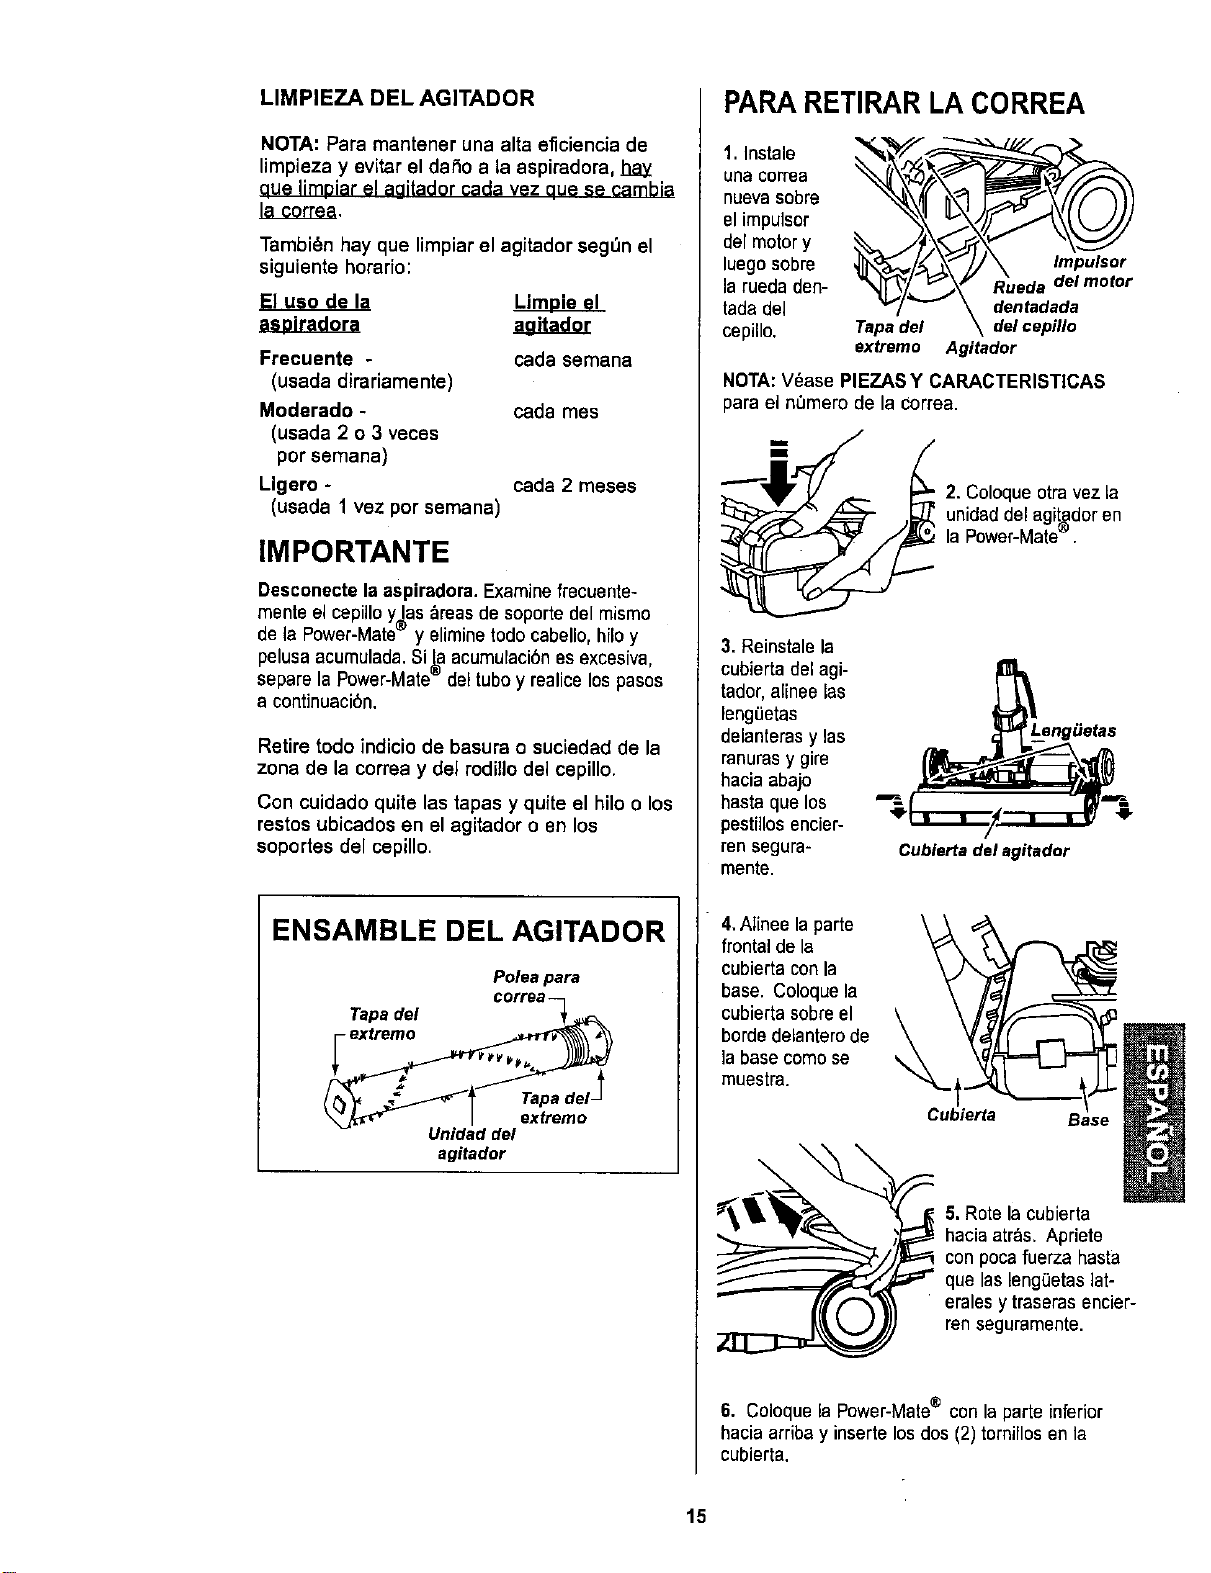
LIMPIEZADELAGITADOR
NOTA:Para mantener una alta eficiencia de
limpieza y evitar el da5o a la aspiradora, J_W-
aue limpiar el aaitador cada vez que se cambia
la correa.
Tambi_n hay que limpiar el agitador seg_3nel
siguiente horario:
El uso de la
Frecuente - cada semana
(usada dirariamente)
Moderado - cada rues
(usada 2 o 3 veces
por semana)
Ligero - cada 2 meses
(usada 1 vez por semana)
IMPORTANTE
Desconectela aspiradora.Examine frecuente-
mente elcepilloy las areas de soportedel mismo
de la Power-Mate y eliminetodocabeno,hiloy
pelusa acumulada.Si_aacumulaci6nes excesiva,
separela Power-Mate deltuboy realicelospasos
a continuaci6n.
Retire todo indicia de basura o suciedad de la
zona de la correa y del rodillo del cepillo.
Con cuidado quite las tapas y quite el hilo o los
restos ubicados en el agitador o en los
soportes del cepillo.
ENSAMBLE DEL AGITADOR
Poleapara
corl ea
Tapadel _.
Unidaddel
agitador
PARA RETIRAR LA CORREA
1. Instale
una correa
nueva sobre
el impulsor
del motory
luegosobre
larueda den-
tadadel
cepillo.
Tapadel deleepillo
extremo Agitador
NOTA:V_ase PIEZAS Y CARACTERISTICAS
para el n_mero de la Correa.
2. Coloque otra vez la
unidaddel agi_dor en
la Power-Mate-.
3. Reinstale la
cubierta del agi-
tador,alineelas
lengLietas
delanterasy las
ranuras y gire
hacia abajo
hasta que los
pesti]losencier-
ren segura-
mente.
Cubierta del agitador
4.Aiinee la parte
frontal de la
cubierta con la
base. Coloque la
cubierta sobre el
borde delantero de
la base como se
muestra.
Cubierta
Base
5. Rote la cubierta
hacia arras. Apriete
con poca fuerza basra
que las lengQetaslat-
erales y traseras encier-
ren seguramente.
6. Coloque la Power-Mate® conla parte inferior
hacia arriba y inserte los dos (2) torniflos en la
cubierta.
15

1.Quite la cubierta de la Power-Mate@ como se
describe en [a secci6n CAMBIO DE LA CORREAY
LIMPIEZA DEL AGITADOR.
I
_ Empuje hacla
adentro y gire
2. Empuje haciaaden-
troy gire la bombilla en
el sentido sontrario al
de las agujas del reloj,
luego tire haciaafuera
para sacar.
I
Empujehacla
adentroy gire
' 3. Empuje hacia adentro
y gire en el sentido con-
trario al de las agujas del
reloj para reemplacer. La
bombilla no debe set
m&s de 15 vatios( 130
voltios/).
4. Reinstale la cubierta de la Power-Mate® come se
describe en la secciSn CAMBIODE LA CORREAY
LIMPIEZA DEL AGITADOR.
NOTA:V_ase PIEZAS Y CARACTERiSTICAS
para el n_mero de la bombilla,
ADVERTENCIA
PARA REVISAR LOS CEPILLOS
_ Cuando esten gas-
_.,_ ados los cepillos al
nivel de las barras
de soporte en la
base, cambie la
unidad del agita-
dor.
Barrade soporte
dela base
PARA CAMBIAR LA UNIDAD
DEL AGITADOR
1. Quite la cubierta de la Power-Mate®, lacubierta
del agitador, la eorrea y la unidad del agitador,
V6ase "Para Cambiar La Correa"en la secci6n de
CAMBIO DELA CORREAY LIMPIEZA DEL
AGITADOR.
2. Cambie la unidad del agitador.
3. Reinstale la correa, la cubierta del agitador y la
cubierta de Power-Mate® . V6ase "Paracambiar la
correa"en la secci6n CAMBIO DE LA CORREAY
LIMPIEZA DELAGITADOR.
16
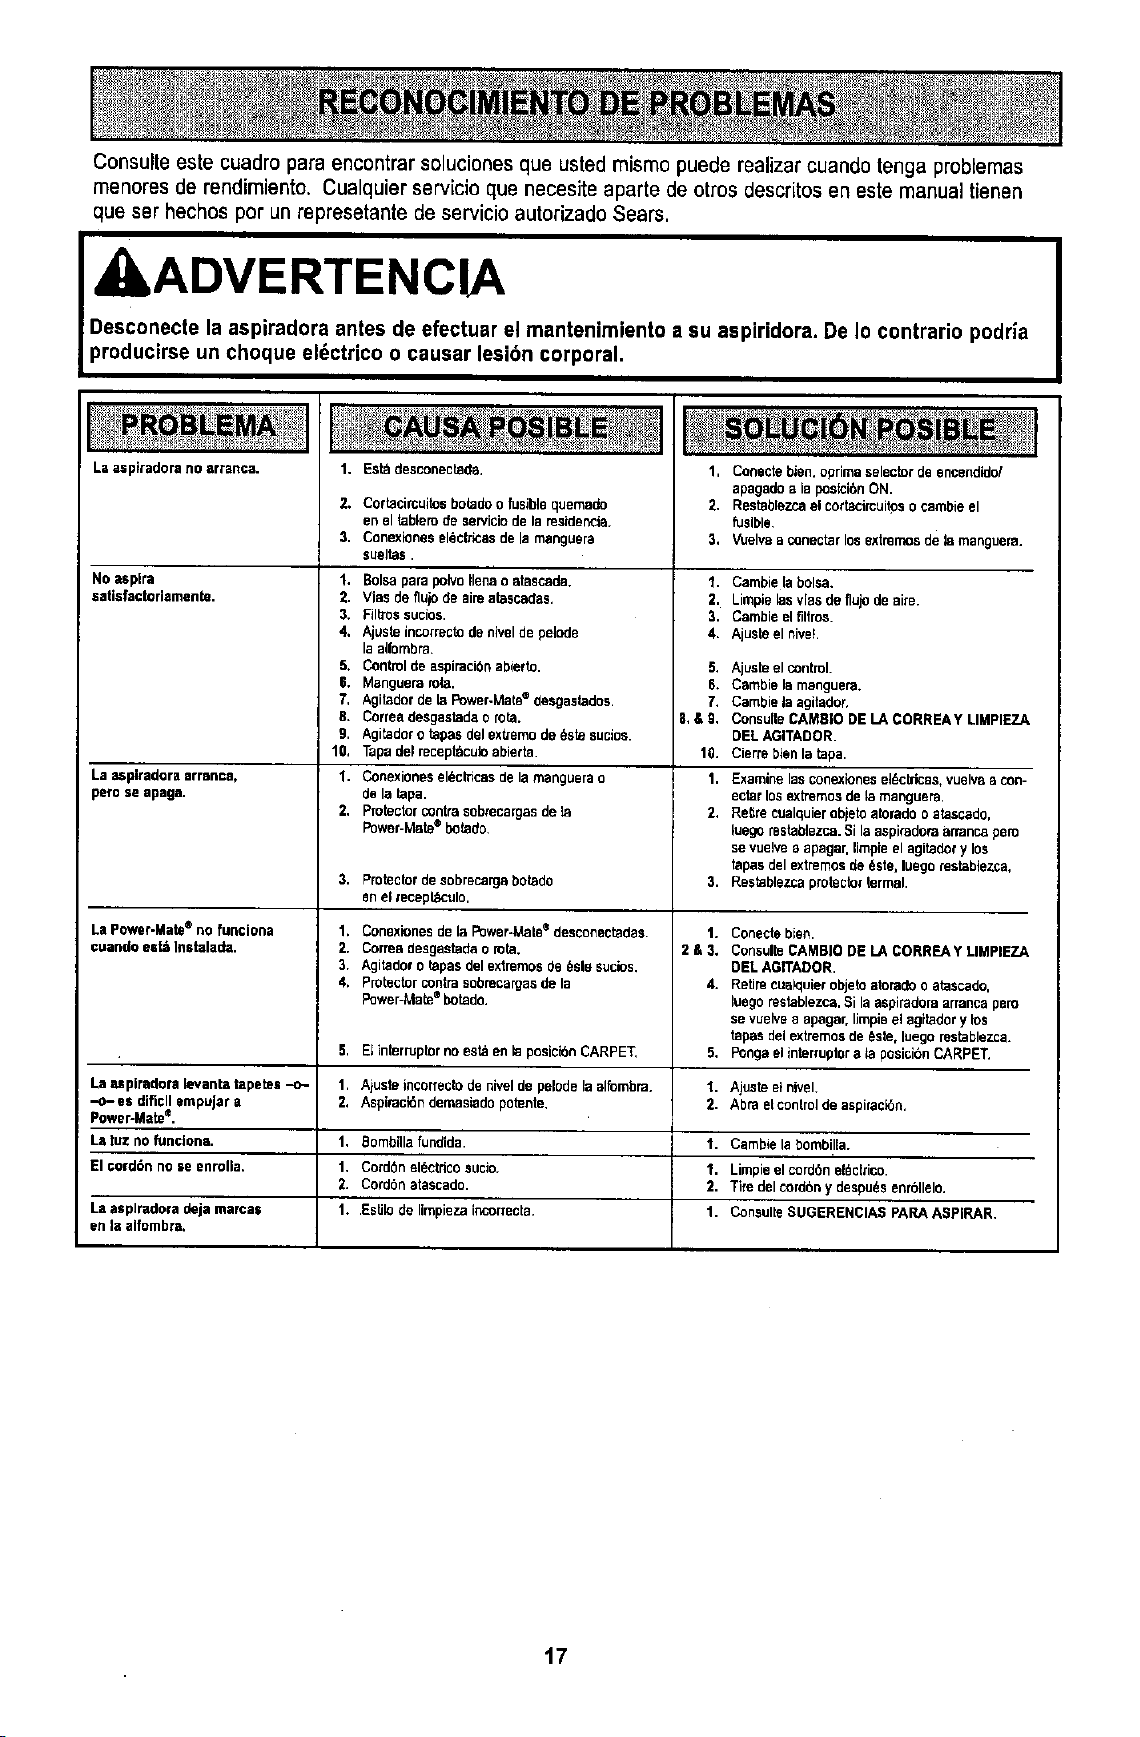
Consulte este cuadro para encontrar soluciones que usted mismo puede realizar cuando tenga problemas
menores de rendimiento. Cualquier servicio que necesite aparte de otros descritos an este manual tienen
que ser hechos por un represetante de servicio autorizado Sears,
ADVERTENCIA
Desconecte laaspiradora antesde efectuar el mantenimiento a su aspiridora. De Io contrario podrla
producirseun choque el_ctrico o causar lesibn corporal,
Laasplradora no arranca.
Noasplta
saUsfactorlamente.
La aspiradora arranca,
pero se apaga.
Es_ desconec_da.
1,
2. Cortacircuitosbotado o fusiblequemado
enel tablerode serviciode la residencia.
3. Conexionesel_ck_casde la manguera
sueltas
1. Bolsapara pok,o Ilena o atascada.
2. Vias de flujode aim alascadas.
3. Filbossucios
4. Ajuste incorrectode nivelde pelode
la alfombra.
5. Controlde aspiraci6nablerto.
6. Manguera rola.
7, Agiladorde la Power.Mate® (tesgastados
a. Correadesgastadao rota.
9. Agitadoro _apasdel ext/emo de _ste sucios
10, Tapadelreceptftculoabierta.
1. Conexionesel_clncasde la manguerao
de la tapa
2, Protector contrasobrecargasde la
Power-Mate®hondo,
1, Conecte bien, optima selectorde encendido/
apagadoa la pos_ci6nON.
2, Res_ablez.cael cortacircuit_so cambie el
fusible
3. Vuelvaa conectarlos extremosde la manguera.
'L Cambie la bolsa,
2, Limpielasvlas de flujo de aim.
3, Cambie el filtros.
4. Ajusie el niveL
S. Ajuste el control.
6, Cambie la manguera.
7. Cambie la agitador,
8,&9, ConsulleCAMBIO DE LA CORREA Y LIMPIEZA
DELAGITADOR
10. Cierre blenla tapa
1. Examine lasconexionese]_,cklcas,vuelvaa con-
ectar losextremosde lamanguera,
2. Retire cualquierobjeto atorado o atascado,
luego restab_ezca.Si la aspicadoraatranca pero
se vuelve a apaga_ limpieel agitado¢y los
tapas del extremosde 6ste, luego restabtezca,
Res_ablezcaprolector lermal
3. Proteclordesobrecargabotado 3.
en el mcepl,_culo.
LaPower-Mate®no funciona 1. ConexJonesde la Power-Male® desconectada$ 1. Conecte bien.
cuandoest_lnstalada. 2. Correadesgastadaorota. 2&3. ConsulteCAMBIODELACORREAYLIMPIEZA
3. Agitadoro tapas del extremosde _sle sucios. DEL AGITADOR.
4. Protectorcontrasobrecargasde la 4. Retire cua)qu_efobjetoatorad_o atascado,
Power-Mate=*botado, luego restablezca.Si la aspiradoraarranca pero
se vuelvea apagar,limpisei agibdor y los
tapas dei exlremosde 6ste, luego restablezca.
5. E;inlerruptornoestdenkaposictbnCARPE_ 5. Pongaeiinterruptora_aposici6nCARPET.
Laupiradoralwantatapetes--c- 1. Ajusteincorrectodeniveldepelodelaalfombra. 1. Ajusteelnivel.
--o-esdiflcllDmpuJara 2. Aspiraci6ndemasiadopotente, 2. Abraetconlroldeaspiracl6n.
Power-Mate®.
La tuz no funclona. 1, Bombilla fundida 1. Camb_ela bombil[a.
El cord6n no se enrolla. 1, Cordbn el_ctricosucio. 1. Limpieel cord6n el_ckico
2. Cord6n atascado 2. Tire del cord6ny despu_senr611elo.
La asplradora deja marcas 1. EstJlode limpiezaincorrecta, 1. ConsulteSUGERENCIAS PARA ASPIRAR.
en la alfombra.
17
..............................................................yOurho meOrOUrS
!_i_!i_!i;_I_i_i
i_ _i_i ii_i_
_iiiiii!i!ilil
!!ii!i i i!_i_!_i
and items like garage door openers and water heaters.
1-800-4-MY-HOME ® Anytime, day or night
(1-800-469-4663) (U.S.A. and Canada)
www.sears.com www.sears.ca
Our Home
For repair of carry-in products like vacuums, lawn equipment,
and electronics, call or go on-line for the nearest
Sears Parts and Re pair Center.
1-800-488-1222 Anytime, day or night (U,S.A. only)
www.sears.com
To purchase a protection agreement (U.S.A.)
or maintenance agreement (Canada) on a product serviced by Sears:
1-800-827-6655 (U.S.A.) 1-806-361-6665 (Canada)
Para pedir servicio de reparacibn Au Canada pour service en frangais:
a domicilio,y para ordenar piezas: 1-SO0-LE.FOYERMc
1-888-SU-HOGAR sM (1-800-533-6937)
(1 888 784-6427)- - www.sears.ca
© Sears, Roebuckend Co,
® Registered Trademark / TM Trademark/ su Service Mark of Sears, Roebuck and Co.
® Marca Registrada / TMMarca de F_brica / sMMarca de Serviclo de Sears, Roebuck and Co.
MCMarque de commerce / MOMarque d6pos6e de Sears, Roebuck and Co.
_iii _i _