Loading ...
Loading ...
Loading ...
ThisUse&CareGuideprovidesgeneral
operatinginstructionsforyourmodel.Use
therefrigeratoronlyasinstructedinthis
Use&CareGuide.Beforestartingthe
refrigerator, follow these important first
steps.
Location
• Choose a place that is near a grounded
electrical outlet. Do Not use an extension
cord or an adapter plug.
• If possible, place the refrigerator out of
direct sunlight and away from the range,
dishwasher or other heat sources.
• The refrigerator must be installed on a floor
that is level and strong enough to support
a fully loaded refrigerator.
• Consider water supply availability for
models equipped with an automatic ice
maker. If you do not hook up water to
the refrigerator, remember to turn the ice
maker off.
Do Not install the refrigerator where the
temperature will drop below 55°F (13°C) or
rise above 110°F (43°C). The compressor
will not be able to maintain proper
temperatures inside the refrigerator.
Do Not block the toe grille on the lower front
of your refrigerator. Sufficient air circulation
is essential for the proper operation of your
refrigerator.
Installation
Installation clearances
• Allow the following clearances for ease
of installation, proper air circulation, and
plumbing and electrical connections:
Sides & Top 3/8 inch
Back 1 inch
Toe Grille Installation and
Removal
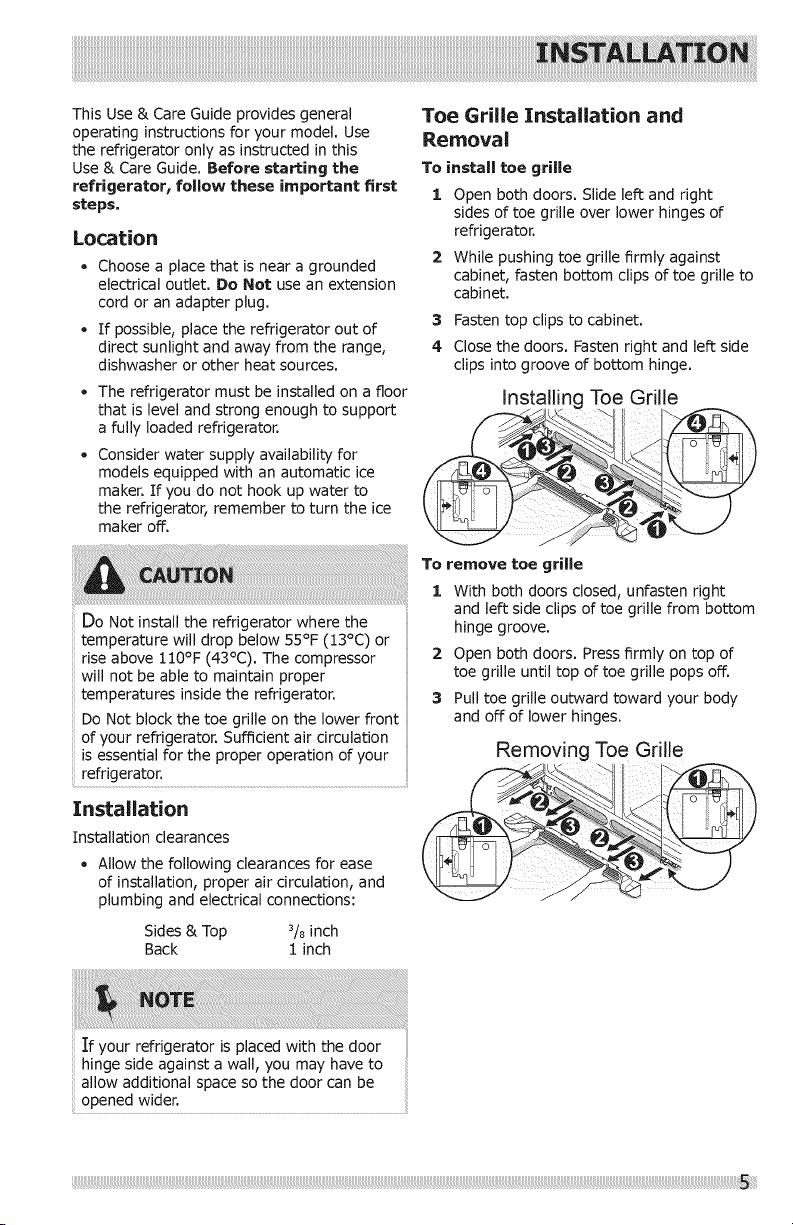
To install toe grille
1 Open both doors. Slide left and right
sides of toe grille over lower hinges of
refrigerator.
2 While pushing toe grille firmly against
cabinet, fasten bottom clips of toe grille to
cabinet.
3 Fasten top clips to cabinet.
4 Close the doors. Fasten right and left side
clips into groove of bottom hinge.
Toe Grille
To remove toe grille
1 With both doors closed, unfasten right
and left side clips of toe grille from bottom
hinge groove.
2
3
Open both doors. Press firmly on top of
toe grille until top of toe grille pops off.
Pull toe grille outward toward your body
and off of lower hinges.
Removing Toe Grille
:If your refrigerator is placed with the door
hinge side against a wall, you may have to
allow additional space so the door can be
opened wider.
Loading ...
Loading ...
Loading ...