
Owner•
s
Manual
TABLE
OF
CONTENTS
PAGE
A
NOTE
ABOUT
SAFETY
.................................................................................
2
GENERAL
...............................................................................................
2
PART
NAMES
............................................................................................
3
OPERATING
INSTRUCTIONS
.........................................................................
4
REMOTE
CONTROL
OPERATION
.....................................................................
5
REMOTE
CONTROL
FUNCTIONS
. . . . . . . . . . . . . . . . . . . . . . . . . . . . . . . . . . . . . . . . . . . . . . . . . . . . . . . . . . . . . . . . . . 6-8
USING
THE
REMOTE
CONTROL
. . . . . . . . . . . . . . . . . . . . . . . . . . . . . . . . . . . . . . . . . . . . . . . . . . . . . . . . . . . . . . . . .
9-16
OPERATING
INSTRUCTIONS
....................................................................
17-19
CLEANING,MAINTENANCE
AND
TROUBLESHOOTING
............................................
20
MAINTENANCE
...................................................................................
21-22
TROUBLESHOOTING
TIPS
.......................................................................
23-25
NOTE
10
EQUIPMENT OWNER:
Please read this Owner's Information Manual carefully before installing and using this air
conditioner and keep this manual for future reference.
For your convenience, please record the model and serial numbers
of
your new equipment in the
spaces provided. This information, along with the installation
data and dealer contact information,
will
be helpful should your system require maintenance or service.
UNIT INFORMATION DEALERSHIP CONTACT INFORMATION
Model#
_____________
Company Name:
___________
_
Serial # Address:
-----------------
INSTALLATION INFORMATION
Phone
Number:.
___________
_
Date
Installed-----------
Technician Name:
___________
_
SAFETY PRECAUTIONS
2

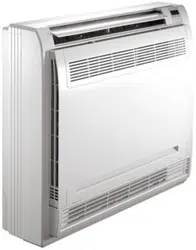
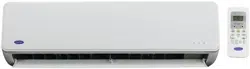
PART
NAMES
Indoor
unit
Outdoor
unit
Indicator
lamp
Depending
on
unit
size,
the
display window
Names
of
parts
Indoor
unit
1.
Front panel
2.
Air inlet
3.
Air filter
4.
Air outlet
5.
Horizontal
air
flow grille
6.
Vertical air flow louver(inside)
7.
Display panel
Outdoor
unit
8.
Connecting pipe
9.
Connecting cable
10. Stop valve
NOTE:
All
illustrations
are
for
reference
only.
Your
unit
may
differ
in
appearance
or
may
not
include
all
components
shown.
Indicator
lamp
~
FRESH
Indicator
(optional)
~
This
lamp
illuminates
when
Clean
Air
feature
is activated.
on
the
indoor
unit
may
look
like
the
following:
onono
ououo
DEFROST
Indicator
(e
(A)
(B)
(Enabled on cooling & heating models only):
Lights
up
when the
air
conditioner starts
defrosting automatically or when the warm
air
control feature is activated in heating
operation.
OPERATION
Indicator
This
lamp
illuminates
when
the
air
conditioner
is
in
operation.
TIMER
Indicator
Lights
up
during
Timer
operation.
88
DIGITAL DISPLAYindicator(optional)
• Displays
the temperature settings when the
air conditioner is
operational.
• Displays
the malfunction code.

4
OPERATING
INSTRUCTIONS
Special
functions
Refrigerant
Leakage
Detection
When
a
refrigeration
leak
is
detected
at
the
outdoor
unit, an
'EC'
error
code
will
appear
on
the
indoor
unit
display
panel.
Louver
Angle
Memory
Function(optional):
The
unit
will
memorize
the
previous
angle
of
the
louver,
as
long
as
it
is
set
within the
louver
safety
limitations.
Note: The
louver
will
return to
the
standard
position
if
the
power
is
turned
off
or
the
manual
control button
is
pressed.
SELF
CLEAN
function
COptional)
• Under
this
function, the
air
conditioner will automatically clean and dry the evaporator.
• The
unit
will operate in following sequence: FAN ONLY mode
at
LOW
fan speed, Heating
operation
at
LOW fan speed (applicable to cooling & heating models
only)
and then
FAN
ONLY operation. Once the FAN ONLY operation has ended, the unit
will
turn off.
Note:
e This function
is
only available under COOL(AUTO COOL, FORCED COOL) and DRY mode.
• Before selecting this function, it
is
recommended to run the
air
conditioner
under
Cooling
operation
for
approximately
one
half
of
an hour. Once the
Self
Clean function is activated,
all TIMER settings will be cancelled.
•
lfthe
SELF CLEAN function
is
selected while the SELF CLEAN function is
already
in
process, the
unit
automatically
shut
down.
Vertical
swing
function
(Optional)
After
the
air
conditioner is operating, users can control the vertical
louver
swing
by
using the remote control.
•

Using the remote control
5
REMOTE CONTROL OPERATION
• I I
(A.
Precautions)
Location
of
the
remote
controller.
•
The
remote
control
can
operate
the
unit
from
a
distance
of
up
to
26ft.
(8
m)
as
long
as
there
are
no
obstructions.
• NOTE:
When
transmitting
a
command
from
the
remote
control
to
the
unit,
be
sure
to
point
the
control
toward
the
right
side
of
the
unit.
The
unit
will
confirm
receipt
of
a
command
by
sounding
an
audible
beep.
• The air conditioner will not operate if curtains, doors or other materials
block the signals from the remote control
to
the indoor unit.
• Prevent any liquid
from
falling into the remote control.
Do
not expose
the remote control to direct sunlight or heat.
•
If
the infrared signal receiver
on
the indoor unit is exposed
to
direct
sunlight,
the
air conditioner may not function properly.
Use
curtains to
prevent the sunlight from falling
on
the
receiver.
•
If
other electrical unit,
air
conditioner
react
to
the
remote control.
either move these
unit,air
conditioner
or consult your local dealer.
Replacing
batteries
TwoAAA
1.5 v alkaline batteries (included) are required
for
operation
of
the remote control.
To
install
or
replace batteries:
1.
Slide the back
cover
off
the control to open the battery compartment.
2.
Insert batteries. Follow the polarity markings inside the
battery compartment.
3.
Replace battery compartment cover.
NOTE:
1. When replacing batteries,
do
not use old batteries
or
a different
type battery. This may cause the remote control to malfunction.
2.
lfthe
remote is not going to be used
for
several weeks, remove
the batteries. Otherwise battery leakage may damage the remote
control.
3. The average battery life under normal use is about 6 months.
4. Replace the batteries when there is no audible beep from the
indoor
unit
or
if
the Transmission Indicator fails to light.
5. When batteries are removed, the remote control erases all
programmed settings. The control must be reprogrammed
after
insertion
of
new batteries.
•
Two AAA 1.5v alkaline batteries
26ft (8m)
6
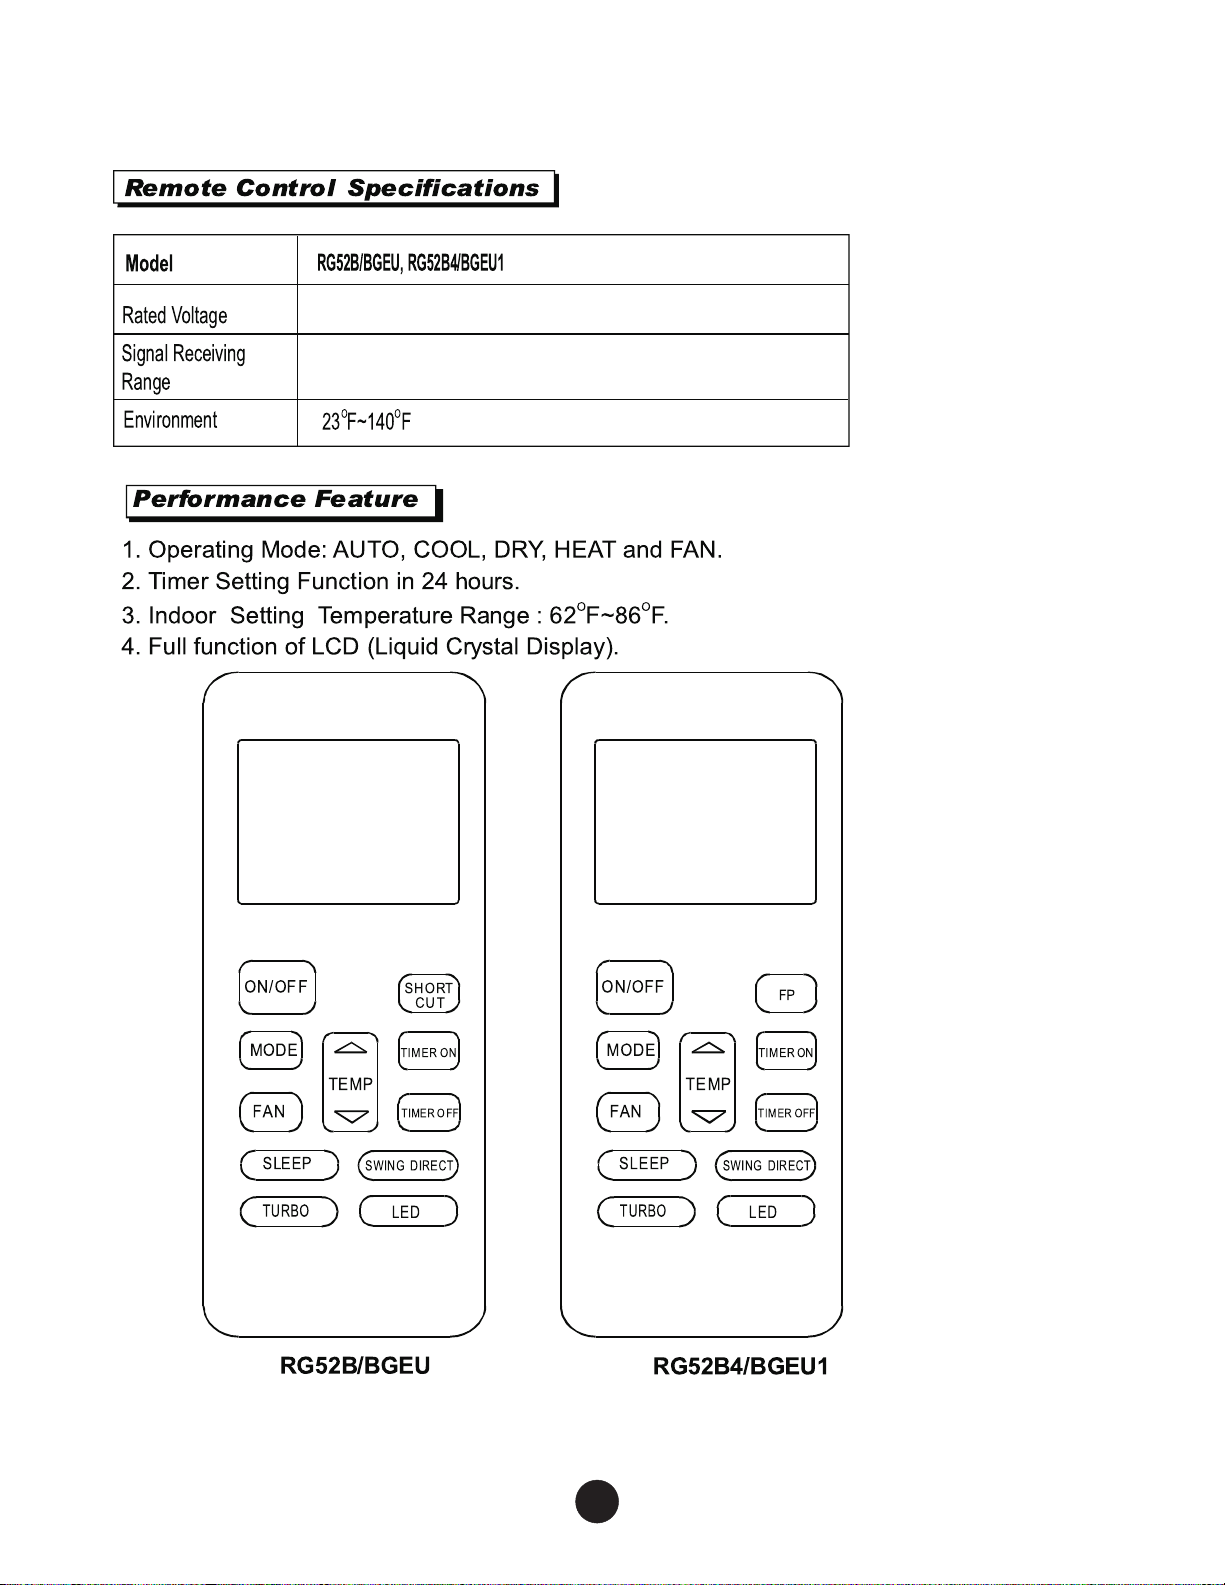
REMOTE CONTROL FUNCTIONS
s

I
Function
buttons
I
(oN/OFF)
(•oo~
[r:•]
a~
(
SLEEP
)
(
TURBO
)
RG52B/BGEU
0 ON/OFF Button
Operation
starls when this button is pressed
and stops when this button is pressed again.
f)
MODE Button
Each time this button
is
pressed,
the
operation
mode is
selected in a sequence
of
follav.~ing:
ruro-coOL-DRY-[_8._~:i:'_~FANJ
NOTE: Please do
not
select
HEAT mode
if
you
have a cooling
only
system.
0
FAN
Button
Used
to select the
fan
speed
in
four steps:
rAUTO-LOW--MED-
HIGH]
0 SLEEP Button
Activate/Disable
sleep
function.
It
can
maintain
the most comfortable temperature and save
energy. This function
is
available on COOL,
HEAT and AUTO mode only .
NOTE: While the unit is running in SLEEP
mode,
it
will be cancelled
if
the, FAN
SPEED
or
ON/OFF
button
is
pressed.
0 TURBO Button
Activate/Disable
Turbo function. Turbo
function
enables the unit to reach the preset
temperature
at
cooling
or
heating operation
in
the shortest time(
if
the
indoor
unit
does
not
support
this
function, a
corresponding
operation
will
not
occur.}
Activate/Disable
0 LED Button
Activate/Disable
indoor screen Display.
When
pressing the LED button, the
indoor
unit
display
screen
will
be cleared.
Once
pressed
again,
the
display
will
illuminate.

........------t--t
7
(•oo~
[r:•]
a'Q'
(SLEEP
)
(
TURBO
)
RG52B4/BGEU1
0 UP
Button(
~
)
Pushing this button will increase the indoor
temperature setting
in
1°F
(1
°
C)
increments up to 86°F
(30
°C).
DOWN
Button(
"V'
)
Pushing
this
button
will
decrease the indoor
temperature setting
in
1°F
(1
°
C)
increments up to 62°F(17°C).
NOTE: Press and
hold
~
~~
and
~"'V'
,
buttons
together for 3 seconds to
alternate the
temperature
display between the °C &
°F
scale.
9 SHORTCUT
Button(
For
RG52BIBGEU
model)
• Used to restore the current settings or
resume previous settings.
•
If
the
SHORTCUT
button
is
the
first
function
selected
upon
unit
operation,
the
unit
will
operate
in
AUTO
mode-
80~
(27°C),
and
auto
fan
speed.
• Push this button when remote control is on,
the system
will automatically revert back
to the previous settings,
including operating
mode, temperature setting, fan speed
level
and sleep featureQf activated).
•
If
pressed
for
more
than
2
seconds,
the
system
will
automatically
restore
the
current
operation
settings,
including
operating
mode,
temperature
settings,
fan speed, and
sleep
features
(if
activated).
(l)
FP Button(For RG52B4JBGEU1
model)
While
the
air
conditioner
operates
in
heating
mode, pressing the LP button
will
activate
4EfF (8°C) heating.
The
display
window
on
the
indoor
unit
will
display
"FP".
0
TIMER
ON
Button
Press
this
button
to
initiate
the
auto-on
time
sequence.
Each
time
the
TIME
ON button
is
pressed,
it
will
increase
the
auto-timed
setting
in 30
minute
increments.
When the
time
setting
displays
10,
the the
auto-timed
setting
will then
increase
by 60
minute
increments.
To
cancel the
auto-timed
program,
simply
adjust
the
auto-on
time
to
0.0.

USING THE REMOTE CONTROL
.----+--t7
(Moo~
[T:•]
E)"Q"
(
SLEEP
)
(
TURBO
)
RG52B/BGEU
® TIMER OFF
Button
Press this button to initiate the auto-off time
sequence. Each time the TIME OFF button
is pressed, it will increase the auto-timed
setting in 30 minute increments. When the
time setting displays 10, the the auto-timed
setting will then increase by 60 minute increments.
To
cancel the auto-timed program, simply adjust
the auto-on time to 0.0.0.0.
Q DIRECT Button
Used to adjust the louver movement and
set
the desired up/down
air
flow direction. Each
time the DIRECT button is pressed, the louver
angle moves 6 degrees.
@ SWING
Button
Used to start
or
stop the horizontal auto
swing feature.
NOTE:
- The remote control button design is based
on the standard model, and may appear
slightly different from the actual remote.
-All
of
the functions described are accom
plished by the unit.
If
the unit does not have
a particular feature, there will be no
corresponding function associated with
that button.
-When
there is a discrepancy between
the "Remote control illustration" and the
"Users Manual", on the remote control
function, the Users Manual will prevail.

!Indicators
on
LCD
I
Mode
display
Displays the current operation mode. Including
auto(®),
cool(*),
dry('),
heat~~)
(Not
applicable to cooling only models),
fan(@
)
and back to auto(
cD
).
Transmission
Indicator
This transmission indicator will illuminate
when remote controller transmits signals to
the indoor unit.
ON/OFF
display
~
Displayed
by
pressing the ON/OFF button.
_ _ _ -f _ _ _ _
1
L Press the ON/OFF button again to remove.
'9
I 0
ON
5FF
TINIER
ON
display
AUTO®
SET
TEMP.
1
Displayed when TIMER ON time is set.
I *
1-11-IIJ
;;tl
COOL
f *
TINIER
OFF
display
1
DRY
• • • I Displayed when TIMER OFF time
is
set.
~
HEAT
:tlf~
1.1.1.1
H I
Sleep
Display
"'
~
1111111111111111111111111111
~
'AN
@
·~
:.·::.·:::.·::::.·:::::.·::::::.
Displayed under sleeping operation.
_ _
~
~:::~:::~::·~:::~
Press the SLEEP button again to remove.
FOLLOW
NIE
Display(on
some
models)
Displayed when FOLLOW
ME
function
is
activated.
Temp./Timer
display
Indicates
the
temperature and
timer
settings.
It
displays
the temperature setting
(6t'F(1
t'C)-BEfF
(3cfC)). It displays
"TIMER ON"
when
the
auto--on time function
is
set, "TIMER OFF"
when the auto--off time function is set, and "TIMER ON OFF
when both functions are set.
L__
_____
Fan
speed
display
Displays the selected fan speed, AUTO(no display)
and three fan speed levels
"~c
i:::i
: " (LOW)
·~
:~:::~::::~::m!·"
(MED)
"Xi
1
:::~::n~::m~::!!!!
1
:;m!!
1
·"
(HIGH) can be indicated.
The
fan
speed
is
AUTO
when
the
operating
mode
is
set
to
either
AUTO
or
DRY.

~
T
fiMERON)
8
EIMER
OF~
(
SLEEP
)
~WNG
DIREC~
(TURBO )
(
LED
)
(
SLEEP
) (swiNG
DIREC~
(
TURBO
) (
LED
)
I
How
to
use
the
buttonsl
Auto
operation
cv
1.
Press the MODE button
to
select Auto.
2.
Press the UP/DOWN button
to
set
the
desired temperature. The temperature can
be
set
within a range
of
62°F(17°C)-86°F(30°C)
in 1°F(1°C) increments.
3.
Press the
ON/OFF
button
to
start
the
air
conditioner.
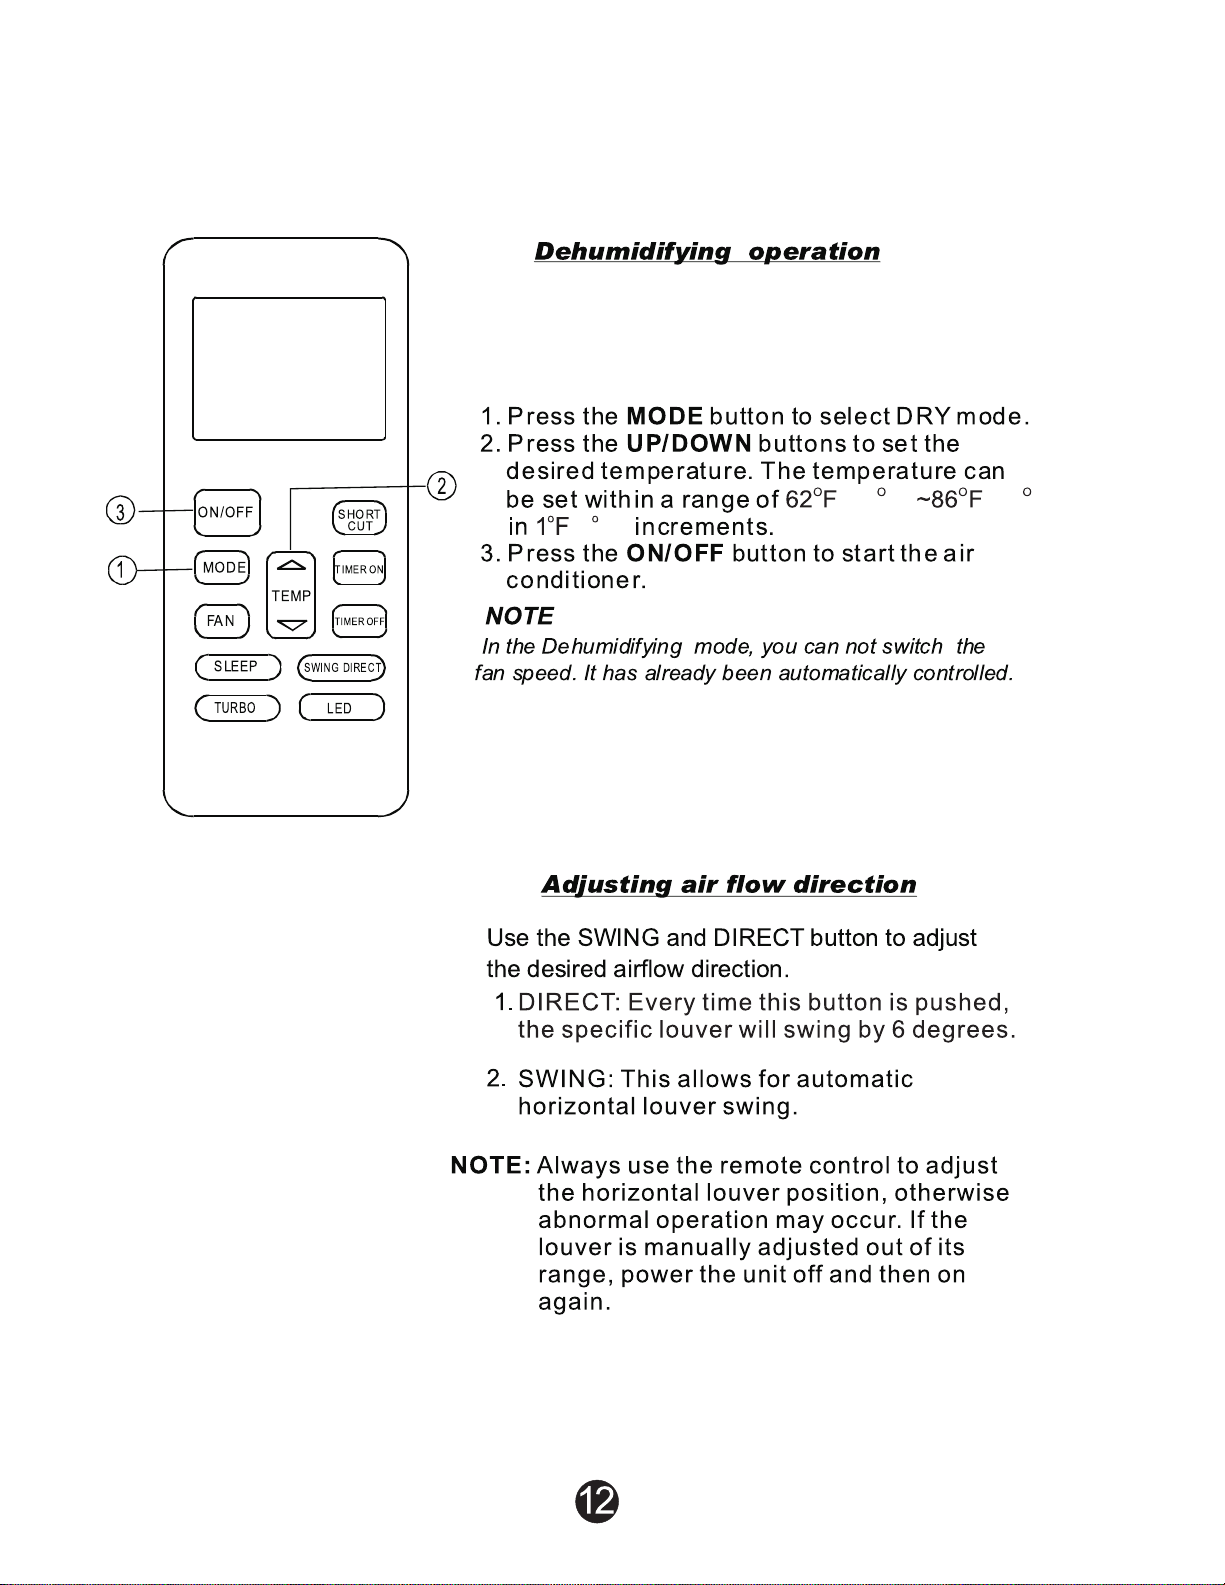
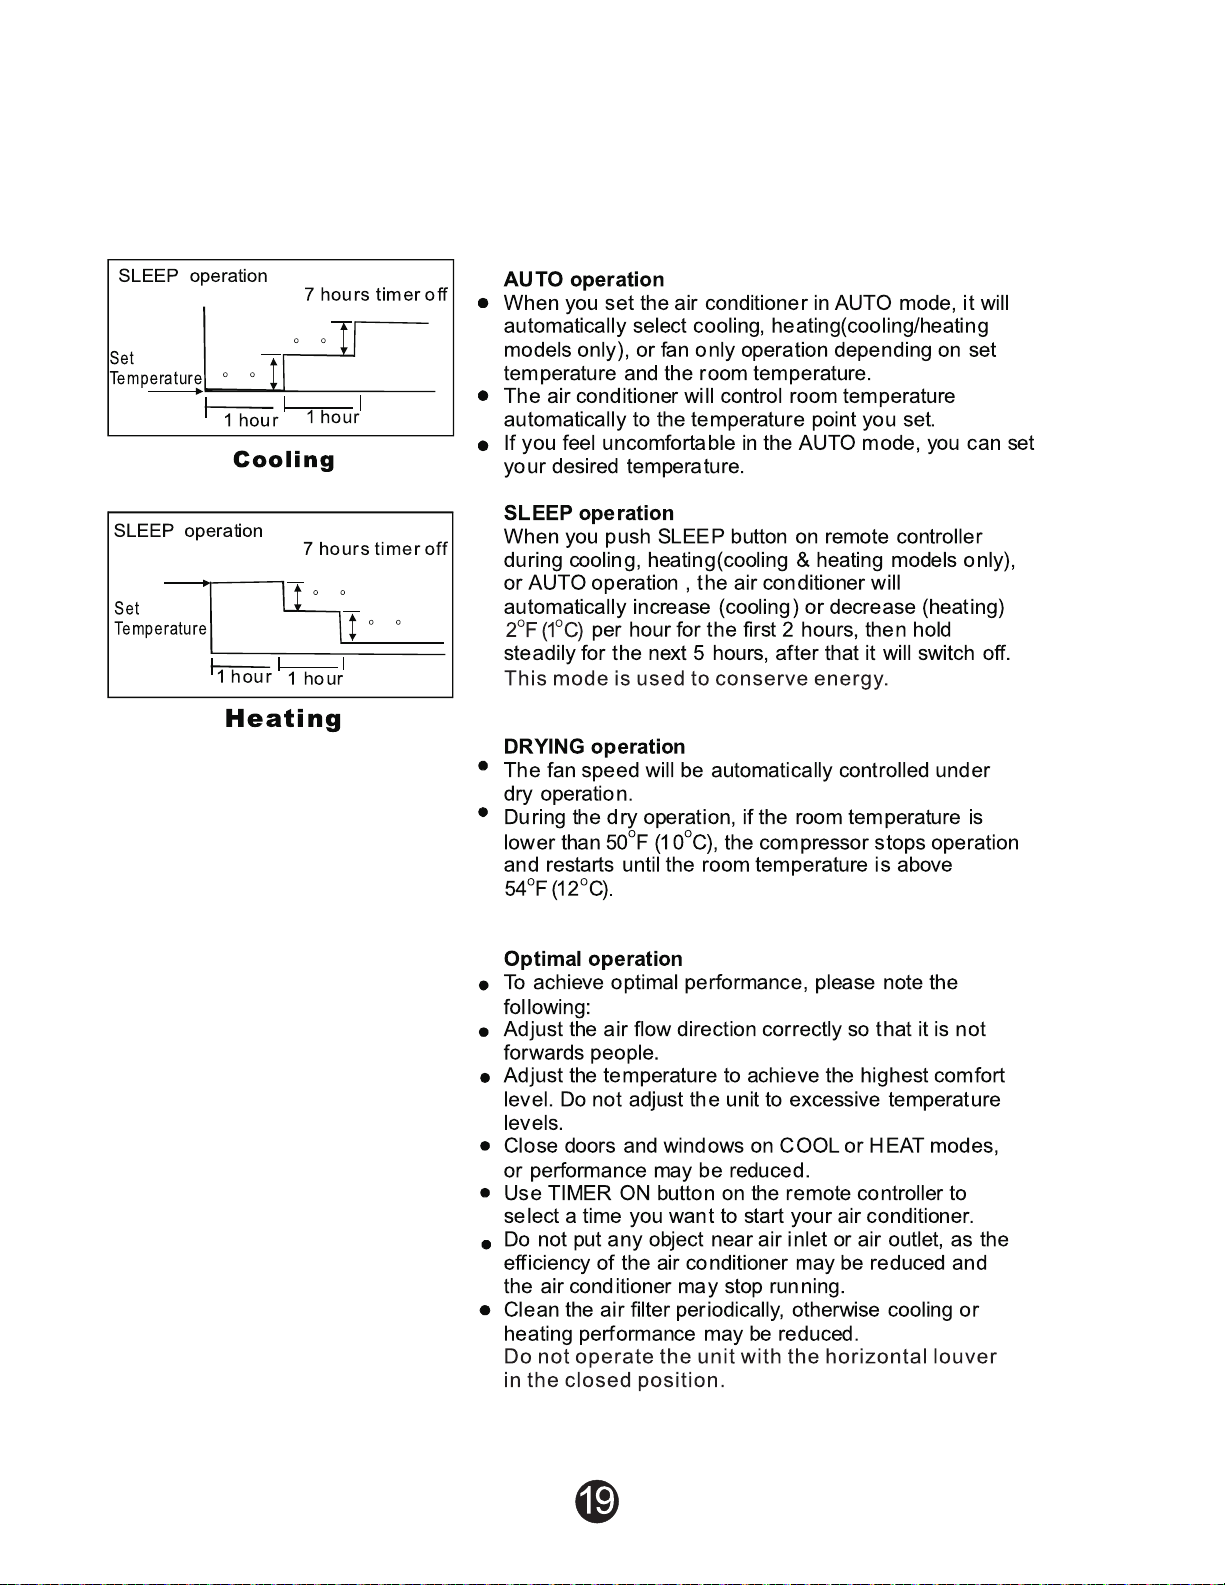
NOTE
1.
In the Auto mode, the
air
conditioner can logically
choose the mode
of
Cooling, Fan,
and
Heating
by
sensing the differenoe between the actual
ambient room temperature
and
the setting
temperature on the remote controller.
2.
In the Auto mode, you can
not
switch
the
fan speed.
It
has
already been automatically controlled.
3.
If
the Auto mode is
not
comfortable
for
you,
the
desired mode can
be
selected manually.
Cooling
/Heating/Fan
operation
1. Press the MODE button to select COOL,
HEAT( cooling &
heating
models
only)
or
FAN mode.
2. Press the
UP/DOWN buttons
to
set
the
desired temperature. The
temperature
can
be
set
with in a range
of
62°F(17°C)-86°F(30°C)
in
1°F(1°C) increments.
3. Press the
FAN
button
to
select
the fan speed
in
four
steps-Auto, Low,
Med,or
High.
4. Press the
ON/OFF button to
start
the
air
conditioner.
NOTE
In the FAN mode, the setting temperature is
not
displayed
on
the remote controller
andy
ou
are
not
able to control the room temperature either. In this
case,
only
step
1,
3
and
4
may
be
performed.
(17 C) (30 C)
(1 C)
In Dehumidification mode, the system dries,
filters and slightly cools room air temperature.
This mode prioritizes air dehumidification
but it does not take the place of a dehumidifier.

TIMER ON (to start the unit) and TIMER OFF
(to stop the unit) can be used separately
or together.
(oN/OFF)
cw
T
~~
(llMERON)
TEMP
®'Q'
fiMEROF~
(
SLEEP
)
(swtlG
DR®
(
TURBO
) (
LED
)
Tin~er
operation
To
set
the
Auto-on
time.
1. Press the TIMER
ON
button. The remote
controller shows TIMER ON, the last Auto-on
setting time and the signal "H" will be shown on
the
LCD display area.
Now
it is ready to reset
the
Auto-on time
to
START the operation.
2.
Push the
TIMER
ON
button again
to
set
desired
Auto-on time. Each time you press the button,
the
time increases
by
half
an
hour between 0
and 10 hours and
by
one
hour
between
10
and
24 hours.
3.
After
setting the
TIMER
ON ,there will
be
a one
second delay before the remote controller
transmits
the
signal to the air conditioner. Then,
after approximately another 2 seconds, the
signal"h"
will disappear and
the
set
temperature
will re-appear on the LCD display window.
To
set
the
Auto-off
time.
1. Press the TIMER
OFF
button. The remote
control shows TIMER OFF, the last Auto-off
setting time and the signal "H" will
be
shown on
the LCD display area.
Now
it
is
ready
to
reset
the Auto-off time to stop the operation.
2. Push
the
TIMER
OFF
button again
to
set
desired Auto-off time. Each time you press the
button, the time increases
by
half
an
hour
between 0 and
10
hours and by
one
hour
between 1 0 and 24 hours.
3. After setting the TIMER OFF, there will be a
one
second delay before the remote control
transmits
the
signal
to
the
air conditioner. Then,
after approximately another 2 seconds, the
signal
"H
"will
disappear and the set temperature
will re-appear
on
the LCD display window.

(AcAUTlON
J
•
The
effective operation
time
set
by
the remote control
for
the
timer
function
is
limited
to
the following settings: 0.5, 1.0, 1.5, 2.0, 2.5, 3.0, 3.5, 4.0, 4.5, 5.0,
5.5, 6.0, 6.5, 7.0, 7.5, 8.0, 8.5, 9.0, 9.5, 10, 11, 12, 13, 14, 15,16,17, 18, 19, 20,
21, 22, 23 and 24.
(Example
of
timer
setting
J
OoN
,.
---
Ce
.
Le
H
Start
EF
---
_______
Set
6 hours I
alar
TIMER ON
(Auto-on Operation)
The TIMER ON feature is useful when you want
the unit to turn on
automatically before you return
home. The air conditioner
will automatically start
operating
at
the set time.
Example:
To
start the air conditioner
in
6 hours.
1. Press the TIMER ON button, the last setting
of
starting operation time and the
signai"H"
will show on the display area.
2. Press the
TIMER ON button to display
"6.0H"
on
the
Tl MER ON display
of
the remote
controller.
3. Wait for 3 seconds and the digital display
area will show the temperature again. The
"TIMER ON" indicator remains
on
and this
function is activated.

15
Set
r
QoFF
ere
•II
~-~
'~
,
~
Q Stop
I
----:;)
----
-----
10 hours later
0
oN
OoFF
ere
I
LI
H
Set 2
hours
later
after
selling
1 0
hours
later
after
setting
TIMER
OFF
(Auto-off Operation)
The TIMER
OFF
feature is useful when you want the
unit to turn
off
automatically after you go to bed. The
air conditioner will stop automatically
at
the set time.
Example:
To
stop the air conditioner in 10 hours.
1.
Press the TIMER OFF button, the last setting
of
stopping operation time and the signal ''H'' will
show
on
the display area.
2. Press the TIMER OFF button to display "10H
"on
the
TIMER OFF display
of
the remote controller.
3.
Wait for 3 seconds and the digital display area
will show the temperature again. The "TIMER
OFF" indicator remains on and this function is
activated.
COMBINED TIMER
(Setting both ON and OFF timers simultaneously)
TIMER
OFF-
TIMER ON
(On - Stop - Start operation)
This feature is useful when you want to stop the
air
conditioner after you
go
to bed, and start it again in
the morning when you wake up
or
when you return
home.
Example:
To
stop the air conditioner 2 hours after setting and
start it again 10 hours after setting.
1.
Press the TIMER OFF button.
2. Press the TIMER OFF button again to display
2.0H on the TIMER OFF display.
3.
Press the TIMER ON button.
4. Press the TIMER ON button again to display 10H
on
the TIMER ON display .
5.
Wait for 3 seconds and the digital display area
will show the temperature again. The "TIMER
ON OFF" indicator remains on and this function
is
activated .
•

OoN
OoFF
r rt
~
...
'.
~
.
~
H
Start
2 tours
liter
afiBr settlrg
5 hours
laar
afiBr settirg
TIMER ON - TIMER OFF
{Off-
Start-
Stop operation)
This feature is useful when you want to start
the air conditioner before you wake up and
stop
it
after you leave the house.
Example:
To start the air conditioner 2 hours after setting,
and stop
it
5 hours after setting.
1. Press the TIMER ON button.
2. Press the TIMER ON button again to display
2.0H on the TIMER ON display.
3. Press the TIMER OFF button.
4. Press the TIMER OFF button again to display
5.0H on the TIMER OFF
display.
5. Wait for 3 seconds and the digital display area
will show the temperature again. The "TIMER
ON OFF"
indicator remains
on
and this function
is activated.

OPERATING INSTRUCTIONS
NOTE:
This
manual
does
not
include
Remote
Control
Operations,
see
the
<<Remote
Control
Instruction>>
packed
with
the
unitfor
details.
Operating temperature
~e
li
Cooling operation Heating operation Drying operation
Room temperature
62°F-90°F
32°F-86°F
50°F-90°F
(17°C-32°C)
(
0°C-30°C)
(10°C-32°C}
32
°C-
122°C
Outdoor temperature (0
°F-
50°F)
5
°C-
80°C
32
°C-
122°C
( 5
°C-
122
°C
/-15
°F-
50
°F:
(
-15
°F-
30
°F)
(0
°F-
50°F)
For
the models with
low
temperature cooling system)
NOTE:
1.
Optimum performance will be achieved within these operating temperatures.lf air
conditioner is used outside
of
the above conditions, certain safety protection features
might come into operation and cause the unit to function abnormally.
2.
If
the
air
conditioner runs for a long time
in
cooling mode and the humidity is high( over
80%) , condensed water may drip out
of
the unit. Please sets the vertical air flow louver to
its maximum angle (vertically to the floor), and
set
HIGH fan mode.
Suggestion:
For
the unit adopts an Electric Heater, when the outside ambient temperature
is below 32°F(0°C),
we
strongly recommend you to keep the machine plugged in order to
guarantee it running smoothly.
Manual operation
Units are equipped with a switch
to
run
emergency operation mode. It can be accessed by
opening the front panel. This switch is used for manual operation in case the remote controller
fails
to
work
or
maintenance is necessary.
Manual switch
(1)
Suspension
bar
Manual switch
(2)
NOTE:
The
unit
must
be
turned
off
before
operating
the
manual control button.
If
the
unit
is
operational, continue pressing
the
manual control button until the unit is off.
G)
Open
and
lift
the
front panel
up
to
an
angle
until it remains fixed with a clicking sound.
For some models, please use suspension
bars
to
prop up the panel.
<2)
One press
of
the
manual control switch will
lead to
the
forced AUTO operation. If pressed
twice within five seconds,
the
unit
wi
II
ope rate under forced C
00
Lop
era tion .
CD
Close
the
panel firmly to its original
position.
CAUTION:
• This switch is used
for
testing purposes
only.
•
To
restore the remote controller operation,
use the remote controller directly.
OPERATING INSTRUCTIONS
CONTROL
18
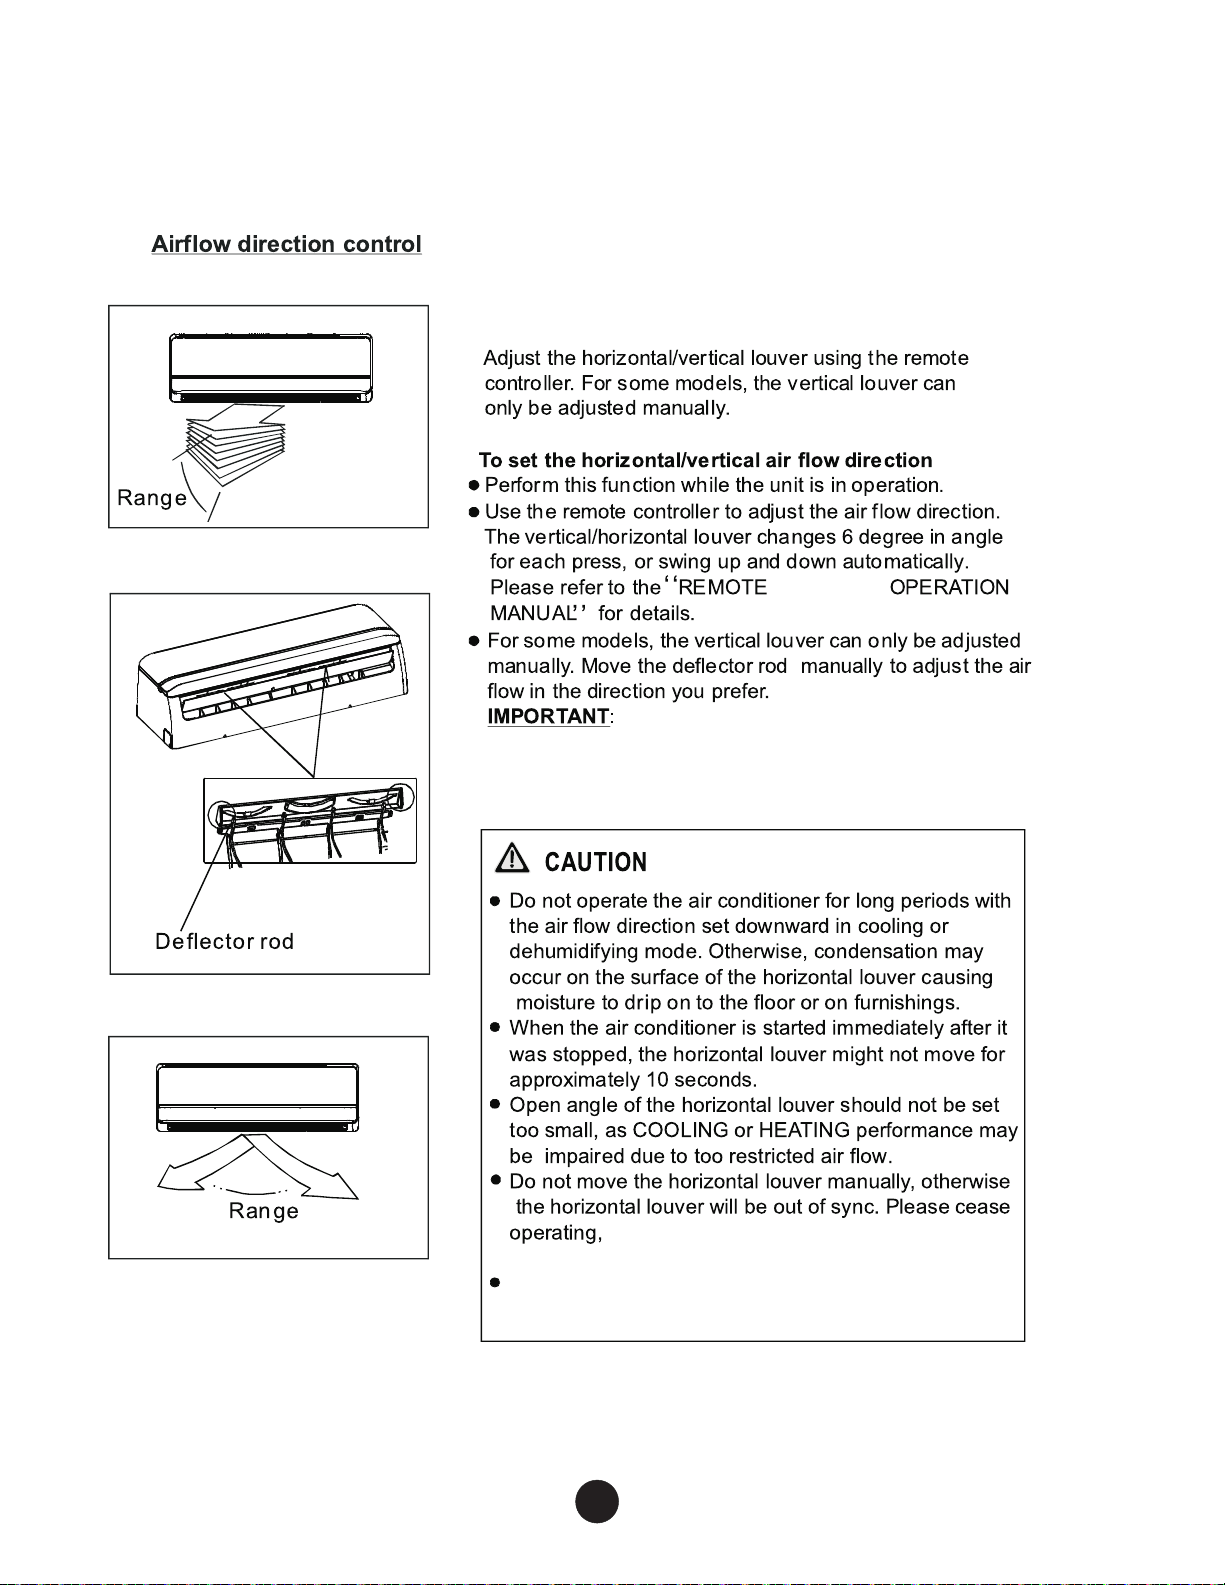
Adjust the airflow direction properly, otherwise
it may cause discomfort or uneven room
temperatures.
Do not insert fingers or objects into the
blower panel and suction side of the unit. The
fan could cause injury.
turn off the unit power, and restart the air
conditioner.
Do not operate the unit with the horizontal louver in
the closed position.
OPERATING INSTRUCTIONS
2 1
F/ C
2 1
F/ C
2 1
F/ C
2 1
F/ C

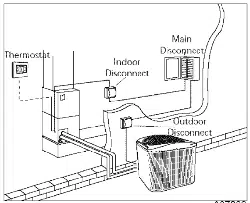
CLEANING, MAINTENANCE AND TROUBLESHOOTING
A CAUTION
ELECTRICAL
SHOCK
HAZARD
Failure to follow this caution
may
result in pc:IWnal injury
or
death.
Always
tum
off
power
to
the
system before performing any
cleaning
or
maintenance to the system. Tum
off
the outdoor
disconnect switch located near outdoor unit.
Be
sure to
disconnect indoor
unit
if
on
a separate switch
A CAUTION
EQUIPMENT
DAMAGE/OPERATION
HAZARD
Failure to follow this caution
may
result
in
equipment
damage
or
improper
unit
operation.
Operating the system with dirty
air filters
may
damage the
indoor
unit
and
could cause reduced cooling performance,
intennittent system operation, frost
build-up
on
indoor coil
or
blown
fuses.
Periodic Maintenance
Periodic maintenance is recommended to ensure proper operation
of
the unit. Recommended maintenance intervals
may
vary
depending
on
the
installation environment, e.g., dusty zones, etc.
Refer to Table
1.
A CAUTION
CUT
HAZARD
Failure
to
follow this caution
may
result
in
pc:IWnal injury.
The coil
fins
are
very
sharp. Use caution when cleaning.
Cleanin~:
the Coil
Clean the coil
at
the beginning
of
each cooling season,
or
when
necessary.
Use
a vacuum cleaner
or
a long-bristle brush
to
avoid
damage to the coil fins.
Air
Filters
Remove
and
clean
the
air filters
once
a month.
NOTE:
If
air filters show signs
of
excessive wear
or
are tom, they
must
be
replaced. Contact
your
local dealer for replacement filters.
1. Open front panel
on
unit.
2.
Pull
filters
down
to
remove.
3. Vacuum filters.
4. Clean
with
warm water.
5.
Shake filter to remove excess water and
dry
thoroughly.
6. Replace filter
by
sliding into rack until filter snaps
in
place.
7. Close front panel
on
unit.
A CAUTION
EQUIPMENT
DAMAGE
HAZARD
Failure to follow this caution
may
result in equipment
damage.
When
cleaning the front panel,
do
not
use water hotter than
105°F
(40.56°C)
and
do
not
pour
water onto the fan coil.
Do
not
use
abrasive
or
petroleum based cleaners as they
may
damage
the
front panel.
Indoor
Unit
Front
Panel
To clean the front panel
on
the indoor unit, wipe the outside with
a
soft, dry cloth.
If
necessary, a mild liquid detergent can
be
applied
and
wiped
off
with
a dry cloth.
Preparin~:
for
Extended Shutdown Period
Clean the filters and reposition them in
the
unit. Operate the
unit
in
Fan
only
mode
for 12 hours
to
dry all internal parts.
Tum
main
power
supply
off
and remove batteries from the remote
control.
System Operation Recommendations
The
items outlined
in
the following list will help to assure proper
system operation:
• Replace
both
remote control batteries
at
the same time.
• Point
the
remote control toward the unit display panel when
transmitting a command.
• Keep doors and windows closed while
unit
is operating.
• Contact
an
authorized service representative
if
a problem arises
that cannot
be
easily resolved.
•
Do
not
perform cleaning
or
maintenance activities while
unit
is on.
• Keep display panel
on
unit away from direct sunlight
and
heat
as
this
may
interfere with remote control transmissions.
•
Do
not
block air intakes and outlets
on
the
indoor
or
outdoor
units.
Enem
Savin~:
Recommendations
The
following recommendations will add greater efficiency to the
ductfree system:
• Select a comfortable thermostat setting and leave
it
at chosen
setting. Avoid continually
raising
and
lowering the setting.
• Keep unit filter clean. Frequent cleaning
may
be
necessary de-
pending
on
indoor air quality.
•
Use
drapes, curtains
or
shades to keep direct sunlight from
heating
room
on
very
hot
days.
•
Do
not
obstruct air intake
on
front panel.
• Tum
on
air conditioning before indoor air becomes too
un-
comfortable.
Troubleshootin~:
Refer
to
trouble
shooting
tips
on
pages
21-23
before
contacting
your
local
dealer.

MAINTENANCE
21
Filter
Handle
Before maintenance
•Tum
the system off before cleaning.
To
clean, wipe with
a soft, dry cloth.
Do
not
use
bleach or abrasives.
NOTE:
Power
supply
must
be disconnectd before
cleaning the
indoor
unit.
& CAUTIONS
• A cloth dampened with
oold
water may be used
on
the
indoor unit
if
it
is very dirty.
• Do
not
use a chemically treated cloth
or
duster to
clean the unit.
• Do
not
use benzine, thinner, polishing powder,
or
similar solvents for cleaning. These may cause
the plastic surface to crack
or
deform.
• Never use water hotter than 1 04°F(40°C}to clean
the front panel, it could cause deformation
or
dis co !oration.
Cleaning
the
unit
To
clean
the
front
panel
on
the
indoor
unit,
wipe
the
outside
with
a
soft,
dry
cloth.
If
necessary,
a
mild
liquid
detergent
can
be
applied
and
wiped
off
with
a
dry
cloth.
Cleaning
the
air
filter
and
air
freshening
filter
A clogged
air
filter reduces the cooling efficiency
of
this unit. Please clean the filter once every 2 weeks.
1.
Lift the indoor unit panel
up
to an angle until it
stops with a clicking sound.For some models,
please use suspension bars to prop up the panel.
2.
Take hold
of
the handle
of
the
air
filter and lift it
up slightly to take
it
out
from the filter holder,
then pull it downwards.
3.
Remove the AIR FILTER from the indoor unit.
Clean the
AIR
FILTER once two weeks.
Clean the
AIR
FILTER with a vacuum cleaner
or
water, then
dry
it
up
in
cool place .
•

MAINTENANCE
Air
freshening filter
~~]
Air
filter
Hold the two parts
of
Plasma where
are
marked
with"
signal and lift it. Than you
can
open
the cover
of
lh e the plasma and
remove the
filter.
(2)
4. Remove the
Air
Freshening Filters from its supporting
frame (The solution to disassemble rna}' differ from
each
other
for different filters. Refer to
CD
and®
).
Clean
the
air freshening filter at least once a month,
and replace
it
every
4-5 months.
Clean it with vacuum cleaner, then
dry
it in cool place.
& For the models with plasma, do not touch the plasma
within 10 minutes after you open
the
panel.
5. Install the air freshening filter back into position.
6. Insert the upper portion
of
air filter
back
into the
unit, taking care that the left and right edges line
up
correctly and place filter into position.
Replacement
of
air
filter and air freshening filter
1. Remove the
air
filter.
2. Reinstall the
air
filter
and
securely close the front
panel.
Preparation for extended non-operation
If
you plan to idle the unit for a long time, perform
the following:
(1)
aean
the indoor unit
and
filters.
(2) Operate the
fan
for
about half a day to
dry
the
inside
of
the unit.
(3) Stop the air conditioner and disconnect power.
(4) Remove the batteries from the remote controller.
The outdoor unit requires periodic maintenance
and cleaning. Do not attempt to do this yourself.
Contact your dealer
or
service provider.
Pre-season inspection
• Check
that
the wiring is not broken
off
or
disconnected.
• Clean the indoor
unit
and filters.
• Check
that
the air filter is installed.
• Check
if
the air outlet
or
in let is blocked after the
air conditioner has not been used
for
a long time.
fh
Caution
• Do not touch the metal parts
of
the unit when
removing the filter. Injuries can occur
when
handling sharp metal edges.
• Do not use water to clean inside the air conditioner.
Exposure
to
water can destroy the insulation,
leading to possible electric shock.
• When cleaning the unit, first make sure that the
power and circuit breaker are tumed
off.
• Do not wash
air
filter with hot
water
at more than
104
°
F
(
40°C
~
Shake
off
moisture completely and
dry
it
in
the shade. Do not expose it directly
to
the sun,
it
may
shrink.

TROUBLESHOOTING
Til'S
Nonnal
function
of
the
air
conditioner
The following events may occur during normal operation.
1.
Protection
of
the
air
conditioner.
Compressor
protedion
• The compressor can't restart for
3-4
minutes after it stops.
Anti-cold
air
(Cooling and heating models
only}
• The unit
is
designed not to blew cold air on
HEAT
mode,
when
the indoor heat exchanger
is
in
one
of
the following three situations and the set temperature
has
not been
reached.
A)
When
heating
has
just started.
B)
Defrosting.
C)
Low temperature heating.
• The indoor
or
outdoor fan stop running
when
defrosting
(Cooling
and
heating models only).
Defrosting
(Cooling
and heating
models
only}
• Frost may
be
generated on
the
outdoor unit during heat cycle when outdoor temperature
is
low
and
humidity is high resulting
in
lower heating efficiency of the air conditioner.
•
During
this condition air
condRioner
will stop heating operation and start defrosting automatically.
•
The time
to
defrost
may
vary
from
4 to 10 minutes according to the outdoor temperature
and
the
amount
of
frost built
up
on
the outdoor unit.
2.
A
white
mist
corning
out
from
the
indoor
unit
• A white mist may generate due to a large temperature difference
between
air inlet and air outlet
on
COOL
mode
in
an
indoor environment that
has
a high relative
humidity.
• A white mist may generate due to moisture generated from defrosting process when the air
conditioner restarts
in
HEAT
mode
operation after defrosting.
3.
Low
noise
of
the
air
conditioner
•
You
may hear a low hissing sound
when
the compressor
is
running or has just stopped running.
It is the sound of the refrigerant flowing or coming
to
a stop.
•
You
can also hear a low
"squeakR
sound when
the
compressor is
running
or
has just stopped
running.
This is caused by heat expansion
and
cold
contraction
of
the plastic parts
in
the unit
'Nhen
the temperature is changing.
• A noise may be heard due to louver restoring to
its
original position when power
is
turned
on.
4.
Dust
is
blown
out
from
the
indoor
unit.
This
is
a normal condition when
the
air conditioner
has
not
been
used for a long time
or
during first
use of the unit
5.
A
peculiar
smell
comes
out
from
the
indoor
unit
This
is
caused by the indoor unit giving off smells permeated from building material, from furniture,
or smoke.
6.
The
air
conditiooer turns
to
FAN
only
mode from COOL
or
HEAT (For cooling and
heating
models only} mode.
When
indoor
temperature
reaches
the
1emperature
setting
on
air
conditioner,
the
compressor
will
stop
automatically,
and
the
air
oonditioner
turns
to
FAN
only
mcxle.
The
compressor
will
start
again
when
the
indoor
temperature
rises
on
COOL
mode
or
falls
on
HEAT
mode
(Fa
cooling
and
heating
models
only)
to
the
set
point.

TROUBLESHOOTING
TIPS
7.
The air conditioner runs Anti-mildew function after turning
off
the unit.
When
turning
off the unit under COOL(AUTO
COOL,
FORCED
COOL)
and
DRY
mocle,
the air
conditioner
will
run
Anti-mildew
function for
7-10
minutes, if
turns
off on
HEAT
mode,
the unit will
continue operatil'l] for
about
30 seconds at
LOW
fan
speed,
then
stop the operation
and
tum
off the unit automatically.
8.
Drippil'l) water
may
generate
on
the
surfare of the
indoor
unit
when
oooling
in
a
high
relatively
humidity
(relative
humidity
higher
than
BOOk).
Adjust
the
horizontal
louver
to
the
maximum
air outlet
position
and
select
HIGH
fan
speed.
9.
Heating mode (For cooli"lg and heating models only)
The
air
conditioner
draws
in
heat
from
the
outdoor
unit
and
releases
I
via
the
indoor
unit
duril'l) heatil'l]
operation.
When
the
wtdoa
temperature
falls,
heat
drawn
in
t:7y'
the
air
conditioner deaeases
e~:cordingly.
At
the
same
time,
heat loadil'l] of the air
conditioner
increases
due
to
larger
difFerence
between
indoor
and
outdoor
temperature.
If
a
comfortable
temperature
can't
be
achieved
by
the
air condtioner,
we
suggest
you
use
a
supplementary
heatilg devire.
10.
Auto..ntstart function
• Power failure wring operaion
will
stop
the
air
conditioner
completely.
• For air conditioners without
Auto-restart
feature,
when
the
power
restores,
the
OPERATION
indicabr
on
the
indoor
unit
starts
flashing.
To
restart
the
operation,
push
the
ON/OFF
butbn
on
the
remote
controler.
For
air conditioners
with
Auto-restart
feature,
when
the
power
restores,
the
air
conditioner
restarts
automatically
with
all
the
previous
settings preserwd
by
the
memory
function.

TROUBLESHOOTING
TIPS
Troubleshooting
guide
OPERATION(RUN) indicator
or
other
The
air
conditioner
may
stop
operation or
continue to run in a safety condition
indicators continue flashing.
(depending on
models). Waiting for
about 1
0 minutes, the
fault
may
be
If
one
of
the following code appears on the
recovered
automatically,
if
not,
disconnect the
po~Aer
and then
Trouble
display area :
EO,E1
,E2,E3 .....
or
PO,P1
,P2,
connect it in again.
If
the
problem
P3 .... , or F1,F2,F3 .......
still exists, disconnect the power and
contact the nearest customer service
center.
Fuse
blows frequently
or
circuit breaker trips
frequently.
Stop
the
air
conditioner immediately,
Other
objects or water fall into the
air
conditioner.
disconnect the
pONer and contact the
Terrible odors are smelled
or
abnormal sounds
nearest customer service center.
are
heard.
Malfunctions
Cause
What
should
be
done?
Power
cut
Wait for power to
be
restored.
Air
conditioner
does
not
start
Air
conditioner may have become
Check that
plug is securely in wall
Unplugged.
receptacle.
Fuse may have blown.
Replace
the fuse.
Battery in Remote
controller may
have been exhausted.
Replace the battery.
The
time
you
have set with
timer
Wait
or
cancel timer setting.
is
incorrect.
Air
conditioner not
Inappropriate temperature
Set
temperature correctly. For
cooling
or
heating
setting.
detailed method please refer to
(Cooling/
heating
RUsing
remote
controiR
section.
models
only)
Air filter is blocked. Clean the
air
filter.
room
very
well
r.vhile
air
flowing
Doors
or
Windows are open.
Close
the
doors
or
windONs.
out
from
the
air
Air inlet
or
outlet
of
indoor
or
Clear obstructions
away
first
then
conditioner
outdoor unit has been blocked.
restart the unit.
Compressor 3 minutes
Wait.
protection has been activated.
If
the trouble has not been corrected, please contact a local dealer.
Be
sure to inform them
of
the
detailed malfunctions and air conditioner model number.
Notes:
Do
not
attempt
to
repair
the
unit
yourself.
Always
consult
an
authorized
service
provider.
38-40MA-01OM