
2
Contents
Safety information
………………………………… 3 - 7
Before using your appliance
………………………………… 7
Product Overview
………………………………… 8 – 9
Timer Control
Dial ………………………………… 10 - 11
Dryer Times Reference Table
………………………………… 10 - 11
Positioning
………………………………… 12
Floor Installation
………………………………… 13
Wall Installation
………………………………… 14 – 17
Vent Hose Installation
………………………………… 18
Operating
instructions ………………………………… 19 - 21
Reversing the Door
………………………………… 21
Care and maintenance
………………………………… 22 - 24
Trouble shooting
………………………………… 25 - 26
Technical specification
………………………………… 27
Product fiche
………………………………… 27
Connection
to mains supply ………………………………… 28
Guarantee
………………………………… 29
Notes
………………………………… 30 - 31

3
Safety instructions
Important note:
Please read this booklet before installing and switching on this appliance. The
manufacturer assumes no responsibility for incorrect installation and usage as
described in this booklet.
• This appliance can be used by children aged from 8 years and above
and persons with reduced physical, sensory or mental capabilities or
lack of experience and knowledge if they have been given supervision
or instruction concerning use of the appliance in a safe way and
understand the hazards involved. Children shall not play with the
appliance.
• Do not use an extension lead for this appliance. Only plug directly into a wall
socket.
• Do not plug in damaged plug sockets.
• In case the power cable becomes damaged, contact 0345 208 8750 for advice.
• Never pull the cable when unplugging – always grip the plug itself.
• Do not plug-in or pull-out the plug from the receptacle with wet hands
to prevent electric shock.
• Never touch the machine with wet hands or feet.
• Never force the door to open when the appliance is running.
• In case of any breakdown, unplug the appliance first and then turn the tap
off. Do not attempt to repair by yourself, always contact 0345 208 8750 for
advice.
• Remember that packaging materials of your machine may be dangerous for
children.
• Keep the packaging materials in a place where children cannot reach or
dispose of them appropriately.
• Do not allow your children to play with the tumble dryer as it is an
electrically driven appliance.
• Children of less than 3 years should be kept away unless continuously
supervised.

4
Safety instructions
• Keep your pets away from your machine.
• Your machine should only be used by adults in line with the information
provided in this user’s manual.
• Your machine is designed to be used domestically. Commercial use will
cause your warranty to be cancelled.
• Any tampering with the machine, except by a qualified engineer, in any
way, will cause your warranty to be invalid.
• Ideal ambient temperature of your machine is 15-30˚C.
• Do not place your machine on carpet as this will block ventilation of the base.
• Do not keep inflammable liquids near your machine.
• Your machine is not covered under warranty for faults caused by any kind of
external factors (pesticides, fire, etc.).
To avoid fire, electrical shock and other accidents, please remember the
following:
• To ensure your safety, an earthed power supply should be used.
• Only the voltage indicated in power label can be used. If you are not clear
of the voltage at home, please contact your electricity supplier.
• Adequate ventilation must be provided around the tumble dryer.
• Exhaust air must not be discharged into a flue which is used for exhausting other
fumes from appliances burning gas or other fuel.
• Please note it is not recommended that the dryer is placed directly next to
ovens, cookers, or other heat sources as the performance of the dryer may be
affected.
• A carpet must not obstruct the ventilation openings in the base of the dryer.
• Do not stack the tumble dryer on top of other appliances .

5
Safety instructions
• Under no circumstances should anything other than the recommended articles
be placed in the tumble dryer.
• The tumble dryer should be serviced by an appointed service team with genuine
parts. Please contact the service team below for assistance with any repairs.
• It is dangerous to alter or modify the product in any way other than fitting
authorized accessories.
• We recommend that the appliance is unplugged each time after use. It should
always be disconnected from the electricity supply when not in use for long
periods of time.
• The rear of the dryer gets quite hot during use. Position the dryer so that the
back is not accessible while in operation, but ensure that the sides have a space
available to allow airflow. Use the hose to assist with the ventilation.
• The special mains cable and plug assembly must only be replaced with a genuine
part from the manufacturer, please contact the customer support team below.
• It is important to clean fluff from the window of the dryer and around the door
seal after each drying cycle.
• Do not install the appliance close to a fire or heat source.
• Do not rest anything burning, such as a candle, on the appliance.
• Do not install the appliance in a damp environment, the dampness may cause
damage to the tumble dryer.
• Do not install the tumble dryer in direct sunlight, or in a hot environment.
• The tumble dryer is not to be used if industrial chemicals have been used for
cleaning Make sure items that may cause damage do not get in to the dryer,
such as coins, safety pins, nails, screws, stones . Check the pockets on all the
items of clothing.
• Any electrical work required to install the appliance should be carried out by a
qualified person.

6
Safety instructions
• It is important to clean the lint filter after each drying cycle or the restrictions to
airflow will extend drying times and could cause the safety cut-out to trip.
• Do not place items that have any type of oil soaked in to the fabric, in the
tumble dryer. There is a potential the oil could catch on fire.
• Fabric softeners, or similar products, should be used as specified by the
fabric softener instructions.
• Do not use the appliance to dry cushions, quilts, duvets, or similar items.
• The appliance must not be installed in a cabinet.
• The appliance must not be installed behind a lockable door, a sliding door or a
door with a hinge on the opposite side to that of the tumble dryer, in such a way
that a full opening of the tumble dryer door is restricted.
• Check the appliance is not standing or pressing on the power cable.
• Foam rubber, latex, shower caps, waterproof textiles, rubber backed articles
and any other items with foam rubber pads should not be dried in the tumble
dryer.
• Always unplug the appliance after use, clean and maintain.
• Do not overload the appliance.
• Do not place clothes that are dripping wet in the tumble dryer..
• Clothes that have been in contact with volatile liquids should not be machine
dried. Any fluid should be fully removed from the item before it can be dried.
• Items that have been soiled with substances such as cooking oil, acetone,
alcohol, petrol, kerosene, spot removers, turpentine, waxes and wax removers
should be washed in hot water with an extra amount of detergent before being
dried in the tumble dryer.
• Do not dry unwashed items in the tumble dryer.
7
Safety instructions
• The final part of a tumble drying cycle occurs without heat (cool down cycle) to
ensure the items are not damaged. Do not stop the dryer before it has fully
finished the drying cycle.
• Do not use excessive, or high pressure water when cleaning the tumble dryer.
• Oil-affected items can ignite spontaneously, especially when exposed to heat
sources such as in a tumble dryer. The items become warm, causing an
oxidation reaction in the oil. Oxidation creates heat. If the heat cannot escape,
the items can become hot enough to catch fire. Piling, stacking or storing oil-
affected items can prevent heat from escaping and so create a fire hazard.
• The appliance should not be overturned during normal use or maintenance.
• Remove all objects from pockets such as lighters and matches.
• WARNING: Never stop a tumble dryer before the end of the drying cycle unless
all items are quickly removed and spread out so that the heat is dissipated.
Before using your appliance
• Before installation, check that all parts are present. If any parts are missing,
please contact the customer service team on: 0345 208 8750.
8
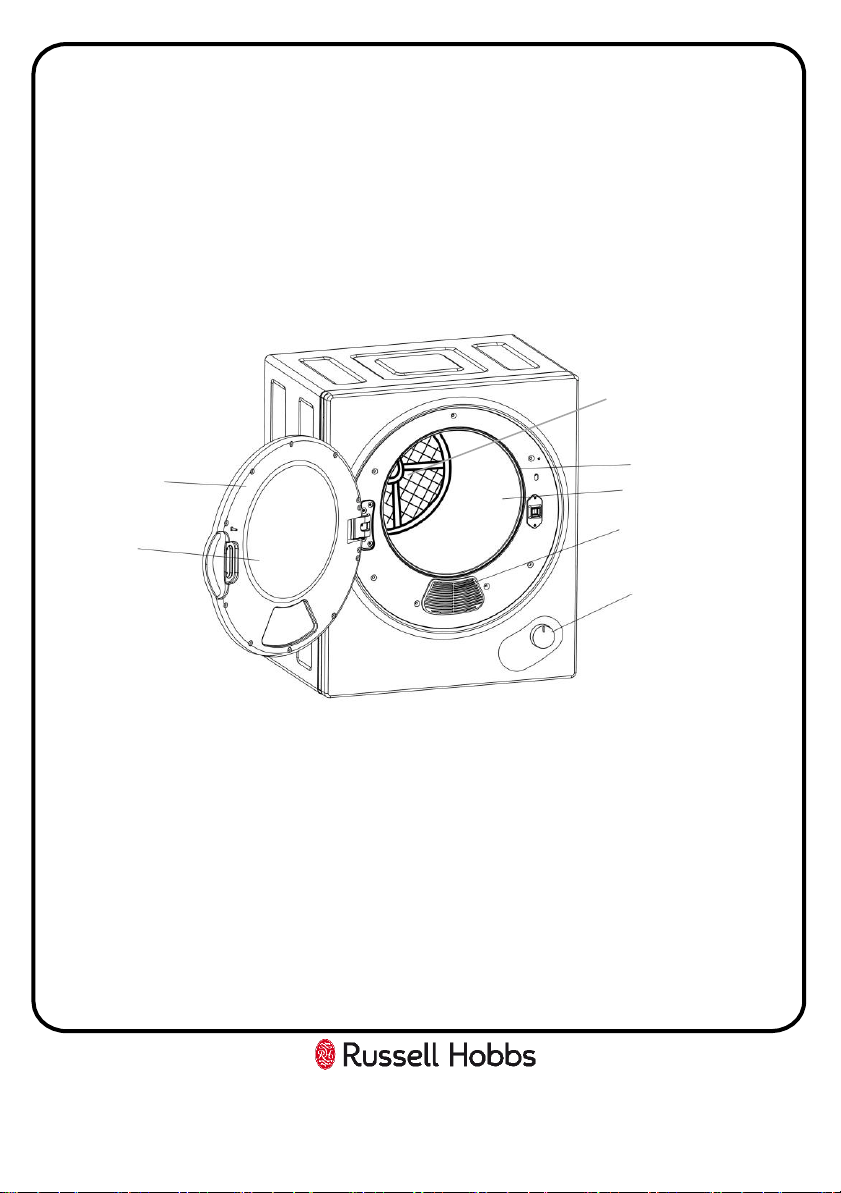
Product Overview
Note: The drawings in the book may vary from your dryer. They are
designed to show the different features of all models covered by this
book. Your model may not include all features.
1. Door
2. Window
3. Lint/fluff filter
4. Door gasket
5. Drum
6. Air intake cover/filter
7. Timer dial
1
2
4
7
6
5
Front view
3
9
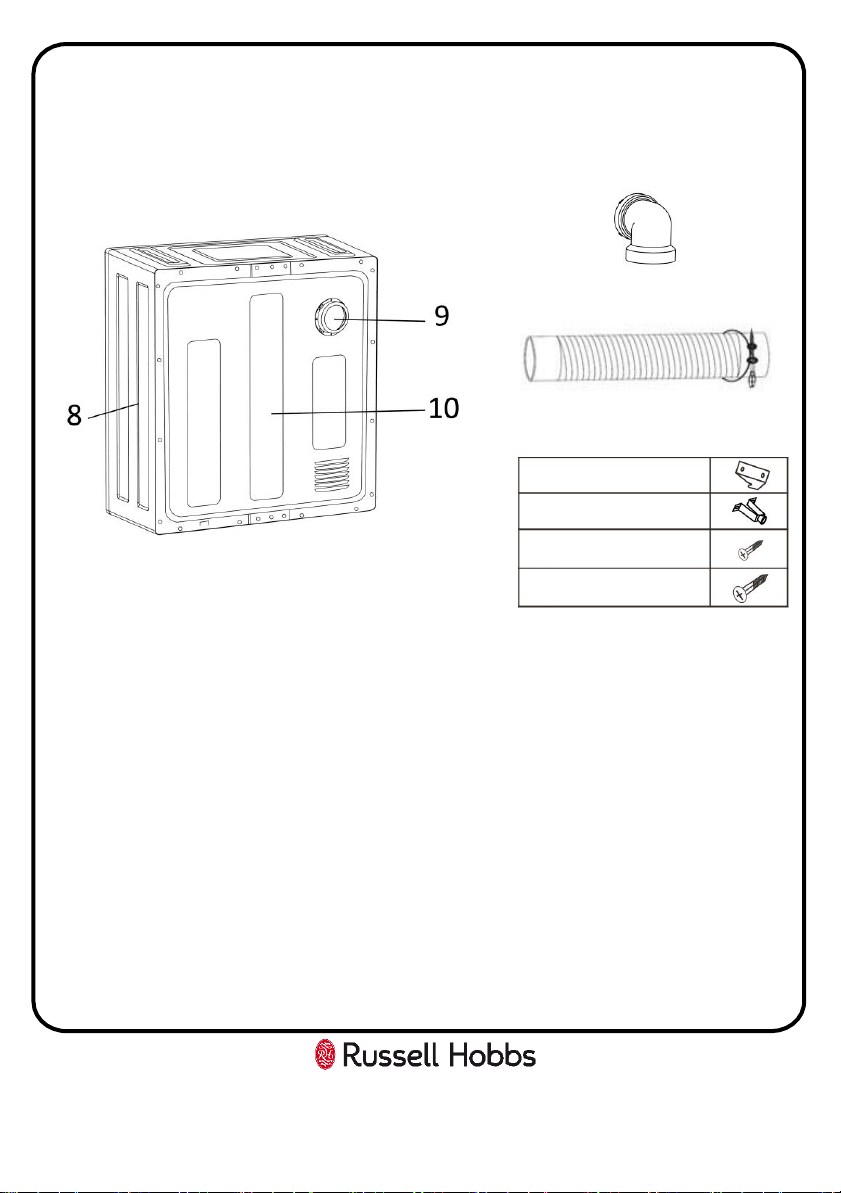
Product Overview
Rear view
8. Casing
9. Exhaust vent
10. Back cover
12
Unit Parts & Spare Parts
Before installation, check that all parts detailed in the product overview are
present. If any parts are missing, please contact the Customer Service team on
0345 208 8750 or visit us at https://mda.russellhobbs.com
13
11
11. Exhaust connector
12. Vent hose with jubilee clip
13. Wall mounting kit
2 x Hanging bracket
2 x Spacers
4 x 12mm Screws
6 x 25mm Screws
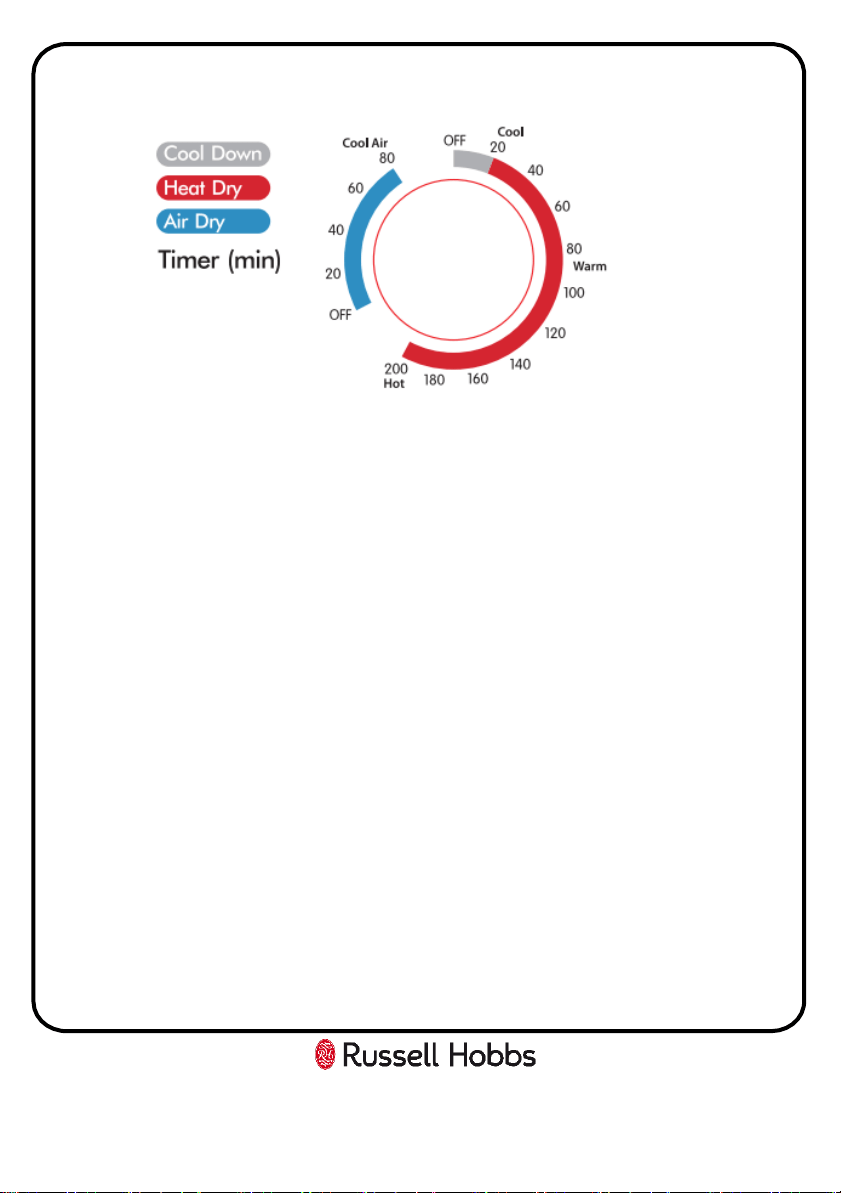
1. Off
When the ‘Drying Timer’ dial is in the ‘OFF' position no power is supplied to
the unit. As soon as the dial is turned clockwise to the desired program the
dryer will start.
2. Cool (Off – 20mins)
This setting is generally used to cool the items that have just been dried. This
helps to prevent creasing. Instead of the motor pushing heat or hot air into
the drum of the dryer it will generate cool air and push it in to the drum.
3. Warm (20 – 120mins)
Warm drying setting: This function will dry and cool items and in most cases
leave items wrinkle free (depending on material). We recommend setting the
timer between 60-120 minutes.
To use as an Anti-crease setting for items that are difficult to iron: cotton
shirts and linen for example. Set the drying timer dial between 30-60 minutes
depending on the amount of items in the dryer. Once the timer stops
(Including the Cool program) the items will still contain moisture, making the
ironing process easier.
10
Timer Control Dial
4. Hot (120 – 200 mins)
For drying large quantities or bulky Items (the drum inside the dryer is
more than 1/2 full). Set the timer for more than 120 minutes.
5. Air Dry (Off – 80mins)
This function runs with cool air, primarily to air items that require
freshening: clothes that have been put away for a long period of time for
example.
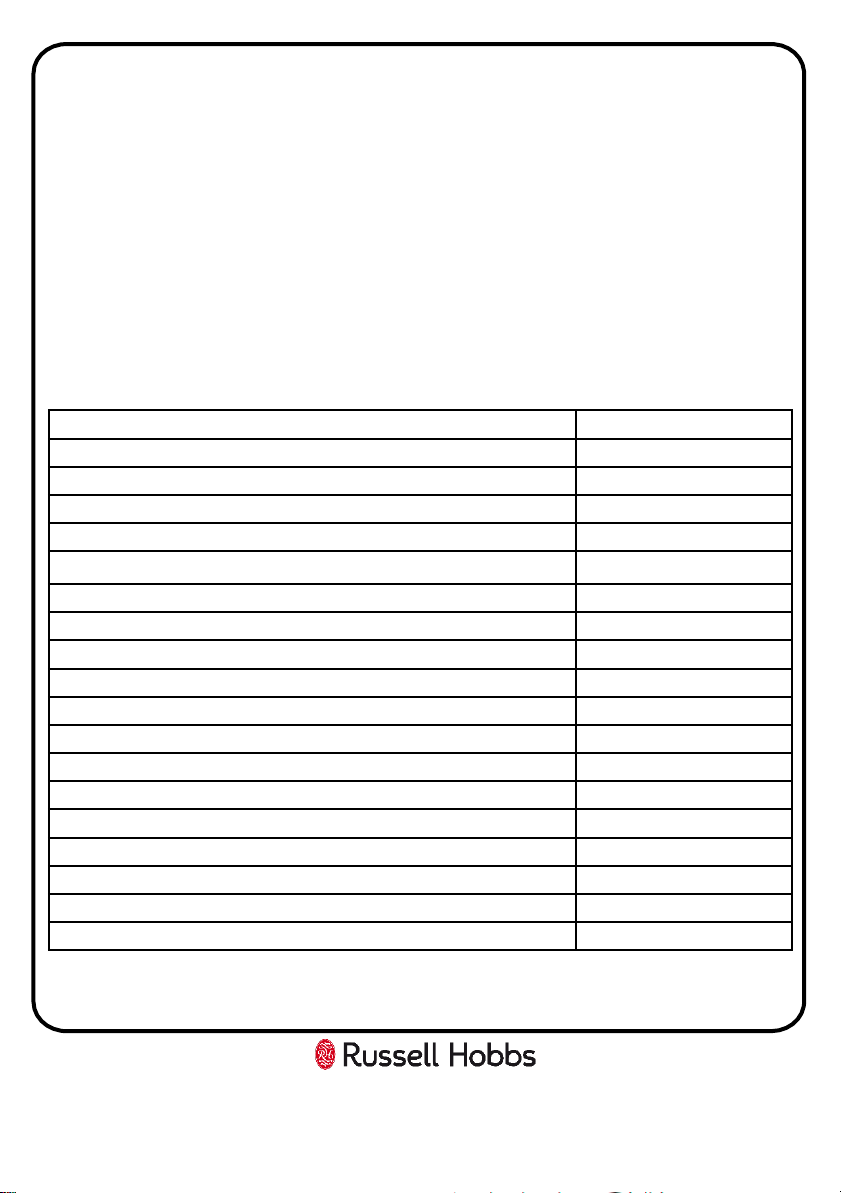
Dryer Times Reference Table
Drying times can be affected by many factors such as the wetness of the clothes
(quick wash vs standard wash: quick washes leaves clothes heavier because they
don’t extract as much water from the clothes due to reduced spinning cycles &
speeds), materials, bulkiness, load amount/weight, etc. Below is a guide as to
what setting should be used, if longer is needed simply reset the dryer and run the
drier again:
11
Timer Control Dial
Drying capacity / load (kg) Drying time (mins)
0.5kg (approximately) 30mins (approximately)
1.0kg (approximately) 60mins (approximately)
1.5kg (approximately) 120mins (approximately)
2.5kg (approximately) 200mins (approximately)
12
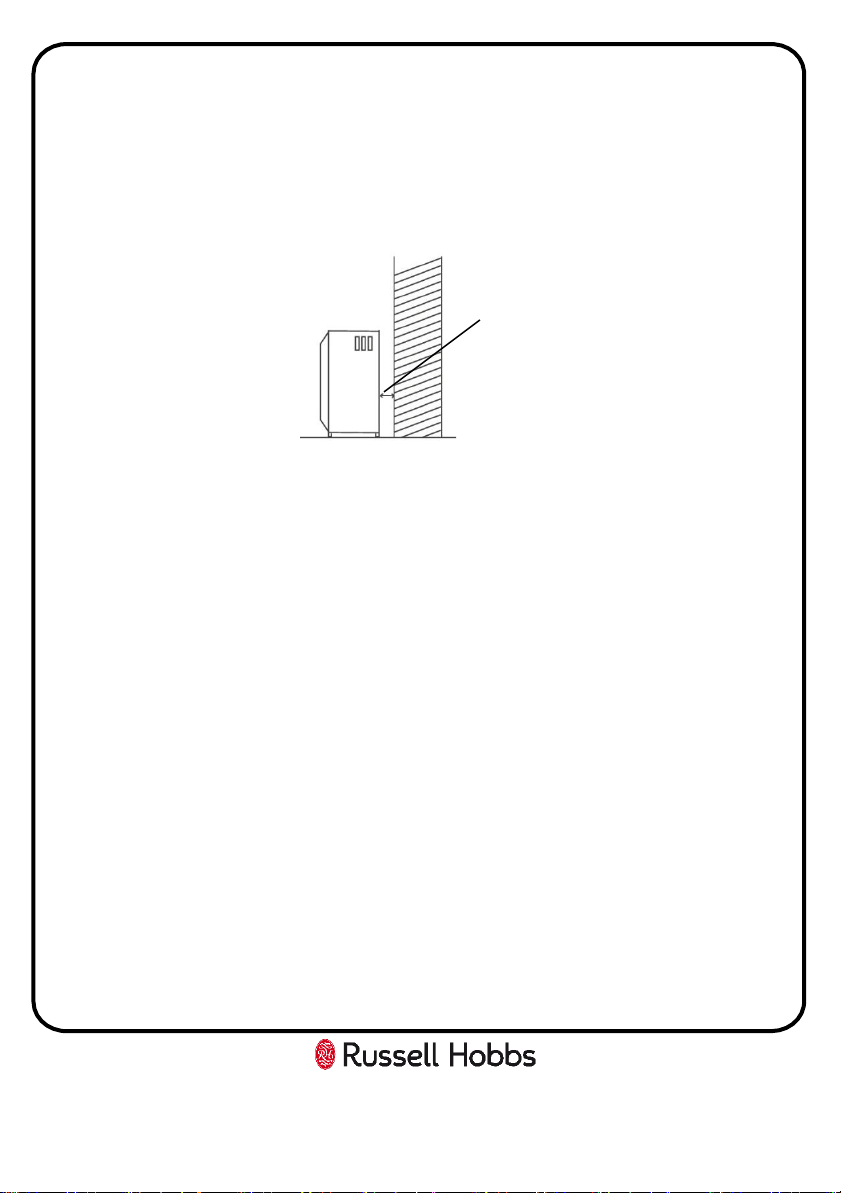
Positioning
For convenience, dryers are often positioned close to the washing machine,
so the laundry can be easily transferred. The dryer should be placed in a
ventilated area with at least a 15cm distance from the wall. It is
recommended that there are no obstacles within 1.5m in front of dryer.
The dryer should be positioned away from heat and direct sunlight. If the
dryer is not wall mounted, it must be placed on firm horizontal ground. Do
not place the dryer on carpet as this will block the intake.
The tumble dryer will expel moist air, and it’s recommended this is directed
outside to avoid condensation accumulating inside a room. Position the vent
hose supplied, through a window or an air outlet so that the moisture can
escape. Contact a qualified tradesman to fit the vent hose so it exits through
a wall or door. Exhaust of humid air from the dryer into a room may damage
the walls and furniture in the room.
Install the tumble dryer so that the plug remains accessible after installation.
Do not block any vents on the dryer, as this will impair the working of the
machine. It should be placed on a firm level surface, as this helps keep noise
and vibration to a minimum. There should be no movement from the dryer.
Do not remove the feet from the dryer.
The hot air emitted from the tumble dryer can reach temperatures of 70˚c,
therefore, make sure the floor can handle these temperatures. The tumble
dryer works best in a room between 15˚c and 30˚c.
15cm
13
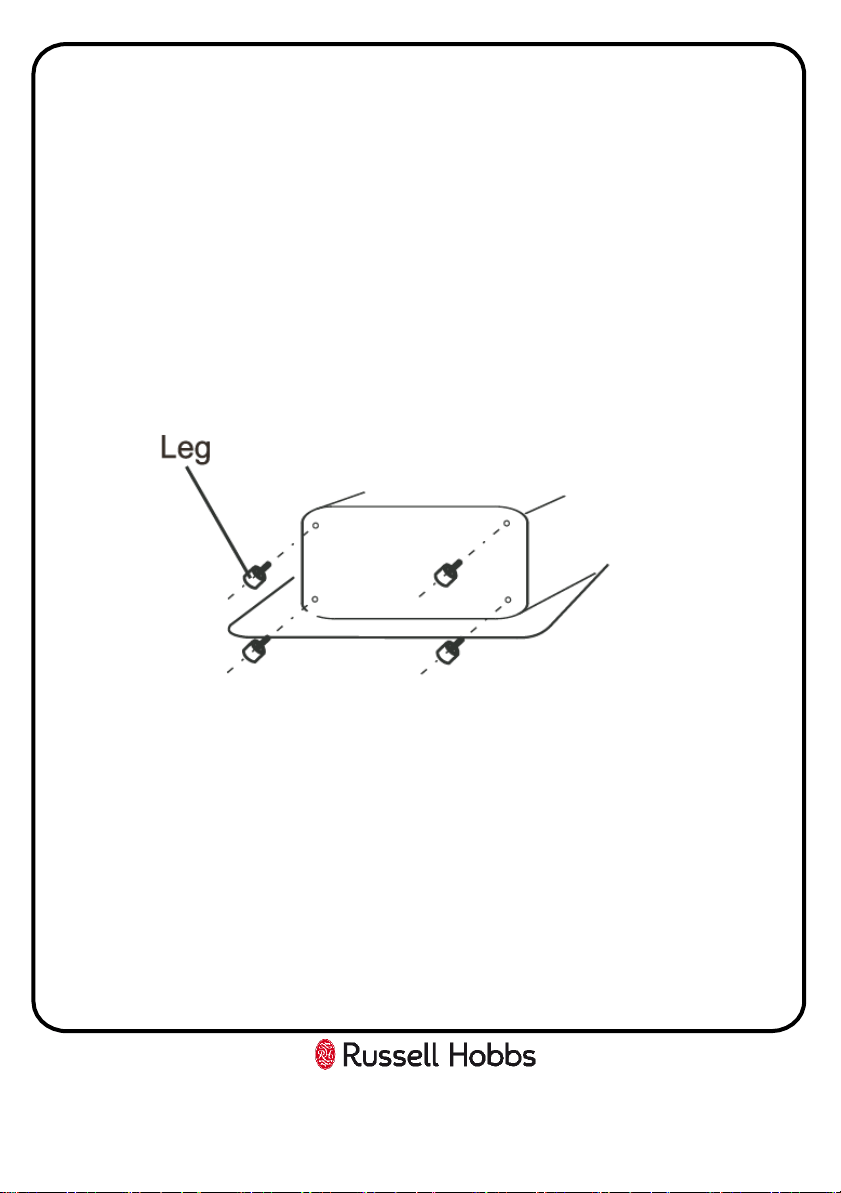
Floor Installation
Note: This dryer can not be used upside down
• Do not place your appliance on a carpeted surface as this will
prevent adequate ventilation and block the intake.
• This appliance should only be placed on a flat, firm surface.
• There should be at least a 15cm between the rear of the dryer and the
wall.
• The dryer comes with fixed legs that are pre-assembled, to ensure
stability.
Note: This dryer is not suitable to be directly placed on top of a washing
machine.
Note: The dryer hanging brackets have to be installed into timber studs or
timber slats. Do not install into plasterboard.
Tools Required: Philip head screwdriver, drill and 3mm drill bit.
For your own safety, a minimum of 2 people should lift or hold this product.
Wall Mounting
1. Locate the wall mount kit, this will be packaged with the IB inside the
drum of the appliance
2. Determine the position on wall that you want the dryer to be situated.
Mark the required bracket position.
i. A minimum 50mm is needed between the top of the dryer and
the ceiling for ease of installation.
ii. If mounting above a washing machine, allow sufficient room to
open the lid of the washer (if needed)
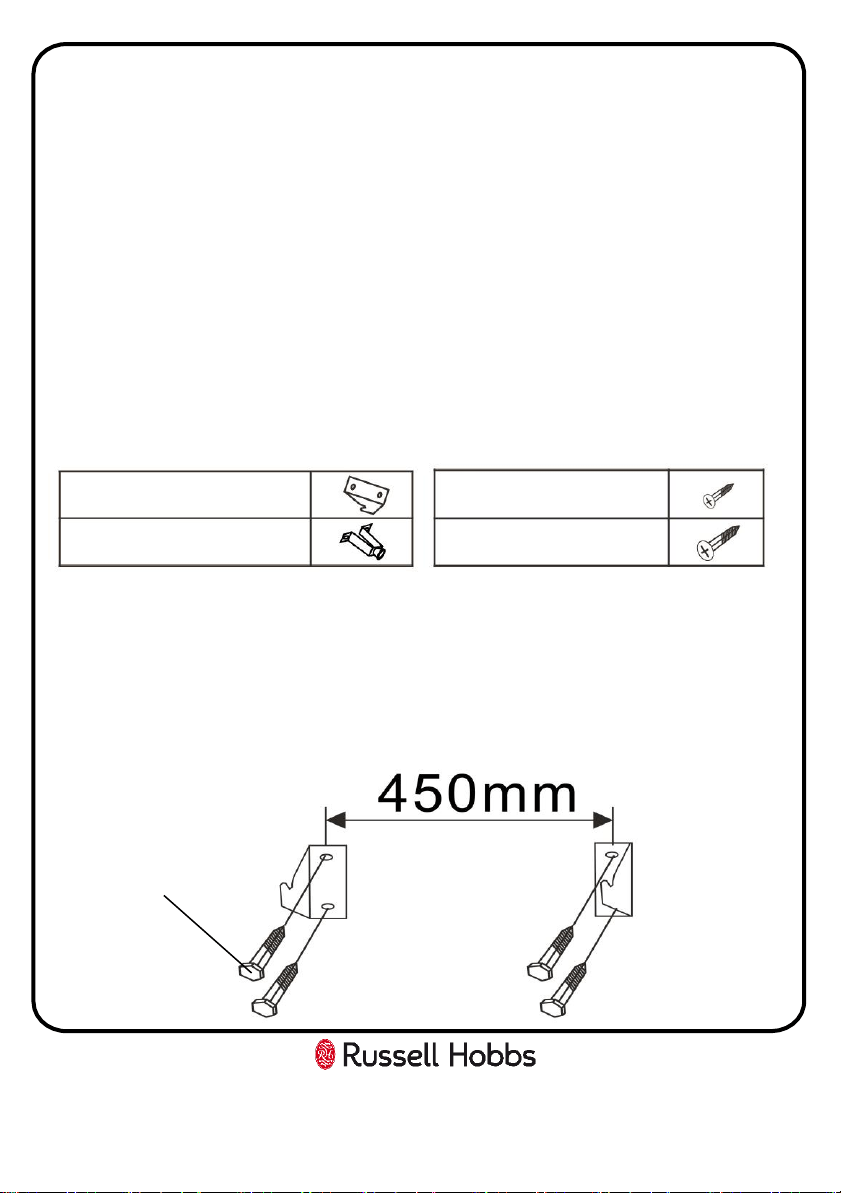
14
Wall Installation
25mm screws
2 x Hanging bracket
2 x Spacers
4 x 12mm Screws
6 x 25mm Screws
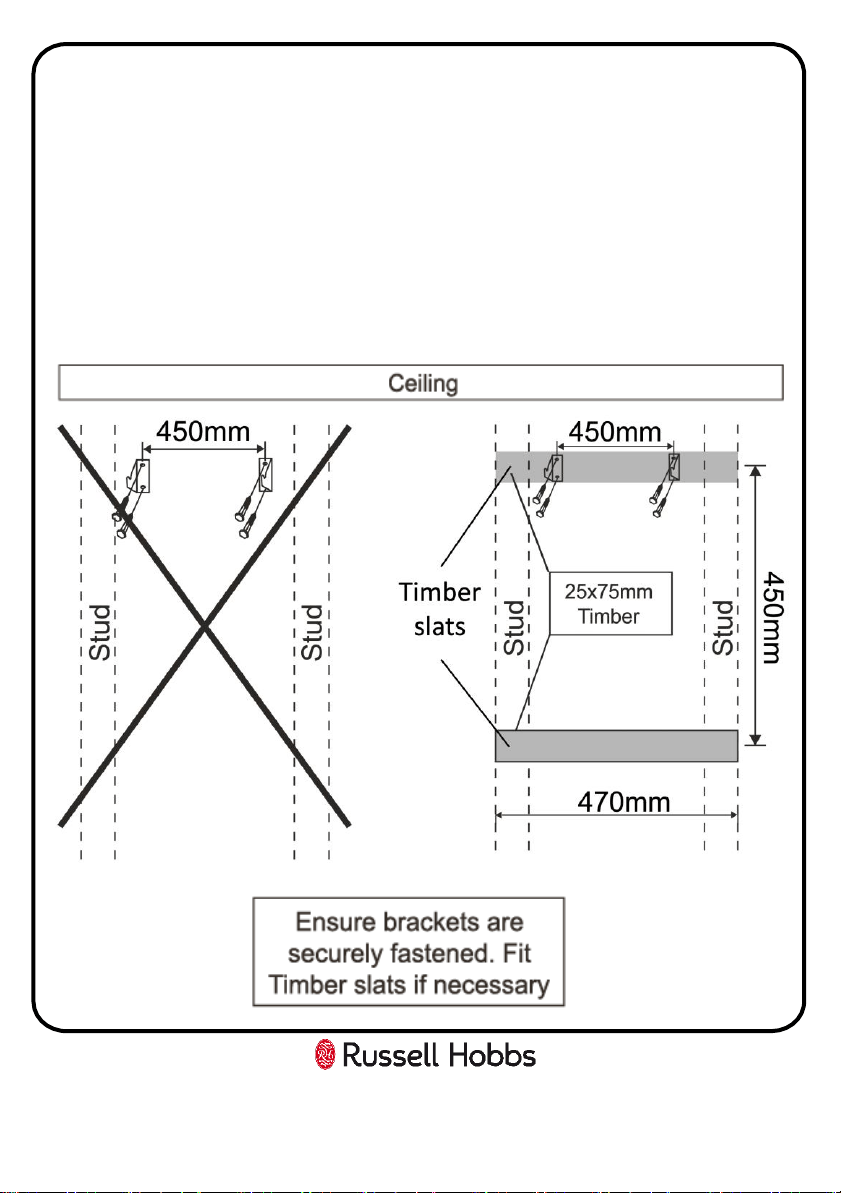
3. To ensure the dryer is fixed securely to the wall and there is no danger
of it falling from the wall or coming away from the wall. The wall
hanging brackets have to be fixed into timber studs that are within the
wall. These can found by using a stud finder (not supplied). If there
aren’t timber studs in the location you want to fit the wall hanging
brackets because the stud position is too narrow or too wide then you
will have to fit timber slats between the studs to mount the brackets.
Do not install into plasterboard.
15
Wall Installation
Timber
slats
450mm 450mm
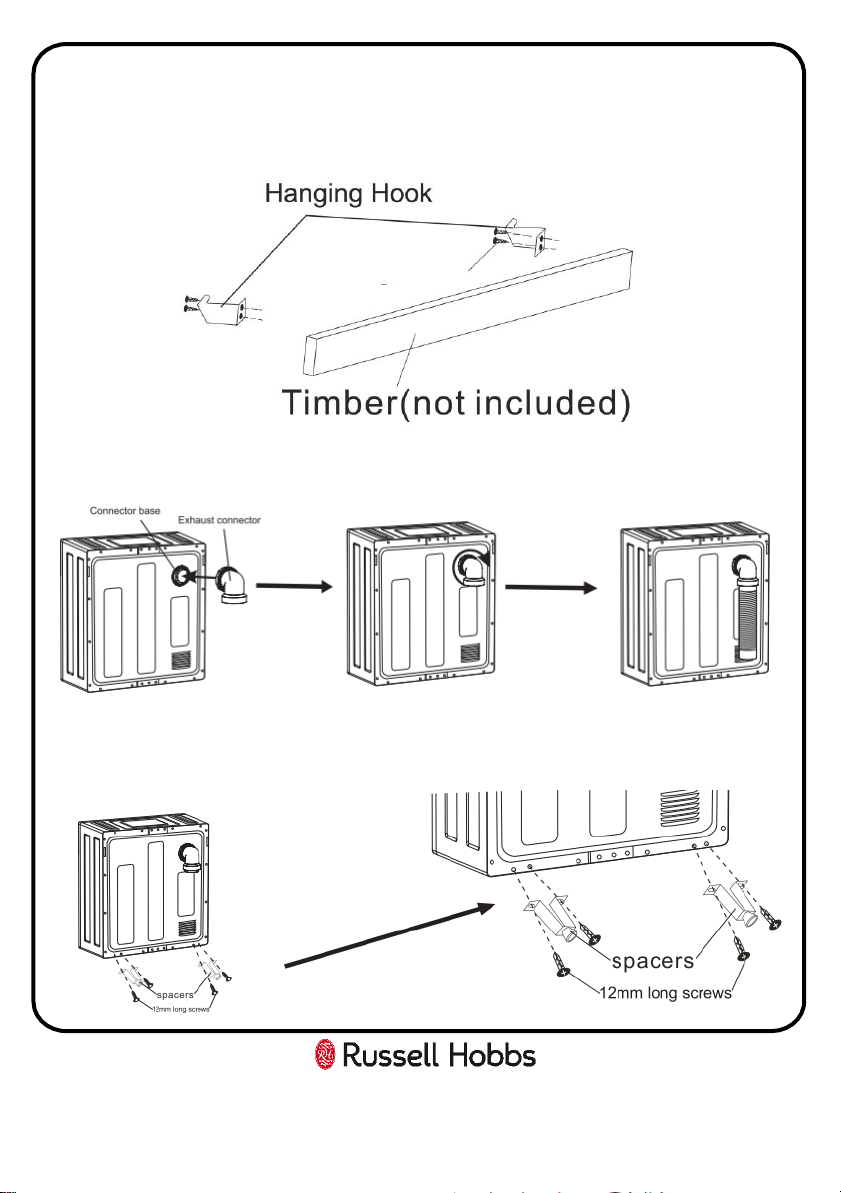
4. Install and fix the hanging hooks to the timber studs or timber slats
(ensuring the hooks are aligned) with the 4 x 25mm screws.
5. Install or adjust the exhaust connector direction by turning the exhaust
connector clockwise, until it inserts into the connector's groove.
6. Using 4 x 12mm screws provided, fix the 2 spacers to the rear of the
appliance.
16
Wall Installation
25mm screws
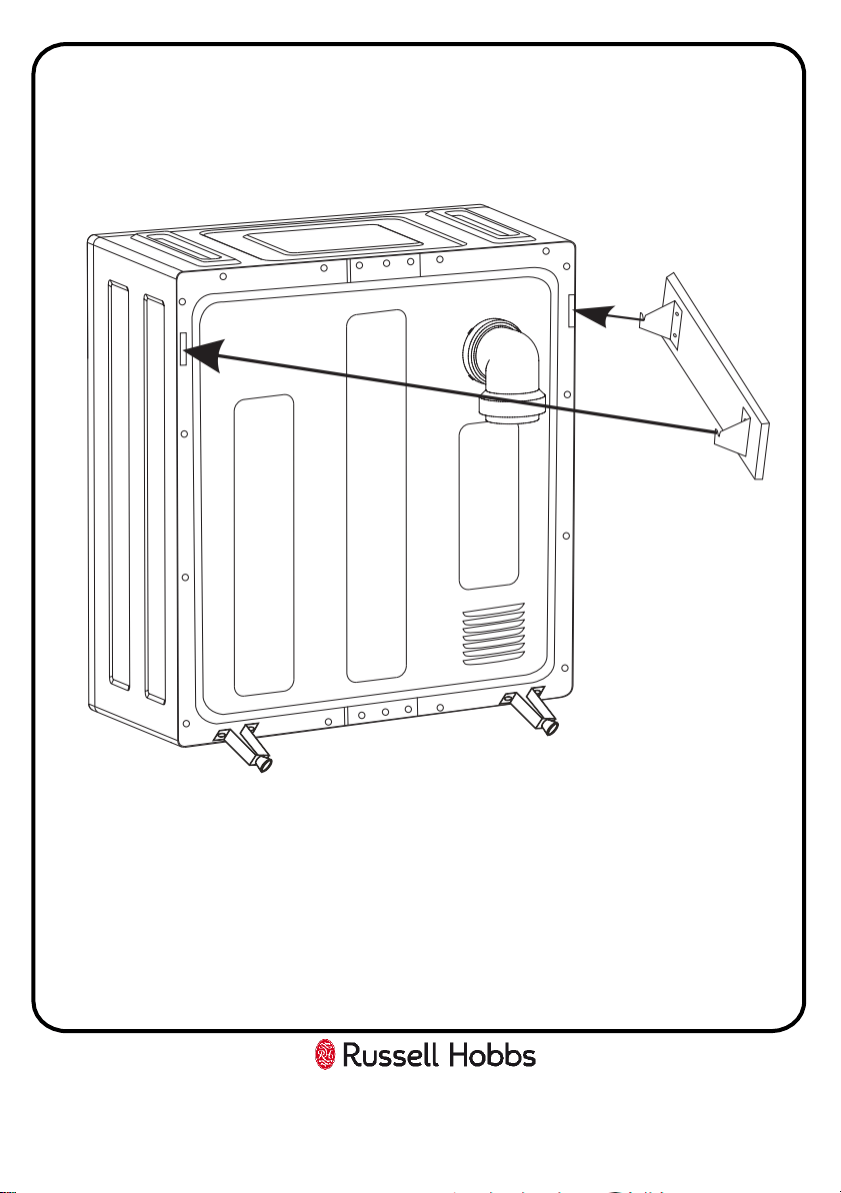
7. With assistance, mount the dryer on to the wall bracket.
17
Wall Installation
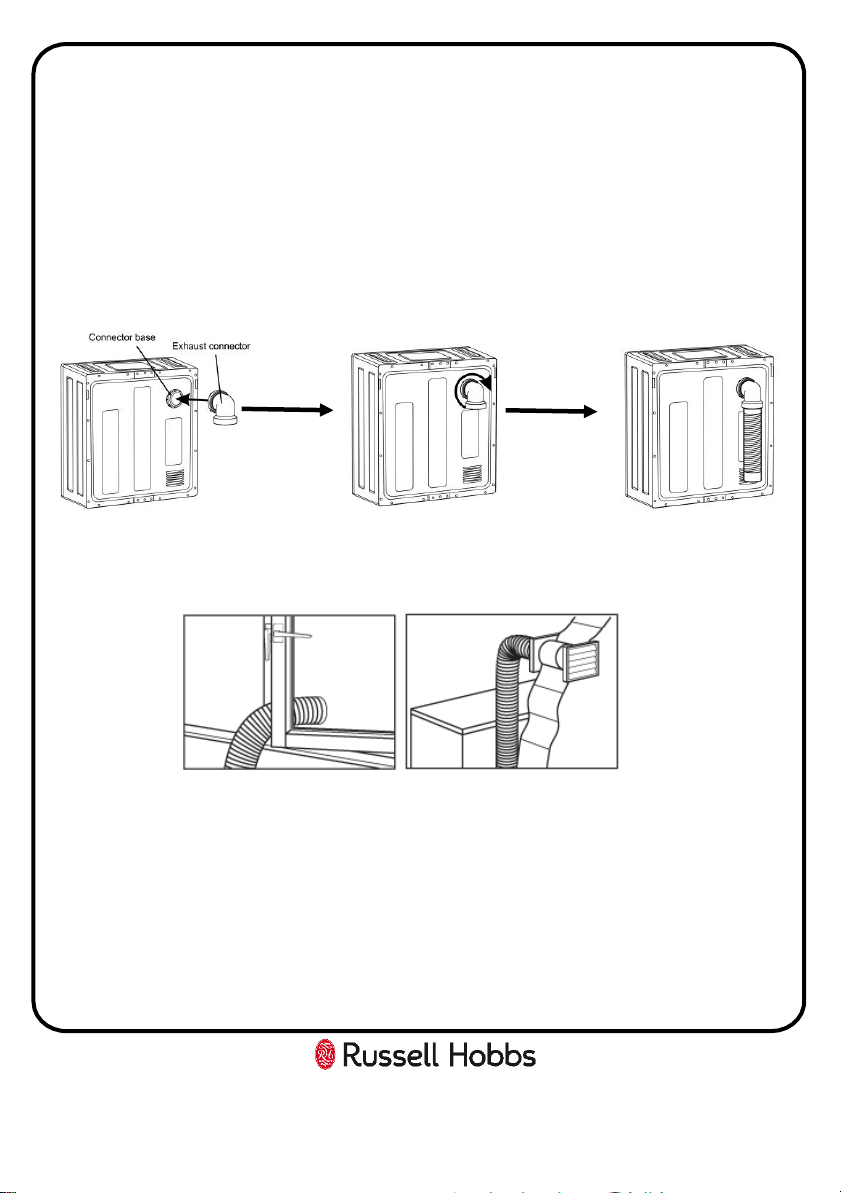
Fitting the vent hose
One edge of the exhaust connector has a thread, this edge is to be aligned
with the vent on the back of the appliance. When aligned, push and twist
the end of the exhaust connector in a clockwise direction until the exhaust
connector is attached securely. You can then push the vent hose into the
exhaust connector and secure it using the jubilee clip that is supplied.
The air outlet hose must be extended directly to the outdoors.
Do not allow more than two bends in the hose and end of the hose should
not be bent, stepped on or folded between the drain and the machine.
Moisture may accumulate in the hose, it may be useful to drill a small hole
at a low point to allow the moisture to escape.
18
Vent Hose Installation
19
Operating Instructions
IMPORTANT NOTE - If you are drying laundry that weighs less than 0.8kg
(small loads) when wet, then select the Time function to dry clothes
(minimum of 1 hour should be set).
Remove all the packaging material, including any material inside the drum.
Before using the appliance for the first time, it is advised to place two damp
clothing articles inside the drum and dry them for 1 hour. There may be
some dust in the drum of the tumble dryer, and this will help remove the
dust.
Step 1 - Open the door and place the laundry in the drum, one item at a
time. Lightly shake and loosen the clothing to prevent it getting tangled.
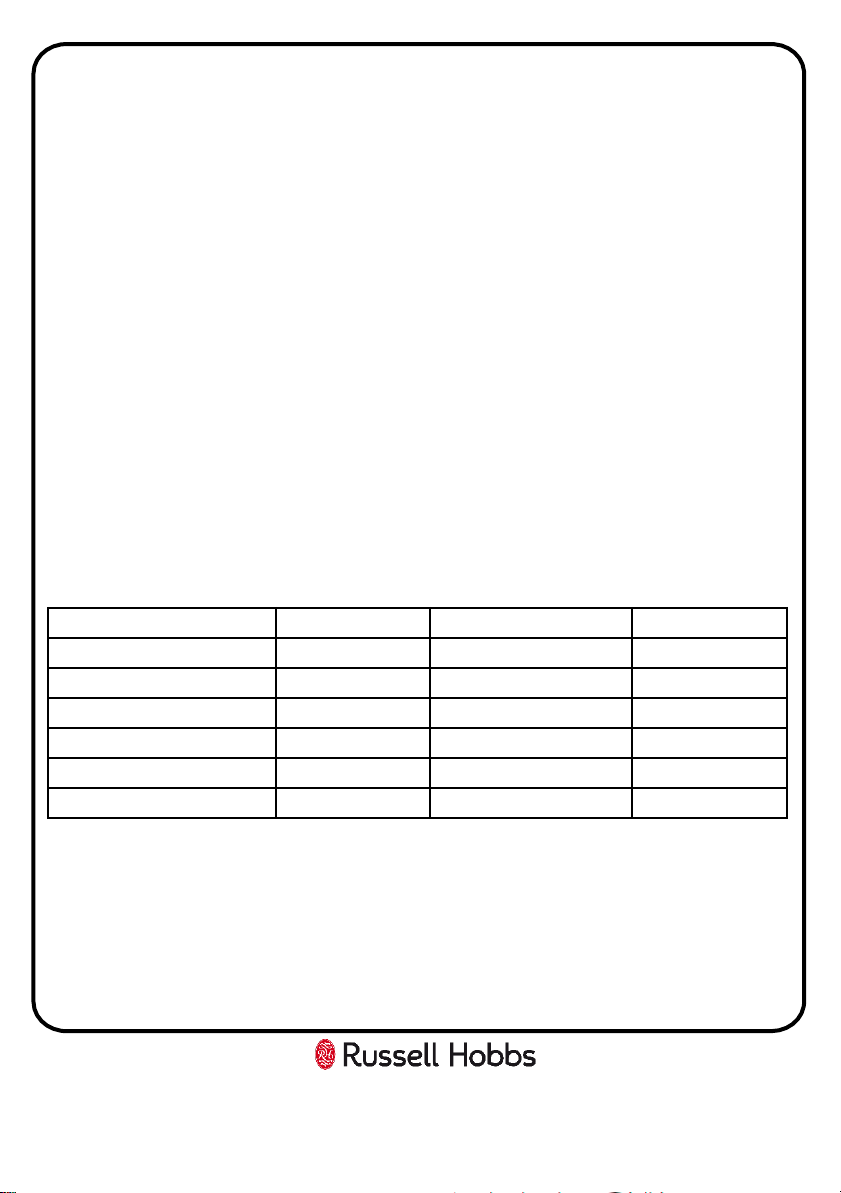
Important note: Do not overload your dryer. The following table lists some
common items and their approximate weight when wet, consider this when
loading the dryer. Do not overload.
Step 2 - Close the door, ensuring no items are trapped in the door.
Step 3 – Turn the timer dial to the required time/setting and the dryer will
start its cycle.
Quilt cover 700g Shirt 600g
Sheet 500g T-shirt 200g
Pillow case 200g Blouse 100g
tablecloth 250g Bathrobe 1200g
Napkin 100g Night gown 200g
Bath towel 1200g Pyjamas 500g
Tea towel 100g Underwear 100g
20
To change a timer/setting that has already started, simply turn the dial to
the required time/setting. If the door is opened during a cycle the dryer will
stop. To restart, close the door.
When drying large items such as sheets, we suggest you periodically stop
the dryer to redistribute the load.
There is an automatic cool down period at the end of every cycle, during
which the heater is switched off. This helps to minimize creasing, and must
always be used fully to avoid the risk of fire.
ALWAYS CLEAN THE FLUFF FILTER AFTER EACH USE. Failure to do so could
cause the safety cut-out to operate.
• Never tumble dry the following; Delicate items such as net curtains,
woollen items, silk items, items with metal trims, nylon tights, bulky
items such as blankets, or sleeping bags, feather quilts and items
containing or including rubber foam.
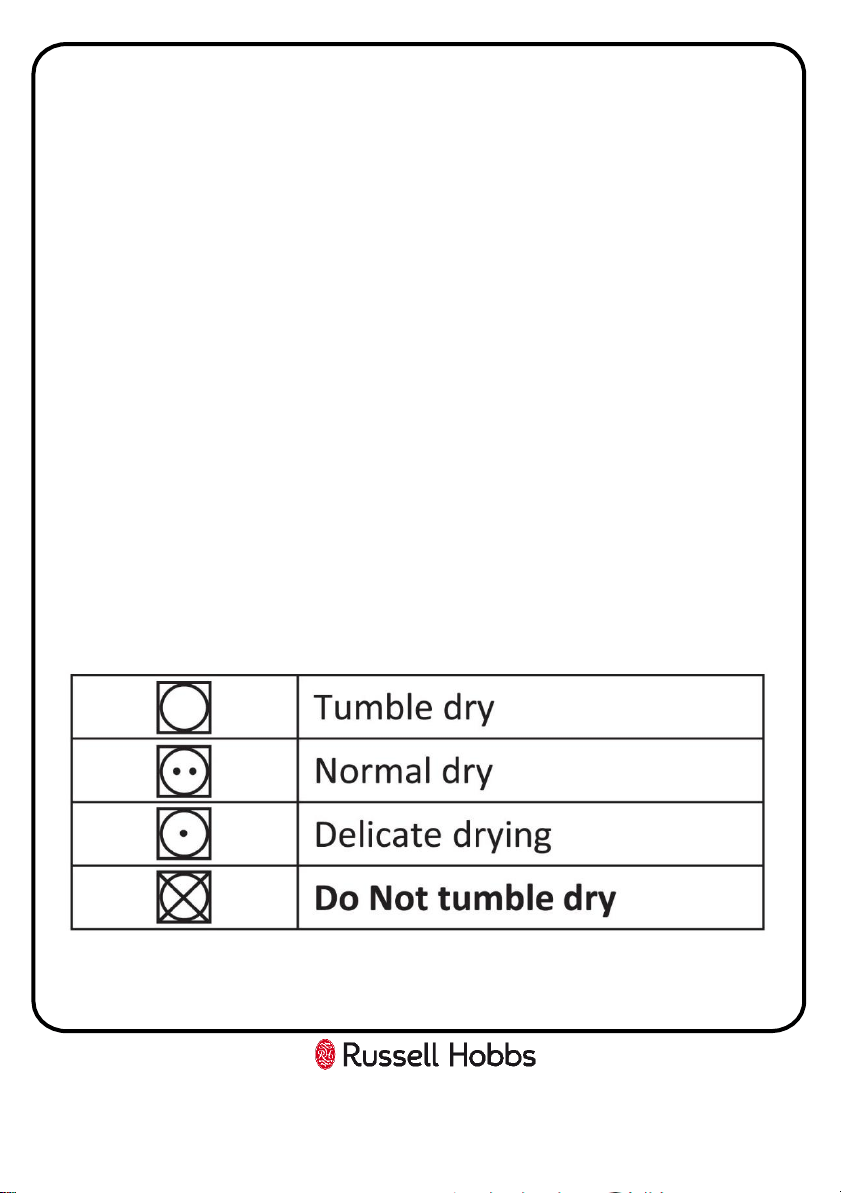
• Follow the instructions on the garment label;
• To prevent some items getting tangled, make sure zips, press studs, and
hooks are closed, to try and prevent any tangling with other items.
Operating Instructions

21
• Do not over dry laundry, by not over drying it avoids creasing and saves
energy.
• Avoid drying dark clothes with light coloured fluffy items, the fluff will
be noticeable on the dark clothing.
• Make sure the laundry is thoroughly spun before tumble drying.
Reversing the Door
The door cannot be reversed
Operating Instructions
Care and maintenance
Cleaning the Lint Filter
Note:
• ALWAYS CLEAN THE FILTER AFTER EACH USE. Failure to do so could
cause the safety cut-out to operate.
• The lint filter must be in place whenever drying.
• Unplug the power cord prior to any cleaning.
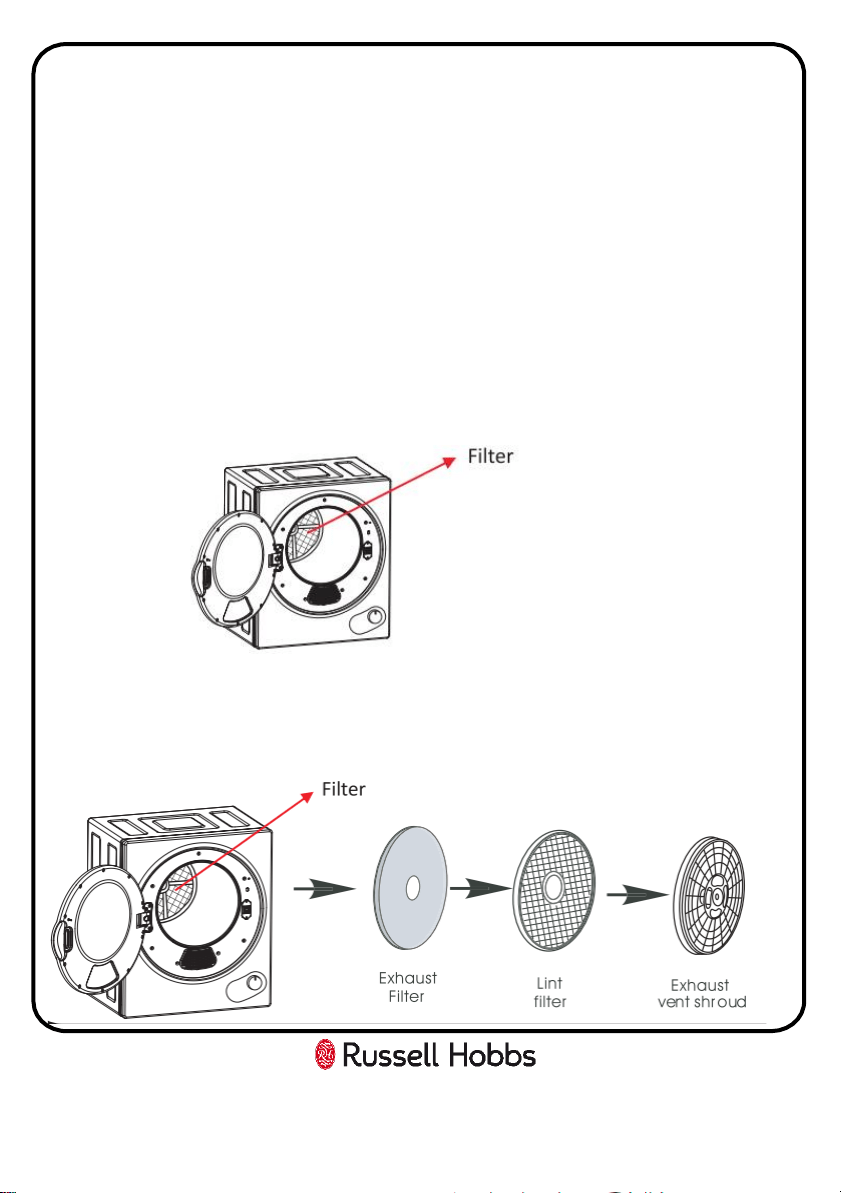
1. Open the appliance door and remove the filter that is inside at the
rear of the drum.
2. Remove the filter from the rear of the drum by pulling the filter
outwards with your fingers inserted into the four holes around the
exhaust vent shroud. The filter has 3 parts: Exhaust vent shroud, lint
filter and exhaust filter. Pull the filter out of the appliance.
22
Care and maintenance
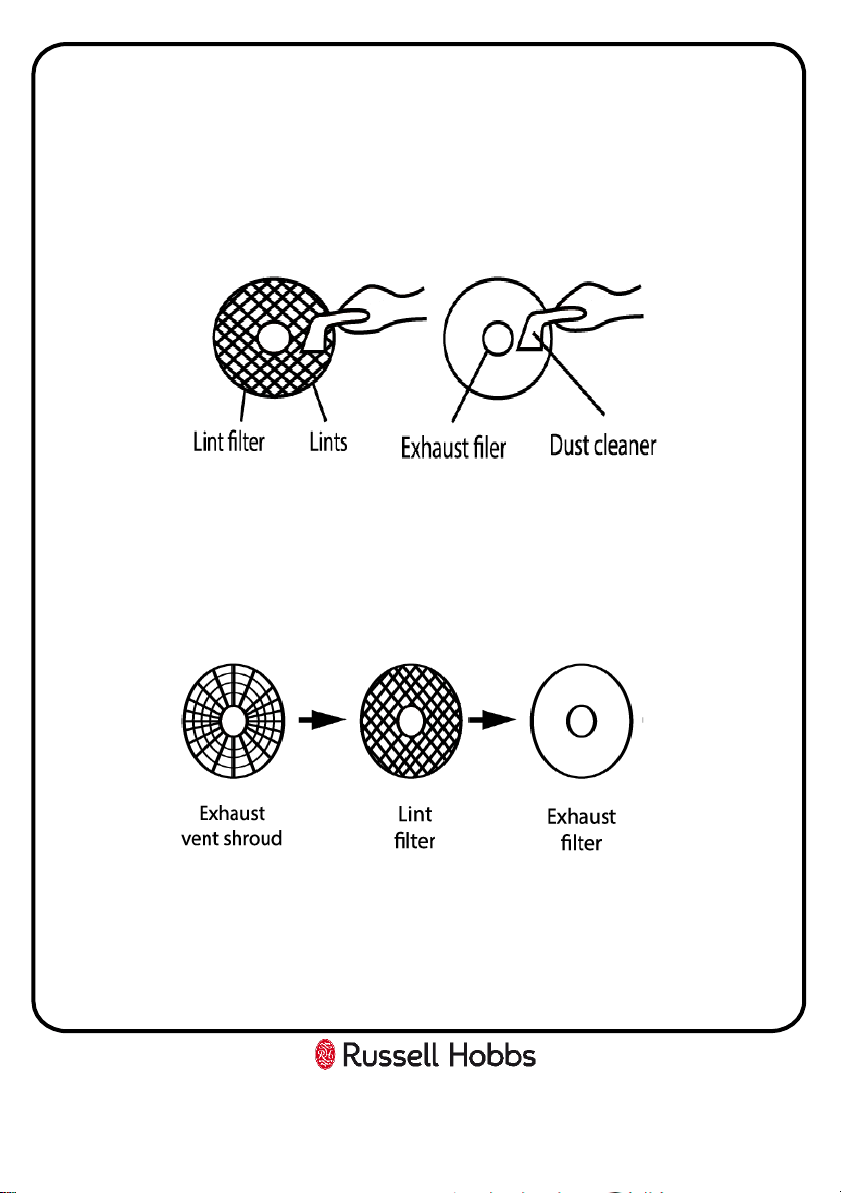
3. Separate the 3 parts of the filter: exhaust vent shroud, lint filter,
exhaust filter. Clean/remove the lint from the lint filter and exhaust
filter with a soft brush. Do not damage the filters.
4. After cleaning, reassemble the filter in the sequence: exhaust filter,
lint filter, exhaust vent shroud. Align the centre of the filter with the
slots at the rear of the drum inside the appliance and fix the filter
back into place. You must ensure that it has been firmly fixed in
place
Note:
• If your filter becomes damaged, replace it to ensure no damage is
caused to the dryer.
23
Care and maintenance
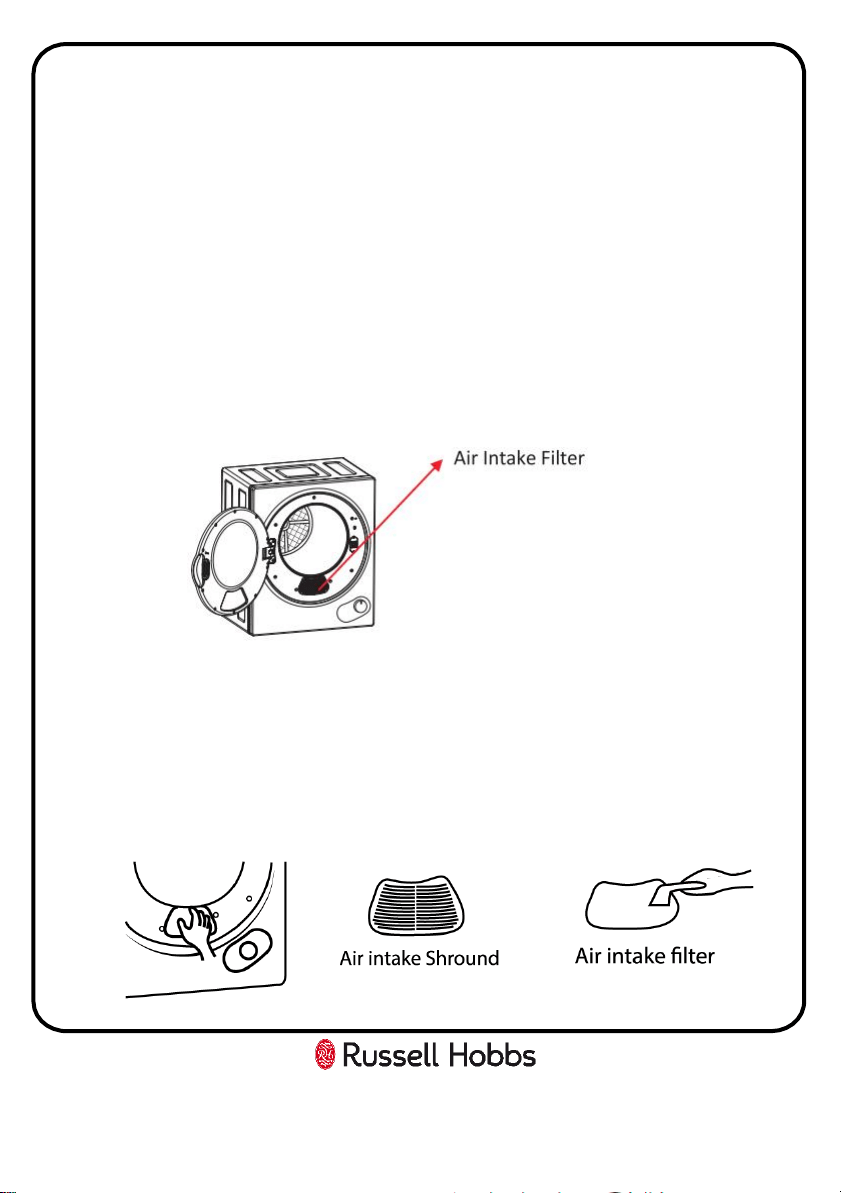
Cleaning the Air Intake Filter
Note:
• CLEAN THE FILTER ONCE A MONTH. Failure to do so could cause the
safety cut-out to operate.
• The air intake filter must be in place whenever drying.
• Unplug the power cord prior to any cleaning.
1. Open the appliance door and remove the air intake filter just below
the door cavity.
2. Remove by holding the upper and lower parts of the air intake filter
and pull it away from the appliance. Remove the filter inside the
shroud by slightly pushing upwards with your thumb until the latch
hook disconnects. Remove the filter and and clean it with a soft
brush. Reassemble and install as before.
24
25
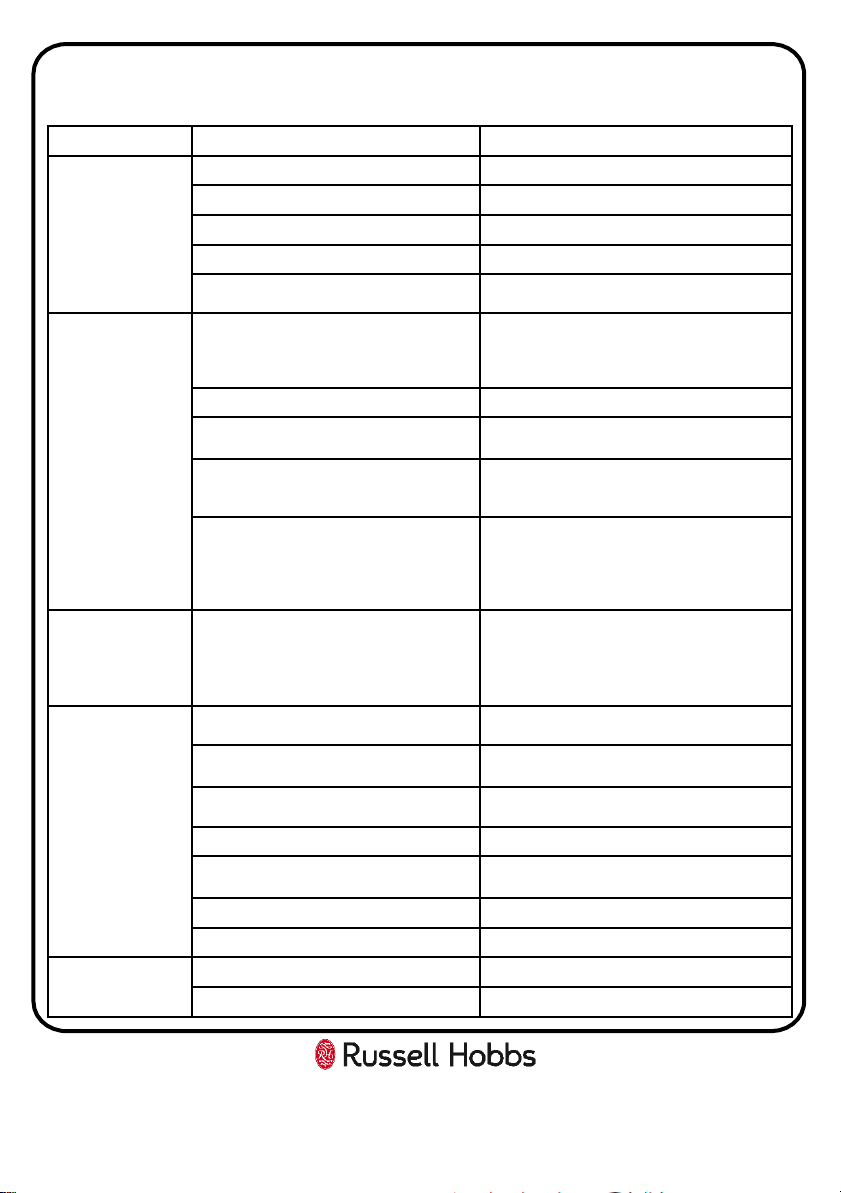
Trouble shooting
Problem
Cause Solution
Your appliance does
not start.
It is not plugged in Plug the machine in
The fuse has blown Replace the fuse
Electricity cut -off Check mains power
Start/pause button not pressed Press the Start/pause button
The machine door is not completely closed
Close the machine door
Clothes aren't dry
Dryer has been underloaded
If you are drying laundry that weighs less than
0.5kg (small loads) when wet. Then the Time+
programme must be used
Dryer has been overloaded Remove excessive clothes
Incorrect programme selected for the type
of fabric you are drying
Check that you used the correct programme.
Lint/fluff filter full
Check that the lint/fluff filter has been cleaned.
A blocked filter will restrict the airflow.
Dryer not working correctly
Check that your dryer is heating - below the
door in the middle, should feel warm to the
touch after the first 10-15 minutes of its
programme
Laundry has shrunk,
become felted or
deteriorated
Programme suitable for the laundry type
might have not been used
Only dry laundry which is suitable for drying in
your machine after checking the labels on your
clothes. Also select a programme suitable for
the laundry type to dry your clothes
Long drying time
Lint/fluff filter full
The fluff filter/lint filter It should be cleaned
after each load
Incorrect programme selected for the type
of fabric you are drying
Change the programme
Flexible Vent Hose blocked or kinked
Check it for foreign objects or condensate
(water)
Air inlet obstructed Clear obstruction
Flap on the storm cover obstructed
(Permanent venting)
Clear obstruction
Clothes excessive wet Re-run the programme
Dryer has been overloaded Remove excessive clothes
External hot or can
smell hot
Lint/fluff filter full or dirty Clean the lint/fluff filter
The uptake or exhaust duct is dirty Clean the uptake or exhaust duct
26
Trouble shooting
Failure to heat may indicate the safety cut-out has operated. This cut-out
only operates if the airflow is severely restricted so make sure the filter is
clean, the air inlets and outlets at the front and back are not blocked.
If the safety cut-out operates you should contact Customer Services on
0345 208 8750.
If your machine does not work check the following before calling the
customer service helpline:
• Check that the machine has the correct weight load in the drum before
starting the appliance.
• Check that there is a supply of electricity or the machine is plugged in
and the power switched on.
• Check that the door has been properly closed and the machine is
switched on (start button pressed, if fitted).
• The child lock has not been activated.
• Check the fuse in the plug.
27
Technical Specification
Brand Russell Hobbs
Model number RH3VTD800 (B) (S)
Type Vented dryer
Efficiency rating C
Capacity (KGs) 2.5
Dimensions (CMs): (H)58.5 x (W)49.5 x (D)41.5
Product fiche
Brand name
Russell Hobbs
Model Number
RH3VTD800 (B) (S)
Capacity cotton
2.5 kg
Dryer type
Air-vented
Energy efficiency class (2010/30/EC)
C
Weighted annual energy consumption, electric dryer (2010/30/EC)
199 Kwh/annum
Drying process non
-automatic tumble dryer Non-automatic
Energy consumption electric dryer, full load (2010/30/EC)
1.815 Kwh
Energy consumption electric dryer, partial load (2010/30/EC)
0.811 Kwh
Power consumption in off
-mode (2010/30/EC) 0 W
Power consumption in left
-on mode (2010/30/EC) 0 W
Rated programme time at full load min
161 min
Rated programme time at partial load min
76 min
Condensation efficiency class (2010/30/EC)
N/A
Average condensation efficiency full load %
N/A
Average condensation efficiency partial load %
N/A
Weighted condensation efficiency %
N/A
Noise level
62
Construction type
Free-standing
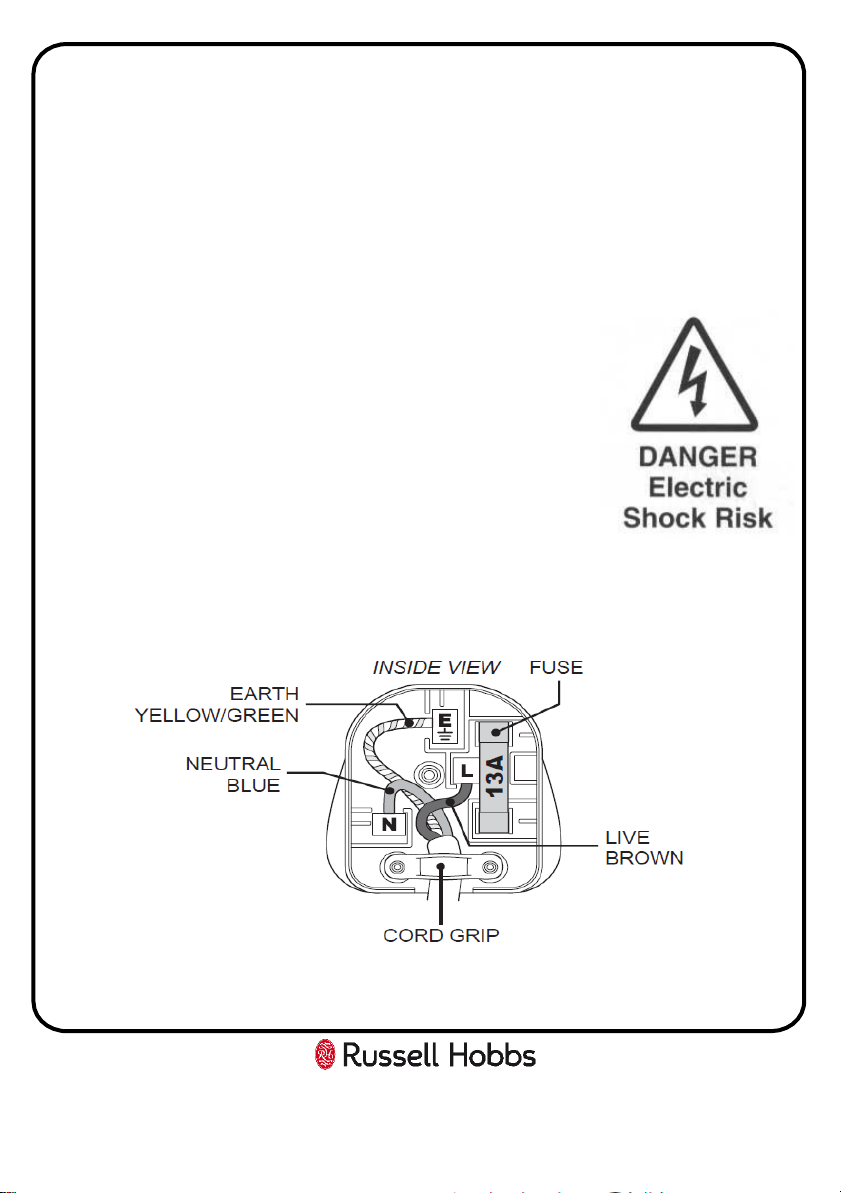
Connection to the mains supply
For UK use only – Plug fitting details (where applicable):
As the colours of the wires in the mains lead of this appliance may not
correspond with the coloured markings identifying the terminals in your plug,
proceed as follows:
The GREEN/YELLOW wire is the EARTH and must be connected to the
terminal which is marked with the letter E or by the earth symbol or coloured
GREEN or
GREEN/YELLOW.
The BLUE wire is the NEUTRAL and must be connected to the
terminal marked with the letter N or coloured BLACK. The
BROWN wire is the LIVE wire and must be connected to the
terminal marked with the letter L or coloured RED.
Always ensure that the plug cord grip is fastened correctly.
If a 13A (BS1363) fused plug is used it must be fitted with a
13amp fuse conforming to BS1362 and be BSI or ASTA approved.
28

Guarantee
This product is guaranteed for 12 months from the date of the original
purchase. If any defect arises due to faulty materials or workmanship the
faulty product must be returned to the place of purchase.
Refund or replacement is at the discretion of the retailer.
The following conditions apply:
• The product must be returned to the retailer with the original proof of
purchase.
• The product must be installed and used in accordance with the
instructions contained in this instruction guide and any other
instructions for use which are supplied.
• It must be used for domestic purposes only and for its intended use.
• This warranty does not cover wear and tear, damage, misuse or
consumable parts.
This does not affect your statutory rights.
Produced for:
G2S Limited,
Wigan,
WN2 4AY
29

30
Notes:

31
Notes:
For Customer Services &
Spare Parts please call
0345 208 8750
or visit us at
https://mda.russellhobbs.com
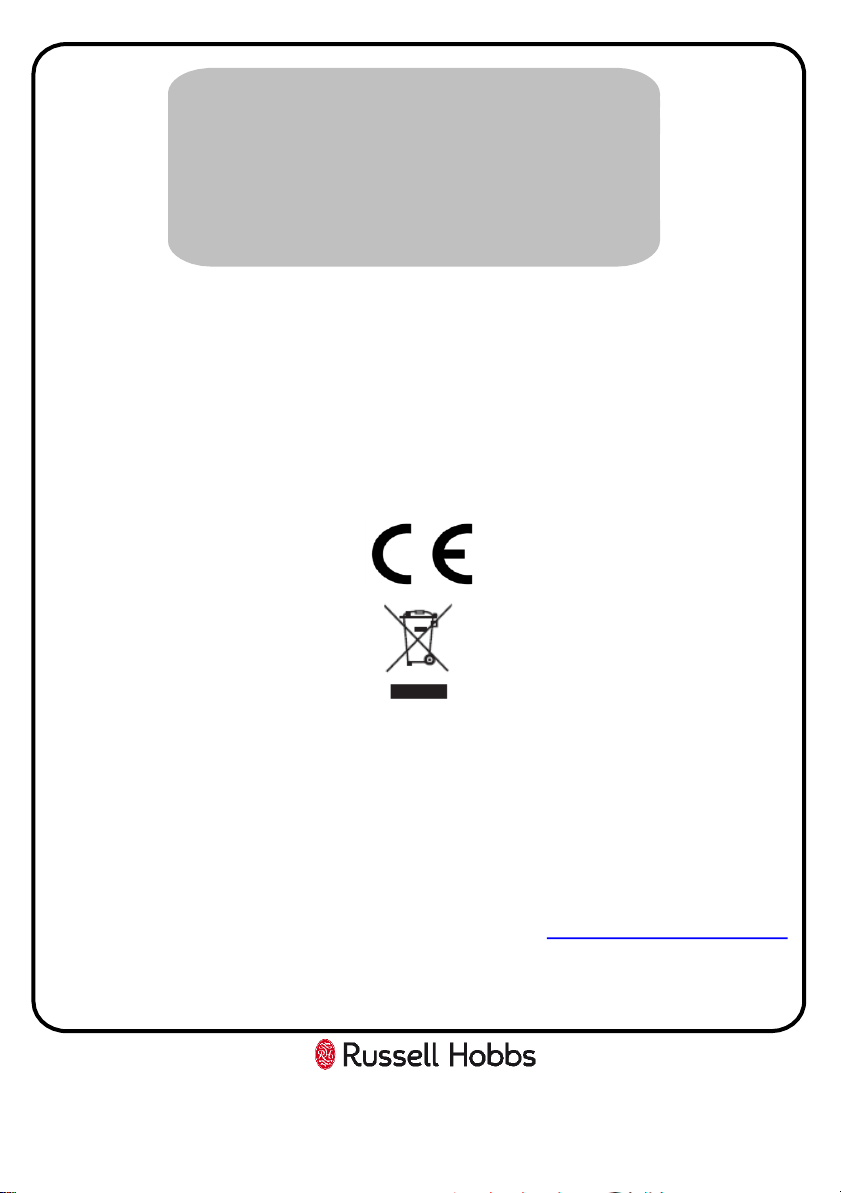
This symbol is known as the 'Crossed-out wheelie bin Symbol'. When this
symbol is marked on a product/batteries, it means that the product/batteries
should not be disposed of with your general household waste. Only discard
electrical/electronic/battery items in separate collection schemes, which cater
for the recovery and recycling of materials contained within. Your co-operation
is vital to make sure the success of these schemes and for the protection of the
environment. For your nearest disposal facility, visit www.recycle-more.co.uk
or ask in store for details.
We reserve the right due to possible changes to design to alter the
instruction manual without prior notice.
Revision 1