Model number:
RHBI75140WD1
For Customer Services & Spare Parts please call 0345 208 8750
Opening times: Monday - Friday 8am – 8pm & Saturday 9am – 1pm
or visit us at www.productcare.co.uk
7KG / 5KG 1400 Spin Speed
Washer Dryer
Instruction Manual
IMPORTANT:
RETAIN FOR FUTURE REFERENCE

For Customer Services & Spare Parts please call 0345 208 8750
Opening times: Monday - Friday 8am – 8pm & Saturday 9am – 1pm
or visit us at www.productcare.co.uk
Contents
Sa
fety Instructions …………………………………………
…….
3 - 6
B
efore using the appliance …………………………………………
…….
7 - 8
I
nstallation …………………………………………
…….
9 - 16
H
ow to use …………………………………………
…….
17 -
22
Helpful tips
…………………………………………
…….
23 -
24
Control panel & functions
…………………………………………
…….
25 -
29
Additional functions
…………………………………………
…….
30 -
35
First wash
…………………………………………
…….
36
Program table
…………………………………………
…….
37 -
38
Program selection
…………………………………………
…….
39 -
41
Drying cycle
…………………………………………
…….
42 -
45
Automatic washing/Drying cycle
…………………………………………
…….
45 -
46
Error codes
…………………………………………
…….
47
Trouble shooting
…………………………………………
…….
48 -
50
Maintenance
…………………………………………
…….
51 -
55
Removing stains
…………………………………………
…….
56 –
57
Specification
…………………………………………
…….
58
Connection to the mains supply
…………………………………………
…….
59
Guarantee
…………………………………………
…….
60
Notes
…………………………………………
…….
61 -
63

• Carefully read this manual for correct and safe appliance use and for
helpful tips on efficient maintenance.
• Only use the washing machine after carefully reading these
instructions. We recommend you always keep this manual on hand
and in good condition for any future owners.
• Please check that the appliance is delivered with this instruction
manual, warranty certificate, service centre address and energy
efficiency label. Also check that plugs, drain hose support hook and
liquid detergent or bleach tray (only on some models) are included.
We recommend you keep all these components.
• On receipt of your appliance please check it carefully for damage. Any
damage found must be reported to the delivery driver immediately.
Alternatively damage found must be reported to the retailer within 2
days of receipt.
• Each product is identified by a unique 16- character code, also called
the “serial number”, printed on the sticker. This can be found inside
the door opening. This code is a unique code for your product that you
will need to register the product warranty, or if you need to contact
the Customer Service Centre.
• This appliance is intended to be used in a household and is not for
commercial uses, such as:
• Staff kitchen areas in shops, offices and other working
environments;
• By clients in hotels, motels and other residential type
environments;
• Bed and breakfast type environments.
• A different use of this appliance from a household environment or
from typical housekeeping functions, as commercial use by expert or
trained users, is excluded. If the appliance is used in a manner
inconsistent with this it may reduce the life of the appliance and may
void the manufacturer’s guarantee. Any damage to the appliance or
Safety instructions
3

other damage or loss arising through use that is not consistent with
domestic or household use (even if located in a domestic or household
environment) shall not be accepted by the manufacturer to the fullest
extent permitted by law.
• This appliance can be used by children aged from 8 years and above
and persons with reduced physical, sensory or mental capabilities or
lack of experience and knowledge if they have been given supervision
or instruction concerning use of the appliance in a safe way and
understand the hazards involved.
• Children shall not play with the appliance. Cleaning and user
maintenance shall not be made by children without supervision.
• Children should be supervised to ensure that they do not play with the
appliance.
• Children of less than 3 years should be kept away unless continuously
supervised.
• If the supply cord is damaged, it must be replaced by a special cord or
assembly available from the manufacturer or its service agent.
• Only use the hose-sets supplied with the appliance for the water
supply connection (do not reuse old hose-sets).
• Water pressure must be between 0.05 MPa and 0.8 MPa.
• Make sure carpets or rugs do not obstruct the base or any of the
ventilation openings.
• After installation, the appliance must be positioned so that the plug is
accessible.
• The maximum load capacity of dry clothes depends on the model used
(see control panel).
• To consult the product technical specification please refer to the
manufacturer website.
• The technical details (supply voltage and power input) are indicated on
the product rating plate.
Safety instructions
4

• Make sure that the electrical system is earthed, complies with all
applicable law and that the (electricity) socket is compatible with the
plug of the appliance. Otherwise, seek qualified professional
assistance.
• The use of converters, multiple sockets or extension cords is strongly
advised against.
• Before cleaning or maintaining the washing machine, unplug the
appliance and turn off the water tap.
• Do not pull on the power cord or appliance to unplug the machine.
• Make sure there is no water in the drum before opening the door.
• Do not expose the washing machine to rain, direct sunlight or other
weather elements. Protect from possible freezing.
• When moving, do not lift the washing machine by the knobs or
detergent drawer; during transport, never rest the door on the trolley.
We recommend two people lift the washing machine.
• In the event of fault and/or malfunction, turn off the washing
machine, close the water tap and do not tamper with the appliance.
Immediately contact the Customer Service Centre and only use
original spare parts. Failure to observe these instruction may
jeopardise appliance safety.
• WARNING: water may reach very high temperatures during the
wash cycle.
• Do not put combustible liquid or solids, such as oil, gasoline, petrol
and alcohol into the appliance or nearby.
• Make sure clothing is fully rinsed of detergent and stain remover,
before placing in the tumble dryer.
• Make sure items that may cause damage do not get in to the dryer,
items such as coins, safety pins, nails, screws, stones. Check the
pockets on all the items of clothing.
Safety instructions
5

• Foam rubber, latex, shower caps, waterproof textiles, rubber backed
articles and any other items with foam rubber pads should not be
dried in the tumble dryer.
• Clothes that have been in contact with volatile liquids should not be
machine dried. Any fluid should be fully removed from the item before
it can be dried.
• Do not dry unwashed items in the tumble dryer.
• The final part of a tumble drying cycle occurs without heat (cool down
cycle) to ensure the items are not damaged. Do not stop the dryer
before it has fully finished the drying cycle.
• Do not attempt to dry dripping wet articles.
• Do not use the tumble dryer if you suspect that it is damaged in any
way. Under no circumstances should you attempt to repair the
appliance yourself. Repairs carried out by inexperienced persons may
cause serious injury. Contact the customer helpline
• Do not handle laundry in the dryer, until it has stopped completely.
• Check the dryer contains only laundry before closing the door to start
it working.
• Do not block the air inlets at the front, base, rear and side of your
dryer.
• Do not allow fluff to accumulate around the tumble dryer. There is a
risk the fluff may cause a fire.
• Do not exceed the recommended maximum load.
• Do not place articles in the dryer if anything other than a water
solution has been used in the cleaning process.
WARNING: Never stop a tumble dryer before the end of a drying cycle,
unless the items are removed very quickly
Safety instructions
6
• Transportation screws which are located at the back of the machine,
must be removed before using or running the machine. You will void
the manufacturer’s guarantee if these are not removed before using or
running the machine
• Before installation, check that all parts listed below are present.
If any parts are missing, please contact the product care service
team on 0345 208 8750.
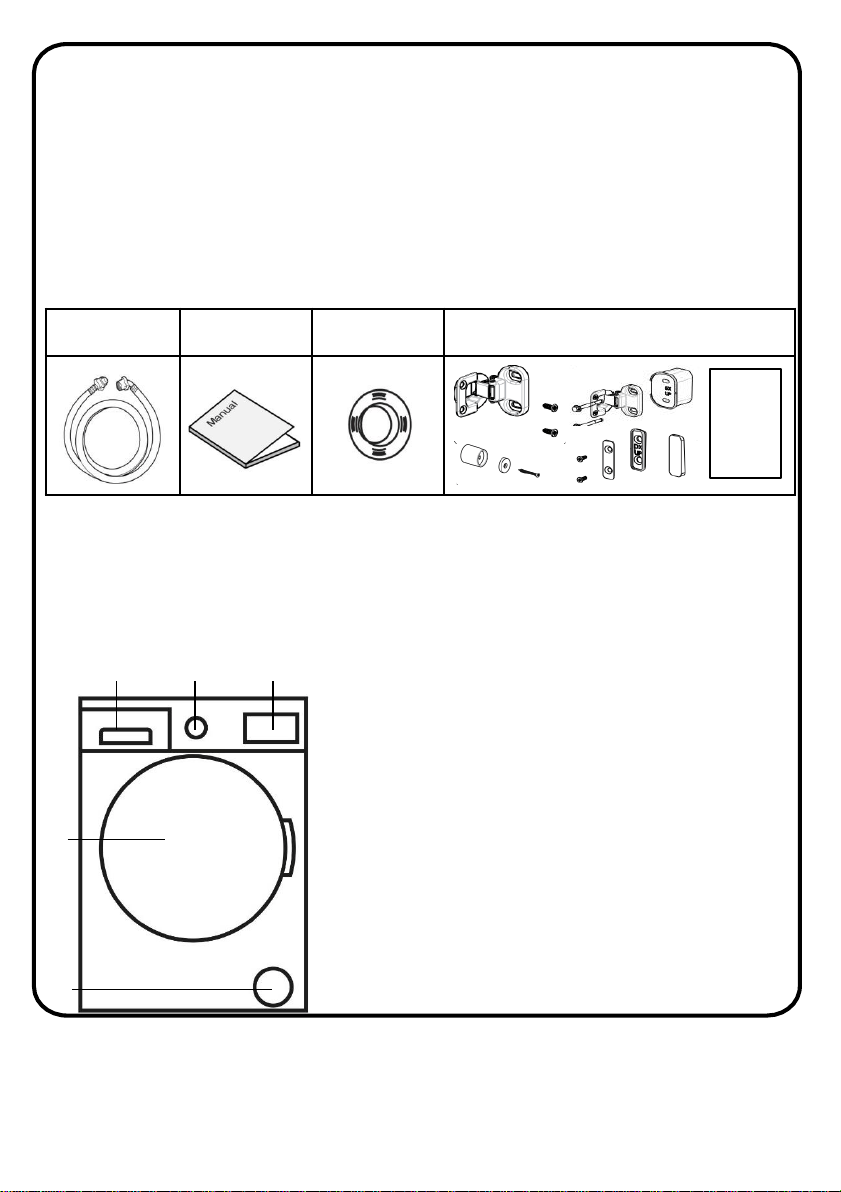
The Front of the machine
Note:
The drawings in the book may vary from your washer model. They are
designed to show the different features of all models covered by this book.
Your model may not include all features.
Inlet hose Manual Cap holders
Door mounting fixture, fittings & template
Before using your appliance
123
4
6
7
1. LED display & function buttons
2. Programme dial
3. Detergent drawer
4. Door & drum
5. Pump filter cover
Before using your appliance
The Back of the machine
7
9
8
10
7. Water inlet valve
8. Drainage hose
9. Power cable
10. Transit bolts
8
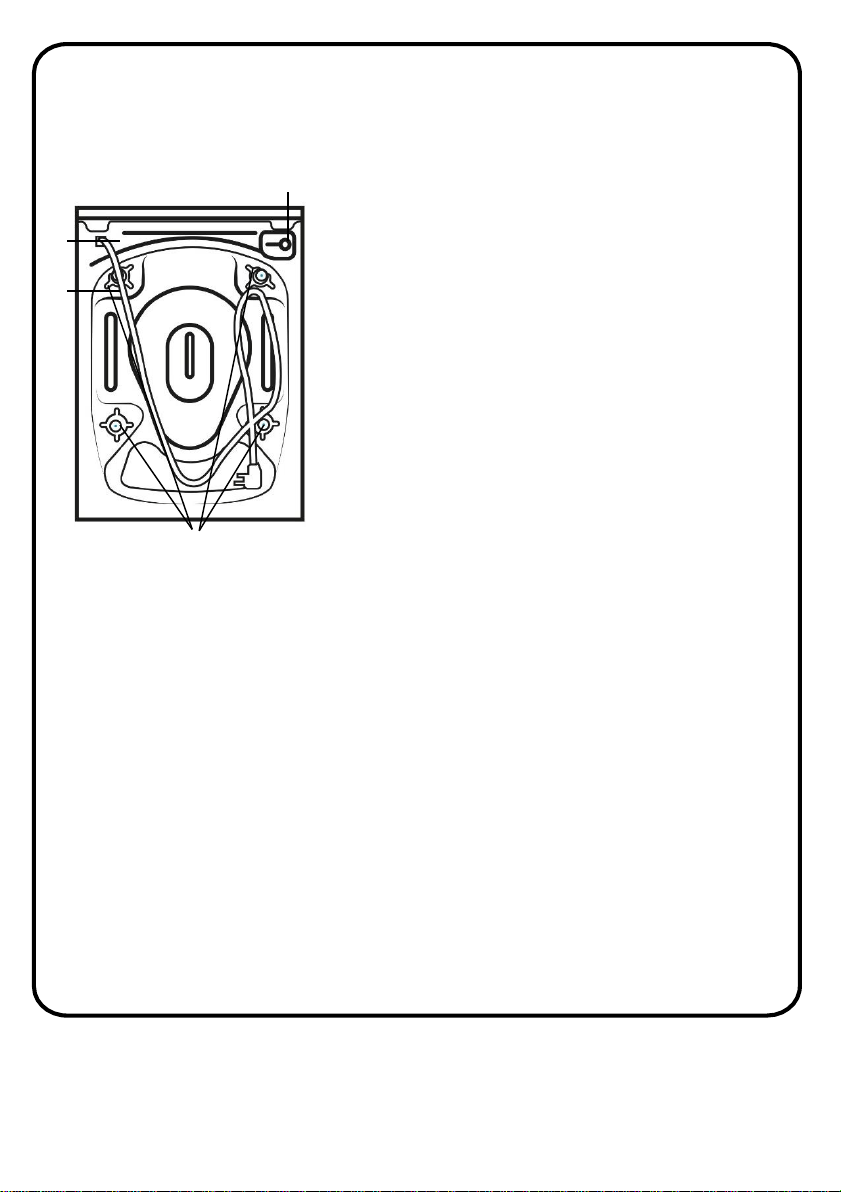
Installation
• Remove the 2 or 4 transportation screws (A) on the back and remove
the 2 or 4 flat washers, rubber bungs and plastic spacer tubes (B) as
illustrated in figure 1.
• If the washing machine is built-in, unscrew the 3 or 4 transportation
screws (A) and remove the 3 or 4 flat washers, rubber bungs and
plastic spacer tubes (B).
• During the removal of the screws occasionally spacer tubes fall inside
the product, these can be removed by tilting the product forward and
recovering them from the floor or inside the base of the machine.
• Cover the open transportation screw holes with the 2 or 4 plastic caps
included in the instruction bag.
• Warning: keep packaging materials away from children.
• Place the corrugated plastic sheet, found on top of the appliance
during the unpacking process, into the base of the appliance as shown
in figure 2 (according to the model, consider version A, B or C).
• In some models this operation will not be necessary, because the
corrugated plastic sheet will be already placed on the bottom of the
appliance.
9
Fig 1.
Fig 2.
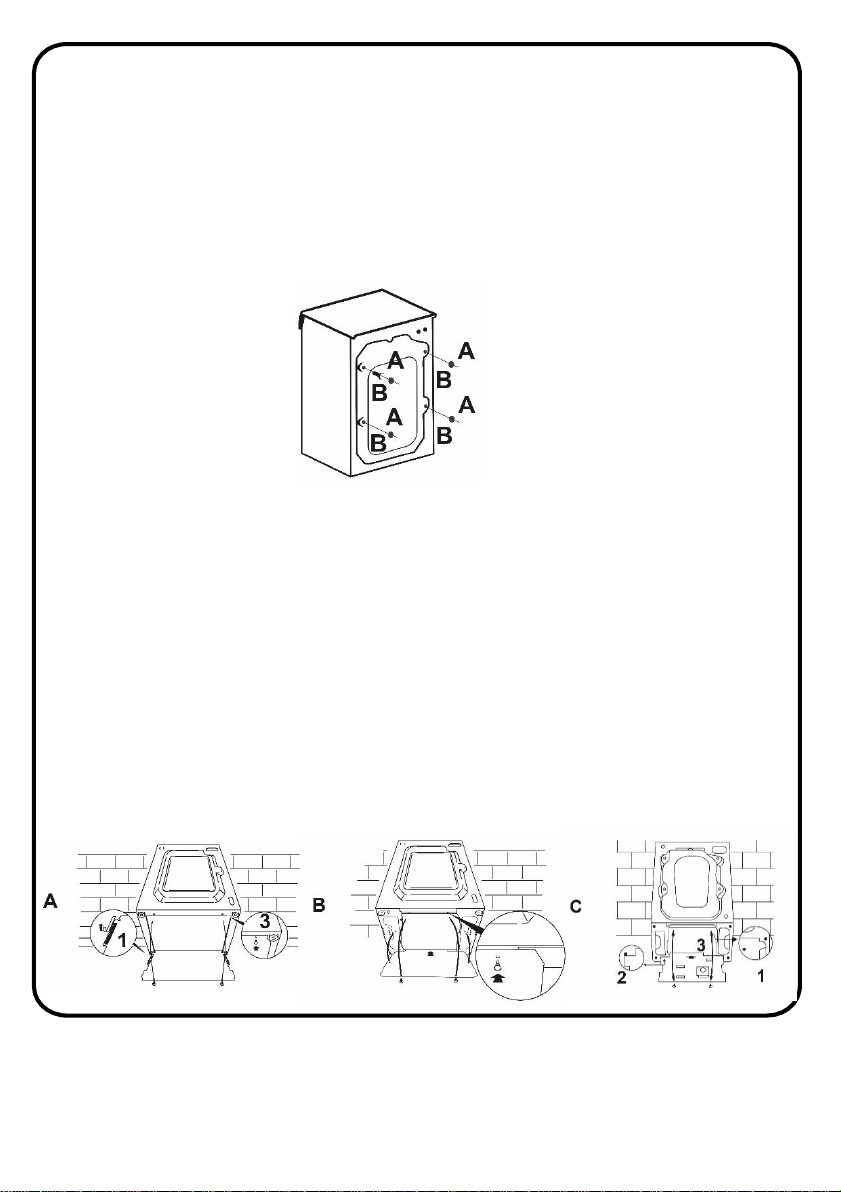
• Position and align the template onto the reverse of the furniture door. It
is possible to mount the hinges and closure magnet on the right or left-
hand side depending on your requirements. Mark the screw hole
positions, then drill out these positions.
• Fix the hinges in place with the 4 screws provided (A) and fix the magnet
(B) in place using screw (C).
Instructions for mounting the furniture door
10
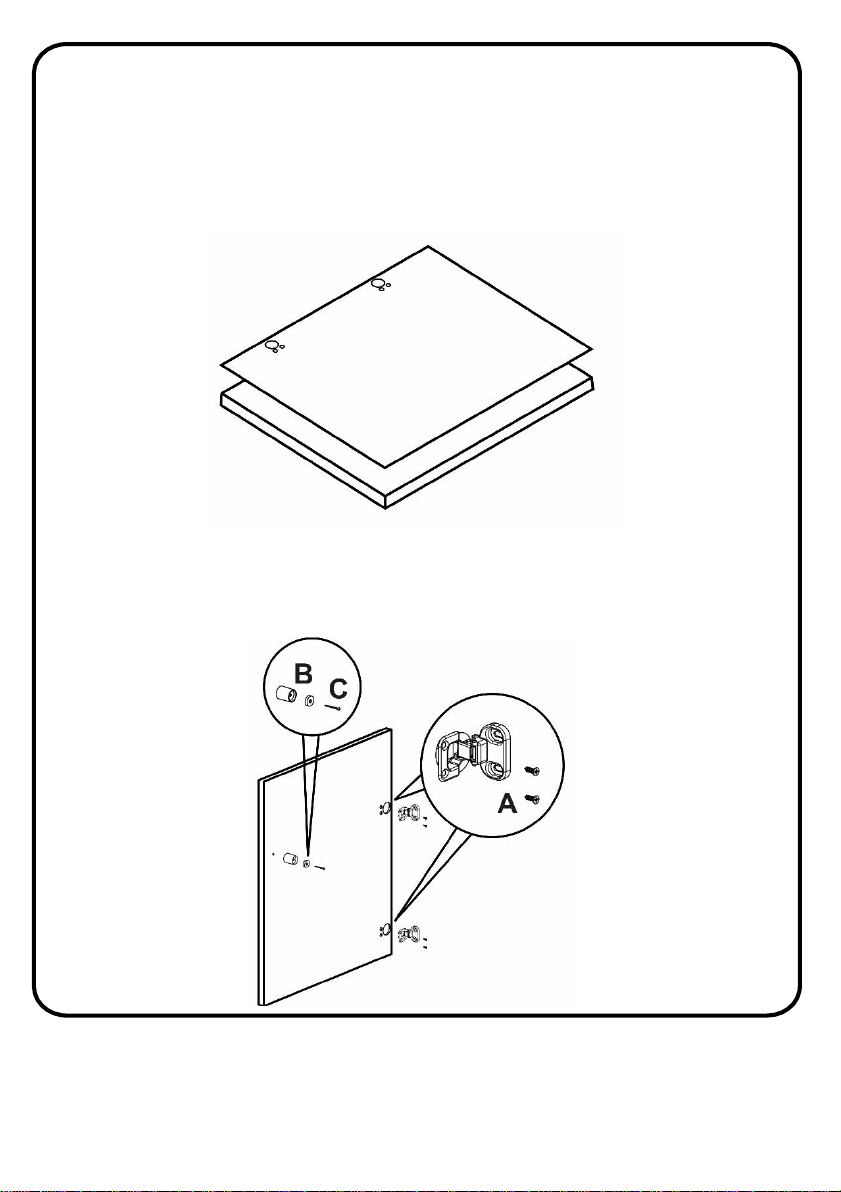
Instructions for mounting the furniture door
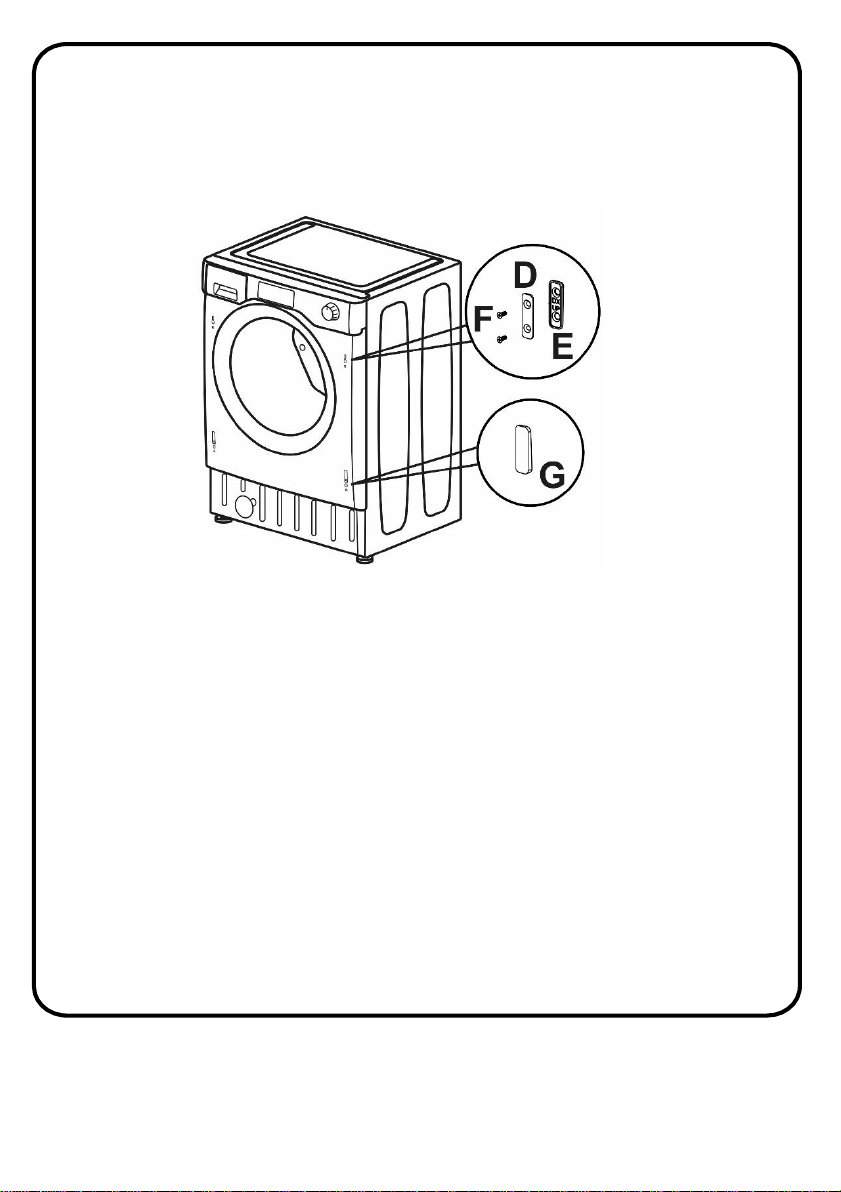
• Mount the plate (D) on the right or left-hand side, depending on your
installation requirements. Place the plastic support (E) under the plate
and fix it in position with screw (F).
• Snap mount cap (G) in the lower position.
11
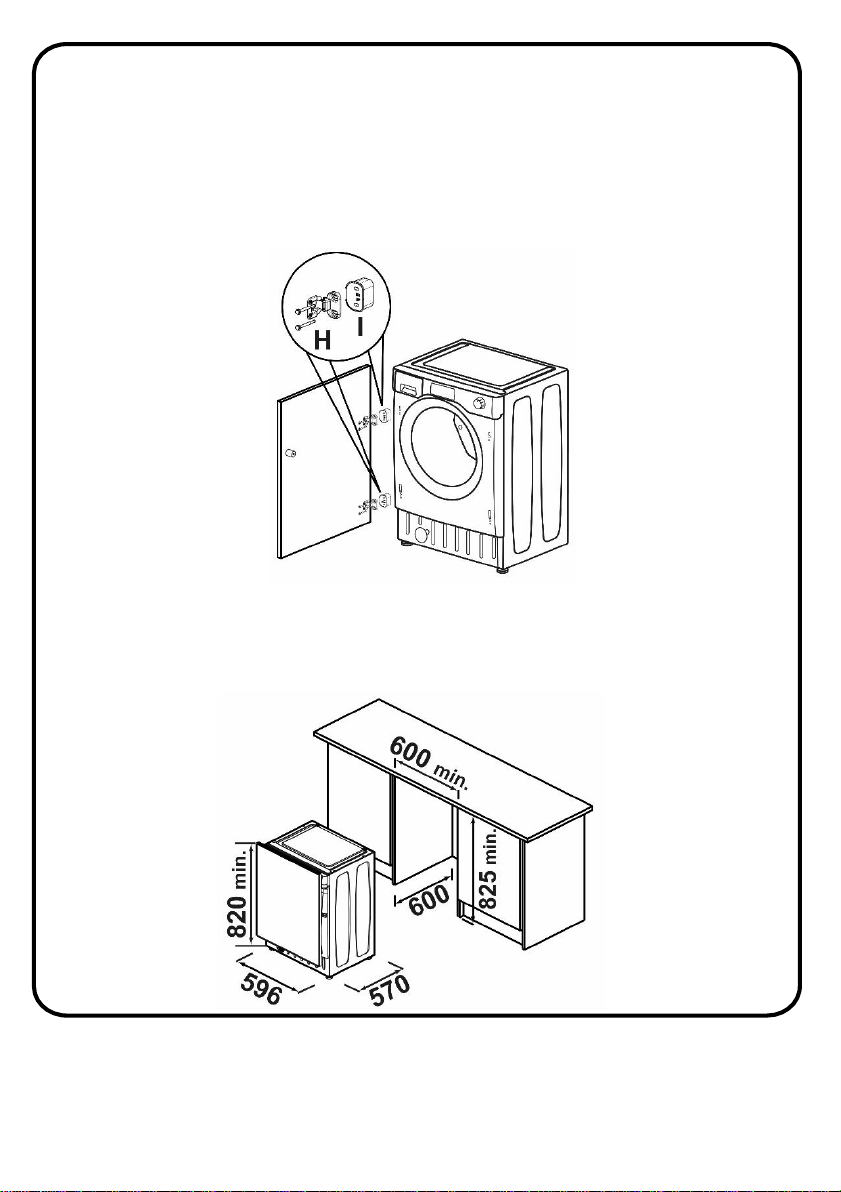
• Mount the furniture door to the front of the washer using the hinges.
Place the spacers under the hinges (I) and then fix in position with screw
(H). We suggest mounting the furniture door so that it opens towards
the left, which is the same direction as the porthole door. This will
leave more space when you are loading washing into the appliance.
• Slide the washer into a minimum aperture size of (H)825mm x
(W)600mm x (D)600mm. A furniture plinth may be run across the front
of the appliance, but its height will be dictated by the height the washer
is set at.
Instructions for mounting the furniture door
12
Instructions for mounting the furniture door
• The 4 adjustable feet allow the height of the washer to be adjusted
from 820 mm to a maximum of 840 mm. To adjust the height, you
should remove the nuts fitted to each foot and replace these with the
5 mm nuts supplied. Raise the feet to your desired height and then
fully tighten the lock nut to the base of the washer.
Electrical connection
• Your washing machine is set to 220-240V and 50Hz.
• The mains cord of your washing machine is equipped with a specific
earthed plug. This plug should always be inserted in to an earthed
socket of 13 amps. The current value of the fuse should be 13 amps.
• We do not take responsibility for any damage that occurs due to non
earthed usage.
• If you do not have a suitable socket and fuse conforming with this,
please ensure the work is carried out by a qualified electrician.
• Operating your machine under low voltage will cause the life cycle
of your machine to be reduced and its performance to be restricted.
13

• Connect the water hose to the water supply tap (fig. 3) only using the
hose supplied with the appliance (do not reuse old hose-sets).
SOME MODELS may include one or more of the following features:
• AQUASTOP (fig. 4):a device located on the supply tube that stops water
flow if the tube deteriorates; in this case, a red mark will appear in the
window “A” and the tube must be replaced. To unscrew the nut, press
the one-way lock device "B".
• AQUAPROTECT – SUPPLY TUBE WITH GUARD (fig. 5): Should water leak
from the primary internal tube "A", the transparent containment sheath
"B" will contain water to permit the washing cycle to complete. At the
end of the cycle, contact the Customer Service Centre to replace the
supply tube
Water inlet hose connection
14
Fig 3.
Fig 4.
Fig 5.
Water inlet hose connection
• The washing machine should be installed in its final position
such that the water fill hose is not kinked or trapped. The
corrugated drain hose should be inserted into suitable drain
pipe of between 50cm and 85cm height above the floor using
the curved drain hose support. If an under sink connection is
used the drain hose must be routed above the sink overfill
openingto prevent backsiphoning. Care must be taken to avoid
kinking or trapping the drain hose (fig. 6).
15
Fig 6.
Levelling the Appliance
• Level the appliance using the feet as illustrated in figure 7:
a. turn the nut clockwise to release the screw;
b. rotate the foot to raise or lower it until it touches to the floor;
c. lock the foot by screwing in the nut, until it tightens against
the bottom of the washing machine.
• Plug in the appliance.
WARNING: contact Customer Services should the power cord need
replacing.
WARNING: installation faults are not covered by the manufacturers
warranty.
16
Fig 7.
How to use
To obtain the best washing results, you must operate your washer properly.
This section gives you this important information.
Preparing clothes for washing
• Close zippers, snaps, and hooks to avoid snagging on other items.
• Ensure that there are no metallic materials (Remove pin, buckles, etc.)
on your laundry or in the pockets; if so, remove them to avoid scratching
the washer interior.
• Empty pockets and pull them inside out.
• Turn down cuffs and turn synthetic knits inside out to avoid pilling.
• Reverse textiles such as pants, knitwear, t-shirt and sweat suits.
• Tie strings and sashes to avoid tangling.
• Treat spots and stains. (See ‘Removing stains’ section).
• Follow the washing instructions supplied on the clothing.
• Separate your laundry according to type (cotton, synthetic, sensitive,
wool etc.), washing temperature (cold, 30°, 40°, 60°, 90°) and the degree
of dirtiness (slightly stained, stained, highly stained).
• Never wash coloured and white laundry together.
• Dark textiles may contain excess dye and should be washed separately
several times.
• Remove the metallic or plastic hooks of curtains or place them in a
washing net or bag.
• Wash socks, handkerchiefs and other small items in a washing net.
17
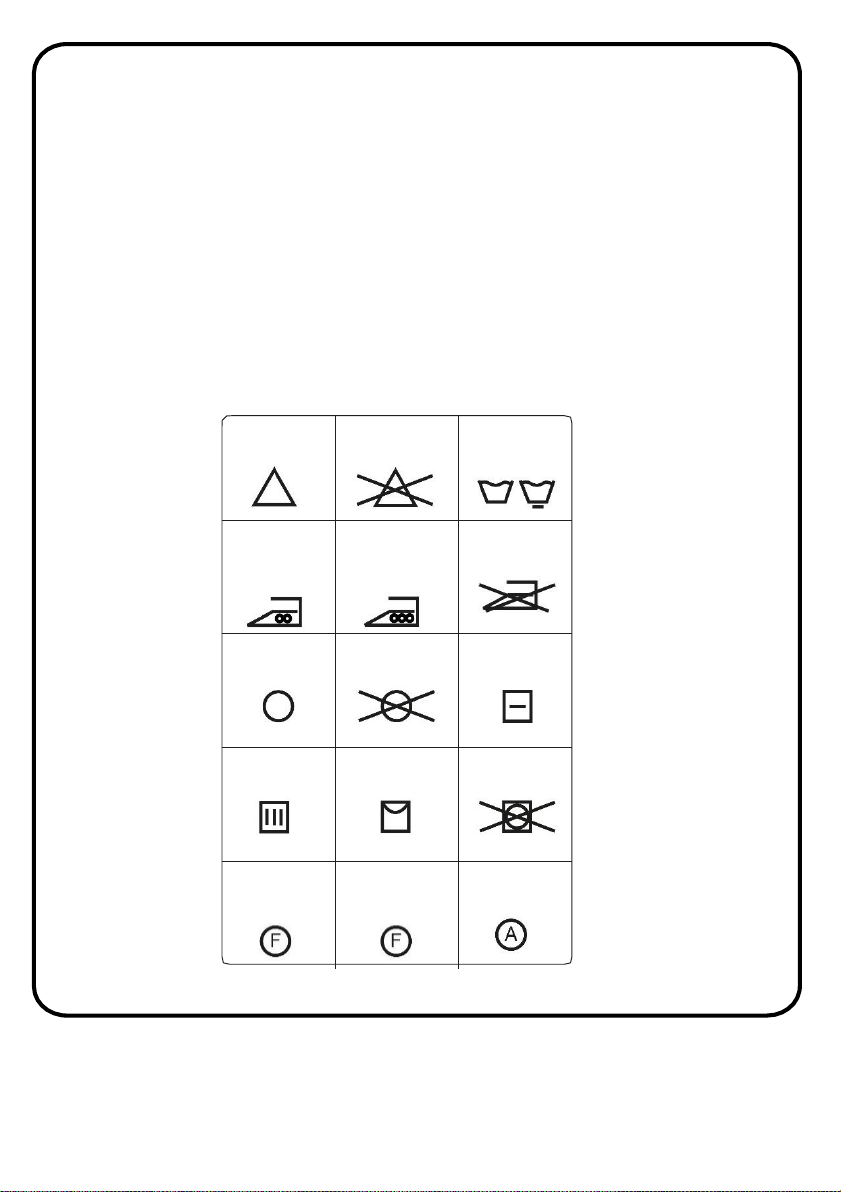
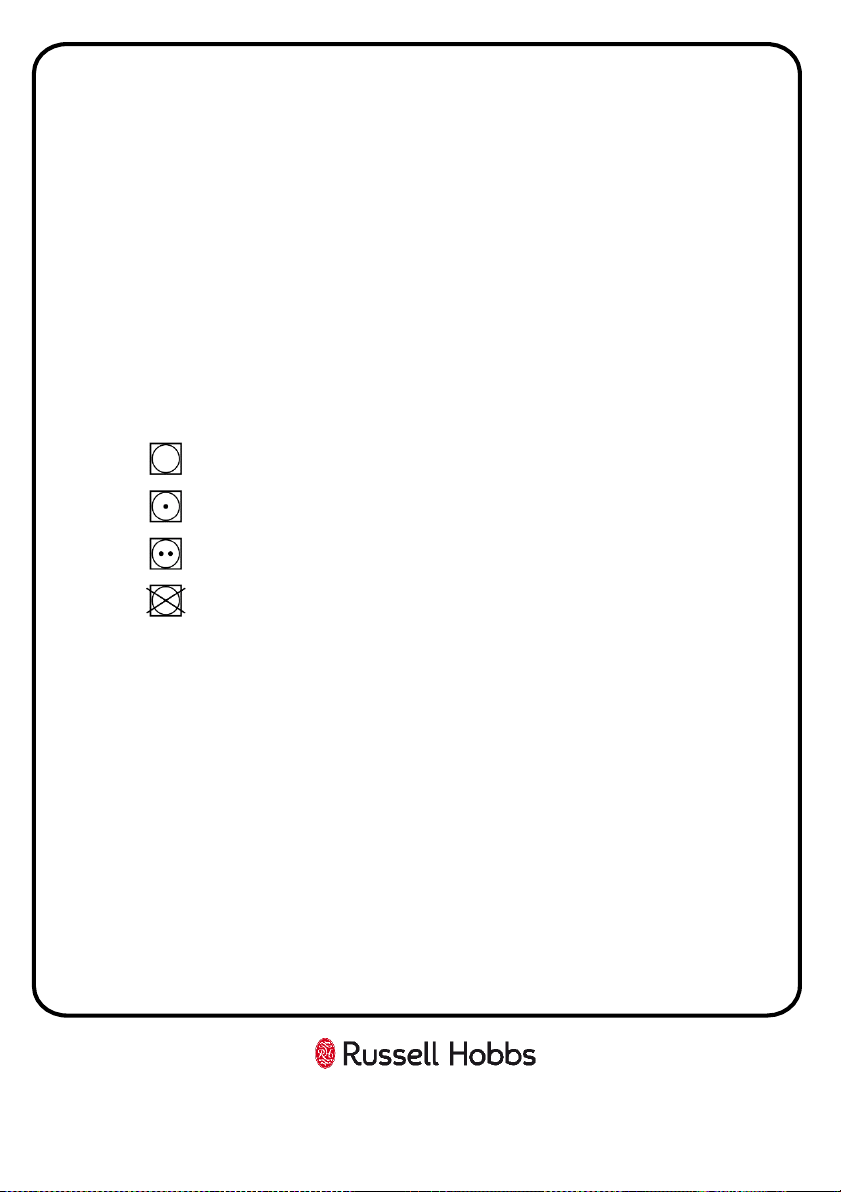
Can be
bleached
Do not bleach
Normal
washing
Maximum
ironing
temperature
150°C
Maximum
ironing
temperature
200°C
Do not iron
Can be dry
cleaned
No dry
cleaning
Dry flat
Drip dry Hang to dry
Do not tumble
dry
Dry cleaning in
gas oil, pure
alcohol and
R113 is allowed
Perchloroethylene
R11, R13,
Petroleum
Perchlorinetyhlene
R11, R113, Gas
oil
18
How to use
Important note:
Faults that arise due to the penetration of foreign objects will void the
manufacturer’s guarantee
• Separate heavily soiled items from lightly soiled ones, even if they would
normally be washed together.
• Separate dark colours from light colours, colourfast items from non-
colourfast items.
• Wash lint producers and lint collectors separately.
• Some cloth warning marks/washing instructions are shown below:
How to use
Loading clothes for washing
• Drop items into the washer loosely. Items should move easily through
wash water for the best cleaning and wrinkle-free results.
• Load washer properly.
• Overloading and selecting a setting too small for the wash load can :
• Cause poor cleaning, Increase wrinkling, Create excessive lint
• Wear out items faster (because of pilling)
Mix large and small items in each load. Load evenly to maintain
washer balance. An unbalanced load can make the washer vibrate
during spin.
• Ensure that no laundry is caught between the cover and below the seal
when closing the door of your machine.
• When closing the door, push the door of your machine until you hear
the locking sound – this indicates the door is fully closed.
• Close the door of your machine properly; otherwise your machine
will not start the washing operation.
Important note:
Maximum loading capacity may vary based on the laundry type you
wash, degree of contamination and the programme you have
chosen. Do not exceed the maximum dry loading capacity indicated
in the programme table for washing programmes. The following
table of laundry weights should be used as an indication of what you
are loading into the machine:
Laundry type Weight (kg)
Towel 0.2
Linen 0.5
Bathrobe 1.2
Duvet/quilt cover 0.7
Pillow case 0.2
Underwear 0.1
Tablecloth 0.25
19
How to use
Adding detergent
• Only use detergent powder for a front loading and automatic washing
machine. Only use the correct amount of detergent; see the instructions
of the detergent manufacturer to identify this.
• In areas of hard water, more detergent will be required.
• The amount of the detergent required will increase with higher washing
loads.
• If your clothes are only slightly soiled, do not pre-wash. Put a small
amount of detergent (as specified by the manufacturer) into the
main wash compartment.
• If your clothes are excessively soiled, select a programme with pre-
wash and put ¼ of the detergent to be used into pre-wash
compartment and the rest in to the main wash compartment.
• It is possible to use fluid detergents in all programmes without a pre-
wash.
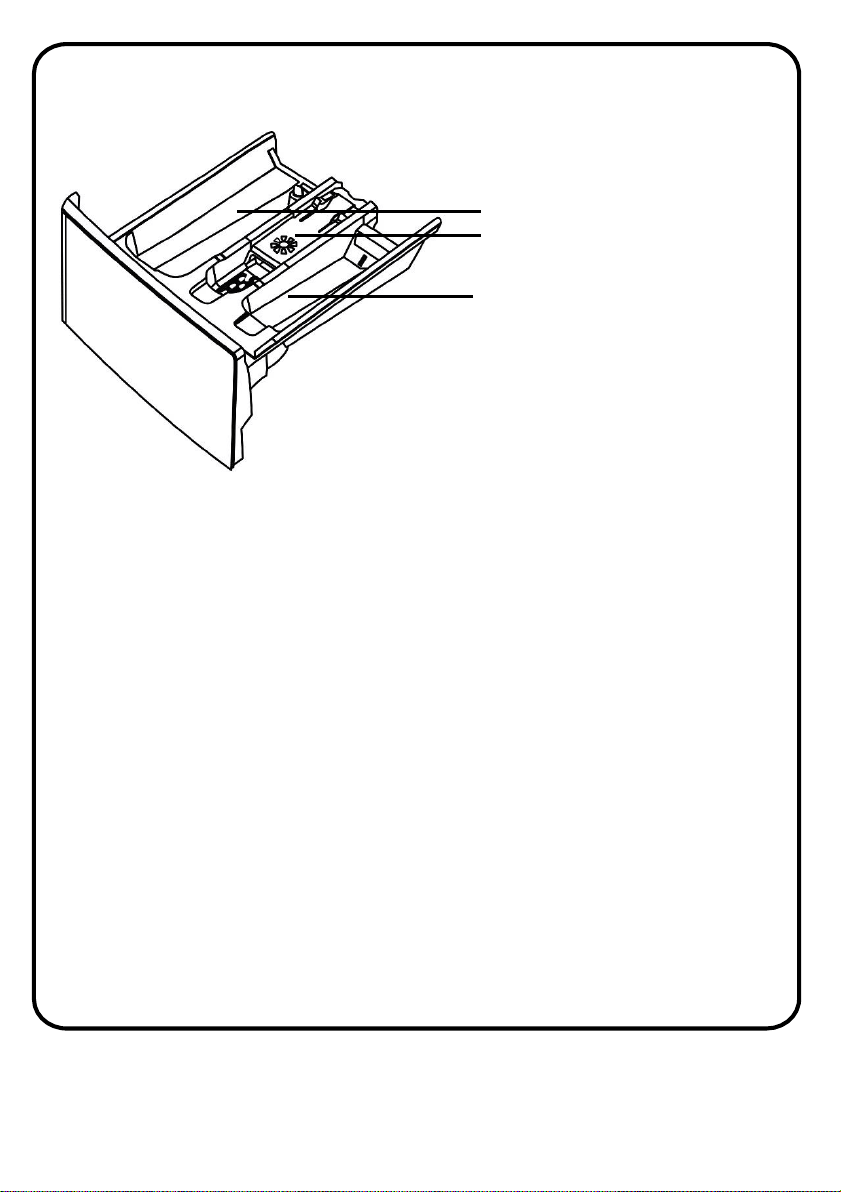
1 - Main wash compartment
2 - Softener compartment
3 - Pre-wash detergent
compartment
20

• Using an excessive amount of detergent (more than the
recommended amount) can cause excessive soapsuds and this will
overload the machine and the motor. In addition, this will
deteriorate the washing and rinse performance.
Adding fabric softener
• If desired, add measured liquid fabric softener to the softener
compartment
• This is the middle compartment of the detergent drawer.
• Pour liquid fabric softener into the dispenser using the recommended
amount specified on the packaging of the fabric softener.
• Do not exceed the MAX level.
• Thick softeners may cause clogging of the drawer and should be
diluted.
• Overfilling can cause early dispensing of the fabric softener which
could stain clothes.
• Do not open the detergent draw when water is being let into the
appliance.
• Do not pour fabric softener directly on the clothes.
WARNING: only use liquid products; the washing machine is set to
automatically dose additives at each cycle during the last rinse.
WARNING: Some detergents are not designed for use in the dispenser
drawer but are supplied with their own dispenser that is place in the
drum directly
How to use
21
Main wash detergent compartment
This compartment is for liquid or powder detergents or limescale remover.
Fabric conditioner, starch compartment
This compartment is for softeners, conditioners or starch. Follow the
instructions on the packaging. If softeners leave residue after use, try
diluting them or using a liquid softener.
Pre-wash detergent compartment
This compartment should be used only when the pre-wash feature is
selected. We recommend that the pre-wash feature is used only for very
dirty laundry.
How to use
22

Helpful tips
A guide to environmentally friendly and economic use of your appliance.
Maximise The Load Size
• Achieve the best use of energy, water, detergent and time by using the
recommended maximum load size.
• Save up to 50% energy by washing a full load instead of 2 half loads.
Do you need to pre-wash?
• For heavily soiled laundry only!
• SAVE detergent, time, water and between 5 to 15% energy consumption
by NOT selecting Prewash for slight to normally soiled laundry.
Is a hot wash required?
• Pre-treat stains with stain remover or soak dried in stains in water before
washing to reduce the necessity of a hot wash programme. Save energy
by using a low temperature wash programme.
Before using a drying programme (WASHER-DRYERS)
• SAVE energy and time by selecting a high spin speed to reduce the
water content in laundry before using a drying programme.
Following is a quick guide with tips and recommendations on detergent use
at the various temperatures. In any case, always read the instructions on
the detergent for correct use and doses.
Additional tips
• When washing heavily soiled whites, we recommend using cotton
programs of 60°C or above and a normal washing powder (heavy duty)
that contains bleaching agents that at medium/high temperatures
provide excellent results.
23

Helpful tips
• For washes between 40°C and 60°C the type of detergent used needs to
be appropriate for the type of fabric and level of soiling.
• Normal powders are suitable for “white” or colour fast fabrics with high
soiling, while liquid detergents or “colour protecting” powders are
suitable for coloured fabrics with light levels of soiling.
• For washing at temperatures below 40°C we recommend the use of
liquid detergents or detergents specifically labelled as suitable for low
temperature washing.
• For washing wool or silk, only use detergents specifically formulated for
these fabrics.
Before using a drying programme
• SAVE energy and time by selecting a high spin speed to reduce
the water content in laundry before using a drying programme.
24
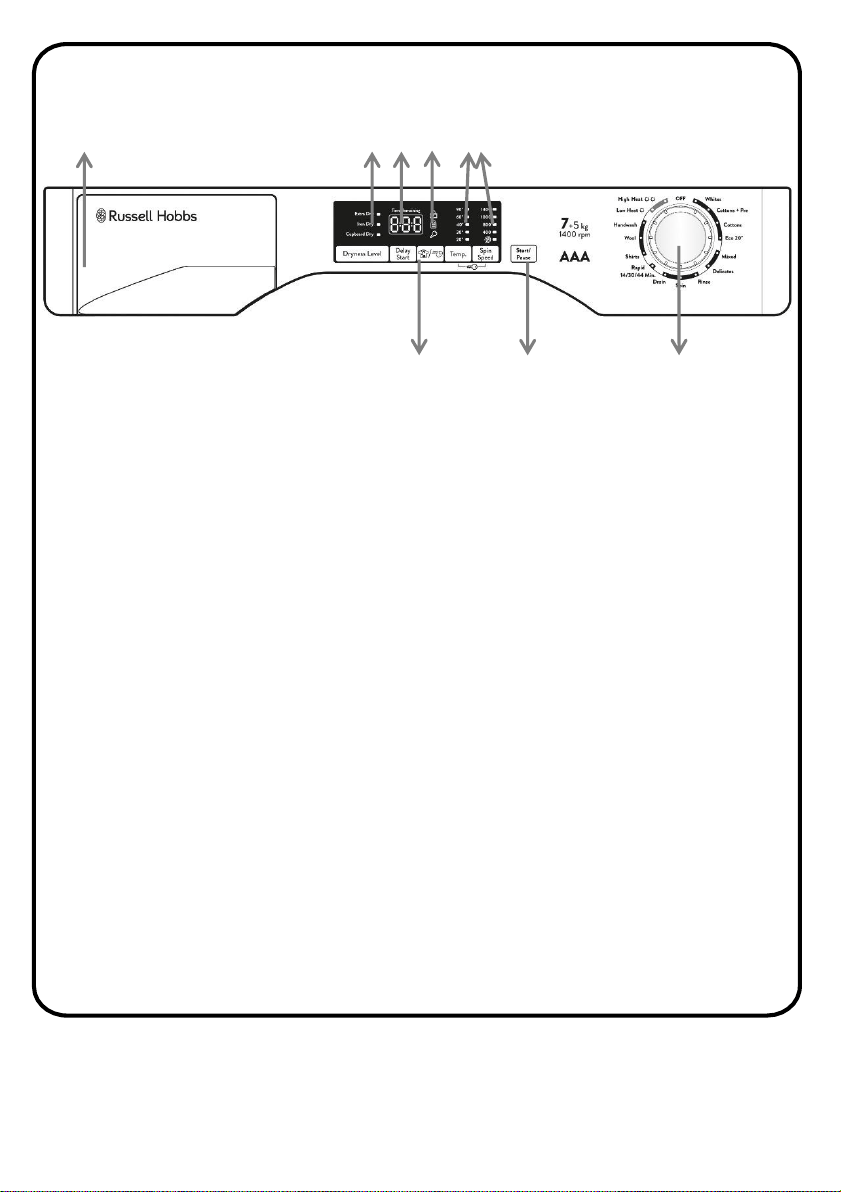
Control Panel
1. Detergent drawer
2. Dryness level indicators
3. LED display
4. Door locked indicator, kg load indicator & key lock indicator
5. Function buttons
6. Temperature & spin speed indicators
7. Start/pause button
8. Programme dial
Note:
• This washing machine automatically adjusts the level of the water to
the type and quantity of washing. This system gives a reduction in
energy consumption and a saving in washing times.
• Should the power go out when the washing machine is running, a
special memory saves the settings and, when power returns, the
machine resumes the cycle from where it left off.
• Wait until the DOOR LOCKED light has gone out before opening the
door.
1
3
42
5
6
7
8
25
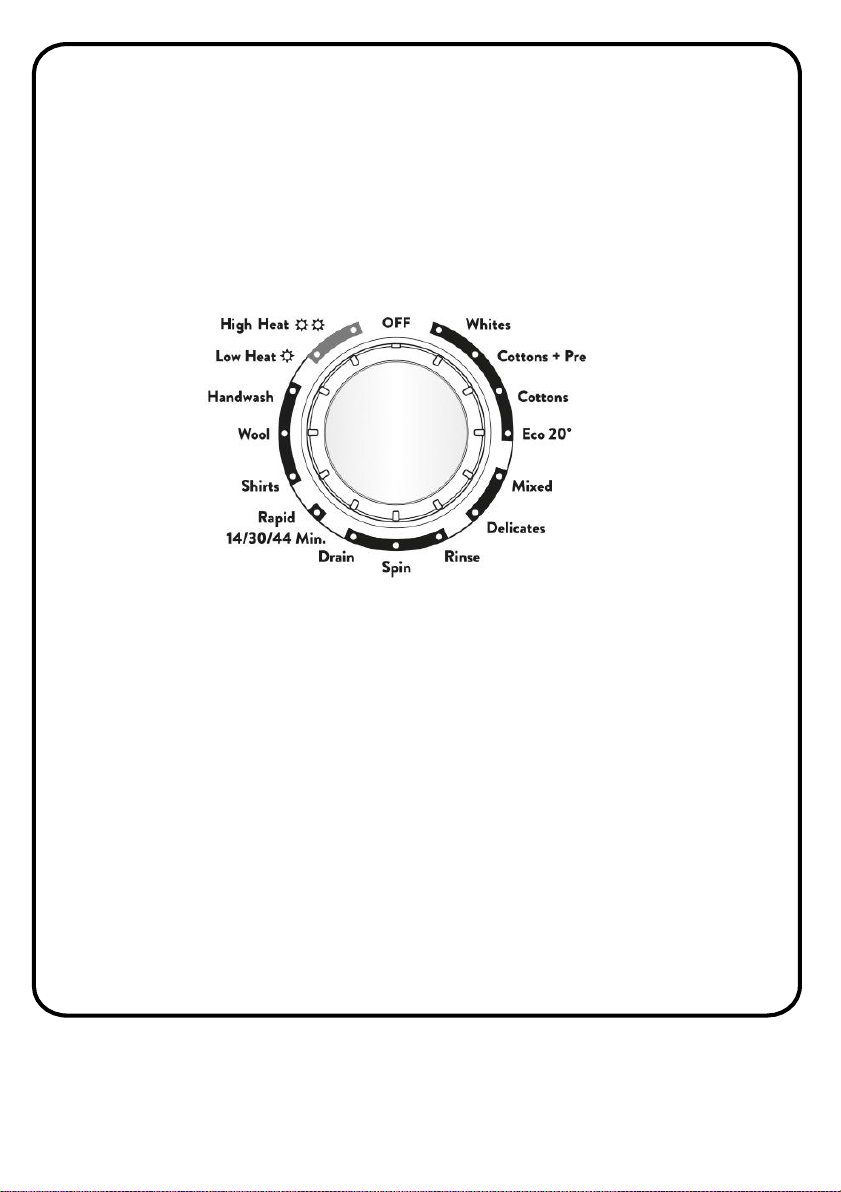
Programme dial
You can select the program you want by turning the program dial. The
marker on the dial points to the chosen programme. You must ensure the
dial is set exactly to the programme you require. The programme time,
temperature and spin speed will be shown on the LED display and indicators.
For energy saving, at the end of the cycle or with an inactivity period, the
display level contrast will decrease.
Note: To switch the machine off, turn the programme selector to the OFF
position.
DRYING: If you would like the drying cycle to begin automatically after
washing, select the programme required using the DRYING SELECTION
button. Or you can finish the wash and then select the drying programme
and load size.
Control Panel
26
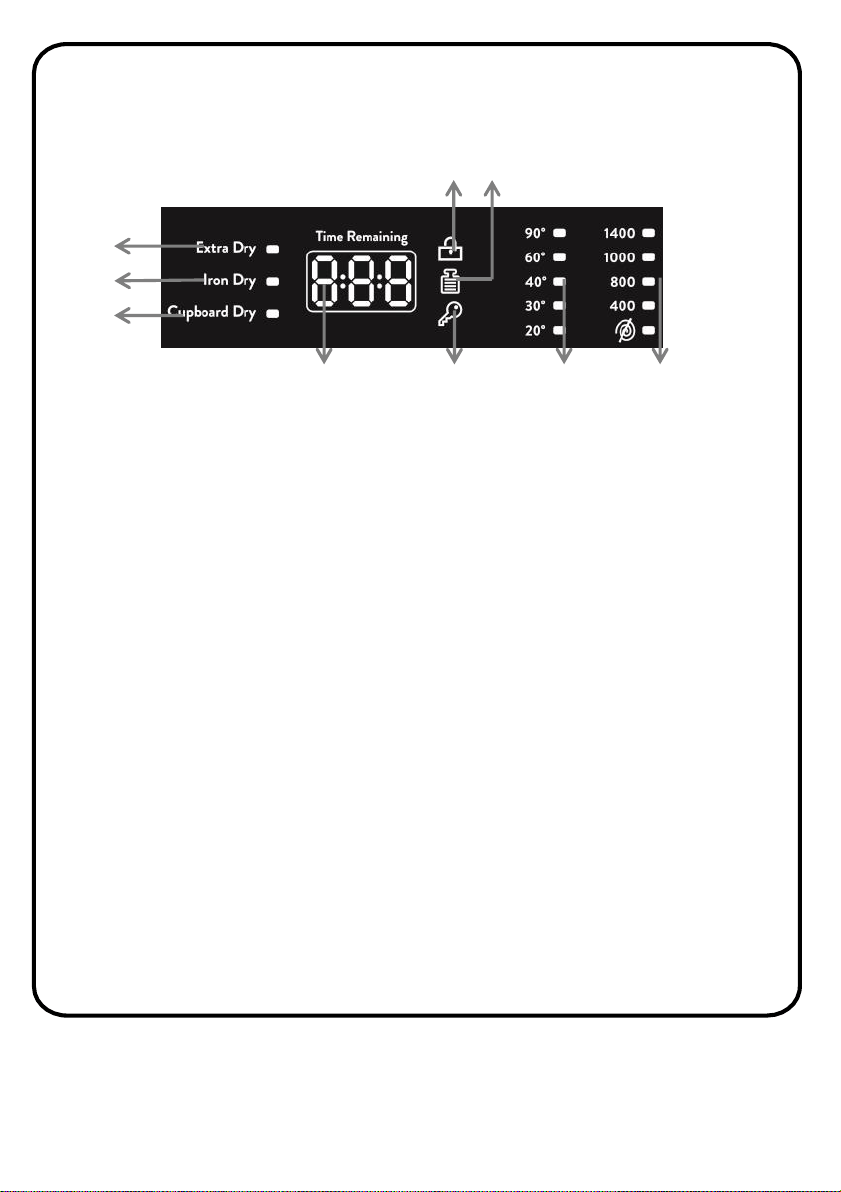
LED display
Extra dry indicator (suitable for towels, bathrobes and bulky loads)
The indicator lights up when the extra dry dryness level has been selected by
pressing the Dryness level button.
Iron dry indicator (leaves the laundry ready for ironing)
The indicator lights up when the Iron dry dryness level has been selected by
pressing the Dryness level button.
Cupboard dry indicator (for items that will be put away without ironing)
The indicator lights up when the cupboard dry has been selected by
pressing the Dryness level button.
Programme time/remaining time
When a programme is selected the display automatically shows the cycle
duration, which can vary, depending on the options selected.
Control Panel
1
2
3
9
8
4
5
6
7
1. Extra dry indicator
2. Iron dry indicator
3. Cupboard dry indicator
4. Programme/remaining time
5. Key lock icon/indicator
6. Temperature indicators
7. Spin speed indicators
8. KG load icon/indicator
9. Door lock icon/indicator
27

Control Panel
During the initial filling phase of the cycle the machine calculates the actual
cycle time needed based on the load size, content and options selected. The
real time of the wash will then be displayed. This time can recalculate
during the wash depending on detergent levels and load balancing.
Door lock icon
The icon is illuminated when the door is fully closed.
Note: Close the door BEFORE selecting the START/PAUSE button.
KG load icon
This function is active only on Cotton and Synthetics programmes.
During the first minutes of the cycle, the "Kg LOAD" indicator will remain on
while the intelligent sensor will weigh the laundry and adjust the cycle
time, water and electricity consumption accordingly. Through every wash
phase "Kg LOAD" allows to monitor information on the wash load in the
drum and in the first minutes of the wash it:
• adjusts the amount of water required
• determines the length of the wash cycle
• controls rinsing according to the type of fabric selected to be washed
• adjusts the rhythm of drum rotation for the type of fabric being washed
• recognises the presence of too much soap suds, and if necessary, adjust
the amount of rinse water.
• adjusts the spin speed according to the load, thus avoiding any imbalance
Key lock icon
The indicator lights up when the key lock is activated
Temperature indicators
This show the washing temperature of the selected programme that can be
changed (where allowed) by the relevant button. If you want to carry out
28

a cold wash all the indicators must be off.
Spin speed indicators
This shows the spin speed of the selected programme, you can reduce or
omit this by pressing the relevant button.
Additional features
Before starting a programme, you can select an additional function. Press
the button on the Control Panel of the additional function you wish to
select.
If the indicator light of the additional function lights up and stays on
continuously, the function has been activated. If the symbol of the
additional function blinks and disappears , the function has not been
activated.
Reason for non-activation:
• The additional function is not compatible with the selected washing
programme.
• Your machine has progressed too far into the programme for the
additional function to be possible.
• The additional function you have chosen is not compatible with another
additional function you have already selected.
Control Panel
29

Additional Functions
Dryness level
This button allows you to choose between 3 different dryness levels. For
automatic washing/drying cycle: after the selection of washing programme
according to laundry type, select a degree of dryness by pressing this
button. At the end of the washing programme, the selected drying cycle
will start automatically. If a washing programme is not compatible with
automatic drying selected, this function will not be activated. If you want
delete the selection before the programme starts, press the button
repeatedly until the lights go off or reposition the programme selector to
the OFF position.
Extra dry
Suitable for towels, bathrobes and bulky loads.
Iron dry
Leaves the laundry ready for ironing
Cupboard dry
For items that will be put away without ironing
Note:
• If an option is selected that is not compatible with the selected
programme then the option indicator light first flashes and then goes
off.
• If you exceed the maximum dryable load of laundry indicated in the
programme table, the laundry may not be dried satisfactory.
30

Additional Functions
Drying only cycle: select via the programme dial the desired drying
programme in conjunction with your fabrics. Press the dryness level button
to select the degree of dryness that is different to the default one (except
for the wool drying programme).
To cancel the cycle during the drying phase, please press the button for
about 3 seconds. "End" will appear in the display at the end of the program
and the DOOR LOCKED light will go off, it is now possible to open the door.
It is also possible to cancel the drying cycle by turning the programme
selector to the OFF position. It is necessary to wait for the cooling phase’s
end (10/20 minutes) and the DOOR LOCKED light to go off before opening
the door.
Delay start
This button allows you to pre-programme the wash cycle to delay the start
of the cycle for up to 24 hours. Press the Delay start button and h00
appears on the display, then press it again to set a 1 hour delay (h01
appears on the display). The pre-set delay increases by 1 hour each time
the button is pressed, until h24 appears on the display, at which point
pressing the button again will reset the delay start to zero.
31

Additional Functions
Note: If you have skipped the delay time you wanted to set, keep pressing
the Delay button until the desired delay time is displayed again.
For the delay timer function to work, you must press Start/Pause button.
It is possible to cancel the delay start by turning the programme selector
to OFF.
If there is any break in the power supply while the machine is operating, a
special memory stores the selected programme and when the power is
restored, it continues where it left off.
Rapid/Stain level
This button allows you to choose between two different options,
depending on the selected programme.
Rapid - The button becomes active when you select the RAPID (14/30/44
Min.) programme on the dial and allows you to select one of three
durations indicated.
Stain - Once the programme has been selected the wash time set for that
programme will be automatically shown. This option allows you to choose
between 3 levels of wash intensity modifying the length of the
programme, depending on how much the fabrics are soiled (can only be
used on some programmes as shown in the table of programmes).
Temperature selection
Use the temperature adjustment button to alter the automatically
programmed washing water temperature. When you select a programme
the maximum temperature for that programme is automatically selected.
To adjust the temperature, press the water temperature adjustment button
until the desired temperature is displayed on the digital display.
32

Additional Functions
You can gradually decrease the washing water temperature between the
maximum washing water temperature of the selected programme and
coldest washing temperature by pressing the temperature adjustment
button.
If you want carry out a cold wash all the indicators must be off.
Note:
• If you have skipped the temperature you wanted, keep pressing the
washing water temperature adjustment button until the desired
temperature is displayed again.
• It is not possible to raise the temperature over the maximum allowed
for the programme, in order to protect the fabrics.
Spin speed selection
When you select a programme, the maximum spin speed is automatically
selected. To adjust the spin speed between the maximum spin speed and
the cancel spinning option, press the Spin speed button until the desired
speed is displayed.
If you have skipped the spin speed you want to set, keep pressing the spin
speed adjustment button until the desired spin speed is displayed again.
Note:
• To prevent damage to the fabrics, it is not possible to increase the
speed over the maximum allowed for the programme.
• The machine is fitted with a special electronic device, which prevents
the spin cycle should the load be unbalanced. This reduces the noise
and vibration in the machine and so prolongs the life of your machine.
33

Additional Functions
Key lock
The key lock function allows you to lock the buttons so that the wash cycle
you have chosen cannot be changed unintentionally. To activate key lock,
press and hold the temperature and spin speed button simultaneously for
at least 3 seconds. The key lock icon will flash on the display when the
keylock is activated.
If any button is pressed or selected programme is changed by the
programme dial while the key lock is active, the key lock icon will flash on
the display.
To deactivate the key lock, press and hold the temperature and spin speed
button simultaneously for at least 3 seconds until the key lock icon on the
display disappears.
Start/Pause
To start the selected programme, press the Start/Pause button. When
Start/Pause is pressed on the machine with the door closed, the door lock
indicatorwill flash momentarily and then illuminate.
Note:
• If the door is not properly closed, the light will continue to flash for
about 7 seconds, after which the start command will be automatically
cancelled. In this case, close the door in the proper way and press the
Start/Pause button.
• A special safety device prevents the door from being opened
immediately after the end of the cycle. Wait for 2 minutes after the
wash cycle has finished and the DOOR LOCKED light has gone out
before opening the door. At the end of the cycle turn the programme
selector to OFF.
34

Additional Functions
Add or remove items after a program has started (pause)
1. Press and hold the Start/Pause button for about 2 seconds (some
indicator lights and the time remaining indicator will flash, showing that
the machine has been paused). Wait 2 minutes until the safety device
unlocks the door.
2. Before you open the door, please check water level is below the door
opening to avoid flooding.
3. After you have added or removed items, close the door and press the
Start/Pause button (the programme will start from where it left off).
Cancelling the Programme
To cancel a running programme at any time:
1. Turn the programme dial to the “OFF” position.
2. Your machine will stop the washing operation and the programme will
be cancelled.
3. Turn the programme dial to the Drain program to drain the machine.
4. Your machine will perform the necessary draining operation and cancel
the programme.
5. You can now select and run a new programme.
Programme end
Your machine will stop by itself as soon as the programme you have
selected finishes.
• “END” will flash on the electronic display.
• You can open the machine’s door and remove the laundry.
• Leave the door of your machine open to allow the inner part of your
machine to dry.
• Switch the programme dial to STOP position.
• Unplug your machine & Turn the water tap off.
35
First wash
Before using the machine for laundry, ensure you run the machine on a
cycle of 90°C, with detergent and without laundry.
Important note
If the power is turned off at any stage of the washing programme and then
turned on, your machine will continue the programme from the point
where it was interrupted. This is not harmful for your machine.
Recommendations
• Ensure you run the machine empty (without any clothes) on a full cycle
at 90°C with detergent before using the machine properly for the first
time.
• Put detergent into the drawer at the beginning of each wash.
• It is recommended that you wash only extremely dirty/soiled
laundry in a pre-washing programme.
• The amount of laundry that you put in your washing machine should not
exceed 7kg or 8kg depending on your model
• If your machine is not going to be used for a long period of time you
should unplug the appliance, turn off the water inlet and leave the door
slightly open. This is so that the inside of your machine will remain dry
and will not cause an unpleasant odour.
Before Use
• Plug in the machine
• Ensure the inlet hose is connected correctly and turn the inlet valve
from its closed position to the open position.
• Check that the drainage hose is connected correctly.
• Open the machine door.
• Place your laundry in your machine.
• Close the door of your machine until you hear the locking sound.
• Select the programme you require.
• Put detergent and softener in the detergent drawer, (if required).
• Press the Start/pause button.
36
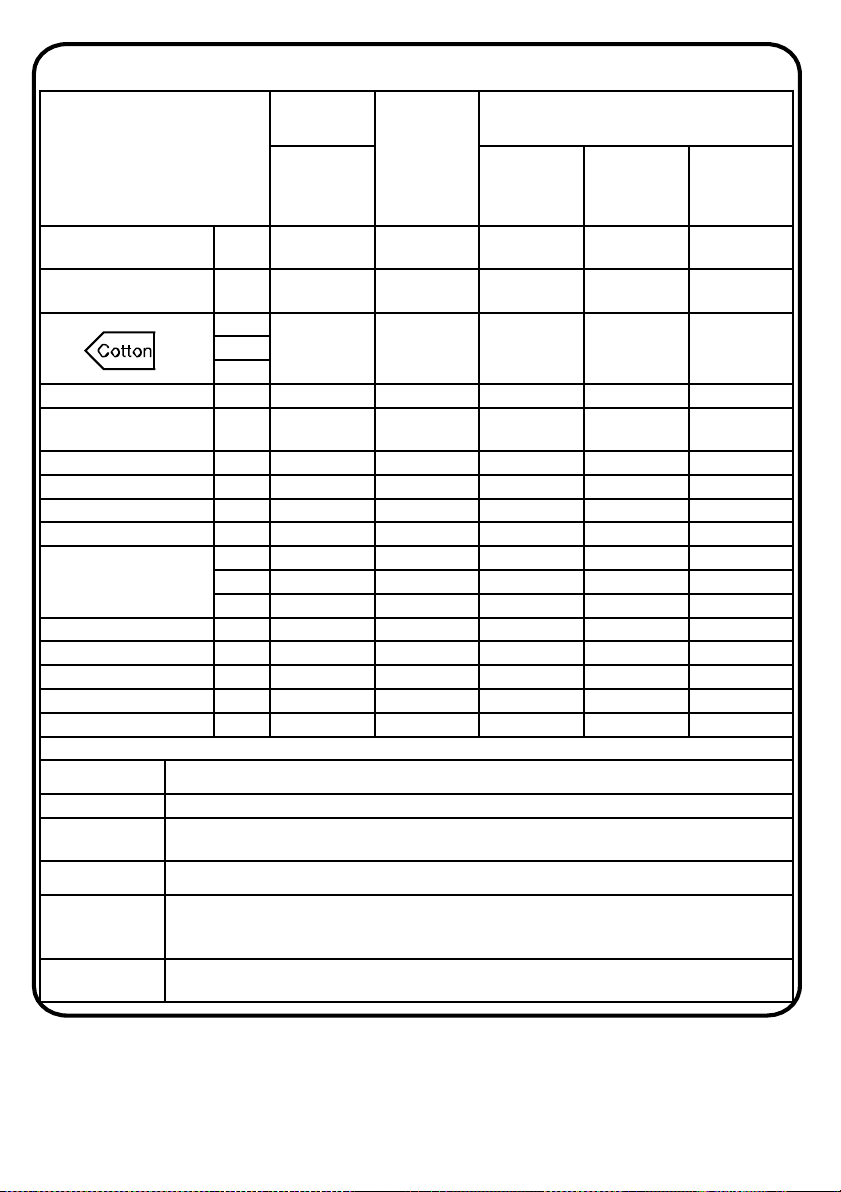
Program Table
Programme
Load
capacity*
Maximum
Temp
(⁰C)
Detergent drawer compartment
7kg
Main
wash
compartment
Softener
compartment
Pre-wash
detergent
compartment
Whites
2)
4)
7 90° x x
Cotton + Prewash
2)
4)
7 60° x x x
**
7 60° x x2)
4)
Eco 20° 4) 7 20° x x
Mixed
2)
4)
3.5 60° x x
Delicates 2.5 40° x x
Rinse - - x
Spin - -
Drain - -
Rapid
3)
14/30/44 Min.
14' 1 30° x x
30' 2.5 30° x x
44' 3.5 40° x x
Shirts 4) 3.5 30° x x
Wool 1 40° x x
Handwash 1 30° x x
Low heat 3.5 - - - -
High heat 5 - - - -
Please read these notes
*
Maximum load capacity of dry clothes, according to the rated capacity of the model used (see control
panel).
** STANDARD COTTON PROGRAMMES ACCORDING TO (EU) No 1015/2010 and No 1061/2010.
1)
When a programme is selected, the display shows the recommended wash temperature. This can be
reduced (where allowed) by the relevant button.
2)
For the programmes shown you can adjust the duration and intensity of the wash using the STAIN LEVEL
button.
3)
Selecting the RAPID program, it will be possible to select with the RAPID button, one
of the three rapid programs: 14’, 30’ and 44’.
4) Programmes for automatic drying
37
Programme table
INFORMATION FOR THE TEST LABORATORIES (Ref. EN 50229 Standards)
Washing
Use the programme ** with the maximum degree of soiling selected,
maximum spin speed and a temperature of 60°C. Programme
recommended also for test with a lower temperature.
Drying
First drying with A kg (a load consist pillowcases and hand-towels) selecting
the cotton drying programme.
High heat – Cupboard dry
Second drying with B kg (a load consist: sheets and hand towels) selecting
the cotton drying programme.
High heat – Cupboard dry
38
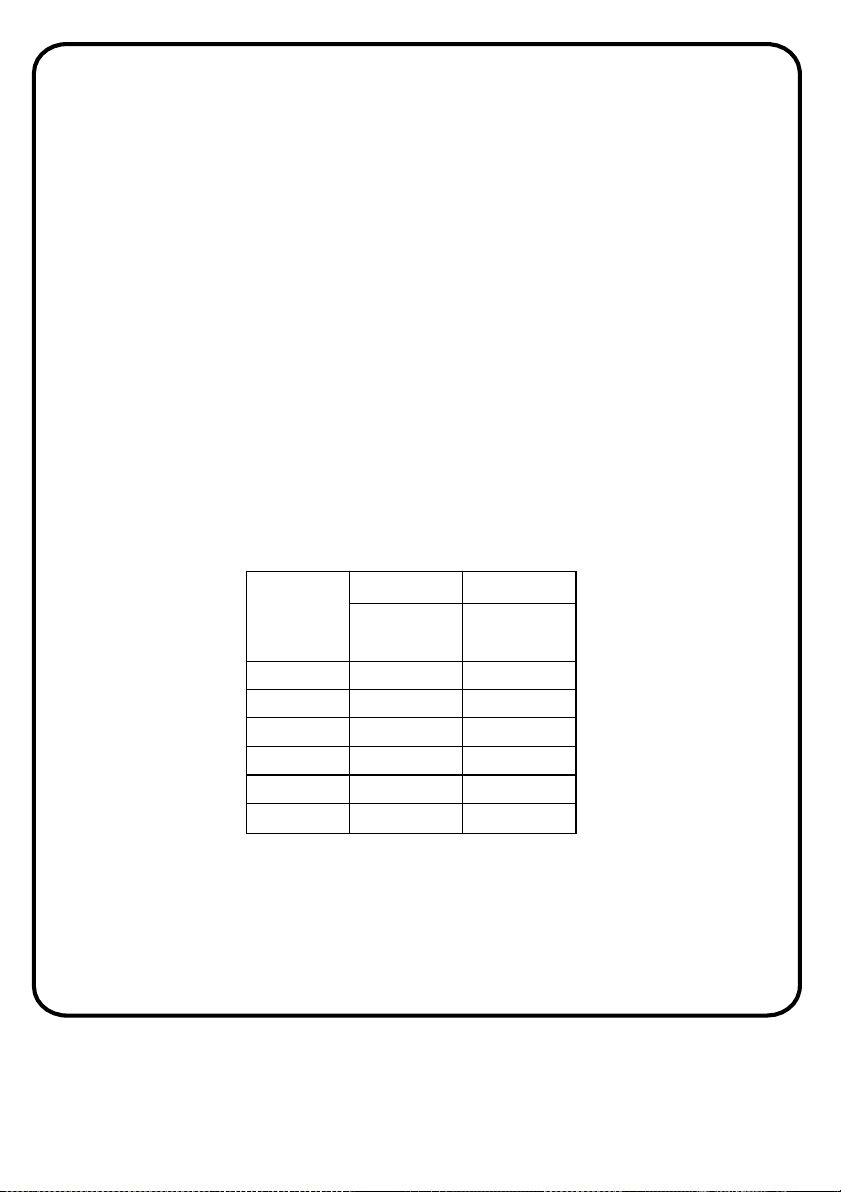
Capacity
(washing
)
(kg)
A (kg) B (kg)
First
drying
Second
drying
6 4 2
6 5 1
7 5 2
8 5 3
8 6 2
9 6 3

Programme selection
To clean different types of fabrics and various levels of dirt, the washing
machine has specific programs to meet every need of washing (see table of
programmes).
Washing
Whites
An intensive wash. The final spin at maximum speed gives more efficient
removal.
Cotton + Prewash
This programme has been designed to remove the stronger stains from
cotton white clothes. The prewash guarantees the tough dirt removal. Add
into compartment "1" a quantity of detergent equal to 20% of that used for
main wash.
Cotton
This program is suitable to clean normally soiled cotton laundry and it is
the most efficient program in terms of combined energy and water
consumptions for washing cotton laundry.
Eco 20°
This innovative programme, allows you to wash different fabrics and
colours together, such as cottons, synthetics and mixed fabrics at only 20°C
and provides an excellent cleaning performance. Consumption on this
program is about 40% of a conventional 40°C cottons wash.
Mixed
The washing and rinsing optimise the speed and rhythm of the drum action
and water levels. The gentle spin, ensures a reduced formation of creases
in the fabric.
39

Programme selection
Delicates
This program has reduced periods of drum rotation during the cycle and is
particularly suitable or washing delicate fabrics. The wash cycle and rinses
are carried out with a high level of water to ensure the best performance.
Rinse
This program performs 3 rinses with an intermediate spin (which can be
reduced or excluded by using the appropriate button). It is used for rinsing
any type of fabric, for example after a wash carried out by hand.
Spin
The programme carries out a maximum spin. It is possible to delete or
reduce the spin with the SPIN SPEED button.
Drain
This programme drains out the water.
Rapid (14/30/44 Min.)
Washing cycle suggested for low loads and slightly dirty. With this program
it is recommended to reduce the quantity of detergent normally used, in
order to avoid unnecessary waste. Selecting the RAPID program and acting
on the button you can choose one of three programs available.
Shirts
The washing cycle is optimized to reduce the creation of creases, keeping
an excellent washing performance. It is also possible to further reduce the
spin speed, to ensure an easier ironing.
40

Programme selection
Wool
This program performs a wash cycle dedicated to the wool fabrics that can
be washed in a washing machine, or the articles to be washed by hand.
Handwash
Program for hand wash only clothes, the program ends with 3 rinses and a
slow spin.
Drying
WARNING:
• Dispensers used for concentrated powders and liquid detergents must
be removed from the drum before commencing the tumble drying
programmes.
The drum changes direction during the drying cycle to prevent the
laundry from tangling and producing even more drying. Cool air is used
during the last 10/20 minutes of the dryingcycle to minimize creasing.
Low heat (mixed)
Low temperature drying programme recommended for synthetics and
mixed fibres (always refer to the laundry care label).
High heat (cottons)
High temperature drying programme recommended for cottons and linen
items (always refer to the laundry care label).
41
For Customer Services & Spare Parts please call 0345 208 8750
Opening times: Monday - Friday 8am – 8pm & Saturday 9am – 1pm
or visit us at www.productcare.co.uk
42
Drying cycle
• Drying guidance advice is general, but practical experience of using
the product will help you to achieve the best drying results.
• We recommend setting a lower drying time than indicated, when first
using the appliance in order to establish the degree of dryness
required.
• We recommend not drying fabrics that fray easily, such as rugs or
garments with a deep pile, in order to avoid air duct clogging.
• We recommend that you sort the laundry by the following methods:
• By drying care symbols, which are displayed on the clothing
labels
Suitable for tumble drying.
Tumble dry at high temperature.
Tumble dry at low temperature only.
DO NOT tumble dry.
Note: If the fabric does not have a care label, you should assume that it
is not suitable for drying.
By size and thickness
Whenever the wash load is bigger than the drying capacity, separate the
clothes according to thickness (e.g. towels from thin underwear).
By fabric type
Cottons/linen: towels, cotton jersey, bed and table linen.
Synthetics: blouses, shirts, overalls, etc. made of polyester or polyamide,
as well as for cotton/synthetic mixes.
• Only dry pre-spun laundry.
For Customer Services & Spare Parts please call 0345 208 8750
Opening times: Monday - Friday 8am – 8pm & Saturday 9am – 1pm
or visit us at www.productcare.co.uk
43
Drying cycle
The correct way to dry
• Open the door.
• Fill with the laundry, not exceeding the maximum drying load
indicated in the programme table. For large items (e.g. sheets) or very
absorbent items (e.g. towels or jeans), it is a good idea to reduce the
load.
• Close the door.
• Turn the programme dial to the more suitable drying programme for
your laundry.
• The washer dryer can perform the following types of drying:
Low heat
Low temperature drying programme recommended for mixed fabrics
(synthetics/cotton) synthetic fabrics.
High heat
High temperature drying programme recommended for cotton, terry
towelling, linen, hemp fabrics, etc...
• Select the degree of dryness that you require:
• EXTRA DRY (suitable for towels, bathrobes and bulky loads).
• IRON DRY (that leaves the laundry ready for ironing).
• CUPBOARD DRY (for items that will be put away without
ironing).
• The washer dryer will calculate the time needed for drying and the
level of moisture remaining in the laundry, according to the load and
drying type selected.

Drying cycle
• Check that the tap is turned on and that the discharge hose is
positioned correctly.
WARNING:
• Do not dry woollen garments or articles with special padding (e.g.
quilts, quilted anoraks, etc.) and very delicate fabrics. If garments
are drip/dry, load less items as to prevent creasing.
• Press the START/PAUSE button (the display will show the drying time
remaining).
• The appliance calculates the time to the end of the selected
programme based upon a standard loading. During the cycle, the
appliance corrects the time according to the size and composition of
the load.
• During the drying phase the drum will accelerate to a higher speed to
distribute the load and to optimize the drying performance.
• When the programme is finished the word "End" will appear on the
display. After 5 minutes the appliance will go into standby mode (on
certain models, the display will show two lines).
• Switch off the machine by turning the programme selector to the OFF
position.
Open the door and remove the laundry.
Turn off the tap.
Cancelling the drying programme
To cancel the drying programme, press and hold the DRYING SELECTION
button for about 3 seconds.
44

Drying cycle
WARNING:
• After cancelling the drying programme, the cool down phase will
begin and you must wait for about 10/20 minutes before opening
the door.
In order to ensure the correct operation of the appliance, it is advisable
not to interrupt the drying phase unless it is absolutely necessary.
Automatic washing/drying cycle
You cannot exceed the maximum dryable load of laundry indicated in the
programme table, otherwise the laundry will not be dried satisfactory.
Washing
• Open the drawer and put in the correct amount of detergent.
• Refer to the list of washing programmes for the fabrics to be washed
(e.g. very dirty cotton) and turn the selector knob to the required
programme.
• Adjust the wash temperature if necessary.
• Press the option buttons (if required).
• Check that the tap is turned on and that the discharge hose is
positioned correctly.
Drying
• Select the degree of dryness that you require:
• EXTRA DRY (suitable for towels, bathrobes and bulky loads).
• IRON DRY (that leaves the laundry ready for ironing).
• CUPBOARD DRY (for items that will be put away without
ironing).
• Press the START/PAUSE button.
45

Automatic washing/drying cycle
• At the end of the wash phase the display will show the drying time
remaining.
• When the programme is finished the word "End" will appear on the
display. After 5 minutes the appliance will go into standby mode (on
certain models, the display will show two lines).
• Switch off the machine by turning the programme selector to the OFF
position.
• Open the door and remove the laundry.
• Turn off the tap.
Cancelling the drying programme
• To cancel the drying programme, press and hold the DRYING
SELECTION button for about 3 seconds.
WARNING:
After cancelling the drying programme, the cool down phase will begin
and you must wait for about 10/20 minutes before opening the door.
In order to ensure the correct operation of the appliance, it is advisable
not to interrupt the drying phase unless it is absolutely necessary.
46
Error codes
Note: Your Washing Machine is equipped with a built-in fault detection
system, indicated by error codes being shown on the LED display. The most
common failure codes are shown below.
All repairs to your machine should be carried out by a qualified engineer
or contact Product Care on 0345 208 8750.
Error shown Possible causes and practical solutions
E2
(with display)
2
flashes of the LEDs
(without
display)
The
machine cannot load water.
Make
sure the water supply tap is open.
Make
sure the water supply hose isn’t bent, kinked or trapped.
Make
sure thedrainpipeisattheproperheight(seeinstallationsection).
Close
the water supply tap, unscrew the filler hose from the back
of
the washing machine and make sure the “anti-sand” filter is
clean
and not blocked.
E3
(with display)
3
flashes of the LEDs
(without
display)
The
washing machine does not drain water.
Make
sure the filter is not clogged.
Make
sure the drain hose isn’t bent, kinked or trapped.
Make
sure the home drainage system is not blocked and is
allowing
waterto flowthroughwithoutobstruction.Tryto drainthe
water
in the sink.
E4
(with display)
4
flashes of the LEDs
(without
display)
There
is too much foam and/or water.
Ensure
the correct amount of detergent is being used and
the
detergent is designed for use in a washing machine.
E7
(with display)
7
flashes of the LEDs
(without
display)
Door
problem.
Make
sure the door is correctly closed.
Make
sure the clothes inside the drum are not preventing the
door
from closing fully.
If
the door is locked, turn off and unplug the washing machine
from
the electrical supply socket, wait 2-3 minutes and reopen
the
door.
Any other
code
Turn
off and unplug the washing machine, wait a minute. Turn on
the
machine and restart a program. If the error occurs again
contact
an Authorised Customer Service Centre directly.
47
Trouble shooting
• All repairs to your machine should be carried out by a qualified
engineer or contact Product Care on 0345 208 8750.
• Before contacting a qualified engineer or Product Care, please see if the
problem your machine has developed can be solved with the help of the
below:
Fault Possible cause Removing methods
Your appliance does not
start.
It is not plugged in. Plug the machine in.
The fuse is faulty or has blown.
Replace the fuse.
Electricity cut - off. Check mains power.
Start/pause button not pressed.
Press the Start/pause button.
Programme dial ‘OFF’ position.
Switch the programme dial to
the desired position.
The machine door is not
completely closed.
Close the machine door.
Your appliance does not
fill with water.
Water tap has been turned off.
Turn the water tap on.
Water inlet hose may be
twisted.
Check water inlet hose and
untwist.
Water inlet hose clogged.
Clean water inlet hose
filters.
Valve inlet filter clogged.
Clean the valve inlet filters.
The machine door is not
completely closed.
Close the machine door.
Your appliance does not
discharge water.
Drain hose is clogged or twisted
Check the drain hose, then
either clean or untwist.
Pump filter clogged. Clean the pump filter.
Laundry settled in the machine
unevenly
Spread your laundry in the
machine evenly.
48
Trouble shooting
Fault Possible cause Removing methods
Excess foam has formed in
the detergent draw.
Excessive amount of
detergent used.
Press the Start/pause button.
To eliminate foam formation,
mix a tablespoon of softener
with 500ml of water and
pour the mixture in the
detergent drawer. After 5
-
10 minutes, press the
Start/pause button again. For
the next washing operation,
use the correct amount of
detergent.
Wrong detergent used.
Use detergents produced
only for automatic washing
machines.
Your appliance vibrates.
The feet of your machine have
not been adjusted correctly.
Adjust the feet on your
machine.
Transportation screws have not
been removed.
Remove transportation
screws.
Your machine is under
-
loaded
with laundry or laundry settled
unevenly.
This will not stop the
operation of your machine.
Your machine is overloaded
with laundry or laundry settled
unevenly.
Do not overload the
appliance more than the
amount recommended and
settle the laundry in the
machine evenly.
Your machine rests on a hard
surface.
Prevent your machine from
resting on hard surfaces.
(sides and rear)
No water appears in the
drum during washing.
No fault. Water is in the
unseen part of the drum.
-
49
Trouble shooting
Fault Possible cause Removing methods
Unsatisfactory washing
results.
The dirtiness of the laundry
does not match the
programme select.
Select the appropriate
programme for the dirtiness
of the laundry.
Insufficient amount of
detergent used.
Adjust the amount of
detergent based on the dirt
level of the laundry.
The washing machine is
overloaded with laundry.
Load the washing machine
with the correct amount and
weight and do not exceed
maximum laundry capacity.
Hard water.
Increase the amount of
detergent following the
manufacturer’s instructions.
Your laundry is too tightly
packed together in the drum.
Check that your laundry is
spread out.
Laundry has detergent
residue.
Non-dissolving particles of
some detergents may appear
on your laundry as white spots.
Perform an extra rinse, or
clean your laundry with a
brush after it dries.
Grey spots appear on the
laundry.
There is untreated oil, cream or
ointment on your laundry.
Use the amount of detergent
as instructed on the
packaging in the next wash.
As soon as the machine is
loaded with water, water
discharges.
The end of water drain hose is
too low for the machine.
Check that the drain hose is
at a suitable height.
The spin cycle does not
take place or takes place
later than expected.
No fault. The unbalanced load
control system has been
activated.
The unbalanced load control
system will try to spread your
laundry. The spinning cycle
will begin once your laundry
is spread. Load the drum
evenly for the next wash.
50

Non-use or vacation care
If you are on vacation or don’t use your washer for an extended period of
time, you should:
• Unplug the power supply cord or turn off electrical power to the washer.
• Turn off the water supplier to the washer.
This helps avoid accidental flooding (due to a water pressure surge) while
you are away.
Outbuilding & winter conditions
• Install and store your washer where it will not freeze because some
water may stay in the hoses/pipes, and freezing can damage your
washer.
Storage
• Run washer on a rinse and spin setting.
• Once finished unplug the power supply cord.
• Turn off water tap and disconnect the water inlet and drain hose
To use washer again
• Flush water pipes and hoses.
• Reconnect water inlet hoses.
• Turn on water faucet.
• Reconnect the power supply cord.
Maintenance
51
Maintenance
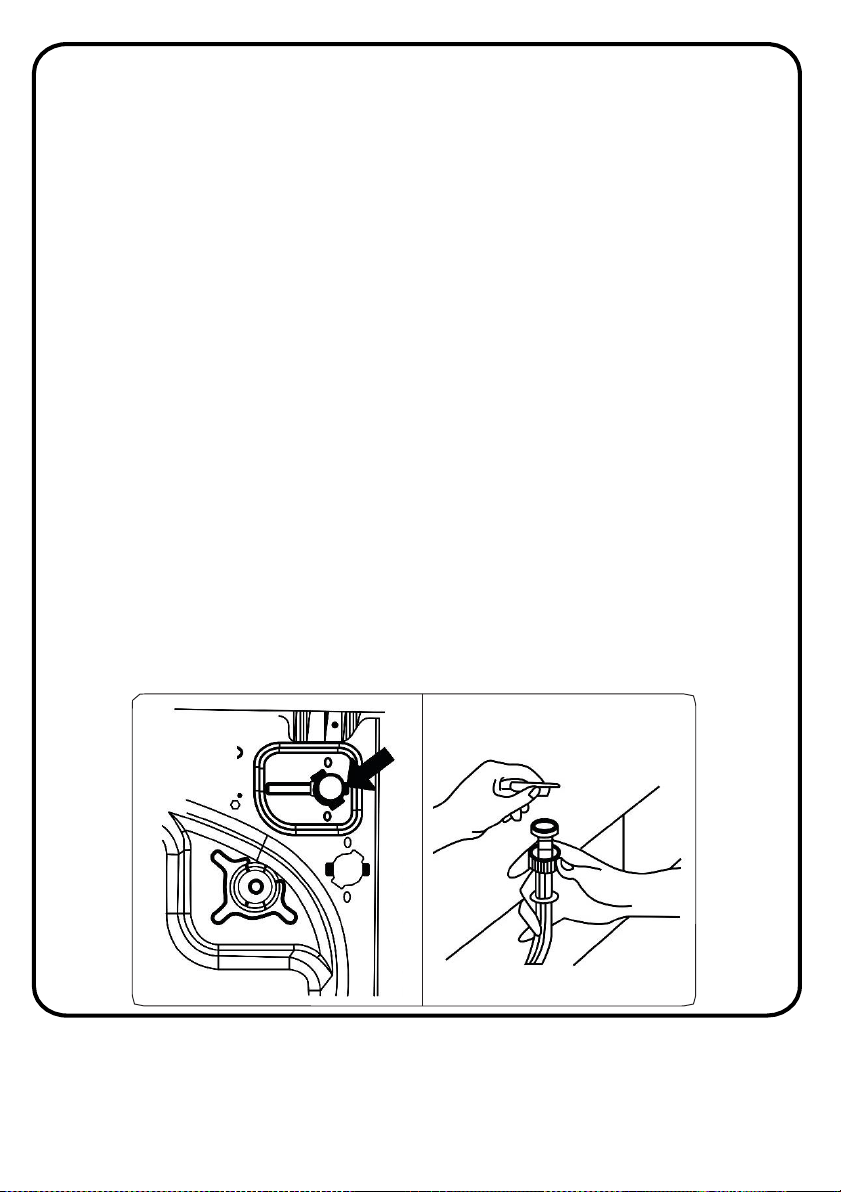
Cleaning the water inlet filter
Water inlet filters prevent dirt and foreign substances in the water from
entering the machine. These are on the tap and on the ends of water valves
along the water inlet hose of your machine. We recommend that these filters
are cleaned every 2 months or when your machine cannot take sufficient
amounts of water despite the tap being open.
To do this follow the below steps:
1. Turn off the water supply
2. Unscrew the water inlet hose(s) from the Washing Machine.
3. To remove the water inlet filter from the water inlet valve, use a pair of long-
nosed pliers to gently pull on the plastic bar in the filter.
4. A second water inlet filter is located in the tap end of the water inlet hose. To
remove the second water inlet filter, use a pair of long-nosed pliers to gently
pull on the plastic bar in the filter.
5. Clean the filter thoroughly with a soft brush and wash with soapy water then
rinse thoroughly. Re-insert the filter by gently pushing it back into place.
Note: The filters at the water inlet valve may become clogged due to water
quality or lack of required maintenance and may break down. This may cause a
water leak. Any such breakdowns are out of the scope of the guarantee.
52
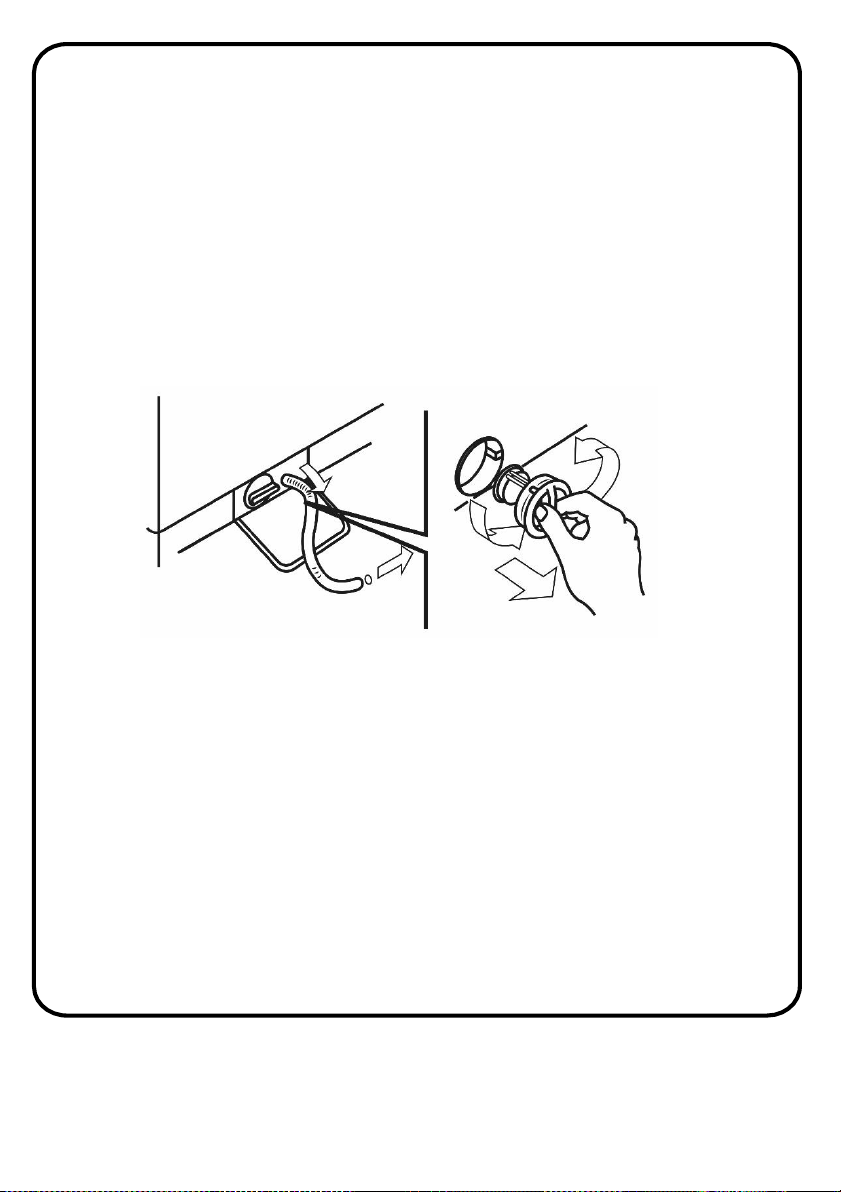
Cleaning the pump filter
The pump filter system in your Washing Machine prolongs the life of the
pump by preventing foreign objects such as threads, coins, pins, buttons,
etc. We recommend that you clean the pump filter every 2 months.
WARNING: The water in the pump may be hot, wait until it has cooled
down to carry out any cleaning or maintenance
The pump filter is located behind the cover on the front-lower right corner.
To clean the pump filter:
1. Ensure all the water has been emptied from the drum.
2. Open the filter pump cover.
3. Before unscrewing the filter, we recommend you place a container
and an absorbent cloth under it to keep the floor dry. A small amount
of water will come out of the filter as you remove it - this is normal.
4. Turn the filter counter-clockwise to the limit stop.
5. Remove and clean the filter. Remove any foreign materials from the
filter with a soft brush.
6. When finished, replace it by turning it clockwise. The filter handle will
be locked when it is not possible to turn any further and the handle is
horizontal.
Maintenance
53
Maintenance
7. Smearing a small amount of liquid soap on the filter seal will help
refitting.
8. Close the filter pump cover
NOTE: Depending on the amount of water inside the machine, you may
have to empty the water collection container a few times.
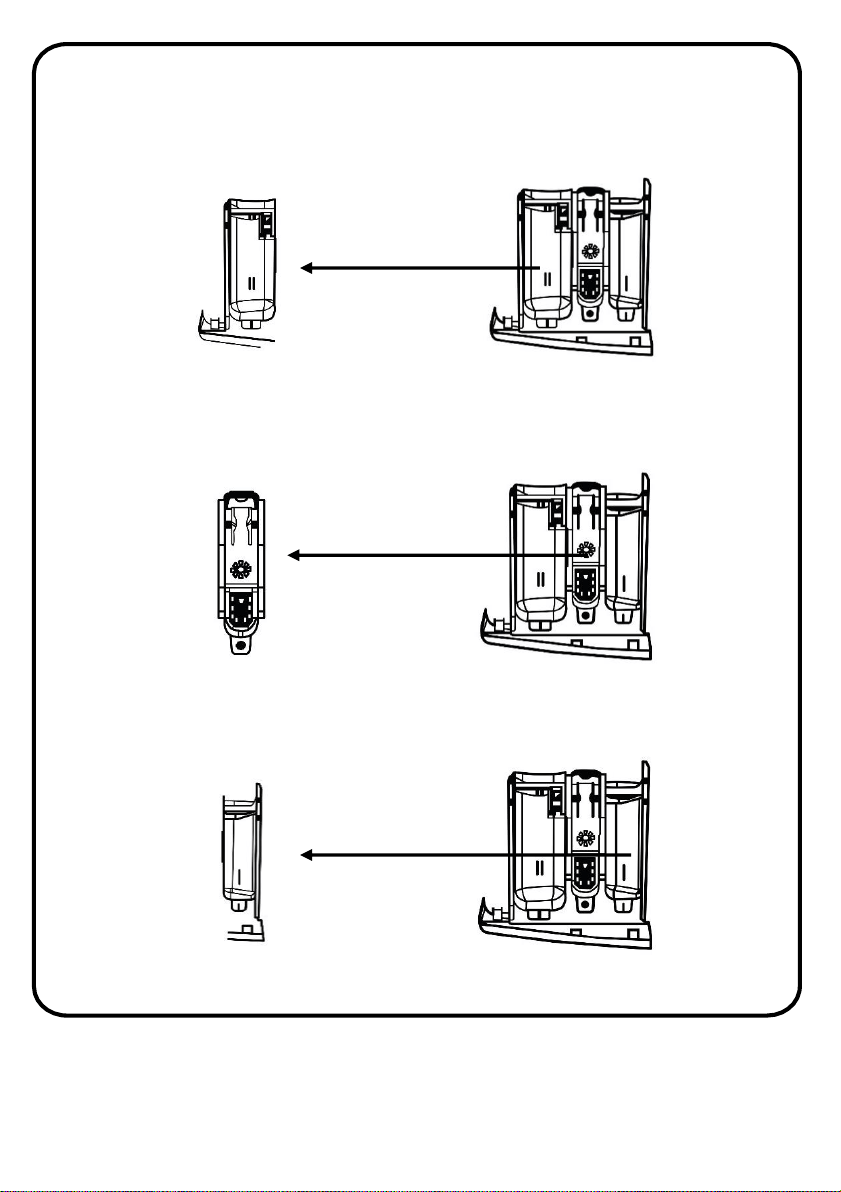
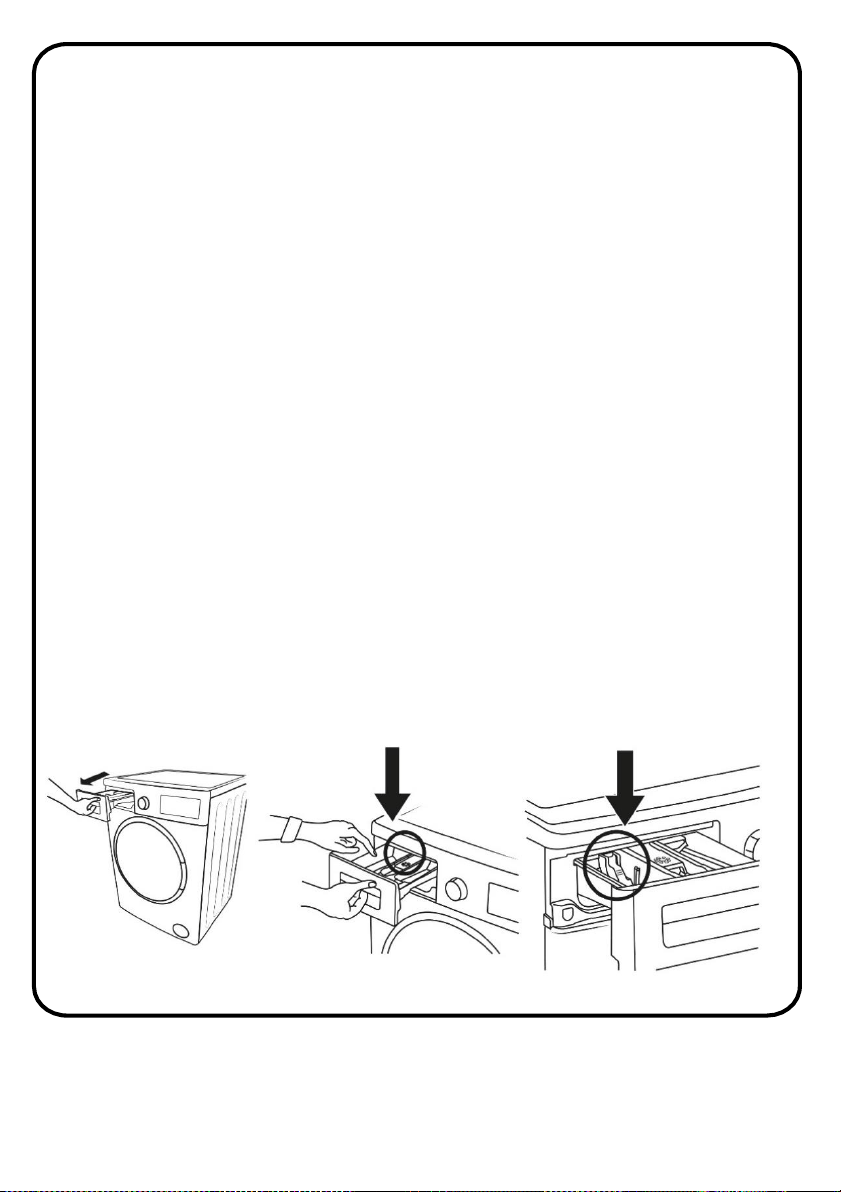
Cleaning the detergent drawer
The use of detergent may cause residual build up in the detergent drawer
over time. We recommend that you remove the drawer every 2 months to
clean the accumulated residue.
To remove the detergent drawer:
• Pull the drawer forwards until it is fully extended.
• Gently press down on the drawer (as shown below) and pull the drawer
from its housing.
• Clean the drawer with water and a soft brush.
• If there is any residue in the drawer housing, remove with a soft brush.
Take care to prevent any residue from dropping into the machine.
• Dry the drawer thoroughly and slide it back into the housing.
Note: Do not wash your detergent drawer in dishwasher.
54

Maintenance
Cleaning the flush stopper
Remove the detergent drawer and disassemble the flush stopper. Clean
thoroughly to completely remove any softener residue. Refit the flush
stopper after cleaning and check that it is seated properly.
55

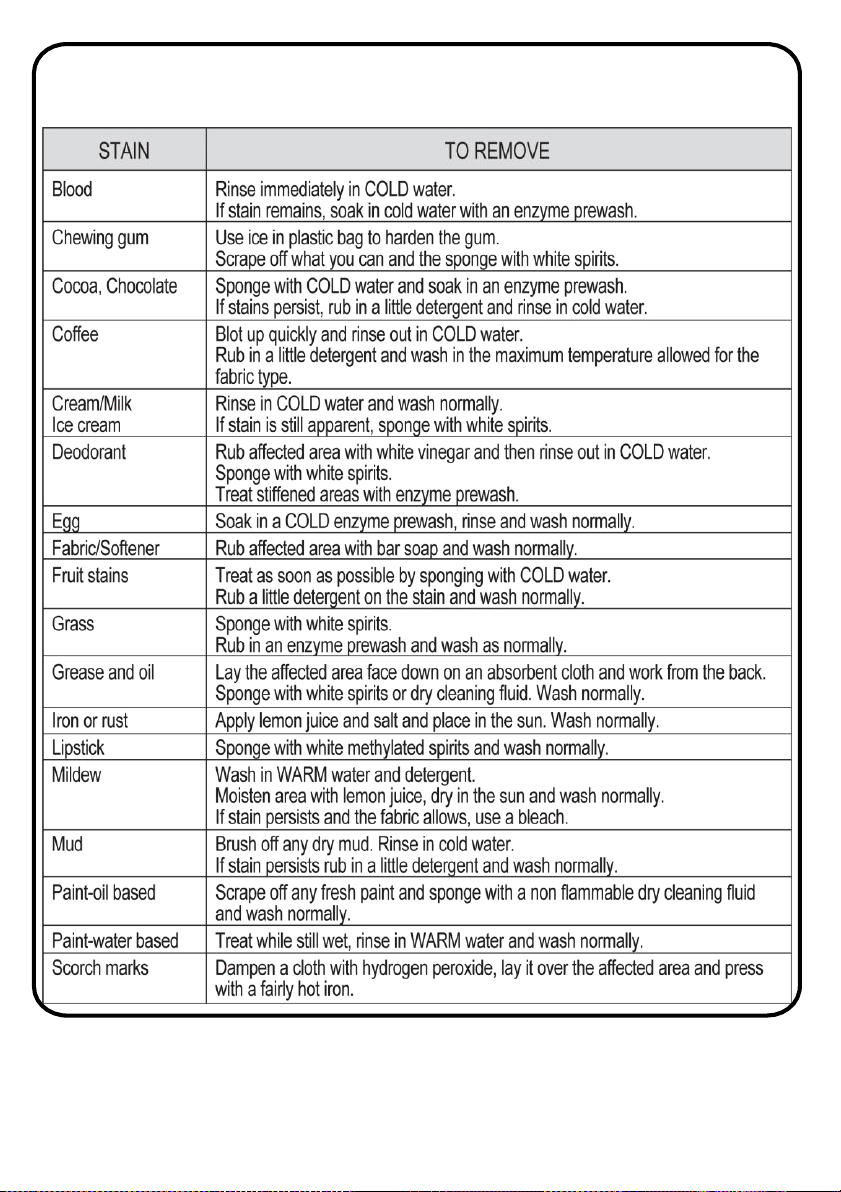
Removing stains from clothes
Stained, heavily-soiled, or greasy items may need to be prewashed or
soaked for best results. Soaking helps remove protein-type stains like
blood, milk or grass. Prewashing helps loosen soil before washing.
Stain removal rules
• Use warm water for soaking or prewashing stained laundry. Hot water
can set stains.
• Most stains are easier to remove when they are fresh.
• Before treating any stain, find out what kind of stain it is, how old the
stain is, what kind of fabric it is, and whether the fabric is
colourfast(Check the care label).
• Washing and drying can set some stains.
• Start with cold or warm water. Hot water can set some stains.
• When bleach is recommended, use a bleach that is safe for the fabric.
• Put the stained area face down on a paper towel or white cloth. Apply
the stain remover to the back of the stain. This forces the stain off
fabric instead of through it.
56
Removing stains from clothes
57
Specification
Mo
del RHBI75140WD1
Dimension
(mm) (H)845 X (W)597 X (D)557
M
aximum mass of dry
clothes
(kg)
7.0kg
M
aximum mass of wet
clothes
(kg)
5.0kg
W
ater pressure (Mpa) 0.1MPa~1MPa
S
pin Speed (RPM) 1400
Rate
d Current
10A
Ope
rating voltage / frequenc
y
(
V/Hz)
(220-240) V ~/50Hz
Rated Power
2200W
58
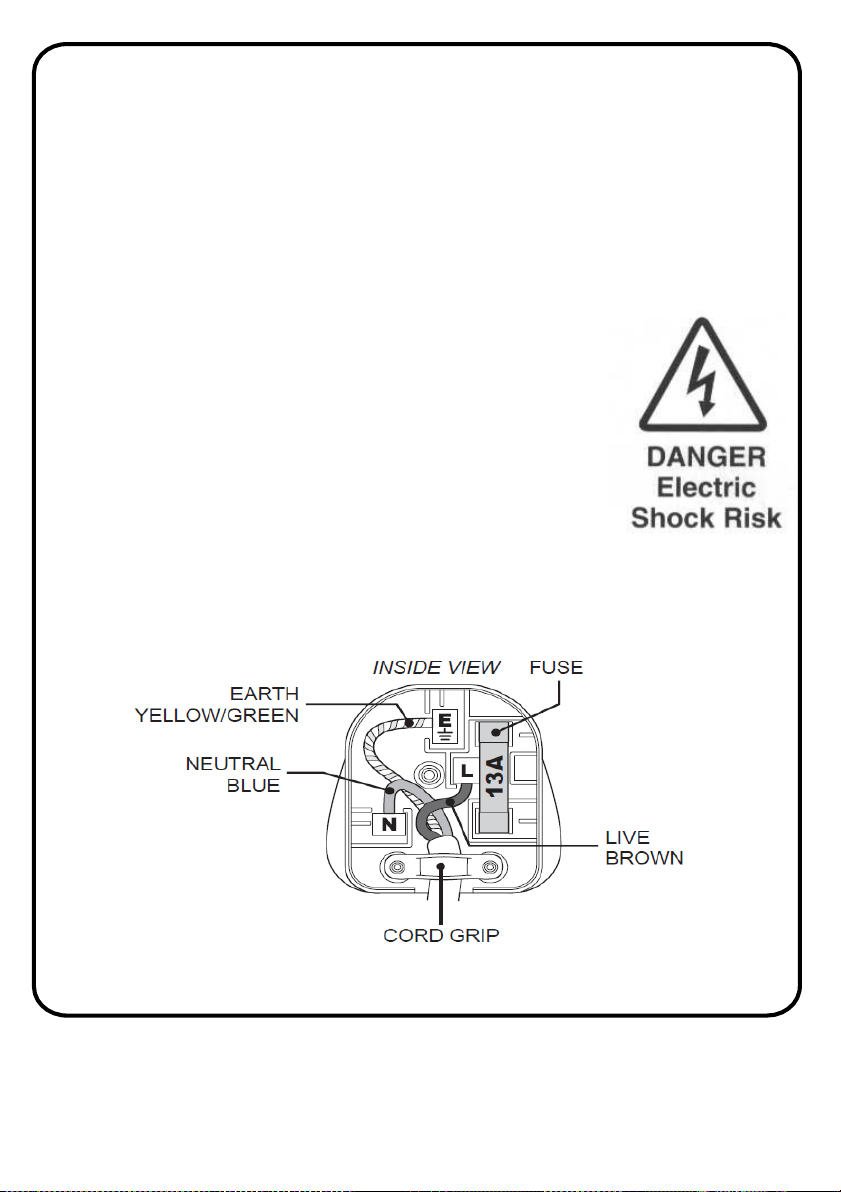
Connection to the mains supply
For UK use only – Plug fitting details (where applicable):
As the colours of the wires in the mains lead of this appliance may not
correspond with the coloured markings identifying the terminals in your plug,
proceed as follows:
The GREEN/YELLOW wire is the EARTH and must be connected to the
terminal which is marked with the letter E or by the earth symbol or coloured
GREEN or GREEN/YELLOW.
The BLUE wire is the NEUTRAL and must be connected to the
terminal marked with the letter N or coloured BLACK. The
BROWN wire is the LIVE wire and must be connected to the
terminal marked with the letter L or coloured RED.
Always ensure that the plug cord grip is fastened correctly.
If a 13A (BS1363) fused plug is used it must be fitted with a
13amp fuse conforming to BS1362 and be BSI or ASTA approved.
59

Guarantee
This product is guaranteed for 12 months from the date of the original
purchase. If any defect arises due to faulty materials or workmanship the
faulty product must be returned to the place of purchase.
Refund or replacement is at the discretion of the retailer.
The following conditions apply:
• The product must be returned to the retailer with the original proof of
purchase.
• The product must be installed and used in accordance with the
instructions contained in this instruction guide and any other
instructions for use which are supplied.
• It must be used for domestic purposes only and for its intended use.
• This warranty does not cover wear and tear, damage, misuse or
consumable parts.
This does not affect your statutory rights.
Produced for:
G2S Limited
Wigan
WN2 4AY
60

For Customer Services & Spare Parts please call 0345 208 8750
Opening times: Monday - Friday 8am – 8pm & Saturday 9am – 1pm
or visit us at www.productcare.co.uk
61
Notes:

For Customer Services & Spare Parts please call 0345 208 8750
Opening times: Monday - Friday 8am – 8pm & Saturday 9am – 1pm
or visit us at www.productcare.co.uk
62
Notes:

For Customer Services & Spare Parts please call 0345 208 8750
Opening times: Monday - Friday 8am – 8pm & Saturday 9am – 1pm
or visit us at www.productcare.co.uk
63
Notes:
For Customer Services &
Spare Parts please call
0345 208 8750
Opening times:
Monday – Friday
8am – 8pm
&
Saturday
9am – 1pm
or visit us at
www.productcare.co.uk
This symbol is known as the 'Crossed-out wheelie bin Symbol'. When this symbol is
marked on a product/batteries, it means that the product/batteries should not be
disposed of with your general household waste. Only discard
electrical/electronic/battery items in separate collection schemes, which cater for the
recovery and recycling of materials contained within. Your co-operation is vital to
make sure the success of these schemes and for the protection of the environment.
For your nearest disposal facility, visit www.recycle-more.co.uk
or ask in store for details.
We reserve the right due to possible changes to design to alter the
instruction manual without prior notice.
Revision 1