User manualDishwasher
ESF6767KXA

2 electrolux.com.au
CONGRATULATIONS
Thank you for purchasing an Electrolux dishwasher.
You’ve chosen a product that brings with it decades
of professional experience and innovation. Ingenious
and stylish, it has been designed with you in mind.
So whenever you use it, you can be safe in the
knowledge that you’ll get great results every time.
Welcome to Electrolux.
REGISTERING YOUR APPLIANCE
Please visit our website www.electrolux.com.au/register
to quickly and easily register your product.
BEFORE USING YOUR APPLIANCE
Check for any damage or marks. If you nd the appliance
damaged or marked you must report it within 7 days to
claim for damages under the manufacturers warranty.
Before you use the appliance, we recommend that you
read through the whole user manual which provides
the description of the product and its functions. It is
important that the product is installed correctly and that
you read the safety instructions carefully to avoid misuse
and hazards.
For future reference, please store this booklet in a
safe place.
This appliance complies with the requirements of
Australian Standard AS/NZS 60335.2.5.
CONDITIONS OF USE
This appliance is intended to be used in household and
similar applications such as:
• Sta kitchen areas in shops, oces and
other working environments
• Farm houses
•
By clients in hotels, motels and other residential
type environments
• Bed and breakfast type environments.
BEFORE YOU CALL
Please ensure you read the instruction manual fully
before you call for service, or a full service fee could be
applicable. Record model and serial number here:
Model number:
___________________________________
Serial number: ____________________________________
PNC number: _____________________________________
CONTENTS
Safety information .................................................... 3
Product description
...................................................5
Getting familiar with your machine
.............................6
Programs
..................................................................7
Options
.....................................................................9
Before rst use
........................................................10
Daily use
.................................................................. 11
Settings
...................................................................12
Hints and tips
..........................................................17
Loading your dishwasher
.........................................19
Care and cleaning
....................................................21
Consumption values
................................................22
Power half load consumption values
........................ 23
Care and cleaning
....................................................24
Troubleshooting
.......................................................24
Technical specications
...........................................27
Installation
...............................................................29
Notes
......................................................................38
Warranty
.................................................................. 31
IMPORTANTINFORMATIONTHATMAY
IMPACTYOURMANUFACTURER’S
WARRANTY
Adherence to the directions for use in this manual
is extremely important for health and safety.
Failure to strictly adhere to the requirements in
this manual may result in personal injury, property
damage and aect your ability to make a claim
under the Electrolux manufacturer’s warranty
provided with your product. Products must be
used, installed and operated in accordance with
this manual. You may not be able to claim on the
Electrolux manufacturer’s warranty in the event
that your product fault is due to failure to adhere
this manual.

3
• Some dishwasher detergents are strongly alkaline.
They can be extremely dangerous if swallowed. Avoid
contact with the skin and eyes and keep children
away from the dishwasher when the door is open.
• Before any maintenance operation, deactivate the
appliance and disconnect the mains plug from
the socket.
• Do not use high pressure water sprays and/or steam
to clean the appliance.
• If the appliance has ventilation openings in the base,
they must not be covered e.g. by carpet.
• The appliance is to be connected to the water mains
using the new supplied hose-sets. Old hose-sets
must not be used.
Safetyinstructions
Installation
• Remove the packaging.
• Do not install or use a damaged appliance.
• Do not install or use the appliance where the
temperature is less than 0°C.
• Follow installation instructions supplied with
appliance.
• Make sure that the appliance is installed below and
adjacent to safe structures.
Electricalconnection
WARNING!
Riskofreandelectricalshock
• The appliance must be earthed.
• Make sure the parameters on the rating plate are
compatible with the electrical ratings of the main
power supply.
• Always use a correctly installed shock proof socket.
• Do not use multi-plug adapters and extension cables.
• Make sure not to cause damage to the mains plug
and the mains cable. Should the mains cable need
to be replaced, this must be carried out by our
Authorised Service Centre.
• Connect the mains cable to the mains socket only
at the end of the installation. Make sure that there is
access to the mains plug after installation.
• Do not pull the mains cable to disconnect the
appliance. Always pull the mains plug.
Waterconnection
• Do not cause damage to the water hoses.
• Before connection to new pipes, pipes not used for
a long time, where repair work has been carried out
or new devices tted (water meters etc.), let the water
ow until it is clean and clear.
SYMBOLS
WARNING!
Thissymbolindicatesinformationconcerning
yourpersonalsafety.
CAUTION!
Thissymbolindicatesinformationonhowto
avoiddamagingtheappliance.
IMPORTANT!
Thissymbolindicatestipsandinformationabout
useoftheappliance.
ENVIRONMENT!
Thissymbolindicatestipsandinformationabout
economicalandecologicaluseoftheappliance.
Before the installation and use of the appliance, carefully
read the supplied instructions. The manufacturer is not
responsible for any injuries or damages that are the
result of incorrect installation or usage. Always keep the
instructions in a safe and accessible location for future
reference.
Childrenandvulnerablepeoplesafety
• This appliance can be used by children aged from
8 years and above and persons with reduced physical,
sensory or mental capabilities or lack of experience
and knowledge if they have been given supervision
or instruction concerning the use of the appliance in a
safe way and understand the hazards involved.
• Do not let children play with the appliance.
• Keep detergents away from children.
• Keep children and pets away from the appliance
when the door is open.
• Children shall not carry out cleaning and user
maintenance of the appliance without supervision.
GeneralSafety
• Do not change the specification o
f
the appliance.
• T
h
e operating water pressure (minimum and
maximum)must be between 0.3 (0.03) / ( ) bar
(MPa)
• Obey the maximum number of 15 place settings.
• I f the supply cord is damaged, it must be replaced
by the manufacturer, it Authorised Service Centre or
similarly qualified persons in order to avoid a hazard.
• Put cutlery in the cutlery basket with the sharp ends
pointing down or put them in the cutlery drawer in
horizontal position with the sharp edge down.
• Do not leave the appliance with the open door
unattended to avoid stepping accidentally onto it.
SAFETY INFORMATION
1
0
1
0
.

4 electrolux.com.au
SAFETY INFORMATION
Use
• Do not sit or stand on the open door.
• Dishwasher detergents are dangerous. Follow the
safety instructions on the detergent packaging.
• Do not drink and play with the water in the appliance
• Do not remove the dishes from the appliance until the
program is complete. Some detergent may remain
on the dishes.
• The appliance can release hot steam if you open the
door while a program operates.
• Do not put ammable products or items that are wet
with ammable products in, near or on the appliance.
Disposal
WARNING!
• Riskofinjuryorsuocation
• Disconnecttheappliancefromthemains
supply.
•
Cutothemainscableanddiscardit.
• Removethedoorcatchtopreventchildren
andpetstogetclosedintheappliance.
Environmentalconcerns
• Recycle the materials with the symbol
. Put the
packaging in applicable containers to recycle it.
Help protect the environment and human health
and to recycle waste of electrical and electronic
appliances. Do not dispose appliances marked with
the symbol with the household waste. Return the
product to your local recycling facility or contact
your municipal oce.
• Ensure that there are no visible water leaks during
and after the rst use of the appliance.
• If the water inlet hose is damaged immediately close
the water tap and disconnect the mains plug from
the mains socket. Contact the Authorised Service
Centre to replace the water inlet hose.
5
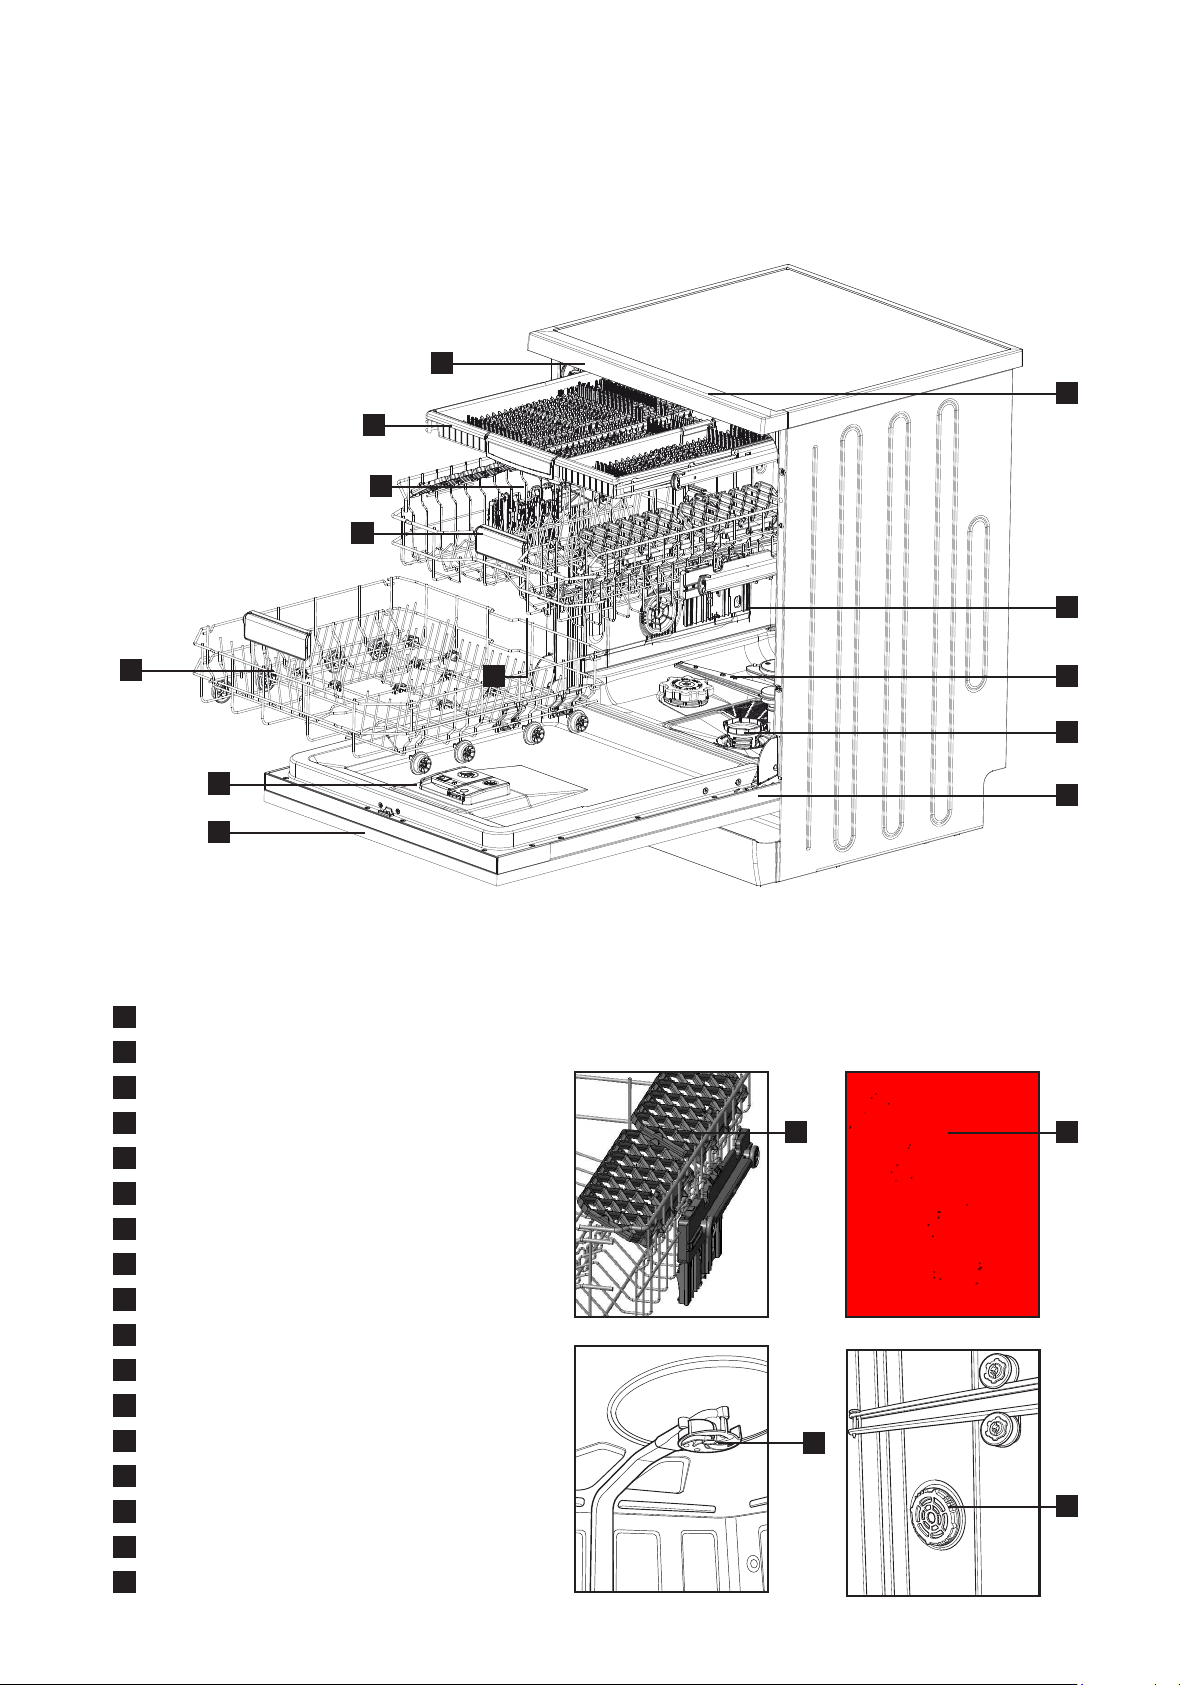
PRODUCT DESCRIPTION
1
Worktop
2
Glass stem grip on cup racks
3
Upper basket with cup racks
4
Upper basket direct wash system
5
Upper spray arm
6
Lower basket with folding supports
7
Lower spray arm triple wash system
8
Filters
9
Rating plate
10
Control panel
11
Detergent and rinse-aid dispenser
12
Upper basket height adjusting mechanism
13
Basket handle
14
Cutlery tray
15
Ceiling spray
16
Turbo drying unit
17
Door latch
15
16
2 4
1
3
13
14
6
10
11
7
12
17
8
9
5
6 electrolux.com.au
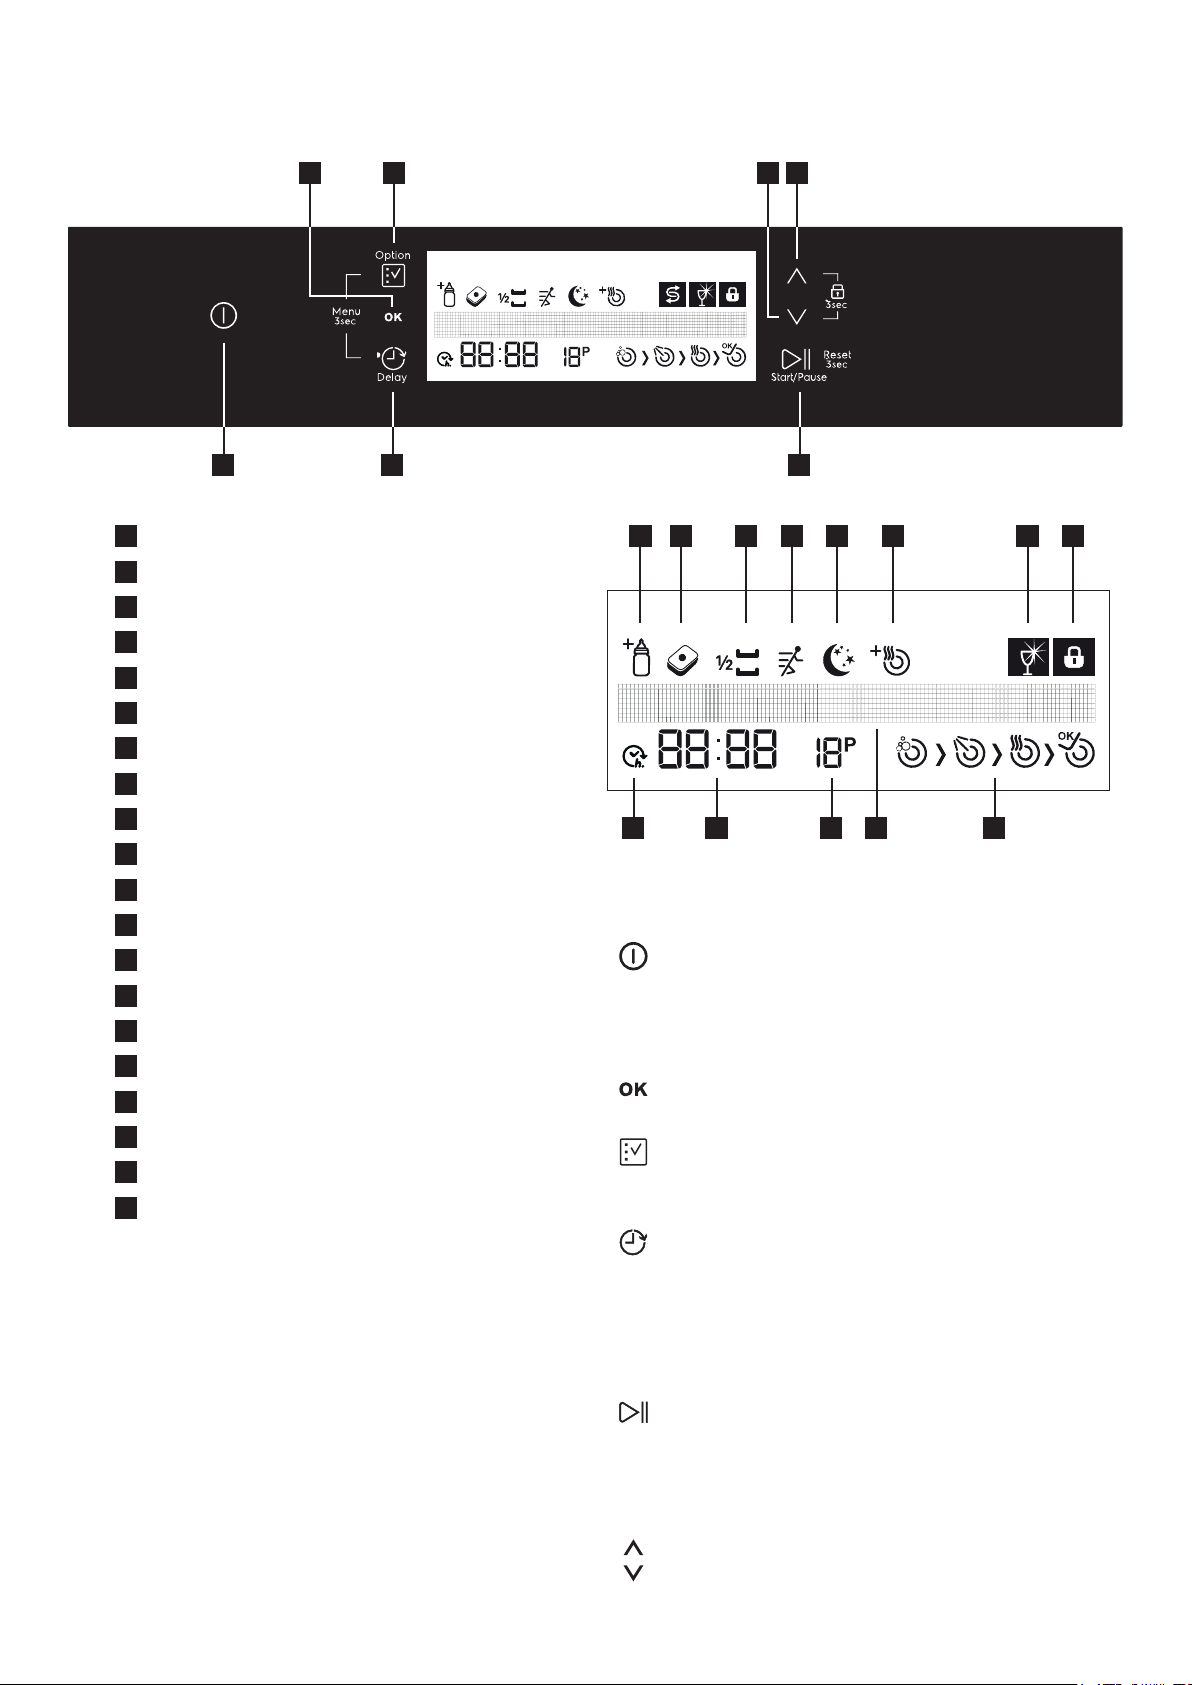
GETTING FAMILIAR WITH YOUR MACHINE
3 6
7
1
4 5
2
8
9 10 11 12 13 14 15
16
17
18
19
20
Buttons
1.PowerOn/OButton
When you press the on/o button, the machine is
energized and the display shows the last used program;
in the o position, the LEDs on the display are o.
2.ConrmationButton
Conrms (saves) your additional functions and settings.
3.OptionButton
Allows you to use the functions in the additional
function s men u. (8- 9-10-11-12-13).
4.DelayButton
Delays the starting time of the program you have
selected (1-24 hours). You may see the delay time in the
Remaining Time/Delay Time Indicator (17). When the
delay button is pressed, Delay Indicator (16) is seen on
the display.
5.Start/PauseButton
When you press the Start/Pause Button, the selected
program starts and washing symbol (a) appears on
the display. You may follow the washing phases on the
display. (2 -a-b-c-d).
6.Up/DownButtons
Allows you to browse in Program, Additional functions,
delay and settings menus.
1
On/O
2
Conrmation Button
3
Option Button
4
Delay Start Button
5
Start/Pause button
6
Up Selection Button
7
Down Selection Button
8
Extra Hygiene Indicator
9
Tablet Indicator
10
Half Load Indicator
11
Extra Fast Indicator
12
Extra Silent Indicator
13
Extra Drying Indicator
14
Rinse Aid Level Warning Indicator
15
Child Lock Indicator
16
Delay Start Indicator
17
Remaining Time/Delay Time Indicator
18
Program Number Indicator
19
Display Information Line
20
Washing cycle progress indicators
a Washing Cycle Symbol
b Rinse Cycle Symbol
c Drying Cycle Symbol
d End Cycle Symbol
0

7
DualWash
This program is to wash both delicate/less soiled dishes and heavily soiled dishes at the same time. The delicate dishes
on the upper basket are washed at a lower pressure and the heavily soiled dishes on the lower basket are washed at a
higher pressure.
Jetwash14’ program can be used for low levels of fresh soil, It is suitable for dishes of four persons. Only powder
detergent should be used.
Warning: In Jetwash 14’ min, Quick 30 min and Super 50 min programs, there is no drying step.
Program
Degreeofsoiltype
ofload
Programphases Options
DetergentAmount
PreWash
-
Cold rinse Delay start, Power Half
load, Child lock
-
Jetwash14’
Low soil levels, fresh light
soil, coee, milk, tea
Main wash
Hot rinse
Delay start, Power Half
load, Child lock
25
Quick30’
Low soil levels, fresh light
contamination, coee,
tea, milk, cold meat,
vegetables
Main wash 40°C
Cold rinse
Hot rinse
Delay start, Power Half
load, Child lock, Extra
drying
15
Eco
Normal soil levels, old
soups, sauces, pastries,
egg, rice, potato and oven
foods, fried foods
Cold rinse
Main wash 50°C
Warm rinse
Hot rinse
Delay start, Power Half
load, tablet, child lock,
extra fast, extra hygiene,
extra drying, extra silent
40
Super50’
Medium soil levels, old
soups, sauces, pastries,
egg, rice, potato and oven
foods, fried foods
Main wash 65°C
Warm rinse
Hot rinse
Delay start, Power Half
load, tablet, child lock,
extra hygiene, extra drying
40
Daily60°C
Heavy soil levels, old
soups, sauces, pastries,
egg, rice, potato and oven
foods, fried foods
Cold rinse
Main wash 60°C
Cold rinse
Hot rinse
Dry
Delay start, Power Half
load, Tablet, Child lock,
Extra fast, Extra hygiene,
Extra silent, Extra drying
40
FlexiWash60°C
For both delicate
glassware and heavily
soiled crockery at the
same time
Prewash 40°C
Main wash 60°C
Inter rinse 45°C
Hot rinse
Dry
Delay start, Power Half
load, Tablet, Child lock,
Extra fast, Extra hygiene,
Extra silent, Extra drying
40
AutoFlex
30°C-50°C
Automatically adjusts the
washing time, temperature
and amount of water by
determining the soil level
of dishes
Washing steps
are determined
automatically
according to the level
of soil.
Delay start, Power Half
load, Tablet, Child lock,
Extra hygiene, Extra drying
15
AutoFlex
50°C-60°C
Delay start, Power Half
load, Tablet, Child lock,
Extra hygiene, Extra drying
40
AutoFlex
60°C-70°C
Delay start, Power Half
load, Tablet, Child lock,
Extra hygiene, Extra drying
40
PROGRAMS
8 electrolux.com.au
PROGRAMS (CONTINUED)
AdditionalOptions
8.ExtraHygieneoption
You may select this option in order to obtain
extra hygiene and a cleaner washing process by
altering the water temperature and washing time
of the program you have selected.
9.TabletDetergentoption
Please use the Tablet Detergent option while
using salt, rinse agent and combined detergents
with extra properties.
10.PowerHalfLoadoption
Using the extra lower/upper basket function,
three sorts of washing up can be done those
being lower basket, upper basket and both
baskets.
If you have only a few dishes in your machine
and you would like to wash them, you can
also activate the semi-lling function for some
programs. If you have dishes in both baskets,
press the key and select the position in which
both lamps (10) are highlighted.
If you have dishes in the upper basket only,
press the extra lower/upper basket key and
select the icon where the gure above is lit.
Thus your machine will perform washing in the
upper basket, and a detailed washing cycle will
be carried out by the extra water jet in the upper
basket.
If you have dishes in the lower basket only, press
extra lower/upper basket key and select the icon
where the gure above is lit. Thus, your machine
will perform washing in the lower basket, and
a 360° washing cycle will be carried out by the
two extra water jets on the base. Make sure that
there are no dishes in the upper basket while
using this feature.
11.ExtraFastoption
Washes the dishes with more pressure, thus
shortens the time of the selected program and
provides economical water usage.
12.ExtraSilentoption
Washes the dishes with less pressure, thus
provides more sensitive and silent washing.
13.ExtraDryingoption
With extra drying function, you may add extra
drying steps to your program and thus obtain
drier dishes.
WarningIndicators
14.RinseAgentLevelWarningIndicator
In order to understand whether the rinse agent
in your machine is sucient or not, please
check the rinse agent level warning display.
If this display is illuminated, ll the rinse agent
compartment.
15.Childlockindicator
When this indicator is displayed the Child
lock function is on and control panel button
operations are disabled.
16.Delaystartindicator
When a delay start has been selected, this
indicator is illuminated and the selected delay
time is shown in the digital display (17).
17.Timeindicator
The digit display indicates the program time, remaining
time or the delay start time when selected.
18.Programnumberdisplay
This display indicates the program number selected.
19.Informationdisplay
Program information, function selections and warnings
are displayed in this section of the panel.
20.Washingprogressindicators
These indicators progressively illuminate to show the
program phases - Washing (a), Rinsing (b), Drying (c) and
End (d).
a
b c
d
9
SETTINGS
Programprogressindicator
Wash Rinse Dry Finished
You can follow the progress with the help of the program
progress symbols on the display.
When the program you have selected starts, you may
see the estimated remaining time in the time indicator.
Note:A few minutes after the program nishes and
the Finished Symbol
is illuminated, you may open
the door slightly and leave it ajar in order for the drying
process to be faster.
Note:If the machine door is opened or a power failure
occurs during washing, the machine will proceed from
where it stopped after the door is closed or power is
restored.
Note:If a power cut occurs or if the door is opened
during drying, the program ends. The machine will be
ready for selecting a new program.
TurningontheMachine
Press Power On/O switch
. (1)
Note: Select your washing program appropriate for your
dishes with the help of the program list on page 7.
Select the washing program by using up/down (6,7)
selection buttons. Note: The program time is indicated in
the display.
If required select additional options by using the option
button
.
You can start the program by pressing the Start/Pause
button
. (5)
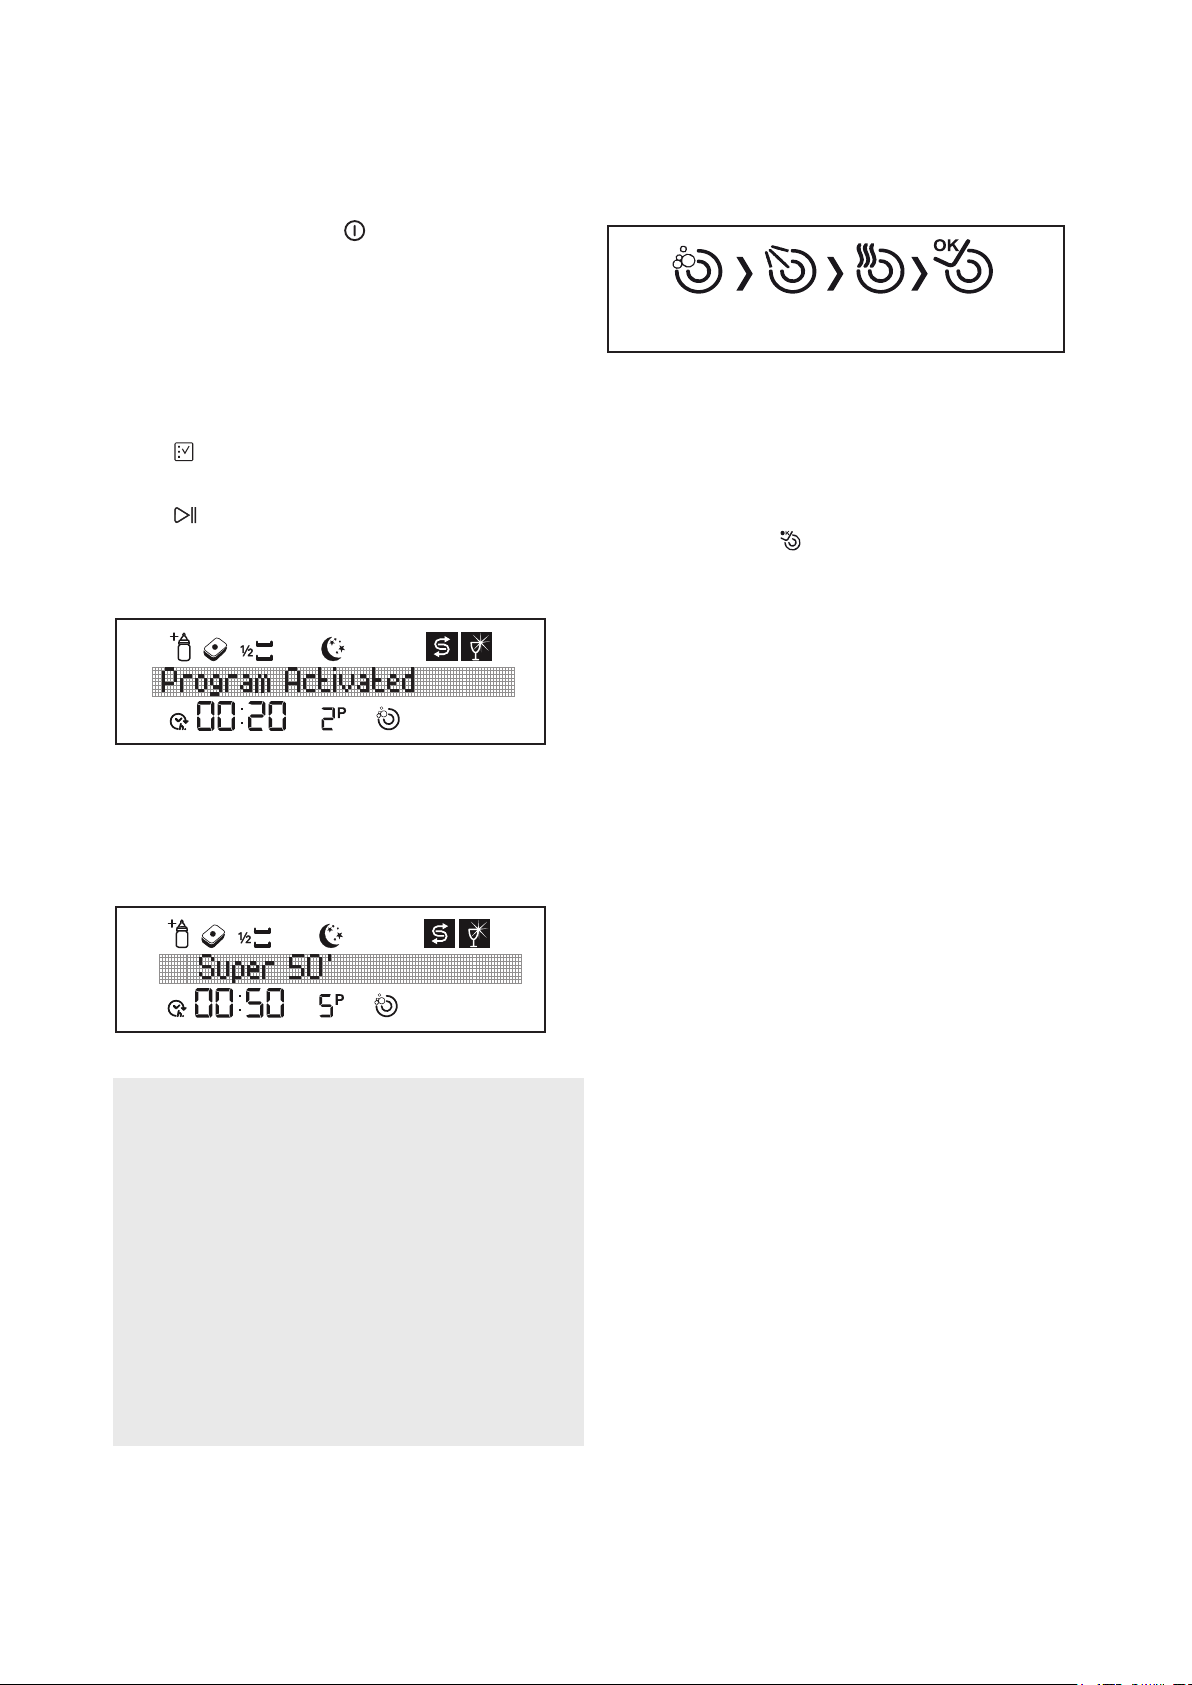
“Program Activated” will appear on the display and the
selected program will start.
When the program starts, you will see the name of the
selected program in the Display information line (19),
remaining washing time in the remaining time indicator
(17) and the program number of the selected program in
the program number indicator (18).
Note
Try not to open the door of the machine while it
is operating; if you absolutely need to, stop the
program by pressing Start/Pause button.
“Program Paused” will appear on the display.
Once you see this text, you may open the door.
Steam might come out when you open the door –
be careful.
You may resume the program after closing the
door and pressing the Start/Pause button again.
When you press the Start/Pause button, “Program
Activated” will appear on the display.
10 electrolux.com.au
SETTINGS (CONTINUED)
Inordertoaddadditionaloptionstotheprogram;
Select the appropriate washing program for your dishes
using the up/down buttons
after pressing the
option button .
Enter the additional options menu by pressing
the option button
. After selecting the additional option
using up/down buttons , illuminate the additional option
indicators by pressing the conrmation button .
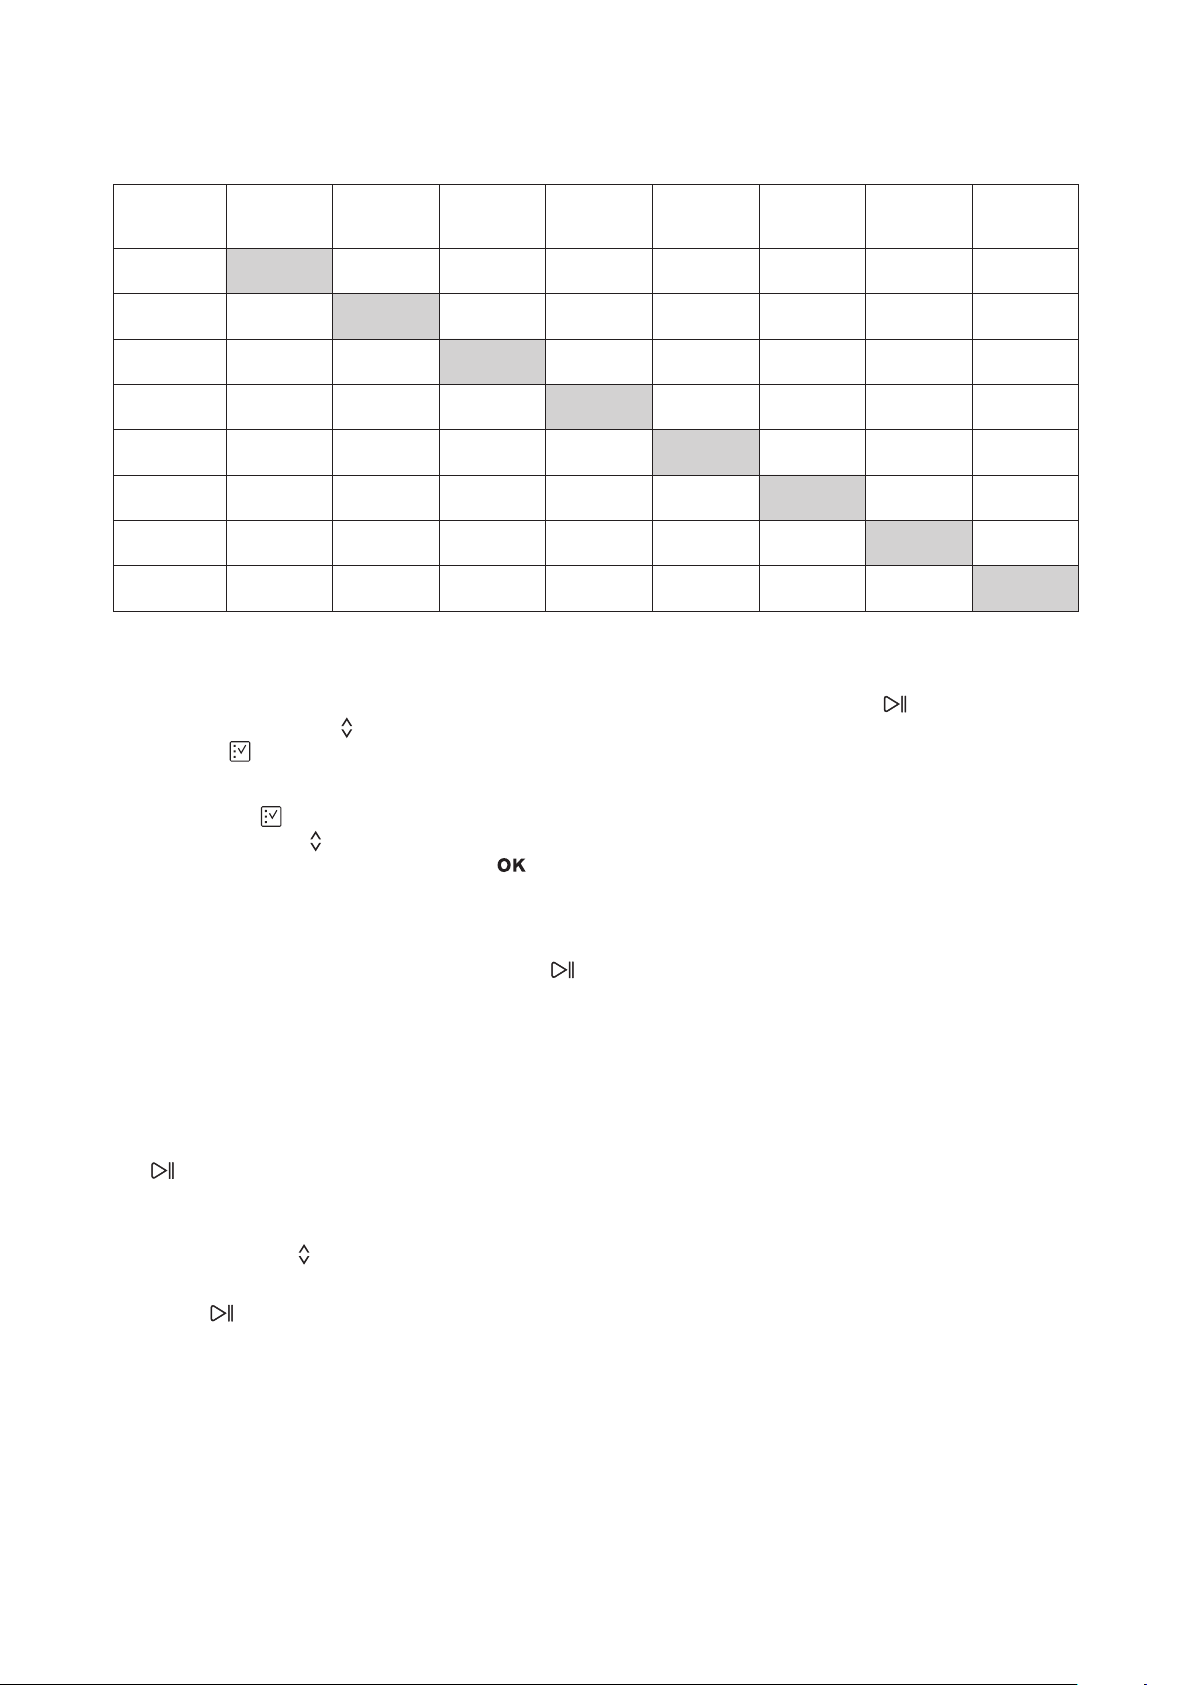
Some options cannot be selected at the same time;
refer to the chart for allowable combinations.
Start the program by pressing the Start/Pause button
.
“Program activated” will appear on the display.
ChangingtheProgram
If you want to change a washing program after it has
been started;
1. Pause the program by pressing the Start/Pause
button. “Program paused” will appear on the
display.
2. Select the desired program by pressing the
selection buttons
.
3. Start the program by pressing the Start/Pause
button
again.
“Program activated” will appear on the display.
Note
The new program starts from the step where the
previous program was left. If you want the new program
to start from the beginning, you must rst cancel the
previous program and then select a new one.
CancellingtheProgram
1. Hold the Start/Pause button
for 3 seconds to
cancel a program.
2. The display will show (“Program Cancelling ..X”)
to let you know how many more seconds you
have to hold the button. 1 minute after you do this,
“Program Finished” will appear.
3. After this warning, you may select and additional
function or time setting.
Note
Depending on the step where the cancelled program
was left, there may be detergent leftovers within the
machine or on the dishes.
Options
Delay Start
Power Half
Load
(3 modes)
Tablet Child Lock Extra Fast
Extra
Hygiene
Extra Silent Extra Drying
Delay Start
P P P P P P P
Half Load
(3 modes)
P P P P P P P
Tablet
P P P P P P P
Child Lock
P P P P P P P
Extra Fast
P P P P
O O
P
Extra
Hygiene
P P P P
O O O
Extra Silent
P P P P
O O
P
Extra Drying
P P P P P
O
P
11
You may change the program according to your
preferences by selecting additional options to the
washing program. The washing programs have been
designed so as to obtain the best cleaning considering
the type and amount of food soil properties of the
washing materials. The additional options were
developed in order to save time, water and electricity
and thus allow you to wash your dishes more
conveniently. For example, if you think your dishes are
slightly dirty, you may select the Fast option
and make
your washing process more economical in terms of time
and water.
If you are going to use a multipurpose detergent,
you obtain better performance by selecting tablet
detergent
option.
If you live in a place where electricity is cheaper to use
at night, you might select the silent option and wash
your dishes more economically and silently; this function
was developed also for a more sensitive washing
process.
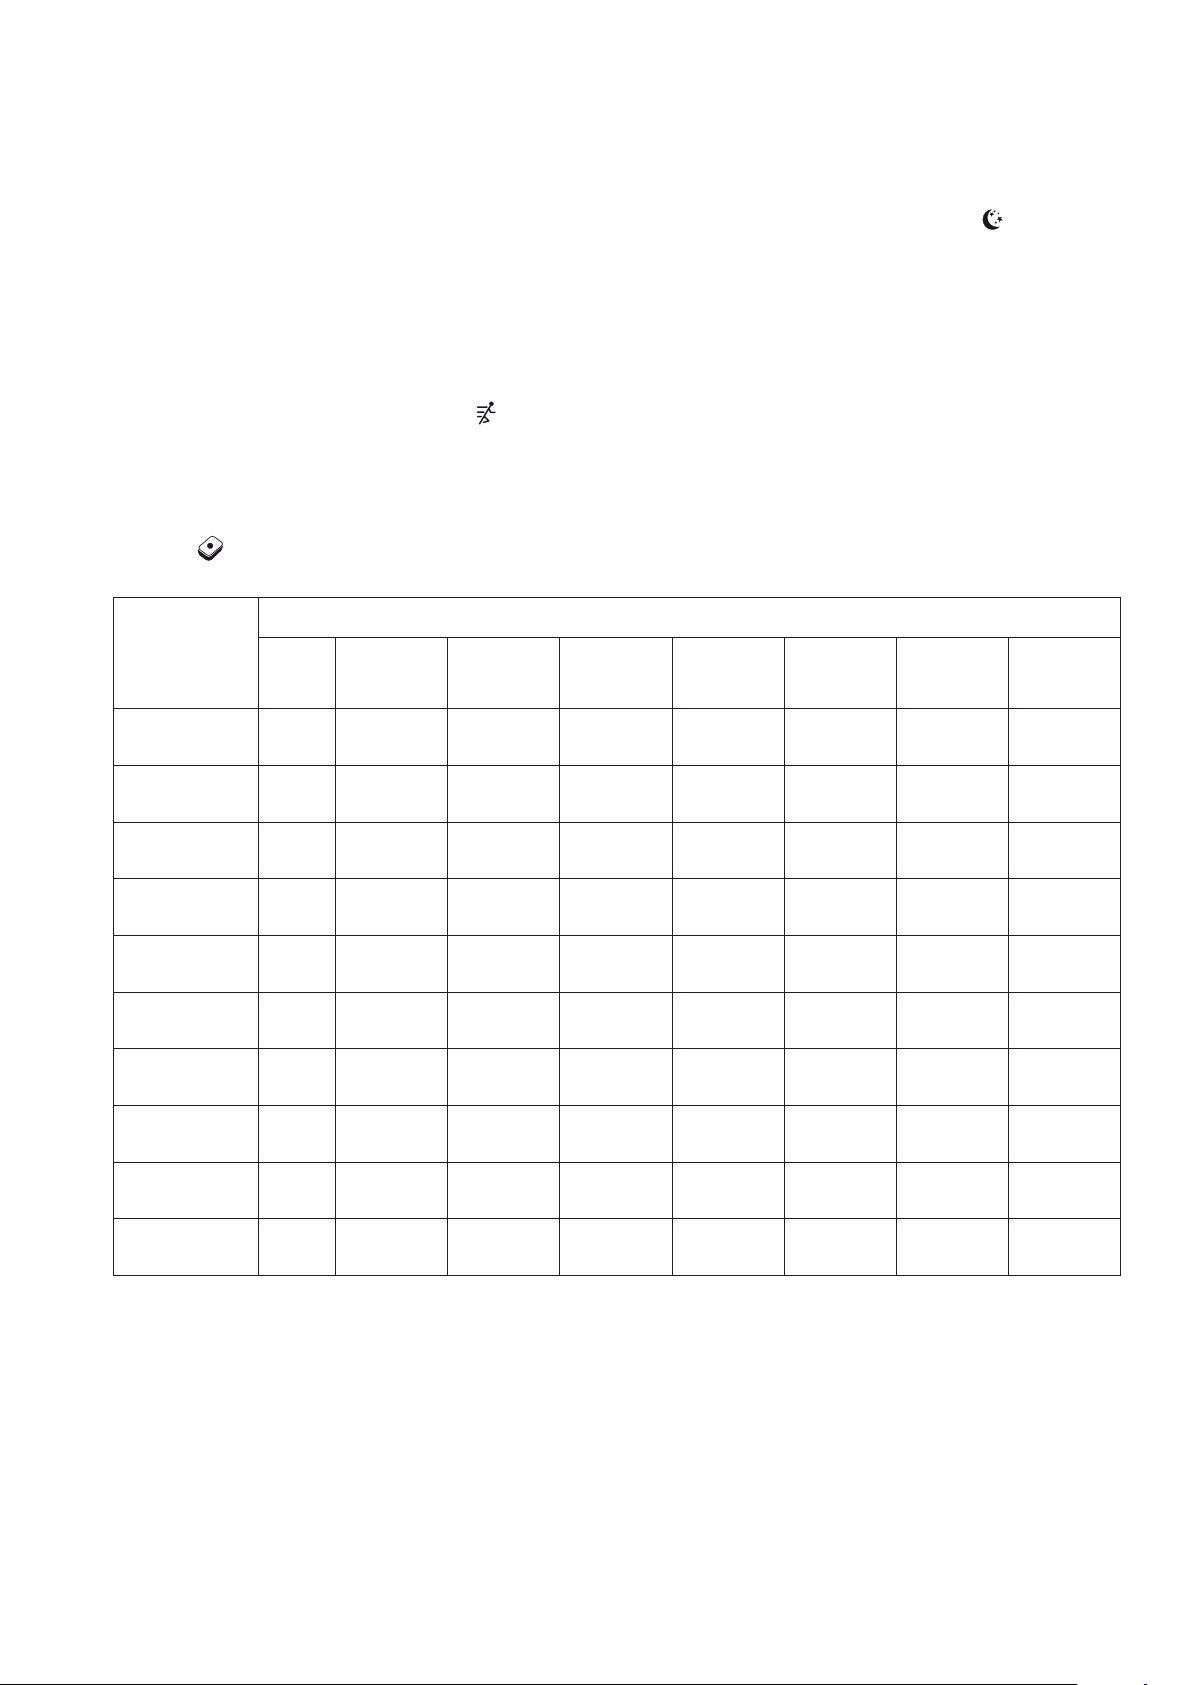
Additional options are not suitable for every program;
you might nd below the functions suitable for the
programs. For the programs not suitable for additional
options, you will see that the option indicator is not
illuminated.
Programs
Options
Delay
Start
Power Half
Load
(3 modes)
Tablet Child Lock Extra Fast
Extra
Hygiene
Extra Silent Extra Silent
PreWash
P P
O
P
O O O O
Jetwash 14’
P P
O
P
O O O O
Quick 30’
P P
O
P
O O O
P
Eco
P P P P P P
O
P
FlexiWash 60°C
P P P P P P P P
Super 50’
P P P P
O
P
O
P
Daily 60°C
P P P P P P P P
AutoFlex
60°C - 70°C
P P P P
O
P
O
P
AutoFlex
50°C - 60°C
P P P P
O
P
O
P
AutoFlex
30°C - 50°C
P P P P
O
P
O
P
“
O“ Function cannot be selected “P” Function can be selected.
12 electrolux.com.au
SettingsMenu
In order to enter the Settings Menu, hold the option
and delay buttons for 3 seconds. The display will
show (“Keep Pressing ..X”) to let you know how many
more seconds you have to hold the button. When this
number is zero, you will see the Menu settings on the
display. You may navigate within the menu by using the
selection buttons . In order to exit the menu, hold the
option and delay start buttons for 3 seconds or
you may select the seventh row in the menu with the
conrmation button .
The menu content is as follows:
1. Language
2. Rinse-aid
3. Volume
4. Brightness
5. Eco mode
6. Factory Settings
7. Exit Menu
Languagesettings
After you enter the menu settings, use up/down
selection buttons
to select the language. The display
will show (1.Language: X) in which “X” is the current
language.
Press the conrmation button to activate the language
selection and after selecting the new language, save it
by pressing the conrmation button again.
Available languages that you can select:
English Greek Nederlands Polish
Turkish Croatian Swedish Czech
French Russian Dansk Slovene
Deutsch Finnish Spanish Hungarian
Italian Norwegian Portuguese
Rinse-aidsettings
In order to understand whether the rinse agent in your
machine is sucient or not, please check the rinse agent
level warning display. If this display is illuminated, ll the
rinse agent compartment.
Volumelevel
After entering the menu, select the “3- Volume” by using
the selection buttons
. Here you will see “Volume:X”
(X:L1,L2,L3 ). L1 is the lowest, L3 is the highest volume
level. After pressing the conrmation button
, activate
“X”, select the desired noise level and save the selection
by pressing the conrmation button once more.
Brightnesslevel
After entering the menu, select the “4- Brightness”
by using the selection buttons
. Here you will see
“brightness :X” (X:L1,L2,L3 ). L1 is the lowest, L3 is the
highest brightness level. select the desired brightness
level and save the selection by pressing the conrmation
button , activate “X” and save by pressing the
conrmation button once more.
Ecomode
This mode saves energy by minimizing the display
brightness level after 15 minutes of non-operation. After
entering the menu, select the “5- Eco mode” by using
the selection buttons
. Here you will see “Ecomode: X”
(X:YES or NO). After pressing the conrmation button
, activate “X”.
FactorySettings
In order to discard all the settings you made and restore
the factory settings, select the “6- Factory settings”
by using the selection buttons
. Here you will see
“6.Factory settings: “X” (X:yes or no). After pressing the
conrmation button , activate “ X ”; you might save
your selection by selecting “Yes“ or “No” and pressing
the conrmation button again. When you restore the
factory settings,
the machine will return to the following settings:
Language English
Rinse-aid L4
Volume L2
Brightness L3
Eco Mode Yes
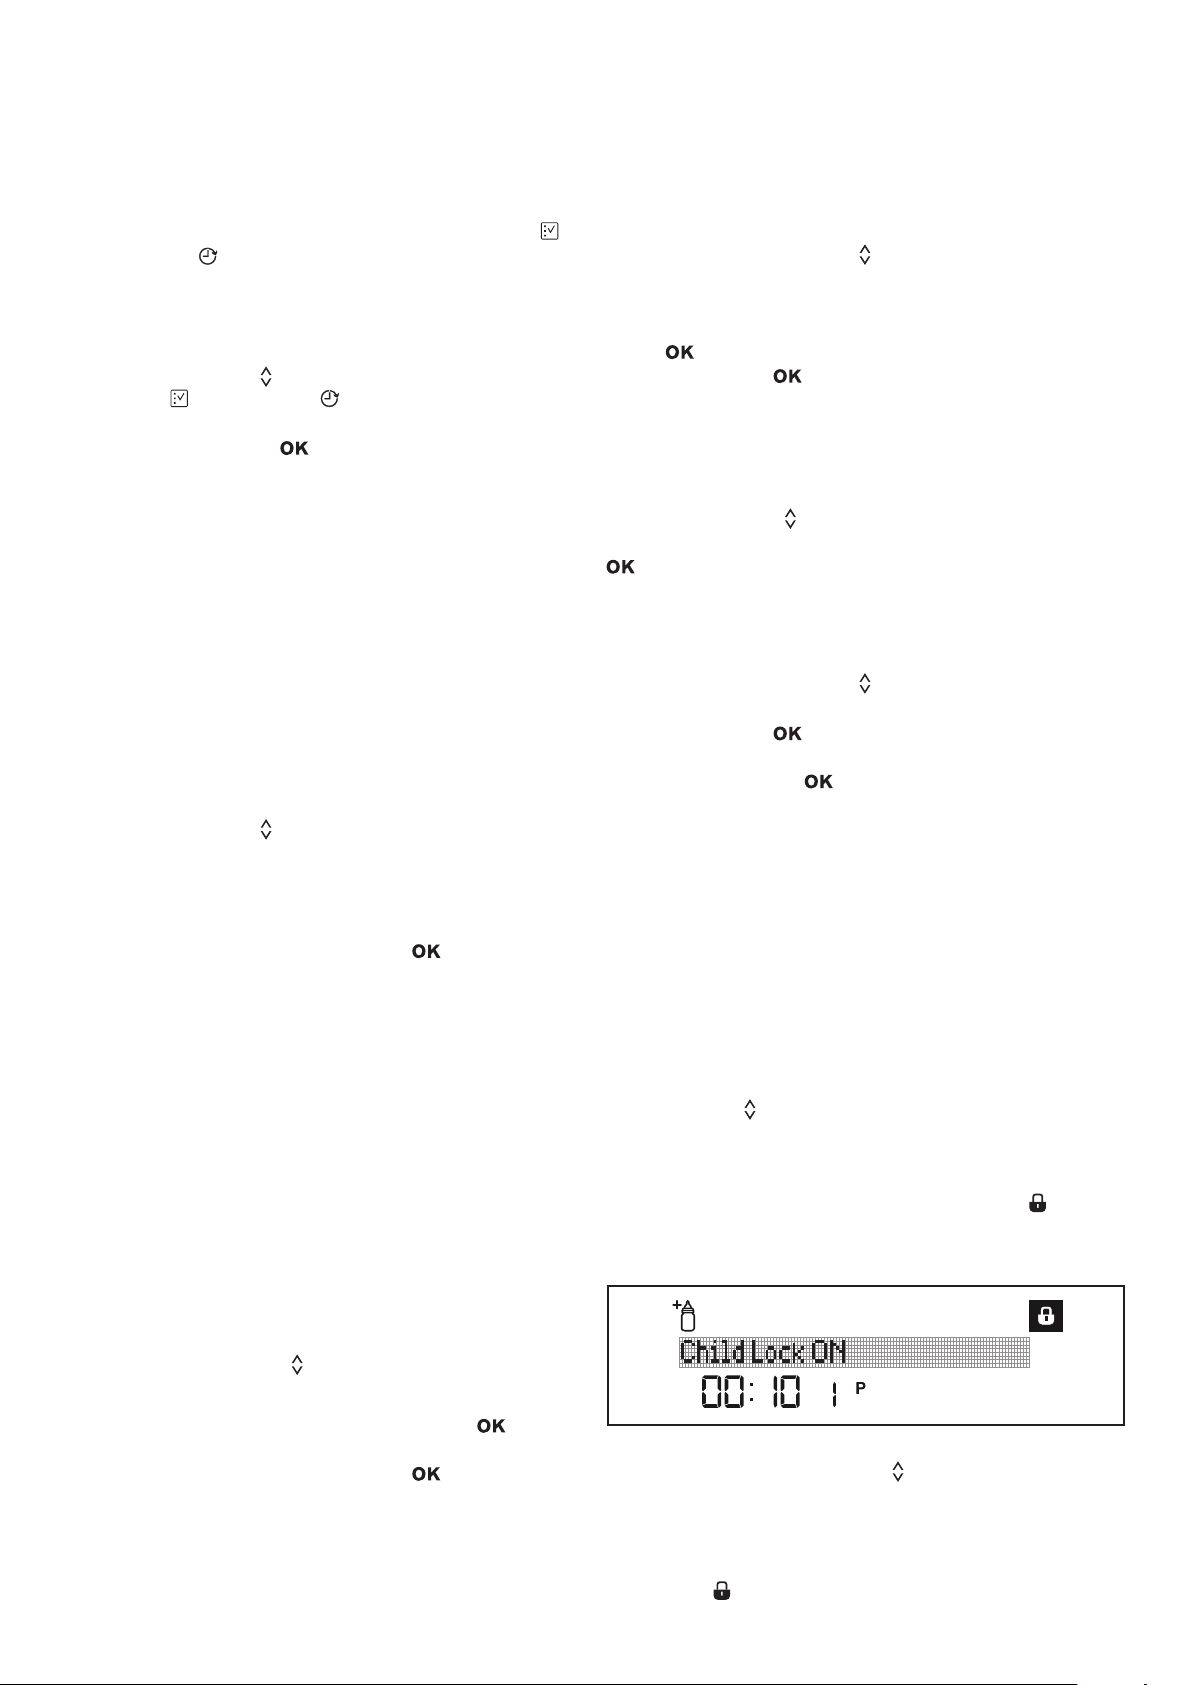
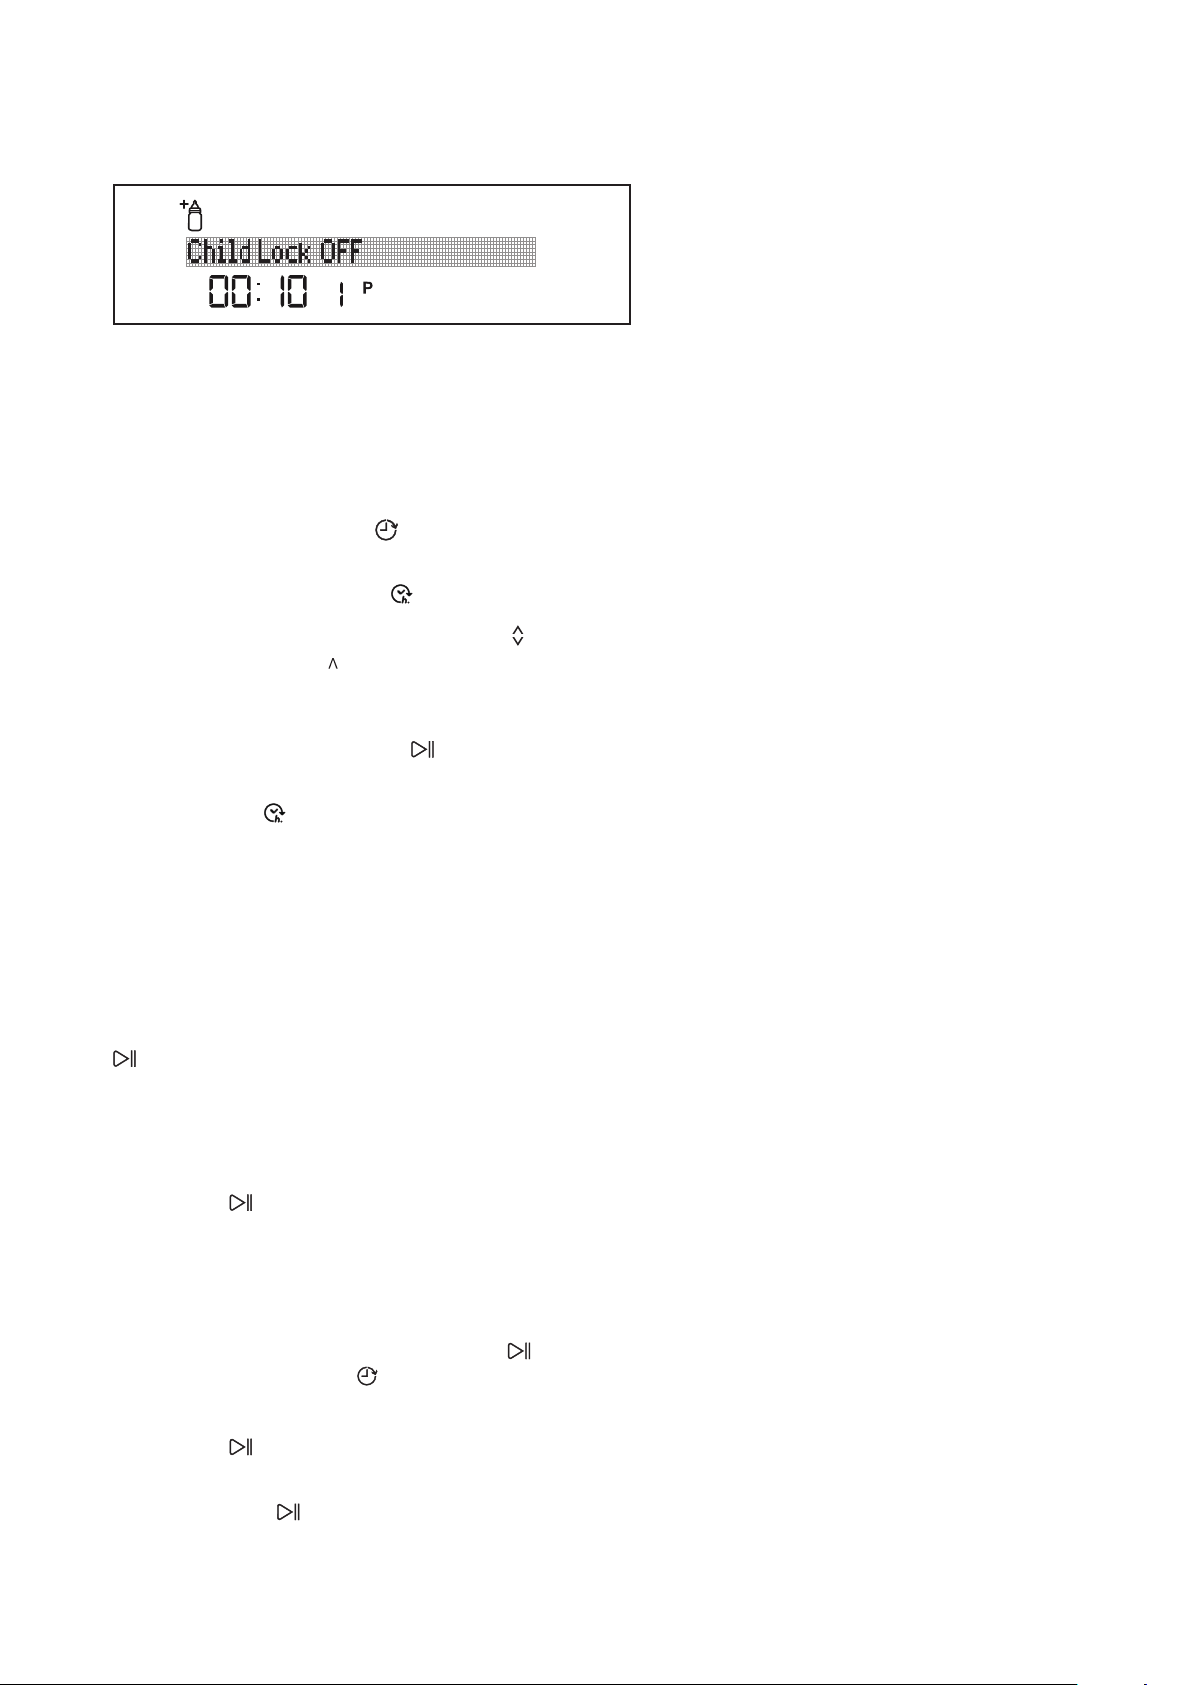
ChildLock
Child lock prevents others from modifying your settings
while the machine is in operation. After starting the
program, press the up selection button and down
selection button
at the same time for 3 seconds.
This screen will inform you as to how many seconds
you need to hold the buttons by “Keep Pressing..X”.
When this time is over, the child lock is activated, “Child
Lock ON” appears on the screen and the indicator is
illuminated. When the child lock is active, all the buttons
are deactivated.
In order to cancel the child lock, press the up selection
button and down selection button
at the same time
for 3 seconds. This screen will inform you as to how
many seconds you need to hold the buttons by “Keep
Pressing..X”. When this time is over, the child lock is
cancelled, “Child Lock OFF” appears on the screen and
the indicator
is o.
SETTINGS (CONTINUED)
13
DelayedStart
The starting time of the selected program can be
delayed up to 24 hours. You can not make a delay
setting after the program starts. In order for you to be
able to make a delay setting, the selected program must
not to be in operation.
1 Press the delay start button
2 Hour “00:00” is displayed on the display information
line (20) and the delay symbol starts ashing.
3 Set the delay time with the selection buttons
to
the desired time. The “ ” button increases the time
by
1 hour while “v” button decreases by 1 hour.
By pressing the Start/Pause button
, you may start
the countdown until the delay time.
The delay symbol
will continuously be illuminated
during this period. Remaining Time/Delay Time
indicators display the delay time. After the countdown
is over, the selected program will start. The indicator
screen will begin to show the time remaining until the
end of the selected program.
ChangingtheprogramorfunctiononDelayed
Start:
Pause the machine by pressing the Start/Pause button
; the countdown will stop and the “program paused”
and “Delay timer active” appear on screen. If you press
the buttons without pausing the machine, you will
receive warnings such as “Delay timer active” or “invalid”.
After pausing the Delayed Start, you may select program
and add functions to the program. By pressing the Start/
Pause button once more, starts the countdown for
the delay time.
Ifyouwanttocancelormakeanewtimesetting
whenthemachineisonDelayedStart;
If you want to reschedule the delay time, stop the
countdown by pressing the Start/Pause button
. Press the delay start button to enter the delay
menu; set the new Delay time by pressing the selection
buttons. Start the countdown by pressing the Start/
Pause button .
Ifyouwanttocancelthedelaysetting, hold the
Start/Pause button
for 3 seconds.
The display will inform you how many seconds you need
to hold the button by “Program Cancelling .. X”. This
way, the delay countdown is cancelled.
14 electrolux.com.au
BEFORE FIRST USE
1. Fill the rinse aid dispenser.
2. Turn on the water tap.
3. Start a program (‘Super 50’ is recommended) to
remove any processing residuals that can still be
inside the appliance. Do not use detergent and do
not load the baskets.
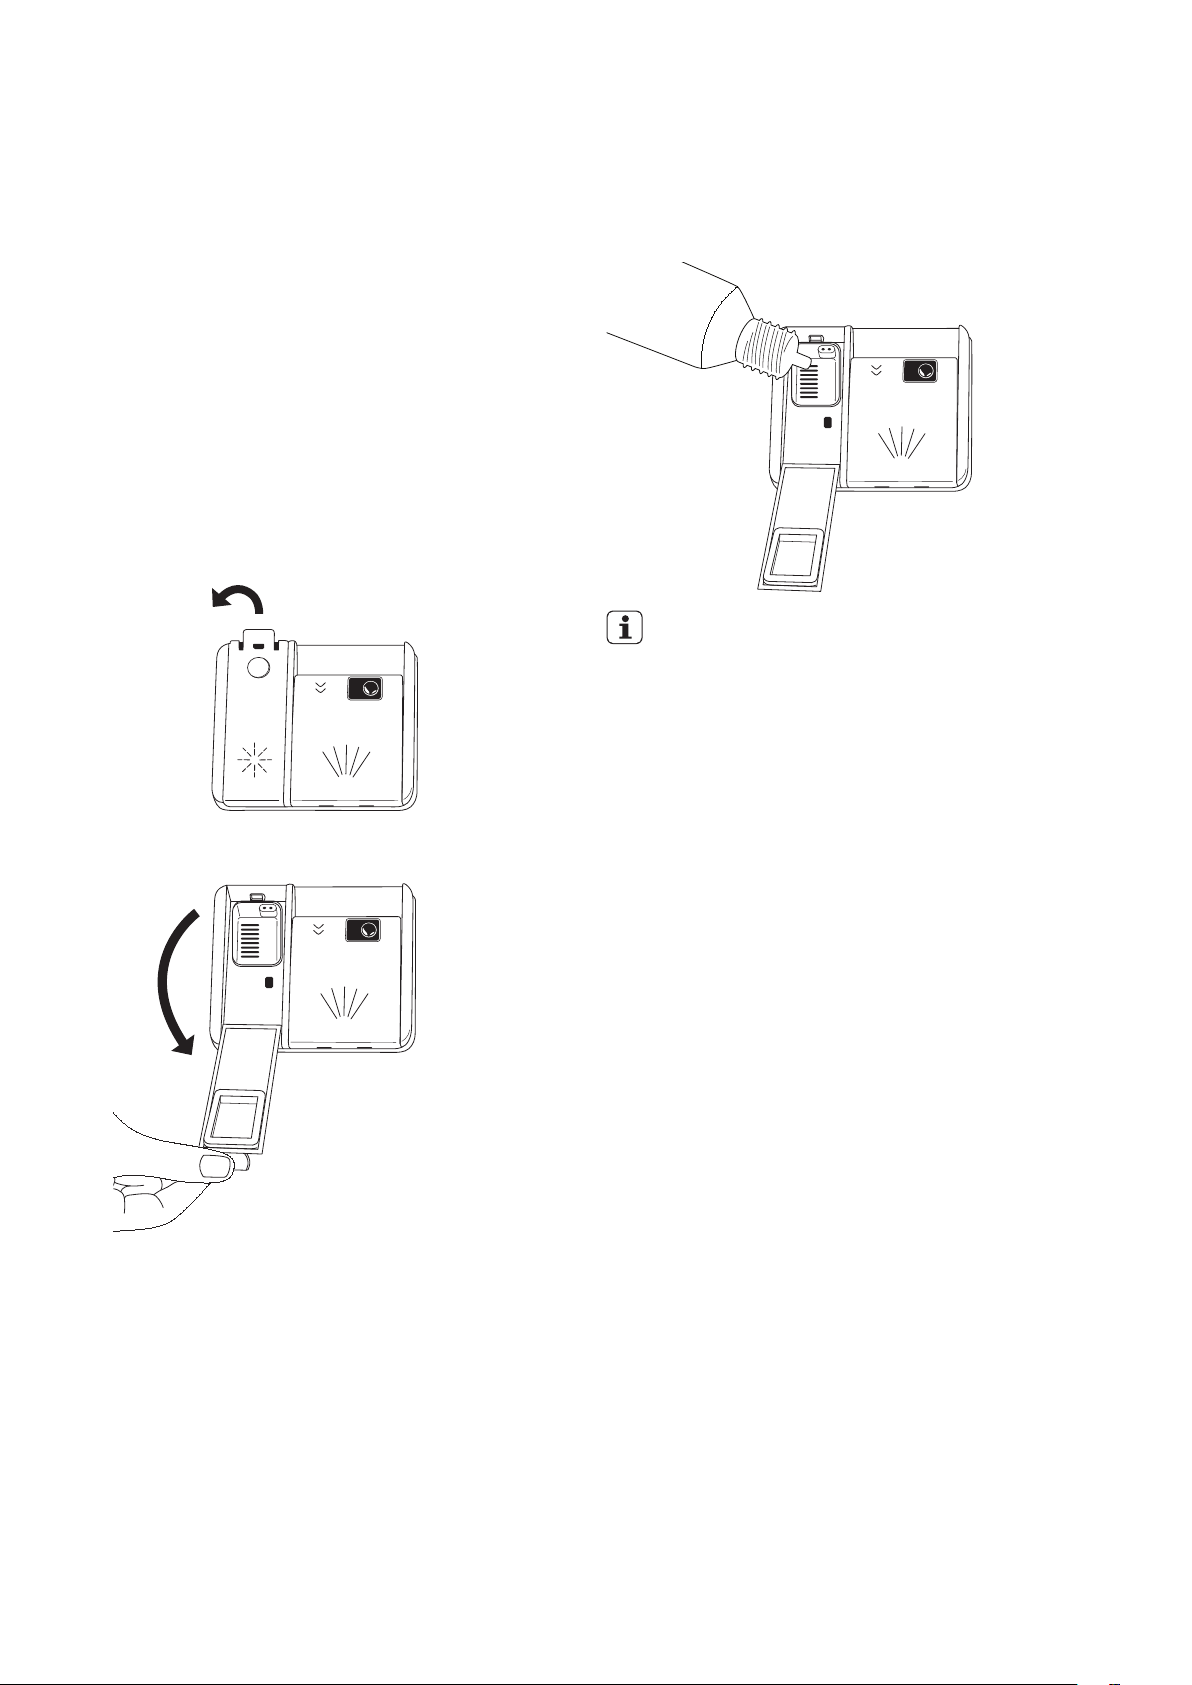
Fillingtherinse-aidandsetting
To ll the rinse aid compartment, open the rinse-aid
compartment cap. Fill the compartment with rinse aid
until MAX level and then close the cap. Be careful not to
overll the rinse aid compartment and wipe up any spills.
Rinse aid level is changed by using Rinse aid menu.
Be careful not to overll the rinse aid compartment
and wipe up any spills.
RINSE-AID
IMPORTANT!
Filltherinseaiddispenserwhentheindicator
onthedisplayilluminates.
Ifyouusemulti-tabletswerecommend
toalwaysuserinseaidforbetterdrying
performance,alsoincombinationwithmulti
tabletscontainingrinsingagent.
1515
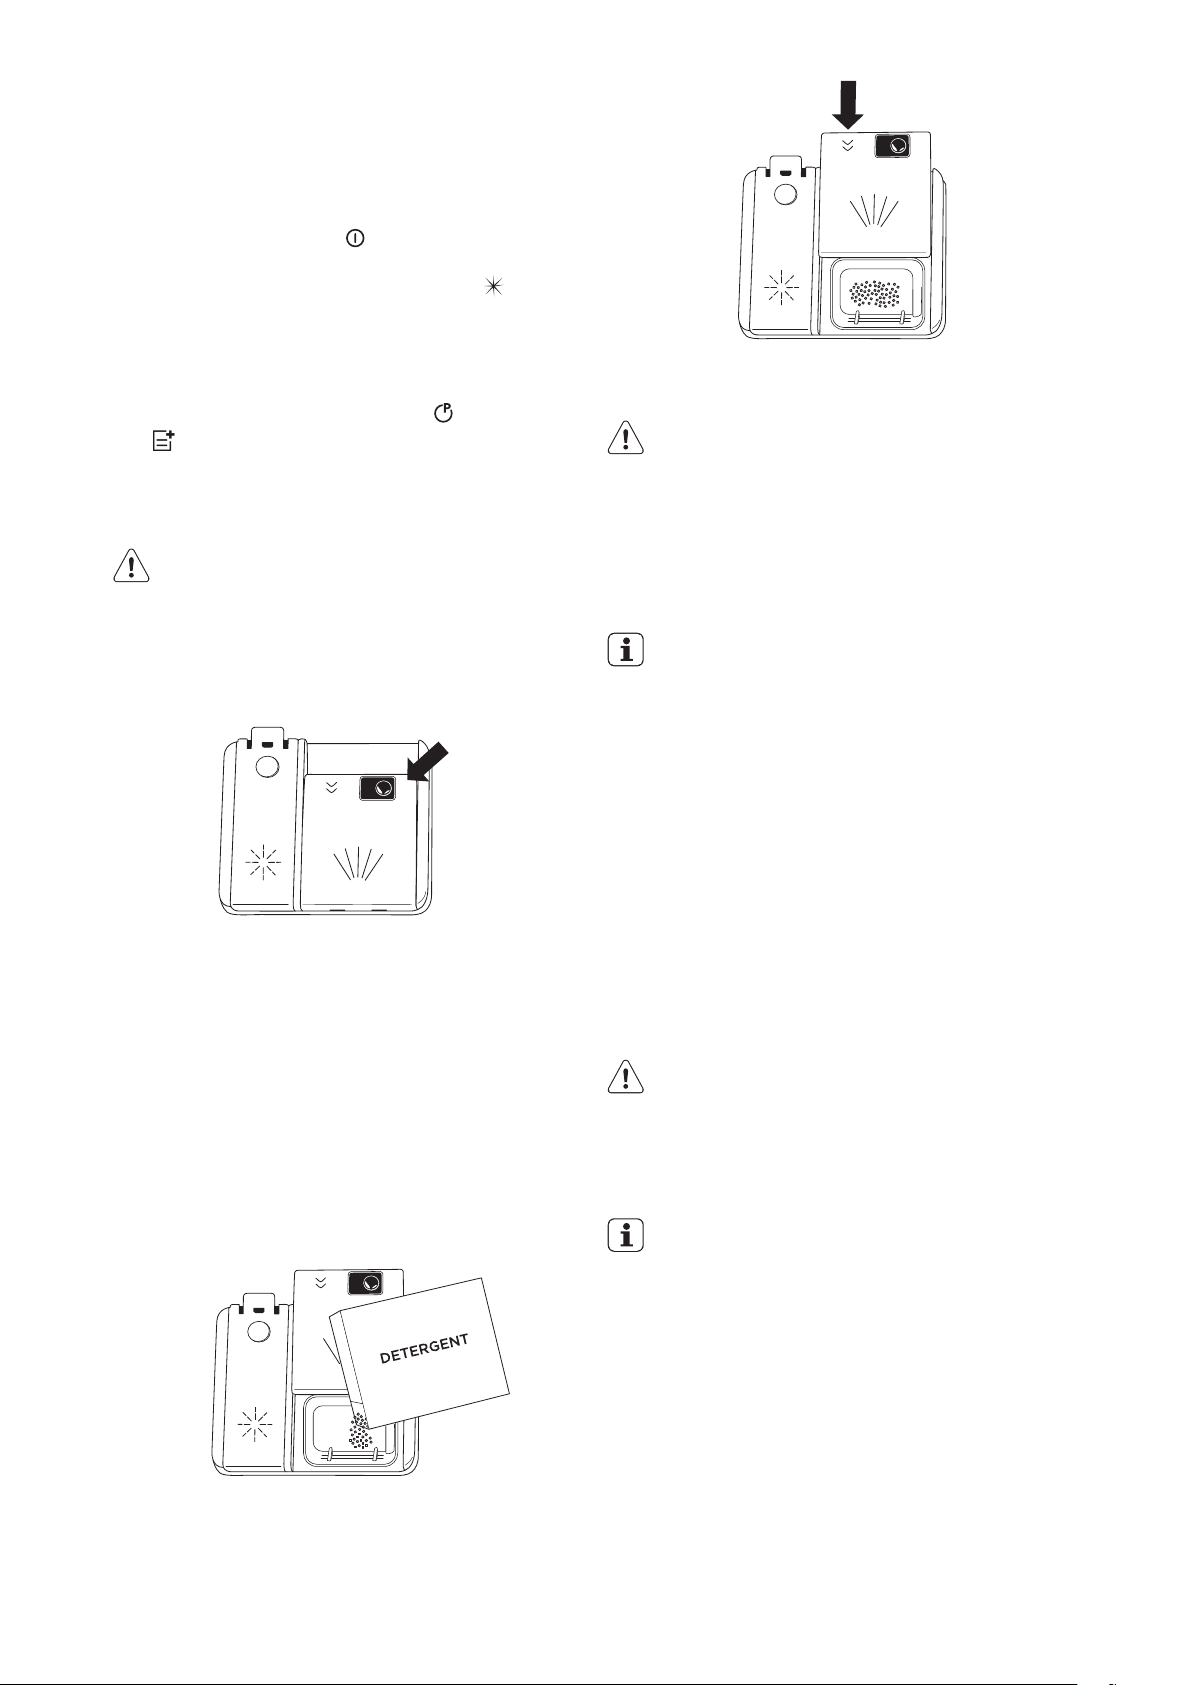
To close the detergent container, push the cover as
shown until it locks.
CAUTION
Solubilityofthetabletdetergentsproduced
bydierentcompaniescanvarydependingon
thetemperatureandtime.Therefore,itisnot
recommendedtousetabletdetergentsinshort
programs.Itismoresuitabletousepowder
detergentsfortheseprograms.
IMPORTANT!
Ifyourdisheshavebeendirtyforalongperiod,if
thereisdriedfoodwasteonthemandifyouhave
fullyloadedthedishwasher,pour5cm
3
detergent
intothepre-washcompartmentandstartyour
machine.
Youmayhavetoaddmoredetergentintoyour
machine,dependingonthedegreeofsoilandon
thewaterhardnesslevel.
Openingthedoorwhiletheapplianceoperates
If you open the door while a program is running, the
appliance stops. It may aect the energy consumption
and the program duration. When you close the door,
the appliance continues from the point of interruption.
CAUTION
Whenopeningthedoorofthemachinewhilea
programisinprogress,openthedoorslightly
inordertoavoidspillageofhotwaterwith
detergent,orexcessivesteam.
IMPORTANT!
Makesurethatthereisdetergentinthe
detergentdispenserbeforeyoustartanew
program.
Endofprogram.
When the program is completed, open the door and
press the power button to turn o the appliance.
Turn o the water tap.
DAILY USE
1. Turn on the water tap.
2. Press the on/o button
to activate the appliance.
Make sure that the appliance is in program
selection mode. If the rinse aid indicator is on, ll
the rinse aid dispenser.
3. Load the basket.
4. Add the detergent.
5. Set the start, the correct program
and options
for the type of load and the degree of soil. See
Settings section for more detail.
Addingthedetergent
CAUTION
Onlyusedetergentspecicallydesignedfor
dishwashers
Press the latch to open the detergent container as
shown in the image.
Detergent container has level lines inside. It is possible to
measure the right detergent amount using these lines.
The detergent container can take a maximum of 40cm
3
detergent.
Open the dishwasher detergent container and pour
25cm
3
if your dishes are heavily soiled or 15cm
3
if they are
less soiled.
You may have to add more detergent into your machine,
depending on the degree of soil and the water hardness
in your area.
If your dishes are from the previous day and there is
dried food waste on them, or if you have fully loaded the
dishwasher, pour 5cm
3
detergent onto the base of the
door and start your machine.

16 electrolux.com.au
General
The following hints will ensure optimal cleaning and
drying results in daily use and also help to protect the
environment.
• Remove larger residues of food from the dishes into
the waste bin.
• Do not pre-rinse dishes by hand.
• When needed, use the prewash program (if
available) or select a program with a prewash phase.
• Always use the whole space of the baskets.
• When loading the appliance, make sure that the
dishes can be completely reached and washed
by the water released from the spray arm nozzles.
Make sure that items do not touch or cover each
other.
• You can use dishwasher detergent, rinse aid and
salt separately or you can use the multi-tablets (e.g.
‘’3-in-1’’, ‘’4-in-1’’, ‘’All-in-1’’). Follow the instructions
written on the packaging.
• Select the program according to the type of load
and degree of soil.
With the ECO program you have the most ecient use
of water and energy consumption for crockery and
cutlery with normal soil.
ENVIRONMENT!
Operatethemachineafteritiscompletelyfull.
Usepre-washingprogramonlywhennecessary.
If the appliance is in a location where the risk of freezing
exists, you must completely drain the water that has
remained in the machine. Turn o the tap and drain the
water from the inlet hose.
Usingrinseaidanddetergent
• Only use rinse aid and detergent for dishwashers.
Other products can cause damage to the appliance.
• At least once a month run the appliance with
the use of appliance cleaner which is particularly
suitable for this purpose.
• Detergent tablets do not fully dissolve with short
programs. To prevent detergent residues on the
tableware, we recommend that you use the tablets
with long programs.
• Do not use more than the correct quantity of
detergent. Refer to the instructions on the detergent
packaging.
Whattodoifyouwanttostopusingmulti-tablets
Before you start to use detergent and rinse aid
separately, follow this procedure.
1. Make sure that the rinse aid container is full.
2. Start the shortest program with a rinsing phase. Do
not add detergent and do not load the baskets.
3. Adjust the released quantity of rinse aid.
Beforestartingaprogram
Make sure that:
• The lters are clean and correctly installed.
• The spray arms are not clogged.
• There is dishwasher rinse aid (unless you use multi-
tablets).
• The position of the items in the baskets is correct.
• The program is applicable for the type of load and
for the degree of soil.
• The correct quantity of detergent is used.
CAUTION!
Ensurethatthedishesloadedinthebasketswill
notblocktheupperandlowersprayarmsand
preventthemfromspinning.
Loadingthebaskets
• Only use the appliance to wash items that are
dishwasher-safe.
• Do not put in the appliance items made of wood,
horn, aluminium, pewter and copper.
• Do not put in the appliance items that can absorb
water (sponges, household cloths).
• Remove larger residues of food from the dishes into
the waste bin.
• Soak (soften) and remove any burnt food from your
crockery before placing in the dishwasher.
• Put hollow items (cups, glasses and pans) with the
opening down.
• Make sure that glasses do not touch other glasses.
• Put cutlery and small items in the cutlery drawer.
• Put light items in the upper basket. Make sure that
the items do not move.
• Make sure that the spray arms can move freely
before you start a program.
HINTS AND TIPS
17
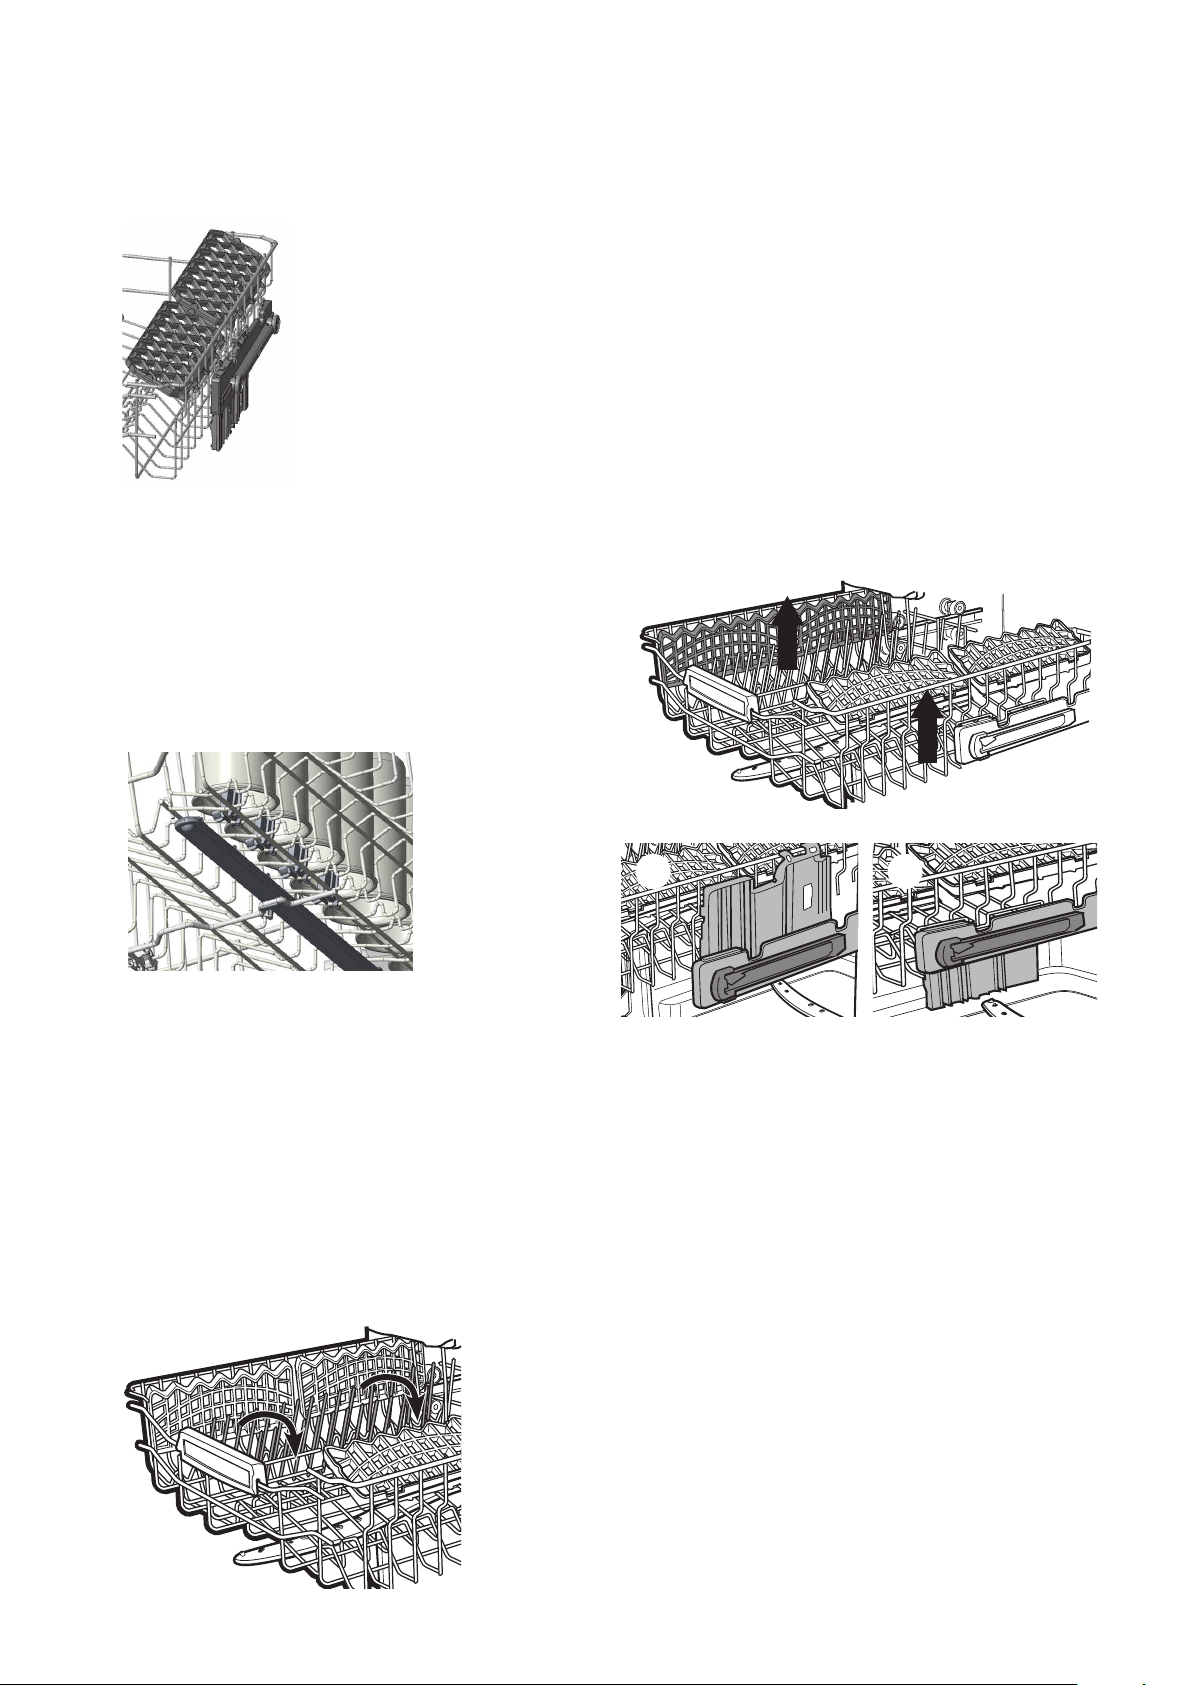
Upperbasket
Heightadjustablecuprack
These racks are designed to increase the capacity of the
top basket. You can place your glasses and cups on the
racks. You can adjust the height of these racks. Thanks
to this feature, you can place dierent sizes of glasses
under these racks.
If you have delicate stemmed glasses, the soft supports
will support and protect the glasses.
The following hints will ensure optimal cleaning and
drying results in daily use and also help to protect the
environment.
•Remove larger residues of food from the dishes
into the waste bin.
•Do not pre-rinse dishes by hand.
•When needed, use the prewash program (if
available) or select a program with a prewash
phase.
•Always use the whole space of the baskets.
•When loading the appliance, make sure that the
dishes can be completely reached and washed
by the water released from the spray arm nozzles.
Make sure that items do not touch or cover each
other.
•You can use dishwasher detergent, rinse aid and
salt separately or you can use the multi-tablets (e.g.
‘’3-in-1’’, ‘’4-in-1’’, ‘’All-in-1’’). Follow the instructions
written on the packaging.
•Select the program according to the type of load
and degree of soil.
With the ECO program you have the most efcient use
of water and energy consumption for crockery and
cutlery with normal soil.
If the appliance is in a location where the risk of freezing
exists, you must completely drain the water that has
remained in the machine. Turn off the tap and drain the
water from the inlet hose.
•Only use rinse aid and detergent for dishwashers. Other
products can cause damage to the appliance.
•At least once a month run the appliance with the use of
appliance cleaner which is particularly suitable for this
purpose.
•Detergent tablets do not fully dissolve with short
programs. To prevent detergent residues on the
tableware, we recommend that you use the tablets with
long programs.
•Do not use more than the correct quantity of detergent.
Refer to the instructions on the detergent packaging.
Before you start to use detergent and rinse aid separately,
follow this procedure.
1.Make sure that the rinse aid container is full.
2.Start the shortest program with a rinsing phase. Do not
add detergent and do not load the baskets.
3.Adjust the released quantity of rinse aid.
Make sure that:
•Thlters are clean and correctly installed.
•The spray arms are not clogged.
•There is dishwasher rinse aid (unless you use multi-
tablets).
•The position of the items in the baskets is correct.
•The program is applicable for the type of load and for the
degree of soil.
•The correct quantity of detergent is used.
•Only use the appliance to wash items that are
dishwasher-safe.
•Do not put in the appliance items made of wood, horn,
aluminium, pewter and copper.
•Do not put in the appliance items that can absorb water
(sponges, household cloths).
•Remove larger residues of food from the dishes into the
waste bin.
•Soak (soften) and remove any burnt food from your
crockery before placing in the dishwasher.
•Put hollow items (cups, glasses and pans) with the
opening down.
•Make sure that glasses do not touch other glasses.
•Put cutlery and small items in the cutlery drawer.
•Put light items in the upper basket. Make sure that the
items do not move.
•Make sure that the spray arms can move freely before
you start a program.
These racks are designed to increase the capacity of the top
basket. You can place your glasses and cups on the racks.
You can adjust the height of these racks. Thanks to this
feature, you can place different sizes of glasses under these
racks.
If you have delicate stemmed glasses, the soft supports will
support and protect the glasses.
Due to the height adjustment mechanism mounted on the
basket, you can use your cup racks at two different heights.
In addition, you can place long forks, knives and spoons on
these racks horizontally, so that they do not block the rotation
of the spray arm.
Folding tines (prongs) on the upper basket are designed to
allow you to place larger items such as pots, pans, etc, easily.
Each rack can be folded separately or together, depending on
the space required.
Basket height adjustment mechanism on the upper
basket of your machine is designed to let you adjust the
height of your upper basket (refer to diagram 1) upwards
or (refer to diagram 2 ) downwards, without removing it
from your machine when it is full, to create large spaces
at the upper or bottom area of your machine as needed.
The basket of your machine is set to the upper position
from the factory.
In order to raise your basket, hold it from both sides
and pull it upwards. In order to lower it, hold it from both
sides again, pull upwards and then lower carefully.
Make sure that both sides are in the same position (up or
down).
Due to the height adjustment mechanism mounted on
the basket, you can use your cup racks at two dierent
heights.
In addition, you can place long forks, knives and spoons
on these racks horizontally, so that they do not block the
rotation of the spray arm.
Upperbasketfoldingracks
Folding tines (prongs) on the upper basket are designed
to allow you to place larger items such as pots, pans,
etc, easily. Each rack can be folded separately or
together, depending on the space required.
Upperbasketheightadjustmentwhileitisfull
Basket height adjustment mechanism on the upper
basket of your machine is designed to let you adjust the
height of your upper basket (refer to diagram 1) upwards
or (refer to diagram 2) downwards, without removing it
from your machine when it is full, to create large spaces
at the upper or bottom area of your machine as needed.
The basket of your machine is set to the upper position
from the factory.
In order to raise your basket, hold it from both sides
and pull it upwards. In order to lower it, hold it from both
sides again, pull upwards and then lower carefully.
Make sure that both sides are in the same position (up or
down).
1 2
18 electrolux.com.au
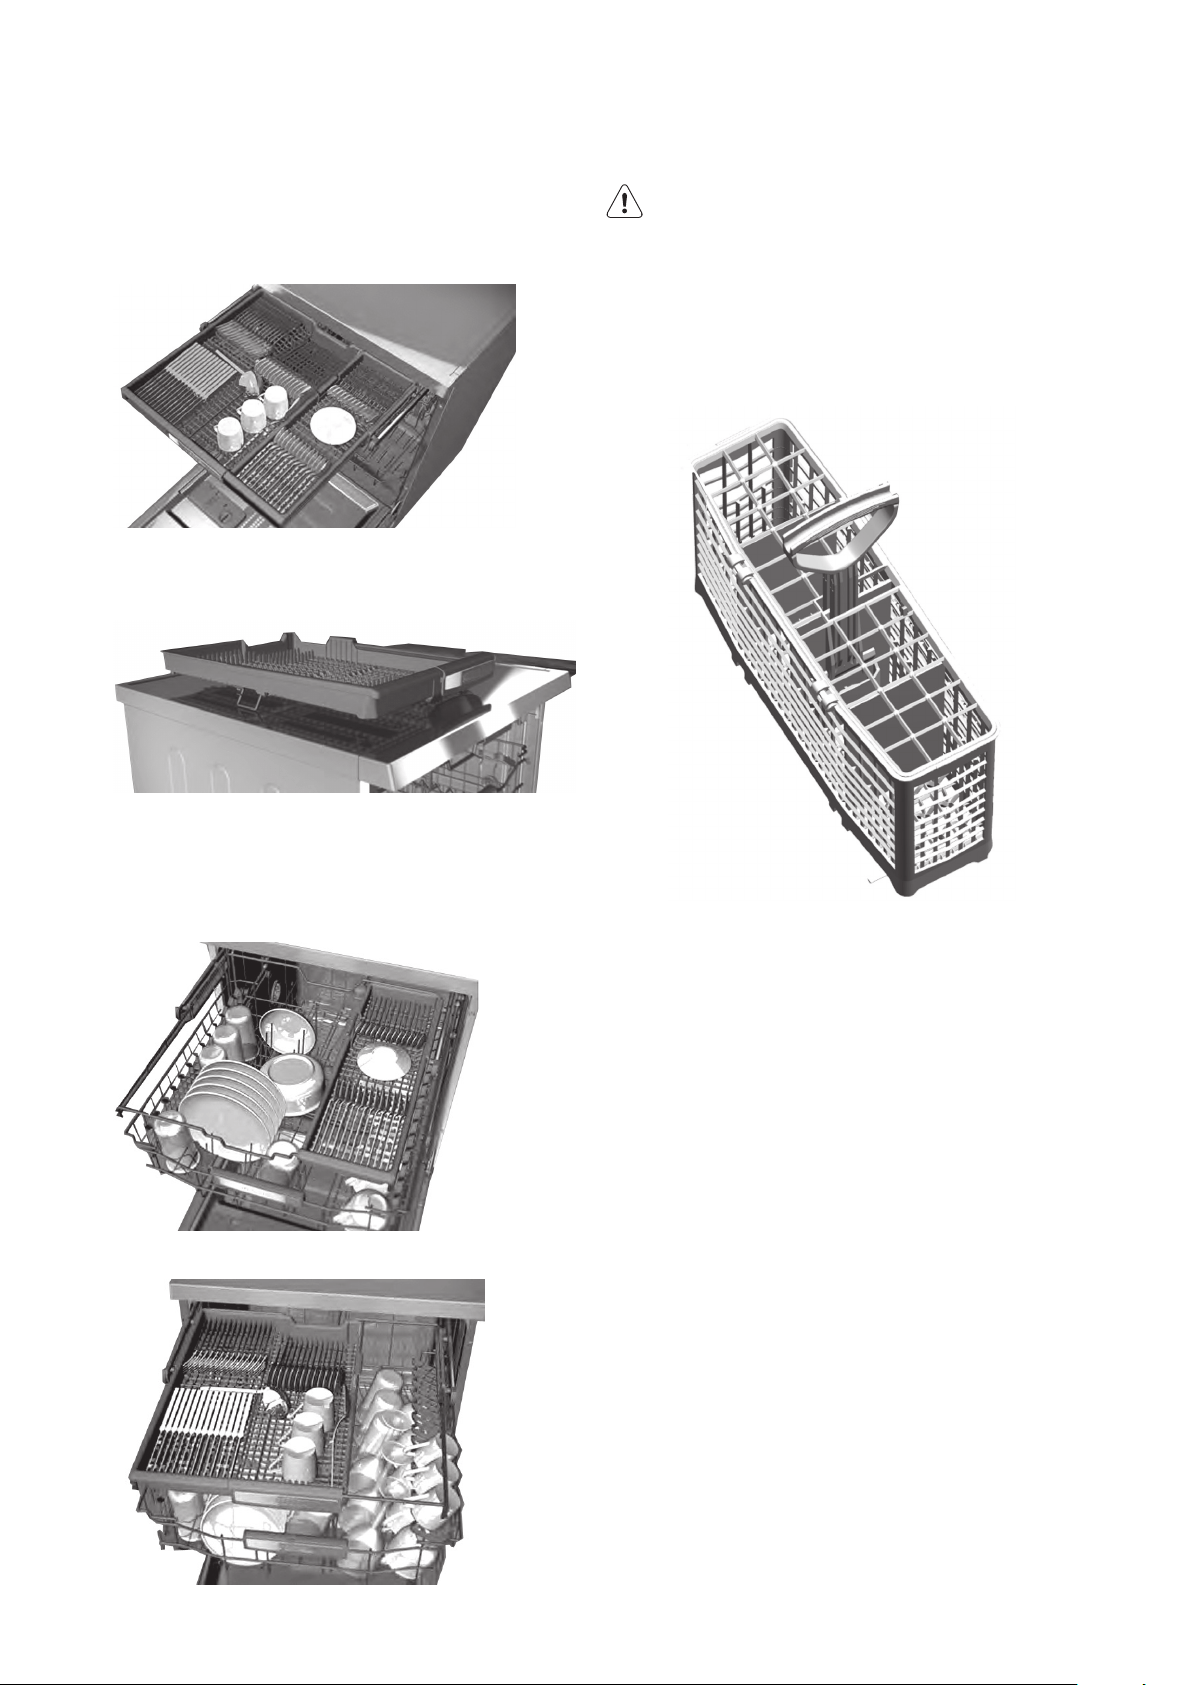
UpperCutleryTray
The upper cutlery tray is designed for you to place forks,
spoons and knives, long and small items.
If desired, when the program has completed, the tray
can be taken out with your cutlery.
The upper cutlery basket is composed of two pieces;
if you need to make space for the dishes in the upper
basket, you can take out the left or right part of the upper
cutlery basket in order to create more space.
WARNING!
Knivesandothersharpobjectsmustbeplaced
horizontallyinthecutlerybasket.
Alternatecutlerybasket
An alternate cutlery basket is available as an accessory
for your convenience.
LOADING YOUR DISHWASHER
19
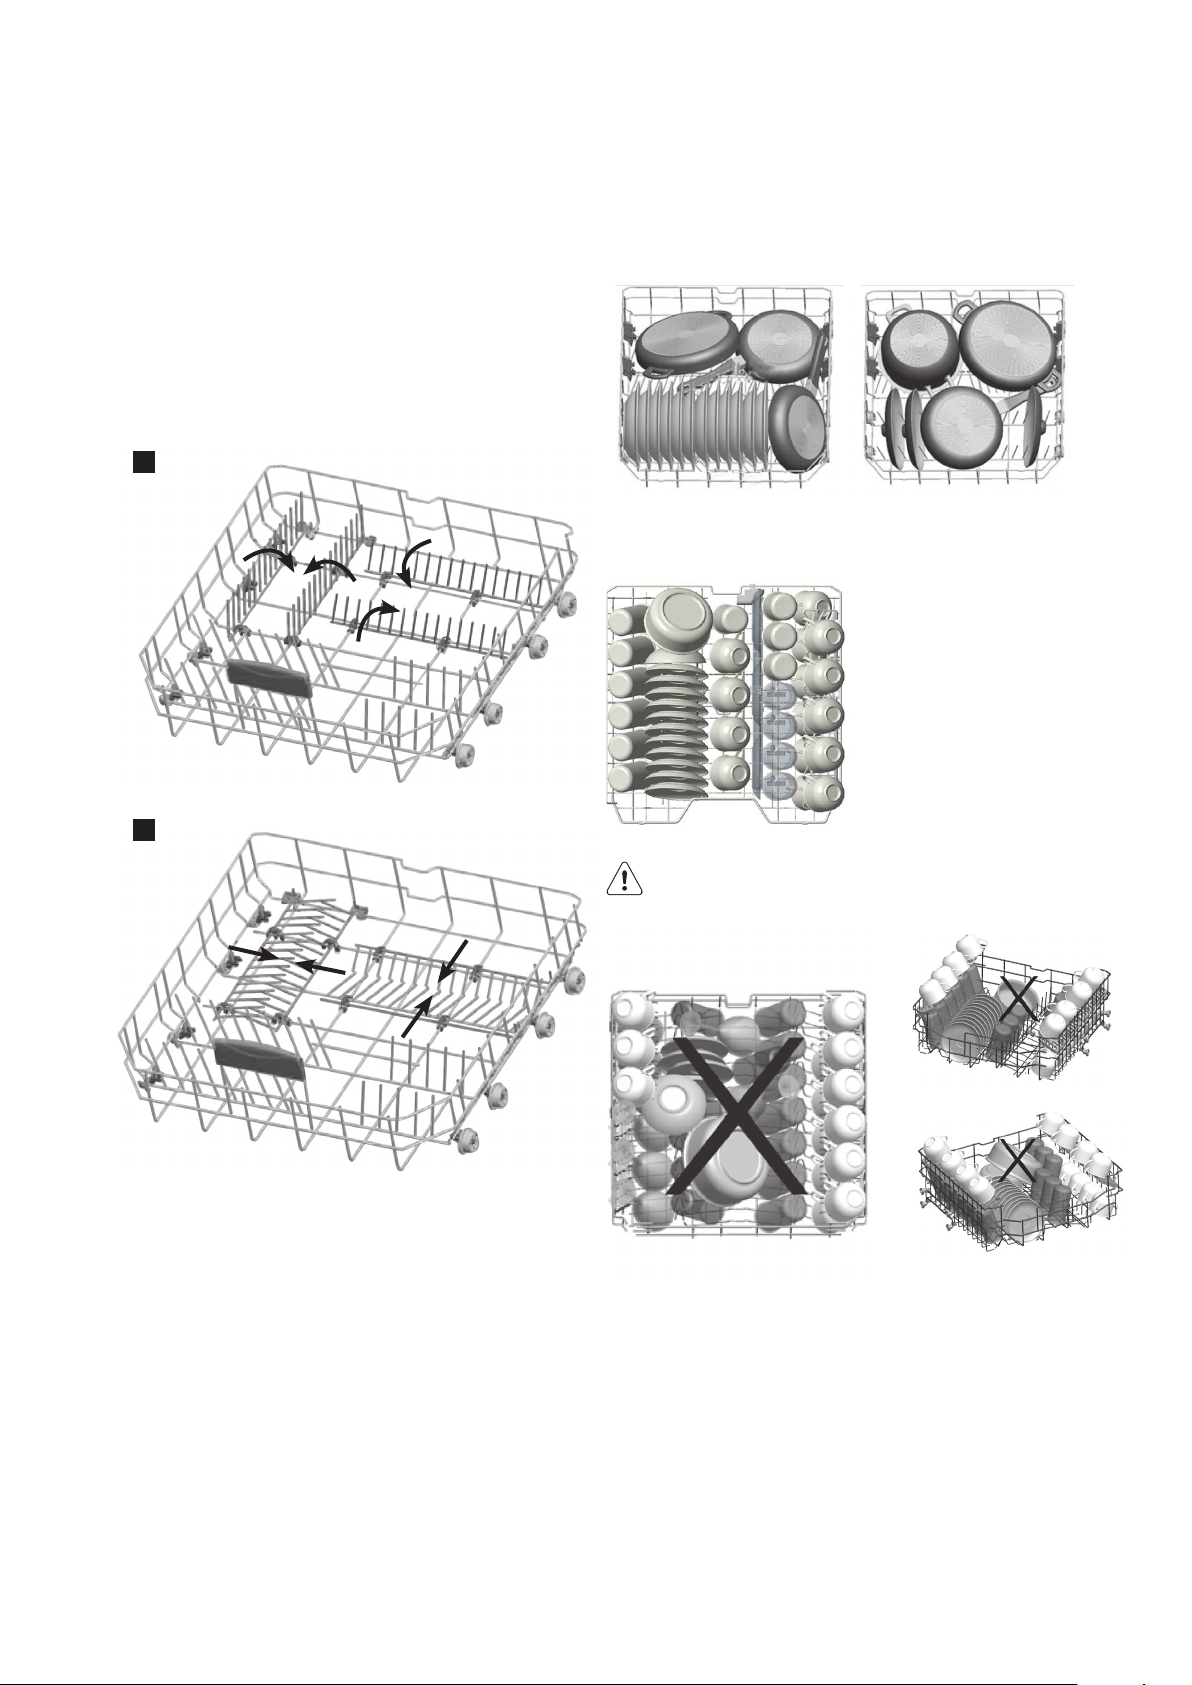
LowerBasketFoldingRacks
Folding tines (prongs) consisting of four parts that
are located on the lower basket of your machine are
designed in order to let you place big items easier such
as pots, pans, etc.
If required, each rack can be folded separately, or all of
them can be folded and larger spaces created. You can
use folding tines (prongs) in the upright position, or by
folding.
Alternativebasketloads
LowerBasket
UpperBasket
The upper cutlery tray is designed for you to place forks,
spoons and knives, long and small items.
If desired, when the program has completed, the tray
can be taken out with your cutlery.
The upper cutlery basket is composed of two pieces;
if you need to make space for the dishes in the upper
basket, you can take out the left or right part of the upper
cutlery basket in order to create more space.
An alternate cutlery basket is available as an accessory for
your convenience.
Folding tines (prongs) consisting of four parts that are located
on the lower basket of your machine are designed in order
to let you place big items easier such as pots, pans, etc. If
required, each rack can be folded separately, or all of them
can be folded and larger spaces created. You can use folding
tines (prongs) in the upright position, or by folding.
Examples of incorrect loading
*Illustration only
2
1
WARNING!
Examples of incorrect loading
*Illustration only
2
1

20 electrolux.com.au
LOADING YOUR DISHWASHER (CONTINUED)
Unloadingthebaskets
The upper cutlery tray is designed for you to place forks,
spoons and knives, long and small items.
1. Let the tableware cool down before you remove
it from the appliance. Hot items can be easily
damaged.
2. First remove items from the lower basket, then from
the upper basket.
IMPORTANT!
Attheendoftheprogramwatercanstillremain
onthesidesandonthedooroftheappliance.
Forbetterdryingresultssettheautodoor
function,oropenthedoor5–10cmandallow
tablewaretocooldownfor30–40min.
Wheneveryouwillnotbeoperatingyourmachine
• Unplug the machine and then turn the water o.
• Leave the door slightly ajar in order to prevent the
formation of unpleasant smells.
• Keep the machine interior clean.

21
CAUTION!
Cleaningthemachineinregularintervalsprolongs
themachine’sservicelife.
Wheneveryouwillnotbeoperatingyourmachine
• Fill the detergent compartment without loading any
dishes into the machine, select a program that runs
at high temperature, and start the machine. If this
is ineective, use a specialty dishwasher cleaner
available from most supermarkets.
Cleaningthesealsinthemachinedoor
• To clean any accumulated residues in the door
seals, wipe the seals regularly by using a
dampened cloth.
Cleaningthemachine
• Clean the lters and spray arms at least once
a week.
• Unplug your machine and turn o its tap before
starting the cleaning.
• Do not use hard materials when cleaning your
machine. Wipe with a ne cleaning material and a
dampened cloth.
Filters
• Check if any food wastes have remained on the
coarse and ne lters.
• If any food wastes are left, remove the lters and
clean them thoroughly under the water tap.
• Micro Filter
• Coarse Filter
• Metal/Plastic Filter
1. To remove and clean the lter combination,
turn it counter clockwise and take it out by lifting
upwards.
1
2. Pull and remove the metal/plastic lter.
3
3. Then pull the coarse lter out of the micro lter.
2
4. Rinse it with lots of water under the tap. Ret the
metal/plastic lter. Insert the coarse lter into the
micro lter in a way that the marks will correspond
to one another. Attach micro lter into the metal/
plastic lter and turn to the direction of arrow and it
is locked when the arrow on micro lter can be seen
from across.
4
• Never use your dishwasher without any lter.
• Incorrect tting of the lter will reduce the washing
eectiveness.
• Clean lters are very important in terms of the proper
running of the machine.
.
4
2
3
1
c
b
a
Sprayarms
Check whether or not the holes for the upper and lower spray
arms are clogged. If there is any clogging, remove the spray
arms and clean them under water.
You can remove the lower spray arm by pulling it upwards,
while the upper spray arm nut can be removed by turning the
nut to the left.
Be sure that the nut is perfectly tightened when retting the
upper spray arm.
CARE AND CLEANING

22 electrolux.com.au
CONSUMPTION VALUES
Program Water(l) Energy(kWh) Duration(min)
PreWash
4.2 0.02 15
Jetwash14’
6.6 0.34 14
Quick30’
10.9 0.74 30
*Eco
12.2 0.65 138
Super50’
10.7 1.29 50
Daily60°C
14.9 1.38 99
FlexiWash60°C
15.4 1.43 113
AutoFlex
30°C-50°C
10.6 - 17.7 0.82 79 - 91
AutoFlex
50°C-60°C
10.9 - 18.5 1.18 102 - 122
AutoFlex
60°C-70°C
12.3 - 24.6 1.3 107 - 179
Caution: Values above have been tested
according to
r
elated Standards in
la
boratory conditions, these values
may vary due to environment conditions (mains voltage,
water pressure, water inlet temperature and ambient
temperatures).
*With this program you have the most ecient use
of water and energy consumption for crockery and
cutlery for normal soil (This is the standard program
for Test Institutes).
CAUTION
TheJetwash14minute,Quick30’minuteand
Super 50’Minuteprogramsdonothaveadrying
step.
Thevaluesstatedabovearevaluesthatare
obtainedinlaboratoryenvironmentrelativeto
relatedstandards.
Thesevaluescanchangeaccordingtothe
product’susageandenvironment(mains
voltage,waterpressure,waterinlettemperature
andambienttemperatures).
O mode and end of cycle mode tests in accordance
with AS/NZS Standards must be carried out with
Ecomode brightness level.

23
CONSUMPTION VALUES WHEN
HALF LOAD OPTION IS USED
Program Water(l) Energy(kWh) Duration(min)
PreWash
4.2 0.02 15
Jetwash14’
6.6 0.34 14
Quick30’
10.9 0.74 30
*Eco
127
Super50’
10.7 1.23 48
Daily60°C
11.1 1.34 93
FlexiWash60°C
11.1 1.33 103
AutoFlex
30°C-50°C
9.9 - 13.7 0.83 62 - 85
AutoFlex
50°C-60°C
10.5 - 14.3 1.7 82 - 110
AutoFlex
60°C-70°C
11.9 - 19.9 1.52 123 - 168
InformationforTestinstitutes
For all the necessary information for test performance;
send an email to dishwasher@standardtest.info and
provide the model and PNC number on the rating plate.
11.6 0.65

24 electrolux.com.au
Hoselter
The inlet hose lter reduces contamination (sand, clay,
rust etc.) that might be occasionally carried in through
the mains water supply or the indoor plumbing, and
avoids damage to the dishwasher components.
Check the lter and the hose from time to time and clean
them if necessary. To clean the lter, rst turn o your tap
and then remove the hose.
After removing the lter from the hose, clean it under the
tap. Insert the cleaned lter back into its place
inside the hose. Ret the hose, turn on the tap and
check for leaks.
CARE AND CLEANING
25
TROUBLESHOOTING
Problemandalarmcode Possiblecauseandsolution
You cannot activate the appliance.
• Make sure that the mains plug is connected to the mains socket.
• Make sure that there is no damaged fuse in the fuse box.
The program does not start
• Make sure that the appliance door is closed.
• If the delay start is set, cancel the setting or wait for the end of the countdown.
The appliance does not ll with water.
The display showsF5
• Make sure that the water tap is turned on.
• Make sure that the pressure of the water supply is not too low. For this
information, contact your local water authority.
• Make sure that the water tap is not clogged.
• Make sure that the lter in the inlet hose is not clogged.
• Make sure that the inlet hose has no kinks or bends.
The appliance does not drain the water
The display shows F2
• Make sure that the sink spigot is not clogged.
• Make sure that the lter in the outlet hose is not clogged.
• Make sure that the interior lter system is not clogged.
• Make sure that the drain hose has no kinks or bends.
The anti-ood device is on.
The display shows F1
• Close the water tap and contact an Authorised Service Centre
The appliance stops and starts more
times during operation.
• It is normal. It provides optimal cleaning results and energy savings.
The program lasts too long.
• Select the Extra Fast option to shorten the program time.
• If the delayed start option is set, cancel the delay setting or wait for the end of
the countdown.
The remaining time in the display
increases and skips nearly to the end
of program time.
• This is not a defect. The appliance is working correctly
WarningMessages:
Your machine provides feedback while in operation;
When above warning is seen;
1 Make sure that the water is not cut
2 Make sure that the tap is turned on.
3 If both are true, call a qualied technician.
Whenever an error which you cannot x occurs, the
following warning will be displayed. When you see it,
call a qualied technician.
When your machine shows these warnings, the error
codes are specied after the denition. You might nd
related information in the “FAILURE CODES AND WHAT
TO DO IN CASE OF FAILURE” section in your user guide.
If the appliance does not start or it stops during
operation, rst check if you can solve the problem
yourself with the help of the information in the table or
contact an Authorised Service Centre.
WARNING!
Repairsnotproperlydonemayresultinserious
risktothesafetyoftheuser.Anyrepairsmustbe
performedbyqualiedpersonnel.
Withsomeproblems,thedisplayshowsanalarm
code.Themajorityofproblemsthatcanoccurcan
besolvedwithouttheneedtocontactanAuthorised
ServiceCentre.

26 electrolux.com.au
Iftheprogramwon’tstart
• Check if the plug is connected.
• Check your indoor fuses.
• Be sure that the water inlet tap is turned on.
• Be sure that you have closed the machine door.
• Be sure that you switched o the machine by
pressing the Power On / O button.
• Be sure that the water inlet lter and the machine
lters are not clogged.
Ifdetergentresiduesareleftinthedetergent
compartment
• Detergent has been added when the detergent
compartment was wet.
Ifwaterisleftinsidethemachineattheendof
theprogram
• The water drain hose is clogged or twisted.
• The lters are clogged.
• The program is not nished yet.
Ifthemachinestopsduringawashoperation
• Power failure.
• Water inlet failure.
• Program can be on standby mode.
Ifshakingandhittingnoisesareheardduringa
washoperation
• Dishes placed incorrectly.
• Spray arm hitting the dishes.
Iftherearepartialfoodwastesleftonthedishes
• Dishes placed incorrectly into the machine, sprayed
water did not reach related places.
• Basket overly loaded.
• Dishes leaning against one another.
• Very small amount of detergent added.
• An unsuitable, rather weak wash program selected.
• Spray arm clogged with food wastes.
• Filters clogged.
• Filters incorrectly tted.
• Water drain pump clogged.
Iftherearewhitishstainsonthedishes
• A very small amount of detergent is being used.
• Rinse aid dosage setting at a very low level.
• A detergent without phosphate used; try one that
contains phosphate.
Ifthedishesarenotdry
• A program without a dry operation selected.
• Rinse aid dosage set too low
• Dishes unloaded too soon
Ifthereareruststainsonthedishes
• Stainless-steel quality of the dishes washed is not
dishwasher grade.
• High level of salt in the wash water.
• Poor mains grounding.
Call an Authorised Service Centre if the problem still
persists after the controls or in case of any malfunction
not described above.
TROUBLESHOOTING (CONTINUED)

27
Errorcode Possiblecauseandsolution Control
F1
Overll
• Power o your machine and close the tap.
• Contact the customers services centre.
F2
Not draining
• Water discharge hose is clogged.
• Water drainage hose kinked, check installation.
• The lters of your machine might be clogged.
• Power o–on your machine and activate the program
cancellation command.
• If the error continues, contact the Customer Care Centre.
F3
Inlet valve faulty
• Close the tap.
• Contact the Customer Care Centre.
F5
Inadequate water supply
• Make sure the water tap is fully open and that there is
mains water available.
• Water inlet hose kinked, check installation.
• Close the water tap, disconnect the hose from the tap
and clean the lter at the connection.
• Restart your machine, contact the service if the error
resumes.
F6
Faulty heater sensor
• Contact the Customer Care Centre.
F7
Over temperature • Contact the Customer Care Centre.
F8
Heating error • Contact the Customer Care Centre.
F9
Diverter valve faulty • Contact the Customer Care Centre.
FE
Power supply problem • Contact the Customer Care Centre.
Errorcodes,causeandsolution

28 electrolux.com.au
TECHNICAL SPECIFICATIONS
Technicalspecications ESF6767KXA
Capacity
15 place settings
Height with worktop
850mm
Height (without worktop)
820mm
Width
598mm
Depth
598mm
Net weight
55kg
Electricity input
220–240V, 50Hz
Total power
1900W
Current
10A
Water supply pressure
0.03 MPa (0,3 bar) – 1 MPa (10 bar)
Water supply
Hot or Cold water, max 60
o
C, 10L/min
ESF6767KXA
29
INSTALLATION
General
• When determining where to put your machine,
choose a place where you can easily load and
unload your dishes.
• Do not put your machine in any location where
there is a probability for the room temperature
to fall below 0°C.
• Before positioning, take the machine out of its
packaging by following the warnings located on
the package.
• Position the machine close to a water tap or
drain. You need to site your machine, taking into
consideration that its connections will not be altered
once they are made.
• Do not grip the machine by the door in order to
move it.
• Leave a clearance on all sides of the machine so
that you can comfortably move it back and forth
during cleaning.
• Make sure that the water inlet and outlet hoses
aren’t squeezed while positioning the machine.
Also, make sure that the machine does not stand
on the electrical cable.
• Adjust the machine’s adjustable feet so that it can
stand level and balanced. Proper positioning of the
machine ensures problem-free opening and closing
of the door.
• If the door of your machine does not close properly,
check if the machine is stable on the oor it stands;
if not, adjust the feet and ensure its stable position.
Locationofservices
All dishwasher services should be located in the cabinet
next to the dishwasher opening.
Waterconnection
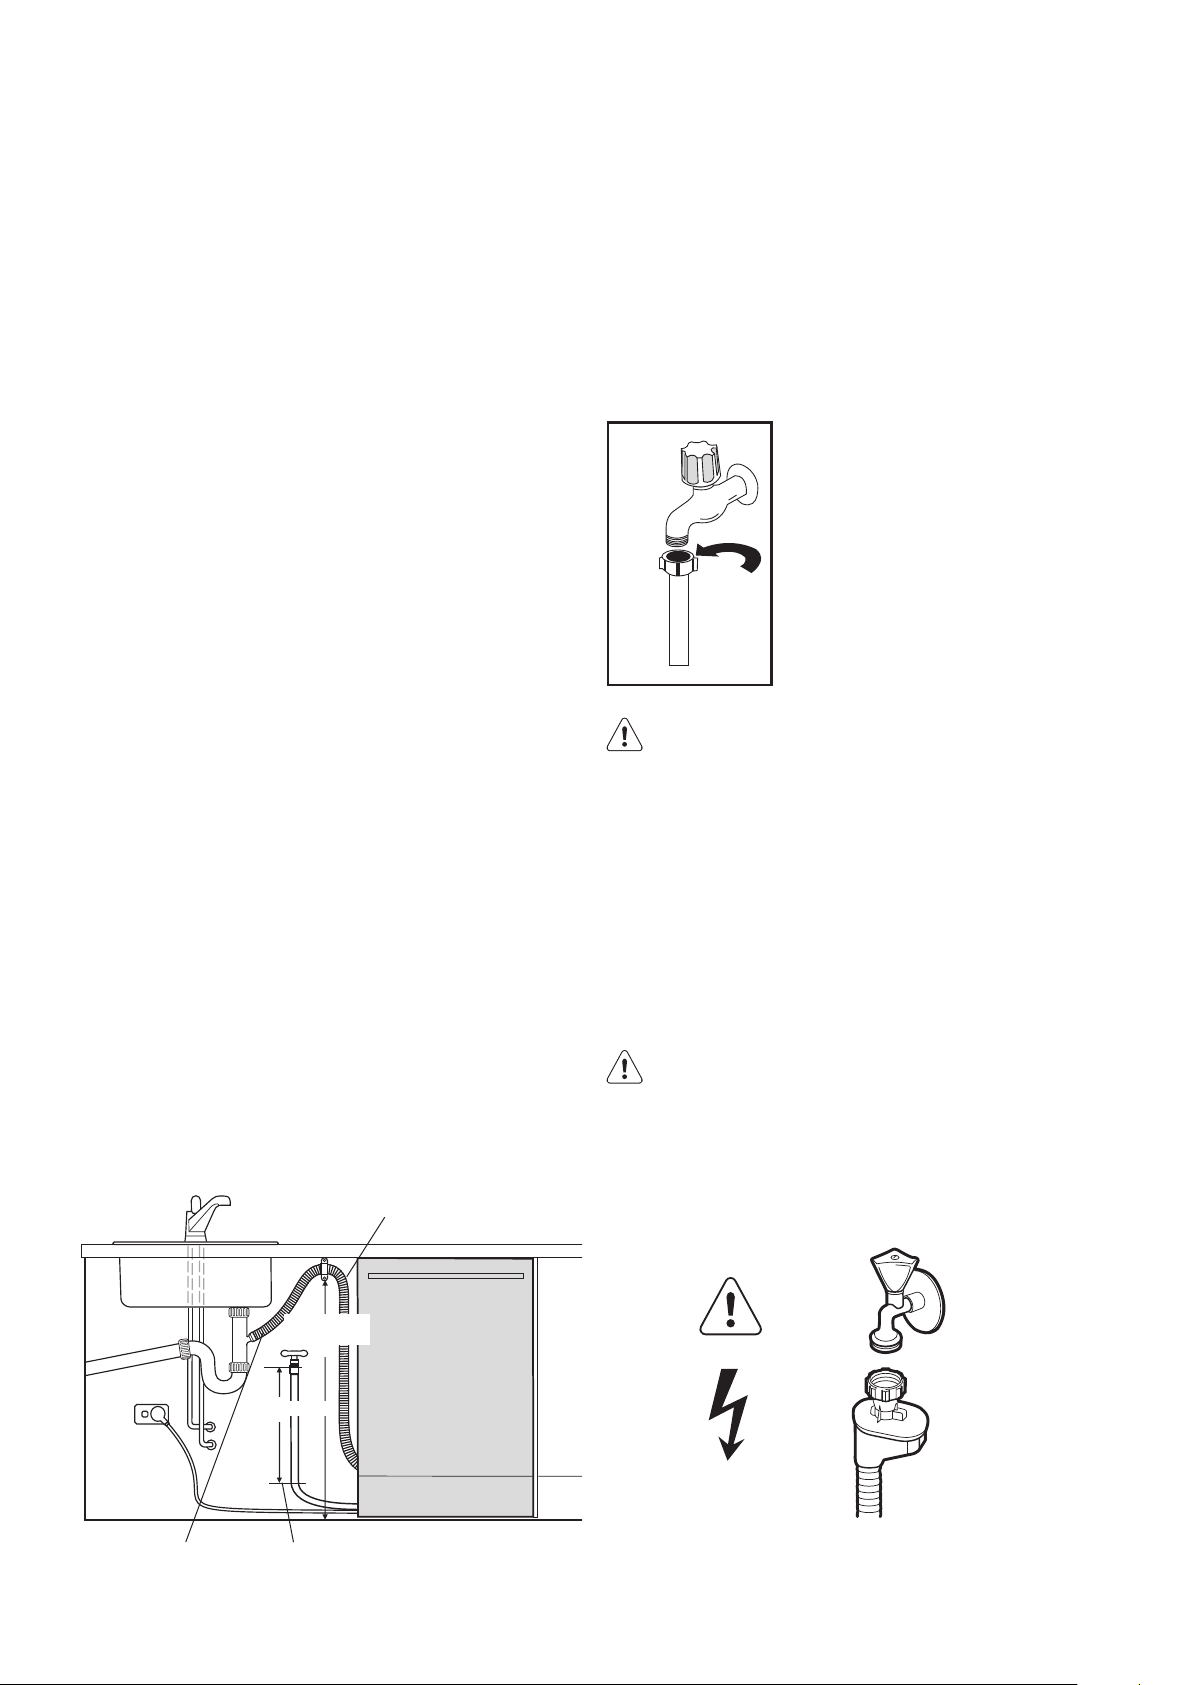
Connect the inlet hose to a water tap with an external
BSP thread spout of 3/4”.
For best washing performance it is recommended to
connect the appliance to a cold water supply. Energy
savings can be made by connecting the appliance to a
solar water system and using economy options, however
the water temperature must not exceed 60°C.
CAUTION!
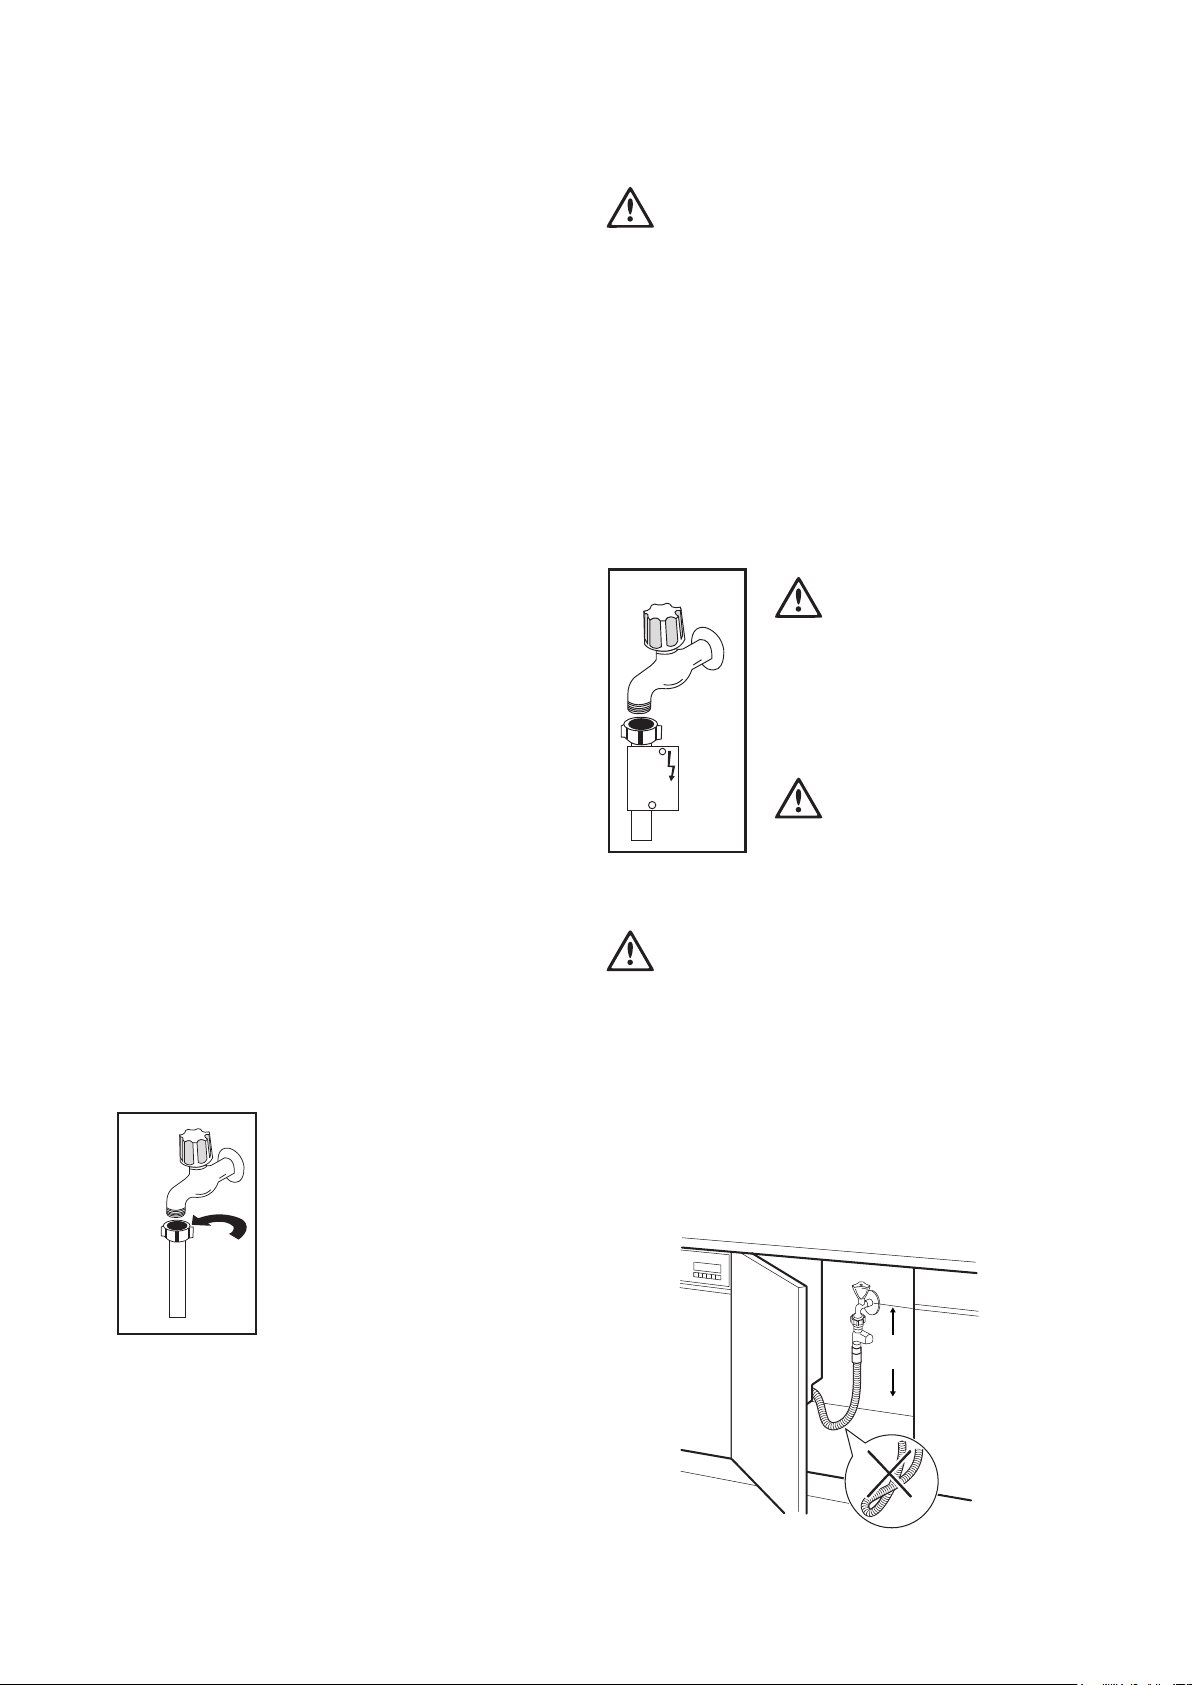
Onlyturnthelockingnuttosecurethehose.Do
notturnthehose.
Inletwatersupply
• Water pressure: 800kPa max – 50 kPa min.
• Water ow rate 10 L/minute.
• If water pressure is in excess of 800 k Pa, a pressure
reducing valve should be used. Check for leaks.
• If water temperature is in excess of 60°C, a
tempering valve should be used. Check for leaks.
CAUTION!
Alwaysusenewhoseswhenyouconnectthe
appliancetothewatermains.Oldhosesmustnot
beused.Thewaterinlethosemustbeexamined
atanintervaloftwelvemonthsfordeterioration
andreplacedifnecessary.
Remove entire plastic
membrane from sink trap
spigot and t drain hose to
spigot with clamp
The drain hose should not be extended
by more than 2m otherwise water
pump out problems could occur
min. 400mm
straight section
400mm min.
power outlet
sink
600mm max.
300mm min.
30 electrolux.com.au
INSTALLATION (CONTINUED)
Positioningthemachine
When considering the location for the dishwasher,
ensure that there is adequate space to enable loading
and unloading of the dishes.
• Do not put your machine in any location where
the ambient temperature can fall below 5°C.
• Before positioning, take the machine out of its
packaging by following the warnings located on
the package.
• Position the machine close to a water tap and
drain. You need to position your machine, taking
into consideration that its connections will not be
altered once they are made.
• Do not grip the machine by its door or panel in
order to move it.
• Take care to leave a certain clearance from all sides
of the machine so that you can comfortably move
it back and forth during cleaning.
• Make sure that the water inlet and outlet hoses do
not get squeezed while positioning the machine.
Also, make sure that the machine does not stand
on the electrical cable. Adjust the machine’s feet
so that it is level and stable. Proper positioning of
the machine ensures problem-free opening and
closing of its door.
• If the door of your machine does not close properly,
check if the machine is stable on the oor; if not,
adjust the feet and ensure it is level and stable.
Waterconnection
Ensure that the indoor plumbing is suitable for installing
a dishwasher and complies with AS/NZS 3500.1. Also,
we recommend that you t a lter at the entrance of
your place or apartment so as to avoid any damage
to your machine because of any contamination
(sand, clay, rust etc) that might be
occasionally carried in through the
main’s water supply or the indoor
plumbing, and to avoid problems of
staining and formation of deposits
after washing.
Waterinlethose
Do not use the water inlet hose of
your old machine, you must use
the new water inlet hose supplied with your machine.
Before connecting the water inlet hose to the water
tap, ensure clean water is owing from the tap before
making the connection. Connect the water inlet hose
directly to the water inlet tap. The pressure supplied by
the tap should be at a minimum of 0.03 MPa and at a
maximum of 1 MPa. If the water pressure is above 1
MPa, a pressure-relief valve should be installed.
WARNING
Onlyturnthelockingnuttosecurehose–
donotturnthehose.
• The rst time you use the appliance, make sure
that there is no leakage.
• The water inlet hose has a safety valve and a
sheath with an inner mains cable.
• After the connections are made, the tap should be
turned on fully and checked for water tightness.
For the safety of your machine, make sure to
always turn o the water inlet tap after each wash
program is nished.
WARNING
NOTE: Aquastop inlet hose has
components using 240V. Do not
cut Aquastop inlet hose. Do not let
it get folded, twisted, kinked
or crushed.
WARNING
NOTE: A water tempering valve is
required if the water temperature
is over 60°C.
CAUTION
Alwaysusenewhoseswhenyouconnectthe
appliancetothewatersupply.Oldhosesmust
notbeused.Thewaterinlethosemustbe
examinedatanintervaloftwelvemonthsfor
deteriorationandreplacedifnecessary.
Inordertopassthesafetyvalvethroughthe
kitchencabinets,anopeningofatleast45mmx
90mmisneeded.
30cm
min.
31
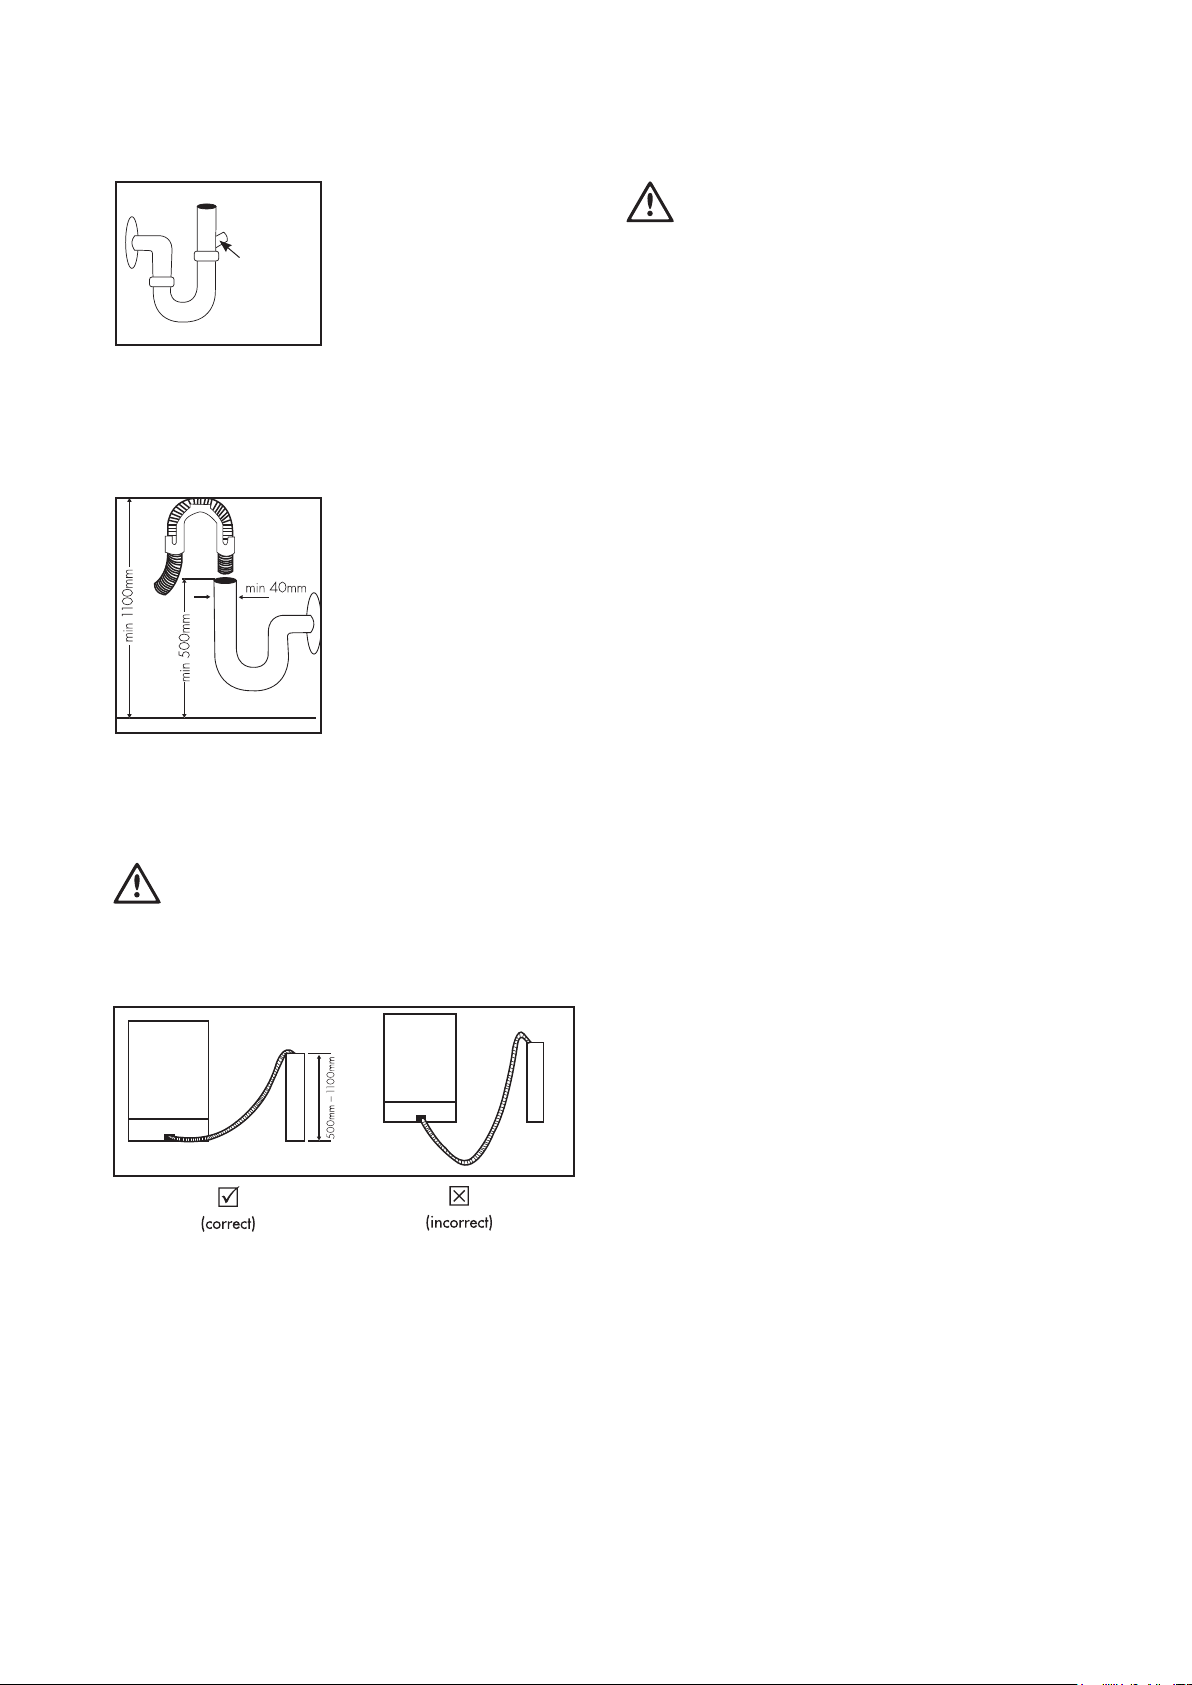
Waterdrainhose
If you connect the water
drain hose to a trap spigot
under the sink, remove the
plastic membrane. If you
do not remove the entire
membrane, remaining food
can cause blockage in
the drain hose spigot. Ensure a hose clamp is used to
secure the hose to the spigot.
Waterdrainhose
The water drain hose can
be connected either directly
to the water drain hole or to
the sink outlet spigot. Using
a hose hook (if available),
the water can be drained
directly into the sink by
positioning the hose hook
over the edge of the sink.
This connection should be at a minimum of 50cm
and at a maximum of 110cm above the base of the
dishwasher.
WARNING
Maximumdrainhoselengthis4m.Longerhose
lengthwillpreventcorrectdraining,
andresultinpoorwashperformance.
WARNING
ElectricalConnection
The plug of your machine should be connected to an
earthed outlet that supplies suitable voltage and current.
If there is no earthing installation, have a competent
electrician carry out an earthing installation. In case of
usage without earthing installed, our company will not be
responsible for any loss of usage that might occur.
The indoor fuse current value should be 10-16 A.
Your machine is designed for 220-240 V. The machine
should not be plugged in during installation.
• Always use the molded plug supplied with your
machine.
• Running in low voltage will cause a decline in
washing quality.
• The machine’s electrical cable should be replaced
by an authorised service or an authorised electrician
only. Failure to do so may lead to accidents.
• For safety purposes, always make sure to
disconnect the plug when a wash program
is nished.
• In order not to cause an electric shock, do not
unplug when your hands are wet.
• When disconnecting your machine from the mains
supply, always pull from the plug. Never pull the
cord itself.
Fittingthemachineundercounter
If you wish to t your machine undercounter, check
whether you have sucient space under your
countertop and whether the wiring-plumbing is suitable
to do so.
1. To ensure the stability of the dishwasher for
an underbench installation, if the underbench
dimension is greater than 820mm, any gap between
the dishwasher and the underside of the benchtop
should be bridged with a packing piece. This may
be achieved by wedging a piece of timber between
the dishwasher and the benchtop as shown
2. If required, remove the worktop as shown in the
illustration.
3. To remove the worktop, remove the screws that
hold the worktop which are located at the rear of
the machine; then push the front panel 1cm from
the front
Remove
entire internal
membrane
32 electrolux.com.au
INSTALLATION (CONTINUED)
1. towards the rear and lift it.
2. Adjust the machine feet according to the slope
of the oor.
3. Fit your machine by pushing it undercounter without
letting the hoses get crushed or bent.
WARNING
After removal of worktop, ensure the opening for the
dishwasher is according to the following dimensions.
Timber
wedging
piece
Bench top
3mm gap
Filler piece
cut to suit
installation
1
570
465
97
85
598
596
850
820
2
3
min. 600mm
570mm
5

33
NOTES

34 electrolux.com.au
NOTES

35
This document sets out the terms and conditions of the product
warranties for Electrolux Appliances. It is an important document.
Please keep it with your proof of purchase documents in a safe place
for future reference should there be a manufacturing defect in your
Appliance. This warranty is in addition to other rights you may have
under the Australian Consumer Law.
1. In this warranty:
(a) ‘ACL’ or ‘Australian Consumer Law’ means Schedule 2 to the
Competition and Consumer Act 2010;
(b) ‘Appliance’ means any Electrolux product purchased by you and
accompanied by this document;
(c) ‘ASC’ means Electrolux’s authorised serviced centres;
(d) ‘Electrolux’ is the brand controlled by Electrolux Home Products Pty
Ltd of 163 O’Riordan Street, Mascot NSW 2020, ABN 51 004 762
341 in respect of Appliances purchased in Australia and Electrolux
(NZ) Limited (collectively “Electrolux”) of 3-5 Niall Burgess Road, Mount
Wellington, in respect of Appliances purchased in New Zealand;
(e) ‘WarrantyPeriod’meanstheperiodspeciedinclause3ofthis
warranty;
(f) ‘you’ means the purchaser of the Appliance not having purchased
the Appliance for re-sale, and ‘your’ has a corresponding meaning.
2. Application: This warranty only applies to new Appliances, purchased
and used in Australia or New Zealand and is in addition to (and does not
exclude, restrict, or modify in any way) other rights and remedies under
a law to which the Appliances or services relate, including any non-
excludable statutory guarantees in Australia and New Zealand.
3. Warranty Period: Subject to these terms and conditions, this warranty
continues for in Australia for a period of 24 months and in New Zealand
for a period of 24 months, following the date of original purchase of the
Appliance.
4. Repair or replace warranty: During the Warranty Period, Electrolux
or its ASC will, at no extra charge if your Appliance is readily accessible
for service, without special equipment and subject to these terms and
conditions, repair or replace any parts which it considers to be defective.
Electrolux may, in its absolute discretion, choose whether the remedy
oeredforavalidwarrantyclaimisrepairorreplacement.Electroluxorits
ASC may use refurbished parts to repair your Appliance. You agree that
any replaced Appliances or parts become the property of Electrolux.
5. Travel and transportation costs: Subject to clause 7, Electrolux will
bear the reasonable cost of transportation, travel and delivery of the
Appliance to and from Electrolux or its ASC. Travel and transportation will
be arranged by Electrolux as part of any valid warranty claim.
6. Proof of purchase is required before you can make a claim under this
warranty.
7. Exclusions: You may not make a claim under this warranty unless the
defect claimed is due to faulty or defective parts or workmanship. This
warranty does not cover:
(a) lightglobes,batteries,ltersorsimilarperishableparts;
(b) parts and Appliances not supplied by Electrolux;
(c) cosmeticdamagewhichdoesnotaecttheoperationofthe
Appliance;
(d) damage to the Appliance caused by:
(i) negligence or accident;
(ii) misuse or abuse, including failure to properly maintain or service;
(iii) improper, negligent or faulty servicing or repair works done by
anyone other than an Electrolux authorised repairer or ASC;
(iv) normal wear and tear;
(v) power surges, electrical storm damage or incorrect power supply;
(vi) incomplete or improper installation;
(vii) incorrect, improper or inappropriate operation;
(viii) insect or vermin infestation;
(ix) failure to comply with any additional instructions supplied with
the Appliance;
In addition, Electrolux is not liable under this warranty if:
(a) the Appliance has been, or Electrolux reasonably believes that the
Appliance has been, used for purposes other than those for which
the Appliance was intended, including where the Appliance has
been used for any non-domestic purpose;
(b) theApplianceismodiedwithoutauthorityfromElectroluxinwriting;
(c) the Appliance’s serial number or warranty seal has been removed
or defaced
8. How to claim under this warranty: To enquire about claiming under
this warranty, please follow these steps:
(a) carefully check the operating instructions, user manual and the terms
of this warranty;
(b) have the model and serial number of the Appliance available;
(c) have the proof of purchase (e.g. an invoice) available;
(d) telephone the numbers shown below.
9. Australia: For Appliances and services provided by Electrolux in
Australia: Electrolux goods come with guarantees that cannot be
excluded under the Australian Consumer Law. You are entitled to a
replacement or refund for a major failure and for compensation for any
other reasonably foreseeable loss or damage. You are also entitled to
have the Appliance repaired or replaced if the Appliance fails to be of
acceptable quality and the failure does not amount to a major failure.
‘Acceptable quality’ and ‘major failure’ have the same meaning as
referred to in the ACL.
10. New Zealand: For Appliances and services provided by Electrolux
in New Zealand, the Appliances come with a guarantee by Electrolux
pursuant to the provisions of the Consumer Guarantees Act, the Sale
of Goods Act and the Fair Trading Act. Where the Appliance was
purchased in New Zealand for commercial purposes the Consumer
Guarantee Act does not apply.
11.Condentiality: You accept that if you make a warranty claim, Electrolux
and its agents including ASC may exchange information in relation to you
to enable Electrolux to meet its obligations under this warranty.
Warranty
FOR SALES IN AUSTRALIA AND NEW ZEALAND
APPLIANCE: ELECTROLUX DISHWASHERS
Important Notice
Before calling for service, please ensure that the steps listed in clause 8 above have been followed.
FOR SERVICE
ortondtheaddressofyournearest
authorised service centre in Australia
PLEASE CALL 13 13 49
For the cost of a local call (Australia only)
AUSTRALIA
ELECTROLUX HOME PRODUCTS
163 O’Riordan Street, Mascot NSW 2020
electrolux.com.au
FOR SPARE PARTS
ortondtheaddressofyournearest
spare parts centre in Australia
PLEASE CALL 13 13 50
For the cost of a local call (Australia only)
FOR SERVICE
ortondtheaddressofyournearest
authorised service centre in New Zealand
PLEASE CALL 0800 10 66 10
(New Zealand only)
NEW ZEALAND
ELECTROLUX (NZ) Limited
3-5 Niall Burgess Road, Mount Wellington
electrolux.co.nz
FOR SPARE PARTS
ortondtheaddressofyournearest
spare parts centre in New Zealand
PLEASE CALL 0800 10 66 20
(New Zealand only)
EDish_Warr_Jul17
shop.electrolux.com.au
ElectroluxHomeProductsAustralia
telephone: 1300 363 640
fax: 1800 350 067
email: customercare@electrolux.com.au
web: electrolux.com.au
ElectroluxHomeProductsNewZealand
telephone: 0800 436 245
fax: 0800 225 088
email: customercare@electrolux.co.nz
web: electrolux.co.nz
Toaddatouchof
professionalinspiration
toyourhome,visit
electrolux.com.au
orelectrolux.co.nz
electrolux.com.au
or electrolux.co.nz
P/No.52217762-A.
© 2019 Electrolux Home Products Pty Ltd.
EMAN_ESF6767XA_11Apr19