Loading ...
Loading ...
Loading ...
13 ― English
BECOME FAMILIAR WITH THE CHARGER
See Figure 9, page iii
Before attempting to use this charger,
become familiar with all of its operating
features and safety requirements.
CHARGING THE BATTERY PACK
See Figure 10, page iii
BATTERY PACK AND CHARGER
■ Do not use other battery chargers. The
battery charger supplied is specically
designed for the Lithium-Ion battery used in
this garden appliance.
■ Check the main power supply! The voltage
of the power supply must correspond with the
data on the nameplate of the battery charger.
Battery chargers operate on 120V.
■ The battery is equipped with a temperature
monitor that allows charging only within a
temperature range between 23
o
F and 122
o
F.
This ensures an optimum battery service life.
WARNING!
■ If any part of the charger is missing or
damaged, do not operate it! Replace the
charger with a new one. Failure to heed this
warning could result in possible serious injury.
■ Check the voltage! The voltage must
comply with the information on the rating
label.
BATTERY CHARGING PROCEDURE
■ Align the battery pack to the slots on the
charger and slide it in until it locks in place.
■ Connect the charger to the power supply.
■ Allow sufcient charging time (see Product
Specications), and then disconnect the
charger from the power supply.
■ Press the release button on the battery
pack and remove it from the charger.
NOTE:
It is normal for the battery pack and
charger to become warm (but not hot) during
charging process. If the battery does not
charge properly, check to make sure the
electrical outlet is "live".
Always charge the battery before storage!
NOTE:
The battery is supplied partially
charged. To ensure full capacity of the
battery, charge the battery in the battery
charger before using the product for the rst
time. The Lithium-Ion battery can be charged
at any time without reducing its service life.
Interrupting the charging procedure does not
affect the battery.
WARNING!
To reduce risk of re, never
leave the battery connected with the charger
for more than 24 hours!
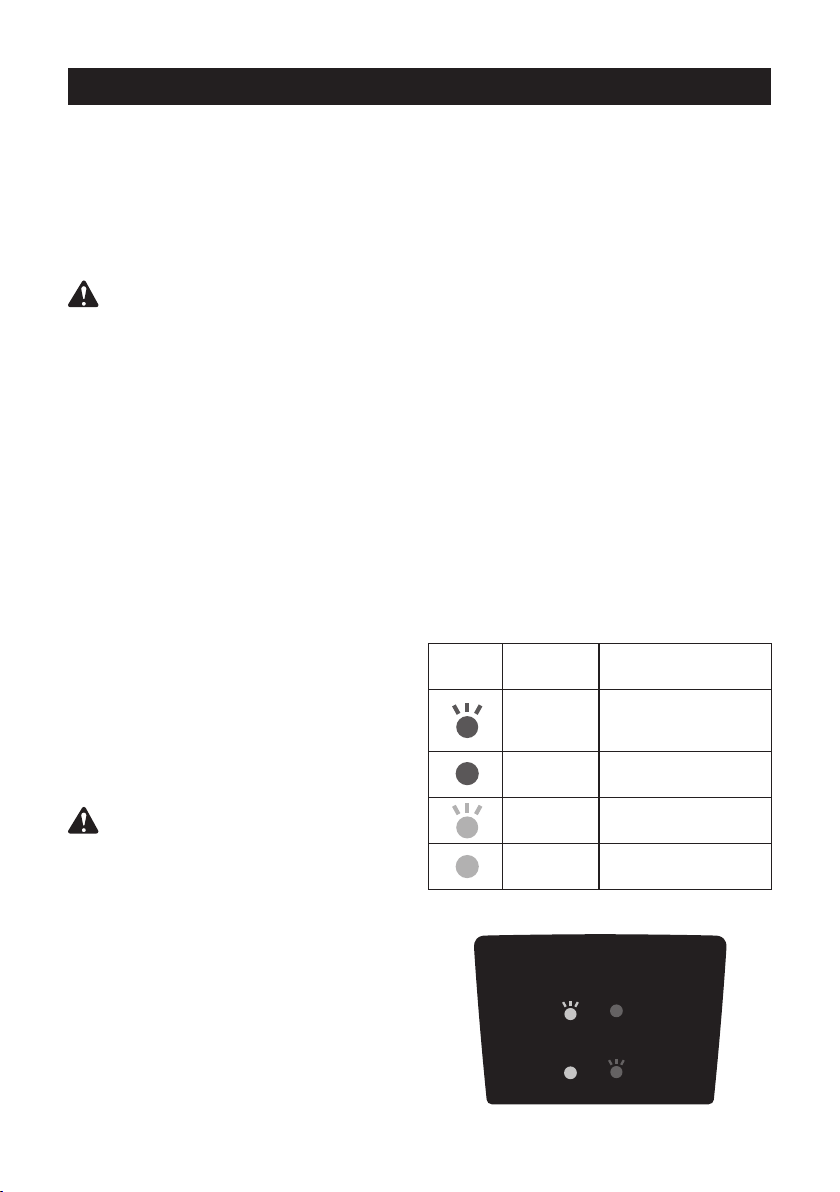
CHARGER INDICATORS
■
Preparation:
The charging process starts
as soon as the battery charger is plugged
into a power supply socket and the battery is
inserted into the charger.
■ If the battery is not inserted,
a continuous
red light
indicates that the charger is plugged
into a power supply socket and is now ready
to begin charging.
■
Charging: a ashing green LED
on the
charger indicates that the battery is charging
normally.
■
Charged: continuous green LED
on the
charger indicates that the battery is ready for
use.
■ The indicator lights on the charger show
the charger status:
SYMBOL
INDICATOR
LIGHTS
STATUS
red,
blinking
charging problem;
see Technical Issue
info on next page
red,
continuous
connected to power
supply
green,
blinking
charging
green,
continuous
fully charged
Charger Indicator Panel
Connected
To Power
Technical
Issue
(see manual)
Fully
Charged
Charging
24V
Charging Status
Loading ...
Loading ...
Loading ...