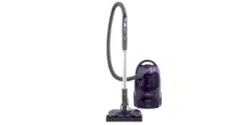
Use & Care Guide
Manual de Uso V Cuidado
Kenmore
_16 _ _ _ _S
Vacuum Cleaner Help Line:
1-877-531-7321
8:00am-5:00pm EST, M-F
(U.S.A. and Canada)
Sears Brands Management Corporation
Hoffrnan Estates, IL 60179 USA
www.kenmore.corn
www.sears.corn
www.krnar t.corn
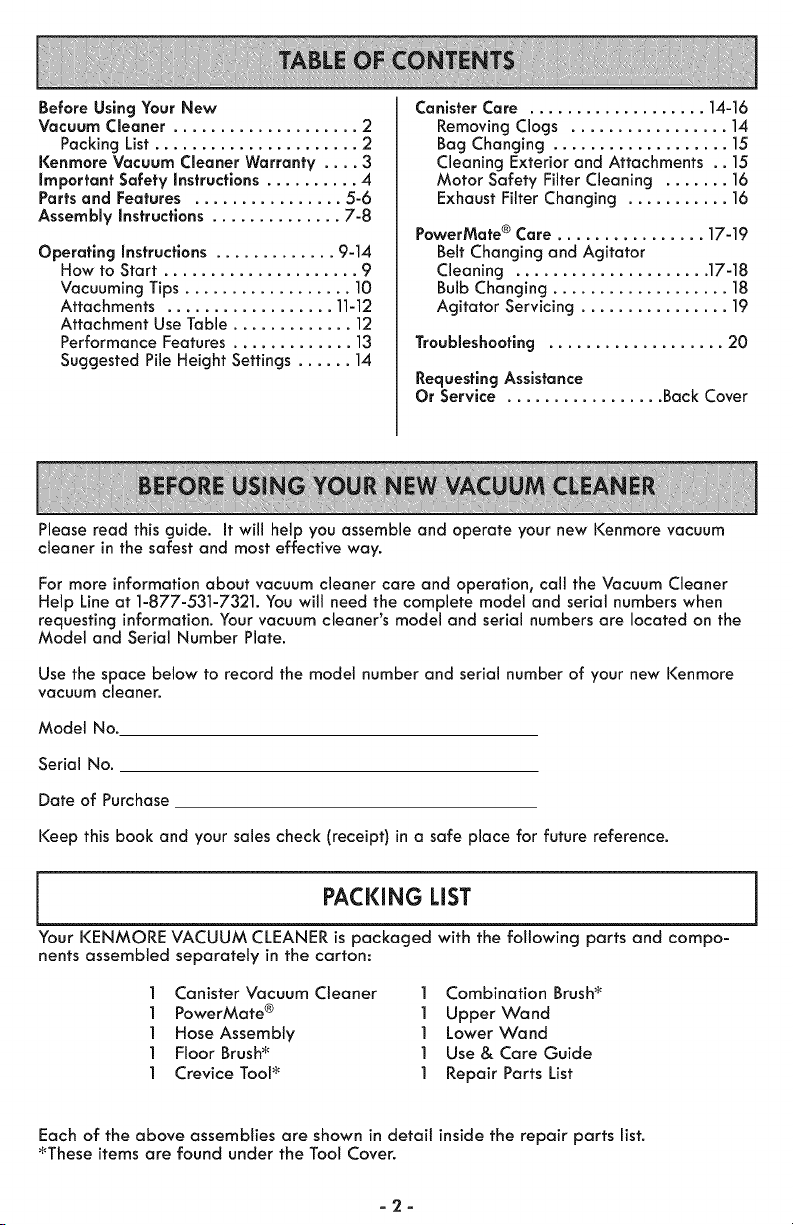
Before Using Your New
Vacuum Cleaner .................... 2
Packing List ...................... 2
Kenmore Vacuum Cleaner Warranty .... 3
important Safety instructions .......... 4
Parts and Features ................ 5-6
Assembly instructions .............. 7-8
Operating Instructions ............. 9-14
How to Start ..................... 9
Vacuuming Tips .................. 10
Attachments .................. ]1-12
Attachment Use Table ............. 12
Performance Features ............. 13
Suggested Pile Height Settings ...... 14
Canister Care ................... 14-16
Removing Clogs ................. 1A
Bag Changing ................... 15
Cleaning Exterior and Attachments .. ]5
Motor Safety Filter Cleaning ....... ]6
Exhaust Filter Changing ........... 16
PowerMate ® Care ................ 17-19
Belt Changing and Agitator
Cleaning ..................... 17-18
Bulb Changing ................... 18
Agitator Servicing ................ ]9
Troubleshooting ................... 20
Requesting Assistance
Or Service ................. Back Cover
Please read this guide. It will help you assemble and operate your new Kenmore vacuum
cleaner in the safest and most effective way.
For more information about vacuum cleaner care and operation, call the Vacuum Cleaner
Help Line at 1-877-531-7321. You will need the complete model and serial numbers when
requesting information. Your vacuum cleaner's model and serial numbers are located on the
Model and Serial Number Plate.
Use the space below to record the model number and serial number of your new Kenmore
vacuum cleaner.
Model No.
Serial No.
Date of Purchase
Keep this book and your sales check (receipt) in a safe place for future reference.
j PACKING LiST J
Your KENMORE VACUUM CLEANER is packaged with the following parts and compo-
nents assembled separately in the carton:
1 Canister Vacuum Cleaner 1 Combination Brush_
1 PowerMate ® 1 Upper Wand
] Hose Assembly ] Lower Wand
] Floor Brush_ ] Use& Care Guide
] Crevice Tool_ ] Repair Parts List
Each of the above assemblies are shown in detait inside the repair parts list.
_These items are found under the Tool Cover.
-2-
KENMORE LiMiTED WARRANTY
FOR ONE YEAR from the date of sate this appliance is warranted against defects in
material or workmanship when it is correctly installed, operated and maintained
according to all supplied instructions.
WITH PROOF OF SALE, a defective appliance will be replaced free of charge.
For warranty coverage details to obtain free repair or replacement, visit the web page:
www.ken more.corn/warranty.
This warranty does not cover filters, belts, bags, or bulbs, which are expendable parts
that can wear out from normal use within the warranty period.
This warranty is void if this product is ever used for other than private household
purposes.
This warranty gives you specific legal rights, and you may also have other rights which
vary from state to state.
Sears Brands Management Corporation, Hoffman Estates, IL 60179
-3-
Read all instructions in this guide before assembling or using your vacuum cleaner.
WARNING
Your safety is important to us. To reduce the risk of fire, electrical shock, injury to persons
or damage when usingyour vacuum cleaner, follow basic safety precautions
Including the following:
Use your vacuum cleaner only as
described in thisguide. Use only with
Sears recommended attachments.
Disconnect electrical supply before
servicing or cleaning out brush area.
Failure to do so could result in brush
unexpectedly starting, causing personal
injury from moving parts
Do not leave vacuum cleaner when
plugged in. Unplug from outlet when
not in use and before performing
maintenance.
To reduce the risk of electrical shock -
Do not use outdoors or on wet surfaces.
Do not allow to be used as a toy. Close
attention is necessary when used by or
near children.
Do not use with damaged cord or plug.
if vacuum cleaner is not working as it
should,has been dropped, damaged,
left outdoors, or dropped into water,
return it to a Sears Service Center.
Do not pull or carry by cord, use cord
as a handle, close door on cord, or pull
cord around sharp edges or corners.
Do not run vacuum cleaner over cord.
Keep cord away from heated surfaces.
Do not unplug by pulling on cord. To
unplug, grasp the plug, not the cord.
Do not handle plug or vacuum cleaner
with wet hands.
Do not put any objects into openings.
Do not use with any opening blocked;
keep free of dust, lint, hair and anything
that may reduce airflow.
Keep hair, loose clothing, fingers, and
all parts of body away from openings
and moving parts.
Turn off all controls before unplugging.
Use extra care when cleaning on stairs.
Do not put on chairs, tables, etc. Keep
on floor.
Do notusevacuum cleanerto pickup
flammable or combustible liquids
(gasoline, cleaning fluids, perfumes,
etc.), or use in areas where they may
be present. The fumes from these
substances can create a fire hazard or
explosion.
Do not pick up anything that is burning
or smoking, such as cigarettes,
matches, or hot ashes.
Do not use vacuum cleaner without dust
bag and/or filters in place.
Always change the dust bag after
vacuuming carpet cleansers or
freshener, powders and fine dust. These
products clog the bag, reduce airflow
and can cause the bag to burst. Failure
to change bag could cause permanent
damage to the vacuum cleaner.
Do not use the vacuum cleaner to pick
up sharp hard objects, small toys, pins,
paper clips, etc. They may damage the
vacuum cleaner or dust bag.
Do not operate vacuum cleaner without
the exhaust filter or exhaust filter door
in place.
The hose contains electrical wires. Do
not use when damaged, cut, or
punctured. Replace if cut or worn. Do
not pick up sharp objects.
Always turn off and unplug the vacuum
cleaner before connecting or
disconnecting either hose, Pet Handi
Mate TM (if applicable), or nozzle.
Hold plug when rewinding onto cord
reel.
Do not altow plug to whip when
rewinding.
You are responsible for making sure
that your vacuum cleaner is not used by
anyone unable to operate it properly.
SAVE THESE iNSTRUCTiONS
Proper assembly and safe use of your vacuum cleaner are your responsibilities. Your
vacuum cleaner is intended for Household use. Read this Use & Care Guide
carefully for important use and safety information. This guide contains safety
statements under warning and caution symbols.
-4-
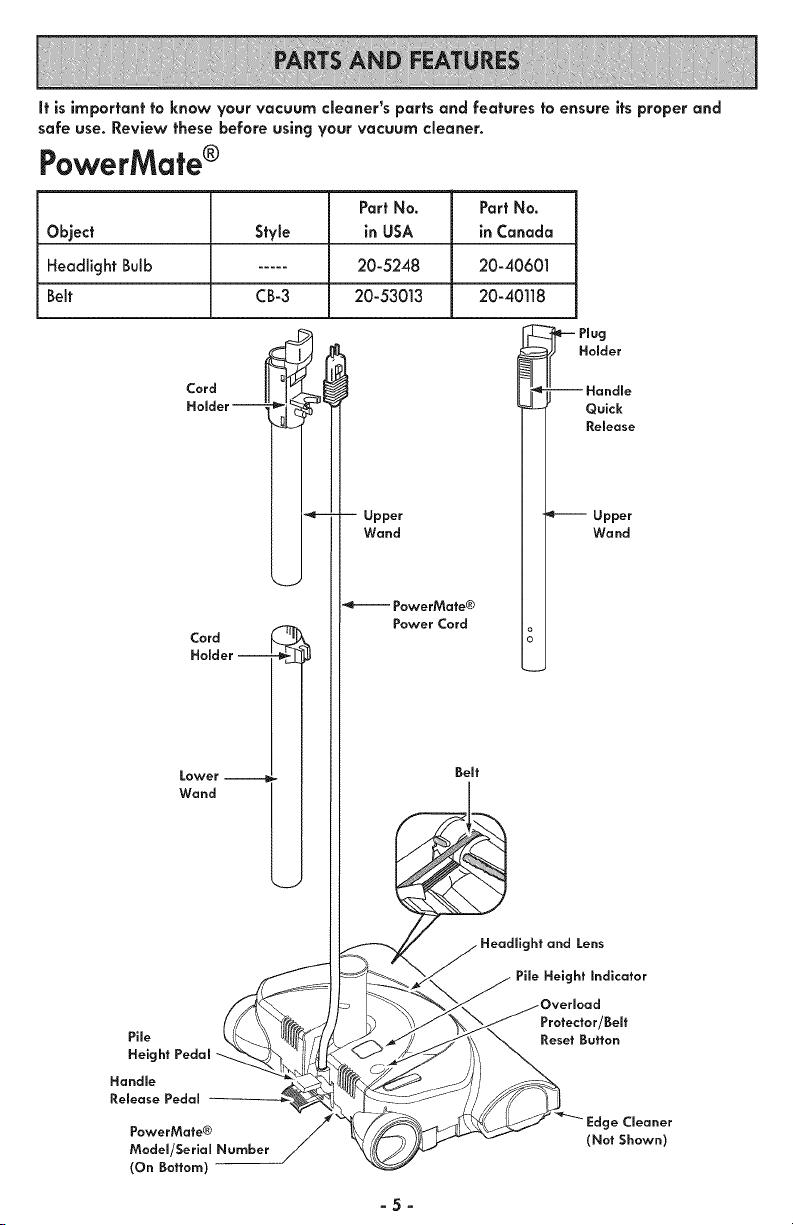
It is important to know your vacuum cleaner's parts and features to ensure its proper and
safe use. Review these before using your vacuum cleaner.
PowerMate®
Part No. Part No.
Object Style in USA in Canada
Headlight Bulb ..... 20-5248 20-40601
Belt CB-3 20-53013 20-40118
Cord
Holder
J
Cord
Holder J
Lower --
Wand
Pile
Height Pedal
Handle
Release Pedal
PowerMate®
Model/Serial Number
(On Bottom)
I
Upper
Wand
-eJ PowerMate®
Power Cord
Belt
--Handle
Quick
Release
Upper
Wand
Headlight and Lens
Pile Height Indicator
)verload
Protector/Belt
Reset Button
ge Cleaner
(Not Shown)
-5-
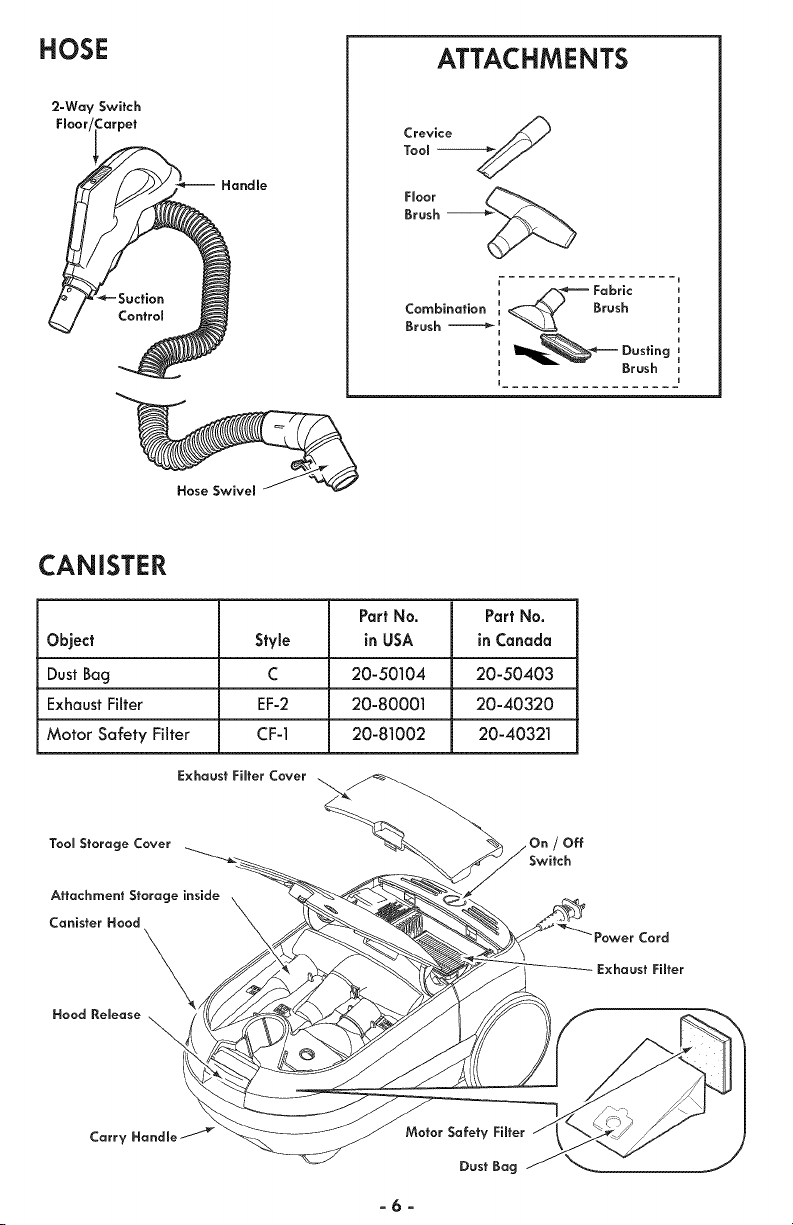
HOSE
2-Way Switch
Fmoor Carpet
Handle
ATTACHMENTS
L/_ _='-- Fabric
CombinatiOnBrush_ "__ Brush
Ig_.-h_ Dusting
Brush
Hose Swivem
CANISTER
Part No. Part No.
Object Style in USA in Canada
Dust Bag C 20-50104 20-50403
Exhaust Filter EF-2 20-80001 20-40320
Motor Safety Filter CF-1 20-81002 20-40321
Tool Storage Cover
Attachment Storage inside
Canister Hood
\,
Hood Release
\
Off
Switch
Cord
Exhaust Fiffer
Carry Handle /
Motor Safety Fiffer
Dust Bag
-6-
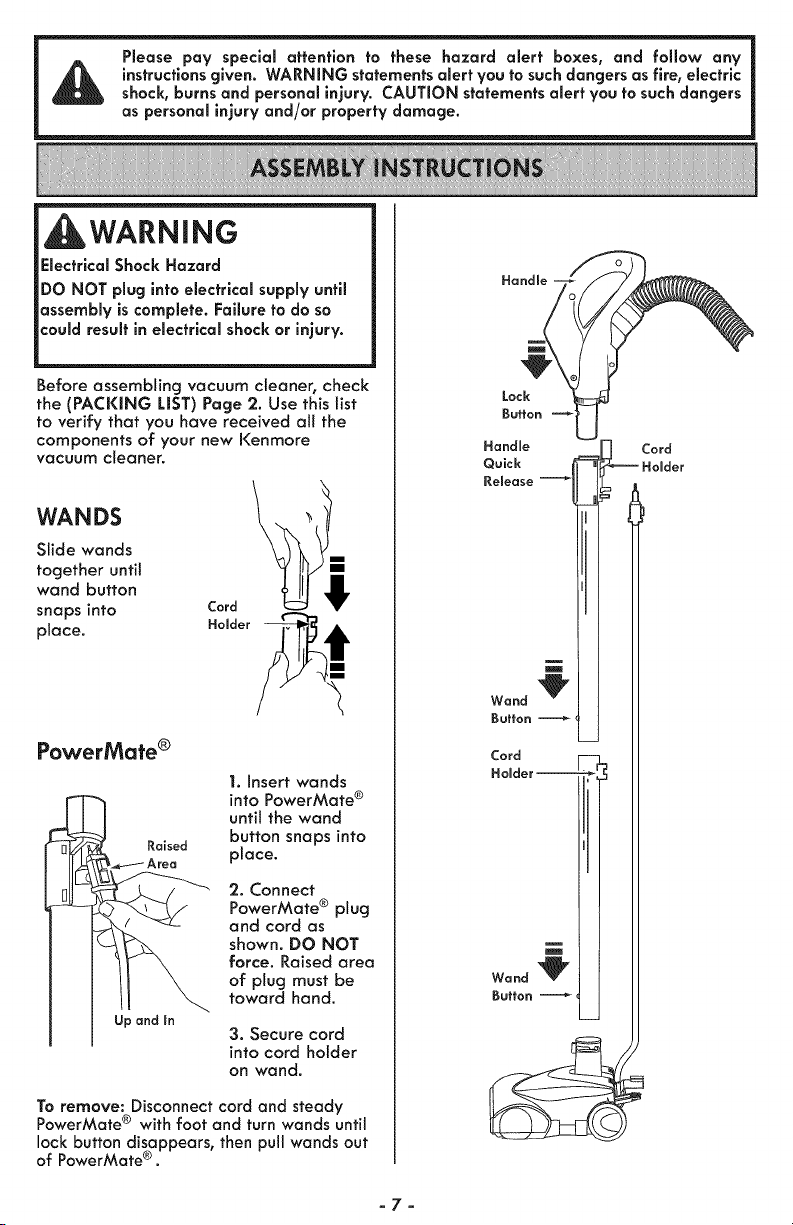
Please pay special attention to these hazard alert boxes, and follow any
instructions given. WARNING statements alert you to such dangers as fire, electric
shock, burns and personal injury. CAUTION statements alert you to such dangers
as personal injury and/or property damage.
WARNING
Electrical Shock Hazard
DO NOT plug into electrical supply until
assembly is complete. Failure to do so
could result in electrical shock or injury.
Before assembling vacuum cleaner, check
the (PACKING LIST) Page 2. Use this list
to verify that you have received all the
components of your new Kenmore
vacuum cleaner.
WANDS
Slide wands
together until
wand button
snaps into
place.
PowerMate ®
Raised
Up and in
1. Insert wands
into PowerMate ®
until the wand
button snaps into
place.
2. Connect
PowerMate ® plug
and cord as
shown. DO NOT
force. Raised area
of plug must be
toward hand.
3. Secure cord
into cord holder
on wand.
To remove: Disconnect cord and steady
PowerMate ® with foot and turn wands until
lock button disappears, then pull wands out
of PowerMate ® .
Handle
Quick
Release
C°rldder _
Cord
Holder
-7-
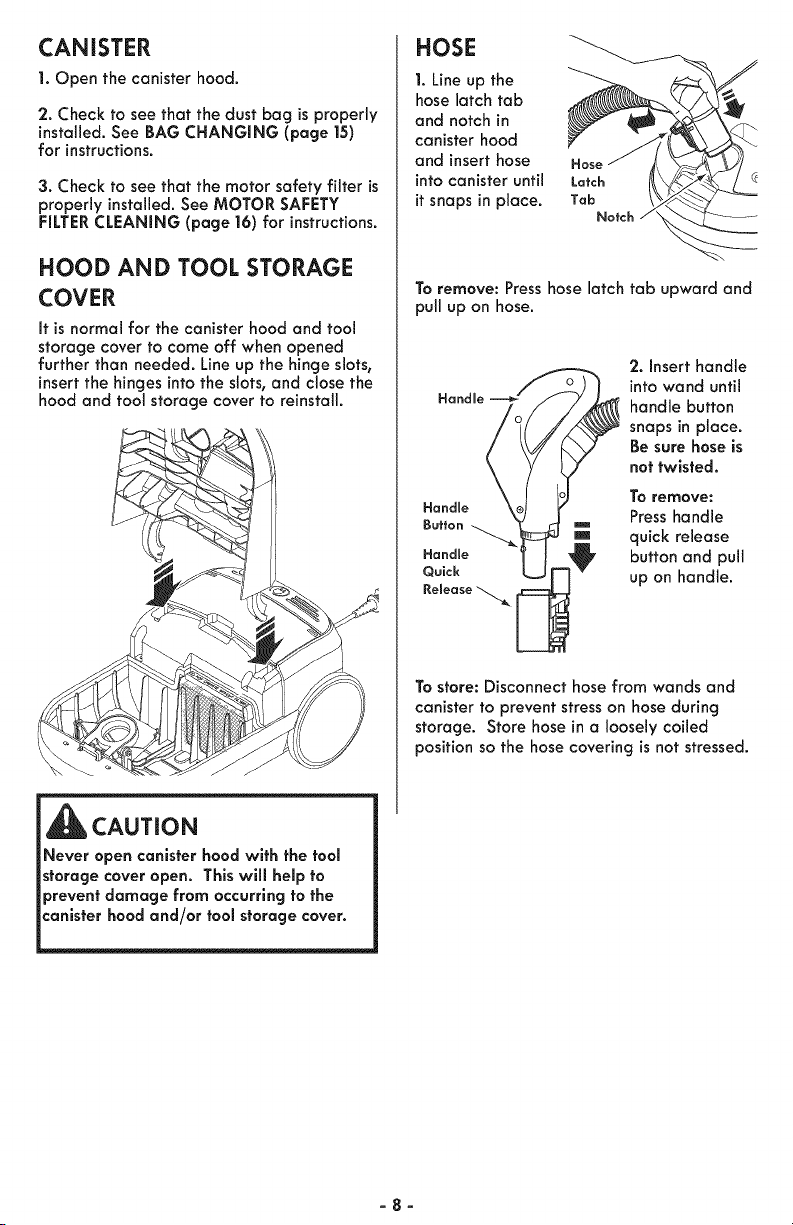
CANISTER
1. Open the canister hood.
2. Check to see that the dust bag is properly
installed. See BAG CHANGING (page 15)
for instructions.
3. Check to see that the motor safety filter is
properly installed. See MOTOR SAFETY
FILTER CLEANING (page 16) for instructions.
HOOD AND TOOL STORAGE
COVER
It is normal for the canister hood and tool
storage cover to come off when opened
further than needed. Line up the hinge slots,
insert the hinges into the slots, and close the
hood and tool storage cover to reinstall.
\
HOSE
1. Line up the
hose latch tab
and notch in
canister hood
and insert hose
into canister until
it snaps in place.
Hose
Latch
Tab
Notch
To remove: Presshose latch tab upward and
pull up on hose.
Handle
Handme
Button
Handle
Quick
Release
2. Insert handle
into wand until
handle button
snaps in place.
Be sure hose is
not twisted.
To remove:
Press handle
quick release
button and pull
up on handle.
To store: Disconnect hose from wands and
canister to prevent stress on hose during
storage. Store hose in a loosely coiled
position so the hose covering is not stressed.
CAUTION
Never open canister hood with the tool
storage cover open. This will help to
prevent damage from occurring to the
canister hood and/or tool storage cover.
-8-

CAUTION
Moving parts! To reduce the risk of personal injury,
DO NOT touch the agitator when vacuum cleaner
cleaner is on. Contacting the agitator whlle it is
rotating can cut, bruise or cause other injuries.
Always turn off and unplug from electrlcal outlet
before servicing.
Use caution when operating near chlldren.
HOW TO START
WARNING
Personal injury and Product Damage
Hazard
DO NOT plug in if switch is in ON
position. Personal injury or property
damage could result.
The cord moves rapidly when
rewinding. Keep children away
and provide a clear path when
rewinding the cord to prevent
personal injury.
DO NOT use outlets above counters.
Damage from cord to items in
surrounding area could occur.
1. Pull cord out of
canister to desired
length.
NOTE: Yellow tape indicates full extension of
cord. DO NOT pull cord out farther than yellow
tape to prevent jamming of cord reel
2. Snap cord
into grip to
prevent
accidental
rewinding.
3. Plug the polarized power cord into a 120
Volt outlet located near the floor.
NOTE: To reduce the risk of electric shock,
this vacuum cleaner has a polarized plug;
one blade is wider than the other. This plug
will fit in a polarized outlet only one way. If
the plug does not fit fully in the outlet,
reverse the plug. If it still does not fit,
contact a qualified electrician to install the
proper outlet. Do not change the plug in any
way.
To rewind: Turn off and unplug the vacuum
cleaner. Remove cord from grip. Hold the
plug while rewinding to prevent damage or
injury from the moving cord. A slight tug will
release the locking pawls in the cord reel
allowing it to retract.
_--_ _._ PileHeight
Indicator
4. Lower wand from upright position by
pressing on the handle release pedal.
5. Select a pile height setting by pressing
the small pedal on the rear of the
®
PowerMate . The pile height setting shows
on the indicator. See SUGGESTED PiLE
HEIGHT SETTINGS (page 14).
-9-
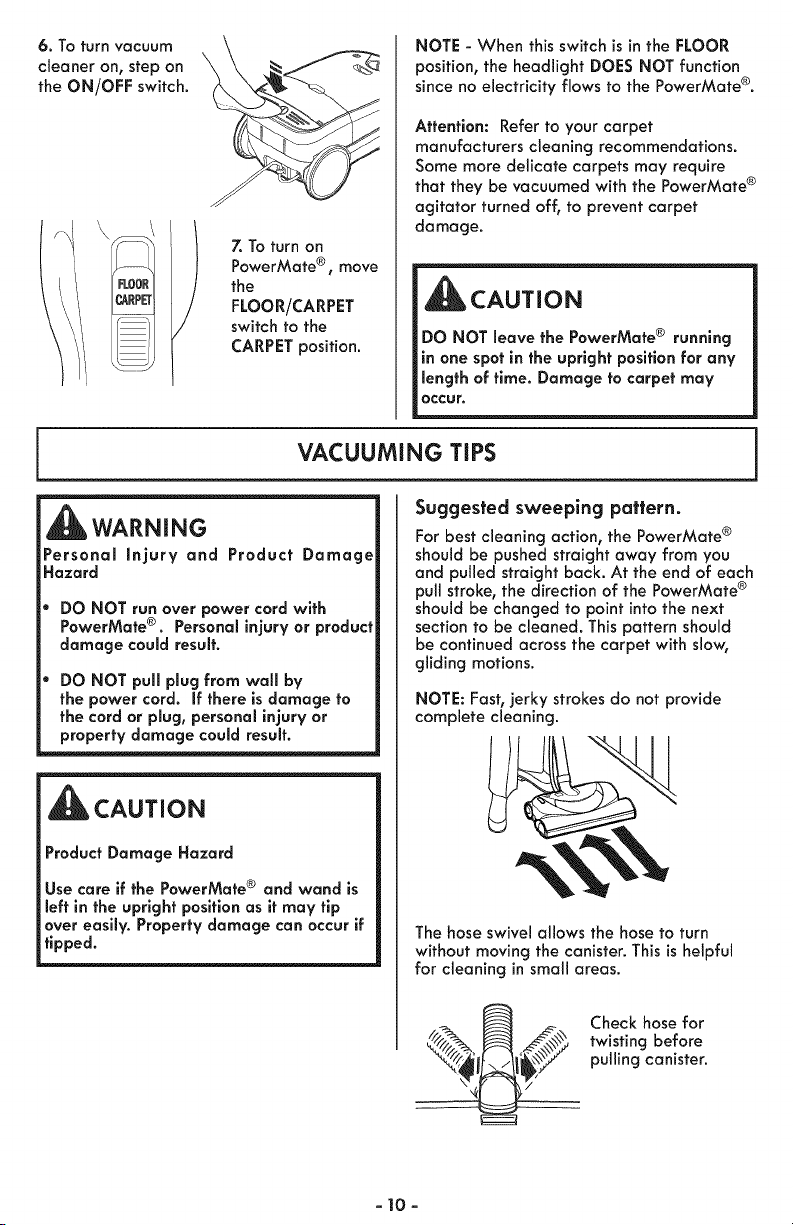
6. To turn vacuum
cleaner on, step on
the ON/OFF switch.
7. To turn on
PowerMate ®, move
the
FLOOR/CARPET
switch to the
CARPET position.
NOTE - When this switch is in the FLOOR
position, the headlight DOES NOT function
since no electricity flows to the PowerMate ®.
Attention: Refer to your carpet
manufacturers cleaning recommendations.
Some more delicate carpets may require
that they be vacuumed with the PowerMate ®
agitator turned off, to prevent carpet
damage.
CAUTION
DO NOT leave the PowerMate ® running
in one spot in the upright position for any
length of time. Damage to carpet may
occur.
VACUUMING TIPS
WARNING
Personal injury and Product Damage
Hazard
DO NOT run over power cord with
PowerMate ®. Personal injury or product
damage could result.
DO NOT pull plug from wall by
the power cord. If there is damage to
the cord or plug, personal injury or
property damage could result.
CAUTION
Product Damage Hazard
Use care if the PowerMate ® and wand is
left in the upright position as it may tip
over easily. Property damage can occur if
tipped.
Suggested sweeping pattern.
For best cleaning action, the PowerMate ®
should be pushed straight away from you
and pulled straight back. At the end of each
pull stroke, the direction of the PowerMate ®
should be changed to point into the next
section to be cleaned. This pattern should
be continued across the carpet with slow,
gliding motions.
NOTE: Fasb jerky strokes do not provide
complete cleaning.
The hose swivel allows the hose to turn
without moving the canister. This is helpful
for cleaning in small areas.
Check hose for
twisting before
pulling canister.
- 10-
WARNING
Personal injury Hazard
Use care if canister is placed on stairs. If
may fall, causing personal injury or
property damage.
_CAUTION
Product Damage Hazard
Do not pull on the hose to move the
canister from one stair to the next. When
finished cleaning in one area use the
handle grip on the canister to move the
vacuum cleaner to a new location for
further cleaning.
Suction
Carpeted stairs need to be vacuumed
regularly. For best cleaning results, fully
close the suction control.
For best cleaning results, keep the airflow
passage open. Check each assembly area
in REMOVING CLOGS (page 14)
occasionally for clogs. Turn off and unplug
vacuum cleaner from outlet before
checking.
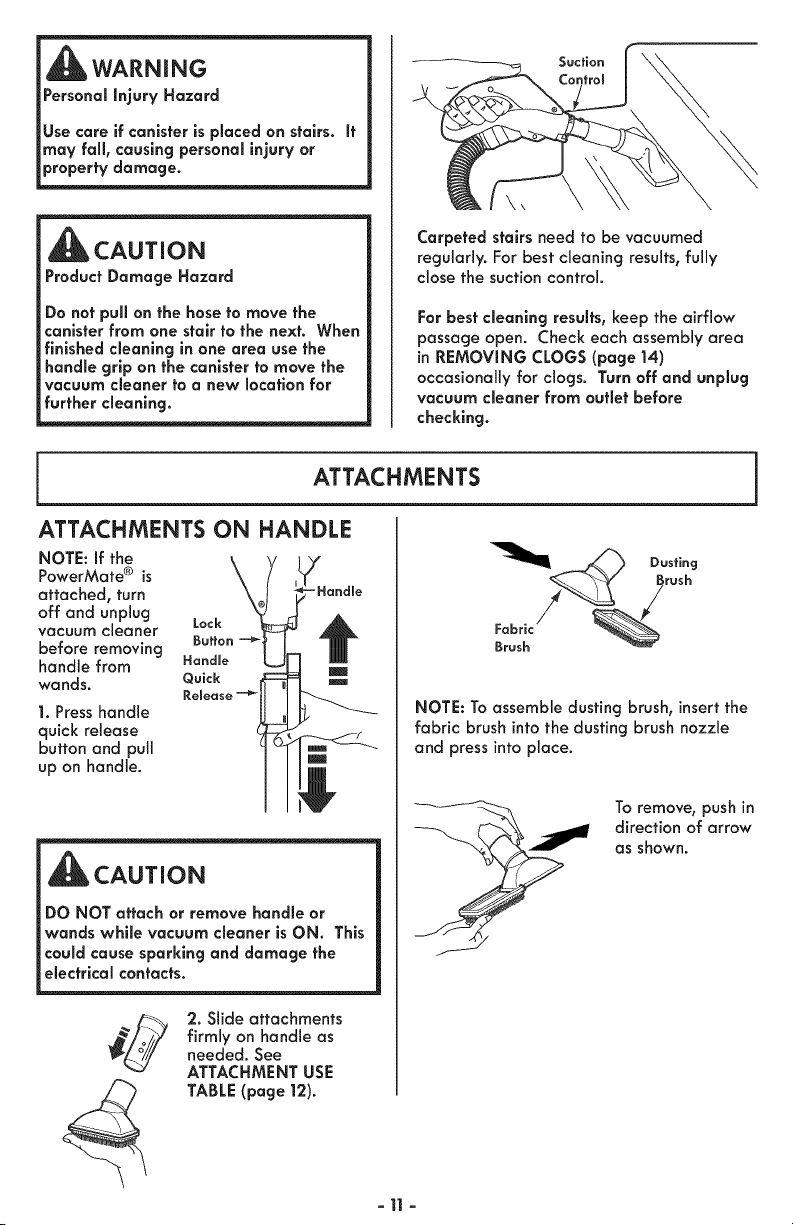
ATTACHMENTS
ATTACHMENTS ON HANDLE
NOTE: If the
PowerMate ® is
attached, turn
off and unplug
vacuum cleaner Lock
before removing Button
handle from Handle
wands. Quick
Release
1. Press handle
quick release
button and pull
up on handle.
-Handle
CAUTION
DO NOT attach or remove handle or
wands while vacuum cleaner is ON. This
could cause sparking and damage the
electrical contacts.
2. Slide attachments
firmly on handle as
needed. See
ATTACHMENT USE
TABLE (page 12).
-11 -
NOTE: To assemble dusting brush, insert the
fabric brush into the dusting brush nozzle
and press into place.
To remove, push in
direction of arrow
as shown.
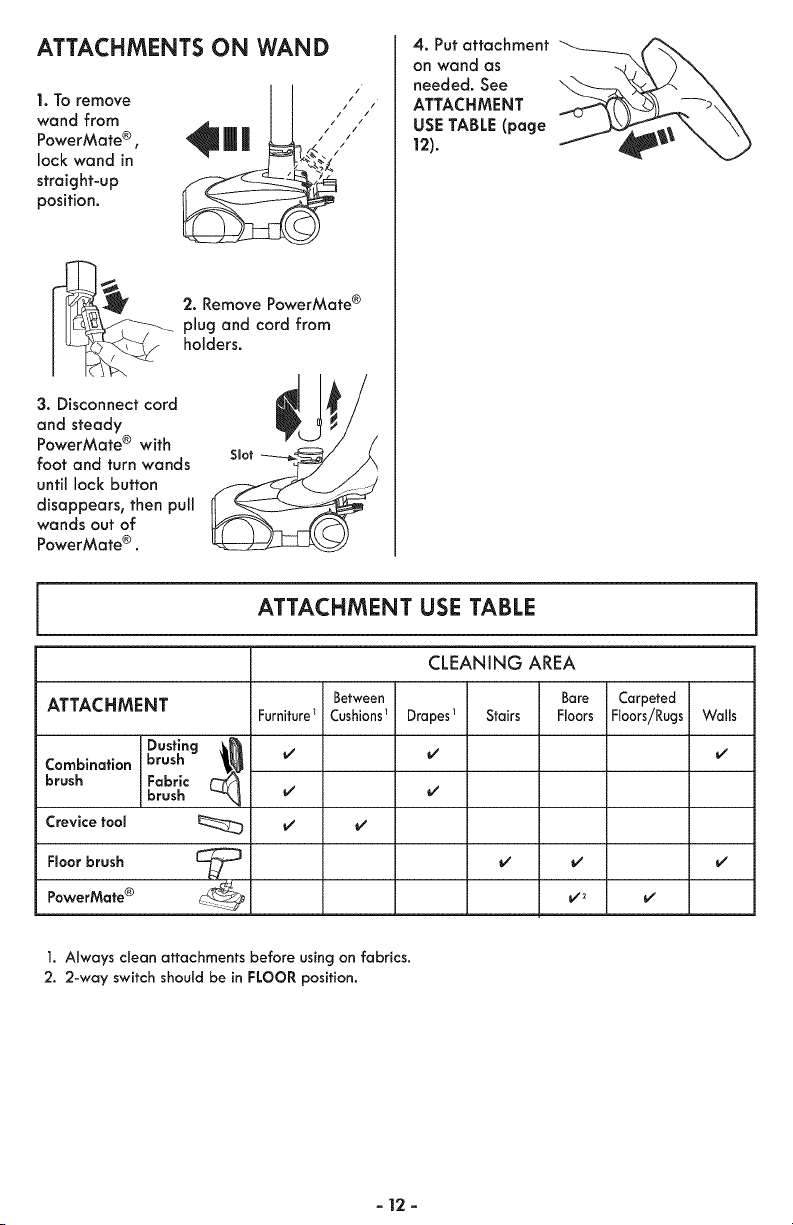
ATTACHMENTS ON WAND
I.To remove
wand from
PowerMate ® ,
lock wand in
straight-up
position,
2. Remove PowerMate ®
plug and cord from
holders.
3. Disconnect cord
and steady
PowerMate ® with
foot and turn wands
until lock button
disappears, then pull
wands out of
PowerMate ® .
Slot
4. Put attachment
on wand as
needed. See
ATTACHMENT
USE TABLE (page
12).
ATTACHMENT USE TABLE
ATTACHMENT
Combination
brush
Crevice tool
Floor brush
PowerMate ®
Dusting (_
brush
Fabric
brush
Furniture
Between
Cushions1
I/
CLEANING AREA
Bare
Drapes_ Stairs Floors
i/
i/
i/ i/
Carpeted
Floors/Rugs
i/
i/
1. Always clean attachments before using on fabrics.
2. 2-way switch should be in FLOOR position.
- 12 -
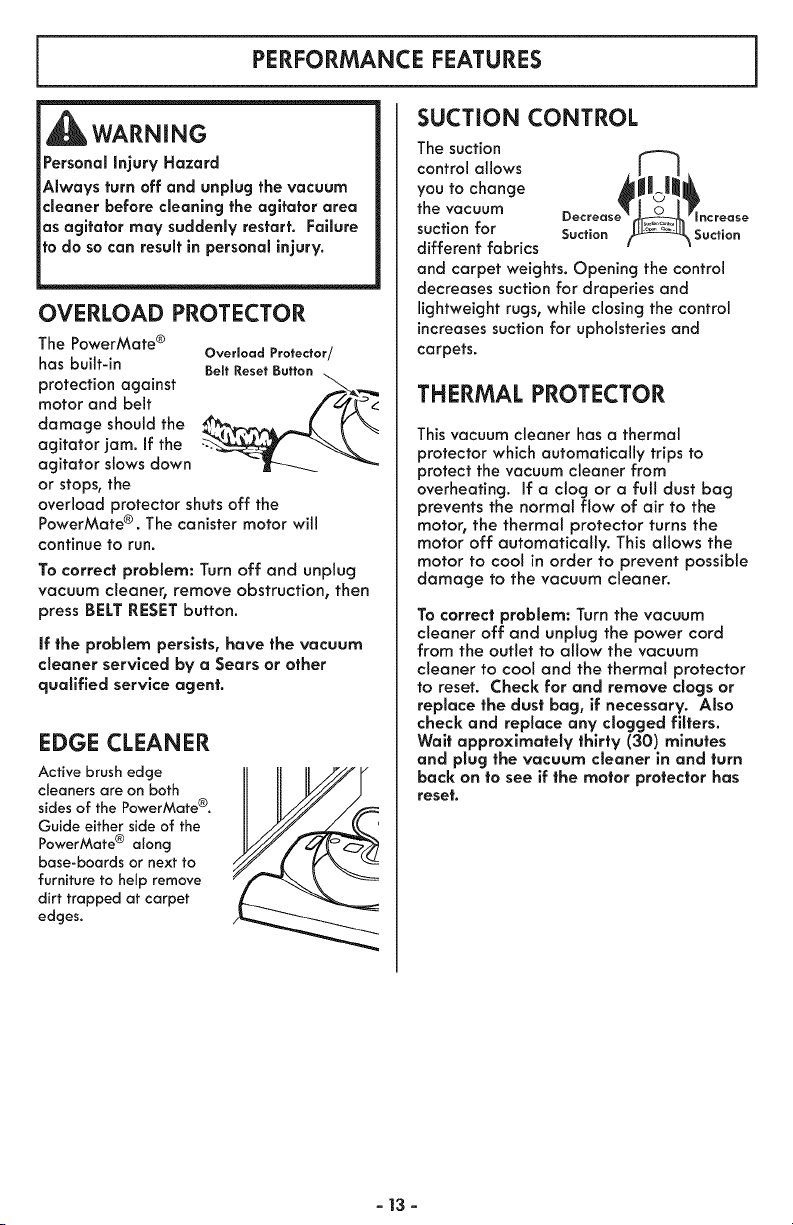
PERFORMANCE FEATURES
WARNING
Personal injury Hazard
Always turn off and unplug the vacuum
cleaner before cleaning the agitator area
as agitator may suddenly restart. Failure
to do so can result in personal injury.
OVERLOAD PROTECTOR
The PowerMate ®
has built-in
protection against
motor and belt
damage should the
agitator jam. If the
agitator slows down
or stops, the
Overload Protector/
Beff Reset Button
overload protector shuts off the
PowerMate ®. The canister motor will
continue to run.
To correct problem: Turn off and unplug
vacuum cleaner, remove obstruction, then
press BELT RESET button.
if the problem persists, have the vacuum
cleaner serviced by a Sears or other
qualified service agent.
EDGE CLEANER
Active brush edge
cleaners are on both
sides of the PowerMate ®.
Guide either side of the
PowerMate ® along
base-boards or next to
furniture to help remove
dirt trapped at carpet
edges.
SUCTION CONTROL
The suction
control allows
you to change
the vacuum
suction for Suction
different fabrics
and carpet weights. Opening the control
decreases suction for draperies and
lightweight rugs, while closing the control
increases suction for upholsteries and
carpets.
THERMAL PROTECTOR
This vacuum cleaner has a thermal
protector which automatically trips to
protect the vacuum cleaner from
overheating. If a clog or a ful! dust bag
prevents the normal flow of air to the
motor, the thermal protector turns the
motor off automatically. This allows the
motor to cool in order to prevent possible
damage to the vacuum cleaner.
To correct problem: Turn the vacuum
cleaner off and unplug the power cord
from the outlet to allow the vacuum
cleaner to cool and the thermal protector
to reset. Check for and remove clogs or
replace the dust bag, if necessary. Also
check and replace any clogged filters.
Wait approximately thirty' (30) minutes
and plug the vacuum cleaner in and turn
back on to see if the motor protector has
reset.
- 13 -
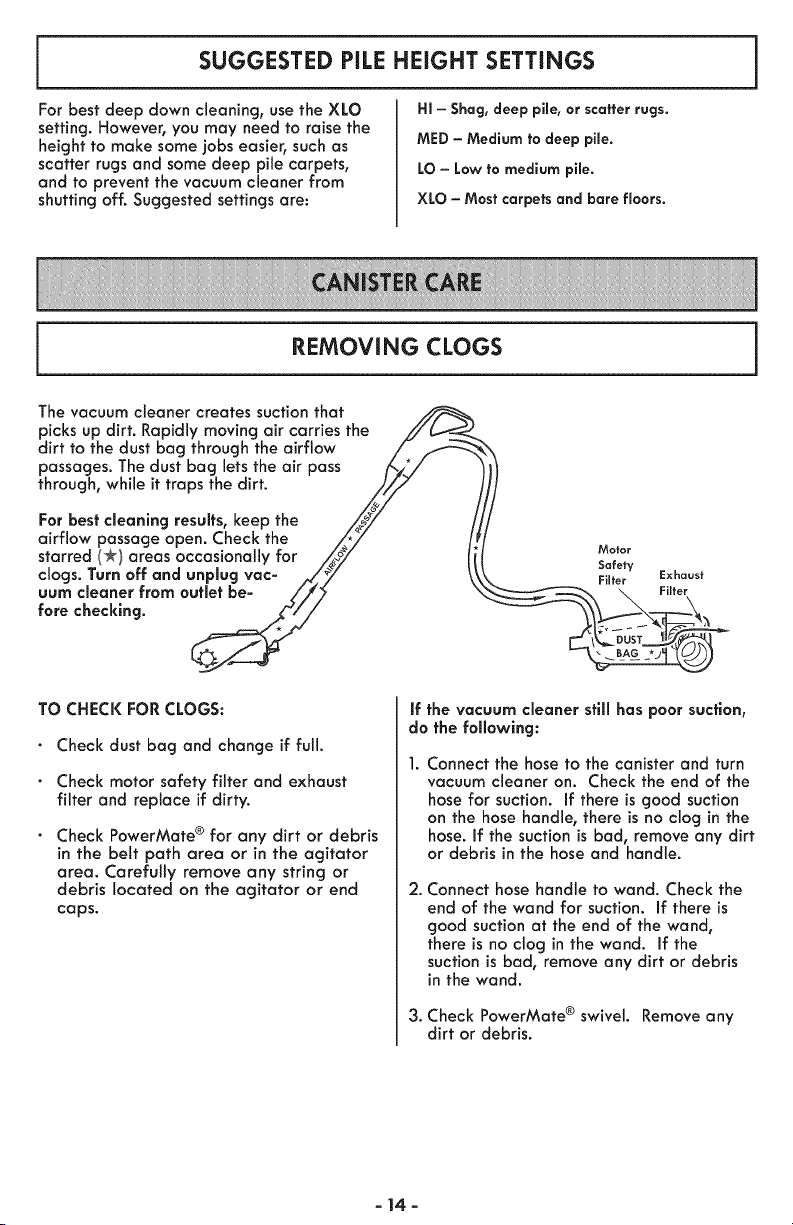
SUGGESTED PILE HEIGHT SETTINGS
For best deep down cleaning, use the XLO
setting. However, you may need to raise the
height to make some jobs easier, such as
scatter rugs and some deep pile carpets,
and to prevent the vacuum cleaner from
shutting off. Suggested settings are:
HI - Shag, deep pile, or scatter rags.
MED - Medium to deep pile.
LO - Law to medium pile.
XLO - Most carpets and bare floors.
REMOVING CLOGS
The vacuum cleaner creates suction that
picks up dirt. Rapidly moving air carries the //'_-,_
dirt to the dust bag through the airflow / _ \
passages. The dust bag lets the air pass _,_/
through, while it traps the dirt. j_i,z
For best cleaning results, keep the _,/_/ /
airflow passage open. Check the _*_/ /.
starred (*/areas occasionally for _oy li Mo,o,
clogsTurnoffandunplugvac-A/" y ,x,oo,,
uum cleaner from outlet be- /,//_ ' _ Filter
fore checking. _,/_//" ....
6f-
TO CHECK FOR CLOGS:
Check dust bag and change if full.
Check motor safety filter and exhaust
filter and replace if dirty.
Check PowerMate ® for any dirt or debris
in the belt path area or in the agitator
area. Carefully remove any string or
debris located on the agitator or end
caps.
if the vacuum cleaner still has poor suction,
do the following:
Connect the hose to the canister and turn
vacuum cleaner on. Check the end of the
hose for suction. If there is good suction
on the hose handle, there is no clog in the
hose. If the suction is bad, remove any dirt
or debris in the hose and handle.
2. Connect hose handle to wand. Check the
end of the wand for suction. If there is
good suction at the end of the wand,
there is no clog in the wand. If the
suction is bad, remove any dirt or debris
in the wand.
3. Check PowerMate ® swivel. Remove any
dirt or debris.
- 14-
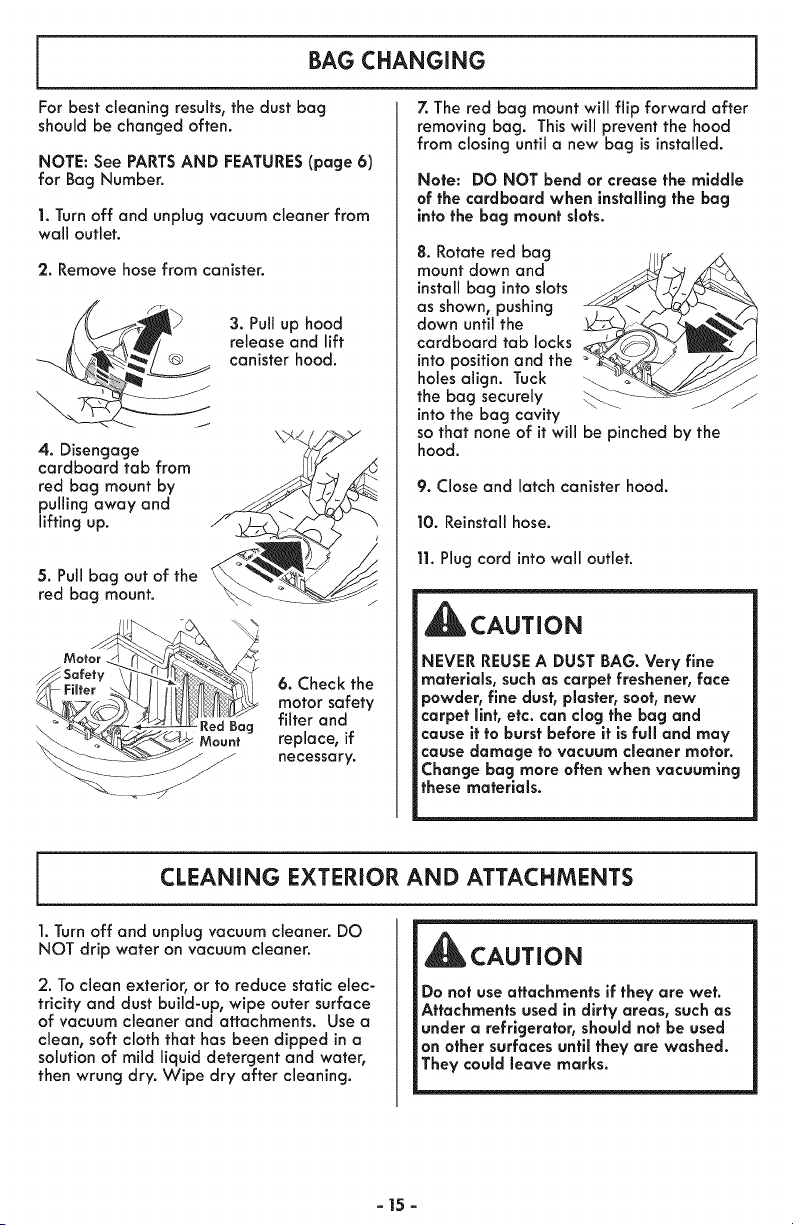
BAG CHANGING
For best cleaning results, the dust bag
should be changed often.
NOTE: See PARTSAND FEATURES(page 6)
for Bag Number.
1. Turn off and unplug vacuum cleaner from
wall outlet.
2. Remove hose from canister.
3. Pull up hood
release and lift
canister hood.
4. Disengage
cardboard tab from
red bag mount by
pulling away and
lifting up.
5. Pull bag out of the
red bag mount.
Y_F,tor HI II.
6. Check the
motor safety
Red Bag filter and
Mount replace, if
necessary.
7. The red bag mount will flip forward after
removing bag. This will prevent the hood
from closing until a new bag is installed.
Note: DO NOT bend or crease the middle
of the cardboard when installing the bag
into the bag mount slots.
8. Rotate red bag jlj_ _
mount down and
install bag into slots
as shown, pushing
down until the
cardboard tab locks '
into position and the
holes align. Tuck
the bag securely
into the bag cavity
so that none of it will be pinched by the
hood.
9. Close and latch canister hood.
10. Reinstall hose.
11. Plug cord into wall outlet.
CAUTION
NEVER REUSE A DUST BAG. Very fine
materials, such as carpet freshener, face
powder, finedust, plaster, soot, new
carpet llnt, etc. can clog the bag and
cause it to burst before it is full and may
cause damage to vacuum cleaner motor.
Change bag more often when vacuuming
these materials.
CLEANING EXTERIOR AND ATTACHMENTS
1. Turn off and unplug vacuum cleaner. DO
NOT drip water on vacuum cleaner.
2. To clean exterior, or to reduce static elec-
tricity and dust build-up, wipe outer surface
of vacuum cleaner and attachments. Use a
clean, soft cloth that has been dipped in a
solution of mild liquid detergent and water,
then wrung dry. Wipe dry after cleaning.
CAUTION
Do not use attachments if they are wet.
Attachments used in dirty areas, such as
under a refrigerator, should not be used
on other surfaces until they are washed.
They could leave marks.
- 15 -
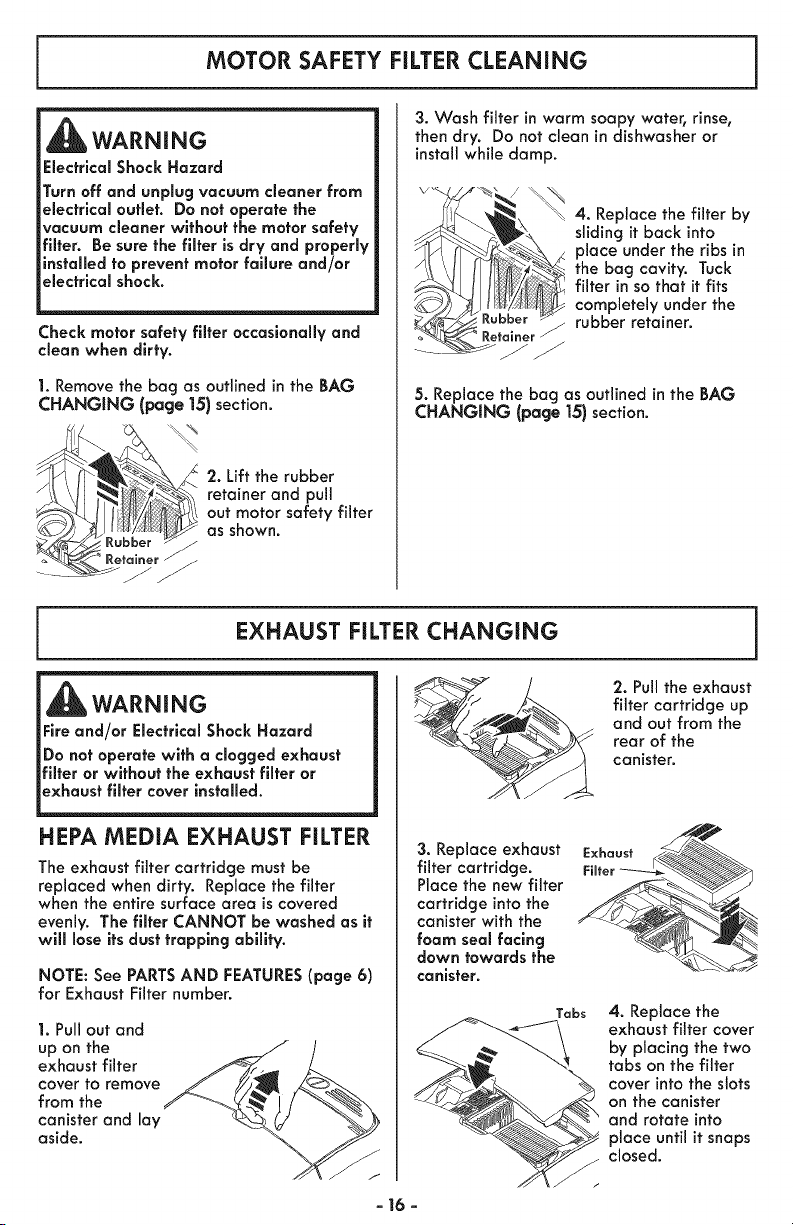
MOTOR SAFETY FILTER CLEANING
WARNING
Electrical Shock Hazard
Turn off and unplug vacuum cleaner from
electrical outlet. Do not operate the
vacuum cleaner without the motor safety
filter. Be sure the filter is dry and properly
installed to prevent motor failure and/or
electrical shock.
;heck motor safety filter occasionally and
clean when dirty.
1. Remove the bag as outlined in the BAG
CHANGING (page 15) section.
2. Lift the rubber
retainer and pull
out motor safety filter
as shown.
3. Wash filter in warm soapy water, rinse,
then dry. Do not clean in dishwasher or
install while damp.
4. Replace the filter by
sliding it back into
place under the ribs in
the bag cavity. Tuck
filter in so that it fits
completely under the
rubber retainer.
5. Replace the bog as outlined in the BAG
CHANGING (page 15) section.
EXHAUST FILTER CHANGING
WARNING
Fire and/or Electrical Shock Hazard
Do not operate with a clogged exhaust
filter or without the exhaust filter or
exhaust filter cover installed.
HEPA MEDIA EXHAUST FILTER
The exhaust filter cartridge must be
replaced when dirty. Replace the filter
when the entire surface area iscovered
evenly. The filter CANNOT be washed as it
will lose its dust trapping ability.
NOTE: See PARTSAND FEATURES(page 6)
for Exhaust Filter number.
1. Pull out and
up on the
exhaust filter
cover to remove
from the
canister and lay
aside.
3. Replace exhaust
filter cartridge.
Place the new filter
cartridge into the
canister with the
foam seal facing
down towards the
canister.
Tabs
2. Pull the exhaust
filter cartridge up
and out from the
rear of the
canister.
4. Replace the
exhaust filter cover
by placing the two
tabs on the filter
cover into the slots
on the canister
and rotate into
place until it snaps
closed.
- 16 -
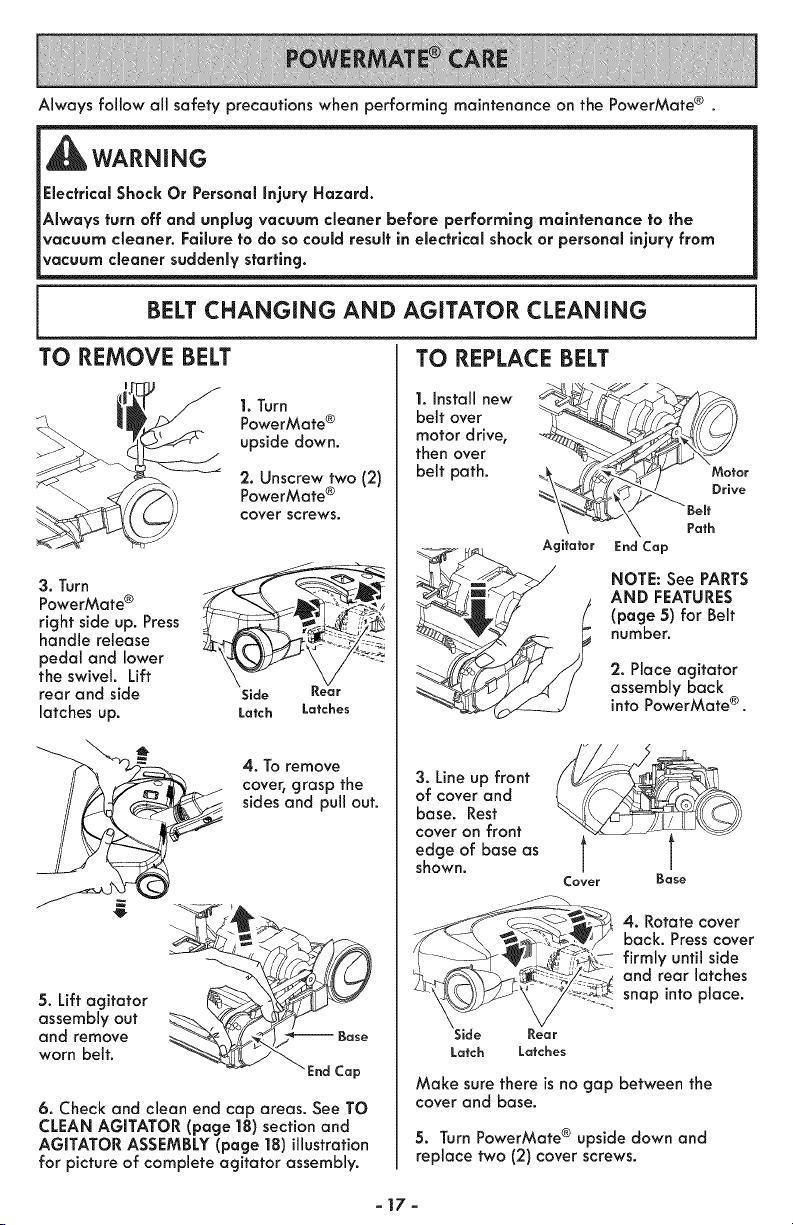
Always follow all safety precautions when performing maintenance on the PowerMate ® .
WARNING
Electrlcal Shock Or Personal Injury Hazard.
Always turn off and unplug vacuum cleaner before performing maintenance to the
vacuum cleaner. Failure to do so could result in electrical shock or personal injury from
vacuum cleaner suddenly starting.
BELT CHANGING AND AGITATOR CLEANING
TO REMOVE BELT
1. Turn
PowerMate ®
upside down.
2. Unscrew two (2)
PowerMate ®
cover screws.
3. TurnPowerMate ®
right side up. Press __,__
handle release _ _.-_ :_
pedal and lower ...."_'_
the swivel. Lift __
rear and side Side Kear
latches up. Latch Latches
4. To remove
cover, grasp the
sides and pull out.
5. Lift agitator
assembly out
and remove
worn belt.
6. Check and clean end cap areas. See TO
CLEAN AGITATOR (page 18) section and
AGITATOR ASSEMBLY (page |8) illustration
for picture of complete agitator assembly.
TO REPLACE BELT
1. Install new
belt over
motor drive,
then over
belt path.
r
e
Agitator EndCap
NOTE: See PARTS
AND FEATURES
(page 5) for Belt
number.
2. Place agitator
assembly back
into PowerMate e .
3. Line up front
of cover and
base. Rest
cover on front
edge of base as
shown.
Cover
Base
4. Rotate cover
back. Press cover
firmly until side
and rear latches
snap into place.
;ide Rear
Latch Latches
Make sure there is no gap between the
cover and base.
5. Turn PowerMate ® upside down and
replace two (2) cover screws.
-17-
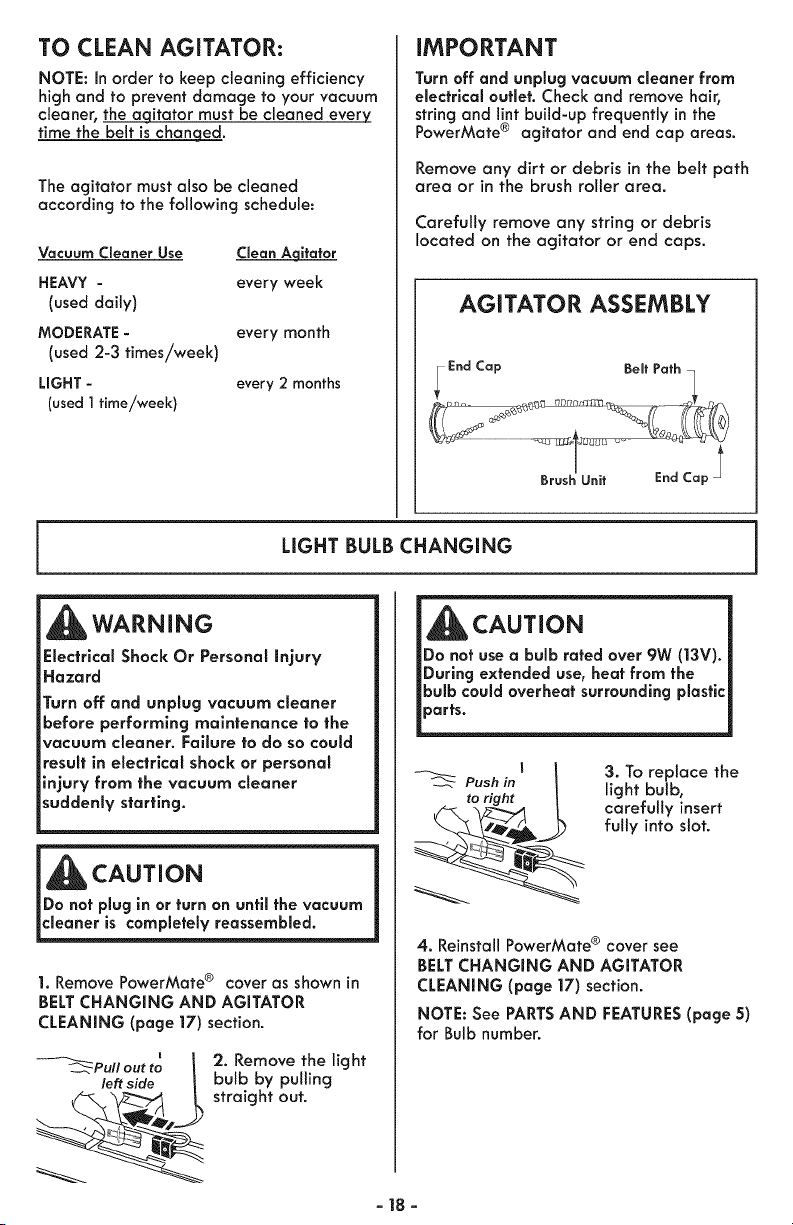
TO CLEAN AGITATOR:
NOTE: In order to keep cleaning efficiency
high and to prevent damage to your vacuum
cleaner, the aqitator must be cleaned every
time the belt is chan eqed.
The agitator must also be cleaned
according to the following schedule:
Vacuum Cleaner Use Clean Aqitafor
HEAVY - every week
(used daily)
MODERATE - every month
(used 2-3 times/week)
LIGHT - every 2 months
(used ] time/week}
IMPORTANT
Turn off and unplug vacuum cleaner from
electrical outlet. Check and remove hair,
string and lint build-up frequently in the
PowerMate ® agitator and end cap areas.
Remove any dirt or debris in the belt path
area or in the brush roller area.
Carefully remove any string or debris
located on the agitator or end caps.
AGITATOR ASSEMBLY
LIGHT BULB CHANGING
WARNING
Electrical Shock Or Personal Injury
Hazard
Turn off and unplug vacuum cleaner
before performing maintenance to the
vacuum cleaner. Failure to do so could
result in electrical shock or personal
injury from the vacuum cleaner
suddenly starting.
_ CAUTION
Do not plug in or turn on until the vacuum
1. Remove PowerMate ® cover as shown in
BELT CHANGING AND AGITATOR
CLEANING (page 17) section.
_Pull out to I
left side L
'2. Remove the light
bulb by pulling
straight out.
CAUTION
Push in
to right
3. To replace the
light bulb,
carefully insert
fully into slot.
4. Reinstall PowerMate ® cover see
BELT CHANGING AND AGITATOR
CLEANING (page 17) section.
NOTE: See PARTSAND FEATURES(page 5)
for Bulb number.
-18-
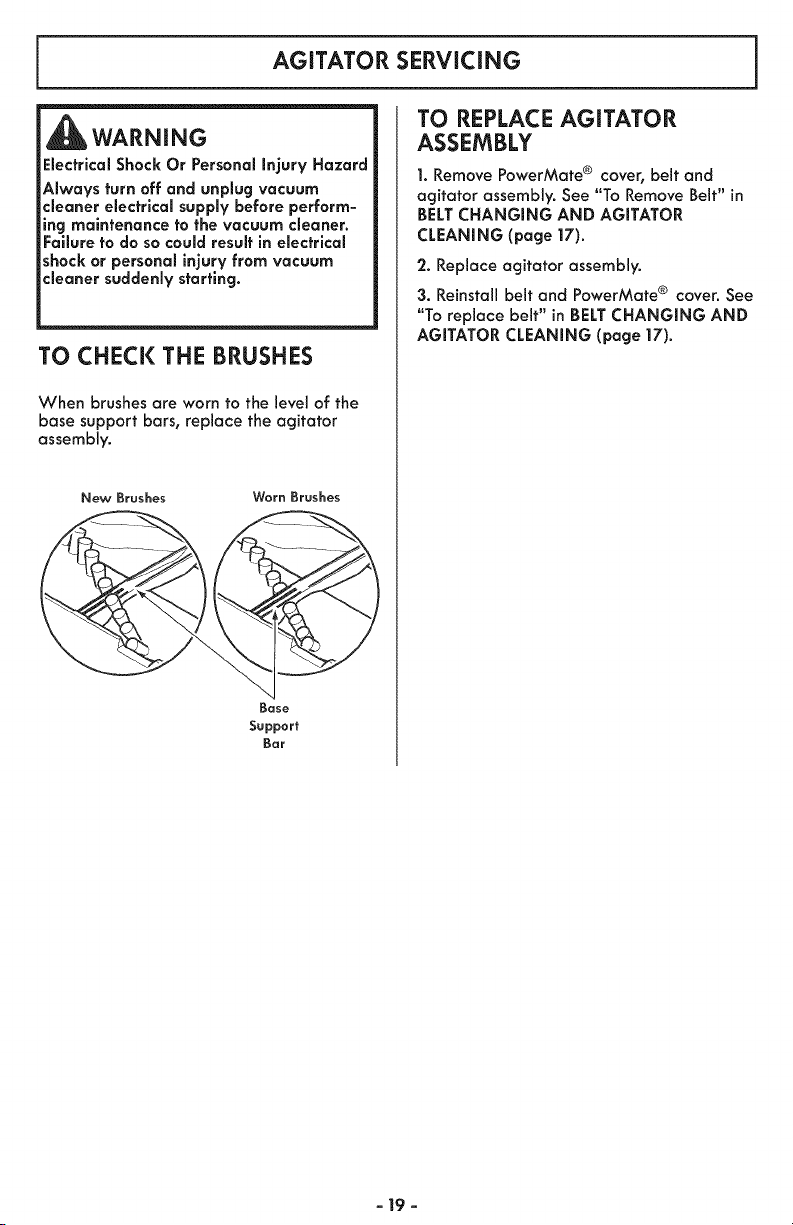
AGITATOR SERViCiNG
_WARNING
Electrical Shock Or Personal Injury Hazard
Always turn off and unplug vacuum
cleaner electrical supply before perform-
ing maintenance to the vacuum cleaner.
Failure to do so could result in electrical
shockor personal injury from vacuum
cleaner suddenly starting.
TO CHECK THE BRUSHES
When brushes are worn to the level of the
base support bars, replace the agitator
assembly.
New Broshes Worn Brushes
Bose
Support
Bar
TO REPLACE AGITATOR
ASSEMBLY
1. Remove PowerMate ® cover, belt and
agitator assembly. See "To Remove Belt" in
BELT CHANGING AND AGITATOR
CLEANING (page |7).
2. Replace agitator assembly.
3. Reinstall belt and PowerMate ® cover. See
"To replace belt" in BELTCHANGING AND
AGITATOR CLEANING (page 17).
- 19 -
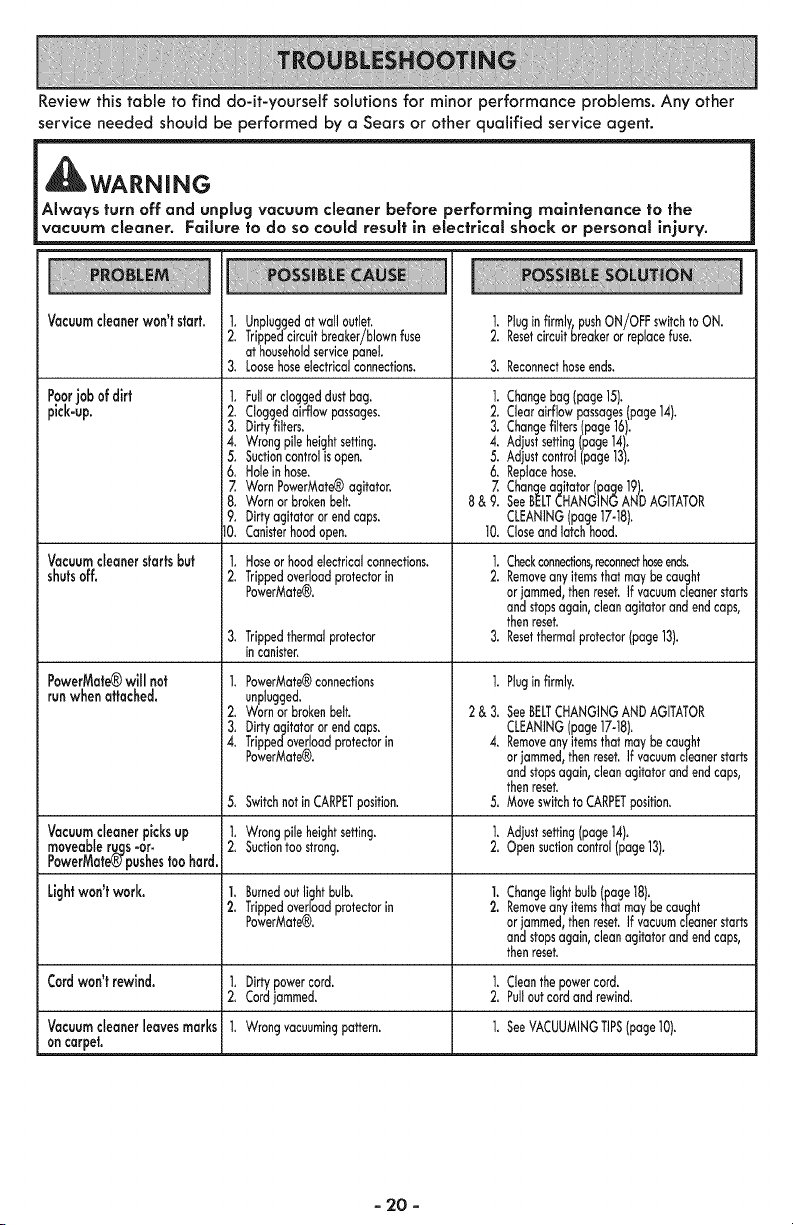
Review this table to find do-it-yourself solutions for minor performance problems. Any other
service needed should be performed by a Sears or other qualified service agent.
WARNING
Always turn off and unplug vacuum cleaner before performing maintenance to the
vacuum cleaner. Fallure to do so could result in electrical shock or personal injury.
VacuumcJeanerwon'tstart.
Poorjobof dirt
pick-up.
Vacuumcleanerstartsbut
shutsoff.
PowerMate®will not
runwhen attached.
Vacuumcleanerpicksup
moveableruqs=or.
PowerMate_pushestoo hard.
Lightwon'twork.
Cordwon't rewind.
Vacuumcleanerleavesmarks
oncarpet.
1. Unpluggedatwall outbt.
2. Trippedcircuitbreaker/blownfuse
at householdservicepanel
3. Loosehoseelectricalconnections.
1. Fullor doggeddustbag.
2. Cloggedairflowpassages.
3. Dirtyfilters.
4. Wrongpileheightsetting.
5. Suctioncontrolis open.
6. Holeinhose.
Z WornPowerMate®agitator.
8. Wornorbrokenbelt.
9. Dirtyagitatororendcaps.
10. Canisterhoodopen.
1. Hoseor hood electrical connections.
2, Trippedoverload protector in
PowerMate®.
3, Trippedthermalprotector
in canister,
1. PowerMate®connections
unplugged.
2. Wornorbrokenbelt.
3, Dirtyagitatororendcaps,
4. Trippedoverloadprotectorin
PowerMate_.
1. Pluginfirmly,pushON/OFFswitchto ON.
2. Resetcircuitbreakerorreplacefuse.
3. Reconnecthoseends.
]. Changebag page15).
2. Clearairflowpassages(page14).
3. Changefilters(page16.
4. Adjustsetting(page14).
5. Adjustcontrol(page13).
6. Replacehose.
Z Changeagitator(page19).
8& 9. SeeBELTCHANGINGANDAGITATOR
CLEANINGpage17-18.
10. Coseandlatchhood.
1. Checkconnections,reconnecthoseends.
2. Removeanyitemsthatmaybecaught
orjammed,thenreset.If vacuumcleanerstarts
andstopsagain,cleanagitatorandendcaps,
thenreset.
3. Resetthermalprotector(page13).
1,
2&3,
4.
Pluginfirmly.
SeeBELTCHANGINGAND AGITATOR
CLEANING(page 17-18).
Removeany itemsthat may be caught
orjammed, then reset, if vacuumcleaner starts
and stopsagain, clean agitator and end caps,
then reset.
Moveswitch to CARPETposition.5, Switchnot in CARPETposition. 5,
1, Wrong pile height setting. 1. Adjust setting(page 14),
2, Suctiontoo strong. 2, Open suctioncontrol (page 13).
1. Burnedout light bulb. 1. Changelight bulb (page 18),
2. Trippedoverload protector in 2. Removeanyitems that may be caught
PowerMate(R). orjammed, then reset. If vacuumcleaner starts
and stopsagain, clean agitator and end caps,
then reset.
1. Dirty power cord. 1. Cleanthe power cord.
2. Cord jammed. 2. Pullout cord and rewind.
1. Wrong vacuumingpattern. 1. SeeVACUUMINGTIPS(page 10).
- 20 -
Antes de usar su aspiradora nueva ........... ]
Lista de embaiaje ...................... ]
Garantia de maaspiradora de I(enmore ........ 2
Instrucciones importantes de
seguridad ............................... 3
Piezas y caracteristicas ................... 4-5
Instrucciones de
ensambJe .......................... 6-7
Instruccionesde operaci6n ............... 8-13
Para comenzar ........................ 8
Sugerenciaspara aspirar ............... 9
Accesorios ........................... 10
Cuadro de usode los accesorios.......... 11
Caracteristicasde rendimiento ........... ]2
Sugerenciassobre el ajuste de niveJde
peJode JaaJfombra ................... 13
Cuidado dei recept6culo ................. 13-15
Remover obstrucciones ................. ]3
Cambio de JaboJsa ................... 14
LimpJeza deJexterior y de los accesorios ... 14
Limpieza deJfiJtro de seguridad del motor .. 15
Cambio del filtro de escape ............. 15
Cuidado de la PowerMate® .............. 16-18
Cambio de la correa y Jimpieza
del agitador ....................... 16-17
Cambio de la bombilla ................. 17
Cuidado del acjitador................... 18
Reconocimientode probJemas............... 19
Informaci6n de
asistencia o servicio .......... Cubierta Posterior
Por favor lea esta guia que le ayudara a ensamblar y operar su aspiradora nueva de Kenmore en
una manera m6ssegura y efectiva.
Para mas informaci6nacerca del cuidado y operaci6n de esta aspiradora, Ilame a la Linea de
Ayuda de aspiradoras al 1-877-531-7321. Cuando pregunte por informaci6nusted necesitar6 el
n6mero completo de serie y modelo de la aspiradora que est6 Iocalizado en la placa de los
n6merosde modelo y serie.
Useel espacio de abajo para registrar el n6merode modelo y serie para su nueva aspiradora de
Kenmore.
NOmero de Mode_o
NOmero de Serie
Fecha de Compra
Mantenga este libra y su recibo en un lugar seguro para futuras referencias.
I USTA DE EMBALAJE
Su ASPIRADOR KENMORE se ernpaca con las siguientes piezas y cornponentes por se-
parado:
1 Recept6culo 1 CepiHo pora combinaci6n _
1 PowerMate ® 1 Tubo superior
1 Manguera 1 Tubo inferior
1 CepiHo para pisos_ 1 Manual de uso y cuidado
1 Herramienta para 1 Listode partes de
hendiduras _ reparaci6n
Cada uno de estos ensambles es mostrado detallodamente en Io lista de piezos para re-
paroci6n.
_Estos artfculos se encuentran bajo la cubierta de almacenamiento para accesorios.
-1-

Garantia timitada de Kenmore
DURANTE un a_o a partir de la fecha de compra este aparato est6 garantizado contra
defectos de materiales o mano de obra cuando se es instalado correctamente, operado
y mantenido seg_n las instrucciones suministradas.
CON LA PRUEBA DE COMPRA, el aparato defectuoso ser6 remplazado sin costo.
Para los deta!les de la cobertura de garanHa, para obtener la reparaci6n o reemplazo
gratuito, visite la p6gina web: www.kenmore.com/warranty.
Esta garantfa no cubre fittros, correas, bolsas, o focos, los cuales son partes gastables
las cuales se deterioran con el uso normal en el periodo de garanHa.
Esta garanHa queda anulada si este producto se utiliza para otros prop6sitos que no
sean de uso dom_sticos.
Esta garanHa le otorga derechos legales especfficos, y usted podrra tener otros
derechos que varran en funci6n de cada estado.
Sears Brands Management Corporation, Hoffman Estates, IL 60179
-2-
Lea las instrucciones en este manual antes de armar o usar su aspiradora.
ADVERTENCIA
Su seguridad es rnuy importante para nosotros. Para reducir el riesgo de incendio,
choque electrico, lesi6n corporal o dahos al utilizar su aspiradora, act(se de acuerdo
con precauciones b&sicas de seguridad, entre elias:
Use suaspiradora Onicamenfe en la forma
descrifa en este manual. Use Onicamente con
accesorios recomendados por Sears.
Desconecte el cord6n el_ctrico antes de
componer o limpiar el 6rea del cepillo. De Io
contrario, el cepillo podda arrancar de forma
imprevista o podda producirse un choque
el_ctrico.
No abandone la aspiradora cuando est_
conectada. Descon_ctela cuando no la est_
usando y antes de darle servicio.
Para reducir el riesgo de choque el_ctrico, no
use suaspiradora al aire libre ni sobre
superficies mojadas.
No permita que sea ufilizada como juguete.
Se requiere tener mayor cuidado cuando sea
utilizada en la proximidad de niSos o per
ni_os.
No use la aspiradora si el cord6n o el
enchufe est6n da5ados. Si la aspiradora no
est6 funcionando adecuadamente o si se ha
dejado caer, est6 da_ada, se ha dejado
expuesta a la intemperie o se ha dejado caer
en agua, devu_lvala a un Centro de servicio
de Sears.
No jale ni transporte la aspiradora per el
cord6n; no use el cord6n como mango; no
cierre puertas sobre el cord6n; no jale el
cord6n sobre rebordes agudos ni esquinas.
No pase la aspiradora sobre el cord6n.
Mantenga el cord6n alejado de superficies
calientes.
No desconecte la aspiradora tirando del
cord6n el_ctrico. Para desconectarla, jale el
enchufe, no el cord6n.
No toque la aspiradora ni el enchufe con las
manos mojadas.
No coloque objetos en las aberturas.
No ufilice la aspiradora si alguna abertura
est6 bloqueada; mant_ngala libre de polvo,
pelusa, cabellos y cualquiera cosa que
podrfa disminuir el flujo de aire.
Mantenga el cabello, ropa suelta, dedos y
todas las partes del cuerpo alejados de las
aberturas y piezas mec6nicas.
GUARDE ESTAS
Apague todos los controles antes de
desenchufar.
Tenga cuidado especial al utilizar la
aspiradora en escalones. No la coloque sobre
sillas, mesas, etc. Mant_ngala en el piso.
No use la aspiradora para aspirar ffquidos
inflamables o combustibles (gasolina, ffquidos
para limpieza, perfumes, etc.) ni la use en
lugares donde _stos poddan estar presentes.
Losvapores de estas sustancias pueden crear
un peligro de incendio o explosi6n.
No levante ninguna cosa que se est_
quemando o emifiendo humo, como
cigarrillos, cerillos o cenizas calientes.
No use la aspiradora sin tener instalada la
bolsa para polvo y/o los flltros.
Cambie siempre la bolsa para polvo despu_s
de aspirar Iimpiadores de alfombras o
desodorantes, talcos y polvos finos. Estos
productos atascan la bolsa, reducen el flujo
de aire y pueden causar que _sta se rompa.
Si no cambia la bolsa podda ocasionar daSo
permanente a [a aspiradora.
No use la aspiradora para levantar objetos
agudos, juguetes peque5os, alfileres,
sujetapapeles, etc. Poddan daSar la
aspiradora o la bolsa para polvo.
No opere sin el filtro de escape ni la cubierta
del filtro de escape instalados.
La manguera contiene cables el_ctricos. No
la use cuando est6 daSada, cortada, o
perforada. Reemplace si est6 cortada o
desgastada. No levante objetos afilados.
Siempre apagu_ y desconecte la aspiradora
antes de conectar o desconectar la
manguera, Pet HandiMate (si aplicable), o la
boquilla.
Sujete el enchufe con la mano al enrollar el
cord6n el_ctrico. Para desconectarla, jale el
enchufe, no el cord6n.
Usted es responsable de asegurar que su
aspiradora no sea utilizada por ninguna
persona que no pueda manejarla
correctamente.
INSTRUCCIONES
El armado y uso seguro de su aspiradora son su responsabilidad. Esta aspiradora ha sido
diseSada exclusivamente para uso dom6stico. La aspiradora deber6 almacenarse en un lugar
seco yen el interior. Lea este Manual de Uso y Cuidado detenidamente, pues contiene
informaci6n importante sobre seguridad y uso. Esta guia contiene informaci6n sobre seguridad
debajo de sfmbolos de advertenc[a cuidado.
-3-
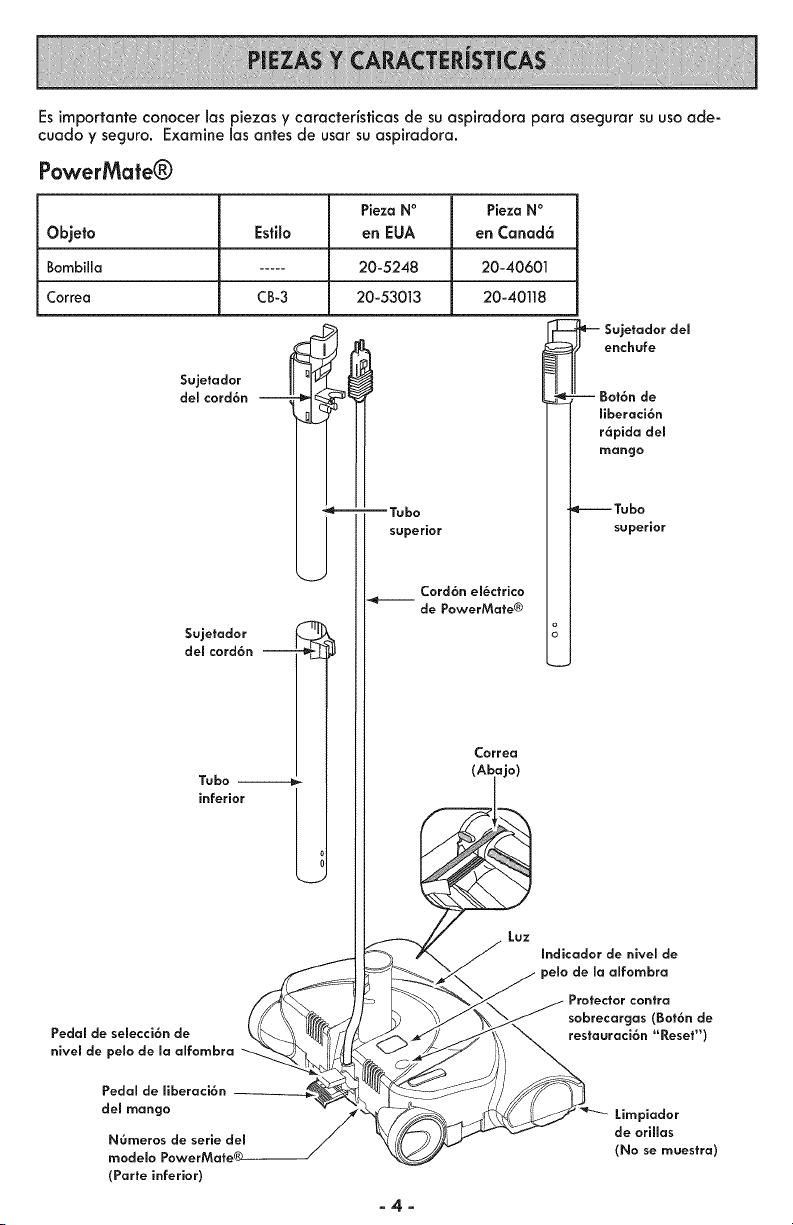
Esimportanfeconocerlospiezasycaractedsticasdesuaspkadoraparaasegurarsuusoade-
cuadoyseguro.Examine1asantesdeusarsuaspkadora.
PowerMate®
Pieza N°
Objeto Estib en EUA
Bombilla ..... 20-5248
Correa CB-3 20-53013
$ujetodor
del cord6n
J
$ujetodor
del cord6n
J
Ta[0o --
inferior
Pedal de semecci6n de
nivem de pelo de maalfombra
I
j-
--Tabo
superior
",_kJ
Cord6n em_ctrico
de PowerMafe®
Pieza NO
en Canad6
20-40601
20-40118
e'-- SeUJ;huad;r del
J Bot6n de
I I ffberaci6n
II r6aPindgaod el
_1 I m_uu_e°rior
Laz
Correo
(Aiaj°)
Indicodor de nivem de
de maalfombra
Protector contra
sobrecorgos (Bot6n de
resfauraci6n "Reset")
Pedal de ffberaci6n
del mango
NOmeros de serie del
modelo PowerMate®
(Porte inferior)
Limpiador
de oriHos
(No se maestro)
-4-

MANGUERA
Interruptor de dos posiciones
(Floor/Carpet)
(Piso/AIfromba)
Mango
ACCESORIOS
para.erramie. a
hendidaras
Cepiffo
para pisos
4/_---- Cepiffo
CepiHo para _ ___-¢_'_ para temas
cornbinaci6n ----=_ _
i
I para
i
, sacadir
RECEPTACULO
Dispositivo
giratorio de
mamanguera
Pieza N ° Pieza N °
Objeto Esti_o en EUA en Canad6
Bolsa para polvo C 20-50104 20-50403
Filtrode escape EF-2 20-80001 20-40320
Fiitro de secjuridad CF-1 20-81002 20-40321
det motor
Cubierta de almacenomiento
para accesorios
Almacenamienlo de accesorios
dentro
Tapa de! recept6culo
\
Pesfillo de Io tapa ,,_
\
/ Bot6n de
encendido / apagado
Zord6n el_ctrico
de escape
Monij_
guridad
del motor
Bolso para polvo
-5-
Par favor panga especial atenci6n a _stos recuadras can alerta de riesgo.
Advertencla: Este informaci6n le alertar6 del peligro de fuego, chaques el_ctrlcas,
quemadas V leslanes. Culdado: Esta infarmaci6n _e alertara de pefigras coma
lesiones ¥ dafias de prapiedad.
ADVERTENCIA
Pellgro de chaque el_ctrlco
No conecte la asplradora hasta que termine
de armarla. De la contrarla pod6a causar un
choque el_ctrlco a lesi6n corporal.
Antes de armar la aspiradora, revisela LISTA
DE EMBALAJE(p6g 1). Useesta lista para
verificar que ha recibido todos 1as
componentes de
su nueva
aspiradora
Kenmore.
TUBOS
Una los tubas
desliz6ndolos
hasta que el
bot6n quede fUo
en posici6n.
Sujetador
del cord6n
POWERMATE®
Area
Hacia arriba
y hacia dentro
1. Introduzca los
tubas en la
PowerMate ® hasta
que el bot6n del
tuba quede fijo en
posici6n.
2. Conecte el
enchufe y cord6n de
la PowerMate ®
como se muestra,
NO LO forc_. El
6rea elevada del
enchufe tiene que
estar hacia la rnano.
3. Asegure el cord6n en el sujetador
del tuba.
Para retirar: Desconecte el cord6n, apoye el
pie sabre la PowerMate® y gire los tubas
hasta que el bot6n desaparezca y luego tire
de 1astubas para retirarlo de la PowerMate®.
Mango
Bat6 _nd_el _
mango
Bot6n de
ffberaci6n
r6pida del
mango
Bot6n
del tuba
Sujetadordel --
cord6n _ _ll
Sujetador
_'_=_ del cord6n
-6-

RECEPTACULO
1. Abra la tapa del recept6culo.
2. Examineque la balsa para polvo este
instalada correctamente. Consulte las
instruccionesde instalaci6n en CAMBIO DE LA
BOLSA (p6g 14).
3. Examine que el filtro de seguridad del
motor este insfalado correctamente. Consulte
las instruccionesde instalaci6nen LIMPIEZA
DEL FILTRODE SEGURIDADDELMOTOR
(p6g 15).
LA TAPA Y LA CUBiERTA
Esnormal que la tapa del recept6culo o la
cubierfa de los accesorios se desprendan al
ser abierta m6s de Io necesario. Para colo-
carlas nuevamenfe en su lugar, alinee la
bisagra en las ranuras e inserfe 1as, cierre la
tapa y la cubierfa.
MANGUERA
1. Alinee la pesfafia de sujeci6n de la
manguera y la ranura de la cubierta del
recept6culo e introduzcala manguera en el
recept6culo basra que quede fija en posici6n.
Para retlrar: Presione el pesfillo de la man-
guera y tire de la manguera.
2. Infroduzca el mango en el tubo basra que
el bot6n del mando quede en posici6n.
AsegOresede que la manguera no est_
torcida.
Para retirar: Oprima e[ bot6n de fiberaci6n
r6pida del mango para liberar el mango y fire
de1mango hacia arriba.
Bot6n del
Bot6n de
ffberaci6n
r6pida del
Para Guardar:
Desconecte la
manguera del tubo
de la aspiradora y
el recepf6culo para
prevenir la tensi6n
en la manguera
mienfras se guarda.
Guarde la magua
en una posici6n
enrollada y floja
de tal manera que
la cubierta de la
manguera no se
esfres_.
_ CUIDADO
Nunca debe abrk la capucha del contenedor
estandola tapa abierta. Asi se evitar6 da_os
__ contenedor V/o a la tapa.
-7-
CUIDADO
iPartes en movimiento! Para reduclr el rlesgo de
da_os corporales, no toque el agltador cuando la
aspiradora est6 encendida. El tocar el agitador mientras
que est6 girando puede cortar, contusionar o causar
otras lesiones. Siempre apague y desconecte del
tomacorrlente antes de dar mantenlmlento. Tenga
culdado al asplrar cerca de ni_os.
PARA COMENZAR
ADVERTENCIA
Pefigro de _esi6n personal y da_o a_ producto
NO enchufela aspkadora siel
interruptorest6 en la poslci6nON.
Podriacausar lesi6npersonalo da_o
al producto.
El cord6nel_ctrlco se mueve
r6pldamente durante el enrollamlento.
Mantenga alejados a losni_osy
asegure dejar espaciosuficientepara
evitar leslonespersonalesal enrollar
el cord6n.
NO use los enchufes IocaEizados sobre
los muebles. Los objetos cercanos
podrian resultar da_ados.
1.Tire del cord6n
para sacarlo del
recept6culo basra
tener la Iongitud
deseada.
REMARQUE:Le ruban jaune JndiqueI'extension
complete du cordon d'alimentation. NE PAS tirer le
cordon d'alimentatJonplus loin que le rubanjaune
afin de pr_venir le blocage de I'enrouleur de
cordon.
2. Inserte el cord6n
en el sujetador
para prevenir el
enrollamiento
accidental.
3. Conecte el cord6n el_ctrico polarizado en
un enchufe de 120 voltios que se encuentre
cerca del piso.
NOTA: Para reducir el riesgo de choque
el_ctrico, esta aspiradora cuenta con una
clavija polarizada, uno de los contactos es
m6s ancho que el otro. La claviia s61o puede
introducirse de una manera en el enchufe. Si la
clavijano cabe bien en elenchufe,invi_rtala.
Siagn no cabe, flame a un electricistapara
que instaleun enchufecorrecto.No alterela
clavija de ninguna manera.
Para enrollar: Desconecte la aspiradora.
Removerel cord6n del sujetador. Sujete el
enchufe mientras enrolla el cord6n para impe-
dir da_o o lesi6n corporal por el movimiento
del cord6n. Los sujetadores del carrete del
cord6n se desbloquean con un tir6n leve, Io
que permite que el cord6n se enrolle.
4. Baje el tubo desde la posici6n vertical pi-
sando el pedal de liberaci6n del mango.
Pedal de selecci6n
de nivel de
pelo de ma
alfombra-
i/ll ,°dioodorde
nivemde pelo
ilfombra
Pedal de
ffberaci6n
del mango -_ i
5. Seleccione una altura de pelo de la alfom-
bra usando el pedal peque_o ubicado en la
parte posterior de la PowerMate®. Elnivel de
pelo de la alfombra se muestra en el indica-
dor. Consulte SUGERENCIASSOBREEL
AJUSTEDENIVEL DEPELODE LA ALFOMBRA
(p6g 13).
-8-
6. Encienda la
aspiradora pisando en
el interruptor
Encendido/Apagado.
7. Encienda la
PowerMate ®,
deslizando el selector
FLOOR/CARPET(piso
/alfombra) a la
posici6n CARPET
(alfombra).
Nora: Cuando el interruptorse encuentraen la
posici6n (Piso) la luz no funciona ya que no
hay corriente el_ctrica hacia la PoweMate.
Atenci6n: Refi_rosea los recomendaciones del
fabricante para limpiar su alfombra. Algunas
alfombras m6s delicodas pueden requerir el
uso de la o_iradora con el agitador
PowerMate_' apagodo para prevenir dodos a
la alfombra.
CUIDADO
NO deje la PowerMate® funclonando en
p.oslci6nverticalenun mlsmo lugar durante
nmg0n espacio de tiempo: se puede da_ar la
alfombra.
SUGERENCIAS PARA ASPIRAR
Estilode limpieza sugerido.
_ADVERTENCIA
Pellgrode lesi6n personal y da_o al
_roducto
No atropelle el cord6n el_ctrico con la
PowerMate e. Exlste el pellgro de
lesi6n corporal o dodos de propiedad.
No tire del cord6n el_ctrlco para desconec
ratio de la pared. Si hay da_osen
el cord6n el_ctrico o el enchuFe,existe el
pellgrode lesi6n corporal o dodosde
propiedad.
CUIDADO
Peligrode da_o al producto
Tenga culdado sl el PowerMate® V la
manguera se dejan en posici6nvertical pues
puedencaerse f6cilmentecausando dodos
de propiedad.
Paro obtener la mejor acci6n de limpieza se
recomienda empujor la PowerMote®en direc-
ci6n directomente opuesta ousted y ]alarla en
I[nea recta. AI final de cada pasada de
regreso, cambie Io direcci6n de la
®
PowerMote hacia la siguiente secci6n a lim-
pior. Continge
asi a trav_s
de toda la
alfombra de
una manera
lento y desli-
zante,
NOTA: Movimientos
r6pidos y ]aloneos
no Iogran una
limpieza completa.
El disposifivo giratorio de la manguera permite
que _sta gire sinnecesidod de mover el recep-
t6culo. Estoes muy 0ill para limpior en 6teas
peque5as. Aseg0resede que la manguera no
est_ torcida antes de jalar el recept6culo.
-9-
Peligrodelesi6n personal
Tengaculdado si colocael recept6cula sabre
escalones. Si se cae, padria causar lesi6n
CUIDADO
Pellgro de da_o al praducto
No jale de la rnanguera para mover la
aspiradora de un escal6n al slgulente.
Cuando terrnlne de llrnpiar un 6tea use Io
rnanija en la aspiradora para rnoverla a
otto lugor pora continuar la lirnpieza.
Losescalonesalfornbradas requieren limpieza
peri6dica. Cierre par completoel controlde
aspiraci6n para Iograr los mejores resultados
de limpieza.
Mantenga el paso de aire abierto para Iograr
los rnejores resultadosde llrnpieza. Examine
de vez en cuando cada una de las 6reas de
uni6n coma se muestra en REMOVER
OBSTRUCCIONES(p6g 13)para asegurarse
de que no existan bloqueos. Apague V
desconectela aspiradora antes de revisarla.
ACCESORIOS
ACCESORIOS DEL MANGO
NOTA: Si fiene
instalada la
PowerMate®,
apague y Bot6n de
desconecte la
aspiradora antes
de quitar el Bot6n
mango de los r6pido de
tubas, ffberaci6n
del
1. Oprima el
bot6n de
liberaci6n r6pida
del mango para
liberar el mango y
tire del mango hacia arriba.
CUIDADO
NO instale nl retire el mango nl los tubas
cuando la aspiradora est_ encendida. Esto
podria cousar chispos y da6or los contac-
tos el_ctricos.
2. Deslice el accesorio deseado con firmeza
sabreel mango. Consulte la CUADRODEusa
DE LOSACCESORIOS(p6g 11).
_/_ CepiHo
_ pala sacudir
NOTA: Para montar el cepillo para sacudir,
inserteel cepillo para telas dentro de la
boquilla del cepillo para sacudir y deslice a
su lugar.
Para quitar,
empuje loen
direcci6n de la
flecha coma
se muestra.
- 10-
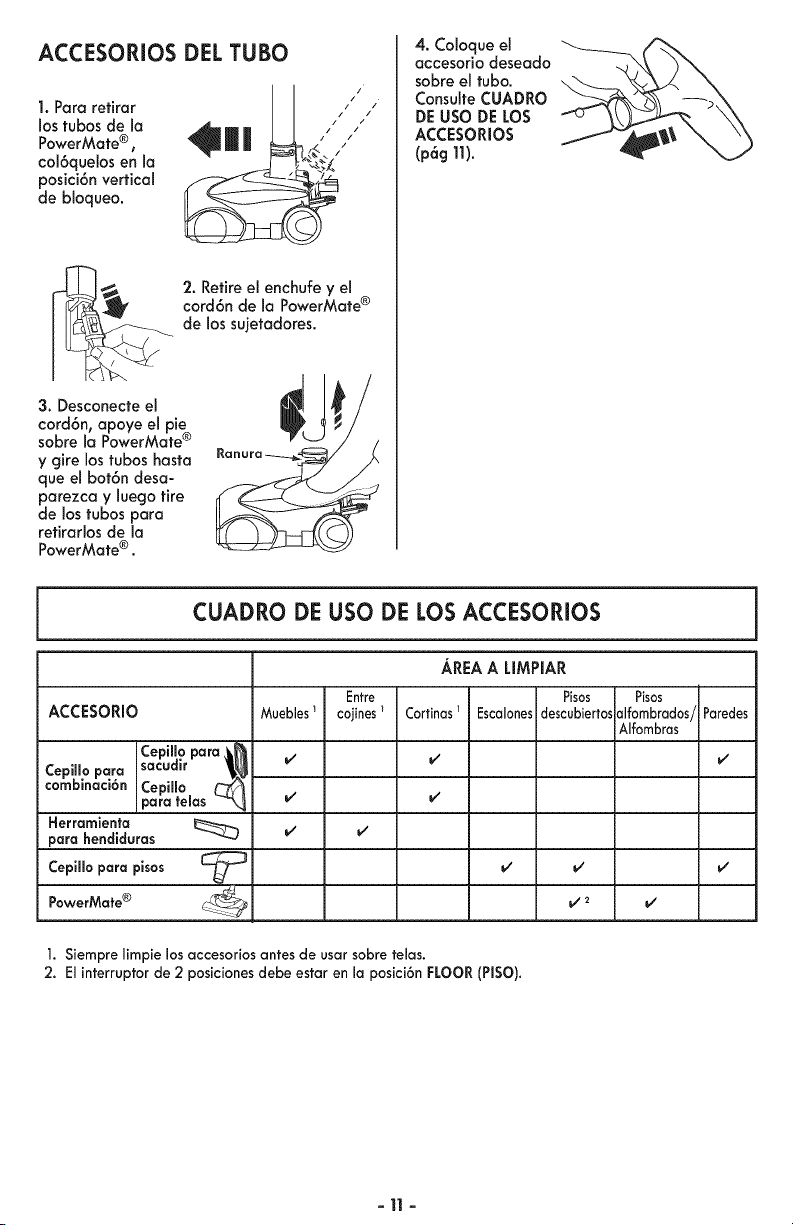
ACCESORIOS DEL TUBO
1. Para refirar
los tubos de la
PowerMafe®,
col6quelos en la
posici6n vertical
de bloqueo,
2. Retire el enchufe y el
cord6n de la PowerMafe ®
de los sujetadores.
3. Desconecte el
cord6n, apoye el pie
sobre la PowerMate ®
y gire los tubos hasta
que el bot6n desa-
parezca y luego tire
de los tubos para
refirarlos de la
PowerMafe ® .
4. Coloque el
accesorio deseado
sobre el fubo.
Consulfe CUADRO
DE USO DE LOS
ACCESORIOS
(pag11).
CUADRO DE USO DE LOS ACCESORIOS
ACCESORIO
Cepiffo para _,_
Cepiffo para sacudir _
combinaci6n Cepillo C_
para telas -_
Herramienta
para hendiduras
Cepiffopara pisos [-_
PowerMate® L-_
AREA A LIMPIAR
Entre Pisos Pisos
MueNes_ cojines_ Cortinasl Escalonesdescubiertosalfombrados/Paredes
Alfombras
1. Siempre limpie los accesoriosantes de usar sobre telas.
2. El interruptor de 2 posiciones debe estar en la posici6n FLOOR(PISO).
-11 -
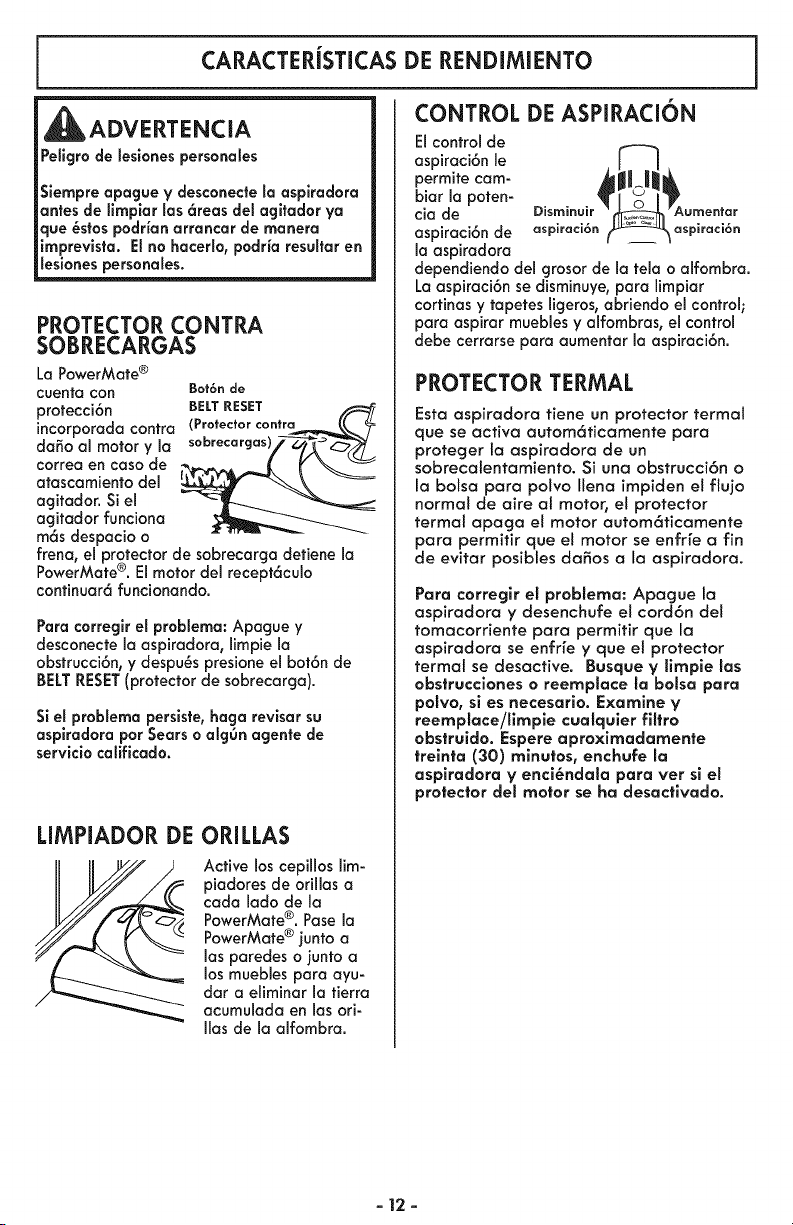
CARACTERiSTICASDE RENDIMIENTO
CONTROL DE ASPIRACION
ADVERTENCIA
Peligrade leslones personales
Siempreapague V desconectela aspkadora
antes de llmplar las 6reas del agltador ya
que _stos podrianarrancar de manera
imprevista. El no hacerla,padria resultar en
lesianes persanales.
PROTECTOR CONTRA
SOBRECARGAS
La PowerMate®
cuentacon Bot6nde
protecci6n BELT RESET
incorporada contra (Protector contra p_
dang al motor y la s°brecargasV-_O_--- _
correa en caso de
atascamiento del _
agitador. Si el
agitador funciona
m6s despacio o
frena, el protector de sobrecarga detiene la
®
PowerMate . El motor del recept6culo
continuar6 funcionando.
Para correglr el problema: Apague y
desconecte la aspiradora, limpie la
obstrucci6n, y despu_s presione el bot6n de
BELTRESET(protectorde sobrecarga).
Siel problemaperslste,haga revlsar su
asplradora par Sears o algOn agente de
servicio calificado.
LIMPIADOR DE ORILLAS
Activeloscepilloslim-
piadoresde orillasa
cada lado de la
PowerMate®. Pasela
PowerMate® ]untoa
las paredes o junto a
los muebles para ayu-
dar a eliminarlatierra
acumulada en las ori-
Ilas de la alfombra.
Elcontrolde
aspiraci6n le aD_;m_U__aAUp?r: _ti_rn
permite cam-
biarlapoten-
ciade
aspiraci6n de
la aspiradora
dependiendo del grosor de la tela o alfombra.
La aspiraci6n se disminuye, para limpiar
cortinas y tapetes ligeros, abriendo el control;
para aspirar muebles y alfombras, el control
debe cerrarse para aumentar la aspiraci6n.
PROTECTOR TERMAL
Esta aspiradora tiene un protector termal
que se activa autom6ticamente para
proteger la aspiradora de un
sobrecalentamiento. Si una obstrucci6n o
la balsa para polvo Ilena impiden el fiujo
normal de aire al motor, el protector
termal apaga el motor autom6ticamente
para permitir que el motor se enfr[e a fin
de evitar posibles da_os a la aspiradora.
Para corregir eJ problema: Apague la
aspiradora y desenchufe el cord6n de!
tomacorriente para permitir que la
aspiradora se enfr[e y que el protector
termal se desactive. Busque V limpie los
obstrucciones o reemplace la balsa para
polvo, si es necesario. Examine y
reemplace/limpie cualquier fiItro
obstruido. Espere aproximadamente
treinta (30) minutos, enchufe la
aspiradora V enci_ndala para vet sl el
protec|or del motor se ha desacfivado.
- 12 -

SUGERENCIASSOBREELAJUSTE DENIVEL DE PELODELA ALFOMBRA
Useel ajuste XLO (bajo) para obtener la
mejor limpieza a fondo. Porotra parte, quiz6s
se requiera elevar el nivel para facilitar algu-
nas tareas, como por ejemplo cuando se trata
de tapetes y algunas alfombras de pelo largo,
y para impedir que la aspiradora se apague.
Se sugieren los siguientes ajustes:
HI - Pelomuy largo y suelto,tapetes,alfom
bras muy acojinadas.
MED - Pelo mediano a largo.
LO - Pelo corto a mediano.
XLO - La mayoria de las alfombras y pisos
descubiertos.
REMOVER OBSTRUCCIONES
La aspiradora crea succi6no aspiraci6n que levanta
la tierra. La tierra es impulsadaa trav_s de las
vias de flujo aire hasta la bolsa por una r6pida
corriente de aire. La bolsa para polvo permite
el flujo de aire, pero atrapa la tierra.
Para Iograr los mejores resultados de
limpieza, mantenga abiertas las vias
de aire. Examine peri6dicamente
las 6reas indicadas con asteriscos
(-k) para asegurarse de que no
est_n bloqueadas. Apagu_ y
desconecte del
recept6culo antes de
revisarlo.
Filtro de
seguHdad
del motor
Filtro de
PARA CHECAR OBSTRUCCIONES:
Checar la bolsa de polvo y cambiar al
estar Ilena. Ver CAMBIO DE LA BOLSA
(p6g 14).
Checar filtro de seguridad del motor y el
filtro de escape y cambiar Io si esta sucio.
Ver CAMBIO DEL FILTRO DE SEGURIDAD
DELMOTOR (p6g 15) y CAMBIO DEL
FILTRO DE ESCAPE(p6g 15).
Checar Power Mate sabre cualquier
suciedad u obstrucci6n en el area de la
banda o el area del agitador.
Cuidadosamente remueva cualquier
obstrucci6n u objeto Iocatizados en el
agitador o sus tapas. Vet UMPIEZA DEL
AGITADOR (p6g 17).
Si la aspiradora aun tiene una baja succi6n,
haga Io slguiente.
Conecte la maguera a la aspiradora y
prenda. Cheque el final de la manguera
para la succi6n. Si hay buena succi6n en
el mango de la manguera, no hay
obstrucci6n en la manguera. Si la succi6n
es mala, remueva cualquier suciedad u
objeto en la maguera y mango.
2.
.
Conecte la manguera al tubo telesc6pico.
Cheque el final del tuba telesc6pico para
la succi6n. Si hay buena succi6n al final,
significa que no hay obstrucci6n en el
tubo telesc6pico. Si la succi6n es mala,
remover cualquier suciedad u objeto en el
tubo telesc6pico.
Revisar el conducto de succi6n del Power
Mate. Remover cualquier suciedad u
objeto.
- 13 -
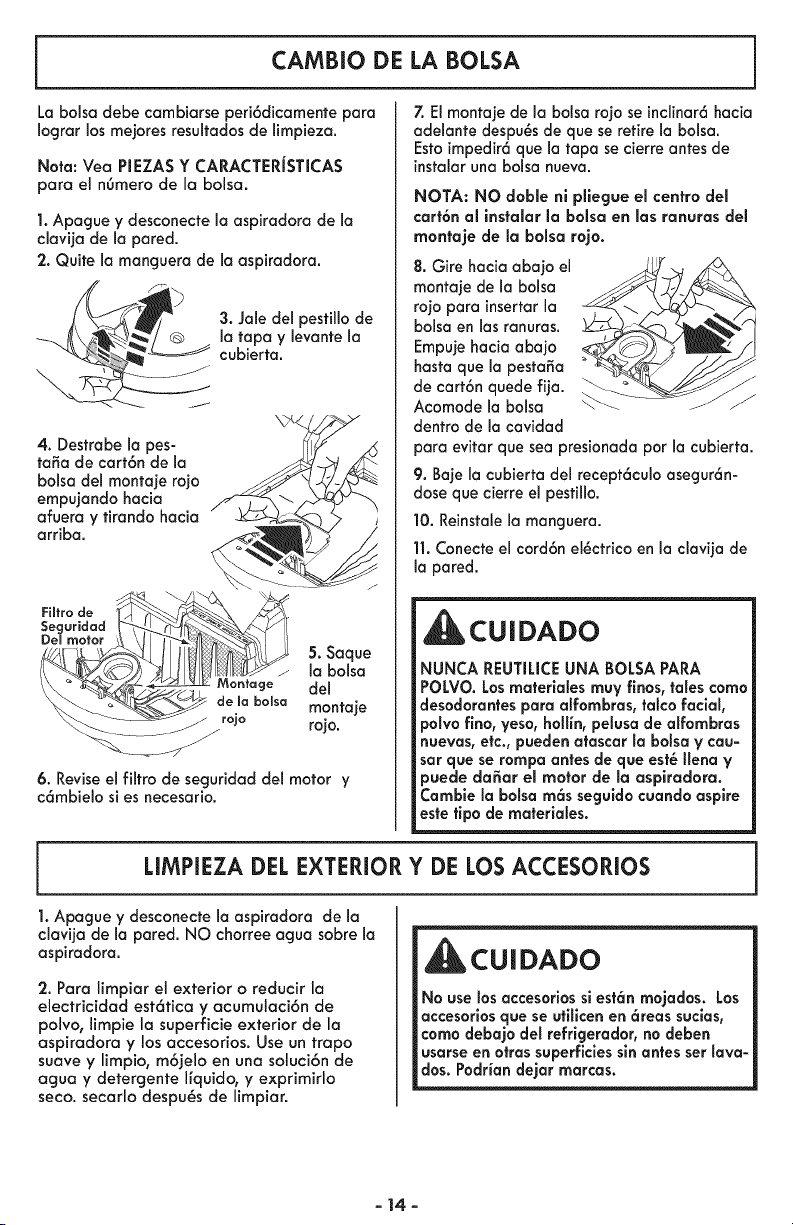
CAMBIO DE LA BOLSA
La bolsa debe combiorse peri6dicomente para
Iograr los mejores resultados de limpiezo.
Not°: Vea PIEZAS Y CARACTERiSTICAS
par° el n6mero de la bolsa.
1. Apogue y desconecte la aspiradora de la
clovija de Io pored.
2. Quite la manguera de la aspiradora.
3. Jole del pestillo de
Io topo y levante la
cubierta.
4. Destrabe Io pes-
to5a de cort6n de Io
bolso del montoje rojo
empujondo hocio
afuero y firandohacia
arriba.
. oquo
[ ' J la bolsa
___ do)° b-o,s° montoje
rojo
6. Revise el filtro de seguridad de1 motor y
c6mbielo si es necesario.
7. El montaje de la bolsa rojo seinclinar6hacia
adelante despu_sde que se retire la bolsa.
Estoimpedir6que la tapa se cierre antes de
instalaruna bolsa nueva.
NOTA: NO doble ni pllegue el centro del
cart6n ol instolor la bolso en los ronuros del
rnontoje de Io bolso rojo.
8. Gire hacia abajo el
montaje de la balsa
rojo para insertarla
balsa en las ranuras.
Empujehacia abajo
hasta que la pesto_o
de cart6n quede fija.
Acomode la bolsa
dentro de la cavidad
J /
para evitar que sea presionada por la cubierta.
9. Baje la cubierta del recept6culo asegur6n-
dose que cierre el pestillo.
10. Reinstalela manguera.
11.Conecte el cord6n el_ctrico en la clavija de
la pared.
CUIDADO
NUNCA REUTILICEUNA BOLSAPARA
POLVO.Losrnaterlales rnuy finos, tales corn°
desodorantespar° alfornbras, talco facial,
polvofino, yeso,hollin, pelusade alfombras
nuevas, etc., puedenat°scar la balsa V cau-
sat que se tampa antes de que est_ lien° ¥
puede do,or el motor de la ospirodoro.
Cambie la balsa rn6s seguidocuando aspire
este tipo de rnateriales.
LIMPIEZA DEL EXTERIOR Y DE LOS ACCESORIOS
1. Apague y desconecte la ospirodora de Io
clovijo de Io pared. NO chorree ogua sobre la
aspirodoro.
2. Pora limpior el exterior o reducir la
electricidod est6fica y ocumulaci6n de
polvo, limpie la superficie exterior de la
aspiradora y los accesorios. Use un trapo
suave y limpio, m6jelo en una soluci6n de
aguo y detergente I[quido, y exprimirlo
seco. secarlo despu_s de limpiar.
CUI DADO
No use losaccesorios sl est6n rnojados. Los
accesorlosque se utilicen en 6teas sucias,
coma debaio del refrigerador, no deben
usarse en otrassuperficlessinantes ser lava-
dos. Podrian dejar marcas.
- 14-

LIMPIEZA DEL FILTRO DE SEGURIDAD DEL MOTOR
_ADVERTENCIA
Pellgro de choque el_ctrlco
Apague y desconecte la asplradora de la co-
rriente el_ctrlca. No opere la asplradora sin
el filtro de seguridad del motor. Aseg_rese
de que el filtro est_ seco e instalado adecua-
damente para impedir que el motor falle y/o
que se produzca un choque el_ctrico.
Examine el filtro de seguridad del motor
ocasionalmente y ffmpie io cuando est_ sucio.
1. Remueva la
balsa, siguiendo los
instrucciones en
CAMBIO DE LA
BOLSA (p6g 5).
2. Levante el dispositivo de retenci6n de goma
y saqueel filtro de seguridad de1motor coma
se muestra.
_3. Laveel filtro en
agua tibia y jabo-
nasa; enjagLieIoy
d_]elo secar. No love
el filtro en lavadora
de platosnl Io instale
cuando est_ hOmedo.
de gorna
J
4. Reemplace el filfro desliz6ndolo detr6s de
1ascosfillas en la cavidad de la balsa. Aco-
mode el filtro de farina que quepa par com-
pleto debajo de1dispositivo de refenci6n de
goma.
5. Reemplace la balsa coma se indicaen la
secci6n CAMBIO DELA BOLSA (p6g 5).
CAMBIO DEL FILTRO DE ESCAPE
ADVERTENCIA !
Fuego and/or pellgro de choque el_ctrlco
No opere con un filtro de escape bloqueado |
o sin el filtro de escape o la cubierta del filtro|
de escape instalados.
FILTRODE ESCAPE
El filtro de escape se debe cambiar cuando
esf_ sucio. Cambie el filfro cuando susuperfi-
cie est_ cubierta par completo. El filtro NO se
puede lavar puespierde su capacidad para
atrapar polvo.
NOTA: V_ase PIEZAS Y CARACTERiSTICAS
(p6g 5) para el ngmero del filtro de escape.
1. Jale y suba la
cubierta del filtro
de escape para
quitarla de la
piradora y colo-
qu_ la a un lado.
3. Reemplace el
cartucho del filtro
de escape. Coloque
el filtro nuevo en la
aspiradora con el
sello de esponja
hoci.a abaca en dl-
recc=ono Maosplro-
dora.
2. Jale el cartucho
del filtro de escape
hacia arriba y
hacia fuera de la
porte posterior de
la aspiradora.
_Fiffro de
Lem Lietas
4. Monte la cu-
bierfa del filfro
de escape cola-
condo los dos
lengiJetas en la
cubierta del filtro
en los ranuras de
la aspiradora y
gire en su lugar
J basra que cierre
complefamenfe.
- 15 -
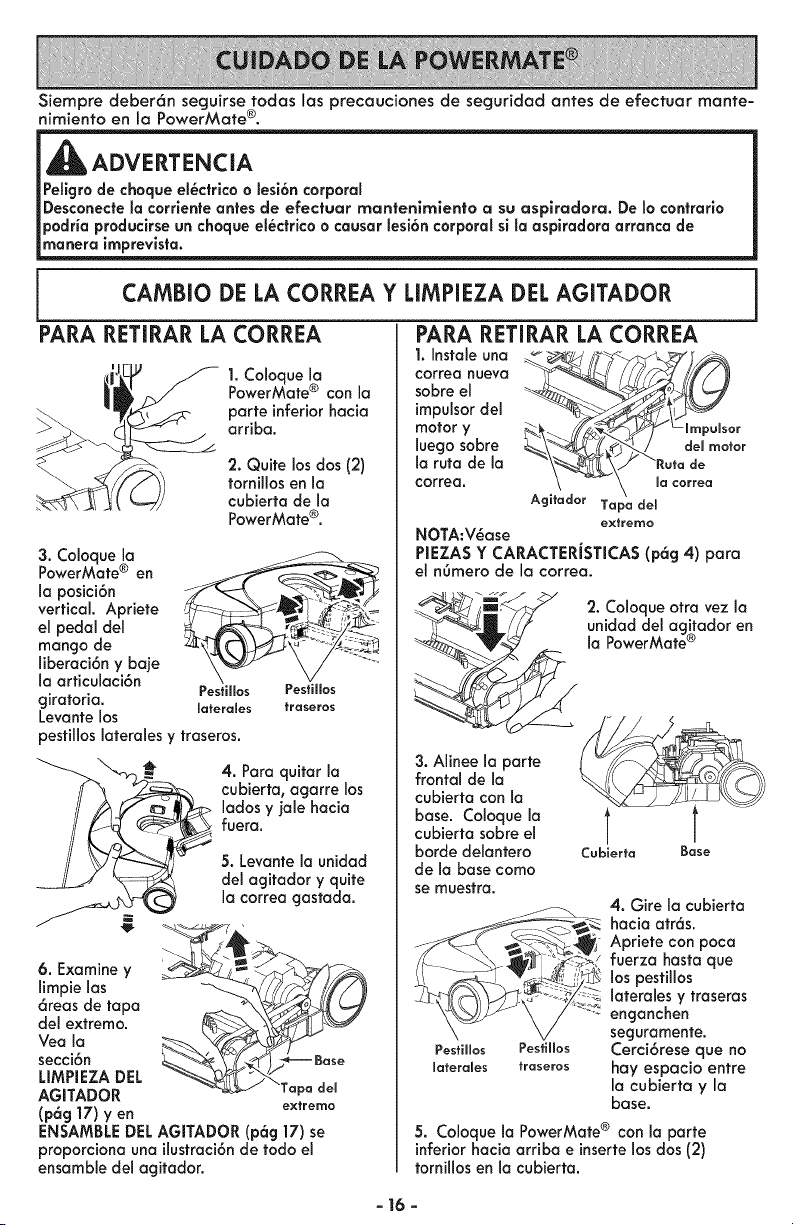
Siempredeber6nseguirsetodaslasprecauciones de seguridad antes de efectuar mante-
nimiento en la PowerMate ®.
_ADVERTENCIA
Pellgro de choque el_ct6co o lesi6n corporal
Desconecte la corriente antes de efectuar mantenimiento a su aspiradora. De Io contrario
pod6a produclrse un choque el_ctrico o causar lesi6n corporal sila aspiradora arranca de
manera imprevista.
CAMBIO DE LA CORREA Y LIMPIEZA DEL AGITADOR
PARA RETIRAR LA CORREA
t, Tyf
1.Coloque la
PowerMate® conIo
porte inferiorhacia
arriba.
2. Quite los dos (2)
tornillos en la
cubierta de Io
PowerMate®.
3. Coloque Io
PowerMate ® en
laposici6n E
vertical.Apriete
el pedal del
mango de
liberoci6ny baje
la articuloci6n
Pestillos
giratoria, laferales
Levante los
Pestillos
fraseros
pestillos Ioterales y traseros.
4. Para quitar Io
cubierta, ogorre los
lados y jale hacia
fuera.
5. Levante la unidad
del agitador y quite
la correa gostada.
6. Examine y
limpie los
6reos de topo
del extremo.
Yea la
secci6n
LIMPIEZA DEL
AGITADOR pa dem
[p6g 17) yen extremo
ENSAMBLE DEL AGITADOR [p6g 17) se
proporciona una ilustroci6n de todo el
ensamble del agitador.
1. Instal® una
correa nueva
sabre el
impulsor del
motor y
luego sabre
la ruto de la
correa.
PARA RETIRAR LA CORREA
r
\_L\/ "Ratade
\ -- \ ma_a.ea
Agitador Tapa clel
eytremo
NOTA:V_ase
PIEZA$ Y CARACTERiSTICA$ (p6g 4) para
el n6mero de la correa.
.__ ;i,_ 2. Coloque otra vez la
unidad del agitodor en
la PowerMate ®
3. Alineela porte
frontal de la
cubiertacon la
base. Coloque la
cubierta sabre el
/
Cabierta Baseborde delantero
de la base coma
se muestra.
PesBllos Pesfillos
laterales traseros
4. Gire la cubierta
hacia atr6s.
Apriete con poca
fuerzo hasta que
los pesfillos
lateroles y troseras
enganchen
seguromente.
Cerci6rese que no
hay espacio entre
la cubierta y la
base.
5. Coloque la PowerMate ® con la porte
inferior hacia arriba einserte los dos (2)
tornillos en la cubierta.
- 16 -
LIMPIEZA DEL AGITADOR
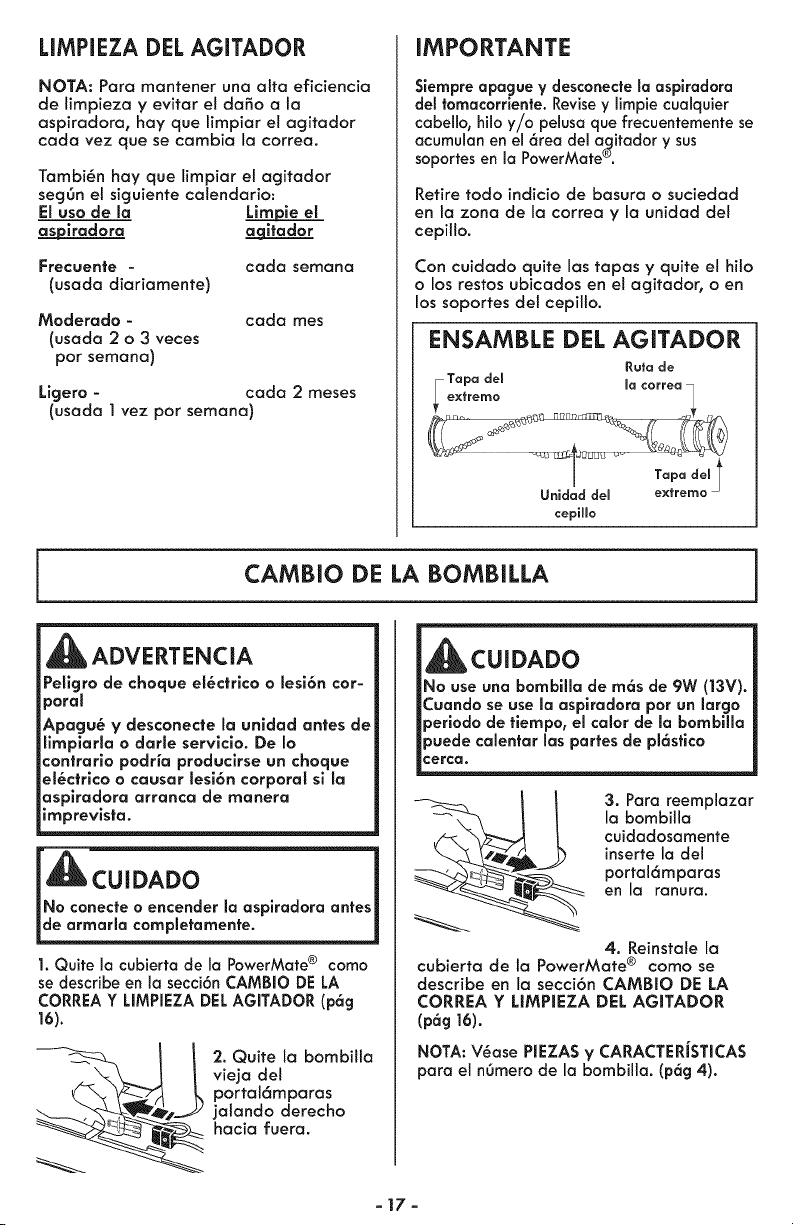
NOTA: Para mantener una alta eficiencia
de limpieza y evitar et dafio a la
aspiradora, hay que limpiar el agitador
cada vez que se cambia la correa.
Tambi@n hay que limpiar et agitador
seg6n el siguiente calendario:
El uso de la Limj_ie el
g=splradora a==gltador
Frecuente -
(usada diariamente)
cada semana
Moderado -
(usada 2 o 3 veces
por semana)
cada rues
Ligero - cada 2 meses
(usada I vez por semana)
IMPORTANTE
Siempreapague y desconectela asplradora
del tomacorrlente.Revisey limpie cualquier
cabello, hilo y/o pelusa que frecuentementese
acumulan en el 6rea del a_itador y sus
soportes en la PowerMate_.
Retire todo indicia de basura o suciedad
en la zona de la correa y la unidad del
cepillo.
Con cuidado quite las tapas y quite et hito
o los restos ubicados en e! agitador, o en
los soportes de! cepillo.
ENSAMBLE DEL AGITADOR
Ruta de
Tapa dem macorrea •
ex_rerno [_R_ _
Unidad del extremo
cepiHo
CAMBIO DE LA BOMBILLA
ADVERTENCIA
Peligro de choque el@ctrico o lesi6n cor-
poral
Apagu@ y desconecte la unldad antes de
limpiarla o darle servlcio. De Io
contrario podria producirse un choque
el@ctrico o causar lesi6n corporal sl la
asplradora arranca de manera
imprevlsta.
_CUIDADO
INo conecte o encender la asplradora antes 1
de armarla completamente.
1. Quite la cubierta de la PowerMate ® coma
se describe en la secci6n CAMBIO DE LA
CORREA Y LIMPIEZA DEL AGITADOR (p6g
16).
2. Quite la bombitta
vieja del
portal6mparas
jalando derecho
hacia fuera.
_CUIDADO
No use una bombllla de m6s de 9W (|3V).
_uando se use la aspiradora por un largo
_eriodo de tiempo, el calor de la bombilla
_uede calentar las partes de pl6stico
:erca.
3. Para reemplazar
la bombilla
cuidadosamente
inserte la del
portal6mparas
en la ranura.
4. Reinstale la
cubierta de la PowerMate ® como se
describe en la secci6n CAMBIO DE LA
CORREA Y LIMPIEZA DEL AGITADOR
(pag 16).
NOTA: V@ase PIEZA$ V CARACTERJSTICAS
para el n6mero de la bombilla. (p6g 4).
-17-
CUIDADO DEL AGITADOR
ADVERTENCIA
Pellgro de choque el_ctrlco o lesi6n corporal
Siempre apague y desconecte la asplradora
de la corrlente antes de efectuar el mante-
nimlento a su asplradora. De Io contraria
podria produclrse un choque
el_ctrlco o causar lesi6n corporal sl la
aspiradara arranca de manera imprevista.
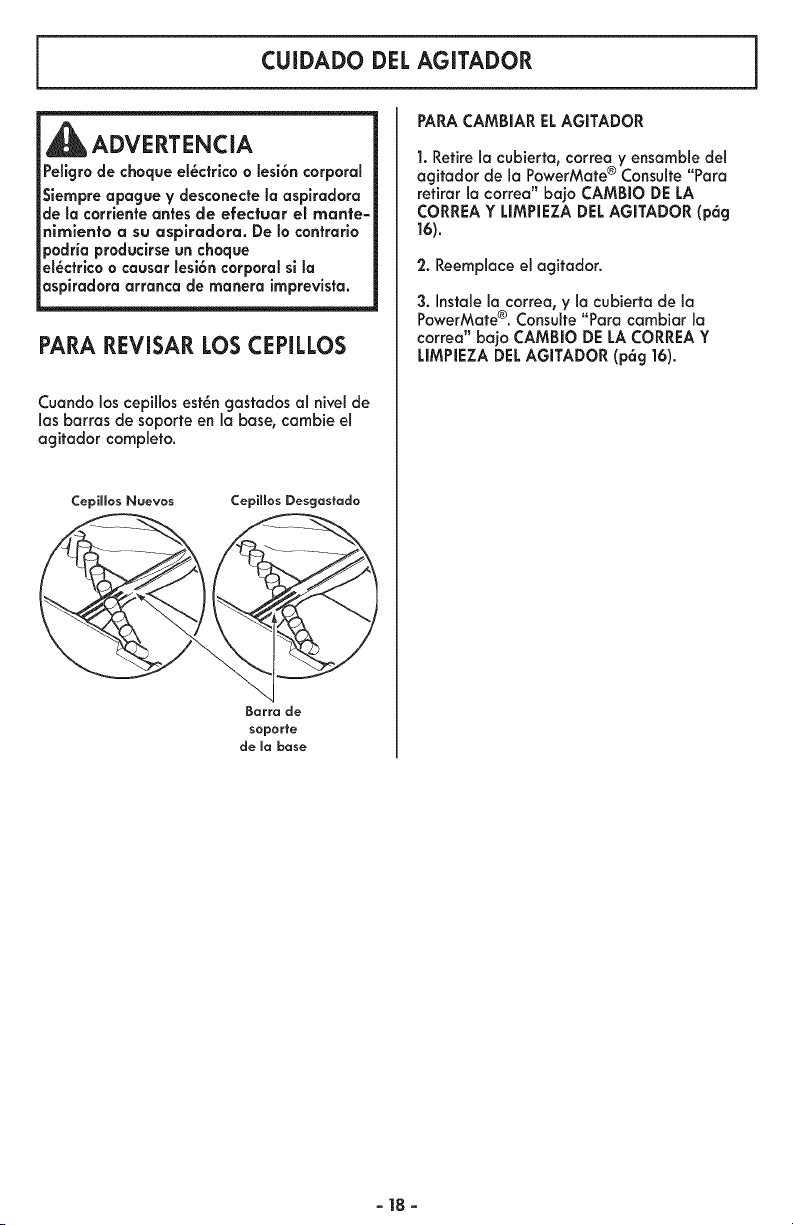
PARA REVISAR LOS CEPILLOS
Cuando los cepillos est_n gastados al nivel de
1asbarras de soporte en la base, cambie el
agitador completo.
CepiHos Naevos CepiHos Desgastado
Barra de
soporte
de mabase
PARACAMBIAR ELAGITADOR
1. Retire la cubierta, correa y ensamb!e del
agitador de la PowerMate ® Consulte Para
retirar la correa" bajo CAMBIO DE LA
CORREA Y LIMPIEZA DEL AGITADOR (p6g
16).
'2. Reemplace el agitador.
3. Instale la correa, y la cubierta de la
PowerMate®. Consulte"Para cambiar la
correa" bajo CAMBIO DELA CORREAY
LIMPIEZA DELAGITADOR (p6g 16).
-18-
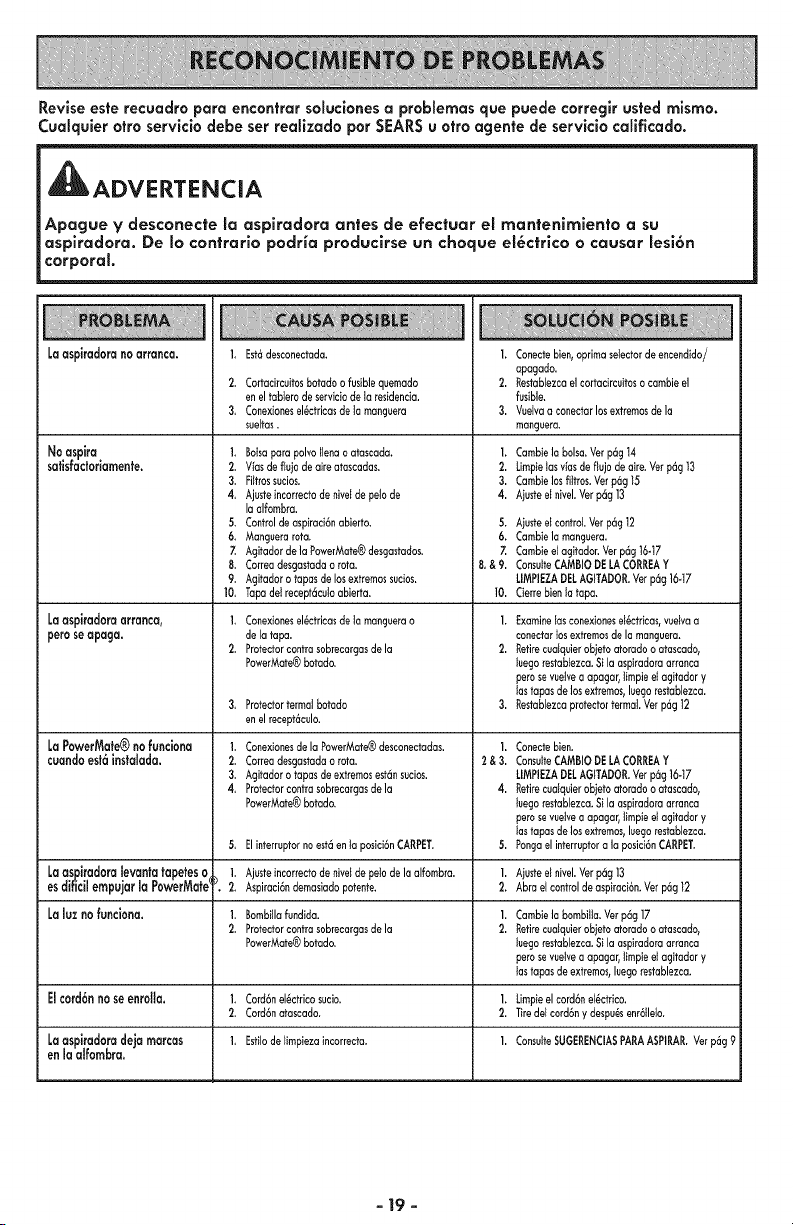
Revise este recuadro pare encontrar soluclones a problemas que puede correglr usted mismo.
Cualquier otro servicio debe ser realizado por SEARS u otro agente de servicio calificado.
1_ADVERTENCIA
Apague V desconecte la aspiradora antes de efectuar el man|enlmlento a su
aspiradora. De Io contrarlo podHa produclrse un choque el_ctrlco o causer lesi6n
corporal.
Laaspkadoranoarranca.
Noaspire
safisfacioriamente.
Laaspkadoraarranca,
peroseapaga.
LaPowerMate®nofunciona
cuandoest6insfcsffsdcs.
1,
2.
3,
Est6desconectada.
Cortocircuitosbotodo o fusible quemado
en el tabterode serviciode to residencia.
Conexionesel_ctricasde to mangeera
sueltas.
1. Botsapara polvo tlena o otoscada,
2. V_asdeflejo de aire atascadas.
3. Piltrossecios.
4, Ajeste incorrectode nivetde petode
Io alfombra.
5. Control deaspiroci6nobierto.
6. Manguera rota.
7. Agitador de la PowerMote®desgastodos.
8. Correa desgastadao rote.
9. AgJfadoro tapes de los extremossucios.
10, Tapa det recept6cutoobierta.
1, Conexionesel_ctricasdetomanguerao
delatapa.
2. Protectorcontrosobrecargasdela
PowerMate®botodo.
Protector termat botodo
en el recept6culo.
1. Conexionesde la PowerMate®desconectodas.
2. Correa desgastadao roto.
3. Agitador o tapas deextremosest6nsecios.
4, Protector controsobrecargasde la
PowerMate®botodo.
1. Conectebien,oprimaselectordeencendido/
apogado.
2. Restablezcoelcortocircuitoso cambieel
fusible.
3. Veetvaaconectarlosextremosdela
manguera.
1. Cambielabolsa.Verp6g14
2. Limpietosviasdeflu)odeaire.Verp6g13
3. Cambielosfittros.Verp6g15
4. Aiusteet nivel.Verp6g13
5. Aiusteetcontrol.Verp6g12
6. CambieIomonguera.
7. Cambieetagitodor.Verp6g16-17
8,&9. ConsulteCAMBIODELACORREAY
LIMPIEZADELAGffADOR.Verp6g16-17
10. Cierrebienlatape.
I. Examinelosconexioneset_ctrieas,veelvoa
conectortosextremosdelamonguera.
2. Retirecualquierobietoatorodoo atascado,
leegorestabtezca.Si laospiradoraarranca
peroseveeivea apagar,timpieetagitodor_'
lastapasdelosextremos,luegorestoblezco.
3. RestoblezcoprotectortermaLVerp6g12
|.
2&3.
Conectebien.
ConsuiteCAMBIODELACORREAY
LIMPIEZADELAGITADOR.Verp6g16-17
Retirecuotquierobietoatorodooatascado,
luegorestablezca.Sila ospiradoraarranca
peroseveetvea apagar,timpieetagitodory
lastapasdelosextremos,luegorestoblezco.
Pongaelinterreptora Ioposici6nCARPET.5, Elinterreptornoest6enta posici6nCARPET. 5.
Laasoiradoralevantatapeteso 1. Ajusteincorrectodenivetdepetodelaalfombra. 1. Aiusteet nivel.Verp6g13
esdi_cilempujarla PowerMate__. 2. Aspiraci6ndemasiodopotente. 2. AbroeIcontroldeaspffoci6n.Vetp6g12
Laluz no funciona. ]. Bombillofundida. 1. CambieIobombitta.Verp6g17
2. Protectorcontrosobrecargasdela 2. Retirecuelquierobjetoatorodoo atascado,
PowerMate®botodo, luegorestablezca.Sila aspiradoraarranca
peroseveetvea apagar,timpieetagitodory
lastapasdeextremos,leegorestablezca.
Elcord6n no seenrolla. 1. Cord6nel_ctricosucio. 1. Limpieelcord6net_ctdco.
2. Cord6notascado. 2. Tiredelcord6ny despu_senr6lleto.
Laaspiradoradeja marcas 1, Estilodelimpiezaincorrecta. I. ConsulteSUGERENCIA8PARAASPIRAR.Vetp_g9
en la aifombra.
- 19 -

Your Home
For troubleshooting, product manuals and expert advice:
managemylife
www.managemylife.com
For repair - in your home - of all major brand appliances,
lawn and garden equipment, or heating and cooling systems,
no matter who made it, no matter who sold it !
For the replacement parts, accessories and
owner's manuals that you need to do-it-yourself.
For Sears professional installation of home appliances
and items like garage door openers and water heaters.
1-800-4-MY-HOME ® Call anytime, day or night
(1-800-469-4663) (U.S.A. and Canada
www.sears.com www.sears.ca
TM
® Registered Trademark / Trademark of KCD IP, LLC in the United States, or Sears Brands, LLC in other countries
TM
® Marca Registrada/ Marca de Fabrica de KCD IP, LLC en Estados Unidos, o Sears Brands, LLC in otros paises
MC Marque de commerce / MD Marque depos6e de Sears Brands, LLC
P/N C01ZDXG20U00 - I<C01ZDXGZOU0