Owner's Manual
ManualDel Propietario
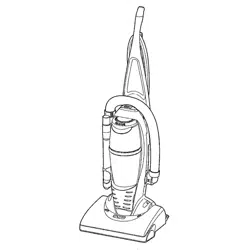
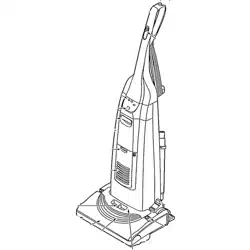
VacuumCleaner
Aspiradora
Model, Modelo
116.31912
116,31913
CAUTION:
Read and follow all
safety and operating
instructions before first
use of this product.
CUIDADO:
Lea y sigue todas las
instrucciones de operacion
y seguridad antes del uso de
este producto.
Y
Sears, Roebuck and Co., Hoffman Estates, IL 60179 U.S.A.
www.sears.com
Printed in Mexico
Part No. CQ1 ZCHA1 QUQ(D-KCQ1ZCHAZQUQ Imprime aux Mexique
iiiiiiiiii i;iiiiiil;i;iii i i;iiiliiiii ili;i i!!!!i!iiiiiiiiiiiiiiiiiiiii!!!! ;i;;iiiiiiiiill
i_i_i_i_i__iiii!;;;;!_____;_________!!__!!!_!__________i_;__i;!_iii_i!i_!!!!!!i!i!i!i!!ii_!!!_!_!_!_!_!_i_!i!__;_i!ii__;ilililili;iiiiililiiiiiii;!iii!i;!iii;;iii!!iii!ii_!i!i!i!iiiiiiiiiiiiiii_iliiiiii_iii_i_iii_ii_iiiili;! !!!!!!i!!!!!iil;;iiiiii!;!;!i!i!i!i!i!i!iiii!i!i!i!iii!i!iilli!iiiiiiii;;;;iiiiii!!! ii1
Before UsingYour New Vacuum ........ 2
KenmoreVacuum Cleaner Warranty .... 2
ImportantSafety Instructions ........... 3
UprightVacuum Cleaner Parts and
Features ............................ 4
Assembly Instructions ............... 5-6
Operating Instructions................. 6
Releasing the Handle ................. 7
ON/OFF Switch ..................... 7
Pile Height Selection and Setting ........ 7
Agitator On/Off Selector .............. 8
Attachments ..................... 8-10
Attachment Use Chart ............... 11
Vacuuming Tips .................... 11
Performance/Safety Features ....... 12-13
Vacuum Cleaner Care ............... 14
Vacuum Storage ................... 14
Cleaning Exterior and Attachments ..... 14
Dust Bag Changing ................. 15
Filter Changing .................... 16
Light Bulb Changing ................. 17
Agitator Cleaning ................... 17
Clog Removal ..................... 18
Troubleshooting ..................... 19
RequestingAssistanceOr Service ..... 20
Nr
Please read this guide• It will help you assemble and operate your new Kenmore vacuum in
the safest and most effective way.
For more information about vacuum cleaner care and operation, call your nearest Sears store.
You will need the complete model and serial numbers when requesting information. Your vacu-
um's model and serial numbers are located on the Model and Serial Number Plate.
Use the space below to record the model number and serial number of your new Kenmore
vacuum.
Model No. ..............................................................
Serial No.
Date of Purchase
Keep this book and your sales check (receipt) in a safe place for future reference.
lililiiiiii!i!iiiiiiiiiiiii!iiiiiiiiiiiiiiiiii!!!!!iii_iiii!i!i!i!i!ililililiiiiiiii!iiiiiiiiiiii!iiiiiii!iiii!ililililliiiiiiiiiiii!ii!_!_!i!i!_i_i_i_i_i_ii_ii_!ii_i_i_i_!_i_ii!i!_!iii!ii_i_i_i_i_i_i_i_i_i_i_i_i_i_i_i_iiiii_i_iiiiiii!_i_i!i_i_i_i_i!iiii!iii!i!i!i!i!i!l_llii_iiiiiiiii_,_i_i_i_i_i_!i!i
LIMITED ONE YEAR WARRANTY ON KENMORE VACUUM CLEANER
This warranty is for one year from the date of purchase, and includes only private household
vacuum cleaner use. During the warranty year, when this vacuum cleaner is operated and
maintained according to the owner's manual instructions, Sears will repair any defects in
material or workmanship free of charge.
This warranty excludes vacuum bags, belts, light bulbs, and filters, which are expendable parts
and become worn during normal use.
Forwarrantyservice, returnthis vacuum cleaner tothe nearest Sears Service Center in the
UnitedStates.
This warranty applies only while this product is in use in the United States• This warranty gives
you specific legal rights, and you may also have other rights which vary from state to state.
Sears, Roebuck and Co., D/817 WA, Hoffman Estates, IL 60179
2
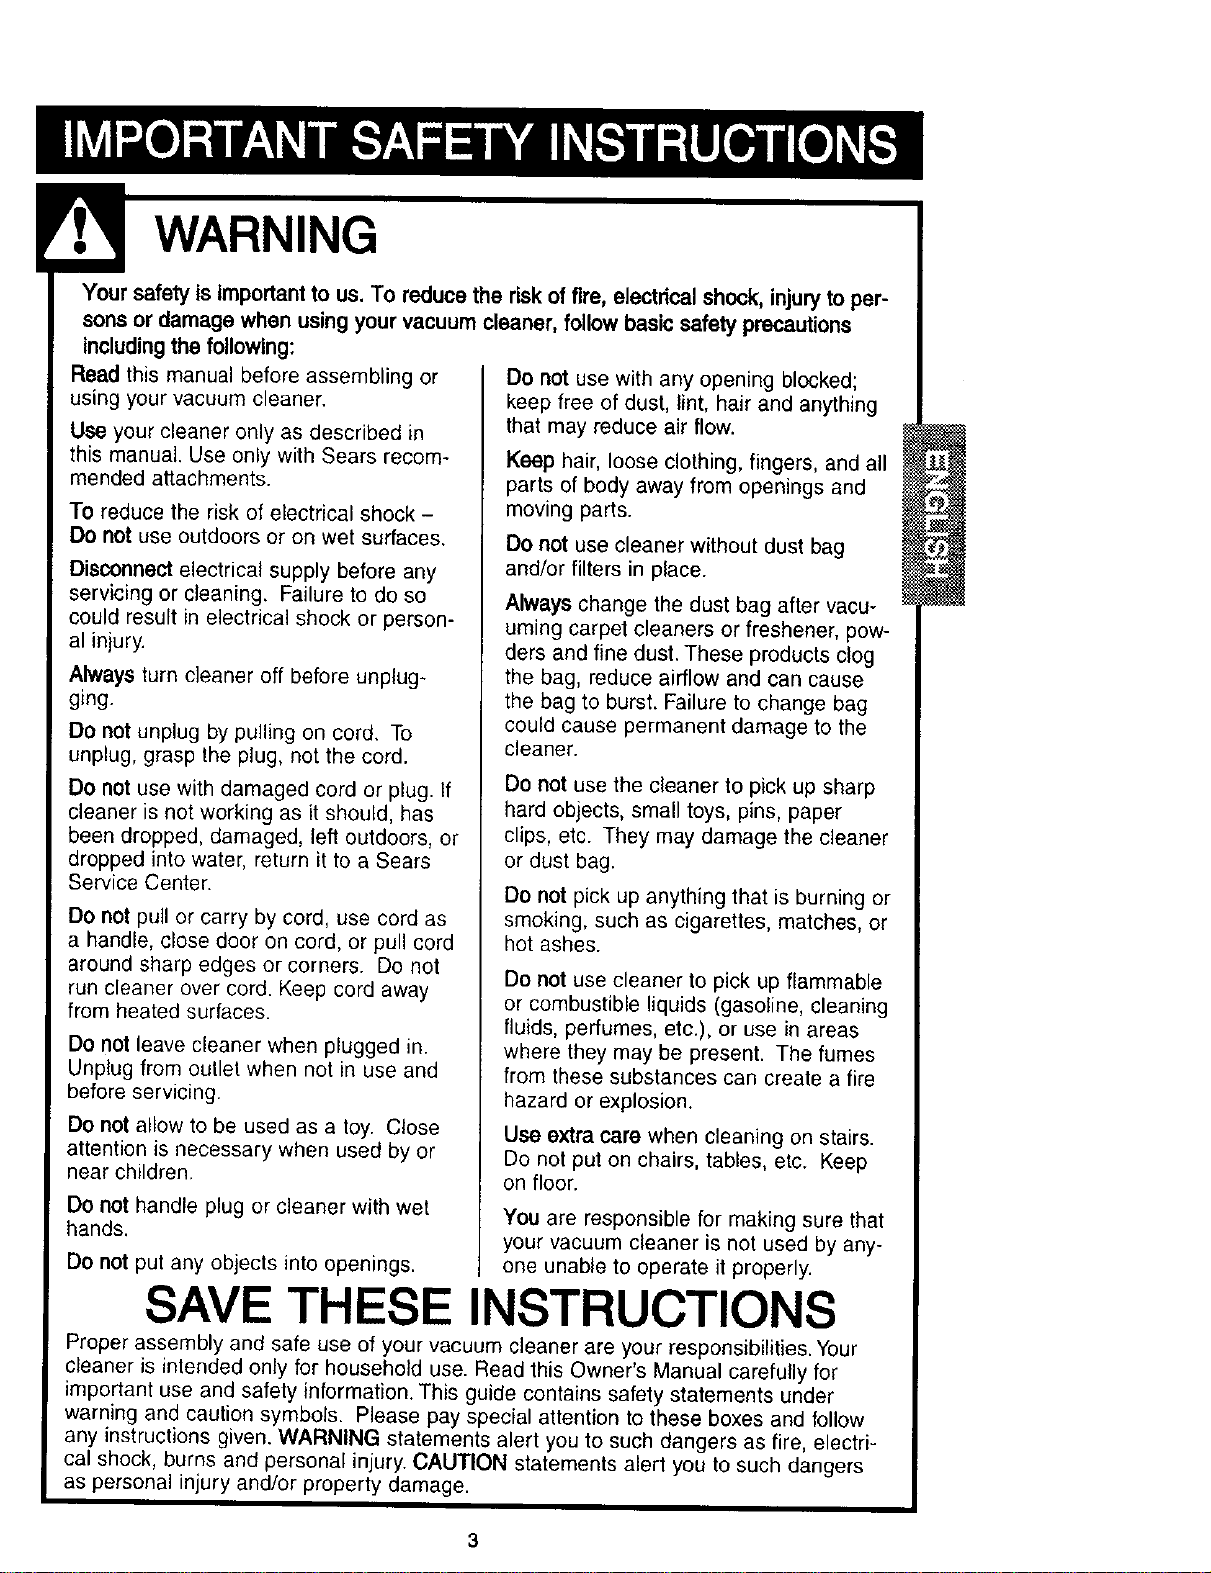
Your safety is importantto us. To reduce the riskof fire, electricalshock, injuryto per-
sonsor damage when usingyour vacuum cleaner, follow basicsafety precautions
Including the following:
Read this manual before assembling or
using your vacuum cleaner.
Use your cleaner only as described in
this manual. Use only with Sears recom-
mended attachments.
TOreduce the risk of electrical shock -
Do not use outdoors or on wet surfaces,
Disconnect electrical supply before any
servicing or cleaning. Failure to do so
could result in electrical shock or person-
al injury.
Always turn cleaner oft before unplug-
ging.
Do not unplug by pulling on cord. To
unplug, grasp the plug, not the cord.
Do not use with damaged cord or plug. If
cleaner is not working as it should, has
been dropped, damaged, left outdoors, or
dropped into water, return it to a Sears
Service Center.
Do not pull or carry by cord, use cord as
a handle, close door on cord, or pull cord
around sharp edges or corners. Do not
run cleaner over cord. Keep cord away
from heated surfaces.
Do not leave cleaner when plugged in.
Unplug from outlet when not in use and
before servicing.
Do not allow to be used as a toy. Close
attention is necessary when used by or
near children.
Do not handle plug or cleaner with wet
hands.
Do not use with any opening blocked;
keep free of dust, lint, hair and anything
that may reduce air flow.
Keep hair, loose clothing, fingers, and all
parts of body away from openings and
moving parts.
Do not use cleaner without dust bag
and/or filters in place.
Always change the dust bag after vacu-
uming carpet cleaners or freshener, pow-
ders and fine dust. These products clog
the bag, reduce airflow and can cause
the bag to burst. Failure to change bag
could cause permanent damage to the
cleaner.
Do not use the cleaner to pick up sharp
hard objects, small toys, pins, paper
clips, etc. They may damage the cleaner
or dust bag.
Do not pick up anything that is burning or
smoking, such as cigarettes, matches, or
hot ashes.
Do not use cleaner to pick up flammable
or combustible liquids (gasoline, cleaning
fluids, perfumes, etc.), or use in areas
where they may be present. The fumes
from these substances can create a fire
hazard or explosion.
Use extra care when cleaning on stairs.
Do not put on chairs, tables, etc. Keep
on floor.
You are responsible for making sure that
your vacuum cleaner is not used by any-
Do not put any objects into openings, one unable to operate it properly.
SAVE THESE NSTRUCTIONS
Proper assembly and safe use of your vacuum cleaner are your responsibilities. Your
cleaner is intended only for household use. Read this Owner's Manual carefully for
important use and safety information. This guide contains safety statements under
warning and caution symbols. Please pay special attention to these boxes and follow
any instructions given. WARNING statements alert you to such dangers as fire, electri-
cal shock, burns and personal injury. CAUTION statements alert you to such dangers
as personal injury and/or property damage.
::_::::::::_: _:_::%_:;:;:::::::::;:::::::::_::::_::::::::: ::::;:::_::::::::::;:::::::::::::::::_:::..,.,,:, :,.,.::,......_.:.:.:,:.:¢,_:.:_::: :; :>_.:.:,>:+:<:_ .:,,__..:.:,:., :..:_.__.:._._.::.:.:+:+ _:_:+::;;_::::::_::::;:::::::::::::::::::::::::::::::::::::::::_::::::::::::::::_::::::::::_; ;:: :::::::;:_:::
_ii_.i.!.!.i_._i_i_iTi.i...i_i_i_i_i_i_i_i_i_._i_i_i_Ti_i.i_iiT.!_%_i_i_i_i_i_i_._i_i_i.._._.i_iTi.i_i_i.i._._._...i........................'"i.................ii''_'_'''°"....................i.............................iiiiili..........iii!i!_i_!_i_!iiiiiiiiT!!!_i_i_!!i_i_iiiiiii_i''-!i!!!_iiiiiii_
1_i_ii:_i:ii_i_: _::_:::_:::::" :::_:"""_::_:_i:iiiii_ " : ' " : ::: " :_::::_:::_:_:_'_:_::,....................._ii!::!ii_::::_:_:_:_::_::::!:::_
|::::::::::_:::::;:::::::::::::::::: ::::::::: :::::::::::::;;:::;::::;:::::::::::;:::::::::_:_:_:::::::::::::::::::::::::;::::_ _ :_ ::; ::::_ :::::::::::::::::::_::::::::::::;:::::::::::::::;:;:::::::::::::::::;;::::::::::::;;:::::_::::::::;:;:::::::::::::_::::_::::::::: I
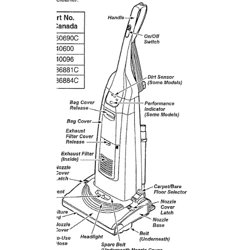
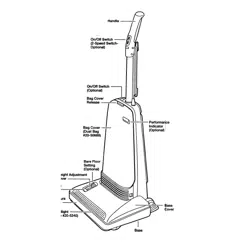
It is important to know your vacuum cleaner's parts and features to assure its proper and safe
use. Review these before using your cleaner.
Item Part No. Part No.
In U.S. In Canada
Dust Bag 20-50690 20-50690C
Headlight Bulb 20-5248 20-5248C
Exhaust Filter 20-86889 20-86889C
Motor Safety Filter 20-86884 20-86884C
Switch
Quick Release
Bag Cover
Bag
Exhaust
Filter Cover
(Soma
Models)
Performance
Indicator
(Some
Models)
Exhaust Filter
Lower
Agitator
On/Off
Selector
Carry
Crevice
Tool --
Telescoping
Wan1
Dusting
Comb_aUon
B_sh
Handle
Release
ModeVSerlel
Numbe_
i _J _lReady-to-Use
I Swivel Hose
Motor
Protector
Agitator
(Underneath)
Release
Pedal
Headlight
Base
Agitator Overload
Reset Button
EXTENSION HOSE KITS
SOME MODELS
Extension Hose
!((II[{U({{lU(IHIII
_F SOME MODELS
(_-- Adaptor
loot BrUSwhand Handl!Mate" Jr.
U
E WARNING
ElectricalShock Hazard
Do not plug into the electricalsupply
until the assembly iscomplete, Failure
to do so could result in electricalshock
or injury.
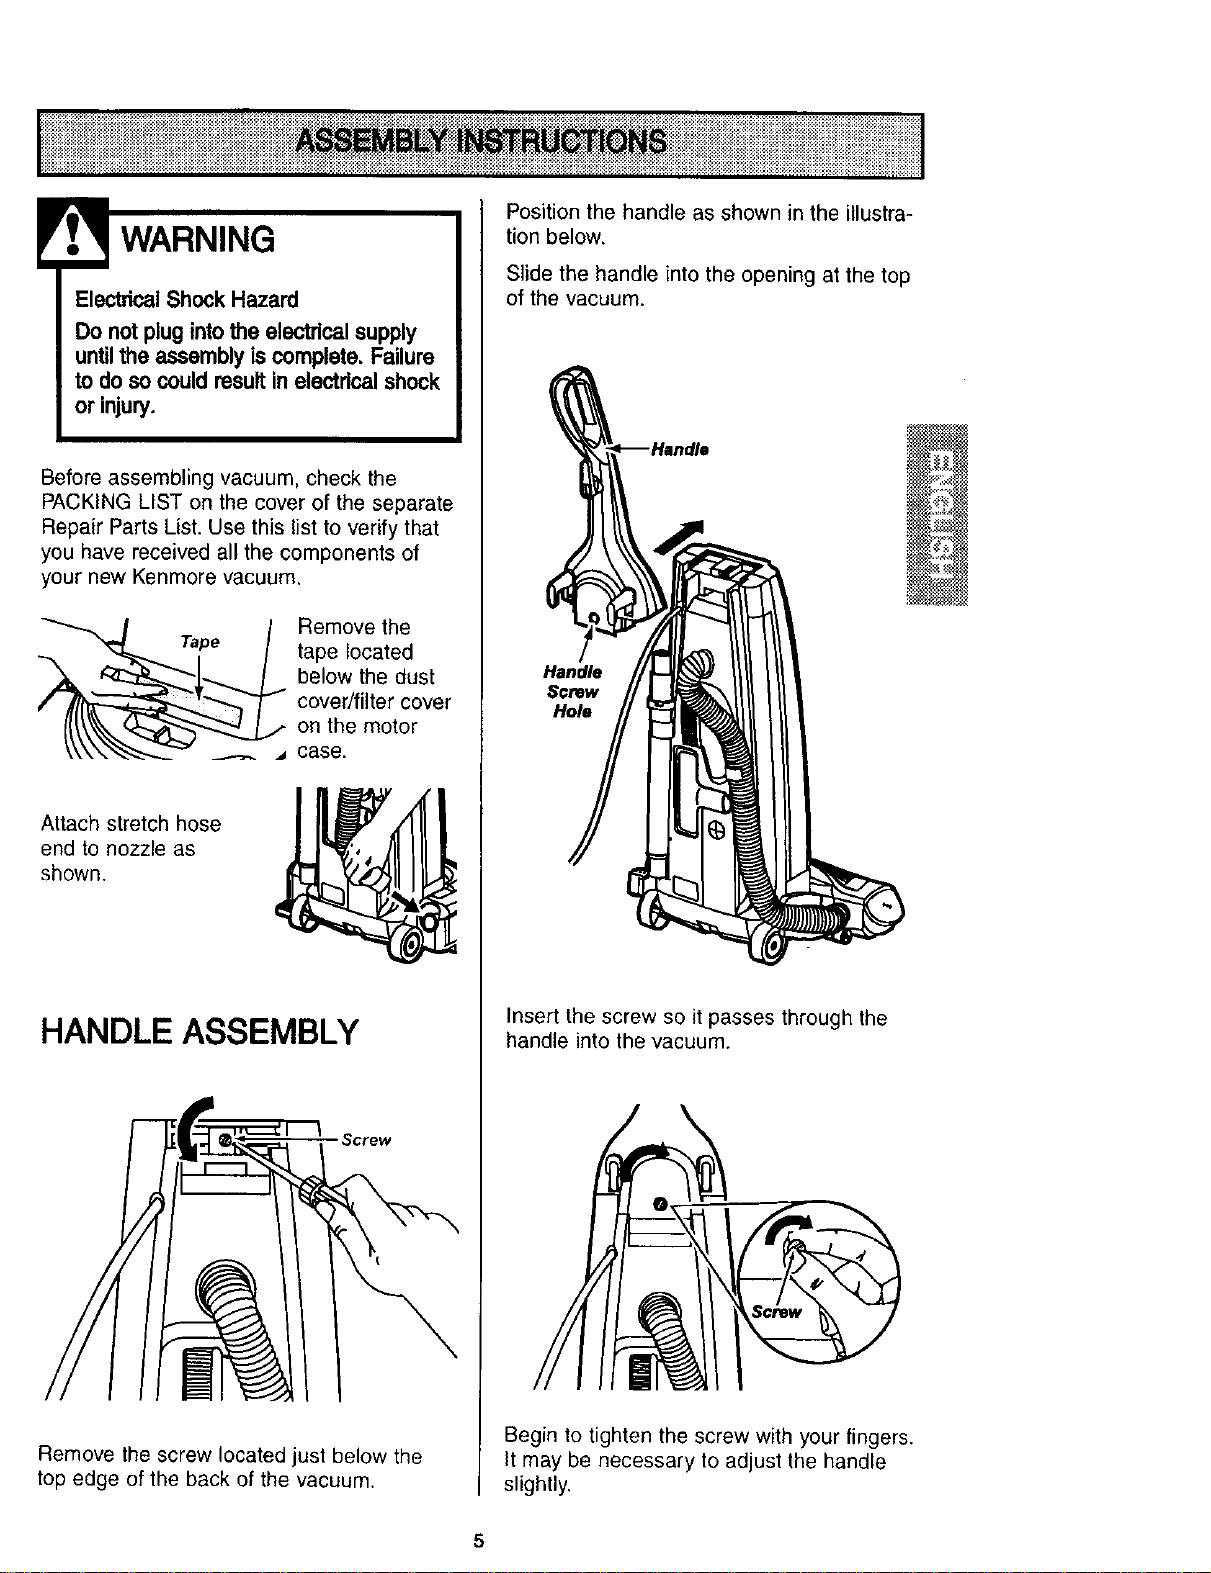
Before assembling vacuum, check the
PACKING LIST on the cover of the separate
Repair Parts List. Use this list to verify that
you have received all the components of
your new Kenmore vacuum.
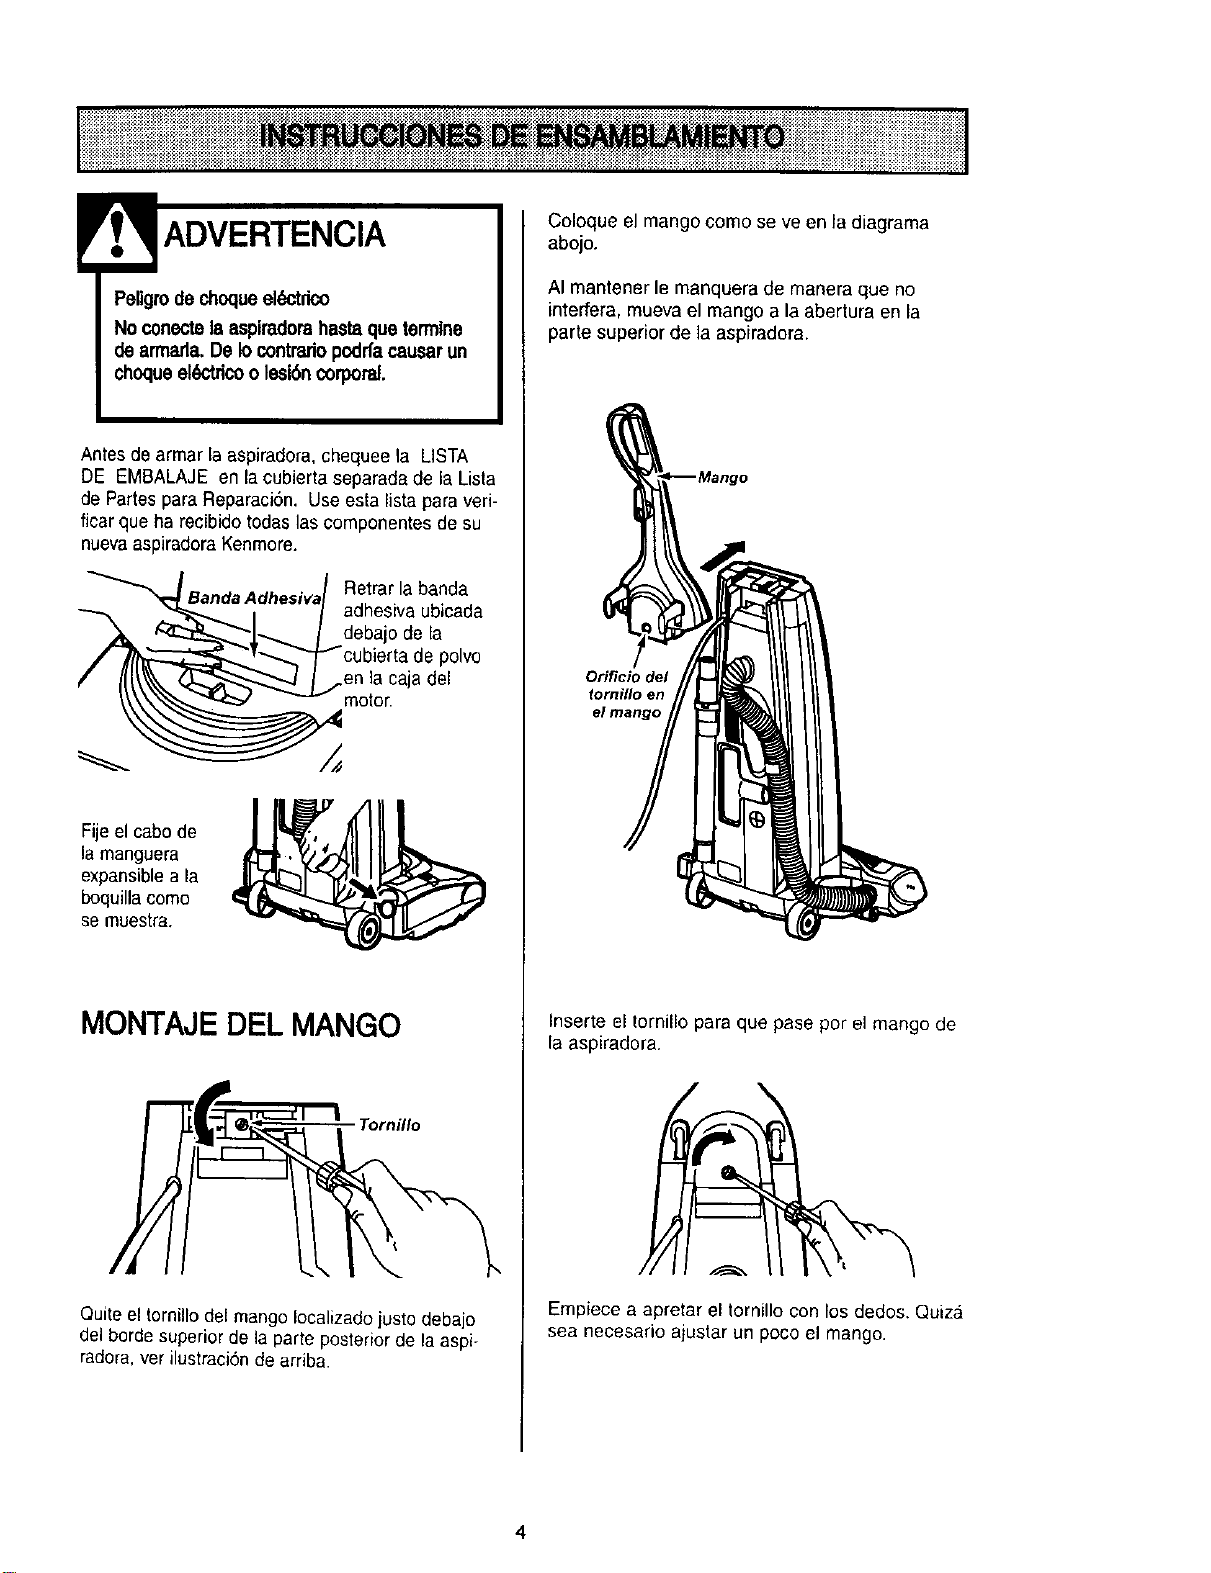
_ Remove the
e tape located
below the dust
cover/filter cover
on the motor
case•
Attach stretch hose
end to nozzle as
shown.
HANDLE ASSEMBLY
Screw
Remove the screw located just below the
top edge of the back of the vacuum•
Position the handle as shown in the illustra-
tion below.
Slide the handle into the opening at the top
of the vacuum.
Handle
Screw
Hole
Insert the screw so it passes through the
handle into the vacuum.
Begin to tighten the screw with your fingers•
It may be necessary to adjust the handle
slightly.
_._._

Using a
screwdriver,
tighten the
screw.
Do not overtighten.
Overtighteningcould stdp the screw
holes.
Do not operate the cleaner withoutthe
screw in place.
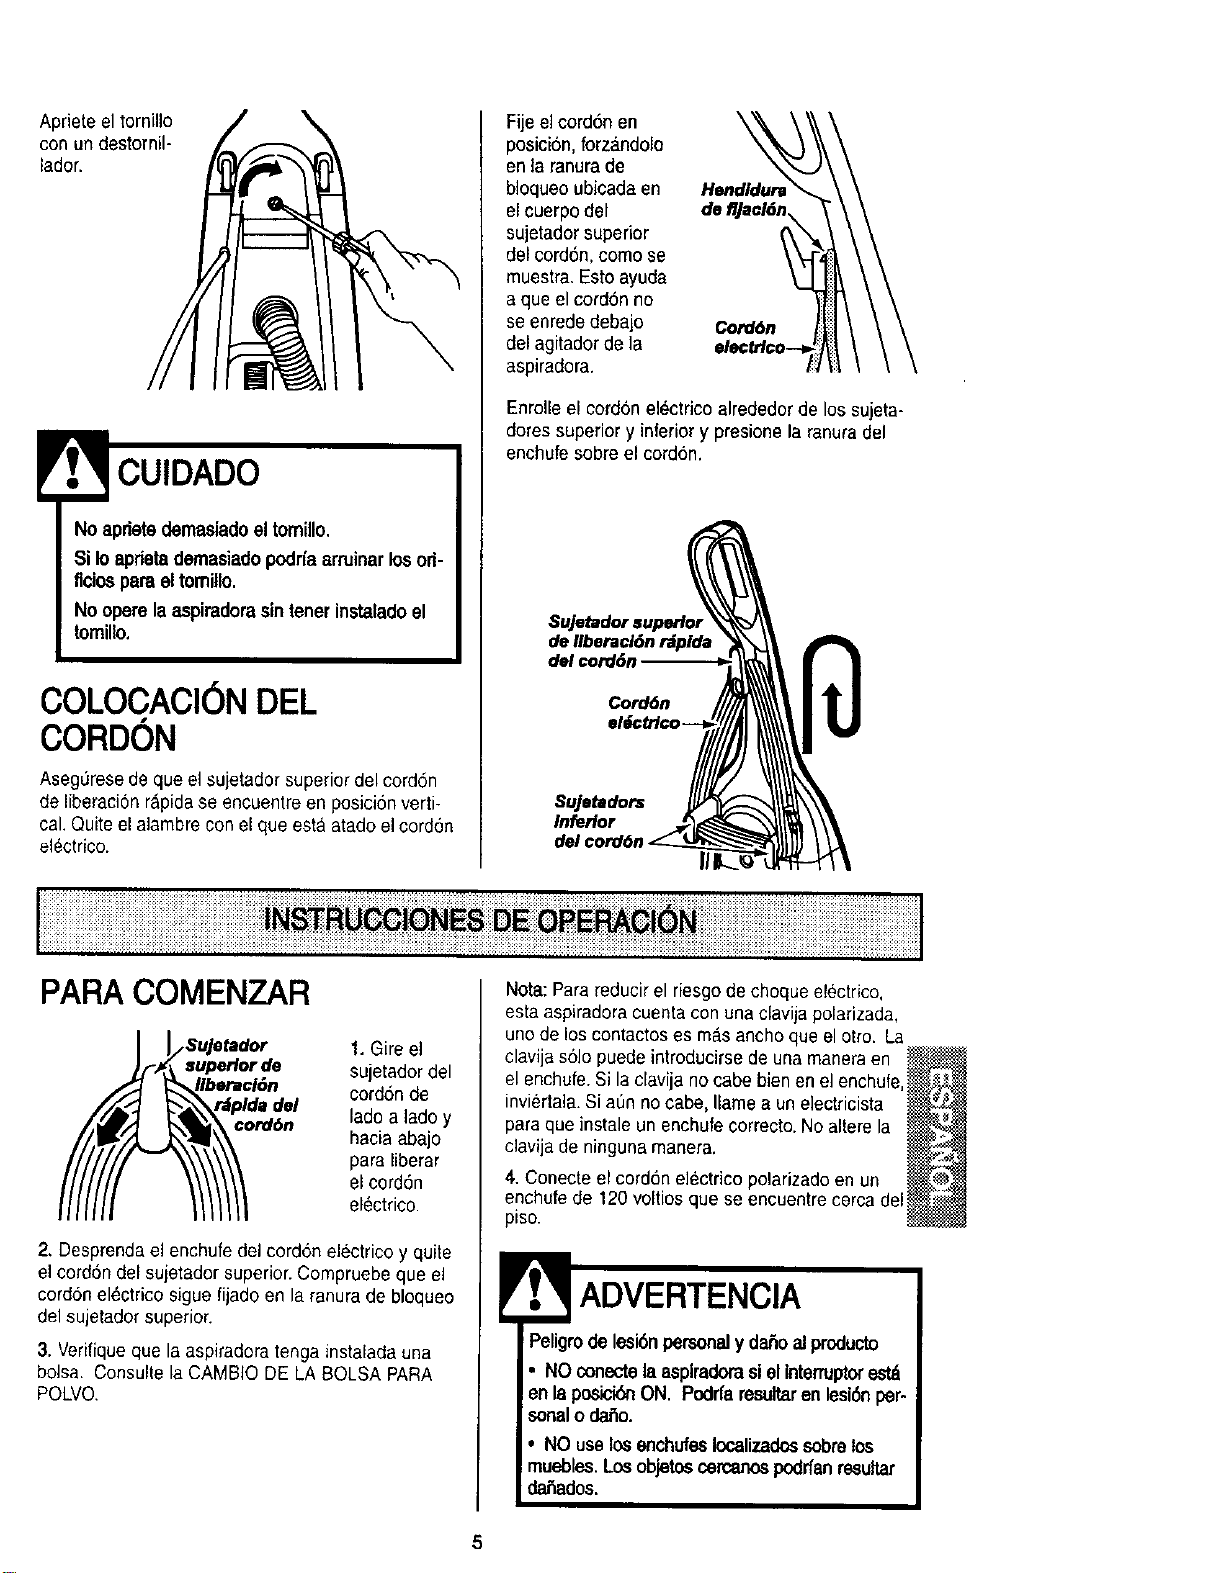
CORD ASSEMBLY
Make sure the quick release upper cord
hook is in the upright position. Remove the
wire tie from the power cord.
Lock the cord into
place by forcing it
into the locking
notch on the body
of the quick
release upper cord
hook as shown.
This helps keep
the power cord out
from under the Power
vacuum cleaner
agitator.
Wrap the power cord around the upper and
lower cord hooks and lock the power cord
plug onto the power cord.
Upper Cord
Power
Lower
Cord
HOW TO START
1. Turn the
Rel_s= quick release
Upper Cord
Hook upper cord
hook to either
side and
down to
release the
power cord.
2. Release the power cord plug from the
power cord and pull the cord off the quick
release upper cord hook. Check to be sure
the power cord is still locked into the lock in
the quick release upper cord hook.
3. Check to see if the cleaner has bag
installed. See DUST BAG CHANGING.
Note: To reduce the risk of electric shock,
this vacuum cleaner has a polarized plug,
one blade is wider than the
other. This plug will fit in a polarized outlet
only one way. If the plug does not fit fully in
the outlet, reverse the plug. If it still does not
fit, contact a qualified technician to install
the proper outlet. Do not change the plug in
any way.
4. Plug the polarized power cord into a 120
Volt outlet located near the floor.
l WARNING
Personal Injury and Product Damage
Hazard
, DO NOT plug in if switch is in the ON
_osition. Personal injury or damage
;'ould result.
• DO NOT use outlets above counters.
Damage from cord to items in surround-
ing area could occur.
6
iiiiiiiiiiiiiiiiiiiii!iiiiiiiii!i!iiiiiiiii i iiiiiiiiii i!i!i i iiiiiiiiiiiiiiiiiiiiiiiiiiiiiii!iiiiiiiiiiiiiiiiii ii Eiii N ii ii!!!!!ii! iiiiiiiiiiiliiiiiiiiiiii!!!!!!!!!ili! iiiiii!i!i!iiiiii!iiii
iiiii!iii!!!i iiiii!!iiiiiiiiiii !! !!iiii!!ii _l_i_:_l_;_i_;_ii_!;_i_;_i_i_i!ii_i_i_;_i_ii_i_i_ iii!ii!!i!!!i!!!!!!!i!iiiiiiiiiiiiii!!ii!!!1
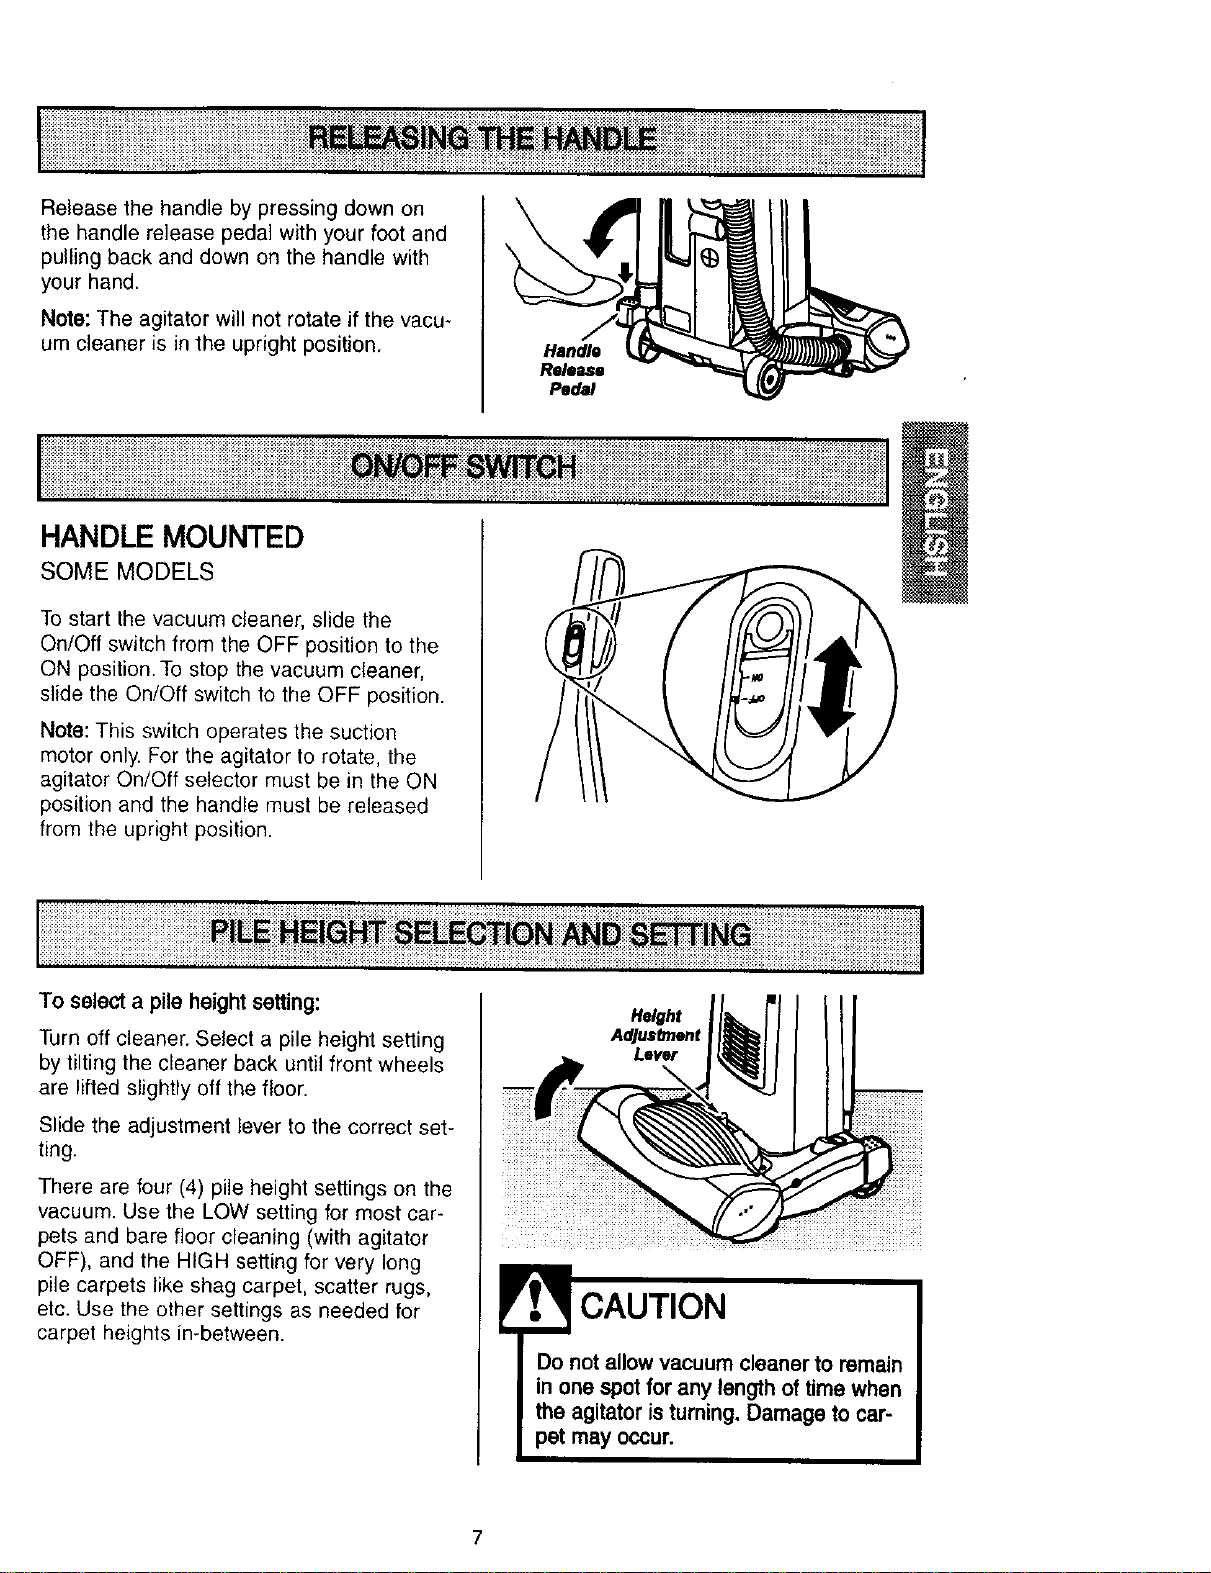
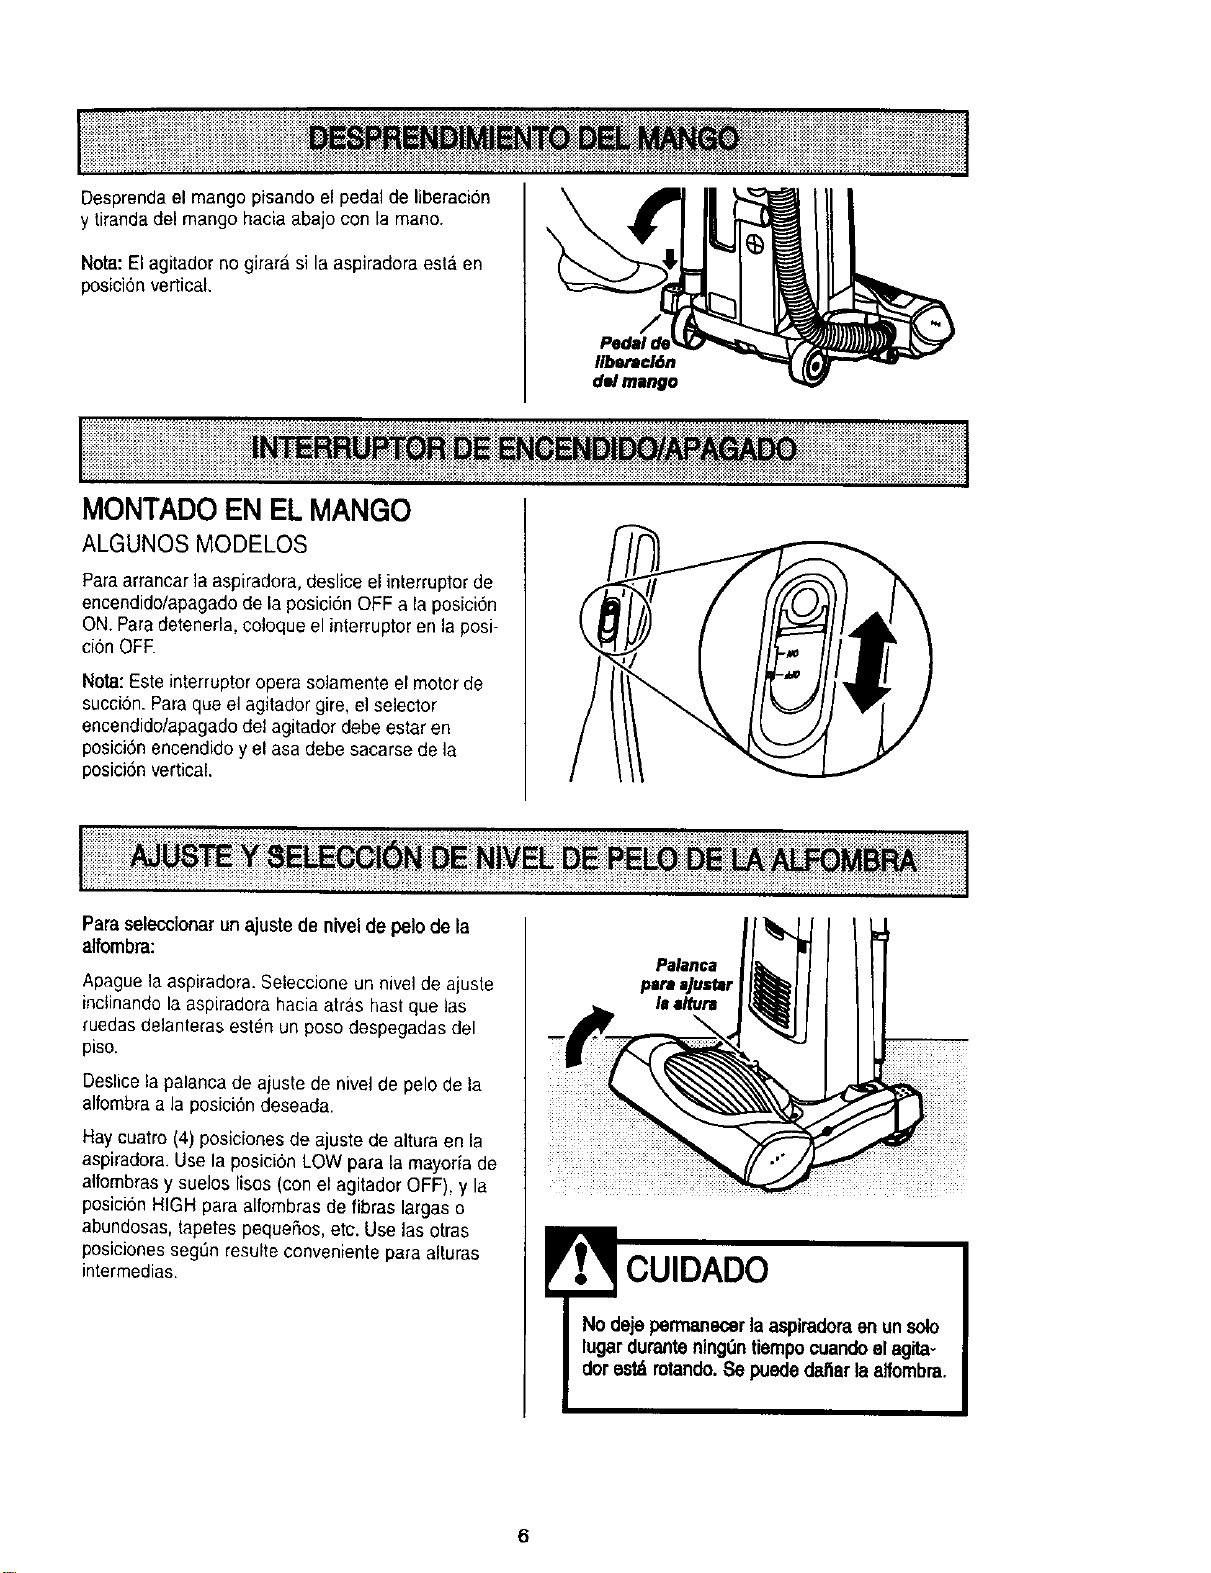
Release the handle by pressing down on
the handle release pedal with your foot and
pulling back and down on the handle with
your hand.
Note: The agitator will not rotate if the vacu-
um cleaner is in the upright position.
Handle
Ro_eue
Pedal
_i_i___Ez_i_iiiii_iiiiiiiiiiiiiiiiiiii!iiiiiiii!!!i!!!!!!!!!_!E__i_F____iiii!!!i!i!_
HANDLE MOUNTED
SOME MODELS
To start the vacuum cleaner, slide the
On/Off switch from the OFF position to the
ON position. To stop the vacuum cleaner,
slide the On/Off switch to the OFF position.
Note: This switch operates the suction
motor only. For the agitator to rotate, the
agitator On/Off selector must be in the ON
position and the handle must be released
from the upright position.
To selecta pile height setting:
Turn off cleaner. Select a pile height setting
by tilting the cleaner back until front wheels
are lifted slightly off the floor.
Slide the adjustment lever to the correct set-
ling.
There are four (4) pile height settings on the
vacuum. Use the LOW setting for most car-
pets and bare floor cleaning (with agitator
OFF), and the HIGH setting for very long
pile carpets like shag carpet, scatter rugs,
etc. Use the other settings as needed for
carpet heights in-between.
Height
Adjustment
Lever
CAUTION
Do not allow vacuum cleaner to remain
in one spot for any length of time when
the agitator is turning. Damage to car-
pet may occur.
i!ii!iiiliiiiiiiii!!iliiiiiiiiiiiiiiiiiiiiiii Eiiiiiiiiiiii!!!i!!i!iiiiiiiiiiii!i!i!i!ililili!}iiiiiiiii!ii!!!!iiiiiiiii
lii iiiiiii! !iiil _!i!_ii!_!_ii!iiii_i_i!ii!@!i!_!_!_i_i_i_iiii_il!_ii!i!i!iiii!i_i_ii_iii_i!!%_!_i!_!_iiiii iil i iii_iiiiii_!iii_;_;_!_!i_i!i!i!_!i!i!!!!_!_!_!_i_iiiiiiii_!_!_!_!!!!!_i!!!!_iiii_i!i_@_!_!_i_!_!_ii!i!_!_!i!i!i!i!!iiiiii {{iiiiiii}iii!iiiii!Siiiii}iiiiiilJ
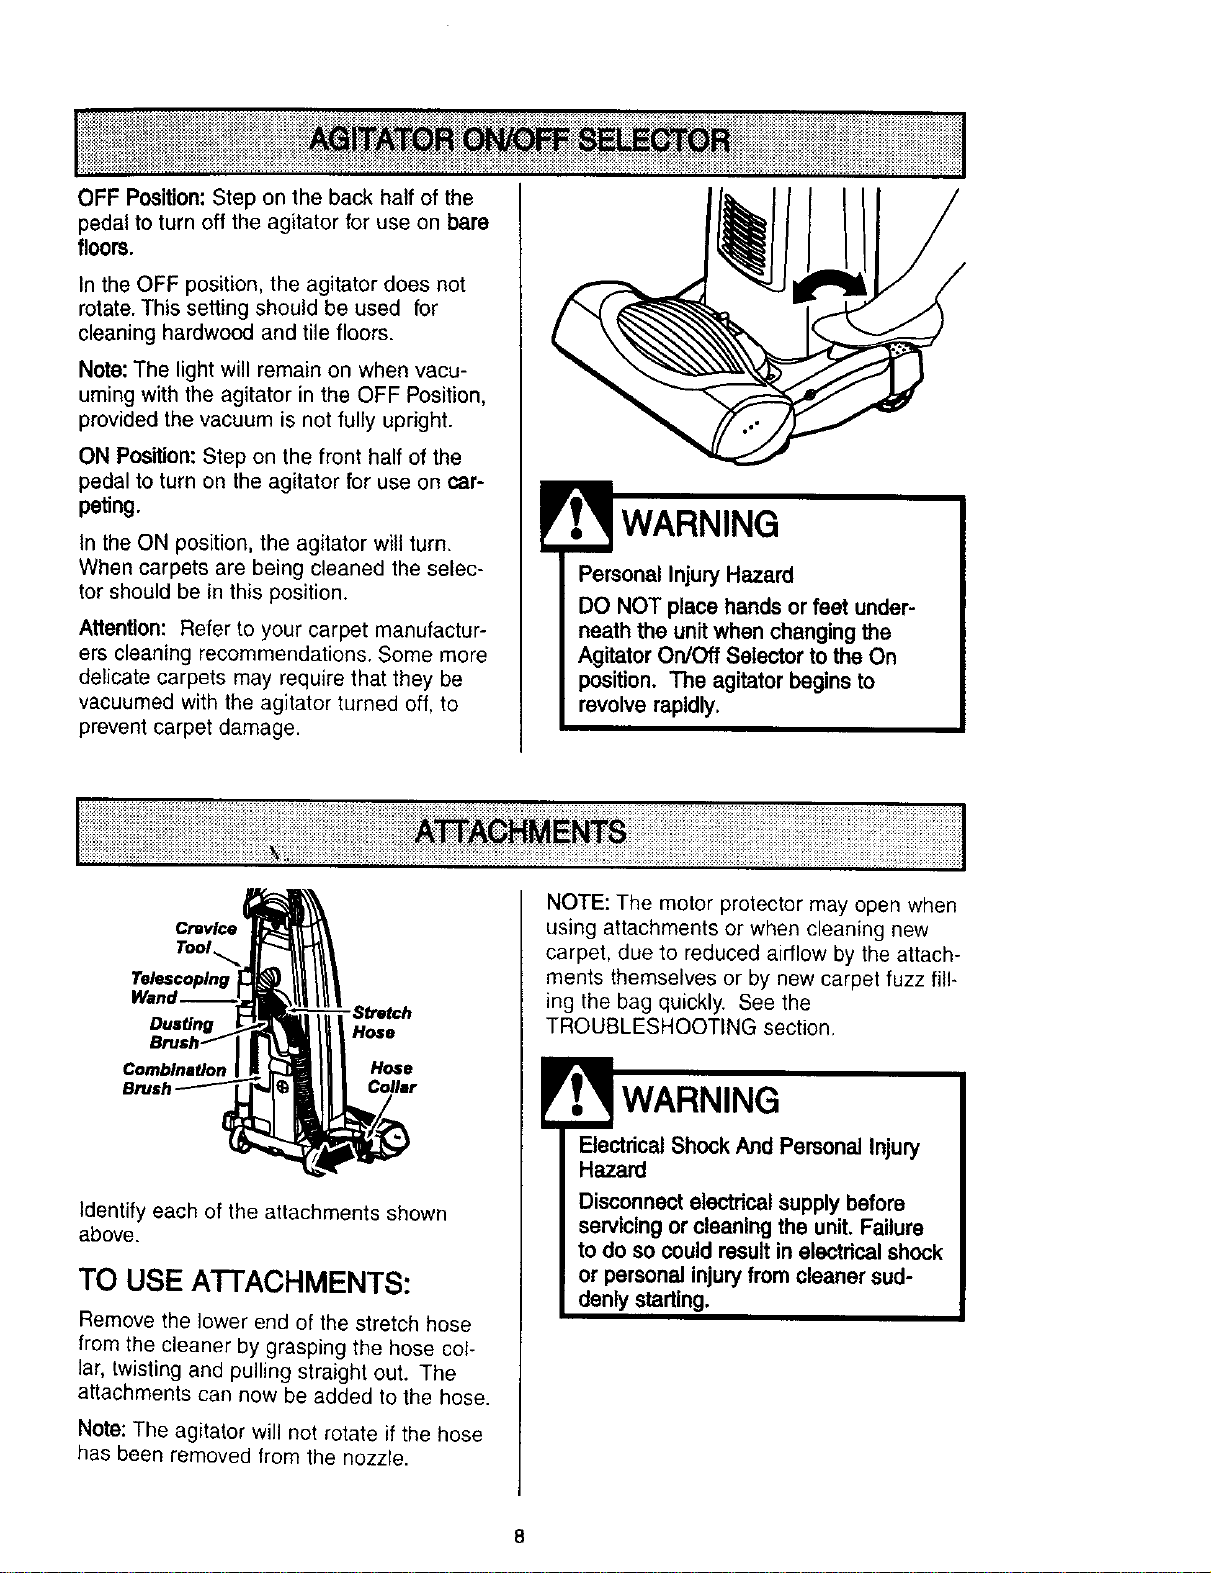
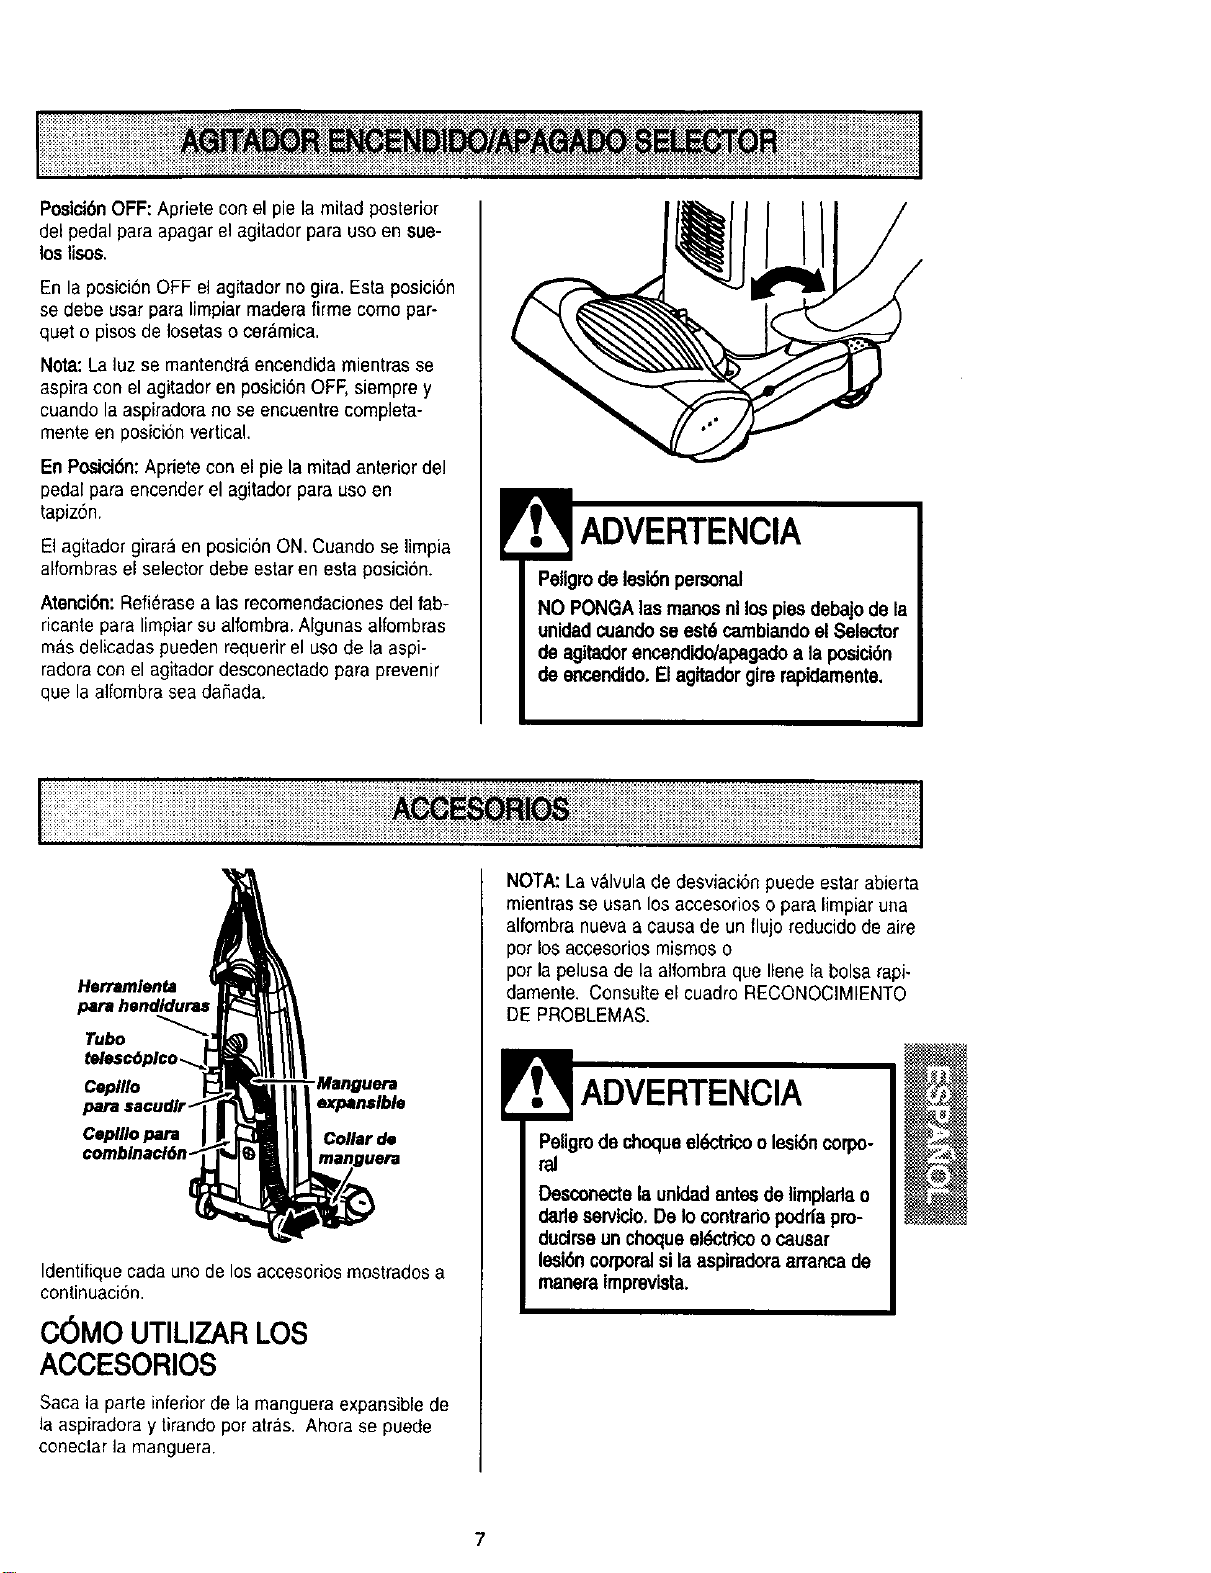
OFF Position: Step on the back half of the
pedal to turn off the agitator for use on bare
floors.
In the OFF position, the agitator does not
rotate. This setting should be used for
cleaning hardwood and tile floors.
Note: The light will remain on when vacu-
uming with the agitator in the OFF Position,
provided the vacuum is not fully upright.
ON Position: Step on the front half of the
pedalto turn on the agitator for use on car-
peting,
In the ON position, the agitator will turn.
When carpets are being cleaned the selec-
tor should be in this position.
Attention: Refer to your carpet manufactur-
ers cleaning recommendations. Some more
delicate carpets may require that they be
vacuumed with the agitator turned off, to
prevent carpet damage.
!
r,f WARNING
Personal InjuryHazard
DO NOT place hands or feet under-
neath the unit when changing the
Agitator On/Off Selector to the On
position. The agitator begins to
revolve rapidly.
Cl_vlce
Tool
-Stretch
Dusting Hose
Combination Hose
Brus Collar
Identify each ofthe attachments shown
above.
TO USE ATTACHMENTS:
Remove the lower end of the stretch hose
from the cleaner by grasping the hose col-
lar, twisting and pulling straight out. The
attachments can now be added to the hose.
Note: The agitator will not rotate if the hose
has been removed from the nozzle.
NOTE: The motor protector may open when
using attachments or when cleaning new
carpet, due to reduced airflow by the attach-
ments themselves or by new carpet fuzz fill-
ing the bag quickly. See the
TROUBLESHOOTING section.
rf, WARNING
Electrical Shock And Personal Injury
Hazard
Disconnectelectricalsupplybefore
servicing or cleaningthe unit. Failure
to do so could resultin electricalshock
or personalinjuryfrom cleaner sud-
denly starting.
The attached
hose swivels to
make cleaning
easier in every
direction.
Remove the Hose
Clip
hose from the
hose clip by
pulling straight
out.
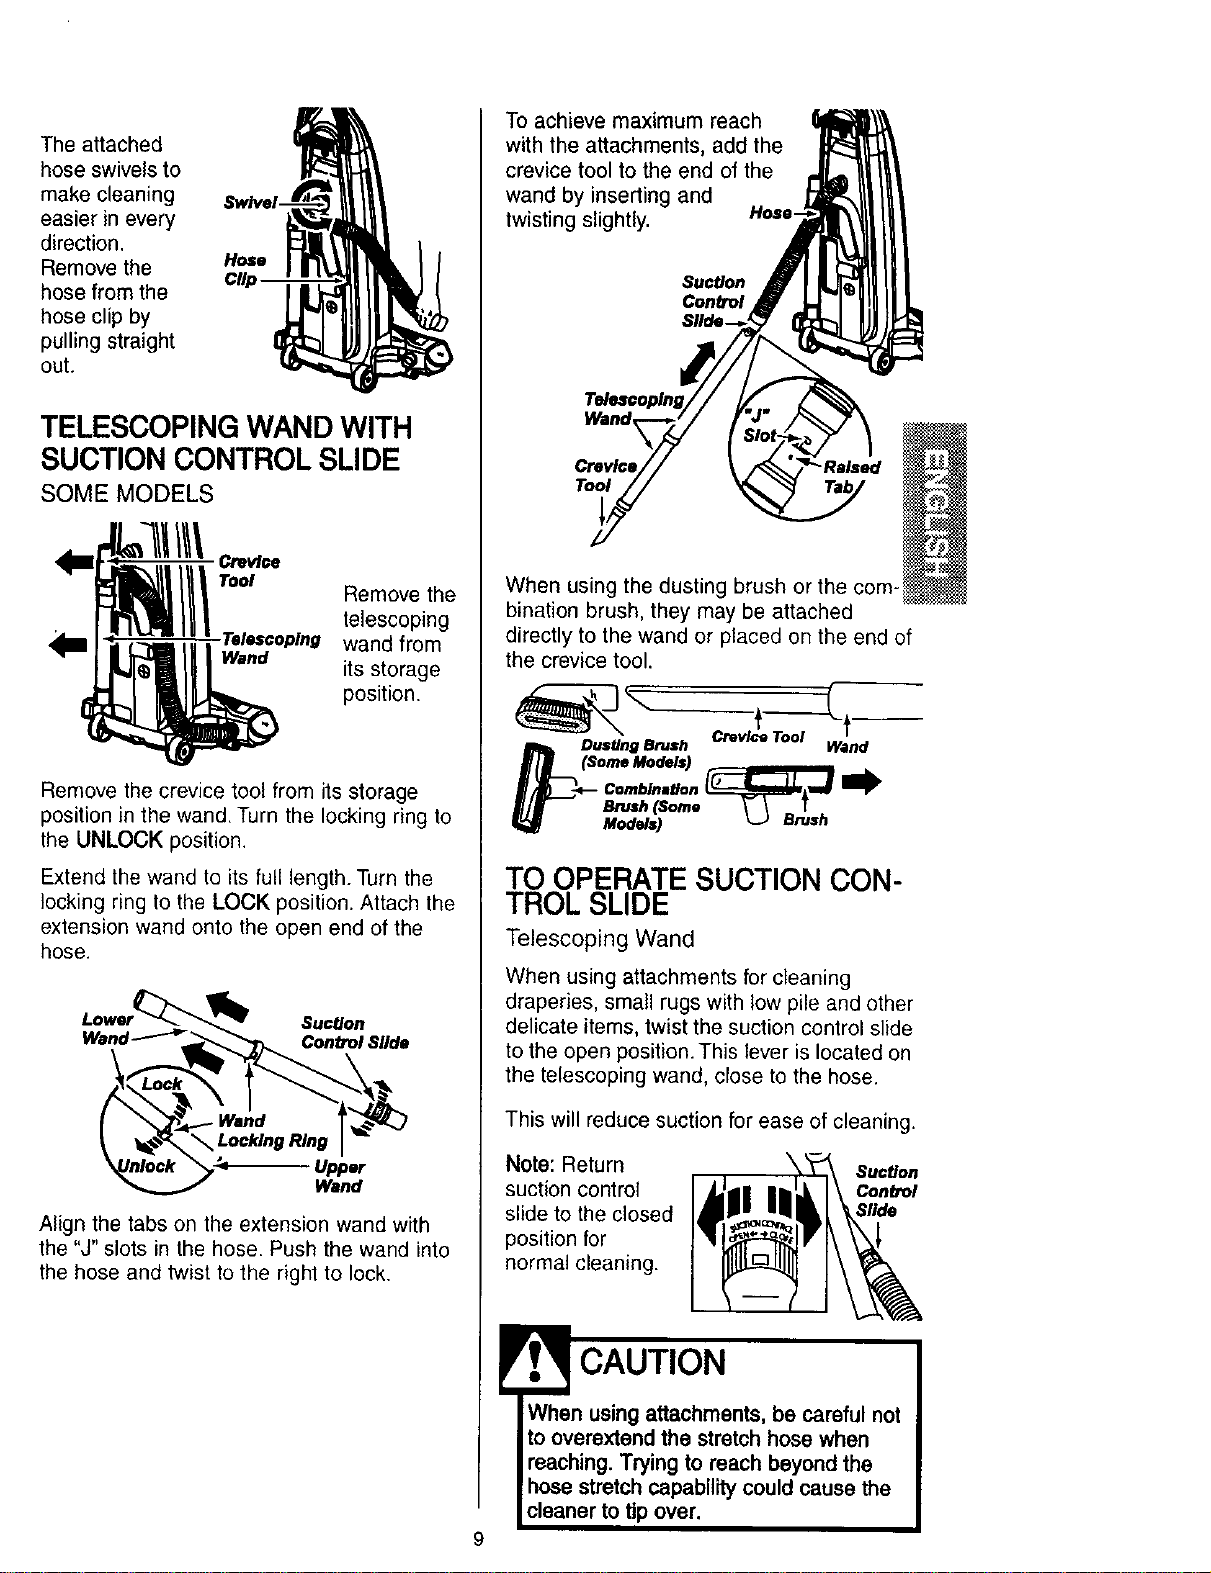
TELESCOPING WAND WITH
SUCTION CONTROL SLIDE
SOME MODELS
Crev/ae
I Tool Remove the
telescoping
,Telescoping wand from
Wand its storage
position.
Remove the crevice tool from its storage
position in the wand. Turn the locking ring to
the UNLOCK position.
Extend the wand to its full length. Turn the
locking ring to the LOCK position. Attach the
extension wand onto the open end of the
hose.
Lower_ SucUoo
Wand----'_ Control Slide
I _.\L,°cklngRIngl
_lnlock "_ Upper
Wand
Align the tabs on the extension wand with
the "J" slots in the hose. Push the wand into
the hose and twist to the right to lock.
To achieve maximum reach
with the attachments, add the
crevice tool to the end of the
wand by inserting and
twisting slightly. Hose-
Suction
Control
Wand,
Crevlcl "Raised
Tool
When using the dusting brush or the com-
bination brush, they may be attached
directly to the wand or placed on the end of
the crevice tool.
Dustlng Brush Wand
(Some Models)
Combination _A_ I1_
Brush (Some \ \ !
Models) _._ Brush
TO OPERATE SUCTION CON-
TROL SLIDE
Telescoping Wand
When using attachments for cleaning
draperies, small rugs with low pile and other
delicate items, twist the suction control slide
to the open position. This lever is located on
the telescoping wand, close to the hose.
This will reduce suction for ease of cleaning.
Note: Return
suction control
slide to the closed
position for
normal cleaning.
Suction
Control
Slide
CAUTION
When using attachments, be careful not
to overextend the stretch hose when
reaching. Trying to reach beyond the
hose stretch capability could cause the
cleaner to tip over.
TO STORE A'I-FACHMENTS
Remove dusting brush or combination
brush. Snap into appropriate storage loca-
tion.
Remove crevice tool from the wand by twist-
ing. Lay aside.
Remove the extension wand from the hose.
Twist the wand to the left and pull from the
hose end.
Wand
Locking
Rlng E_
Upper
Wand
Unlock the wand by turning the wand lock-
ing ring to the UNLOCK position.
Slide the lower wand into the upper wand.
Turn the wand locking ring to the LOCK
position.
Place the crevice tool down into the com-
pressed wand. Snap, into the appropriate
storage ]ocation.
Reinsert the hose fully into the opening on
the lower body from which it was removed.
Press firmly to assure connection.
WARNING
Personal Injury Hazard
The agitator may begin rotating when
the hose is inserted. Ensure that the
agitator is clear of all hands, feet,
objects, etc.
t,3 CAUTION
DO NOT pull the vacuum cleaner
around the room by the hose. Property
damage could result.
EXTENSION HOSE
SOME MODELS
Some models include an extra hose which
connects to the stretch hose on the vacuum
for a longer cleaning reach.
Unit Hose ,_k Extension Hose
Insert the two tabs on the end of the
extension hose into the two "J" shaped slots
on the unit hose and twist to connect.
All attachments and the telescoping wand
can be attached to the open end of the
hose.
FLOOR BRUSH AND WAND:
SOME MODELS
Some models have an extra brush and wand
for cleaning bare floors. Twist one end of the
adaptor into the floor brush and the other
end into the straight wand. Connect the
straight wand to the telescopic wand and
then to the vacuum hose or extension hose.
UI w..dJ
When usingthe regular hose or with
the extensionhose attached, the
cleanershould be on a solidsurface
onthe same levelor belowthe level of
the user's feet. DO NOT usethe hoses
when the cleaner isabove the level of
the user'sfeet.
10
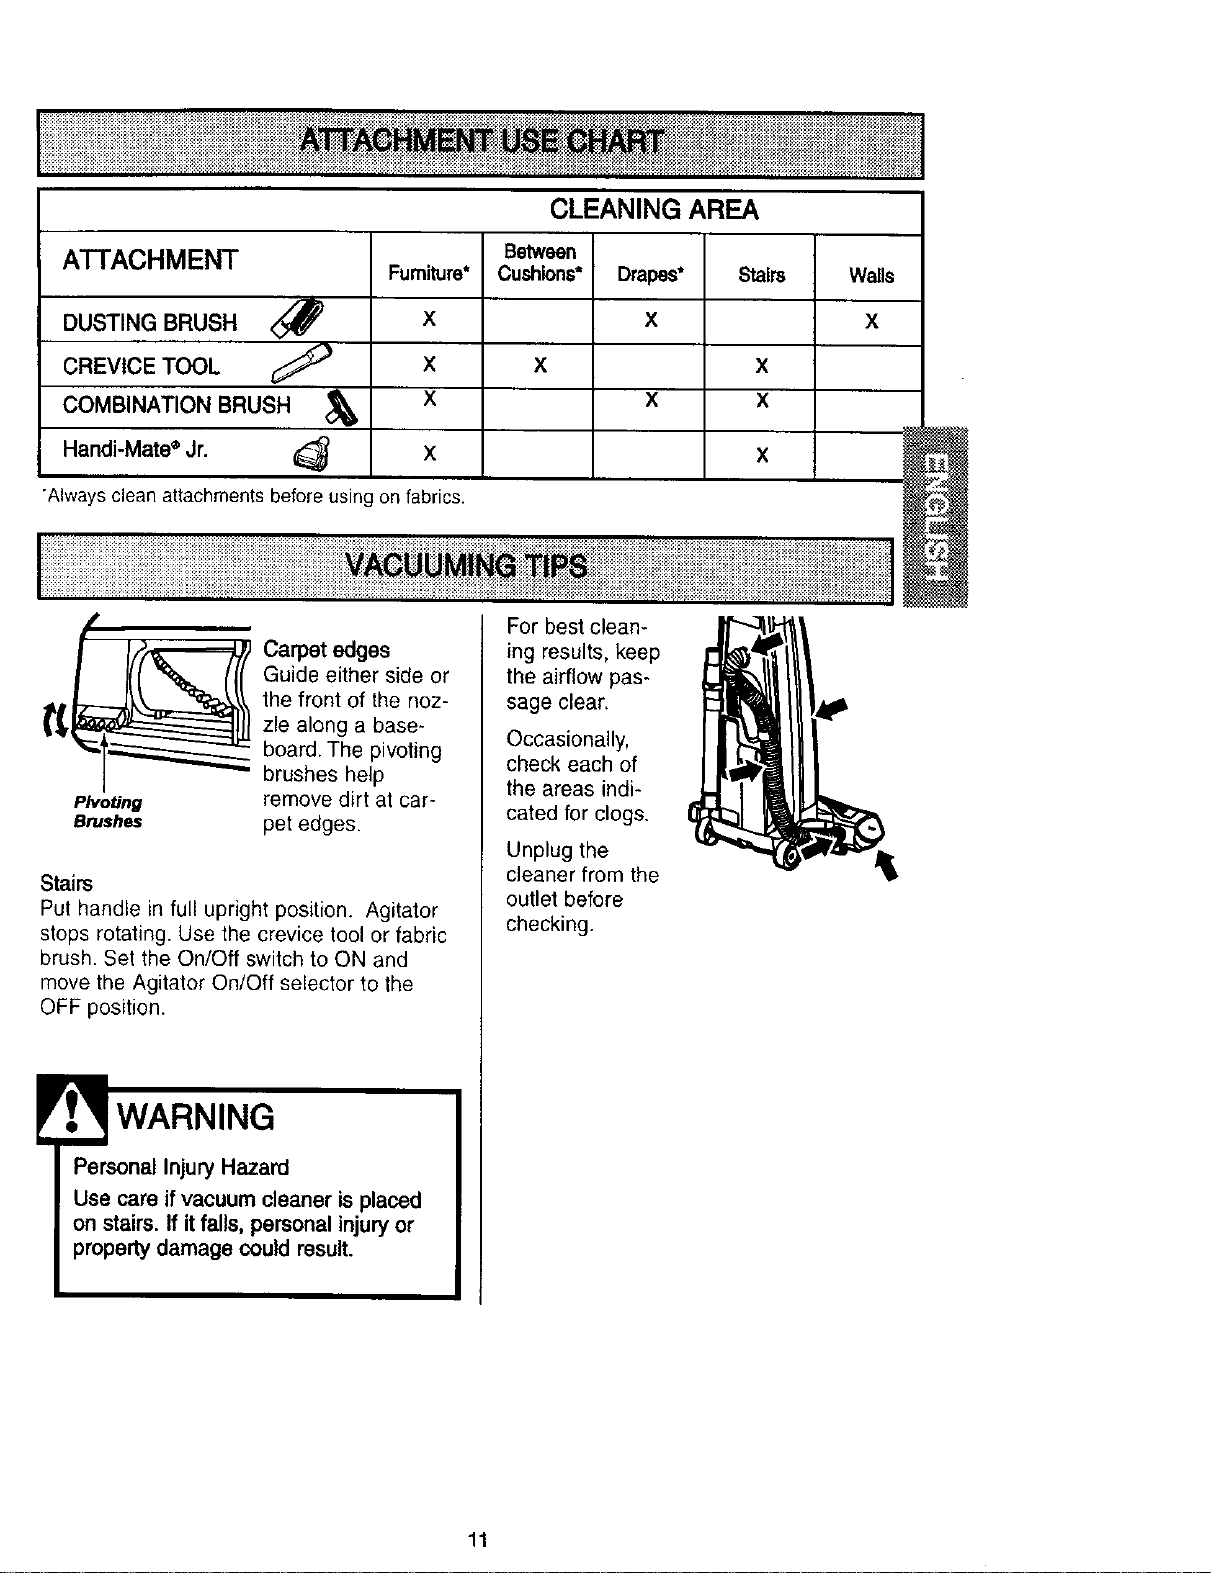
ATTACHMENT
DUSTING BRUSH <_
CREVICE TOOL
COMBINATION BRUSH _lb
Handi-Mate ®Jr. _ X
"Always clean attachments before using on fabrics.
Furniture*
X
X
X
CLEANING AREA
Between
Cushions*
X
Drapes*
X
X
Stairs
X
X
X
Walls
X
For best clean-
_._ Carpet edges ing results, keep
Guide either side or the airflow pas-
t{j the front of the noz- sage clear.
zle along a base-
board. The pivoting
brushes help
Pivoting remove dirt at car-
Brushes pet edges.
Stairs
Put handle in full upright position. Agitator
stops rotating. Use the crevice tool or fabric
brush. Set the On/Off switch to ON and
move the Agitator On/Off selector to the
OFF position.
Personal Injury Hazard
Use care if vacuum cleaner is placed
on stairs. If it falls, personal injury or
property damage could result.
Occasionally,
check each of
the areas indi-
cated for clogs.
Unplug the
cleaner from the
outlet before
checking.
11
........................,, ......i .....................................................................................,..........• ....
I
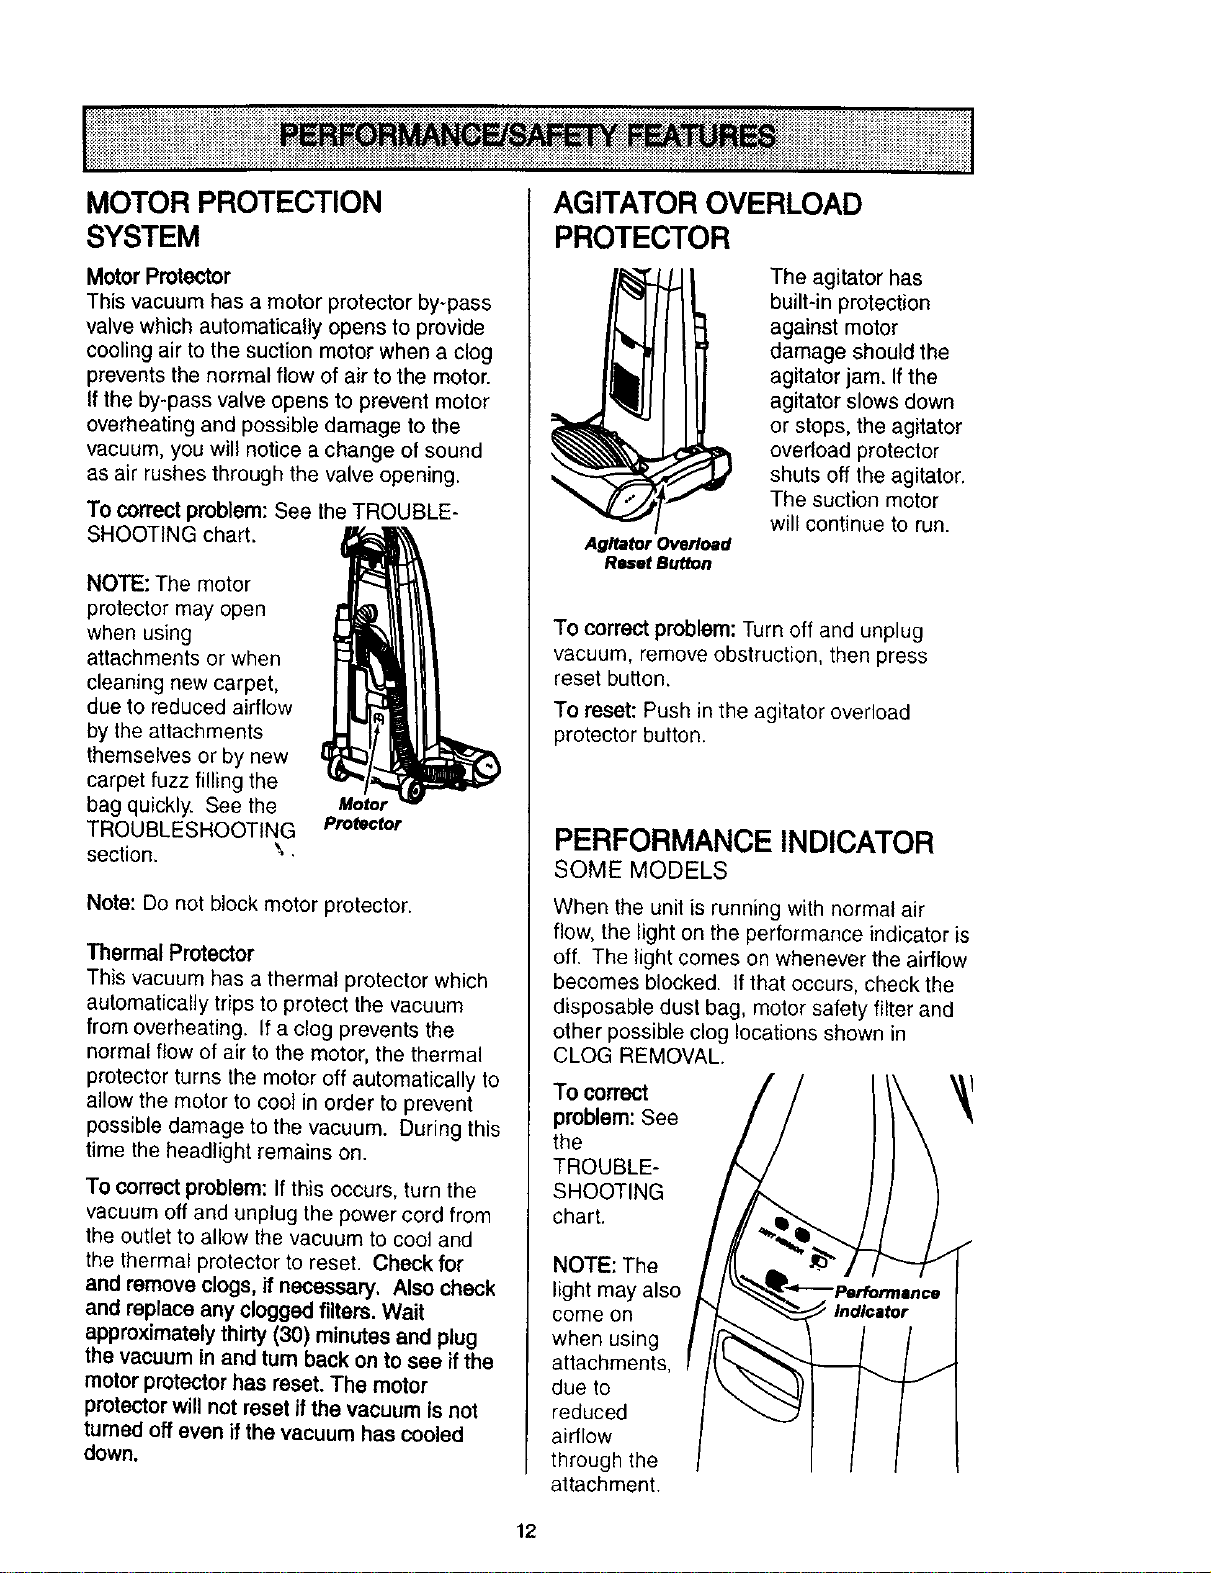
MOTOR PROTECTION
SYSTEM
Motor Prot_.-'tor
This vacuum has a motor protector by-pass
valve which automatically opens to provide
cooling air to the suction motor when a clog
prevents the normal flow of air to the motor.
If the by-pass valve opens to prevent motor
overheating and possible damage to the
vacuum, you will notice a change of sound
as air rushes through the valve opening,
To correctproblem:See the TROUBLE-
SHOOTING chart.
NOTE: The motor
protector may open
when using
attachments or when
c_eaning new carpet,
due to reduced airflow
by the attachments
themselves or by new
carpet fuzz filling the
bag quickly. See the
TROUBLESHOOTING
section. \.
Motor
Protector
Note: Do not block motor protector.
Thermal Protector
This vacuum has a thermal protector which
automatically trips to protect the vacuum
from overheating. If a clog prevents the
normal flow of air to the motor, the thermal
protector turns the motor off automatically to
allow the motor to cool in order to prevent
possible damage to the vacuum. During this
time the headlight remains on.
To correct problem: If this occurs, turn the
vacuum off and unplug the power cord from
the outlet to allow the vacuum to cool and
the thermal protector to reset. Check for
and remove clogs, if necessary, Also check
and replace any clogged filters. Wait
approximately thirty (30) minutes and plug
the vacuum in and turn back on to see if the
motor protector has reset. The motor
protector will not reset if the vacuum is not
turned off even if the vacuum has cooled
down.
AGITATOR OVERLOAD
PROTECTOR
The agitator has
built-in protection
against motor
damage should the
agitator jam. If the
agitator slows down
or stops, the agitator
overload protector
shuts off the agitator.
The suction motor
wil) continue to run.
Agitator Overload
Reset Button
To correct problem: Turn off and unplug
vacuum, remove obstruction, then press
reset butlon.
To reset: Push in the agitator overload
protector button.
PERFORMANCE INDICATOR
SOME MODELS
When the unit is running with normal air
flow, the light on the performance indicator is
off. The light comes on whenever the airflow
becomes blocked. If that occurs, check the
disposable dust bag, motor safety filter and
other possible c_og _ocations shown in
CLOG REMOVAL.
To correct
problem: See
the
TROUBLE-
SHOOTING
chart.
NOTE: The
light may also
come on
when using
attachments,
due to
reduced
airflow
through the
attachment.
12
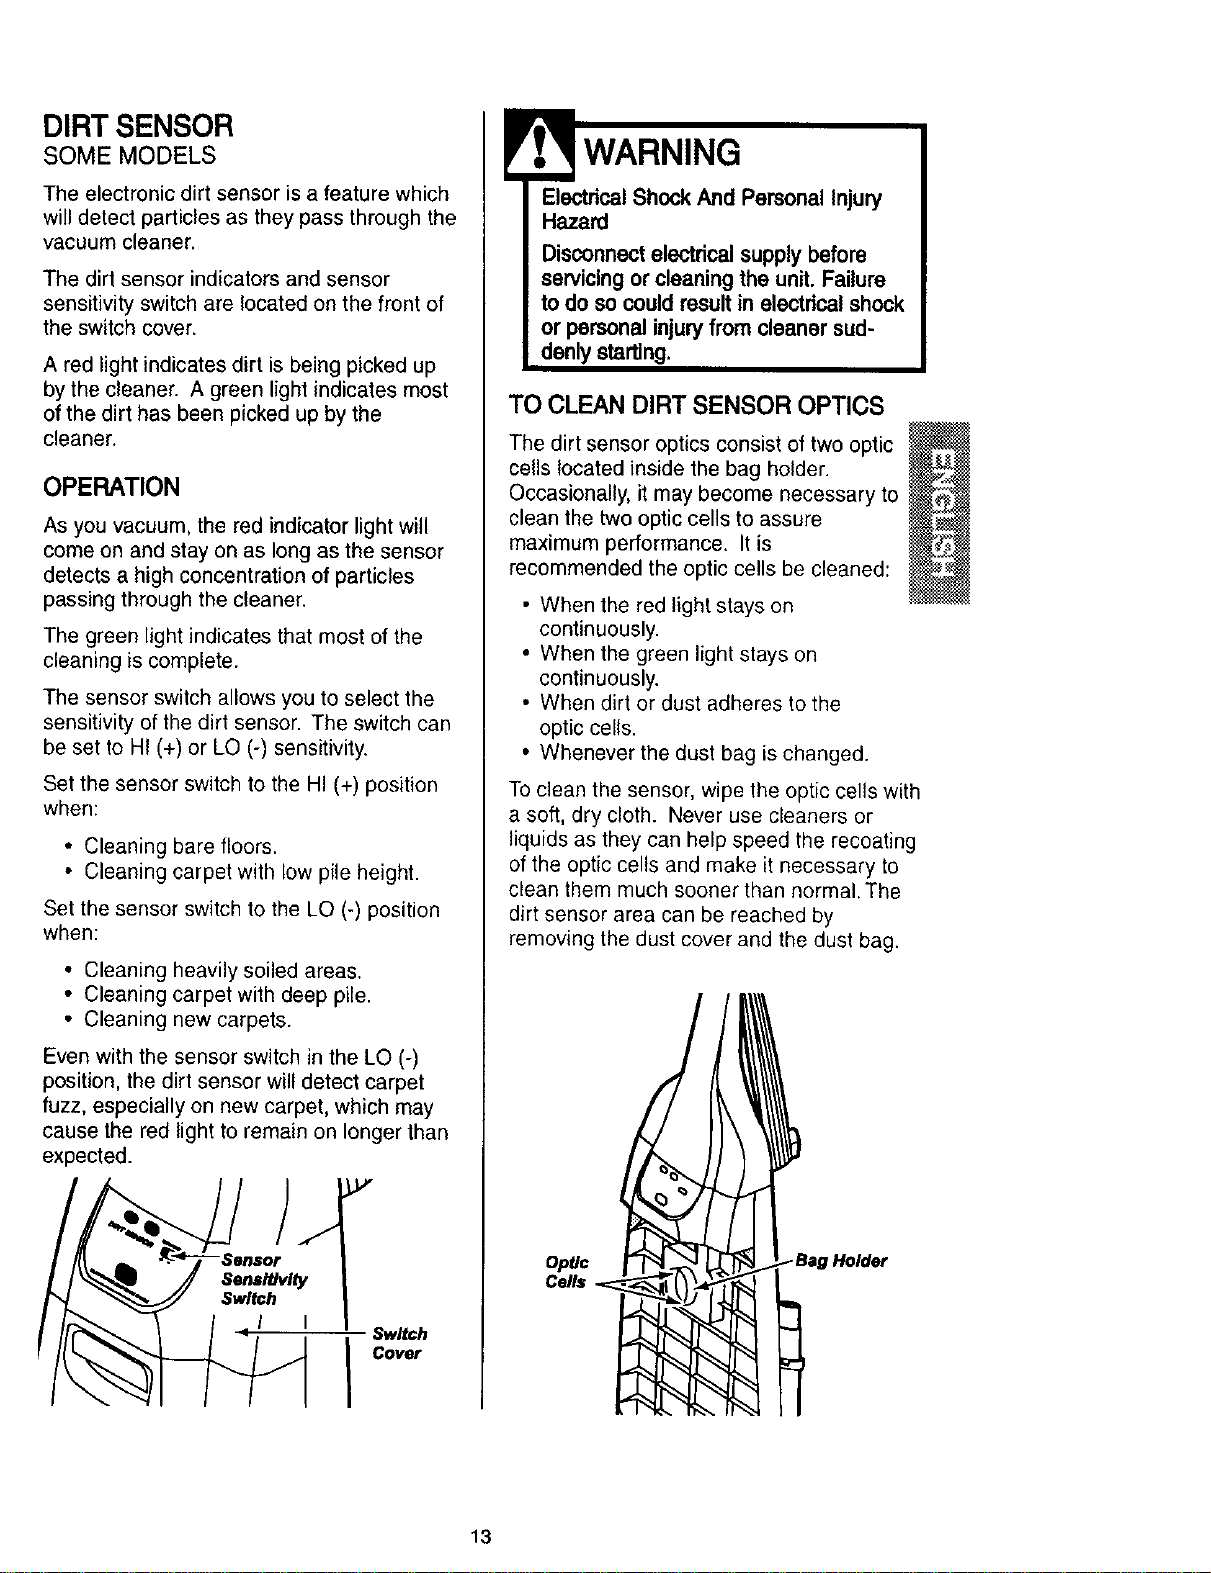
DIRT SENSOR
SOME MODELS
The electronic dirt sensor is a feature which
will detect particles as they pass through the
vacuum cleaner.
The dirt sensor indicators and sensor
sensitivity switch are located on the front of
the switch cover.
A red light indicates dirt is being picked up
by the cleaner. A green light indicates most
of the dirt has been picked up by the
cleaner.
OPERATION
As you vacuum, the red indicator light will
come on and stay on as long as the sensor
detects a high concentration of particles
passing through the cleaner.
The green light indicates that most of the
cleaning is complete.
The sensor switch allows you to select the
sensitivity of the dirt sensor. The switch can
be set to HI (+) or LO (-) sensitivity.
Set the sensor switch to the HI (+) position
when:
• Cleaning bare floors.
• Cleaning carpet with low pile height.
Set the sensor switch to the LO (-) position
when:
• Cleaning heavily soiled areas.
• Cleaning carpet with deep pile.
• Cleaning new carpets.
Even with the sensor switch in the LO (-)
position, the dirt sensor will detect carpet
fuzz, especially on new carpet, which may
cause the red light to remain on longer than
expected.
Switch
Cover
WARNING
Electrical Shock And Personal Injury
Hazard
Disconnectelectricalsupplybefore
servicingor cleaningthe unit.Failure
to do so couldresultin electdcalshock
or personalinjuryfrom cleaner sud-
denlystarting.
TO CLEAN DIRT SENSOR OPTICS
The dirt sensor optics consist of two optic
cells located inside the bag holder.
Occasionally, it may become necessary to
clean the two optic cells to assure
maximum performance. It is
recommended the optic cells be cleaned:
• When the red light stays on
continuously.
• When the green light stays on
continuously.
• When dirt or dust adheres to the
optic cells.
• Whenever the dust bag is changed.
To clean the sensor, wipe the optic cells with
a soft, dry cloth. Never use cleaners or
liquids as they can help speed the recoating
of the optic cells and make it necessary to
clean them much sooner than normal. The
dirt sensor area can be reached by
removing the dust cover and the dust bag.
Optic
Cells
Holder
13
....................... , ..,_; _ : :::: :::::: :::::_:_ :_::::_ : ::::::::::: :r;::: ............ :-:;,:: ............... ::: ............... : |
I
1_/: : ::: :::::: I:::::::::::::: ::::: :::::::::::.: :::::::::::::::::::::::::::::: _::: ::::: ::::r:: _:::;::: ::::::: :::::::::::::::::I:::: ::::::::: : :: ::::r::::r::::::: ;::::::::::: ::::: ::::::::::::::::::1
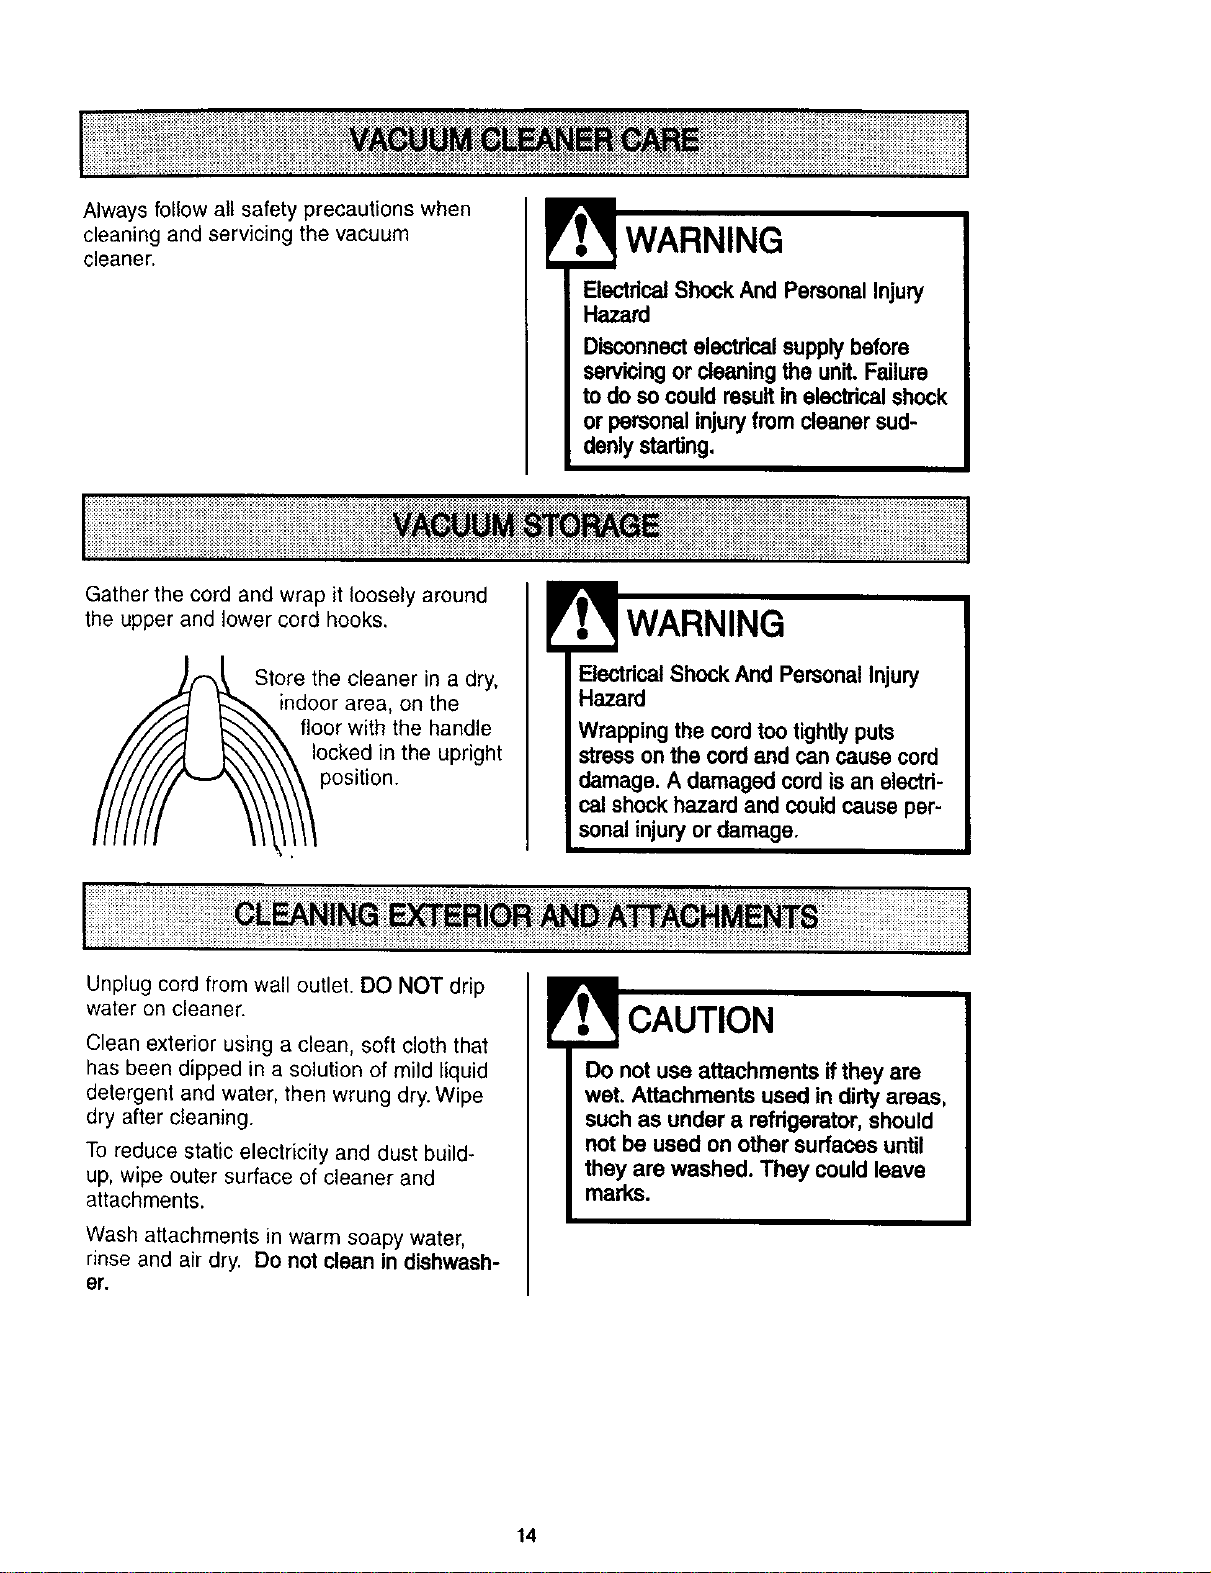
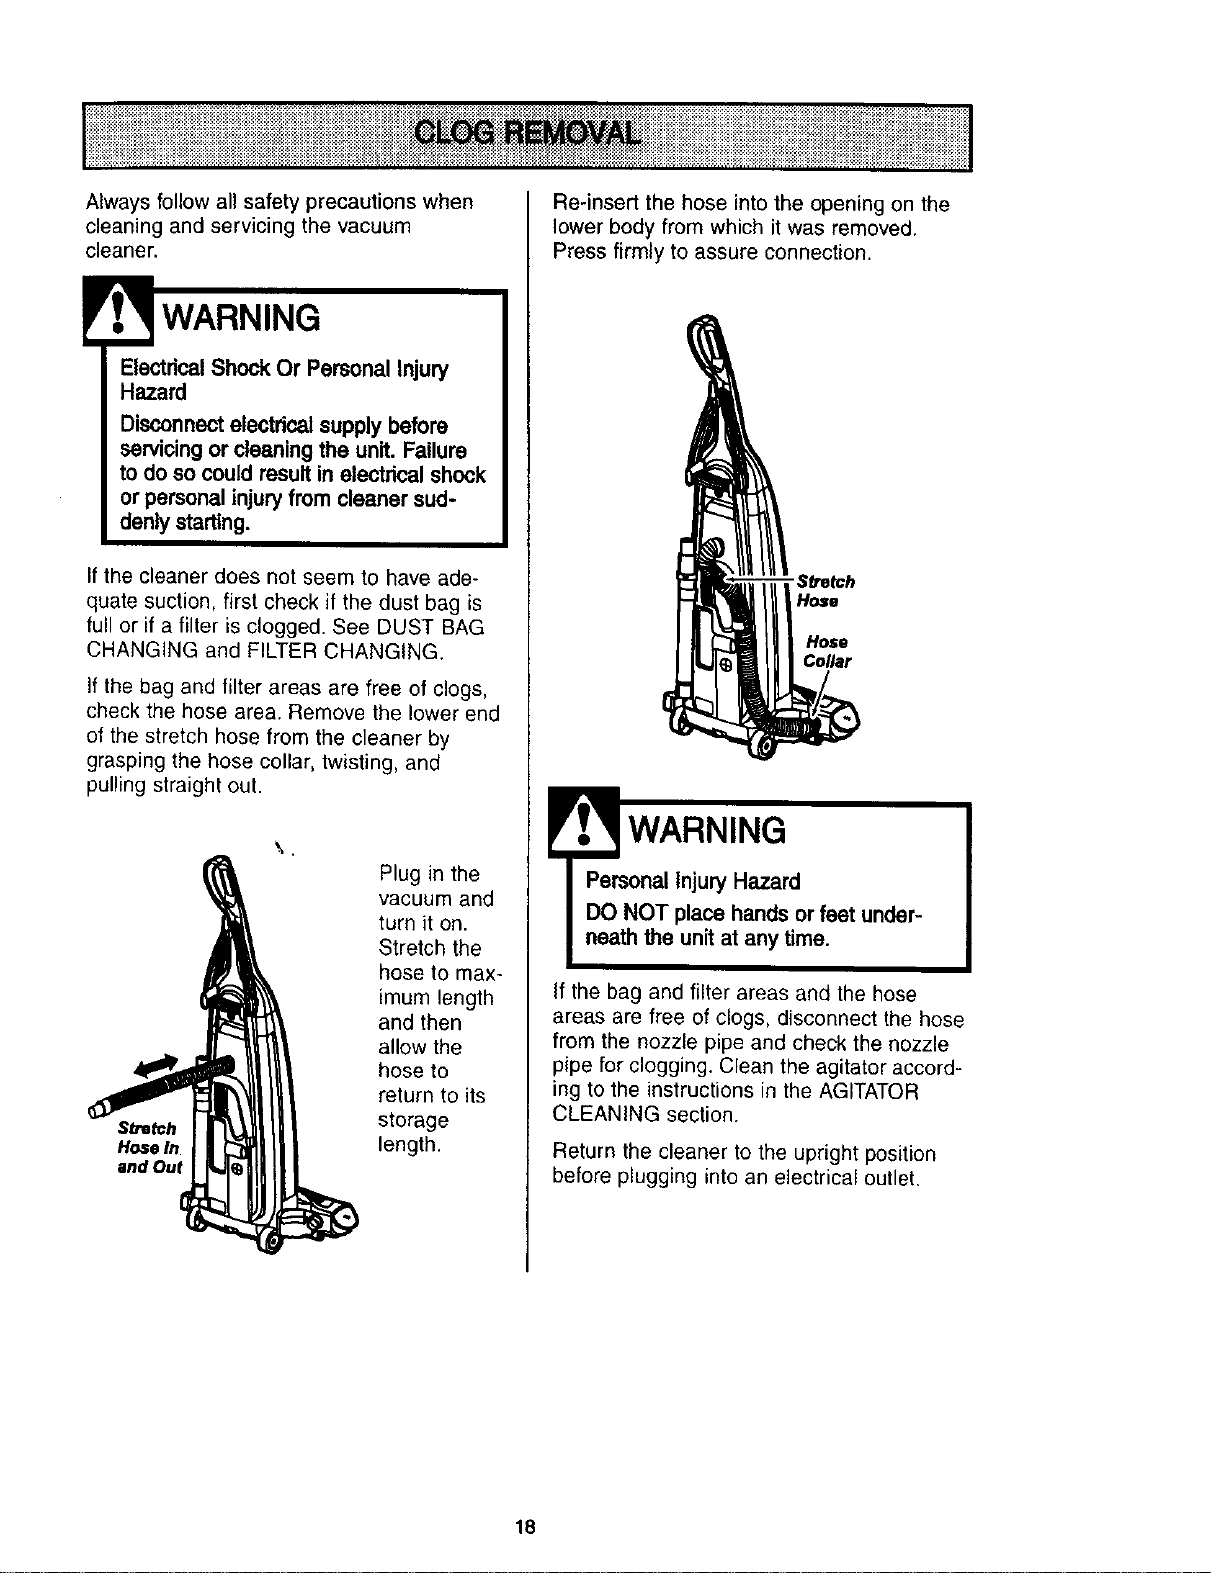
Always follow all safety precautions when
cleaning and servicing the vacuum
cleaner.
!
WARNING
ElectricalShock And Personal Injury
Hazard
Dis(_nect electricalsupplybefore
servicingor cleaningthe unit. Failure
todo so could resultin electricalshock
or personalinjuryfrom cleaner sud-
denlystarting.
Gather the cord and wrap it loosely around
the upper and lower cord hooks.
Store the cleaner in a dry,
indoor area, on the
floor with the handle
locked in the upright
position.
WARNING
dcal Shock And PersonalInjury
Hazard
Wrappingthe cord too tightlyputs
stresson the cordand can cause cord
damage. A damaged cord is an electri-
cal shock hazard and couldcause per-
sonal injuryor damage.
Unplug cord from wall outlet. DO NOT drip
water on cleaner.
Clean exterior using a clean, soft cloth that
has been dipped in a solution of mild liquid
detergent and water, then wrung dry. Wipe
dry after cleaning.
To reduce static electricity and dust build-
up, wipe outer surface of cleaner and
attachments.
Wash attachments in warm soapy water,
rinse and air dry. Do not clean in dishwash-
er.
CAUTION
Do not use attachments ifthey are
wet. Attachments used In dirty areas,
such as under a refrigerator, should
not be used on other sudaces until
they are washed. They could leave
marks.
14
ii: i i ii!i ii i i i ii ii i i i iii i i i i i i i iiiii iiiiiiiiiiii i iiiiiiiiiiiii ii iiiiii iiiiiiiiiiii i i i iii i i i ill iii ii i ii i i i i iiii !iiiii i iiiii i i i
iiii:ii:i_i'iii'i'i'i'i'i'i'ii'i'i'i'i'i'ii_i'i'i'i'i:i'ii:i:1%:i:iii_i:i:i:i_ii_C_C_i_i:i:i:i_i_1%%,,ii:_:,::_%:11:1%_:::i_'ii:_:::i_': _"_i'_'__'_:_';'i'_'_'_i_:'_'_"_':_'i_':':'_";;'_':_'_'_':'_'_'_:_':'_'_:_:%::::i:i:i:i:i:i:i_i_i_ii
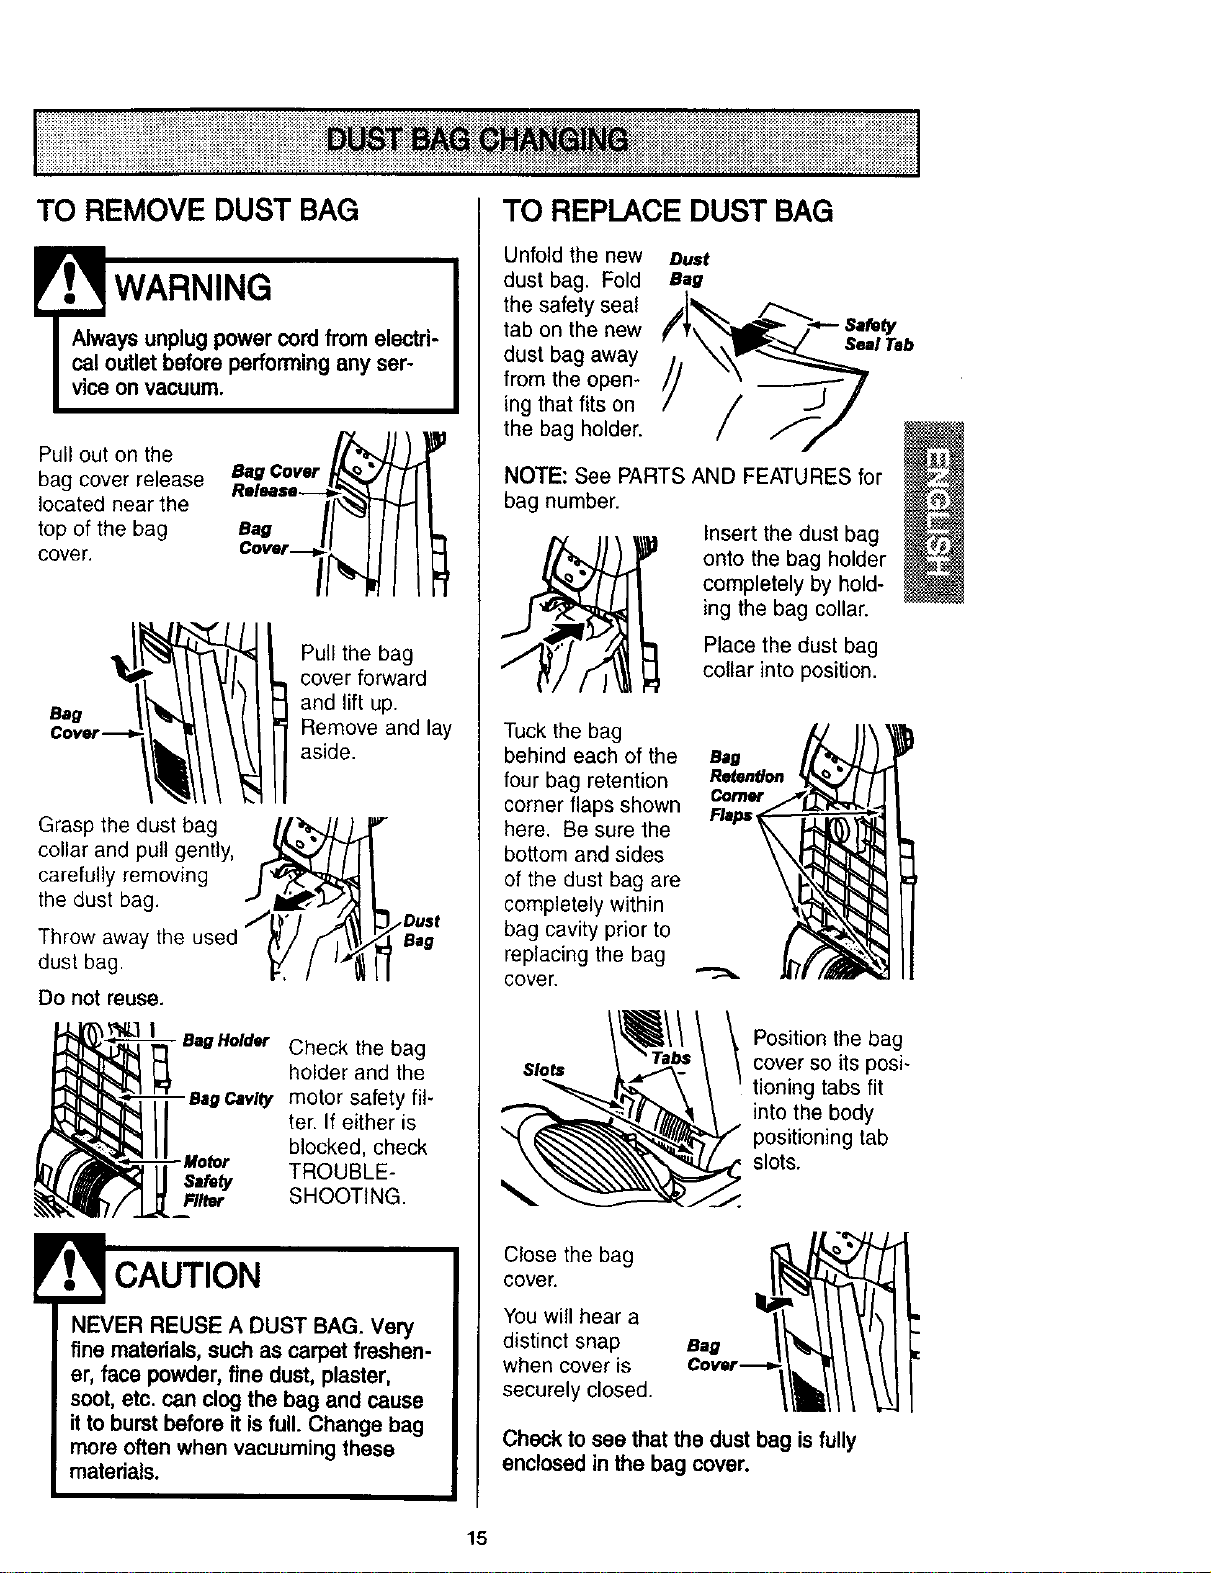
TO REMOVE DUST BAG
WARNING
Pull out on the
bag cover release
located near the
top of the bag
cover.
Bag //_I1
oo- H
Bag
Pull the bag
cover forward
and lift up.
Remove and lay
aside.
Grasp the dust bag ht'_JJ _ J_
collar and pull gently, _"
carefully removing
the dust bag.
Dust
dustThrowaway the usedbag. _. F'_ as'
Do not reuse.
- B,_l.lold_r Check the bag
holder and the
Cavity motor safety fil-
ter. If either is
blocked, check
- Motor
Safety TROUBLE-
Filter SHOOTING.
_,f,_CAUTION
NEVER REUSE A DUST BAG. Very
fine materials, such as carpet freshen-
er, face powder, fine dust, plaster,
soot, etc. can clog the bag and cause
it to burst before it is full. Change bag
more often when vacuuming these
materials.
TO REPLACE DUST BAG
Unfold the new Dust
dust bag. Fold Bag
the safety seal
tab on the new
dust bag away
t,
from the open- //
ing that fits on
/
the bag holder.
NOTE; See PARTS AND FEATURES for
bag number.
Insert the dust bag
onto the bag holder
completely by hold-
ing the bag collar.
Place the dust bag
collar into position.
Tuck the bag
behind each of the a,,#
four bag retention RetenUon
corner flaps shown corner
here. Be sure the
bottom and sides
of the dust bag are
completely within
bag cavity prior to
replacing the bag
cover.
Seal Tab
Slots
Position the bag
cover so its posi-
tioning tabs fit
into the body
positioning tab
slots.
Close the bag
cover.
You will hear a
distinct snap Bag
when cover is
securely closed.
Check to see that the dust bag is fully
enclosed in the bag cover.
15

iiiiii}:il:_i_iii_}__:_ iiiii_iiiiiiiiiii!iiiiiiiiiiiiiiiiii:_iiii:_iiiiiii!iii!iiiiill:i_i_::_:::::iiii:iii2iiiii;iiiiiiiiii!!i!ilzlii
iiiiiiiiii!i!i!iiiiiiiiiiiiiiii!iiii!iiiiiiiiiiiiiiiiiiiiiiiiiiiiiiiiiiiiiiiiii!!i!iil: ii_B_j_iiill iiilliiiiiiiiiiiiiiiiiiiiiiiiiiiiiiiiiiiiiii!ililililiiii!!iiiii!iiiiiiiiiiiiiii]
Check motor safety filter frequently and
change when dirty.
Er_.._WARNING
ElectricalShock Hazard
Unplugpower cord from electricalout-
let. Do not operate the cleaner without
the motorsafety filter. Be sure the fil-
ter isdry and properlyinstalledto pre-
vent motorfailure and/or electrical
shock.
Remove the dust bag as outlined in the
DUST BAG CHANGING section.
MOTOR SAFETY FILTER
ELECTROSTATIC
1, This white & grey
filter must be
replaced when dirty. Motor
It should be replaced safety
regularly depending FI_
on use conditions.
The filter CANNOT
be washed as it will \
lose its dust trapping
ability. \
Note: See PARTS AND FEATURES for
motor safety filter number.
Motor
Safety
2. If the filter, locat-
ed in the bottom of
the bag cavity, is
dirty, remove it by
pulling forward out
from under the
ribs.
3. Replace the
filter, white side
up, by sliding it Motor
back into place safety
under the ribs in Rite,
the bag cavity.
Replace the bag as outlined in the DUST
BAG CHANGING section.
EXHAUST FILTER
HEPA
E'W.,_WARNING
Do not operate without exhaust
filter.
The exhaust filter cartridge must be
replaced when dirty, It should be replaced
regularly depending on use conditions. The
filter CANNOT be washed as it will lose its
dust trapping ability.
Note: See PARTS AND FEATURES for the
exhaust filter number.
Slide the exhaust
filter cover
release down.
Pull out on
exhaust filter
cover to remove
from bag cover.
_ohvaUStReFl#te._re___p._
Exhaust _l_ll_
Bag
Exhaust
Remove the
exhaust filter car-
tridge from the bag
cover.
Replace the exhaust
filter cartridge, care- Bag
Covert-
fully positioning it so
that it fits into the bag
Exhaust
cover. The grey edge el_pr--
of the filter should be
facing away from the
operator, Push only ...(_--_--_r_
on filter cartridge
frame, not on filter itself.
Exhaust Filter _ J/
Cover Release "-_1_
Exhau,, _
Replace the
exhaust filter
cover and
secure the
latch by push-
ing it upward.
16

WARNING
ElectricalShock Or Personal Injury
Hazard
Disconnectelectdcal supplybefore
servicingor cleaning the unit. Failure
to do so couldresultin electricalshock
or personal injuryfrom cleaner sud-
denlystarting.
TO REMOVE LIGHT BULB
Disconnect power cord from electrical out-
let.
Light
Pry light lens
out at slot in
rear as shown
on both sides.
Rotate lens up
and lift off.
Slots
CAUTION
Do not use a bulb rated over 9W (13V).
During extended use, heat from the bulb
could overheat surroundingplastic
Remove the
light bulb by
pulling
straight out.
To Release
To replace
the light
bulb careful-
ly insert fully
into slot.
Note: See PARTS AND FEATURES for bulb
number.
uD ° CAUTION I
otpluginor turnon untilthe vacu-
s completely reassembled.
To replace light
lens, place tabs
at front of lens
into slots. Rotate
lens down and
snap into place.
To maintain efficient cleaning, the agitator
must be kept free of carpet pile, string, or
hair build-up. After every 7 to 10 uses,
unplug and turn vacuum over and check
agitator for string and hair build-up.
Use a scissors to remove any build-up
entangled around the agitator.
17
I
|::::::::::::::::::::::::_:::::::_::::::::::::::::::::::::::_:::::::::::::::::::::::::::::::::::::: ::::: :::::::::_:::_:::.;_.:_ :•_:_ _:::: :::::::;:::;:::::::;::::::::_::::_:::::::::::::::;::::;:;:::::;;;:::;_:;:::::::: ::::::::;;;;:::::::!:i:i:_:_:_:_;_:_:_:_:!:_!!!!_
Always follow all safety precautions when
cleaning and servicing the vacuum
cleaner.
E WARNING
ElectricalShock Or Personal Injury
Hazard
Disconnectelectricalsupply before
servicingor cleaning the unit. Failure
to do so could result in electrical shock
or personalinjuryfrom cleaner sud-
denlystarting.
If the cleaner does not seem to have ade-
quate suction, first check if the dust bag is
full or if a filter is clogged. See DUST BAG
CHANGING and FILTER CHANGING.
If the bag and filter areas are free of clogs,
check the hose area. Remove the lower end
of the stretch hose from the cleaner by
grasping the hose collar, twisting, and
pulling straight out.
Stretch
Hose In.
and Out
Plug in the
vacuum and
turn it on.
Stretch the
hose to max-
imum length
and then
allow the
hose to
return to its
storage
length.
!
Re-insert the hose into the opening on the
lower body from which it was removed.
Press firmly to assure connection.
"Stretch
Hose
Hose
Collar
WARNING
Personal Injury Hazard
DO NOT place hands or feet under-
neath the unit at any time.
the bag and filter areas and the hose
areas are free of clogs, disconnect the hose
from the nozzle pipe and check the nozzle
pipe for clogging. Clean the agitator accord-
ing to the instructions in the AGITATOR
CLEANING section.
Return the cleaner to the upright position
before plugging into an electrical outlet.
18
.;;.v///;;;.-/;;;%u•:iiii::::::.:::iii_i! ',••v - -.:. Hii::iiii .:_._j;...;._j: :.:•j:;;;;:: •:.....%//........... :..v._..._... j. ..-- -...-.v•......._._ _.:.;._._•:::;,/_•••,...v;;.%:_/:.:.;._j ..'/'•.'.'/.%'.'.'/•..;;;.V.•!_.II..._•%y/••••!II.'/L%-V;;.I
:::::::::::::::::::::::%::::::::::::::;::::::::::::::::::::: ::;::::;:: ::::: : ::: .::: ::::: , _ _ . • ;_ : :;::::::::::::::_ _::: i::::i:::.::::::::::::::::_:::::::::::::::::_::::::: ::::::;:;_::::::::::::::::::::
iiiiiiiiiiiiiiiiiii__ iiiiiiiiiiiiiiiiiiii !!i!!i!iiiiiiiiii i_iii_i_!!!!!ii!,__, " ,,i ". " .._ __' iiiiiiiiii iiii _ i iii_iiiiiii__ i i _ii_i!i iiii
I
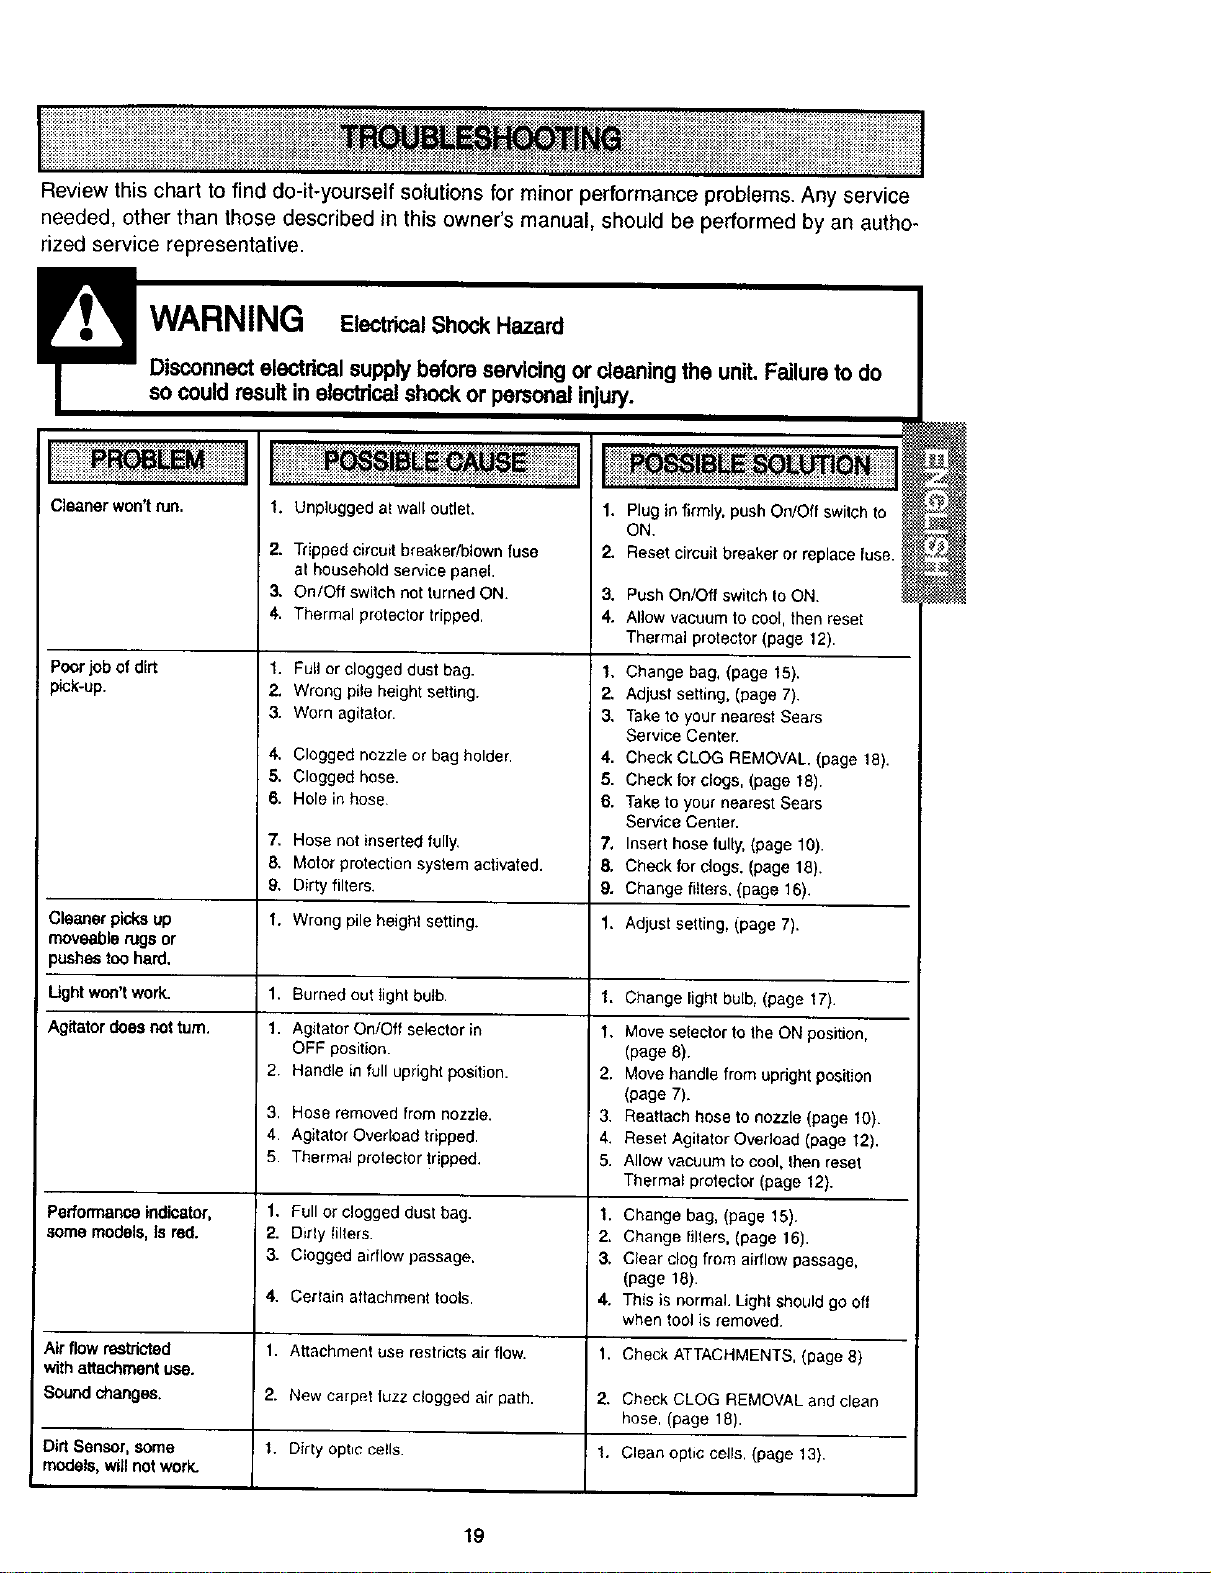
Review this chart to find do-it-yourself solutions for minor performance problems. Any service
needed, other than those described in this owner's manual, should be performed by an autho-
rized service representative.
_n_ _heun'mF_ilumtodo
Cleaner won'trun.
Poor jobof dirt
pick-up.
Cleaner picks up
moveablerugsor
pushes toohard.
f. Unplugged at wall outlet.
2. Tripped circuit breaker/blown fuse
at household service panel.
3. On/Oft switch not turned ON.
4. Thermal protector tripped.
1. Full or clogged dust bag.
2. Wrong pile height setting.
3. Worn agitator•
4. Clogged nozzle or bag holder.
5. Clogged hose.
6. Hole in hose.
1. Plug in firmly, push On/Off switch to
ON.
2.. Reset circuit breaker or replace fuse•
:3. Push On/Oft switch to ON.
4. Allow vacuum to cool, then reset
Thermal protector (page 12).
1. Change bag, (page 15).
2. Adjust setting, (page 7).
3. Take toyour nearest Sears
Service Center.
4. Check CLOG REMOVAL. (page 18).
5. Check for clogs, (page 18).
6. Take to your nearest Sears
Service Center.
7,
8,
9,
Ught won'twork. 1.
Agitator does not turn. 1.
2.
3,
4.
5.
Performanceindicator, 1.
some models, |s red. 2.
3.
4.
Air flow restricted 1.
withattachmentuse.
Sm_ndchar_jes. 2.
1.DirtSensor,some
models, will notwork.
Hose not insertedfully, 7,
Motor protectionsystem activated. B.
Dirty filters. 9.
Wrong pile height setting. 1.
Burned out light bulb•
Agitator On/Off selector in
OFF position.
Handte in foil upright position.
Hose removed from nozzle.
Agitator Overload tripped.
Thermal protector tripped.
Full or clogged dust bag.
Dirty lilters.
Clogged airflow passage,
Certain attachment tools.
Attachment use restricts air flow.
New carpet luzz dogged air path.
Dirty optic cells•
Insert hose fully, (page 10).
Check for clogs. (page 18).
Change filters. (page 16).
Adjust setting, (page 7).
1. Change light bulb, (page 17).
1. Move selector to the ON position,
(page 8).
2. Move handle from upright position
(page 7).
3. Reattach hose to nozzle (page 10).
4. Reset Agitator Ovedoad (page 12).
5. Allow vacuum to cool, thenreset
Thermal protector (page 12).
1. Change bag, (page 15).
2. Change tilters, (page 16).
3. Clear clog from airflow passage,
(page 18).
4. This is normal. Light should go oft
when tool is removed.
f.
2.
Check ATTACHMENTS, (page 8)
Check CLOG REMOVAL and clean
hose, (page 18).
1. Clean optic cells. (page 13),
19

20
I...................................................!!!..................................i..i.i.!!i!!!!!iiiii.i.i.!!!.i.i.i:.!.i.i.i.i.i%i.liiiiiii!iii!i.iiiii.i.i.':.i.!.!.ii".iiiiii_iiiiiiiiiilliilii%iiii-i_!!iiiiiiiiiii_'ii!iiiii!i_iiiiiilj.iiiiiiiiiiiiiiiiiiiii!iiiiiii!iiiiiiiii.liiiiiiiiI
E_!IIEE_I_EE_EE_SEEI_i!_!_!_!_!_!_!I!!!!i!!!i!!!!I!!!i!I_iiI!!!!E!!i_!!!!!!!!!!!!. i_ _:: _"_i _ "___": _" _" _" :i '_ • "::_iEE E_E_i_lii_i_:_E i_!i! iiiE_i_!_i_i_i_i_!_!_!E_iii_i i:_i_!_i_i_i_ii!
Antesde usarsu aspiradoranueva ....... t
Garantiade la aspiradorade Kenmore..... 1
Instruccionesimportantes de
seguridad ............................. 2
Piezas y caracterfsticasde aspiradora
ve_ ................................ 3
Instruccionesde ensamblamiento ....... 4-5
Instrucciones de operaci_n............... 5
Desprendimiento del mango.............. 6
Interrupterde encendido/apagado......... 6
Ajuste y seleeci6nde nivelde pelo de la
alfombra ............................ 6
Agitador encendido/apagado Selector ...... 7
Accesorios ......................... 7-9
Cuadre de use de los accesorios ......... 10
Sugerenciaspara aspirar ............... 10
Carecteriisticas de
rendimiento/seguridad ............... 11-12
Cuidado de la aspiradora ............... 13
Almacenamientode la aspiradora ........ 13
Limpieza delexterior y de los accesorios ... 13
Cambio de la bolsa para polvo ........... 14
Cambio des filtros .................... 15
Cambio de la bombilla ................. 16
Limpiezadel agitador .................. 16
C6mo eliminarlos residuesde basura
en los conductos ..................... 17
Reconocimientode pmblemas ........... 18
Informaci6nde essistancia
o servicio ..................... (backpage)
!!iiiiiii!i!ii!iiiiiiii iiiii ii ii ii ii ii , ,iiiiJiiiiiiiJi,iiiii iiiiiiiiii,I
Per favorlea esta guia que le ayudaraa assemblar y operarsu aspiradora nuevade Kenmoreen una manera
ma.ssegura y etfectiva.
Para mas informaciSnacefca del cuidado y operaci6nde esta aspirador,Ilame a sutienda Searsmas cercana.
Cuando prequnteper informaciSnusted necisitar_ elnL_merocomplete de serie y modelode laaspiradoraque
esta Iocadoen la placa de los nQmerosde modelo y serie.
Use elespacio de abajo pararegistrar el nQmerode modelo y serie para su nuevaaspiradorade Kenmore,
N_mero de Modelo
Nt_merode Serie
Fecha deCompra
Matenga estelibro y su recibo en u lugarseguro para referenciasfutures.
GARANT{ALIMITADADE UN A_IODE LAASPIRADORAKENMORE
Esta garantia es per un aSodesde la fecha de compra, e incluyesolamente eluse de la aspiradoraen
hogaresprivados.Durante ela5o de garantia, cuando laaspiradora esoperada y mantenidade acuerdoal
manualde instruccionesdel dueSo,Sears reparar_ cualquierdefecto en materialeso fabricacionlibre decargo.
Esta garantia excluyelas bolsas de celecci6n, correas,lamparillas,y filtros, las cuales son partes gastablesque
sedeterioran con el use normal.
Paraelserviciode garantia,retome esta aspiradoraal Centrode Servicio Searsm&scercanoen los Estados
UnJdos.
Esta garantia se aplica solamente mientras este producto est& en use en los Estados Unidos. Esta garant[a le
da a usted dereehos legales especificos, y usted puede tener tambi_n otros derechos los cuales varian de
estado a estado.
Sears, RoebuckandCo., D/817WA, HoffmanEstates,IL 60179
Susegufldedes muyimportantepara nosotros.Pare reducireldesgode incendio,chequeel6ctrico,
lesi6ncorporalo dafiosal utilizarsuaspiradora,acttiedeacuerdoconprecaucionesbdsicasde
seguridad,entreelias:
Leaeste manual antes de armar outilizarsu
aspiradora.
Use su aspiradora_nicamente en la lorma
descdtaen este manual. Usednicamente con
accesorios recomendadosper Sears.
Para reducir elriesgo de cheque el6ctrico, no use
suaspiradora al aire libre ni sobresuperficies
mojadas.
Desconectela fuente de electricdad antesde dar
servicio o limpiar. De Iocontrario pedria causar
un cheque electricoo lesi6n corporal.
Siempredebe apagar suaspiradora antes de
desconectarla.
Nodesconecte laaspiradora tirandodel cord6n
electrico.Para desconectada, hale elenchufe, no
el cordon.
No use la aspiradorasi el cord6n e elenchufe
esta dafiado.Si la aspiradora no est,.
funcionando adecuadamenteo sise ha dejado
caer,est_ dafiada, s_.ha dejado expuesta a la
intemperieo se ha dejado caer en agua, devu6F
valaa un Centre deservicio de Sears.
Nohale ni transporte la aspiradera perel cord6n;
no use elcord6n come mango; no cierrepuertas
sobreel cord6n; no haleel cord6n sobrerebor-
des agudos ni esquinas. No pasela aspiradora
sobreel cord6n. Mantengael cordon alejado de
superficiescalientes.
Noabandone la aspiradoracuando este conec-
tada. Desconectela cuando nola est_ usandoy
antes dedarle servicio.
Nopermita que sea utilizada comejuguete. Se
requteretenor mayor cuidado cuando sea
utilizadaen la proximidadde nifioso per nifios.
Notoquela aspiradora ni el enchufecon las
manes mojadas.
Nocoloque objetos en las aberturas.
No utiiice laaspiradorasi alguna abertura est_
bloqueada;mant_ngala librede polvo,pelusa,
cabellos y cualquieracosaque podrfa disminuir
el flujo deaire.
Ma,ntengael cabello,ropa suelta,dedos y todas
ias partesdel cuerpo alejados deias aberturas y
piezas mec_nicas.
NOuse la aspiradorasin tenor instaladala bolsa
para polvoy/o losfiltros.
Getablesiempre labolsa para polvodespues de
aspirar limpiadoresde alfombraso desodorantes.
talcos ypelves fines. Estesproductosatascan la
bolsa, reducenel flujo de airey pueden causar
que estase rompa.Si no cambiala bolsapodrfa
ocasionar dafio permanentea la aspiradora.
NOuse la aspiradorapara levantarobietos agu-
dos, juguetespequefios, alfileres,sujetapapeles>
etc.Podrfandafiar la aspiradorao labolsa para
polvo.
No levanteninguna cosa quese este quemando
o emitiendohumo, come cigarrillos,cerilles o
cenizas calientes.
No use laaspiradorapara aspirarliquidos
inflamableso combustibles(gasolina, liquidos
para limpieza,perfumes,etc.) ni la use en
lugaresdonde estos podrfanestar presentes. Los
vapores de estassustancias puedencrear un
peligro deincendioo explosi6n.
Tongacuidadoespecialal utilizar laaspiradora
en escalones.No la coloque sobresillas, mesas,
etc. Mantengalaen el piso.
Usted es responsablede asegurarque su aspira-
dora nosea utilizada per ningunapersona que no
pueda manejarlacorrectamente.
GUARDE ESTAS INSTRUCClONES
El armado y use segurode su aspiradorason su responsabi]idad.Esta aspiradoraha sidedisefiada
exclusivamentepara use domestico.La aspiradora deber_ almacenarseen un lugarseco yen el inte-
rior.Lea este Manual del propietario detenidamente,puescontiene informacionimportantesobre segu-
ridad y use.Esta quiacontiene informaci6nsobre seguridad debaio de simbolosde advertiencia
cuidado. Per favorponga atenci6n especial aestas instruccienes dadas. Adverfencia: Este informaci6n
le alertara con el poligro de fuego, chequeselectricos, quemadas y lesiones. Cuidado: Esle
informaci6nle alertara apeligros come lesiones y daflos de propiedad.
2

Esimportanteconcerlaspiezasycaracteristicasdesuaspiradoraparaasegurarsuusoadecuadoyseguro.
Examfnelasantesdeusarsuaspiradora.
Objeto Pieza No Pieza N°
en EUA en Canadd
Bolsa para polvo 20-50690 20-50690C
Bombilla de farol 20-5248 20-5248C
Filtro de escape 20-86889 20-86889C
Filtro de seguridad 20-86884 20-86884C
del motor
$eguro dela
cublertade
la
-Mango
"lnterroptor
de encendldo/
apagado
Indlcadorde
polvo (algunos
modeles)
Indlcador de
rendlmlento
(algunos modelos)
SujeMdor superior
de Ilberacl6n r_plda
del cord6n
Cord6n
escape
(dentro)
del cord6n
Mango para
Herramlentas
para
Tubo
Ceplllo para
Cepillo para
comblnacl6n.
Pedal de
Ilberacl6n
NtJmeros d_
del modelo
Manguara
IIII=
Protector
de motor
Agltador
(Abajo)
-Agltador encendldo/
apagado selector
llbaraci6n
del mango
_ase de
boqullla
Bot6n
Sobrecarga del agltador
JUEGOS DE MAN_UERA
DE EXTENSION
ALGUNOS MODELOS
Manguera _e extenslb_)
lUI([(UI[I[(II[IllU({[[I,i
ALGUNOS
-.- MODELOS
(_j Adaptador
_.j-e--- Cepil/o paraTPuibsoos -_
Handi-Mate '_ Jr,
@
Peligrodechoqueel(_ctrico
Noconectela aspiradorahastaque termine
dearmm'la. De Iocontrariopodrfacausarun
choqueel_ctdcoo lesi6ncorporal.
Antes dearmar la aspiradora,chequee la LISTA
DE EMBALAJE en lacubierta separada de la Lista
de Partespara Reparacidn. Use esta listapara veri-
ficar que ha recibido todas las componentes de su
nuevaaspiradoraKenmore.
Retrar la banda
adhesiva ubicada
debajo de la
...polvo
]a caja del
motor.
Fijeelcabo de
la manguera
expansiblea la
boquilla como
se muestra.
MONTAJE DEL MANGO
Tornillo
Quiteel tornillo del mangoIocalizadojustodebajo
del borclesuperior de la parte posterior de la asp(
radora,ver ilustracion de arriba.
Coloque el mango como se ve en la diagrama
abojo.
AI mantener le manquera de manera que no
interfera, mueva el mango a la abertura en la
parle superior de la aspiradora.
fornillo en
Inserte el tornillo para que pase por el mango de
la aspiradora.
Empiece a apretar el tornillocon los dedos. Quiza
sea necesario ajustar un poco el mango.
4
Aprieteeltornillo
conundestornil-
lador.
No aprietedemasiadoel tomillo.
Si Ioaprietademasiadop_r/a arruinar losod-
flciospareeltomillo.
No operelaaspiradorasintener instaladoel
tomUlo.
COLOCACI6N DEL
CORDON
Aseg_resede que elsujetador superior del cord6n
de liberaci6nr_,pidase encuentre en posici6n verti-
cal. Quiteel alambrecon el que esta atado elcord6n
electrico.
Fije elcord6nen
posici6n,forzandolo
en la ranurade
bloqueo ubicada en
el cuerpo del
sujetador superior
cle}cord6n, como se
muestra.Esto ayuda
a queel cord6n no
se enrededebajo Co,,_6n
del agitador dela
aspiradora.
Enrolle el cord6n electrico alrededor de lossujeta-
dores superior y inferior y presione la ranuradel
enchufe sobre el cord6n.
Sujetadorsuperior
deIlberacl6nr_pida
del cord6n
Cord6n
PARA COMENZAR
1. Gire el
sujetador del
cord6n de
de/
cord6n lado a lado y
hacia abajo
pare liberar
el cord6n
el_ctrico.
2, Desprenda el enchufe del cordon eiectrico y quite
el cord6n del sujetador superior. Compruebe que el
cord6n el_ctrico sigue fijadoen la ranura de bloqueo
del sujetador superior.
3. Verifiqueque la aspiradoratenga instalada una
boise. Consulte la CAMBIO DE LABOLSA PARA
POLVO.
Note:Parare_ucirel riesgo dechoque electrico,
esta aspiradoracuenta con una clavijapolarizada,
unode los contactoses m_.sancho que elotro. La
clavija s61opuede introducirse de una maneraen
el enchufe.Si la clavija no cabe bien en elenchul
inviertala.Si alannocabe, Ilamea un electricista
para queinstale un enchufecorrecto. Noaltere la
claviia deninguna manera.
4. Conecte el cord6n electricopolarizado en un
enchufe de 120 voltioe que se encuentrecerca del
piso.
ADVERTENCIA
Peligrode lesi6npersonaly daSoaJproducto
• NOconectela esplradorasiel interruptorest_
en laposici_ ON, Podrfa resultarenlesi(_nper-
sonalodaSo.
• NO uselos enchufesIocalizadossobrelos
muebles.Los objetoscercanospodrfanresultar
da,'_ados.
Desprenda elmango pisando el pedal de liberaci6n
,tirandadel mango hacia abajo con la mano.
Nora: Elagitador no girara si la aspiradora esta en
posici6n vertical,
Pedal,
Ilberacl6n
del mango
Paraarrancarla aspiradora,deslice el interruptor de
encendido/apagadode la posici6nOFF a la posici6n
ON. Paradetenerla, coloque elinterruptor en la posi-
ci6nOFE
Nota:Este interruptor opera solamente elmotor de
succi6n.Para qua elagitador gire, el selector
encendido/apagadodel agitador debe estar en
posici6nencendido y el asa debe sacarse de la
posici6nvertical.
iiiiili!ii_i_iiiiliiiiiiiiiiiiiiiii_!_!_!i!ililiiii_iiiiiiiiii_i_ii_iiiii!iiiiii!iiiiiiiiiiiiiiii!iiiii!ililiiii!iiiiiiiiiii!i!i!iii!i!i!iliiii!i!iiiii!i!i!iliiiii!iiiiiiiiiiii_i_i_iii_iiiiiii!i_i!iiiiiliiiiiiiii!ii_iii!ii_iiiiliiiiiiiiiiiiiiii_ii!iiiii!_!il!iliiiii!iiiiiiiiiiiiiiiili!ili!iiiiiiiiiiiiiiii!i!i!ii!i!i!ililiiii!iiii_ii!ilililiiiiiiiiiiiiiii!i!i!i!iliiiiiiiiiiiiiiiiililililililiiiiiiiiiiiiiii!i!i!i!i]
Para seleccJonarun ajustede nivelde pelo de la
alfombra:
Apague laaspiradora. Seleccione un nivel de ajuste
inctinandola aspiradora hacia arras hast que tas
fuedas delanterasesten un poso despegadas del
piso.
Deslicela palancade ajuste de nivel de pelo de la
alfombraa la posici6ndeseada.
Hay cuatro(4) posiciones de ajuste de altura en la
aspiradora.Use la posici6n LOWpara la mayoriade
allombras y suelos lisos (con el agitador OFF), y la
posicion HIGH paraalfombras de fibras largas o
abundosas,tapetes pequefios, etc. Use las otras
posicionesseg6n resulte conveniente para alturas
intermedias.
E
Palanca
paraaJustar
laaltura
\
CUIDADO
No dejepermanecerla aspiradoraen unsolo
lugar duranteningOntiempocuandoel agita-
dorastdrotando.Se puededafiarla alfombra.
6
Poeici6nOFF: Apriete con el piela mitad posterior
del pedalpara apagar el agitador parausa en sue-
los lisos.
En la posici6n OFF el agitadorno gira.Esta posici6n
se debe usar pars limpiar readersfirms coma par-
quet o pisosde Iosetaso cer_,mica.
Nots: Laluz se mantendr_,encendida mientrasse
aspiracon el agitador en posici6n OFF,siempre y
cuando la aspiradorano se encuentre completa-
mente en posici6n vertical.
EnPosickSn:Aprietecon el pie la mitad anterior del
pedal pars encender el agitadorpara usaen
tapiz6n.
El agitador girar_en posici6n ON. Cuando se limpia
alfombrasel selectordebe estar en esta pesici6n.
Atenci6n: Refi_rasealas recomendacionesdel fab-
ricante paralimpiarsu alfombra.Algunasalfombras
m_.sdelicadas pueden requerir el usade la aspi-
radars con el agitadordesconectado pars prevenir
que laalfombra seadafiada.
!rV. ADVERTENCIA
Peligrode lesi6npersonal
NO PONGAlasmanesni lospiesdebajodela
unidadcuandose est6 cambJandoelSelector
de agitadorencendido/apagadoa la posici6n
de encendido.Elagitadorgirerapidarnente.
Herramlenta
para hendidura=
Tuba "_'_
telesc6plco......_
Ceplllo _.
para sacudlr I
Ceplllo para I
comblnaci6n _
"Manguera
expansible
, Collarde
Identifiquecada uno de losaccesorios mostrados a
continuaci6n.
C6MO UTILIZAR LOS
ACCESORIOS
Saca la parts inferior de la manguera expansible de
la aspiradera y tirando par atras. Ahora se puede
conectar la manguera.
NOTA:La v&lvulade desviaci6npuedeestar abierta
mientrasse usan los accesorios o pars limpiar una
alfombra nuevaa causa de un flujo reducidode sire
par los accesoriosmismos o
per la pelusade la alfombraque liens la balsa rapi-
damente. Consulte el cuadro RECONOCIMIENTO
DE PROBLEMAS.
ADVERTENClA
Peligrode chequeel6ctricoolesi6n corpo-
ral
Desconectela unldadantesde limptarlao
darleservtdo.De Io contrariopodrfapro-
dudrseunchequeel_ctricoocausar
lesi6ncorporalsila aspiradoraarranca de
maneraimprevista.
7
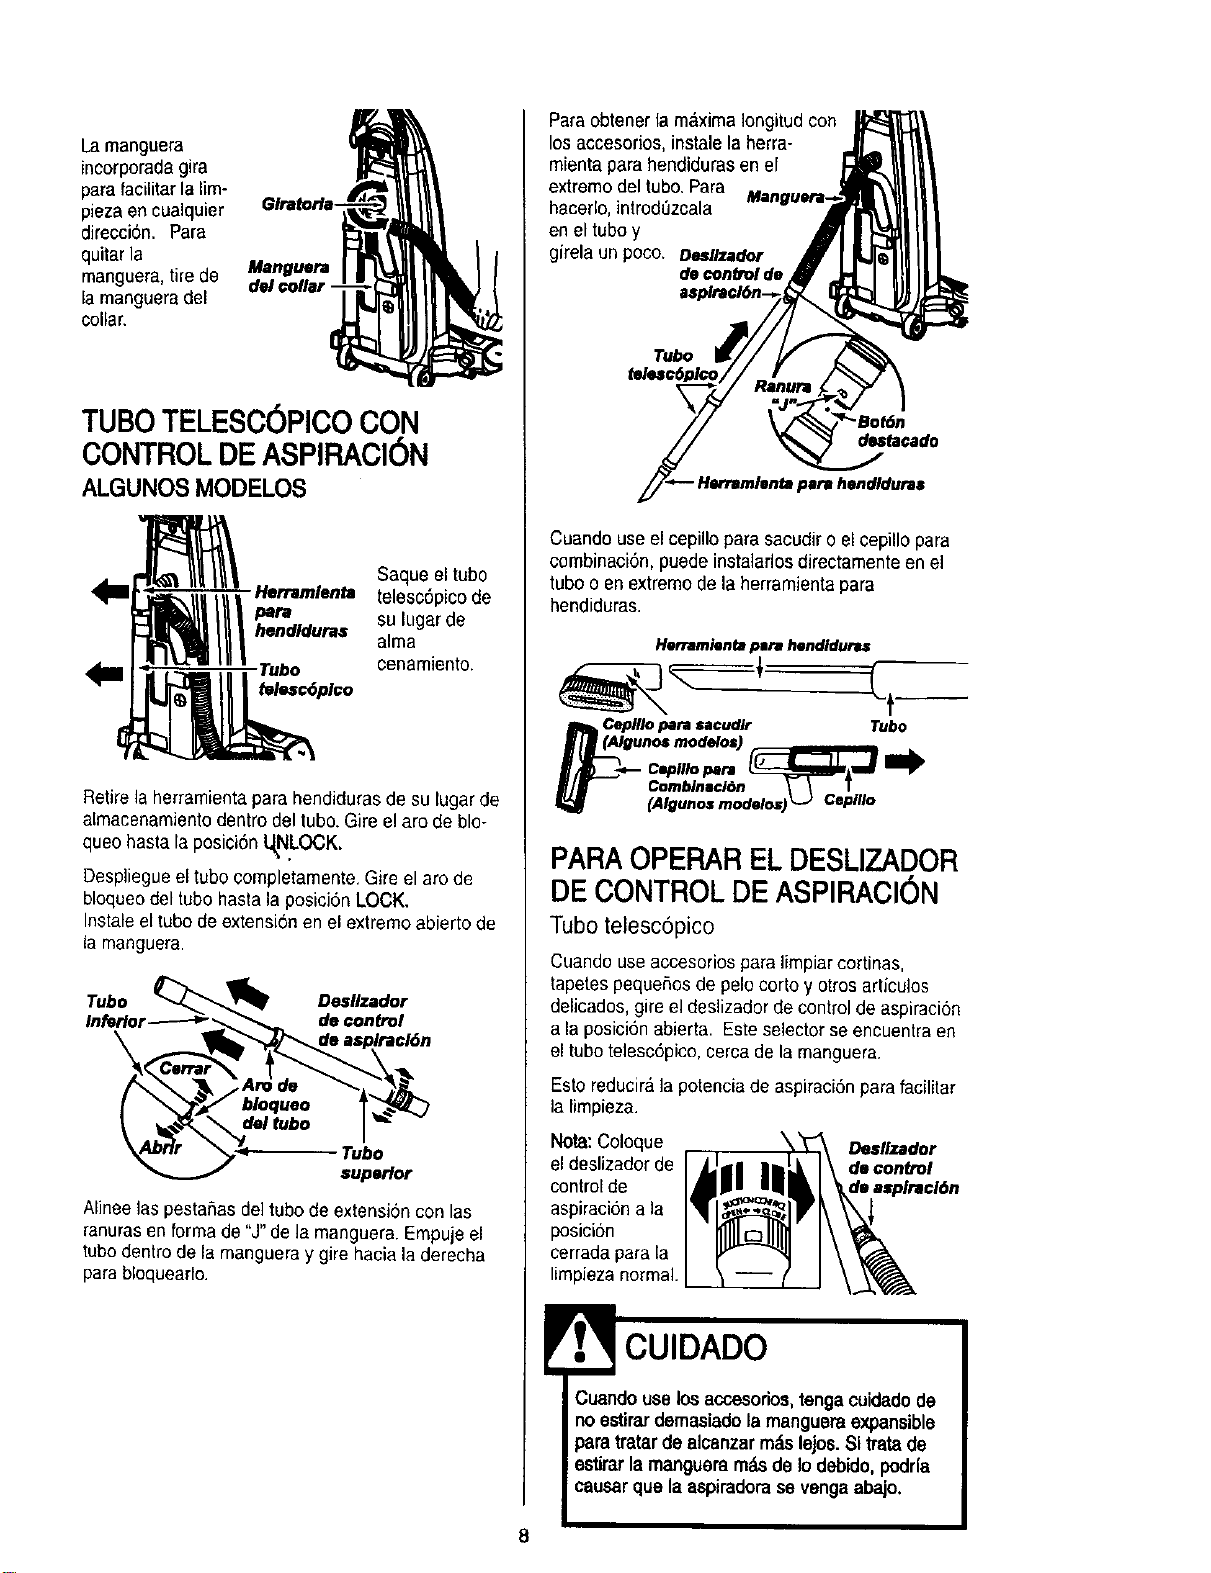
Lamanguera
incorporadagila
parafacilitarlalim-
piezaencualquier
direcci6n.Para
quitarla
manguera,tirede Manguera
la mangueradel
collar.
TUBOTELESC6PICO CON
CONTROLDEASPIRACI6N
ALGUNOSMODELOS
Saque eltube
telesc6pico de
su lugar de
alma
cenamiento.
Retirela herramientapara hendidurasde su lugar de
almacenamientodentro det tubo.Gire el arode blo-
queo hastala posici6n L_N.LOCK.
Despliegueel tubo completamente. Gireel aro de
bLoqueodeI tubo basrala posicidn LOCK.
Instaleel tubode extensionen el extremo abierto de
la manguera.
Tubo DesUzador
Inferior de control
Tubo
superior
Alineelas pestahasdeltubo de extension con las
ranutasen forma de"J"de lamanguera. Empuje eI
tubodentrode lamanguera y gire hacia la derecha
parabloquearlo.
Paraobtener la m&ximaIongitudcon I_"_
losaccesorios, instalelaherra- ,,,IL, _| I_]
mienta parahendidurasene[ Jl_/_ _'
extremodel tubo Para Jiii_i _l
• , " Manguera-_-
hacerlo, ,ntroduzcala "Jk' \ lll
en eltubo y _111L_I II
girelaunpoco. Des/Izador ,Jr I _L"J_Q71_III/
doconS'old._ _ I Ill II
y-,.-- Herramlontm para hendlduras
Cuando useel cepillopara sacudir o elcepillo para
combinaci6n, puedeinstalarlosdirectamente enel
tubo o en extremedela herramienta para
hendiduras.
Herramienta para hendldunls
Ceplllo para sacudlr Tubo
unosmode_s)
(Algunosmodelos)L_ Cepillo
PARA OPERAR EL DESLIZADOR
DE CONTROL DE ASPIRACI6N
Tubo telesc6pico
Cuando useaccesorios paralimpiarcortinas,
tapetes pequeSosdepelocorto ¥ otros articulos
delicados,gire el deslizador decontrol de aspiracion
a laposici6n abierta. Esteselector seencuentra en
el tubotelesc6pico,cerca de la manguera.
Esto reducirAla potenciade aspiraci6npara facilitar
la limpieza.
Nora:Coloque
eldeslizador de
control de
aspiraciona la
pesici6n
cerrada para la
limpiezanormal.
Cuando use los accesofios, tengactJk_adode
noestirardemasiadola mengueraexpansible
paratratardealcanzarmztslejos.81tratade
estirarlamangueram_ de Iodebido,podrfa
causarque la aspiradorase vengaabajo.
8
ALMACENAJEDE LOS
ACCESORIOS:
Retireel cepillopara sacudir o elcepillo para
combinaci6n.Col6quelos firmemente en su lugarde
almaoenamientocorrespondiente.
Retire laherramientaparahendiduras del tube
gir&ndola.P6ngalaa un lade.
Retire eltubede extensi6nde la manguera.Gire el
tube hacia la izquierday tire del extreme de la
manguera.
inferior
Abrlr
Cerrar
bloqueo
,del tubo
Tubo
superior
Desbloqueeel tube girando elare de bloqueo hasta
la posici6nUNLOCK.
Desliceel tube inferiordentro del tube superior, Gire
el arede bloqueo del tube a la posicion LOCK.
Introduzca laherramientapara hendidurasdentro
del tube ¢omprimido.Instalebien en su posicionde
almacenamiento.
Aseg0resede que la unidadest_apagada. Inserte
nuevamentela mangueracompletamentedentrode
taabertura ubicadaen la parleinferiorde la
aspiradora, dedonde la sac6 inicialmente.
I ADVERTENCIA
Peligrode lesi6n personal
El agitadorpuedeempezara girarcuandose
Insertalamanguera.Asegdresede que el agi-
tadorest_ librede manos,pies,objetos,etc.
E
CUIDADO
NO tire de laaspiradora per la mangueraen
la habltaci6n.Podrian ocurrir datios asusper-
tenenclas.
MANGUERA DE EXTENSION
ALGUNOS MODELOS
Unos modelosincluyen una mangueraauxiliarque
conecta con la manguerade estiraren la aspiradora
para unaextensi6nmas larga para limpiar.
Mangueradela unldad Mangueradeextensl6n
Insertelasdos leng0etasen el extreme de la
manguerade extensi6nen lasdos ranurasformadas
come laletra Jen la aspiradoray gire para conectar.
Se puede ¢onectartodas las herramientasy eltube
telesc6pico con elextreme abiertode la manguera.
CEPILLO PARA PISOS Y TUBe:
ALGUNOS MODELOS
Unos modeiostienenun cepilloy un tube auxiliares
para limpiarlos suelos sin alfombras.Gire el extreme
del adaptadorhacia el cepillo de suelo yel otto
extreme hacia el tube recto.Conecteel tube recto
con el tube telesc6pico y luego con la mangueraen
la aspiradorao con la manguerade extensi6n.
I
Cepillopara plsos ._p,-_
(]} Tubo _jA. Adaptado-_-----JrO_(_
CUIDADO
Cuandouselamangueraenforms normal
oconla mangueradeextensi6ninstalada,
la aspiradora debemantenersesobreuna
superficiefirmealmismoniveloa un nivel
inferiorque lospiesdel usuario.NO uselas
manguerascuandola aspiradoraest6 a un
nivelm&saltoquelospiesdel usuario.
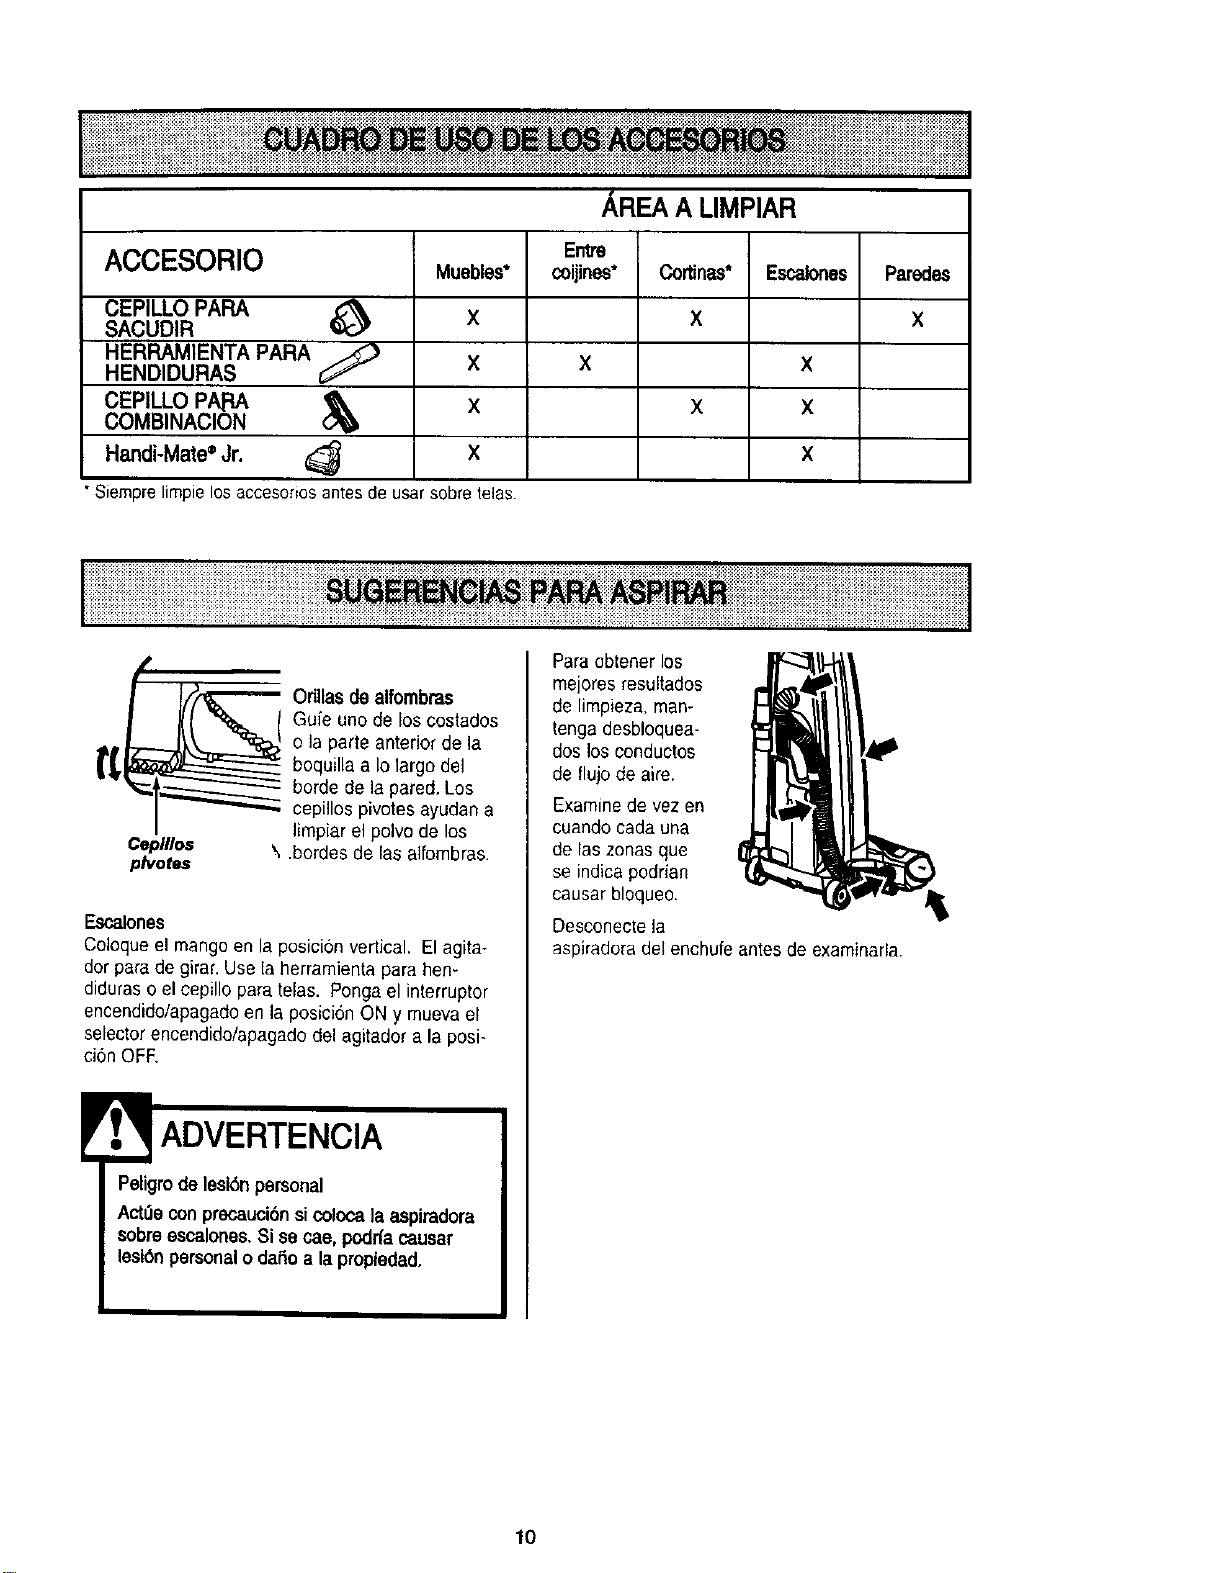
ACCESORIO Muebles.
CEPILLO PAPA _ X
SACUDIR
HERRAMIENTA PARA
HENDIDURAS _ X
CEPILLO PA.RA
COMBINACION & X
Handi-Mate ®Jr. _ X
•Siemprelimpielosaccesor_osantesde usarsobretelas.
AREA A LIMPIAR
Entre
coijines*
Cortinas*
X
Escalones
x X
x X
x
Paredes
X
iii i i i i iii iiii i i i i i iiiiiiii iiiiiiiiii!i!iiiiiiiiiiiiiiiiiii iii!i iiiiii ii iiiiiiiiiii@ i ii i iiiiiii; iiiiii iiEii iiiiiiE l
Cepillos
plvotes
_ dllasde alfombras
Gufe uno de los costados
o la parte anterior de la
boquilla a Iolargo del
borde de la pared. Los
cepillos pivotes ayudana
limpiar el polvo de los
\ .bordesde las alfombras.
Esc_ones
Coloqueel mangoen la posicion vertical. El agita-
dor parede girar.Use la herramientapara hen-
diduraso el cepillo pare telas. Ponga el interruptor
encendido/apagadoen la posici6n ON y mueva el
selectorencendido/apagado del agitador ala posi-
ci6n OFE
!
, ADVERTENCIA
Peligrode lesi6npersonal
Act_econ precaucibn sicoloca laaspimdora
sobreescalones, Si se cae, podn'acauser
lesi6npersonalo dafio ala propiedad.
Para obtener los
mejores resultados
de limpieza,man-
tenga desbloquea-
dos los conductos
de llujode aire.
Examine de vez en
cuando cada una
de laszones que
se indica podrian
causar bloqueo.
Desconectela
aspiradoradel enchufe antes de examinarla
10
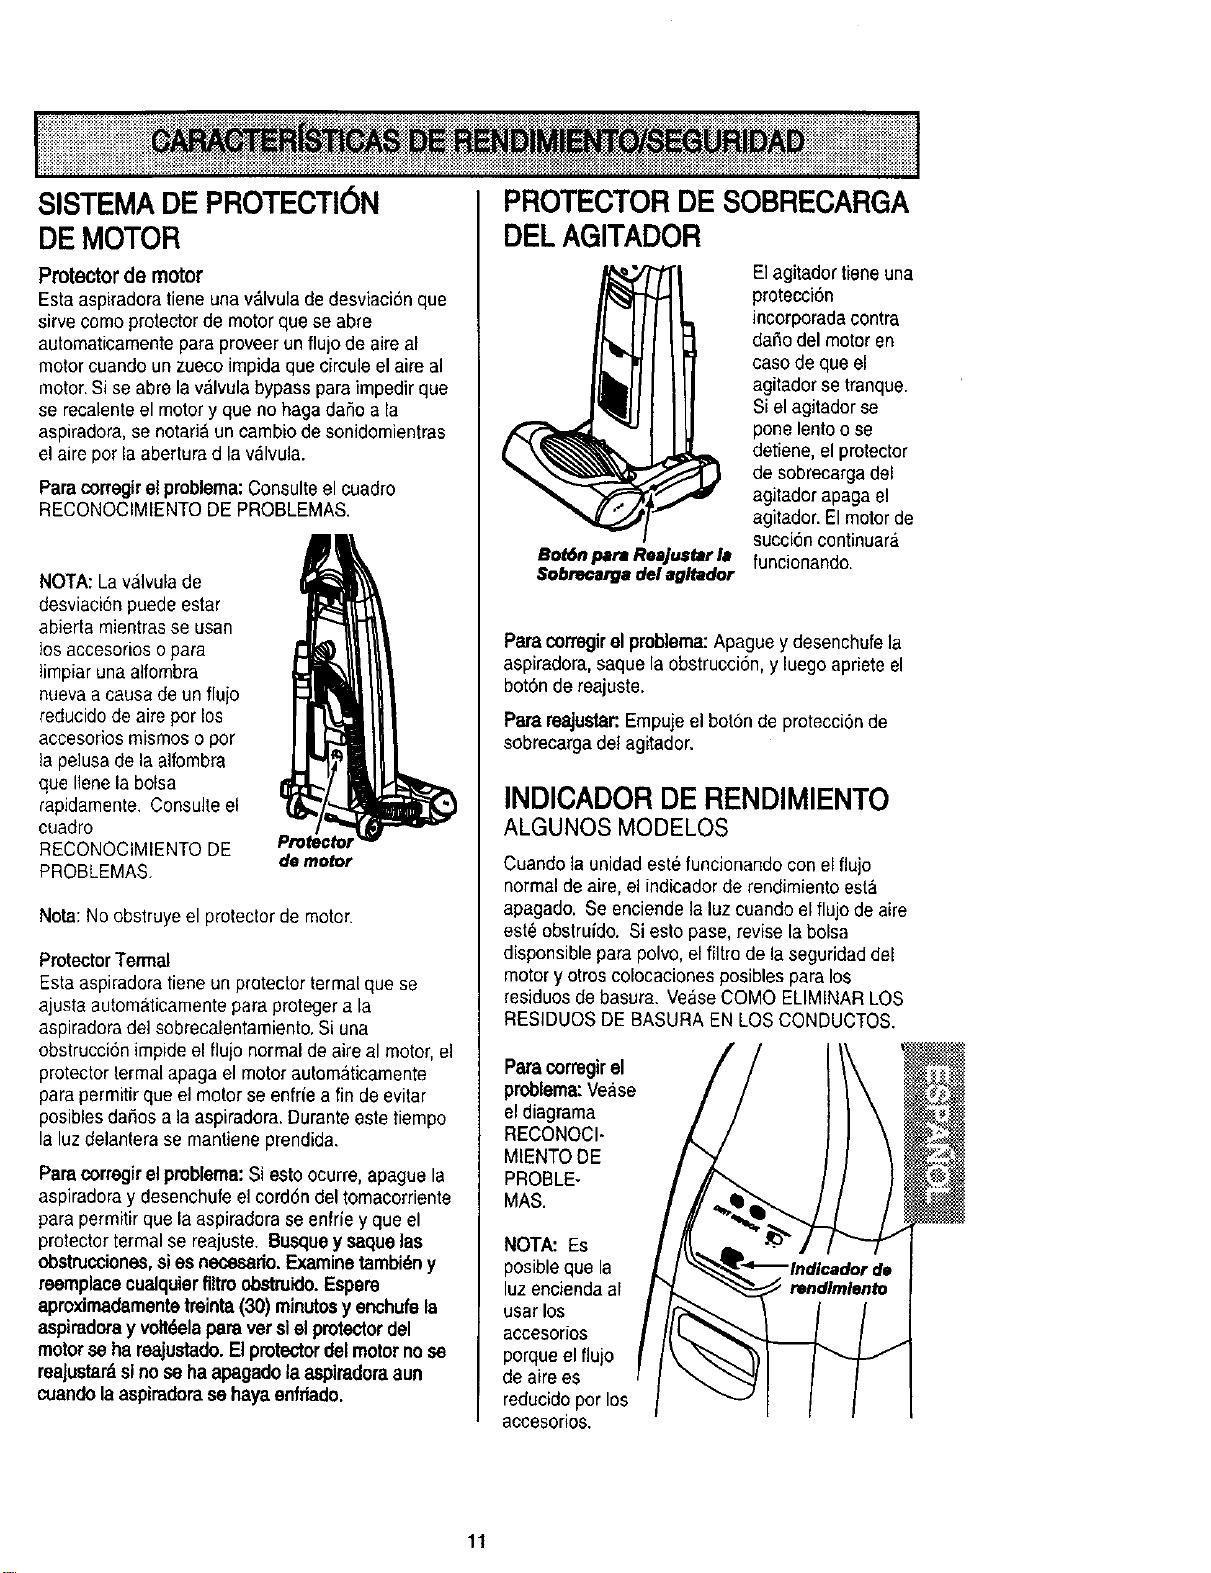
SISTEMA DE PROTECTION
DE MOTOR
Protector de motor
Esta aspiradoratieneuna v_.lvulade desviaci6nque
sirve comeprotectorde motor quese abre
automaticamentepara proveerun flujo de aire al
motor cuandoun zueco impidaque circule el aire al
motor.Si se abre la v_lvulabypass paraimpedirque
se recalenteel motor y queno haga daSo ala
aspiradora,se notaria un cambio desonidomientras
el aire per la aberturad la v&lvula.
Parecorregirel problema:Consulteel cuadro
RECONOCIMIENTODE PROBLEMAS.
NOTA:Lavalvula de
desviaci6npuede ester
abierta mientrasse usan
los accesories opara
limpiar una alfombra
nuevaa cause de unflujo
reducidode aire per los
accesorios mismoso per
ta pelusade la alfombra
que Itenela boise
rapidamente. Consulteel
cuadro
RECONOCIMIENTODE
PROBLEMAS.
_e motor
Note:Noebstruyeel protector de motor.
ProtectorTermal
Esta aspiradoratiene un protector termal quese
ajusta autom;_ticamentepara protegerala
aspiradorade]sobrecalentamiento.Si una
obstrucci6n impideel flujo normalde aire al motor,el
protector termalapaga el motorautom;_ticamente
pare permitirque el motorse enfrie a fin de evitar
posibles daSosala aspiradora. Duranteeste tiempo
la luzdelanterase mantieneprendida,
Parecorregirel preblema:Si estoocurre, apague la
aspiradoray desenchufeelcord6ndel tomacorriente
para permitirque la aspiradorase enfrie y que el
protectortermal se reajuste. Busquey saquelas
obstrucciones,sies necesado.Examine tambi_ny
reereplacecualquierfirm obstruido. Espere
aproximadamentetreinta (30) reinutosy enchufela
espiradoray volt6elapare vet slel protectordel
motorse ha reajustado.El protector del motorno se
reaJustar_sl no se ha apagadola aspiradora aun
cuando la aspiradorase haya enfriado.
PROTECTOR DE SOBRECARGA
DEL AGITADOR
Bot6npara Reajustarla
Sobrecargadel agltedor
El agitadortiene una
protecci6n
incorporadacontra
daSodel motor en
case deque el
agitadorsetranque.
Si elagitador se
pone lentoo se
detiene, elprotector
de sobrecargadel
agitaderapaga el
agitador.El motor de
succi6ncontinuara
funcionando.
Parecorregirel problerea:Apaguey desenchufela
aspiradora, saquela obstrucci6n,y luego aprieteel
bot6nde reajuste.
ParereajustaEEmpujeel bot6nde protecci6nde
sobrecarga delagitador,
INDICADOR DE RENDIMIENTO
ALGUNOS MODELOS
Cuando la unidadeste luncionando con el flujo
normalde aire, el indicador de rendimientoest_
apagado. Se enciendelaluz cuando elflujode aire
est_ obstrufdo. Si esto pase, revisela bolsa
disponsible parapolvo, elfiltro de la seguridaddel
motory otres colocaciones posiblespara los
residuesde basura, VeaseCOMe ELIMINARLOS
RESIDUES DE BASURAEN LOS CONDUCTOS.
Parecorregirel
problema:Vease
el diagrama
RECONOCI-
MIENTODE
PROBLE-
MAS.
NOTA: Es
posibleque la
luzenciendaal
usar los
accesorios
porque elflujo
de airees
reducidoper los
accesorios.
11
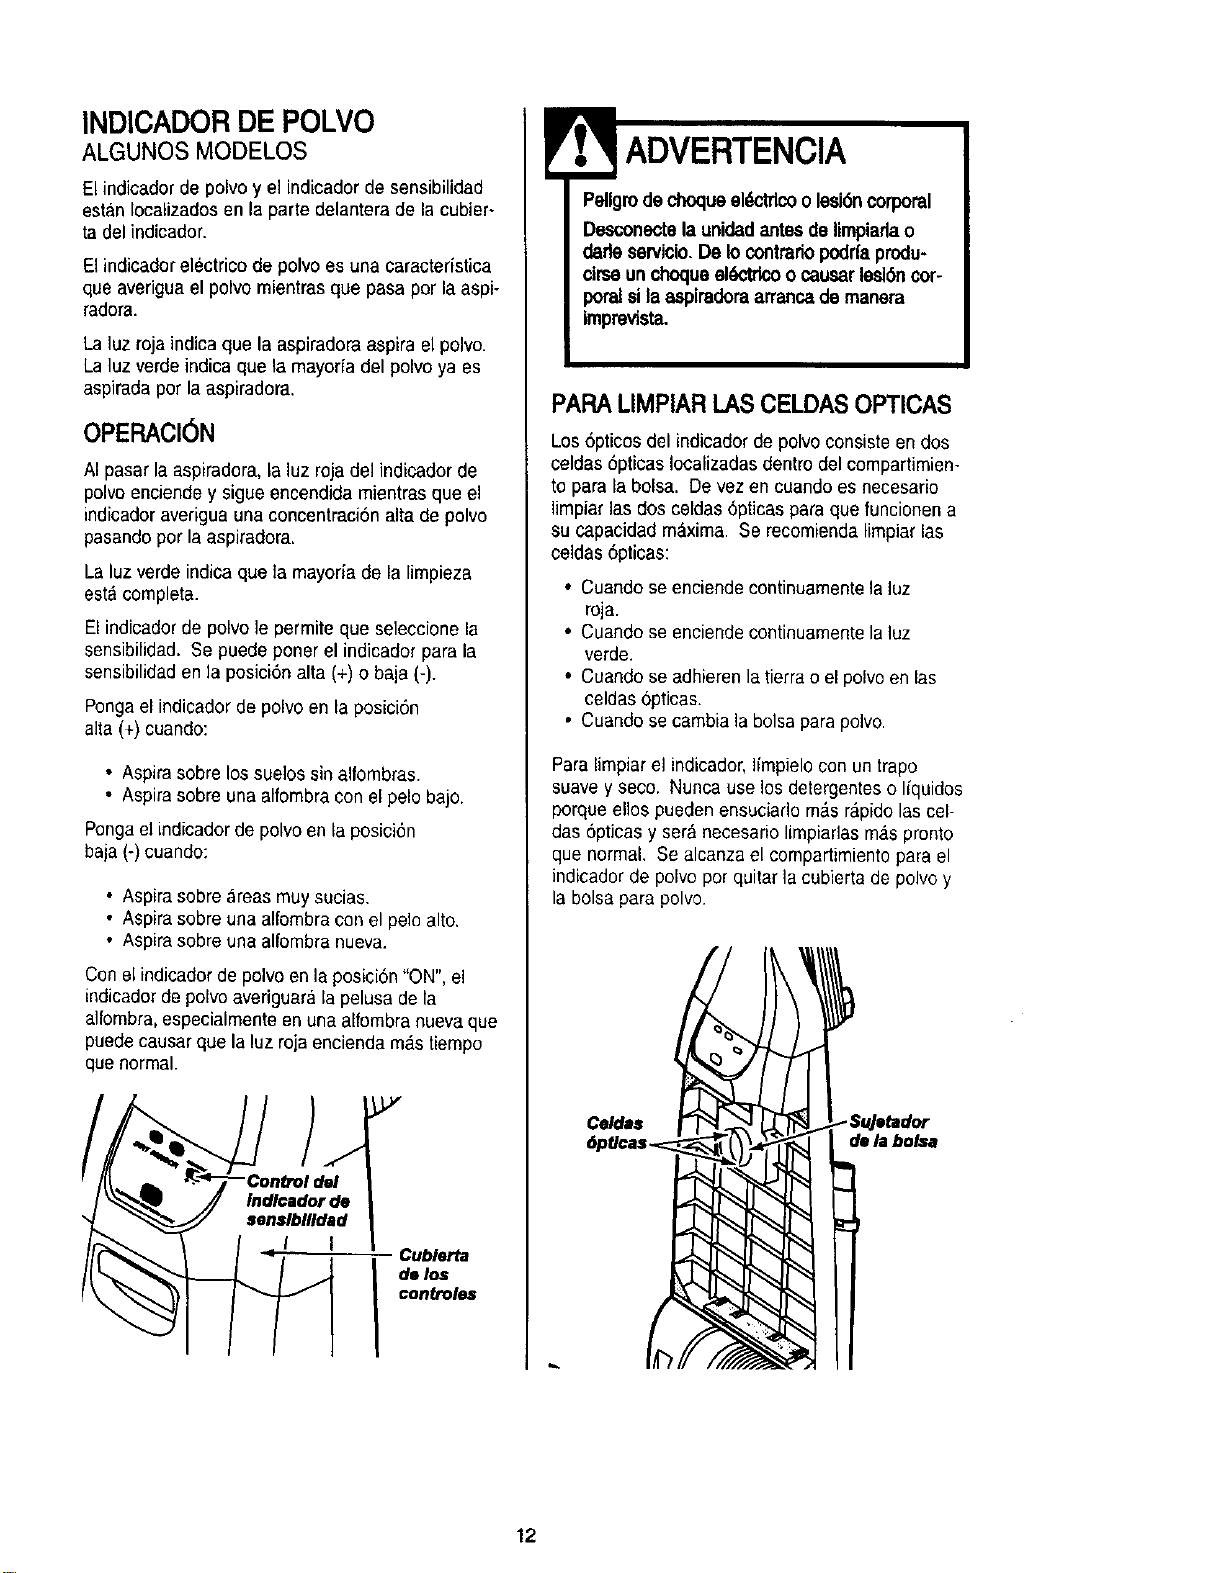
INDICADORDE POLVO
ALGUNOS MODELOS
El indicadorde polvoy el indicador de sensibilidad
estan Iocalizadosen la parte delantera de la cubier-
ta del indicador.
Etindioadorelectrico de polvo ee una caracteristica
que averiguael polvo mientras que pasa perla aspi-
radora.
Laluz roja indicaque la aspiradora aspira et polvo.
La luz verdeindica que la mayorfadel polvoya es
aspiradaper la aspiradora.
OPERACI6N
N pasarla aspiradora, _aLuzrojadet indicador de
polvoenciendey sigueencendida mientrasque el
indicadoraveriguauna concentraci6nalta de polvo
pasandoper la aspiradora,
La luzverde indicaque ta mayoria de la limpieza
est_ completa.
El indicadorde polvo le permite que seleccione la
sensibilidad. Se puede p0ner el indicador para la
sensibilidaden _aposici6nalta (+) o baia (-).
Pongael indicadorde polvo en la posici6n
alia (+)ouando:
• Aspirasobre los suelos sin alfombras.
• Aspirasobre una alfombracon el pelo bajo.
Pongael indicador de polvo enla posici6n
bala (-)cuando:
• Aspirasobre areas muy sucias,
• Aspirasobre una alfombra con el pelo alto.
• Aspira sobreuna aliombranueva.
Conel indicadorde polvo en la posici6n"ON", el
indicadorde polvoaveriguara la pelusa de la
alfombra,especialmenteen unaalfombra nuevaque
puedecausar que la luz roja enciendam_.stiempo
que normal.
jY "
Indlcadorde
sen$1bllldad
I
Cublerta
I delos
controle=
! ADVERTENCIA
PellgrodechequeeI_TIco 0 lesi6ncorporal
Desconectela unidadantesde limpiarlao
(Jadeservicio.De Io contrariopodrfaprodu-
cirseuncheque_ o causarles_6ncor-
poralsila aspiradoraarrancade manera
imprevista.
PARA LIMPIAR!_ASCELDAS OPTICAS
Los6pticos del indicadorde polvo consiste en dos
celdas 6pticas Iocalizadasdentro del compartimien-
to para labolsa. De vez encuando es necesafio
limpiar las dos celdas 6pticas paraque funcionen a
su capacidadm&xima. Se recomiendalimpiar las
oeldas 6pticas:
. Cuando se enciendecontinuamentela luz
roia.
• Cuando seenciende continuamentela ]uz
verde.
• Cuando seadhieren la_ie_rao el polveen _as
celdas opticas.
• Cuando secambia la bolsa parapolvo.
Para limpiarel indicador, limpielo con untrapo
suave y seco. Nunca use los detergenteso Ifquidos
porque eLIospuedenensuciado m_,sr&pidolas cel-
das 6pticas y ser_ necesario limpiaflas m,is pronto
que normal. Se alcanzael cornpartimientopara el
indicader de polvo perquitar la cubierta de polvo _/
la bolsa para polvo.
Celdas
de la bolsa
12
Iiiiliiiiiiiilliiiiiiiii!iiii iiiiiii;;iiiiiiiiiiiiiiiiiiiiiiiiiiiil;ii!!iiiiiiiiiii;iiiiiiiiiiiiiil;i;i
! iiiiiiiii!iiiiiilliii!iiiiiiiiiiiiiiTiiiiiiiiiii!ii_ii_iiiiiiiiiiiiiiiiii!iii!i!iiiiiiiliiiiliiiiiiiliiiiiliiiiiiiiiiliiiiliii_ii!i!i_:_i_i !ii!! !
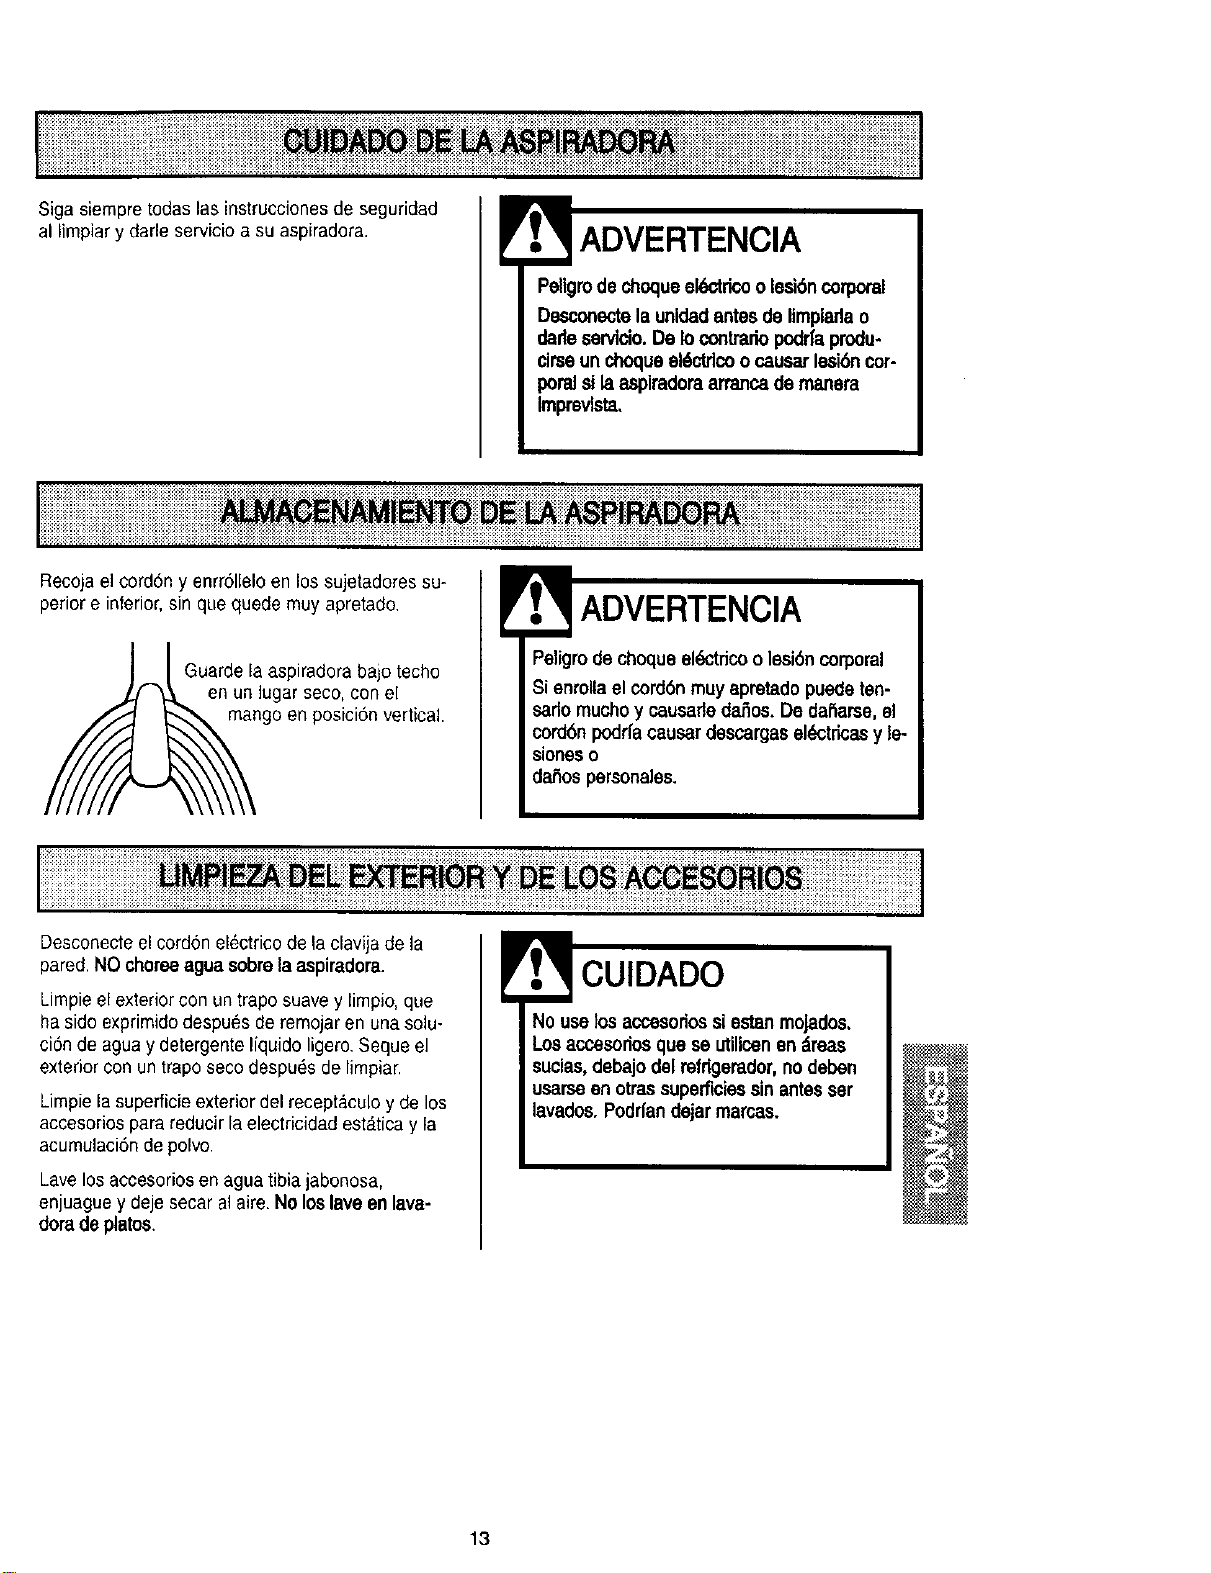
Siga siempretodas las instruccionesde seguridad
al Impiar y dade servicio a su aspiradora.
E't,,_ADVERTENCIA
Peigro de choqueel6ctricoo lesi6ncorporal
Desconectela unldad antes delimplarla o
darteservlcio. Delo contrsriopodrfaprodu-
clrseun choqueel6ctrlcoo ¢._us_rlesi6ncor-
poralsi laaspiradom arrancade manara
Impmvlsta,
J!:!ii]i,ill:iiiiii:iii]i ::!:iiill]iiiiii
iiliiiiiiiiiiiiiiiiiiiiiiiiiiiiiiiiiiiiiiiiiiii_i_i_!i_i!i_i_ii_i_!_i_i iiiiiiii!iiii!i!!iiiiiiiiliiiiiii!iiiiii!i!i!i_iiiii!iiiiii!iiiiiiiiiiiiiiiiii!iiiii!ii!iii!!!!!iiiiiiiliiililliiiii!i!i!i!iiiii!i!i!iiiiiiiii!i!iiiiiiiii!i!i!ililiiiiiiil
Recoja elcord6n y enrr61leloen los sujetadoressu-
perior e interior,sin quequede muy apretado.
Guarde laaspiradora bajo techo
en un lugar seco, con el
mangoen posici6n vertical.
!'t.._ADVERTENCIA
Peligro dechoqueel_tdco olesi6ncorporal
Sienrollael cord6nmuyapretado puedeten-
sadomuchoy causarleda,5os.Dedaf_arse,el
cord6npodrfacausardescargaselL=ctricasy le-
sioneso
da_ospersonales.
Desconeeteel cord6n el_ctricode la clavija dela
pared.NOchorseagua sobrela aspiradora.
Limpieel exterior con un trapo suavey limpio,que
ha sido exprimidodespu#s de remojaren unasolu-
ci6n de aguaydetergente Ifquidoligero.Seque el
exterior con untrapo seco despu_s de limpiar,
Limpiela superficieexteriordel receptaculoy de los
accesorios parareducir la electricidad est_tica y la
acumulaci6n depolvo.
Lavelosaccesorios enagua tibiajabonosa,
enjuague y dejesecar al aire.No loslave en lava-
dora deplates.
!'t.,t,_CUIDADO
NOuselos accesorios sisstanmoJados.
Losaccesodos qua se utillcen en_reas
sucias,debajo del refdgerador,no deben
usarse enotras superficiessinantesser
lavados. Podrlan dejarmarces.
13
iiiiii!i!iiiii!i!i iii!iii!i!iiMi!i!i iiiiiii! ii !!!i!iiiiiiiiiiiiiiiiii!!!i!ii!i!!!iiill]
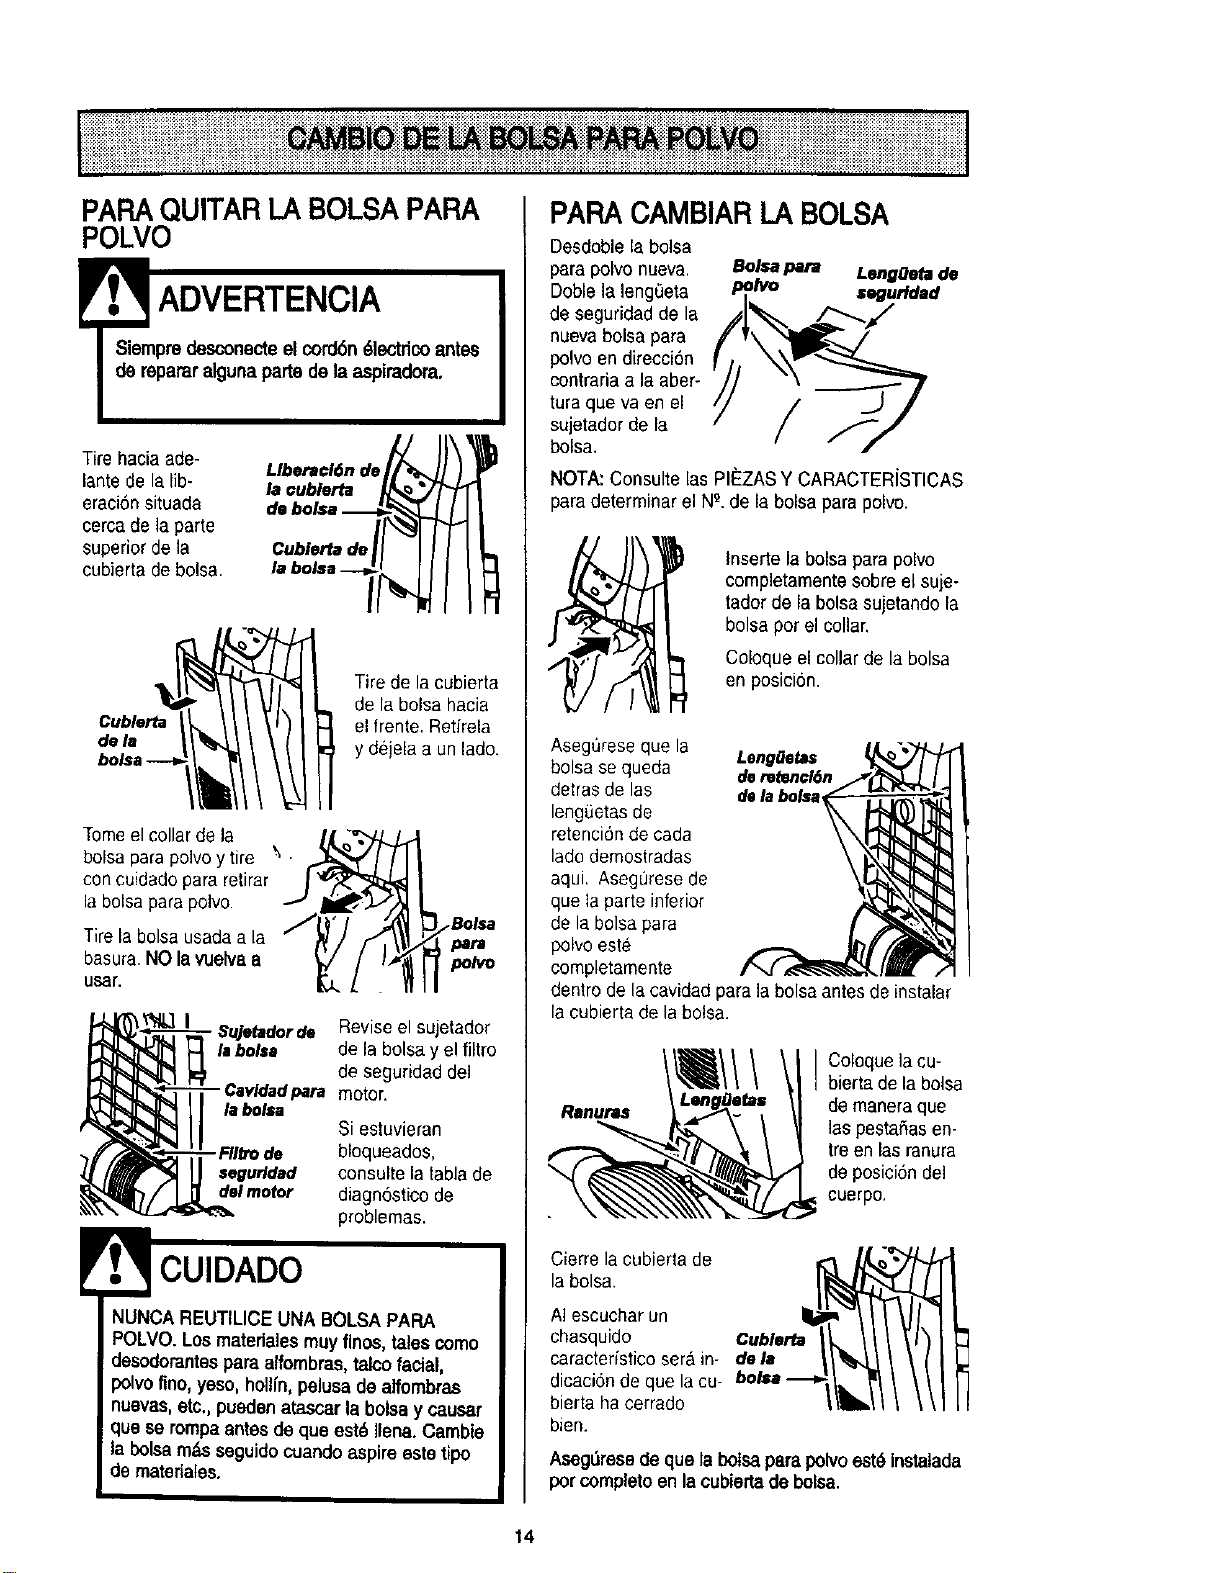
PAPAQUITARLA BOLSAPARA
POLVO
E ADVERTENCIA
Siempredesconecteel cord6n_lectdco antes
de repamralguna partedela aspiradora.
Tire haciaade-
lantede la lib-
eraciSnsituada
cerca dela parte
superiorde la
cubierta debolsa.
Llberacl6n de_
Cublerta
de la
Tire de lacubierta
de labolsa hacia
el frente. Retirela
y dejela a un lade.
Tomeelcollarde la H
bolsa parapo]vo ytire \ . _,_
concuidado para retirar r_
la bolsapara polvo. _" ._
Tire la bolsa usadaa la _'_/_"
basura.NOlavuelva a
usar, D.
!
- 8ujetadorde Reviseel sujetador
I=belea de la bolsay el filtro
de seguridad de]
para motor.
lebolsa
Si estuvieran
- F/Ibode bloqueados,
segurldad consulte latablade
delmotor diagnostico de
problemas.
CUIDADO
NUNCAREUTILICEUNA BOLSA PARA
POLVO.Losmaterlalesmuyfines,talescome
desodorantespara alfombras,talcofacial,
polvofine, yeso,hollin, pelusadealfombras
nuevas,etc., puedenatascarla bolsay causar
quese rompaantes de que est_ Ilena.Cambie
la bolsam_sseguidocuandoaspire este tipo
demateriates.
PARA CAMBIAR LA BOLSA
Desdoble labolsa
para polvo nueva.
Doblela lengeeta
de seguridad de la
nuevabolsa para
polvoen direcci6n
contraria a la aber-
tura que va en el
sujetador de la
bolsa.
Bolsa para LengOeta de
polvo segurldad
NOTA:Consulte las PII_ZASY CARACTERISTICAS
para determinarel N_.de la bolsapara polvo.
Inserte la bolsa para polvo
completamentesobre el suje-
tador de labolsa sujetando la
bolsa per elcollar.
Coloque el collarde la bolsa
en posicion.
Asegt_reseque la
LengOstas
bolsa sequeda deretenc/6n
detras de las delabo/r,a,
leng_etas de
retenci6n decada
lado demostradas
aqui. Asegflrese de
que ta parte inferior
de labolsapara
polvoeste
completamente
dentro de lacavidad para ]abolsaantes de instalar
la cubierta de la bolsa.
Ranuras
I Coloque]aeu-
biertade la bolsa
de maneraque
]aspestafias en-
treen lasranura
de posici6nde]
cuerpo.
Cierre la cubiertade _,-
la bolsa.
A]escuchar un
chasquido Ceub/e
caracteristico ser_,in-
dicaciondequelacu-bolu'--_'Ji/_l_ / \\
bierta ha oerrado
bien.
AseglJresede que labotsa parapolvoest_ Instatade
per completeen lacubiertadebolsa.
14
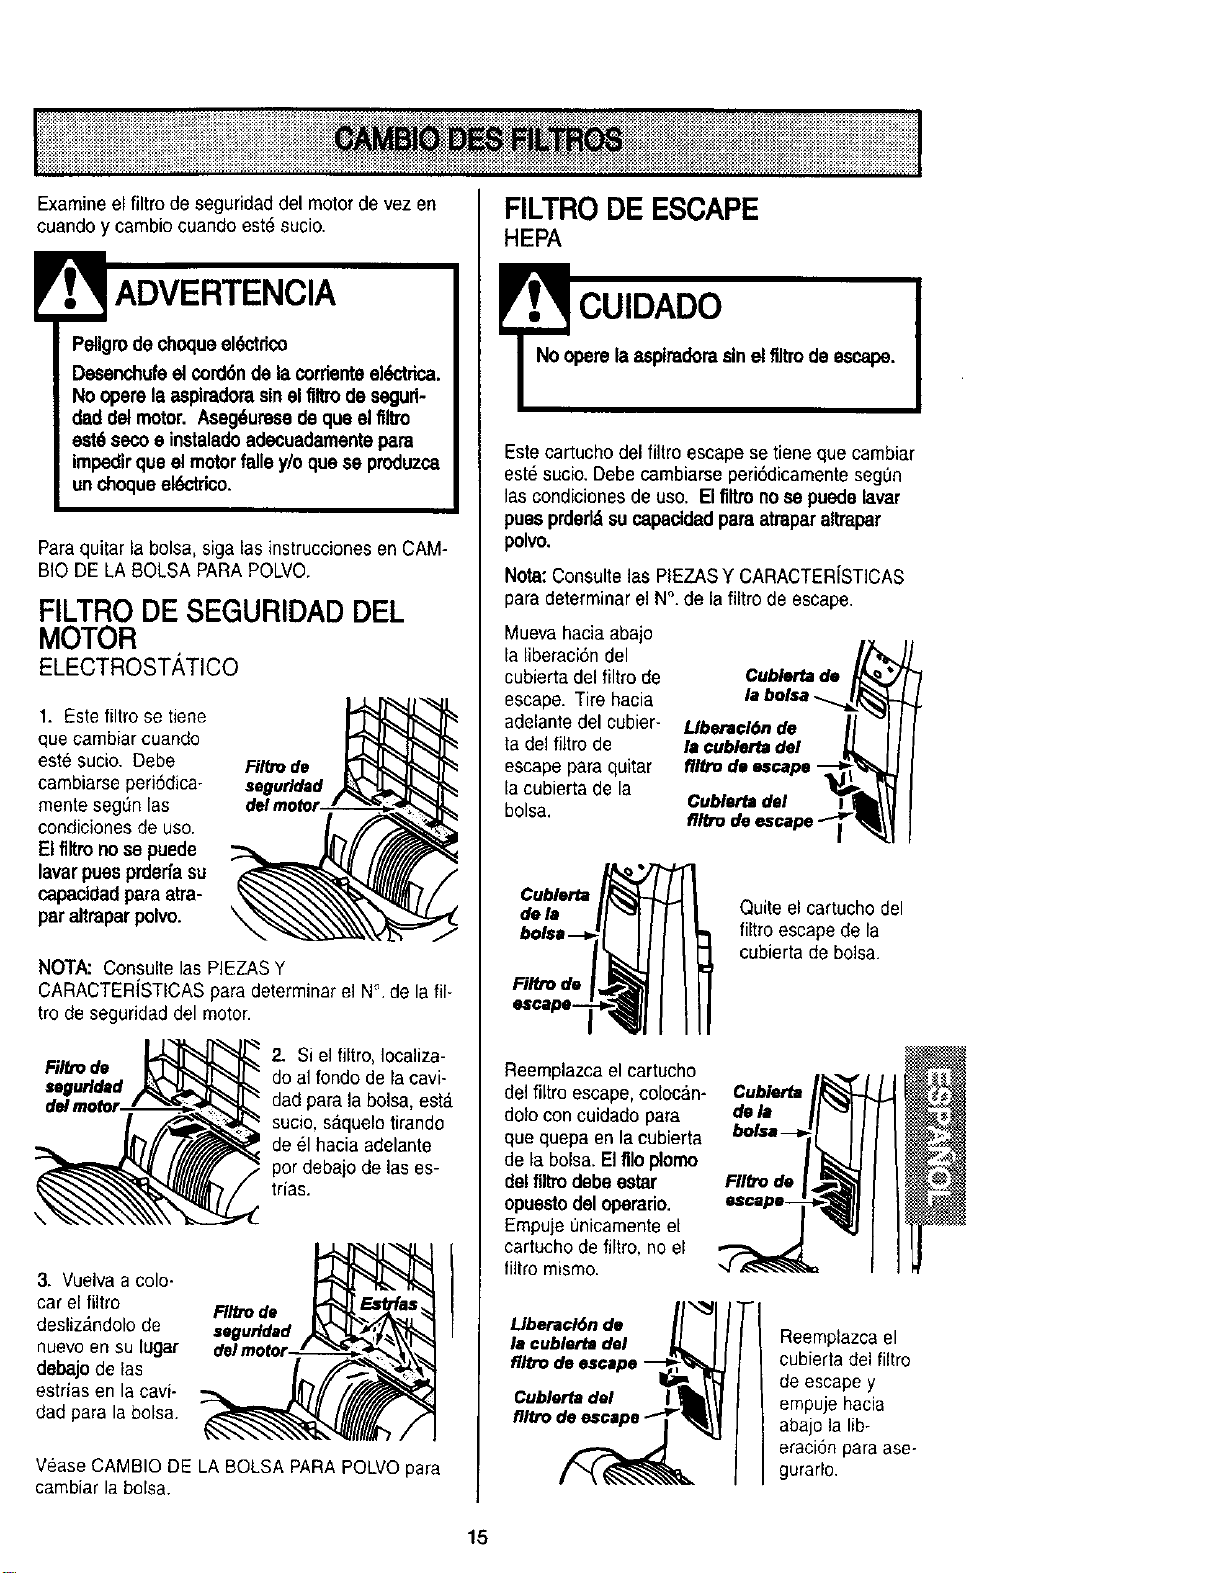
Examineelfiltrodeseguridaddelmotordevezen
cuandoycambiocuandoest_sucio.
! ADVERTENCIA
Peligrodechoqueel_'trico
Desenchufeelcord6nde la corrienteel_'trica.
No operela aspiradorasinel filtro de seguri-
daddel motor. Aseg6uresede queel filtro
est6seco• instaladeadecuadamentepare
impedirque el motorfalley/o que se produzca
unchoqueel_-'trico,
Paraquitar la boise, siga las instruccionesen CAM-
BIO DE LA BOLSA PARAPOLVO.
FILTRO DE SEGURIDAD DEL
MOTOR
ELECTROST,_TICO
1. Este filtro se tiene
que cambiarcuando
este sucio. Debe
cambiarse periSdica-
mente seg_n las
condicionesde use.
El flltronose puede
lavar puesprderfasu
capacidadparaatra-
paraltraparpolvo.
Filtro de
segurldad
NOTA: Consulte las PIEZASY
CARACTERiSTICAS paradeterminar el N°. de laill-
tro de seguridaddel motor.
Filtm de
segurldad
2. Siel filtro, Iocaliza-
do alrondo de la cavi-
dad parela bolsa,est_
sucie,saqueletirando
de 61hacia adelante
por debajode lases-
tries.
3. Vuelvaa colo-
car el filtro F//b-ode
desliz_ndolo de segurldad
nuevo en su lugar
debajo de las
estrias en lacavi-
dad pare la boise.
Vease CAMBIO DE LA BOLSA PARA POLVO pare
cambiar la boise.
FILTRODE ESCAPE
HEPA
cUIDADO
re la aspimdomsinelfiltrode escape. J
Este cartucho delfiltro escape se tiene que cambiar
est_ sucio.Debe cambiarseperi6dicamentesegL_n
las condicienesde uso. Elfiltrono se puede laver
puesprded._sucapacidadpareatraparaltrapar
polvo.
Note:Consulte]as PIEZASY CARACTER[STICAS
para determinerel N°.de la filtro de escape.
Mueva haciaabajo
[a liberaci6ndel
cubierta delfiltro de
escape. Tire hacia
adelantedel cubier-
ta del filtro de
escape paraquitar
[acubierta de la
boise.
Cublerta de
la bolsa -_.._
Llberacl6n de I I
I. cublerta de, J
fllb'o de .cape "-_ll _
Cublerta del _l t_l_
flltro de escape -T _
Cublerta
de le
Filb'o de
Quite el cartucho del
filtro escapede la
cubierta deboise.
Reemplazca elcartucho
de]filtre escape,coloean-
dolo con cuidado para
que quepa en la cubierta
de la bolsa. Elflloplomo
delfiltro debe ester
opuestodeloperado.
EmpujeL_nicamenteel
cartucho de filtro, noel
filtro mismo.
LIberacl6n de
la cublertadel
flltrode escape--
Cublertadel i
Cublerta
dela
FII_ de
Reemplazcael
cubiefta del filtro
de escapey
empuje hacia
abajo lalib-
eraci6n pare ase-
gurado,
15
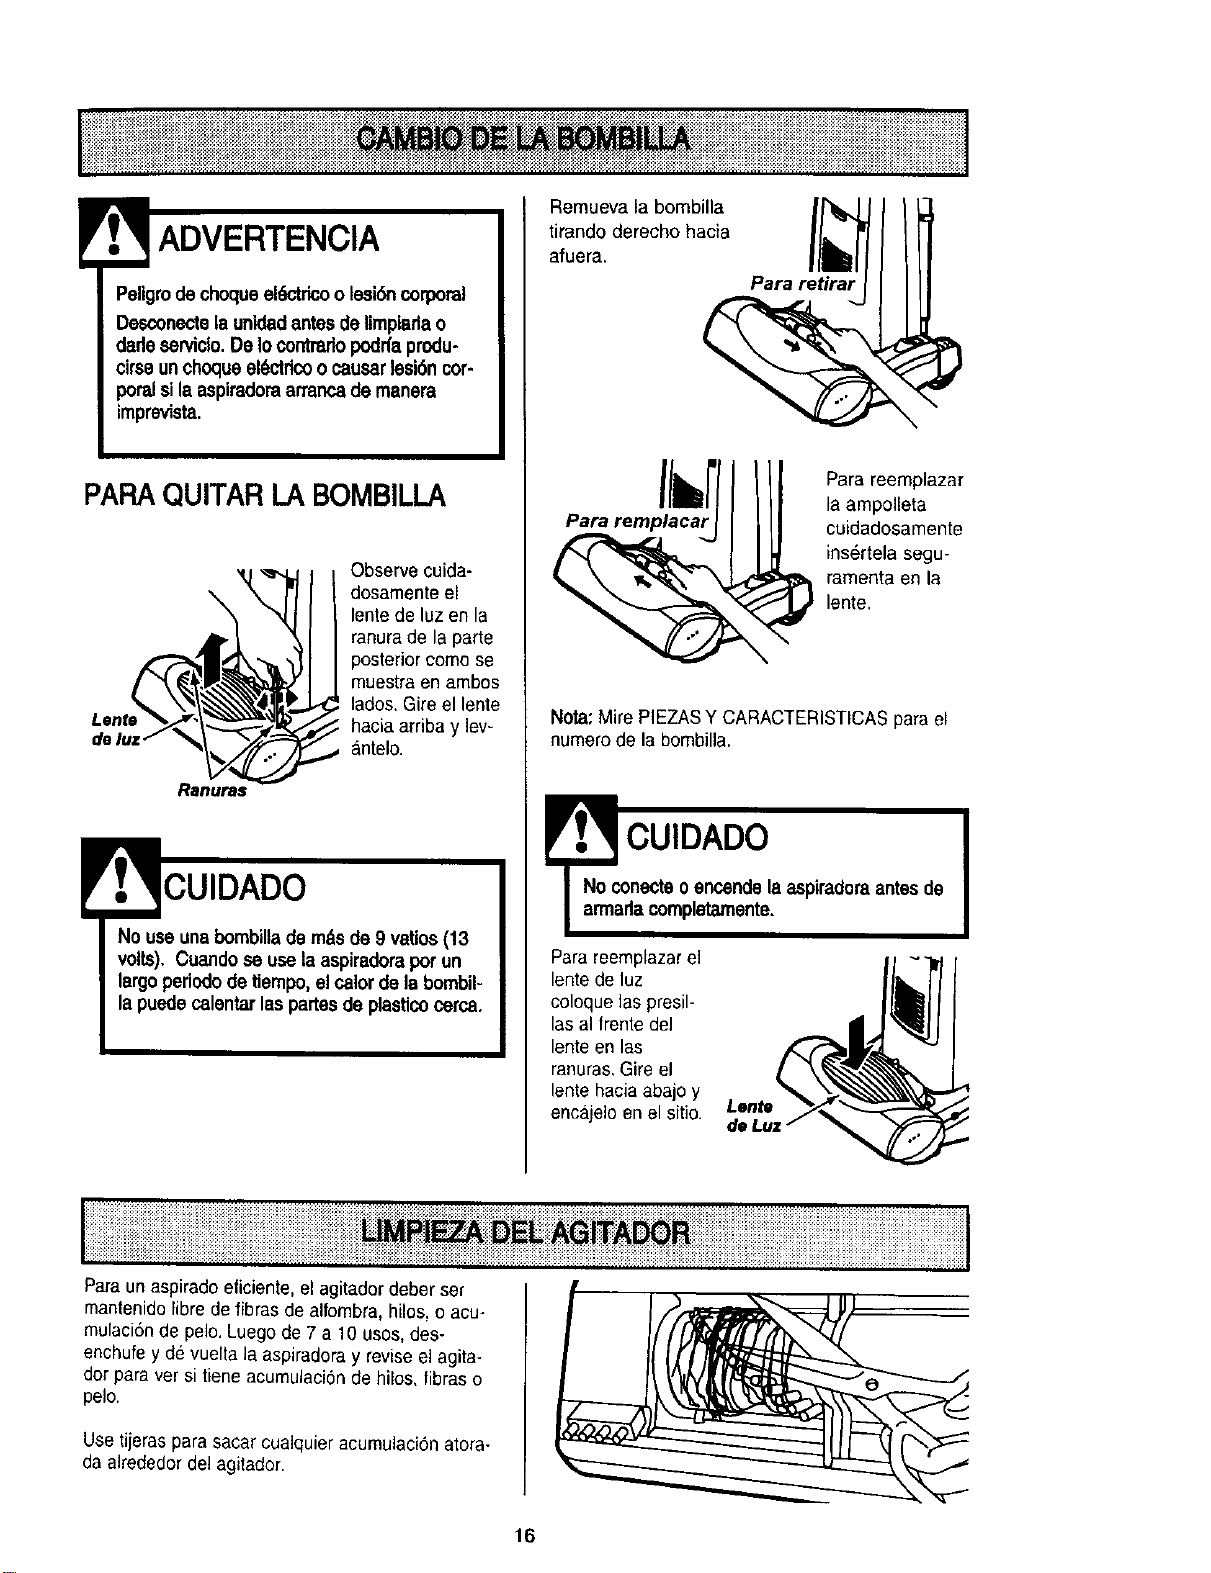
rt.. ADVERTENCIA
Peligrode choqueek_'tricoolesi6n corporal
Desconectelaunidedantesde limpiadao
derle serviclo.DeIocontrarlopodrfaprodu-
cirseunchoqueel6ctricoocausarlesi6ncor-
poralsilaaspiradoraarranca demanera
imprevista.
PARAQUITAR LA BOMBILLA
Observe cuida-
dosamente el
lentede luzen la
ranura de la parte
posterior como se
muestra en ambos
lades. Gireel lente
hacia arriba y lev-
antelo.
CUIDADO
No useuna bombillade m&sde 9 vatios(13
volts), Cuando se usela aspiradorapot un
largoperiododetiempo,el calordela bombil-
lapuedecalentarlespartesdeplasticocerca.
Remueva la bombilla
tirandoderecho hacia
afuera.
Pare retirat
Para remplacar
Pare reemplazar
la ampolleta
cuidadosamente
ins6rtela segu-
/4 _ ramenta en la
•_ _ lente,
=,,
Note; Mire PIEZASY CARACTERISTICASpara el
numerode la bombilla.
CUIDADO
onecteoencendela aspiradoraantes de
rlacompletamente.
Para reemplazare]
lente de luz
coloque laspresil-
las al lrente del
lente en las
ranuras,Gire el
lente hacia abajo y
encajelo en el sitio,
Lente
de Luz"
Paraun aspiradoeficiente,el agitador deber ser
mantenido librede fibras de alfombra, hilos,o acu-
mulaci6nde pelo,Luego de 7 a 10 usos,des-
enchufe y de vuelta la aspiradoray revise el agita-
dor para ver si tiene acumulacionde hilos, tibras o
pelo.
Use tijeras para sacar cualquier acumulaci6n atora-
da alrededordel agitador.
16
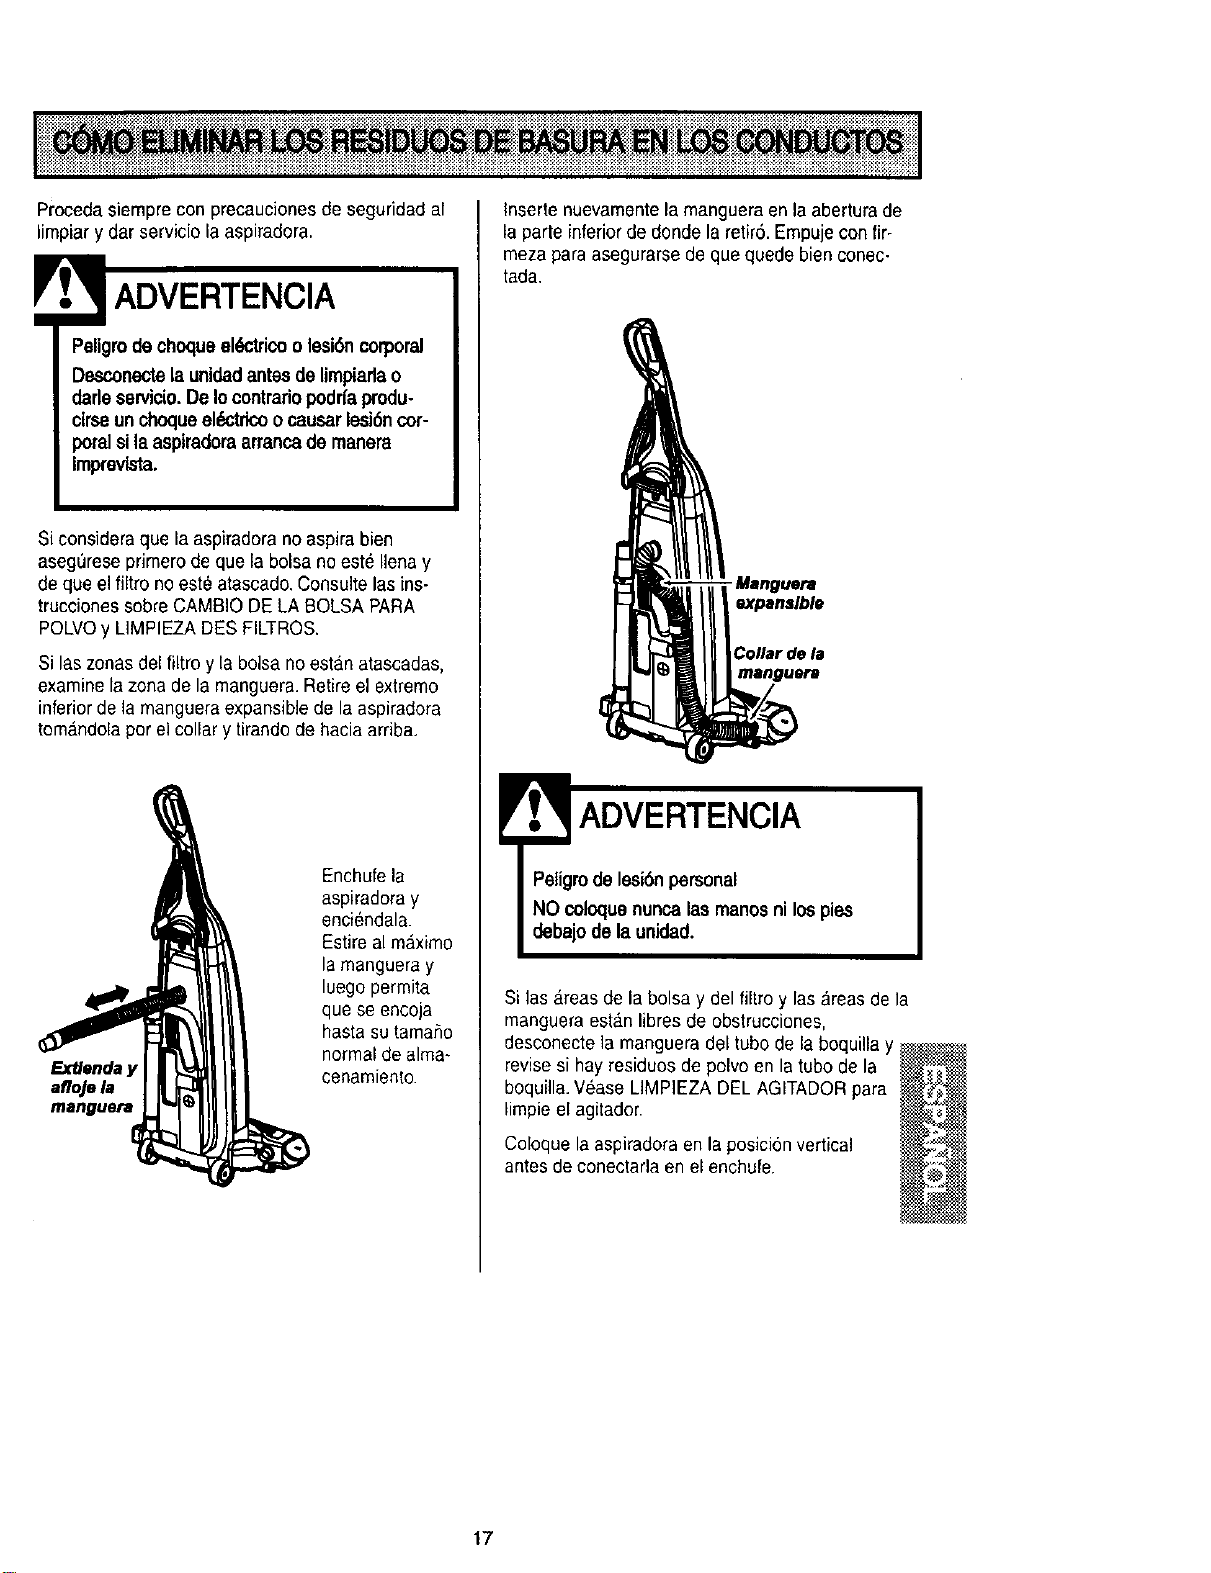
Procedasiempreconprecaucionesdeseguridadal
limpiarydarservicielaaspiradora.
!. ADVERTENCIA
Peligrode choqueel_rico olesi6ncorporal
Desconectela unidad antesde limpiadao
dadeservicio.DeIocontrariopodrfaprodu-
cirseunchoqueel_'trico ocausarlesi6ncor-
poralsila aspiradoraarranca de mar=era
Imprevista.
Si consideraque laaspiradora no aspira bien
asegurese primerode qua labolsa no este Ilenay
de queel filtro no esteatascado. Consu]telas ins-
trucciones sobfeCAMBIO DELA BOLSA PARA
POLVOy LIMPIEZA DES FILTROS.
Si las zonasdel filtroy la bolsano esta.natascadas,
examine lazonade la manguera.Retire el extreme
inferiorde la mangueraexpansiblede la aspiradora
tomandola ;,orel collar y tirandode haciaarriba.
Ex'Uanda y
af/oJe la
manguera
Enchufela
aspiradora y
enciendala.
Estire almaximo
la mangueray
luego permita
que se encoja
hasta sutamaho
normalde alma*
cenamiento.
Inserte nuevamentela manguera en la abertura de
la parte inferiorde donde laretir6. Empujeconfir-
meza paraasegurarse deque quede bien conec-
tada,
Manguera
expansible
Collar de la
manguera
ADVERTENClA
Si las &teasde la bolsa y del filtro y las &reasde la
mangueraest_.nlibres de obstrucciones,
desconecte lamanguera del tubo de la boquilla y
revise si hay residuosde polvoen latubo de la
boquilla.Vease LIMP]EZA DEL AGITADORpara
limpieel agitador.
Coloque la aspiradoraen la posicionvertical
antes deconectarla en el enchufe.
17
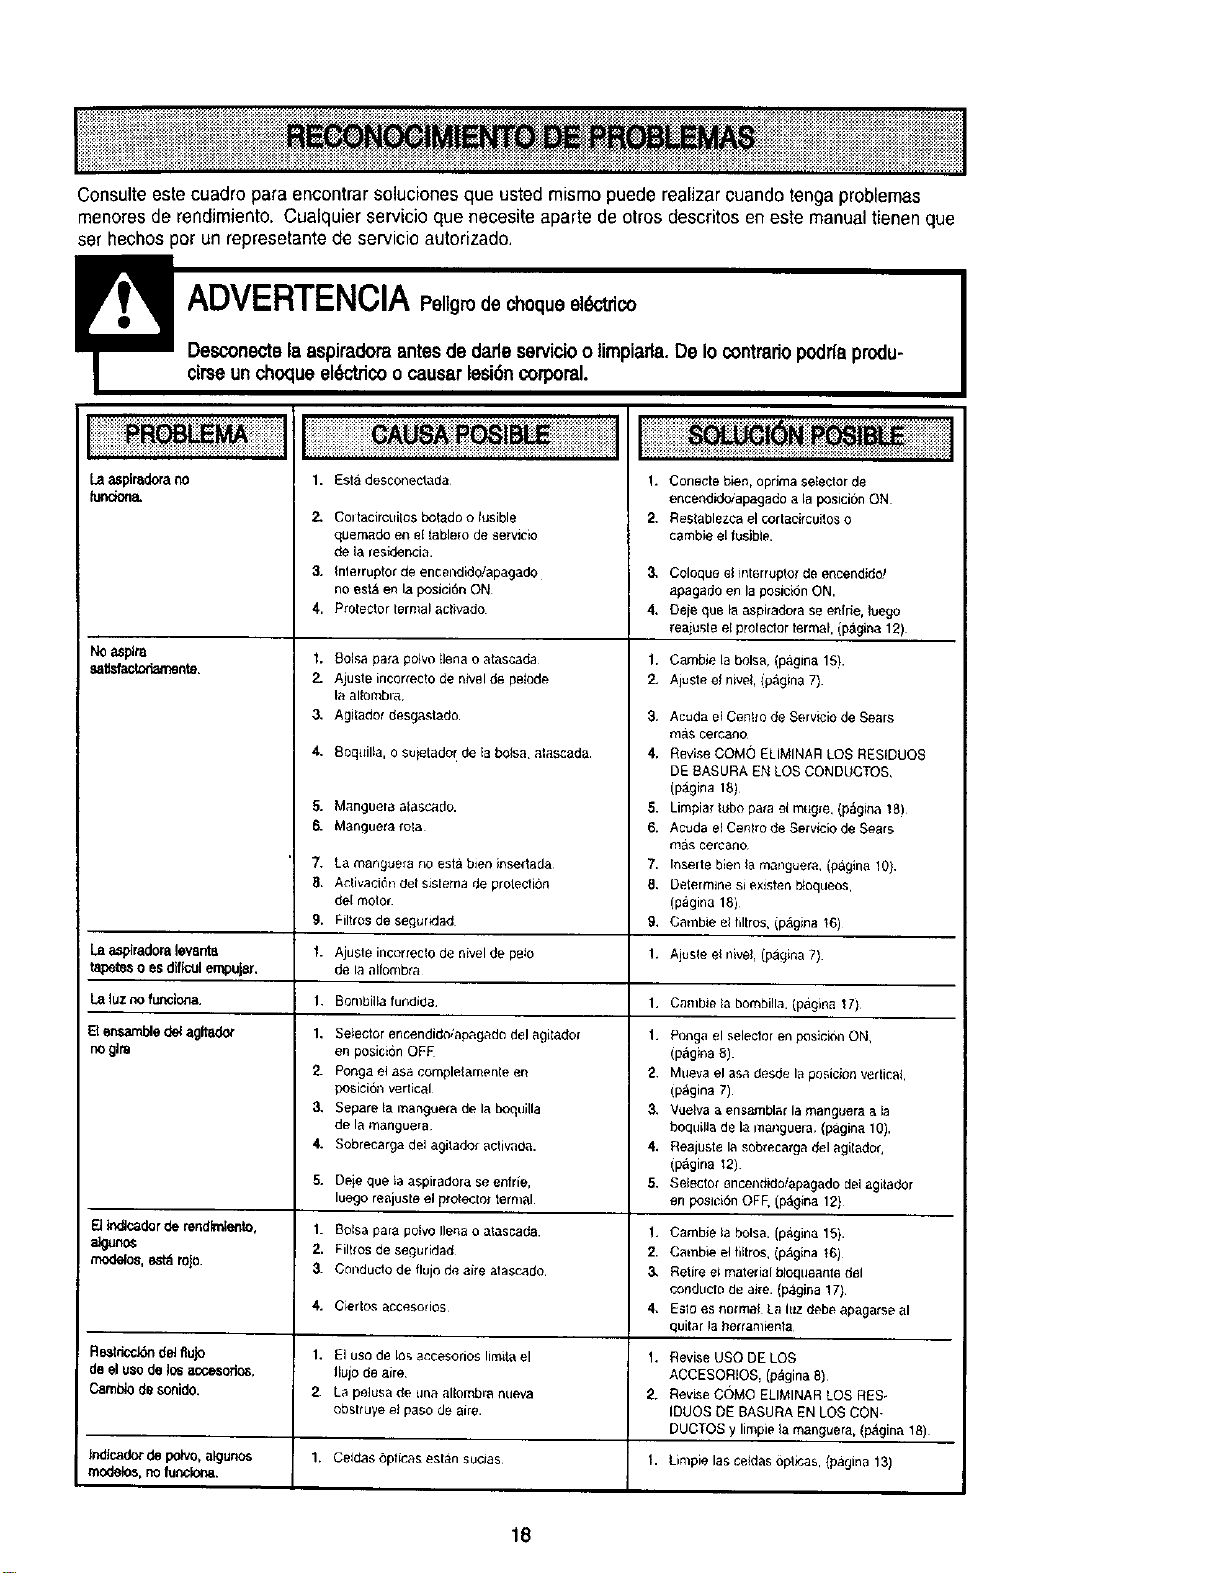
Consulteestecuadroparaencontrarsolucionesque usted mismo puede realizar cuando tonga problemas
menoresde rendimiento. Cualquier servicio que necesite aparte de otros descritos en este manualtienen que
set hechosper un represetantede servicio autorizado,
iiiili;ililililili R iiiiiii!iiiii!ililiiiiiiiiiiiiiiililililiiii AU ili i iiiiiI
_]_]:_:_:_:_:[_::::_:_:_:_:_:_:_:_:_:_:_:_:_:_:_::_:_:_:::_:_:_V__:;I_;::_ ii_i_i_ii _i_ _i_ _____i____i___:_:_:_:_:_:_:]:[:_:_:_;_:_:[:_:_;:::i:i:;_::_:i;i:::;_::::::i:i::::
La asplrsdora no 1. Esta desco_ectada
funciona.
NO_plra
sa_sfacto_mente,
5,
&
7.
8.
9.
La aspiradora levents 1.
tapetes o es dif{culempujar.
La luz no funoiona. 1.
El ensamble de_agltadot 1,
no glta
2.
&
4.
5.
El Indtcador de rendlmlento, 1.
a_guno_ 2.
modelos, est_ rojo. 3.
4.
Restricck_ndet flu}o 1.
de el u8o de ]osaccesorio&
Cambb de sonido. 2.
fndbadet de pobo, algunos 1.
modelos, no funolona.
Z Codacircuilos he,ado o lusible
quemado en eEtable_ode servido
de _aresidencia.
3. _nletruptor de encendido!apagado
no estb e_ la posiclSa ON
4. Protector formal activado
1. Boisa para pone tlena o atascade
2. Ajuste incorrecto de ravel de pebde
la albmbla
3. Agi(ador desgastade
4.
8oq_lilta, o suietade [ de la bofsa, atascada.
Manguera alascade.
Manguera rota
La manguera no esta bien bsertada
Ac_ivaci6t_ det sistema de protection
de[ motor.
Filtros de segurdad
Ajuste incorrecto de nivel de pelo
de la allornbra
Bonlbilla fundida
Selector encendide/apagade del agitadof
en posicion OFF
Ponga el asa completarnenle en
position vertical
Separe ta manguera de la boquilla
de la ;'nanguera
Sobrecarga del agitader activacta.
Deie queta aspiradera se enfrie,
luego reajuste el protector termal
Bolsa para poivo Ilena o atascada.
Filt{os de seguridad
Conducto de tlujo de aire atascado
Ciedos ;_ccesorlos
Ei use de io_accesorios limita el
llujo de aire
La pelusa de una allombla nueva
obstruye el paso de air&
Celd_$ ophca£ _.£t&n sucJa£
1. Conecte bien, optima setector de
encendkJoiapagado a la position ON
2. Restablezca el ¢ortacircuilos o
cambie el fusible.
& Coloque el interruplor de encendlde!
apagade en la posicide ON.
4, Deje que la aspiradora se enlrie, luego
reajuste el protector termal, (pagina 12)
1. Cambie la bolsa, {p&gina 101.
2. Aiuste ef nive_, ip&gina 7)
3. Acuda el Cenlfo de Servicio de Sears
m_s cercano
4, Revise COM0 ELIMINAR LOS RESIDUES
DE 8ASURA EN LOS CONDUCTOS,
(pa.gina 18)
5. Limpiar tube para el mug_e, (pagina 18)
6. Aeuda el Centre de Servicio de Sears
m&s cercano
7. Insede bbn ta manguera, (p&gina I0}.
8. Determine si existen b_oqueos,
(pagina 18)
9. Cambie el liltros, (p&gina t6)
1. Ajusle e_nivel, (pagina 7)
1. Cambie la bombilla. (pagina 11)
1. Ponga el selector en posicibn ON,
(pagina 8)
2. Mueva el asa desde laposicbn verlicai,
(p&gina 7)
3. Vuelva a ensamblar la manguera a la
boquilla de la manguera, (pagina 10).
4. Reajuste la sobrecarga del agilador,
(pagina 12)
5. SeJe_tor encendideiapagado del agitader
en poslciSnOFF, (l_gina 12}
1. Cambie {a bolsa. (pagina 10).
2. Cambie el tiltros, (p#{gJnat6)
& Retire e{ material btoquear_te del
conducto de aire. (pagina 17)
4. Esto es normal La luz debe apagatse al
quitar la herram_enta
1. Revise use DE LOS
ACCESORIOS, (p_gina 8)
2. Revise COMe ELIMINAR LOS RES-
IDUES DE BASURA EN LOS CON-
DUCTOS y limpie {a manguera, (p_gina 18)
1. Limpie las ce_das operas, (pagina 13)
18

19
@
Your Home
For repair - in your home - of all major brand appliances,
lawn and garden equipment, or heating and cooling systems,
no matter who made it, no matter who sold it!
For the replacement parts, accessories and
owner's manuals that you need to do-it-yourself.
For Sears professional installation of home appliances
and items like garage door openers and water heaters.
1-800-4-MY-HOME ® Anytime, day or night
(1-800-469-4663) (U.S.A. and Canada)
/
www.sears,com www.sears.ca
Our Home
For re_air of carry-in products like vacuums, lawn equipment,
_.nd electronics, call or go on-line for the nearest
Sears Parts and Repair Center.
1-800-488-1222 Anytime, day or night (U.S.A. only)
www.sears.com
To purchase a protection agreement (U.S,A.)
or maintenance agreement (Canada) on a product serviced by Sears:
1-800-827-6655 (U.S.A.)
Para pedir serv_o=ode reparaci6n
a domicilio, y para oroenar piezas:
1..888-SU-HOGAR sM
(1-888-784-6427)
8E/
1-800-361-6665 (Canada)
Au Canada pour service en francais:
1-800-LE-FOYER Mc
(1-800-533-6937)
www.sears.ca
© Sears, Roebuck and Co.
® Registered Trademark / rMTrademark / sM Service Mark of Sears, Roebuck and Co.
® Marca Registrada / T_,IMarca de F&brica / sM Marca de Servicio de Sears, Roebuck and Co.
_c Marque de commerce / MOMarque di3pos6e de Sears. Roebuck and Co.