Documents: Go to download!
- Owner's manual - (English, French, Spanish)
- Water Pressure
- Reverse Osmosis Water Supply
- Remove Doors and Hinges
- Replace Doors and Hinges
- Remove and Replace Freezer Drawer Front
- Remove Drawer Front
- Replace Drawer Front
- Remove and Replace Handle Medallions (optional)
- Door Closing and Door Alignment
- Additional Control Center Features
- Max Ice
- Humidity Control
- Door Alarm
- Max Cool
- Filter Reset
- Ice Maker
- Ice Production Rate
- Replacing the Water Filter
- Cleaning
- To Clean Your Refrigerator
- Changing the Light Bulb
- TROUBLESHOOTING
- The refrigerator will not operate
- The motor seems to run too much
- The refrigerator seems noisy
- Temperature and Moisture
- Temperature is too warm
- There is interior moisture buildup
- Ice and Water
- The ice maker is not producing ice or not enough ice
- The ice cubes are hollow or small
- Off-taste, odor or gray color in the ice
- Water is leaking from the dispenser system
- Water from the dispenser is warm
Table of contents
User manual Refrigerator for KitchenAid KRFC300ESS
Water Pressure
- A cold water supply with water pressure of between 35 and 120 psi (241 and 827 kPa) is required to operate the water dispenser and ice maker. If you have questions about your water pressure, call a licensed, qualified plumber.
Reverse Osmosis Water Supply
IMPORTANT: The pressure of the water supply coming out of a reverse osmosis system going to the water inlet valve of the refrigerator needs to be between 35 and 120 psi (241 and 827 kPa).
- If a reverse osmosis water filtration system is connected to your cold water supply, the water pressure to the reverse osmosis system needs to be a minimum of 40 to 60 psi (276 to 414 kPa).
- If the water pressure to the reverse osmosis system is less than 40 to 60 psi (276 to 414 kPa):
- Check to see whether the sediment filter in the reverse osmosis system is blocked. Replace the filter if necessary.
- Allow the storage tank on the reverse osmosis system to refill after heavy usage.
- If your refrigerator has a water filter, it may further reduce the water pressure when used in conjunction with a reverse osmosis system. Remove the water filter. See "Water Fitration System."
- If you have questions about your water pressure, call a licensed, qualified plumber.
Remove Doors and Hinges
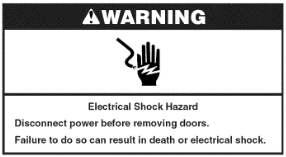
- Unplug refrigerator or disconnect power.
- Keep the refrigerator doors closed until you are ready to lift them free from the cabinet. NOTE Provide additional support for the refrigerator door while the hinges are being removed. Do not depend on the door gasket magnets to hold the door in place while you are working.
- Starting with the right-hand side door, remove the parts for the top hinge as shown in Top Hinge graphic. Lift the refrigerator door from the bottom hinge pin. NOTE: On some models, remove the shim from the bottom hinge pin and keep it for later use. See Bottom Hinge graphic.
- Before removing the left-hand side door, disconnect the wiring plug located on top of the top hinge by wedging a flat-blade screwdriver or your fingernail between the two sections. See Wiring Plug graphic. NOTE: The green, ground wire remains attached to the hinge.
- Remove the parts for the top hinge as shown in Top Hinge graphic. Lift the left-hand side door from the bottom hinge pin.
NOTE: On some models, remove the shim from the bottom hinge pin and keep it for later use. See Bottom Hinge graphic.
Replace Doors and Hinges
- Assemble the parts for the top hinge as shown in Top Hinge graphic. Do not tighten the screws completely.
- Replace the parts for the bottom hinge as shown in Bottom Hinge graphic. Tighten screws. Replace the refrigerator door. NOTE: Provide additional support for the refrigerator door while the hinges are being moved. Do not depend on the door gasket magnets to hold the door in place while you are working.
- Align the door so that the bottom of the refrigerator door aligns evenly with the top of the freezer drawer. Tighten all screws.
- Reconnect the wiring plug on top of the left-hand side refrigerator door.
- Replace the top hinge covers.
Remove and Replace Freezer Drawer Front
IMPORTANT: Two people may be required to remove and replace the freezer drawer front. Graphics are included later in this section.
Remove Drawer Front
- Open the freezer drawer to full extension.
- Loosen the four screws attaching the drawer glides to the drawer front. See Drawer Front Removal graphic. NOTE: Loosen screws three to four turns. Keep the screws in the drawer front.
- Lift drawer front upward and off the screws. See Drawer Front Removal graphic.
Replace Drawer Front
- Slide the drawer glides out of the freezer compartment. Insert the screws in the top of the drawer front into the slots in the drawer brackets. See Drawer Front Replacement graphic.
- Pull the drawer brackets toward you to position the two screws in the bottom of the drawer front into the brackets. See Drawer Front Replacement graphic.
- Completely tighten the four screws.
Remove and Replace Handle Medallions (optional)
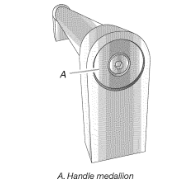
The handles for your model have red medallions on the ends. Replacement medallions are available for purchase. See "Accessories" to order.
- Using a " hex key, remove the medallion from the end of the handle.
- Replace medallion.
- Using the fastener removed in Step 1, attach the medallion to the handle.
Door Closing and Door Alignment
The base grille covers the leveling screws and roller assemblies located at the bottom of the refrigerator cabinet below the freezer door or drawer. Before making adjustments, remove the base grille and move the refrigerator to its final location.
- Remove the two screws fastening the base grille to the cabinet, and set the screws aside. Grasp the grille and pull it toward you.
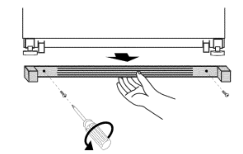
- Move the refrigerator to its final location. NOTE: To allow the refrigerator to roll easier, raise the leveling legs off the floor by turning the leveling screws counterclockwise. The front rollers will be touching the floor.
- So the doors will close easier, use a ¼" hex driver to turn both leveling screws clockwise. This will raise the front of the refrigerator tilting it slightly downward to the rear. Turn both leveling screws the same amount. NOTE: Having someone push against the top of the refrigerator takes some weight off the leveling screws. This makes it easier to turn the screws.
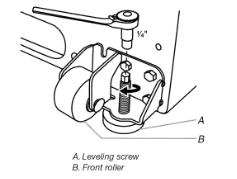
- Open and close the doors to make sure they close as easily as you like. If not, increase the tilt by turning both leveling screws clockwise. It may take several turns of the leveling screw to allow the doors to close easier.
- Check for door alignment. If one door is lower than the other, adjust the leveling screw, on the lower side of the refrigerator. Using a 4" hex driver, turn the screw clockwise to raise that side of the refrigerator until the doors are aligned. It may take several turns of the leveling screw to raise the refrigerator. NOTE: Having someone push against the top of the refrigerator takes some weight off the leveling screws. This makes it easier to turn the screws.
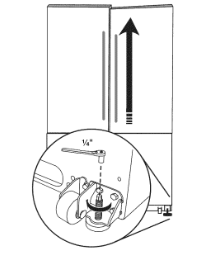
- Make sure the refrigerator is steady. If the refrigerator seems unsteady or rolls forward when the door or drawer is opened, adjust the leveling screws. Using a 4" hex driver, turn the leveling screw on each side clockwise until the rollers are up and the leveling feet are firmly against the floor.
- Replace the base grille by aligning the holes in the grille with the holes in the cabinet and fasten using the screws removed In Step 1.
Additional Control Center Features
Max Ice
- The Max Ice feature assists with temporary periods of heavy ice use by increasing ice production. Press the Max Ice feature touch pad to set the freezer to the lowest temperature setting.
- Press the Max Ice feature touch pad again to return to the normal freezer set point.
- NOTE: The Max Ice feature will automatically shut off in approximately 24 hours.

Humidity Control
- The Humidity Control feature turns on a heater to help reduce moisture on the door hinge seal. Use in humid environments or when you notice moisture on the door hinge seal. The refrigerator uses more energy when Humidity Control is on.
- Press Humidity Control when the environment is warm and more humid, or if you notice moisture on the door hinge seal. The indicator light will be lit when humidity control is ON.
- Press Humidity Control to save energy when the environment is less humid.

Door Alarm
- The Door Alarm feature sounds a chime every few seconds when the refrigerator door has been left open for 5 continuous minutes. The chime will sound until the door is closed or Door Alarm is turned off.
- Press the Door Alarm touch pad to turn this feature on or off. The indicator light will be lit when the Door Alarm feature is on.

Max Cool
- The Max Cool feature assists with periods of high refrigerator use, full grocery loads, or temporarily warm room temperatures. Press Max Cool to set the freezer and refrigerator to the lowest temperature settings. Press Max Cool again to return to the normal refrigerator set point.
- NOTE: The Max Cool feature will automatically shut off in approximately 12 hours.

Filter Reset
- The Filter Reset control allows you to restart the water filter status tracking feature each time you replace your water filter. See "Water Filtration System."
- Press and hold the Filter Reset touch pad for 3 seconds, until the Order or Replace light turns off.

Ice Maker
IMPORTANT: Flush the water system before turning on the ice maker. See "Water Dispenser."
- Turning the Ice Maker On/Off
- To turn the ice maker ON, simply lower the wire shutoff arm. To manually turn the ice maker OFF, lift the wire shutoff arm to the OFF (arm up) position and listen for the click.
- NOTE: Your ice maker has an automatic shutoff. As ice is made. the ice cubes will fill the ice storage bin and the ice cubes will raise the wire shutoff arm to the OFF (arm up) position. Do not force the wire shutoff arm up or down.
- NOTE: Turn off the ice maker before removing the ice storage bin to serve ice or to clean the bin. This will keep the ice cubes from dropping out of the ice maker and into the freezer compartment. After replacing the ice storage bin, turn on the ice maker.
Ice Production Rate
- The ice maker should produce a complete batch of ice approximately every 3 hours.
- To increase ice production, lower the freezer and refrigerator temperature. See "Using the Controls." Wait 24 hours between adjustments.
Replacing the Water Filter
To purchase a replacement water filter, see Accessories.
IMPORTANT: Air trapped in the water system may cause water and filter to eject. Always dispense water for at least 2 minutes before removing the filter or blue bypass cap.
- Turn filter counterclockwise to remove.
- Remove sealing label from replacement filter and insert the filter end into the filter head.
- Turn the filter clockwise until it stops. Snap the filter cover closed.
- Flush the water system. See "Water Dispenser" or "Water and Ice Dispenser."
NOTE: The dispenser feature may be used without a water filter installed. Your water will not be filtered. If this option is chosen, replace the filter with the blue bypass cap.
Cleaning
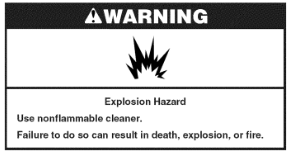
Both the refrigerator and freezer sections defrost automatically. However, clean both sections about once a month to avoid buildup of odors. Wipe up spills immediately.
IMPORTANT:
- Because air circulates between both sections, any odors formed in one section will transfer to the other. You must thoroughly clean both sections to eliminate odors. To avoid odor transfer and drying out of food, wrap or cover foods tightly.
- For stainless steel models, stainless steel is corrosion resistant and not corrosion-proof. To help avoid corrosion of your stainless steel, keep your surfaces clean by using the following cleaning instructions.
To Clean Your Refrigerator
NOTE: Do not use abrasive or harsh cleaners such as window sprays, scouring cleansers, flammable fluids, muriatic acid, cleaning waxes, concentrated detergents, bleaches or cleansers containing petroleum products on exterior surfaces (doors and cabinet), plastic parts, interior and door liners or gaskets. Do not use paper towels, scouring pads, or other harsh cleaning tools.
- Unplug refrigerator or disconnect power.
- Hand wash, rinse, and dry removable parts and interior surfaces thoroughly. Use a clean sponge or soft cloth and a mild detergent in warm water.
- Clean the exterior surfaces. Painted metal: Wash painted metal exteriors with a clean, soft cloth or sponge and a mild detergent in warm water. Rinse surfaces with clean, warm water and dry immediately to avoid water spots. Stainless steel: Wash stainless steel surfaces with a clean, soft cloth or sponge and a mild detergent in warm water. Rinse surfaces with clean, warm water and dry immediately to avoid water spots. NOTE: When cleaning stainless steel, always wipe in the direction of the grain to avoid cross-grain scratching.
- There is no need for routine condenser cleaning in normal home operating environments. If the environment is particularly greasy or dusty, or there is significant pet traffic in the home, the condenser should be cleaned every 2 to 3 months to ensure maximum efficiency.
- Plug in refrigerator or reconnect power.
Changing the Light Bulb
IMPORTANT: The light bulbs in both the refrigerator and freezer compartments of your new refrigerator use LED technology. If the lights do not illuminate when the refrigerator and/or freezer door is opened, call for assistance or service. See "Warranty" for phone numbers.
- Unplug the refrigerator or disconnect power.
- Remove the light shield (on some models). Top of the refrigerator compartment - Slide the light shield toward the back of the compartment to release it from the light assembly.

- Replace the burned-out LED bulb(s) with a bulb of the same size, shape and wattage.
- Replace the light shield.
- Plug in refrigerator or reconnect power.
TROUBLESHOOTING
The refrigerator will not operate
- Power cord unplugged? Plug into a grounded 3 prong outlet.
- Is outlet working? Plug in a lamp to see if the outlet is working.
- Household fuse blown or circuit breaker tripped? Replace the fuse or reset the circuit breaker. If the problem continues, call an electrician.
- Are controls on? Make sure the refrigerator controls are on. See "Using the Control(s)."
- New installation? Allow 24 hours following installation for the refrigerator to cool completely.
- NOTE: Adjusting the temperature controls to coldest setting will not cool either compartment more quickly.
The motor seems to run too much
- Your new refrigerator may run longer than your old one due to its high-efficiency compressor and fans. The unit may run even longer if the room is warm, a large food load is added, doors are opened often, or if the doors have been left open.
The refrigerator seems noisy
Refrigerator noise has been reduced over the years. Due to this reduction, you may hear intermittent noises from your new refrigerator that you did not notice from your old model. Below are listed some normal sounds with explanations.
- Buzzing - heard when the water valve opens to fill the ice maker.
- Pulsating - fans/compressor adjusting to optimize performance.
- Hissing/Rattling - flow of refrigerant, movement of water lines, or from items placed on top of the refrigerator.
- Sizzling/Gurgling - water dripping on the heater during defrost cycle.
- Popping - contraction/expansion of inside walls, especially during initial cool-down.
- Water running - may be heard when ice melts during the defrost cycle and water runs into the drain pan.
- Creaking/Cracking - occurs as ice is being ejected from the ice maker mold.
Temperature and Moisture
Temperature is too warm
- New installation? Allow 24 hours following installation for the refrigerator to cool completely.
- Door(s) opened often or left open? Allows warm air to enter refrigerator. Minimize door openings and keep doors fully closed.
- Large load of food added? Allow several hours for refrigerator to return to normal temperature.
- Controls set correctly for the surrounding conditions? Adjust the controls a setting colder. Check temperature in 24 hours. See "Using the Control(s)."
There is interior moisture buildup
NOTE: Some moisture buildup is normal.
- Humid room? Contributes to moisture buildup.
- Door(s) opened often or left open? Allows humid air to enter refrigerator. Minimize door openings and keep doors fully closed.
Ice and Water
The ice maker is not producing ice or not enough ice
Refrigerator connected to a water supply and the supply shutoff valve turned on? Connect refrigerator to water supply and turn water shutoff valve fully open.
- Kink in the water source line? A kink in the line can reduce water flow. Straighten the water source line.
- Ice maker turned on? Make sure wire shutoff arm or switch (depending on model) is in the ON position.
- New installation? Wait 24 hours after ice maker installation for ice production to begin. Wait 72 hours for full ice production.
The ice cubes are hollow or small
NOTE: This is an indication of low water pressure.
- Water shutoff valve not fully open? Turn the water shutoff valve fully open.
- Kink in the water source line? A kink in the line can reduce water flow. Straighten the water source line.
- Water filter installed on the refrigerator? Remove filter and operate ice maker. If ice quality improves, then the filter may be clogged or incorrectly installed. Replace filter or reinstall it correctly.
- Reverse osmosis water filtration system connected to your cold water supply? This can decrease water pressure. See "Water Supply Requirements."
- Questions remain regarding water pressure? Call a licensed, qualified plumber.
Off-taste, odor or gray color in the ice
- New plumbing connections? New plumbing connections can cause discolored or off-flavored ice.
- Ice stored too long? Discard ice. Wash ice bin. Allow 24 hours for ice maker to make new ice.
- Odor transfer from food? Use airtight, moisture proof packaging to store food.
- Are there minerals (such as sulfur) in the water? A water filter may need to be installed to remove the minerals.
- Water filter installed on the refrigerator? Gray or dark discoloration in ice indicates that the water filtration system needs additional flushing. Flush the water system before using a new water filter. Replace water filter when indicated. See "Water Filtration System.“
Water is leaking from the dispenser system
NOTE: One or two drops of water after dispensing is normal.
- Glass not being held under the dispenser long enough? Hold the glass under the dispenser 2 to 3 seconds after releasing the dispenser lever.
- New installation? Flush the water system. See "Water Dispenser."
- Recently changed water filter? Flush the water system. See "Water Dispenser."
- Water on the floor near the base grille? Make sure the water dispenser tube connections are fully tightened. See "Refrigerator Door(s) and Drawer."
Water from the dispenser is warm
NOTE: Water from the dispenser is only chilled to 50°F (10°C).
- New installation? Allow 24 hours after installation for the water supply to cool completely.
- Recently dispensed large amount of water? Allow 24 hours for water supply to cool completely.
- Water not been recently dispensed? The first glass of water may not be cool. Discard the first glass of water.
- Refrigerator connected to a cold water pipe? Make sure the refrigerator is connected to a cold water pipe. See "Water Supply Requirements."
See other models: KEWD105HWH3 KSRS25IKBL03 KSB1570SL0 KPCB348POB1 KBFS25EWMS1
