
Instructions for the Use and Care and Installation of
BRCE60X
BRCE90X
Rangehood.
- 3 -
A
167.2
20
A
C
A
B
M
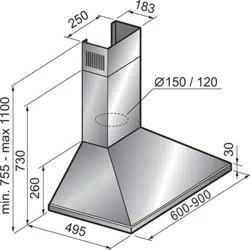
max 90 cm
B
C
D
E
A
Fig.1
Fig.2
Fig.3
Fig.4
Fig.5
ABC
- 4 -
90°
Fig.6
Fig.7

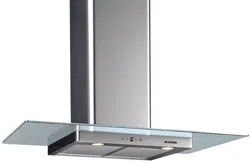
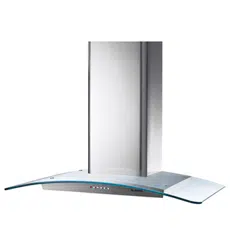
Dear Customer
You will find that the modern look of your Bla
nco rangehood blends in perfectly with your kitchen décor. It is
easy to use and performs to a high standard.
Blanco also makes a range of products that will enhance your kitchen – such as cooktops, ovens,
dishwashers, microwaves, sinks and taps. There are models to complement your new Blanco rangehood
and Blanco now also has a range of laundry products to choose from.
Of course, we make every effort to ensure that our prod
ucts meet all your requirements. Our Customer
Service Department is at your disposal, to answer your questions and to listen to your suggestions.
Please complete the warranty section of this manual and keep
your receipt as proof of purchase. Retain all
documents relating to the purchase of this Blanco product.
Blanco is committed to providing increasingly effici
ent products that are easy to use, respect the
environment and are attractive and reliable.
BLANCO
General Warnings.
• T
he appliance is not intended for use by young children or infirm persons without supervision.
• Young children should be supervised to ensure that they do not play with the appliance.
• If the suppl
y cord is damaged, it must be replaced by the manufacturer or its service agent or a similarly
qualified person in order to avoid a hazard.
• T
here shall be adequate ventilation of the room when the range rangehood is used at the same time as
appliances burning gas or other fuels.
• Ensure that the
range rangehood is cleaned frequently.
• There is a risk of fire if cleaning is not carried out in accordance with the instructions.
• Do not flambé under the range rangehood.
Warnings for Installation:
• T
he exhaust air must not be discharged into a flue that is used for exhausting fumes from appliances
burning gas or other fuels.
• T
he minimum distance from the hob surface and the lowest part of the range rangehood must not be
less than 60cm. If the instructions for the hob specify a greater distance, please consider this.
• T
he regulations concerning the discharge of exhaust air have to be fulfilled.
• Exercise care when the rangehood is installed in an area where a gas burner is operating. Depending
on the size of the room, the rangehood may draw from the room air that is necessary for proper
combustion of the burner. All Blanco rangehoods are used for indoor application only.
GENERAL
Carefully read the following important information regardi
ng installation, safety and maintenance. Keep this
information booklet accessible for further reference.
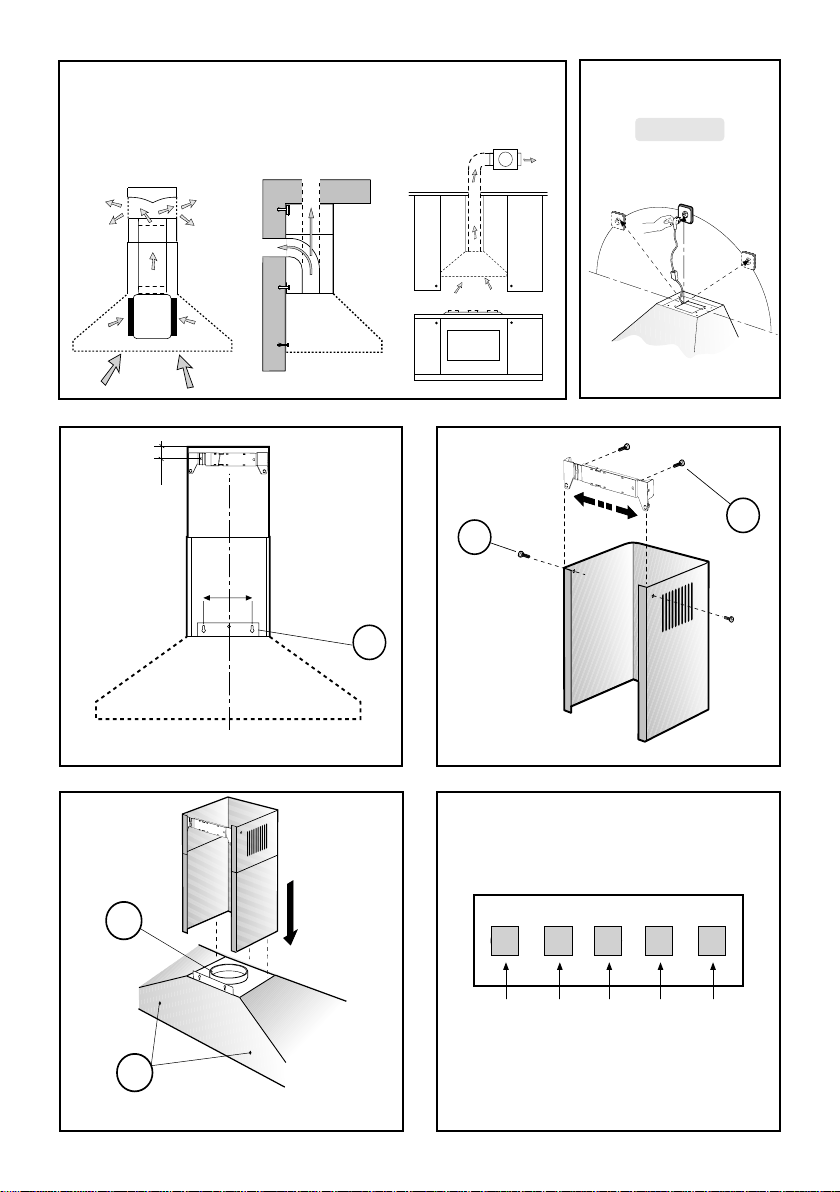
The rangehood has been designed for use as;
Recirculating version (air circulation on the inside – Fig.1A)
Ducting version (air exhaust to the outside – Fig.1B)
Ducted with external motor (Fig.1C).
SAFETY PRECAUTION
Exercise care when the rangehood is installed in an are
a where a gas burner is operating. Depending on the
size of the room, the rangehood may draw from the room air that is necessary for proper combustion of the
burner. All Blanco rangehoods are for indoor application only.
Before connecting the rangehood to the electricity network:
• Refer to the da
ta plate (positioned inside the appliance) to ascertain that the voltage and power
correspond to the network and the socket is suitable. If in doubt ask a qualified electrician.
• If the po
wer supply cable is damaged, it must be replaced with another cable of the same specification.
• Assembl
y and electrical connections must be carried out by qualified tradesperson / electrician.
INSTALLATION INSTRUCTIONS
Assembly and electrical connections must be carried out by q
ualified tradesperson / electrician.
Electric Connection
The rangehood has been manufactured as
a class II, therefore no earth cable is necessary.

The connection to the mains is carried out as follows:
BROWN = L line
BLUE = N neut
ral
If not provided, connect a plug for the electrical load indicated on the rating label. Where a plug is provided,
the rangehood must be installed in order that the plug is easily accessible.
An omnipolar switch with a minimum opening of 3mm bet
ween contacts, in line with the electrical load and
local standards, must be placed between the appliance and the network in the case of direct connection to
the electrical network.
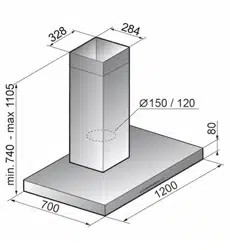
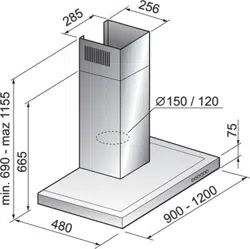
• The minimum distance between the support surfaces of the cooking pots on the cooktop and the lowest
part of the rangehood must be at least 60 cm.
If a ducting tube composed of two parts is used, the up
per part must be placed outside the lower part.
Do not connect the rangehood exhaust to the same ducting used to circu
late hot air or for evacuating fumes
from other electrical appliances.
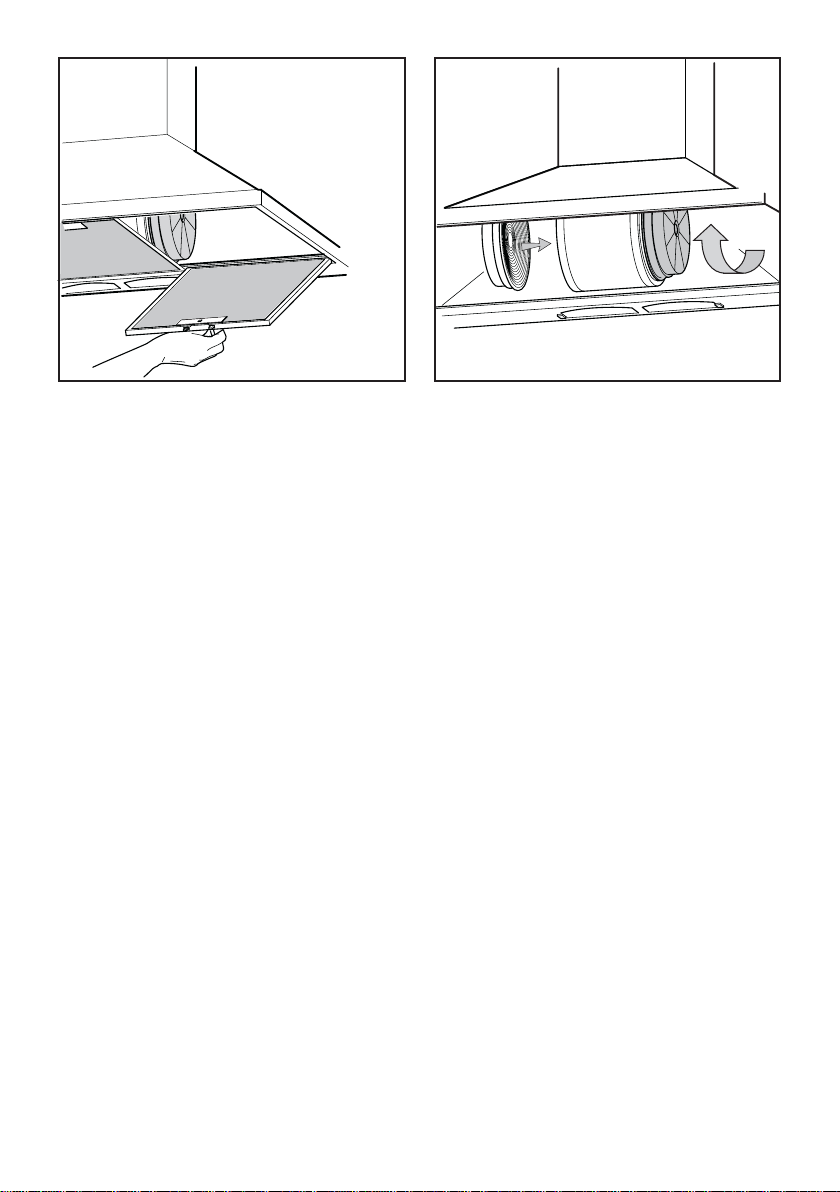
Before proceeding with the assembly operations, remove the anti
grease filter(s) (Fig.6) so that the unit is
easier to handle.
FIXING TO THE WALL
Drill the holes A as per the dimensions shown (Fig.2). F
ix the appliance to the wall and align it in
horizontally.
When the appliance has been adjusted, fix the rangehood using the screws A (F
ig.4). For the various
installations use screws and screw anchors suited to the type of wall (e.g. reinforced concrete, plasterboard,
etc.). If the screws and screw anchors are provided with the product, check that they are suitable for the type
of wall on which the
rangehood is to be fixed.
FIXING THE FLUE
Arrange the electrical power supply within the dimensions
of the flue. If your appliance is to be installed in
the ducting version or in the version with external motor, prepare the air exhaust opening.
Adjust the width of the support bracket of the upper flu
e (Fig.3). Then fix it to the wall using the screws A
(Fig.3) in such a way that it is in line with your rangehood and taking into account the distance from the
ceiling indicated in Fig.2. Connect the flange C to the air exhaust hole using a connection pipe (Fig.4). Insert
the upper flue into the lower flue and rest above the frame. Extract the upper flue up to the bracket and fix it
with the screws B (Fig.3).
RECIRCULATED VERSION
Install the rangehood and the two flues as described in the p
aragraph for installation of the rangehood in
ducting version. Assemble the recirculating attachments and flue, refer to the instructions contained in the
kit.
Carbon filters are recommended when the rangehood is recirculated. The filters must be applied to the
suction u
nit positioned inside the rangehood. They must be centred by turning them 90 degrees until the
stop catch is tripped (fig. 7).
Rangehoods may be ducted in two ways:
1. Ducted to the atmosphere (outside).
2. Recirculating.
We recommend ducting to the atmosphere to ensure optim
um performance. Recirculating the air back into
the room should only be used when outside extraction is not possible. To ensure maximum performance
when ducting it is important the ducting that carries the fumes away, be as short and as straight as possible.
When incorporating a rangehood in the design of a kitchen the following points need to be
co
nsidered to achieve the most benefit from the rangehood.
1. Ducting from a rangehood carrying the exhaust air, shou
ld not exceed a length of three (3) metres.
2. For ducted installation we recommend using galvanised or similar meta
l type flue pipe. PVC pipe is not
recommended.
3. Ducting containing a 90° degree bend will encounter a loss in efficiency of approximately 35%. Additional
90° degree bends can cause losses of up to 15% per bend.
4. Ducting size should always comply with the manufacturers specification.
5. We recommend carbon filters be used when re-circulating the air into th
e room. There will be some loss of
air movement when carbon filters are fitted.
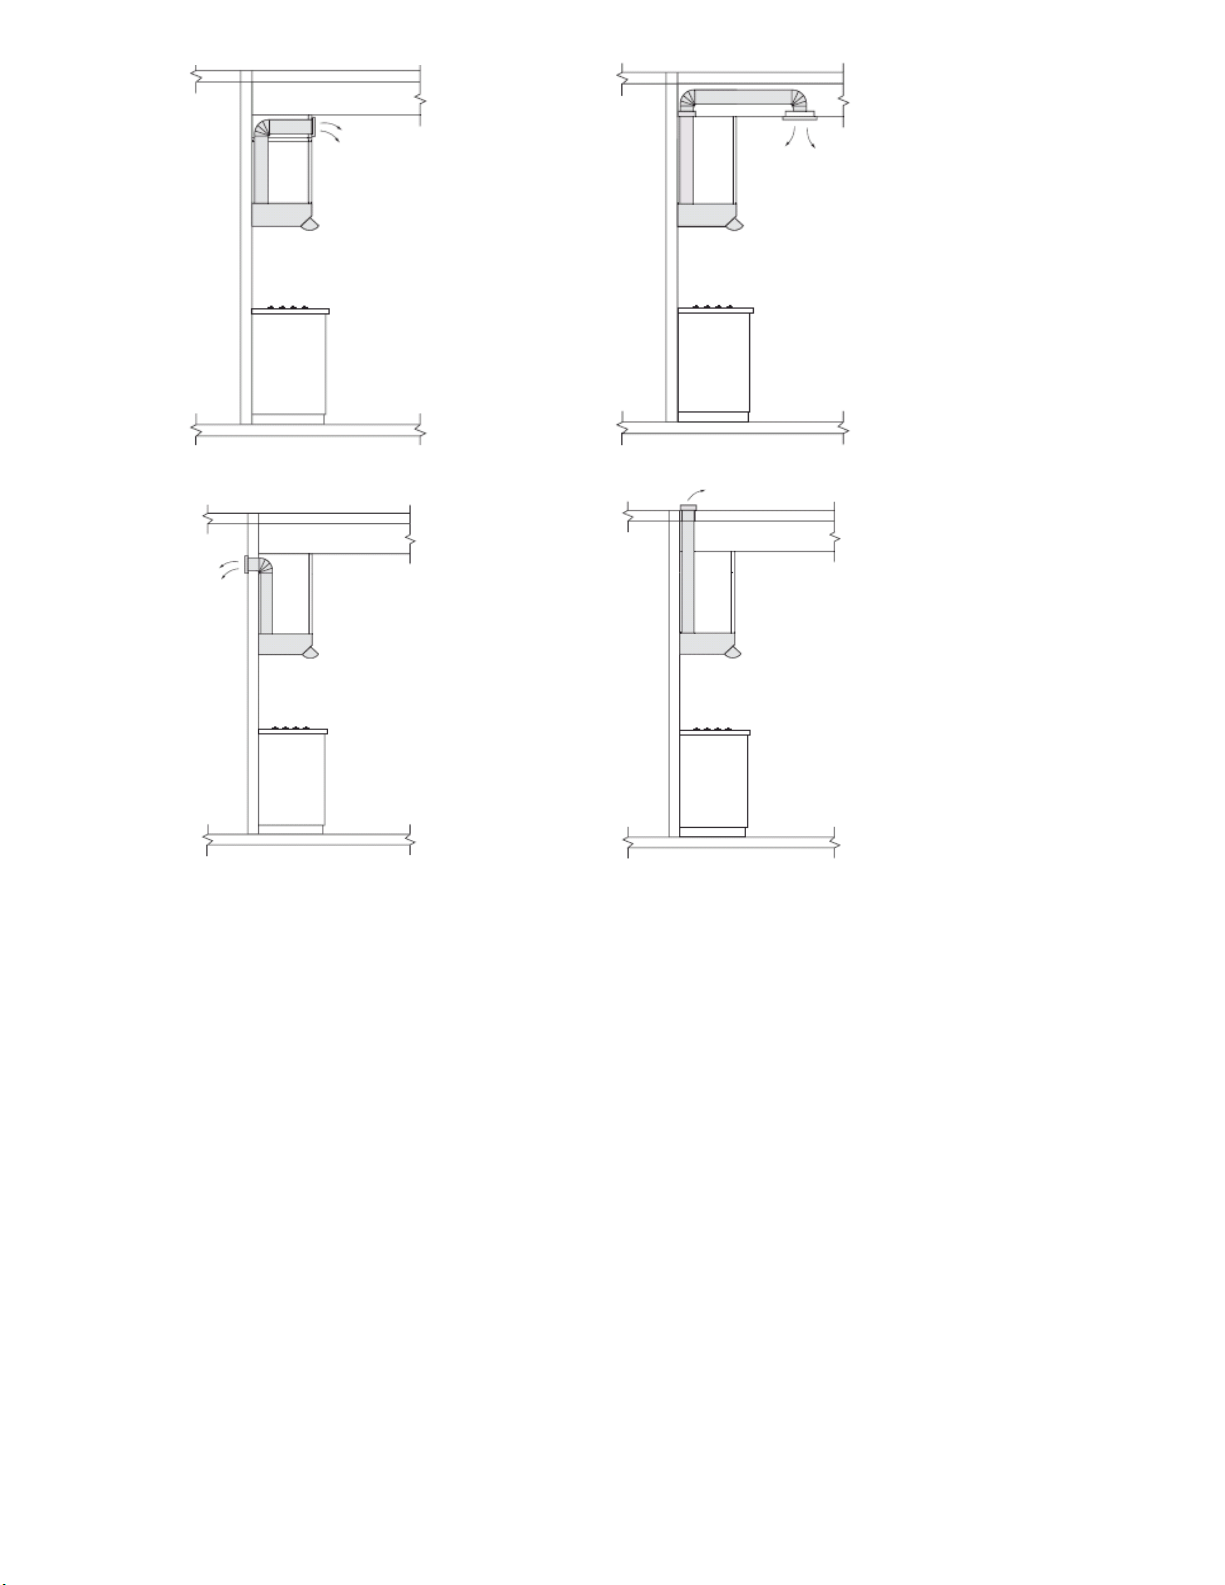
Recirculated to kitchen area via bulkhead Recirculated to kitchen area via ceiling cavity
Ducted to atmosphere through wall Ducted to atmosphere through roof
USE AND MAINTENANCE
• It is recommended to operate the appliance prior to cooking.
• It is recommended to leave the appliance in operation for 15 minutes after cooking to help eliminate
cooking vapors and odors.
• It is important to properly maintain the rangehood and the carbon filters to ensure proper function of the
rangehood.
• The anti-grease filters capture the grease particles suspended in the air, and are therefore subject to
clogging according to the frequency of the use of the appliance.
In order to prevent fire hazard, it is recommendable to clean the filter at a maximum of 2 months by carrying
out the following instructions:
- Remove the filters from the rangehood and wash them in a solution of water and neutral liquid detergent,
leaving to soak.
- Rinse thoroughly with warm water and leave to dry.
- The filters may also be washed in the dishwasher. The aluminium panels may alter in colour after several
washes. This is normal and the filter panels will not need to be replaced.
• The active carbon filters purify the air that is recirculated into the environment. The filters are not washable
nor reusable and must be replaced at maximum every four months. The saturation of the active carbon filter
depends on the frequency of use of the appliance, by the type of cooking and the regularity of cleaning the
anti-grease filters.
• Clean the fan and other surfaces of the rangehood regularly using a cloth moistened with denatured
alcohol or non abrasive liquid detergent.
• The lighting is designed for use during cooking and not for prolonged general illumination of the
environment. Prolonged use of the light notably reduces the duration of the bulb and is generally not
recommended.

REPLACING THE GLOBES.
• Open the anti-grease filters.
• Un-screw the globe.
• Replace the globe.
• Re-install the anti-grease filter.
Globe: Tubular E14 (40Watts 240volts).
CONTROLS (Fig.5) MECH
ANICAL the key symbols are explained below:
A = L
IGHT
B = OF
F
C = SPEED I
D = SPEED II
E = SPEED III
THE MANUFACTURER DECLINES ALL RESPONSIBILITY FOR EVENTUAL DAMAGES CAUSED BY
BRE
ACHING THE ABOVE WARNINGS.