Loading ...
Loading ...
3
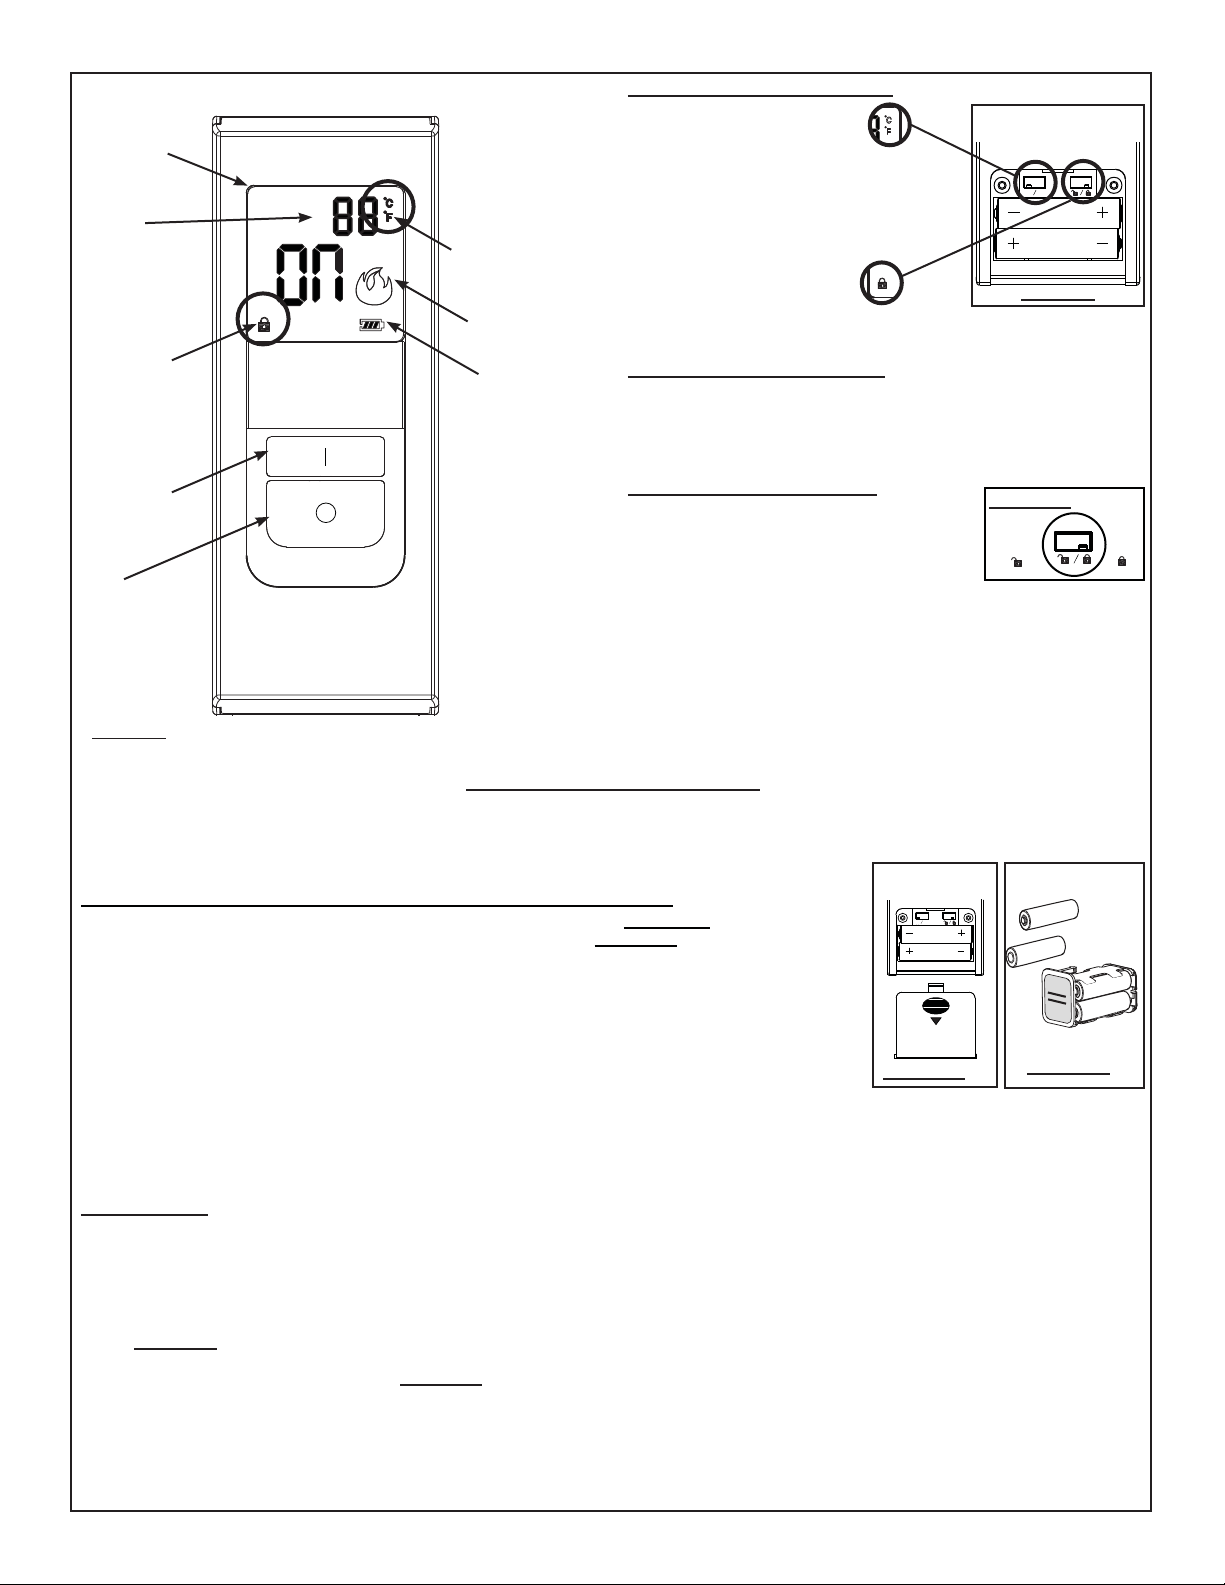
4. TRANSMITTER OPERATION:
The receiver switch must be
in the REMOTE position for
the transmitter to function.
This remote system operates
using radio frequency signals
sent by the transmitter to the
receiver. It is recommended
that the distance between the
transmitter and receiver never
exceeds 20’ and 10’ if the
receiver is located within the
fi rebox shell. Low batteries will
also affect operational distance.
5.
TEMPERATURE FUNCTION:
Remove the battery cover on the back of the transmitter to expose the
°C/°F dip switch. Move the dip switch to your desired temperature mode.
Selected temperature mode will appear in the top right corner beside the
room temperature.
6. CHILD-PROOF FUNCTION:
6.1 Remove the battery cover at the back of the
transmitter to expose the child-proof dip switch.
6.2 Slide the child-proof dip switch to the lock
position to activate the child-proof function. A lock
symbol will appear in the bottom left corner of the
transmitter display when the child-proof function is activated.
6.3 In child-proof mode the transmitter will not operate the receiver until
the switch is returned to the un-lock position however the receiver will
continue operate in the thermostatic mode when locked.
AAA
AAA
°F °C
TRANSMITTER
REAR VIEW
FIGURE 9
LOCK
UN-LOCK
FIGURE 10
LCD
DISPLAY
ON
BUTTON
OFF
BUTTON
FLAME
INDICATOR
LOW
BATTERY
INDICATOR
CHILD-PROOF
FUNCTION
INDICATOR
TEMPERATURE
INDICATOR
FIGURE 8
ROOM
TEMPERATURE
2. COMMUNICATION BETWEEN THE TRANSMITTER AND RECEIVER:
2.1 Place 2 “AAA” batteries into the battery compartment of the transmitter. FIGURE 11
2.2 Place 4 “AA” batteries into the battery compartment of the receiver. FIGURE 12
2.3 Slide the switch on the receiver to the “REMOTE” position. The low battery indicator on the receiver will
fl ash and the receiver will beep twice. The receiver is now ready to communicate with the transmitter.
2.4 Point the transmitter at the receiver, push and hold the “ON” button for 1 to 2 seconds to capture a pre-
determined code.
You only have 30 seconds after the receiver is put in the “REMOTE” position to capture the code,
which will be indicated by three beeps from the receiver.
2.5 The low battery indicator on the receiver will fl ash and the receiver will beep three times to confi rm
synchronization with the transmitter. At this time the remote should be fully operational.
2.6 TROUBLESHOOTING
The transmitter display says “ON” but the appliance is not on. Turn the transmitter to “OFF” and then back to “ON”. Pushing the “ON” button too
quickly will not allow the receiver to pick up the signal from the transmitter. The transmitter button must be held for 1 to 2 seconds. If the remote still
fails to communicate with the receiver move closer to the receiver to ensure communication is not interrupted.
AAA
AAA
BATTERY
COVER
TRANSMITTER
°F °C
+
AA -
- AA +
+ A
A
-
- A
A
+
RECEIVER
FIGURE 12
FIGURE 11
60 TRANSMITTER OPERATION
The 60 universal remote has been approved for use with most gas fi replaces, stoves, and inserts using a millivolt system or electronic ignition.
The 60 is a thermostatically controlled transmitter that provides on/off status, displays room/set temperature as well as having low battery indicator
and child-proof features.
This transmitter kit is tested and safe when installed in accordance with these instructions.
3. BATTERIES:
New batteries have a limited shelf life and depending upon their age, may need to be replaced after a short period of time. Batteries should be
replaced at least every 6 months or when the low battery indicator is lit on the receiver or the transmitter LCD. Use alkaline batteries only.
Remember to change the batteries in both the receiver and the transmitter.
3.1 TO CHANGE BATTERIES:
Receiver: Slide the switch to OFF. Press the battery compartment slightly into the receiver and release enabling the battery compartment to pop
out. After removing the original batteries, wait at least 1 minute before replacing with fresh batteries. (Follow the programming instructions previously
stated) FIGURE 12
Transmitter: Gently press and slide the battery cover from the rear surface of the transmitter. After removing the original batteries, wait at least 1
minute before replacing with fresh batteries. FIGURE 11
3.2 IN THE EVENT OF A BATTERY FAILURE:
If the receiver batteries fail, the appliance will no longer cycle on or off, remaining in the current operating mode. To operate the appliance in the event
of a battery failure, the slide switch located on the receiver may be switched to the “ON” position to operate the appliance. (Section 1)
3.3 If the transmitter batteries fail while in Thermostatic mode and there is no communication with the receiver, as a safety feature, the appliance will
shut down after 12 hours and not function until batteries are replaced.
45
Loading ...
Loading ...
Loading ...