

IT
Tosasiepi portatile a motore -
MANUALE DI ISTRUZIONI
ATTENZIONE: prima di usare la macchina, leggere attentamente il presente libretto.
CS
Přenosné motorové plotové nůžky -
NÁVOD K POUŽITÍ
UPOZORNĚNÍ: před použitím stroje si pozorně přečtěte tento návod k použití.
DA
Bærbar motordreven Hækkeklipper -
BRUGSANVISNING
ADVARSEL: læs instruktionsbogen omhyggeligt igennem, før du tager denne maskine i brug.
DE
Tragbare motorbetriebene Heckenschere -
GEBRAUCHSANWEISUNG
ACHTUNG: vor inbetriebnahme des geräts die gebrauchsanleitung aufmerksam lesen.
EL
Φορητό ψαλίδι μπορντούρας βενζίνης -
ΟΔΗΓΙΕΣ ΧΡΗΣΠΣ
ΠΡΟΣΟΧΗ: πριν χρησιμοποιησετε το μηχανημα, διαβαστε προσεκτικα το παρον εγχειριδιο.
EN
Powered hand-held hedge trimmer -
OPERATOR’S MANUAL
WARNING: read thoroughly the instruction booklet before using the machine.
ES
Cortasetos portátil de motor -
MANUAL DE INSTRUCCIONES
ATENCIÓN: antes de utilizar la máquina, leer atentamente el presente manual.
ET
Kaasaskantav mootoriga hekilõikur -
KASUTUSJUHEND
TÄHELEPANU: enne masina kasutamist lugeda tähelepanelikult antud kasutusjuhendit.
FI
Käsin kannateltava moottorikäyttöinen pensasleikkuri
KÄYTTÖOHJEET -
VAROITUS: lue käyttöopas huolellisesti ennen koneen käyttöä.
FR
Taille-haie portatif à moteur -
MANUEL D’UTILISATION
ATTENTION: lire attentivement le manuel avant d’utiliser cette machine.
HR
Prijenosne motorne škare za živicu -
PRIRUČNIK ZA UPORABU
POZOR: prije uporabe stroja, pažljivo pročitajte ovaj priručnik.
HU
Hordozható motoros sövénynyíró -
HASZNÁLATI UTASÍTÁS
FIGYELEM! a gép használata előtt olvassa el figyelmesen a jelen kézikönyvet.
LT
Rankinės motorinės gyvatvorių žirklės -
NAUDOJIMO INSTRUKCIJOS
DĖMESIO: prieš naudojant įrenginį, atidžiai perskaityti šį naudotojo vadovą.
LV
Ar piedziņu aprīkotais rokturamais dzīvžoga apgriezējs
LIETOŠANAS INSTRUKCIJA -
UZMANĪBU: pirms aparāta lietošanai rūpīgi izlasiet
doto instrukciju.
MK
Преносен поткаструвач -
УПАТСТВА ЗА УПОТРЕБА
ВНИМАНИЕ: прочитајте го внимателно ова упатство пред да ја користите машината.
NL
Draagbare heggeschaar met motor -
GEBRUIKERSHANDLEIDING
LET OP: vooraleer de machine te gebruiken, dient men deze handleiding aandachtig te lezen.
NO
Bærbar motordrevet hekksaks -
INSTRUKSJONSBOK
ADVARSEL: les denne bruksanvisningen nøye før du bruker maskinen.
PL
Ręczny sekator spalinowy -
INSTRUKCJE OBSŁUGI
OSTRZEŻENIE: przed użyciem maszyny, należy uważnie przeczytać niniejszą instrukcję.
PT
Corta-sebes portátil motorizado -
MANUAL DE INSTRUÇÕES
ATENÇÃO: antes de usar a máquina, leia atentamente o presente manual.
RU
Портативные моторизованные шпалерные ножницы
РУKОВОДСТВО ПО ЭKСПЛУАТАЦИИ -
ВНИМАНИЕ: прежде чем
пользоваться оборудованием, внимательно прочтите зто руководство по зксплуатации.
SL
Prenosni motorni rezalnik grmičevja -
PRIROČNIK ZA UPORABO
POZOR: preden uporabite stroj, pazljivo preberite priročnik z navodili.
SV
Motordrivna handhållna häcksaxar -
BRUKSANVISNING
VARNING: läs igenom hela detta häfte innan du använder maskinen.
TR
Motorlu elde taşınabilir çit budama makinesi -
KULLANIM KILAVUZU
DİKKAT: makıneyı kullanmadan önce talımatlar ıçeren kilavuzu dıkkatle okuyun.
171506803/0 rev.1
01/2021
H 555
H 645
H 655


ITALIANO - Istruzioni Originali ...................................................................................................
IT
БЪЛГАРСКИ - Превод на оригиналните инструкции ..............................................................
BG
BOSANSKI - Prijevod originalnih uputa ........................................................................................
BS
ČESKY - Překlad původního návodu k používání .........................................................................
CS
DANSK - Oversættelse af den originale brugsanvisning ..............................................................
DA
DEUTSCH - Übersetzung der Originalbetriebsanleitung ..............................................................
DE
ΕΛΛΗΝΙΚΑ - Μετάφραση του πρωτοτύπου των οδηγιών χρήσης
...................................................
EL
ENGLISH - Translation of the original instruction ..........................................................................
EN
ESPAÑOL - Traducción del Manual Original ................................................................................
ES
EESTI - Algupärase kasutusjuhendi tõlge .....................................................................................
ET
SUOMI - Alkuperäisten ohjeiden käännös ....................................................................................
FI
FRANÇAIS - Traduction de la notice originale ..............................................................................
FR
HRVATSKI - Prijevod originalnih uputa .........................................................................................
HR
MAGYAR - Eredeti használati utasítás fordítása ...........................................................................
HU
LIETUVIŠKAI - Originalių instrukcijų vertimas ...............................................................................
LT
LATVIEŠU - Instrukciju tulkojums no oriģinālvalodas ....................................................................
LV
МАКЕДОНСКИ -Превод на оригиналните упатства ................................................................
MK
NEDERLANDS - Vertaling van de oorspronkelijke gebruiksaanwijzing
...................................................
NL
NORSK - Oversettelse av orginal bruksanvisning .........................................................................
NO
POLSKI - Tłumaczenie instrukcji oryginalnej ................................................................................
PL
PORTUGUÊS - Tradução do manual original ...............................................................................
PT
ROMÂN - Traducerea manualului fabricantului ............................................................................
RO
РУССКИЙ - Перевод оригинальных инструкций .....................................................................
RU
SLOVENŠČINA - Prevod izvirnih navodil ......................................................................................
SL
SLOVENSKY - Preklad pôvodného návodu na použitie ...............................................................
SK
SRPSKI - Prevod originalnih uputstva ...........................................................................................
SR
SVENSKA - Översättning av bruksanvisning i original ..................................................................
SV
TÜRKÇE - Orijinal Talimatların Tercümesi ....................................................................................
TR

2
1
3
4
1
3 4
2
II
I
ϒ
6
5
7
1
2
3
1
1
2
9
8
10
11
12

INTRODUCTION 1
EN
Dear Customer,
thank you for choosing one of our products. We hope that you will be completely satised with this machine
and that it fully meets your expectations. This manual has been compiled in order to provide you with all
the information you need to get acquainted with the machine and use it safely and eciently. Don’t forget
that it is an integral part of the machine, so keep it handy so that it can be consulted when necessary, and
pass it on to a further user if you resell or loan the machine.
Your new machine has been designed and manufactured in pursuance of current regulations, and is safe
and reliable if used in compliance with the instructions provided in this manual (proper use). Using the
machine in any other way, or non-compliance with the safety specications relative to use, maintenance
and repair is considered “improper use” which will invalidate the warranty, relieve the manufacturer from
all liabilities, and the user will consequently be liable for all and any damage or injury to himself or others.
Since improvements are periodically made to our products, you may nd slight dierences between your
machine and the descriptions contained in this manual. Certain modications can be made to the machine
without prior warning and without the obligation to update the manual, although the essential safety and
function characteristics will remain unaltered. In case of any doubts, please contact your Retailer. And
now enjoy your work!
TABLE OF CONTENTS
1. Identication of the main components ........................................ 2
2. Symbols ..................................................................................... 3
3. Safety requirements ................................................................... 4
4. Preparing to work ....................................................................... 6
5. How to start - Use - Stop the engine .......................................... 7
6. Using the machine ..................................................................... 8
7. Maintenance and storage ......................................................... 10
8. Troubleshooting ....................................................................... 12
9. Technical data .......................................................................... 12
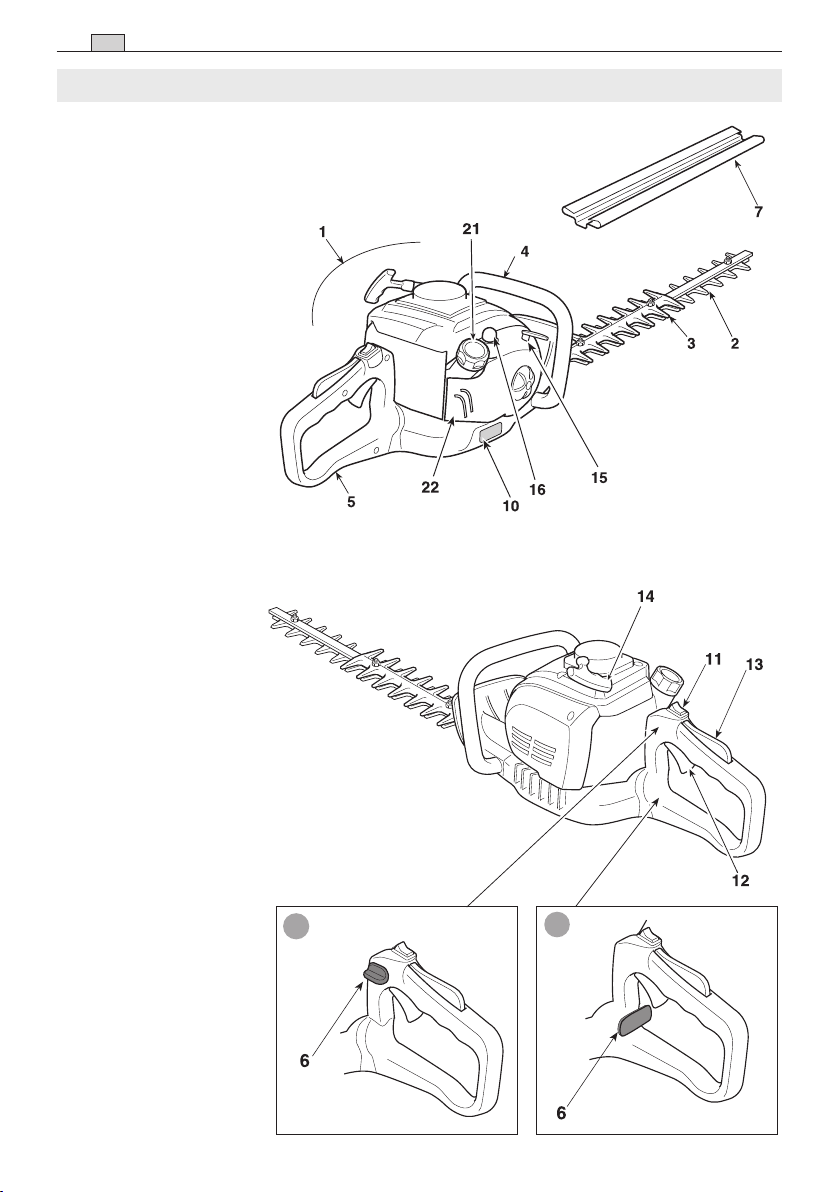
2 IDENTIFICATION OF MAIN COMPONENTS
EN
1. Engine
2. Cutting device (blade)
3. Cutter protection plate
4. Front handgrip
5. Rear handgrip
6. Rear handgrip release
command
7. Blade protection
10. Registration plate
CONTROLS
AND FILLING POINTS
11. Engine stop switch
12. Blade command
(Accelerator lever)
13. Accelerator safety
lever
14. Starter
15. Choke
16. Primer
21. Fuel tank cap
22. Air cleaner cover
1. IDENTIFICATION OF MAIN COMPONENTS
II
I

SYMBOLS 3
EN
1) Warning! Danger.
2) Read the instruction manual before using the
machine.
3) Irreversible damage can be caused to your
hearing.
Anyone operating this machine under normal con-
ditions during continuous daily use may be ex-
posed to a noise level equal to or exceeding 85
dB (A).
The operator must wear Personal Protective
E quip ment (PPE).
Always wear safety goggles and ear protectors
while using the machine.
If the operator is working in an area where there
is a risk of falling objects, a safety helmet must
also be worn.
4) The blade is very sharp and you could easily
cut yourself.
2. SYMBOLS
WARNING: The machine you have purchased has been manufactured for domestic use.
REGISTRATION PLATE
1) Acoustic output level
2) Mark of conformity
3) Month/Year of manufacture
4) Type of machine
5) Serial number
6) Name and address of the manufacturer
7) Article Code
11) Fuel tank
12) Choke
13) Primer
EXPLANATORY SYMBOLS ON THE MACHINE (if presents)
dB
L
WA
Art.N.
Type:
- s/n
26 14
5 73
L’esempio della dichiarazione di conformità
si trova nelle ultime pagine del manuale.

4 SAFETY REQUIREMENTS
EN
A) TRAINING
1) THIS MACHINE MAY CAUSE SERIOUS DAM-
AGE AND INJURIES. Carefully read the instruc-
tions for proper use, preparation, maintenance,
start up and stopping of the machine. Become
acquainted with the controls and the proper use of
the machine. Learn how to stop the engine quickly.
2) Only use the machine for its intended use, that
is “the cutting and trimming of hedges, con-
sisting in plants with small sized branches”.
Any other use may be dangerous and severly da-
ma ge the machine. Examples of improper use may
include, but are not limited to:
– general grass cutting and in particular, near
kerbs;
– chopping material for composts;
– pruning;
– using the machine for cutting non-plant material;
– use of the machine by more than one person.
3) Never allow children or persons unfamiliar with
these instructions to use the machine. Local re-
gulations may restrict the age of the operator.
4) The machine must never be used by more than
one person.
5) Never use the machine:
– when people, especially children or pets are in
the vicinity;
– if the user is tired or unwell, or has taken medi-
ci ne, drugs, alcohol or any substances which
may slow his reexes and compromise his jud-
gement;
– if the user is not capable of holding the ma chine
rmly with two hands and/or of remaining stand-
ing on the ground whilst working.
6) Remember that the operator or user is respon-
sible for accidents or hazards occurring to other
people or their property.
B) PREPARATION
1) Always wear adequate clothing when using the
machine which do not hamper movements in any
manner.
– Always wear slim-tting protective clothing, t-
ted with shear-proof protection devices.
– Always wear protective gloves and eye-goggles
and safety anti-shear boots with non-slip so les.
– Always wear ear and hearing protection de vi-
ces.
– Never wear scarves, shirts, necklaces, or any
han ging or apping accessory that could catch
in the machine or in any objects or ma te rials in
the work area.
– Tie your hair back if it is long.
2) WARNING: DANGER! Fuel is highly amma-
ble:
– keep the fuel in containers which have been
specically manufactured and homologated for
such use;
– never smoke when handling fuel;
– slowly open the fuel tank to allow the pressure
inside to decrease gradually;
– top up the tank with fuel in the open air, using
a tunnel;
– add fuel before starting the engine. Never re-
mo ve the fuel tank cap or add fuel while the en-
gine is running or when the engine is hot;
– if you have split some fuel, do not attempt to
start the engine but move the machine away
from the area of spillage and avoid creating any
source of ignition until the fuel has evaporated
and fuel vapours have dissipated;
– immediately clean up all traces of fuel spilt on
the machine or on the ground;
– never start the machine in the same place you
re lled it with fuel;
– make sure your clothing does not come into con-
tact with the fuel, on the contrary, change your
clothes before starting the engine;
– always put the tank and fuel container caps back
on and tighten well.
3) Replace faulty or damaged silencers.
4) Before using the machine, check its general
con dition and in particular:
– the accelerator lever and the safety lever must
mo ve freely, they must not need forcing and
should return automatically and rapidly back to
the neutral position;
– the accelerator lever must remain locked until
the safety lever is pressed;
– the engine stop switch must easily move from
one position to the other;
– the electric cables and in particular the spark
plug cable must be in perfect condition to a void
the generation of any sparks and the cap must
be correctly tted on the spark plug;
– the machine handgrips and protection devices
must be clean and dry and well fastened to the
machine;
– the blades must never be damaged or in poor
condition;
5) Before starting your work, make sure that all the
protection devices are correctly tted.
C) OPERATION
1) Do not operate the engine in a conned space
where dangerous carbon monoxide fumes can
collect.
2) Work only in daylight or good articial light.
3) Take on a rm and well-balanced position:
– where possible avoid working on wet slippy
ground or in any case on uneven or ripid ground
which does not guarantee stability for the op-
3. SAFETY REQUIREMENTS

6) Always wear protective gloves when handling
the cutting device.
7) Make sure the blades are well sharpened. All
operations on the blades require a certain level
of experience and specialised tools. For safety
reasons, take them to a specialised centre to be
sharpened.
8) For safety reasons, never use the machine with
a worn or damaged cutting device or other parts.
Damaged parts are to be replaced and never re-
paired. Only use o ri gi nal spare parts. Parts that are
not of the same qua lity can seriously damage the
equipment and com promise safety.
9) Store the machine out of the reach of children!
E) TRANSPORTATION AND HANDLING
1) Whenever the machine is to be inspected, han-
dled or transported you must:
– turn o the engine, wait for the blades to stop,
disconnect the spark plug cap and wait until the
machine cools down;
– apply the protection devices to the blades;
– only hold the machine using the handgrips and
position the blades in the opposite direction to
that used during operations.
2) When using a vehicle to transport the ma chi ne,
position it so that it can cause no danger to per-
sons and fasten it rmly in place to avoid it from
tipping over, which may cause damage or fuel
spillage.
F) HOW TO READ THE MANUAL
Certain paragraphs in the manual contain particu-
larly signicant information and are marked with
various levels of highlighting with the follo wing
meaning:
NOTE
or
IMPORTANT
These give details or further
information on what has already been indicated,
and aim to prevent both damage to the machine,
and the machine from causing damage.
WARNING!
Non-observance will re-
sult in the risk of injury to oneself or others.
DANGER!
Non-observance will re-
sult in the risk of serious injury or death to
one self or others.
SAFETY REQUIREMENTS 5
EN
erator;
– avoid using unstable ladders or platforms;
– never run, but walk carefully paying attention to
the lay of the land and any eventual obstacles.
– Always be aware of your surroundings and stay
alert for possible hazards of which you may not
be aware due to the noise of the hedge trimmer.
4) Start the engine when the machine is rmly on
the ground and hold it in place with your free hand:
– start the motor in an area at least 3 metres from
where you refuelled;
– check that there are no persons in the vicinity
of the machine;
– do not direct the silencer and therefore the ex-
haust fumes towards inammable materials.
5) Exercise caution when near live electric cables.
6) Do not change the engine tuning and do not rev
the engine excessively at maximum speed.
7) Check that when the machine is running at mi-
ni mum speed and ticking over, there is no move-
ment of the blades and, after accelerating, the en-
gine quickly returns to minimum speed.
8) Make sure the blades do not come into violent
contact with foreign bodies and try to prevent any
material from being hurled after trimming.
9) If the cutting mechanism strikes any foreign ob-
ject or the hedge trimmer starts making any unu-
sual noise or vibration, shut o the power source
and allow the hedge trimmer to stop. Disconnect
the spark plug wire from the spark plug and take
the following steps:
– inspect for damage;
– check for and tighten any loose parts;
– have any damaged parts replaced or repaired
with parts having equivalent specications.
10) Stop the engine before:
– cleaning or when clearing a blockage;
– checking, carrying out maintenance or working
on the hedge trimmer;
– adjusting the working position of the cutting de-
vice;
– leaving the hedge trimmer unattended.
D) MAINTENANCE AND STORAGE
1) Keep all nuts, bolts and screws tightly faste ned
to be sure the equipment is in safe working condi-
tion. Routine maintenance is essential for sa fety
and for maintaining a high performance level.
2) Do not store the machine with fuel in the tank in
an area where the fuel vapors could reach an open
ame, a spark or a strong heat source
3) Allow the engine to cool before storing in any
enclosure.
4) To reduce re hazards, keep the engine, ex-
haust silencer and fuel storage area free from
bran ches, leaves, or excessive grease; never
lea ve containers with the cut debris inside the sto-
rage area.
5) If the fuel tank has to be emptied, this should be
done outdoors once the engine has cooled down.

• Preparation and preservation
of the fuel mix
DANGER!
Petrol and the fuel mix are highly inammable!
– Keep the petrol and fuel mix in homologated
fuel containers, in safe place, away from
any ames or heat sources.
– Never leave the containers within the reach
of children.
– Never smoke whilst preparing the mix and
avoid inhaling the petrol fumes.
The chart indicates the amount of petrol and oil to
use to prepare the fuel mix according to the type
of oil used.
To prepare the fuel mix:
– Place about half the amount of petrol in a ho mo-
logated tank.
– Add all the oil, according to the chart.
– Add the rest of the petrol.
– Close the top and shake well.
IMPORTANT
The fuel mix tends to age. Do
not prepare excessive amounts of the fuel mix to
avoid deposits from forming.
IMPORTANT
Keep the petrol and fuel mix
containers separate and easily identiable to avoid
the mistake of using one in place of the other.
IMPORTANT
Periodically clean the petrol
and fuel mix containers to remove any eventual
deposits.
CHECKING THE MACHINE
Before starting work please:
– Check that all the screws on the machine and
the blade are tightly fastened;
– check that the blades are sharp and there are no
signs of any damage;
– check that the air lter is clean;
– check that the protection devices are well fa-
stened and working eciently;
– check that the handgrips are well fastened
PREPARING THE FUEL
This machine is tted with a two-stroke engine
which requires a mix of petrol and lubricating oil.
IMPORTANT
Using petrol alone will da-
ma ge the motor and will cause for invalidation of
the warranty.
IMPORTANT
Only use quality fuels and
oils to maintain high performance and guarantee
the duration of the mechanical parts over time.
• Petrol characteristics
Only use unleaded petrol (green petrol) with oc-
tane number no less than 90 N.O.
IMPORTANT
Unleaded petrol tends to cre-
ate deposits in the container if preserved for more
than 2 months. Always use fresh petrol!
• Oil characteristics
Only use top quality synthetic oil specically for
two-stroke engines.
Your retailer can provide you with oils which ha ve
been specically studied for this type of en gi ne,
which are capable of guaranteeing a high le vel of
protection.
The use of these oils makes it possible to prepa re
a 2.5% mix, consisting in 1 part oil to 40 parts
pe trol.
6 PREPARING TO WORK
EN
4. PREPARING TO WORK
Petrol Synthetic oil 2-stroke
liters liters cm
3
1 0.025 25
2 0.050 50
3 0.075 75
5 0.125 125
10 0.250 250

2. Gently press the bulb (2) on the “primer” 7-10
times until the fuel ows from the exhaust pipe.
3. Turn the starter control lever (3) to the
«CHOKE» position.
4. Hold the machine rmly on the ground with one
hand on the handgrip, in order not to lose con-
trol of the machine during startup.
WARNING!
If the machine is not held
rmly, the force of the engine could cause the
user to lose his balance or direct the blade
towards an obstacle or the same user.
5. Pull the starter rope slowly for 10 - 15 cm until
you feel some resistance, then tug it a few times
until you hear the engine turn over.
IMPORTANT
To avoid breaking the starter
rope, do not pull the whole length of it or let it slide
along the edge of the cable guide hole. Release
the starter gradually, to avoid letting it y back un-
controllably.
STARTING THE ENGINE
WARNING!
The engine must be start -
ed in an area at least 3 metres from where you
relled the fuel tank.
Before starting the engine:
– Place the machine rmly on the ground.
– Remove the blade protection devices.
– Make sure the blade is not touching the ground
or any other object.
– Make sure the handgrip is locked in the centre
position.
• Cold start
NOTE
A “cold” start of the engine
means starting it after at least 5 minutes from when
it was switched o or after refuelling.
To start the engine (Fig. 2):
1. Press switch (1) to position «I».
– Clean the fuel tank cap and the surrounding
area to avoid any dirt from entering the tank
du ring relling.
– Carefully open the fuel tank cap to allow the
pressure inside to decrease gradually. Use a
funnel to rell and avoid lling the tank to the
brim (Fig. 1).
WARNING!
Always close the fuel tank
cap rmly.
WARNING!
Immediately clean all tra-
ces of fuel which may have dripped on the
ma chine or the ground and do not start the
engine until the petrol fumes have dissipated.
REFUELLING
DANGER!
Never smoke whilst refuel-
ling and avoid inhaling the petrol fumes.
WARNING!
Carefully open the tank
top as pressure could have formed inside
Before refuelling:
– Shake the fuel mix container well.
– Place the machine on a at stable surface, with
the fuel tank cap facing upwards.
PREPARING TO WORK / HOW TO START - USE - STOP THE ENGINE 7
EN
5. HOW TO START - USE - STOP THE ENGINE

To respect persons and the environment :
– Please try not to cause any disturbance.
– Scrupolously comply with local regulations
and provision for disposal of waste materials
after trimming.
– Scrupolously comply with local regulations
and provision for the disposal of oils, pe trol,
damaged parts or any element which has a
strong impact on the environment.
– Disposal of the packaging should be done in
accordance with the local regulations in force.
WARNING!
Prolonged exposure to vi-
brations can cause injuries and neurovascular
disorders (also called “Renaud’s syndrome” or
“white hand”), especially to people suering
from circulation disorders. The symptoms can
regard the hands, wrists and ngers and are
shown through loss of sensitivity, torpor, itch-
ing, pain and discolouring of or structural
changes to the skin. These eects can be wors-
ened by low ambient temperatures and/or by
gripping the handgrips excessively tightly. If the
symptoms occur, the length of time the machine
is used must be reduced and a doctor consulted.
DANGER!
This machine’s starter unit
generates an average sized electromagnetic
eld, but it is not however possible to exclude
the possibility of interference on any active or
passive medical devices that operators may be
wearing; this could be risky for their health con-
ditions. All those using medical devices should
always consult their GP, or the device manufac-
turer, before using this machine.
WARNING!
Always wearing suitable
clothing when using the machine. Your retailer
can provide you with all the information on the
most suitable accident prevention de vi ces to
guarantee your safety at work
engine to run at minimum speed for a few se-
conds.
– Press the (2) switch to the «O» position.
WARNING!
When the engine is ticking
over, it will take a few seconds for the bla des
to stop.
WARNING!
In the event of an emer-
gency stop, move the switch immediately to
the «O» position.
6. Pull the starter rope again until the engine starts
as normal.
7. Turn the starter control lever (3) to the «RUN»
position.
8. Allow the engine to run at minimum speed for
at least one minute before accelerating to ma-
ximum speed.
IMPORTANT
If the handle (4) on the star ter
wire is pulled repeatedly with the starter control
lever (3) in the «CHOKE» position it can ood the
engine and make starting dicult.
If you have ooded the engine, remove the spark
plug and gently pull the handle (5) on the starter
wire to eliminate any excess fuel; then dry the
spark plug electrodes and replace it on the en gine.
• Hot starting
When hot starting (immediately after stopping the
engine), follow the procedure indicated a bo ve in
points 1 - 4 - 5 - 6.
USE OF THE ENGINE (Fig. 3)
The speed of the cutting device is regulated by
the accelerater lever (1) positioned on the rear
hand grip (2).
It is only possible to use this lever if the safety lever
(3) is pressed simultaneously.
The movement is transmitted from the engine to
the blade by a centrifugal mass clutch that pre-
vents the blade from moving when the engine is
running at minimum speed.
WARNING!
Do not use the machine if
the cutting device moves when the engine is
running idle; in this case, contact you dealer.
The correct running speed will be achieved by
pressing the accelerator lever (1) as far as pos-
sible.
IMPORTANT
Avoid using the engine at full
power for the rst 6-8 working hours.
STOPPING THE ENGINE (Fig. 4)
To stop the engine:
– Release the accelerator lever (1) and allow the
8 HOW TO START - USE - STOP THE ENGINE/ USING THE MACHINE
EN
6. USING THE MACHINE

WARNING!
If something breaks or an
accident occurs during mowing, turn o the en-
gine immediately and move the machine away to
prevent further damage; if an accident occurs
with injuries or third parties are injured, carry
out the rst aid measures most suitable for the
situation immediately and contact the medical
authorities for any necessary health care. Care-
fully remove any debris that might cause dam-
age or harm persons or animals should it not be
seen.
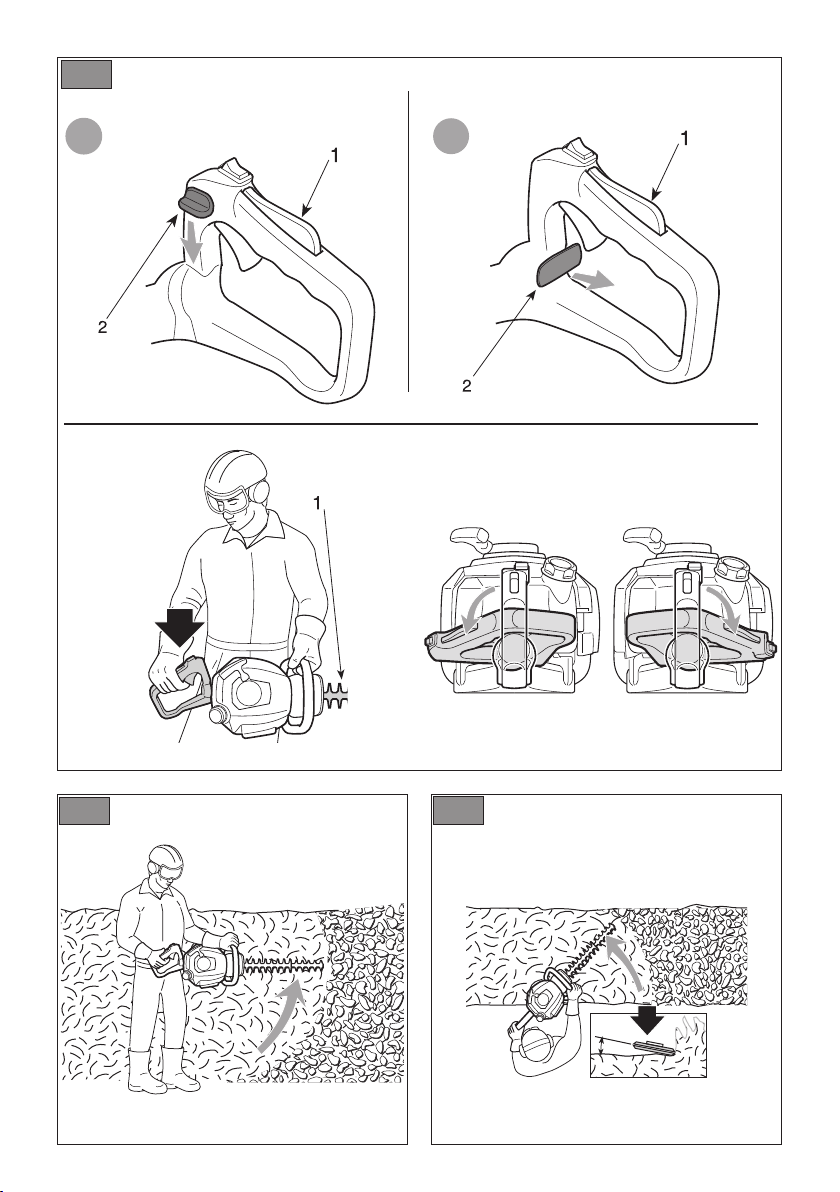
REGULATING THE HANDGRIP (Fig. 5)
The rear handgrip (1) can be adjusted to 3 dierent
positions in relation to the cutting device to make
trimming your hedges easier.
WARNING!
The handgrip must only be
adjusted when the engine is switched o.
• Type I
– Lower the release lever (2).
– Rotate the rear handgrip (1) to the desired position.
– Before using the machine check that the re lea se
lever (2) has correctly returned in the high po sition,
and the rear handgrip is rmly attached.
• Type II
– Pull the release lever (2).
– Rotate the rear handgrip (1) to the desired position.
– Before using the machine check that the re lea se
lever (2) has correctly returned in the high po sition,
and the rear handgrip is rmly attached.
WARNING!
When working, the rear
handgrip must always be in a vertical position,
whatever the position of the cutting de vi ce (3).
CUTTING PROCEDURES
WARNING!
When cutting, always hold
the machine rmly with both hands.
WARNING!
Immediately stop the en-
gine if the blades block while running or if they
get caught up in the hedge branches
It is recommended to trim the two vertical sides of the
hedge before trimming the top.
• Vertical trimming (Fig. 6)
Proceed to cut by using curved movements from the
bottom towards the top, keeping the blade as far from
the body as possible.
USING THE MACHINE 9
EN
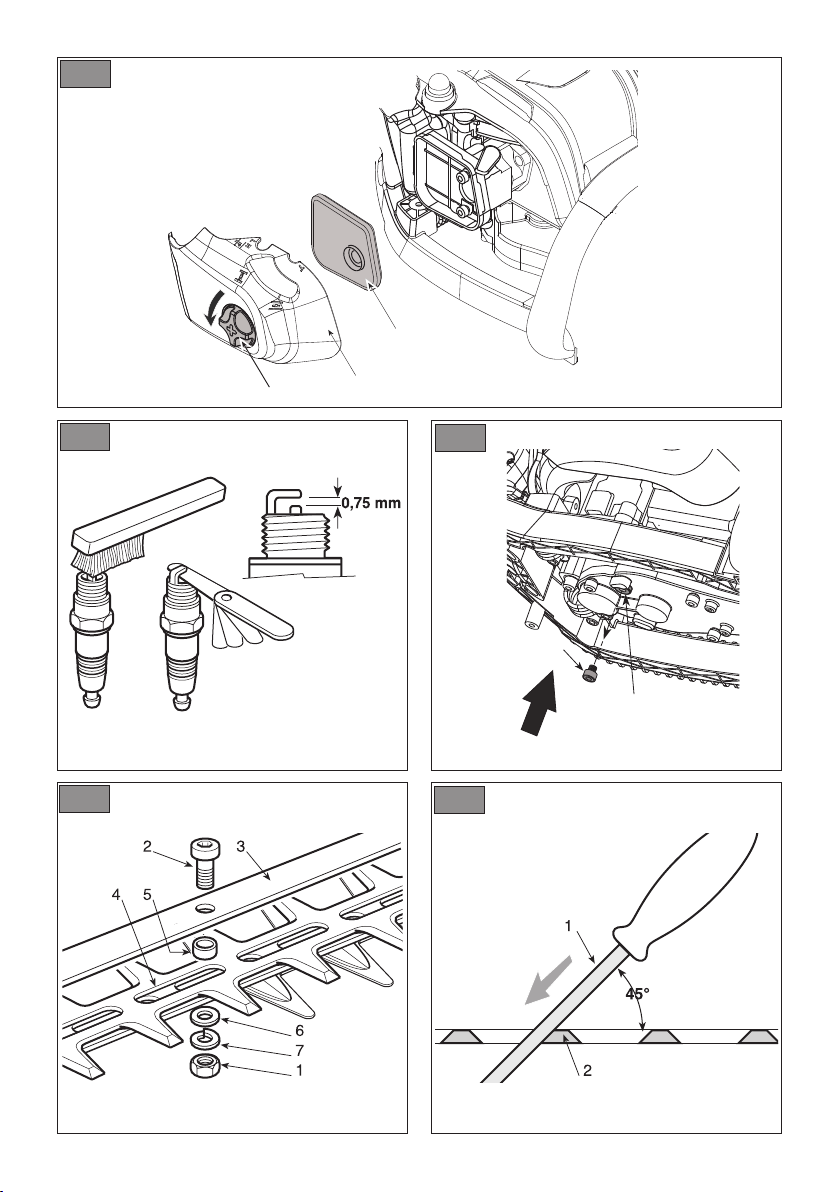
• Horizontal trimming (Fig. 7)
The best results will be obtained with the blade
slightly inclined (5° - 10°) in the direction you are
cutting, proceed with a curved movement, slowly and
without interruptions, especially in the ca se of very
thick hedges.
LUBRICATING THE BLADES DURING JOBS
If the trimming device overheats whilst working, it is
necessary to lubricate the internal surfaces of the
blades.
WARNING!
This operation must only be
performed when the blades have stopped run-
ning and the engine is switched o.
END OF OPERATIONS
When you have nished your work:
– Switch o the engine as indicated above (Chap. 5).
– Wait for the blades to stop and replace the pro-
tection device.

Check and reset the correct distance between the
electrodes (Fig. 9).
Replace the spark plug and fasten it rmly using
the supplied key.
The spark plug must be replaced with one with
the same characteristics in the cases where the
electrodes have burnt or the insulation has worn
out, and in any case every 50 working hours.
TUNING THE CARBURETTOR
The carburettor is tuned by the manufacturer to
achieve maximum performance in all situations
of use, with a minimum emission of toxic gas in
compliance with current specications.
In the case of poor performance, rst check that
the blades are not partially blocked or deformed,
on the contrary ask your Retailer to check the car-
burettor and the engine.
• Tuning minimum speed
WARNING!
The cutting device must
not move when the engine is running idle. If
the cutting device moves when the engine is
running idle, contact your dealer to correctly
regulate the engine.
LUBRICATING THE REDUCTION GEAR
(Fig. 10)
Every 20 working hours, top up the level with spe-
cial molybdenum bisulphur lubrication, in jec ting it ,
after unscrewing the screw (1), into the lubricator
(2), positioned at the bottom of the machine.
BLADE CLEANING AND CHECK
WARNING!
Periodically check that the
blades are not bent or deformed and that the
screws are adequately tightened.
Adjustment of the distance between blades is not
necessary, as this is predetermined by the ma-
nufacturer.
Cleaning of debris from the inner grooves must be
done regularly, as this could impede the bla des
from turning correctly.
Proceed with cleaning (Fig. 11):
– Loosen the nuts (1), remove the screws (2) and
Correct maintenance is essential to maintain the
o r iginal ecency and safety of the machine over
time.
WARNING!
During maintenance ope-
ra tions:
– remove the spark plug cap.
– Wait until the engine is suciently cold.
– Use protective gloves when handling the
bla des.
– Keep the blade protection devices on, ex-
cept when intervening directly on the blade.
– Never dispose of oils, fuel or other polluting
materials in unauthorised places
CLEANING THE ENGINE AND THE SILENCER
To reduce re risks, periodically clean the cylinder
aps with compressed air and clear the si len cer
area from branches, leaves or other de bris.
CLEANING THE AIR FILTER
IMPORTANT
Cleaning the air lter is es-
sen tial to guarantee the eciency and duration of
the machine.
It must be cleaned after every 15 working hours.
To clean the lter (Fig. 8):
– Loose the knob (1), remove the cover (2) and
the lter element (3).
– Wash the lter element (3) with soap and wa ter.
Do not use petrol or other solvents.
– Leave the lter to dry in the open air.
– Replace the lter element (3) and the cover (2)
and tighten the knob (1).
FUEL FILTER
Inside the fuel tank there is a lter which prevents
impurities from entering the engine.
The lter should be replaced once a year by your
Re tailer.
CHECKING THE SPARK PLUG
Periodically, remove and clean the spark plug from
any eventual deposits using a metal brush.
10 MAINTENANCE AND PRESERVATION
EN
7. MAINTENANCE AND PRESERVATION

them from rusting.
The machine must be preserved in a dry area,
protected from all weather conditions and with the
blade protection device correctly tted.
PROLONGED IDLE PERIODS
IMPORTANT
If the machine will not be
used for a period of more than 2-3 months it is
recommended to follow some advice to avoid dif-
culty when you wish to use the machine and to
prevent permanent damage to the engine.
• Storage
Before storing the machine:
– Empty the fuel tank.
– Start the engine and allow it to tick over until it
comes to a halt, so that it uses all the fuel that is
left in the carburettor.
– Allow the engine to cool down and remove the
spark plug.
– Pour a a teaspoon of (new) 2-stroke engine oil
into the spark plug slot.
– Pull the starter wire a couple of times to dis-
tribuite the oil in the cylinder.
– Replace the spark plug with the piston in the
dead end upper position (visibile from the spark
plug slot when the piston is at maximum stroke).
• Restarting work
When you wish to start using the machine again:
– Remove the spark plug.
– Pull the starter wire a couple of times to elimi-
nate all excess oil.
– Check the spark plug as described in chapter
“Checking the spark plug”.
– Prepare the machine as indicated in the para-
graph entitled “Preparing for work”.
the bar (3).
– Carefully remove any dust or debris from the
slots (4).
– Lubricate the internal surfaces of the blades.
– Remount the bar (3) with the screws (2), taking
care to reposition the spacers accurately (5) and
the washers (6) and (7) under the nuts (1).
– Fully tighten the nuts (1).
WARNING!
Always check that the
nuts (1) are tightened as far as possible be-
fore starting work.
SHARPENING THE BLADES
It is necessary to sharpen the blades when
the trimming performance decreases and the
branches tend to stick together.
WARNING!
Always replace and never
repair a blade which has blunt cutting edges
IMPORTANT
We recommend you take your
machine to your Retailer for sharpening as he has
the required tools and suitable experience.
In order to sharpen the blades, it is recommended
to use a ne grain le and proceed as follows (Fig.
12):
– Place the le (1) on the blade (2) at a 45° angle,
and proceed with upward strokes towards the
cutting edge.
– Make sure that you put pressure on the le only
when stroking upwards and raise it from the
blade when you move it back towards you.
– Only remove a smallest amount of material.
– Eliminate any burr with a grinding stone.
– Eliminate all grinding traces and lubricate the
blades before reassembling them.
EXTRAORDINARY INTERVENTIONS
All maintenance operations not foreseen in this
manual must be performed exclusively by your
Retailer.
All and any operations performed in unauthorised
centres or by unqualied persons will totally invali-
date the warranty.
PRESERVATION
After each working session, carefully clean the
machine from dust and debris, repair or replace
any faulty parts and lubricate the blades to prevent
MAINTENANCE AND PRESERVATION 11
EN

12 IDENTIFICATION OF FAULTS / TECHNICAL SPECIFICATIONS / ACCESSORIES
EN
8. IDENTIFICATION OF FAULTS
PROBLEM LIKELY CAUSE SOLUTION
1) The engine
will not start
or will not
keep running
2) The engine starts
but is lacking
in power
3) The engine runs
irregularly and lacks
in power when
revved
4) The engine gives
o an excessive
amount of smoke
– Incorrect starting procedure
– Dirty spark plug or incorrect distance
between the electrodes
– Air lter clogged
– Carburation problems
– Air lter clogged
– Carburation problems
– Dirty spark plug or incorrect
distance between the electrodes
– Carburation problems
– Incorrect composition
of the fuel mix
– Carburation problems
– Follow the instructions
(see chap. 5)
– Check the spark plug
(see chap. 7)
– Clean and/or replace the lter
(see chap. 7)
– Contact your Retailer
– Clean and/or replace the lter
(see chap. 7)
– Contact your Retailer
– Check the spark plug
(see chap. 7)
– Contact your Retailer
– Prepare the fuel mix according to
the instructions (see chap. 4)
– Contact your Retailer
9. TECHNICAL SPECIFICATIONS
H 555 H 645 H 655
Capacity cm
3
22,5 22,5 22,5
Power kW 0,65 0,65 0,65
Petrol : Oil ratio 40 : 1 40 : 1 40 : 1
Tank capacity liters 0,26 0,26 0,26
Trimming lenght mm 560 455 560
Weight kg 5,1 5,1 5,1
Measured sound pressure level at
ear’s operator
- Measurement uncertainty
dB(A)
dB(A)
99,5
3
97,5
3
99,5
3
Measured sound power level
- Measurement uncertainty
dB(A)
dB(A)
105,5
3
105,3
3
105,5
3
Guaranteed acoustic power level dB(A) 108 108 108
Vibrations transmitted to the hand on
the front handgrip
- Measurement uncertainty
m/s
2
m/s
2
3,3
1,5
2,6
1,5
3,3
1,5
Vibrations transmitted to the hand on the
rear handgrip
- Measurement uncertainty
m/s
2
m/s
2
3,8
1,5
2,8
1,5
3,8
1,5
- Cutting means code 118805310/0 118805311/0 118805309/0
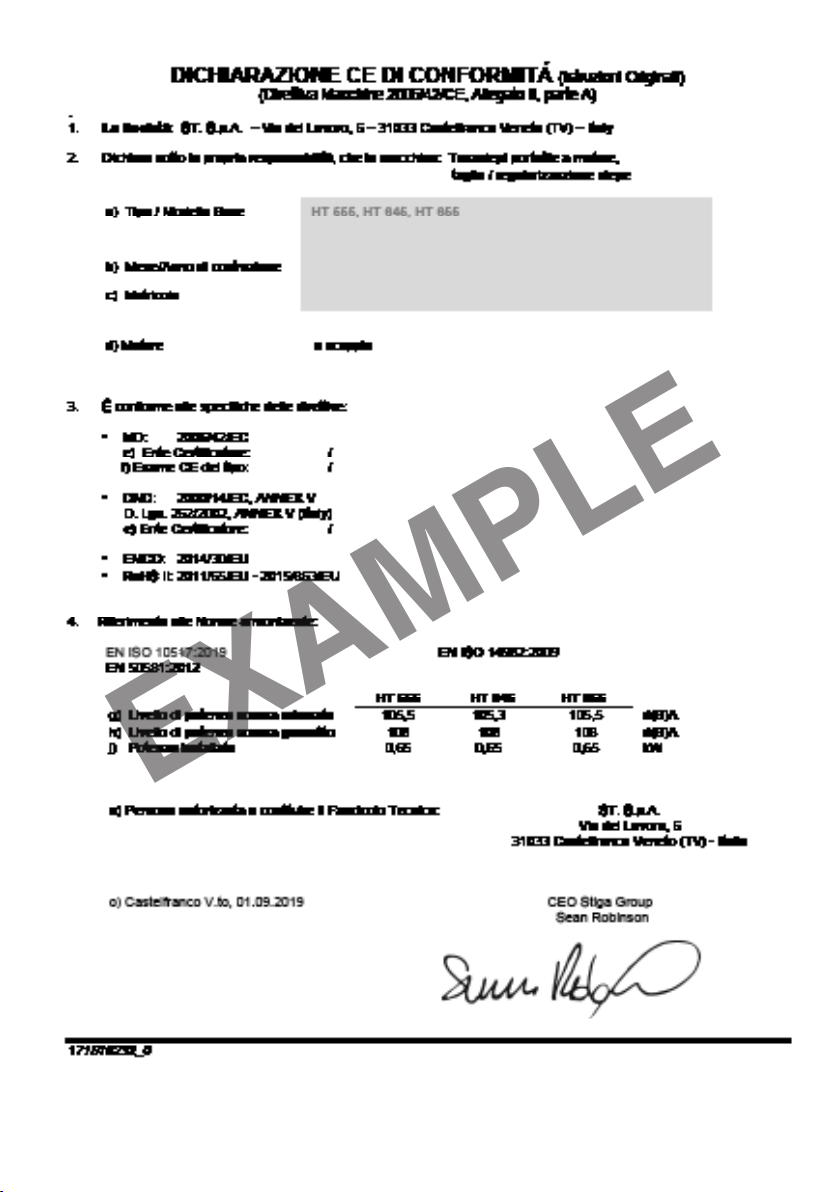
EXAMPLE

EXAMPLE

© by ST. SpA
IT • Il contenuto e le immagini del presente manuale d’uso sono stati realizzati per conto di ST. SpA e sono tutelati da diritto d’autore – E’
vietata ogni riproduzione o alterazione anche parziale non autorizzata del documento.
BG • Съдържанието и изображенията в настоящото ръководство са извършени за ST. SpA и са защитени с авторски права –
Забранява се всяко неоторизирано възпроизвеждане или промяна, дори и отчасти на документа.
BS • Sadržaj i slike iz ovog korisničkog priručnika napravljeni su isključivo za ST. SpA i zaštićeni su autorskim pravima – zabranjena je
svaka neovlaštena reprodukcija ili izmjena dokumenta, djelomično ili u potpunosti.
CS • Obsah a obrázky v tomto návodu k použití byly zpracovány jménem společnosti ST. SpA a jsou chráněny autorským právem – Repro-
dukce či nepovolené pozměňování tohoto dokumentu, a to i částečné, je zakázáno.
DA • Indhold og illustrationer i denne vejledning er blevet skabt på vegne af ST. SpA og er beskyttet af ophavsret – Enhver gengivelse eller
ændring, også delvis, af dokumentet uden autorisation hertil er forbudt.
DE • Inhalt und Bilder dieser Bedienungsanleitung wurden im Namen von ST. SpA erstellt und sind urheberrechtlich geschützt – Jede
nicht genehmigte Vervielfältigung oder Veränderung, auch auszugsweise, dieses Dokuments ist verboten.
EL • Το περιεχόμενο και οι εικόνες στο παρόν εγχειρίδιο χρήσης δημιουργήθηκαν για λογαριασμό της εταιρείας ST. SpA και
προστατεύονται από πνευματικά δικαιώματα – Απαγορεύεται οποιαδήποτε αναπαραγωγή ή τροποποίηση, έστω και μερική, του
εγγράφου χωρίς έγκριση.
EN • The content and images in this User Manual were produced expressly for ST. SpA and are protected by copyright – any unauthorised
reproduction or modication to the document, either partially or in full, is prohibited.
ES • El contenido y las imágenes del presente manual de uso han sido creados por ST. SpA y están protegidos por los derechos de autor
– Se prohíbe toda reproducción o modicación, incluso parcial, no autorizada del documento.
ET • Käesoleva kasutusjuhendi sisu ja kujutised on toodetud konkreetselt ettevõttele ST. SpA ja neile rakendub autorikaitseseadus – doku-
mendi igasugune osaline või täielik ilma loata reprodutseerimine või muutmine on keelatud.
FI • Tämän käyttöoppaan sisältö ja kuvat on valmistettu ST. SpA -yhtiön toimesta ja niitä suojaa tekijänoikeuslaki. – Asiakirjan kaikenlainen
kopioiminen tai muuttaminen, osittainkin, on kielletty ilman erityistä lupaa.
FR • Le contenu et les images du présent manuel d'utilisation ont été réalisés pour le compte de ST. SpA et sont protégés par un droit
d'auteur - Toute reproduction ou modication non autorisée, même partielle, du document, est interdite.
HR • Sadržaj i slike u ovom priručniku za uporabu izrađeni su za tvrtku ST. SpA te su obuhvaćeni autorskim pravima – Zabranjuje se
neovlašteno umnožavanje ili prilagodba, djelomična ili u cijelosti, ovog dokumenta.
HU • Ennek a használati útmutatónak a tartalma és a benne szereplő képek kizárólag a ST. SpA számára készültek és szerzői joggal
védettek – tilos a dokumentum bármely részének vagy egészének engedély nélküli sokszorosítása és módosítása.
LT • Šio naudotojo vadovo turinys ir paveikslėliai skirti tik „ST. SpA“ ir yra saugomi autorių teisėmis – dokumentą atgaminti ar modikuoti,
visiškai arba iš dalies, yra draudžiama.
LV • Šīs lietotāja rokasgrāmatas saturs un attēli ir veidoti tikai ST. SpA un ir aizsargāti ar autortiesībām. Jebkāda dokumenta vai tā daļas
prettiesiska kopēšana vai pārveide ir stingri aizliegta.
MK • Содржината и сликите во Упатството за корисникот се подготвени исклучиво за ST. SpA и се заштитени со авторски права
– забрането е секое делумно или целосно неовластено репродуцирање или измена на документот.
NL • De inhoud en de afbeeldingen van deze gebruikshandleiding werden gerealiseerd voor rekening van ST. SpA en zijn beschermd door
het auteursrecht – Elke niet-geautoriseerde reproductie of wijziging, ook gedeeltelijke, van het document is verboden.
NO • Innholdet og bildene i denne brukerveiledningen er utført på oppdrag fra ST. SpA og er beskyttet ved opphavsrett - Enhver gjengivel-
se eller endring, selv kun delvis, er forbudt.
PL • Treść oraz ilustracje zawarte w niniejszej instrukcji obsługi powstały na zlecenie spółki ST. SpA i są chronione prawami autorskimi –
Zabrania się wszelkiego kopiowania bądź modykowania, także częściowego, niniejszego dokumentu bez uzyskania stosownej zgody.
PT • As imagens e os conteúdos contidos no presente Manual do Utilizador foram expressamente criados para uso exclusivo da ST. SpA,
encontrando-se protegidos por direitos de autor. Qualquer tipo de reprodução ou alteração, parcial ou integral, não autorizadas deste
Manual estão expressamente proibidas.
RO • Conţinutul şi imaginile din manualul de utilizare de faţă au fost realizate în numele ST. SpA şi sunt protejate de drepturi de autor –
Este interzisă orice reproducere sau modicare chiar şi parţială neautorizată a documentului.
RU • Тесты и изображения, содержащиеся в настоящем руководстве, были созданы в интересах ST. SpA и защищены
авторскими правами – Любое несанкционированное воспроизведение или изменение документа запрещено.
SK • Obsah a obrázky v tomto návode na používanie boli spracované menom spoločnosti ST. SpA a sú chránené autorským právom –
Reprodukcie či nepovolené pozmeňovanie tohto dokumentu, a to aj čiastočné, je zakázané.
SL • Vsebine in slike v tem uporabniškem priročniku so izdelane za podjetje ST. SpA in so zaščitene z avtorskimi pravicami – vsakršno
nepooblaščeno razmnoževanje ali spreminjanje dokumenta, v celoti ali delno, je prepovedano.
SR • Sadržaj i slike ovog priručnika za upotrebu su napravljeni u ime ST. SpA i zaštićeni su autorskim pravima – Zabranjena je svaka
potpuna ili delimična reprodukcija ili izmena dokumenta bez odobrenja.
SV • Innehållet och bilderna i denna användarhandbok har framställts för ST. SpA och skyddas av upphovsrätt – all form av reproduktion
eller ändring, även partiell, som inte auktoriserats är förbjuden.
TR • Bu Kullanıcı Kılavuzundaki içerik ve resimler açıkça ST. SpA için üretilmiştir ve telif hakkı ile korunmaktadır – dokümanın izinsiz olarak
tamamen ya da kısmen herhangi bir şekilde çoğaltılması ya da değiştirilmesi yasaktır.

dB
L
WA
Type:
................................
.................. -s/n ........................................
Art.N .......................................................
ST. S.p.A.
Via del Lavoro, 6
31033 Castelfranco Veneto (TV) ITALY