¢L AI3
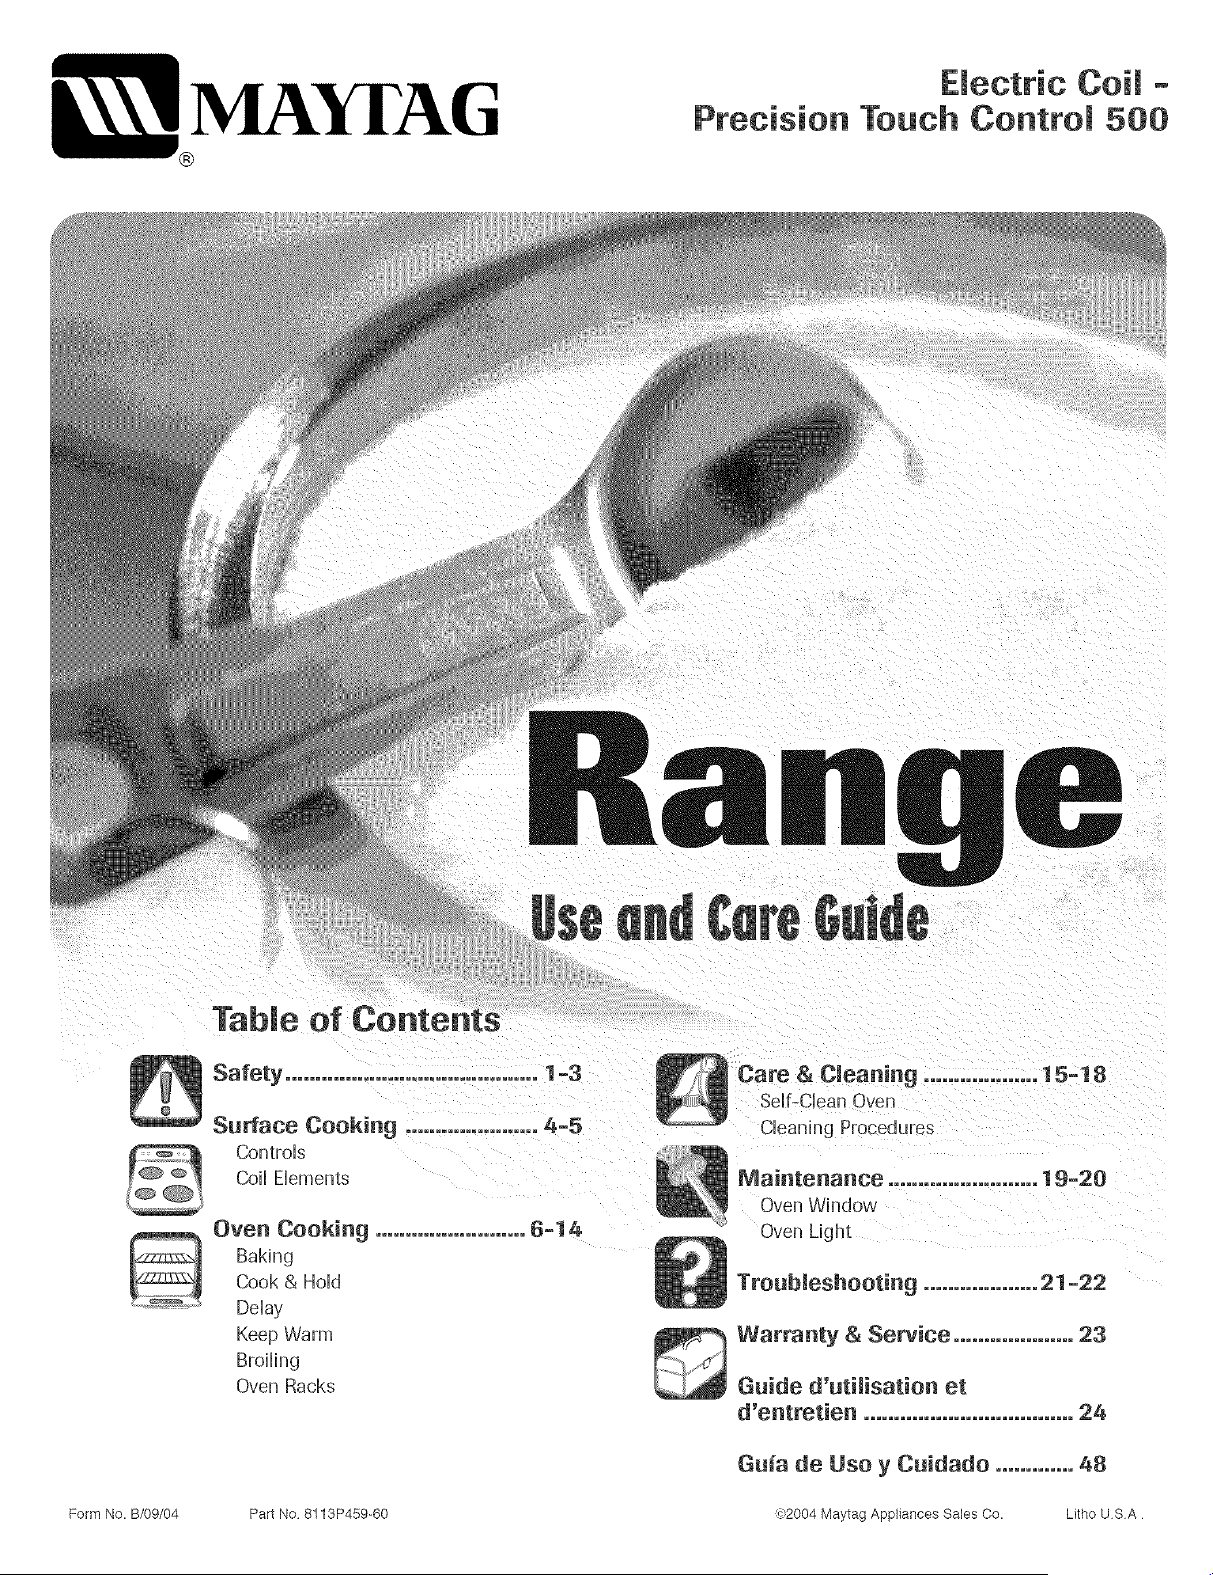
Electric Goim -
Precision Touch Control 500
Table of Contents
Safety .......................................... 1 =3
Surface Cooking ...................... 4-5
ControHs
CoiHHements
Oven Cooking ......................... 6-14
Bakhg
Cook & HoM
Dday
Keep Warm
BroiHing
Oven Racks
Care & Cieaniag ........
Self-Clean Oven
Cleaning Procedures
15-18
Maintenance ......................... 19-20
Oven Whldow
Oven Lhght
Troubleshooting ................... 21 =22
Warranty & Service .................... 23
Guide d'utilisation et
d'entretien ................................... 24
Guia de Use y Cuidado ............. 48
Form No. B/09/04 Part No 8113P459=60 !_'2004 Maytag Appliances Sales Co. Litho USA
installer: Pleaseleave this manual with this appfiance
Oensumer: Please read and keep this manual for future
reference. Keep sabs receipt and. or cancded check as proof
of purchase.
Model Number
Serial Number
Date of Purchase
f you have questions, carl:
Maytag Customer Assistance
1-800-688-9900 USA
1-800-688-2002 Canada
1-800-688-2080 ( U.S. FrY for hearing or speech impaired}
(Mon.-Fri.. 8 am-8 pm Eastern Time}
InterneL http:iiwww.ma} rag,corn
in our continuing effort to improvethe quaiityand performance
of our cooking products, it may be necessar_ to make changes
to the appliance without revising this guide.
For setlfice infermade_, see page 23.
To ensure proper and safe operation: Appliance must
be properly installed and grounded by a qualified techni-
cian. Do not attempt to adjust, repair, service, or replace
any par of your appliance unless it is specificafly recom-
mended in this guide. All other servicing should be
referred to a qualified servicer.
Always disconnect power to appliance before servicing.
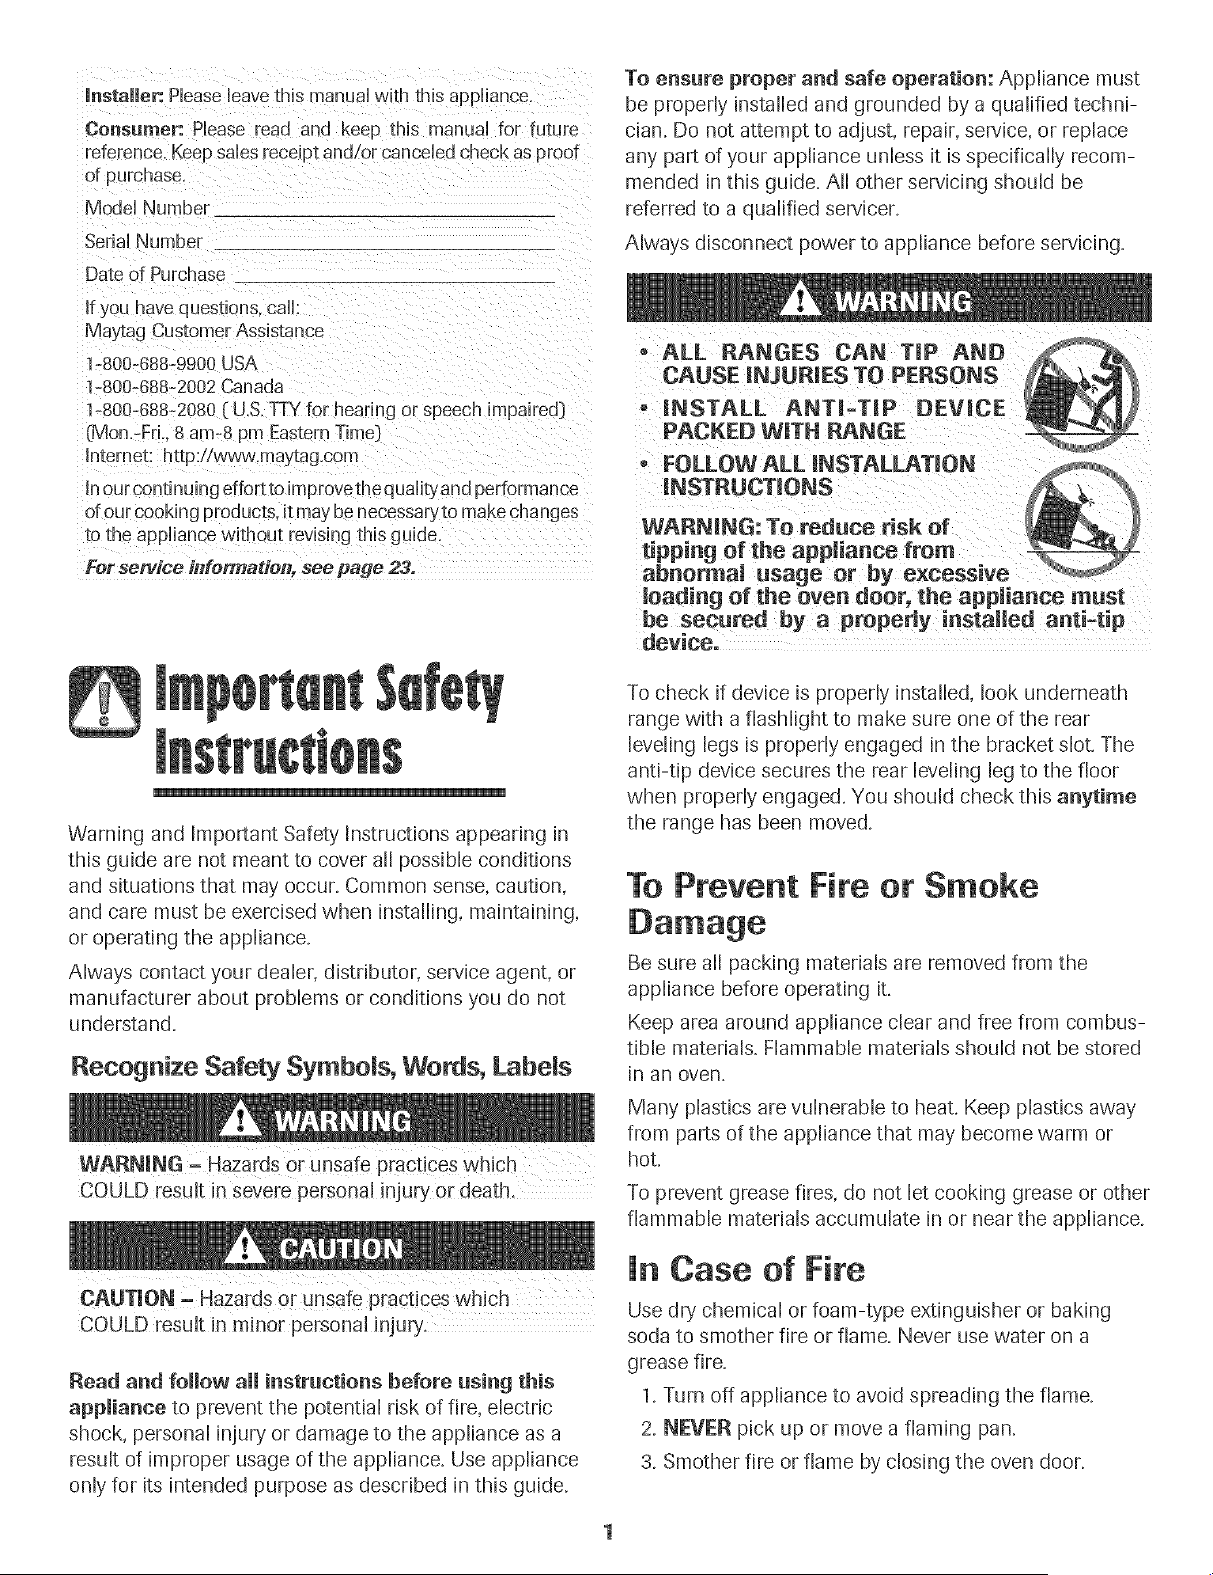
• ALL RANGES CAN TiP AND
CAUSE iNJURiES TO PERSONS
, INSTALL
PACNEU WITH RANGE
• FOLLOWALL iNSTALLATiON
iNSTRUCTiONS
WARNING: TO reduce risk of
tippiug of the appliaace from
abuorma_ usage or by excessive
loadiag of the oveu door, the appliaace must
be secured by a properly installed anti-tip
device.
Warning and ImpoRant Safety Instructions appearing in
this guide are not meant to cover all possible conditions
and situations that may occur. Common sense, caution,
and care must be exercised when installing, maintaining,
or operating the appliance.
Always contact your dealer, distributor, service agent, or
manufacturer about problems or conditions you do not
understand.
Recognize Safety Symboms, Words, Labels
COULD resuJt in severe personal injury or death,
CAUTUON, Hazards or unsafe practices which
COULD result in minor personal injury.
Read and follow aH instructions before using this
appmiance to prevent the potential risk of fire, electric
shock, personal injury or damage to the appliance as a
result of improper usage of the appliance. Use appliance
only for its intended purpose as described in this guide.
To check if device is properly installed, look underneath
range with a flashlight to make sure one of the rear
leveling legs is properly engaged in the bracket slot. The
anti-tip device secures the rear leveling leg to the floor
when properly engaged. You should check this anytime
the range has been moved.
To Prevent Fire or Smoke
Be sure all packing materials are removed from the
appliance before operating it.
Keep area around appliance clear and free from combus-
tibb materials. Flammabb materials should not be stored
in an oven.
Many plastics are vulnerable to heat. Keep plastics away
from pars of the appliance that may become warm or
hot.
To prevent grease fires, do not let cooking grease or other
fiammabb materials accumulate in or near the appliance.
In Case of Fire
Use dry chemical or foam-type extinguisher or baking
soda to smother fire or flame. Never use water on a
grease fire.
1. Turn off appliance to avoid spreading the flame.
2. NEVER pick up or move a flaming pan.
3. Smother fire or flame by closing the oven door.
ChimdSafety
above an app!iance. Children piimbing On the app!!ance
or on the appliance door to reach items could be
sedousiy injured,
NEVER leave children alone or unsupervised near the
appliance when it is in use or is still hot. Children should
never be allowed to sit or stand on any part of the appli-
ance as they could be injured or burned.
Children must be taught that the appliance and utensils in
it can be hot. Let hot utensils cool in a safe place, out of
reach of small children. Children should be taught that an
appliance is not a toy. Children should not be allowed to
play with controls or other parts of the appliance.
About Your Appliance
above. Misuse of appliance door, such as stepping,
tipping of the appliance, breakage of door, and serious
injuries,
To prevent potential hazard to the user and damage to the
appliance, do not use appliance as a space heater to heat
or warm a room. Also, do not use the oven as a storage
area for food or cooking utensils.
Do not obstruct the flow of air by blocking the oven venL
DO NOT TOUCH HEATING ELEMENTS OR INTERIOR
SURFACES OF OVEN. Heating elements may be hot even
though they are dark in color. Interior surfaces of any
oven become hot enough to cause burns. During and
after use, do not touch, or let clothing or other flammable
materials contact heating elements or interior surfaces of
oven until they have had sufficient time to cool. Other
surfaces of the appliance may become hot enough to
cause burns - among these surfaces are: oven vent
opening and surface near this opening, oven door, win-
dow of oven door.
Do not touch a hot oven light bulbwith a damp cloth as
the bulb could break. Should the bulb break, disconnect
power to the appliance before removing bulb to avoid
electrical shock
NEVER use aluminum foil to cover an oven rack or oven
bottom. Misuse could result in risk of electric shock, fire, or
damage to the appliance. Use foil only as directed in this
guide.
Cooking Safety
Never heat an unopened food container in the oven.
Pressure build-up may cause container to burst resulting in
serious personal injury or damage to the appliance.
Use dry, sturdy potholders. Damp potholders may cause
burns from steam. Dish towels or other substitutes should
never be used as potholders because they can trail across
hot elements and ignite or get caught on appliance parts.
Wear proper apparel. Loose fitting or long hanging-sleeved
apparel should not be worn while cooking. Clothing may
ignite and cause burns if garment comes in contact with
heating elements.
Always place oven racks in the desired positions while oven
is cool. Slide oven rack out to add or remove food, using
dry, sturdy potholders. Always avoid reaching into the oven
to add or remove food. If a rack must be moved while hot,
use a dry potholder. Do not let potholder contact hot
element in oven.
Use racks only in the oven in which they were shipped/
purchased.
Use care when opening the oven door. Let hot air or steam
escape before removing or replacing food.
PREPARED FOOD WARNING: Follow food manufacturer's
instructions. If a plastic frozen food container and/or its
cover distorts, warps, or is otherwise damaged during
cooking, immediately discard the food and its container.
The food could be contaminated.
Do not allow aluminum foil or meat probe to contact
heating element.
Always turn off all controls when cooking is completed.
Utensim Safety
Follow the manufacturer's directions when using oven
cooking bags.
This appliance has been tested for safe performance using
conventional cookware. Do not use any devices or accesso-
ries that are not specifically recommended in this guide. Do
not use eyelid covers, stove top grills or add-on oven
convection systems. The use of devices or accessories that
are not expressly recommended in this guide can create
serious safety hazards, result in performance problems, and
reduce the life of the components of the appliance.
2
If pan is smaller than element, a portion of the element will
be exposed to direct contact and could ignite clothing or
potholder.
Only certain types of glass, glass!ceramic, ceramic, earth-
enware, or other glazed utensils are suitable for cooktop or
oven service without breaking due to the sudden change
in temperature. Follow utensil manufacturer's instructions
when using glass.
Turn pan handle toward center of cooktop, not out into the
room or over another surface element. This reduces the
risk of burns, ignition of flammable materials, or spillage if
pan is accidently bumped or reached by small children.
Cleaning Safety
Clean cooktop with caution. Turn off all controls and wait
for appliance parts to cool before touching or cleaning.
Clean with caution. Use care to avoid steam burns if a wet
sponge or cloth is used to wipe spills on a hot surface.
Some cleaners can produce noxious fumes if applied to a
hot surface.
Clean only parts listed in this guide.
Seff-Cmean Oven
NEVER leave surface units unattended especially when
using high heat. An unattended boilover could cause
smoking and a greasy spillover can cause a fire.
This appliance is equipped with different size surface
elements. Select pans with flat bottoms large enough to
cover element. Fitting pan size to element will improve
cooking efficiency.
Coim Emements
To prevent damage to removable heating elements, do
not immerse, soak or clean in a dishwasher or self-clean
oven. A damaged element could short resulting in a fire
or shock hazard.
Make sure drip bowls are in place as absence of these
bowls during cooking could damage wiring.
Protective Liners: Do not use aluminum foil to line
surface unit drip bowls or oven bottoms, except as
suggested in the manual. Improper installation of these
liners may result in a risk of electric shock or fire.
Deep Fat Fryers
Use extreme caution when moving the grease pan or
disposing of hot grease. Allow grease to cool before
attempting to move pan.
Ventimating Hoods
Clean range hood and filters frequently to prevent grease
or other flammable materials from accumulating on hood
or filter and to avoid grease fires.
When flaming foods under the hood, turn the fan on.
utensils, etc, in the oven during the self:clean cycle.
Do not dean door gasket. The door gasket is essential for a
good seal. Care should be taken notto rub, damage, or
move the gasket.
Do not use oven cleaners or oven liners of any kind in or
around any part of the self-clean oven.
Before self-cleaning the oven, remove broiler pan, oven
racks and other utensils, and wipe off excessive spillovers to
prevent excessive smoke or flare ups.
important Safety Notice and
The California Safe Drinking Water and Toxic Enforcement
Act of 1986 (Proposition 65} requires the Governor of
California to publish a list of substances known to the State
of California to cause cancer or reproductive harm, and
requires businesses to warn customers of potential expo-
sures to such substances.
Users of this appliance are hereby warned that when the
oven is engaged in the self-clean cycle, there may be some
low-level exposure to some of the listed substances, includ-
ing carbon monoxide. Exposure to these substances can be
minimized by properly venting the oven to the outdoors by
opening the windows and/or door in the room where the
appliance is located during the self-clean cycle.
UMPORTANT NOTUCE REGARDUNG PET BURDS: Never
keep pet birds in the kitchen or in rooms where the fumes
from the kitchen could reach. Birds have a very sensitive
respiratory system. Fumes released during an oven self-
cleaning cycle may be harmful or fatal to birds. Fumes
released due to overheated cooking oil, fat, margarine and
overheated non-stick cookware may be equally harmful.
Save These instructions for Future Reference
3
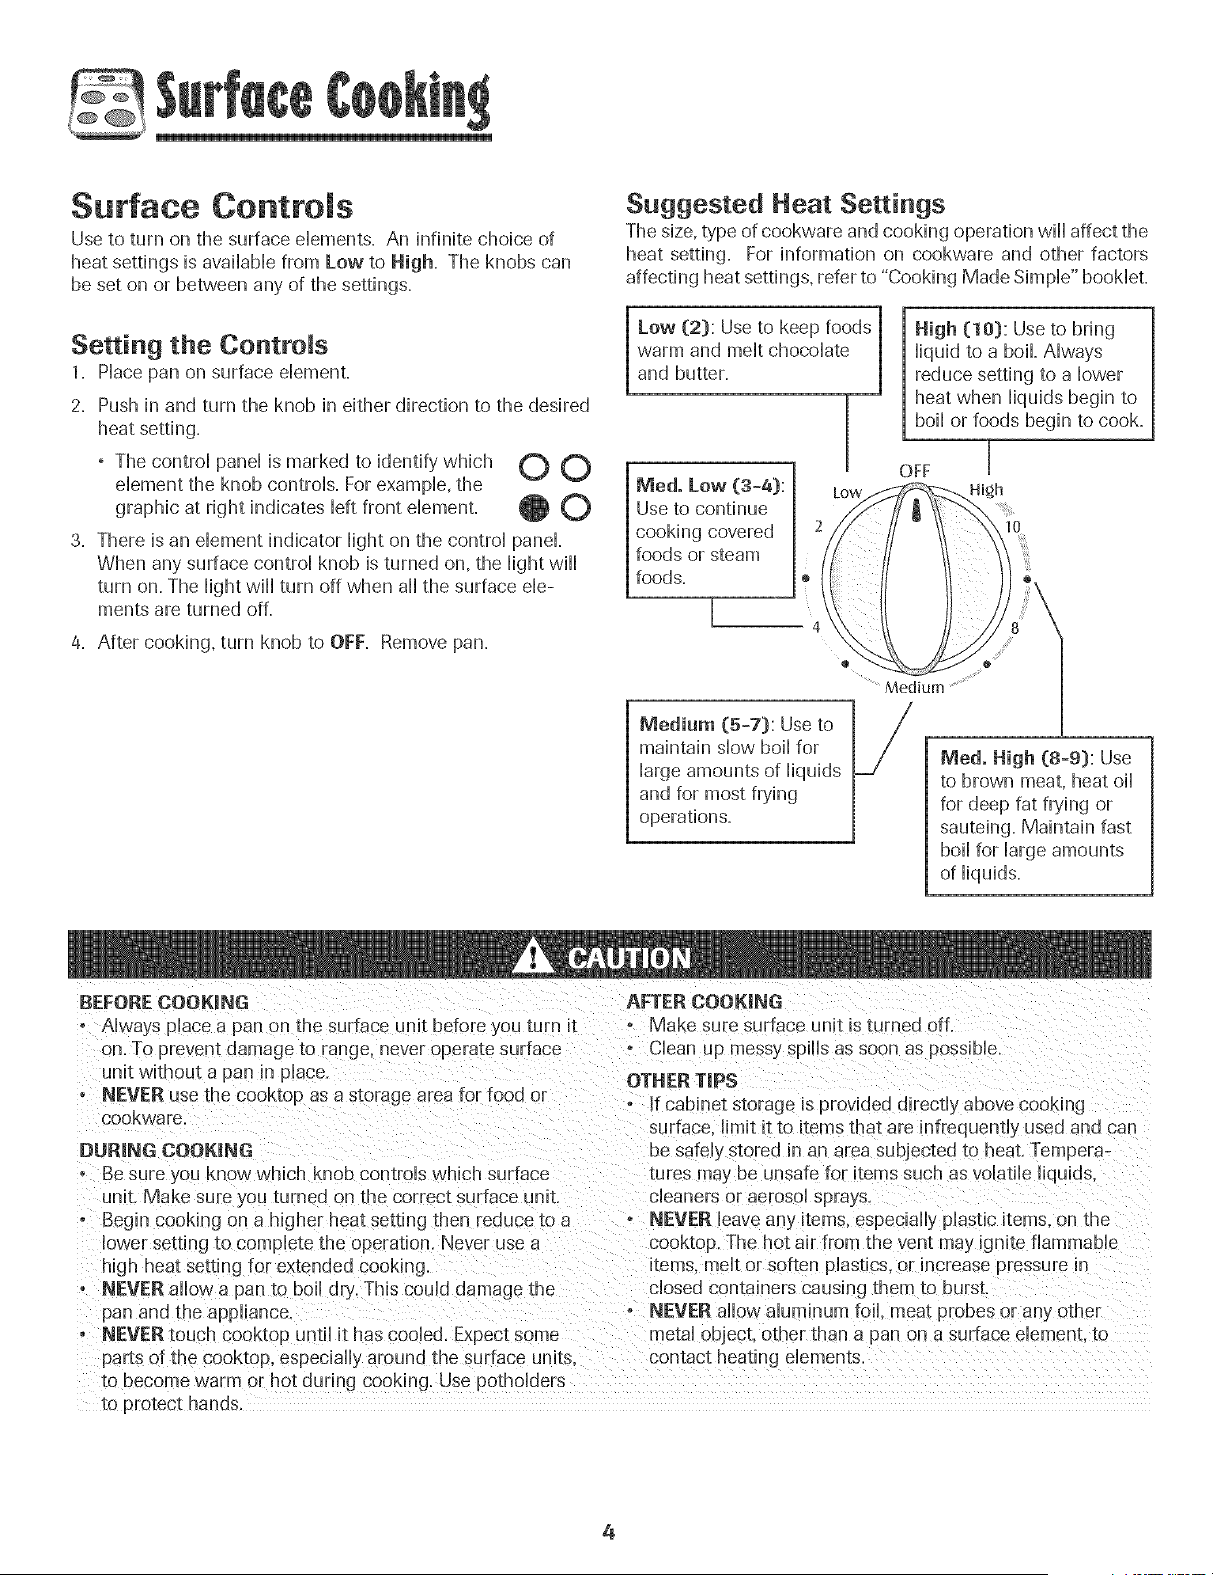
Surface Controls
Use to turn on the surface elements. An hfhite choice of
heat settings is avaiHabHefrom Low to High. The knobs can
be set on or between any of the settings.
Setting the Controls
1. Place pan on surface element.
2. Push in and turn the knob in either direction to the desired
heat setting.
° The control panel is marked to identify'which _ _'_
element the knob controls. For example, the
at right indicates left front dement. @ 0
graphic
3. There is an element indicator light on the control panel
When any surface control knob is turned on, the light wiil
turn on. The light wiil turn off when ail the surface ele-
ments are turned off.
4= After cooking, turn knob to OFF= Remove pan.
Suggested Heat Settings
The size, type of cookware and cooking operation will affect the
heat setting. For information on cookware and other factors
affecting heat settings, refer to "Cooking Made Simple" booklet.
Low (2): Use to keep foods 1
warm and melt chocolate |
and butter. .|
Meal. Low (3°4):
Use to continue
cooking covered
foods or steam
foods.
High (10): Use to bring
liquid to a boil. Always
reduce setting to a lower
heat when liquids begin to
boil or foods begin to cook.
OFF [
Hi_,h
10
@ •
Medium ...............
f_ledium (5=7): Use to
maintain slow boil for
large amounts of liquids
and for most frying
operations.
Medo High (8-9): Use
to brown meat, heat oil
for deep fat frying or
sauteing. Maintain fast
boil for large amounts
of liquids.
BEFORECOOK|NG AFTER COOKING
° Always place a pan on the surface unit before you turn it - Make sure surface unit is turned off.
on. To prevent damage to range, never operate surface • Clean up messy spills as soon as possible.
unit without a pan in place.
o NEVER use the cooktop as a storage area for food or
cookware
DURING COOKING
o Be sure you know which knob controls which surface
unit. Make sure you turned on the correct surface unit.
• Begin cooking on a higher heat setting then reduce to a
lower setting to complete the operation. Never use a
high heat setting for extended cooking.
o NEVER allow a pan to boil dry. This could damage the
pan and the appliance
o NEVER touch cooktop until it has cooled. Expect some
parts of the cooktop, especially around the surface units.
te uecome warm or hot during cooking. Use potholders
OTHER TIPS
If cabine_ storage msprovided directly above cooking
surface limit it to items that are infrequently used and can
be safely stored in an area subjected to qeat.Tempera-
tures ma,_be unsafe fou items such as volatile liquids,
cleaners or aerosol sprays.
• NEVER leave any items, especially plastic items, on the
cooktop. The hot air fron the vent may ignite flammable
kems melt or soften plastics, or increase pressure in
closed containers causing them to burst
NEVER allow aluminum foil. meat probes or any other
metal object, other than a pan on a surface element, to
...............................
to protect hands.
4

@
Coi E ement Surface
° Cban cooktop after each use.
° Wipe acidic or sugary spills as soon as the cooktop
has coobd as these spills may discobr or etch the
porcelain.
To protect drip bowl finish:
° To bssen discobradon and crazing, avoid using high
heat for bng periods.
° Do not use oversized cookware. Pans shouM not
extend more than 1-2 inches beyond the dement.
° When home canning or cooking with big pots, use
the Canning Ebment (Modal CE1}. Contact your
Maytag dealer for details or caii 1-877-232-8771 USA
or 1-800-888-8408 Canada to order.
, Clean frequently. (See page 17.}
Coil Dements
, When an element is on, it will cycle on and off to maintain the
heat setting.
° Coil dements are self-cleaning. Do not immerse in water.
To remove: When cool, raise ele-
menL Carefully pull out and away
from receptacle.
To replace: Insert dement ter-
minals into receptacle. Guide the
dement into place. Pressdown on
the outer edge of element until it
sits level on drip bowl
TERMINALS
Drip BowRs
The drip bowls under each surface element catch boilovers and
must always be used. Absence of drip bowls during cooking may
damage wiring.
To prevent the risk of electric shock or fire, never line drip bowls
with aluminum foil
Drip bowls wiii discolor {blue/gold stains} or craze over time if
overheated. This discoloration or crazing is permanent. This wiii
not affect cooking performance.
5
@
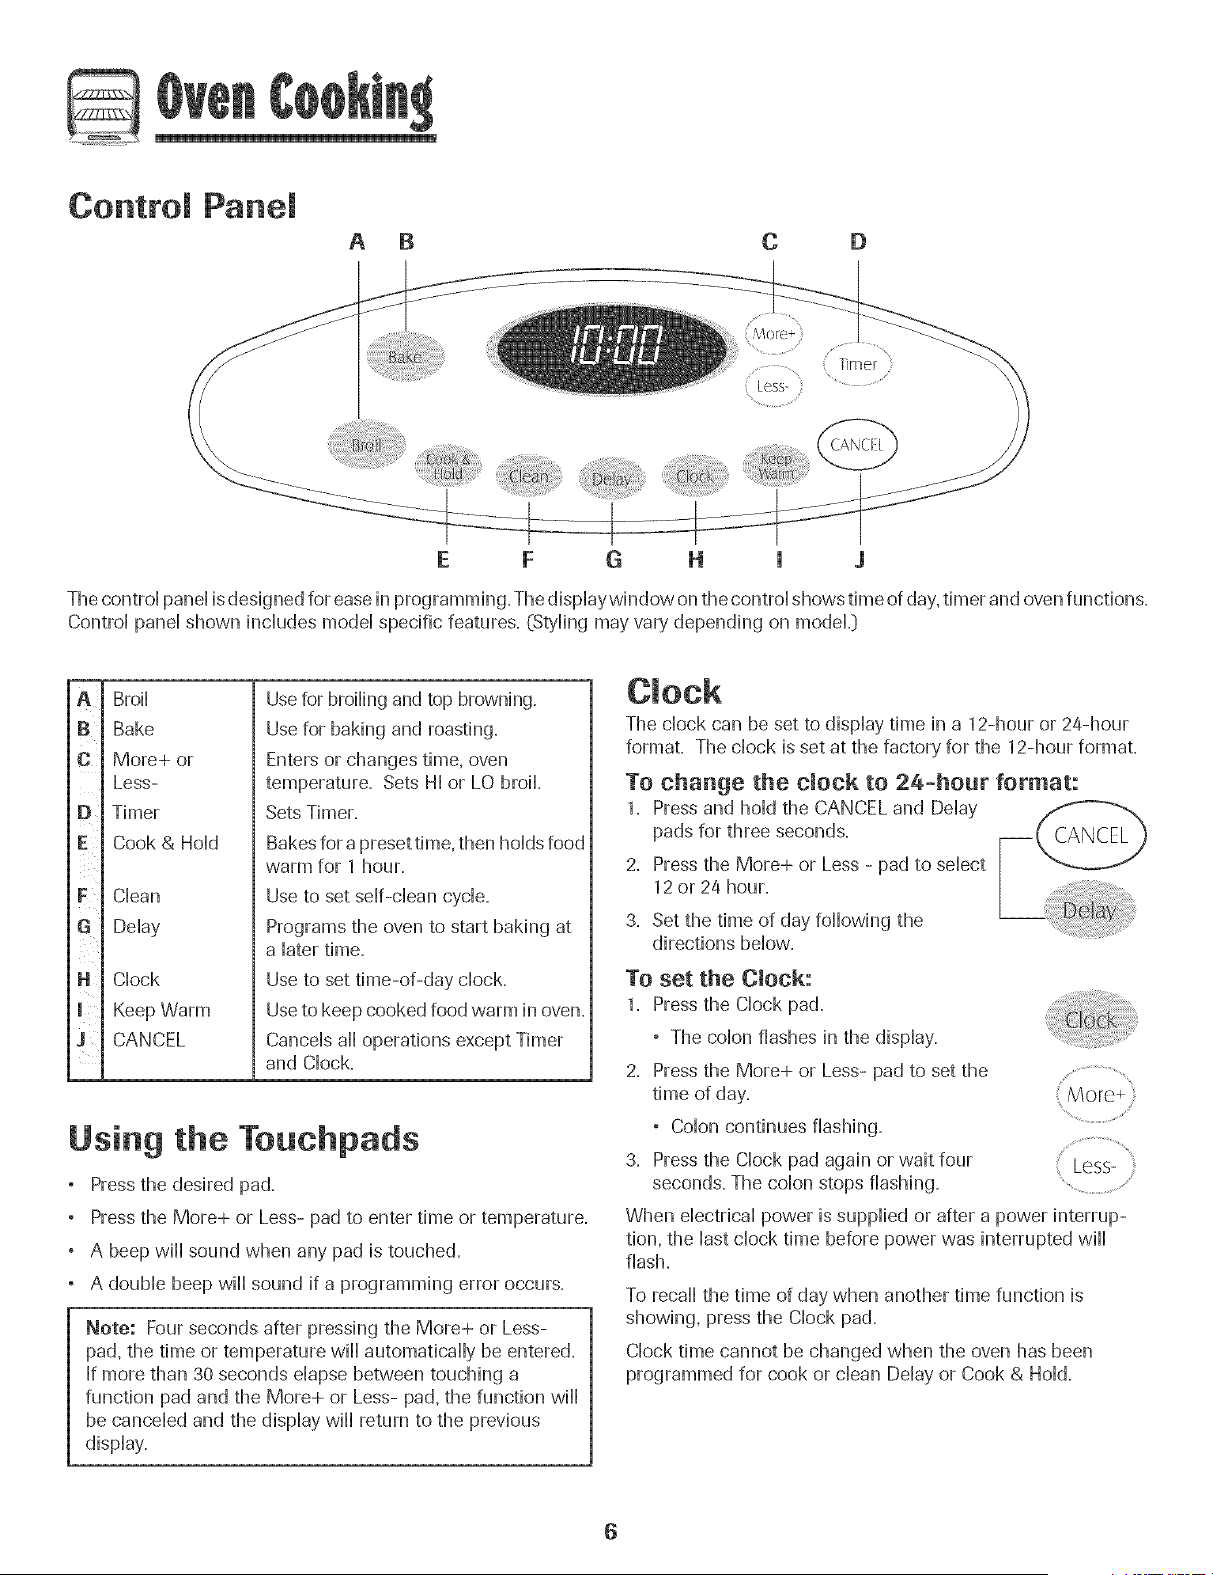
Control Panel
A B C D
E F
G
The controi panei is designed for ease in programming. The dispiaywindow on the controi shows time of day,timer and oven functions.
Controi panei shown inciudes modei specific features. (Styiing may vary' depending on modek}
A
B
C
D
E
F
G
N
J :
Broii
Bake
More+ or
Less-
Timer
Cook & Hoid
Ciean
Deiay
Clock
Keep Warm
CANCEL
Usefor broiling and top browning.
Use for baking and roasting.
Enters or changes time, oven
temperature. Sets HI or LO broil.
Sets Timer.
Bakes for a preset time, then holds food
warm for 1 hour.
Use to set self-clean cycle.
Programs the oven to start baking at
a later time.
Use to set time-of-day clock.
Useto keep cooked food warm in oven.
Cancels all operations except Timer
and Clock.
Using the Teuchpads
° Press the desired pad.
° Press the More+ or Less- pad to enter time or temperature.
° A beep wiii sound when any pad is touched.
° A doubie beep wiii sound if a programming error occurs.
Note: Four seconds after pressing the More+ or Less-
pad, the time or temperature will automatically be entered.
If more than 30 seconds elapse between touching a
function pad and the More+ or Less- pad, the function will
be canceled and the display will return to the previous
display.
The clock can be set to display time in a 12-hour or 24-hour
format. The clock is set at the factory for the 12-hour format.
To change the clock to 24-hour format:
1. Press and hold the CANCEL and Delay
pads for three seconds.
2. Press the More+ or Less - pad to select
12or 24 hour.
3. Set the time of day following the
directions below.
To set the Clock:
1. Press the Clock pad.
° The colon flashes in the display.
2. Press the More+ or Less- pad to set the
time of day.
, Colon continues flashing. ...............................................
3. Press the Clock pad again or wait four Less-
seconds. The colon stops flashing.
When electrical power is supplied or after a power interrup-
tion, the last clock time before power was interrupted will
flash.
To recall the time of day when another time function is
showing, press the Clock pad.
Clock time cannot be changed when the oven has been
programmed for cook or clean Delay or Cook & Hold.

To cancem the Clock display:
[f you do not want the time of day to dispiay:
Press and hoM the CANCEL and CHock
pads for three seconds. The time of day
will disappear from the dispiay
When the chock dispiay is cancebd, press
the CHockpad to brbfiy dispiay the time
of day.
To restore the Clock display:
Press and hoid the CANCEL and CHockpads for three sec-
onds. The time of day will reappear in the dispiay.
The timer can be set from one minute (0:01} up to 99 hours
and 59 minutes (:99:59}+
The timer can be used independendy of any other oven
activity. It can abo be set while another oven function is
operating+
The Timer does not control the oven. It only controls a
beeper.
To set the Timer:
1. Press the Timer pad. Timer ,
° 0:00 lights in the display.
° The colon flashes in the display. ............................
2. Press the More+ or Less- pad untii the Less- }
correct time appears in the display. ...................................
° The colon will continue to flash.
3. PressTimer pad again or wait four seconds.
° The colon continues flashing and the time begins
counting down.
° The last minute of the timer countdown wiii be displayed
as seconds.
4. At the end of the set time, one long beep wiii sound.
To cancem the Timer:
1. Press and hold the Timer pad for three seconds.
OR
2. Press the Timer pad and set the time to 0:00.
Locking the Contro
and Oven Door
The touchpad controls and oven door call be locked for
safety, cleaning, or to prevent unwanted use. They will not
function when locked.
If the oven is currently in use, the controls and door cannot be
locked.
The current time of day wiii remain in the display when the
controls are locked.
To mock:
Press and hold the CANCEL and Cook &
Hold pads for three seconds. (Press the
CANCEL pad first.}
LOCK flashes in the display.
To un+ock:
Press and hold the CANCEL and Cook & Hold pads for three
seconds. (Press the CANCEL pad first.}
LOCK disappears from the display.
Fault Codes
BAKE or LOCK may flash rapidly ill the display to alert you if
there is an error or a problem. If BAKE or LOCK flash in the
display, press CANCEL pad. If BAKE or LOCK continue to
flash, disconnect power to the appliance. Wait a few minutes,
and then reconnect power. If the flashing still continues,
disconnect power to the appliance and call an authorized
servicer.
?

To set Bake:
1. Press the Bake pad.
, BAKEwill flash.
, 000 will light in the display. .............................
2. Select the oven temperature. The oven tempera- More+
ture can be set from 170° to 550°. Pressor press .............................
and hold the More+ or Less- pads.
° 350° will light when either pad is first pressed.
Less-
j_
, Press the More+ pad to increase the temperature.
° Press the Less- pad to decrease the temperature.
3. Press Bake pad again or wait four seconds.
° BAKE will stop flashing and light in the display.
° 100° or the actual oven temperature will display. The
temperature will rise in 5° increments until the preset
temperature is reached.
4. Allow the oven to preheat for 8-15 minutes.
° When the set oven temperature is reached, one long
beep will sound.
° To recall the set temperature during preheat, press the
Bake pad.
5. Place food in the oven.
8. Check cooking progress. Cook longer if needed.
7. When cooking is finished, press CANCEL.
8. Remove food from the oven.
Baking Notes:
° To change the oven temperatare daring cooking,
press the Bake pad, then the More+ or Less- pad until
the desired temperature is displayed.
, To change the oven temperatare daring preheat,
press the Bake pad twice, then press the More+ or Less-
pads until the desired temperature is displayed.
° If you forget to turn off the oven, it will automatically turn
off at the end of 12 hours. If you wish to deactivate this
feature, see page 11.
° For additional baking and roasting tips, see "Cooking
Made Simple" bookleL
Baking Differences Between Your OJd
and New Oven
It is normal to notice some baking time differences between a
new oven and an old one. See"Adjusting the OvenTemperature"
on page 11.
Cook & Hold
Cook & Hold allows you to bake for a preset amount of time,
followed by a one-hour Keep Warm cycle.
To set Cook & Hold:
1. Press the Cook & Hold pad.
° BAKE and HOLD flash,
° 000 lights in the display.
2. Select the oven temperature. The oven tempera-
ture can be set from 170° to 550°. Pressor press
and hold the More+ or Less- pad. less-
.................................
_ Press the More+ pad to increase the temperature.
° Press the Less- pad to decrease the temperature.
3. Press Cook & Hold again ORwait four seconds.
° HOLD flashes.
° 00:00 flashes in the display.
4. Enter the amount of time you want to bake by pressing the
More+ or Less- pad. Bake time can be set from ten
minutes @0:10} to 11 hours, 59 minutes (11:59}.
° BAKE and HOLD light in the display.
° The baking time will light in the display.
° The baking time will start counting down.
When the cooking time has eJapsed:
° Four beeps wiii sound.
° BAKE will turn off.
° HOLD and WARM will lighL
° 170°will display.
After one hour in HOLD WARM:
° "End" will display=
° The time of day reappears in the display.
To canceJ Cook & Hold at any time: (CANCEL]
Press the CANCEL pad. Remove food from oven.
8
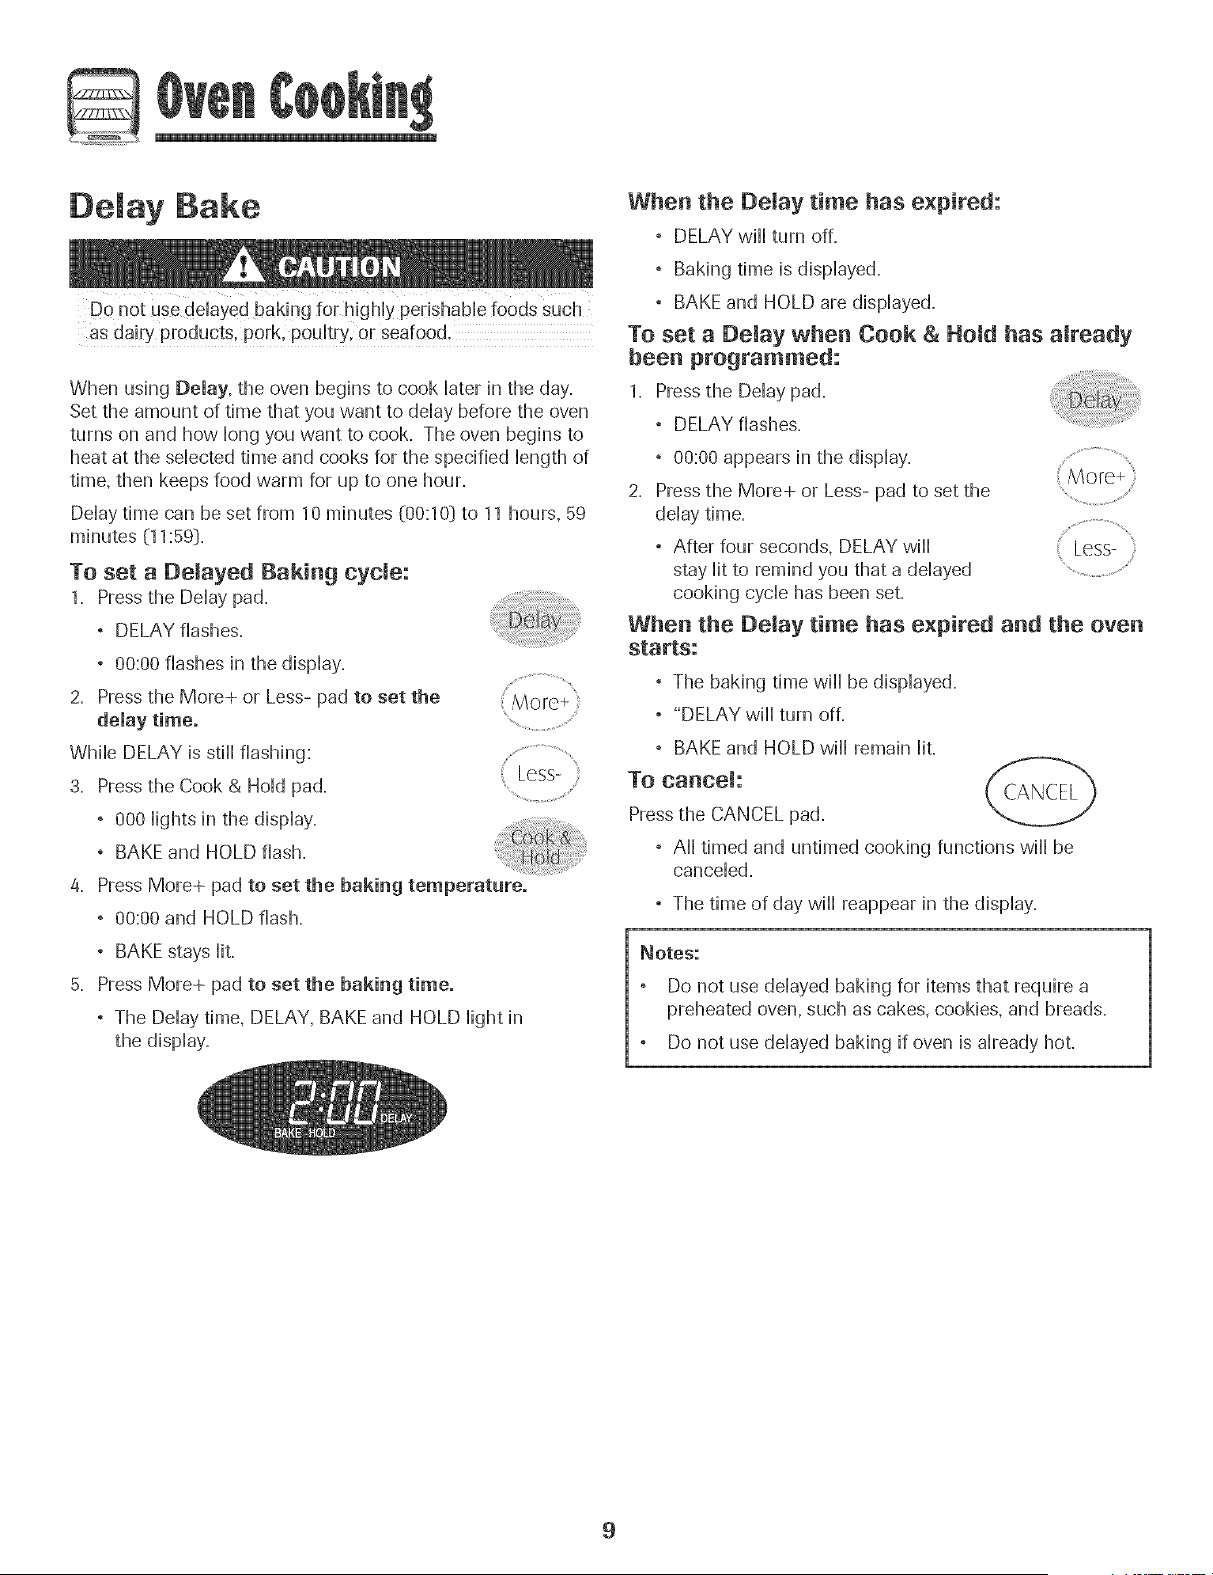
Delay Bake
Do not use deHayedbaking for higNy perishabHefoods such
as dairy products, pork, poultry, o[ sea[ood,
When using Delay, the oven begins to cook Haterin the day.
Set the amount of time that you want to deHaybefore the oven
turns on and how Hongyou want to cook. The oven begins to
heat at the seHectedtime and cooks for the specified Hengthof
time, then keeps food warm for up to one hour.
DeHaytime can be set from 10 minutes (00:10} to 11 hours, 59
minutes (11:59}.
To set a Demayed Baking cycle:
1. Press the DeHaypad.
, DELAY flashes.
, 00:00 flashes in the dispHay.
2. Press the More+ or Less- pad to set the
delay time.
While DELAY is stHHflashing:
3. Press the Cook &Hoid pad.
, 000 Hightsin the dispHay.
, BAKE and HOLD flash.
4.
Less-
Press More+ pad to set the baking temperature.
, 00:00 and HOLD flash.
, BAKE stays Hit.
Press More+ pad to set the baking time.
, The DeHaytime, DELAY, BAKE and HOLD Hightin
the dispHay.
When the Delay time has expired:
, DELAY wiHHturn off.
, Baking time is dispHayed.
, BAKE and HOLD are dispHayed.
To set a Demay when Cook & Hold has aJready
been programmed:
1. Press the DeHaypad.
, DELAY flashes.
, 00:00 appears in the display...............................
More+
2. Pressthe More+ or Less- pad to set the
deHaytime.
, After four seconds, DELAY wiHH : Less-
stay Hitto remind you that a deHayed ....................................
cooking cycHehas been set.
When the Delay time has expired and the oven
starts:
, The baking time wiHHbe dispHayed.
, "DELAY wiHHturn off.
, BAKE and HOLD wiHHremain Hit.
To cancel:
Press the CANCEL pad,
, AHHtimed and untimed cooking functions wiHHbe
canceHed.
° The time of day wiii reappear in the display.
Notes."
Do not use deHayedbaking for items that require a
preheated oven, such as cakes, cookies, and breads.
Do not use deHayedbaking if oven is aHreadyhot.
9
@
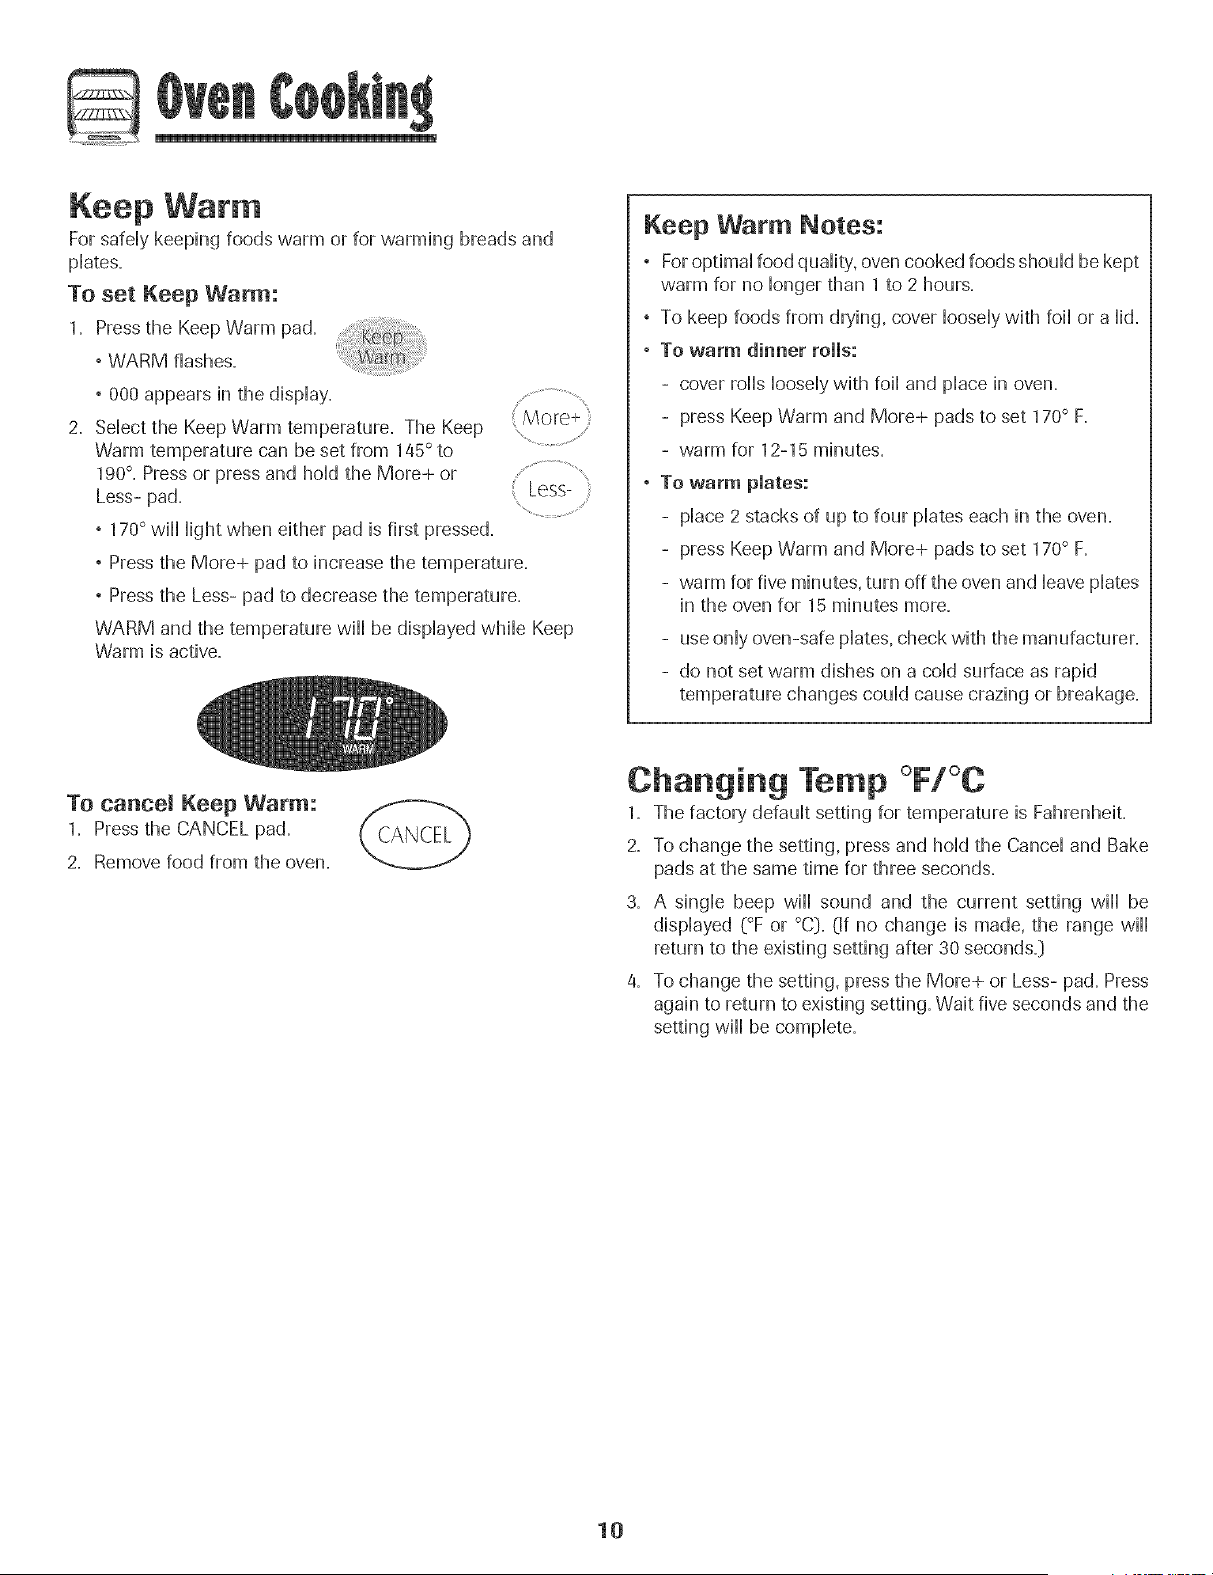
Keep War
For safeHykeephg foods warm or for vvarmhg breads and
pHates=
To set Keep Warm:
1, Press the Keep Warm pad ..... ......
, WARM flashes,
° 000 appears in the dispHay, .................................
2, SeHectthe Keep Warm temperature, The Keep
Warm temperature can be set from 145° to ....................................
190°- Press or press and hold the More+ or
Less- pad, Less-
...................................
_ 170° wiHHHightwhen either pad is first pressed,
, Pressthe More+ pad to increase the temperature,
, Pressthe Less- pad to decrease the temperature,
WARM and the temperature wiHHbe dispHayedwMHeKeep
Warm is active,
Keep Warm Notes:
, ForoptimaHfood quaHity,oven cooked foods shouHdbe kept
warm for no Hongerthan 1 to 2 hours,
, To keep foods from drying, cover HooseHywith foiHor a Hid,
, To warm dinner rolls:
- cover roHHsHooseHywith foiHand pHacein oven,
- press Keep Warm and More+ pads to set 170° R
- warm for 12-15 minutes,
, To warm plates:
- pHace2 stacks of up to four pHateseach in the oven,
- press Keep Warm and More+ pads to set 170° R
- warm for five minutes, turn off the oven and HeavepHates
in the oven for 15 minutes more,
- use onHyoven-safe pHates,check with the manufacturer,
- do not set warm dishes on a coHdsurface as rapid
temperature changes couHdcause crazing or breakage,
To cancem Keep Warm:
1, Press the CANCEL pad,
2, Remove food from the oven,
Changing Temp °F/°C
1= The factory' defauHtsetting for temperature is FahrenheiL
2, To change the setting, press and hoHdthe CanceHand Bake
pads at the same time for three seconds,
3, A singHe beep wiHHsound and the current setting wiHHbe
dispHayed (°F or °C)=(If no change is made, the range wiHH
return to the existing setting after 30 seconds,[)
4, To change the setting, press the More+ or Less- pad, Press
again to return to existing setting, Wait five seconds and the
setting wiHHbe compHete,
10
@
Automatic Shut-Off/Sabbath
Mode
The oven will automatically turn off after 12 hours if you
accidentally Heaveit on. This safety' feature can be turned off.
TO cancel the 12-hour shut-off and run the
oven continuously for 72 hours:
1. Set the oven to bake _seepage 8].
2. Press and hoHdthe CHockpad for five seconds.
° SAb will be dispHayedand flash for five seconds.
° SAb will then be dispHayedcontinuousHyuntil turned off
or until the 72-hour time limit is reached.
° BAKE will also be displayed if a bake cycle is in use
while the oven is in Sabbath Mode.
All other functions EXCEPTBAKE (Timer, Keep Warm,
Clean, etc.:)are locked out during the Sabbath Mode.
To cancel Bake when in Sabbath Mode:
Press CANCEL.
° BAKE will turn off in the display.
° No beeps will sound.
To cancel the Sabbath Mode:
1= Press the Clock pad for five seconds.
OR
2= After 72 hours, the Sabbath Mode will end=
° SAb will flash for 5 seconds.
° The time of day will return to the display.
Adjusting the Oven Temperature
Oven temperatures are carefully tested for accuracy at the
factory. It is normal to notice some baking or browning
differences between a new oven and an old one= As ranges
get older, the oven temperature can shift.
You may adjust the oven temperature if you think the oven is
not baking or browning correctly. To decide how much to
change the temperature, set the temperature 25° higher or
lower than your recipe recommends, then bake. The results
of the "test" should give you an idea of how much to adjust
the temperature.
TO adjust the oven temperature:
1= Press Bake.
2. Enter 550° by pressing the More+ pad.
3. Pressand hold the Bake pad for several
seconds or until 0° appears in the display. "................................
If the oven temperature was previously adjusted, the
change will be displayed. For example, if the oven tem-
perature was reduced by 15° the display will show "-15°"`
4= Press the More+ or Less- pad to adjust the temperature.
Each time a pad is pressed, the temperature changes by
5°` The oven temperature can be increased or decreased
by 5° to 35°=
5. The time of day will automatically reappear in the display.
You do not need to readjust the oven temperature if there
is a power failure or interruption. Broiling and cleaning
temperatures cannot be adjusted.
Sabbath Mode Notes:
° Sabbath Mode can be turned on at any time with or
without the oven on=
° Sabbath Mode cannot be turned on if the touchpads are
locked out or when the door is locked.
° If the oven is baking when Sabbath Mode is set, BAKE
will go out at the end of the baking cycle. There will be
no audible beeps.
° If the oven light is desired while in Sabbath Mode, it
must be turned on before the Sabbath Mode is started.
° When the Sabbath Mode is started, no preheat beep wiii
sound.
° All prompts, messages and beeps are deactivated when
Sabbath Mode is active.
° The automatic door lock does not operate during the
Sabbath Mode.
° Pressing CANCEL will cancel a Bake cycle, however the
control will stay in the Sabbath Mode.
° If power fails, the oven will power up in Sabbath Mode with
72 hours remaining and no cycle active.
11
@
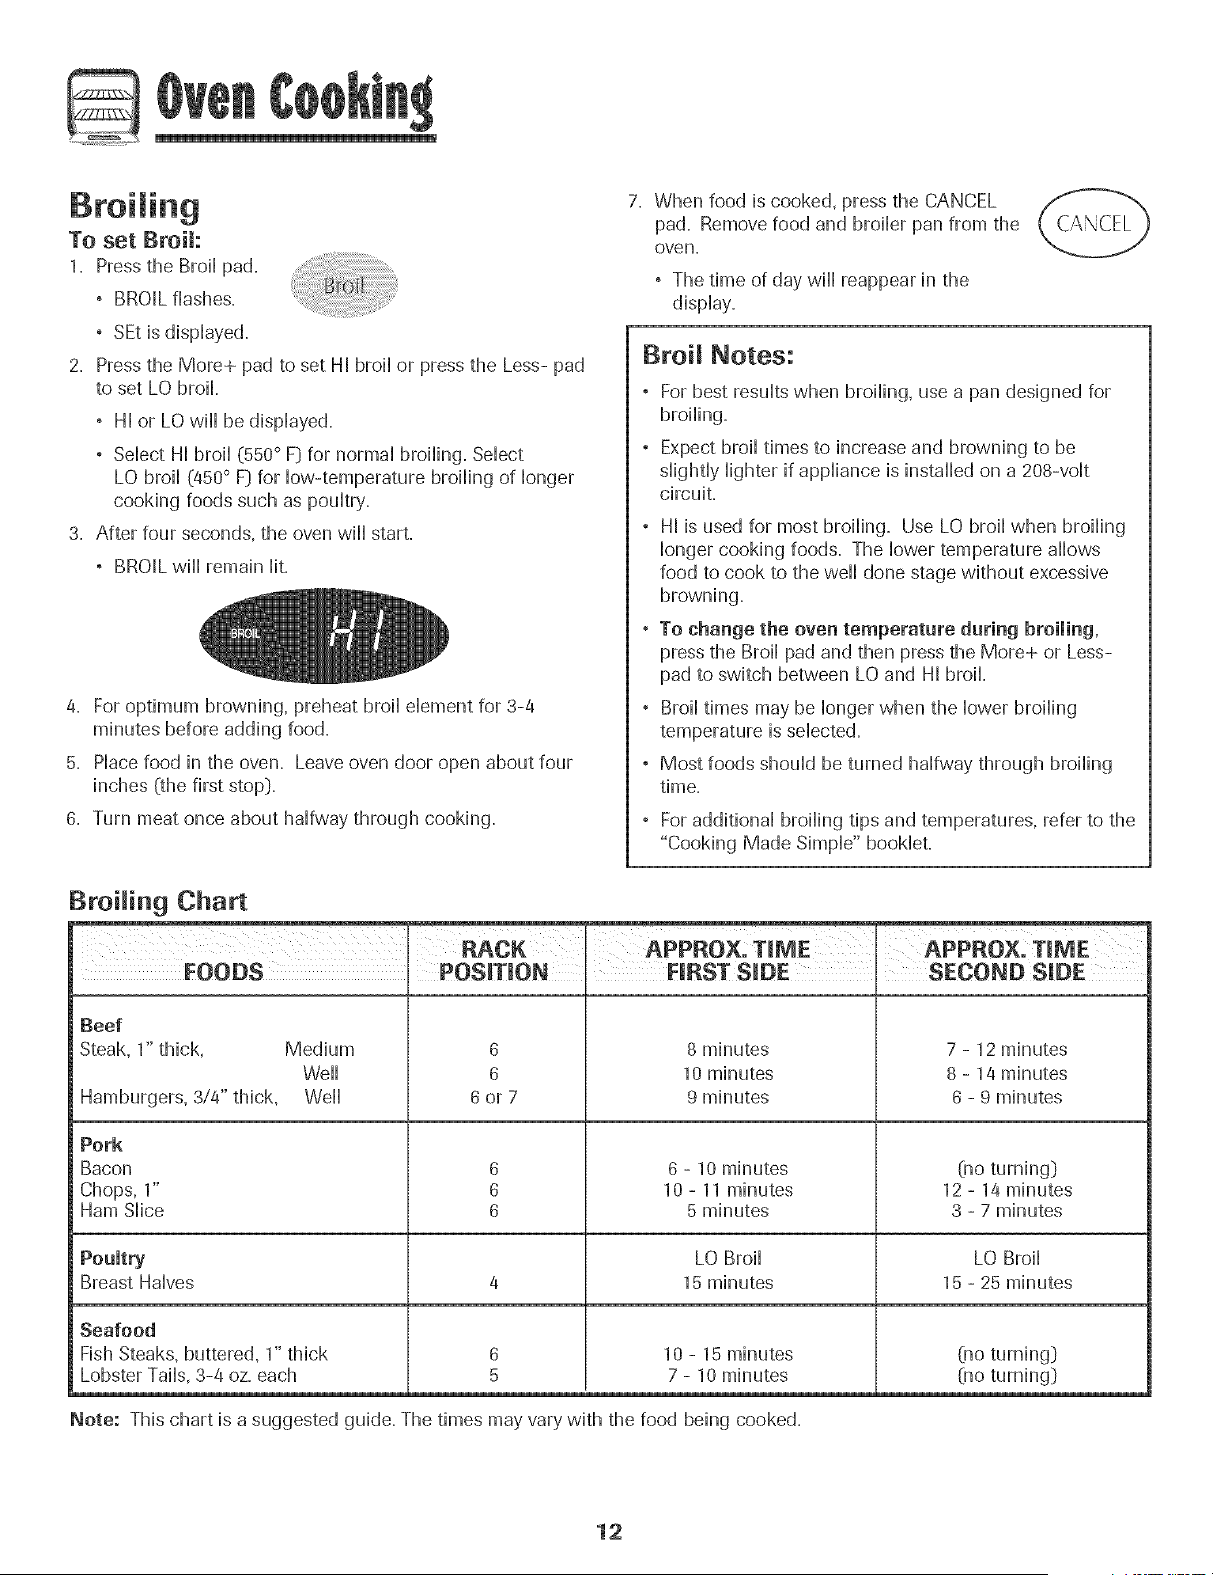
To set Broil:
1. Press the Broil pa&
° BROIL flashes.
° SEt is dispiayed.
2. Press the More+ pad to set H[ broil or press the Less- pad
to set LO bro&
° H[ or LO wH[ be dispiayed.
° Seiect H[ broil (550 ° F] for norma[ broiling. Seiect
LO broil (450° F] for How-temperature broiling of [onger
cooking foods such as pouitry.
3. After four seconds, the oven wH[ start.
° BROIL wH[ remain Hit.
4. For optimum browning, preheat broil dement for 3-4
minutes before adding food.
5. Piace food in the oven. Leave oven door open about four
inches {the first stop].
6. Turn meat once about haifway through cooking.
When food is cooked, press the CANCEL
pad. Remove food and broiler pan from the
eve n.
, The time of day wiil reappear in the
display.
Broil Notes:
, For best results when broiling, use a pan designed for
broiling.
, Expect broil times to increase and browning to be
slightly lighter if appliance is installed on a 208-volt
circuit.
, HI is used for most broiling. Use LO broil when broiling
longer cooking foods. The lower temperature allows
food to cook to the weil done stage without excessive
browning.
. To change the oven temperature during broiling,
press the Broil pad and then press the More+ or Less-
pad to switch between LO and H[ broil.
, Broil times may be longer when the lower broiling
temperature is selected.
, Most foods should be turned halfway through broiling
time.
, For additional broiling tips and temperatures, refer to the
"Cooking Made Simple" bookieL
Broiling Chart
I
FOODS POS[TmON
Beef
Steak, 1" thick,
Hamburgers, 3/4" thick,
Medium
Weii
Weii
Pork
Bacon
Chops, 1"
Ham Slice
6
6
6or7
APPROX:TmME APPROXlT ME
FIRST SIDE SECOND SIDE
8 minutes
10 minutes
9 minutes
7 - 12 minutes
8 - 14 minutes
6 - 9 minutes
6
6
6
6 - 10 minutes
10 - 11 minutes
5 minutes
Cno turning]
12 - 14 minutes
3 - 7 minutes
Poumtry LO Broil LO Broil
Breast Halves 4 15 minutes 15 - 25 minutes
10 - 15 minutes
7- 10 minutes
Seafood
Fish Steaks, buttered, 1" thick
Lobster Tails, 3-4 oz. each
Note: This chart is a suggested guide. The times may vary with the food being cooked.
(:no turning]
Olo turning]
12

G
Oven Vent
When the oven is hl use the area near the vent may become
hot enough to cause burns. Never Mock the vent opening.
The oven vent is located below the backguard vent
shield on your range.
OVEN VENT
LOCATION
Do not prince
pHasticsnear the
vent opening as
heat from the vent
couM distort or
meg the pHastic=
Oven Light
Press the Oven Light switch on the controHpaneHto
turn the oven Highton and off=The oven Hightis onHy
activated by this switch.
Oven
Licht
Oven Bottom
Protect oven bottom against spiHovers,especially acidic or
sugary spills, as they may discolor the porcelain enamel. Use
the correct pan size to avoid spillovers and boilovers. Do not
place utensils or aluminum foil directly on the oven
bottom.
Oven Racks
, Do not attempt to change the lack position when the oven
is hot,
Do not use the oven for storing food Or cookware.
The oven has two racks. All racks are designed with a lock-
stop edge.
To remove:
1. Pull rack straight out until it
stops at the lock-stop
position.
2. Lift up on the front of the
rack and pull out.
To replace:
1. Place rack on the rack support in the oven.
2. Tilt the front end up slightly. Slide rack back until it clears
the lock-stop position.
3. Lower front and slide back into the oven.
Never cover an entire rack with amuminum foil or prance
foil on the oven bottom. Baking results wiii be affected
and damage may occur to the oven bottom.
Rack Positions
RACK 7 (highest position): [ _ _-_
For toasting bread or _I_
broiling thin, non-fatty _
foods.RACK6: Usedformost _ _ 3
broiling.
Oven
RACK 5: For two rack Bottom
Two Rack Baking
baking.
RACK 4: Used for most baked goods on a cookie sheet or
jelly roll pan, fruit pies, or frozen convenience foods. Also use
for broiling chicken pieces.
RACK :3:For casseroles, baking loaves of bread, bundt cakes
or custard pies.
cont.
13
RACK 2: Used for roasting smaHHcuts of meat, frozen pies,
dessert souffles or angeHfood cake, AHsouse for two rack
baking,
RACK 1: Used for roasting Hargecuts of meat and pouHtry,
Oven Bottom: PHaceoven rack on
raised sides of oven bottom, Use for
additionaHspace when cooking Harge
oven meaHs,
MULTmPLE RACK COOKmNG: Two
rack: Use rack positions 2 and 5,
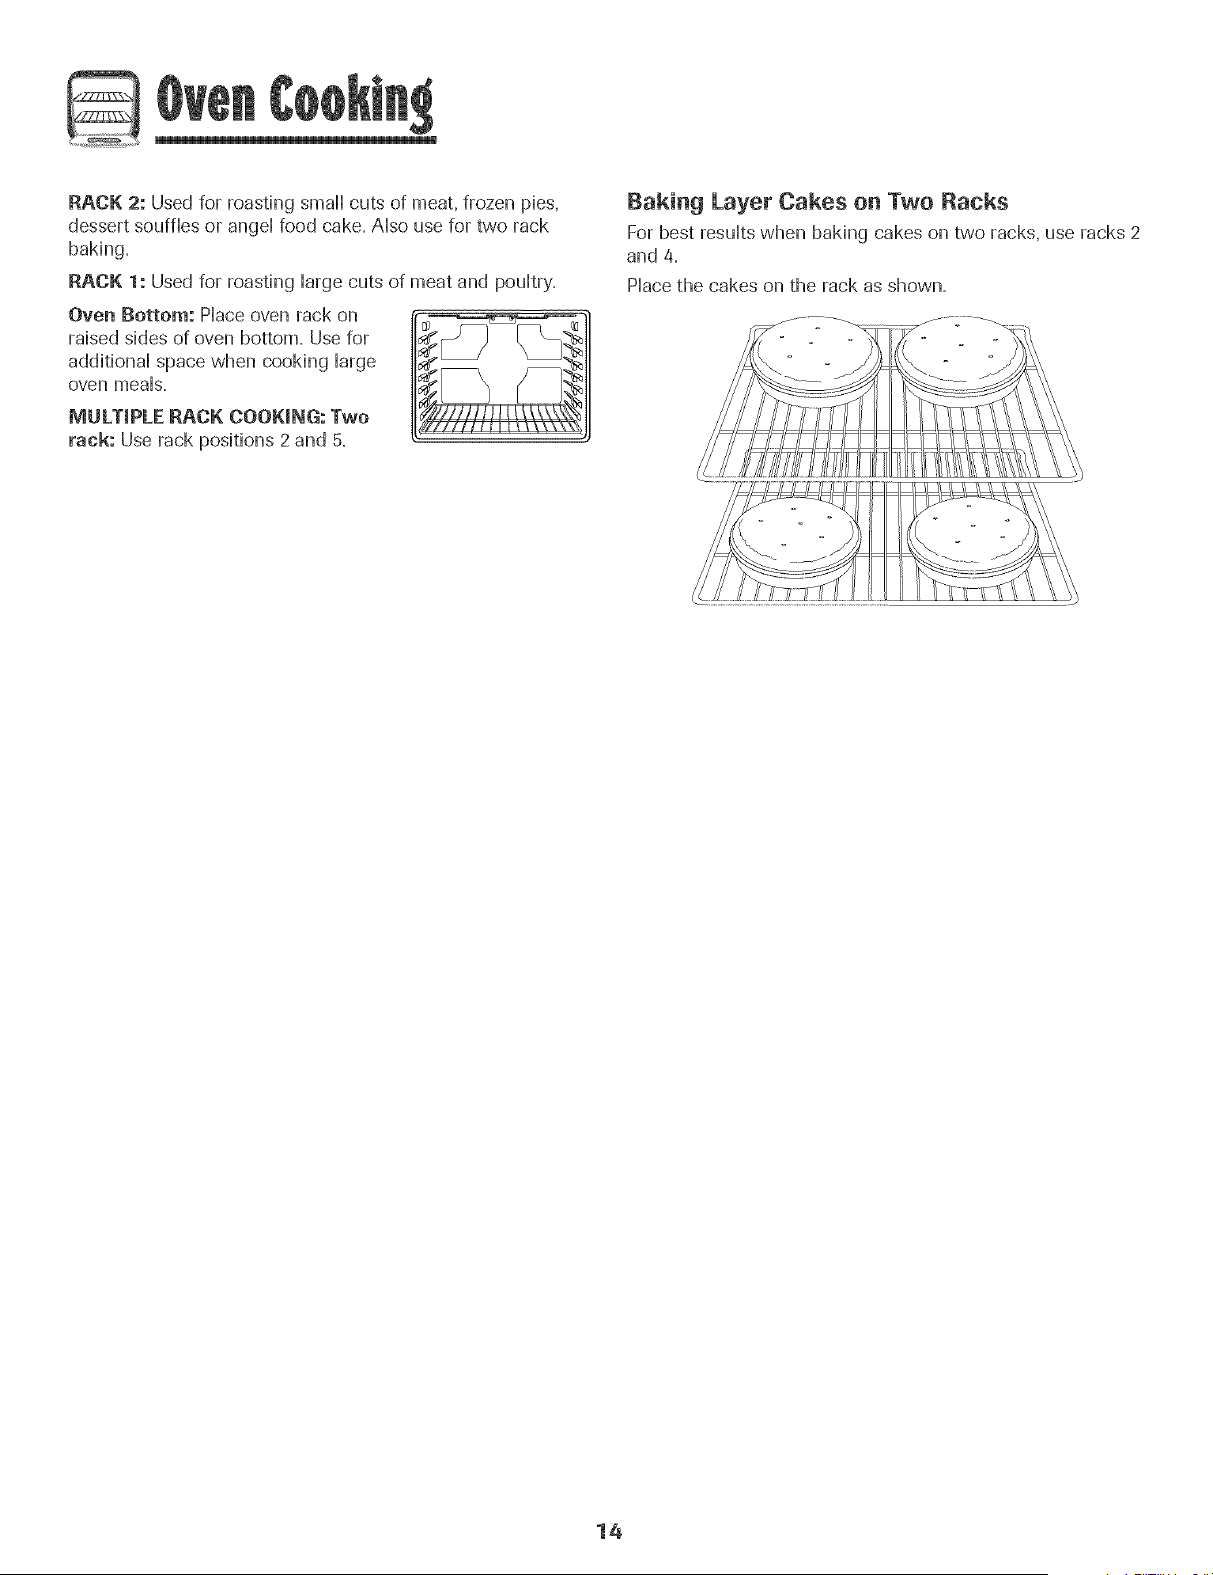
Baking Layer Cakes on Two Racks
For best resuHtswhen baking cakes on two racks, use racks 2
and 4,
PHacethe cakes on the rack as shown,
14

Seff-C ean Oven
o It is normal fol parts of the range to become hot during a
self-clean cycle.
- To prevent damage to oven door. do not attelr pt to open
the door when "LOCK" is displayed.
• Avoid touching cooktop, door. window or oven vent area
during a clean cycle.
• Do no_ use commercial oven cleaners on the oven finish
or around any part of the oven. The:, will damage the
finish or parts.
The self-clean cycle uses above-normal cooking temperatures
to automatically clean the oven interior.
It is normal for flare-ups, smoking, or flaming to occur during
cleaning if the oven is heavily soiled. It is better to clean the
oven regularly rather than to wait until there is a heavy build-
up of soil in the oven.
During the cleaning process, the kitchen should be well
ventilated to get rid of normal odors associated with cleaning.
Before Seff-C eaning
1. Turn off the oven light before cleaning. The light may burn
out during the clean cycle.
2. Remove broiler pan, all pans, and oven racks from the
oven. The oven racks will discolor and may not slide easily
after a self-clean cycle if they are not removed.
3. Clean oven frame, door frame, area outside of gasket, and
around the opening in the door gasket with a nonabrasive
cleaner such as Bon Ami* or detergent and water. The
self-cleaning process does not clean these areas. They
should be cleaned to prevent soil from baking on during
the clean cycle. (The gasket is the
seal around the oven door and _ _
window}. ".
4. To prevent damage, do not clean or
rub the gasket around the oven
door. The gasket is designed to
seal in heat during the clean cycle.
5. Wipe up excess grease or spillovers from the oven bottom.
This prevents excessive smoking, flare-ups or flaming
during the clean cycle.
6. Wipe up sugary and acidic spillovers such as sweet
potatoes, tomato, or milk-based sauces. Porcelain enamel
is acid-resistant, not acid-proof. The porcelain finish may
discolor if acidic spills are not wiped up before a self-clean
cycle.
To set Self-Clean:
Note: Oven temperature must be below 400° F to program
a clean cycle.
1. Close the oven door.
2. Pressthe Clean pad.
, CLEAN flashes in the display. .........................
3. Pressthe More+ or Less- pad.
, CL-M (Medium Soil, 3 hours} is displayed. ...................................
If the door is not closed, beeps will sound and Less-
"door" will display. If the door is not closed
within 45 seconds, the self-cleaning operation will be
canceled and the display will return to the time of day.
4. Pressthe More+ or Less- pad to scroll through the self-
cleaning settings.
CL-H (Heavy Soil, 4 hours}
CL-M (Medium soil, 3 hours}
CL-L (Light Soil, 2 hours}
Choosing the soil level of the oven automatically programs
the self-cleaning time.
5. After four seconds, the oven will start cleaning.
, The cleaning time will start counting down in the display.
, LOCK will appear in the display.
, CLEAN will appear in the display.
TO Delay a Self-Clean Cycle:
1. Pressthe Delay pad.
, DELAY flashes.
, 00:00 will appear in the display.
2. Pressthe More+ or Less- pad to set the
amount of time you want to delay the cycle.
Delay time can be set from ten minutes (00:10} ..............................
to 11 hours, 59 minutes (11:59}.........................
3. While delay is flashing, press the Less-
Clean pad. ............................
, CLEAN will flash.
4. Pressthe More+ or Less- pad.
, CL-M (Medium Soil, 3 hours] is displayed.
eonto
Brand names for cleaning products are registered trademarks of the respective manufacturers,
15
5. Press the More+ or Less- pad to scroii through the serf-
cieaning settings.
CL-H (Heavy SeE 4 hours:}
CL-M (Medium soil 3 hours:}
CL-L (Light SeE 2 hours:}
Choosing the soii ievei of the oven automaticaHHyprograms
the seif-cieaning time.
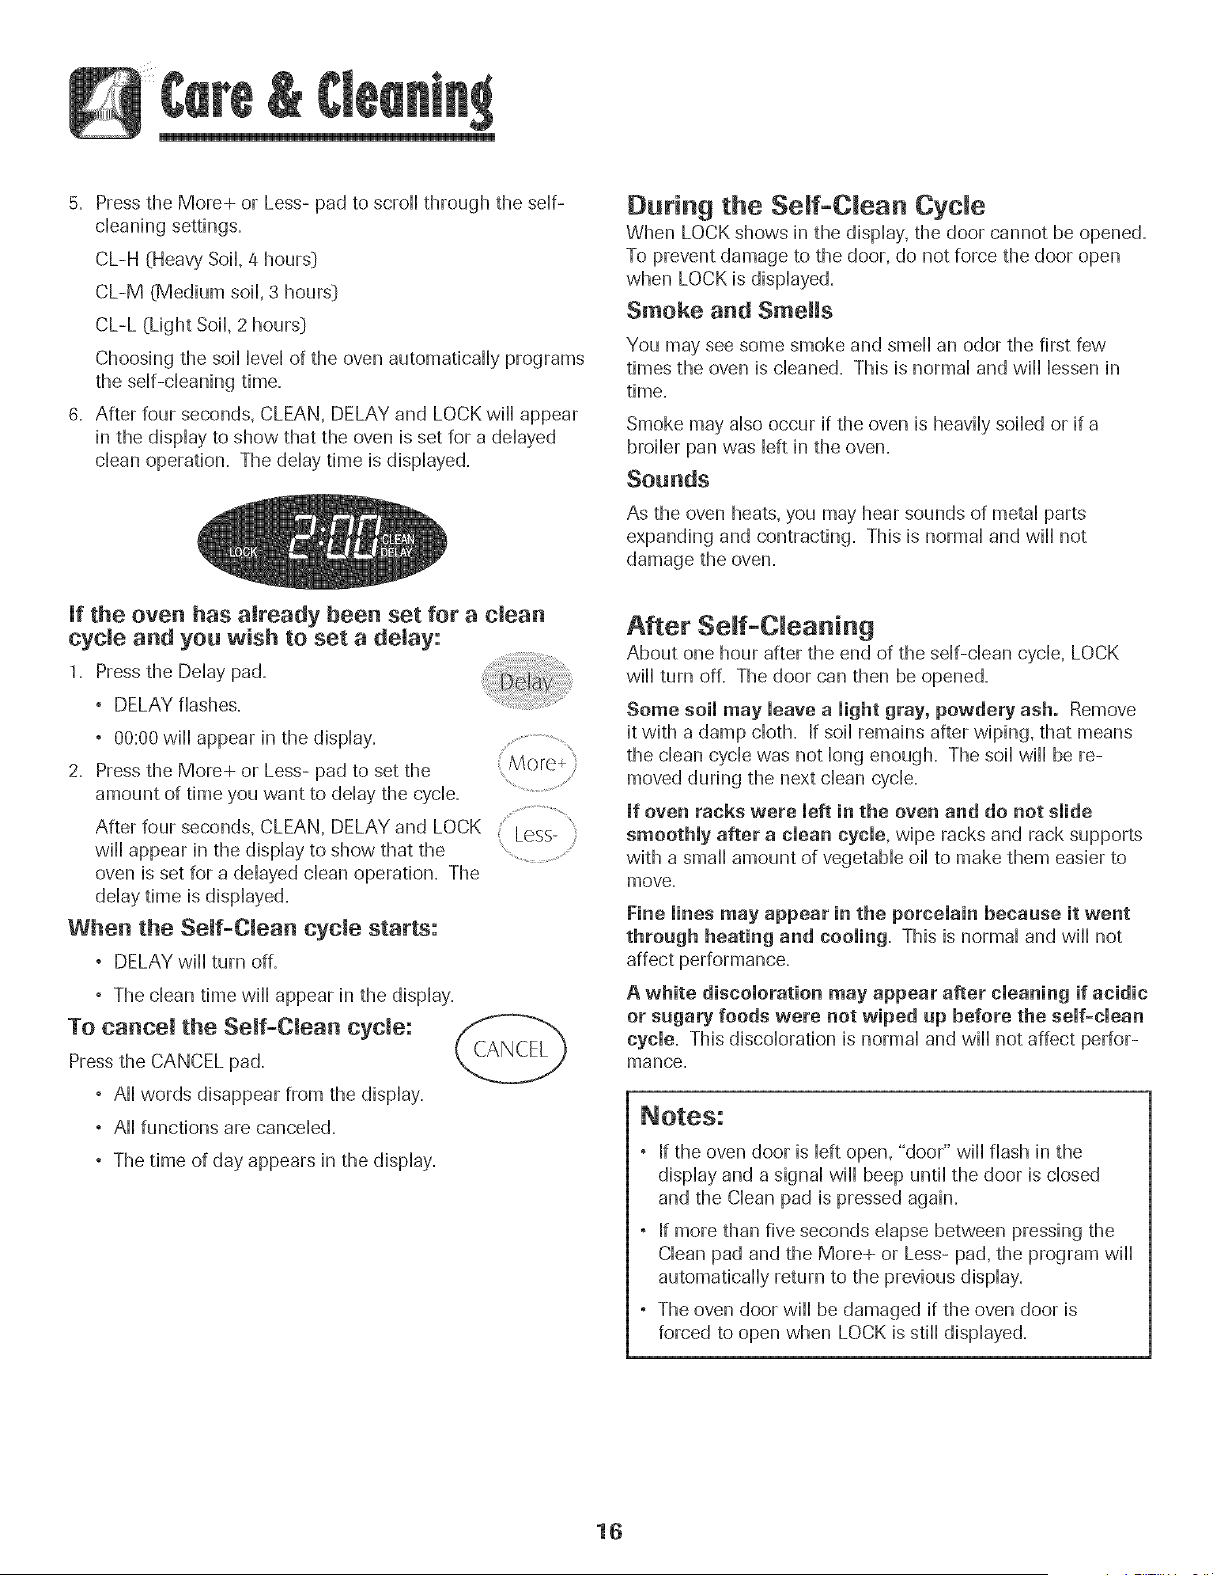
6. After four seconds, CLEAN, DELAY and LOCK wiii appear
in the dispiay to show that the oven is set for a deiayed
dean operation. The deiay time is dispiayed.
If the oven has already been set for a cmean
cycle and you wish to set a delay:
1. Press the Deiay pad.
° DELAY flashes.
, 00:00 will appear in the display.
2. Press the More+ or Less- pad to set the More÷
amount of time you want to deiay the cyclic. ...................................
After four seconds, CLEAN, DELAY and LOCK + Less-
will appear in the display to show that the
oven is set for a delayed dean operation. The
delay time is displayed.
When the Self-Clean cycle starts:
, DELAY will] turn off.
, The dean time wiii appear in the dispiay.
To cancel the Self-Clean cycle:
Press the CANCEL pad.
° Aii words disappear from the display.
, AHHfunctions are cancelled.
° The time of day appears in the display.
During the Seff+C_ean Cycle
When LOCK shows in the dispiay, the door cannot be opened+
To prevent damage to the door, do not force the door open
when LOCK is dispiayed.
Smoke and Sine+ms
You may see some smoke and smell an odor the first few
times the oven is cleaned. This is normal and will lessen in
time.
Smoke may abe occur if the oven is heavily soiled or if a
broiler pan was left in the oven.
Sounds
As the oven heats, you may hear sounds of metal parts
expanding and contracting. This is normal and will not
damage the oven.
After Seff+C_eaning
About one hour after the end of the seif-ciean cycie, LOCK
wiii turn off. The door can then be opened.
Some soil may leave a light gray, powdery ash. Remove
it with a damp cioth. If soii remains after wiping, that means
the clean cycie was not iong enough. The soii wiii be re-
moved during the next dean cyclic.
If oven racks were left in the oven and do not slide
smoothly after a clean cycle, wipe racks and rack supports
with a smaii amount of vegetabie oii to make them easier to
move.
Fine lines may appear in the porcelain becaase it went
throagh heating and cooling, This is normai and wiii not
affect performance.
A white discoloration may appear after cleaning if acidic
or sugary foods were not wiped up before the self-clean
cycle. This discoioration is normai and wiii not affect perfor-
mance.
If the oven door is left open, "door" wiii flash in the
display and a signal will beep until the door is closed
and the Clean pad is pressed again.
If more than five seconds elapse between pressing the
Clean pad and the More+ or Less- pad, the program will
automatically return to the previous display.
The oven door will be damaged if the oven door is
forced to open when LOCK is still displayed.
16
Cleaning Procedures
, Be sure appliance is Off and all parts are coo! before handling
or cleaning. This is to avoid damage and possible burns.
, To Prevent staining or discol0rati0n, c!ean appliance after each use,
t !1:a part is removed, be sure it is c0rrect!y repUaced.
Brand names are registered trademarks of the
respective manufacturers.
** To order caii 1-877-232-6771 USA or
1-800-688-8408 Canada.
PROCEDURE
Cooktop -
Porcelain Enamel
Broiler Pan and
insert
Clock and
Control Pad
Area
Control Knobs
Drip Bowls -
Porcelain
Oven Window
and Door - Glass
Porcelain enamel is glass fused on metal and may crack or chip with misuse. It is acid resistant, not acid
proof. All spillovers, especially acidic or sugar}, spillovers, should bewiped up immediately with a dry cloth.
, When cool, wash with soapy water, rinse and dry.
, Never wipe off a warm or hot surface with a damp cloth. This may cause cracking or chipping.
, Never use oven cleaners, abrasive or caustic cleaning agents on exterior finish of range.
Never cover insert with aluminum foil as this prevents the fat from draining to the pan below.
° Place soapy cloth over insert and pan; let soak to loosen soil=
° Wash in warm soapy water. Use scouring pad to remove stubborn soil
, Broiler pan and insert can be cleaned in dishwasher.
° To activate "Control Lock" for cleaning, see page 7.
° Wipe with a damp cloth and dry. Do not use abrasive cleaning agents as they may scratch the finish.
° Glass cleaners may be used if sprayed on a cloth first. BO NOTspray directly on controlpad and
display area.
° Remove knobs in the OFF position by pulling forward.
, Wash, rinse and dry. Do not use abrasive cleaning agents as they may scratch the finish.
, Turn on each dement to be sure the knobs have been correctly replaced.
Porcelain may discolor or craze if overheated. This is normal and wiii not affect cooking performance.
, When cool, wash after each use, rinse and dr}, to prevent staining or discoloration. May be washed in the
dishwasher.
° To clean heavy soil, soak in hot sudsy water, then use a mild abrasive cleaner such as Soft Scrub* and a
plastic scouring pad.
° For burned on soil, remove from range, place on newspapers and carefully spray with commercial oven
cleaner. {Do not spray surrounding surfaces.} Placein plastic bag and allow to soak several hours. Wearing
rubber gloves, remove from bag, wash, rinse and dr},.
, Avoid using excessive amounts of water which may seep under or behind glass causing staining.
, Wash with soap and water. Rinse with clear water and dry. Glasscleaner can be used if sprayed on a cloth
first.
, Do not use abrasive materials such as scouring pads, steel wool or powdered cleaners as theywill scratch
glass.
Follow instructions on page 15-16 to set a self-clean cycle.
Oven interior
17
Stainmess Steem
(seHectmodeHs]
Storage Drawer_
Door HandJe,Side
Panels - Painted
Enamel
CHeanwith soapy water.
Remove stubborn soiHwith cHeansingpowder or soap-fiHHedscouring pad=Rinse and dry=
RackswiHHpermanentHydiscoHorand may not snidesmoothHyif Heftin the oven during a seHf-cHeanoperation.
If this occurs, wipe the rack edge and rack support with a smaHHamount of vegetabHeoiHto restore ease
of movement, then wipe off excess oil
° DO NOT USE ANY CLEANING PRODUCT CONTAINING CNLORINE BLEACH.
. O0 NOT USEABRASIVE OR ORANGE CLEANERS.
. ALWAYS WIPE WITH THE GRAIN WHEN CLEANING.
. Dai_yC_eaning/LightSoi_--wi_ewith_ne_fthef_HH_wing-s_a_ywater_whitevinegar/waters_Huti_n_
FormuHa409 GHassand Surface CHeaner_or a simiHargHasscHeaner- using a sponge or soft cHoth=Rinse
and dry=To poHishand heHpprevent fingerprints, foHHowwith StainHessSteeHMagic Spray (Part No=
20000008)_=
° Moderate/Heavy Soil -- Wipe with one of the foHHowing- Bon Ami, Smart CHeanser,or Soft Scrub _-
using a damp sponge or soft cHoth=Rinse and dry'.Stubborn soiHsmay be removed with a damp muHti-
purpose Scotch-Brite _pad; rub evenHywith the grain. Rinse and dry'.To restore Husterand remove streaks,
foHHowwith StainHessSteeHMagic Spray_=
, Discoloration -- Using a damp sponge or soft cHoth,wipe with Cameo StainHessSteeHCHeaner_=Rinse
immediateHyand dry=To remove streaks and restore Huster,foHHowwith StainHessSteeHMagic Spray*=
, When cooi,wash with warm soapy water, rinse and dry=Never wipe a warm or hot surface with a damp cloth
as this may damage the surface and may cause a steam burn.
, For stubborn soil, use mildly abrasive cleaning agents such as baking soda paste or Bon Ami._ Do not use
abrasive,caustic or harsh cleaning agents such assteelwool padsor ovencleaners.These products wiII scratch
or permanently damage the surface.
NOTE: Use a dry towel or cloth to wipe up spills, especially acidic or sugary spills. Surface may discolor
or dun if soil is not immediately removed. This is especially importau_t for white surfaces.
Brand names for cHeaning products are registered trademarks of the respective manufacturers,
_* To order direct, carl 1-877-232-8771 USA or 1-800-888-8408 Canada,
18
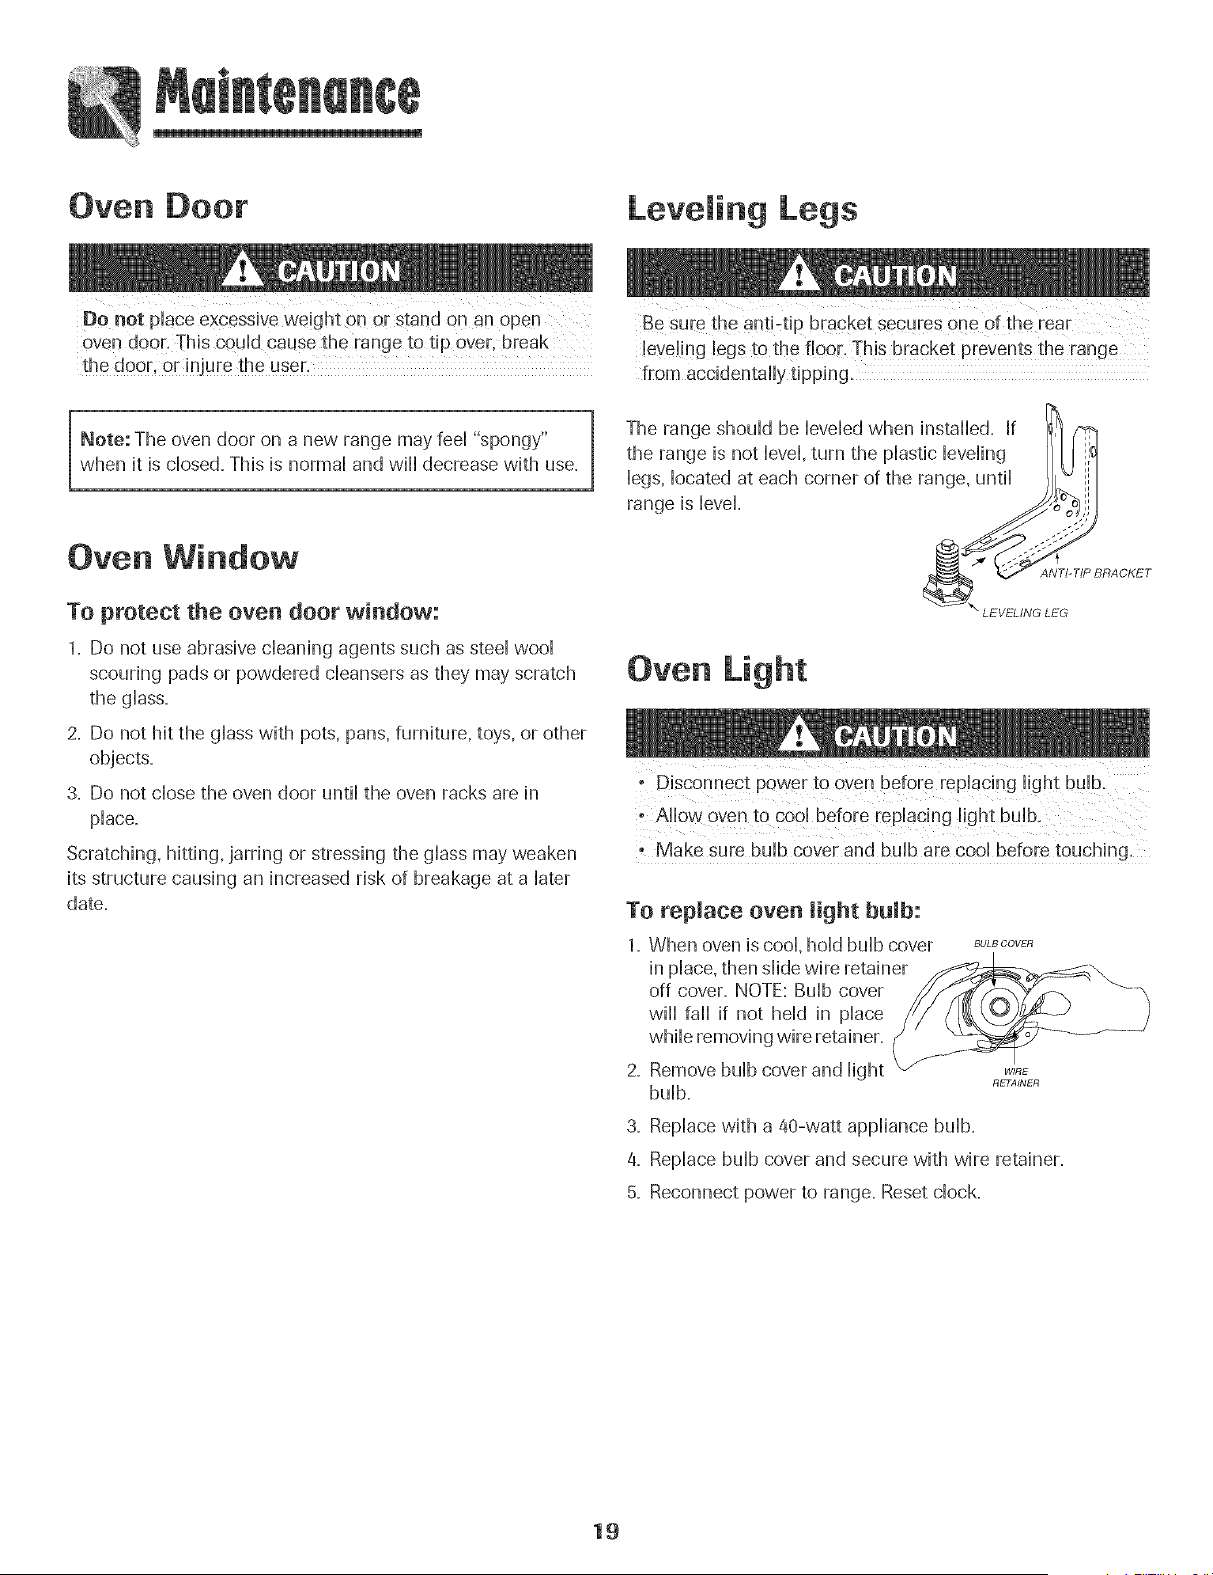
Oven Door
Leveling Legs
Do not place excessive weight on or stand on an open
oven door. This could cause the range to tip over, break
the d00r, 0r k_Jurethe USeh
!evel!ng legs to the floe[. This bracket prevents the range
from accidentally tipping.
Note: The oven door on a new range may feel "spongy"
when it is closed. This is normal and will decrease with use.
Oven Window
To protect the oven door window:
1. Do not use abrasive cleaning agents such as steel wool
scouring pads or powdered cleansers as they may scratch
the glass.
2. Do not hit the glass with pots, pans, furniture, toys, or other
objects.
3. Do not close the oven door until the oven racks are in
place.
Scratching, hitting, jarring or stressing the glass may weaken
its structure causing an increased risk of breakage at a later
date.
Oven Light
• Disconnect power to oyen before replacing light bulb.
• Make Sure bulb cover and bulb are cool before touching.
To replace oven light bulb:
1. When oven is cool, hold bulb cover B_'LBOOVER
in place, then slide wire retainer
off cover. NOTE: Bulb cover
wiii fail if not held in place
while removing wire retainer.
2. Remove bulb cover and light
RETAINER
bulb.
3. Replace with a @-watt appliance bulb.
a.
Replace bulb cover and secure with wire retainer.
Reconnect power to range. Reset clock.
19
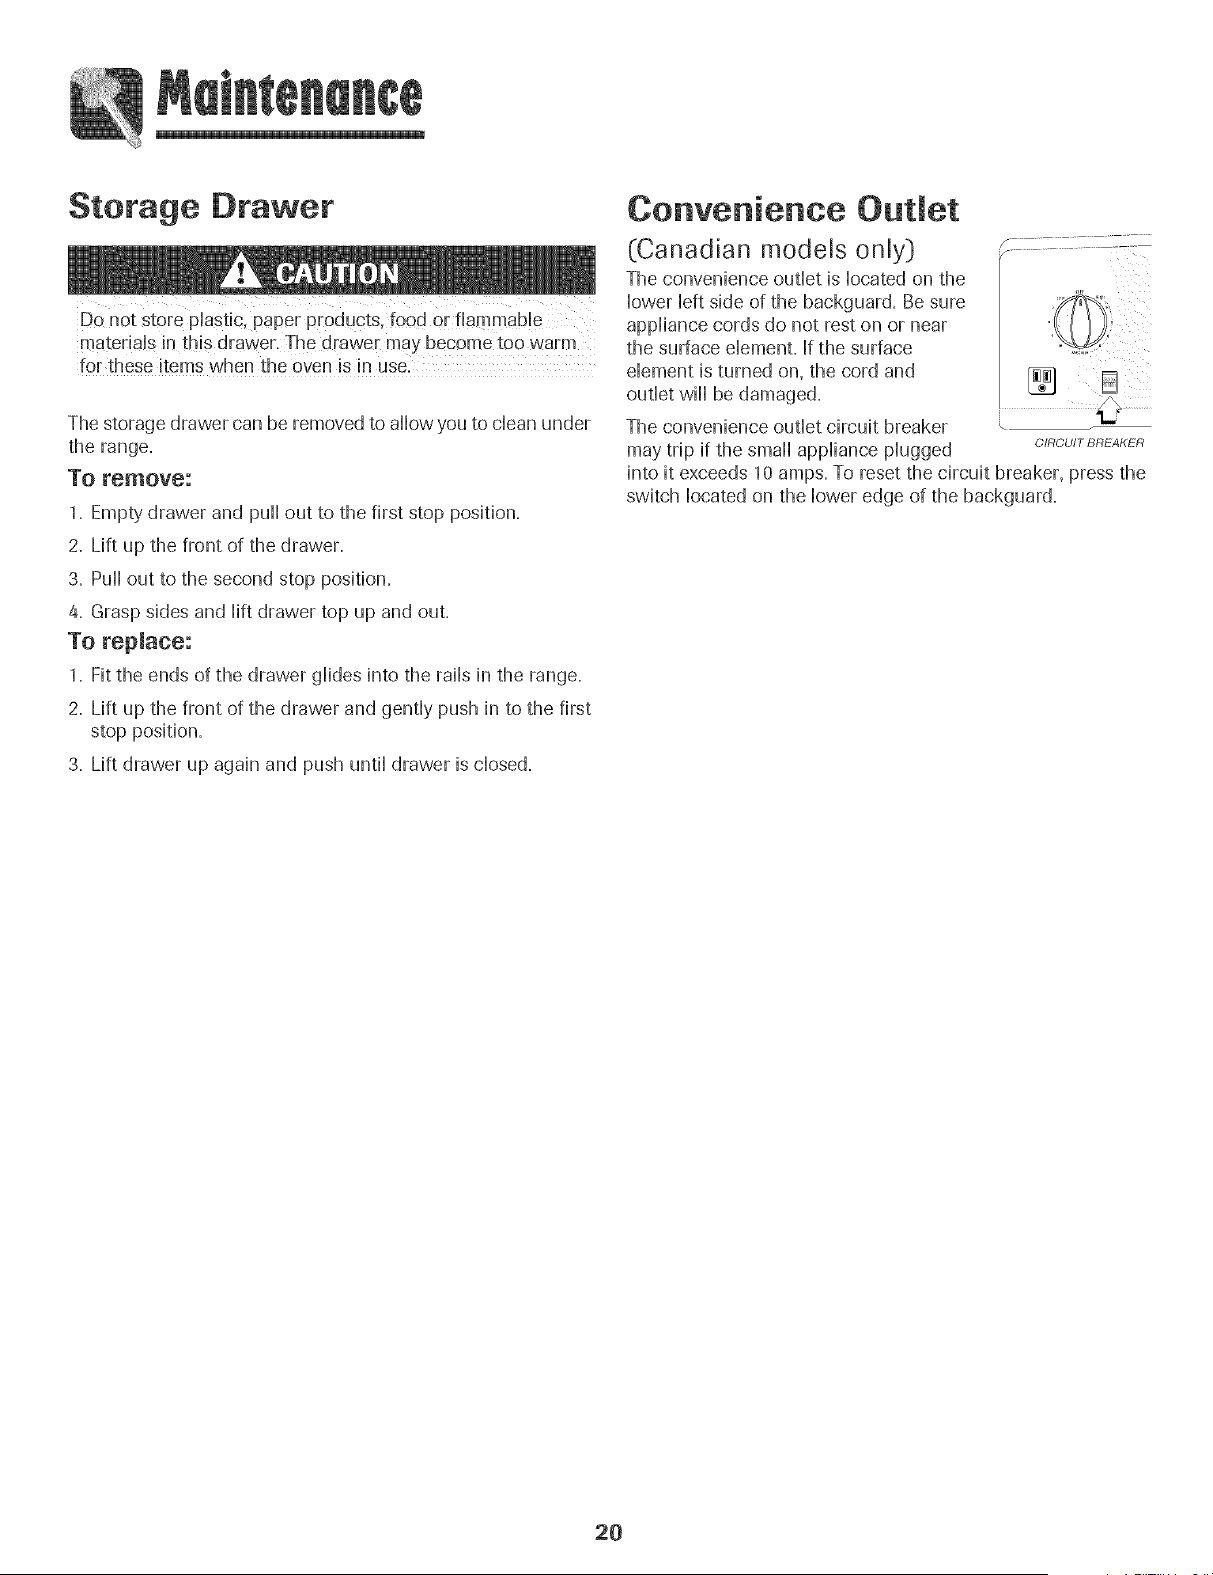
Storage Drawer
materials in this drawer. The drawer may become too warm
for these items when the oven is in use.
The storage drawer can be removed to allow you to clean under
the range.
To remove:
1. Empty drawer and pull out to the first stop position.
2. Lift up the front of the drawer.
3. Pull out to the second stop position.
4. Grasp sides and Hiltdrawer top up and out.
To replace:
1. Fit the ends of the drawer giides into the raiis in the range.
2. Lift up the front of the drawer and gently push in to the first
stop position.
3. Lift drawer up again and push untii drawer is dosed.
Convenience Out et
(Canadian models only)
The convenience outlet is located on the
lower left side of the backguard. Be sure
appliance cords do not rest on or near
the surface elemenL If the surface
dement is turned on, the cord and _1
outlet will be damaged.
L_J
The convenience outlet circuit breaker
may trip if the small appliance plugged C_-_CU_TBRE,_KE_-_
into it exceeds 10 amps. To reset the circuit breaker, press the
switch located on the lower edge of the backguard.
20
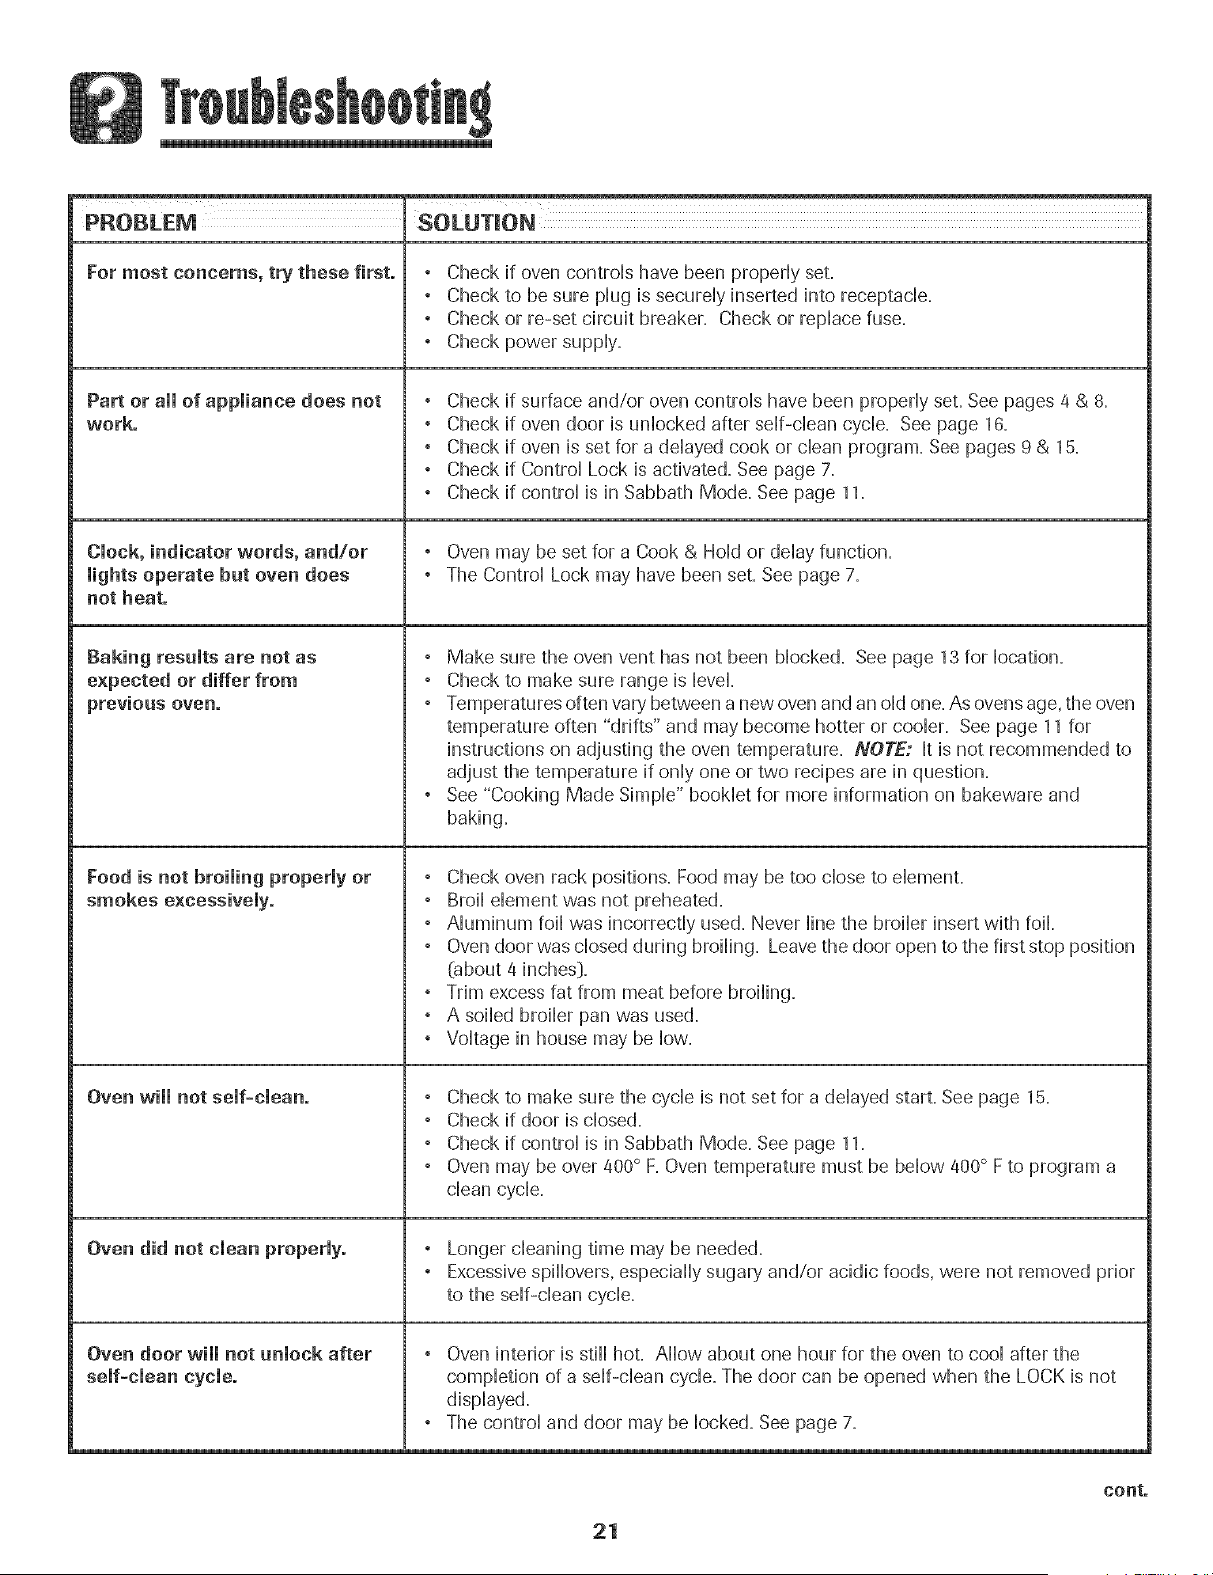
PROBLEM SOLUTION
For most concerns, try these first. , Check if oven controb have been properiy set.
° Check to be sure piug is secumiy inserted into receptacle.
° Check or re-set circuit breaker. Check or repiace fuse.
, Check power suppiy.
Part or all of appliance does not
work.
Clock, indicator words, and/or
lights operate but oven does
not heat.
Baking results are not as
expected or differ from
previous oven.
Food is not broiming properly or
smokes excessively.
Oven will not self=clean.
Oven did not clean properly.
Oven door will not unlock after
self-clean cycle.
° Check if surface and/or oven controb have been properiy set. See pages 4 & 8.
° Check if oven door is unbcked after stir-dean cycb. See page 16.
° Check if oven is set for a delayed cook or clean program. See pages 9 & 15.
° Check if Control Lock is activated=See page 7.
° Check if control is in Sabbath Mode. See page 11.
° Oven may be set for a Cook & Hold or delay function.
° The Control Lock may have been set. See page 7.
° Make sure the oven vent has not been blocked. See page 13 for location.
° Check to make sure range is level=
° Temperatures often var}.'between a new oven and an old one. As ovens age, the oven
temperature often "drifts" and may become hotter or cooler= See page 11 for
instructions on adjusting the oven temperature. NOTE: It is not recommended to
adjust the temperature if only one or two recipes are in question.
° See "Cooking Made Simple" booklet for more information on bakeware and
baking.
° Check oven rack positions. Food may be too close to dement.
, Broil dement was not preheated.
° Aluminum foil was incorrectly used. Never line the broiler insert with foil.
° Oven door was closed during broiling. Leave the door open to the first stop position
@bout 4 inches}.
, Trim excess fat from meat before broiling.
° A soiled broiler pan was used.
, Voltage in house may be low.
, Check to make sure the cycle is not set for a delayed start. See page 15.
° Check if door is closed.
° Check if control is in Sabbath Mode. See page 11.
° Oven may be over 400° F.Oven temperature must be below 400° F to program a
clean cycle.
° Longer cleaning time may be needed.
° Excessivespillovers, especially sugar}, and/or acidic foods, were not removed prior
to the self-clean cycle.
, Oven interior is still hot. Allow about one hour for the oven to cool after the
completion of a self-clean cycle. The door can be opened when the LOCK is not
displayed.
° The control and door may be locked. See page 7.
21
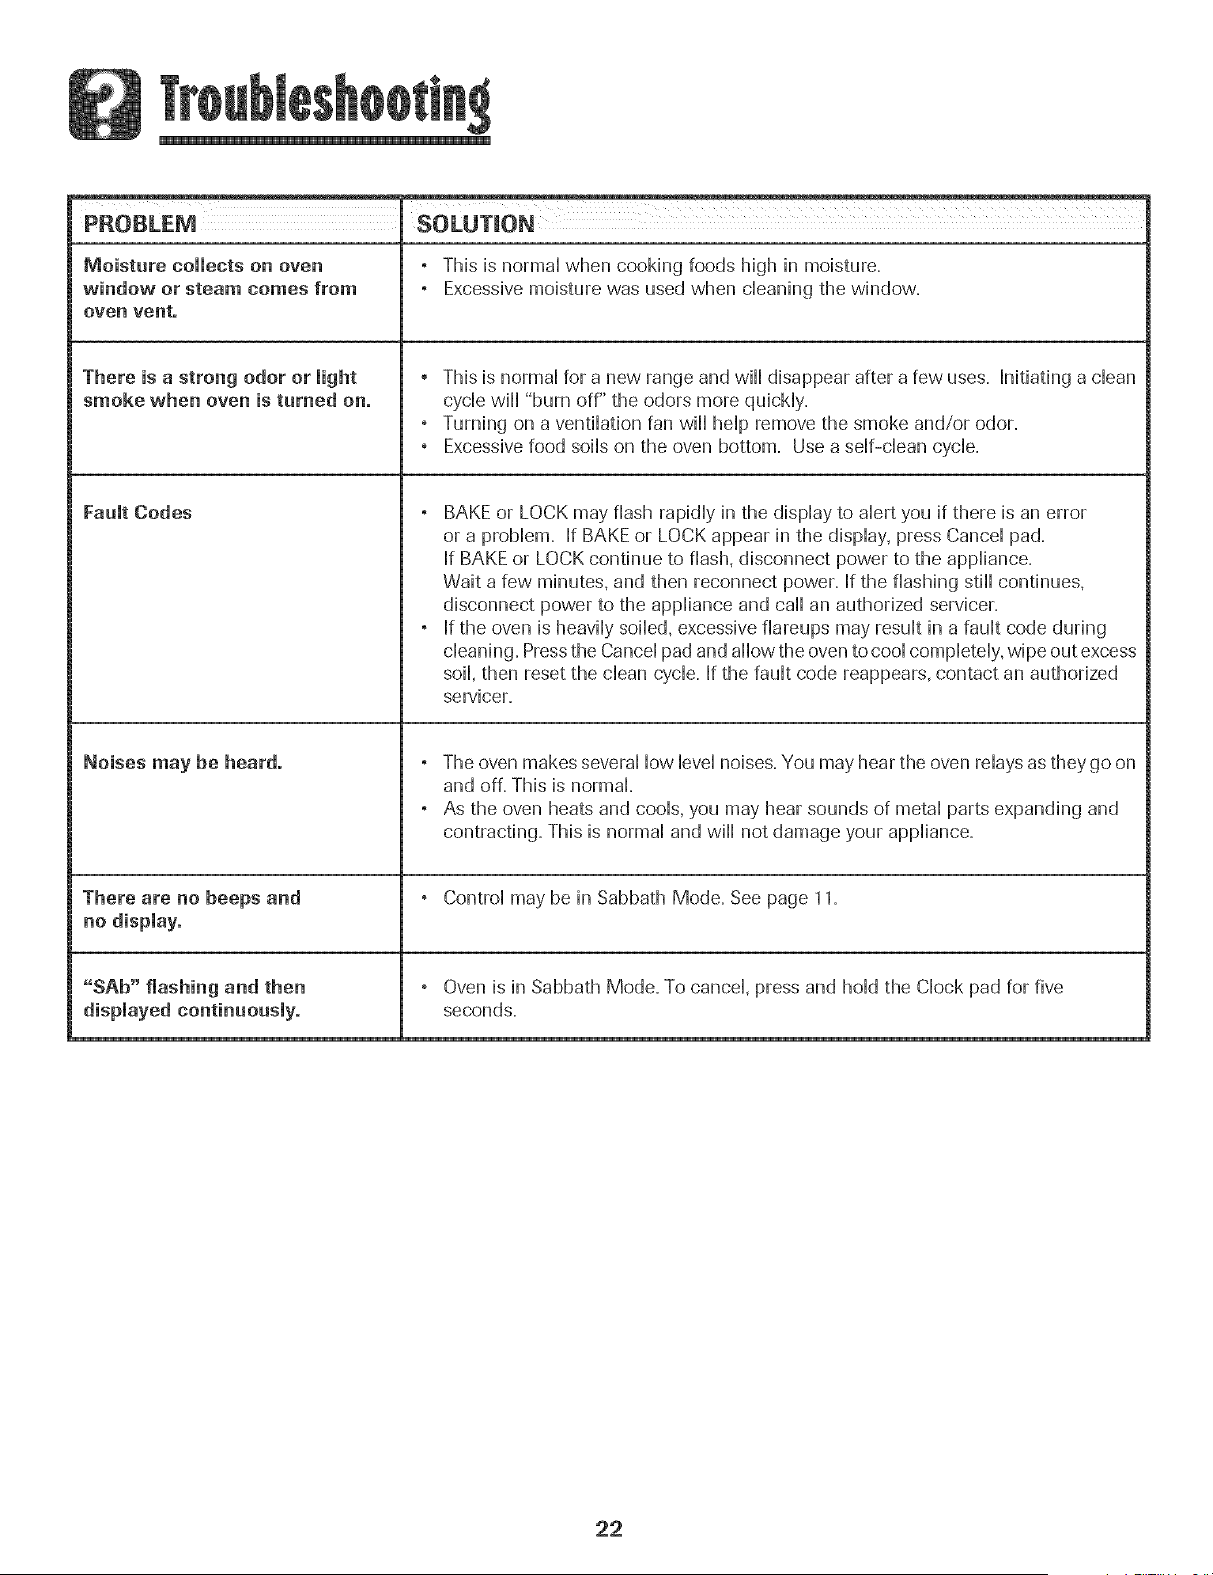
cont.
PRGBLEM SOLUTmON
Moisture collects on oven , This is normal when cooking foods high in moisture.
window or steam comes from , Excessive moisture was used when cleaning the window.
oven vent.
There is a strong odor or light , This is normal for a new range and will disappear after a few uses. Initiating a clean
smoke when oven is turned on. cycle will "burn off" the odors more quickly.
° Turning on a ventilation fan will help remove the smoke and/or odor.
° Excessive food soils on the oven bottom. Use a self-clean cycle.
Fault Codes ° BAKE or LOCK may flash rapidly in the display to alert you if there is an error
or a problem. If BAKE or LOCK appear in the display, press Cancel pad.
If BAKE or LOCK continue to flash, disconnect power to the appliance.
Wait a few minutes, and then reconnect power. If the flashing still continues,
disconnect power to the appliance and call an authorized servicer.
° If the oven is heavily soiled, excessive fiareups may result in a fault code during
cleaning. Press the Cancel pad and allow the oven to cool completely, wipe out excess
soil, then reset the clean cycle. If the fault code reappears, contact an authorized
servicer.
Noises may be heard. ° The oven makes several low level noises. You may hear the oven relays as they go on
and off. This is normal.
° As the oven heats and cools, you may hear sounds of metal parts expanding and
contracting. This is normal and will not damage your appliance.
There are no beeps and ° Control may be in Sabbath Mode. See page 11.
no display.
"SAb" flashing and then , Oven is in Sabbath Mode. To cancel, press and hold the Clock pad for five
displayed continuously, seconds.
22
Fuji One Year Warranty =
Parts and Labor
For erie (1} year from the original
retail purchase date. any part which
hils in normal home use wHUbe
repaired or repBced free of charge.
Canadian Residents
The above warranties only cover an
appliance installed in Canada that has
been certified or listed by ap propriate
test agencies for compliance to a
National Standard of Canada unless
the appliance was brought into
Canada due to transter of residence
from the Upited States to Canada.
Limited Warranty Outside the
United States and Canada -
Parts Only
For one (1} yea from the date of
original retai purchase, any part which
fails in normal home use will be
repaired or rephced free of charge fo[
the part itself, with the owner paying
aii other costs, including labor, mib-
age, transportation, trip charge and
diagnostic chart ge, if required.
The spedfb warranties expressed
above are the ONLY warranties
prodded by me manutacturef: These
wa#antles give you specific legal tights.
and you may also have other rights
which vary fi'om state to state.
What is Not Covered By These
1. Conditions and damages resulting from any of the following:
a. Improper installation, delivery, or maintenance.
b. Any repair, modification, alteration, or adjustment not authorized by
the manufacturer or an authorized servicer.
c. Misuse, abuse, accidents, or unreasonable use.
d. Incorrect electric current, voltage, or supply.
e. Improper setting of any control
2. Warranties are void if the original serial numbers have been removed, altered,
or cannot be readily determined.
3. Light bulbs.
4. Products purchased for commercial or industrial use.
5. The cost of service or service caii to:
a. Correct installation errors.
b. Instruct the user on the proper use of the product.
c. Transport the appliance to the servicer.
6. Consequential or incidental damages sustained by any person as a result of
any breach of these warranties. Some states do not allow the exclusion or
limitation of consequential or incidental damages, so the above exclusion may
not apply.
If You Need Service
® Call the dealer from whom your appliance was purchased or call Maytag
Services sM, Maytag Customer Assistance at 1-800-688-9900 U.S.A. or
1-800-688-2002 Canada to locate an authorized servicer.
® Be sure to retain proof of purchase to verify warrant}/' status. Refer to
WARRANTY for further information on owner's responsibilities for warranty
service.
o If the dealer or service company cannot resolve the problem, write to Maytag
Services sM,Attn: CAIR _ Center, P.O. Box 2370, Cleveland, TN 37320-2370, or
call 1-800-688=9900 UoSoAoor 1-800-688=2002 Canada.
U.S.customers using TTY for deaf, hearing impaired or speech impaired, caii
1-800-688-2080.
User's guides, service manuals and parts information are available from
Maytag Servicess_a,Maytag Customer Assistance.
When writing or calling about a service problem, please include:
a. Your name, address and telephone number;
b. Model number and serial number;
c. Name and address of your dealer or servicer;
d. A clear description of the problem you are having;
e. Proof of purchase {sales receipt}.
23
MAYI'AG
Cuisini_re _lectrique en _16_ents
- _ touches de precision 500
m m m
HIISfH
Table des mati
instructions de s_curit6
importantes ................................ 25-28
Cuisson sur masurface ............. 29-30
Commandes
EH6mentsspiral6s
Cuissen darts mefour ................ 31=38
CUiSSOR coursI][e
Cuisson et maintien
Cuisson courante diff6r6e
Maintien au chaud
Cuisson au gril
Grilles du four
Netteyage ...................................39-42
Four autonetto} ant
M6thodes de nettoyage
Entretien ......................................83-44
Hublot du four
Lampe du four
Recherche des pannes ............ 45=46
Garantie et service aprSs-vente ... 42
Guia de Use y Cuidade ....................48
JnstaUateur : Labsezce guideavec FappareiL
Consommateur : VeuillezJireJeguideet Jeconserverpour
consul[ationuRedeure.Conservezla facture d'achat ou Jecheque
encafssecommepreuvede J'acha[
Num@ode rnodele
Num@ode serJe
Dated'achat
Sivous avezdes questions,veuHbznous appe_er:
Service a la client#Je d e Maytag
1-800-688-9900 aux E.-U.
1-800-688-2002 au Canada
(iundi au vendred[.8 h _ 20 h. heure ae ['Est}
Internet:http://www.may[ag.com
Dansle cadre de nospratiques d'ameiiorationcons[an[eoe [a
qua[it6et de [a performanceae nos prodults de cuisson ues
modificationsde i'appareilqu_nesont pas mentionneesdartsce
guLdeon[ pu 6tre introduites.
Repertez_veus _ la page 47 peurplus d'infermatierla
cencemant te sePJiceaprss-vente.
Les instructions de securite importantes et bs paragraphes
<<avertissement >>de ce guide ne sont pas destines a couvrir
toutes bs conditions et situations qui pourraient se presenter.
II faut faire preuve de bon sens, de prudence et de soin lots de
Finstdlation, de Fentretien ou du fonctionnement de Fappareik
Toujours prendre contact avec le detaillant, le distributeur,
Fagent de service apres-vente ou le fabricant dans le cas de
probbmes ou de conditions qui ne seraient pas comprises.
Reconna_tre Jes etiquettes, paragraphes
et symboJes sur _a securit6
AVERTJSSEMENT- Dangers ou pratiques dangereuses qu!
mort,
POURRAIENTresuiter en des blessures mineures.
Life toutes les instructions avant d'utiliser cet appareii;
observer toutes ies instructions pour eiiminer ies risques
d'incendie, choc eiectrique, dommages materiels et corporeis
que pourrait susciter une utiiisation incorrecte de i'appareii,
Utiiiser i'appareii uniquement pour ies fonctions prevues,
decrites dans ce guide,
Pour une utilisation adequate et en s_eurit_, ii faut que
i'appareii soit convenabiement instaiie par un technicien
qualifie, et relic a la terre,
Ne pas regier, r@arer ni rempiacer un composant, a moins que
cela ne soit specifiquement recommande dans ce guide, Toute
autre reparation doit etre effectuee par un technicien qualifie,
Toujours debrancher i'appareii avant d'y faire de i'entretien,
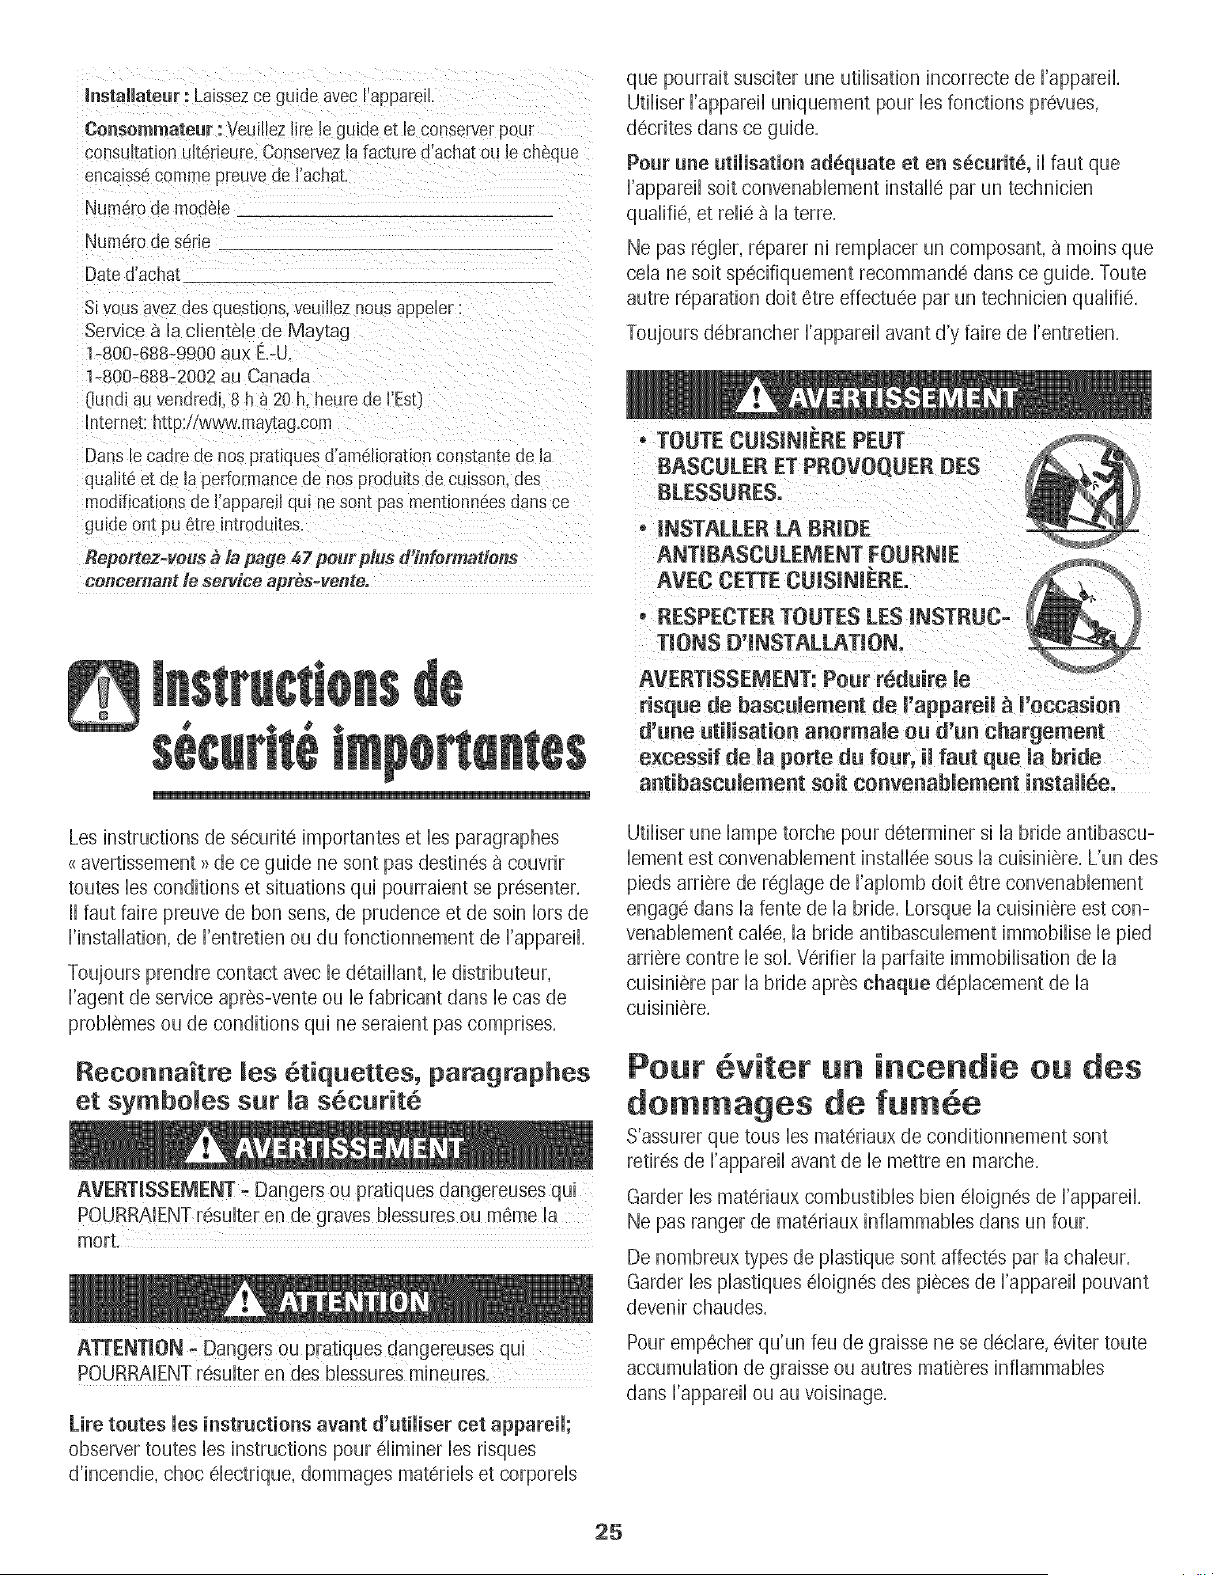
, TOUTECUJSiNI REPEUT
BASCULER ET PROVOQUER DES
INSTALLER LA BRIDE
ANTiBA$CULEMENT FOURNJE
risque de bascu!eme_t de !,appateil _ !,occasion
d'_ne utilisation a_orma_e elmd'_n chargement
excessif de Ja porte do fear, iJfa_t q_e [a bride
a_tibasc_Jeme_t soit co_ve_abJeme_t i_staJJ_e.
Utiliser une lampe torche pour determiner si la bride antibascu-
bment est convenabbment installee sous la cuisiniere, L'un des
pieds arriere de reglage de Faplomb doit etre convenabbment
engage dans la fente de la bride, Lorsque la cuisiniere est con-
venabbment cdee, la bride antibascubment immobilise b pied
arriere contre le sol, Verifier la parfaite immoNisation de la
cuisiniere par la bride apres chaque d@hcement de la
culsmlere,
Po r vitet i ce die des
dommages de
S'assurer que tous[es materiaux de conditionnement sont
retires de [appareil avant de b mettre en marche,
Garder bs materiaux combustibles bien eloignes de Fappareik
Ne pas ranger de materiaux inflammables dans un four,
De nombreux types de plastique sont affectes par la chabur,
Garder bs plastiques eloignes des pieces de Fappareil pouvant
devenir chaudes,
Pour empecher qu'un feu de graisse ne se declare, eviter toute
accumulation de graisse ou autres matieres inflammables
dans I'appareil ou au voisinage,
25
En cas d'incendie
Ne jamais utfliser d'eau pour 6teindre de [a graisse
enflammee. Utfliser du bicarbonate de soude ou un extincteur
poudre chimique ou a mousse pour etouffer [es flammes.
1. [nterrompre ['aIimentation 6[ectrique de rapparefl pour
minimiser [a propagation des flammes.
2. NE JAB/JAmSsaisir ou d@Iacer un ustensfle de cuisine
enflamme.
3, Fermer [a porte du four pour 6touffer [es flammes,
S6curit pour [es enfants
parefl des articles auxquds les enfants peuvent s'Jnt@esser.
pour atte[ndre un objet, pourrait se bUessergravement.
NE JAMAiS [aisser des enfants seu[s ou sans supervision
Iorsque I'appare[I est en service ou encore chaud, Ne jamais
laisser un enfant s'asseoir ou se tenir sur une partie quelconque
de I'appareil, [I pourrait se blesser ou se br01er,
[I est important d'enseigner aux enfants que I'appareil et les
ustensiles places dedans peuvent etre chauds, Laisser refroidir
[es ustens[[es en un lieu s0r, hors d'atte[nte des enfants, [[ est
important d'enseigner aux enfants qu'un appareil menager n'est
pas un jouet, et qu'ils ne doivent toucher aucune commande ou
autre composant de I'appareil,
Famiiiarisation avec ['apparei[
NE JAMAiS uti!iser un apparei! comme escabeau pour
atteindre les armoires se trouvant au-dessus, Le mauvais
empl0i de porte d apparei! comme par exemp!e en tant
qu'escabeau, le fait de s'appuyer ou de s'asseoir surla POrte,
peuvent entrainer !e renversement de I'appare!!, casser Ja
porte et gravement blesser.
Ne pas utiiiser cet appareil pour chauffer ou pour garder
chaude une piece, sinon des dommages a i'appareii pourraient
s'ensuivre et ceia pourrait etre dangereux pour I'utiiisateur.
Aussi, ne pas utiiiser ie four pour ranger des aliments ou des
ustensiies de cuisine.
Ne pas bioquer ou obstruer I'event du four.
NE JAMAIS TOUCHER LES ELEMENTSCHAUFFANTSNI LES
PAROISINTERIEURESDU FOUR,Les elements chauffants
peuvent etre brQiants meme s'iis ne sont plus rouges. Les
surfaces intdrieures du four peuvent atteindre une temperature
suffisamment elevee pour infliger des br01ures. Pendant et
apres usage, ne pas toucher les elements chauffants ni les
parois intdrieures du four et eviter leur contact avec des
vetements ou autres matdriaux inflammables avant qu'ils
n'aient eu le temps de refroidir suffisamment. D'autres surfaces
peuvent egalement atteindre une temperature suffisamment
6levee pour bn31er:le ouverture d'dvent et le surface
avoisinante, ainsi que le porte et le hublot de four.
Ne pas toucher I'ampoule du four bn31anteavec un chiffon
humide car elle pourrait se briser. Si tel est le cas, debrancher
I'appareil avant de retirer I'ampoule pour eviter une decharge
e[ectrique.
NE JAJ_AiS gamir la sole du four ou une grille du four avec
de la feuille d'aluminium. Ceci pourrait susciter un risque de
decharge electrique ou d'incendie, ou une deterioration de
I'appareil. Utiliser de la feuille d'aluminium uniquement selon
les instructions de ce guide.
Cuisson et s6curit6
NE JAMAIS faire chauffer un recipient non ouvert dans le
four, L'accumuiation de pression dans ie recipient pourrait
provoquer son eciatement et de graves dommages materiels
ou corporeis,
Utiiiser des maniques robustes et seches, Des maniques
humides peuvent provoquer ia formation de vapeur brQiante,
Ne jamais utiiiser un torchon a vaisseiie ou autre article textile
la place de maniques; un tel article pourrait trainer sur un
element et s'enflammer, ou accrocher un ustensiie ou un
composant de i'appareii,
Porter un vetement approprid, @iter de porter des vetements
ampies ou a Iongues manches pendant I'utiiisation de
I'appareil, [is peuvent prendre feu si le vetement entre en
contact avec un ei6ment de cuisson brQiant,
Placer toujours [es grilles a [a position appropriee dans [e four
Iorsque le four est froid. Faire coulisser la grille vers I'extdrieur
avant d'ajouter ou enlever un plat; utiliser pour cela une
manique robuste et seche. @iter d'introduire la main darts le
four pour y placer ou retirer un plat. S'il est necessaire de
d@lacer une grille Iorsqu'elle est chaude, utiliser une manique
seche. Ne pas toucher un element chaud avec une manique.
N'utiliser les grilles que darts le four darts lequel elles ont dte
achetees/expediees.
26
Ouvrir toujours la porte du four tres prudemment, Laisser Fair
chaud ou la vapeur s'@happer avant de retirer ou dlntroduire
un plat,
AVERTISSEMENT - METS PREPARES : Respecter bs
instructions du fabrbant, Si b contenant ou b couverde en
pBsdque d'un mets surgeie se ddorme ou est endommage
durant la cubson, jeter immediatement b recipient et son
contenu, Les aliments pourrabnt 6tre contamines,
Ne pas permettre b contact de papier d'aiuminium ou de la
sonde a viande avec bs elements chauffants,
Toujours eteindre toutes bs commandes une fob la cuisson
terminee,
Ustensiles et s curit
Appliquer bs instructions du fabricant Iors de Femploi d'un
sachet pour cuisson au four,
La s@urit6 de fonctionnement de cet appareil a ere testee
I'aide d'ustensibs de cuisine traditionneb, Ne pas utiliser un
ustensib ou accessoire qui n'est pas sp@ifiquement
recomman@ darts ce guide, Ne pas utiliser de couvre-
element, gril place sur la table de cuisson ou systeme de
convection additionnek L'utilisation d'un dispositif ou
accessoire qui n'est pas expressement recomman@ darts ce
guide peut degrader la s@urite de [appareil ou sa perfor-
mance, ou reduire la Iongevite des composants,
Si un ustensib est plus petit que I'element utilise, une partie
de I'element chauffant est exposee et peut provoquer
I'infiammation d'un vetement ou des maniques,
Seub certains materiaux en verre, vitroceramique, ceramique,
gres, ou certains ustensibs vitrifies/emailles peuvent 6tre
utilises sur la table de cuisson ou darts b four sans risque de
bris sous I'effet du choc thermique, Observer bs instructions
du fabricant Iors de I'utilisation d'un ustensib en verre,
Orienter la poignee de chaque ustensib vers b centre de la
table de cuisson et non vers I'exterieur ou vers un autre
element; ceci reduira b risque de brOlure, inflammation de
matiere inflammable ou renversement Curtjeune enfant
pourrait saisir et renverser un ustensib dont b manche est
oriente vers I'exterieur},
Table de cuisson
NE JAMAIS laisser un element de surface allume sans
surveillance, particulierement avec chauffage ebve, Le
d@ordement du contenu de I'ustensib pourrait provoquer la
generation de fumee abondante et I'infiammation de la
graisse,
Cet appareil comporte des elements chauffants de differentes
tailles, Utiliser toujours un ustensile a fond plat, de taille
suffisante pour qu'ii puisse recouvrir compietement i'eiement,
Pour optimiser i'efficacite, choisir un ustensiie de meme taiiie
que i'eiement,
1
Elements spiral s
Pour @iter de @teriorer bs elements chauffants amovibbs, ne
pas bs immerger / tremper / nettoyer darts un hve-vaisselb,
ou darts un four autonettoyant, Un element chauffant
endommage pourrait provoquer un court-circuit suscitant un
incendie ou un choc eiectrique,
Veiller a ce que la cuvette de recuperation soit toujours en
place Iors de I'utilisation de I'element; I'absence de la cuvette
de recuperation Iors d'une cuisson peut faire subir des
dommages au cabiage,
Garnitures de protection : Ne pas garnir les cuvettes de
recuperation sous ies elements ou ie fond du four avec de ia
feuille d'aluminium, saul Iorsque ceci est suggere darts le
guide, La mise en place d'un tel garnissage peut susciter un
risque de choc eiectrique ou d'incendie,
Exercer une prudence extreme Iors du deplacement du
recipient de graisse ou Iors de I'elimination de graisse chaude,
Laisser la graisse refroidir avant de deplacer I'ustensile,
Hottes d'e×traction
Nettoyer frequemment les filtres et la hotte de la cuisiniere
pour emp@her ia graisse ou d'autres produits inflammables
de s'accumuier sur ies fiitres ou ia hotte en provoquant des
feux de graisse,
Pour flamber des aliments sous la hotte, mettre le ventilateur
en ruarche,
Nettoyage et s curit6
Nettoyer prudemment la table de cuisson, Arreter routes les
commandes et attendre le refroidissement de tousles
composants avant de les toucher ou d'entreprendre le
nettoyage, Nettoyer I'appareil avec precaution, Travailler
prudemment pour eviter des bn_iures par ia vapeur en cas
d'utiiisation d'un chiffon ou d'une @onge humide iors de
i'eiimination d'un produit renverse sur une surface chaude,
Certains produits de nettoyage peuvent generer des vapeurs
nocives iorsqu'on ies applique sur une surface chaude,
Nettoyer uniquement les pieces mentionnees clans ce guide,
27
Four autonettoyant
!6ch@ite dans le four !ors de !:autonettoyage.
Ne pas nettoyer ie joint de porte; ie joint joue un rob essentiei
quanta I'etancheite. Ne pas frotter, endommager ou d@lacer
le joint.
Ne pas utiiiser de produits de nettoyage pour four ou enduits
de four, darts ie four autonettoyant ou sur ies zones voisines.
Avant d'executer une operation d'autonettoyage, retirer la
lechefrite, les grilles du four et les autres ustensiles, et eliminer
par essuyage tout exces de residus renverses pour eviter ia
formation de fumee ou i'infiammation de ces residus.
Avertisse ent et avis
important pour la s6curit6
La Ioi caiifornbnne <_Safe Drinking Water and Toxic Enforce-
ment Act >_de 1986 {proposition 65} stipule la publication par
ie gouverneur de ia Caiifornie d'une iiste de substances que
i'etat de Caiifomie consi@re comme cancerigenes ou
dangereuses pour ie systeme reproducteur, et impose aux
entreprises commerciaies i'obiigation de signaler a burs
clients ies risques d'exposition a de teiies substances.
Nous informons les utilisateurs de cet appareil que Iors d'une
operation d'autonettoyage, iis peuvent etre exposes a une
faible concentration de certaines substances figurant dans la
liste mentionnee ci-dessus, dont le monoxyde de carbone,
Pour minimiser [exposition, veiller ace que la piece 08 se
trouve le four soit convenablement aeree durant une operation
d'autonettoyage par I'ouverture d'une fenetre ou d'une porte,
AViS iMPORTANT - OISEAU× FAMIMERS : Les oiseaux ont
un systeme respiratoire tres sensible, Ne pas garder un oiseau
famiiier darts ia cuisine ou darts une piece ou:Jii pourrait etre
expose aux fumees, Les fumees emises durant une operation
d'autonettoyage peuvent etre dangereuses ou morteiies pour
un oiseau, de meme que les fumees emises Iors du chauffage
excessif de graisse, huile, margarine, et du chauffage excessif
dans un ustensile a revetement antiadhesif,
Conserver ces instructions pout consultation ult6tieute
28
@
Boutons de commande
PermettentI'utJlisationdes 616mentschauffants de surface,avecune
progressioncontinue de la puissanceentre Ies reglagesextremes
Low (Bas]et Nigh (Eleve)+On peut regier un bouton_ toute
positionentre ces deux extremes+
RegJage des commandes
1+ PlacerI'ustensilesur 1'element+
2. Enfonceret faire tourner le bouton jusqu'_ la positiondesiree
(rotationclansun sensou clansI'autre).
• Des marquessur Ietableau de commande
identifient I'elementcommandepar chaque bouton.
Parexemple,le graphique _ droite indique
I'elementavant/gauche.
3. IIy a un temoin hmineux pour leseiementssur le tableau de
commande.LorsqueI'un des boutonsde commanded'un
elementde surfaceest alimente,le temoin s'illumine.Letemoin
s'eteint des qu'on interrompt I'aJimentationde relement.
4. Apres une cuisson,ramenerJebouton _ la position OFF(Arret).
RetirerJ'ustensile.
OO
@0
Suggestions pour Je regJage
On doit choisirla puissancede chauffageen fonction de divers
facteurs :tailIe,type de I'ustensileet operation de cuisson+Pour
rinformation concemantles ustensileset autres facteursaffectant la
puissancede chauffagea utiliser,se reporterb la brochureLa
cuissonsimplifiee+
Low (Bas) (2) : Pourfusion
de chocoIatou beurre,ou Ie
maintiende la temperature
d'un mets.
Meal.Low (Moyen
bas) {S-a] : Pour
continuer la cuisson
de mets encasse-
rolesfermeespar
couvercleou pour
cuire _ Javapeun
!
1
1
Medium [Moyen] (5-7} :
Pourle maintiende
['ebullition lente d'une
grande quantit6 de [iquide
ou pour [a p[upartdes
operationsde friture.
APRE$ LACUISSON
Nigh (Emeve}(10] : Pour
['ebullitiond'un liquide.On doit
toujours reduire la puissancede
chauffage desque Ia tempera-
ture d'ebulJitionestatteinte ou
que I'alimentcommencea cuire.
OFF i
High
10
@ 1
Meal. Nigh (Moyen 61ev_}
(:8+9] : Pourrissoler tes
viandes,chauffer I'huile
[grandefriture ou aliments
sautes)et pourIe maintien
de rebullition rapided'une
grandequantit6 de liquide.
AVANTLA CWSSON
o Placertoujours I'ustensi+_sur I'elementavant d'alimenter - Sassurerque I elementes_arr+te.
I'element.Pourev+terque laculmme+enesubissedes dommages, + El+minerdesque possibletous les residusde renversemen_e_
nejammsfaire fonctionner un elementde surfacesansy placer
un ustenslle.
• NEJAMAIS utiliser +atable de cuissoncomme lieu de remisage
d'Niments ou d'ustensiles.
DURANTLA CUISSON
. Vei]]er_ bien connaftrela correspondanceentre les boutons de
commandeet les elements.Veiile[ _commander!'aHmentat_on
de I'elernen[vouJu.
o Commencerla cusson avecune puissancede chauffage
super_eure,puis reduire la pu+ssancede chauffagepour
poursuivrela cuisson.Nejamais utiliser une puissancede
chauffageeleveepour une cuisson prolongee.
. NEJA_AIS iaisserle contenu d'un ustensiles'evapors+
compl_:ement;cec+pourrait falre subir aes dommages
i'ustensileet _ I'appare+L
o NE,IAMAIS toucher +atable de cuissonavant qu'elle se soil
compi_[emen[refroidie.Certameszonesde la +ablede culsson+
particulierementauvoisJnagedes Ndmentsde surface,peuven[
devenirtres chaudesdurant une cuisson.Utiliser des maniques.
project+ons.
NJTRES CONSEILS
- S'iJ} a une armoirede rangementdirectementau+dessusde la
table de culsson,on ne dolt y placerque des al[icies peu
fi equemmentutllJsdset qu+peuvent _tre exposesb la chaJeur.La
chaieurCruisepar is culsinterepourrait susciter un p+oblemepour
desarticles commeiiquidesvoJatiis,produitsde ne[[oyagee[
flaconsd'aerosol.
+ NE_AP_AISImsserd'art+c+esur latable de cu+sson.
particulierementd'art+cleen plastique.L'air chaud qui s'echappe
pal I'eventdu four pourrait provoquer]'inflammationd'un ar[Jcle
inflammable,faJrefondre/amo!l+run articleen plastique,ou
provoquerune augmentationde pressionprovoquant I'eclatement
J'un recipientferme.
- NEJA_AIS laisserde la feu+lied'aJuminium,unesonde
thermometdque8 vmndeou un oujet metalliqueautre qu'un
ustenmtedecu_ssonsur fatable de cuisson entrer en contact
avecun _l_mentchauffant.
29
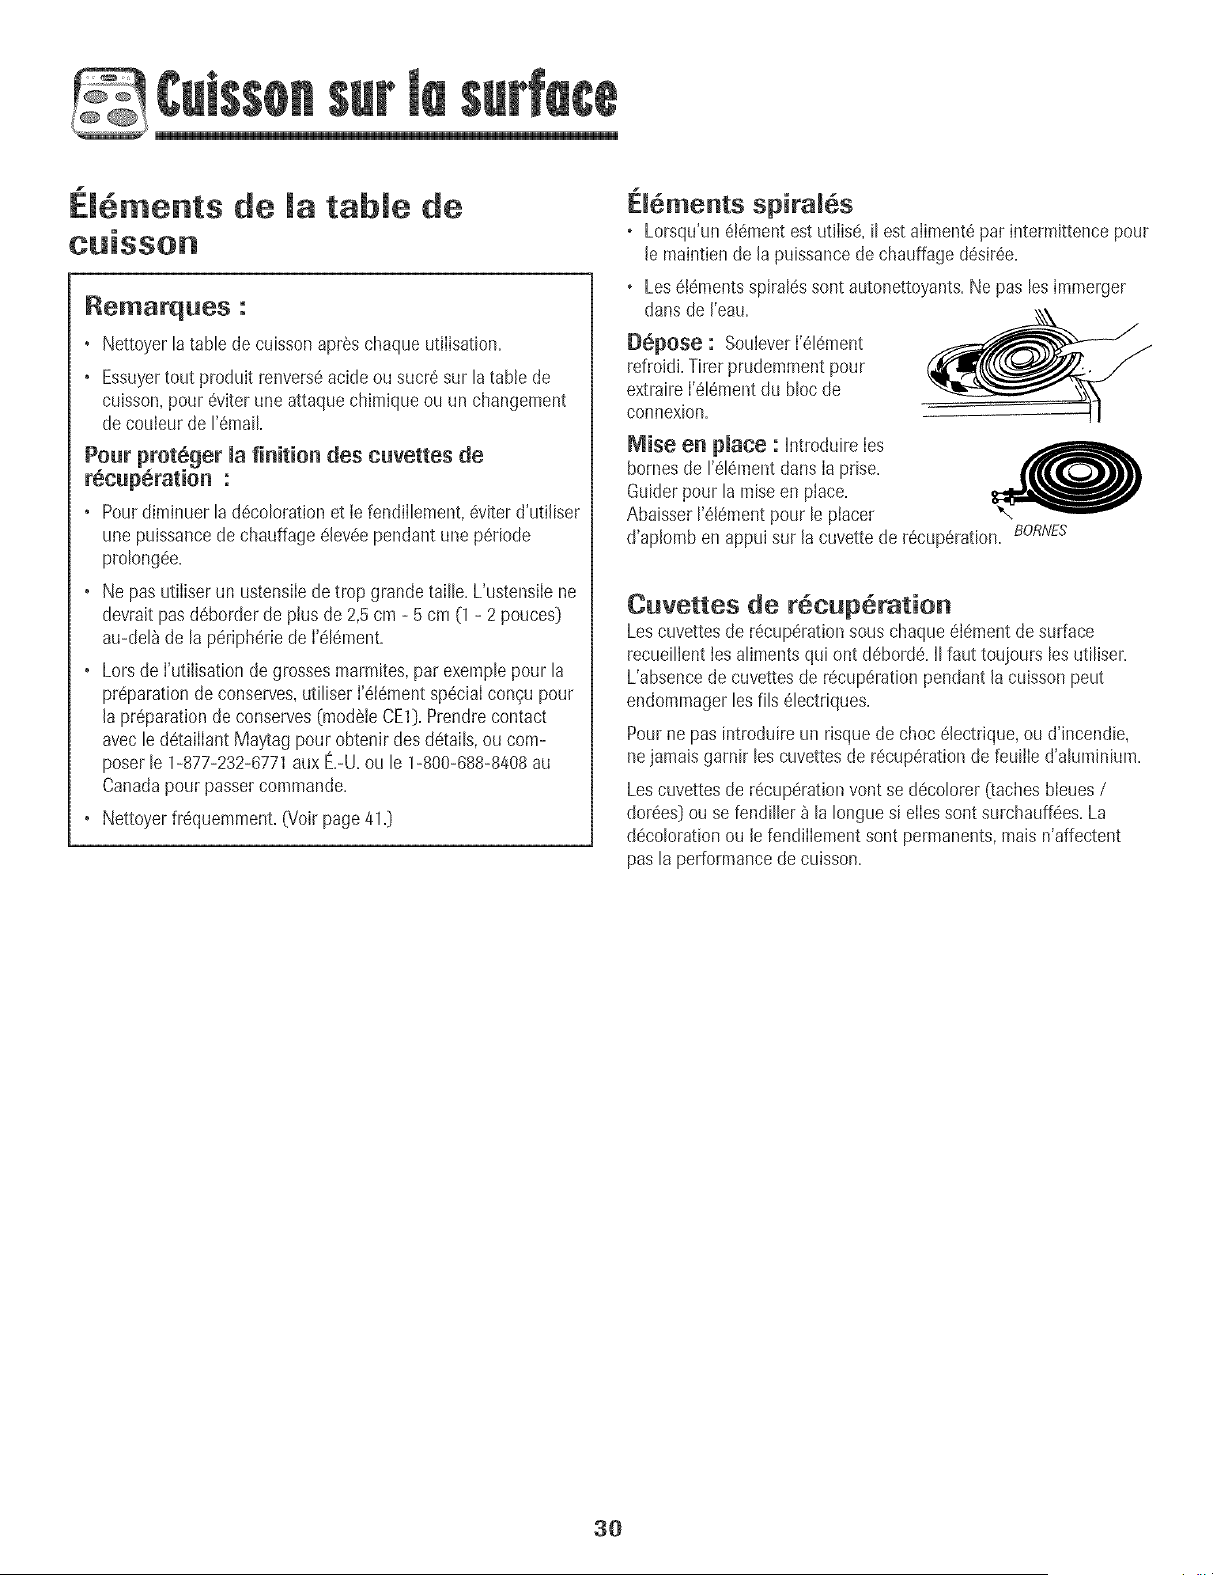
1
El .ments de la table de
Remarques :
• Nettoyerlatable de cuissonapr6s chaqueutiIisation.
• Essuyertout produit renvers6acide ou sucr6 sur latable de
cuisson,pour 6viter une attaquechimiqueou un changement
de couleurde 1'6mail
Pour prot6ger la finition des cuvettes de
r_cup6ration :
• Pourdiminuer la d6colorationet iefendiIlement,6viter d'utiliser
une puissancede chauffage61ev6ependant une p6riode
prolongee.
• Ne pas utiIiserun ustensiIede trop grande taille.L'ustensiIene
devraitpas d6borderde plus de 2,5crn - 5 cm (1- 2 pouces}
au-del_de la p6ripherie de I'616ment.
• Lorsde RJtilisationde grossesmarmites,parexemplepour la
preparationde conserves,utiliserI'6i6mentsp6ciaIcongu pour
la pr6parationde conserves(mod6leCE1}.Prendrecontact
avecle d6taiIIantMa_¢agpour obtenir des d6tails,ou com-
poser le 1-877-232-6771aux E.-U.ou le 1-800-688-8408au
Canadapour passercommande.
• Nettoyer%quemment. (Voir page41.}
EI6ments spiral6s
o Lorsqu'un6!6mentestutiIis6,il est aliment6par intermittencepour
le maintiende la puissancede chauffaged6sir6e.
®
dans de [eau.
[}6pOSe : SouleverI'616ment
refroidi.Tirer prudemmentpour
extraireI'616mentdu blocde
connexion.
Mise en place : Introduire Ies
homesde rel6ment dansIa prise.
Guiderpour la raiseen place.
Abaisser1'61ementpour le placer
Leselementsspiral6ssont autonettoyants.Ne pas lesimmerger
d'ap[omben appuisur [a cuvette de r6cup6rat[on. 80RtVES
Cuvettes de r6cup6ration
Lescuvettesde r6cup6rationsous chaque616mentde surface
recueillenties alimentsqui ont d6borde.II faut touiours lesutiliser.
L'absencede cuvettesde recuperationpendant la cuisson peut
endommagerlesills 61ectriques.
Pourne pas introduire un risquede choc 61ectrique,ou d'incendie,
nejamais garnir les cuvettesde recup6rationde feuille d'aluminium.
Lescuvettesde r6cup6rationvont se d6colorer(tachesbieues/
dor6es}ou se fendiller _ la Ionguesi eIIessont surchauff6es.La
decolorationou le fendiIIementsont permanents,mais n'affectent
pas la performancede cuisson.
3O
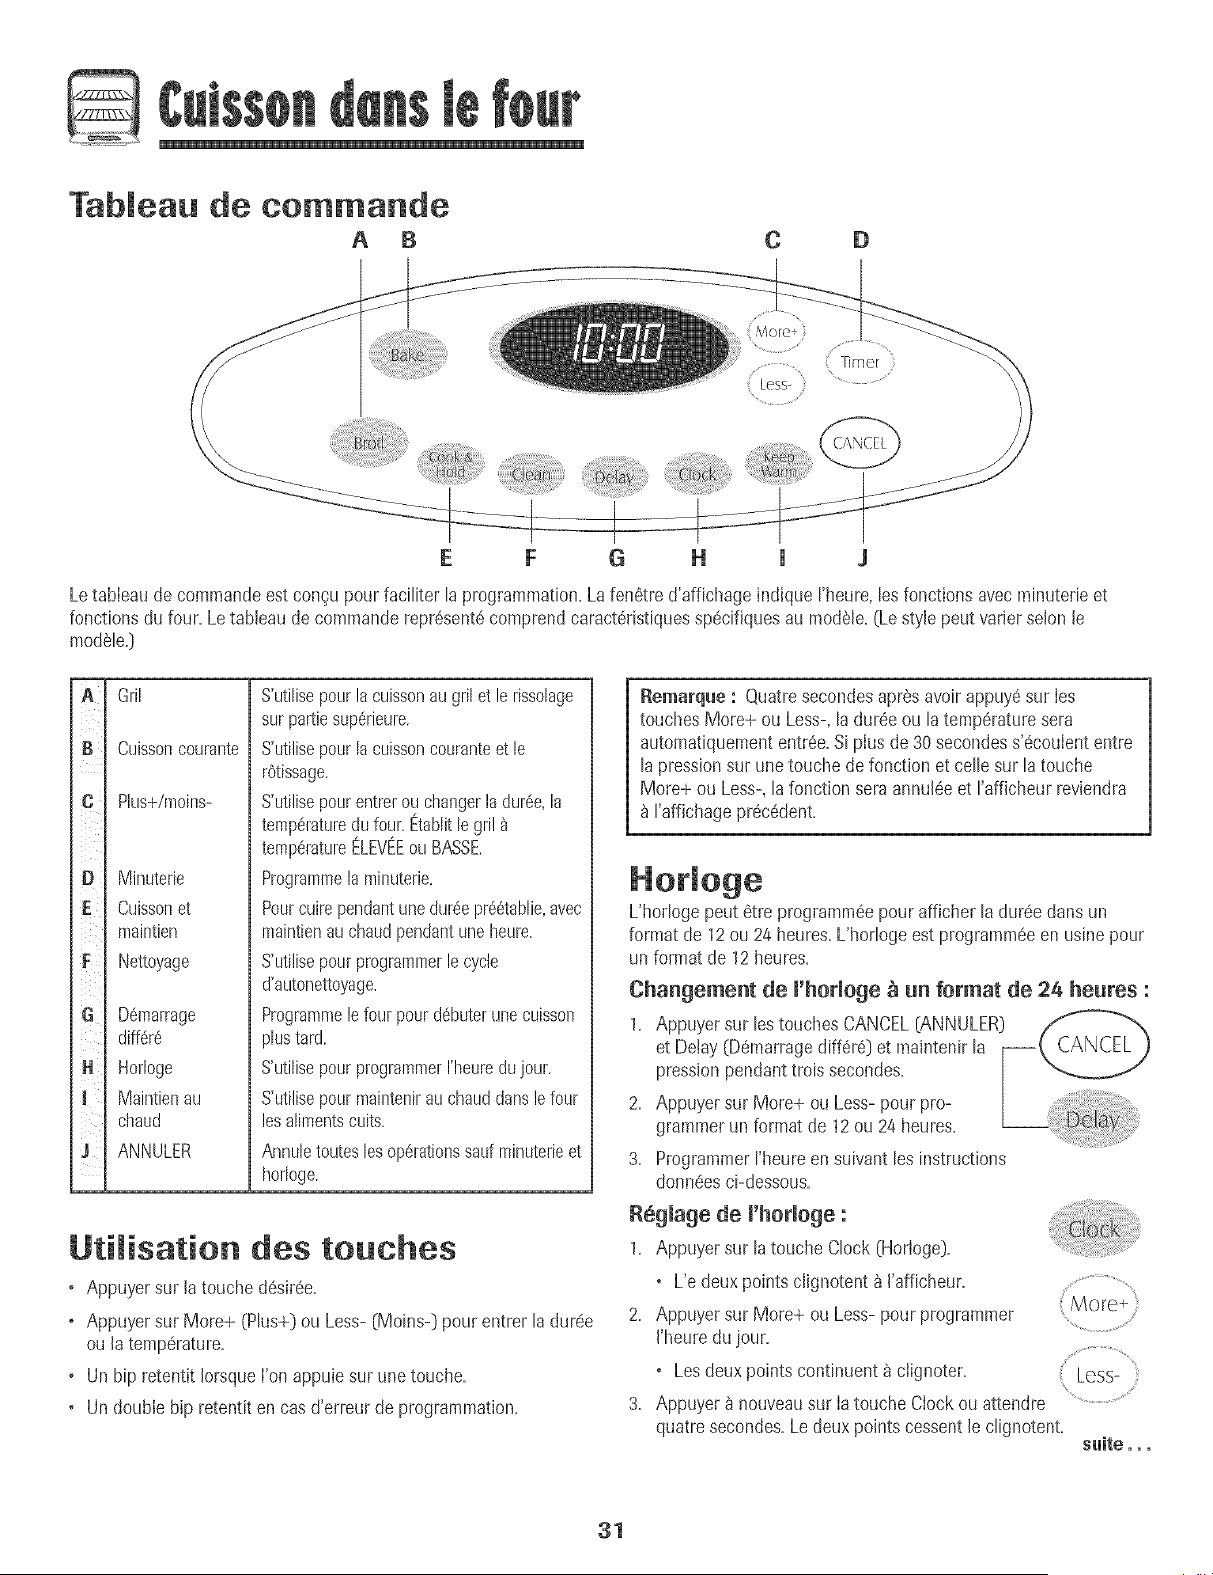
D
Tableau de commande
A B C 0
Timer
Less+ ..... ......
H J J
Letableaude commandeest con_u pour faciliter la programmation,La fen6tre d'affichageindique I'heure,losfonctions avecminuterie et
fonctions du four, Letableau de commandorepr6sent6comprend caract6ristiquessp6cifiquesau modSle,(Le style peut varier selonle
mod_te,]
A
B ¸
iiii_
G
H ¸
J
Gril
Cuisson courante
Plus+/moins-
Minuterie
Cuissonet
maintien
Nettoyage
D6marrage
diff6r6
Horloge
Maintienau
chaud
ANNULER
S'utilisepourlacuissonau gril et lerissolage
surpattiesup_rieure.
S'utilisepourlacuissoncouranteet le
rOtissage.
S'utilisepourentrerouchangerla dur6e,la
tetr_p_raturedufour. Etablitlegril
tetr}p6ratureELEVEEou BASSE.
Programmela minuterie.
Pourcuirependantunedur6epr_6tablie,avec
maintienauchaudpendantune heure.
S'utiiisepourprogrammerle cycle
d'autonettoyage.
Programmelefour pourd6buterunecuisson
plustard.
S'utJlisepour programmerrheuredujour.
S'utilisepourmaintenirauchauddansle four
lesalimentscuits.
Annuletouteslesop6rationssaufminuterieet
horloge.
Utilisation des touches
o Appuyersur la touche d(_sir6e,
o Appuyersur More+ (Plus+) ou Less-(Moins-) pour entrer la dur6e
ou la temperature,
o Un hip retentit IorsqueI'on appuie sur une touche,
o Un double hip retentit en cas d'erreur de programmation,
Remarque: Quatresecondesapres avoirappuy6sur Ies
touches More¢ ou Less-,ladur6e ou latemp6raturesera
automatiquemententr6e.Si plus de 30 secondess'#coulententre
la pressionsur unetouche de fonction et celle sur la touche
More¢ ou Less-,la fonction sera annul6eet rafficheur reviendra
raffichage pr6c6dent.
L'horJogepout Qtreprogramm6epour affiche+[a dur6edans un
format de 12ou 24 heures,L'holloge est programm6een usinepour
un format de 12heures,
Changement do l'horloge _ _ format de 24 he_res :
Appuyersur los touchesCANCEL(ANNULER]
et Delay(Demarragediff6r6] et maintenir la --!_ LANLhL ,)
pressionpendanttrois secondes.
Appuyersur More¢ ou Less- pour pro-
grammerun format de 12ou 24 heures.
ProgrammerI'heureen suivantles instructions
donn_esci-dessous.
Reglage de l'horloge :
1, Appuyersur la touche Clock (Horloge],
o L'e deux points clignotent _ I'afficheur,
2, Appuyersur More¢ ou Less-pour programmer
I'heuredujour,
o Lesdeux points continuent _ ciignoter,
3, Appuyer_ nouveausur Iatouche Clock ou attendre
quatresecondes,Ledeux points cessentle clignotent,
S¸.......
Less-
smite, oo
31
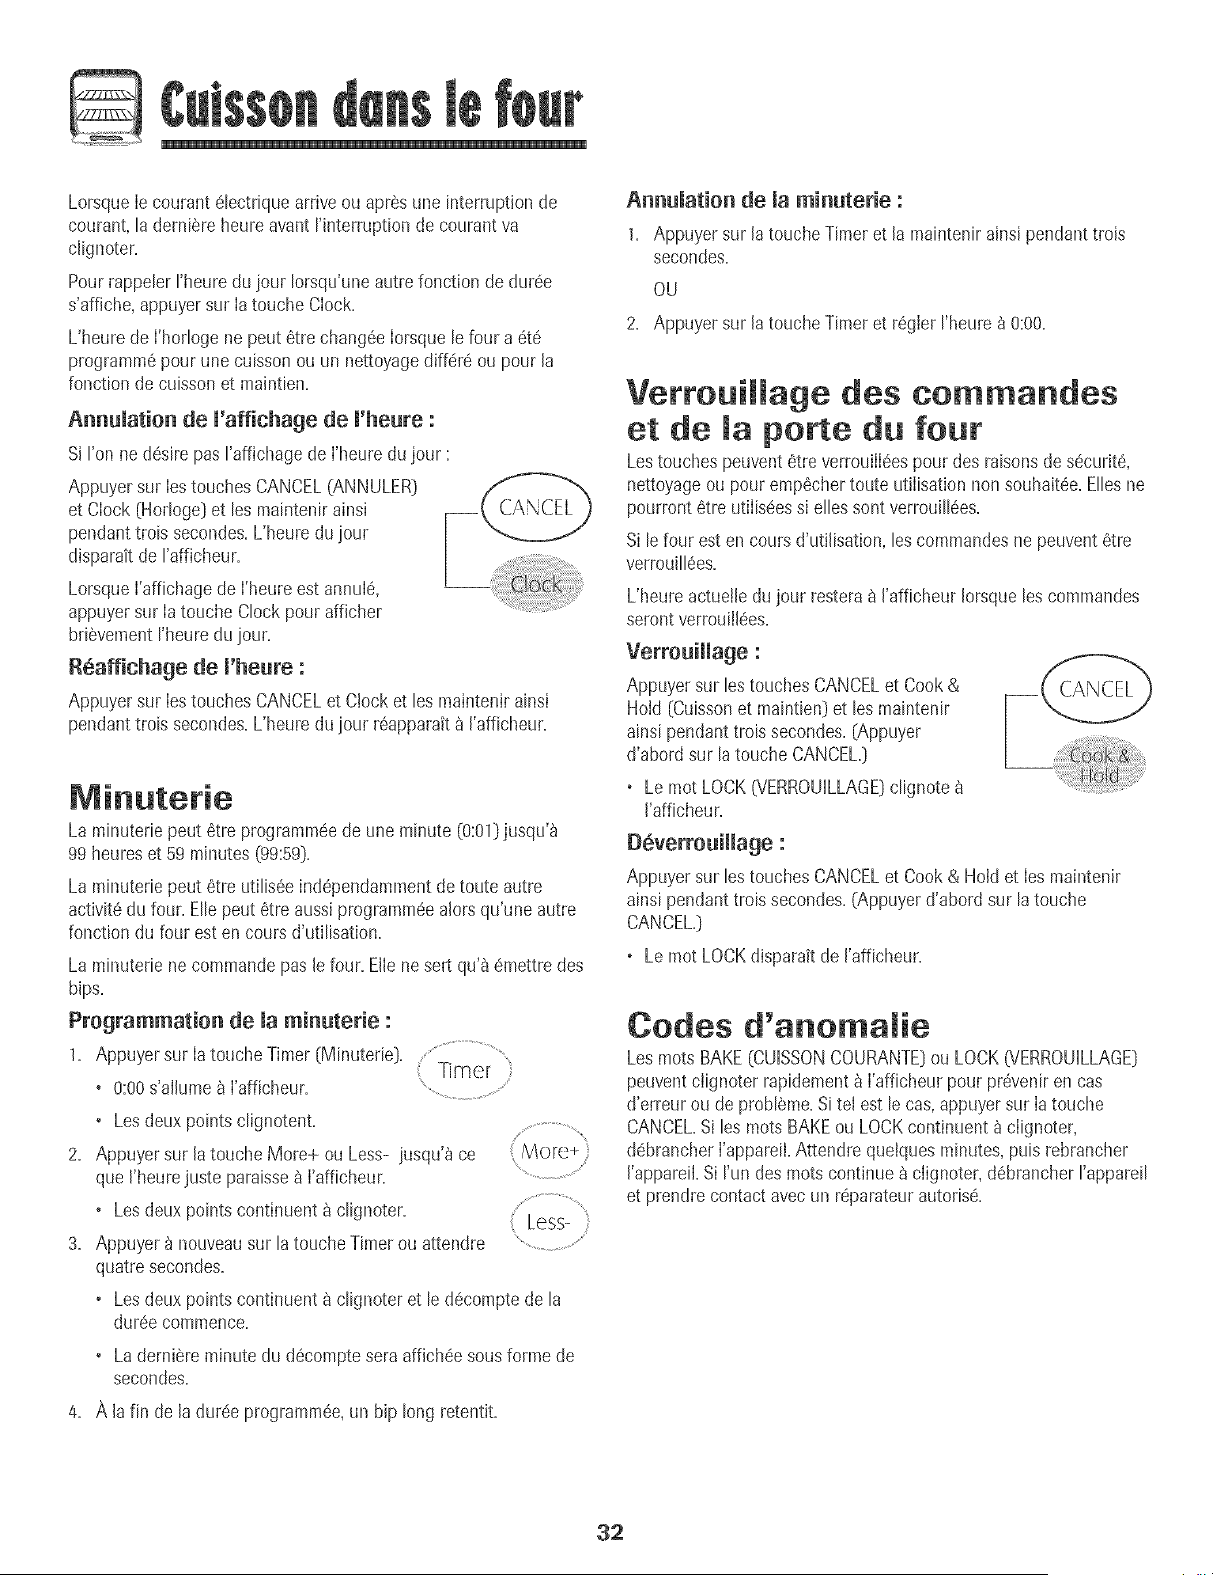
©
LorsqueIe courant6bctrique arriveou apres une interruption de
courant,!a demiere heureavant !'interruptionde courant va
c!ignoter.
Pourrappebr !'heureduiour brsqu'une autre fonction de dur@
s'affbhe, appuyersur Iatouche CIocL
L'heure de I'hodogene peut etre chang@ Iorsqueb four a ete
programmepour une cuissonou un nettoyagediffere ou pour la
fonction de cuissonet maintien.
Annumation de m'affichage de m'heure :
Si I'onne desire pasI'affmhagede l'heure du jour :
Appuyersur lestouches CANCEL(ANNULER}
et Ciock (Horloge}et los maintenir ainsi
pendanttrois secondes.L'heuredu iour
disparaitde rafficheur.
Lorsquei'affichagede i'heure est annule,
appuyersur ia touche Clockpour affbher
bri@ementrheuredu jour.
Reaffichage de m'heure :
Appuyersur bs touches CANCELet C!ocket los maintenirainsi
pendanttrois secondes.L'heuredu ]our rSapparatt_ I'afficheur.
La minuterie peut etre programme de une minute (0:00 jusqu'_
99 heures et 59 minutes (99:59}.
La minuterie pout etre utilis@ ind@endamment de toute autre
activit6 du four. Elle pout etre aussi prograpam@ aJors qu'une autre
fonction du four est en cours d'utilisation.
La minuterb necommandopas !e four. El!enesert qu'a emettredes
bips.
Programmation de maminuterie :
1. Appuyer sur Ia toucheTimer{Minuterie}. ................................................
Tim e r
0:00s'alhme _ I'afficheur.
• Losdeux pointsclignotent.
2. Appuyer sur la touche More+ ou Less- iusqu'_ ce More+ :
queI'heurejuste paraisse_ I'afficheur.
• Losdeux pointscontinuent _ clignoter. Less-
3. Appuyer _ nouveausur la touche Timer ou attendre ...................................
quatresecondes.
• Losdeux pointscontinuent _ clignoter et le d@omptede la
dureecommence.
• La derniere minute du decompte sera affichee sous forme de
secondes.
4. A la fin de la duree programme, un hip long retentit.
Annumation de maminuterie :
1. Appuyer sur la toucheTimer et la maintenir ainsipendant trois
secondes.
OU
2. Appuyer sur la touche Timeret regler I'heure_ 0:00.
Verrouim age des cow.andes
et de maporte du four
Lostouches peuventetre verrouiII@spour des raisonsde securite,
nettoyageou pour emp@hertoute utiIisationnon souhait@.Ellesne
pourront 6tre utiIis@ssi elles sontverrouill@s.
Sile four esten cours d'utilisation,les copamandesne peuvent 6tre
verrouill@s.
L'heure actue!ledujour restera_ I'afficheur Iorsquelescommandes
serontverrouiil@s.
Verrouimmage:
Appuyersur bs touches CANCELet Cook&
HoId [Cuissonet maintbn} et bs maintenir
ainsi pendanttrois secondes.{Appuyer
d'abord sur latouche CANCEL.}
• Le mot LOCK(VERROUILLAGE}clignote
I'afficheur.
Deverreuimmage:
Appuyersur lestouches CANCELet Cook& Ho!d et Iesmaintenir
ainsi pendanttrois secondes.(Appuyerd'abord sur latouche
CANCEL.}
o Le mot LOCKdisparak de I'afficheur.
Codes d'a o a ie
Los rootsBAKE(CUISSONCOURANTE}ou LOCK6,!ERROUILLAGE}
peuventc!ignoter rapidement_ i'afficheurpour pr@eniren cas
d'erreur ou de probleme.Si tel est lecas,appuyersur ia touche
CANCEL.Si bs rootsBAKEou LOCKcontinuent _ ciignoter,
debrancheri'appareiLAttendre que!quesminutes,puis rebrancher
!'appareii.Si run des rootscontinueb ciignoter,debrancherrappareil
et prendrecontact avecun r@arateur autoris_.
$2
D
Cuisson courante
Pregrammatien de macuisson ceurante :
1,
Appuyersur [atouche Bake (Cuissoncourante).
o Le mot BAKE(CUISSONCOURANTE)clignote.
o 000 clignote_ I'afficheur.
2. %lectionner Ia temperaturedu four. Latemperature More+,
peut 6tre programmeede 75 _ 290 °C(170_ 550°F), ........................................
Appuyerune lois sur Ia toucheMore+ (Plus+) ou
Less-(Moins-), ou appuyersur latouche More+ ou Less-
Less- et la maintenirainsi. .......................
o 175° (350°) s'ailume Iorsqueton appuie la
premierelois sur I'unedes touches.
o Appuyersur la touche More+ pour augmenter latemperature.
o Appuyersur la touche Less- pourdiminuer Ia temperature.
3. Appuyer_ nouveausur la touche Bakeou attendrequatresecondes.
o Le mot BAKEs'arretede clignoter et s'allume _ I'afficheur.
5,
6.
• 38° (100°] ou Ia temperaturereeiledu four sera affichee.La
temperatureaugmentera par intervallede 3 °C(5 °F)jusqu'_
ce que la temperaturepreprogrammeesoit atteinte.
LaisserIe four prechaufferpendant 8 _ 15 minutes.
• LorsqueIa temperatureprogrammeepour le four estatteinte,
un hip long retentit.
• Pourrappeterlatemperatureprogrammeependant le
prechauffage,appuyersur la touche Bake.
Placerla nourriture dartsle four.
Verifier I'avancementde lacuisson _ Iaduree minimalede
cuisson.Cuire phs Iongtempsau besoin.
Remarques sur cuisson courante
au four :
o Pear changer matemp_ratare da roar pendant macaisson,
appuyersur la touche Bake,puis sur Iatouche More+
ou Less-jusqu'_ ce que I'onobtienne la temperaturedesiree.
o Poar changer matemperatare da fear morsda
preehaaffage, appuyerdea× lois sur Ia touche Bake,puis sur
latouche More+ ou Less-jusqu'_ ce que latemperature
desireesoit affichee=
o Si I'onoublied'arreter Iefour, iI s'arreteraautomatiquement
apres 12heures.Si I'ondesire desactivercette fonction, voir
page36.
o Pourdes conseilssupplementairessur Ia cuissoncourante et le
rOtissage,voir la brochure Lacuissonsimplifiee.
7. LorsqueIacuisson estterminee,appuyersur
latouche CANCEL(ANNULER).
8. Retirerla nourriture du four.
Differences de cuissen entre 'aneien
four et nouveau
II est normalde remarquerquelques differencesdans la dureede
cuissonentre un four neuf et un four ancien.Voir Ajustementde la
temperaturedu four _ lapage 36.
Cuisson et maintien
Lafonction Cook & Hold (Cuissonet maintien)permet de cuire
pendant uneduree predeterminee,suivie parun cycle de maintien au
chaud d'une heure.
Programmation de la fonction cuisson et maintien :
1. Appuyer sur la toucheCook & Hold (Cuissonet
maintien).
• Lesroots BAKE(CUISSON)et HOLD
(MAINTIEN)clignotent. ..................................
• 000s'allume _ I'afficheur. ...............................
2. %tectionner Iatemperaturedu four. La temperature .........................................,
peut etre programmeede 75 _ 290 °C(170_ 550 °F}. Less- ,
Appuyer unefois sur Iatouche Mole+ ou Less- ou ...................................
appuyersur latouche More+ ou Less- et la maintenirainsL
• Appuyer sur la toucheMore+ pour augmenterla temperature.
• Appuyer sur la toucheLess- pour diminuer Iatemperature.
3. Appuyer _ nouveausur Jatouche Cook& Hold OU attendre quatre
secondes.
• Le mot HOLDclignote.
• 00:00clignote_ I'afficheur.
4. EntrerIaduree pendant laquelleI'ondesireque la cuissonait Iieu
en appuyantsur le touche More+ ou Less-. La dureede cuisson
peut etre programmeede 10minutes (00:10}a 11 heures,59
minutes(11:59}.
• Lesroots BAKEet HOLDs'allument _ I'afficheur.
• La dureede cuissons'alIumea I'afficheur.
• La dureede cuJssoncommencele compte_ rebours.
Lorsque maduree de cuisson s'est eoouiee :
• Quatrehips retentissent.
• Le mot BAKEs'eteint.
• Lesroots HOLDet WARM (CHAUD)s'allument.
• 75° (170°) parait _ ['afficheur.
33
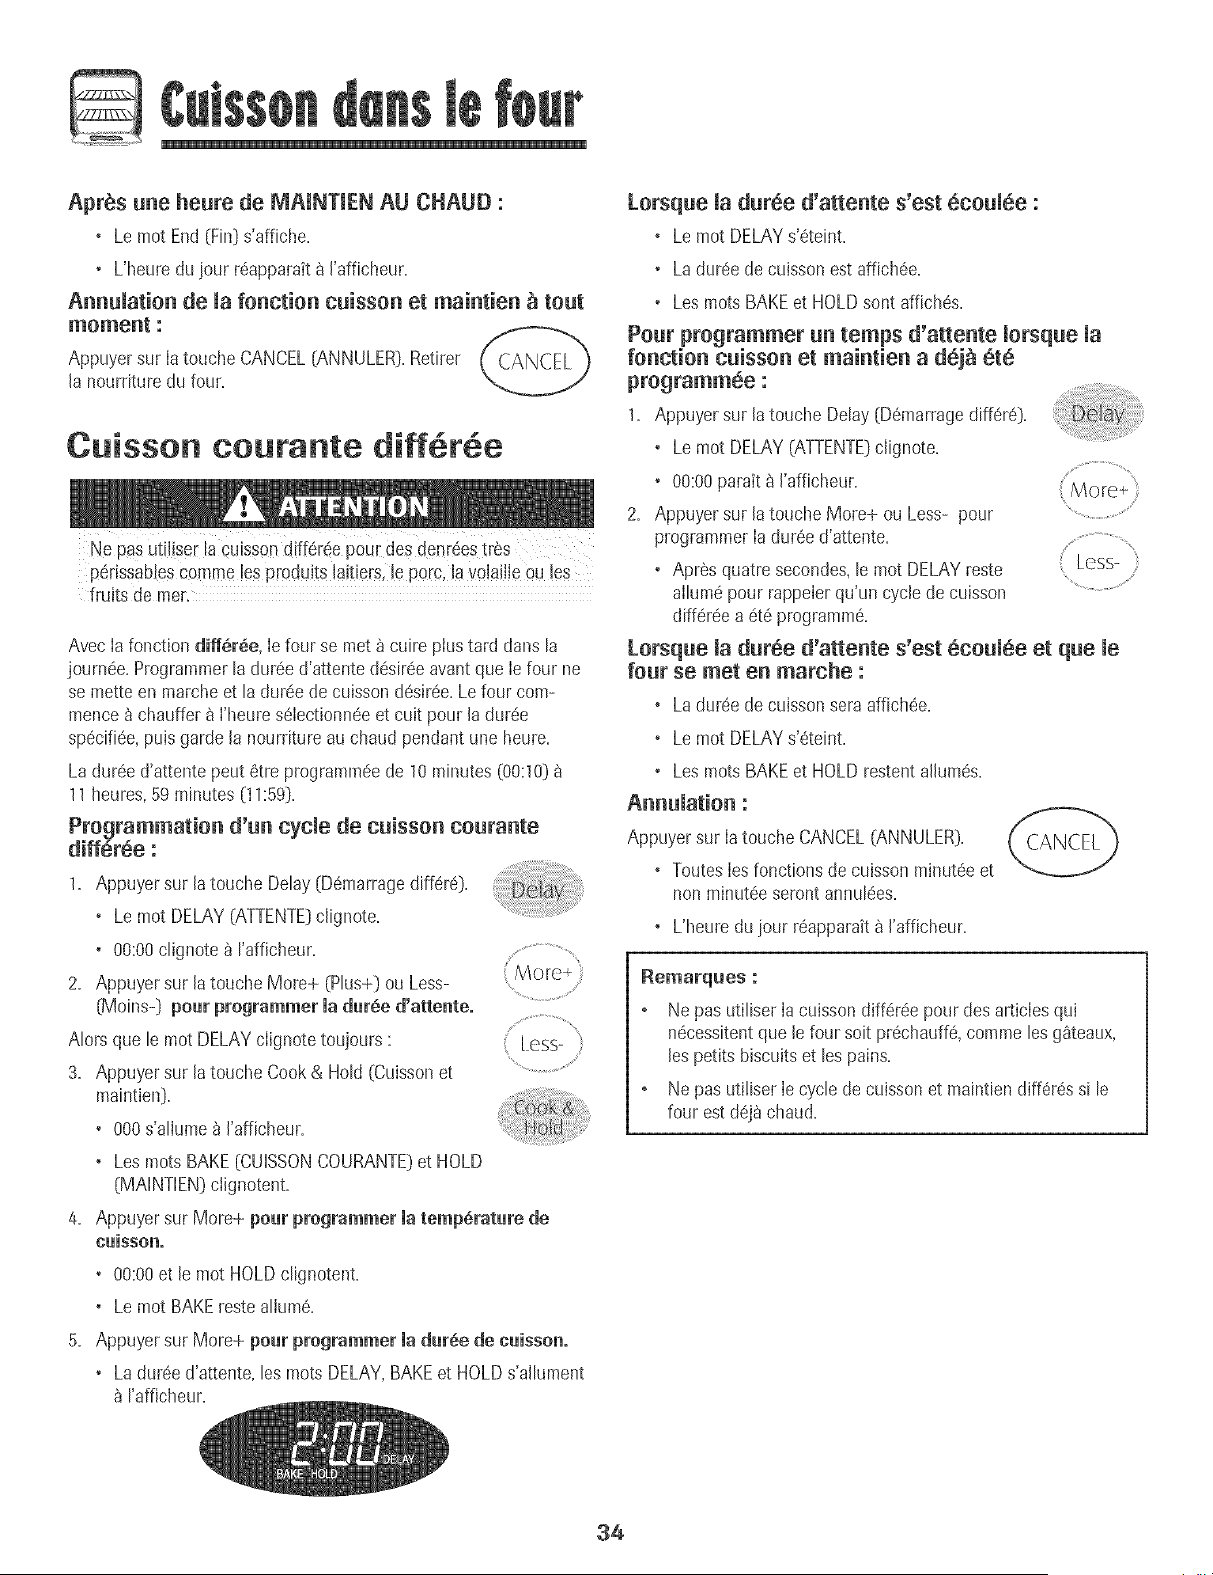
©
Apr_s une heure de MAmNTIEN AU CHAUD :
, Lemot End (Fin]s'affiche.
° L'heuredu iour r6apparaitb ['afficheur.
Annulation de la fonction cuisson et maintien _ tout
moment :
Appuyersur [atouche CANCEL(ANNULER[.Retirer (CANCFI "}
[a nourriture du four.
Cuisson courante diff r e
Ne pas utiliser lacuissondiffer_,epour des denr6estrSs
p@issablescomme les produits laitiers,le porc, la volaiJleou les
fruits de mer.
AvecIa fonctlon di#Sr_e, Ie four se met b cuire plustard dans la
journ6e. Programmerla dur6e d'attented6sir@ avantque Ie four ne
se mette en marcheet la dur@ de cuissond6siree.Lefour com-
menceb chaufferb I'heures6Iectlonneeet cult pour Jadur6e
sp6cifiee,puis gardeJanourriture au chaud pendantune heure.
La dur@ d'attentepeut 6tre programm#ede 10minutes(00:10)
11heures,59 minutes (11:59].
Pregrammatien d'un cycle de cuissen ceurante
differee :
1. Appuyer sur Jatouche Delay (D6marragediffere].
• Lemot DELAY(ATTENTE]clignote.
• 00:00clignote _ I'afficheur.
2. Appuyer sur Jatouche More+ (Plus+] ou Less-
(Moins-] pour programmer madurSe d'attenteo
AIorsque le mot DELAYclignote toujours : less- '1
3. Appuyer sur Jatouche Cook& Hold (Cuissonet
maintien).
• 000s'aliume_ Fafficheur.
• LesrootsBAKE(CUISSONCOURANTE]et HOLD
(MAINTIEN)clJgnotent.
4. Appuyer sur More+ pour programmer la temp@ature de
Cl.ligsol't,
• 00:00et le mot HOLDclignotent.
• Lemot BAKErestealium&
5. Appuyer sur More+ pourprogrammer ia dur_e de cuisson.
• Ladur6ed'attente, les roots DELAY,BAKEet HOLDs'a%ment
I'affJcheur.
lorsque la duree d'attente s'est 8coul6e :
° Le mot DELAYs'6teint.
• Laduree decuisson est affich6e.
• Les rootsBAKEet HOLDsent affiches.
Pour programmer un temps d'attente lorsq_e la
fe_ctio_ c_isse_ et mai_tie_ a d_j_ ete
pregrammee :
1. Appuyersur Jatouche Delay(D6marragediff@_].
• Le mot DELAY(ATTENTE]clignote.
• 00:00parait _ I'afficheur.
2. Appuyersur latouche More+ ou Less- pour
programmerIa durSed'attente.
• Apr_squatre secondes,le mot DELAYreste
Less-
allure@pour rappelerqu'un cyclede cuisson .................................
differeea 6t6 programm&
LorsqBe la dBree d'atteBte s'est ecoBlee et qBe le
four se met e_ marche :
• Laduree decuisson seraaffich6e.
• Le mot DELAYs'Steint.
• Les rootsBAKEet HOLDrestent alhmes.
A_ulatie_ :
Appuyersur Iatouche CANCEL(ANNULER].
• ToutesIesfonctionsde cuisson minuteeet
non minut_e serontannul_es.
• L'heuredujour rSapparatt_ I'afficheur.
Remarq_es :
Ne pas utiliserIa cuissondiff@6epour des articlesqui
n@cessitentqueJefour soit pr_chauff& commeles g_teaux,
Jespetits biscuitset les pains.
Ne pas utiliserIe cycle de cuissonet maintiendiffSr_ssi le
four estd@j_chaud.
34

Q
Maintien au chaud
Pourmaintenir auchaud (Jarls[e four des alimentscults et chauds
ou pour r6chaufferpains et assiettes.
Programmation du maintien au chaud :
1. Appuyersur [atouche KeepWarm
[Maintien au chaud).
• Le motWARM (CHAUD:)ctignote.
• 000parait _ rafficheur.
2. %lectionner tatemp6raturede maintienau chaud.
Celle-cipeut 6tre r6g[6ede 63 _ 90 °C [145_ ...............................
190°F).Appuyerune fois sur la touche More+
[Plus+] ou Less- (Moins-) ou appuyersur la ( Less-
toucheMore+ ou Less- et la maintenirainsi.
• 75° [170°) s'allume IorsqueI'onappuiela premierelois sur
rune destouches.
• Appuyersur Iatouche More+ pour augmenterIatemperature.
, Appuyersur latouche Less- pour diminuer la temp6rature.
Lemot WARM [CHAUD] et la temp6ratureseront affich6s pendant
que la fonction maintienau chaud est active.
Annumation du maintien au chaud :
1.Appuyersur latouche CANCEL[ANNULER). ('CANCEL _)
2. Retirerla nourrituredu four.
Remarques sur Ja fonction maintien
au chaud :
• Pourobtenir des qualit6salimentaireset nutritivesoptimales,
les alimentscuits au four ne doiventpas6tre gardes au chaud
plus de 1_ 2 heures.
° Pour empecherIesalimentsde dess6cher,Iesrecouvrir de
papieraluminium,sans serrer,ou d'un couvercle.
• Pour r_chauffer des petits pains :
- recouvrirles petits painsde papier ahminium sans serrer et
les placer aufour.
- appuyersur les touches KeepWarmet More+ pour
programmer75 °C [170 °F).
- r6chaufferpendant 12_ 15minutes.
• Pour r6chauffer des assiettes :
- placer deux piles de quatre assiettes maximum dans le four.
- appuyer sur [es touches Keep Warm et More+ pour
programmer 75 °C [170 °F}.
- r6chauffer pendant cinq minutes, arreter le four et laisser les
assiettes au four pendant encore 15 minutes.
- n'utiliser que des assiettes pouvant aller au four, _ v6rifier
avec le fabricant.
- ne pas poserdes assiettestiedes sur unesurface froide, les
changementsrapidesdetemperaturepouvantcasser
I'assietteou la fendiller.
Changement de Ja
temperature °F/°C
1. Le r6glagepar ddaut de I'usinepour latemperatureest en
Fahrenheit.
2. Pour modifier ce r6glage, appuyer sur Ies touches CANCEL et
Bake simultan6ment et maintener-les enfoncees pendant trois
secondes.
3. Un bip retentit et Ie r6glagecourant (°Fou °C)parait _ I'afficheur.
[Sivous nefaites pas de changement,la cuisiniSreretoume au
r6glageexistantaprSs30secondes.D
4. Pourmodifier le reglage,appuyersur Iatouch6 More+ ou Less-.
Appuyer _ nouveausur Iatouche pour retournerau r6glage
existant.Attendercinq secondeset le r6glage sera6ffectuQ.
35
Arr t auto atique/Mode
Lefour s'arr6teautomatiquementapres12heuress'il a 6tO
accidentellementlaisseen marche=Cettecaracteristiquede s6curite
pout etre arret6e=
Pour annuler l'arr_t 12 heures et faire fonctionner me
four en continu pendant 72 heures :
1= Programmerlefour pour une cuissoncourante (voir page33).
2= Appuyer sur la touche Clock (Horloge)et la
maintenirainsipendant cinq secondes=
• SAbsera affiche et clignotera pendant
cinq secondes=
• SAbsera ensuite affich_ en continujusqu'b ce qu'on rarr6te
oujusqu'_ ce que la duree limite de 72 heuressoit atteinte=
• Lemot BAKE[CUISSONCOURANTE)sera aussiaffichesi un
cyciede cuissoncouranteest en cours alors que lefour est en
modesabbat.
Toutes Iesautresfonctions (Minuterie,Maintien au chaud,
Nettoyage,etc=)sont verrouill6es,SAUFBAKE,pendant le mode
sabbat=
Annulation de la cuisson courante alors que le four
est en mode sabbat :
Appuyersur CANCEL(ANNULER).
• Lemot BAKEs'6teint_ rafficheur.
, Aucun hip sonorene retentit.
Annulation du mode sabbat :
1. Appuyer sur la toucheClock pendantcinq secondes.
OU
2. Apres 72 heures,le modesabbat setermine.
• SAbclignote pendantcinq secondes.
• L'heuredu iour revient& I'afficheur.
Ajustement de la temp6rature
du four
La pr6cisiondes temperaturesdu four a _t6 soigneusementverifi6e
I'usine=lI est normalde remarquerquelquesdiff6rencesdans la
cuissonentre un four neuf et un four ancien=Au fur et _ mesureque
loscuisinieressont moins neuves,la temp6raturedu four peut varlet=
II estpossibled'ajuster latemp6raturedu four si I'onpenseque Ie
four necuit pasou nerissole pas correctement=Pourdecider de
I'ajustement_ apporter,r6gIer le four _ une temperaturede 15°C
(25 °F)pius 6teveeou plus bassoque la temp6ratureindiqu6e darts
la recette,puis faire cuire Ia preparation=Lesr6suItatsdu <_test >>de
cuissondoiventdonner une id6edu nomb_ede degr6sduquel la
temp6raturedoit 6tre aiust6e=
Ajustement de la temperature du four :
1. Appuyer sur Ia toucheBake (Cuissoncourante).
2. Entrer285 °C(550°F)en appuyantsur la touche
More+ (Plus+).
3. Appuyer sur la touche Bake et Ia maintenirainsi
pendant plusieurssecondesoujusqu'_ ceque 0°
paraisse_ I'afficheur.
Si Ia temperaturedu four a 6td pr6c6demmentajustee,Ie
changementseraaffich6.Par exemple,si la temperaturedu four
a 6t6 reduitede 8 °C (15 °F),I'afficheurindiquera-8 (-15).
4. Appuyer sur la touche More+ (Plus+) ou Less- (Moins-) pour
ajuster latempSrature.
A chaquelois que I'onappuiesur une touche, la tempSrature
change de3 °C(5 °F).Latempdlature du four pout etre
augment6eou diminuee de 3 _ 20 °C (5 _ 35 °F).
5. L'heuredu iour r6apparaitautomatiquement8 I'afficheur.
IIn'est pas necessairede reaiusterIatemperaturedu four en cas
de panneou d'interruption de courant. Lestemperaturesde
cuissonau gril et de nettoyagene peuventetre aiust6es.
Remarques sur le mode sabbat :
• Le modesabbatpeut etre mis en marche_ tout moment,que
le four soit en marcheou non=
• Le modesabbatne peut pas 8tin mis en marchesi Ies
commandessont verrouilleesou laporte verrouilIee=
• Si lefour esten mode cuissonIorsquele modesabbat est
programme,le mot BAKE(CUISSONCOURANTE)s'Steint_:_Ia
fin du cycle decuisson=IIn'y aura aucunsignal sonoreaudible=
• Si reclairagedu four estsouhait_pendant le modesabbat,la
lampedevraetre alhmee avantque Ie modesabbat nedebute=
• Lorsquele modesabbata demarre,aucun hip de pr_chauffage
ne retentit=
Tous Iesmessageset les bips sontdSsactivSsIorsquelemode
sabbatest actiE
LeverrouiIIageautomatiquede la porte nefonctionne pas
pendant le modesabbat=
Si I'onappuiesur Iatouche CANCEL,un cycle de cuisson
couranteau four sera annuie=Cependant,le programmateur
resteraen mode sabbat=
Apr6s unepanne de courant, le four revienten modesabbatavec
72 heuresrestanteset aucun cycleactif.
36

Cuisson au grim
Programmation de la cuisson au gril :
1. Appuyersur [atouche Broil (Gri[).
o Le mot BROIL(GRIL)clignote.
o Le mot SEt (VALIDER)est aMche.
2. Appuyersur latouche More+ (Plus+)pour programmer un gril
temp6rature6iev6eou sur la touche Less- (Moins-] pour
programmerun grH_temperature basse.
o Les roots HI (ELEVEE)ou LO (BASSE)seront affich_s.
o %lectionner HIbroil (GriI_temp6rature6iev6e)(290 °C
[550°F]) pour un griI normal %lectionner LO broil (Gril
temperaturebasse](230°C [450°F]] pour un grii _ tempe,,ra-
ture inf_rJeured'aliments_cuisson plus Ionguecomme la
volaille.
3. Apr6s quatresecondes,Ie four se meten marche.
o Le mot BROHLreste allure6.
4. Pourun rissolagemaximum,p+ichauffer +'616mentdegril
pendanttrois ou quatre minutesavant d'ajouter la nourrJture.
5. PlacerIa nourrituredans lefour. Laisserla porte du four ouverte
d'environ 10cm [4 po] [premiere but6e}.
G.
7.
Retournerlaviande une fois a Ia moiti6 de Jadur6e de cuisson.
Lorsqueralimentest cuit, appuyersur Iatouche
CANCEL(ANNULER}.Retlrerla nourriture et la
JechefrJtedu four.
o L'heure du jour r6apparait_ ['afficheur.
Remarques sur Uacuisson au griU:
• Pourde meiIleursr6sultats lots du gril, se servird'un ustensJle
prevupour ce type de cuisson.
• Prevoirdes dur6esde cuissonau gril plus Iongueset un
rJssolage16gSrementmoinsdor6 si I'appareilfonctionne sur un
circuit de 208volts.
+ Le gril au r6glageHI (Elev6)est utilis6 pourIa majorit6 des
operationsde cuissonau gril. Utiliser le gril au r6giageLO
(Bas)pour Ia cuissonde metsdevantcuire plus Iongtemps,
afin de leur permettred'etre bien cuits sansrissolageexcess+f.
+ Pour changer la temperature du four pendant la cuisson
au gril, appuyersur Iatouche BmiI, puissur la touche More+
ou Less-pour changerentre la cuissonau gril _ tempSrature
81evSe(HI] et lacuisson au gdl _tempSraturebasse(LO].
• Lesdurees de cuisson au gr[I peuvent6tre plus Ionguesavec
unetemperaturede gril infSrieure.
+ Retournerla plupart des alimentsIorsque lamoJti8de la duree
pr6vuepour la cuissonau griI s'est_coul_e.
• PourdestempSratureset des conseilssupplementairessur la
cuissonau griJ,se reporter _ la brochureLa cuissonsimpIM6e.
Tablea de c isso all gril
,
I POSITION DES OUREE APPROX.
ALI_ENTS GRILLES. P_EMJER COTE
Beeuf
Bifteck,2,5cm (1po) d'6paisseur A point
Biencuit
Hamburger,2 cm (3/4 po} d'6paisseur Biencuit
Por_
Bacon
COtelette,2,5cm (1 po}
Tranchede jambon
Voiaiiie
Demi-poitrine
Fruits de met
Darnede poisson,beurr_e,2,5cm (1po) d'_paisseur
Queuede homard,85 8 115g (3 &4 onces]
G
G
Gou7
t DUREE APP_,
DEUXIE_E COTE
8 minutes
10 minutes
9 minutes
7 - 12 minutes
8 - 14 minutes
G- 9 minutes
G
G
G
G- 10minutes
10- 11 minutes
5 minutes
(sans retourner]
12- 14 minutes
3 - 7 minutes
Gril_ temperaturebasse Gril _ temperaturebasse
4 15minutes 15- 25 minutes
10 - 15 minutes
7 - 10 minutes
(sansretourner]
(sansretourner]
Remarq_e : Cetableau n'est qu'un guidede suggestions.Lesdur#espeuventvarierselon raliment _ cuire.
37
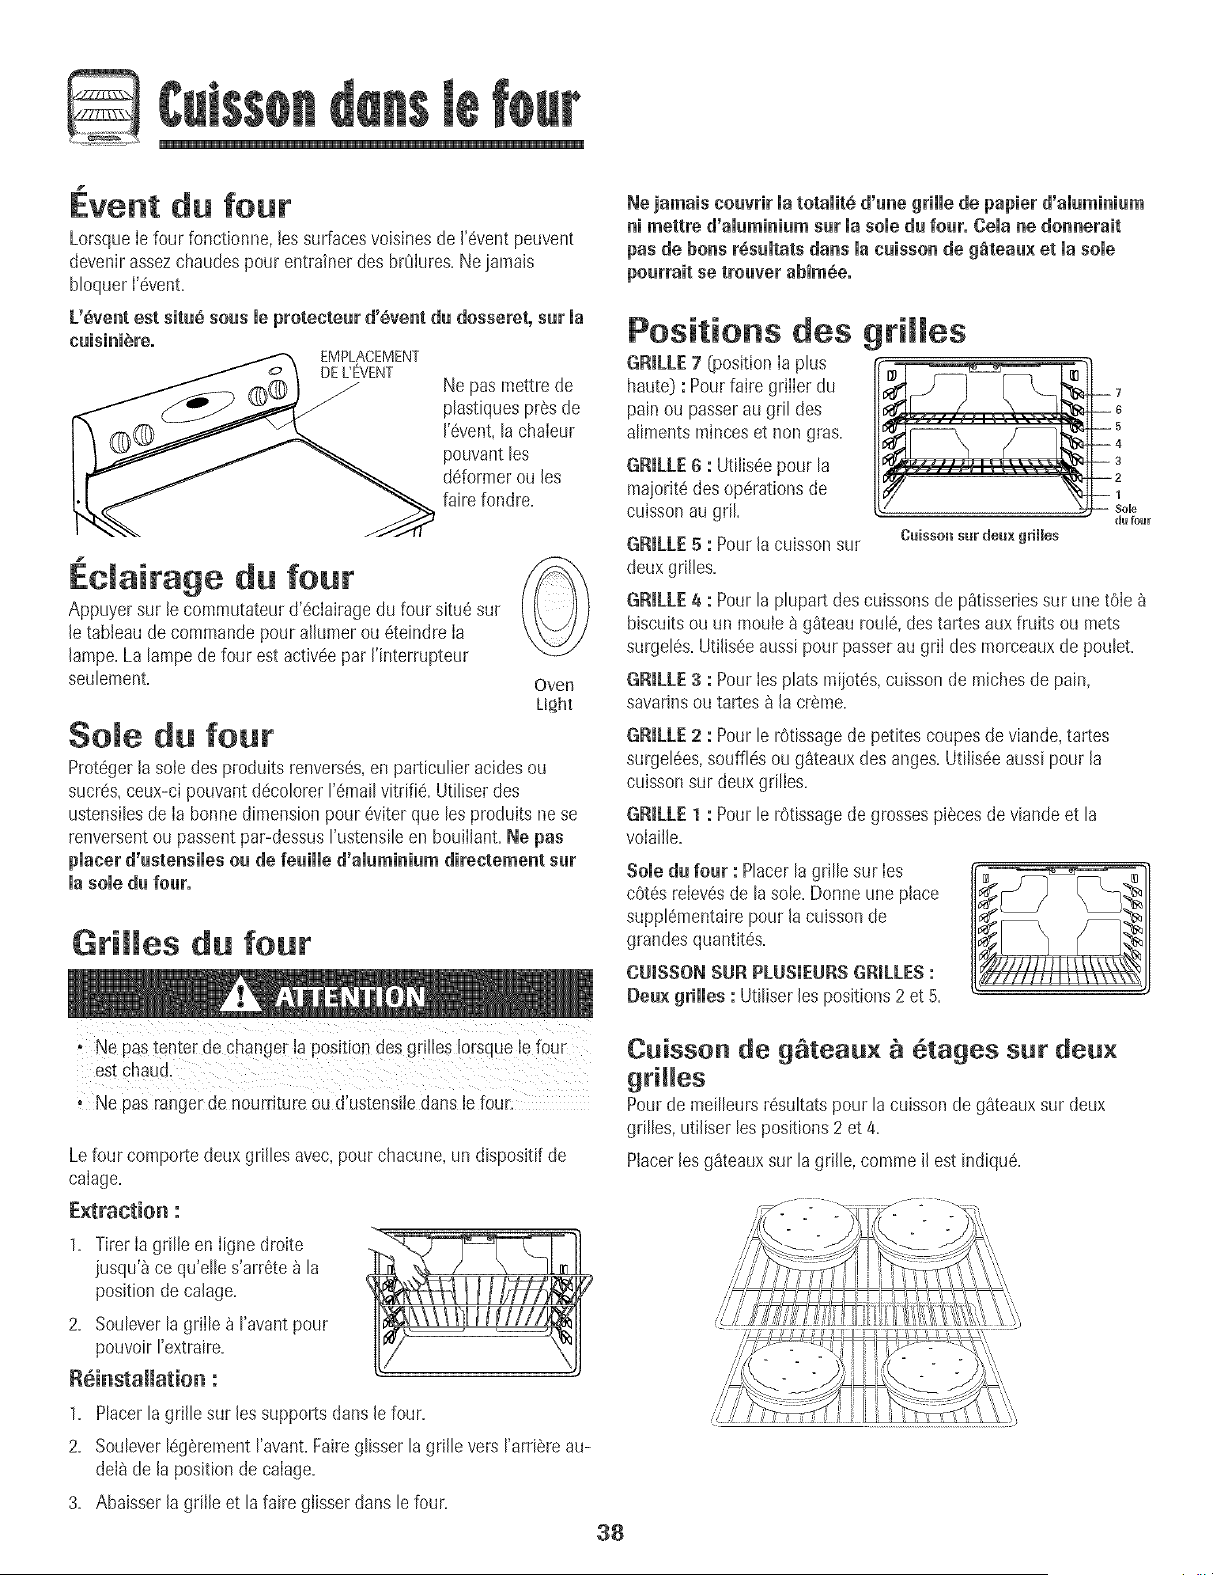
@
1
Event du four
LorsqueIe four fonctJonne,lessurfacesvoisinesde 1'Gventpeuvent
devenirassezchaudespour entrainerdes brOlures.Nejamais
Noquer I'@ent.
[/_vent est site8 sees meprotecteer d'_vent de dosseret, set me
EMPLACEMENT
DE L'EVENT
J
eeisinibre.
Ne pasmettre de
plastiquesprSsde
1'Gvent,la chaleur
pouvantles
dGformerou les
faire fondre.
Eclairage da fear
Appuyersur lecommutateurd'Gclairagedu four situ6 sur
le tableaude commandepour alhmer ou eteindre Ia
lampe.La lampede four est activeepar I'interrupteur
seuIement.
Ovee
Light
Sole da fear
Protegerlasole des produits renversGs,en particulier acidesou
sucres,ceux-ci pouvantdrGcolorerI'r_mailvitrifie. Utiliserdes
ustensilesde Ia bonne dimensionpour @iter qua les produitsnese
renversentou passentpar-dessusI'ustensileen bouiIlant.Ne pas
placer d'estemsiles oe de feeiiie d'alemimiem directememt set
mesole de fear.
Grilles da fear
tNe Pastenter de changerIa POSitiOndesgrilles [ersque lefour
' Ne pas rangerde nourritureeu d'ustensiledans lefour:
Le four comportedeux grilles avec,pourchacune,un dispositif de
caIage.
E×traction :
1. Tirer Ia grille en Iigne dmite
jusqu'_ ce qu'elle s'arrGte_ la
positionde calage.
2. Souleverla griIle _ I'avantpour
pouvoirI'extraire.
RGinstallation :
1. Placerla grille sur [assupports darts[e four.
2. Soulever16g_rementI'avant.Fake glisserla grille vers I'arriSreau-
de[_de la position de caIage.
3. Abaisser la grilleet la fake glisser clansle four.
Ne jamais eeevrir la totalit6 d'emegrille de papier d'alemimiem
mimettre d'amemimiemser masole du fear. Cola medommerait
pas de boresrGsemtatsdamsmeceissom de g_teae× et masome
Positions des grilles
GRILLE7 (positionIa plus
haute) : Pourfake griIIerdu
pain ou passerau gril des
alimentsminceset non gras.
GRILLE6 : Utiliseepour la
maioritedes operationsde
cuissonau griL
GRILLE5 : Pour[acuissonsur
deux grilles.
1
du four
Ouisson sur deux grilles
GRILLE4 : Pourla plupart descuissons de p_tisseriessur une t6Ie
biscuitsou un moule _ g_teauroule, destartes aux fruits ou mets
surgeles.UtiiJseeaussipour passerau griI des morceauxde poulet.
GRILLE3 : PourIesplatsmiiotes,cuisson de mJchesde pain,
savarJnsou tartes & [acrSme.
GRILLE2 : Pour[e rGtissagede petites coupesdeviande,tartes
surgelees,soufflesou g&teauxdes anges.UtiiisGeaussi pour [a
cuissonsur deux grilles.
GRILLE1 : Pour le r0tissagede grossespisces de viande et la
volaii[e,
Sole de fear : Placerlagrille sur los
cGtGsrelevesde la sole. Donneune place
supplementairepour [acuisson de
grandesquantitGs.
CU[SSONSUR PLUS[EURSGRILLES:
Deex grilles : Utiliserles positions2 et 5,
Caisson de g tea x tages deux
griHes
Pourde meilleursr_sultats pour la cuisson degSteauxsur deux
grilles,utiliser lespositions2 et 4.
Placerlesg_teauxsur la grille, commeil estindiqu&
38
Four autonettoyant
II est normal que certames pJ#cesde [a cuisini_re dewennem
tr_s chaudes Jots d'un cycle de nettoyage.
o Pour 6vJter que [a porte du four ne subisse des dommages, ne
pastenter de I'ouvrir Iorsque le mot LOCK @'ERROUlLLAGE}es[
visibie sur ['afficheur.
o Eviter de tOUCherla surface de cuisson, la porte, le hubbt et la
zone de i'dvent du four [ors d'un cycle d'autonettoyage
o Ne pas utiliser de net[oyant pour four d_ commerce sur ie fin[
du four ou sur tout autre composant du four. CeJaabimeraJt le
fini ou bs composan[s ou Tour.
Le cycied'autonettoyageutilise destemp6raturessup6rieures_ Ia
normaIepour assurerIe nettoyageautomatiquede la totaiit6 du four.
Si b four esttr6s sale, il est normaIqu'on observelaformation de
rum@ ou de flammesdurant ie nettoyage.Nettoyerlefour
intervalbs r6gulierspIutOtque d'attendre une accumulation
importantede r@idus.
Durant b processusd'autonettoyage,il convient de bien a6rer la
cuisinepour 61iminerles odeursnormalement6raisesdurant le
nettoyage.
Avant I'autonettoyage
1. EteindreIa lampe du four avant le nettoyage.Celle-cipourrait en
effet griibr.
2. Enbver la I@hefrite,tous bs plats et iesgrilbs du four=Les griIIes
risquentde se d@oIoreret de ne plus glisseraussJbienaprSsun
cycled'autonettoyagesi on ne Iesenl@epas.
3. Nettoyerle cadre du four, Ie cadrede la porte [zone_ I'ext6rieur
duioint) et autour de I'ouverturedartsIejoint de laporte, _ I'aide
d'un produit de nettoyagenonabrasif commeBenAmi* ou d'eau
additionn@de detergent=Le processusd'autonettoyagene
nettob pas ceszones=Eibs doivent6tre nettoy@spour emp@her
lasaiet6 de s'incrusterpendant le cycle de nettoyage.(Le joint
assurei'6tanch6it6autour de la porte et
du hubbt du four.) \,
4. Pouremp@hertout dommage,ne [)as
nettoyerni frotter le joint qui se trouve
autourde la porte du four. Cejoint est
con_upour @iter bs pertesde chabur
pendantIe cycle d'autonettoyage.
5. EliminerIesr@idus de graisseou de produitsrenvers6ssur la
sob avantie nettoyage.Ceciemp@he laformation de flammes
oude rum@ durant ie nettoyage.
6. Essuyerbs r@idussucr@et acides,comme bs patatesdeuces,
latomate ou bs sauces_ basede Bit. La porcelainevJtrifi@
possSdeunecertaine r@istanceauxcompos@acides,maisqui
n'est pas limit@. Eriepeut se d@oIorersi les r@idusacidesou
sucr@ne sentpas eniev@avantde commencerI'autonettoyage.
Programmation de ['autenetteyage :
Remarque : La temp6raturedu four dolt 6tre situ6een dessous
de 205°C[400 °F) pour programmerun cycb d'autonettoyage.
1. Fermerla porte du four.
2. Appuyer sur la touche Cban CNettoyage}.
• Le mot CLEAN(NETTOYAGE}clignote _ I'afficheur.
3. Appuyer sur la touche More+ (Plus+) ou Less-
(Moins-}.
• CL-M (Nettoyage- salet6 moyenne,3 heures}
est affich6.
Si Ia porte n'est pas ferm@, desbips retentissentet
le mot_ door>>@orte}parait _ I'afficheur.Si la porte n'est pas
ferm@ dans Ies 45secondes,I'op6rationd'autonettoyageest
annul@ et I'afficheurrevient_ I'heuredu jour.
4. Appuyer sur la touche More+ ou Less- pour voir ddiler les
diff6rents r6glagesde rautonettoyage.
CL-H (Nettoyage- satet6@aisse,4 heules}
CL-M (Nettoyage- saIet6moyenne,3 heures}
CL-L (Nettoyage- saIet6I6g6re,2 heures}
Lechoix du niveaudesaIet6du four programme
automatiquementla dur@ du cycle d'autonettoyage.
5. Apr6s quatre secondes,le four commence lenettoyage.
• La dur@ de nettoyagecommencele d@omptea I'afficheur.
• Le mot LOCK6iERROUiLLAGE}parait _ I'afficheur.
o Lemot CLEANparait _ ['afficheur.
D_marrage diff6r6 d'un cycle d'autenetteyage :
1. Appuyer sur [a toucheDeJay[D@_arragediffSr@.
• Le mot DELAY[ATTENTE}clignote.
• 00:00parait _ ['afficheur.
2. Appuyer sur la touche More+ ou Less- pour
programmerla dur@ d'attenteavantque ne
commenceIe cycb. LaOur@d'attente peut _tre
r_g[@,de 10 minutes(00:10)_ 11heures,59 Less-
minutes(11:59}. .........................................
3. Alors que Ie mot DELAYc@note, appuyersur la
touche Cban (Nettoyage).
• Le mot CLEAN(NETTOYAGE}va c@noter.
/s ...........................,,
less-
suite,,,
*Lesnoms de marquedes produits de nettoyagesent des marquesd@os@sdes diff6rentsfabricants.
$g
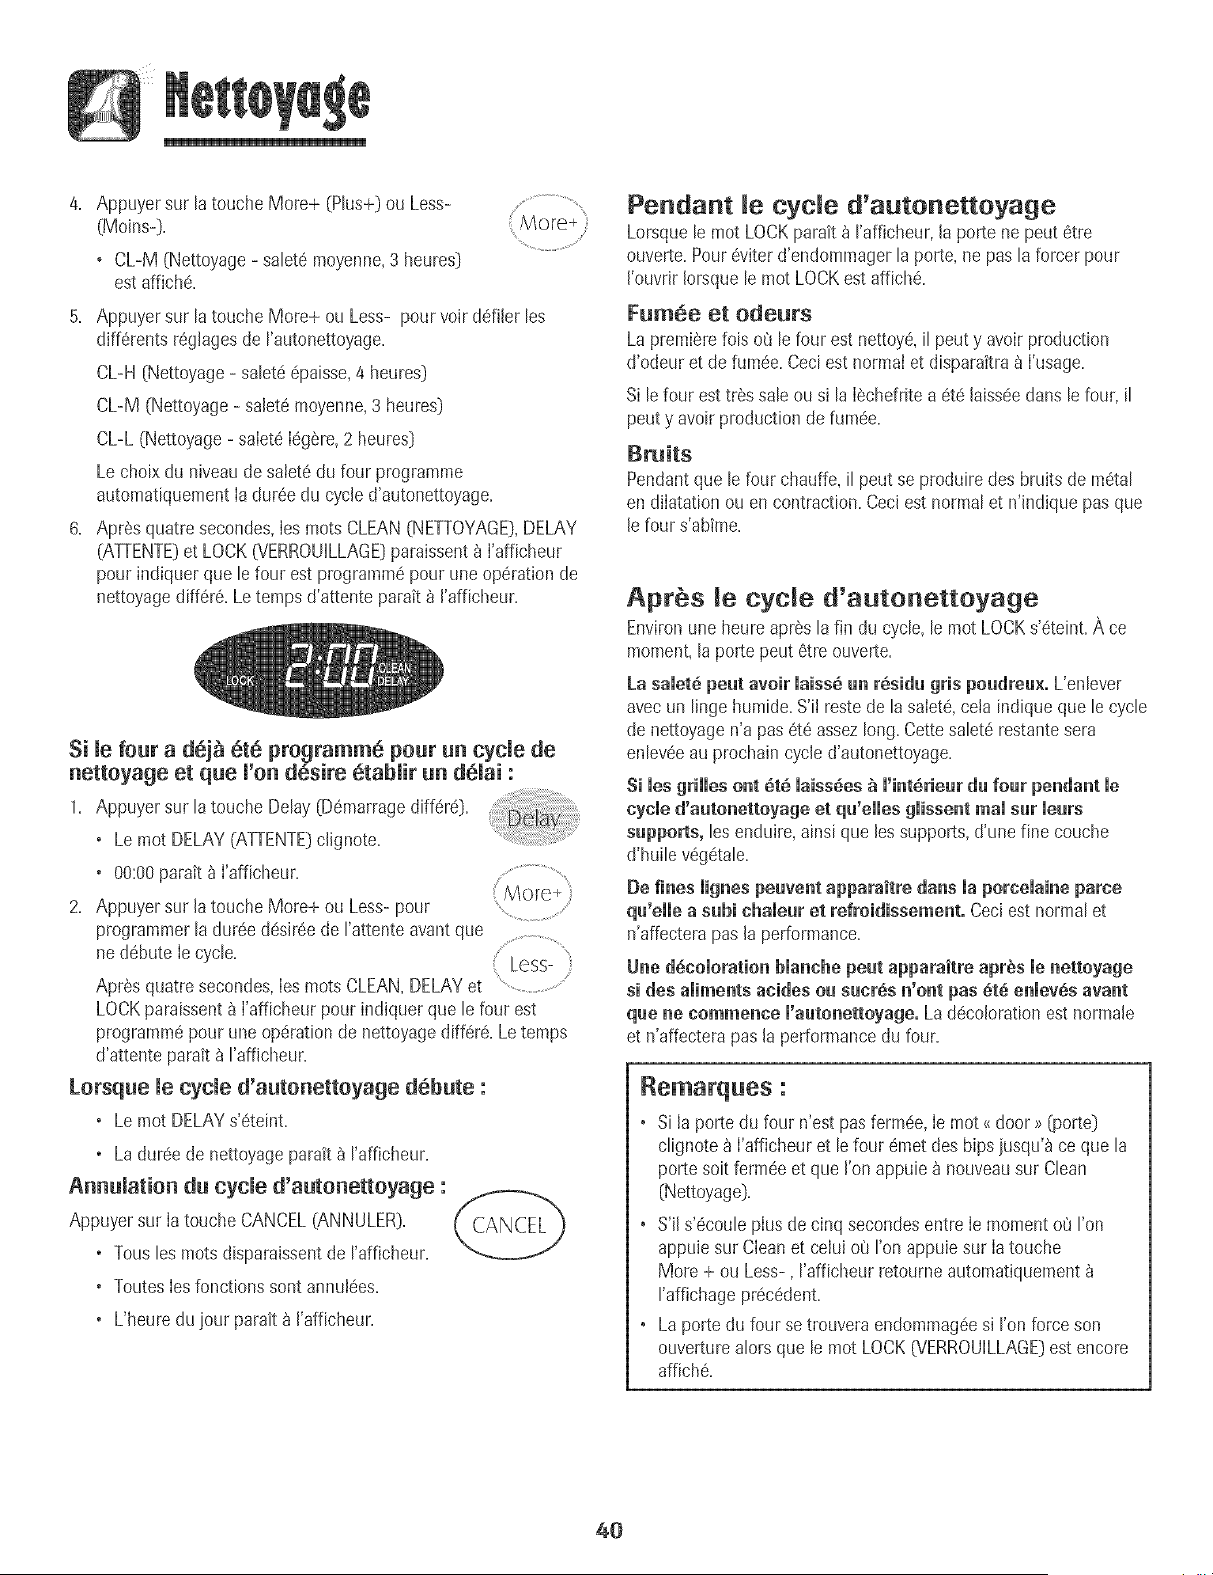
Appuyersur latouche More+ (Plus+)ou Less- ............................
[Moins-)+
o CL-M (Nettoyage- sa[et#moyenne,3 heures]
estaffiche+
5+ Appuyersur la touche More+ ou Less- pour voir driller les
diff6rentsr6glagesde I'autonettoyage+
CL-H [Nettoyage- salet66paisse,4 heures]
CL-M (Nettoyage- salet6 moyenne,3 heures]
CL-L (Nettoyage- salet616g_re,2 heures]
Le choixdu nlveaude salet6 du four programme
automatiquementla dur6e du cycle d'autonettoyage+
6+ AprSsquatre secondes,les roots CLEAN(NETTOYAGE],DELAY
(ATTENTE]et LOCK0/ERROUILLAGE)paraissent_ l'afficheur
pour indiquerque le four est programm6pourune op6rationde
nettoyagediff6r6+Le temps d'attente parait _ ['afficheur+
Si [e four a dej_ ete programme pour un cycle de
nettoyage et que ['on desire 6tabiir un deiai :
1+ Appuyersur [atouche Delay [D6marragediff6re]+
o Le mot DELAY(ATTENTE]c[[gnote+
o 00:00paratt b ['afficheur.................................
2. Appuyersur [atouche More+ ou Less-pour ...........................
programmer[a dur6edesJr6ede ['attenteavantque
nedSbute[e cycle. { Less- }
Apr_squatre secondes,[esroots CLEAN,DELAYet .............................
LOCKpara[ssent_ ['aff[cheurpour indiquer que [e four est
programmepour une op#rat[onde nettoyaged[ffer#+Letemps
d'attenteparait _ ['affJcheur+
Lorsque [e cycJe d'autonettoyage dSbute :
o Le mot DELAYs'6te[nt+
o La dur6e de nettoyageparait _ ['afficheur+
Annu[ation du cycJe d'autonettoyage :
Appuyersur [a toucheCANCEL(ANNULER)+
o Tous[es rootsdisparaissentde ['afficheur+
o Toutes[es fonctionssont annulees+
o L'heuredu jour parait _ ['afficheur+
Pendant [e cycle d'autonettoyage
Lorsque[e mot LOCKparait _ ['afficheur,[a porte ne peut 6tre
ouverte+Pour6viter d'endommager[a porte,ne pas[a forcer pour
['ouvrJr[orsque[e mot LOCKest affich6+
Fum6e et odeurs
La premierefois o_ lefour est nettoy#,il peut y avoir production
d'odeur et de fum_e+Ceciest norma[ et disparaitra_ ['usage.
Si [efour esttr6s saleou si [a [_chefritea 6t6 [aiss6edans [e four, i[
peut y avoir productionde fum6e+
BruitS
Pendantque [efour chauffe, i[ peut se produiredes bruits de instal
en dilatationou en contraction+Cec[estnormal et n'ind+quepasque
[e four s'abtme+
gprbs [e cycle d'autonettoyage
Environuneheure apres [a fin du cycle, [e motLOCKs'6teint+#,ce
moment,[aporte peut 6tre ouverte+
La samet6peut avoir maiss_an r6sidu gris poudma×.L'enlever
avecun [inge hum[de.S'[Jreste de [asaiete,cela [nd[queque [e cycle
de nettoyagen'a pas 8t_ assezlong+Cettesa[et6restantesera
en[ev6eau pmchain cycled'autonettoyage+
Si lea gillies ont 8t8 iaissees_ i'interieur da roar pendant me
cycle d'autonettoyage et qu'eiies giissent maJ sat Jeurs
supports, [es enduire,ainsi que lessupports, d'une fine couche
d'huiIev6getaIe+
De fi_es iig_es pervert apparaitre da_s is porceiai_e parce
qa'eJJea s_bi chaJeur et refroidisseme_t. Ceciest normal et
n'affecterapas [a performance.
U_e d_coioratio_ blanche peut apparaitre apr_s me_ettoyage
si des aliments at[des ou sacr_s _'o_t pas _t_ e_mev_savast
qae _e eomme_ce m'aato_ettoyage.Lad_co[orationestnorma[e
et n'affecterapas [a performancedu four+
_emarqmes :
• Si [a porte du four n'est pas ferm6e,[e mot <_door >>[porte)
cIignoteb ['afficheur et [efour _metdes hips jusqu'_ ce que [a
porte soitfermee et que ['onappuie a nouveausur Clean
[Nettoyage].
• S'i[ s'_couIeplus de cinq secondesentre [e momentoQ['on
appuiesur Cleanet celu[ o_ ['on appuie sur [a touche
More + ou Less-, ['afficheur retourneautomatiquement
raffichage precedent.
• Laporte du four se trouveraendommag6es[ ron forceson
ouvertureaIorsque [e mot LOCK(VERROUiLLAGE}est encore
affich6.
40

M6thodes de nettoyage
* Avant route manipulation ou operation de nettoyage, verifier que
I'appareil est arr_t_ et que teas ies eompesantssent froids, afin
d'_viter des dommages oa des br_iures.
. Pour_viter [aformation de taches ou un changemen[ae cou_eul nettoyer
o Aprestout ddmontagede composams veillera eflectuer un remontage
correct.
Les nomsde marquesent des marques
d6pos6esdescliff,rents fabricants.
_ Pourcommanderdirectement,composer
le 1-877-232-6771aux E.-U.ou le
1-800-688-8408au Canada=
PIECES NETTOYAGE
Dosseret et table L'6mailvitri% est duverre lie au metalpar fusion.IIpeut sefissurerou s'6cailJeren cas de mauvaiseutJlisation.IJ est
de caisson - resistantauxacides,maispastotalementinattaquablepar lesacides.Touslesproduits renvers6s,en particulier
l_mail vitrifi_ acidesou sucr6s,doivent6treessuy6simm6diatementavecun Iingesec.
oUnelois la piecerefroidie,Ia laveravecde [eau savonneuse,dnceret secher.
oNe iamaisessuyerunesurfacetilde ou chaudeavecun IJngehumide.Ceci pourraitlafissurerou I'6cailIer.
oNe jamaisutiliserde nettoyantspourfour, d'agentsde nettoyagecaustiquesou ab_asifssur lefini ext6rieurde la
cuisiniSre.
[_ehefrite et sa Ne jamafs ceuvfir la ffri#e de papier d_luminium; cela emp_che la ffraisse de ceuler dai_sla tbcheMte.
• Recouvrirta I_chefriteet sa grilled'un lingesavonneux;taisseragir pourd6tachertesr6sidus.
oLaveravec dereausavonneusetJ6de.UtJliserun tampon_ r6curerpour 6![minerlessouJllurestenaces.
oOn peut placerles deuxcomposantsde la 18chefrJteclansun lave-vaisselle.
Zone de la console oPourutiliser la fonctJonVerrouillagedescommandespour Ie nettoyage,voir page 32.
de eommandeet oEssuyeravecun linge humide,puis faire s6cher.Ne pasutiliser un agentde nettoyageabrasifsusceptiblede rayerla
finition=
oOn peut utillser unproduit de nettoyageduverre,pulv_ris6d'abordsur un chiffon=NE PAS prejeter le preduit
directement sur les touches de cemmande eu sur l af#cheur.
Boutons de oPlacerchaquebouton_ Iapositiond'ARRET,et retirerchaqueboutonen le tirant.
cemmande oLaver,rincer et faires_cher=Ne pasutiliser unagent de nettoyageabrasifsusceptiblede rayerIa finition=
oFairefonctionnerbriSvementchaque_lSmentpourv_rifierque le boutona 8t8 correctementr_instaiI_=
Cuvettesde L'_mailpeutse decolorerouse fendillers'i! est surchauffe=Ceciest normalet n'affectepas lesperformancesde cuisson=
r_cup_ration - oUnefois lescuvettesde r_cup_rationrefroidies,les laverapr_schaqueutilisation,lesrinceret Iess_cherpour _viter
lestachesou ladeceleration.Lescuvettesde rScup_rationpeuvent8treIav_esen Iave-vaisselle.
oPour_liminerIes grossessouillures,faire tremperclansde I'eausavonneusechaude,puisutJliserun produit de
nettoyagepeu abrasifcommeSoftScrub_et untampon _ r_cureren plastique.
oEn casde salet_incrust_edartsIescuvettesde r_cupSration,lesretirerde Ia cuisini_re,lesposersur desfeuilles
de papierjournal et Ies pulveriserdoucementde nettoyantcommercialpour four.(Ne paspulvSriserde produit
sur lessurfacesavoisinantes.]Mettreles cuvettesde r_cup_rationdartsunsac en plastiqueet laisserle produit
agir plusieursheures.Porterdes gantsen caoutchoucpour retirer lescuvettesde recuperationdu sac,laverles
cuvettes,lesrinceret lessScher.
Hublet et porte oEviterd'utilisertrop d'eau,qui risqueraitdes'infiltrersousou derrierele verreet de tacher.
_lufour en verre o Laver_ I'eauet au savon.Rinceravecde I'eaupropreet s_cher.Un produit de nettoyagedu verrepeut _treutJlis_
en levaporisantd'abordsur un Iinge.
oNe pas utiliserde produitsabrasJfscommetampons_ r_curer,lained'acierou produit de nettoyageen poudrequi
risqueraientderayerIeverre.
Interleaf _lufour • ExScuterIesinstructionspresentSesaux pages39-40pour I'autonettoyagedufour=
41
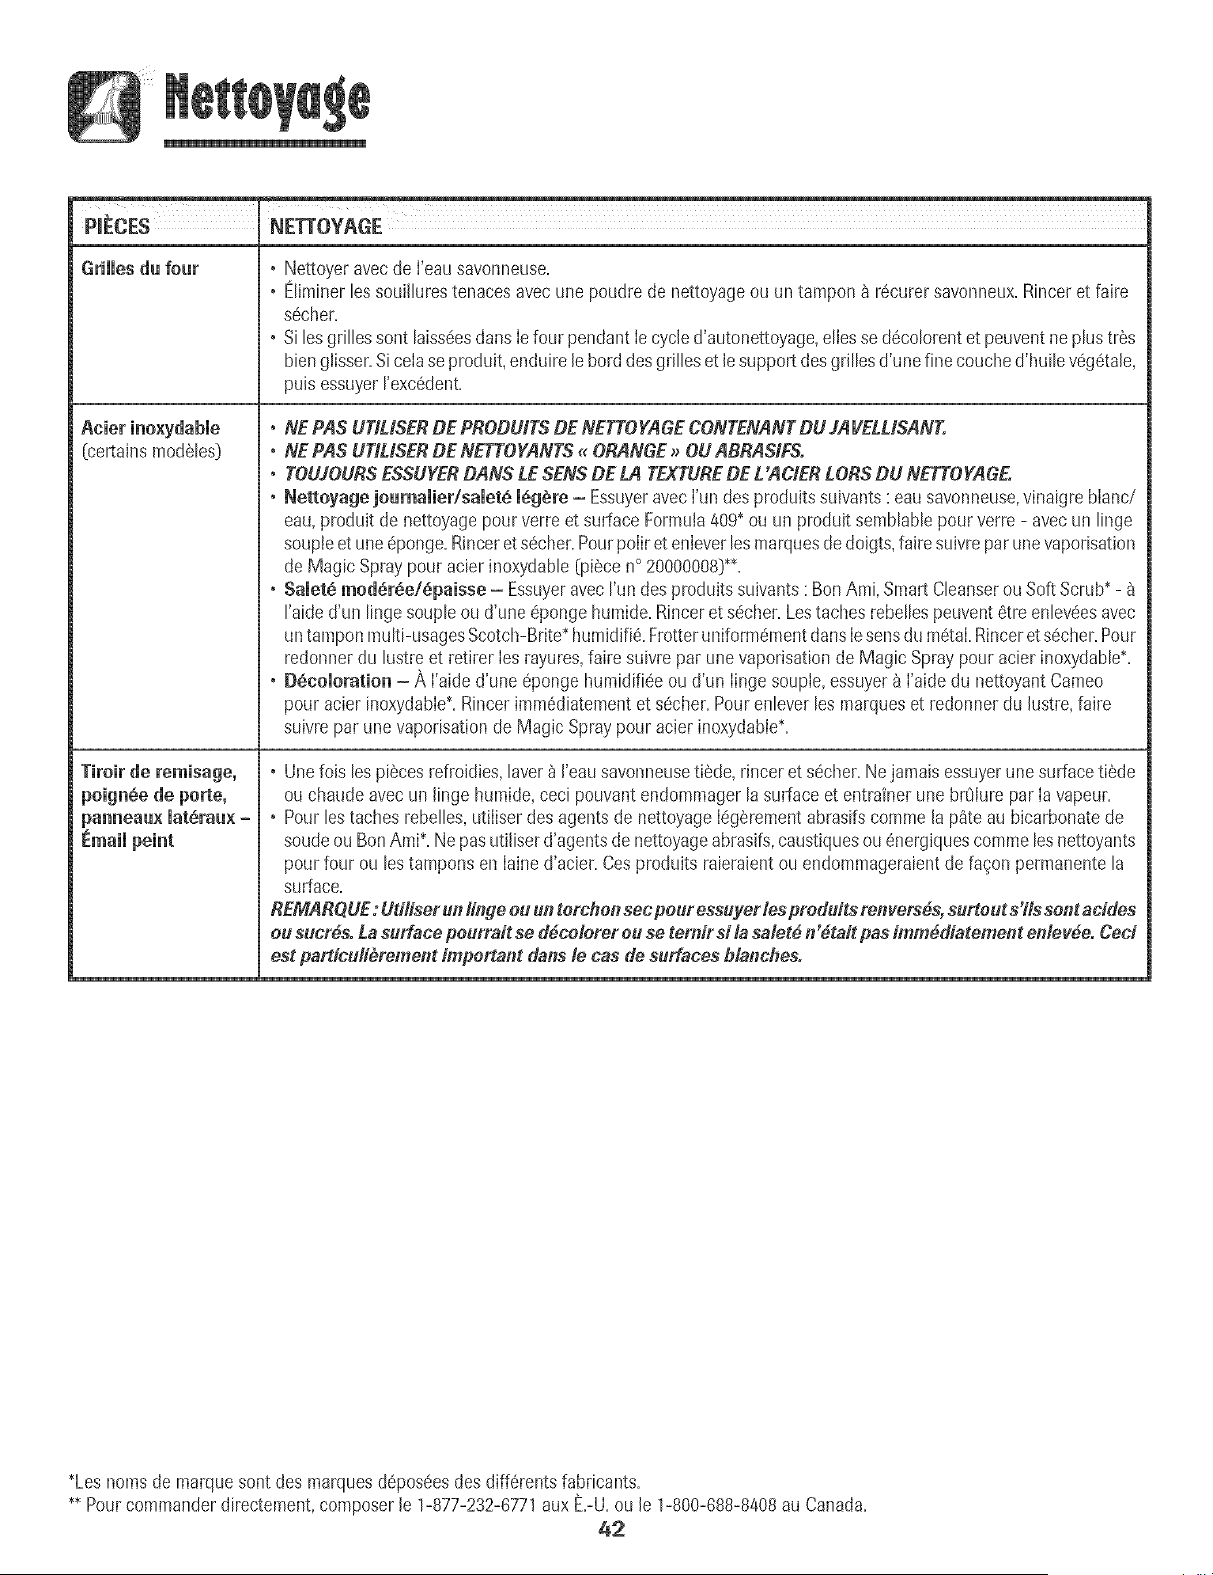
[certainsmodules]
Tiroir de remisage,
poign6e de porte,
panneau× lat6rau× =
° Nettoyeravec de I'eausavonneuse.
° Etiminertessouilturestenacesavecune poudre de nettoyageou untampon _ r6curersavonneux.Rinceret faire
s6cher.
° Si tesgrilles sont taiss6esdartsIefour pendant Iecycled'autonettoyage,elJessed6colorentet peuventne plus tr6s
bienglisser.Sicelase produit,enduire le bord desgrilleset le supportdesgrillesd'une fine couched'huile v6g6tale,
puis essuyerI'exc6dent.
• HE PASUTIUSERDE PRODUffS DE HETTOYAGECOHTENANTDU JAVELUSANT.
° HE PASUTILISERDE HETTOYAHTS_ ORANGE_ OU ABRASlFSo
• TOUJOURSESSUYERDANS LE SENSDE LA TEXTUREDE L'AC/ERLORSDU NETTOYAG£.
• Nettoyage joumaiier/saiet8 16g_re- Essuyeravecl'un desproduitssuivants: eausavonneuse,vinaigre blanc/
eau,produit de nettoyagepour verre et surface Formuia409*ou un produJtsemblablepour verre - avecun linge
soupleet une6ponge.Rinceret secher.PourpoIiret enleverlesmarquesdedoigts,fairesuiwe par unevaporisation
de Magic Spraypour acier inoxydable{piece n° 20000008}**.
• Saiet_ mod6r_e/6paisse - EssuyeravecI'un desproduitssuivants: BonAmi,Smart CleanserouSoft Scrub*-
raide d'un lingesoupleou d'une 6ponge humide.Rinceret s6cher.Lestaches rebelJespeuvent6tre enlev6esavec
untampon multi-usagesScotch-Brite*humidi% FrotteruniformdmentdansIesensdu m6taLRincerets6cher.Pour
redonnerdu lustreet retirer Ies rayures,faire suivrepar une vaporisationde Magic Spraypour acier inoxydable*.
° DScoieration - #,I'aided'une 6pongehumidi%e oud'un Iingesouple,essuyer{_I'aidedu nettoyantCameo
pour acier inoxydabIe_.Rincerimm6diatementet s6cher.Pourenlever les marqueset redonner du lustre,faire
suivre parune vaporisationde Magic Spraypour acier inoxydabie*.
° Unefois les pi6cesrefroidies,laver_ I'eausavonneusetiede, rJnceret s6cher.Nejamais essuyerune surfaceti6de
ou chaudeavecun Jingehumide,ceci pouvantendommagerlasurface et entrainer unebrOiurepar Iavapeur.
° Pour Jestaches rebelles,utiIiserdes agentsde nettoyageI6g6rementabrasifscommela pate au bicarbonatede
soudeou BonAmi*. Nepas utiJiserd'agentsde nettoyageabrasifs,caustiquesou6nergJquescommelesnettoyants
pourfour ou lestamponsen Iained'acier. Cesproduits raieraientou endommageraientde fagonpermanentela
surface.
REMARQUE:UdHserua linge eu tm tercflellsec peur ess#yer lespreduits re_lvers6s,surtout s'its sent addes
ou sucr6s. La surface peurrait se d6co!erer eu se remitsi la salet_ n'6tait pas imm_diatemellt eldev_e. Ced
est particuH6reme_t impe_ta_t darts/e cas de surfaces blanches°
*Lesnoms de marquesont des marquesd6poseesdes diff6rentsfabricants.
** Pourcommanderdirectement,composerle 1-877-232-6771aux E.-U.ou Je1-800-688-8408au Canada.
42
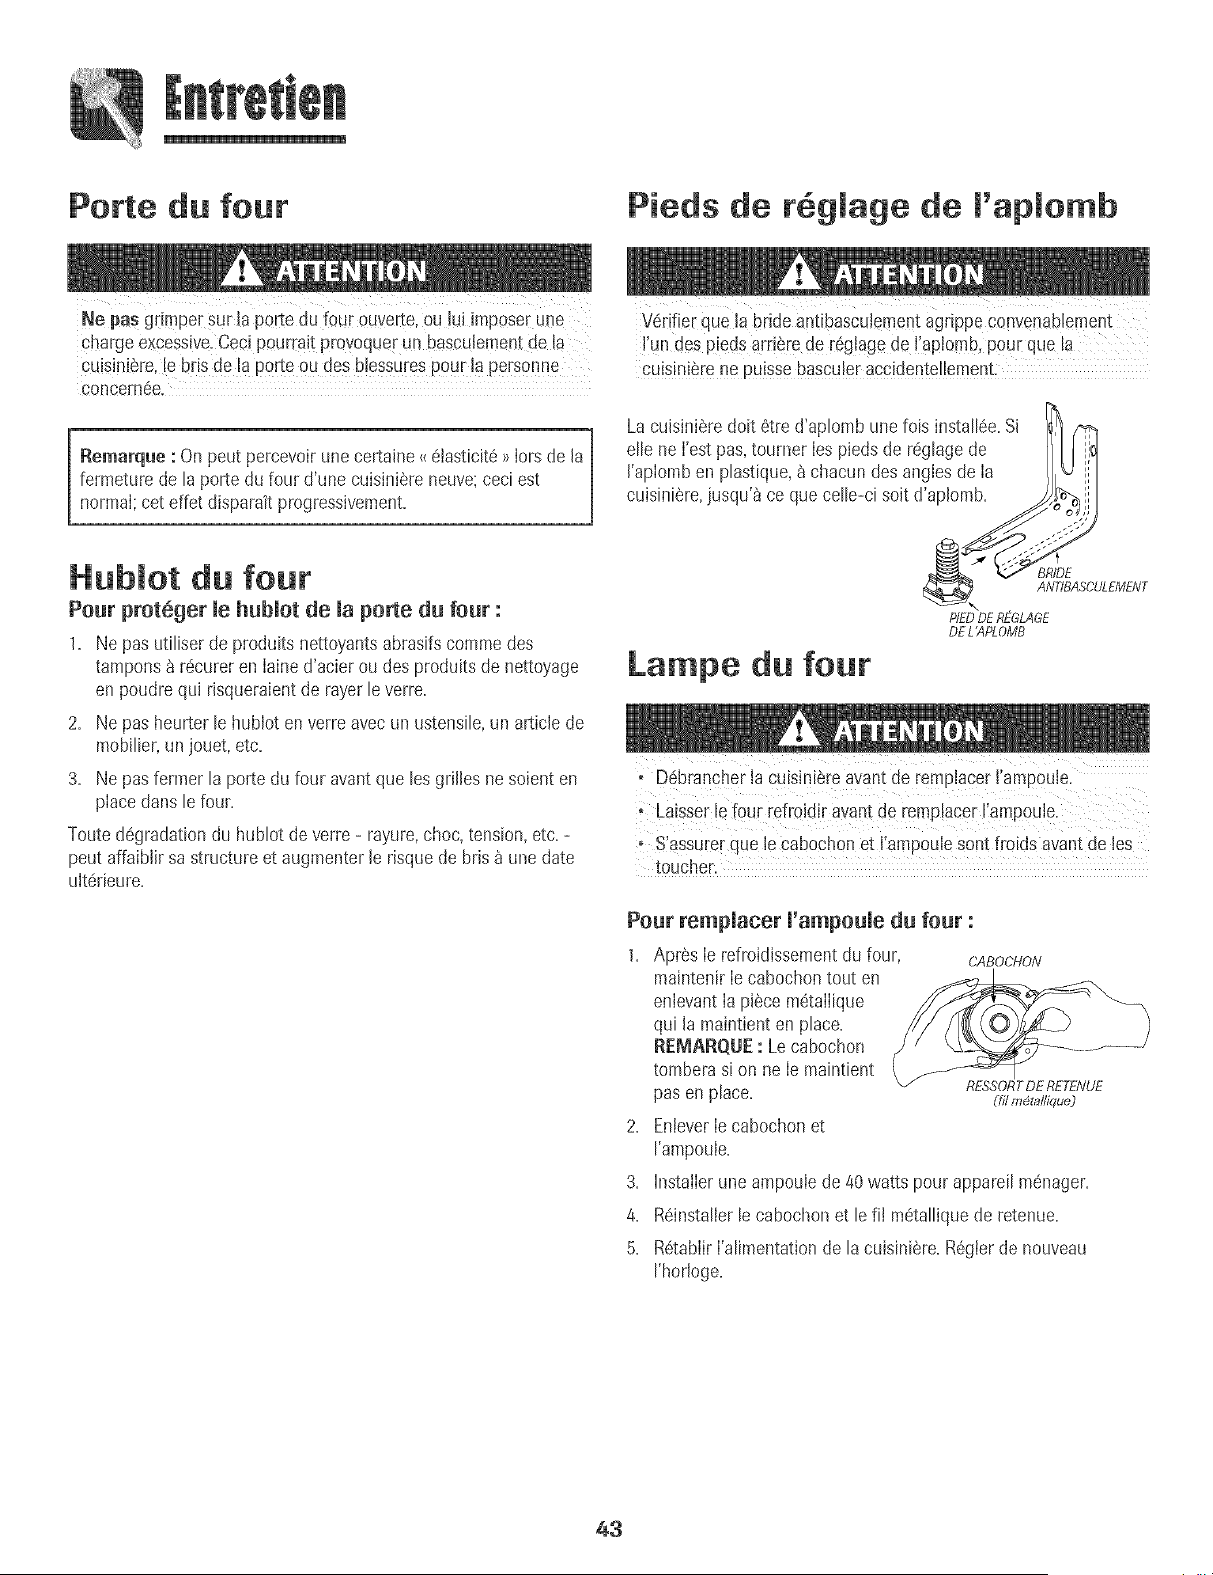
Porte du four
Pieds de r6glage de l'aplomb
Ne pas grimpersurla porte du four ouverte,ou lui imposerune
charge excessive:Cecipourra!t provoquerun bascuJementde !a
cuisini_re,!e bris de Ia porte ou des b!essuresp0u_la #em0nne
concern6e,
[ emarque : Onpeut percevoirune certaine<<6tasticit6>>Iorsde la
fermeturede la porte du four d'une cuisiniSreneuve;ceciest
normal;cet effet disparait progressivement.
Hubmot du four
Pour prot_ger le hublot de la porte du four :
1. Ne pas utiliser de produits nettoyantsabrasifscommedes
tampons& r6cureren Iained'acier ou des produitsde nettoyage
enpoudre qui risqueraientde rayer leverre.
2. Ne pas heurter le hublot enverre avecun ustensile,un article de
mobilier,un jouet, etc.
3. Ne pasfermer la porte du four avantque lesgrilles ne soient en
placeclansle four.
Toutedegradationdu hublot de verre- rayure,choc, tension,etc.-
peut affaiblir sa structureet augmenterle risque de bris & une date
ult6rieure.
V6rifier quela bride antibascu!ementagrippe convenablement
Fundes piedsardSrede r6ghge de Faplombpour que la
CU!SiniSrenepuissebascu!eraccidentellement,
La cuisiniSredoit 6tre d'aplombune fois install6e.Si h
elle neI'est pas,tourner Ies piedsde reglagede )Ill ,q
I'aplomben plastique,_ chacundes anglesde Ia I _LJ
_\ . ANTIBASCULEMENT
PIEDDEREGLAGE
DEL'APLOMB
Lampe du four
, D6brancberla cuisini6reavantde rempiacerI'amp0ule.
Laisserlefour refroid r avant de remplacerFampoule.
, S'assurerque le cabochon et Fampoulesont froids avantde les
toucher.
Pear rempmacerm'ampoumedu four :
1. Apr6s Ie refroidissementdu four, CABOCHON
maintenirIecabochon tout en
enlevantIa piece m6talIique
qui la maintienten place.
REMARQUE : Lecabochon
tombem si on ne Ie maintient
pas en place.
2. EnteverIecabochonet
I'ampoule.
3. Instaileruneampoulede 40 watts pour appareilmenager.
4. R6installerlecabochon et lefil metalliquede retenue.
5. R6tablirI'alimentationde lacuisiniere.R6gierde nouveau
I'horloge.
RESSORTDE RETENUE
(fLIm@ta#ique)
43
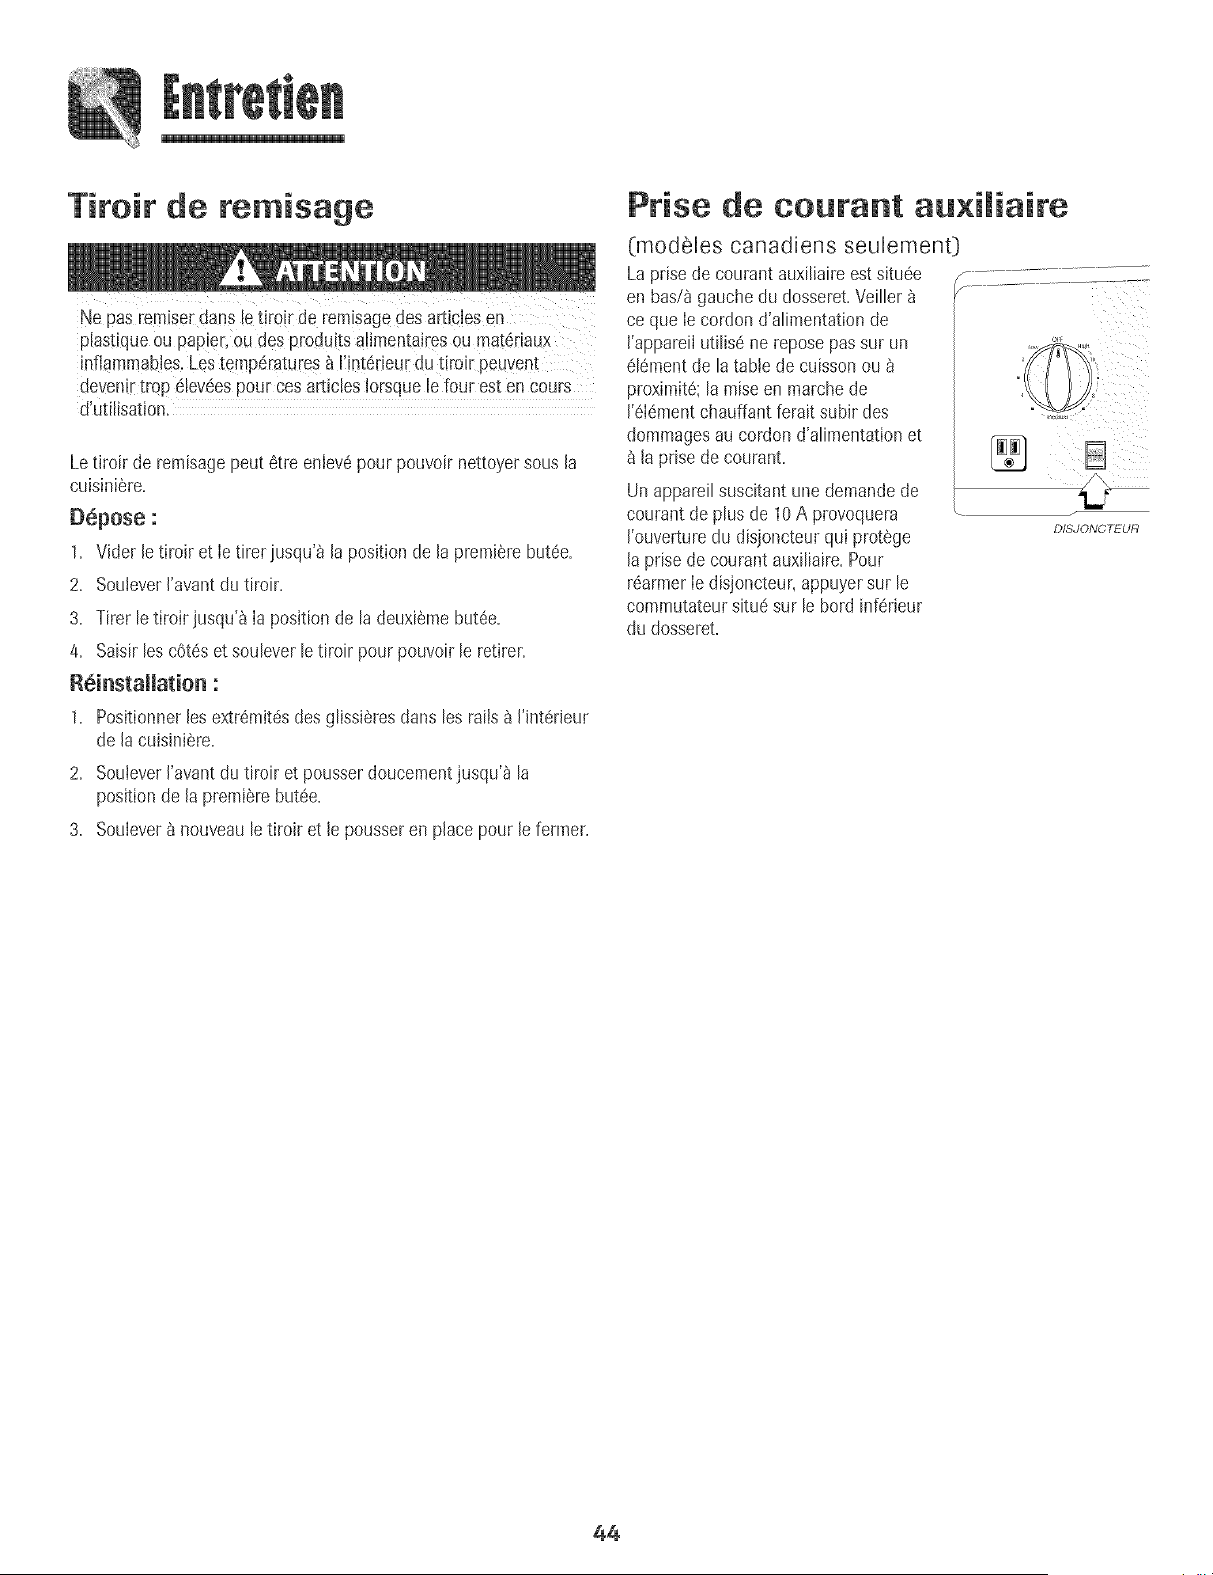
Tiroir de remisage
piastique ou papier,ou desproduitsa!imenta+cesou mat6riaux
inflammabJes.Lestemp@atures_ [Jnt@ieurdutiroir peuvent
devenirtrop dlevdespour ces articlesIorsquele four est en cours
d'utilisation.
LetJroirde remisagepeut 6tre enJev6pour pouvoir nettoyersous Ja
cuisini@re.
D6pose :
1. Vider Jetiroir et Ietirer jusqu'_ Japositionde la premierebut6e.
2. SouleverJ'avantdu tiroir.
3. Tirer letiroir jusqu'_ Ia position de la deuxiemebut6e.
4. Saisirles cOt6set souleverlet[roir pour pouvoirle retirer.
R6instaJJation :
1+ PositionnerJesextrSmit6sdes glissiSresclansles rafts_ J'interJeur
de JacuisJni@re+
2+ SouleverJ'avantdu t[roir et pousser doucementjusqu'_ la
posRionde Japremi@ebutee+
3+ Souiever_ nouveaule tiroir et le pousseren pJacepour Jerefiner+
Prise de coutar|t au×iliaire
(]modeles canadiens seulemenO
La prisede courant auxi!iaireest situ6e
en bas/_gauche du dosseret.Veiller
ce que Ie cordon d'alimentationde
]'appareiIutilis6ne reposepassur un
616mentde latable de cuissonou
proximit6;la raiseen marche de
1'6ldmentchauffant feraitsubir des
dommagesau cordon d'alimentationet
la prise de courant.
Un appareilsuscitantune demandede
courantde plus de 10A provoquera
I'ouverturedu disjoncteurqui prot%e
la prise de courantauxiliaire.Pour
r6armerIe disjoncteur,appuyersur le
commutateursitu6sur le bord inf6rJeur
du dosseret.
B ¸
DISJONCTEUR
44
PROBLEME SOLUTION
Pour mapmupartdesprobm_mes oV6rifier que les commandesdu fo_Jrsontcorrectementr6gI6es.
observSs, essayer d'abord mes oV6rifier si Iefiche est bien inser6eduns la prise.
somutionspossibmes,_ droite, o Inspecter/r6armerIe disjoncteur.Inspecter/remplacerlesfusibles.
o ContrOlerla sourced'alimentation61ectrique.
Non=fonctionnement de m'appareim-
total ou partieL
L'hormogeou ruesmampesfonctionnent,
ruesroots paraissent _ m'afficheur,
mais mefour ne chauffe pus.
R_suitats de cuisson au four
cliff, rents des attentes ou de ceu× qui
sont produits par mefour ant_rieur,
R6sumtutsincerrects morsdema
cuisson au grim,ou _mission
excessive de fum_e.
_mpossibimit6d'autonettoyage du
four.
Le four ne se nettoie pus
correctement°
La porte du four ne se dSverrouille
pusapr_s m'autonettoyage.
o D6terminersiles commandesdes 616mentsde surfaceet/ou du four sont convenablement
r6gl6es.Voir pages29 et 33.
o D6terminersi la porte du four s'estdeverrouill6eapres une operationd'autonettoyage.
Voir pages39.
o Determinersile four est regle pourune cuissondiff6r6e ou un nettoyagediffere.Voir pages
34 et 39.
oV6rifier si ie verroui!lagedes commandosest en marche.Voir page32.
oV6rifier si la commandoest en modesabbat.Voir page 36.
oLescommandessont peut-6tre programm_espour une fonct[on de cuissonet maintien ou
ded6marragediff6r6.
oLa fonction de verrouillagedes commandesest peut-6tre activ6e.Voir page 32.
o Determinersi revent du four est obstru& Voir son emplacementpage38.
oS'assurerque la cuisiniereest d'aplomb.
o Les reglagesde temp6raturevadentsouvententre un four neuf et le four qu'il remplace.On
observesouventune d6rivedu r6glage detemp6ratured'un four _ mesurequ'il vieillit; il pout
devenirplus chaud ou moins chaud.Voir page36 les instructionsd'ajustementde la
temperaturedu four. REMA,qQUE:II n'est pus utile de modifier le r6glagedetemperaturesi
lavariation n'affecte qu'une oudeux recettes.
o Pourd'autresinformationsausuiet de la cuissonau four, voir labrochure La cuisson
simplifi6e.
o DeterminerIa positiondesgrilles. Los alimentspeuventetre trop pros de I'elementdu griL
o t_lementdu griI pus prechauff&
o Utilisationincorrectede feuille d'aluminium.Ne iamais garnir la grille de lechefriteavecde la
feuille d'aluminium.
o Portedu four ferm6edurant Iacuissonau gril. Laisserla porte du four entrouverted'environ
10cm (4pouces} - premierebutee.
o EnleverI'exc6sde graissesur Iapi6ce de viandeavant la cuissonau griL
o Utilisationd'une I6chefritesouillee.
o Latension electriquede la maisonest peut-etre basse.
o D_terminerque I'appareiIn'apas8tOprogramm6pour un autonettoyagediffer& Voir page39.
oV_rifier que la porte est fermSe.
oVSrifiersi Iacommandoest en modesabbat.Voir page 3&
o Lefour est peut-Stre_ une temp6raturesup_rieure_205 °C(400°F).Latemperaturedu four
doit 8tre inferieure_ 205 °C (400°F)pour pouvoirprogrammer uncycle d'autonettoyage.
o Un tempsde nettoyageplus long pout 8tre n6cessaire.
o Onn'a puselimin8avant I'operationd'autonettoyagelosaccumulationsexcessivesde residus,
particulierementles rSsidusd'alimentsacidesousucres.
o L'h_tSrieurdu four estencore chaud.Attendre environune heure apres I'achevementde la
pSrioded'autonettoyage.IIest possibled'ouvrirlaporte apr6sla disparitiondu messageLOCK
[VERROUILLAGE)sur I'afficheur.
o Loscommandeset la porte sont peut-etre verrouillSes.Voir page32.
suite
45
PROBLEME SOLUTION
Accumulation d'humidit6 sur le o Ceci est normaldurant Iacuissond'alimentscontenant beaucoupd'eau.
hubmotou vapeur sortant de m'_vento o Utilisationexcessived'humidit6 Iorsdu nettoyagedu hublot.
Emission d'une forte odeur ou de o Ceci est normalpour une cuisiniCreneuve;cet effet disparaitapres quelquesutilisations.
fumCe lets de lu raise en murche L'ex_cutiond'un programmed'autonettoyagepermettrade faire disparakrecette odeur plus
du feuro rapidement.
o Fairefonctionner leventilateurpour 6vacuerIa fum@eou rodeur.
• PrCsenced'une accumulationde residusaJimentairessur lefond du four. ExScuterune
opSrationd'autonettoyage.
Codes d'anomalie o LesrootsBAKEou LOCKpeuventclignoterrapidementb I'afficheurpourprCvenird'une erreur
ou d'un probleme.Si le motBAKEou LOCKparaitb I'afficheur,appuyersur Iatouche Cancel
(Annule0. Si Ie mot BAKEou LOCKcontinue b c@noter, dCbrancherI'appareiLAttendre
quelquesminutes,puis rebrancherI'appareiLSi le mot continue_ c@noter, dCbrancher
I'appareiIet prendrecontact avec un rCparateurautorisC.
o Sile four est tl_s sale,Iesfiamm_chespeuventproduire un coded'anomalieaucours ducycle
d'autonettoyage.Appuyersurlatouche CanceletlaisserIefour refroidircompl_tement,essuyer
IasaletCenexcCspuisreprogrammerrautonettoyage.Silecoded'anomalierCapparait,prendre
contactavec un rCparateurautorisC.
Des bruits se font entendreo o Lefour fait plusieurs bruitsfaibles.II estpossibled'entendreles relaisdu four qui se mettent
en marcheet s'arrCtent.Ceciest normal.
o AIorsquele four serCchauffeet serefroidit,il estpossibled'entendredesbruitscorrespondant
ladilatation et b la contractiondes piecesmCtalliques.Ceciest normalet n'endommagepas
I'appareiL
JJn'y a ni hip ni affichageo o Le commandeest peut-Ctreen modesabbat.Voir page 36.
• Lefour esten modesabbat.Pourannuler, appuyersur la touche Clock et maintener-Ja
reste allum_, enfonceependant cinq secondes.
46
Garantiecompleted'uneann6e-
Pieces e| main-d'_uvre
Durantune periode d'un {[1) an a
compterde la date de I'achatinitial au
d6tafl,tou[e piece qui se rev61erait
ddectueuse dans des conditionsnormales
d'usagemenagersera repareeou
remplaceegratultement.
Residents canadiens
Les ga[antles ci-dessuscouvren[un
appareilinstall6au Canada.seuiements'il
a et6 agreepar lesagencesde test
habflit6es[verificationde laconformlt6
une normenat_onaLedu Canada),sauf si
['appare[Ia ete introduit auCanada
!'occasiond'un changementde r6sidence
des Etats-Unisvers leCanada
Garantie limit6e hers des Etats-
Unis et du Canada - Pi_ces
seulement
Pendantun [1} an a compter de la dateae
I'achatinitial aud6tail,toute pieca qul se
revdlera_ddectueuse dans des conditions
normalesd'usagemenagersera r6pareeou
rempiaceegratultement(pi6ce seulement};
le propri_,taireaevraassumertousles
autresfrais, y comprisfrais demain°
d'(_uvre,ded6placement,de_rahsport.de
kilorn6trageet de diagnostic.[e cas
echeant.
Les gatanties specifiques forrnulees ci-
dessus sent/es SEULES que /e fa'bricant
accorde. Ces garanties vous conf_re de,_
droits juridiqL 9ssp_cifiques et vou_ oouvez
eqa/ementjouir d'autres drotts, variables
d'un _tat b/'autre, d'une province a une
BUtTe.
Ne sent pas couverts par ces garanties
1. Lesdommagesou derangementsdus _:
a. Miseen service,Iivraisonou entretien effectues incorrectement.
b.Toutereparation,modification,alt6ration et tout r6glagenon autoris6spar le
fabricantou parun prestatairede serviceapres-venteagre6.
c.Accidents,mauvaiseutilisation ou usageabusifou d6raisonnable.
d.Atimentation6tectrique[tension, intensite)incorrecte.
e. R6glageincorrect d'une commande.
2. Lesgarantiesne peuvent6tre honor6essi les numSrosde s6ried'origine ont ete
enlev6s,modifiesou ne sent pas facilement lisibles.
3. Ampoules.
4. Appareils achetesaux fins d'usagecommercialou industrieL
5. Lesfrais devisite d'un prestatairedeserviceou de serviceaprSs-venteencouruspour
les raisonssuivantes:
a. Correctiond'erreursde raiseen service.
b. Initiation de I'utilisateur_ I'emploi de rappareiL
c.Transportde I'appareiIaux Iocauxdu prestatairede service.
6. Dommagessecondairesou indirectssubispar toute personnesuite au non-respectde
cesgaranties.Certainsetats ou provincesne permettentpas I'exclusionou Ia limitation
desdommagessecondairesou indirects; par consequentles limitations ou exclusions
ci-dessuspeuventne pass'appliquer_ votrecas.
Si l'intervention d'un r parateur est
• ContacterIe d6taiilantchezqui I'appareila 6t6 achet6,ou contacter Maytag ServicesSM/
service_ la clientelede Maytag au 1-800-688-9900aux E.-U.ou 1-800-688-2002au
Canada,pour obtenir Iescoordonneesd'une agencede serviceagr86e.
• VeilIer_ conserverIafacture d'achat pourjustlfier de la validit_de la garantle. Pour
d'autres informatlonsence qui concerne Iesresponsabilitdsdu proprietaire _ 1'Sgard
du servicesousgarantle,voir le texte de Ia GARANTIE.
• Si le detaillantou ragence de serviceapr_s-ventene peut rdsoudrele probleme,dcrire
MaytagServicessM,attention : CAIR" Center,P.O.Box2370,Cleveland,TN 37320-
2370ou telephonerau 1_800_688_99ee aa× [._LIooa 1_800_688_2e02 an Canada.
• Lesguides d'utilisation,les manuelsde serviceet les renseignementssur lespisces
sent disponiblesauprSsde Maytag Servicess_,service_ laclientSlede Maytag.
_e_atq_es :
Lors detout contactconcemant un probJ_me,fournir ['informationsuivante :
a. Nora,adresseet num_rode tdlSphonedu client;
b. Numerode modeleet numSrodeserie de I'appareil;
c. Noraet adressedu d6taiIIantou de I'agencede service;
d. Descriptionclaire du probIemeobserve;
e. Preuved'achat [facturede vente[}.
47
MAYI'&G
®
Estufa Em6ctr[ca con E[e_entos
Tubu[ares y Control a Precisi6n
Sensible a[ Tacto 50(}
Tabmade Materias
Instrucciones [mportantes
sobre Seguridad ........................49-52
Cocinando en [a Estufa ............ 53-54
Controles
Eiementos Tubulares
Cocinando en emHomo ............ 55=62
Horneado
'Cook & Hold'
'Cook & Hold' Diferido
Mantener Caiiente
Asar a la Parrilla
Parrillas del Homo
Cuidado y Limpieza .................. fi3-fG
Procedimientos de Limpieza
Mantenimiento .......................... 67-68
Ventana de[ Horno
Luz de[ Homo
Locaiizaci6n y Soiuci6n
de gver_as ...................................89-70
Garant_a y Servicio ..........................71
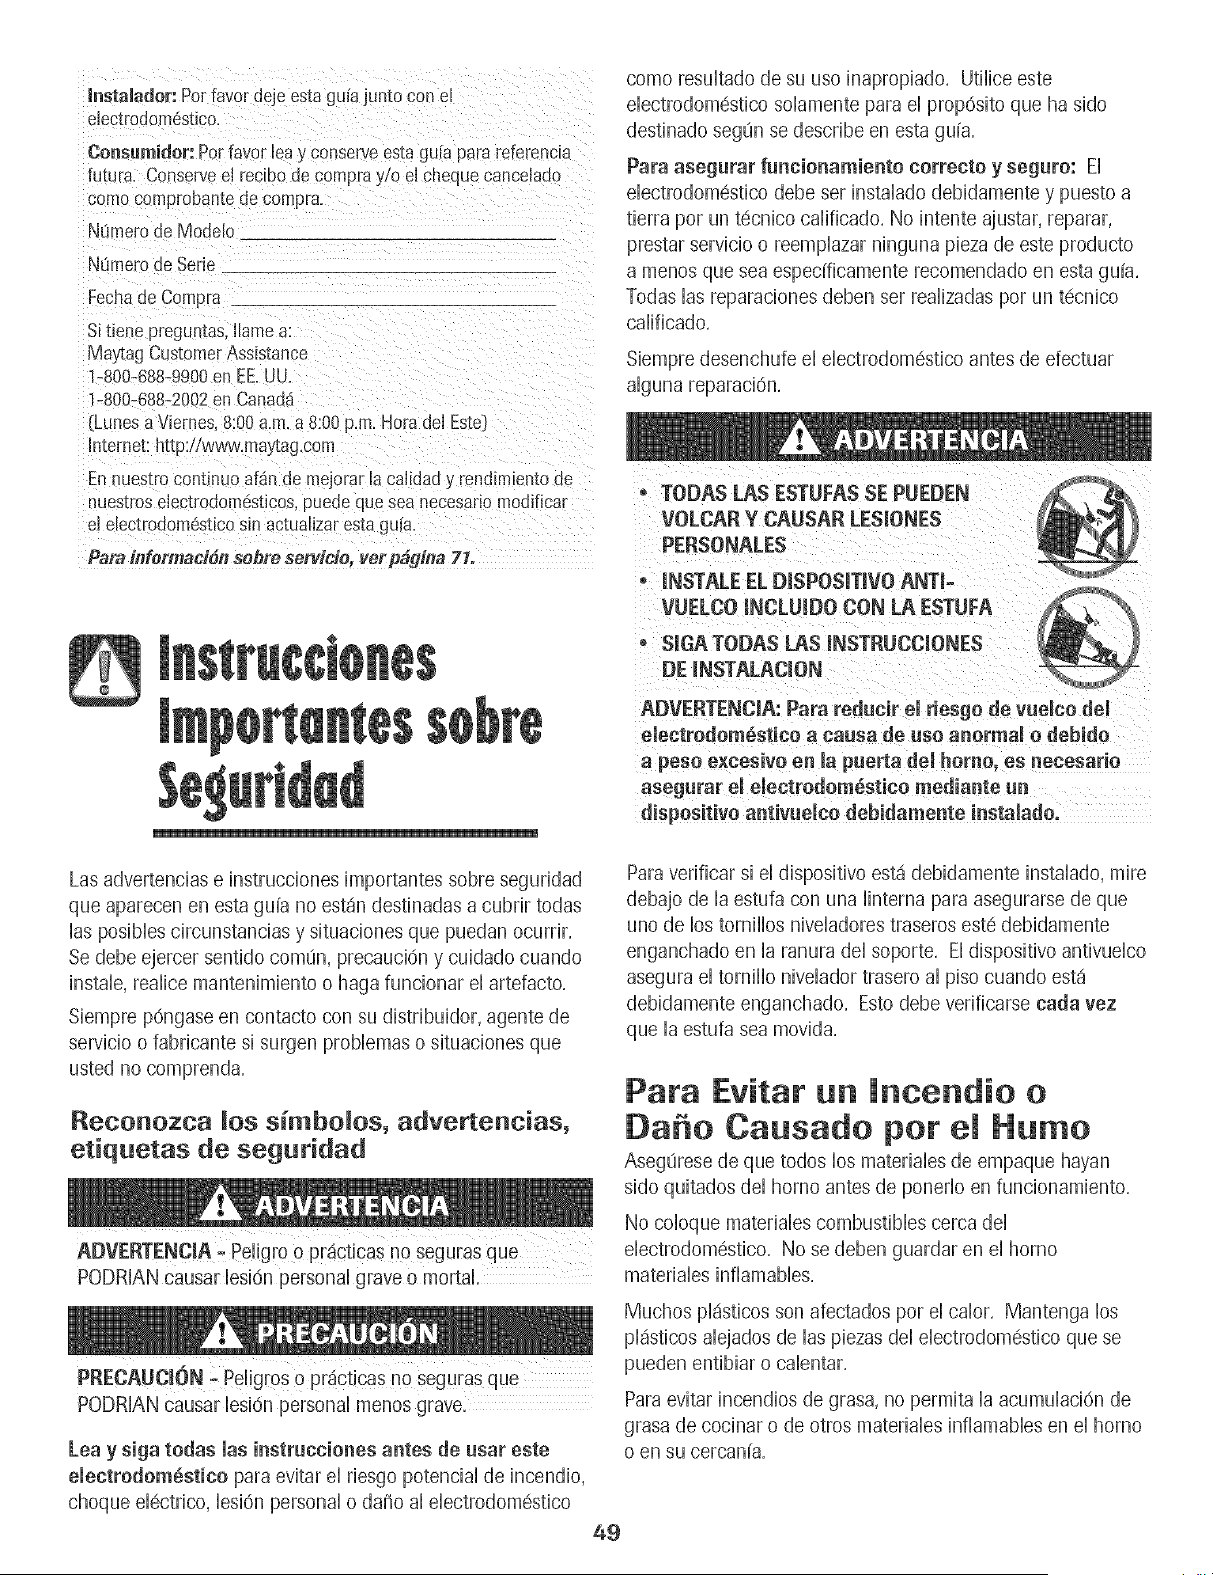
Instamador:Porfavor deje estagu[a iun[o con eE
ebctrodomestico.
Oonsemidor:Potfavor lea y conserveestagu[a para referencia
futura. Conserveel recibode compl ay/o el chequecancelado
comocomprobantede compra.
N_imerode Mode[o
NOmerode Sefie
Fechaae Coml_ra
S[tiene preguntas.[lame a:
May_agCustomerAssistance
1-800-688-9900en EE.UU.
1-800-6{-8-2002en Canada1
(LunesaViernes 8:00a.m.a 8:00p.m.Hora de[ Este}
[ntemet: http://www.may_ag.com
Enhues[tocontlnuo af_n de mejorar[a cal[dad y rend[mientode
nuestroselectrodom@ticos,puede que seanecesanomodificar
ele[ectrodomeshcosin actua[izaresta gufa.
Pare infermad6n sebre set_dde, vet pbdina 11.
como resultado de su uso inapropiado, Utilice este
electrodomestico solamente para el prop6sito que ha sido
destinado segOn se describe en esta guia,
Para asegurar funcionamiento correcto y seguro: Ei
ebctrodom6stico debe ser instaBdo debidamente y puesto a
tierra por un t@nico cdificado, No intente ajustar, reparar,
prestar servicio o reemplazar ninguna pieza de este producto
a menos que sea espedficamente recomendado en esta guia,
Todas Bs reparaciones deben ser redizadas por un t@nico
calificado,
Siempre desenchufe el electrodom6stico antes de efectuar
aiguna reparaci6n,
" TODAS LAS ESTUFAS SE PUEDEN
ADVERTENGIA: Para redacir el #esgo de welce de!
electredem_stice a causa de use anermal e debide
a peso e×cesive ea la puerta del homo, es aecesarie
aispositivoantivuelcodebidamente instaladol
Las advertencias e instrucciones importantes sobre seguridad
que aparecen en esta guia no est_n destinadas a cubrir todas
las posibles circunstancias y situaciones que puedan ocurrir,
Se debe ejercer sentido comun, precauci6n y cuidado cuando
instale, realice mantenimiento o haga funcionar el artefacto,
Siempre p6ngase en contacto con su distribuidor, agente de
servicio o fabricante si surgen problemas o situaciones que
usted no comprenda,
Reconozca _os simbo_os, advertencias,
etiquetas de seguridad
PODRIAN causar bsi6n personal grave o mortal
Para verificar si el dispositivo est,1debidamente instalado, mire
debajo de ia estufa con una iinterna para asegurarse de que
uno de los tornillos niveladores traseros este debidamente
enganchado en la ranura del soporte, El dispositivo antivuelco
asegura el tornillo nivelador trasero al piso cuando est,1
debidamente enganchado, Esto debe verificarse carla vez
que la estufa sea movida,
Para Evitar un lncendio o
Da o Causado per emHumo
AsegLirese de que todos los materiabs de empaque hayan
sido quitados del homo antes de poneflo en funcionamiento,
No coloque materiabs combustibles cerca del
ebctrodomestico, No se deben guardar en el homo
materiabs infiamabbs,
Muchos pl_sticos son afectados por el calor, Mantenga los
pl_isticos alejados de las piezas del electrodom6stico que se
; pueden entibiar o calentar,
PODRIAN causar lesi6n personal menos grave.
Lea y siga todas las instrucciones antes de usar este
electrodom_stico para evitar ei riesgo potenciai de incendio,
choque ei6ctrico, iesi6n personal o ddio ai eiectrodom6stico
Para evitar incendios de grasa, no permita la acumulaci6n de
grasa de cocinar o de otros materiales inflamables en el homo
o en su cercan[a,
49
En Case de lncendio
Use un extintor con producto quimico seco o del %o espuma o
bicarbonato para apagar el incendio o las llamas, Nunca use
agua en un incendio de grasa,
1, Apague el homo para evitar que la llama se disperse,
2, NUNCA levante o mueva una sarten en llamas,
3, Apague el fuego o la llama cerrando la puerta del homo,
Seguridad para los Ni os
NUNCA guarde aFticulos de inter6s para !os niSos en !os
NO TOQUE LOS ELEMENTOSCALEFACTORESNI LAS
SUPERFICIESINTERIORESDEL HORNO, Los eiementos
calefactores pueden estar calientes aOn cuando su color sea
obscuro, Las superficies interiores de cuaiquier homo se
calientan Io suficiente como para causar quemaduras, Du-
rante y despu_s dei uso, no toque ni permita que ias ropas u
otros materiales inflamables entren en contacto con los
eiementos caiefactores o ias superficies interiores dei homo
hasta que no se hayan enfriado, Otras superficies que pueden
estar calientes incluyen la cubierta, las superficies que est_in
dirigidas hacia ia cubierta, ei respiradero dei homo, ia
superficie cercana a ia abertura dei respiradero, ia puerta dei
homo y ia 4rea que ia rodea, y ia ventaniiia dei homo,
No toque un foco caiiente dei homo con un par3oh0medo
pues se puede quebrar, Si ei foco se quiebra, desenchufe ei
eiectrodom6stico antes de sacar ei foco para evitar sufrir un
para a!canzar bs a[t[cu!0s pueden les!0narse gravemente!
NUNCA deje a los ni_ios solos o sin supervisi6n cuando e[
homo estd en uso o cuando estd caliente, Nunca permita que
los ni_os se sienten o se paren en ninguna pieza del
electrodom6stico pues se pueden lesionar o quemar,
Se les debe ense_ar a los ni_os que el electrodomestico y los
utens[[[os que est4n en _[ pueden estar ca[[entes, Deje enfr[ar
los utensiiios caiientes en un lugar seguro, fuera del aicance
de los niiios, Se ies debe ensdiar a los niiios que un
eiectrodom6stico no es un juguete y que no deben jugar con
los controies u otras piezas del artefacto,
Jnsttucciones Generales
NUNCA use un electrodom6stico como un peldaho para
dcanzar los af manos supedores, El uso incorrecto de la
puerta del electrodom6stico tales como pisar sobre ella.
apoyarse o sentarse en la pued_apuede resultal en oue el
electrodom6stico se vuelque, se rompa la puerCLa_ se
causen lesiones graves,
Para evitar posibies riesgos para el usuario y daffo al
eiectrodomdstico, no use este producto como una estufa para
caientar o entibiar una habitaci6n, Adem4s no use ei homo
como un lugar para guardar aiimentos o utensiiios de cocina,
No obstruya ia circuiaci6n dei aire bioqueando ei respiradero
dei homo,
NUNCA use papei de aiuminio para cubrir ias parriiias dei
homo ni ei panel inferior dei homo, Ei uso incorrecto puede
resuitar en un riesgo de choque eiectrico, incendio o dar3oai
eiectrodomdstico, Use papel de aiuminio soiamente como se
indica en esta guia,
Seguridad al Cocinar
Nunca cdiente un contenedor de dimento cerrado en el
homo, La acumulaci4n de presi4n puede reventar el
contenedor causando una lesi4n personal grave o da_io al
electrodomdstico,
Use tomaolhs secos y gruesos, Los tomaollas h0medos
pueden causar quemaduras por vapor, No se deben usar
todlas de secar los platos ni otros sustitutos en vez de los
tomaollas porque pueden pasar sobre los elementos cdientes
y encenderse o pueden quedar atrapados en las piezas del
electrodom6stico,
Use vestimentas apropiadas, Las ropas sueltas o ropas con
mangas largas sueltas no se deben usar cuando se esta
cocinando, La ropa se puede prender fuego y causar
quemaduras si entra en contacto con los elementos
calefactores,
Siempre coloque las parrflhs del homo en hs posiciones
deseadas cuando el homo estd frio, Deslice la parrflla del
homo hacia afuera para agregar o retirar alimentos usando
tomaollas secos y gruesos, Siempre evite colocar o retirar
alimentos del homo sin sacar la parrilla hacia afuera, Si una
parrflla debe ser movida cuando estd caliente, use un
tomaollas seco, No deje que el tomaolla entre en contacto
con el elemento cdiente del homo,
5O
Use las parrillas solamente en el homo en que fueron
enviadas/compradas.
Tenga cuidado cuando abra la puerta del homo. Primero deje
que sdga el aire o vapor caliente antes de sacar o volver a
colocar el dimento en el homo.
ADVERTENCiA SOBRE ALiMENTOS PREPARADOS: Siga
las instrucciones del fabricante del dimento, Si un contenedor
de dimento congelado de pl4stico y/o su tapa se deforma,
comba o de otra manera se da_a durante la cocci6n,
inmediatamente descarte el alimento y su contenedor, El
alimento puede estar contaminado,
No permita que el papel de aluminio o la sonda de la came
toque el elemento calefactor,
Siempre apague todos los controles cuando haya terminado
de cocinar,
Seguridad sobre el Use
de UtensiJios
Siga las instrucciones del fabricante cuando use bolsas para
cocinar en el homo.
El rendimiento y funcionamiento seguro de este
electrodom6stico ha sido comprobado usando utensilios de
cocina tradiciondes. No use ningun dispositivo o accesorio
que no haya sido espedficamente recomendado en esta guia.
No use cubiertas, rejillas superiores de la estufa o sistemas de
convecci6n para homos. El uso de dispositivos o accesorios
que no sean expresamente recomendados en esta guia puede
crear peligros graves de seguridad, afectar el rendimiento y
reducir la vida Otil de los componentes de este
electrodom6stico.
Si e[ utensi[io es mas pequeffo que e[ e[emento, una porci6n
del elemento quedar4 expuesta y puede encender la ropa o un
tomaollas,
Solamente ciertos tipos de utensilios de vidrio, vidrio ceramico,
cer4mica, gres u otros utensilios vidriados son convenientes
para cocinar en la superficie o en el homo sin quebrarse
debido al repentino cambio de temperatura. Siga las
instrucciones del fabricante del utensilio cuando use vidrio.
Gire los mangos de los utensi[ios hacia e[ centro de [a
cubierta, no hacia la habitaci6n ni sobre otto elemento
superior. Esto reduce el riesgo de quemaduras, encendido de
materiales infiamables o derrames si el utensilio es tocado
accidentalmente o alcanzado pot nifios pequeffos.
NUNCA deje los elementos superiores sin supervisi6n,
especialmente cuando este usando los ajustes de calor altos.
Un derrame que no reciba la debida atenci4n puede causar
humo y un derrame de grasa puede causar un incendio.
Este electrodom6stico tiene diferentes tamaffos de elementos
superiores. Seleccione utensilios que tengan bases planas Io
suficientemente grandes para cubrir el elemento. La relaci6n
adecuada entre el utensilio y el elemento mejorara la
eficiencia al cocinar.
Elementos TubuJares
Para evitar dafio a los elementos cdefactores removibles, no
los sumerja, remoje ni lave en un lavavajillas o en un homo
autolimpiante. Un elemento da_ado puede producir un
cortocircuito resuRando en un incendio o riesgo de choque
eldctrico.
Asegurese de que los platillos protectores esten en su lugar
pues la ausencia de estos durante la cocci4n )uede dafiar el
alambrado.
Fortes Protectores: No use papel de aluminio para forrar los
phtillos protectores o la parte inferior del homo, excepto como
se sugiera en la guia. La instalaci6n incorrecta de estos forros
puede resuRar en un riesgo de choque eldctrico o incendio.
OJJas Freidoras
Use extremo cuidado cuando mueva la olla con aceite o
descarte la grasa caliente. Deje que la grasa se enfrie antes
de intentar mover la olla.
Campanas de VentiJaci6n
Limpie con frecuencia la campana y los fiRros a fin de evitar
que se acumule en ellos grasa u otros materiales infiamables y
para evitar incendios de grasa.
Cuando prepare dimentos fiameados debajo de la campana,
encienda el ventilador.
51
Seguridad en la Li pieza
Limpie con cuidado la cubierta, Apague todos los controles y
espere que se enfrien las piezas del electrodom6stico antes de
tocarlas o limpiarlas, Limpie con cuidado, Tenga cuidado
para evitar quemaduras de vapor si usa una esponja o un
patio mojado para iimpiar derrames en una superficie caiiente,
Aigunos iimpiadores pueden producir vapores nocivos cuando
se aplican en una superficie caliente,
Limpie solamente las piezas indicadas en esta guia,
Homo Autoli piante
NO deje las pardi!as, asaderal aiimentos o utensilios de
No iimpie ia junta de ia puerta, La junta de ia puerta es
esencial para obtener un sellado hermetico, Se debe tener
cuidado de no frotar, dafiar ni mover la junta,
No use limpiadores de homo ni forros de homo de ningun tipo
alrededor ni en ninguna parte del homo autolimpiante,
Antes de iniciar el ciclo de autolimpieza del homo, retire la
asadera, las parrillas del homo y otros utensilios y limpie
cualquier derrame para evitar humo excesivo o llamaradas,
Aviso y Advertencia
l portante Sobre Seguridad
La Propuesta 65 de la Ley de 1986del Estado de California
Sobre Seguridad y Contaminaci6n del Agua Potable {Califor-
nia Safe Drinking Water and Toxic Enforcement Act of 1986}
exige que ei Gobernador de California publique una lista de
las sustancias que segqn el estado de California causan
cancer o da_o al sistema reproductivo y exige que las
empresas advbrtan a sus dbntes sobre la exposici6n
potencial a tabs sustancias,
Se advierte a los usuarios de este electrodom6stico que
cuando el homo est_ funcionando en el cicio de autolimpieza,
puede haber exposici6n de bajo nivei a aigunas de ias
sustancias indicadas en la lista, incluyendo mon6xido de
carbono, La exposici6n a estas sustancias puede ser reducida
a un minimo ventilando el homo al exterior en forma
adecuada, abriendo las ventanas y/o la puerta en la habitaci6n
en donde esta ubicado el electrodomestico durante el cicio de
autolimpieza,
AVISO IMPORTANTE RESPECTO A LOS PAJAROS
DOMESTmCOS:
Nunca mantenga los p_jaros en ia cocina o en ias
habitaciones donde puedan llegar los humos de la cocina, Los
p_jaros tienen un sistema respiratorio muy sensitivo, Los
humos producidos durante el cicio de autolimpieza del homo
pueden ser perjudiciaies o mortaies para los p_jaros, Los
humos que despide el aceite de cocina recalentado, la grasa,
margarina y los utensilios antiadherentes recalentados
tambi6n pueden set perjudiciales,
Conserve estas instrucciones para referencia futura
52
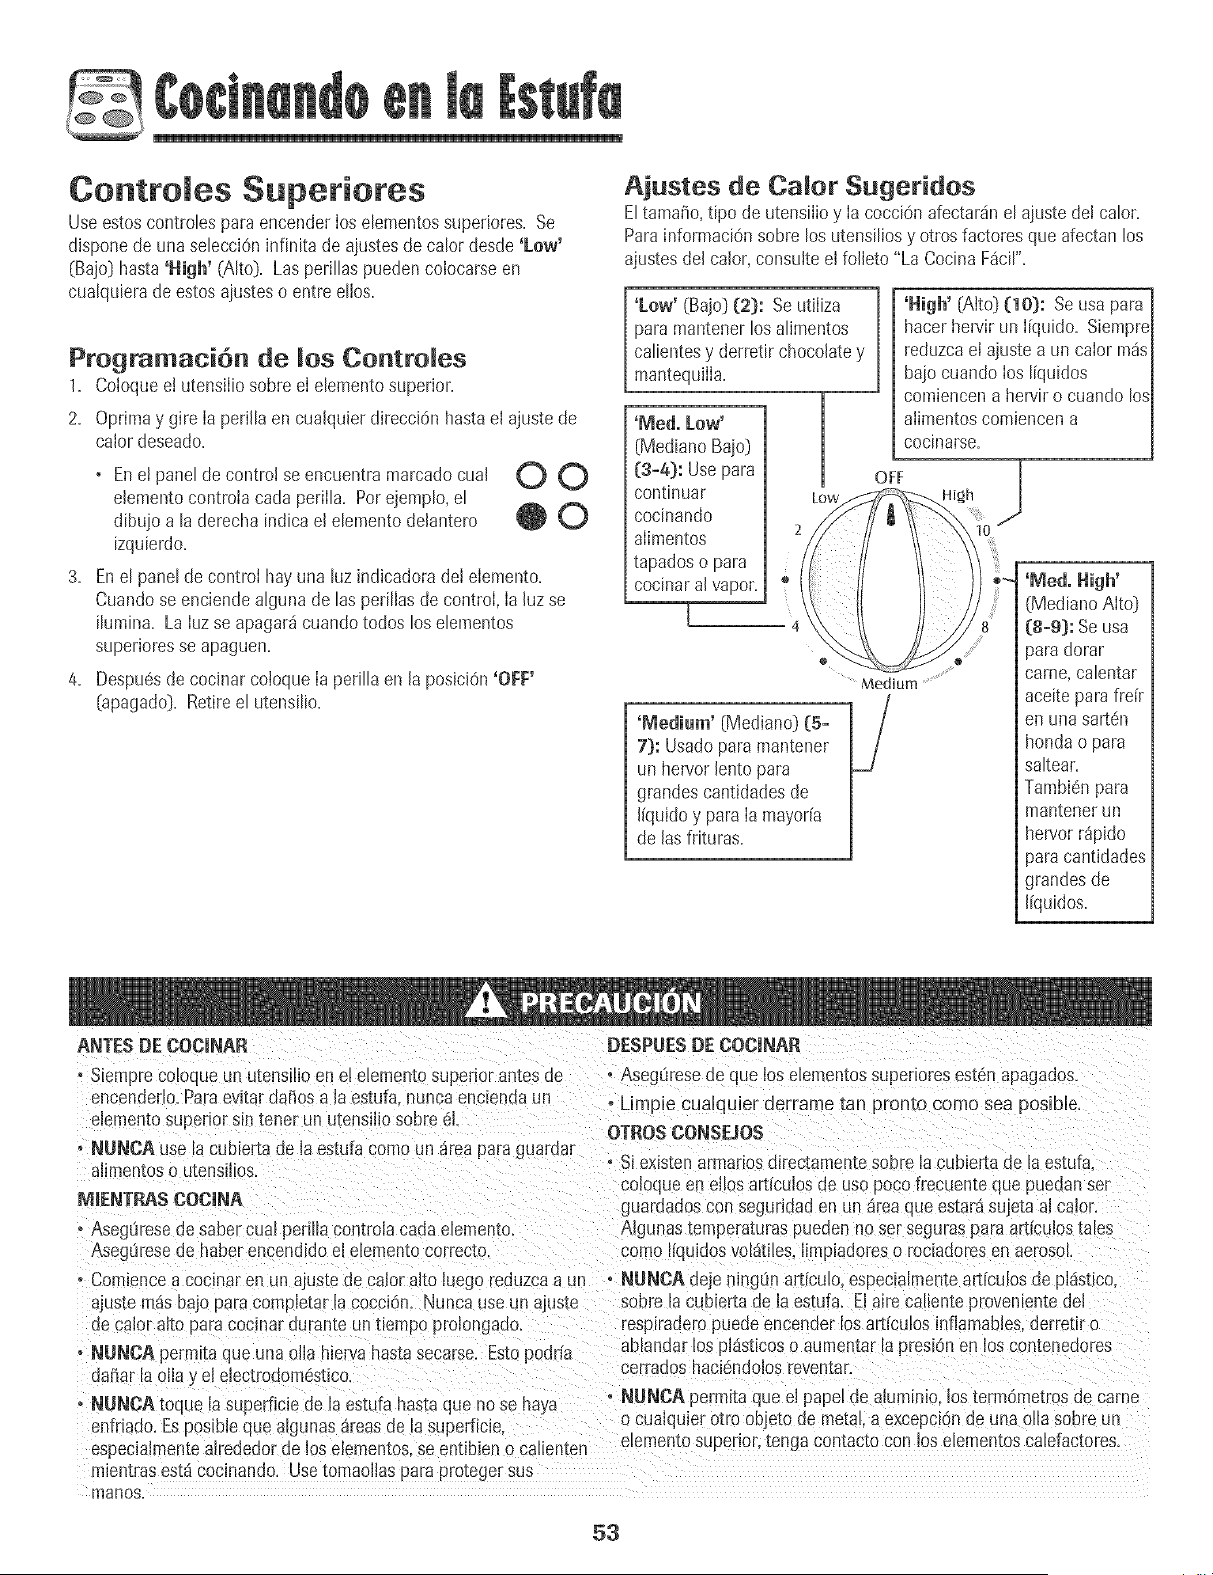
Controles Superiotes
Useestoscontrolespara encenderlos elementossupedores. Se
dlsponede una selecci6ninfinita de ajustesde calor des@ 'Low'
(Bajo] hasta'Nigh' (Alto}. Las perillaspuedencolocarseen
cualquierade estosajusteso entre ellos.
Programaei6n de los Controles
1. Coloquee! utensilio sobre el elementosuperior.
2. Oprimay gire Ia perillaen cualquier direcci6n hastael ajuste de
calordeseado.
3.
4.
+ Enet panel decontro! se encuentra marcadocual O O
elementocontroiacada perilla. Porejemplo,el
dibujoa laderecha indicael elemento delantero _ _J
izquierdo.
Enel paneldecontrol hayuna luz indicadoradel elemento.
Cuandose enciendealguna de las perillasde control, Ia hz se
ilumina. La Iuzse apagar_cuandotodos los elementos
superioresse apaguen.
Despu@de cocinarcoioqueIa perilla en la posiciOn'OFF'
{apagado). Retireel utensilio.
Ajustes de Calor Sugeridos
EltamaSo,tipo de utensilio y Ia cocci@ afectardnel ajuste del calor.
ParainformaciOnsobre los utensiliosy otrosfactoresque afectan los
ajustesdel calor,consulte el folleto "La CocinaF_cil'.
'Low' (Bajo] (2}: Seutiliza
paramantener losalimentos
calientesy derretir chocolatey
mantequilIa.
'iVied. Low+
{MedianoBajo]
{[3-8}: Usepara
continuar
cocinando
alimentos
tapadoso para
cocinaral vapor.
[ +
'Nigh' {Alto} {10): Se usapara
hacerhen/it un Ifquido. Siempre
reduzcael ajuste a un calor m_s
bajocuando los Ifquidos
comiencena hervir o cuando los
aiimentoscomiencena
cooinarse.
OFF
High
O
Medium ...................
'lViedium' {IVlediano}(5-
7): Usadopara mantener
un hen/or lento para
grandescantidadesde
Ifquidoy para Ia mayorfa
de las frituras.
(MedianoAlto}
(8-9}: Se usa
}ara dorar
carne,calentar
aceitepara frefr
en una sart_n
hondao para
saltear.
Tambi6npara
mantenerun
hen/or r@ido
)ara cantidades
grandesde
Ifquidos.
ANTESDE COCINAR
• SLemprecoloque un u_ensflloen e! etementosupenor antes de
encenderlo.Paraev+tarua;los a laestufa, nuncaenciendaun
elemen_osuperior sm tenet un utensiliosobre 61.
, NUNCA ase [acub_ertade [aestufa como un area para guarda+
aiimentosc utensilios.
NT]ENTP_SCOCINA
+AsegQresedesabercure perlllacontrolacada elememo.
Aseg8resede haber encendidoel ebmemo correc_o.
• Com+encea coc+naren un ajus[e de calor alto luegoreduzcaa un
ajustemas bNOparacompbtar lacocci6n. Nunca useun ajuste
de caior alto paracocmarouran[e un t_enLpoprolongado,
, NUNCA permitaque una olla hiervahasta secarse. Estopodria
da+3arla o+la_el eiectrodom@tlco.
+ NUNCAtoque la superficie de la es[ufahasm que nose haya
enfnado.Esposibb quealgunas _ireasde la superficie
especialmentealrededorde los eiemen[os,se entibien o calien[en
mientrasest,1cocinando. Usetomaoilas parapro[eger sus
rnanos.
DESPUESDE COCINAR
, Asegureseue q Je los ebmemos supedoresest6napagados.
, Limpie cuaiquier derrame tan pron[o como sea posibb
OTROSCONSEJOS
* Siexistenarmanosdlrectamentesobre la cubierta de la estufa.
coioque enel!os articulosde usopoco +recuenteque puedanset
guardadoscon segundaden un _rea queestar_ sujetaal calor,
Algunastemperaturaspuedenno set segurasparaarticulostales
como liquidosvolatfles,hmpiadoreso rociadoresen aerosol
" NUNOA deje n+ngOnarticulo,especialmemeart[culosde pl_stico+
sobre ia cubiertade la estufa. ElairecalLenteprovenientedel
respiraderopuede encender losarticulos inflamables,derretir o
ablandarlos pl_sticoso aumentar ta presionen los contenedores
cerradosnaci6ndolosrevenmr.
o NUNCA permitaqueel papelue aiuminio, los termOmetrosde came
s cualqubr otto objeto de metat,a excepciOnde una olia sobreun
elemen[osuper+or,tenga contacto con los ebmentos cabfactores.
53
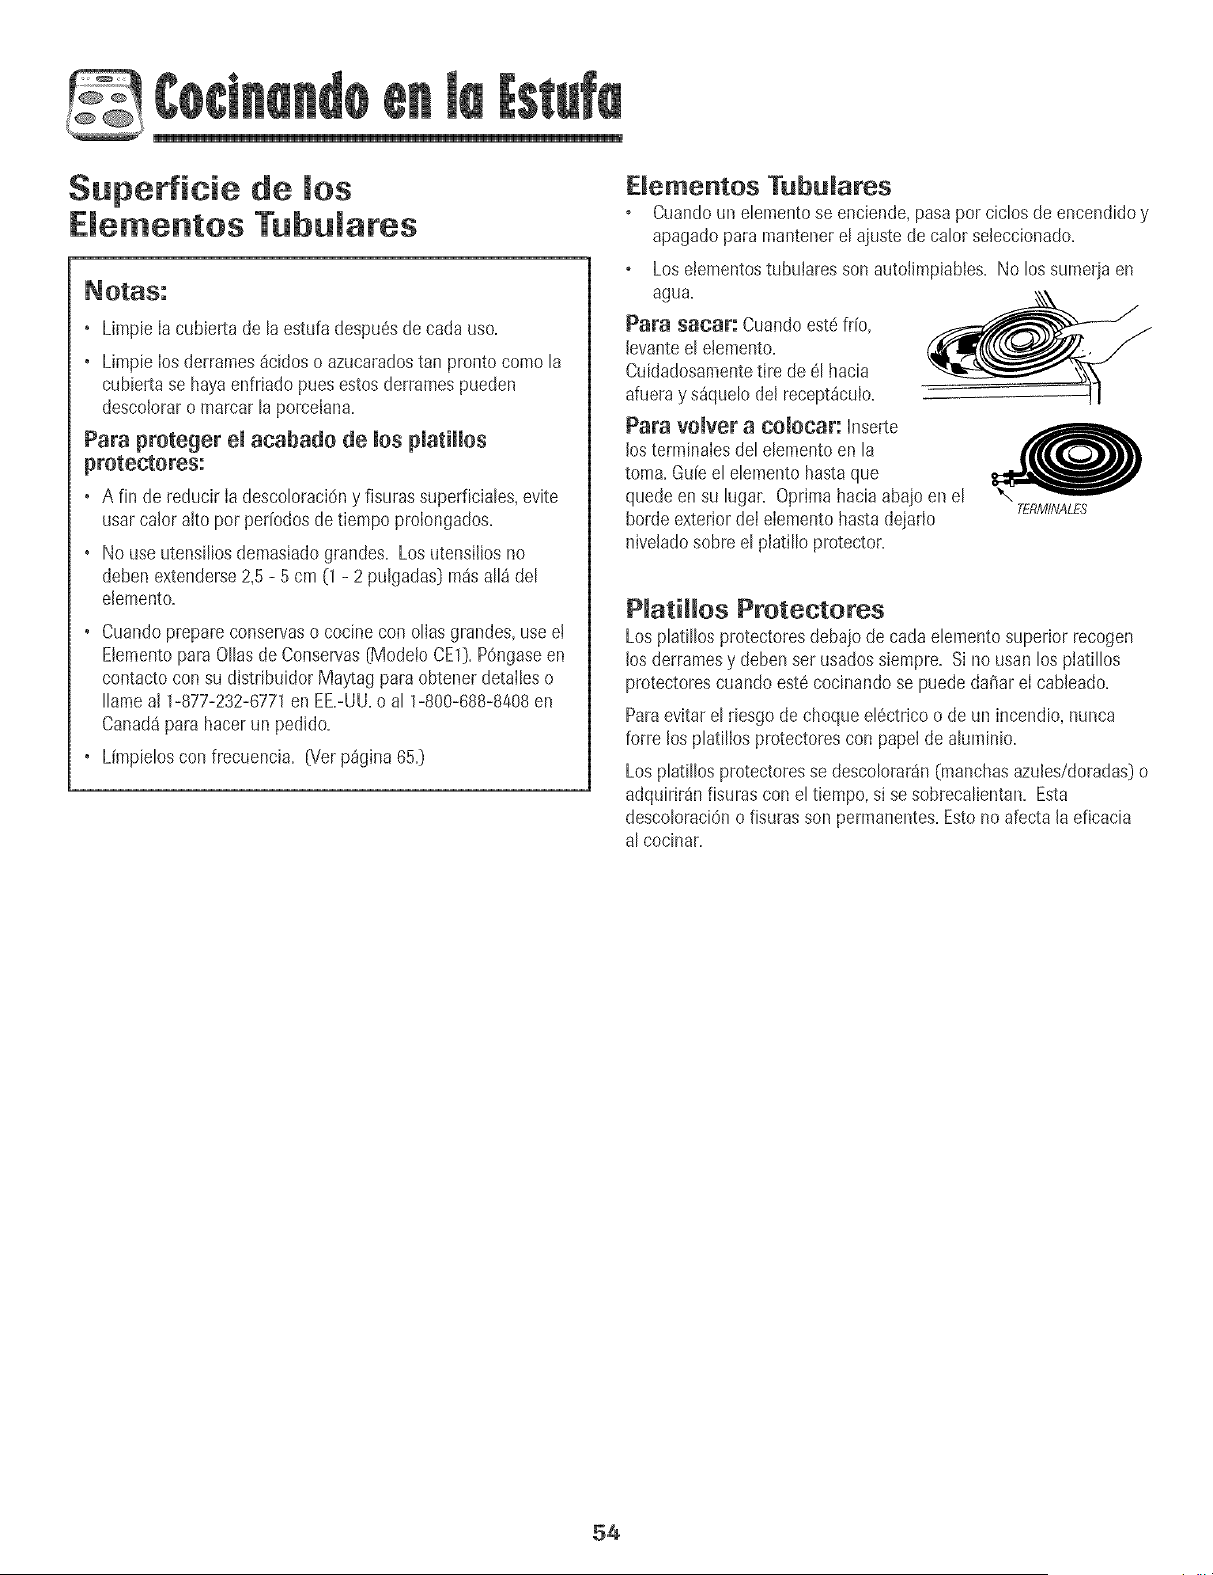
Supetficie de los
E e entos Tubu ares
• Limpie Iacubierta de taestufa despu6sde cadauso.
• Limpie Ios derrames_cidoso azucaradostan pronto como ta
cubiertase hayaenfriado puesestosderramespueden
descoloraro marcar ta porcelana=
Para proteger emacabado de ruespmatimmos
protectores:
• A fin de reducir Ia descotoraci6ny fisurassuperficiates,evite
usarcalor alto pot per[odosdetiempo prolongados=
• No use utensiliosdemasiadograndes=Los utensiliosno
debenextenderse2,5 - 5 cm (1 - 2 pulgadas)m_sall_ del
elemento=
• Cuandoprepareconservaso cocinecon ollas grandes,usee!
Elementopara Ollasde Conservas[ModetoCE1)=POngaseen
contactocon su distribuidor Ma_,¢agpara obtenerdetalleso
Ilameal 1-877-232-6771en EE.-UU.o al 1-800-688-8408en
Canad8para hacerun pedido.
• L[mpieJoscon frecuencia. [Ver p_gina 65.)
Dementos Tubu_ares
Cuandoun elemet_tose enciende,pasapor ciclos de encendidoy
apagadopara mantenerel ajuste de calor seleccionado.
Los elementostubulares sonautotimpiables=No los sumeriaen
agua=
Par8 sacar: Cuandoest_frio,
levanteel etemento.
Cuidadosamentetire de 61hacia
afueray s_quelodel recept_culo=
Para vomvera comocar: Inserte
losterminalesdel elementoen la
toma. Gu[eel elemento hastaque
quedeen su lugar. Oprimahaciaabajo en el
bordeexteriordel elemento hastadejaflo
hive[adosobre el piatillo protector.
TERfVIhVAL£S
PRatiRIos Protectores
Losplatillos protectoresdebajode carla elementosuperior recogen
los derramesy debenser usadossiempre=Si no usan los platillos
pmtectorescuando est6 cocinandose puede daSareI cableado=
Paraevitarel riesgode choqueel6ctrico o de un incendio, nunca
forte los platillosprotectorescon papelde aluminio=
Losplatillos protectoresse descolorarSn(manchasazules/doradas)o
adquirir_nfisuras con el tiempo,si se sobrecalientan=Esta
descoloraciOno fisuras son permanentes=Estono afectala eficacia
al cocinar=
54
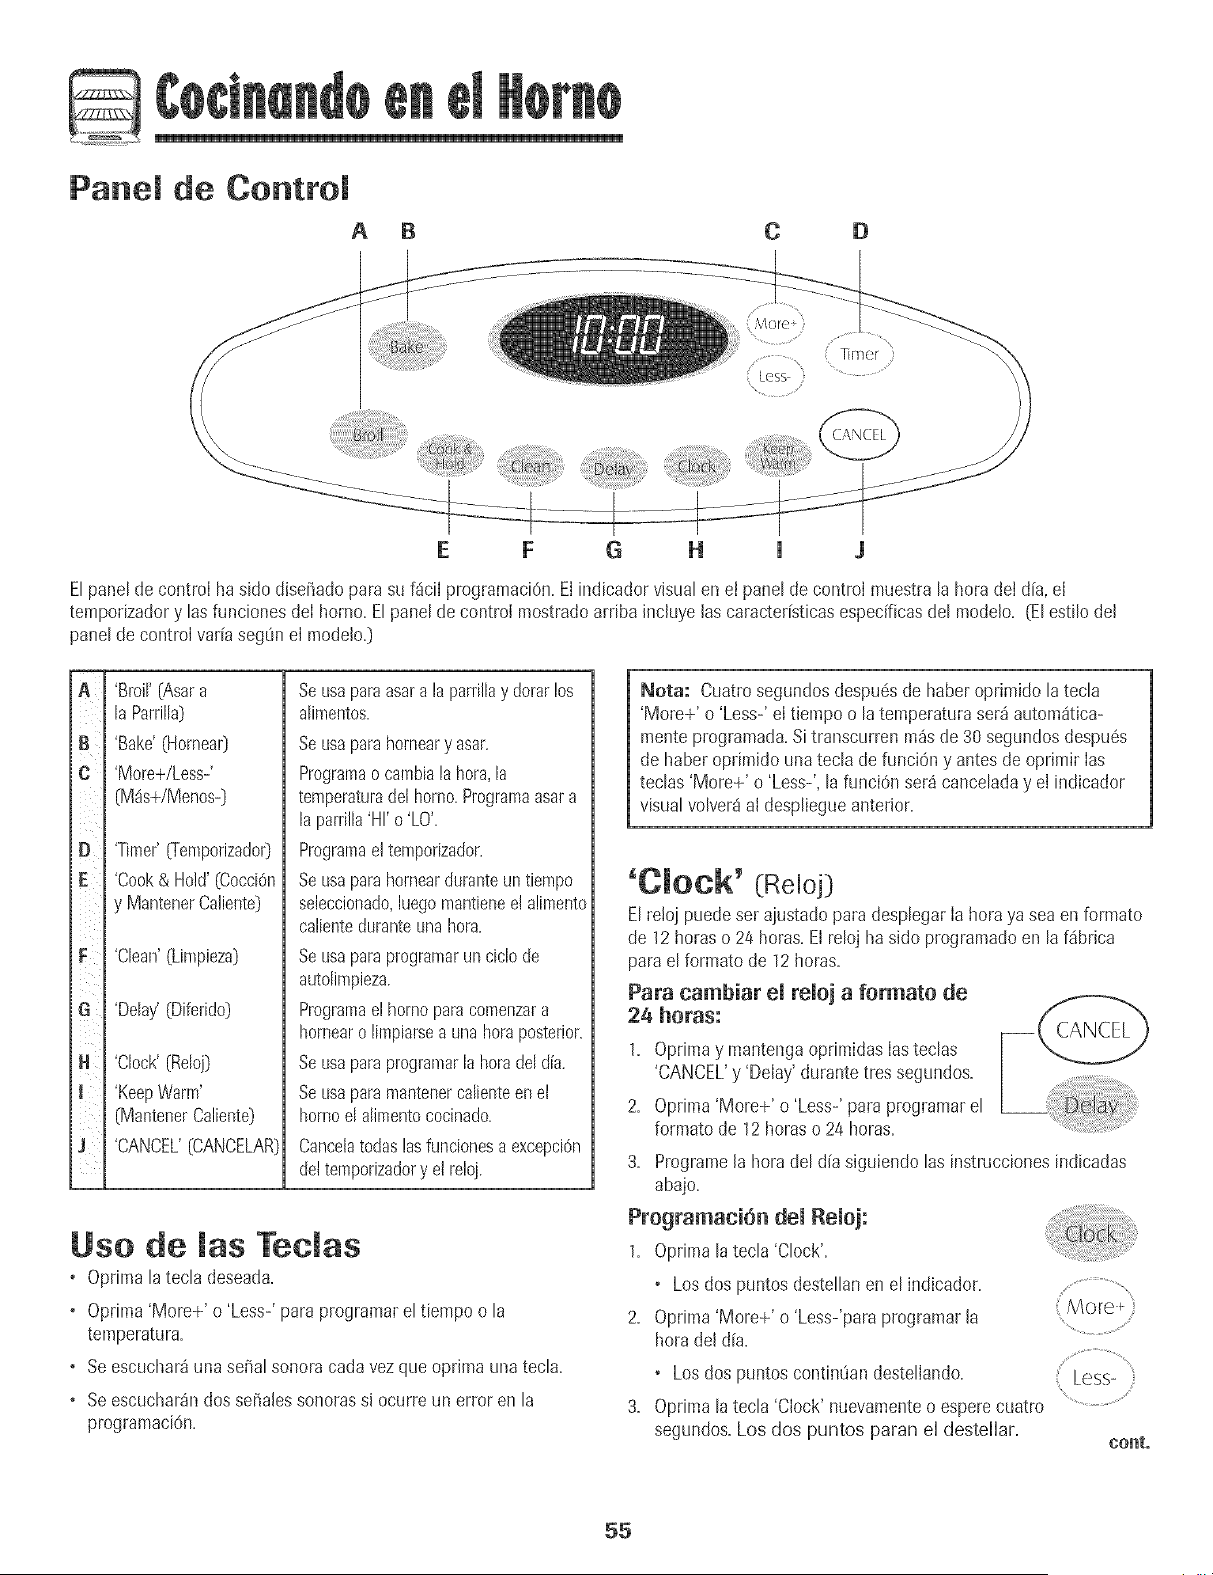
Panel de Control
A B
C D
H l j
Elpanel de control ha sido disefiadopara su f4cil programaciOn.El indicadorvisualen et panelde control muestrala hora del dFa,el
temporizadory tas funcionesdel homo. Etpanelde control mostradoarriba inchye [as caracterBticasespecMcasdet modelo. (Etestilodel
panelde control varFaseg0n el modelo.)
iii:i
C
D
E¸
G
H
J
J
'Broil'(Asara
la Parrilla)
'Bake'[Hornea0
'More+/Less-'
(M_is+/Mer!os-)
'Timer'_emporizador}
'Cook& Hold'(CocciOn
y MantenerCaliente}
'Clean'(Limpieza}
'Delay'(Diferido)
+Clock'[Reloj}
+KeepWarm'
(MantenerCaliente)
'CANCEL'{CANCELAR}
Seusaparaasara la parrillay dorarlos
alimentos.
Seusaparahorneary asar.
Programao cambiala hera,la
temperaturadelhorno.Programaasara
laparrilla'HI'o 'LO'.
Programae! temporizador.
Seusaparahornearduranteuntiempo
seleccionado,hegomantienee!alimento
calienteduranteunahera.
Seusaparaprogramarun ciclode
autolimpieza.
Programael hornoparacomenzara
hornearo limpiarsea unaheraposterior.
Seusaparaprograraarlahora deldia.
Seusaparamantenercalienteen et
homoel alimentococinado.
Cancetatodaslasfuncionesa excepci6n
dettemporizadory etreloj.
Use de Jas Teclas
• Optimalatecla @sea@+
• Oprima'More+' o 'Less-' para programarel tiempo o la
temperatura.
+ Se escuchar4unasd_alsonora cadavez queoprJmaunatecla.
+ Se escuchar_ndos se5alessonorassi ocurreun erroren la
programaciOn.
Nota: Cuatrosegundosdespu6sde haber oprimido la tecla
'More+' o 'Less-' el tiempo o la temperaturaser_autom4tica-
menteprogramada.Si transcurren m_sde 30 segundosdespu6s
de haberoprimido una tecla de funciOny antesdeoprimir Ias
teclas 'More+' o 'Less-',la funciOnset4canceladay el indicador
visualvolver4al despliegueanterior.
'OJOCk' (Reloj)
Elre!oj puedeser ajustado paradesplegarIa horaya seaen formato
de 12horaso 24 horas.El reloj ha sido programadoen la f_brJca
parael formato de 12 horas.
Para cambiar ei reioj a formate de
26 horas:
1. Optima y mantengaoprimidasIasteclas
'CANCEL'y 'Delay' durantetres segundos.
2. Optima'More+' o 'Less-'para programarel
formato de 12horaso 24 horas.
3=
abajo.
Programaci6n dei Reioj:
1. Optima h tech 'Clock'.
• Los dos puntosdestelhn en el indicador.
2. Oprima'More+' o 'Less-'paraprogramar[a
hora deld[a.
• Los dos puntoscontin[ian desteliando.
3. Oprima[a tecla 'Clock' nuevamenteo esperecuatro
segundos.Los dos puntos paran el destellar.
Programe [a hera del dia siguiendo las instruccionesindicadas
More,
/p+. ........................
_i::Less-
cont,
55

Cuandose conectaenergiae!6ctricaal homo o despu6sde una
interrupci6nde la energ[aei6ctrica,Ia likima hora del reloj previaa
la interrupciOndestellar4en el indicador.
Paradesplegarla hora deI aliacuando el indicadorest6 mostrando
otra funciOndetiempo, oprima la tech 'Clock'.
La horadel reJojno puedeset cambiadacuandoel hornohayasido
programatic para'DelayCook','Delay Clean'o 'Cook & Hold'.
Para canceJar eJ despJiegue deJ reJoj:
Si nodeseaque e! indicadorvisual muestre la hora del alia:
Oprimay mantengaoprimida Iasteclas
'CANCEL'y 'Clock' durantetres segundos.La
horadel dia desaparecer4del indicador.
Cuandose cancelael desplieguedeI reloj,
oprima Iatecla 'Clock' paradesplegar
blevementeIa horadel dia.
Para restaurar eJ despJiegue deJ reJoj:
Oprimay mantengaoprJmidaIasteclas 'CANCEL'y 'Clock'durante
tres segundos.Lahora del d[a reaparecer4en el indicador.
'Timer' (Temporizador)
Eltemporizadorpuede ser programadode un minuto (0:01)hasta99
horasy 59 minutos(99:59).
Eltemporizadorpuede ser usado independientementedecualquier
otra actMdad del horno.Adem4spuede ser programadocuando otra
funciOndel homo est6 en funcionamiento.
Eltemporizadorno controla el horno,solamentecontrola una serial
so[_ora,
Para programar el temporizader:
1. Optima Ia tecla 'Timer+Cremporizador)+ Timer
+ '0:00'se ilumina en el indicadorvisual. .......................................
• Losdos puntosdesteliar_n.
2. OprimaIatecla 'More+' o 'Less-'hasta que e!
tiempo correctoaparezcaen el indicadorvisual
+ Losdos puntos contin0andestellando.
3. Optimanuevamentela tecla 'Timer'o esperecuatro
segundos.
; More+
Less-,i:i
• Losdos puntoscontintian desteJlandoy comienzaJacuenta
regresJvadel tiempo.
+ El _iltimominutode Ia cuenta regresivadel temporizadorse
desplegar4en segundos.
4. A! final del tiempo programatic,se escuchar4una seBaJsonora
larga.
Para canceJar eJtemporizador:
1. Opnmay mantengaoprh_Jdala tecJa'Timer' durantetres
segundos.
U
2. Optima la tecla 'Timer'y coloque lahora a 0:00.
BJoqueo de Jos ConttoJes y de
la Puetta deJ Homo
Elteclado y Ia puertadeJhomo puedenser bloqueadospara
seguridad,Iimpiezao evitar el uso noautorizado.Los controlesy Ja
puerta nofuncionar4n cuando est6n bloqueados.
Siel homo est4en uso, los controlesni la puerta pueden bloquearse.
La horaactual del d[a permanecer4en el indicador cuando los
controlesest6nbloqueados.
Para bJoquear:
Oprimay mantengaoprimidaslasteclas
'CANCEL'y 'Cook & Hold'durante tres
segundos.(Oprimapdmero la teela 'CANCEL').
'LOCK'destellaen el indicadorvisual
Para desbJoquear:
Opr+may mantengaoprimidaslasteclas 'CANCEL'y 'Cook & Hold'
durantetres segundos.(Oprimaprimero la tecla 'CANCEL').
'LOCK'desaparecedel indicador visual
C6digos de Ettotes
'BAKE'o 'LOCK'pueden destelhr r@idamentepara advertirleque
hay un error o un problema.Si'BAKE'o 'LOCK'destelIanen el
indicadorvisual,optima le tecla 'CANCEL'.Si'BAKE'o 'LOCK'
contimian destellando,desconectela corrienteel6ctrJcadel
artefacto.Espereunos pocos minutosy vuelvaa conectarla
corrienteel@ctrica.Si Iaspalabrasa0n contin0andesteiJando,
desconecteIa cordenteel6ctricadel artefactoy Jlamea un t6cnico
de servicioautorizado.
56
'Bake' (Horneado}
Para programar 'Bake' (Homeado}:
1. OprJmala tecia 'Bake'.
• 'BAKE'destethr_.
+ '000'destetlar_en el indicadorvisual. .......................
2. Seleccionela temperaturadel horno. La temperatura
deJhorno puedeset programadade 75° a285° C ........................
070° a 550° F).Oprimau oprimay mantenga
oprJmida[a tecJa'More+' o 'Less-'. ' Less-
, Cuandocualquierade estasdos teclasse oprime pot
prJmeravez,175° (350°] se ituminar4.
+ Optima latecla 'More+' para aumentarIa temperatura.
+ Optima latecla 'Less-' paradisminuir la temperatura.
3. Oprh4aJatecla 'Bake' nuevamenteo esperecuatrosegundos.
+ 'BAKE'dejar4de @stellary se iluminar4en el indicadorvisual
° 38° {100°} o la temperatura actual del horno se desplegar&
Latemperaturase elevar4en incrementosde3° (5°} hastaque
se alcancela temperaturapr%ramada.
4. Espereaque et homo se precalientedurante 8-15 minutos.
+ Cuandoet horno Ileguea Ia temperaturaprogramadase
escuchar_una sepal sonoraIarga.
+ ParavedficarIa temperaturaprogramadadurante el
precalentamientodel horno,optima latecla 'Bake'.
5. Coloquee! alimentoen el homo.
6. Venfique el progresode Ia cocciOncuando hayatranscurndoel
tiempo minimorecomendado.Contimiela cocci6n si es necesario.
7. AI t@minode la cocciOn,optima la tecla 'CANCEL'.SAr\ r,m_
8. Retireel alimentodel horno.
Notas sobre Hemeado:
+ Para camhiar matemperatura demhomo durante em
homeado, optima la tecla 'Bake',Iuegooprima Iatecla 'More+'
o 'Less-' hastaque Ileguea la temperaturadeseada.
+ Para eamhiar la temperatura demhomo durante 'Preheat',
oprJmados votes Ia tecla 'Bake',Iuegooprima Iatecla 'More+'
o 'Less-' hastaque se desplieguelatemperaturadeseada.
o Si oJvidaapagarel homo, seapagar_ autom4ticamentedespu6s
detranscurrir 12 horas.Si deseadesactivaresta caracter[stica,
yea la p%ina 80.
o Parasugerenciasadicionalessobre horneadoy asado,consulte
elfolIeto "La Cocina F_cil".
Diferencias de_ homeado entre su homo
antiguo y su homo nuevo
Esnormal observaralgunas diferenciasen el tiempo de horneadode
su homo antiguoy su homo nuevo.Vea"Ajustede la Temperatura
del Horno" en la p%ina 60.
'Cook & Hemal' (Coccion y
Mantener CaJiente:
'Cook & }{old' Ie permitehornear durante una cant+dad
determinadadetiempo, seguidode un ciclo 'KeepWarm' de una
hora.
Para programar 'Cook & Hemal':
1. Optima latecla 'Cook & Hold'.
+ 'BAKE'y 'HOLD' destellan.
+ '000'se ihmina en el indicadorvisual.
2. SeJeccionela temperaturadeI horno.La temperatura _ore÷
de! homo puedeset programadade 75° a 285° C
070° a550° F).Optima u optimay mantenga
oprimida la tecla'More+' o 'Less-'.
Less-
• Oprimala teela 'Mole+' para aumentarla
temperatura.
+ Oprimalatecla 'Less-' para disminuir latemperatura.
3. Optima la tecla 'Cook & Hold' nuevamenteo esperecuatro
segundos.
+ 'HOLD'destella.
+ '00:00'deste!Iaen e! indicadorvisual
4. ProgrameIacantldadde tiempo durante la cual usted@sea
hornearoprimiendo IatecJa'More+' o 'Less-', Eltiempo de
homeadopuedepr%ramarse desde 10 minutos (00:10}hasta
11horas,59 minutos (11:59}.
+ 'BAKE'y 'HOLD'se iluminanen el indicador visual
+ Eltiempo de horneadose iluminar_ en el indicadorvisual.
+ Comenzar4Jacuenta regresivadeJtiempo de horneado.
Cuando haya e×pirado el tiempo de cocci6m
+ Se escuchar4ncuatro seSalessonoras.
• 'BAKE'se apagar_.
+ 'HOLD'y 'WARM'se ihminar4n.
+ Enel indicadorse desplegar_75° [170°[.
5?
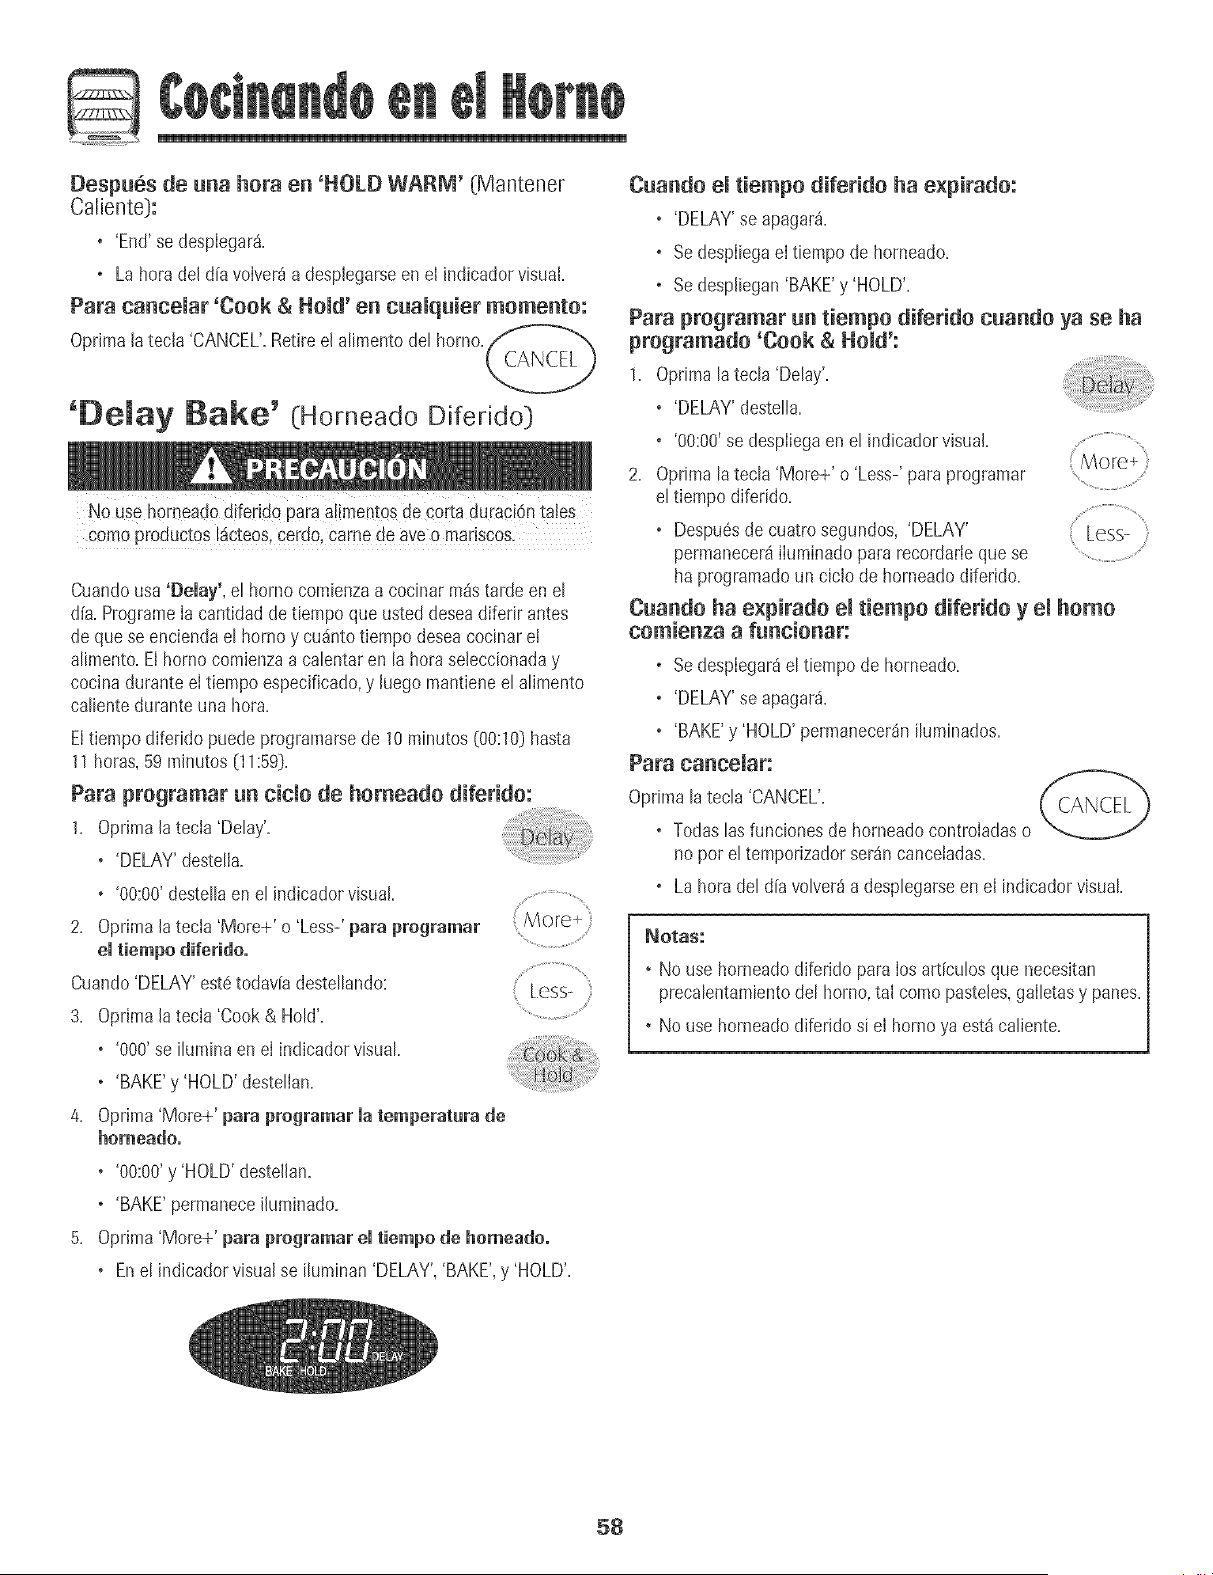
Q
Despubs de una hora en 'HOLD WARM' (Mantener
Caliente):
. 'End' se desplegar&
. La hora del dfa voIver_ a desplegarse en el indicador visual
Para caacelar 'Cook & Hold' ea cualquier momento:
Oprimala tecla 'CANCEL'.Retireel alimento (]el horno.C(_A_.._(_
'Delay Bake' (HorneadoDifeddo]
No use homeado difendo paraalimentosde corta duraci0ntales
comoproductos kicteos,cerdo, came de ave o manscos.
Cuandousa 'Delay', el horno comienzaa cocinarm4starde en el
d[a.ProgrameIa cantidad detiempo que usteddeseadiferir antes
de quese enciendael homo y cu_nto tiempo deseacocinar el
alimento.Elhomo comienzaa calentar en la hora seleccionaday
cocinadurante ei tiempo especificado,y luego mantieneel alimento
calientedurante una hora.
Eltiempo diferido puedeprogramarsede 10 minutos (00:10}hasta
11horas,59 minutos[11:59].
Para programar un cicio de homeado diferido:
1. Oprimala tecla 'Delay'.
. 'DELAY'destelIa.
. '00:00'destellaen el indicadorvisual.
2. OprimalatecIa 'More+' o 'Less-'para programar
el tiempo diferido.
Cuando'DELAY'est6todav[adestellando:
3.
Oprimalatecla 'Cook & HoW.
. '000'se ilumina en el indicadorvisual
. 'BAKE'y 'HOLD'destellan.
4. Oprima'More+' para programar la temperatara de
hemeado,
. '00:00'y'HOLD' destellan.
. 'BAKE'permaneceihminado.
5. Oprima'More+' para programar el tiempo de homeado°
less_
Cuando el tiempo diferido ha expirado:
. 'DELAY'se apagar&
. Se despIiegaeI tiempode horneado.
. Se despliegan'BAKE'y 'HOLD'.
Para programar un tiempo diferido cuando ya se ha
programatic 'Cook & Hold':
1. Optima latecla 'Delay'.
. 'DELAY'destella.
. '00:00'se despliegaen el indicadorvisual. ...............................
2. Oprimalatecla 'More+' o 'Less-'para programar .......................
eltiempo difeddo. ................................
, Despu6sde cuatrosegundos, 'DELAY' Less-
permanecer_iiluminadopara recordarleque se ..............................
ha programadoun ciclo de horneadodiferido.
Cuando ha expirado el tiempo diferido y el homo
comienza a funcionar:
. Se desplegar_el tiempo de horneado.
. 'DELAY'se apagar&
. 'BAKE'y 'HOLD'permanecerdniluminados.
Para cancelar:
Oprima latecla 'CANCEL'.
. Todas lasfunciones de horneadocontroladaso
no pot eltemporizadorser_ncanceladas.
. La horadel d[aw_lver_a desplegarseen el indicadorvisual
Notas: ]
• No use horneadodiferido paralos articu[os que necesitan [
precalentamientodel horno,tal como pasteles,galletasy panes./
/
No use horneadodiferido si el hornoya est_caliente. [
J
. Enel indicadorvisual se iluminan 'DELAY','BAKE',y 'HOLD'.
58
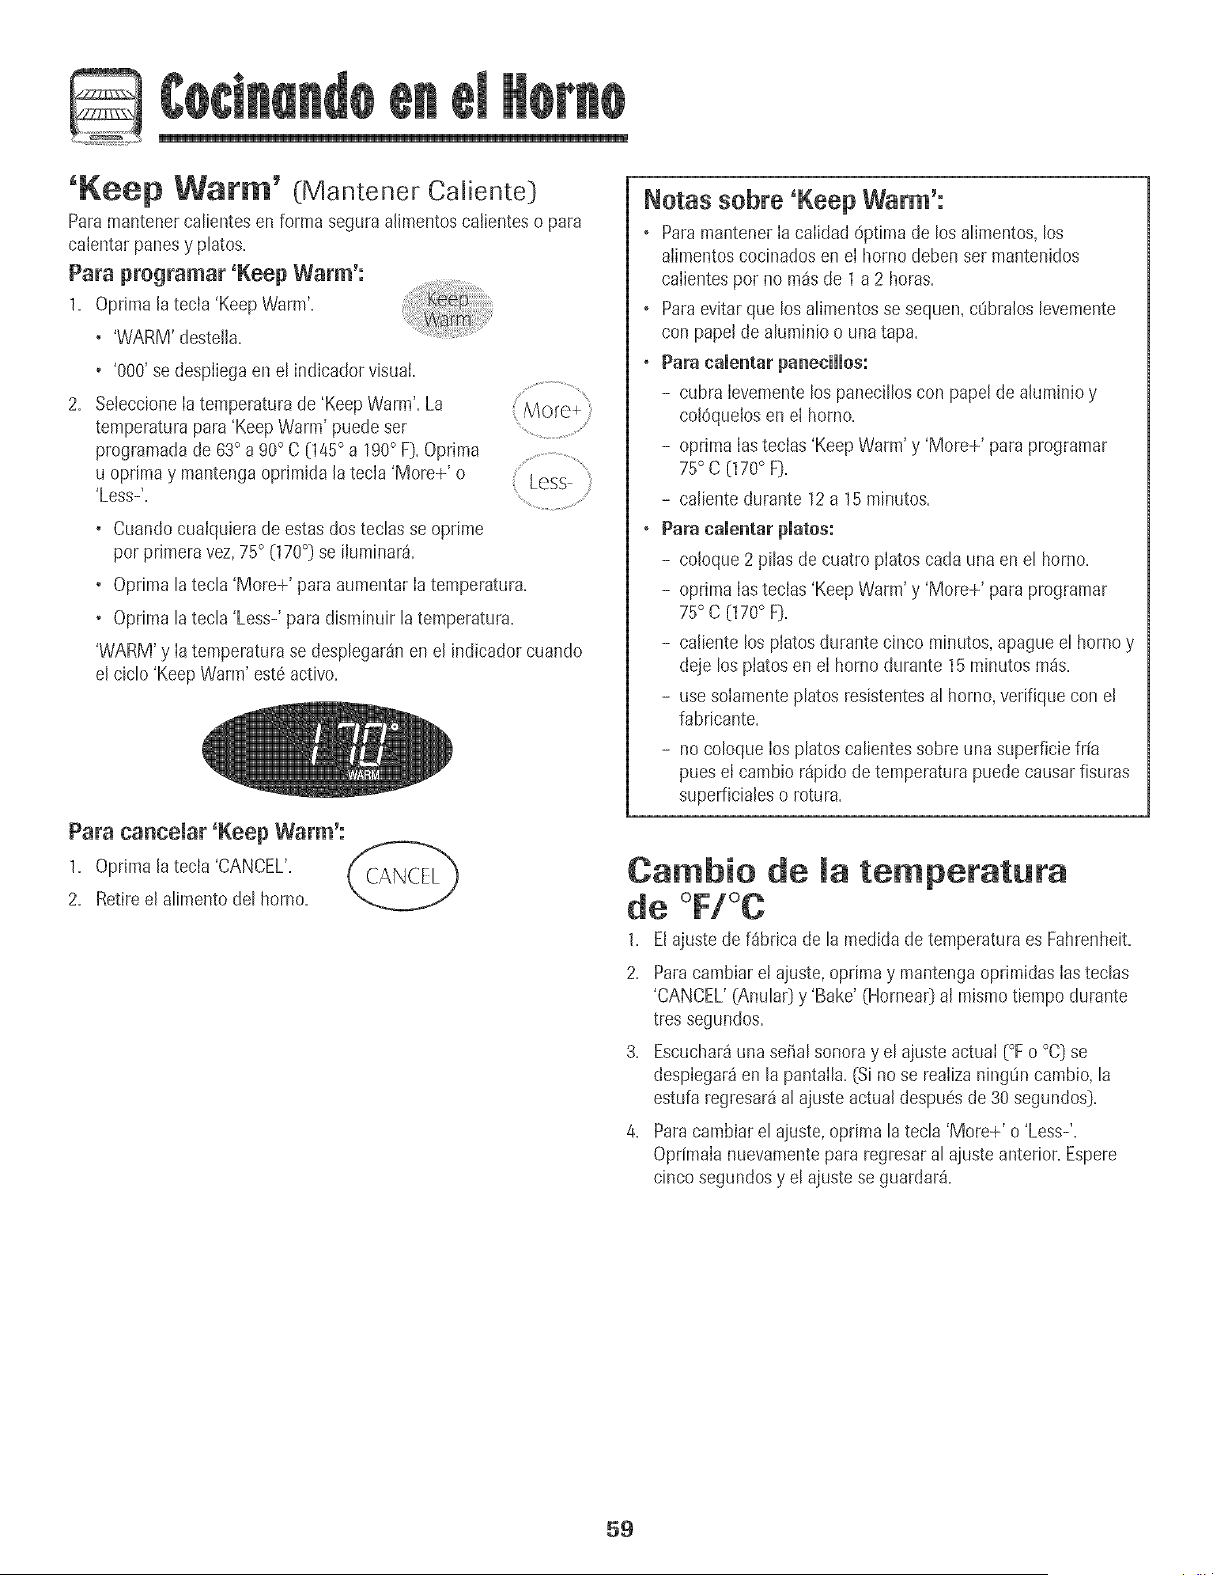
i
Keep Warm' (Mantener Caliente)
Paramantenercatientesen forma seguraalimentoscaiienteso para
calentarpanesy phtos.
Para pregramar 'Keep Warm':
1. Optima Jatecla 'Keep Warm'.
• 'WARM'desteila.
• '000'se despliegaen et indicadorvisuai.
2. SeleccioneIatemperaturade 'KeepWarm'.La
temperaturapara 'KeepWarm' puedeset
programadade 63° a 90° C 045 ° a 190° F). Oprima
u optimay mantengaoprJmidala tecla 'More+' o
'Less-'.
• Cuandocuaiquierade estasdos teclasse oprime
por prJmeravez,75° (170°] se iJuminar&
• Optimalatecla 'More+' para aumentarla temperatura.
• Optimalatecla 'Less-' para disminuir latemperatura.
'WARM'y Iatemperaturase desplegar4nen el indicadorcuando
el ciclo'Keep Warm' est6activo.
Para ca_oeJar 'Keep Warm':
1. Optima Jatecla 'CANCEL'.
2. Retireel alimentodel homo.
Notas sobre +Keep Warm':
o ParamantenerIa calidad 6ptimade los alJmentos,los
alimentoscocinadosen el horno debenser mantenidos
calientespor no m4s de 1 a 2 horas.
o Paraevitarque losalimentosse sequen,cQblaJoslevemente
con papelde alumJnioouna tapa.
o Para camentarpaneeiHos:
- cubra Ievementelos panecilloscon papel de ahmJnioy
coBqueios en el homo.
- optima Ias teclas'Keep Warm'y 'More+' para programar
75° C (170° F).
- caJientedurante 12a 15 minutos.
+ Para camemarplates:
- coloque 2 pilas de cuatro platoscada una en el homo.
- optima Ias tecias'Keep Warm'y 'More+' para pmgramar
75° C (170° F).
- caJientelos platosdurante cinco minutos,@ague el homo y
deje los piatosen el horno durante 15minutosm4s.
- use solamenteplatos resistentesal horno,verifique con el
fabricante.
- nocoloque los platoscalientessobreuna superficiefr{a
pues el cambior4pido de temperaturapuede causarfisuras
superficialeso rotura.
Cambio de la temperature
de °F/°C
1. El ajustede f_brica de la medidade temperaturaes Fahrenheit.
2. Paracambiarei ajuste,opnma y mantengaoprimidasIasteclas
'CANCEL'(AnulaOy 'Bake' (HorneaOal mJsmotiempodurante
tres segundos.
3. Escuchar_una serial sonoray el ajusteactuai (°Fo °C] se
desplegar_en lapantalla. (Sino se realizaning_incambio, la
estufa regresar4al ajuste actualdespu6sde 30 segundos].
4. Paracambiarel ajuste,opdma la tecla 'More+' o 'Less-'.
Oprimalanuevamentepara regresaral ajusteanterior. Espere
cinco segundosy el ajuste se guardar&
5g

Q
Ciette Autom tico/Modo Ajuste de la Tempetatuta del
Elhomo se apagar_autom_ticamentedespu6sde 12 horassi usted
Iodeja accidentaimenteencendido. Estacaracteffsticade seguridad
puedeset desactivada.
Para cancemar emcierre autem_tice de 12 betas y
dejar que el home funciene centinuamente durante
72 heras:
1. Programeel homo para hornear [verp_gina 57}.
2. Oprimay mantengaopdmida la tecla 'Clock'
durante cinco segundos.
o 'SAb'se desplegar_y destelIar_durantecinco segundos.
o 'SAb'se desplegar_continuamentehasta quese desactiveo
hastaque transcurraeI limite de 72 horas.
o 'BAKE'tambi_n se desplegar_isJse est_ usandoun ciclo de
horneadocuando el homo est_ en Modo Sab_tico.
Todaslasotras funciones EXCEPTO'BAKE'['Timer','KeepWarm',
'Clean',etc0 est_nbloqueadasdurante el Modo SabStico.
Para cancemar 'Bake' cuande emMode Sab_tice est_
activo:
Optima'CANCEL'. CANCEL
o 'BAKE'se apagar4en el indicadorvisual
o No se oir4 ninguna serialsonora.
Para cancemar emMedo Sab_tice:
1. Oprimalatecla 'Clock' durante cinco segundos.
O
2.
Despu6sde 72 horas,el Modo Sab_ticoterminar_.
o 'SAb'destellar8durante 5 segundos.
o La hora del dia reaparecer_en el indicadorvisual.
La exactitudde las temperaturasdel homo es cuidadosamente
probadaen Iaf4brica. Esnormal notar alguna diferenciaentre la
temperaturade horneadoentre un horno nuevoy un hornoantiguo.
ConeJcorrerdel tiempo, Iatemperaturadel horno puedecambiar.
Ustedpuedeajustar Ia temperaturadel homo si consideraque su
homo noest4 horneandoo dorandoenforma correcta. Paradecidir
cu4ntodebe cambiarIa temperatura,programelatemperaturadeI
homo a 15° C (25° F} masalta o m_s bajaque la temperatura
indicadaen sus recetas,luego hornee. Los resultadosde la
"prueba" puedendarleuna ideade cu4nto ajustarJatemperatura.
Ajuste de matemperatura dem home:
1. Oprima 'Bake'.
2. Programe285° [5500 oprimiendolatecla
'More+'.
3. Oprimay mantengaoprimida [a tecia 'Bake'
durante vadossegundoso hasta queO° aparezca
en el indicador visual
Si Ia temperaturadel homo ha sido previamenteajustada,el
cambioaparecer_en et indicadorvisual Por eiemplo,si Ia
temperaturadel horno fue reducidaen 8° C (15° F} el indicador
mostrar_'- 8°' ['-15°'}.
Oprima latecla 'More+' o 'Less-' para ajustar latemperatura.
Cadavezque se oprimeuna tecla, la temperaturacambiaen 3° C
[5° F}. La temperaturadeI horno puedeser aumentadao
disminuidaen 3° a 20° C [5° a 35° F}.
Lahora del d[a reaparecer_autom_ticamenteen el indicador
visual
No necesitareajustarla temperaturadet horno si hayuna falla o
interrupciOnde energ[ae!6ctrica. Lastemperaturasdeasar a la
parrilla y limpiezano puedenset ajustadas.
Notas Sobte eUMode Sab tico:
• ElModo Sab_iticopuedeseractivadoen cualquier momento,
est6o no el homo encendido.
• ElModo Sab_ticono se puede activar si lasteclasest_n
bloqueadaso cuando la puerta est_ bloqueada.
• Sie! horno est_horneandocuando se programael Modo
Sab_tico,'BAKE'se apagar_al final del ciclode horneado.No
se emitirSnsefialessonoras.
• Sise deseamantenerla IuzdeI homo encendidael Modo
Sab_tico,6stadebe set activadaantes de que comienceel
Modo Sab_tico.
o Cuandocomienzael Modo Sab_tico,no se emitir_ la serial
sonorade precalentamiento.
o Cuandoel Modo Sab_ticoest_ activo,todos los avisos,
mensajesy sefialessonorasest_n desactivados.
o El bloqueoautom_ticode lapuerta no funcionadurante el
Modo Sab_tico.
o Si oprime la tecla 'CANCEL'se canceiar_un ciclo 'Bake',sin
embargoei control permanecer_en Modo Sab_tico.
o Si falla Iacorrienteetectrica,cuandovuelvaIa energ[ael horno
se activar_enModo Sab_ticocon 72 horasrestantesy ningOn
ciclo activo.
6O
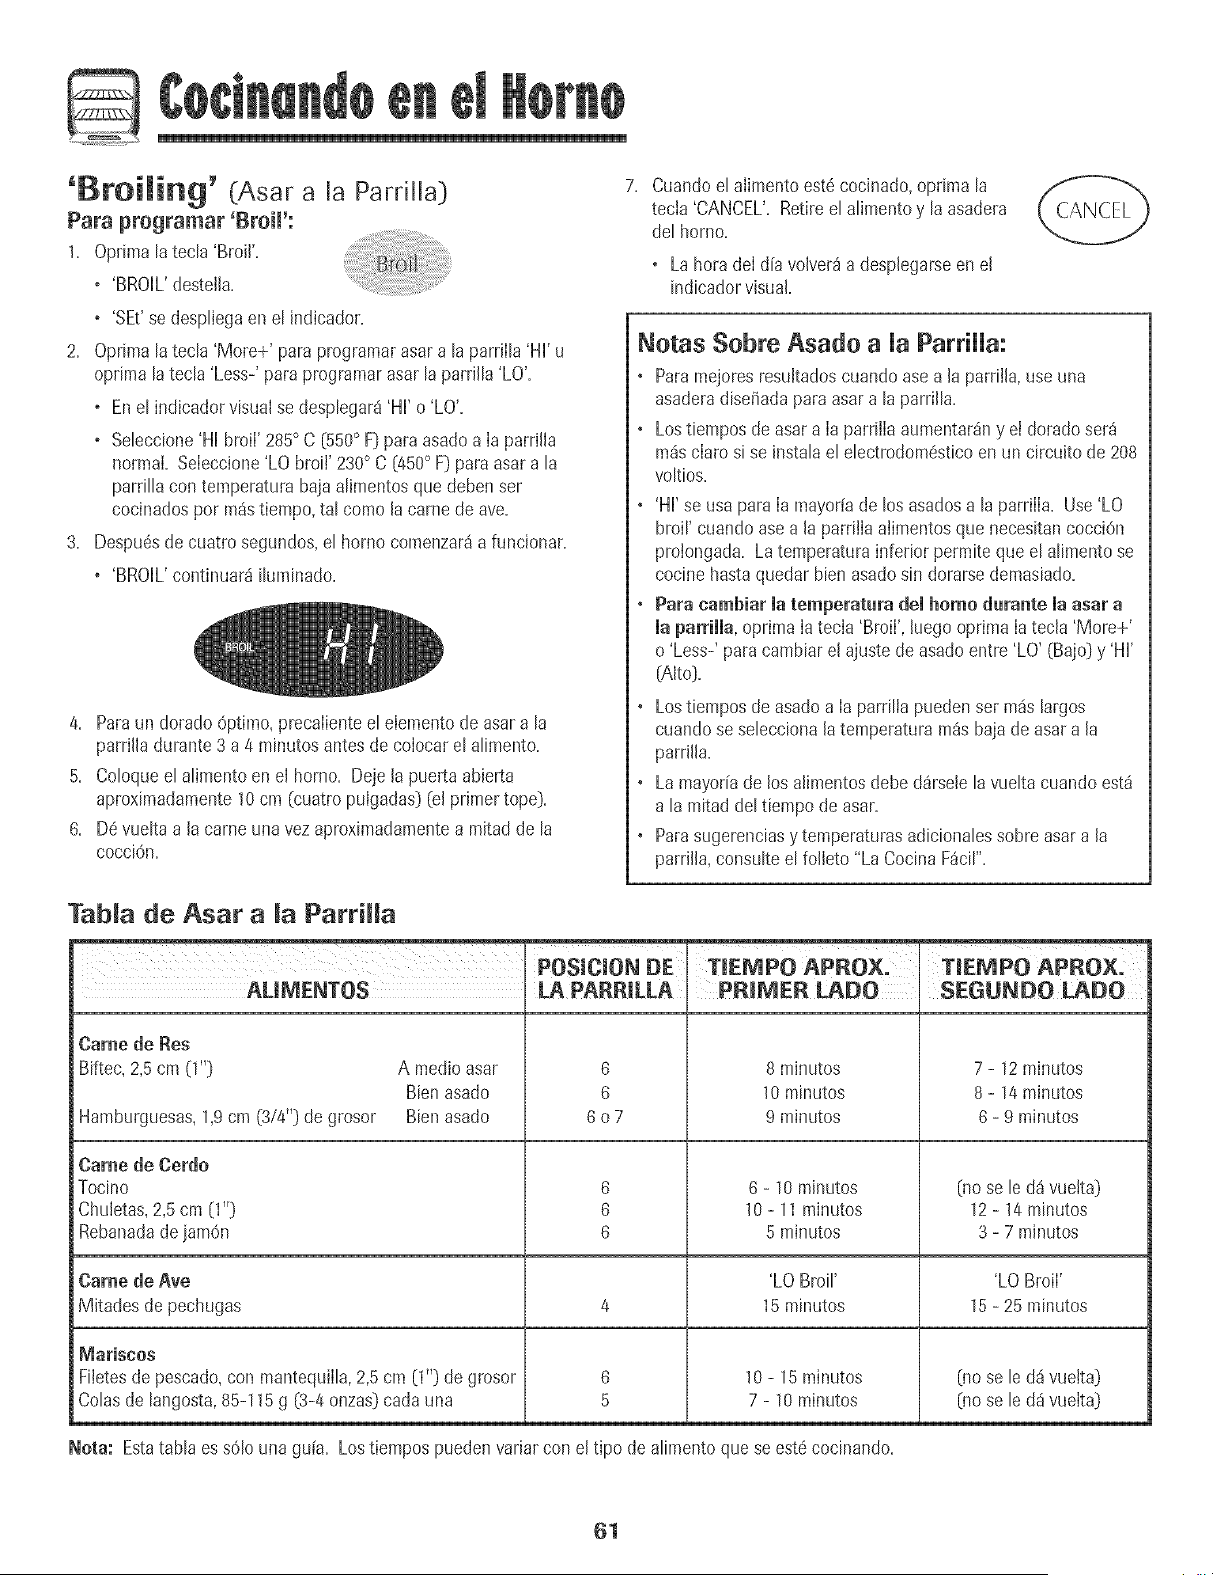
Q
'Broiming' (Asar a la Pardiia}
Para programar 'Broil':
1. Optima la tecB 'Broil'.
o 'BROIL'desteila.
o 'SEt'se despliegaen el indbador.
2. OprimaB tecB 'More+' para programarasara B parriIB 'Hi' u
optima lateda 'Less-' para programarasar laparrilB 'LO'.
o En el indbador visual se despbgar8 'Hi' o 'LO'.
o Sebccione 'Hi broiI' 285° C (550° F} paraasadoa Ia parrilla
normai. SeIeccione'LO broil' 230° C (450° F}paraasar a la
parrillacon temperatura bajaalimentosque @ben ser
cocinadospor pa_stiempo,tal como la came de ave.
3. Despuesde cuatrosegundos,el homo comenzar8a funcionar.
o 'BROIL'continuar_ iluminado.
4. Paraun dorado0ptimo, precalienteel elementode asar a la
parrilladurante 3 a 4 minutosantes de colocar el alimento.
5. Coloqueel alimentoen el homo. Deje la puerta abierta
aproximadamente10cm (cuatropulgadas}(el primertope}.
6. De vueltaa la came una vezaproximadamentea mitad de la
cocci0n.
7. Cuandoel aiimentoeste cocinado,oprima [a
tec[a 'CANCEL', Retiree[ a[imentoy [aasadera
de[ homo,
o La hora de[ d[avolver_ adesp[egarseen el
indicadorvisual
CANCEL
Notas Sobre Asado a [a Parri[[a:
• Paramejoresresultadoscuando asea [a parrii[a,use una
asaderadisefiadaparaasar a la parri[la.
• Lostbmpos de asara [a parrilia aumentar_ny e[ doradoser_
m_sciaro si se instalael ebctmdopa@ticoenun circuito de 208
vo[t[os.
° 'Hi' se usapara [a mayoffade los asadosa [a parri[[a. Use'LO
broil' cuando asea [a pardi[aa[imentosque necesitancocci@
proiongada. Latemperaturainferbr perm[teque e[ aHmentose
coc[ne hastaquedar bbn asadosin dorarsedemasiado.
° Para cambiar matemperatura demhomo durante maasar a
mapardmma,oprima [atecia 'Bmi[', [uegooprima [atec[a 'More+'
o 'Less-' para cambiarel ajustede asadoentre 'LO' (Bajo}y 'Hi'
(Alto}.
• Lostiemposde asadoa Ia pardIIa puedenset m_s largos
cuandose seIeccionalatemperatura m_s bajadeasar a la
parrilla.
• La mayoffade los alimentosdebe d_rselela vueItacuandoest_
a la mitad de[tiempo de asar.
• Parasugerenciasy ternperaturasadicionaIessobreasar a la
parrilla,consuIteel folleto "La CocinaF_cil'.
Tab[a de Asar a [a Parr[Ha
POS[CiON DE [ T[EMPO APROX. T[EMPO APP,OX,
AUMENTOS U PARR[LLA
Came de Res
Biftec, 2,5 cm (1"}
Hamburguesas,1,9cm (3/4"} degrosor
A medioasar
Bienasado
Bbn asado
Came de Cerdo
Tocino
Chuletas,2,5 cm (1"}
Rebanadade jam@
6
6
6o7
6
6
6
} PRIMER LADO
8 minutos
10minutos
9 minutos
6 - 10 minutos
10- 11minutos
5 minutos
SEGUNDO LADO
7 - 12 minutos
8 - 14 minutos
6 - 9 minutos
(no se le d_ wJetta}
12 - 14 minutos
3 - 7 minutos
Came de Ave 'LO Broil' 'LO Broil'
MJtadesde pechugas 4 15minutos 15- 25 minutos
6
5
_ariscos
Fiietesde pescado,con mantequil[a,2,5cm (1"} degrosor
CoBsde langosta,85-115g (3-4onzas}cada una
10 - 15 minutos
7 - 10 minutos
(no se led_ wJelta}
(no se led_ vuelta}
Nora: Estatabla es sOlouna gu[a. Lostiempos puedenvariar con el%0 de alimentoque se estecocinando.
61
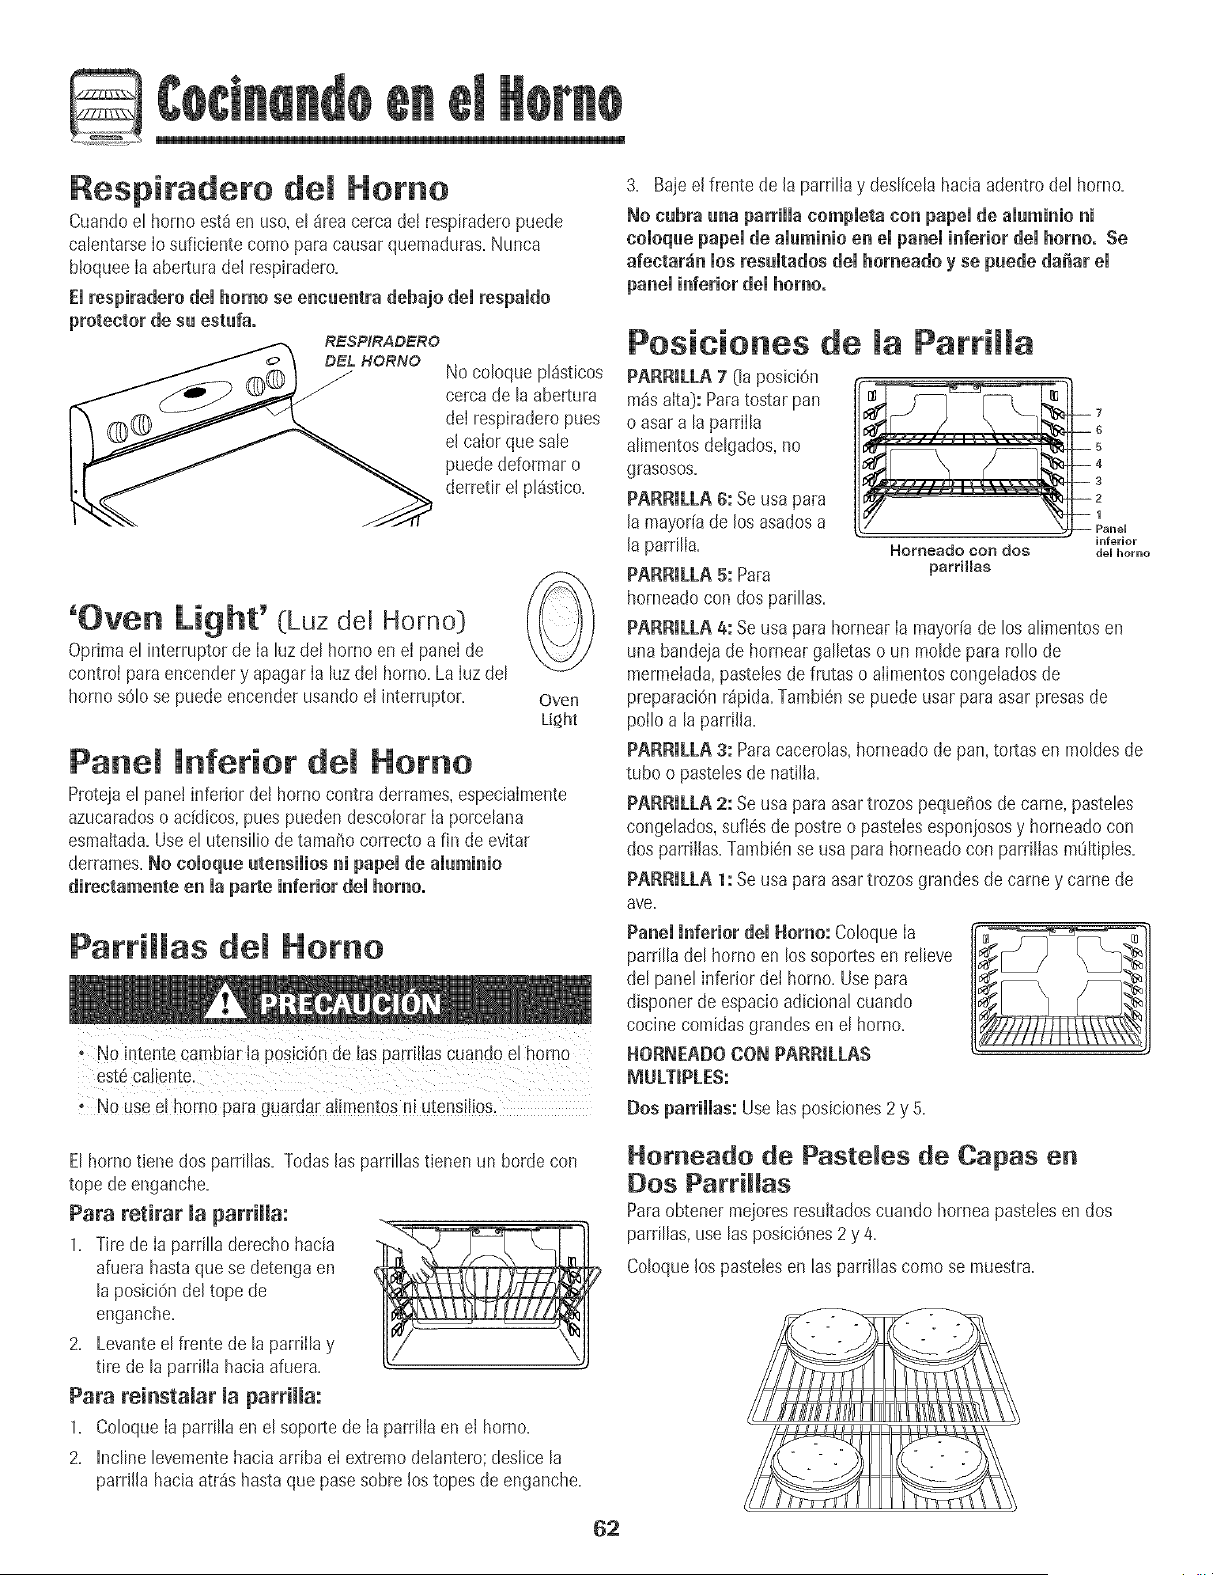
Respiradero del Homo
Cuandoet horno est_ en use,et _reacerca de! respiraderopuede
catentarseIosuficientecome para causarquemaduras.Nunca
bloqueeIa aberturadel respiradero.
emrespiradero demhomo se eneuentra debajo demrespamdo
proteeter de su estufa.
RESPIRADERO
DEL HORNO
No cotoquept_sticos
cercade taabertura
del respiraderopues
el calor que sate
puededeformar o
derretir el pt_stico.
'Oven Light' (Luz del Homo)
Oprimaet interrupterde Ia luz del homo en eI panel de
control paraencendery apagar Ia Iuz del borne. LaIuz del
homo sOlose puedeencenderusandoel interrupter. Oven
Light
Panel inferior del Homo
Proteiael pane!inferior de! homo contraderrames,especialmente
azucaradoso addicos, puespuedendescololar Ia porcelana
esmaltada.Useel utensilio detamario correctoa fin de evitar
derrames.No coioque utensiiios ni papei de aiuminie
directamente en ia parte inferiordei homo.
3. Bajeel frente de la parrillay deslfcelahacia adentrodel borne.
No cubra una parrimmacompmetacon papei de amuminioni
comoquepapemde amuminioen empaneminferiordemhomo. Be
afeetar_n mosresumtadesdemhomeado y se puede da_ar em
paneminferior demhomo°
Posieiones de Parri a
PARRtu.A 7 0a posiciOn
m_salta}: Paratostar pan
o asara laparrilla
alimentosdelgados,no
grasosos.
PARRILLA 6: Seusa para
la mayor[ade losasadosa
la parrilla.
PARRtU.A 5: Para
horneadocon dos parillas.
Homeado con dos
parrHlas
inferior
del home
PARRtLLA 4: Seusa para hornearIa mayor[ade los alimentosen
una bandejade homear galletas o un moldepara folio de
mermelada,pastelesde frutas o alimentoscongetadosde
preparaciOnr_pida.Tambi6nse puedeusarpara asarpresasde
polio a la parrilla.
PARRIIJ.A 3: Paracacerolas,horneadode pan,tortas en moldes de
tube o pastelesde natilla.
PARRmLLA2: Seusa para asartrozos pequei_osde came,pasteles
congelados,sufi6s de postreo pastelesesponiososy horneado con
dos parrillas.Tambi6nse usa parahorneadocon parrillasm_iltiples.
PAt_RII_ILA1: Seusa para asartrozos grandesde came y came de
ave.
Parrillas del Homo
Paneminferior demHomo: Co[oque[a
parrillade[ homo en los soportesen relieve
de[ panelinferior de[ homo. Use para
disponerde espacioadicional cuando
cocinecomidasgrandesen el homo.
HORNEADO CON PARRILLAS
MULTIPLES:
• NOUSee! homOpaFaguardar a[[mentosni utens
Homo Autoiimpiante
o Es normalque JaspJezasde[ homo secalbnten duranteel cic[o
de autolimp+eza,
o Paraevitardafio a la puerta, no intente aonrlacuando [a paiabra
LOCK'estddespiegadaen el indicado+vLsua[.
o Evitetocar [a cubbrta+la pueRa,ia ventanao el area ael
respiraderode homo duranceun ciclo de iimDeza.
+ No use limpiadoresde homos comerclalesen el acabadodei
homo ni airededorde i mguna piezadel homo pues pueae
dafiar el acabadoo [as Dezas.
Elcic[o de autoiimpiezausatemperaturasde cocci6n supedoresalas
normalespara [impiar automaiticamentetodo e[ interior del homo+
Esnormal queocurran flamaradas,humoo llamasdurante [a limpbza
si ei hornoest4demasiadosucio+Esmejor limpiar el horno
regularmenteenvez de esperarhasta quese hayaacumuiado
demasiadasuciedad+
Durantee[ proceso de limpbza, [acocina debe estarbien ventilada
paraeliminar los o[ores normalesasociadoscon la limpbza+
Antes de [a Autoiimpieza
1+ Apague [a [uz det hornoantes de la [impbza+La luz del horno
puedefundirse duranteel cicJode [impieza+
2+ Retire B asadera,todos [os utensiiiosy las parriilasdel homo+Las
parrillasde[ hornose descolorar4ny no se desiizar4nf_ciimente
despu@de un ciclo de autoiimpiezasi no son retiradasde[ homo+
3+ Limpiee! marcodel homo,el marco de [a puerta,el 4tea fuera de
[ajunta de la puertay airededorde laaberturaen [ajunta de la
puerta,con un agentede [impiezano abrasivota[ como 'Bon
Ami'+o con detergentey agua+Ei procesode autolimpiezano
fimpiaestas_reas+Eliasdeben ser [impiadaspara evitarque la
sucbdad se horneedurantee! ciclo de autolimpieza+(La junta es
el seilo ahededorde la puertay ventana del homo+)
4= Paraevitar dafio no[impie ni frote [a _=Z_ _
junta situadaalrededorde la puerta del \ -
homo.La junta est4disefiadapara
sellar herm6ticamenteel calor durante
el ciclo de Iimpieza.
5. Limpiee! excesodegrasa o derrames
de laparte inferiordel homo. Esto
evita humo excesivoo llamaradasdurante el ciclo de Iimpieza.
6. Limpie losderramesazucaradoso _cidostales comopapa dulce
(camote},tomateso salsasa basede leche.La porcelana
esmaltadaes resistenteal 4cido pero no a prueba de 4cidos. El
acabadode porcelanapuede descolorarsesi los derrames_cidos
o azucaradosno son Iimpiadosantesde un ciclo deautolimpieza.
Para pregramar +Self-Clean' (Autolimpieza):
Nora: Latemperaturadel horno debeser inferior a 205° C
(400 F) para programar un cicJo de [impieza+
1+
2.
3.
Cierre lapuerta del horno.
OprJma[atecia 'Cban'.
• 'CLEAN'destellaen el indicadorvisual.
OprJmalatecia 'More+' o 'Less-'.
o Se despiiega'CL-M (Sucbdad Mediana,
3 horas}.
Si la puerta nose cierra, se oir4n sefiaiessonorasy la Less-
......................
pa_abra'door' se despiegar4en ei indicadorvisual Si
la puerta no se cierra dentro de 45segundos,[a operaciOnde
autoiimpiezaser_ canceiaday el indicadol voiver4 a desplegarla
hora de[ dia,
Oprima [atec[a 'More+' o 'Less-' para despiazarlos ajustesde
auto[[mpieza+
'CL-H' [SuciedadIntensa,4 horas}
'CL-M' (Sucbdad Median& 3 horas}
'CL- L' [SuciedadLeve,2 horas}
A[ sebccionar e[ nive[de suciedad de[ homo se programa
autom4tbamentee[ tiempode [impieza.
Despu@decuatro segundos,el homo comenzar_a [impiar.
o E[tbmpo de [impiezacomenzard[a cuentaregresivaen e[
indicador.
o 'LOCK'se despiegar_en e[ indicadorvisual+
o 'CLEAN'se despiegar4en e[ indicadorvisual.
Para diferir un cicJo de autoiimpieza:
1. OprJma[atecia 'Delay'.
o 'DELAY'destella.
o '00:00'se despbgar4 en el indicadorvisual
2. Oprima Iatecia 'More+' o 'Less-' para programarIa
cantidadde tiempo que usted@sea difenr eI cicIo.
EItbmpo diferido puede ser programadode 10
minutos {00:10}a 11 horas,59 minutos (11:59}.
3. Cuandola tecia DELAYdesteliar4n,oprimala tecia
'Clean'.
o 'CLEAN'deste[[ar&
4+ OprJma[atecia 'More+' o 'Less-'.
o 'CL-M' (Sucbdad Mediana,3 horas}se
despJiegaen e[ indicador+
tess-
..................................
( More+
conto
*Losnombresde los productosson marcasregistradasde sus respectivosfabrJcantes.
63
5. OptimaIatecla 'More+' o 'Less-'paradesplazarlos ajustesde
autolimpieza.
'CL-H' (SuciedadIntensa,4 horas[
'CL-M' (SuciedadMediana,3 horas)
'CL-L' (SuciedadLeve,2 horas[
At seleccionarel nivel de suciedadde! homo se pragrama
autom_ticamenteel tiempo de Iimpieza.
6. Despu6sde cuatrosegundos,'CLEAN','DELAY'y 'LOCK'se
desplegar_inen et indicadorvisual paraindicar que el horno est_
programaticpara un ciclo de lirnpiezadiferido. Eltiempo diferido
tambiense despliegaen el indicadorvisual+
Durante el Cido de Auto_impieza
Cuandoaparece'LOCK'eneI indicador,Ia puerta no se puede abrir.
Paraevitardai_oa la puerta, nofuerce la puertapara abrirtacuando
la palabra'LOCK'est_ desplegadaen el indicadorvisual+
Humo y Olores
Ustedpuedevet humoy sentiroIor Ias primerasvecesque eI homo
es limpiado. Estoes normal y disminuir_con el tiempo.
Tambienpuedehaber humo si e[ homo est_ demasiadosucio o si se
ha dejadouna asaderaenel homo+
Sonidos
A medidaque el homo se calienta,usted puedeoir sonidos de
piezasmet_licasquese expandeny contraen. Estoes normaly no
dahar_el homo+
Si el homo ya ha sido programatic para un cicmode
limpieza y usted desea programar un tiempo
1. Oprimala tecla 'Delay'.
• 'DELAY'destella.
• '00:00'se despiegar_en el indicadorvisual.
2. OprimaIatecla 'More+' o 'Less-'para programarIa
cantidadde tiempo que usted deseadiferir el ciclo. ................................
Despu6sde cuatro segundos,'CLEAN','DELAY'y
'LOCK'sedesptegar_nen el indicador visualpara : Less-
indicar queel horno est_ programaticpara un ciclo ...........................................
de limpiezadiferido.El tiempodiferido tambiSnse despiiegaen
el indicadorvisual
Cuando comienza el ciclo de autolimpieza:
• 'DELAY'se apagar&
• Eltiempo de limpiezase despiegar_en et indicadorvisual.
Para cancelar el ciclo de autolimpieza:
Optimala tecla 'CANCEL'. f_ a\_r-ri_"_
• Elindicadorvisualqueda en bianco.
• Todaslasfuncionesson canceladas.
• Lahora deldia se despliegaen eI indicadorvisual.
Oespu6s del Ciclo de Autolimpieza
Aproximadamenteunahora despuesdeIfin det ciclo de limpieza,
'LOCK'desaparecer& Lapuerta ahora puedeset abierta.
Alguna suciedad puede quedar como una mereceniza gris tipo
poivo. Ret[relacon un paho h_medo. Si Ia suciedadpermanece
despuesde Iimpiada,significa que e! ciclo de Iimpiezano rueIo
suficientementeIargo. Lasuciedadser_eliminada duranteeI
proximociclo de limpieza.
Si maaparriiiasdemhomofueron dejadasenel homoy no se
desmizansuavemente despu6s de un cicmode mimpieza,Iimpie
las parrillasy los soportesde lasparrillas con una pequeSacantidad
de aceitevegetaipara haceriasdesiizarcon m_s facilidad.
Pueden apareeer m_neasdemgadasen maporcemanaampasar pot
cities de camentamientoy enfriamiento. Estoes normaly no
afectar_eI rendimiento.
Una deseomoraci6n bmanca paede apareeer despu_s demeicmo
de mimpiezasi mosamimentos_cidos o azuearados no fueron
mimpiadosantes demeicmode automimpieza.EstadescoloraciOnes
normaly no afectar_eI rendimiento.
_otas:
* Si se dejaabierta la puertadel homo,Ia palabra 'door'
destellar8eneI indicadorvisuaIy se escuchar_una sehaI
sonora hastaque la puertasea cerraday la tecia'Clean'sea
oprimidanuevamente.
, Si transcurrenm_s de cincosegundos despu_sde oprimir Ia
tecia 'Clean'y antesde oprimir Ias tecias'More+' o 'Less-',eI
pragramavoIver_autom_ticamenteaI despiiegueprevio.
* Lapuerta de[ homo se daiiar_ si se fuerza paraabriria cuando
[a paJabra'LOCK' contin0adespJegadaen el indicador.
64
Procedi ientos de Limpieza
fr_as antes de tocarie o limpiarlo. De este modQ se evitar_n da_os y
posibies quemaduras, _ Los hombresde los prod_Jctosson marcas
registradasde sus respectivosfabricantes.
, Parsevitar manchaso dec0!oraci6nlimp!e el hemo despu6Sde cads use.
_ Parshacer pedidos,Ilameal 1-877-232-6771en
• Sise retira alguna pieza,asegGresedeque sea reinstaladaen forrnacorrecta: EE.UU.o 1-800-688-8408en Canad&
P_EZA PROCED_M_ENTO DE LI_,_P_EZA
Protector Trasere
y Cubier!.a -
Perceiana
Fsmaltada
Bandeja de Asar
e Inselto
Area dei Reioj y
de masTeelas
de Centrol
Pmatimmos
Preteeteres,
Pereeiana
Ventana y
Pue_a dem
Homo =Vidrio
Laporcelanaesmaltadaesvidriofundidoen metaly puedeagrietalseo picarsesi nose usacorrectamente.Esresistentea
los_cidos,noapruebade_cidos.Todoslosderrames,especialmentelosderramesazucaradoso addicosdebenset limpiados
inmediatamentecon unpatio seco.
° Cuandoseenfr[e,lavecon aguajabonosa,enjuaguey seque.
° Nurlcalimpieuna superficietibia o calientecon un patio hOmedo.Estopuedecausaragrietamientoo picaduras.
• Nuncauselimpiadoresdehomo,agentesde limpiezaabrasiveso c_usticosenel acabadoexteriorde laestufa.
Nunca cubra el insette cell papel de afumirde plies este evita que la gFasase eseurm a & bandeja inferior.
• Coloqueunpatio enjabonadosobreel insertoy labandeja;dejeremojarpars soltarlasuciedad=
• Laveen aguajabonosatibia.Use unaesponjade fregarpars quitarlasuciedadpersistente.
• La bandejade asary el insertopuedenset lavadosen el lavavajillas.
° Paraactivar'ControlLock' {BIoqueodeloscontroles}parala limpieza,ver pdgina56.
° Limpieconun pa_ohOmedoy seque.No useagentesde limpiezaabrasivespuespuedenrayarla superficie.
° Se puedenusarlimpiavidriossi se rocFanenel paiio primero.NO rode directamenteell elpalleL
° Retirelasperillascuandoest_nen la posiciOn'OFF'tir_ndolashaciaadelante.
° Lave,enjuaguey seque. No useagentesde limpiezaabrasivespuespuedenrayarla superficie.
° Enciendacadsquernadorparsasegurarsede quelasperillashayansidecorrectarnentereinstaladas.
Laporcelanapuededescolorarseo adquirirfisurassuperficialessi se sobrecalienta.Estoes normaly no afectar_el
rendimientode h cocciOn.
• Ouandoest_nfrfos,lavedespu_sde cads use,enjuaguey sequepars evitar manchasy deco!oraciOn.Puedenlavarseen
e! lavavajillas.
• Parslimpiarsuciedadexcesiva,remojeen aguacalienteconjabOn,luegouse un limpiadorabrasivesuavetal come Soft
Scrub_y una esponjadefregar de pl_stico.
° Parasuciedadquemada,retireel phtillo de la estufa,co!OquelosobreperiOdicosy rode cuidadosamentecon limpiador
de homo comerciaL(No rode lassuperficiesadyacentes.}Ooloqueen una bolsade pl_isticoy deje remojardurante
variashoras.Useguantesde gems pars sacarlode la bolsa,lave,enjuaguey seque.
• Eviteusa!cantidadesexcesivasde aguapues puedeescurrirsedebajoo detrdsdelvidrio causandomanchas=
• Lavecon aguayjabOn. Enjuaguecon agualimpiay seque. El limpiadordevidrio puede usarsesi se rods en un paiio
primero.
° No usematerialesabrasivestales comeesponjasderestregar,limpiadoresen polvoo esponjasde lanadeaceropues
puedenrayarel vidrio.
• Sigalasinstruccionesen lasp_ginas63-64pars programarun ciclo de autolimpieza.
65
P_EZA PROCED_MIENTO DE UMP_EZA
Parrillasdel , LJmpiecon aguaconjab6n.
Home , Saquelas manchasdiffcilesconjab6n enpolvoo con unaesponjaIlenaconjabOn. Enjuaguey seque.
° Lasparrillasse desco!orar_npermanenternentey puedenno deslizarsecon suavidadsi son dejadasen el homodurante
unciclo de autolimpieza.Siestosucede,limpielaparrillay lossoportesen relieveconunapeque_acantidaddeaceite
vegetalpararestaurarlafacilidadde movimiento,luego limpieelexcesode aceite.
Aeere lno×idable
{mode!osselectos}
Gaveta de
Ammacenamiento,
Manija de la
Puerta, Paneles
Laterales -
EsmaJte Pintado
• NO USENiNGUN PRODUCTODE LIMPIEZAQUECONTENGABLANQUEADOBA BASEDE CLOBO.
, NO USEUMPIADORES"ORANGE"NI UMPIADOBESABRASIVES.
, SIEMPREUMPIE LAS SUPERFICIESDEACEROA FAVORDELGRANO.
• Limpieza Diaria/Suciedad Leve- Limpiecon unode lossiguientes- aguaconjab0n,unasoluciOnde vinagreblanco
conagua,limpiadorparasuperficiesy vidrio'Formula409'_o un limpiavidriossimihr - usandounaesponjaoun paiio
suave. Enjuaguey seque.Parapuliry evitarmarcasde dedos,useel producto'StainlessSteelMagic Spray'_
(PiezaNo.20000008)_.
• Suciedad Mediana/Jntensa - Limpieconuric delossiguientes- 'BenAmi'_,'SmartCleanser'_o 'SoftScrub'_ - usando
unaesponiahOmedao un pasosuave.Enjuaguey seque. Las manchasdificilespuedenserquitadasconunaesponja
multi-use'Scotch-Bdte'_htimeda;frote a favordel grano. Enjuaguey seque.Pararestaurarel lustrey sacarlasvetas,
aplique'StainlessSteelMagic Spray'*.
• DesceJeraci6n- Useunaesponjamojadaoun patiosuave,limpiecon limpiadorde acero'CameoStainlessSteel
Cleaner'*.Enjuagueinmediatamentey seque.Paraeliminarlasestffasy restaurare[ lustre,usedespu_srociadorparaacero
inoxidable'StainlessSteelMagicSpray'S.
• Cuandoest6fffa,laveconaguatibia jabonosa,enjuaguey seque.Nuncalimpieuna supefficietibia o calientecon un patio
h0raedopuesesto puededaiiarla supefficiey causaruna quemaduraa causadelvapor.
, Paramanchasrebeldes,useagentesde Iimpiezalevementeabrasivestal comepastadebicarbonateo 'BenAmi'*.No use
agentesdeIimpiezaabrasives,c4usticoso_sperostal comeesponjasde lanade aceroo limpiadoresde hornos.Estos
productospuedenrayaro dafiarpern_aner_tementelasupefficie.
NOTA: Useurla teaHae un parle sece pa_ Hmpiar los derrame& especiatmente los derramesac[dices e
azucaradosoLa superficie se puede descolorar eperder el bdHe si el derrame no se Hmpia inmediatamente. Esto
es especialmente impertante ee las supedieies Har_eas.
_Loshombresde los productosson marcasregistradasde sus respectivosfabricantes.
_ Parahacer pedidos,Ilameal 1-877-232-6771en EEUU.o 1-800-688-8408en Canada.
66
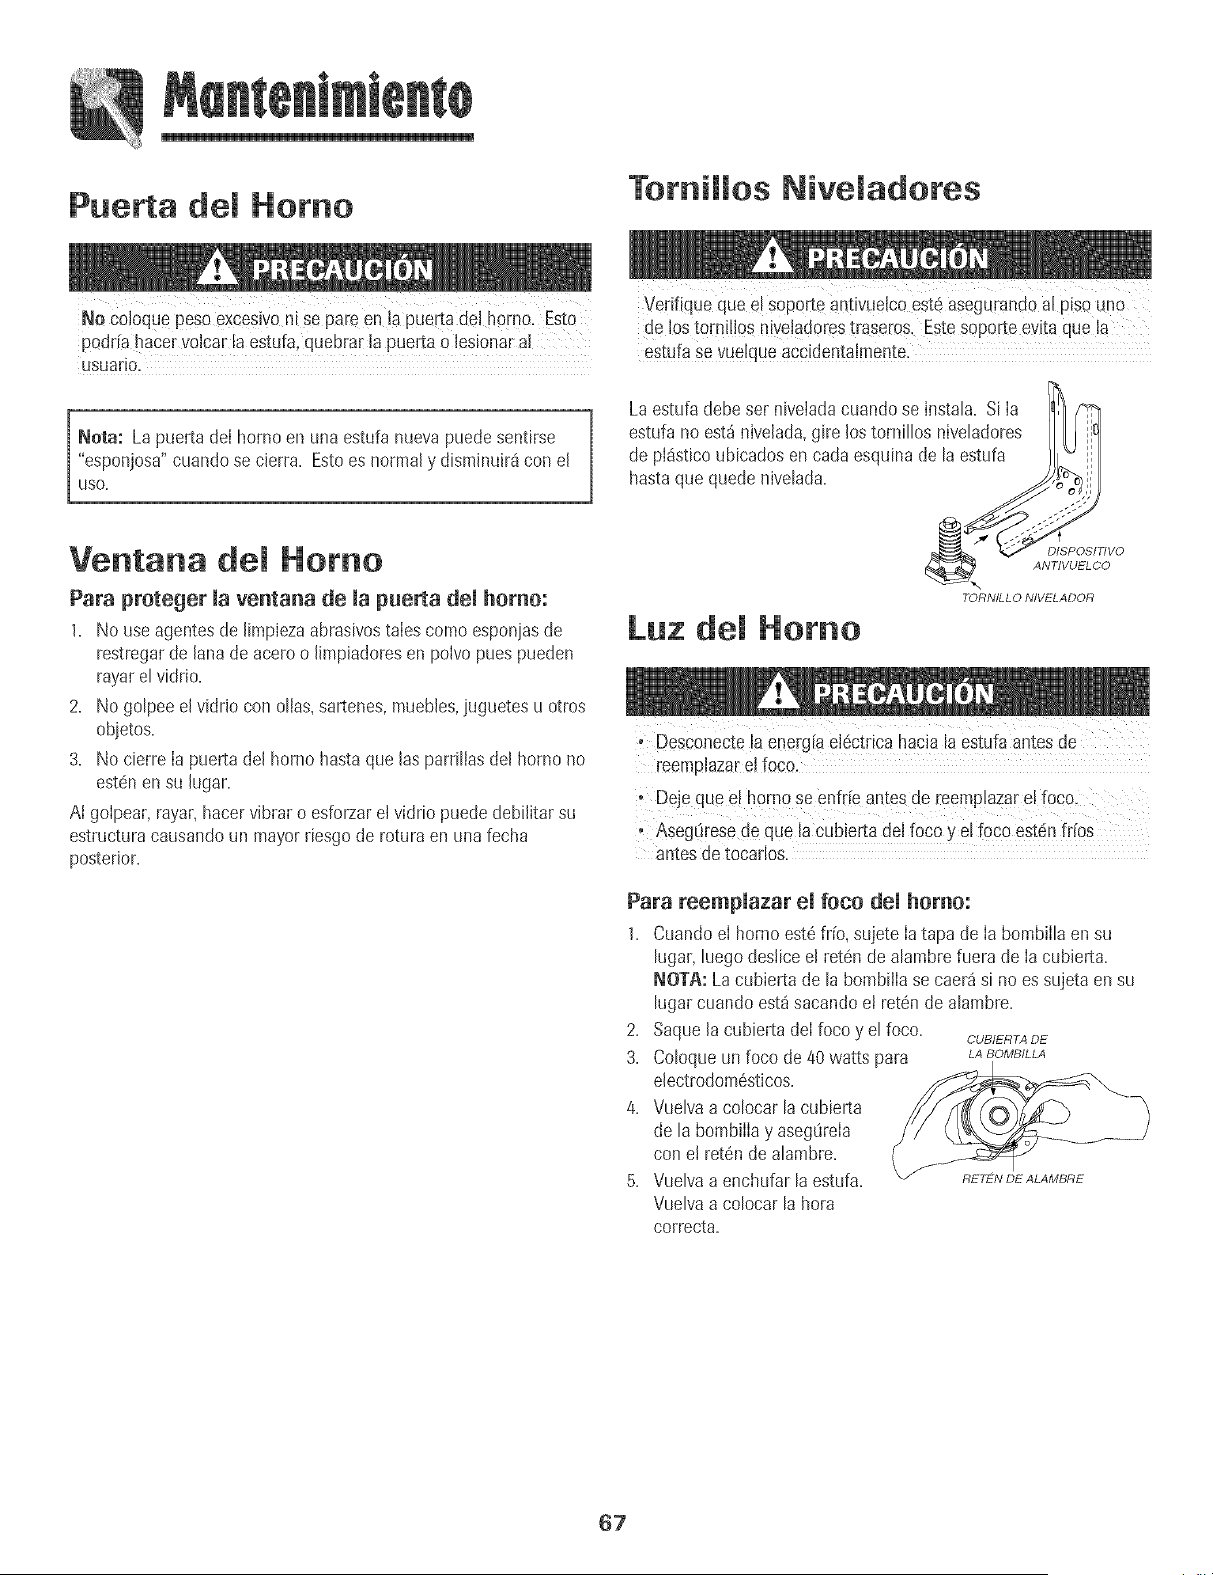
Puerta del Homo
Tomillos Niveladores
No co!oquepeso excesivoni se pare en [a puertadel horno. Esto
podr[ahacervolear laestufa, quebrarla puerta o lesionaral
usHaFio.
Nora: La puertadeI homo en una estufa nuevapuedesent[rse
"esponjosa"cuandose cierra. Estoes normaly disminuir8 con el
USO.
Ventana del Homo
Para proteger la ventana de la puerta del homo:
1. No use agentesde limpiezaabrasivostaIescomo esponjasde
restregarde lana de acero o limpiadoresen polvo puespueden
rayarel vidrio.
2. No golpeeel vidr[o con ollas,sartenes,muebles,juguetesu otros
objetos.
3. No cierre la puerta del homo hastaque las parrillasdel homo no
est6nen su lugar.
At golpear,rayar,hacervibrar o esforzarel vidrio puededebilitar su
estructuracausandoun mayorriesgode roturaen una fecha
posterior.
Verifique qua e! S0porteantiw+eicoeste asegurandoal piso uno
de las tomilios hive+adorestraseros.Este soporteevita que la
estufase vuelqueaccidentaimentel
La estufadebeser niveiadacuando se instala. Si Ia
estufa no est_ niveiada,gire los tornillos niveladores I 9
de pI_sticoubicadosen cadaesquina de la estufa
hastaque quede nivelada. _,,JJ
TORNILLO NIVELADOR
Luz del Homo
• Desconecte laenerg[ael6ctrica hac!a Ia estufa antesde
reernplazare[ foco.
• Dejequa el homo se enfffe antes de reemplazar8[ foco.
" AsegOresede qua [acubierta delfoco y el f0c0 est6n fffos
antesde tocarlos.
Para reemplazar el foco del homo:
1. CuandoeI hornoest6 fifo, sujete Iatapa de Ia bombiIla ensu
lugar,luegodesiice el ret6n de alambrefuera de Iacubierta.
NO]A: La cubiertade la bombiiIa se caerasi no es sujetaen su
lugarcuando est_sacando ei ret6n de alambre.
2. Saque la cubiertadeIfoco y el foco.
CUBIERTA DE
3. Coloqueun foco de 40 watts para LABOMRILLA
e[ectrodom6sticos.
4. Vuelvaa colocar la cubierta
de la bombiiia y aseg_reia
con et ret6n dealambre.
5. Vuelvaa enchufar la estufa. "/" F?ETENDEALAMRFtE
Vuelvaa colocarla hora
correcta.
67
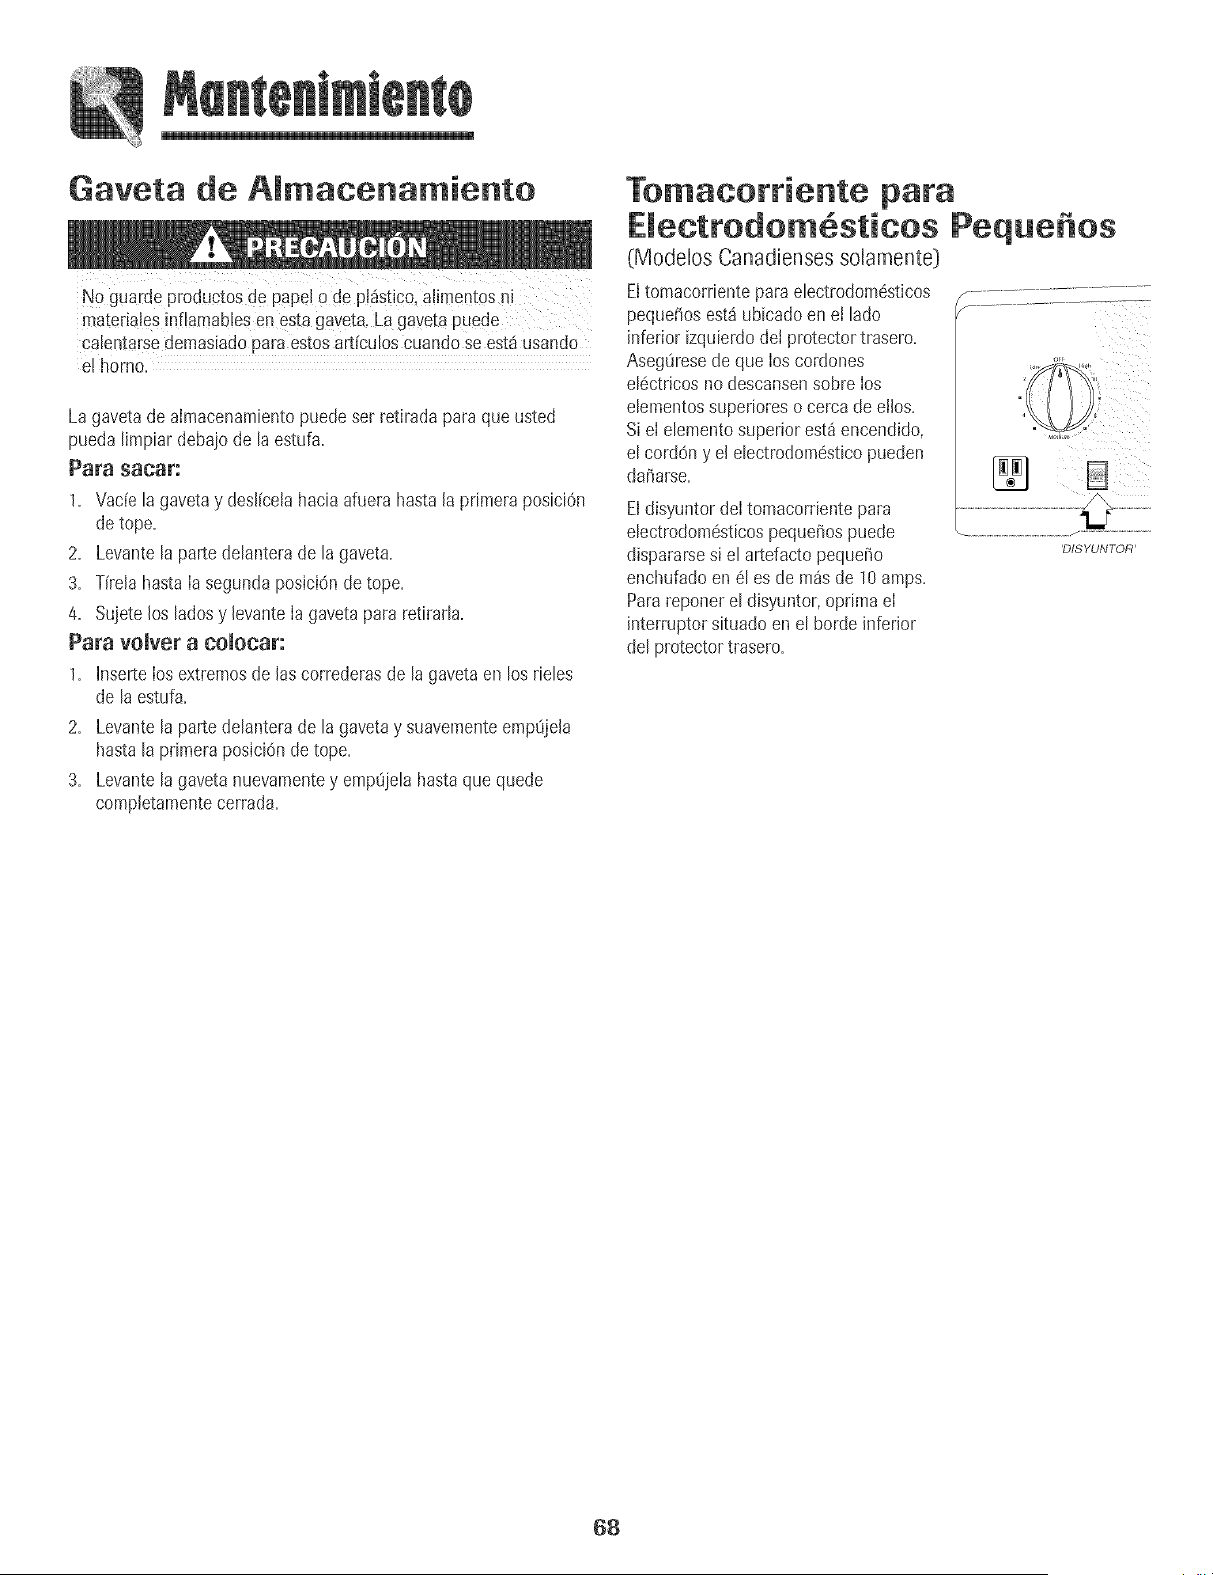
Gaveta de AJmacenamiento
NOguarde pmductos de papeJ0 de pj_istico,a!imentosni
materiales!nfiamab!esen estagaveta.La gavetaPUede
calentarse demasiadoparaestosarticuloscuando se est,1usando
e! homo.
La gavetade almacenamientopuedeset retiradaparaque usted
puedalimpiar debaio de la estufa.
Para sacar:
1. Vade la gavetay desl[celahaciaafuera hastala primeraposici6n
detope.
2. Levantela partedelanterade la gaveta.
3. T(relahasta Iasegundaposici6nde tope.
4. Sujete los Mos y levanteIa gavetapara retirada.
Para velvet a coiocar:
1. hserte los extremosde las correderasde la gavetaen los rieles
de laestufa.
2. Levantela partedelanterade la gavetay suavementeempOjela
hastala primeraposiciOnde tope.
3. Levantelagaveta nuevamentey emp_jelahastaque quede
completamentecerrada.
Tomacorriente para
EJectrodom sticos Peque os
(Modelos Canadienses solamente}
Eltomacorrientepara electrodom6sticos
pequeSosest_ ubicadoen et lado
inferior izquierdodet protectortrasero.
Aseg_iresede que los cordones
el6ctricosno descansensobre los
elementossuperioreso cerca de etlos.
Siel elementosuperior est_ encendido,
el cord6n y el electrodom6sticopueden
dariarse.
Eldisyuntor deItomacordentepara
electrodom6sticospequeSospuede
dispararsesi el artefacto pequeiio
enchufadoen 61es de m_s de 10amps.
Parareporterel disyuntor,optima el
interruptorsituado en el horde inferior
del protectortrasero.
68
ii ii ii ii ii ii ii ii ii ii ii ii ii ii ii ii ii ii ii
PROBLEMA SOLUC_GN
Para mamayor_ade mosproNemas, • Revisesi los controlesdeJhomo est4ndebidamenteajustados,
verifiqaeprimero mesigaienteo • Verifiquesi el enchufeest4firmementeinsertadoen el tomacorriente,
• Verifiqueo vuelvaa reponerel disyuntor,Verifiqueo reemplaceel fusible,
• Verifiqueel suministrode energiaelectrica,
Todala estafa o parte de ella no • Revisesi la superficiey/o los controlesdel homoest4ndebidamenteaiustados, Vet p4ginas
fancionao 53y 57.
• Verifiquesi lapuertadel homo seha desNoqueadodesp@sdel ciclode autolimpiez& Ver
p4gina83,
• Revisesi el homo est4ajustadopara homeadodiferidoo programade limpieza,Ver p4ginas58
y 64,
• Verifiquesi 'Control Lock' [Bioqueode Control]est_activado, Vet p4g,56,
• VerJfiquesi el control est_en Mode Sab4tico,Ver p4g,60,
El reloj, las palabras en el indicador • Elbornepuedeestar programadoparauna funci6n de'Cook& Hold'o unafunci6n diferid&
visaal y/o las laces fancionan pore . PuedeestaractJvadalacaracter[sticade Noqueodelos controlesdel homo, CVerp4g,56,)
el homo no se caiienta.
Los resamtadosdamhomeado no • Aseg0resede quaeI respiraderodel borneno esteb]oqueado,Vet p4gina62parala ubicaciOn,
son come se esperaban o son • Verifiqueparaasegurarsede que la estufaest4 nivelada,
diferentes a losdemhomo anterior. • Lastemperaturasa menudovat[an entreun homo nuevoy uno antigua. A medidaquepasa
eltiempo,la temperaturadel borne cambiay puede hacersem4scalienteo m4sif[a, Ver
p_gina60 para Iasinstluccionescomeajustar Iatemperaturadel homo, NOTA:No se
recomiendaa]ustarla temperaturasi ha tenido problemascon solo unao dos recetas,
• Consulteelfolleto "La CocinaF4cil"paramayorinformaciOnsobre losutensiliosde hornear,
Los aiimentoa no se asan a ia • VerifiqueIasposJcionesde lasparriilasdel borne.Elalimentopuedeestar muycercadel
parriiiaen forma debida o sale elemento.
demasiado heine° • Elelementode asar nofue precalentado,
• Elpapalde ahminio se us6de maneraincorrect& Nuncaforre el insertodel asadorcon papal
deaiuminio.
• Lapuerta deI borneestabacerrada mientrasse asabaa la parrilla. Deje la puertaabierta en la
primeraposici6n (alrededorde 10 cm [4 puJgadas]].
• RecorteeIexcesodegrasade Ia carneantesde ponerlaa asara la parrilla.
• Se us6unaasaderasucia.
• Elvoltaiedel hogar puedeser bale.
Emhomo no se aatomimpia. • Verifiqueparaasegurarsede que el ciclo no est6aiustadoparaun comienzodiferido,Ver
p_gina84.
• VerJfiquesi la puertaest4cerrad&
• Verifiquesie! control est4en Modo Sab4tico,Verp4g,80,
• Elhornopuedeestar a m_sde 205° C [400° F], Latemperaturadel homo debe serinferior a
205° C (400° F] paraprogramarunciclo de limpiez&
EJhomo no se Jimpi6 en forma • Puedeque seanecesarioun tiempode limpiezam4slargo.
debida. • Losderrarnesexcesivos,especialmentede afimentosazucaradosy/o 4cidosnofueron limpiados
antesdelciclo de autolimpiez&
La paerta del homo no se • Elinteriordel homotodav{aest_caliente, De]eque pasoaproximadamenteunaherapara que
desbloqaea despa6s del title eJhornose enfr{eantesde quese completeun ciclo de autoiimpieza,La puertapuedeset
de aatoiimpieza, abiertacuandodesaparezcaIa palabra'LOCK'del indicadorvisual.
• Elcontroly la puertapuedenestarbloqueadas.Verp_g.5&
69
PROBLEMA SOLUC 6N
Sejunta humedad en maventana , Estoes normal cuandose cocinan aiimentoscon alto contenido de humedad.
del homo o sale vapor per , Seus0 humedadexcesivacuandose limpiOla ventana.
emrespiradere demhomo.
Hay un omorfuerte o humo mere ° Estoes normal en una estufanuevay desaparecer_despu6sde unos pocosuses=
cuando se enciende emhomo, AI iniciar un ciclo deautolimpiezase "fluemaran"los oloresm_s rSpidamente=
o Sise enciendeel ventihdor ayudar_a eliminar el humo y/o el clot=
• Haysuciedadexcesivadealimentosen elpanelinferiordel homo. Useun ciclodeautolimpieza=
C6digos de Errores .
Se esnuchan ruidoso
NO se es(;uchan sesamessonoras
y emindicador visuamno se activao
'SAb' destella y luego se
despliega nontinuamenteo
'BAKE'o 'LOCK'puedendesteJlarr4pidamenteen el indicador para avJsadeque hayun error
o un problema.Si 'BAKE'o 'LOCK'aparecenen elindicadorvisual,oprimaIa tecla 'CANCEL'.
Si'BAKE'o 'LOCK'continOandestellando,desconecteJaenerg[ael6ctricaaielectrodom@stico.
Espereunospocosminutesyvuelvaa reconectarla energ[ael6ctrica.Sicontimiandestellando,
desconectelaenerg[ael6ctricadeIelectrodom@sticoy flameal t6cnJcode sewJcioautodzado.
Siel borne est_demasiadosucio,puedenocurrir demasiadasIlamaradasIo cual resuJtar4en
un c6digodeerror durante IaIimpieza.Oprimala tecla'CANCEL'y deje queel homose enfr[e
compietamente,limpieeIexcesode suciedady luego vuelvaa programarel cicJode Jimpieza.
Siel c6digo de error reaparece,Ilamea un t6cnico autorizado.
° Elhornoemitevariessonidosbaios. Ustedpuedeoir los relesdel hornocuandose encienden
y se apagan.Estoes normal.
o A medidaque el bornese calientayse enfria,usted puedeo[rsonidosdepiezasmet_licasque
se expandeny contraen. Estoes normaly no dariar_su electrodomestico.
° Elborne puedeestar en Mode Sab_tico. Ver p_g.60.
• Elhomo est_en modesab_tico.Paraanular el modesab_tico,optimay mantengaoprimidala
tecla 'Clock'(Reloi}durante cinco segundos.
7O
Garant[a Compieta de Un A_o - Piezas
y Mano de Obra
Duranteun (1} a_o desdelafecha original Je
compraal par menor:se repararao reemp_azara
gratuitamentecualqu[erp_ezaque faHedurantesu
usa normalen el hogar.
Residentes Canadienses
Lasgarant[a_antedatescubrensolamente
aqueLIoselectrodomesticosinstaladosen Canada
queban sido certificadoso aprobadospar las
agenciasde prueDascorrespondientespara
cumplimientocon la Norma Naciona[de Canada1a
menosqueel electrodom6sticohayasidotra[doa
Canadadesdelos EEUU.debidoa un cambiode
resLdencla.
Garantia Limitada Fuera de rues
Estados Unities y Canad_ = Piezas
Solamente
Duranceun (lJ alia desdela fechade compra
originalal par menor,cualquierplezaque talle
duranteusanorma_en el hogarserareemplazaua
o reparadagratultamen[een _oque respec[aa _a
piezay el propietariodeber_ pagartodoslos a[ros
cosmosincluyendomariade obra.kiIometraje_
millaje,transporte,costa delviajey costade[
diagn0sttco,si fuese necesano
Lasgarantfasespecfficasexpresadasan[enormen[e
son/asUNICASgarantfasprovistaspar d
fabricante.EstascJarantLas/eotorcjanderechos
legalesespecfficosy ustedpuede tenetademas
arrasderect_osque vayfande unestadoa otto.
Lo que No Cubten Estas Garantm'as:
1. Situacionesy daSosresultantesde cualquierade Iassiguienteseventualidades:
a. InstalaciOn,entregao mantenimientoinapropiados.
b. CualquierreparaciOn,modificaciOn,alteraciOno ajusteno autorizadopar
el fabricanteo par un centrode servicioautorizado.
c. Mal usa,abuso,accidenteso usa irrazonable.
d. Corrienteel6ctrica,voltajeo suministro incorrecto.
e. ProgramaciOnincorrectade cualquierade Ioscontroles.
2. Lasgarantiasquedan nuIassi Iosn_imerosde serieoriginaleshan side retirados,
alteradoso no sonf_cilmente legibles.
3. Focos.
4. Productoscompradospara usa comercialo industrial.
5. Elcostadel servicioo Jlamadadeserviciopara:
a. Corregirerroresde instalaci6n.
b. Instruir al usuariosabre ei usa correctodeI artefacto.
c. Transportedei artefactoal establecimientode servicio.
6. LosdaBosconsecuenteso incidentalessufddospar cualquier personacoma
resultadode cualquier incumplimientode estasgarantias.En algunosestadosno
se permiteIaexclusi6no limitaciOnde los daBosconsecuenteso incidentales,par
Jotanto la exclusionanterior puedeque no se apJiqueen su caso.
Si Necesita Setvicio
o LlameaI distribuidor donde compr0su electrodom6sticoo Ilamea Maytag
ServicessM,Servicioa los ClientesMa}¢agIlamandoai 1-800-688-9900en EEUU.o
aI 1-800-688-2002en Canad¶ ubicar a un t6cnico autorizado.
• Aseg0resede conservarel comprobantede compra paravenficar eIestadode la
garant[a. ConsuIteIasecci6nsabre Ia GARANTIApara mayorinformaciOnsabrelas
responsabilidadesde! propietariopararecibir servicio bajoIa garant[a.
• Siel distribuidoro la compaS[ade serviciono pueden resoIvere! problema,escriba
a Maytag Services_sM,Attn: CAIR_ Center,P.O.Box2370,Cleveland,TN37320-2370
o Ilameal 1_see_688_990e en EE.UU.o al 1_800_688_2002 en Canada1.
• Las gu[asdel usuario,manualesde servicioe informaci6nsabre laspiezaspueden
solicitarsea Maytag ServicessM,Servicioa losClientesMaytag.
CuandoIlameo escriba acercade un problemade servicio,par favor incluyala
siguienteinformaciOn.
a. Su hombre,direcci6ny n_imerode teldono;
b.N_merode modeloy nLimerode serie;
c. Nombrey direcci6n de su distribuidoro t6cnico de servicio;
d. Una descripci6nclara del problemaqueest_ experimentando;
e. Comprobantede compra 0_ecibode compra).
Form No B/09/04 Part No. 8113P459-60 (,:'2004 Maytag Appliances Sales Co. Litho U.S.A