Loading ...
Loading ...
Loading ...
- 8 -
03/2019
Copyright © 2019, Fast ČR, a.s.
B. Adjusting the time of apreset program
1. After selecting a program, press the frying time setting button B9, the time on the
touch display A1 will start flashing.
2. Using the increase frying time B12 button / decrease frying time B14 button, set
the new preheating time. Each time the button is pressed, the time will increase or
decrease by 1 minute. Holding down the button will speed up the frying time setting.
You can set the frying time in the range 01:00 – 60:00 minutes.
3. Press the start / pause button B16 and the fryer will start the frying process to the
newly set temperature and time.
Note:
We recommend adjusting the preheating temperature and time based
on the intended selection of the preset program and its temperature, e.g.
if you wish to prepare apizza in the fryer at 160 °C, lower the preheating
temperature to 160 °C.
SETTING CUSTOM FRYING TEMPERATURES AND TIMES
The frying temperature and time can be set according to one’sown personal preferences.
A. Setting the temperature
1. Turn on the fryer using button B13.
2. Press the temperature setting button B8, the temperature on the touch display A1 will
start flashing.
3. Use the increase temperature B12
/ decrease temperature B14 buttons to set the
temperature. Each time the button is pressed, the temperature will increase or
decrease by 5 °C. Press and hold down the buttons to speed up the temperature
setting process. You can set the temperature in the range 60 °C – 200 °C.
B. Setting the frying time
1. Press the frying time setting button B9, the time on the touch display A1 will start
flashing.
2. Using the increase frying time B12 button / decrease frying time B14 button, set the
frying time. Each time the button is pressed, the time will increase or decrease by 1
minute. Holding down the button will speed up the frying time setting. You can set the
frying time in the range 01:00 – 60:00 minutes.
3. Press the start / pause button B16 and the fryer will start the frying process to the
newly set temperature and time.
Note:
If you need to preheat the fryer, proceed according to the instructions in
chapter "Preheating function". If you do not wish to preheat the fryer
before frying, increase the frying time by approximately 3 minutes.
Frying food in afryer
1. Allow the fryer to preheat. Proceed according to steps 1 – 4 in chapter “Preheating
function”.
2. While the fryer is preheating, prepare the food that you wish to fry in the fryer. Place it
on the selected accessory (pizza pan A16, rack A17, frying basket A19) and attach the
carry handle A21.
3. Once the preheating process is complete, open the door A3 and place the food inside
the fryer. Release the handle A21 and close the door A3.
Note:
To insert and remove the accessories (pizza pan A16, rack A17, frying basket
A19), always use the carry handle A21.
4. Set the frying temperature and time, see (“Setting custom frying temperatures and
times”) or select one of the preset programs (see chapter “Preset programs”) and
press the start / pause button B16. The fryer will start and the preset time will start
counting down on the touch display A1.
5. While the internal area is heating up to the set temperature, the top heating element
A6 will illuminate the internal area of the fryer. However, once the set temperature is
reached, the top heating element A6 will turn off and will stop illuminating the internal
area. If the temperature inside the fryer falls, the top heating element A6 will turn on
again.
6. After the frying process is finished, asound will be made. The touch display A1 will
turn off and the fryer will switch to the stand-by mode after approximately 1minute of
inactivity.
7. Open the door A3, attach the handle A21 on to the accessory and remove it from the
fryer. Place it on ametal rack, or another heat resistant mat as appropriate.
8. In the event that you will not be using the fryer, turn it off by pressing the On/Off
button B13, disconnect it from the power socket and allow it to cool down.
Attention:
Regularly check the progress of frying through the glass window
A4. If necessary, open the door A3 and check the frying process.
The frying process will be interrupted and the countdown on the
touch display A1 will stop. Then properly close the door A3 and
the frying process will resume.
Do not touch the accessories or the internal area of the fryer with
your hands, the surface is very hot. There is adanger of aburns.
Food stirring function
1. Follow the steps 1 - 4 in the chapter „Frying food in a fryer“.
2. Press the food stirring button B11 to turn on the stirring fuction manually. Press it
again to turn it off.
Note:
The stirring function can be turned on/off manually by pressing the button
B11 only for the programs at which the stirring function is not preset. If the
stirring function is already preset, it cannot be turned off.
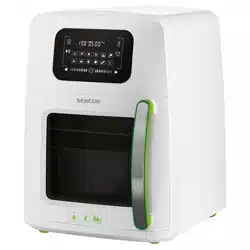
USING THE ACCESSORIES
Thanks to the supplied accessories and their various combinations, you will be able to
prepare various foods.
1. Pizza pan A16
– Suitable for preparing pizzas with a diameter of 25 cm, meat, cakes, biscuits,
vegetables, skewered meat, etc.
– Recommended position: middle position A9 and bottom position A10
2. Combination of the the frying basket A19 and the food stirring attachment A18.
– Suitable for frying fresh or frozen French fries.
– Attach the food stirring attachment A18 on to the central connector in the frying
basket A19. Check that it is correctly seated.
– Recommended position: middle position A9
3. Combination of the pizza pan A16 and the rack A17
– Suitable for preparing chicken, steaks, ribs, grilled toasts, grilling, etc.
– Recommended position: middle position A9 (intended for the rack A17) and the
bottom position A10, or both accessories in the middle position A9 if appropriate.
4. Combination of the the frying basket A19 and the rack A17
– Suitable for simultaneously frying French fries in the frying basket A19 and toasting
bread on the rack A17
– Recommended position: top position A8 (intended for the rack A17) and middle
position A9
5. Combination of the frying basket A19, food stirring attachment A18 and the
chicken roaster rack A20
– Suitable for roasting the whole chicken.
– Attach the food stirring attachment A18 on to the central connector in the frying
basket A19. Check that it is correctly seated. Place the chicken roaster rack A20 on
to the food stirring attachment A18.
– Recommended position: middle position A9
Attention:
Never fill the frying basket A19 past the MAX mark.
Always place the pizza pan A16 or frying basket A19 underneath
the rack A17. In this way you will catch any excess juices, e.g.
from the meat and prevent the bottom part of the internal area
of the fryer from being splattered.
Never fry food only on the rack A17 itself.
Safety switch
The fryer is equipped with a safety switch that automatically turns off the heating
elements A6 and A12 and stops the countdown when the door A3 is opened while it is
running. The fryer automatically resume
s operation when the door A3 is correctly closed.
Attention:
Once the frying process is complete and the fryer is turned off
using the On/Off button B13, you may register that the fan may
run for about another 1 minute. This is anormal safety feature by
which the fan cools the inner area and the motherboard of the
fryer to prevent their damage by the effect of high temperature.
Overheating protection
The fryer is equipped with asafety fuse against overheating, which protects it against
damage. In the event of the fryer heating up excessively, e.g. due to long use, the safety
fuse against overheating will be activated automatically. If this happens, the frying of
food will be automatically stopped. Disconnect the fryer from the power outlet and allow
it to cool down completely. Contact the authorised service centre to replace the safety
fuse. Under no circumstances, replace the safety fuse by yourself.
CLEANING AND MAINTENANCE
Prior to cleaning the appliance, disconnect it from the power socket and allow it to cool
down. The appliance will cool down faster when the door A3 is open. Carefully remove all
the accessories and set them aside to cool down.
We recommend cleaning the appliance immediately after it cools down to prevent food
scraps from drying on. These are then harder to remove later.
Using apaper towel, remove any food scraps from the accessories and the internal area
of the fryer.
You may wash the accessories in warm water with asmall amount of kitchen detergent
using a soft sponge. Rinse and wipe dry. Likewise, you may wash the accessories in
adishwasher.
Wipe the external case of the appliance and the internal area using sponge lightly dipped
in warm water. Wipe dry using aclean wiping cloth.
Do not use steel wool, abrasive cleaning products, solvents, etc. to clean any part of this
appliance.
Store the appliance in adry and well-ventilated location. Do not place any items on the
appliance.
WARNING:
To prevent the risk of injury by electrical shock, do not submerge
the appliance, power cord or power plug into water or another
liquid.
TROUBLESHOOTING
If the appliance does not work as described in the user’smanual, check the list of most
frequent problems below in order to remedy the problem. In the event that your problem
is not listed or if the problem persists, turn off the appliance, pull the power plug out
of the power socket and contact an authorised service centre. Under no circumstances
should you attempt to repair the appliance yourself.
Loading ...