Loading ...
Loading ...
Loading ...
- 7 -
03/2019
Copyright © 2019, Fast ČR, a.s.
EN
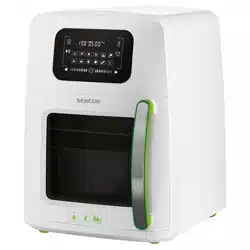
Vita fryer
User'sManual
■ Prior to using this appliance, please read the user’smanual thoroughly, even in cases,
when one has already familiarised themselves with previous use of similar types of
appliances. Only use the appliance in the manner described in this user’smanual. Keep
this user’smanual in asafe place where it can be easily retrieved for future use.
■ We recommend saving the original cardboard box, packaging material, purchase
receipt and responsibility statement of the vendor or warranty card for at least the
duration of the legal liability for unsatisfactory performance or quality. In the event of
transportation, we recommend that you pack the appliance in the original box from
the manufacturer.
DESCRIPTION OF THE APPLIANCE
A1 Touch display
A2 Fryer unit
A3 Door
A4 Glass window
A5 Handle
A6 Top heating element
A7 Protective cover
A8 Top position for inserting accessories
A9 Middle position for inserting
accessories
A10 Bottom position for inserting the
accessories
A11 Safety micro-switch
A12 Bottom heating element
A13 Central connector
A14 Air inlet/outlet andceramic filter
A15 Power cord
A16 25cm pizza pan
A17 Rack
A18 Food stirring attachment
A19 Frying basket
A20 Chicken roaster rack
A21 Accessory carry handle
DESCRIPTION OF THE DISPLAY
B1 Set temperature in°C
B2 Fan indicator light
B3 Stirring function indicator light
B4 Set frying time in minutes
B5 PREHEATING indicator light
B6 FINISHED indicator light
B7 HEATING indicator light
B8 Temperature setting button
B9 Frying time setting button
B10 Preset program icons
B11 Food stirring On/Off button
B12 Increase frying time / temperature
button
B13 Fryer On/Off button
B14 Reduce frying time / temperature
button
B15 MENU button
B16 Start / pause button
B17 Preheat button
BEFORE FIRST USE
Before first use, take the appliance and its accessories out of the packaging material and
remove all promotional labels and stickers.
Wipe the external surface of the fryer using sponge lightly dipped in warm water. Wipe
dry using aclean wiping cloth.
Wipe the internal area of the fryer using sponge lightly dipped in warm water. Wipe dry
using aclean wiping cloth.
Wash the pizza pan A16, rack A17, food stirring attachment A18, frying basket A19,
chicken roaster rack A20 and accessory carry handle A21 in warm water with asmall
amount of neutral kitchen detergent. Rinse with clean water and wipe thoroughly until
dry.
USING THE FRYER
Preheating function
1. Place the fryer on a stable, even and clean surface. Insert the power plug into
aproperly grounded power socket. Asound will be made and the On/Off button B13
on the touch display A1 will start flashing.
2. Press button B13 to turn on the fryer and press preheat button B17. The touch display
A1 will be lit and show the values of the preheating function: 190 °C and5 minutes.
The preheating function enables the inner area of the fryer to heat up to the operating
temperature. The temperature is factory preset to 190 °C and the heating time to
5minutes.
3. Press the start / pause button B16 and the fryer will start the preheating process. The
set time will count down on the touch display A1.
4. Asound is made when the preheating process is complete. The touch display A1 will
turn off and the fryer will switch to the stand-by mode after 5 minutes of inactivity.
A. Adjusting the preheating temperature
1. When the fryer’spreheat values appear on the touch display A1: 190 °C and5minutes,
press the temperature setting button B8, the temperature on the touch display A1 will
start flashing.
2. Use the increase temperature button B12
/ decrease temperature button B14 to set
the new temperature. Each time the button is pressed, the temperature will increase
or decrease by 5
°C. Press and hold down the buttons to speed up the temperature
setting process. You can set the temperature in the range 60 °C – 200 °C.
3. If you do not need to adjust the preheating time, press the start / pause button B16
and the fryer will start the preheating process.
B. Adjusting the preheating time
1. When the fryer’spreheat values appear on the touch display A1: 190 °C and5minutes,
press the frying time setting button B9, the time on the touch display A1 will start
flashing.
2. Using the increase frying time B12 button / decrease frying time B14 button, set
the new preheating time. Each time the button is pressed, the time will increase or
decrease by 1 minute. Holding down the button will speed up the time setting. You
can
set the preheating time in the range 01:00 – 60:00 minutes.
3. Press the start / pause button B16 and the fryer will start the preheating process to the
newly set temperature and time.
Note:
If you do not press the start / pause button B16 within 5 minutes, the fryer
will automatically switch to the stand-by mode.
Preset programs
The fryer has 12 preset programs thanks to which you can quickly and easily prepare
various types of foods.
1. When the preheating process is complete, press the MENU button B15 and the preset
program icon will be lit on the touch display A1. Use the buttons B12 or B14 to select
the desired program.
2. Place the food that you wish to fry into the fryer.
3. Press the start / pause button B16 and the fryer will start the selected program. The
preset time will start counting down on the touch display A1.
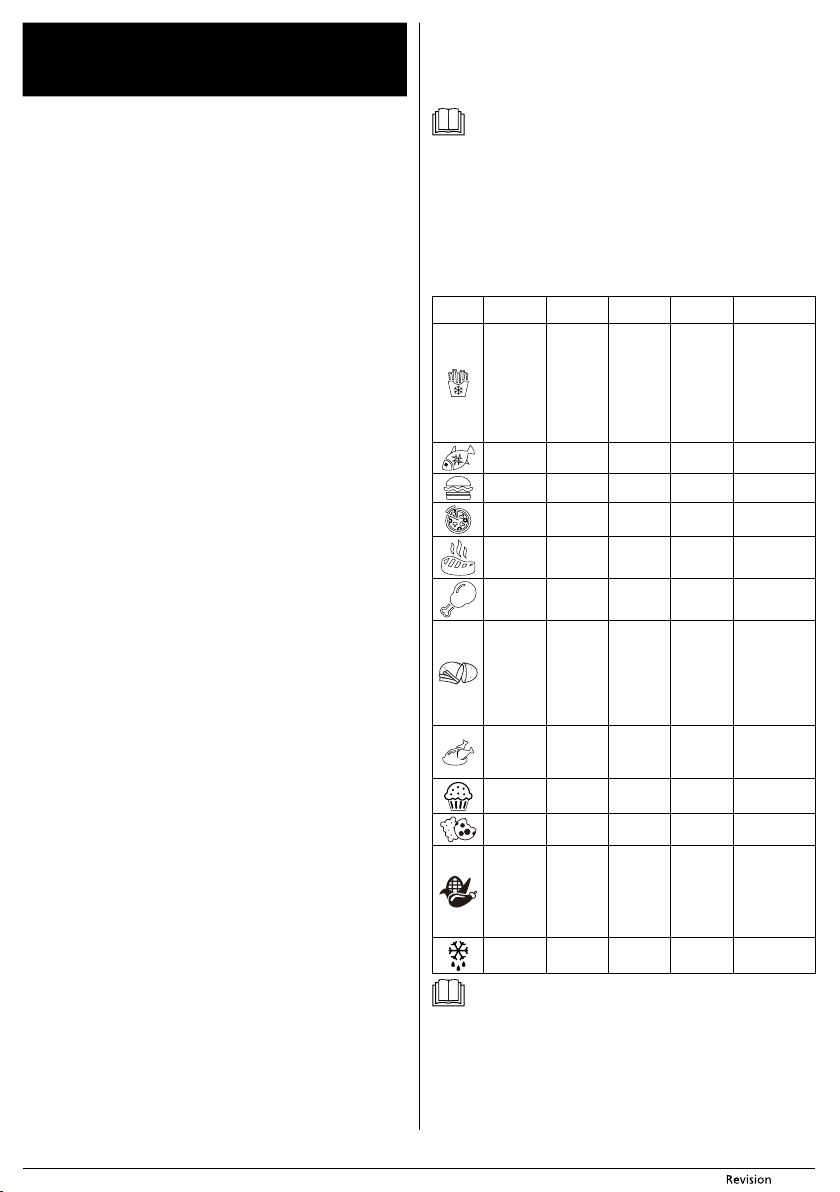
Table of programs
Icon Food
Temperature
in °C
Frying time
in min
Recommended
amount
Recommendations
Frozen
French fries
200 20
1 – 1.2 kg
Use the frying
basket A19,
food stirring
attachment
A18. The top
and bottom
heating element
will be turned
on.
Fish /
seafood
180 13 2x 0.5 kg
Hamburger 180 13 4x 0.2 kg
Frozen pizza 160 9 1x 25cm
Steak 180 11 2x 0.2 kg
Frozen
chicken
pieces
180 13
1 kg
(approx. 6
pieces)
Fresh
French fries
200 25 0.5 kg
Use the frying
basket A19,
food stirring
attachment A18.
The top and
bottom
heating element
will be turned on.
Fried
chicken
180 25 1.5 kg
The top and
bottom heating
element will be
turned on.
Cakes 150 38 0.5 kg
Biscuits 160 18 <20 pcs
Fried
vegetables
170 10 0.5 kg
The top and
bottom heating
element will be
turned on. You
can also use the
food stirring
attachment A18.
Defrosting 50 5 0.5 kg
Note:
If you do not press the start / pause button B16 within 5 minutes, the fryer
will automatically switch to the stand-by mode.
A. Adjusting the temperature of apreset program
1. After selecting aprogram, press the temperature setting button B8, the temperature
on the touch display A1 will start flashing.
2. Use the increase temperature button B12
/ decrease temperature button B14 to set
the new temperature. Each time the button is pressed, the temperature will increase
or decrease by
5 °C. Press and hold down the buttons to speed up the temperature
setting process. You can set the temperature in the range 60°C–200 °C.
3. If you do not need to adjust the frying time, press the start / pause button B16 and the
fryer will start the frying process.
Loading ...
Loading ...