0
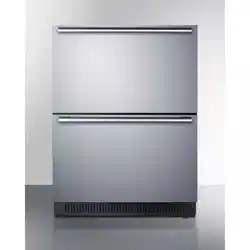
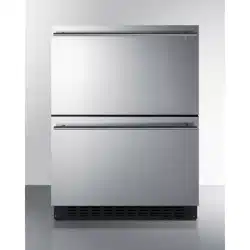
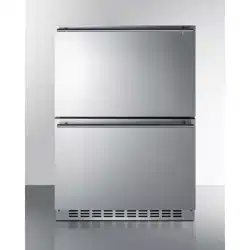
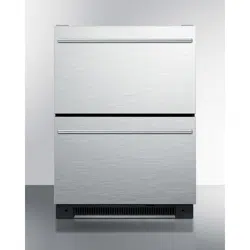
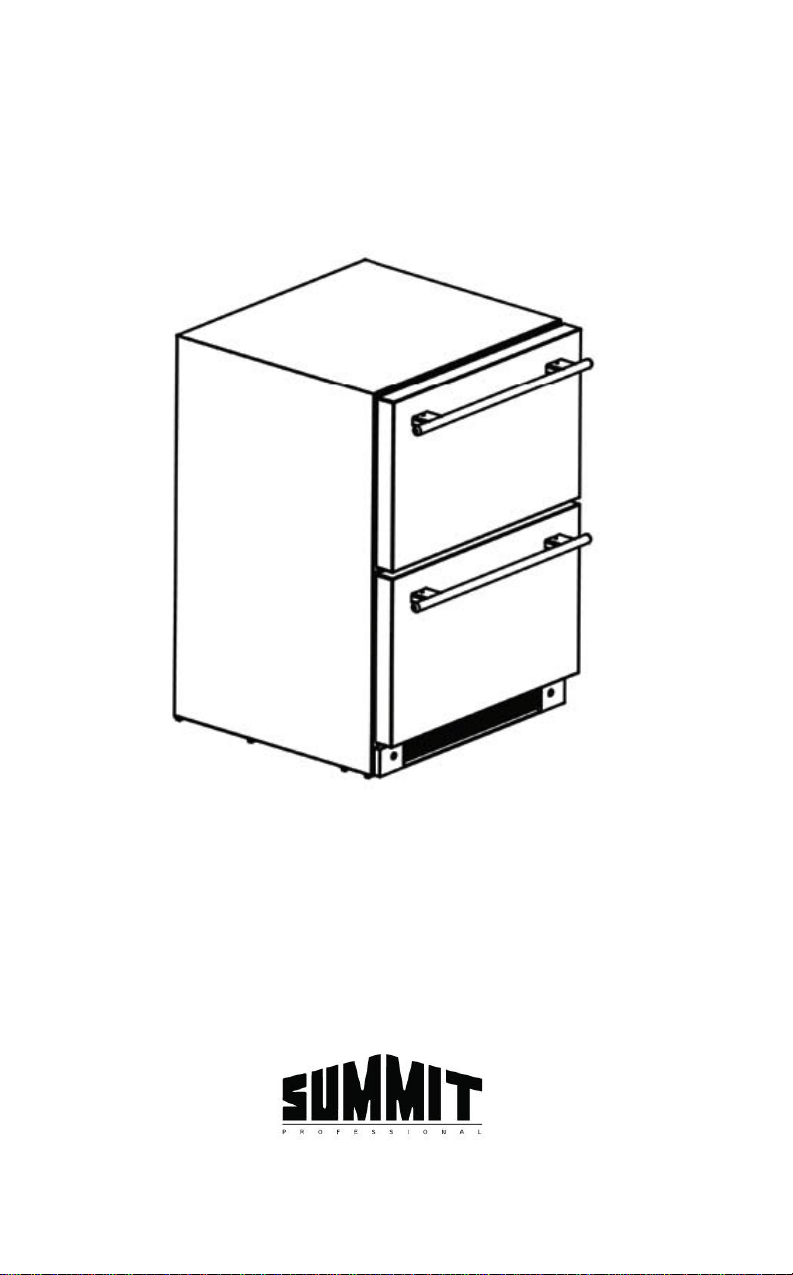
Dual-Drawer Refrigerator
Réfrigérateur à deux tiroirs
User Manual | Guide d'utilisation
Models | Modèles :
SP5DS2DBLK (Black exterior | extérieur noir)
SP5DS2DSSHH (Stainless steel door | porte en acier inoxydable)

1
7. This appliance is designed for built-in use only into an enclosed
cabinet.
SAVE THESE INSTRUCTIONS
DANGER
Important Safeguards
When using this appliance, always exercise basic safety
precautions, including the following:
1. Read all of the instructions before using this appliance.
2. Use this appliance only for its intended purpose as described in this use and
care guide.
3. This refrigerator must be properly installed in accordance with the
installation instructions before it is used. See grounding instructions in
the installation section.
4. Never unplug your refrigerator by pulling on the power cord. Always
grasp the plug firmly and pull straight out from the outlet.
5. Unplug your refrigerator before cleaning or before making any repairs.
Note: If for any reason this product requires service, we strongly
recommend that a certified technician performs the service.
6. Repair or replace immediately, all electric power cords that have become
frayed or otherwise damaged. Do not use a cord that shows cracks or
abrasion damage along its length, the plug or the connector end.
8. If your old refrigerator is not being used, we recommend that you
remove the door and leave the shelves in place. This will reduce
the
possibility of danger to children.
9. Do not operate your refrigerator in the presence of explosive fumes.
10. Cabinet edges along stamp/cut-out areas may be sharp. Please avoid
placing hands, fingers or other appendages near these areas.
11. This appliance is not intended for use by young children or infirm
persons without supervision. Young children should be supervised to
ensure they do not play with the appliance.
12. CAUTION: DO NOT USE EXTENSION CORDS.
Risk of child entrapment. Before you throw away your old appliance,
take off the doors. Leave the shelves in place so that children may
not easily climb inside.

2
Table of Contents
PAGE
Important Safeguards ............................................................................ 1
Parts and Overall Dimensions .............................................................. 3
Pre-Installation Instructions ................................................................. 4
Preparation before installing .................................................................... 4
Installation ................................................................................................ 5
Interior Parts ........................................................................................... 6
Crisper ..................................................................................................... 6
Adjustable Divider .................................................................................... 6
Drawers ................................................................................................... 8
Upper Drawer ........................................................................................... 8
Lower Drawer ........................................................................................... 8
How To Use This Product ..................................................................... 8
Important notes before connecting the power supply .............................. 8
Connect the power supply ....................................................................... 8
Interior LED bulbs .................................................................................... 8
Temperature setting ................................................................................. 8
Centigrade and Fahrenheit Conversion ................................................... 9
Power switch ............................................................................................ 9
Sabbath mode .......................................................................................... 9
Door Ajar Alarm
......................................................................................... 10
Auto Defrost ........................................................................................... 10
Cleaning ................................................................................................ 10
Troubleshooting .................................................................................. 11
Limited Warranty .................................................................................. 12
Thank you for using our Summit
product. This easy-to-use manual will
Model number:
guide you in getting the best use of
your refrigerator.
Serial number:
Remember to record the model and
serial number. They are on a label in
Date of purchase:
back of the refrigerator.
Staple your receipt to your manual.
You will need it to obtain
warranty service.
3
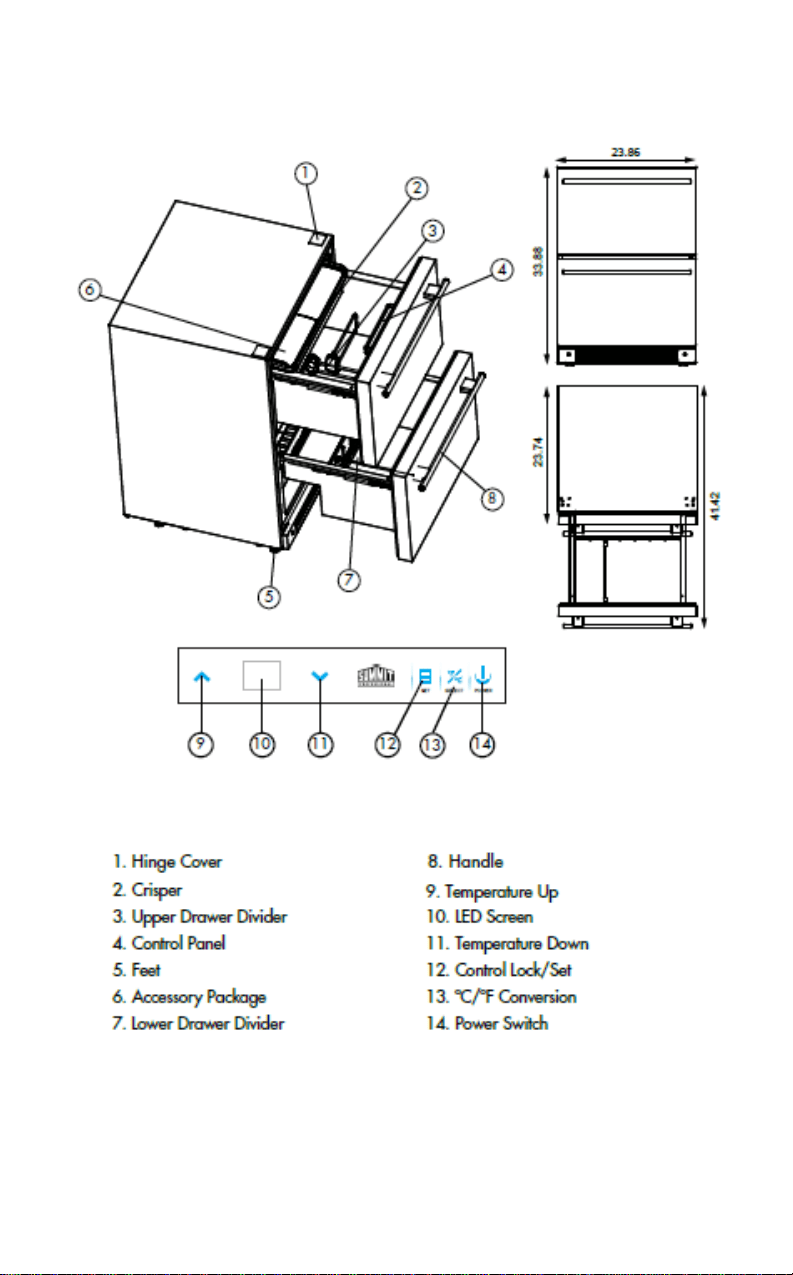
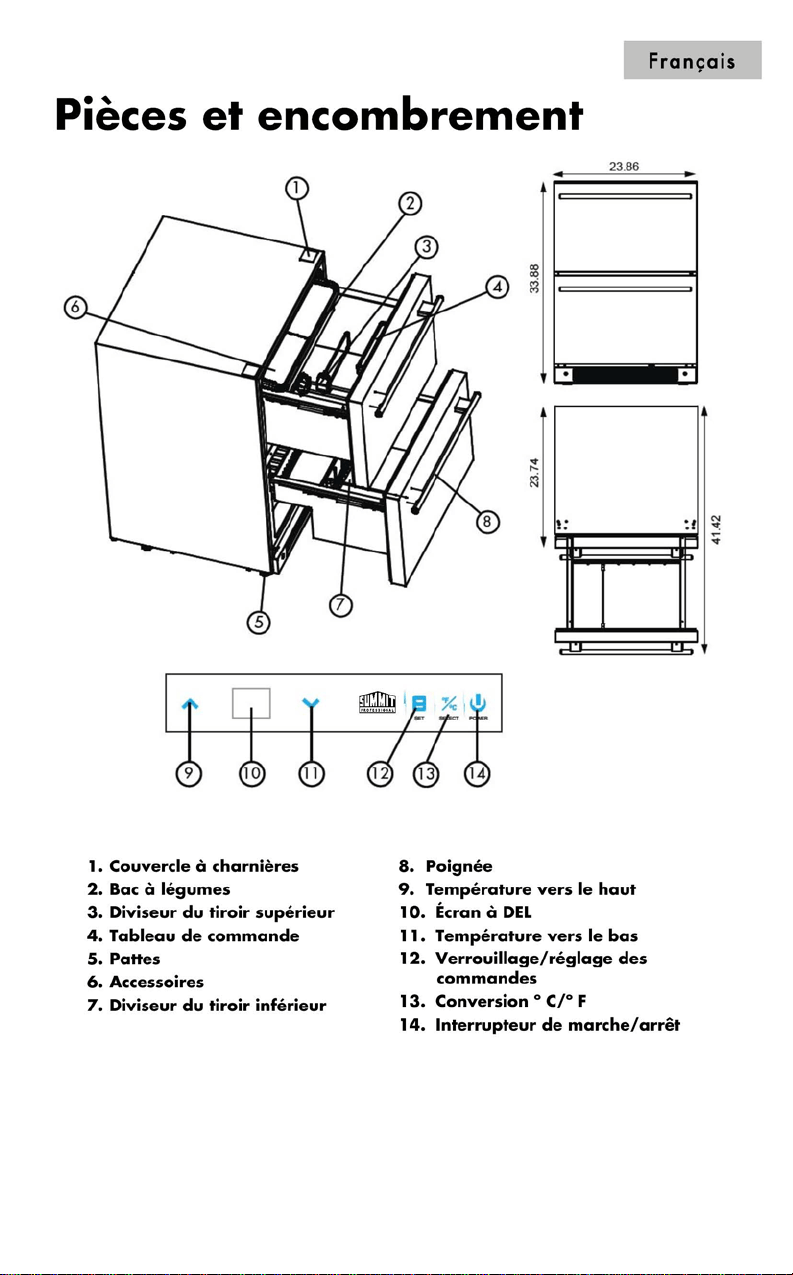
Parts And Overall Dimensions
4
Pre-Installation Instructions
This refrigerator is for built-in use only. Before use, this product must be
installed properly.
To allow for proper ventilation, leave a clearance of at least
3/16” on either side, 1/16” at the top and 2” at the rear when i
nstalling. Be sure
that airflow under the appliance is not blocked.
Note: Allow the unit to sit on its base for at least one hour before installation.
Preparation Before Installing
First, clean product's surface with a soft cloth. R
emove all protective
packaging covering the product.
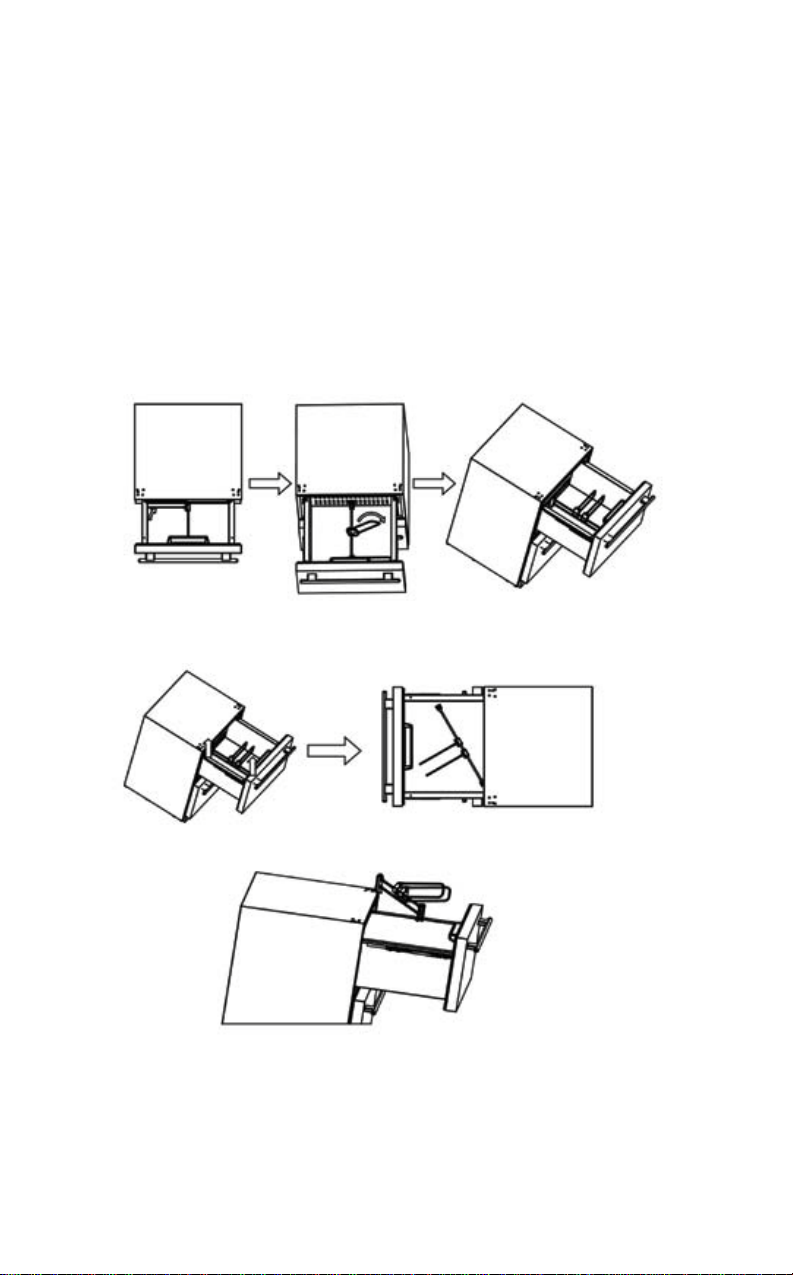
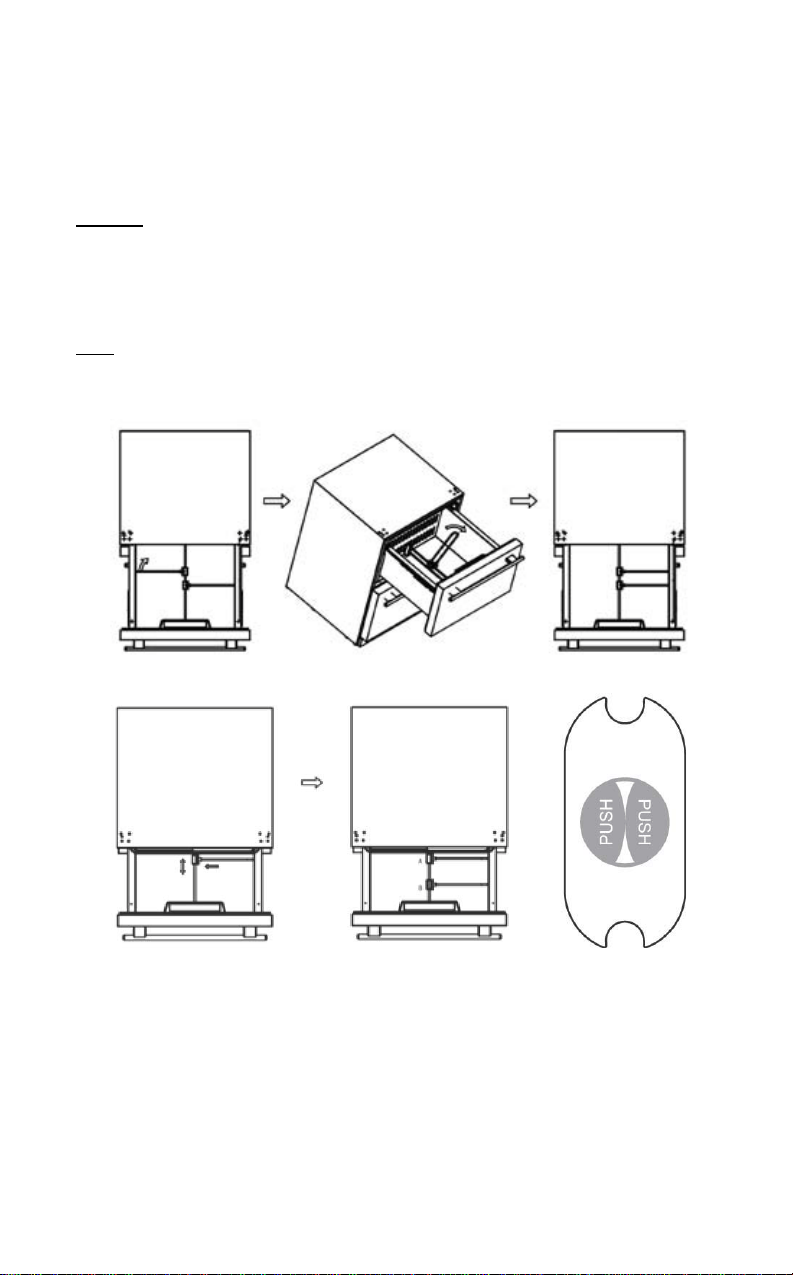
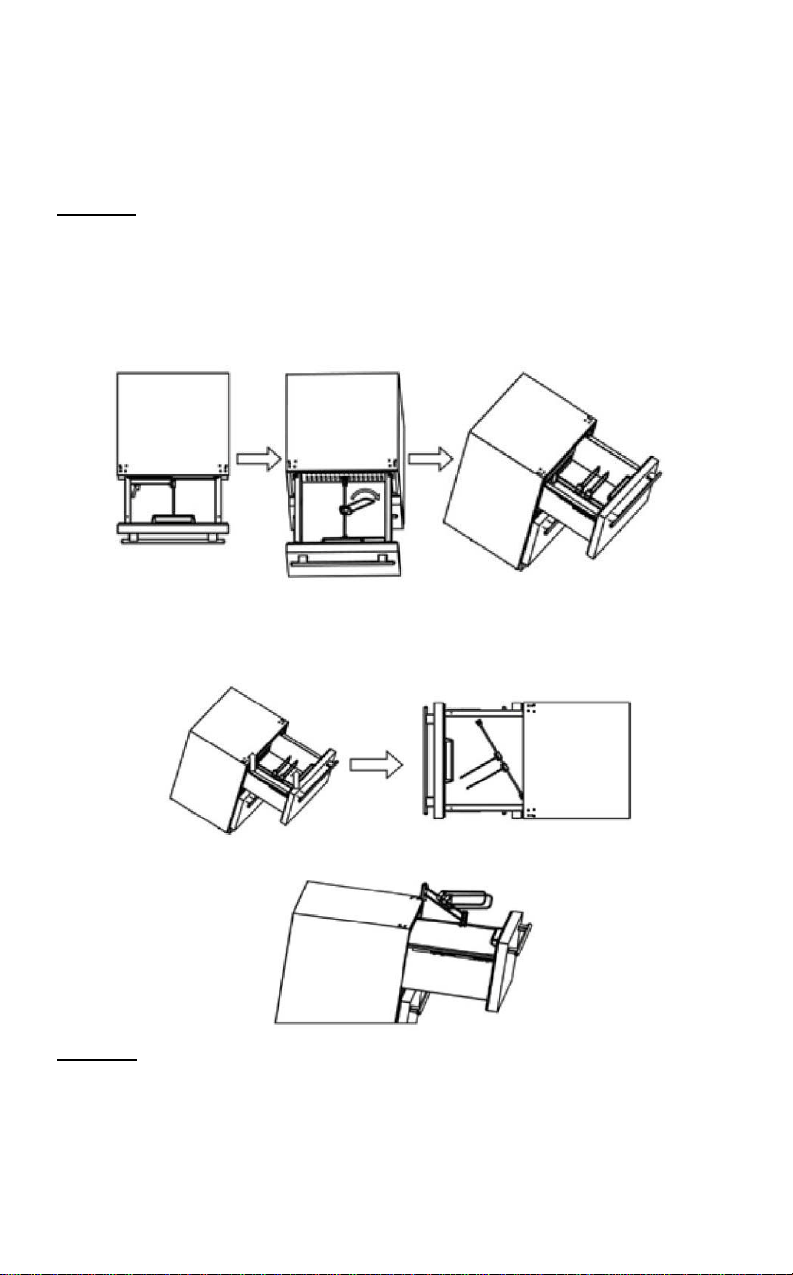
1. Pull the upper drawer open. Refer to the illustrations below. Remove
crisper and set aside. Then place drawer dividers to one side as illustrated.
2. With two hands, lift up on the metal drawer divider rod to remove it from the
slots in the front and rear of the drawer. Once the drawer divider rod is free
from the slots (as illustrated), turn and lift so as not to hit the control panel.
3. Take the drawer divider assembly out of the upper compartment and place
safely aside.
Note: After completing these three steps, please close the upper drawer to
avoid damage to your person and product during installation.
5
Installation
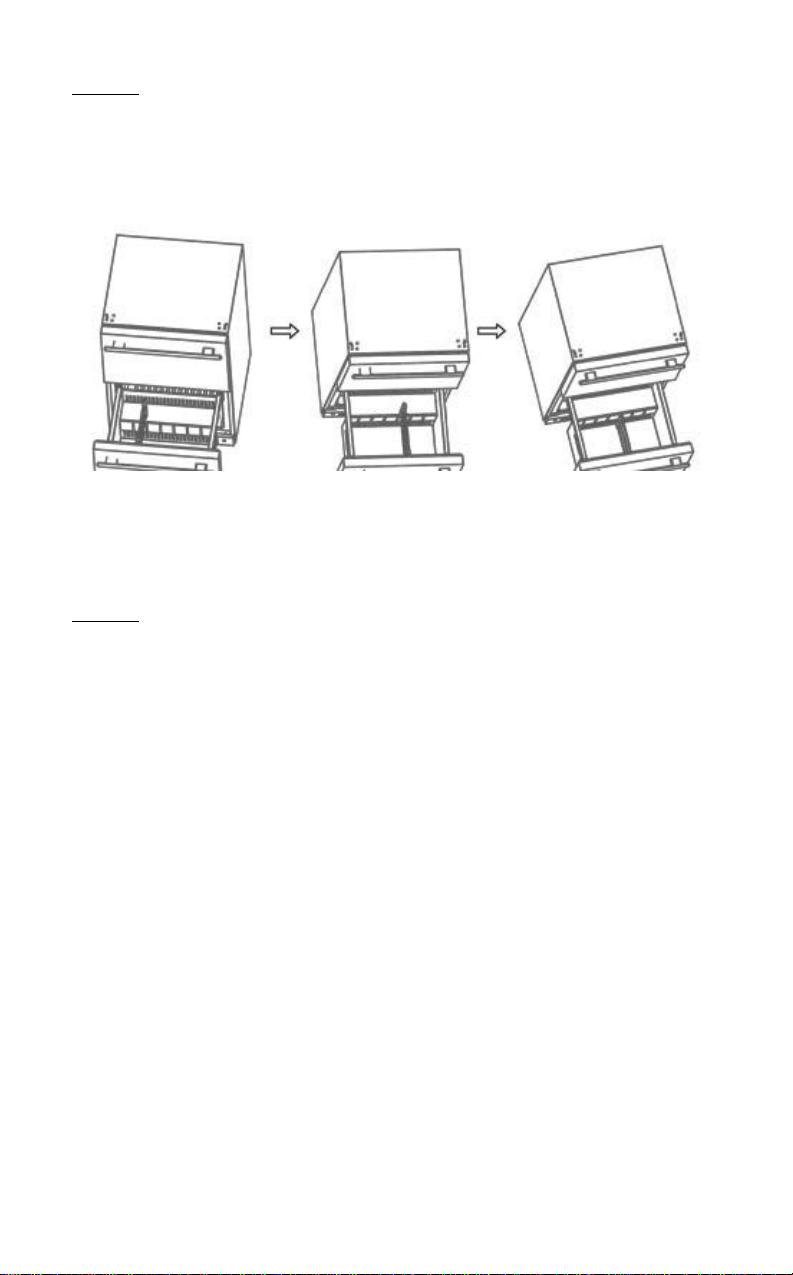
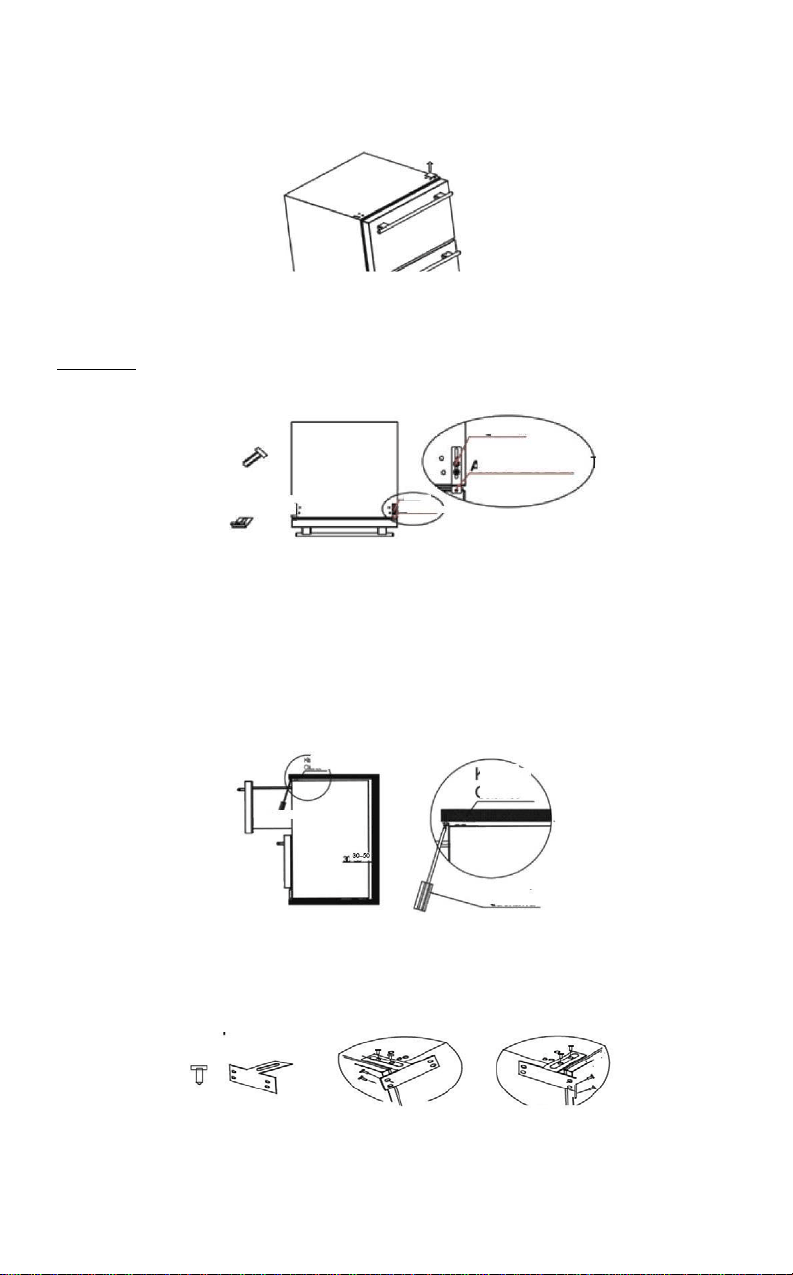
1. Take off hinge cover(Part #1, page 3) with an upward motion. Refer to
illustration below:
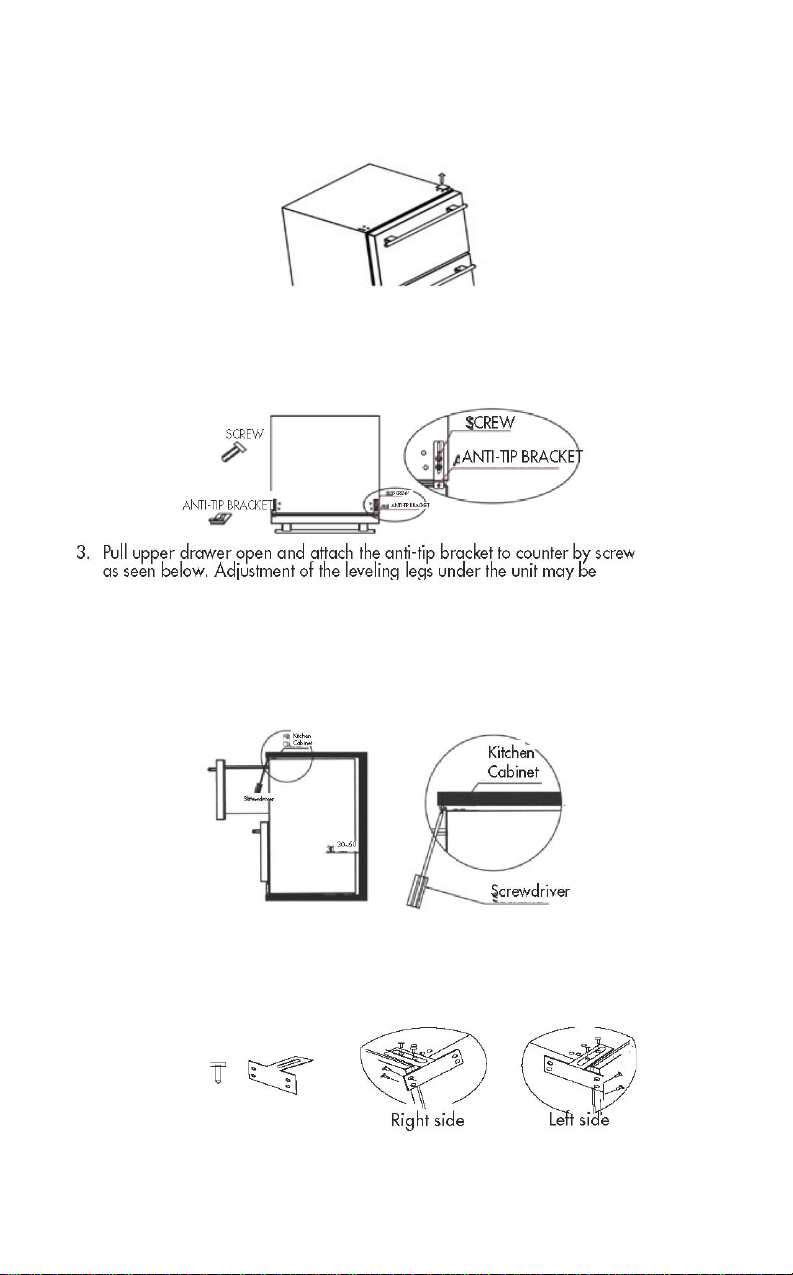
2. Take the anti-tip bracket and screws from the accessory bag. Tighten
the anti-tip bracket on the top of the product with screws as follows in
the illustration.
Note: Follow instructions properly or you may do damage to the product.
so as not to damage accidently the cabinetry or
flooring. Then perform the
same adjustments to the front leveling legs to bring the front of unit to the
proper level to install the anti-tip bracket and fit evenly under the counter.
4.
Another set of anti-tip brackets for side installation is provided as option
when the counter top is granite and hard to fix by screws. This set of
brackets includes two anti-tip brackets and eight screws for installation on
left side and right side of the cabinet. The illustration below shows this. T
he
drawer needs to be open to perform this procedure.
necessary for a proper fit in the cabinet opening. Start with the rear legs
(if necessary) before you slide the unit fully into the opening - raise or lower the
rear legs to make the unit fit properly. Then carefully slide the unit into opening
6
Interior Parts
Crisper
One crisper with cover is located in the upper drawer.
Purpose
:
Convenient storage of fresh vegetables. The user can remove the
crisper if it is not needed.
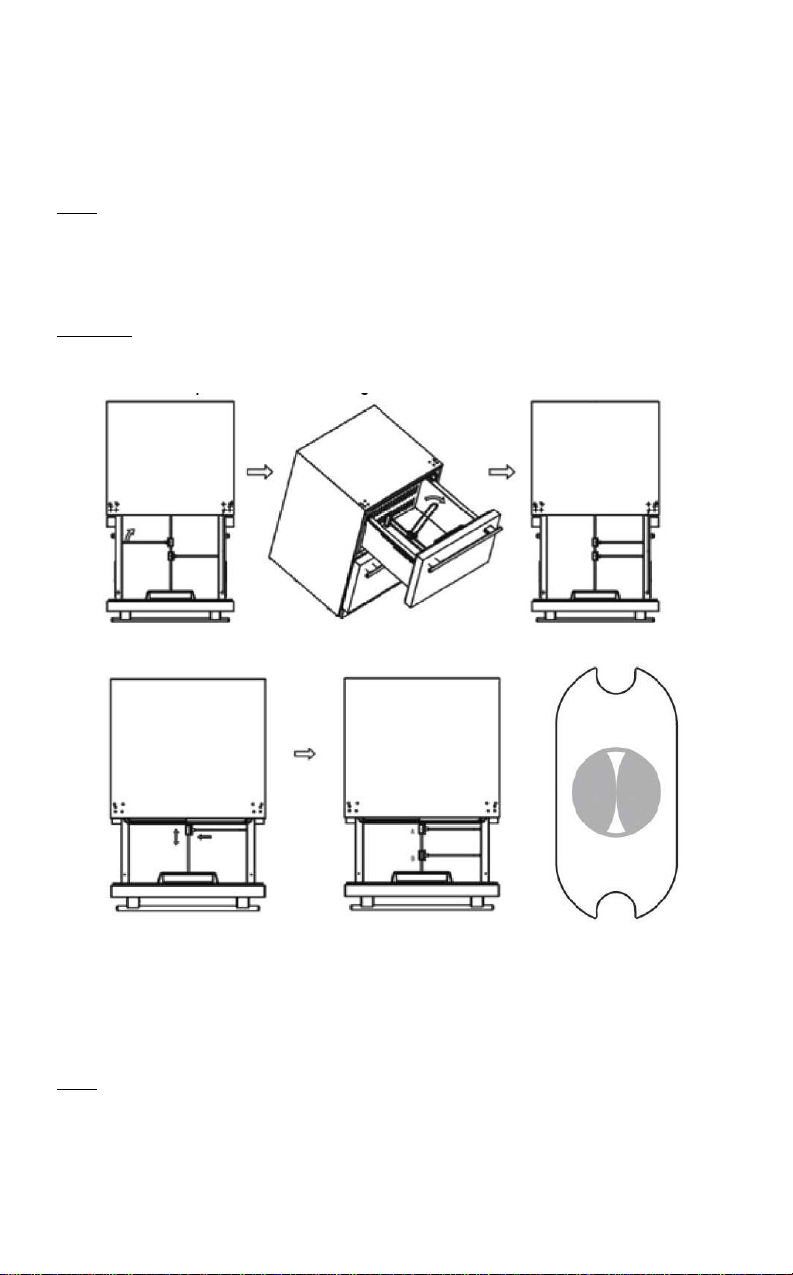
Adjustable Divider
There is an adjustable divider in each drawer. These can be adjusted for
flexibility in food storage. Dividers can be removed if not needed.
Note: If dividers are removed, keep them in a safe place away from
children. The drawers are designed to hold up to 44.1 lbs/20kg of food
items.
You can separate a compartment into various configurations, as shown.
The upper compartment is separated by a divider fastened to the bin cradle of the
upper compartment.
Those two dividers can be adjusted left and right, also back and
front. For left and right adjust: rotate directly. For back and front: you should press
the “PUSH” button (see illustration) in middle connector and move it back to front. If
you want to clean your refrigerator, you can remove the shelf foll
owing steps located
in section Preparation Before installation.
7
Purpose:
User can separate the upper compartment with divider according to
personal needs. This feature also keeps foods from falling down or spilling
when the drawers are opened or closed.
Adjust the divider in the lower compartment by referring to illustration:
The divider in the lower compartment is fixed between the embossments of
the
front and back walls of the drawer. You can choose different embossments to
divide into different spaces in the drawer.
Purpose: Separate the lower compartment with divider according to personal needs.

8
Drawers
Upper Drawer
Can hold any item under 12 inches tall.
Lower Drawer
Lower drawer is separated by a step. Foods or beverages whose height is less
than 12 inches can be kept in the space without the step. Smaller items can be
placed on the step.
How to use this product
Important Notes Before You Connect the Power Supply
Actual power supply should be kept in accordance with marks on rating
plate (115V/60HZ). Rating plate is on back of unit. Power socket should be
equipped with a 10A fuse. Allow the unit to sit on its base for at least one
hour before installation.
CAUTION: DO NOT USE AN EXTENSION CORD.
Connect the power supply
Unit is tested and set to operate at 38ºF before leaving the factory. When
connected with the power supply, unit will work properly.
Interior LED bulbs
An LED bulb is located on top of the interior liner in both the
upper and lower
compartments. It is controlled by the opening and closing of the drawer
: when
the drawer is open, the light is on; when drawer is closed, light is off.
Caution: There are magnets that are affixed to the left side of the interior upper
drawer and to the bottom of the lower drawer door. Don’t re
move them as they
are required for proper functioning of the light system.
Temperature setting
If you want to change the set temperature, press “SET” for three
seconds. The unit will beep, the temperature will flash on the control
panel, then you can adjust the figure using the ‘ ’ and buttons.
When the desired temperature appears on the display, press the “SET”
button again to confirm your setting. The user will hear a beep and the
temperature will no longer flash.
If you want to lower the temperature, press the ‘ ’ button. If you want
to raise the temperature, press the button.
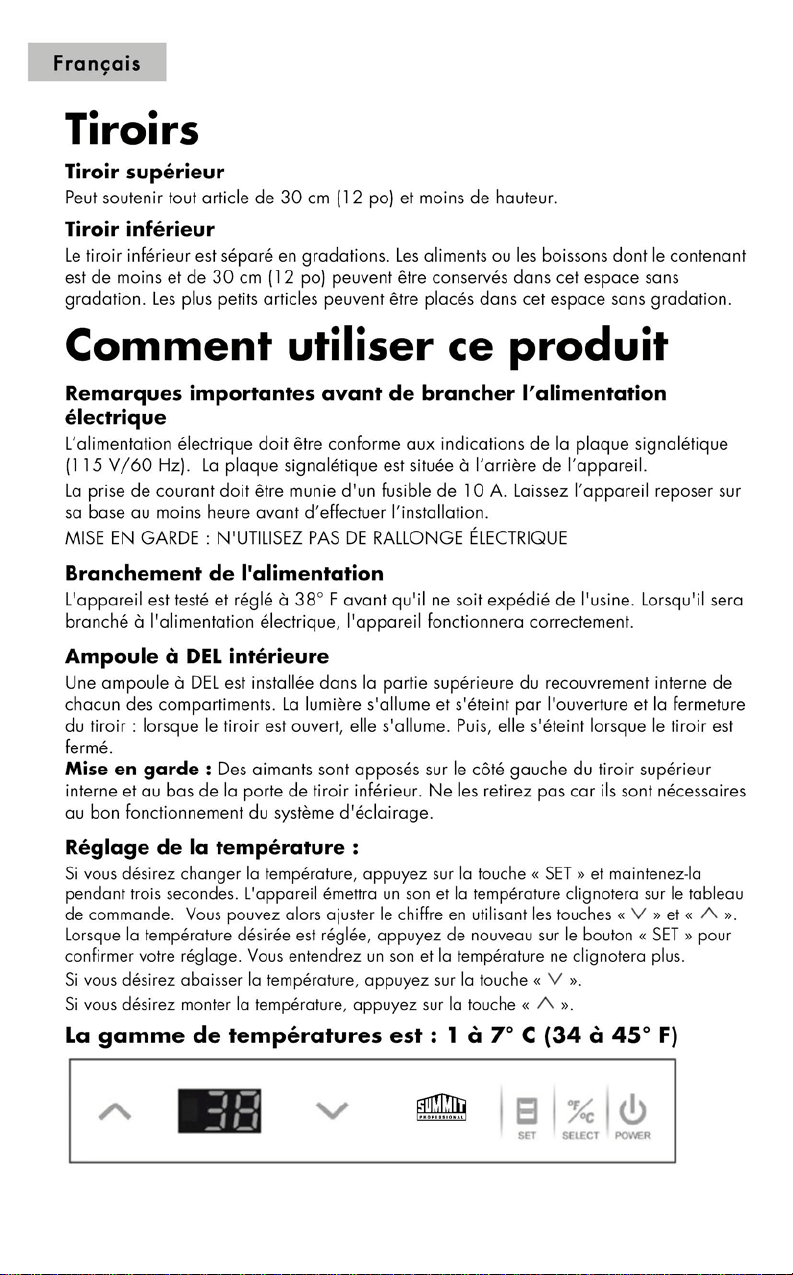
Temperature range is : 34-45ºF (1-7ºC)
Control panel

9
Centigrade and Fahrenheit Conversion
Press and hold “SELECT” for 3 seconds. The
temperature display will change
from Fahrenheit to Centigrade and the unit will beep once. Press and hold
“SELECT” again for 3 seconds, and the display will change from Centigrade
back to Fahrenheit. Again, the unit will respond with a beep.
Power switch
The control panel has a P
ower button. If you want to stop unit from working
for a short time or to restart, press and hold “POWER”
for 3 seconds to turn
on and off.
Note: If you want to stop the unit from working for an extended period of
time, shut off the unit, unplug it, remove food, clean the refrigerator and
leave the drawers slightly open to prevent odors.
Sabbath mode
Press and hold ‘ and ‘ ’ at the same time for 3 seconds. The unit will beep
once and the display panel will flash 5 times and stop. This indicates that the unit
has entered Sabbath mode. In this mode, normal cooling operations still take place
(compressor, magnetic valve, fan, heater strip), but all luminous equipment
including display panel and LED bulbs will shut off, no matter if the door is open
ing
or closing.
To exit the Sabbath mode, press and hold and ‘ ’ at the same time for 3
seconds. The display panel will flash 5 times to indicate that the Sabbath model
has been disabled.
Note: This mode is available for the observance of certain religious holidays.

10
Door Ajar Alarm
If the door of unit is ajar for more than 3 minutes, the system will give a
beeping alarm. If you want to stop it, please press “SET” button.
Auto Defrost:
The unit defrosts automatically. The water on the back wall will drain into
a
water tray and be evaporated by the compressor.
Cleaning
Before cleaning, turn the unit off and disconnect it.
Clean interior and exterior surfaces, as well as accessories, with
a solution
of cold water and a little baking soda.
To avoid damaging the product, don’t clean with steam.
Don’t use abrasive, acidic or harsh chemical cleansers.
Keep cleaning liquids away from electrical equipment. Clean and dry all
accessories. Clean the drain hole which is between compartments of
the
unit with a small piece of soft
material such as a cotton swab. (The drain
hole is located behind the lower drawer. Please refer to the
Drawer
Removal section for these instructions.)
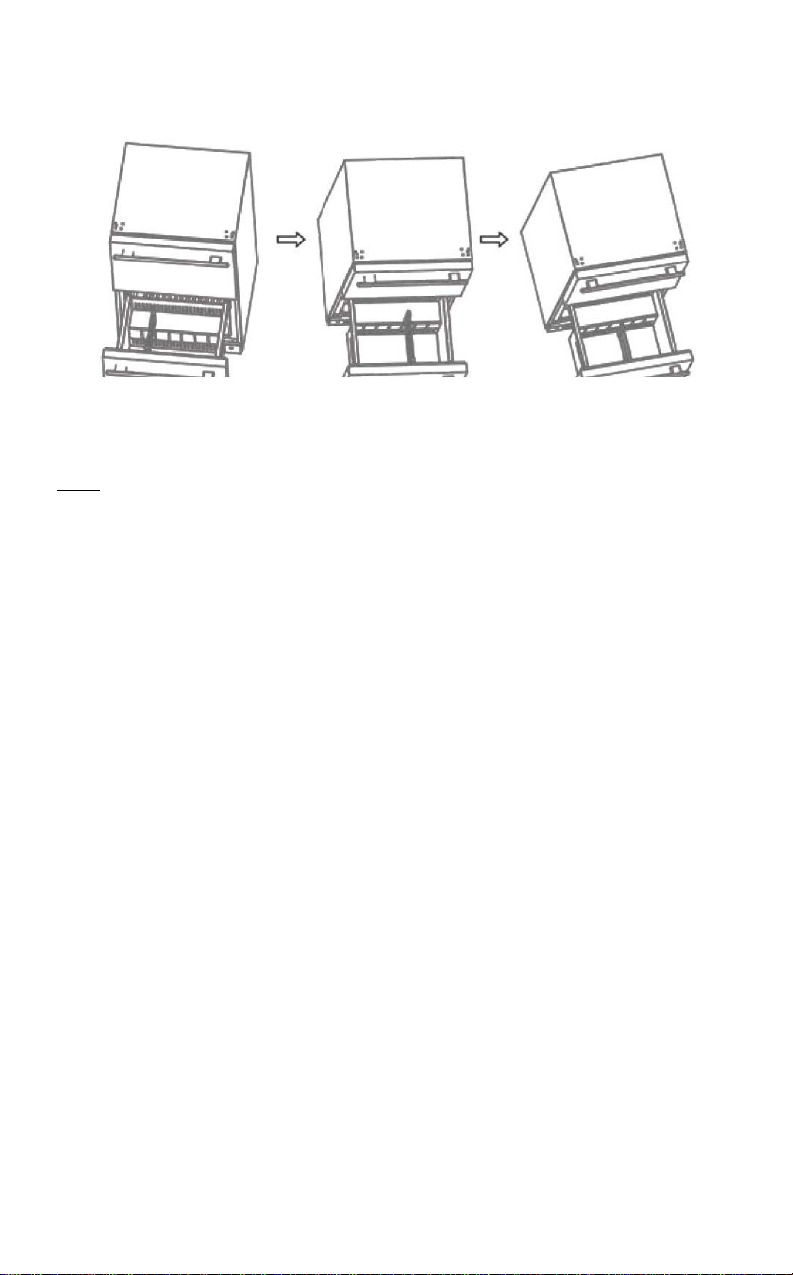
Drawer Removal
1. Pull out the lower drawer and, turning a screwdriver in a counter-clockwise
direction, disengage the two screws that fix the lower drawer to the slides
.
2. Remove the lower drawer.
3. Clean the drain hole illustrated below with a soft material such as a cotton
swab, then reinstall the lower drawer by reversing the procedure described
above.
10

11
Troubleshooting
If Refrigerator does not operate:
Check if refrigerator is plugged in. Check the circuit breaker to see if
there is power in the AC outlet.
If Refrigerator is too warm:
Frequent drawe
r openings. Allow time for recently added food items
to reach the desired temperature. Check gaskets for proper seal.
Clean condenser coils. Adjust temperature control to colder setting.
If Refrigerator runs too frequently:
This may be normal to maintain constant temperature during days of high
temperature and humidity. Drawers may have been opened frequently or left
open for an extended period of time.
Clean condenser coils. Check gaskets for proper seal. Check to see if drawe
rs
are completely closed.
If Moisture builds up on interior or exterior surfaces of the refrigerator:
This is normal during high humidity periods. Prolonged or frequent door
openings. Check gaskets for proper seal.
If Refrigerator drawer does not shut properly:
Level the refrigerator. Check for blockages, e.g., beverage bottles, food spills
,
etc.

12
Summit Limited Warranty
Summit Appliances warrants this
product to be free from defects in
materials and workmanship for a
period of one year from the date of
original purchase or delivery with an
additional 5 years parts only on the
compressor. Any parts determined to
be defective will be replaced by
SUMMIT at no charge to you. Plastic
parts, liners and outer cabinets are
warranted to be manufactured to
commercially acceptable standards
and free from defects at the time of
delivery.
This limited warranty does not
apply to:
1. Improper installation
2. Customer misuse,
negligence or damage
3. Incorrect electrical current
4. Products with the serial number
altered or removed
5. Products sold or used outside
the fifty United States or the
District of Columbia
6. Commercial or industrial users
7. Damage to this product from
accidents, alterations, failure to
follow instructions, fire, floods,
earthquakes, war, civil disturbance
or Acts of God.
Tel.: (718) 893-3900
www.summitappliance.com
SUMMIT is not liable for consequential
or incidental damage.
SUMMIT APPLIANCE DIV.
FELIX STORCH, INC.
770 GARRISON AVENUE
BRONX, NY 10474
12
DISCLAIMER OF IMPLIED WARRANTIES; LIMITATION OF REMEDIES
CUSTOMER'S SOLE AND EXCLUSIVE REMEDY UNDER THIS LIMITED WARRANTY
SHALL BE PRODUCT REPAIR AS PROVIDED HEREIN. IMPLIED WARRANTIES,
INCLUDING WARRANTIES OF MERCHANTABILITY OR FITNESS FOR A
PARTICULAR PURPOSE, ARE LIMITED TO ONE YEAR. WARRANTOR SHALL NOT
BE LI
ABLE FOR INCIDENTAL OR CONSEQUENTIAL DAMAGES. SOME STATES DO
NOT ALLOW THE EXCLUSION OR LIMITATION OF INCIDENTAL OR
CONSEQUENTIAL DAMAGES, OR LIMITATIONS ON THE DURATION OF IMPLIED
WARRANTIES OF MERCHANTABILITY OR FITNESS, SO THESE EXCLUSIONS OR
LIMITATION
S MAY NOT APPLY TO YOU. THIS WARRANTY GIVES YOU SPECIFIC
LEGAL RIGHTS AND YOU MAY ALSO HAVE OTHER RIGHTS, WHICH VARY FROM
STATE TO STATE.
13
13

14
Table des matières
PAGE
Mesures de protection importantes ........................................................ 13
Pièces et encombrement .......................................................................... 15
Directives à suivre avant l’installation .................................................... 16
Préparation avant l’installation .................................................................... 16
Installation ................................................................................................... 17
Pièces internes .......................................................................................... 18
Bac à légumes ............................................................................................ 18
Diviseur ajustable ........................................................................................ 18
Tiroirs ......................................................................................................... 20
Tiroir supérieur ............................................................................................ 20
Tiroir inférieur .............................................................................................. 20
Comment utiliser ce produit …..................................................................20
Remarques importantes avant de brancher l’alimentation électrique ......... 20
Branchement de l'alimentation .................................................................... 20
Ampoule à DEL intérieure ........................................................................... 20
Réglage de la température ......................................................................... 20
Conversion des degrés Celsius et Fahrenheit ............................................ 21
Interrupteur de marche/arrêt ....................................................................... 21
Mode Sabbath ............................................................................................. 21
Alarme de porte ouverte .............................................................................. 22
Dégivrage automatique ............................................................................... 22
Nettoyage ................................................................................................... 22
Dépannage ................................................................................................. 23
Garantie limitée ......................................................................................... 24
Merci d'utiliser ce produit Summit. Ce guide facile à suivre vous aidera à utiliser votre
réfrigérateur de façon optimale.
Numéro de modèle:
Numéro de série :
Rappelez-vous de prendre en note les
numéros de modèle et de série. Ils sont indiqués
sur l'étiquette à l'arrière de votre réfrigérateur.
Date d'achat:
Brochez votre reçu de caisse à votre guide.
Vous en aurez besoin pour obtenir du
service en vertu de la garantie.
15
15
16
Directives à suivre avant l’installation
Ce réfrigérateur est destiné à un usage en tant qu'appareil encastré uniquement. Avant
l’utilisation, il doit être correctement installé. Pour permettre une bonne ventilation
, laissez
un espace libre d'au moins 3/16" de chaque côté, 1/16" en haut et 2" à l'arrière
lors de
l'installation. Assurez-vous que la ventilation sous l'appareil n'est pas bloquée.
Remarque : Laissez l’appareil reposer sur sa base au moins 1
heure avant d’effectuer
l’installation.
Préparation avant l’installation
Nettoyez d’abord la surface du produit avec un linge doux et retirez tout l’emballage de
protection qui recouvre le produit.
1. Ouvrez le tiroir supérieur. Consultez les illustrations ci-dessous. Retirez le bac à légumes et
mettez-le de côté pour l’instant. Placez ensuite les diviseurs de tiroir sur un des côté,
2. À l’aide des deux mains, soulevez la tige du diviseur de tiroir en métal pour la retirer des
rainures à l’avant et à l’arrière du tiroir. Une fois que la tige du diviseur de tiroir est retirée des
rainures (tel que montré), soulevez et tournez de sorte à n
e pas frapper le tableau de commande.
3. Retirez le diviseur de tiroir du compartiment supérieur et placez-le en lieu sûr.
Remarque :
Après avoir effectué ces trois étapes, veuillez fermer le tiroir supérieur afin
d’éviter toute blessure et tout dommage au produit pendant l’installation.
17
Français
Installation
1. Retirez le couvercle à charnière (page 15, pièce 1) en le soulevant. Consultez l’illustration
ci-dessous :
2. Sortez le support antibasculement et les vis du sac d’accessoires. Serrez le support
antibasculement sur le dessus du produit avec les vis comme suit, tel que montré dans
l'illustration.
Remarque : Suivez les instructions à la lettre car sinon vous risquez d’endommager le produit.
VIS
VIS SUPPORT ANTIBASCULEMENT
SUPPORT
SCREW
ANTI-TIP BRACKET
ANTIBASCULEMENT
3. Ouvrez le tiroir en le tirant et fixez le support antibasculement au comptoir à l’aide des vis, tel
que montré ci-dessous. Il peut être nécessaire d’ajuster les pattes de nivellement sous l’appareil
pour qu’il s’adapte correctement dans l’ouverture d’armoire. Commencez par les pattes arrière (si
nécessaire) avant de glisser l’appareil entièrement dans l’ouverture; soulevez ou abaissez les
pattes arrière de sorte que l’appareil s’adapte correctement à l’ouverture. Puis, glissez
délicatement l’appareil dans l’ouverture en prenant garde de ne pas endommager
accidentellement les armoires ou le plancher. Effectuez ensuite les mêmes ajustements aux
pattes de nivellement avant de sorte que la partie avant de l’appareil soit au niveau approprié pour
installer le support antibasculement et s’adapte correctement en-dessous du comptoir.
Armoire de cuisine
Armoire de
cuisine
Tournevis
4.
Un autre ensemble de supports antibasculement est fourni pour l’installation latérale en tant
qu’option lorsque le comptoir est en granite et que la fixation à l’aide de vis peut être difficile. Cet
ensemble de supports comprend deux supports antibasculement et huit vis pour l’installation du
côté gauche. Cette installation est montrée à l’illustration ci-
dessous. Le tiroir doit être ouvert pour
effectuer cette installation.
Côté droit Côté gauche
18
Pièces internes
Bac à légumes
Un bac à légumes est placé dans le tiroir supérieur.
Utilité :
Rangement pratique des légumes frais. L’utilisateur peut enlever le bac à légumes s’il n’est
pas requis.
Diviseur ajustable
Chaque tiroir est doté d’un diviseur ajustable. L'utilisateur peut l’ajuster selon ses besoins pour
le rangement des aliments. L’utilisateur peut enlever les diviseurs s’ils ne sont pas requis.
Remarque : Gardez le diviseur en lieu sûr, loin des enfants,
s'il est retiré de l'appareil. Les tiroirs
sont conçus pour soutenir jusqu'à 20 kg (44,1 lb) d’aliments.
Séparez les compartiments de gauche et de droit et vice versa.
Séparez les compartiments avant et arrière et vice versa.
Le compartiment supérieur est séparé par un diviseur fixé au support de compartiment du
compartiment supérieur. Ces deux diviseurs peuvent être ajustés à gauche et à droite ainsi que
vers l'avant et l'arrière. Pour un ajustement gauche et droit : tournez tout simplement. Pour un
ajustement avant et arrière : vous devez pousser sur le bouton « PUSH » (consultez l'illustration)
du connecteur du centre et le déplacer vers l'avant. Pour nettoyer votre réfrigérateur, vous pouvez
enlever l'étagère en suivant les étapes indiquées dans la section « Préparation avant l'installation ».
Utilité : L'utilisateur peut séparer le compartiment supérieur à l’aide d’un diviseur selon ses
besoins. Cette caractéristique permet également d'éviter que les aliments ne tombent ou ne
déversent lorsque les tiroirs sont ouverts ou fermés.
19
Français
Ajustez le diviseur du compartiment inférieur en vous référant à l'illustration :
Le diviseur du compartiment inférieur est fixé entre les parties en relief de la paroi avant
et arrière du tiroir. Vous pouvez choisir différentes parties en relief pour diviser le tiroir en
différents sections.
Utilité : Séparer le compartiment inférieur à l’aide d’un diviseur selon ses besoins.
20
20
Panneau de commande

21
Français
Conversion des degrés Celsius et Fahrenheit :
Appuyez sur la touche « SELECT » et maintenez-
la enfoncée pendant 3 secondes. L'affichage de
la température passera des degrés Fahrenheit à Celsius. L'appareil émettra alors un son.
Appuyez sur la touche « SELECT » et maintenez-
la enfoncée pendant 3 secondes. L'affichage de
la température passera des degrés Celsius à Fahrenheit. L'appareil émettra alors un son de
nouveau.
Interrupteur de marche/arrêt :
Le panneau d'affichage est doté d’une touche de mise en marche/arrêt. Si vous désirez
interrompre le fonctionnement de l’appareil pendant une courte période ou le redémarrer, appuyez
sur la touche « POWER » et maintenez-la enfoncée pendant 3 secondes pour
mettre l’appareil en
marche et en arrêt.
Remarque : Si vous désirez arrêter le fonctionnement de l’appareil pendant une période
prolongée, débranchez l’appareil, enlevez les aliments, nettoyez le réfrigérateur et laissez
l’appareil légèrement ouvert afin d’empêcher la production d’odeurs.
Appuyez sur les touches «
» et «
Appuyez sur les touches «V» et «Ʌ» en même temps et maintenez-les enfoncées pendant 3
secondes. L'appareil émettra alors un son, le panneau d'affichage clignotera 5 fois et arrêtera.
Cela indique que l’appareil est passé au mode Sabbath. Dans ce mode, les opérations normales
de refroidissem
ent ont toujours lieu (compresseur, vanne électromagnétique, ventilateur, cordon
chauffant), mais tout l’équipement lumineux, incluant le panneau d’affichage et l’ampoule à DEL,
est fermé que la porte soit ouverte ou fermée. Appuyez sur les touches «V» et «Ʌ» en même
temps et maintenez-
les enfoncées pendant 3 secondes. Lorsque le panneau d'affichage clignote
5 fois, cela signifie que vous quittez le mode Sabbath.
Remarque : Ce mode est disponible pour certaines pratiques religieuses
Mode Sabbath :

22
Alarme de porte ouverte :
Si la porte de l’appareil demeure ouverte plus de 3 minutes, le système émet une alarme
sonore. Si vous désirez l’arrêter, veuillez appuyer sur la touche « SET ».
Dégivrage automatique :
L’appareil peut effectuer un dégivrage automatique. L’eau de la paroi arrière se vidange
dans le réservoir d’eau et s’évapore par le condensateur.
Nettoyage
Éteignez l’appareil avant de le nettoyer.
Nettoyez les surfaces internes et les accessoires ainsi que le châssis externe avec de
l’eau chaude et un peu de bicarbonate de soude.
Ne le nettoyez pas à la vapeur car vous risquez d’endommager le produit. N’utilisez
pas de nettoyant abrasif, acide et chimique.
Gardez les liquides de nettoyages éloignés de l’équipement électrique.
Nettoyez et asséchez tous les accessoires.
Nettoyez l’orifice de vidange situé entre les compartiments de l’appareil à l’aide d’un petit
matériau doux tel qu’un coton-tige. (L’orifice de vidange est situé derrière le tiroir inférieur.
Veuillez consulter la section « Retrait du tiroir » au sujet des directives reliées).
Retrait du tiroir
1. À l’aide d’un tournevis, tirez le tiroir inférieur, dévissez dans le sens inverse des
aiguilles d'une montre les deux vis qui retiennent le tiroir inférieur aux glissières.
2. Retirez le tiroir inférieur
3. Nettoyez l’orifice de vidange montré ci-dessous à l’aide d’un matériau doux tel qu’un
coton-tige. Installez ensuite le tiroir inférieur en effectuant la procédure inverse de celle
décrite ci-dessus.
Emplacement
de l’orifice de
vidange
Emplacement des vis

23
Français
Dépannage
Si le réfrigérateur ne fonctionne pas :
Vérifiez si le réfrigérateur est branché. Vérifiez s'il y a du courant dans la
prise c.a. en inspectant le disjoncteur.
Si le réfrigérateur est trop chaud :
Ouvertures fréquentes de la porte.
Laissez le temps aux aliments récemment ajoutés d'atteindre la température souhaitée.
Vérifiez si les joints sont suffisamment étanches.
Nettoyez le serpentin du condensateur.
Ajustez la température à un réglage plus froid.
Si le réfrigérateur se met en marche trop souvent :
Cela peut être normal pour maintenir une température constante lors des journées très
chaudes et humides.
Les portes ont peut-
être été ouvertes trop souvent ou laissées ouvertes pour de longues
périodes.
Nettoyez le serpentin du condensateur.
Vérifiez si le joint est suffisamment étanche.
Vérifiez si les portes sont complètement fermées.
L'humidité s'accumule à l'intérieur ou l'extérieur du réfrigérateur :
Cela est normal lors des périodes d'humidité élevée.
Ouvertures fréquentes ou prolongées de la porte.
Vérifiez si les joints sont suffisamment étanches.
Si le tiroir du réfrigérateur ne se referme pas correctement :
Nivelez le réfrigérateur. Vérifiez s'il y a des obstructions comme des bouteilles,
des déversements, etc.

24
Garantie Limitée Summit
Summit Appliances garantit ce produit contre
tout défaut de fabrication sur les pièces et main
d’oeuvre pour une période d’un an à compter de
la date d’achat ou de livraison avec des pièces
supplémentaires de 5 ans seulement sur le
compresseur. Les pièces défectueuses seront
remplacées par SUMMIT gratuitement. Les
pièces en plastique, les douilles et la carrosserie
sont garantis fabriqués conformes aux
standards commerciaux acceptables et sans
défauts au moment de la livraison.
Cette garantie ne couvre pas:
1. Une mauvaise installation
2. Une mauvaise utilisation, négligence ou
dommages par l’utilisateur
3. Une mauvaise tension électrique
4. Les produits avec un numéro de série
altéré ou retire
5. Les produits vendus ou utilisés en
dehors de l’Amérique continentale (50
États) ou du District of Columbia.
6. L’utilisation commerciale ou industrielle
7. Les dommages dus à des accidents,
altérations, un non-respect des
instructions, un incendie, des
inondations, un tremblement de terre,
une guerre, des troubles civils ou des
catastrophes naturelles.
SUMMIT APPLIANCE
Div. Felix Storch, Inc.
770 Garrison Avenue, Bronx NY 10474
Tél. : (718) 893-3900
www.summitappliance.com
SUMMIT n’est pas responsable des
dommages matériels, économiques et
secondaires.

25