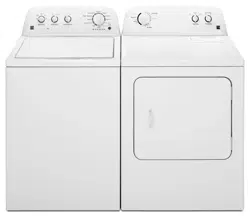
User Gudie Kenmore 1105142510 Washer
Table of contents
- WASHER SAFETY
- WHAT'S NEW UNDER THE LID?
- CONTROL PANEL AND FEATURES
- CYCLE GUIDE
- USING YOUR WASHER
- WASHER MAINTENANCE
- TROU BLESHOOTI NG
- PROTECTION AGREEMENTS
- WARRANTY
- ASSISTANCE OR SERVICE
Automatic Load Size Sensing
- Once you start the cycle, the washer will fill to the water level.
- When the washer is done filling, it will start to agitate after it determines the correct water level for the load.
- This low-water wash method uses less water and energy compared to a traditional agitator-style washer.
Choosing the Right Detergent
- Use only High Efficiency detergents. The package will be marked "HE" or "High Efficiency." Low-water washing creates excessive sudsing with a regular non-HE detergent.
- Using regular detergent will likely result in longer cycle times and reduced rinsing performance. It may also result in component failures and noticeable mold or mildew. HE detergents are made to produce the right amount of suds for the best performance.
- Follow the manufacturer's instructions to determine the amount of detergent to use and do not go over the Max line on the dispenser. See
- Using Laundry Product Dispensers" for more information.
Use only High Ef_ciency (HE) detergent.
- For best performance, it is recommended to load items in loose heaps evenly around the washplate. improved Cleaning
- Low-water cleaning means concentrated cleaning. Rather than diluting detergent as done in an agitator-style washer, this washer delivers the detergent directly to the soils.
- This low water wash also allows the clothing to move in a more effective way to remove soils.
Normal Sounds You Can Expect
- At different stages of the wash cycle, you may hear sounds and noises that are different from those of your previous washer. For example, you may hear a clicking and hum at the beginning of the cycle, as the lid lock goes through a self-test.
- There will be different kinds of humming sounds as the washplate moves the load and as basket is slowing down to stop. And sometimes, you may hear nothing at all, as the washer determines the correct water level for your load or allows time for clothes to soak
SOIL LEVEL
- Select the most suitable setting for your load. For heavily soiled and sturdy fabrics, select Heavy Soil Level for more wash time, if needed.
- For lightly soiled and delicate fabrics, select Light Soil Level for Jesswash time, if needed. Lighter soil level setting wJJJhelp reduce tangling and wrinkling.
- The Cycle Status Lights show the progress of a cycle. At each stage of the process, you may notice sounds or pauses that are different from traditional washers.
WASH TEMP
- Wash Temp senses and maintains uniform water temperatures by regulating incoming hot and cold water.
- Select a wash temperature based on the type of fabric and soils being washed. For best results and following the garment label instructions, use the warmest wash water safe for your fabric.
- On some models and cycles, warm and hot water may be cooler than your previous washer.
- Even Jn a cold and cool water wash, some warm water may be added to the washer to maintain a minimum temperature. All rinses are cold.
SENSING
- When the Start/Pause button is pressed, the washer will flil and begin sensing to determine the load size.
- Once sensing is compiete_ the washer will fill to the detected load size and then begin the wash phase of the cycle.
NOTE:
- Sensing fill and agitation phases will be paused by opening the unlocked lid. Close the lid to resume the cycle.
- If the lid is left open for more than 10 minutes the washer will cancel the cycle and pump out the water. The lid will lock after the wash phase to begin the initial spin out and remain locked for the remainder of the cycle.
WASH CYCLE KNOB
- Use the Wash Cycle knob to select cycles on your washer.
- See "Cycle Guide" for detailed descriptions of cycles.
- START/PAUSE/Unlock Lid button
- Press to start the selected cycle; press again to pause the cycle and unlock the lid.
NOTE:
- Jf the washer is spinning, it may take several minutes to unlock the lid. Press and hold for 3 seconds to cancel a cycle.
WASH
You will hear the motor and agitator moving the load.
- During the first stage of the sensing/wash cycle, water will partially fill the washer and then begin to move the load. It is normal to have the sensing light on during this stage. You will hear the agitator rotate, followed by a several second pause.
- This process will repeat for several minutes, allowing the entire load to become saturated. The lower water level combined with HE detergent at this stage allows for concentrated cleaning.
- Concentrated cleaning delivers the detergent directly to the soils. It Js normal for the load to be above the water line during this stage. At the beginning of the second stage_ the washer wJJJadd water to the correct level based on the load size. You wJJl hear the agitator move quicker during this stage of the wash cycle.
- The motor sounds may change at different stages in the wash cycle.
Add laundry products
- Add a measured of amount of detergent or single-dose laundry packet into the basket. if using
- Oxi-type boosters, color-safe bleach, or fabric softener crystals_ add to the bottom of the washer basket before adding clothes. iMPORTANT: Use only High Emciency detergents.
- The package will be marked "HE" or "High Efficiency." Low-water washing creates excessive sudsing with a regular non-HE detergent.
- Using regular detergent will JJkeJy result Jn longer cycle times and reduced rinsing performance. It may also result in component failures and noticeable mold or mildew. HE detergents are made to produce the right amount of suds for the best performance.
- Follow the manufacturer's instructions to determine the amount of detergent to use.
NOTE:
- Follow the manufacturer's instructions to determine the amount of laundry products to use.
Adding Liquid Fabric Softener Manually to Wash Load
- During the final rinse, wait until the washer has completed filling, press the START/PAUSE/Unlock Lid button to pause the washe
- Lift the lid and add the measured recommended amount of liquid fabric softener. Do not allow liquid fabric softener to spill, splash, drip, or run into the basket or on load.
- Do not use more than the recommended amount. Close the lid and press the START/PAUSE/Unlock Lid button again to start the washer.
Wash Temp
- Select the Wash Temperature by turning knob to desired temperature. All rinses are tap cold.
NOTE:
- Always read and follow fabric care label instructions to avoid damage to your garments.
- Press START/PAUSE/Unlock Lid to begin wash cycle
HOLD 3 SEC
- Press the START/PAUSE/Unlock Lid button to start the wash cycle. When the cycle has finished, the Cycle Complete status light wJJJlight.
- Promptly remove garments after cycle has completed to avoid odor, reduce wrinkling, and rusting of metal hooks, zippers, and snaps.
- Unlocking the lld to add garments
- If you need to open the lid to add 1 or 2 missed garments:
- Press START/PAUSE/Unlock Lid; the lid will unlock once the washer movement has stopped. This may take several minutes if the load was spinning at high speed. Then close lid and press
- START/PAUSE/Unlock Lid again to restart the cycle.
NOTES:
- Washer will not fill with the lid open.
- If your washer does not have a soak option, then pause your washer to soak by pressing the Start/Pause button.
- Soaking should be done with the lid closed. When you are done soaking, press the Start/Pause button to bring washer out of Pause and resume the cycle. iMPORTANT: If lid Js left open for more than 10 minutes, the water wJJJpump out automatically.
WATER iNLET HOSES
- Replace inlet hoses after 5 years of use to reduce the risk of hose failure. Periodically inspect and replace inlet hoses if buiges, kinks, cuts, wear, or leaks are found.
- When repiacing your inlet hoses, mark the date of replacement on the iabei with a permanent marker.
NOTE:
- This washer does not include inlet hoses. See the qnstallation instructions" for more information.
WASHER CARE
- Recommendations to Help Keep Your Washer Clean and
- Performing at its Best
- Always follow the detergent manufacturer's instructions regarding the amount of detergent to use. Never use more than the recommended amount because that may increase the rate at which detergent and soil residue accumulate inside your washer, which in turn may result in undesirable odor.
- Use warm and hot wash water settings sometimes (not exclusively cold water washes), because they do a better job of controlling the rate at which soils and detergent accumulate.
- Always leave the washer lid open between uses to help dry out the washer and prevent the buildup of odor-causing residue.
Cleaning Your Top Loading Washer
- Read these instructions completely before beginning the routine cleaning processes recommended below. This Washer
- Maintenance Procedure should be performed, at a minimum, once per month or every 30 wash cycles, whichever occurs sooner, to control the rate at which soils and detergent may otherwise accumulate in your washer.
Cleaning the inside of the Washer
- To keep your washer odor-free, follow the usage instructions provided above, and use this recommended monthly cleaning procedure:
- Recommended Cycle for Cleaning the Washer
- Refer to the "Cycle Guide" for the optimal cycle for cleaning the inside of the washer. Use this cycle with affresh ® Wa
Sort laundry into loads that can be washed together
- Sort items by recommended water temperatures, wash time, and agitate/spin speeds_ ° Separate white, light, and colorfast items from dark and noncolorfast items,
- Separate items which shed lint from items which attract lint Permanent press,synthetic, knit and corduroy items will pick up lint from towels, rugs and chenille bedspreads,
- Separate heavily soiled items from lightly soiled items.
- Separate lacy, sheer and loosely knit items from sturdy items.
Prepare items for washing.
- Empty pockets_
- Brush off lint and dirt. Shake out rugs and beach towels
- Closezippers, fasten hooks, tie stringsand sashes,and remove nonwashable trims and ornaments. ° Remove pins, decorative buttons, belt buckles, and other objects which could be damaged. This also helps protect other items in the wash load,
- Mend rips and tears to prevent further damage during washing, ° Place delicate items such as bras, shoulder pads, hosiery, and belts in a mesh bag to prevent tangling during the wash cycle.
Turn knit items inside out to prevent pilling.
- If desired, add liquid bleach to Bleach Dispenser(some models).
- Before adding the wash load, add liquid bleach to bleach dispenser located in left front corner under the lid:
- 3/4 cup (180 ml) for small loads : 1 cup (240 ml) for large loads
- 1-1/4 cups (300 ml) for extra-large loads,
- Then add 1 cup (240 rnl) water to flush the dispenser.
- Do not use powdered bleach in the bleach dispenser..
Add laundry load to washer.
- Dry load level should not be higher than top row of holes inwash tub. Do not overload washer. .
- Do not put items on top of agitator or wrap them around it Load items evenly .
- Combine large and small items in a load Load large itemsfirst. Large items should not be more than half the total wash !on& ° When washing a single heavy item, add 1or 2 towels to balance the load
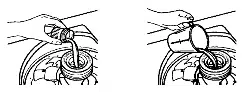
For models with a removable dispenser (see picture to the left):
- Attach fabric softener dispenser to top of agitator by pressing down gently.
- Add softener to the dispenser, following fabric softener label directions.
- Add water to bring liquid level to top of the peg in the center of the cu
- Remove the dispenser from the agitator after each use Rinse both lid and bowl thoroughly with warm water Reassemble and place dispenser on agitator or store it nearby
Start the washer.
- Close the washer lid and pull out the cycle selector knob. Washer will fill and agitate with the lid open The tub will not spin unless the lid is closed..
- To stop the washer, push in the cycle selector knob_
- Do not stop and restart washer during aspin when using the fabric softener dispenser.
- To change acycle, push in the cycle selector' knob. Turn it clockwise to the desired setting. Pull out the knob to restart the washer..
Winterizing Instructions
If the laundry center is stored in an area where freezing can occur or moved in freezing temperatures, follow these winterizing instructions to prevent damage to the laundry center:
- Turn off water supply faucets.
- Disconnect hoses from water supply and drain water from hoses.
- Plug electrical cord into a properiy grounded etectricai outlet..
- Add 1 gallon nontoxic recreational vehicle (RV) antifreeze to empty wash tub, Close lid_
- Set cycle selector knob at a spin setting
- Pull out knob and let washer spin for 1 minute to drain out all water
- Not all of the RVantifreeze will be expelled,
- Push in knob, unplug electrical power- cord, dry tub interior, and close lid
- Store washer in an upright position
- To rernove antifreeze from washer after storage, run empty washer through a complete cycle using detergent Do not add wash load.
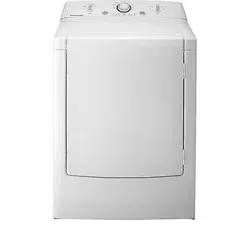
Cleaning the Lint Screen
- Every load cleaning: The lint screen may be located either in the door opening or the top of the dryer depending on model.
- A screen blocked by lint can increase drying time.
To clean:
- Remove the lint screen. If necessary, press the tab to release and open the lint screen. Roll lint off the screen with your fingers. Do not rinse or wash screen to remove lint. Wet lint is hard to remove.
- Push the lint screen firmly back into place.
IMPORTANT:
- Do not run the dryer with the lint screen loose, damaged, blocked, or missing. Doing so can cause overheating and damage to both the dryer and fabrics.
- If lint falls off the screen into the dryer during removal, check the exhaust hood and remove the lint. See “Venting Requirements” in the Installation Instructions.
- Clean space where lint screen is located, as needed. Using a vacuum, gently remove any lint that has accumulated outside of the lint screen.
- As-needed cleaning: Laundry detergent and fabric softener residue can build up on the lint screen.
- This buildup can cause longer drying times for your clothes, or cause the dryer to stop before your load is completely dry.
- The screen is probably clogged if lint falls off while the screen is in the dryer. Clean the lint screen with a nylon brush every 6 months, or more frequently, if it becomes clogged due to a residue buildup