
Owner's Manual
[RRFTSMRlio
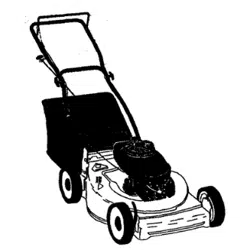
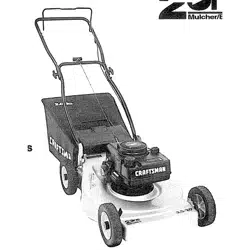
6.0 HORSEPOWER
20" REAR DISCHARGE
ROTARY LAWN MOWER
Model No.
917.387280
, Safety
® Assembly
, Operation
® Maintenance
,, EspaSol
,, Repair Parts
CAUTION:
Read and follow all
Safety Rules and instructions
before operating this equipment
Sears, Roebuck and Co., Hoffman Estates, IL 60179
Warranty 2 Product Specifications 11
Safety Rules 2 Service and Adjustments 13
Assembly 4 Storage 14
Operation 6 Troubleshooting 15
Maintenance Schedule I0 Repair Parts 32
Maintenance ,:_ 10 Parts Ordering Back Cover
UMtTED TWO YEAR WARRANTY' ON CRAFTSMAN POWER MOWER
For two years from date of _hurchase,when this Craftsman Lawn Mower is maintained,
lubricated, and tuned up according to the operating and maintenance instructions in the
owner's manual, Sears will repair free of charge any defect in material or workmanship.
If this Craftsman Lawn Mower is used for commercial or rental purposes, this warranty
applies for only 90 days from the date of purchase.
This Warranty does not cover:
• Expendable items which become worn during normal use, such as rotary mower
b_ades,blade adapters, belts, air cleaners and spark p_ug.
- Repairs necessary because of operator abuse or negligence, including bent crank_
shafts and the failure to maintain the equipment according to the instructions con-
tained in the owner's manual.
Warranty service is available by returning the Craftsman power mower to the nearest
Sears Service Center/Department in the United States. This warranty applies only while
this product is in use in the United States.
This Warranty gives you specific legai rights, and you may also have other rigt_tswhich
vary from state to state. ._
SEARS, ROEBUCK AND CO,, D/8t7 WA, HOFFMAN ESTATES, 1LLINOIS 60179
TRAINING:
• Read this operator's manual carefully.
Become familiar with the controls and
know how to operate your mower
proper_y. Learn how to quickly stop
mower,
, Do not altow children to use _jourmower.
Never a_towadults to Use mower without
proper instructions.
= Keep the area_f operation clear of a!l
persons, especi_.llysmall children and
pets.
• Use mower only as the manufacturer
intended and as described in this manual.
= Do not operate mower if it has been
dropped or damaged in any manner.
Always have damage repaired before
using your mower.
° Do not use accessoryattachments that
are not recommended by the manufac-
turer. Use of such attachments may be
hazardous.
, The blade turns when the engine is
running.
PREPARATION:
• Always thoroughly check the area to be
mowed and dear it of all stones, sticks,
wires, bones, and other foreign objects.
These objects wilt be thrown by the blade
and can cause severe injury.
• Always wear safety glasses or eye
shields when starting and while using
your mower.
, Dress properly. Do not operate mower
when barefoot or wearing open sandals.
Wear only solid shoes with good traction
when mowing.
= Check fuel tank before starting engine.
Do not fill gas tank indoors, when the
engine is running or when the engine is
hot.Allowtheenginetocootforseveral
minutesbeforefillingthegastank.Clean
offany spilled gasoline before starting the
engine.
Always make wheel height adjustments
before starting your mower. Never
attempt to do this while the engine is
running.
* Mow only in daylight or good artificial
light.
OPERATION:
- Keep your eyes and mind on your mower
and the area being cut. Do not letother
interests distract you.
° Do not mow wet or slippery grass. Never
run while operating your mower. Always
be sure of your footing -- keep a firm
hold on the handles and walk.
° Do not put hands or feet near or under
rotating parts. Keep clear of the discharge
opening at a!l times.
, Always stop the engine whenever you
leave or are not using your mower, or
before crossing driveways, walks_:roads,
and any gravel--covered areas.
, Never direct discharge of material toward
bystanders nor allow anyone near the
mower while you are operating itS'
° Before cleaning, inspecting, or repairing
your mower, stop the engine and make
absolutely sure the blade and all moving
parts have stopped. Then disconnect the
spark plug wire and keep it away !tom the
spark plug to prevent accidental starting.
* Do not continue to run your mower if you
hit a foreign object. Follow the procedure
outlined above, then repair any damage
before restarting and operating you
mower.
, Do not change the governor settings or
overspeed the engine. Engine damage or
personal injury may result.
- Do not operate your mower if it vibrates
abnormally. Excessive vibration is an
indication of damage; stop the engine,
safely check for the cause ofvibration
and repair as required.
o Do not run the engine indoors. Exhaust
fumes are dangerous.
o Never cut grass by pulling the mower
towards you. Mow across the face of
slopes, never up and down or you might
lose your footing, Do not mow exces-
sively steep slopes. Use caution when
operating the mower on uneven terrain
or when changing directions -- maintain
good footing.
o Never operate your mower without
proper guards, plates, grass catcher or
other safety devices in place.
MAINTENANCE AIID STORAGE:
• Check the blade and the engine mount-
ing bolts often to be sure they are
tightened properly.
Check all bolts, nuts and screws al
frequent intervals for proper tightness to
be sure mower is in safe working
condition.
, Keep all safety devices in place and
working.
o To reduce fire haza'rd, keep the engine
free of grass, leaves or excessive grease
and oil,
• Check grass catcher often for deteriora-
tion and wear and replace worn bags.
Use only replacement bags that are
recommended by and comply with
specifications of the manufacturer of your
mower.
, Always keep a sharp blade on your
mower.
o Allow engine to cool before storing in any
enclosure.
, Never store mower with fuei in the tank
inside a building where fumes may reach
an open flame or an ignition source such
as a hot water heater, space heater,
clothes dryer, etc,
CAUTION: Always disconnect spark
plug wire and place wire where it
cannot contact spark plug in order to
prevent accidental starting when
setting up, transporting, adjusting or
making repairs.
WARNING
The engine exhaust from this product
contains chemicals known to the State
of California to cause cancer, birth
defects, or other reproductive harm.
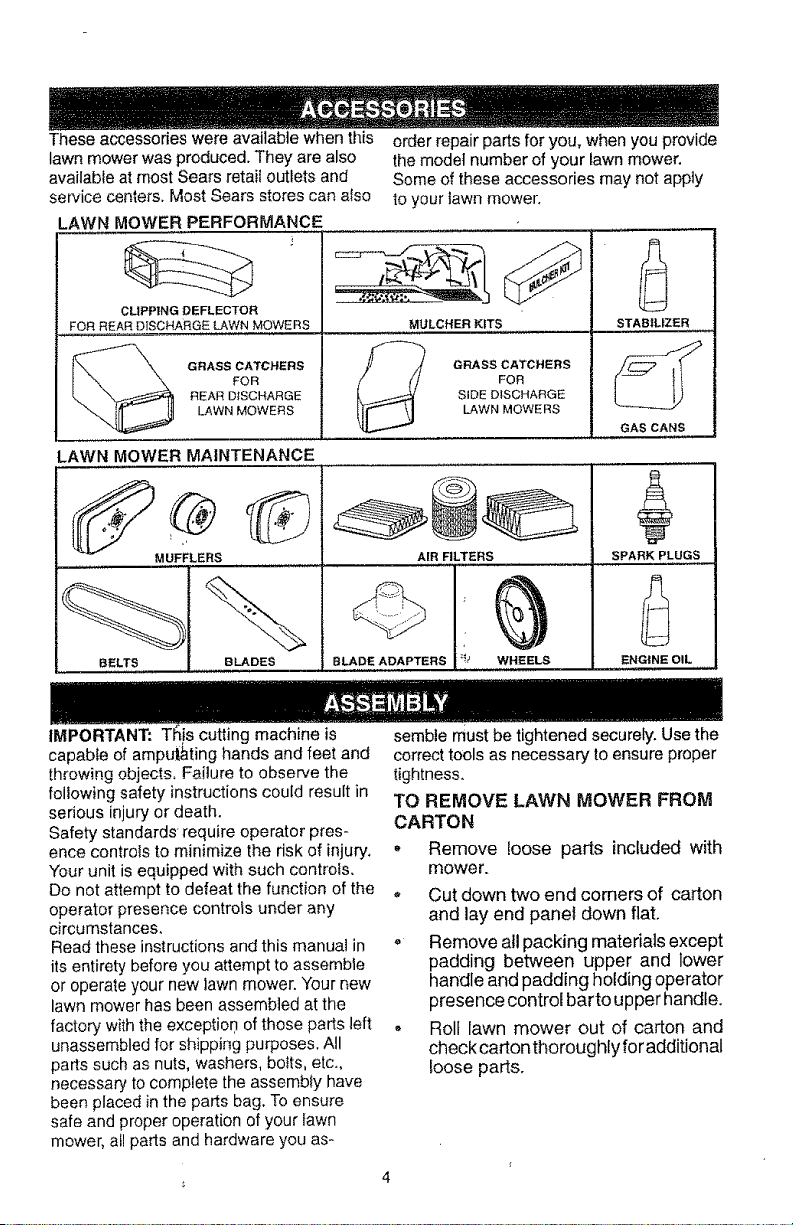
Theseaccessoneswereavailablewhenthis
lawnmowerwasproduced.Theyarealso
availableatmostSearsretailoutletsand
servicecenters.MostSearsstorescanalso
LAWN MOWER PERFORMANCE
CLIPPING DEFLECTOR
FOR REAR DISCHARGE LAWN MOWERS
GRASS CATCHERS
FOR
REAR DISCHARGE
LAWN MOWERS
LAWN MOWER MAINTENANCE
MUFFLERS
BELTS BLADES
order repair parts foryou, when you provide
the model number of your lawn mower.
Some of these accessories may not apply
to your lawn mower.
MULCHER KITS
GRASS CATCHERS
FOR
SIDE DISCHARGE
LAWN MOWERS
AIR FILTERS
BLADE ADAPTERS WHEELS
STABILIZER
GAS CANS
SPARK PLUGS
ENGINE OIL
IMPORTANT: Tf !s cutting machine is
capable of amput&ting hands and feet and
throwing objects, Failure to observe the
following safety instructions could result in
serious injury or death.
Safety standards require operator pres-
ence controls to minimize the risk of injury.
Your unit is equipped with such controls.
Do not attempt to defeat the function of the
operator presence controls under any
circumstances.
Read these instructions and this manual in
its entirety before you attempt to assemble
or operate your new lawn mower. Your new
lawn mower has been assembled at the
factory with the exception of those parts left
unassembled for shipping purposes. All
parts such as nuts, washers, bolts, etc.,
necessary to complete the assembly have
been placed in the parts bag. To ensure
safe and proper operation of your fawn
mower, all parts and hardware you as-
semble must be tightened securely. Use the
correct tools as necessary to ensure proper
tightness.
TO REMOVE LAWN MOWER FROM
CARTON
• Remove loose parts included with
mower.
,, Cut down two end comers of carton
and lay end panel down flat.
,, Remove all packing materials except
padding between upper and lower
handle and padding holding operator
presence control barto upper handle.
• Roll lawn mower out of carton and
check carton thoroughly foradditional
loose parts.
4

HOW TO SET UP YOUR LAWN
MOWER
TO UNFOLD HANDLE
IMPORTANT: Unfold handles carefully so
as not to pinch or damage control cables.
• Raise handles until lower handle section
Iocks into place in mowing position.
• Remove protective padding, raise upper
handle section into place on !ower
handles and tighten both handle knobs.
= Remove handle padding holding
operator presence conlrot bar to upper
handle.
o Your lawn mower handle can be
adjusted for your mowing comfort. Refer
to "Adjust Handle" in the Service and
Adjustment section of this manual,
Operator presenc_
control bar
Lift up
Lower
handle
Mowing
position
TO iNSTALL ATTACHMENTS
Your lawn mower was shipped ready to be
used as a mulcher. To convert to bagging
or discharging:
• Open rear door and remove mulcher
plug. Store mufcher plug in a safe place.
• You can now install catcher or optional
clipping deflector.
To return to mulching operation, install
mulcher plug into discharge opening of
mower,
Mulcher plug 1
CAUTION: Do not run your lawn mower
without muicher plug in place or approved
clipping deflector or grass catcher in
place. Never attempt to operate the lawn
mower with the rear door removed or
propped open.
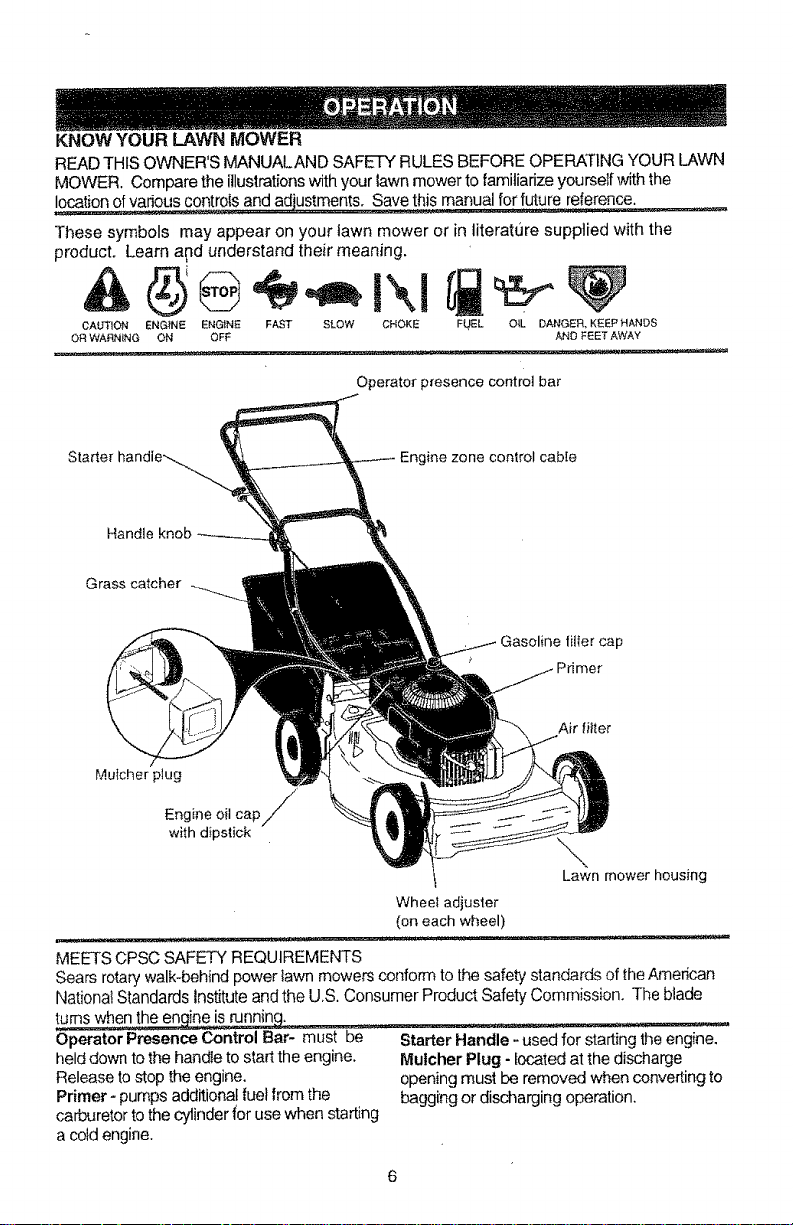
KNOW YOUR LAWN MOWER
READ THIS OWNER'S MANUALAND SAFETY RULES BEFORE OPERATING YOUR LAWN
MOWER. Compare the illustrationswith yourlawn mower to familiarizeyourself withthe
locationofvarious controlsand adjustments. Savethis manual forfuture reference
These symbols may appear on your lawn mower or in titerattJre supplied with the
product. Learn and understand their meaning.
CAUTION ENGfNE ENGtNE FAST SLOW CHOKE FUEL OtL DANGER, KEEP HANDS
O£ WARNING ON OFF AND FEET AWAY
Operator presence control bar
Engine zone control cable
Handle knob
Grass catcher
Gasoline _fer cap
Muicher plug
Engine oil cap//'
with dipstick
Lawn mower housing
Wheel adjuster
(oneachwheel)
MEETSCPSC SAFETY REQUIREMENTS
Sears rotarywalk-behindpower lawn mowersconform to the safetystandards of theAmerican
NationalStandardsinstitute andthe U.S.Consumer Product SafetyCommission. The blade
turns when the engine isru_
Operator Presence Control Bar- must be
helddown to the handle tostartthe engine.
Releasetostop the engine.
Primer- pumps additionalfuel from the
carburetorto the cylinderfor use when starting
acold engine.
Starter Handle - used for starting the engine,
Mulcher Plug - located at the discharge
opening must be removed when converting to
bagging or discharging operation.
6
The operation of any dawnmower can resultin
foreignobjectsthrowninto the eyes,which can
resultinsevere eye damage. Always wear
safetyglassesor eye shieldswhile operating
your lawn moweror performingany adiust-
meritsor repairs. We recommend a wide
vision safetymask overthe spectacles or
standard saietyglasses.
HOW TO USE YOUR LAWN MOWER
ENGINE SPEED CONTROL
The engine speed was set at the factory
for optimum performance. Speed is not
adjustable.
ENGINE ZONE CONTROL
CAUTION: Federal regulations require
an engine control to be installed on this
lawn mower in order to minimize the risk
of blade contact injury. Do not under any
circumstances attempt to defeat the
function of the operator control. The blade
turns when the engine is running.
, Your lawnmower is equipped ,Mthan
operatorpresence control barwhich
requiresthe operator tobe positioned
behind thelawnmower handle tostart and
operatethe lawnmower, _;
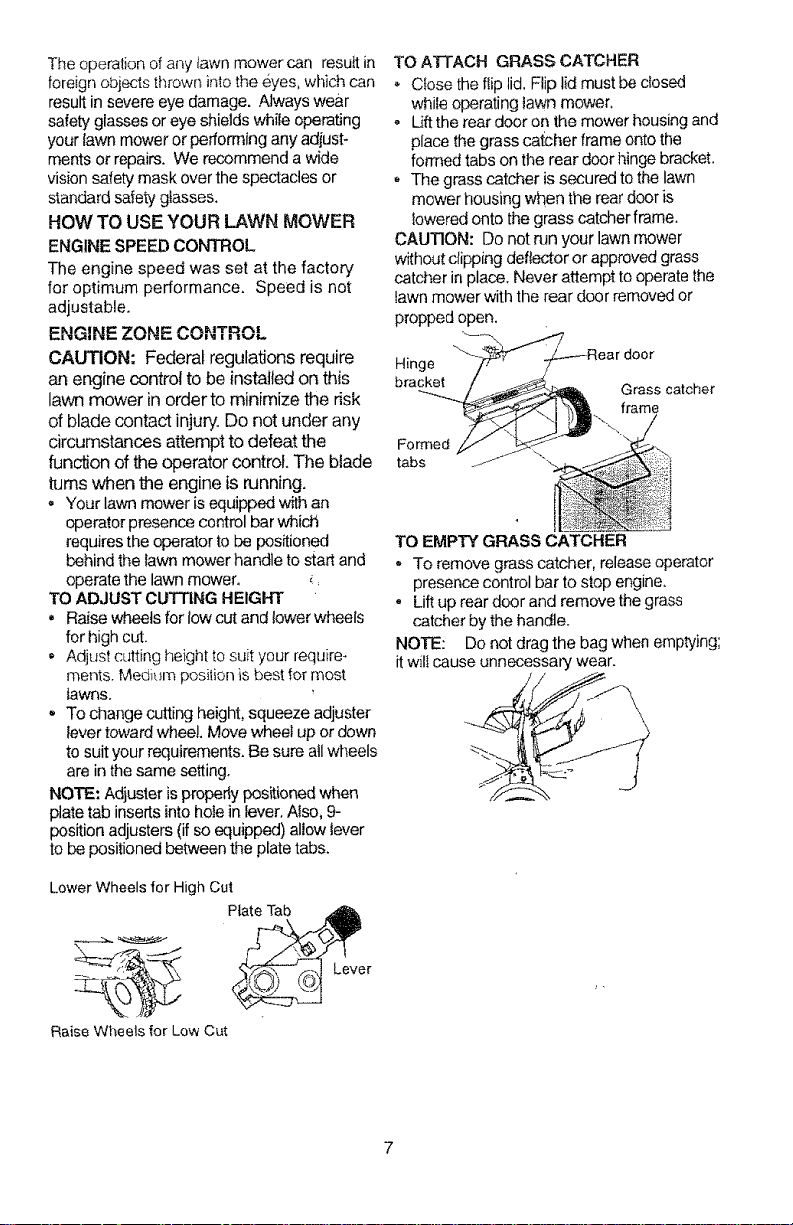
TO ADJUST CUTTING HEIGHT
• Raisewheels fortowcut and towerwheels
for high c_.
, Adjust cuttingheight tosuit your require-
ments. Medi_m posilion isbest for most
tawns.
• Tochange cutting height, squeeze adjuster
levertoward wheel. Move wheel up ordown
to suityourrequirements. Be sure allwheels
are inthe same setting.
NOTE: Adjusterisproperly positionedwhen
platetab insertsinto holein lever.Also, 9-
positionadjusters(ifso equipped)allow lever
to be positionedbetween the plate tabs,
Lower Wheels for High Cut
RaiseWheelsIor LowCut
TO ATrACH GRASS CATCHER
Ctose the flip lid.Flip lid mustbedosed
while operating lawn mower,
° Liftthe reardoor on the mower housingand
place the grasscatcher frameontothe
formed tabs on the rear door hingebracket.
* The grasscatcher is securedto the lawn
mower housing when the rear dooris
lowered onto the grass catcher frame.
CAUTION: Do not run your lawnmower
withoutdipping deflector or approved grass
catcher in place.Never attempt tooperatethe
lawnmower withthe rear door removedor
proppedopen.
ear door
Hinge
bracket Grass catcher
frame
Formed
tabs --_
TO EMPTY GRASS CATCHER
,, To removegrass catcher, release operator
presence control bar to stop engine.
* Liftup reardoor and remove the grass
catcher by the handle.
NOTE: Do not drag the bag when emptying;
itwit1causeunnecessary wear.
7
BEFORE STARTING ENGINE
OIL
"fourlawnmower is shippedwithout oilin the
engine,
,' Besuremower is leveland area around oit
fillis clean.
,, Removeengine oilcap w/dipstick andfillto
the full line onthe dipstick.
o Use20ozs,of oil. Fortype andgrade ofoil
to use,see "ENGINE"inCustomer
Responsibilitiessectionof thismanual.
Pouroilslowly. Do not overfill.
. Check oi!!eve!beforeeach use. Add oilif
needed. Filltofull lineon dipstick,
,, To readproper tevel,tightenengine oilcap
eachtime,
o ReinstalIengine oil cap and tighten.
• Change theoilafter every25 hoursof
operationor each season, You may need
tochangethe oil moreoften underdusty,
dirtyconditions.
GAS
. Fillfuel tank. Use fresh, clean, regular
unleadedgasolinewith a minimum of 87
octane.Do not mixoilwith gasoline.
Purchasefuel in quantitiesthat can be used
within30days to assurefuel freshness.
WARNING: Experience indicates that
alcohol blended fuels (cailed gasohof or
using ethanol or methanol) can attract
moisture which leads to separation and
formation of acids during storage. Acidic
gas can damage_the fue! system of an
engine while in storage. To avoid engine
problems, the fuel system should be
emptied before storage of 30 days or
longer. Drain the fuel tank, start the engine
and let it run until fuel lines and carburetor
are empty. Use fresh fuel next season.
See Storage Instructions for additional
information. Never use engine or carbure-
tor cleaner products in fuel tank or
permanent damage may occur.
TO START ENGINE
. To start acold engine, pushprimer five(5)
times beforetryingto start. Useafinn push,
This step is not usually necessarywhen
startingan engine which hasalready runfor
afew minutes.
° Holdoperator presence control bardown to
the handle andpult starterhandle quickly,
Do not aliowstarter rope to snap back.
. To stop.engine;reiease operatorpresence
controlbar.
NOTE: Incoolerweather it may be necessary
to repeatprimingsteps, tnwarmer weather
over priming maycause flooding andengine
will not start, ifyou do flood engine, wait a few
minutes beforeattempting to startanddo not
repeat priming steps,
MOWING TIPS
* Under certain conditions,such asvery tail
grass, itmay be necessaryto raise the
height ofcut toreduce pushing effortand to
keepfrom overloading the engine and
leavingclumps of grass clippings.
, For extremely heavycutting, reducethe
widthof cut andraise the rear ofthe lawn
mower housingone (1) wheel adjuster
settinghigherthan the front forbetter
discharge ofgrass.
,, When using a reardischarge lawn mower in
moist,iteavy grass, clumps of cutgrass
may not enter the grass catcher.Reduce
ground speed (pushing speed)and/or nan
the lawn mower over the area a second
time.
o Ifatrailof grassclippings is leftonthe right
side ofa rear discharge lawnmower, mow
in a clockwisedirection with a smalloverlap
to collectthe clippings on the nextpass.
, Keeptop of engine around starterclearand
clean of grassclippings and chaff.This will
helpengine airflow and extend engine life.
, Pores incloth grass catchers can become
filledwith dirt and dust with useand
catchers will collect less grass. To prevent
this, regularlyhosecatchers offwith water
andletdry before using.
MULCHINGMOWINGTIPS
IMPORTANT: For best performance_
keep mower housing free of built-up grass
and trash. Clean UNDERSIDE OF
MOWER HOUSING after each use. See
"Cleaning" in CUSTOMER
RESPONSIBILITIES section of this
manual.
= The specialmulching bladewill recutthe
grass clippings manytimes and reduce
them in size so that as they fallontothe
lawn theywiltdisperse intothe grassand
not be noticed. Also,the mulched grasswill
biodegrade quicklyto providenutrientsfor
the lawn.Always mulchwith your highest
engine (blade) speed asthiswill provide the
best recutting action ofthe blades.
, Avoid cuttingyour lawnwhen it iswet. Wet
grass tendsto form ciumpsand interferes
with the mulching action.The best timeto
mow your lawn isthe earlyafternoon.Atthis
timethe grass has dried andthe ne_,Aycut
area wiltnot be exposed tothe directsun.
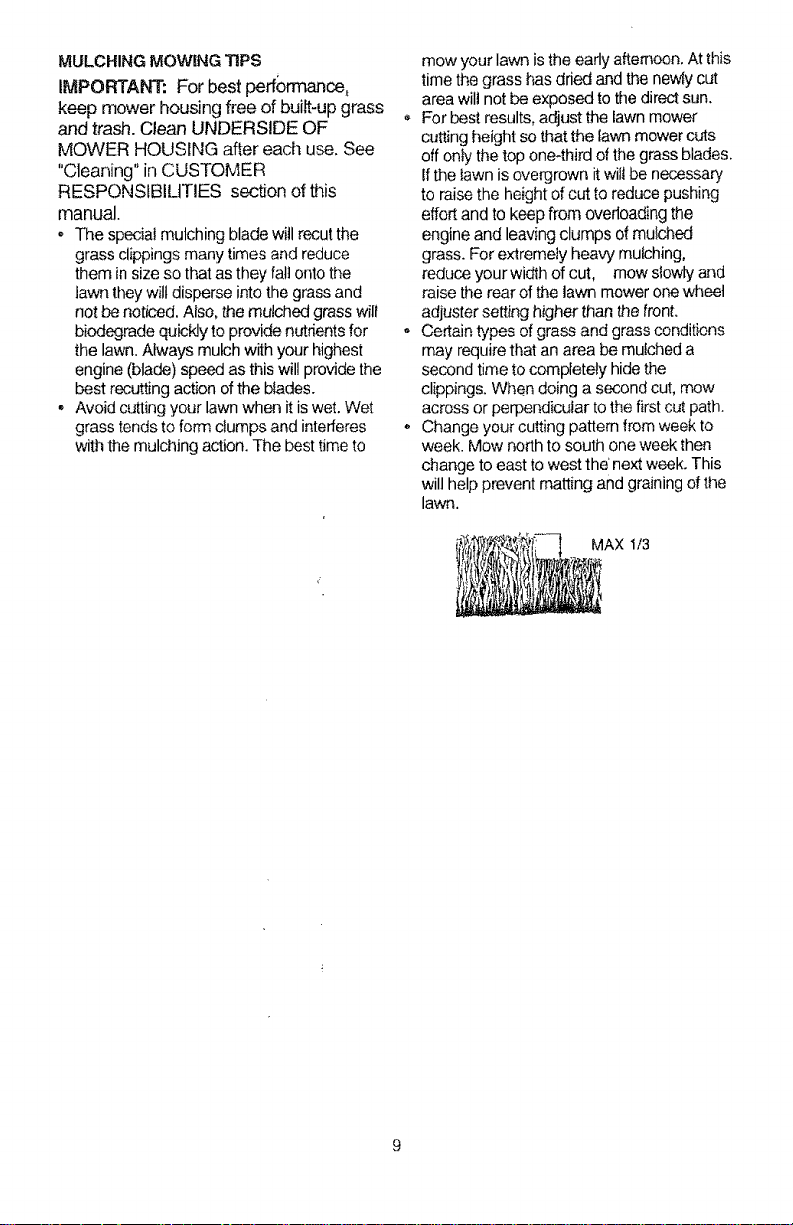
,, For best results,adjust the lawn mower
cuttingheight so thatthe fawn mowercuts
off onlythe top one-thirdof the grassblades.
Ifthe lawn is overgrown itwiltbe necessary
to raise the heightofcut to reduce pushing
effort and to keep from overloading the
engine and leaving clumps of mulc_ed
grass. For extremely heavy mulching,
reduce yourwidth ofcut, mow slowlyand
raise the rear ofthe lawn mower onewheel
adjustersetting higher than the front.
o Certaintypes of grassand grassconditions
may requirethat an area be mulcheda
second time to completely hidethe
clippings.When doing a secondcut, mow
across or perpendicular tothe firstcut path.
,, Change yourcutting pattern from weekto
week. Mow north to south one weekthen
change toeast to west the'nextweek. This
will help prevent matting and grainingof the
lawn.
MAX 1/3
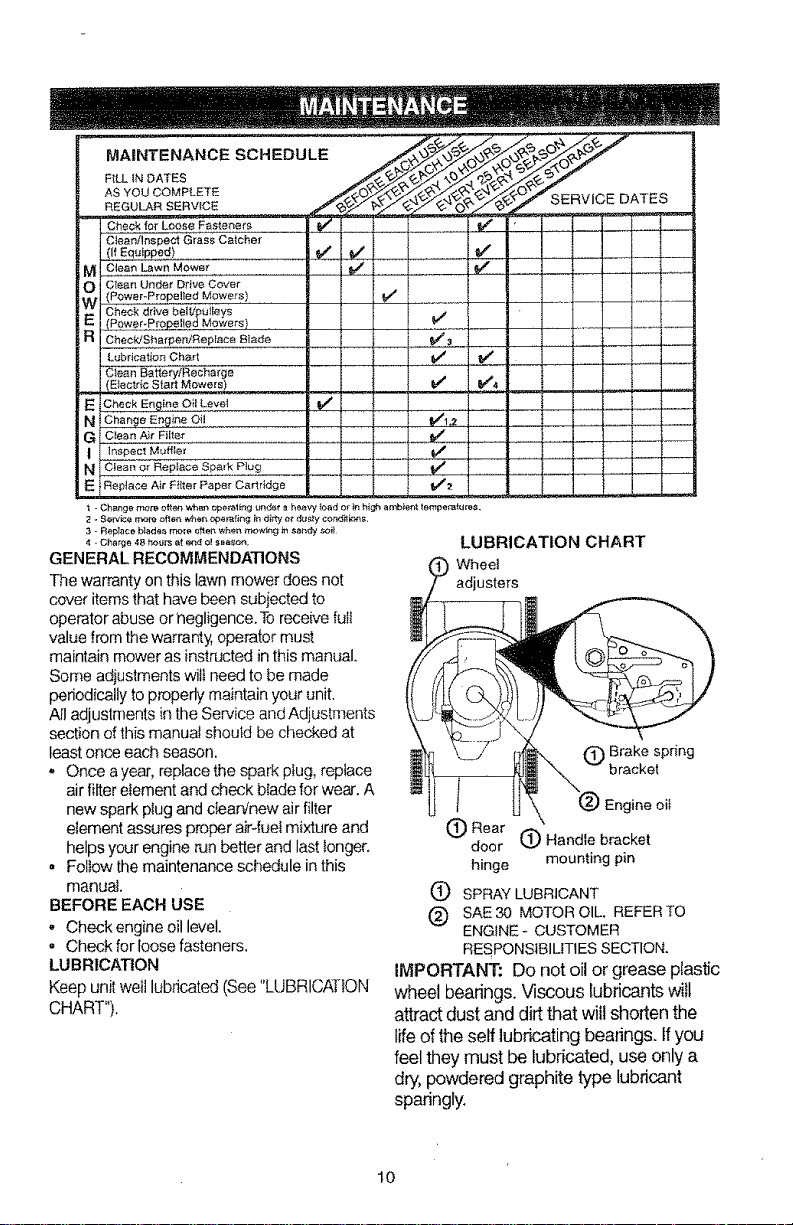
MAINTENANCE SCHEDULE
RLL IN DATES
AS YOU COMPLETE 7SERVICE DATEs
REGULAR SERVICE
m Check |or Loose Fasteners " _
_ G_a_C_icher i ........... I _---
(,Eq._pp_> V" Iv" i _ I I i..............L
M! Clean Lawn MOwe_ _ I ....f./ t ..............
i Ctegn Under" Drive Cover i I t I t t 1 1 t
_--_I_lttoutleys I_ E t t _ ' J t ] t E
i _Powe r-P ropeltoaMowe_'s) I [ [ ............ 1 [----_-_--_'---
aiC_ec_'Sharpen/RgP'ac_8_de' [ i I _ l [ !_
....[_E_o_.os_,_uo_,01 i _ J, ,,,l,,,_,, i [
'E ICheckE._e O_ILevel V" t l 1 I [
G ....... l
- Chat_ge mone o_te_ when _p_mi_g und_' a hee_ to_d or _ hig_ a mbiet_t le_'_lpem_m_,
2 " _eWice raefe Dfte_ wEen _e_Jng ir_ _i_ty ,'_1d#sly ¢or_k_m
3 - Replace Made_ rr_r_ _f_en _h_w mo_g _ sa_ soil
GENERAL RECOMMENDATIONS
The warranty on this lawn mower does not
cover items that have been subjected to
operator abuse or negligence. To receive futi
value from the warranty, operator must
maintain mower as instructed in this manual.
Some adiustments witt need to be made
periodically to propedy maintain your unit.
All adjustments in the Service and Adjustments
section of this manuai should be checked at
least once each season.
• Once a year, replace the spark piug, replace
air filter element and check blade for wear. A
new spark plug and c_aWnew air filter
element assures proper air4uet mixture and
helps your engine run better and last longer.
,Fotlow the maintenance schedule in this
manual
BEFORE EACH USE
° Check engine oil level.
o Check for loose fasteners.
LUBRICATION
Keep unit welI lubricated (See "LUBRICATION
CHART").
LUBRICATION CHART
Wheet
adjusters
(_ Brake spring
bracket
Engine oil
(_) Rear
door (_ Handle bracket
hinge mounting pin
(_ SPRAY LUBRICANT
(_ SAE 30 MOTOR OIL. REFER TO
ENGINE * CUSTOMER
RESPONSiBILiTiES SECTION.
IMPORTANT: DO not oil or grease plastic
wheel bearings.Viscous lubricantswiil
attractdust and dirtthat willshortenthe
life of the self lubricating bearings. If you
feet they must be lubricated, useonlya
dry, powdered graphite type lubricant
sparingly.
10
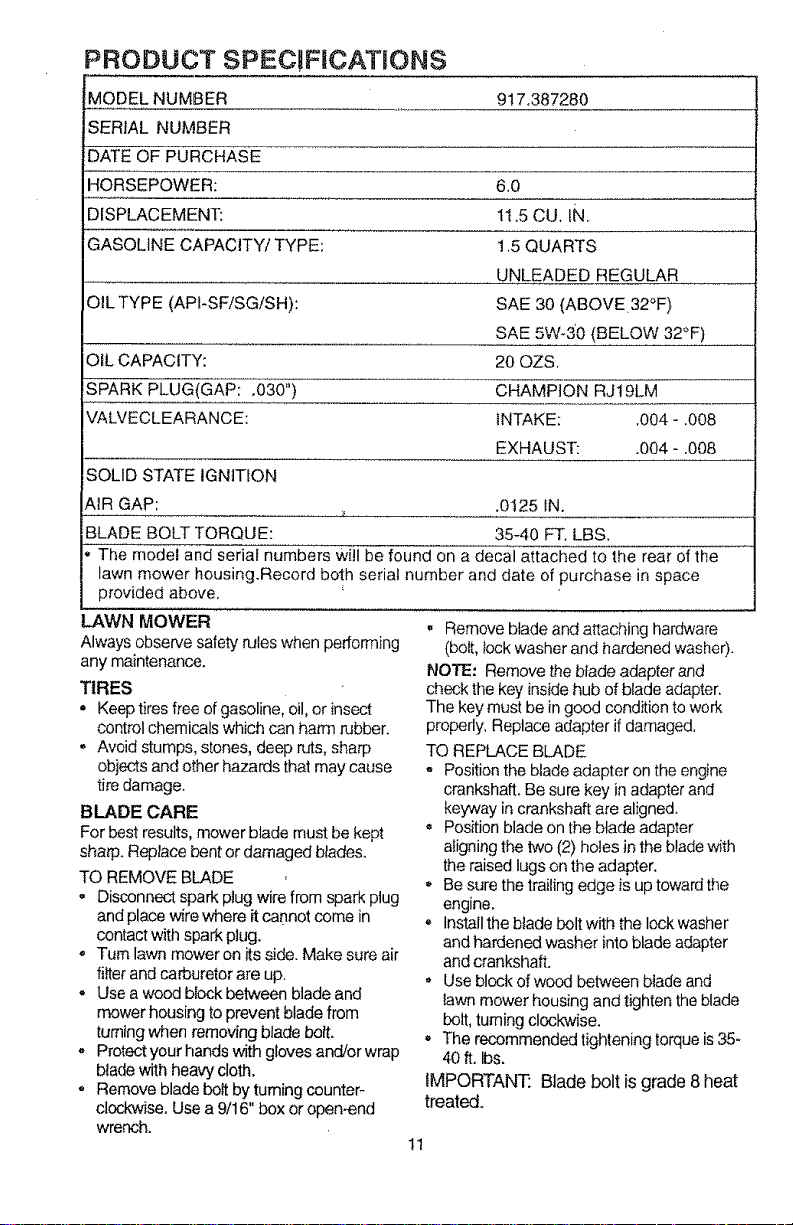
PRODUCT SPEC!FICATRONS
MODEL NUMBER 917.387280
SERIAL NUMBER
DATE OF PURCHASE
HORSEPOWER: 6.0
DISPLACEMENT: 11,5 CU. IN.
GASOLINE CAPACITY/TYPE: t .5 QUARTS
UNLEADED REGULAR
OIL TYPE (API-SFISGfSH): SAE 30 (ABOVE32°F)
SAE 5W_3'0 (BELOW 32°F)
OIL CAPACITY: 20 OZS.
SPARK PLUG(GAP: .030") CHAMPION RJt9LM
VALVECLEARANCE: iNTAKE: .004 - ,008
EXHAUST: .004 - .008
SOLID STATE IGNITION
A1R GAP: .0125 IN.
BLADE BOLT TORQUE: 35-40 FT. LBS.
The model and serial numbers will be found on a decal attached to the rear of the
lawn mower housing.Record both serial number and date of purchase in space
provided above,
LAWN MOWER
Alwaysobserve safetyrules when performing
any maintenance.
TIRES
• Keep tiresfree of gasoline, oil,or insect
control chemicalswhich can harm rubber.
• Avoid stumps, stones, deep ruts,sharp
objectsand other hazardsthat may cause
tire damage.
BLADE CARE
For bestresults,mower blade must be kept
sharp. Replace bentor damaged blades.
TO REMOVE BLADE
. Disconnect sparkplug wirefrom spark plug
andplace wirewhere it cannotcome in
contactwith spark plug.
• Turnlawn mower on its side. Make sureair
filterand carburetor are up.
• Use a wood block betweenblade and
mower housing to preventbladefrom
turningwhen removing blade bolt.
- Protectyour handswith gloves and/or wrap
bladewithheavy cloth.
, Remove bladebolt byturningcounter-
clockwise. Use a9/16" box or open-end
wrench.
. Remove bladeand attaching hardware
(bolt,lock washer and hardened washer).
NOTE: Remove the blade adapter and
checkthe keyinside hubof blade adapter.
The key must be ingood conditionto work
properly,Replace adapter if damaged,
TO REPLACE BLADE
,, Positionthe blade adapter onthe engine
crankshaft. Be surekey in adapterand
keyway in crankshaft are aligned.
. Positionblade onthe blade adapter
aligningthe two (2)holes in the bladewith
the raised lugson the adapter.
• Be surethe trailingedge is uptoward the
engine.
,, Installthe bladebolt with the lock washer
andhardened washer into blade adapter
andcrankshaft.
,, Use block ofwood between bladeand
lawnmower housing and tighten the blade
belt,turning clockwise.
• The recommended tightening torqueis3,5-
40ft. Ibs.
IMPORTANT: Blade bolt isgrade 8 heat
treated.
11
NOTE: We do not recommend sharpening
blade - but if you do, be sure the biade is
balanced.
TO SHARPEN BLADE
Careshould betaken to keep the blade
balanced.An unbalanced bladewitlcause
eventual damage tolawn mower or engine,
The bladecan be sharpenedwith a file or
on agrindingwheel. Do notattempt to
sharpenwhile Onthe mower.
. To check bladebalance,drivea nailintoa
beam orwall, Leaveabout one inchofthe
straightnailexposed. Piacecenterhole of
bladeoverthe head ofthe nail.Ifblade is
balanced,it shouldremainir_a horizontal
position,ffeither endofthe blademoves
downward,sharpen the heavyend untilthe
btadeis balanced.
GRASS CATCHER
. The grasscatcher may be hosedwith
water, but mustbe dry when used,
,, Checkyour grasscatcher oftenfordamage
ordeterioration.Through normaluse itwill
wear. If catcher needs replacing,repface
onlywithamanufacturer approved
replacementcatcher.Givethe lawn mower
modeinumber when ordering.
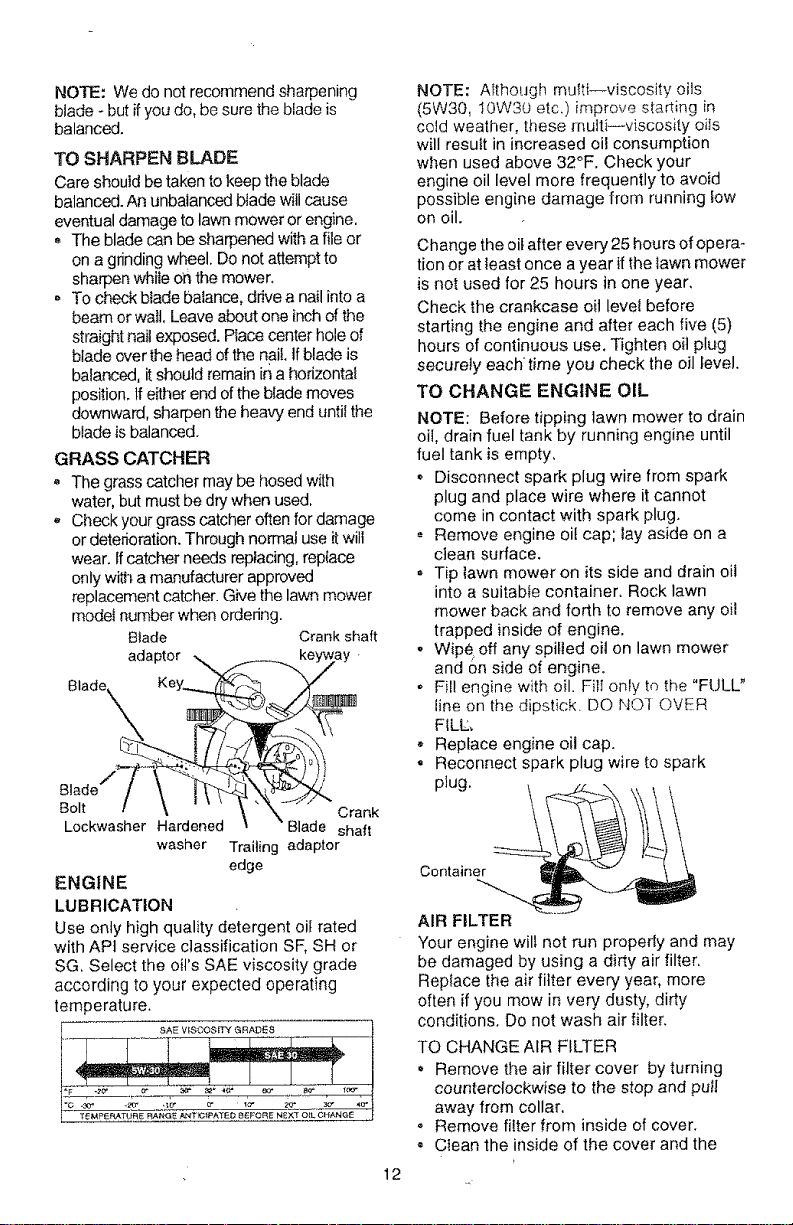
Blade
adaptor _
Blade. \ Key_
Bolt I \ " "
Lockwasher Hardened
Crank shaft
_____.....I, ._yway
/
washer Trailing adaptor
edge
ENGINE
LUBRICATION
Use only high quality detergent oil rated
with APt service classification SF, SH or
SG, Select the oil's SAE viscosity grade
according to your expected operating
temperature,
12
NOTE: Although muTti--viscosity oils
(5W30. 10W3O etc.) improve starting in
cold wealher, those multi--viscosity oils
will result in increased oil consumption
when used above 32°F. Check your
engine oil level more frequently to avoid
possible engine damage from running low
on oil.
Change the oil after every 25 hours ofopera-
tion or at least once ayear ifthe lawn mower
is not used for 25 hours in one year.
Check the crankcase oil level before
starting the engine and after each five (5)
hours of continuous use. Tighten oil plug
securely eachtime you check the oil level.
TO CHANGE ENGINE OIL
NOTE: Before tipping lawn mower to drain
oil, drain fuel tank by running engine until
fuel tank is empty,
. Disconnect spark plug wire from spark
plug and place wire where it cannot
come in contact with spark plug.
Remove engine oil cap; lay aside on a
clean surface.
• Tip lawn mower on its side and drain oft
into a suitable container, Rock lawn
mower back and forth to remove any oil
trapped inside of engine,
o Wipe off any spilled oil on lawn mower
and Onside of engine.
o Fill engine with oil. FilI only to the "FULL"
line on the dipstick. DO NO] OVER
FILL,
,' Replace engine oil cap.
, Reconnect spark plug wire to spark
plug.
Container
AIR FILTER
",'our engine will not run properly and may
be damaged by using a dirty air filter,
Reptace the air filter every year, more
often if you mow in very dusty, dirty
conditions. Do not wash air filter.
TO CHANGE AIR FILTER
= Remove the air filter cover by turning
counterclockwise to the stop and pull
away from collar,
o Remove filter from inside of cover,
• Ctean the inside of the cover and the
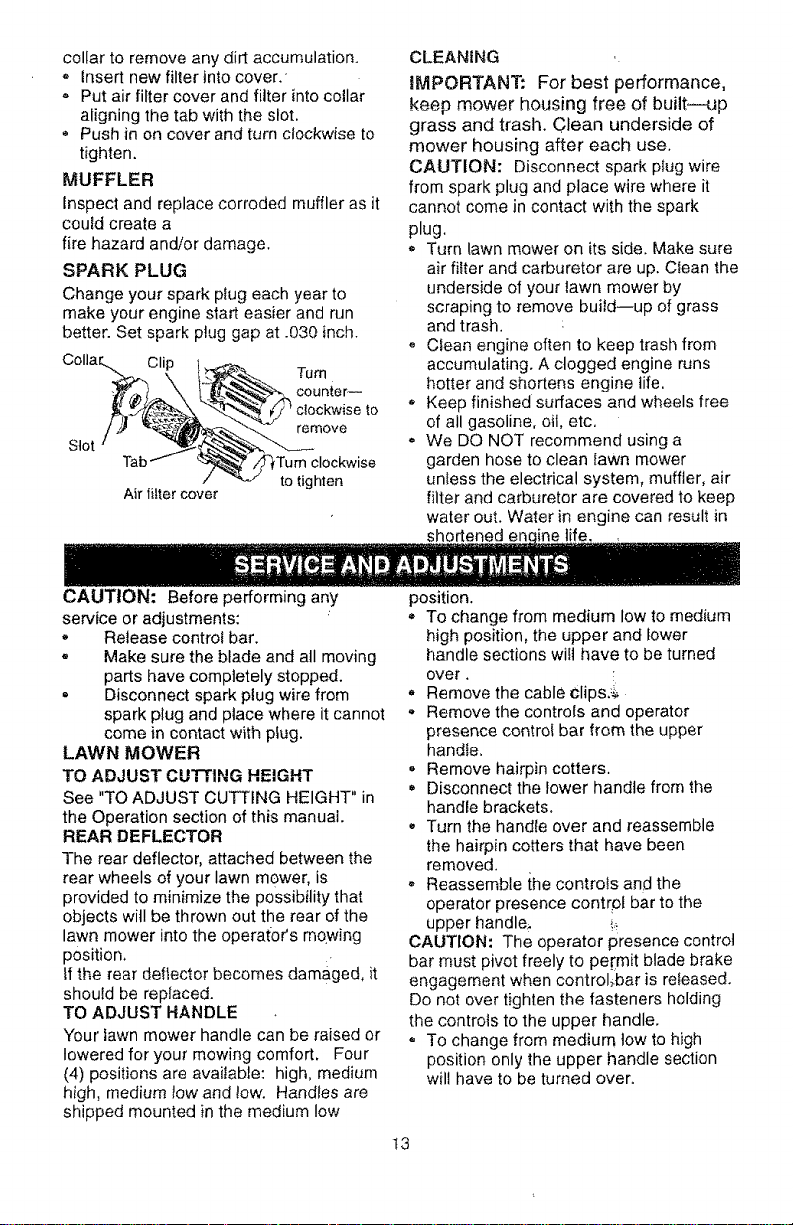
collar to remove any dirt accumulation.
o Insert new filter into cover.'
o Put air filter cover and filter into collar
aligning the tab with the slot.
Push in on cover and turn clockwise to
tighten.
MUFFLER
Inspect and replace corroded muffler as it
could create a
fire hazard and/or damage.
SPARK PLUG
Change your spark plug each year to
make your engine start easier and run
better. Set spark plug gap at .030 inch.
Collar_
Tum
counter--
clockwise to
remove
Slot
clockwise
to tighten
Air filter cover
CLEANING ..
iMPORTANT: For best performance,
keep mower housing free of builtmup
grass and trash. Clean underside of
mower housing after each use.
CAUTION: Disconnect spark plug wire
from spark plug and place wire where it
cannot come in contact with the spark
plug,
Turn lawn mower on its side. Make sure
air filter and carburetor are up. Clean the
underside of your lawn mower by
scraping to remove build--up of grass
and trash.
Clean engine often to keep trash from
accumulating. A clogged engine runs
hotter and shortens engine life.
Keep finished surfaces and wheels free
of all gasoline, oil, etc.
- We DO NOT recommend using a
garden hose to clean lawn mower
unless the electrical system, muffler, air
filter and carburetor are covered to keep
water out. Water in engine can result in
shortened encine life.
CAUTION: Before performing any
service or adjustments: "
,, Release control bar.
,, Make sure the blade and all moving
parts have completely stopped.
, Disconnect spark plug wire from
spark plug and place where it cannot
come in contact with plug.
LAWN MOWER
TO ADJUST CUTTING HEIGHT
See "TOADJUST CUTTING HEIGHT" in
the Operation section of this manual.
REAR DEFLECTOR
The rear deflector, attached between the
rear wheels of your lawn mower, is
provided to minimize the possibility that
objects will be thrown out the rear of the
lawn mower into the operatoCs mowing
position.
If the rear deflector becomes damaged, it
should be replaced.
TO ADJUST HANDLE
Your lawn mower handle can be raised or
lowered for your mowing comfort, Four
(4) positions are available: high, medium
high, medium tow and low. Handles are
shipped mounted in the medium low
position.
= To change from medium low to medium
high position, the upper and lower
handle sections will have to be turned
over.
,' Remove the cable clips.-_
- Remove the controls and operator
presence control bar from the upper
handle.
, Remove hairpin cotters.
= Disconnect the lower handle from the
handle brackets.
, Turn the handle over and reassemble
the hairpin cotters that have been
removed.
= Reassemble ihe controls and the
operator presence contrpt bar to the
upper handle_ !_.
CAUTION: The operator presence control
bar must pivot freely to pe[mit blade brake
engagement when control._bar is released.
Do not over tighten the fasteners holding
the controls to the upper handle.
To change from medium low to high
position only the upper handle section
wil! have to be turned over.
t3
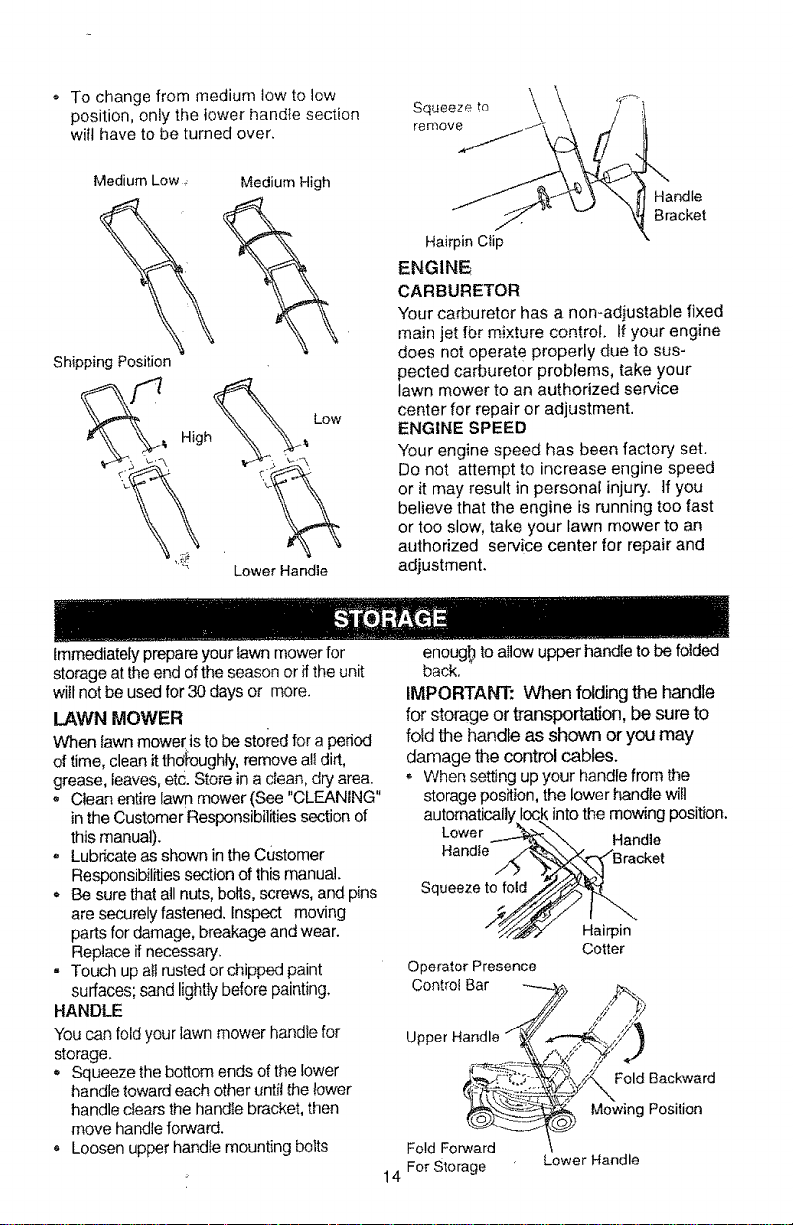
To change from medium low to low
position, only the lower handte section
will have to be turned over.
Medium Low
Shipping Position
MediumHigh
"" Lower Handle
Squeeze to
remove
Handle
Bracket
HairpinClip
ENGINE
CARBURETOR
"Yourcarburetor has a non-adiustable fixed
main jet fbr mixture control. If your engine
does not operate properly due to sus-
pected carburetor problems, take your
lawn mower to an authorized service
center for repair or adjustment.
ENGINE SPEED
"Yourengine speed has been factory set.
Do not attempt to increase engine speed
or it may result in personal injury, tf you
believe that the engine is running too fast
or too slow, take your lawn mower to an
authorized service center for repair and
adjustment.
Immediately prepareyour lawn mowerfor
storage atthe end ofthe season or if theunit
wiltnot be usedfor30 days or more.
LAWN MOWER
When lawnmower is tobe stored for aperiod
of time, clean itthd_oughly,remove all dirt,
grease, leaves, etc. Store inaclean,dry area.
, Clean entire lawnmower (See "CLEANING"
in the Customer Responsibilitiessectionof
thismanual).
, Lubricate asshown in the Customer
Responsibilitiessection ofthis manual.
• Be sure that all nuts,bolls, screws, and pins
are securelyfastened, Inspect moving
parts fordamage, breakageand wear.
Replaceifnecessary.
- Touch up allrusted or chipped paint
surfaces;sand lightlybefore painting.
HANDLE
"Youcan fold your lawn mower handle for
storage.
, Squeezethe bottomends of the lower
handle toward each other until the lower
handle clearsthe handle bracket,then
move handle forward.
• Loosen upperhandle mounting bolts
enoug!_to allow upper handle tobe folded
back.
IMPORTANT: When folding the handle
for storage or transportation, be sure to
fold the handle as shown or you may
damage the control cables.
,, When setting upyour handle from the
storageposition, the lower handle ,wilt
lock intothe mowing position.
Lower Handle
Handle
Squeeze to fold
Operator Presence
Contro{ Bar
Hairpin
Cotter
Upper Handle
Fold Forward
14 For Storage
Fold Backward
Mowing Position
Lower Handle
ENGINE
FUEL SYSTEM
iMPORTANT: it isimportant to prevent
gum deposits from forming in essential
fuel system parts such as carburetor, fuel
filter, fuel hose, or tank during storage,
Also, experience indicates that alcohol
blended fuels (called gasohot or using
ethanol or metllanol) can attract moisture
which leads to separation and formation
of adds during storage. Acidic gas can
damage the fuel system of an engine
while in storage.
• Drain the fuel tank.
° Start theengine and let it run untilthe fue_
lines and carburetor areempty.
• Never use engine or carburetorcleaner
products in the fuel tank or permanent
damage may occur.
• Use fresh fuel next season.
NOTE: Fuel stabilizerisan acceptable
aitemativein minimizingthe formation offuel
gumdeposits duringstorage. Add stabilizerto
gasolinein fuel tank or storage container.
Always followthe mixratiofound on stabilizer
container. Run engine at least t0 mi0utes
after adding stabilizertoaltow the stabilizerto
reachthe carburetor. Do not drain the gas
tank and carburetorif usingfuel stabi{izer.
ENGINE OIL
Drain oil (with enginewarm) and replace with
clean engine oil, (See "ENGINE" inthe
Customer Responsibilitiessectionofthis
manua0.
CYLINDER
o Remove sparkplug.
* Pourone ounce(29 ml) of oil throughspark
plug hole intocylinder.
, Pull starterhandie slowly a fewtimes to
distributeoil,
. Replace with new spark plug.
OTHER
o Do not store gasolinefrom one season to
another.
- Replace yourgasoline can ifyour can stads
to rust. Rustand/ordirt in your gasolinewill
cause problems.
- tfpossible, storeyour unit indoorsand cover
it togive protectionfrom dust and dirt.
, Cover your unitwith a suitableprotective
cover that doesnot retain moisture. Do not
use plastic. Plasticcannot breathe which
allows condensationto form andwill cause
your unitto rust.
IMPORTANT: Never cover mower while
engine and exhaust areas are stillwarm.
CAUTION: Neverstore the lawn mowerwith
gasoline in the tank inside a buitdingwhere
fumes may reachan open flame or spark.
Allow the engine tocoo_before storingin any
enclosure.
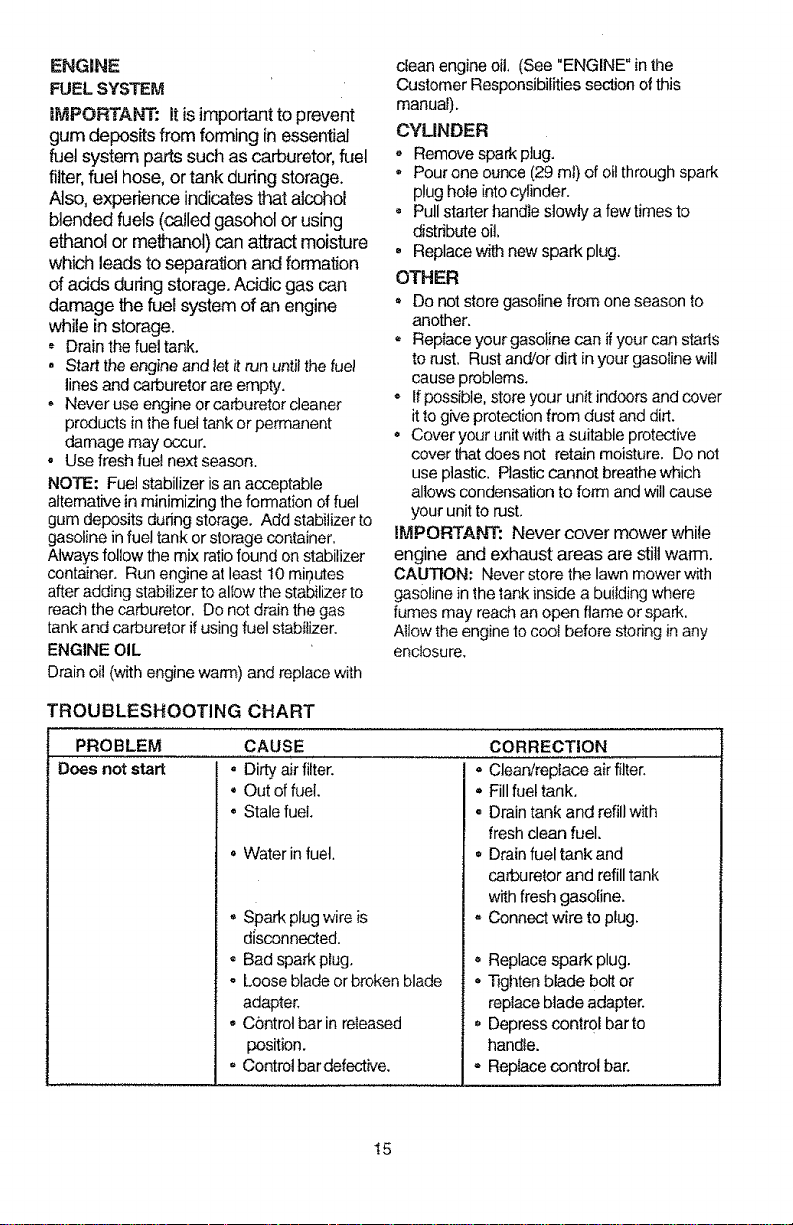
TROUBLESHOOTING
PROBLEM
Does not start
CHART
CAUSE
oDirty airfilter.
• Out of fuel.
• Stale fuel.
oWater in fuel.
• Spark plug wire is
dlsconnected.
Bad sparkplug,
o Loose bladeor brokenblade
adapter.
• Control barinreleased
position.
, Controlbardefective.
CORRECTION
• Clear_ireplaceairfilter.
• Fillfuel tank.
= Draintank and refillwith
freshclean fuel.
• Drainfuel tank and
carburetorand refilltank
withfresh gasoline.
" Connectwire toplug,
• Replacespark plug.
• Tightenblade bolt or
replaceblade adapter.
° Depresscontrol barto
handle.
,, Replacecontrol bar.
!5

"ROUBLESHOOTtNG CHART
.OB,EM_ }CAUSE.............................CORRECTIO.....
Loss of power , Rear of lawn mower housing , Set to "Higher Cut"
Poor cut- uneven
Excessive
vibration
Starter rope hard
to pull
Grass catcher
not filling (if so
quipped)
or cuttingblade dragging
in heavy grass.
Cuttingtoo much grass.
o Dirty air filter.
° Buildup of grass, leaves,
and trash under mower.
• Too much oit in engine.
=Watking speed too fast.
Io Worn, bent or loose blade.
• Wheel heights uneven.
Hardto push
,* Buildupof grass,leaves
andtrash undermower.
,, Wom, bent or loose blade.
° Bent engine crankshaft.
o Engine flywheel brake is on
when control bar is reIeased.
o Bent engine crankshaft.
° Blade adapter broken.
=BIade dragging ingrass.
pos_ion.
, Setto"Higher Cut"
positibn.
, Clean/replace airfilter.
Cleanunderside of mower
housing.
, Checkoil level.
,' Cut atslower walking
speed.
° Replaceblade. Tighten
bladebolt.
= Setall wheels at same
height
, Clean underside of
mower housing.
,, Replace blade. Tighten
blade bolt.
,, Contact an authorized
service center.
!:; Depress control bar to
upper handle before
pulling starter rope.
, Contact an authorized
service center.
• Replace blade adapter.
Move lawn mower to cut
grass or to hard surface
to start engine.
Cutting height too tow.
= Lift on blade worn off.
= Catcher not venting air.
,, Grass is too high or wheel
height is too tow.
° Rear of lawn mower
housing or blade dragging
in grass.
o Grass catcher too full.
Handle height position not
right for you.
,, Raise cutting height.
• Replace blade.
Clean grass catcher.
,, Raise cutting height.
, Raiserearof lawn mower
housingone (1) setting
higher.
= Emptygrass catcher.
• Adjust handle height to
su_.
16
CRAFTSMAN Model No. _9t 7.387280
Garantfa 17 Especificaciones del Producto 25
Regias de Seguridad 17 Servicio y Adjustes 27
Montaje 19 Almacenamiento 28
Operaci6n 20 tdentificaci6n de problemas 30
Mantenimiento 24 Partes de repuesto Vea e] manual
Programa de Mantenimiento 24 ingI_s de] due_o
Orden de Partes Contratapa
GARANT[A LIMITADA DE DOS AI_OS PARA LA SEGADORA A MOTOR CRAFTSMAN
Pot dos (2) aSos, a partir de la fecha de compra, cuando esta Segadora Craftsman se mantenga, _ubrique
y afine segSn 1as instr_cciones para la operadSn yet rnantenimiento en el manuaJ det due_5o, Soars
reparar& gratis todo defec|o en el material y Ja mano de obra.
Si la Segadora Craftsman se usa para fines comerciales o de arriendo, esta garantia s61o se aptica per
noventa (90) dias a par_ir de Ia fecha de compra.
Esta Garantfa no cobre:
• Articulos que se desgastan durante el uso normaJ tales como las c_chiiias segadoras rotatorias, los
adaptadores de la cuchilla, las correas, los fiitros de aire y ias bujias.
• Reparaciones necesarias debido aJabt_,soo a ta negfigencia det operador, ir_uy_ndose a los
cig(Je_'_Jes doblades y a ]a fatta de mantenimiento del equipe seg_Jn tas instrucciones que se incluyen
en el manual det due_,o.
EL SERVICIO DE GARANTiA ESTA DIS_PONIBLE al devotver la segadpra a motor Craftsman ai centroi
departmento de servicio Sears mas cemano en los Estados Unidos. Esta garant_a se aplica so_amente
miantms el producto este en uso en !os Estados Unidos.
Esta Gar_qtia Ie otorga derechos tegafes especificos, y puede que tambien tenga otros derechos que
varian de estado a estado.
Sears, Roebuckand Co., Df817WA, Hoff_llan Estates, IL 60179 USA
Los estandrares de seguridad exigen tapres_ncia
de]operator enios controies para reducira un
minimo etriesgo de lesionarse. S u unidad viane
equipada con dichos controtes. Pot ningun motivo
trate deIeliminar fafunci6n de los cont_es que
exigen la presenciadel operador.
ENTRENAMIENTO:
- Lea estemanual deloperador
cuidadosamente. Famitiaricese con los
controfes yaprenda aoperar su segadora en
forma adecuada. Aprenda a parar su
segadora rapidamente.
• No pennita que los niSos usen su segadora.
Nunca perrnita cluelosaduttos operenla
segadora sin contar con las lostrucciones
ade_Jadas.
., Mantenga el &tea deoperaci6n despejada
de genre, especiaJmentede nii=lospequeiSos
y de animales dome_ticos.
o Use la segadora soiamente paralos
fines pmpuestos porel fabdcanta y
seg,Jntasexplicacionesdescritas en
este manual.
No opere Iasegadora si se ha ca[do o daSado
ancLlaiquieraioupa. Siempre repare losda_os
antes de usada.
, No use accesorios que no hayan sido
recomendados per el fabrloante. EIuse de
dichos accesorios puede ser peligreso.
* Lacuchilla gira cuando etmotor est&
funcionando.
PREPARACI6N:
o Siempre revise cuidedosamente el _.rea que
se va a segar y desp_jela de todas]aspiedras,
palos, aiambres, hue,sosy afros
objetos extraSos. Estos objetos
ser_n lanzados con taoJchiUay pueden
producir lesionesgraves. ._
Siempre use anteojos de seguridad o
protectoresde ojos coando arranque y du-
rante el tiempo queuse la segadora.
o Vistase en fonna adeoJada. No opere Ia
segadora sin zapatoso con sandalias
abiertas. Use solamente zapatos sSIidoscon
buena tracci6n cuande siegue.
17
Vistase en farina adecuada. No opere la
segadora sin zapatos o con sandalias
mientras que el motor estb, funeionando.
, Siegue siempre duranle et alia o con buena
tuz artificial.
OPERACt6N:
* Mantenga sus ojos y su mente en [a
segadora y en et &rea que se est& cortando.
No permita qiJe o_os intereses to distraigan.
- No corte c_sped mojado o resbaloso. Nunca
corra mientras eg|_ operando su segadora.
Siempre aseg,3rese de mantener el equilibrio
- mantenga el mango agarrado firrnemente y
camine.
, No ponga Ias manes o los pies cerca odebajo
de las partes rotatorias. Mant_ngase
alejado de ta abertura de descarga en todo
memento.
* Siempre pare el motor cuando se vaya
ocuando no est,_ usando su segadora, o
antes de atravesar Ias entradas para autos,
los senderos, carninos y &reas cubiertas de
ripio,
- Nunca dirija la descarga del material hacia
los espectadores ni permita a nadie cerca de
ta segadora mientras la est6 operando.
. Antes de timpia), inspeccionar o de reparar t
a segadora, pare e[ motor y este
completamente seguro de que ia euchilta y
que todas Ias partes que se mueven se
hayan detenido. Luego, desconecte et
alambre de Ia bujia y mant_ngalo alejado de
_sta para evitar el arranque per accidente.
- No contin0e haciendo funcionar su segadora
site pega a un objeto extrafio. Siga e!
procedimiento descrito anteriormente, fuego
repare cualquier daffo antes de volver a
arrancar y de operar su segadora.
- No cambie los ajustes de[ regulador o
hagaque el motor ande a una ve!ocidad
excesiva. Se pueden producir daffos en el
motor y I esiones personales.
° No opere su segadora si vibra fuera de Io
normal. La vibraci6n excesiva es una
indicaci6n de daffo; pare el motor, revise en
forma segura ta causa de ta vibraci6n y haga
las reparaciones seg_n sea necesario.
- No haga funcionar et motor en
recintoscerrados. Los gases de escape son
petigrosos.
o Nunca corte ei c6sped tirando ta segadora
hacia usted. Siegue a trav6s de {a cara de
las pendientes, nunca hacia arriba o hacia
abajo pues puede perder el equilibrio. No
siegue pendientes demasiado empinadas.
Tenga cuidado cuando opere Ia segadora en
terreno disparejo o cuando cambie de
direcciOn - mantenga un buen equilibdo.
Nunca opere la segadora sin las
protecciones adecuadas, las planchas, el
recogedor de c_,sped y otros dispositivos de
segur_dad en su lugar.
MANTENIMIENTO Y ALMACENAMIEN_
TO:
o Revise ta cuchilfa y los pemos de montaje
del motor a menudo, para asegurarse que
est_,n apretados en la forma adecuada.
o Revise redes los pemos, tuercas y tomillos a
intervalos frecuentes, para verificar si est_in
apretados en forma adecuada, y
asegurarseque la segadora se encuentra en
condiciones de funcionamiento seguro.
° Mantenga todos los dispositivos de seguridad
en su Jugar y listos para luncionar.
* Rata reducir el peligro de incendio,
mantenga el motor sin c6sped, hojas y grasa
o aceite en exceso.
° Revise el recogedor de c6sped a menudo
para verificar si hay deterioro y desgaste y
cambie las bolsas desgastadas. Use
solamertte las boisas de repuesto
recomendadas per el fabricante de su
segadora o que cumpten con las
especi[icaciones de _ste.
, Siempre man(enga una cuchiIla afilada en su
segadora.
Siempre permita que et motor se enfrie
antes d_._guardarla en cualquier recinto
cerrado'. _
Nunca guarde la segadora con combustible
en el estanque dentro de un edificio endonde
los gases pueden alcanzar una llama
expuesta o una fuente de ignici6n, tal come el
calentador de agua, la estufa de
calefaoci6n, fa secadora de ropa, etc.
PRECAUCI_N" Siempre desconecte el
alambre de Ia bujia y p6ngalo donde no pueda
entrar en contacto con ta bujia, para evitar et
arranque per accidente, durante la preparaci6n,
el transporte, el ajuste o cuando se hacen
reparaciones.
PRECAUCt_)N: Es conocido per el Estado de
California que los gases de escape del motor de
este productor contienen quimicos los cuales a
ciertos niveies, pueden ocasionar, c_,ncer,
defectos de nacimiento, y otros daffos atsistema
reproductive.
18
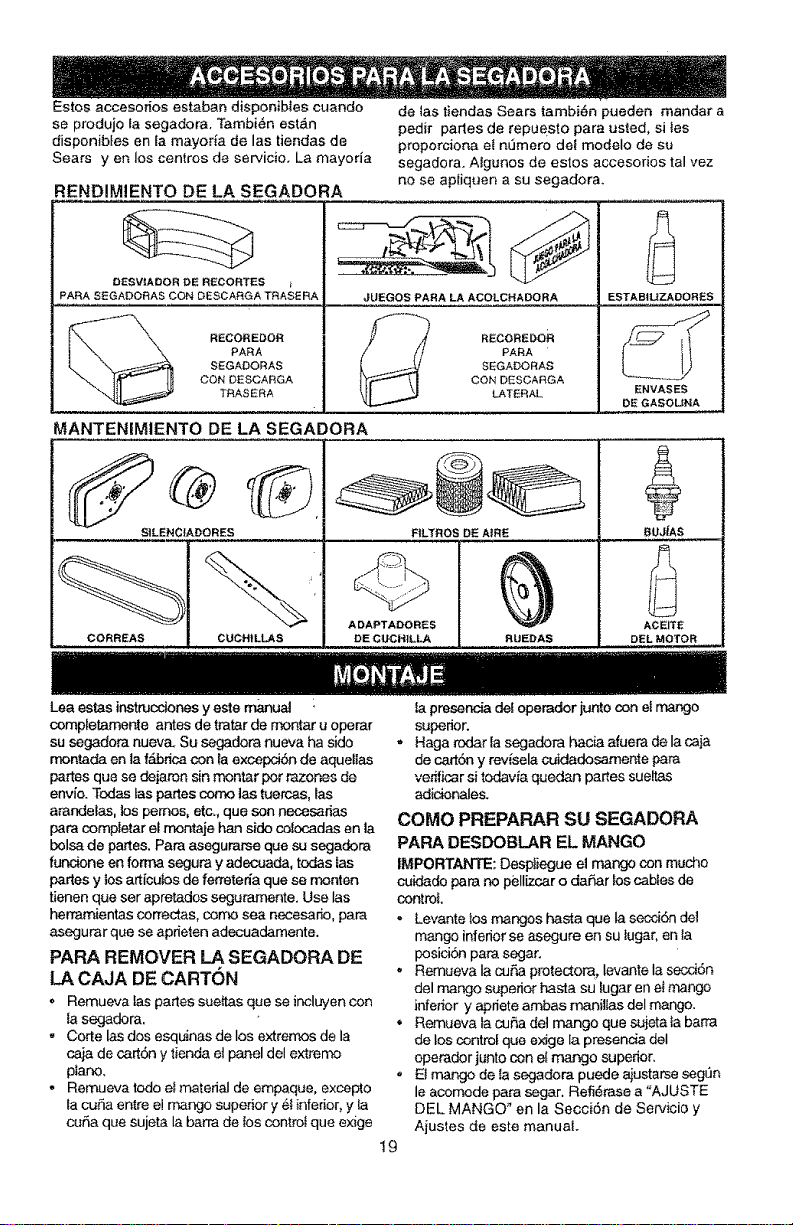
Estos accesorios estaban disponibtes cuando
se produjo ta segadora. Tambi_n est&n
disponibies en {a mayoria de las tiendas de
Sears yen los centros de servicio. La mayoria
RENDIMIENTO DE LA SEGADORA
de {as tiendas Sears tarnbi6n pueden mandar a
pedir partes de repuesto para usted, si bs
preperciona el n_3mero de! modelo de su
segadora. Atgunos de estos accesofios tal vez
no se ap{iquen a su segadora.
OESV_ADOR DE RECORTES
PARA SSGADORAS CON DESCARGA TRASERA
RECOREDOR
PARA
SEGADORAS
CON DESCARGA
TRASERA
JUEGOS PARA LA ACOLCHADORA
_---"_ eECO*EDOR
PARA
SEGADORAS
CON DESCARGA
LATERAL
ESTABIUZADORES
ENVASES
DE GASOUNA
MANTENIMtENTO DE LA SEGADORA
RLTROS DE A{RE
ADAPTADORES
DE CUCH|LLA RUEDAS
mtJfAS
ACEITE
DEL MOTOR
Leaestas instmcdones yeste rrk_nual
completamente antes detratar de rnontar u operar
su segadora nuev& Su segadora nueva ha side
montada en la f&bricacon laexcepci6n de aquetlas
partes que se dejaron sin montar per razones de
envio. Todas tas partes come lastuercas, Ins
arandefas, los pemos, etc., que son nec_sad_
pare completar ei montaje hart side cobcadas en la
bolsade pa_es.Para asegurarse quesu segadera
funcione enforma segura y ader'j.Jada,todas ias
#aries y losart{cutos de ferreteda que se monten
tienenque ser apretados seguramente. Use las
herramientas correctas, come sea necesano, para
asegurar que se aprietenadecuadamente.
PARA REMOVER LA SEGADORA DE
LA CAJA DE CARTON
o Remueva tas paries suettas que se incluyen con
{asegadora.
- Corte Insdes esquinas de los extremes de la
ca_ade cariSny tienda el panel del extreme
plano,
o Remueva lode elrnateri_ de empaque, excepto
facuF_ entre elmangosupenor y el inferior, y la
cut]a que sujeta la barra de {oscentre{que exige
la presenda defoperador junto con el mango
superior.
Haga rodar la segadora hacia afuem de Iacaia
decart6n y revisela cuidadosamente para
veffficar si todavia quedan partes sueltas
adidonales.
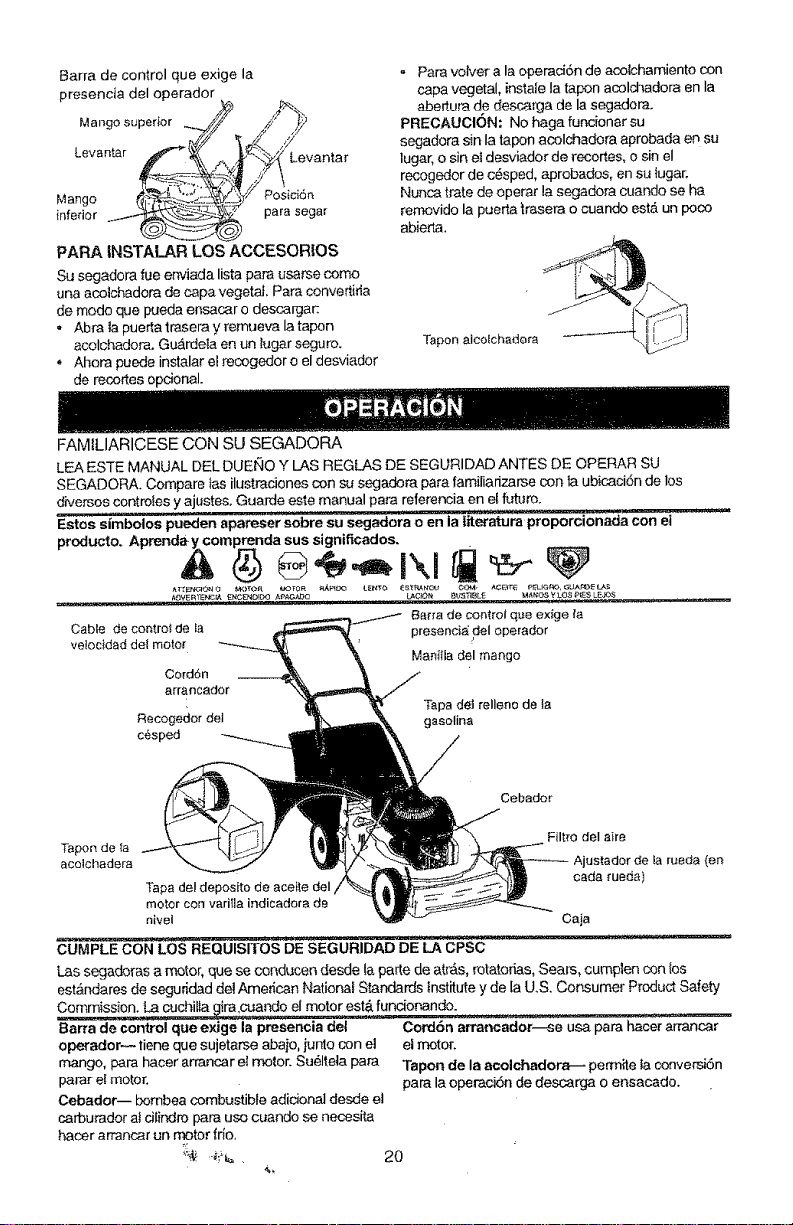
COMe PREPARARSU SEGADORA
PARA DESDOBLAR EL MANGO
IMPORTANTE: Despliegue el mango con mucho
cuidado parano pell[zcaro da_ar _oscabIes de
control
- Levante bs mangos hasta que Ia secci6ndel
mango inferior se asegure en su _ugar,en la
posici6npar_ segar.
. Remueva IacuF'-,aprotecto_, levante Iaseod6n
del mango supenor hasta su lugar enel mango
infenor y apdete ambas manillas deI mango.
* Remueva tacuF_adel mango que sujeta{a barra
de los control que ex{ge Ia presenc{a deI
operador junto con el mango superior,
,, Et mango de lasegadora puede ajustarsesegen
le acornode para segar. Refi6rase a "AJUSTE
DEL MANGO" en la Secci6n de Servicio y
Ajustes de este manual
t9
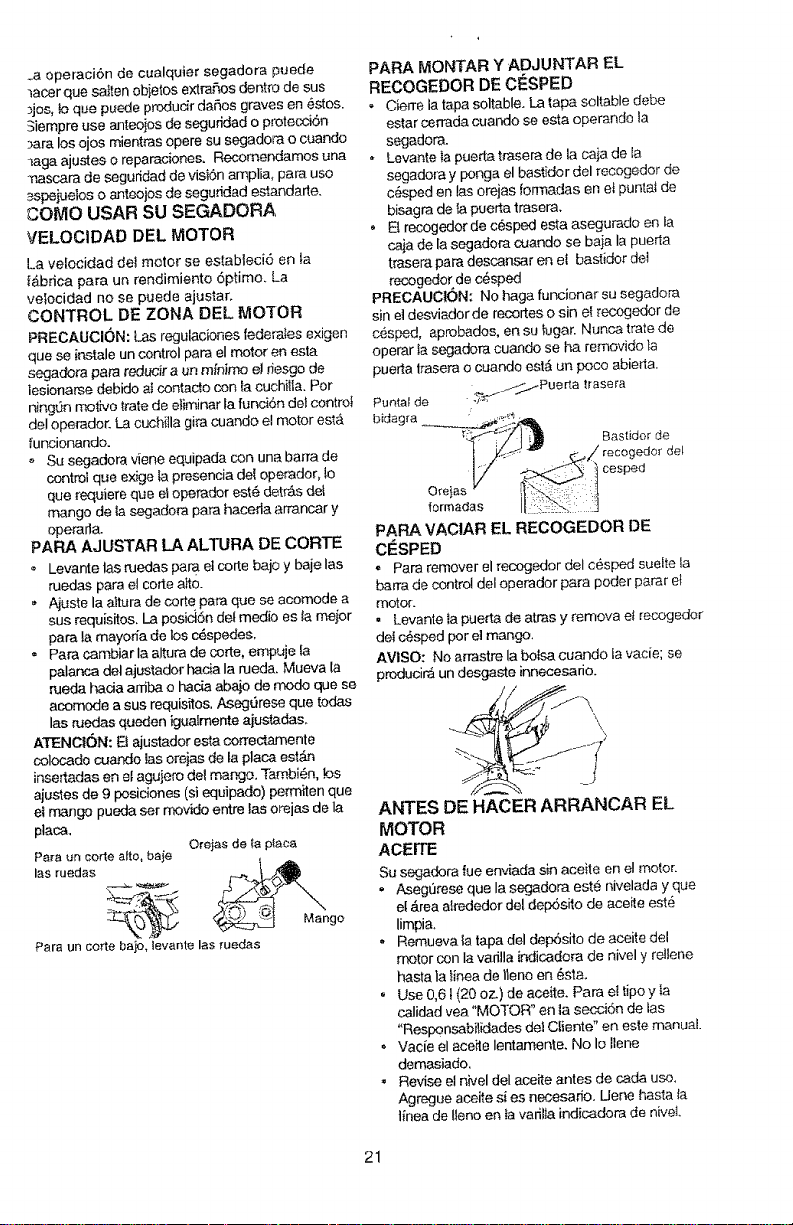
Barra de control que exige la
presencia deI operador
Mango superior
Levantar
Mango Posici6r_
inferior para segar
PAPA |NSTALAR LOS ACCESORIOS
Susegadora rue erMada lista para usarse como
una acolchadora decapa vegetal. Paraconve_ida
de modoque pueda ensacar o descargar
, Abra la puertatrasera y remueva la tapon
acolchadora. Gu_rdeta enun lugar seguro.
Ahora puede instalar el recogedor o el desviador
de recortes opcional.
FAMILIARICESE CON SU SEGADORA
- Para volver a la operaci6n de acolchamiento con
capa vegetal, instale la tapon acolchadora en Ia
abertum de descan:ja de la segadora.
PRECAUCt6N: No haga funcionar su
segadora sin Ia tapon acolchadora aprobada en su
lugar, o sin et desviador de recortes, o sin el
recogedor de c_sped, aprobados, en su tugar.
Nunca trate de operar la segadora cuando se ha
removido la puerta _rasera o cuaodo estA un poco
abierta.
Tapon aicolchadera
LEA ESTE MANUAL DEL DUENO Y LAS REGLAS DE SEGURIDAD ANTES DE OPERAR SU
SEGADOP_. Compare tas ilustradones con su segadora para familiadzarse con ta ubicaci6n de los
diversos controles y ajustes. Guarde este manual para referencia en el futuro.
Estos s[mbolos pueden apareser sobre su segadora o en ia literatura proporcionada con el
producto. Aprenday comprenda sus significados.
A'r __'44_1_'4 O f_)TOA _,fzD[0}_ t4_P_Llo tE_tTO _ S}'_ NGtt _-O_,_. ACEIT_, p_UG_{<_,,GUA£_SLA$
AOVER'rEtCC#, LAC,_4_N BU._T_BLF M^ r;OS Y LOS 21ES LEJO8
Barra de control qua exige ta
Cable de control de la
ve!oc}dad det motor
presencia del operador
?
Manilla del mango
Cord6n
arrancador
Tapa de{ relleno de la
Recogedor del gasolina
c,_sped
Cebador
Filtro deI aire
Tapon de Ia
acolchadera Ajustador de la rueda {en
Tapa de! deposito de aceite del cada [ueda)
motor con varitla indicadora de
nivel Oaja
CUMPLE CON LOS REQUISITOS DE SEGURIDAD DE LA CPSC
Las segadoras a motor, que se conducen desde la paLte de atms, rotatodas, Sears, cumplen con Ios
estb_ndares de segur_dad del Amedcan National Standards institute y de la U.S. Consumer Product Safety
Commission. La cuchilla gim,cuando el motor est& fundonando.
Barra de control que exige la presencia det
operador_ tiene que sujetarse abajo, iunto con el
mango, para hacer arrancar el motor. Su61tela para
parar e{ motor.
Cebador-- bombea combustible adidonal desde et
carburador ai cilindro pare uso cuando se necesita
hacer arrancar un motor (rio.
Cord6n arrancador--se usa para hacer arrancar
el motor.
Tapon de la acolchador,,_,-- permite ia conve_6n
pare la operacibn de descarga o ensacado.
_a operaci6n de cualquier segadora puede
lacer que satten obietos extraRos dentro de sus
_jos, to qua puede produdr dahos graves en _stos.
3iempre use anteoios de seguddad o proteoci6n
)are los ojos mientras opera su segadora o cuando
_aga ajustes o reparaciones, Recomendamos una
_ascara de seguridad de visi6n amplia, pare use
_spejuelos o anteojos de segundad estandarte.
COMe USAR SU SEGADORA
VELOClDAD DEL MOTOR
La velocidad dei motor se estabieci6 en ta
IAbrica para un rendimiento 6primo, La
velocidad no se puede ajus_ar,
CONTROL DE ZONA DEL MOTOR
PRECAUCION: Las reguladones federates exigen
que se instale un control pare et motor en esta
segadora pare reducir a un minimo e! rJesgo de
lesioname debido at contacto con ta cuch{lla. Per
ningOn motive trate de elimJnaHa funcJbn de_centre}
deI operador. La cuch{lla gira cuando el motor esla
funcionando.
o Su segadora viene equipada con una barra de
control que exige ta presencia del operador, lo
qua requiere que ei operador est_ detrAs de_
mango de ia segadora pare haceda arrancar y
operarla.
PAPA AJUSTAR LAALTURA DE CORTE
• Levante las ruedas para el corte bajo y baja las
ruedas pare et corte alto.
• A_uste la aitum de corte pare que se acomode a
sus requisites, La posid6n del media ee _ameier
pare la mayoria de los c6spedes,
= Pare cambiar Ja altura de corte, empuje
palanca det ajustador hacia Ia rued& Mueva la
rueda hacia arriba o hac_a abajo de mode que se
acomode a sus requisites, AsegOrese que redes
las ruedas queden iguafmente ajustadas,
ATENCK)N: E_ajustador esta correctamente
coloc,_do cuar_o tas orejas de ta place est_n
insertadas an et agujero del mango. Tambi_n, bs
aiustes de 9 posiciones (si equipado) perm;ten qua
el mango pueda set movido entre las orejas de la
place,
Ore_as de ta ptaca
Pare un code a_to,baje
Pare un corte bajo, levante las medas
PARA MONTAR Y ADJUNTAR EL
RECOGEDOR DE CESPED
, Cierre la/apa soltab_e. La tape soltabte debe
estar cen'ada cuando se esta operande ta
segadora.
* Levante ta puerta trasem de la caja de ta
segadora y ponga el bastidor del recogedor de
c_sped en las orejas fon_adas en el punta_ de
bisagra de _apuerta traser&
o Et recogedor de c6sped esta asegurado en ta
caja de la eegadora cuando se ba_a la pueda
tmsera pare descansar en el bastidor de_
recogedorde c6sped
PRECAUCION: No haga funcionar su segadora
sin el desviador de recortes o sin el reccgedor de
c_sped, ap_badoe, en su fugar. Nunca trate de
operar ia segadora, cuando se ha removido _a
pueria lrasera o cuando est_i un poco abierta,
Punta_de __f-'jS'TPue rta
trasera
bidagra _i_.
t_'_ _ Bas_Jdorde
PAPA VAOIAR EL RECOGEDOR DE
CF_SPED
° Pare remover el recogedor det cesped suelte fa
barra de control det operador para poder parer e}
motor,
• Levante _apue_ta de arras y remove e_recogedor
dei c_sped per el mango.
AVISO: No amastre la botsa cuando Ia vacie; se
produd_ un desgaste innecesario.
ANTES DE HACER ARRANCAR EL
MOTOR
ACErrE
Su segadora rue enviada sin aceite en el mo(or.
, AsegQrese que Ia segadora este nivelada y que
el &tea alrededor del dep6sito de aceite est_
/impia+
" Remueva {a tapa del dep6sito de aceite del
motor oon la vadlla indicadora de nivel y reltene
hasta }atinea de ileno en _sta.
, Use 0,61 (20 oz..) de aeeite. Para ei tipo y Ia
calidad yea "MOTOR" en ta secci6n de las
"Responsabi_dades del Cliente" en esle manual
" Vacie el aee_le Ientamente. No Io llene
demasiado,
- Revise et nivel deI aceite antes de cada us,o,
Agregue aceite si es necesado. Uene basra ta
t{nea de !leno en ta vad/ta indicadora de niveL
21
o Para teer el nk,et adecuade, apfiete la tapa deI
del>Ssite de aceite del motor cada vez.
* Vuetva a instalar Ia tapa de! dep6sito det aceite y
apnelela.
o Cambie el aceite despu6s de 25 horas de
operaci6n o una vez per temporade, Puede
necesitar cambiar et aceite mas a menudo
cuando las cor_dirJones son po_vorosas o sucias.
GASOLtNA
o Uene el estanque de combustible. Use gasolina
regular, sin ptomo, nueva y limpia con el minimo
de 87 octanes. No mezcle el aceite con la "
gasoIina. Para asegurar que ta gasolina utilizada
sea tresca compre estanques los cuaIes puedan
set utiIizados durante los pnmeros 30 dias.
ADVERTENCIA: La experiencia ha indicado que
los combustibles mezclados con alcohol (conocidos "
coma gasohol, o el usa de etanol o metanoI)
pueden atraer Ia humedad, la que conduce a la
separaci6n y formaci6n de #,cities durante el
almacenamiento. La gasolina acidica puede dafar
el sistema deI combustible de un motor durante el
alrr_cenamiento. Para evitarlos problemas con el "
motor, se debe vadar e! sistema del oombustible
antes de guardado par un pefiodo de 30 alias o
rr_s. Vacie et estanque del combustible, haga
arrancar el motor y hAga_o funcionar hasta que Ias
tineas del combustible y el carburador queden
vac_os, La pr6xJma temporada use combustible
nuevo. Vea tas lnstrucoiones Para El
Almacenamiento para mAs informadSn. Nunca use
productos de limpieza para el motor o para e[
carburador en ef estanque del combustible pues se
pueden producir dafios permanentes.
PARA HACER ARRANCAR EL MOTOR
- Para hacer arrar'c-.,arun motor fdo, empuje el
cebador dnco (5) veces antes de tratarfo. Use un
empuje firmemente. Este paso r,o_nalmente no
es necesado cua_rdo se hace arrancar un motor
que ya ha estado funcionando per unos cuantos
m}nutos.
, Sujete la barra de control que exige la presenda
del operador abaje en el rrk3.ngo y tire el mango
del anancador rapidamente. No permita que el
cord_ dei arrancador se devueiva
abruptamente.
, Para parar el motor, suette la barra do control
que exJge la presencia det operation
AVtSO: En dimas rr_s fdos puede que sea
necesado repetJr ios pasos del cebade. En climas
mAs calurosos el cebar demasiade puede producir
el ahogo y el motor no va a arrancar. Si se ahoga et
motor espere unos cuantos minutes antes de tratar
de hacedo arrancar y no repita los pasos del
cebado.
CONSEJOS PARA SEGAR
,, Bajo dertas condiciones, ta} come c6sped muy
allot puede ser necesaria el etevar la altura det
carte para reducir el esfuerzo necesado para
empujar Ia segadera y para evitar sobrecargar el
motor, dejando montones de recortes de r__sped.
, Para un carte mW pesado, reduzca el arr.:ho del
carte pasando parcialment e per encima deI iugar 22
antedormente cortado y siegue Ientamente.
Para un meier ensecado det c6sped y para la
mayorfa de tas condiciones de carte, la veloddad
del motor debe ajustatse a Ia posid6n de r&pido.
Cuando use una segadera con descarga trasera
en c6sped ht_medo y pesado, los montones del
cesped coltado puede que no entrenen et
recogedor de c6sped. Reduzca fa vetocidad del
recorrido (vetocidad de empuie) y/o haga
luncionar la segadora sabre el Area per segunda
vez.
Si queda una huelta de cortes an el lack) derecho
de una segadora con descarga trasera, siegue
en la direcci6n en que giran Ias ma_llas del reloj,
solapande un pc,so para recaudar los recortes en
lapr6x{ma pasada.
Los pores en los recogedores de c6specl de tela
pueden llenam_e con mugre y po#ao con el use y
los recogedores recaudar&n menos c6sped.
Para evitar esto, rocie el recogedor con la
manguera de agua regularmante y d6ielo
secarse antes de usaffo.
Mantenga la patte supedor deI motor, alrededor
del arrancador, despeiada y sin recortes de
r._sped y paja. Esto ayuda_ etflujo deI aire def
motor y extender ta duraci6n @ste.
CONSEJOS PARA SEGAR Y
ACOLCHAR
IMPORTANTE: Para obtener el meier
rendimiente mantenga Ia caja de ta segadora
sin acumulacion de cesped y basura. Vea
"limpieza" en Ia seccion de
"RESPONSABILtDADES DEL CLIENTE" de
este manual.
o La cuchilta acolchadora especial va a volver
a co,tar los reeortes de c@sped muchas
veces, y los reduce en tama_,o, de mode que
si se caen en et c6sped se van a dispesar
entre 6ste y no se van a netar. Tambi@n, el
c6sped acotchado se va a deshacer
r&pidamente entregando substancias
nutritivas para et c_sped, Siempre acolche
con la velocidad del motor (cuchifta) m,_s
alta, pues as[ se obtandr,_ ta meier acci6n de
recorte de Ias cuchillas.
• Evite cortar el c_sped cuando est6 mojado.
Et c_sped mojado tiende a formar montones
e inlerfiere con la acci6n de acolchado. La
meier hera para segar el cesped es
temprano en la tarde. A esa hera este se ha
secado y el Area reci_-n cortada no quedar_.
expuesta at sol directo.
• Para obtener los mejores resuftados, ajuste
la attura del carte de la segadora de mode
que _sta carte sefamente el tercio supedor
de tas hoias de cesped. En el case de que el
c_sped haya crecido demasiado, puede ser
necesario el elevar Ia altura del carte para
educir e} esfuerzo necesar_o pare empujar Ia
segadora y pare evitar sobrecargar el motor,
dejando montones de recertes de c_sped.
Pare un acolchemiento muy pesado, reduzca
et ancho de! corte pasando per encima del
Iugar antefiormente cortado y siegue
tentamente,
, Cieflos tipos de c_sped y sus condiciones
pueden exigir que un area tenga que ser
acolchada pot segunda vez pare esconder
completamente los recortes, Cuando se haga
et segundo corse,siegue atravesado o en
forma perpendicular ata pasada del primer
code,
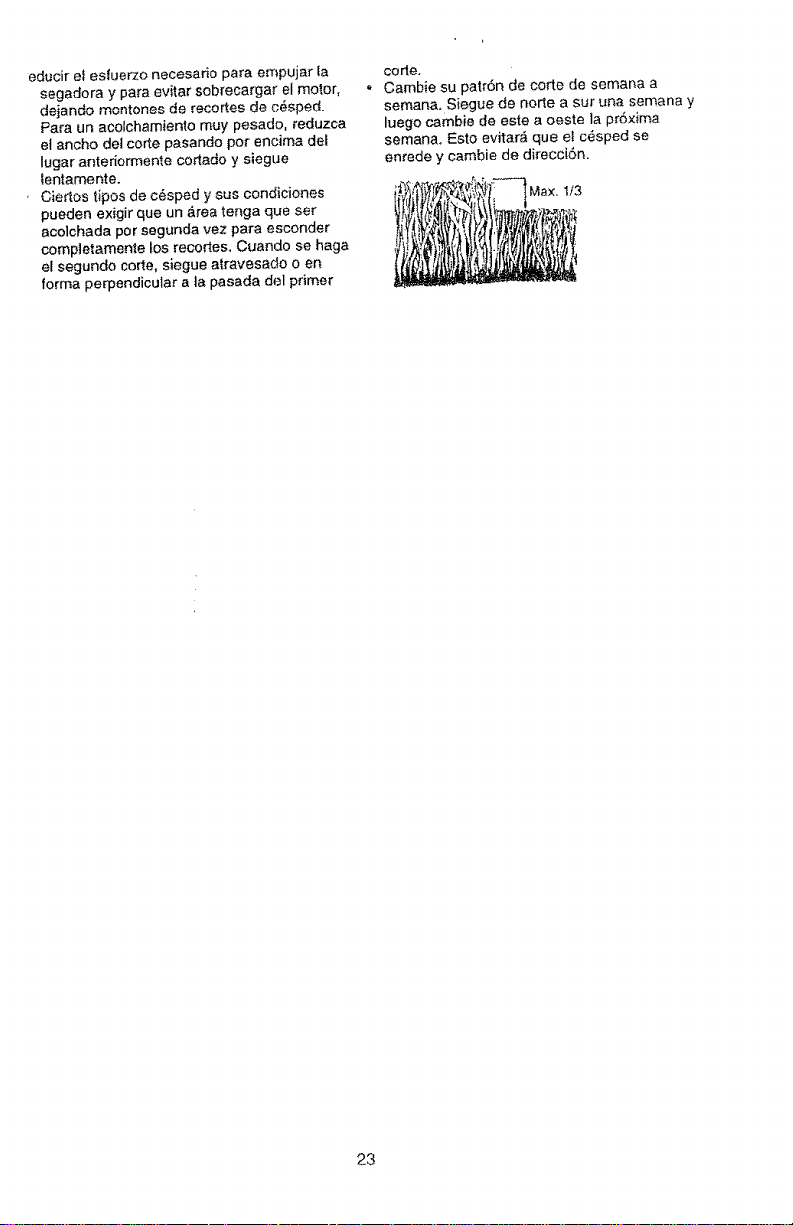
• Cambie su patr6n de corte de semana a
semanao Siegue de norte a sur una semana y
luego cambie de este a oeste la pr6xima
semana. Esto evitar,_ que e! c6sped se
enrede y cambie de direcci6n.
Max, 1t3
23
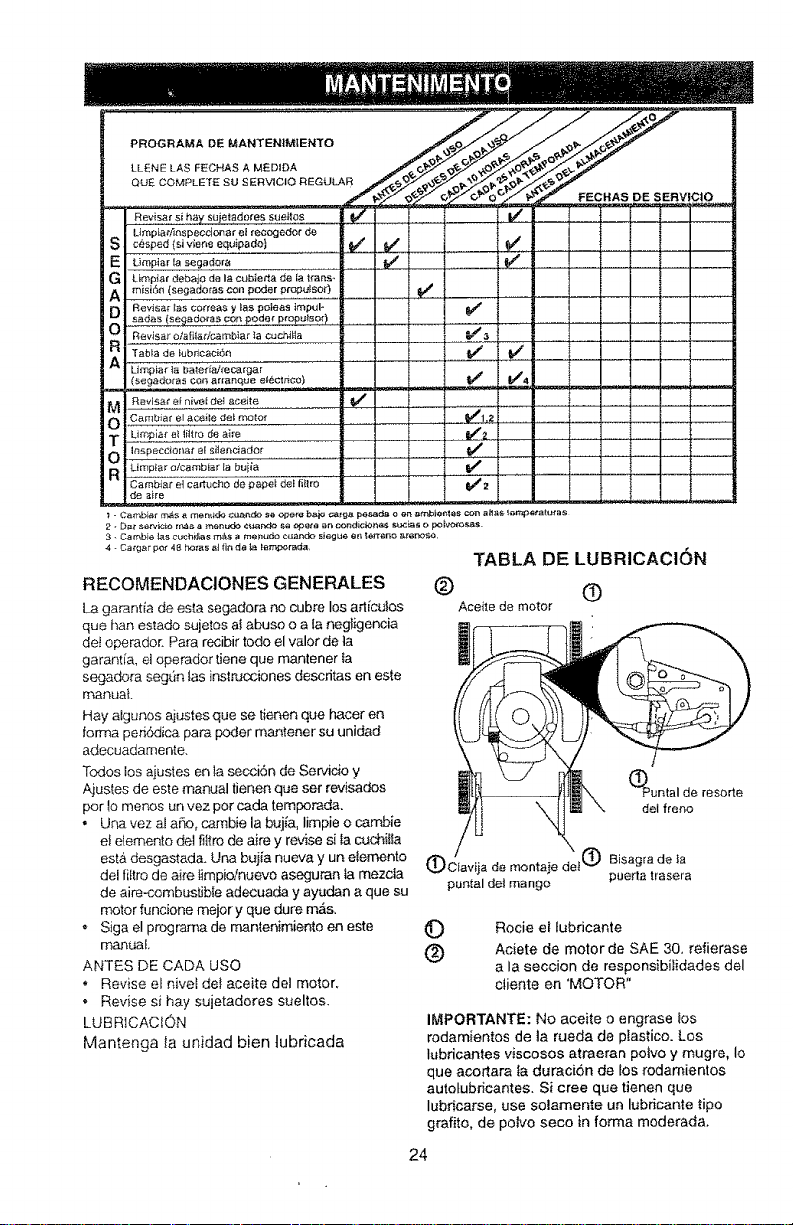
PROGRAMA DE MANTENtMtENTO
LLENE LAS FECHAS A MEDIDA
QUE COMPLETE SU SERVICIO REGULAR
R_v,_a,si_ _e_o_ _/ !v"
LimpiatAnspecc4onarelrecogederde
cesped{st vieneequipado)
Limpiar la segadofa .............
Limpiaf debajo de la cubieila de la trans-
misi6n {segadoras con pealer propuIso0
Revisar ias co_'reas y las peleas impul-
_as ¢or_ pode_ propulsor_
Re_4sar o/afi_adcambiar _a cuchi_a
Tab_a de lub_lcaci6rt
£_m_i_6a_,,_/_,_',ga'i ..............
(segadorasconarranqueeiectnco) _ _'4
RevisatelniveIdielacei_e $/'
Carqbia_'el aceiledet motor
Limpia_ el liltro de aire
Inspecciena_" el siiencJador
Limpiar oicambiar Ia buiia
Cambiat et ¢_rlucho de papef de_ fiflrO
de aire
FECHAS DE $ERVICtO
I/ .......... i/
..........v' _i_L____
I/1,2
e,"
4 - Catgar_pof 48 b_'a _at tin de la lemp_rada,
RECOMENDAClONES GENERALES
La garantia de es_a segadora no cubre Ios ad[culos
que hart estado sujetos at abuso o a la negligencia
de_operador. Para recibir todo el valor de ta
garantia, el operador tiene que mantener Ia
segadora segQn las inslr_cciones descdtas en este
ma_ua{.
Hay alguRos ajustes que se tienen que Pacer en
torma peri6dica para poder mantener su unidad
adecuadamente.
Todos los ajustes en la secci6n de Servicio y
Ajustes de este manual tienen que ser revisados
For Io menos un vez pot cada temporada,
• Una vez al aSo, cambie ia bujla, limpie o cambie
et etemento de! fittro de aire y revise si la cuchiita
esta desgastad& Una buiia nueva y un etemento
deI filtro de aire timpioinuevo aseguran ta mezcta
de aire-combustible adecuada y ayudan a que su
motor funcione mejor y que dure m&s.
', Siga el programa de mantenimiento en este
manual
ANTES DE CADA USQ
,, Revise el nive_ deI aeeite det motor,
• Revise si hay sujetadores sueltos.
LUBRICACtON
Mantenga la unidad bien lubricada
TABLA DE LUBRICAClON
® ®
Aceite de motor
Cuntal de resorte
del freno
O(_tavija de montaje det (_ Bisagra de ta
puntal det mango pueMa trasera
©
®
Rocie et lubdcante
Aciete de motor de SAE 30. refierase
a la seccion de responsibilidades del
cliente en 'MOTOR"
IMPORTANTE: No aceite o engrase los
rodamientos de ta rueda de pfastico. Los
Iubricantes viscosos atraeran Folvo y mugre, Io
que acortara ta duraci6n de tos rodamientos
autotubncantes. Si cree que tienen que
lubricarse, use solamente un lubricante tipo
grafito, de polvo seco in forma moderada.
24
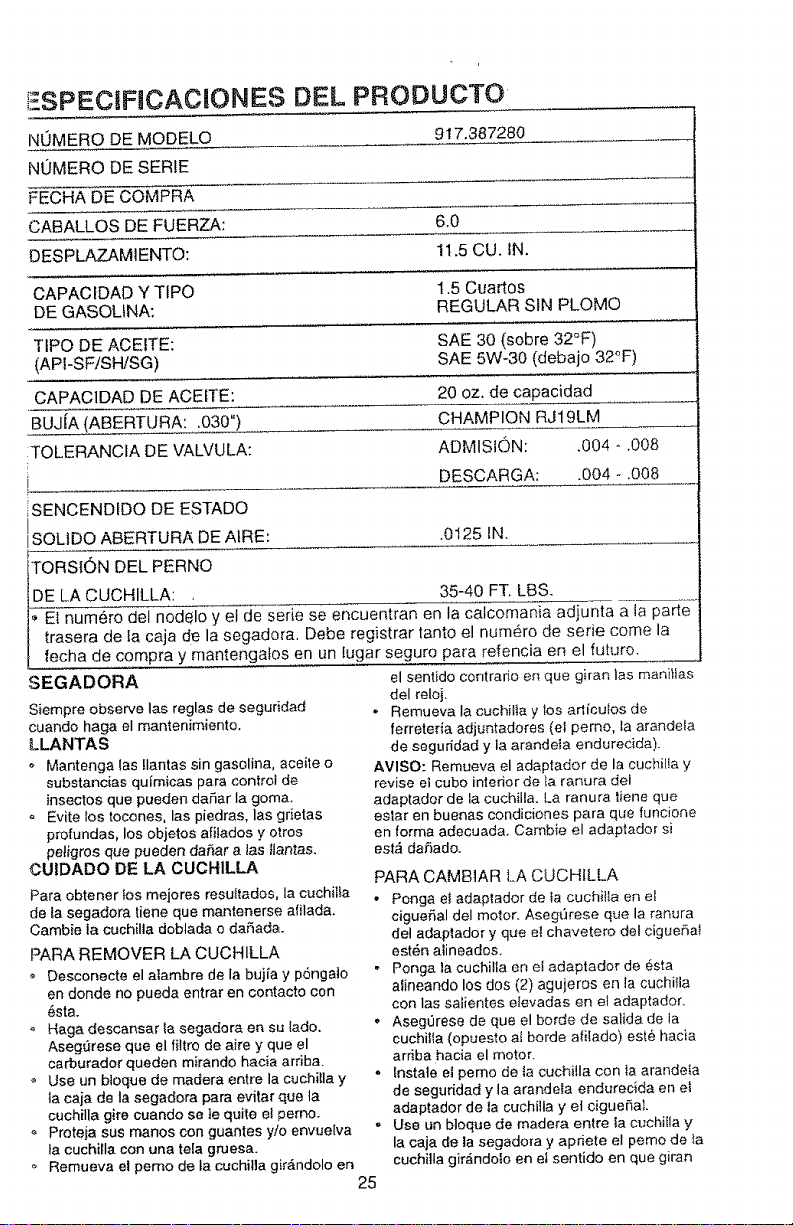
I +SPECtFJCAC]ONES DEL PRODUCTO
NUMERO DE MODELO 9t7.387280
NUMERO DE SERLE
FECHA DE COMPRA
CABALLOS DE FUERZA: 6.0
OESPLAZAMIENTO: 11.5 CU, IN.
CAPACIDAD Y TIPO 1.5 Cuartos
DE GASOLfNA: REGULAR SIN PLOMO
TtPO DE ACEITE: SAE 30 (sebre 32°F)
(APi-SF/SH/SG) SAE 5W-30 (debajo 32°F)
CAPACIDAD DE ACEITE:
BUJiA _ABERTURA: .030")
:TOLERANCfA DE VALVULA:
20 oz, de capacidad
CHAMPION RJ1 gLM
ADMISION: ,004 _.008
DESCARGA: 004 - 008
ISENCENDtDO DE ESTADO
SQL1DO ABERTURA DE AIRE: 0125 IN.
TORSION DEL PERNO
DE LA CUCHILLA: 35-40 FT, LBS.
El numero deI nodelo y el de serie se encuentran en la calcomania adjunta a la parte
trasera de la caja de la segadora. Debe registrar tanto e! num_ro de serie come la
fecha de compra y mantengatos en un lugar seguro para refencia en el futuro.
SEGADORA el sentido contrado en que giran las manilUa.s
Siempre observe las reglas de seguridad
cuando haga el mantenimiento.
LLANTAS
++ Mantenga las !lantas sin gasolina, aceite o
substancias qu imicas para con|rot de
insectos que pueden da+fiar la goma.
o Evite los tocones, las piedras, las grietas
profundas, los objetos atiIados y otros
petigros que pueden da#+ar alas llantas.
CUIDADO DE LA CUCHILLA
Para obtener los mejores resuttados, la ¢uchilla
de lasegadora liene que man_enerse afilada.
Cambie la cuchilla dobtada o daSada
PARA REMOVER LA CUCHILLA
Desconecte el alambre de la bujia y p6nga]o
en donde no pueda entrar en contacto con
6sta,
o Haga descansar la segadora en su tado,
Aseg_Jrese que el filtro de aire y que el
carburador queden mirando hacia arriba+
Use un bloque de madera entre la cuchilla y
ta caja de la segadora para evitar que ta
cuchilla gire cuando se ie quite etperno+
Preteia sus manos con guantes yio envue[va
la cuchilla con urta te[a gruesa.
+, Remueva el pemo de la cuchilla gir_,ndolo en
del reloj
° Remueva la cuchilia y los articulos de
ferreteria adjuntadores (el perno, la arandela
de seguridad y la arandeta endurecida)
AVISO: Remueva el adaptador de la cuchilla y
revise el cubo intmior de la ranura dei
adaptador de la cuchiJla La ranura liene que
estar en buenas condiciones para que funcione
en forma adecuada. Cambie el adaptador si
esl_ dahado.
25
RARA CAMB1AR LA CUCHILLA
• Ponga el adaptador de Ia cuchilla en el
ciguefial del motor Aseg(_rese que la ranura
de{ adaptador y que et chavetero del cigueSal
est4n alineados
• Ponga la cuchilla en el adap|ador de _sta
alineando los dos (2) agujeros en la cuchifla
con tas salientes elevadas en el adaptador.
• Aseg_rese de que el horde de salida de la
cuchitla (opuesto a{ borde afilado) es_,_ haeia
arriba hacia el motor
. fnstate el pemo de ta cuchilla con ta arandeia
de seguridad y la arandela endurecida en el
adaptador de ta cuchilta y et cigueSal
,_ Use un btoque de madera entre la cuchilla y
la ¢aja de la segadora y apriete el perno de la
euchi]la gir_,ndolo en et sentido en que giran
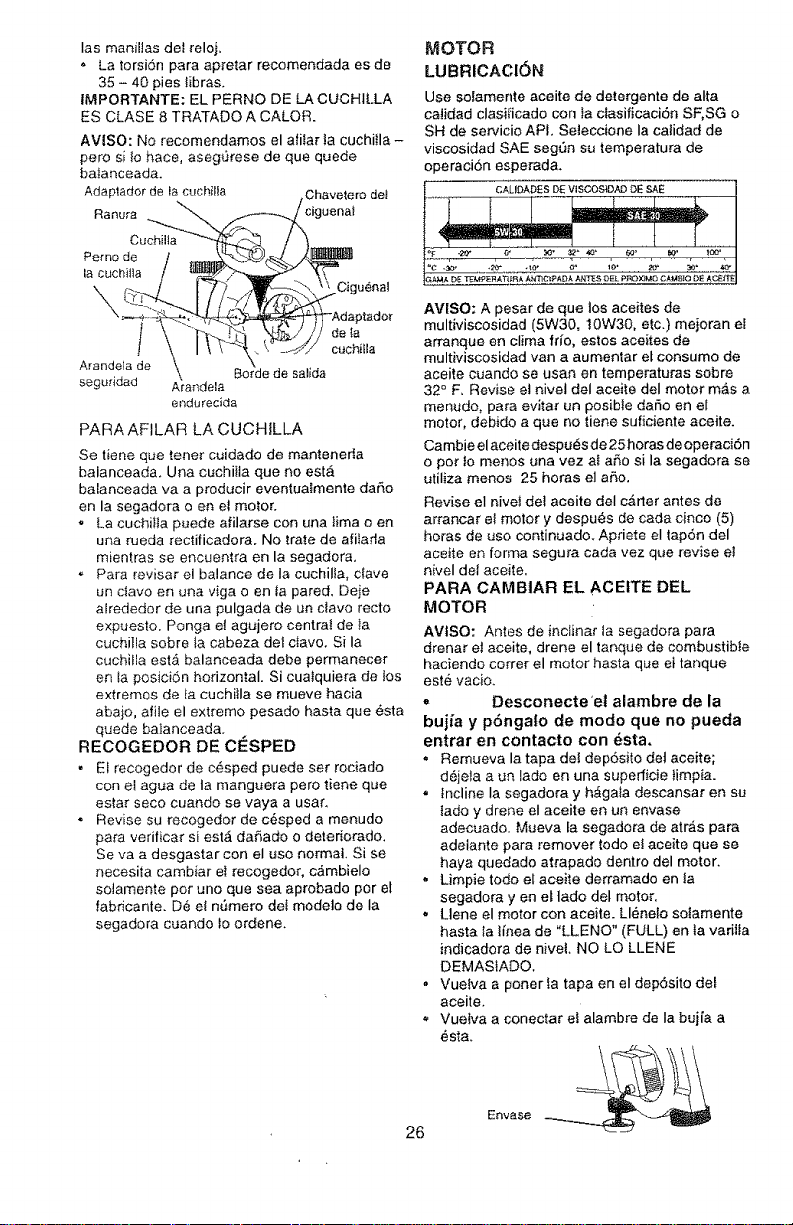
Iasmanillasdetreloj,
. Latorsionparaap[etarrecomendadaesde
35-40pies!ibras.
IMPORTANTE:ELPERNODELACUCHILLA
ESCLASE8TRATADOACALOR.
AVISO:Norecomendamoselafitarlacuchilla-
perosiIohace,asegt_resedequequede
balanceada.
Adap_adordelacuchi_la Chaveterodet
o oo,
la cuchitla / _ s>---_ _,'\
__Adaptado_"
1 \ .....
Arandeta de
\ Borde de satlda
seguddad A_andela
endurecida
PARA AFILAR LA CUCHILLA
Se tiene que tenet cuidado de mantenerIa
balanceada. Una cuchitla que no est,.
balanceada va a producir eventuaImente da6o
en la segadora o en e] motor.
o La cuchitia puede afilarse con una lima o en
una rueda rectificadora. No trate de afilarla
mientras se encuentra en la segadora.
" Para revisar el balance de Ia cuchilta, clave
un ciavo en una riga o en ta pared, Deje
alrededor de una pulgada de un clave recto
expuesto, Ponga el agujero central de la
cuchitla sobre ia cabeza det clavo. Si la
cuchitla est& balanceada debe permanecer
en Ia posicion horizontal. Si cualquiera de toe
extremos de ta cuchiila se mueve hacia
abajo, afite el extremo pesado basra que 6sta
quede baIanceada.
RECOGEDOR DE Ct_SPED
• El recogedor de c_sped puede set rociado
con el agua de ta manguera pero tiene que
estar seco cuando se vaya a usar.
• Revise su recogedor de c_sped a menudo
para verificar si est_ daSado o deteriorado.
Se va a desgastar con el use normal. Si se
necesita cambiar el recogedor, e&mbielo
solamente pot uno que sea aprobado pot el
fabricante. De el n6mero deI modeto de Ia
segadora cuando io ordene.
MOTOR
LUBRICACl6N
Use solamente aceite de detergente de atta
catidad clasii_icado con ia clasificaci6n SF, SG o
SH de servicio APf, Seteccione la calidad de
viscosidad SAE seg5n su temperatura de
operaci6n esperada.
,_f.o.._,. o, =e. _ _. e_o _, i_
AVISO: A pesar de que los aceites de
multiviscosidad (5W30, t0W30, etc.) mejoran el
arranque en clima frio, estos aceites de
multiviscosidad van a aumentar el consumo de
aceite cuando se usan en temperaturas sobre
32 ° F, Revise e] nivet deI aceite deI motor mb,s a
menudo, para evitar un posible dar_o en el
motor, debido a que no tiene suficiente aceite.
Cambie el aceitedespu_s de 25horas deoperaci6n
o pot Io menos una vez al aSo si la segadora se
utiliza menos 25 horas el aSo.
Revise el nivei de] aceite del carter antes de
arrancar et motor y despu6s de cada cinco (5)
horas de uso continuado. Apriete el tap6n del
aceite en forma segura cada vez que revise el
niveI dei aceite,
PARA CAMBtAR EL ACEtTE DEL
MOTOR
AVISO: Antes de inclinar ta segadora para
drenar el aceite, drene el tanque de combustibte
haciendo correr el motor hasta que el tanque
este vacio.
, Desconecte'et alambre de la
bujia y p6ngato de modo que no pueda
entrar en contacto con _sta.
, Remueva la tapa det dep6sito del aceite;
d@jola a un lado en una superficie timpia.
,, Incline la segadora y h_gala descansar en su
lado y drene el aceite en un envase
adecuado. Mueva fa segadora de atr_.s para
adelante para remover todo el aceite que so
haya quedado atrapado dentro del motor.
,, Limpie todo el aceite derramado en la
segadora y on et tado del motor.
,, Uene el motor con aceite. Ll6nelo sotamente
hasta la ifnea de "LLENO" (FULL) en ia varilla
indicadora de nivet. NO LQ LLENE
DEMASIADO.
Vuetva a poner la tapa en el depSsito det
aceite.
,, Vuelva a eonectar el alambre de Ia buj[a a
_sta.
Envase
26
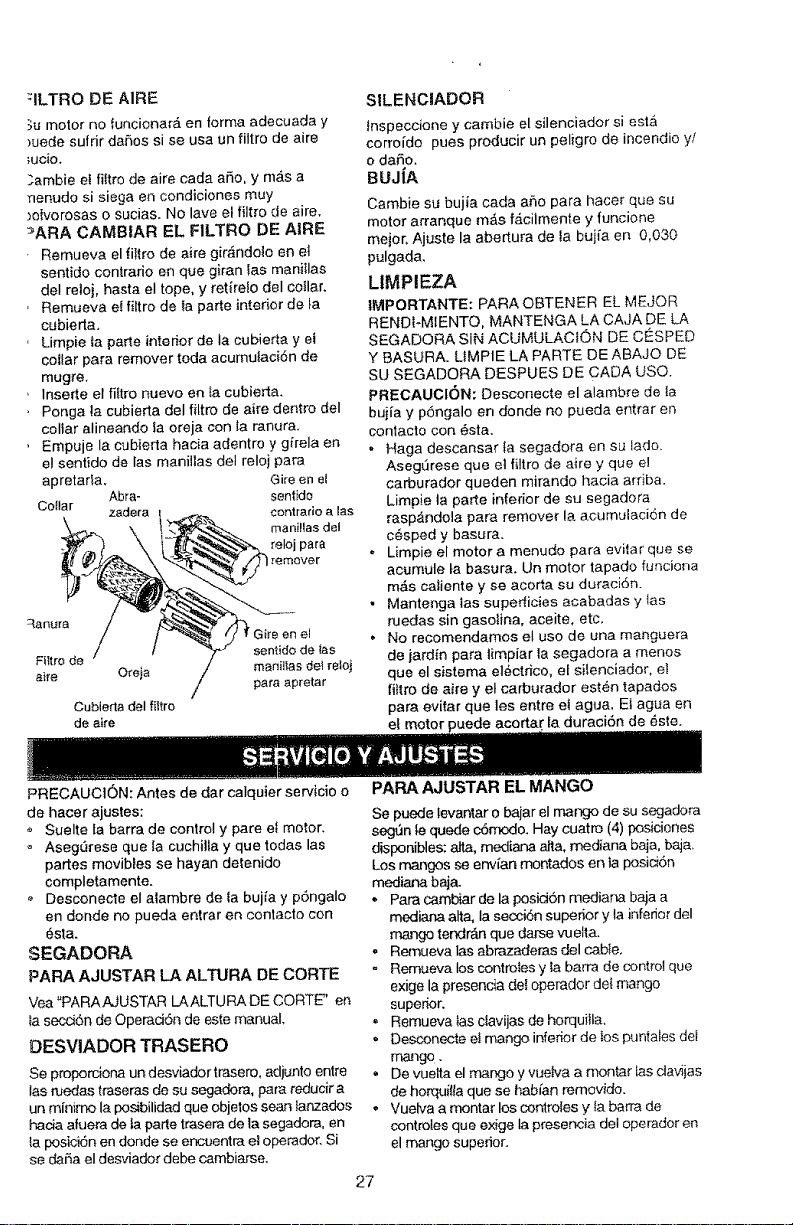
:ILTRO DE A1RE
_,umotor no funcionarA en forma adecuada y
)uede sufrir daSos si se usa un fittro de aire
;ucio.
;ambie e! fi{tro de aire cada aSo, y m&s a
'nenudo si siege en condiciones muy
)oivorosas o sucias. No lave el fittro de aire.
=ARA CAMBtAR EL FILTRO DE AIRE
Remueva el filtro de aire gir,_ndoto en el
sentido contrario en que giran las manitlas
deI reloj, hasta el tope, y retlrelo deI collar.
Remueva e{ filtro de ia parle interior de ta
cubierta.
Limpie Ia parle interior de Ja cubierta y ei
collar para remover toda aeumuiaei6n de
mugre.
Insede el filtro nuevo en ta cubierta.
Ponga la cubierta del filtro de aire dentro del
coltar alineando la oreja con ia ranura.
Empuje la cubierta hacia adentro y girela en
el sentido de Ias manillas deI relo} pare
apretada. Gire en el
Abra- sentEdo
Cotlar
zadera contrado alas
maniflas deJ
reloj para
remover
qanura
en eJ
sentido de {as
Filtre de
aire Oreia m_J{_s de_ re|e i
pare apretar
Cubierta del filtro
de aire
SILENCIADOR
Inspeccione y cambie el silenciador si est,_
corro[do pues producir un peligro de incendio y/
o dai5o,
8UJjA
Cambie sv bujta cada afio para hacer que su
motor arranque m_s f4.cilmente y funcione
meier, Aiuste la abertura de _a bujia en 0,030
pulgada.
LIMPIEZA
tMPORTANTE: PARA OBTENER EL MEJOR
RENDI-MIENTO, MANTENGA LA CAJA DE LA
SEGADORA SiN ACUMULACK_N DE CESPED
Y BASURA. UMP1E LA PARTE DE ABAJO DE
SU SEGADORA DESPUES DE CADA USO.
PRECAUCtON: Desconecte el atambre de fa
bui[a y p6ngalo en donde no pueda entrar en
contacto con 6eta.
. Haga descansar _a segadora en su lade.
Aseg6rese que et filtro de aire y que e!
carburador queden mirando hacia arriba.
Limpie ta parle inferior de su segadora
rasp_ndola para remover la acumulaci6n de
c_sped y basura.
* Limpie el motor a menudo pare evitar que se
acumute ta basura. Un motor tapado funciona
m_Sscaliente y se acorla su duraci6n.
- Mantenga tas supedicies acabadas y tas
ruedas sin gasotina, aceite, etc,
, No recomendamos et use de una manguera
de jardin para timpiar la segadora a menos
que el sistema el_ctrico, et siIenciador, el
littro de aire y el carburador est6n tapados
pare eviler que lee entre el agua, El agua en
el motor puede acorta[ la duracidn de 6ste.
PRECAUCtON: Antes de dar calquier servicio o
de haeer ajustes:
Suelte la barra de conlroi y pare el motor.
o Aseg,3rese que fa cuchilla y que todas las
partes movibtes se hayan detenido
completamente.
Desconecte el alambre de la bujia y p6ngalo
en donde no pueda entrar en contacto con
_sta.
SEGADORA
PAP-.& AJUSTAR LA ALTURA DE CORTE
Vea"PARAi_JUSTAR LAALTURA DECORTE" en
la secci'Snde Operaci6n do este manual,
DESVIADOR TRASERO
Se proporciona un desviador trasero, edjunto entre
_as ruedas traseras de su segadora, l_ara redueir a
un minimo la posibilidad que objetos sean iar.zados
hada afuera de ta parle trasera de {asegadora, en
la posici6n en donde se encuentra el operador. Si
se daSa el des_ador debe cambiarse.
PARA AJUSTAR EL MANGO
Se puede levantar o bajar el mango de su segadora
segt_n {e quede c6modo_ Hay cuatro (4) posiciones
disponibles: ella, mediana alia, mediana baja, baja,
Los mangos se env{an montados en ta pesid6n
mediana baja.
-Para cambiar de la posici6n mediana baja a
mediana ella, Ia seoci6n superior y la inferior del
mango tendr_n que darse vuelta.
o Remueva Ias abrazaderas del cable.
- Remueva los contmtes y la barra de contro! que
exige la presencia del operador det mango
superior.
• Remueva tas ciavijas de horquilta,
• Desconecte el mango inferior de los puntales dei
mango.
• De vuelta el mango y vuelva a reenter ias davijas
de horquilla que se habian removido.
• Vuelva a montar los controies y Ia barra de
controles que exige Ia presencia det operador en
el mango superior.
27
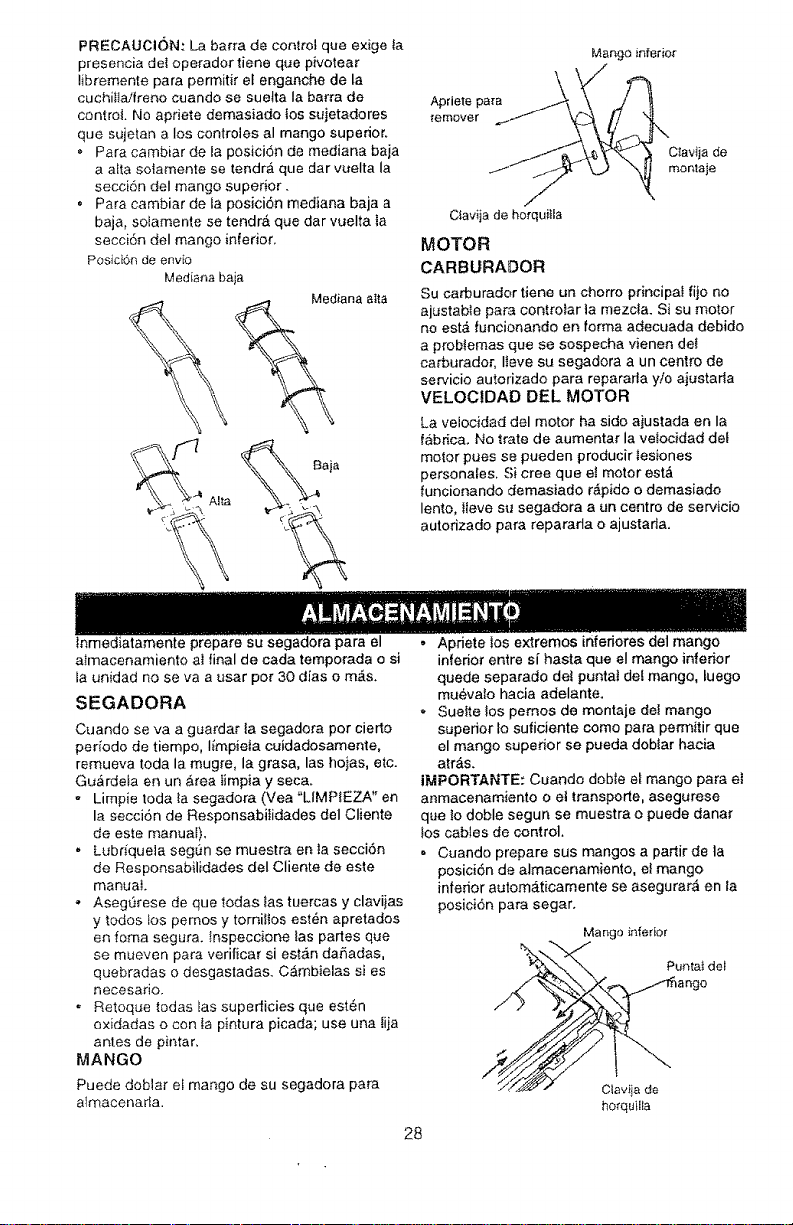
PRECAUCION: La barra de control que exige la
presencia del operador tiene que pivotear
libremente para permitir et enganche de la
cuchilla/freno cuando se suetta Ia barra de
controi. No apriete demasiado los sujetadores
que sujetan a Ios controles al mango superior.
• Para cambiar de la posici6n de mediana baja
a alia soiamente se tendr,& que dar vuelta la
secci6n deI mango superior.
• Para cambiar de Ia posicibn mediana baja a
baja, solamente se tendr& que dar vuelta la
secci6n deI mango inferior,
Posici6n de envio
Mediana baia
_idiana atta
Alta
Mango inferior
Ciavija de ho_quiila
MOTOR
CARBURADOR
Su catburador tiene un chorro principal fiio no
ajustable para controlar ta mezcta. Si su motor
no estA funcionando en forma adecuada debido
a probtemas que se sospecha vienen deI
carburador, Iteve su segadora a un centro de
servicio autorizado para repararta yio ajustarla
VELOCIDAD DEL MOTOR
La velocidad del motor ha sido ajustada en Ia
fabrica. No trate de aumentar la velocidad det
motor pues se pueden producir tesiones
personales. Si cree queet motor estA
funcionando demasiado r,_pido o demasiado
lento, Ileve su segadora a un centro de servicio
autorizado para repararta o ajustafla.
inmediatamente prepare su segadora para el
aimacenamiento al final de cada temporada o si
la unidad no se va a usar per 30 dias o mA&
SEGADORA
Cuando se va a guardar la segadora pot cierto
per_odo de tiempo, Iimpiela cuidadosamente,
remueva toda la mugre, la grasa, las hojas, etc.
Guardeta en un Area timpia y seca.
o Limpie toda ta segadora (Vea "LtMPIEZA" en
la secci6n de Responsabifidades del Cliente
de este manual).
Lubriquela seg6n se muestra en Ia secci6n
de Responsabilidades del Cliente de este
manual
• Asegt_rese de que todas Ias tuercas y claviias
y todos tos pemos y torni_tos est_n apretados
en foma segura, inspeccione las partes que
se mueven para verificar si est&n da,_adas,
quebradas o desgastadas. Cambielas si es
necesado.
, Retoque todas las superficies que est6n
oxidadas o con ta pintura picada; use una Iija
antes de pintar.
IVIANGO
Puede doblar el mango de su segadora para
almacenarta.
28
o Apriete Ios extremos inferiores del mango
inferior entre si hasta que eI mango inferior
quede separado de! puntaI del mango, luego
muevaIo hacia adelante.
o Suelte los pemos de montaje del mango
superior Io suficiente como para permitir que
el mango superior se pueda dobiar hacia
arras.
IMPORTANTE: Cuando doble e_ mango para et
anmacenamiento o et transporte, asegurese
que lo doble segun se muestra o puede danar
tos cables de control.
. Cuando prepare sus mangos a partir de la
posici6n de almacenamiento, el mango
inferior automaticamente se asegurar,_ en la
posici6n para segar°
Mango inferior
_>'_ Punta_ de,
horquilfa
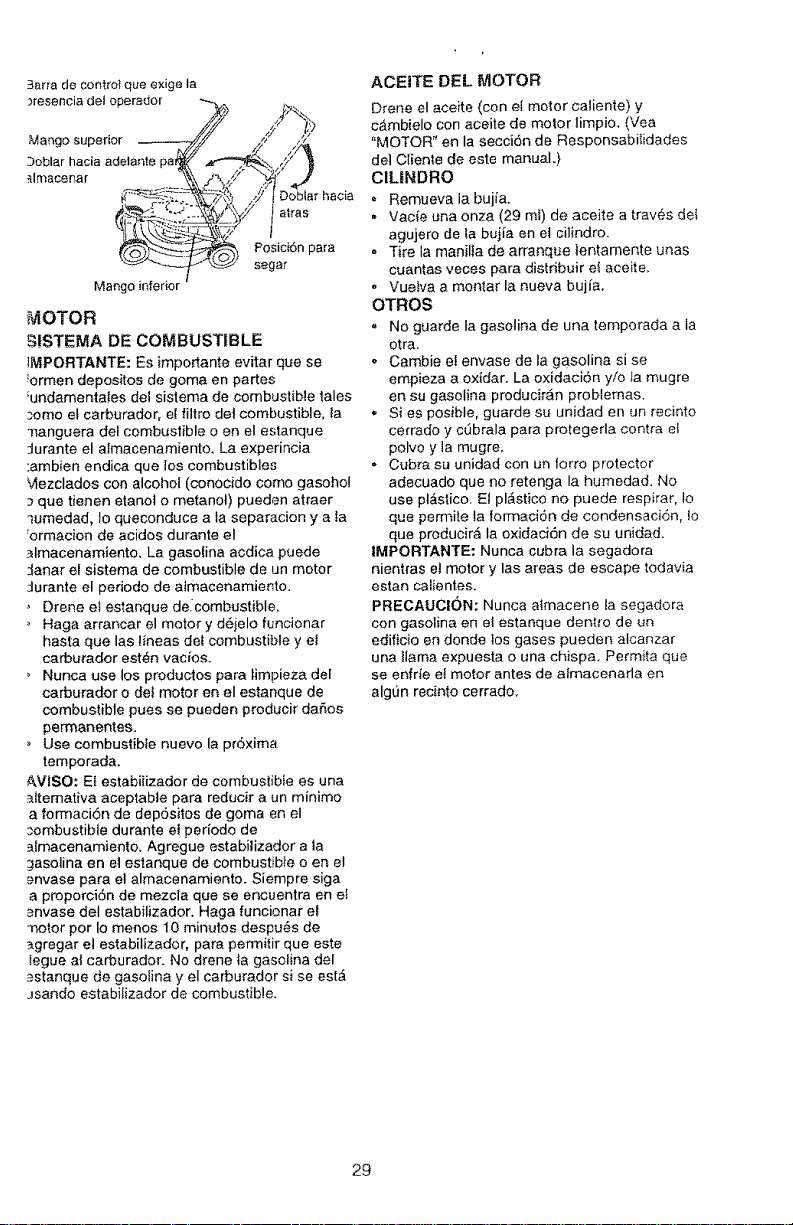
£arradecontrolqueexigeIa
_resenciadetoperador---_-,^ ,_._
/7
=°ogo=°po,,o,----S/ ,/'
tlmacenar "_\ ,p%i,:Y "_._' ,I
__:_ /9 IDobla_"hacia
. "y =og=,
MangO ifllef!or
MOTOR
_ISTEMA DE COMBUSTIBLE
tMPORTANTE: Es importante evitar que se
_ormen depositos de goma en partes
;undamentaIes del sistema de combustible tales
_omo et carburador, e{ filtro del combustible, {a
"nanguera del combustible o en el estanque
Jurante el a/macenamiento. La experineia
:ambien endica qua los combustibles
k4ezclados con alcohol (conocido como gasohoi
que tienen etanol o metanot) pueden atraer
'_umedad, lo queconduce ala separacion y ala
_ormacion de acidos durante el
Nmacenamiento. La gasoiina acdica puede
:tanar el sistema de combustible de un motor
turante el pedodo de atmacenamiento.
Drene eI estanque de_combustible,
Haga arrar_car el motor y d6jelo funcionar
haste que las lineas de! combustible yet
carburador est6.n vacios.
Nunca use los productos pare timpieza del
carburador o del motor en el estanque de
combustible pues se pueden producir daSos
permanentes.
, Use combustible nuevo la pr6xima
temporadao
#,VISO: Et estabiiizador de combustibie es una
_ltemativa aceptabte pare reducir a un minimo
a formaci6n de dep6sitos de goma en el
3ombustible durante el perfodo de
_{macenamiento. Agregue establizador ata
;lasotna en et estanque de combustible o en el
_nvase pare et almacenamiento. Siempre siga
a proporci6n de mezcla que se encuentra en el
_nvase del estabilizador, Haga funcionar el
notor per Io menos 10 minutos despu6s de
_gregar el estabilzador, pare permitir que este
tegue a{ carburador. No drene ta gasoline del
_stanque de gasolna y el carburador si se est,_
Jsando establizador de combustible.
ACEtTE DEL MOTOR
Drene el aceite (con el motor caliente) y
c£mbielo con aceite de motor limpio, (Vea
"MOTQR" en Ia secci($n de Responsabilidades
del Cliente de este manual,)
CILtNDRO
* Remueva ia bujia,
, Vacfe una onza (29 mi) de aceite a trav6s del
agujero de ta bujfa en et ciliridro.
o Tire ta manila de arranque tentamente unas
cuantas veces pare dislribuir e! aceite,
o Vuetva a montar la nueva bujfa.
OTROS
No guarde Ia gasolina de una temporada ata
otra.
- Cambie et envase de ta gasolina si se
empieza a oxidar. La oxidaci6n yio ta mugre
en su gasolina producir_n problemas.
. Si es posible, guarde su unidad en un recinto
cerrado y ctibrala pare protegerla contra el
polvo y la mugre,
o Cubra su unidad con un forro protector
adecuado que no retenga la humedad. No
use pt&stico. Et pl_lstico no puede respirar, Io
que permite I8 formaci6n de condensaci6n, Io
que producir__ Ia oxidaci6n de su unidad.
IIItPORTANTE'. Nunca cubra la segadora
nientras e! motor y las areas de escape todavia
estan calientes.
PRECAUCl6N: Nunca almacene la segadora
con gasoline en el estanque dentro de un
edificio en donde los gases pueden alcanzar
una llama expuesta o una chispa. Permita que
se enfrie el motor antes de almacenada en
algtTn reeinto cerrado,
29
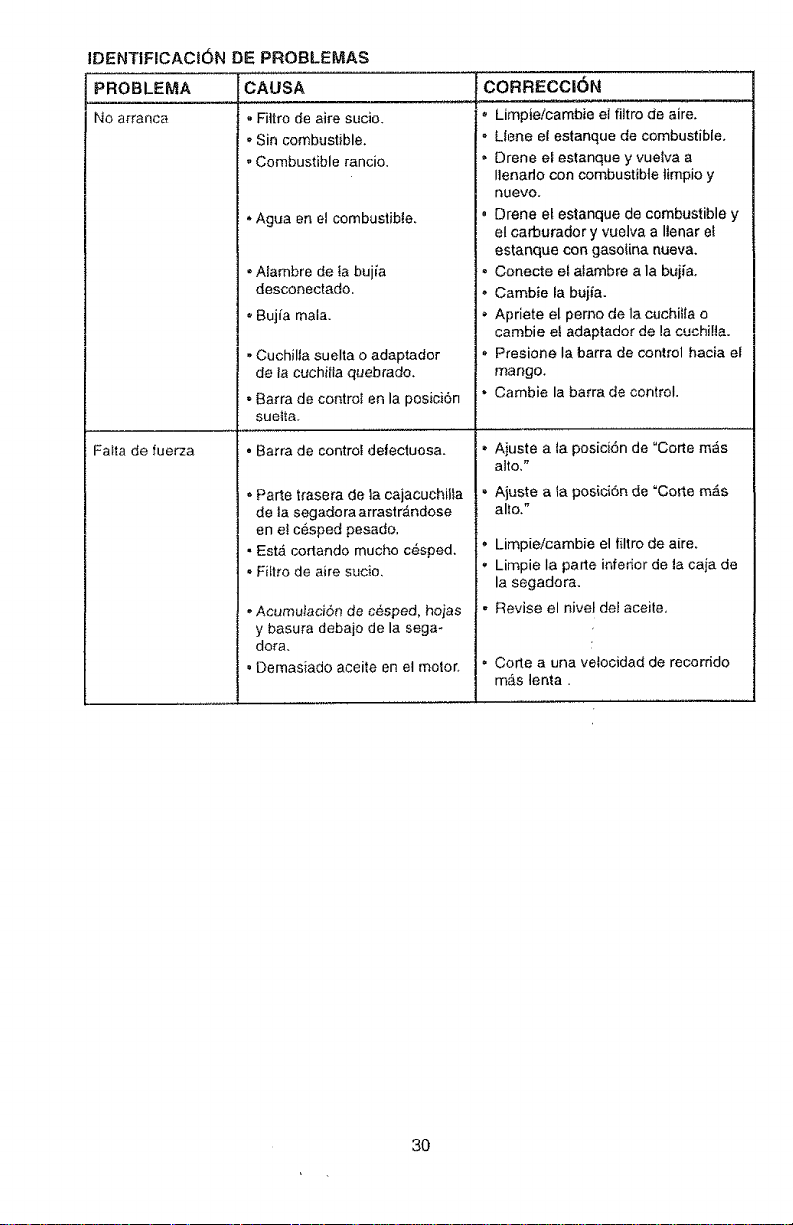
IDENT|FICACi_N DE PROBLEMAS
PROBLEMA CAUSA
No arranca
Fatta de fuerza
,, Fittro de aire sucio.
o Sin combustible.
oCombustible rancio.
•Agua en et combustible.
• Alambre de fa bujia
desconectado,
Bujia mala.
- Cuchilla suelta o adaptador
de la cuchilta quebrado.
• Barra de controt en la posici6n
suetta.
CORRECCI6N
- =............
,, Lirnpieicambie ei filtro de aire.
, Llene et estanque de combustible.
,, Drene el estanque y vuelva a
Ilenado con combustible limpio y
nuevo.
• Drene el estanque de combustible y
el carburador y vuelva a Ilenar el
estanque con gasoiina nueva.
. Conecte et alambre a la bujia.
o Cambie la bujia.
• Apriete el pemo de la cuchitia o
cambie ef adaptador de la cuchifia.
,, Presione Ia barra de control hacia el
mango.
- Cambie la barra de control.
• Barra de control detectuosa. . Ajuste a ta posici6n de "Corte mas
. Parte t_asera de la cajacuchilta
de ia segadoraarrastr&ndose
en et cesped pesado,
• Est& cortando mucho c_sped.
- Filtro de aire sucio,
. Acumulaci6n de cesped, hojas
y basura debajo de la sega-
dora.
• Demasiado aceite en et motor.
atto."
,, Ajuste a ta posici6n de "CoRe m_s
alto."
. Limpieicambie el filtro de aire.
. Limpie ia parte infedor de ta caja de
la segadora.
- Revise el nivel deJ aceJte,
Corte a una velocidad de recorfido
m#,s lenta.
3O

PROBLEMA
Aalcorte -dispareio
Vibraci6n excesiva
Cord6n arrancador
dificil de tirar
Recogedor de c6sped
no se tlena (si viene
equipado)
DificiI de empujar
CAUSA OORRECClON
Cuchilta desgastada, doblada o
suelta.
Altura de tas ruedas disparej&
Acumulaci6n de cesped, hojas o
basura debajo de Ia segadora,
Cuchilla desgastada, doblada o
sueita.
Ciguedal dot motor doblado,
* Ei freno deI volante del motor
est_ aplicado cuando se suelta
la barra de control.
, Cigueiiat del motor doblado.
, Adaptador de la cuchilla
quebrado.
* La cuchilIa se arrastra en et
cesped.
Altura de corte demasiado
baja.
Levantamiento de fa cuchitla
desgastado.
Recogeder sin ventilaci6n de
aire.
Et c_sped est#, demasiado alto
o la altura de la rueda dema-
siado baja.
Parle trasera de ta cajaicuchiila
de la segadora arrastrAndose
en et c_sped.
Recogedor de c_sped dema-
siado ileno,
Posici6n de la aitura deI mango
no adecuada para usted,
Cambie ta cuchilla. Apriete ei
pemo de ta cuchilia.
Ajuste todas las ruedas a {a
misma aitura.
Limpie la parte inferior de la caja
de ta segadora.
Cambie la cuchitla. Apriete el
pemo de la cuchilla,
P6ngase en tentacle con su
centre de servicio autodzado
m_s cercano.
Presione la barra de control
hacia et mango superior antes de
tirar el cordSn arrancador.
P6ngase en contacto con su
centre de servicio autorizado
m&e cercano.
Cambie ef adaptador de la
cuchi!!a,
Mueva ia segadora a un lugar en
donde el c_sped ha side corlade
o a una supefficie firme para
hacer arrancar el motor.
Eieve ta attura de corle.
Cambie la cuchiltas.
Limpie el recogedor de cesped.
EIeve ia aitura de corte.
Eieve ta parle trasera de la caja de
la segadora (t) un tugar m_s alto,
Vacie el recogedor de c_sped.
Ajuste la altura deI mango de
mode qua le acomode.
3t
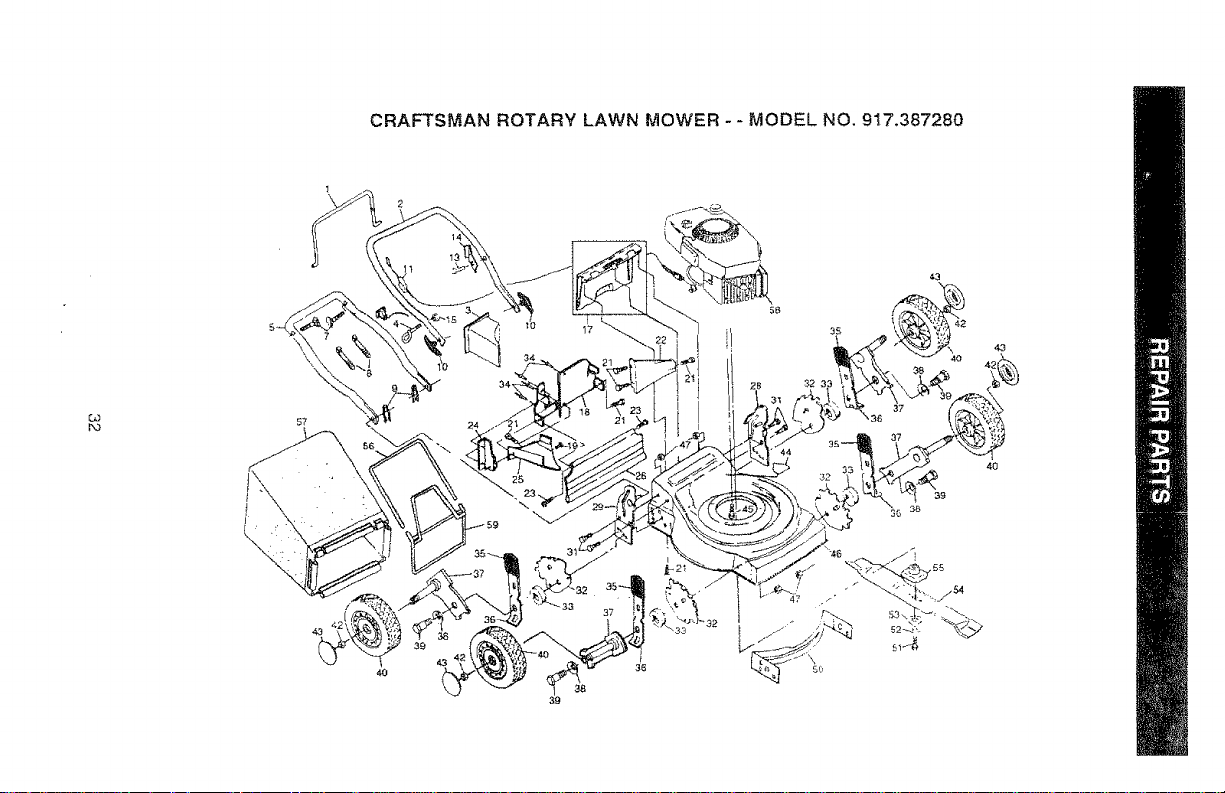
CRAFTSMAN ROTARY LAWN MOWER - - MODEL NO. 9_7.387280
oJ
\
\
\
32 3_
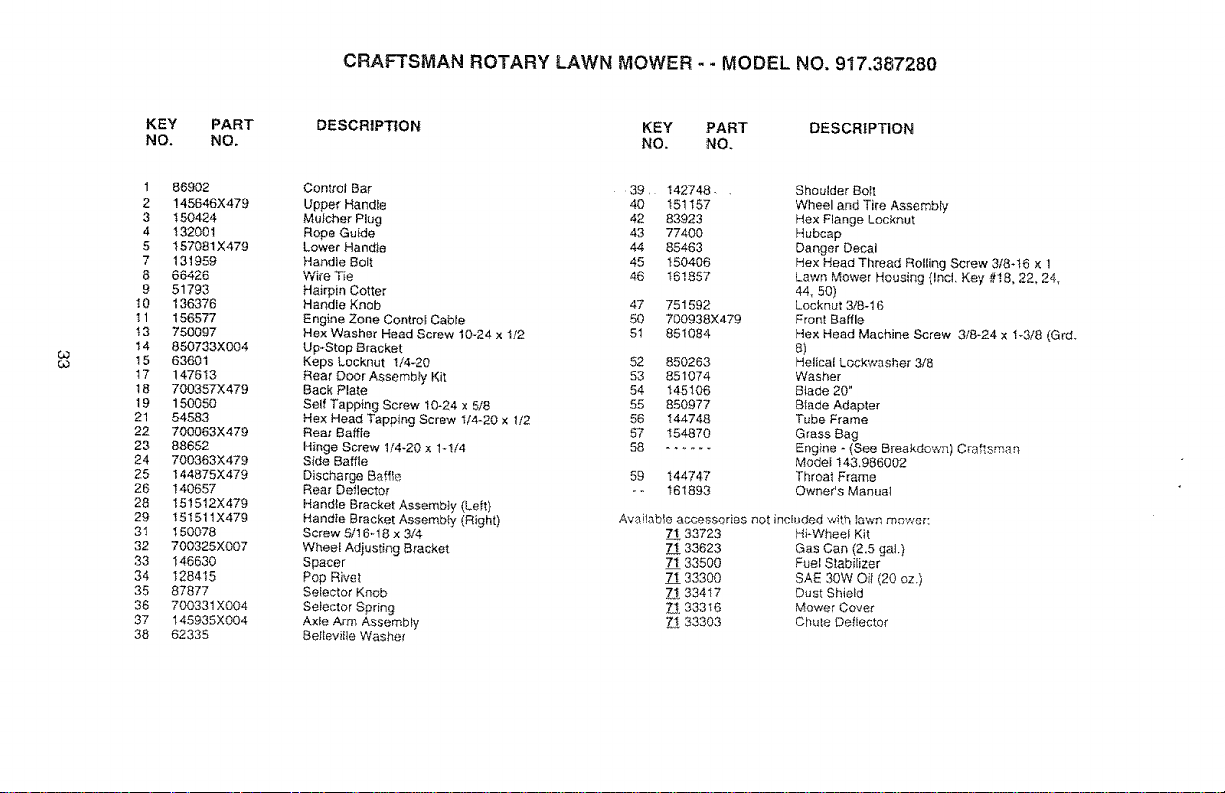
CRAFTSMAN ROTARY LAWN MOWER - - MODEL NO. 917.387280
KEY
NO.
PART
NO.
DESCRIPTION KEY PART DESCRiPTiON
NO. NO.
1
2
3
4
5
7
8
9
t0
11
t3
14
15
t7
t8
19
21
22
23
24
25
26
28
29
3I
32
33
34
35
36
37
38
86902
!45646X479
150424
132001
157081X479
131959
66426
51793
136376
156577
750097
850733X004
63601
147613
700357X479
150050
54583
700063X479
88652
700363X479
t44875X479
140657
t51512X479
151511X479
150078
700325X007
146630
128415
87877
700331X004
145938X004
62335
Control Bar 39, 142748..
Upper Handie 40 t51157
Muieher Plug 42 83923
Rope Guide 43 77400
Lower Handle 44 85463
Handle Bolt 45 150406
Wire Tie 46 161857
Hairpin Cotter
Handle Knob 47 751592
Engine Zone Contro_ Cable 50 700938X479
He× Washer Head Screw 10-24 x t/2 51 851084
Up-Stop Bracket
Keps Locknut 1/4-20 52 850263
Rear Door AssembLy Kit 53 851074
Back Plate 54 145106
Self Tapping Screw 10-24 x 5/8 55 850977
He× Head Tapping Screw I/4-20 x !/2 56 144748
Rear Bafffe 57 154870
Hinge Screw 1/4-20 x 1-I/4 58 ......
Side Baffle
Discharge Baffle 59 144747
Rear Deflector - - 161893
Hand{e Bracket Assembty (Left)
HandIe Bracket Assembty (Right}
Screw 5/16-18 x 3/4
Wheel Adjusting Bracket
Spacer
Pop Rivet
Selector Knob
Selector Spring
AxIe Arm Assembly
Beflevil]e Washer
Shoulder BofI
Wheel and Tire Assembly
Hex Flange Locknut
Hubcap
Danger Decal
Hex Head Thread Rolling Screw 3/8-16 × 1
Lawn Mower Housing (Incl. Key #!8, 22, 24,
44, 50)
Locknut 3/8-16
Front Baffle
Hex Head Machine Screw 3/8=24 x 1 _3/8 (Grd.
8)
Helical Lockwasher 3/8
Washer
B{ade 20"
BIade Adapter
Tube Frame
Grass Bag
Engine - (See Breakdown) Craftsman
Model 143,986002
Throat Frame
Owr_er's Manual
Avaitable accessories not included with Iawn mower:
71 33723 Hi-Whee_ Kit
7t 33623 Gas Can (2.5 gat.}
7t 33500 Fuel Slabilizer
7! 33300 SAE 30W Oit (20 oz.)
33417 Dust Shield
Z! 33316 Mower Cover
7t 33303 Ch_te Deflector
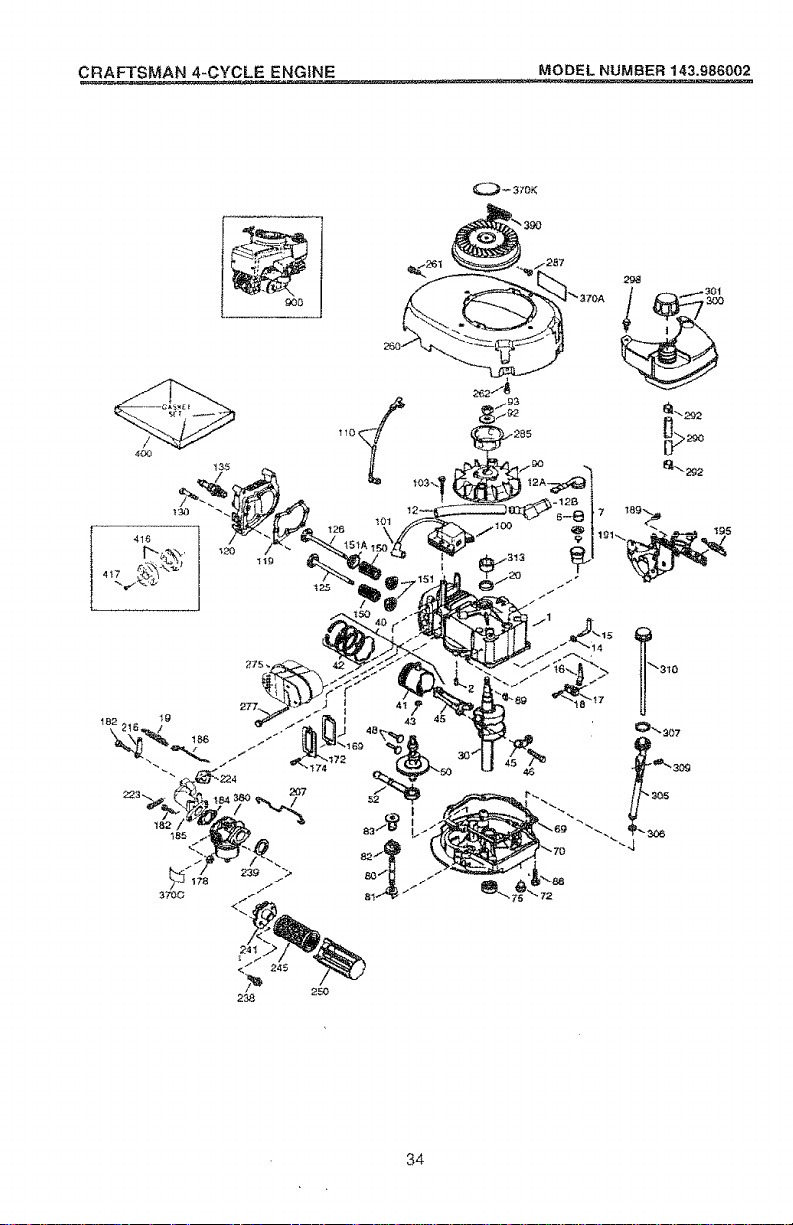
CRAFTSMAN 4-CYCLE ENGINE MODEL NUMBER 143.986002
40O
1-35
I82 lg
250
34
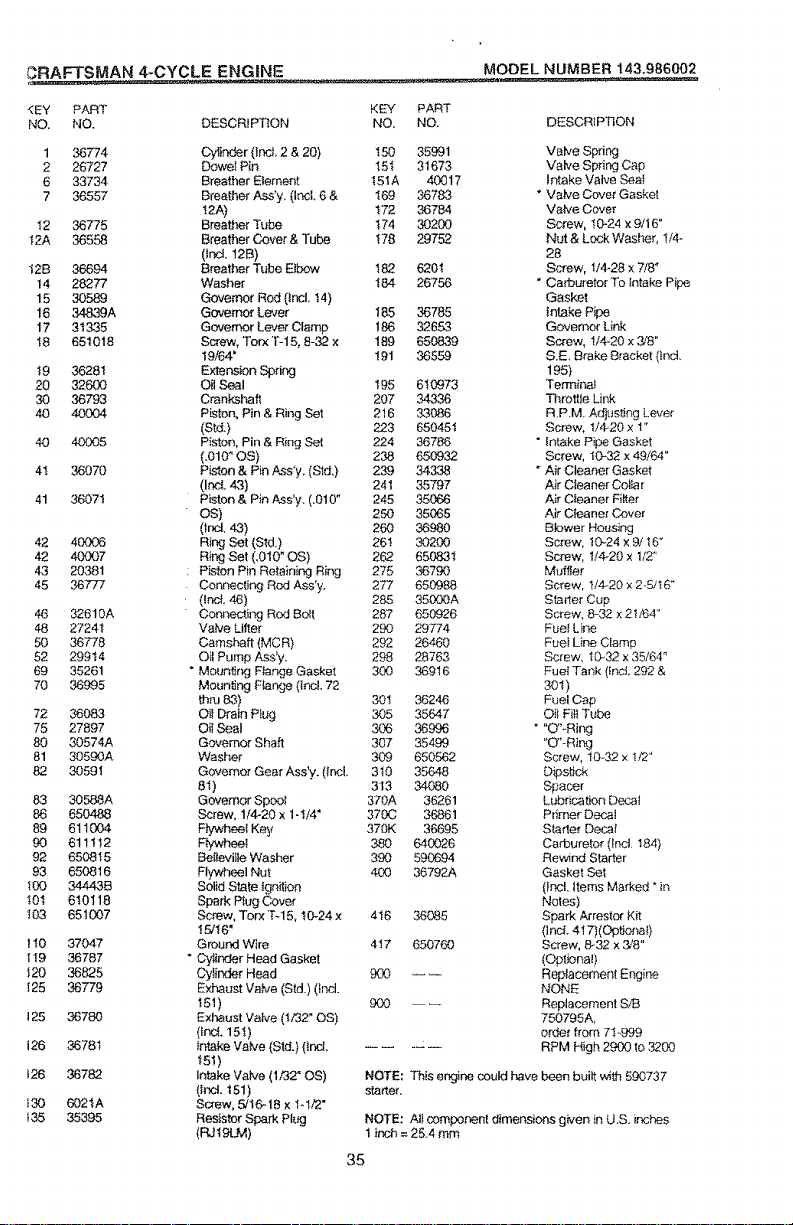
_RAFT_MAN4-CYCLE ENGINE MODEL NUMBER 143,986002
<EY PART
NO. NO. DESCRIPTION
1
2
6
7
36774
26727
33734
36557
I2 36775
t2A 36558
12B 36694
14 28277
15 30589
16 34839A
17 31335
18 651018
19
2O
3O
4O
4O
4t
42
42
43
45
46
48
5O
52
69
7O
72
75
8O
81
82
83
86
89
9O
92
93
100
_01
I0.3
ti0
t19
$20
[25
125
126
b26
_30
_35
36281
32600
36793
40OO4
40005
36070
36071
40006
4O0O7
20381
36777
32610A
27241
36778
29914
35261
36995
36083
27897
30574A
3059OA
30591
30588A
650488
611004
611112
650815
650816
34443B
610118
651007
37047
36787
36825
36779
36780
36781
36782
602tA
35395
KEY PART
NO. NO. DESCR_PTION
Cy{inder (IncL 2 & 20) t50 35991 Valve Spring
Dowel Pin t5I 31673 Valve Spring Cap
Breather Element 151A 40017 Intake Valve SeaI
Breather Ass'y, (Incl. 6 & 169 36783 * Valve Cover Gaske!
12A) 172 36784 Valve Cover
Breather Tube 174 30200 Screw, I0.-24 x 9/16"
Breather Cover & Tube !78 29752 Nut & Lock Washer, l/4-
(Ira,12B) 28
Breather Tube Elbow t 82 620t Screw, !/428 x 7/8"
Washer !84 26756 * Carburetor To _ntake Pipe
Governor Rod (Incl. t4) Gasket
Governor Lever 185 36785 intake Pipe
Governor Lever Clamp t 86 32653 Governor Link
Screw, Torx T-15, 8-32 x 189 650839 Screw, 1/4-20 x 3/8"
19/64" 191 36559 S.E, Brake Bracket (Ind.
Extension Sprir_ 195)
Oil Seal t95 610973 Termir_l
Crankshaft 207 34336 Throttle Link
Piston, Pin & Ring Set 216 33086 R.P.M Adjus_ng Lever
(Std.) 223 650451 Screw, t/4,20 x 1"
Piston, Pin & Ring Set 224 36786 " intake Pipe Gasket
(.010" OS) 238 650932 Screw, 10-32 x 49/64"
PL-_on & Pin Ass'y. (Std.) 239 343,38 "Air Cleaner Gasket
(Irt_. 43) 241 35797 Air C_eaner Oolia_
piston & Pin Ass'y. (.010" 245 35066 A_r Cleaner Fimter
OS) 250 35065 Air C_aner O3ver
(thcl, 43) 260 36980 Blower Housing
Ring Set (Std,) 26! 30200 Screw, I0_24 x 9/t6"
Ring Set (,010" OS) 262 650831 Screw, I/4-20 x 1/2"
Piston Pin Retaining Ring 275 36790 Muffler
Connecting Rod Ass'y. 277 650988 Screw, 1/4-20 x 2-5,q 6"
(Inof. 46) 285 35000A Starter Cup
Connecting ROd Bott 287 65(_26 Screw, 8-32 x 2 t/64"
Vaive Lifter 290 29774 Fuet Line
Camshaft (MCR) 292 26460 Fue_ Line Clamp
Oil Pump Ass'y, 298 28763 Screw, I0.32 x 35/64 _
" Mounting F_ange Gasket 300 36916 Fuel Tank (tncL 292 &
Mounting Flange (Incl. 72 30t)
_htu 83) 30t 36246 Fuel Cap
Oft Drain Plug 305 35647 Oil Fiit Tube
Oil Seal 306 36996 * "O"_Ring
Govemor Shaft 307 35499 "O"- Ring
Washer 309 650562 Screw, 10-32 x 1/2"
Governor Gear Ass'y, {incl. 3t0 35648 Dips#ck
8t) 3t3 34080 Spacer
Governor Spool 370A 36261 Lubrication Deca_
Screw, 1/4-2{3 x 1-1/4' 370C 36861 Pdmer Decal
F_rwl-_eel Key 370K 36695 Stader Decat
F_y_¢_.e_ 380 640026 Carburetor (_nc[ 184)
Bei_eville Washer 390 590694 Rewind Starter
Flywheel Nut 40,0 36792A Gasket Set
Solid State tge_ion (_ncl, Items Marked" in
Spark Pfug Oover Notes)
Screw, Torx %15, t0-24 x 416 36085 Spark Arrestor K_
15/t6' (IncL 417){Optio_at)
Ground Wire 4t7 650760 Screw, 8-32 x 2_'8"
" C¥_nder Head Gasket (Opt©nal)
Cytinder Head 900 -- _ Replacemen_t Engir, e
Exha_st Valve (Std.) (Incl. NONE
151 ) 900 -- _ Replacement SF8
Exhaust Valve (t/32" OS) 750795A,
(ted, 15t ) order from 7I-999
intake Valve (Std.) (Ind. RPM High 2900 to 3200
t51)
Intake Valve (1/32" OS) NOTE: This engine could have been bufft with 590737
(Ir_. t51) starter.
Screw. &t16-18 x I-t/2"
Resistor Spark PIug NOTE: Att component dimensions given in U,S, inches
(RJf9LM) 1 ir'_J_ = 25.4 mm
35
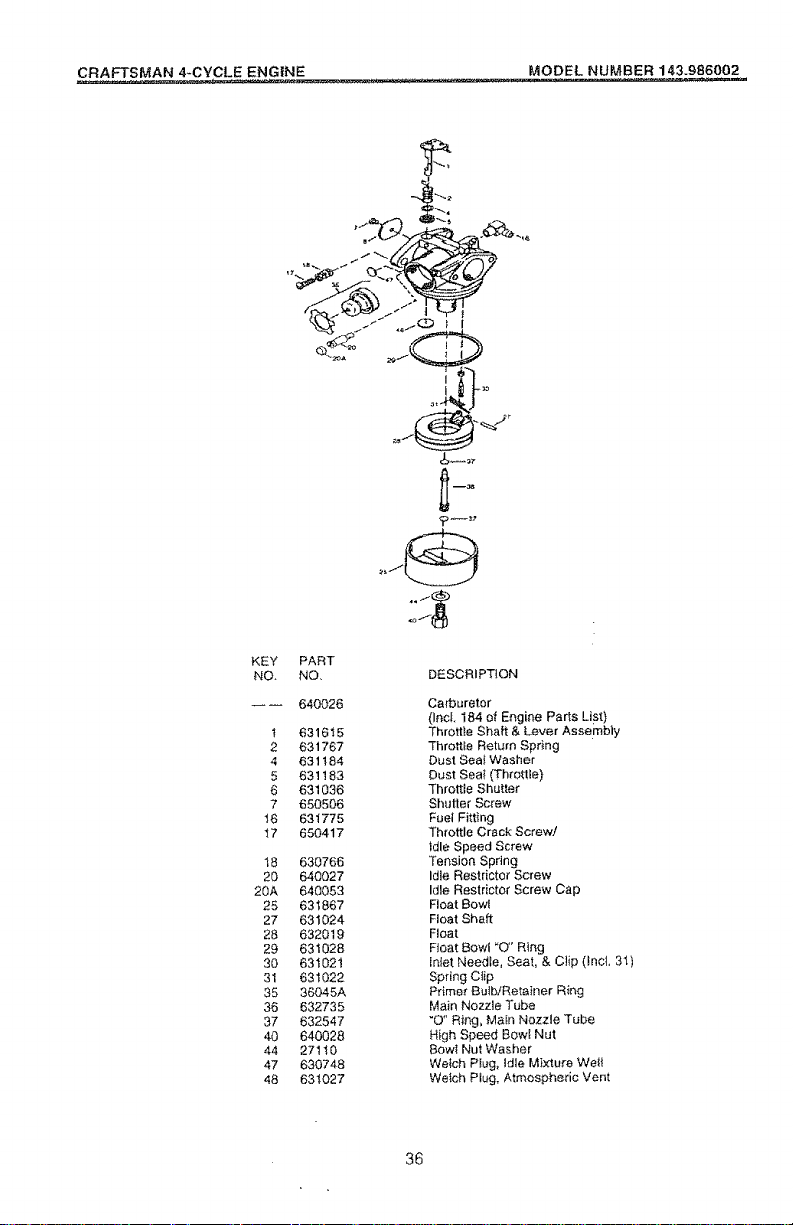
CRAFTSMAN 4-CYCLE ENGINE MODEL NUMBER 143.986002
KEY
NO,
I
2
4
5
6
7
t6
17
18
20
20A
25
27
28
29
30
31
35
36
37
40
44
47
48
PART
NO, DESCFIIPT_ON
640026
631615
631767
631184
631183
631036
650506
631775
650417
630766
640027
640053
631867
631024
632019
631028
631021
631022
36045A
632735
632547
640028
27110
630748
631027
Carburetor
(IncL t84 of Engine Parts List)
Throttle Shaft & Lever Assembly
Throttte Return Spring
Dust Seat Washer
Dust Seal (Throttle)
Throttle Shutter
Sl_utter Screw
Fuel Fitting
Throttle Crack Screw/
_dleSpeed Screw
Tension Spring
Idle Restrictor Screw
Idle Restrictor Screw Cap
Float BowI
Float Shaft
Float
Float Bowl _O" Ring
inter Needle, Seat, & Clip ($nct, 31)
Spring C_ip
Prime_ Bulb/Retainer Ring
Main Nozzle Tube
"O" Ring, Main Nozzle Tube
High Speed BowI Nut
8owt Nut Washer
Welch PIug, Idle Mixture Wet/
Wetch Piug, Atmospheric Vent
36
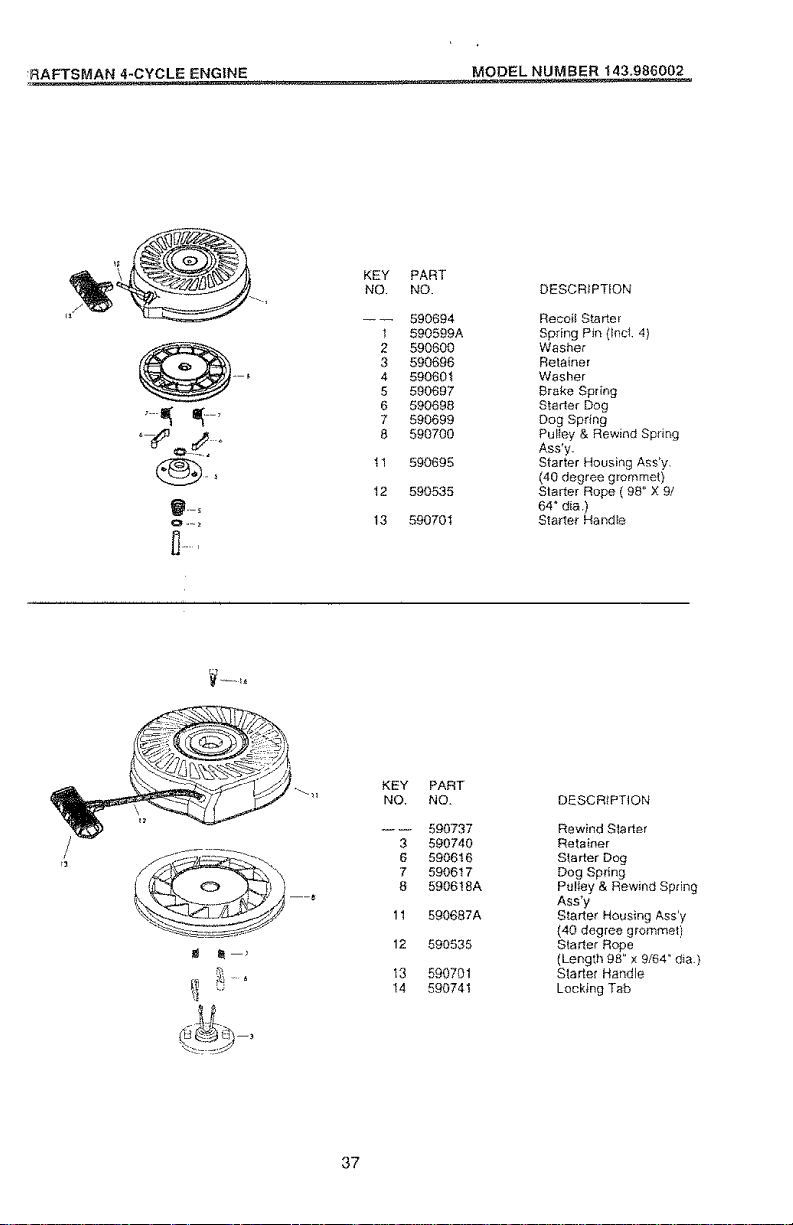
RAFTSMAN 4-CYCLE ENGINE MODEL NUMBER 143,986002
....=; .;--,
KEY
NO.
I
2
3
4
5
6
7
8
tl
t2
13
PART
NO.
590694
590599A
590600
590696
590601
590697
590698
590699
590700
590695
590535
590701
DESCRfPTION
RecoiI Starter
Spring Pin (h_ct. 4}
Washer
Retainer
Washer
Brake Spring
Starter Dog
Dog Spring
PuIIey& Rewind Spring
Ass'y_
Starter Housing Ass'y,
(40 degree grommet}
Starter Rope ( 98" X 9/
64" die.)
Starter Handte
KEY PART
NO. NO.
590737
3 590740
6 590616
7 590617
8 590618A
11 590687A
12 590535
13 590701
14 590741
DESCRIPTION
Rewind Starter
Retainer
Starter Dog
Dog Spring
Pulley & Rewind Spdng
Ass'y
Starter Housing Ass'y
(40 degree grommet)
Starlet Rope
(Length 98" x 9/64" die.)
Starter Handle
Locking Tab
37

38

39

For the [epair or replacement parts you need
delivered directly to your home
Call 7 am - 7 pm, 7 days a week
1-800-366°PART
(1-800-366-7278)
Para ordenar piezas con entrega a
domicilio - 1-800-659-7084
For in-house major brand repair service
CalI 24 hours a day, 7 days a week
1-800-4-REPAIR
(1-800-473-7274)
Para pedir servicio de reparaci6n a
domicilio - 1-800-676-5811
For the location of a Sears Parts and
Repair Center in your area
Call 24 hours a day, 7 days a week
1-800-488-1222
For informalion on purchasing a Sears
Maintenance Agreement or to inquire
about an existing Agreement
Catt 9 am - 5 pm,Monday-Saturday
1-800-827-6655
When requesting service or ordering
parts, always provide the fottowing
information:
• Product Type +Part Number
. Model Number . Part Description
America's Repair Specms_sfs
161893 REV.2 02.03.98 VB Printed in U.S.A.