
1 | 18
User Manual of KeyboardEmulator
Version: 1.0.0
2 | 18
Introduction
This document aims to guide customers on how to use KeyboardEmulator.
KeyboardEmulator is internal software application to test barcode-scanning and
RFID-reading function. Meanwhile, it can be used in some basic business scenarios
depending on customer’s choice.
In KeyboardEmulator, there’re four main sections and one addition function part.
Following we will introduce one by one. Please review this document for more
information and details.

3 | 18
Contents
1.0 Function
..................................................................................................................
4
1.1 Barcode
..............................................................................................................
4
1.2 UHF
...................................................................................................................
5
2.0 AppSettings
.............................................................................................................
5
2.1 Basic Function
...................................................................................................
6
2.2 Process mode
.....................................................................................................
7
2.3 End mark
...........................................................................................................
7
2.4 Data Format
.......................................................................................................
8
2.5 Continuous scan
................................................................................................
9
2.6 Virtual Scan button
.........................................................................................
10
2.7 Factory data reset
............................................................................................
10
2.8 Save log
...........................................................................................................
11
3.0 2DSettings
.............................................................................................................
11
3.1 Base setting
.....................................................................................................
11
3.2 Common Barcodes
..........................................................................................
12
3.3 Adding parameters
..........................................................................................
13
4.0 Addition Functions
..............................................................................................
14
4.1 QR code-WIFI
.................................................................................................
15
4.2 QR code-ScannerConfig
.................................................................................
15
4.3 Black white list
................................................................................................
16
4.4 Version Update
................................................................................................
16
4 | 18
4.5 Firmware upgrade
...........................................................................................
17
4.6 Barcode Test
....................................................................................................
18
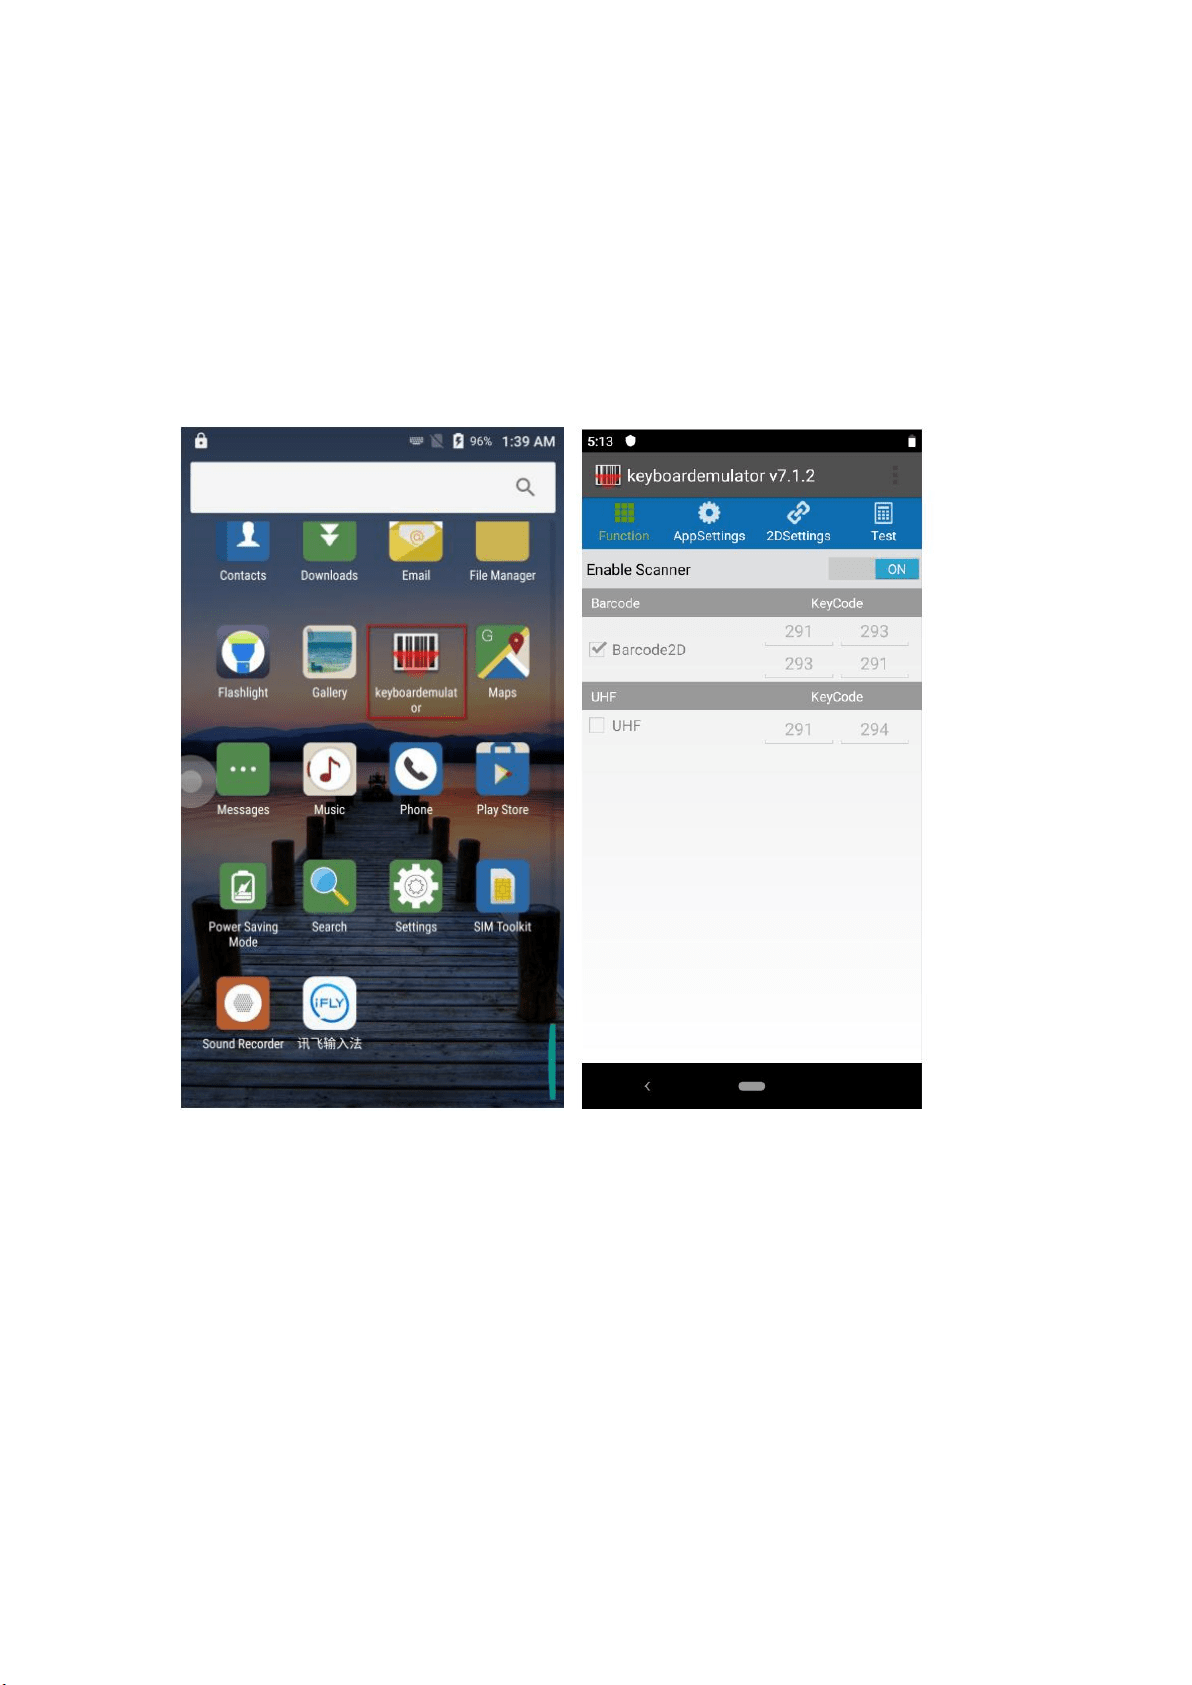
1.0 Function
There’re 2 main parts under this section, one is for Barcode, the other one is
for UHF.
By following, we show you how to trigger side-button/pistol to trigger
barcode-scanning or RFID-reading.
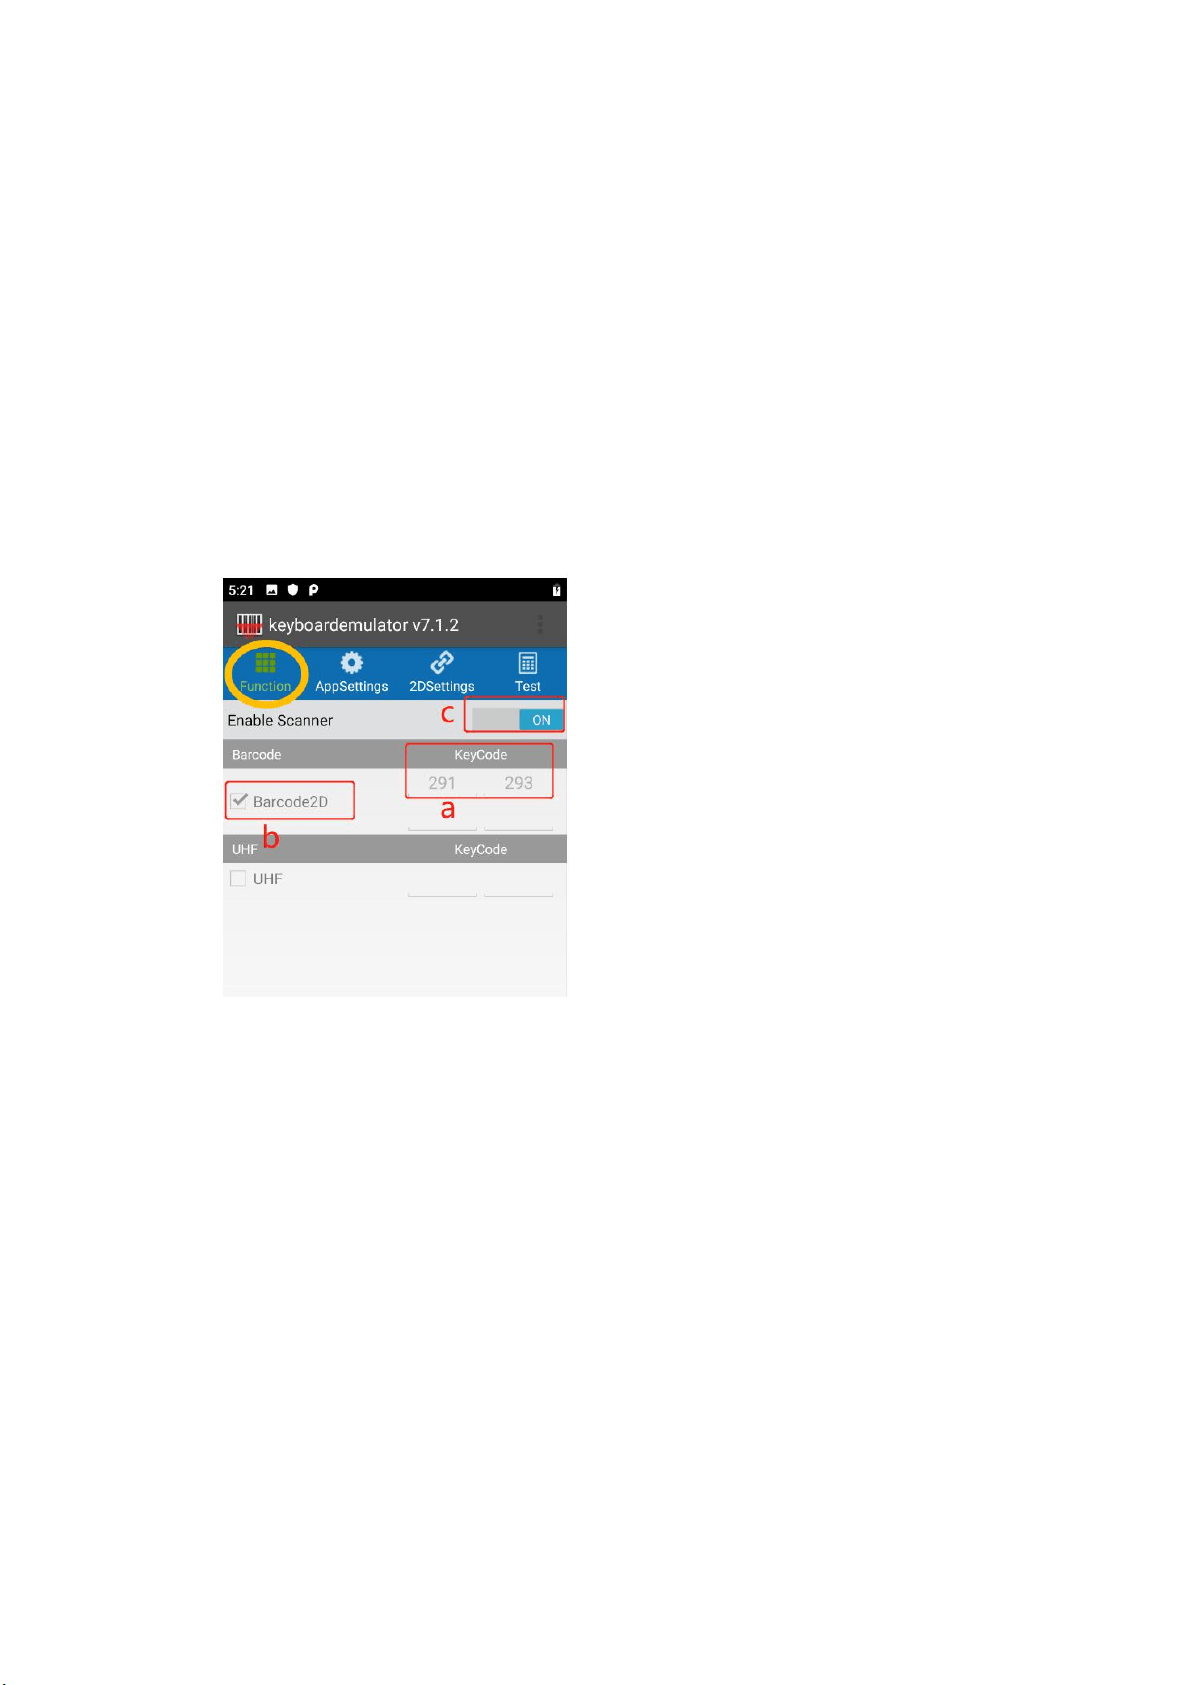
1.1 Barcode
If customers would like to use side button/pistol to trigger Barcode-reading,
please follow below steps:
a. – put the cursor on the input box, then press side button/pistol, its
key-code will appear automatically.
b. – tick the checkbox of barcode.
c. – toggle Off to On.
After finish above steps, then you can use side button/pistol to trigger
barcode-scanning.
5 | 18
1.2 UHF
If customers would like to use side button/pistol to trigger UHF-reading, please
follow below steps:
a. – put the cursor on the input box, then press side button/pistol, its key-code
will appear automatically
b. – tick the checkbox of UHF
c. – toggle Off to On
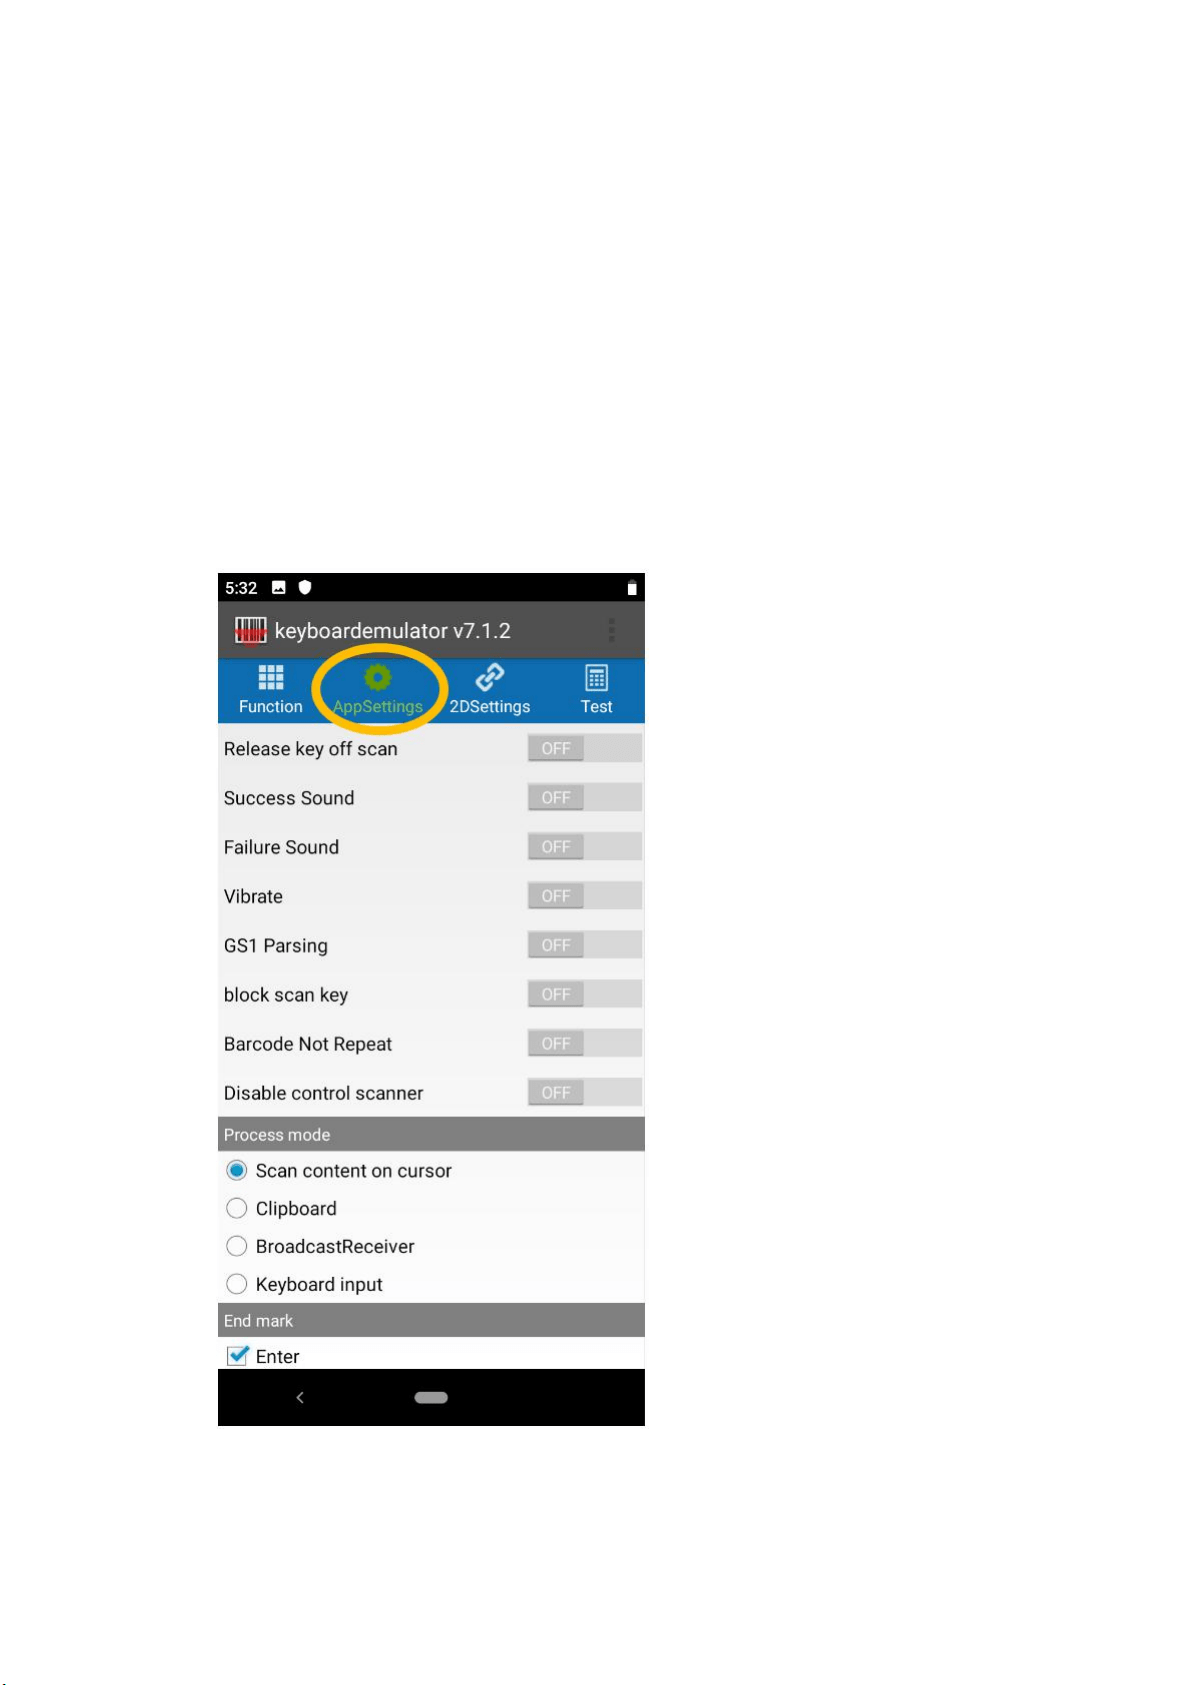
2.0 AppSettings
This section is basically for some specific setting from KeyboardEmulator level
Under this section, it will cover below 8 parts:
6 | 18
2.1– basic function
2.2– Process mode
2.3– End mark
2.4– Data format
2.5– Continuous scan
2.6– Virtual scan button
2.7– Factory scan button
2.8– Debug
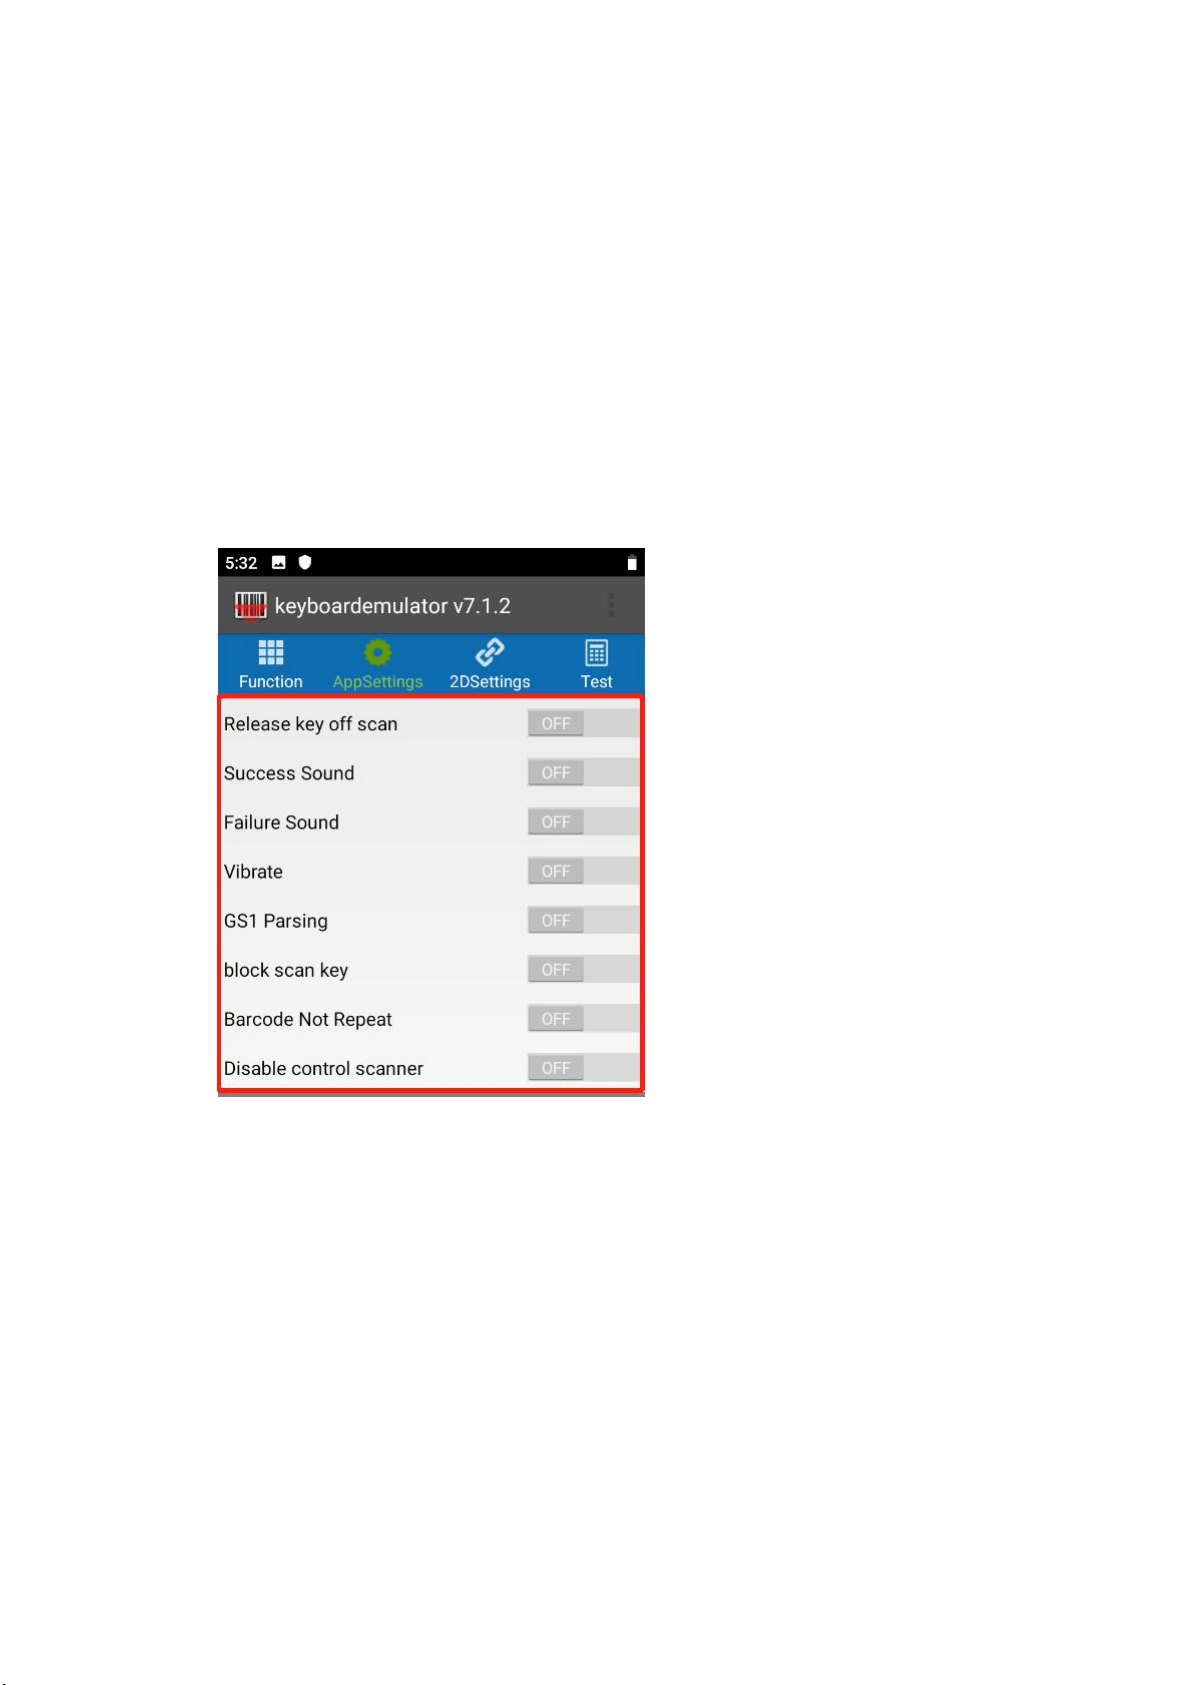
2.1 Basic
Function
Release key off scan – if you realse scan key, then scanning would stop.
Success Sound – if scan successfully, there will be sound as reminder.
Failure sound – if failed to scan, there will be sound as reminder.
Vibrate – if scan successfully, there will be vibration as reminder (the premise is
device is with vibration sensor).
GS1 Parsing – in this mode, when scan GS1 barcodes, all characters of GS1
barcode will be read.
Block scan key – this is to block scan key value, can leave it if it’s not necessary.
Barcode Not Repeat – on this mode, repeated barcodes will not show when
scanning.
Disable control of scanner – this is to stop other apps from controlling
KeyboardEmulator.
7 | 18
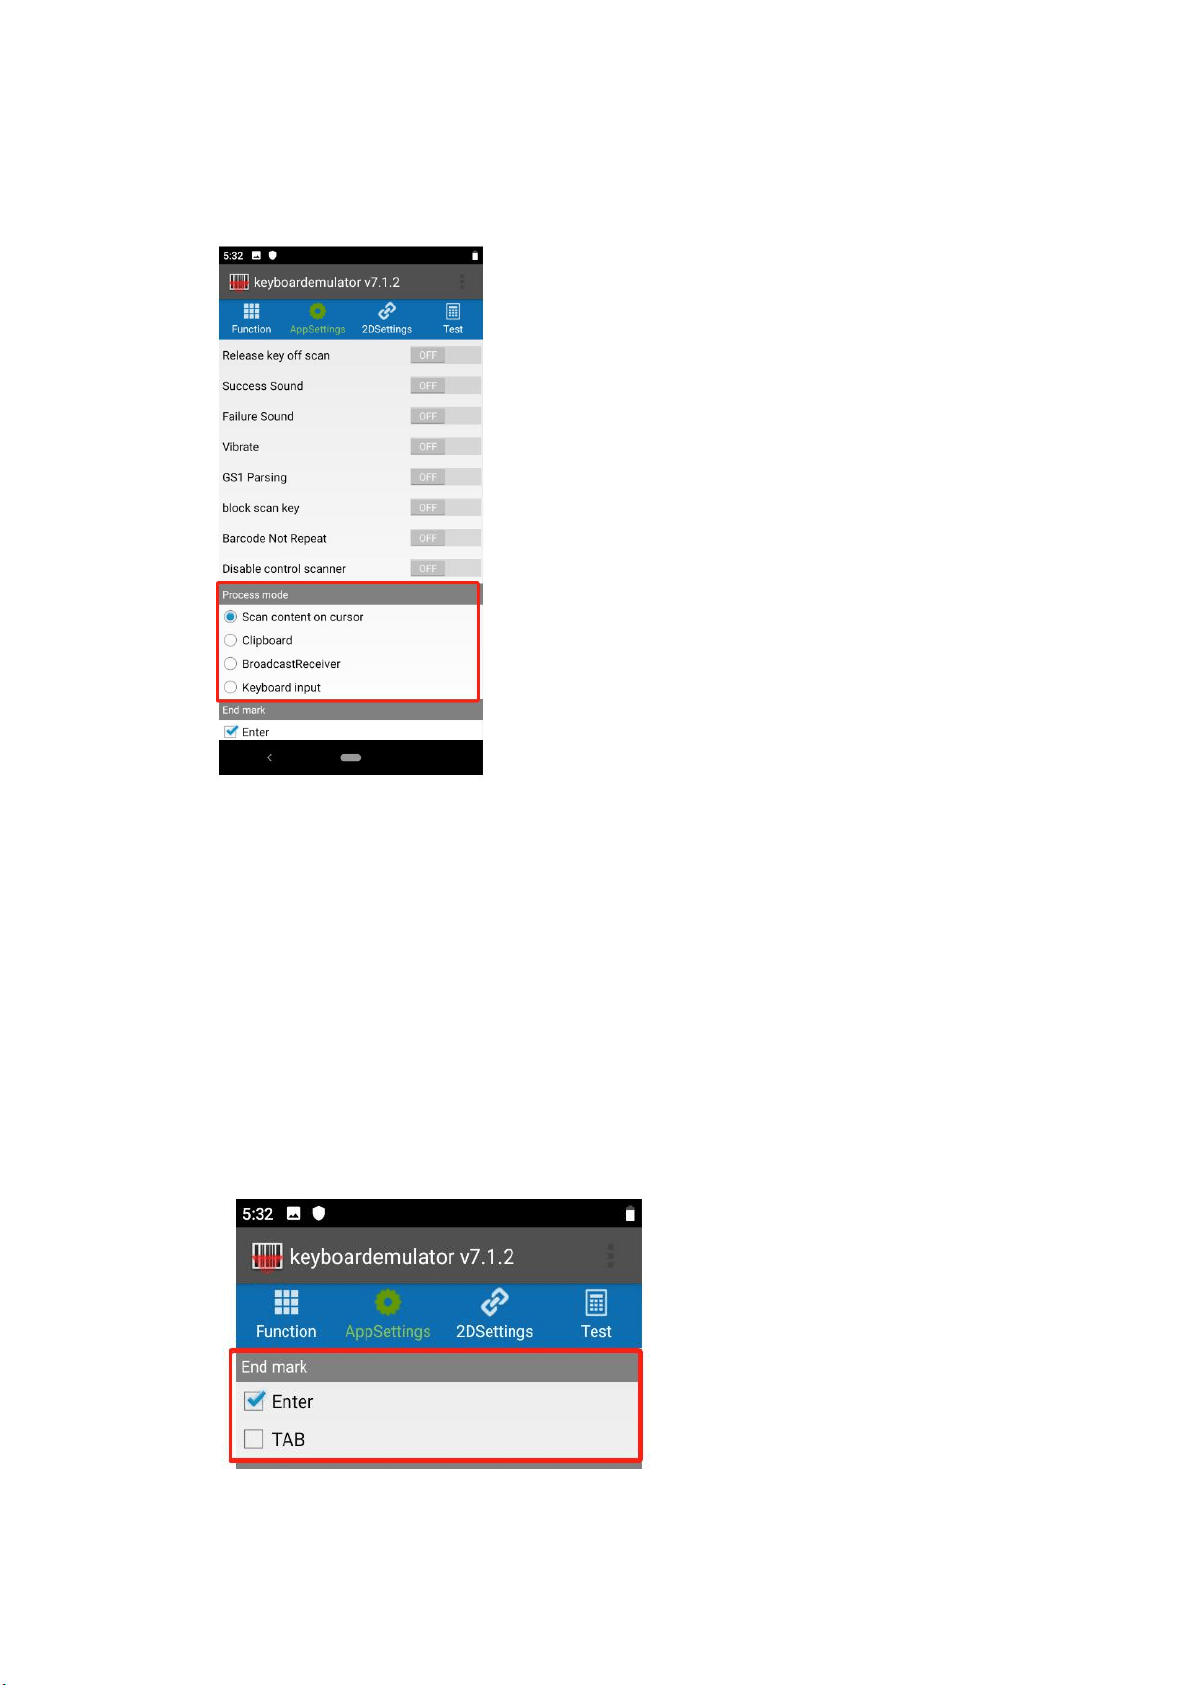
2.2 Process mode
Scan content on cursor – the data will show up in the place with cursor
simultaneously.
Clipboard – read-out data will be saved in the clipboard, and can be paste directly
to anywhere with the cursor.
BroadcastReceiver – it is the method that uses the broadcast mechanism of
Android to transfer data to the customer’s program.
Keyboard input – the data will show up together in the input box with the cursor.
2.3 End mark
The end mark means adding a specific mark at the end of read-out data.
Enter – tick this checkbox, the output will be word-wrapping automatically.
8 | 18
TAB – the read-out data will be added with the tab character-“\t” suffix. when
data is acquired in Excel, the cursor will move to the next cell automatically.
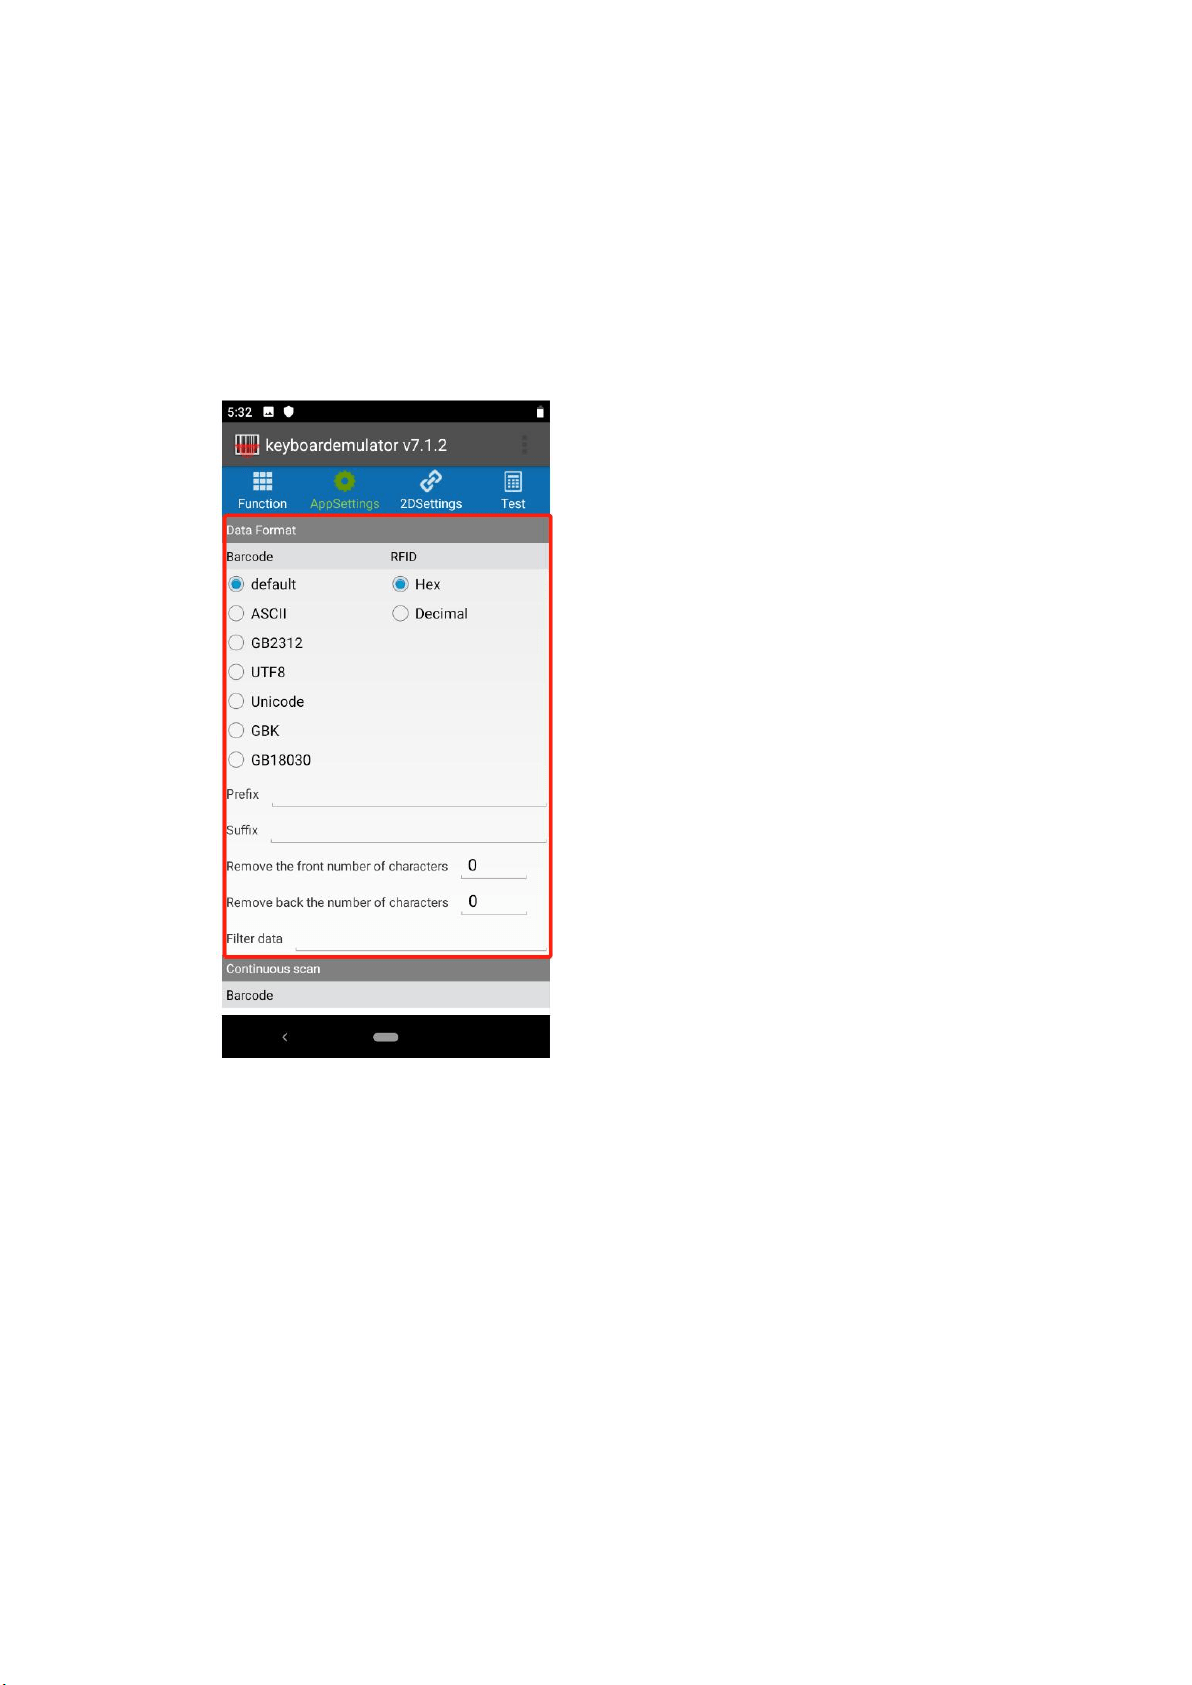
2.4 Data Format
Under this section, you can choose different data formats listed in the below
picture for Barcode and RFID accordingly based on specific requirements.
And to meet further demand, there’re 5 more features that might be applied in
some basic scenarios.
Prefix: the prefixing numbers or letters will be added to the output.
e.g if you input ‘ABC’, and the original barcode is ‘12345’, then the final
output will be as ‘ABC12345’.
Suffix: the suffixing numbers or letters will be added to the output.
e.g if you input ‘ABC’, and the original barcode is ‘12345’, then the final
output will be as ‘12345ABC’.
Remove the number of characters from the front:
input 1, the first digit will be trimmed.
input 2, the first two digits will be trimmed, and so on.
Remove the number of characters from the back:
input 1, the last digit will be trimmed.

9 | 18
input 2, the last two digits will be trimmed, and so on.
Filter data: Literally, if input ‘a’, then the character ‘a’ will be filtered out.
2.5 Continuous scan
There’re two main parts under this section, one is for Barcode, and the other is for
UHF.
Barcode
Just like literal meaning, it will enter into continuous scan mode when ticking the
continuous checkbox. And under the continuous mode, you can choose [Normal
Mode] or [Zebra Mode]:
【
Normal Mode
】
– there will interval between each scanning
【
Zebra Mode
】
– there is no interval between each scanning
Meanwhile, there’re 2 parameters available to be adjusted:
Time out – if input 10s and scanning light is moved away from tags and can’t
focus on tags again within 10s, then the scanning light will be off.
Interval – if input 10 ms, then the interval of the continuous scan will be 10ms.
To stop the continuous scan, just uncheck the box of a continuous scan.
UHF
check the box of the continuous scan, then it will enter continuous scan mode.
Before entering continuous mode, there’re 3 parameters (timeout, interval, output
power) available for you to adjust under this model.
Timeout
10 | 18
Interval
Output power – can choose from 1 to 30 dBm, the reading performance is in
proportion to the output power, which means, the higher you set output power, the
better reading performance you will get.
Plus, you can also choose to read the EPC or TID of the RFID tags by selecting
the EPC or TID checkbox.
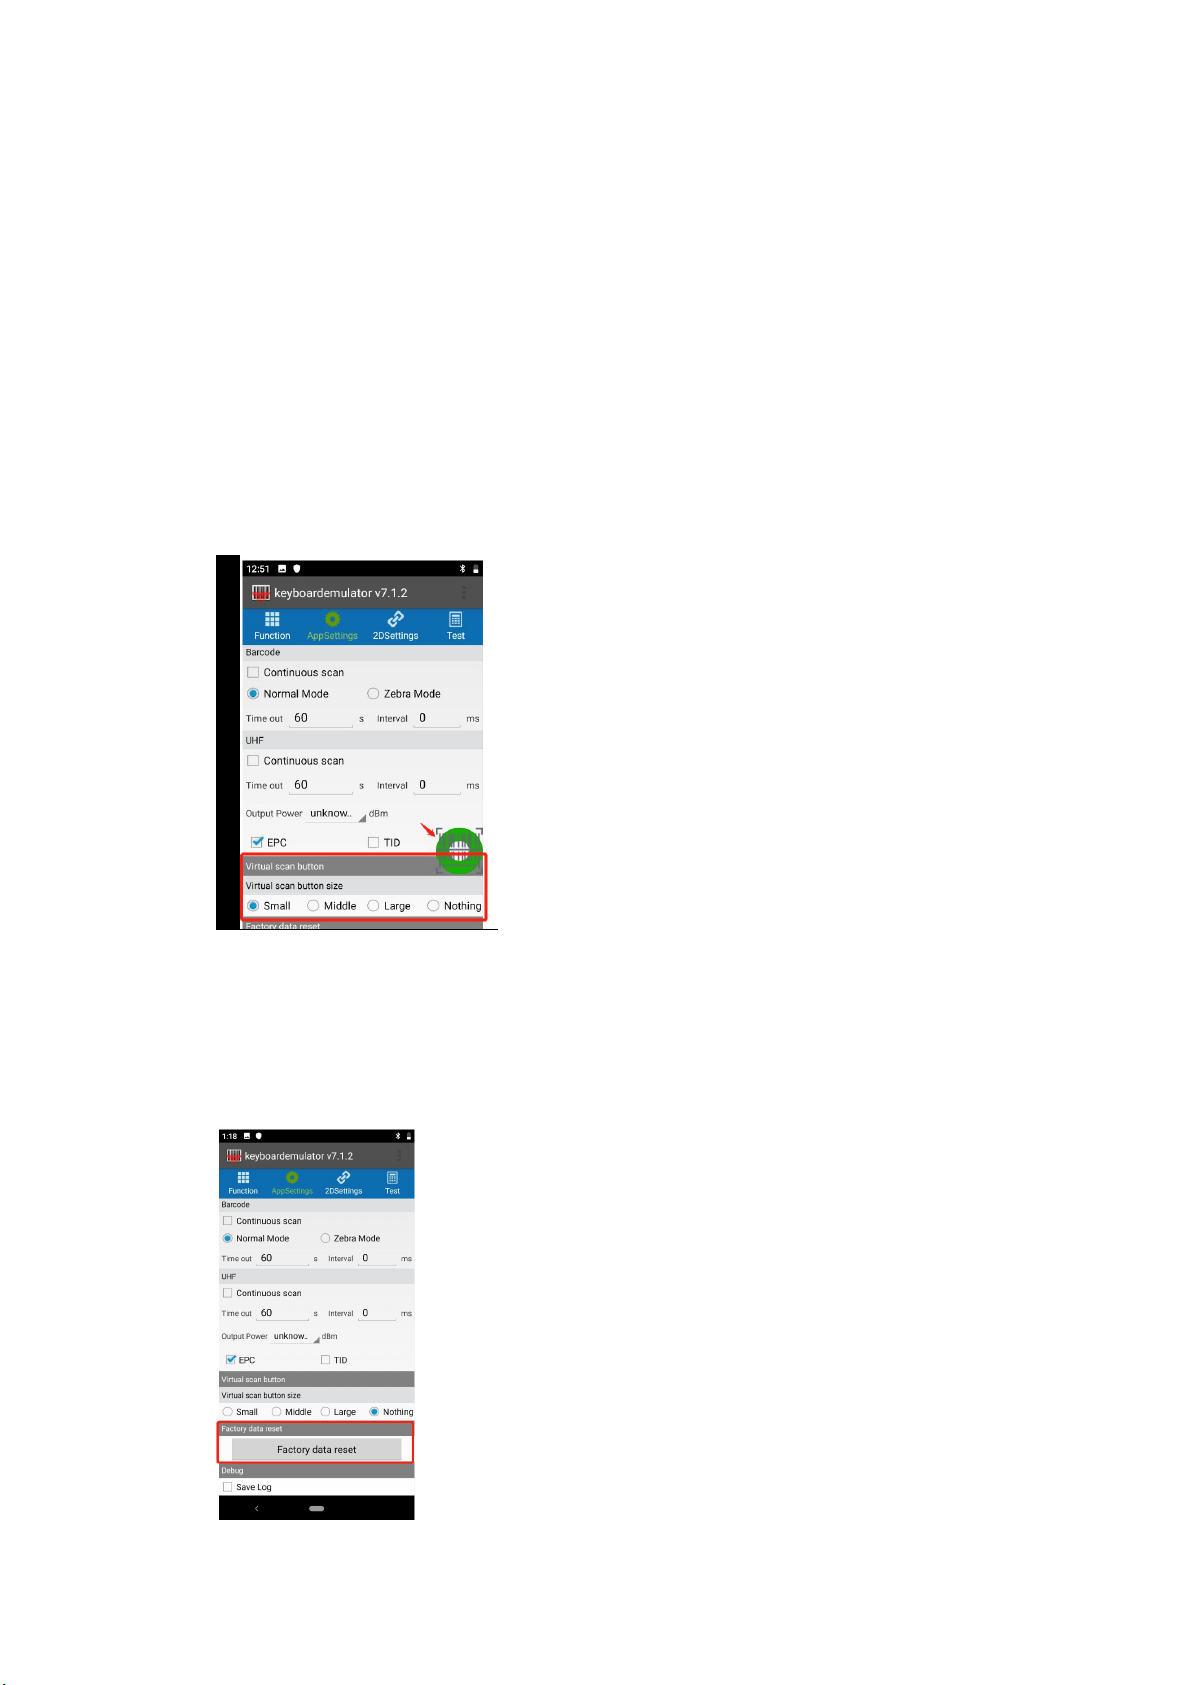
2.6 Virtual Scan button
Under this section, you can choose to use virtual button to trigger barcode-reading
or UHF-reading.
2.7 Factory data reset
By clicking ‘factory reset’, the setting you made previously in keyboardEmulator
will be removed and back to the original status.
11 | 18
2.8 Save log
After tick the checkbox, all your action in KeyboardEmulator will be saved in
below path: File Manager > scanner > data
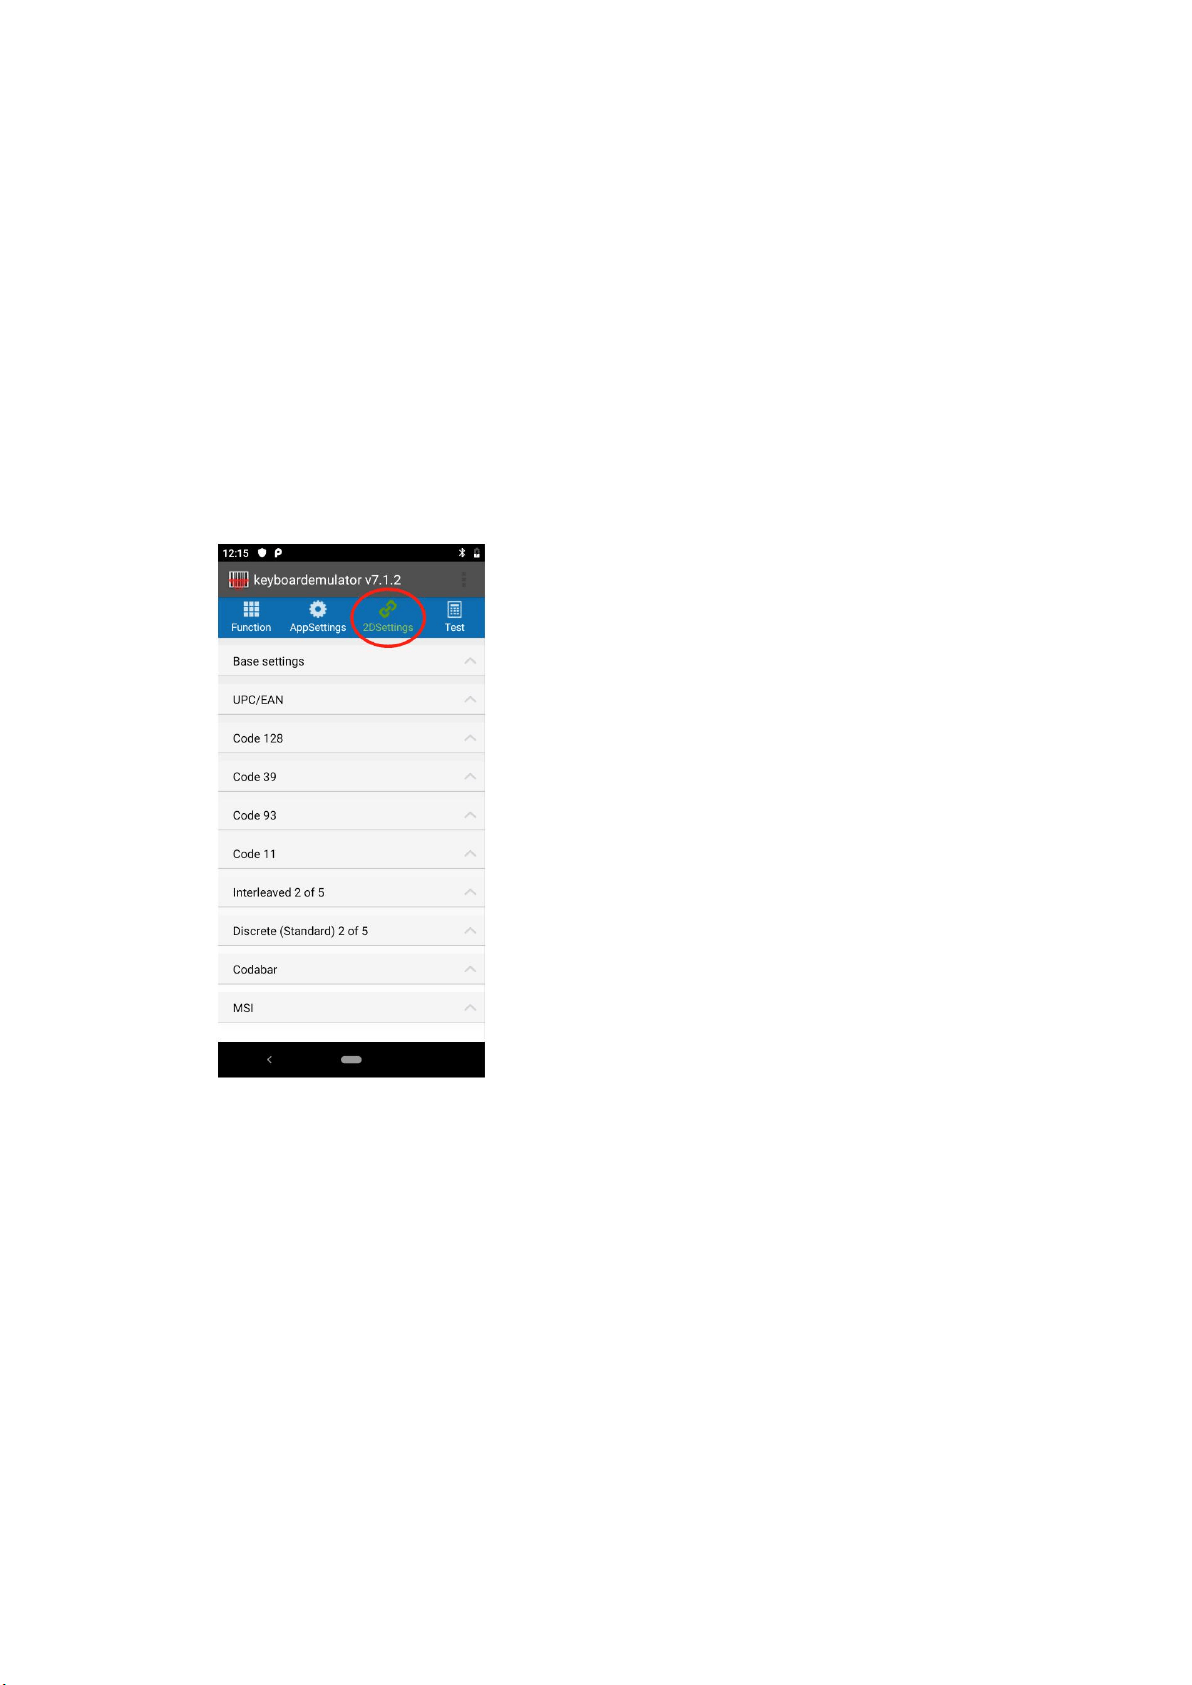
3.0 2DSettings
This section is basically for setting from the scanner level. we’ve integrated some
common settings here. Under this section, you will find ‘base setting’ and some
common barcodes of 1D and 2D.
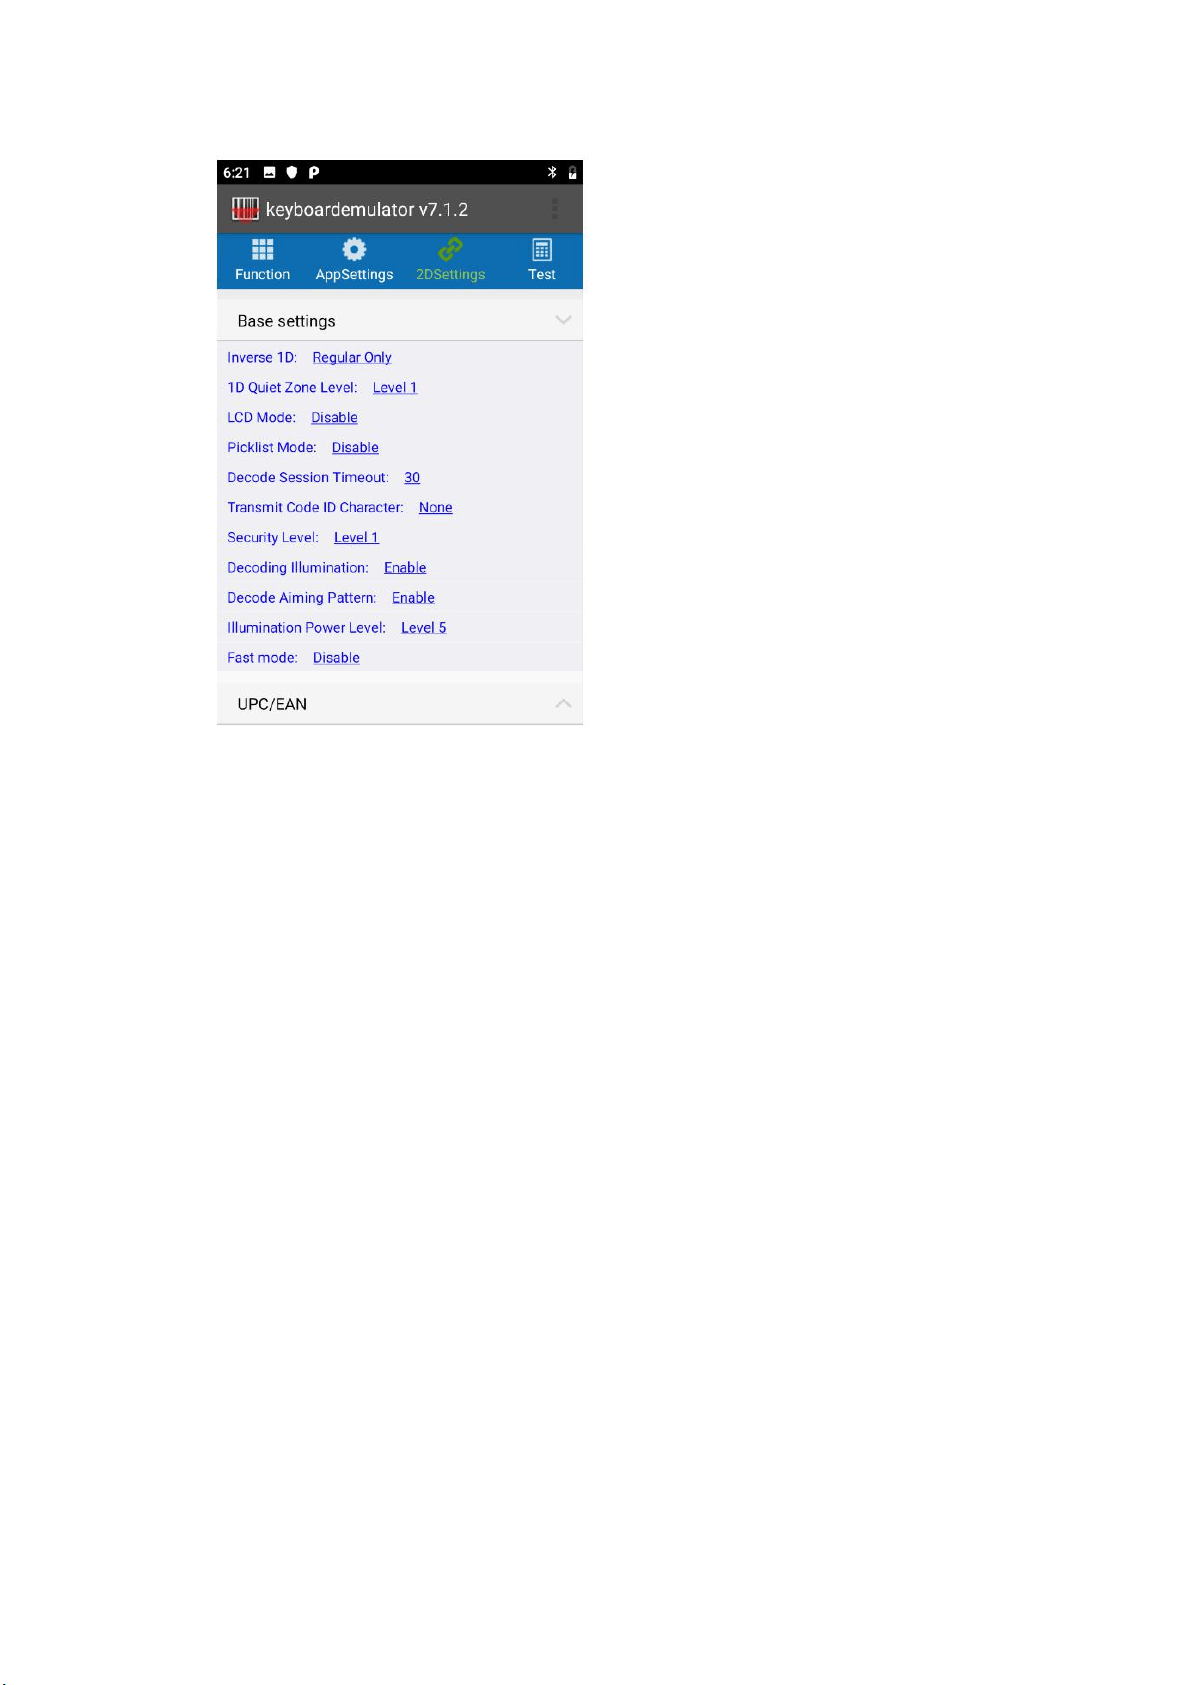
3.1 Base setting
Under this section, customers can do settings according to their specific
requirements.
We will only introduce【picklist mode】and【security level】here due to limited.
For further and more details, please refer to the technical documents for the
scanner accordingly.
12 | 18
【
Picklist mode
】
- enables the decoder to decode only barcodes aligned under
the center of the laser aiming pattern.
【
Security Level】- There is an inverse relationship between security and decoder
aggressiveness. Increasing the level of security can reduce scanning
aggressiveness, so select only the level of security necessary.
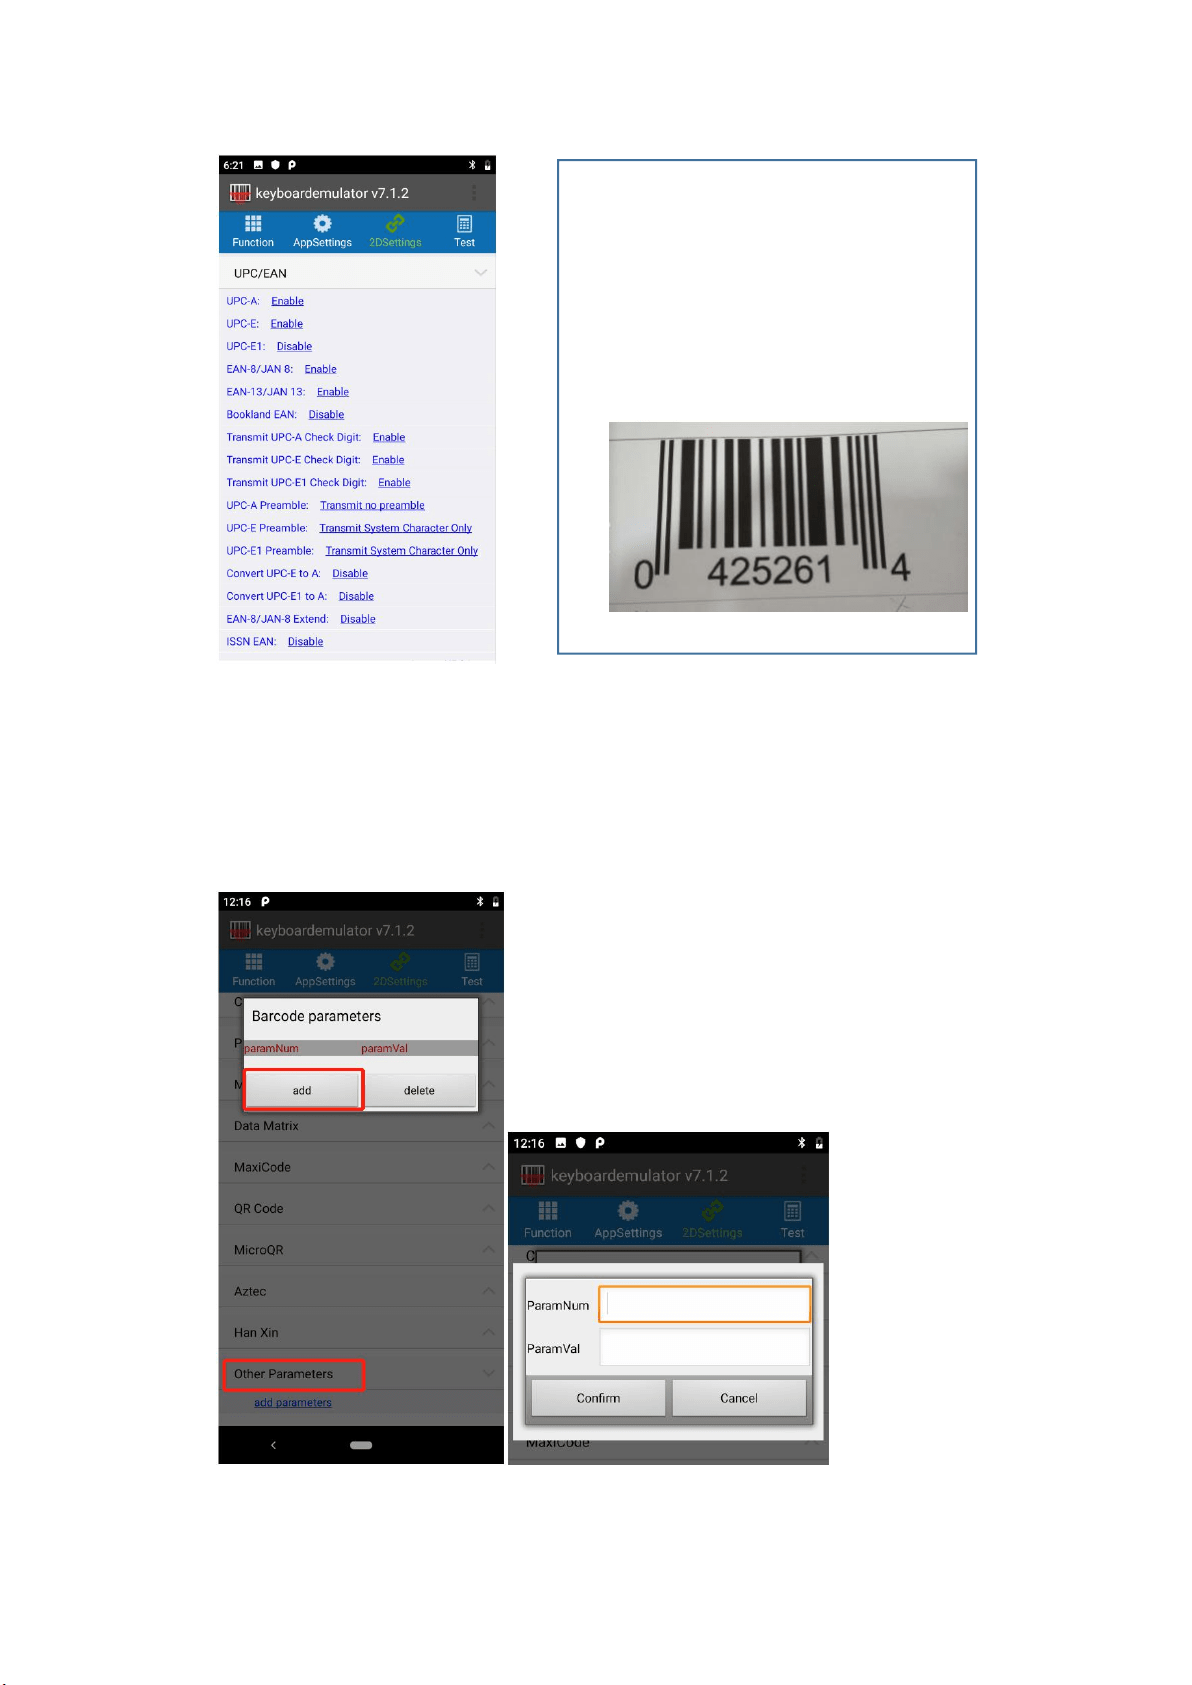
3.2 Common Barcodes
We’ve integrated some common barcodes into KeyboardEmulator, like UPC/EAN,
EAN-8, EAN-13 and etc. They’re visible under this section, and customers can easily
set accordingly.
The right side is the live example-1 for reference.
13 | 18
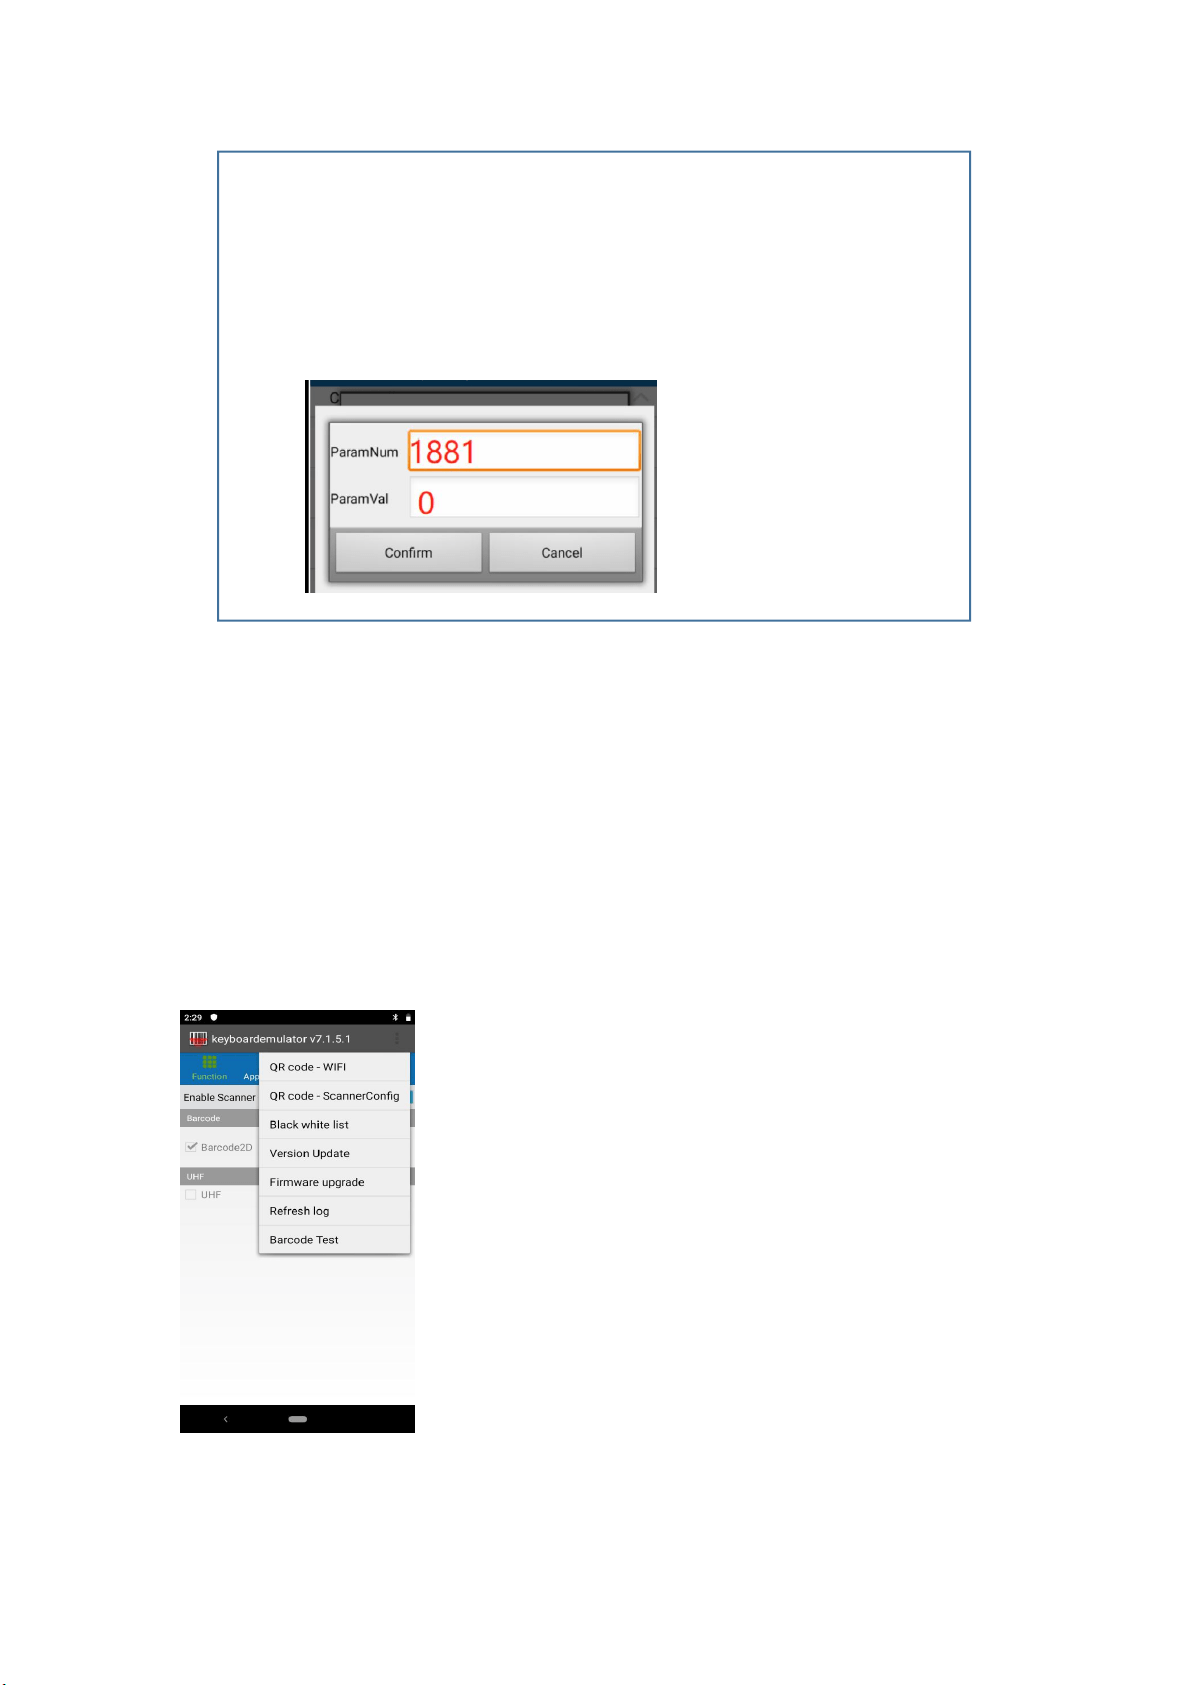
3.3 Adding parameters
For those scanner functions that’s invisible under the 2D setting, we can add the
specific function via the below way (referring to below the pic.). And About what
parameters shall be used, pls refer to technical documents of scanners for details.
Live Example-1
1. Barcode type: UPC-E(as below pic.)
2. Requirement: customer would like to cut
the last digit of below barcode number.
3. Action: below setting shall be followed:
a: UPC-E: Enable
b: Transmit UPC-E Check Digit: Disable
14 | 18
4.0 Addition Functions
Under this section, there’re 7 functions.
4.1 QR code-WIFI
4.2 QR code-ScannerConfig
4.3 Black white list
4.4 Version Update
4.5 Firmware upgrade
4.6 Refresh log
4.7 Barcode Test
By following, we will introduce one by one.
Live example-2
1. Barcode type: EAN-8
2. Requirement: the customer would like to cut the last digit of below barcode
number
3. Action: below setting shall be followed:
a. Eable EAN-8
b. Add below parameters
15 | 18
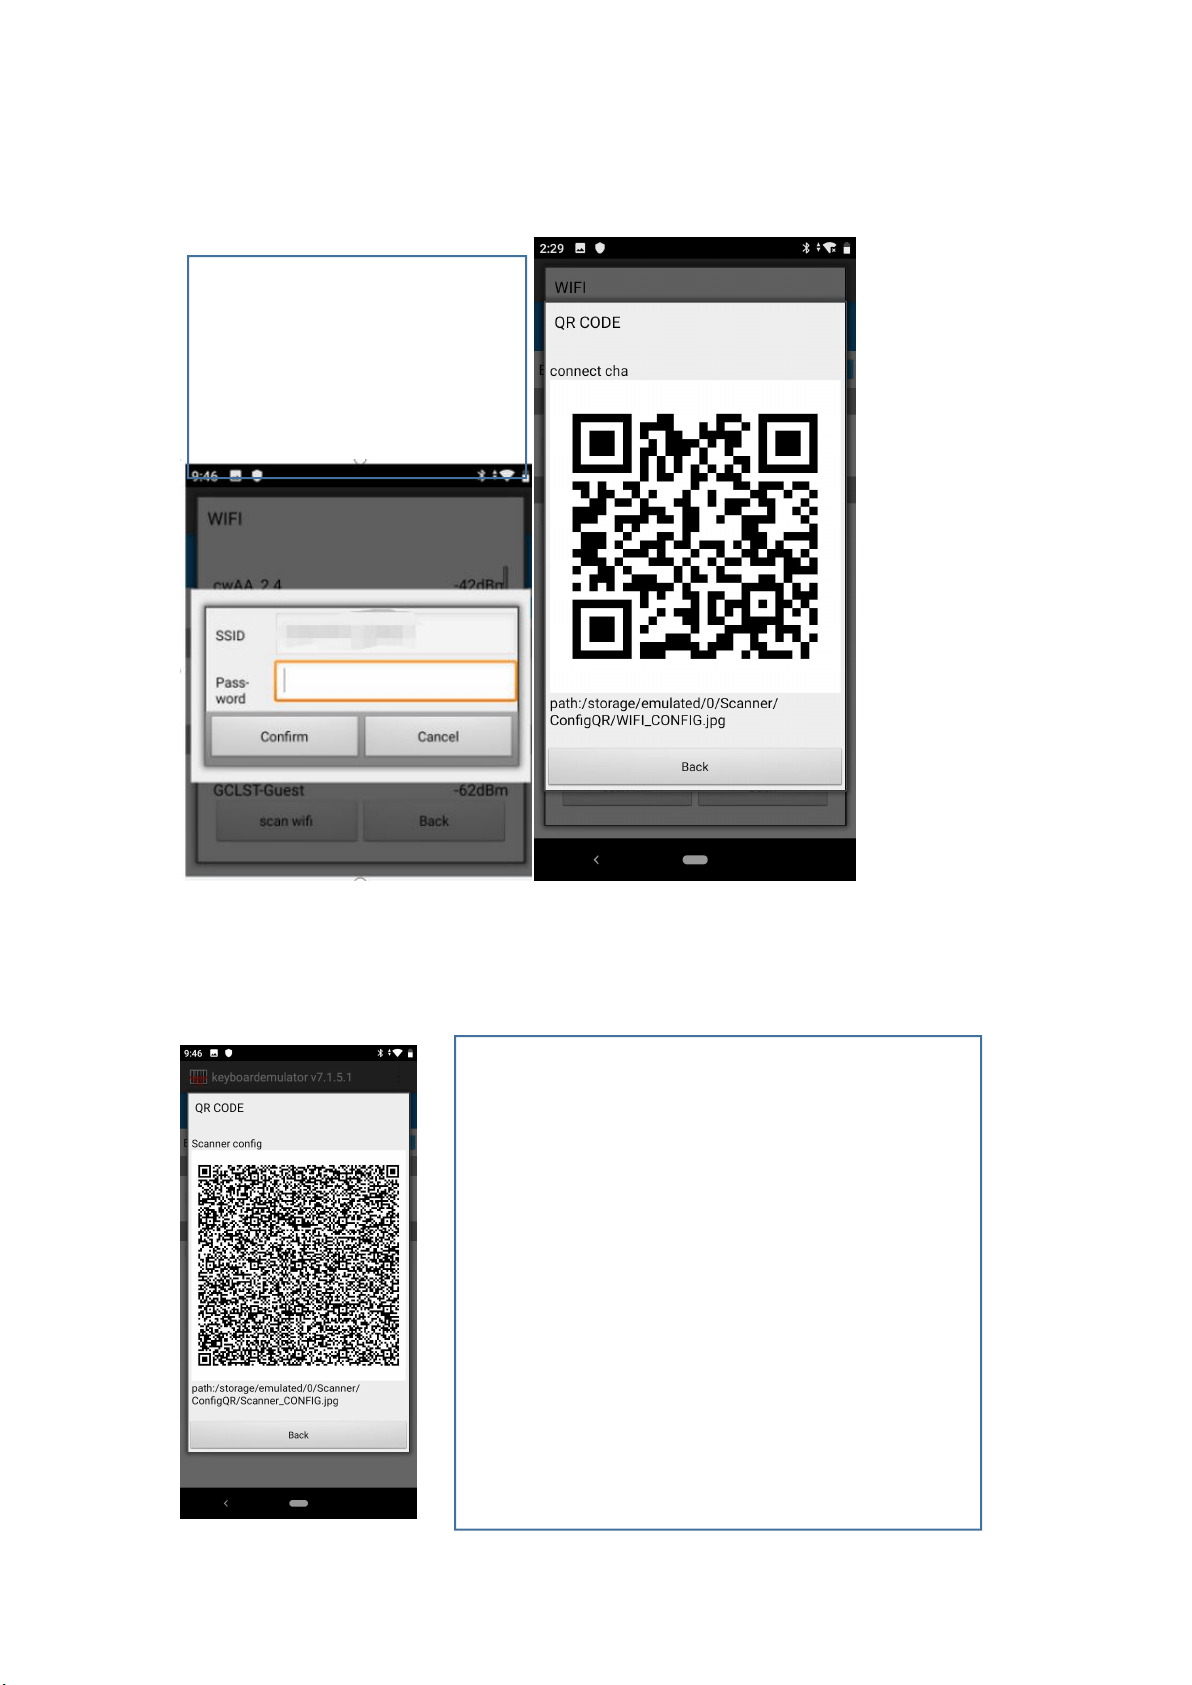
4.1 QR code-WIFI
4.2 QR code-ScannerConfig
This function is for customer to
connect wifi by scanning the QR
code via using KeyboardEmulator.
After input wifi password, a QR
CODE for wifi will be generated.
After you’ve done the setting based on specific
requirement in KeyboardEmulator, then can click this to
generate QR Code. If there’re other devices needing to do
the same configuration in KeyboardEmulator, then just
need to use KE to scan this QR Code.
16 | 18
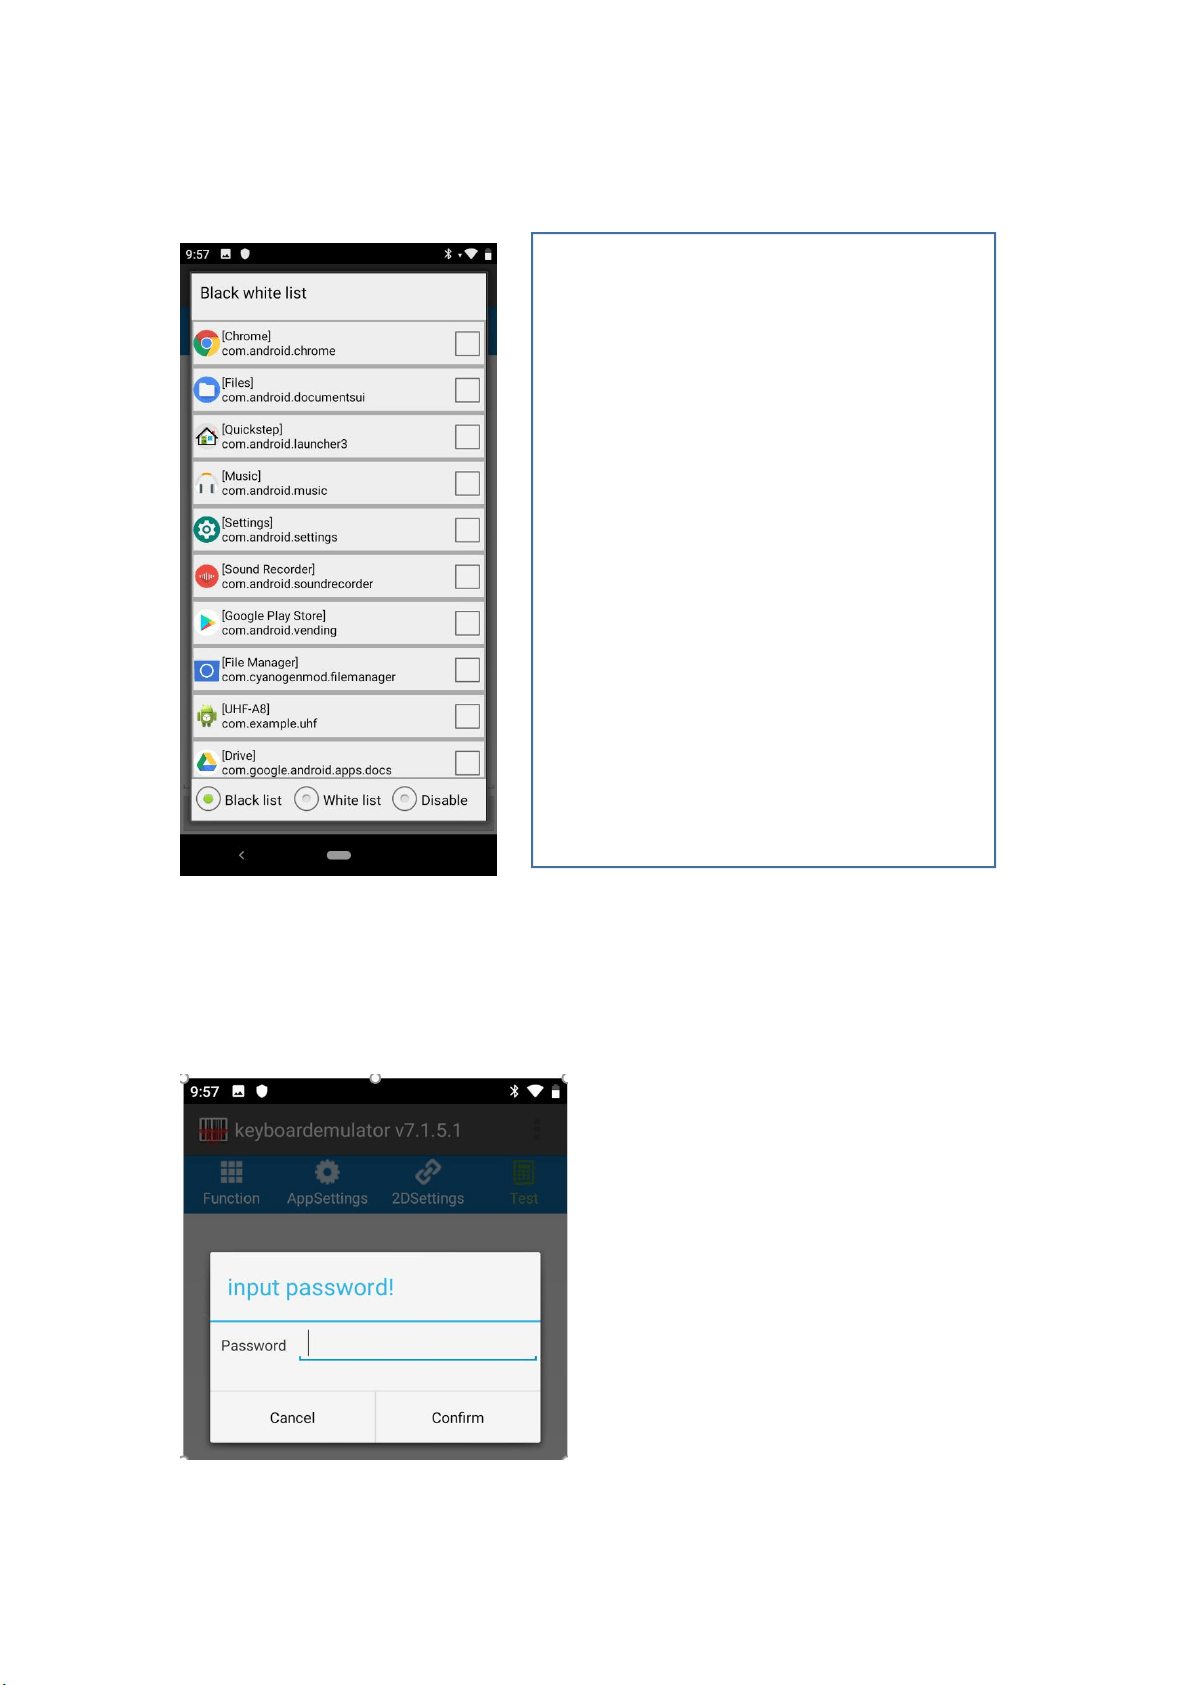
4.3 Black white list
4.4 Version Update
This function is not available yet.
BlackList – if include into the blacklist, then
means can’t use KeyboardEmulator. For example,
if you tick [Chrome] and choose Blacklist Mode,
then KeyboardEmulator will not work in Chrome
WhiteList- opposite to Blacklist, if included in
whitelist, then means KE can be applied freely.
Disable – function of black white list is disabled.

17 | 18
4.5 Firmware upgrade
This function is not available yet (only available for zebra scanner).
18 | 18
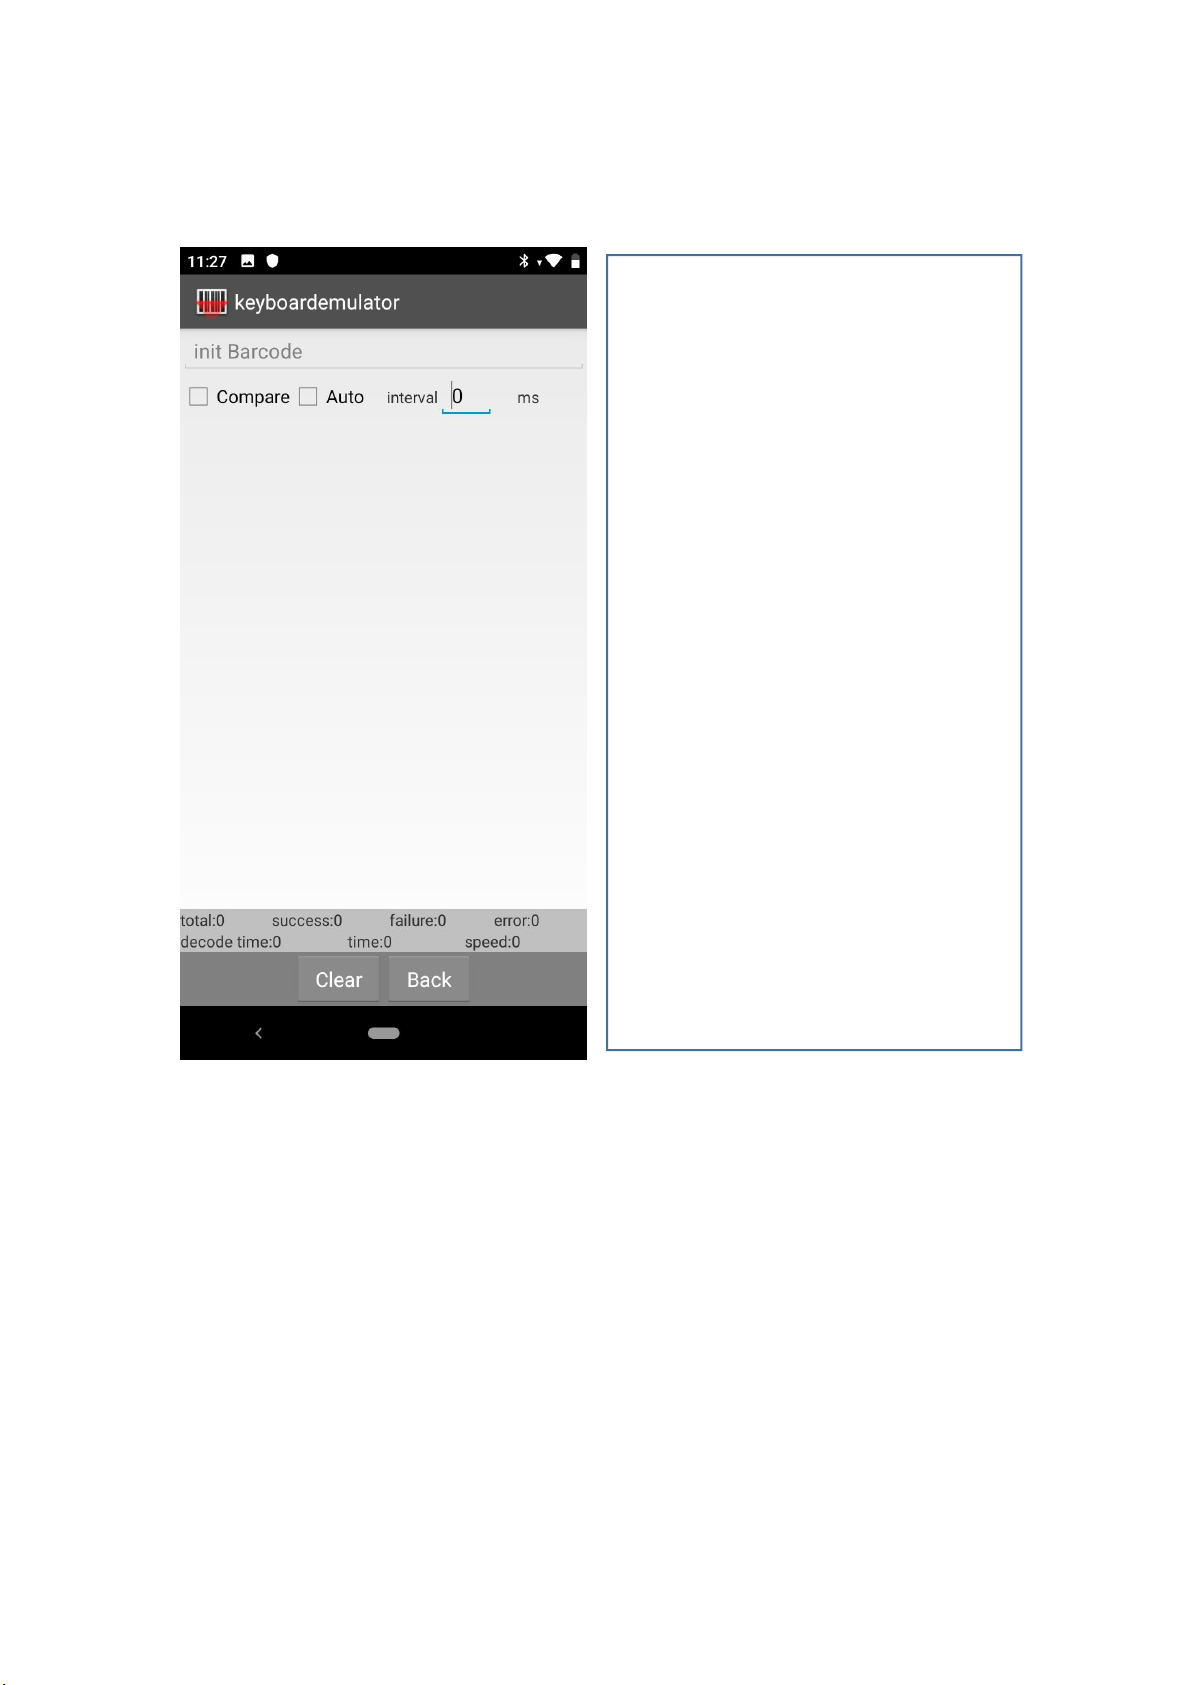
4.6 Barcode Test
Select ‘Barcode Test’, you will enter the left
page. Here you can select ‘compare’ or
‘Auto’.
Compare –
The 1
st
read-out barcode will be the sample,
and the following read-out barcodes will
compare with the sample barcode. If same
then will count as success, if different then
count as an error.
Auto – this equals continuous scan mode,
and you can adjust the interval accordingly.