Loading ...
Loading ...
Loading ...

- 9 -
06/2019
Copyright © 2019, Fast ČR, a.s.
EN
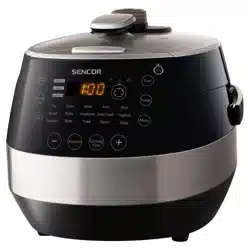
Pressure cooker
User’smanual
■
Prior to using this appliance, please read the user’s manual
thoroughly, even in cases, when one has already familiarised
themselves with previous use of similar types of appliances. Only use
the appliance in the manner described in this user’smanual. Keep this
user’smanual in asafe place where it can be easily retrieved for future
use. In the event that you hand this appliance over to somebody else,
make sure to also include this user’smanual.
■
Carefully unpack the appliance and take care not to throw away any
part of the packaging before you find all its parts. We recommend
saving the original cardboard box, packaging material, purchase
receipt and responsibility statement of the vendor or warranty
card for at least the duration of the legal liability for unsatisfactory
performance or quality. In the event of transportation, we recommend
that you pack the appliance in the original box from the manufacturer.
DESCRIPTION OF THE PRESSURE COOKER
A1 Pressure cooker unit lid
A2 Inner pot lid
A3 Open lid button
A4 Pressure cooker unit
A5 Control panel with display
A6 Pressure cooker socket
A7 Steam release valve cover
A8 Safety float valve indicator
When the temperature and
pressure inside the pressure
cooker reaches acertain
level, the steam will push
the valve into ahole in the
lid, which will subsequently
push out the indicator. At the
same time, the mechanism
that locks the lid in place is
activated and prevents the
lid from being opened.
A9 Swivel handle
A10 Removable inner pot
A11 Built-in outer pot
A12 Carry handle
A13 Temperature sensor (inside
the built-in outer pot)
It monitors the internal
temperature and based on
it automatically regulates
heating intensity.
A14 Hotplate (inside the built-in
outer pot)
A15 Power cord
A16 Steamer insert
A17 Measuring cup
A18 Ladle
A19 Spoon
B1 Display
B2 Cancel / Keep Warm
Cancels the last performed
action / keeps food at an
ideal temperature for up to
24 hours to be served later
B3 Manual (Custom setting)
Enables custom cooking
time and temperature
settings.
B4 Add ingredient
Serves to release all steam to
enable the lid to be opened
safely during the cooking
process and the food inside
the inner pot to be handled.
B5 Cooking programs menu
B6 Minus (–) button
Serves to lower the time or
temperature value and to
scroll through the cooking
programs.
B7 Temperature
In the manual setting mode,
it enables the required
cooking time to be set in the
range from 30 to 160°Cin
5°Cincrements.
B8 Manual cooking mode
indicator
B9 Delayed cooking function
indicator
B10 Countdown indicator
B11 Locked lid indicator
B12 Unlocked lid indicator
B13 Pressure inside cooker
indicator
Indicates pressure inside the
cooker, which prevents the
lid from being opened.
B14 Heating element activity
indicator
B15 Start
It serves to start the cooking
process.
B16 Preset
Serves to activate the
delayed cooking function.
B17 Cooking program selection
button
Press this button to select
apreset cooking program.
B18 Plus (+) button
Serves to increase the time
or temperature value and to
scroll through the cooking
programs.
B19 Cooking time
Serves to set acustom
cooking time.
C1 Lid body
C2 Gasket seal
C3 Steam valve cover
D1 Magnetic float valve
D2 Float valve
D3 Steam release valve, inner part
D4 Temperature sensor
E1 Steam release valve cover
E2 Steam release valve, outer
part
E3 Float valve hole
F1 Steam release valve cover
latch
G1 Water condensate tank
PURPOSE OF USE
■ The electric pressure cooker is intended for cooking meals at high
pressure, which enables the cooking time to be reduced by more
than half, whilst retaining flavours and aromas of the cooked meal.
■ The pressure cooker can be used for cooking meals such as soups,
rice, stewed meals, goulash and all other meals that can be cooked
in standard pressure cookers or in stew pots. Furthermore, it enables
the cooking of legumes (beans, chickpeas, etc.) without pre-soaking
and it is also suitable for cooking healthier meals.
■
The pressure cooker can be used either in automatic mode by
selecting one of 15preset programs without having to perform
any other settings or in manual mode where the cooking time and
temperature can be set based on your needs and experience.
■
Afurther function of the cooker is delayed cooking; an automatic or
manually set function for keeping ameal warm after it has finished
cooking; or cooking with the lid open.
Attention:
This appliance is not intended to be operated using
an external timer switch or aremote control system.
BEFORE FIRST USE
■
Open the lid A1 as described in chapter OPENING THE LID OF ACOLD
PRESSURE COOKER. Take out the inner pot A10 and, together with
accessories A16 to A19, thoroughly wash in warm water using
neutral kitchen detergent. Then rinse them with clean water and dry
them thoroughly with afine wiping cloth. The inner pot can also be
washed in adishwasher.
■
Wipe the inside of the built-in outer pot A11 with alightly dampened,
soft wiping cloth and then wipe dry using adry, clean wiping cloth.
CORRECTLY HANDLING THE LID
OPENING THE LID OF ACOLD PRESSURE COOKER
■
Rotate the handle A9 anticlockwise all the way to the symbol and
then press button A3. If the pressure cooker is connected to the
mains power supply and in stand-by mode, the melody for “OPEN”
is played and the open lid indicator B12 is lit.
OPENING THE LID DURING AND AFTER COOKING
■
When cooking and after finishing cooking, it is only possible to open
the lid once the steam is released from inside the pressure cooker.
When it is not possible to rotate the handle A9 (the steam symbol
B13 is lit or flashing), it means that there is still steam inside the
pressure cooker, the temperature of which still presents adanger to
you. If this happens, hold down button B4 (Add ingredients). Steam
will be continuously emitted from the steam valve A7 and indicator
B13 will flash. When indicator B13 turns off, four dashes will be
shown on the display. The lid can now be opened.
Loading ...
Loading ...
Loading ...