
INSTRUCTION AND RECIPE BOOKLET
Cuisinart
®
Convection Toaster Oven Broiler TOB-60N2

2
CONTENTS
Important Safeguards........................................2
Special Cord Set Instructions .................................3
Features and Benefits .......................................4
Before First Use ............................................5
General Guidelines ..........................................5
Operation .................................................5
Cleaning and Maintenance ...................................6
Oven Rack and Pan Position Diagrams..........................7
Troubleshooting ............................................7
Warranty ..................................................8
Recipes...................................................9
IMPORTANT
SAFEGUARDS
When using an electrical appliance, basic safety precautions should
always be taken, including the following:
1. Read all instructions.
2. UNPLUG FROM OUTLET WHEN NOT IN USE AND BEFORE
CLEANING. Allow to cool before cleaning or handling.
3. Do not touch hot surfaces. Use handles.
4. To protect against electric shock, do not place any part of the toaster
oven broiler in water or other liquids. See instructions for cleaning.
5. This appliance should not be used by or near children or individuals
with certain disabilities.
6. Do not operate any appliance with a damaged cord or plug, or after
the appliance has malfunctioned or has been dropped or damaged in
any way or is not operating properly. Return the toaster oven broiler to
the store or retailer where purchased for examination or repair.
7. The use of accessory attachments not recommended by Cuisinart
may cause injury.
8. Do not use outdoors.
9. Do not let cord hang over the edge of the table or countertop, where
it could be pulled on inadvertently by children or pets, or touch hot
surfaces, which could damage the cord.
10. Do not place toaster oven broiler on or near a hot gas or electric
burner or in a heated oven.
11. Do not use this toaster oven broiler for anything other than its
intended purpose.
12. Extreme caution should be exercised when using containers
constructed of materials other than metal or glass in the toaster
oven broiler.
13. To avoid burns, use extreme caution when removing tray or disposing
of hot grease.
14. When not in use, always unplug the unit. Do not store any materials
other than manufacturer’s recommended accessories in this oven.
15. Do not place any of the following materials in the oven: Paper,
cardboard, plastic and similar products.
16. Do not cover crumb tray or any part of the oven with metal foil.
This will cause overheating of the oven.
17. Oversize foods, metal foil packages and utensils must not be inserted
in the toaster oven broiler, as they may involve a risk of fire or electric
shock.
18. A fire may occur if the toaster oven broiler is covered or touching
flammable materials, such as curtains, draperies or walls, when in
operation. Do not store any items on top of the appliance when in
operation. Do not operate under wall cabinets.
19. Do not clean with metal scouring pads. Pieces can break off the pad
and touch electrical parts, involving a risk of electric shock.
20. Do not attempt to dislodge food when the toaster oven broiler is
plugged into electrical outlet.
21. Warning: To avoid possibility of fire, NEVER leave toaster oven broiler
unattended during use.

3
22. Use recommended temperature settings for baking and roasting.
23. Do not rest cooking utensils or baking dishes on glass door.
24. Turn the OVEN dial and the TOAST dial to the OFF position to turn
off toaster oven broiler.
25. To disconnect, turn any control to “OFF”, then remove plug from wall
outlet.
26. Do not operate your appliance in an appliance garage or under a
wall cabinet. When storing in an appliance garage, always unplug the
unit from the electrical outlet. Not doing so could create a risk of fire,
especially if the appliance touches the walls of the garage or the door
touches the unit as it closes.
SAVE THESE
INSTRUCTIONS
Please read and keep these instructions handy. These instructions
will help you to use your Cuisinart
®
Convection Toaster Oven Broiler
to its fullest so that you will achieve consistent, professional results.
SPECIAL CORD SET INSTRUCTIONS
A short power-supply cord is provided to reduce the risks resulting
from becoming entangled in or tripping over a longer cord.
Extension cords are available and may be used if care is exercised
in their use.
If an extension cord is used, the marked electrical rating of the
extension cord must be at least as great as the electrical rating of the
appliance, and the longer cord should be arranged so that it will not
drape over the countertop or tabletop, where it can be tripped over
or pulled on by children.
NOTICE
This appliance has a polarized plug (one blade is wider than the other).
As a safety feature, this plug will fit in a polarized outlet only one way.
If the plug does not fit fully in the outlet, reverse the plug. If it still does
not fit, contact a qualified electrician. Do not attempt to defeat this
safety feature.
FOR HOUSEHOLD
USE ONLY
NOT INTENDED FOR
COMMERCIAL USE

4
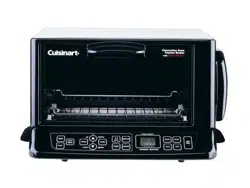
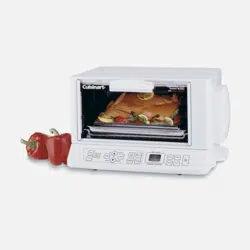
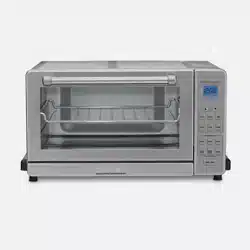
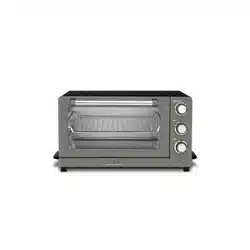
FEATURES AND BENEFITS
1. Temperature Dial
Selects desired temperature for the Bake, Broil
or Warm functions.
2. Oven Dial
Turns on selected toaster oven function - Warm, Broil,
Convection Broil, Convection Bake, Bake/Pizza.
3. Toast Dial
Turns on to toast to your selected shade, from light to dark.
4. Oven On Indicator
Indicator light will remain lit when oven is in use.
5. Oven Rack
Has two positions. The top position has a 50% stop feature
so the rack stops halfway out of the oven. It can be removed
by lifting the front of the rack and sliding it out.
6. Slide-Out Crumb Tray (not shown)
The slide-out crumb tray comes already positioned in your
oven. The crumb tray slides out from the bottom of the toaster
oven broiler, in the front of the oven, for easy cleaning.
7. Cord Storage (not shown)
Take up excess cord and keep countertop neat.
8. Easy-Clean Interior
The sides of the oven are coated, providing an easy-to-clean
surface.
9. Baking Pan/Drip Tray
A baking pan/drip tray is included for your convenience.
8
5
8
1
2
3
4
9

5
BEFORE FIRST USE
Place your oven on a flat surface.
Before using your oven, move it 2 to 4 inches away from the wall or from
any objects on the countertop. Do not use on heat-sensitive surfaces.
OBJECTS SHOULD NOT BE STORED ON THE TOP OF THE OVEN.
IF THEY ARE, REMOVE ALL OBJECTS BEFORE YOU TURN ON
YOUR OVEN. THE EXTERIOR WALLS GET VERY HOT WHEN IN USE.
KEEP OUT OF REACH OF CHILDREN.
GENERAL GUIDELINES
Bake/Pizza: This function can be used as you would normally use your
kitchen oven for roasting meats, including chicken, or for delicate baked
goods like cakes and custards.
Use the provided baking pan for making fresh pizza. When baking frozen
pizza, place directly on the rack.
Convection Bake: Convection baking uses a fan to circulate heated air
around food as it cooks. Use this function for baked goods that require
even browning like muffins, scones, cookies, pastry and bread.
Most baking recipes recommend reducing temperatures by 25 degrees
when using the convection feature. Always check doneness 10 minutes
before suggested cooking time.
Broil: The Broil function can be used for beef, chicken, pork, fish
and more. It also can be used to top-brown casseroles and gratins.
Convection broil is best for meats and fish, while traditional broil should
be reserved for top browning. Caution: Aluminum foil is not recommended
for covering the rack or tray. If covered, the foil prevents the fat from
dripping into the drip tray. Grease will accumulate on the foil surface and
may catch fire. If you choose to use foil to cover the drip tray, be sure foil
is tucked neatly around the pan and does not touch the wall or heating
elements.
Toasting: Always have the rack in the upper toasting position, as
indicated in the diagram on page 7, for even toasting. Always position
your item/items in the middle of the rack.
WARNING: Placing the rack in the lower position or in the upper
position with the rack upward while toasting may result in a fire.
Refer to rack position diagram on page 7 for proper use.
Turning off the toaster oven broiler: Turn the OVEN dial and the
TOAST dial to OFF. The indicator light will turn off.
OPERATION
Unwind the power cord. Check that the crumb tray is in place and that
there is nothing in the oven. Plug power cord into the wall outlet.
Broil or Convection Broil
Set TEMPERATURE dial to Broil. Then set the OVEN dial to either Broil
or Convection Broil.
To stop Broil operation, turn OVEN dial to OFF position.
Note: Never use glass oven dishes to broil.
Bake/Pizza
If making fresh pizza, place directly in the pan in the lower position.
If making frozen pizza, place directly on the rack in the lower position.
For chicken or other large items, the pan can be in the lower position.
Turn the TEMPERATURE dial to the desired temperature, OVEN dial to
Bake/Pizza position. The oven indicator light will turn on. Preheat oven
for five to 10 minutes (time will vary depending upon desired temperature);
then begin to bake. After cooking, you will need to turn off the oven
manually by turning the OVEN dial to the OFF position.
Convection Bake
Place the pan in upper position for baking. For chicken or other large
items, the pan can be in the lower position. Turn the TEMPERATURE dial
to the desired temperature, turn OVEN dial to Convection Bake. The oven
indicator light will turn on. Preheat oven for five to 10 minutes (time will
vary depending upon desired temperature); then begin to convection bake.
After cooking, you will need to turn off the oven manually by turning the
OVEN dial to the OFF position.

6
Warm
To keep food warm, turn the TEMPERATURE dial to Warm; turn the
OVEN dial to Warm. The oven indicator light will turn on. Preheat oven
for five minutes before warming.
Toast
To toast, make sure the oven rack is in the upper position, as indicated
in the diagram on page 7. If toasting one or two items, center the item
or items in the middle of the rack. Four items should be evenly spaced
– two in front, two in back. Six items should be evenly spaced – three in
front, three in back.
- Shade Selection
Make sure the OVEN dial is turned to the OFF position. Turn the
TEMPERATURE dial to Toast. Turn the TOAST dial to desired shade
setting – from light to dark within the marked settings on this dial.
This will turn on the toaster oven broiler and the oven indicator light
will turn on.
- Stop Toasting
When the toasting cycle is finished, the oven will ring once and turn
off. If you wish to stop the toasting cycle before it is finished, simply
turn the TOAST dial to OFF. The toaster oven broiler will cancel your
toast cycle.
- Important Notes on Toasting
The oven rack must be in the upper position as indicated in the
diagram on page 7.
CLEANING AND MAINTENANCE
Always allow the oven to cool completely before cleaning.
1. Always unplug the oven from the electrical outlet.
2. Do not use abrasive cleaners, as they will damage the finish.
Simply wipe the exterior with a clean, damp cloth and dry thoroughly.
Apply the cleansing agent to a cloth, not directly onto the toaster
oven, before cleaning.
3. To clean interior walls, use a damp cloth and a mild liquid soap
solution or a spray solution on a sponge. Never use harsh abrasives
or corrosive products. These could damage the oven surface.
Never use steel wool pads, etc., on interior of oven.
4. To remove crumbs, slide out the crumb tray and discard crumbs.
Wipe clean and replace. To remove baked-on grease, soak the tray
in hot, sudsy water or use nonabrasive cleaners. Never operate the
oven without the crumb tray in place.
5. Wire rack, baking pan and crumb tray should be handwashed in hot,
sudsy water or use a nylon scouring pad or nylon brush.
6. Never wrap the cord around the outside of the oven. Use the cord
storage cleats on the back of the oven.
7. Any other servicing should be performed by an authorized service
representative.
IMPORTANT
After cooking greasy foods and after your oven has cooled, always
clean top interior of oven. If this is done on a regular basis, your oven
will continue to perform like new. Removing the grease will help to keep
toasting consistent, cycle after cycle.
All of our recipes have been tested in our kitchen and are specially
developed to work in the Cuisinart
®
Convection Toaster Oven Broiler.
These mouthwatering recipes are just a sampling of what this appliance
can do.
7
QUESTION ANSWER
Why is my food
burning?
a.
Check if you are in convection mode. Convection can speed up
cooking, so you should try less time and/or lower the temperature.
b.
Adjust oven rack position. Food may be too close to heating
elements.
c.
Because of its smaller capacity, countertop ovens heat up quicker
than convectional ovens and may require less time and/or lower
temperature for cooking.
Why would I use
convection?
a.
Convection uses a small fan to circulate hot air around food for even
cooking, often resulting in quicker cook times.
Why is there
condensation on
the oven door?
a.
This is normal, as moisture is created from cooking high-moisture
foods; it will dissipate during the cooking process.
Why are the
heating elements
going on and off,
and/or aren’t all on
at the same time?
a.
Heating elements cycle on and off to achieve temperature accuracy.
b.
Different functions utilize the heating elements differently; for
instance, the Broil function only uses the top heating elements.
Why isn’t my oven
heating up?
a.
Make sure your unit is securely plugged into a wall outlet and the
door is properly sealed.
b.
For toasting, make sure that the TOAST dial is not turned to the
OFF position. For all other oven functions, make sure that the OVEN
dial is not turned to the OFF position.
c.
Call Customer Service.
Why is there
smoke/odor?
a.
Smoke and/or odor are normal during the first use of your oven.
This should not continue after the initial heating period.
b.
If smoke and/or odor appear after first use, make sure there is
no food residue on the heating elements (do not clean heating
elements until unit is turned off and has cooled down).
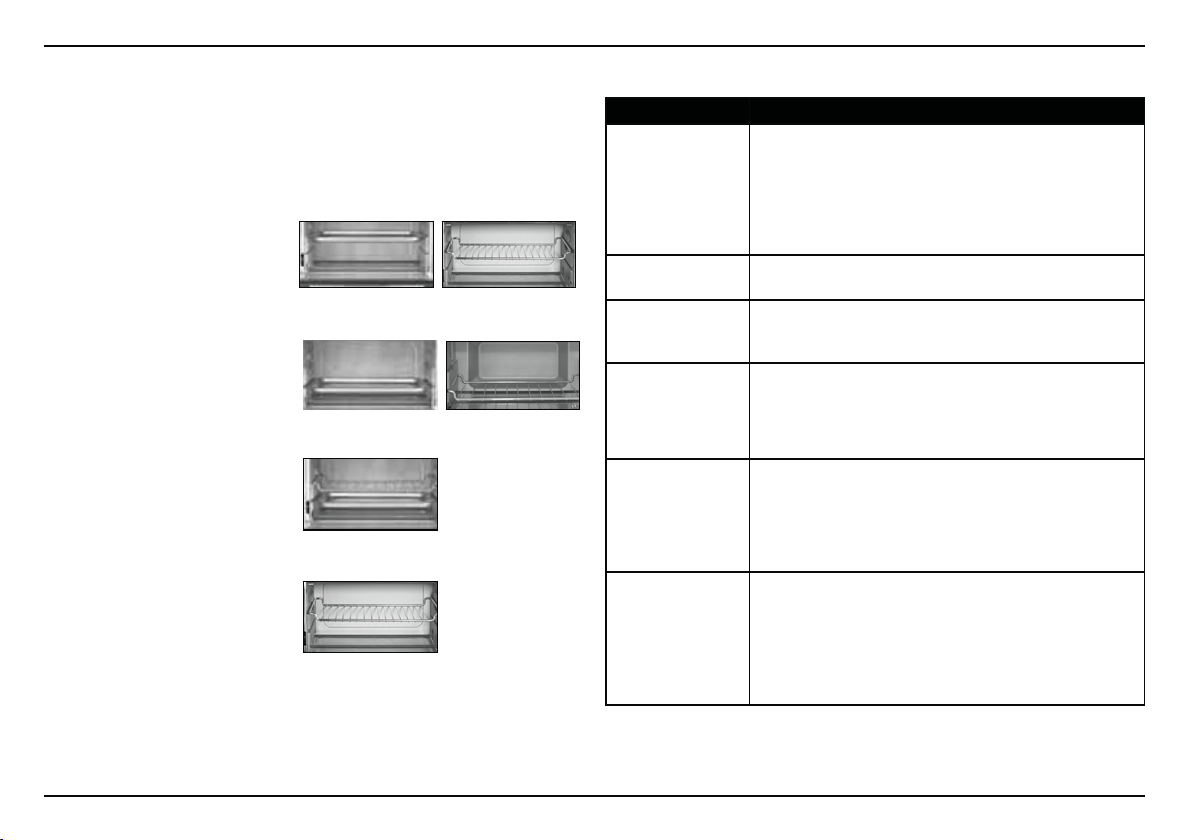
TROUBLESHOOTINGOVEN RACK AND PAN POSITION DIAGRAMS
Each recipe gives you step-by-step directions and will even tell
you where the oven rack and pan should be positioned for
best results. Please refer to the diagram below for oven rack positions.
UPPER POSITION FOR BAKING
NOTE: For chicken or other large
items the pan or rack can be in the
lower position.
LOWER POSITION FOR BAKING
POSITION FOR BROILING
POSITION FOR TOASTING
WARNING: Placing the rack in the bottom position or in the
top position with the rack upward while toasting may result
in a fire.
Refer to rack position diagram for proper use.

8
WARRANTY
LIMITED THREE-YEAR WARRANTY
This warranty is available to U.S. consumers only. You are a consumer
if you own a Cuisinart
®
Convection Toaster Oven Broiler that was
purchased at retail for personal, family or household use. Except as
otherwise required under applicable law, this warranty is not available
to retailers or other commercial purchasers or owners. We warrant that
your Cuisinart
®
Convection Toaster Oven Broiler will be free of defects
in materials and workmanship under normal home use for 3 years from
the date of original purchase. We recommend that you visit our website,
www.cuisinart.com, for a fast, efficient way to complete your product
registration. However, product registration does not eliminate the need
for the consumer to maintain the original proof of purchase in order to
obtain the warranty benefits. In the event that you do not have proof of
purchase date, the purchase date for purposes of this warranty will be
the date of manufacture.
CALIFORNIA RESIDENTS ONLY
California law provides that for In-Warranty Service, California residents
have the option of returning a nonconforming product (A) to the store
where it was purchased or (B) to another retail store that sells Cuisinart
products of the same type. The retail store shall then, according to
its preference, either repair the product, refer the consumer to an
independent repair facility, replace the product, or refund the purchase
price less the amount directly attributable to the consumer’s prior usage
of the product. If neither of the above two options results in the
appropriate relief to the consumer, the consumer may then take the
product to an independent repair facility, if service or repair can be
economically accomplished. Cuisinart and not the consumer will be
responsible for the reasonable cost of such service, repair, replacement,
or refund for nonconforming products under warranty. California
residents may also, according to their preference, return nonconforming
products directly to Cuisinart for repair or, if necessary, replacement
by calling our Consumer Service Center toll-free at 1-800-726-0190.
Cuisinart will be responsible for the cost of the repair, replacement, and
shipping and handling for such nonconforming products under warranty.
HASSLE-FREE REPLACEMENT WARRANTY
Your ultimate satisfaction in Cuisinart products is our goal, so if
your Cuisinart
®
Convection Toaster Oven Broiler should fail within
the generous warranty period, we will repair it or, if necessary, replace
it at no cost to you. To obtain a return shipping label, email us at
https://www.cuisinart.com/customer-care/product-returns.
Or call our toll-free customer service department at 1-800-726-0190
to speak with a representative.
Your Cuisinart
®
Convection Toaster Oven Broiler has been manufactured
to the strictest specifications and has been designed for use only in
120-volt outlets and only with authorized accessories and replacement
parts. This warranty expressly excludes any defects or damages
caused by attempted use of this unit with a converter, as well as use
with accessories, replacement parts or repair service other than those
authorized by Cuisinart. This warranty does not cover any damage
caused by accident, misuse, shipment or other than ordinary household
use. This warranty excludes all incidental or consequential damages.
Some states do not allow the exclusion or limitation of these damages,
so these exclusions may not apply to you. You may also have other
rights, which vary from state to state.
Important: If the nonconforming product is to be serviced by
someone other than Cuisinart’s Authorized Service Center, please
remind the servicer to call our Consumer Service Center at 1-800-726-
0190 to ensure that the problem is properly diagnosed, the product
is serviced with the correct parts, and that the product is still
under warranty.

9
RECIPES
Cranberry Bran Muffins ............................................................... 10
Sausage, Spinach and Fontina Quiche .......................................10
French Toast Strata ...................................................................... 11
Stuffed Mushrooms ..................................................................... 12
Gorgonzola and Ricotta Bruschetta ............................................ 12
Roasted Vegetable Quesadillas ...................................................13
Twice-Baked Potatoes .................................................................13
Oven-Roasted Steak Fries .......................................................... 14
Roasted Sweet Potatoes ............................................................. 14
Roasted Asparagus ..................................................................... 14
Roasted Fennel, Carrots and Parsnips .......................................15
Broccoli and Cauliflower Gratin ................................................... 15
White Pizza with Prosciutto, Arugula and Tomatoes ..................16
Tomato, Onion and Bacon Pizza .................................................16
Zucchini, Tomato and Onion Tart ................................................17
Chicken, Vegetable and Black Bean Burritos .............................18
Baked Rigatoni with Chicken Sausage, Broccolini
and Peppers .................................................................................18
Herb-Crusted Beef Tenderloin ..................................................... 19
Classic Roast Chicken ................................................................. 20
Moroccan-Spiced Baked Chicken ..............................................20
Broiled Pork Chops with Hot Cherry Peppers ............................ 21
Roasted Sole with Artichokes and Capers .................................21
Rosemary Focaccia ..................................................................... 22
Buttermilk Biscuits ...................................................................... 22
Multigrain Rolls ........................................................................... 23
Whole-Wheat Banana Chocolate Chip Bread ........................... 23
Apple, Cherry and Raisin Crisp .................................................. 24
Bittersweet Espresso Brownies .................................................. 25
Lemon Squares ........................................................................... 25
Cinnamon Cake with White Chocolate Glaze ............................ 26
Caramel Walnut Tart with Raspberry and Chocolate ................ 27
Pizza Dough ................................................................................ 27
Pâte Brisée .................................................................................. 28
Pâte Sucrée................................................................................. 28

10
Cranberry Bran Muffins
Makes 6 muffins
nonstick cooking spray
¾ cup unbleached, all-purpose flour
¼ cup whole-wheat flour
¾ teaspoon kosher salt
¼ teaspoon baking soda
½ teaspoon baking powder
½ teaspoon ground cinnamon
¼ cup unsalted butter, room temperature
¼ cup packed light brown sugar
1 large egg, lightly beaten
2½ tablespoons honey
1 teaspoon pure vanilla extract
2
/
3
cup buttermilk
½ cup dried cranberries
¼ cup wheat germ
1. Preheat the Cuisinart
®
Convection Toaster Oven Broiler to 375°F on
Convection Bake with the rack in the lower position. Lightly coat a
6-cup muffin tin with nonstick cooking spray. Reserve.
2. In a small mixing bowl, add the flours, salt, baking soda, baking
powder and cinnamon. Whisk to combine; reserve.
3. Using a Cuisinart
®
Hand or Stand Mixer fitted with the paddle or
beating attachment, mix the butter until creamy. Add the brown
sugar and beat until light and fluffy. Add the egg, honey and vanilla
and mix until fully combined. While mixing, slowly add one-third of
the dry mixture, then follow with half of the buttermilk – adding when
the batter is still streaky with flour. Continue in that pattern – do not
overmix. Gently fold in the cranberries and wheat germ.
4. Pour batter evenly into prepared muffin tin. Bake for about 25 minutes,
or until muffin tops spring back when pressed and a cake tester
comes out clean.
Nutritional information per muffin:
Calories 228 (34% from fat) • carb. 34g • pro. 5g • fat 9g
• sat. fat 5g • chol. 55mg • sod. 380mg
• calc. 53mg • fiber 3g
Sausage, Spinach and Fontina Quiche
Makes one 9-inch deep-dish quiche, 8 to 12 servings
½ recipe Pâte Brisée (see page 28)
6 ounces sweet Italian sausage, casings removed
2 tablespoons unsalted butter or olive oil
2 garlic cloves, finely chopped
2 cups packed baby spinach
½ teaspoon kosher salt, divided
½ teaspoon freshly ground black pepper, divided
1 cup whole milk
1 cup heavy cream
4 large eggs
½ cup shredded fontina (about 3 ounces)
1. Roll out the dough into a 10-inch disc about
1
/
8
-inch thick. Fit into
an ungreased 9-inch deep-dish pie plate. Chill in refrigerator for about
20 minutes.
2. Preheat the Cuisinart
®
Convection Toaster Oven Broiler to 350°F on
Bake/Pizza with the rack in the lower position. Using a fork, prick the
dough evenly all over, but make sure not to go entirely through the
dough. Line the shell with parchment and weigh down with dried beans
or rice. Bake in preheated oven for 20 to 22 minutes, or until the dough
under the parchment is no longer wet. Remove the beans/rice and
parchment and continue baking until the shell is golden brown, about
an additional 15 minutes. Remove; reserve.
3. Heat a skillet over medium-high heat. Add the sausage, breaking it
up with a spatula or the back of a wooden spoon. Sauté until lightly
browned; reserve. Do not clean out pan.
4. Add the butter or olive oil to the hot pan. When it has melted, add the
garlic and sauté until golden. Add the spinach, about a quarter-cup at a

11
time, and a pinch each of the salt and pepper. Sauté until bright and
wilted; add to sausage and stir to combine; reserve.
5. In a medium bowl, mix the milk, cream, eggs and remaining salt and
pepper. Using a Cuisinart
®
Hand or Stand Mixer fitted with the whisk
attachment, whip the mixture until completely combined. Spread the
sausage/spinach mixture evenly on the bottom of the tart shell. Pour in
the liquid mixture and top with the fontina.
6. Bake about 40 to 60 minutes, or until the quiche has browned on top
and is just set.
Nutritional information per serving (based on 12 servings):
Calories 300 (75% from fat) • carb. 10g • pro. 9g • fat 25g
• sat. fat 7g • chol. 110mg • sod. 380mg
• calc. 98mg • fiber 0g
French Toast Strata
Makes 8 servings
nonstick cooking spray
4 large eggs
2 cups whole milk
1 cup heavy cream
1 tablespoon pure vanilla extract
1
⁄
3
cup maple syrup
2 teaspoons ground cinnamon
1 teaspoon ground nutmeg
¼ teaspoon kosher salt
1 loaf (1 pound) challah bread, cut into ½-inch x 9-inch strips
2 tablespoons packed light brown sugar, divided
2 tablespoons unsalted butter, cut into ½-inch cubes
1. Lightly coat a 9-inch square pan with nonstick cooking spray; reserve.
2. Add the eggs, milk, heavy cream, vanilla extract, syrup, spices and salt
to a medium mixing bowl. Using a Cuisinart
®
Hand Mixer fitted with the
chef’s whisk, beat the mixture until foamy.
3. Tightly fit half of the challah bread strips into the bottom of the prepared
pan. Pour half of the egg mixture on top and evenly sprinkle with half
of the brown sugar. Repeat with the remaining bread, layering in the
opposite direction of the first layer of bread. Pour the remaining egg
mixture on top, sprinkle with the remaining brown sugar. Cover and
chill in the refrigerator for at least 2 hours, or overnight.
4. Remove the strata from the refrigerator and bring to room temperature.
Preheat the Cuisinart
®
Convection Toaster Oven Broiler to 350°F on
Convection Bake with the rack in the lower position. Dot the top of the
strata with the butter and loosely cover with aluminum foil. Bake in
preheated oven for about 15 minutes; remove foil and bake for an
additional 10 minutes, or until the internal temperature of the strata
reaches 160°F.
5. Remove and serve immediately.
Nutritional information per serving:
Calories 420 (47% from fat) • carb. 44g • pro. 11g
• fat 22g • sat. fat 12g • chol. 190mg • sod. 430mg
• calc. 177mg • fiber 2g
Stuffed Mushrooms
Makes 16 servings
16 stuffing mushrooms (about 14 ounces)
½ cup panko (Japanese breadcrumbs)
¼ teaspoon dried basil
½ teaspoon dried oregano
1 tablespoon fresh parsley
¼ teaspoon kosher salt
½ teaspoon freshly ground black pepper
3 tablespoons olive oil, divided
1 garlic clove, finely chopped
2 tablespoons grated Parmesan
1. Clean the mushrooms and remove and reserve the stems.

12
2. In the bowl of a Cuisinart
®
Mini Chopper or Food Processor, add the
panko, basil, oregano, parsley, salt and pepper. Process until finely
ground. Add the mushroom stems and pulse to chop. Reserve.
3. Heat 1 tablespoon of the oil in a medium skillet over medium-low heat.
Add the garlic and sauté until softened and golden. Add the panko
mixture and sauté until mixture is very soft and toasted, adding one
tablespoon of oil halfway through cooking – this should take about 5
minutes. Stir in the Parmesan and combine.
4. Preheat the Cuisinart
®
Convection Toaster Oven Broiler to 425°F
on Bake/Pizza.
5. Line the baking pan with aluminum foil. Place the mushroom caps on
the prepared pan and evenly divide the breadcrumb mixture among
the mushrooms, mounding the mixture in each mushroom. Drizzle the
remaining olive oil over the prepared mushrooms. Slide the pan into the
upper position and bake in preheated oven for about 5 to 7 minutes,
or until the tops are browned.
6. Remove and let cool for 5 minutes. Serve warm or at room
temperature.
Nutritional information per serving:
Calories 40 (65% from fat) • carb. 2g • pro. 1g • fat 3g
• sat. fat 0g • chol. 0mg • sod. 45mg
• calc. 9mg • fiber 0g
Gorgonzola and Ricotta Bruschetta
Makes 12 bruschetta
12 slices (½-inch thick) French bread
1 garlic clove, smashed
1½ tablespoons extra-virgin olive oil
1 cup ricotta, strained
2 tablespoons grated Parmesan
½ teaspoon kosher salt
½ teaspoon freshly ground black pepper
pinch ground nutmeg
½ cup crumbled Gorgonzola
½ to 1 tablespoon honey
1. Preheat the Cuisinart
®
Convection Toaster Oven Broiler to 375°F on
Bake/Pizza with the rack in the upper position and the pan in the
lower position.
2. Rub one side of each slice of bread with garlic and then brush with
olive oil. Carefully place on the rack and bake in the preheated oven
for about 2 to 3 minutes per side, or until lightly toasted.
3. While bread is toasting, prepare topping. In a small bowl, add the
ricotta, Parmesan, salt, pepper and nutmeg. Stir to combine.
Distribute evenly on the toasted bread slices, and then top with
the Gorgonzola. Return to rack and then set on Broil for about
3 minutes, or until cheese is fully warmed.
4. Drizzle honey over bruschetta and serve immediately.
Nutritional information per bruschetta:
Calories 120 (46% from fat) • carb. 11g • pro. 5g • fat 6g
• sat. fat 3g • chol. 10mg • sod. 300mg
• calc. 108mg • fiber 1g
Roasted Vegetable Quesadillas
Makes 2 quesadillas (4 servings)
¼ medium zucchini (approximately 2 ounces), cut into
½-inch dice
½ red or yellow bell pepper (approximately 3 ounces), cut into
½-inch dice
½ jalapeño, seeded and finely chopped
¼ medium onion (approximately 2 ounces), sliced
1 garlic clove, smashed
1 teaspoon olive oil, plus ½ tablespoon for brushing
¼ teaspoon kosher salt
¼ teaspoon freshly ground black pepper
¼ cup frozen corn kernels

13
1 tablespoon cilantro, roughly chopped
1 ounce Monterey Jack, shredded
1 ounce goat cheese
2 10-inch flour tortillas
Nonstick cooking spray
1. Preheat the Cuisinart
®
Convection Toaster Oven Broiler to 400°F
on Bake/Pizza.
2. Toss the zucchini, peppers, onion, garlic, 1 teaspoon of the olive oil,
salt and pepper together in a mixing bowl. Line the baking pan with
aluminum foil and transfer the vegetables to the prepared pan.
Carefully slide the pan into the upper position. Bake in preheated
oven until vegetables are softened and browned, about 20 minutes.
Discard garlic and return remaining vegetables to mixing bowl; toss
with the corn and cilantro.
3. Assemble quesadillas: Lay the tortillas on a work surface. Place equal
amounts of the vegetable mixture on half of each tortilla, then place
even amounts of cheese on each. Fold each in half, making a half-
moon shape.
4. Spray prepared baking pan with cooking spray. Place the quesadillas
on baking pan and brush the tops lightly with oil. Bake quesadillas at
400°F for about 6 to 6½ minutes, until tops are golden and cheese
is melted.
5. Cut quesadillas in half and serve with salsa, guacamole and/or
sour cream.
Nutritional information per serving:
Calories 190 (38% from fat) • carb. 23g • pro. 7g • fat 8g
• sat. fat 4g • chol. 10mg • sod. 860mg
• calc. 123mg • fiber 2g
Twice-Baked Potatoes
Makes 8 servings
4 Idaho or russet potatoes (10 to 12 ounces each)
1 teaspoon olive oil, divided
2
⁄
3
cup low-fat milk
2 tablespoons unsalted butter, plus 1 teaspoon for finishing
½ cup sour cream
½ teaspoon kosher salt
½ teaspoon freshly ground black pepper
¼ cup chopped fresh chives
1. Preheat the Cuisinart
®
Convection Toaster Oven Broiler to 400°F
on Bake/Pizza with the rack in the lower position.
2. Rub each potato with ¼ teaspoon of olive oil, and then evenly prick
about 6 to 8 times with a fork. Place potatoes directly on the rack
and bake for about 55 to 60 minutes. Remove and let cool slightly.
Carefully remove the rack and reduce oven temperature to 375°F.
3. When potatoes are cool enough to handle, cut off top quarter of each
potato and scoop out cooked potato, leaving a ¼-inch-thick potato
shell. Reserve cooked potato and skin shells.
4. In a medium bowl put cooked potato, milk and 2 tablespoons of the
butter. Using a potato masher or hand mixer, mash/beat until smooth.
Add sour cream, salt, pepper and chives. Mash/beat to combine
completely. Generously fill the potato shells with sour cream and
potato mixture. (Potatoes may be prepared a day ahead to this point –
cover and refrigerate. Bring to room temperature before baking.)
Place the potatoes on the baking pan. Melt remaining teaspoon of
butter and drizzle on potatoes. Carefully slide the pan into the lower
position and bake for 35 to 45 minutes, until potatoes are hot and
golden on the tops.
Nutritional information per serving (½ potato):
Calories 180 (31% from fat) • carb. 27g • pro. 4g • fat 6g
• sat. fat 4g • chol. 20mg • sod. 160mg
• calc. 58mg • fiber 3g

14
Oven-Roasted Steak Fries
Makes 2 servings
1 pound Idaho or russet potatoes (about 2 to 3 medium
potatoes), cut into ½-inch wedges
2 tablespoons olive oil
½ teaspoon kosher salt
¼ teaspoon freshly ground black pepper
pinch cayenne
1. Preheat the Cuisinart
®
Convection Toaster Oven Broiler to 425°F
on Bake/Pizza.
2. Place potatoes in a medium to large mixing bowl. Toss with the
remaining ingredients. Line the baking pan with aluminum foil
and arrange the potatoes, cut-side down.
3. Carefully slide the pan into the lower position. Bake for about
30 minutes, turning the potatoes halfway through the cooking time.
4. Remove and adjust seasonings to taste. Serve immediately.
Nutritional information per serving (1 cup):
Calories 130 (91% from fat) • carb. 3g • pro. 0g • fat 14g
• sat. fat 2g • chol. 0mg • sod. 530mg
• calc. 3mg • fiber 0g
Roasted Sweet Potatoes
Makes 4 servings
1¾ pounds (about 2 to 3 large) sweet potatoes, cut lengthwise
into quarters
4 tablespoons unsalted butter, melted
½ teaspoon kosher salt
2 tablespoons packed light brown sugar
1. Preheat the Cuisinart
®
Convection Toaster Oven Broiler to 375°F
on Bake/Pizza.
2. Place potatoes in a medium to large mixing bowl. Toss with
the remaining ingredients. Line the baking pan with aluminum
foil and arrange the potatoes cut-side down.
3. Carefully slide the pan into the lower position. Bake for about
35 minutes, turning the potatoes every 10 minutes.
4. Remove and serve immediately.
Nutritional information per serving (1 cup):
Calories 290 (34% from fat) • carb. 46g • pro. 3g • fat 11g
• sat. fat 7g • chol. 30mg • sod. 380mg
• calc. 60mg • fiber 6g
Roasted Asparagus
Makes 4 servings
1 pound asparagus
1 teaspoon extra-virgin olive oil
¼ teaspoon kosher salt
¼ teaspoon freshly ground black pepper
1. Preheat the Cuisinart
®
Convection Toaster Oven Broiler to 425°F
on Bake/Pizza.
2. Wash and thoroughly dry asparagus and trim the rough ends.
Place asparagus in a mixing bowl and toss with the olive oil, salt
and pepper.
3. Line the baking pan with aluminum foil and arrange asparagus on
the pan. Carefully slide the pan into the upper position and bake in
preheated oven for 10 to 15 minutes, until the asparagus is tender.
4. Serve immediately.
Nutritional information per serving:
Calories 36 (29% from fat) • carb. 4g • pro. 3g • fat 2g
• sat. fat 0g • chol. 0mg • sod. 135mg
• calc. 28mg • fiber 2g

15
Roasted Fennel, Carrots and Parsnips
Makes 4 servings
2 fennel bulbs, quartered
3 medium carrots, cut into 1-inch pieces
1 large parsnip, cut into 1-inch pieces
1 garlic clove, smashed
3 tablespoons olive oil
1 teaspoon fresh thyme
½ teaspoon kosher salt
¼ teaspoon freshly ground black pepper
pinch ground cinnamon
1. Preheat the Cuisinart
®
Convection Toaster Oven Broiler to 450°F
on Bake/Pizza.
2. Place vegetables in a medium to large mixing bowl and toss with
the remaining ingredients.
3. Arrange the vegetables in the baking pan lined with aluminum foil.
Carefully slide the pan into the upper position and bake in preheated
oven for 45 minutes, tossing every 15 to 20 minutes.
Nutritional information per serving (½ cup):
Calories 170 (54% from fat) • carb. 18g • pro. 2g • fat 11g
• sat. fat 2g • chol. 0mg • sod. 360mg
• calc. 85mg • fiber 6g
Broccoli and Cauliflower Gratin
Makes 8 servings
nonstick cooking spray
1½ pounds broccoli florets
1 pound cauliflower florets
1½ teaspoons olive oil
1 garlic clove, finely chopped
½ medium onion, finely chopped
½ teaspoon kosher salt
¾ teaspoon freshly ground black pepper
2 cups shredded Cheddar, divided
¾ cup panko (Japanese breadcrumbs), divided
¼ cup grated Parmesan, divided
1. Lightly and evenly coat a 9-inch square pan with nonstick cooking
spray; reserve.
2. In a large stockpot, bring salted water to a boil. Add broccoli and
cauliflower and cook 2 to 3 minutes, until bright and just tender.
Immediately put vegetables into a large bowl of ice water. Once cooled,
drain and reserve.
3. Heat the oil in a medium skillet set over medium-low heat. Once hot
and shimmering, add the garlic and onion and cook 2 to 3 minutes,
or until slightly softened.
4. Preheat the Cuisinart
®
Convection Toaster Oven Broiler to 400°F
on Bake/Pizza with the rack in the lower position.
5. Add the blanched vegetables, the garlic and onion, salt, pepper, half of
the Cheddar and half of the breadcrumbs to a large mixing bowl. Stir to
completely combine. Transfer mixture to the prepared pan and then top
with the reserved Cheddar and breadcrumbs and the Parmesan. Bake
15 minutes, or until the cheeses begin to brown.
6. Serve immediately.
Nutritional information per serving:
Calories 190 (49% from fat) • carb.13g • pro.12g • fat 11g
• sat. fat 6g • chol. 30mg • sod. 280mg
• calc. 284mg • fiber 2g

16
White Pizza with Prosciutto,
Arugula and Tomatoes
Makes one 12-inch pizza (8 servings)
nonstick cooking spray
1
⁄
3
recipe Pizza Dough (page 27)
1 tablespoon extra virgin olive oil
1–1½ ounces (about 4 to 6 slices) prosciutto, halved
3 medium garlic cloves, finely chopped, divided
1 cup halved grape tomatoes
2 cups packed arugula
1½ cups ricotta, strained
½ cup grated Parmesan (about 2 ounces)
pinch kosher salt
½ teaspoon freshly ground black pepper
1. Preheat the Cuisinart
®
Convection Toaster Oven Broiler to 425°F
on Bake/Pizza.
2. Lightly coat the baking pan with nonstick cooking spray. Roll out/
stretch the pizza dough into a 10 x 9-inch rectangle (to fit the pan).
Fit into the prepared pan. Brush the outer edge of the dough with olive
oil. Carefully slide into the lower position. Bake in preheated oven
for about 6 to 8 minutes, or until dough is lightly golden.
3. While dough is baking, put a medium skillet over medium-high heat.
Once the pan is hot, add the prosciutto. Sauté until crisp; remove
and reserve.
4. Add
2
⁄
3
of the chopped garlic to the hot pan. Sauté until fragrant,
and then add the tomatoes. When tomatoes just begin to soften, stir in
the arugula, about ¼ cup at a time. Cook until the arugula is wilted;
remove and reserve.
5. In a medium bowl, mix the strained ricotta, Parmesan, remaining garlic,
salt and pepper until well combined. Reserve.
6. Spread the ricotta mixture evenly over the partially baked pizza dough.
Top the ricotta with the arugula mixture and then finish with the
prosciutto. Carefully slide the pan into the lower position. Bake in
preheated oven for about 10 to 12 minutes, or until the dough is
golden and crisp and the cheeses start to bubble and brown on top.
7. Remove the pizza from the oven. Cut into slices and serve immediately.
Nutritional information per serving:
Calories 160 (30% from fat) • carb. 19g • pro. 10g • fat 6g
• sat. fat 3g • chol. 20mg • sod. 400mg
• calc. 167mg • fiber 2g
Tomato, Onion and Bacon Pizza
Makes one 12-inch pizza (8 servings)
3 slices bacon
nonstick cooking spray
1
⁄
3
recipe Pizza Dough (page 27)
1 tablespoon extra-virgin olive oil
1 cup hearty pizza sauce, strained
6 ounces fresh mozzarella, cubed
1 plum tomato, cut into ½-inch slices
¼ medium onion, thinly sliced
1 tablespoon thinly sliced basil leaves
1. Lay the bacon slices evenly on the prepared pan and slide into the
upper position of the Cuisinart
®
Convection Toaster Oven Broiler.
Set to Broil and cook for about 8 minutes, or until bacon is almost
crisp. Carefully remove pan and transfer bacon to a separate dish
and reserve. Wipe pan clean and then lightly coat with nonstick
cooking spray.
2. Preheat oven to 425°F on Bake/Pizza.
3. Roll out/stretch dough into a 10 x 9-inch rectangle (to fit the pan).
Fit into the prepared pan and brush the outer edge of the dough
with olive oil. Carefully slide pan into the lower position and bake
in preheated oven for about 6 to 8 minutes, or until dough is lightly
golden.

17
4. Spread the sauce evenly over the baked dough. Top with the cheese,
and then finish with the tomatoes, onions, bacon and basil. Carefully
slide pan into the lower position. Bake in preheated oven for about
12 to 14 minutes, or until the dough is nicely browned and the
cheese is melted and bubbling on top.
5. Remove the pizza from the oven. Cut into slices and serve immediately.
Nutritional information per serving:
Calories 200 (47% from fat) • carb. 19g • pro. 7g • fat 11g
• sat. fat 5g • chol. 25mg • sod. 330mg
• calc. 3mg • fiber 3g
Zucchini, Tomato and Onion Tart
Makes 10 servings
½ recipe Pâte Brisée (page 26)
3 small zucchini
2 small onions
4 tablespoons olive oil, divided
½ teaspoon kosher salt, divided
½ teaspoon freshly ground black pepper, divided
3 tablespoons grated Parmesan
3 plum tomatoes
½–¾ ounce soft goat cheese
5 small basil leaves, thinly sliced (chiffonade)
1. Roll and shape the pâte brisée into a 12 x 4-inch rectangle. Fold up
the edges to ¼-inch high. Refrigerate for about 30 minutes.
2. While dough is chilling, prepare the vegetables. Preheat the Cuisinart
®
Convection Toaster Oven Broiler to 425°F on Bake/Pizza. Line the
baking pan with aluminum foil.
3. Using a Cuisinart
®
Food Processor fitted with the 4mm/medium slicing
disc, slice the zucchini and onions. In a medium bowl, toss the sliced
vegetables with 3 tablespoons of the olive oil and ¼ teaspoon each of
the salt and pepper. Arrange in a single layer on the prepared baking
pan. Roast for about 20 minutes, or until vegetables begin to brown
and soften. Transfer the vegetables to a separate dish and discard
the foil. Wipe pan clean of any excess oil, if necessary.
4. Switch the oven to 350°F on Convection Bake.
5. Remove the tart shell from the refrigerator and place on the baking pan.
Using a fork, prick the dough evenly all over, but make sure not to go
entirely through the dough. Line the shell with parchment and weigh
down with dried beans or rice. Carefully slide pan into the lower
position and bake for about 20 minutes, or until the dough under the
parchment is no longer wet. Remove the beans/rice and parchment
and sprinkle with the Parmesan. Return to oven and continue baking
until the shell is golden brown, an additional 2 to 3 minutes. Reserve.
6. While the tart shell is pre-baking, slice the tomatoes in the food
processor, using the same 4mm/medium slicing disc. Lay the slices
on a towel-lined plate; sprinkle with the remaining salt. Reserve until
ready to use.
7. Once the tart shell is baked, prepare the tart. Arrange the vegetables
and the tomatoes in the baked tart shell by tightly overlapping them in
rows (start with one vegetable, using a different vegetable in each row).
Drizzle with the remaining tablespoon of olive oil and sprinkle with the
remaining pepper. Dot the tart with pea-sized pieces of the goat cheese
(use more or less, according to taste).
8. Carefully slide the pan into the lower position of the hot oven. Bake 20
minutes or until crust is fully browned and the vegetables are tender
and golden. Remove from oven and sprinkle with the sliced basil.
9. Serve warm or at room temperature.
Nutritional information per serving:
Calories 180 (67% from fat) • carb. 13g • pro. 3g • fat 14g
• sat. fat 7g • chol. 25mg • sod. 200mg
• calc. 30mg • fiber 1g

18
Chicken, Vegetable
and Black Bean Burritos
Makes 4 servings
½ large zucchini, diced
1 small onion, thinly sliced
1 large carrot, diced
3 garlic cloves, roughly chopped
½ jalapeño, finely chopped
½ red bell pepper, chopped
¼ medium sweet potato, peeled and diced
2½ teaspoons olive oil, divided
¼ teaspoon kosher salt, divided
2
⁄
3
cup frozen corn kernels (not thawed)
1 cup shredded cooked chicken
2 cups canned/cooked black beans (drained and rinsed,
if using canned)
1
⁄
3
cup chopped cilantro
2 tablespoons fresh lime juice (about 1 to 2 limes)
pinch ground cumin
pinch chili powder
pinch dried oregano
pinch freshly ground black pepper
1 cup shredded Monterey Jack (about 4 ounces)
4 10-inch flour tortillas
1. Preheat the Cuisinart
®
Convection Toaster Oven Broiler to 400ºF
on Bake/Pizza. Line the baking pan with aluminum foil.
2. In a large mixing bowl, toss the vegetables (except for the corn) with
2 teaspoons of the olive oil and a pinch of salt. Arrange evenly on the
prepared baking pan. Carefully slide the pan into the upper position
and roast in the preheated oven for about 18 to 20 minutes, or until
vegetables are softened and are beginning to brown. Transfer the
vegetables back to the mixing bowl and toss with the corn, chicken,
beans, cilantro, lime juice, spices, pepper and remaining salt.
3. Spread one-quarter of the vegetable mixture in a line just below the
center of each tortilla. Top each with one-quarter of the cheese.
Roll the burritos and place them seam-side down in the same baking
tray on which the vegetables were roasted. Brush the top of each rolled
burrito with the remaining olive oil.
4. Carefully slide the pan into the lower position. Bake burritos in the hot
oven (still at 400°F) for 8 to 10 minutes, or until the tortillas are just
crisp and browned. Serve with guacamole, salsa and sour cream
for garnish.
Nutritional information per serving:
Calories 620 (35% from fat) • carb. 71g • pro. 33g • fat 25g
• sat. fat 8g • chol. 55mg • sod. 1mg
• calc. 373mg • fiber 12g
Baked Rigatoni with Chicken Sausage,
Broccolini and Peppers
Makes 6 to 8 servings
5 ounces broccolini, about half a bunch, ends trimmed
1 teaspoon extra-virgin olive oil, divided
2 tablespoons dry white wine
2 tablespoons chicken stock
6 ounces Italian chicken sausage, fully cooked, cut into
½-inch rounds
½ red bell pepper, sliced
½ medium onion, sliced
2 garlic cloves, finely chopped
¼ teaspoon kosher salt, divided
¼ teaspoon freshly ground black pepper, divided
½ pound dried rigatoni pasta, cooked according to
manufacturer’s instructions
¾ cup ricotta

19
8 ounces mozzarella, shredded
¼ cup grated Parmesan (about 1 ounce)
4–6 basil leaves, roughly torn
nonstick cooking spray
1. Bring a pot of salted water to a boil. Set up a large bowl filled with ice
water. Add broccolini to boiling water and cover. Cook for about 4 to 6
minutes or until bright green. Plunge cooked broccolini into prepared
ice water. Once cool, discard ice water and cut broccolini into 1-inch
pieces.
2. Preheat a large skillet over medium-high heat; add oil. Once oil is hot
and shimmering, add the blanched broccolini. Sauté 2 to 3 minutes,
and then add the wine and stock. Raise temperature to high and sauté
until liquids have evaporated. Reserve.
3. Preheat the Cuisinart
®
Convection Toaster Oven Broiler to 400°F
on Bake/Pizza. Line the baking pan with aluminum foil.
4. Put the sausage, pepper, onion and garlic with a pinch each of the salt
and pepper on the prepared baking pan. Carefully slide the pan into
the upper position and roast in the preheated oven for about 15
minutes, or until sausage and vegetables have browned. Remove and
reduce temperature to 350°F and slide the rack into the lower position.
5. In a large mixing bowl, toss the broccolini, roasted sausage and
vegetables, and the remaining ingredients until well combined.
6. Lightly coat a 2-quart baking dish with nonstick cooking spray. Add the
pasta mixture. Bake in the preheated oven for about 30 to 35 minutes,
or until cheeses are hot and bubbling.
Nutritional information per serving (based on 8 servings):
Calories 260 (53% from fat) • carb. 14g • pro. 17g • fat 16g • sat. fat 7g • chol. 40mg
• sod. 383mg • calc. 341mg • fiber 1g
Herb-Crusted Beef Tenderloin
Makes 6 servings
1½ pounds trimmed beef tenderloin roast (preferably top cut)
½ teaspoon kosher salt, divided
½ teaspoon freshly ground black pepper, divided
3 garlic cloves, peeled
2 sprigs fresh thyme, stems discarded
1 sprig fresh rosemary, stem discarded
1 sprig fresh oregano, stem discarded
½ teaspoon dried tarragon
3 tablespoons extra-virgin olive oil
2 tablespoons Dijon mustard
1. Preheat the Cuisinart
®
Convection Toaster Oven Broiler to 375°F on
Convection Bake. Line the baking pan with aluminum foil. Rub the beef
with ¼ teaspoon each of the salt and pepper. Reserve.
2. In the bowl of a Cuisinart
®
Mini Chopper or Food Processor, process
the garlic, herbs and the reserved salt and pepper until well combined.
With the chopper/processor running, add the oil in a slow and steady
stream. Process until combined.
3. Rub the mustard on the tenderloin; evenly spread the herb/oil mixture
on top. Place beef on the prepared baking pan. Carefully slide the
pan into the lower position and roast for about 40 minutes, or until
the internal temperature reads 125°F. Let meat rest 10 to 15 minutes
before slicing.
Nutritional information per serving:
Calories 390 (77% from fat) • carb. 2g • pro. 20g • fat 33g
• sat. fat 12g • chol. 80mg • sod. 350mg
• calc. 18mg • fiber 0g

20
Classic Roast Chicken
Makes 4 to 6 servings
1 3½- to 4-pound chicken
1 teaspoon kosher salt
½ teaspoon freshly ground black pepper
1 lemon, halved
1 teaspoon olive oil
2 teaspoons herbes de Provence or fines herbes
1 small bundle mixed fresh herbs
(i.e., thyme, rosemary, parsley, etc.)
3 garlic cloves, smashed
1 medium onion, quartered
1. Preheat the Cuisinart
®
Convection Toaster Oven Broiler to 375°F
on Convection Bake. Line baking pan with aluminum foil.
2. Sprinkle the salt and pepper all over the chicken, including in the cavity.
Squeeze the lemon juice all over the chicken and place the juiced
lemon in the cavity. Rub the olive oil on the chicken and sprinkle all
over with the dried herbs. Place the fresh herbs, garlic cloves and
onion in the cavity and tie the legs together with butcher’s twine.
3. Place chicken on prepared baking pan and carefully slide the pan
into the lower position. Bake in the preheated oven for 30 minutes.
Reduce temperature to 350°F and continue to bake for an additional
30 to 40 minutes, or until the internal temperature registers 160°F
for the light meat and 170°F for the dark meat.
4. Allow chicken to rest for 15 minutes; carve and serve.
Nutritional information per serving (based on 6 servings):
Calories 590 (62% from fat) • carb. 5g • pro. 49g • fat 40g
• sat. fat 11g • chol. 240mg • sod. 540mg
• calc. 57mg • fiber 1g
Moroccan-Spiced Baked Chicken
Makes about 4 servings
1½ pounds mixed chicken parts
1 tablespoon olive oil
1½ tablespoons fresh lemon juice (about ½ lemon)
1 teaspoon kosher salt
¾ teaspoon ground cumin
½ teaspoon ground cinnamon
pinch cayenne
2 shallots, quartered
1. Preheat the Cuisinart
®
Convection Toaster Oven Broiler to 375°F
on Convection Bake. Line the baking pan with aluminum foil.
2. Toss chicken in a large mixing bowl with the oil, lemon juice, salt and
spices. Lay the shallots on the prepared baking pan and place the
chicken on top of the shallots.
3. Carefully slide the pan into the lower position and bake for 30 to 40
minutes, depending on the size of the chicken pieces (internal
temperature should read 160°F for light meat and 170°F for dark meat).
Nutritional information per serving (based on 4 servings):
Calories 371 (53% from fat) • carb. 5g • pro. 32g • fat 24g
• sat. fat 6g • chol. 141mg • sod. 671mg
• calc. 38mg • fiber 0g

21
Broiled Pork Chops
with Hot Cherry Peppers
Makes 4 servings
4 pork chops (each 1½ inches thick)
1 teaspoon kosher salt
1 teaspoon freshly ground black pepper
4 to 6 hot cherry peppers
2 to 3 garlic cloves, smashed
½ medium onion, cut into ½-inch pieces
1. Line the baking pan with aluminum foil. Rub the pork chops evenly
with salt and pepper. Lay the prepared chops on the prepared baking
pan; surround with the cherry peppers, garlic and onion.
2. Slide the pan into the upper position. Set to Convection Broil and cook
for about 20 minutes, flipping the chops halfway through the cooking
time. The internal temperature of the meat should be between 145°F
and 150°F.
Nutritional information per serving:
Calories 220 (17% from fat) • carb. 5g • pro. 34g • fat 7g
• sat. fat 2g • chol. 76mg • sod. 2mg
• calc. 17mg • fiber 0g
Roasted Sole with Artichokes
and Capers
Makes 4 servings
2 medium artichokes, trimmed, choke removed,
and cut into wedges
3½ tablespoons fresh lemon juice, divided
3 tablespoons olive oil, divided
¾ teaspoon kosher salt, divided
½ teaspoon freshly ground black pepper, divided
1 pound fillet of sole, or other similar white fish
2 tablespoons drained capers
1. Preheat the Cuisinart
®
Convection Toaster Oven Broiler to 425°F
on Bake/Pizza. Line the baking pan with parchment paper.
2. Put the artichokes in a medium mixing bowl. Add enough cold
water to just cover and then stir in 2 tablespoons of the lemon juice.
Agitate artichokes in the water/lemon mixture with your fingers.
Drain and pat dry. Toss with 2 tablespoons of oil and ¼ teaspoon
each of the salt and pepper. Place on the prepared baking pan and
slide the pan into the lower position. Roast for about 20 minutes,
or until lightly browned.
3. While artichokes are roasting, rinse and pat dry the fish. Rub with the
remaining olive oil, salt, pepper and lemon juice. Once artichokes have
been roasted, place the seasoned fish on top of the artichokes; top
with the capers. Carefully slide the pan back into the lower position,
keeping the temperature at 425°F. Roast until the fish is just cooked
through, about 15 minutes, depending on the thickness of the fish.
4. Remove and serve immediately.
Nutritional information per serving:
Calories 290 (53% from fat) • carb. 10g • pro. 25g • fat 17g
• sat. fat 3g • chol. 5mg • sod. 660mg
• calc. 74mg • fiber 5g

22
Rosemary Focaccia
Makes 18 servings
2¼ teaspoons active dry yeast
1
⁄
8
teaspoon granulated sugar
1
⁄
3
cup warm (105°F to 110°F) water
4 cups unbleached, all-purpose flour, plus more for dusting
3 teaspoons kosher salt, divided
1 cup cold water
¼ cup extra-virgin olive oil, divided
nonstick cooking spray
2 tablespoons fresh rosemary
1. Dissolve the yeast and sugar in the warm water. Let stand 3 to 5
minutes, or until mixture is foamy.
2. Put the flour and 1 teaspoon of salt in the work bowl of a Cuisinart
®
Food Processor fitted with the dough blade; process 10 seconds to
combine. Add cold water and 2 tablespoons of oil to the yeast
mixture.
3. With the machine running, slowly pour the liquid yeast mixture through
the feed tube. Note: You may not need all of the liquid yeast mixture.
Process until a dough ball forms. Continue to let the machine run
another minute to knead.
4. Place the dough in a lightly floured sealable plastic bag. Let rise in
a warm place until doubled in size, about 45 minutes to 1 hour.
5. Lightly coat the baking pan with nonstick cooking spray.
6. Turn the dough out onto a floured surface. Roll out into a rectangle and
then fit into the prepared pan, stretching the ends of the dough to meet
the edges of the baking tray. Using your fingers, make indentations in
the dough over the entire surface. Brush the dough with the remaining
olive oil, and sprinkle the salt and rosemary to cover. Cover with plastic
wrap and let rise until puffy, about 20 minutes.
7. Preheat the Cuisinart
®
Convection Toaster Oven Broiler to 400°F on
Convection Bake. Remove the plastic wrap from the pan and then
carefully slide the pan into the lower position. Bake until golden
and crisp, about 20 to 25 minutes. Let cool slightly on wire rack.
Note: For another version of this Italian staple, sprinkle with some
chopped Kalamata olives prior to baking.
Nutritional information per serving:
Calories 120 (24% from fat) • carb. 20g • pro. 3g • fat 3g
• sat. fat 0g • chol. 0mg • sod. 360mg
• calc. 1mg • fiber 1g
Buttermilk Biscuits
Makes 8 biscuits
1½ cups unbleached, all-purpose flour
½ cup cake flour
2 teaspoons cream of tartar
1½ teaspoons baking soda
pinch granulated sugar
1½ teaspoons kosher salt
¼ teaspoon freshly ground black pepper
6 tablespoons unsalted butter, cold, cut into ¼-inch cubes
1 cup buttermilk
3 tablespoons unsalted butter, melted, for finishing
1. Preheat the Cuisinart
®
Convection Toaster Oven Broiler to 450°F
on Convection Bake. Line the baking pan with parchment paper.
2. Sift flours, cream of tartar and baking soda together. Put in the bowl
of a Cuisinart
®
Food Processor fitted with the chopping blade. Add the
sugar, salt and black pepper. Process for about 5 seconds to combine.
Add the 6 tablespoons of butter and pulse until the mixture is crumb-
like, about 6 to 8 pulses. Slowly add the buttermilk and pulse 2 to 3
times, until a dough forms.
3. Turn the dough out onto a lightly floured surface. Gently and carefully
knead 2 to 3 times to ensure the dough is fully mixed. Divide the dough

23
into 8 equal pieces. Shape each piece, with floured hands, into a ball
(they do not have to be perfectly smooth – you do not want to
overwork or biscuits will be tough). Place each roll on the prepared
pan, leaving 1 inch between rolls.
4. Carefully slide pan into the lower position. Bake in preheated oven
for 10 to 12 minutes, or until golden brown. Remove and brush liberally
with the melted butter. Serve immediately.
Nutritional information per biscuit:
Calories 230 (50% from fat) • carb. 25g • pro. 4g • fat 13g
• sat. fat 8g • chol. 35mg • sod. 600mg
• calc. 37mg • fiber 1g
Multigrain Rolls
Makes 15 rolls
2¼ teaspoons active dry yeast
1
2
⁄
3
cups warm (105°F to 110°F) water
1 tablespoon molasses
3½ cups whole-wheat flour
1¾ cups bread flour
1½ tablespoons vital wheat gluten
2 teaspoons kosher salt
2 tablespoons flax seed oil
3 tablespoons flax seeds
1 cup golden raisins
1. Dissolve the yeast in the water mixed with the molasses. Let stand
4 to 6 minutes, or until mixture is foamy. Add the flours, vital wheat
gluten, salt and oil to the bowl of a Cuisinart
®
Stand Mixer fitted with
the dough hook. Mix on speed 3 to combine. With mixer on speed 1,
slowly add the yeast mixture. Let mixture come to a ball, add the flax
seeds and raisins, and then increase gradually to speed 3. Let dough
knead about 8 minutes.
2. Place dough in a 1-gallon sealable plastic bag with the air squeezed
out, or in a bowl covered with plastic wrap. Let rise in a warm place
until it has doubled, about 45 to 60 minutes.
3. Lightly butter a 10-inch round baking pan. Divide the dough into 15
equal pieces, about 2¼ ounces each. Roll into smooth rounds and
arrange in the prepared pan. Cover with plastic wrap and let rise until
about doubled, about 30 to 40 minutes.
4. Preheat the Cuisinart
®
Convection Toaster Oven Broiler to 450°F
on Convection Bake with the rack in the lower position.
5. Remove the plastic from the pan and put into the preheated oven and
bake until golden brown, about 20 to 25 minutes. Remove from pan
and let cool on a rack for about 10 minutes before serving.
Nutritional information per roll:
Calories 210 (13% from fat) • carb. 42g • pro. 7g • fat 4g
• sat. fat 0g • chol. 0mg • sod. 310mg
• calc. 24mg • fiber 5g
Whole-Wheat Banana
Chocolate Chip Bread
Makes one 9 x 5 x 3-inch loaf
1 cup chopped walnuts
nonstick cooking spray
1 cup unbleached, all-purpose flour
1 cup whole-wheat flour
¾ teaspoon baking soda
¾ teaspoon kosher salt
½ cup granulated sugar
½ teaspoon ground cinnamon
½ cup semisweet chocolate chips
6 tablespoons unsalted butter, room temperature
2 large eggs
1 teaspoon pure vanilla extract
3 medium, very ripe bananas, mashed
¼ cup sour cream

24
1. Preheat the Cuisinart
®
Convection Toaster Oven Broiler to 400°F on
Bake/Pizza. Line the baking pan with aluminum foil. Arrange the
walnuts evenly on the prepared baking pan and carefully slide into
the upper position. Toast for about 3 minutes, or until fragrant and
lightly browned. Reserve. Switch the oven to 350°F on Convection
Bake with the rack in the lower position.
2. Lightly coat a loaf pan with nonstick cooking spray. Reserve.
3. In a small to medium bowl, mix the flours, baking soda, salt, sugar,
cinnamon, chocolate chips and toasted walnuts; reserve.
4. Add the butter, eggs, vanilla, bananas and sour cream to the mixing
bowl of a Cuisinart
®
Stand Mixer fitted with the flat paddle. Mix on
speed 1, gradually increasing to speed 4, for 20 seconds, or until
completely combined. Reduce the mixer to speed 1 and add the dry
ingredients. Mix until just combined. Pour batter into the prepared pan.
5. Bake in the preheated oven for about 50 to 55 minutes, or until a cake
tester comes out clean.
Nutritional information per serving (based on 12 servings):
Calories 330 (41% from fat) • carb. 45g • pro. 6g • fat 16g
• sat. fat 6g • chol. 50mg • sod. 230mg
• calc. 27mg • fiber 3g
Apple, Cherry and Raisin Crisp
Makes 8 servings
Nonstick cooking spray
1 cup rolled oats
½ cup packed light brown sugar
1
⁄
3
cup unbleached, all-purpose flour
1 teaspoon ground cinnamon
¼ teaspoon kosher salt
6 tablespoons unsalted butter, melted
1½ pounds apples, peeled, cored, quartered and cut into
¼-inch slices*
1 tablespoon fresh lemon juice
½ cup dried cherries
¼ cup raisins
½ cup granulated sugar
2 tablespoons honey
1 teaspoon pure vanilla extract
1. Preheat the Cuisinart
®
Convection Toaster Oven Broiler to 350ºF
on Bake/Pizza with the rack in the lower position. Lightly coat a
9-inch square baking pan with nonstick cooking spray.
2. In a medium bowl, combine the oats with the brown sugar, flour,
cinnamon and salt. Add the melted butter and stir until the mixture
is evenly moistened. Use your fingers to pinch the mixture into large
crumbs; reserve.
3. In a medium bowl, toss the sliced apples with the lemon juice, cherries,
raisins, granulated sugar, honey and vanilla. Spoon the apple mixture
evenly into the prepared baking pan. Sprinkle evenly with the reserved
crumb mixture.
4. Bake in the preheated oven for 35 to 40 minutes, until the apples are
tender and the filling is bubbling. Let rest for 20 to 30 minutes before
serving. Serve warm or at room temperature with vanilla ice cream,
frozen yogurt or freshly whipped cream.
* For ease in slicing, use the Cuisinart
®
Food Processor fitted with the
4mm/medium slicing disc.
Nutritional information per serving:
Calories 360 (23% from fat) • carb. 67g • pro. 5g • fat 10g
• sat. fat 6g • chol. 25mg • sod. 75mg
• calc. 25mg • fiber 5g

25
Bittersweet Espresso Brownies
Makes 16 brownies
½ cup chopped walnuts
nonstick cooking spray
¾ cup (1½ sticks) unsalted butter, cubed
4 ounces unsweetened chocolate, finely chopped
2 ounces bittersweet chocolate, finely chopped
3 large eggs
1 cup granulated sugar
½ cup packed light brown sugar
2 teaspoons instant espresso
2 teaspoons pure vanilla extract
¾ cup unbleached, all-purpose flour, plus more for dusting pan
¾ teaspoon kosher salt
1. Preheat the Cuisinart
®
Convection Toaster Oven Broiler to 400°F on
Bake/Pizza. Line the baking pan with aluminum foil. Spread the walnuts
on the prepared pan and carefully slide into the upper position. Toast
for 2 to 3 minutes, or until fragrant and lightly browned. Cool to room
temperature. Switch oven to 375°F on Convection Bake with the rack
in the lower position.
2. Lightly coat a 9-inch baking pan with nonstick cooking spray; lightly
dust with unbleached, all-purpose flour. Reserve.
3. Put the butter and chocolates into a heatproof bowl and place over
a pot of simmering water. Once both are almost completely melted,
set aside to cool to room temperature. Reserve.
4. In a large mixing bowl, beat eggs with a Cuisinart
®
Hand Mixer until
lightened, about 30 seconds. Add the sugars and beat until light and
thickened, another 30 seconds to 1 minute. Add instant espresso
and vanilla; beat until well combined. Add flour and salt; mix until
just incorporated. Gently fold in toasted walnuts.
5. Pour into prepared pan. Bake for about 35 minutes, or until edges are
dry. Cool before cutting into squares.
Nutritional information per brownie:
Calories 260 (54% from fat) • carb. 28g • pro. 3g • fat 17g
• sat. fat 9g • chol. 60mg • sod. 120mg
• calc. 30mg • fiber 2g
Lemon Squares
Makes 16 servings
Crust:
nonstick cooking spray
½ cup whole almonds
1 cup unbleached, all-purpose flour
1
⁄
3
cup confectioners’ sugar
½ teaspoon kosher salt
1 teaspoon grated lemon zest
¼ cup (½ stick) unsalted butter, cold and cubed
Lemon Filling:
5 large eggs
¾ cup granulated sugar
½ cup fresh lemon juice (about 3 lemons)
½ teaspoon pure vanilla extract
1 teaspoon grated lemon zest
½ teaspoon baking powder
½ teaspoon kosher salt
¼ cup unbleached, all-purpose flour
2 tablespoons heavy cream
1. Preheat the Cuisinart
®
Convection Toaster Oven Broiler to 400°F
on Bake/Pizza. Line the baking pan with aluminum foil. Spread the
almonds on the prepared pan and carefully slide into the upper
position. Toast for 2 to 3 minutes, or until fragrant and lightly browned.
Cool to room temperature. Switch oven to 350°F on Convection Bake
with the rack in the lower position.

26
2. Lightly coat a 9-inch baking pan with nonstick cooking spray; line with
2 pieces of parchment, leaving a 1- to 2-inch overhang on each side.
Reserve.
3. Pulse cooled almonds in a Cuisinart
®
Food Processor fitted with
the chopping blade until ground. Add flour, confectioners’ sugar,
½ teaspoon salt and 1 teaspoon lemon zest. Process for about 5
seconds, or until mixture is completely combined. Add the cold,
cubed butter and pulse until mixture resembles coarse crumbs.
Press into prepared baking pan. Bake in the preheated oven for
about 16 to 18 minutes, or until lightly browned. Remove and reserve.
Reduce temperature to 300°F.
4. While the crust is baking, add the eggs to a medium mixing bowl.
Beat with a Cuisinart
®
Hand Mixer until lightened, about 30 seconds.
Add the sugar and beat until light and thickened, another 1 to 1½
minutes. Add the lemon juice, vanilla and lemon zest and mix to
incorporate. Add the baking powder, salt, flour and heavy cream
and mix until combined. Pour mixture on top of the warm, prepared
crust. Bake in the preheated oven for about 25 minutes, or until set.
5. Dust with confectioners’ sugar before serving.
Nutritional information per square:
Calories 160 (40% from fat) • carb. 21g • pro. 4g • fat 7g
• sat. fat 3g • chol. 75mg • sod. 180mg
• calc. 30mg • fiber 1g
Cinnamon Cake with
White Chocolate Glaze
Makes 16 servings
Cake:
nonstick cooking spray
1¼ cups cake flour, plus more for dusting
1½ teaspoons ground cinnamon
1 teaspoon kosher salt
1 teaspoon cream of tartar
¼ teaspoon baking soda
½ cup (1 stick) unsalted butter, room temperature
¾ cup granulated sugar
¼ cup packed light brown sugar
3 large egg whites
2 teaspoons pure vanilla extract
½ cup whole milk
Glaze:
6 tablespoons heavy cream
¼ teaspoon pure vanilla extract
pinch kosher salt
1½ teaspoons light corn syrup
3 ounces white chocolate, chopped
1. Preheat the Cuisinart
®
Convection Toaster Oven Broiler to 350°F
on Convection Bake setting with the rack in the lower position.
Lightly coat a 9-inch cake pan with nonstick cooking spray;
lightly dust with flour. Reserve.
2. In a small bowl, stir together the flour, cinnamon, salt, cream of tartar
and baking soda; reserve. Add the butter to the bowl of a Cuisinart
®
Stand Mixer fitted with the flat mixing paddle. Beat until the butter
is softened and creamy. With the unit running, slowly add the sugars;
beat until light and fluffy. Add one-third of the egg whites at a time,
being sure not to add another one until the previous one is completely
mixed. Add the vanilla and mix to combine. With the unit running on
the lowest speed, add half of the dry ingredients. Mix until the batter
is streaky with flour and then add half of the milk. Continue with the
remaining dry ingredients and carefully mix until no more flour is visible.
3. Pour batter into prepared pan. Bake for about 25 to 30 minutes, or until
a cake tester comes out clean and the top of the cake springs back
to the touch. Cool in pan for 10 minutes; remove and then cool
completely on a wire rack.
4. Prepare the White Chocolate Glaze. In a small saucepan, add the
cream, vanilla, salt and corn syrup and set over medium-low heat.
Place the chopped chocolate in a small mixing bowl; reserve. Once the
cream mixture just comes to a boil, pour it over the chopped chocolate.

27
Let the mixture rest for a few minutes, and then whisk to combine.
Pour the glaze over the cooled cake and spread evenly with a large
offset spatula.
5. Transfer glazed cake to a refrigerator and let chill for at least 2 hours
to allow the glaze to set.
Nutritional information per serving:
Calories 200 (44% from fat) • carb. 25g • pro. 2g • fat 10g
• sat. fat 6g • chol. 25mg • sod. 200mg
• calc. 25mg • fiber 0g
Caramel Walnut Tart
with Raspberry and Chocolate
Makes 16 servings
2½ cups chopped walnuts
½ recipe Pâte Sucrée (page 28)
1½ cups granulated sugar
1 cup water
3 tablespoons light corn syrup
pinch kosher salt
½ cup heavy cream
1
⁄
3
cup raspberry preserves, strained
2 ounces bittersweet chocolate, chopped
1. Preheat the Cuisinart
®
Convection Toaster Oven Broiler to 400°F
on Bake/Pizza. Line the baking pan with aluminum foil. Spread the
walnuts on the prepared pan and carefully slide into the upper position.
Toast for 4 to 5 minutes, or until fragrant and lightly browned. Cool to
room temperature. 2. Roll out the dough into a 10-inch disc about
1
/
8
-inch thick. Fit into an ungreased fluted tart pan. Chill in refrigerator
for about 20 minutes. A few minutes before the shell is done chilling,
preheat the oven on Convection Bake at 350°F with the rack in the
lower position. Using a fork, prick the dough evenly all over, but make
sure not to go entirely through the dough. Line the shell with parchment
and weigh down with dried beans or rice. Bake in preheated oven for
about 20 minutes, or until the dough underneath the parchment is no
longer wet. Remove the beans/rice and parchment and continue baking
until the shell is golden brown. Remove and reserve.
2. While the shell is baking, add the sugar, water, corn syrup and salt to
a heavy-bottomed, medium saucepan. Wipe down the inside walls
of the pan with a wet pastry brush to be sure that there are no sugar
granules in the pan – if the walls of the pan are not clean, it will hinder
the quality of the caramel. Cook the sugar mixture over medium heat
until it turns to an amber color. Once it achieves that color, take off
from heat and slowly stir in the cream. (Note: The mixture will bubble
quite a bit, so it is important to do this step slowly and off the heat.)
Then stir in the toasted walnuts.
3. While caramel is cooking, spread the raspberry jam on the cooled tart
shell. Pour the caramel-walnut mixture on top of the raspberry layer.
4. Put the chocolate in a bowl over a pot of simmering water. Once the
chocolate is almost fully melted, remove from heat and stir to cool to
room temperature. Drizzle chocolate over the caramel-nut tart. Chill in
refrigerator for 3 hours, or overnight.
Nutritional information per serving:
Calories 330 (54% from fat) • carb. 35g • pro. 4g • fat 21g
• sat. fat 6g • chol. 35mg • sod. 55mg
• calc. 25mg • fiber 2g
Pizza Dough
Makes three 12-inch pizzas
2¼ teaspoons active dry yeast
½ cup warm (105°F to 110°F) water
1 teaspoon granulated sugar
4 cups unbleached, all-purpose flour, plus more for dusting
1½ teaspoons kosher salt
1 tablespoon extra-virgin olive oil
1 cup cold water
1. Dissolve the yeast and sugar in the warm water. Let stand 3 to 5
minutes, or until the mixture gets foamy.

28
2. Place the flour, salt and olive oil in the work bowl of a Cuisinart
®
Food
Processor fitted with the dough blade. Pulse about 5 times to mix;
scrape down the sides of the bowl.
3. Add the cold water to the yeast mixture. With the motor running,
slowly pour the liquid yeast mixture through the feed tube of the
food processor. Process until a ball forms. Let the machine run
for an additional minute to knead. Dough will be slightly sticky.
4. Lightly dust a sealable plastic bag with flour. Dust dough with flour.
Place the dough in the floured bag; squeeze out all of the air and seal.
Let rise in a warm place for 45 minutes to 1 hour. At this point your
dough is ready to use. Follow one of our pizza recipes on page 16,
or a favorite of your own. If you are not using right away, dough will
keep in a refrigerator, in a plastic bag, for 1 to 2 days. To freeze, wrap
dough well in wax paper and then in a freezer bag – it can stay frozen
for up to 3 months.
Nutritional information per serving (based on 24 servings):
Calories 98 (14% from fat) • carb. 20g • pro. 3g • fat 2g
• sat. fat 0g • chol. 0mg • sod. 178mg
• calc. 1mg • fiber 3g
Pâte Brisée
Makes two 9-inch single-crust tarts/pies, or one double-crust pie
2 cups unbleached, all-purpose flour
1 teaspoon kosher salt
½ pound (2 sticks) unsalted butter, cold and cubed
4 tablespoons ice water
1. Put flour and salt in a Cuisinart
®
Food Processor fitted with the
chopping blade. Process for 10 seconds. Add butter to work bowl
and pulse until the mixture resembles coarse crumbs. Pour in water,
1 tablespoon at a time, and pulse until a dough just forms.
(Note: You may not need to use all the water.)
2. Form dough into 2 flat discs. Wrap in plastic wrap and refrigerate
until ready to use. Wrapped well in plastic wrap and in a freezer bag,
the dough can be frozen for up to 3 months.
Nutritional information per serving (based on 24 servings):
Calories 101 (67% from fat) • carb. 7g • pro. 1g • fat 7g
• sat. fat 5g • chol. 20mg • sod. 89mg
• calc. 0mg • fiber 0g
Pâte Sucrée
Makes two 9-inch single-crust tarts
2 cups unbleached, all-purpose flour
2 tablespoons granulated sugar
½ teaspoon kosher salt
¾ cup (1½ sticks) unsalted butter, room temperature
2 large egg yolks
1 tablespoon ice water
½ teaspoon pure vanilla extract
1. Put flour, sugar and salt in a Cuisinart
®
Food Processor fitted with
the chopping blade. Process for 10 seconds. Add butter to work bowl
and process until combined. With the machine running, add the yolks,
one at a time, and process until incorporated. Add the water and
vanilla; pulse 3 to 5 times until combined.
2. Form dough into 2 flat discs. Wrap in plastic wrap and refrigerate until
ready to use. Wrapped well in plastic wrap and in a freezer bag,
the dough can be frozen for up to 3 months.
Nutritional information per serving (based on 32 servings):
Calories 70 (58% from fat) • carb. 6g • pro. 1g • fat 5g
• sat. fat 3g • chol. 25mg • sod. 35mg
• calc. 1mg • fiber 0g

29
NOTES:

30
NOTES:

31
NOTES:

©2021 Cuisinart
East Windsor, NJ 08520
Printed in China
20CE075514
IB-17010-ESP
TOB-60N2
MANUAL DE INSTRUCCIONES Y LIBRO DE RECETAS
Horno tostador/asador de convección Cuisinart
®

2
ÍNDICE
Medidas de seguridad importantes .............................2
Uso de alargadores .........................................3
Piezas y características ..................................... 4
Antes del primer uso ........................................5
Pautas generales ...........................................5
Instrucciones de operación ...................................5
Limpieza y mantenimiento ................................... 6
Posiciones de la bandeja/rejilla ............................... 7
Resolución de problemas ....................................7
Garantía ..................................................8
Recetas ..................................................9
MEDIDAS DE SEGURIDAD
IMPORTANTES
Al usar aparatos eléctricos, siempre debe tomar precauciones básicas
de seguridad, entre ellas las siguientes:
1. Lea todas las instrucciones.
2. DESENCHUFE EL APARATO CUANDO NO ESTÉ EN USO
Y ANTES DE LIMPIARLO. Permita que el aparato se enfríe
antes de limpiarlo o manipularlo.
3. No toque las superficies calientes; use los mangos/asas.
4. Para reducir el riesgo de descarga eléctrica, no sumerja el cable,
el enchufe ni ninguna otra parte del aparato en agua ni en ningún
otro líquido. Véase las instrucciones de limpieza.
5. Este aparato no debe ser usado por o cerca de niños o personas
con ciertas discapacidades.
6. No use este aparato si el cable o el enchufe están dañados, después
de un mal funcionamiento, después de que se haya caído, o si está
dañado; devuélvalo a un centro de servicio autorizado o al lugar
donde lo compró para su revisión y reparación.
7. El uso de accesorios/aditamentos no recomendados por Cuisinart
puede causar heridas.
8. No lo use en exteriores.
9. No permita que el cable cuelgue del borde de la encimera o de la
mesa, donde niños o animales lo puedan jalar o tropezar, ni que tenga
contacto con superficies calientes.
10. No coloque el aparato sobre o cerca de un quemador a gas o de
un hornillo eléctrico caliente, ni en un horno caliente.
11. No use el aparato para ningún fin que no sea el indicado.
12. Tenga mucho cuidado al usar fuentes que no sean de metal o de
vidrio en el horno.
13. Tenga mucho cuidado al sacar la bandeja del horno o tirar la grasa
caliente.
14. Desenchufe el aparato cuando no lo está usando. Guarde en
el horno solamente los accesorios recomendados por el fabricante.
15. No ponga ninguno de los siguientes materiales en el horno: papel,
cartón, plástico y materiales similares.
16. No cubra la bandeja recogemigas ni la rejilla del horno con papel
de aluminio; esto puede provocar un sobrecalentamiento.
17. No coloque alimentos muy grandes, papel de aluminio o envases/
utensilios metálicos en el horno; esto puede crear un riesgo de
incendio o de descarga eléctrica.
18. Puede ocurrir un incendio si el aparato está cubierto, toca, o se
encuentra cerca de materiales inflamables, tales como cortinas,
colgaduras o paredes. No coloque ningún artículo sobre el aparato
mientras está encendido o caliente. No haga funcionar el aparato
debajo de un armario/gabinete.
19. No use estropajos metálicos para limpiar el aparato; partículas
de metal podrían depositarse en sus componentes eléctricos,
presentando un riesgo de descarga eléctrica.
20. No intente desalojar alimentos atascados mientras el aparato
está enchufado.

3
21. Advertencia: Para evitar los riesgos de incendio, NUNCA descuide/
deje el aparato sin vigilancia durante el uso.
22. Use las temperaturas recomendadas para hornear y asar.
23. No apoye ningún utensilio de cocina o fuente en la puerta de vidrio.
24. Ponga los botones OVEN y TOAST en la posición de apagado “OFF”
apagar el horno.
25. Para desconectar, apague el aparato, poniendo todos los controles en
“OFF”, y luego desenchúfelo.
26. No haga funcionar el aparato debajo o dentro de un armario/
gabinete. Siempre desenchufe el aparato antes de guardarlo en un
armario/gabinete. Dejar el aparato enchufado representa un riesgo
de incendio, especialmente si este toca las paredes o la puerta del
armario/gabinete cuando se cierra.
GUARDE ESTAS
INSTRUCCIONES
Por favor, lea y conserve estas instrucciones en un lugar seguro.
Estas instrucciones le ayudarán a sacar el máximo provecho de su
horno tostador/asador de convección Cuisinart
®
y siempre obtener
resultados consistentes y profesionales.
USO DE ALARGADORES
El cable provisto con este aparato es corto para reducir el riesgo de que
alguien se enganche o tropiece con un cable más largo.
Se podrá usar un cable alargador/de extensión, siempre que respete las
precauciones siguientes.
La clasificación nominal del cable alargador/de extensión debe ser por lo
menos igual a la del aparato. El cable más largo debe ser acomodado de
tal manera que no cuelgue de la encimera/mesa, donde puede ser jalado
por niños o causar tropiezos.
AVISO: El cable de este aparato cuenta con un enchufe polarizado
(una pata es más ancha que la otra). Como medida de seguridad,
se podrá enchufar de una sola manera en la toma de corriente polarizada.
Si no entra en la toma de corriente, inviértalo. Si aun así no entra
completamente, comuníquese con un electricista. No intente ir en
contra de esta función de seguridad.
PARA USO DOMÉSTICO
SOLAMENTE
NO APROBADO PARA
USO COMERCIAL
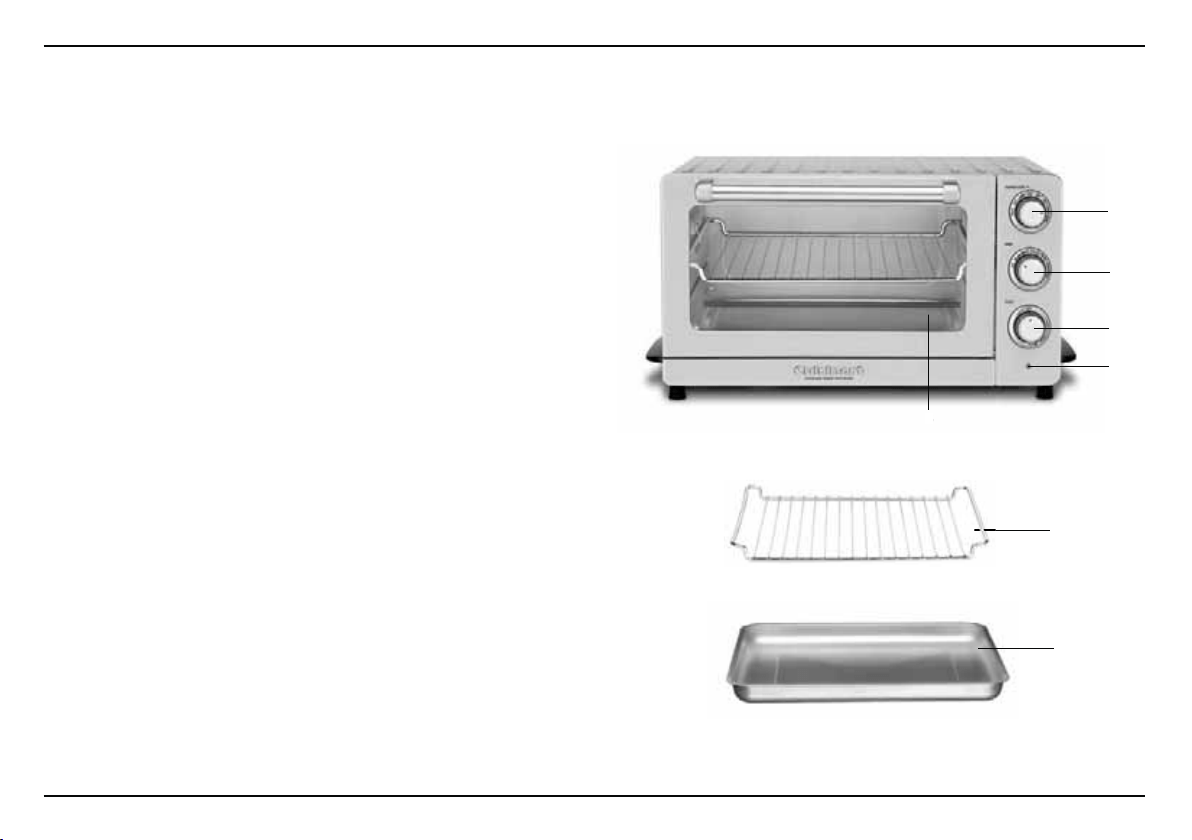
4
PIEZAS Y CARACTERÍSTICAS
1. Perilla TEMPERATURE (temperatura)
Permite elegir la temperatura deseada para hornear,
asar o mantener caliente.
2. Perilla OVEN (horno)
Permite elegir la función deseada: “WARM” (mantener
caliente), “BROIL” (asar/gratinar), “CONV BROIL” (asar/
gratinar por convección), “CONV BAKE” (hornear por
convección) o “BAKE/PIZZA” (hornear/hornear pizza).
3. Perilla TOAST (tostar)
Permite elegir el grado de tostado, desde ligeramente
tostado (“LIGHT”) hasta muy tostado (“DARK”).
4. Luz de encendido
Permanece encendida durante el funcionamiento.
5. Rejilla del horno
La rejilla puede posicionarse en dos niveles. En la posición
superior, se detendrá a la mitad al jalarse fuera del horno.
Para retirarla del horno, deberá levantar la parte delantera
y deslizarla hacia afuera.
6. Bandeja recogemigas removible (no ilustrada)
La bandeja recogemigas deslizante/removible está integrada
al horno. Se desliza hacia fuera, desde el frente del horno,
para facilitar la limpieza.
7. Espacio para guardar el cable (no ilustrado)
Mantiene la encimera ordenada.
8. Interior de fácil limpieza
Los paneles laterales del horno tienen un revestimiento
especial que facilita la limpieza.
9. Bandeja para hornear/Bandeja de goteo
Para su conveniencia, una bandeja para hornear/bandeja
de goteo está incluida.
8
5
8
1
2
3
4
9

5
ANTES DEL PRIMER USO
Coloque el horno sobre una superficie plana.
Deje un espacio libre de 2 a 4 in. (5 a 10 cm) alrededor del aparato para
permitir que el aire circule libremente alrededor de este. No lo coloque
sobre una superficie sensible al calor.
NO GUARDE NINGÚN OBJETO ENCIMA DEL HORNO.
SI LO HACE, QUÍTELOS ANTES DE ENCENDER EL HORNO. EL
EXTERIOR DEL APARATO SE PONE MUY CALIENTE DURANTE EL
USO; MANTÉNGALO FUERA DEL ALCANCE DE LOS NIÑOS.
PAUTAS GENERALES
Función “BAKE/PIZZA” (hornear/hornear pizza): Esta función puede
usarse para todas las tareas que requieren normalmente un horno de
cocina, p. ej., para asar carne (incluso pollo), hornear pasteles, natillas
y mucho más.
Para hornear pizza fresca, coloque la pizza en la bandeja provista.
Para hornear pizza congelada, coloque la pizza directamente sobre la
rejilla del horno.
Función “CONV BAKE” (hornear por convección): La función de
horneado por convección usa un ventilador que hace circular el aire
alrededor de los alimentos mientras se hornean. Use esta función para
hornear alimentos que necesitan dorarse uniformemente, tales como
“muffins”, bollos ingleses (“scones”), galletas, hojaldres y panes,
y cuando usa más de una rejilla.
Por lo general, se debe reducir la temperatura en 25°F/15°C
(en comparación con la temperatura aconsejada para el horneado
tradicional) con la función “horneado por convección”. Siempre
compruebe si la comida está lista unos 10 minutos antes del final
del tiempo de cocción sugerido.
Función “BROIL” (asar/dorar/gratinar): Esta función puede usarse
para asar carne de res, pollo, cerdo, pescado y mucho más. También
es perfecta para dorar/gratinar cazuelas y platos gratinados. Use
preferiblemente la función “CONV BROIL” (asar/gratinar por convección)
para asar carne y pescado, y la función “BROIL” (asar/dorar/gratinar)
tradicional para asar/dorar/gratinar. Precaución: No cubra la bandeja para
hornear ni la rejilla con papel de aluminio; esto impide que la grasa caiga
en la bandeja de goteo. Además, la grasa puede acumularse en el papel
de aluminio y prender fuego. Si desea cubrir la bandeja para hornear/de
goteo con papel de aluminio, compruebe que el papel no toca las paredes
del horno.
Función “TOAST” (tostar): Siempre ponga la rejilla en la posición
superior para tostar (véase la sección “Posiciones de la rejilla”).
Siempre coloque los alimentos en el centro de la rejilla.
ADVERTENCIA: Colocar la rejilla al revés, ya sea en la posición
inferior o superior, puede causar un incendio. Consulte el diagrama
en la 7 para más información.
Para apagar el horno: Ponga la perilla OVEN y la perilla TOAST en la
posición “OFF”; la luz de encendido se apagará.
INSTRUCCIONES DE OPERACIÓN
Desenrolle y enderece el cable. Compruebe que la bandeja recogemigas
está en su sitio y que el horno está vacío. Enchufe el cable en una toma
de corriente.
Para asar/dorar/gratinar o asar/dorar/gratinar con convección
Ponga la perilla TEMPERATURE en la posición “BROIL”. Luego, ponga la
perilla OVEN en la posición “BROIL” o “CONV BROIL”, dependiendo del
modo que desea usar.
Para interrumpir el asado, ponga la perilla OVEN en la posición “OFF”.
Nota: Nunca ase/dore/gratine alimentos colocados en fuentes de vidrio.
Para hornear/hornear pizza
Para hornear pizza fresca, ponga la pizza directamente en la bandeja para
hornear, en la posición inferior.
Para hornear pizza congelada, ponga la pizza directamente sobre la rejilla
del horno, en la posición inferior.
Para hornear pollo o artículos grandes, la bandeja para hornear puede
colocarse en la posición inferior.
Ponga la perilla TEMPERATURE en la temperatura deseada, y ponga

6
la perilla OVEN en la posición “BAKE/PIZZA”; la luz de encendido se
encenderá. Precaliente el horno por 5 a 10 minutos, dependiendo de la
temperatura elegida, antes de poner la fuente en el horno. Para apagar
el horno después de la cocción, ponga la perilla OVEN en “OFF”.
Para hornear por convección
Coloque la rejilla del horno en la posición superior. Para hornear pollo
o artículos grandes, la bandeja para hornear puede colocarse en la
posición inferior. Ponga la perilla TEMPERATURE en la temperatura
deseada, y ponga la perilla OVEN en la posición “CONV BAKE”; la luz
de encendido se encenderá. Precaliente el horno por 5 a 10 minutos,
dependiendo de la temperatura elegida, antes de colocar la fuente en
el horno. Para apagar el horno después de la cocción, ponga la perilla
OVEN en “OFF”.
Para mantener caliente
Para mantener los alimentos calientes, ponga la perilla TEMPERATURE
y la perilla OVEN en “WARM”; la luz de encendido se encenderá.
Precaliente el horno por 5 minutos antes de colocar los alimentos en
el horno.
Para tostar
Antes de tostar, compruebe que la rejilla del horno está en la posición
superior (véase la sección “Posiciones de la rejilla”). Ponga los alimentos
en el centro de la rejilla. Si tuesta más de dos artículos a la vez, espacie
estos uniformemente en la rejilla, p. ej., dos en frente y dos atrás cuando
tuesta cuatro artículos, o tres en frente y tres atrás cuando tuesta seis
artículos.
- Control del grado de tostado
Compruebe la perilla OVEN está en la posición “OFF”. Ponga la
perilla TEMPERATURE en “TOAST”. Luego, ponga la perilla TOAST
en la posición deseada, desde ligeramente tostado (“LIGHT”) hasta
muy tostado (“DARK”); la luz de encendido se encenderá.
- Interrupción del ciclo de tostado
Al final del ciclo de tostado, el horno emitirá un pitido y se apagará.
Si desea interrumpir el tostado antes del final del ciclo, ponga la
perilla TOAST en “OFF”; esto cancelará el ciclo de tostado.
- IMPORTANTE
Antes de tostar, compruebe que la rejilla del horno está en la
posición superior (véase la sección “Posiciones de la rejilla”).
LIMPIEZA Y MANTENIMIENTO
Permita que el aparato se enfríe completamente antes de limpiarlo.
1. Siempre desconecte el cable de la toma de corriente.
2. No use limpiadores abrasivos; esto podría dañar el acabado.
Simplemente limpie la carcasa del aparato con un paño húmedo
y séquelo bien. Si desea usar un limpiador, aplique este en el paño,
no en el horno.
3. Para limpiar el interior del horno, use una esponja ligeramente
humedecida con agua jabonosa. Nunca use productos químicos
fuertes o abrasivos; esto podría dañar la superficie del horno.
Nunca use estropajos metálicos (p. ej., lana de acero) para limpiar
el horno.
4. Para eliminar las migajas, deslice la bandeja recogemigas hacia fuera.
Limpie la bandeja y vuelva a colocarla en su lugar. Para eliminar grasa
quemada, remoje la bandeja en agua jabonosa caliente o use un
limpiador no abrasivo. Nunca haga funcionar el aparato sin la bandeja
recogemigas.
5. Lave la rejilla, la bandeja para hornear y la bandeja recogemigas en
agua jabonosa caliente, usando un estropajo o un cepillo de nylon.
6. Nunca enrolle el cable alrededor del aparato; más bien, enróllelo atrás
del mismo, usando los tacos diseñados para esto.
7. Cualquier otro servicio debe ser realizado por un técnico/representante
de servicio autorizado.
IMPORTANTE
Después de cocinar alimentos grasos, siempre limpie el techo del horno,
luego de que se haya enfriado. Si lo hace regularmente, su horno seguirá
funcionando como nuevo. Limpiar la grasa también asegurará un tostado
consistente y uniforme, ciclo tras ciclo.
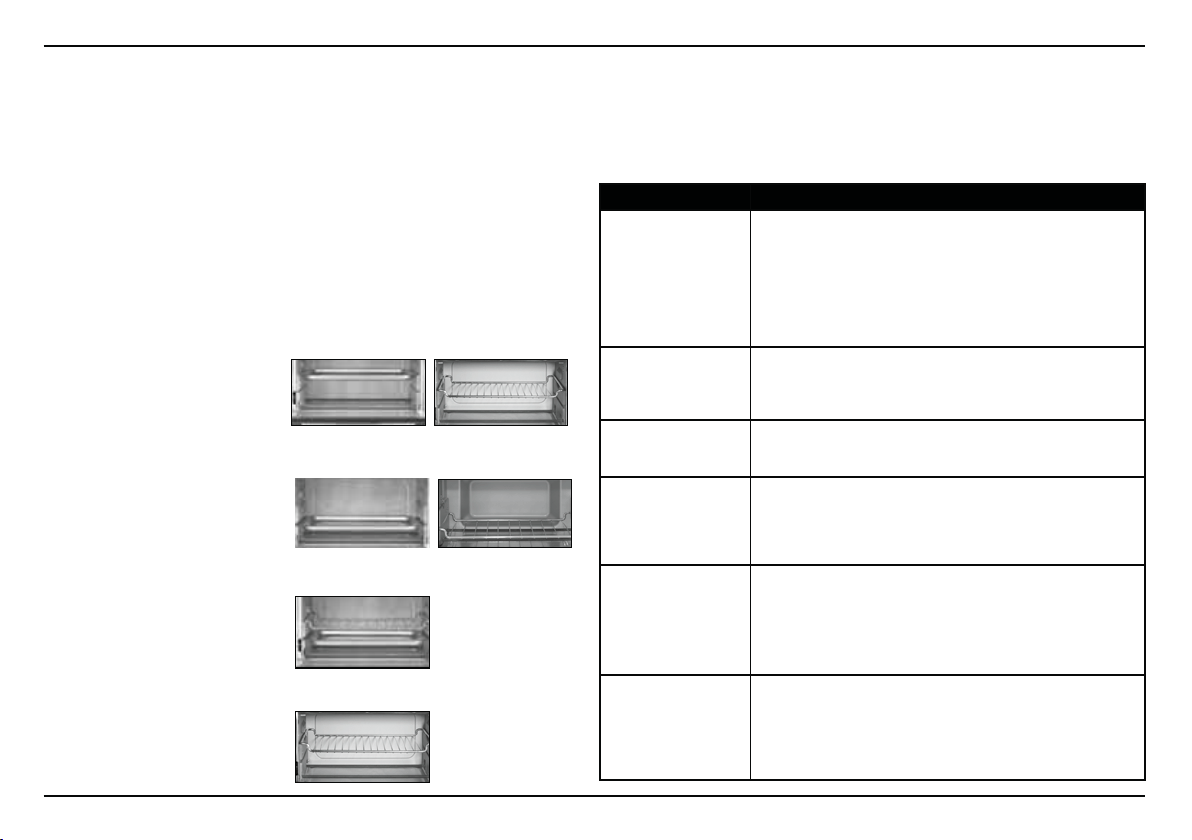
7
PROBLEMA SOLUCIÓN
¿Por qué se están
quemando los
alimentos?
a. Compruebe si la unidad está en el modo de convección.
La convección puede acelerar la cocción, por lo que debe
cocinar los alimentos menos tiempo y/o bajar la temperatura.
b. Ajuste la posición de la rejilla del horno. Los alimentos pueden
estar demasiado cerca de las resistencias.
c. Debido a su menor capacidad, los hornos de encimera se calientan
más rápido que los hornos convencionales y pueden requerir
menos tiempo y/o temperaturas más bajas para cocinar.
¿Cuáles son las
ventajas de la
convección?
a. La convección usa un pequeño ventilador para hacer circular
el aire caliente alrededor de los alimentos para cocinarlos de
manera uniforme, lo que a menudo resulta en tiempos de
cocción más rápidos.
¿Por qué hay
condensación en la
puerta del horno?
a. Esto es normal. Cocinar alimentos altos en humedad causa
humedad en el horno, causando condensación en la puerta.
La condensación se dispersará durante el proceso de cocción.
¿Por qué se encienden
y se apagan las
resistencias, y/o no
se encienden todas al
mismo tiempo?
a. Las resistencias se encienden y se apagan durante el
funcionamiento para mantener temperaturas precisas.
b. Diferentes funciones usan las resistencias de forma distinta.
P. ej., la función “BROIL” (asar/dorar/gratinar) solo usa las
resistencias superiores.
¿Por qué no se calienta
el horno?
a. Compruebe que la unidad está bien enchufada y que la puerta
está bien cerrada.
b. Para tostar, compruebe que la perilla TOAST no está en la posición
“OFF”. Para todas las demás funciones, compruebe que la perilla
OVEN no está en la posición “OFF”.
c. Llame a nuestro servicio de atención al cliente.
¿Por qué hay humo o
un olor anormal?
a. Durante el primer uso, es normal que el horno produzca humo
o un olor anormal. Esto cesará después del calentamiento inicial.
b. Si la unidad produce humo o algún olor anormal después del
primer uso, compruebe que no hay residuos de alimentos en las
resistencias. De haberlos, limpie las resistencias (después de haber
apagado la unidad y permitido que se enfríe).
RESOLUCIÓN DE PROBLEMAS
Todas nuestras recetas han sido probadas en nuestra cocina y han sido
especialmente desarrolladas para cocinarse el horno tostador/asador de
convección Cuisinart
®
. Estas recetas, que le harán agua la boca, son solo
unos ejemplos de lo que este horno puede hacer.
POSICIONES DE LA REJILLA
Y DE LA BANDEJA
Cada receta provee instrucciones de preparación paso a paso,
indicando incluso dónde colocar la rejilla del horno y la bandeja para
hornear para obtener resultados óptimos. Los diagramas a continuación
muestran las posiciones en que se puede colocar la rejilla.
POSICIÓN SUPERIOR PARA HORNEAR
NOTA: Para hornear pollo
o artículos grandes, la bandeja
puede colocarse en la posición
inferior.
POSICIÓN INFERIOR PARA HORNEAR
POSICIÓN PARA ASAR/DORAR/GRATINAR
POSICIÓN PARA TOSTAR
ADVERTENCIA: Colocar la rejilla al revés, ya sea en la posición
inferior o superior, puede causar un incendio.
Consulte el diagrama para colocar la rejilla en la posición correcta.

8
GARANTÍA
GARANTÍA LIMITADA DE TRES AÑOS
Esta garantía es para los consumidores que residen en los EE.UU.
solamente. Usted es un consumidor si posee un horno tostador/asador de
convección Cuisinart
®
que fue comprado en una tienda para uso personal,
familiar o casero. A menos que la ley aplicable exija lo contrario, esta
garantía no es para los minoristas u otros consumidores/compradores
comerciales. Cuisinart garantiza este producto contra todo defecto de
materiales o fabricación durante 3 años después de la fecha de compra
original, siempre que el aparato haya sido usado para uso doméstico
y según las instrucciones. Le aconsejamos que llene el formulario de
registro disponible en www.cuisinart.com, a fin de facilitar la verificación
de la fecha de compra original. Sin embargo, no es necesario registrar
el producto para recibir servicio bajo esta garantía. En ausencia de prueba
de la fecha de compra, el período de garantía será calculado a partir de
la fecha de fabricación del producto.
RESIDENTES DE CALIFORNIA
La ley del estado de California ofrece dos opciones bajo el período
de garantía. Los residentes del estado de California pueden regresar
el producto defectuoso (A) a la tienda donde lo compraron o (B) a otra
tienda que venda productos Cuisinart
®
de este tipo. La tienda, a su
opción, reparará el producto, referirá el consumidor a un centro de
servicio independiente, cambiará el producto o reembolsará el consumidor
por el precio original del producto, menos la cantidad imputable al uso
del producto por el consumidor hasta que este se dañe. Si estas dos
opciones no satisfacen al consumidor, podrá llevar el aparato a un centro
de servicio independiente, siempre que se pueda arreglar o reparar el
aparato de manera económica. Cuisinart (no el consumidor) será
responsable por los gastos de servicio, reparación, sustitución o
reembolso de los productos defectuosos bajo garantía. Los residentes de
California también pueden, si lo desean, mandar el producto defectuoso
directamente a Cuisinart para que lo reparen o lo cambien. Para esto, se
debe llamar a nuestro servicio posventa al 1-800-726-0190. Cuisinart será
responsable por los gastos de reparación, reemplazo, manejo y envío de
los productos defectuosos durante el período de garantía.
GARANTÍA DE REEMPLAZO SIN DIFICULTADES
Su máxima satisfacción es nuestra prioridad, así que si este producto
Cuisinart
®
falla dentro del generoso período de garantía, lo repararemos
o, de ser necesario, lo reemplazaremos, sin costo alguno para usted.
Para obtener una etiqueta de envío de devolución, envíenos un correo
electrónico, visitando www.cuisinart.com/customer-care/product-
return. o llamando sin cargo a nuestro servicio de atención al cliente,
al 1-800-726-0190, para hablar con un representante.
Este producto satisface las más altas exigencias de fabricación y ha
sido diseñado para funcionar con 120 V, usando accesorios y repuestos
autorizados solamente. Esta garantía excluye expresamente los defectos
o daños causados por accesorios, piezas o reparaciones no autorizados
por Cuisinart, así como los defectos o daños causados por el uso de un
convertidor de voltaje. Esta garantía no cubre el uso comercial o industrial
del producto, y no es válida en caso de daños causados por mal uso,
negligencia o accidente. Esta garantía excluye todos los daños
incidentales o consecuentes. Algunos Estados no permiten la exclusión
o limitación de daños incidentales o consecuentes, de modo que las
limitaciones mencionadas pueden no regir para usted. Usted puede tener
otros derechos que varían de un Estado a otro.
Importante: Si debe llevar el aparato defectuoso a un centro de servicio
no autorizado, por favor informe al personal del centro de servicio que
deben llamar al servicio posventa de Cuisinart, al 1-800-726-0190, a fin
de diagnosticar el problema correctamente, usar las piezas correctas para
repararlo y asegurarse de que el producto aún está bajo garantía.

9
RECETAS
“Muffins” de arándanos con salvado de trigo ......................... 10
“Quiche” de salchicha, espinaca y queso Fontina .................. 10
Budín de pan Jalá .................................................................... 11
Champiñones rellenos .............................................................. 12
“Bruschettas” de Gorgonzola y ricota/requesón ..................... 12
Quesadillas de vegetales asados ............................................. 13
Papas asadas dos veces ........................................................ 13
Papas “fritas” asadas al horno ................................................ 14
Batatas asadas ......................................................................... 14
Espárragos asados .................................................................. 15
Hinojo, zanahorias y chirivía asados ........................................ 15
Brécol y coliflor al gratén ......................................................... 15
Pizza blanca con jamón de Parma, rúcula y tomates ............. 16
Pizza de tomate, cebolla y tocino ............................................ 17
Tarta de calabacín/calabacita, tomate y cebolla ..................... 17
Burritos de pollo, vegetales y frijoles negros ........................... 18
Rigatoni al horno con salchicha de pollo,
broccolini y pimientos dulces .................................................. 19
Filete de res con corteza de hierbas........................................ 20
Pollo asado clásico .................................................................. 20
Pollo al horno con especias al estilo marroquí ........................ 21
Chuletas de cerdo al horno con pimentón .............................. 21
Lenguado asado con alcachofas y alcaparras ........................ 21
Focaccia con romero ............................................................... 22
Panecillos de suero de leche ................................................... 22
Pancitos multigranos ................................................................ 23
Bizcocho de banana, chispas
de chocolate
y harina integral ....................................................................... 24
Postre crujiente de manzana, cereza y pasas ......................... 24
“Brownies” semiamargos de chocolate y café expreso .......... 25
Cuadritos de limón ................................................................... 26
Pastel de canela con cobertura de chocolate blanco ............. 27
Tarta de caramelo y nueces con frambuesas y chocolate ...... 27
Masa de pizza .......................................................................... 28
“Pâte brisée” (masa quebrada) ................................................ 29
“Pâte sucrée” (masa dulce) ...................................................... 29

10
“Muffins” de arándanos
con salvado de trigo
Rinde 6 muffins
Spray vegetal
¾ taza (95 g) de harina común
¼ taza (30 g) de harina de trigo integral
¾ cucharadita de sal kosher
¼ cucharadita de bicarbonato de sodio
½ cucharadita de polvo de hornear
½ cucharadita de canela en polvo
¼ taza (55 g) de mantequilla sin sal, a temperatura ambiente
¼ taza llena (50 g) de azúcar rubia (azúcar de caña integral)
1 huevo grande, ligeramente batido
2½ cucharadas de miel
1 cucharadita de extracto natural de vainilla
2
⁄
3
taza (160 g) de suero de leche (“buttermilk”)*
½ taza (60 g) de arándanos agrios secos
¼ taza (55 g) de germen de trigo
1. Colocar la rejilla del horno en la posición inferior. Precalentar el horno
a 375°F (190°C), usando la función “CONV BAKE” (hornear por
convección). Engrasar ligeramente un molde para seis “muffins”
con spray vegetal. Reservar.
2. Colocar las harinas, la sal, el bicarbonato, el polvo de hornear y la
canela en un tazón pequeño; revolver. Batir para mezclar; reservar.
3. Usando una batidora de pie o una batidora de mano Cuisinart
®
equipada con batidores regulares o con un batidor plano, mezclar
los ingredientes hasta obtener una mezcla cremosa. Agregar el azúcar
rubia y batir hasta obtener una mezcla ligera y cremosa. Agregar el
huevo, la miel y la vainilla; seguir batiendo hasta que los ingredientes
estén completamente combinados. Mientras sigue mezclando, agregar
lentamente un tercio de la mezcla de ingredientes secos, y luego
la mitad del suero de leche (antes de que la harina haya sido
incorporada). Seguir agregando los ingredientes, alternándolos,
sin mezclar demasiado. Incorporar suavemente los arándanos y el
germen de trigo.
4. Verter la mezcla en los moldes para “muffins”. Hornear por aprox.
25 minutos, hasta que un probador salga limpio.
Información nutricional por “muffin”:
Calorías 228 (34% de grasa) • Carbohidratos 34g • Proteínas 5g • Grasa 9g
Grasa saturada 5g • Colesterol 55mg • Sodio 380mg • Calcio 53mg • Fibra 3g
“Quiche” de salchicha, espinaca
y queso Fontina
Ideal para el desayuno-almuerzo, esta “quiche” rinde 8 a 12 porciones.
½ receta de masa quebrada (página 29)
6 onzas (170 g) de salchicha italiana dulce, sin tripa
2 cucharadas (30 g) de mantequilla sin sal o aceite de oliva
2 dientes de ajo, finamente picados
2 tazas (60 g) de espinaca tierna (espinaca “baby”) fresca
½ cucharadita de sal kosher
½ cucharadita de pimienta negra recién molida
1 taza (235 ml) de leche entera
1 taza (235 ml) de crema líquida para batir (“heavy cream”)
4 huevos grandes
½ taza (85 g) de queso Fontina rallado
1. Estirar la masa, formando un disco de aprox. 10 in. (25 cm) de diámetro
y
1
/
8
in. (3 mm) de espesor. Acomodar la masa en un molde de tarta
hondo de 9 in. (23 cm) de diámetro, no engrasado. Refrigerar por
aprox. 20 minutos.
2. Colocar la rejilla del horno en la posición inferior. Precalentar el horno
a 350°F (175°C), usando la función “BAKE/PIZZA” (hornear/hornear
pizza). Pinchar el fondo de tarta varias veces con un tenedor, teniendo
cuidado de no perforar completamente la masa. Cubrir la masa con
una hoja de papel sulfurizado y llenar parcialmente el molde con arroz
crudo o frijoles secos. Hornear por 20 a 22 minutos, o hasta que la

11
masa debajo del papel sulfurizado esté seca. Retirar el arroz crudo/los
frijoles secos y el papel sulfurizado, y hornear el fondo de tarta por
15 minutos adicionales, hasta dorarse. Retirar del horno y reservar.
3. Poner una salteadora a calentar a fuego medio-alto. Agregar la
salchicha, rompiéndola con un cucharón de madera. Saltear hasta
que esté ligeramente dorada; reservar. No limpiar el sartén.
4. Agregar la mantequilla (o el aceite de oliva) al sartén caliente.
Cuando esté derretida, agregar el ajo y saltear hasta dorarse.
Agregar la espinaca, poco a poco, y una pizca de sal y pimienta.
Saltear hasta que se marchite, y luego revolver con la salchicha
y reservar.
5. Colocar la leche, la crema, los huevos y la sal/pimienta restantes en un
tazón mediano; revolver. Usando una batidora de pie o una batidora de
mano Cuisinart
®
equipada con batidor, mezclar los ingredientes hasta
obtener una mezcla homogénea. Esparcir la mezcla de salchicha/
espinaca en el fondo de tarta. Agregar la mezcla líquida y salpicar
con queso Fontina.
6. Hornear por aprox. 40 a 60 minutos, hasta que la “quiche” esté justo
cuajada y que la parte superior esté dorada.
Información nutricional por porción (basada en 12 porciones):
Calorías 300 (75% de grasa) • Carbohidratos 10g • Proteínas 9g • Grasa 25g
Grasa saturada 7g • Colesterol 110mg • Sodio 380mg • Calcio 98mg • Fibra 0g
Budín de pan Jalá
Rinde 8 porciones
Spray vegetal
4 huevos grandes
2 tazas (475 ml) de leche entera
1 taza (235 ml) de crema líquida para batir (“heavy cream”)
1 cucharada de extracto natural de vainilla
1
⁄
3
taza (80 ml) de jarabe de arce
2 cucharaditas de canela en polvo
1 cucharadita de nuez moscada rallada
¼ cucharadita de sal kosher
1 libra (455 g) de pan Jalá (“Challah”), en tiras de ½ x 9 in.
(1.5 x 23 cm)
2 cucharadas llenas (25 g) de azúcar rubia (azúcar de
caña integral)
2 cucharadas (30 g) de mantequilla sin sal, en pedacitos
1. Engrasar un molde cuadrado de 9 x 9 in. (23 x 23 cm) con spray
vegetal; reservar.
2. Colocar los huevos, la leche, la crema, la vainilla, el jarabe, las especias
y la sal en un tazón mediano. Batir, usando una batidora de mano
Cuisinart
®
equipada con batidor de alambre, hasta que la mezcla se
ponga espumosa.
3. Disponer la mitad de las tiras de pan en el fondo del molde. Verter la
mitad de la mezcla encima y rociar uniformemente con la mitad del
azúcar rubia. Disponer el resto de las tiras de pan, en dirección
opuesta a la primera capa. Verter el resto de la mezcla encima y rociar
uniformemente con el azúcar rubia restante. Cubrir y refrigerar por un
mínimo de 2 horas, o por una noche.
4. Sacar el budín del refrigerador y llevar a temperatura ambiente antes de
hornear. Colocar la rejilla del horno en la posición inferior. Precalentar
el horno a 350°F (175°C), usando la función “CONV BAKE” (hornear
por convección). Salpicar la mantequilla encima del budín y cubrir sin
apretar con papel de aluminio. Hornear por aprox. 15 minutos, y luego
quitar el papel de aluminio y hornear por 10 minutos adicionales, hasta
que la temperatura interna del budín alcance 160°F (71°C).
5. Servir inmediatamente.
Información nutricional por porción:
Calorías 420 (47% de grasa) • Carbohidratos 44g • Proteínas 11g
Grasa 22g • Grasa saturada 12g • Colesterol 190mg • Sodio 430mg
Calcio 177mg • Fibra 2g

12
Champiñones rellenos
Rinde 16 porciones
16 champiñones para rellenar
½ taza (50 g) de pan rallado japonés “panko”
¼ cucharadita de albahaca seca
½ cucharadita de orégano seco
1 cucharada de perejil fresco
¼ cucharadita de sal kosher
½ cucharadita de pimienta negra recién molida
3 cucharadas de aceite de oliva
1 diente de ajo, finamente picado
2 cucharadas de queso Parmesano rallado
1. Limpiar los champiñones y reservar los tallos.
2. Colocar el pan rallado, las hierbas, la sal y la pimienta en el tazón de
una mini-procesadora de alimentos o una picadora Cuisinart
®
.
Procesar hasta que estén finamente picados. Agregar los tallos de los
champiñones; pulsar para picar. Reservar.
3. Poner 1 cucharada de aceite a calentar a fuego medio-lento, en un
sartén mediano. Agregar el ajo y saltear hasta dorarse. Agregar la
mezcla de pan rallado y saltear por aprox. 5 minutos, hasta que esté
muy suave y dorado, agregando una cucharada de aceite a la mitad
del tiempo. Agregar el queso Parmesano y revolver para mezclar.
4. Precalentar el horno a 425°F (220°C), usando la función “BAKE/
PIZZA” (hornear/hornear pizza).
5. Forrar la bandeja con papel de aluminio. Disponer los sombreros de
los champiñones en la bandeja y rellenar con la mezcla de pan rallado.
Rociar con el resto del aceite de oliva. Hornear (en la posición superior)
por aprox. 5 a 7 minutos, hasta que la parte superior esté dorada.
6. Retirar del horno y dejar enfriar durante 5 minutos. Servir tibio o a
temperatura ambiente.
Información nutricional por porción:
Calorías 40 (65% de grasa) • Carbohidratos 2g • Proteínas 1g • Grasa 3g
Grasa saturada 0g • Colesterol 0mg • Sodio 45mg • Calcio 9mg • Fibra 0g
“Bruschettas” de Gorgonzola
y ricota/requesón
Rinde 12 “bruschettas”
12 rebanadas de pan francés de ½ in. (1.5 cm) de grueso
1 diente de ajo, machacado
1½ cucharadas de aceite de oliva virgen extra
1 taza (245 g) de queso ricota/requesón, escurrido
2 cucharadas de queso Parmesano rallado
½ cucharadita de sal kosher
½ cucharadita de pimienta negra recién molida
1 pizca de nuez moscada rallada
½ taza (70 g) de queso Gorgonzola desmenuzado
½ a 1 cucharada de miel
1. Colocar la rejilla del horno en la posición inferior. Precalentar el horno a
375°F (190°C), usando la función “BAKE/PIZZA” (hornear/hornear
pizza).
2. Frotar un lado de cada rebanada de pan con ajo y cepillar con aceite
de oliva. Con cuidado, colocar las rebanadas directamente en la rejilla
y hornear por aprox. 2 a 3 minutos por lado, hasta tostarse
ligeramente.
3. Mientras el pan se está tostando, preparar la cobertura. Colocar el
queso ricota/requesón, el queso Parmesano, la sal, la pimienta y la
nuez moscada en un tazón pequeño. Revolver para mezclar.
Esparcir la mezcla sobre las rebanadas de pan tostadas, y luego rociar
con queso Gorgonzola. Volver a colocar las rebanadas en la rejilla y
gratinar (usando la función “BROIL”) por aprox. 3 minutos, hasta que el
queso esté caliente.
4. Rociar la miel sobre las “bruschettas” y servir inmediatamente.

13
Información nutricional por “bruschetta”:
Calorías 120 (46% de grasa) • Carbohidratos 11g • Proteínas 5g • Grasa 6g
Grasa saturada 3g • Colesterol 10mg • Sodio 300mg • Calcio 108mg • Fibra 1g
Quesadilla de vegetales asados
Rinde 4 porciones (2 quesadillas)
½ calabacín/calabacita (“zucchini”) mediano, en cubitos
½ pimiento dulce rojo o amarillo, en cubitos
½ jalapeño, sin semillas, finamente picado
¼ cebolla mediana, en rodajas
1 diente de ajo, machacado
1 cucharadita de aceite de oliva + ½ cucharada para cepillar
¼ cucharadita de sal kosher
¼ cucharadita de pimienta negra recién molida
¼ taza (25 g) de maíz congelado
1 cucharada de cilantro picado grueso
1 onza (30 g) de queso Monterey Jack, rallado
1 onza (30 g) de queso de cabra
2 tortillas de trigo de 10 in. (25 cm)
Spray vegetal
1. Precalentar el horno a 400°F (205°C), usando la función “BAKE/
PIZZA” (hornear/hornear pizza).
2. Colocar el calabacín/calabacita, los pimientos dulces, el jalapeño,
la cebolla, el ajo, una cucharada del aceite de oliva, la sal y la pimienta
en un tazón mediano; revolver. Forrar la bandeja con papel de aluminio
y colocar los vegetales adentro. Con cuidado, colocar la bandeja en la
rejilla superior. Hornear por aprox. 20 minutos, hasta que los vegetales
estén suaves y dorados. Retirar del horno y revolver con el maíz y
el cilantro.
3. Para armar las quesadillas: Colocar las tortillas en una superficie plana.
Esparcir la mezcla de vegetales, y luego el queso uniformemente en la
mitad inferior de cada tortilla. Doblar la mitad inferior de cada tortilla
por encima del relleno.
4. Engrasar ligeramente la bandeja con spray vegetal. Colocar las
quesadillas en la bandeja y cepillar la parte superior con el aceite
restante. Hornear en 400 °F (205 °C) por aprox. 6 a 6½ minutos,
hasta que el queso esté derretido y que la parte superior de las
quesadillas esté dorada.
5. Cortar las quesadillas a la mitad y servir con salsa, guacamole o
crema agria.
Información nutricional por porción:
Calorías 190 (38% de grasa) • Carbohidratos 23g • Proteínas 7g • Grasa 8g
Grasa saturada 4g • Colesterol 10mg • Sodio 860mg • Calcio 123mg • Fibra 2g
Papas asadas dos veces
Rinde 8 porciones
4 papas “Idaho” o “Russet” grandes de 10 a 12 onzas
(285 a 340 g)
1 cucharadita de aceite de oliva
2
⁄
3
taza (80 ml) de leche baja en grasa/semidescremada
2 cucharadas (30 g) de mantequilla sin sal + 1 cucharadita (5 g)
para rociar
½ taza (120 ml) de crema agria
½ cucharadita de sal kosher
½ cucharadita de pimienta negra recién molida
¼ taza (10 g) de cebollinos (“chives”) frescos picados
1. Colocar la rejilla del horno en la posición inferior. Precalentar el
horno a 400°F (205°C), usando la función “BAKE/PIZZA” (hornear/
hornear pizza).
2. Restregar cada papa con ¼ de cucharadita de aceite de oliva y
pinchar uniformemente aprox. 6 a 8 veces con un tenedor. Colocar las
papas directamente sobre la rejilla del horno y hornear por aprox.
55 a 60 minutos. Retirar del horno y dejar enfriar ligeramente.
Retirar cuidadosamente la bandeja y ajustar la temperatura a 375 °F
(190 °C).

14
3. Cuando las papas estén tibias, cortar la parte superior y sacar la
carne/pulpa, dejando “cáscaras” de piel de ¼ in. (5 mm) de espesor.
Reservar la carne/pulpa y las “cáscaras”.
4. Colocar la carne/pulpa, la leche y 2 cucharadas (30 g) de la mantequilla
en un tazón mediano; revolver. Aplastar con un machacador o batir
con un batidor de mano para hacer puré. Agregar la crema agria, la
sal, la pimienta y los cebollinos. Seguir machacando/batiendo para
mezclar. Rellenar generosamente las cáscaras con la mezcla. (Nota: Si
está preparando las papas el día anterior, cubrir y refrigerar. Llevar a
temperatura ambiente antes de hornear.) Colocar las papas en una
bandeja de hornear. Derretir la cucharadita de mantequilla restante
y rociar las papas con ella. Con cuidado, colocar la bandeja en la
posición inferior y hornear por 35 a 45 minutos, hasta que las papas
estén calientes y que la parte superior esté dorada.
Información nutricional por porción (½ papa):
Calorías 180 (31% de grasa) • Carbohidratos 27g • Proteínas 4g • Grasa 6g
Grasa saturada 4g • Colesterol 20mg • Sodio 160mg • Calcio 58mg • Fibra 3g
Papas “fritas” asadas al horno
Rinde 2 porciones
1 libra (455 g) de papas de Idaho o Russet, en bastones gruesos
2 cucharadas de aceite de oliva
½ cucharadita de sal kosher
¼ cucharadita de pimienta negra recién molida
1 pizca de pimienta de Cayena
1. Precalentar el horno a 425°F (220°C), usando la función “BAKE/
PIZZA” (hornear/hornear pizza).
2. Colocar las papas en un tazón medio a grande. Agregar el resto de los
ingredientes y revolver suavemente. Forrar la bandeja con papel de
aluminio y disponer las papas en ella, el lado cortado apuntando hacia
abajo.
3. Con cuidado, colocar la bandeja en la posición inferior Hornear por
aprox. 30 minutos, volteando las papas a la mitad del tiempo.
4. Retirar del horno y ajustar la sazón al gusto. Servir inmediatamente.
Información nutricional por porción de (1 taza):
Calorías 130 (91% de grasa) • Carbohidratos 3g • Proteínas 0g • Grasa 14g
Grasa saturada 2g • Colesterol 0mg • Sodio 530mg • Calcio 3mg • Fibra 0g
Batatas asadas
Rinde 4 porciones
1¾ libras (795 g) de batatas/camote, cortadas longitudinalmente
en cuartos
4 cucharadas (85 g) de mantequilla sin sal, derretida
½ cucharadita de sal kosher
2 cucharadas llenas (25 g) de azúcar rubia (azúcar de
caña integral)
1. Precalentar el horno a 375°F (190°C), usando la función “BAKE/
PIZZA” (hornear/hornear pizza).
2. Colocar las batatas en un tazón medio a grande. Agregar el resto
de los ingredientes y revolver suavemente. Forrar la bandeja con papel
de aluminio y disponer las batatas en ella, el lado cortado apuntando
hacia abajo.
3. Con cuidado, colocar la bandeja en la posición inferior Hornear por
aprox. 35 minutos, volteando las batatas cada 10 minutos.
4. Retirar del horno y servir inmediatamente.
Información nutricional por porción de (1 taza):
Calorías 290 (34% de grasa) • Carbohidratos 46g • Proteínas 3g • Grasa 11g
Grasa saturada 7g • Colesterol 30mg • Sodio 380mg • Calcio 60mg • Fibra 6g

15
Espárragos asados
Rinde 4 porciones
1 libra (455 g) de espárragos
1 cucharadita de aceite de oliva virgen extra
¼ cucharadita de sal kosher
¼ cucharadita de pimienta negra recién molida
1. Precalentar el horno a 425°F (220°C), usando la función “BAKE/
PIZZA” (hornear/hornear pizza).
2. Lavar y secar los espárragos, y cortar la parte dura del tallo.
Colocar los espárragos, el aceite de oliva, la sal y la pimienta en un
tazón y revolver para mezclar.
3. Forrar la bandeja con papel de aluminio y disponer los espárragos en
ella. Con cuidado, colocar la bandeja en la posición superior y hornear
por 10 a 15 minutos, hasta que los espárragos estén tiernos.
4. Servir inmediatamente.
Información nutricional por porción:
Calorías 36 (29% de grasa) • Carbohidratos 4g • Proteínas 3g • Grasa 2g
Grasa saturada 0g • Colesterol 0mg • Sodio 135mg • Calcio 28mg • Fibra 2g
Hinojo, zanahorias y chirivía asados
Rinde 4 porciones
2 bulbos de hinojo, en cuartos
3 zanahorias medianas, en trozos
1 chirivía grande, en trozos
1 diente de ajo, machacado
3 cucharadas de aceite de oliva
1 cucharadita de tomillo fresco
½ cucharadita de sal kosher
¼ cucharadita de pimienta negra recién molida
1 pizca de canela en polvo
1. Precalentar el horno a 450°F (230°C), usando la función “BAKE/
PIZZA” (hornear/hornear pizza).
2. Colocar los vegetales en un tazón medio a grande y agregar el resto
de los ingredientes; revolver.
3. Disponer los vegetales en la bandeja forrada con papel de aluminio.
Con cuidado, colocar la bandeja en la posición superior y hornear por
45 minutos, revolviendo y dando vuelta cada 15 a 20 minutos, hasta
que los espárragos estén tiernos.
Información nutricional por porción de ½ taza:
Calorías 170 (54% de grasa) • Carbohidratos 18g • Proteínas 2g • Grasa 11g
Grasa saturada 2g • Colesterol 0mg • Sodio 360mg • Calcio 85mg • Fibra 6g
Brécol y coliflor al gratén
Rinde 8 porciones
Spray vegetal
1½ libras (680 g) de cogollos de brécol/brócoli
1 libra (455 g) de cogollos de coliflor
1½ cucharaditas de aceite de oliva
1 diente de ajo, finamente picado
½ cebolla mediana, finamente picada
½ cucharadita de sal kosher
¾ cucharadita de pimienta negra recién molida
2 tazas (240 g) de queso Cheddar rallado
¾ taza (75 g) de pan rallado japonés “panko”
¼ taza (30 g) de queso Parmesano rallado
1. Engrasar ligeramente un molde cuadrado de 9 x 9 in. (23 x 23 cm)
con spray vegetal; reservar.
2. Poner agua salada a hervir en una olla grande. Agregar el brécol/
brócoli y la coliflor, y cocinar por 2 a 3 minutos, hasta que estén
tiernos. Colocar los vegetales inmediatamente en un tazón grande de
agua helada para detener la cocción. Una vez fríos, escurrir y reservar.

16
3. Calentar el aceite de oliva a fuego medio-lento, en un sartén mediano.
Cuando el aceite esté caliente, agregar el ajo y la cebolla y cocinar por
2 a 3 minutos, hasta suavizarse ligeramente.
4. Colocar la rejilla del horno en la posición inferior. Precalentar el horno
a 400°F (205°C), usando la función “BAKE/PIZZA” (hornear/hornear
pizza).
5. Colocar los vegetales escaldados, el ajo, la cebolla, la sal, la pimienta,
la mitad del queso Cheddar y la mitad del pan rallado en un tazón
grande. Revolver bien para combinar. Verter la mezcla en la bandeja
y esparcir el queso Cheddar restante, el pan rallado y el queso
Parmesano encima. Hornear por 15 minutos, o hasta que el queso
empiece a dorarse.
6. Servir inmediatamente.
Información nutricional por porción:
Calorías 190 (49% de grasa) • Carbohidratos 14 g • Proteínas 11g • Grasa 2 g
Grasa saturada 6g • Colesterol 30mg • Sodio 280mg • Calcio 284mg • Fibra 2g
Pizza blanca con jamón de Parma,
rúcula y tomates
Rinde 8 porciones; una pizza de 12 in. (35 cm)
Spray vegetal
1
⁄
3
receta de masa de pizza (página 28)
1 cucharada de aceite de oliva virgen extra
1 a 1½ onzas (30 a 45 g) de lonchas de jamón de Parma (Prosciutto)
3 dientes medianos de ajo, finamente picados
1 taza (150 g) de tomates de pera, cortadas a la mitad
2 tazas llenas (60 g) de rúcula/rúgula/arúgula fresca
1½ tazas (365 g) de queso ricota/requesón, escurrido
½ taza (60 g) de queso Parmesano rallado
1 pizca de sal kosher
½ cucharadita de pimienta negra recién molida
1. Precalentar el horno a 425°F (220°C), usando la función “BAKE/
PIZZA” (hornear/hornear pizza).
2. Engrasar ligeramente la bandeja con spray vegetal. Estirar la masa
hasta formar un rectángulo de 10 x 9 in. (25 x 23 cm) (del tamaño
de la bandeja). Acomodar la masa en la bandeja. Cepillar las orillas
con aceite de oliva. Con cuidado, colocar la bandeja en la posición
inferior. Hornear por aprox. 6 a 8 minutos, hasta que la masa esté
ligeramente dorada.
3. Mientras la masa se está horneando, precalentar un sartén mediano a
fuego medio-alto. Cuando el sartén esté caliente, agregar el jamón de
Parma. Saltear hasta que esté crujiente; reservar.
4. Agregar
2
⁄
3
del ajo picado al sartén caliente. Saltear hasta que esté
fragante, y luego agregar los tomates. Cuando los tomates empiecen
a suavizarse, agregar la rúcula poco a poco. Cocinar hasta que se
marchite y retirar del fuego; reservar.
5. Colocar el queso ricota/requesón, el queso Parmesano, el ajo restante,
la sal y la pimienta en un tazón mediano; revolver bien para combinar.
Reservar.
6. Esparcir la mezcla de queso en la masa parcialmente cocida. Añadir la
mezcla de rúcula, y luego el jamón de Parma. Con cuidado, colocar la
bandeja en la posición inferior. Hornear por aprox. 10 a 12 minutos,
o hasta que la masa esté dorada y crujiente y que el queso esté
completamente derretido y bien dorado.
7. Retirar del horno. Cortar y servir inmediatamente.
Información nutricional por porción:
Calorías 160 (30% de grasa) • Carbohidratos 19 g • Proteínas 10g • Grasa 6g
Grasa saturada 3g • Colesterol 20mg • Sodio 400mg • Calcio 167mg • Fibra 2g

17
Pizza de tomate, cebolla y tocino
Rinde 8 porciones; una pizza de 12 in. (35 cm)
3 lonchas de tocino
Spray vegetal
1
⁄
3
receta de masa de pizza (página 28)
1 cucharada de aceite de oliva virgen extra
1 taza (235 ml) de salsa para pizza con pedazos, escurrida
6 onzas (170 g) de queso Mozzarella fresco, en cubitos
1 tomate italiano, en rodajas de ½ in. (1.5 cm)
¼ cebolla pequeña, en rodajas finas
1 cucharada de hojas de albahaca fresca, finamente rebanadas
1. Disponer las lonchas de tocino en la bandeja y meter la bandeja al
horno en la posición superior. Asar (en “BROIL”) por aprox. 8 minutos,
hasta que el tocino esté crujiente. Retirar del horno y reservar. Limpiar
la bandeja con papel absorbente y engrasar con spray vegetal.
2. Precalentar el horno a 425°F (220°C), usando la función “BAKE/
PIZZA” (hornear/hornear pizza).
3. Estirar la masa hasta formar un rectángulo de 10 x 9 in. (25 x 23 cm)
(del tamaño de la bandeja). Acomodar la masa en la bandeja y cepillar
las orillas con aceite de oliva. Con cuidado, colocar la bandeja en la
posición inferior y hornear por aprox. 6 a 8 minutos, o hasta que la
masa esté ligeramente dorada.
4. Esparcir la salsa uniformemente encima de la masa. Cubrir con queso,
y luego añadir los tomates, las cebollas y la albahaca. Con cuidado,
colocar la bandeja en la posición inferior. Hornear por aprox. 12 a 14
minutos, o hasta que la masa esté bien dorada y que el queso esté
completamente derretido.
5. Retirar del horno. Cortar y servir inmediatamente.
Información nutricional por porción:
Calorías 200 (47% de grasa) • Carbohidratos 19 g • Proteínas 7g • Grasa 11g
Grasa saturada 5g • Colesterol 25mg • Sodio 330mg • Calcio 3mg • Fibra 3g
Tarta de calabacín/calabacita,
tomate y cebolla
Rinde 10 porciones
½ receta de “pâte brisée” (masa quebrada) (página 29)
3 calabacines/calabacitas (“zucchini”) pequeños
2 cebollas pequeñas
4 cucharadas de aceite de oliva
½ cucharadita de sal kosher
½ cucharadita de pimienta negra recién molida
3 cucharadas de queso Parmesano rallado
3 tomates italianos
½ a ¾ onza (15 a 20 g) de queso de cabra suave
5 hojas pequeñas de albahaca fresca, finamente rebanadas
(“chiffonade”)
1. Estirar la masa para formar un rectángulo de 12 x 4 in. (30 x 10 cm).
Doblar los bordes para formar un borde de ¼ in. (5 mm) de alto.
Refrigerar por aprox. 30 minutos.
2. Mientras la masa se está enfriando, preparar los vegetales. Precalentar
el horno a 425°F (220°C), usando la función “BAKE/ PIZZA” (hornear/
hornear pizza). Forrar la bandeja con papel de aluminio.
3. Usando una procesadora de alimentos Cuisinart
®
equipada con disco
rebanador de 4 mm, cortar los calabacines/calabacitas y las cebollas
en rodajas. Colocar los vegetales rebanados, 3 cucharadas del aceite
de oliva y ¼ de cucharadita de sal y de pimienta en un tazón mediano;
revolver. Disponer los vegetales en una capa en la bandeja preparada.
Hornear por aprox. 20 minutos, hasta que los vegetales empiecen a
dorarse y suavizarse. Retirar del horno, reservar los vegetales en un
tazón y tirar el aceite. Limpiar la bandeja con un papel absorbente si
es necesario.
4. Ajustar la temperatura del horno a 350°F (175°C) y elegir la función
“CONV BAKE” (hornear por convección).

18
5. Retirar el fondo de tarta del refrigerador y colocarlo en la bandeja.
Pinchar el fondo de tarta varias veces con un tenedor, teniendo
cuidado de no perforar completamente la masa. Cubrir la masa con
una hoja de papel sulfurizado y llenar parcialmente el molde con arroz
crudo o frijoles secos. Con cuidado, colocar la bandeja en la posición
inferior y hornear por aprox. 20 minutos, o hasta que la masa debajo
del papel sulfurizado esté seca. Retirar los frijoles/el arroz y el papel
sulfurizado del fondo de tarta y esparcir el queso Parmesano encima.
Volver al horno y hornear por 2 a 3 minutos adicionales, hasta que la
masa esté dorada. Reservar.
6. Cortar los tomates en rodajas, usando una procesadora de alimentos
equipada con disco rebanador de 4 mm (medio). Colocar las rodajas
en un plato forrado con papel absorbente y sazonar con la sal restante.
Reservar hasta el momento de usar.
7. Cuando el fondo de tarta está listo, preparar la tarta. Disponer los
vegetales y los tomates en el fondo de tarta, superponiéndolos en
líneas rectas (empezar con un vegetal diferente en cada línea). Rociar
con el aceite de oliva restante y sazonar con la sal y la pimienta
restantes. Esparcir pedacitos del queso de cabra encima de la tarta
(usar más o menos, al gusto).
8. Con cuidado, colocar la bandeja en la posición inferior. Hornear por 20
minutos, hasta que la masa esté bien dorada y que los vegetales estén
tiernos y dorados. Retirar del horno y rociar con albahaca.
9. Servir tibio o a temperatura ambiente.
Información nutricional por porción:
Calorías 180 (67% de grasa) • Carbohidratos 13g • Proteínas 3g • Grasa 14g
Grasa saturada 7g • Colesterol 25mg • Sodio 200mg • Calcio 30mg • Fibra 1g
Burritos de pollo, vegetales
y frijoles negros
Rinde 4 porciones
½ calabacín/calabacita (“zucchini”) grande, en cubitos
1 cebolla pequeña, en rodajas finas
1 zanahoria grande, en cubitos
3 dientes de ajo, picados
½ jalapeño, finamente picado
½ pimiento dulce rojo, picado
¼ batata/camote mediano, pelado y cortado en cubitos
2½ cucharaditas de aceite de oliva
¼ cucharadita de sal kosher
2
/
3
taza (170 g) de maíz en grano congelado
1 taza (125 g) de pollo cocido, triturado
2 tazas (500 g) de frijoles negros en lata (enjuagados y
escurridos) o cocinados
1
⁄
3
taza (20 g) de cilantro picado
2 cucharadas de jugo de lima/limón verde fresco (aprox. 1 a 2
limones)
1 pizca de comino en polvo
1 pizca de chile en polvo
1 pizca de orégano seco
1 pizca de pimienta negra recién molida
1 taza (115 g) de queso Monterey Jack rallado
4 tortillas de trigo de 10 in. (25 cm)
1. Precalentar el horno a 400 °F (205°C), usando la función “BAKE/
PIZZA” (hornear/hornear pizza). Forrar la bandeja con papel de
aluminio.
2. Colocar los vegetales, excepto el maíz y los frijoles, en un tazón
grande. Añadir 2 cucharaditas de aceite de oliva y una pizca de sal, y
revolver para mezclar. Esparcir los vegetales en el fondo de la bandeja.
Con cuidado, colocar la bandeja en la posición superior y hornear por

19
aprox. 18 a 20 minutos, hasta que los vegetales estén suaves y
empiecen a dorarse. Volver a colocar los vegetales en el tazón y
agregar el maíz, el pollo, los frijoles, el cilantro, el jugo de limón,
las especias, la pimienta y la sal restante.
3. Esparcir un cuarto de la mezcla en una línea justo debajo del centro
de cada tortilla. Rociar con un cuarto del queso. Enrollar los burritos
y colocarlos en la bandeja, la unión apuntando hacia abajo. Cepillar la
parte superior con el aceite restante.
4. Con cuidado, colocar la bandeja en la posición inferior. Hornear
(aún en 400 °F/205 °F) por 8 a 10 minutos, hasta que las tortillas
estén crujientes y doradas. Servir con guacamole, salsa y crema agria.
Información nutricional por porción:
Calorías 620 (35% de grasa) • Carbohidratos 71g • Proteínas 33g • Grasa 25g
Grasa saturada 8g • Colesterol 55mg • Sodio 1mg • Calcio 373mg • Fibra 12g
Rigatoni al horno con salchicha
de pollo, broccolini y pimientos dulces
Rinde 6 a 8 porciones
5 onzas (145 g) de broccolini, las extremidades de los tallos
cortadas
1 cucharadita de aceite de oliva virgen extra
2 cucharadas de vino blanco seco
2 tazas (475 ml) de caldo de pollo
6 onzas (170 g) de salchicha de pollo italiana, cocida y cortada
en rodajas
½ pimiento dulce rojo, en rodajas
½ cebolla mediana, en rodajas
2 dientes de ajo, finamente picados
¼ cucharadita de sal kosher
¼ cucharadita de pimienta negra recién molida
½ libra (225 g) de pasta Rigatoni, cocida “al dente” de acuerdo
a las instrucciones
¾ taza (185 g) de queso ricota/requesón
8 onzas (225 g) de queso Mozzarella, rallado
¼ taza (30 g) de queso Parmesano rallado
4 a 6 hojas de albahaca fresca, rebanadas gruesas
Spray vegetal
1. Poner agua salada a hervir en una olla. Llenar un tazón grande con
agua y hielo; reservar. Colocar el broccolini en el agua hirviendo y
tapar. Cocinar por aprox. 4 a 6 minutos, hasta que adquieran un color
vivo. Retirar del agua y colocar en el baño de hielo. Cuando esté frío,
cortar el broccolini en trozos de 1 in. (2.5 cm).
2. Calentar un sartén grande a fuego medio-alto; agregar el aceite.
Cuando el aceite esté caliente, agregar el broccolini escaldado.
Saltear por 2 a 3 minutos, y luego agregar el vino y el caldo. Ajustar la
temperatura a fuego alto y saltear hasta que todo el líquido se haya
evaporado. Reservar.
3. Precalentar el horno a 400°F (205°C), usando la función “BAKE/
PIZZA” (hornear/hornear pizza). Forrar la bandeja con papel
de aluminio.
4. Colocar la salchicha, el pimiento, la cebolla y el ajo en la bandeja;
sazonar con una pizca de sal y de pimienta. Con cuidado, colocar la
bandeja en la posición superior y hornear por aprox. 15 minutos, hasta
que los vegetales estén suaves y empiecen a dorarse. Retirar del
horno. Ajustar la temperatura a 350°F (175 °C) y colocar la rejilla en
la posición inferior.
5. Colocar la salchicha asada, los vegetales y el resto de los ingredientes
en un tazón grande; revolver bien para combinar.
6. Engrasar ligeramente una fuente de 2 cuartos de galón (1.9 L) con
spray vegetal. Agregar la mezcla de pasta. Hornear por aprox. 30 a 35
minutos, hasta que el queso esté derretido y burbujeante.
Información nutricional por porción (basada en 8 porciones):
Calorías 260 (53% de grasa) • Carbohidratos 14g • Proteínas 17g • Grasa 16g
Grasa saturada 7g • Colesterol 40mg • Sodio 383mg • Calcio 341mg • Fibra 1g

20
Filete de res con corteza de hierbas
Rinde 6 porciones
1½ libras (680 g) de filete de res para asar
½ cucharadita de sal kosher
½ cucharadita de pimienta negra recién molida
3 dientes de ajo
2 ramas de tomillo fresco (sin tallos)
1 rama de romero fresco (sin tallos)
1 rama de orégano fresco (sin tallos)
½ cucharadita de estragón seco
3 cucharadas de aceite de oliva virgen extra
2 cucharadas de mostaza de Dijon
1. Precalentar el horno a 375°F (190°C), usando la función “CONV
BAKE” (hornear por convección). Forrar la bandeja con papel de
aluminio. Restregar la carne con ¼ de cucharadita de sal y ¼ de
cucharadita de pimienta. Reservar.
2. Colocar el ajo, las hierbas y la sal restante en el tazón de una mini-
procesadora de alimentos o una picadora Cuisinart
®
. Procesar hasta
que los ingredientes estén combinados. Sin apagar la máquina,
agregar lentamente el aceite por la boca de alimentación o el orificio
en el empujador. Procesar hasta obtener una mezcla homogénea.
3. Restregar la carne con la mostaza y rociar con la mezcla de hierbas.
Esparcir los vegetales en el fondo de la bandeja. Con cuidado, colocar
la bandeja en la posición inferior y hornear por aprox. 40 minutos,
o hasta que la temperatura interna alcance 125°F (52 °C).
Dejar descansar la carne por 10 a 15 minutos antes de cortar.
Información nutricional por porción:
Calorías 390 (77% de grasa) • Carbohidratos 2g • Proteínas 20g • Grasa 33g
Grasa saturada 12g • Colesterol 80mg • Sodio 350mg • Calcio 18mg • Fibra 0g
Pollo asado clásico
Rinde 4 a 6 porciones
1 pollo de 3½ a 4 libras (1.6 a 1.8 kg)
1 cucharadita de sal kosher
½ cucharadita de pimienta negra recién molida
1 limón, cortado a la mitad
1 cucharadita de aceite de oliva
2 cucharaditas de hierbas provenzales (Herbes de Provence)
o hierbas italianas
1 manojo de hierbas frescas (tomillo, romero, perejil, etc.)
3 dientes de ajo, machacados
1 cebolla mediana, en cuartos
1. Precalentar el horno a 375°F (190°C), usando la función “CONV
BAKE” (hornear por convección). Forrar la bandeja con papel de
aluminio.
2. Rociar todo el pollo, incluso la cavidad, con sal y pimienta. Rociar el
pollo con jugo de limón y colocar el limón exprimido en la cavidad.
Restregar el pollo con aceite de oliva y espolvorear con las hierbas
secas. Colocar las hierbas frescas, los dientes de ajo y la cebolla en
la cavidad y atar las piernas juntas con hilo de cocina.
3. Colocar el pollo en la bandeja y, con cuidado, colocar esta en la
posición inferior. Hornear por 30 minutos. Ajustar la temperatura a
350 °F (175 °C) y hornear por 30 a 40 minutos adicionales, o hasta
que la temperatura interna alcance 160°F/71°C (carne blanca)
o 170°F/77°C (carne oscura).
4. Dejar descansar el pollo por 15 minutos antes de cortar y servir.
Información nutricional por porción (basada en 6 porciones):
Calorías 590 (62% de grasa) • Carbohidratos 5g • Proteínas 49g • Grasa 40g
Grasa saturada 11g • Colesterol 240mg • Sodio 540mg • Calcio 57mg • Fibra 1g

21
Pollo al horno con especias
al estilo marroquí
Rinde aprox. 4 porciones
1½ libras (680 g) de presas mixtas de pollo
1 cucharada de aceite de oliva
1½ cucharadas de jugo de limón fresco (aprox. ½ limón)
1 cucharadita de sal kosher
¾ cucharadita de comino en polvo
½ cucharadita de canela en polvo
1 pizca de pimienta de Cayena
2 chalotes, en cuartos
1. Precalentar el horno a 375°F (190°C), usando la función “CONV
BAKE” (hornear por convección). Forrar la bandeja con papel de
aluminio.
2. Colocar el pollo, el aceite, el jugo de limón, las especias y la sal en un
tazón grande; revolver. Disponer los chalotes en el fondo de la bandeja
y colocar el pollo encima de ellos.
3. Con cuidado, colocar la bandeja en la posición inferior y hornear por 30
a 40 minutos, hasta que la temperatura interna alcance 160°F/71°C
(carne blanca) o 170°F/77°C (carne oscura).
Información nutricional por porción (basada en 4 porciones):
Calorías 371 (53% de grasa) • Carbohidratos 5g • Proteínas 32g • Grasa 24g
Grasa saturada 6g • Colesterol 141mg • Sodio 671mg • Calcio 38mg • Fibra 0g
Chuletas de cerdo al horno
con pimentón
Rinde 4 porciones
4 chuletas de cerdo gruesas
1 cucharadita de sal kosher
1 cucharadita de pimienta negra recién molida
4 a 6 pimentones (“hot cherry peppers”)
2 a 3 dientes de ajo, machacados
½ cebolla mediana, en pedazos de ½ in. (1.5 cm)
1. Forrar la bandeja con papel de aluminio. Restregar las chuletas
uniformemente con sal y pimienta. Disponer las chuletas en la bandeja
y rodear con los pimentones, el ajo y la cebolla.
2. Con cuidado, colocar la bandeja en la rejilla superior. Asar en “CONV
BROIL” (asar por convección) por aprox. 20 minutos, volteando las
chuletas a la mitad del tiempo. La temperatura interna de la carne
debería estar entre 145 °F y 150 °F (63 y 65 °C).
Información nutricional por porción:
Calorías 220 (17% de grasa) • Carbohidratos 5g • Proteínas 34g • Grasa 7g
Grasa saturada 2g • Colesterol 76mg • Sodio 2mg • Calcio 17mg • Fibra 0g
Lenguado asado con alcachofas
y alcaparras
Rinde 4 porciones
2 alcachofas medianas, sin los pelitos, cortadas en pedazos
3½ cucharadas de jugo de limón fresco
3 cucharadas de aceite de oliva
¾ cucharadita de sal kosher

22
½ cucharadita de pimienta negra recién molida
1 libra (455 g) de filete de lenguado u otro pescado blanco
2 cucharadas de alcaparras, escurridas
1. Precalentar el horno a 425°F (220°C), usando la función “BAKE/
PIZZA” (hornear/hornear pizza). Forrar la bandeja con papel sulfurizado.
2. Colocar las alcachofas en un tazón mediano. Cubrir con agua fría
y añadir 2 cucharadas de jugo de limón. Agitar con los dedos.
Escurrir y secar con papel absorbente. Colocar en un tazón, junto con
2 cucharadas del aceite y ¼ de cucharadita de sal y pimienta; revolver.
Disponer en la bandeja y colocar esta en la rejilla en inferior. Asar por
aprox. 20 minutos, hasta que estén ligeramente doradas.
3. Mientras tanto, enjuagar y secar el pescado. Restregar con el aceite
de oliva, la sal, la pimienta y el jugo de limón restantes. Cuando las
alcachofas estén asadas, colocar el pescado encima y rociar con las
alcaparras. Hornear, con la rejilla en la posición inferior. Hornear por
aprox. 15 minutos, hasta que el pescado esté cocido.
4. Retirar del horno y servir inmediatamente.
Información nutricional por porción:
Calorías 290 (53% de grasa) • Carbohidratos 10g • Proteínas 25g • Grasa 17g
Grasa saturada 3g • Colesterol 5mg • Sodio 660mg • Calcio 74mg • Fibra 5g
Focaccia con romero
Rinde 18 porciones
2¼ cucharaditas de levadura seca activa
1
⁄
8
cucharadita de azúcar granulada
1
/
3
taza (80 ml) de agua tibia (105 °F a 110 °F)
4 tazas (500 g) de harina común + un poco más para
espolvorear
3 cucharaditas de sal kosher
1 taza (235 ml) de agua fría
¼ taza (60 ml) de aceite de oliva virgen extra
Spray vegetal
2 cucharadas de romero fresco
1. Disolver la levadura y el azúcar en agua tibia. Dejar fermentar por 3 a 5
minutos, o hasta que la mezcla se ponga espumosa.
2. Colocar la harina y 1 cucharadita de sal en el bol de una procesadora
de alimentos Cuisinart
®
equipada con cuchilla amasadora y procesar
por 10 segundos para combinar. Revolver la mezcla de levadura con
el agua fría y 2 cucharadas de aceite.
3. Encender la máquina y verter el líquido lentamente por la boca de
alimentación. Nota: Puede que no necesite todo el líquido. Procesar
hasta que se forme una bola de masa. Después de esto, seguir
amasando por un minuto adicional.
4. Colocar la masa en una bolsa hermética ligeramente enharinada.
Dejar leudar al doble de su volumen, en un lugar templado, por aprox.
45 a 60 minutos.
5. Engrasar ligeramente la bandeja con spray vegetal.
6. Colocar la masa sobre una superficie enharinada. Extender la masa
para formar un rectángulo. Acomodar la masa en la bandeja y estirarla
para cubrir todo el fondo. Aplastar la superficie de la masa con la yema
de los dedos para hacer abolladuras. Cepillar la masa con el aceite de
oliva restante y rociar con la sal restante y el romero. Cubrir con papel
film/plástico y dejar leudar por aprox. 20 minutos.
7. Precalentar el horno a 400°F (205°C), usando la función “CONV
BAKE” (hornear por convección). Quitar el plástico y, con cuidado,
colocar la bandeja en la posición inferior. Hornear por aprox. 20 a 25
minutos, hasta que la masa esté dorada y crujiente. Dejar enfriar
ligeramente sobre una rejilla.
Nota: Disfrute de este pan italiano clásico sin cobertura o con aceitunas
Kalamata picadas.
Información nutricional por porción:
Calorías 120 (24% de grasa) • Carbohidratos 20g • Proteínas 3g • Grasa 3g
Grasa saturada 0g • Colesterol 0mg • Sodio 360mg • Calcio 1mg • Fibra 1g

23
Panecillos de suero de leche
Rinde 8 panecillos
1½ tazas (185 g) de harina común
½ taza (70 g) de harina de repostería
2 cucharaditas de crémor tártaro
1½ cucharaditas de bicarbonato de sodio
1 pizca de azúcar granulada
1½ cucharaditas de sal kosher
¼ cucharadita de pimienta negra recién molida
6 cucharadas (85 g) de mantequilla sin sal, en pedacitos
1 taza (245 g) de suero de leche (“buttermilk”)
3 cucharadas (45 g) de mantequilla sin sal, derretida
1. Precalentar el horno a 450°F (230°C), usando la función “CONV
BAKE” (hornear por convección). Forrar la bandeja con papel
sulfurizado.
2. Tamizar juntos la harina, el crémor tártaro y el bicarbonato. Poner en el
bol de una procesadora de alimentos Cuisinart
®
equipada con cuchilla
picadora. Agregar el azúcar, la sal y la pimienta. Procesar por 5
segundos. Agregar las 6 cucharadas (85 g) de mantequilla y pulsar
aprox. 6 a 8 veces. Agregar lentamente el suero de leche y pulsar 2 a 3
veces, hasta obtener una masa.
3. Colocar la masa sobre una superficie ligeramente enharinada. Amasar
suave y cuidadosamente 2 a 3 veces. Dividir la masa en 8 porciones
iguales. Enharinarse las manos y formar una bola con cada porción.
(Nota: La bola no tiene que estar perfectamente suave. Si amasa la
masa demasiado, los panecillos podrían resultar duros). Disponer las
bolas en la bandeja preparada, dejando una distancia de 1 in. (2.5 cm)
entre ellos.
4. Con cuidado, colocar la bandeja en la posición inferior. Hornear por 10
a 12 minutos, hasta que estén dorados. Retirar del horno y cepillar con
la mantequilla derretida. Servir inmediatamente.
Información nutricional por panecillo:
Calorías 230 (50% de grasa) • Carbohidratos 25g • Proteínas 4g • Grasa 13g
Grasa saturada 8g • Colesterol 35mg • Sodio 600mg • Calcio 37mg • Fibra 1g
Pancitos multigranos
Rinde 15 pancitos
2¼ cucharaditas de levadura seca activa
1
2
/
3
tazas (390 ml) de agua tibia (105 °F a 110 °F)
1 cucharada de melaza
3½ tazas (420 g) de harina de trigo integral
1¾ tazas (220 g) de harina para hacer pan
1½ cucharadas de gluten de trigo
2 cucharaditas de sal kosher
2 cucharadas de aceite de linaza
3 cucharadas de semillas de linaza
1 taza (165 g) de pasas doradas
1. Disolver la levadura y la melaza en el agua. Dejar fermentar por 4 a 6
minutos, o hasta que la mezcla se ponga espumosa. Colocar la harina,
el gluten, la sal y el aceite en el bol de una batidora de pie Cuisinart
®
equipada con gancho amasador. Batir a velocidad 3 para combinar.
Ajustar la velocidad al nivel 1 y agregar la mezcla de levadura. Cuando
la masa llegue a formar una bola, agregar las semillas de linaza y las
pasas, aumentando progresivamente la velocidad al nivel 3. Amasar
por aprox. 8 minutos.
2. Colocar la masa en una bolsa hermética grande ligeramente
enharinada. Expulsar el aire y cerrar la bolsa. Nota: También puede
poner la masa en un recipiente y cubrir con papel film/plástico.
Dejar leudar al doble de su volumen en un lugar templado, por aprox.
45 a 60 minutos.
3. Engrasar ligeramente un molde redondo de 10 in. (25 cm) con
mantequilla. Dividir la masa en 15 porciones iguales. Formar bolitas
suaves y disponer estas en el molde. Cubrir con papel film/plástico y
dejar leudar casi al doble de su volumen, por aprox. 30 a 40 minutos.

24
4. Colocar la rejilla del horno en la posición inferior. Precalentar el horno
a 450°F (230°C), usando la función “CONV BAKE” (hornear por
convección).
5. Quitar el plástico y hornear por aprox. 20 a 25 minutos, hasta que
estén dorados. Desmoldar y dejar enfriar sobre una rejilla por aprox.
10 minutos antes de servir.
Información nutricional por pancito:
Calorías 210 (13% de grasa) • Carbohidratos 42g • Proteínas 7g • Grasa 4g
Grasa saturada 0g • Colesterol 0mg • Sodio 310mg • Calcio 24mg • Fibra 5g
Bizcocho de banana, chispas
de chocolate y harina integral
Rinde una barra de 9 x 5 x 3 in. (23 x 13 x 8 cm)
1 taza (150 g) de nueces picadas
Spray vegetal
1 taza (125 g) de harina común
1 taza (120 g) de harina de trigo integral
¾ cucharadita de bicarbonato de sodio
¾ cucharadita de sal kosher
½ taza (100 g) de azúcar granulada
½ cucharadita de canela en polvo
½ taza (40 g) de chispas de chocolate
6 cucharadas (85 g) de mantequilla sin sal, a temperatura
ambiente
2 huevos grandes
1 cucharadita de extracto natural de vainilla
3 bananas medianas maduras, machacadas
¼ taza (60 ml) de crema agria
1. Precalentar el horno a 400°F (205°C), usando la función “BAKE/
PIZZA” (hornear/hornear pizza). Forrar la bandeja con papel de
aluminio. Disponer las nueces en la bandeja y, con cuidado, colocar la
bandeja en la posición superior. Tostar por aprox. 3 minutos, hasta que
estén fragantes y ligeramente doradas. Reservar. Ajustar la temperatura
del horno a 350°F (175°C) y la función a “CONV BAKE” (hornear por
convección), y colocar la rejilla en la posición inferior.
2. Engrasar ligeramente un molde de barra con spray vegetal. Reservar.
3. Colocar la harina, el bicarbonato, la sal, el azúcar, la canela, las chispas
de chocolate y las nueces tostadas en un tazón pequeño a mediano;
revolver y reservar.
4. Colocar la mantequilla, los huevos, la vainilla, las bananas y la crema
agria en el bol de una batidora de pie Cuisinart
®
equipada con gancho
amasador. Mezclar (empezando con la velocidad 1 y ajustando
progresivamente al nivel 4) por 20 segundos, o hasta obtener una
mezcla suave. Ajustar la velocidad al nivel 1 y agregar lentamente los
ingredientes secos. Revolver brevemente para mezclar. Verter la
mezcla en la bandeja preparada.
5. Hornear por aprox. 50 a 55 minutos, hasta que un probador salga
limpio.
Información nutricional por porción (basada en 12 porciones):
Calorías 330 (41% de grasa) • Carbohidratos 45g • Proteínas 6g • Grasa 16g
Grasa saturada 6g • Colesterol 50mg • Sodio 230mg • Calcio 27mg • Fibra 3g
Postre crujiente de manzana,
cereza y pasas
Rinde 8 porciones
Spray vegetal
1 taza (80 g) de copos de avena
½ taza llena (100 g) de azúcar rubia (azúcar de caña integral)
1
⁄
3
taza (40 g) de harina común
1 cucharadita de canela en polvo
¼ cucharadita de sal kosher
6 cucharadas (85 g) de mantequilla sin sal, derretida
1½ libras (680 g) de manzanas, cortadas en cuartos y luego
rebanadas de ¼ in. (4 mm)*

25
1 cucharada de jugo de limón fresco
½ taza (60 g) de cerezas pasas
¼ taza (30 g) de pasas
½ taza (100 g) de azúcar granulada
2 cucharadas de miel
1 cucharadita de extracto natural de vainilla
1. Colocar la rejilla del horno en la posición inferior. Precalentar el horno
a 350 °F (175°C), usando la función “BAKE/PIZZA” (hornear/hornear
pizza). Engrasar ligeramente un molde de 9 x 9 in. (23 x 23 cm) con
spray vegetal.
2. Colocar la avena, el azúcar rubia, la harina, la canela y la sal en un
tazón mediano; revolver. Agregar la mantequilla derretida y revolver
hasta obtener una mezcla homogénea. Pellizcar la masa con los dedos
para formar migajas grandes; reservar.
3. Colocar las manzanas, el jugo de limón, las cerezas pasas, las pasas,
el azúcar granulada, la miel y la vainilla en un tazón mediano; revolver.
Usando una cuchara, colocar la mezcla de manzanas en el molde
preparado. Rociar uniformemente con la mezcla de migajas reservada.
4. Hornear por 35 a 40 minutos, hasta que las manzanas estén tiernas y
que el relleno esté burbujeante. Dejar reposar por 20 a 30 minutos
antes de servir. Servir tibio o a temperatura ambiente con helado/
helado de yogur de vainilla o crema batida fresca.
*Para que sea más fácil rebanar las manzanas, usar una procesadora de
alimentos Cuisinart
®
equipada con disco rebanador de 4 mm.
Información nutricional por porción:
Calorías 360 (23% de grasa) • Carbohidratos 67g • Proteínas 5g • Grasa 10g
Grasa saturada 6g • Colesterol 25mg • Sodio 75mg • Calcio 25mg • Fibra 5g
“Brownies” semiamargos de chocolate
y café expreso
Rinde 16 “brownies”
½ taza (60 g) de nueces picadas
Spray vegetal
¾ taza (170 g) de mantequilla sin sal, en cubitos
4 onzas (115 g) de chocolate amargo, finamente picado
2 onzas (55 g) de chocolate semiamargo, finamente picado
3 huevos grandes
1 taza (200 g) de azúcar granulada
½ taza llena (100 g) de azúcar rubia (azúcar de caña integral)
2 cucharaditas de café expreso instantáneo
2 cucharaditas de extracto natural de vainilla
¾ taza (95 g) de harina común + un poco más para espolvorear
¾ cucharadita de sal kosher
1. Precalentar el horno a 400°F (205°C), usando la función “BAKE/
PIZZA” (hornear/hornear pizza). Forrar la bandeja con papel de
aluminio. Disponer las nueces en la bandeja y, con cuidado, colocar la
bandeja en la posición superior. Tostar por aprox. 3 minutos, hasta que
estén fragantes y ligeramente doradas. Dejar enfriar a temperatura
ambiente. Ajustar la temperatura a 375°F (190°C) y la función a
“CONV BAKE” (hornear por convección), y colocar la rejilla en la
posición inferior.
2. Engrasar ligeramente un molde de 9 x 9 in. (23 x 23 cm) con spray
vegetal; espolvorear con una pequeña cantidad de harina. Reservar.
3. Derretir la mantequilla y los chocolates picados a baño María.
Cuando el chocolate esté casi completamente derretido, retirar del
fuego y llevar a temperatura ambiente. Reservar.
4. Colocar los huevos en un tazón grande y batirlos con un batidor de
mano Cuisinart
®
por aprox. 30 segundos, hasta obtener una mezcla
ligera. Agregar el azúcar y batir por 30 a 60 segundos adicionales,
hasta obtener una mezcla clara y espesa. Agregar el café expreso
instantáneo y la vainilla; batir para mezclar. Agregar la harina y la sal,

26
y mezclar justo hasta que la harina esté incorporada. Incorporar
suavemente las nueces tostadas.
5. Verter la mezcla en la bandeja preparada. Hornear por aprox. 35
minutos, hasta que las orillas estén secas. Dejar enfriar antes de cortar
en cuadritos.
Información nutricional por “brownie”:
Calorías 260 (54% de grasa) • Carbohidratos 28g • Proteínas 3g • Grasa 17g
Grasa saturada 9g • Colesterol 60mg • Sodio 120mg • Calcio 30mg • Fibra 2g
Cuadritos de limón
Rinde 16 porciones
Base:
Spray vegetal
½ taza (100 g) de almendras enteras
1 taza (125 g) de harina común
1
⁄
3
taza (30 g) de azúcar glasé
½ cucharadita de sal kosher
1 cucharadita de ralladura de limón
¼ taza (55 g) de mantequilla sin sal, en pedacitos
Crema de limón:
5 huevos grandes
¾ taza (150 g) de azúcar granulada
½ taza (120 ml) de jugo de limón fresco
½ cucharadita de extracto natural de vainilla
1 cucharadita de ralladura de limón
½ cucharadita de polvo de hornear
½ cucharadita de sal kosher
¼ taza (30 g) de harina común
2 cucharadas (30 ml) de crema líquida para batir
(“heavy cream”)
1. Precalentar el horno a 400°F (205°C), usando la función “BAKE/
PIZZA” (hornear/hornear pizza). Forrar la bandeja con papel de
aluminio. Disponer las almendras en la bandeja y, con cuidado, colocar
la bandeja en la posición superior. Tostar por 2 a 3 minutos, hasta que
estén fragantes y ligeramente doradas. Dejar enfriar a temperatura
ambiente. Ajustar la temperatura a 350°F (175°C), y la función a
“CONV BAKE” (hornear por convección) y colocar la rejilla en la
posición inferior.
2. Engrasar ligeramente un molde de 9 x 9 in. (23 x 23 cm) con spray
vegetal y forrar con 2 hojas de papel sulfurizado, dejando 1 a 2 in.
(2.5 a 5 cm) de papel en cada lado. Reservar.
3. Poner las almendras enfriadas en el bol de una procesadora de
alimentos Cuisinart
®
, equipada con cuchilla picadora; pulsar hasta
que estén finamente picadas. Agregar la harina, el azúcar glasé,
½ cucharadita de la sal y 1 cucharadita de ralladura. Procesar por
aprox. 5 segundos, o hasta que la mezcla esté completamente
combinada. Agregar la mantequilla fría y pulsar hasta obtener una
mezcla parecida a migajas gruesas. Comprimir la mezcla en el fondo
del molde. Hornear por aprox. 16 a 18 minutos, hasta que esté
ligeramente dorado. Retirar del horno y reservar. Ajustar la temperatura
a 300°F (150°C).
4. Mientras la corteza se está horneando, colocar los huevos en un tazón
mediano. Batir por aprox. 30 segundos, usando una batidora de mano
Cuisinart
®
. Agregar el azúcar y batir por 1 a 1½ minutos adicionales,
hasta obtener una mezcla clara y espesa. Agregar el jugo de limón,
la vainilla y la ralladura; mezclar para incorporar. Agregar el polvo de
hornear, la sal, la harina y la crema líquida para batir; mezclar hasta
que todos los ingredientes estén bien combinados. Verter la mezcla
encima de la corteza tibia. Hornear por aprox. 25 minutos, o hasta
cuajarse.
5. Espolvorear con azúcar glasé antes de servir.
Información nutricional por cuadrito:
Calorías 160 (40% de grasa) • Carbohidratos 21g • Proteínas 4g • Grasa 7g
Grasa saturada 3g • Colesterol 75mg • Sodio 180mg • Calcio 30mg • Fibra 1g

27
Pastel de canela con
cobertura de chocolate blanco
Rinde 16 porciones
Pastel:
Spray vegetal
2½ tazas (170 g) de harina de repostería + un poco más
para espolvorear
1½ cucharaditas de canela en polvo
1 cucharadita de sal kosher
1 cucharadita de crémor tártaro
¼ cucharadita de bicarbonato de sodio
½ taza (115 g) de mantequilla sin sal a temperatura ambiente
¾ taza (150 g) de azúcar granulada
¼ taza llena (50 g) de azúcar rubia (azúcar de caña integral)
3 claras de huevo grande
2 cucharaditas de extracto natural de vainilla
½ taza (120 ml) de leche entera
Cobertura:
6 cucharadas (90 ml) de crema líquida para batir
(“heavy cream”)
¼ cucharadita de extracto natural de vainilla
1 pizca de sal kosher
1½ cucharaditas de jarabe de maíz claro
3 onzas (85 g) de chocolate blanco, picado
1. Colocar la rejilla del horno en la posición inferior. Precalentar el
horno a 350°F (175°C), usando la función “CONV BAKE” (hornear por
convección). Engrasar ligeramente un molde de 9 x 9 in. (23 x 23 cm)
con spray vegetal; espolvorear con una pequeña cantidad de harina.
Reservar.
2. Colocar la harina, la canela, la sal y el polvo de hornear en un tazón
pequeño; revolver y reservar. Colocar la mantequilla en el bol de una
batidora de pie Cuisinart
®
equipada con un batidor plano. Batir hasta
que esté suave y cremosa. Sin apagar la máquina, agregar lentamente
el azúcar y seguir batiendo hasta conseguir una mezcla ligera.
Agregar las claras, un tercio a la vez, combinando bien después
de cada adición. Agregar la vainilla y revolver para mezclar. Con la
unidad encendida a la velocidad más baja, agregar la mitad de los
ingredientes secos. Mezclar hasta que la harina esté parcialmente
incorporada, y luego agregar la mitad de la leche. Agregar los
ingredientes secos restantes y mezclar hasta que la harina esté
completamente incorporada.
3. Verter la mezcla en el molde preparado. Hornear por aprox. 25 a 30
minutos, o hasta que un probador salga limpio. Dejar enfriar en el
molde por 10 minutos, y luego desmoldar y dejar enfriar sobre
una rejilla.
4. Preparar la cobertura de chocolate blanco: Calentar a fuego medio-
lento la crema, la vainilla, la sal y el jarabe de maíz en una cacerola
pequeña. Colocar el chocolate picado en un tazón pequeño; reservar.
Cuando la mezcla empiece a hervir, verterla sobre el chocolate.
Dejar reposar por varios minutos, y luego batir para mezclar.
Bañar el pastel con la cobertura, usando una espátula angulada.
5. Refrigerar el pastel por un mínimo de 2 horas para fijar la cobertura.
Información nutricional por porción:
Calorías 200 (44% de grasa) • Carbohidratos 25g • Proteínas 2g • Grasa 10g
Grasa saturada 6g • Colesterol 25mg • Sodio 200mg • Calcio 25mg • Fibra 0g
Tarta de caramelo y nueces
con frambuesas y chocolate
Rinde 16 porciones
2½ tazas (425 g) de nueces picadas
½ receta de masa dulce (página 29)
1½ tazas (300 g) de azúcar granulada
1 taza (235 ml) de agua
3 cucharadas de jarabe de maíz claro
1 pizca de sal kosher
½ taza (120 ml) de crema líquida para batir (“heavy cream”)

28
1
⁄
3
taza (80 ml) de mermelada de frambuesa, colada
2 onzas (55 g) de chocolate semiamargo, picado
1. Precalentar el horno a 400°F (205°C), usando la función “BAKE/
PIZZA” (hornear/hornear pizza). Forrar la bandeja con papel de
aluminio. Esparcir las nueces en la bandeja y, con cuidado, colocar la
bandeja en la posición superior. Tostar por aprox. 5 minutos, hasta
que estén fragantes y ligeramente doradas. Dejar enfriar a temperatura
ambiente. 2. Estirar la masa para formar un disco de aprox. 10 in. (25
cm) de diámetro y
1
/
8
de grueso. Acomodar la masa en un molde de
tarta acanalado. Refrigerar por aprox. 20 minutos. Unos minutos antes
de retirar el fondo de tarta del refrigerador, colocar la rejilla del horno
en la posición inferior y precalentar el horno a 375°F (190°C), usando
la función “CONV BAKE” (hornear por convección). Pinchar el fondo
de tarta varias veces con un tenedor, teniendo cuidado de no perforar
completamente la masa. Cubrir la masa con una hoja de papel
sulfurizado y llenar parcialmente el molde con arroz crudo o frijoles
secos. Hornear por aprox. 20 minutos, o hasta que la masa debajo
del papel sulfurizado esté seca. Quitar el arroz crudo/los frijoles secos
y el papel sulfurizado, y volver a meter el fondo de tarta al horno;
seguir horneando hasta que esté bien dorado. Retirar del horno
y reservar.
2. Mientras el fondo de tarta se está horneando, colocar el azúcar,
el agua, el jarabe de maíz y la sal en una cacerola mediana de fondo
pesado. Secar las paredes de la cacerola si es necesario (usando una
brocha), ya que residuos de agua o azúcar puede afectar la calidad
del caramelo. Cocinar la mezcla a fuego medio hasta que adquiera
un color ambarino. Retirar del fuego y agregar lentamente la crema.
(Nota: El caramelo estará muy caliente y es importante que agregue
la crema lentamente, retirando la cacerola del fuego.) Agregar las
nueces tostadas al caramelo; revolver.
3. Mientras el caramelo se está cocinando, esparcir la mermelada de
frambuesa en el fondo de tarta enfriado. Verter la mezcla de caramelo/
nueces encima.
4. Colocar el chocolate en un tazón, en una cacerola de agua hirviendo
a fuego lento, y derretir el chocolate a baño María. Cuando el
chocolate esté casi completamente derretido, retirar del fuego y dejar
enfriar a temperatura ambiente, revolviendo. Rociar el chocolate sobre
la tarta. Refrigerar por 3 horas, o por una noche.
Información nutricional por porción:
Calorías 330 (54% de grasa) • Carbohidratos 35g • Proteínas 4g • Grasa 21g
Grasa saturada 6g • Colesterol 35mg • Sodio 55mg • Calcio 25mg • Fibra 2g
Masa de pizza
Rinde 3 pizzas de 12 in. (30 cm)
2¼ cucharaditas de levadura seca activa
½ taza (120 ml) de agua tibia
1 cucharadita (5 g) de azúcar granulada
4 tazas (500 g) de harina común + un poco más para
espolvorear
1½ cucharaditas de sal kosher
1 cucharada de aceite de oliva virgen extra
1 taza (235 ml) de agua fría
1. Disolver la levadura y el azúcar en agua tibia. Dejar fermentar por
3 a 5 minutos, o hasta que la mezcla se ponga espumosa.
2. Colocar la harina, la sal y el aceite de oliva en el bol de una
procesadora de alimentos Cuisinart
®
equipada con cuchilla amasadora.
Pulsar 5 veces para mezclar, raspando el bol con una espátula.
3. Agregar el agua fría a la mezcla de levadura; revolver. Encender la
máquina y verter el líquido lentamente por la boca de alimentación.
Procesar los ingredientes hasta que lleguen a formar una bola de
masa. Luego, amasar por un minuto adicional. La masa estará
ligeramente pegajosa.
4. Espolvorear ligeramente el interior de una bolsa hermética con
harina. Espolvorear la masa con harina. Colocar la masa en la bolsa
enharinada; expulsar el aire y cerrar la bolsa Dejar leudar, en un lugar
templado, por 45 a 60 minutos. En este punto, la masa está lista para
su uso. Preparar la pizza según la receta ver nuestras recetas en las
páginas 16 y 17 o usar su receta favorita) Nota: La masa se conservará
en el refrigerador por 1 a 2 días, en una bolsa hermética, o en el
congelador por hasta 3 meses, envuelta en papel encerado y en una
bolsa de congelación.

29
Información nutricional por porción (basada en 24 porciones):
Calorías 98 (14% de grasa) • Carbohidratos 20g • Proteínas 3g • Grasa 2g
Grasa saturada 0g • Colesterol 0mg • Sodio 178mg • Calcio 1mg • Fibra 3g
“Pâte brisée” (masa quebrada)
Rinde 2 fondos de tarta de 9 in. (23 cm)
2 tazas (250 g) de harina común
1 cucharadita de sal kosher
½ libra (225 g) de mantequilla sin sal fría, en pedacitos
4 cucharadas (60 ml) de agua helada
1. Colocar la harina y la sal en el bol de una procesadora de alimentos
Cuisinart
®
equipada con cuchilla picadora. Procesar por 10 segundos.
Agregar la mantequilla y seguir procesando hasta que se formen
migajas grandes. Agregar el agua, una cucharada a la vez; pulsar justo
hasta obtener una masa. Nota: Puede que no necesite toda el agua.
2. Formar 2 discos planos con la masa. Envolver cada disco en papel
film/plástico y refrigerar hasta el momento de usar. La masa se
conservará en el congelador por hasta 3 meses, envuelta en plástico
y metida en una bolsa de congelación.
Información nutricional por porción (basada en 24 porciones):
Calorías 101 (67% de grasa) • Carbohidratos 7g • Proteínas 1g • Grasa 7g
Grasa saturada 5g • Colesterol 20mg • Sodio 89mg • Calcio 0mg • Fibra 0g
“Pâte sucrée” (masa dulce)
Rinde 2 fondos de tarta de 9 in. (23 cm)
2 tazas (250 g) de harina común
2 cucharadas (25 g) de azúcar granulada
½ cucharadita de sal kosher
¾ taza (180 g) de mantequilla sin sal a temperatura ambiente
2 yemas de huevo grande
1 cucharada de agua helada
½ cucharadita de extracto natural de vainilla
1. Colocar la harina y la sal en el bol de una procesadora de alimentos
Cuisinart
®
equipada con cuchilla picadora. Procesar por 10 segundos.
Agregar la mantequilla y procesar hasta que esté completamente
combinada. Sin apagar la máquina, agregar las yemas, una por una,
y seguir procesando hasta haber incorporado todos los ingredientes.
Agregar el agua y la vainilla; pulsar 3 a 5 veces.
2. Formar 2 discos planos con la masa. Envolver cada disco en papel film/
plástico y refrigerar hasta el momento de usar. La masa se conservará
en el congelador por hasta 3 meses, envuelta en papel film/plástico
y metida en una bolsa de congelación.
Información nutricional por porción (basada en 32 porciones):
Calorías 70 (58% de grasa) • Carbohidratos 6g • Proteínas 1g • Grasa 5g
Grasa saturada 3g • Colesterol 25mg • Sodio 35mg • Calcio 1mg • Fibra 0g

30
NOTAS:

31
NOTAS:

©2021 Cuisinart
East Windsor, NJ 08520
Impreso en China
20CE075514
IB-17010-ESP