Documents: Go to download!
User Manual
- Owner's manual - (English, French, Spanish)
- Energy Guide - (English)
- Spec Sheet - (English)
- Spec Sheet (web) - (English)

- Installation
- Door bins
- Step-by-step installation
- STEP 1 Select a site
- STEP 2 Flooring
- STEP 3 Door removal for entrance
- To reattach the fridge doors
- To detach the freezer drawer
- STEP 4 Leveling the refrigerator
- STEP 5 Adjust the door height and the door gap
- STEP 6 Connect the water dispenser line (applicable models only)
- STEP 7 Initial settings
- STEP 8 Final check
- Operations
- Control panel
- Setting the desired temperature or function
- Activating or deactivating the Cooling Off mode
- SmartThings
- Installation
- Samsung account
- Getting started
- Refrigerator app
- Maintenance
- AutoFill Pitcher (applicable models only)
- Fridge shelves
- Top shelf
- Vegetable shelf
- Door bins
- Crisper+ / Fridge Drawers
- Cleaning
- Interior and exterior
- Dispenser nozzle (applicable models only)
- Troubleshooting
- Temperature
Table of contents
User manual Refrigerator for Samsung RF24BB6200AP
Installation
Refrigerator at a glance
The actual refrigerator and provided component parts of your refrigerator may differ from the illustrations in this manual, depending on the model and the country.


NOTE
- For energy efficiency, keep all shelves, drawers, and baskets in their original positions.
- When closing the door, make sure the vertical hinged section is in the correct position to avoid scratching the other door.
- If the vertical hinged section is reversed, put it back into the correct position, and then close the door.
- Moisture may form at times on the vertical hinged section.
- If you close a door forcefully, the other door may open.
- If the internal or external LED lamp is not working, contact a local Samsung service center.
Door bins
Your refrigerator ships with door bins of different types and sizes. If the door bins for your refrigerator were packaged separately, use the figure below to help you position the bins properly.
NOTE
- The actual refrigerator and provided component parts of your refrigerator may differ from the illustrations in this manual, depending on the model and the country.

Step-by-step installation
STEP 1 Select a site
The site must:
- Have a solid level surface without carpeting or flooring that may obstruct ventilation
- Be out of direct sunlight
- Have adequate room for opening and closing the door
- Be away from any heat source
- Provide room for maintenance and servicing
- Have a temperature range between 50 °F (10 °C) and 110 °F (43 °C)
Clearance
See the following figures and tables for installation space requirements.
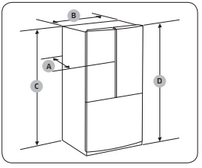
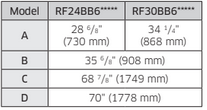
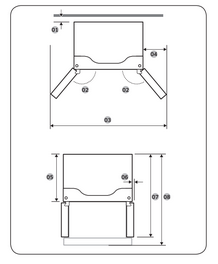
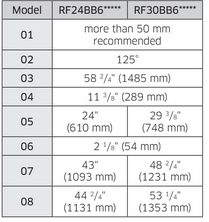
STEP 2 Flooring
If the refrigerator cannot pass through the entrance due to its size, see Door removal for entrance.
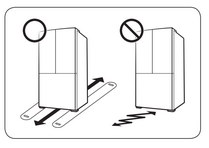
NOTE
To prevent floor damage, make sure the front leveling legs are in the upright position.
- The surface you install the refrigerator on must support a fully loaded refrigerator.
- To protect the floor, put a large piece of cardboard along the path to the refrigerator's final installation location.
- Once the refrigerator is in its final position, do not move it unless necessary to protect the floor. If you have to move the refrigerator, place thick paper or cloth such as old carpets along the path of movement.
STEP 3 Door removal for entrance
If the refrigerator cannot pass through the entrance to your home or kitchen due to its size, follow these instructions to remove and then re-install the refrigerator's doors. If you do not need to remove the doors, go to page 28 to continue the installation procedure.
WARNING
Unplug the power cord of the refrigerator before removing the doors.
Tools required (not provided)
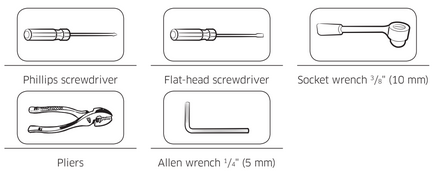
Detach the fridge doors
- With the doors closed, use a Phillips screwdriver to remove the screws (x3) from the top cover. Pull up and remove the top cover with the connectors.
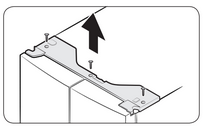
- Disconnect the two wire connectors on the left door. The position of the connectors differs with the model.
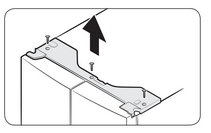
- Disconnect the water tube from the coupler on the left door as shown. This step does not apply to the models without the AutoFill Pitcher and the water dispenser.

- Gently draw up the clamp in several steps. To prevent finger injuries, do not apply a sudden force to the clamp.
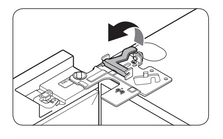
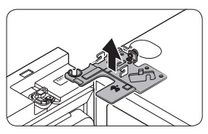
- Pull up the clamp to remove.

- Open the door 90 degrees. While holding the door, pull up and remove the top hinge. Be careful not to damage the connector wires when you remove the hinge.
- Gently pull up the door vertically to remove. Do not apply excessive force to the door. The door may fall, causing physical injury.
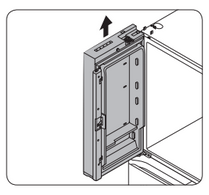
- Lay the door down on a flat surface.
- Repeat steps 1-8 for the other door, except for step 3. There is no water tube on the right side door. Step 2 does not apply to the models without the Showcase door.
To reattach the fridge doors
- While holding the door open by more than 90 degrees, insert the shaft on the middle hinge into the hole on the bottom of the door.

- Put the top hinge into position on the top of the refrigerator, and then insert the hinge shaft into the top hole of the door. Make sure the wires from the door pass through the hole in the hinge shaft.
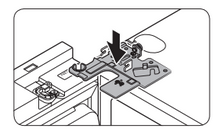
- Insert the clamp in the direction of the arrow.
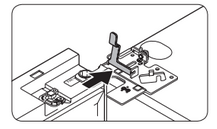
- Push back the clamp as shown.

- Connect the wire connectors.
- Connect the water tube. This step does not apply to the models without the AutoFill Pitcher and the water dispenser.
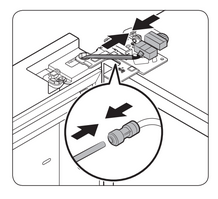
- Repeat steps 1-5 for the other door. Step 5 does not apply to the models without the Showcase door.
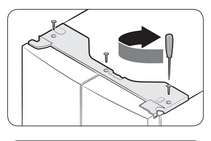
- Attach the top cover with the front side first, and then press down on its back to get it into position. Then, tighten the screws (x3).
To detach the freezer drawer
- Lift up the front of the upper basket and pull up to remove.

- Then, pull up to remove the lower basket from the rail assembly.
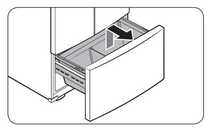
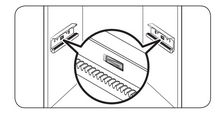
- Press down the hooks to unlock the rail assembly.
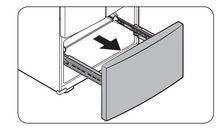
- While holding the upper area of the freezer drawer front, slide the drawer out all the way to remove the freezer drawer from the rail assembly.
STEP 4 Leveling the refrigerator
CAUTION
- When installed, the refrigerator must be leveled on a flat, solid floor. Not leveling the refrigerator can cause damage to the refrigerator or physical injury.
- Leveling must be performed with the refrigerator empty. Make sure no food items are inside the refrigerator.
- For safety reasons, adjust the front a little higher than the rear.
Level the refrigerator using the special screws (levelers) on the front legs. Use a flat-head screwdriver to turn the levelers.
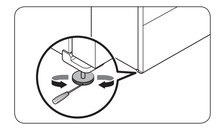
- To adjust the height of the left side: Insert a flat-head screwdriver into the leveler of the left side front leg. Turn the leveler clockwise to raise the left side or turn it counterclockwise to lower.
- To adjust the height of the right side: Insert a flat-head screwdriver into the leveler of the right side front leg. Turn the leveler clockwise to raise the right side or turn it counterclockwise to lower.
STEP 5 Adjust the door height and the door gap
Snap rings
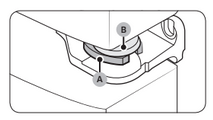
- The height of a door can be adjusted using the provided snap rings, which come in 4 different sizes (1 mm, 1.5 mm, 2 mm, and 2.5 mm).

To adjust the height of a door
- Check the height difference between the doors, and then lift up and hold the door with the lower height.
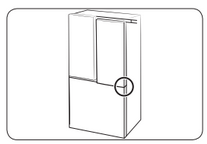
- Insert a suitable-sized snap ring (A) between the door grommet (B) and the hinge as shown.
CAUTION
- Insert only one snap ring. If you insert two or more snap rings, the rings may slip out or make a rubbing noise.
- Keep the snap rings out of children’s reach and keep them for future use.
- Do not raise the door too much. The door can contact and damage the top cover.
STEP 6 Connect the water dispenser line (applicable models only)
A water dispenser with a filter is one of the helpful features on your new refrigerator. To help promote better health, the water filter removes unwanted particles from your water. However, it does not sterilize or destroy microorganisms. You may need to purchase a water purifying system to do that.
The water line also connects to the ice maker. For the ice maker to operate properly, water pressure must be between 30-125 psi (206-861 kPa).
If the refrigerator is installed in an area with low water pressure (below 30 psi / 206 kPa), you can install a booster pump to compensate for the low pressure.
After you have connected the water line, check if the water dispenser works properly.
Press the water dispenser lever until the water runs from the water outlet.
NOTE: Water line installation kits are available at extra cost from your retailer. We recommend using a water line installation kit that contains copper tubing and a 1/4" (6 mm) compression nut.
- Shut off the main water source.
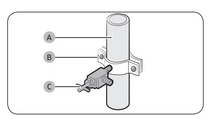
- Insert the pipe clamp (B) and the shutoff valve (C) into the cold water line (A).
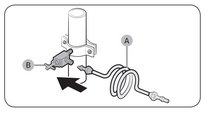
- Connect the water line installation kit (A) to the shutoff valve (B).
STEP 7 Initial settings
By completing the following steps, the refrigerator should be fully functioning.
- Plug the power cord into the wall socket to turn the refrigerator on.
- Open the door, and check if the interior light lights up.
- Set the temperature to the coldest setting, and wait for about an hour. Then, the freezer will be slightly chilled, and the motor should be running smoothly.
- Wait until the refrigerator reaches the set temperature. Now the refrigerator is ready for use.
STEP 8 Final check
When installation is complete, confirm that:
- The refrigerator is plugged into an electrical outlet and grounded properly.
- The refrigerator is installed on a flat, level surface with a reasonable clearance from walls and cabinets.
- The refrigerator is level and is sitting firmly on the floor.
- The door opens and closes freely, and the interior light turns on automatically when you open the door.
Operations
Control panel


NOTE
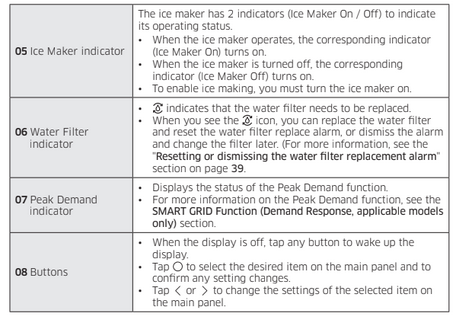
- The control panel is designed to stay off when the refrigerator is not in use. It only becomes active and lights up when you open the door or tap the buttons.
- If the door is left open for 5 minutes, the internal light will blink for 5 minutes and turn off to alert deaf and hard of hearing users that a door is open. Note that this function is normal.
Setting the desired temperature or function
Select the fridge or freezer and set the desired temperature or function of your choice.
- Tap any button (< ,O, or >) to wake up the display.
This step may not apply to some models.
- Tap until the fridge or freezer indicator blinks.
The selected compartment’s indicator blinks.
- Tap < or > to select the desired temperature or function.
Refer to the table for available selection for each compartment.

- Wait for 5 seconds or tap O to confirm your selection.
The selected compartment’s indicator stops blinking.
NOTE
- Using Power Cool or Power Freeze increases power consumption.
- When you change the temperature on the panel, the panel displays the actual temperature inside the refrigerator until the temperature matches the temperature you set. Then, the panel displays the new set temperature. Note that it will take time for the refrigerator to reach the new temperature. This is normal. During this time, you do not need to set the temperature again.
- To ensure optimal performance, we recommend setting the temperature to 0 °F (-18 °C) for the freezer, and 37 °F (3 °C) for the fridge.
- The temperature in the refrigerator may rise if you open the door frequently or put a large amount of food into the refrigerator. If this happens, the temperature display blinks until the refrigerator returns to the specified temperature settings. If the blinking continues for an extended time, contact a local Samsung service center for technical assistance.
- While the temperature display is blinking, an alarm may occur. To stop the alarm, tap any button on the display.
Activating or deactivating the Cooling Off mode
The Cooling Off mode (also called the Shop mode) is designed for retailers to display refrigerators on a retail floor. In the Cooling Off mode, the refrigerator’s fan motor and lights operate normally, but the compressors do not run, so neither the refrigerator nor the freezer becomes cold.
- To activate or deactivate the Cooling Off mode, tap and hold < and > simultaneously for 6 seconds. Then, when the display blinks, press O.
When the Cooling Off mode is on, the refrigerator chime sounds, and the refrigerator shows “0” on the fridge indicator and “FF” on the freezer indicator.
SmartThings
Installation
Visit the Google Play Store, Galaxy Apps, or Apple App Store and search for “SmartThings”. Download and install the SmartThings app provided by Samsung Electronics to your smart device.
NOTE
- The supporting software version of the SmartThings app is subject to change according to the OS supporting policy the manufacturer provides. In addition, as for the SmartThings app or the functions that the app supports, the new application update policy on the existing OS version can be suspended due to usability or security reasons.
- The SmartThings app is subject to change without notice to improve usability or performance. As the mobile phone OS version is updated every year, the SmartThings is also updated continually according to the latest OS. If you have enquiries regarding the items mentioned above, please contact us on [email protected].
- For improved performance, the SmartThings app is subject to change without notice or discontinued support according to the manufacturer’s policy. In addition, further updates on the app or the function in the app may stop due to usability and security reasons, even if updates are currently supported on your OS.
- Recommended encryption systems include WPA/TKIP and WPA2/AES. Any newer or non-standard Wi-Fi authentication protocols are not supported.
- Wireless networks may be affected by the surrounding wireless communication environment.
- If your Internet service provider has registered the MAC address of your PC or modem for identification, your Samsung Smart Refrigerator may fail to connect to the Internet. If this happens, contact your Internet service provider for technical assistance.
- The firewall settings of your network system may prevent your Samsung Smart Refrigerator from accessing the Internet. Contact your Internet service provider for technical assistance. If this symptom continues, contact a local Samsung service center or retailer.
- To configure the wireless access point (AP) settings, see the user manual of the AP (router).
- Samsung Smart Refrigerators support both Wi-Fi 2.4 GHz with IEEE 802.11 b/g/n and Soft-AP protocols. (IEEE 802.11 n is recommended.)
- Unauthorized Wi-Fi wireless routers may fail to connect to applicable Samsung Smart Refrigerators.
Samsung account
You are required to register your Samsung account to use the app. If you don’t have a Samsung account, follow the app’s onscreen instructions to create a free Samsung account.
Getting started
- Turn on the device you want to connect, open the SmartThings app on your phone, and then follow the instructions below.
- If a pop-up appears saying that a new device has been found, tap ADD NOW.
- If a pop-up doesn't appear, tap the + button, and then select the device you want to connect from the list of available devices.
- If your device isn't in the list of available devices, tap Supported Devices, select the device type (Refrigerator), and then select the specific device model.
- Follow the instructions in the app to set up your device. Once setup is complete, your refrigerator will appear as a "card" on your Devices screen.
Refrigerator app
Integrated control
You can monitor and control your refrigerator at home and on the go.
- Tap the refrigerator icon on the SmartThings Dashboard or tap the Devices icon at the bottom of the Dashboard, and then tap the refrigerator "card" to open the Refrigerator page.
- Check the operation status or notifications related to your refrigerator, and then change options or settings if necessary.
NOTE Some options or settings of the refrigerator may not be available for remote control.

Maintenance
AutoFill Pitcher (applicable models only)
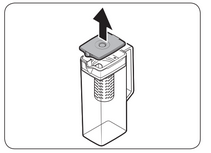
- Grasp a handle groove of the lid, and then pull up to remove.
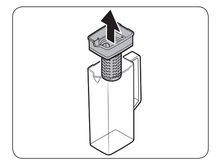
- Grasp both sides of the infuser holder, and then lift to remove.
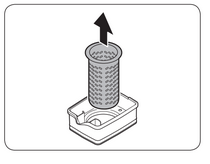
- While slightly twisting the infuser, pull it out of the sealed mouth.
- Clean the infuser with neutral agents and running water. Rinse and dry well.
- Reassemble the AutoFill Pitcher in the reverse order of disassembly.
CAUTION: The water pitcher and lid are not microwave safe and can melt or deform if exposed to heat (including hot water). Please hand wash in cool or warm water as needed.
Fridge shelves
The appearance of the shelves differs by model.
Top shelf
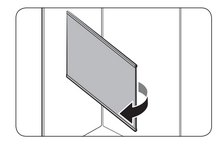
- Lift the rear side of the shelf with one hand, and then pull it out.

- Tilt the shelf vertically as shown in the figure.
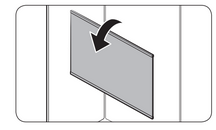
- Carefully pull out the shelf as shown in the figure.
Vegetable shelf
NOTE: You must remove the Quick Space shelf before removing the Vegetable shelf.
- Pull the shelf out.
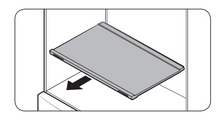
- Press the front of the shelf to lift the rear side of it.

- Hold the rear side of the shelf and tilt it vertically.
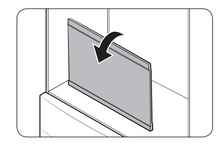
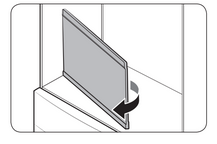
- Carefully pull out the shelf as shown in the figure.
Door bins
- To remove the door bin, hold the front sides of the bin, and then gently lift up to remove.
- To reinsert, insert the door bin slightly above its final location making sure that the back of the bin is against the door. Hold the rear of the door bin with both hands, and then press down so that it fits snugly.
CAUTION
- Do not remove a bin that is filled with food. Empty the bin beforehand.
- Use caution when opening the door if the bottom bin contains larger bottles, which may fall over.
- Do not allow children to play with the bins. Sharp corners of the bin may cause injury.
Crisper+ / Fridge Drawers
Gently lift up the front of the drawer and slide out.
- We recommend that you remove the door bins before removing the drawer. This is to prevent damage to the door bins.
- To reinsert, insert the drawer into the frame rails and then slide inward.
Cleaning
Interior and exterior
Regularly use a dry cloth to remove all foreign substances such as dust or water from the power plug terminals and contact points.
- Unplug the power cord.
- Use a moistened, soft, lint-free cloth or paper towel to clean the refrigerator’s interior and exterior.
- When done, use a dry cloth or paper towel to dry well.
- Plug in the power cord.
Dispenser nozzle (applicable models only)
- Hold the end of the dispenser nozzle (A).
- While turning the dispenser nozzle (A) left, pull it down to remove it from the dispenser.
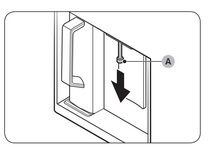
- Clean the dispenser nozzle thoroughly, and then assemble it back.
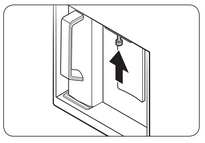
CAUTION
- Fully insert the dispenser nozzle, so it is back to its original position.
- Do not use a sponge with rough textures for cleaning the dispenser nozzle.
Troubleshooting
Temperature
Fridge/freezer does not operate. Fridge/freezer temperature is warm.
- Power cord is not plugged in properly.
Properly plug in the power cord.
- Temperature control is not set correctly.
Set the temperature lower.
- Refrigerator is located near a heat source or direct sunlight.
Keep the refrigerator away from direct sunlight or a heat source.
- Not enough clearance between refrigerator and nearby walls or cabinets.
Make sure there is a gap of at least 2.5 inches (5 cm) between the refrigerator back and sides and any nearby walls or cabinets.
- The refrigerator is overloaded. Food is blocking the refrigerator vents.
Do not overload the refrigerator. Do not allow food to block vents.
Fridge/freezer is over-cooling.
- Temperature control is not set correctly.
Set the temperature higher.
Refrigerator has odors
- Spoiled food.
Clean the refrigerator and remove any spoiled food.
- Food with strong odors.
Make sure strong smelling food is wrapped airtight.
Frost around the vents
- Food is blocking the vents.
Make sure no food blocks the refrigerator vents.
Frost on interior walls
- Door is not closed properly.
Make sure food does not block the door. Clean the door gasket.
Condensation forms on the interior walls
- If door is left open, moisture enters the refrigerator.
Remove the moisture and do not leave a door open for extended periods of time.
- Food with high moisture content.
Make sure food is wrapped airtight.
Water flow is weaker than normal.
- Water pressure is too low.
Make sure the water pressure is between 30- 125 psi (206-861 kPa)
Ice maker makes a buzzing sound.
- The ice maker function is activated, but the water supply to the refrigerator has not been connected.
Turn off the Ice Maker.
Ice maker does not make ice.
- Ice maker has just been installed.
You must wait for 12 hours for the refrigerator to make ice.
- Freezer temperature is too high.
Set the freezer temperature below 0 °F (-18 °C) or -4 °F (-20 °C) in warm ambient air.
- Ice maker is off.
Turn on the ice maker.
See other models: RF24BB6900AW RF24BB6900AC RF29BB8200QL RF29BB8200AP RF30BB6200QL
