
SafetyInstructions& Operator'sManualfor
22" WALKBEHIND
MOWERS
Models
$2265FC(7800262)
SP2265FC (7800263)
SPV22675HWFC (7800264)
J
NOTE:Specifications are correctat time ofprinting and are subjectto changewithout notice.
* Actual sustainedengine powerwill likely be lower due to operating limitations and environmentalfactors. Please refer to 'EnginePower Rating Information' for
further details.
SNAPPER.cooooo_..o_,_o_o_
Manual No. 7101687 (Rev. '-', 4/7/2008)
TP100-5386---WB-N

ThankYou for purchasingthis quality-built Snappermower.We're pleasedthat you placedyour
confidencein the Snapperbrand.Whenoperatedand maintainedaccordingto the instructions in this
manual,your Snappermowerwill provide manyyearsof dependableservice.
Thismanualcontainssafety information to makeyou awareof the hazardsand risks associatedwith the
machineand how to avoidthem. This machineis designedand intendedonlyfor finish cutting of
establishedlawnsand is not intendedfor any other purpose.It is importantthat you readand understand
theseinstructions thoroughly beforeattemptingto start or operatethis equipment.Savethese
instructions for future reference.
PRODUCT REGISTRATION
IMPORTANT:KEEPTHISINFORMATIONFORYOURPERSONALRECORDS
(CompletethefollowinginformationonyourSnapperpurchase)
Dateof Purchase
Retailer
Retailer's Phone Number
Equipment
Model Number
SerialNumber
Engine
Model .Type. Trim
It isveryimportantthatyouregister yourpurchasewithSnapperto ensurewarrantycoverage.Please
mail yourproductregistrationcardto:
Snapper at P.O. Box 1379, IVlcDonough,Georgia 30253.
Youcancontactusat ourwebsite(www.snapper.com),orif youwouldlike tospeakwith a Customer
ServiceRepresentative,call usat the SnapperCustomerRelationsCenterat 1-800-317-7833. For
fasterservicepleasehaveyourSerial NumberandModel Numberavailable.
SNAPPERis a trademarkof
Briggs& StrattonPower ProductsGroup,LLC
Jefferson,WI, USA.
Briggs& StrattonYardPower Products Group
Copyright© 2008, Briggs& StrattonCorporation
Milwaukee, WI, USA. All RightsReserved.
Table of Contents
OperatorSafety ................................................ 2
Important OperatorSafety Instructions .................................. 2
Preparation ................................................... 4
Unpacking ......................................................... 4
Handle ............................................................ 4
HandleHeight ...................................................... 5
Grass Bag ......................................................... 6
Side Discharge Deflector .............................................. 8
Mulching Tips ...................................................... 9
How to Preparethe Engine ............................................ 9
Final Preparation .................................................... 9
Operation ................................................... 10
Engine Stop Lever .................................................. 10
Front Wheel Drive System (Self-Propelled Units) .......................... 10
Stopping the Engine ................................................ 10
Starting the Engine ................................................. 11
Rules for Safeand EffectiveOperation .................................. 11
Maintenance ................................................. 12
Engine Maintenance ................................................ 12
EngineTipping .................................................... 12
Cleaningthe Mower Housing ......................................... 12
Lubrication ....................................................... 12
Adjusting the Height of Cut ........................................... 12
Removingthe Drive Belt ............................................. 13
Adjusting the Drive Cable ............................................ 14
BladeService ..................................................... 15
Removingthe Blade ............................................. 15
Sharpeningthe Blade ............................................ 15
Checkingthe Levelof Cut ......................................... 15
Preparing the Mower for Storage ...................................... 16
Troubleshooting............................................... 17
Warranty .................................................... 18
(1D
,.-z.
,.-z.
"0
(1D
,.-z.
mo
"-I
(1D
,.-z.
"-I
"-I
,.-z.
CD
.-I
.-I
(1D
(1D
,.-z.
m.
.-I
WARNING
Batteryposts, terminals and relatedaccessoriescontain
lead and lead compounds, chemicalsknown to the State of
California to cause cancer andbirth defects or other
reproductiveharm. Wash handsafter handling.
WARNING
Engineexhaust, some of its constituents, and certain
vehicle components contain or emit chemicals known to
the State of California to causecancer or other reproductive
harm.
,-I
€1D
t_
a..
,A
IMPORTANTOPERATORSAFETYINSTRUCTIONS
WARNING:This powerful cutting machine is capableof amputating handsand feet andcanthrow objects
that can cause injury and damage! Failureto comply with the following SAFETYinstructions could result in
serious injury or deathto the operator or other persons.The owner of the machine must understand these
instructions and must allow only persons who understandthese instructions to operate machine.Each
personoperating the machine must be of sound mind and body and must not be under the influence of any
substance,which might impair vision, dexterity or judgment. If you haveany questions pertaining to your
machinewhich your dealer cannot answerto your satisfaction, call or write the CustomerService
Departmentat SNAPPER,McDonough, Georgia30253. Phone:(1-800-317-7833).
Protection for Children
Tragic accidents canoccur if the operator is not alert to the
presenceof children. Children are often attractedto the
machine andthe mowing activity. Neverassumethat
children will remain whereyou last saw them.
1. KEEPchildren out of the mowing area andunder the
watchful careof a responsible adult other than the operator.
2. DONOTallow children in yard when machine is operated
andturn machine OFFif anyoneenters the area.
3. DONOTallow pre-teenagechildren to operate machine.
4. ALLOW only responsible adults & teenagerswith mature
judgment under closeadult supervision to operate machine.
5. DONOTpull mower backwards unless absolutely
necessary.LOOKand SEEbehind and down for children,
pets and hazards beforeand while backing.
6. USEEXTRACAREwhen approaching blind corners,
shrubs, trees, or other objects that may obscure vision.
SlopeOperation
1. Slopesare a major factor relatedto slip and fall acci-
dents,which can result in severe injury. All slopes require
extra caution. If you feel uneasyon a slope, DONOTmow
it.
2. Mow across slopes, neverup-and-down. Exercise
extremeCAUTIONwhen changing directions on slopes. DO
NOTmow steep slopesor other areaswhere stability or
traction is in doubt. Referto the Slope Guideat the endof
this manual.
3. Useextra carewith grass catchers or other attachments;
these affect the handling and the stability of the machine.
Preparation
1. Read,understand, and follow instructions and warnings
in this manualand on the mower, engine and attachments.
Knowthe controls and the proper useof the mower before
starting.
2. Only mature, responsible persons shall operatethe
machine and only after proper instruction.
3. Data indicatesthat operators age 60 and above,are
involved in a large percentageof mower-related injuries.
Theseoperators should evaluatetheir ability to operatethe
mower safely enough to protect themselvesand others
from serious injury.
Preparation
(ContinuedFromPreviousColumn)
4. Handlefuel with extra care. Fuelsareflammable and
vapors are explosive. Useonly an approvedfuel container.
DONOTremovefuel capor addfuel with engine running.
Add fuel outdoors only with engine stoppedand cool. Clean
spilled fuel and oil from machine. DONOTsmoke.
5. Checkthe areato be mowed and removeall objects such
as toys, wire, rocks, limbs and other objects that could
cause injury if thrown by bladeor interfere with mowing.
Also notethe location of holes, stumps, and other possible
hazards.
6. Keeppeople and pets out of the mowing area.
Immediately,STOPBlade,Stop engine and Stop mower if
anyone enters the area.
7. Checkshields, deflectors, switches, blade controls and
other safety devicesfrequently for proper operation and
location.
8. Make sureall safety decalsare clearly legible. Replaceif
damaged.
9. Protectyourself when mowing and wear safety glasses,a
dust mask, long pants, andsubstantial footwear. DONOT
mow barefooted or with sandals.
10. Know how to STOPbladeand enginequickly in
preparationfor emergencies.
11. Use extra carewhen loading or unloading the machine
into a trailer or truck.
12. Checkgrass catchercomponents frequently for signs of
wear or deterioration and replaceas neededto prevent
injury from thrown objects going through weakor torn
spots.
Safe Handlingof Gasoline
Toavoid personal injury or property damage, useextreme
care in handling gasoline. Gasolineis extremely flammable
and the vapors are explosive.
1. Extinguishall cigarettes, cigars, pipes and other sources
of ignition.
2. Use only an approvedfuel container.
3. DONOTremovefuel cap or add fuel with the engine
running. Allow the engineto cool before refueling.
4. DONOTrefuelthe machine indoors.
5. DONOTstorethe machine or fuel container inside where
there is an openflame, spark or pilot light such as on a
water heateror other appliances.
2 www.snapper.com

ImportantOperatorSafetyInstructions(Continued)
Safe Handling of Gasoline
(ContinuedFromPreviousPage)
6. DONOTfill fuel containers inside a vehicle or on a truck
or trailer bed with aplastic liner.Always placethe contain-
ers on the ground away from thevehicle beforefilling.
7. Removegas-powered equipmentfrom the vehicle or
trailer and refuel it on the ground. Ifthis is not possible,
then refuel equipment using a portable container,rather
than a gasolinedispenser nozzle.
8. DONOTstart gaspowered equipment in enclosedvehi-
cles or trailers.
9. Keepthe nozzle incontact with the rim of the fuel tank or
container opening at all times until fueling is complete. DO
NOTusea nozzlelock-open device
10. If fuel is spilled on clothing, changeclothing
immediately.
11. DONOToverfill a fuel tank. Replacefuel capand tight-
en securely.
Operation
1. DONOTput handsor feet near or under rotating parts.
Keepclearof discharge areawhile engine is running.
2. STOPengine when crossing gravel drives, walks, or
roads, and under anyconditions where thrown objects
might be a hazard.
3. Mow only in daylight or good artificial light.
4. DONOToperatemower while under the influence of
alcohol or drugs.
5. After striking a foreign object or if mower vibrates
abnormally,STOPthe engine, disconnect and secure spark
plug wire. Inspectthe mower for any damageand repair
the damagebeforestarting.
6. DONOTmow near drop offs, ditches or embankments.
Operatorcould lose footing or balance.
7. STAYALERTfor holesand other hidden hazards.Tall
grass can hide obstacles. Keepawayfrom ditches,
washouts, culverts, fencesand protruding objects.
8. DONOTmow on wet grass. Always be sure of your
footing. Keepa firm hold on the handleand walk, never
run. Slipping could causeinjury.
9. ALWAYSstay behind handlewhen engine (motor) is
running.
10. DONOTleavethe machinewith the enginerunning.
STOPBLADEand STOPENGINEbefore leavingthe opera-
tors position for any reason.
11. Beforecleaning, repairing or inspecting makecertain
engine,blade andall moving parts haveSTOPPED.
Disconnectand securespark plug wire away from plugto
prevent accidentalstarting.
12. STOPengine and wait until the blade comesto com-
pleteSTOPbefore removing grass bag and/or clearing
grass.
Operation
(ContinuedFromPreviousColumn)
13. DONOToperatemower without the entire grass catch-
er, or guards in placedischarge guard, rearguard or other
safety devicesin placeand working. DONOTpoint dis-
charge at people,passing cars, windows or doors.
14. DONOTdischarge material against a wall or obstruc-
tion. Material may ricochet backtowards the operator.
15. Slow down beforeturning.
16. Watchout for traffic when nearor crossing roadways.
17. DONOToperateengine in enclosedareas. Engine
exhaust gasescontain carbon monoxide, a deadly poison.
18. Onlyuse accessoriesapprovedby the manufacturer.
See manufacturer'sinstructions for proper operation and
installation of accessories.
MaintenanceandStorage
1. DONOTstore mower or fuel container inside where
fumes may reachan open flame, sparkor pilot light such as
in awater heater,furnace, clothes dryer or other gasappli-
ance. Allow engine to cool before storing machinein an
enclosure. Store fuel container out of reachof children in a
well ventilated, unoccupied building.
2. Keepmower and engine free of grass, leavesor excess
greaseto reducefire hazardand engine overheating.
3. Whendraining fuel tank, drain fuel into an approved
container outdoors and away from openflame.
4. Keepall bolts, especially bladebolts, nuts and screws
properly tight. Checkthat all cotter pins are in proper
position.
5. Alwaysprovide adequateventilation when running
engine. Engineexhaust gasescontain carbon monoxide, a
deadly poison.
6. Serviceengine and makeadjustments only when engine
is stopped. Removedspark plug wire from spark plug and
secure wire awayfrom spark plugto prevent accidental
starting.
7. DONOTchangeengine governor speedsettings or
overspeed engine.
8. Checkgrass bag assemblyfrequently for wear or
deterioration to avoidthrown objects andexposure to
moving parts. Replacewith new bag if loose seamsor tears
are evident. Replaceslider or bagadapterif brokenor
cracked.
9. Mower bladesare sharp andcan cut. Wrap the bladesor
wear heavy leathergloves and useCAUTIONwhen handling
them.
10. DONOTtest for spark by grounding spark plug next to
spark plug hole; spark plug could ignite gas exiting engine.
11. Havemachine serviced by an authorizedSNAPPER
dealer at least once ayear and havethe dealerinstall any
newsafety devices.
12. Use only genuine SNAPPERreplacementparts to
assure that original standards are maintained.
11D
,,,,,,i
Preparation
,w
0,3
=,.,.
WARNING:Beforedoinganyassemblyor
maintenancetothe mower,removethe wire
from the sparkplug.
NOTE.In this instruction book, left and right describe the
location of a part with the operator standing behind the
handle.
Unpacking
The mower was fully assembledatthe factory.When the
mower was put in the carton, the handlewas put in the
storage position. Toput the handle inthe operating position,
follow the steps below.
Handle
1. Removethe mower from the carton.
2. Removeall packing material from the mower and the
handle.
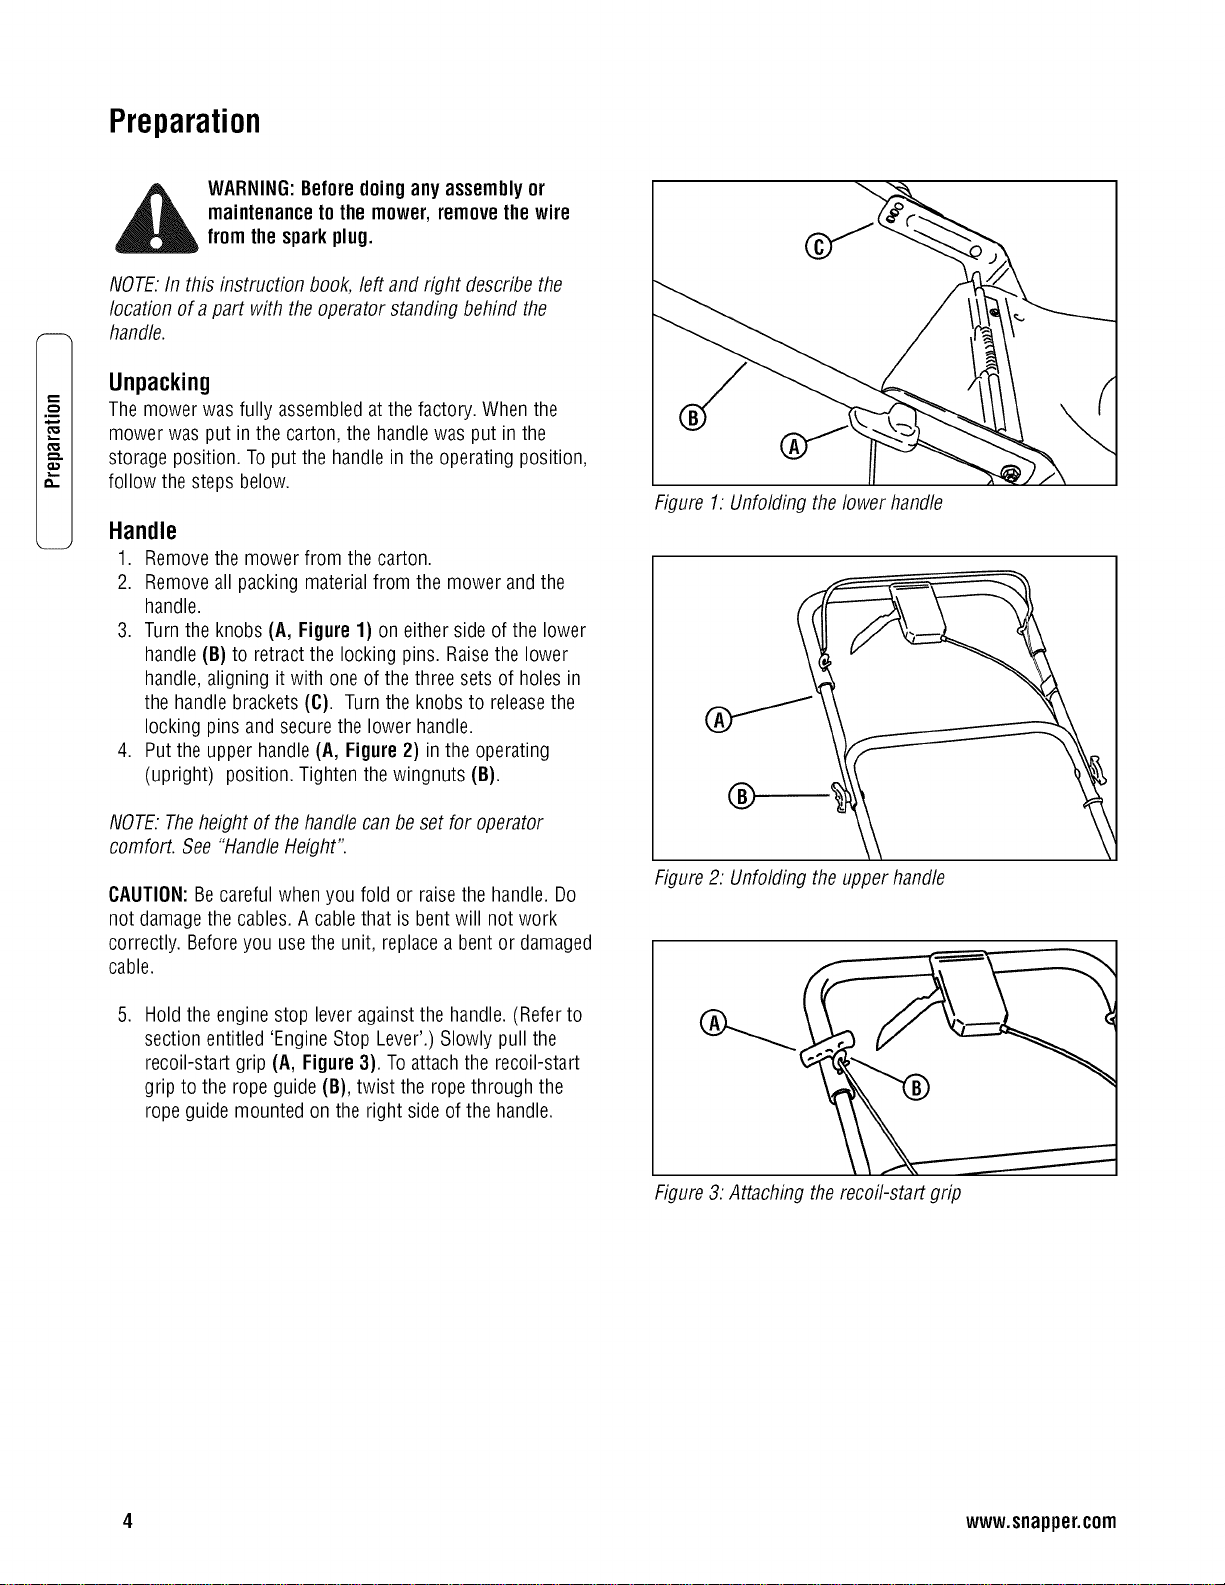
3. Turnthe knobs (A, Figure 1) on either sideof the lower
handle (B) to retractthe locking pins. Raisethe lower
handle,aligning it with oneof the three sets of holes in
the handle brackets (C). Turnthe knobs to releasethe
locking pins and securethe lower handle.
4. Put the upper handle(A, Figure 2) inthe operating
(upright) position. Tightenthe wingnuts (B).
NOTE.Theheight of the handle canbe set for operator
comfort. See "HandleHeight".
CAUTION:Becareful whenyou fold or raisethe handle.Do
not damagethe cables.A cablethat is bentwill not work
correctly. Beforeyou usethe unit, replacea bent or damaged
cable.
,
Hold the engine stop lever againstthe handle.(Refer to
section entitled 'EngineStop Lever'.) Slowly pull the
recoil-start grip (A, Figure3). Toattach the recoil-start
grip to the rope guide (B), twist the rope through the
rope guide mounted on the right sideof the handle.
Figure 1: Unfolding the lower handle
Figure2: Unfolding the upper handle
Figure3: Attaching the recoil-start grip
4 www.snapper.com
Preparation(Continued)
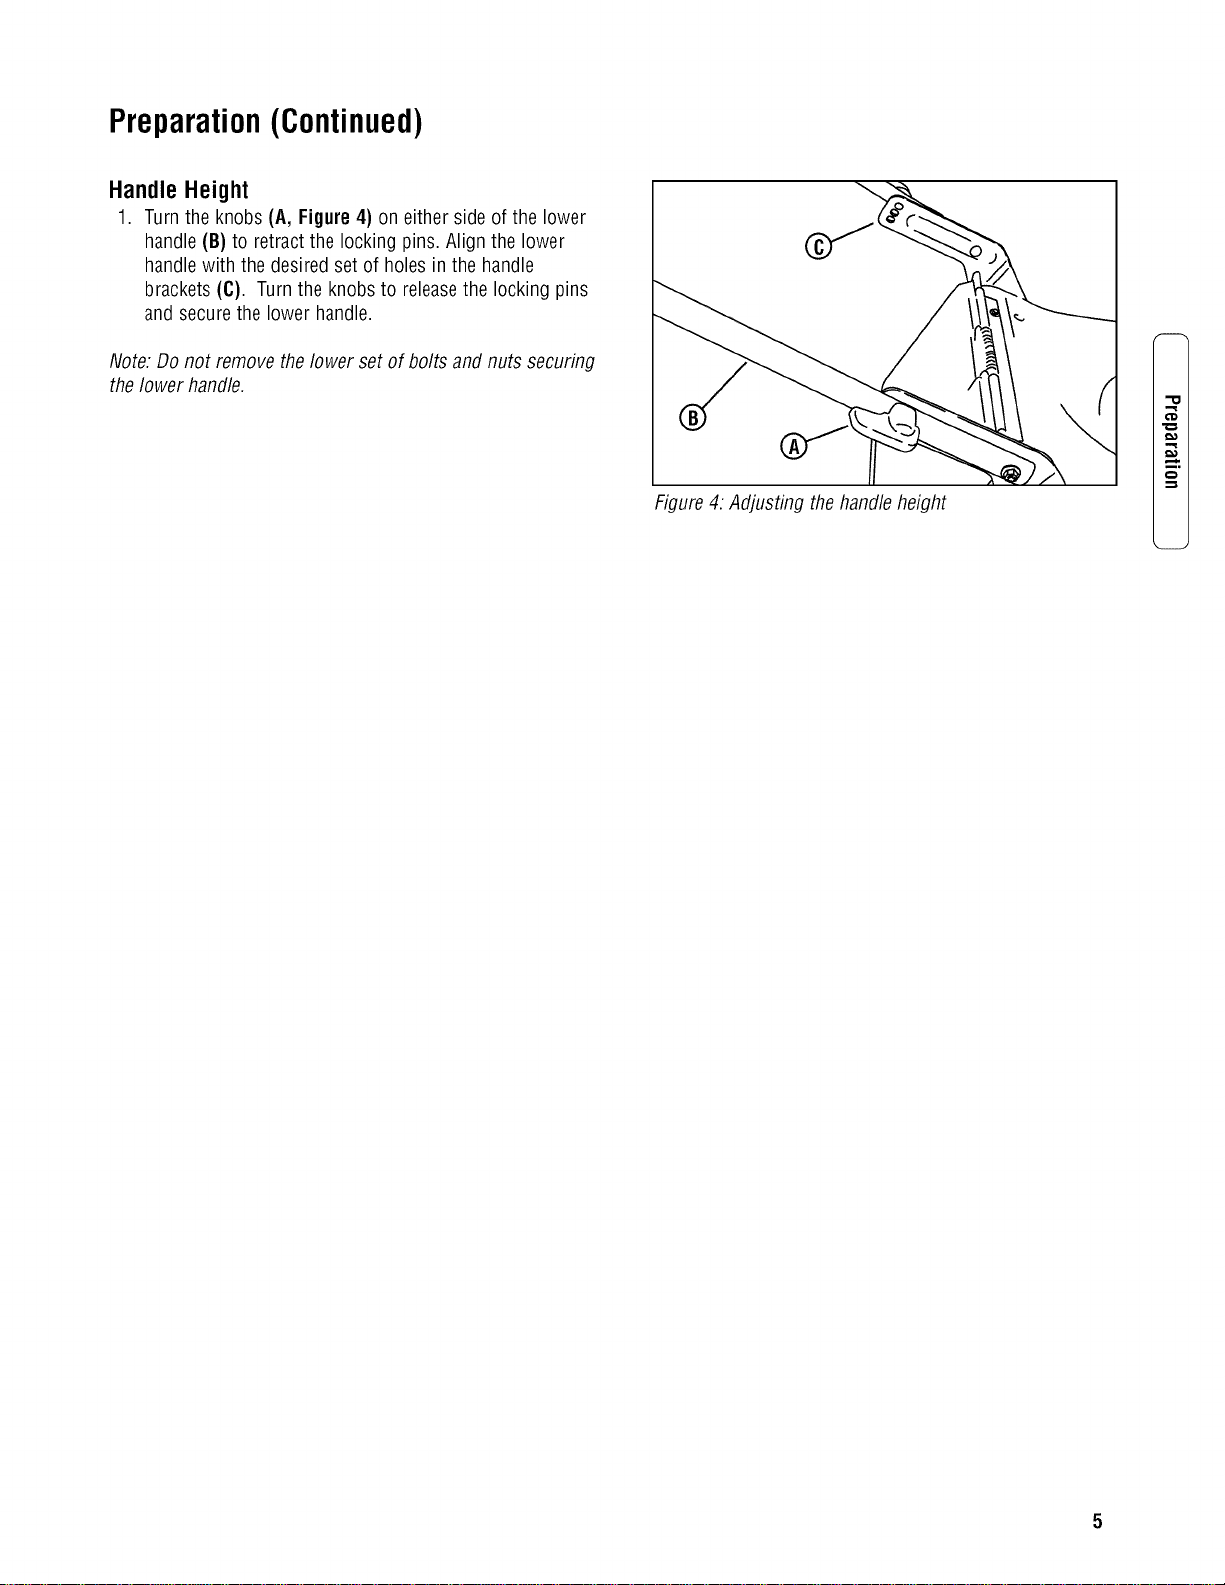
Handle Height
1. Turnthe knobs (A, Figure4) on either sideof the lower
handle (B) to retractthe locking pins. Align the lower
handle with the desired set of holes in the handle
brackets (C). Turnthe knobs to releasethe locking pins
and secure the lower handle.
Note. Do not remove thelower set of bolts and nuts securing
the lower handle.
Figure4: Adjusting the handle height
"0
€'D
mo
€_

Preparation(Continued)
Assemblingthe GrassBag
Note: On some models, the side mounted discharge deflector
is temporarily attached (for shipping purposes) to the rear of
the mower. Beforeassembly of thegrass bag, remove the
side mounted discharge deflector.
,w
=,,.
0,.
.
Slide the frame assembly (A, Figure5) into the grass
bag (B).
Figure5: Installing the frame assembly
,
.
Make surethe handle (A, Figure 6) is on the outside of
the grass bag.
First, attachthe clips (B, Figure 6) to the sideof the
frame assembly (C). Next, attachthe clips to the top and
bottom of the frame assembly.
Figure6: Installing the bag clips
6 www.snapper.com
Preparation(Continued)
Mounting the Grass Bag
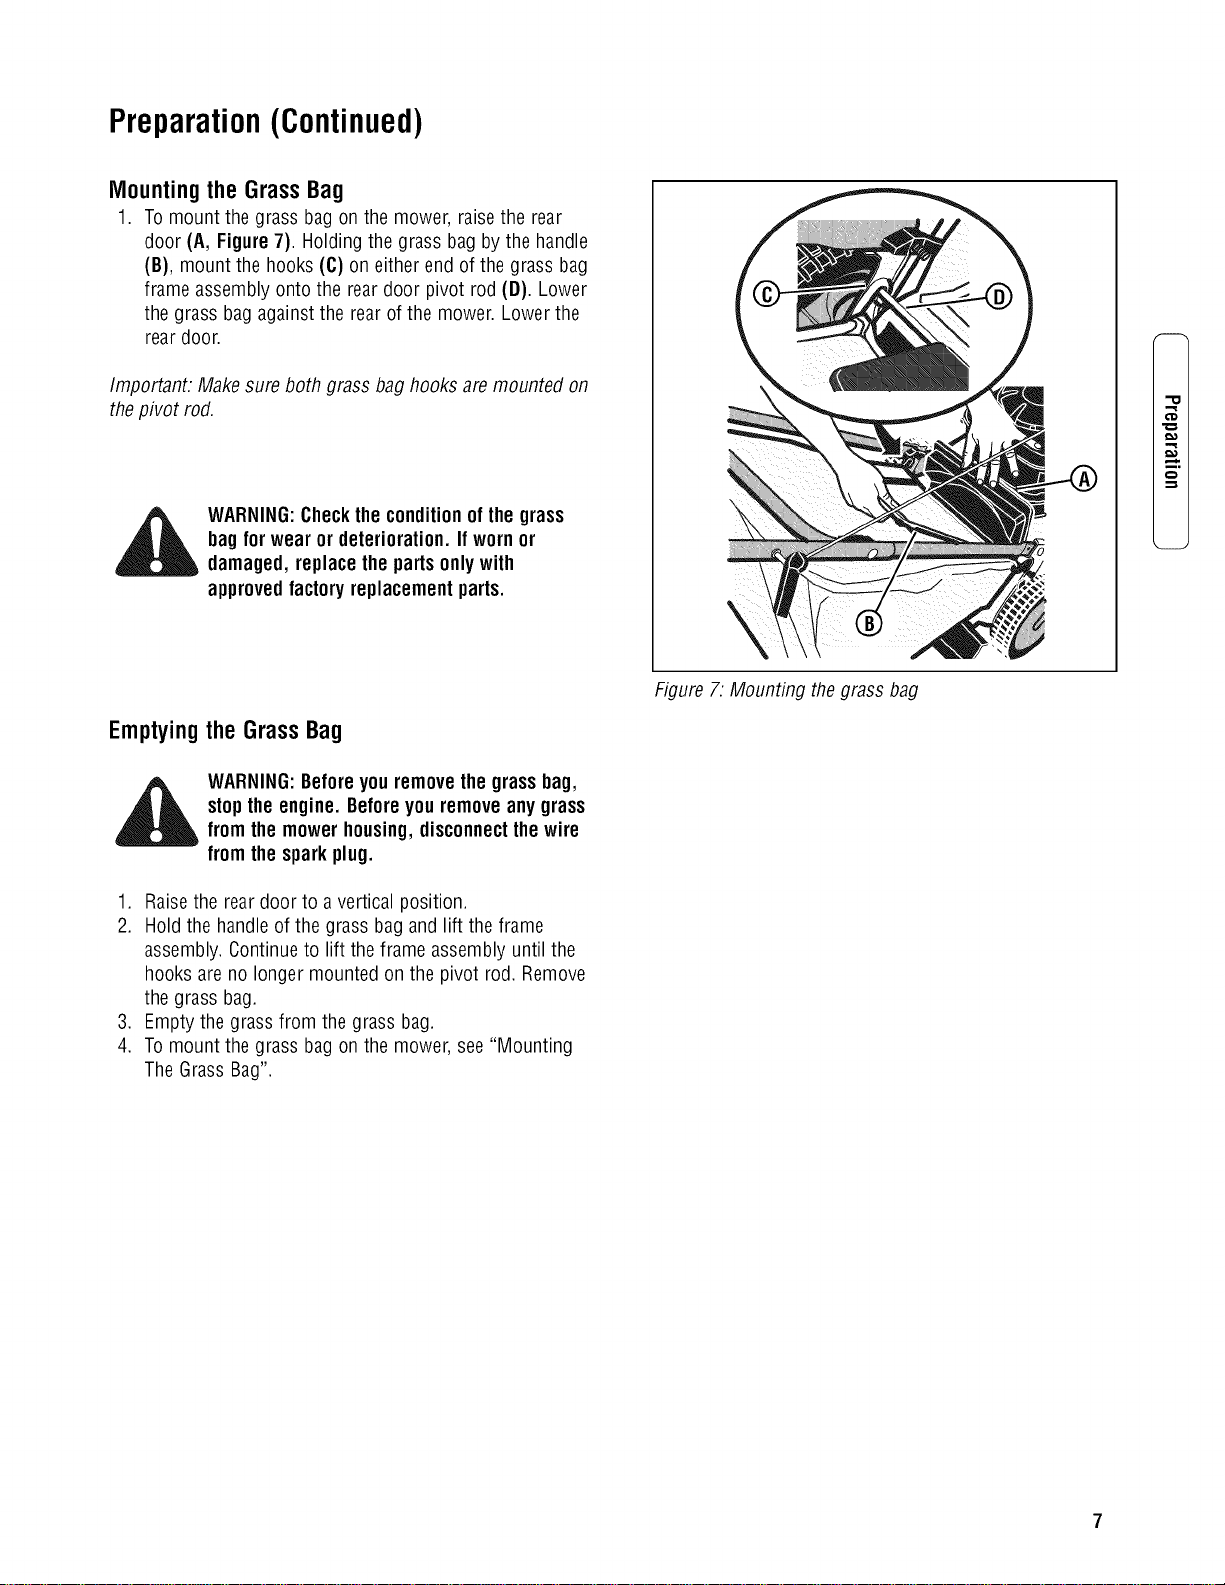
1. Tomount the grass bag onthe mower, raisethe rear
door (A, Figure7). Holding the grass bagby the handle
(B), mount the hooks (C) on either end of the grass bag
frame assembly onto the reardoor pivot rod (D). Lower
the grass bag againstthe rear of the mower. Lowerthe
rear door.
Important. Makesure both grass baghooks are mounted on
the pivot rod.
WARNING:Checkthe conditionof thegrass
bagfor wear or deterioration.If wornor
damaged,replacethe parts onlywith
approvedfactoryreplacementparts.
,,=z.
m.
,-I
Emptying the Grass Bag
WARNING:Beforeyou removethe grassbag,
stopthe engine. Beforeyou removeanygrass
from the mower housing,disconnectthewire
from the sparkplug.
1. Raisethe rear door to a vertical position.
2. Hold the handle of the grass bag and lift the frame
assembly.Continueto lift the frameassembly until the
hooks are no longer mounted on the pivot rod. Remove
the grass bag.
3. Empty the grass from the grass bag.
4. Tomount the grass bag on the mower,see "Mounting
The GrassBag".
Figure7: Mounting thegrass bag
Preparation(Continued)
,w
O=
O_
=,.,.
Attachingthe SideMountedDischargeDeflector
WARNING:Toprevent the enginefrom
starting,disconnectthe wire from the
sparkplug.
For shipping purposes, the side deflector was not installed.
Locate the side deflector and install as follows.
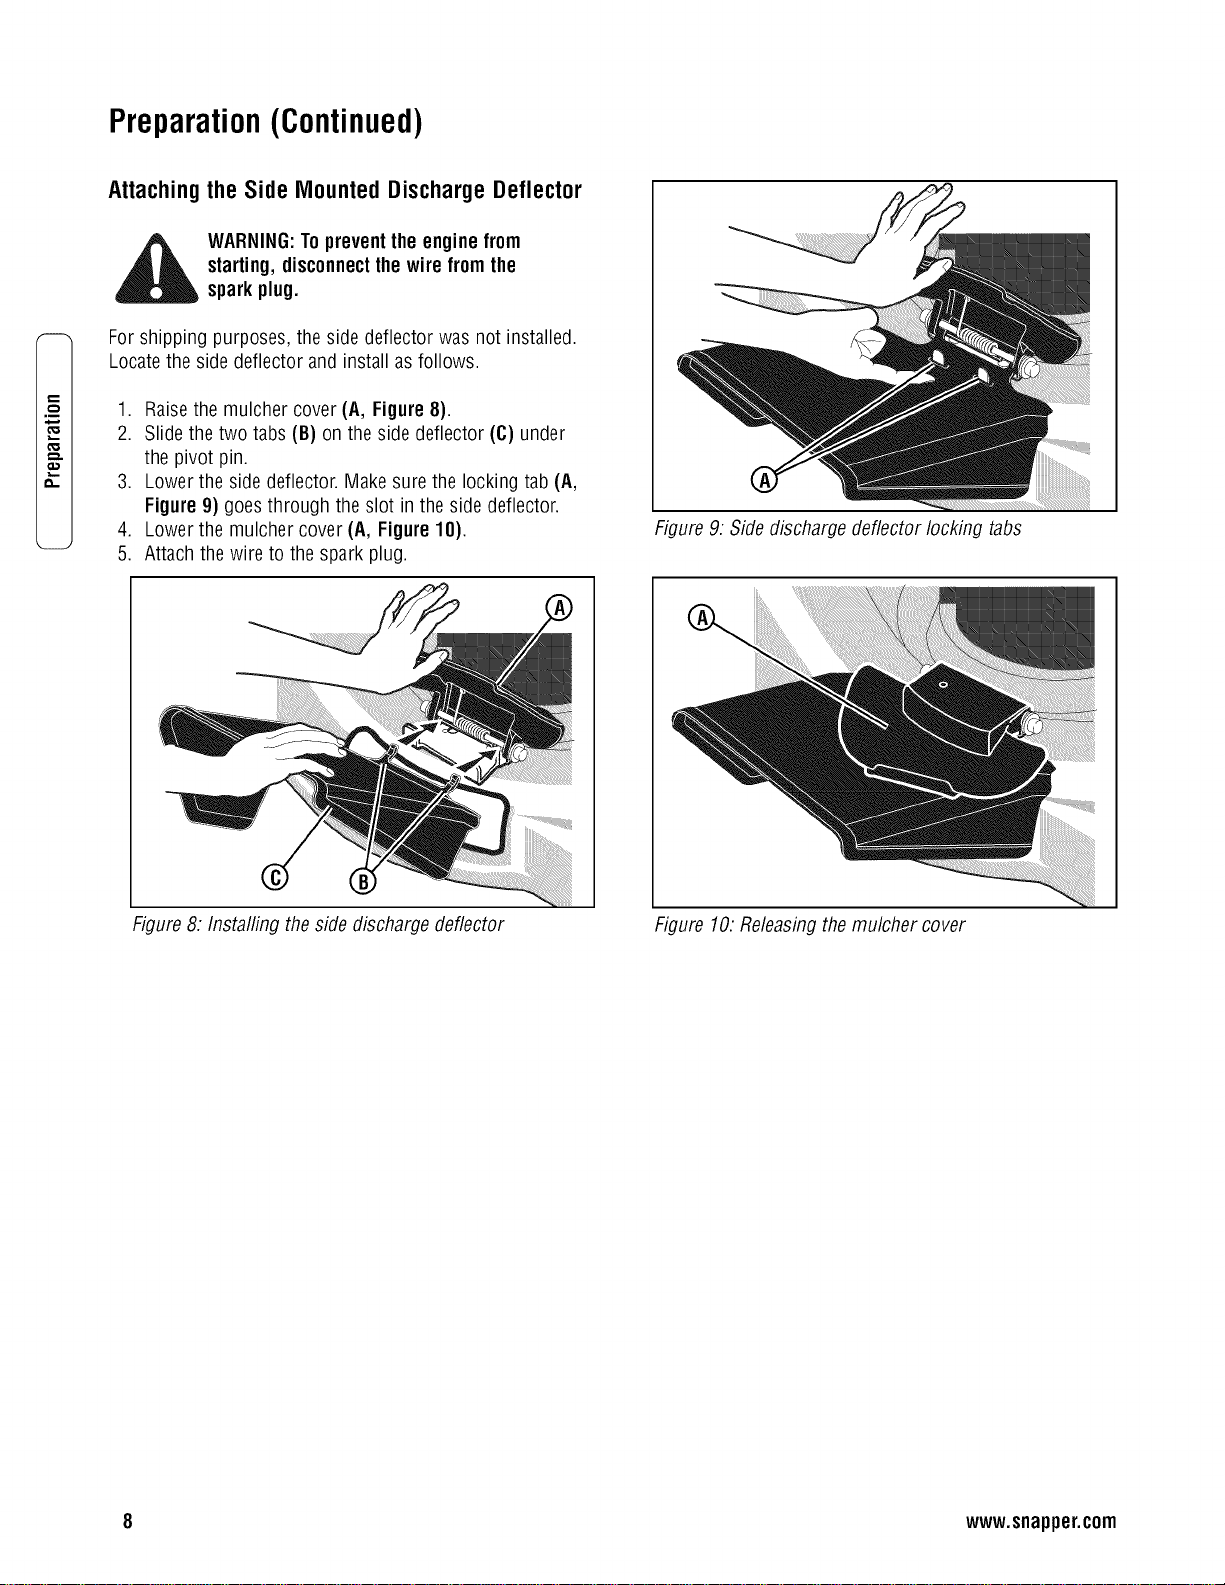
1. Raisethe mulcher cover (A, Figure8).
2. Slide the two tabs (B) on the side deflector (C) under
the pivot pin.
3. Lower the side deflector. Make sure the locking tab (A,
Figure 9) goesthrough the slot inthe side deflector.
4. Lower the mulcher cover (A, Figure 10).
5. Attach thewire to the spark plug.
Figure9: Side dischargedeflector locking tabs
Figure8: Installing the side discharge deflector
Figure 10.Releasingthe mulcher cover
8 www.snapper.com
Preparation(Continued)
Mulching Tips
Mulching finely cuts the grass so that the grass can be easily
recycled. Becausethe nutrients are returnedto the soil, the
lawn will need less fertilizer. Tocorrectly mulchthe lawn,
follow the tips below.
• Thegrass must be dry. If the grass is wet, it will be
difficult to cut and cause heavyclumps of grass.
• Thegrass must not be too tall. The maximum height to
effectively cut is 4 1/2 inches.Set the height adjusters
so that only the top third of the grass is cut.
• If the grass is more than 4 1/2 inches high, two
mowings will be necessary.Forthe first mowing, set the
height adjusters in the highest position. Then, lower the
height adjusters for the second mowing.
• Keepa sharp edge on the blade.A bladethat is not
sharp will causethe ends of the grass to become brown.
• Cleanthe undersideof the mower housing. Grassand
other debris cankeepthe mower from working
correctly.
If the quality of cut is marginal, try the following:
• Set the height adjusters at ahigher cutting height.
• Cutthe grass more frequently.
• Operatethe mower at a slower ground speed.
• Overlapthe cutting swaths instead of cutting a full
swath with each pass.
• Mow across the marginal areasa second time.
m.
Preparing the Engine
ENGINEDOESNOTCONTAINOIL ORGASOLINE
Using the bottle of oil supplied in the carton, fill the engine
with the proper amount of oil. Seethe enginemanufacturer's
instructions for the type of gasoline and oil to use. Before
you usethe unit, readthe information on safety,operation,
maintenance,and storage.
WARNING:Followthe enginemanufacturer's
instructionsfor thetype ofgasolineand oilto
use. Alwaysusea safetygasolinecontainer.
Donot smokewhen addinggasolinetothe
engine.When insidean enclosure,do not
fill with gasoline. Beforeyou add gasoline,
stopthe engine. Letthe enginecoolfor
severalminutes.
Note: Theoperation of a new engine will sometimes result in
a slight amount of smoke. Thissmoke is caused by paint or
oil on or around the muffler This is normal and only
expectedduring initial operation.
IMPORTANT:This unit is equippedwith aninternal
combustion engine and must not be usedon or nearany
unimproved forest-covered, brush-coveredor grass-covered
and unless the engine's exhaust system is equipped with a
spark arrester meeting applicable localor state laws (if any).
If a spark attester is used, it must be maintained in effective
working order by the operator.
Inthe Stateof California the aboveis required by law
(Section 4442 of the California Public ResourcesCode).
Otherstates may havesimilar laws. Federallawsapply on
federal lands. Seean AuthorizedService Centerfor a spark
attester for the muffler.
Note.Actual sustained enginepower will fikelybe lower due
to operating fimitations and environmental factors.
Final Preparation
Beforeyou usethe mower, checkthe assembly of the
wheels,the handle,and the controls. Makesure all the
fasteners are tight. Make surethe throttle control (if
equipped) and the engine stop leverwork correctly.
If the mower is equippedwith height adjusters, makesure
the height adjusters function properly. Beforestarting the
engine, makesure eachheight adjuster is set atthe desired
height. See"Adjusting TheHeight Of Cut" in the Maintenance
sections.
Operation
,w
O=
=..,
€=.
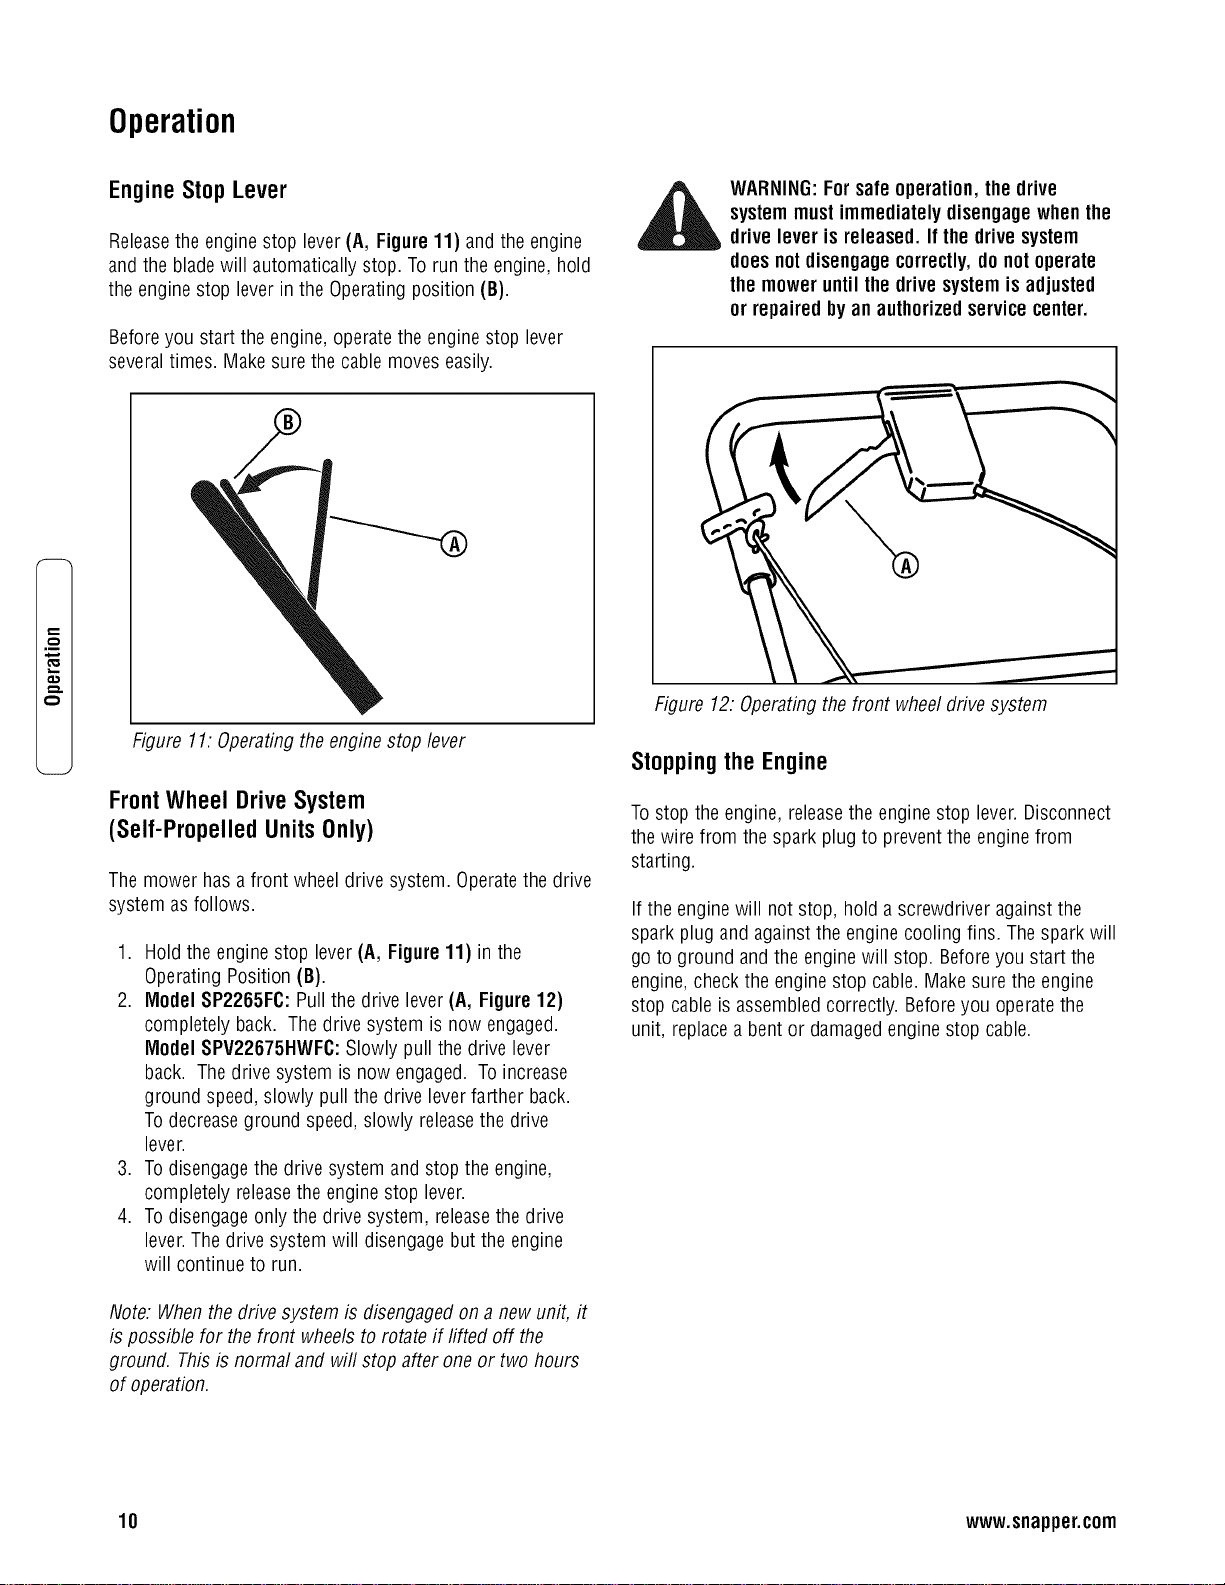
EngineStopLever
Releasethe engine stop lever (A, Figure11) and the engine
and the blade will automatically stop. To run the engine, hold
the engine stop lever in the Operatingposition (B).
Beforeyou start the engine,operatethe engine stop lever
severaltimes. Makesure the cable moveseasily.
Figure 11:Operatingthe engine stop lever
FrontWheel DriveSystem
(Self-PropelledUnitsOnly)
The mower has a front wheel drive system. Operatethe drive
system asfollows.
1. Hold the engine stop lever (A, Figure 11) inthe
Operating Position (B).
2. Model SP2265FC:Pull the drive lever(A, Figure12)
completely back. Thedrive system is now engaged.
Model SPV22675HWFC:Slowly pull the drive lever
back. Thedrive system is now engaged. Toincrease
ground speed, slowly pull the drive leverfarther back.
Todecreaseground speed,slowly releasethe drive
lever.
3. Todisengagethe drive system and stop the engine,
completely releasethe engine stop lever.
4. Todisengageonly the drive system, releasethe drive
lever.The drive system will disengagebut the engine
will continue to run.
Note: Whenthe drivesystem is disengagedon a new unit, it
is possible for the front wheelsto rotate if lifted off the
ground. Thisis normal and will stop after one or two hours
of operation.
_[ ARNING:Forsafe operation,the drive
systemmustimmediately disengagewhenthe
drivelever is released. If the drivesystem
doesnotdisengagecorrectly,donot operate
the mower until thedrive systemis adjusted
or repairedbyan authorizedservice center.
Figure 12. Operatingthe front wheel drivesystem
Stoppingthe Engine
Tostop the engine, releasethe engine stop lever.Disconnect
the wire from the spark plug to prevent the engine from
starting.
If the engine will not stop, hold a screwdriver against the
spark plug and againstthe enginecooling fins. Thespark will
go to ground and the enginewill stop. Beforeyou start the
engine,check the engine stop cable.Makesure the engine
stop cable is assembledcorrectly. Beforeyou operatethe
unit, replacea bentor damagedengine stop cable.
10 www.snapper.com
Operation (Continued)
Startingthe Engine
WARNING:The bladewill rotate
when the engineruns.
IMPORTANT:Beforeyou start the engine,operatethe engine
stop lever severaltimes. Make sure the enginestop cable
moves freely.
Note: Theengine design doesnot include a throttle control
or an enginespeedadjustment. Theengine is set at thebest
speed for cutting grass, bagging grass, and for extended
engine life.
1. Checkthe oil.
2. Fill the fuel tank with regular unleadedgasoline. Make
sure the gasoline is clean. Leadedgasolinewill increase
deposits and shorten the life of the valves.
Note: Do not usegasohol or methanol Donot usepremium
unleadedgasoline.
WARNING:Alwaysusea safetygasoline
container.Donot smokewhenaddinggasoline
to thefuel tank. When insidean enclosure,do
notadd gasoline. Beforeyou addgasoline,
stopthe engine and letthe engine coolfor
severalminutes.
3. Make sure the spark plugwire is connectedto the spark
plug.
4. Self-Propelled Models Only- Makesure the drive lever
is in the disengagedposition.
WARNING:Toprevent an accident, make sure
the drive lever is in the DISENGAGEDposition.
Whenthe drive lever is in the ENGAGED
position,donot starttheengine.
.
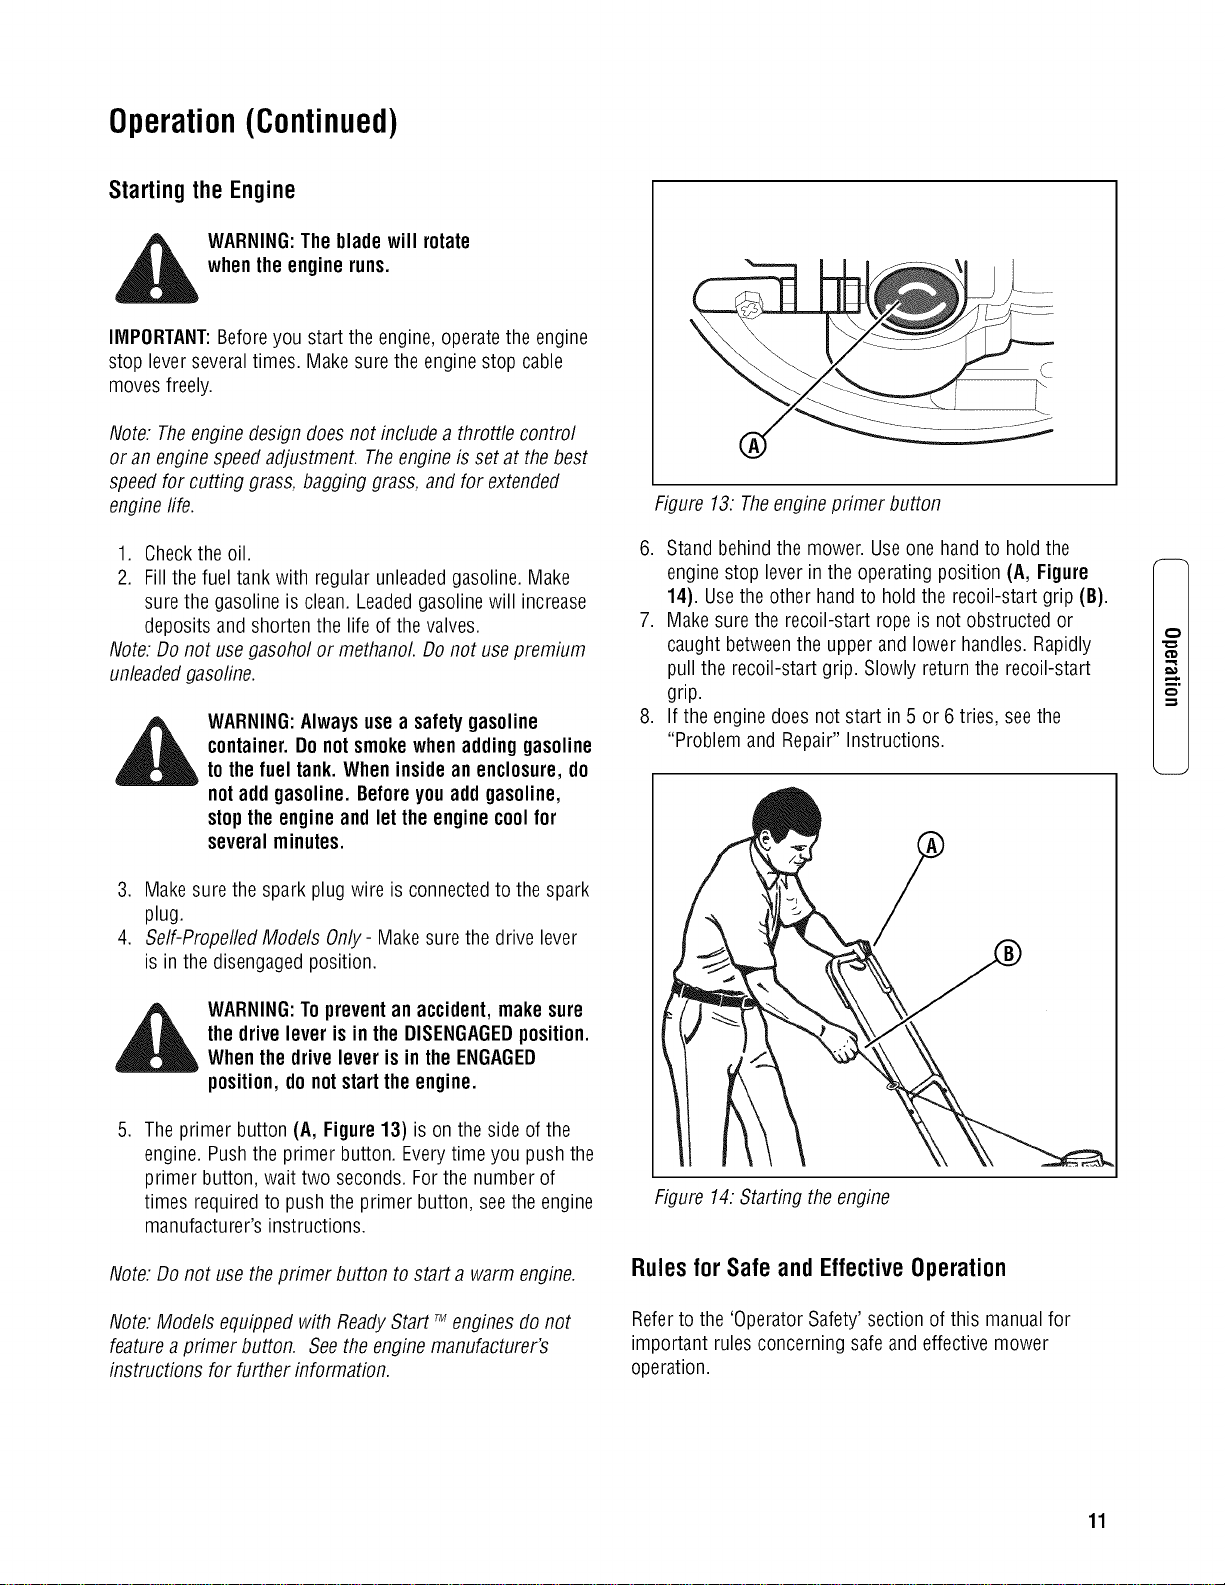
The primer button (A, Figure13) is on the side of the
engine. Pushthe primer button. Everytime you pushthe
primer button, wait two seconds. Forthe number of
times required to pushthe primer button, seethe engine
manufacturer's instructions.
Note. Do not usetheprimer button to start a warm engine.
Note. Models equipped with ReadyStart _ enginesdo not
feature a primer button. Seethe engine manufacturer's
instructions for further information.
Figure 13: Theengine primer button
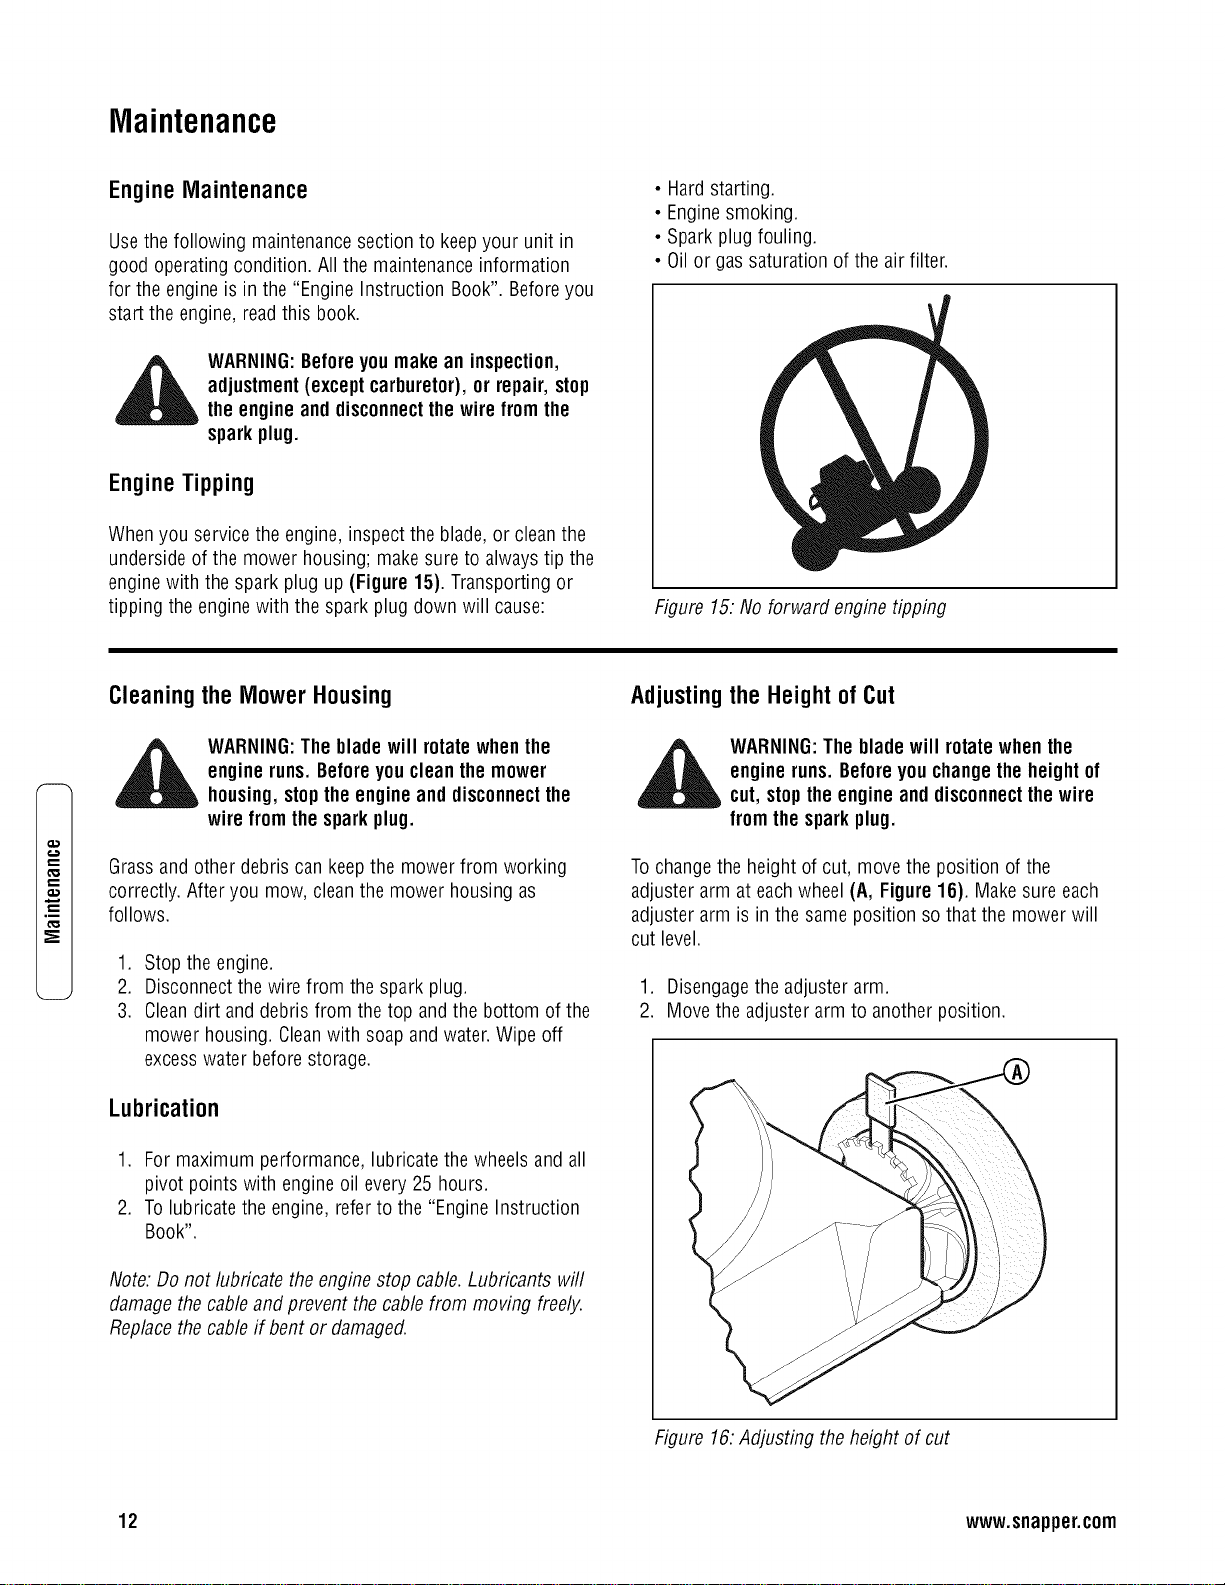
6. Stand behindthe mower. Useone hand to hold the
engine stop lever in the operating position (A, Figure
14). Usethe other hand to hold the recoil-start grip (B).
7. Makesure the recoil-start rope is not obstructed or
caught betweenthe upper and lower handles. Rapidly
pull the recoil-start grip. Slowly return the recoil-start
grip.
8. If the enginedoes not start in 5 or 6 tries, seethe
"Problem and Repair" Instructions.
Figure 14.Starting the engine
Rules for Safe and Effective Operation
Referto the 'OperatorSafety'section of this manualfor
important rulesconcerning safe and effective mower
operation.
m.
,-z
11
Maintenance
EngineMaintenance
Use thefollowing maintenancesection to keepyour unit in
good operating condition. All the maintenanceinformation
for the engine is in the "Engine Instruction Book". Beforeyou
start the engine,read this book.
WARNING:Beforeyou make an inspection,
adjustment(exceptcarburetor),or repair,stop
the engine and disconnectthewire fromthe
sparkplug.
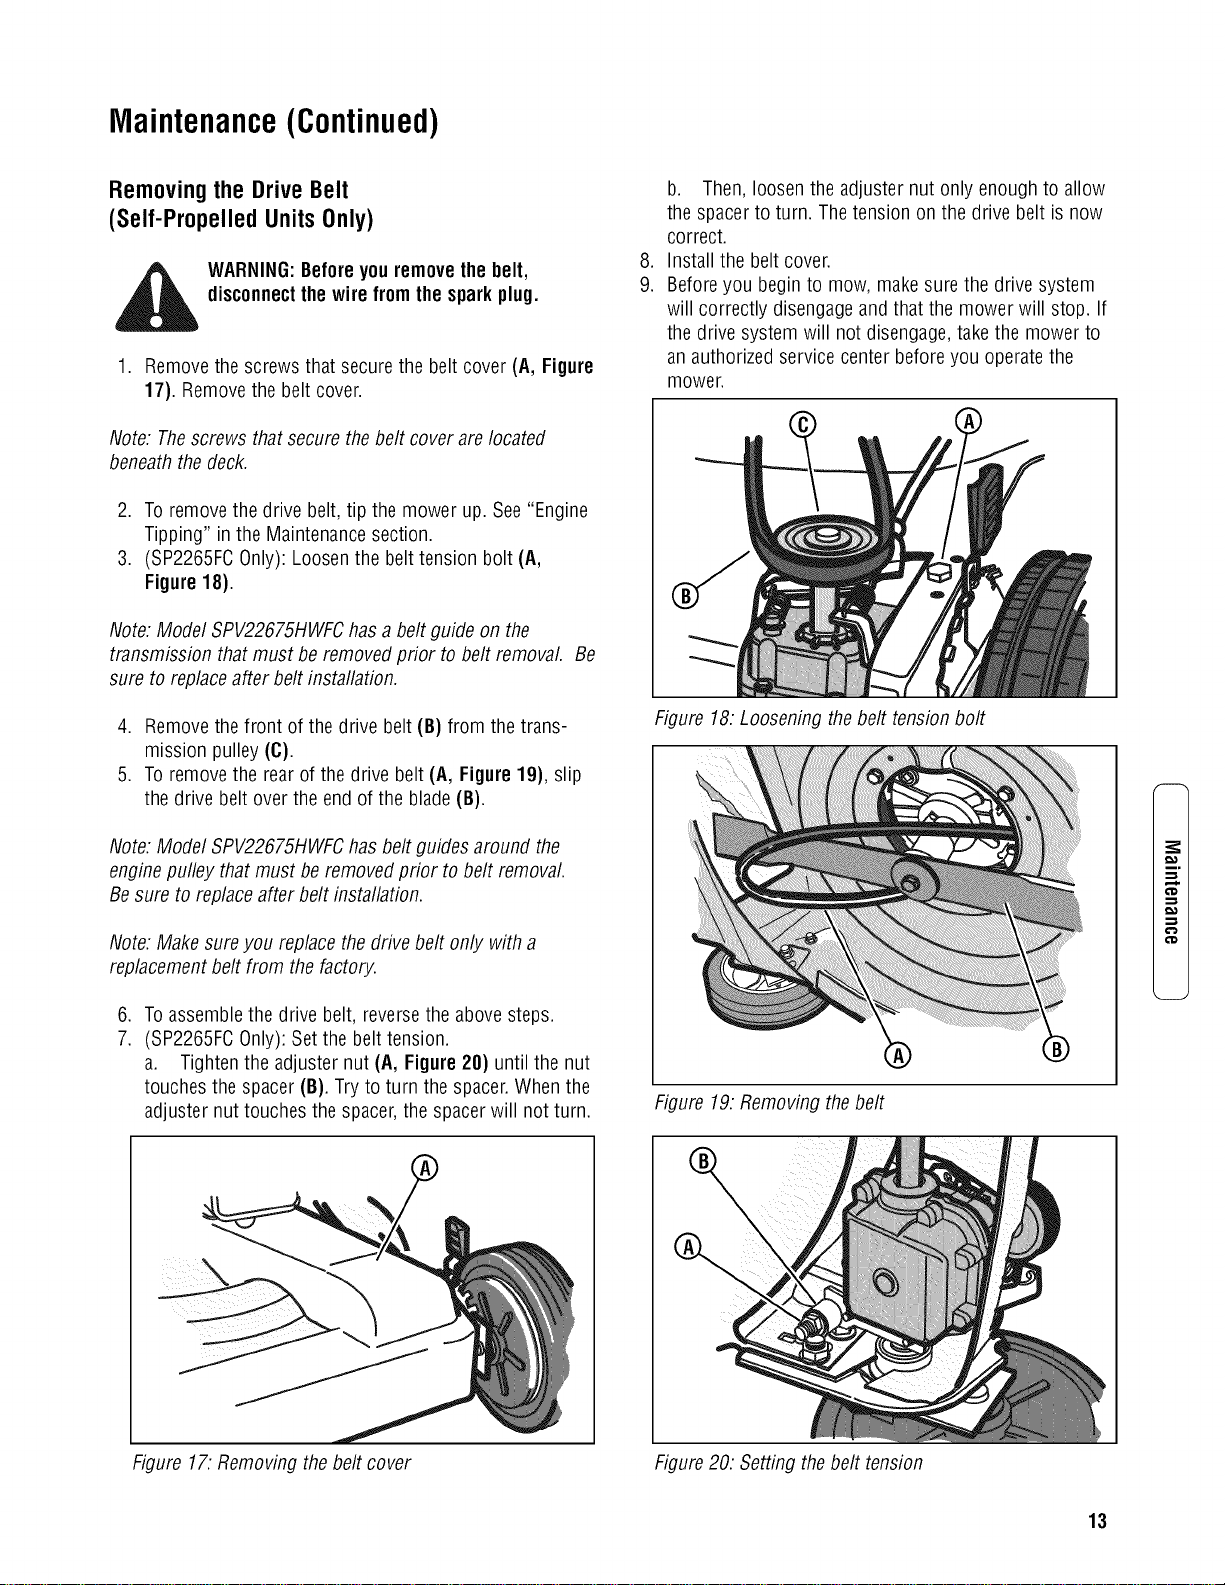
Engine Tipping
Whenyou servicethe engine, inspectthe blade,or cleanthe
underside of the mower housing; make sure to alwaystip the
engine with the spark plug up (Figure 15}. Transporting or
tipping the enginewith the spark plug down will cause:
• Hardstarting.
• Enginesmoking.
• Spark plugfouling.
• Oilor gas saturation of the air filter.
Figure 15.No forward enginetipping
.m
Cleaningthe MowerHousing
WARNING:The blade will rotate whenthe
engineruns. Beforeyouclean the mower
housing,stoptheengine and disconnectthe
wire fromthe sparkplug.
Grassand other debris can keepthe mower from working
correctly. After you mow, cleanthe mower housing as
follows.
1. Stop the engine.
2. Disconnectthe wire from the spark plug.
3. Cleandirt and debris from the top and the bottom of the
mower housing. Cleanwith soapand water.Wipe off
excesswater before storage.
Lubrication
Adjusting the Height of Cut
_i ARNING:The blade will rotatewhen the
engineruns. Beforeyou changetheheight of
cut, stoptheengine and disconnectthewire
from the sparkplug.
Tochangethe height of cut, move the position of the
adjuster arm at eachwheel (A, Figure 16). Makesure each
adjuster arm is in the same position so that the mower will
cut level.
1. Disengagethe adjusterarm.
2. Movethe adjuster arm to anotherposition.
1. For maximum performance, lubricate thewheels and all
pivot points with engine oil every 25 hours.
2. Tolubricate the engine, referto the "EngineInstruction
Book".
Note. Do not lubricate the engine stop cable. Lubricants will
damagethe cableand prevent the cablefrom moving freely.
Replacethe cableif bent or damaged.
Figure 16:Adjusting the height of cut
12 www.snapper.com
Maintenance(Continued)
Removingthe DriveBelt
(Self-PropelledUnitsOnly)
WARNING:Beforeyou removethe belt,
disconnectthe wire from thesparkplug.
1. Removethe screws that secure the belt cover (A, Figure
17). Removethe belt cover.
Note. Thescrews that securethe belt cover are located
beneaththe deck.
2. Toremove the drive belt, tip the mower up. See"Engine
Tipping" in the Maintenancesection.
3. (SP2265FC0nly): Loosenthe belt tension bolt (A,
Figure18).
Note. Model SPV22675HWFChasa belt guide on the
transmission that must be removedprior to belt removal. Be
sure to replaceafter belt installation.
4. Removethe front of the drive belt(B) from the trans-
mission pulley (C).
5. Toremove the rear of the drive belt (A, Figure 19), slip
the drive belt over the end of the blade (B).
Note. Model SPV22675HWFChas beltguides around the
engine pufley that must be removedprior to belt removal.
Be sure to replaceafter belt installation.
Note. Make sureyou replacethe drive belt only with a
replacementbelt from the factory.
,
7.
Toassemblethe drive belt, reversethe abovesteps.
(SP2265FC0nly): Set the belt tension.
a. Tighten the adjuster nut (A, Figure 20) until the nut
touches the spacer (B). Try to turn the spacer.Whenthe
adjuster nut touches the spacer,the spacer will not turn.
,
9.
b. Then, loosenthe adjuster nut only enough to allow
the spacer to turn. The tension on the drive belt is now
correct.
Install the belt cover.
Beforeyou begin to mow, make surethe drive system
will correctly disengageand that the mower will stop. If
the drive system will not disengage,takethe mower to
an authorized service center beforeyou operatethe
mower.
Figure 18.Loosening the belt tension bolt
Figure 19.Removing the belt
Figure 17.Removing the belt cover Figure20. Setting thebelt tension
13
Maintenance(Continued)
Adjustingthe DriveCable
(Self-PropelledUnitsOnly)
WARNING:Beforeyou adjustthe drivecable,
release theengine stoplever and wait for the
engineto stop.
If the drive system doesnot engageand disengagecorrectly,
checkthe handlefor correct assembly.Make surethat all
parts are in good condition, not broken or bent, and that all
fasteners are tight.
Worn parts and cablestretch will changethe performanceof
the drive system. Whenyou mow in high or thick grass or
on hills, the drive system can slip. If the drive system is
slipping, adjust asfollows or takethe mower to an
authorized servicecenter.
IMPORTANT:Beforeyou start the engine,operatethe engine
stop lever severaltimes. Make sure the enginestop cable
moves freely.
Note: Theengine design doesnot include a throttle control
or an enginespeedadjustment. Theengine is set at the best
speed for cutting grass, bagging grass, and for extended
enginelife.
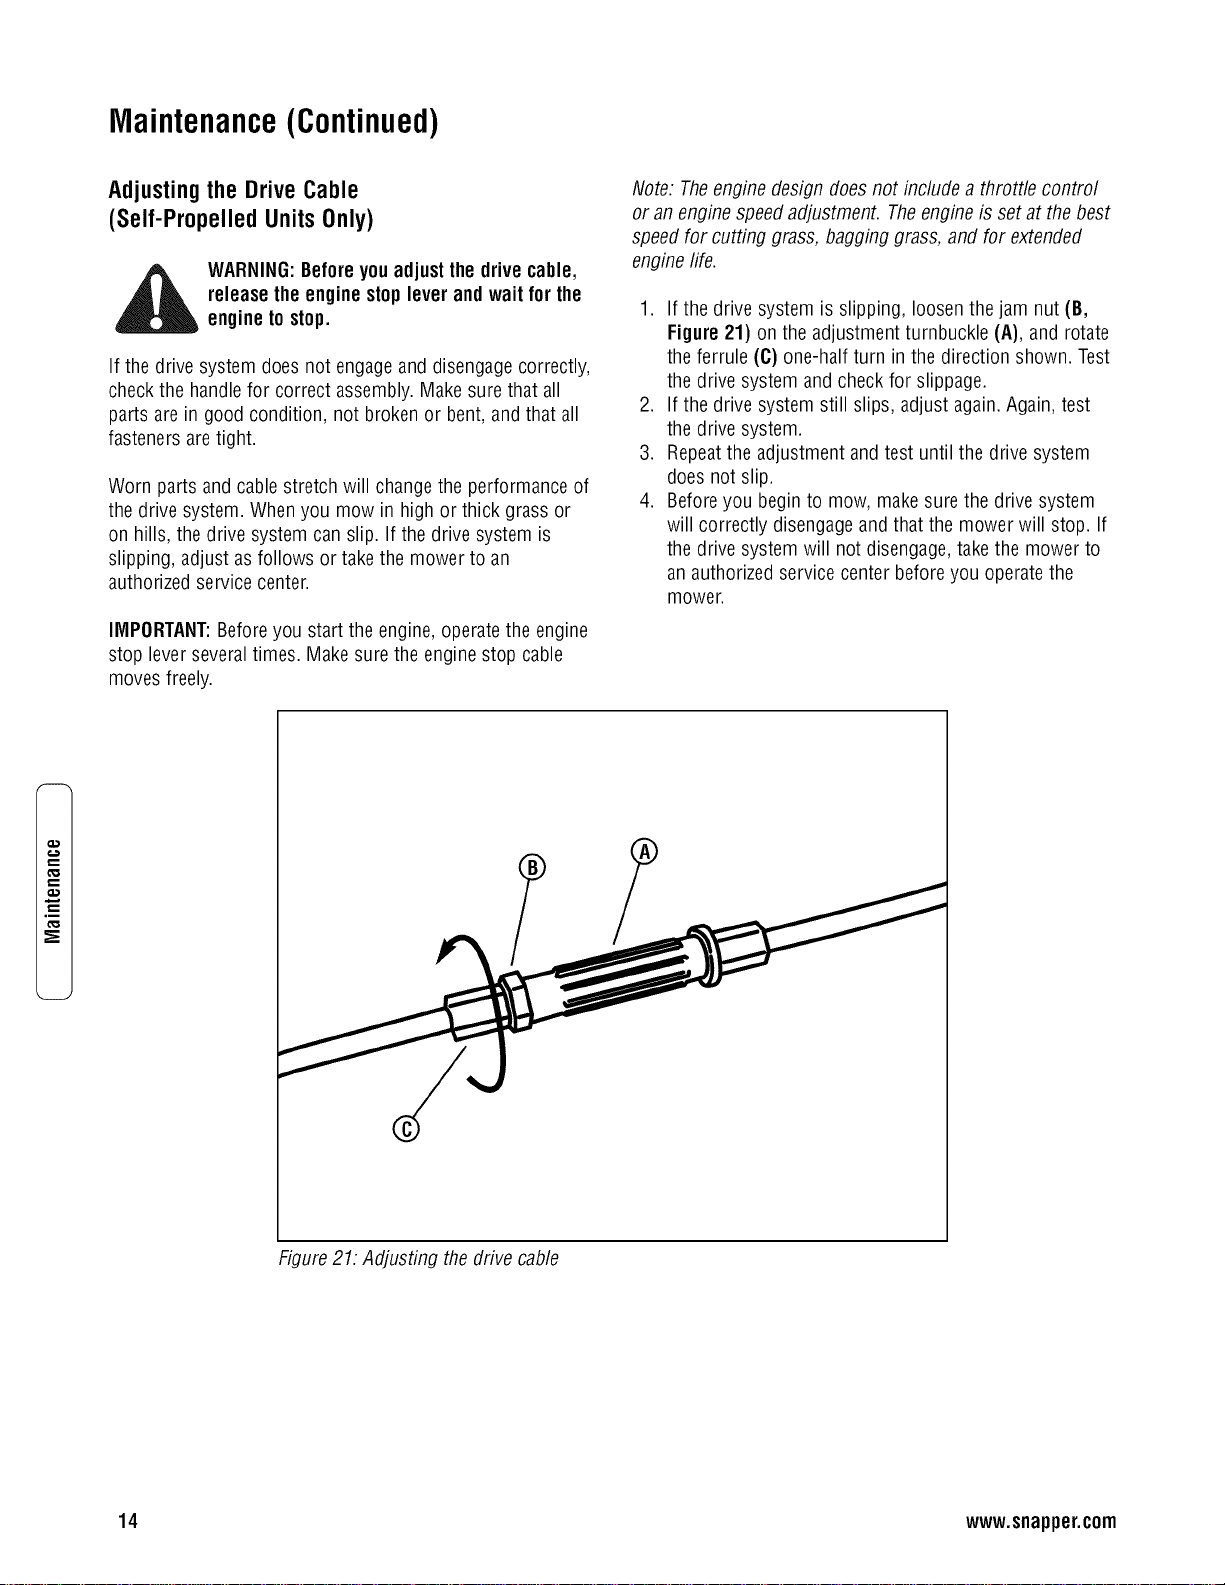
1. If the drive system is slipping, loosenthe jam nut (B,
Figure 21) on the adjustment turnbuckle (A), and rotate
the ferrule (C) one-half turn in the direction shown. Test
the drive system and check for slippage.
2. If the drive system still slips, adjust again.Again, test
the drive system.
3. Repeatthe adjustment and test until the drive system
does not slip.
4. Beforeyou begin to mow, make surethe drive system
will correctly disengageand that the mower will stop. If
the drive system will not disengage,takethe mower to
an authorized service center beforeyou operatethe
mower.
,m
Figure21.Adjusting the drive cable
14 www.snapper.com
Maintenance(Continued)
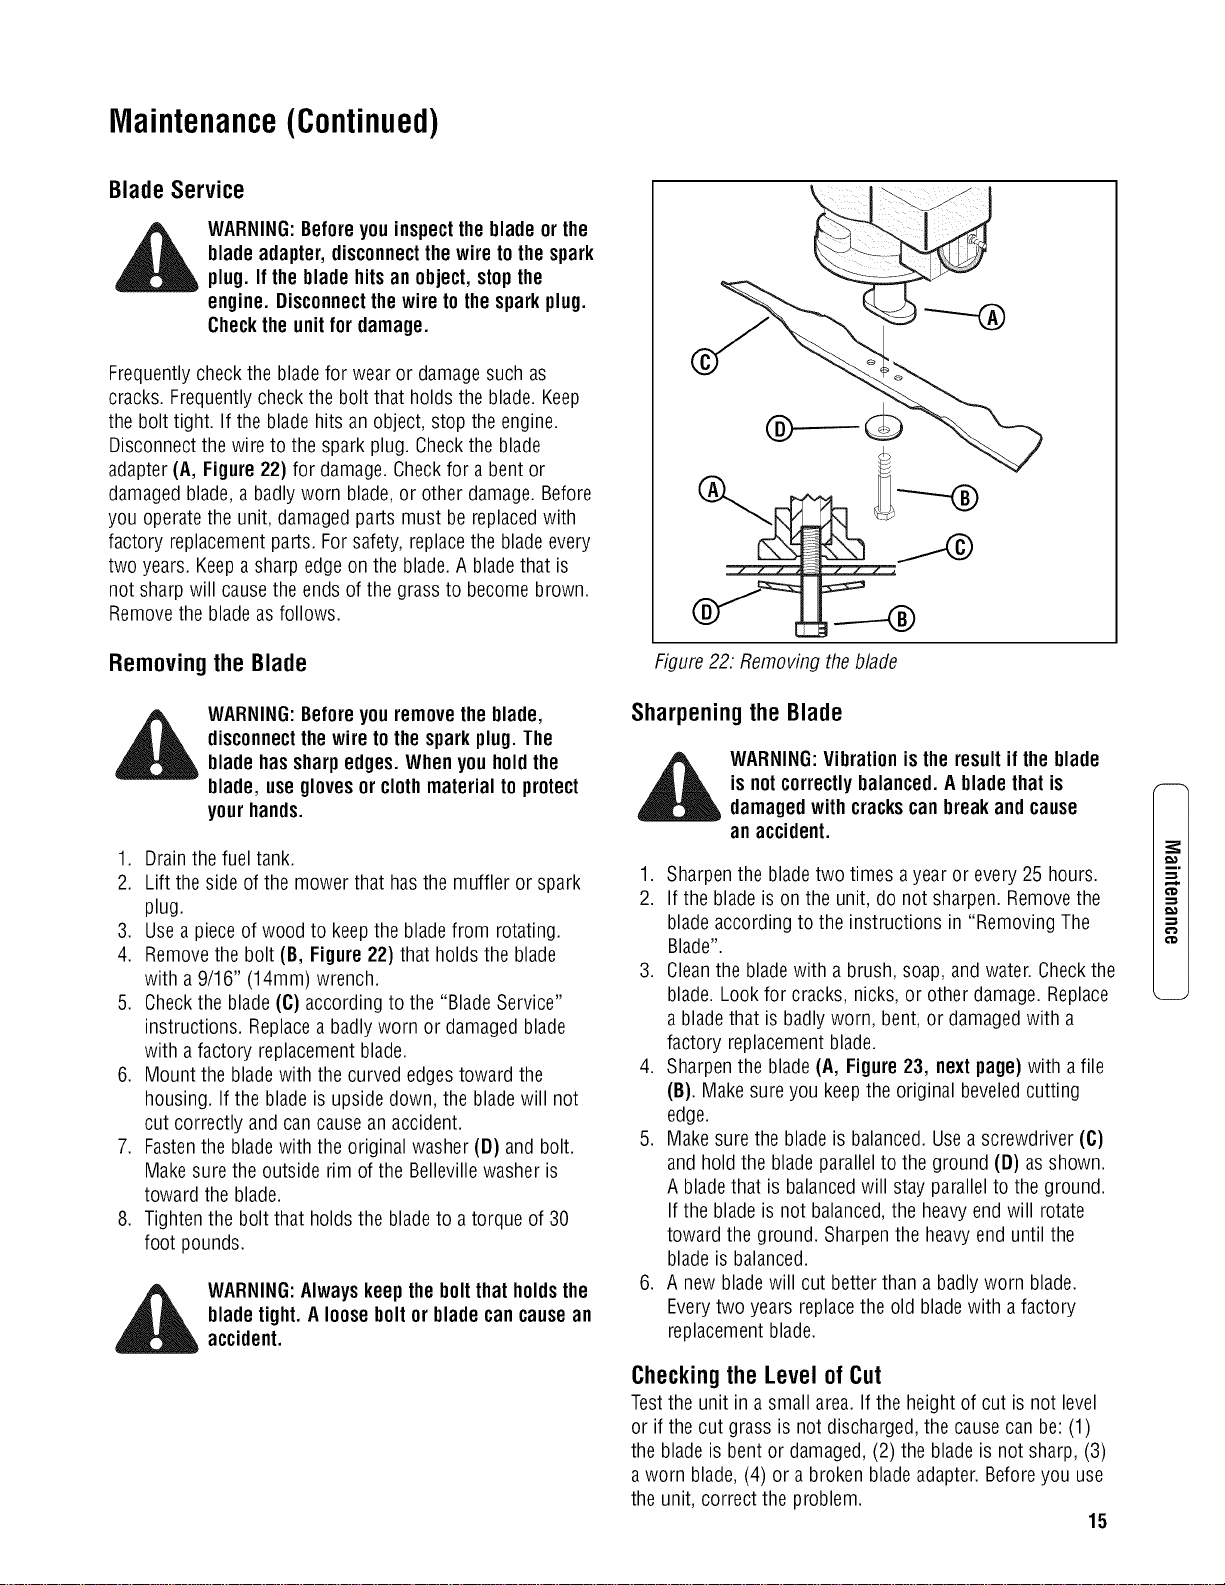
BladeService
WARNING:Beforeyou inspecttheblade or the
blade adapter, disconnectthe wire tothe spark
plug. If theblade hits anobject, stopthe
engine. Disconnectthewire to thesparkplug.
Checkthe unitfor damage.
Frequentlycheckthe blade for wear or damagesuch as
cracks. Frequentlycheckthe bolt that holds the blade. Keep
the bolt tight. If the blade hits anobject, stop the engine.
Disconnectthe wire to the spark plug. Checkthe blade
adapter(A, Figure 22) for damage. Checkfor a bent or
damagedblade,a badlyworn blade,or other damage.Before
you operatethe unit, damaged partsmust be replacedwith
factory replacementparts. Forsafety,replacethe blade every
two years. Keepa sharp edge on the blade.A bladethat is
not sharpwill causethe ends of the grass to become brown.
Removethe blade asfollows.
Removingthe Blade
WARNING:Beforeyou removethe blade,
disconnectthe wire to thespark plug. The
bladehassharpedges.Whenyou holdthe
blade, useglovesor clothmaterial to protect
yourhands.
1. Drain the fuel tank.
2. Lift the side of the mower that hasthe muffler or spark
plug.
3. Use apieceof wood to keepthe bladefrom rotating.
4. Removethe bolt (B, Figure22) that holds the blade
with a 9/16" (14ram) wrench.
5. Checkthe blade (C)according to the "BladeService"
instructions. Replaceabadlyworn or damaged blade
with a factory replacementblade.
6. Mount the blade with the curved edgestoward the
housing. If the blade is upsidedown, the blade will not
cut correctly and can causean accident.
7. Fastenthe blade with the original washer (D) and bolt.
Make sure the outside rim of the Bellevillewasher is
toward the blade.
8. Tighten the bolt that holds the bladeto a torque of 30
foot pounds.
WARNING:Alwayskeeptheboltthat holdsthe
blade tight. A looseboltor blade cancausean
accident.
Figure22. Removing the blade
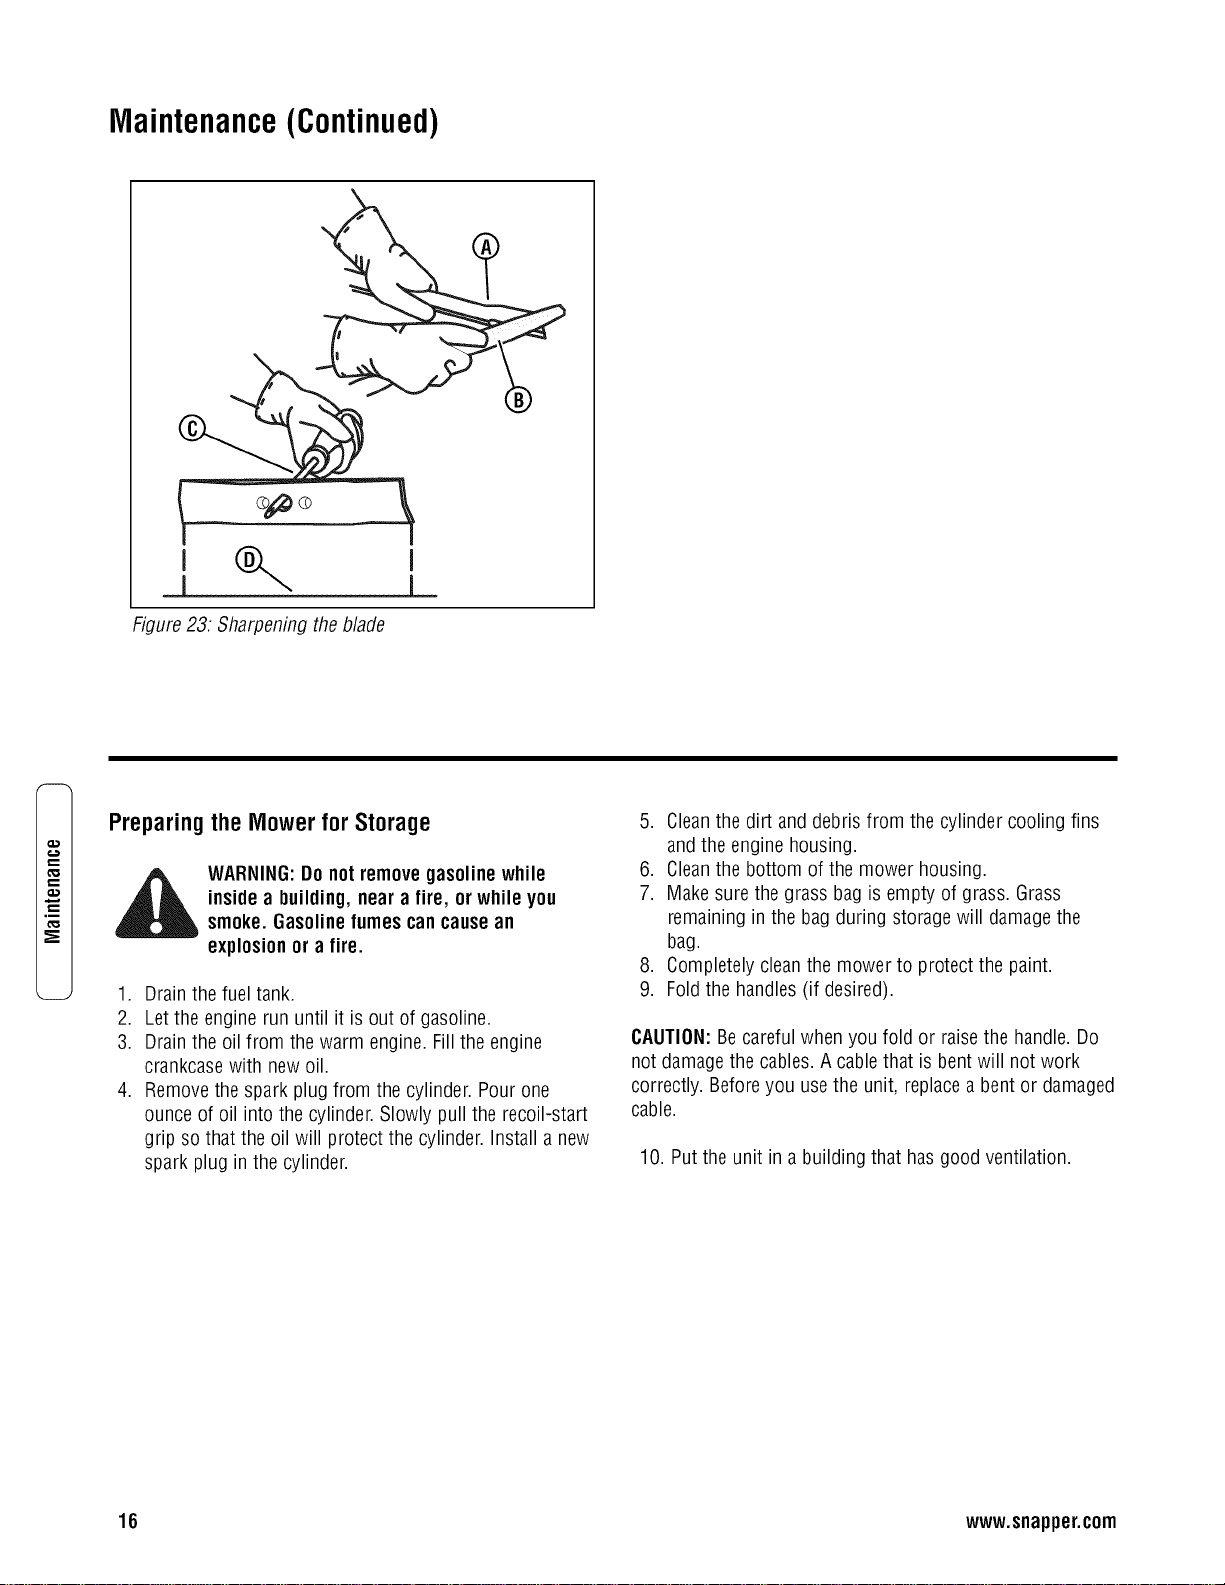
Sharpeningthe Blade
4_ WARNING:Vibration is the resultif the blade
is notcorrectlybalanced.A bladethat is
damagedwith crackscanbreak andcause
anaccident.
1. Sharpenthe bladetwo times a yearor every 25 hours.
2. If the bladeis on the unit, do not sharpen. Removethe
blade according to the instructions in "Removing The
Blade".
3. Cleanthe bladewith abrush, soap, and water. Checkthe
blade. Lookfor cracks, nicks, or other damage. Replace
a blade that is badly worn, bent, or damagedwith a
factory replacementblade.
4. Sharpenthe blade(A, Figure23, nextpage) with afile
(B). Makesure you keepthe original beveledcutting
edge.
5. Makesure the bladeis balanced. Usea screwdriver (C)
and hold the blade parallel to the ground (D) as shown.
A bladethat is balancedwill stay parallel to the ground.
If the blade is not balanced,the heavyendwill rotate
toward the ground. Sharpenthe heavyend until the
blade is balanced.
6. A newblade will cut better than a badlyworn blade.
Everytwo years replacethe old bladewith a factory
replacementblade.
Checking the Level of Cut
Testthe unit in a smallarea. If the height of cut is not level
or if the cut grass is not discharged,the causecan be: (1)
the blade is bent or damaged, (2) the blade is not sharp, (3)
a worn blade, (4) or a broken blade adapter.Beforeyou use
the unit, correct the problem.
15
m.
€1D
Maintenance(Continued)
Figure23: Sharpening the blade
.m
Preparing the Mowerfor Storage
WARNING:Do not removegasolinewhile
insidea building, near a fire, or while you
smoke.Gasolinefumescancausean
explosionor a fire.
1. Drain the fuel tank.
2. Let the engine run until it is out of gasoline.
3. Drain the oil from the warm engine.Fillthe engine
crankcasewith newoil.
4. Removethe spark plug from the cylinder. Pourone
ounce of oil into the cylinder. Slowly pull the recoil-start
grip so that the oil will protect the cylinder. Install a new
spark plug in the cylinder.
5. Cleanthe dirt and debrisfrom the cylinder cooling fins
and the engine housing.
6. Cleanthe bottom of the mower housing.
7. Makesure the grassbag is empty of grass. Grass
remainingin the bag during storage will damagethe
bag.
8. Completelycleanthe mower to protect the paint.
9. Foldthe handles(if desired).
CAUTION:Be careful whenyou fold or raisethe handle.Do
not damagethe cables.A cablethat is bent will not work
correctly. Beforeyou usethe unit, replacea bent or damaged
cable.
10. Put the unit in a building that hasgood ventilation.
16 www.snapper.com
Troubleshooting
The enginewill notstart.
1. Make sure the fuel tank is filled with cleangasoline. Donot useold gasoline.
2. On acold engine,push the primer button (optional on some models). Forthe number of times requiredto push the
primer button, seethe engine manufacturer's instructions.
3. Make sure the wire for the spark plug is connectedto the spark plug.
4. Adjust the Carburetor.Referto the engine manual.
5. Thereis too much gasoline in the engine cylinder. Removeand dry the spark plug. Pull the recoil-start grip severaltimes.
Install the spark plug. Connectthe wire to the spark plug. Start the engine.
6. Theengine is difficult to start in heavyor high grass. Move the mower to a cleandry surface.
7. Make sure the enginestop leveris in the operating position.
8. Make sure the fuel valveis in the ONposition. Refer to the engine manual.
The enginewill notstop.
1. Releasethe engine stop lever.
2. Checkthe enginestop cable. Replacethe cableif bent or damaged.
Engineperformance is bad.
1. Checkthe height of cut settings. Raisethe height of cut if the grass is high.
2. Checkthe bottom of the blade housing. Cleanthe blade housing of grass and other debris.
3. Checkthe wire to the spark plug. Makesure the wire is connected.
4. Cleanthe engine cooling fins of grass and other debris.
5. Checkthe carburetor adjustments. Referto the engine manual.
6. Checkthe spark plug gap. Setthe spark plug gap at 0.030".
7. Checkthe amount of oil in the engine. Fillwith oil if necessary.
8. Checkthe engineair cleaner.Refer to the engine manual.
9. Thegasoline is bad. Drain and cleanthe fuel tank. Fill the fuel tank with cleangasoline.
Excessivevibration.
1. Removethe blade. Checkthe blade and balanceif necessary.Seethe blade maintenanceinstructions.
2. Checkfor a bent or broken blade.A damaged blade is dangerous and mustbe replaced.
3. Checkthe blade adapter.Replacea brokenbladeadapter.
4. If the vibration continues, takethe mower to an Authorized Service Center.
The grasswill notdischargecorrectly.
1. Cleanthe bottom of the mower housing.
2. Checkfor a badlyworn blade.Removeand sharpenthe blade. Forsafety, replacethe blade every two years with a factory
replacementblade.
The grassisnotcuteven.
1. Checkthe height adjustment at eachwheel. The height adjustment must be the samefor eachwheel.
2. Make sure the bladeis sharp.
3. Checkfor a bent or broken blade.A damaged blade is dangerous and mustbe replaced.
4. Checkfor a broken blade adapter.Replace a brokenbladeadapter.
e-
€'D
t_
m,
17
6@
t_
,w
2 YEAR LIMITED WARRANTY
Fortwo (2) years from purchasedatefor the original purchaser's residential,non-commercial use, SNAPPER,through any
_uthorizedSNAPPERdealerwill replace,free of charge (exceptfor taxeswhere applicable), any part or parts found upon
_xaminationby the factory at McDonough, Georgia,to be defective in material or workmanship or both.
Forninety (90) days from purchasedatefor the original purchaser'scommercial, rental,or other non-residential use, SNAP-
PER,through any authorized SNAPPERdealerwill replace,free of charge,any part or partsfound upon examination by the
factory at McDonough, Georgia,to be defective in material or workmanship or both.
&ll transportation costs incurred by the purchaser in submitting material to an authorized SNAPPERdealerfor replacement
under this warranty must be paid by the purchaser.
This warranty does not apply to certain transmissions, to engines and their components, and batteries, asthese items arewar-
rantedseparately. This warranty does not apply to parts that havebeen damagedby accident, alteration, abuse, improper
lubrication, normal wear,or other cause beyondthe control of SNAPPER.This warranty does not cover anymachine or com-
ponent partthat hasbeen alteredor modified changing safety, performance, or durability.
Batterieshavea one(1) year warranty period with free replacementif required for one (1) year from the original purchase
:late.SNAPPERwill not be responsiblefor anyinstallation cost incurred. Thebattery warranty only covers original equipment
batteriesand does not cover damageto the battery or machinecaused by neglect or abuse, destruction by fire, explosion,
freezing,overcharging, improper maintenance,or useof improper electrolyte.
[here is no other expresswarranty.
DISCLAIMEROFWARRANTY
Implied warranties, includingthoseof merchantabilityand fitnessfor a particular purpose,are limited to two(2) years
from purchasedatefor the originalpurchaser'sresidential or othernon-commercialuse, and ninety(90) daysfrom pur-
chase for theoriginal purchaser'scommercial,rental or othernon-residentialuse, and tothe extentpermittedbylaw, any
andall impliedwarranties are excluded.This isthe exclusiveremedy.Liabilitiesfor consequentialdamages,underany
andall warranties are excluded.
Somestatesdonot allow limitations onhow longan implied warrantylasts, or do notallow the exclusionor limitation of
incidentalor consequentialdamages,sothe abovelimitation or exclusionmay notapplytoyou.
This warranty gives you specific legalrights, and you may also haveother rights which vary from state to state.
WARNING:THE USEOFREPLACEMENTPARTSOTHERTHAN GENUINESNAPPERPARTSMAYIMPAIRTHESAFETYOF
SNAPPERPRODUCTSAND WILL VOIDANY LIABILITYANDWARRANTYBYSNAPPERASSOCIATEDWITH THE USEOF
SUCHPARTS.
IMPORTANT:
Pleasefill out the attachedSNAPPERProduct Registration Cardimmediately and mail to:
Snapper'sProductRegistrationCenter, P.O.Box1379, IVlcDonough,Georgia30253
18 www.snapper.com
o_
=m
o
m
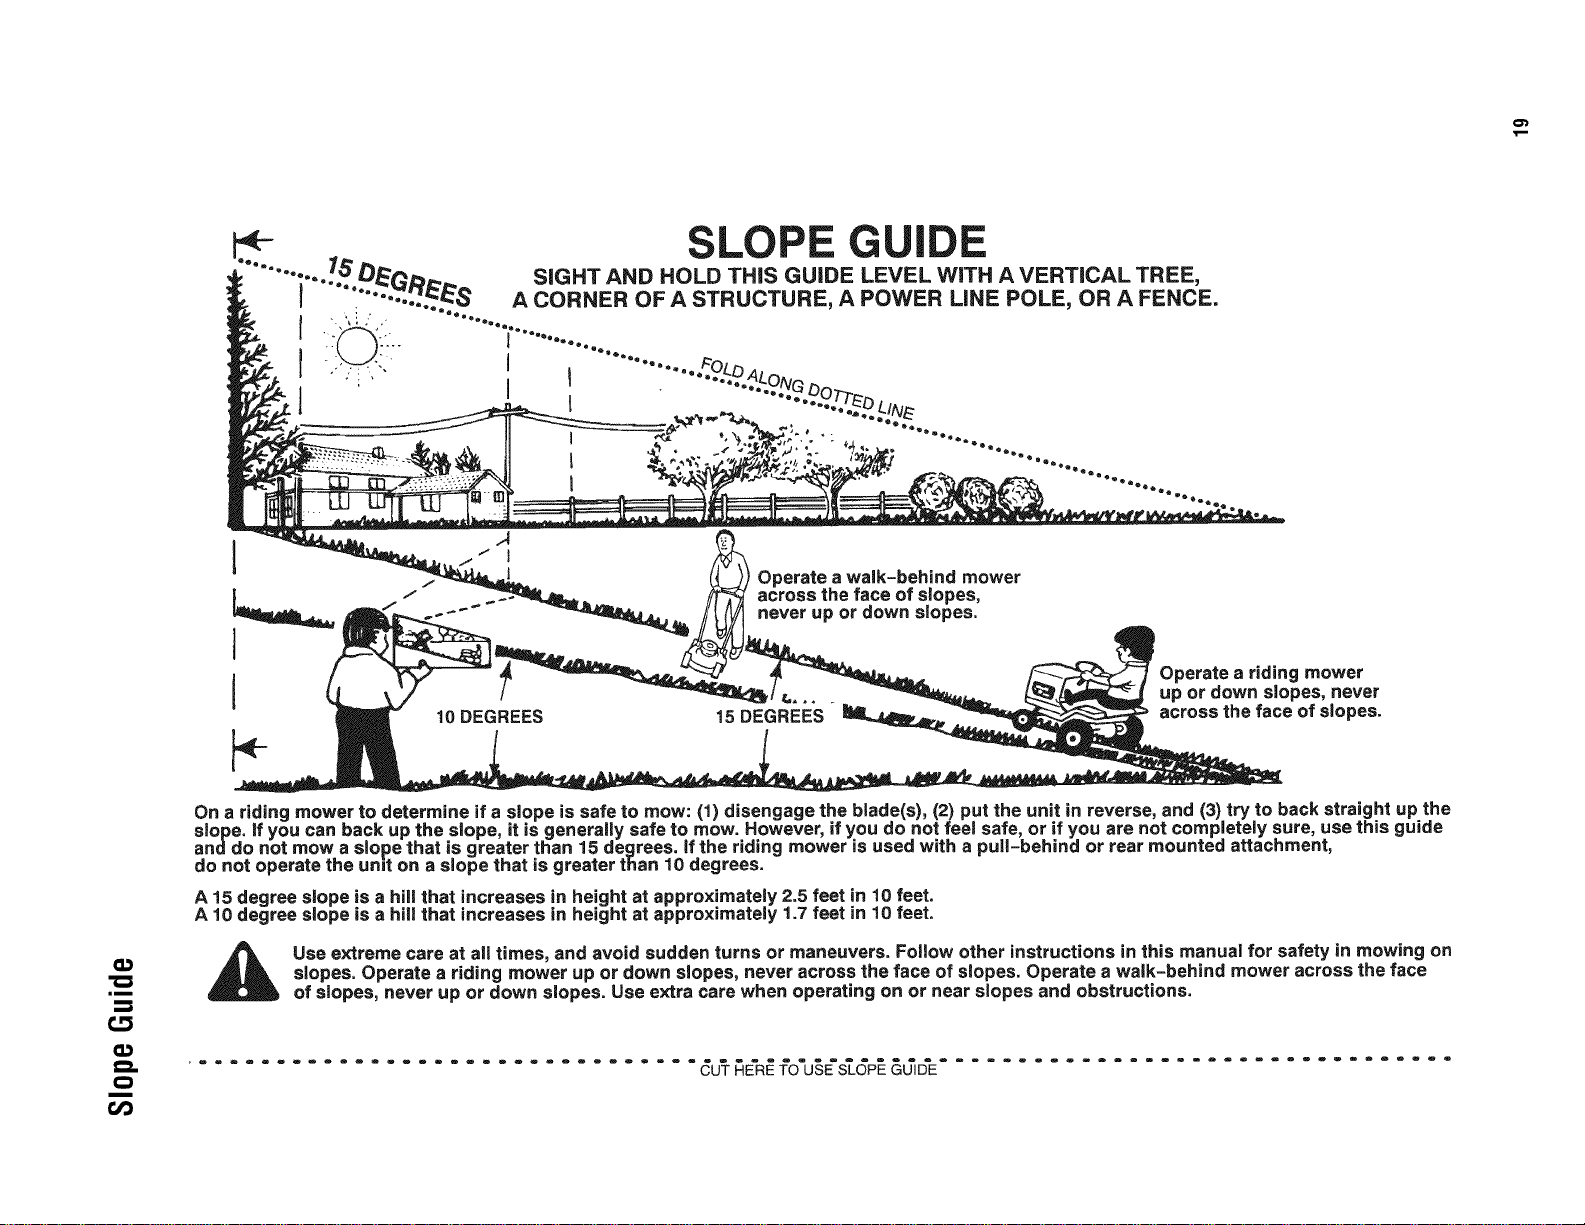
I
Operate a walk-behind mower
across the face of slopes,
never up or down slopes.
10 DEGREES 15 DEGREES
Operate a riding mower
up or down slopes, never
across the face of slopes.
On a riding mower to determine if a slope is safe to mow: (1) disengage the blade(s), (2) put the unit in reverse, and (3) try to back straight up the
slope, ifyou can back up the slope, it isgenerally safe to mow. However, if you do not feel safe, or if you are not completely sure, use this guide
anddo not mow aslope that is greater than 15 degrees, ifthe riding mower is used with a pull-behind or rear mounted attachment,
do not operate the umt on a slope that is greater than 10 degrees.
A 15 degree slope is a hill that increases in height at approximately 2.5 feet in 10 feet.
A 10 degree slope is a hill that increases in height at appro×imateiy 1.7 feet in 10 feet.
Use extreme care at all times, and avoid sudden turns or maneuvers, Follow other instructions in this manual for safety in mowing on
slopes. Operate a riding mower up or down slopes, never across the face of slopes. Operate a walk-behind mower across the face
of slopes, never up or down slopes. Use extra care when operating on or near slopes and obstructions.

Notes
20 www.snapper.com

Notes
21
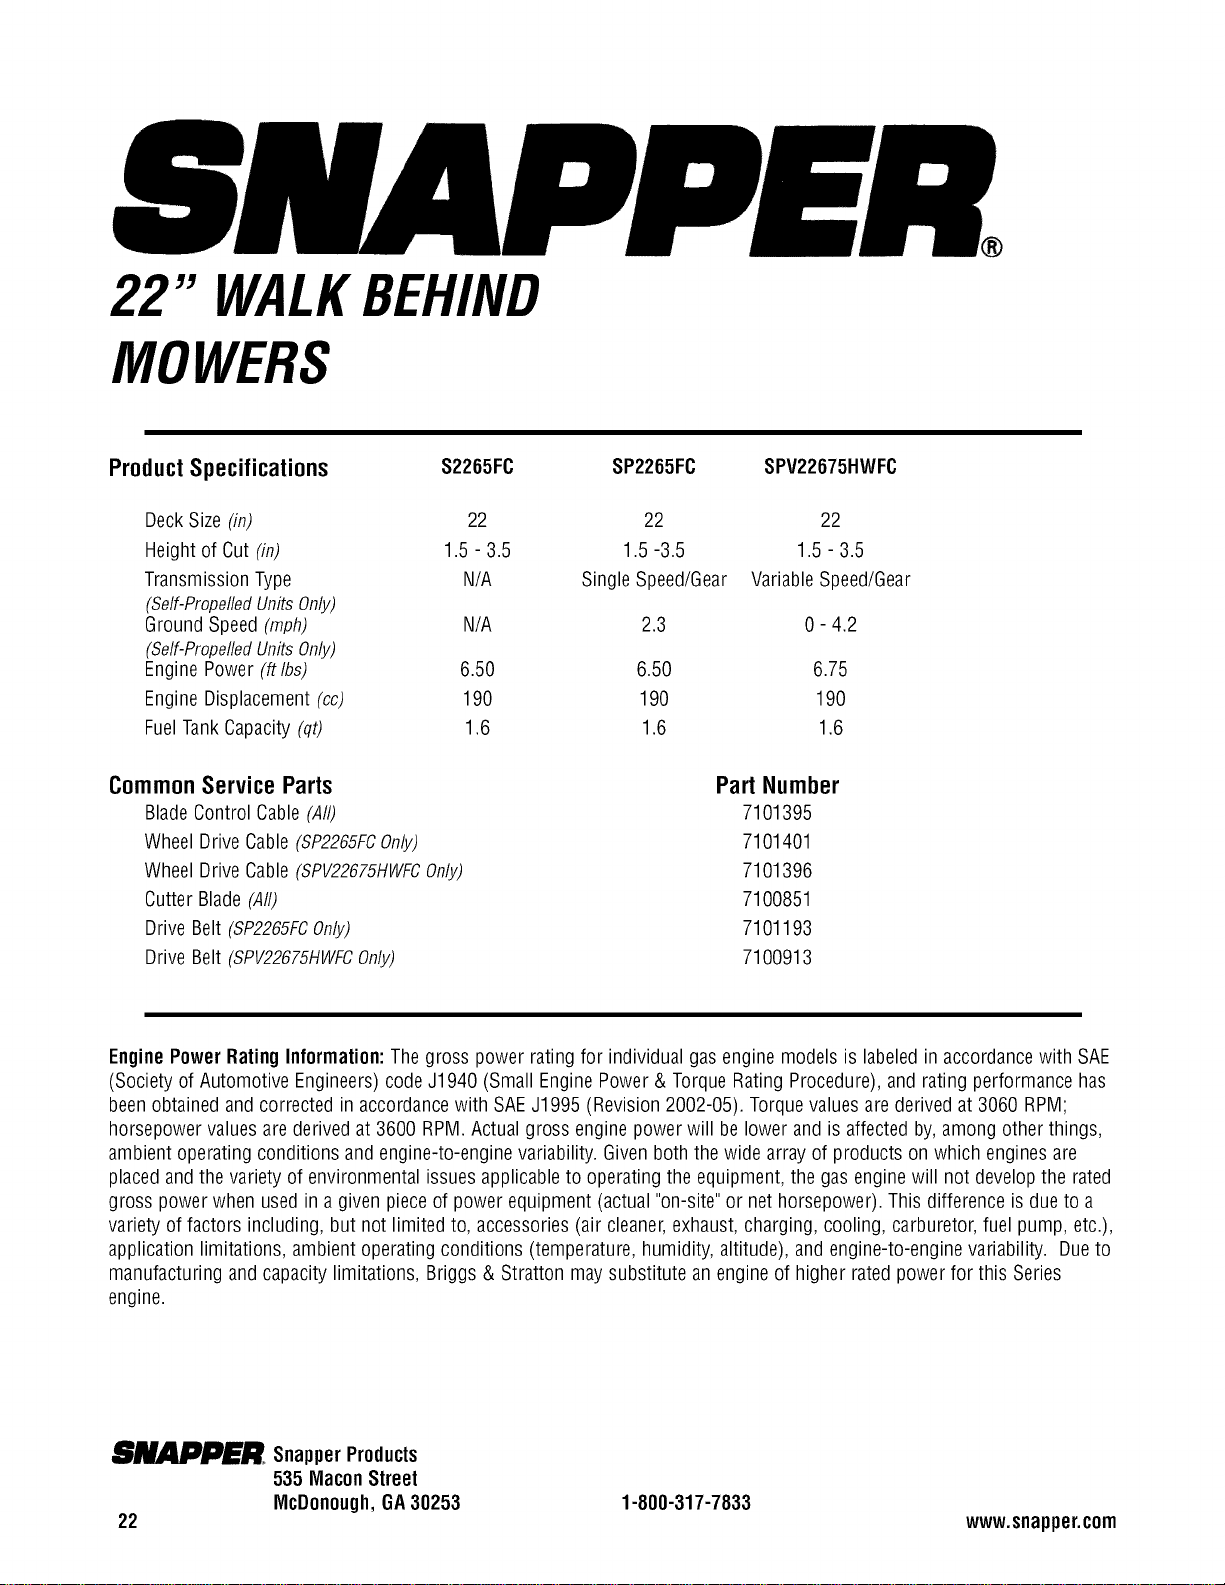
22" WALKBEHIND
MOWERS
Product Specifications
$2265FC SP2265FC
DeckSize (in) 22 22
Height of Cut (in) 1.5 - 3.5 1.5 -3.5
TransmissionType N/A Single Speed/Gear
(Self-PropelledUnitsOnly)
Ground Speed (mph) N/A 2.3
(Self-PropelledUnitsOnly)
Engine Power (ftlbs) 6.50 6.50
Engine Displacement(cc) 190 190
FuelTankCapacity (qt) 1.6 1.6
CommonServiceParts
Blade Control Cable(All)
Wheel Drive Cable(SP2265FCOnly)
Wheel Drive Cable(SPV22675HWFCOnly)
Cutter Blade (All)
Drive Belt (SP2265FCOnly)
Drive Belt (SPV22675HWFCOnly)
SPV22675HWFC
22
1.5 - 3.5
VariableSpeed/Gear
0-4.2
6.75
190
1.6
Part Number
7101395
7101401
7101396
7100851
7101193
7100913
EnginePower Rating Information:Thegross power rating for individual gas engine models is labeled in accordancewith SAE
(Society of Automotive Engineers)code J1940 (Small EnginePower & TorqueRating Procedure), and rating performance has
been obtainedand corrected in accordancewith SAEJ1995 (Revision2002-05). Torquevalues are derivedat 3060 RPM;
horsepower values are derived at 3600 RPIVI.Actual gross engine power will be lower and is affected by,among other things,
ambient operating conditions and engine-to-enginevariability. Givenboth the wide arrayof products on which engines are
placedand the variety of environmental issuesapplicableto operating the equipment, the gasengine will not developthe rated
gross power when used in a given pieceof power equipment (actual "on-site"or net horsepower).This difference is due to a
variety of factors including, but not limited to, accessories(air cleaner,exhaust,charging, cooling, carburetor, fuel pump, etc.),
application limitations, ambient operating conditions (temperature, humidity, altitude), and engine-to-enginevariability. Dueto
manufacturing and capacity limitations, Briggs & Stratton may substitute an engine of higher rated powerfor this Series
engine.
_J_LDJDEJI_ SnapperProducts
535 MlaconStreet
IVlcDonough,GA30253
22
1-800-317-7833
www.snapper.com