the possibilities
Thank you for purchasingthis Samsung proauct,
To recewe a more complete service.
please register ;,our product at
www.samsung.com/register
WF210AN-02832A EN.indd 1 2010-02-09 o_,,,f1:14:51
r
1. Extra Large Capacity
Even bulky garments and blankets get super clean. The large capacity leaves enough room
for a more thorough, cleaner wash.
2.VRT TM(Vibration Reduction Technology)
This Samsung washer performs smoothly at top spin speeds, minimizing noise and vibration.
3. Direct Drive Inverter Motor
The power to handle anything! Our direct-drive inverter motor delivers power right to the
washer tub from a variable speed, reversible motor. A beltless direct-drive motor generates
a higher spin speed of 1,150rpms for more effective, quiet operation. The washer also has
fewer moving parts, meaning fewer repairs.
4. Woolmark Certified 0NF220*)
The machine wash wool cycle on the Samsung machines has been tested and passed the
required Woolmark Company specification for machine washable wool products. Fabrics
should be washed according to the instructions on the garment label as specified by
Woolmark and Samsung.
5. Sanitize (WF220*)
When selecting this cycle, the water heats to an extra high temperature to remove 99.9% of
certain bacteria typically found on clothing, bedding, or towels. This certification is conducted
by NSF International, an independent third-party testing and certification organization.
Please check garment care label to avoid garment damage.
Only sanitizing cycles have been designed to meet the requirements of this protocol for
sanitization efficacy.
NSF Protocol P172
Sanitization Performance of Residential and
Commercial, Family--Sized Clothes Washers
6. Pure Cycle TM (WF220*)
Using the Pure Cycle drum cleaning process helps to keep your washing machine clean even
without any chemical detergent or bleach. Keep your drum cleansed and odourless with this
specialized cleaning program.
7. Child Lock
The Child Lock function ensures that curious little hands are kept out of your washing
machine.
This safety feature stops your children from playing with the operation of the washing
machine, and alerts you when it is activated.
8. Delay End
Delay a cycle for up to 19 hours in one-hour increments and increase the convenience of
using your washing machine especially when you have to go out.
2 features of your new washer
WF210AN-02832A EN.indd 2 2010-02-09 a_,,,f 1:14:52
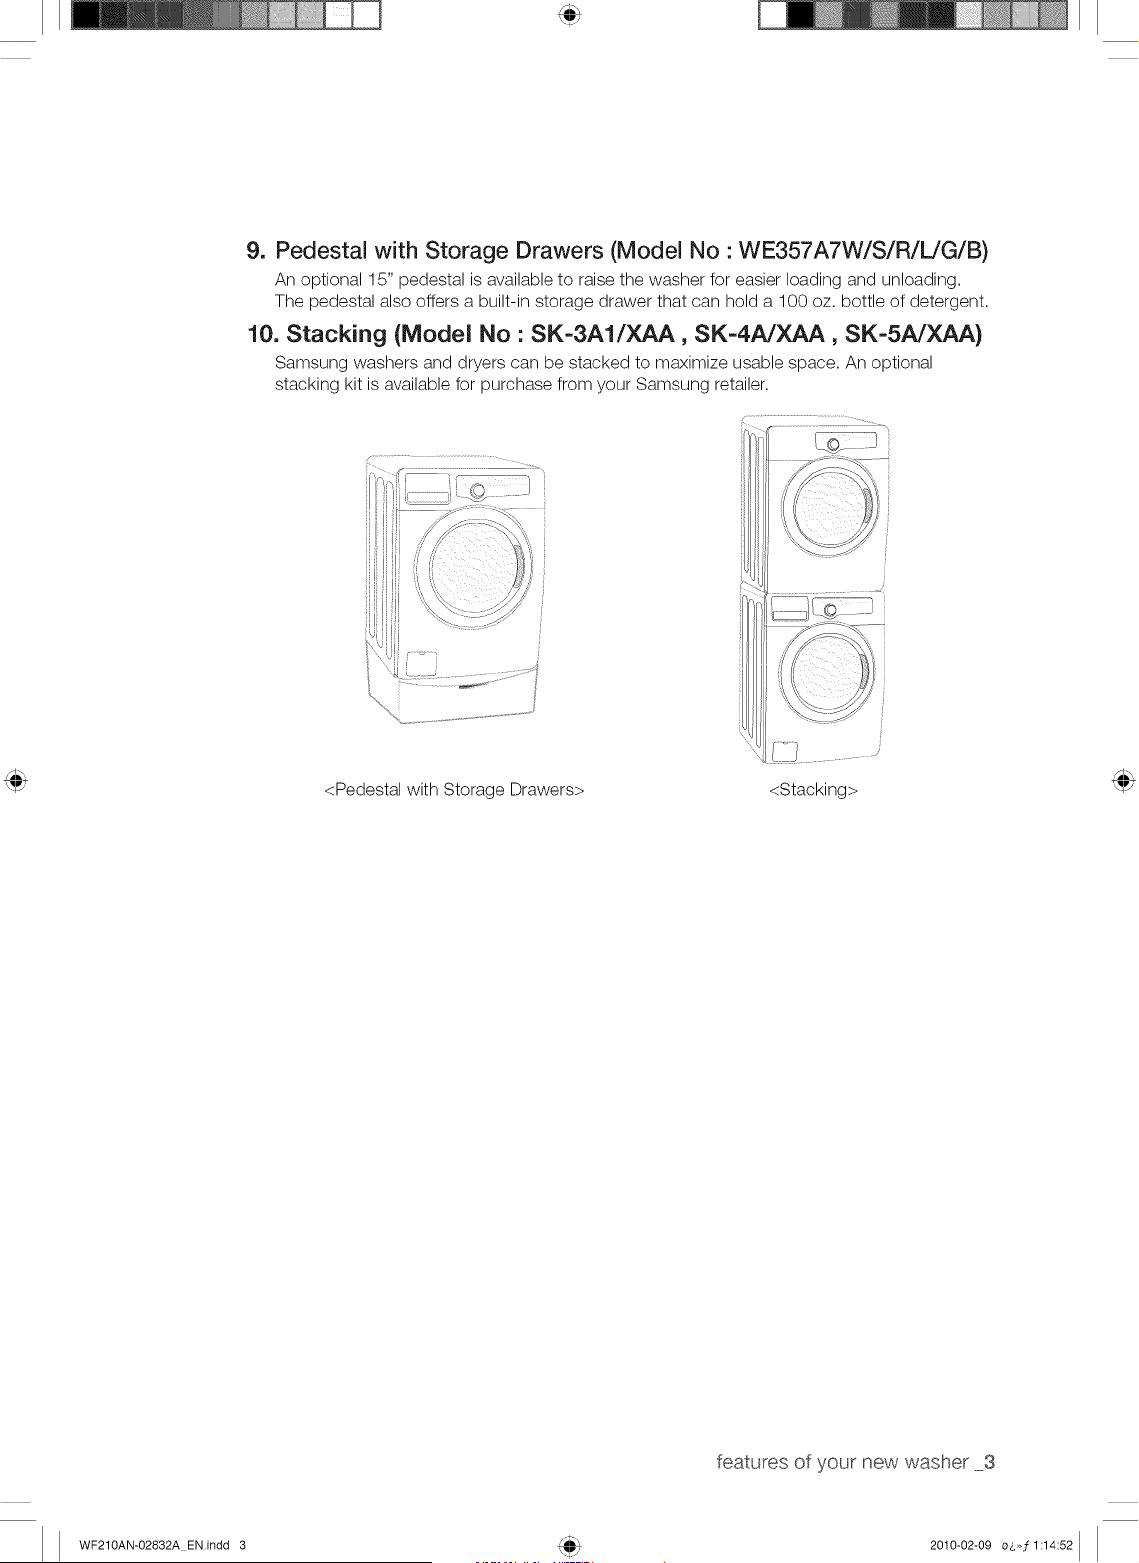
9. Pedestal with Storage Drawers (Model No • WE357A7W/S/R/L/G/B)
An optional 15" pedestal is available to raise the washer for easier loading and unloading.
The pedestal also offers a built-in storage drawer that can hold a 100 oz. bottle of detergent.
10. Stacking (Model No : SK=3A1/XAA, SK=4A/XAA, SK=5AJXAA)
Samsung washers and dryers can be stacked to maximize usable space. An optional
stacking kit is available for purchase from your Samsung retailer.
ieill¸ zz}i}i}i}i}i}i}i}i}i}i......... _.
/
{1111¸¸5...................
<Pedestal with Storage Drawers> <Stacking>
features of your new washer 3
WF210AN-02832A EN.indd 3 2010-02-09 o6,,f 1:14:52
Congratulations on your new Samsung ActivFresh TMwasher. This manual
contains important information on the installation, use and care of your
appliance. Please take time to read this manual to take fuji advantage of your
washer's many benefits and features.
WHAT YOU NEED TO KNOW ABOUT SAFETY INSTRUCTIONS
Warnings and Important Safety Instructions in this manual do not cover all possible conditions and
situations that may occur. It is your responsibility to use common sense, caution, and care when installing,
maintaining, and operating your washer.
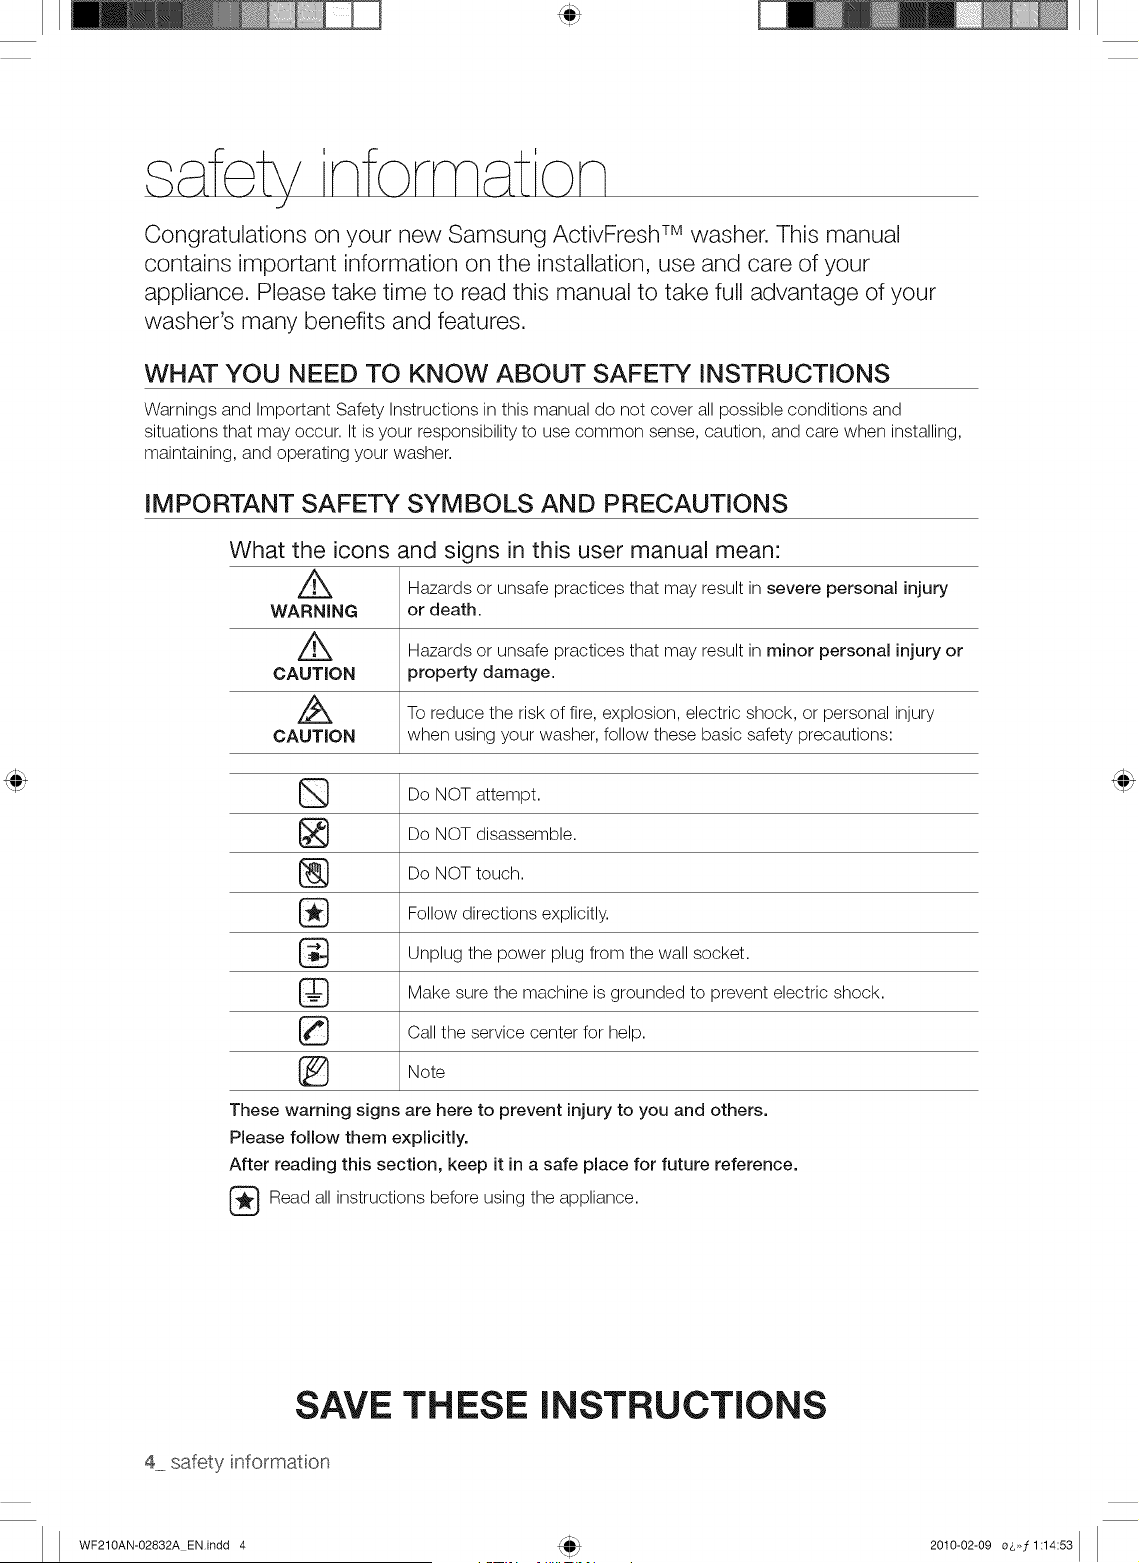
IMPORTANT SAFETY SYMBOLS AND PRECAUTIONS
What the icons and signs in this user manual mean:
Hazards or unsafe practices that may result in severe personal injury
WARNING or death.
//_ Hazards or unsafe practices that may result in minor personal injury or
CAUTION property damage.
Z_ To reduce the risk of fire, explosion, electric shock, or personal injury
CAUTION when using your washer, follow these basic safety precautions:
Do NOT attempt.
Do NOT disassemble.
(_) Do NOT touch.
Follow directions explicitly.
Unplug the power plug from the wall socket.
Make sure the machine is grounded to prevent electric shock.
Call the service center for help.
Note
These warning signs are here to prevent injury to you and others.
Please follow them explicitly.
After reading this section, keep it in a safe place for future reference.
Read all instructions before using the appliance.
SAVE
4 safety information
THESE INSTRUCTIONS
WF210AN-02832A EN.indd 4 2010-02-09 o_,,,f 1:14:53
Z_ WARNING: To reduce the risk of fire, electric shock, or injury to persons when using your
WAnN_,Gappliance, follow basic precautions, including the following:
1. Read all instructions before using the appliance.
2. Do not wash or dry articles that have been previously cleaned in, washed in, soaked in,
or spotted with gasoline, dry-cleaning solvents, other flammable or explosive substances
as they give off vapors that could ignite or explode.
3. Do not allow children to play on or in the appliance. Close supervision of children is
necessary when the appliance is used near children.
4. Before the appliance is removed from service or discarded, remove the door to the
washing or drying compartment.
5. Do not reach into the appliance if the drum is moving.
6. Do not install or store this appliance where it will be exposed to the weather.
7. Do not tamper with controls.
8. Do not repair or replace any part of the appliance or attempt any servicing unless
specifically recommended in the user-maintenance instructions or in published user-
repair instructions that you understand and have the skills to carry out.
9. Do not add gasoline, dry-cleaning solvents, or other flammable or explosive substances
to the wash water. These substances give off vapors that could ignite or explode.
10.Under certain conditions, hydrogen gas may be produced in a hot water system
that has not been used for 2 weeks or more. HYDROGEN GAS IS EXPLOSIVE. If
the hot water system has not been used for such a period, before using a washer or
combination washer-dryer, turn on all hot water faucets and let the water flow from
each for several minutes. This will release any accumulated hydrogen gas. As the gas is
flammable, do not smoke or use an open flame during this time.
SAVE THESE iNSTRUCTiONS
safety informaton 5
WF210AN-02832A EN.indd 5 2010-02-09 o_,,,f 1:14:53
SEVERE WARNING SIGNS FOR iNSTALLATiON
WARNING
Plug the power cord into an AC 120V/60Hz/15A wall socket or higher and use the socket
for this appliance only. In addition, do not use an extension cord.
Sharing a wall socket with other appliances using a power strip or extending the power
cord may result in electric shock or fire.
Do not use an electric transformer. It may result in electric shock or fire.
Ensure that the power voltage, frequency and current are the same as those listed in the
product specifications. Failing to do so may result in electric shock or fire.
The installation of this appliance must be performed by a qualified technician or service
company.
Failing to do so may result in electric shock, fire, an explosion, problems with the
product, or injury.
Remove all foreign substances such as dust or water from the power plug terminals and
contact points using a dry cloth on a regular basis.
Unplug the power plug and clean it with a dry cloth.
Failing to do so may result in electric shock or fire.
Plug the power plug into the wall socket in the right direction so that the cord runs towards
the floor.
If you plug the power plug into the socket in the opposite direction, the electric wires
within the cable may be damaged and this may result in electric shock or fire.
This appliance must be properly grounded.
Do not ground the appliance to a gas pipe, plastic water pipe, or telephone line.
Failure to ground properly may result in electric shock, fire, an explosion, or problems
with the product
Never plug the power cord into a socket that is not grounded correctly. Make sure the
outlet is in compliance with local and national codes.
Q
Do not install this appliance near a heater, inflammable material.
Do not install this appliance in a humid, oily or dusty location, or in a location exposed to
direct sunlight and water (rain drops).
Do not install this appliance in a location where gas may leak.
This may result in electric shock or fire.
Plug the power plug into the wall socket firmly. Do not use a damaged power plug,
damaged power cord, or loose wall socket.
This may result in electric shock or fire.
Do not pull or excessively bend the power cord.
Do not twist or tie the power cord.
Do not hook the power cord over a metal object, place a heavy object on the power cord,
insert the power cord between objects, or push the power cord into the space behind the
appliance.
This may result in electric shock or fire.
Do not pull the power cord when unplugging the power plug.
Unplug the power plug by holding the plug.
Failing to do so may result in electric shock or fire.
_lf the power plug or power cord is damaged, contact your nearest service center.
6 safety information
WF210AN-02832A EN.indd 6 2010-02-09 o_,,,f 1:14:53
CAUTION SIGNS FOR INSTALLATION
CAUTION
This appliance should be positioned in such a way that it is accessible to the power plug.
- Failing to do so may result in electric shock or fire due to electric leakage.
Install your appliance on a level and hard floor that can support its weight.
Failing to do so may result in abnormal vibrations, noise, or problems with the product.
_ nplug the power plug when the appliance is not being used for long periods of time or
during a thunder/lightning storm.
Failing to do so may result in electric shock or fire.
SEVERE WARNING SIGNS FOR USING
WARNING
lf the appliance is flooded, cut the power immediately and contact your nearest service
center.
If the appliance generates a strange noise, a burning smell or smoke, unplug the power
plug immediately and contact your nearest service center.
Failing to do so may result in electric shock or fire.
In the event of a gas leak (such as propane gas, LP gas, etc.), ventilate immediately without
touching the power plug. Do not touch the appliance or power cord.
Do not use a ventilating fan.
A spark may result in an explosion or fire.
Do not wash items contaminated with gasoline, kerosene, benzene, paint thinner, alcohol or
other flammable or explosive substances.
This may result in electric shock, fire or an explosion.
Do not open the washer door by force while it is operating (high-temperature washing/
drying/spinning).
Water flowing out of the washer may result in burns or cause the floor to be slippery.
This may result in injury.
Opening the door by force may result in damage to the product or injury.
Make sure to remove the packaging (sponge, styrofoam) attached to the bottom of the
washer before using it.
Do not insert your hand under the washer.
This may result in injury.
safety informaton 7
WF210AN-02832A ENindd 7 2010-02-09 o_,,,f 1:14:54
Do not touch the power plug with wet hands.
- This may result in electric shock.
Do not turn the appliance off by unplugging the power plug while an operation is in
progress.
Plugging the power plug into the wall socket again may cause a spark and result in
electric shock or fire.
Keep all packaging materials well out of the reach of children, as packaging materials can
be dangerous to children.
If a child places a bag over its head, it may result in suffocation.
Do not let children or infirm persons use this washer unsupervised.
Failing to do so may result in electric shock, burns or injury.
Do not insert your hand or a metal object under the washer while it is operating.
This may result in injury.
Do not attempt to repair, disassemble, or modify the appliance yourself.
Do not use any fuse(such as cooper, steel wire, etc.) other than the standard fuse.
When repairing or reinstalling the appliance is required, contact your nearest service
center.
Failing to do so may result in electric shock, fire, problems with the product, or injury.
lf any foreign substance such as water has entered the appliance, unplug the power plug
and contact your nearest service center.
Failing to do so may result in electric shock or fire.
When the water supply hose comes loose from the faucet and floods the appliance, unplug
the power plug.
Failing to do so may result in electric shock or fire.
CAUTION SIGNS FOR USING
CAUTION
When the washer is contaminated by a foreign substance such as detergent, dirt, food
waste, etc., unplug the power plug and clean the washer using a damp and soft cloth.
Failing to do so may result in discoloration, deformation, damage or rust.
The front glass may be broken by a strong impact. Take care when using the washer.
When the glass is broken, it may result in injury.
After a water supply failure or when reconnecting the water supply hose, open the faucet
slowly.
Open the faucet slowly after a long period of non-use.
The air pressure in the water supply hose or the water pipe may result in damage to a
part or in water leakage.
If a drain error occurs during an operation, check if there is a draining problem.
If the washer is used when it is flooded because of a draining problem, it may result in
electric shock or fire due to electric leakage.
8 safety information
WF210AN-02832A EN.indd 8 2010-02-09 o_,,,j 1:14:54
Insert the laundry into the washer completely so that laundry does not get caught in the
door.
If laundry gets caught in the door, it may result in damage to the laundry or the washer,
or result in water leakage.
Ensure that the faucet is turned off when the washer is not being used.
Ensure that the screw on the water supply hose connector is properly tightened.
Failing to do so may result in property damage or injury.
Check if the rubber seal is not contaminated by foreign substances (waste, thread, etc).
If the door is not closed completely, it may result in water leakage.
Open the faucet and check if the water supply hose connector is firmly tightened and that
there is no water leaking before using the product.
If the screws or the water supply hose connector are loose, it may result in water
leakage.
Do not stand on top of the appliance or place objects (such as laundry, lighted candles,
lighted cigarettes, dishes, chemicals, metal objects, etc.) on the appliance.
This may result in electric shock, fire, problems with the product, or injury.
Do not operate the appliance with wet hands.
This may result in electric shock.
Do not spray volatile material such as insecticide onto the surface of the appliance.
As well as being harmful to humans, it may also result in electric shock, fire or problems
with the product.
Do not place an object that generates a electromagnetic field near the washer.
This may result in injury due to a malfunction.
Since the water drained during a high-temperature wash or drying cycle is hot, do not
touch the water.
This may result in burns or injury.
Do not wash, spin or dry water-proof seats, mats or clothing (*).
Do not wash thick, hard mats even if the washer mark is on the care label.
This may result in injury or damage to the washer, walls, floor or clothing due to
abnormal vibrations.
* Woolen bedding, rain covers, fishing vests, ski pants, sleeping bags, diaper covers,
sweat suits, and bicycle, motor cycle, car covers, etc.
Do not operate the washer when the detergent box is removed.
This may result in electric shock or injury due to water leakage.
Do not touch the inside of the tub during or just after drying as it is hot.
This may result in burns.
Do not insert your hand into the detergent box after opening it.
This may result in injury as your hand may be caught by the detergent input device.
safety informaton 9
WF210AN-02832A EN.indd 9 2010-02-09 o_,,,f 1:14:54
Do not place any objects (such as shoes, food waste, animals) other than laundry into the
washer.
This may result in damage to the washer, or injury and death in the case of pets due to
the abnormal vibrations.
Do not press the buttons using sharp objects such as pins, knifes, fingernails, etc.
This may result in electric shock or injury.
Do not wash laundry contaminated by oils, creams or lotions usually found in skincare
shops or massage clinics.
This may result in the rubber seal becoming deformed and water leakage.
Do not leave metal objects such as a safety pin or hair pin, or bleach in the tub for long
periods of time.
This may cause the tub to rust.
If rust starts appearing on the surface of the tub, apply a cleansing agent (neutral) to the
surface and use a sponge to clean it. Never use a metal brush.
Do not use dry cleaning detergent directly and do not wash, rinse, or spin laundry
contaminated by dry cleaning detergent.
This may result in spontaneous combustion or ignition due to the heat of the oxidation of
the oil.
Do not use hot water from water cooling/heating devices.
This may result in problems with the washer.
Do not use natural hand-washing soap for the washer.
If it hardens and accumulates inside the washer, it may result in problems with the
product, discoloration, rust or bad odors.
Do not wash large laundry items such as bedding in the washing net.
Place socks and brassieres into the washing net and wash them with the other laundry.
Failing to do so may result in injury due to abnormal vibrations.
Do not use hardened detergent.
If it accumulates inside the washer, it may result in water leakage.
Do not wash throw rug or doormat.
If you wash throw rug or doormat, the sand will accumulate inside the washer. It may
result in error such as not draining.
SEVERE WARNING SIGNS FOR CLEANING
WARNING
Do not clean the appliance by spraying water directly onto it.
Do not use benzene, thinner or alcohol to clean the appliance.
This may result in discoloration, deformation, damage, electric shock or fire.
Before cleaning or performing maintenance, unplug the appliance from the wall socket.
Failing to do so may result in electric shock or fire.
10 safety informaton
WF210AN-02832A EN.indd 10 2010-02-09 oo, f1:14:54
ontent
SETTING UP YOUR WASHER
i ,
12 Checking the parts
13 Meeting installation requirements
13 Electrical supply
13 Grounding
14 Water
14 Drain facility
14 Flooring
14 Location consideration
14 Alcove or closet installation
15 Installing your washer
WASHING A LOAD OF LAUNDRY
i ,
CLEANING AND MAINTAINING YOUR
WASHER
TROUBLESHOOTING AND
INFORMATION CODES
APPENDIX
18 Loading your washer
19 Getting started
20 Overview of the control panel
22 Child Lock
23 Spin Only
23 Garment+ _*
23 My cycle (WF210")
24 Detergent use
24 Features
26 Cleaning the exterior
26 Cleaning the interior
26 Cleaning the dispensers
26 Storing your washer
27 Cleaning the debris filter
28 Cleaning the door seal/bellow
28 Preserving the top cover and the front frame
29 Pure Cycle_M(WF220*)
30 Check these points if your washer.,.
32 Information codes
34 Fabric care chart
36 Helping the environment
36 Declaration of conformity
36 Specifications
37 Cycle chart
WARRANTY 38 Warranty
contents 11
WF210AN-02832A EN.indd 11 2010-02-09 o$,,f 1:14:55
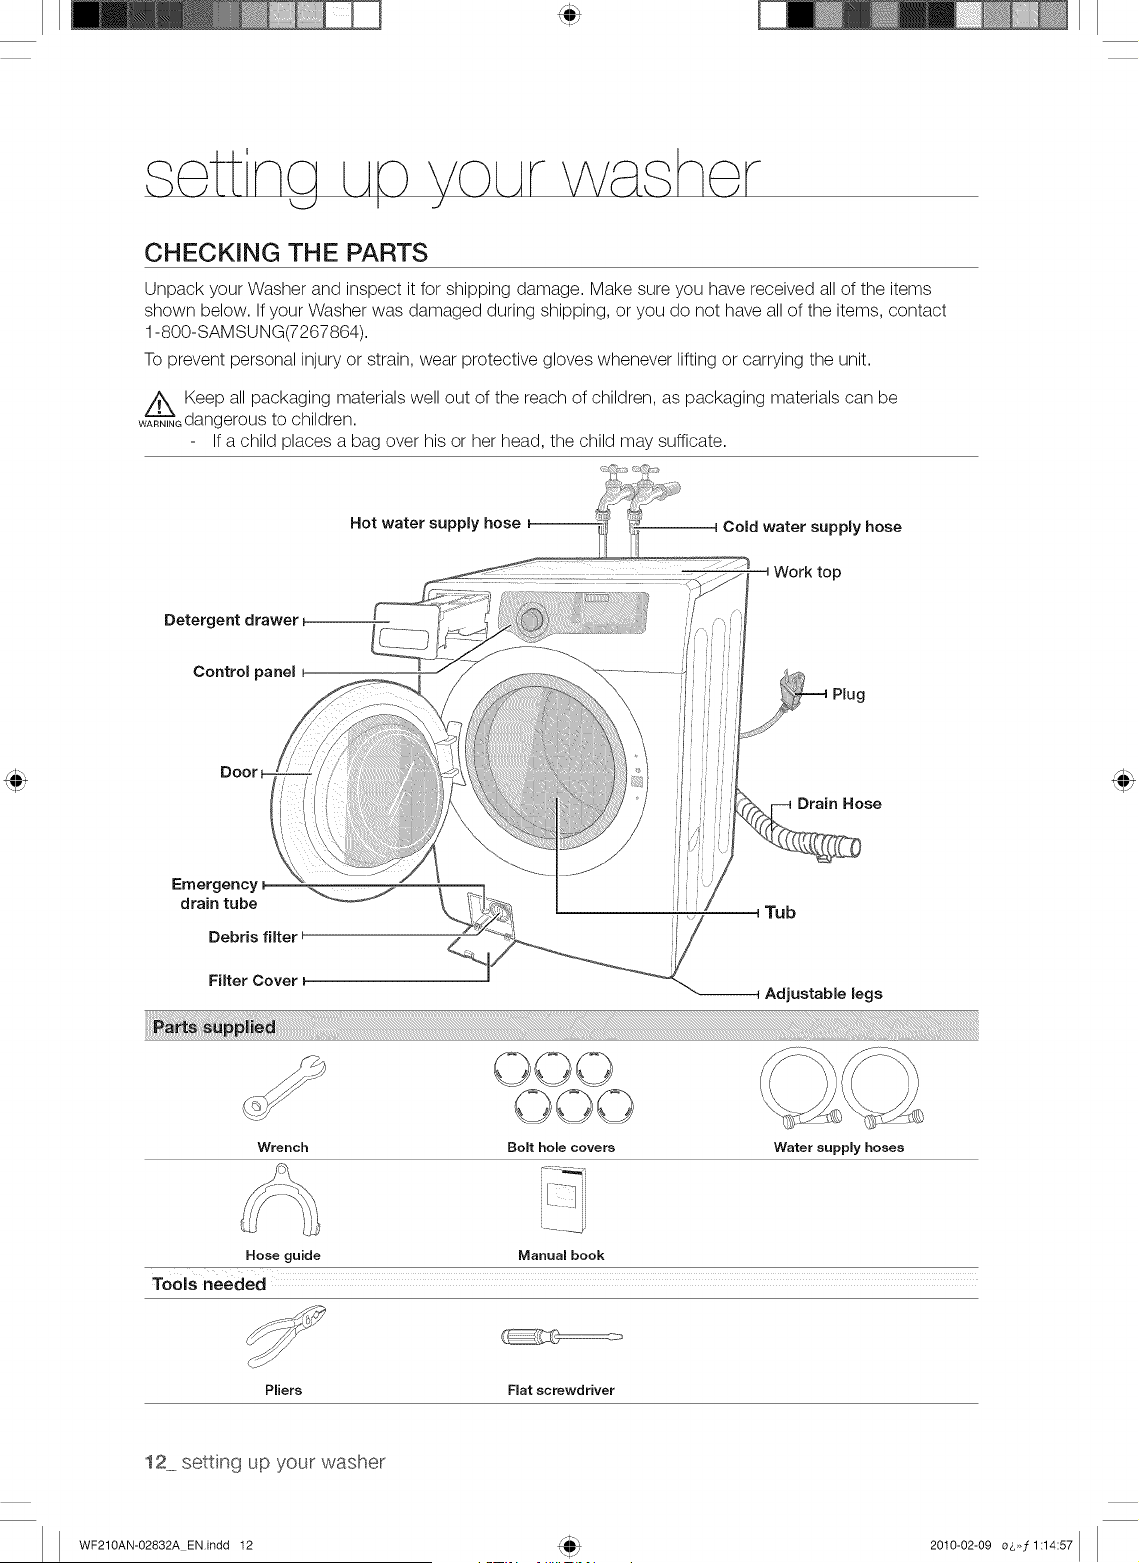
CHECKING THE PARTS
Unpack your Washer and inspect it for shipping damage. Make sure you have received all of the items
shown below. If your Washer was damaged during shipping, or you do not have all of the items, contact
1-800-SAM SU NG(7267864).
To prevent personal injury or strain, wear protective gloves whenever lifting or carrying the unit.
wARZ_N_Keep all packaging materials well out of the reach of children, as packaging materials can be
Gdangerous to children.
If a child places a bag over his or her head, the child may sufficate.
_:-_]_? .....
Hot water supply hose water supply hose
..... _Work top
Detergent drawer i
Control panel t
Door
Drain Hose
Emergency
drain tube
Debris filter
Filter Cover ,_
Tub
Adjustable legs
©©©
Wrench Bolt hole covers Water supply hoses
Ii!i 1
Hose guide Manual book
Tools needed
Pliers Flat screwdriver
12 setting up your washer
WF210AN-02832A EN.indd 12 2010-02-09 o&>,f1:14:57
MEETING iNSTALLATiON REQUIREMENTS
Electrical supply
• 120 Volt 60 Hz 15 AMP fuse or circuit breaker
Individual branch circuit serving only your Washer is recommended.
Your Washer is equipped with a power cord.
_ Never use an extension cord.
CAUTION
Grounding
ELECTRICAL GROUNDING IS REQUIRED FOR THIS APPLIANCE.
This appliance must be grounded. In the event of malfunction or breakdown, grounding will
reduce the risk of electric shock by providing a path of least resistance for electric current.
This appliance is equipped with a power cord having a three-prong grounding plug for use in a
properly installed and grounded outlet.
Z_ Improper connection of the equipment-grounding conductor can result in a risk of electrical
....... shock. Check with a qualified electrician or serviceman if you are in doubt as to whether
the appliance is properly grounded. Do not modify the plug provided with the appliance. If it
does not fit the outlet, have a proper outlet installed by a qualified electrician.
IMPORTANT SAFETY PRECAUTIONS
To prevent unnecessary risk of fire, electrical shock or personal injury, all wiring and
grounding must be done in accordance with the National Electrical Code ANSI/FNPA, No.
70 Latest Revision and local codes and ordinances. It is the personal responsibility of the
appliance owner to provide adequate electrical service for this appliance.
Z_ Never connect ground wire to plastic plumbing lines, gas lines, or hot water pipes.
CAUTION
settng up your washer 13
WF210AN-02832A EN.indd 13 2010-02-09 o_,,,f1:14:57
Water
To correctly fill your washer in the proper amount of time, water pressure of 20-116psi (137-
800kPa) is required.
Water pressure less than 20 psi (137kPa) may cause water valve failure, or may not allow the
water valve to shut off completely. Or, it may extend the fill time beyond what your washer
controls allow, resulting in your washer turning off. A time limit is built into the controls in the
event of an internal hose becoming loose and flooding your home.
The water faucets must be within 4 ft.(122cm) of the back of your washer for the inlet hoses
provided with your washer.
_ ccessory inlet hoses are available in various lengths up to 10 ft.(305cm) for faucets that
are further away from the back of your washer.
To avoid the possibility of water damage:
• Have water faucets easily accessible.
• Turn off faucets when the washer is not in use.
• Periodically check that there is no leakage from the water inlet hose fittings.
Z_ Check all connections at the water valve and faucet for leaks.
WARNING
Drain facility
The recommended height of the standpipe is 18 in (46 cm). The drain hose must be routed
through the drain hose clip to the standpipe. The standpipe must be large enough to accept the
outside diameter of the drain hose. The drain hose is attached at the factory.
Flooring
For best performance, your washer must be installed on a solidly constructed floor. Wood floor
may need to be reinforced to minimize vibration and/or unbalanced load situations. Carpeting
and soft tile surfaces are contributing factors in vibration and may cause your washer to move
slightly during the spin cycle.
Z_ Never install your washer on a platform or weakly supported structure.
CAUTION
Location consideration
Do not install your washer in areas where water may freeze, since your washer will always
maintain some water in its water valve, pump, and hose areas. This can cause damage the
pump, hoses and other components.
Alcove or closet installation
MINIMUM CLEARANCES FOR CLOSET AND ALCOVE INSTALLATIONS:
Sides- 1 In. (2.5 cm) Top - 17 In. (43.2 cm)
Rear - 4 In. (10.2 cm) Closet Front - 2 In. (5.1 cm)
If the washer and dryer are installed together, the closet front must have at least 72 in2 (465 cm 2)
of an unobstructed air opening. Your washer alone does not require a specific air opening.
14 setting up your washer
WF210AN-02832A EN.indd 14 2010-02-09 o&,,f1:14:58
INSTALLING YOUR WASHER
STEP 1
Selecting a location
_ Before you install the washer, make sure the location:
• Has a hard, level surface without carpeting or flooring that may obstruct ventilation.
Has no dust or alien substances.
Is away from direct sunlight.
Has adequate ventilation.
Will not be freezing (below 32 °F or 0 °C).
Is away from heat sources such as oil or gas.
Has enough space so that the washer doesn't stand on its power cord.
STEP 2
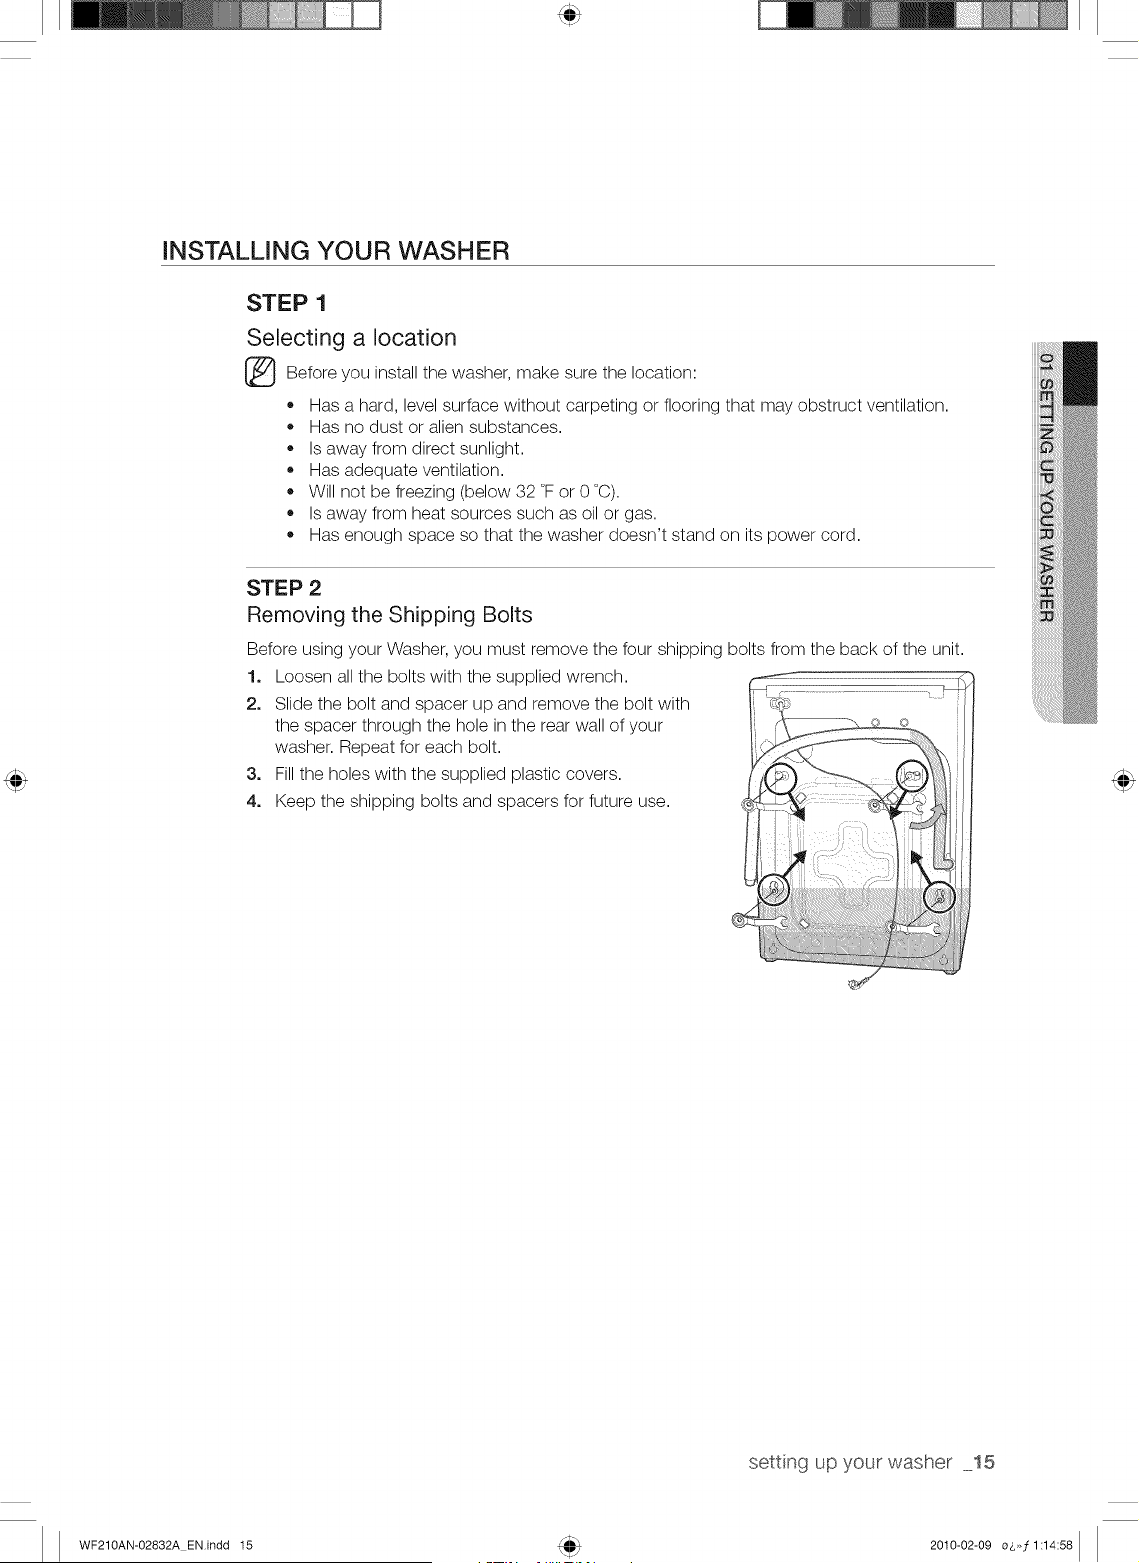
Removing the Shipping Bolts
Before using your Washer, you must remove the four shipping bolts from the back of the unit.
1. Loosen all the bolts with the supplied wrench.
2. Slide the bolt and spacer up and remove the bolt with
the spacer through the hole in the rear wall of your
washer. Repeat for each bolt.
3. Fillthe holes with the supplied plastic covers.
4. Keep the shipping bolts and spacers for future use.
settng up your washer 15
WF210AN-02832A ENindd 15 2010-02-09 o&,,f1:14:58
STEP 3
Installing your Washer
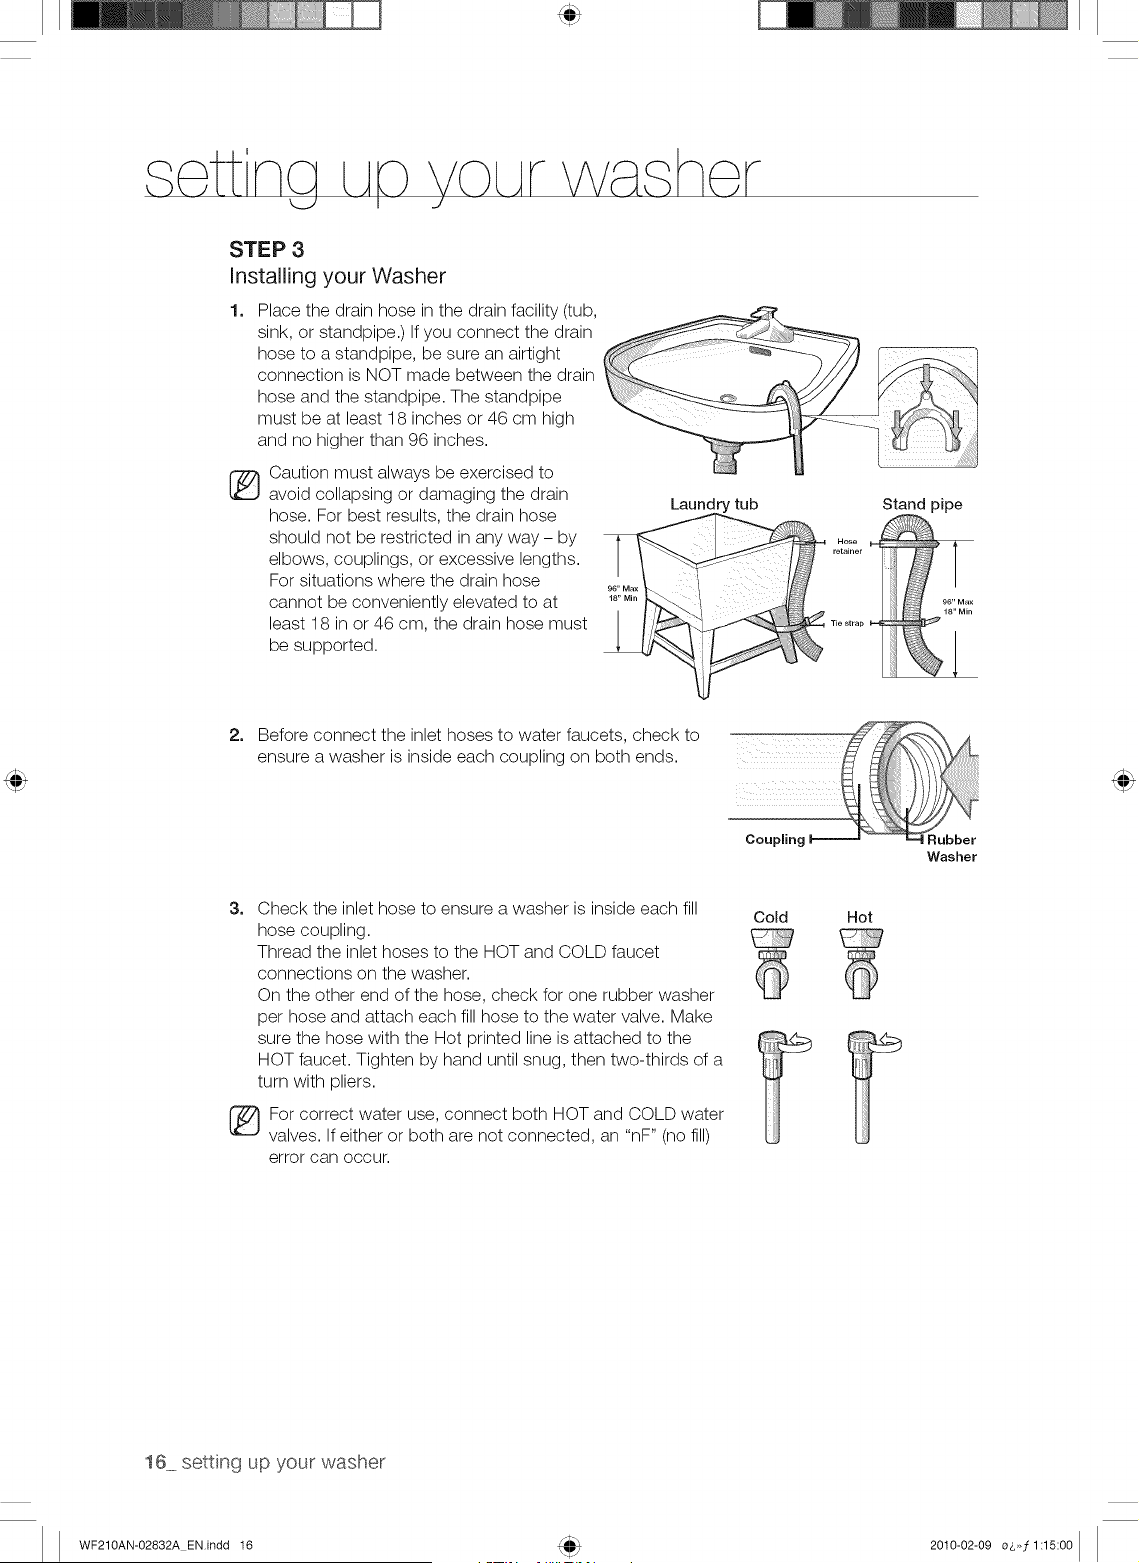
1,
Place the drain hose in the drain facility (tub,
sink, or standpipe.) If you connect the drain
hose to a standpipe, be sure an airtight
connection is NOT made between the drain
hose and the standpipe. The standpipe
must be at least 18 inches or 46 cm high
and no higher than 96 inches.
®
Caution must always be exercised to
avoid collapsing or damaging the drain
hose. For best results, the drain hose
should not be restricted in any way - by
elbows, couplings, or excessive lengths.
For situations where the drain hose
cannot be conveniently elevated to at
least 18 in or 46 cm, the drain hose must
be supported.
Laundry tub Stand pipe
_°_°
re alner
96" Max
" in
Tie strap
2. Before connect the inlet hoses to water faucets, check to
ensure a washer is inside each coupling on both ends.
Couplin£
I Rubber
Washer
3, Check the inlet hose to ensure a washer is inside each fill
hose coupling.
Thread the inlet hoses to the HOT and COLD faucet
connections on the washer.
On the other end of the hose, check for one rubber washer
per hose and attach each fill hose to the water valve. Make
sure the hose with the Hot printed line is attached to the
HOT faucet. Tighten by hand until snug, then two-thirds of a
turn with pliers.
For correct water use, connect both HOT and COLD water
valves. If either or both are not connected, an "nF" (no fill)
error can occur.
Cold Hot
16 setting up your washer
WF210AN-02832A EN.indd 16 2010-02-09 o_,,,f1:15:00
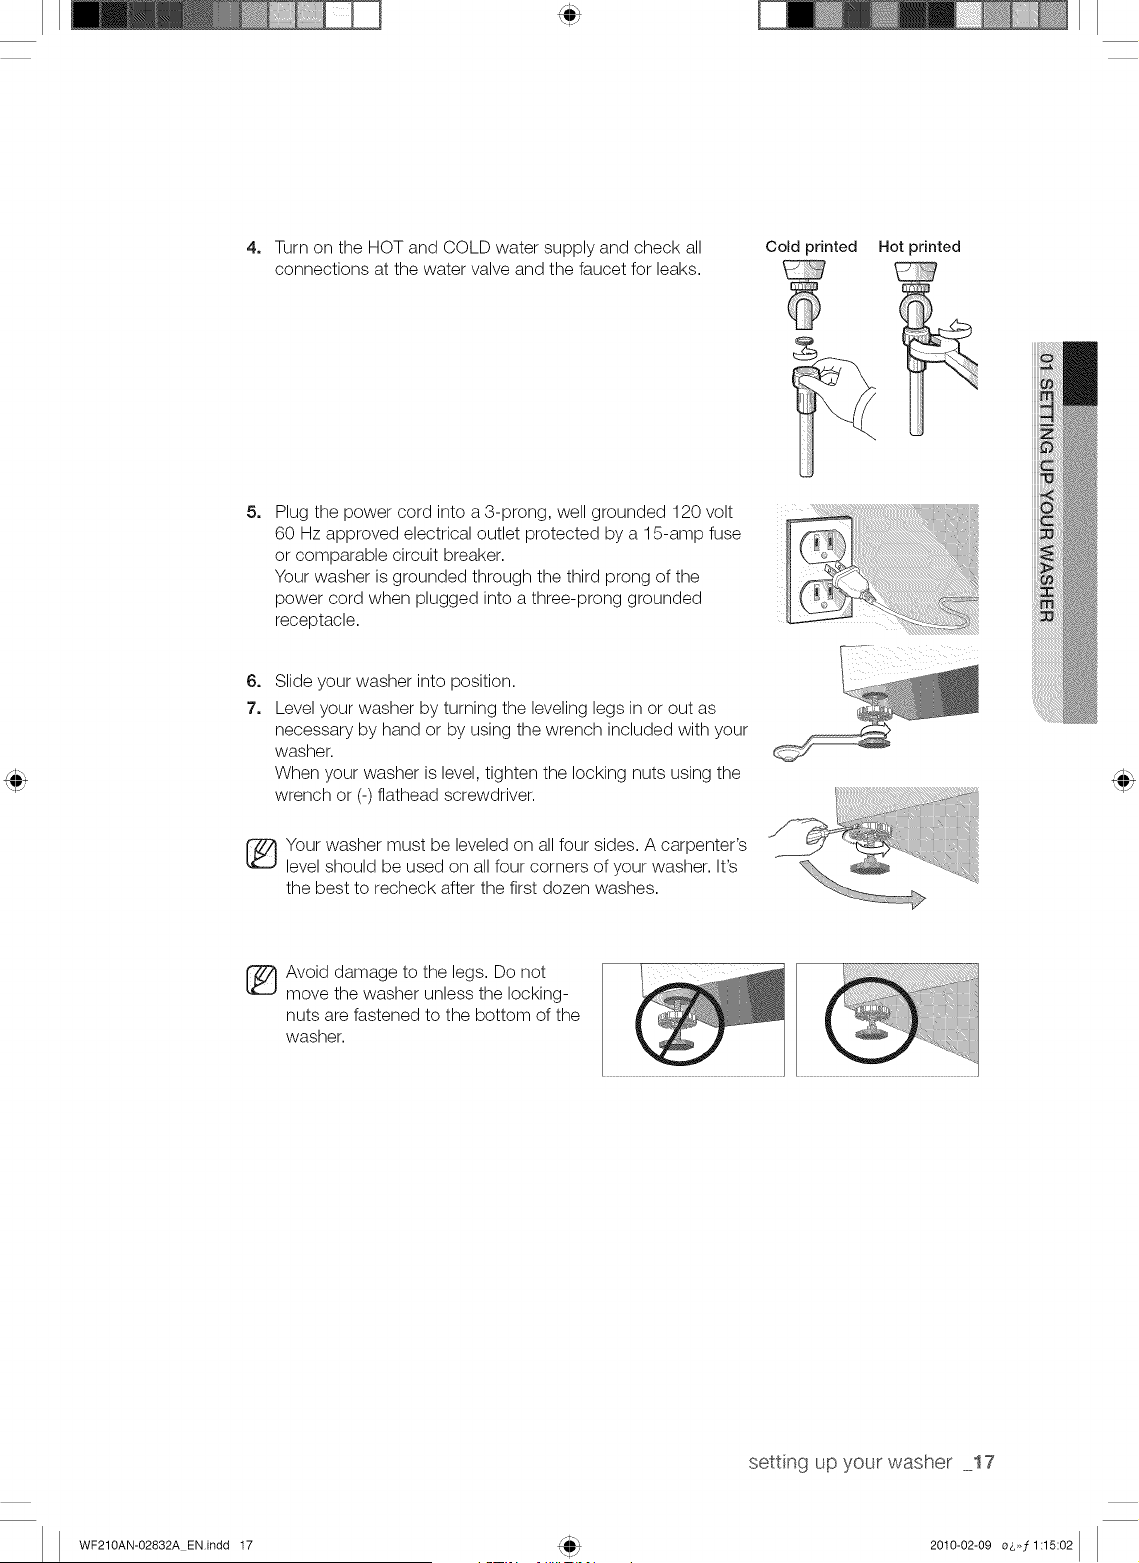
4, Turn on the HOT and COLD water supply and check all
connections at the water valve and the faucet for leaks.
Cold printed Hot printed
5,
Plug the power cord into a 3-prong, well grounded 120 volt
60 Hz approved electrical outlet protected by a 15-amp fuse
or comparable circuit breaker.
Your washer is grounded through the third prong of the
power cord when plugged into a three-prong grounded
receptacle.
6,
7,
Slide your washer into position.
Level your washer by turning the leveling legs in or out as
necessary by hand or by using the wrench included with your
washer.
When your washer is level, tighten the locking nuts using the
wrench or (-) flathead screwdriver.
Your washer must be leveled on all four sides. A carpenter's
level should be used on all four corners of your washer. It's
the best to recheck after the first dozen washes.
Avoid damage to the legs. Do not
move the washer unless the locking-
nuts are fastened to the bottom of the
washer.
settng up your washer 17
WF210AN-02832A EN.indd 17 2010-02-09 oO, f1:15:02
\
LOADING YOUR WASHER
• You can fill the tub with dry, unfolded clothes, but DO NOT OVERLOAD the tub.
,, Overloading may reduce washing efficiency, cause excess wear, and possibly cause creasing or
wrinkling of the load.
Wash delicate items such as bras, hosiery, and other lingerie in the Delicates cycle with similar
lightweight items.
When washing big bulky items or a few smaller items that don't fill the tub completely - a rug, a pillow,
stuffed toys, or one or two sweaters, for example - add a few towels to improve tumbling and spin
performance.
_ uring the spin cycle, the washer may add additional water to redistribute any excess unbalance
inside the drum.
When washing heavily soiled loads, not overloading your Washer is very important to assure good
cleaning results.
To add a forgotten item:
1, Press the Power button.
2, Press the Start/Pause Button.
3, Wait for the Door Lock light to go out (5 seconds).
4, Add the item, close the door, and press the Start/Pause Button.
After a 10-second pause, the cycle resumes.
[_To add items within five minutes of the wash
ensure
thorough cleaning, starting cycle.
18 washng a oad of aundry
WF210AN-02832A EN.indd 18 2010-02-09 o_,,,f1:15:03
G ETTi NG STARTE D
1. Load your Washer.
2. Close the door.
3. Press the Power button.
4. Add detergent and additives to the dispenser (see pages 20-21).
5. Select the appropriate cycle and options for the load (see pages 18-19).
6. Press the Start/Pause Button.
7. The Wash Indicator light illuminates.
8. The estimated cycle time appears in the display.
The time may fluctuate to better indicate the time remaining in the cycle.
The actual time required for a cycle may differ from the estimated time in the display depending on the
water pressure, water temperature, detergent, and laundry.
9. Before your washer starts to fill, it will make a series of clicking noises to check the door lock and do a
quick drain.
o When the cycle is complete, the Door Lock light goes out and "End" appears in the display.
DO NOT attempt to open the door until the Door Lock light is off. To add a forgotten item, see
"Loading your Washer" section. (page 19)
When your Washer is restarted after a pause, expect a delay of up to 15 seconds before the cycle
continues.
Pressing Power cancels the cycle and stops your washer.
The Wash, Rinse and Spin indicator lights illuminate during those portions of the cycle.
washng a oad of aundry 19
WF210AN-02832A EN.indd 19 2010-02-09 oo, f1:15:03
- Delicates/
Normal _,___-_ Hand Wash
HeavyDuty,/\ Q=ckWash
Perm Press O _ Rinse+Spin i
I
t
........ i Delayi
,--i Extra i
1
M 1
Cyle i
,::: @ @ ®
0 Hot/Cold @ High Heavy
Q Normal
WarmlWarm Medium
WarmlCold • Low Light
ColdlCold No S_in
@ ®
f
©
_ Delicates/
Normal @ ....... . _ Hand Wash
Heavy Duty 0 ,,,' "_, _ @Wool
Perm Press Q )i _ Quick Wash
Sanitize _ "R /,' 0 Rinse+Spin
/
/
@@@ @ @ @
sNs_j
LRinse]
rp.A_f!
L_5'_3
• Het/Cold _!!!iiiiHigh _iiiiii_Heavy
ii!g Warm/Warm _iii Medium • Normal
iii Warrn/CoJd Q Low @ Light
©
@
@
s6h
On/Off
®
p..... <
®®
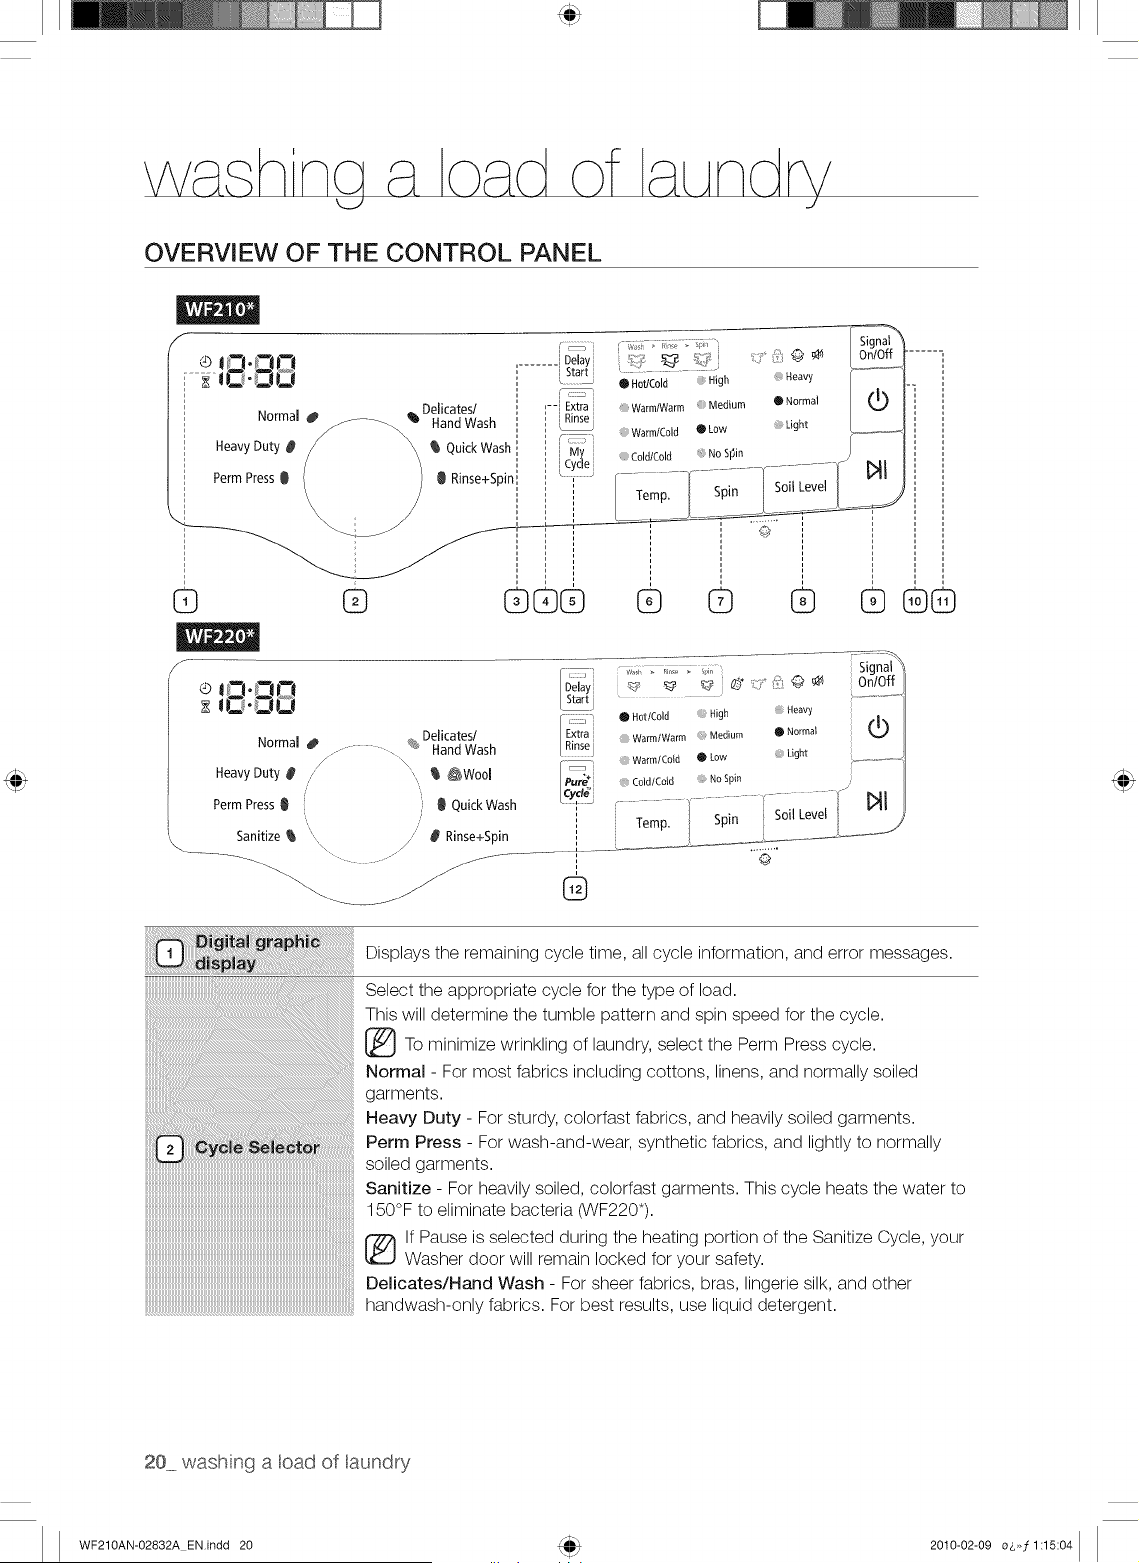
Displays the remaining cycle time, all cycle information, and error messages.
Select the appropriate cycle for the type of load.
This will determine the tumble pattern and spin speed for the cycle.
To minimize wrinkling of laundry, select the Perm Press cycle.
Normal - For most fabrics including cottons, linens, and normally soiled
garments.
Heavy Duty - For sturdy, colorfast fabrics, and heavily soiled garments.
Perm Press - For wash-and-wear, synthetic fabrics, and lightly to normally
soiled garments.
iiiiiiiiiiiiiiiiiiiiiiiiiiiiiiiiiiiiiiiiiiiiiiiiiiiiiiiiiiii iiiiiiiiiiiiiiiiiiiiiiiii
Sanitize- For heavily soiled, colorfast garments. This cycle heats the water to
150°F to eliminate bacteria (WF220*).
If Pause is selected during the heating portion of the Sanitize Cycle, your
Washer door will remain locked for your safety.
Delicates/Hand Wash - For sheer fabrics, bras, lingerie silk, and other
handwash-only fabrics. For best results, use liquid detergent.
20 wash nga load of laundry
WF210AN-02832A EN.Jndd 20 2010-02-09 o&>, 1 1:15:04
Wool - For machine-washable wool. Loads should be under 8 pounds
(WF220*). A load of 4.4 pounds or less is recommended.
• The Wool cycle washes laundry by moving the wash drum horizontally to
maintain the characteristics of the wool fibers and to prevent damaging
the cloth. It then stops for a while to allow the laundry to soak in the
water. This stop operation is not a problem.
• It is recommended using a neutral detergent to prevent damage to the
cloth and to improve the washing results.
The wool wash cycle of this machine has been approved
by Woolmark for the washing of machine washable
Woolmark products provided that the products are washed
according to the instructions on the garment label and
those issued by the manufacturer of this washing machine,
M0914ONoolmark approval number).
Quick Wash - For lightly soiled garments needed quickly.
Rinse + Spin - Use for loads that need rinsing only or to add rinse-added
fabric softener to a load.
Any cycle can be delayed for up to 19 hours in one-hour increments.
Displayed hour indicates the time at which the wash will be started.
Add an additional rinse at the end of the cycle to more thoroughly remove
laundry additives and perfumes.
Choose yourfavoritecycle includingtemperature,spin, soillevel,option, etc (seepages
:: : :::::: :::::::::: ::::: 23).
Press the button repeatedly to cycle through the different water temperature options.
Hot/Cold - Whites and heavilysoiled, colorfast items.
Warm0aNarm- Colorfast items. When warm rinse is selected, only the final rinse will
be warm.
The other rinses will be cold to conserve energy.
Warm/Cold - Moderately soiled, colorfast items; most wrinkle-free items.
Cold/Cold - Brightly colored, very lightly soiled items.
Press the button repeatedly to cycle through the different spin speed options.
High - Use for underwear, t-shirts, jeans, and sturdy cottons.
Medium- Use for jeans, wrinkle-free or wash-and-wear items, and synthetics.
Low- Use for delicate items needing a slow spin speed.
No Spin - Drains your Washer without spinning. Use for extremely delicate
items that cannot tolerate any spin.
Spin Only - Only the spin cycle is performed.
Press the button to select the Soil Level/washing time.
Heavy - For heavily soiled loads.
Normal - For moderately soiled loads. This setting is best for most loads.
Light - For lightly soiled loads.
Press to pause and restart programs.
Press once to turn your washer on. Press again to turn your washer off. If
the washer is left on for more than 10 minutes without any buttons being
touched, the power automatically turns off.
Press the Signal button to turn the signal on or off.
Use for drum cleaning. It cleanses drum of dirt and bacteria. Regular use
(after every 40 washes) is recommended. No detergent or bleach needed
(see pages 29).
washng a cad of aundry 21
WF210AN-02832A EN.indd 21 2010-02-09 o_,,,f 1:15:05
\
Child Lock
This function prevents children from playing with your washer.
Activating the Child Lock function
Press and hold both the Spin and Soil Level buttons simultaneously for approximately 3 seconds.
• If the Child Lock function is activated, the door is locked and the "Child Lock [@]" lamp is lit.
If the Start/Pause button is pressed after the Child Lock function is activated, none of the
buttons will work except for the Power button.
If a button is pressed when the buttons are locked, the "Child Lock [@ ]" lamp blinks.
Pausing the Child Lock function
When the door is locked or the buttons are locked by the Child Lock function, you can pause the
Child Lock operation for 1 minute by pressing and holding both the Spin and Soil Level buttons
simultaneously for approximately 3 seconds.
If Child Lock mode is paused temporarily, the door lock is released for 1 minute for user
convenience. During this period, the "Child Lock [@]" lamp blinks.
If the door is opened after the minute is over, an alarm sounds for up to 2 minutes.
If the door is closed within the 2 minutes, the door is locked and the Child Lock function is
reactivated. If the door is closed after the 2 minutes, the door will not be locked automatically
and no alarm will be heard.
Deactivating the Child Lock function
Press and hold both the Spin and Soil Level buttons simultaneously for approximately 6
seconds.
If the Child Lock function is deactivated, the door is unlocked and the "Child Lock [ @ ]" is
turned off.
Z_ • Child Lock is a function to prevent children or the infirm from accidently operating the
....... washer and injuring themselves.
If a child enters the washing machine, the child may become trapped and suffocate.
o
CAUTION
O
Once the Child Lock function is activated, the Child Lock function continuous working
even if the power is turned off.
Opening the door by force can result in injury due to damage to the product.
To add laundry when the Child Lock function is activated, you have to first pause or
deactivate the Child Lock function.
If you want to open the door of the washing machine when the Child Lock function is
activated:
Pause or deactivate the Child Lock function.
Turn the washing machine off and then on again.
22 washng a oad of aundry
WF210AN-02832A EN.indd 22 2010-02-09 o&,,f 1:15:06

Spin Only
If you press the Power button and then press and hold the Spin button for 2 seconds, the spin
time is displayed on the display panel.
Then, press the Spin button repeatedly until the required spin level is selected, and then press
the Start/Pause button.
Before pressing the Spin Only button to use the Spin Only function, you can select a course
with the Cycle Selector. If you have selected a course, you can only select the spin level
corresponding to the selected course.
Garment+_ ÷
You can add or take out laundry items even after the wash has started, as long as the
"Garment+ _÷" light is turned on. Pressing the Start/Pause button unlocks the door, unless the
water is too hot or if there is too much water in your washer. If you are able to unlock the door
and wish to continue the wash cycle, close the door, and then press the Start/Pause button.
My cycle (WF210*)
Allows you to activate your custom wash (temperature, spin, soil level, etc.) with one-button
convenience.
By pushing the My Cycle button, you activate the settings used during the My Cycle mode. The
"My Cycle" Ilight indicates activation.
You can select all options as follows in the My Cycle mode.
1. Select cycles using the Cycle Selector.
2. After cycle selection, set each option.
3_
See page 37 for available option settings with each cycle.
Then, you can store the cycle and options you select by pressing the Start/Pause button
in the My Cycle mode. The cycle and options you select are displayed the next time you
choose the My Cycle function.
You can change the My Cycle settings by repeating the process above.
The last used setting is displayed the next time you choose the My Cycle function.
If washing is completed in My Cycle mode, the washing machine automatically enters
My Cycle mode when you turn the power on by pressing the Power button.
wash nga oad of aundry _23
WF210AN-02832A EN.indd 23 2010-02-09 o_,,,f 1:15:06
\
DETERGENT USE
Your Washer is designed to use high efficiency (HE) detergents.
• For best cleaning results, efficiency detergents such as Tide HE, Wisk
HE, Cheer HE or Gain HE*. High efficiency detergents contain suds
suppressors that reduce or eliminate suds. When fewer suds are
produced, the load tumbles more efficiently and cleaning is maximized.
,/_ Regular detergent is NOT recommended. Please use only HE
....... detergents.
Reducing the amount of detergent may reduce the quality of cleaning. It is important to pre-treat
stains, sort carefully by color and soil level, and avoid overloading.
* Brand names are trademarks of their respective manufacturers.
FEATURES
Automatic dispenser
Your Washer has separate compartments for dispensing
detergent and color-safe bleach, chlorine bleach, and
fabric softener. Add all laundry additives to their respective
compartments before starting your Washer.
z_The automatic dispenser MUST ALWAYS be in place before
....... starting your Washer.
DO NOT open the automatic dispenser when your washer is running.
To use:
• Never exceed the manufacturer's recommendations when
adding detergent.
• This compartment holds liquid detergent for the main wash
cycle, which is added to the load at beginning of cycle.
When using powdered detergent, remove the liquid
detergent compartment from the detergent drawer.
Powdered detergent will not be dispensed from the Liquid
detergent compartment.
•I Liquid detergent
compartment
24 washng a cad of aundry
WF210AN-02832A EN.indd 24 2010-02-09 o_,,,f 1:15:07
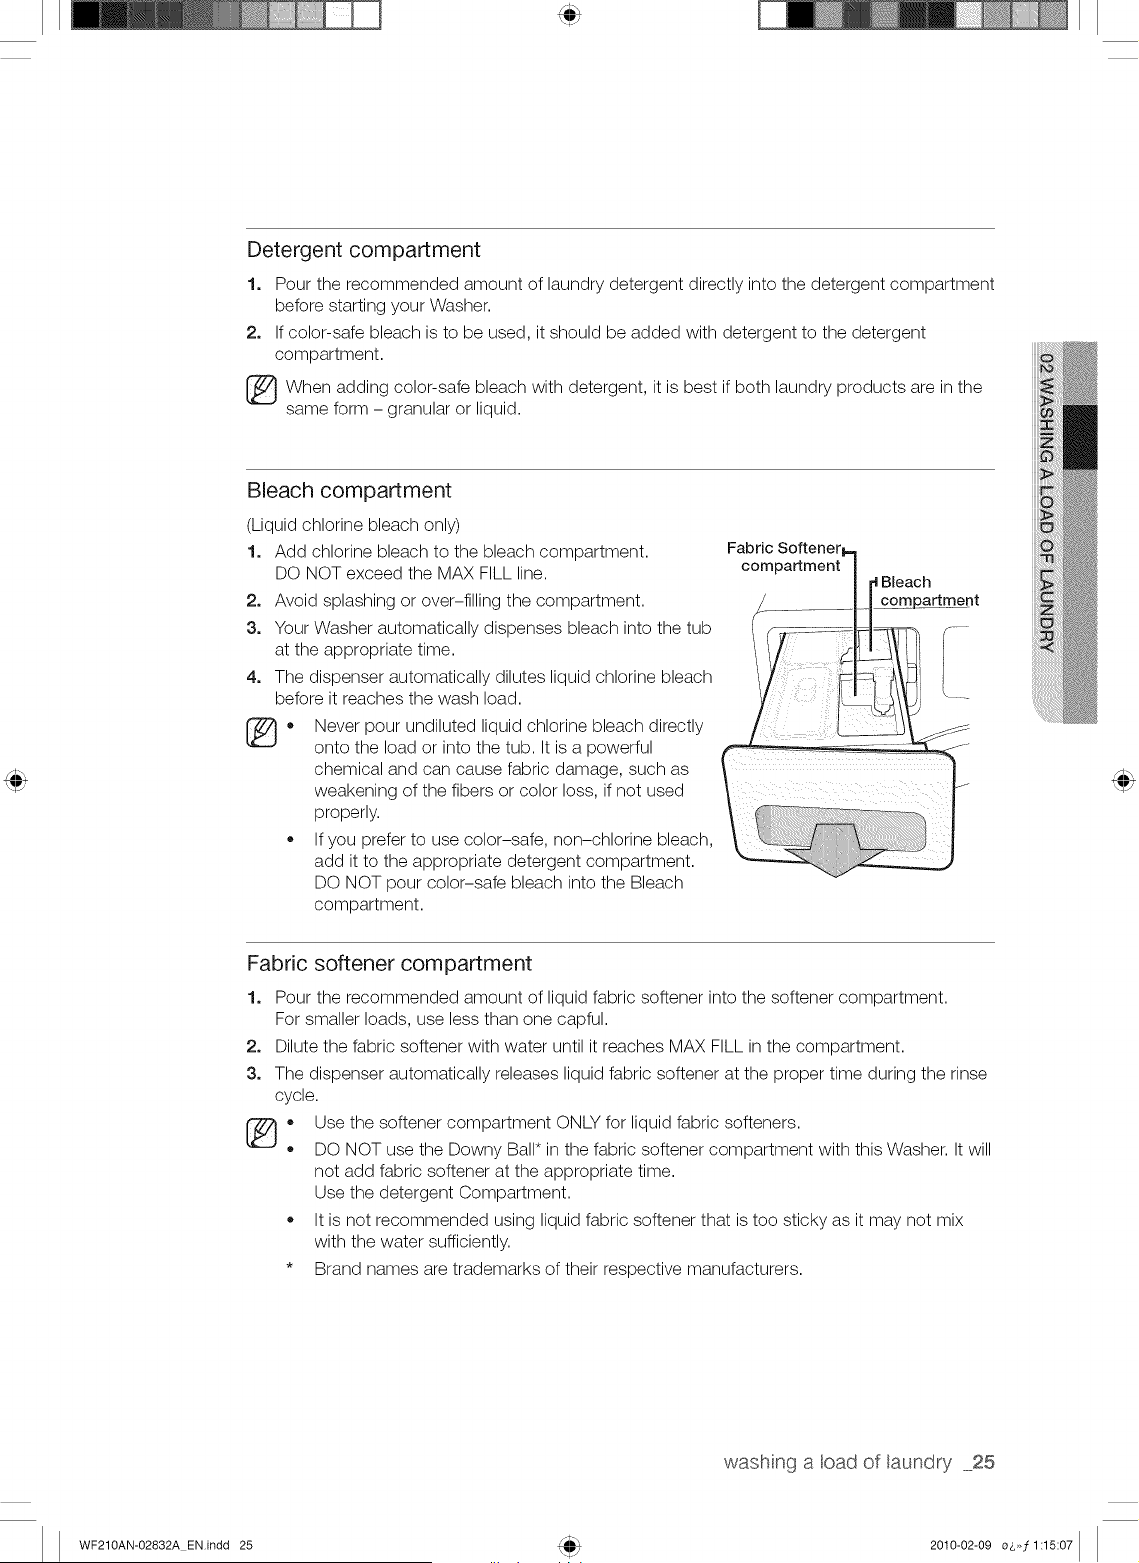
Detergent compartment
1. Pour the recommended amount of laundry detergent directly into the detergent compartment
before starting your Washer.
2. If color-safe bleach is to be used, it should be added with detergent to the detergent
compartment.
When adding color-safe bleach with detergent, it is best if both laundry products are in the
same form - granular or liquid.
Bleach compartment
(Liquid chlorine bleach only)
1. Add chlorine bleach to the bleach compartment.
DO NOT exceed the MAX FILL line.
2. Avoid splashing or over-filling the compartment.
3. Your Washer automatically dispenses bleach into the tub
at the appropriate time.
4. The dispenser automatically dilutes liquid chlorine bleach
before it reaches the wash load.
_o Never pour undiluted liquid chlorine bleach directly
onto the load or into the tub. It is a powerful
chemical and can cause fabric damage, such as
weakening of the fibers or color loss, if not used
properly.
If you prefer to use color-safe, non-chlorine bleach,
add it to the appropriate detergent compartment.
DO NOT pour color-safe bleach into the Bleach
compartment.
Fabric Softener
compartment
compartment
__
Fabric softener compartment
1.
2.
3.
o
Pour the recommended amount of liquid fabric softener into the softener compartment.
For smaller loads, use less than one capful.
Dilute the fabric softener with water until it reaches MAX FILL in the compartment.
The dispenser automatically releases liquid fabric softener at the proper time during the rinse
cycle.
Use the softener compartment ONLY for liquid fabric softeners.
DO NOT use the Downy Ball* in the fabric softener compartment with this Washer. It will
not add fabric softener at the appropriate time.
Use the detergent Compartment.
It is not recommended using liquid fabric softener that is too sticky as it may not mix
with the water sufficiently.
* Brand names are trademarks of their respective manufacturers.
washng a cad of aundry 25
WF210AN-02832A EN.indd 25 2010-02-09 o_,,,f 1:15:07
oeanng and
\
mantan ng
Keeping your washer clean improves its performance, wards off unnecessary
repairs, and lengthens its life,
CLEANING THE EXTERIOR
Turn off the water faucets after finishing the day's washing.
This will shut off the water supply to your Washer and prevent the unlikely possibility of damage from
escaping water. Leave the door open to allow the inside of your Washer to dry out.
Use a soft cloth to wipe up all detergent, bleach, or other spills as they occur.
Clean the following as recommended:
Control Panel - Clean with a soft, damp cloth. Do not use abrasive powders or cleaning pads. Do not spray
cleaners directly on the panel.
Cabinet - Clean with soap and water.
CLEANING THE INTERIOR
Clean the interior of your Washer periodically to remove any dirt, soil, odor, mold, mildew, or bacterial
residue that may remain in your Washer as a result of washing clothes.
Failure to follow these instructions may result in unpleasant conditions, including odors and/or permanent
stains on your Washer or laundry.
Hard water deposits may be removed, if needed. Use a cleaner labeled "Washer safe".
CLEANING THE DISPENSERS
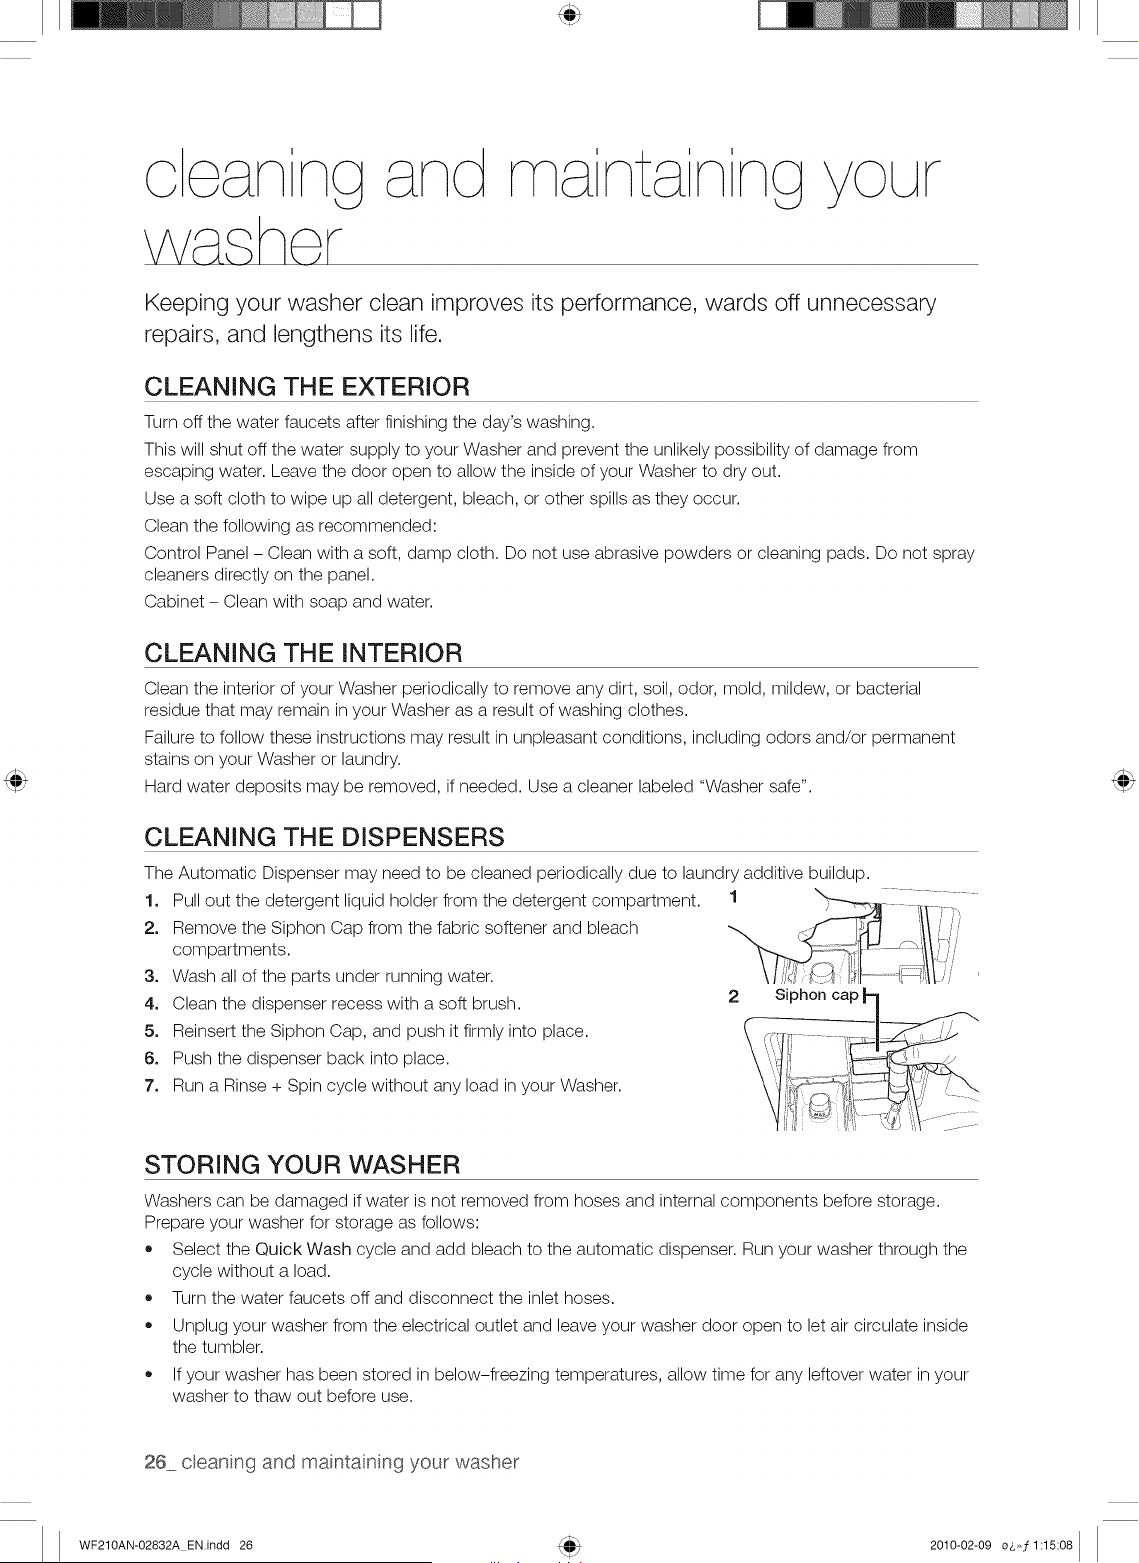
The Automatic Dispenser may need to be cleaned periodically due to laundry additive buildup.
1, Pull out the detergent liquid holder from the detergent compartment.
2, Remove the Siphon Cap from the fabric softener and bleach
compartments.
3, Wash all of the parts under running water.
4, Clean the dispenser recess with a soft brush.
5, Reinsert the Siphon Cap, and push it firmly into place.
6, Push the dispenser back into place.
7, Run a Rinse + Spin cycle without any load in your Washer.
2 Siphon
STORING YOUR WASHER
Washers can be damaged if water is not removed from hoses and internal components before storage.
Prepare your washer for storage as follows:
• Select the Quick Wash cycle and add bleach to the automatic dispenser. Run your washer through the
cycle without a load.
Turn the water faucets off and disconnect the inlet hoses.
Unplug your washer from the electrical outlet and leave your washer door open to let air circulate inside
the tumbler.
If your washer has been stored in below-freezing temperatures, allow time for any leftover water in your
washer to thaw out before use.
26 ceaning and maintan ng your washer
WF210AN-02832A EN.indd 26 2010-02-09 o_,,,f 1:15:08
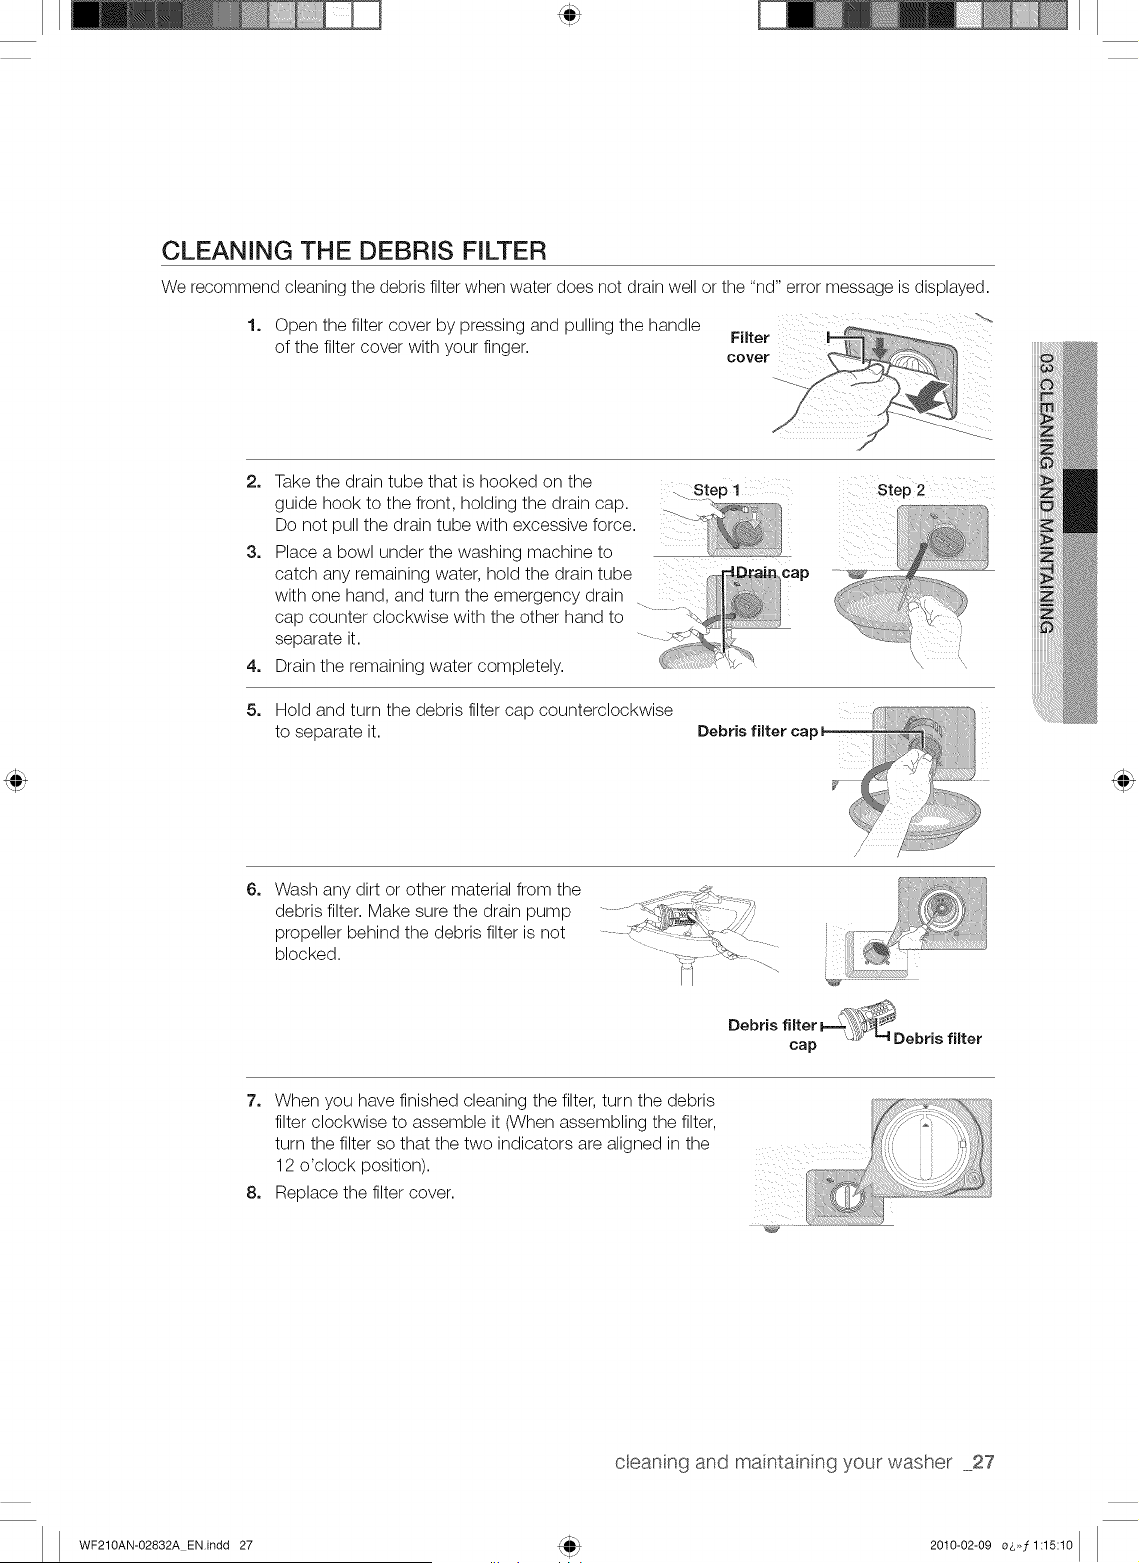
CLEANING THE DEBRIS FILTER
We recommend cleaning the debris filter when water does not drain well or the "nd" error message is displayed.
1. Open the filter cover by pressing and pulling the handle
Filter
of the filter cover with your finger, cover
2.
3.
4.
5.
6.
Take the drain tube that is hooked on the . Step 1 step 2
guide hook to the front, holding the drain cap. ...........
Do not pull the drain tube with excessive force.
Place a bowl under the washing machine to
catch any remaining water, hold the drain tube _:,:_:
with one hand, and turn the emergency drain
cap counter clockwise with the other hand to .... _i
separate it..........
Drain the remaining water completely.
Hold and turn the debris filter cap counterclockwise
to separate it.
Debris filter cap
Wash any dirt or other material from the
debris filter. Make sure the drain pump
propeller behind the debris filter is not
blocked.
7.
8.
When you have finished cleaning the filter, turn the debris
filter clockwise to assemble it (When assembling the filter,
turn the filter so that the two indicators are aligned in the ..........................
12 o'clock position).
Replace the filter cover.
cleaning and mantanng your washer 27
WF210AN-02832A EN.indd 27 2010-02-09 o_,,,f 1:15:10
oeanng and
\
mantan ng
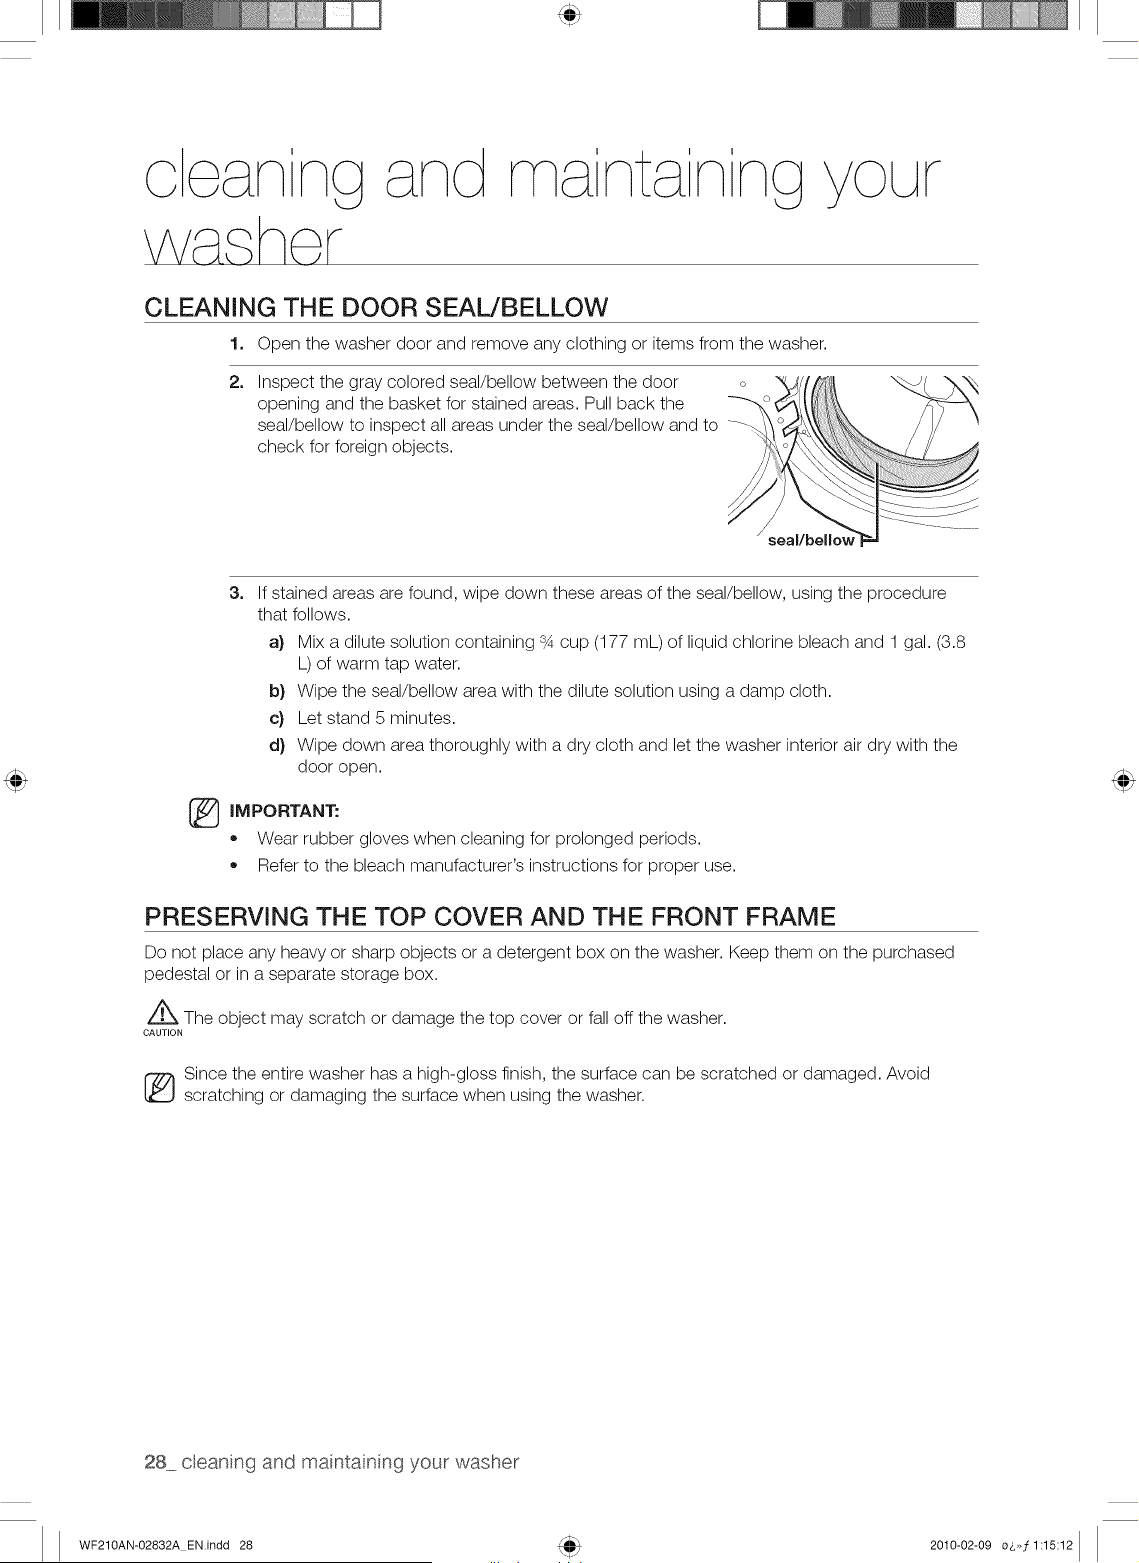
CLEANING THE DOOR SEAL/BELLOW
1. Open the washer door and remove any clothing or items from the washer.
2. Inspect the gray colored seal/bellow between the door
opening and the basket for stained areas. Pull back the
seal/bellow to inspect all areas under the seal/bellow and to --_-
check for foreign objects.
seal/bellow
®
3=
If stained areas are found, wipe down these areas of the seal/bellow, using the procedure
that follows.
a) Mix a dilute solution containing 34 cup (177 mL) of liquid chlorine bleach and 1 gal. (3.8
L) of warm tap water.
b} Wipe the seal/bellow area with the dilute solution using a damp cloth.
c} Let stand 5 minutes.
d} Wipe down area thoroughly with a dry cloth and let the washer interior air dry with the
door open.
IM PC RTANI"."
• Wear rubber gloves when cleaning for prolonged periods.
Refer to the bleach manufacturer's instructions for proper use.
PRESERVING THE TOP COVER AND THE FRONT FRAME
Do not place any heavy or sharp objects or a detergent box on the washer. Keep them on the purchased
pedestal or in a separate storage box.
Z_ The object may scratch or damage the top cover or fall off the washer.
CAUTION
Since the entire washer has a high-gloss finish, the surface can be scratched or damaged. Avoid
scratching or damaging the surface when using the washer.
28 ceaning and maintan ng your washer
WF210AN-02832A EN.indd 28 2010-02-09 oo, f 1:15:12
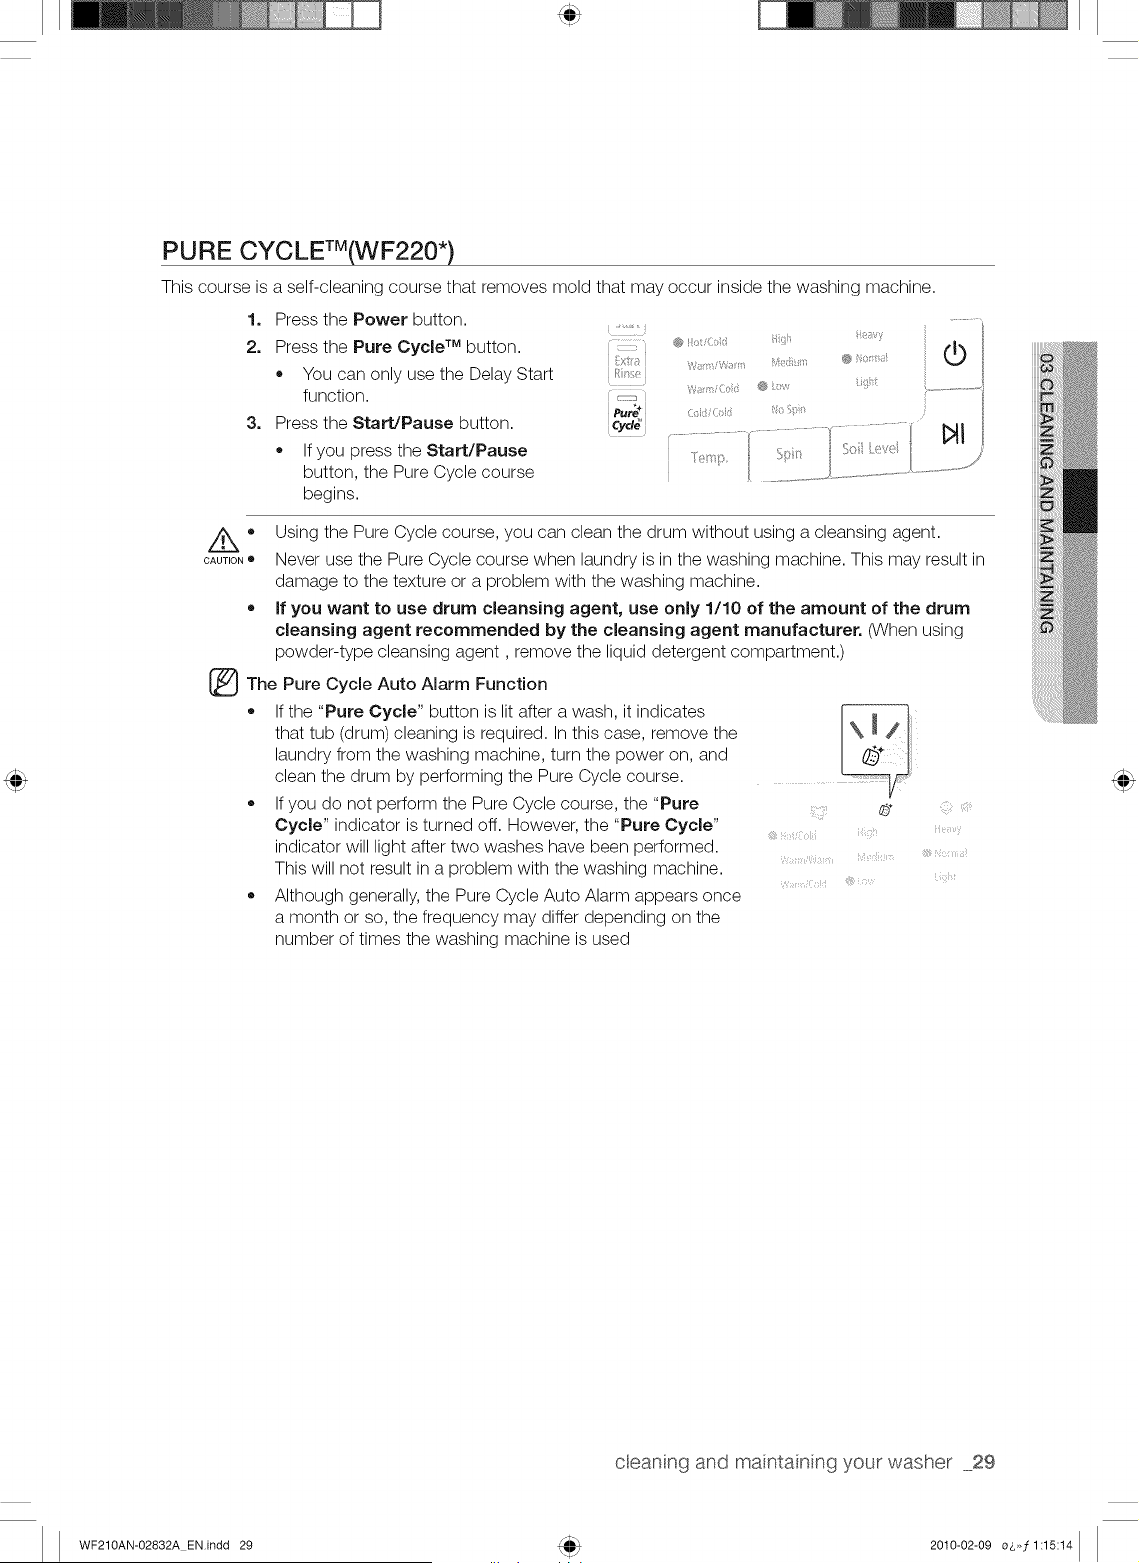
PURE CYCLETM(WF220 *)
This course is a self-cleaning course that removes mold that may occur inside the washing machine.
1. Press the Power button.
2. Press the Pure Cycle TM button.
• You can only use the Delay Start
function.
3. Press the Start/Pause button.
If you press the Start/Pause
button, the Pure Cycle course
begins.
.......iiiiiii17_iiii_i
ixt
pu_*
Cyd__
_ •
CAUTION Ii
Using the Pure Cycle course, you can clean the drum without using a cleansing agent.
Never use the Pure Cycle course when laundry is in the washing machine. This may result in
damage to the texture or a problem with the washing machine.
If you want to use drum cleansing agent, use only 1/10 of the amount of the drum
cleansing agent recommended by the cleansing agent manufacturer. (When using
powder-type cleansing agent, remove the liquid detergent compartment.)
[_The Pure Cycle Auto Alarm Function
If the "Pure Cycle" button is lit after a wash, it indicates
that tub (drum) cleaning is required. In this case, remove the
laundry from the washing machine, turn the power on, and
clean the drum by performing the Pure Cycle course.
If you do not perform the Pure Cycle course, the "Pure
Cycle" indicator is turned off. However, the "Pure Cycle"
indicator will light after two washes have been performed.
This will not result in a problem with the washing machine.
Although generally, the Pure Cycle Auto Alarm appears once
a month or so, the frequency may differ depending on the
number of times the washing machine is used
t'__wJ,_i",,,_q_,_i,_',i i:i',,'_i_ _;_'
igolT,:
t_7!7i_
cleaning and maintaining your washer _29
WF210AN-02832A EN.indd 29 2010-02-09 o7,>,7 1:15:14
b hoot ncj
nform on
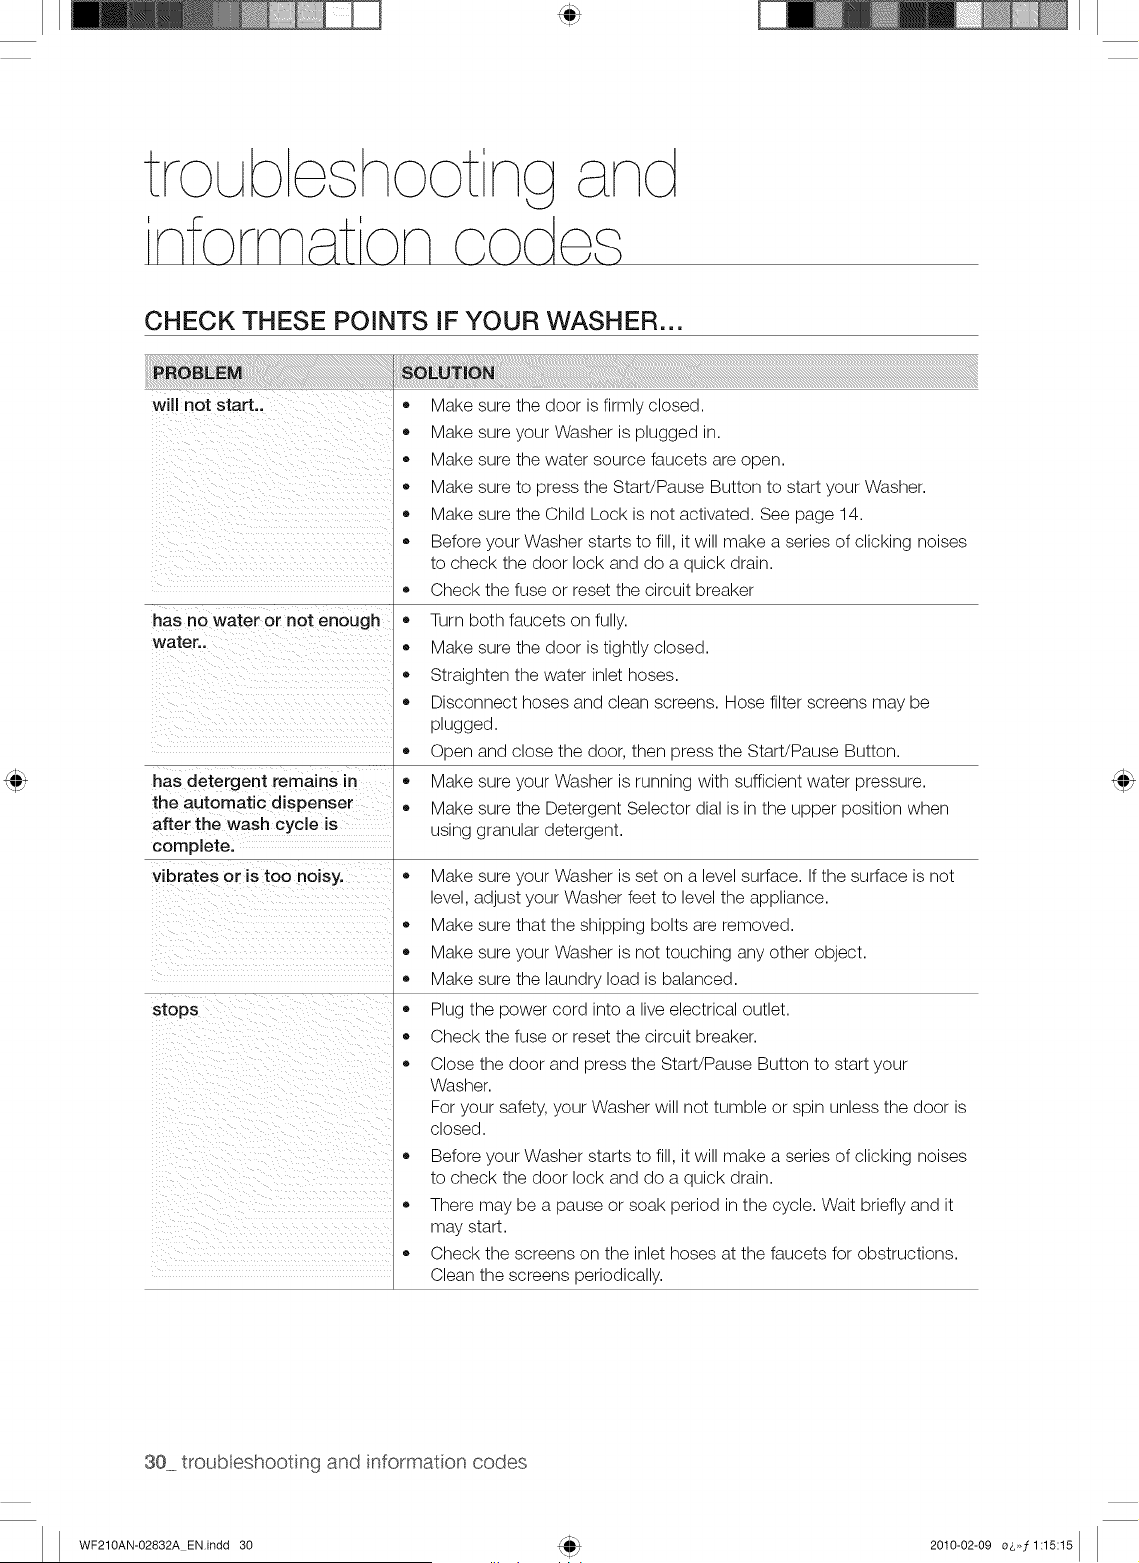
CHECK THESE POINTS IF YOUR WASHER...
will not start..
has no water or not enough
water..
has detergent remains in
the automatic dispenser
after the wash cycle is
complete.
vibrates or is too noisy.
stops
,, Make sure the door is firmly closed.
• Make sure your Washer is plugged in.
Make sure the water source faucets are open.
Make sure to press the Start/Pause Button to start your Washer.
Make sure the Child Lock is not activated. See page 14.
Before your Washer starts to fill, it will make a series of clicking noises
to check the door lock and do a quick drain.
Check the fuse or reset the circuit breaker
Turn both faucets on fully.
Make sure the door is tightly closed.
Straighten the water inlet hoses.
Disconnect hoses and clean screens. Hose filter screens may be
plugged.
Open and close the door, then press the Start/Pause Button.
• Make sure your Washer is running with sufficient water pressure.
Make sure the Detergent Selector dial is in the upper position when
using granular detergent.
Make sure your Washer is set on a level surface. If the surface is not
level, adjust your Washer feet to level the appliance.
Make sure that the shipping bolts are removed.
Make sure your Washer is not touching any other object.
Make sure the laundry load is balanced.
Plug the power cord into a live electrical outlet.
Check the fuse or reset the circuit breaker.
Close the door and press the Start/Pause Button to start your
Washer.
For your safety, your Washer will not tumble or spin unless the door is
closed.
Before your Washer starts to fill, it will make a series of clicking noises
to check the door lock and do a quick drain.
There may be a pause or soak period in the cycle. Wait briefly and it
may start.
Check the screens on the inlet hoses at the faucets for obstructions.
Clean the screens periodically.
30 troubeshooting and informaton codes
WF210AN-02832A ENindd 30 2010-02-09 o_,,,f 1:15:15
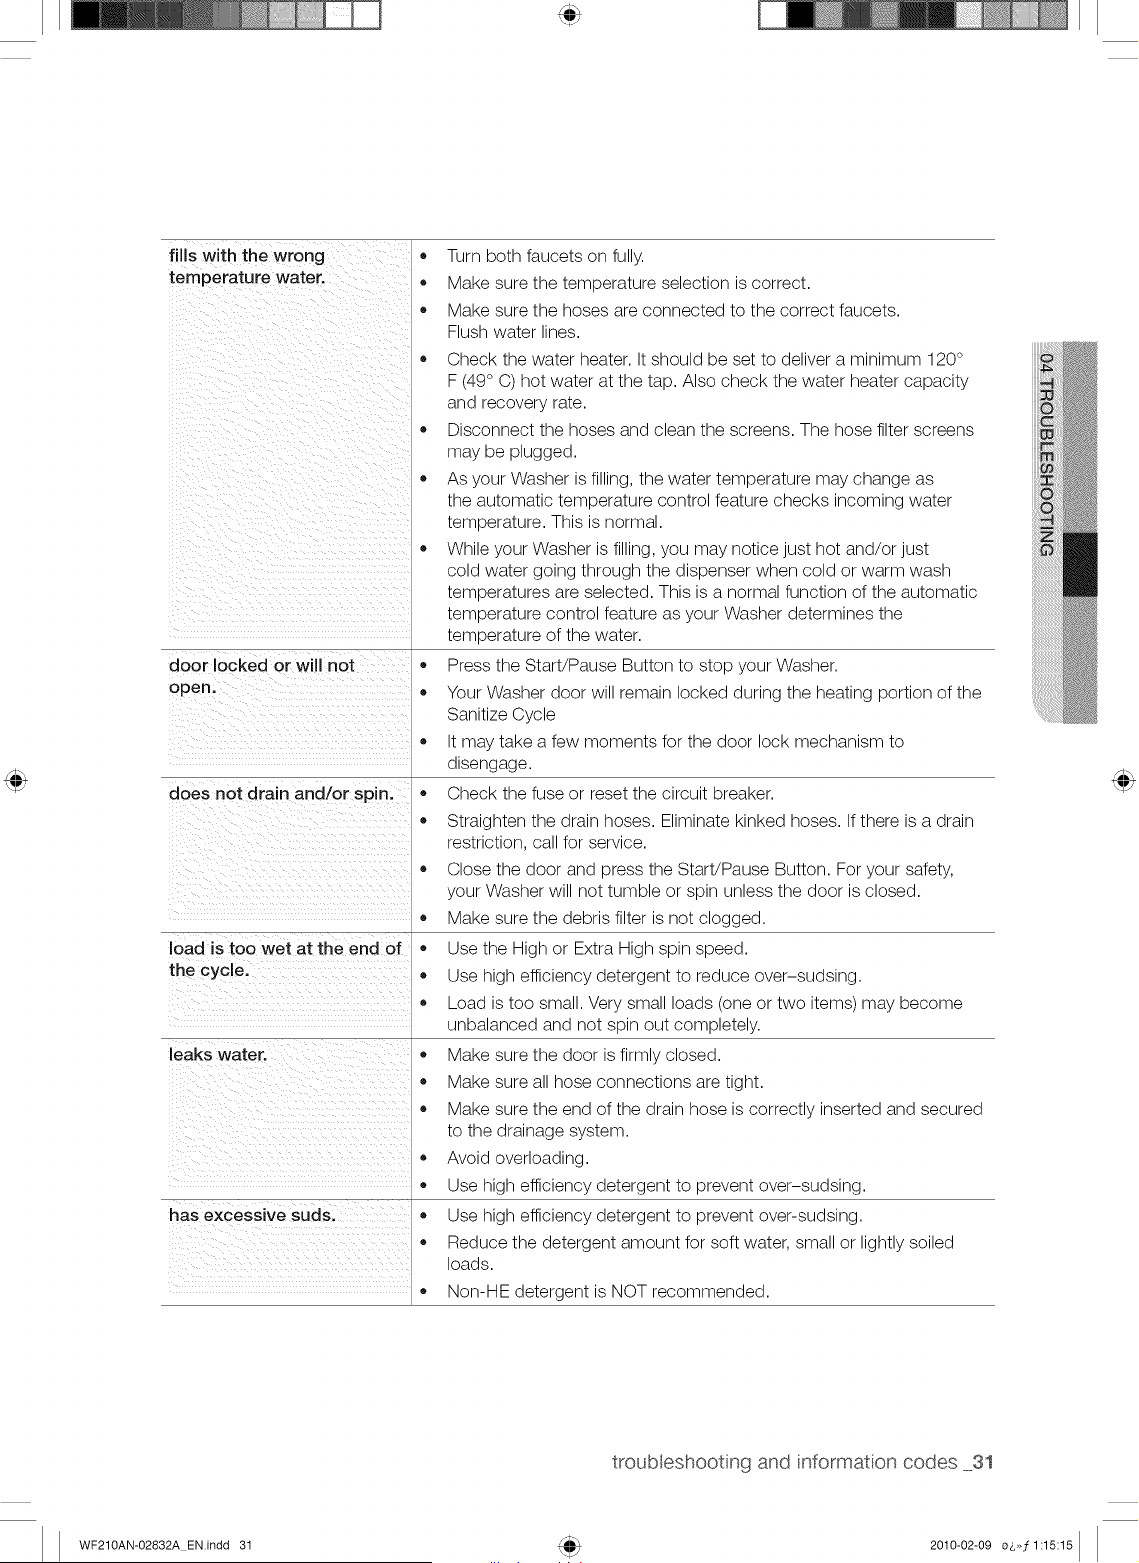
fills with the wrong
temperature water.
door locked or will not
open.
does not drain and/or spin.
load is too wet at the end of
the cycle.
leaks water.
has excessive suds.
• Turn both faucets on fully.
• Make sure the temperature selection is correct.
• Make sure the hoses are connected to the correct faucets.
Flush water lines.
• Check the water heater. It should be set to deliver a minimum 120 °
F (49° C) hot water at the tap. Also check the water heater capacity
and recovery rate.
• Disconnect the hoses and clean the screens. The hose filter screens
may be plugged.
• As your Washer is filling, the water temperature may change as
the automatic temperature control feature checks incoming water
temperature. This is normal.
• While your Washer is filling, you may notice just hot and/or just
cold water going through the dispenser when cold or warm wash
temperatures are selected. This is a normal function of the automatic
temperature control feature as your Washer determines the
temperature of the water.
• Press the Start/Pause Button to stop your Washer.
• Your Washer door will remain locked during the heating portion of the
Sanitize Cycle
• It may take a few moments for the door lock mechanism to
disengage.
• Check the fuse or reset the circuit breaker.
• Straighten the drain hoses. Eliminate kinked hoses. If there is a drain
restriction, call for service.
• Close the door and press the Start/Pause Button. For your safety,
your Washer will not tumble or spin unless the door is closed.
• Make sure the debris filter is not clogged.
• Use the High or Extra High spin speed.
• Use high efficiency detergent to reduce over-sudsing.
• Load is too small. Very small loads (one or two items) may become
unbalanced and not spin out completely.
• Make sure the door is firmly closed.
• Make sure all hose connections are tight.
• Make sure the end of the drain hose is correctly inserted and secured
to the drainage system.
• Avoid overloading.
• Use high efficiency detergent to prevent over-sudsing.
• Use high efficiency detergent to prevent over-sudsing.
• Reduce the detergent amount for soft water, small or lightly soiled
loads.
• Non-HE detergent is NOT recommended.
troubleshooting and informaton codes 31
WF210AN-02832A EN.indd 31 2010-02-09 o_,,,f 1:15:15
b ncj
nform on
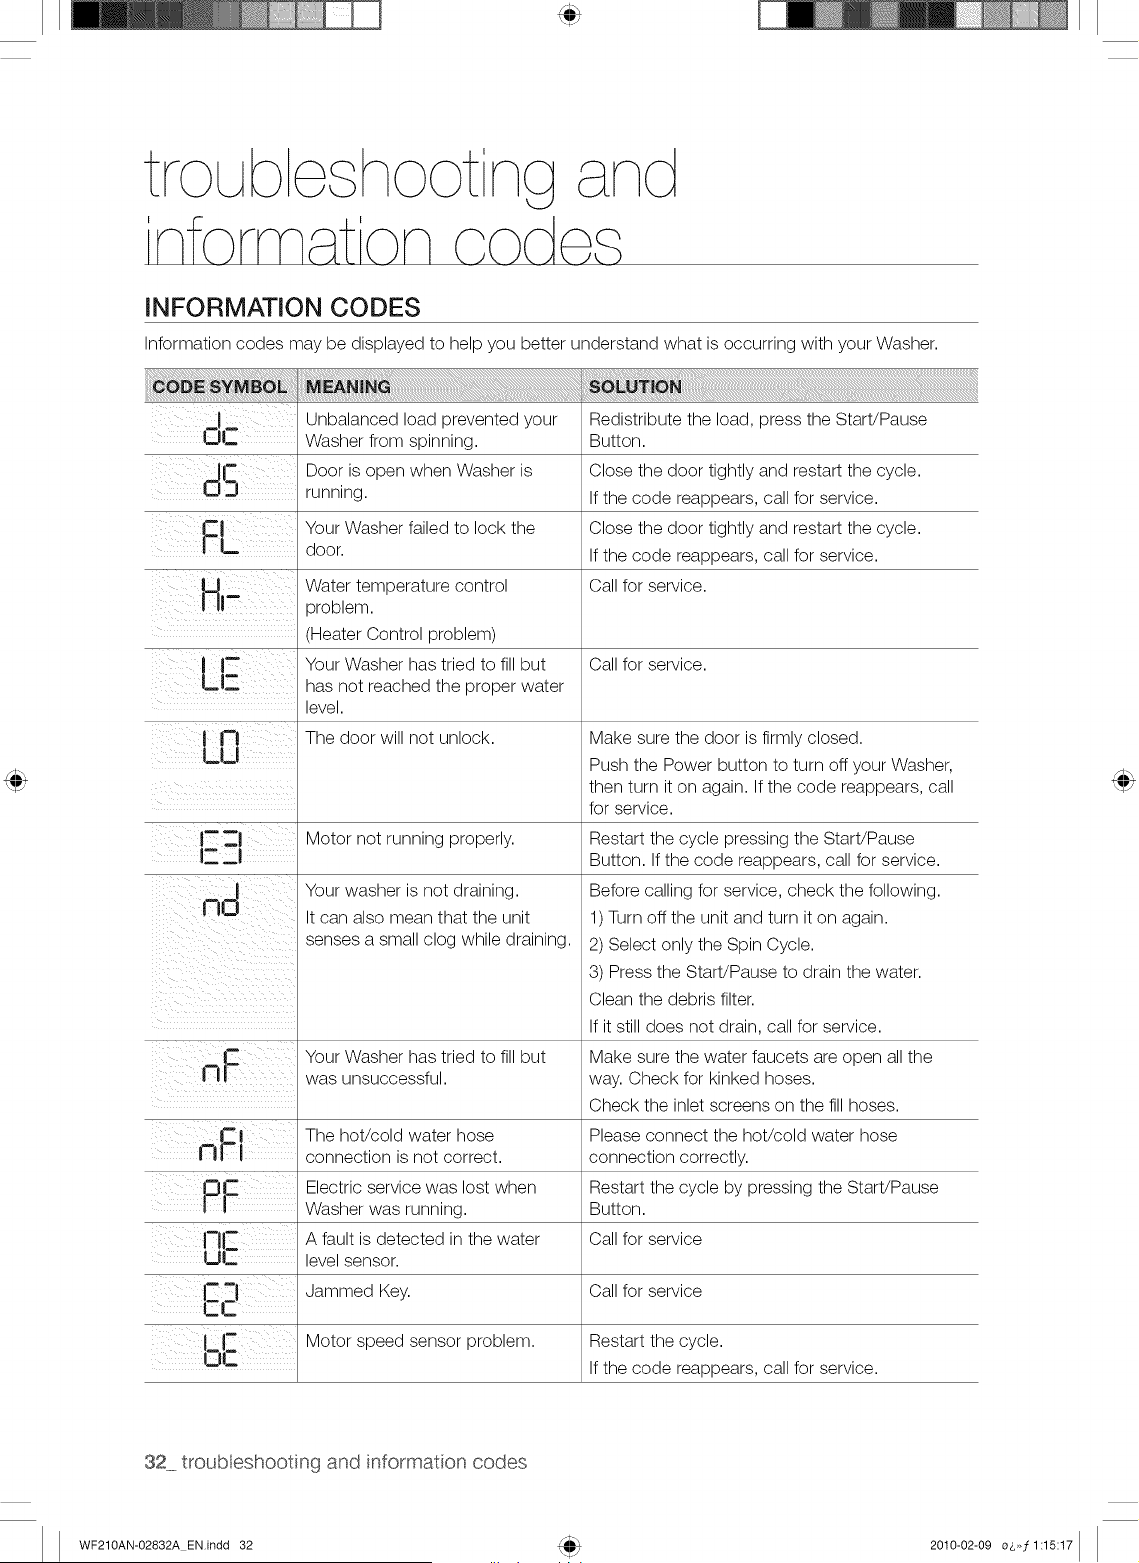
INFORMATION CODES
Information codes may be displayed to help you better understand what is occurring with your Washer.
I Unbalanced load prevented your
OC Washer from spinning.
Door is open when Washer is
running.
Your Washer failed to lock the
door.
Water temperature control
oroblem.
..................... (Heater Control problem)
Your Washer has tried to fill but
has not reached the proper water
level.
The door will not unlock.
LU
iii i i
/-if ¸
Jammed Key.
i-C
I tm Motor speed sensor problem.
OC
Motor not running properly.
Your washer is not draining.
It can also mean that the unit
senses a small clog while draining.
Your Washer has tried to fill but
was unsuccessful.
The hot/cold water hose
connection is not correct.
Electric service was lost when
Washer was running.
A fault is detected in the water
level sensor.
Redistribute the load, press the Start/Pause
Button.
Close the door tightly and restart the cycle.
If the code reappears, call for service.
Close the door tightly and restart the cycle.
If the code reappears, call for service.
Call for service.
Call for service.
Make sure the door is firmly closed.
Push the Power button to turn off your Washer,
then turn it on again. If the code reappears, call
for service.
Restart the cycle pressing the Start/Pause
Button. If the code reappears, call for service.
Before calling for service, check the following.
1) Turn off the unit and turn it on again.
2) Select only the Spin Cycle.
3) Press the Start/Pause to drain the water.
Clean the debris filter.
If it still does not drain, call for service.
Make sure the water faucets are open all the
way. Check for kinked hoses.
Check the inlet screens on the fill hoses.
Please connect the hot/cold water hose
connection correctly.
Restart the cycle by pressing the Start/Pause
Button.
Call for service
Call for service
Restart the cycle.
If the code reappears, call for service.
32 troubleshooting and informaton codes
WF210AN-02832A EN.indd 32 2010-02-09 o_,,,f 1:15:17
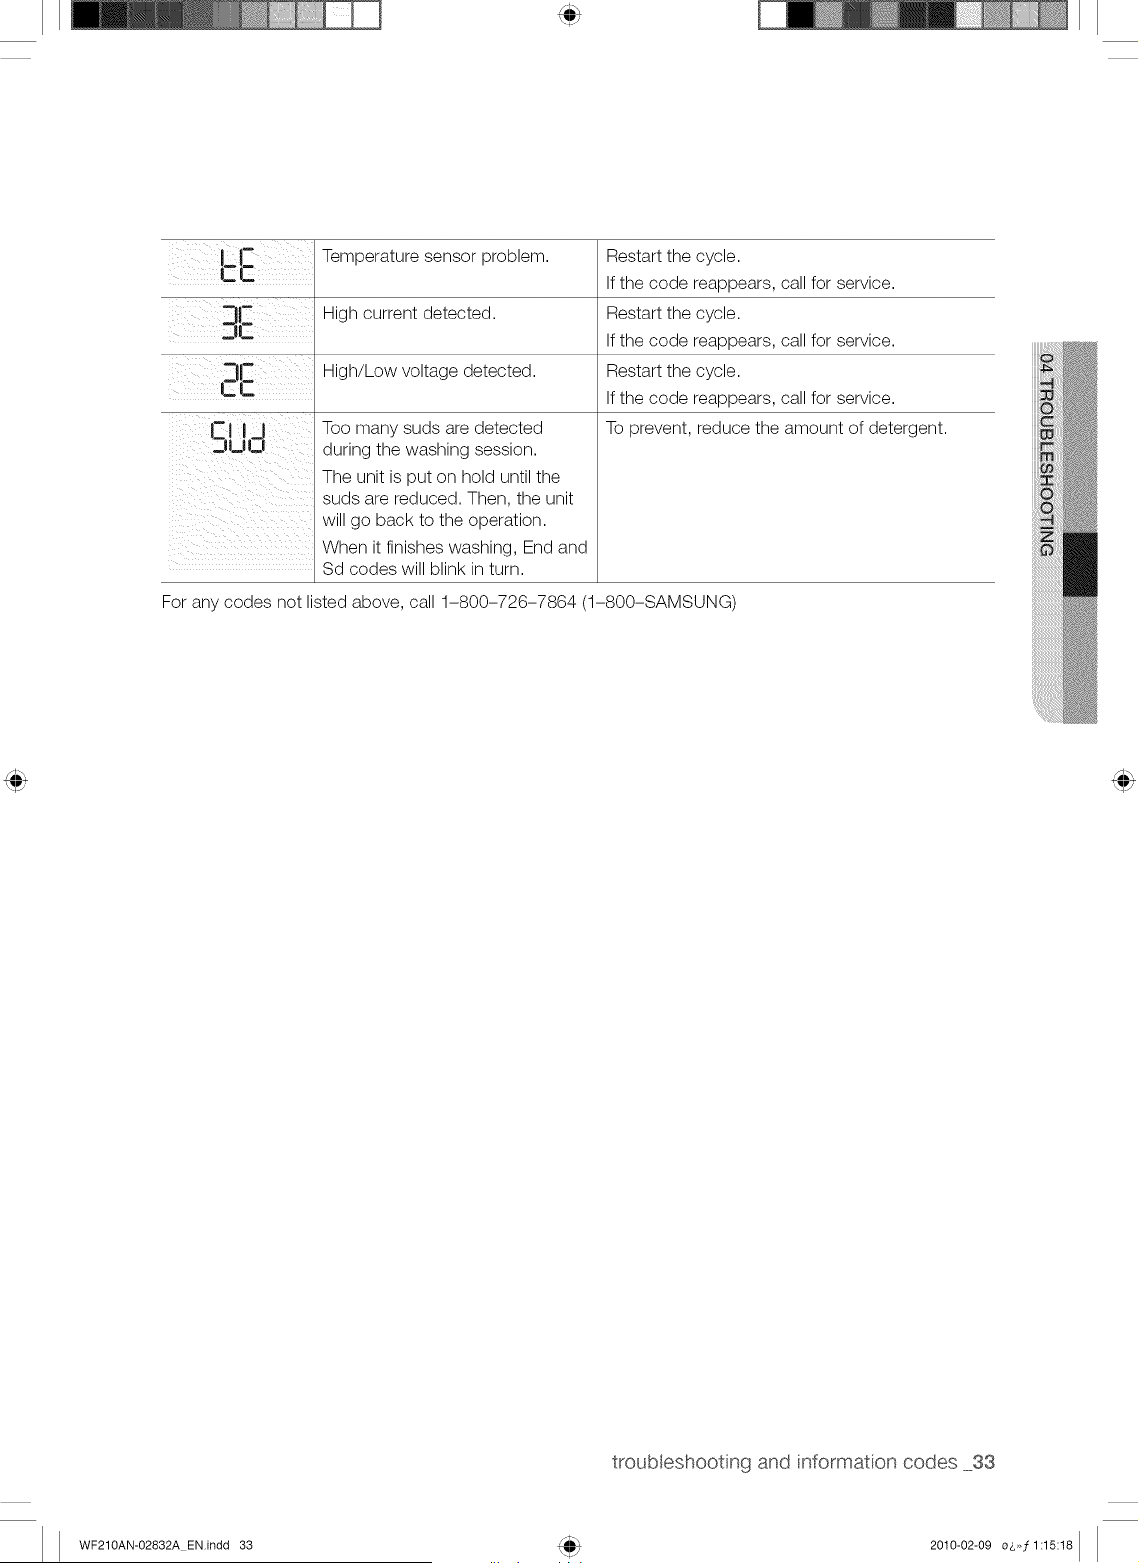
[- Temperaturesensorproblem.
Zlt- High current detected.
High/Low voltage detected.
CIZ
Too many suds are detected
during the washing session.
The unit is put on hold until the
suds are reduced. Then, the unit
will go back to the operation.
When it finishes washing, End and
Sd codes will blink in turn.
Restart the cycle.
If the code reappears, call for service.
Restart the cycle.
If the code reappears, call for service.
Restart the cycle.
If the code reappears, call for service.
To prevent, reduce the amount of detergent.
For any codes not listed above, call 1-800-726-7864 (1-800-SAMSUNG)
troubeshooting and informaton codes 33
WF210AN-02832A EN.Jndd 33 2010-02-09 o_,,,f 1:15:18
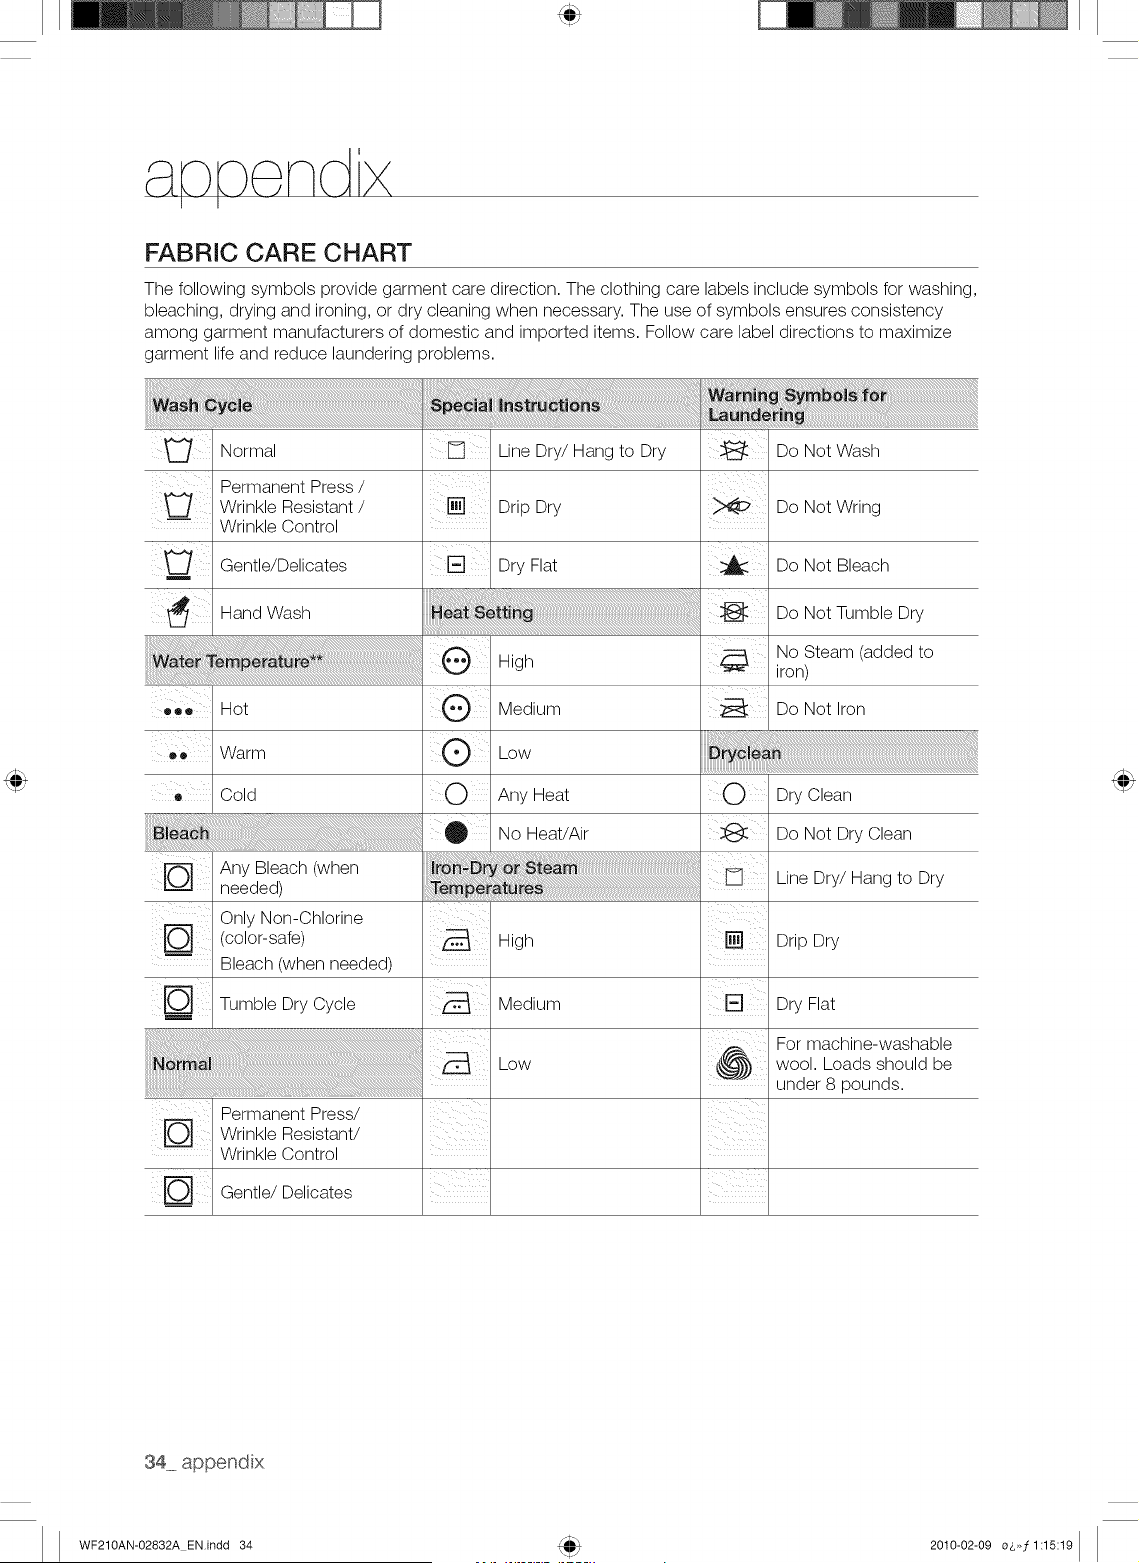
FABRIC CARE CHART
The following symbols provide garment care direction. The clothing care labels include symbols for washing,
bleaching, drying and ironing, or dry cleaning when necessary. The use of symbols ensures consistency
among garment manufacturers of domestic and imported items. Follow care label directions to maximize
garment life and reduce laundering problems.
iiii{!i!!i!¸I¸ili!iii@iiiii!ii¸ii¸i¸i¸i£1ii!!i{{{{{{{
Normal LineDry/Hang to Dry Do Not Wash
Permanent Press /
Wrinkle Resistant / [] Drip Dry Do Not Wring
Wrinkle Control
Gentle/Uelicates Dry Flat _ Do Not Bleach
Hand Wash Do Not Tumble Dry
No Steam (added to
__ High iron)
• ,, Hot Medium Do Not Iron
o0 Warm Low
Any Heat O
No Heat/Air
Cold O
Any Bleach (when
needed)
Only Non-Chlorine
/color-safe/
Bleach (when needed)
Tumble Dry Cycle
Permanent Press/
Wrinkle Resistant/
Wrinkle Control
Gentle/Delicates
High
Medium
Low
Dry Clean
Do Not Dry Clean
Line Dry/Hang to Dry
Drip Dry
Dry Flat
For machine-washable
wool. Loads should be
under 8 pounds.
34 append x
WF210AN-02832A EN.indd 34 2010-02-09 o&>,f 1:15:19
** The dot symbols represent appropriate wash water temperatures for various items. The temperature
range for Hot is 105 ° - 125 ° F/41 ° - 52°C, for Warm 85 ° - 105 ° F/29 ° - 41 ° C and for Cold 60 ° - 85 ° F/16 °
- 29 ° C. (Wash water temperature must be a minimum of 60 ° F/16°C for detergent activation and effective
cleaning.) The clothes Washer may not ensure these temperatures because the actual water temperatures
entering your Washer are dependent on water heater settings and regional water supply temperatures. For
example, cold water entering the home in the northern states during winter may be 40 ° F/4 ° C which is
too cold for effective cleaning. The water temperature in this situation will need to be adjusted by selecting
a warm setting, adding some hot water to the MAX FILL line or using your Washer's heating option, if
available.
WF210AN-02832A EN.indd 35 2010-02-09 o&,,f 1:15:19

HELPING THE ENVIRONMENT
o
o
o
o
Your Washer is manufactured from recyclable materials. If you decide to dispose of it, please observe
local waste disposal regulations. Cut off the power cord so that the appliance cannot be connected
to a power source. Remove the door so that animals and small children cannot get trapped inside the
appliance.
Do not exceed the detergent quantities recommended in the detergent manufacturers' instructions.
Use stain removal products and bleaches before the wash cycle only when necessary.
Save water and electricity by only washing full loads (the exact amount depends upon the program used).
DECLARATION OF CONFORMITY
This appliance complies with UL2157.
SPECIFICATIONS
DIMENSIONS
A: Height.oVerall
B' Width
C, Depth with door open 90°
D, Depth
38" (96.5)
27" (68.6)
50.8" (129)
31.1" (80)
WATER PRESSURE 20 116 psi (137 kPa - 800 kPa)
WEIGHT 18Slbs (8S kg)
HEATER RATING 900 W
POWER WASHING
CONSUMPTION
WASHING AND HEATING
SPIN
DRAIN
SPIN REVOLUTION WF210*/WF220*
120V
120V
120V
120V
1100 rpm
140 W
960 W
430 W
8O W
36 append x
WF210AN-02832A ENindd 36 2010-02-09 oL,,,f 1:15:32
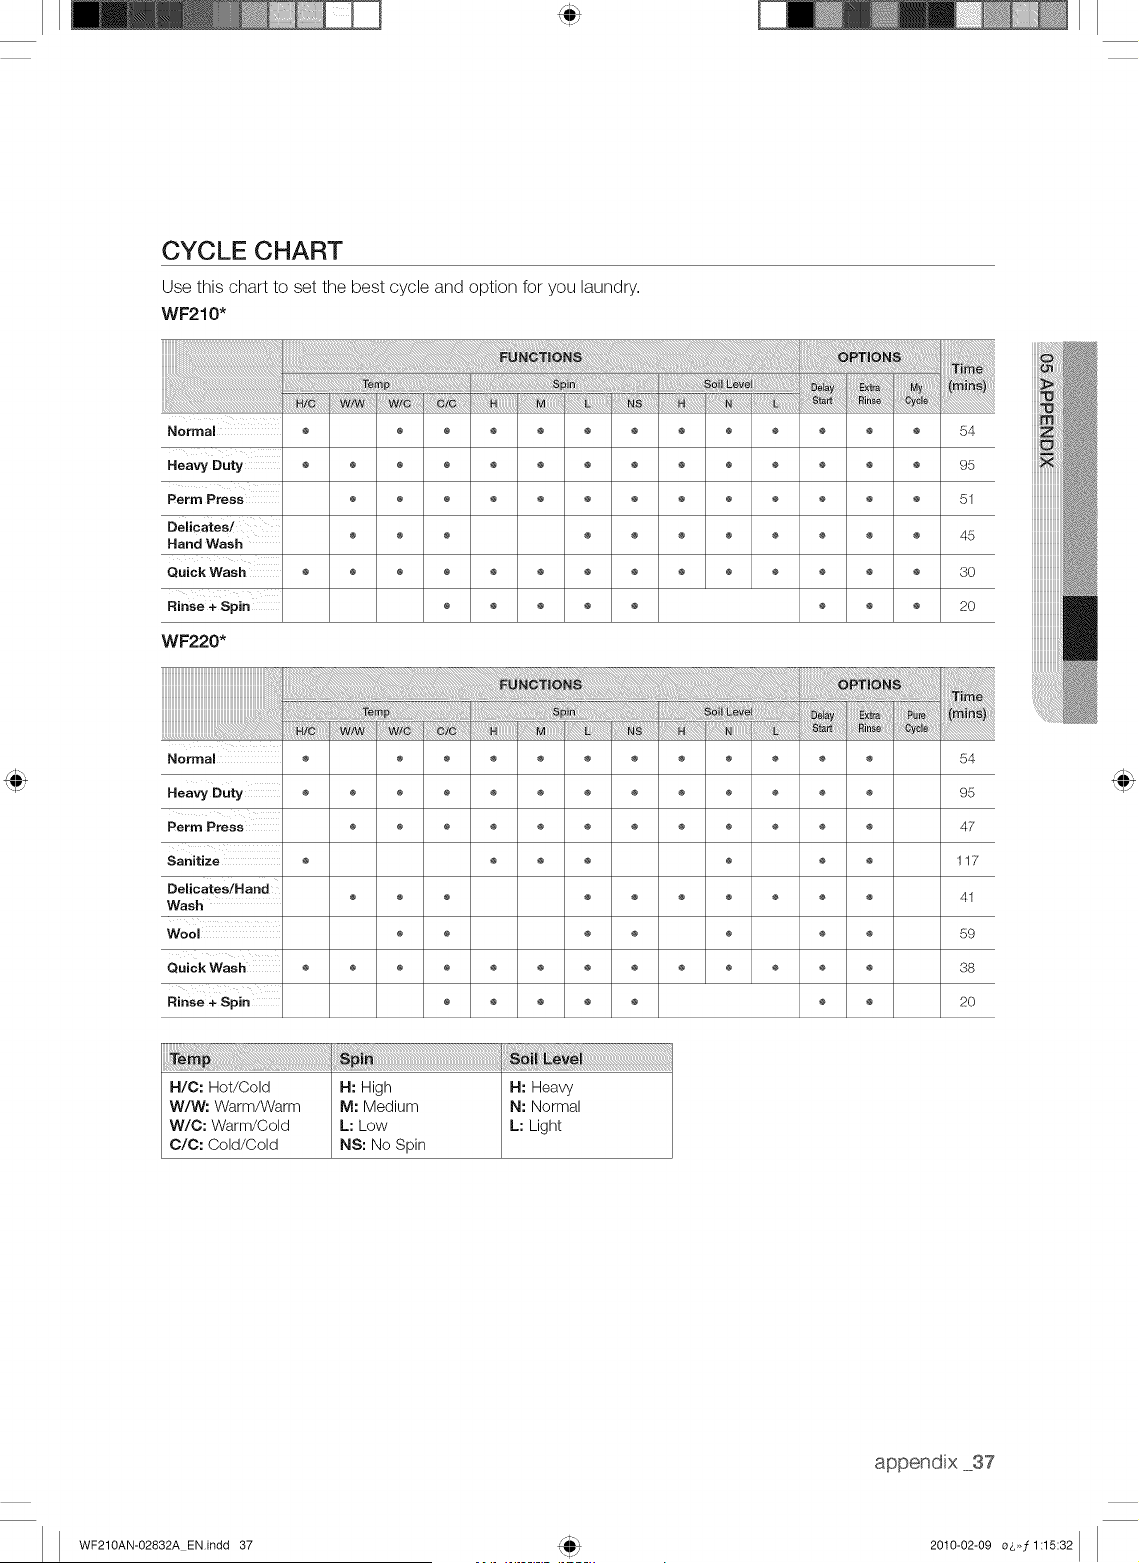
CYCLE CHART
Use this chart to set the best cycle and option for you laundry.
WF210*
Normal
HeavyD"ty o
Perm Press
Delisates/
Hand Wash
Quick Wash
Rinse + Spin
WF220*
54
95
51
45
30
20
Normal
Heavy Duty
Perm Press
Sanitize
Delicates/Hand
Wash
Wool
Quick Wash
Rinse + Spin
54
95
47
117
41
59
38
2O
H/C: Hot/Cold
W/W: Warm/Warm
W/C: Warm/Cold
C/C: Cold/Cold
H: High
M: Medium
L: Low
NS: No Spin
H: Heavy
N: Normal
L: Light
WF210AN-02832A EN.indd 37 2010-02-09 o_,,,f 1:15:32
SAMSUNG WASHER
LiMiTED WARRANTY TO ORiGiNAL PURCHASER
This SAMSUNG brand product, as supplied and distributed by SAMSUNG ELECTRONICS AMERICA, INC.
(SAMSUNG) and delivered new, in the original carton to the original consumer purchaser, is warranted by
SAMSUNG against manufacturing defects in materials and workmanship for a limited warranty period of:
One (1) Year parts & Labor
Two (2) years control board (part)
Three (3) years stainless tub part
Ten(10) years motor part
This limited warranty begins on the original date of purchase, and is valid only on products purchased and
used in the United States. To receive warranty service, the purchaser must contact SAMSUNG for problem
determination and service procedures. Warranty service can only be performed by a SAMSUNG authorized
service center. The original dated bill of sale must be presented upon request as proof of purchase to
SAMSUNG or SAMSUNG's authorized service center. SAMSUNG will provide in-home service during the
warranty period at no charge, subject to availability within the contiguous United States. In-home service is
not available in all areas.
To receive in-home service, product must be unobstructed and accessible to the service agent. If service
is not available, SAMSUNG may elect to provide transportation of the product to and from an authorized
service center.
SAMSUNG will repair, replace, or refund this product at our option and at no charge as stipulated herein,
with new or reconditioned parts or products if found to be defective during the limited warranty period
specified above. All replaced parts and products become the property of SAMSUNG and must be returned
to SAMSUNG. Replacement parts and products assume the remaining original warranty, or ninety (90)
days, whichever is longer.This limited warranty covers manufacturing defects in materials and workmanship
encountered in normal, noncommercial use of this product and shall not apply to the following: damage
that occurs in shipment; delivery and installation; applications and uses for which this product was not
intended; altered product or serial numbers; cosmetic damage or exterior finish; accidents, abuse, neglect,
fire, water, lightning, or other acts of nature or God; use of products, equipment, systems, utilities, services,
parts, supplies, accessories, applications, installations, repairs, external wiring or connectors not supplied
or authorized by SAMSUNG that damage this product or result in service problems; incorrect electrical
line voltage, fluctuations and surges; customer adjustments and failure to follow operating instructions,
maintenance and environmental instructions that are covered and prescribed in the instruction book;
product removal and reinstallation; problems caused by pest infestations. This limited warranty does not
cover problems resulting from incorrect electric current, voltage or supply, light bulbs, house fuses, house
wiring, cost of a service call for instructions, or fixing installation errors. SAMSUNG does not warrant
uninterrupted or error-free operation of the product.
38 warranty
WF210AN-02832A ENindd 38 2010-02-09 o&,f 1:15:33
EXCEPT AS SET FORTH HEREIN, THERE ARE NO WARRANTIES ON THIS PRODUCT EITHER EXPRESS
OR IMPLIED, AND SAMSUNG DISCLAIMS ALL WARRANTIES INCLUDING, BUT NOT LIMITED TO, ANY
IMPLIED WARRANTIES OF MERCHANTABILITY, INFRINGEMENT OR FITNESS FOR A PARTICULAR
PURPOSE.
NO WARRANTY OR GUARANTEE GIVEN BY ANY PERSON, FIRM, OR CORPORATION WITH RESPECT
TO THIS PRODUCT SHALL BE BINDING ON SAMSUNG. SAMSUNG SHALL NOT BE LIABLE FOR LOSS
OF REVENUE OR PROFITS, FAILURE TO REALIZE SAVINGS OR OTHER BENEFITS, OR ANY OTHER
SPECIAL, INCIDENTAL OR CONSEQUENTIAL DAMAGES CAUSED BY THE USE, MISUSE, OR INABILITY
TO USE THIS PRODUCT, REGARDLESS OF THE LEGAL THEORY ON WHICH THE CLAIM IS BASED,
AND EVEN IF SAMSUNG HAS BEEN ADVISED OF THE POSSIBILITY OF SUCH DAMAGES.
NOR SHALL RECOVERY OF ANY KIND AGAINST SAMSUNG BE GREATER IN AMOUNT THAN THE
PURCHASE PRICE OF THE PRODUCT SOLD BY SAMSUNG AND CAUSING THE ALLEGED DAMAGE.
WITHOUT LIMITING THE FOREGOING, PURCHASER ASSUMES ALL RISK AND LIABILITY FOR LOSS,
DAMAGE, OR INJURY TO PURCHASER AND PURCHASER'S PROPERTY AND TO OTHERS AND THEIR
PROPERTY ARISING OUT OF THE USE, MISUSE, OR INABILITY TO USE THIS PRODUCT. THIS LIMITED
WARRANTY SHALL NOT EXTEND TO ANYONE OTHER THAN THE ORIGINAL PURCHASER OF THIS
PRODUCT, IS NONTRANSFERABLE AND STATES YOUR EXCLUSIVE REMEDY.
Some states do not allow limitations on how long an implied warranty lasts, or the exclusion or limitation
of incidental or consequential damages, so the above limitations or exclusions may not apply to you. This
warranty gives you specific rights, and you may also have other rights, which vary from state to state.
To obtain warranty service, please contact SAMSUNG at:
SAMSUNG ELECTRONICS AMERICA, INC. - CONSUMER ELECTRONICS CUSTOMER SERVICE
105 Challenger Road Ridgefield Park, NJ 07660-0511
1-800-SAMSU NG (726-7864)
www, samsung,com
WF210AN-02832A EN.indd 39 2010-02-09 o_,,,f 1:15:33
QUESTIONS OR COMMENTS?
U.S.A 1-800-SAMSUNG(726-7864)
MEXICO 01-800-SAMSUNG(726-7864)
www,samsung,oom
www,samsung.com
Code No. DC68-02832A_EN
WF210AN-02832A EN.indd 40 2010-02-09 o$,,f 1:15:33
_,_las posibilidades
Gracias Dotadauirireste Droducto Samsung.
Para recibir un servicio mas completo.
registre su producto en
www.samsung, com/reg ister
WF210AN-02832A MES.indd 1 2010-02-09 o&,,]2:44:46
o r ote st
lavadora
rlUOVc
1. Capacidad extra grande
Aun las prendas y mantas voluminosas quedan superlimpias. La gran capacidad deja
suficiente espacio para un lavado ma,s profundo y limpio.
2. VRT TM(Tecnologia de Reducci6n de la Vibraci6n)
Esta lavadora Samsung funciona con suavidad durante el centrifugado a velocidad m_txima,
minimizando el ruido y las vibraciones.
3. Motor inversor de accionamiento directo
iEI poder de manejarlo todo! El motor inversor de accionamiento directo suministra energia
al tambor de la lavadora desde un motor reversible de velocidad variable. Un motor de
accionamiento directo sin correa genera una velocidad de centrifugado ma,s alta de 1.150
rpm para un funcionamiento ma,s eficiente y silencioso. La lavadora tambien posee menos
piezas movibles, Io cual se traduce en menos reparaciones.
4. Certificado Woolmark 0NF220*)
El ciclo de lavado de lana en las ma,quinas Samsung ha sido probado y cumpli0 con la
especificaci0n de Woolmark Company requerida para productos de lana lavables en
lavadora. Las prendas deben lavarse de acuerdo con las instrucciones que figuran en sus
etiquetas, tal como Io establecen Woolmark y Samsung.
5. Desinfecci6n 0NF220*)
AI seleccionar este ciclo, el agua se calienta a una temperatura extremadamente alta para
eliminar el 99,9% de las bacterias que suelen alojarse en prendas, ropa de cama o toallas.
La presente certificaci0n ha sido realizada pot NSF International, una organizaci0n privada
de evaluaci0n y certificaci0n.
Lea la etiqueta de la prenda para evitar danos a la misma.
0nicamente los ciclos de desinfecci0n fueron disenados para cumplir con los requisitos de
este protocolo para una desinfecci0n eficaz.
NSF Protocol P172 ]
Desinfeccbn en lavadoras comerciales,
residenciales y famfliares
6. Pure Cycle rM 0NF220*)
Usar el proceso de limpieza del tambor pure cycle ayuda a mantener su lavadora limpia
incluso sin ningun detergente quimico ni lejia. Mantenga su tambor limpio y sin olor con
este programa de limpieza especializado.
7. Seguro para ni_os
La funci0n Seguro para ninos asegura que las manitos curiosas se mantengan alejadas de
la lavadora.
Esta funci0n de seguridad evita que sus hijos jueguen con el funcionamiento de la lavadora
y le advierte cuando esta se activa.
8. Inicio Retardado
Demote un ciclo pot hasta 19 horas en incrementos de a una hora y aumente su
comodidad al utilizar su lavadora especialmente cuando tenga que salir.
2 caracter sticas de su nueva avadora
WF210AN-02832A MES.indd 2 2010-02-09 o_,,,]2:44:47
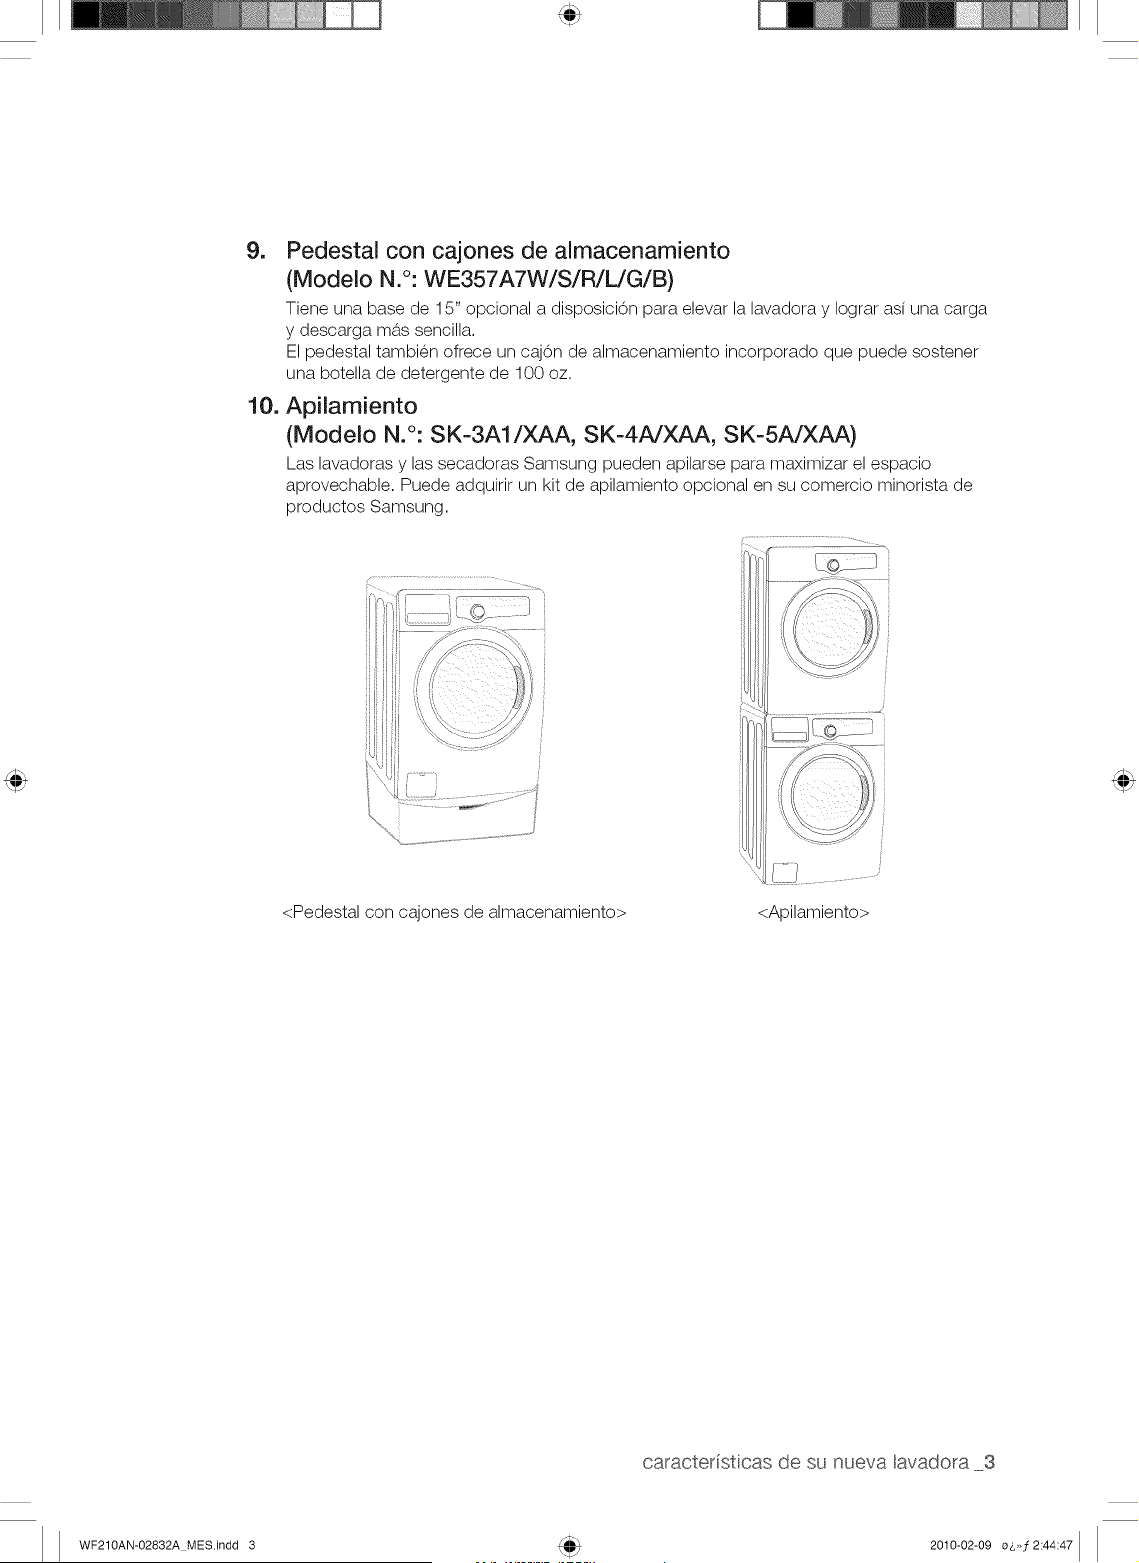
9. Pedestal con cajones de almacenamiento
(Modelo N,°: WE357A7W/S/R/L/G/B)
Tiene una base de 15" opcional a disposici0n para elevar la lavadora y Iograr asi una carga
y descarga ma,s sencilla.
El pedestal tambien ofrece un caj0n de almacenamiento incorporado que puede sostener
una botella de detergente de 100 oz.
10, Apilamiento
(Modelo N.°: SK-3A1/XAA, SK-4A/XAA, SK-5A/XAA)
Las lavadoras y las secadoras Samsung pueden apilarse para maximizar el espacio
aprovechable. Puede adquirir un kit de apilamiento opcional en su comercio minorista de
productos Samsung.
_;iI .....................J
<Pedestal con cajones de almacenamiento> <Apilamiento>
caracter sticas de su nueva avadora 3
WF210AN-02832A MES.indd 3 2010-02-09 o&,,f2:44:47
nformac On ,sobre ,see(Jrdad
Felicitaciones por la compra de la nueva lavadora ActivFresh TMde Samsung.
Este manual contiene informaciOn importante acerca de ia instaiaciOn, ei uso y
ei cuidado dei eiectrodomestico. Lea detenidamente estas instrucciones a fin de
aprovechar al maximo los m0itipies beneficios y funciones de ia iavadora.
LO QUE NECESITA SABER SOBRE LAS INSTRUCCIONES DE
SEGURIDAD
Las advertencias y las instrucciones de seguridad importantes de este manual no cubren todas las posibles
condiciones y situaciones que pueden ocurrir. Es su responsabilidad actuar con sentido comun, precaucion
y cuidado cuando instale, realice el mantenimiento y ponga en funcionamiento la lavadora.
SiMBOLOS Y PRECAUCIONES DE SEGURIDAD IMPORTANTES
Los iconos y las sedales incluidas en este manual del usuario
significan Io siguiente:
Peligros o pra,cticas inseguras que pueden causar lesiones fisicas
ADVERTENClA graves o la muerte.
Peligros o pra,cticas inseguras que pueden causar lesiones fisicas
PREOAUOION leves o da_os materiales.
Para reducir el riesgo de incendio, explosion, descargas electricas o
lesiones fisicas cuando usa esta lavadora, siga estas instrucciones de
PRECAUCION
seguridad b_tsicas:
NO intente hacer nada.
NO desarme.
[_ NO toque.
Siga las instrucciones completamente.
Desenchufe el cable de alimentacion electrica del tomacorriente de
pared.
Asegurese de que la m_tquina tenga buena conexion a tierra para evitar
descargas electricas.
Llame al centro de servicio tecnico para obtener asistencia.
Nota
Estas se_ales de advertencia est_n aqui para evitar que usted u otras personas sufran
da_os.
Siga las instrucciones completamente.
DespuOs de leer esta secciOn, gu_rdela en un lugar seguro para consultas futuras.
_Lea todas las instrucciones antes de usar el electrodomestico.
CONSERVE
4 informacion sobre segurdad
ESTAS INSTRUCCIONES
WF210AN-02832A MES.indd 4 2010-02-09 o_,,,f2:44:48
ADVERTENCIA:Para reducir el riesgo de incendio, descargas electricas o lesiones fisicas
ADVE_E,0,Acuando usa este electrodomestico, siga las instrucciones de seguridad ba,sicas que figuran
a continuaci0n:
1. Lea todas las instrucciones antes de usar el electrodomestico.
2. No lave o seque prendas que han sido previamente limpiadas, lavadas, remojadas o
salpicadas con gasolina, solventes de limpieza en seco u otras sustancias inflamables o
explosivas, ya que emiten vapores que pueden prenderse fuego o explotar.
3. No permita que los ninos jueguen sobre la lavadora o dentro de ella. Se requiere de
supervisi6n cuando el electrodomestico es utilizado cerca de los ninos.
4. Antes de descartar el aparato o de trasladarlo para que se le efectue el servicio tecnico,
retire la puerta del compartimiento de la lavadora o la secadora.
5. No introduzca la mano en el electrodomestico si el tambor esta, en movimiento.
6. No instale o guarde este electrodomestico donde quede expuesto a factores clima,ticos.
7. No modifique los controles.
8. No repare, reemplace ni intente realizar el mantenimiento de cualquier pieza del
electrodomestico salvo que este recomendado especificamente en las instrucciones
de mantenimiento del usuario o en las instrucciones de reparaci0n para el usuario
publicadas y que, a su juicio, usted tenga la habilidad para Ilevarlas a cabo.
9. No agregue gasolina, solventes de limpieza en seco u otras sustancias inflamables o
explosivas al agua del lavado. Estas sustancias emiten vapores que se pueden prender
fuego o explotar.
10. En ciertas circunstancias, se puede producir gas hidr0geno en un sistema de agua
caliente que no se ha usado durante 2 semanas o ma,s. EL GAS HIDROGENO ES
EXPLOSIVO. Si el sistema de agua caliente no fue utilizado durante dicho periodo, antes
de usar la lavadora o la lavadora y la secadora combinadas, abra las Ilaves de agua
caliente y deje cotter el agua pot varios minutos. De esta manera, se eliminara, el gas
hidr0geno acumulado. Dado que el gas es inflamable, no fume ni use una llama abierta
eR ese memento.
CONSERVE ESTAS INSTRUCClONES
informacion sobre segurdad 5
WF210AN-02832A MES.indd 5 2010-02-09 o_,,,f2:44:48
nformac'On sobre see(Jrdad
SENALES DE ADVERTENCIA IMPORTANTES PARA LA
INSTALACiON
_ nchufeel cablede alimentaciOnen un tomacorriente de pared de 120 V/60 Hz/15 A CA o superiory
utilice eltomacorriente solo con este electrodomestico.No use un cable prolongador.
Compartir eltomacorriente mural con otros electrodomesticos utilizandoun multicontacto o
prolongandoel cablede alimentaciOnpuede provocarun incendioo una descarga el@trica.
No utiliceun transformadorel@trico. Puede provocarun incendioo una descargael@trica.
Aseguresede que elvoltaje, lafrecuenciay la corriente son los mismosque los relacionadosen las
especificacionesdel producto. Si no Io hace puede provocarun incendioo una descargael@trica.
La instalaciOnde esteelectrodomesticola debe efectuar un t@nico cualificadoo una empresade
servicios.
Si no Io hace, puede provocaruna descarga el@trica, un incendio, unaexplosion, problemascon el
producto o lesiones.
Retireregularmentetodas las sustanciasextraflas,como polvo o agua, de losterminalesy los puntos
de contacto de la alimentaciOncon un patio seco.
Desenchufeel cablede alimentaciOny limpielocon un patio seco.
Si no Io hace puede provocarun incendioo una descargael@trica.
Enchufeel cablede alimentaciOnen untomacorriente de pared en la direcciOnadecuadade manera
que el cable bajehaciael suelo.
Si enchufa elcable de alimentaciOnen el tomacorrienteen la direcciOnopuesta, los cablesel@tricos
del interiordel cable se pueden daflar y se puede provocarun incendioo una descarga el@trica.
Este electrodomesticodebe conectarse a tierracorrectamente.
La toma de tierra nose ha de conectar a unaconducciOnde gas o de agua ni a lalineatelefOnica.
UnconexiOna tierraincorrecta puede provocaruna descarga el@trica, un incendio, una explosiono
problemascon el producto.
Nuncaenchufeel cable de alimentaciOnen untomacorriente que no este conectadoa tierra
correctamente.Asegurese de que latoma guarde conformidad con los cOdigoslocalesy nacionales.
@
No instaleeste electrodomesticocerca de un calefactor o materialesinflamables.
No instaleeste electrodomesticoen un lugar humedo, con aceiteso polvo, ni expuestoa la luzdirecta
del sol o al agua(gotas de Iluvia).
No instaleeste electrodomesticoen un lugar donde pueda haberfugas de gas.
Puedeprovocar un incendio o una descarga el@trica.
Enchufeel cablede alimentaciOnfirmementeen eltomacorriente de pared. No utiliceun cablede
alimentaciOndaflado ni un tomacorrienteque este flojo.
Puedeprovocar un incendio o una descarga el@trica.
No tire del cable de alimentaciOnni Io doble excesivamente.
No tuerza niate el cablede alimentaciOn.
No cuelgueel cable de alimentaciOnde un objeto meta,lico, no coloque objetos pesados sobre61,no
inserb el cablede alimentaciOnentreobjetos ni Io empujeen un espacio detra,s del electrodomestico.
Puedeprovocar un incendio o una descarga el@trica.
No tire del cable de alimentaciOnpara desenchufarlo.
Desenchufeel cablede alimentaciOnsujeta,ndolo por el enchufe.
Si no Io hace puede provocarun incendioo una descargael@trica.
Si elenchufe o el cable de alimentaciOnesta,n daflados, comuniquesecon elcentro de servicioma,s
cercano.
6 informacion sobre segurdad
WF210AN-O2832A MES.indd 6 2010-02-09 o8,,f2:44:48
SEI ALES DE PRECAUCION PARA LA INSTALACION
PRECAUCION
Este electrodomestico debe estar ubicado de manera tal que se pueda acceder al enchufe.
- Si no Io hace puede provocar un incendio o una descarga causados pot fugas
electricas.
Instale el electrodomestico sobre una superficie nivelada que pueda soportar su peso.
Si no Io hace pueden producirse vibraciones anormales, ruidos o problemas con el
producto.
_ esenchufe el electrodomestico si no Io va a utilizar durante un periodo prolongado o
durante una tormenta con aparato electrico.
Si no Io hace puede provocar un incendio o una descarga electrica.
SENALES DE ADVERTENCIA IMPORTANTES DURANTE EL USO
ADVERTENCIA
Si el electrodomestico se inunda, desconectelo inmediatamente y Ilame al centro de
servlclO mas cercano.
Si el electrodomestico genera ruidos extranos, olores de quemado o humo, desconectelo
inmediatamente y Ilame al centro de servicio ma,s cercano.
Si no Io hace puede provocar un incendio o una descarga electrica.
En caso de fugas de gas (como propano, LP, etc.), ventile inmediatamente sin tocar el
enchufe. No toque el electrodomestico ni el cable de alimentacion.
No utilice un ventilador.
Una chispa puede provocar un incendio o una explosion.
No lave prendas contaminadas con gasolina, queroseno, benceno, disolventes de pinturas,
alcohol u otras sustancias inflamables o explosivas.
Puede provocar una descarga electrica, un incendio o una explosion.
No abra la puerta de la lavadora pot la fuerza mientras este en funcionamiento (lavado a
alta temperatura/secado/centrifugado).
Elagua que salga de la lavadora puede causar quemaduras o convertir el suelo en
resbaladizo.
Puede causar lesiones personales.
Abrir la puerta pot la fuerza puede danar el producto o causar lesiones personales.
Asegurese de quitar el embalaje (goma espuma, poliestireno) del fondo de la lavadora antes
de utilizar esta.
No introduzca las manos bajo la lavadora.
Puede causar lesiones personales.
informacion sobre segurdad 7
WF210AN-02832A MES.indd 7 2010-02-09 o6,,#2:44:48
nformac'On ,sobre ,see(Jrdad
No toque el enchufe con las manos mojadas.
- Puede causar lesiones personales.
No apague el electrodomestico desenchufa, ndolo mientras este en funcionamiento.
Si vuelve a enchufar el electrodomestico en el tomacorriente puede originar una chispa y
causar una descarga electrica o un incendio.
Mantenga los materiales del embalaje fuera del alcance de los ninos, ya que son peligrosos
para estos.
Si un nino introduce la cabeza en una bolsa se puede asfixiar.
No permita que los ninos o las personas inestables utilicen la lavadora sin supervision.
Si Io hace puede provocar una descarga electrica, quemaduras o lesiones.
No introduzca la mano ni objetos de metal bajo la lavadora mientras esta este en
funcionamiento.
Se puede causar lesiones personales.
No trate de reparar, desensamblar ni modificar la lavadora usted mismo.
- No utilice un fusible (de cobre, cable de acero, etc) que no este normalizado.
Para reparar o volver a instalar el electrodomestico comuniquese con el centro de
servicio ma,s cercano.
Si no Io hace puede provocar una descarga electrica, un incendio, problemas con el
producto o lesiones.
Si alguna sustancia extrana, como agua, se introduce en el electrodomestico, desenchufe
el cable de alimentaci0n y comuniquese con el centro de servicio ma,s cercano.
Si no Io hace puede provocar un incendio o una descarga electrica.
Si se afloja la manguera de suministro de agua del grifo y se inunda el electrodomestico,
desenchufe el cable de alimentaci0n.
Si no Io hace puede provocar un incendio o una descarga electrica.
/iX, SENALES DE PRECAUCiON DURANTE EL USO
PRECAUCION
Si la lavadora esta, contaminada pot sustancias extranas, como detergente, tierra, restos
de alimentos, etc. desenchufe el cable de alimentaci0n y limpie la lavadora con un pano
suave humedecido.
Si no Io hace se puede producir decoloraci0n, deformaci0n, danos u oxido.
El cristal frontal se puede romper con un impacto fuerte. Sea cuidadoso cuando utilice la
lavadora.
La rotura del cristal puede causar lesiones.
Ante una falla de suministro de agua o cuando se vuelve a conectar la manguera de
suministro, abra lentamente la Ilave del agua.
Abra lentamente la Ilave del agua tras un periodo prolongado de falta de uso.
La presi0n del aire de la manguera de suministro o de la conducci0n de agua puede
danar una pieza o provocar fugas de agua.
Si durante el funcionamiento hay una falla en el drenaje, compruebe este.
Si se utiliza la lavadora inundada pot una falla en el drenaje, se puede provocar una
descarga electrica o un incendio.
8 informacion sobre segurdad
WF210AN-02832A MES.indd 8 2010-02-09 o_,,,f2:44:49
Introduzca completamente la ropa en la lavadora para que no pueda quedar atrapada pot
la puerta.
Si la ropa queda atrapada pot la puerta, se puede danar la ropa o la lavadora, o puede
haber fugas de agua.
Asegurese de que la Ilave del agua este cerrada cuando la lavadora no se utiliza.
Asegurese de que el tornillo del conector de la manguera de suministro del agua este
correctamente apretado.
Si no Io hace puede provocar danos materiales o lesiones.
Compruebe si la junta de goma esta, contaminada pot sustancias extranas (suciedad, hilos,
etc.).
Si la puerta no cierra completamente, se pueden producir fugas de agua.
Antes de utilizar el producto, abra la Ilave del agua y compruebe si el conector de la
manguera de suministro del agua ester firmemente asegurado y que no haya fugas de agua.
Si los tornillos o el conector de la manguera de suministro del agua esta,n flojos, puede
haber fugas de agua.
No se suba encima del electrodomestico ni coloque encima de este objetos (como ropa,
velas o cigarrillos encendidos, platos, productos quimicos, objetos meta,licos, etc.)
Puede provocar una descarga electrica, un incendio, problemas con el producto o
lesiones.
No haga funcionar el electrodomestico con las manos mojadas.
Puede causar lesiones personales.
No rode materiales vola,tiles, como insecticidas, en la superficie del electrodomestico.
Adema,s de set perjudiciales para las personas, tambien pueden provocar una descarga
electrica, un incendio o problemas con el producto.
No coloque objetos que generen campos electromagneticos cerca de la lavadora.
Puede causar lesiones pot un malfuncionamiento.
No toque el agua que se drena durante el lavado a alta temperatura o durante el ciclo de
secado ya que esta, caliente.
Puede causar lesiones personales o quemaduras.
No lave, centrifugue ni seque alfombrillas o prendas impermeables(*).
No lave alfombrillas gruesas y espesas aunque Ileven la marca de lavado en la etiqueta.
Se pueden causar lesiones o danar la lavadora, las paredes, el suelo o la ropa debido a
vibraciones anormales.
* Ropa de cama de lana, fundas de Iluvia, ropa para pescar, pantalones de esqui,
bolsas de dormir, cubiertas de panales, cha,ndales, cubiertas de bicicletas, motos y
autom0viles, etc.
No haga funcionar la lavadora sin el caj0n del detergente.
Se puede provocar una descarga electrica o lesiones debido a fugas de agua.
No toque el interior de la tina durante o inmediatamente despues del secado, ya que esta,
caliente.
Puede causar quemaduras.
No introduzca las manos en el caj0n del detergente despues de abrirlo.
Se puede danar la mano ya que esta puede quedar atrapada pot el dispositivo de
introducci0n del detergente.
informacion sobre segurdad 9
WF210AN-02832A MES.indd 9 2010-02-09 o_,,,f2:44:49
nformac'On sobre see(Jrdad
No introduzca ningun objeto (como zapatos, restos de comida, animales) que no sea ropa
en la lavadora.
Se puede danar la lavadora, causar lesiones o la muerte en caso de mascotas pot
vibraciones anormales.
No presione los botones con objetos afilados, como alfileres, cuchillos, las unas, etc.
Puede provocar una descarga electrica o lesiones personales.
No lave ropa contaminada pot aceites, cremas o Iociones que se utilizan normalmente en
los establecimientos para el cuidado de la piel o en las clinicas de masajes.
Se puede deformar la junta de goma y provocar fugas de agua.
No deje objetos de metal, como horquillas o clips, ni lejia en la tina durante periodos
prolongados de tiempo.
Se puede oxidar la tina.
Si comienza a aparecer oxido en la superficie de la tina, aplique un agente limpiador
(neutro) sobre la superficie y utilice una esponja para limpiarla. Nunca utilice un cepillo de
metal.
No utilice detergentes de limpieza en seco directamente ni lave, enjuague ni centrifugue
ropa contaminada pot detergentes de limpieza en seco.
Se puede producir una combustion esponta,nea o un incendio pot el calor de la
oxidacion del aceite.
No utilice agua caliente de los dispositivos de calentamiento o enfriamiento del agua.
Podria tenet problemas con la lavadora.
No utilice jabon natural para lavado a mano en la lavadora.
Si se endurece y se acumula en el interior de la lavadora, puede causar problemas en el
producto, como decoloracion, oxido y malos olores.
No lave prendas grandes como ropa de cama dentro de una red.
Coloque medias y sujetadores en una red y la,velos junto con otra ropa.
De no hacerlo se pueden producir lesiones personales pot las vibraciones anormales.
No utilice detergente endurecido.
Si se acumula en el interior de la lavadora, puede provocar fugas de agua.
No lave alfombras ni felpudos.
Si lava una alfombra o felpudo, se acumulara, arena en el interior de la lavadora. Puede
provocar errores como la falta de drenaje.
SENALES DE ADVERTENCIA IMPORTANTES DURANTE LA
A0vE E00,ALIMPIEZA
No limpie el electrodomestico rociando directamente agua dentro de 61.
No utilice benceno, disolventes ni alcohol para limpiar el electrodomestico.
Puede provocar decoloracion, deformacion, danos, incendio o descarga electrica.
Antes de la limpieza o las tareas de mantenimiento, desenchufe el electrodomestico del
tomacorriente de la pared.
Si no Io hace puede provocar un incendio o una descarga electrica.
10 informacion sobre segurdad
WF210AN-02832A MES.indd 10 2010-02-09 o_,,,f2:44:49
ontendo
INSTALACION DE SU LAVADORA
i ,
LAVADO DE UNA CARGA DE ROPA
i ,
LIMPIEZA Y MANTENIMIENTO DE SU
LAVADORA
i
ii
SOLUCION DE PROBLEMAS Y
CODIGOS DE INFORMACION
APENDICE
12 Comprobaci6n de las partes
13 Cumplir con los requisitos de instalaci6n
13 Suministro electrico
13 Conexi0n a tierra
14 Agua
14 Drenaje
14 Piso
14 Consideraciones acerca de la ubicaci0n
14 Instalaci0n del electrodomestico en un
gabinete o en un hueco
15 Instalaci6n de la lavadora
18 C6mo cargar la lavadora
19 C6mo comenzar
20 Descripci6n general del panel de control
22 Seguro para ninos
23 S01ocentrifugado
23 Ma,s prendas _J:_+
23 Mi ciclo 0NF210*)
24 Uso del detergente
24 Caracteristicas
26 Limpieza del exterior
26 Limpieza del interior
26 Limpieza de los dosificadores
26 C6mo guardar la lavadora
27 Limpieza del filtro de residuos
28 Limpieza del sello/fuelle de la puerta
28 Mantenimiento de la cubierta superior y del
marco frontal
29 Pure Cycle TM (WF220*)
30 Controle estos puntos si su lavadora...
32 C6digos de informaci6n
34 Tabla de indicaciones sobre la tela
36 Ayuda al medioambiente
36 Declaraci6n de conformidad
36 Especificaciones
37 Tabla de ciclos
GARANTiA 38 Garantia
contendo 11
WF210AN-02832A MES.indd 11 2010-02-09 o&,,f 2:44:50
COMPROBACi0N DE LAS PARTES
Desembale la lavadora e inspecci6nela para controlar que no se hayan producido da_os durante el transporte.
Compruebe que haya recibido todos los elementos que se muestran a continuaci6n. Si la lavadora sufri6 da_os
durante el transporte, o si falta algun elemento, comuniquese con el 1-800-SAMSUNG(7267864).
Para evitar lesiones fisicas o tirones, use guantes protectores cada vez que levante o transporte la unidad.
z_ Mantenga los materiales del embalaje fuera del alcance de los ni_os, ya que son peligrosos para estos.
ADVE_TEN0_A- Si un ni_o mete la cabeza en una bolsa se puede asfixiar.
....
Jill i_
Manguera de suministro __ _ Manguera de suministro
de agua caliente __:'_ { de agua fria
Tapa
Caj6n para
detergente K
Panel de control
Enchufe
Puerta
Tubo de
desagQe de
emergencia
Filtro de residuos i
Cubierta del filtro ._
Manguera
de drenaje
Tambor
Patas ajustables
©OO
Llave inglesa
Tapones para los orificios de los
tornillos
Mangueras de suministro de agua
Guia de la manguera Manual de instrucciones
Herramientas necesarias
Pinzas Destornillador piano
12 instalaciOn de su avadora
WF210AN-02832A MES.indd 12 2010-02-09 o$,,f 2:44:52
CUMPLIR CON LOS REQUISITOS DE INSTALACi0N
Suministro electrico
• Fusible o disyuntor de 120 voltios, 60 Hz, 15 A
Se recomienda contar con un circuito derivado individual destinado unicamente a la
lavadora.
La lavadora esta, equipada con un cable de alimentacion.
Z_ Nunca utilice un cable prolongador.
PRECAUClON
Conexion a tierra
ES PRECISO QUE ESTE ELECTRODOMESTICO ESTE CONECTADO A
TIERRA,
Este electrodomestico debe conectarse a tierra. En caso de que el electrodomestico funcione
real o se descomponga, la conexion a tierra reducira, el riesgo de descarga electrica al ofrecer
una via de menos resistencia a la corriente electrica.
Este electrodomestico esta, equipado con un cable de alimentacion que cuenta con un enchufe
de tres pines con conexion a tierra para utilizar en un tomacorriente con conexion a tierra.
/_ La conexion inadecuada del conductor de conexion a tierra del equipo puede dar como
ADVER"--'_TEN_resultado un riesgo de descarga electrica. Consulte a un electricista o tecnico calificado si
le surgen dudas acerca de si la conexion a tierra del electrodomestico es adecuada. No
modifique el enchufe provisto con el aparato. Si no entra en el tomacorriente, solicite a un
electricista calificado que instale el tomacorriente adecuado.
PRECAUCIONES DE SEGURIDAD IMPORTANTES
Para evitar el riesgo de incendio, descarga electrica o lesiones fisicas innecesarias, todo
el cableado y la conexion a tierra deben realizarse en conformidad con el Codigo Electrico
Nacional, ANSI/FNPA, Nro. 70, la revision ma,s reciente, y los codigos y ordenanzas locales.
Es exclusiva responsabilidad del propietario del electrodomestico proveer los servicios
electricos adecuados para este electrodomestico.
,/_ Nunca conecte el cable a tierra alas tuberias de pl_tstico, las tuberias de gas o a las
PREOA'--'--_UCJNcanerias de agua caliente.
instalaciOn de su lavadora 13
WF210AN-02832A MES.indd 13 2010-02-09 oL>,f2:44:52
Agua
Para Ilenarcorrectamente la lavadora en eltiempo correcto, se requiereuna presi6n de agua de 20 a 116
psi (137-800 kPa).
Una presiOnde agua inferior a 20 psi (137 kPa)puede ocasionar fallas en lav_tlvulade agua o impedir
que la valvulade agua se cierre completamente.O puede prolongar el tiempo de Ilenadomas alia de Io
permitido pot los controles de la lavadoray que, como resultado,la lavadora se apague. En los controles
se establece un limite de tiempo en caso de que una manguera intema se aflojey se inunde lacasa.
Las Ilavesde agua deben estar colocadas dentro de los 4 pies (122 cm) de distancia de la parte posterior
de la lavadorapara las manguerasde entrada provistas con ella.
Las mangueras de entrada accesorias est_tndisponibles en varias longitudes hasta 10 pies (305 cm)
para Ilavesque se encuentren alejadas de la parte posterior de la lavadora.
Paraevitar laposibilidad de que se produzcan dahos a causa del agua:
,, Las Ilavesde agua deben ser de f_tcilacceso.
,, Cierre las Ilavescuando no use la lavadora.
,, VerifiqueperiOdicamenteque no haya perdidas de agua que provengan de los accesorios de la
manguerade entrada de agua.
Z_ Controle que todas lasconexiones de la valvulay de la Ilavede agua no presenten perdidas.
ADVERTENC_A
Drenaje
La altura recomendadade latoma de agua es de 18 pulg. (46 cm). La manguera de drenaje debe ajustarse
pot medio del gancho de la manguera de drenajeal tubo vertical. La toma de agua debe tenet la suficiente
Iongitud como para aceptar el di_tmetroexterior de la manguerade drenaje. Lamanguera de drenajeviene
conectada de fabrica.
Piso
Para un mejor desempeho, la lavadora debe estar instalada sobre un piso de construcciOn sOlida.
Posiblementelos pisos de madera necesitenreforzarse para minimizarlavibraciOny/o losdesequilibrios
de lacarga. Las superficiesalfombradas o con revestimientosintetico son factores que contribuyen a la
vibraciOny pueden provocar que la lavadora se mueva levementedurante el ciclo de centrifugado.
Z_ Nuncainstale la lavadorasobre una plataforma o sobre una estructura con soportes poco resistentes.
PRECAUClON
Consideraciones acerca de la ubicacion
No instale la lavadora en _treas donde el agua se congele, dado que la lavadora siempre
mantendr_t algo de agua en el _trea de la v_tlvula de agua, la bombay la manguera. Esto puede
ocasionar danos a la bomba, las mangueras y demurs componentes.
Instalacion del electrodomestico en un gabinete o en un hueco
DEJE UN ESPACIO LIBRE MiNIMO CUANDO INSTALE EL
ELECTRODOMESTICO EN UN GABINETE O EN UN HUECO:
Laterales - 1 pulgada (2,5 cm) Parte superior - 17 pulgadas (43,2 cm)
Parte posterior - 4 pulgadas (10,2 cm) Frente del gabinete - 2 pulgadas (5,1 cm)
Si la lavadora y la secadora se instalan una junto a la otra, el frente del gabinete debe contar pot
Io menos con una abertura sin obstrucciones de 72 pulg 2 (465 ore2). La lavadora unicamente no
requiere una abertura especifica.
14 instalaciOn de su avadora
WF210AN-02832A MES.indd 14 2010-02-09 oL,,f2:44:53
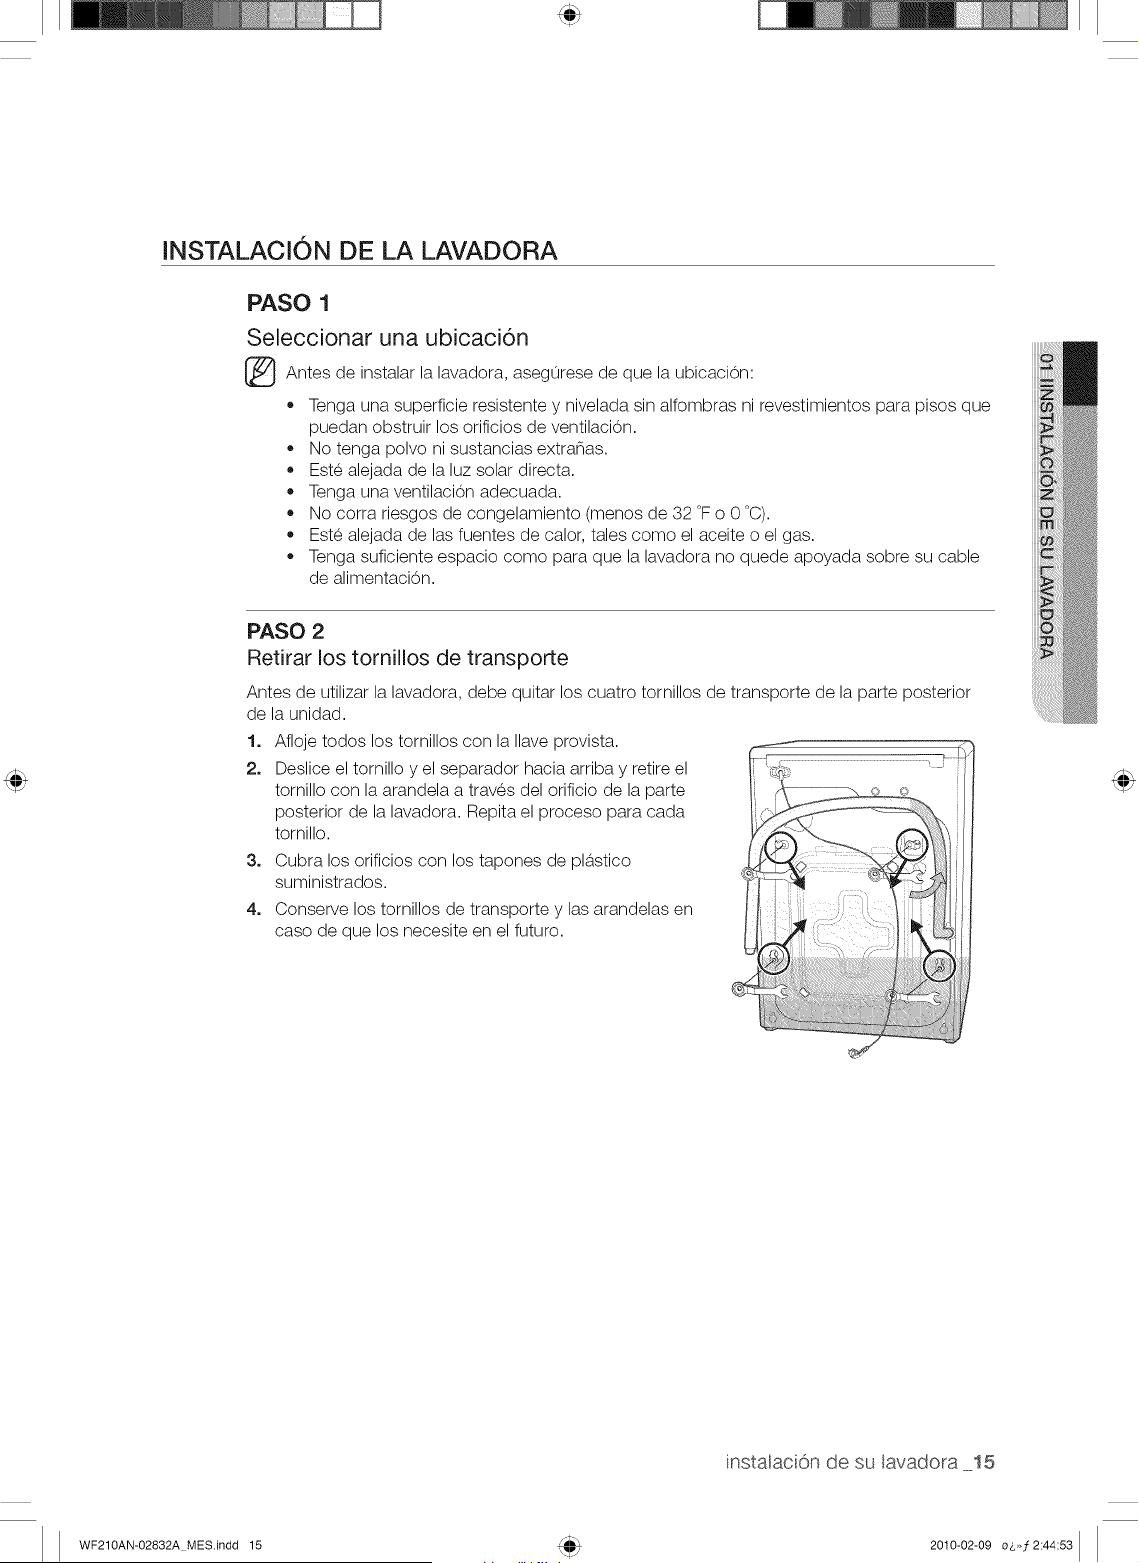
INSTALACION DE LA LAVADORA
PASO 1
Seleccionar una ubicaci6n
_ Antes de instalar la lavadora, asegurese de que la ubicaci0n:
• Tenga una superficie resistente y nivelada sin alfombras ni revestimientos para pisos que
puedan obstruir los orificios de ventilaci0n.
No tenga polvo ni sustancias extranas.
Este alejada de la luz solar directa.
,, Tenga una ventilaci0n adecuada.
No corra riesgos de congelamiento (menos de 32 °F o 0 °C).
,, Este alejada de las fuentes de calor, tales como el aceite o el gas.
Tenga suficiente espacio como para que la lavadora no quede apoyada sobre su cable
de alimentaci0n.
PASO 2
Retirar los tornillos de transporte
Antes de utilizar la lavadora, debe quitar los cuatro tornillos de transporte de la parte posterior
de la unidad.
1. Afloje todos los tornillos con la Ilave provista.
2. Deslice el tornillo y el separador hacia arriba y retire el
tornillo con la arandela a traves del orificio de la parte
posterior de la lavadora. Repita el proceso para cada
tornillo.
3. Cubra los orificios con los tapones de pD,stico
suministrados.
4. Conserve los tornillos de transporte y las arandelas en
caso de que los necesite en el futuro.
instalaciOn de su avadora 15
WF210AN-02832A MES.indd 15 2010-02-09 o&,,f2:44:53
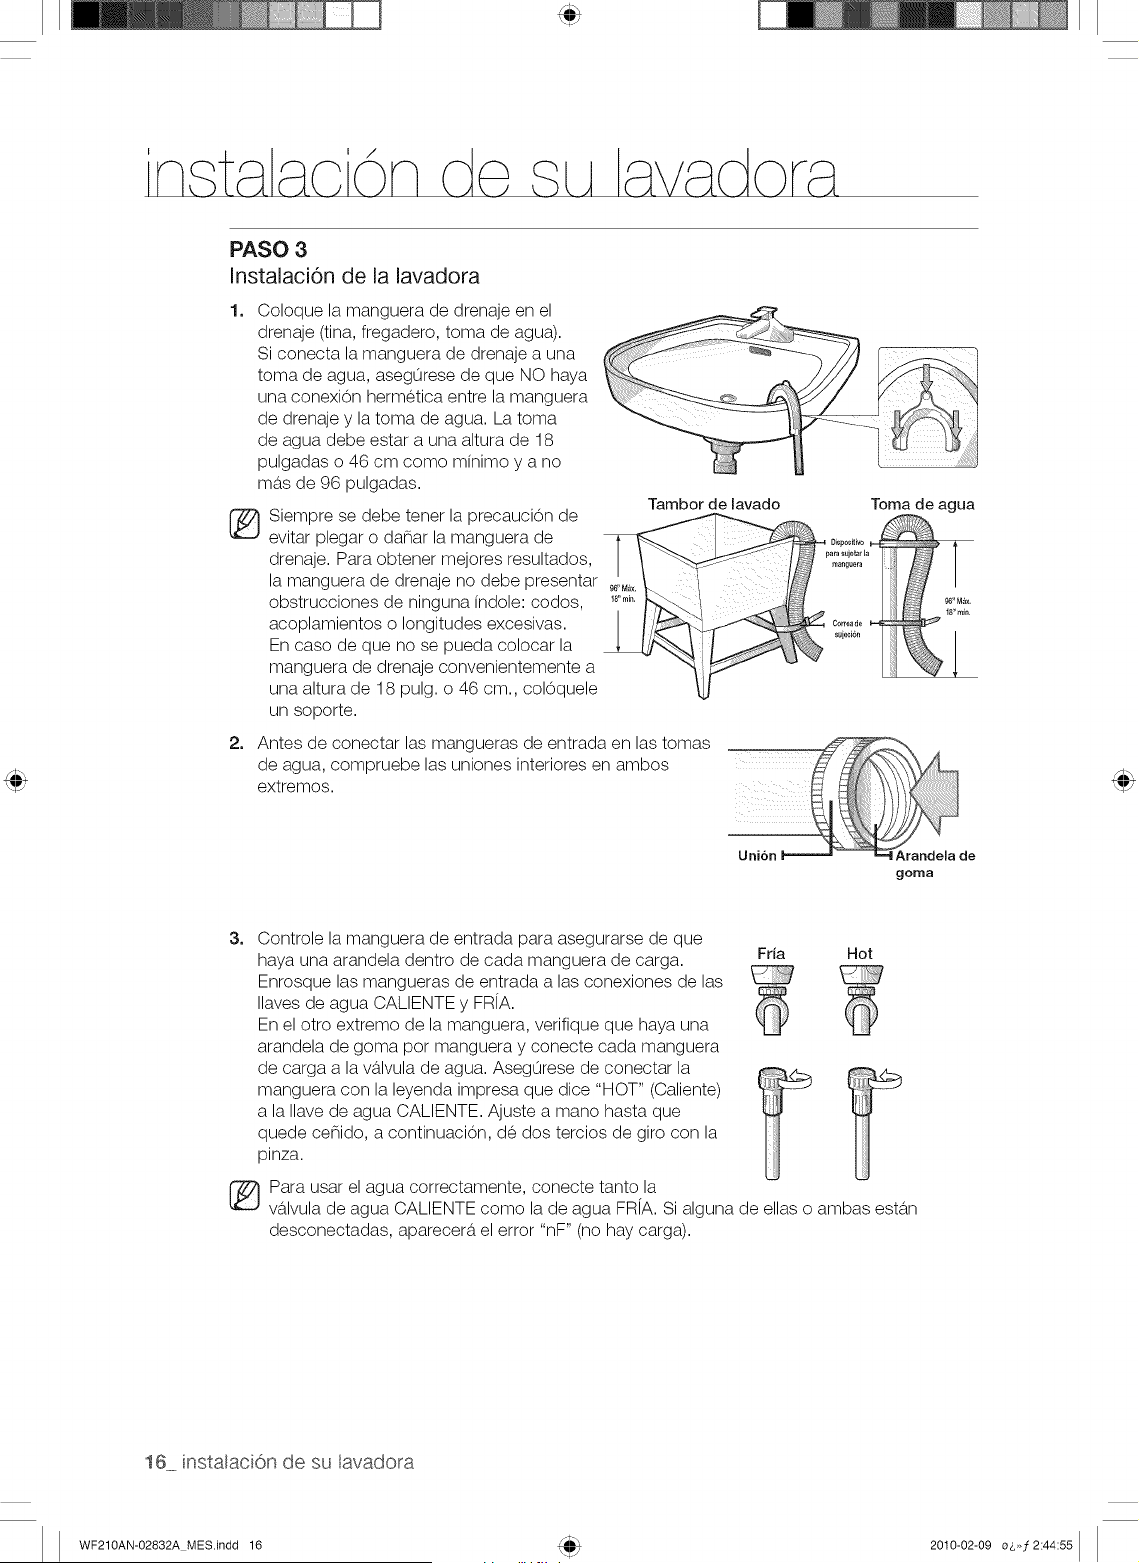
PASO 3
Instalaci6n de la lavadora
®
2_
Coloque la manguera de drenaje en el
drenaje (tina, fregadero, toma de agua).
Si conecta la manguera de drenaje a una
toma de agua, asegurese de que NO haya
una conexi0n hermetica entre la manguera
de drenaje y la toma de agua. La toma
de agua debe estar a una altura de 18
pulgadas o 46 cm como minimo y a no
ma,s de 96 pulgadas.
Siempre se debe tenet la precauci0n de
evitar plegar o danar la manguera de
drenaje. Para obtener mejores resultados,
la manguera de drenaje no debe presentar
obstrucciones de ninguna indole: codos,
acoplamientos o longitudes excesivas.
En caso de que no se pueda colocar la
manguera de drenaje convenientemente a
una altura de 18 pulg. o 46 cm., col0quele
un soporte.
Tambor de lavado
Toma de agua
Antes de conectar las mangueras de entrada en las tomas
de agua, compruebe las uniones interiores en ambos
extremos.
de
goma
3_
Controle la manguera de entrada para asegurarse de que
haya una arandela dentro de cada manguera de carga.
Enrosque las mangueras de entrada alas conexiones de las
Ilaves de agua CALIENTE y FR[A.
En el otto extremo de la manguera, verifique que haya una
arandela de goma pot manguera y conecte cada manguera
de carga a la v_tlvula de agua. Asegurese de conectar la
manguera con la leyenda impresa que dice "HOT" (Caliente)
a la Ilave de agua CALIENTE. Ajuste a mano hasta que
quede cenido, a continuaci0n, de dos tercios de giro con la
pinza.
®
Fria Hot
Para usar el agua correctamente, conecte tanto la
v_tlvula de agua CALIENTE como la de agua FR[A. Si alguna de elias o ambas est_tn
desconectadas, aparecer_t el error "nF" (no hay carga).
16 instalaciOn de su avadora
WF210AN-02832A MES.indd 16 2010-02-09 o_,,,f2:44:55
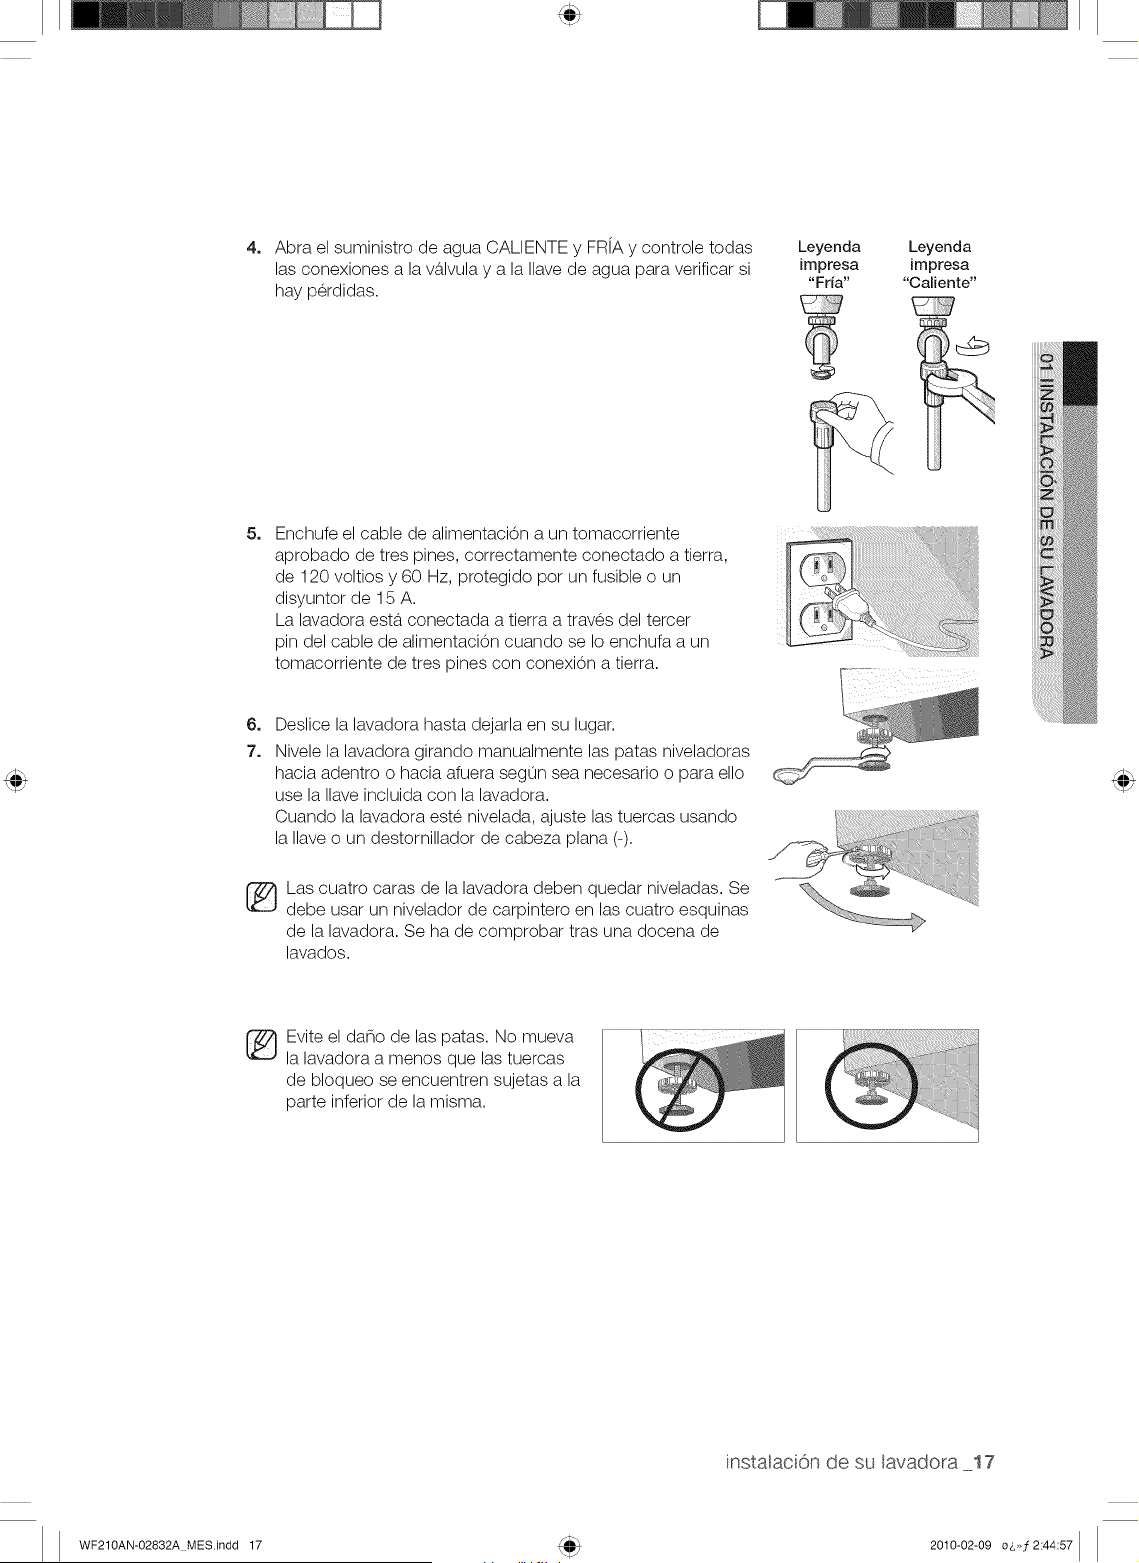
4. Abra el suministro de agua CALIENTE y FR[A y controle todas
las conexiones a la v_tlvula y a la Ilave de agua _ara verificar si
hay perdidas.
Leyenda Leyenda
impresa impresa
"Fria .... Caliente"
5, Enchufe el cable de alimentaci0n a un tomacorriente
aprobado de tres pines, correctamente conectado a tierra,
de 120 voltios y 60 Hz, protegido pot un fusible o un
disyuntor de 15 A.
La lavadora esta, conectada a tierra a traves del tercer
pin del cable de alimentaci0n cuando se Io enchufa a un
tomacorriente de tres pines con conexi0n a tierra.
6,
7,
Deslice la lavadora hasta dejarla en su lugar.
Nivele la lavadora girando manualmente las patas niveladoras
hacia adentro o hacia afuera segun sea necesario o para ello
use la Ilave incluida con la lavadora.
Cuando la lavadora este nivelada, ajuste las tuercas usando
la Ilave o un destornillador de cabeza plana (-).
Las cuatro caras de la lavadora deben quedar niveladas. Se
debe usar un nivelador de carpintero en las cuatro esquinas
de la lavadora. Se ha de comprobar tras una docena de
lavados.
_ vite el dano de las patas. No mueva
la lavadora a menos que las tuercas
de bloqueo se encuentren sujetas a la
parte inferior de la misma.
instalaciOn de su avadora 17
WF210AN-02832A MES.indd 17 2010-02-09 oO, f2:44:57
COMO CARGAR LA LAVADORA
• Puede cargar el tambor con ropa seca, sin doblar, pero NO L© S©BRECARGUE.
• La sobrecarga puede reducir la eficacia del lavado, causar desgaste adicional y posiblemente causar
pliegues o arrugas on las prendas.
• Lave prendas delicadas, tales como los brassieres, los calcetines y dema,s lenceria, en el ciclo Delicates
(Ropa delicada) con prendas livianas similares.
Cuando lave articulos voluminosos o algunos articulos ma,s pequenos, no cargue el tambor
completamente; coloque, pot ejemplo, un tapete, una almohada, munecos de peluche, o uno o dos
sueteres, agregue algunas toallas para que el lavado y el centrifugado resulten ma,s eficaces.
Durante el ciclo de centrifugado, la lavadora puede agregar agua adicional para redistribuir el
desequilibrio excesivo dentro del tambor.
Cuando lava cargas muy sucias, no sobrecargar la lavadora es muy importante para garantizar un
lavado de Optima calidad.
,, Para agregar una prenda que se habia olvidado:
1. Presione el bot6n Power (Encendido}.
2. Presione el bot6n Start/Pause (Inicio/Pausa}.
3. Espere hasta que la luz de la traba de la puerta se apague (5 segundos).
4. Agregue la prenda, cierre la puerta y presione el boton Start/Pause (Inicio/Pausa}.
Despues de una pausa de 10 segundos, se reanudara, el ciclo.
Para garantizar un lavado a fondo, agregue la prenda dentro de los cinco minutos posteriores al
comienzo del ciclo de lavado.
18 avado de una carga de ropa
WF210AN-02832A MES.indd 18 2010-02-09 o_,,,f2:44:57
COMO COMENZAR
1. Cargue la lavadora.
2. Cierre la puerta.
3. Presione el bot0n Power (Encendido).
4. Vierta detergente y aditivos en el dosificador (consulte las pa,ginas 20-21).
5. Seleccione el ciclo apropiado y las opciones para la carga (consulte las pa,ginas 18-19).
6. Presione el boton Start/Pause (Inicio/Pausa}.
7. Se iluminara, la luz del indicador Wash (lavado).
8. El tiempo del ciclo calculado aparecera, en la pantalla.
Es posible que el tiempo fluct0e para indicar mejor el tiempo restante en el ciclo.
EI tiempo real requerido para un ciclo puede diferir del estimado en la pantalla dependiendo de la
presi0n y la temperatura del agua, el detergente y la ropa.
9. Antes de que la lavadora comience a Ilenarse, se escuchar_t una serie de sonidos semejantes a un "clic"
para controlar la traba de la puerta y que se efect0e un drenaje ra,pido.
o
o
Cuando finaliza el ciclo, la luz de la Traba de la puerta se apaga y la palabra "End" (Fin) aparece en
la pantalla.
NO intente abrir la puerta hasta que la luz de la traba de la puerta se haya apagado. Para agregar
una prenda que se haya olvidado, consulte la secci0n "C0mo cargar la lavadora". (pa,gina 19)
Cuando la lavadora reinicia el funcionamiento despues de una pausa, espere a que produzca una
demora de hasta 15 segundos antes de que el ciclo continue.
Si presiona Power (Encendido), se cancelara, el ciclo y la lavadora se detendra,.
Las luces del indicador Wash (Lavado), Rinse (Enjuague) y Spin (Centrifugado) se iluminan durante
dichas fases del ciclo.
avado de una carga de ropa 19
WF210AN-02832A MES.indd 19 2010-02-09 o_,,,]2:44:58
DESCRIPCiON GENERAL DEL PANEL DE CONTROL
@
f
e ®®® ®
,::: @ @ ®
0 Hot/Cold @ High Heavy
Q Normal
Warm/Warm Medium
Warm/Cold • Low Light
Cold/Cold No S_in
_ Delicates/
Normal @ ....... . _ Hand Wash
Heavy Duty 0 ,,,' "_, _ @Wool
Perm Press Q O Quick Wash
Sanitize _ "R / 0 Rinse+Spin
sNs_j
LRinse]
©
@ @ @
• Het/Cold _!!!iiiiHigh _iiiiii_Heavy
ii!g Warm/Warm i_ii]iMedium • Normal
iii Warrn/CoJd Q Low @ Light
rp._i
@
sob
On/Off
@
::_ Cold/Cold No Spin
_ y / l:>tl
i SNn Soil Level
/emp, _ P i j/
©
®®
Muestraeltiempo restantedel ciclo,toda la informaciOndel ciclo y losmensajesde error.
Seleccioneel cicloapropiadopara eltipo de carga.
Esto determinar4tel patronde giroy lavelocidadde centrifugadodel ciclo.
ParaminimizarlaformaciOnde arrugasde laropa,seleccioneel cicloPermPress
(Planchapermanente).
Normal - Parala mayorpartede lastelas,entreelias,elalgodOn,el linoy lasprendas
moderadamentesucias.
Heavy Duty (Servicio pesado) - paratelas resistentesqueno destiBeny prendasmuy
sucias.
Perm Press (Plancha permanente)- para telassinteticasque no necesitanplanchadoy
prendasligeramentea moderadamentesucias.
Sanitize (DesinfecciOn)- Paraprendasmuysuciasy que no destiBen.Esteciclocalientael
aguaa 150 °F (65°O) paraeliminarlasbacterias(VVF220*).
SiseleccionaPause(Pausa)durantelafase de calentamientodel ciclo Sanitize
(DesinfecciOn),lapuerta de la lavadorapermanecer4ttrabada pot su seguridad.
Delicates/Hand Wash (Ropa delJcada/Lavadoa man@- paratelas finas,brassieres,
lenceriade seday otrastelas paraser lavadasa mano unicamente.Paraobtenermejores
resultados,use detergenteliquido.
20 avado de una carga de ropa
WF210AN-02832A MES.indd 20 2010-02-09 o_,,,]2:44:58
Wool (Lane)- Pare laneque se puedalaveren lavadora.Las cargas debentenerun peso
inferioralas 8 libras (3,62kg) (WF220*),Se recomiendaunacarga de 4,4 libras(2 kg)o
menos,
• Elciclo Lanelavala ropemoviendoeltambor horizontalmentepare mantenerlas
caracteristicasde lasfibresde lane y nodanarla rope,Se detienedurantealg0ntiempo
pare permitirque la ropese remoje,Estaparade no significaun problema,
• Se aconsejautilizerdetergenteneutro pare no da_arlarope y mejorarel lavado.
........ Elciclo de lavadode lanede esteartefactohaside aprobadopor
Woolmarkpare el lavadode produotosWoolmarklavablesen lavadora
t'_'_'"!:! siemprey cuando losproductos selaven conformea lasinstrucciones
de la etiquetade laprenday aquellasdel fabricantede la lavadora,
M0914(numerode aprobacionde Woolmark).
Quick Wash (Lavado r_pido) - Pareprendasligeramentesuciasque se necesitancon
urgencia.
Rinse + Spin (Enjuagado + Centrifugado) - 0selo parecargasque necesitanunicamente
enjuagueo pare agregara la cargasuavizantede telas quese a_adeduranteel enjuague,
Oualquierciclo puede retardarsehaste 19 horasen incrementosde unahora,La hera en
pantallaindica eltiempo en elcual comenzar_tellavado.
Agregueun enjuagueadicionalalfinaldel ciclo pare removerlos aditivosy perfumesdel
lavadocon mayoreficacia,
Elijasu ciclo favorite,incluyendotemperature,centrifugado,opcionde nivelde suciedad,
etc (consultelapeg, 23),
Presioneesteboton repetidamenteparerotarentrelasdistintasopcionesdisponiblesde
temperaturedel ague,
Hot/Cold (Caliente/Fria) - Rope blancay prendasmuysuciasque no desti_en,
Warm/Warm (Tibia/Tibia)- Prendasque no desti_en.Ouandoseseleccionaenjuagarcon
aguetibia, sOloel enjuaguefinalse realizar_tcon aguetibia.
Los demasenjuaguesse efectuarancon aguefriapare preserverlaenergia,
Warm/Cold (Tibia/Fria) - Prendasmoderadamentesucias,queno desti_en;la mayoriade
lasprendassin arrugas.
Cold/Cold (Fda/Fria)- Prendasde coloresvivos,ligeramentesucias,
Presioneesteboton repetidamenteparerotarentrelasdistintasopcionesde velocidadde
centrifugado,
High (Alta)- Usepare la rope interior,lascamisetas,losjeansy los algodonesresistentes,
Medium (Mediana) - Useparejeans,prendassinarrugas o que noneeesitanplanohadoy
telas sinteticas,
...................................._ Low (Baja) - Usepare las prendasdelicadasque necesitanun centrifugadoavelocidad
lenta.
No Spin (Sincentrifugado) - drenala lavadorasin centrifugar.Utilicelapareprendas
extremadamentedelicadasqueno puedantolerarel centrifugado.
Spin Only (SOlocentrifugado) - SOloseejecutael ciclode centrifugado.
Presioneel botOnpare seleccionarel nivelde suciedady eltiempo de lavado,
Heavy (Muy sucia) - Pareprendasmuysucias,
Normal (Normal)- Pareprendasmoderadamentesucias.Estaopcion es lamejor pare la
mayoriade lascargas.
Light (Ligeramente sucia) - Pareprendasligeramentesucias,
Presionelopare detenery reiniciarlosprogramas,
Presionelounavezpare encenderla lavadora,Vuelvaa presionarlopareapagar lalavadora.
Silalavadorapermaneceencendidadurantemasde 10 minutessinque setoque ninguno
de los botones,se apagar_tautom_tticamente.
Presioneel botOnSenalpareencendero apagarlasepal.
0selopare limpiareltambor,Limpialasuciedady bacteriasdel tambor,Se recomiendael
uso regular(despuesde 40 lavados),Noes necesariodetergenteni lejia(veasela p_tgina29),
avado de una carga de rope 21
WF210AN-O2832A MES.indd 21 2010-02-09 o_,,,f2:45:00
Seguro para nidos
Esta funci0n evita que los ninos jueguen con la lavadora.
Activaci6n de la funci6n Seguro para ni_os
Mantenga presionados simulte,neamente los botones Spin (Centrifugado} y Soil Level (Nivel
suciedad} durante aproximadamente 3 segundos.
• Si la funci0n Seguro para ninos este, activada, la puerta se bloquea y la le,mpara de "Child
lock (Seguro para ninos) [@]" se ilumina.
Si se presiona el boton Start/Pause (Inicio/Pausa) despues de activar la funci0n de
Seguro para ninos, no funciona ningun boton, excepto Power (Encendido}.
Si se presiona un boton cuando los botones este,n bloqueados, la le,mpara de "Child lock
(Seguro para ninos) [@ ]" parpadea.
Pausa en la funci6n Seguro para ni_os
Cuando la puerta este, bloqueada o los botones este,n bloqueados pot la funci0n Seguro para
ninos, puede hacer una pausa en la funci0n de seguro para ninos durante 1 minuto al mantener
presionados simulte,neamente los botones Spin (Centrifugado} y Soil Level (Nivel suciedad}
durante aproximadamente 3 segundos.
Si el modo de Seguro para ninos este, en pausa temporalmente, el bloqueo de la puerta se
libera durante 1 minuto para comodidad del usuario. Durante este tiempo, la le,mpara de
"Child lock (Seguro para ninos) [@]" parpadea.
Si se abre la puerta transcurrido el minuto, suena una alarma durante 2 minutos.
Si se cierra la puerta antes de transcurrir los 2 minutos, esta se bloquea y la funci0n Seguro
para ninos se reactiva. Si se cierra la puerta despues de los 2 minutos, esta no se bloquea
autome, ticamente ni se oye ninguna alarma.
ADVERTENClA
@
PRECAUCION
@
Desactivacion de la funcion Seguro para ni_os
Mantenga presionados simulte,neamente los botones Spin (Centrifugado} y Soil Level (Nivel
suciedad) durante aproximadamente 6 segundos.
Si la funci0n Seguro para ninos este, desactivada, la puerta se desbloquea y la le,mpara de
"Child lock (Seguro para ninos) [@]" se apaga.
La funci0n Seguro para ninos impide que los ninos o las personas discapacitadas
pongan en funcionamiento la lavadora accidentalmente y se lesionen.
Si un nino entra a la lavadora, puede quedar atrapado y asfixiarse.
Una vez activada la funci0n Seguro para ninos, esta continua funcionando aunque la
lavadora este apagada.
Abrir la puerta pot la fuerza puede danar el producto y causar lesiones personales.
Para agregar ropa cuando la funci0n Seguro para ninos este, activada, primero se debe
poner en pausa o desactivar dicha funci0n.
Si desea abrir la puerta de la lavadora cuando la funci0n Seguro ninos este, activada:
para
Ponga en pausa o desactive la funci0n Seguro para ninos.
Apague la lavadora y enciendala de nuevo.
22 avado de una carga de ropa
WF210AN-02832A MES.indd 22 2010-02-09 o_,,f2:45:00
Solo centrifugado
Si presiona el bot6n Power (Encendido} y luego mantiene presionado el bot6n Spin
(Centrifugado} durante 2 segundos, se indica el tiempo de centrifugado en la pantalla.
Luego vuelva a presionar el bot6n Spin (Centrifugado} hasta que se seleccione el nivel de
centrifugado requerido y presione el bot6n Start/Pause (Inicio/Pausa}.
Antes de pulsar el bot0n Spin Only (S01ocentrifugado) para utilizar esta funci0n, debe
seleccionar un programa con el Selector de ciclos. Si ya ha seleccionado un programa, s61o
puede seleccionar el nivel de centrifugado correspondiente al programa seleccionado.
Mas prendas _'+
Puede agregar o retirar prendas para lavar inchso despues de que haya comenzado el lavado,
siempre y cuando este encendida la hz de "Garment+ (M_s prendas) t2 ÷''. AI presionar el bot6n
Start/Pause (Inicio/Pausa} se destraba la puerta, salvo que el agua este demasiado caliente o
que no haya mucha agua en la lavadora. Si puede destrabar la puerta y desea continuar el ciclo
de lavado, cierre la puerta y presione el bot6n StarUPause (Inicio/Pausa}.
Mi ciclo (WF210*)
Le permite activar el lavado a su medida (temperatura, centrifugado, nivel de suciedad, etc.) con
la practicidad de presionar un s01o bot0n.
AI presionar el bot6n My Cycle (Mi ciclo), activa las opciones usadas durante el modo Mi ciclo.
La hz de "My Cycle (Mi ciclo)" indicara que esta activo.
Puede seleccionar todas las opciones en el modo Mi ciclo de la siguiente manera:
1. Seleccione el ciclo utilizando el Selector de ciclos.
2. Despues de seleccionar el ciclo, elija una opci6n.
_ onsulte la pagina 37 para conocer las configuraciones de las opciones disponibles para
cada ciclo.
3. Puede almacenar el ciclo y las opciones presionando el bot6n Start/Pause (Inicio/Pausa}
en el modo Mi ciclo. El ciclo y las opciones que seleccione apareceran la pr6xima vez que
elija la funci6n Mi ciclo.
o uede modificar las configuraciones de Mi ciclo repitiendo el proceso anterior.
La pr6xima vez que seleccione la funci6n Mi ciclo aparecera la ultima configuraci6n
utilizada.
Si ha completado el lavado en el modo Mi ciclo, la lavadora automaticamente accede al
modo Mi ciclo cuando se enciende con el bot6n Power (Encendido).
avado de una carga de ropa 23
WF210AN-02832A MES.indd 23 2010-02-09 o&,,f2:45:01
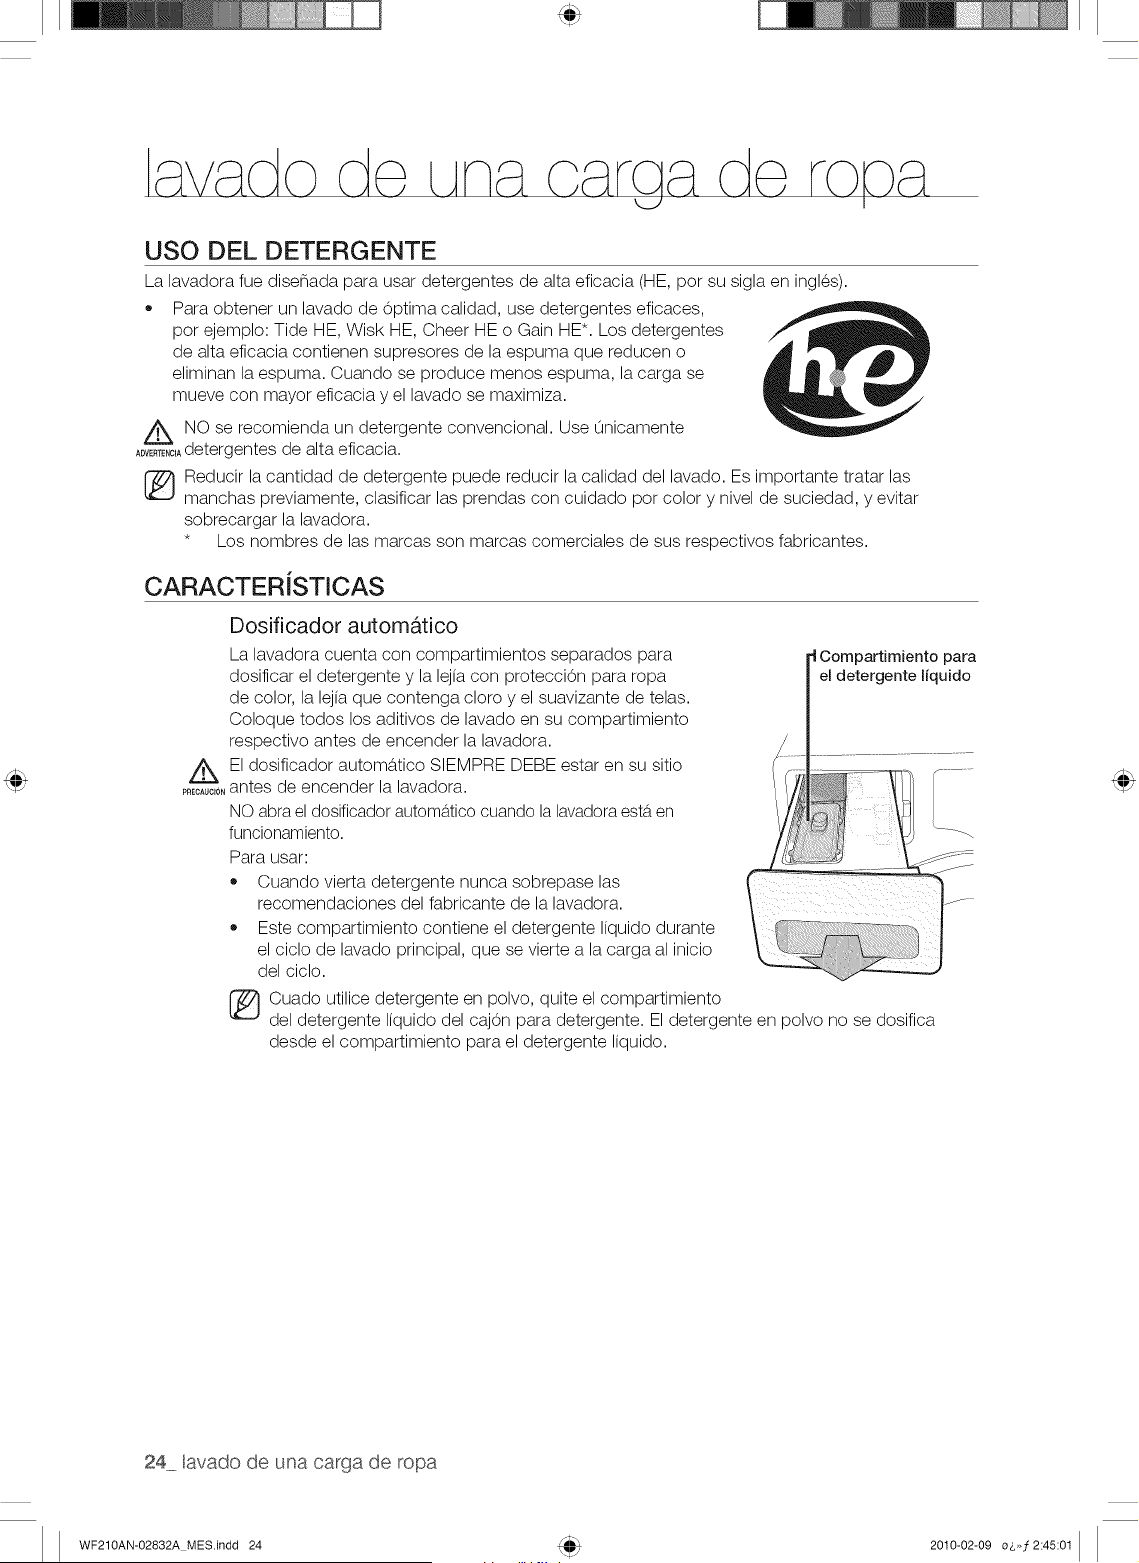
USO DEL DETERGENTE
La lavadora fue disenada para usar detergentes de alta eficacia (HE, pot su sigla en ingles).
• Para obtener un lavado de Optima calidad, use detergentes eficaces,
pot ejemplo: Tide HE, Wisk HE, Cheer HE o Gain HE*. Los detergentes
de alta eficacia contienen supresores de la espuma que reducen o
eliminan la espuma. Cuando se produce menos espuma, la carga se
mueve con mayor eficacia y el lavado se maximiza.
//_, NO se recomienda un detergente convencional. Use unicamente
ADVER_NO_Adetergentes de alta eficacia.
Reducir la cantidad de detergente puede reducir la calidad del lavado. Es importante tratar las
manchas previamente, clasificar las prendas con cuidado pot color y nivel de suciedad, y evitar
sobrecargar la lavadora.
* Los nombres de las marcas son marcas comerciales de sus respectivos fabricantes.
CARACTERISTICAS
Dosificador automatico
La lavadora cuenta con compartimientos separados para
dosificar el detergente y la lejia con proteccion para ropa
de color, la lejia que contenga cloro y el suavizante de telas.
Coloque todos los aditivos de lavado en su compartimiento
respectivo antes de encender la lavadora.
/_ El dosificador automa,tico SIEMPRE DEBE estar en su sitio
pRECA_"_UC_,antes de encender la lavadora.
NO abra el dosificador automa,tice cuando la lavadora esta,en
funcionamiento.
Para usar:
Cuando vierta detergente nunca sobrepase las
recomendaciones del fabricante de la lavadora.
Este compartimiento contiene el detergente liquido durante
el ciclo de lavado principal, que se vierte a la carga al inicio
del ciclo.
Cuado utilice detergente en polvo, quite el compartimiento
del detergente liquido del cajon para detergente. El detergente en polvo no se dosifica
desde el compartimiento para el detergente liquido.
•I Compartimiento para
el detergente liquido
24 avado de una carga de ropa
WF210AN-02832A MES.indd 24 2010-02-09 o_,,,f2:45:01
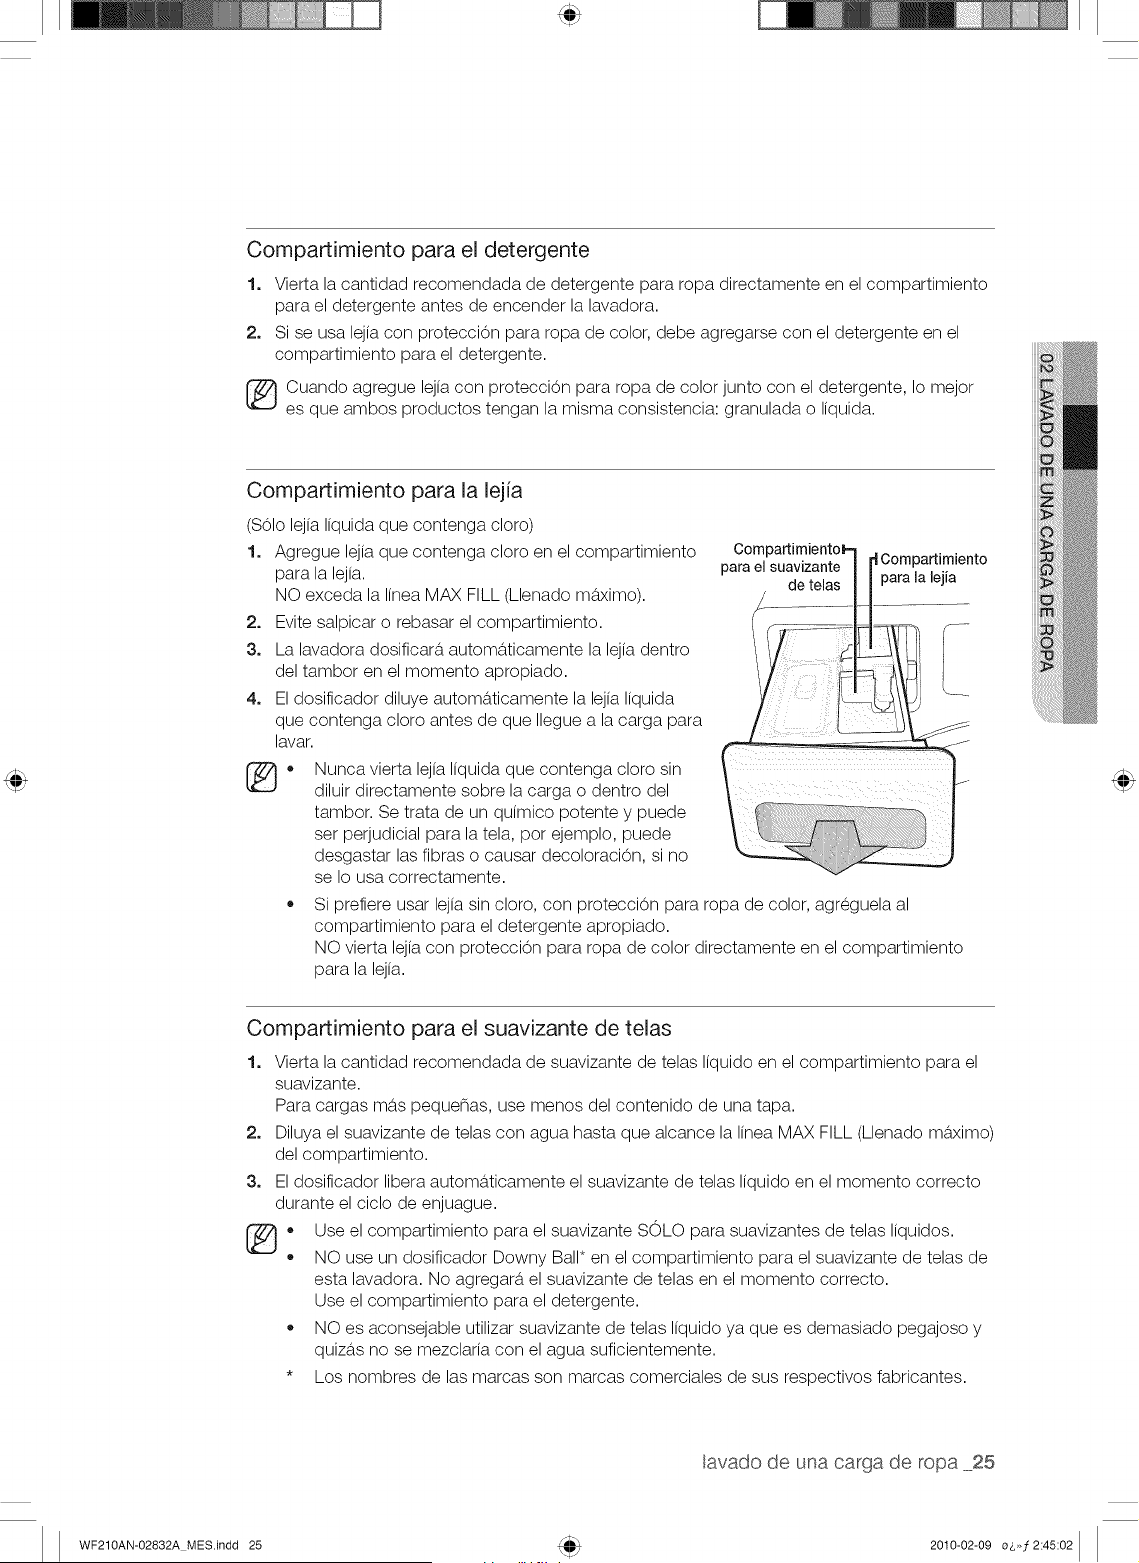
Compartimiento para el detergente
1. Vierta la cantidad recomendada de detergente para ropa directamente en el compartimiento
para el detergente antes de encender la lavadora.
2. Si se usa lejia con proteccion para ropa de color, debe agregarse con el detergente en el
compartimiento para el detergente.
_ uando agregue lejia con proteccion para ropa de color junto con el detergente, Io mejor
es que ambos productos tengan la misma consistencia: granulada o liquida.
Compartimiento para la lejia
(S01olejia liquida que contenga cloro)
1. Agregue lejia que contenga cloro en el compartimiento
para la lejia.
NO exceda la linea MAX FILL (Llenado ma,ximo).
2. Evite salpicar o rebasar el compartimiento.
3. La lavadora dosificar_t autom_tticamente la lejia dentro
del tambor en el momento apropiado.
4. El dosificador diluye automa, ticamente la lejia liquida
que contenga cloro antes de que Ilegue a la carga para
lavar.
Compartimiento_.-
para el suavizante -ICompartimiento
de telas para la lejia
Nunca vierta lejia liquida que contenga cloro sin
diluir directamente sobre la carga o dentro del
tambor. Se trata de un quimico potente y puede
set perjudicial para la tela, pot ejemplo, puede
desgastar las fibras o causar decoloracion, si no
se Io usa correctamente.
Si prefiere usar lejia sin cloro, con proteccion para ropa de color, agreguela al
compartimiento para el detergente apropiado.
NO vierta lejia con proteccion para ropa de color directamente en el compartimiento
para la lejia.
Compartimiento para el suavizante de telas
2_
3.
®.
o
Vierta la cantidad recomendada de suavizante de telas liquido en el compartimiento para el
suavizante.
Para cargas m_ts pequenas, use menos del contenido de una tapa.
Diluya el suavizante de telas con agua hasta que alcance la linea MAX FILL (Llenado m_tximo)
del compartimiento.
El dosificador libera automa,ticamente el suavizante de telas liquido en el momento correcto
durante el ciclo de enjuague.
Use el compartimiento para el suavizante SOLO para suavizantes de telas liquidos.
NO use un dosificador Downy Ball* en el compartimiento para el suavizante de telas de
esta lavadora. No agregara, el suavizante de telas en el momento correcto.
Use el compartimiento para el detergente.
• NO es aconsejable utilizar suavizante de telas liquido ya que es demasiado pegajoso y
quizb,s no se mezclaria con el agua suficientemente.
• Los nombres de las marcas son marcas comerciales de sus respectivos fabricantes.
avado de una carga de ropa 25
WF210AN-02832A MES.indd 25 2010-02-09 o_,,,f2:45:02
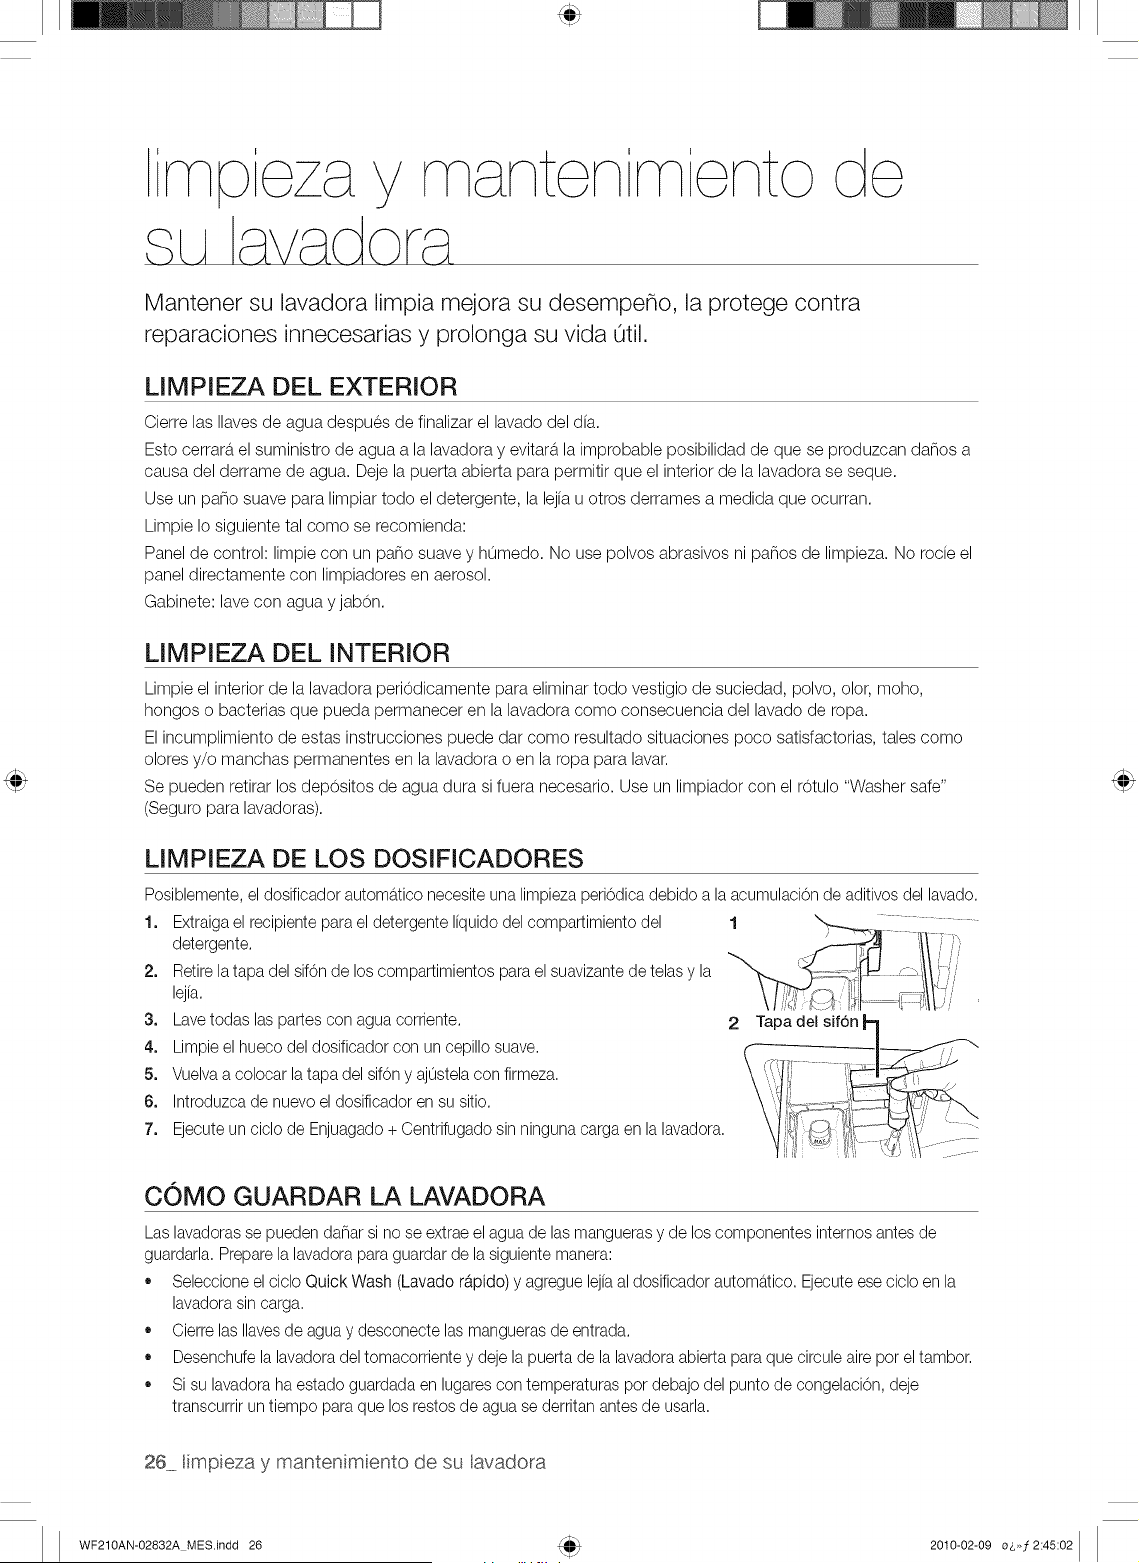
mp y
m Nto
Mantener su lavadora limpia mejora su desempeno, la protege contra
reparaciones innecesarias y prolonga su vida Otil.
LIMPIEZA DEL EXTERIOR
Cierre las Ilaves de agua despues de finalizar el lavado del dia.
Esto cerrara,el suministro de agua a la lavadora y evitara,la improbable posibilidad de que se produzcan da_os a
causa del derrame de agua. Deje la puerta abierta para permitir que el interior de la lavadora se seque.
Use un paso suave para limpiar todo el detergente, la lejia u otros derrames a medida que ocurran.
Limpie Io siguiente tal como se recomienda:
Panel de control: limpie con un paso suave y humedo. No use polvos abrasivos ni pa_os de limpieza. No rode el
panel directamente con limpiadores en aerosol.
Gabinete: lave con agua y jabon.
LIMPIEZA DEL INTERIOR
Limpie el interior de la lavadora periodicamente para eliminar todo vestigio de suciedad, polvo, olor, moho,
hongos o bacterias que pueda permanecer en la lavadora como consecuencia del lavado de ropa.
El incumplimiento de estas instrucciones puede dar como resultado situaciones poco satisfactorias, tales como
olores y/o manchas permanentes en la lavadora o en la ropa para lavar.
Se pueden retirar los dep0sitos de agua dura si fuera necesario. Use un limpiador con el r0tulo "Washer safe"
(Seguro para lavadoras).
LIMPIEZA DE LOS DOSIFiCADORES
Posiblemente, el dosificador automa.ticonecesite una limpiezaperiOdicadebido a la acumulaciOnde aditivos del lavado.
1. Extraigael recipientepara el detergente liquido del compartimiento del
detergente.
2. Retirela tapa del sifOnde loscompartimientos para el suavizantede telas y la
tejia.
3. Lavetodas las partes con agua corriente. 2 del sif6n
4. Limpie el hueco del dosificador con un cepillo suave.
5. Vuelvaa colocar la tapa del sifOny aj0stelacon firmeza.
6. Introduzca de nuevoel dosificador en su sitio.
7. Ejecute un ciclo de Enjuagado+ Centrifugado sin ninguna carga en lalavadora.
COMO GUARDAR LA LAVADORA
Las lavadorasse pueden dahar si no se extrae el agua de las mangueras y de los componentes internos antes de
guardarla.Preparela lavadora para guardar de la siguientemanera:
• Seleccioneel ciclo Quick Wash (Lavado rapido) y agregue lejiaal dosificador automa.tico.Ejecuteese ciclo en la
lavadora sin carga.
Cierre las Ilavesde agua y desconecte las mangueras de entrada.
Desenchufe la lavadoradel tomacorriente y deje la puerta de la lavadora abierta para que circule aire pot el tambor.
Si su lavadoraha estado guardada en lugarescon temperaturas pot debajo del punto de congelaciOn,deje
transcurrir untiempo para que los restos de agua se derritan antes de usarla.
26 mpieza y mantenmento de su avadora
WF210AN-02832A MES.indd 26 2010-02-09 o8,,f2:45:02
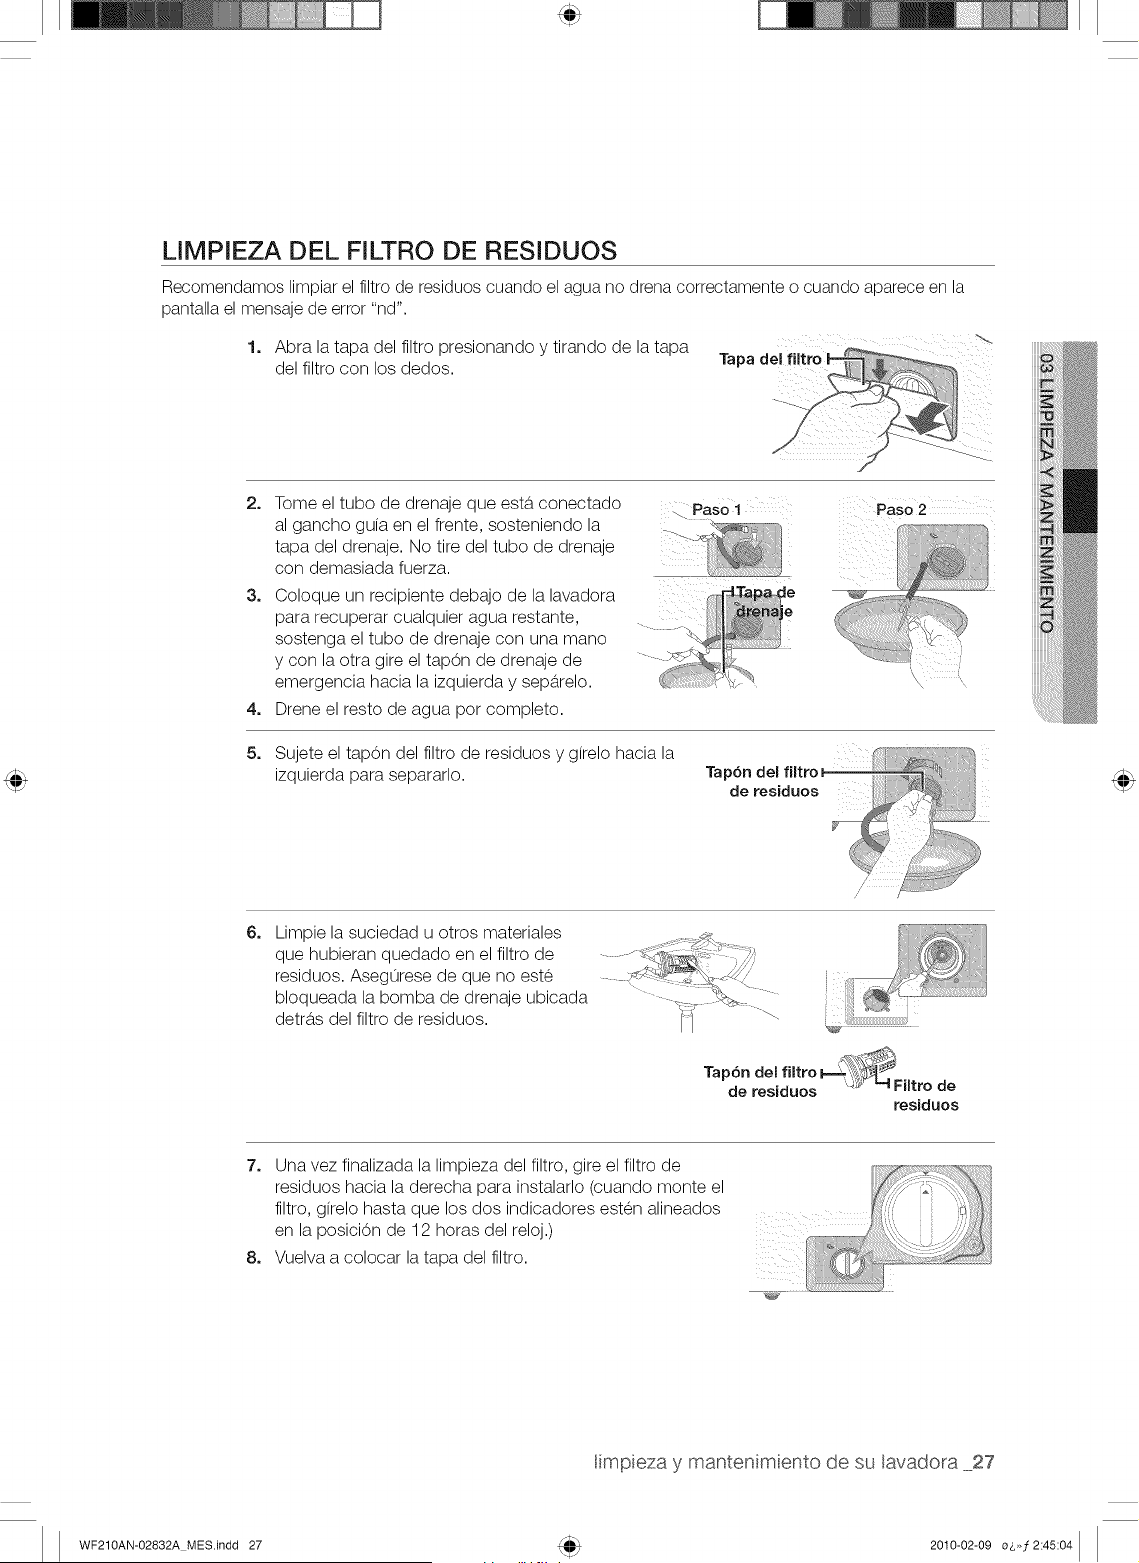
LIMPIEZA DEL FILTRO DE RESIDUOS
Recomendamos limpiar el filtro de residuos cuando el agua no drena correctamente o cuando aparece en la
pantalla el mensaje de error "nd".
1. Abra la tapa del filtro presionando y tirando de la tapa ""
del filtro con los dedos. Tal:
2=
3=
4=
5.
Tome el tubo de drenaje que esta, conectado
al gancho guia en el frente, sosteniendo la
tapa del drenaje. No tire del tubo de drenaje
con demasiada fuerza.
Coloque un recipiente debajo de la lavadora
para recuperar cualquier agua restante,
sostenga el tubo de drenaje con una mano
y con la otra gire el tap0n de drenaje de
emergencia hacia la izquierda y sepa,relo.
Drene el resto de agua pot completo.
Paso 2
Sujete el tap0n del filtro de residuos y girelo hacia la
izquierda para separarlo. Tapbn del filtro. _
de residuos
6=
Limpie la suciedad u otros materiales
que hubieran quedado en el filtro de
residuos. Asegurese de que no este
bloqueada la bomba de drenaje ubicada
detra,s del filtro de residuos.
. _%*__!
Tapbn del flltro F-==_',_
de residuos ',4J 4 Filtro de
residuos
7. Una vez finalizada la limpieza del filtro, gire el filtro de
residuos hacia la derecha para instalarlo (cuando monte el
filtro, girelo hasta que los dos indicadores esten alineados V,"/
en la posiciOn de 12 horas del reloj.) _-__-
[i i: :::" :;;::
8. Vuelva a colocar la tapa del filtro. :_,,,_.,,_,L_,,,
I mpieza y manten m ento de su lavadora 27
WF210AN-02832A MES.indd 27 2010-02-09 o_,,,f2:45:04
mpe y
ten m ento de
LIMPIEZA DEL SELLO/FUELLE DE LA PUERTA
1. Abra la puerta de la lavadora y saque la ropa o cualquier otto objeto.
2.
Inspeccione el sello/fuelle de color gris entre la apertura de
la puerta y la canasta para buscar zonas manchadas. Hale
el sello/fuelle para inspeccionar todas las a,reas debajo del
sello/fuelle y comprobar si hay objetos extranos.
seUo/fueUe
®
3. Si hay manchas en el a,rea del sello/fuelle, limpielas siguiendo este procedimiento.
a) Mezcle una soluci0n diluida de s4 de taza (177 ml) de blanqueador liquido con cloro y 1
gal. (3,8 L) de agua corriente caliente.
b} Limpie el a,rea del sello/fuelle con esta soluci0n mediante un pano humedo.
c} Deje reposar durante 5 minutos.
d} Limpie meticulosamente el a,rea con un pano seco y deje la puerta abierta para que se
seque el interior de la lavadora.
IMPORTANTE:
,, Pongase guantes de goma cuando vaya a realizar una limpieza prolongada.
• Consulte las instrucciones del fabricante del blanqueador para un uso adecuado.
MANTENIMIENTO DE LA CUBIERTA SUPERIOR Y DEL MARCO
FRONTAL
No coloque objetos pesados ni afilados ni tampoco el paquete de detergente sobre la lavadora.
Mantengalos apartados sobre el pedestal o en una caja de almacenaje, que puede adquirir pot separado.
z_ El objeto puede rayar o danar la cubierta superior o caerse de la lavadora.
PRECAUTION
Ya que toda la lavadora tiene un acabado brillante, la superficie se puede rayar o danar D,cilmente.
Evite rayar o danar la superficie cuando use la lavadora.
28 mpieza y mantenmento de su avadora
WF210AN-02832A MES.indd 28 2010-02-09 o6,,#2:45:06
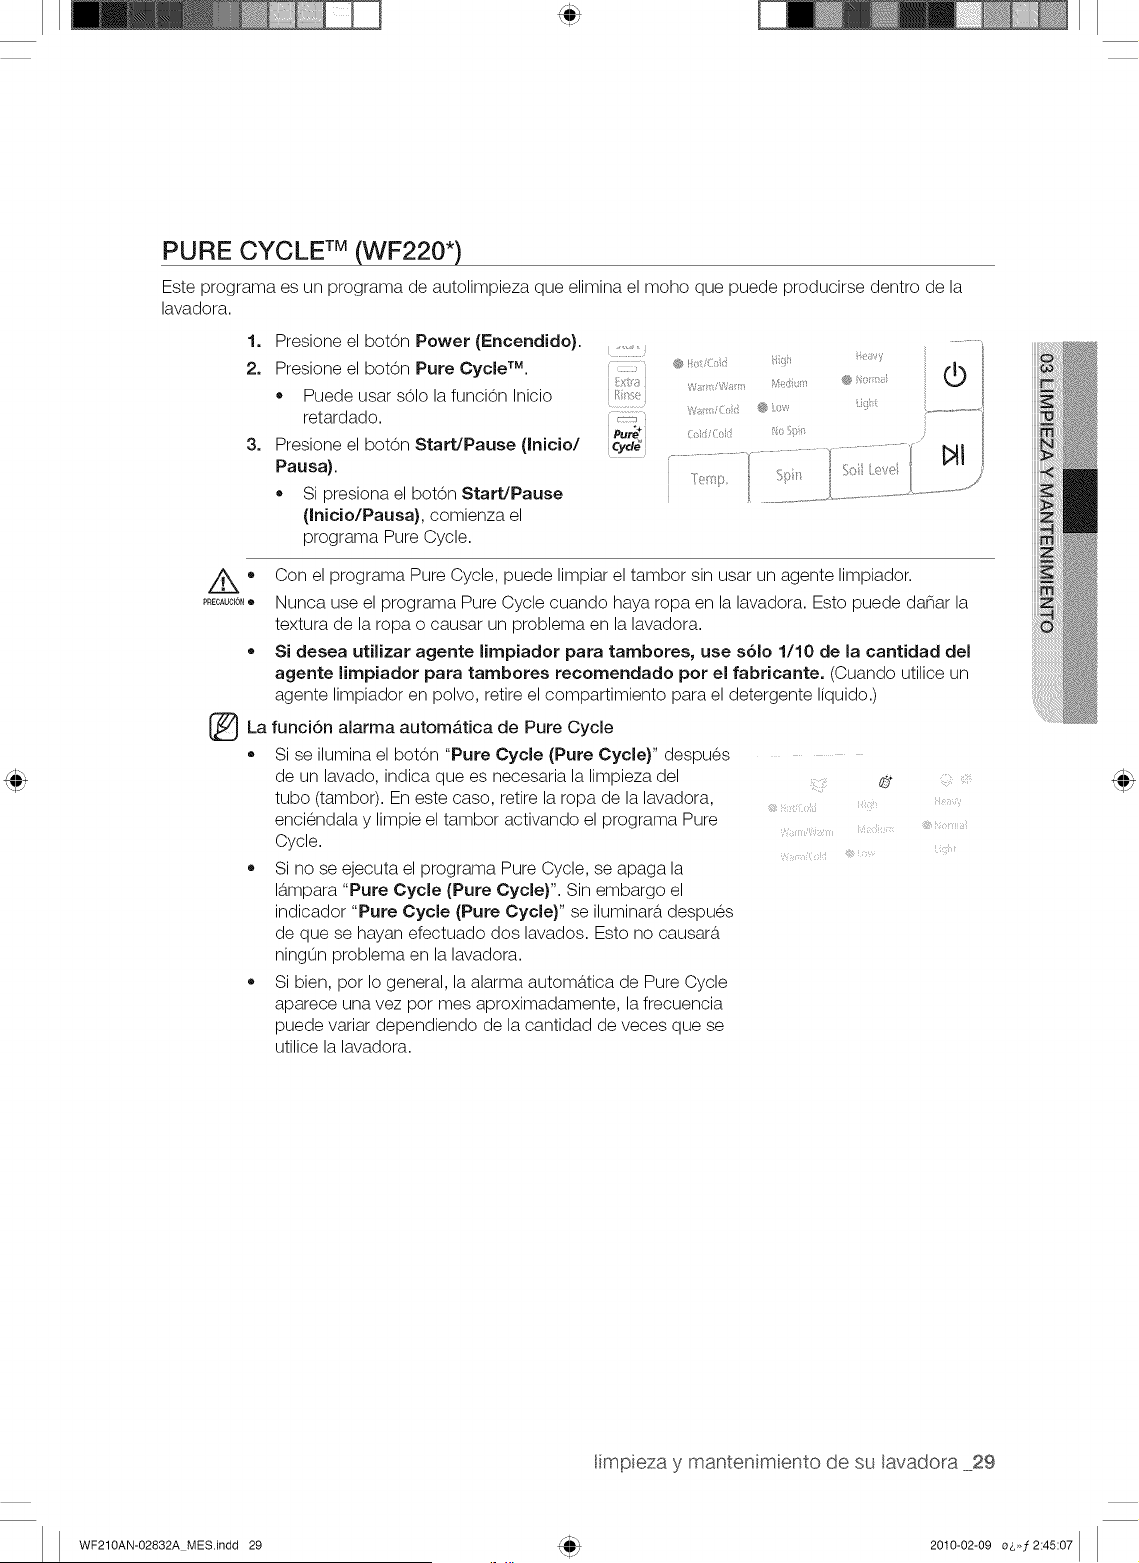
PURE CYCLE TM(WF220*)
Este programa es un programa de autolimpieza que elimina el moho que puede producirse dentro de la
lavadora.
1. Presione el bot6n Power (Encendido}.
2. Presione el bot6n Pure Cycle TM.
• Puede usar s61ola funci6n Inicio
retardado.
3. Presione el bot6n Start/Pause (Inicio/
Pausa).
• Si presiona el boton Start/Pause
(Inicio/Pausa), comienza el
programa Pure Cycle.
i.ik!TM
PUt_ +
cyd#
.......... ; . ®+,< i
7 ;i_;i ® :_v i;fi ..................!
.....<:7, "'" ...........i'bJl
....../. ........../
PRECAUTIONi
Con el programa Pure Cycle, puede limpiar el tambor sin usar un agente limpiador.
Nunca use el programa Pure Cycle cuando haya ropa en la lavadora. Esto puede danar la
textura de la ropa o causar un problema en la lavadora.
Si desea utilizar agente Iimpiador para tambores, use s61o 1/10 de la cantidad del
agente limpiador para tambores recomendado pot el fabricante. (Cuando utilice un
agente limpiador en polvo, retire el compartimiento para el detergente Ifquido.)
La funci6n alarma automAtica de Pure Cycle
Si se ilumina el boton "Pure Cycle (Pure Cycle)" despues
de un lavado, indica que es necesaria la limpieza del
tubo (tambor). En este caso, retire la ropa de la lavadora,
enciendala y limpie el tambor activando el programa Pure
Cycle.
Si no se ejecuta el programa Pure Cycle, se apaga la
la,mpara "Pure Cycle (Pure Cycle)". Sin embargo el
indicador "Pure Cycle (Pure Cycle)" se iluminara, despues
de que se hayan efectuado dos lavados. Esto no causara
ning0n problema en la lavadora.
Si bien, pot Io general, la alarma automatica de Pure Cycle
aparece una vez pot mes aproximadamente, la frecuencia
puede variar dependiendo de la cantidad de veces que se
utilice la lavadora.
@+
{i_iT_'___!,s__( (_i__, 'i! ___,_,, '_J_ _'_,v_
limpieza y manten m ento de su lavadora _29
WF210AN-02832A MES.indd 29 2010-02-09 o6>,f2:45:07
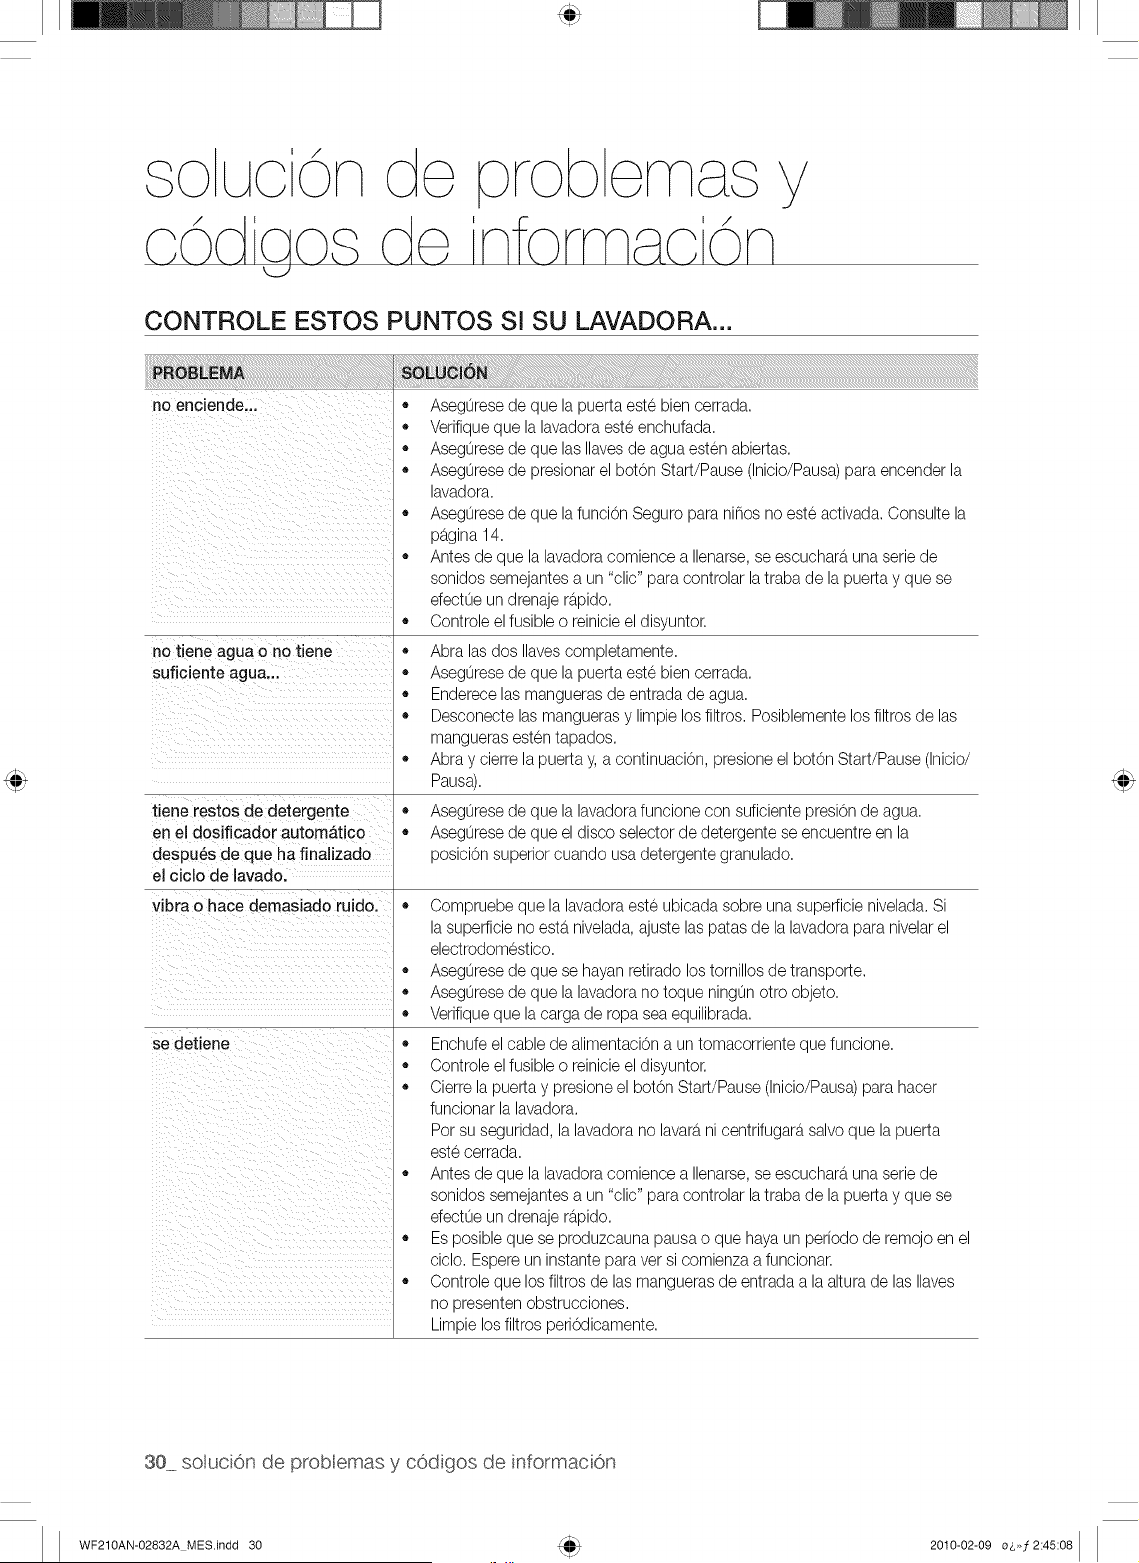
CONTROLE ESTOS PUNTOS SI SU LAVADORA...
no enciende...
no tiene agua o no tiene
suficiente agua...
tiene restos de detergente
en el dosificador autom&tico
despu6s de que ha finalizado
el ciclo de lavado.
vibra o hace demasiado ruido.
se detiene
,, Aseguresede que lapuerta este bien cerrada.
,, Verifiqueque la lavadora este enchufada.
,, Aseguresede que lasIlavesde agua esten abiertas.
,, Aseguresede presionarel botOn Start/Pause (Inicio/Pausa)para encender la
lavadora.
,, Aseguresede que lafunciOnSeguro para niflos no este activada. Consulte la
p_tgina14.
,, Antes de que la lavadoracomience a Ilenarse,se escuchara una seriede
sonidos semejantes a un "clic" para controlar la traba de lapuerta y que se
efectLieun drenaje r@ido.
,, Controleel fusible o reinicieel disyuntor.
,, Abra lasdos Ilavescompletamente.
,, Aseguresede que lapuerta este bien cerrada.
,, Enderecelas manguerasde entrada de agua.
,, Desconecte las manguerasy limpie los filtros. Posiblementelos filtrosde las
manguerasesten tapados.
,, Abra y cierre la puerta y, a continuaciOn,presione el botOn Start/Pause (Inicio/
Pausa).
,, Aseguresede que lalavadora funcione con suficiente presiOnde agua.
,, Aseguresede que el disco selector de detergente se encuentre en la
posiciOnsuperiorcuando usa detergente granulado.
,, Compruebe que la lavadora este ubicada sobre una superficienivelada. Si
la superficieno estb.nivelada, ajuste las patas de la lavadorapara nivelarel
electrodomestico.
,, Aseguresede que se hayan retirado lostomillos de transporte.
,, Aseguresede que lalavadora no toque ningun otto objeto.
,, Verifiqueque la carga de ropa sea equilibrada.
,, Enchufeel cable de alimentaciOna un tomacorriente que funcione.
,, Controleel fusible o reinicieel disyuntor.
,, Cierre la puerta y presione el botOn Start/Pause (Inicio/Pausa)para hacer
funcionar la lavadora.
Pot su seguridad, la lavadora no lavarani centrifugara salvo que la puerta
este cerrada.
,, Antes de que la lavadoracomience a Ilenarse,se escuchara una seriede
sonidos semejantes a un "clic" para controlar la traba de lapuerta y que se
efectLieun drenaje r@ido.
,, Es posible que se produzcauna pausao que haya un periodo de remojo en el
ciclo. Espereun instantepara vet si comienza a funcionar.
,, Controleque los filtros de las manguerasde entrada a laaltura de las Ilaves
no presenten obstrucciones.
Limpie los filtros periOdicamente.
30 sotucion de prob emas y cod gos de nformacion
WF210AN-02832A MES.indd 30 2010-02-09 o_,,,f2:45:08
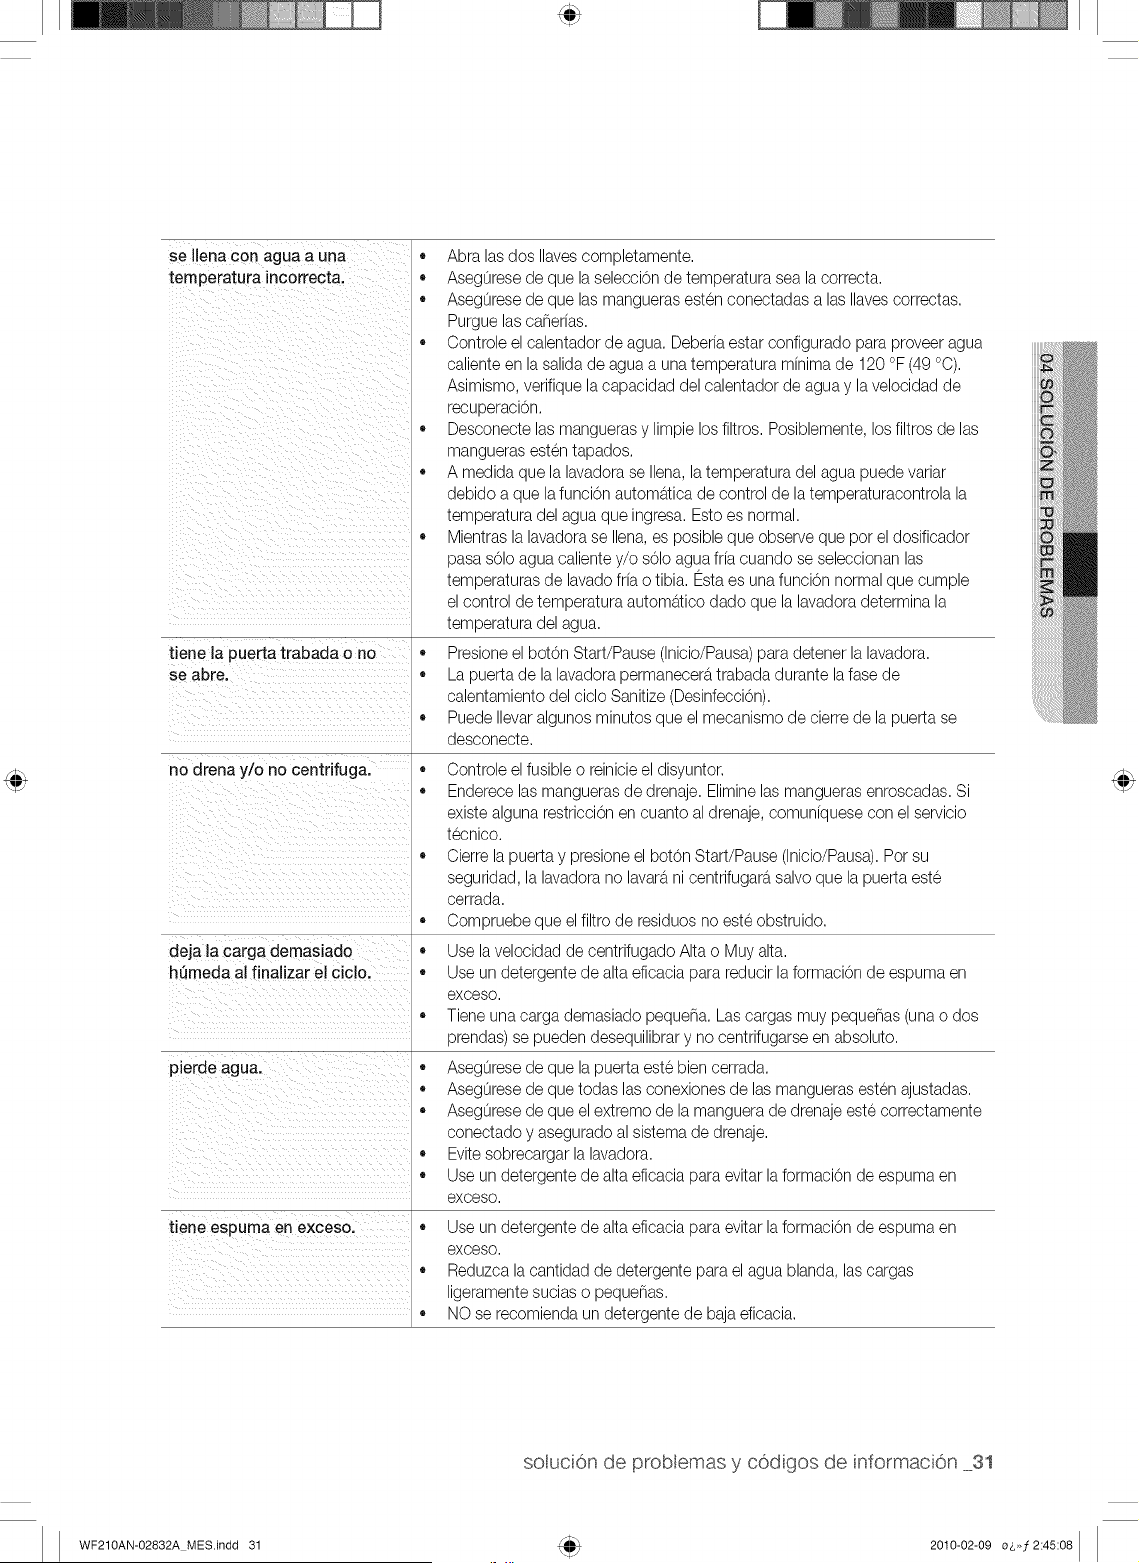
se Ilena con agua a una
temperatura incorrecta.
tiene la puerta trabada o no
se abre,
no drena y/o no centrifuga.
deja lacarga demasiado
hQmeda al finalizar el ciclo.
pierde agua.
tiene espuma en exceso,
,, Abra las dos Ilavescompletamente.
,, Aseguresede que la selecci6nde temperatura sea la correct&
,, Aseguresede que las manguerasesten conectadas alas Ilavescorrectas.
Purgue las caflerias.
,, Controle el calentador de agua. Deberiaestar configurado para proveer agua
caliente en la salidade agua a una temperatura minima de 120 °F (49 °C).
Asimismo, verifique lacapacidad del calentador de aguay la velocidad de
recuperaci6n.
,, Desconectelas manguerasy limpie losfiltros. Posiblemente, losfiltros de las
manguerasesten tapados.
,, A medida que la lavadora se Ilena, la temperatura del agua puedevariar
debido a que lafunci6n automatica de control de la temperaturacontrola la
temperatura del agua que ingresa. Esto es normal.
,, Mientras la lavadorase Ilena,es posible que observe que pot el dosificador
pasa s61oagua calientey/o s61oagua fria cuando se seleccionan las
temperaturas de lavado fria o tibia. Esta es una funci6n normal que cumple
el control de temperatura automatico dado que la lavadora determina la
temperatura del agua.
,, Presioneel bot6n Start/Pause (Inicio/Pausa)para detener la lavadora.
,, La puerta de la lavadora permanecera trabada durante la fasede
calentamiento del ciclo Sanitize (Desinfecci6n).
,, Puede Ilevaralgunos minutosque el mecanismo de cierre de la puerta se
desconecte.
,, Controle el fusible o reinicieel disyuntor.
,, Enderecelas mangueras de drenaje. Eliminelas manguerasenroscadas. Si
existe algunarestricci6n en cuanto al drenaje, comuniquese con el servicio
tecnico.
,, Cierre la puerta y presione el bot6n Start/Pause (Inicio/Pausa).Pot su
seguridad, la lavadora no lavara ni centrifugarasalvo que la puerta este
cerrada.
,, Compruebe que el filtro de residuos no este obstruido.
,, Use la velocidad de centrifugado Alta o Muy alta.
,, Use un detergente de alta eficaciapara reducir la formaci6n de espuma en
exceso.
,, Tiene unacarga demasiado pequefla. Lascargas muy pequeflas (una o dos
prendas) se pueden desequilibrary no centrifugarseen absoluto.
,, Aseguresede que la puerta este bien cerrada.
,, Aseguresede que todas las conexionesde las manguerasesten ajustadas.
,, Aseguresede que el extremode la manguerade drenaje este correctamente
conectado y asegurado al sistema de drenaje.
,, Evitesobrecargar lalavadora.
,, Use un detergente de alta eficaciapara evitar laformaciOn de espuma en
exceso.
,, Use un detergente de alta eficaciapara evitar laformaciOn de espuma en
exceso.
,, Reduzca lacantidad de detergente para elagua bland& las cargas
ligeramente sucias o pequeflas.
,, NO se recomienda un detergente de baja eficacia.
soiuciOn de prob emas y cod gos de nformaciOn 31
WF210AN-02832A MES.indd 31 2010-02-09 o&,,f2:45:08
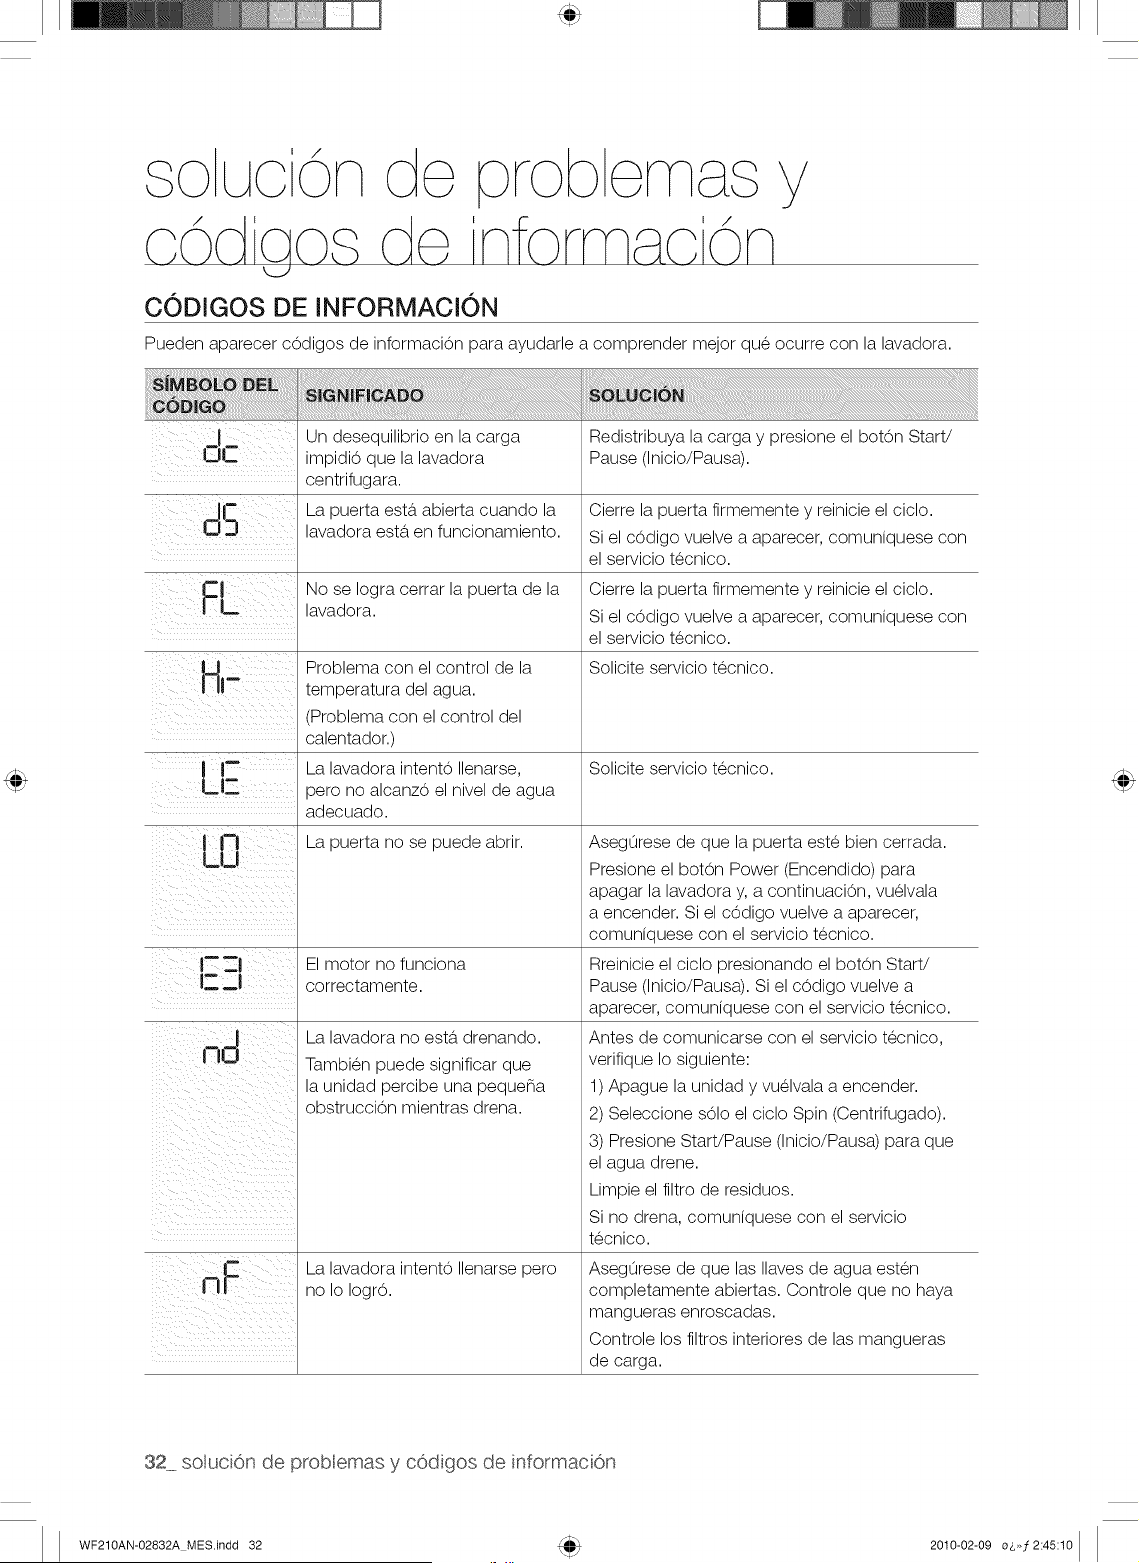
so u¢ On de Drobemas
CODIGOS DE INFORMACi0N
Pueden aparecer c0digos de informacion para ayudarle a comprender mejor que ocurre con la lavadora.
I Un desequilibrio en la carga
O|_-- impidio que la lavadora
centrifugara.
La puerta esterabierta cuando la
lavadora esteren funcionamiento.
No se Iogra cerrar la puerta de la
lavadora.
Problema con el control de la
temperatura del agua.
(Problema con el control del
calentador.)
LF LalavadoraintentoIlenarse,
-- aero no alcanzo el nivel de agua
adecuado.
La puerta no se puede abrir.
El motor no funciona
correctamente.
La lavadora no esta, drenando.
Tambien puede significar que
la unidad percibe una pequena
obstruccion mientras drena.
La lavadora intento Ilenarse pero
no Io Iogro.
Redistribuya la carga y presione el boton Start/
Pause (Inicio/Pausa).
Cierre la puerta firmemente y reinicie el ciclo.
Si el codigo vuelve a aparecer, comuniquese con
el servicio tecnico.
Cierre la puerta firmemente y reinicie el ciclo.
Si el codigo vuelve a aparecer, comuniquese con
el servicio tecnico.
Solicite servicio tecnico.
Solicite servicio tecnico.
Asegurese de que la puerta este bien cerrada.
Presione el boton Power (Encendido) para
apagar la lavadora y, a continuacion, vuelvala
a encender. Si el codigo vuelve a aparecer,
comuniquese con el servicio tecnico.
Rreinicie el ciclo presionando el boton Start/
Pause (Inicio/Pausa). Si el codigo vuelve a
aparecer, comuniquese con el servicio tecnico.
Antes de comunicarse con el servicio tecnico,
verifique Io siguiente:
1) Apague la unidad y vuelvala a encender.
2) Seleccione s01o el ciclo Spin (Centrifugado).
3) Presione Start/Pause (Inicio/Pausa) para que
el agua drene.
Limpie el filtro de residuos.
Si no drena, comuniquese con el servicio
tecnico.
Asegurese de que las Ilaves de agua esten
completamente abiertas. Controle que no haya
mangueras enroscadas.
Controle los filtros interiores de las mangueras
de carga.
32 sotucion de problemas y cod gos de nformacion
WF210AN-02832A MES.indd 32 2010-02-09 o_,,,f2:45:10
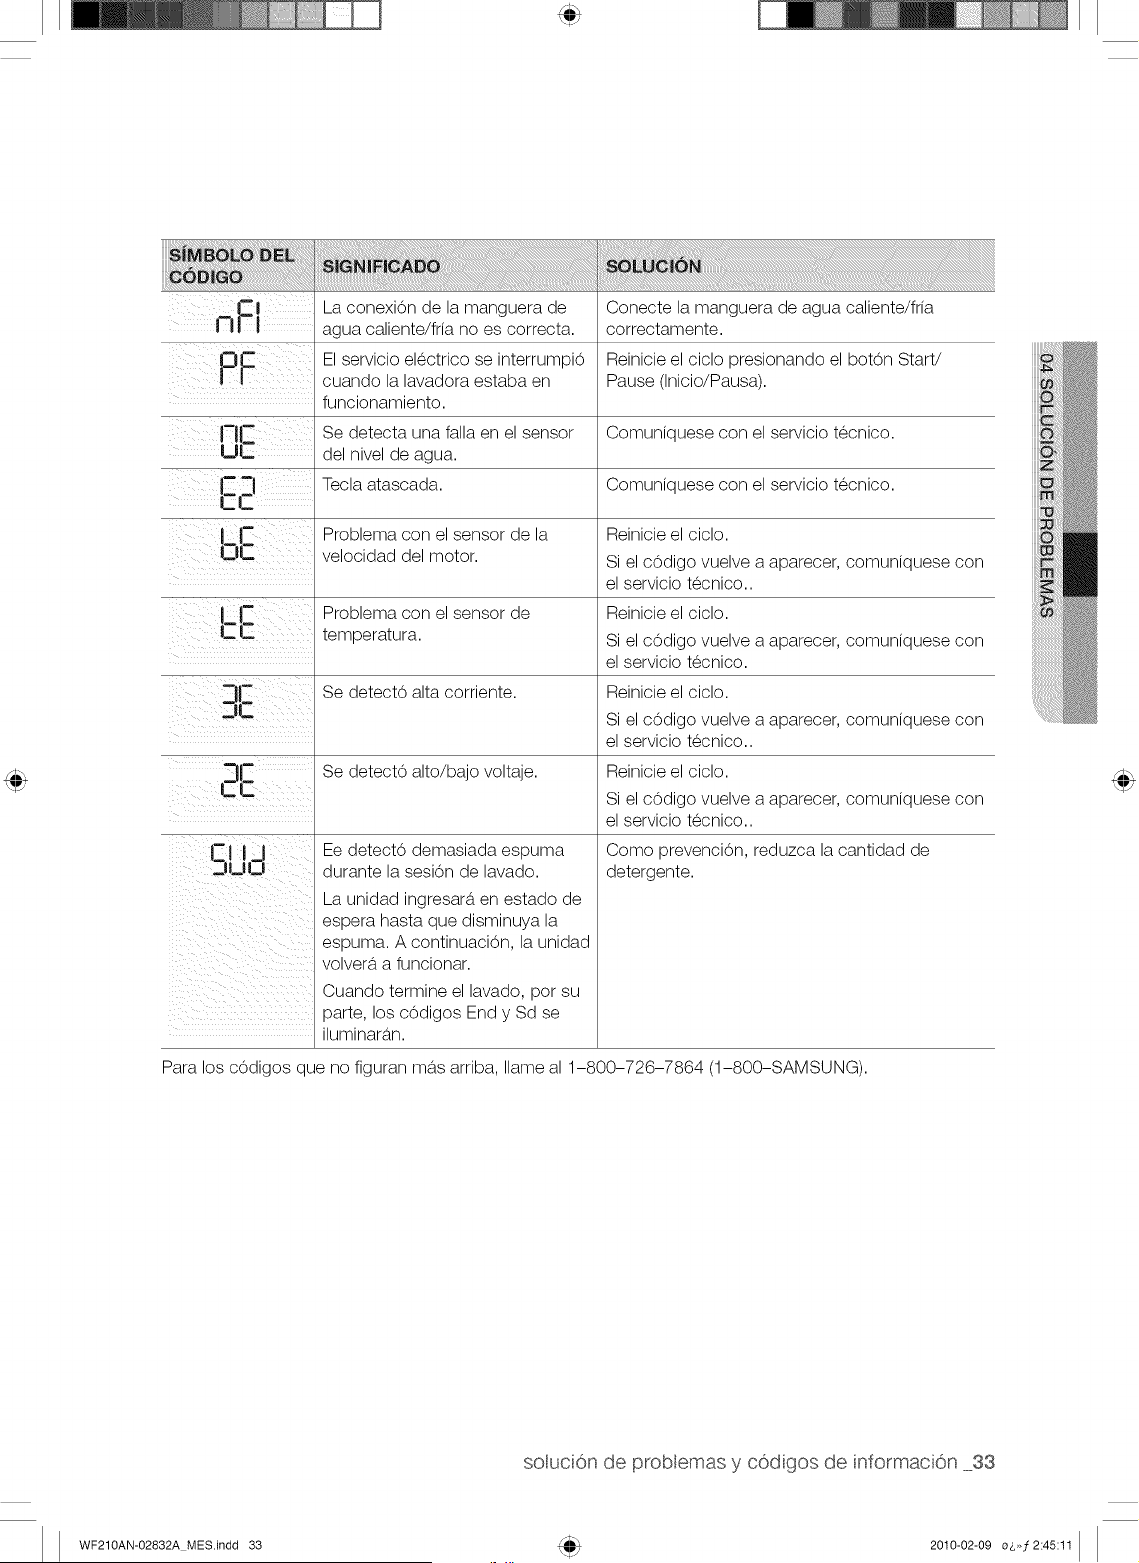
h-I La conexi6n de la manguera de
agua caliente/frfa no es correcta.
PF El servicio electrico se interrumpio
cuando la lavadora estaba en
funcionamiento.
FH Se detecta una falla en el sensor
del nivel de agua.
Tecla atascada.
i
i _ i ii
i:ii i :i:i:i:i
iiiiiiiii
Problema con el sensor de la
velocidad del motor.
Problema con el sensor de
temperatura.
Se detect0 alta corriente.
Se detect6 alto/bajo voltaje.
Ee detect0 demasiada espuma
durante la sesi0n de lavado.
La unidad ingresar_t en estado de
espera hasta que disminuya la
espuma. A continuaci0n, la unidad
volvera, a funcionar.
Cuando termine el lavado, pot su
parte, los c0digos End y Sd se
iluminara,n.
Conecte la manguera de agua caliente/frfa
correctamente.
Reinicie el ciclo presionando el bot6n Start/
Pause (Inicio/Pausa).
Comunfquese con el servicio tecnico.
Comunfquese con el servicio tecnico.
Reinicie el ciclo.
Si el c6digo vuelve a aparecer, comunfquese con
el servicio tecnico..
Reinicie el ciclo.
Si el c6digo vuelve a aparecer, comunfquese con
el servicio tecnico.
Reinicie el ciclo.
Si el c6digo vuelve a aparecer, comunfquese con
el servicio tecnico..
Reinicie el ciclo.
Si el c6digo vuelve a aparecer, comunfquese con
el servicio tecnico..
Como prevenci0n, reduzca la cantidad de
detergente.
Para los c6digos que no figuran ma,s arriba, Ilame al 1-800-726-7864 (1-800-SAMSUNG).
soluci6n de p_ob emas y c6d gos de nformaci6n 33
WF210AN-02832A MES.indd 33 2010-02-09 o_,.f 2:45:11
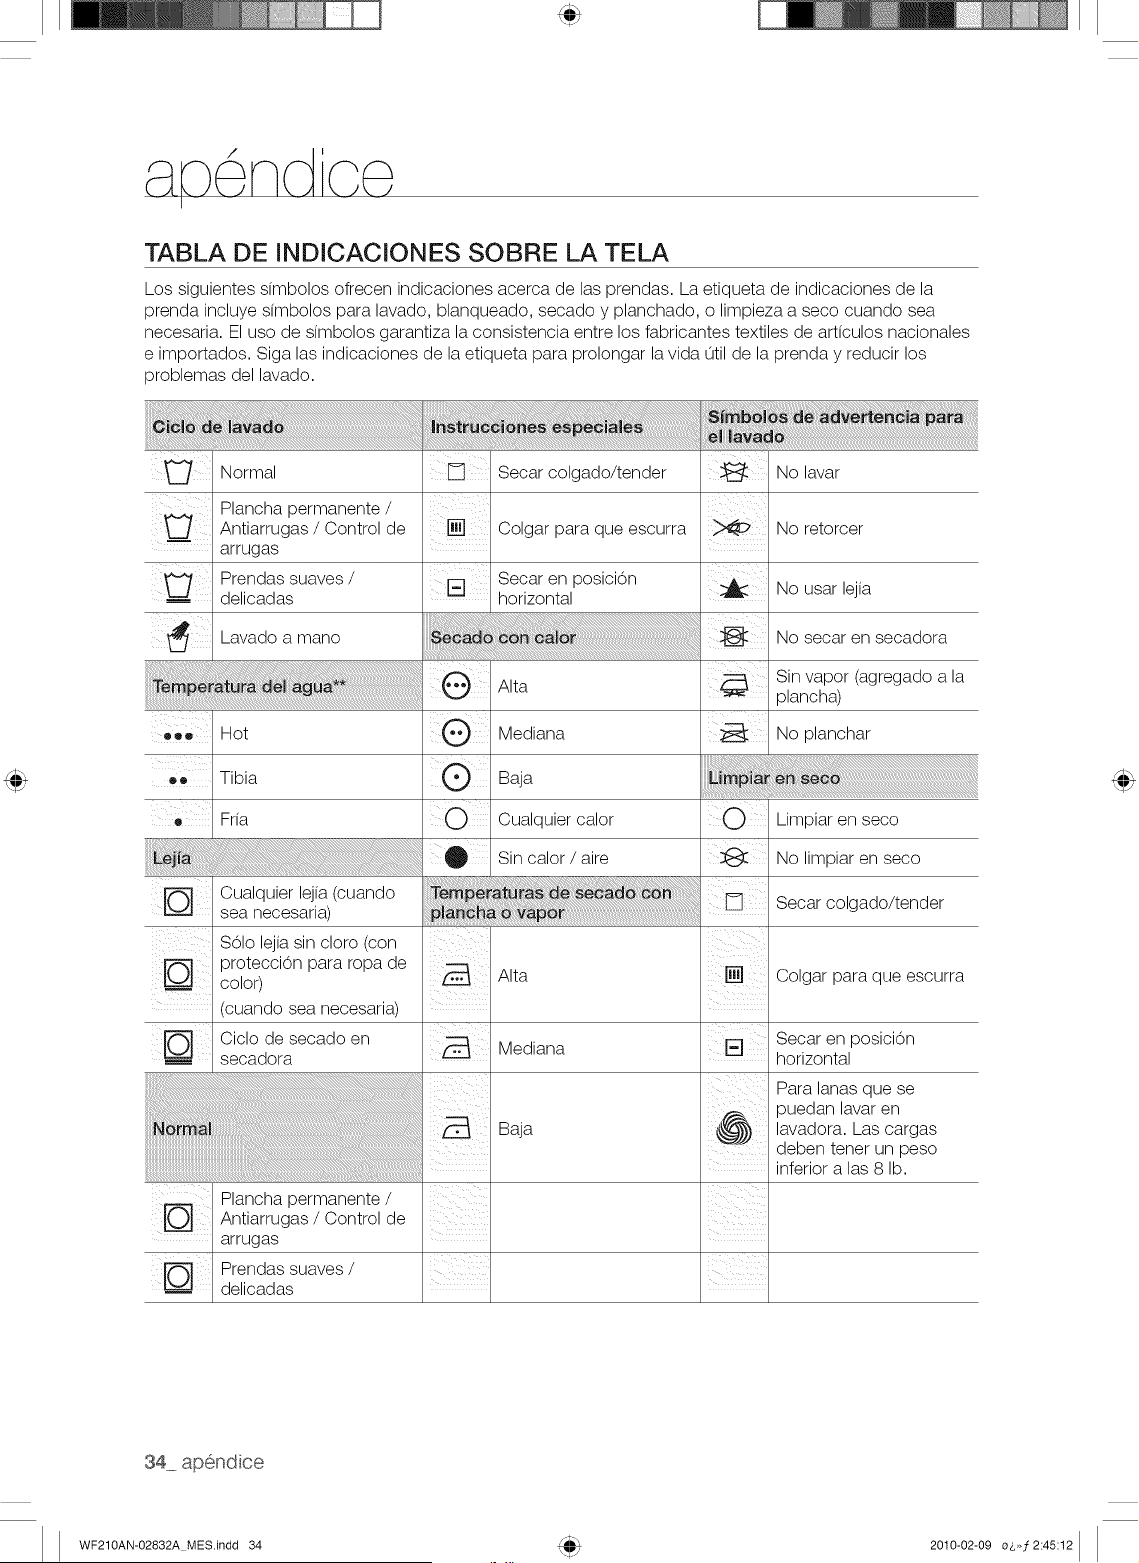
I
ap nd oe
TABLA DE INDICACIONES SOBRE LA TELA
Los siguientes simbolos ofrecen indicaciones acerca de las prendas. La etiqueta de indicaciones de la
prenda incluye simbolos para lavado, blanqueado, secado y planchado, o limpieza a seco cuando sea
necesaria. El uso de simbolos garantiza la consistencia entre los fabricantes textiles de articulos nacionales
e importados. Siga las indicaciones de la etiqueta para prolongar la vida util de la prenda y reducir los
problemas del lavado.
Normal Secar colgado/tender _ No lavar
Plancha permanente /
Antiarrugas / Control de
arrugas
Prendassuaves/
delicadas
,avadoamano
eoe Hot
TibiaO0
• Fria
[] Colgar para que escurra
Secar en posici0n
horizontal
@ Alta
@ Mediana
@/ Baja
0 Cualquier calor O
Sin calor / aire
No retorcer
No usar lejia
No secar en secadora
Sin vapor (agregado a la
plancha)
No planchar
Limpiar en seco
No limpiar en seco
Cualquier lejia (cuando
sea necesaria)
861o lejia sin cloro (con
protecci6n para ropa de
m color)
(cuando sea necesaria)
secadoraCiCl°de secado en
@: P,anohapermanente,
Antiarrugas / Control de
arrugas
Prendas suaves /
delicadas
i i
Alta
L
Mediana
Baja
Secar colgado/tender
Colgar para que escurra
Secar en posici0n
horizontal
Para lanas que se
puedan lavar en
lavadora. Las cargas
deben tenet un peso
inferior alas 8 lb.
34 apendice
WF210AN-02832A MES.indd 34 2010-02-09 o_,,,f2:45:12
** Los simbolos con punto representan las temperaturas del agua del lavado apropiadas para diversas
prendas. El tango de temperatura para Caliente es de 41 °C a 52 °C (105 °F a 125 °F), para Tibia es de
29 °C a 41 °C (de 85 °F a 105 °F) y para Fria es de 16 °C a 29 °C (de 60 °F a 85 °F). (La temperatura del
agua del lavado debe alcanzar un minimo de 16 °C (60 °F) para que se active el detergente y se Iogre
un lavado eficaz). Posiblemente la lavadora no garantice estas temperaturas porque las temperaturas
reales del agua que ingresa en la lavadora dependen de la configuraci0n del calentador de agua y de las
temperaturas del suministro de agua regional. Pot ejemplo, el agua fria que ingresa en las casas de los
Estados del Norte durante el invierno puede set de 4 °C (40 °F), la cual es demasiado fria para que se Iogre
un lavado eficaz. En este caso, serg, preciso ajustar la temperatura del agua seleccionando la opci0n de
temperatura c_tlida, agregando algo de agua caliente a la linea MAX FILL (Llenado m_tximo) o usando la
opci0n de calentamiento de la lavadora, si se dispone de ella.
WF210AN-02832A MES.indd 35 2010-02-09 o&,,f2:45:12
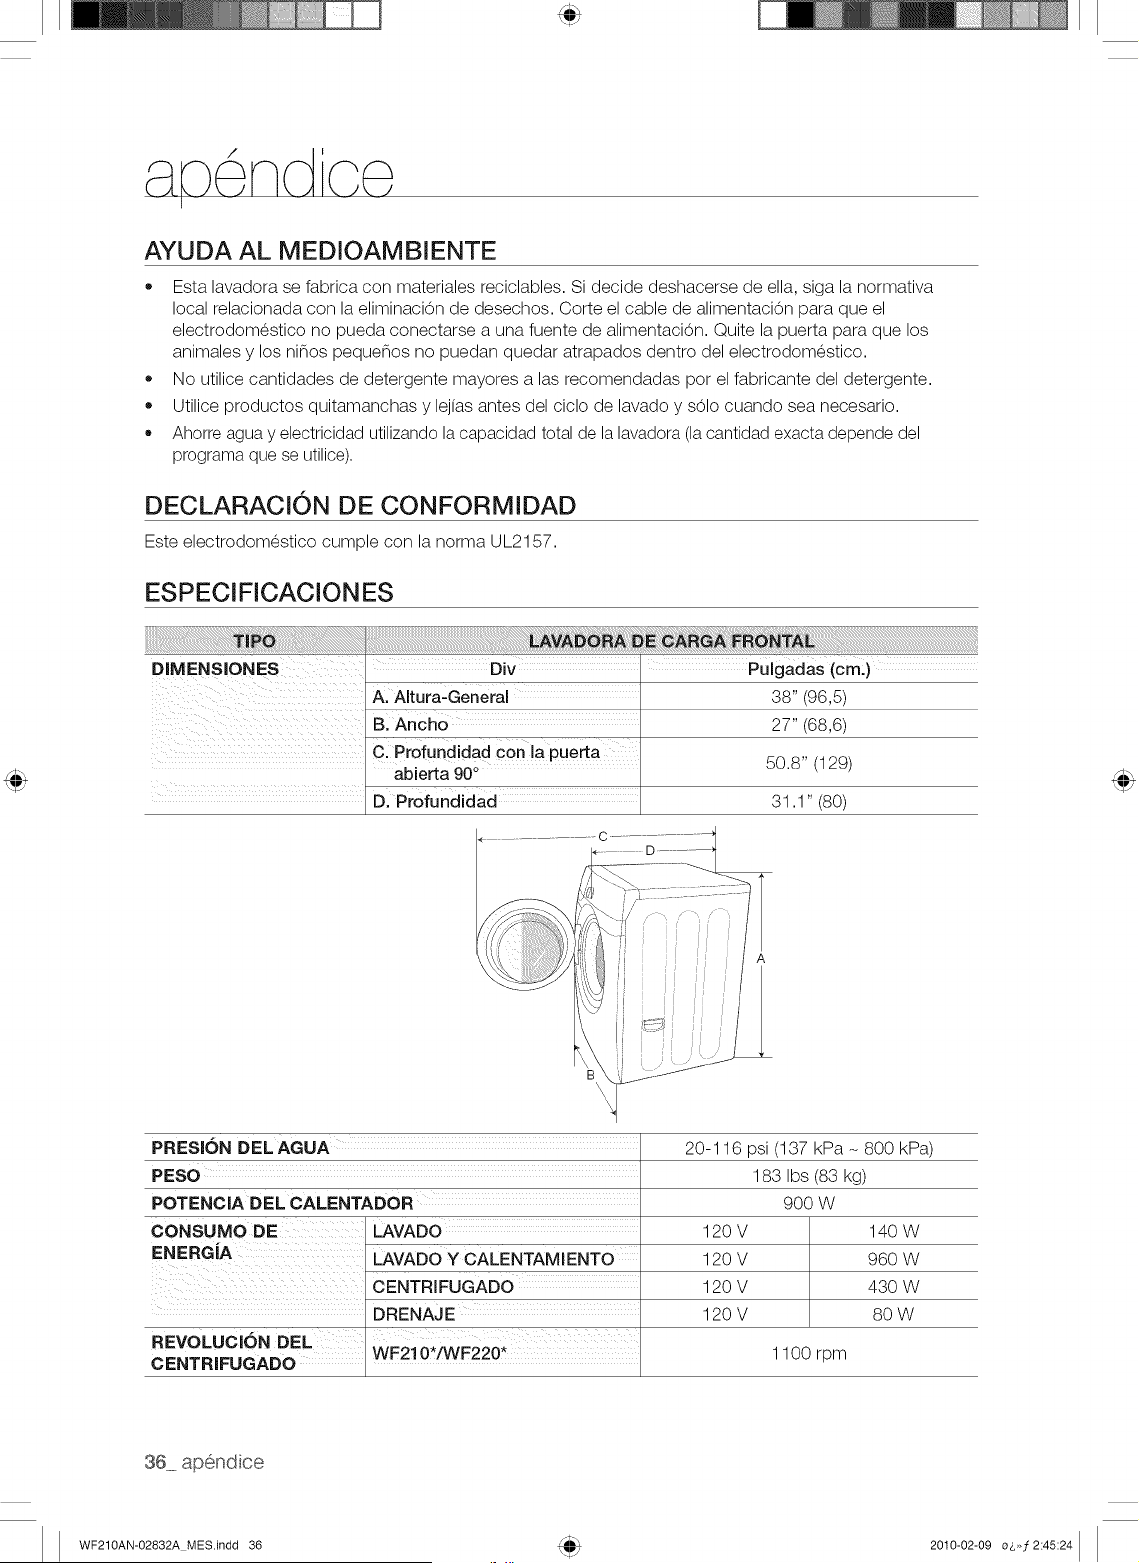
I
AYUDA AL MEDIOAMBIENTE
o
o
o
o
Esta lavadora se fabrica con materiales reciclables. Si decide deshacerse de ella, siga la normativa
local relacionada con la eliminacion de desechos. Corte el cable de alimentacion para que el
electrodomestico no pueda conectarse a una fuente de alimentacion. Quite la puerta para que los
animales y los ninos pequenos no puedan quedar atrapados dentro del electrodomestico.
No utilice cantidades de detergente mayores alas recomendadas pot el fabricante del detergente.
Utilice productos quitamanchas y lejias antes del ciclo de lavado y sOlo cuando sea necesario.
Ahorre agua y electricidad utilizando la capacidad total de la lavadora (la cantidad exacta depende del
programa que se utilice).
DECLARACi0N DE CONFORMIDAD
Este electrodomestico cumple con la norma UL2157.
ESPECIFICACIONES
DIMENSIONES DiV I Pulgadas (cm;)
38"(96,5)
B. Ancho 27" (68,6)
C' Profund!dad €0nla puerta
abierta 90° 50.8" (129)
.......... D. Pr0fundidad 31.1" (80)
PRESION DEL AGUA
PESO
POTENCIA DEL CALENTADOR
I
CONSUMO DE LAVADO
ENERGIA LAVADO Y CALENTAMIENTO
CENTRIFUGADO
DRENAJE
REVOLUCION DEL
CENTRIFUGADO
20-116 psi (137 kPa- 800 kPa)
183 Ibs (83 kg)
900 W
120 V 140 W
120 V 960 W
120 V 430 W
120 V 80 W
1100 rpm
36 apendice
WF210AN-02832A MES.indd 36 2010-02-09 o_,,,f2:45:24
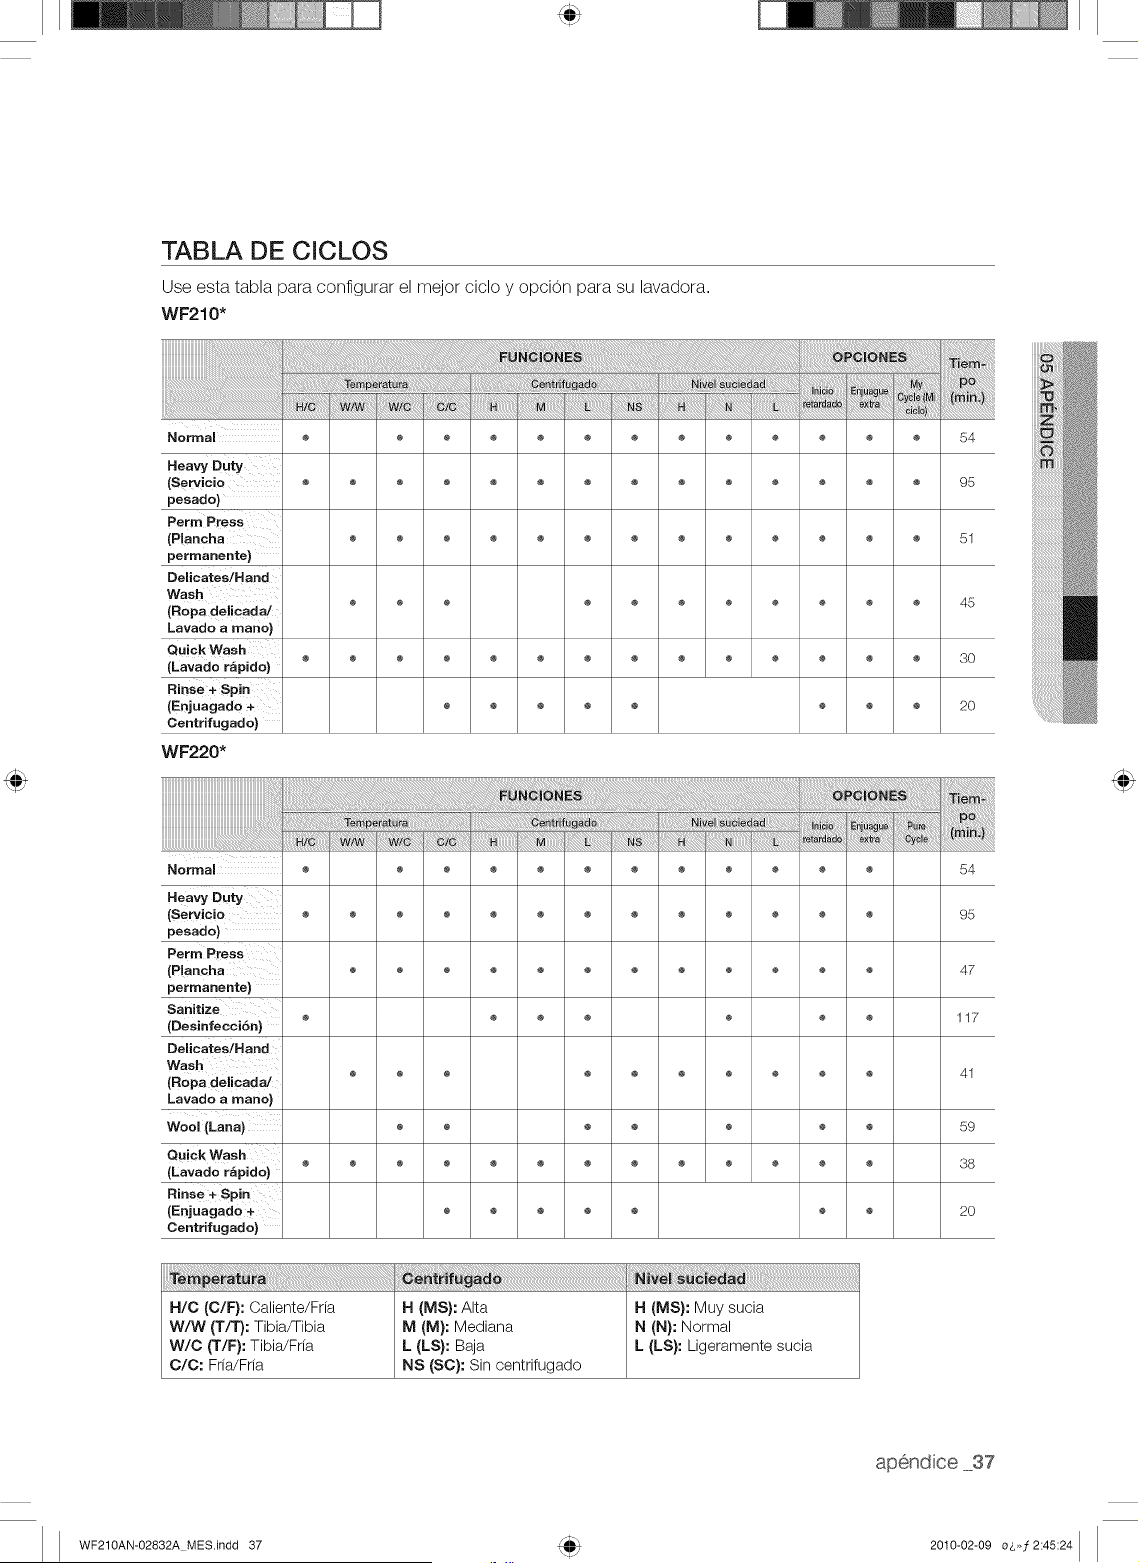
TABLA DE CICLOS
Use esta tabla para configurar el mejor ciclo y opci0n para su lavadora.
WF210*
Normal
NeovyOU '
{Servicio
pesado)
Perm Press
(P!ancha
permanents}
Delicates/Hand
Wash
(Ropa delicada/
Lavado a mano)
Quick Wash
(Lavado r_pido)
(Enjuagado +
Centrifugado}
WF220*
54
95
51
45
30
20
Normal
Heavy Duty
(Servicio
pesado)
Perm Press
(P!ancha
permanents}
sanitize
(Desinfecci6n}
Delicates/Hand
Wash
(Ropa delicada/
Lavado a mano)
Wool (Lana)
Quick Wash
(Lavado r_pido)
Rinse+Spin
(Enjuagado
Centrifugado)
54
95
47
117
41
59
38
20
H/C (C/F): Caliente/Fria
W/W (TIT): Tibia/Tibia
W/C {T/F): Tibia/Fria
C/C: Fria/Fria
H (MS): Alta
M (M): Mediana
L (LS): Baja
NS (SO): Sin centrifugado
H (MS): Muy sucia
N (N): Normal
L (LS): Ligeramente sucia
WF210AN-02832A MES.indd 37 2010-02-09 _,,,_2:45:24

ga,ra,ntfa
GARANTiA
LAVADORA SAMSU NG
GARANTIA LIMITADA PARA EL COMPRADOR ORIGINAL
El presente producto de la marca SAMSUNG, tal como Io provee y distribuye SAMSUNG ELECTRONICS
AMERICA, INC. (SAMSUNG) y Io entrega nuevo, en su embalaje de carton original al comprador o
consumidor original, esta, garantizado pot SAMSUNG contra defectos de fabricacion de los materiales y la
mano de obra durante el periodo limitado de la garantia de:
Un (1) ano para las piezas y la mano de obra
Dos (2) anos para el panel de control (piezas)
Tres (3) anos para las piezas del tambor inoxidable
Diez (10) anos para las piezas del motor
La presente garantia limitada comienza en la fecha original de compra y es va,lida unicamente para
productos comprados y usados en los Estados Unidos. Para recibir el servicio tecnico de la garantia,
el comprador debe comunicarse con SAMSUNG con el fin de que se determine el problema y los
procedimientos del servicio. El servicio tecnico de la garantia sOlo puede set prestado pot un centro de
servicio tecnico autorizado de SAMSUNG. Se debe presentar la factura de compra original como prueba
de compra a SAMSUNG o al servicio tecnico autorizado de SAMSUNG. SAMSUNG prestara, servicio
tecnico a domicilio durante el periodo de la garantia sin costo, sujeto a la disponibilidad dentro de los
Estados Unidos contiguos. El servicio tecnico a domicilio no esta, disponible en todas las a,reas.
Para recibir el servicio tecnico a domicilio, el producto no debe presentar obstrucciones y debe set
accesible para el agente del servicio tecnico. Si el servicio tecnico no esta, disponible, SAMSUNG puede
optar pot transportar el producto hasta y desde el servicio tecnico autorizado.
SAMSUNG reparara,, reemplazara, el producto u ofrecera, un reembolso a su criterio y sin cargo adicional,
tal como se establece en la presente garantia, con piezas o productos nuevos o reacondicionados si se
comprueba que es defectuoso durante el periodo limitado de la garantia especificado anteriormente. Todas
las piezas y los productos reemplazados pasan a set propiedad de SAMSUNG y deben set devueltos a
SAMSUNG. Las piezas y los productos reemplazados asumen la garantia original que testa, o noventa (90)
dias, el periodo que sea el ma,s prolongado. La presente garantia limitada cubre defectos de fabricacion
de los materiales y la mano de obra encontrados durante el uso normal y domestico de este producto y
no sera, va,lida para Io siguiente: danos que ocurran durante el envio; entrega e instalacion; aplicaciones
y usos para los cuales el presente producto no fue destinado; numeros de serie o producto alterados;
dano cosmetico o acabado exterior; accidentes, abuso, descuido, incendio, inundacion, caida de rayos, u
otros casos fortuitos o de fuerza mayor; uso de productos, equipo, sistemas, utilidades, servicios, piezas,
suministros, accesorios, aplicaciones, instalaciones, reparaciones, cableado externo o conectores no
provistos ni autorizados pot SAMSUNG que darien este producto o que acarreen problemas en el servicio;
voltaje de la linea electrica incorrecto, fluctuaciones y sobretension; ajustes del cliente e incumplimiento
de Io establecido en el manual de instrucciones, instrucciones de mantenimiento y ambientales que esta,n
cubiertas y recomendadas en el manual de instrucciones; traslado y reinstalacion del producto; problemas
causados pot plagas. La presente garantia limitada no cubre problemas derivados de la corriente, el voltaje
o el suministro electrico incorrectos, las bombillas de luz, los fusibles de la casa, el cableado de la casa,
el costo del servicio tecnico para recibir instrucciones o corregir errores en la instalacion. SAMSUNG no
garantiza el funcionamiento ininterrumpido o sin errores del producto.
38 garantia
WF210AN-02832A MES.indd 38 2010-02-09 o_,,,f2:45:24
EXCEPTO LO ESTABLECIDO EN EL PRESENTE, NO EXISTEN GARANT[AS SOBRE ESTE PRODUCTO,
YA SEAN EXPRESAS O TACITAS, Y SAMSUNG DESCONOCE TODAS LAS GARANT[AS QUE INCLUYEN,
AUNQUE NO EN CARACTER TAXATIVO, CUALQUIER GARANT[A TACITA DE QUE EL PRODUCTO SE
ENCUENTRA EN CONDICIONES APTAS PARA LA VENTA, DE DEFRAUDACION DE DERECHOS O DE
QUE EL PRODUCTO SE ADECUA A LOS FINES ESPECiFICOS PARA LOS CUALES SE ADQUIERE.
NINGON AVAL O GARANT[A OTORGADOS POR PERSONA, COMPAN[A O CORPORACION
ALGUNA CON RESPECTO AL PRESENTE PRODUCTO REVESTIRA CARACTER VINCULANTE PARA
SAMSUNG. SAMSUNG NO SERA RESPONSABLE POR PI2RDIDA DE INGRESOS O LUCRO CESANTE,
IMPOSIBILIDAD DE GENERAR AHORROS U OBTENER OTROS BENEFICIOS, O CUALQUIER DANO
DERIVADO DE CIRCUNSTANCIAS ESPECIALES, DANO IMPREVlSTO O DERIVADO CAUSADO
POR EL USO, USO INCORRECTO, O INCAPACIDAD PARA USAR EL PRESENTE PRODUCTO,
INDEPENDIENTEMENTE DE LA TEOR[A LEGAL EN QUE SE FUNDE EL RECLAMO Y AUN CUANDO SE
LE HAYA NOTIFICADO A SAMSUNG DE LA POSIBILIDAD DE TALES DANOS.
NINGON RESARCIMIENTO DE NINGUNA [NDOLE CONTRA SAMSUNG SUPERARA EL PRECIO DE
COMPRA DEL PRODUCTO VENDIDO POR SAMSUNG Y CAUSANTE DEL PRESUNTO DANO. SIN
LIMITAR LO PRECEDENTE, EL COMPRADOR ASUME TODO EL RIESGO Y LA RESPONSABILIDAD POR
PI2RDIDA, DANO O LESION AL COMPRADOR Y A LOS BIENES DEL COMPRADOR Y A TERCEROS Y A
SUS BIENES DERIVADOS DEL USO, USO INCORRECTO O INCAPACIDAD PARA USAR EL PRESENTE
PRODUCTO. LA PRESENTE GARANTiA LIMITADA NO SE EXTENDERA A NINGUNA PERSONA DISTINTA
DEL COMPRADOR ORIGINAL DEL PRESENTE PRODUCTO, ES INTRANSFERIBLE Y ESTABLECE SU
EXCLUSIVA REPARACION.
Algunos estados no permiten limitaciones en cuanto al plazo de una garantia implicita, o la exclusion o
limitacion de danos imprevistos o derivados, pot Io tanto las limitaciones o exclusiones antedichas pueden
no aplicarse en su caso. Esta garantia le otorga derechos especificos, y adema,s puede tenet otros
derechos que varian segun el estado en el que se encuentre.
Para recibir servicio t_cnico de garantia, comuniquese con SAMSUNG a:
SAMSUNG ELECTRONICS AMERICA, INC. - CONSUMER ELECTRONICS CUSTOMER SERVICE
105 Challenger Road Ridgefield Park, NJ 07660=0511
1=800=SAMSU NG (726=7864}
www, san3sung,com
WF210AN-02832A MES.indd 39 2010-02-09 o_,,,f2:45:24

sTiENE PREGUNTAS O COMENTARiOS?
U.S.A 1-800-SAMSUNG(726-7864)
MEXICO 01-800-SAMSUNG (726-7864)
www,samsung,com
www,samsung.com
N. ° de c0digo: DC68-02832A_MES
WF210AN-02832A MES.indd 40 2010-02-09 oo, f2:45:25