GEAppliances.com
U
Safety Instructions ...... 2-7
Operating Instructions
Aluminum Foil ................ 13
Clock and Timer ........... 15,16
Oven ...................... 10-25
Baking and Roasting ........ 13
Broiling, Broiling Guide ....... 14
Oven Control ............. 10,11
Power Outage ........... 12,16
Preheating ................... 13
Sabbath Feature ......... 19,20
Self-Cleaning ............. 24, 25
Special Features ............. 18
Thermostat Adjustment ..... 21
Timed Baking
and Roasting ................ 17
Surface Cooking ............. 8,9
Worming Drawer ......... 22, 23
Care and Cleaning
Burner Assembly .......... 26-28
Burner Grates ................. 26
Control Panel and Knobs ..... 32
Cooktop Surface .............. 29
Door Removal ................ 30
Kick Panel ..................... 31
Lift-Up Cooktop ............... 29
Oven Bottom ................. 30
Oven Light Replacement ...... 32
Oven Vents ................... 29
Self-Cleaning .............. 24, 25
Racks ......................... 32
Stainless SteelSurfaces ....... 29
Storage Drawer ............... 31
Warming Drawer ............. 31
Installation
Instructions ............ 33-44
Air Adjustment ................ 43
Anti-Tip Device ............ 36, 44
Checking Burner Ignition ...... 42
Connecting the Range
to Gas .................... 37-40
Dimensions and Clearances ...35
Electrical Connections ..... 41, 42
Leveling the Range ........... 43
Location ...................... 36
LP ............................. 44
Troubleshooting
Tips ...................... 45-48
Accessories ................ 49
Consumer Support
Consumer
Support .............. Buck Cover
Warranty for Customers
in Canada ..................... 51
Warranty for Customers
in the U.S.A................... 50
JGB3000
JGB3001
JGB281
JGB300
JGB400
JGBP25
JGBP26
JGBP27
JGBP28
JGBP29
JGBP33
In Canada contact us at:
www.GEAppliances.ca
Write the model and serial
numbers here:
Model #
Serial #
You can find them on a label
on the front of the range behind
the warming drawer, storage
drawer or kick panel.
49-85177 04-2010 GE
IMPORTANT SAFETY INFORMATION.
READ ALL INSTRUCTIONS BEFORE USING.
WARNING!
For your safety, the information in this manual must be followed to minimize the risk offire
or explosion, electric shock, or toprevent property damage, personal injury, or loss of life.
®
,_ WARNING: iftheinformation
in this manual is not followed exactly,
e fire or explosion may result causing
property damage, personal injury
or death.
-- Do not store or use gasoline or other
flammable vapors and liquids in the
vicinity of this or any other appliance.
- WHAT TODO IF VOU
SMELL GAS
Do not try to light any appliance.
Do not touch any electrical switch;
do not use any phone in your
building.
Immediately call your gas supplier
from o neighbor's phone. Follow the
gas supplier's instructions.
If you cannot reach your gas
supplier, call the fire department.
-- Installation and service must be
performed by o qualified installer,
service agency or the gas supplier.
2
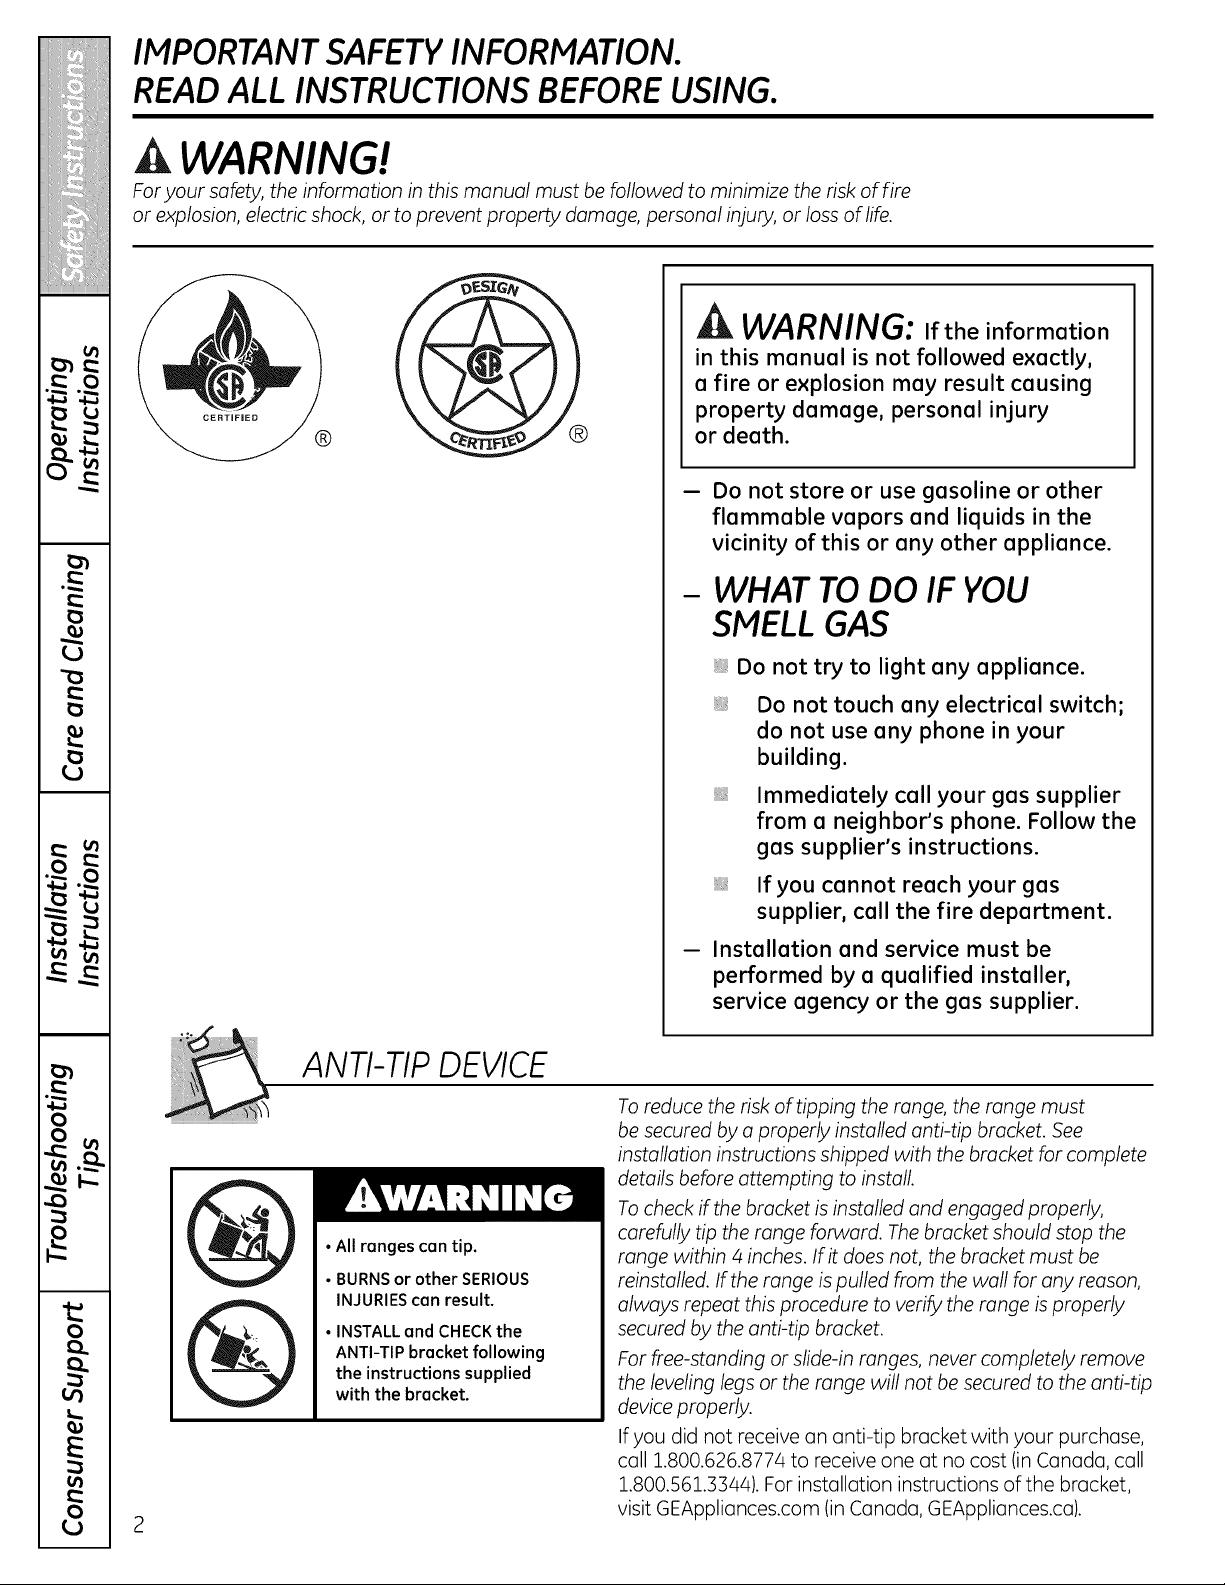
ANTI-TIP DEVICE
•All ranges can tip.
• BURNSor other SERIOUS
INJURIEScon result.
• INSTALL and CHECKthe
ANTI-TIP bracket following
the instructions supplied
with the bracket.
To reduce the risk oftipping the range, the range must
be secured by a properly installed anti-tip bracket. See
installation instructions shipped with the bracket for complete
details before attempting to install
To check ifthe bracket isinstalled and engaged properly,
carefully tip the range forward. Thebracket should stop the
range within 4 inches. If it does not, the bracket must be
reinstalled. If the range is pulled from the wall for any reason,
always repeat this procedure to verify the range is properly
secured by the anti-tip bracket.
For free-standing or slide-in ranges, never completely remove
the leveling legsor the range will not be secured to the anti-tip
device properly.
If you did not receive an anti-tip bracket with your purchase,
call 1.800.626.8774 to receive one at no cost (in Canada, cull
1.800.561.3344). Forinstallation instructions of the bracket,
visit GEAppliances.com (in Canada, GEAppliances.ca).
GEAppliunces.com
A WARNING!
IMPORTANT SAFETY NOTICE
TheCalifornia Safe Drinking Water and ToxicEnforcement Act requires the Governor of California
to publish a list of substances known to the state to cause birth defects or other reproductive harm,
and requires businesses to warn customers ofpotential exposure to such substances.
Gasappliances can cause minor exposure to four ofthese substances, namely benzene, carbon
monoxide formaldehyde and soot, caused primarily by the incomplete combustion of natural gas
or LPfuels. Properly adjusted burners, indicated by a bluish rather than a yellow flame will minimize
incomplete combustion. Exposure to these substances can be minimized by venting with an open
window or using a ventilation fan or hood.
SAFETY PRECAUTIONS
Have theinstaller show you the location oftherange gas shut-off volve and how to shut itoff ifnecessory.
Have your range installed and properly Plug your range into a 120-volt grounded
grounded by a qualified installer, in
accordance with the Installation Instructions.
Any adjustment and service should be
performed only by qualified gas range
installers or service technicians.
Donot attempt to repair or replace any
part of your range unless itisspecifically
recommended in this manual. All other service
should be referred to o qualified technician.
outlet only. Donot remove the round
grounding prong from the plug. If in doubt
about the grounding of the home electrical
system, it is your personal responsibility and
obligation to have an ungrounded outlet
replaced with o properly grounded,
three-prong outlet in accordance with
the National Electrical Code. Do not use
on extension cord with this appliance.
IMPORTANT SAFETY INFORMATION.
READ ALL INSTRUCTIONS BEFORE USING.
4
SAFETY PRECAUTIONS
Locate the range out of kitchen traffic path
and out of drafty locations to prevent poor air
circulation.
Be sure all packaging materials are removed
from the range before operating itto prevent
fire or smoke damage should the packaging
material ignite.
Be sure your range iscorrectly adjusted by
a qualified service technician or installer for
the type of gas (natural or LP)that is to be
used. Your range can be converted for use
with either type of gas. See the Installation
of the range section.
WARNING: Theseadjustments
must be made by a qualified service
technician in accordance with the
manufacturer's instructions and all codes
and requirements of the authority having
jurisdiction. Failure to follow these instructions
could result in serious injury or property
damage. The qualified agency performing
this work assumes responsibility for the
conversion.
After prolonged use of a range, high floor
temperatures may result and many floor
coverings will not withstand this kind of
use. Never install the range over vinyl tile
or linoleum that cannot withstand such type
of use. Never install it directly over interior
kitchen carpeting.
Donot leave children alone or unattended
where a range ishot or in operation. They
could be seriously burned.
Donot allow anyone to climb, stand or hang
on the oven door,storage drawer, warming
drawer or cooktop. They could damage the
range and even tip it over, causing severe
personal injury.
CAUTION:Itemsofinterest
to children should not be stored in cabinets
above a range or on the backsplash of
a range-children climbing on the range
to reach items could be seriously injured.
A WARNING: NEVERusethis
appliance as a space heater to heat or
warm the room. Doing so may result
in carbon monoxide poisoning and
overheating of the oven.
Neverwear loose-fitting or hanging garments
while using the appliance. Becareful when
reachingfor items stored in cabinets overthe
range.Flammable material could be ignited
ifbrought in contactwith flameorhot oven
surfacesand may cause severeburns.
Donot store flammable materials in an oven,
a range storage drawer, a warming drawer
or near a cooktop.
Donot store or use combustible materials,
gasoline or other flammable vapors and
liquids in the vicinity ofthis or any other
appliance.
Donot let cooking grease or other flammable
materials accumulate in or near the range.
Donot use water on grease fires. Never pick
up a flaming pan. Turn the controls off.
Smother a flaming pan on a surface burner
bycovering the pan completely with a
well-fitting lid,cookie sheet or flat tray.
Use a multi-purpose dry chemical or
foam-type fire extinguisher.
Flaming grease outside a pan can be put
out by covering itwith baking soda or,
if available, by using a multi-purpose dry
chemical or foam-type fire extinguisher.
Flame in the oven or warming drawer can
be smothered completely by closing the oven
door and turning the control to off or by using
a multi-purpose dry chemical or foam-type fire
extinguisher.
Letthe burner grates and other surfaces cool
before touching them or leaving them where
children can reach them.
Never block the vents (air openings) of
the range. They provide the air inlet and outlet
that are necessary for the range to operate
properly with correct combustion. Air openings
are located at the rear of the cooktop, at the
top and bottom ofthe oven door, and at the
bottom of the range under the warming
drawer, kick panel or storage drawer.
Large scratches or impacts to glass doors can
lead to broken or shattered glass.
GEAppliunces.com
A WARNING!
SURFACEBURNERS
Use proper pan size-avoid pans that are unstable or easily tipped. Select cookware having flat
bottoms large enough to cover burner grates. To avoid spillovers, make sure cookware islarge enough
to contain the food properly. This will both save cleaning time and prevent hazardous accumulations
of food, since heavy spattering or spillovers left on range can ignite. Use pans with handles that can
be easily grasped and remain cool
Always usethe LITE position when igniting
the top burners and make sure the burners
hove ignited.
Never leave the surface burners unattended
at high flume settings. Boilovers cause
smoking and greasy spillovers that may
catch on fire.
Adjust the top burner flame size so it
does not extend beyond the edge of the
cookwure. Excessive flume ishazardous.
Use only dry pot holders-moist or damp pot
holders on hot surfaces may result in burns
from steam. Do not let pot holders come near
open flumes when lifting cookwure. Do not use
u towel or other bulky cloth in place of u pot
holder.
When using glass cookwure, make sure
it isdesigned for top-of-range cooking.
To minimize the possibility of burns,
ignition of flammable materials and spillage,
turn cookwure handles toward the side or
back of the range without extending over
adjacent burners.
Carefully watch foods being fried at u high
flume setting.
Always heat fat slowly, and watch as it heats.
Donot leave any items on the cooktop. The
hot air from the vent may ignite flammable
items and will increase pressure in closed
containers, which may cause them to burst.
If a combination of oils or fats will be used in
frying, stir together before heating or as fats
melt slowly.
Use a deep fat thermometer whenever
possible to prevent overheating fat beyond
the smoking point.
Use the least possible amount of fat for
effective shallow or deep-fat frying. Fillingthe
pan too full offat can cause spillovers when
food isadded.
Donot flame foods on the cooktop. If you do
flame foods under the hood, turn the fan on.
Do not use a wok on the cooking surface
ifthe wok has a round metal ring that is
placed over the burner grate to support
the wok. This ring acts as a heat trap,
which may damage the burner grate and
burner head. Also, it may cause the burner
to work improperly. This may cause a carbon
monoxide level above that allowed by current
standards, resulting in a health hazard.
Foods for frying should be as dry aspossible.
Frost on frozen foods or moisture on fresh
foods can cause hot fat to bubble up and
over the sides of the pan.
Never try to move a pan of hot fat, especially a
deep fat fryer. Wait until the fat is cool.
Do not leave plastic items on the cooktop-
they may melt ifleft too close to the vent.
Keep all plastics away from the surface
burners.
To avoid the possibility of a burn, always be
certain that the controls for all burners are at
the OFF position and all grates are cool before
attempting to remove them.
If range is located near a window, do not
hang long curtains that could blow over the
surface burners and create a fire hazard.
If you smell gas, turn off the gas to the range
and call a qualified service technician. Never
use an open flame to locate a leak.
Always turn the surface burner controls off
before removing cookware.
Donot lift the cooktop on sealed burner
models. Lifting the cooktop can lead
to damage and improper operation
of the range.
IMPORTANT SAFETY INFORMATION.
READ ALL INSTRUCTIONS BEFORE USING.
COOKMEATAND POULTRYTHOROUGHLY...
Cook meat and poultry thoroughly-meat to at least an INTERNAL temperature of l60°F and poultry
to at least an INTERNAL temperature of l80°K Cooking to these temperatures usually protects against
foodbome illness.
OVEN
Stand away from the range when opening the door of a hot oven. Thehot air and steam that escape
can cause bums to hands, face and eyes.
Donot use the oven for a storage area.
Items stored in the oven can ignite.
Keep the oven free from grease buildup.
Placethe oven racks in the desired position
while the oven iscool.
Pulling out the rack to the stop-lock isa
convenience in lifting heavy foods. It isalso
a precaution against burns from touching hot
surfaces ofthe door or oven walls. The lowest
position isnot designed to slide.
Donot heat unopened food containers.
Pressure could build up and the container
could burst, causing an injury.
A WARNING: NEVERcover
any slots, holes or passages in the oven
bottom or cover an entire rack with
materials such asaluminum foil. Doing
so blocks air flow through the oven and
may cause carbon monoxide poisoning.
Aluminum foil linings may also trap
heat, causing a fire hazard.
Donot use aluminum foil anywhere in
the oven except asdescribed in this manual.
Misuse could result in a fire hazard or damage
to the range.
When using cooking or roasting bags in the
oven, follow the manufacturer's directions.
Donot use your oven to dry newspapers.
If overheated, they can catch fire.
Use only glass cookware that isrecommended
for use in gas ovens.
Always remove any broiler pan from range
as soon as you finishbroiling. Greaseleft in
the pan cancatch fireif oven is used without
removing thegrease from the broiler pan.
When broiling, ifmeat is too close to the flame,
the fat may ignite. Trim excess fat to prevent
excessive flare-ups.
Makesureanybroiler pan is in place correctly
to reduce the possibilityofgrease fires.
Ifyou should have a grease fire in a broiler
pan,touch the Clear/Off pad, and keep
the oven door closed to contain fire until
it burns out.
Forsafety and proper cooking performance,
always bake and broil with the oven door
closed.
6
GEAppliances.com
ELECTRICWARMING DRAWER Ionsome models)
The purpose of the worming drawer
isto hold hot cooked foods at serving
temperature. Always start with hot food;
cold food cannot be heated or cooked
in the worming drawer.
Donot use the worming drawer to dry
newspapers. If overheated, they con catch
on fire.
Donot leave paper products, cooking utensils
or food in the worming drawer when not
in use.
Never leavejars or cons of fat drippings
in or near your worming drawer.
Always keep wooden and plastic utensils
and conned food o safe distance away from
your worming drawer.
Donot worm food in the worming drawer
for more than two hours.
i Do not touch the heating element or the
interior surface of the warming drawer.
These surfaces may be hot enough to burn.
REMEMBER: The inside surface of the worming
drawer may be hot when the drawer is
opened.
i Use core when opening the drawer. Open the
drawer o crock and let hot air or steam escape
before removing or replacing food. Hot air or
steam which escapes con cause burns to
hands, face and/or eyes.
i Donot use aluminum foil to line the drawer.
Foilis on excellent heat insulator and will
trap heat beneath it. This will upset the
performance of the drawer and it could
damage the interior finish.
SELF-CLEANING OVEN
iiiiiiiiiiii_iiii
iiiiiiiiiiii_iiii
iiiiiiiiiiii_iiii
Be sure to wipe off excess spillage before
self-cleaning operation.
Before self-cleaning the oven, remove
the rocks, any broiler pan, grid and other
cookwore.
Donot cleon the door gasket. The door gasket
isessential for o good seal. Core should be
token not to rub, damage or move the gasket.
Clean only parts listed in this Owner's Manual.
iiiiiiiiiiii_iiii
iiiiiiiiiiii_iiii
If the self-cleaning mode malfunctions,
turn the oven off and disconnect the power
supply. Hove itserviced by o qualified
technician.
Donot use oven cleaners. Nocommercial
oven cleaner or oven liner of any kind should
be used in or around any port of the oven.
Residue from oven cleaners will damage
the inside of the oven when the self-cleon
cycle isused.
READAND FOLLOWTHIS SAFETY INFORMATIONCAREFULLY.
SAVE THESE INSTRUCTIONS
7
m
m
"0
:2
w
-" ,.i..J
)
it.
0
E
0
¢4
Using the gas surface burners.
Throughout this manual, features and appearance may vary from your model.
Before Lighting a Gas Burner
Drip pansare supplied with your range;
they shouldbe used atall times.
Hake sure all burnersare in place.
Hake sure all grates on the range are
properlyplacedbeforeusinganyburner.
After Lighting a Gas Burner
Do not operatetheburner foran extended
period oftime without cookwareon the
grate. The finish on thegrate may chip
without cookwareto absorbthe heat.
Besure the burnersand grates are cool
before you place your hand, a pot holder,
cleaningcloths or other materials
on them.
\
Pushthe controlknobinandturnit
tothe LITE position.
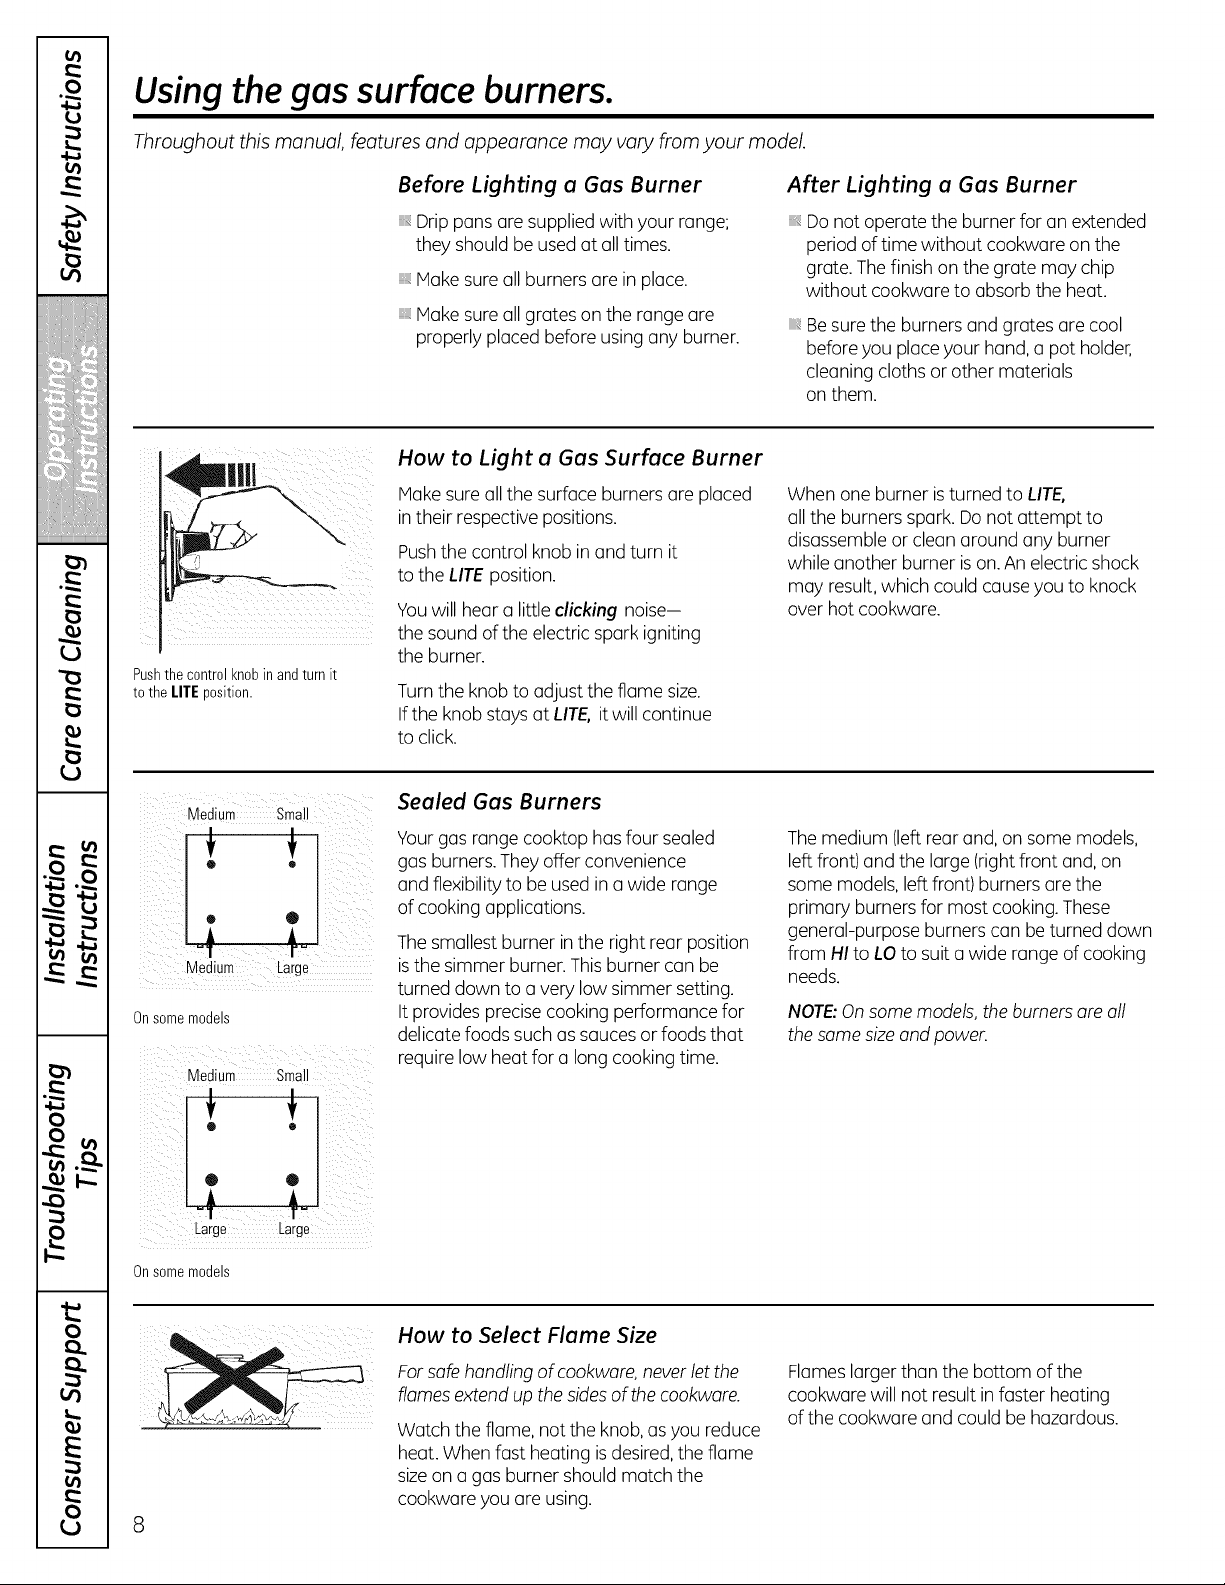
How to Light a Gas Surface Burner
Hake sureall thesurfaceburnersare placed
intheir respective positions.
Pushthecontrol knobin and turn it
to theLITE position.
Youwill hear a little clicking noise-
the soundoftheelectricspark igniting
the burner.
Turn the knobtoadjust theflame size.
Ifthe knobstays atLITE, itwillcontinue
to click.
When one burner is turnedto LITE,
all the burnersspark.Do notattempt to
disassemble or cleanaround anyburner
whileanother burner ison. An electric shock
may result, which could causeyouto knock
over hotcookware.
Medium Small
O
Medium Large
Onsomemodels
Medium Small
Onsomemodels
Sealed Gas Burners
Your gasrange cooktop has four sealed
gas burners.They offer convenience
and flexibility to be usedin a wide range
of cooking applications.
The smallest burner inthe rightrear position
isthe simmerburner.This burner canbe
turned down toa very lowsimmer setting.
It provides precise cooking performance for
delicate foods such as saucesor foods that
require lowheatfor a long cooking time.
The medium (leftrear and, on some models,
left front) and thelarge (rightfront and,on
some models, left front) burnersare the
primary burnersformost cooking.These
general-purpose burnerscanbe turned down
from HI toLO tosuit a widerange ofcooking
needs.
NOTE:On some models, theburners are all
thesame sizeand power.
8
How to Select Flame Size
For safe handling ofcookware, never let the
flamesextend up thesidesofthecookware.
Watch theflame,notthe knob,asyoureduce
heat. Whenfast heatingis desired,theflame
size on a gasburner shouldmatch the
cookware youare using.
Flames larger thanthe bottom of the
cookware willnot result infaster heating
ofthe cookwareand couldbe hazardous.
GEAppliances.com
Top-of-Range Cookware
Aluminum: Medium-weight cookware
is recommended because itheats quickly
and evenly. Most foods brown evenly in
an aluminum skillet. Usesaucepanswith
tight-fitting lids when cooking with minimum
amounts ofwater.
Cast-Iron: If heated slowly, most skillets
willgive satisfactory results.
Enamelware: Under some conditions,
theenamel ofsome cookwure may melt.
Follow cookware manufacturer's
recommendations for cooking methods.
Glass: There are two typesofglass
cookware-those forovenuseonly and those
fortop-of-range cooking (saucepans,coffee
and teapots). Glassconducts heatvery slowly.
HeatproofGlass-Ceramic: Can be used for
eithersurfaceor oven cooking.It conducts
heatvery slowlyand cools very slowly. Check
cookware manufacturer's directionsto be
sureitcanbe usedon gasranges.
Stainless Steel: This metal alone haspoor
heating properties and is usually combined
with copper, aluminum or other metals for
improved heatdistribution. Combination
metal skillets usually work satisfactorily
ifthey are used with medium heat
as the manufacturer recommends.
Stove Top Grills (onmodels with sealed burners)
Donotuse stovetop grills on your sealed gas
burners. If youuse thestovetop grill on the
sealed gasburner, itwillcause incomplete
combustion and can result in exposure to
carbon monoxide levels aboveallowable
current standards.
Thiscanbe hazardous to your health.
i ! ii
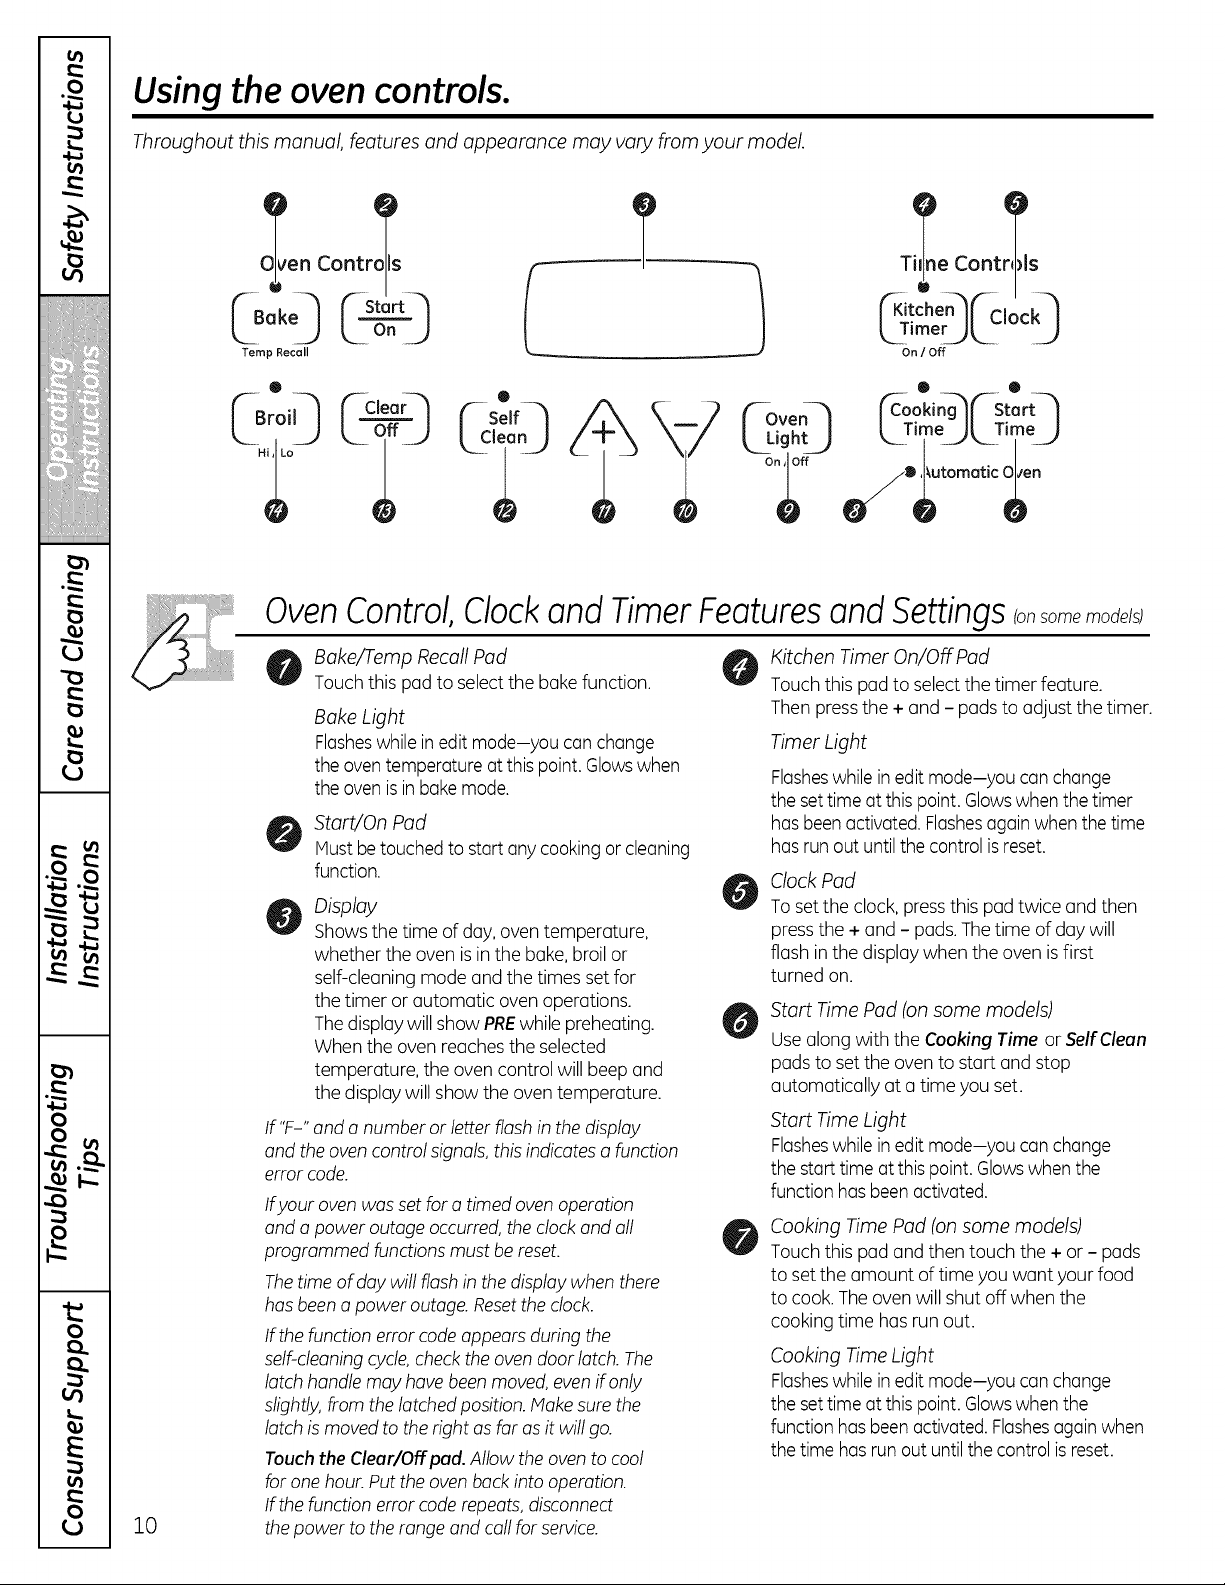
Usea flat-bottomed wok.
Wok This Way (on models with sealed burners)
We recommend that you use a 14" orsmaller
flat-bottomed wok. Make sure the wok bottom
sits flat on the grate. They are available at your
local retailstore.
Only a flat-bottomed wok shouldbe used.
Do notuse a flat-bottomed wok on a support
ring.Placingthe ring overtheburner or grate
may cause the burner towork improperly,
resulting in carbon monoxide levelsabove
allowablestandards. Thiscould be dangerous
toyour health.
In Case of Power Failure
Incaseof a power failure,youcan light
thegassurfaceburnerson your range with
a match. Hold a litmatch tothe burner,
then push in and turn thecontrol knob
tothe LITEposition.Useextremecaution
when lightingburnersthis way.
Surface burnersin use when an electrical
powerfailure occurs willcontinue to operate
normally.
m
€
i
,I
€
!
I
!
(
€
}
/f:i'
i: i
m
(
LI
r_
O'
(
(
(
(
f
Usingthe ovencontrols.
Throughout this manual, features and appearance may vary from your model.
en Contrails
/
Temp Recall
0
Coot:s
["Kltche n_ ["-Cioc k-"_
k_Tim k2..... LJ
On / Off
('_-Oven-_ ['c-o°: ing_ [r st_ rt-"_
k TimeJkTimeJ
10
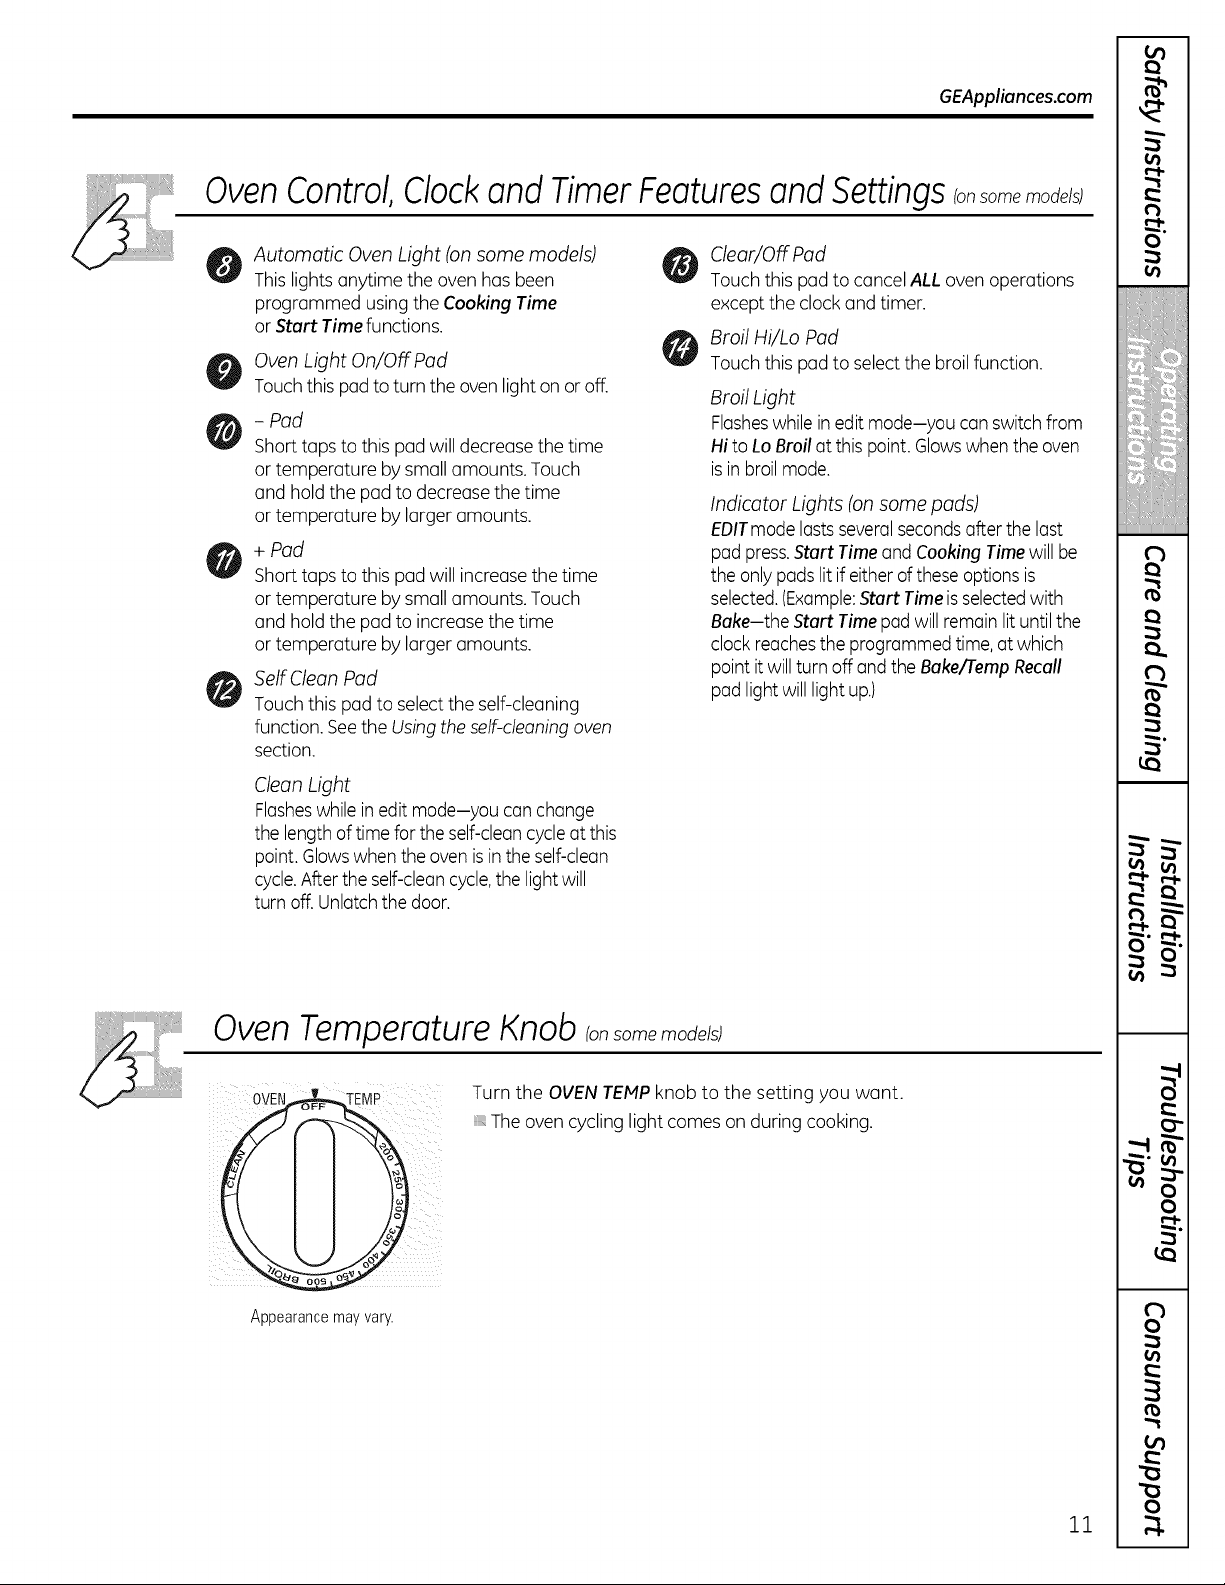
OvenControl,Clockand TimerFeaturesand Settings(onsome models)
Bake/Temp Recall Pad
Touch this pad toselect the bake function.
BakeLight
Flasheswhile in editmode-you canchange
theoventemperatureatthis point. Glowswhen
theoven is in bakemode.
Start/On Pad
Must be touchedto start anycookingor cleaning
function.
Display
Showsthe time ofday, oven temperature,
whether the ovenis in thebake, broil or
self-cleaningmodeand thetimesset for
thetimer or automatic ovenoperations.
The displaywillshow PREwhilepreheating.
Whentheovenreaches theselected
temperature, the oven control will beep and
thedisplay willshow theoventemperature.
If "F-" and a numberor letter flash in thedisplay
and the ovencontrol signals,this indicates a function
error code.
Ifyour oven was set foro timed ovenoperation
and a poweroutageoccurred, theclock and all
programmed functions must be reset.
Thetime ofdaywillflash in thedisplay whenthere
hasbeena power outage.Resettheclock.
If thefunctionerror code appearsduring the
self-cleaning cycle,check theoven door latch.The
latch handle may havebeen moved, even ifonly
slightly,from thelatchedposition.Makesure the
latch ismoved totherightas far as itwillgo.
Touch the Clear/Off pad.Allow theoven tocool
forone hour. Put theovenback intooperation.
If thefunctionerror code repeats, disconnect
the power totherange and call forservice.
Kitchen Timer On/Off Pad
Touch this pad toselect the timer feature.
Then pressthe + and - pads to adjust thetimer.
Timer Light
Flasheswhile in editmode-you canchange
thesettime atthis point. Glowswhenthe timer
has beenactivated. Flashesagainwhenthetime
has run outuntil thecontrol is reset.
ClockPad
To set theclock, pressthis pad twice and then
pressthe + and - pads.The time ofdaywill
flash in the display whenthe ovenis first
turned on.
Start Time Pad (on some models)
Usealong with the Cooking Time or Self Clean
padstoset the oven to startand stop
automatically ata time youset.
Start Time Light
Flasheswhile in editmode-you canchange
thestart time atthis point. Glowswhenthe
functionhas beenactivated.
Cooking Time Pad (on some models)
Touch this pad and then touch the + or - pads
toset the amount of time youwant yourfood
tocook.The oven willshut off when the
cooking time hasrun out.
Cooking Time Light
Flasheswhile in editmode-you canchange
thesettime atthis point. Glowswhenthe
functionhas beenactivated. Flashesagain when
the time has run outuntil thecontrol is reset.
GEAppliances.com
Oven Control, Clockand Timer Features and Settings onsomemo e s;
Automatic OvenLight (on some models)
Thislights anytime theovenhasbeen
programmed using theCooking Time
or Start Timefunctions.
OvenLight On/Off Pad
Touchthis pad toturntheovenlighton or off.
- Pad
Short taps tothis pad willdecrease thetime
or temperature bysmall amounts. Touch
and hold the pad to decrease the time
or temperature bylarger amounts.
+ Pad
Short taps tothis pad will increasethetime
or temperature bysmall amounts. Touch
and hold the pad to increase thetime
or temperature bylarger amounts.
SelfClean Pad
Touch this pad toselect the self-cleaning
function. Seethe Usingthe self-cleaning oven
section.
Clean Light
Flasheswhile in editmode-you canchange
thelength of time for theself-cleancycleatthis
point. Glowswhentheoven is intheself-clean
cycle.After the self-cleancycle,thelight will
turnoff. Unlatchthedoor.
Clear/Off Pad
Touch this pad tocancel ALL ovenoperations
excepttheclockand timer.
Broil Hi/Lo Pad
Touch this pad toselect the broil function.
Broil Light
Flasheswhile in editmode-you canswitchfrom
Hi toLo Broil atthis point. Glowswhentheoven
is in broil mode.
Indicator Lights (on some pads)
EDITmodelasts severalsecondsafter thelast
pad press.Start Timeand Cooking Time willbe
theonly pads litif either of these options is
selected.(Example:Start Time isselectedwith
Bake-the Start Timepad willremainlit until the
clock reachestheprogrammed time, atwhich
pointit will turnoff and theBake/rempRecall
pad light willlightup.)
Oven Temperature Knob Ion some models)
0vE /
\
Appearance may vary.
Turn the OVEN TEMP knob to the setting you want.
The ovencyclinglightcomeson during cooking.
11
m
€
i
€
!
!
€
€
]
#'f];
i: i
m
(
(
r_
O'
(
€
(
€
f
m
m
"0
v
w . o
v
vJ f_
r,_ _
0
vJ
0
L.
0
Using the oven.
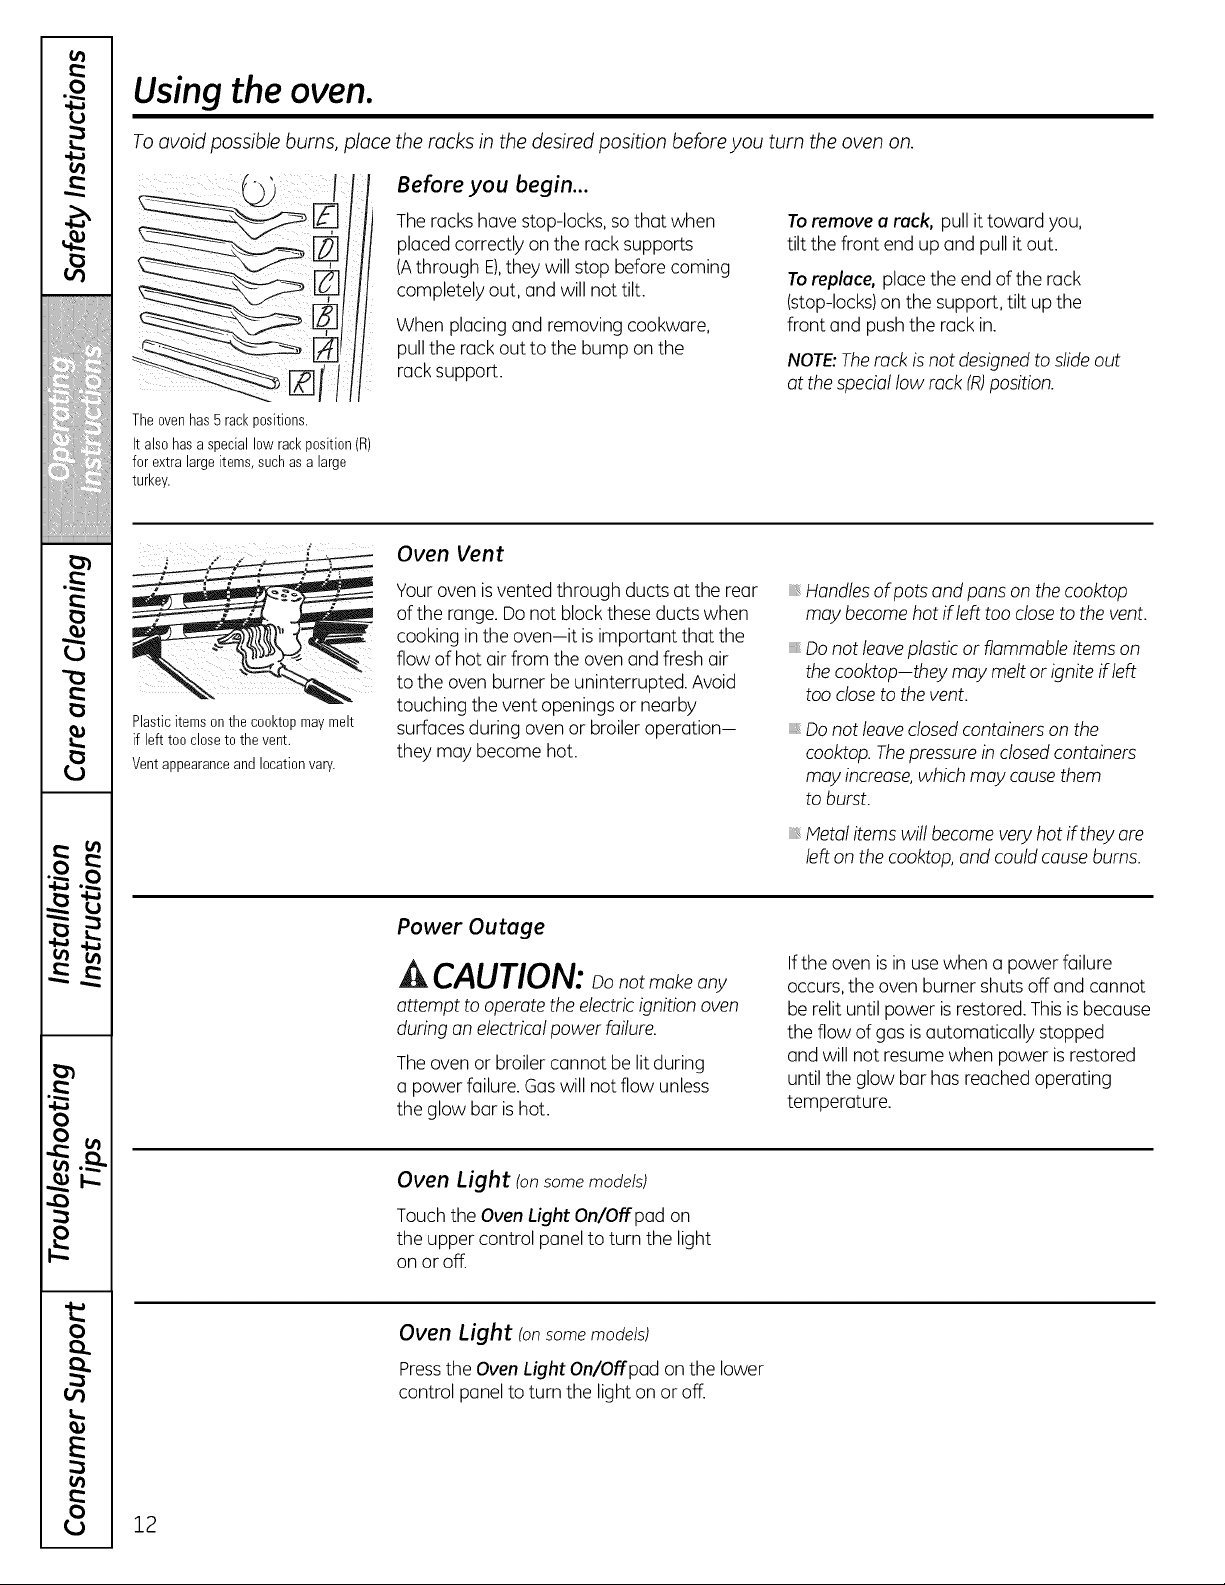
Toavoid possible burns, place the racks in the desired position beforeyou turn the oven on.
Before you begin...
The rackshave stop-locks, so that when
placedcorrectly on the rack supports
(Athrough E),they willstop beforecoming
completely out, and willnottilt.
Whenplacingand removing cookware,
pull the rack outto thebump on the
rack support.
To remove a rack, pull ittoward you,
tilt thefront end up and pull itout.
To replace, place the end ofthe rack
(stop-locks)on the support,tilt up the
front and pushtherack in.
NOTE:Therack is notdesignedto slideout
atthespeciallow rock (R)position.
Theovenhas 5 rackpositions.
Italso hasa special low rackposition(R)
forextra largeitems, suchas alarge
turkey.
Plastic items on the cooktop may melt
if left too close to the vent.
Ventappearanceand locationvary.
Oven Vent
Yourovenis vented through ductsat therear
oftherange.Do not block these ductswhen
cooking in theoven-it isimportant that the
flow ofhot air from the oven and fresh air
tothe ovenburner be uninterrupted.Avoid
touching the vent openingsor nearby
surfaces during ovenor broiler operation-
they may become hot.
Handlesofpots and pans on thecooktop
may become hotif left tooclosetothevent.
Do not leaveplasticor flammable items on
thecooktop-they may melt or ignite ifleft
toocloseto the vent.
Do not leaveclosed containerson the
cooktop. Thepressure in closedcontainers
may increase,which may causethem
to burst.
Metal items will become very hot if they are
left on the cooktop, and could cause bums.
Power Outage
CAUTION: notmakeany
attempt to operate the electric ignition oven
during an electrical powerfailure.
The ovenor broiler cannot be lit during
a powerfailure. Gaswill notflow unless
theglow bar is hot.
Iftheoven is in use when a powerfailure
occurs,the ovenburner shuts off and cannot
be relituntilpowerisrestored. This is because
theflow ofgasis automatically stopped
and willnotresume whenpower is restored
untiltheglow bar hasreachedoperating
temperature.
Oven Light (on some models)
Touch theOvenLight On/Off pad on
theupper control panel to turnthe light
on or off.
Oven Light (on some models)
Press the Oven Light On/Offpad on the lower
control panel to turn the light on or off.
12
Usingthe upper oven.
GEAppliances.com
Ifyour model has a door latch,
for self-cleaning only.
iJ
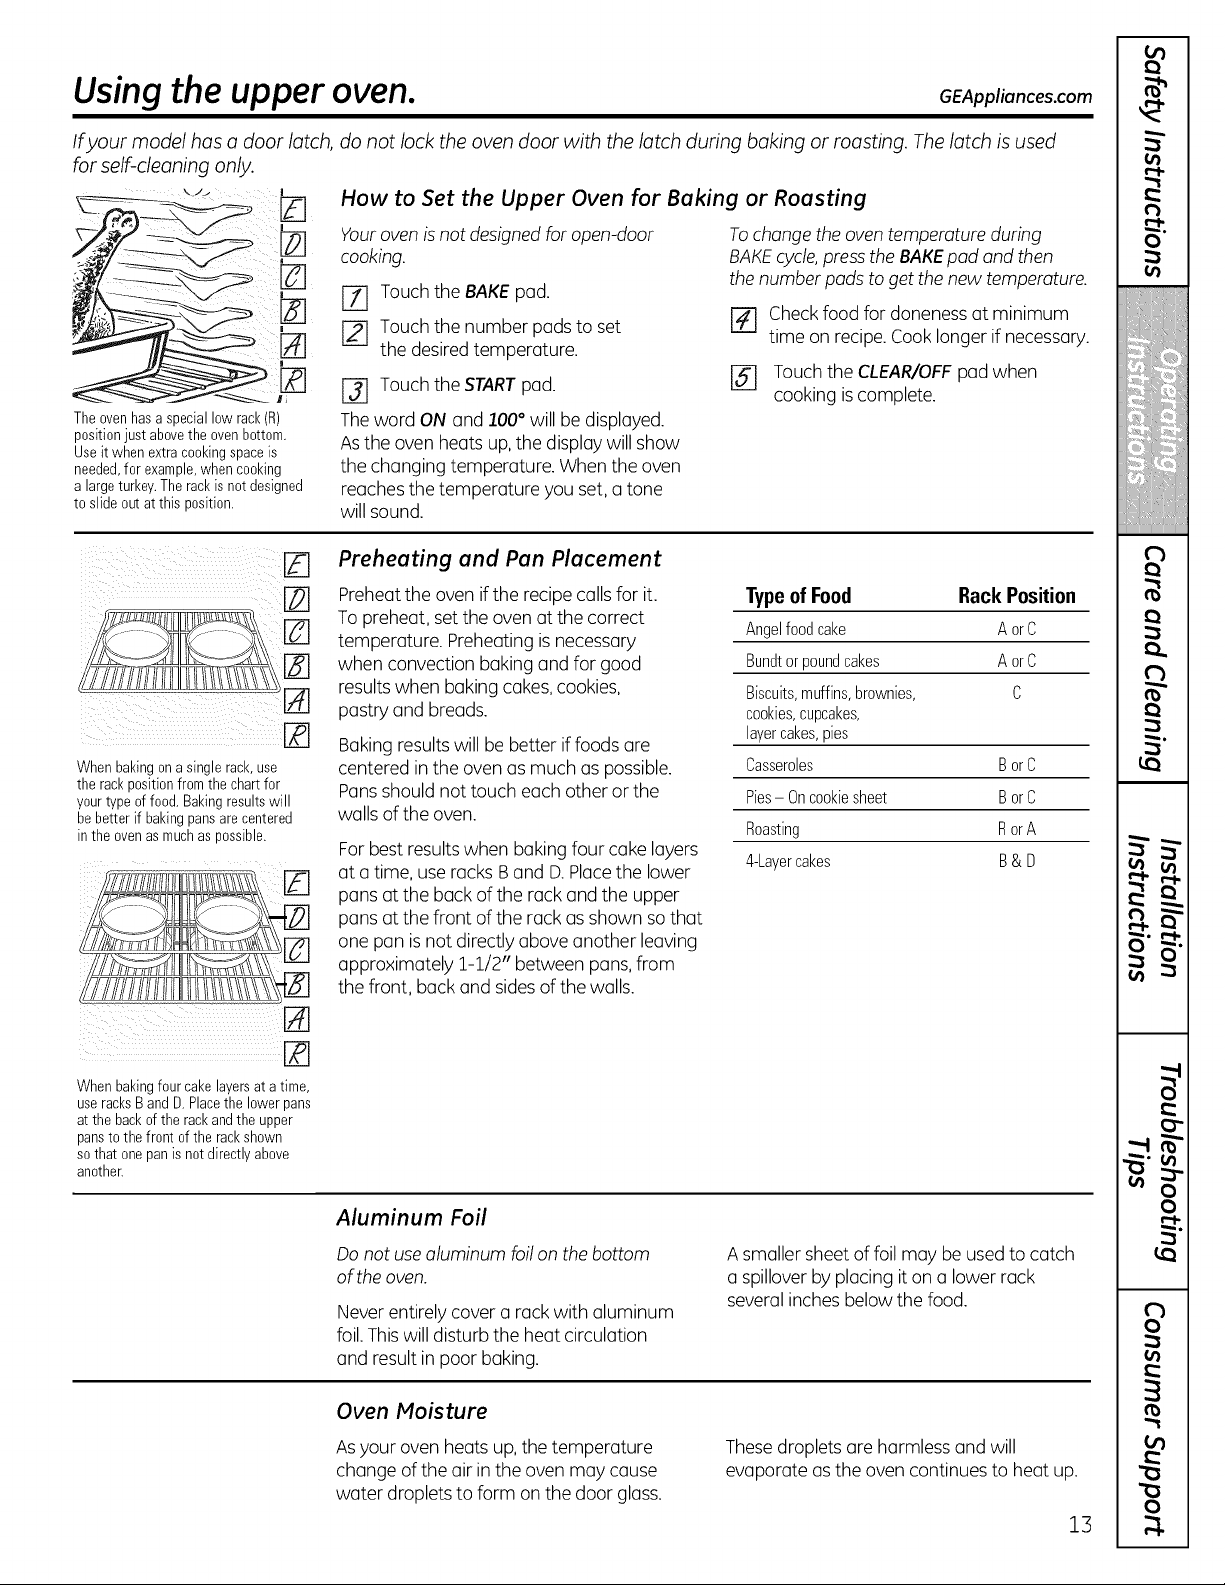
Theovenhasa special low rack(R)
position just above the oven bottom.
Useitwhenextracookingspaceis
needed,for example,when cooking
alargeturkey.Therackisnot designed
toslideoutat this position.
do not lock the oven door with the latch during baking or roasting. Thelatch isused
How to Set the Upper Oven for Baking or Roasting
Youroven is notdesigned foropen-door
cooking.
[Z] Touch the BAKEpad.
[-_ Touch the number padstoset
thedesired temperature.
[] Touchthe STARTpad.
Theword ONand 100°will be displayed.
Asthe ovenheats up,the display willshow
thechanging temperature. Whentheoven
reaches thetemperature you set,a tone
willsound.
To change the oven temperature during
BAKE cycle, press the BAKE pad and then
the number pads to get the new temperature.
F_ Check foodfordoneness at minimum
time on recipe.Cook longer ifnecessary.
[_ Touch theCLEAR/OFFpad when
cooking is complete.
Whenbakingonasinglerack,use
the rackpositionfromthe chartfor
yourtypeoffood. Bakingresultswill
be betterif bakingpansarecentered
in the ovenasmuchas possible.
Preheating and Pan Placement
Preheat theoven if therecipecallsfor it.
Topreheat, set theovenatthecorrect
temperature. Preheating is necessary
when convection bakingand for good
results when bakingcakes,cookies,
pastryand breads.
Baking resultswillbe better iffoods are
centered in theovenasmuch aspossible.
Pans shouldnottouch eachother or the
walls oftheoven.
For best resultswhen baking four cake layers
ata time, use racksBand D.Placethe lower
pansattheback ofthe rack and the upper
pansatthefront of the rack asshown so that
one pan is not directlyaboveanother leaving
approximately 1-1/2" between pans, from
the front, back and sides of thewalls.
TypeofFood RackPosition
Angelfoodcake AorC
Bundtor poundcakes AorC
Biscuits,muffins, brownies, C
cookies, cupcakes,
layercakes,pies
Casseroles BorC
Pies- Oncookiesheet BorC
Roasting RorA
4-Layer cakes B& D
Whenbakingfourcake layersat a time,
useracksB and D.Placethe lower pans
atthe back of the rackand the upper
pansto the front of the rackshown
so that one pan is not directlyabove
another.
Aluminum Foil
Donot use aluminum foilon the bottom
of the oven.
Never entirely cover a rack with aluminum
foil.Thiswilldisturb the heat circulation
and result in poor baking.
A smaller sheet offoilmay be used tocatch
a spillover byplacing it on a lower rack
several inches belowthefood.
Oven Moisture
Asyour ovenheats up, thetemperature
changeoftheair in theovenmay cause
water droplets toform on thedoor glass.
Thesedroplets are harmlessand will
evaporate as theovencontinuesto heatup.
13
m
(
i
€
!
I
!
(
€
.8££¸!
}
{}:
i:
<,
m
(
I
(
u
r_
O'
_a
(
(
€
I
(
(
I
-1
-1
(
f
i
i
"o
:2
w
ra
-I
)
)
it.
0
E
0
Using the oven.
Do not lock the oven door with the latch during broiling. Thelatch isused for self-cleaning only.
Closethedoor.Alwaysbroilwith
the doorclosed.
How to Set the Oven for Broiling
NOTE: On models with on OVEN TEMP knob, turn
it to BROIL.
r-_ Placethe meat or fish on a broiler grid
in a broiler pan.
Followsuggestedrack positions
inthe Broiling Guide.
I-_ The ovendoor must be closed during
broiling.
Touch theBroil Hi/Lo pad oncefor
HiBroil.
Touch theStart/On pad.
Whenbroiling is finished, touch the
Clear/Off pad.
Servethefood immediately,and leave the
pan outside theovento coolduring the meal
foreasiest cleaning.
UseLo Broil tocook foods such aspoultry
or thick cutsofmeat thoroughly without
overbrowning them.
To changeto Lo Broil, touch the
Broil Hi/Lo pad again.
Broiling Guide
Thesize,weight,thickness,
startingtemperatureandyour Food
preferenceof donenesswillaffect Bacon
broilingtimes.Thisguideis based
onmeatsat refrigerator
temperature.
tTheU.S.Departmentof Agriculture BeefSteaks
says "flarebeef ispopular,but you Raret
shouldknowthatcookingit to only Medium
140°Fmeanssomefoodpoisoning Well Uone
organismsmaysurvive."(Source:Safe
FoodBook,YourKitchenGuide USDA
Re_ June1985.)
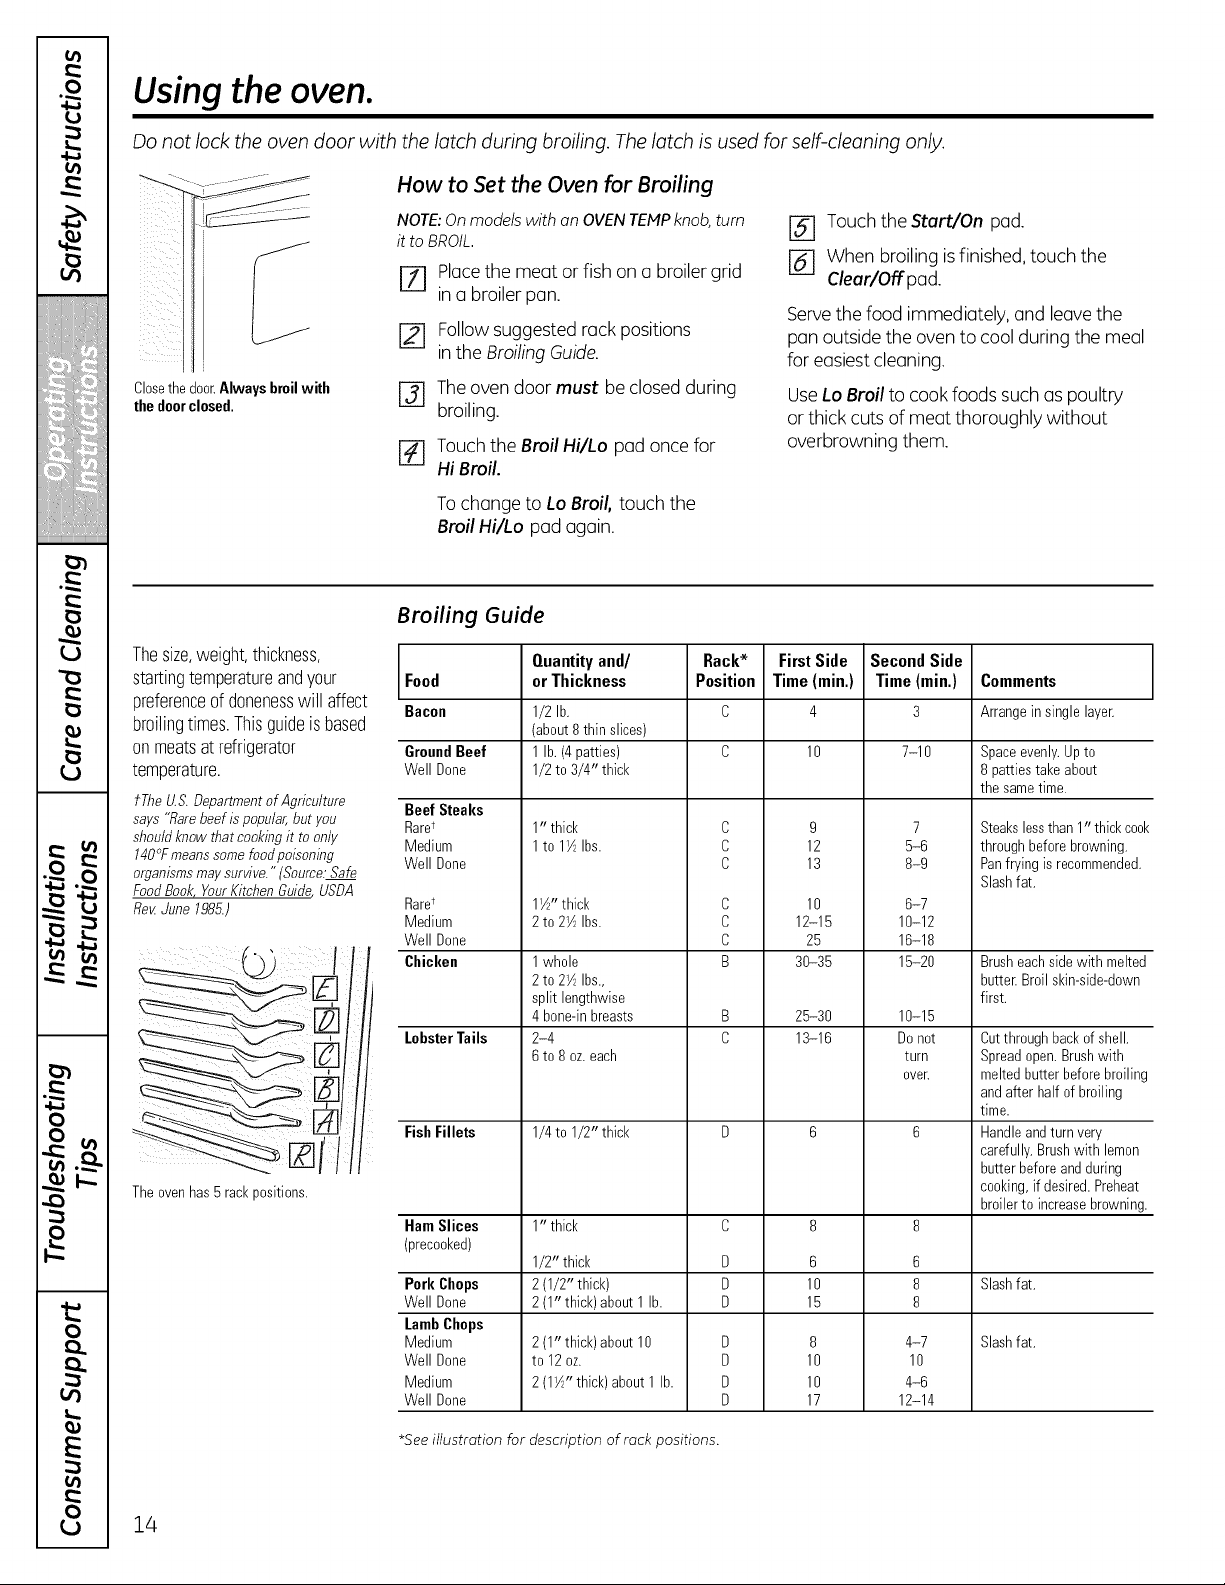
Theovenhas 5 rackpositions.
GroundBeef
Well Done
Raret
Medium
Well Done
Chicken
LobsterTails
FishFillets
HamSlices
(precooked)
Pork Chops
Well Done
LambChops
Medium
Well Done
Medium
Well Done
Quantityand/
orThickness
1/2 lb.
(about 8thinslices)
1lb.(4 patties)
1/2 to 3/4" thick
10 thick
1to 1W_Ibs.
11/Z'thick
2to 2W_Ibs.
1whole
2to 2W_Ibs.,
split lengthwise
4bone-inbreasts
2-4
6to 8oz.each
1/4 to 1/2" thick
1" thick
1/2" thick
2(1/2" thick)
2(1" thick) about1lb.
2(1" thick) about10
to 12oz.
2(1W!'thick)about1lb.
Rack*
Position
C
C
C
C
C
C
B
B
C
D
D
D
D
D
D
D
FirstSide
Time(min.)
10
9
12
13
10
12-15
25
30-35
25-30
13-16
6
10
15
8
10
10
17
SecondSide
Time(min.)
7-10
7
5-6
8-9
6-7
10-12
16-18
15-20
10-15
Donot
turn
oveE
6
8
8
4-7
10
4-6
12-14
Comments
Arrangeinsinglelayer.
Spaceevenly.Up to
8patties takeabout
the sametime.
Steakslessthan 1" thickcook
through beforebrowning.
Panfryingisrecommended.
Slashfat.
Brusheachside with melted
butter.Broil skin-side-down
first.
Cutthrough backof shell.
Spreadopen.Brushwith
meltedbutter before broiling
andafterhalfofbroiling
time.
Handleandturnvery
carefully.Brushwith lemon
butterbeforeand during
cooking,ifdesired. Preheat
broilerto increasebrowning.
Slashfat.
Slashfat.
*Seeillustration for description of rack positions.
14
Usingtheclock and timer, somemode s
GEAppliances.com
Not allfeatures are on all models.
! ¸
51__iiii_ii_ _i_i!_i:!i_k
z
ii¸¸¸; f tom-'l f
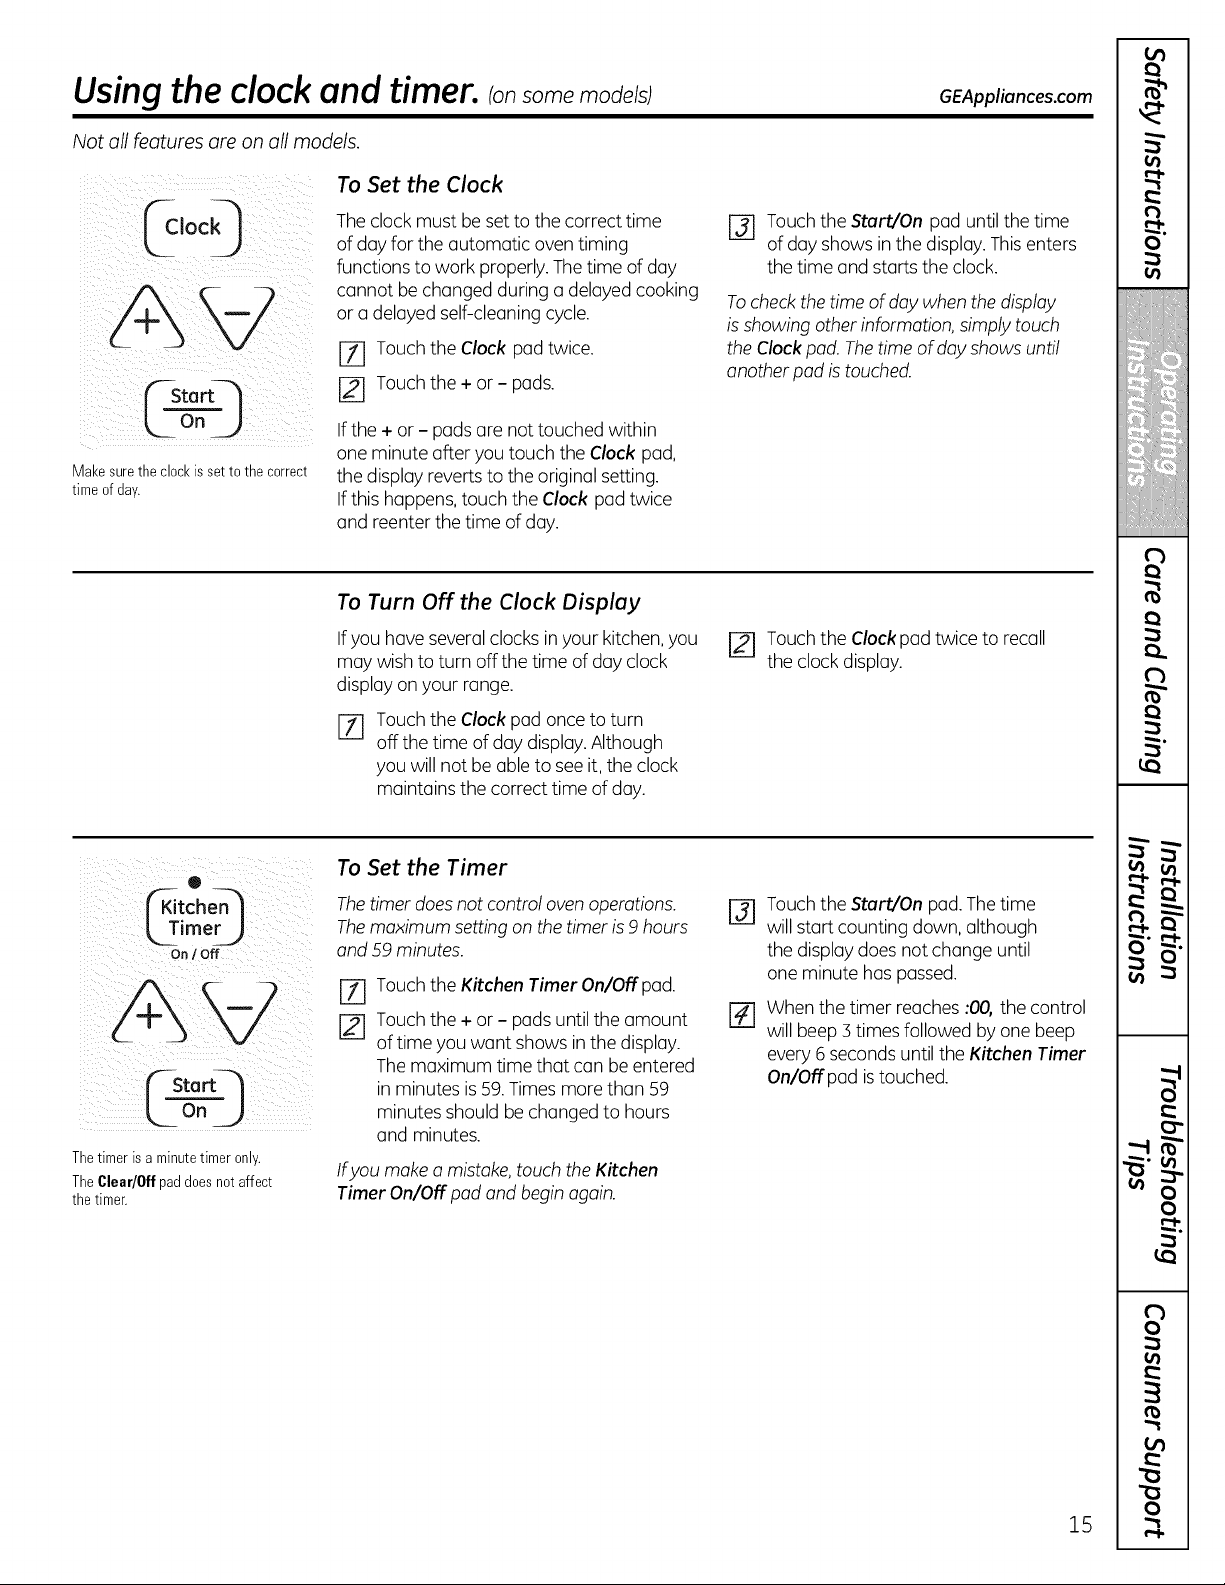
Makesurethe clockissettothe correct
timeofday.
To Set the Clock
The clockmustbe set to thecorrecttime
ofdayforthe automatic oven timing
functions towork properly. The time ofday
cannot be changedduring o delayedcooking
or a delayedself-cleaning cycle.
[Z] Touch theClock pad twice.
[] Touch the+ or - pads.
If the+or - padsare nottouched within
one minute after youtouch theClock pad,
thedisplay reverts tothe original setting.
If this happens, touch the Clock pad twice
and reenterthetime ofday.
r_ Touchthe Start/On pad untilthetime
ofdayshowsin thedisplay. Thisenters
thetime and starts the clock.
Tocheck the time of day when the display
is showing other information, simply touch
the Clock pad. The time of day shows until
another pad istouched.
To Turn Off the Clock Display
If youhoveseveral clocks inyour kitchen, you
may wish to turn offthe time ofdayclock
display on your range.
%
Touch theClockpad once to turn
off thetime ofdaydisplay. Although
you willnotbe able toseeit, theclock
maintainsthe correcttime of day.
Touchthe Clock pad twiceto recall
theclockdisplay.
®
imer__
On / Off
Start_
L2 2)
Thetimer isaminutetimer only.
TheClear/0ff pad doesnot affect
the timer.
To Set the Timer
The timer does not control oven operations.
The maximum setting on the timer is 9hours
and 59 minutes.
%
Touch theKitchen Timer On/Off pad.
Touch the+or - pads untilthe amount
oftime you want showsinthe display.
The maximum time that can be entered
in minutesis 59. Times morethan 59
minutesshould be changedto hours
and minutes.
Ifyou make a mistake, touch the Kitchen
Timer On/Off pad and begin again.
@
[]
Touchthe Start/On pad. The time
willstartcounting down, although
thedisplay doesnotchange until
one minute haspassed.
Whenthetimer reaches :00, the control
willbeep 3 timesfollowed by one beep
every 6 secondsuntiltheKitchen Timer
On/Off pad is touched.
15
m
(
I
i
4
€
!
I
!
(
€
iiiiiiii,!'!iii
m
(
I
I
(
I
r_
O'
_-!.
(
(
(
(
(
f
Usingtheclock and timer, somemode s
Not all features are on all models.
To Reset the Timer
If thedisplay is still showing thetime
remaining, you may change itby touching
theKitchen Timer On/Off pad and then
touching the + or - padsuntilthetime
youwant appearsin thedisplay.
Ifthe remainingtime is not in thedisplay
(clock,starttime or cooking time are in
thedisplay),recall the remainingtime by
touching the Kitchen Timer On/Off pad and
thentouching the+or - pads to enterthe
newtime youwant.
To Cancel the Timer
Touch theKitchen Timer On/Off pad twice.
®
LTime
On I Off
Or
o
ime)
End of Cycle Tones (onsomemodels)
Clear thetones bypressing the pad ofthe
functionyou are using.
Power Outage
Ira flashing time is in thedisplay,you have
experiencedo powerfailure. Resettheclock.
To reset theclock, touch theClockpad. Enter
thecorrecttime ofdaybytouching the + or -
pads.Touch theStart/On pad.
16
Using thetimed baking andmasting features.Ionsomemo e/sI6EA U once,.com
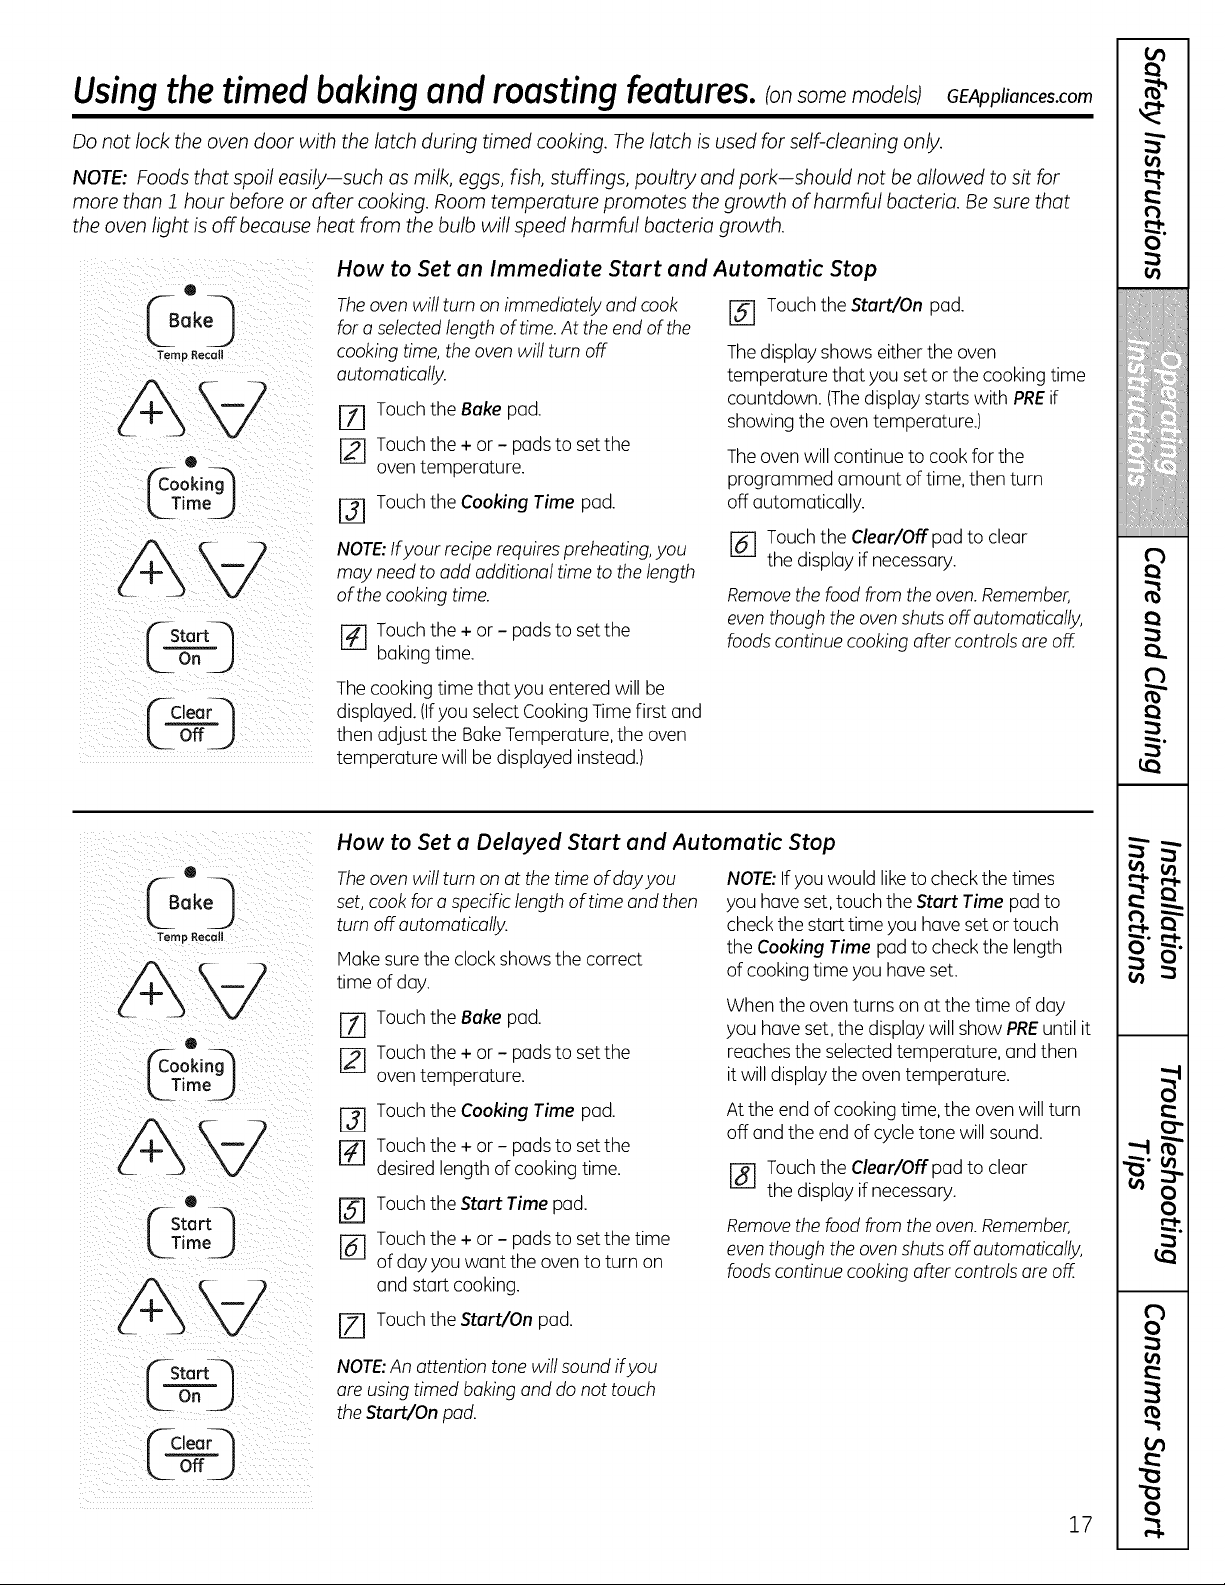
Do not lock the oven door with the latch during timed cooking. Thelatch isused for self-cleaning only.
NOTE: Foods that spoil easily-such asmilk, eggs, fish, stuffings, poultry and pork-should not be allowed to sit for
more than 1 hour before or after cooking. Room temperature promotes the growth of harmful bacteria. Be sure that
the oven light is off because heat from the bulb will speed harmful bacteria growth.
How to Set an Immediate Start and Automatic Stop
The oven willturn on immediately and cook
fora selectedlengthoftime. Attheend ofthe
cooking time, theoven will turnoff
automatically.
[_ Touch theBakepad.
[] Touch the+ or - pads to setthe
oventemperature.
[-3-1Touch theCooking Time pad.
NOTE: If your recipe requires preheating, you
may need to add additional time to the length
of the cooking time.
I-_ Touch the+or - pads to setthe
bakingtime.
[] Touch theStart/On pad.
The display showseithertheoven
temperature that youset or the cooking time
countdown. (Thedisplay starts with PREif
showing theoventemperature.)
The oven willcontinue to cook forthe
programmed amount oftime,thenturn
off automatically.
I-_ Touch the Clear/Off pad toclear
thedisplay ifnecessary.
Remove the food from the oven. Remember,
even though the oven shuts off automatically,
foods continue cooking after controls are off.
The cooking time that you enteredwillbe
displayed. (Ifyou select CookingTime first and
thenadjust the BakeTemperature, the oven
temperature will be displayed instead.)
®
G°,O
Temp Recall
@
¢oo,1@
LZim J
LTimoJ
LOn J
f--Cloa
L_- ZJ
How to Set a Delayed Start and Automatic Stop
The oven will turn on at the time of day you
set, cook for a specific length of time and then
turn off automatically.
Hake sure the clock showsthe correct
time ofday.
[] Touch theBake pad.
Touch the+or - pads to set the
oventemperature.
[_ Touch theCooking Time pad.
r_ Touch the+ or - pads to setthe
desiredlengthofcooking time.
Touch theStart Time pad.
[_ Touch the+ or - pads to set the time
ofdayyouwant the oven to turn on
and startcooking.
r_ Touch theStart/On pad.
NOTE:Ifyouwould like tocheck thetimes
you have set, touch theStart Time pad to
check thestarttime youhaveset or touch
theCooking Time pad tocheckthelength
ofcooking time you have set.
Whentheoventurns on at thetime ofday
you haveset, the display willshow PREuntilit
reaches theselectedtemperature, and then
itwilldisplay theoventemperature.
At the end ofcooking time, the ovenwill turn
off and the end ofcycletonewillsound.
[] Touchthe Clear/Off pad toclear
thedisplay if necessary.
Remove the food from the oven. Remember,
even though the oven shuts off automatically,
foods continue cooking offer controls are off.
NOTE:An attention tone will sound ifyou
are using timed baking and do not touch
the Start/On pad.
17
(
I
i
l
!
I
I
!
I
l
(
I
I
(
I
O'
_-!.
(
(
(
I
"1
"1
I
f
m
f
v
m
-i
)
)
)
0
0..
0..
E
0
_9
Special features of your oven control.
Your new touch pad control has additional features that you may choose to use. Thefollowing are the features and
how you may activate them.
Thespecial feature modes can only be activated while the display isshowing the time of day. They remain in the
control's memory until the steps are repeated.
When the display shows your choice, touch theStart/On pad. The special features will remain in memory after
a power failure.
NOTE:TheSabbath feature and the Thermostat Adjustment feature are also Special Features, but they are addressed
separately in the following sections.
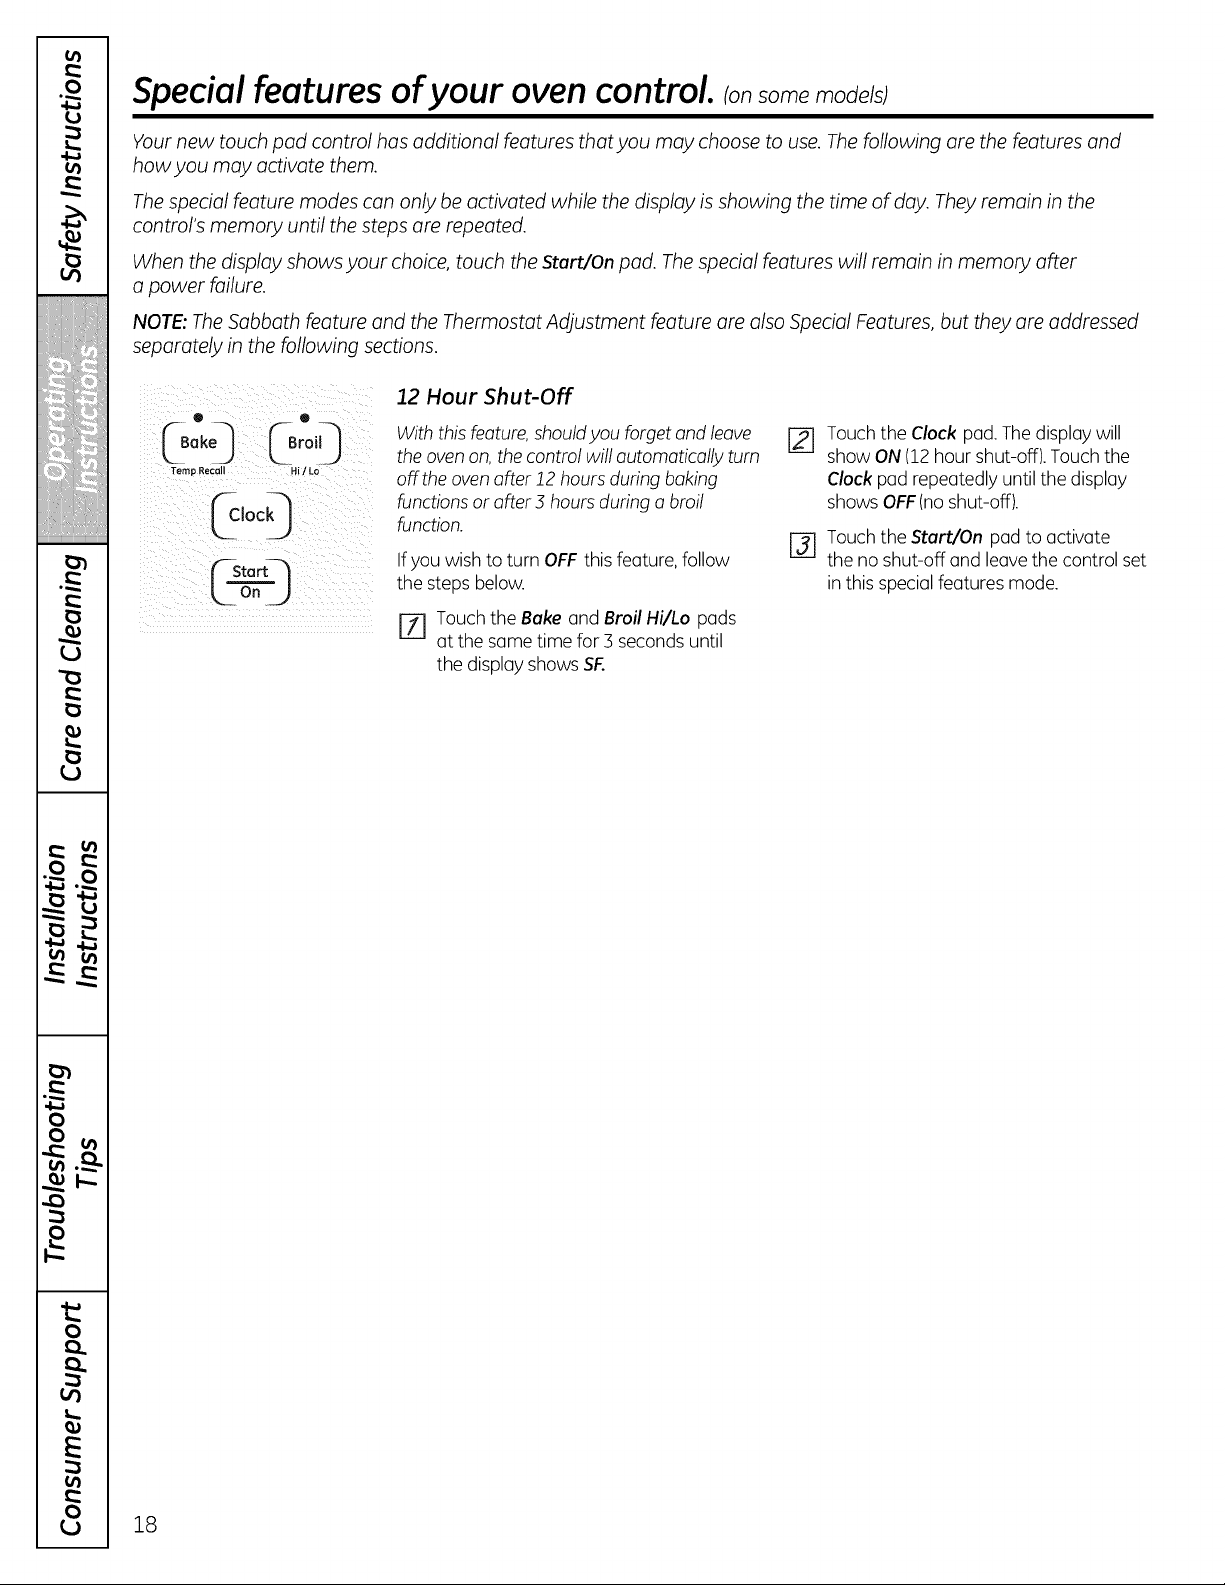
12 Hour Shut-Off
Clock_
• •
theoven on, thecontrol willautomaticallyturn
Temp Recall Hi/Lo Offtheoven after 12 hours during baking
functions or after 3 hours during a broil
function.
If you wish to turn OFF this feature, follow
the steps below.
P1 Touch theBake and Broil Hi/Lo pads
atthe same time for3 seconds until
thedisplay shows SF.
Touchthe Clock pad. The display will
show ON (12 hour shut-off). Touch the
Clockpad repeatedly until the display
showsOFF(no shut-off).
Touch the Start/On pad to activate
the no shut-off and leave the control set
in this special features mode.
18
"'-usingthe Sabbath feature, somemode/s
(Designed for use on the Jewish Sabbath and Holidays) GEAppliances.com
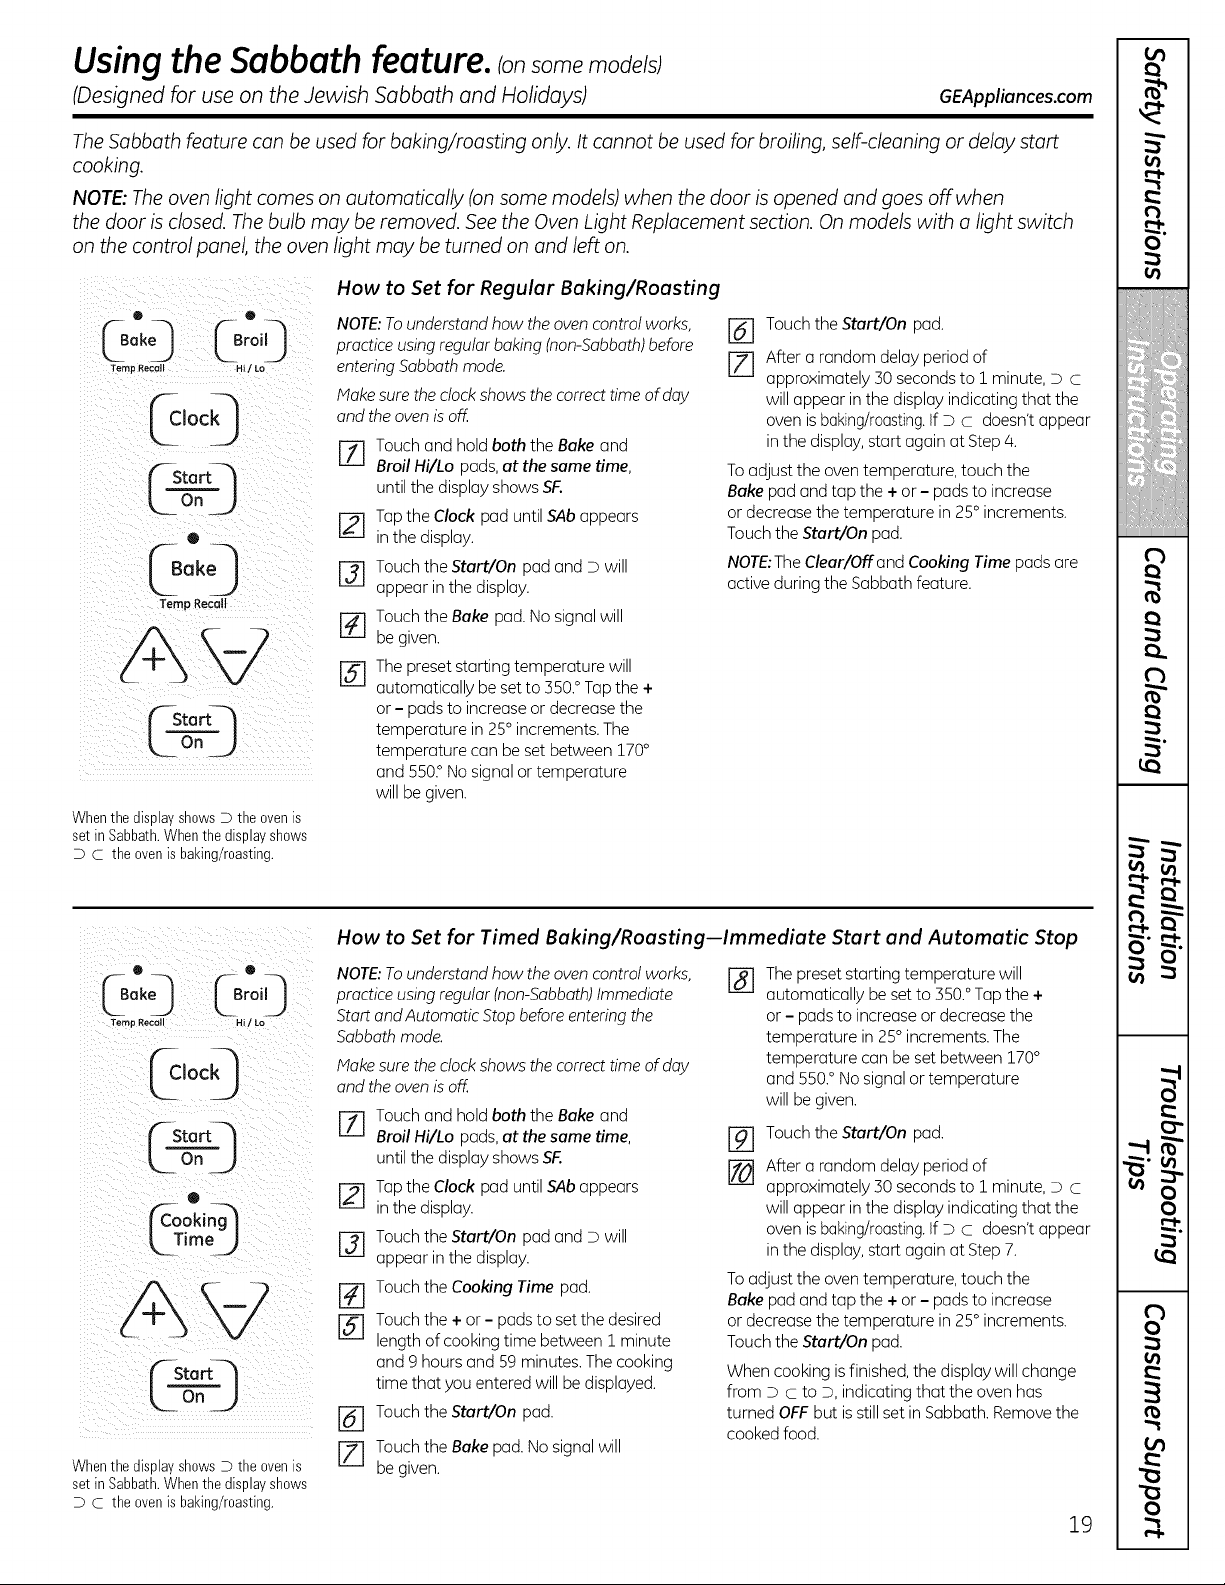
TheSabbath feature can be used for baking/roasting only. It cannot be used for broiling, self-cleaning or delay start
cooking.
NOTE:Theoven light comes on automatically (on some models) when the door isopened and goes off when
the door isclosed. Thebulb may be removed. See the OvenLight Replacement section. On models with a light switch
on the control panel, the oven light may be turned on and left on.
f--Startq
Whenthe display shows D the ovenis
set inSabbath.Whenthedisplayshows
D C theovenisbaking/roasting.
How to Set for Regular Baking/Roasting
NOTE:To understand howtheovencontrolworks,
practiceusing regularbaking(non-Sabbath)before
enteringSabbathmode.
Make sure the clockshowsthe correct time ofday
and theoven isoff.
Touch and hold boththe Bake and
I/I
Broil Hi/Lo pads, at the same time,
untilthe displayshowsSF.
[_-] Tapthe Clock pad untilSAbappears
in the display.
i-31 Touch the Start/On pad and D will
appear in the display.
[] Touch the Bake pad. No signalwill
begiven.
[-_-] Thepreset starting temperature will
automatically beset to 550.° Tap the +
or - pads to increase or decreasethe
temperature in 25° increments. The
temperature can besetbetween 170°
and 550° No signalor temperature
will begiven.
[_ Touch theStart/On pad.
[] After a random delay period of
approximately 50seconds to 1 minute, D C
will appear in the display indicatingthat the
oven isbaking/roasting.If D C doesn'tappear
in the display,start again at Step/4.
To adjust the oven temperature, touch the
Bake pad and tap the +or - pads to increase
or decreasethe temperature in 25° increments.
Touch the Start/On pad.
NOTE:TheClear/Off and Cooking Time pads are
activeduring the Sabbathfeature.
How to Set for Timed Baking/Roasting--Immediate Start and Automatic Stop
e e NOTE:To understand how the oven control works,
C0o,o &o,0
fernpRecall Hi_Lo Start and Automatic Stop before enteringthe
Sabbath mode.
fclockI Makesurethec,ockshowsthecorrecttimeofday
L I and the oven is off.
J
f]rStart-- ZLL__lr-_Touch and hold both the Bake and
Broil Hi/Lo pads, at the same time,
L- On _,_ until the display shows SF..
F-_ Tap the Clock pad until SAb appears
Q
_r_ookin_-] _ in the display.
k Time J
Touch the Start/On pad and D will
appear in the display.
__ [-_WouchtheCookingTimepad.Touchthe
[_ + or- pads to set
the desired
lengthofcooking time between 1 minute
Stortq and 9 hours and 59minutes. Thecooking
time that you entered will bedisplayed.
L_ on_J
[] Touch the Start/On pad.
Touch the Bake
pad.
No
signal
will
WhenthedisplayshowsDtheovenis JZl
begiven.
setinSabbath.Whenthedisplayshows
D c the ovenisbaking/roasting.
%
Thepreset starting temperature will
automatically beset to 550.°Tapthe +
or - pads to increase or decreasethe
temperature in25° increments. The
temperature can be setbetween 170°
and 550.°No signalor temperature
will begiven.
%
[]
Touch the Start/On pad.
After a random delay period of
approximately 50 seconds to 1 minute, D c
will appear in the displayindicating that the
oven isbaking/roasting.If D c doesn't appear
in the display,starL again at Step 7.
To adjust the oven temperature, touch the
Bake pad and tap the +or - pads to increase
or decreasethe temperature in 25° increments.
Touch the Start/On pad.
Whencooking is finished,the display will change
from D Cto D,indicating that the oven has
turned OFF but isstill setin Sabbath. Removethe
cookedfood.
19
m
(
[
i
€
!
I
!
(
€
m
(
[
[
(
[
r_
O'
(
(
[
€
(
I
(
f
€11
€11
m
¢4
-"2
q
v
w
q
.-I
it.
0
o..
o..
0
"'-usingthe Sabbath feature. _onsomemode/s;
(Designed for use on the Jewish Sabbath and Holidays)
f-aoor_
L o_J
• ®
L0o 0@o,0
Temp Recall Hi / to-
@ooq
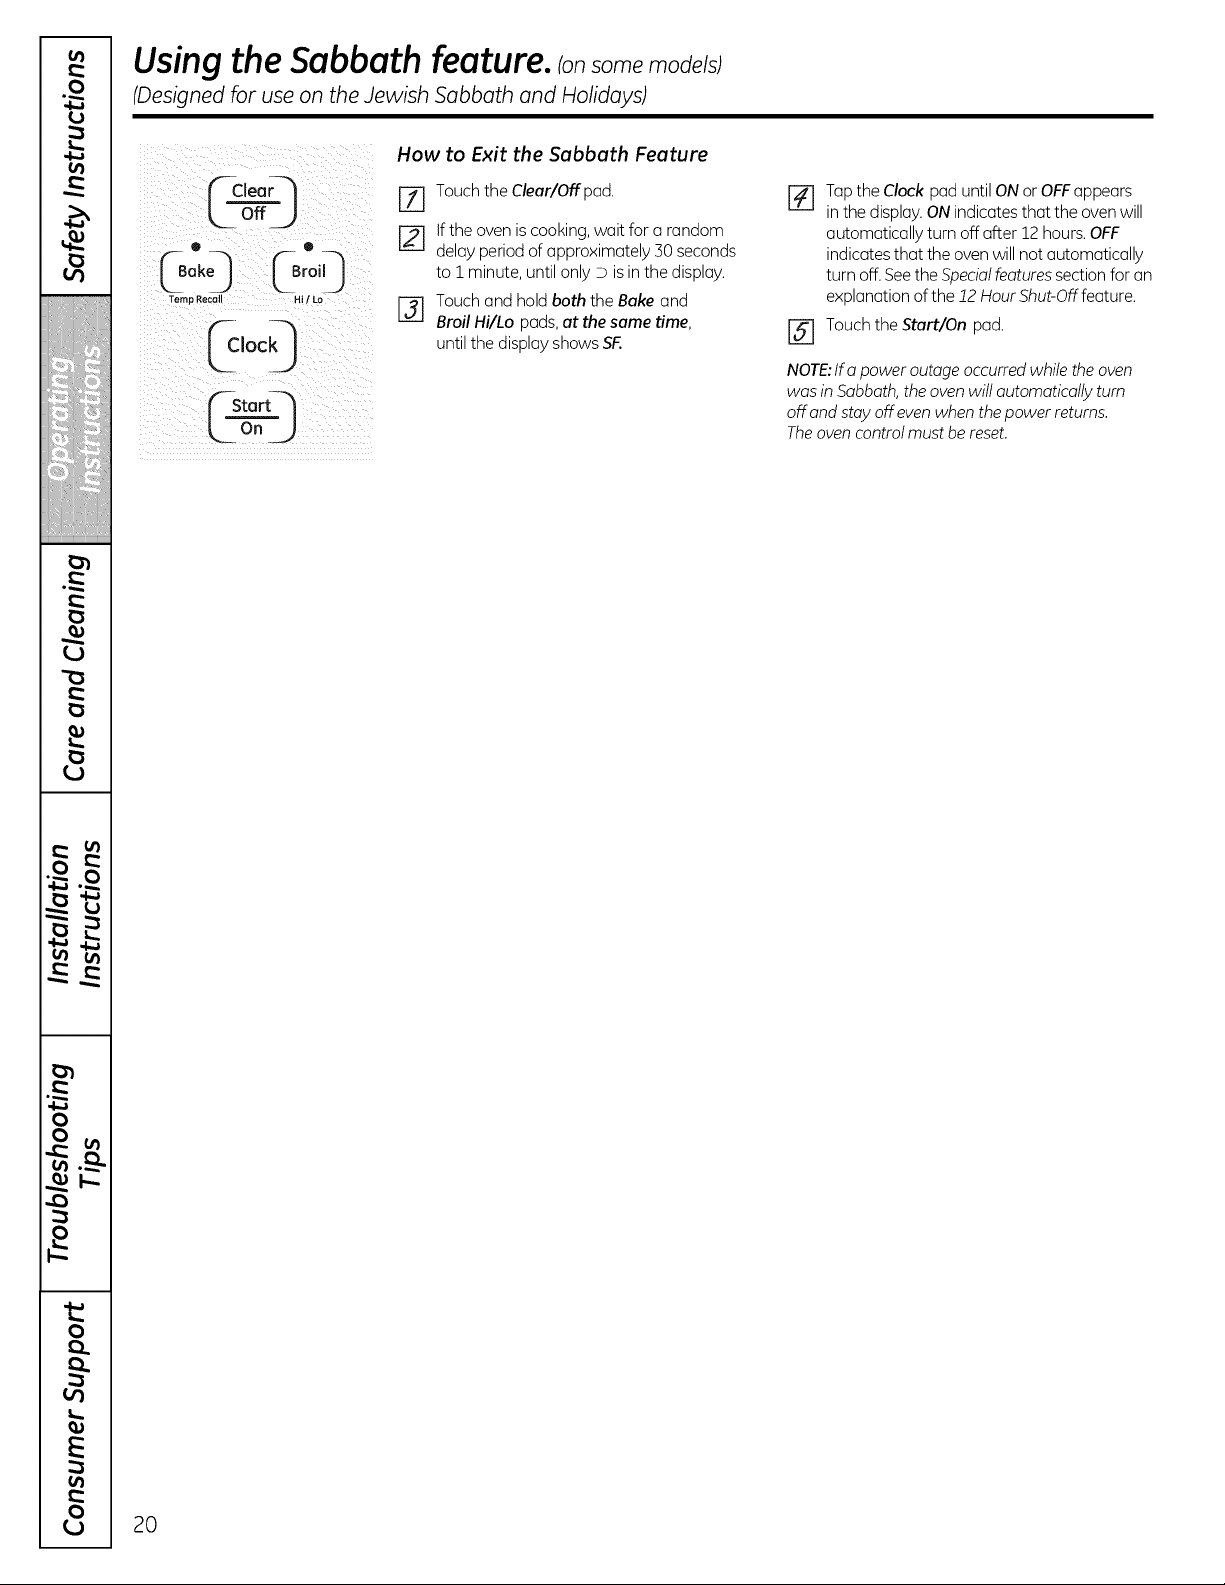
How to Exit the Sabbath Feature
J-_ Touch the Clear/Offpad.
If the oven is cooking, wait for a random
delay period of approximately 30seconds
to i minute, until only D is in the display.
I-_ Touch and hold boththe Bake and
Broil Hi/Lo pads, at the same time,
untilthe displayshowsSF.
20
%
@
Tap the Clock pad until ONor OFFappears
in the display.ON indicates that the oven will
automatically turn offafter 12hours.OFF
indicates that the ovenwillnot automatically
turn off. Seethe Specialfeatures section for an
explanationofthe 12Hour Shut-Off feature.
Touch the Start/On pad.
NOTE:lfa power outage occurred while the oven
was in Sabbath,theoven will automatically turn
offand stayoffeven when the power returns.
The oven controlmust bereset.
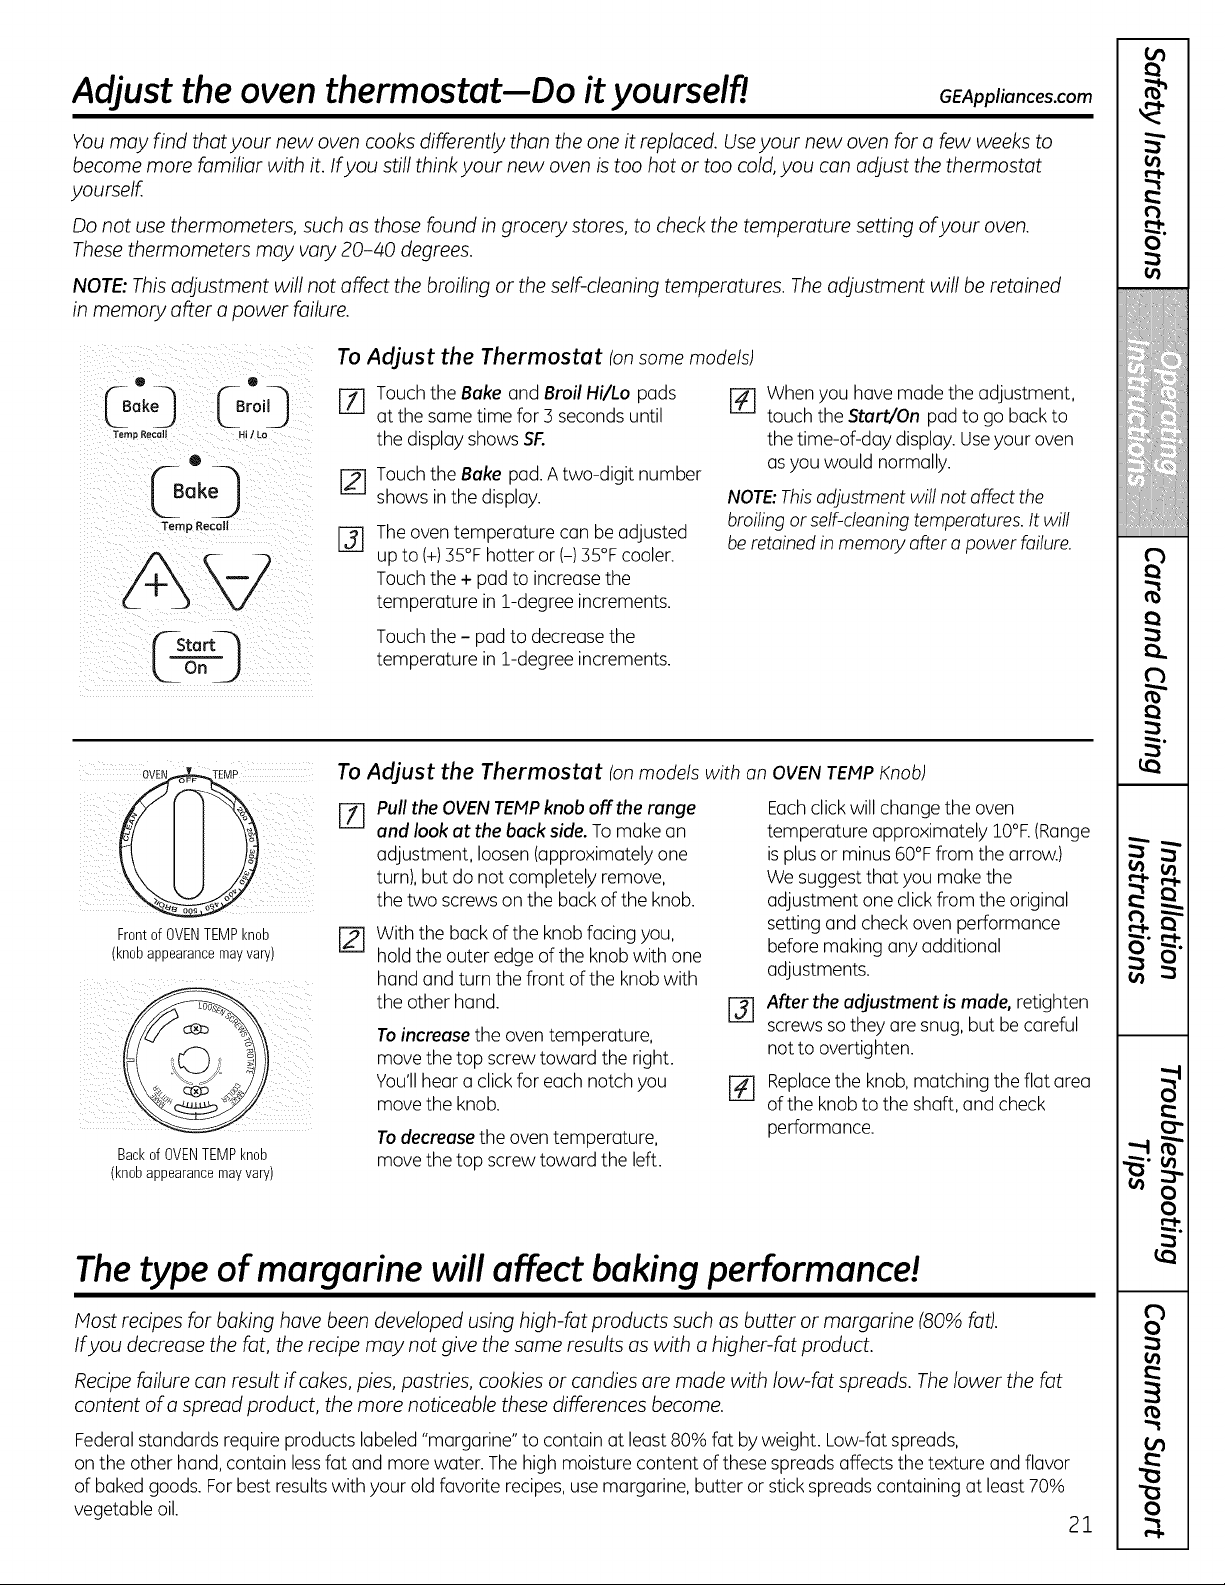
Adjust the oven thermostat--Do ityourselff
GEAppliances.com
You may find that your new oven cooks differently than the one itreplaced. Useyour new oven for a few weeks to
become more familiar with it. Ifyou still think your new oven istoo hot or too cold, you can adjust the thermostat
yourself.
Do not use thermometers, such as those found in grocery stores, to check the temperature setting ofyour oven.
These thermometers may vary 20-40 degrees.
NOTE:This adjustment will not affect the broiling or the self-cleaning temperatures. Theadjustment will be retained
in memory offer a power failure.
To Adjust the Thermostat (on some models)
Loo',O[o,',0 D
Temp Recall Hi/ Lo
®
0ok0
Temp Recall [-_
Touch the Bake and Broil Hi/Lo pods
at the some time for 3 seconds until
the display shows SF.
Touch theBake pad. A two-digit number
showsin thedisplay.
The oven temperature con be adjusted
up to (+)35°F hotter or (-) 35°Fcooler.
Touch the+pod toincrease the
temperature in 1-degree increments.
r_ When you havemodethe adjustment,
touch theStart/On pod to go back to
thetime-of-day display.Useyour oven
as youwould normally.
NOTE:This adjustment willnot affect the
broiling orself-cleaning temperatures. It will
be retained in memory after a power failure.
Touch the- pod to decrease the
temperature in 1-degree increments.
To Adjust the Thermostat (on models with an OVEN TEMP Knob)
[Z] Pull the OVEN TEMPknob off the range Each click willchange the oven
and look at the back side. To make on temperature approximately 10°F. (Range
adjustment, loosen (approximately one is plus orminus 60°F from the arrow.)
turn),but do not completely remove, We suggest that you make the
the two screws on the back of the knob. adjustment one click from the original
Front of OVEN TEMP knob
(knob appearance may vary)
Backof OVENTEMPknob
(knobappearancemayvary)
With thebuck oftheknobfacing you,
hold the outeredge oftheknobwith one
hand and turnthe front ofthe knob with
theother hand.
Toincrease theoventemperature,
move the topscrewtoward the right.
You'llhear a clickforeach notch you
move the knob.
Todecrease theoventemperature,
move the topscrewtoward the left.
@
[]
settingand checkovenperformance
beforemaking anyadditional
adjustments.
After the adjustment is made, retighten
screws so they ore snug, but be careful
not to overtighten.
Replace the knob, matching the flat area
of the knob to the shaft, and check
performance.
The type of margarine willaffect baking performance!
Most recipes for baking have been developed using high-fat products such as butter or margarine (80% fat).
Ifyou decrease the fat, the recipe may not give the same results as with a higher-fat product.
Recipe failure can result ifcakes, pies, pastries, cookies or candies are made with low-fat spreads. Thelower the fat
content of a spread product, the more noticeable these differences become.
Federal standards require products labeled"margarine" to contain at least 80% fat by weight. Low-fatspreads,
on the otherhand,contain less fat and morewater. The high moisturecontent ofthese spreads affectsthetexture and flavor
ofbakedgoods. For best resultswith your old favorite recipes, use margarine, butter or stick spreads containing at least 70%
vegetable oil.
21
m
€
i
€
!
I
!
€
€
m
(
(
u
m
r_
O'
(
(
€
(
I
(
t'
0
o
m
-in
n
v
w • •
v
r-.-- -.2_
0
£
m
0
E
0
Using the warming drawer.
off
Lo Hi
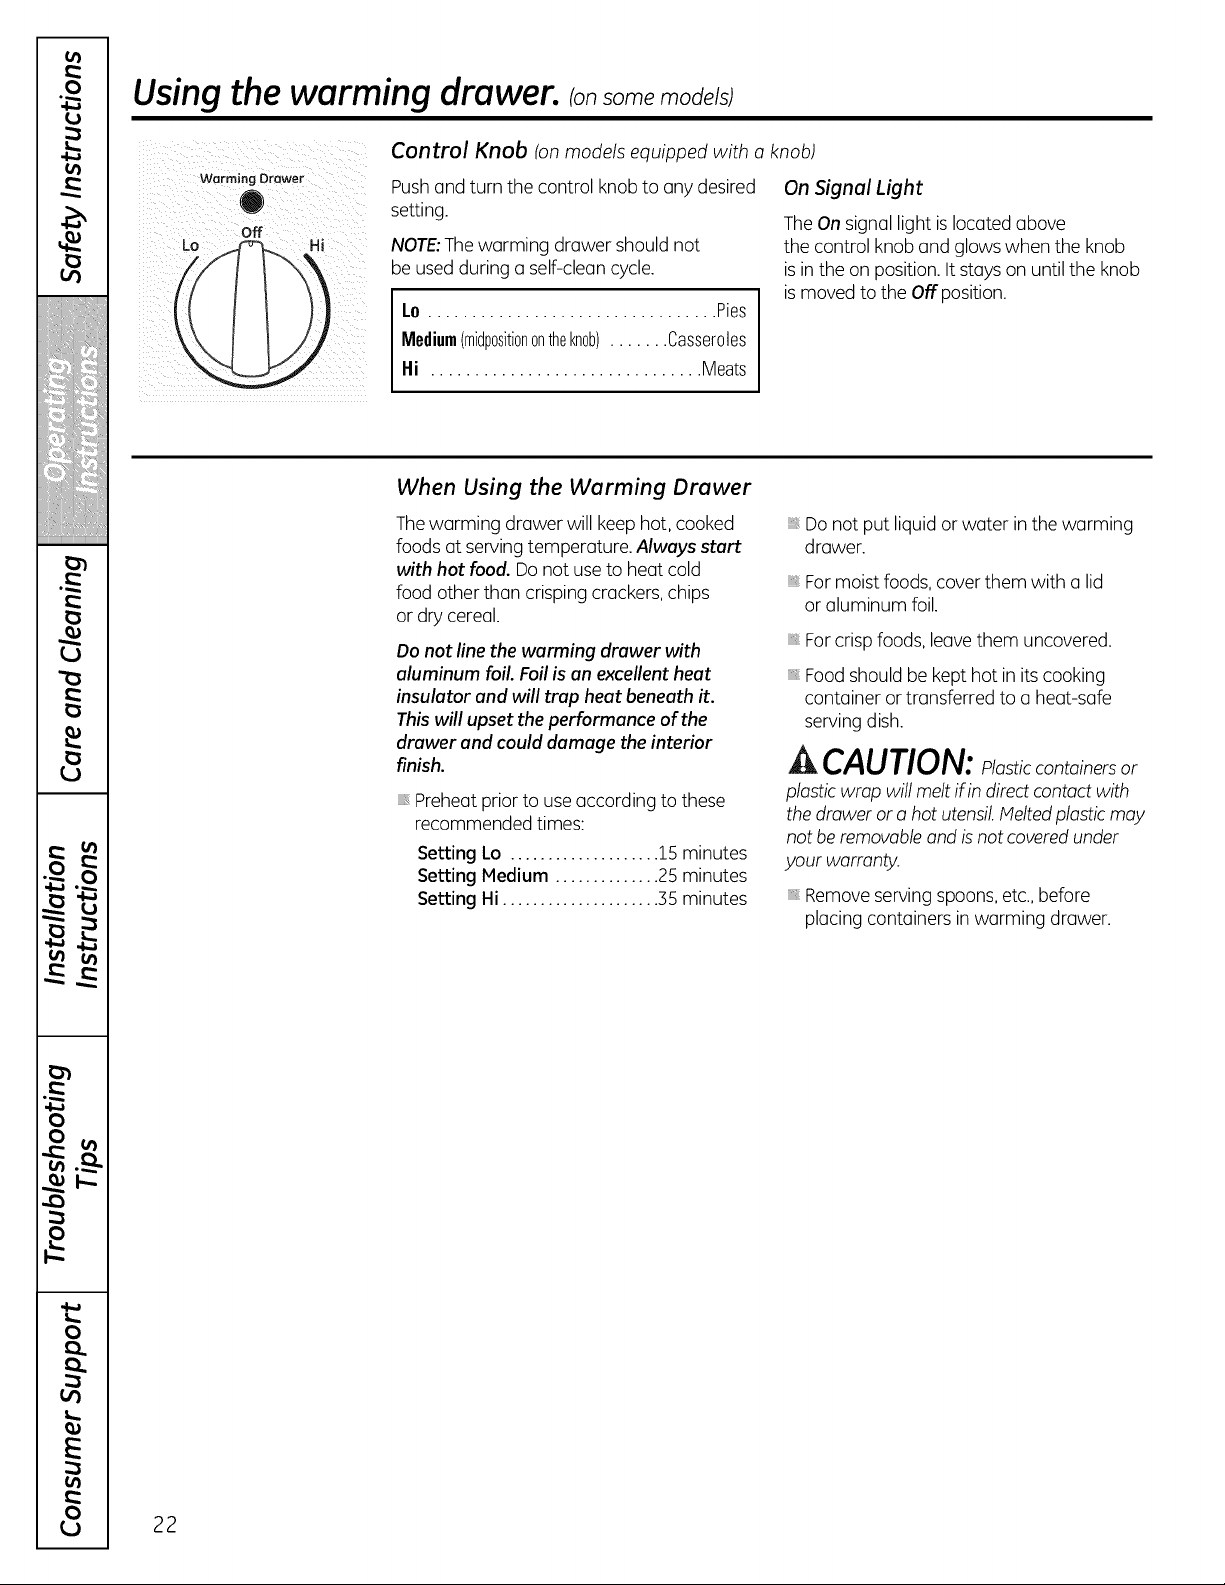
Control Knob (on models equipped with o knob)
Pushand turn the control knob to anydesired
setting.
NOTE:The warming drawershouldnot
be used during a self-cleancycle.
I.o ................................. Pies
Medium(midp0siti0nontheknob)....... Casseroles
I-li ............................... Meats
On Signal Light
The On signallight is located above
the control knoband glows when theknob
is in theon position. It stays on untilthe knob
is moved to theOffposition.
When Using the Warming Drawer
Thewarming drawer willkeephot, cooked
foods at servingtemperature. Always start
with hot food. Do notuse to heatcold
foodotherthan crisping crackers, chips
or drycereal.
Do not line the warming drawer with
aluminum foil. Foil is an excellent heat
insulator and will trap heat beneath it.
This willupset the performance of the
drawer and could damage the interior
finish.
Preheat prior touseaccording tothese
recommended times:
Setting Lo .................... 15 minutes
Setting Medium .............. 25 minutes
Setting Hi ..................... 35 minutes
Donotput liquid or water in thewarming
drawer.
For moistfoods,cover them with a lid
or aluminum foil.
For crisp foods,leavethem uncovered.
Food shouldbe kept hotin its cooking
container or transferred to a heat-safe
serving dish.
,& CAUTION: losticcontainersor
plasticwrap will melt if in direct contact with
the drawer or a hotutensil.Melted plastic may
notberemovable and is notcoveredunder
your warranty.
Remove serving spoons,etc., before
placingcontainers inwarming drawer.
22

GEAppliances.com
Temperature Selection Chart
To keep several different foods hot, set thecontrol
The temperature, type and amount offood,
and thetime held willaffect the quality of
thefood.
Food in heat-safeglass and glass-ceramic
utensilsmay need a higher control setting
ascompared tofood in metal utensils.
Repeatedopening ofthe drawer allows hot
air to escape and food to cool.
Allowextra time forthe temperature
insidethe drawerto stabilize after adding
items.
With large loadsitmay be necessary
to use a higher thermostat settingand
cover some ofthecooked food items.
Do notuseplastic containers or plastic
wrap.
to thefood needing the highest setting.
FoodType ControlSetting
Bacon Hi
Breads Medium
Casserole Medium
Chicken,fried Hi
Eggs,scrambled Medium
Fish Hi
Gravy,sauces Hi
Ham Hi
Muffins Medium
Onionrings Hi
Pies Lo
Pizza Hi
Potatoes,baked Hi
Potatoes,mashed Lo
TortillaChips Lo
A_HLCAUTION: Do notkeep foodin
thewarming drawer formorethantwo hours.
To Crisp Stale Items
Placefood in low-sided dishes or pans.
Preheaton Lo setting.
Check crispnessafter 45 minutes.
Add time asneeded.
To Warm Serving Bowls and Plates
To warm serving bowls and plates,
set thecontrol on Lo.
Useonly heat-safedishes.
Ifyouwant to heatfine chino, please check
with the manufacturer ofthedishes for
their maximum heattolerance.
Youmay warm empty serving disheswhile
preheating thedrawer.
A CAUTION: Disheswill be hot.
Use pot holders or mitts when removing hot
dishes.
23
m
(
i
€
!
I
!
(
€
]
m
(
I
(
u
r'.,t-
O'
_a
(
(
€
I
(
(
I
"I
"I
(
I
I'
m
m
"0
:2
f
v
)
3
)
it.
0
E
€1)
0
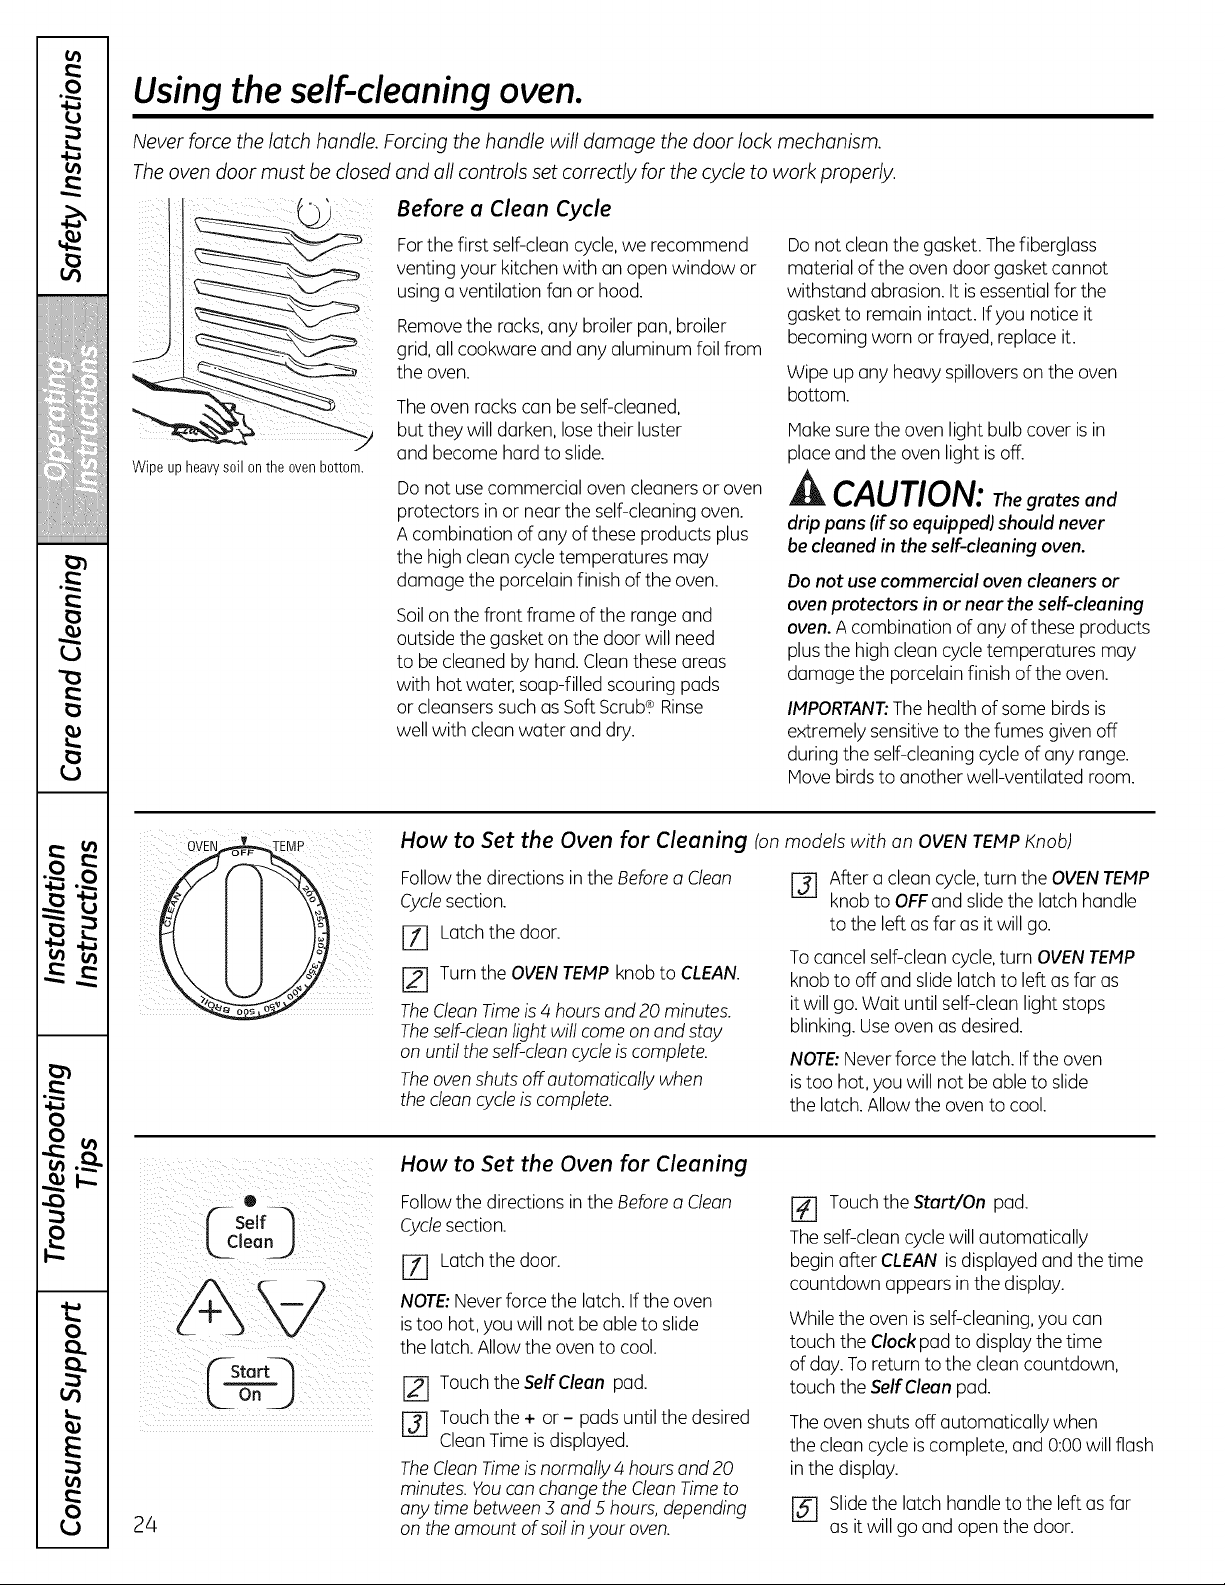
Usingthe self-cleaning oven.
Never force the latch handle. Forcing the handle will damage the door lock mechanism.
Theoven door must be closed and oil controls set correctly for the cycle to work properly.
' Before a Clean Cycle
Wipeup heavysoil onthe ovenbottom.
For thefirst self-cleancycle,we recommend
venting your kitchenwith an open window or
usinga ventilation fanor hood.
Remove theracks,any broiler pan,broiler
grid, all cookware and anyaluminum foil from
theoven.
The ovenracks can be self-cleaned,
butthey willdarken, lose theirluster
and become hard to slide.
Donotuse commercial ovencleaners or oven
protectors in or near theself-cleaningoven.
A combination ofanyofthese products plus
thehigh cleancycle temperatures may
damage theporcelainfinish oftheoven.
Soilon thefront frame ofthe range and
outside the gasket on thedoor willneed
to be cleanedbyhand. Clean these areas
with hotwater, soap-filled scouring pads
or cleansers such asSoft Scrub.¢ Rinse
wellwith cleanwater and dry.
Do notcleanthegasket. The fiberglass
material ofthe ovendoor gasketcannot
withstand abrasion. It is essential for the
gaskettoremain intact. Ifyou notice it
becoming worn or frayed,replaceit.
Wipeup anyheavy spillovers on the oven
bottom.
Hake sure the ovenlightbulb cover isin
placeand the ovenlight isoff.
ik CAUTION: Thegrates and
drip pans (ifsoequipped) should never
be cleaned in theself-cleaning oven.
Donot usecommercial ovencleaners or
ovenprotectors in or near theself-cleaning
oven. A combination ofanyofthese products
plus the high cleancycle temperatures may
damage theporcelainfinish oftheoven.
IMPORTANT:Thehealthofsome birdsis
extremely sensitive tothefumes given off
during theself-cleaningcycle of anyrange.
Hove birds to another well-ventilated room.
How to Set the Oven for Cleaning (on models with on OVEN TEMP Knob)
Followthe directionsin theBefore a Cleon
Cyclesection.
JT] Latch thedoor.
TurntheOVENTEMP knobto CLEAN.
TheCleon Time is 4 hoursand 20 minutes.
Theself-clean lightwillcome on and stay
on untiltheself-cleancycle is complete.
Theoven shutsoff automatically when
thecleon cycleiscomplete.
[-31 After a cleancycle, turn theOVENTEMP
knobto OFFand slide the latch handle
to theleft as farasitwillgo.
To cancel self-clean cycle, turn OVENTEMP
knob to off and slidelatch to left as far as
it willgo. Wait untilself-cleanlightstops
blinking. Useoven asdesired.
NOTE:Never force the latch.If theoven
istoo hot, youwillnot be able toslide
the latch. Allow the oventocool.
0 _
( solfq
CStart_
24
How to Set the Oven for Cleaning
Followthe directionsin theBefore a Cleon
Cyclesection.
[71 Latch thedoor.
NOTE:Neverforce the latch. If theoven
is too hot, youwillnot be able to slide
the latch. Allowtheovento cool.
Touch theSelfClean pad.
r-_ Touch the + or - padsuntilthedesired
CleanTime is displayed.
TheClean Time is normally 4 hours and 20
minutes. Youcanchange theClean Time to
any time between ._and 5 hours, depending
on theamount ofsoil in your oven.
Touch theStart/On pad.
The self-cleancycle willautomatically
begin after CLEAN is displayed and thetime
countdown appearsin the display.
Whiletheovenis self-cleaning,youcan
touch the Clock pad todisplay thetime
ofday. To return tothecleancountdown,
touch the Self Cleanpad.
The ovenshutsoff automatically when
thecleancycleis complete, and 0:00 willflash
inthe display.
[5-7 Slidethe latch handle tothe left asfar
asitwillgo and open thedoor.
GEAppliances.com
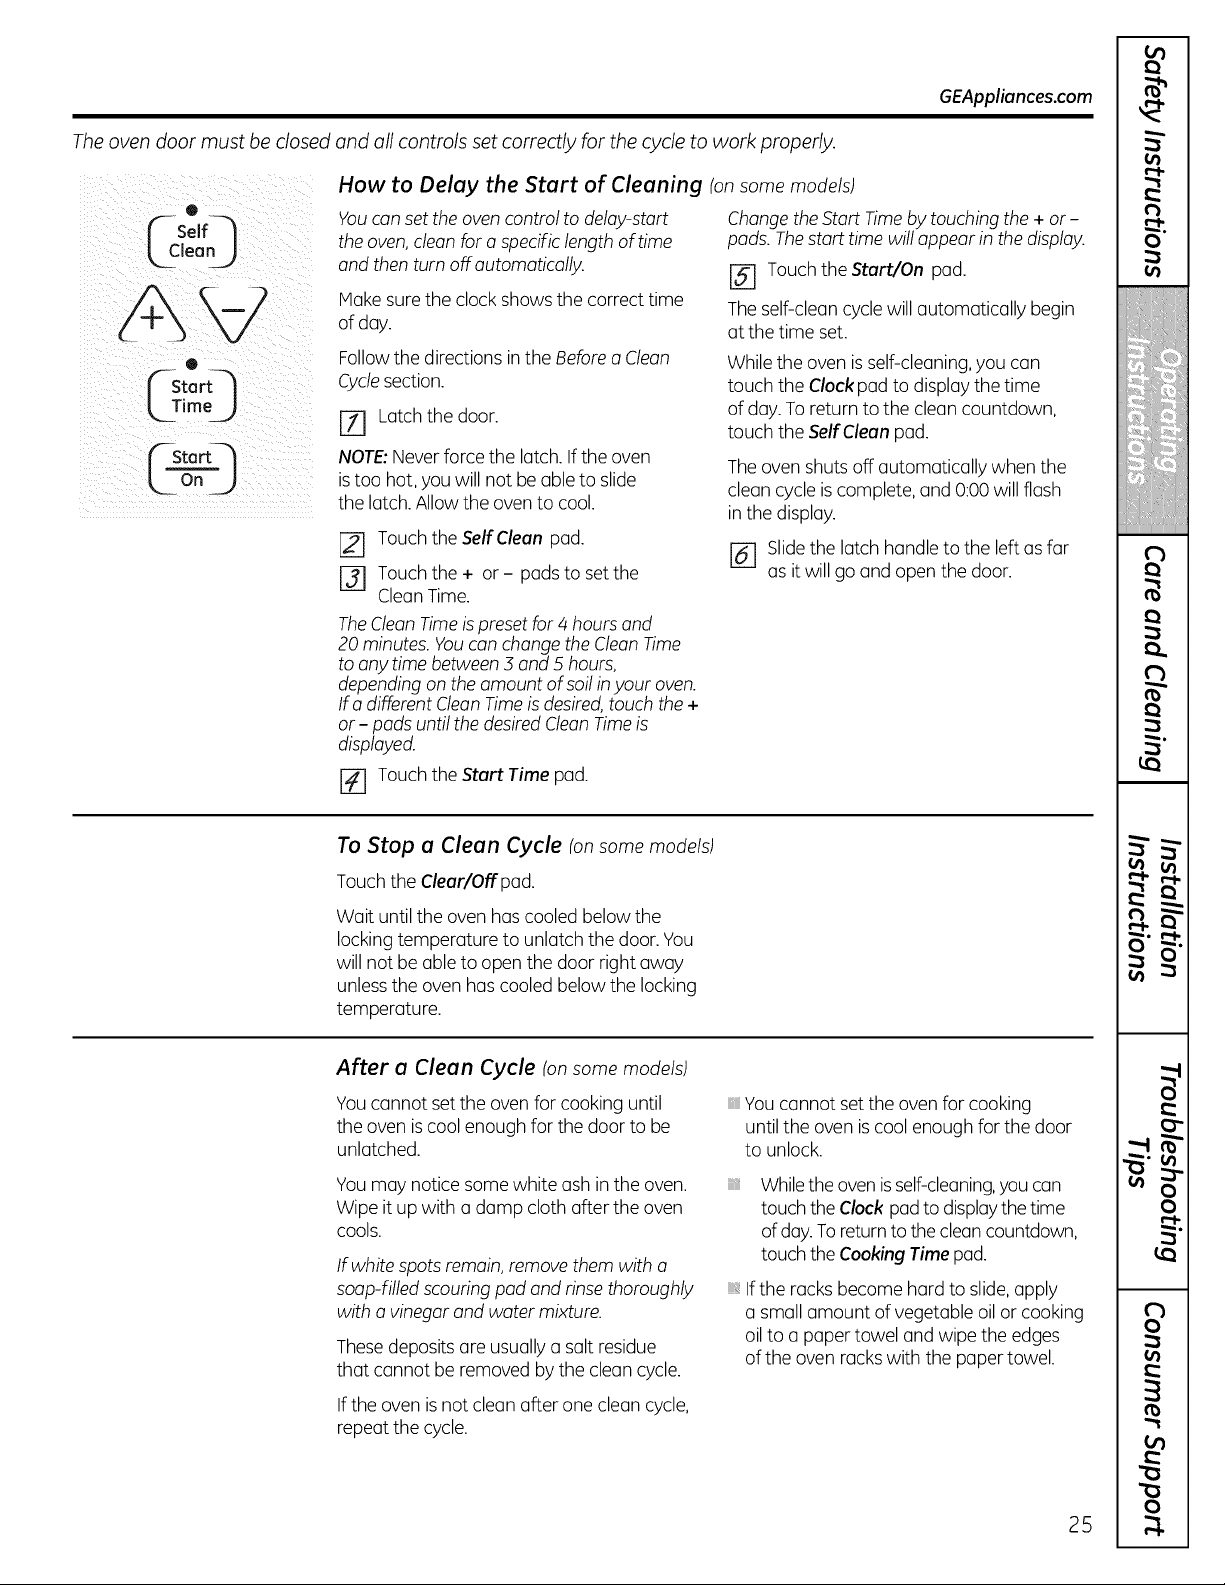
The oven door must be closed and all controls set correctly for the cycle to work properly.
(-- Se°lf---,
Lcleo
k TimeJ
¢-sto
kooj
How to Delay the Start of Cleaning (on some models)
You can set the oven control to delay-start
the oven, clean for aspecific length oftime
and then turn off automatically.
Make sure the clock showsthecorrect time
ofday.
Change the Start Time by touching the + or-
pads. The start time willappear inthe display.
[] Touch the Start/On pad.
The self-cleancycle willautomatically begin
atthe time set.
Followthe directionsin theBefore a Clean
Cyclesection.
E_ Latch thedoor.
NOTE:Neverforce the latch. If theoven
is too hot, youwillnot be able to slide
the latch. Allowtheovento cool.
[] Touch the Self Clean pad.
[_ Touch the + or- pads to set the
Clean Time.
Whiletheovenis self-cleaning,youcan
touch the Clock pad todisplay thetime
ofday. To return tothecleancountdown,
touch the Self Cleanpad.
The ovenshutsoff automatically whenthe
cleancycleis complete, and 0:00 willflash
inthe display.
[_ Slide the latch handle tothe left as far
asitwillgo and open thedoor.
TheClean Time is preset for4 hours and
20 minutes. You can change the Clean Time
to any time between 3 and 5 hours,
depending on the amount ofsoil inyour oven.
Ira different Clean Time isdesired, touch the +
or - pads until the desired Clean Time is
displayed.
r_ Touch theStart Time pad.
To Stop a Clean Cycle (on some models)
Touch theClear/Offpad.
Wait untiltheovenhascooledbelowthe
locking temperature to unlatch thedoor. You
willnotbe able toopen thedoor rightaway
unlessthe ovenhas cooledbelowthe locking
temperature.
After a Clean Cycle Ionsome models)
Youcannot set the oven for cooking until
theovenis coolenough forthe door to be
unlatched.
Youmay notice some white ashin the oven.
Wipeitup with a damp cloth after theoven
cools.
If white spots remain, remove them with a
soap-filled scouring pad and rinse thoroughly
with a vinegar and water mixture.
Thesedeposits are usually a salt residue
that cannot be removed bythecleancycle.
If theovenisnotcleanafter one cleancycle,
repeatthecycle.
Youcannot set the oven for cooking
untilthe ovenis coolenough forthe door
to unlock.
iiiiiii_,
Whiletheovenisself-cleaning,youcan
touch theClock pad todisplaythe time
ofday.To returnto the clean countdown,
touch theCooking Time pad.
iii,If the racks become hard toslide, apply
a small amount ofvegetable oil or cooking
oil to a paper towel and wipe theedges
oftheoven racks with the paper towel.
25
m
€
i
€
!
I
!
€
€
]i
i: i
m
€
O'
"-t
€
I
I
"1
"1
€
f
Care and cleaning of the range.
Be sure electrical power is off and all surfaces are cool before cleaning any part of the range.
A WARNING: _fyourrangeisremovedforcleaning,se_icingoranyreason,be sure the anti-tip device isreengaged properly when the range isreplaced. Failure
to take this precaution could result in tipping ofthe range and cause injury.
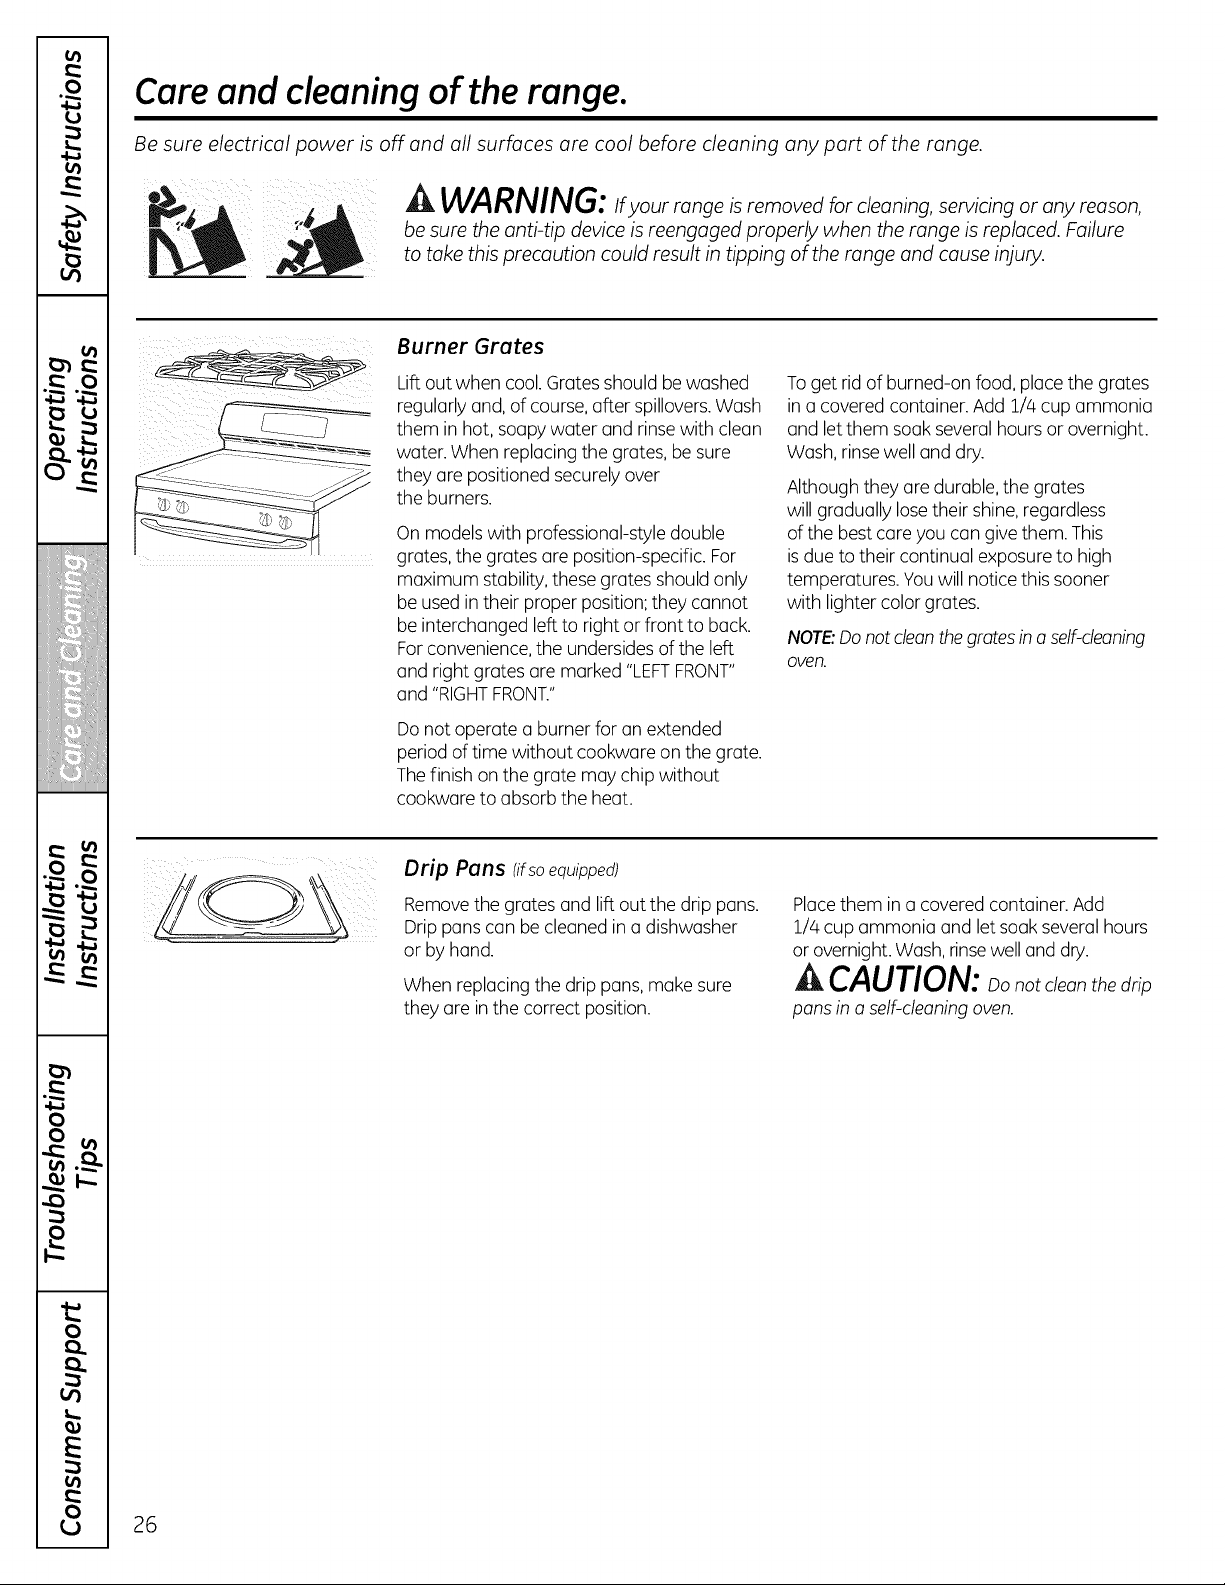
Burner Grates
Lift outwhen cool. Gratesshould bewashed
regularlyand,ofcourse, after spillovers.Wash
them in hot, soapy water and rinse with clean
water.When replacing the grates,be sure
they are positioned securely over
theburners.
On models with professional-style double
grates, the grates are position-specific.For
maximum stability,these grates should only
be usedin their proper position; they cannot
be interchanged left to rightor front to back.
For convenience,the undersides oftheleft
and rightgrates are marked "LEFTFRONT"
and "RIGHTFRONT."
Donotoperate a burner foran extended
period of time without cookware on thegrate.
The finish on thegrate may chipwithout
cookwareto absorbtheheat.
To getrid of burned-on food, place thegrates
in a covered container.Add 1/4cupammonia
and let them soak several hoursor overnight.
Wash, rinse welland dry.
Althoughthey are durable,thegrates
willgradually losetheir shine, regardless
ofthe best care youcan give them.This
is due totheircontinual exposure to high
temperatures.Youwill notice this sooner
with lightercolorgrates.
NOTE:Do not clean the grates ina self-cleaning
oven.
Drip Pons (ifsoequipped)
Removethe grates and lift outthe drip pans.
Drippans can be cleanedin a dishwasher
or byhand.
When replacingthedrip pans, make sure
they are in thecorrect position.
Placethem in a covered container.Add
1/4cup ammonia and let soak several hours
or overnight. Wash, rinsewelland dry.
/A
CAUTION: oonotcleanthe_ri_
pans in a self-cleaning oven.
26
GEAppliances.com
Standard Twin Burner Assemblies (onsome models)
Grate
D[iPpan(ifsoequipped) :
Surfaceburner
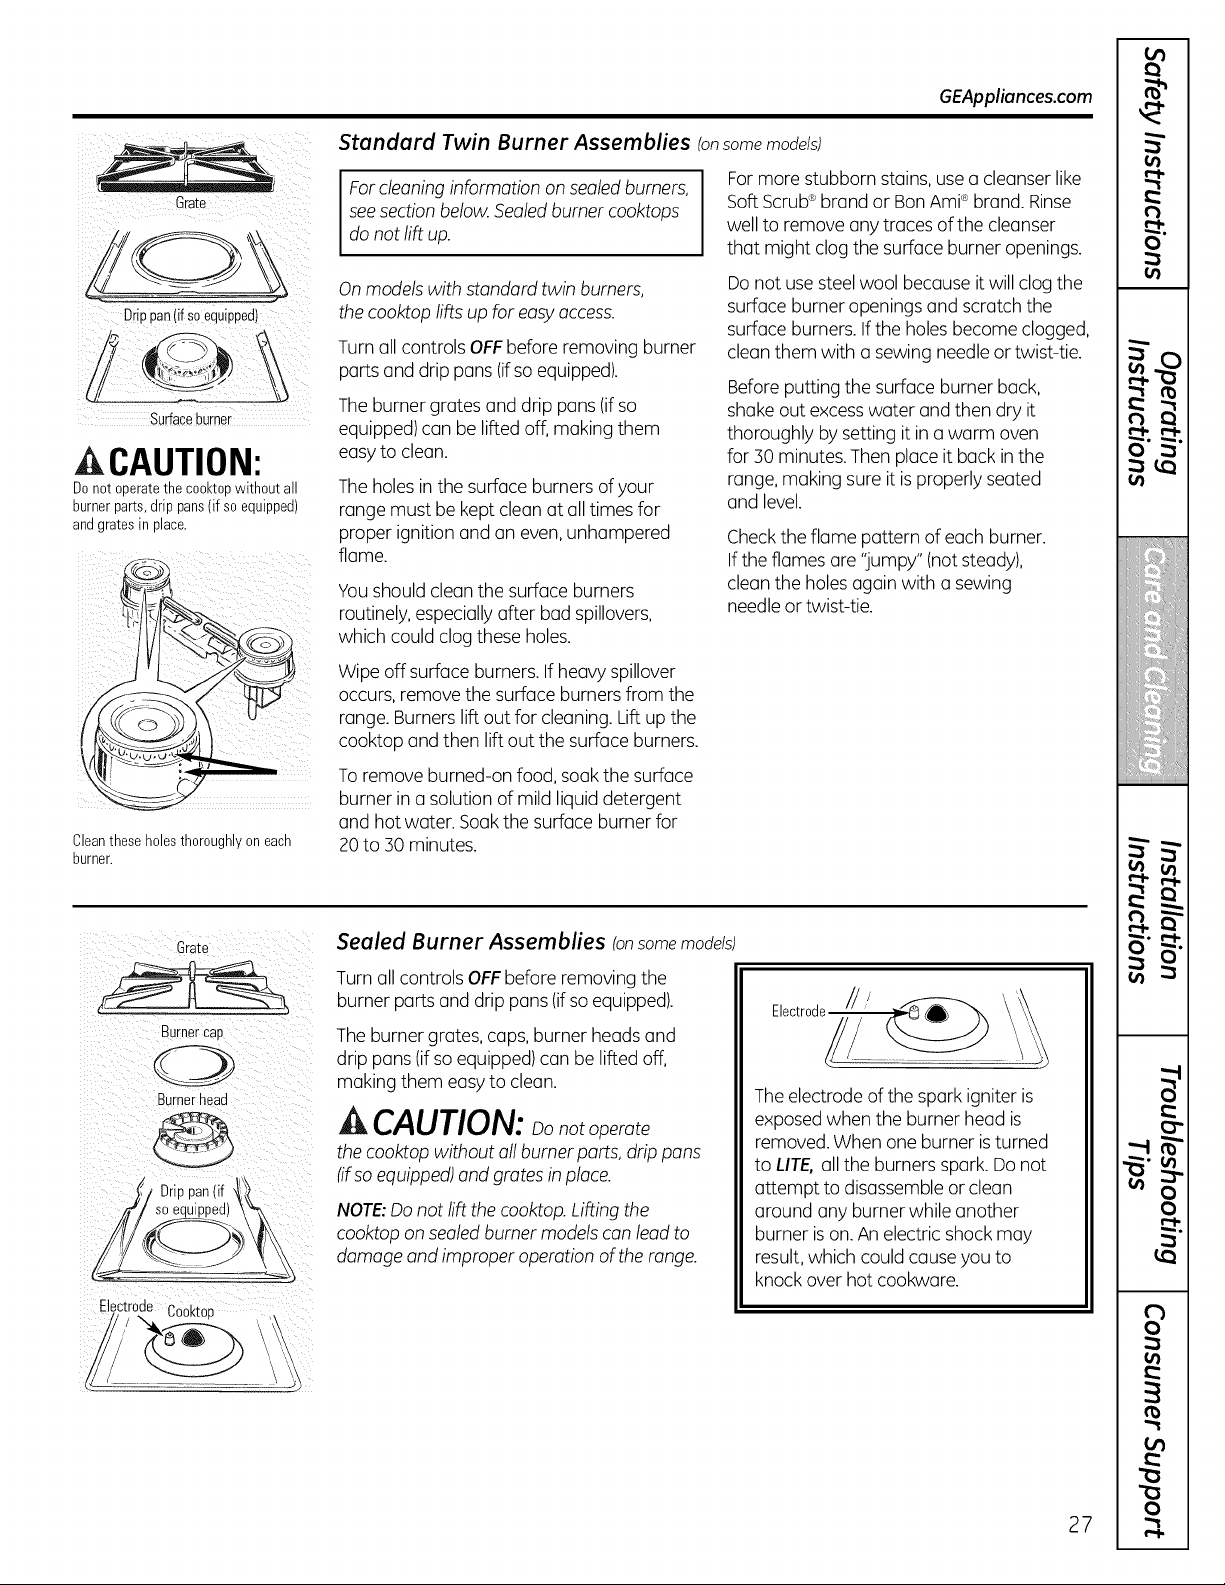
CAUTION:
Donot operatethe cooktopwithoutall
burnerparts,drip pans(if soequipped)
andgrates in place.
Cleantheseholes thoroughlyon each
burner.
For cleaning information on sealed burners,
see section below.Sealed burner cooktops
do not liftup.
Onmodels with standard twin burners,
the cooktop lifts up foreasy access.
Turnall controlsOFFbeforeremoving burner
parts and drip pans (if so equipped).
The burner grates and drip pans(if so
equipped)can be lifted off, making them
easy toclean.
The holes in the surfaceburnersof your
range mustbe kept cleanatall timesfor
proper ignitionand an even,unhampered
flame.
Youshouldclean the surfaceburners
routinely, especially after bad spillovers,
which couldclogthese holes.
Wipeoff surface burners. If heavy spillover
occurs, remove thesurface burners from the
range.Burners lift out forcleaning. Lift up the
cooktop and then lift out thesurfaceburners.
To remove burned-on food, soak thesurface
burner in a solution ofmild liquid detergent
and hotwater.Soak thesurface burner for
20 to :SOminutes.
Formore stubborn stains, use a cleanser like
Soft Scrub®brand or BanAmPbrand.Rinse
welltoremove anytracesofthecleanser
that might clogthesurfaceburner openings.
Do notuse steel wool because itwillclogthe
surfaceburner openingsand scratch the
surfaceburners. If theholesbecome clogged,
cleanthem with a sewing needleor twist-tie.
Before putting thesurfaceburner back,
shake outexcesswater and thendry it
thoroughly by setting itin a warm oven
for30 minutes. Thenplaceitback in the
range,making sureitis properlyseated
and level.
Check theflame pattern ofeachburner.
Iftheflamesare "jumpy"(not steady),
cleantheholesagain with a sewing
needle or twist-tie.
Grate
Burnercab
Burnerhead
Drin nan lif
Sealed Burner Assemblies (onsome models
Turn all controls OFFbeforeremoving the
burner parts and drip pans(ifsoequipped).
The burner grates, caps, burner headsand
drip pans(ifsoequipped) canbe lifted off,
making them easy to clean.
A CAUTION: oonotoperate
thecooktopwithout all burner parts,drip pans
(ifsoequipped) and grates in place.
NOTE:Donot liftthe cooktop. Lifting the
cooktop on sealed burner models can leadto
damage and improper operation of the range.
Electrode ///
The electrode ofthespark igniteris
exposed whenthe burner head is
removed. When one burner is turned
toLITE, all the burnersspark. Donot
attempt to disassemble or clean
around any burner whileanother
burner is on. An electricshockmay
result, which couldcause youto
knockoverhotcookware.
27
Care and cleaning of the range.
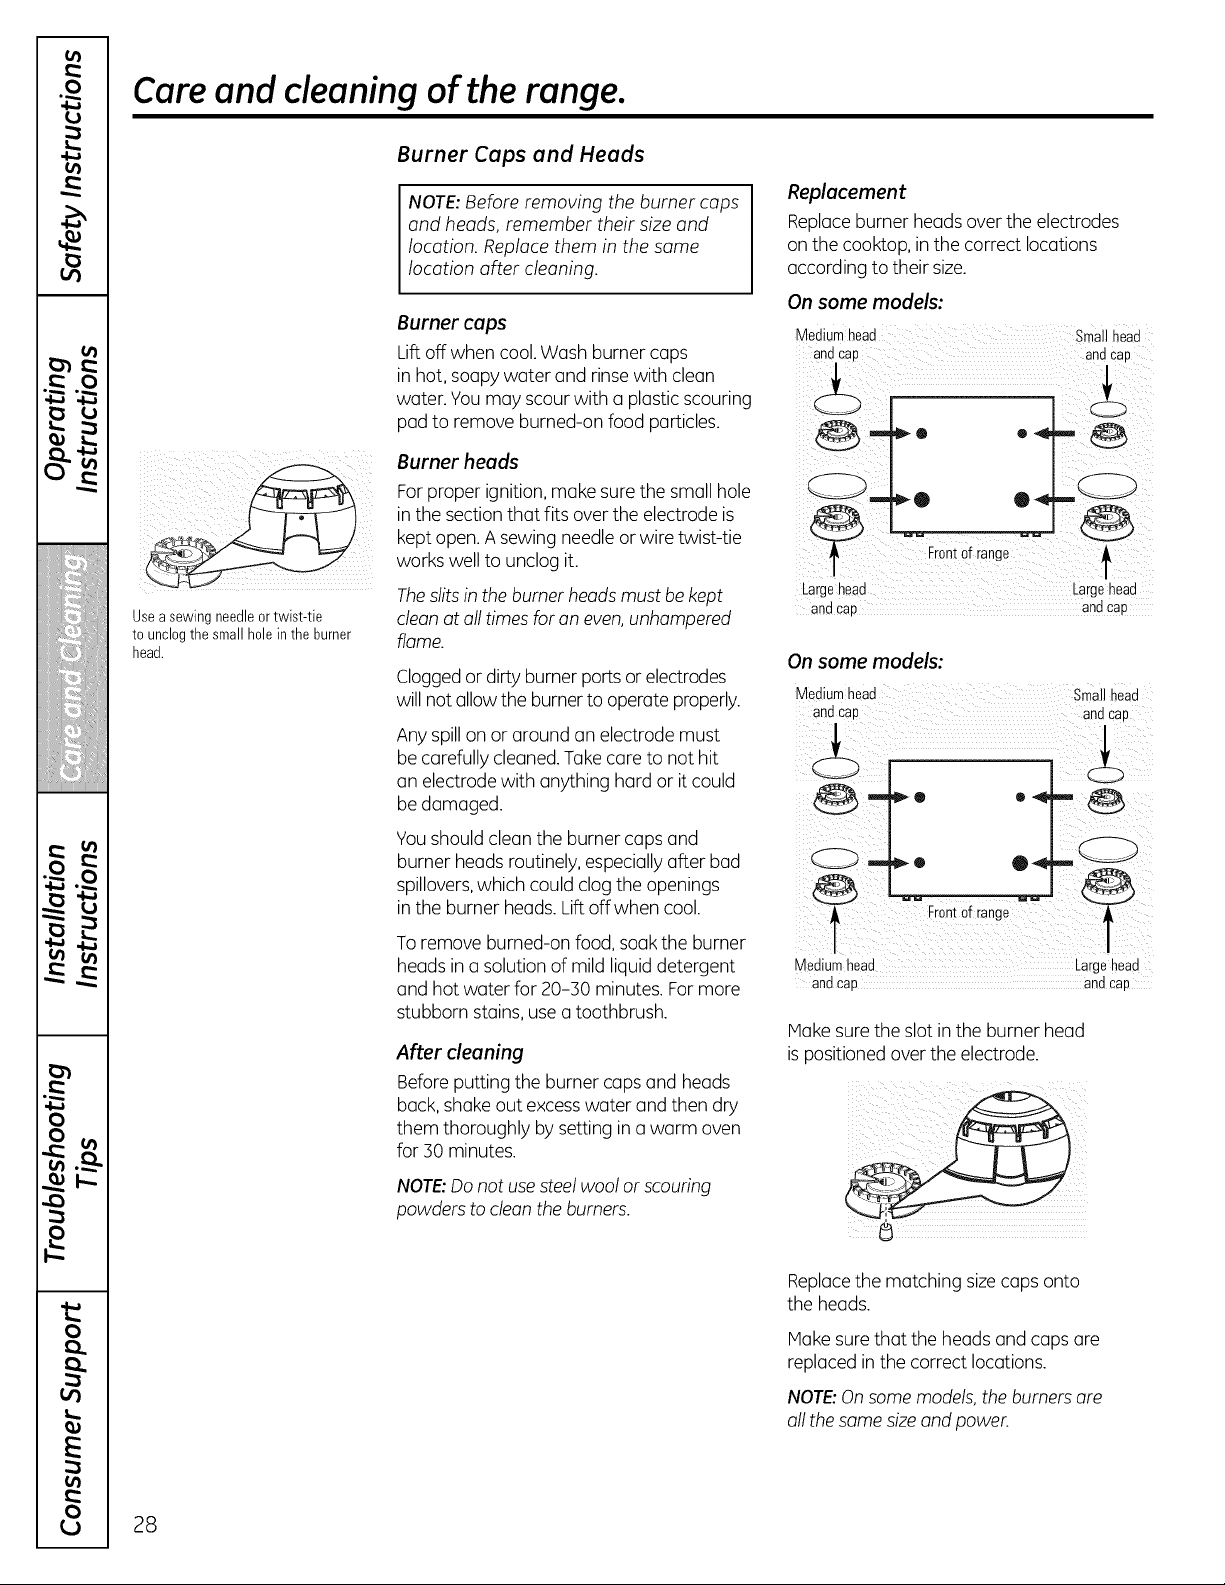
Usea sewing needleortwist-tie
tounclogthe small holein the burner
head.
Burner Caps and Heads
NOTE:Before removing theburner caps
and heads, remember their size and
location. Replace them in thesame
location after cleaning.
Burnercaps
Lift off whencool. Wash burner caps
in hot, soapy water and rinse with clean
water.Youmay scour with a plastic scouring
pad to remove burned-on food particles.
Burner heads
For proper ignition, make sure the small hole
in thesectionthat fits overtheelectrode is
kept open.A sewing needle or wiretwist-tie
workswelltounclog it.
Theslits in the burner heads mustbe kept
clean atall timesforan even,unhampered
flame.
Cloggedor dirty burner ports or electrodes
willnotallow theburner tooperateproperly.
Any spillon or around an electrode must
be carefullycleaned. Takecaretonot hit
an electrode with anything hard or it could
be damaged.
Youshouldcleantheburner caps and
burner headsroutinely, especially after bad
spillovers,which could clog the openings
in the burner heads. Lift offwhen cool.
To remove burned-on food, soak the burner
headsin a solution ofmild liquid detergent
and hotwater for20-30 minutes. For more
stubborn stains, use a toothbrush.
After cleaning
Beforeputting theburner caps and heads
back,shakeout excesswater and then dry
them thoroughly bysettingin a warm oven
for30 minutes.
NOTE:Do not usesteel woolor scouring
powders to clean theburners.
Replacement
Replaceburner headsover the electrodes
on the cooktop, in thecorrect locations
according totheir size.
On some models:
Smn__1chae;d
Q •
Fron!otrang,
Largehead .......... i_argehead
and cap and cap
On some models:
Mediumhead smal head
and cap andcap
Front0 r e"
i i!il
Medium head Largehead
andcap andcap
Hake sure the slot in the burner head
ispositioned over the electrode.
Replacethematching size caps onto
theheads.
Hake sure that theheadsand caps ore
replacedin the correctlocations.
NOTE:Onsome models, theburners are
all thesame sizeand power.
28
GEAppliances.com
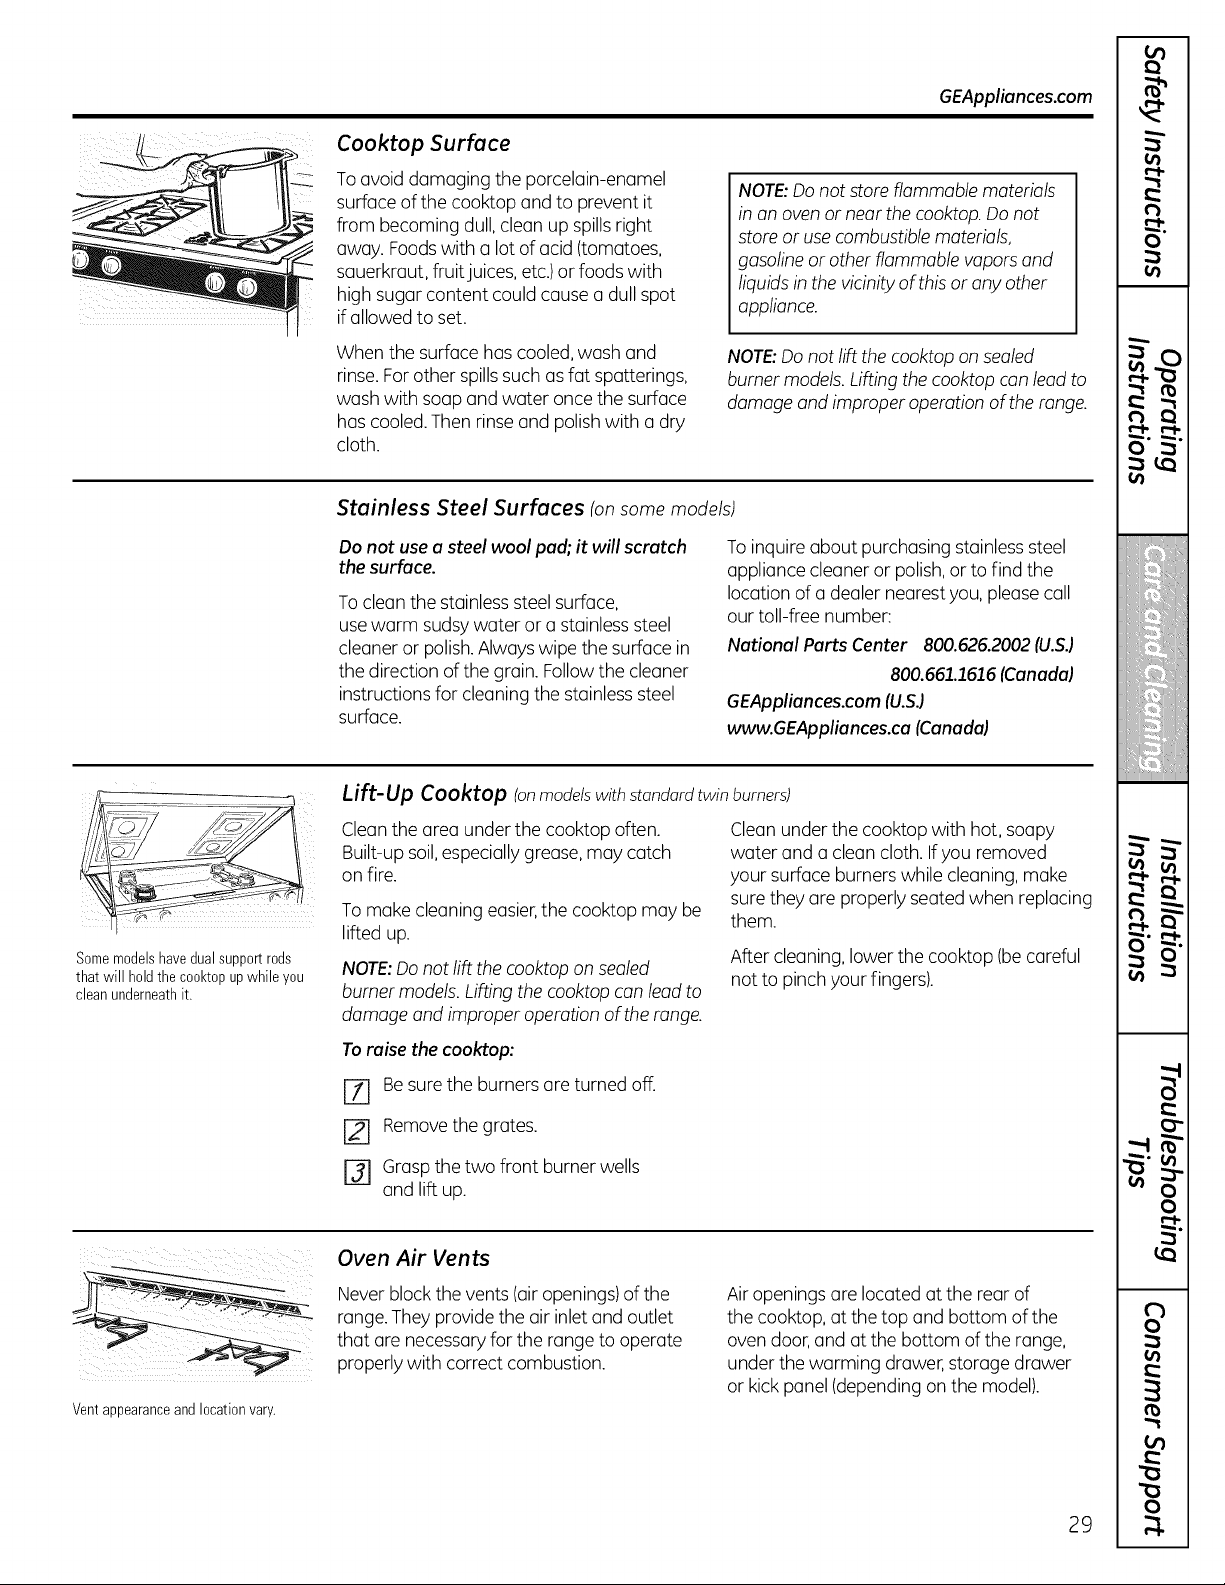
Cooktop Surface
To avoiddamaging the porcelain-enamel
surfaceofthecooktop and to prevent it
from becoming dull, cleanup spills right
away.Foodswith a lotofacid(tomatoes,
sauerkraut, fruit juices, etc.)or foods with
high sugarcontent couldcause a dull spot
ifallowedtoset.
NOTE:Donot store flammable materials
in on oven or near the cooktop. Do not
store oruse combustible materials,
gasoline or other flammable vapors and
liquidsinthe vicinity of this orany other
appliance.
Whenthesurfacehascooled,wash and
rinse. Forother spills such as fat spatterings,
wash with soapand water oncethesurface
hascooled.Thenrinse and polish with a dry
cloth.
NOTE:Donot liftthe cooktop on sealed
burner models. Lifting the cooktop can lead to
damage and improper operation of the range.
Stainless Steel Surfaces (onsome models)
Donot usea steel wool pad; it will scratch
thesurface.
To clean the stainlesssteel surface,
use warm sudsy water or a stainlesssteel
cleaneror polish. Always wipethe surfacein
thedirection ofthegrain.Follow thecleaner
instructionsfor cleaning the stainlesssteel
surface.
To inquire about purchasing stainless steel
appliance cleaner or polish, or to find the
location of a dealer nearest you, please call
our toll-free number:
National Parts Center 800.626.2002 (U.S.)
800.661.1616 (Canada)
GEAppliances.com (U.S.)
www.GEAppliances.ca (Canada)
Lift-Up Cooktop (onmodelswithstandardtwin burners)
on fire.
Cleanthe area under thecooktop often.
Built-upsoil,especially grease,may catch
Somemodelshavedualsupportrods
that will holdthe cooktopup whileyou
cleanunderneathit.
Tomake cleaningeasier,the cooktopmay be
lifted up.
NOTE:Donot liftthe cooktop on sealed
burner models. Lifting the cooktop can lead to
damage and improper operation of the range.
Clean under the cooktopwith hot, soapy
water and a clean cloth.If youremoved
your surfaceburnerswhilecleaning, make
sure they are properlyseated when replacing
them.
After cleaning, lowerthecooktop (becareful
notto pinch your fingers).
To raise the cooktop:
[Z] Be sure the burners are turnedoff.
[] Removethegrates.
r_ Grasp thetwo front burner wells
and lift up.
Vent appearance and location vary.
Oven Air Vents
Neverblock thevents(air openings)ofthe
range. They providetheair inlet and outlet
that are necessary fortherange tooperate
properlywith correctcombustion.
Air openingsare located atthe rear of
thecooktop, atthetop and bottom ofthe
ovendoor, and atthebottom oftherange,
under thewarming drawer, storage drawer
or kick panel (dependingon the model).
29
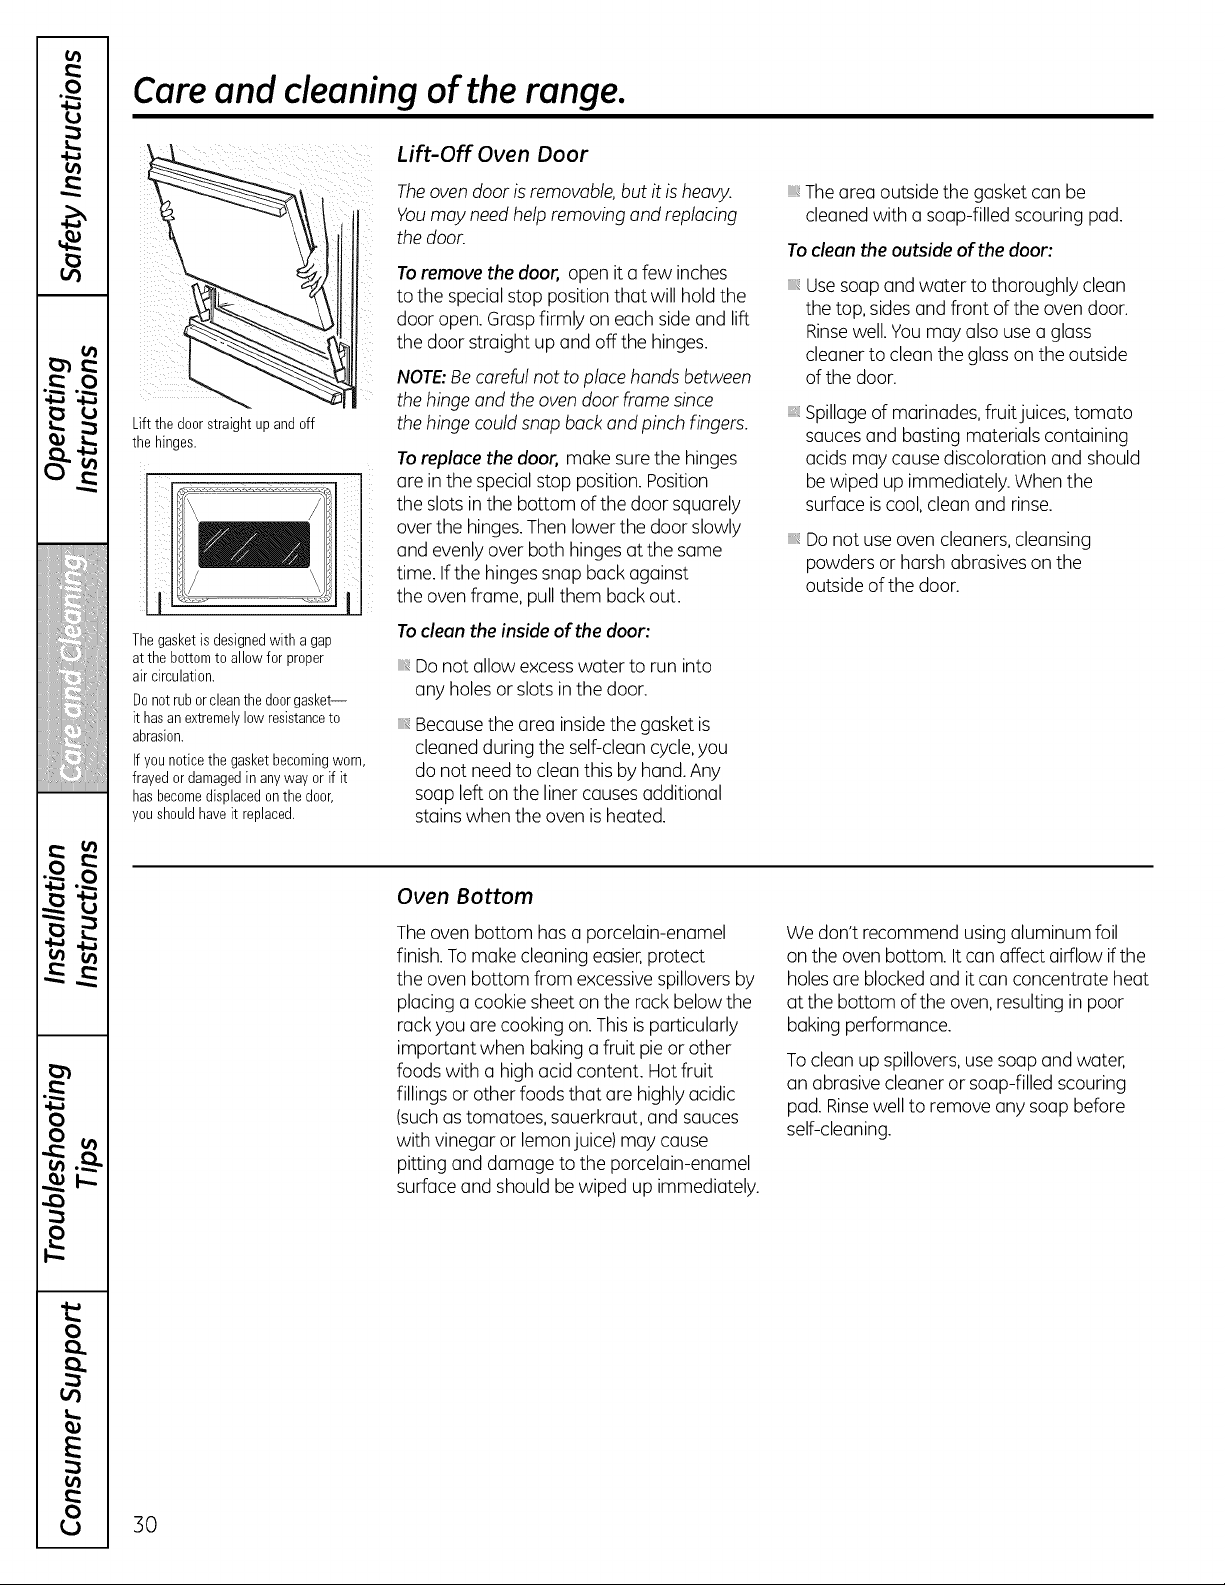
Care and cleaning of the range.
Lift the door straightup and off
the hinges.
Thegasket isdesignedwith agap
at the bottomto allowfor proper
air circulation.
Donotruborcleanthe doorgasket--
it hasanextremelylow resistanceto
abrasion.
Ifyounoticethe gasketbecomingworn,
frayedordamagedin anyway orif it
hasbecomedisplacedon the door,
youshouldhaveit replaced.
Lift-Off Oven Door
The oven door is removable, butitis heavy.
Youmay need help removing and replacing
thedoor.
To remove the door, open ita few inches
tothe specialstop position that willhold the
door open. Grasp firmly on eachside and lift
thedoor straight up and off thehinges.
NOTE:Becareful nottoplacehandsbetween
thehinge and theoven door frame since
thehinge could snapback and pinchfingers.
To replace thedoor, make sure the hinges
1 are inthe special stop position. Position
theslotsin thebottom ofthedoor squarely
over the hinges.Then lowerthe door slowly
and evenly overbothhingesatthesame
time.If thehinges snap back against
theovenframe,pull them back out.
To clean the inside of the door:
Do notallowexcesswater to run into
anyholesor slotsin thedoor.
Becausethe area insidethe gasketis
cleanedduring theself-cleancycle,you
do notneed to clean this byhand. Any
soupleft on theliner causes additional
stainswhentheovenisheated.
iii,The area outside thegasketcanbe
cleanedwith a soap-filled scouring pad.
To clean the outside of the door:
iii, Usesoap and water tothoroughly clean
thetop, sides and front oftheovendoor.
Rinsewell.You may alsouse a glass
cleanertocleantheglass on the outside
ofthedoor.
iii,Spillage ofmarinades,fruit juices, tomato
sauces and busting materials containing
acids may cause discoloration and should
be wiped up immediately.Whenthe
surfaceis cool, cleanand rinse.
iii_Do notuseoven cleaners, cleansing
powders or harshabrasives on the
outside ofthe door.
Oven Bottom
The ovenbottom has a porcelain-enamel
finish. To make cleaningeasier,protect
theovenbottom from excessivespillovers by
placinga cookie sheet on the rack belowthe
rack youare cooking on. Thisis particularly
important when bakinga fruit pie or other
foods with a high acidcontent. Hot fruit
fillings or otherfoods that are highlyacidic
(suchastomatoes,sauerkraut, and sauces
with vinegaror lemon juice)may cause
pitting and damage tothe porcelain-enamel
surfaceand shouldbe wiped up immediately.
We don't recommendusingaluminumfoil
on theovenbottom. It canaffect airflow if the
holes are blocked and itcanconcentrate heat
atthebottom of theoven, resulting in poor
bakingperformance.
To cleanup spillovers,use soapand water,
an abrasive cleaneror soap-filled scouring
pad.Rinsewelltoremove anysoapbefore
self-cleaning.
30
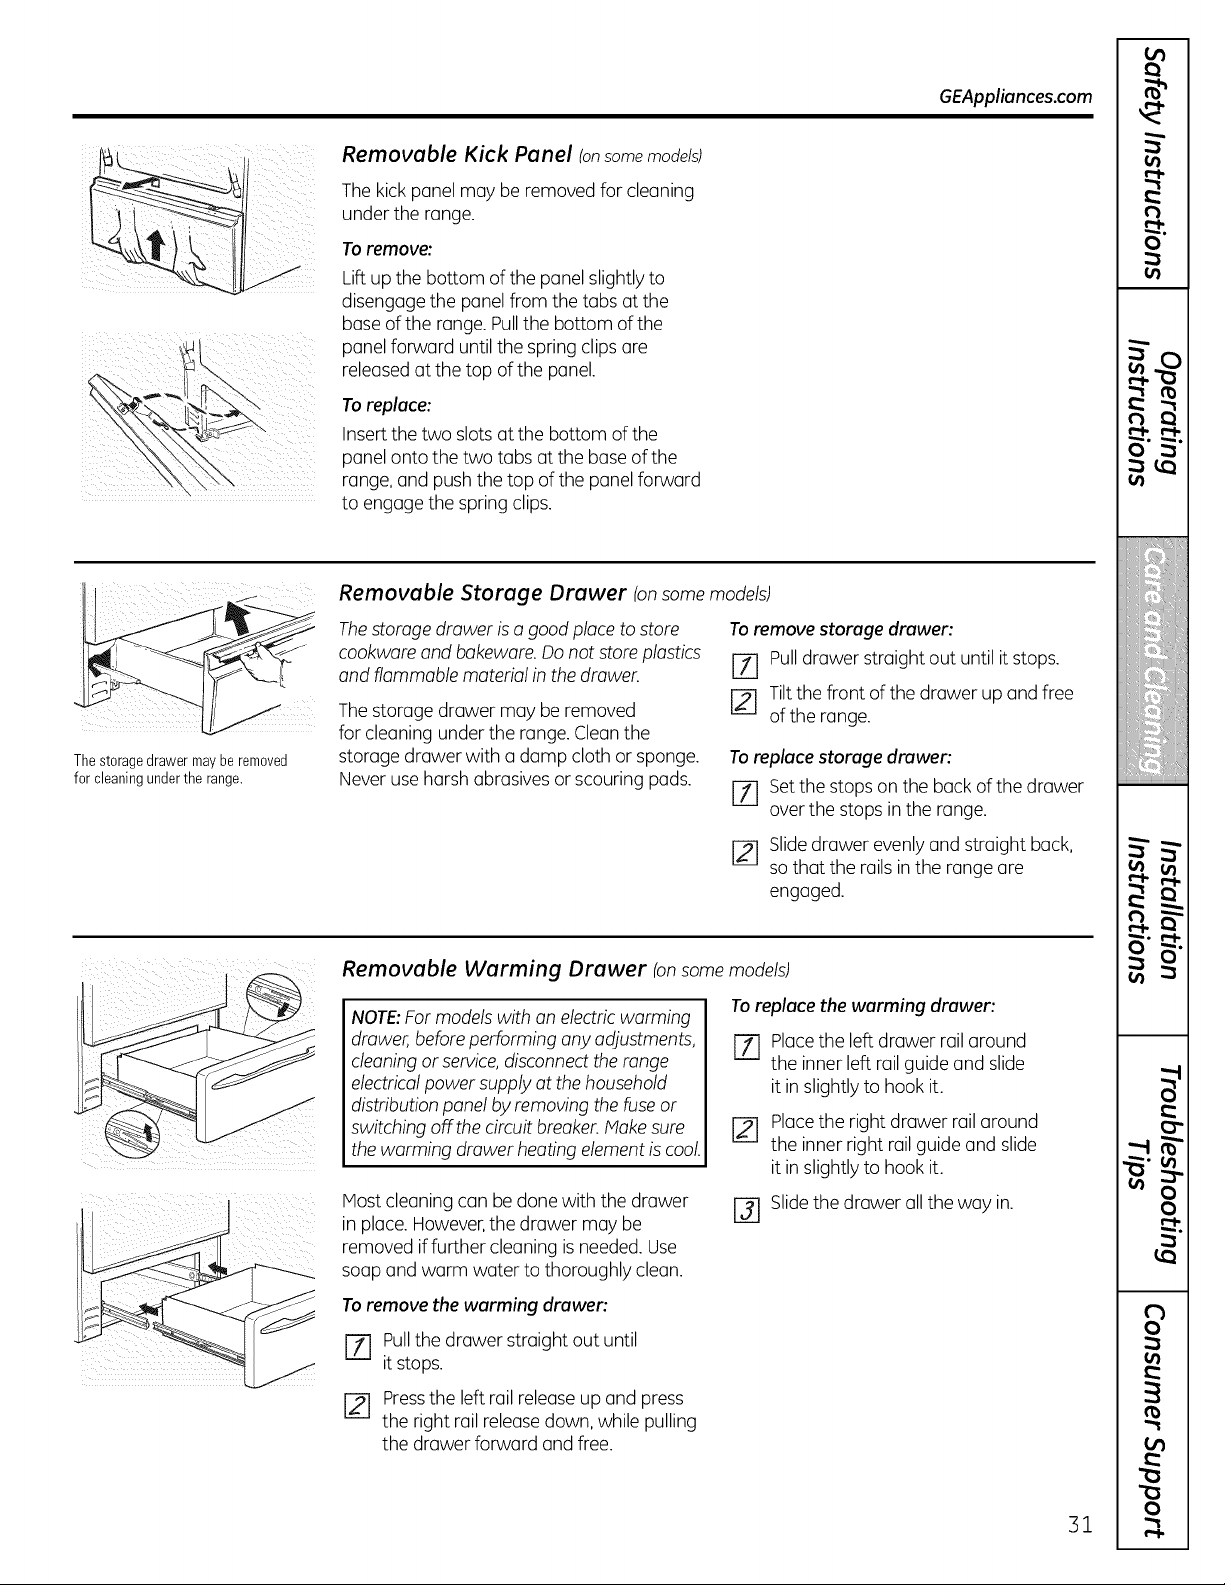
GEAppliances.com
Removable Kick Panel (onsome models)
Thekick panel may be removed forcleaning
under the range.
Toremove:
Liftup the bottom of the panel slightly to
disengage the panel from the tabs at the
base of the range. Pullthe bottom of the
panel forward until the spring clips are
released at the top of the panel.
Toreplace:
Insert the two slots at the bottom of the
panel onto the two tabs at the base of the
range, and push the top ofthe panel forward
to engage the spring clips.
Thestoragedrawermaybe removed
for cleaningunderthe range.
Removable Storage Drawer Ion some models)
Thestorage drawer is a good place tostore
cookwareand bakeware.Donotstoreplastics
and flammable material in thedrawer.
The storage drawer may be removed
forcleaning under therange.Cleanthe
storage drawerwith a damp cloth or sponge.
Never use harshabrasivesor scouring pads.
To remove storage drawer:
[71 Pulldrawerstraight out untilitstops.
[2--1Tilt the front ofthedrawer up and free
ofthe range.
Toreplace storage drawer:
[-71 Set the stops on the back of the drawer
over the stops inthe range.
[] Slidedrawer evenly and straight back,
sothat the rails in the range are
engaged.
Removable Warming Drawer Ionsome models)
Toreplace the warming drawer:
NOTE:For models with an electric warming
drawer, before performing anyadjustments,
cleaning or service,disconnect therange
electrical powersupply atthehousehold
distributionpanel by removing thefuse or
switching off the circuitbreaker.Make sure
thewarming drawerheatingelement is cool.
IVlostcleaningcan be done with thedrawer
in place. However,thedrawer may be
removed if further cleaningis needed.Use
soap and warm water to thoroughly clean.
%
r21
Placethe left drawer rail around
the inner left rail guide and slide
itin slightlyto hookit.
Placethe rightdrawer rail around
the inner right railguide and slide
itin slightlyto hookit.
r31 Slide thedrawer all theway in.
To remove the warming drawer:
Pullthedrawer straight outuntil
[71 itstops.
[] Pressthe left rail release up and press
theright rail release down, while pulling
thedrawer forward and free.
31
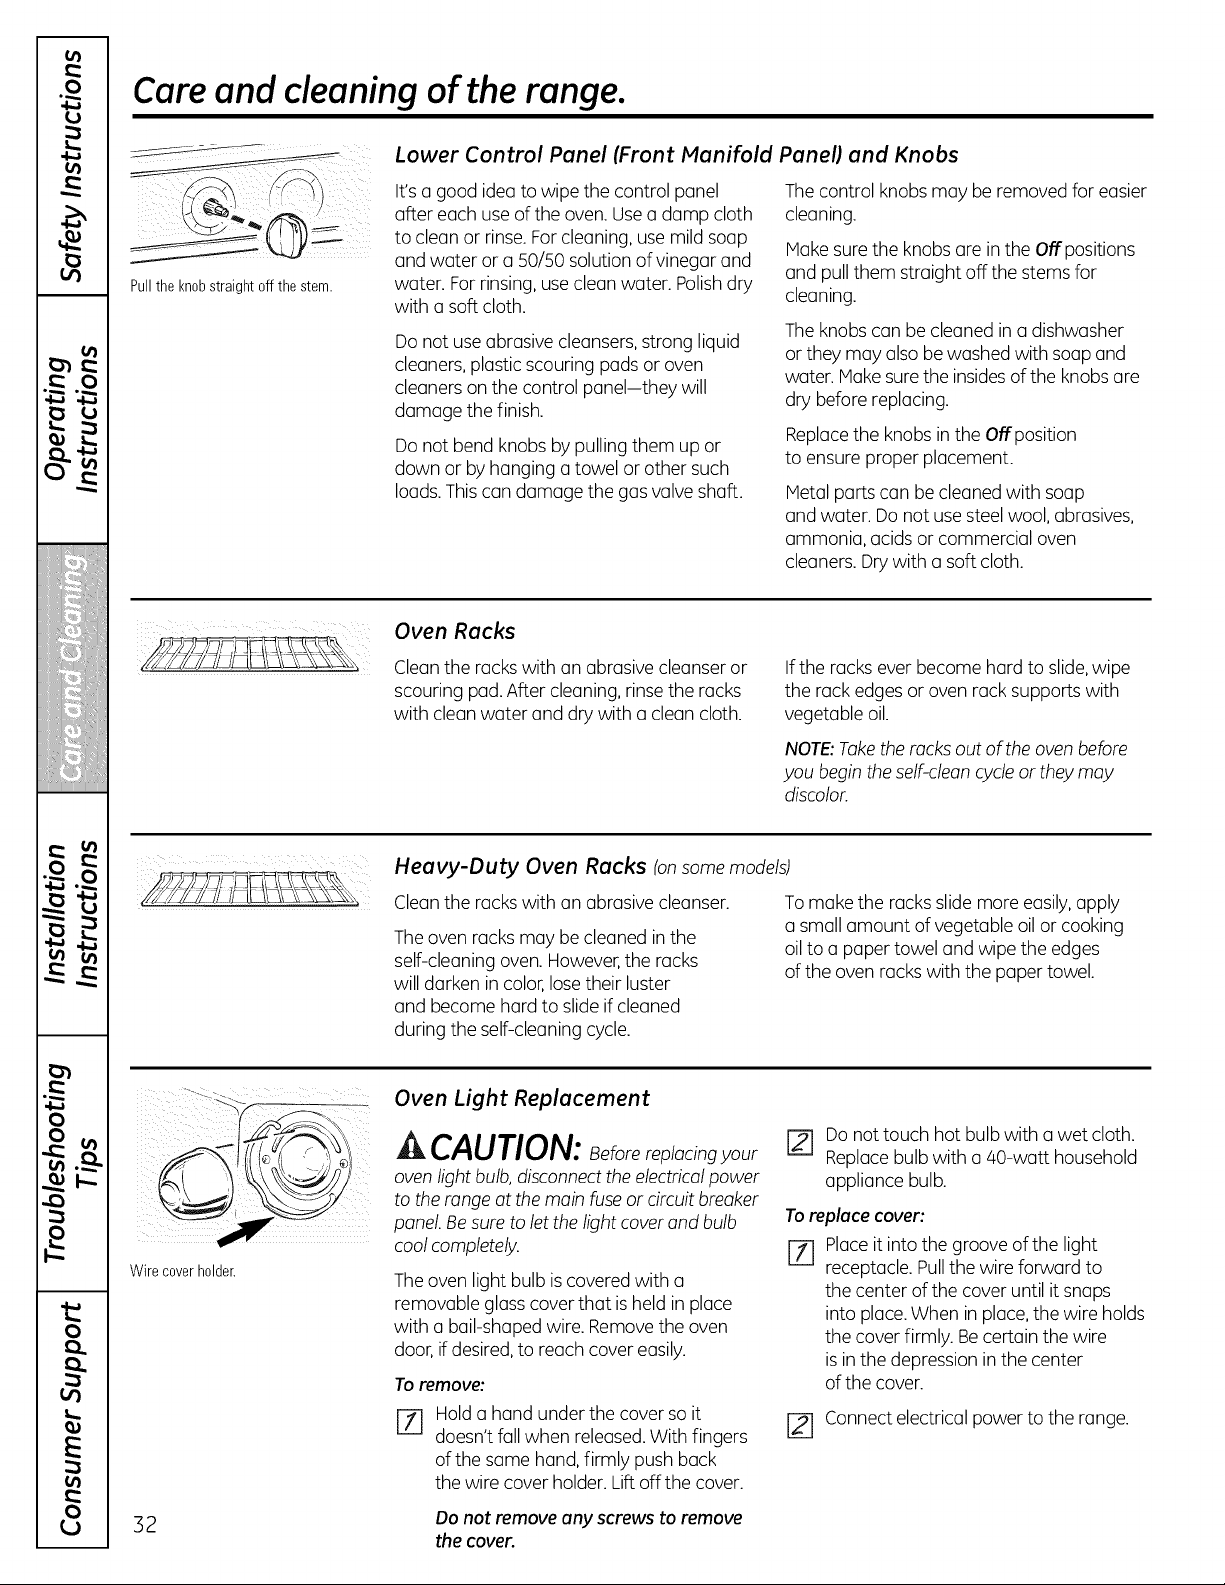
Care and cleaning of the range.
Pullthe knobstraight offthe stem.
Lower Control Panel (Front Manifold Panel) and Knobs
It'sa good idea towipethe control panel
after eachuseoftheoven. Use a damp cloth
tocleanor rinse. For cleaning, usemildsoap
and water or a 50/50solution of vinegar and
water. For rinsing,use cleanwater. Polishdry
with a softcloth.
Do notuse abrasive cleansers,strong liquid
cleaners, plasticscouring pads or oven
cleaners on the control panel-they will
damage thefinish.
Do notbend knobs bypulling them up or
down or byhanging a towel or othersuch
loads.This can damagethe gas valve shaft.
The control knobs may be removed for easier
cleaning.
Hake sure the knobs are in theOffpositions
and pull them straightoff thestems for
cleaning.
The knobs canbe cleanedin a dishwasher
or they may alsobe washed with soap and
water.Hake sure theinsidesofthe knobs are
dry before replacing.
Replacethe knobs in theOffposition
toensureproper placement.
Metal parts can be cleaned with soap
and water. Do notuse steel wool, abrasives,
ammonia, acids or commercial oven
cleaners. Drywith a softcloth.
Oven Racks
Clean theracks with an abrasive cleanser or
scouring pad. After cleaning,rinse the racks
with cleanwater and drywith a cleancloth.
If therackseverbecome hard to slide,wipe
therack edges or ovenrack supportswith
vegetable oil.
NOTE:Taketheracks outoftheovenbefore
you begin the self-clean cycle or they may
discolor.
Heavy-Duty Oven Racks Ion some models)
Clean theracks with an abrasive cleanser.
The ovenracks may be cleaned in the
self-cleaningoven. However,theracks
willdarkenin color,lose their luster
and become hard to slide ifcleaned
during theself-cleaningcycle.
To make the racks slidemoreeasily,apply
a small amount ofvegetable oil or cooking
oil toa paper towel and wipe theedges
oftheovenracks with thepaper towel.
Wire coverholder.
OvenLightReplacement
^ CAUTION: Beforereplacingyour
oven lightbulb, disconnecttheelectrical power
totherange atthemainfuse or circuitbreaker
panel. Besure toletthelightcoverand bulb
cool completely.
The ovenlightbulb is covered with a
removable glass cover that isheld in place
with a bail-shapedwire. Remove theoven
door, if desired,to reachcover easily.
To remove:
Hold a hand under thecover so it
doesn'tfallwhen released.With fingers
ofthesame hand, firmly pushback
thewire cover holder.Liftoff thecover.
r21 Do nottouch hotbulb with a wet cloth.
Replacebulb with a/40-watt household
appliance bulb.
To replace cover:
[Z] Placeitintothegrooveofthe light
receptacle. Pullthewireforward to
thecenter ofthecover untilitsnaps
into place.Whenin place,thewire holds
thecover firmly. Becertain thewire
is in the depression in thecenter
ofthecover.
[] Connectelectricalpowertothe range.
3 2 Do not remove any screws to remove
the cover.
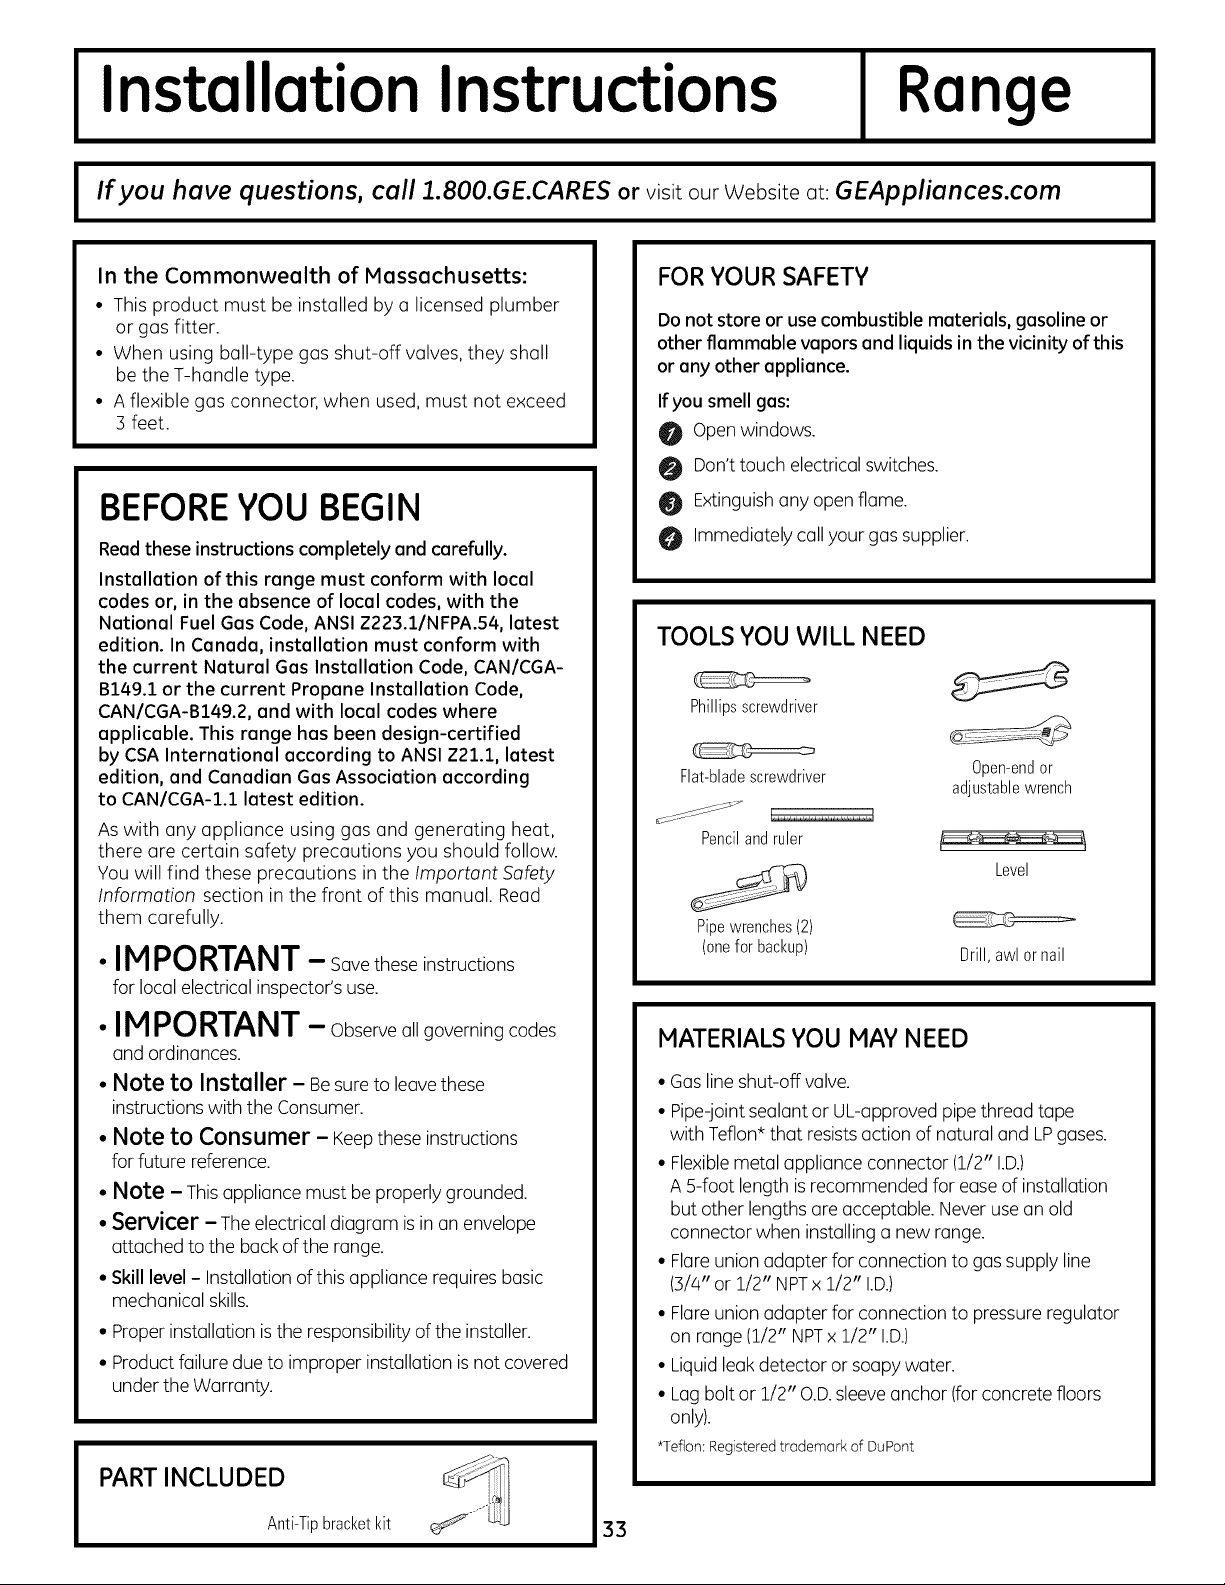
Installation Instructions
Range
I If you have questions, call ].800.GE.CARES or visit our Website at: GEAppliances.com I
In the Commonwealth of Massachusetts:
• This product must be installed by a licensed plumber
or gas fitter.
• When using ball-type gas shut-off valves, they shall
be theT-handle type.
• A flexible gas connector, when used, must not exceed
3 feet.
BEFOREYOU BEGIN
Read these instructions completely and carefully.
Installation of this range must conform with local
codes or, in the absence of local codes, with the
National Fuel Gas Code, ANSI Z223.1/NFPA.54, latest
edition. In Canada, installation must conform with
the current Natural Gas Installation Code, CAN/CGA-
B149.1 or the current Propane Installation Code,
CAN/CGA-B149.2, and with local codes where
applicable. This range has been design-certified
by CSA International according to ANSI Z21.1, latest
edition, and Canadian Gas Association according
to CAN/CGA-I.1 latest edition.
As with any appliance using gas and generating heat,
there are certain safety precautions you should follow.
You will find these precautions in the Important .Safety
Information section in the front of this manual. Read
them carefully.
•IM PORTANT- Savetheseinstructions
for local electricalinspector'suse.
• IMPORTANT- Observeallgoverning codes
and ordinances.
• Note to Installer - Besure to leave these
instructionswith theConsumer.
• Note to Consumer - Keepthese instructions
for future reference.
• Note - Thisappliance mustbe properlygrounded.
• Servicer - The electricaldiagram isin an envelope
attached tothe back ofthe range.
• Skill level- Installation ofthis appliance requiresbasic
mechanicalskills.
• Properinstallation is theresponsibility ofthe installer.
• Product failuredue to improper installationis not covered
under theWarranty.
PART INCLUDED
Anti-Tipbracketkit
33
FOR YOUR SAFETY
Do not store or usecombustible materials, gasoline or
other flammable vapors and liquids in the vicinity of this
or any other appliance.
Ifyou smell gas:
O Open windows.
O Don't touch electrical switches.
Extinguishanyopen flame.
Immediatelycall your gas supplier.
TOOLS YOU WILL NEED
Phillipsscrewdriver
Flat-bladescrewdriver 0pen-endor
adjustablewrench
_S _'_'c_ _.,...,.,..,,.,....,.,.,.,.
Pencilandruler
Level
Pipewrenches(2)
(onefor backup) Drill,awlor nail
MATERIALS YOU MAY NEED
• Gas line shut-off valve.
• Pipe-joint sealant or UL-approved pipe threadtape
with Teflon* that resistsaction of naturaland LP gases.
• Flexiblemetal appliance connector (1/2" I.D.)
A g-foot lengthisrecommended forease ofinstallation
butother lengths are acceptable. Never use an old
connectorwhen installing a new range.
• Flare union adapter for connectionto gas supply line
(3/4"or 1/2" NPTx 1/2" I.D.)
• Flare union adapter for connectionto pressure regulator
on range (1/2" NPTx1/2" I.D.)
• Liquid leak detector or soapy water.
• Lag boltor 1/2" O.D.sleeveanchor (for concrete floors
only).
*Teflon:Registeredtrademark of DuPont
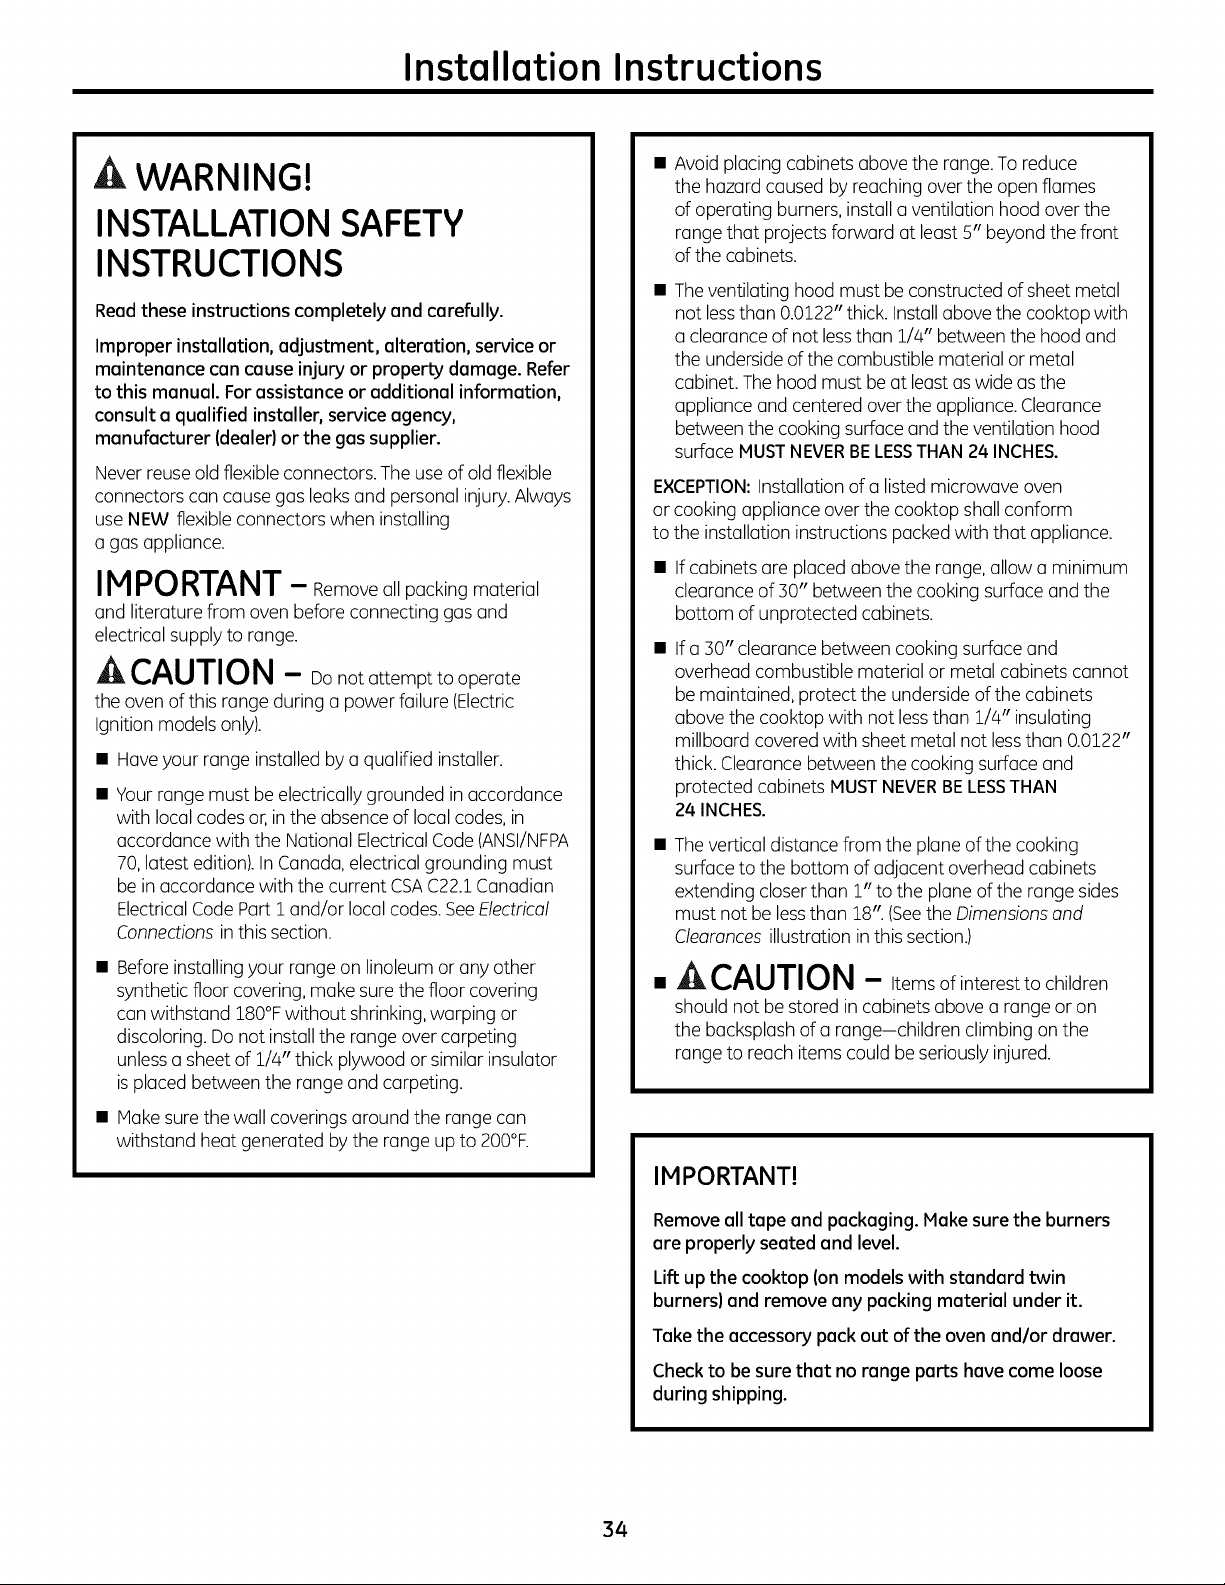
Installation Instructions
A WARNING!
INSTALLATIONSAFETY
INSTRUCTIONS
Readthese instructions completely and carefully.
Improper installation, adjustment, alteration, service or
maintenance can cause injury or property damage. Refer
to this manual. For assistance or additional information,
consult a qualified installer, serviceagency,
manufacturer (dealer)or the gassupplier.
Neverreuse old flexible connectors.The use of old flexible
connectors concouse gosleoks ond personolinjury.Alwoys
useNEW flexible connectors when instolling
o gosopplionce.
IM PORTANT- Removeo,,pockingmotedol
ond Nteroturefromovenbeforeconnectinggosond
electricolsupply to ronge.
A CAUTION - Donotottempttooperote
theovenofthis ronge during o powerfoilure(Electric
Ignition models only).
• Hoveyourronge instolled byo quolified instoller.
• Yourronge must be electricolly grounded in occordonce
with Iocolcodes or, in the obsence ofIocol codes, in
occordonce with the Notionol ElectricolCode (ANSI/NFPA
70, Iotest edition). In Conodo,electricolgrounding must
be in occordoncewith the current CSAC22.1 Conodion
ElectricolCode Port1 ond/or Iocol codes.SeeElectrical
Connections in this section.
• Before instollingyour ronge on linoleumor onyother
syntheticfloorcovering,moke surethefloorcovering
conwithstond 180°Fwithout shrinking, worping or
discoloring.Do notinstoll the ronge overcorpeting
unlesso sheet of 1/4" thick plywood or similor insulotor
is ploced between the ronge ond corpeting.
• Mokesure thewoncoverings oround the ronge con
withstond heotgeneroted bytheronge up to 200°E
Avoid plocing cobinetsobove the ronge. To reduce
thehozordcoused byreochingover the open flomes
ofoperoting burners, instoll o ventilotion hood over the
ronge thot projects forword ot leost 5" beyondthefront
ofthecobinets.
Theventiloting hood must be constructedofsheet metol
not lessthon 0.0122"thick. Instoll obove thecooktopwith
o cleoronce of notlessthon 1/4" between the hood ond
theunderside ofthecombustible moteriol or metol
cobinet.The hood must beot leost os wideos the
opplionceond centered over the opplionce. Cleoronce
between the cooking surfoce ond theventilotionhood
surfoceMUSTNEVERBE LESSTHAN24 INCHES.
EXCEPTION: Instollotion of o listed microwove oven
or cooking opplionce over the cooktop sholl conform
to the instollotion instructions pocked with thot opplionce.
If cobinetsore plocedobove the ronge, ollow o minimum
cleoronce of 30" between the cooking surfoce ond the
bottom ofunprotected cobinets.
If o 30" cleoronce between cooking surfoceond
overheodcombustible moteriol or metol cobinetsconnot
be mointoined, protect theundersideofthecobinets
obovethecooktop with not less thon 1/4" insuloting
millboord covered with sheet metol notlessthon 0.0122"
thick. Cleoronce between the cooking surfoceond
protected cobinetsMUSTNEVERBELESSTHAN
24 INCHES.
The verticoldistoncefrom the plone ofthecooking
surfocetothe bottom ofodjocent overheodcobinets
extending closer thon l" to theplone oftheronge sides
must notbe lessthon 18".(Seethe Dimensionsand
Clearances illustrotion inthis section.)
CAUTION - Itemsofinteresttochildren
shouldnotbestoredincobinetsoboveo rongeoron
thebocksploshofo ronge-childrenclimbingon the
rongetoreochitemscouldbe seriouslyinjured.
IMPORTANT!
Removeall tape and packaging. Make surethe burners
are properly seated and level.
Lift up the cooktop (on models with standard twin
burners) and remove any packing material under it.
Take the accessory pack out ofthe oven andlor drawer.
Check to be surethat no range parts have come loose
during shipping.
34
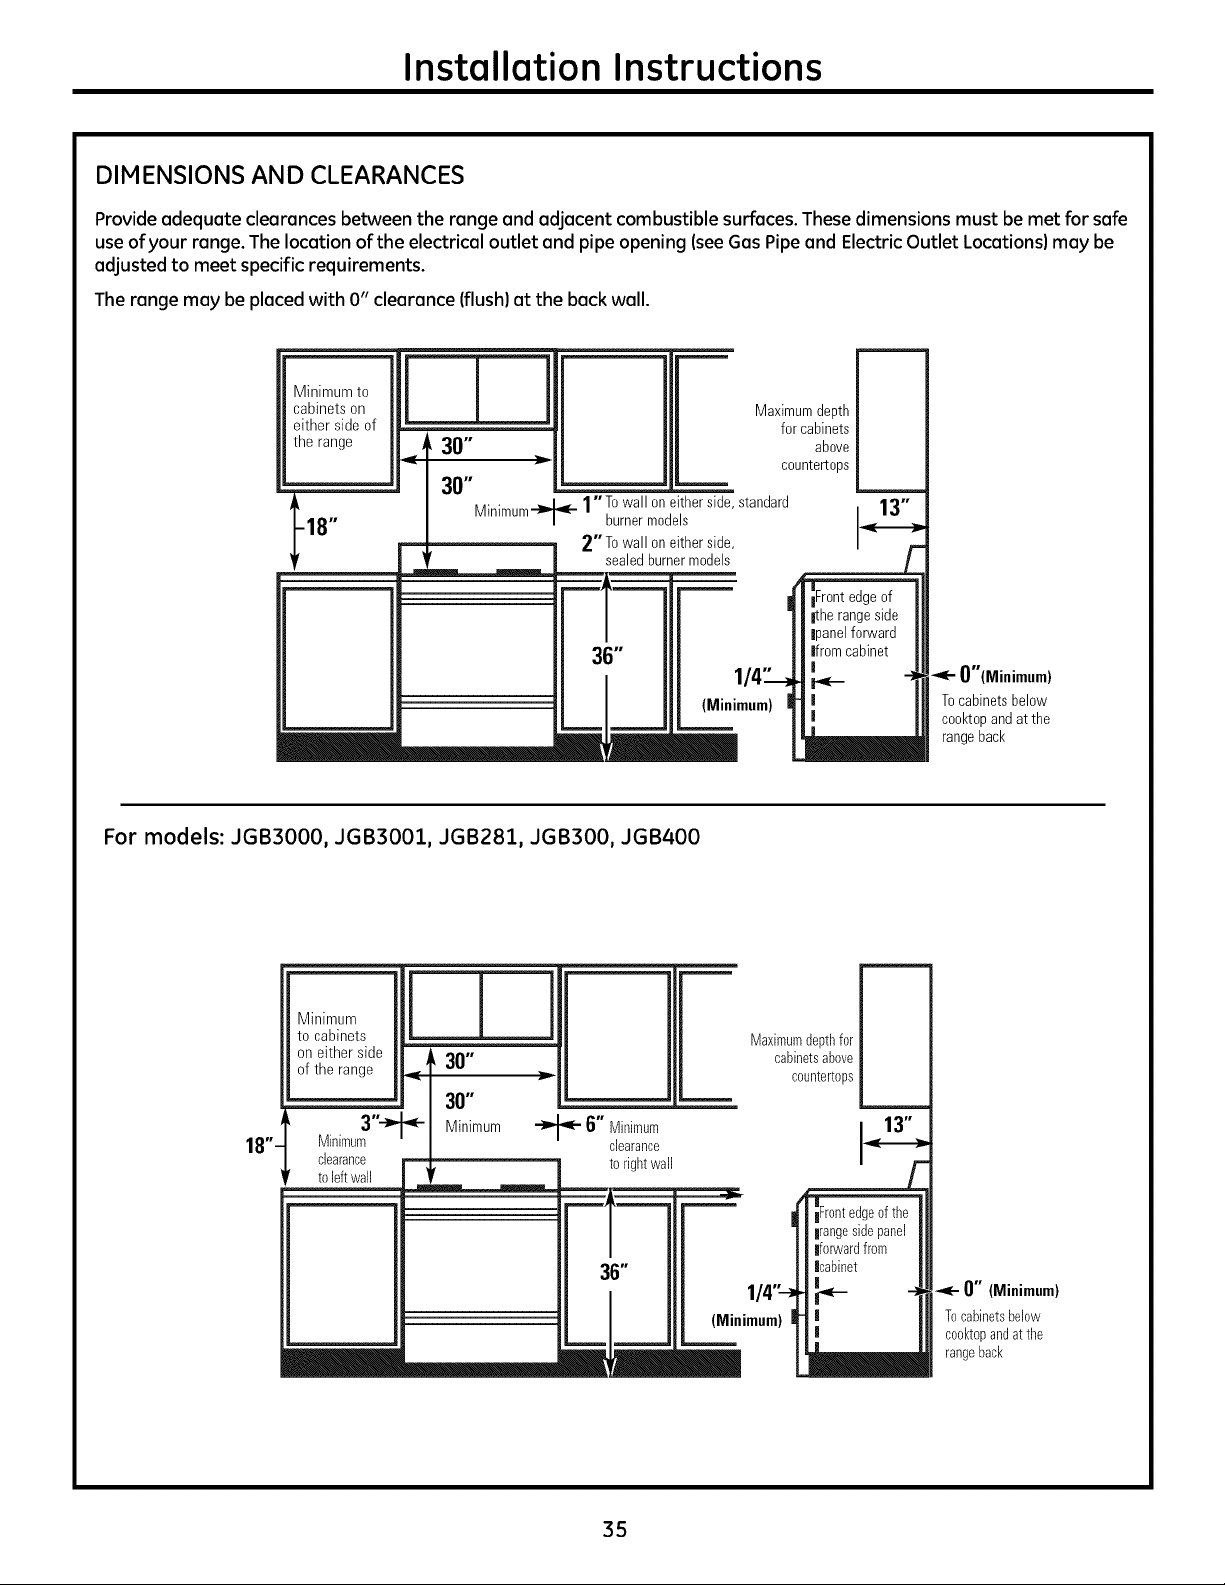
Installation Instructions
DIMENSIONS AND CLEARANCES
Provideadequate clearances between the range and adjacent combustible surfaces.These dimensions must be met for safe
useofyour range.Thelocation of the electrical outlet and pipe opening (see Gas Pipe and Electric Outlet Locations) may be
adjusted to meet specific requirements.
Therange may be placedwith 0" clearance (flush) at the back wall.
Minimum to
cabinets on
either sideof
the range
JJ
<, 30"
30"
Maximumdepth
forcabinets
above
countertops
t .... I_ l"T° wallon either side standard
18" Minlmum-'_"_- burnermodels
-- 2"To wallon eitherside
sealed burnermodels
36"
(Mini
O"(Minimum)
Tocabinetsbelow
co@topandat the
rangeback
For models: JGB3000, JGB3001, JGB281, JGB300, JGB400
811"
on either side |
ofthe range J
3"-_
Minimum
clearance
to leftwall
30"
30"
Minimum
•"_'- 6" Minimum
clearance
to rightwall
Maximumdepthfor
cabinetsabove
countertops
36"
(Minimum)
0" (Minimum)
Tocabinetsbelow
ceektopandat the
rangeback
35
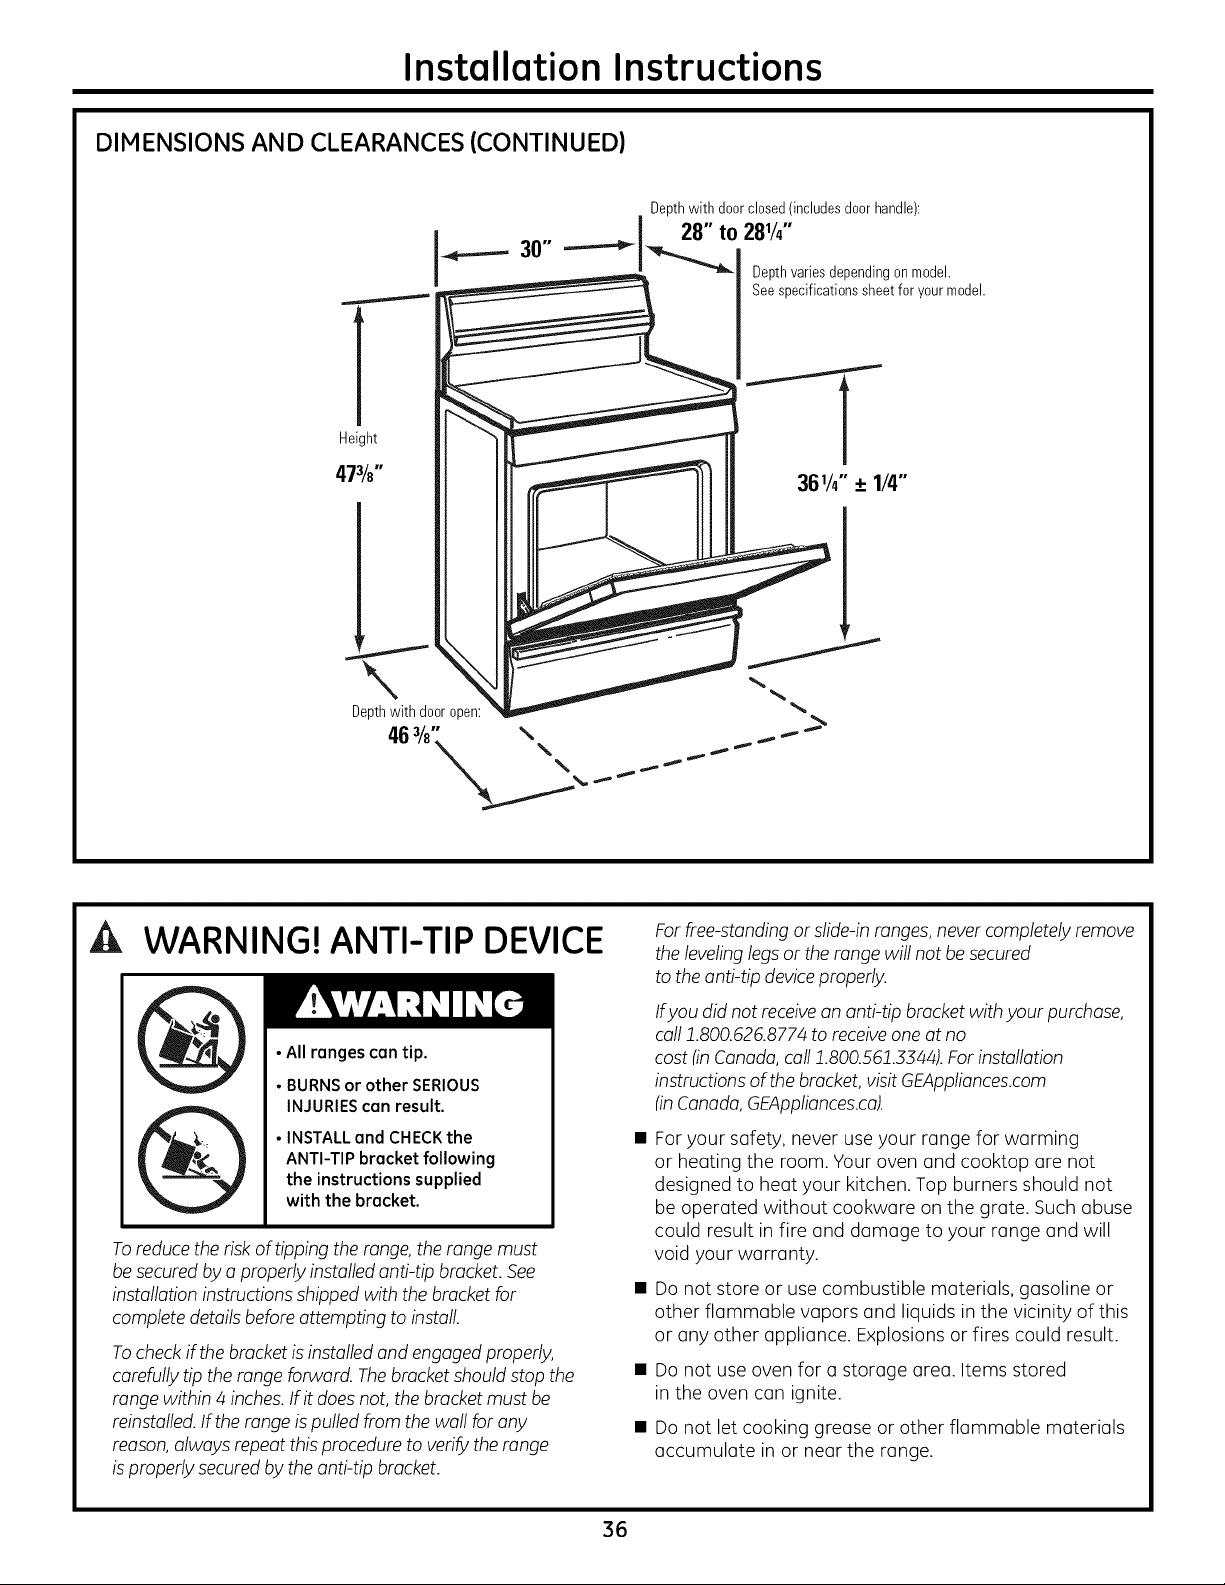
Installation Instructions
DIMENSIONS AND CLEARANCES (CONTINUED)
l
Height
. Depth with door closed!includes door handle):
J_.._.._ 30" .----_l 28 t° 28V4
a_ Depthvariesdependingon model.
Seespecificationssheetforyour model.
WARNING! ANTI-TIP DEVICE
• All ranges can tip.
• BURNS or other SERIOUS
INJURIES can result.
•INSTALL and CHECKthe
ANTI-TIPbracket following
the instructions supplied
with the bracket.
To reduce theriskoftippingtherange, therange must
be securedbya properlyinstalledanti-tip bracket. See
installationinstructions shippedwith thebracket for
completedetailsbefore attempting toinstall.
To check if thebracket isinstalledand engagedproperly,
carefully tiptherange forward. Thebracket shouldstop the
range within 4 inches.If itdoes not, thebracket mustbe
reinstalled.If therange is pulled from thewallforany
reason,alwaysrepeat this proceduretoverify therange
is properlysecuredbythe anti-tip bracket.
For free-standing or slide-inranges,never completely remove
thelevelinglegs or the range willnotbe secured
totheanti-tip device properly.
Ifyou did notreceive an anti-tip bracket with your purchase,
call 1.800.626.8774toreceiveone atno
cost (in Canada,call 1.800.561.3344).For installation
instructions ofthebracket, visit GEAppliances.com
(inCanada, GEAppliances.ca).
Foryour safety, never useyour range for warming
or heating the room. Your oven and cooktop are not
designed to heat your kitchen. Top burners should not
be operated without cookwore on the grate. Suchabuse
could result in fire and damage to your range and will
void your warranty.
Do not store or use combustible materials, gasoline or
other flammable vapors and liquids in the vicinity of this
or any other appliance. Explosionsor fires could result.
Do not use oven for o storage area. Items stored
in the oven can ignite.
Do not let cooking grease or other flammable materials
accumulate in or near the range.
36

Installation Instructions
LOCATION
Do not locate the range where it may be subject to
strong drafts. Any openings in the floor or wall behind
the range should be sealed. Make sure the openings
around the base of the range that supply fresh air for
combustion and ventilation are not obstructed by
carpeting or woodwork.
Yourrange,like many other householditems, is heavy and
cansettleintosoftfloor coverings such ascushioned vinyl
or carpeting.Use carewhen moving the range on this type
offlooring. It is recommended that thefollowing simple and
inexpensive instructionsbe followed to protect yourfloor.
The range shouldbe installed on a sheet ofplywood
(orsimilar material).When thefloorcovering ends at
thefront of the range, thearea that the range will rest
on shouldbe builtup with plywood tothe same level
or higher than thefloorcovering.
Thiswillallowthe range to be moved forcleaning
or servicing.Also, make sure yourfloor covering will
withstand 180°F.(SeetheInstallation Safety Instructions
section.)
Hake sure thewall coverings around your range can
withstand theheatgenerated (upto 200°F)bytherange.
(Seethe Installation SafetyInstructions section.)
ITI PROVIDE ADEQUATE GASSUPPLY
This range is designed for an operating manifold
pressure of 4" or S" water column (W.C.)on natural gas
(see rating label on product) or 10" W.C. on LPgas.
Thisrange comesfrom thefactory set for use on natural
gas, butitis convertiblefor use on LPgas. If youdecideto
use this range on LPgas,conversionmust be made by a
qualified LPinstaller beforeattempting to operatethe
range.
Forproper operation, the inletpressureto theregulator
shouldbe at least 1" W.C.abovethe operating manifold
pressure but mustnotexceed 14"W.C.
The pressure regulator located attheinletoftherange
manifold mustremain in thesupply line regardless of
whether naturalor LP gas isbeing used. When checking for
proper operation of the regulator, the inletpressure mustbe
at least 1" greaterthan theoperating manifold pressure.
A flexible metal applianceconnector used to connectthe
range to thegassupply line should have an I.D.of1/2"and
be 5 feet in length for ease of installation. In Canada,
flexible connectors must be single wallmetal connectors no
longer than 6 feet in length.
[] CONNECT THE RANGE TO GAS
Shutoffthe main gassupply valve before disconnecting
the old range and leaveit off until the newhookup has
been completed. Don't forget to relight the pilot on other
gasappliances when you turn the gasback on.
Because hard piping restrictsmovement of the range,
the use ofa CSAInternational-certified flexible metal
applianceconnector is recommended unless local codes
require a hard-piped connection.
Never use an old connector when installing a new range.
If thehard piping method is used,youmust carefullyalign
the pipe;the range cannot be moved after theconnection
ismade.
To prevent gasleaks,putpipe-joint compound on, or wrap
pipe-thread tapewith Teflon*around,all male (external)
pipe threads.
A.Install a manualgas line shut-off valve in thegasline
in an easily accessed location outside ofthe range.
Hake sure everyone operating therange knowswhere
and howtoshut offthe gassupply tothe range.
B. Installmale1/2" flare union adapter tothe 1/2" NPT
internalthread at inlet of regulator. Usea backup wrench
on the regulatorfitting toavoiddamage.
Wheninstalling the range from thefront, remove the 90°
elbowforeasierinstallation.
C. Install male 1/2" or 3/4" flare union adapter to the NPT
internal thread of the manual shut-off valve, taking care
to back up the shut-off valve to keep it from turning.
D.Connect flexible metal appliance connector to
the adapter on the range. Position range to permit
connection at the shut-off valve.
E.Whenall connections have been made, make sure
all range controls are in theoff position and turn on
the maingassupply valve. Usea liquid leak detector
at alljoints and connections tocheckforleaks in
the system.
WARNING: DO NOTUSEA FLAME
TO CHECK FOR GAS LEAKS.
When usingtest pressures greater than 1/2 psig to
pressure test the gas supply system ofthe residence,
disconnect the range and individual shut-off valve from
the gas supply piping. When using test pressures of 1/2
psig or less to test the gassupply system, simply isolate
the range from the gas supply system byclosing the
individual shut-off valve.
*Teflon: Registered trademark of DuPont
37
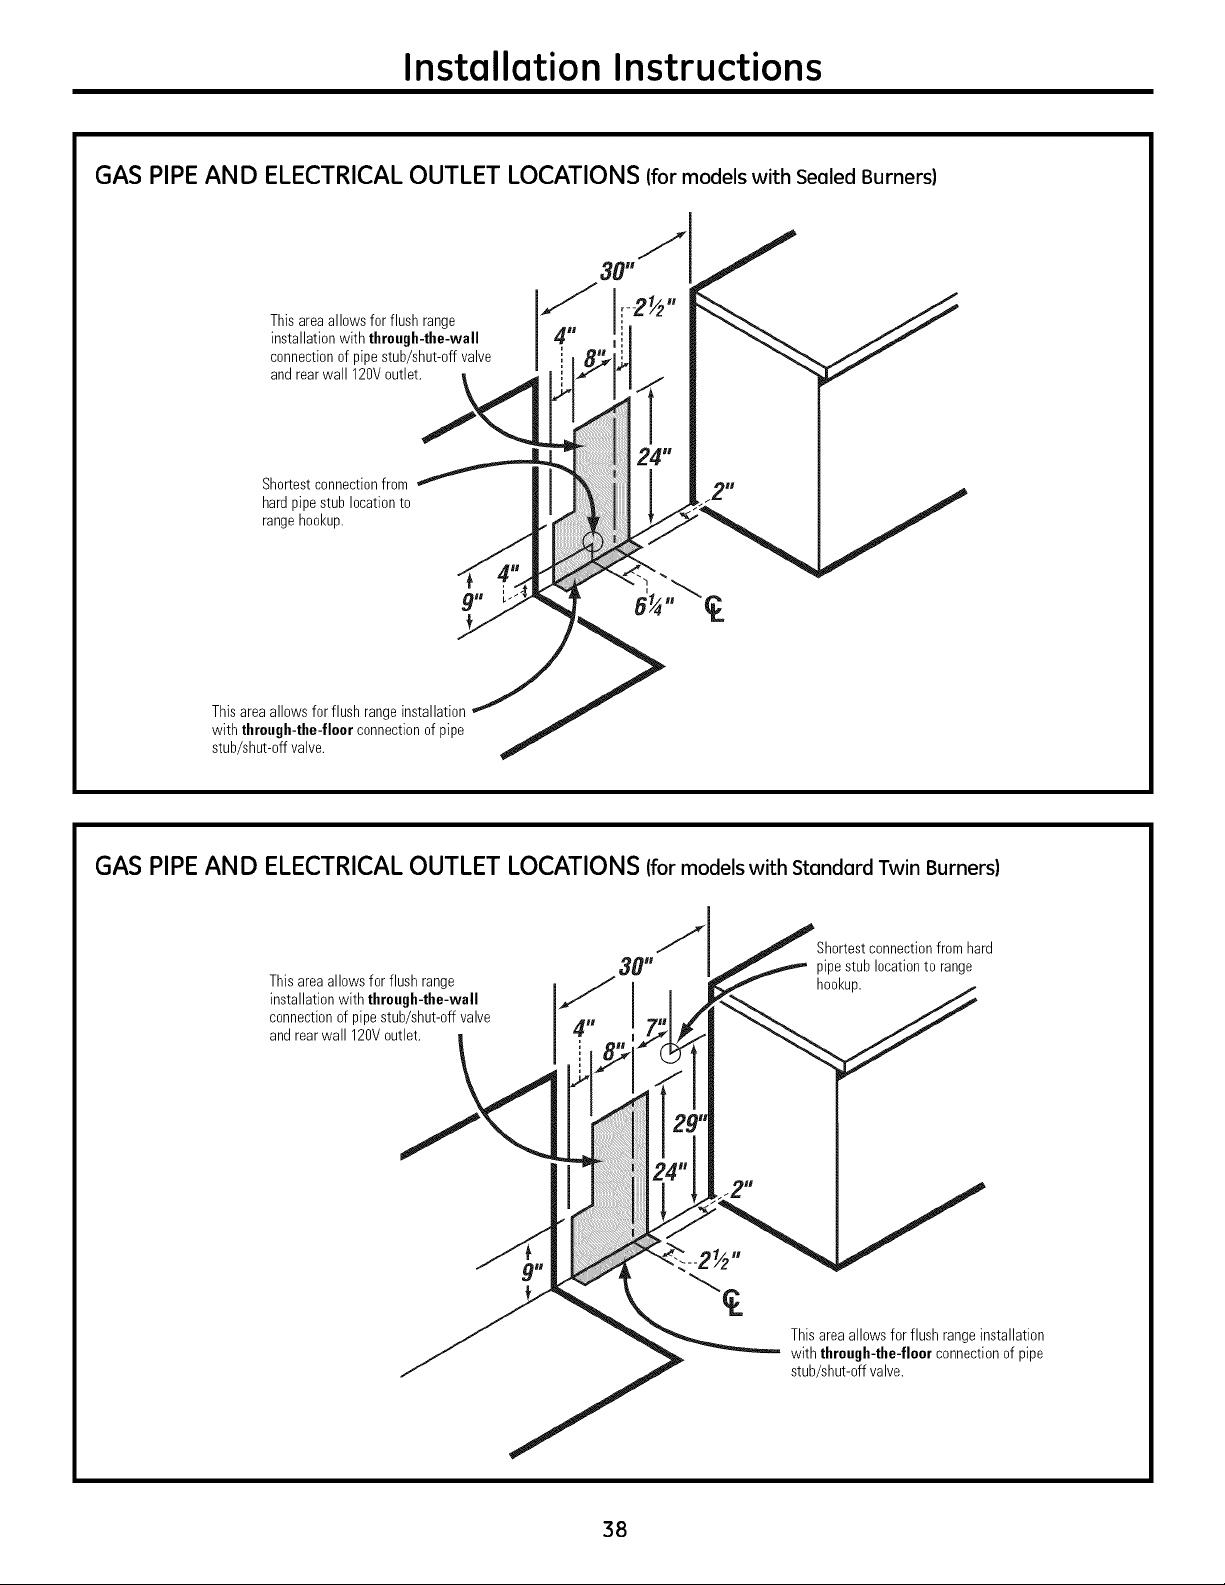
Installation Instructions
GAS PIPE AND ELECTRICAL OUTLET LOCATIONS (formodels with Sealed Burners)
Thisareaallowsfor flush range
installationwith through-the-wall
connectionofpipestub/shut-off valve
and rearwall 120Voutlet.
\
Sho_estconnectionfrom
hardpipestublocationto
rangehookup.
Thisareaallows forflush rangeinstallation
with through-the-floorconnectionof pipe
stub/shut-offvalve.
GAS PIPE AND ELECTRICAL OUTLET LOCATIONS (formodels with Standard Twin Burners)
Thisarea allows forflush range
installationwith through-the-wall
connectionof pipestub/shut-offvalve
and rearwall 120Voutlet.
Shortestconnectionfromhard
pipestublocationtorange
hookup.
Thisarea allowsforflush rangeinstallation
with through-the-floorconnectionof pipe
stub/shut-offvalve.
38

Installation Instructions
FLEXIBLE CONNECTOR HOOKUP (for models equipped with Sealed Burners)
Installer: Inform
theconsumerof the
location ofthe gas
shut-offvalve.
Gas
1/2" or3/4" _ shut-off
Gaspipe_[.,_ - valve
RIGID PIPEHOOKUP OPTIONS (for models equipped with Sealed Burners)
45° Elbow
C-_]_ @ 90° Elbow
_,._,:v - i _--"_"-"-_,_
/',,,///Z'_x; 1' _, !_[ B,ack
(_-///7/Y_ Nipple / I, __ ironpipe
_///./'/// Union III
%y.!z_. Pressure
" regulator _ _e-- Union
"_-- Nipple
Installer: Inform _ Gas
the consumer of the ] ]_-_.,_..--- shut-off
location of the gas ) I_I / valve
shut-off valve. "[ t[LUL.j_ 1/2" or3/4"
Gaspipe
Alternate Hookup
_X_. Adapter
90°Elbow---'_v 90° Elbow
J t _ / Nipple
Nipple--_
II _l Quickconnect
_/or union
_ iC}LJ I¢".,. Pressure
has _ I _ I/_ppte ,.
shut-off _ [_ _ / 90° regutator
valve _ _ _/ Elbow
1/2"or3/4" go° Elbow __
Gaspipe Adapter-'T
I Installer:Informthe I
consumerofthe location
ofthegasshut-offvalve.
39
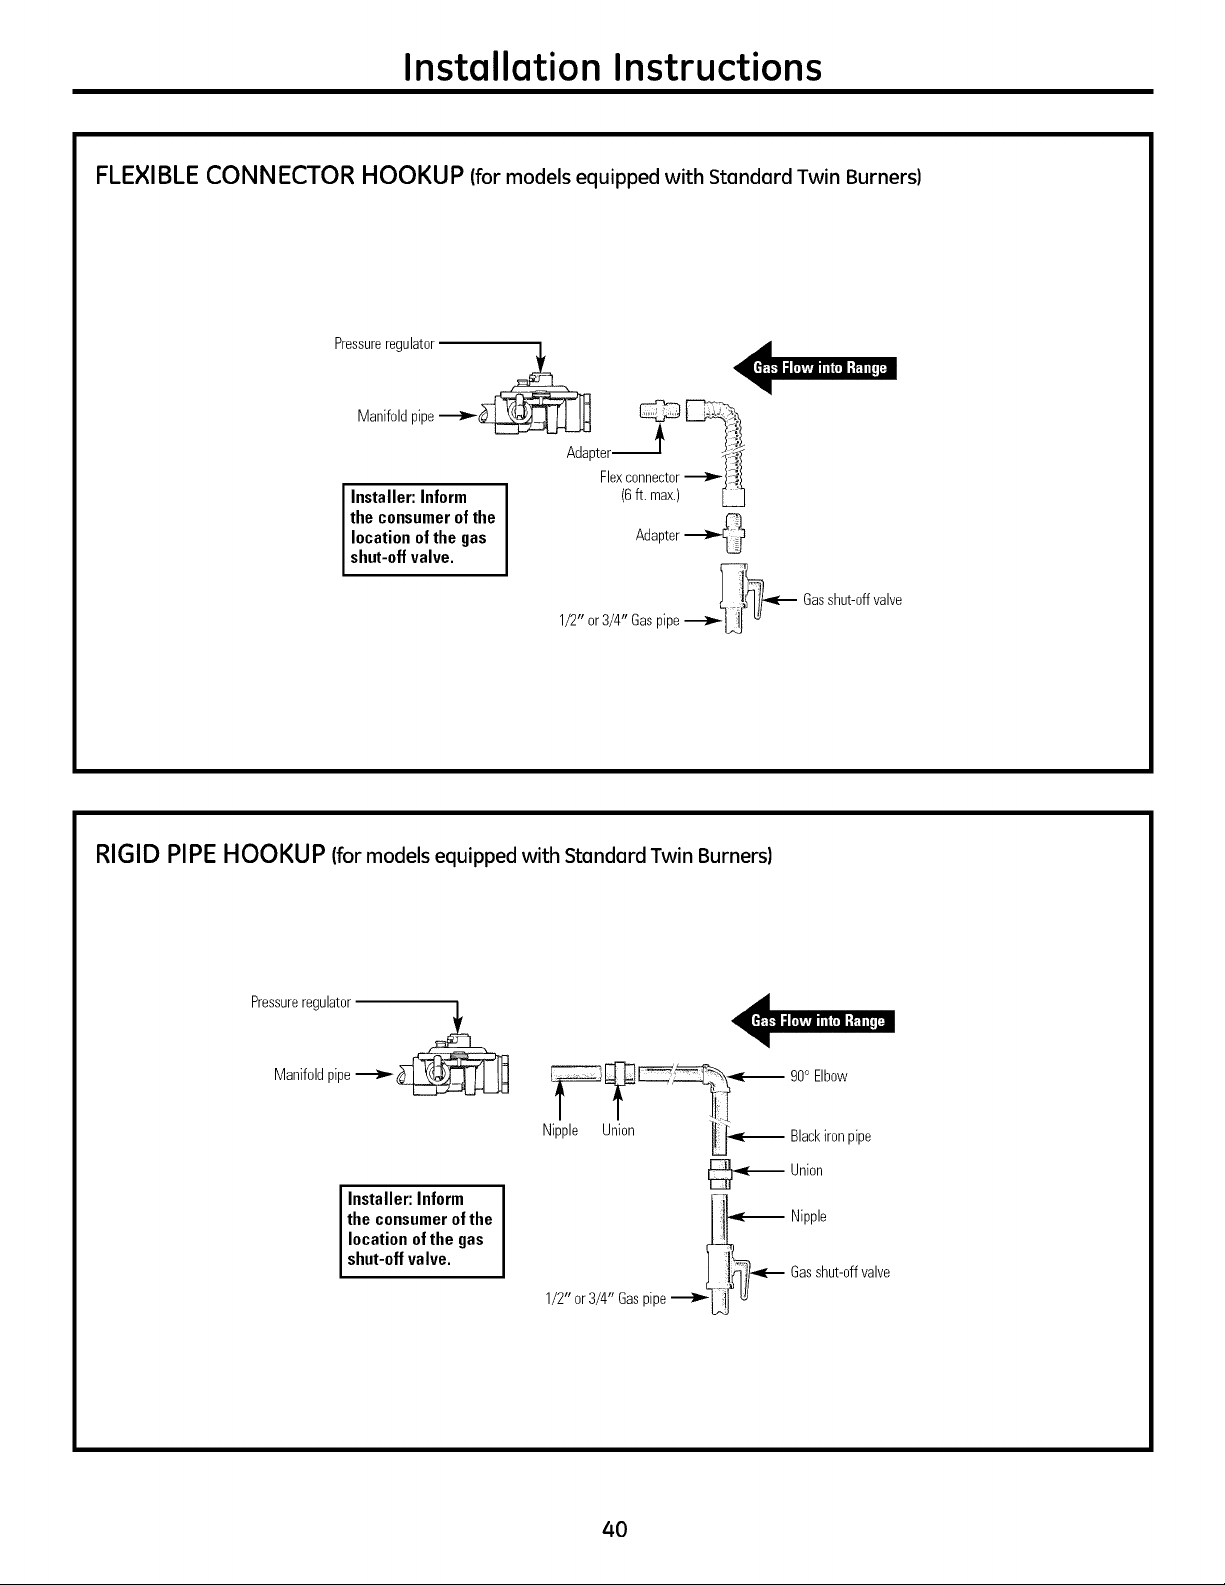
Installation Instructions
FLEXIBLE CONNECTOR HOOKUP (for models equipped with Standard Twin Burners)
Pressureregulator
Manifoldpipe"_'-_
Adapter _ _Flexconnector
Installer: Inform (6ft. max.)
the consumer of the
location of the gas Adapter
shut-off valve.
1/2" or3/4" Gaspipe__ Gasshut-offvalve
RIGID PIPEHOOKUP (for models equipped with Standard Twin Burners)
Pressureregulator
Manifoldpipe__
Installer:Inform
theconsumerof the
location ofthe gas
shut-offvalve.
__ 90° Elbow
Nipple Union _ Blackironpipe
_ Union
_ Nipple
L-_lf "_'_ Gasshut-offvalve
1/2" or3/4" Gaspipe_U _
4O
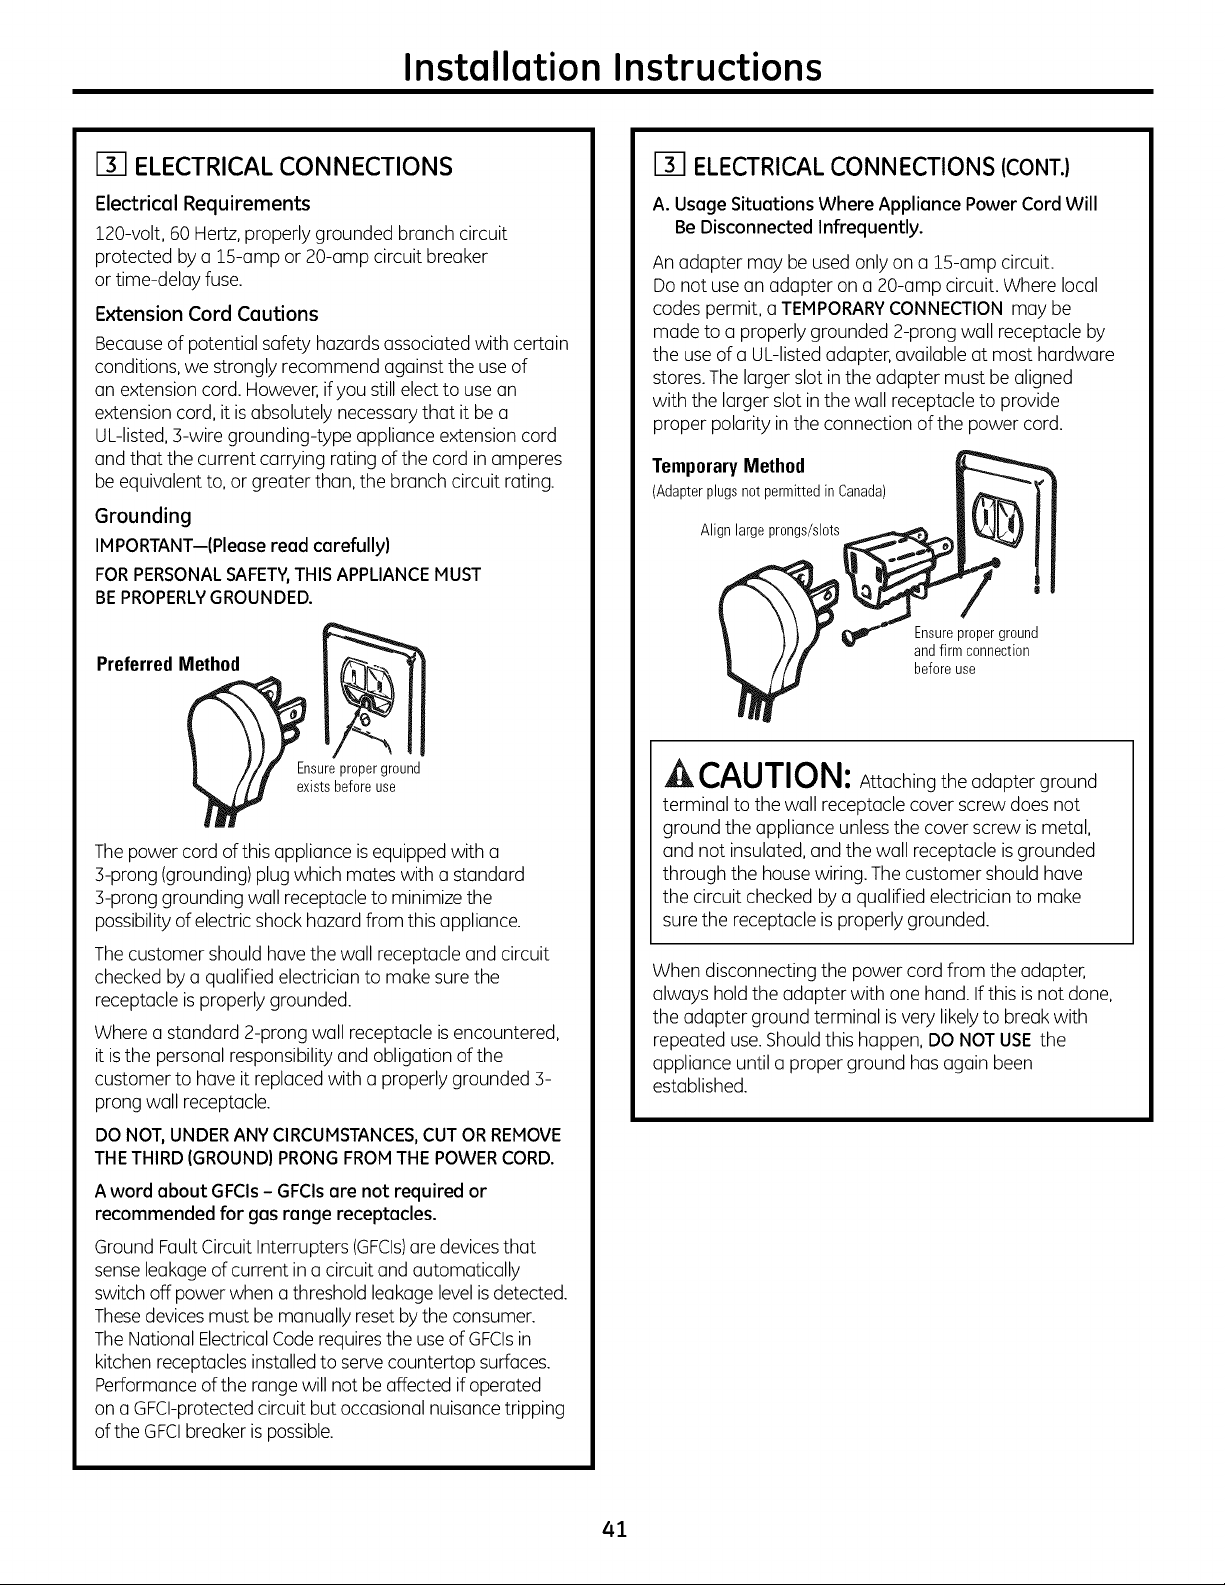
Installation Instructions
[] ELECTRICAL CONNECTIONS
Electrical Requirements
120-volt,60 Hertz,properlygrounded branchcircuit
protected by a 15-amp or 20-ampcircuit breaker
or time-delay fuse.
Extension Cord Cautions
Becauseof potential safety hazards associated with certain
conditions, westrongly recommend against the use of
an extensioncord. However if youstill elect to use an
extensioncord, itis absolutelynecessarythat it be a
UL-listed,3-wire grounding-type applianceextensioncord
and that thecurrent carrying ratingofthe cordin amperes
be equivalent to, or greaterthan, the branchcircuit rating.
Grounding
IMPORTANT--(Pleoseread carefully)
FORPERSONALSAFETY,THISAPPLIANCEMUST
BEPROPERLYGROUNDED.
PreferredMethod
Ensure proper ground
e2:istsbefore use
The powercordof this applianceis equipped with a
3-prong (grounding) plug which mateswith a standard
3-prong grounding wallreceptacle to minimize the
possibilityofelectric shockhazard from this appliance.
The customer shouldhavethewallreceptacleand circuit
checkedbya qualified electriciantomake sure the
receptacleisproperlygrounded.
Wherea standard 2-prong wallreceptacleis encountered,
itis the personal responsibility and obligation ofthe
customer to haveitreplaced with a properlygrounded 3-
prong wallreceptacle.
DO NOT, UNDER ANY CIRCUMSTANCES, CUT OR REMOVE
THETHIRD (GROUND) PRONG FROMTHE POWER CORD.
A word obout GFCIs- GFCIsore not required or
recommended for gosronge receptocles.
Ground Fault Circuit Interrupters (GFCIs)are devicesthat
senseleakage ofcurrent in a circuitand automatically
switch off powerwhen a threshold leakage level isdetected.
Thesedevices mustbe manually reset by the consumer.
The National ElectricalCode requiresthe use ofGFCIsin
kitchenreceptacles installedtoservecountertop surfaces.
Performanceofthe range will notbe affected if operated
on a GFCI-protectedcircuitbutoccasionalnuisance tripping
oftheGFCIbreaker is possible.
[] ELECTRICAL CONNECTIONS (CONT.)
A. Usage Situations Where Appliance Power Cord Will
Be Disconnected Infrequently.
An adapter may be used onlyon a 15-amp circuit.
Donotuse an adapter on a 20-amp circuit. Wherelocal
codes permit, a TEMPORARYCONNECTIONmay be
madeto a properlygrounded 2-prong wallreceptacle by
the use ofa UL-listedadapter, availableat mosthardware
stores.The larger slot in theadapter mustbe aligned
with the larger slot in thewall receptacleto provide
proper polarity in theconnection ofthe powercord.
TemporaryMethod
(Adapterplugsnot permittedinCanada)
Align large prongs/slots
Ensureproperground
and firm connection
before use
^_ CAUTION: Attaching theadapter ground
terminal to thewallreceptaclecover screw doesnot
ground theappliance unless the cover screwis metal,
and not insulated, and thewall receptacleis grounded
through the house wiring. The customer shouldhave
thecircuitcheckedbya qualifiedelectricianto make
sure the receptacleis properlygrounded.
Whendisconnecting the powercordfrom the adapter,
alwayshold the adapter with one hand.Ifthis is not done,
theadapter ground terminal is very likely to break with
repeated use.Shouldthis happen,DO NOTUSE the
appliance untila proper ground has again been
established.
41
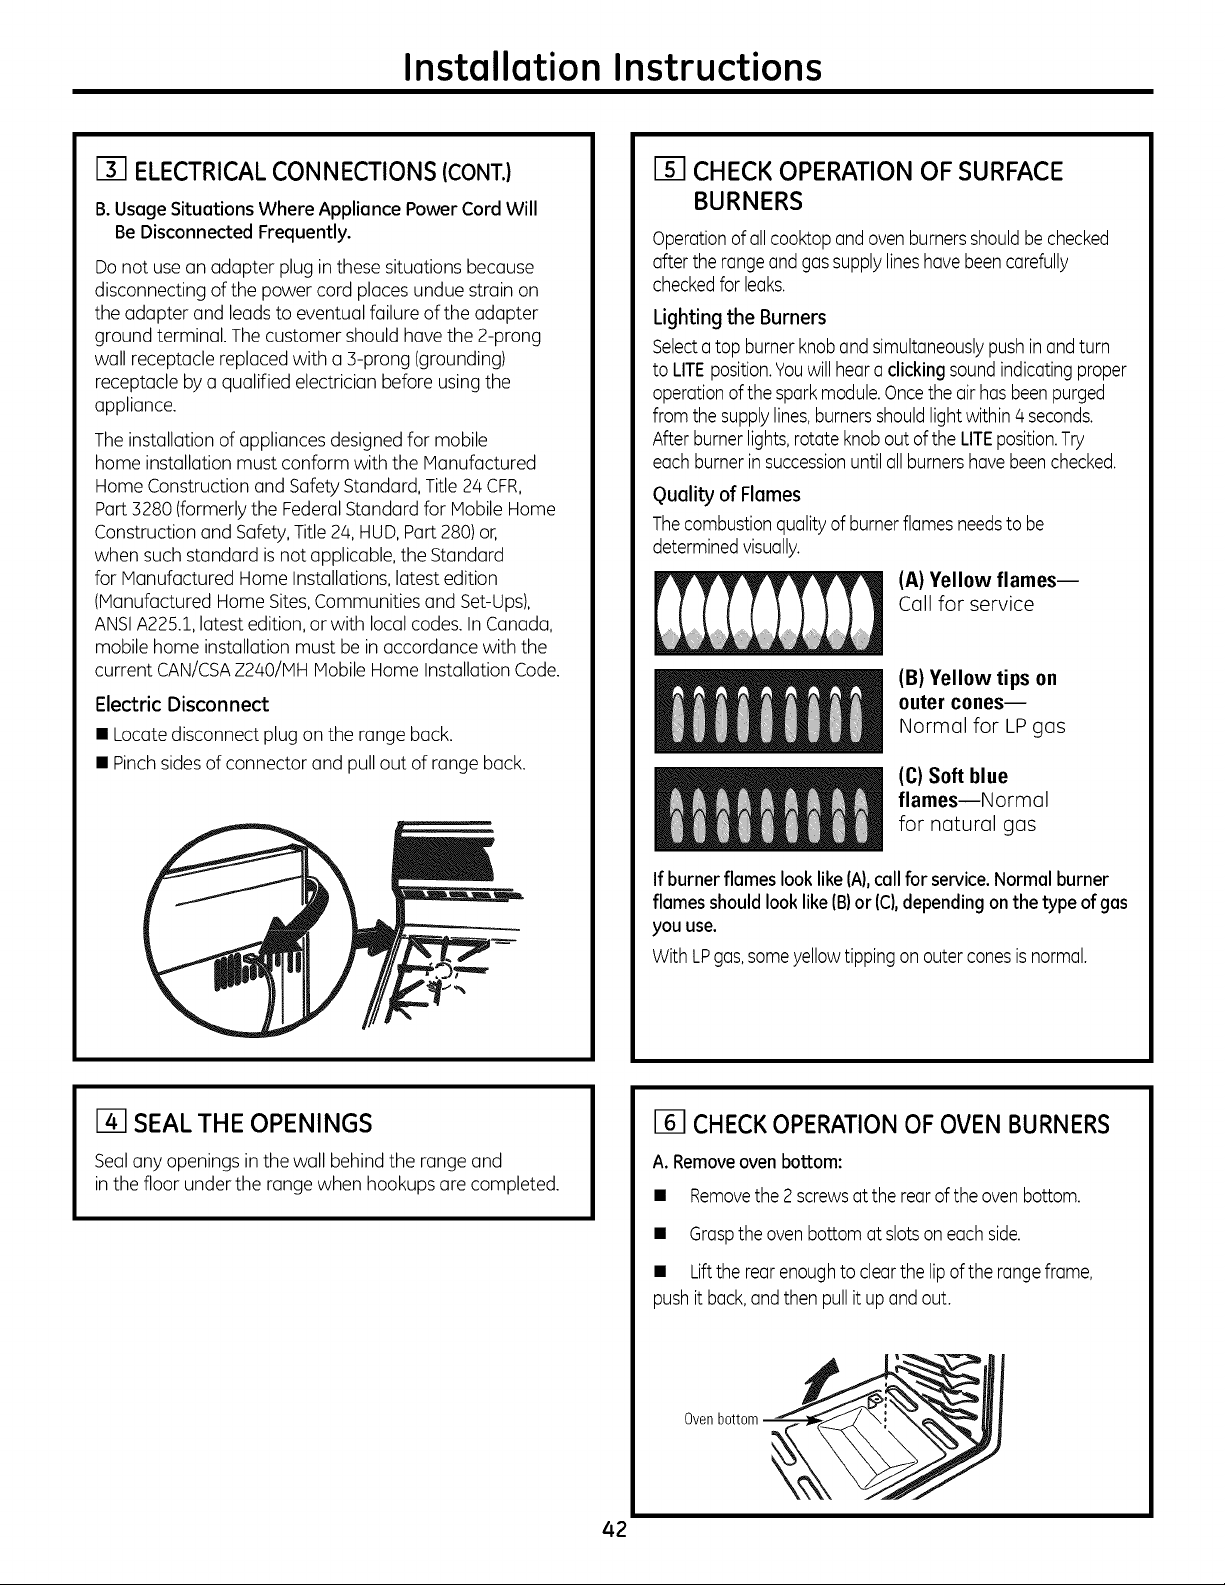
Instollotion Instructions
[] ELECTRICAL CONNECTIONS (CONT.)
B. Usage Situations Where Appliance Power Cord Will
Be Disconnected Frequently.
Do notuse an adapter plug in these situations because
disconnecting ofthe powercordplaces undue strain on
theadapter and leads to eventual failureofthe adapter
ground terminal.The customer shouldhave the 2-prong
wallreceptaclereplacedwith a B-prong (grounding)
receptaclebya qualifiedelectrician beforeusing the
appliance.
The installationofappliances designed for mobile
home installationmustconform with theManufactured
Home Constructionand SafetyStandard,Title 24 CFR,
Part 3280 (formerly the Federal Standard for MobileHome
Constructionand Safety, Title2/4,HUD,Part 280)or,
when such standard is notapplicable, theStandard
for Manufactured Home Installations, latestedition
(Manufactured Home Sites,Communitiesand Set-Ups),
ANSIA225.1,latestedition, or with local codes.In Canada,
mobilehome installationmust be in accordance with the
current CAN/CSAZ240/IV1HMobile Home Installation Code.
Electric Disconnect
• Locatedisconnect plug on the range back.
• Pinchsides of connector and pull outof range back.
CHECK OPERATION OF SURFACE
BURNERS
Operationof all cooktopand ovenburnersshouldbechecked
after the rangeandgas supply lineshave beencarefully
checkedforleaks.
Lighting the Burners
Selecta topburner knoband simultaneouslypushinand turn
toLITEposition.Youwill hear a clicking soundindicating proper
operationof the spark module.Oncetheair has been purged
from the supplylines,burnersshouldlight within 4 seconds.
Afterburner lights,rotate knob out of theLITEposition.Try
each burnerin successionuntil all burnershavebeen checked.
guality of Flames
Thecombustionquality of burner flamesneedstobe
determinedvisually.
(A)Yellow flames--
Call for service
(B)Yellow tips on
outer cones--
Normal for LP gas
(C)Softblue
flamesmNormal
for natural gas
If burner flameslook like (A),callforservice. Normal burner
flames should looklike(B)or (C),depending onthetype of gas
youuse.
With LPgas,some yellowtipping on outer conesis normal.
I-4-1SEALTHE OPENINGS
Sealanyopeningsin thewall behind the range and
in thefloor under the range when hookups are completed.
42
[] CHECK OPERATION OF OVEN BURNERS
A. Removeoven bottom:
• Removethe 2 screwsat therearof the oven bottom.
• Grasptheovenbottomat slotson eachside.
• Lifttherearenoughtoclearthelipof therange frame,
push it back,and thenpullit up andout.
Ovenbottom
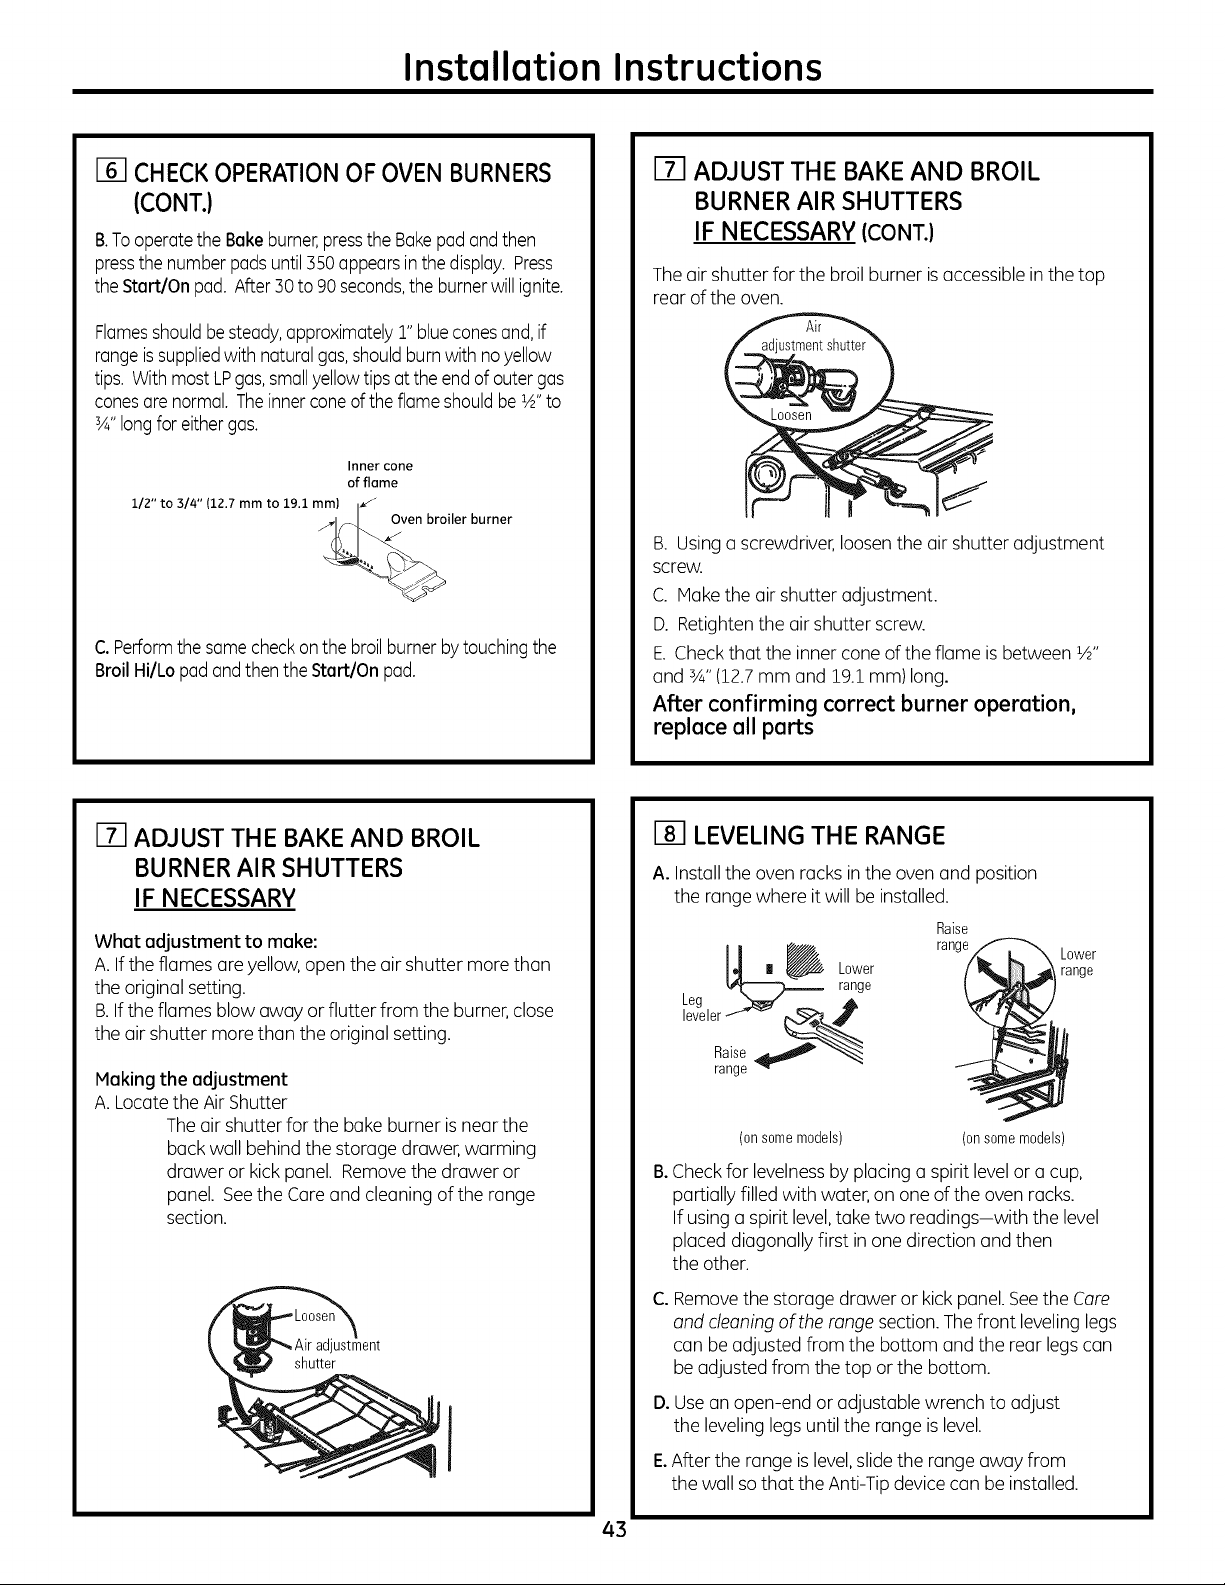
Installation Instructions
[] CHECK OPERATIONOFOVEN BURNERS
(CONT.)
B.TooperatetheBakeburner,pressthe Bakepadand then
pressthe number padsuntil 350 appearsinthe display.Press
the Start/Onpad.After30to90 seconds,theburnerwill ignite.
Flamesshouldbe steady,approximately1"blueconesand, if
rangeis suppliedwith natural gas,shouldburnwith no yellow
tips.With most LPgas,small yellowtips at theendof outer gas
conesare normal. Theinner coneof the flame shouldbe1A"to
3A"longfor either gas.
112" to 314"(12.7mm to 19.1mm)
Innercone
of flame
Oven broiler burner
C.Performthe same checkon the broil burnerby touchingthe
Broil Hi/Lo padand then theStart/Onpad.
[] ADJUST THE BAKE AND BROIL
BURNER AIR SHUTTERS
IFNECESSARY (CONT.)
The air shutter forthebroil burner is accessiblein thetop
rear of the oven.
B. Usinga screwdriver, loosen theair shutter adjustment
screw.
C. Make theair shutteradjustment.
D. Retightenthe air shutter screw.
E.Check that the inner coneoftheflame isbetween 1A"
and 3A"(12.7mm and 19.1 mm)long.
After confirming correct burner operation,
replace all parts
m ADJUST THE BAKEAND BROIL
BURNER AIR SHUTTERS
IF NECESSARY
What adjustment to make:
A. If theflamesare yellow, open the air shutter morethan
theoriginal setting.
B.If theflames blowaway or flutter from the burner,close
theair shutter more than the original setting.
Making the adjustment
A. Locate theAir Shutter
The air shutter forthe bake burner is near the
back wall behind the storage drawer, warming
drawer or kick panel. Removethedrawer or
panel. Seethe Careand cleaningofthe range
section.
adjustment
shutter
I
[] LEVELING THE RANGE
A.Install theovenracksin theovenand position
the range where itwillbe installed.
Raise
_ | _ Lower range
range
Leg _ ,A
leveler f_ __
2 Sgee
Lower
range
B°
(on some models) (on some models)
Checkfor levelnessbyplacinga spirit level or a cup,
partially filled with water, on one ofthe ovenracks.
If usinga spirit level,take two readings-with thelevel
placeddiagonallyfirst in one direction and then
theother.
C°
D°
Removethestorage drawer or kick panel. See theCare
and cleaning oftherange section. The front leveling legs
can be adjusted from thebottom and the rear legs can
be adjusted from thetop or thebottom.
Usean open-end or adjustable wrench to adjust
the leveling legs untilthe range is level.
E.After therange is level, slide therange away from
thewall so that the Anti-Tip device can be installed.
43
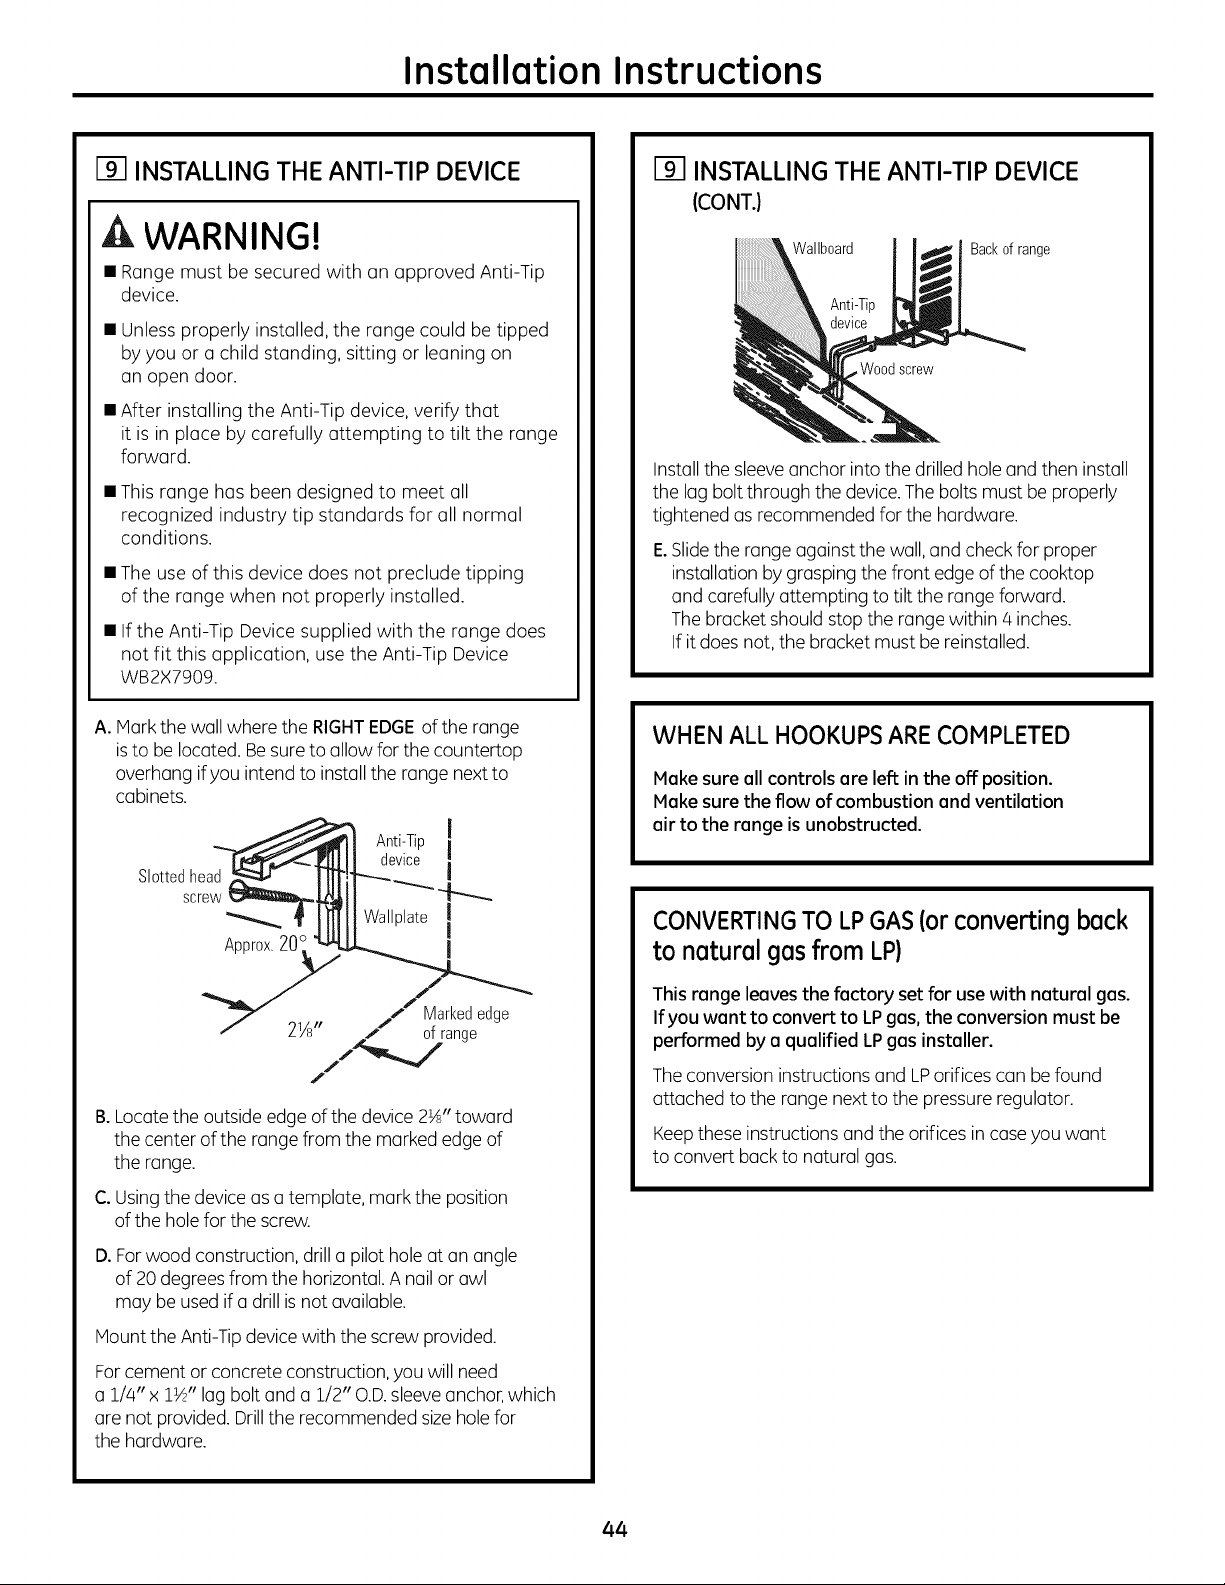
Installation Instructions
[] INSTALLING THE ANTI-TIP DEVICE
WARNING!
• Rangemust be secured with an approved Anti-Tip
device.
• Unless properly installed, the range could be tipped
byyou or a child standing, sitting or leaning on
an open door.
• After installing the Anti-Tip device,verify that
it isin place bycarefully attempting to tilt the range
forward.
• This range has been designed to meet all
recognized industry tip standards for all normal
conditions.
• Theuse ofthis device does not preclude tipping
of the range when not properly installed.
• If the Anti-Tip Devicesupplied with the range does
not fit this application, usethe Anti-Tip Device
WB2X7909.
A.Hark thewallwherethe RIGHTEDGEofthe range
is to be located.Besure to allowforthecountertop
overhangif you intendto install therange next to
cabinets.
Slottedhead
screw
Approx.20
Anti-Tip
device
Wallplate
I
I
I
I
I
I
Marked edge
2Ys" of range
J
B. Locate the outside edge of the device 2½" toward
the center of the range from the marked edge of
the range.
C. Usingthedevice asa template, mark the position
ofthe holefor thescrew.
D.Forwood construction, drill u pilothole atan angle
of 20 degrees from the horizontal. A nail or awl
may be usedif a drill is not available.
Haunt theAnti-Tip device with thescrewprovided.
Forcement or concrete construction, youwill need
a 1//4"x 1½" lag boltand a 1/2" O.D.sleeve anchor,which
are notprovided. Drill therecommended size hole for
thehardware.
INSTALLING THE ANTI-TIP DEVICE
(CONT.}
Wallboard
Backof range
Woodscrew
Install the sleeveanchor intothedrilled hole and then install
the lag boltthrough thedevice.Thebolts mustbe properly
tightened asrecommended forthe hardware.
E.Slide the range against thewall, and checkforproper
installationbygraspingthefront edge ofthecooktop
and carefullyattempting totilt therange forward.
The bracketshould stop the range within/4 inches.
If it doesnot, thebracket mustbe reinstalled.
WHEN ALL HOOKUPSARE COMPLETED
Meke sureell controls ere left in the off position.
Meke surethe flow ofcombustion end ventilation
eir to the range isunobstructed.
CONVERTINGTO LPGAS(or converting beck
to neturel ges from LP)
This renge leeves the factory set for use with neturel ges.
If you wont to convert to LP gas, the conversion must be
performed by e quelified LPgas installer.
The conversioninstructionsand LPorificescan be found
attached tothe range next tothe pressure regulator.
Keepthese instructionsand the orificesin case youwant
toconvert back to natural gas.
44
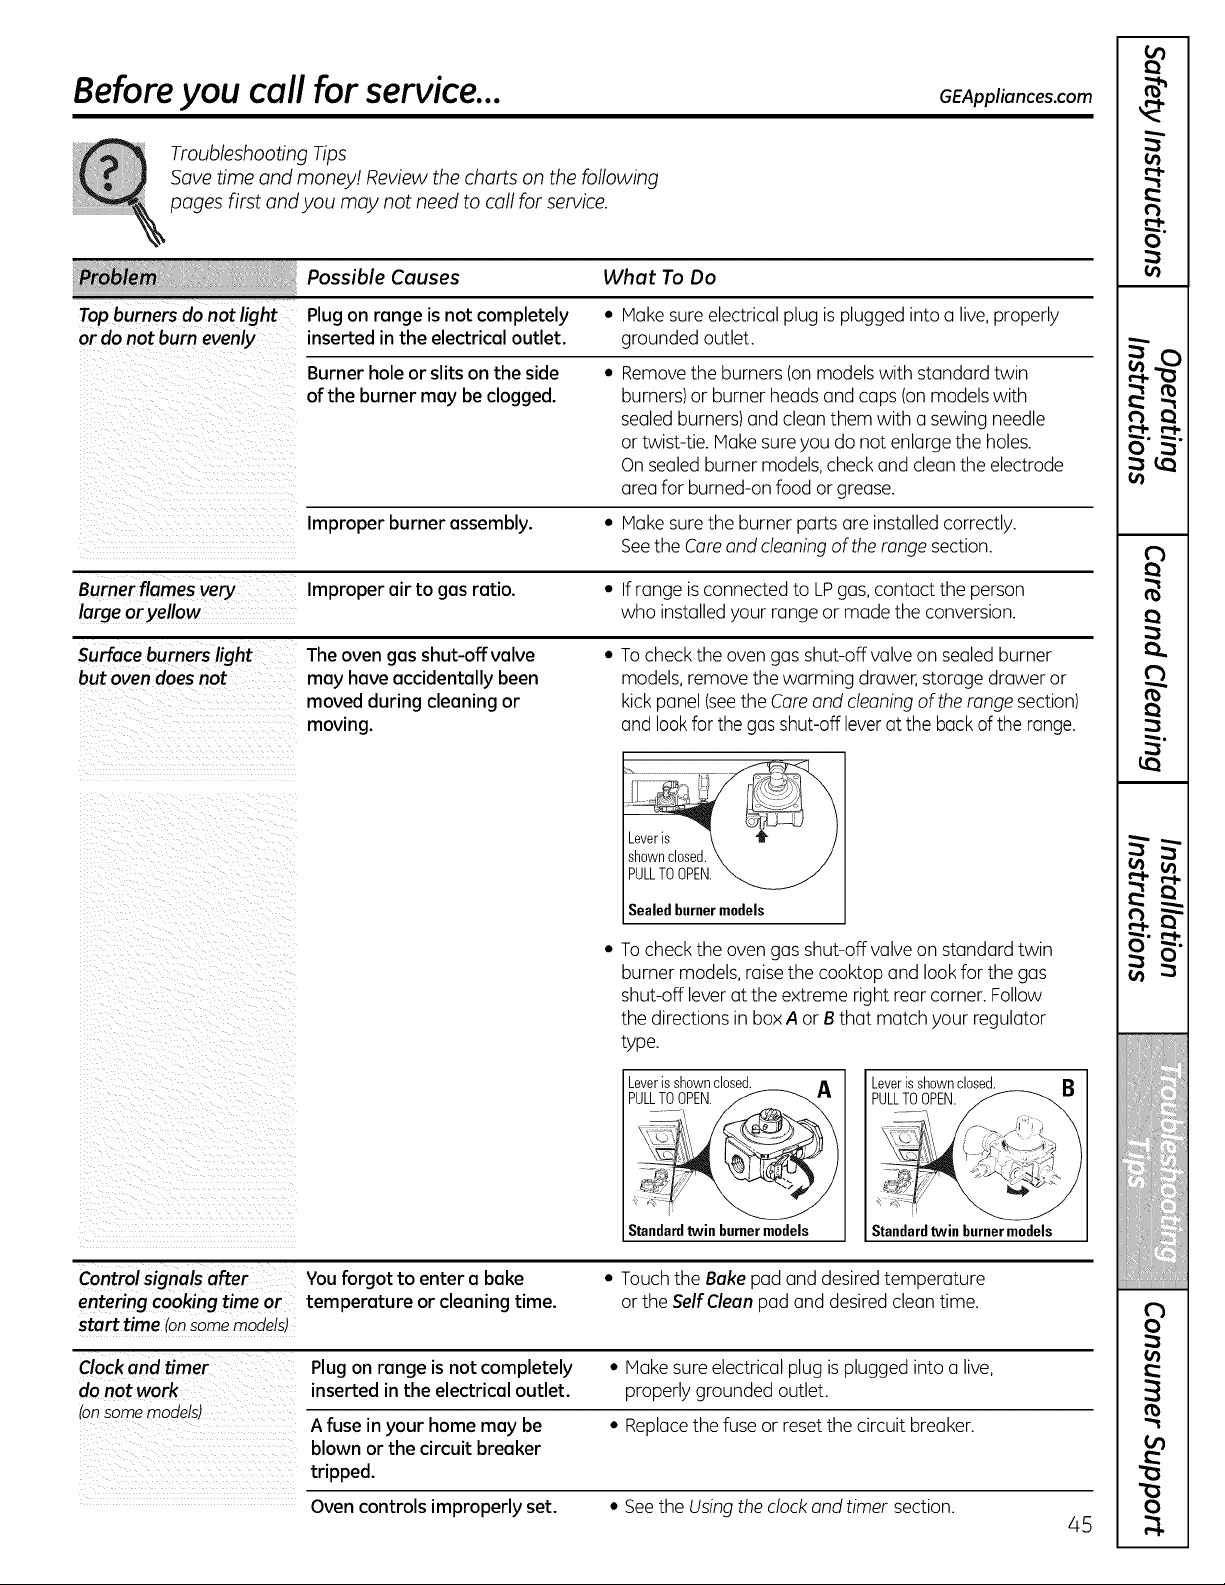
Before you call for service...
Troubleshooting Tips
Savetime and money/. Review the charts on the following
pages first and you may not need to call for service.
GEAppliances.com
What To Do
Top burners do notlight * Hake sureelectrical plug isplugged intoa live,properly
or do not burn evenly grounded outlet.
Possible Causes
Plug on range isnot completely
inserted in the electrical outlet.
Burner hole or slits on the side
ofthe burner may be clogged.
• Removetheburners(on models with standard twin
burners) or burner headsand caps (on models with
sealed burners) and clean them with a sewing needle
or twist-tie. Hake sure you do not enlarge theholes.
On sealed burner models, check and clean theelectrode
area for burned-on food or grease.
Improper burner assembly. • Hake sure the burner parts are installed correctly.
Seethe Coreand cleaning oftherange section.
Burner flames very Improper air to gas ratio. • Ifrange is connected to LPgas, contact the person
large oryellow who installedyour range or made theconversion.
Surface burners light The oven gasshut-off valve • To checktheovengasshut-off valve on sealedburner
but ovendoesnot may haveaccidentally been models, remove thewarming drawer, storage drawer or
moved during cleaning or kickpanel (seetheCare and cleaning oftherange section)
moving, and lookforthegas shut-off leveratthe backoftherange.
Leveris
shownclosed.
PULLTOOPEN.
Sealedburnermodels
To checktheovengasshut-off valve on standard twin
burner models, raise the cooktopand lookforthegas
shut-off lever attheextreme rightrear corner. Follow
thedirectionsin box A or B that matchyour regulator
type.
_jVLeLr_sh_EW_c_
Standardtwinburnermodels Standardtwin burnermodels
Controlsignals after Youforgot to enter a bake
entering cooking time or temperature or cleaning time.
start time Ionsomemodels)
• Touch the Bakepad and desired temperature
or the Self Clean pad and desired cleantime.
Clock and timer Plug on range isnot completely • Hake sure electrical plug is plugged into a live,
do not work inserted in the electrical outlet, properlygrounded outlet.
tonsomemodels)
A fuse in your home may be • Rephce thefuse or reset thecircuit breaker.
blown or the circuit breaker
tripped.
Ovencontrols improperly set. • See theUsingtheclock and timer section.
45
m
)
O
r:'
m
O"
ii!iiiiiiliiil
;i:::_ii!iiiii_i!
!:i!:'!!ii::::i!:iii!
)
£
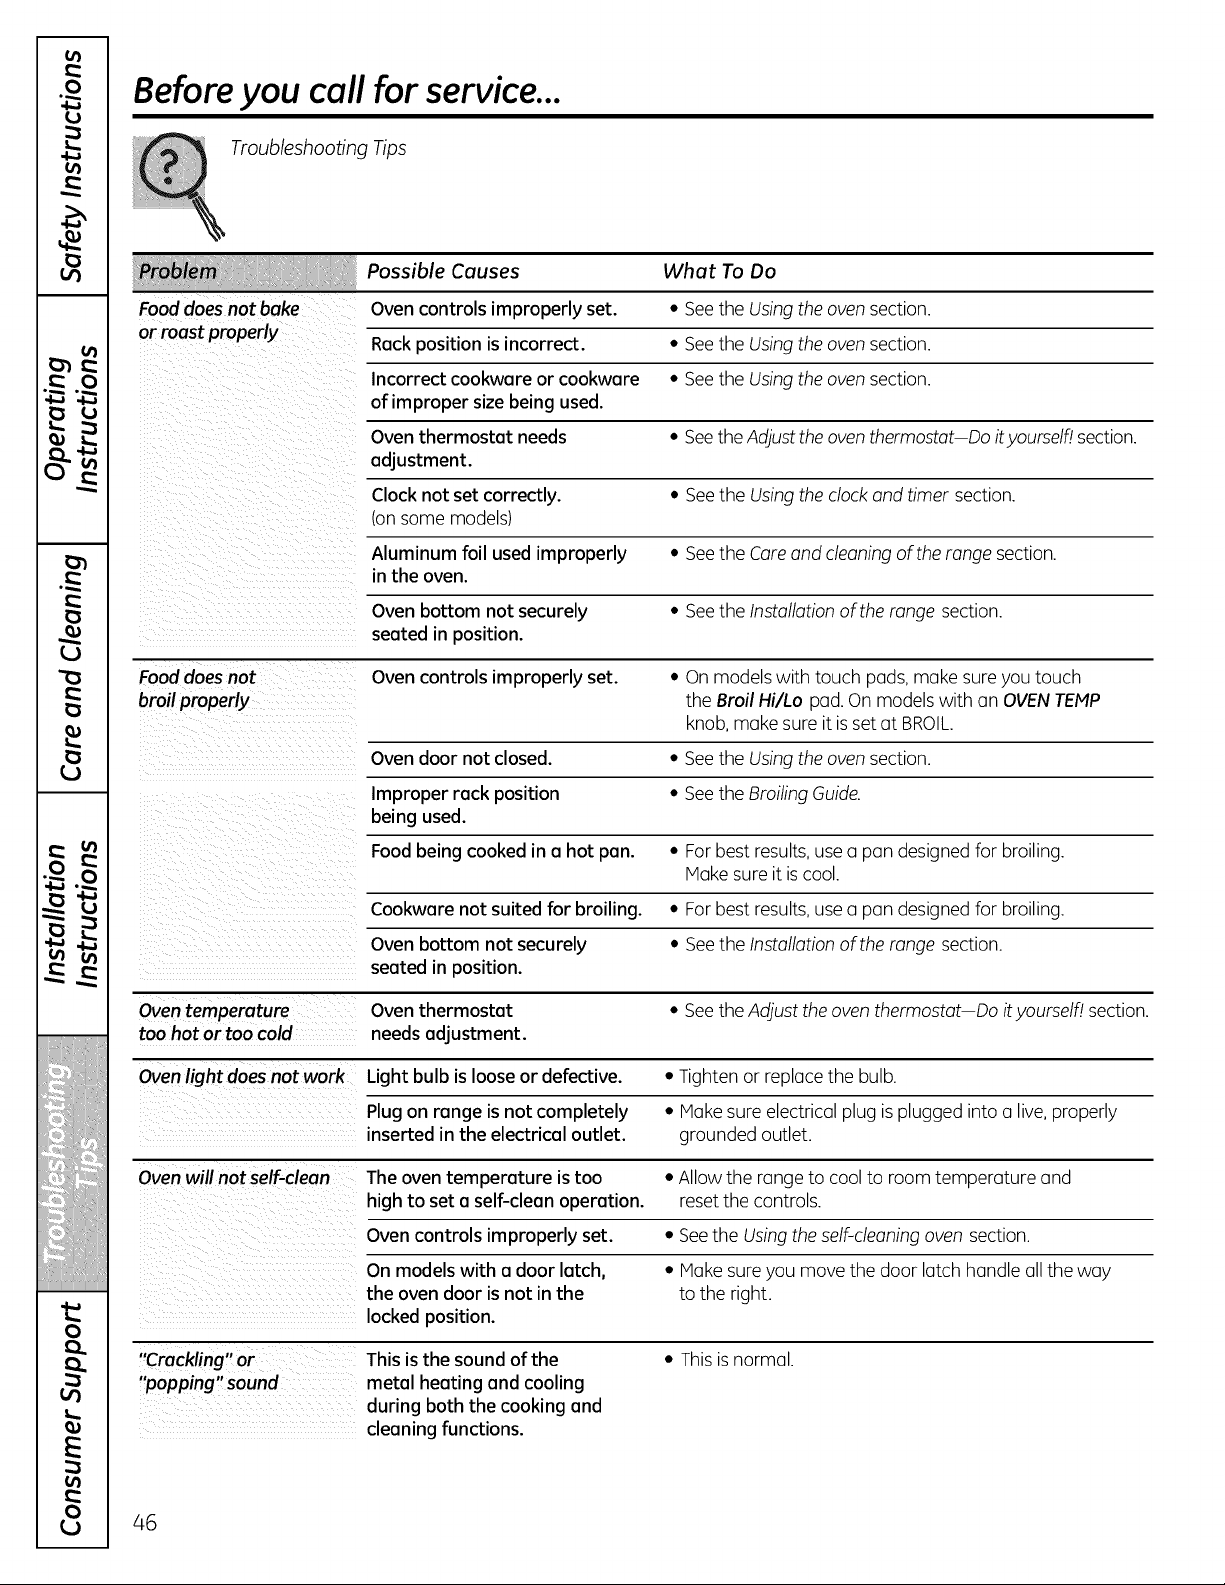
v
m
(J
(J
v
w L
_J I#
!!!_i_i_i!ij_iiiiiiii!iiiiiiiii!!ii_iiiii!
iliiiiH/l! iiii!l i!
0
E
0
Before you call for service...
Troubleshooting Tips
Possible Causes What To Do
Food doesnot bake Ovencontrols improperly set. • SeetheUsing theoven section.
or roast properly Rackposition isincorrect. • See theUsingtheoven section.
Incorrect cookware or cookware • SeetheUsing theoven section.
of improper size being used.
Oventhermostat needs • Seethe Adjust the oven thermostat Do ityoursell_lsection.
adjustment.
Clock not set correctly. • Seethe Usingtheclock and timer section.
(onsome models)
Aluminum foil usedimproperly • SeetheCare and cleaningof therange section.
in the oven.
Ovenbottom not securely • SeetheInstallation oftherange section.
seated in position.
Fooddoes not Ovencontrols improperly set. • On models with touch pads, make sure youtouch
broilproperly the Broil Hi/Lo pad.On models with an OVENTEMP
knob,make sureitis set atBROIL.
Ovendoor not closed. • SeetheUsing theoven section.
Improper rack position • See theBroiling Guide.
being used.
Foodbeing cooked in a hot pan. • For best results, use a pan designedforbroiling.
Hake sureitis cool.
Cookware not suited for broiling. • For best results,use a pan designedforbroiling.
Ovenbottom not securely • SeetheInstallation oftherange section.
seated in position.
Oven temperature Oventhermostat • Seethe Adjust the oventhermostat Doit yourself! section.
too hot or too cold needsadjustment.
Oven light doesnot work Light bulb is looseor defective. • Tighten or replace the bulb.
Plug on range isnot completely • Hake sureelectrical plug is plugged intoa live, properly
inserted in the electrical outlet, grounded outlet.
Oven will not self-clean Theoventemperature istoo • Allow the range to coolto roomtemperature and
high to set a self-clean operation, reset thecontrols.
Ovencontrols improperly set. • Seethe Using theself-cleaning ovensection.
On models with a door latch, • Hake sure you move thedoor latch handle all theway
the ovendoor isnot in the tothe right.
locked position.
This isthe soundof the • This is normal.
"popping" sound metal heating and cooling
during both the cooking and
cleaning functions.
46
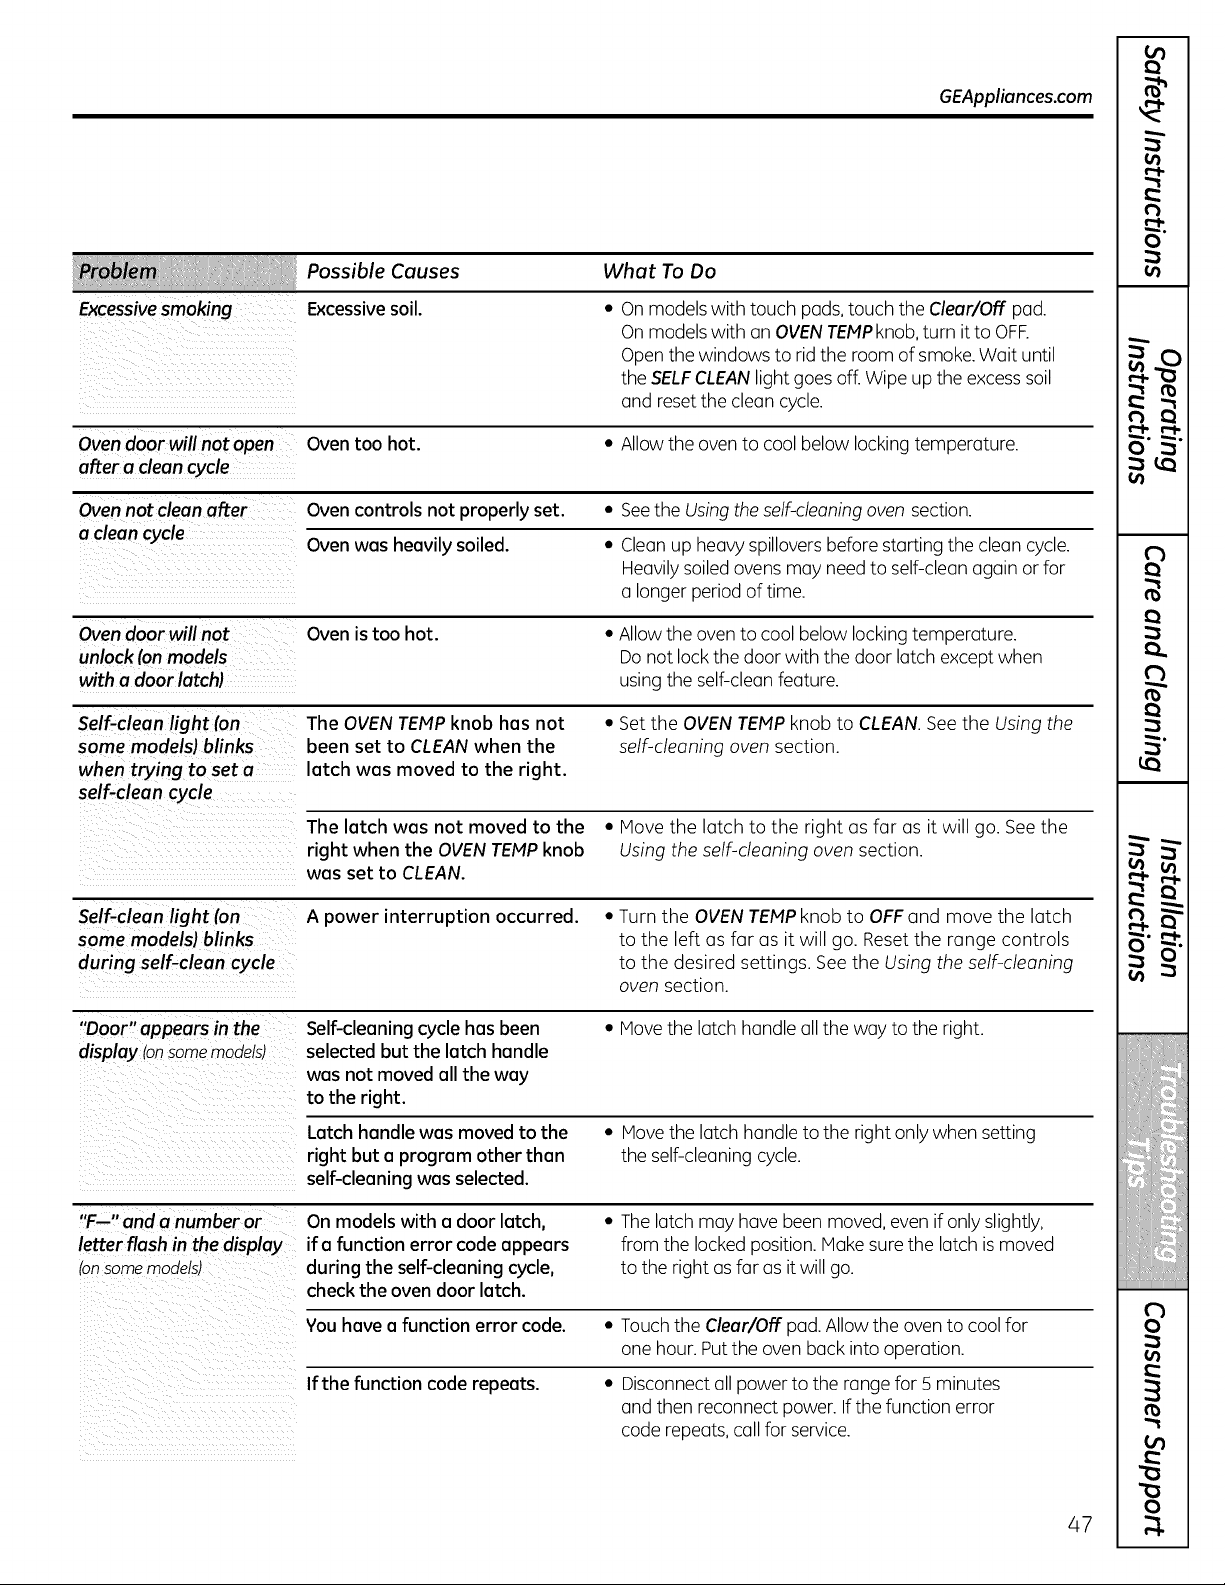
Excessivesmoking
GEAppliances.com
Possible Causes What To Do
Excessive soil.
• On models with touch pads,touch theClear/Off pad.
On models with an OVENTEMPknob, turn itto OFF.
Open thewindows torid the room ofsmoke.Wait until
theSELFCLEANlightgoesoff. Wipeup theexcesssoil
and reset thecleancycle.
Oven door will not open
after a cleancycle
Oventoo hot.
• Allow the oven to coolbelowlocking temperature.
Oven not clean after
a clean cycle
Oven controls not properly set. • Seethe Using the self-cleaning oven section.
Ovenwas heavily soiled. • Clean up heavy spillovers beforestartingthe clean cycle.
Heavilysoiled ovens may need to self-cleanagain or for
a longer period of time.
Oven door will not
unlock fan models
with a door latchl
Ovenistoo hot.
• Allow the oven to coolbelow lockingtemperature.
Do notlock thedoor with the door latch exceptwhen
usingtheself-clean feature.
Self-clean light ran The OVEN TEMPknob has not • Setthe OVEN TEMP knob to CLEAN. Seethe Using the
some modelsl brinks been set to CLEAN when the self-cleaning oven section.
when trying to set a latch was moved to the right.
self-clean cycle
The latch was not moved to the • Move the latch to the right as far as itwill go. See the
right when the OVEN TEMP knob Using the self-cleaning oven section.
was set to CLEAN.
Self-clean light (on A power interruption occurred. • Turn the OVEN TEMP knob to OFF and move the latch
some modelsl blinks to the left as far as itwill go. Reset the range controls
during self-clean cycle to the desired settings. See the Using the self-cleaning
oven section.
"Door" appears in the
display (onsomemodelsJ
Self-cleaning cycle hasbeen
selected but the latch handle
was not moved all the way
to the right.
• Move thelatch handle all theway tothe right.
Latch handle was moved to the
right but a program other than
self-cleaning was selected.
• Movethelatch handle tothe rightonlywhensetting
theself-cleaningcycle.
"F--" and a number or
letter flash in the display
_'onsome modelsJ
On models with a door latch,
ifa function error codeappears
during the self-cleaning cycle,
checkthe oven door latch.
• The latch may havebeen moved, evenifonlyslightly,
from the locked position. Make sure the latch is moved
tothe rightas far asit willgo.
You havea function error code. • Touch the Clear/Off pad. Allowtheoventocoolfor
one hour. Put the ovenback intooperation.
If the function code repeats. • Disconnect all powerto therange for5 minutes
and thenreconnect power. If thefunction error
coderepeats, callforservice.
47
)
N
O
r:'
m
O"
ii!iiiiiiliiil
iE{{f!i:i_
Ziillifill
ii:i:_:_ii!iiiii_i!
)
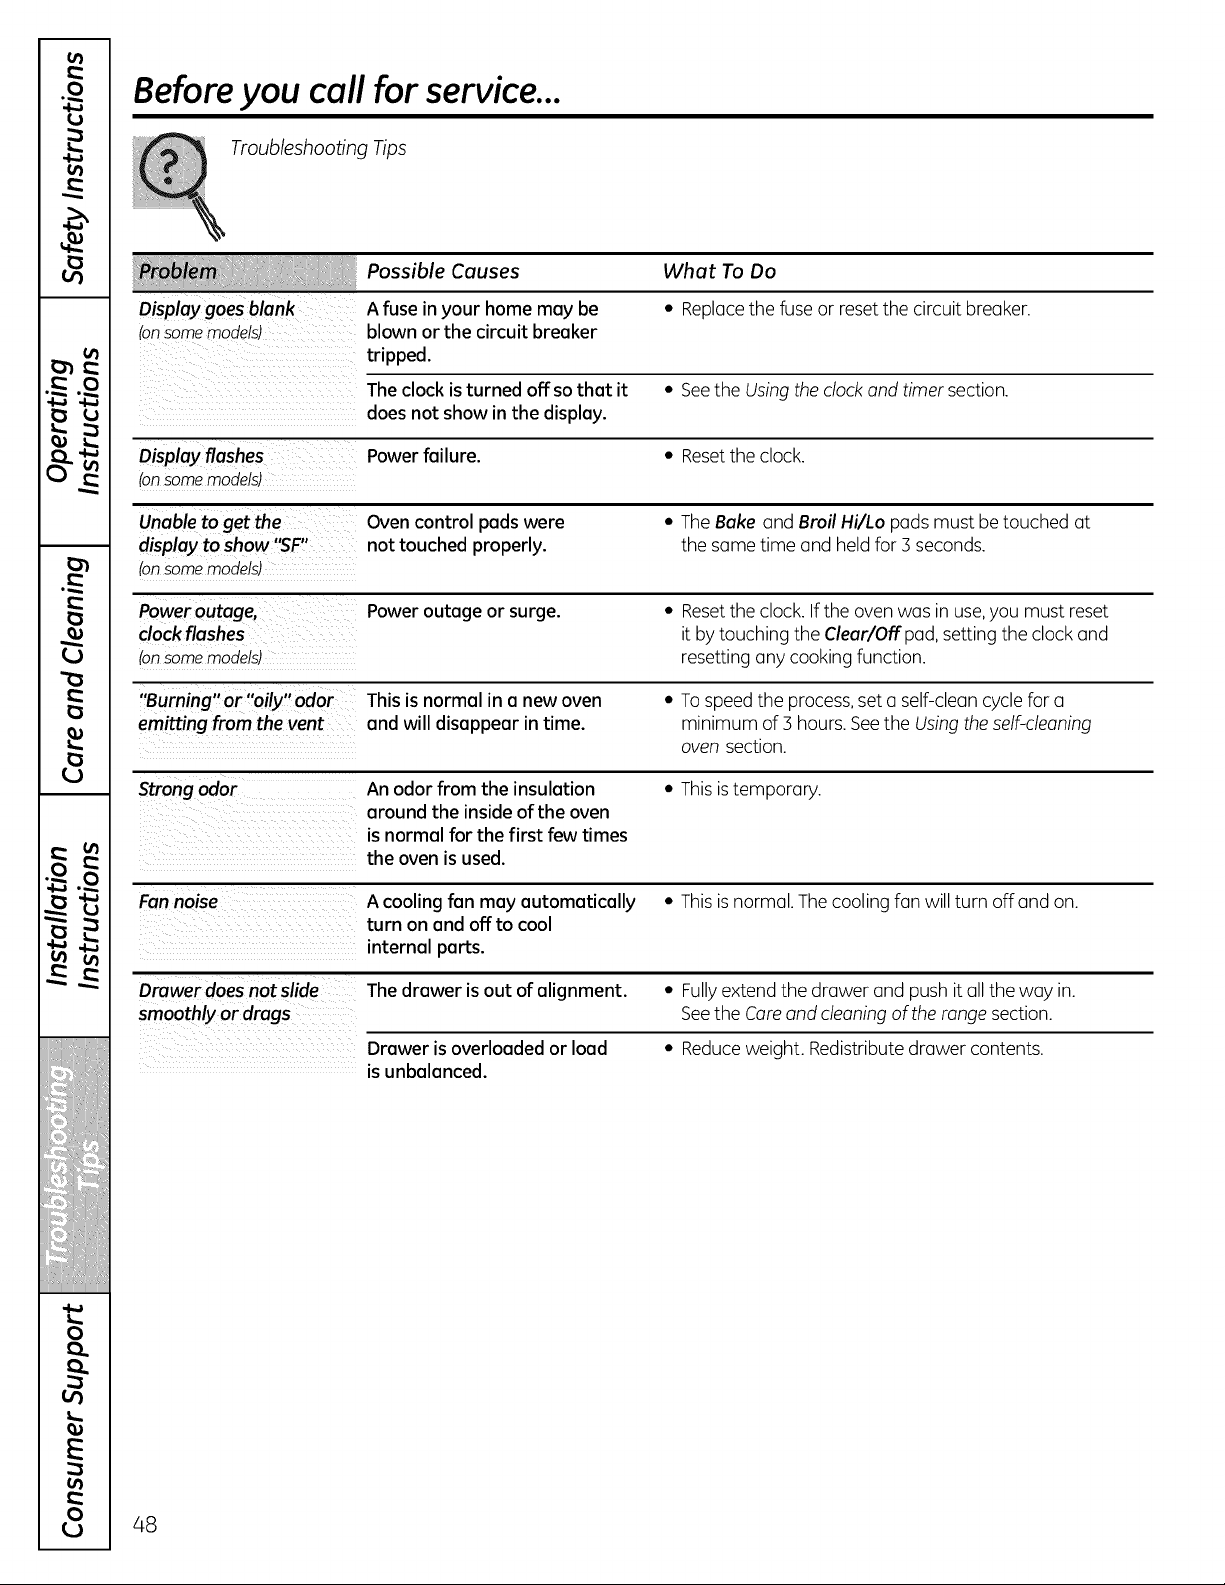
v
w
i
w,_ La]
v A
w . .
_ v
.-- L
iiiiiH/l! iiii!l il
i
0
E
0
Before you call for service...
Troubleshooting Tips
Possible Causes What To Do
Display goesblank A fuse in your home may be • Replacethefuse or reset thecircuitbreaker.
(onsomemodels) blown or the circuit breaker
tripped.
The clock isturned off sothat it • Seethe Usingtheclock and timer section.
doesnot show in the display.
Display flashes Powerfailure. • Resettheclock.
(onsomemodels)
Unableto get the Ovencontrol padswere • The Bake and Broil Hi/Lo padsmust be touched at
display toshow '_F" not touched properly, thesame time and held for3 seconds.
(onsomemodels)
Poweroutage, Poweroutage or surge. • Resettheclock. Iftheovenwas in use,youmust reset
clockflashes itbytouching the Clear/Offpad, settingtheclockand
(onsomemodels) resettinganycooking function.
"Burning" or "oily" odor This isnormal in a newoven • To speed the process,set a self-cleancycle fora
emitting from the vent and will disappear in time. minimum of3 hours. Seethe Using theself-cleaning
ovensection.
Strong odor An odor from the insulation • Thisis temporary.
around the insideofthe oven
isnormal for the first few times
the oven is used.
Fan noise A cooling fan may automatically • Thisis normal. The coolingfan willturn off and on.
turn on and off to cool
internal parts.
Drawer doesnotslide The drawer is out ofalignment. • Fullyextend thedrawer and pushitall theway in.
smoothly or drags Seethe Careand cleaning oftherange section.
Drawer isoverloaded or load • Reduceweight. Redistribute drawer contents.
isunbalanced.
48
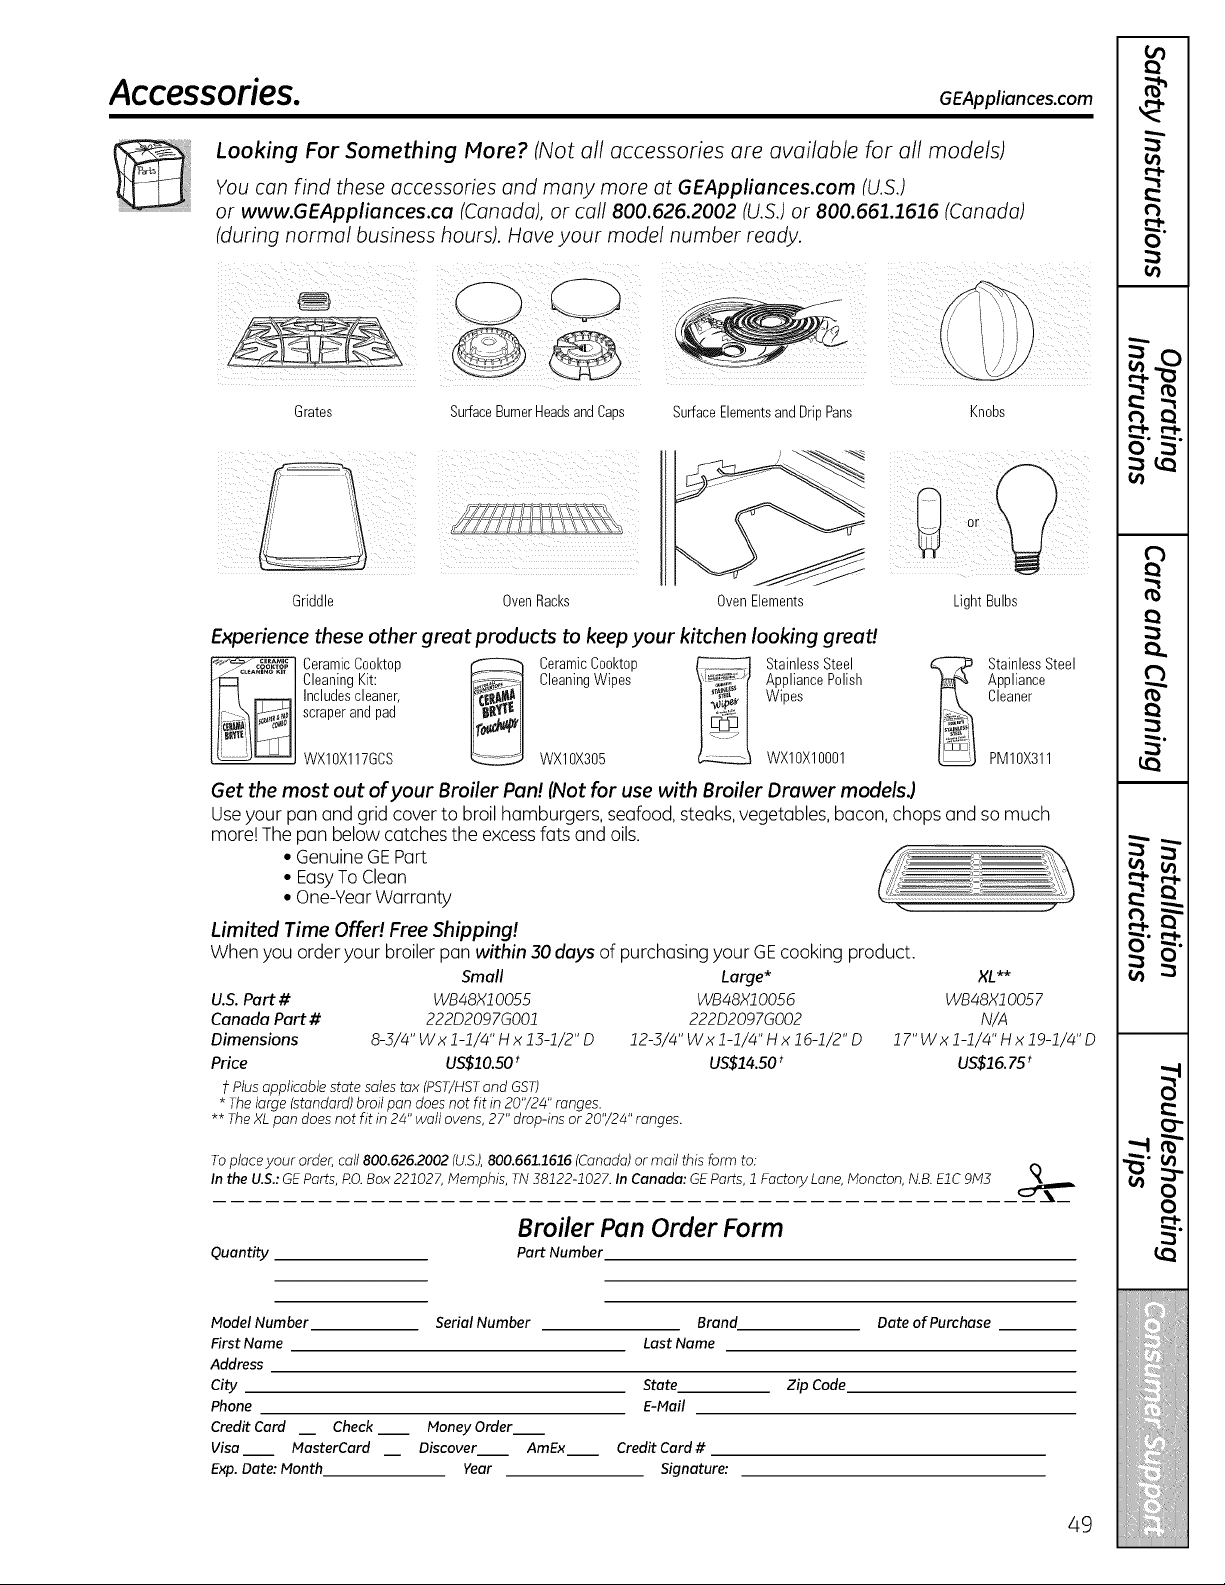
Acce.ssories. GEAppliances.co.
Looking For Something More? (Notall accessories are available for all models)
_'[_ You con find these accessories and many more at GEAppliances.com (U.S.)
: or www.GEAppliances.ca (Canada), or coil 800.626.2002 (U.S.)or 800.661.1616 (Canada)
(during normal business hours). Hove your model number ready.
Grates SurfaceBurnerHeadsandCaps SurfaceElementsandDripPans Knobs
Griddle OvenRacks OvenElements
i!il
LightBulbs
Experience these other great products to keepyour kitchen looking great!
[_ CeramicCooktop _ CeramicCooktop _ StainlessSteel _
CleaningKit: CleaningWipes AppliancePolish
Includescleaner, Wipes
scraperand pad
WXIOX117GCS WXIOX305 WX10X10001
StainlessSteel
Appliance
Cleaner
PM10X311
Get the most out ofyour Broiler Pan! (Not for use with Broiler Drawer modelsJ
Useyour pan and grid cover to broil hamburgers,seafood,steaks,vegetables, bacon, chops and somuch
more! Thepan belowcatches the excess fatsand oils.
• Genuine GE Part
• EasyTo Clean
• One-YearWarranty .. 1
Limited Time Offer! Free Shipping!
Whenyouorderyour broiler pan within 30 days ofpurchasing yourGEcooking product.
Small
U.S. Part # WB48Xl O055
Canada Part # 222D2097GO01
Dimensions 8-5/4" Wx 1-1/4"H x 15-1/2" D
Price US$10.50 t
Plus applicable state salestax (PST/HSTand GST)
* Thelarge (standard) broilpan doesnotfit in 20"/24" ranges.
Large* XL**
WB48X10056 WB48X1005 7
222D2097GO02 N/A
12-3/4"Wxl-1/4"HxlG-1/2"D 17"Wxl-1/4"Hxlg-1/4"D
US$14.50 t US$16. 75 t
** TheXL pan doesnot fit in 24"wall ovens, 27"drop-ins or20"/24" ranges.
Toplace your order,call 800.626.2002(U.S.),800.661.1616 (Canada)ormail thisform to:
Inthe U.$.: GEParts, RO.Box221027,Memphis, TN 38122-1027.InCanada: GEParts,1FactoryLane,Moncton, N.B.EIC 9M3
Quantity
Broiler Pan Order Form
Part Number
Model Number
First Name
Address
City
Phone
Credit Card
Visa
Exp.Date: Month
Check
NasterCard
Serial Number
Money Order
Discover AmEx
Year
Brand Date of Purchase
Last Name
State Zip Code
E-Mail
Credit Card#
Signature:
49
GEGas Range Warranty. iForcustomerstheunitedstotesl
All warranty service provided by our Factory Service Centers,
or an authorized Customer Care ®technician. To schedule
service, visit us on-line at GEAppliances.com, or call
800.GE.CARES (800.432.2737). Pleasehave serial number and
model number available when calling for service.
Staple your receipt here.
Proof of the original purchase
dote is needed to obtain service
under the warranty.
Fromthe doteof the
original purchase
GE Will Replace:
Any part ofthe range which fails due to a defectin materials or workmanship. During this
limited one-year warranty, GEwillalsoprovide, freeof charge, all labor and in-home service
to replace thedefective part.
Service trips to your hometo teach you how to use
the product.
Improper installation, delivery or maintenance.
Failureofthe product if it is abused, misused,
or used for other than the intended purpose or
used commercially.
Replacement of house fuses or resetting of circuit
breakers.
Damage to the product caused by accident, fire, floods
or acts of God.
Incidental or consequential damage caused bypossible
defects with this appliance.
Damage caused after delivery.
Product not accessible to provide required service.
EXCLUSION OF IMPLIED WARRANTIES--Your sole and exclusive remedy isproduct repair as provided
in this Limited Warranty. Any implied warranties, including the implied warranties of merchantability
or fitness for a particular purpose, are limited to one year or theshortest period allowed by law.
This warranty is extended to the original purchaser and any succeeding owner for products purchased
for home use within the USA. If the product is located in an area where service by a GE Authorized Servicer
is not available, you may be responsible for a trip charge or you may be required to bring the product to an
Authorized GE Service Location for service. In Alaska, the warranty excludes the cost of shipping or service calls
to your home.
Some states do not allow the exclusion or limitation of incidental or consequential damages. This warranty
gives you specific legal rights, and you may also have other rights which vary from state to state. Toknow
what your legal rights are, consult your local or state consumer affairs office or your state's Attorney General.
Warrantor: General Electric Company. Louisville, KY 40225
50
Service trips to your hometo teach you howto use
the product.
Improper installation, delivery or maintenance.
Failure ofthe product if itisabused, misused,
or usedfor other than the intended purpose or
usedcommercially.
Replacement of house fuses or resetting of circuit
breakers.
Damage to the product caused byaccident, fire, floods
or acts ofGod.
Incidental or consequential damage caused bypossible
defectswith this appliance.
Damage causedafterdelivery.
Product not accessibleto provide required service.
EXCLUSION OF IMPLIED WARRANTIES--Your sole and exclusive remedy isproduct repair as provided
in this Limited Warranty. Any implied warranties, including the implied warranties of merchantability
or fitness for a particular purpose, are limited to one year or theshortest period allowed by law.
This warranty is extended to the original purchaser and any succeeding owner for products purchased in
Canada for home use within Canada. In-home warranty service will be provided in areas where it is available
and deemed reasonable by Mabe to provide.
Some provinces do not allow the exclusion or limitation of incidental or consequential damages, so the above
exclusion may not apply to you. This warranty gives you specific legal rights, and you may also have other
rights which vary from province to province. To know what your legal rights are in your province, consult your
local provincial consumer affairs office.
Warrantor: Mabe Canada Inc.
Burlington, Ontario
$1

Consumer Support.
GEAppliances Website Inthe U.S.:GEAppliances.com
Have a question or need assistance with your appliance? Try the GEAppliances Website2/4hoursa day,
anydayoftheyear! For greaterconvenienceand fasterservice,youcannow download Owner'sManuals,
order parts or even schedule service on-line.In Canada: www.GEAppliances.ca
Schedule Service In the U.S.:GEAppliances.com
Expert GErepair service isonly one step away from your door. Get on-line and schedule your service at your
convenience any day of the year! Or call 800.GE.CARES(800.432.2737) during normal business hours.
In Canada, call 1.800.561.3344
Real Life Design Studio In the o.s.:GEAppliances.com
GEsupportsthe Universal Designconcept-products, servicesand environments that canbe used bypeople ofall
ages,sizesand capabilities. Werecognizethe need to design fora wide range ofphysical and mental abilities and
impairments. For details ofGE'sUniversal Designapplications, includingkitchendesignideas for people with disabilities,
checkoutour Website today. Forthe hearing impaired, please call800.TDD.GEAC(800.833.4322).
InCanada, contact: IVlanager,ConsumerRelations,IVlabeCanadaInc.
Suite 310,1 Factory Lane
IVloncton,N.B.E1C91v13
Extended Warranties
Inthe U.S.:GEAppliances.com
Purchasea GEextended warranty and learn about special discounts that are availablewhileyourwarranty is still
in effect.You canpurchase it on-line anytime, or call800.626.2224during normal business hours.GE Consumer Home
Serviceswillstill be thereafter yourwarranty expires. In Canada, call 1.888.261.2133
Parts and Accessories
Inthe U.S.:GEAppliances.com
Individualsqualifiedto service theirown appliances can have parts or accessoriessent directly to their homes (VISA,
IVlasterCardand Discovercards are accepted).Order on-line today,2/4hourseveryday or byphone at
800.626.2002during normal business hours.
Instructions contained in this manual cover procedures to be performed by any user. Other servicing generally
should be referred to qualified service personnel. Caution must be exercised, since improper servicing may cause
unsafe operation.
Customers inCanada should consult the yellow pages for the nearest Habe service center, or call 1.800.661.1616.
Contact Us
Inthe U.S.:GEAppliances.com
If youare notsatisfied with theservice youreceive from GE,contact us on our Websitewith allthe details including
yourphone number, or write to: General Manager,Customer Relations
GEAppliances, AppliancePark
Louisville,KY40225
InCanada: www.GEAppliances.ca,or write to: Director,ConsumerRelations,IVlabeCanadaInc.
Suite 310,1 Factory Lane
IVloncton,N.B.E1C91v13
l Register Your Appliance Inthe U.S.:GEAppliances.com
Registeryour new appliance on-line--at your convenience! Timelyproduct registrationwillallowfor enhanced
communication and prompt service under the termsofyourwarranty, should the need arise. Youmay alsomail
in the pre-printed registrationcard includedinthe packing material.InCanada: www.GEAppliances.ca
Printed in Mexico
Thisbook isprinted on recycled paper.

