Loading ...
Loading ...
Loading ...
Diagnostic Code Chart Electronic Thermostat (ET)
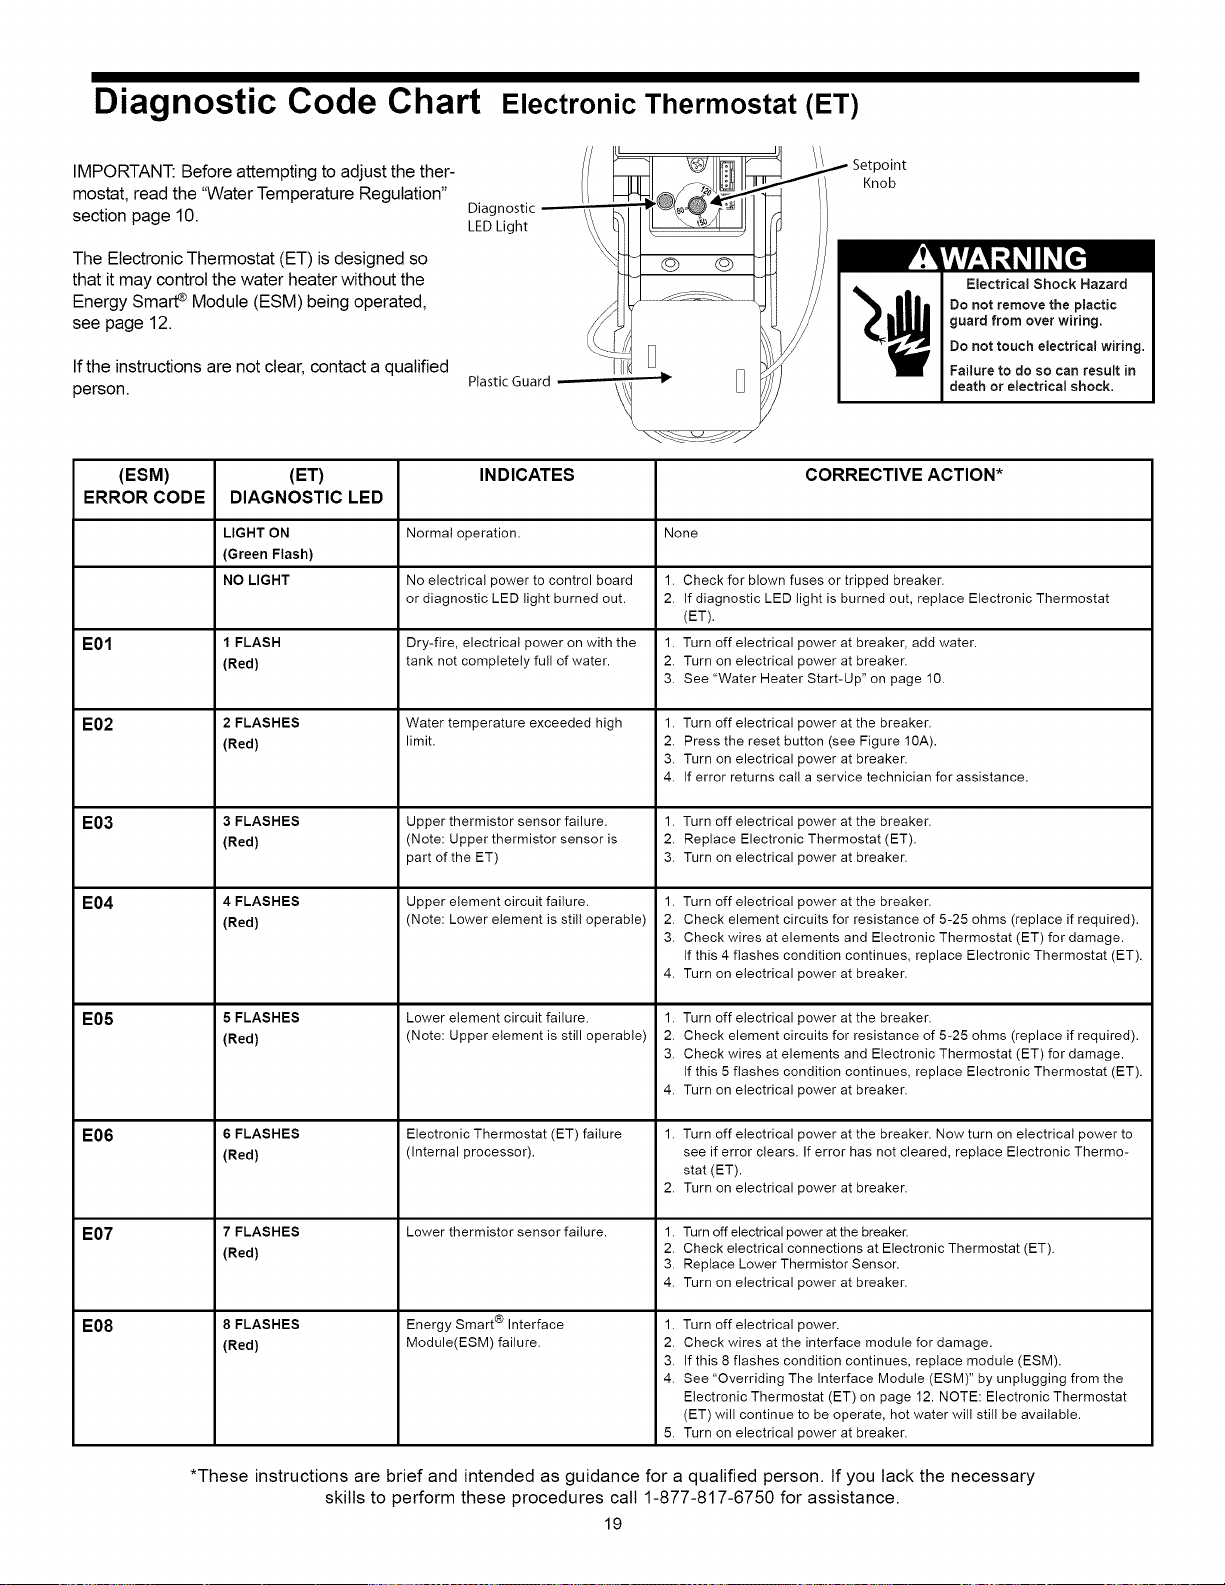
IMPORTANT: Before attempting to adjust the ther-
mostat, read the "Water Temperature Regulation"
section page 10.
The Electronic Thermostat (ET) is designed so
that it may control the water heater without the
Energy Smart_ Module (ESM) being operated,
see page 12.
If the instructions are not clear, contact a qualified
person.
Diag
LED Light
Plastic Guard --
Setpoint
Knob
Electrical Shock Hazard
Do not remove the plactic
guard from over wiring.
Do not touch electrical wiring.
Failure to do so can result in
death or electrical shock.
(ESM) (ET) INDICATES CORRECTIVE ACTION*
ERROR CODE DIAGNOSTIC LED
LIGHT ON Normal operation. None
(Green Flash)
NO LIGHT No electrical power to control board 1. Check for blown fuses or tripped breaker.
or diagnostic LED light burned out. 2. If diagnostic LED light is burned out, replace Electronic Thermostat
(ET).
E01 1 FLASH Dry-fire, electrical power on with the 1. Turn off electrical power at breaker, add water.
(Red) tank not completely full of water. 2. Turn on electrical power at breaker.
3. See "Water Heater Start-Up" on page 10.
E02 2 FLASHES Water temperature exceeded high 1. Turn off electrical power at the breaker.
(Red) limit. 2. Press the reset button (see Figure 10A).
3. Turn on electrical power at breaker.
4. If error returns call a service technician for assistance.
E03 3 FLASHES Upper thermistor sensor failure. 1. Turn off electrical power at the breaker.
(Red) (Note: Upper thermistor sensor is 2. Replace Electronic Thermostat (ET).
part of the ET) 3. Turn on electrical power at breaker.
E04 4 FLASHES Upper element circuit failure.
(Red) (Note: Lower element is still operable)
E05
E06
E07
E08
5 FLASHES
(Red)
6 FLASHES
(Red)
7 FLASHES
(Red)
8 FLASHES
(Red)
Lower element circuit failure.
(Note: Upper element is still operable)
Electronic Thermostat (ET) failure
(Internal processor).
Lower thermistor sensor failure.
Energy Smart ® Interface
Module(ESM) failure.
1.
2.
3.
4.
Turn off electrical power at the breaker.
Check element circuits for resistance of 5-25 ohms (replace if required).
Check wires at elements and Electronic Thermostat (ET) for damage.
If this 4 flashes condition continues, replace Electronic Thermostat (ET).
Turn on electrical power at breaker.
1. Turn off electrical power at the breaker.
2. Check element circuits for resistance of 5-25 ohms (replace if required).
3. Check wires at elements and Electronic Thermostat (ET) for damage.
If this 5 flashes condition continues, replace Electronic Thermostat (ET).
4. Turn on electrical power at breaker.
1. Turn off electrical power at the breaker. Now turn on electrical power to
see if error clears. If error has not cleared, replace Electronic Thermo-
stat (ET).
2. Turn on electrical power at breaker.
1. Turn off electrical power at the breaker.
2. Check electrical connections at Electronic Thermostat (ET).
3. Replace Lower Thermistor Sensor.
4. Turn on electrical power at breaker.
1. Turn off electrical power.
2. Check wires at the interface module for damage.
3. If this 8 flashes condition continues, replace module (ESM).
4. See "Overriding The Interface Module (ESM)" by unplugging from the
Electronic Thermostat (ET) on page 12. NOTE: Electronic Thermostat
(ET) will continue to be operate, hot water will still be available.
5. Turn on electrical power at breaker.
*These instructions are brief and intended as guidance for a qualified person. If you lack the necessary
skills to perform these procedures call 1-877-817-6750 for assistance.
19
Loading ...
Loading ...
Loading ...