Owner's Manual
Manual Del Propietario
Vacuum Cleaner
Aspiradora
Model, Modelo
116.34924
116.34925
CAUTION:
Read and follow all
safety and operating
instructions before first
use of this producL
CUlDADO:
Lea y sigue todas las
instrucciones de operaci6n
y seguridad antes del uso de
este productoo
Sears, Roebuck and Co.,,Hoffman Estates, IL 60179 U.S.A.
www.sears.com
PartNo, C01ZCJN40UOO-KCO IZCJ NZOUO
Printed in Mexico
Impreso en Mexico
Before Using "Your New
_-. :_:::_Vacuum Cleaner-_..
Kenmore Vacuum Cleaner Warranty ..._ 2
Important Safety Instructions ......... 3:
Upright Vacuum Cleaner Parts and
Features ................ 4
Assembly Instructions ........... 5-6
Operating Instructions ............... 6
Cord Release ................... 7
Releaseing the Handle ............... 7
Touch Control .............. 7
Pile Height Selection and Setting ........ 8
Attachments .............. 8-I0
Attachment Use Chart ....... 11
....... ::_::"Wacuuming Tips ................. 11
Performance/Safety Features ..... 12_13
' r- =_, 1
Vac_uum Cleaner Care .......... 14
vacuum Cleaner Storage .......... I4
Cleaning Exterior and Attachments .... t4
Dust Bag Replacement .......... 15
Filter Replacement .............. 16
Light Bulb Replacement ........ 17
Agitator Cleaning ......... 17
Clog Removal .................. 18
Troubleshooting .................. 19
Requesting Assistance Or Service back page
Please read this guider It will help you assemble and operate your new Kenmore vacuum
cleaner in the safest and most effective way.
For more information about vacuum cleaner care and operation, call your nearest Sears store,.
You will need the complete model and serial numbers when requesting information Your vacu-
um cleaner's model and serial number are located on the Model and Serial Number Plate.
Use the space below to record the model number and serial number of your new Kenmore
vacuum cleaner.
Model No,
Serial No.
Date of Purchase
Keep this book and your sales check (receipt) in a safe place for future reference,
LIMITED ONE YEAR WARRANTY ON KENMORE VACUUM CLEANER
This warranty is for one year from the date of purchase, and includes only private household
vacuum cleaner use., During the warranty year, when this vacuum cleaner is operated and
maintained according to the owner's manual instructions, Sears will repair any defects in
material or workmanship free of charge.
This warranty excludes vacuum cleaner bags, belts, light bulbs, and filters, which are
expendable parts and become worn during normal use.
For warranty service, return this vacuum cleaner to the nearest Sears Service Center in
the United States,
This warranty applies only while this product is in use in the United States, This warranty gives
you specific legal rights, and you may also have other rights which vary from state to state,
Sears, Roebuck and Co., D/817 WA, Hoffman Estates, IL 60179
2
J A D _.l _ • Your safety is important to us.To reduce the risk
V V_"&I_ l_ %;_. of fire, electrical shock, injury to persons or
damage when using your vacuum cleaner, follow
basic safety precautions including the following:
Read all instructions in this manual before
assembling or using your vacuum cleaner
Use your vacuum cleaner only as
described in this manual Use only with
Sears recommended attachments,
Disconnect electrical supply before per-
forming maintenance to the brush area.
Failure to do so could result in electrical
shock or the brush suddenly starting
Do not leave vacuum cleaner when
plugged in.. Unplug from outlet when not in
use and before preforming maintenance_
To reduce the risk of electrical shock - Do
not use outdoors or on wet surfaces.
Do not allow to be used as a toy.. Close
attention is necessary when used by or
near chifdreno
Do not use with a damaged cord or plug.
if vacuum cleaner is not working as it
should, has been dropped, damaged, left
outdoors or dropped in water return it to a
Sears Serv ce Center.
Do not pull or carry by cord, use cord as
a handle, close a door on cord, or pull cord
around sharp edges or corners. Do not run
vacuum cleaner over cord. Keep cord
away from heated surfaces,
Do not unplug by pulling on cord. To
unplug, grasp the plug, not the cord.
Do not handle plug or vacuum cleaner with
wet hands
Do not put any objects into openings.
Do not use with any opening blocked;
keep free of dust, lint, hair, and anything
that may reduce air flow,
Keep hair, loose clothing, fingers, and all
parts of body away from openings and
moving parts.
Turn off all controls before unplugging
Do not rest vacuum cleaner on steps..
Do not put on chairs, tables, etc, Keep on
floor.
Do not use vacuum cleaner to pick up_
flammable or combustible liquids (gaso-_
line, cleaning fluid, perfumes, etco), or use_
in areas where they may be present° Thei_
fumes from these substances can create a _,_
fire hazard or explosion
D°onk°ntgp'CkjcUPaanYct_angelheast,i_nb_r_2 o°rr!_
hot ashes.
Do not use vacuum cleaner without dust
bag andlor filters in place.
Always change the dust bag after vacu-
uming carpet cleaners or freshener, pow-
ders, and fine dust, These products clog
the bag, reduce airflow and can cause the
bag to burst, Failure to change the bag
promptly could cause permanent damage
to the cleaner_
Do not use the vacuum cleaner to pick up
sharp hard objects, small toys, pins, paper
clips, etc. They may damage the cleaner or
dust bag°
Do not operate vacuum cleaner without the
belt access door properly installed (if applica-
Ne).
The hose contains electrical wires. Do not
use when damaged, cut, or punctured. Do
Not pick up sharp objects,
Always turn off and unplug the vacuum
cleaner before connecting or disconnect-
ing either hose, Handi-mate Jr. (if applica-
ble) or Power-mate Jr, nozzle_
You are responsible for making sure that
your vacuum cleaner is not used by any-
one unable to operate it properly
SAVE THESE m STRUCTBO S
Proper assembly and safe use of your vacuum cleaner are your responsibilities. Your
vacuum cleaner is intended for Household use. Read this Owner's Manual carefully for
important use and safety information This guide contains safety statements under warn-
ing and caution symbols.
3
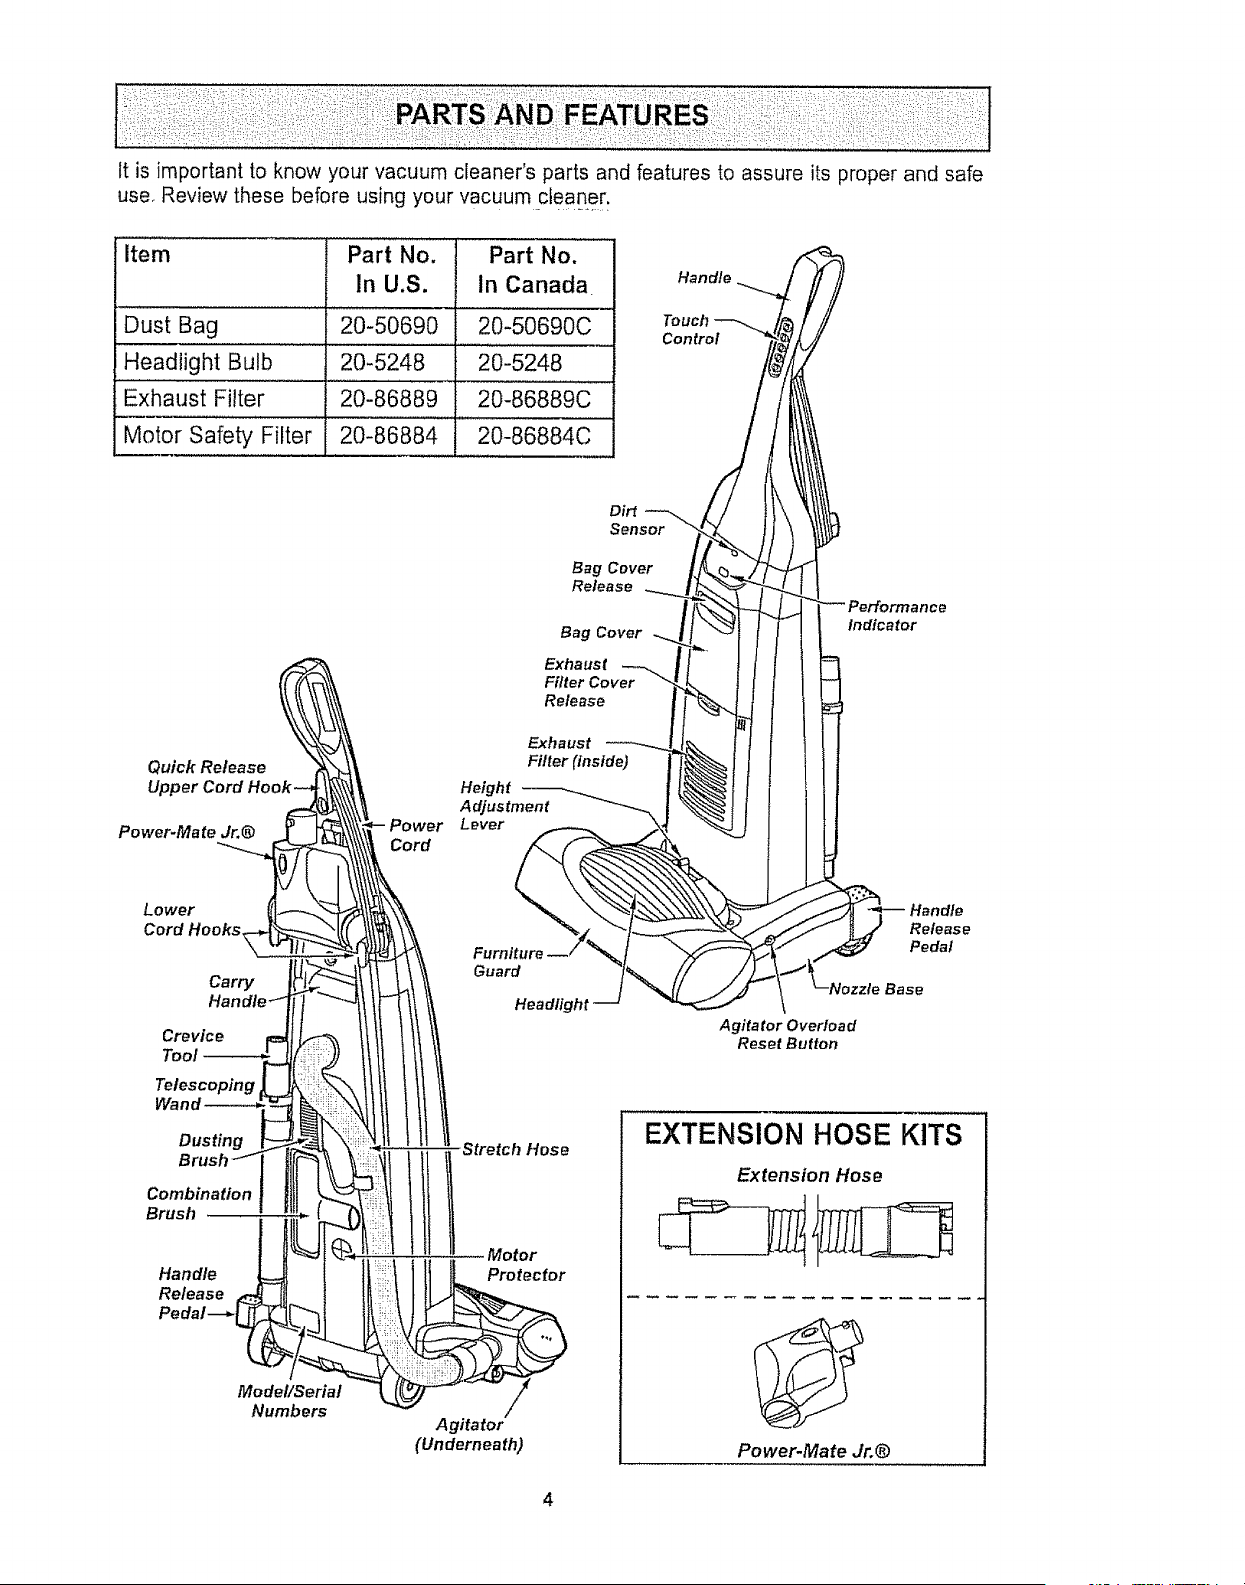
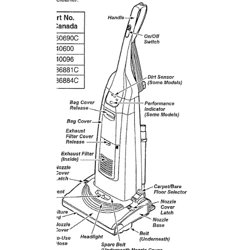
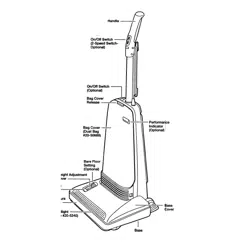
Itis importantto knowyourvacuumcleaner'spartsandfeaturesto assureits properandsafe
use,Reviewthesebeforeusingyourvacuumcleaner.
Item Part No. Part No.
In U,S. in Canada Handle_
Dust Bag 20-50690 20-50690C T_%_rho_
,,H,ead!ight Bulb 20-5248 ii 20-524.8 ...... /_
Exhaust Filter 20-86889 I 20-86889C //
Mo{oi Safety Filter: 20}86884 ............20-86884c .... i//
Dirt _ L / t}
oo.o,
,°,°°.°
Qulck Release E;thearU(tStnstde-_-_i_ I l l
Upper Cord h Height _ ! [_ f J {
Adjustment -_ml \.._t I i
Power-Mate Jr.@ Powe Lever _ ._4 _ ! I
Lower "%. \.. "_'_. _xx.\\\,'_ _ _
Crevice Agitator OveHoad
TeoJ Reset Burton
Indicator
Release
Pedal
Wand
Dusting
Combination
Brush
Handle
Release
Model/Serial
Numbers
Stretch Hose
Motor
Protector
Agitator
(Underneath)
EXTENSION HOSE KITS
Extension Hose
Power-Mate Jr.@
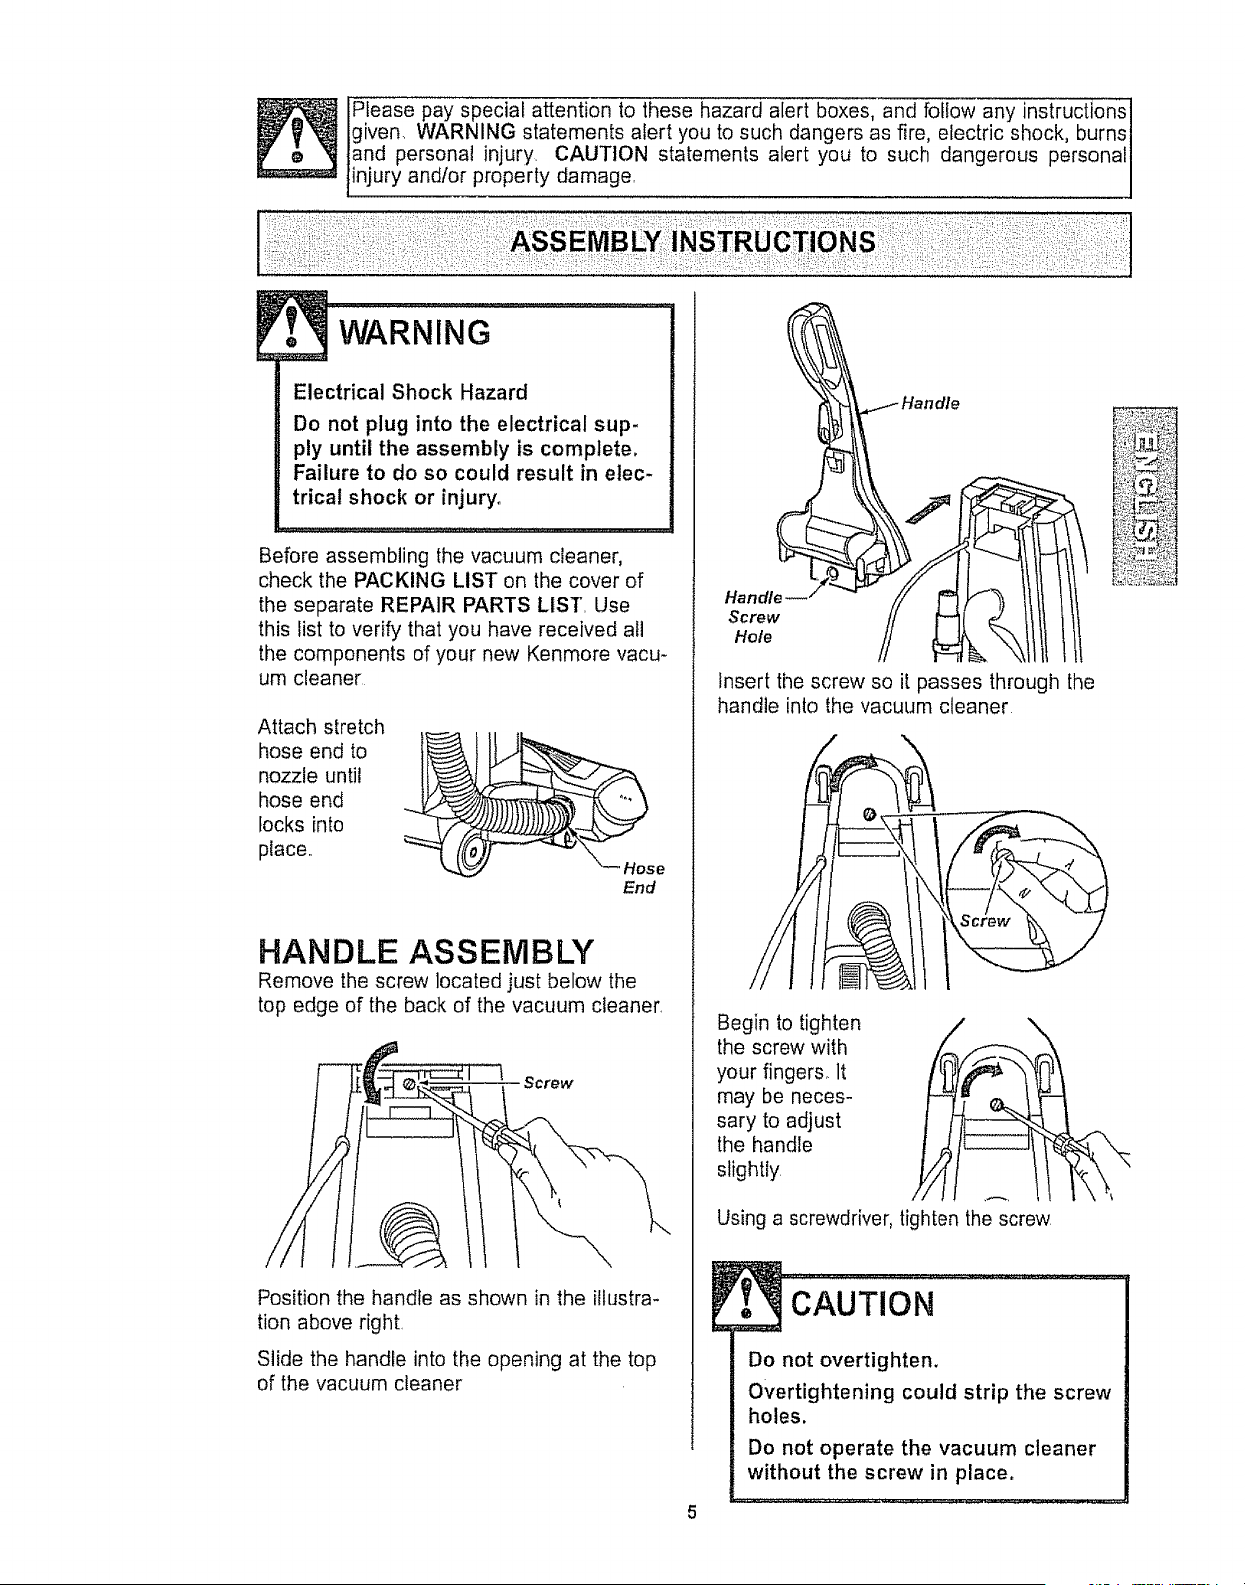
Please pay special attention to these hazard alert boxes, and follow any instructions
given. WARNING statements alert you to such dangers as fire, electric shock, burns
and personal injury CAUTION statements alert you to such dangerous personal
injury andtor property damage.
................... :::::::::::::::::::::::::::::::
WARNING ..........
Electrical Shock Hazard
Do not plug into the electrical sup-
ply until the assembly is complete,
Failure to do so could result in elec-
trical shock or injury,
Before assembling the vacuum cleaner,
check the PACKING LIST on the cover of
the separate REPAIR PARTS LIST, Use
this fist to verify that you have received all
the components of your new Kenmore vacu-
um cleaner
Attach stretch
hose end to
nozzle until
hose end
locks into
place,,
\_ Hose
End
HANDLE ASSEMBLY
Remove the screw located just below the
top edge of the back of the vacuum cleaner,
Screw
Position the handle as shown in the illustra-
tion above right
Slide the handle into the opening at the top
of the vacuum cleaner
Handle
Screw
Hole
Insert the screw so it passes through the
handle into the vacuum cleaner
Begin to tighten
the screw with /
your fingers_ It
l
may be neces-
sary to adjust
the handle
slightly
/ \
Using a screwdriver, tighten the screw
cAuTioN .............................i
Do not overtighten.
Overtightening could strip the screw
holes.
Do not operate the vacuum cleaner
without the screw in place.
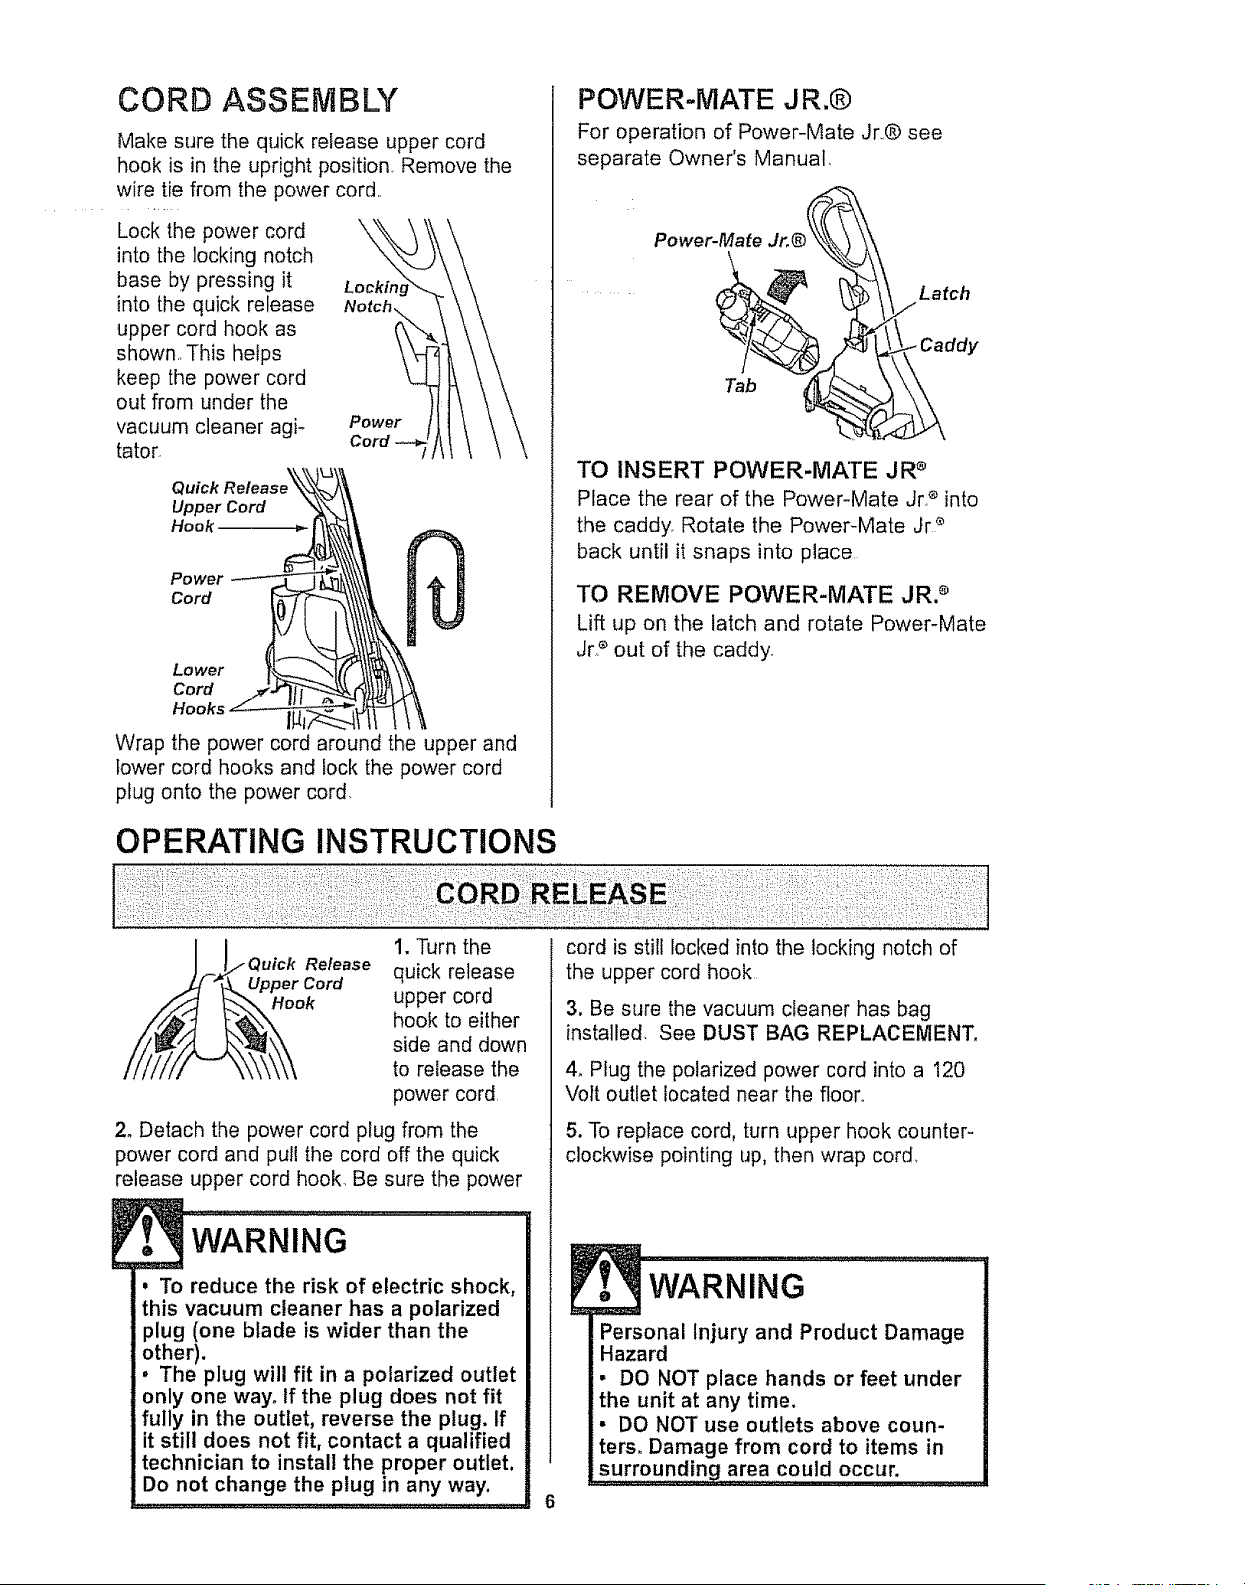
CORD ASSEMBLY
Make sure the quick release upper cord
hook is in the upright position Remove the
wire tie from the power cord,,
Lock the power cord \
into the locking notch
base by pressing it Lockh_
into the quick release
upper cord hook as
shown,. This helps
keep the power cord
out from under the
vacuum cleaner agi- Power
tator.
Quick
Upper Cord
Hook
Power
Cord
Lower
Cord
Wrap the power cord around the upper and
lower cord hooks and lock the power cord
plug onto the power cord.
POWER-MATE J R.®
For operation of Power-Mate Jr,,® see
separate Owner's Manual.
Power-Mate Jr,®_, !_/_/, Latch
TO INSERT POWER-MATE JR _'
Place the rear of the Power-Mate Jr _ into
the caddy_ Rotate the Power-Mate Jr *
back until it snaps into place,
TO REMOVE POWER-MATE JR. _
Lift up on the latch and rotate Power-Mate
Jr.e out of the caddy.
uick Release
Cord
Hook
1. Turn the
quick release
upper cord
hook to either
side and down
to release the
power cord,
2o Detach the power cord plug from the
power cord and pull the cord off the quick
release upper cord hook, Be sure the power
. To reduce the risk of electric shock,
this vacuum cleaner has a polarized
plug (one blade is wider than the
other).
. The plug will fit in a polarized outlet
only one way. If the plug does not fit
fully in the outlet, reverse the plug. If
it still does not fit, contact a qualified
technician to install the proper outlet,
Do not change the plug in any way.
cord is still locked into the locking notch of
the upper cord hook
3. Be sure the vacuum cleaner has bag
installed. See DUST BAG REPLACEMENT,
4, Plug the polarized power cord into a 120
Volt outlet located near the floor,,
5. To replace cord, turn upper hook counter-
clockwise pointing up, then wrap cord,
6
! t
Personal Injury and Product Damage
Hazard
• DO NOT place hands or feet under
the unit at any time.
• DO NOT use outlets above coun.
ters. Damage from cord to items in
surrounding area could occur,
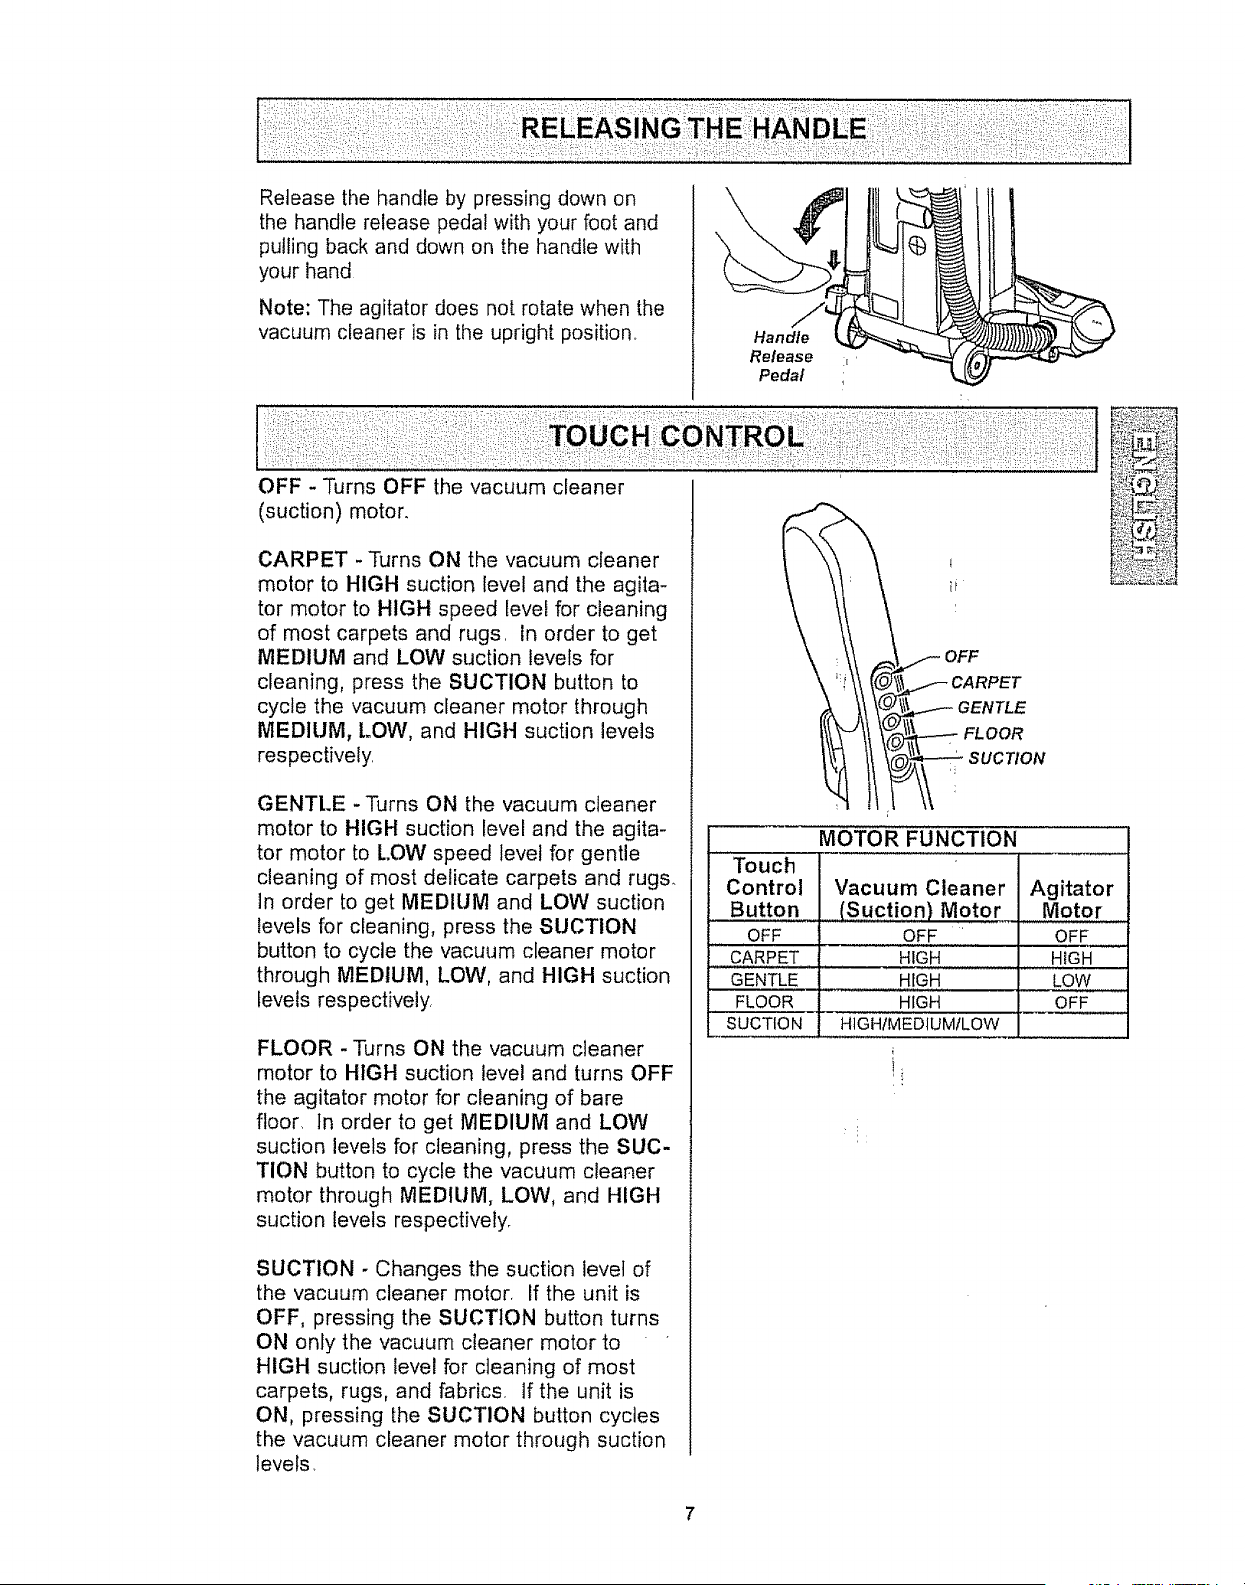
Releasethehandlebypressingdownon
thehandlereleasepedalwithyourfootand
pullingbackanddownon thehandlewith
yourhand
Note:Theagitatordoesnotrotatewhenthe
vacuumcleaneris in theuprightposition
Handle
Release
Pedal
OFF - Turns OFF the vacuum cleaner
(suction) motor.
CARPET -Turns ON the vacuum cleaner
motor to HIGH suction level and the agita-
tor motor to HIGH speed level for cleaning
of most carpets and rugs. in order to get
MEDIUM and LOW suction levels for
cleaning, press the SUCTION button to
cycle the vacuum cleaner motor through
MEDIUM, LOW, and HIGH suction levels
respectively.
GENTI..E -Turns ON the vacuum cleaner
motor to HIGH suction level and the agita-
tor motor to LOW speed level for gentle
cleaning of most delicate carpets and rugs.
In order to get MEDIUM and LOW suction
levels for cleaning, press the SUCTION
button to cycle the vacuum cleaner motor
through MEDIUM, LOW, and HIGH suction
tevels respectively.
FLOOR -Turns ON the vacuum cleaner
motor to HIGH suction level and turns OFF
the agitator motor for cleaning of bare
floor, In order to get MEDIUM and LOW
suction levels for cleaning, press the SUC-
TION button to cycle the vacuum cleaner
motor through MEDIUM, LOW, and HIGH
suction levels respectively.
OFF
\ CARPET
(_iL__.--
A ;I aENTLE
SUCTION - Changes the suction level of
the vacuum cleaner motor, If the unit is
OFF, pressing the SUCTION button turns
ON only the vacuum cleaner motor to
HIGH suction level for cleaning of most
carpets, rugs, and fabrics. If the unit is
ON, pressing [he SUCTION button cycles
the vacuum cleaner motor through suction
levels
_!j:;
MOTOR FUNCTION
Touch
Control Vacuum Cleaner Agitator
Button (Suction) Motor Motor
OFF OFF OFF
,,, ,,
CARPET HIGH HIGH
GENTLE HIGH LOW
FLOOR HIGH OFF
SUCTION HIGH/MEDIUMILOW
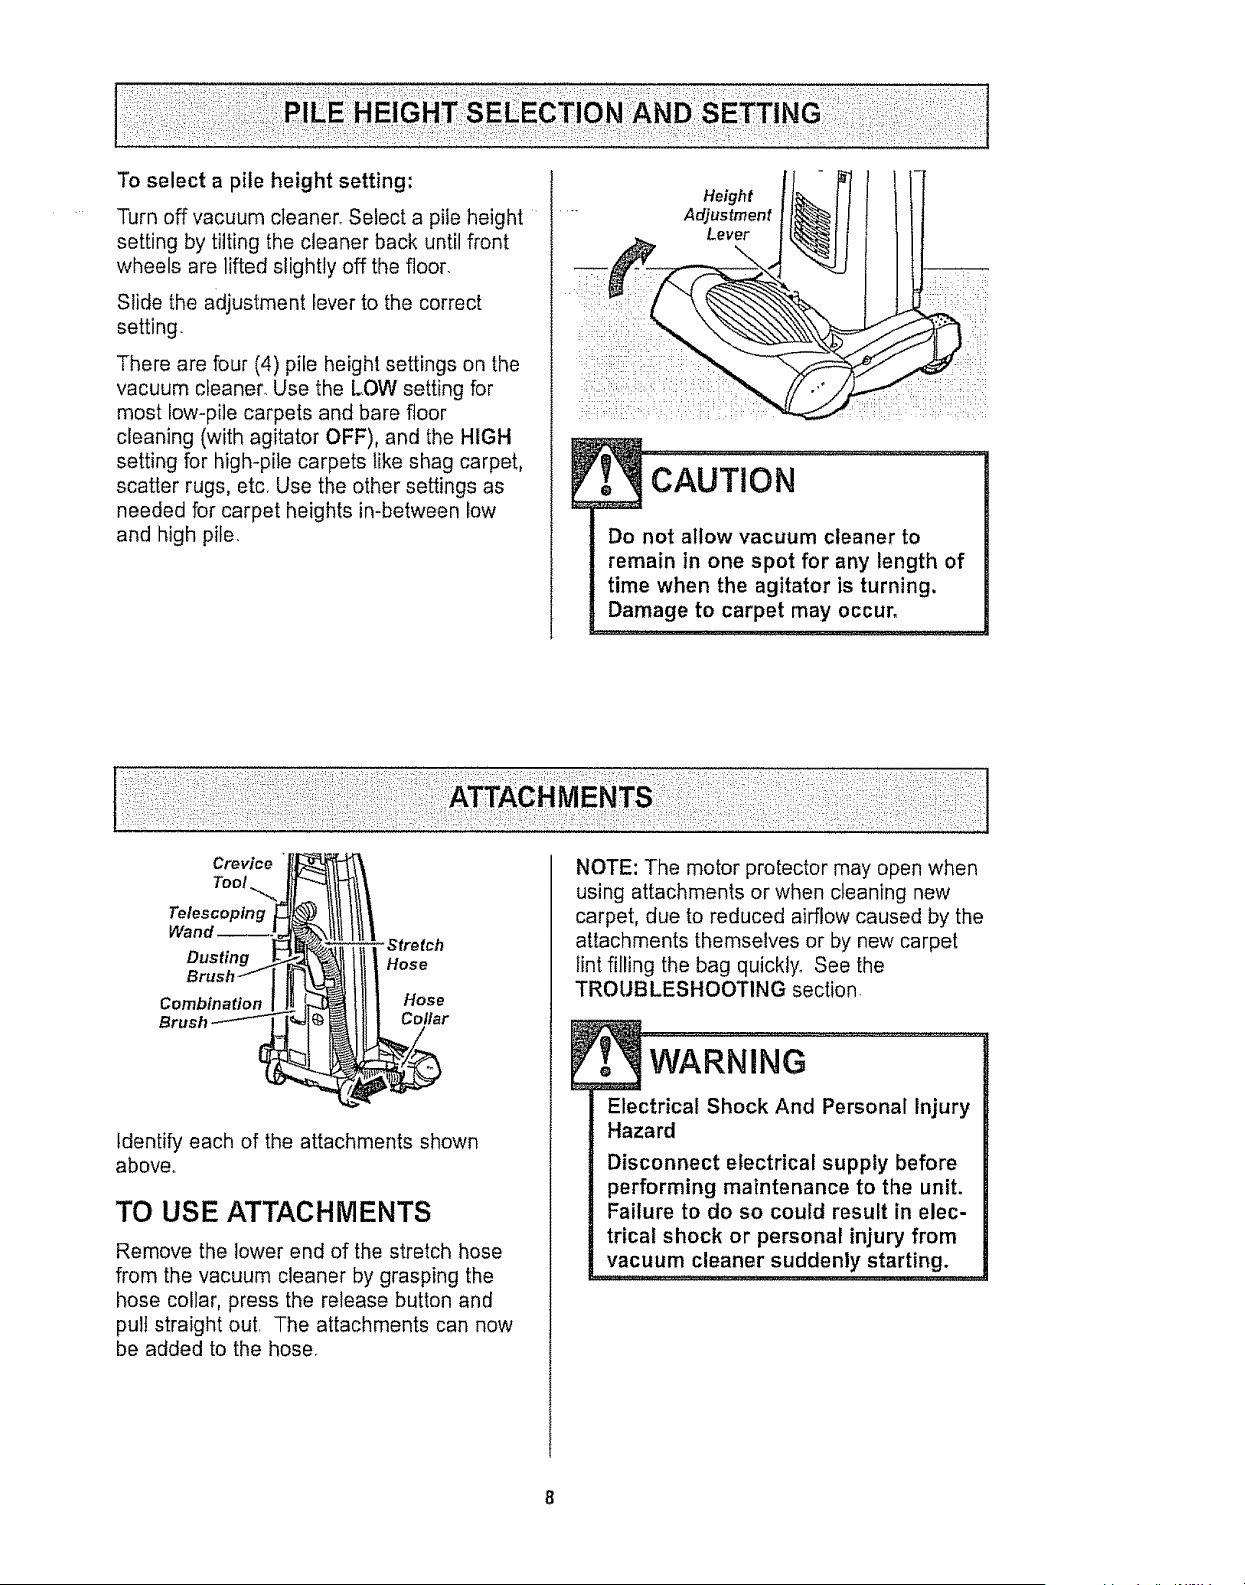
Turn off vacuum cleaner° Select a pile height
setting by tilting the cleaner back until front
wheels are lifted slightly off the floor.
Slide the adjustment lever to the correct
setting.
There are four (4) pile height settings on the
vacuum cleaner. Use the LOW setting for
most bow-pile carpets and bare floor
cleaning (with agitator OFF), and the HIGH
setting for high-pile carpets like shag carpet,
scatter rugs, etc_ Use the other settings as
needed for carpet heights in-between low
and high pile.
Height
Adjustment
Lever
...............
Do not allow vacuum cleaner to
remain in one spot for any length of
time when the agitator is turning.
Damage to carpet may occur,
Crevice
Too! ._,
Telescoping
Dusting
Combination
-Stre tch
Hose
Hose
Collar
Identify each of the attachments shown
above°
TO USE ATTACHMENTS
Remove the lower end of the stretch hose
from the vacuum cleaner by grasping the
hose collar, press the release button and
pull straight out. The attachments can now
be added to the hose.
NOTE: The motor protector may open when
using attachments or when cleaning new
carpet, due to reduced airflow caused by the
attachments themselves or by new carpet
tint filling the bag quickly. See the
TROUBLESHOOTING section
WARNING
Electrical Shock And Personal Injury
Hazard
Disconnect electrical supply before
performing maintenance to the uniL
Failure to do so could result in elec-
trical shock or personal injury from
vacuum cleaner suddenly starting.
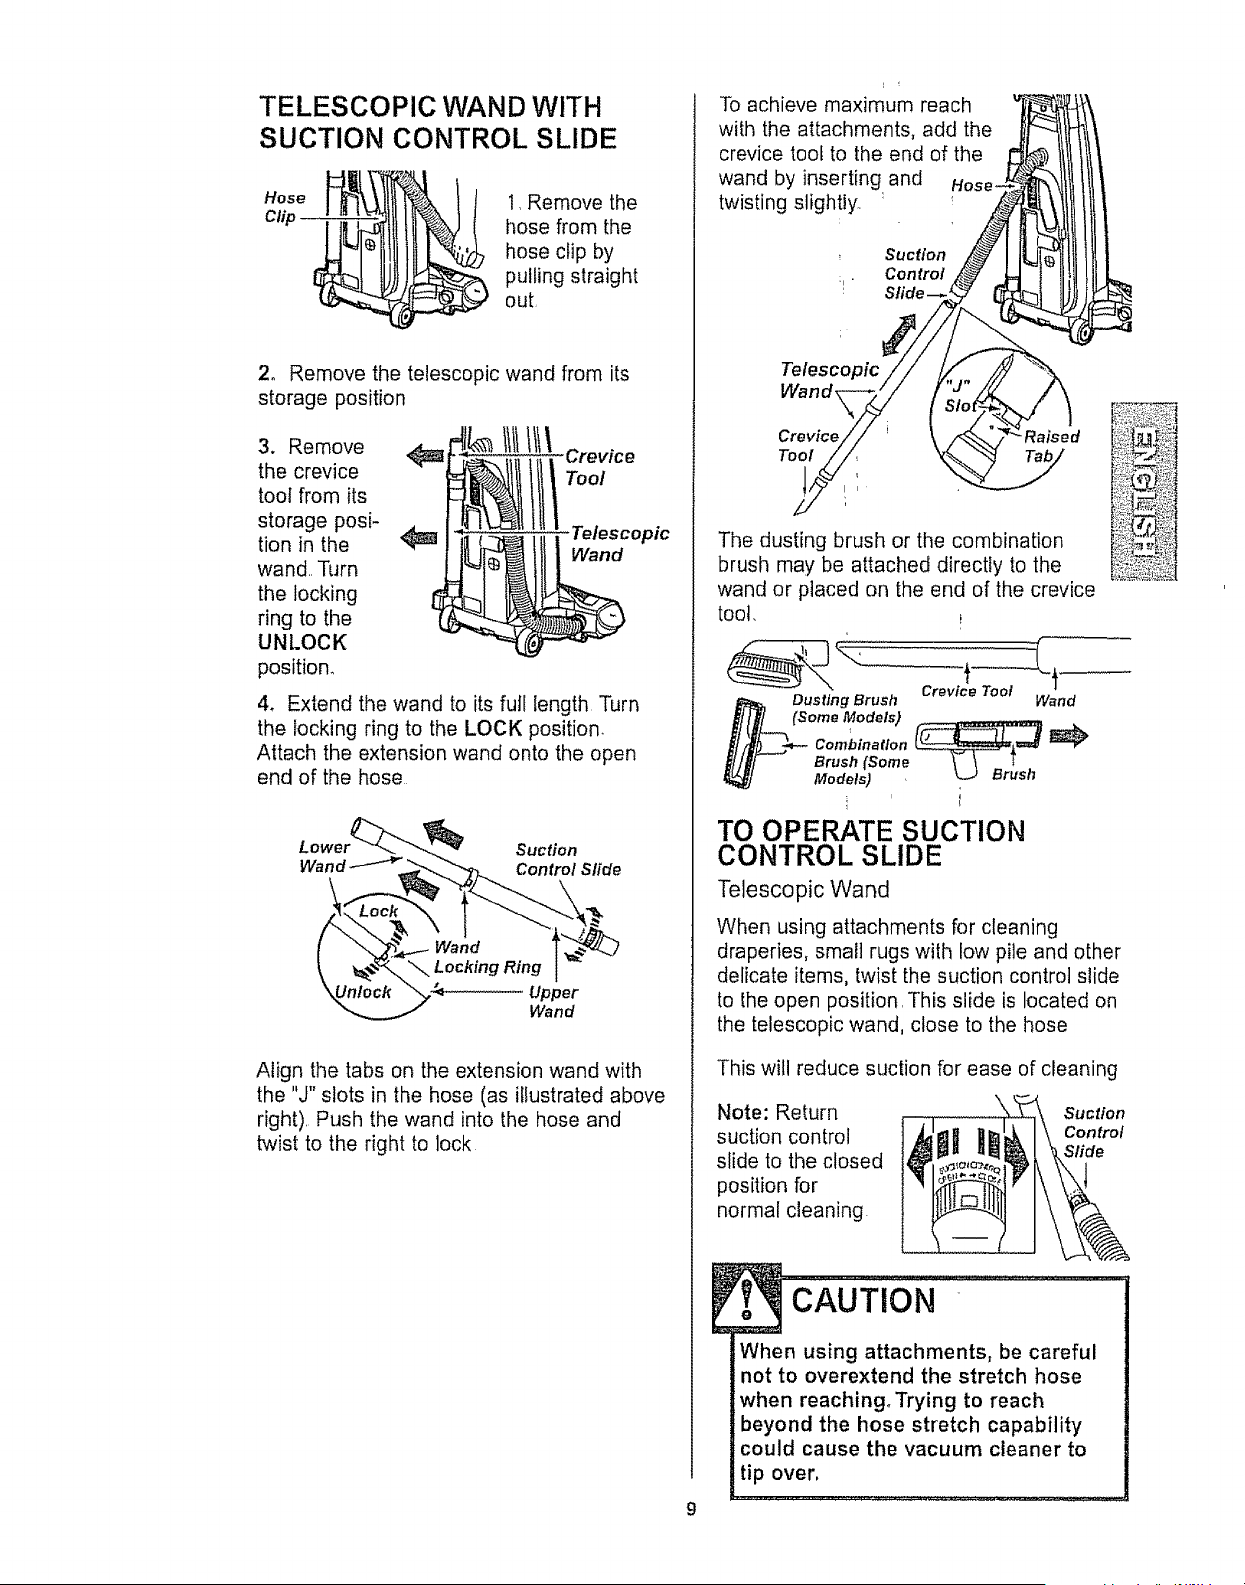
TELESCOPIC WAND WITH
SUCTION CONTROL SLIDE
Hose _mL'_]lI_-_\ltll_& I I I, Remove the
Clip __)_ hose from the
hose clip by
pulling straightout
2, Remove the telescopic wand from its
storage position
3. Remove
the crevice
toot from its
storage posi-
tion in the
wand.. Turn
the locking
ring to the
UNLOCK
position.
1111tt1\c,-ovioo
Telescopic
Wand
4. Extend the wand to its fufl length Turn
the locking ring to the LOCK position.
Attach the extension wand onto the open
end of the hose
Suction
Wand _ Control Slide
Upper
Wand
Align the tabs on the extension wand with
the "J" slots in the hose (as illustrated above
right), Push the wand into the hose and
twist to the right to lock
To achieve maximum reach
with the attachments, add the
crevice tool to the end of the
wand by inserting and
twisting slightly. :
:1 "
Telescopic
Wand,
Con trol
Crevice Raised
Tool
The dusting brush or the combination
brush may be attached directly to the
wand or placed on the end of the crevice
toot.
Crevice Tool
Dusting Brush Wand
(Some Models) ,, .._.,
Brush (Some
Models) '
TO OPERATE SUCTION
CONTROL SLIDE
Telescopic Wand
When using attachments for cleaning
draperies, small rugs with low pile and other
delicate items, twist the suction control slide
to the open position. This slide is located on
the telescopic wand, close to the hose
This will reduce suction for ease of cleaning
Note: Return
suction control
slide to the closed
position for
normal cleaning.
Suction
Control
Slide
9
CAUTION
When using attachments, be careful
not to overextend the stretch hose
when reaching, Trying to reach
!:beyond the hose stretch capability
could cause the vacuum cleaner to
tip over,
TO STORE ATTACHMENTS
Remove dusting brush or combination
brush Snap into appropriate storage location.
Remove crevice tool from the wand by twist-
ingo Lay aside_
Remove the extension wand from the hose.
Twist the wand to the left and pull from the
hose end.
Unlock the wand by turning the wand lock-
ing ring to the UNLOCK position
Lower " I!
2°°
Upper ,_ff I r_ll
Slide the lower wand into the upper wand.
Turn the wand locking ring to the LOCK
position.
Place the crevice tool down into the com-
pressed wand. Snap into the appropriate
storage location,
Reinsert the hose fully into the opening on
the nozzle body from which it was removed.
Press firmly to assure connection.
F
DO NOT pull the vacuum cleaner
around the room by the hose,
Property damage or personal injury
could result,
EXTENSION HOSE
Some models include an extra hose which
connects to the stretch hose on the vacuum
cleaner for a longer cleaning reach,
Extension
Hose
Release
Button _k
Stretch Hose
Electrica!
Connection
Connect extension hose to stretch hose by
pressing together, Make sure electrical
connections are pressed firmly together,
To disconnect press release button on
hose and pull apart,
M_
: .......................................
... ,v_...,.
When using the stretch hose or with
the extension hose attached,the
vacuum cleaner should be on a solid
surface on the same level or below
the level of the user's feet, DO NOT
use the hoses when the vacuum
cleaner is above the level of the
user's feet.
POWER-MATE J R.®
When attaching Power-Mate Jr@ to
extension hose align electrical connec-
tions and press together° Power-Mate
Jr..@ cannot be used with extension wand.
Power-Mate
Release Button
Electrical
Connectors
I0
To disconnect press release button on
hose and pull apart
DO NOT connect PoweFMate Jr,@ to
electrified hose with power to
vacuum cleaner ON. ALWAYS unplug
before connecting powered
attachments.
cAUTioN ..................
DO NOT leave the Power-Mate Jr,®
running in one spot for any length of
time, Damage to carpet may occur.
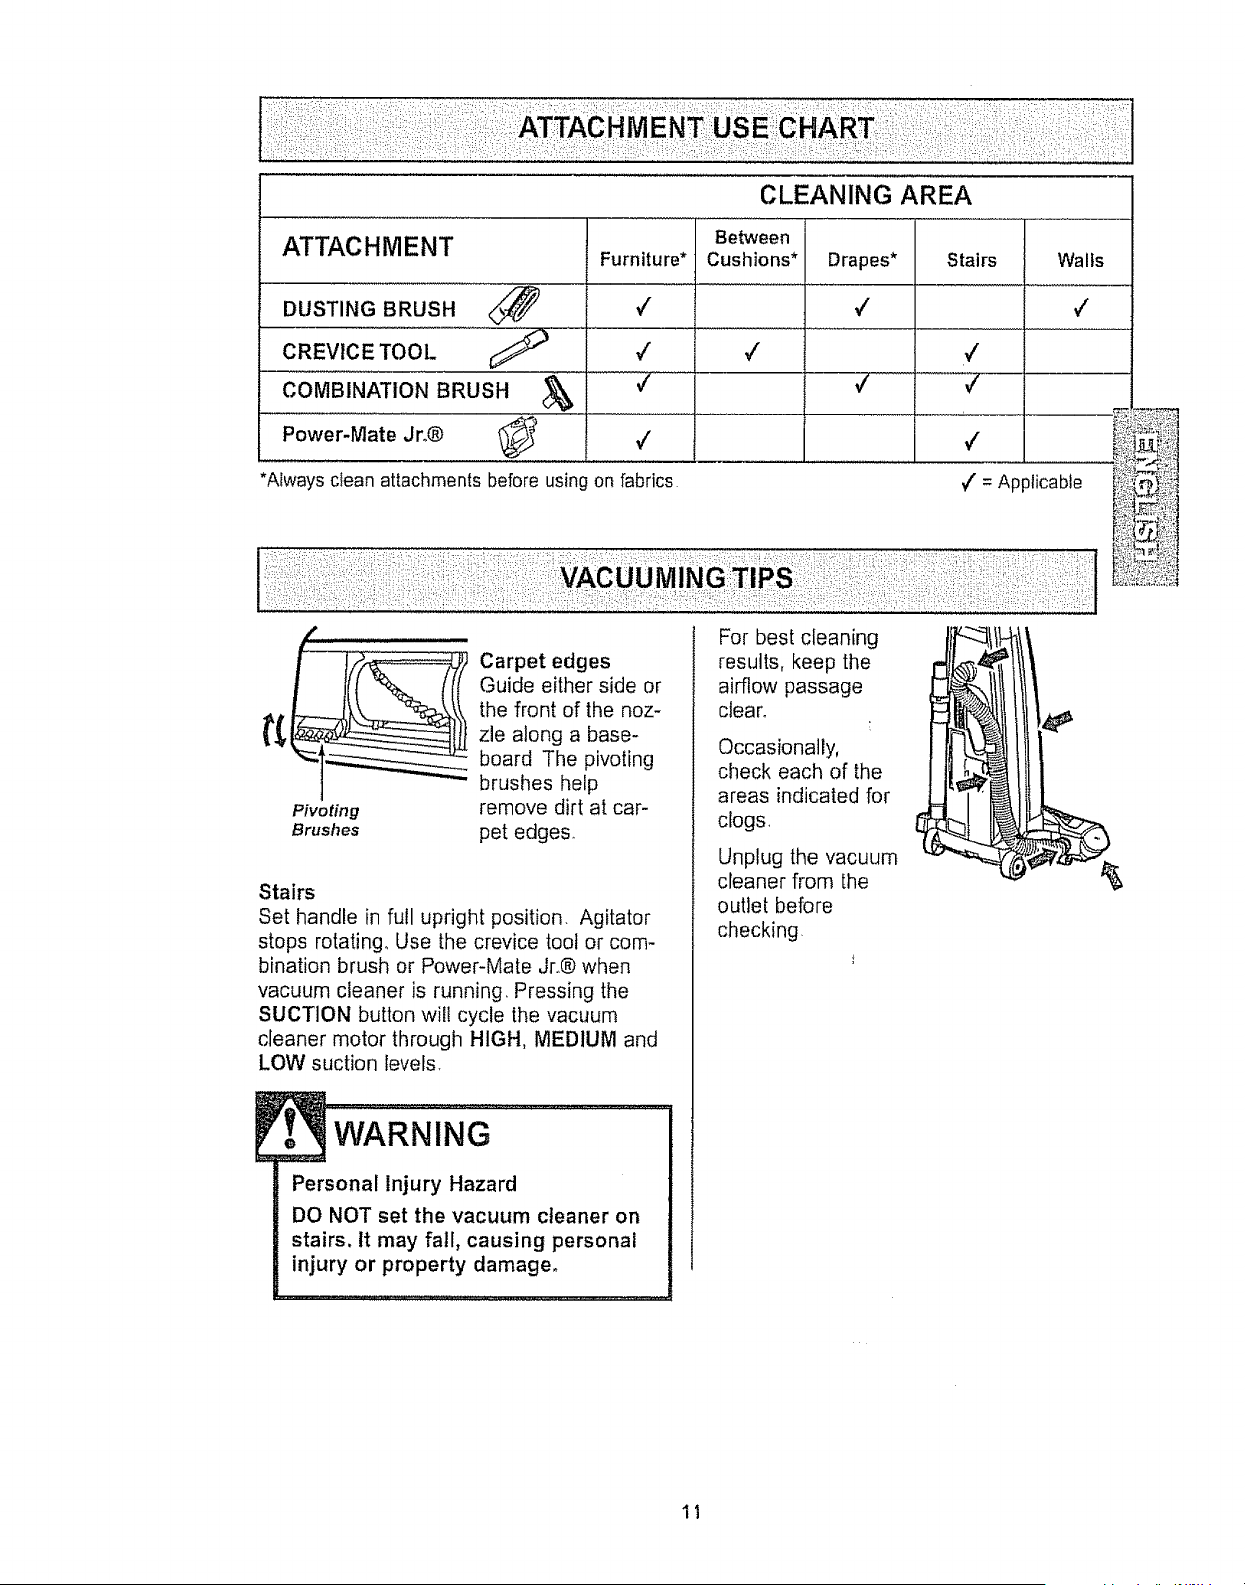
CLEANING AREA
ATTACHMENT
DUSTING BRUSH ............<_
CREVICE TOOL ¢;_
COMBINATION BRUSH &
Power-Mate Jro®
*Always clean attachments before using on fabrics ,/' = Applicable
Pivoting
Brushes
Carpet edges
Guide either side or
the front of the noz-
zle along a base-
board The pivoting
brushes help
remove dirt at car-
pet edges.
Stairs
Set handle in full upright position. Agitator
stops rotating.. Use the crevice toot or com-
bination brush or Power-Mate Jr.® when
vacuum cleaner is running, Pressing the
SUCTION button will cycle the vacuum
cleaner motor through HIGH, MEDIUM and
LOW suction levels.
WARNING
Personal Injury Hazard
DO NOT set the vacuum cleaner on
stairs, tt may fall, causing personal
injury or property damage.
For best cleaning
results, keep the
airflow passage
clear.
Occasionally,
check each of the
areas indicated for
clogs,
Unplug the vacuum
cleaner from the
outlet before
checking
11
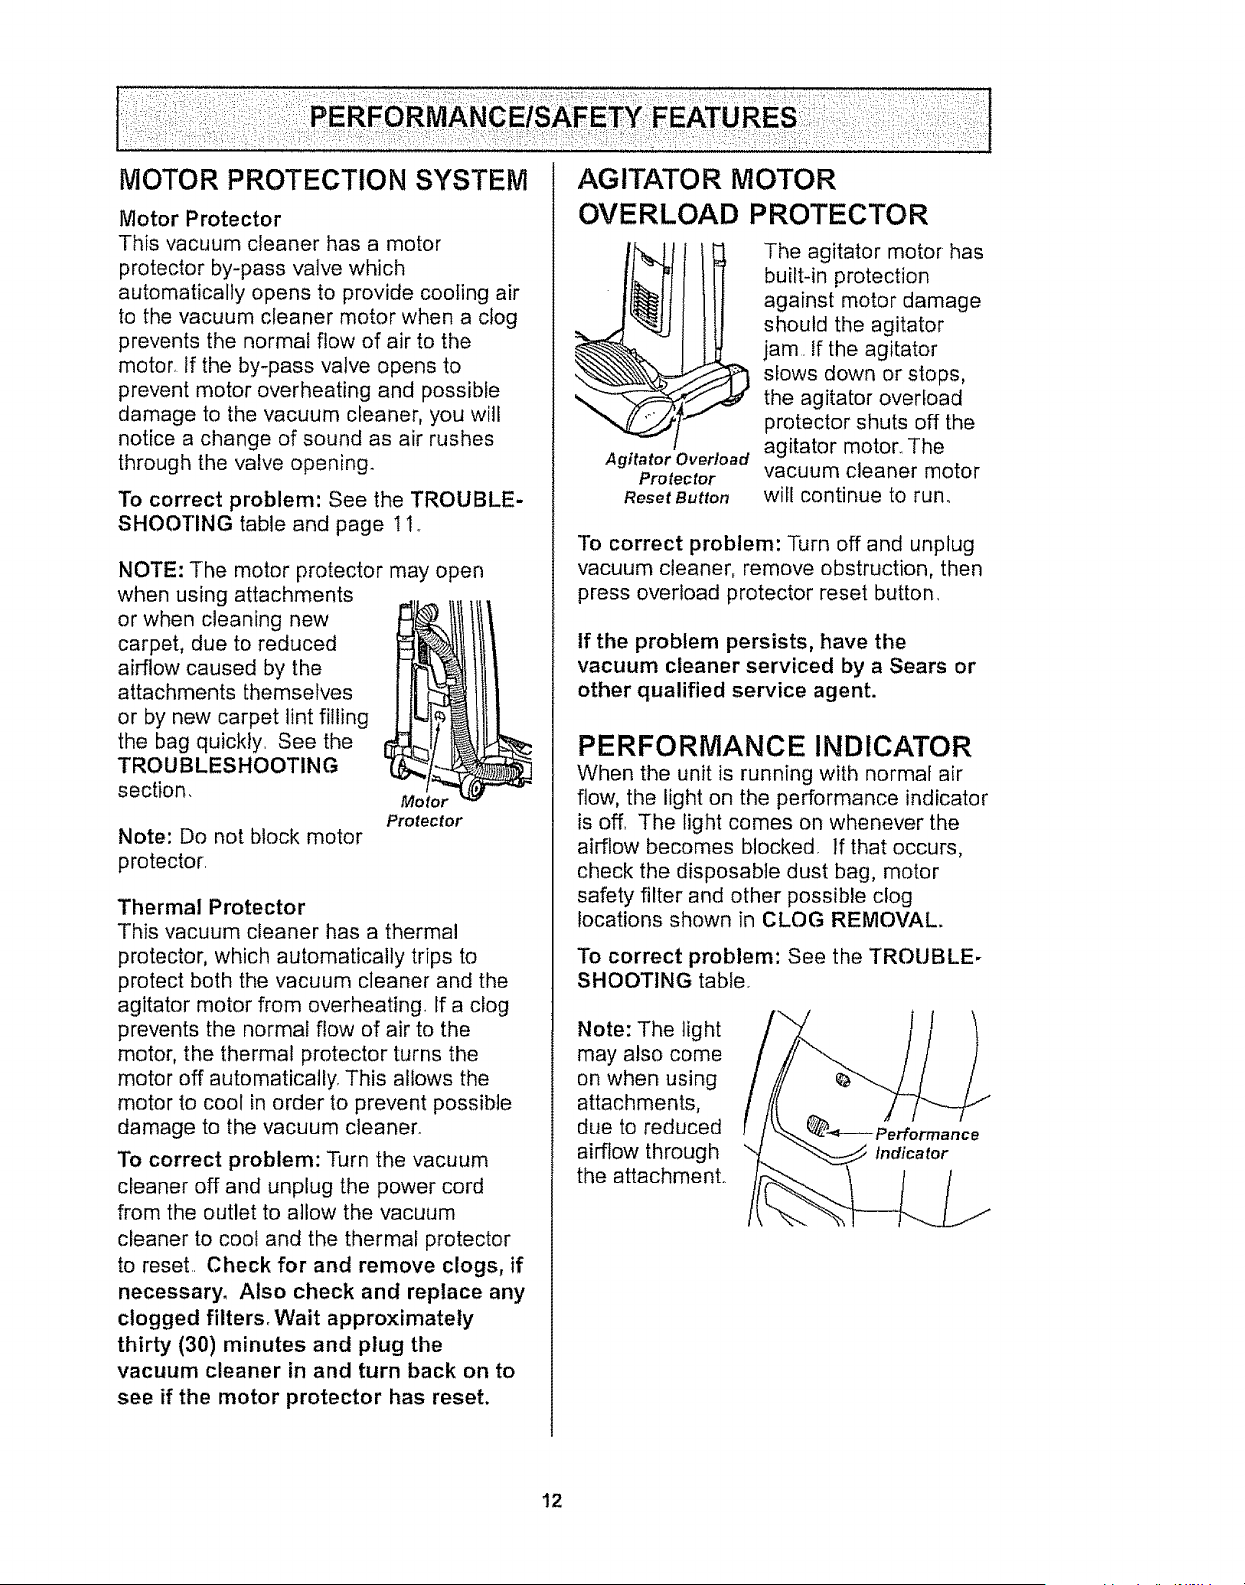
Motor Protector
This vacuum cleaner has a motor
protector by-pass valve which
automatically opens to provide cooting air
to the vacuum cleaner motor when a clog
prevents the normal flow of air to the
motor If the by-pass valve opens to
prevent motor overheating and possible
damage to the vacuum cleaner, you will
notice a change of sound as air rushes
through the valve open_ng_
To correct problem: See the TROUBLE-
SHOOTING table and page t I,
NOTE: The motor protector may open
when using attachments
or when cleaning new
carpet, due to reduced
airflow caused by the
attachments themselves
or by new carpet lint filling
the bag quickly See the
TROUBLESHOOTING
section,
Note: Do not block motor
protector
Motor
Protector
Thermal Protector
This vacuum cleaner has a thermal
protector, which automatically trips to
protect both the vacuum cleaner and the
agitator motor from overheating If a clog
prevents the normal flow of air to the
motor, the thermal protector turns the
motor off automatically This allows the
motor to cool in order to prevent possible
damage to the vacuum cleaner_
To correct problem: Turn the vacuum
cleaner off and unplug the power cord
from the outlet to allow the vacuum
cleaner to cool and the thermal protector
to reset Check for and remove clogs, if
necessary. Also check and replace any
clogged filters. Wait approximately
thirty (30) minutes and plug the
vacuum cleaner in and turn back on to
see if the motor protector has reset.
AGITATOR MOTOR
OVERLOAD PROTECTOR
Agitator Overload
Protector
Reset Button
The agitator motor has
built-in protection
against motor damage
should the agitator
jam. If the agitator
slows down or stops,
the agitator overload
protector shuts off the
agitator motor,, The
vacuum cleaner motor
will continue to run,
To correct problem: Turn off and unplug
vacuum cleaner, remove obstruction, then
press overload protector reset button
If the problem persists, have the
vacuum cleaner serviced by a Sears or
other qualified service agent.
PERFORMANCE INDICATOR
When the unit is running with normal air
flow, the light on the performance indicator
is off, The light comes on whenever the
airflow becomes blocked If that occurs,
check the disposable dust bag, motor
safety filter and other possible clog
locations shown in CLOG REMOVAL
To correct problem: See the TROUBLE-
SHOOTING table
Note: The light
may also come
on when using
attachments,
due to reduced
airflow through
the attachmenL
12
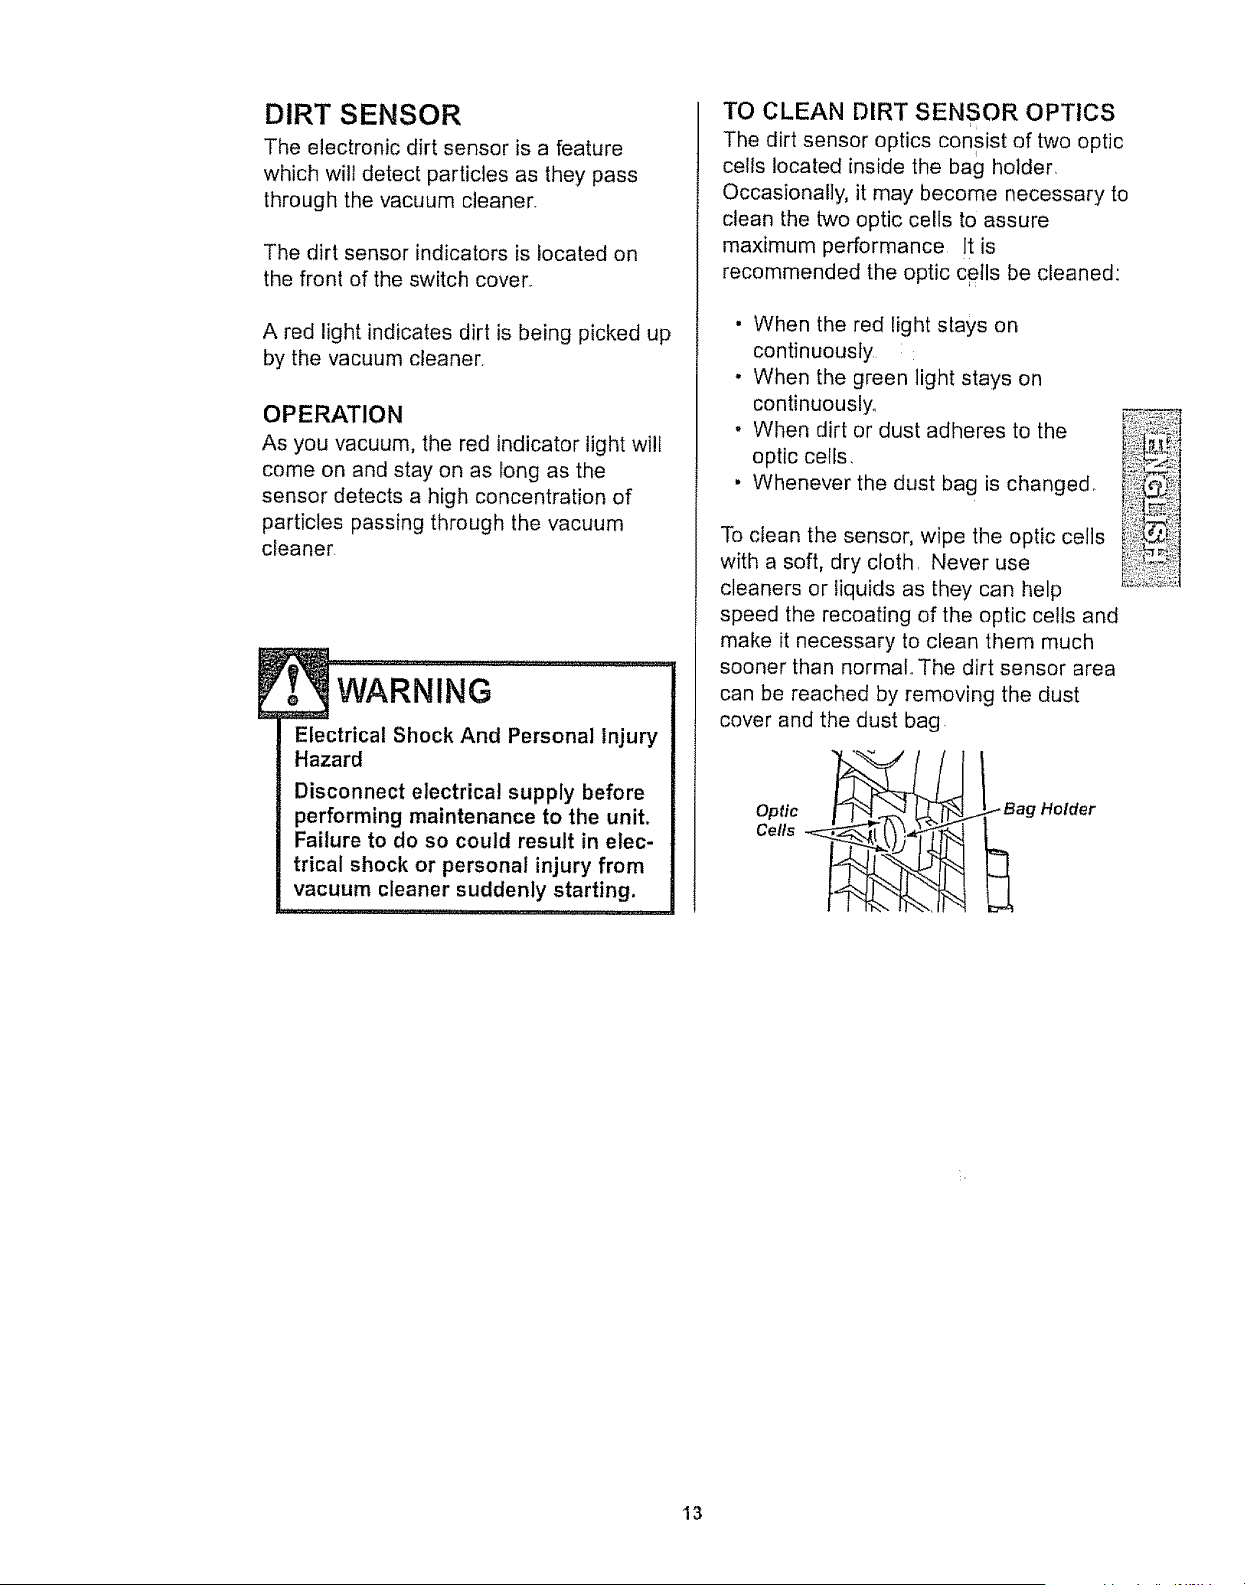
DIRT SENSOR
The electronic dirt sensor is a feature
which will detect particles as they pass
through the vacuum cleaner.
The dirt sensor indicators is located on
the front of the switch cover,
A red light indicates dirt is being picked up
by the vacuum cleaner,
OPERATION
As you vacuum, the red indicator light will
come on and stay on as long as the
sensor detects a high concentration of
particles passing through the vacuum
cleaner
WARNING ......................................
Electrical Shock And Persona] Injury
Hazard
Disconnect electrical supply before
performing maintenance to the unit.
Failure to do so could result in elec-
trical shock or personal injury from
vacuum cleaner suddenly starting.
TO CLEAN DIRT SENSOR OPTICS
The dirt sensor optics consist of two optic
I
cells located inside the bag holder
Occasionally, it may become necessary to
clean the two optic cells to assure
maximum performance It is
recommended the optic cells be cleaned:
• When the red light stays on
continuously
• When the green light stays on
continuously_
, When dirt or dust adheres to the
optic cells,
• Whenever the dust bag is changed,
To clean the sensor, wipe the optic cells
with a soft, dry cloth, Never use
cleaners or liquids as they can help
speed the recoating of the optic cells and
make it necessary to clean them much
sooner than normal,, The dirt sensor area
can be reached by removing the dust
cover and the dust bag
Optic
Cells
_ Bag Holder
13
VACUUM CLEANER CARE
Always bllow all safety precautions when
performing maintenance to the vacuum
cleaner.
WARNING
Electrical Shock And Personal Injury
Hazard
Disconnect electrical supply before
performing maintenance to the unit.
Failure to do so could result in elec-
trical shock or personal injury from
vacuum cleaner suddenly starting.
Gather the cord and wrap it loosely around
the upper and lower cord hooks.
Store the vacuum
cleaner in a dry,
indoor area, on
the floor with the
handle locked in
the upright
position
Electrical Shock And Personal Injury
Hazard
Wrapping the cord too tightly puts
stress on the cord and can cause
cord damage, A damaged cord is an
electrical shock hazard and could
cause personal injury or damage.
Unplug cord from wal! outleL DO NOT drip
water on vacuum cleaner
Clean exterior using a clean, soft cloth that
has been dipped in a solution of mild liquid
detergent and water, then wrung dry. Wipe
dry after cleaning..
To reduce static electricity and dust build-
up, wipe outer surface of vacuum cleaner
and attachments,.
Wash attachments in warm soapy water,
rinse and air dry° DO NOT clean in dish-
washer°
Do not use attachments if they are
wet. Attachments used in dirty
areas, such as under a refrigerator,
should not be used on other
surfaces until they are washed.
They could leave marks°
!4
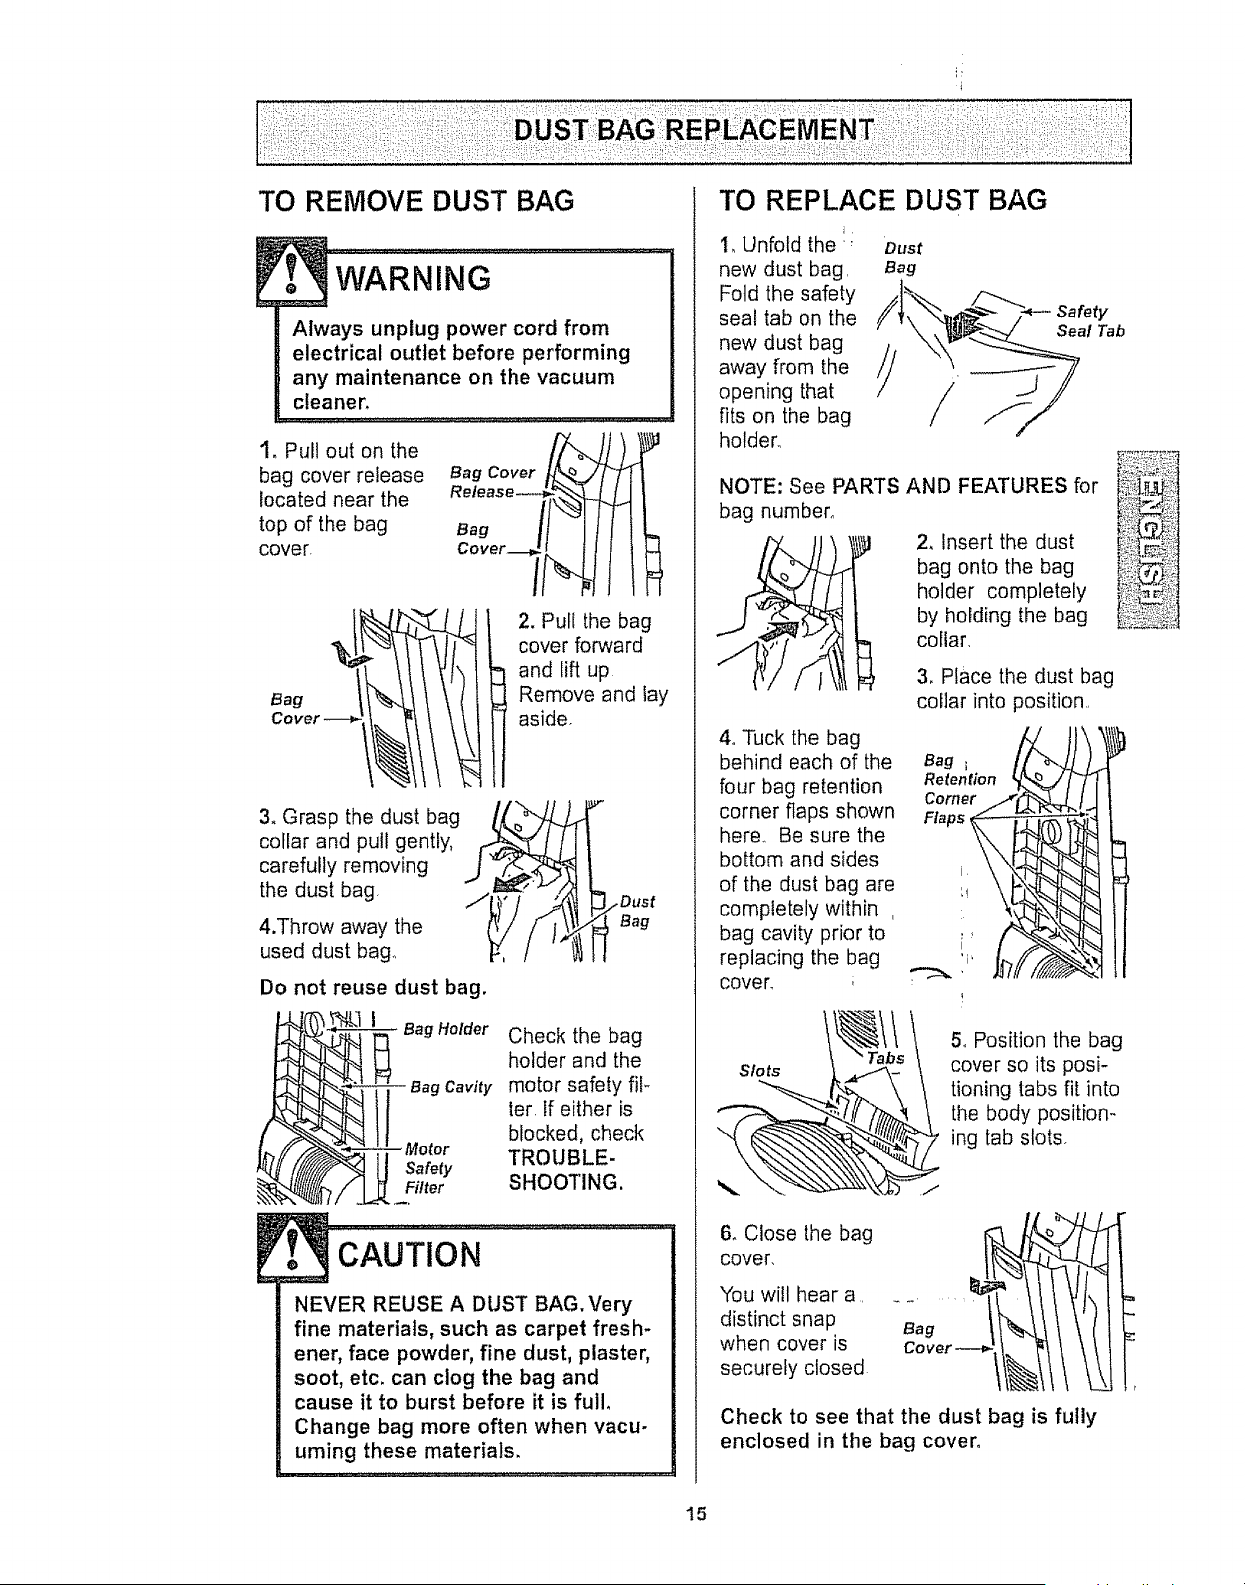
TO REPLACE DUST BAGTO REMOVE DUST BAG
WARNING
Always unplug power cord from
electrical outlet before performing
any maintenance on the vacuum
cleaner_
1_ Pull out on the
bag cover release
located near the
top of the bag
cover.
Bag Cover
Release--
Bag
Cover.i€
2. Pull the bag
cover forward
and lift up
Remove and lay
aside.
3_ Grasp the dust bag
collar and pull gently,
carefully removing
the dust bag,
4.Throw away the
used dust bag,
/ ,Y " Dust
Bag
Do not reuse dust bag.
BagHolder Check the bag
holder and the
- aag Cavity motor safety fil-
ter. If either is
blocked, check
TROUBLE-
Safety
Filter SHOOTING.
CAUTION.................................
NEVER REUSE A DUST BAG. Very
fine materials, such as carpet fresh-
ener, face powder, fine dust, plaster,
soot, etc. can clog the bag and
cause it to burst before it is full,
Change bag more often when vacu-
uming these materials.
1, Unfold the: oust
new dust bag. Bag
Fold the safety .I_
seal tab on the // S-ealTab
newdustbag /// /_ --_
away from the
opening that
fits on the bag
holder,,
NOTE: See PARTS AND FEATURES for
bag number.
bag onto the bag
holder completely
by holding the bag
collar,
3, Place the dust bag
collar into position,,
Re_e..o. _IT
Flaps _ _
4oTuck the bag
behind each of the
four bag retention
corner flaps shown
here,, Be sure the
bottom and sides
of the dust bag are
completely within ,
bag cavity prior to
replacing the bag
cover,
ii!! {il
t_T!!s\ 5oPosition the bag
Slots cover so its posi-
_ tioning tabs fit into
the body position-
ing tab slots
6. Close the bag
cover,
You will hear a,
distinct snap
when cover is
securely closed
Check to see that the dust bag is fully
enclosed in the bag cover.
15
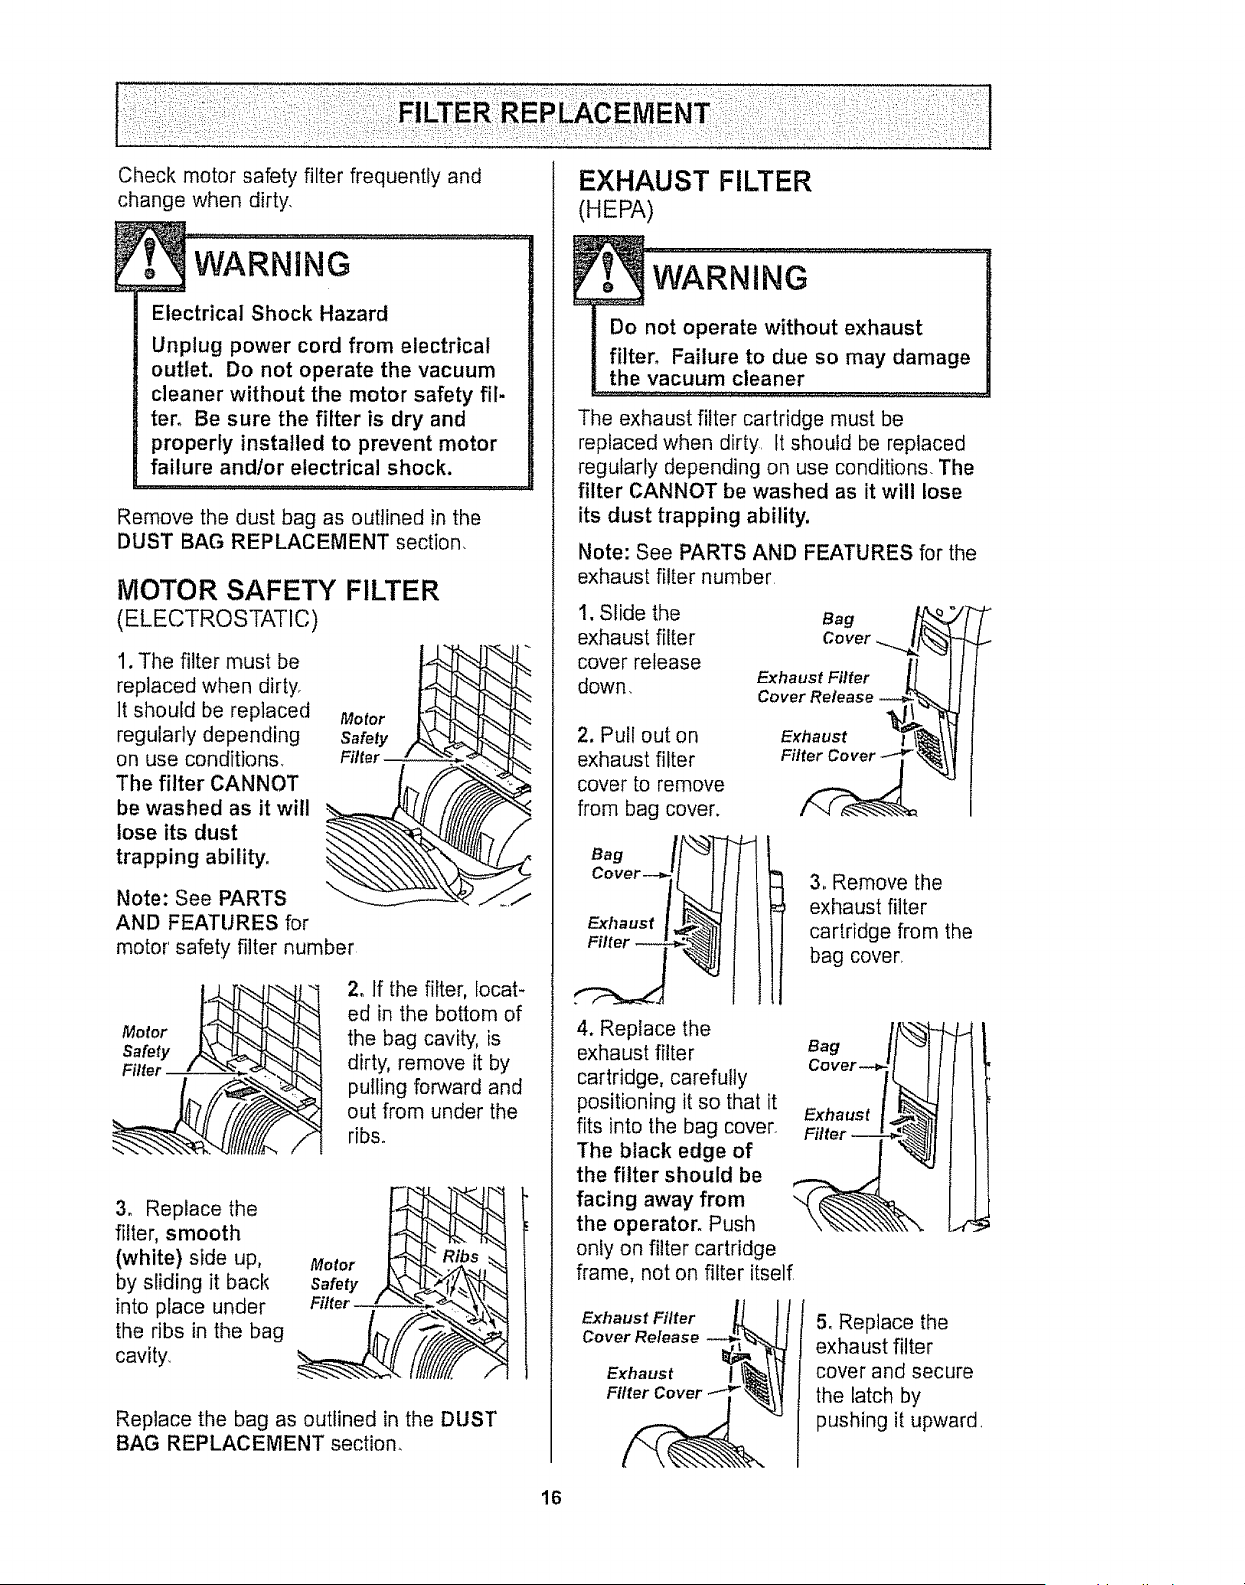
Check motor safety filter frequently and
change when dirty,
Electrical Shock Hazard
Unplug power cord from electrical
outlet. Do not operate the vacuum
cleaner without the motor safety fil-
term Be sure the filter is dry and
properly installed to prevent motor
failure andtor electrical shock.
Remove the dust bag as outlined in the
DUST BAG REPLACEMENT section,
MOTOR SAFETY FILTER
(ELECTROSTATIC)
1. The filter must be "{-_'_,.,._
replaced when dirtyr
It should be replaced Motor
regularly depending safety ,,_."_i¢_.-."11%
on use conditions, Filter ! -_-_ ._-_.
The filter CANNOT . _i_'?F_/_'_
lose its dust
trapping ability,
Note: See PARTS
AND FEATURES for
motor safety filter number
Motor
Safety
Filter
2. If the filter, locat-
ed in the bottom of
the bag cavity, is
dirty, remove it by
pulling forward and
out from under the
ribs°
3. Replace the
filter, smooth
(white) side up,
by sliding it back
into place under
the ribs in the bag
cavity.
Motor
Safety
Filter
Replace the bag as outlined in the DUST
BAG REPLACEMENT section,
EXHAUST FILTER
(HEPA)
The exhaust filter cartridge must be
replaced when dirty. It should be replaced
regularly depending on use conditions. The
filter CANNOT be washed as it will lose
its dust trapping ability.
Note: See PARTS AND FEATURES for the
exhaust filter number
I, Slide the Bag
exhaust filter Cover .....
cover release
down, Exhaust Filter
2. Pull out on
exhaust filter
cover to remove
from bag cover,
/N
Exhaust
Filter Cover
3. Remove the
exhaust filter
cartridge from the
bag cover.
4. Replace the
exhaust filter
cartridge, carefully
positioning it so that it
fits into the bag cover.
The black edge of
the filter should be
facing away from
the operator, Push
only on filter cartridge
frame, not on filter itself
Bag
Co ver
Exhaust
Filter
i
J
I
Exhaust Filter
Cover Release
Exhaust
Filter Cover
5, Replace the
exhaust filter
cover and secure
the latch by
pushing it upward
t6
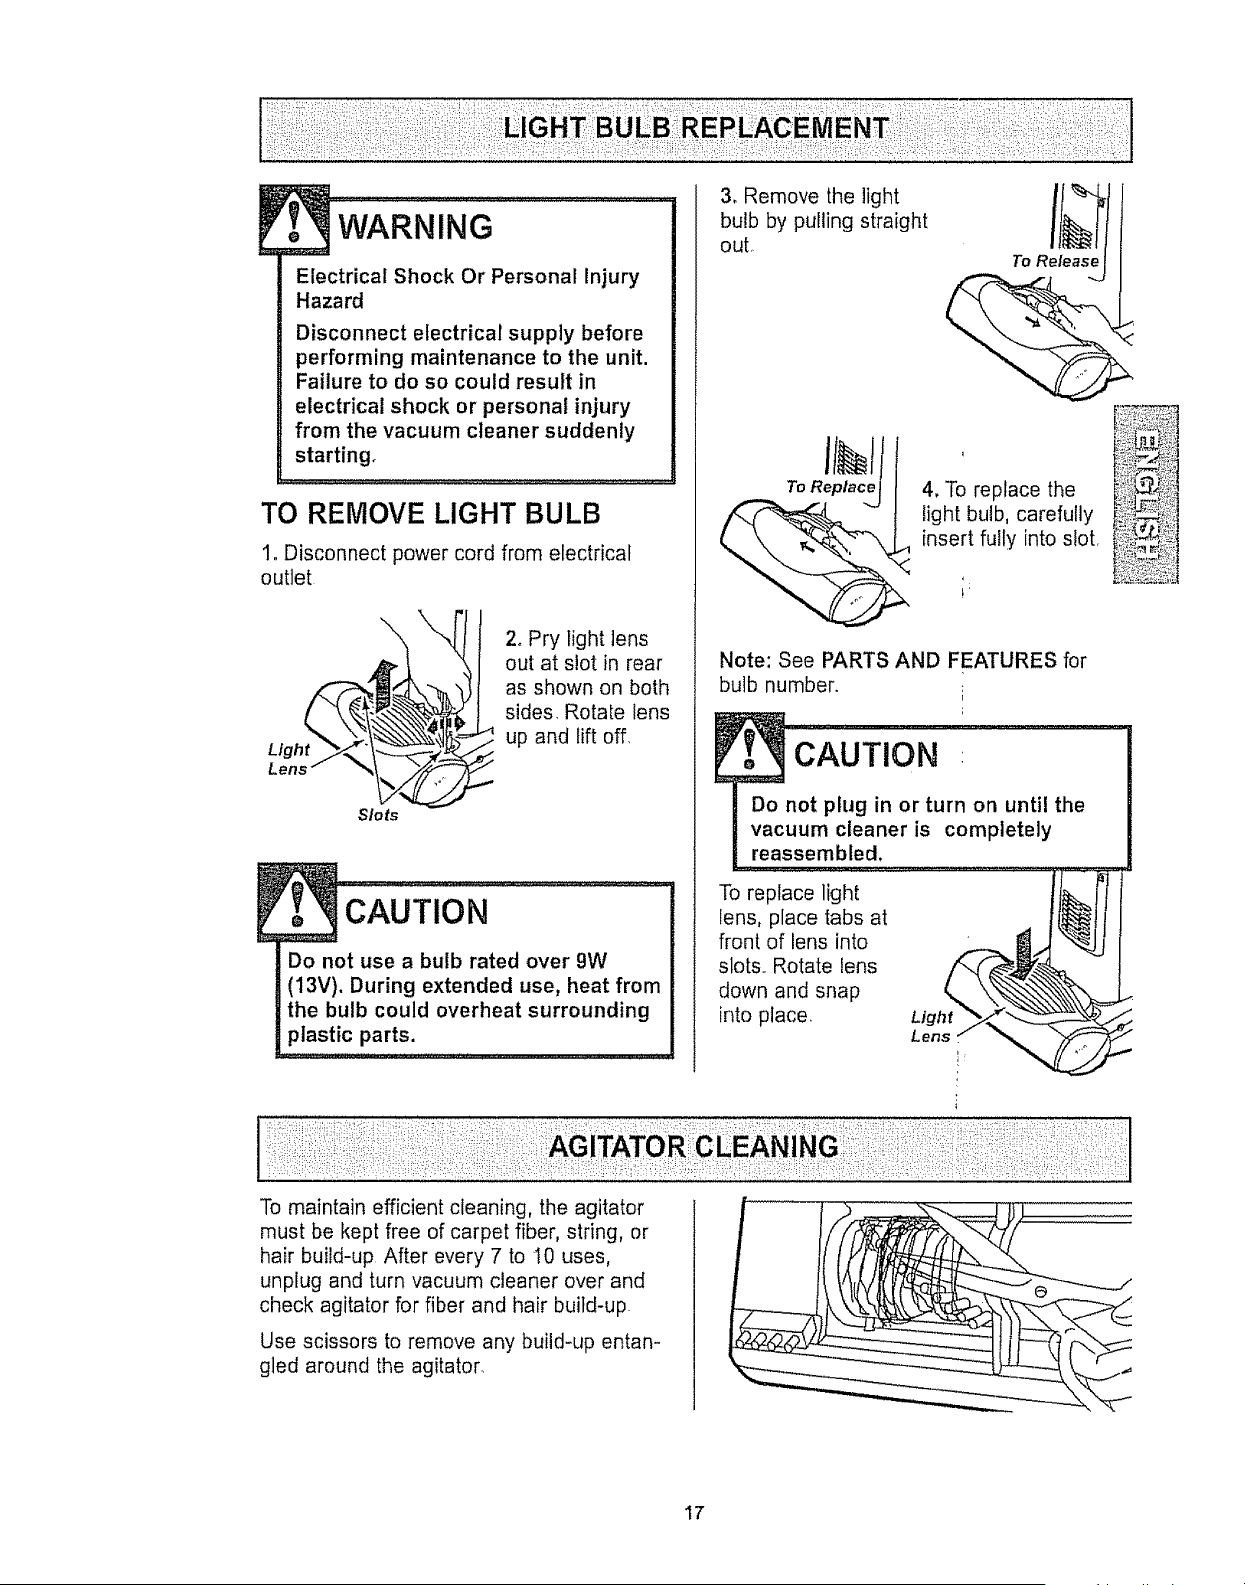
P
I
WARNiNG ......................
Electrical Shock Or Personal Injury
Hazard
Disconnect electrical supply before
performing maintenance to the unit.
Failure to do so could result in
electrical shock or personal injury
from the vacuum cleaner suddenly
starting.
TO RE&lOVE LIGHT BULB
1. Disconnect power cord from electrical
outlet
\
Lens" _-_1_._
Slots
2o Pry light lens
out at slot in rear
as shown on both
sides Rotate lens
¢ up and lift off,
. CAUfioN
Do not use a bulb rated over 9W
(13V). During extended use, heat from
the bulb could overheat surrounding
plastic parts.
3. Remove the light
bulb by pulling straight
out,.
To Release
To Replace
l
4, To replace the
light bulb, carefully
insert fully into slot.
Note: See PARTS AND FEATURES for
bulb number.
CAUTION
Do not plug in or turn on until the
vacuum cleaner is completely
reassembled.
To replace light
lens, place tabs at
front of lens into
slots.. Rotate lens
down and snap
into place. Light
Lens
:AGITATOI
To maintain efficient cleaning, the agitator
must be kept free of carpet fiber, string, or
hair build-up After every 7 to t0 uses,
unplug and turn vacuum cleaner over and
check agitator for fiber and hair build-up.
Use scissors to remove any build-up entan-
gled around the agitator_
17
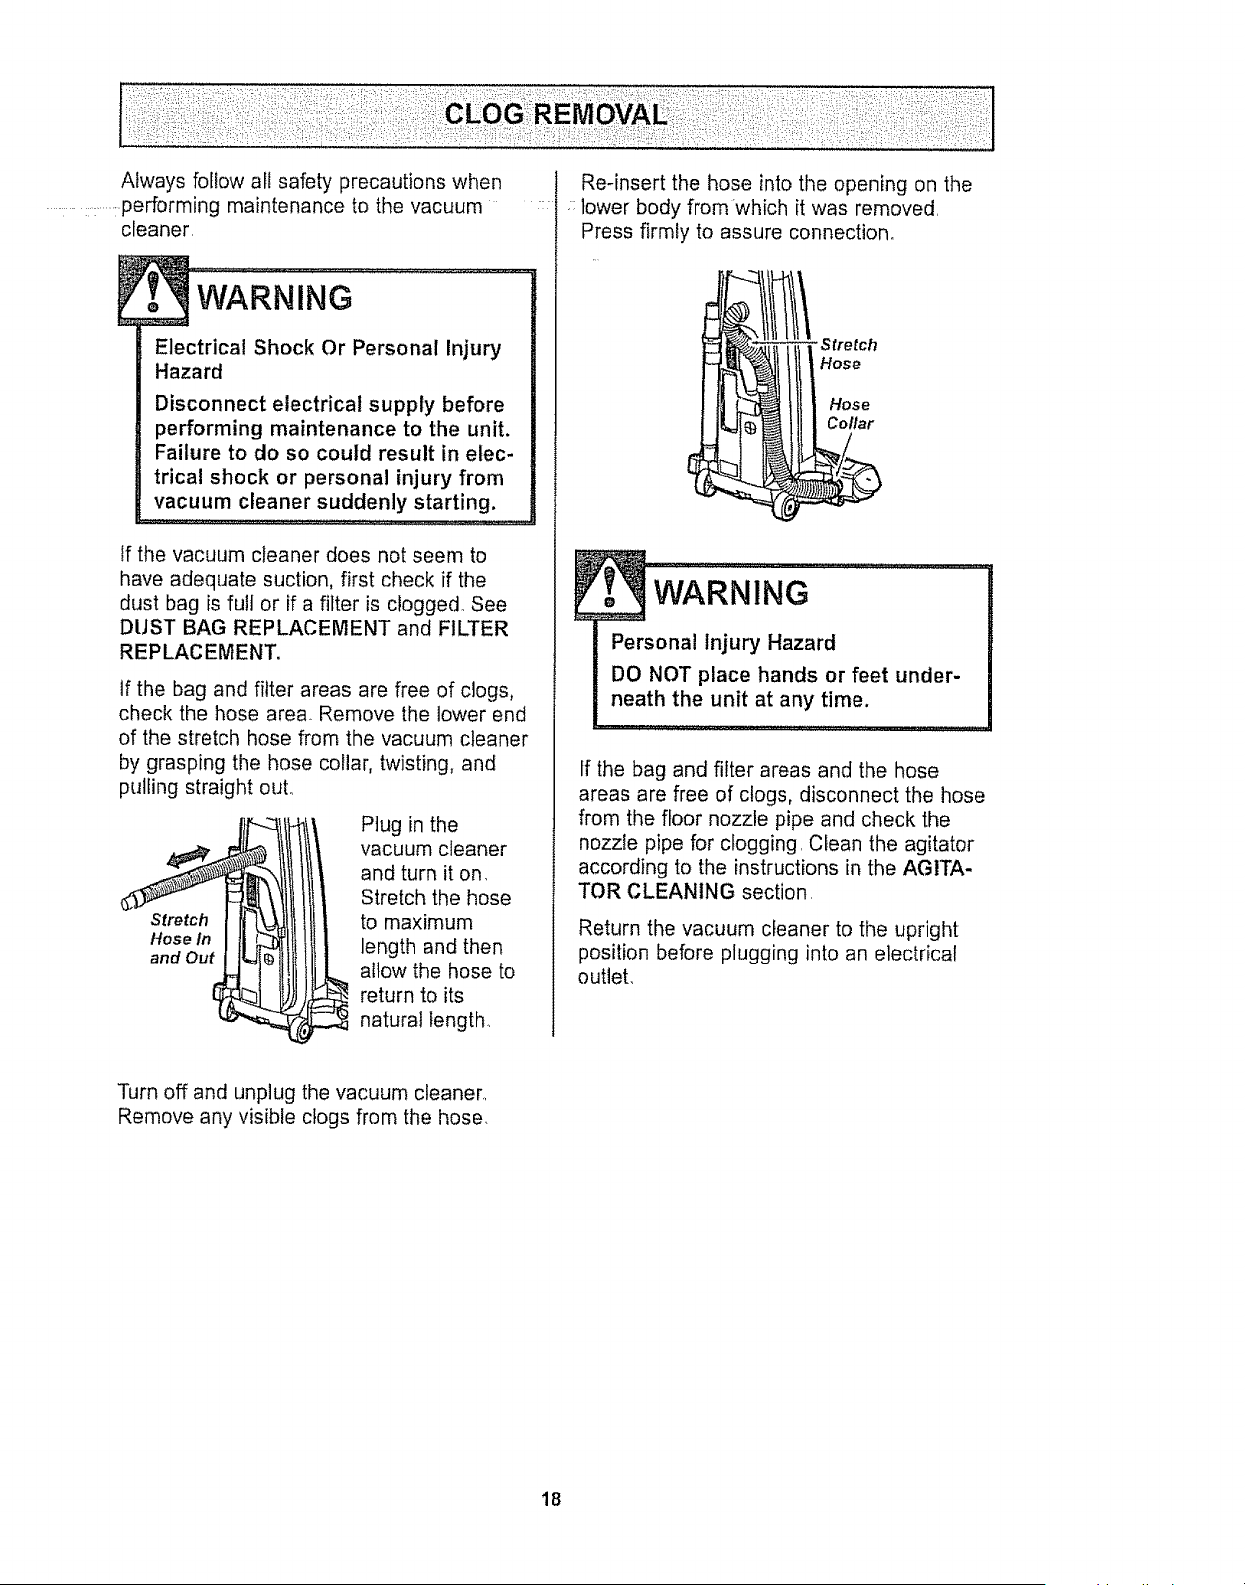
Always follow all safety precautions when
..............:::...........performing maintenance to the vacuum
cleaner.
...................................
Electrical Shock Or Personal Injury
Hazard
Disconnect electrical supply before
performing maintenance to the unit,
Failure to do so could result in elec-
trical shock or personal injury from
vacuum cleaner suddenly starting.
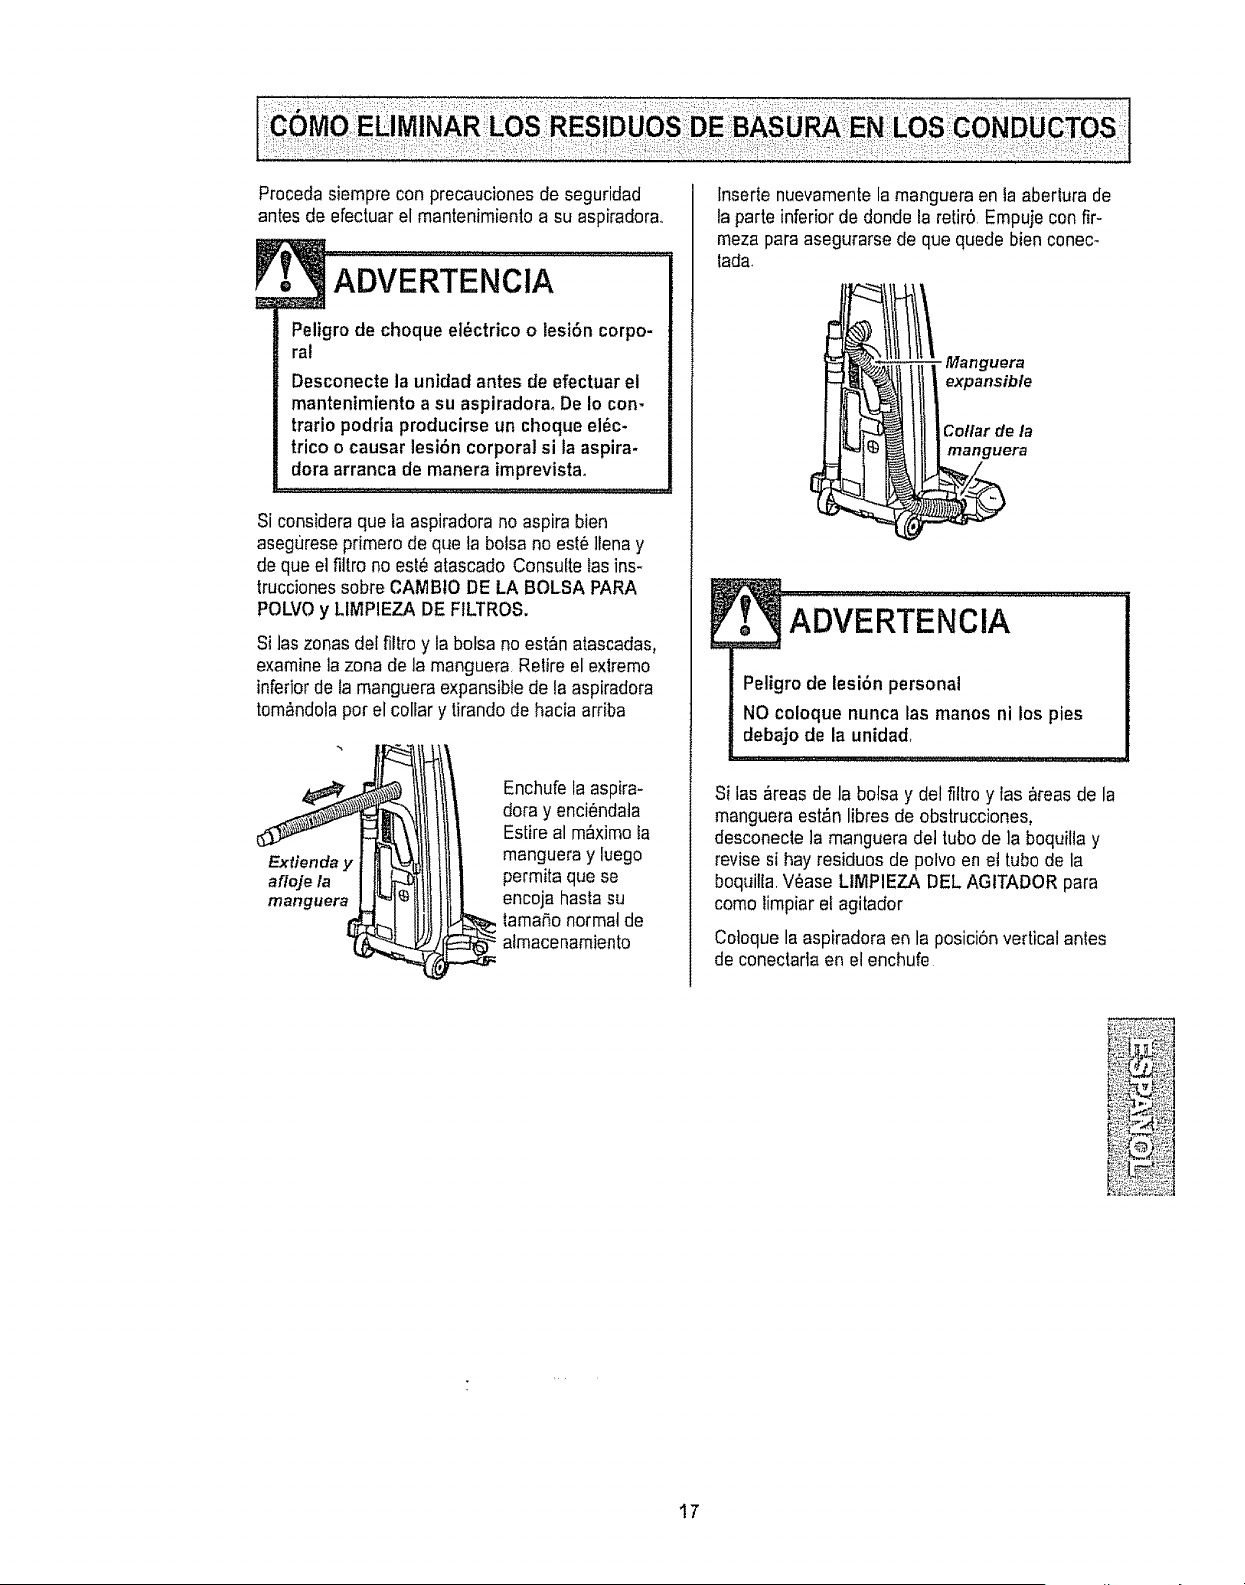
tf the vacuum cleaner does not seem to
have adequate suction, first check if the
dust bag is full or if a filter is clogged. See
DUST BAG REPLACEMENT and FILTER
REPLACEMENT,
If the bag and filter areas are free of clogs,
check the hose area. Remove the lower end
of the stretch hose from the vacuum cleaner
by grasping the hose collar, twisting, and
pulling straight out.
Stretch
Hose In
and Out
Plug in the
vacuum cleaner
and turn it on.
Stretch the hose
to maximum
length and then
allow the hose to
return to its
natural length..
: lower body from which it was removed.
Press firmly to assure connection.
WARNING "-:: ' "
Personal Injury Hazard
DO NOT place hands or feet under-
neath the unit at any time.
If the bag and filter areas and the hose
areas are free of clogs, disconnect the hose
from the floor nozzle pipe and check the
nozzle pipe for clogging. Clean the agitator
according to the instructions in the AGITA-
TOR CLEANING section.
Return the vacuum cleaner to the upright
position before plugging into an electrical
outlet.
Turn off and unplug the vacuum cleaner.,
Remove any visible clogs from the hose.
18
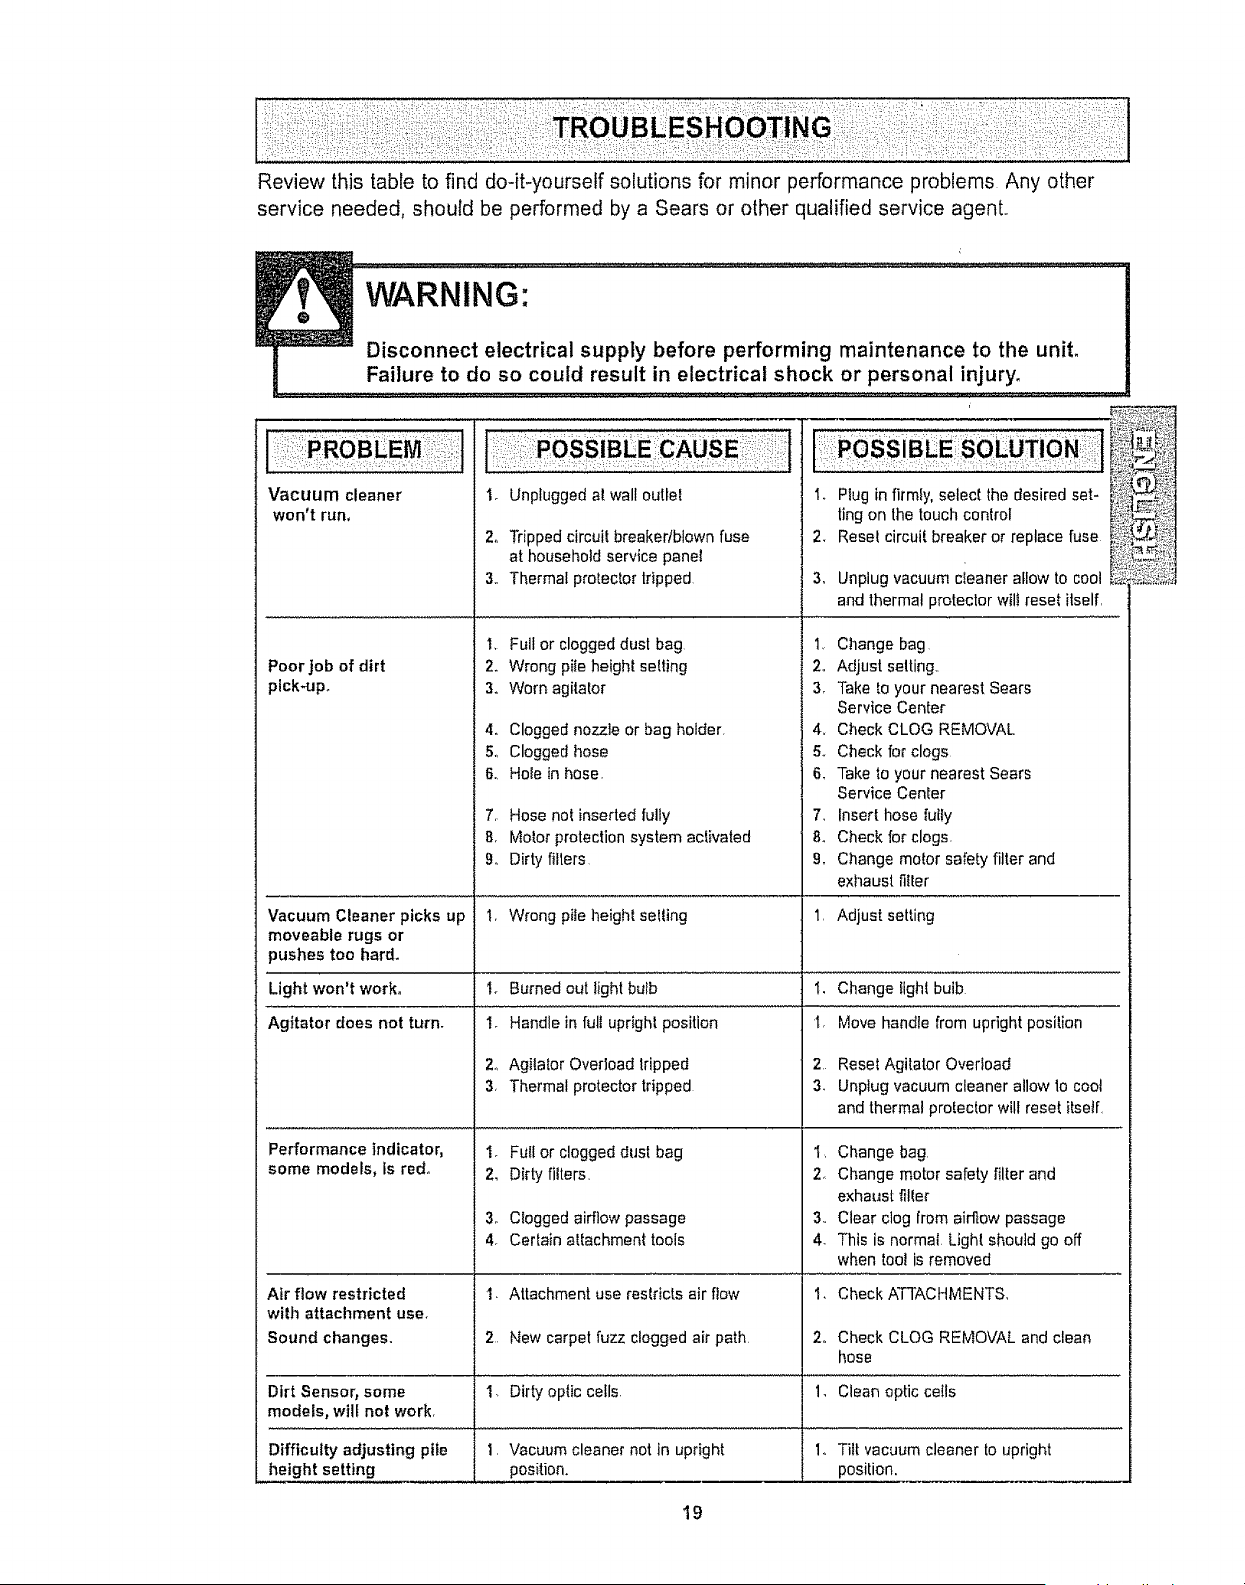
• _!i,i:i_i:i!!fi:,i_il::ii_!_i:!:iii!:!_ii:i_i,_i:i,_:!:iiii!i:!_i::i_i_i_;:i!i_ii::i,!!!i:i
Review this table to find do-it-yourself solutions for minor performance problems Any other
service needed, should be performed by a Sears or other qualified service agent.,
i:,J
Vacuum cleaner
won't run,
Poor job of dirt
pick-up.
1, Unplugged al wall outlet
2o Tripped circuit breaker/blown fuse
at household serv{ce panel
3,, Thermal protector tripped
1, Full or clogged dust bag
2. Wrong pile height setting
3_ Worn agitator
4. Clogged nozzle or bag holder,
5. Clogged hose
6, Hole in hose,
7, Hose not inserted fully
8, Motor protection system activated
9 Dirty filters
1.
2_
3_
Plug in firmly, select the desired set-
tingon the touchcontrol
Reset circuit breaker or replace fuse
Unplug vacuum cleaner allow to cool
and thermal protector wilt reset itself,
t_ Change bag
2o Adjust setting..
3. Take to your nearest Sears
Service Center
4,, Check CLOG REMOVAL
5o Check for clogs
& Take to your nearest Sears
Service Center
7_ Insert hose fuify
& Check for clogs,
g. Change motor safety filter and
exhaust filter
Vacuum Cleaner picks up I, Wrong pile height selling 1 Adjust setting
moveable rugs or
pushes too hard.
Light won't work, Change light bulb
Agitator does not turn. Move handle from upright position
Performance indicator,
some models, fs red°
1,
2,
3,
I_ Burned out light bulb
I. Handle in full upright position
2o Agilator Overload tripped
3, Thermal protector tripped
1. Full or clogged dust bag
2. Dirty filters,
3. Clogged airflow passage
4. Certain attachment tools
Reset Agitator Overload
Unplug vacuum cleaner allow 1ocool
and thermal protector will reset itself
1, Change bag
2 Change motor safety filter and
exhaust filler
3,, Clear clog from airflow passage
4, This is normal Light should go off
when tool is removed
Air flow restricted '1, Attachment use restricts air flow 1. Check ATTACHMENTS,
with attachment use°
Sound changes. 2. New carpet fuzz clogged air path 2. Check CLOG REMOVAL and clean
hose
Dirt Sensor, some 1, Dirty optic cells 1, Clean optic ceils
models, will not work,
Difficulty adjusting pile 1. Vacuum cleaner not in upright 1. Tilt vacuum cleaner to upright
height setting position, position.
19

20

Antes de usar su aspiradora nueva 1
Garantia de ia aspiradora de Kenmore .. 1
Instrucciones importantes de
seguridad ................. 2
Piezas y caracteristicas de aspiradora
vertical .................... 3
Instrucciones de ensamblamiento 4-5
tnstrucciones de operaci6n .......... 5
Liberaci6ndel cordon el_ctrico .......... 5
Desprendimientodel Mango .........
Pulsador de Control ..............
Ajuste y setecci6n de nivel de pelo de la
alfombra .....................
Accesorios ......
Cuadro de uso de los accesorios
6
6
7
7-9
10
Sugerenciaspara aspirar ............. I0
CarecterNsticasde
rendimientolseguridad ........... 11-t 2
Cuidado de la aspiradora ........... !3
Almacenamiento de la aspiradora ..... I3
Limpiezadel exlerior y de los accesorios ... I3
Cambiode fa bolsa para polvo ......... I4
Cambiode fillros ............. t5
Cambiode ta bombilla ................ t6
Limpiezadel agiIador ................. t6
COmoeliminar los residuos de basura
en los conduclos ............... t7
Reconocimiento de problemas ......... 18
Informaci6n de assistancia
o servicio ............... backpage
Por favor lea esta guia que le ayudara a assemblar y operar su aspiradora nueva de Kenmore en una manera
m_s segura y efectiva
Para mas informaci6nacerca def cuidado y operaciOnde esta aspirador,Ilame a su tienda Sears mas cercana
Cuando pregunte por informaci6n usted necisitar_el n_mero compteto de serie y rnodelode la aspiradora que
estan en la placa de los numeros de modeloy serie.
Use el espacio de abajo para registrarel numero de modeloy serie de su nueva aspiradora de Kenmore,
lqt]merode Modelo
Numerode Serie
Fechade Compra
Matengaeste libro y su recibo en un lugar seguro para referencias futuras
GARANTiA LIMITADA DE UN AblO DE LA ASPIRADORA KENMORE
Esta garantia es por un aOodesde la fechade compra, e incluye solamente el uso de la aspiradora en
hogares privados. Duranteel afio de garantia, cuando la aspiradora es operada y mantenida de acuerdo at
manual de instrucciones del dueOo,Sears reparar_ cualquierdefecto en materiales o fabricaciOnlibre de cargo
Esta garantta excfuyelas bolsasde colecci6n,correas, tamparilfas,y filtros, las cuales son partes gastables que
se deterioran con el uso normal.
Para el servicio de garantia, retorne esta aspiradora al Centre de Serviclo Sears m_s cercano en los
Estados Unidos,
Esta garantia se aplica solamente mientraseste producto est&en use en los Estados Unidos Esta garanlia le
da a usteddereches legales espectficos,y usted puede tener tambi#n otros derechoslos cuales varian de
estado a estado
Sears, Roebuck and Co., Df817 WA, Hoffman Estates, tL 60179

ADVERTENCnA
Suseguridad es muy importante pare nosotros. Para
reducir el riesgo de incendio,choque el_ctrico, lesi6n cor-
poral o daSosal utilizar su aspiraclora,actue de acuerdo
con precaucionesb_sicas de seguridad, entre elias:
Lea este manual antes de armar o utilizer su
aspiradora
Use su aspiradora unicamente en la forma
descrita en este manual. Use unicamentecon
accesorios recomendadospor Sears
Pare reducirel riesgo de cttoque e!_ctrico,no use
su aspiradoraai aire libra ni sobre superficies
mojadas
Desconecte la provisi6n de etectricidad antes de
efectuar el mantenimiento def _rea del cepilb
De Io contrario podria causar un choque el_ctrico
o lesi6n corporal.
Siempre debe apagar su aspiradora antes de
desconeclaria
No desconecte la aspiradoratirando del cord6n
et_ctrico.Para desconectarta,jale el enchufe, no
e! cord6n,,
No use la aspiradora si el cord6n o el enchufe
est_da_,ado.Si la aspiradora no est&
funcionandoadecuadamente o si se ha dejado
caer, est&da_,ada,se ha dejadoexpuesta a la
intemperieo se ha dejado caer en agua, devuef-
rata a un Centro de servicio de Sears,
No jate ni transporte la aspiradora pot el cord6n;
no use el cord6n como mango; no cierre puertas
sobre el cord6n;no jate el cord6n sobre rebordes
agudos ni esquinas No pase la aspiradora sobre
el cord6n.Mantengael cordon alejado desuperfi-
cies catientes.
No abandone la aspiradora cuando est_ conec-
tada Descon6ctetacuando no ta est6 usando y
antesde darte servicio.
No permitaque sea utilizadacomo juguete.Se
requieretener mayorcuidado cuando sea
utilizadaen la proximidadde ni5os o por niSos.
No toque ia aspiradora ni el enchufe con las
manosmojadas,
No co]oque objetos en las aberturas.
No utilice la aspiradorasi alguna abertura est&
b!oqueada;mant_ngalalibre de polvo,pelusa,
cabellosy cualquiera cosa que podria disminuir
el flujo de aire
Mantenga el cabeilo,ropa suelta, dedos y todas
taspades del cuerpo alejadosde las aberturasy
piezasmec_nicas
No descanse la aspiradora sobre escatones.
La manguera contiene cables ef6ctricos. No los
use cuando est6n daRadoso pinchados. Evite
levantarobjetos afi]ados
Siempre apage la aspirado[a antes de conectar
o de desconectar la manguera o la boquilla elec-
trica
No use Ia aspiradora sin tarter instalada la boise
parapolvo y/o los filtros,
Cambie siempre la botsa para pofvo despu_sde
aspirer Iimpiadoresde alfombraso desodoranles,
talcosy polvos finos Estos productos atascan fa
bo]sa, reducenel ftujo de aire y pueden causar
qua6sta se rompa Si no cambia la botsa podria
ocasionardaSopermanenteala aspiradora.
No use ta aspiradora para levanlar objelos agu-
dos,juguetes pequeSos,alfileres, suietapapeles,
elc PodriandaSarta aspiradora o la botsa para
potvo
No levanteningunacosa que se est6quernando
o emitiendohumo, comocigarriltos,cerillos o
cenizas calientes
No use ta aspiradora para aspirar ]iquidos
inflarnableso combustibles{gasolina, liquidos
parelimpieza, perfumes,etc) nila use en
lugares donde 6stos podrian estar presentes Los
vapores de estas sustancias puedencrear un
peligrode incendio o explosi6n
Tenga cuidado especial al utilizar la aspiradora
en escalones No la coloque sobre sillas, mesas,
elc Manlengataen el piso
Usted es responsablede asegurar qua su aspira-
dorano sea utilizada pot ningunapersona qua no
pueda maneiarlacorreclamente.
GUARDE ESTAS INSTRUCClO ES
El armado y uso seguro de su aspiradora son su responsabilidad Esta aspiradora ha sido disefiada
exclusivamentepara uso dom6stico.La aspiradoradebar&afmacenarseen un lugar seco yen el interior
Lea esteManuatdel propietariodetenidamente,pues contiene informaci6n irnportantesobre seguridad y
uso_Esta guia contiene inforrnaci6n sobre segundad debaio de simbofos de advertienciao cuidado
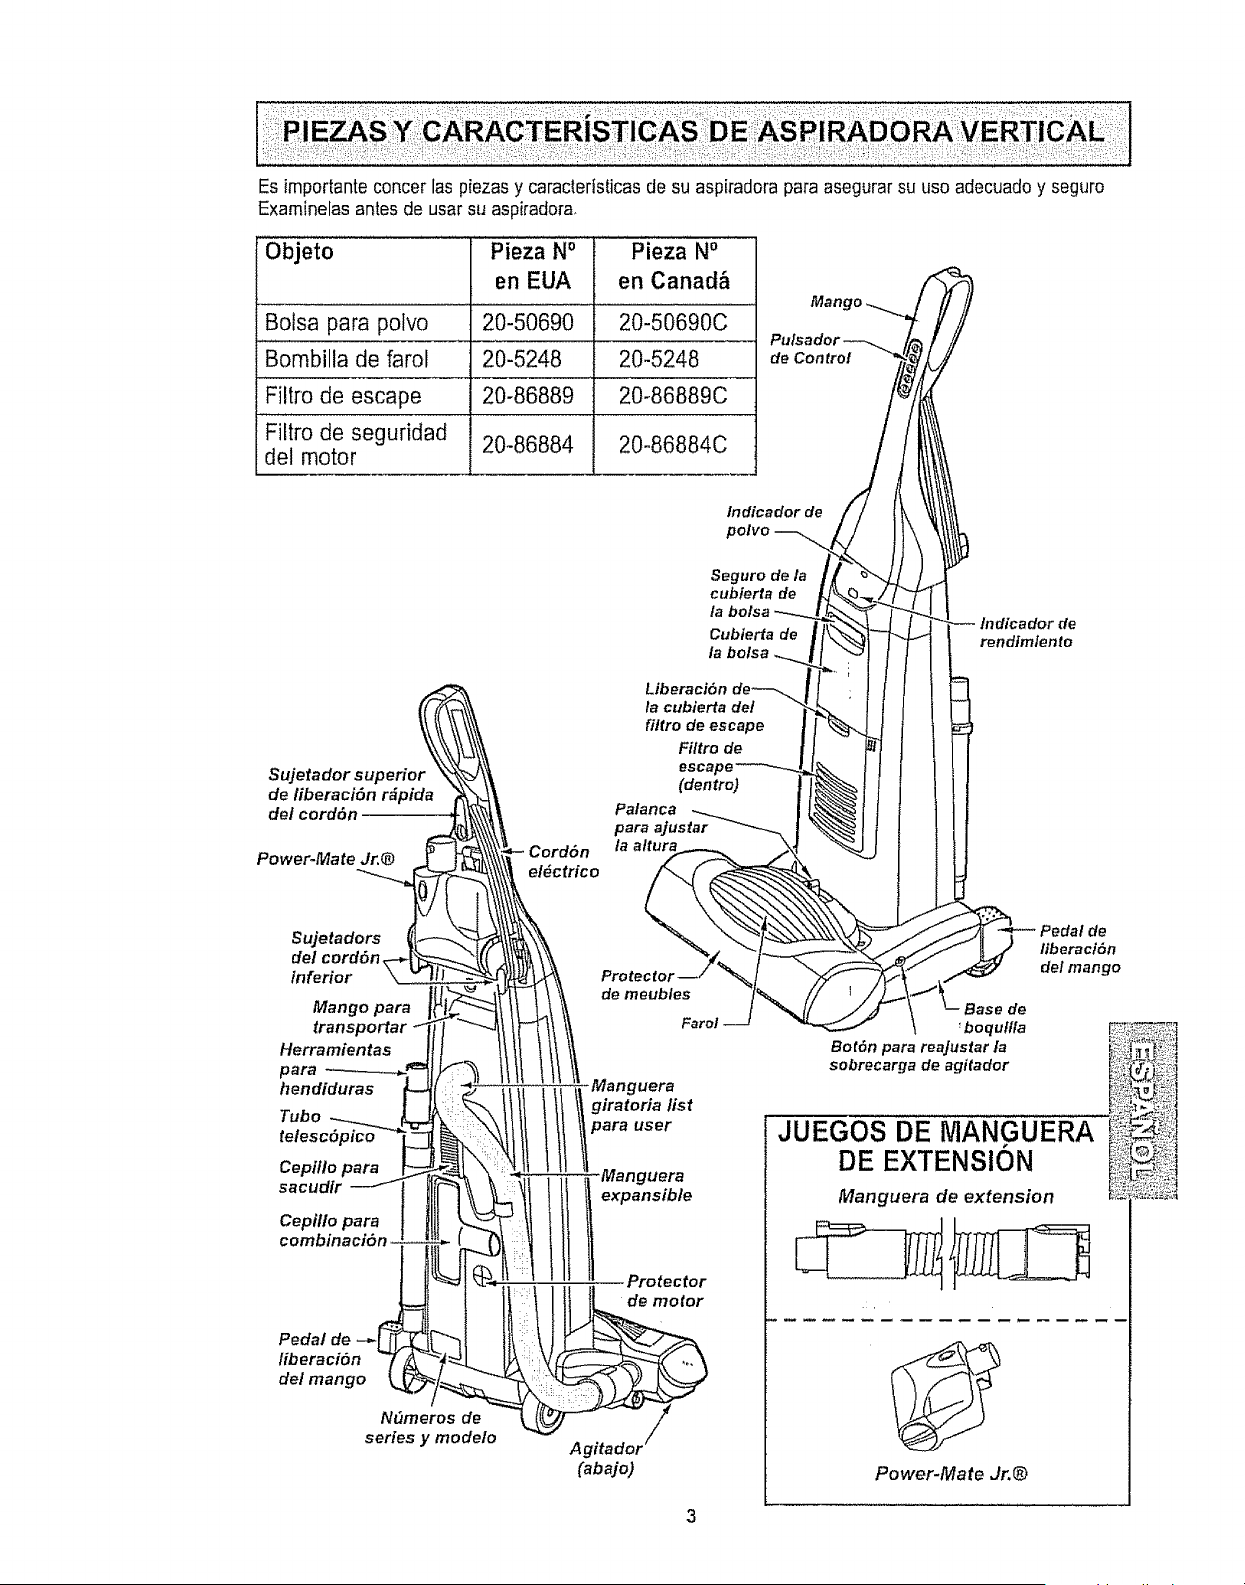
Esimportanteconcerlaspiezasycaracteristicasdesuaspiradoraparaasegurarsuusoadecuadoyseguro
Examinelasantesdeusarsuaspiradora,
Objeto Pieza No Pieza No
en EUA en Canad&
Bolsa para potvo 20-50690 20-50690C
Bombilla de farol 20-5248 20-5248
Filtro de escape 20-86889 20-86889C
Filtro de segufidad 20-86884 20-86884C
del motor
Man i
de Control
Indicador de
Seguro de la
cubierta de
Cubierta de
la bolsa
r_ Liberaci6n
la cubierta de!
filtro de escape
Filtro de
Sujetador superio escat
de/iberaci6n r#pida (dentro)
de/cord6n Palanca
para ajustar
la altura
Power-Mate Jr.@
lndicador de
rendtmlente
Sujetadors de
del cord6n, liberacl=Sn
inferior del mango
series y modelo
Power-Mate Jr.®
3
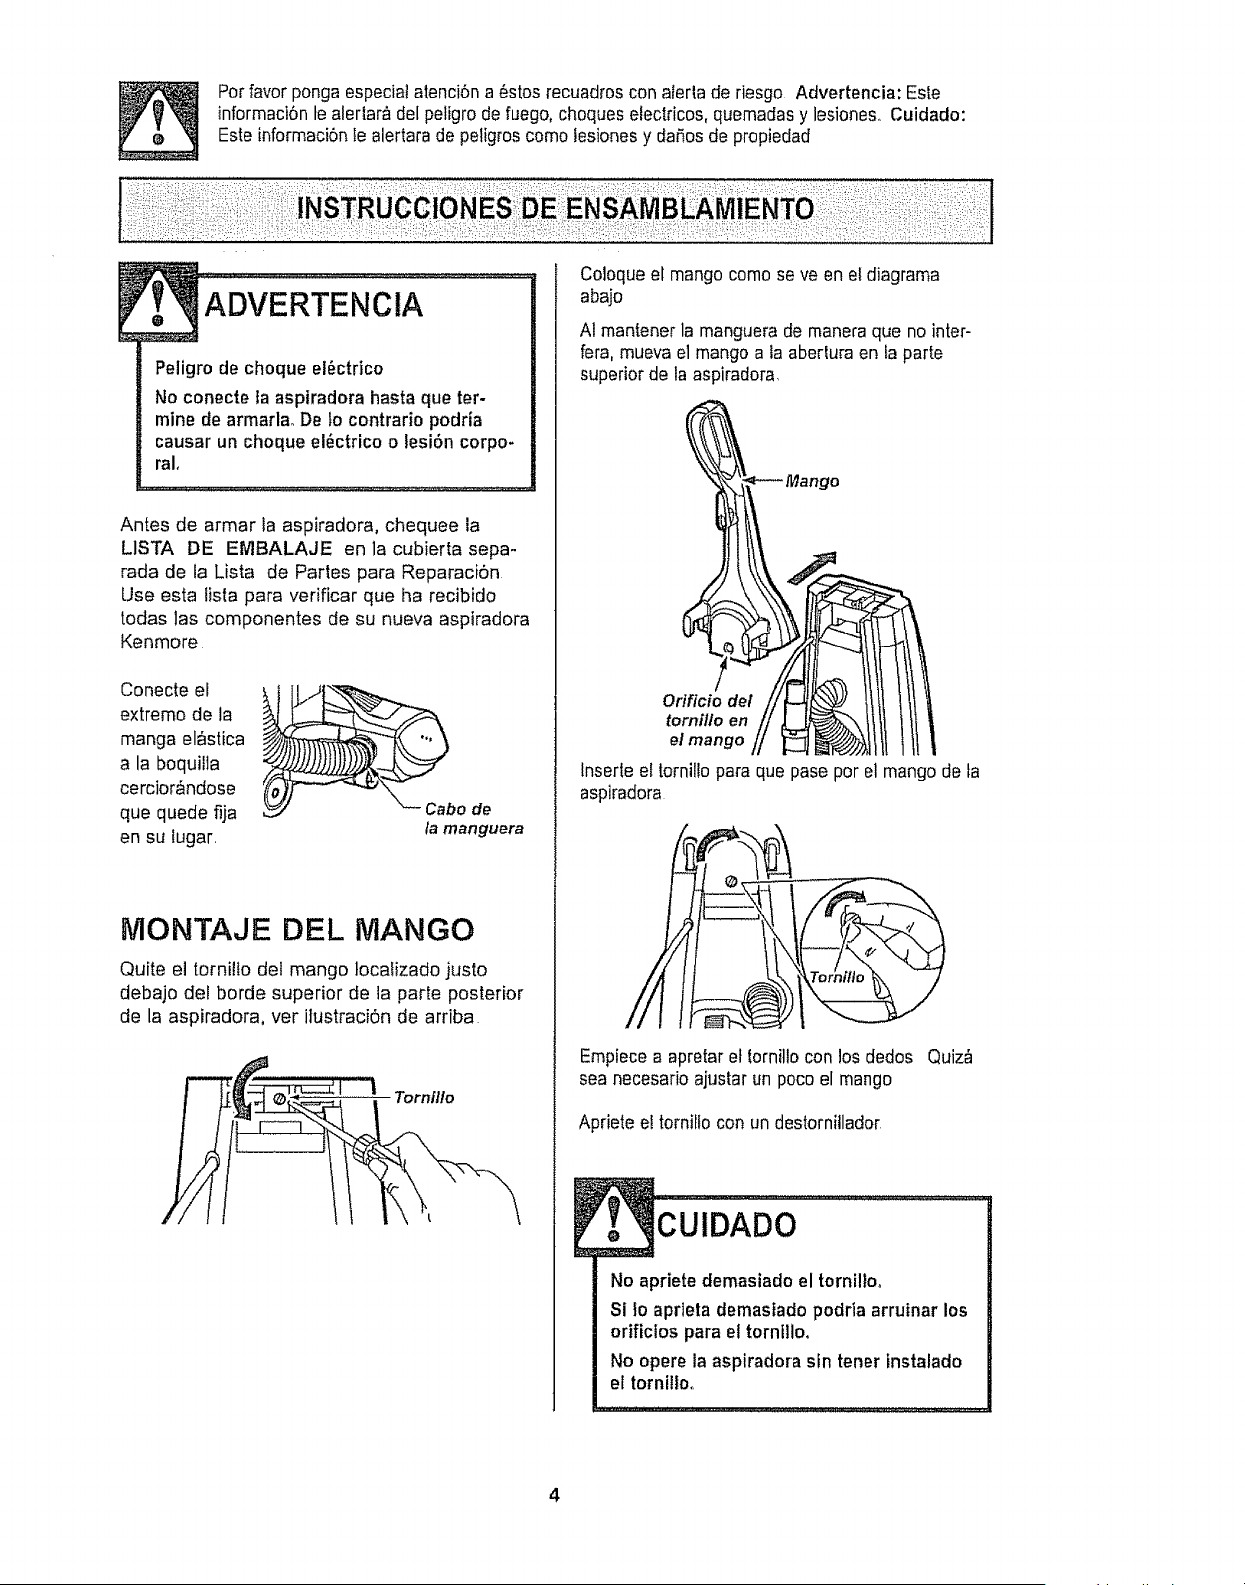
Parfavor pongaespecialatenciSna 6stos recuadros con aferta de riesgo Advertencia: Este
informaci6n le alertar& del peligrode fuego, chequeselectricos, quemadas y lesiones,, Cuidado:
Este informacbn Ie alertarade peligros come tesienes y daSosde propiedad
Peligro de cheque el6ctrico
No conecte ta aspiradora hasta que ter-
mine de armada° De to contrario podria
causar un cheque el6ctrico o lesi6n corpo-
ral,
Antes de armar la aspiradora, chequee la
LISTA DE EMBALAJE en la cubierta sepa-
rada de la Lista de Partes para Reparacion
Use esta tista para vedficar que ha recibido
todas las componentes de su nueva aspiradora
Kenmore
Conecte el i
extreme de la
manga eI_stica
a la boquilla
cercior_ndose
que quede fija
en su tugar,
la manguera
NIONTAJE DEL MANGO
Quite e] tornilio del mango locaiizado justo
debajo del borde superior de la parte posterior
de la aspiradora, vet ilustraci6n de arriba
Tornfllo
Coloque el mango come se ve en et diagrama
abajo
A1mantener la manguera de maneraque no inter-
fera,mueva el mango a la abertura en ta parte
superior de la aspiradora,
Orificio del
tornillo en
el mango
lnserte el tornilto para que pase per el mango de ta
aspiradora
Empiecea apretar et tornilte con los dedos Quiz_
sea necesario ajustar un poco el mango
Apriete ei torniIto con un destornitlador
No apriete demasiado el tornillo_
Si Io aprleta demastado podria arruinar los
orificios para el tornillo,
No opere la aspiradora sin tener instalado
el tornilloo
,,.,...::...............
4
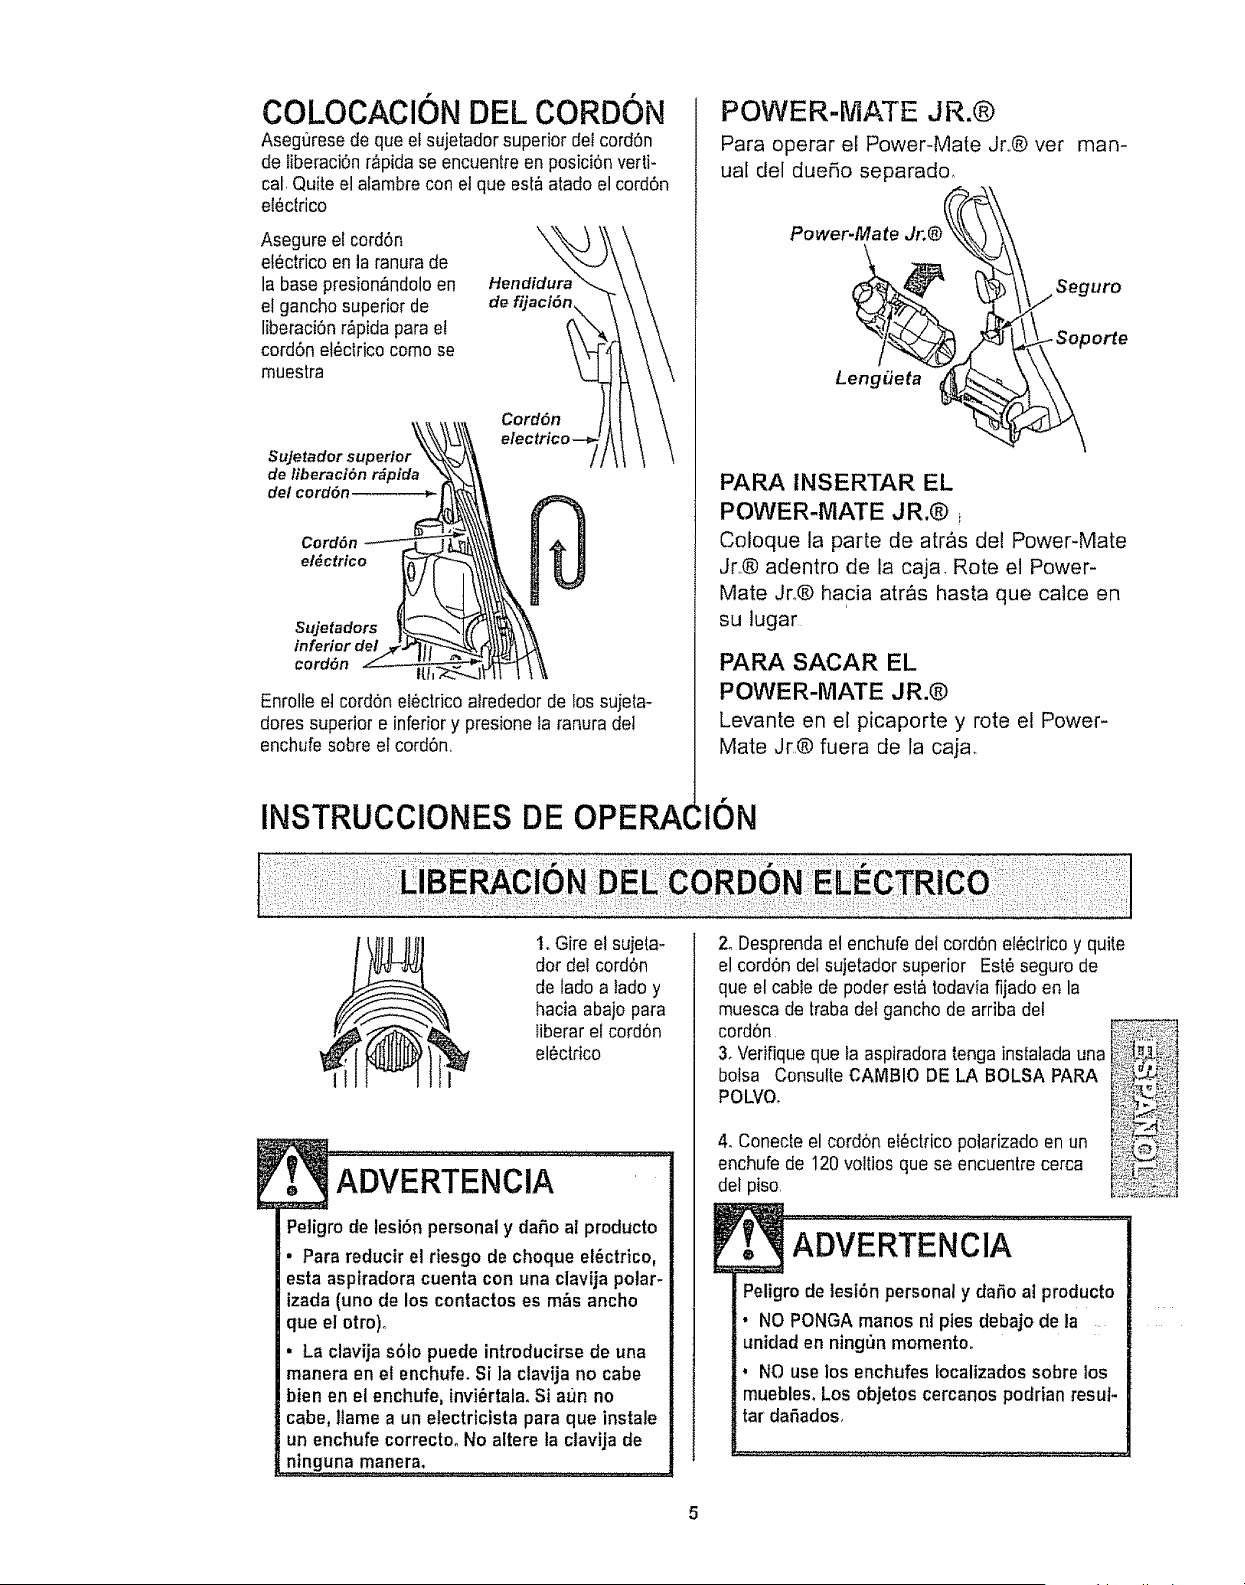
COLOCACl0N DEL CORDON
Aseguresede queef sujetador superior dei cordon
de liberaciOnr&pida se encuentre en posiciOnverti-
cal Quite el alambre con el que est&atado el cord6n
eiOctrico
Asegure el cordon
electrico en la ranurade
la base presion_,ndoloen
el gancho superior de
liberaciOnr_pida para et
cord6n el_clricocome se
muestra
\
Hendidur_
Sujetador superior
de liberaci6n r_pida
de/cord6n
Cord6n
CordOn
el_ctrico
$ujetadors
inferior del
cord6n
Enrolfe el cordon electrico atrededorde !os sujeta-
dores superior e inferior y presione la ranura det
enchufesobre el cord6n
INSTRUCClONES DE OPERA(
POWER-MATE JR.@
Para operar el Power-Mate Jr.,@ vet
uaI del due5o separado,
man-
Power-Mate
rUrO
Leng#eta
PARA INSERTAR EL
POWER-MATE JR.@ i
Coloque la parte de atr&s del Power-Mate
Jr.® adentro de la caja Rote el Power-
Mate Jro@ hacia atr&s hasta que calce en
su lugar
PARA SACAR EL
POWER-MATE JR.@
Levante en e[ picaporte y rote e! Power-
Mate Jr,,@fuera de la caja.
:ION
t. Gire el sujeta-
dot del cordon
de lade a lade y
hacia abajo para
iiberar el cordon
el_ctrico
Petigro de lesi6n personal y dafio al producto
. Para reducir el riesgo de cheque el_ctrico,
esta aspiradora cuenta con una clavija polar-
izada (uno de los contactos es m&s ancho
que el otro)o
• La clavija solo puede introducirse de una
manera en el enchufe, Si la clavija no cabe
bienen el enchufe, invi_rtala. Si aun no
cabe, ltame a un electricista para que instale
un enchufe correctoo No altere la ctavija de
n!nguna manera, .....................
2oDesprendaet enchufe dei cordon elOctricoy quite
el cordon del sujetadorsuperior EstOseguro de
que el cable de pealerest_ todavia fijado en la
muesca de traba dot gancho de arriba de!
cordon
3. Verifique que ia aspiradoratonga instatada una
bolsa Consulte CAMBIO DE LA BOLSA PARA
POLVO.
4. Conecle el cord6n eI_ctrico polarizado en un
enchufe de 120vo!tios que se encuentre cerca
del piso,
[ ADV-ERTENCIA ..............
Peligro de tesiOn personal y daho at producto
• NO PONGA manes ni pies debajo de la
unidad en ning_n memento.
° NO use los enchufes iocalizadossobre los
muebles. Los objetos cercanos podrian resut-
tar daOados.
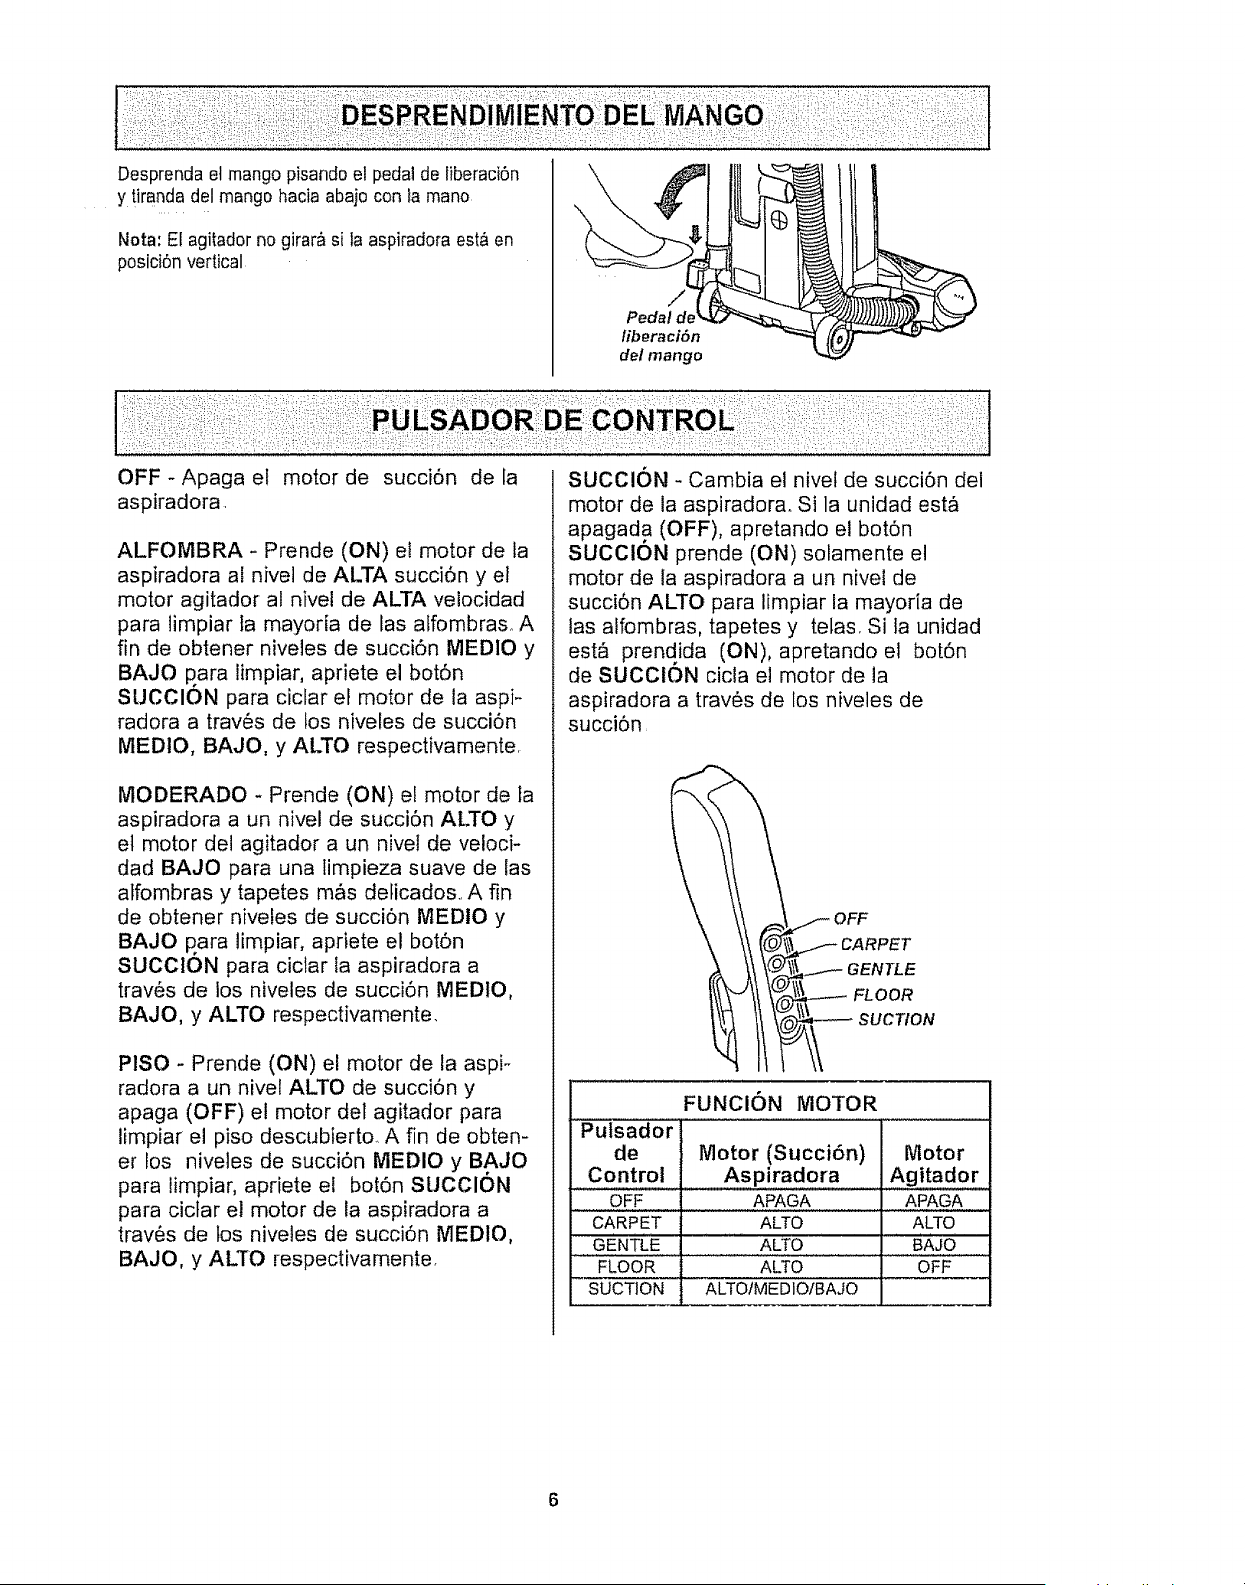
Desprendaetmangopisandoelpedaldeliberaci6n
ytirandadelmangohaciaabajocontamano
Nota: El agitador no girar& si la aspiradora esta en
posici6nvertical
\
Pedal de
liberaci6n
del mango
:i_::i!:'i:!_iii :: ............................
OFF- Apaga et motor de succi6n de la
aspiradora
ALFOMBRA - Prende (ON) el motor de la
aspiradora al nivel de ALTA succi6n y el
motor agitador al nivei de ALTA velocidad
para limpiar la mayoria de las affombras. A
fin de obtener niveles de succi6n MEDIO y
BAJO p ara limpiar, apriete el bot6n
SUCClON para ciclar el motor de la aspi-
radora a trav6s de los niveles de succi6n
MEDIO, BAJO, y ALTO respectivamente
MODERADO - Prende (ON) el motor de la
aspiradora a un nivel de succi6n ALTO y
et motor del agitador a un nivel de veloci-
dad BAJO para una timpieza suave de las
atfombras y tapetes m,Cs delicados.. A fin
de obtener nivefes de succi6n MEDIO y
BAJO p ara limpiar, apriete el bot6n
SUCClON para ciclar la aspiradora a
trav6s de los niveles de succi6n MEDIO,
BAJO, y ALTO respectivamente.
PISO - Prende (ON) el motor de la aspi-
radora a un nivel ALTO de succi6n y
apaga (OFF) el motor del agitador para
limpiar el piso descubierto. A fin de obten-
er los nivetes de succi6n MEDIO y BAJO
para limpiar, apriete el bot6n SUCClON
para cictar el motor de la aspiradora a
trav6s de los nivetes de succi6n MEDIO,
BAJO, y ALTO respectivamente.
SUCClON - Cambia el nivet de succi6n dei
motor de la aspiradora. Si la unidad est&
apagada (OFF), apretando el bot6n
SUCClON prende (ON) solamente el
motor de la aspiradora a un nivel de
succi6n ALTO para limpiar la mayoria de
las alfombras, tapetes y telas. Si ta unidad
est_ prendida (ON), apretando el bot6n
de SUCOION cicla el motor de la
aspiradora a trav6s de los niveles de
succi6n
__k_._ OF F
\ \ \I CARPET
_, \\ \_ I.--- GENTLE
FUNCION MOTOR
Putsador i
de Motor (Succi6n) Motor
Control Aspiradora Agitador
OFF APAGA APAGA
CARPET ALTO ALTO
GENTLE ALTO BAJO
FLOOR ALTO OFF
SUCTION! ALTOIMEDIO/BAJO
6
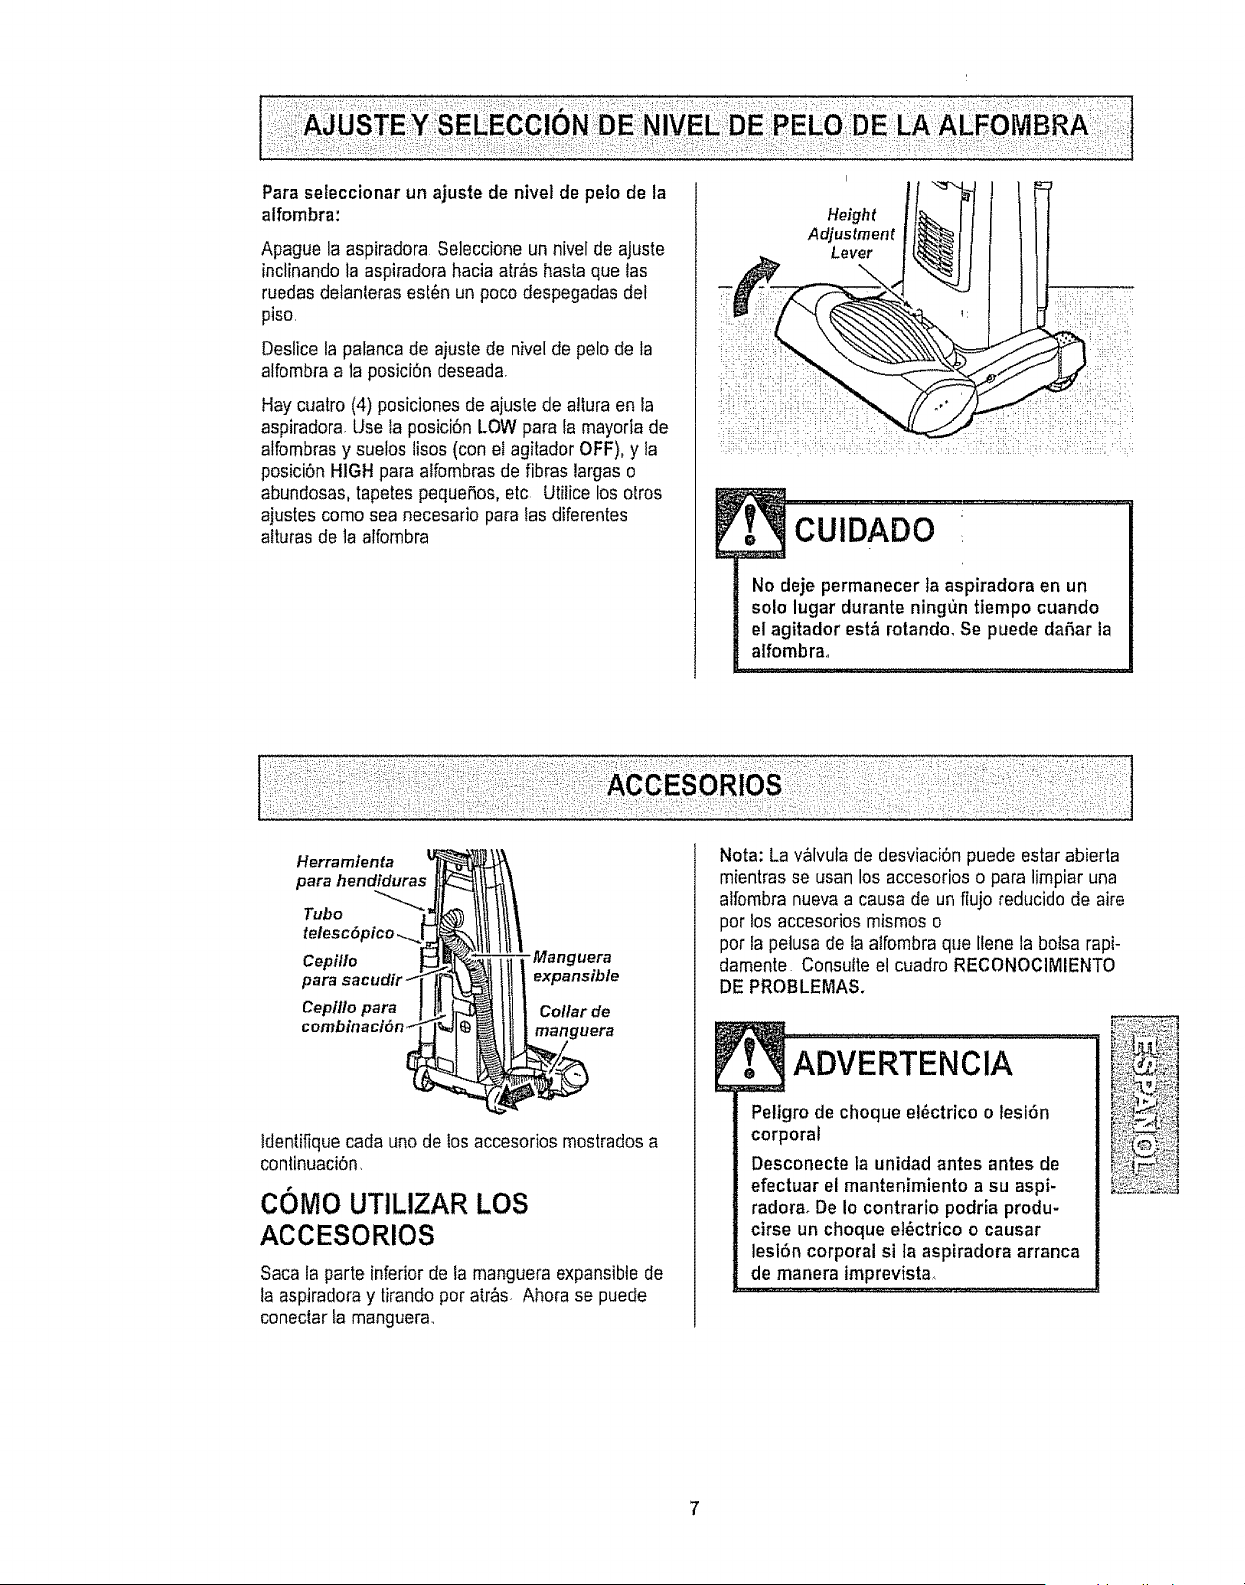
Paraseleccionarunajustedeniveldepelodela
alfombra:
ApaguelaaspiradoraSeleccioneunniveldeajuste
inclinandolaaspiradorahaciaatr,fisbasraquelas
ruedasdetanlerasest6nunpocodespegadasdet
piso,
Deslicelapalancadeaiustedeniveldepelodela
alfombraalaposici6ndeseada.
Haycuatro(4)posicionesdeajustedeaJluraenla
aspiradora,Uselaposici6nLOWparalamayodade
alfombrasy sueloslisos(conelagitadorOFF),y ta
posici6nHIGHparaalfombrasdefibraslargaso
abundosas, tapetes peque5os,etc Utilice los otros
ajustes como sea necesario para las diferentes
alturas de la alfombra
Height
Adjustment
Lever
No deje permanecer ]a aspiradora en un
solo lugar durante ningun tiempo cuando
el agitador estA rotando, Se puede dahar la
alfombrao
klerra mien ta
para hendiduras
Tubo
Cepitlo -Ma ng uera
para expansible
Cepiflo para Collar de
manguera
ldentifiquecada uno de los accesorios mostrados a
continuaci6n,
COMO UTILIZAR LOS
ACCESORIOS
Saca la parte inferior de la manguera expansible de
ta aspiradora y tirandopor atr_s, Ahora se puede
coneclar la manguera,
Nota: La valvula de desviaci6n puede estar abierta
mientrasse usan los accesorioso para limpiar una
alfombra nuevaa causa de unflujo reducido de aire
por los accesorios mismos o
pot la petusade la atfombraque llene la botsarapi-
damente Consulte el cuadro RECONOClMIENTO
DE PROBLEMAS.
-AD ERTENCIA
Peligro de choque el6ctrico o lesi6n
corporal
Desconecte la unidad antes antes de
efectuar el mantenimiento a su aspi-
radoraoDe Io contrario podria produ-
cirse un choque et_}ctrico o causar
lesl6n corporal si ta asptradora arranca
de manera tmprevista,
: ........... ; :_u ....
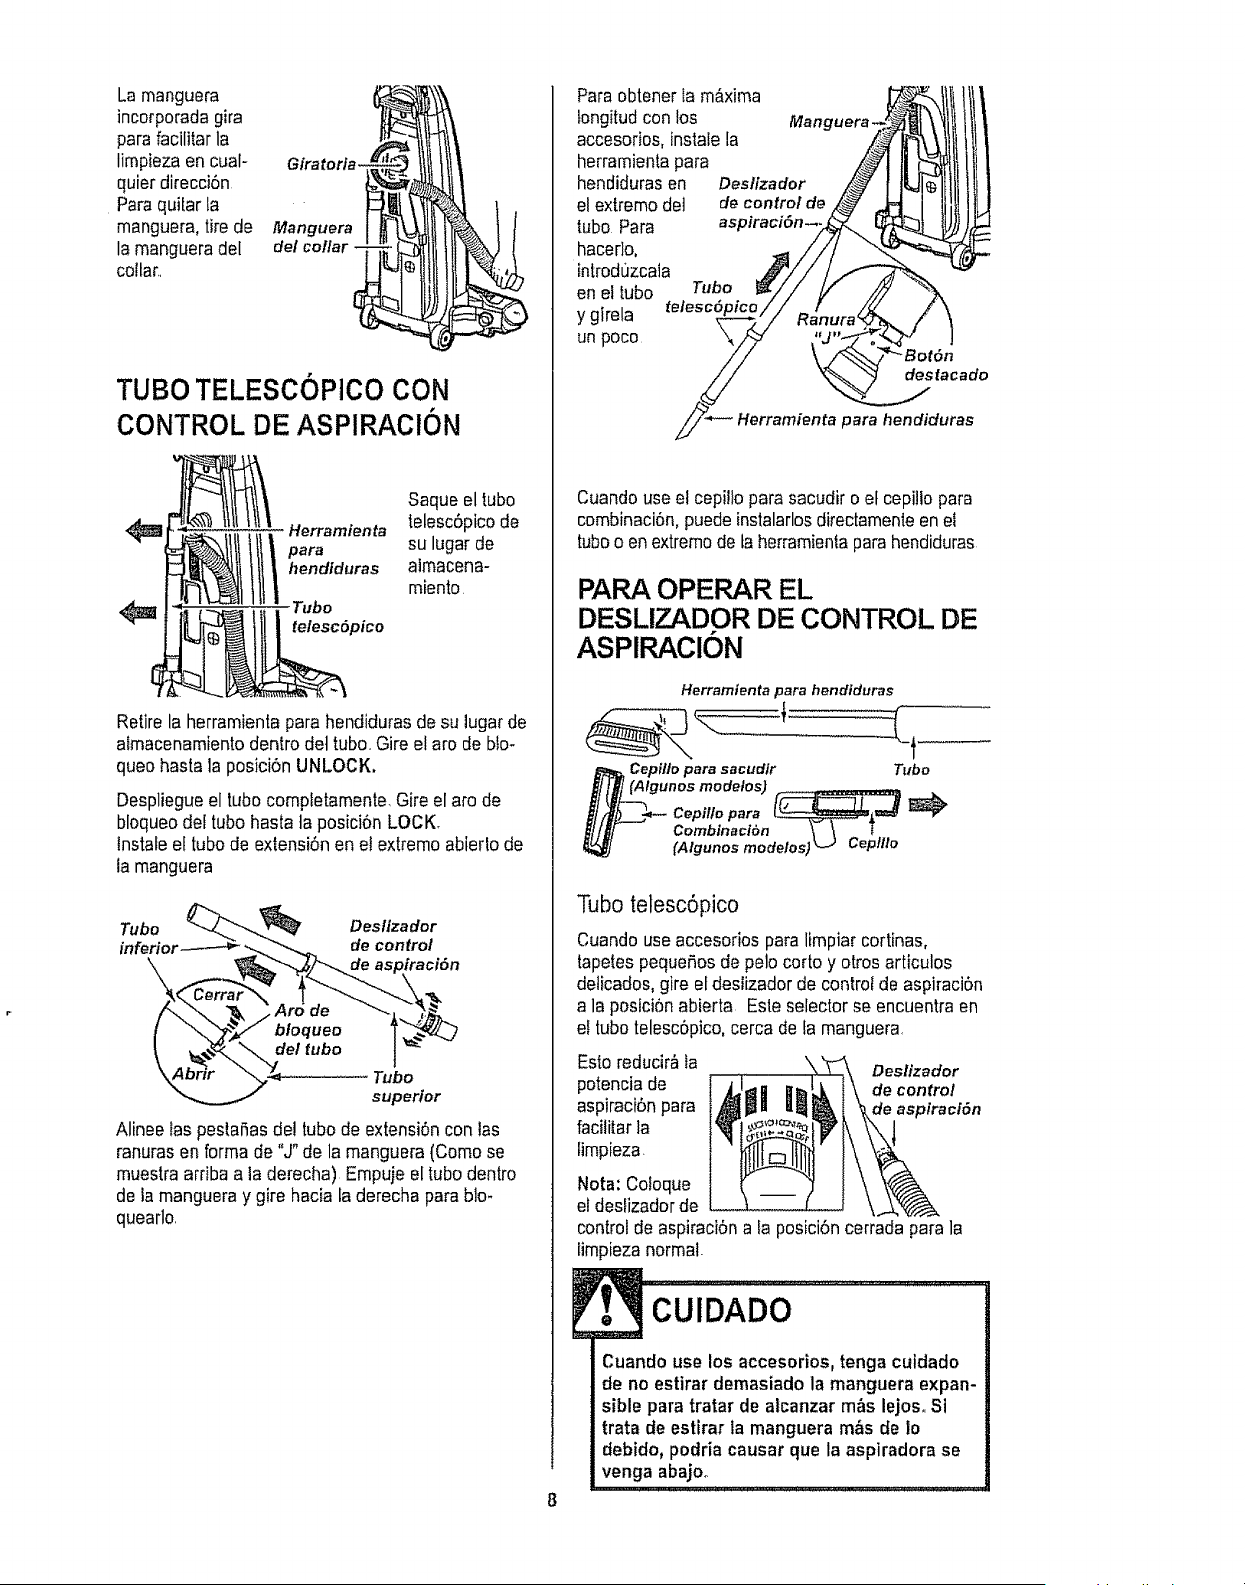
Larnanguera
incorporada gira
para facilitar la
lirnpiezaen cuaI- Giratorfa-
quiet direcci6n
Paraqui[ar la
rnanguera,tire de Manguera
la rnangueradeI del collar -
collar..
TUBO TELESCOPICO CON
CONTROL DE ASPIRAClON
4_ '_ Herramienta
para
_ hendlduras
Tubo
_ telesc6pico
Saqueel tubo
telesc6picode
su lugarde
aimacena-
miento.
Retire la herramientapara hendiduras de su lugar de
aimacenamientodentro det tuba Gire el aro de blo-
queo hastala posici6n UNLOCK.
Despliegueel tubo compietamente,Gireel aro de
bloqueodel tubo hasta ta posici6n LOCK,
tnstale el tubo de extensi6n en et extrernoabierto de
ta manguera
Tubo Desllzador
inferior de control
Tubo
superior
Alinee tas pestanas de! tubo de extensi6n con las
ranuras en forrnade "J" de la manguera(Corno se
muestra arriba a ta derecha) Empuje el tubo dentro
de la mangueray gire hacia la derecha para blm
quearlo,
Paraobtener ta rn&xima
tongitudcon los
accesorios, instafela
herrarnientapara
hendidurasen
el extremo det
tubo Para
hacerlo,
introdt]zcala
en el tubo Tubo
y girela telesc6ptc
un poco
Manguera.
Deslizador
de control de
aspiraclon--.
destacado
Herramienta para hencliduras
Cuando use el cepillo para sacudir o el cepillo para
combinaci6n,puedeinstalarlosdirectamenteen el
tubeo en extrernode taherramieniaparahendiduras
PARA OPERAR EL
DESLIZADOR DE CONTROL DE
ASPIRAClON
Herramienta para hendiduras
Cepillo para sacudir Tubo
t (Algunos modelos) _ .
Cepi!lo para (__==_
Combinaci6n _ 1
[A/gunos rnode/os) _J Cep//Io
Tubo telesc6pico
Cuando use accesorios para limpiar cortinas,
tapetes pequeSosde pelo corto y otros articulos
delicados, gire el deslizador de controt de aspiraci6n
a la posici6n abierta Este selector se encuentraen
el tubo telesc6pico,cerca de fa manguera
Esto reducir&ia Destizador
potencia de de control
aspiraci6npara de aspiraci6n
facilitar la
timpieza
Nora: Co!oque
el desfizadorde
control de aspiraci6na la posici6ncerrada para la
lirnpiezanormal.
[. cuioAoo.................
Cuando use los accesorios,tenga cuidado
de no estirar demasiado la manguera expan-
sible para tratar de alcanzar m&s lejos,. Si
trata de estirar la manguera m&s de Io
debido, podria causar que la aspiradora se
venga abajo_.
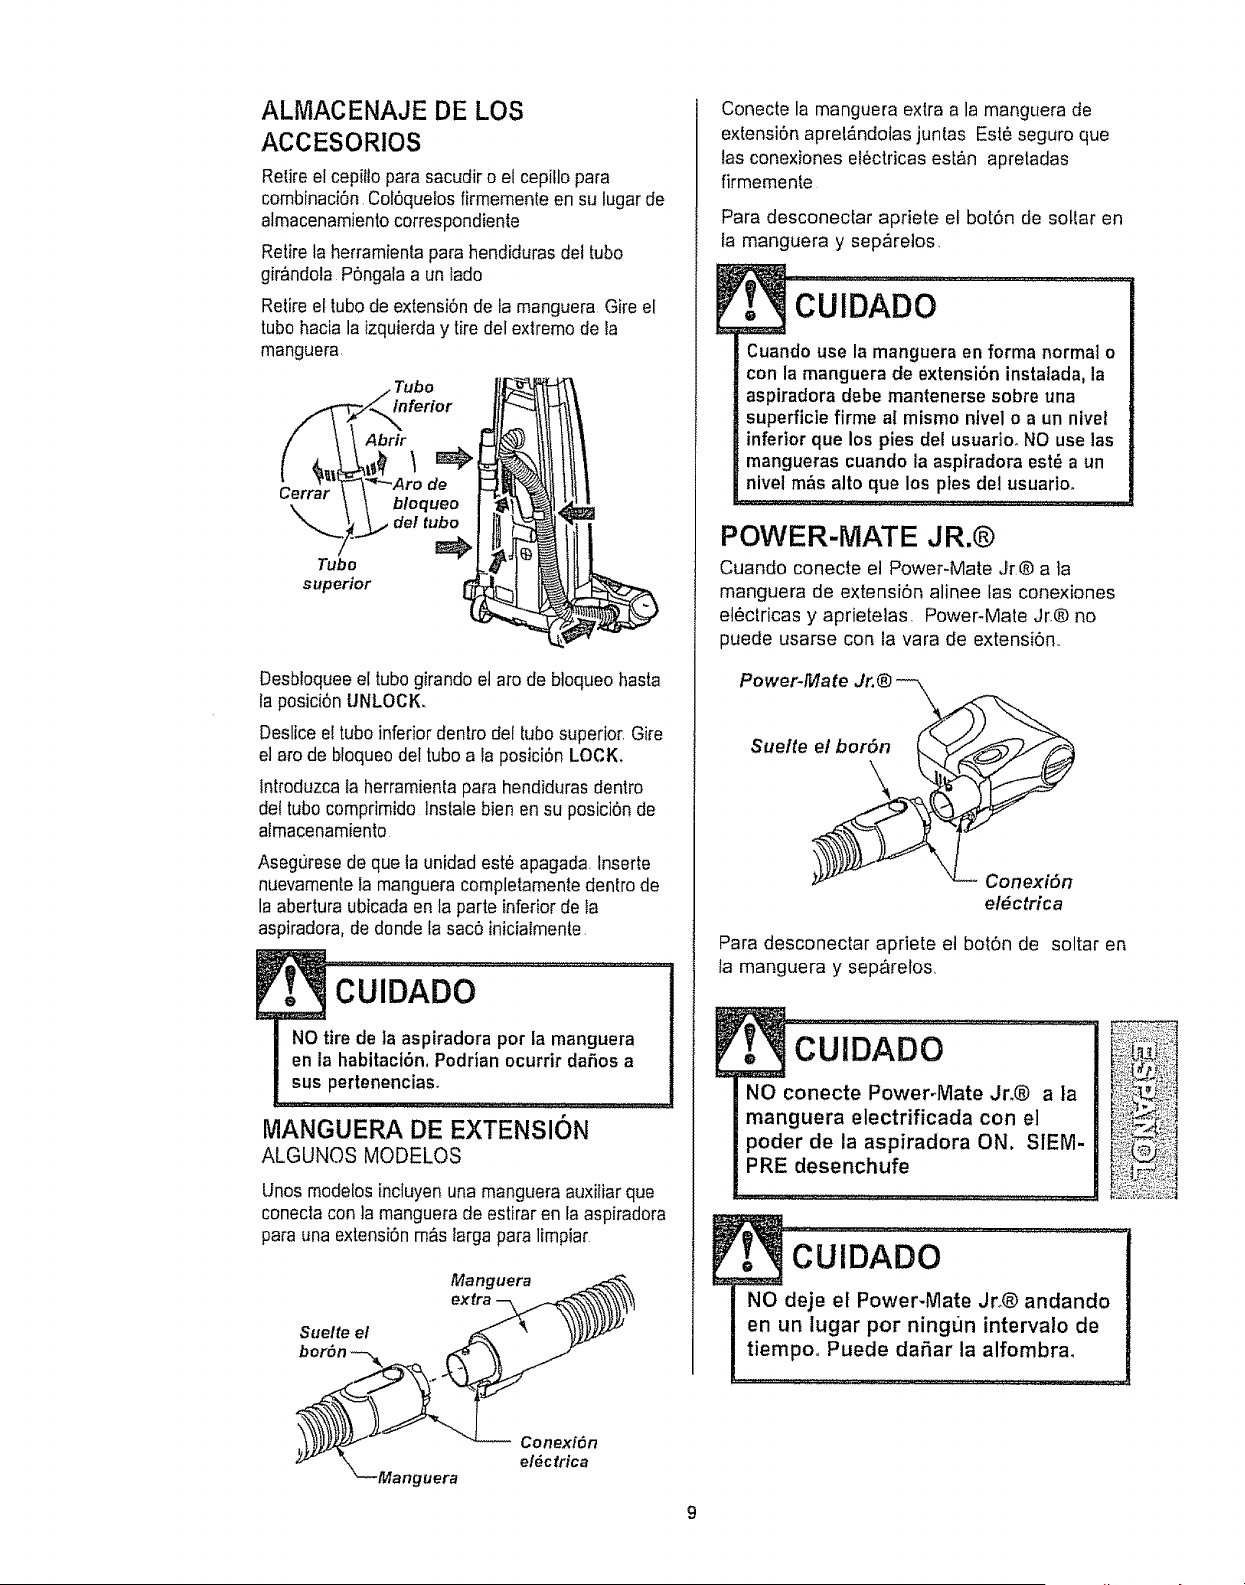
ALIVlACENAJE DE LOS
ACCESORIOS
Retireel cepi{topara sacudir o el cepiflopara
combinaci6n Col6quefosfirmementeen su lugarde
almacenamientocorrespondiente
Retirela herramientapara hendiduras det tube
gir&ndola P6ngala a un lade
Retireel tube de extensi6n de fa manguera Gire el
tube hacia la izquierday tire del extreme de ia
manguera.
Cerrar
Tube
superior
inferior
Abrir
de
b!oqueo
det tube
Desbioqueeel tube girando et are de bloqueo hasta
la posici6n UNLOCK,
Deslice e! tube inferior dentro det [ubo superior. Gire
et are de bfoqueodel tube a ia posici6n LOCK.
Introduzcata herramientapara hendidurasdentro
de{tube comprimido lnstale bienen su posici6n de
almacenamiento
Asegurese de que la unidad este apagada Inserte
nuevamentela manguera completamentedentro de
la abertura ubicada en la parte inferior de la
as )iradora,de donde la sac6 iniciatmente,
. -CU'iDADO ......................
NO tire de la aspiradora per la manguera
en la habitacl6n, Podrian ocurrir daSos a
sus pertenencias.
IMIANGUERA DE EXTENSION
ALGUNOS MODELOS
Unos modeiosincluyenuna manguera auxiliar que
conectacon ]a manguera de estirar en la aspiradora
parauna extensi6n m&s larga para limpiar
Manguera ._
Suelte el _ , _)_z.z_
bor6n ___
; /- _ Conexi6n
el#ctrica
"_--Manguera
Conecte la manguera extra a la manguera de
extensi6n apret&ndotas juntas Est_ seguro que
las conexiones electricas est&n apretadas
firmemente
9
Para desconectar apriete el bot6n de soltar en
la manguera y sep,_retos,
cUiDADo ....
Cuando use la manguera en forma normal o
con la manguera de extensi6n instalada, la
aspiradora debe mantenerse sobre una
superficie firme al mismo ntvel o a un nivel
inferior que los pies del usuario_ NO use las
mangueras cuando la asptradora est,, a un
nivel m_s alto que los ptes del usuario.
POWER-MATE JR.®
Cuando conecte el Power-Mate Jr® a ]a
manguera de extensi6n alinee las conexiones
etectricas y aprietelas, Power-Mate Jr.® no
puede usarse con ia vara de extensi6n..
Power.Mate Jr.® -_ _...
$uelte _
_- Conexi6n
el#ctrica
Para desconectar apriete et bot6n de soltar en
la manguera y sep&relos,
. =CUlDAD0
NO conecte PowePMate Jr.® a ]a
manguera electrificada con el
pealer de la aspiradora ON, SIEM-
PRE desenchufe
. cuIDAD0.................................
NO deje el Power-Mate Jro® andando
en un lugar per ningr_n intervalo de
tiempo. Puede daSar la alfombra.

AREA A LIMPIAR
Entre
ACCESORIO Muebles* cojines* Cortinas* Escalones Parades
CEPILLO PARA
SACUDIR
HERRAMtENTA PARA _
HENDIDURAS _ '/" "/
CEPILLO PAISA ._,. ,/ ,/
COMBINAClON
v _
Power-Mate Jr.® .........................._ ./ ................................ ''"_ ...... '................
• Siemprelimpielos accesoriosantesde usersobretelas _" = Aplicable
Cepfllos
pivotes
Orillas de alfombras
Gufe uno de los costados
o la parte anterior de la
boquitla a Io largo del
borde de la pared Los
cepillos pivotes ayudan a
limpiar et polvo de los
hordes de las alfombras
Escalones
Coioque el mango en la posiciSnvertical. El agita-
dor pare de girar,, Use la herramienta para
grietas o cepiflo combinaci6n o Power-
Mate Jr.@ cuando la aspiradora est&
andando. Apretando el bot6n SUCCION
ciclar_ el motor de la aspiradora a travOs
de los niveles de succi6n ALTO, MEDtO
y BAJO,
P
Peligro de lesi6n personal
NO COLOQUE la asptradora en la
escalera,Si se cae, podria causar lesi6n
personal o dafio aia propiedad.
Paraobtener los
mejoresresultados
de ]impieza,man-
tenga desbloquea-
dos los conductos
de ffujode aire
Examinede vez en
cuando cada una
de las zonas que
se indica podrian
causar bloqueo,
Desconecle la
aspiradora del enchufe antes de examinada
10
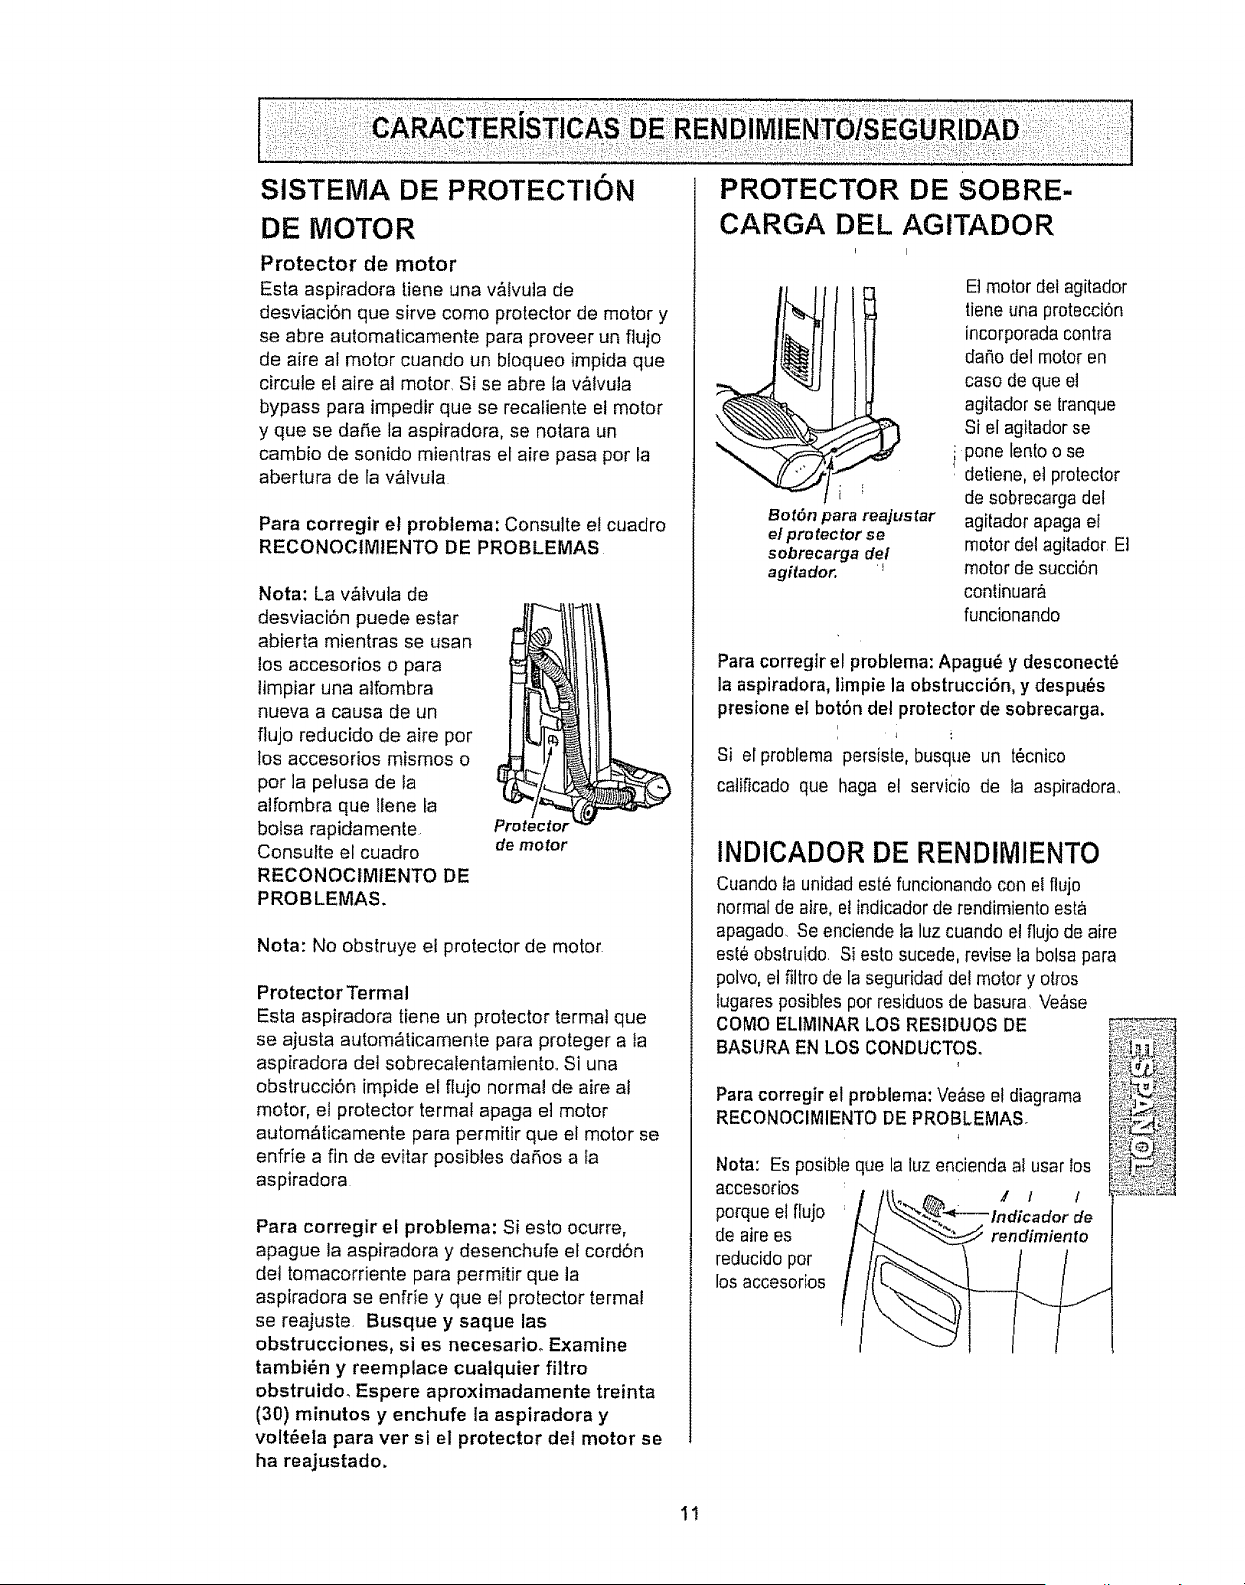
DE MMOTOR
Protector de motor
Esta aspiradora [iene una v&Ivuta de
desviaci6n que sirve como protector de motor y
se abre automaticamente para proveer un flujo
de aire al motor cuando un bloqueo impida que
circule el aire al motor. Si se abre la v&tvula
bypass para impedir que se recaliente el motor
y que se da5e la aspiradora, se nolara un
camb{o de sonido mientras et aire pasa por la
abertura de la valvula
Para corregir et problema: Consulte el cuadro
RECONOCIM1ENTO DE PROBLEMAS
Nota: La v&ivuia de
desviaci6n puede estar
abierta mientras se usan
los accesorios o para
limpiar una alfombra
nueva a causa de un
flujo reducido de aire pot
los accesorios mismos o
por ]a pelusa de ta
alfombra que Ilene la
bolsa rapidamente
Consulte el cuadro
RECONOCtMtENTO DE
PROBLEMAS.
Protector
de motor
Nota: No obstruye el protector de motor
Protector Termal
Esta aspiradora tiene un protector termal que
se ajusta autom_ticamente para proteger a la
aspiradora del sobrecalentamiento. Si una
obstrucci6n impide el flujo normal de aire al
motor, el protector termal apaga e] motor
autom_ticamente para permitir que el motor se
enfrie a fin de evitar posibles daSos a la
aspiradora
Para corregir el problema: Si esto ocurre,
apague la aspiradora y desenchufe el cord6n
de! tomacorriente para permitir que la
aspiradora se enfrie y que el pro[ector terma!
se reajuste. Busque y saque las
obstrucciones, si es necesario° Examine
tambi_n y reemplace cualquier filtro
obstruido_ Espere aproximadamente treinta
(30) minutos y enchufe la aspiradora y
volt_ela para ver si el protector del motor se
ha reajustado.
PROTECTOR DE SOBRE-
CARGA DEL AGITADOR
Bot6n para rea]ustar
el pro _ectot se
sobrecarga del
agitador. '_
E!motor del agilador
tiene una protecciSn
incorporsda contra
dar_odel mob.oren
caso de que el
agitador se {ranque
Si el agi[adorse
i pone lento o se
. detiene, et protec!.or
de sobrecargs dot
agitador apaga el
motor del agitador E]
motor de succiSn
conlinuar_
funcionando
Para corregir el problema: Apagu_ y desconect_
Is aspiradors, limpie la obstrucci6n, y despots
presione el bot_n del protector de sobrecarga.
Si el problema persiste, busque un t_cnico
catificado que haga el servicio de la aspirsdora°
INDICADOR DE RENDliVlIENTO
Cuando ts unidad est_ funcionando con el ftujo
normal de aire, et indicador de rendimiento esta
apagado, Se enciende la luz cusndo el fiujo de aire
est_obslruido. Si esto sucede, revise la botss para
polvo,el filtro de la seguridad de! motor y otros
lugares posibles pot residuos de basura Verse
COMO ELIMINAR LOS RESIDUOS DE
BASURA EN LOS CONDUCTOS.
Para corregir el problema: Verse el diagrsma
RECONOCIIVilENTO DE PROBLEMAS
Nora: Es posible que la luz encienda sl usar Ios
accesodos _ ,' 1
porque el flujo de
de airees
reducido por
los accesorios
1!
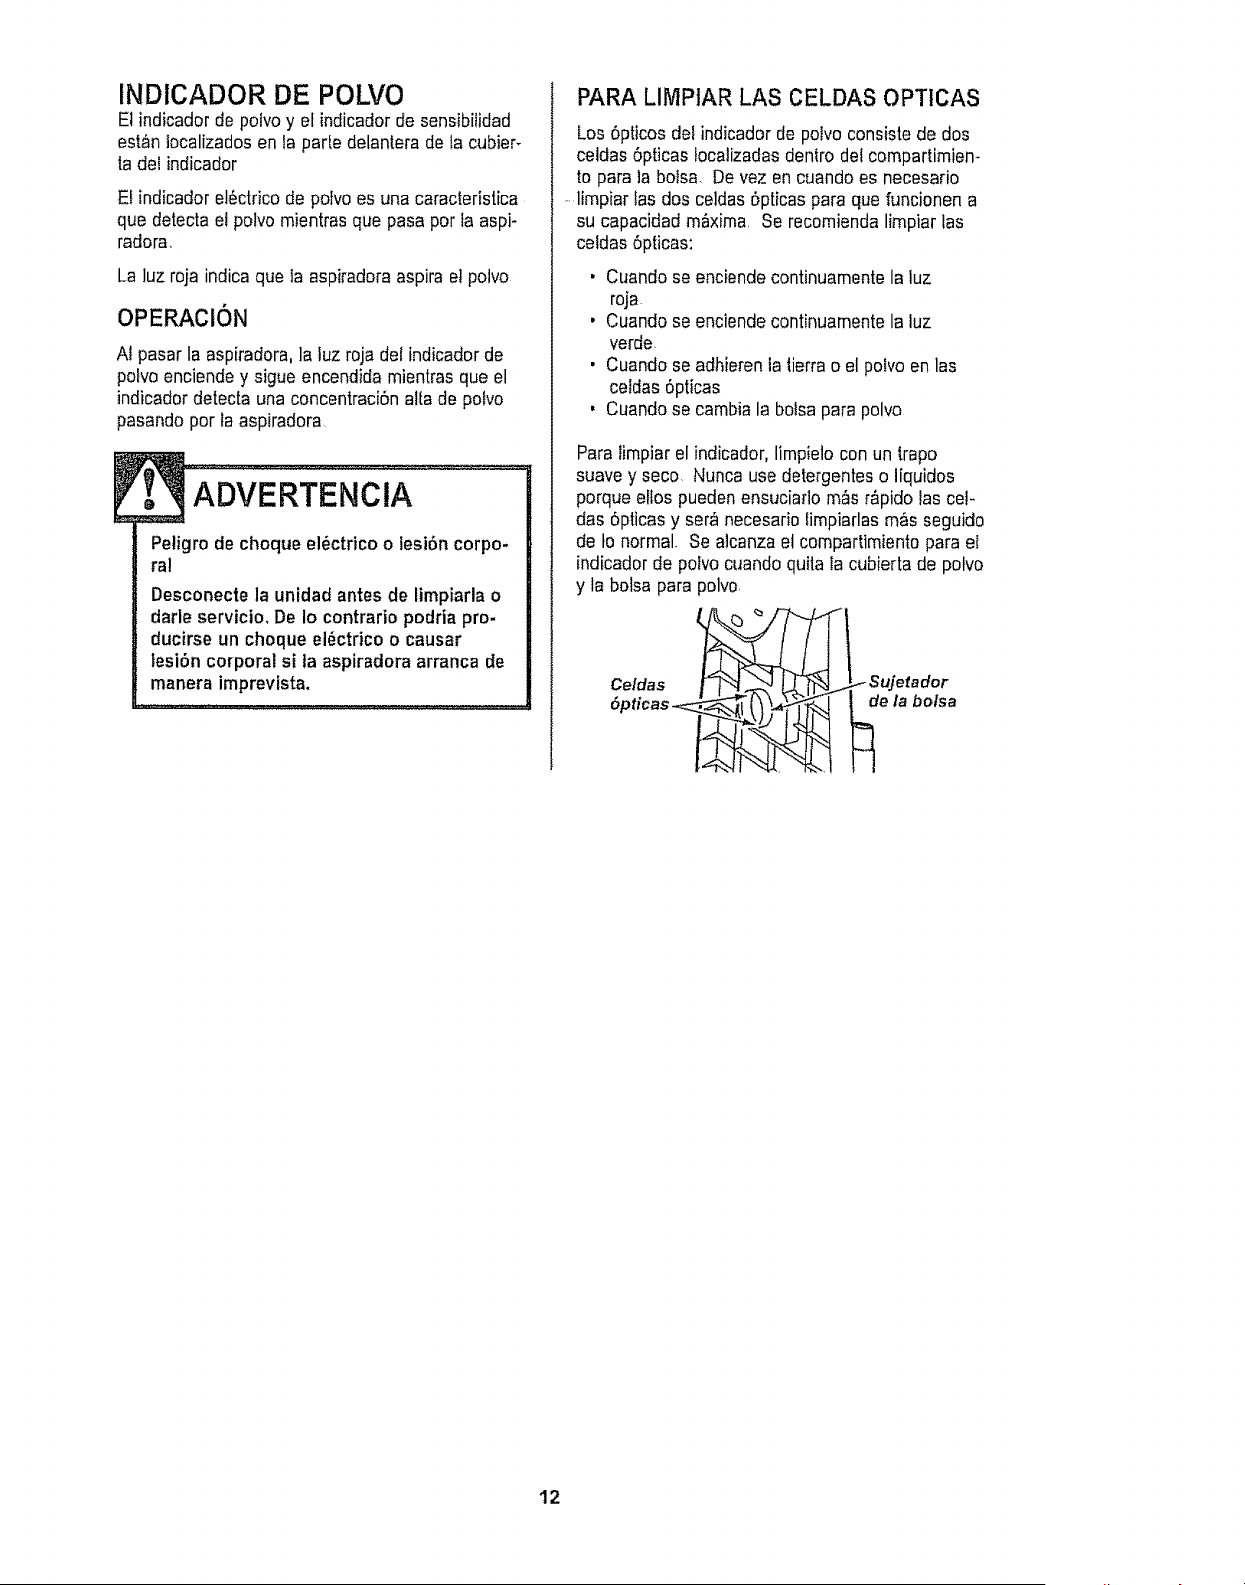
INDICADOR DE POLVO
El indicador de polvo y et indicador de sensibilidad
est_n tecalizadosen la parle delantera de la cubier_
la del indicador
EI indicador el6ctrico de poIvo es una caracteristica
que detecta e! polvo mientras que pasa per fa aspi-
radora.
La luz roja indica que ta aspiradora aspira e! potvo
OPERACiON
A1pasar la aspiradora, la luz roja del indicadorde
potvo enciendey sigue encendida mientras que el
indicador detecta una concentraci6n atta de potvo
pasando per la aspiradora
Petigrode cheque el_ctricoo lesi6n corpo-
ral
Desconecte la unidad antes de limpiarla o
darle servicio, De Io contrario podria pro-
ducirse un cheque el_ctrico o causar
lesi6n corporal si ta aspiradora arranca Be
manera imprevista.
PARA LIMPIAR LAS CELDAS OPTICAS
Los 6pricesdet indicador de potvo consiste de dos
celdas 6pticas Iocalizadasdentro del compartimiem
to para la bofsa. De vez en cuando es necesario
....limpiar fasdos celdas 6pticas para que funcionen a
su capacidadmaxima Se recomiendalimpiar las
celdas 6pticas:
• Cuando se enciende continuamentela luz
roja
, Cuando se enciende continuamentela luz
verde
, Cuando se adhieren la lierra o el polvo en las
celdas 6pticas
' Cuandose cambia la bolsa para polvo
Para limpiar el indicador, limpielo con un trapo
suavey seco. Nunca use detergentes o liquidos
porque ellos puedenensuciarlo m&sr&pidolas cel-
das 5pticas y ser,finecesario limpiarlas m_s seguido
de Io normal. Se alcanza el compartimiento para el
indicador de potvo cuando quila la cubierta de potvo
y la bolsa para polvo.
12
Sigasiempretodastasinstruccionesdeseguridad
antesdeefectuarelmantenimientoasuaspiradora
Petigrodechoqueel6ctricoolesi6ncorpo-
ral
Desconectelaunidadantesdeefectuarel
mantenimientoasuaspiradora.DeIocon-
Irariopodriaproducirseunchoqueel6c-
tricoocausarlesi6ncorporalsi laasptra-
doraarranca de manera imprevista.
t
Recoja el cord6n y enrr61leloen los sujeladoressu-
perior e inferior,sin que quede muy apretado
Guardeta aspiradora
bajo techo en un lugar
seco, con el mango en
posici6n vertical
XDVE RTE ,,C,X................
Peligro de choque el6ctrico o lesi6n corpo-
ral
Si enrolla el cordbn muy apretado puede
tensarlo mucho y causarle daSosoDe daSar-
se, el cordbn podria causar descargas el6c-
tricas y lesiones o
daSos personales,
Desconecte el cord6n electricode la clavija de la
pared NO rocie agua sabre la aspiradora..
Limpie el exterior con un trapo suave y limpio, que
ha sido exprimido despues de remojar en una solu-
ci6n de agua y detergente liquido ligero Seque et
exteriorcon un trapo seco despu_s de limpiar.
Limpia ta superficie exterior del recept&cu!oy de los
accesariospara reducir fa electricidad est_tica y la
acumulaci6nde polvo
Lave los accesorios en agua tibia jabonosa,
enjuague y deje secar at aire No los lave en lava-
dora de platos
No use fos accesorios si estan mojados.
Los accesorios que se utilicen en Areas
sucias, debajo del refrigerador, no deben
usarse en otras superficies sin antes ser _4_:i_!!,:,1
lavadosoPodrian dejar marcaso _:i_:_';-_!:::_
.............. _%,!i_i:_-_
13
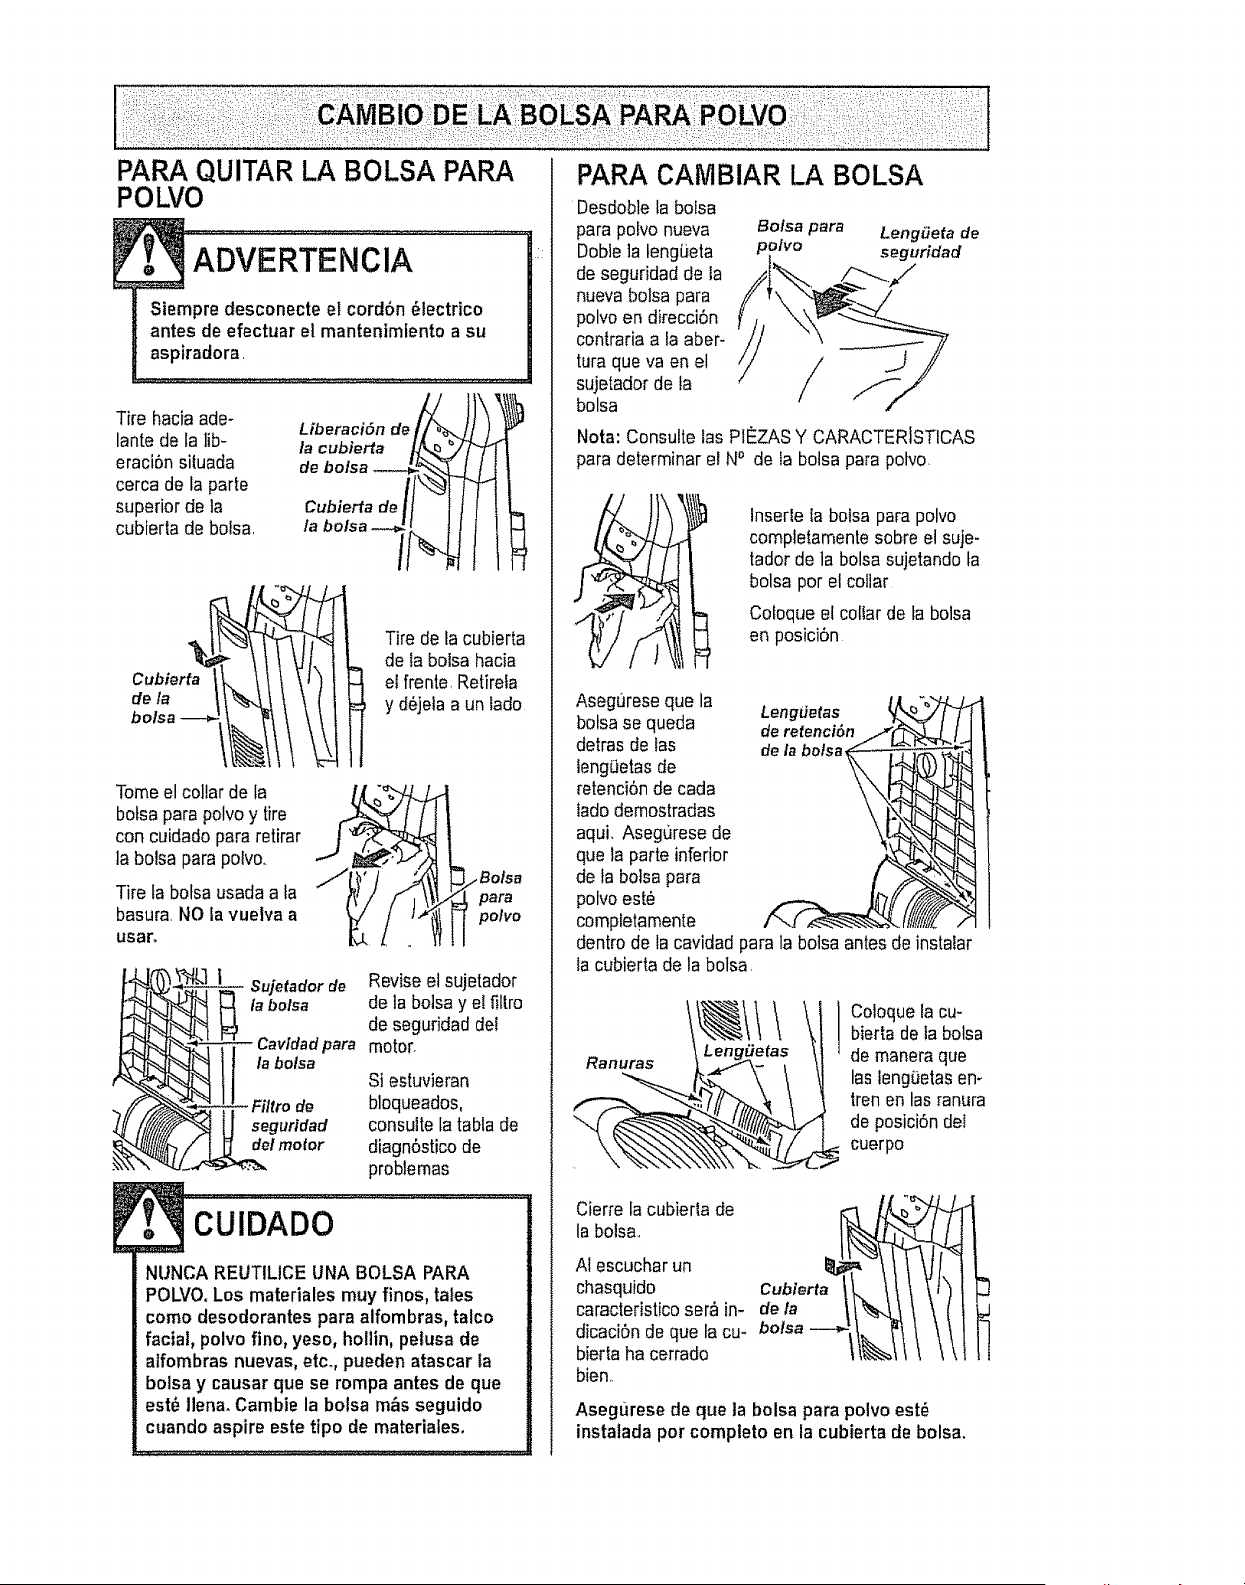
PARA QUITAR LA BOLSA PAPA
POLVO
Tire hacia ade-
lante de la lib-
eraci6n situada
cerca de fa parte
superior de la
cubierta de bolsa.
Liberaci6n de _l
la cubierta
de bo/sa
Cubierta de,
la bolsa -_J
/,
Cubier
\
Tire de ta cubierta
de la bolsa hacia
I el frente Retirela
y d6jeia a un lade
Tome elcollar de la
botsapara polvo y tire
con cuidado pararetirar
la bolsa para pofvo..
Tire ta bolsa usada a la
basura.NO la vuelva a
usa_
para
pone
_tSujetado r Revise el sujetador
de
abolsa de la bolsa y el filtrode seguridad del
Cavtdad para motor.
_ll labolsa Si estuvieran
consulte la tabla de
diagn6sticode
problemas
CUIDADO :
NUNCA REUTILICE UNA BOLSA PARA
POLVO.Los materiales muy fines, tales
come desodorantes para alfombras, talco
facial, polvo fine, yeso, hollin, petusa de
alfombras nuevas, etc_,pueden atascar ta
bolsa y causar que se rempa antes de que
est_ llena. Cambie la bolsa m_s seguido
cuando aspire este tipo de materiales.
PARA CAtVIBIAR LA BOLSA
Desdoblela bolsa
para polvo nueva Bolsa para LengSeta de
DoNe ]a teng_eta polvo seguridad
de seguridad de la
nueva bolsa para
polvo en direcci6n
centrariaa la aber-
tura queva en el /
sujetadorde ta
/
bolsa
Nota: Consulte las PI_ZAS Y CARACTERISTICAS
para determinar el NO de la bolsa para potvo,
Inserle ta bolsa parapolvo
completamente sobre el suje-
tador de la bolsa sujetando ta
bolsa per el collar
Cofoque el collar de la bolsa
en posici6n
Asegureseque la Long,iotas
botsase queda deretenci6n
detrasdo las dela botsa
long,eras de
retenci6nde cada
iadodemostradas
aqui. Asegurese de
que la parte inferior
de la bo]sapara
polvo est_
completamente
dentro de la cavidad para la bolsa antes do instalar
la cubierta de la bolsa,
Cotoquelacu-
bierta deia bolsa
de maneraque
las long(iotas en*
tren en las ranura
de posici6ndot
cuerpo
Cierre la cubierla de
la boisa..
AI escuchar un
chasquido C_l_iaert
caracteristicoser,_in-
dicaci6n de qua ta ca-bolsa--_-i_, 1
bierta ha cerrado
bien..
Asegurese de queta bolsa para polvoest_
instaladaper compteto en la cubierta de bolsa.
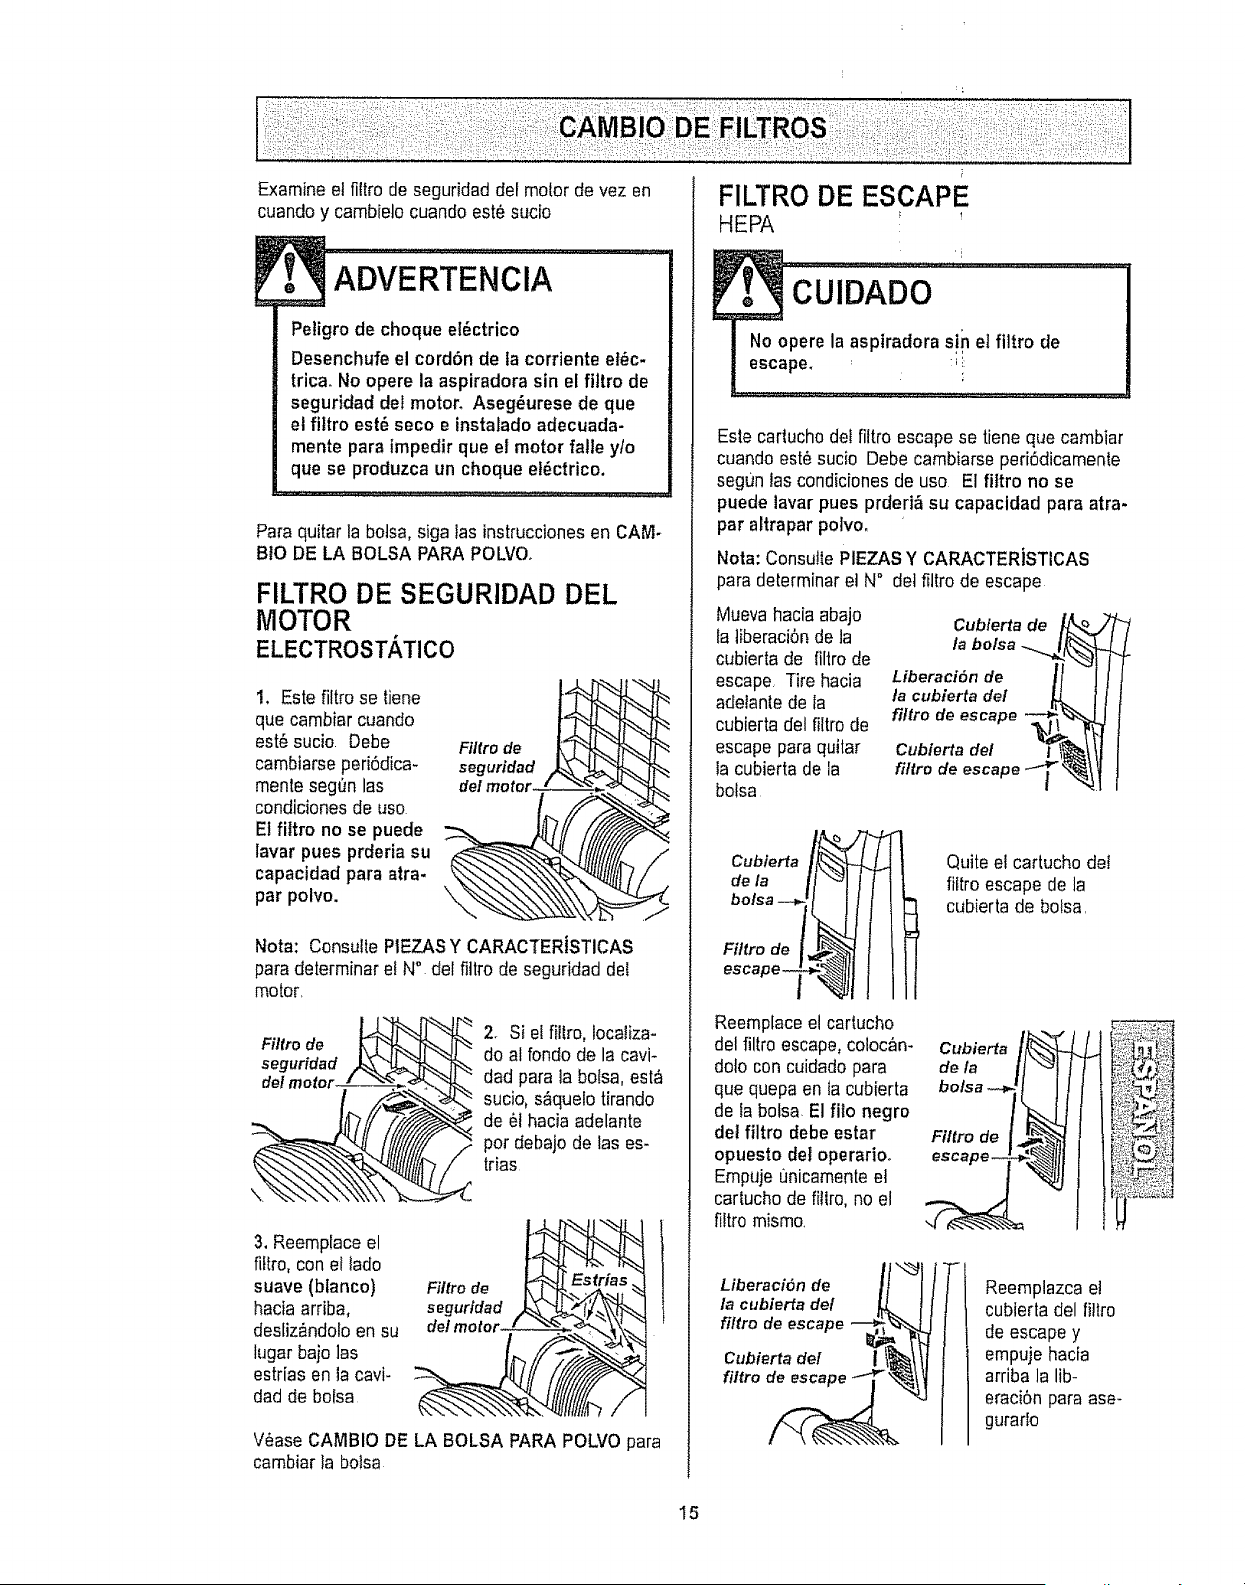
Examineetfiltrodeseguridaddelmotordevezen
cuandoycambietocuandoest6sucio
ADVERTENCIA
Petigro de choque el6ctrico
Desenchufe el cord6n de la corriente et6c.
trice+ No opere la aspiradora sin el fittro de
seguridad del motor. Aseg6urese de que
el ftttro est6 seco e instalado adecuada-
monte para impedir que el motor falle yfo
que se produzca un choque ef_ctrico.
Pare quitar la botsa,siga las instruccionesen CAM-
BtO DE LA BOLSA PARA POLVO°
FILTRO DE SEGURIDAD DEL
MOTOR
ELECTROSTATICO
t. Este filtro se tiene
que cambiar cuando
est6 sucio. Debe
cambiarse peri6dica-
monte segt_nlas
condiciones de uso
El fittro no se puede
lavar pues prderia su
capacidad pare atra-
par polvo. \
Filtro de
seguridad
Note: Consulte PIEZASY CARACTERiSTICAS
pare determinarel N° del fittro de seguridad det
motor.
Filtrode ___
seguridad /t___i_. "
3. Reemplace el
fiftro, con et lado
suave (btanco)
hacia arriba,
desliz&ndoloen su
lugar bajo las
estrias en la cavi-
dad de bolsa
2+ Si el fillro, locatiza-
do al rondo de la cavi-
dad para la botsa, est,€
sucio, s&quelotirando
de 6t hacia adelante
...-_por debajo de las es-
trias
Filtre de
_S
V6ase CAMBIO DE LA BOLSA PARA POLVO para
cambiar la botsa
F1LTRO DE ESCAPE
HEPA _ !
Este carlucho det fittro escape se tiene que cambiar
cuando est6 sucio Debe cambiarse peri6dicamenle
segun las condiciones de uso El fittro no se
puede laver pues prderi& su capacidad pare atra-
par altrapar polvo.
Note: Consu!le PIEZAS Y CARACTERiSTICAS
para determinar et N° dot filtro de escape
Muevahacia abajo
fa tiberaci6n de la
cubierta de filtro de
escape, Tire hacia
adelante de la
cubierta del filtrode
escape para quilar
fa cubierta de la
botsa
Cubierta de
Liberaci6n de
ta cubierta del
filfro de escape
Cubierta del
filtro de escape ._
I
CubieHa
dela II
boise --_! I I
Fittro de [_
Reemplaceel cartucho
del filtro escape, colocan-
doto con cuidado para
que quepa en Ia cubierta
de la botsa. El fito negro
det filtro debe estar
opuesto det operario+
Empuje unicamenteel
cartucho de fillro, no el
fittro mismo
Quite el cartucho det
fittro escape de la
cubierta de boise.
Cubierta
de la
boise
Filtro de
escape- '_
Liberaci6n de
la cubierta del
filtro de escape -_
_j
Cubierta del I
filtro
+ Reemplazca el
cubierta del fi!tro
de escape y
empuje hacia
arriba la lib-
eraci6n pare ase-
gurarfo
15
, ADvERTENciA ..................
Peligrode choque el_ctrico o tesi6n corpo-
ral
Desconecte la unidad antes de efectuar el
mantenlmiento a su aspiradora. De Io con-
trario podria producirse un choque el6c-
trico o causar lesi6n corporal si la aspira-
dora arranca de manera imprevista,.
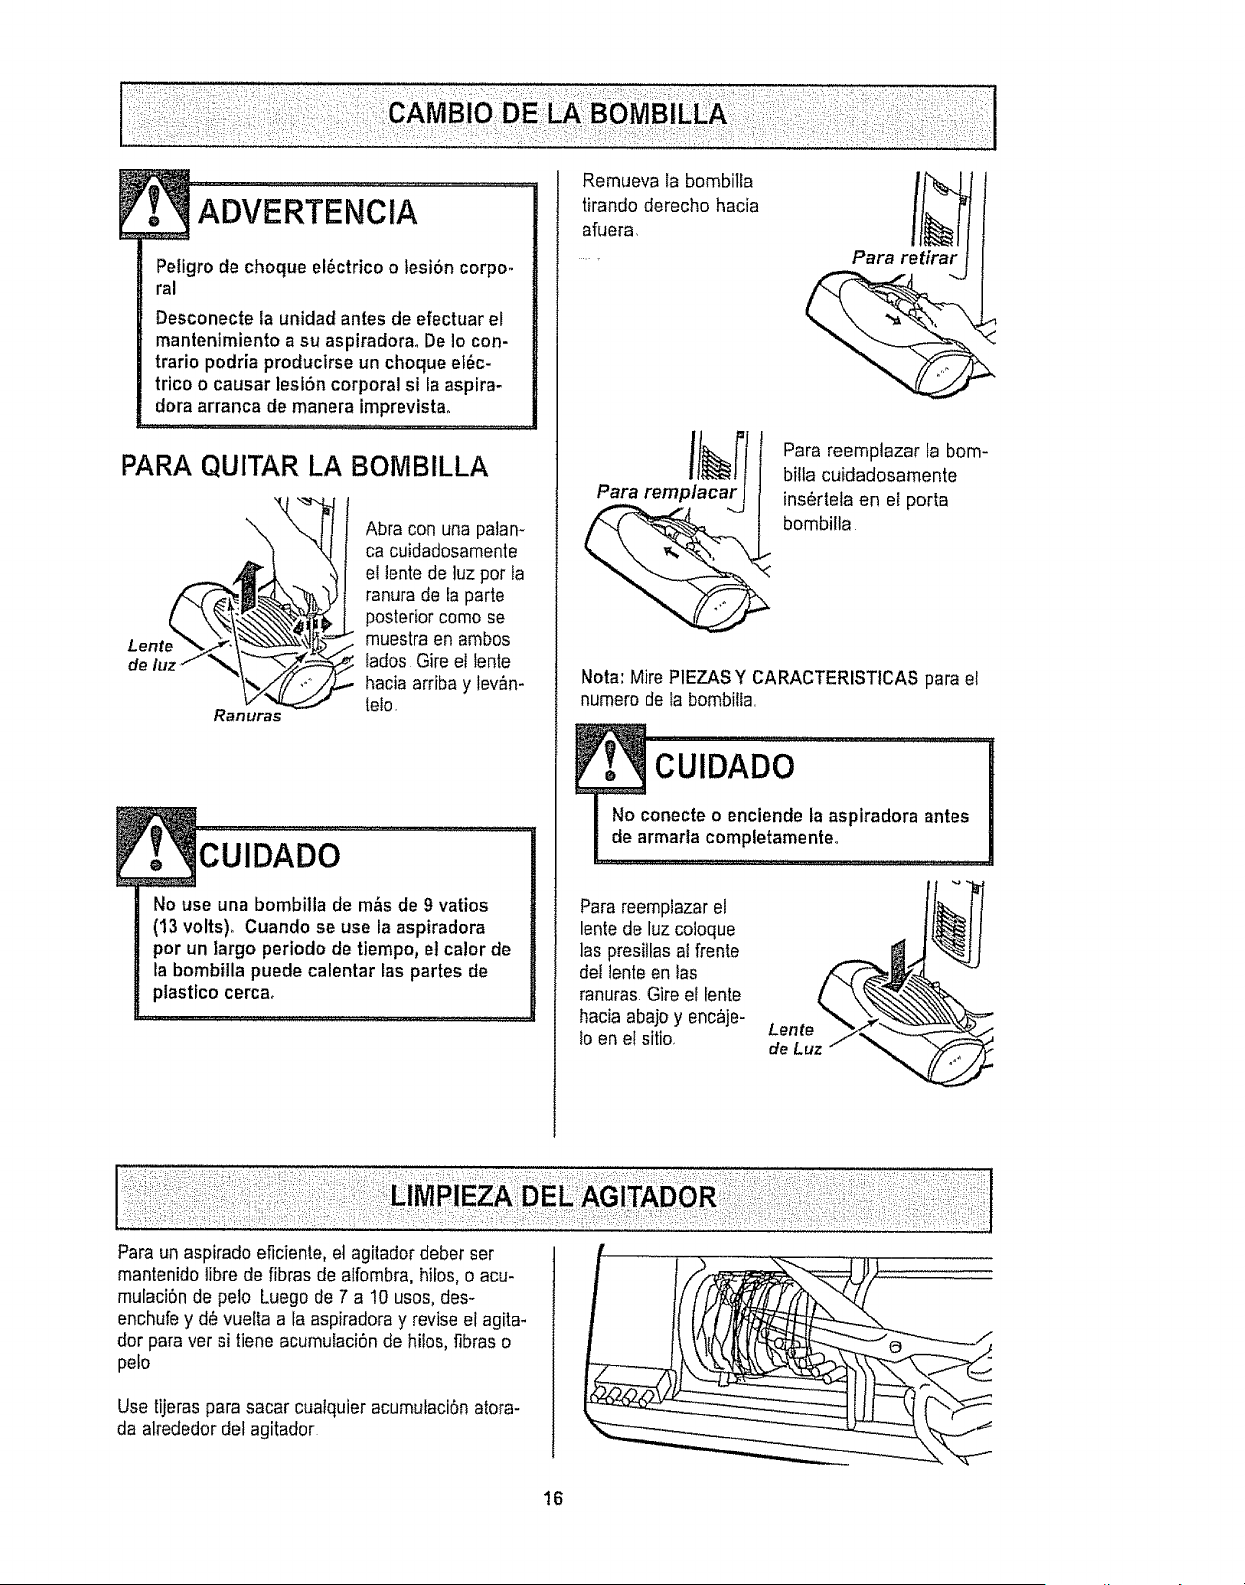
PARA QUITAR LA BOMBILLA
Lente
Abra con una patan-
ca cuidadosamente
ei tentede ]uz pot ta
ranura de fa parte
posterior como se
muestra en ambos
tados Gire el lente
hacia arriba y lev&n-
lelo.
CUlDADO .......................................
No use una bombilla de m&s de 9 vatios
(13 volts). Cuando se use la aspiradora
por un largo periodo de tiempo, et calor de
la bombilla puede calentar las partes de
plastico cerca,
Remueva la bombilla
tirando derecho hacia
afuera
Para remplacar
Para reemplazar la bom-
bflla cuidadosamente
ins_rl.ela en el porta
bombilla
Nota: Mire P1EZASY CARACTERISTICAS para el
numero de la bombitta
Parareemplazarel
lente de luz coloque
las presitlasaI frente
de{ lente en fas
ranuras.Gire el tente
hacia abajoy enc_je-
lo en ef sitio
Lente
de Luz
Paraun aspirado eficiente, et agitador deber ser
mantenidolibre de fibras de alfombra, hilos, o acu-
mulaciSnde pelo Luego de 7 a 10 usos, des-
enchufey d_ vueIta a la aspiradoray reviseel agita-
dor paravet si tiene acumulaciSnde hiIos,fibras o
peto
Use tijeraspara sacar cualquier acumulaci6n atora-
da alrededordef agitador
16
Procedasiempreconprecaucionesdeseguridad
antesdeefectuarelmantenimientoasuaspiradora,,
".................
Peligrode choque el6ctrico o lesi6n corpo-
ral
Desconecte la unidad antes de efectuar el
mantenimiento a su aspiradora_ De Io con-
trario podria producirse un choque el6c.
trico o causar lesi6n corporal si la aspira-
dora arranca de manera imprevista.
Si consideraque la aspiradora no aspira bien
asegr_reseprimero de que la bolsa no est_llena y
de que el fillro no est_atascado Consulte las ins-
truccionessobre CAMBtO DE LA BOLSA PARA
POLVOy LIMPIEZA DE FtLTROS.
Si las zonas del filtro y la botsa no estan atascadas0
examinela zona de la manguera Relire el ex|remo
inferiorde ta manguera expansible de la aspiradora
tom_ndolapor el collar y tirando de hacia arriba
Extienda y
afloje la
manguera
Enchufela aspira-
dora y enci0ndata
Estireal m__ximela
manguera y luego
permita que se
encoja hasfasu
lamaSo normal de
atmacenamiento
lnserte nuevamentela manguera en la aberlura de
ta parte inferior de donde la retir5 Empuje con fir-
meza paraasegurarse de que quede bien conec-
lada
- Manguera
expansible
Collar de la
manguera
ADVER'rENCIA..............
Peligro de lesi6n personal
NO coloque nunca las manos ni los pies
debajo de la unidad
Si las #,reasde la botsa y del fittro y las areas de la
manguera est,_nlibres de obstrucciones,
desconecle la manguera del tubo de la boquilla y
revise si hay residuos de polvo en et tubo de la
boquilla Wase LIMPIEZA DEL AGITADORpara
como limpiar el agitador
Coloque la aspiradora en la posiciOnvertical antes
de coneclada en el enchufe
17
Reviseesterecuadroparaencontrarsotucionesaproblemasquepuedecorregirustedmismo,Cualquierafro
serviciodebeserrealizadoperSEARSu ottoagentedeserviciocalificado,
ADVERTENCIA Peligro de cheque elOctrtco
Desconecte la aspiradora antes de efectuar e! mantenimiento a su aspiridora. De Io
contrario podria producirse un cheque elOctrico o causer lesion corporal
La espkadora no enctende
No aspire
satisfactorlamente
!:i!!: SA :I oSiB
I Est_descor_ecWda
2, Cortaclrc_ilos betadoo f_tsible
quemado en el tablero de servtcio
de ta residencla
3, P_otector termal activado
soluc N;;;POlaf:BE;i i'/t
1 Conecle bien, seleccione la iuncion deseada
en el con!cal manual
2, Res_blezca el corlaclrcuilos o
cambie el fusible
3, DesconecIe la asplradora y permita qua se
enffi& el prolector _Ormico se activate per sl solo
La asplradora levanta
tapetes o as diflc]l empuJar
La luz no funciona
El ensemble delagitador
no funciona
El lndtcedor de rendfmlento,
algunos modelos, estb roje.
Restdcci6n del flujo
de el use de los accesodos
Cambio de sonldo,,
'L
2,,
3,
4
S,
6
T
B.
_J
1
I
2_
3.
2.
2,,
1. Cambiela balsa
2. Ajuste ef _ivel
BoIsapafapelvo]lenao alascada
Ajusleincorreclode niveld_ peb de
laatfombra
AgIIadordesgastado 3,
Boquilla. o sujelador de la bofsa, a_ascada 4
Manguera a_ascado 5,
Manguera rata B.
La manguera no est#_bien insedada 7,
Aclivaci6ndelsislemade p_otecli6n 8,
delreeler
Fillros de seg_ridad 9,
Ajusle Incorreclo de n{vel de polo 1
de Ia affombra
Bombilla{undida I.
El mango esta completamenle en 1
posici6n vedical
Sobrecarga del agtL_dor activada 2
Proteclorl_rmico desactivado 3.
Balsa para polvo liana o aIascada t.
Fitlros de seguridad atascado 2,.
Conducfo de flujo de airs alascado 3.
Cierlos accesorfos 4,
El usa de los accesodos Iimita el 1
IIujOde aire
La pelusade una alfembra nueva 2.
obstruye elpaso de sire
Celdas 6pticas asian suclas 1
Acuda el Centre de Servieio de Sears
m_s cercano
Revise COMO ELIMINAR LOS REStDUOS
DE BASURA EN LOS CONDUCTOS
Limpfe ta manguera de ebsb'ucciones
Acuda et Cenlro de Servicio de Sears
m&s cercano
lnserte bier, la msnguera
Delermine si exislen b!equeos
Cambte eI _it[rode protecciOn al molar y el I]]lro
del escape
A}usle el niveI
Cambie la bombilla
Mueva et mango desde la posiciSn verlical
Reajuste la sobrecarga del agilador,
Desconecie la aspiradora y permIla qua se
enid& el prelector I_rmlco se aclivara par sl solo
Cambie la balsa
Cambie elfillro de proleccidn al molar y el lillro
delescape
Retire et malarial bloqueanle deI
conduclo de a_e
Es!o as normal LB luz debe apagaI'se al
quitar la herramienta
Revise use DE LOS
ACCESORIOS
Revise cOMe ELIMINAR LOS RES-
IDUES DE BASURA EN LOS CON_
DUCTOS y Ilmpie la manguera
Indieador de polvo, algunos t Limpie tas cetdas 6plicas
modelos, no funcfona.
18
19
Your Home
For repair - in your home - of all major brand appliances,
lawn and garden equipment, or heating and cooling systems,
no matter who made it, no matter who sold it7
For the replacement parts, accessories and
owner's manuals that you need to do-it-yourself.
For Sears professional installation of home appliances
and items like garage door openers and water heaters,
1-800-4-MY-HOME ® Anytime, day or night
(1-800-469-4663) (U SA and Canada)
www°sears.com www.sears0ca
Our Home
For repair of carry-in products like vacuums, lawn equipment,
and electronics, call or go on-line for the nearest
Sears Parts and Repair Center.
1-800-488-1222 Anytime, day or night (USA only)
www.sears,com
To purchase a protection agreement (USA,)
or maintenance agreement (Canada) on a product serviced by Sears:
1-800-827-6655 (USA..)
Para pedir servicio de reparaci6n
a domicilio, y para ordenar piezas:
I -BBB-SU-HOGARSM
(I-888-784-6427)
1-800-361-6665 (Canada)
Au Canada pour service en frangais:
1-SO0-LE-FOYERMc
(1-800-533-6937)
WWWsears ca
k
iii -k
_
© Sears, Roebuck and Co
® Registered Trademark /TM Trademark t sM Service Mark of Sears, Roebuck and Co
® Marca Registrada I TMMarca de F_brica / sM Marca de Servicio de Sears, Roebuck and Co
McMarque de commerce 1 MDMarque d_pas_e de Sears, Roebuck and Co,