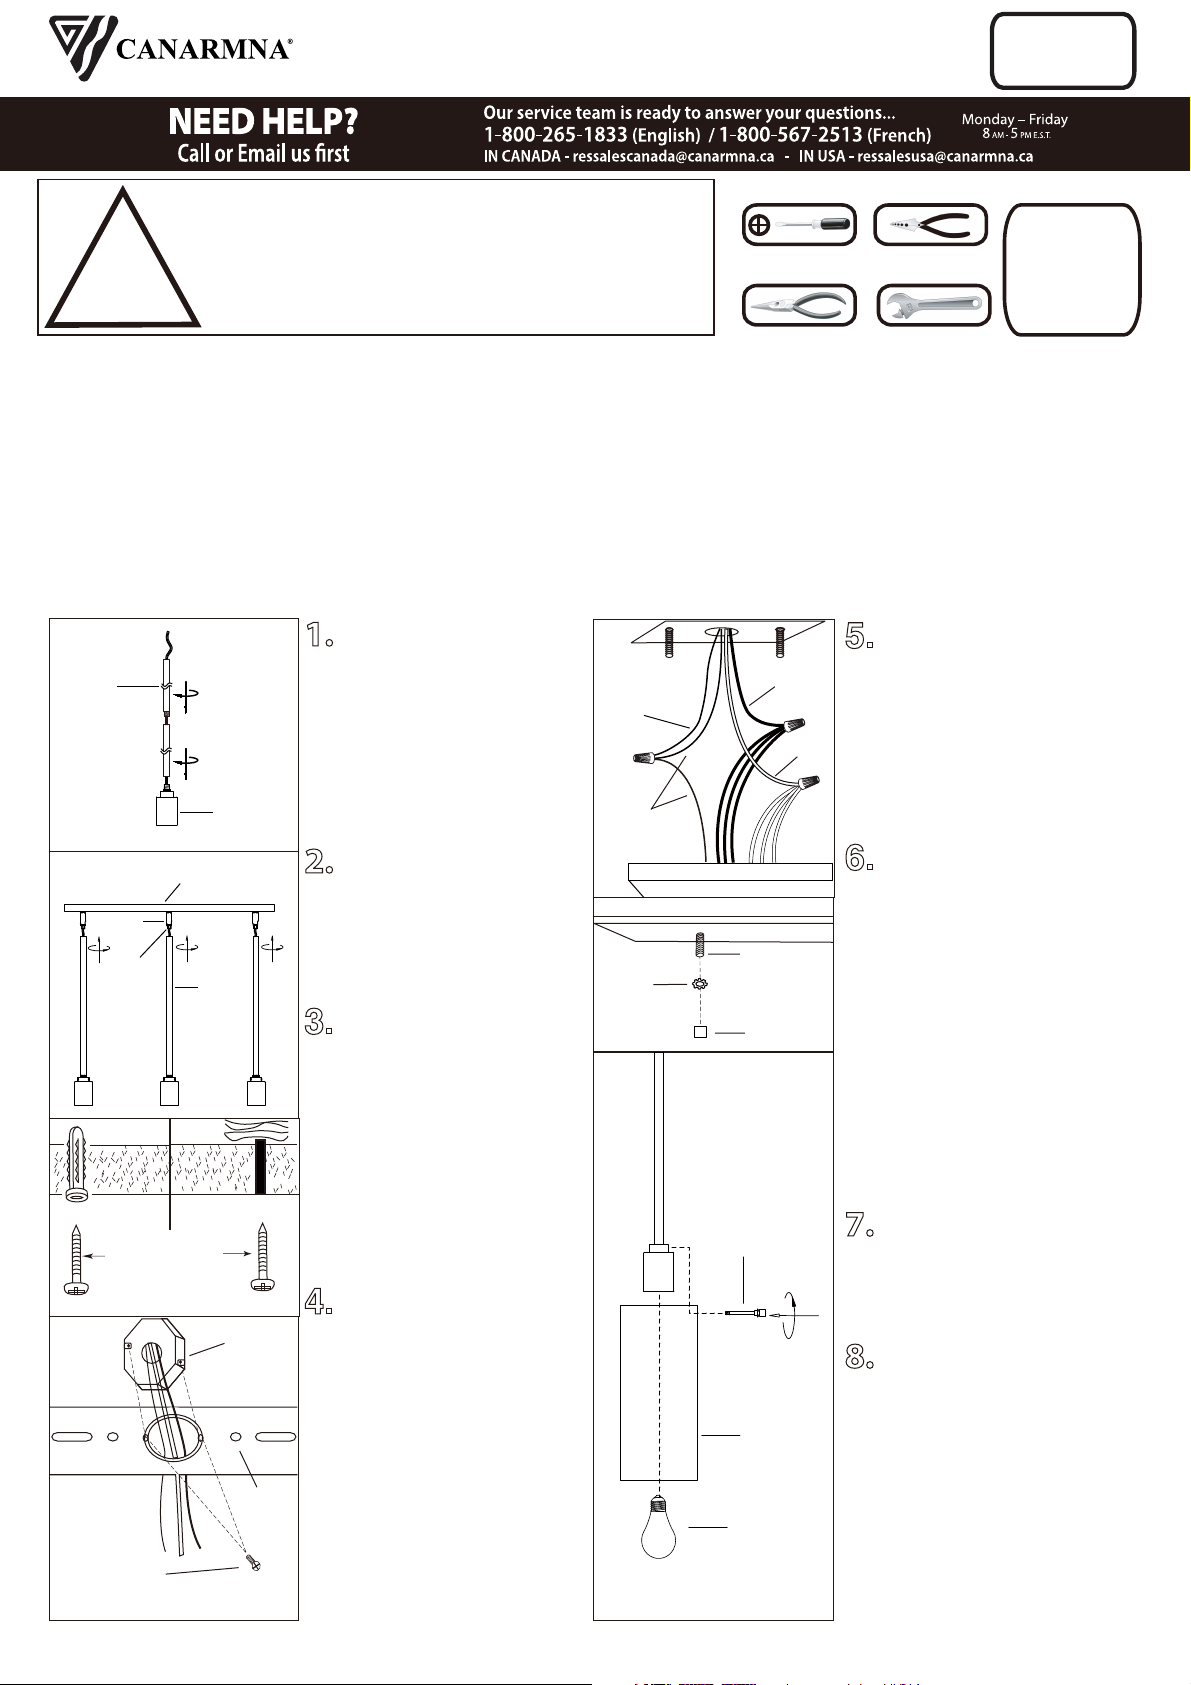
PENDANT LIGHT
5. Connect the ground wires
(bare copper or green) from your
fixture to the ground wire (bare
copper or green) or ground
screw in the electrical box.
Connect the black wire from the
fixture to the black wire in the
electrical box and connect the
white wire from the fixture to the
white wire in the electrical box.
6. Once wire connections are
completed, carefully tuck wires
and wire nuts into the electrical
box making sure no bare wire (on
the black and white) is visible at
the wire nuts. Install the light
fixture to the ceiling by aligning
the hole(s) in the fixture with the
studs on the mounting bracket.
Secure fixture in place with star
washers and cap nuts.
7. Attach the glass shade to the
fixture using the thumb screws
(tighten with fingers only).
8. Install specified bulb type
and wattage (not included).
Tel: (613) 342-5424, Fax: (800) 263-4598
Electrical
Box
Star
Washer
Cap Nut
Fixture
Fixture
Fixture
Stud
Wood screw
Back
Cover
Electrical
Box Screws
(not included)
1. Install the length of rod
that is required by threading
wire through the rod and
screwing it to the fixture.
Repeat this for other rods.
2. Screw the rods assembly
to the canopy ensuring that
the sleeve is at the swivel.
3. Position the back cover on
the ceiling with the center hole
over the electrical box. Mark
the ceiling for the pilot hole
locations through the small
holes on either end. Drill pilot
holes at each location.
Determine the appropriate
way (wood screws for the
wooden studs or plastic wall
anchor and wood screws for
dry wall) of fastening the
fixture to the ceiling.
4. Feed power cords from
the electrical box through the
centre hole of the back cover.
Align holes of back cover over
electrical box and secure with
electrical box screws (not
included). Position the fixture
and add wood screws (one on
each side) for the wooden
studs or plastic wall anchor
and wood screws for dry wall.
NOTE: Make sure the back
cover is level before tightening
the screws.
IPL1063A03
10/20
Phillips
Screwdriver
Wire Cutters
Pliers Wrench
!
INSTRUCTIONS PERTAINING TO RISK OF FIRE OR INJURY TO PERSONS
READ ALL INSTRUCTIONS
IMPORTANT SAFETY
INSTRUCTIONS
SAVE THESE INSTRUCTIONS
Wiring supplies
as required by
local electrical
code
1. TURN OFF ELECTRICAL POWER BEFORE STARTING INSTALLATION OF LIGHT FIXTURE.
2. THIS PRODUCT MUST BE INSTALLED IN ACCORDANCE WITH THE APPLICABLE INSTALLATION CODE
BY A PERSON FAMILIAR WITH THE CONSTRUCTION AND OPERATION OF THE PRODUCT AND THE
HAZARDS INVOLVED.
3. CONNECT THE GROUND WIRES (BARE COPPER OR GREEN) FROM YOUR FIXTURE TO THE GROUND
WIRE (BARE COPPER OR GREEN) OR GROUND SCREW IN THE ELECTRICAL BOX.
4. TO CLEAN THE FIXTURE, TURN OFF THE POWER, WAIT FOR IT TO COOL, AND WIPE THE FIXTURE WITH A
CLEAN, SOFT CLOTH.
NOTE: Product may not look exactly as shown in figures.
INSTALLATION:
SAFETY PRECAUTIONS:
TOOLS AND MATERIALS REQUIRED:
Rod
Rod
Canopy
Sleeve
Swivel
White
Black
House
supply
Ground wire
Fixture
Ground
wire
Bulb
Thumb
Screw
Shade
IPL1063A03
10/20
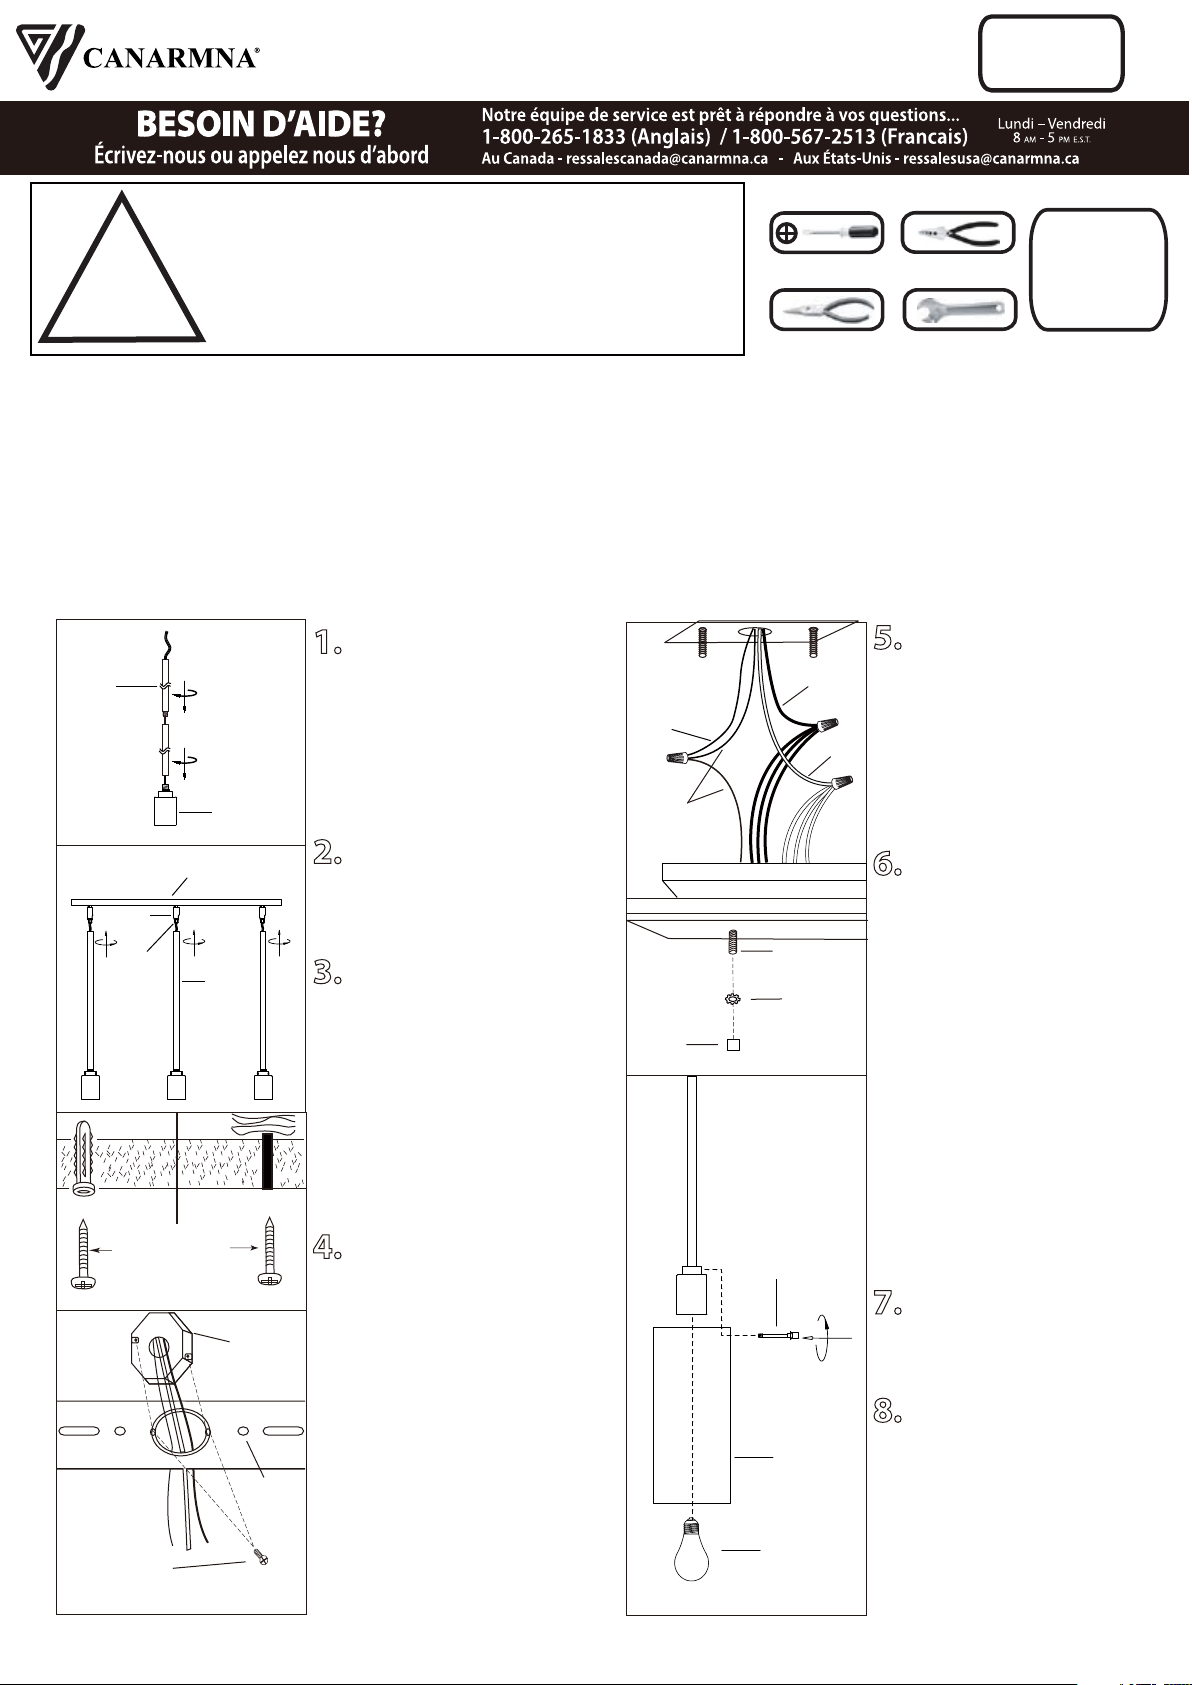
LUMIÈRE SUSPENDU
5. Branchez les fils de la mise
a terre (cuivre nu ou vert) de
votre montage au fil de la mise
A terre (cuivre nu ou vert) ou
vis de la mise a terre dans la
boite electrique. Posez le fil
noir de la fixture au fil noir
dans la boite électrique et
posez le fil blanc de la fixture
au fil blanc dans la boite.
6. Une fois les connexions de
fils terminées, insérez
soigneusement les fils et les
capuchons de connexion dans
la boîte électrique en vous
assurant qu'il n'y a aucun
filament nu (sur le fil blanc et le
fil noir) visible au niveau des
capuchons de connexion.
Posez le luminaire au plafond
en alignant le trou (s) du lustre
avec les boulons sur la ferrure
de montage. Serrez le
luminaire en place à l’aide des
écrous étoilés et les écrous à
capuchon.
7. Posez l’abat--jour sur la
fixture à l’aide de vis à doigt
(surrez seulement qu’au doigt).
8. Posez l'ampoule de type et
de wattage requis (en sus).
PH: (450) 665-2535, FX: (450) 665-0910
Fil De Mise À
La Terre Du
Câblage
Domestique
Fil De Mise
À La Terre Du
Luminaire
Blanc
Noir
Luminaire
Luminaire
Luminaire
Rondelle
En Étoile
Goujon
Écrou
À Tête
Plaque
Arriere
Boîte
Électrique
Vis De La Boîte
Électrique
(En Sus)
Tournevis A
Phillips
Coupeur De Fils
Pinces
Clef
!
INSTRUCTIONS CONCERNANT LE RISQUE
D’INCENDIES OU LES DOMMAGES CORPORELS
LISEZ TOUTES LES INSTRUCTIONS
INSTRUCTIONS DE SÛRETÉ
IMPORTANTES
GARDEZ CES INSTRUCTIONS
Fournitures
électriques telles
que prescrites
par les normes
locales
1. FERMEZ LE COURANT AU DISJONCTEUR AVANT DE DEBUTER L’INSTALLATION DE LA FIXTURE.
2. CE PRODUIT DOIT ÊTRE INSTALLÉ SELON LE CODE D’INSTALLATION PERTINENT, PAR UNE PERSONNE
QUI CONNAIT BIEN LE PRODUIT ET SON FONCTIONNEMENT AINSI QUE LES RISQUES INHÉRENTS.
3. BRANCHEZ LES FILS DE LA MISE A TERRE (CUIVRE NU OU VERT) DE VOTRE MONTAGE AU FIL DE LA MISE
A TERRE (CUIVRE NU OU VERT) OU VIS DE LA MISE A TERRE DANS LA BOITE ELECTRIQUE.
4. POUR NETTOYER LE LUMINAIRE, ÉTEIGNEZ-LE, ATTENDEZ QU’IL SOIT FROID, PUIS NETTOYEZ-LE
AVEC LINGE PROPRE ET DOUX.
N.B.: Peut différer de illustration.
INSTALLATION:
MISE EN GARDE:
OUTILS ET MATERIAUX REQUIS:
Vis À Bois
1. Installez la longueur de
colonne requise en faisant passer
le fil dans la colonne puis en
vissant la colonne sur le luminaire.
Répétez les étapes pour les autres
tiges.
2. Vissez l'assemblage des tiges
sur la coupole en vous assurant
que le manchon est au niveau du
pivot.
3. Placer le couvercle arrière au
plafond avec le trou du centre sur
la boîte de sortie électrique.
Marquer le plafond pour identifier
l’emplacement des petits trous
sur un des bouts. Percer les trous
aux emplacements marqués.
Déterminez la façon la plus
appropriée (vis à bois pour solive
de bois ou ancre en plastique ou
vis à bois pour placoplatre) de
poser votre luminaire au plafond.
4. Faufilez les fils de la boite
électrique en travers du trou au
centre du couvercle arrière.
Alignez les trous du couvercle
arrière avec les trous sur la boite
électrique et fixez en place à
l’aide des vis pour la boite
électrique (en sus). Placez le
luminaire et ajoutez des vis à bois
(une de chaque côté) sur les
structures de bois ou des
ancres en plastique accompag-
nés de vis à bois sur du
placoplatre.
N.B.: Assurez-vous que le
couvercle arrière est bien de
niveau avant de le serrez avec les
vis.
Tige
Tige
Canopé
Machon
Pivot
Ampoule
Vis A Doigt
Abat-jour

