VERSION A0
Renogy ONE
M1
USER MANUAL
02
Applicability
The user manual applies to the following product:
z
Renogy ONE M1 (RMS-LP4-G2)
Disclaimer
z
Renogy makes no warranty as to the accuracy, sufficiency, or suitability of information in the
user manual because continuous product improvements are going to be made.
z
Renogy assumes no responsibility or liability for losses or damages, whether direct, indirect,
consequential, or incidental, which might arise out of the use of information in the user
manual.
z
Renogy is not responsible or liable for the failures, damages, or injuries resulting from repair
attempted by unqualified personnel or improper installation and operation.
z
The illustrations in the user manual are for demonstration purposes only. Details may appear
slightly different depending on product revision and market region.
z
Renogy reserves the right to change the information in the user manual without notice.
z
Renogy ONE collects and uses your data in accordance with the Privacy Policy.
Copyright
Renogy ONE M1 User Manual © 2022 Renogy. All rights reserved. All information in the user
manual is subject to copyright and other intellectual property rights of Renogy and its licensors.
The user manual may not be modified, reproduced, or copied, in whole or in part, without the
prior written permissions of Renogy and its licensors.
Trademarks
The following are trademarks or registered trademarks of Renogy in the United States and other
countries and regions:
RENOGY
All other trademarks in the user manual are the property of their respective owners and their
use herein does not imply sponsorship or endorsement of their products or services. The
unauthorized use of any trademark displayed in the user manual or on the product is strictly
prohibited.
Date and Revision
March 2022, Revision A0

03
Table of Contents
Important Safety Information .......................................................................................................05
Symbols Used .........................................................................................................................05
General Safety Information .....................................................................................................05
Introduction ..................................................................................................................................07
General Information ................................................................................................................07
Key Features ...........................................................................................................................07
Package Contents .......................................................................................................................08
Product Overview ........................................................................................................................09
Wiring Diagram ............................................................................................................................11
Communication Diagram .............................................................................................................12
Renogy ONE Communication Architecture .............................................................................12
Energy Device Communication Connections ..........................................................................12
Preparation ..................................................................................................................................14
Required Tools ........................................................................................................................14
Inspection ................................................................................................................................14
Mounting Location ...................................................................................................................15
Power Wiring ...............................................................................................................................18
Communication Wiring (Optional)................................................................................................20
RS485 Communication ...........................................................................................................20
RV-C Communication ..............................................................................................................23
Load Wiring (Optional).................................................................................................................27
Mounting ......................................................................................................................................31
Activation .....................................................................................................................................32
Operation .....................................................................................................................................33
WLAN ......................................................................................................................................33

04
Pairing with App ......................................................................................................................33
Add Devices/Smart Accesories ...............................................................................................33
Power On/Off ...............................................................................................................................35
Control External Loads ................................................................................................................36
Technical Specifications ..............................................................................................................37
Troubleshooting ...........................................................................................................................38
FAQ .............................................................................................................................................40
Maintenance ................................................................................................................................42
Inspection ................................................................................................................................42
Cleaning ..................................................................................................................................42
Storage ....................................................................................................................................42
Emergency Responses ...............................................................................................................43
Fire ..........................................................................................................................................43
Flooding ..................................................................................................................................43
Smell .......................................................................................................................................43
Noise .......................................................................................................................................43
Technical Support ........................................................................................................................44
Dimensions ..................................................................................................................................45

05
Important Safety Information
The user manual provides important installation, operation, and maintenance instructions for
Renogy ONE M1. Read the user manual carefully before installation and operation and save it
for future reference. Failure to observe the instructions or precautions in the user manual can
result in electrical shock, serious injury, or death, or can damage Renogy ONE M1, potentially
rendering it inoperable.
Symbols Used
The following symbols are used throughout the user manual to highlight important information:
WARNIN
G
Indicates a potentially dangerous condition which could result in
injury or death.
CAUTIO
N
Indicates a critical procedure for safe and proper installation and
operation.
NOT
E
Indicates an important step or tip for optimal performance.
INFO
Indicates that more information is available in other documents
relating to the subject.
General Safety Information
WARNIN
G
z
Inspect Renogy ONE for any visible damage including cracks, dents, deformation, and other
visible abnormalities before installation.
z
Do not puncture, drop, crush, penetrate, shake, strike, or step on Renogy ONE.
z
Do not open, dismantle, repair, tamper with, or modify the components of Renogy ONE.
z
Install Renogy ONE on a vertical surface indoors protected from direct sunlight, high
temperature, and water. Make sure there is good ventilation.
z
Keep Renogy ONE away from heating equipment.
z
Do not insert foreign objects into Renogy ONE.
z
Keep Renogy ONE out of the reach of children.
z
In order to prevent electric shock and protect personal safety, the installation shall be carried
out under the condition of power failure, and live operation is not allowed.
z
Wear proper protective equipment and use insulated tools during the installation or
disassembly of Renogy ONE.
z
Do not touch the connector contacts while Renogy ONE is in operation.
z
Disconnect all connectors from Renogy ONE before maintenance or cleaning.
z
Do not dispose of Renogy ONE as household waste. Comply with local, state, and federal
laws and regulations and use recycling channels as required.
Important Safety Information
Symbols Used General Safety Information

06
Important Safety Information
z
In the event of fire, use fire extinguishers suitable for electrical equipment.
z
If Renogy ONE is installed improperly on a boat, it may cause damage to the corrosive
agents of the boat. Please have Renogy ONE installed by a qualified electrician.
CAUTIO
N
z
Do not expose Renogy ONE to flammable or harsh chemicals or vapors.
z
Ensure that there is no water source including downspouts, sprinklers, or faucets above or
near Renogy ONE.
z
Renogy ONE is only suitable for safe use in areas below 2,000 meters above sea level.
Symbols Used General Safety Information
07
Introduction
Introduction
General Information
Renogy ONE M1 (hereinafter referred to as Renogy ONE) is your all-in-one energy monitoring
and off-grid smart living center that revolutionizes comfort when you live in your off-grid home or
RV.
It is the heart of your off-grid system with a sleek, flush-mount touchscreen that looks great
anywhere. The
4’’
HD display lets you monitor every Renogy device in your home from one
screen. When Renogy ONE works in association with the DC Home app, you will have the same
system monitoring wherever you go on your smartphone.
Renogy ONE makes it possible to live off-grid without compromising comfort. It allows control of
up to three devices at a time through the direct connection with panel relays. In addition, Renogy
ONE delivers peace of mind with enhanced security feature for your off-grid home or RV
. It is
compatible with our Smart Relay, Smart Plug, Door & Window Sensor, and Motion Sensor to
send instant alerts right to your DC Home app if there is a security breach.
Key Features
z
All-in-one Smart Panel
Renogy ONE gets rid of cumbersome cables and multiple monitors by connecting to Renogy
devices and smart accessories via Bluetooth, Zigbee, RV-C, and RS485. Its 4-inch HD
touchscreen lets you monitor and control all compatible Renogy devices in your home from one
screen with intuitive visuals and real-time data.
z
24/7 Energy Monitoring Anywhere
Renogy ONE delivers all the performance data from connected devices directly to your smart
panel through Bluetooth or RS485 and RV-C communication cables. The Wi-Fi connectivity
uploads energy data while you are off grid, so you can monitor your system in real time,
wherever you are, with the DC Home app.
z
Connected Living
Renogy ONE integrates with three panel switches that allow you to turn on or off up to three DC
appliances. When pairing Renogy ONE with the DC Home app, you can set up smart scenes to
control devices together depending on how you live. For instance, you can create an
“Evening”
scene that automatically turns on lights or a “Sleep” s
cene that turns off your home appliances.
General Information
Key Features
08
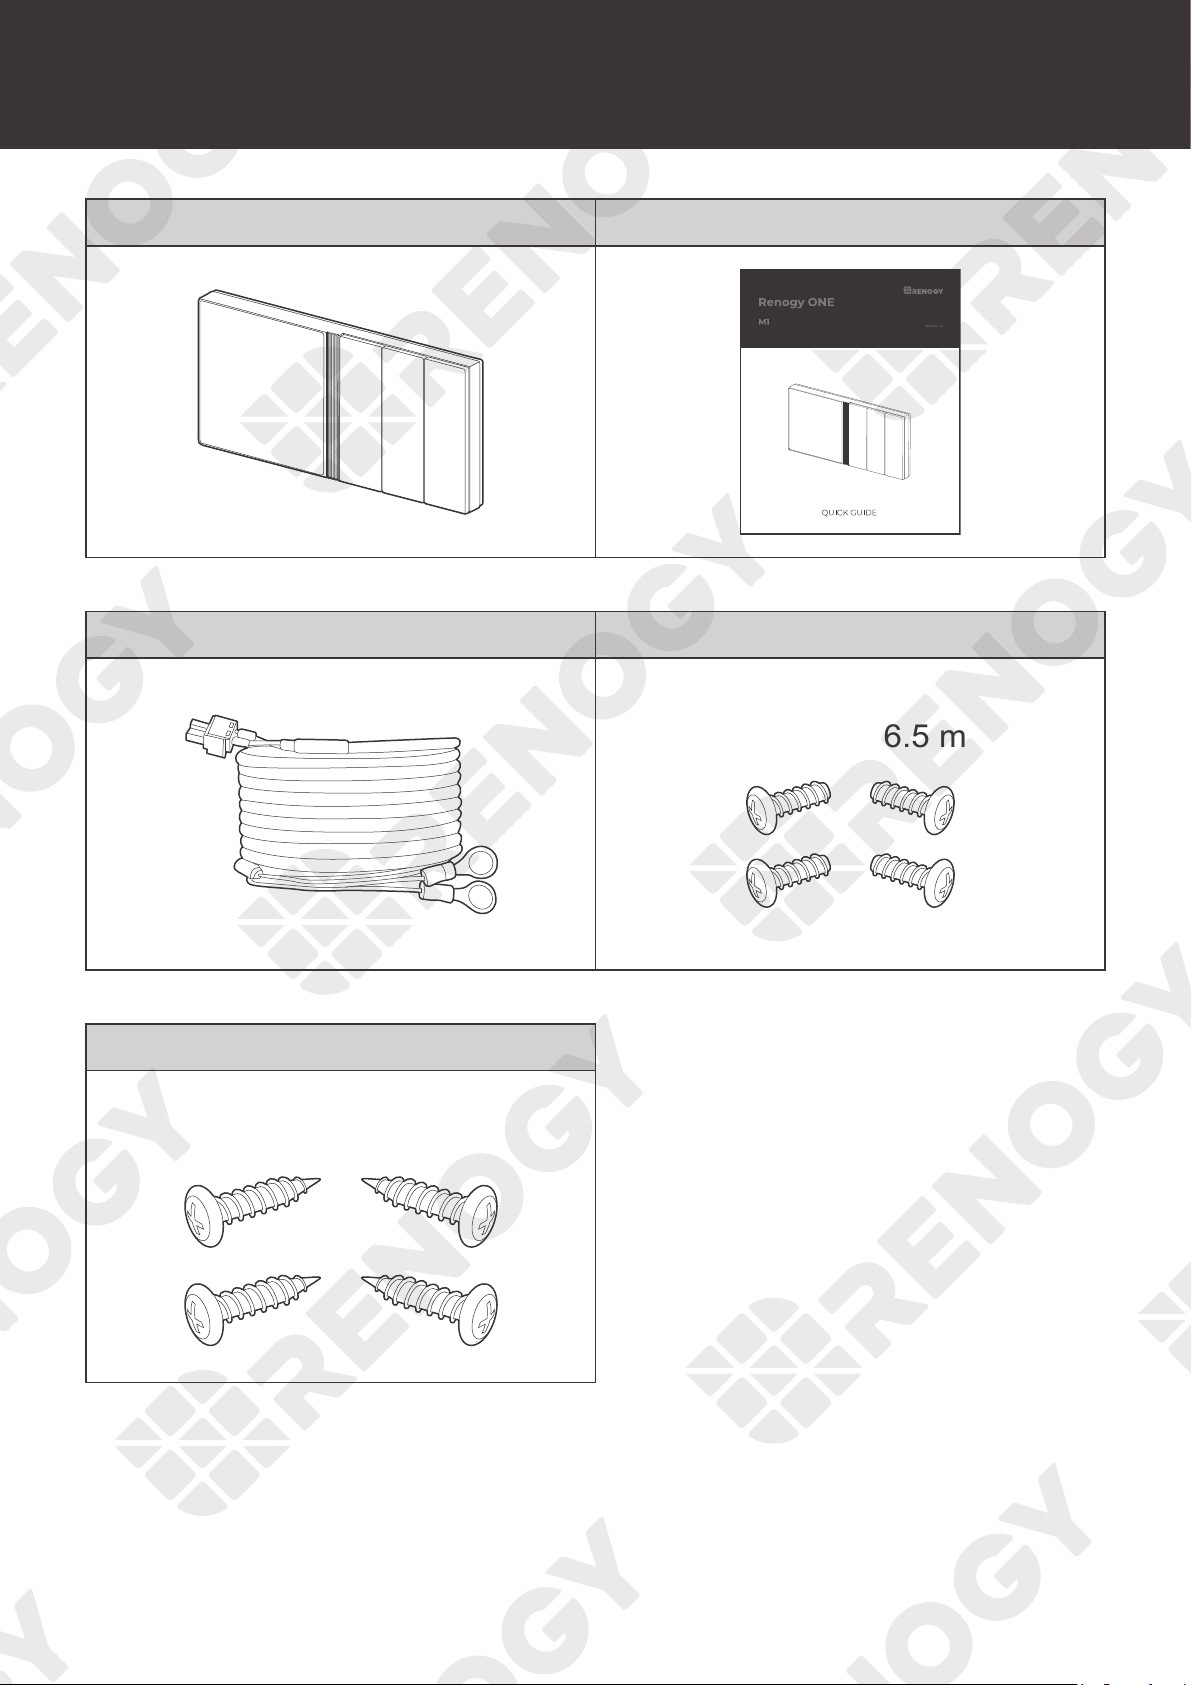
Package Contents
Package Contents
Renogy ONE M1 × 1 Quick Guide × 1
VERSION A1
12V Power Cable (5m) × 1 M2 Screws × 4
ST2 x 1.2 x 6.5 mm
M4 Mounting Screws × 4
ST4 x 2 x 13 mm
09
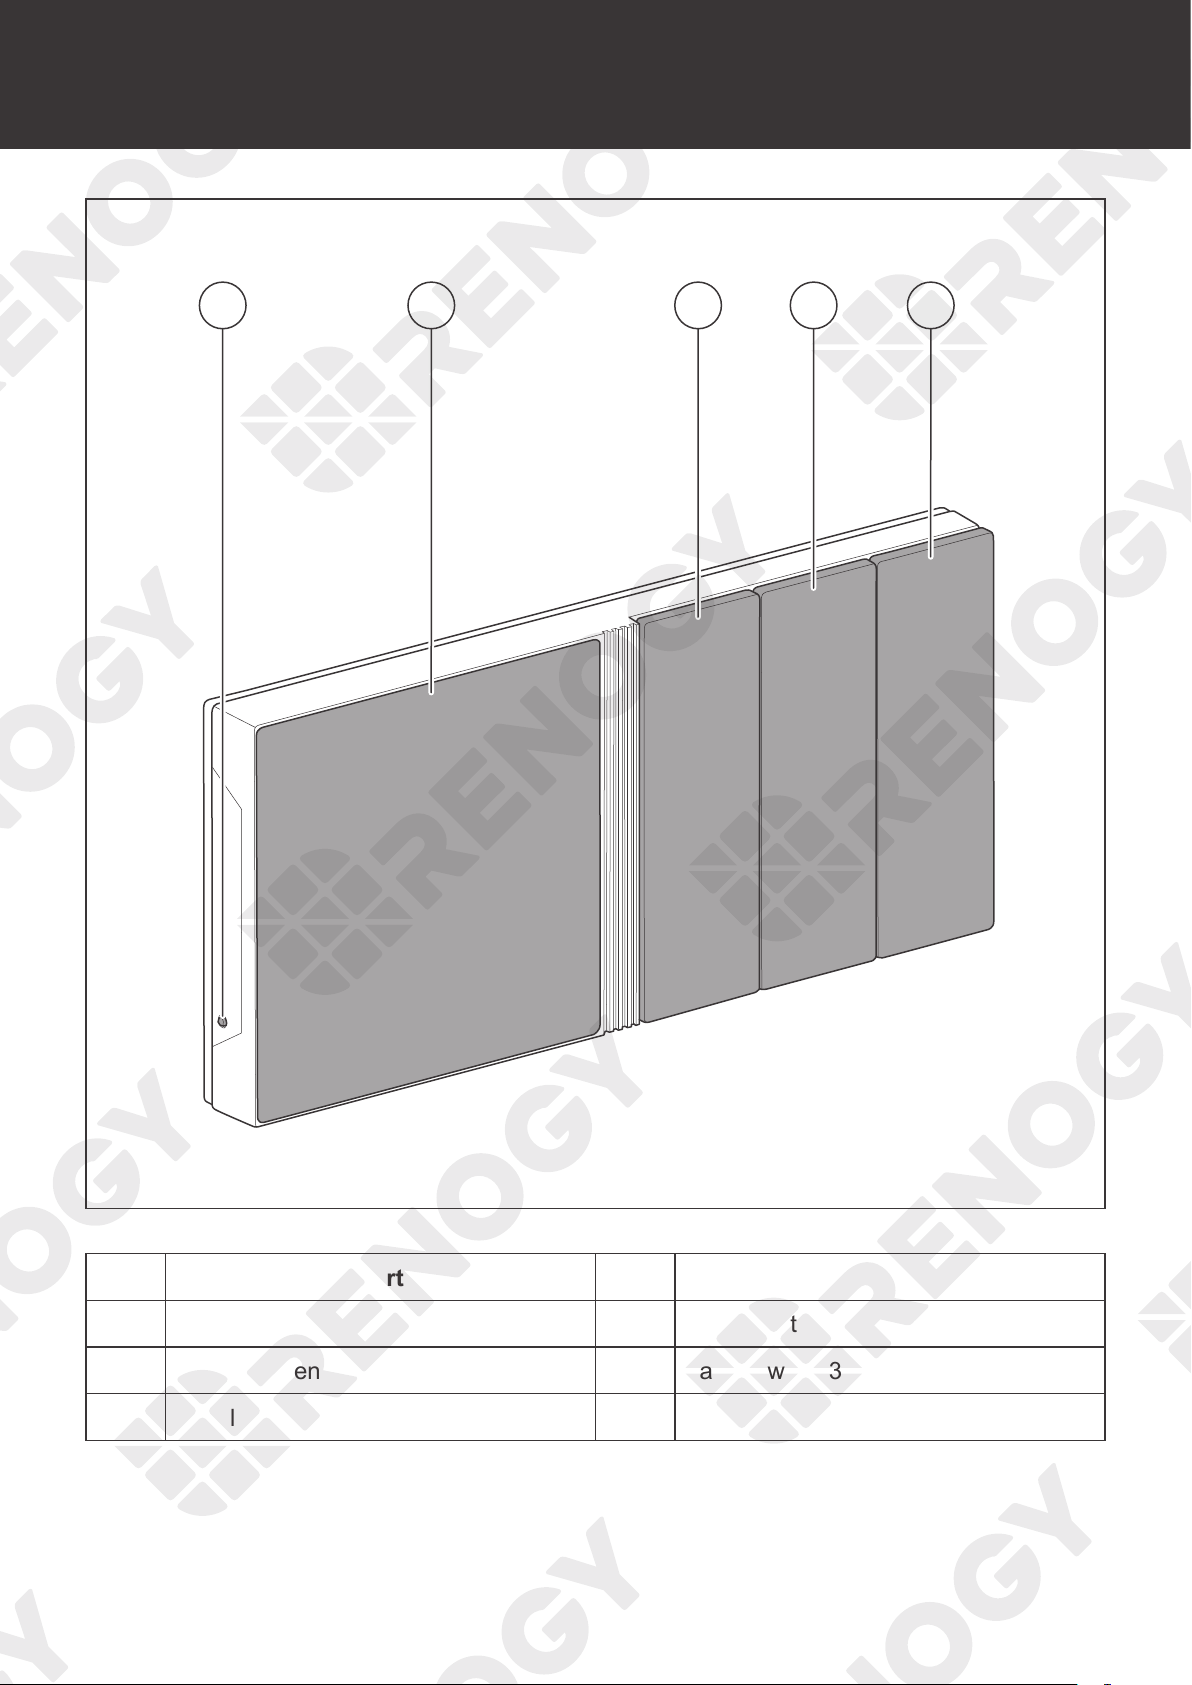
Product Overview
Product Overview
21 3 4 5
No. Part No. Part
1 Power Button 4 Panel Switch 2
2 Touch Screen 5 Panel Switch 3
3 Panel Switch 1
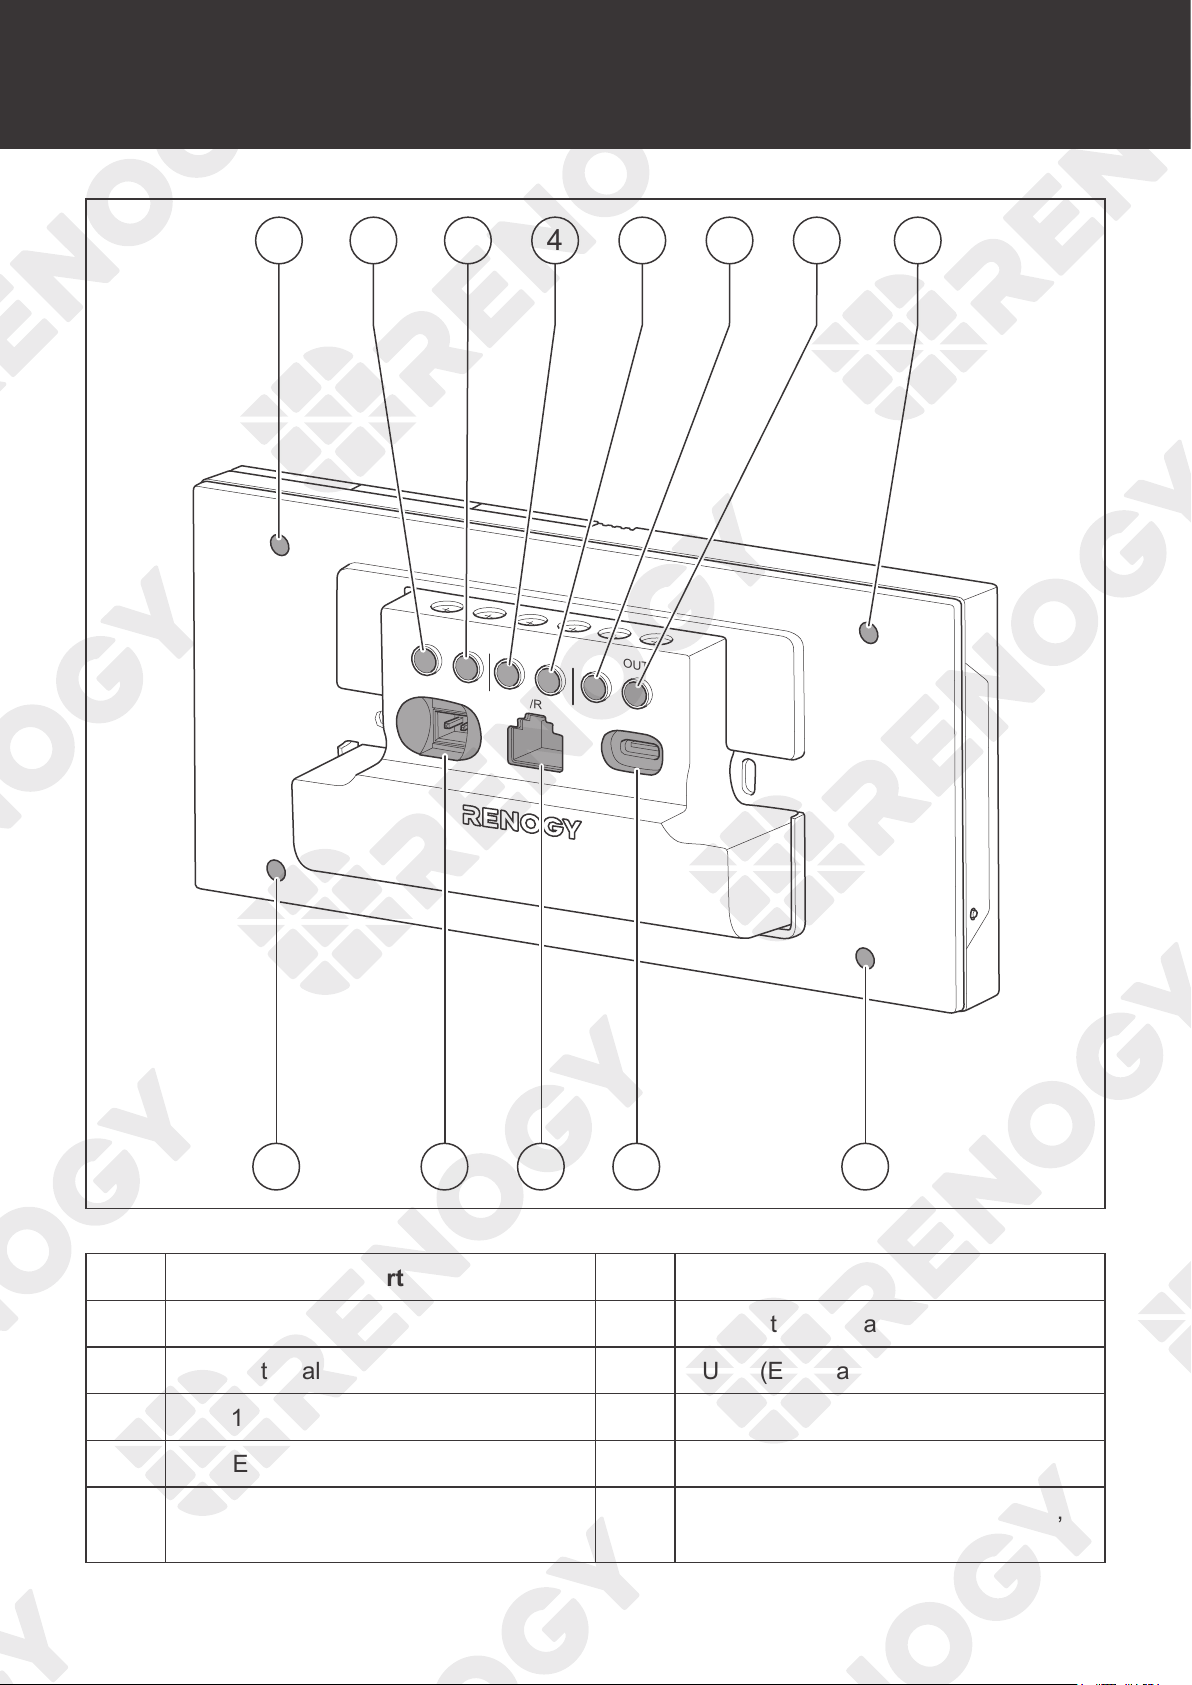
10
Product Overview
IN 1
+ -
IN 2
CAN/RS485
TYPE-C
OUT 1
OUT 2
IN 3
OUT 3
81 19 10
1 2 3 4 5 6 7 1
No. Part No. Part
1 Mounting Holes 6 IN 3 (External Load Input Terminal)
2 IN 1 (External Load Input Terminal) 7 OUT 3 (External Load Output Terminal)
3 OUT 1 (External Load Output Terminal) 8 Power Port (12V, 3.5W)
4 IN 2 (External Load Input Terminal) 9 RJ45 Port
5 OUT 2 (External Load Output Terminal) 10
Alternate Power Input Port (Type-C,
5V, 3.5W)

11
Wiring Diagram
IN 1
+ -
IN 2
CAN/RS485 TYPE-C
OUT 1 OUT 2 IN 3 OUT 3
Negative
Positive
DC Load
(≤30V DC, ≤5A)
Communication
12V
Power
Supply
+
-
≤30V
Power
Supply
+
-
Devices with RV-C or
RS485 communication
Wiring Diagram
12
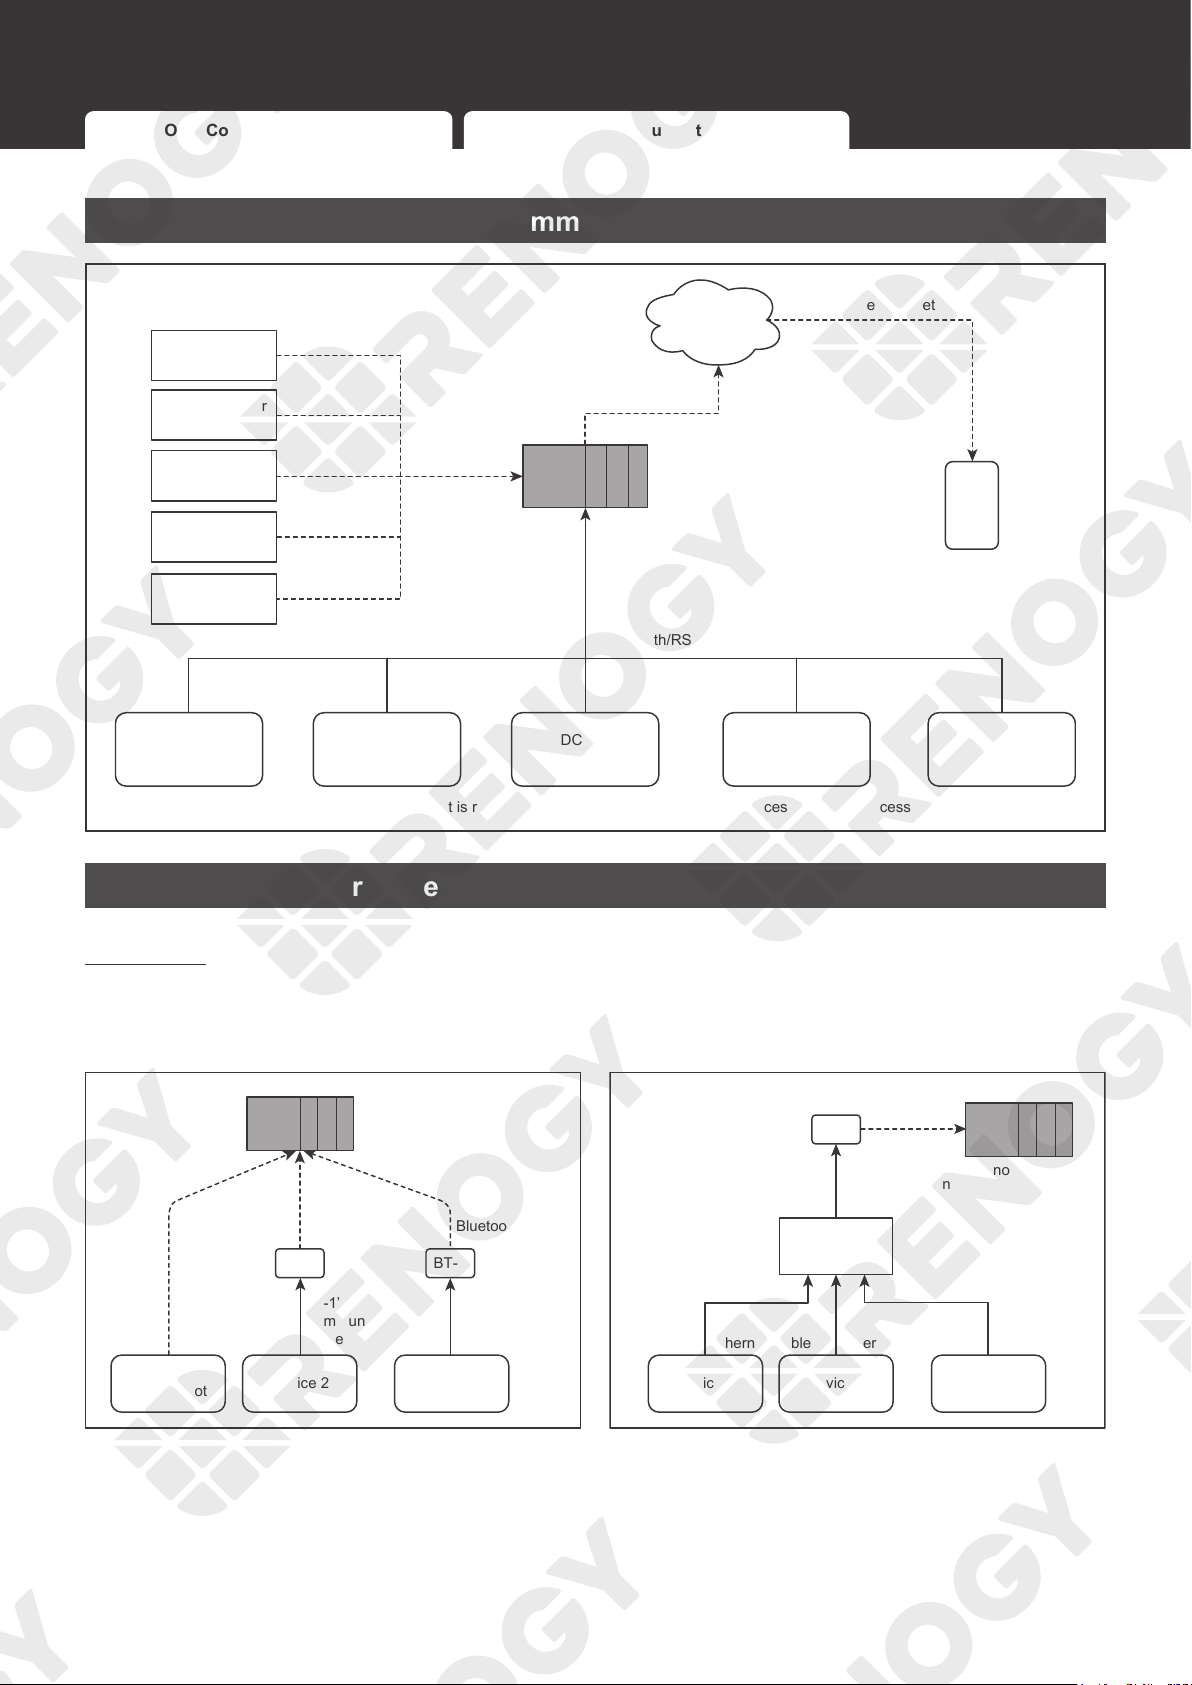
Communication Diagram
Communication Diagram
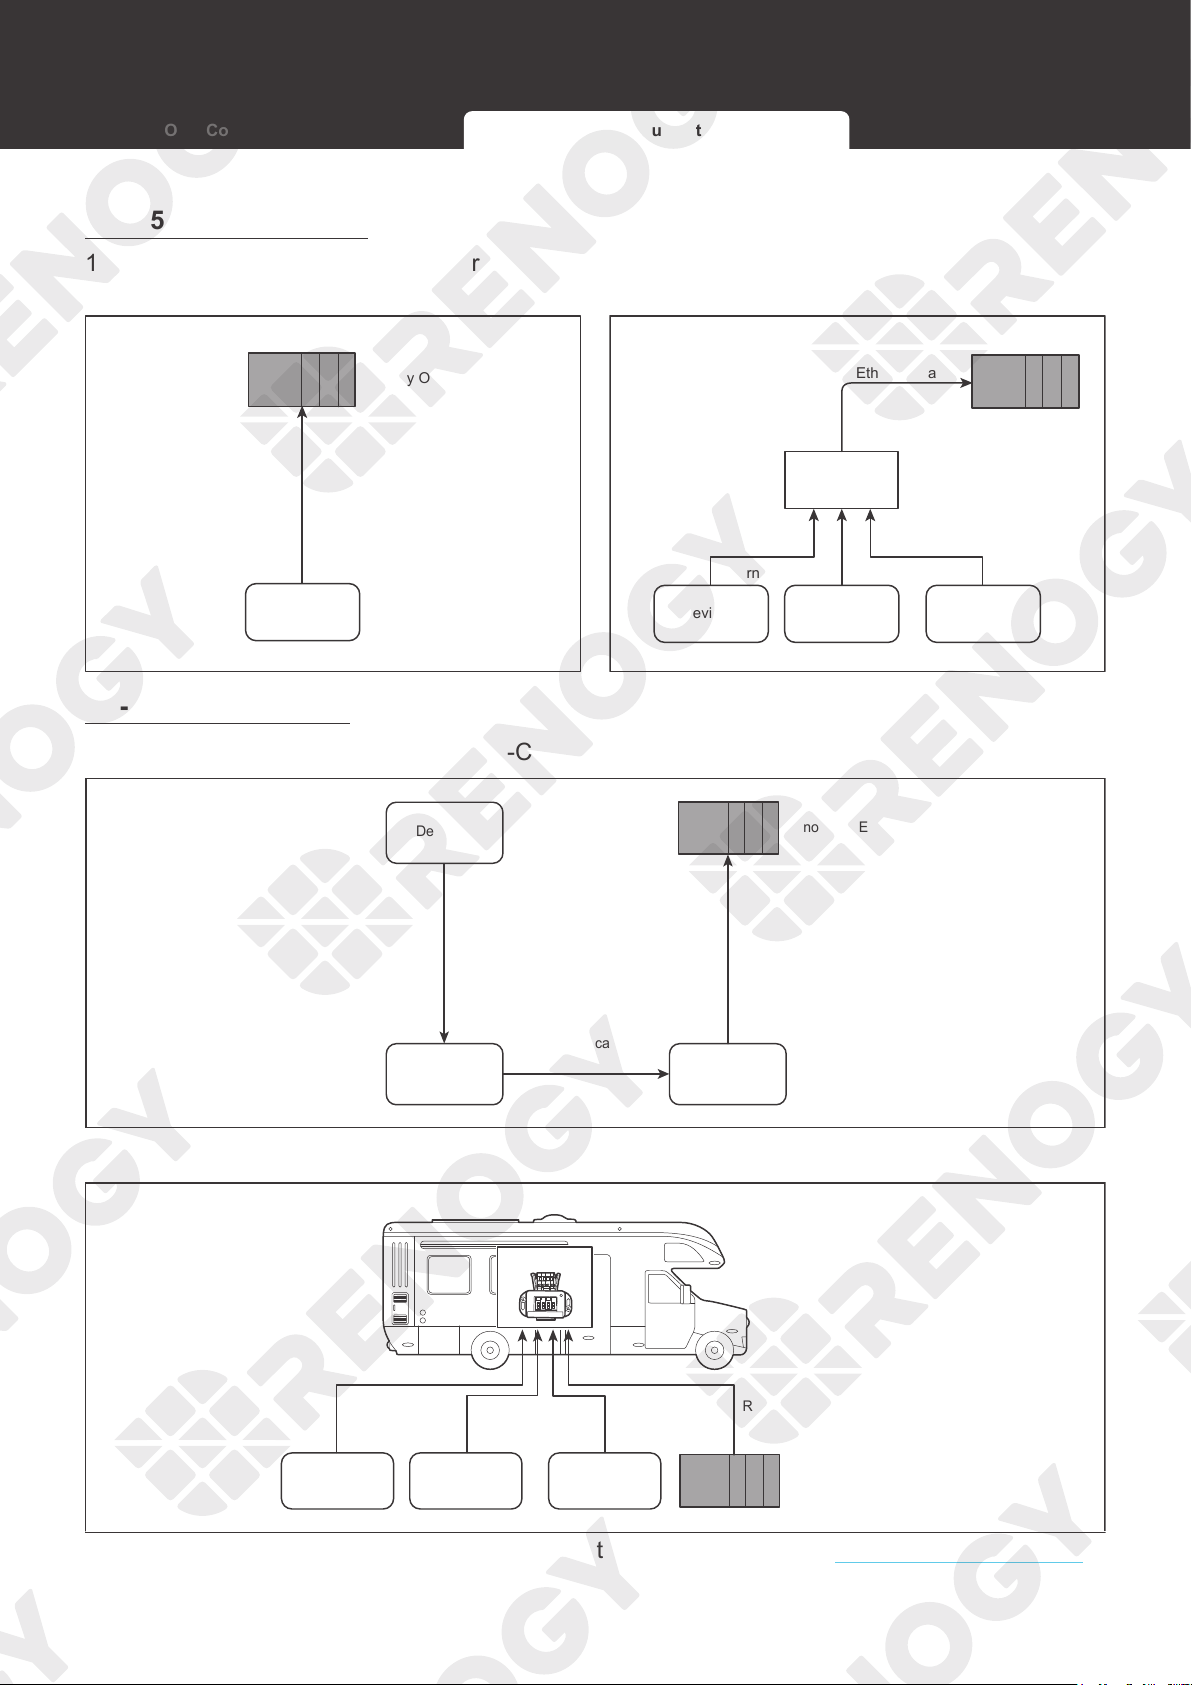
Renogy ONE Communication Architecture
Cloud
Battery Charge Controller
Inverter
DC-DC
Battery Charger
Other Energy
Devices
Motion Sensor
Smart Plug
Smart Relay
Window & Door
Sensor
Other Smart
Accessories
Zigbee
Wi-Fi
Renogy ONE
Wi-Fi/4G Cellular Network
Bluetooth/RS485/RV-C
To ensure good compatibility, it is recommended to use Renogy's energy devices and smart accessories.
DC
Home
App
Energy Device Communication Connections
Bluetooth
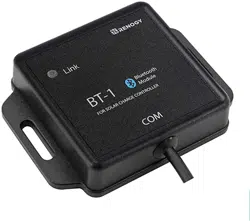
1. For devices with a built-in Bluetooth
module or an external Bluetooth module
(Renogy BT-1 or BT-2):
2. For devices connected to Renogy
Communication Hub and BT-2:
Bluetooth Bluetooth
BT-1’s
Communication
Cable
BT-2’s
Communication
Cable
Bluetooth
BT-1
BT-2
Device 1
(with Bluetooth)
Device 2 Device 3
Renogy ONE
BT-2’s
Communication
Cable
Bluetooth
BT-2
Device 2Device 1 Device N
…
Communication
Hub
Ethernet CableEthernet Cable
Ethernet Cable
Renogy ONE
Renogy ONE Communication Architecture Energy Device Communication Connections
13
Communication Diagram
Renogy ONE Communication Architecture Energy Device Communication Connections
RS485 Communication
1. For a single device with RJ45 port: 2. For devices connected to Renogy
Communication Hub:
Device
Ethernet Cable
Renogy ONE
Device 2Device 1 Device N
Ethernet Cable Ethernet Cable
...
Ethernet Cable
Ethernet Cable
Communication
Hub
Renogy ONE
RV-C Communication
1. For REGO devices connected in RV-C daisy chain topology:
RV-C Daisy Chain Topology
Renogy ONE
Device 2
Device 1
Device N
RV-C
Communication
Cable
RV-C
Communication
Cable
RV-C
Communication
Cable
2. For REGO devices connected in RV-C backbone topology:
RV-C Backbone Topology
Renogy ONE
RV-C
Communication
Cable
RV-C
Communication
Cable
RV-C
Communication
Cable
RV-C
Communication
Cable
Device 2Device 1 Device N
...
Drop Tap
For backbone topology, please contact our customer service through renogy.com/contact-us/.
14
Preparation
Preparation
Required Tools Inspection Mounting Location
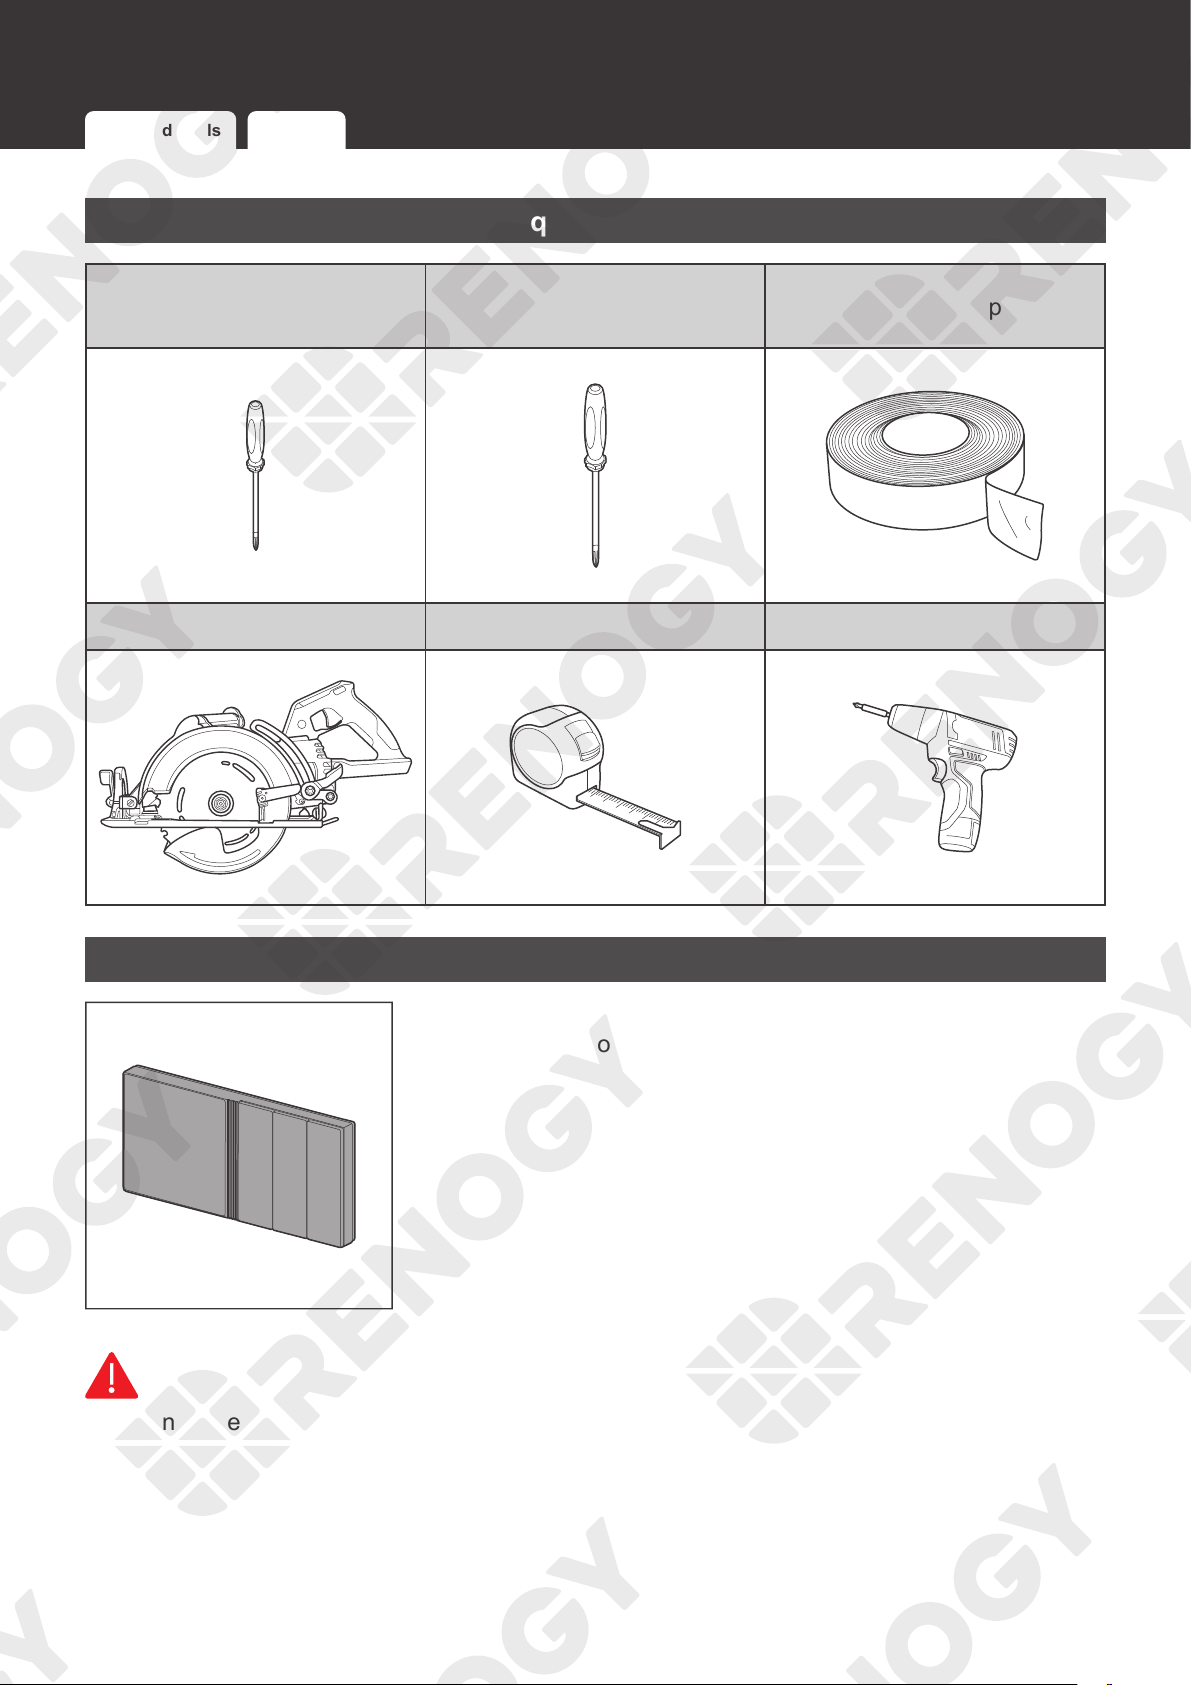
Required Tools
Phillips Screwdriver (#1)
(for M2 Screws)
Phillips Screwdriver (#2)
(for M4 Screws)
Insulation Tape
Skill Saw Measuring Tape Drill (1.5mm)
3
4
5
6
Inspection
Inspect Renogy ONE for any visible damage including cracks,
dents, deformation, and other visible abnormalities before
installation. All connector contacts shall be clean, dry, and free
of dirt and corrosion.
WARNIN
G
z
Do not use Renogy ONE if it appears to be damaged.
15
Preparation
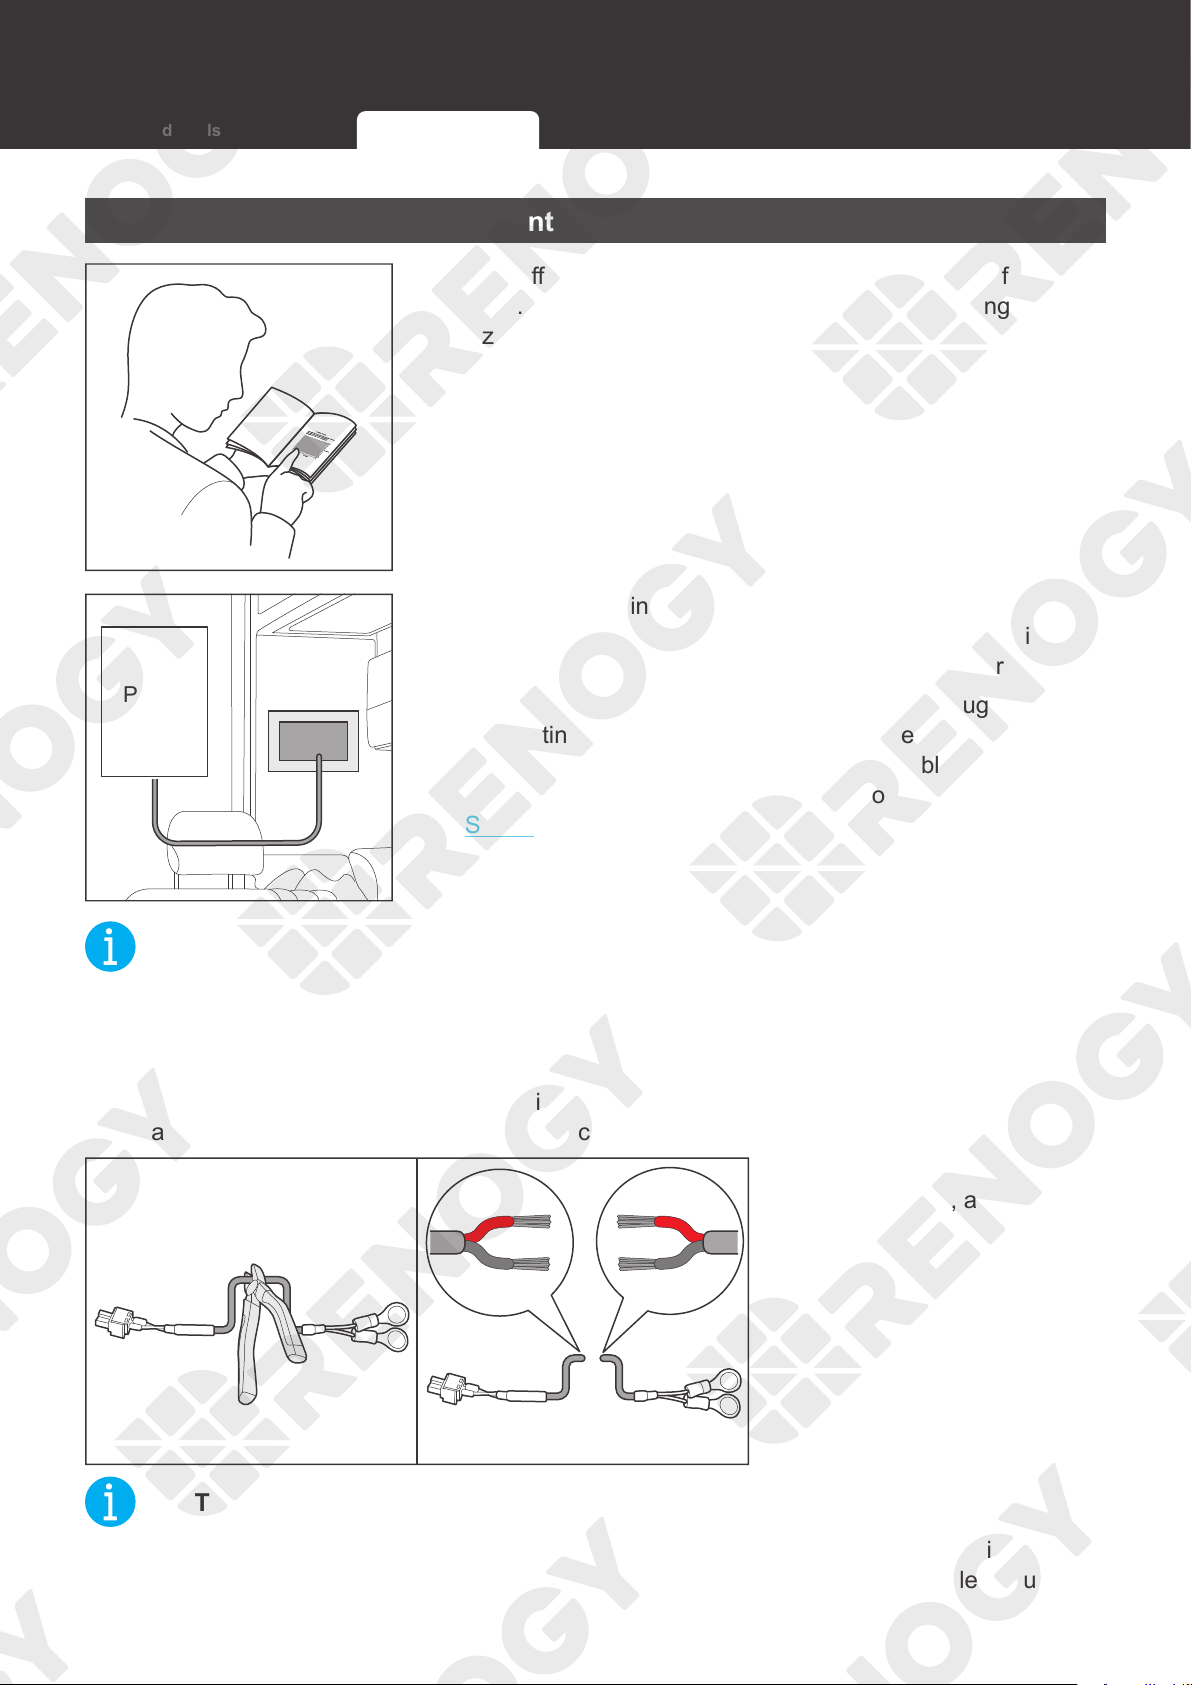
Mounting Location
1. Tear off the mounting template in the quick guide of Renogy
ONE. You can also customize a template according to the
size provided in the guide.
12V
Power
Supply
2. Tape the mounting template to the selected mounting
location, and measure whether the 12V power cable is long
enough to connect Renogy ONE to your DC power supply.
If the included 12V power cable is not long enough for
connecting Renogy ONE to your DC power supply, re-select
a mounting position or use an extension cable (≥ 22 AWG).
If you do not need to extend the 12V power cable, go to
Step 5.
NOT
E
z
Install Renogy ONE on a vertical surface.
z
Mounting Renogy ONE requires installation holes. Make sure that you can drill holes on the
mounting position.
z
To ensure quality wireless communication for Renogy ONE, keep it away from metal objects
at a minimum distance of 200 mm or 7.9 inch.
3. Cut the included 12V
power cable, and strip off
some of the insulation.
NOT
E
z
Confirm the polarities of the included cable and the extension one before connecting them.
A reverse polarity contact will result in abnormal operations. The extension cable should not
exceed 10 meters (32.8 feet).
Required Tools Inspection Mounting Location
16
Preparation
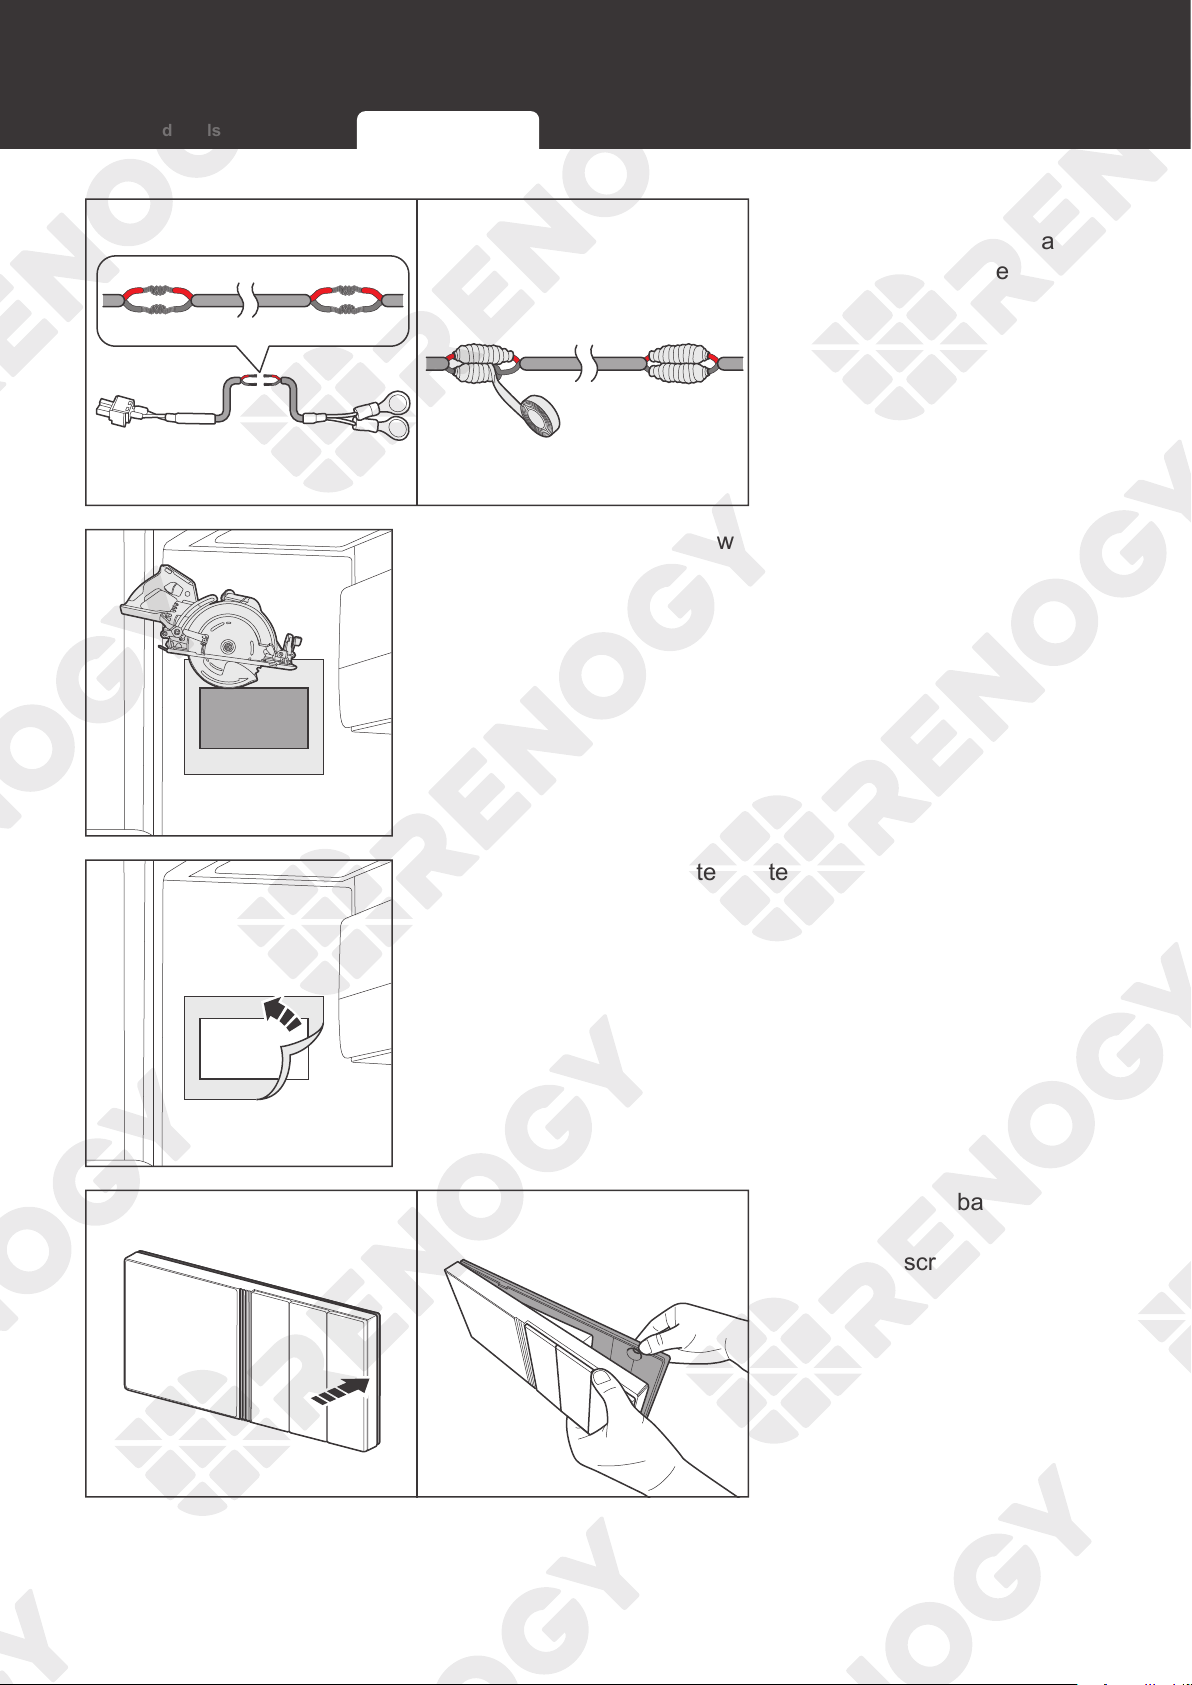
4. Strip some insulation off
the extension cable, and
connect the cable to the
included 12V power supply
cable. Tape over the cut-
off areas.
5. Use the drill and skill saw to dig the installation hole
according to the gray mark on the mounting template.
6. Tear off the mounting template.
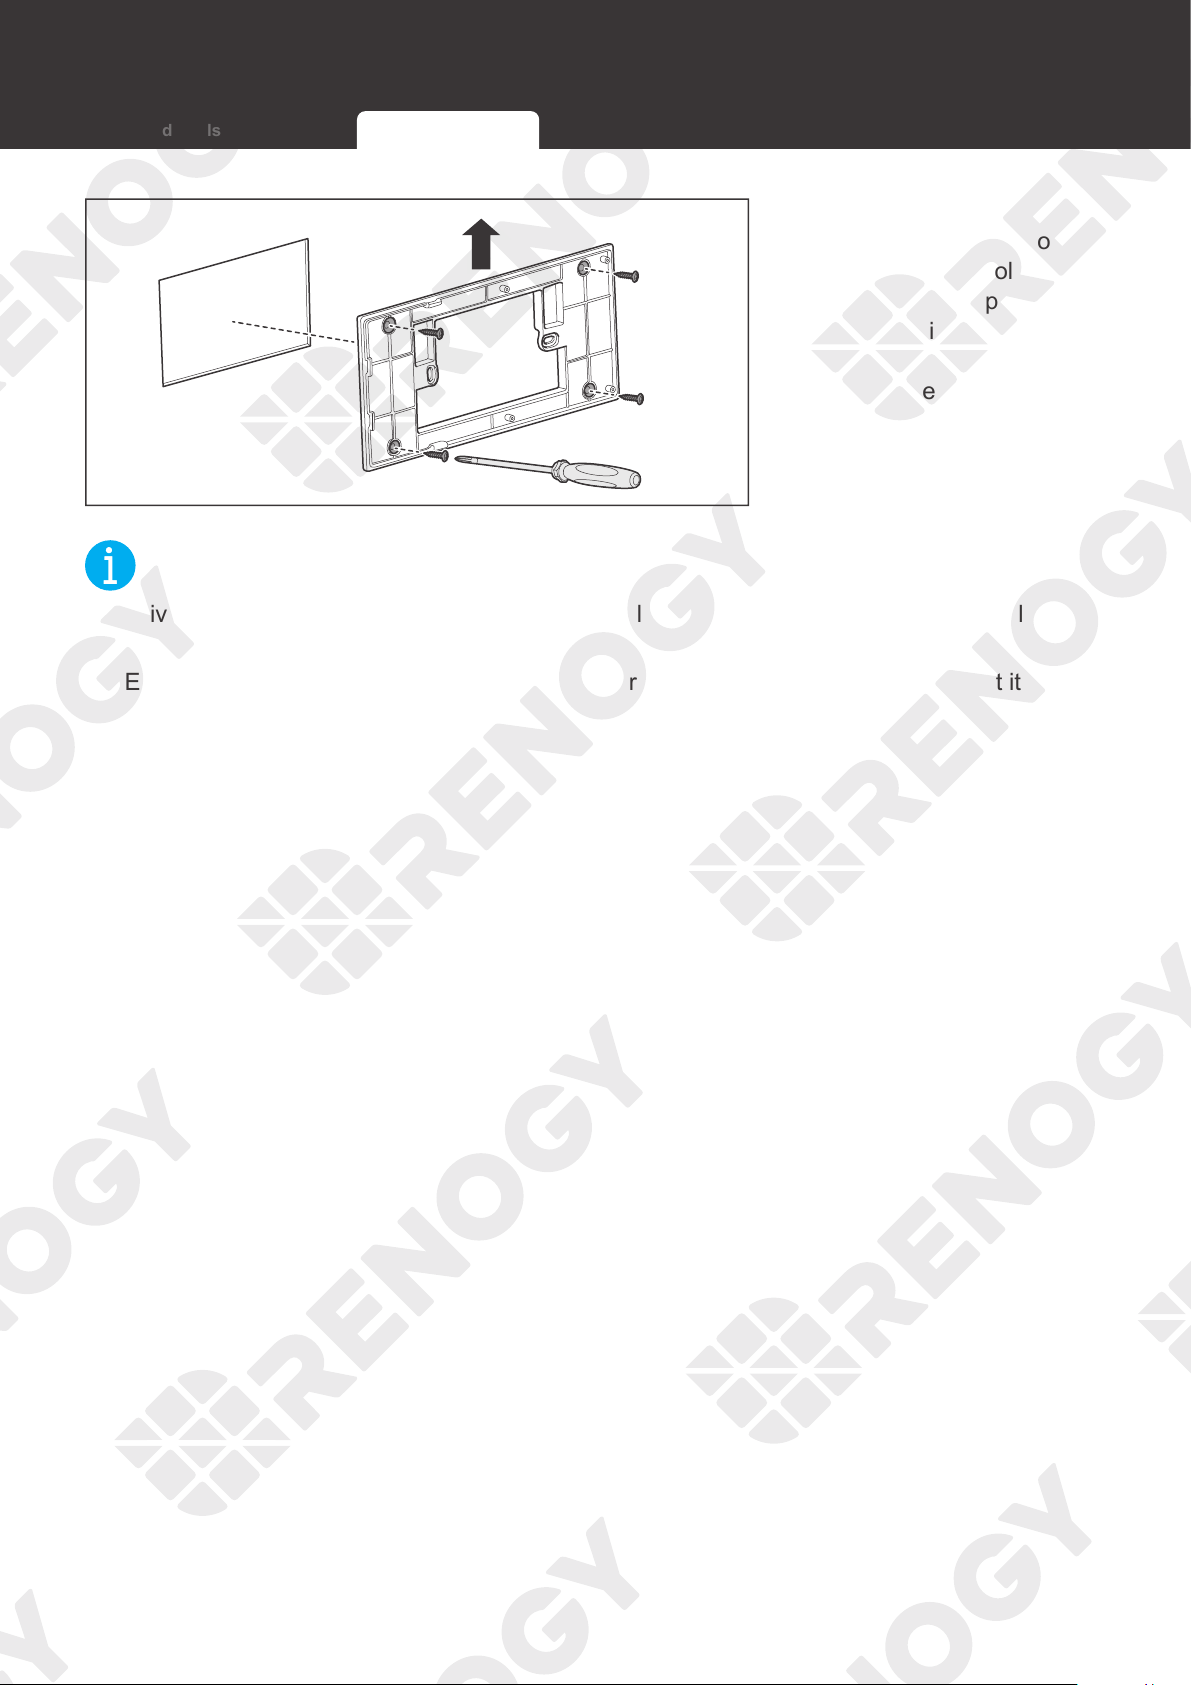
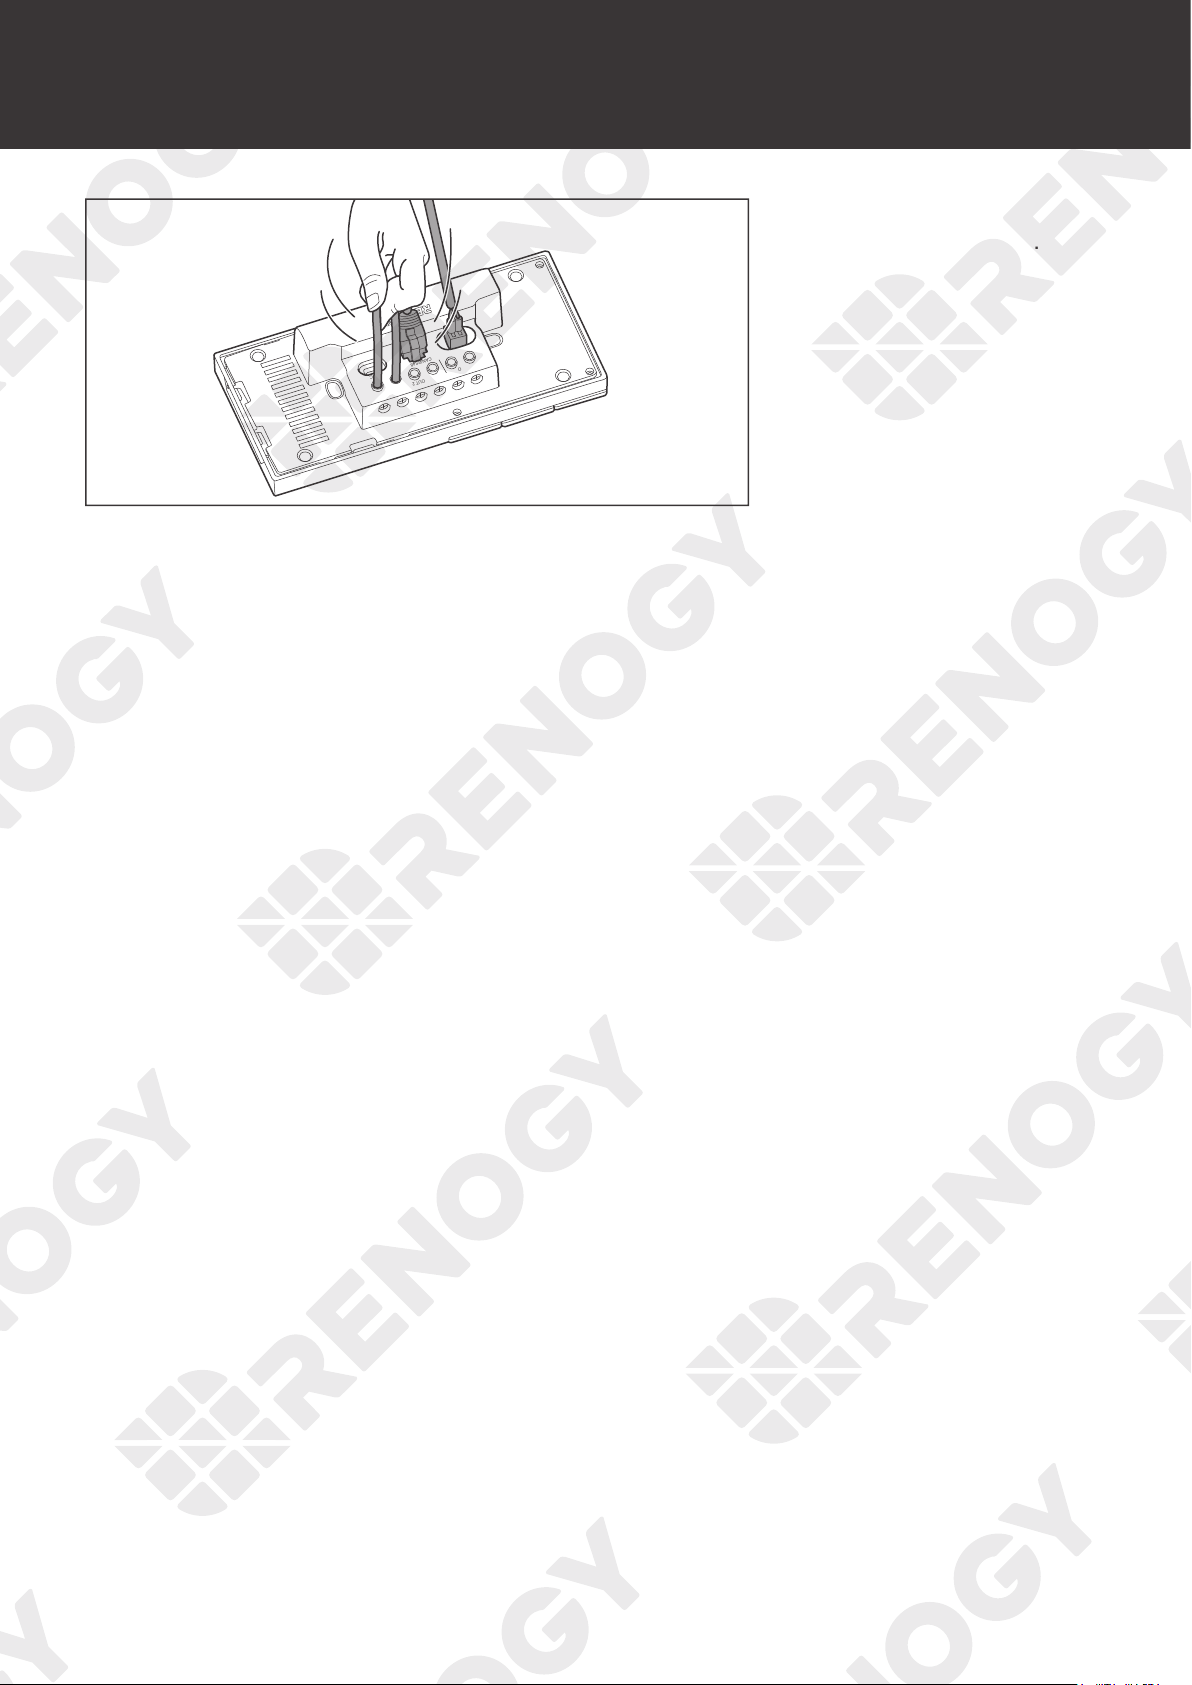
7. Remove the base cover
of Renogy ONE with a
Phillips screwdriver (#2).
Required Tools Inspection Mounting Location
17
Preparation
UP
8. Put the protruding part
of the base cover into
the installation hole (in
a direction and position
as shown in the left
figure, and use a Phillips
screwdriver (#2) to fasten
the base cover with four
M4 mounting screws
through the mounting hole.
NOT
E
z
Drive the screws in straight into the mounting holes to ensure the base cover perfectly fits
into Renogy ONE.
z
Ensure that the base cover of Renogy ONE is firmly mounted to the wall to prevent it from
falling off.
Required Tools Inspection Mounting Location
18
Power Wiring
Power Wiring
Battery Combiner Box
+
1. Connect the ring terminals
of the 12V power cable
to the positive and
negative terminals of the
DC power supply, and
reserve the connector end
of the power cable in the
installation hole.
CAUTIO
N
z
Illustrations in this user manual are based on scenarios where REGO 12V 400Ah Lithium
Iron Phosphate Battery and REGO 3 Ports 400A Battery Combiner Box are adopted as
power supplies.
WARNIN
G
z
Make sure the DC power supply is powered off before connection.
z
Renogy ONE can be connected to a DC power supply of up to 16V; otherwise Renogy ONE
may be damaged.
z
Confirm the polarities of the DC power supply before connection. A
reverse polarity contact
will result in abnormal operations.
+ -
CAN/RS485
TYPE-C
IN 1 IN 2OUT 1 OUT 2 IN 3 OUT 3
2. Insert the 12V power cable terminal block into Power Port of
Renogy ONE.
3. Power on the DC power
supply and check if
Renogy ONE automatically
turns on with the LCD
lighting up.
19
Power Wiring
CAUTIO
N
z
After correct power cable connection and normal power-on of the DC power supply, Renogy
ONE is automatically powered on. Failed automatic power-on indicates Renogy ONE needs
troubleshooting. For details, refer to Troubleshooting in this user manual. For additional
support, please contact our customer service through renogy.com/contact-us/.
WARNIN
G
z
Risk of electric shock! Power off the DC power supply after the test on power-on of Renogy
ONE is completed.
20
Communication Wiring (Optional)
Renogy ONE can communicate with Renogy energy devices in several ways:
1. Bluetooth wireless communication;
2. Wired communication based on RS485 protocol;
3. Wired communication based on RV-C protocol.
You can choose an appropriate communication method according to the actual situation.
• For Bluetooth wireless communication, communication wiring is not required.
• For RS485 or RV-C communication, you need to wire Renogy ONE with energy devices.
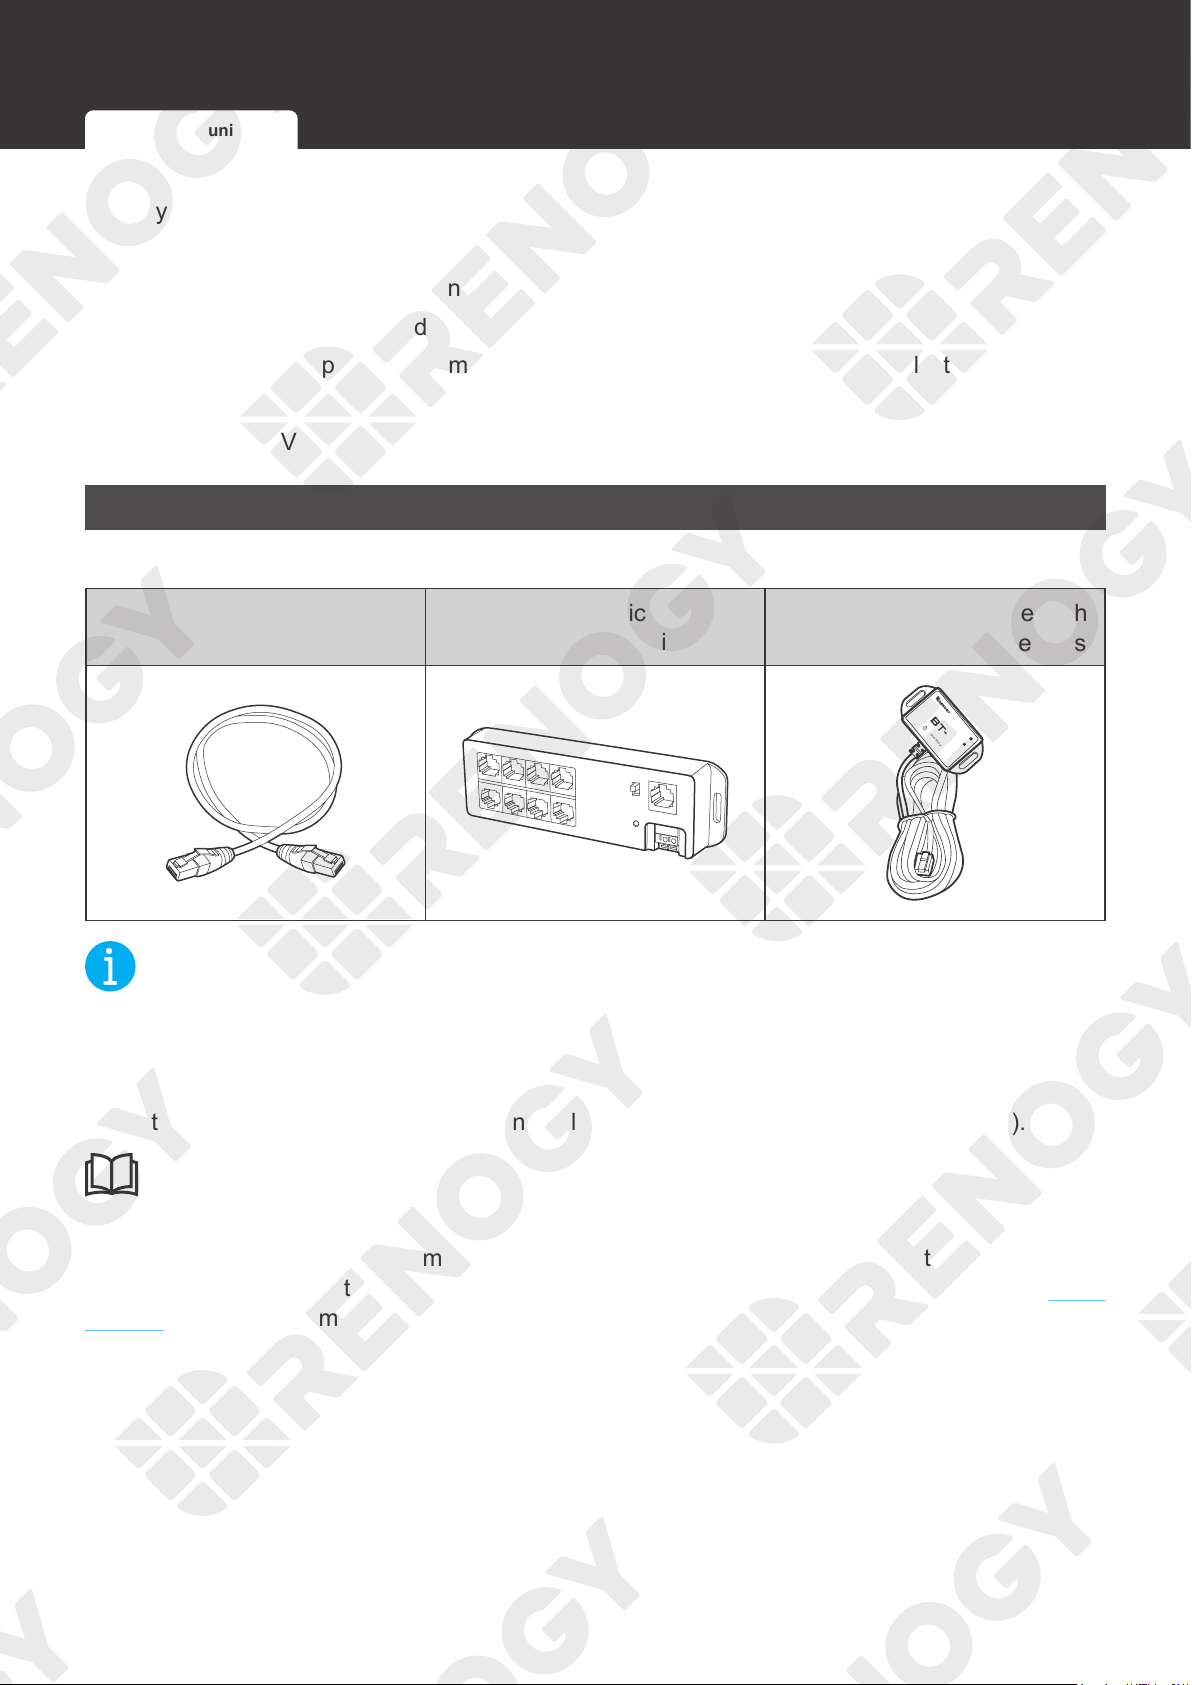
RS485 Communication
Recommended Accessories
Communication Cable (RJ45
Ethernet Cable)
Renogy Communication Hub
(For Multiple Devices)
Renogy BT-1/BT-2 Bluetooth
Module (For Multiple Devices)
HUB
Bluetooth Module
LINK
POWER
2
NOT
E
z
Use CAT5 and higher category cables.
z
Ensure that the device supports RS485 communication.
z
Select the appropriate communication cable (sold separately) according to the distance
between devices. The communication cable should be less than 6 meters (19.6 feet).
INF
O
z
Prior to using a Renogy Communication Hub, read its user manual carefully.
If you need to use a Renogy Communication Hub, connect every single device to the DC Home
app individually through the hub first, and then reconnect all devices to the hub. T
urn to the user
manual of the hub for more details.
Communication Wiring (Optional)
RS485 Communication RV-C Communication
21
Communication Wiring (Optional)
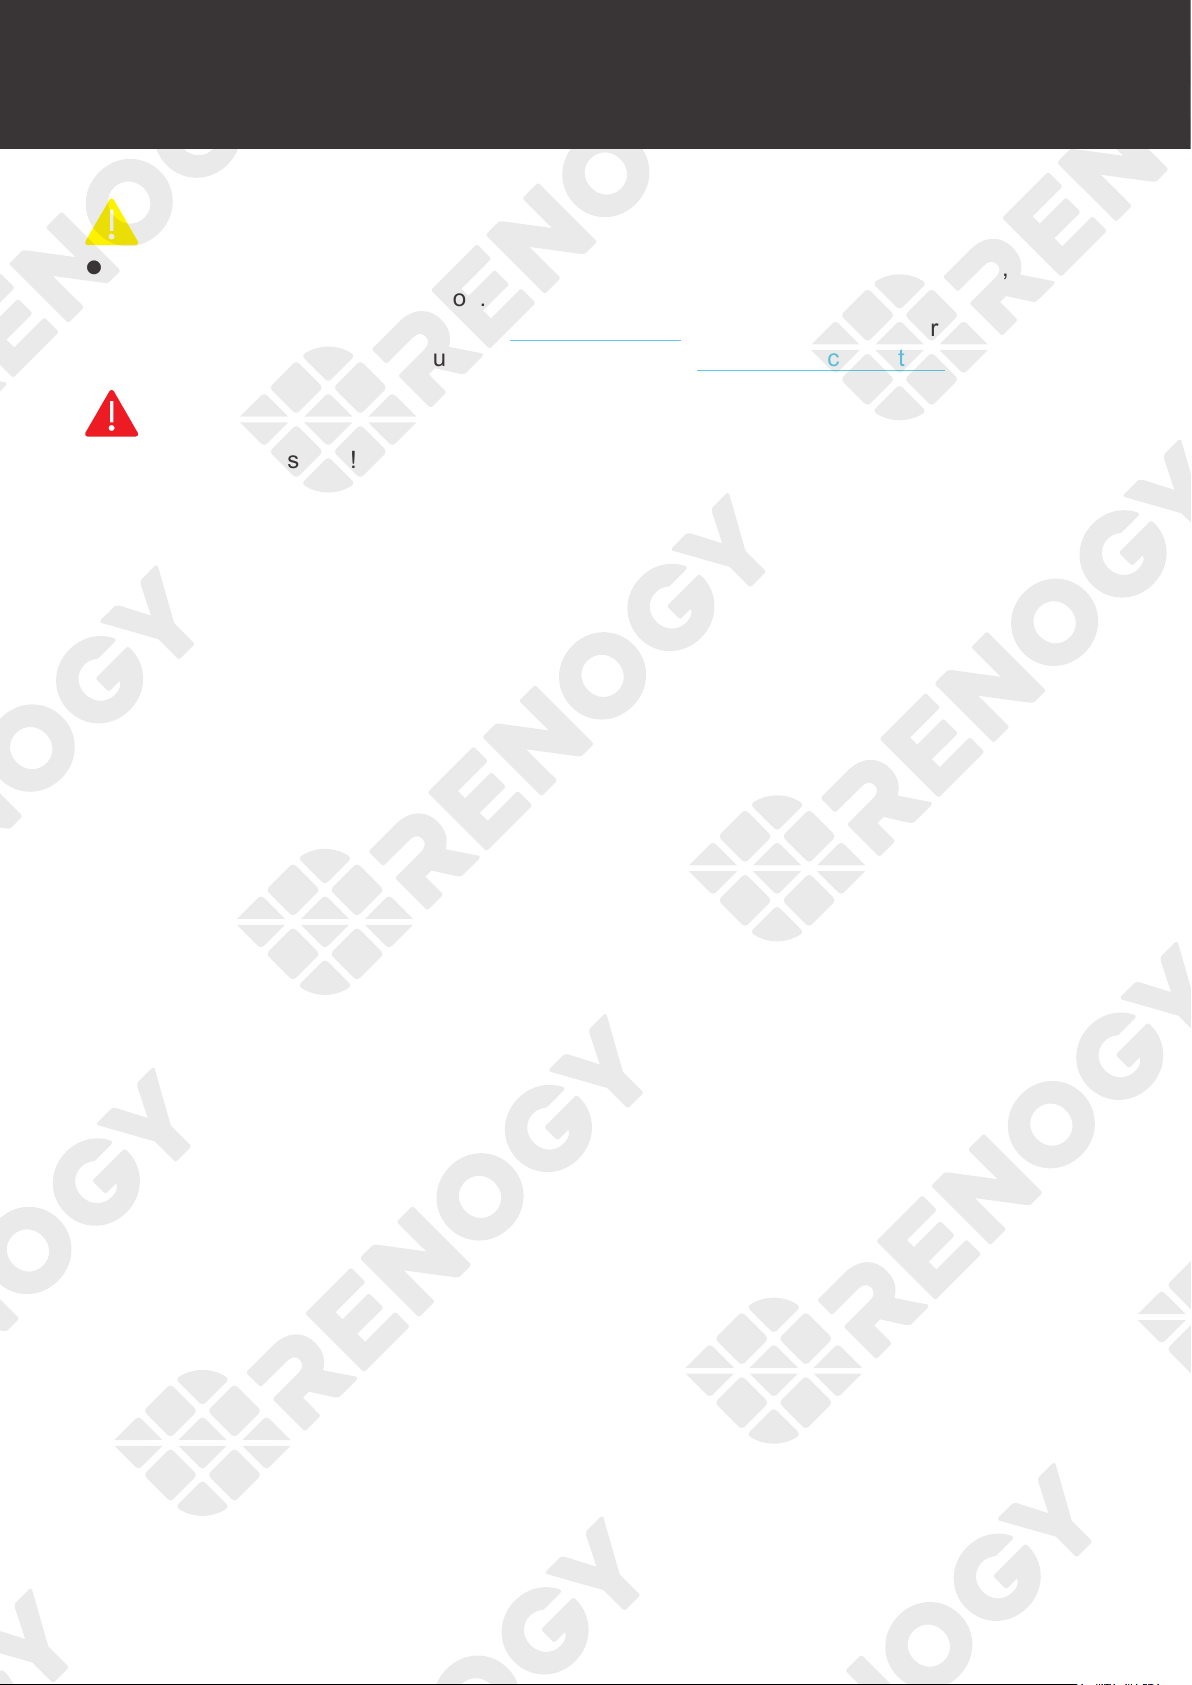
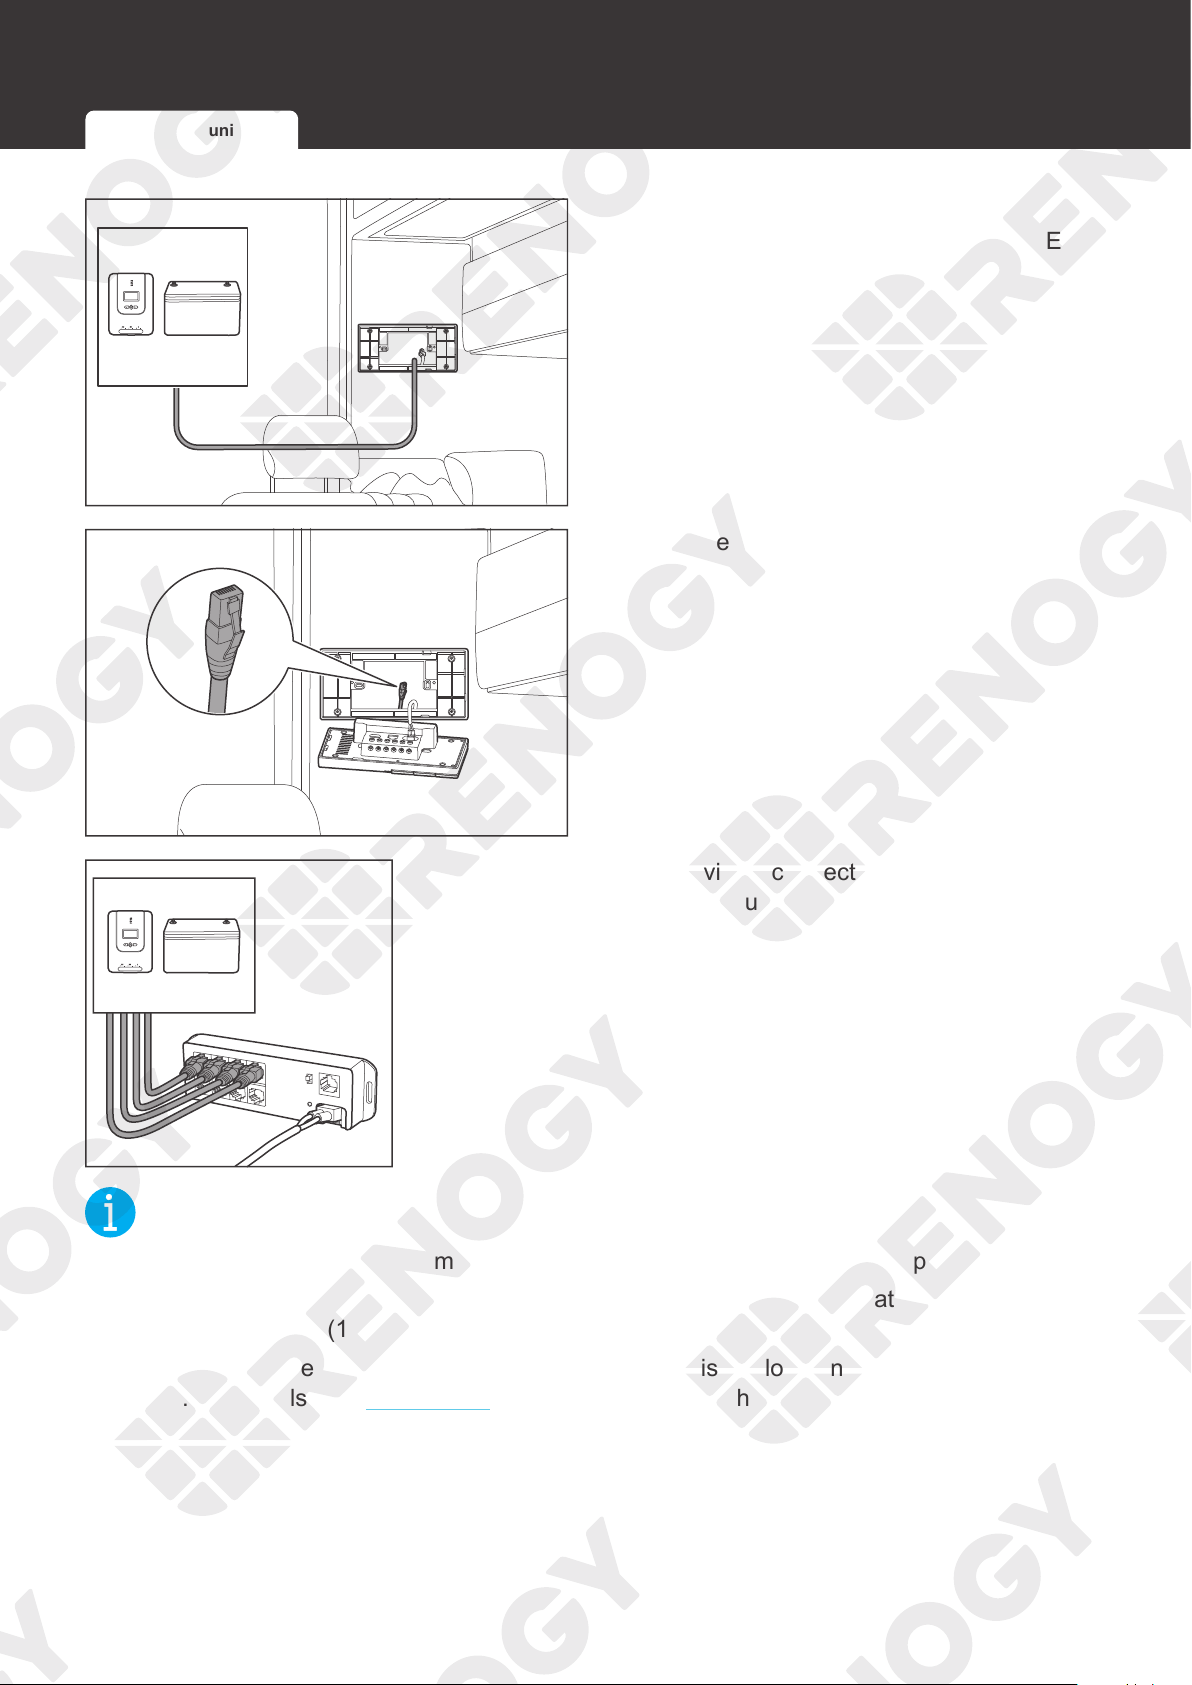
1. Ensure the selected communication cable
is long enough to connect Renogy ONE to
other devices.
+ -
CAN/RS485
TYPE-C
2. Reserve one end of the communication
cable into the installation hole.
HUB
3. If there are multiple devices, connect all the devices to the
Renogy Communication Hub.
NOT
E
z
Ensure that the Renogy Communication Hub is connected to the power supply.
z
The communication cable connecting the device to Renogy Communication Hub should be
less than 6 meters (19.6 feet).
z
If the power cable of the Renogy Communication Hub is not long enough, use an extension
cable. For details, see Preparation. The extension cable should not exceed 10 meters (32.8
feet).
RS485 Communication RV-C Communication
22
Communication Wiring (Optional)
HUB
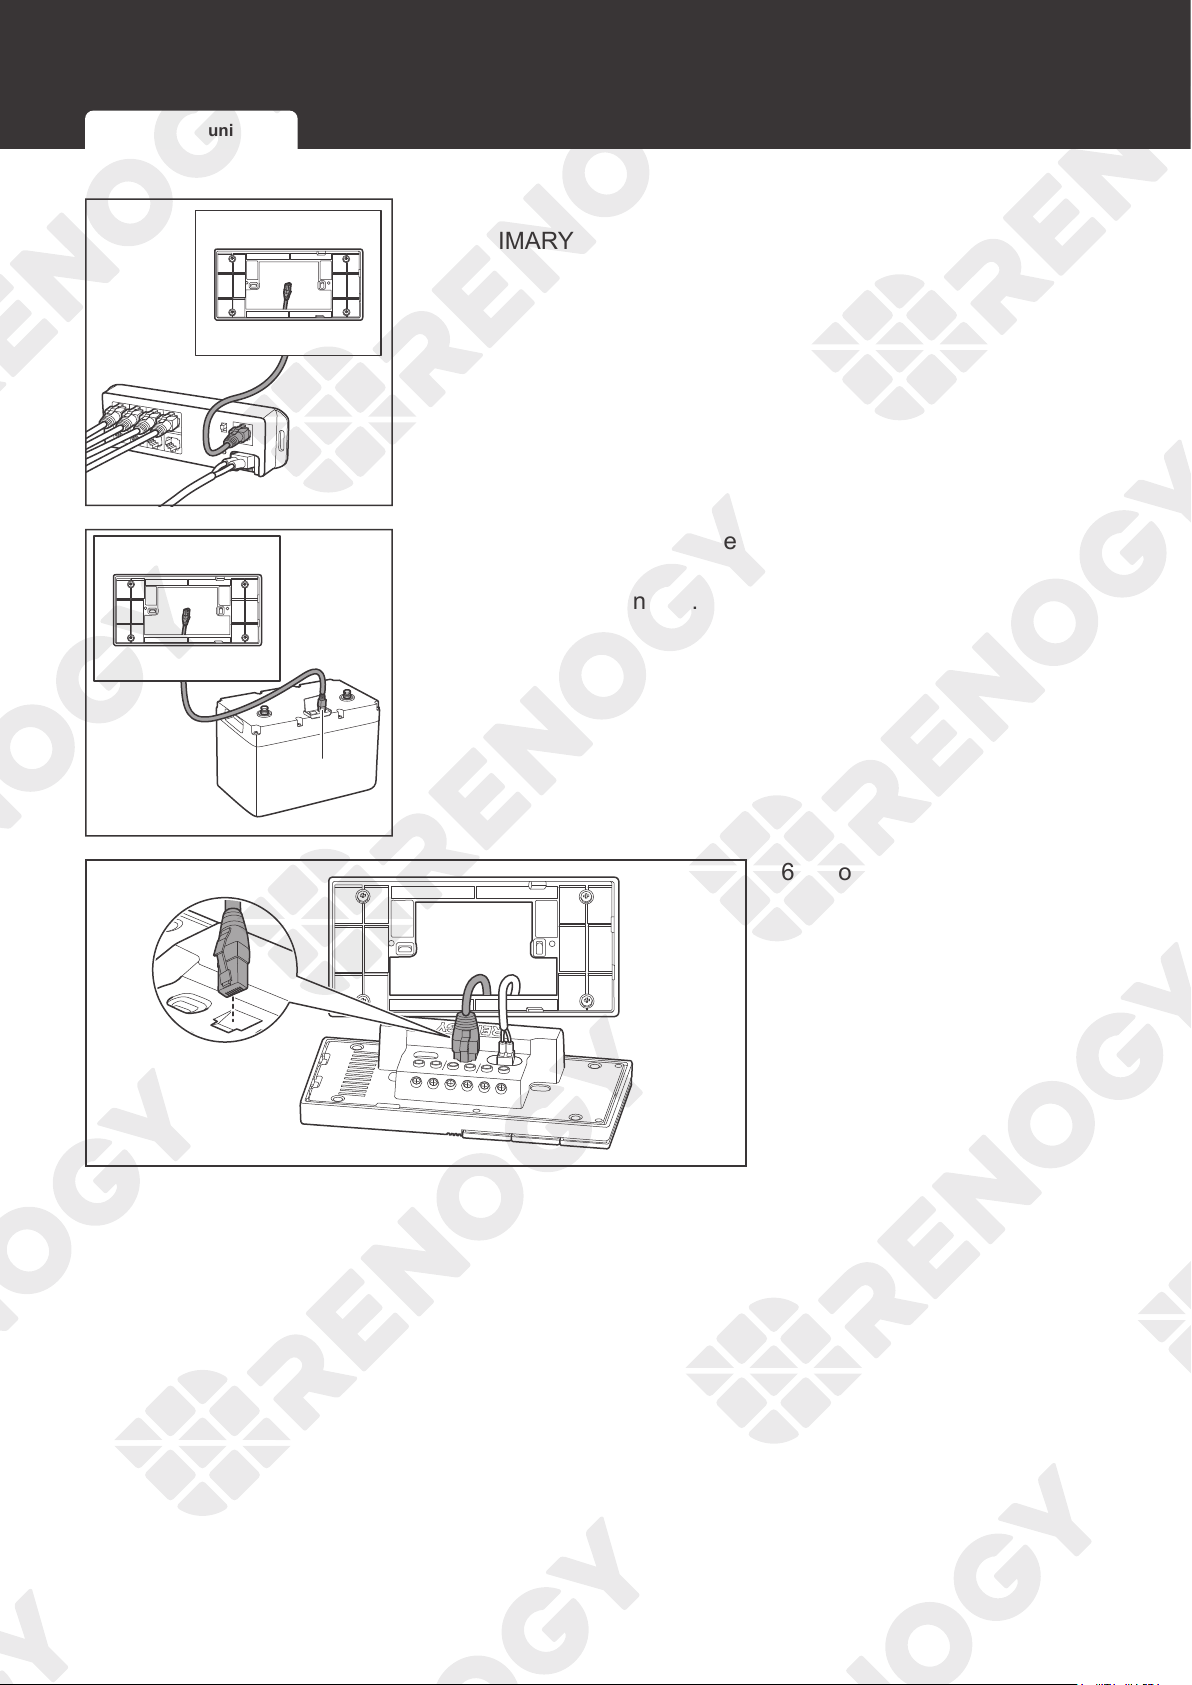
4. Connect the other end of the communication cable to the
PRIMARY Port of Renogy Communication Hub.
+
-
UP port
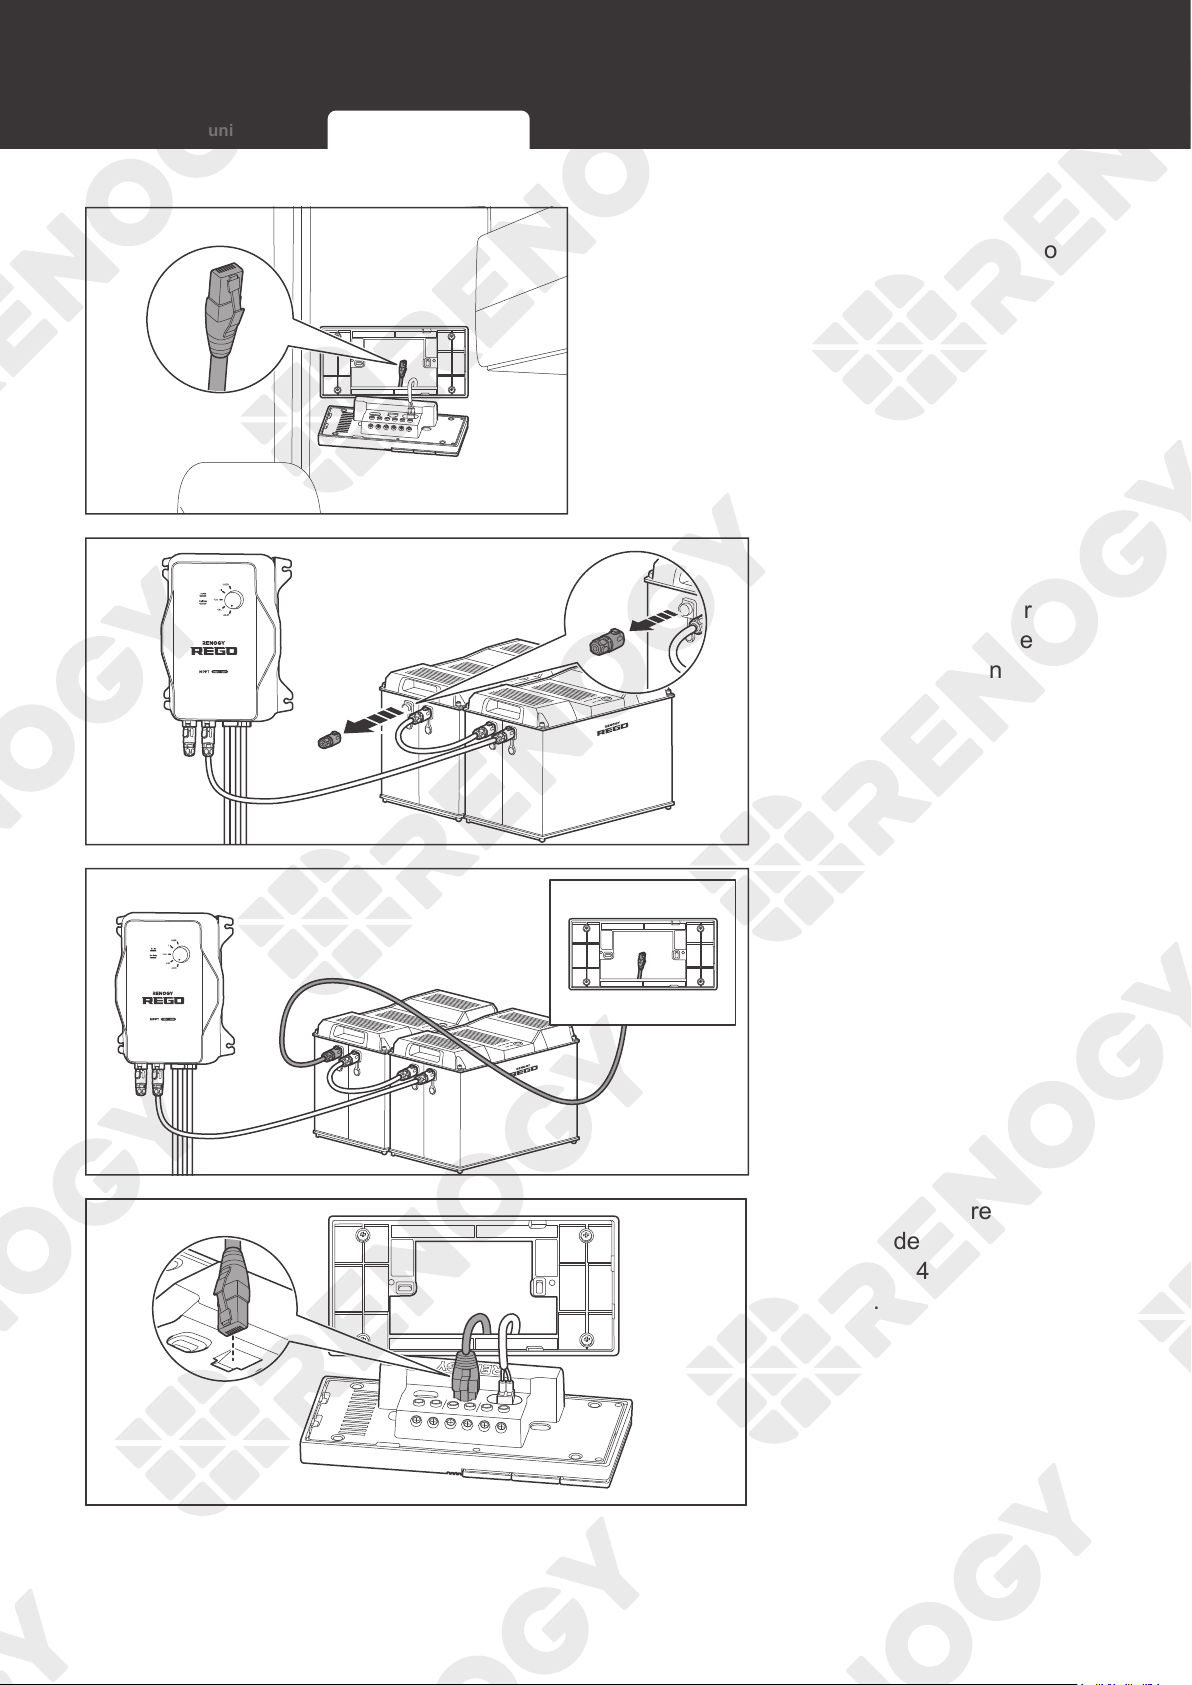
5. If there is only one device, insert the other end of the
communication cable to the communication port of the
specific device in use.
+ -
CAN/RS485
TYPE-C
CAN/RS485
TYPE-C
IN 1
IN 2
OUT 1
OUT 2
IN 3 OUT 3
6. Connect the reserved end
to the RJ45 port of Renogy
ONE.
RS485 Communication RV-C Communication
23
Communication Wiring (Optional)
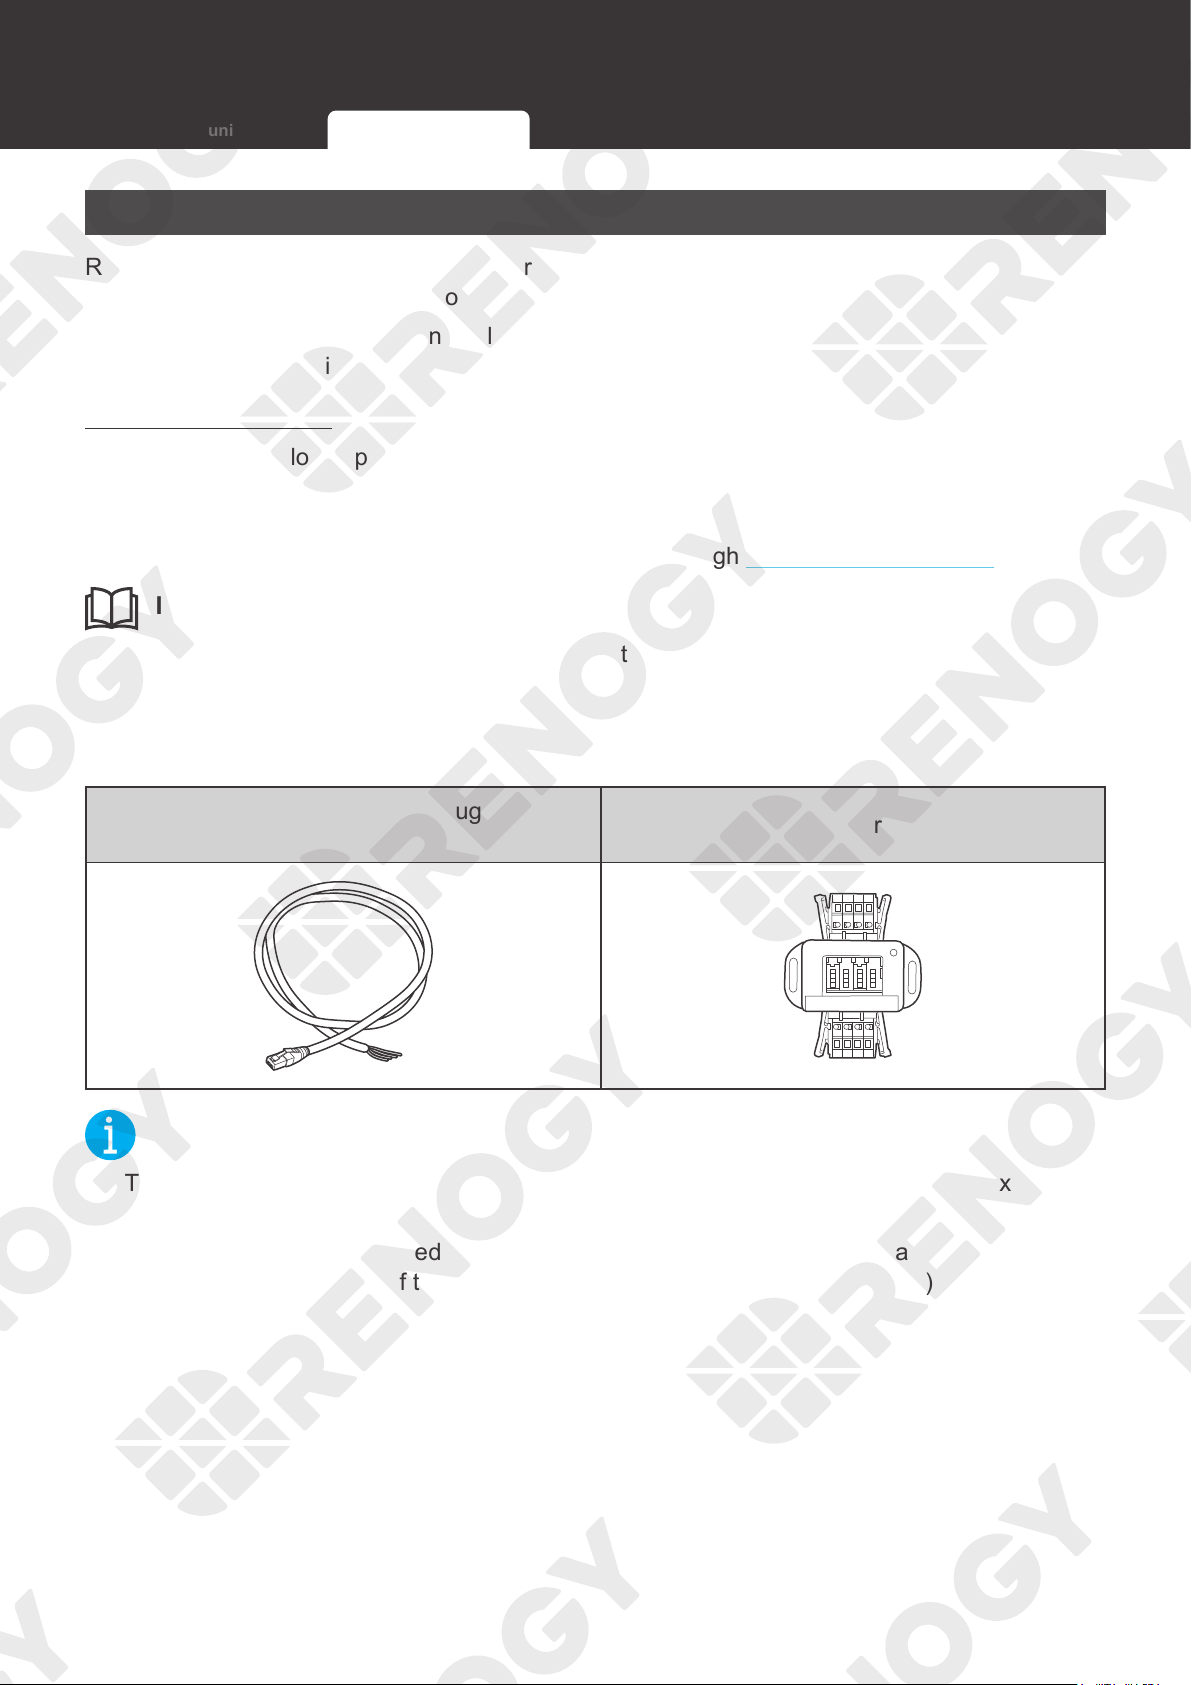
RV-C Communication
Renogy ONE can communicate with other REGO devices, enabling safe operation, smart
control, remote monitoring, and programmable settings.
How to wire RV-C communication cables varies depending on the connection network topology.
Both backbone and daisy chain topologies are supported.
Backbone Topology
The backbone topology applies to RVs that are integrated with RV-C buses with built-in 120Ω
resistors on both ends. Check the RV user manual for details or contact the RV manufacturer if
necessary.
For technical support from Renogy, please contact us through renogy.com/contact-us/.
INF
O
z
Connect devices to Renogy ONE according to the wiring diagram provided by the RV
manufacturer.
Choose proper communication cables according to your specific demands.
Recommended Accessories
Communication Cable (RJ45 Plug to Bare
Drop Cable)
Common Drop Tap
NOT
E
z
The drop cable shall not exceed 6 meters (19.6 feet), and the RV-C bus shall not exceed 30
meters (98.4 feet).
z
Different drop taps are used on the RV-C bus by different RV manufacturers. This user
manual takes the pinout of the MCS MIDI Classic terminal block plug (4-Pin) as an example.
RS485 Communication RV-C Communication
24
Communication Wiring (Optional)
+ -
CAN/RS485
TYPE-C
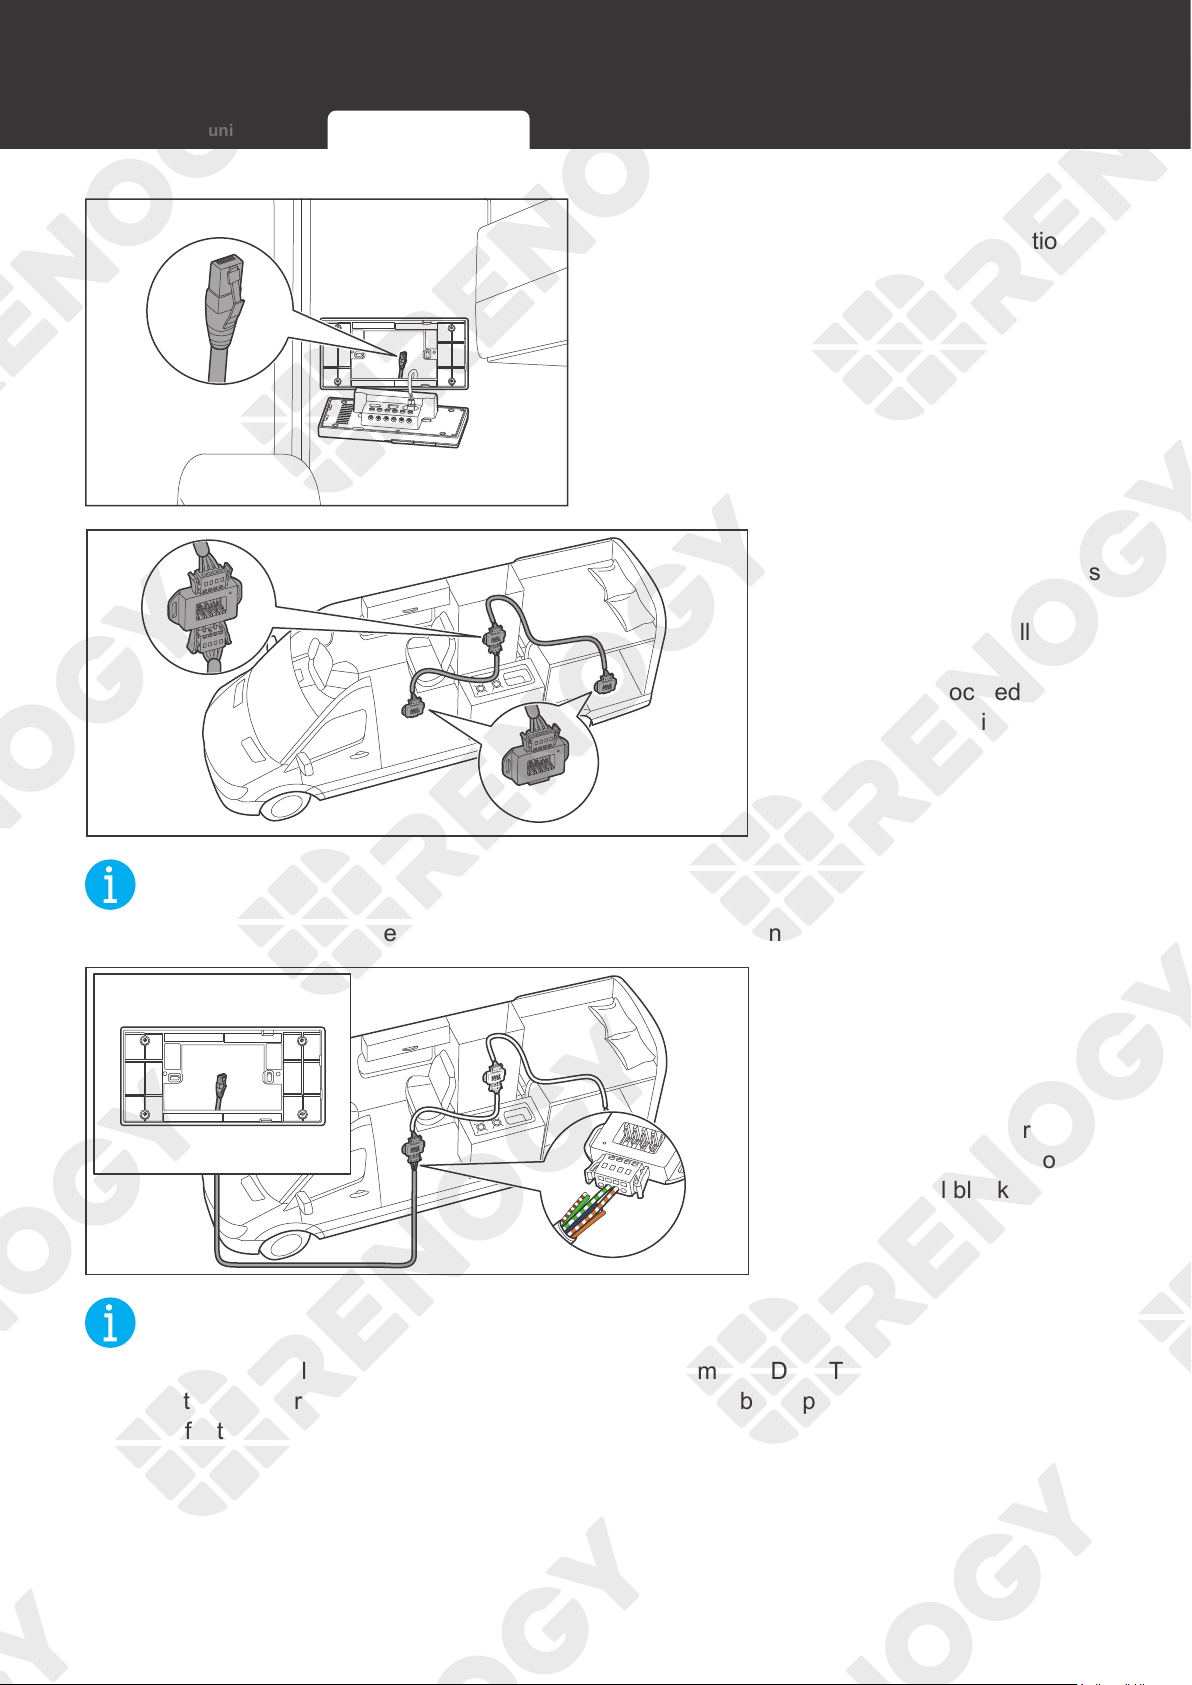
1. Reserve the RJ45 connector of the
communication cable into the installation
hole.
2. Locate the drop tap (not
included) on the RV-C bus
that is the closest to the
Renogy ONE installation
location. The drop taps
are usually located above
the entry door, in the
bathroom, or under the
bed in the RV.
NOT
E
z
If the drop taps cannot be located, please contact the RV manufacturer for help.
CAN
H
CAN
L
- A
+ A
3. Replace the terminated
drop tap at either end of
the RV-C bus with the
Common Drop Tap (not
included). Secure the
bare wires of the Drop
Cable (not included) onto
the terminal block plug of
the Common Drop Tap
following the terminal
block plug pinout.
NOT
E
z
Different terminal block plugs are used on different Common Drop Taps and follow different
pinouts. If you are unsure about the pinout of the terminal block plug, contact the RV
manufacturer.
RS485 Communication RV-C Communication

25
Communication Wiring (Optional)
+ -
CAN/RS485
TYPE-C
CAN/RS485
TYPE-C
IN 1
IN 2
OUT 1
OUT 2
IN 3 OUT 3
4. Connect the pre-
embedded RJ45 connector
to the RJ45 port of Renogy
ONE.
Daisy Chain Topology
The daisy chain topology applies to RVs that are not integrated with RV-C buses.
Recommended Accessories
Communication Cable (LP16 Plug (7-Pin) to
RJ45 Communication Adapter Cable)
NOT
E
z
Select the appropriate communication cable (sold separately) according to the distance
between devices. The communication cable should be less than 6 meters (19.6 feet).
1. Ensure the communication cable is long
enough to be connected to Renogy ONE
and other devices.
RS485 Communication RV-C Communication
26
Communication Wiring (Optional)
+ -
CAN/RS485
TYPE-C
2. Reserve the RJ45 connector of the
communication cable into the installation
hole.
3. Unplug the LP16
Terminator Plug (7-
Pin) from the first or last
REGO device in the
communication network.
4. Insert the LP16
Plug (7-Pin) to RJ45
Communication
Adapter Cables into the
communication ports of
other REGO devices.
+ -
CAN/RS485
TYPE-C
CAN/RS485
TYPE-C
IN 1
IN 2
OUT 1
OUT 2
IN 3 OUT 3
5. Connect the pre-
embedded RJ45 connector
to the RJ45 port of Renogy
ONE.
RS485 Communication RV-C Communication
27
Load Wiring (Optional)
Renogy ONE comes with 3 relays which can be connected to 3 DC loads (appliances) (≤30V
DC, ≤5A). You can power on/off the loads via Panel Switches on Renogy ONE.
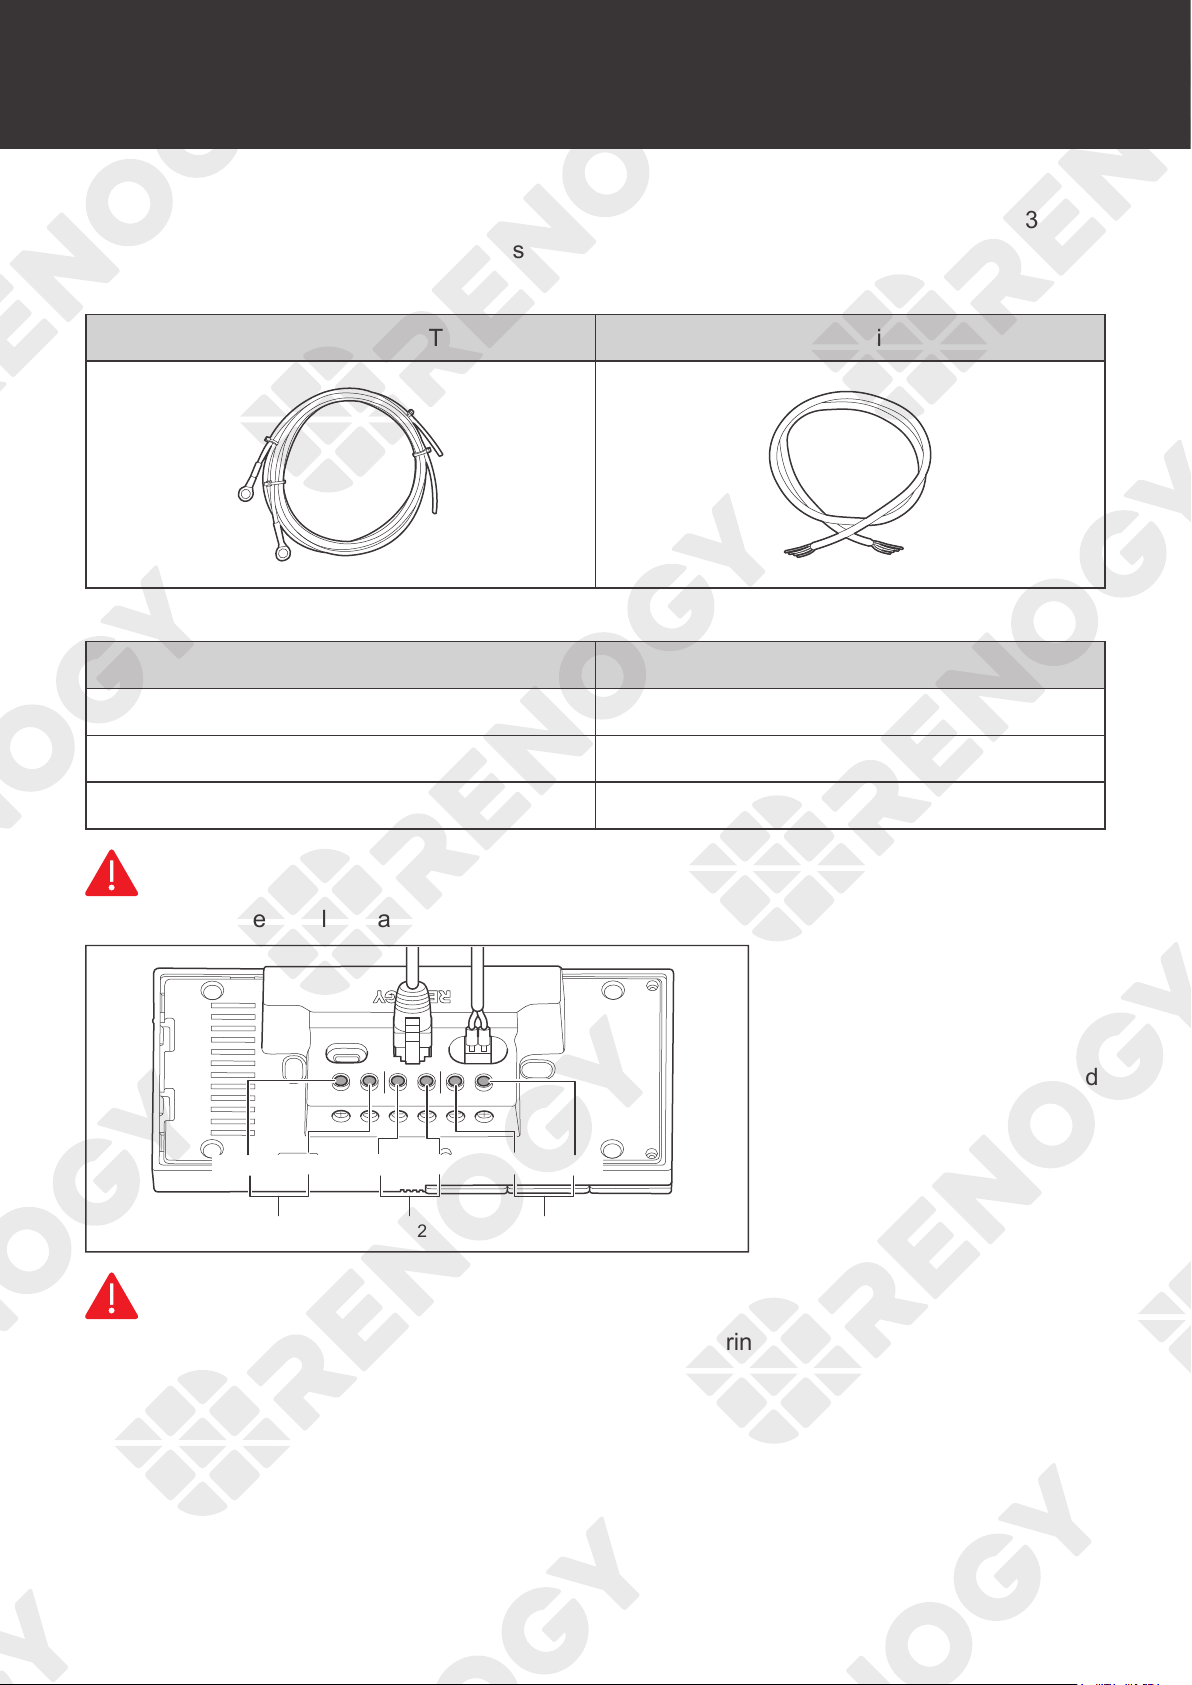
Recommended Accessories
Ring Terminal to Bare Wire Tray Cable Bare Wire
Cable Specifications
Cable Length (ft) / (m) Recommended Cable Size
0 ft to 10 ft (0 m to 3 m) 8 AWG
11 ft to 20 ft (3 m to 6 m) 6 AWG
21 ft to 30 ft (9 m to 6 m) 6 AWG
WARNIN
G
z
For your safety, select cables that meet the specifications according to the actual use.
IN 1
+ -
IN 2
CAN/RS485 TYPE-C
OUT 1 OUT 2 IN 3 OUT 3
CH3
OUT 3 IN 3 OUT 2 IN 2
CH1
OUT 1 IN 1
CH2
1. Ensure that the DC power
supply cable and the cable
that is connected to the
positive pole of the load
(appliance) are connected
to the same group of
terminals. For example,
“
IN 1
”
and
“
OUT 1
”
are in
a group.
WARNIN
G
z
Make sure the DC power supply is powered off before wiring.
Load Wiring (Optional)
28
Load Wiring (Optional)
IN 1
+ -
IN 2
CAN/RS485
TYPE-C
OUT 1 OUT 2 IN 3 OUT 3
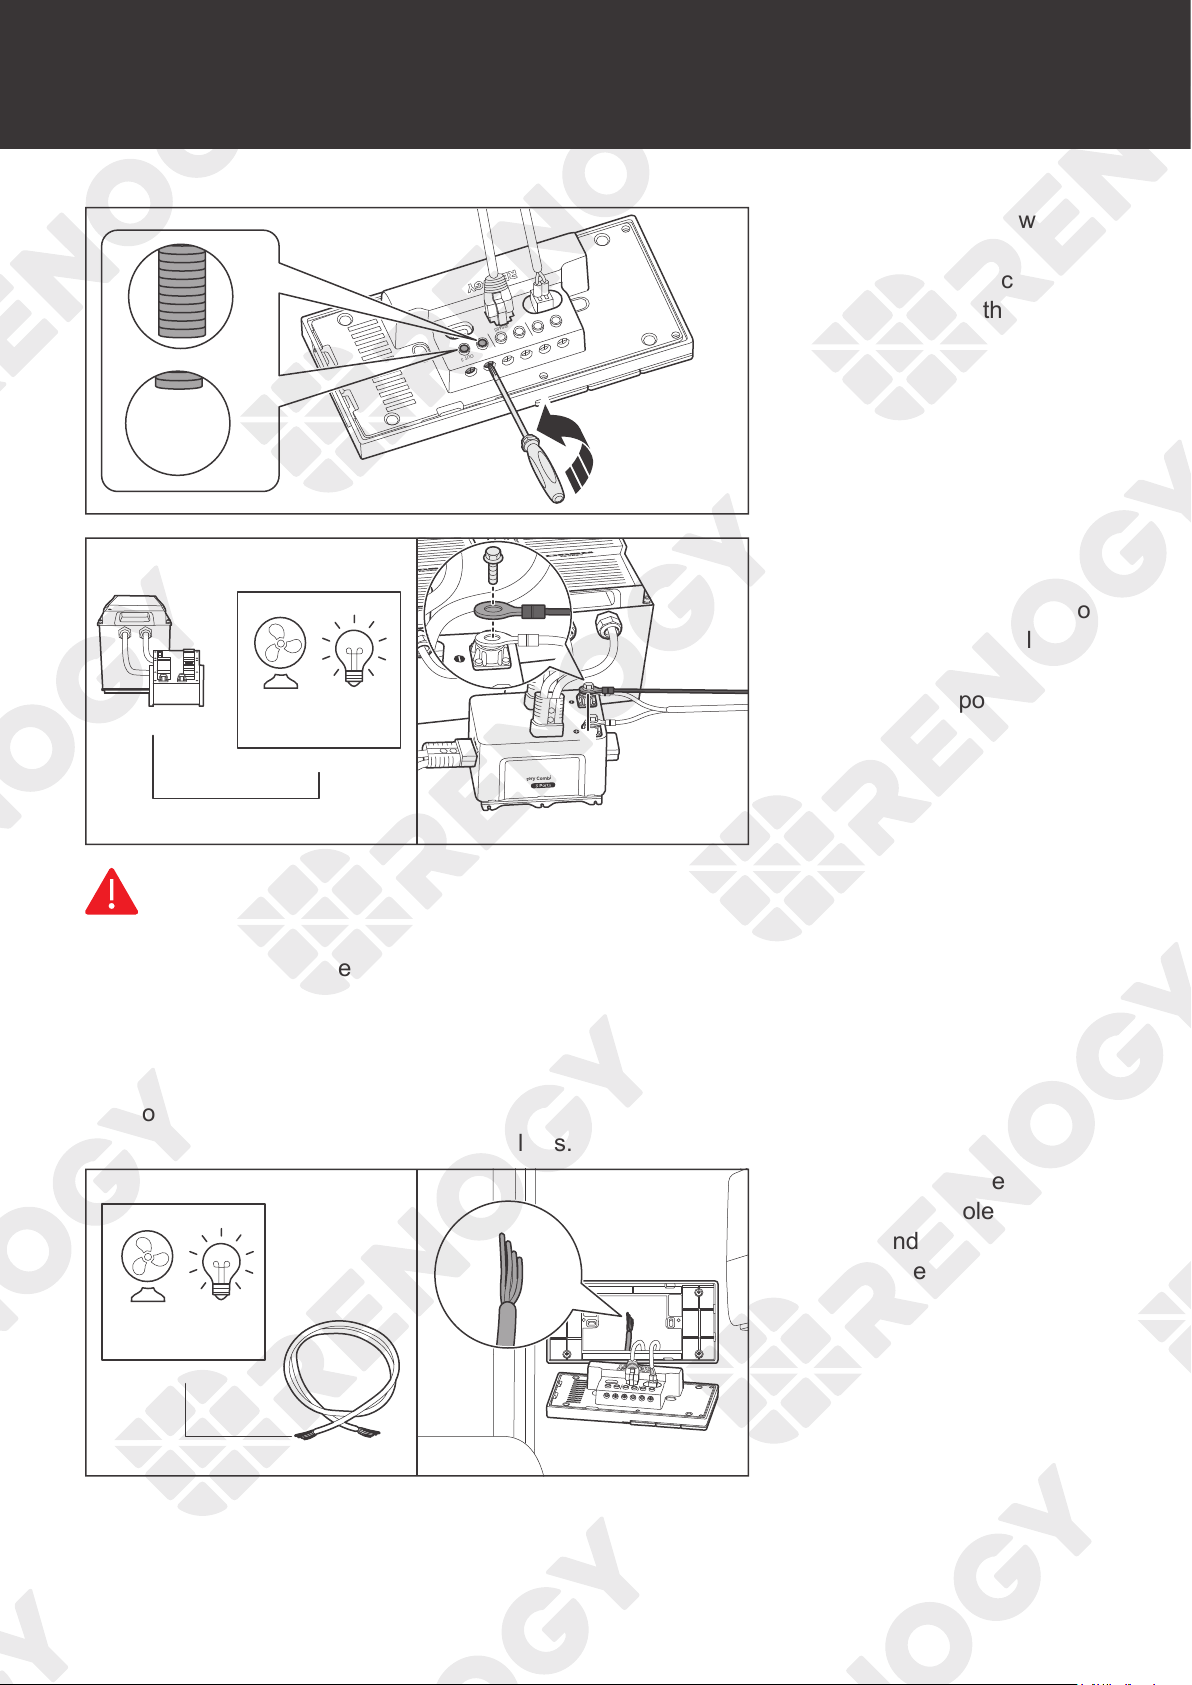
Open
Close
2. Use a Phillips screwdriver
to turn the wire hatch
screw counterclockwise.
Make sure that the terminal
hatch is completely open.
Battery Combiner Box
-
Battery Combiner Box
-
-
DC load
(≤30V DC, ≤5A)
3. Connect one of the ring
terminals of the tray cable
to the negative terminal of
the DC power supply, and
connect the other end to
the negative pole of the
load.
WARNIN
G
z
Ensure that the working current of an external DC load is less than or equal to 5A; otherwise
Renogy ONE may be damaged.
z
Ensure that the output voltage of the DC power supply for an external DC load is less than
or equal to 30V; otherwise Renogy ONE may be damaged.
z
Make sure the DC power supply is powered off before connection.
z
Confirm the polarities of the DC power supply and the load before connection. A
reverse
polarity contact will result in abnormalities.
+ -
CAN/RS485
TYPE-C
+
DC load
(≤30V DC, ≤5A)
4. Connect the bare wire to
the positive pole of the
load, and reserve the other
end in the installation hole.
29
Load Wiring (Optional)
IN1
+ -
IN 2
CAN/RS485
OUT 1 OUT 2 IN 3 OUT 3
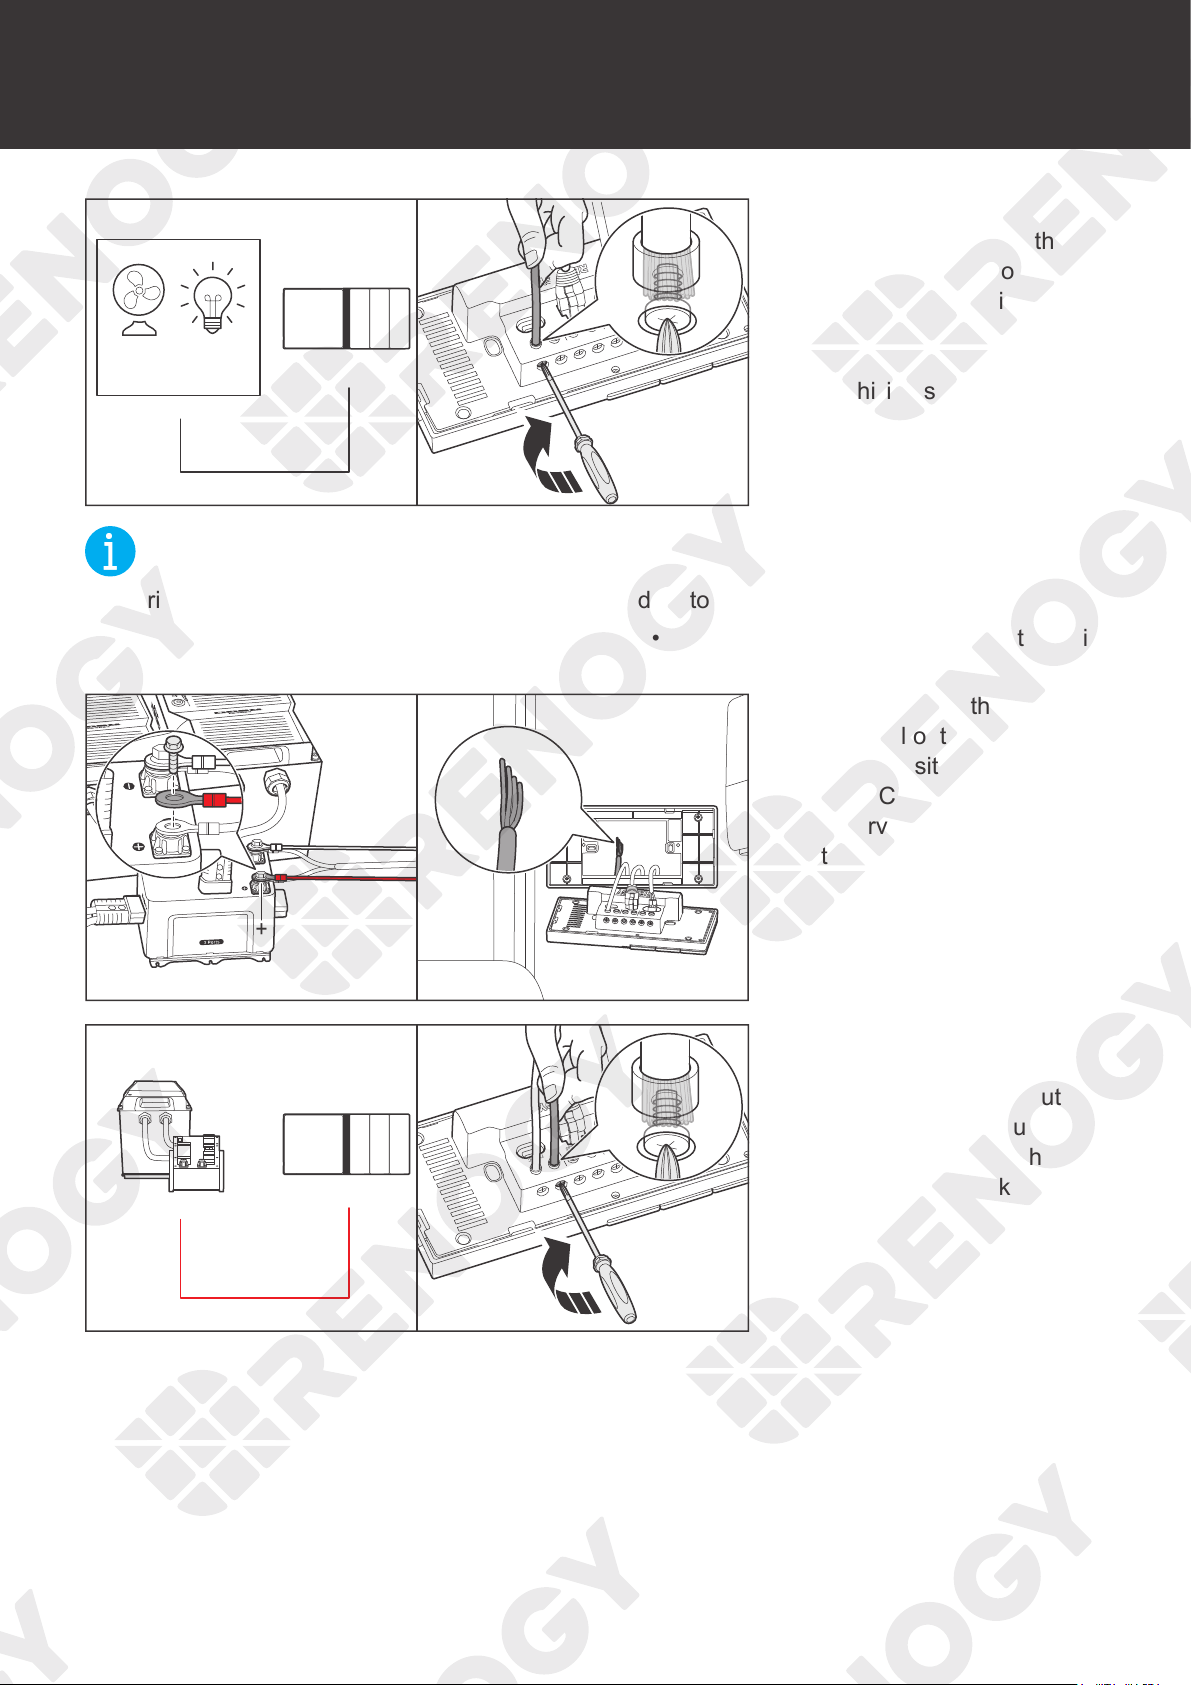
OUT
+
DC load
(≤30V DC, ≤5A)
5. Insert the reserved tray
cable connecting to the
positive terminal of the
load (appliance) into
the Renogy ONE output
terminal (OUT), and use
a Phillips screwdriver to
turn the wire hatch screw
clockwise.
NOT
E
z
Strip some insulation off the bare wire end according to the depth of the installation hole.
z
The maximum screw torque of wire hatch is 0.4 N•m. Do not overtighten the screws to avoid
damage to the hatch.
+ -
CAN/RS485
TYPE-C
Battery Combiner Box
+
Battery Combiner Box
6. Connect the other ring
terminal of the tray cable
to the positive terminal of
the DC power supply, and
reserve the other end in
the installation hole.
IN1
+ -
IN 2
CAN/RS485
TYPE-C
OUT 1 OUT 2 IN 3 OUT 3
IN
+
7. Insert the reserved end
of the tray cable into
the Renogy ONE input
terminal (IN), and use a
screwdriver to turn the wire
hatch screw clockwise.
30
Load Wiring (Optional)
IN 1
+ -
IN 2
CAN/RS485
TYPE-C
OUT 1 OUT 2 IN 3 OUT 3
8. Make sure all connections
are tight and secure.
31
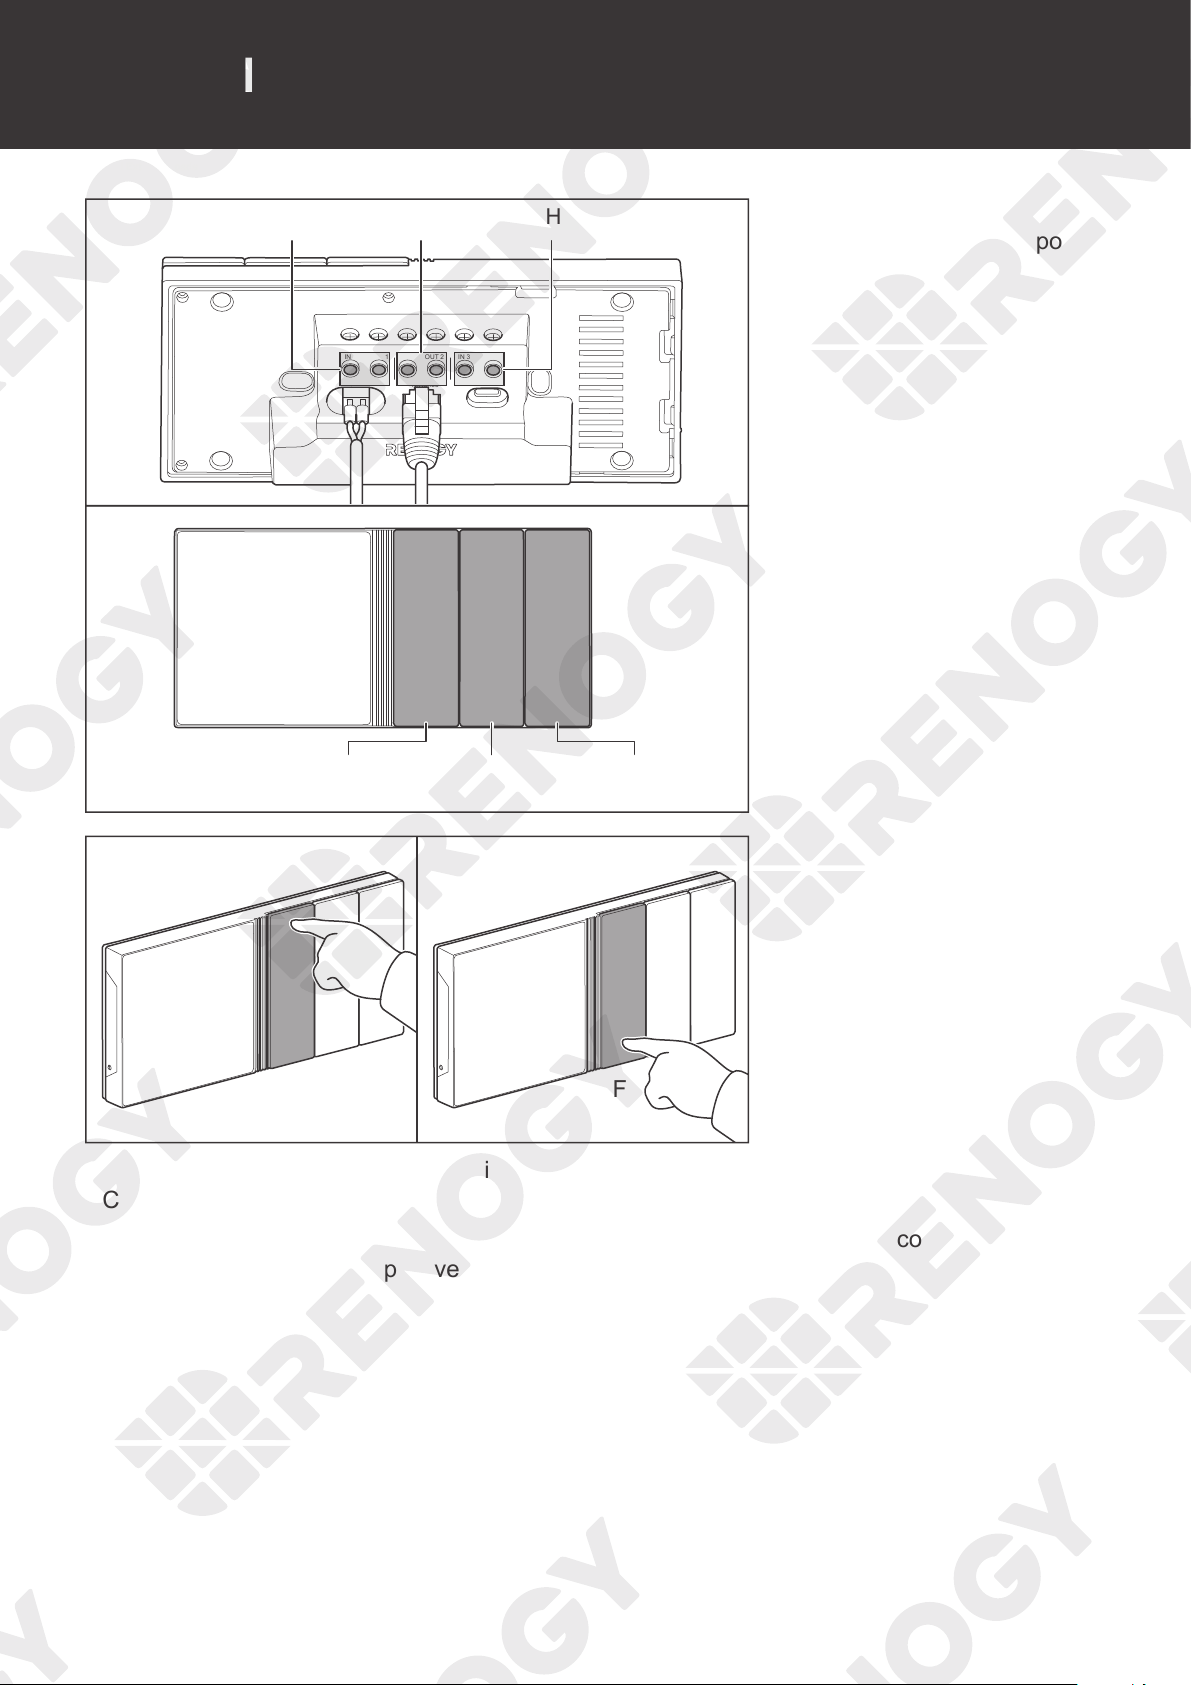
Mounting
Mounting
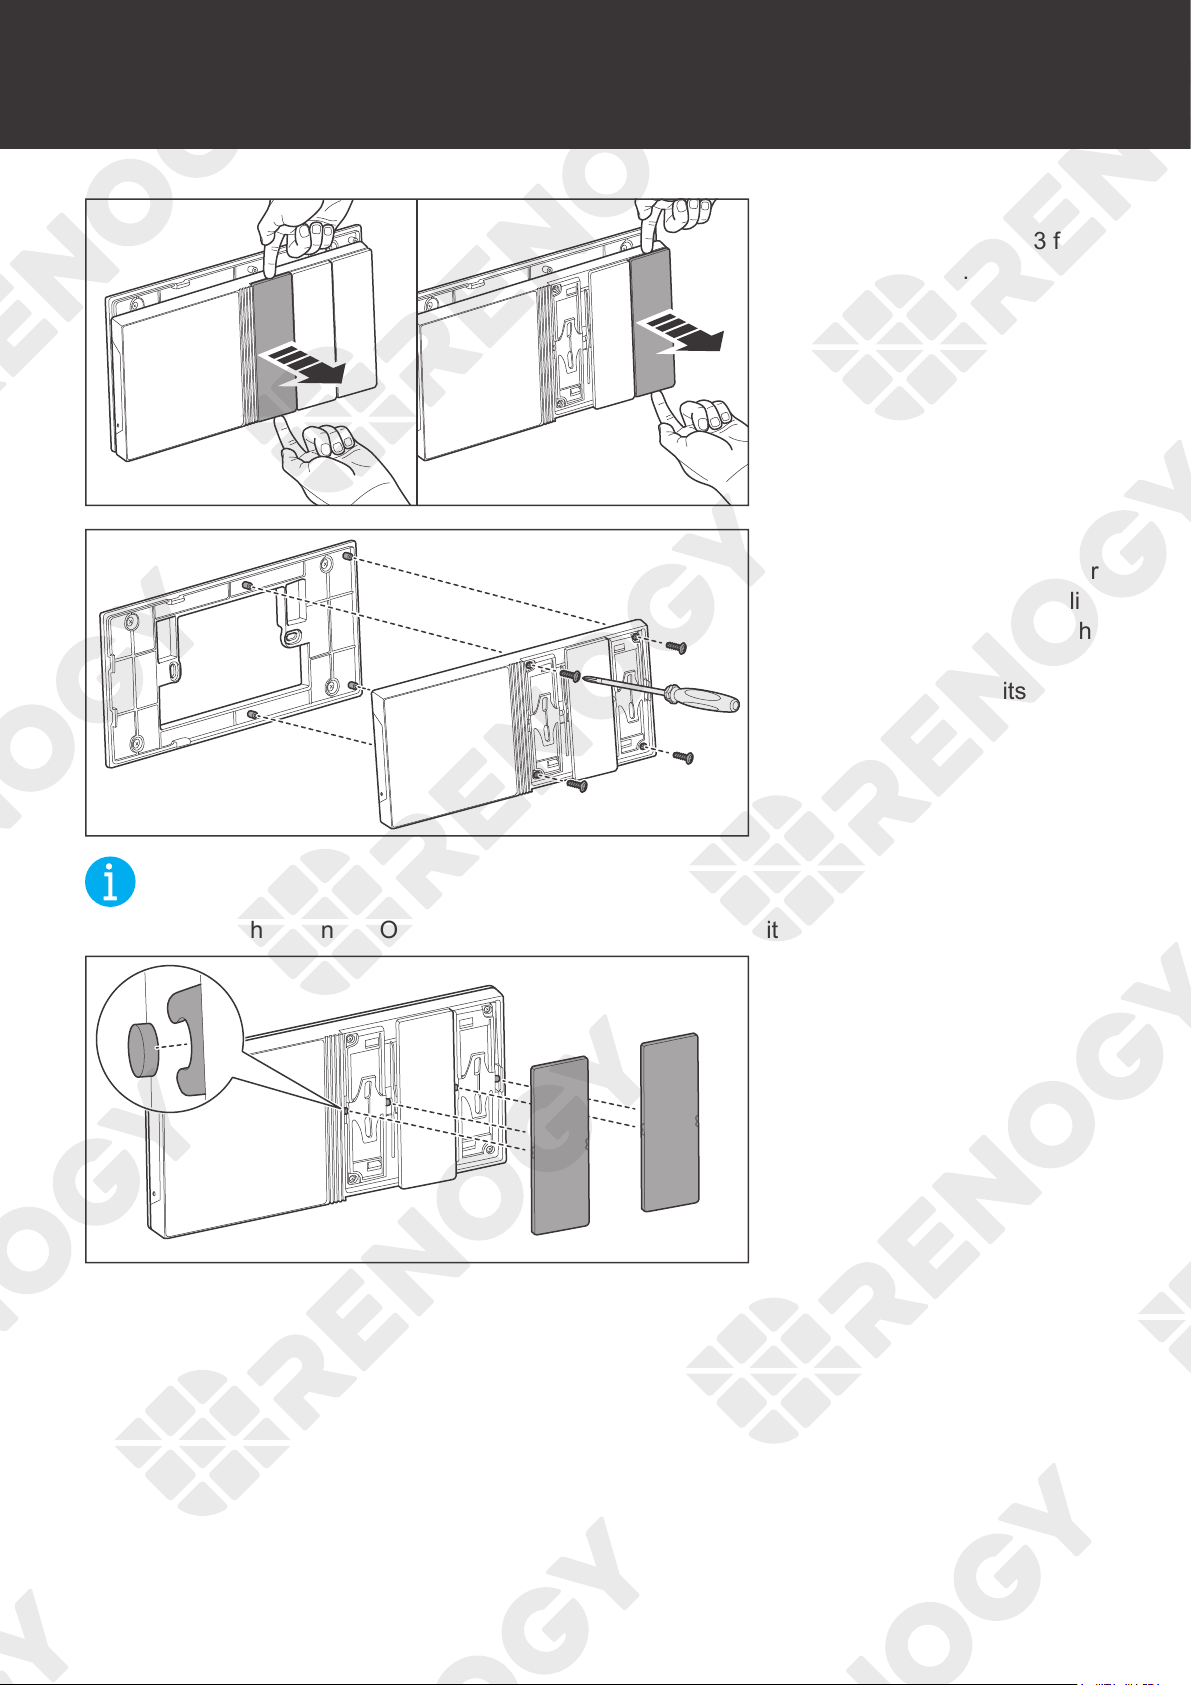
1. Disassemble Panel Switch
1 and Panel Switch 3 from
Renogy ONE.
2. Put Renogy ONE on the
base, and drive in the four
M2 screws with the Phillips
screwdriver #1 through the
mounting holes to fix the
Renogy ONE on its base.
NOT
E
z
Make sure that Renogy ONE is installed securely to prevent it from falling off.
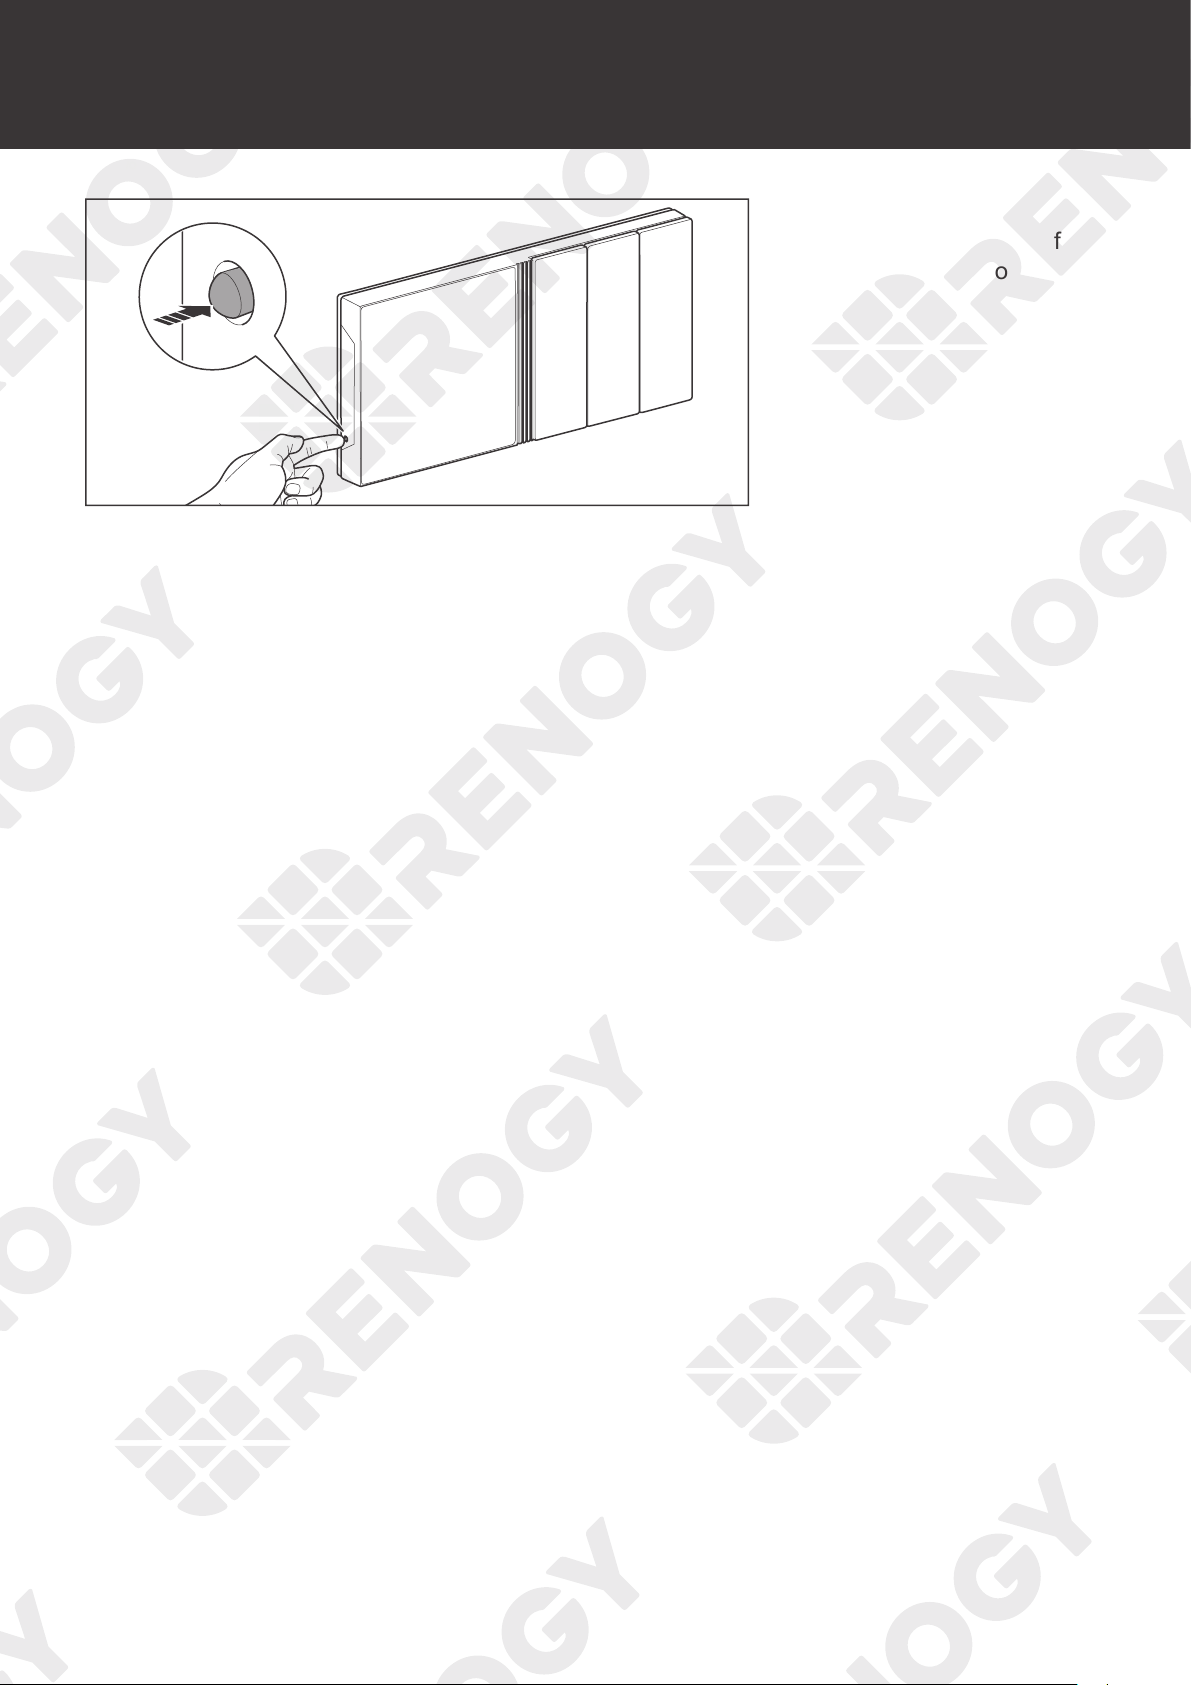
3. Align the snaps on the
back of the panel switches,
and press the switches
until they "click".

32
Activation
Activation
For initial use, Renogy ONE guides you through WLAN connection, app pairing, and device
adding via the activation wizard.
CAUTIO
N
z
You can tap
Skip
in the upper-right corner of the main interface on Renogy ONE to skip
some of the wizard steps. You can re-complete the activation operations through
Settings
.
z
To monitor and operate connected devices remotely, you need to pair Renogy ONE with
your DC Home app under stable Internet access.
33
Operation
Operation
WLAN Pairing with App Add Devices/Smart Accesories
WLAN
On the home page of Renogy ONE, go to Settings > System > Network > WLAN.
NOT
E
z
Renogy ONE supports 2.4 GHz Wi-Fi only. You can also connect Renogy ONE to the
Internet through a mobile hotspot.
z
The steps listed in this chapter are based on Renogy ONE V1.1.15.0_V7_13 and DC Home
V1.8.8 for iOS. The actual steps of the Renogy ONE and DC Home in use prevail.
Pairing with App
If you did not follow the system wizard to pair Renogy ONE with your DC Home app, follow the
steps below.
Method 1: Go to Settings > System > Pairing with App. Open the DC Home app, tap + > Add
Renogy ONE. Scan the QR code to complete pairing.
Method 2: Tap
on the main interface. Open the DC Home app, tap + > Add Renogy ONE.
Enter the SN of Renogy ONE to complete pairing.
After successful pairing, you can control smart accessories and create smart scenes through the
DC Home app.
CAUTIO
N
z
Ensure both Renogy ONE and your phone where the DC Home app runs are connected to
the Internet during pairing.
z
The DC Home app should be in the up-to-date version.
Add Devices/Smart Accesories
How to add devices to Renogy ONE varies depending on the communication connection type.
z
For wired communication (RV-C/RS485), the device is automatically recognized by and
added to Renogy ONE.
z
For wireless communication (Bluetooth/Zigbee), tap Settings and choose Add Devices on
Renogy ONE. If you have paired Renogy ONE with the DC Home app, you can add devices
and smart accessories through the DC Home app.
Renogy ONE is compatible with all Renogy energy devices and smart accessories with
communication functions (RV-C, RS485, Bluetooth, and Zigbee).
CAUTIO
N
z
For adding Renogy energy devices via Bluetooth to Renogy ONE, make sure the device
Bluetooth is turned on.

34
Operation
WLAN Pairing with App Add Devices/Smart Accesories
NOT
E
z
To ensure good compatibility, it is recommended to use Renogy energy devices and smart
accessories.
INF
O
z
For adding smart accessories to Renogy ONE via Zigbee, resetting accessories is required.
For details, refer to the instructions in the user manuals of specific smart accessories.
35
Power On/Off
Power On/Off
3s
Press and hold the Power
Button on Renogy ONE for 3
seconds to power it on or off.
36
Control External Loads
Control External Loads
+ - CAN/RS485 TYPE-C
Control CH3 Control CH2 Control CH1
CH3CH1 CH2
IN 1 IN 2OUT 1 OUT 2 IN 3 OUT 3
1. The 3 panel switches of
Renogy ONE correspond
to 3 panel relays
respectively.
OFF
ON
2. Press the panel switches
to power on/off external
loads.
You can modify the above default settings or set more functions for the panel switch through the
DC Home app.
On the main interface of the DC home app, go to Scenes and tap +. Set the conditions and
actions in When and Do respectively, and then tap Save.
37
Technical Specifications
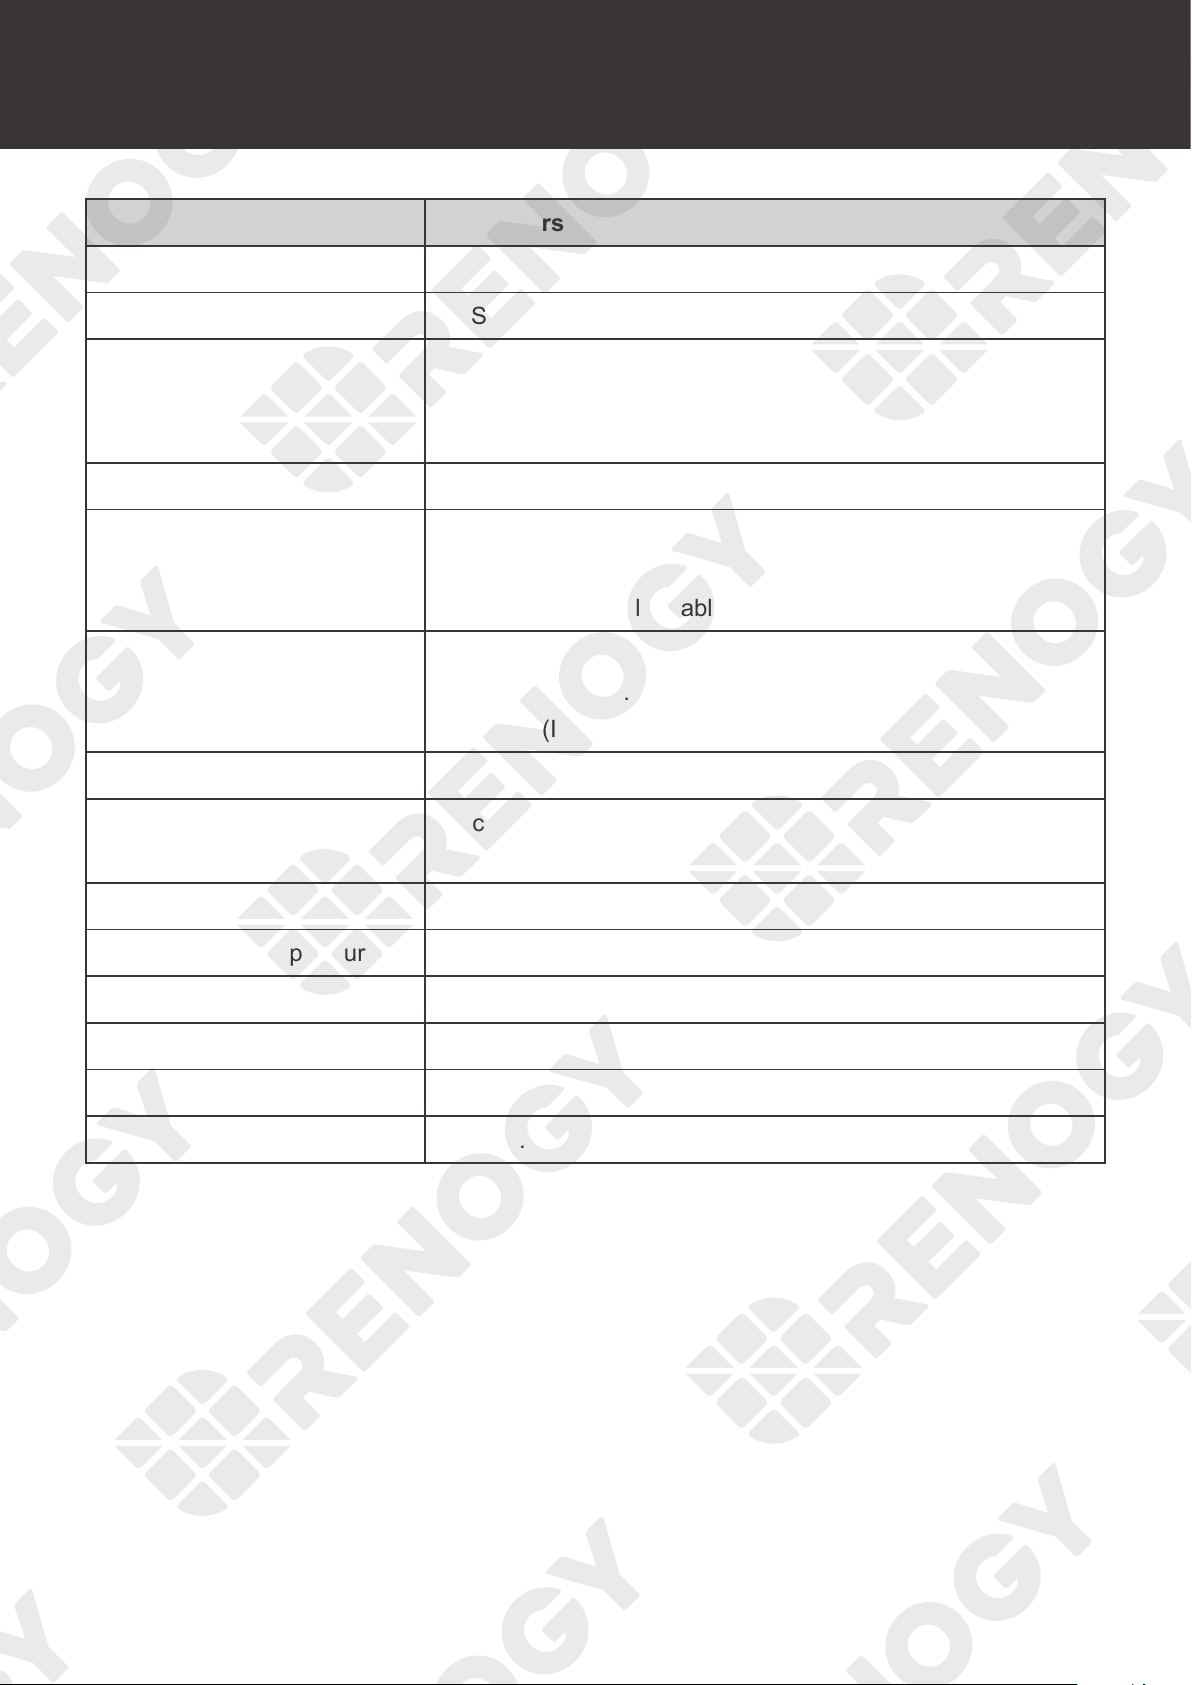
Technical Specifications
Items Parameters
Product Name Renogy ONE M1
Model RMS-LP4-G2
Power Supply
Rated Power 3.5W
• Power Port: 8V to 16V DC
• Type-C Port: 5V DC
Power Consumption < 2.5W (standby)
Ports
• USB Type-C (5V DC)
• RJ45 (CAN & RS485)
• 2-pin 3.81 mm pluggable terminal block (12V DC)
Wireless Communication
• Wi-Fi (IEEE 802.11b/g/n 2.4GHz)
• Bluetooth 2.1/4.2 and Bluetooth LE
• Zigbee (IEEE 802.15.4)
Protocols RV-C / Modbus / Zigbee 3.0
Touch Screen
4 inches (480 x 480p)
White backlight with adjustable brightness
Load ≤30V DC, 5A Max / Channel
Operating Temperature
-4°F to 122°F (-20°C to 50°C)
Operating Humidity 0% to 95% RH
Operating Altitude < 2000m above sea level
Installation Flush mounting
Dimensions 7.16 x 3.42 x 1.66 in (181.8 x 86.8 x 42.2 mm)
38
Troubleshooting
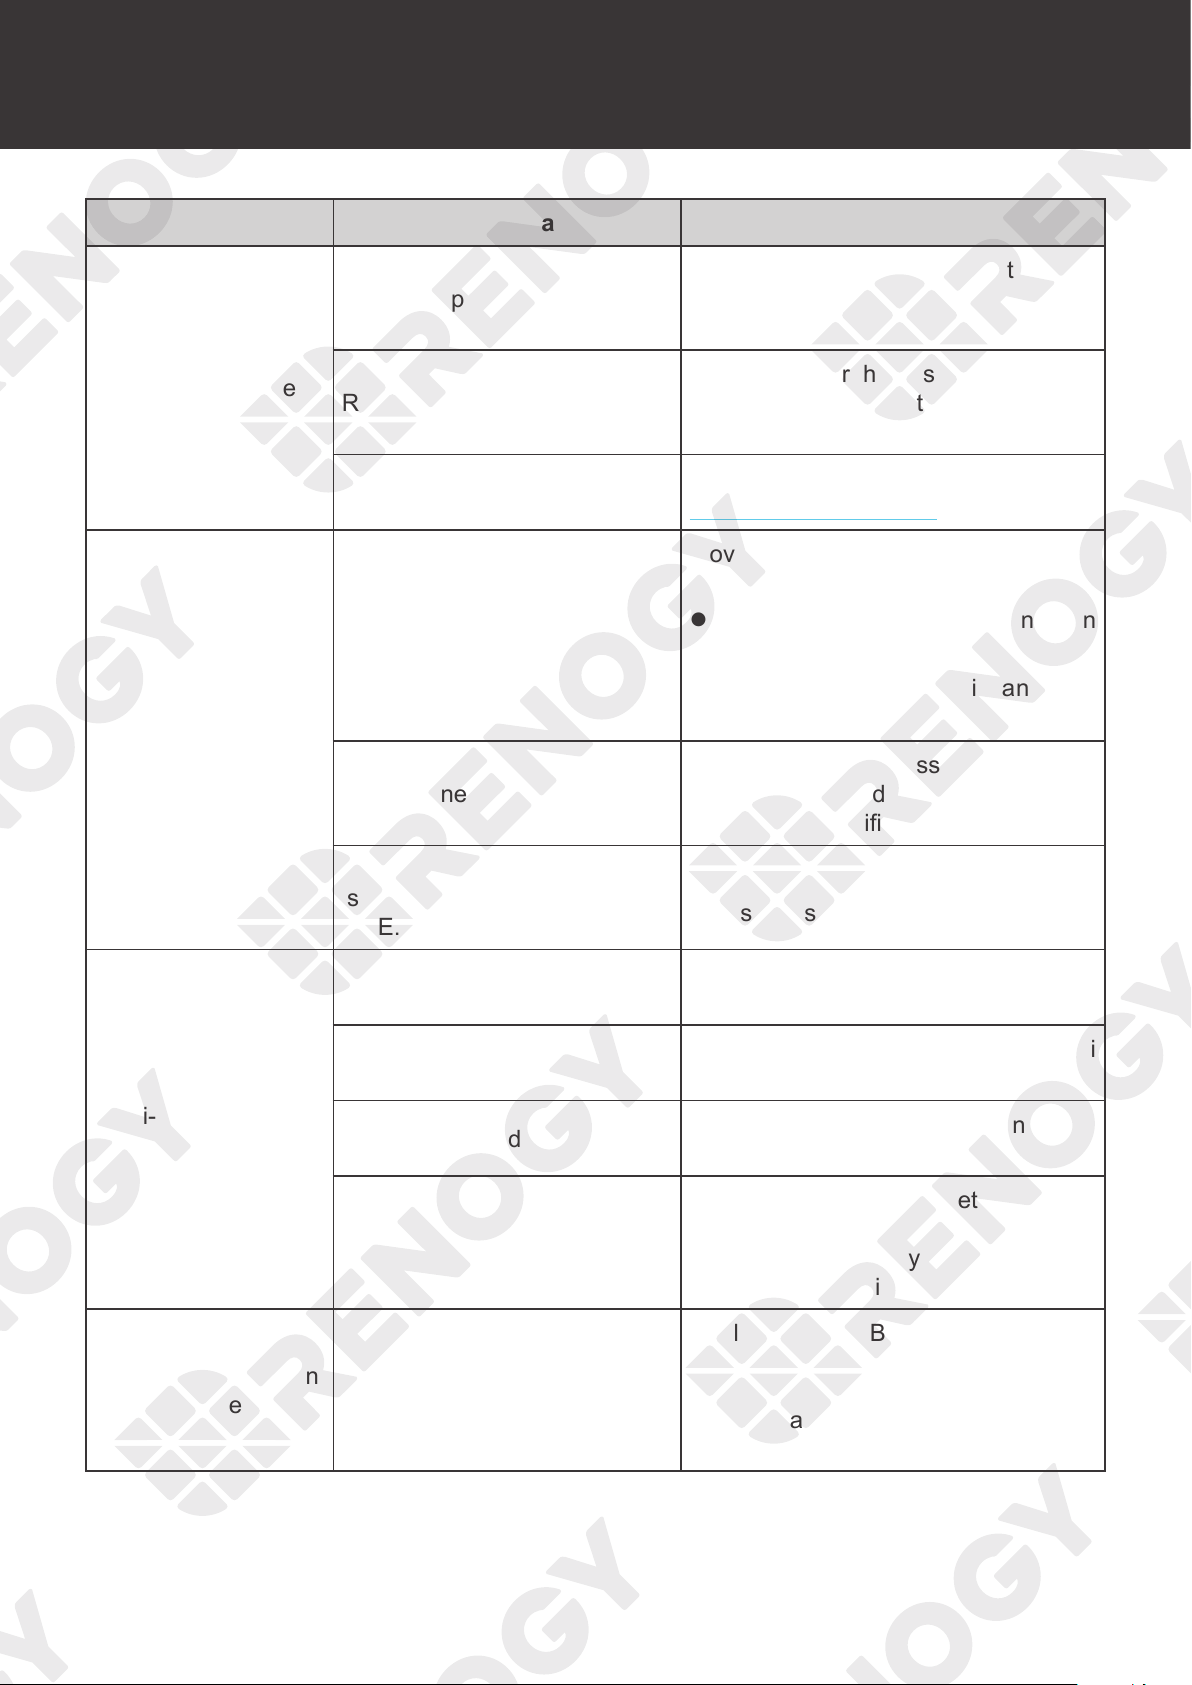
Troubleshooting
Issue Possible Cause Solution
Power on failure
Abnormal power supply
Check whether the voltage of the
power supply is within the normal
range (8V to 16V DC).
Reverse polarity contact
Check whether the positive and
negative polarities of the power
terminals are normally connected.
Renogy ONE damaged
Contact our customer service through
renogy.com/contact-us/.
Failure to add devices
or smart accessories
The device is too far away
from Renogy ONE.
Move the device closer to Renogy
ONE.
z
Bluetooth: within 10 m in an open
environment.
z
Zigbee: within 50 m in an open
environment.
The smart accessories have
been connected to other
devices.
Reset the smart accessories, and
redo adding. For details, see the user
manuals of specific accessories.
The device or smart accessory
is incompatible with Renogy
ONE.
Use Renogy devices and smart
accessories.
Wi-Fi connection
failure
Unsupported Wi-Fi frequency
band
Ensure the Wi-Fi router is working on
the 2.4GHz band.
WPA3 encryption
Disable WPA3 encryption on the Wi-Fi
router.
Wrong password
Enter the correct Wi-Fi SSID and
password.
Signal shielding
Ensure that there is no metal object
around Renogy ONE and the Wi-Fi
router because it may undermine the
wireless communication.
BT-2 communication
failure
Unstable communication
quality
Unplug the BT-2 Bluetooth module
from the devices, and then plug
it to the devices again. Redo
device scanning on Renogy ONE if
necessary.
39
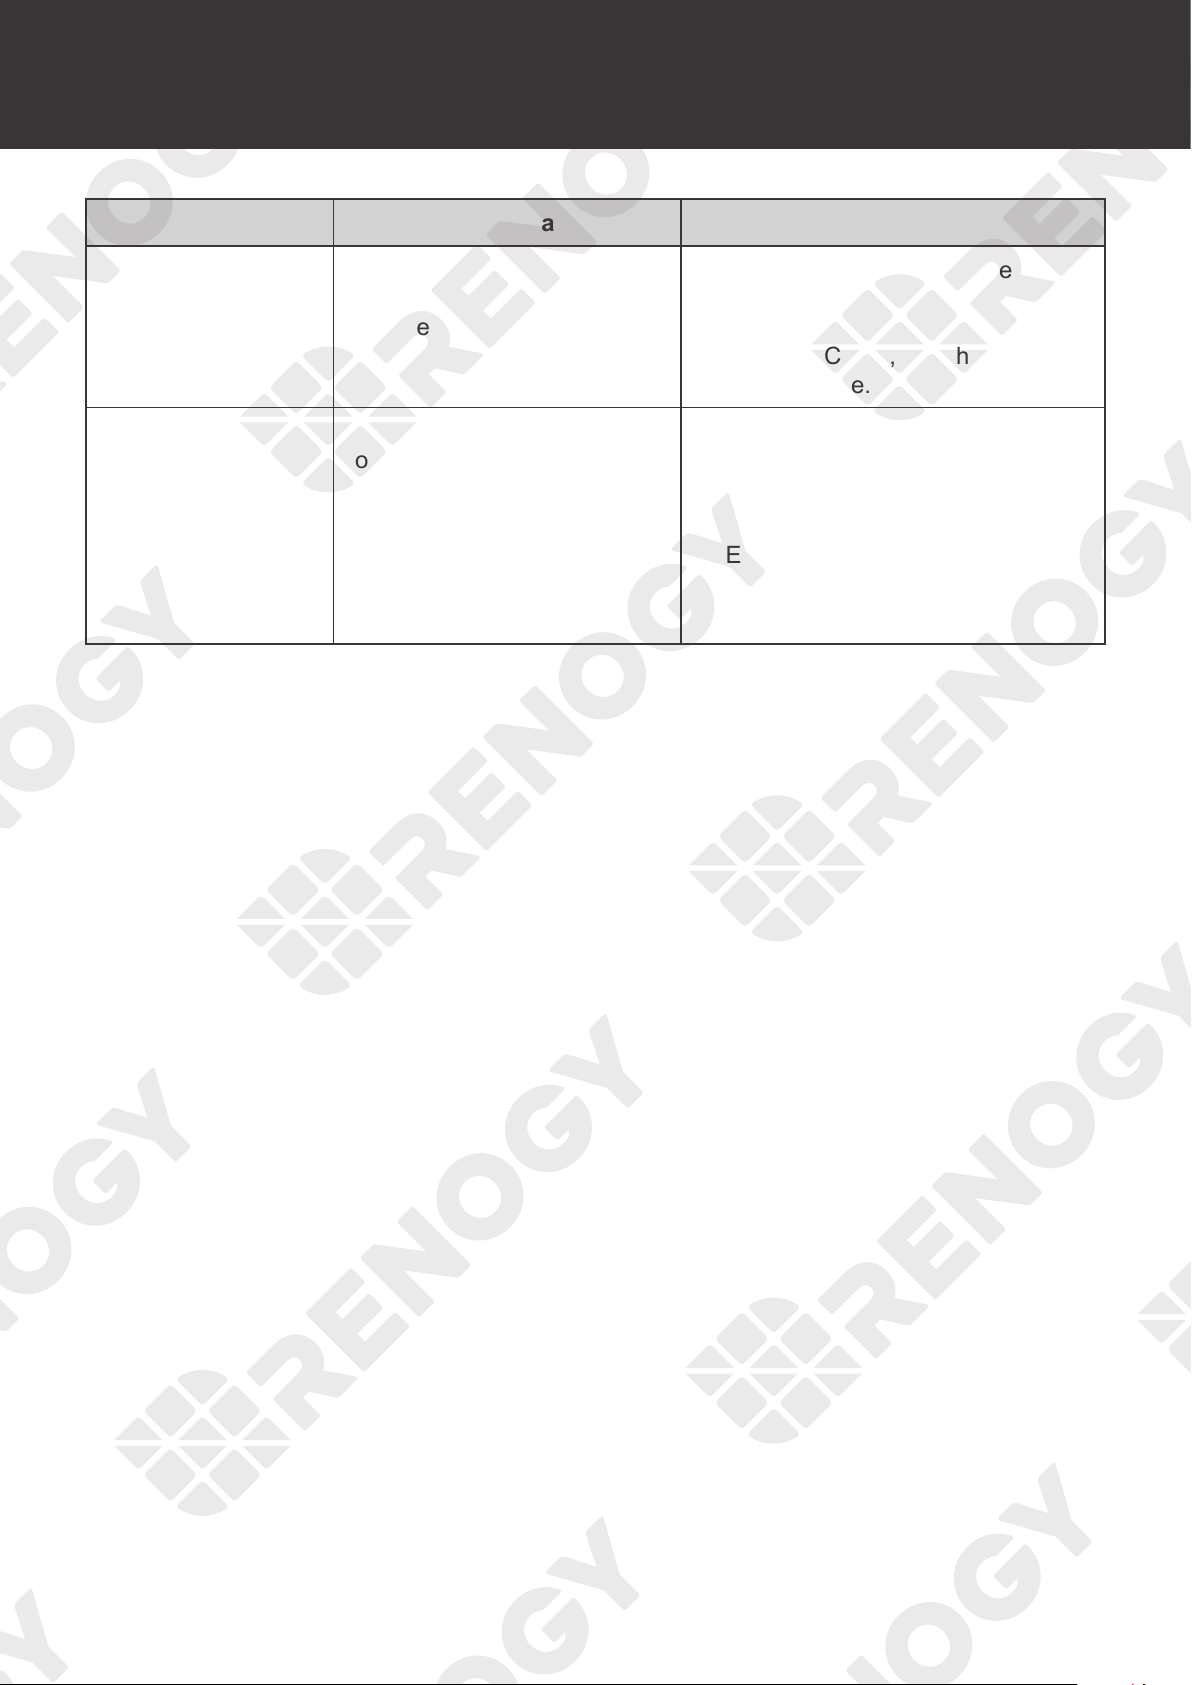
Troubleshooting
Issue Possible Cause Solution
Laggy and
unresponsive
operations on the
LCD
Improper power supply
Check the voltage of the power
supply. Make sure the voltage is 8V to
16V DC for the Power Port or 5V DC
for the Type-C port, and the voltage
should be stable.
Failure to scan
Bluetooth devices
1. The Bluetooth device is
powered off.
2. The Bluetooth device has
been paired with DC Home
app.
3. Bluetooth on the device is
turned off.
1. Power on the Bluetooth device.
2. Unpair the device from the app first
and then redo scanning on Renogy
ONE.
3. Turn on Bluetooth on the device.
40
FAQ
Q1: Does Renogy ONE M1 come with a shunt?
A: No, it does not come with a shunt. Please stay tuned for further updates on this in the
near future.
Q2: Are there any requirements for the installation of Renogy ONE?
A: Renogy ONE is only suitable for indoor uses and in vehicles. Please do not use it at high
temperatures, high humidity, or high altitudes. Please keep Renogy ONE clear of metals for
optimal wireless connection with energy devices and smart accessories.
The optimal conditions for Renogy ONE are as follows:
(1) Temperature:
-4°F to 122°F
(2) Humidity: 0% to 95% RH
(3) Altitude: below 6,561 feet (2,000 meters)
Q3: How do I connect Renogy ONE with different types of batteries?
A: Renogy ONE can connect with Renogy batteries only if they support Bluetooth (built in or
with BT-1/BT-2 plugged in), RS485, or RV-C.
Q4: Is Renogy ONE compatible with third-party Zigbee 3.0 devices?
A: We cannot guarantee the compatibility between Renogy ONE and third-party Zigbee 3.0
devices. Therefore, it is recommended to use smart accessories that have been authorized
by Renogy with your Renogy ONE, such as Smart Plug, Motion Sensor, Door & Window
Sensor, and Smart Relay.
Q5: Do the configured smart scenes still work even when Renogy ONE is offline?
A: Yes. Renogy ONE is wirelessly connected with smart accessories through the Zigbee 3.0
protocol. When you set up a smart scene, the configuration will be saved in the system of
Renogy ONE.
Even if the Wi-Fi network is unavailable, Renogy ONE can still interact with smart
accessories via Zigbee 3.0.
Q6: How many devices can Renogy ONE connect via Bluetooth/RS485/CAN and Zigbee 3.0
at most?
A: You can connect a maximum of seven Bluetooth devices, 64 devices with RS485/CAN
port, and 200 Zigbee 3.0 devices to Renogy ONE.
Please note that Renogy ONE may experience delayed responses if too many devices are
connected with it.
Q7: What is the maximum range between Renogy ONE and Bluetooth devices as well as
Zigbee 3.0 devices?
FAQ

41
FAQ
A: In an open area, the maximum range between Bluetooth devices and Renogy ONE is
32.8 ft (10 m). For Zigbee 3.0 devices, the maximum range will be 164 ft (50 m).
Q8: What kind of power systems can Renogy ONE work with?
A: Please power up Renogy ONE with a 12V or 5V DC power supply. Its rated power is 3.5W.
If you wish to wire home appliances with Renogy ONE for one-touch control, please make
sure the load is below or equal to 30V DC, 5A.
As for energy monitoring, Renogy ONE allows you to monitor power devices that are
connected to it.
Q9: How can Renogy ONE communicate with other devices?
A: Renogy ONE can communicate with other devices wirelessly through Bluetooth and
Zigbee 3.0 or wired RS485 and RV-C cables, as long as they are authorized by Renogy.
Q10: Do I have to pair Renogy ONE with the DC Home app for operation?
A: No, you can add energy devices and simply check energy data without linking to the DC
Home app.
However, we advise you to pair it with the DC Home app to access important features
including remote monitoring, setting up smart scenes, and more.
Q11: Can Renogy ONE connect to the Internet via a hotspot from a smart mobile phone?
A: Yes.
Q12: Does Renogy ONE support WPA3 encrypted Wi-Fi networks?
A: No, it does not support WPA3.
Q13: Does Renogy ONE support 5 GHz Wi-Fi networks?
A: No, it does not.
42
Maintenance
Maintenance
Inspection
For optimum performance, it is recommended to perform these tasks regularly.
z
Check the appearance of the Renogy ONE to make sure it is clean and dry.
z
Ensure the Renogy ONE is installed in a clean, dry and ventilated area.
z
Ensure there is no damage or wear on the cables.
z
Ensure the firmness of the connectors and check if there are any loose, damaged or burnt
connections.
z
Ensure that the Battery indicator and Fault indicator are in normal state.
z
Ensure there is no any corrosion, insulation damage, or discoloration marks of overheating
or burning.
NOT
E
z
In some applications, corrosion may exist around the contacts inside the connector.
Corrosion can loosen springs and increase resistance, leading to premature connection failure.
Please apply dielectric grease to each connector contact periodically. Dielectric grease repels
moisture and protects the connector contacts from corrosion.
WARNIN
G
z
Risk of electric shock! Make sure that all power is turned off before touching the terminals on
the Renogy ONE.
Cleaning
Follow the steps below to clean the Renogy ONE regularly.
z
Shut down Renogy ONE. If you clean the inside of the device, you need to disconnect the
power supply.
z
Wipe the charger housing and connector contacts with a damp cloth or non-metallic brush. If
it is not clean after wiping, use a household cleaner.
z
Dry the Renogy ONE with a clean cloth and keep the area around the Renogy ONE clean
and dry.
z
Make sure the Renogy ONE is completely dry before reconnecting the connector to the
Renogy ONE.
Storage
Follow the tips below to ensure that the Renogy ONE is stored well.
z
Disconnect all connectors that are connected to the Renogy ONE.
z
By applying dielectric grease to each connector contact, the dielectric grease repels
moisture and protects the connector contacts from corrosion.
Inspection Cleaning Storage

43
Emergency Responses
Emergency Responses
Fire Flooding Smell Noise
In the event of any threat to health or safety, always begin with the steps below before
addressing other suggestions.
z
Immediately contact the fire department or other relevant emergency response team.
z
Notify all people who might be affected and ensure that they can evacuate the area.
WARNIN
G
z
ONLY perform the suggested actions below if it is safe to do so.
Fire
1. Disconnect all cables connected to the Renogy ONE.
2. Put out the fire with a fire extinguisher. Acceptable fire extinguishers include water, CO2, and
ABC.
WARNIN
G
z
Do not use type D (flammable metal) fire extinguishers.
Flooding
1. If the Renogy ONE is submerged in water, stay away from the water.
2. Disconnect all cables connected to the Renogy ONE.
Smell
1. Disconnect all cables connected to the Renogy ONE.
2. Make sure nothing is in contact with the Renogy ONE.
3. Ventilate the room.
Noise
1. Disconnect all cables connected to the Renogy ONE.
2. Make sure no foreign objects are stuck in the Renogy ONE connector.
44
Technical Support
For additional support, contact the Renogy technical support team through renogy.com/contact-
us. Have the following information available when contacting Renogy.
z
Owner name
z
Contact information
z
Order number
z
Purchase channel
z
Serial number
z
Brief description of the issue
Renogy offers premium services worldwide:
North America US
www.renogy.com
CA
ca.renogy.com
Asia/Pacific
AU
au.renogy.com
CN
www.renogy.cn
JP
renogy.jp
KR
kr.renogy.com
Europe
UK
uk.renogy.com
DE
de.renogy.com
FR
fr.renogy.com
ES
es.renogy.com
Technical Support
45
Dimensions
Dimensions
+ -
CAN/RS485 TYPE-C
IN 1 IN 2
OUT 1
OUT 2 IN 3 OUT 3
7.16in [181.8mm]
3.42in
[86.8mm]
4.21in [107mm]
1.66in
[42.2mm]
1.1in
[28mm]
1.26in
[32mm]
0.67in
[17mm]
2.68in
[68mm]
3.03in [77mm]
5.51in [140mm]
CAUTIO
N
z
Dimension tolerance: ±0.5 mm (0.2 in)
FCC Statement
This device complies with Part 15 of the FCC Rules. FCC ID: 2ANPBRSMLP4-G2. Operation is
subject to the following two conditions:
(1) This device may not cause harmful interference.
(2) This device must accept any interference received, including interference that may cause
undesired operation.
This equipment has been tested and found to comply with the limits for a Class B digital
device, pursuant to Part 15 of the FCC Rules. These limits are designed to provide reasonable
protection against harmful interference in a residential installation. This equipment generates,
uses and can radiate radio frequency energy and, if not installed and used in accordance with
the instructions, may cause harmful interference to radio communications. However, there is no
guarantee that interference will not occur in a particular installation. If this equipment does cause
harmful interference to radio or television reception, which can be determined by turning the
equipment off and on, the user is encouraged to try to correct the interference by one or more of
the following measures:
(1) Orient or relocate the receiving antenna.
(2) Increase the separation between the equipment and receiver.
(3) Connect the equipment into an outlet on a circuit different from that to which the receiver is
connected.
(4) Consult the dealer or an experienced radio/TV technician for help.
FCC Radiation Exposure Statement
This equipment complies with FCC radiation exposure limits set forth for an uncontrolled
environment. This equipment should be installed and operated with minimum distance 20cm
between the radiator & your body.
Privacy Policy
RENOG
Y (“us”, “we”, or “our”) operates on RENOGY ONE device (hereinafter referred to as the
“Service”).
This page informs you of our policies regarding the collection, use and disclosure of personal
data when you use our Service and the choices you have associated with that data.
We use your data to provide and improve the Service. By using the Service, you agree to the
collection and use of information in accordance with this policy. Unless otherwise defined in this
Privacy Policy, the terms used in this Privacy Policy have the same meanings as in our Terms
and Conditions, accessible from www.renogy.com.
Definitions
z
Service
Service includes but not limited to, serving as a central control panel for your RENOGY ONE
system, enabling you to control your entire system from one single touchscreen, connecting
energy devices and smart accessories, and synchronizing this data to your RENOGY server
and mobile App.
z
Personal Data
Personal Data means data about a living individual who can be identified from those data (or
from those and other information either in our possession or likely to come into our possession).
z
Usage Data
Usage Data is data collected automatically, either generated by the use of the Service or from
the Service infrastructure itself (for example, your IP address and user log).
z
Data Controller
Data Controller means the natural or legal person who (either alone or jointly or in common
with other persons) determines the purposes for which and the manner in which any personal
information are, or are to be, processed.
For the purpose of this Privacy Policy, we are a Data Controller of your Personal Data.
z
Data Processors (or Service Providers)
Data Processor (or Service Provider) means any natural or legal person who processes the data
on behalf of the Data Controller.
We may use the services of various Service Providers in order to process your data more
effectively.
z
Data Subject (or User)
Data Subject is any living individual who is using our Service and whose Personal Data is
collected by us.
z
Information Collection and Use
We collect several different types of information for various purposes to provide and improve our
Service to you.

Types of Data Collected
█
Personal Data
While using our Service, we may ask you to provide us with certain personally identifiable
information that can be used to contact or identify you (
“
Personal Data
”)
. Personally identifiable
information may include, but is not limited to:
z
Email address
z
First name and last name
z
Address, State, Province, ZIP/Postal code, City
We may use your Personal Data to contact you with newsletters, marketing or promotional
materials and other information that may be of interest to you. Y
ou may opt out of receiving any,
or all, of these communications from us by following the unsubscribe link or the instructions
provided in any email we send.
█
Usage Data
We may also collect information on how the Service is accessed and used
(“Usage Data”).
This
Usage Data may include information such as your Renogy One Internet Protocol address (e.g.
IP address), 4G/5G and Wi-Fi access information, power usage, sensor history, user log, unique
device identifiers and other diagnostic data.
█
Location Data
We may use and store information about your location if you give us permission to do so
(
“Location Data”).
We use this data to provide features of our Service, to improve and customise
our Service.
You can enable or disable location services when you use our Service at any time by way of
your device settings.
█
Use of Data
RENOGY uses the collected data for various purposes:
z
To provide and maintain our Service
z
To notify you about changes to our Service
z
To allow you to participate in interactive features of our Service when you choose to do so
z
To provide customer support
z
To gather analysis or valuable information so that we can improve our Service
z
To monitor the usage of our Service
z
To detect, prevent and address technical issues
z
To provide you with news, special offers and general information about other goods, services
and events which we offer that are similar to those that you have already purchased or
enquired about unless you have opted not to receive such information
█
Legal Basis for Processing Personal Data under the General Data Protection
Regulation (GDPR)
If you are from the European Economic Area (EEA), UK or Switzerland, RENOGY’s legal basis
for collecting and using the personal information described in this Privacy Policy depends on the
Personal Data we collect and the specific context in which we collect it.
RENOGY may process your Personal Data because:
z
We need to perform a contract with you
z
You have given us permission to do so
z
The processing is in our legitimate interests and it is not overridden by your rights
z
To comply with the law
█
Retention of Data
RENOGY will retain your Personal Data only for as long as is necessary for the purposes set
out in this Privacy Policy. We will retain and use your Personal Data to the extent necessary to
comply with our legal obligations (for example, if we are required to retain your data to comply
with applicable laws), resolve disputes and enforce our legal agreements and policies.
RENOGY will also retain Usage Data for internal analysis purposes. Usage Data is generally
retained for a shorter period of time, except when this data is used to strengthen the security
or to improve the functionality of our Service, or we are legally obligated to retain this data for
longer periods.
█
Transfer of Data
Your information, including Personal Data, may be transferred to - and maintained on -
computers located outside of your state, province, country or other governmental jurisdiction
where the data protection laws may differ from those of your jurisdiction.
If you are located outside the United States and choose to provide information to us, please note
that we transfer the data, including Personal Data, to the United States and process it there.
RENOGY will take all the steps reasonably necessary to ensure that your data is treated
securely and in accordance with this Privacy Policy and no transfer of your Personal Data will
take place to an organization or a country unless there are adequate controls in place including
the security of your data and other personal information.
Disclosure of Data
█
Disclosure for Law Enforcement
Under certain circumstances, RENOGY may be required to disclose your Personal Data if
required to do so by law or in response to valid requests by public authorities (e.g. a court or a
government agency).
█
Legal Requirements
RENOGY may disclose your Personal Data in the good faith belief that such action is necessary
to:
z
To comply with a legal obligation
z
To protect and defend the rights or property of RENOGY
z
To prevent or investigate possible wrongdoing in connection with the Service
z
To protect the personal safety of users of the Service or the public
z
To protect against legal liability

█
Security of Data
The security of your data is important to us but remember that no method of transmission over
the Internet or method of electronic storage is 100% secure. While we strive to use commercially
acceptable means to protect your Personal Data, we cannot guarantee its absolute security.
█
Your Data Protection Rights under the General Data Protection Regulation (GDPR)
If you are a resident of the European Economic Area (EEA), the UK or Switzerland, you have
certain data protection rights. RENOGY aims to take reasonable steps to allow you to correct,
amend, delete or limit the use of your Personal Data.
If you wish to be informed about what Personal Data we hold about you and if you want it to be
removed from our systems, please contact us.
In certain circumstances, you have the following data protection rights:
z
The right to access, update or delete the information we have on you. Whenever made
possible, you can access, update or request deletion of your Personal Data directly within
your account settings section. If you are unable to perform these actions yourself, please
contact us to assist you.
z
The right of rectification. You have the right to have your information rectified if that
information is inaccurate or incomplete.
z
The right to object. You have the right to object to our processing of your Personal Data, in
certain circumstances including where we are processing your Personal Data on the basis of
our legitimate interests.
z
The right of restriction. You have the right to request that we restrict the processing of your
personal information.
z
The right to data portability. You have the right to be provided with a copy of the
information we have on you in a structured, machine-readable and commonly used format.
z
The right to erasure. You have the right to request that your Personal Data be deleted in its
entirety from our systems. We will comply with your request unless we are required to retain
your Personal Data due to legal or regulatory requirements, as stated in this policy.
z
The right to withdraw consent. You also have the right to withdraw your consent at any
time where RENOGY relied on your consent to process your personal information.
Please note that we may ask you to verify your identity before responding to such requests.
You have the right to complain to a Data Protection Authority about our collection and use of
your Personal Data. For more information, please contact your local data protection authority
in the European Economic Area (EEA), the ICO in the UK or the Federal Data Protection and
Information Commissioner in Switzerland.
█
Your Privacy Rights under the California Consumer Privacy Act (CCPA)
If you are a California resident, you have certain privacy rights as specified under California law,
including the CCPA. These include:
z
The right to know what personal information we collect
z
The right to know who we share your data with. We do not sell your data, but we do
share your information with others for legitimate business purposes, as described above.

z
The right to request deletion of your data, unless an exception applies. Examples of
exceptions include when we need to keep data to meet legal obligations or fix security
issues. Upon your verified request, we will delete your personal information unless an
exception applies, and will direct our service providers to do the same.
z
Get a timely response. You have the right to make two free requests in any 12 month
period. We will respond to your request within 45 days, and in more difficult cases we may
extend our response time by another 45 days.
z
Non-discrimination. We will not hold it against you when you exercise any of your rights,
and we encourage you to review your privacy settings closely and reach out to us with your
questions.
Under the CCPA, we are required to inform you of the data we may collected in the last 12
months:
z
Identifiers, such as your name, email address and IP address
z
Internet or other electronic network activity information
We may share your personal information with a third party for business purposes or at your
direction. We enter into agreements with our service providers in which they can only use your
information for specific purposes and are required to ensure its confidentiality. In the past 12
months, we have disclosed the above categories of personal information for a business purpose
or at your direction with our affiliates, services providers and third parties. For more details on
third parties we share data with, please see the Service Providers section below.
Please contact us at support@renogy.com if you have any questions about data protection or if
you wish to exercise any of your rights described above.
Service Providers
We may employ third party companies and individuals to facilitate our Serv
ice (“Service
Providers”
), provide the Service on our behalf, perform Service-related services or assist us in
analyzing how our Service is used.
These third parties have access to your Personal Data only to perform these tasks on our behalf
and are obligated not to disclose or use it for any other purpose.
Analytics
We may use third-party Service Providers to monitor and analyze the use of our Service.
Changes to This Privacy Policy
We may update our Privacy Policy from time to time. We will notify you of any changes by
posting the new Privacy Policy on this page.
We will let you know via email and/or a prominent notice on our Service, prior to the change
becoming effective and update th
e “eective date” at
the top of this Privacy Policy.
You are advised to review this Privacy Policy periodically for any changes. Changes to this
Privacy Policy are effective when they are posted on this page.
Contact Us
If you have any questions about this Privacy Policy, please contact us via renogy.com/contact-
us.