SONY
__.L_¸_) < .,1- ,__,(__l
3-756-515-22 (1)
Contents
Preface
This section tells you about special
features, safety information, and
preparatory information for using this
manual.
Chapter 1: Setting Up
This section shows you the steps
necessary for installing and presetting you
TV, and how to connect optional video an(
audio equipment.
Chapter 2: Using Basic Features
This section gives you basic information
about operating and adjusting your "I-V.
Trinitron°ColorT!/
OperatingInstructions
Before operating your TV, please read this manual
thoroughly and retain it for future reference.
KV-13TR28/29 KV-2150R
KV-1430R KV-2160WR
KV-1440WR KV-20TS29
KV-20TR23 KV-2170RS
KV-21STR2
KV-20TS32
KV-20TS50
Chapter 3: Using Advanced
Features
This section shows you the steps for other
useful features with using the On-Screen
Menus.
Appendlx
This section gives you specifications and
troubleshooting information.
• For a detailed table of contents,.see
page 3.
Owner's Record
The model and serial numbers are located at the rear of
the "IV. Record these numbers in the spaces provided
below. Refer to them whenever you call upon your Sony
dealer regarding this product.
Model No. Serial No.
© 1993 by Sony Corporation
WARNING
Precautions
To prevent fire or shock hazard, do not
expose the unit to rain or moisture.
RISK OF ELECTRIC SHOCK
DO NOT OPEN
CAUTION : TO REDUCE THE RISK OF ELECTRIC SHOCK,
DO NOT REMOVE COVER (OR BACK).
NO USER-SERVICEABLE PARTS INSIDE.
REFER SERVICING TO QUALIFIED SERVICE PERSONNEL.
• Operate the TV only on 120 V AC (except tol
KV-1440WR/2160WR/21STR2).
• Operate the TV on 110 - 120 V or 220 - 240 V AL;
(KV-1440WR/2160WR/21STR2 only).
• One blade of the plug is wider than the other for safety
purposes and will fit into the power outlet only one way. It
you are unable to insert the plug fully into the outlet,
contact your dealer.
,, Should any liquid or solid object fall into the cabinet,
unplug the TV and have it checked by qualified personnel
before operating it any further.
• Unplug the TV from the wall outlet if you are not going to
use it for several days or more. To disconnect the cord,
pull it out by the plug. Never pull the cord itself.
[llt;tF3]]_]
This symbol is intended to alert the user to
the presence of uninsulated "dangerous
voltage" within the product's enclosure
that may be of sufficient magnitude to
constitute a risk of electric shock to
persons.
This symbol is intended to alert the user to
the presence of important operating and
maintenance (servicing) instructions in the
literature accompanying the appliance.
TO PREVENT ELECTRIC SHOCK, DO NOT USE THIS
POLARIZED AC PLUG WITH AN EXTENSION CORD,
RECEPTACLE OR OTHER OUTLET UNLESS THE
BLADES CAN BE FULLY INSERTED TO PREVENT
BLADE EXPOSURE.
• To prevent internal heat build-up, do not block the
ventilation openings.
• Do not install the TV in a hot or humid place, or in a place
subject to excessive dust or mechanical vibration.
Clean the TV with a soft dry cloth. Never use strong
solvents such as thinner or benzine, which might damage
the finish of the cabinet.
Keep the original carton and packing materials to use for
safe transport of your TV in the future.
If you have any questions or problems concerning your TV,
please contact your nearest Sony dealer.
For details concerning safety precautions, see the supplied
leaflet "IMPORTANT SAFEGUARDS."
Note to CATV system Installer
This reminder is provided to call the CATV system installer's
attention to Article 820-40 ofthe NEC that provides
guidelines for proper grounding and, in particular specifies
that the cable ground shall be connected to the grounding
system of the building, as close tothe point of cable entry as
practical.
When using TV games, computers, and similar products
with your TV, keep the brightness and contrast functions at
low settings. If a fixed (non-moving) pattern is left on the
screen for long periods of time at a high brightness or
contrast setting, the image can be permanently imprinted
onto the screen. These types of imprints are not covered by
your warranty because they are the result of misuse.
Use of this television receiver for other private viewing of
programs broadcast on UHF or VHF or transmitted by cable
companies for the use of the general public may require
authorization from the broadcaster/cable company and/or
program owner.
This television receiver provides display of television closed
captioning in accordance with § 15.119 of the FCC rules.
(USA models only)
Preface
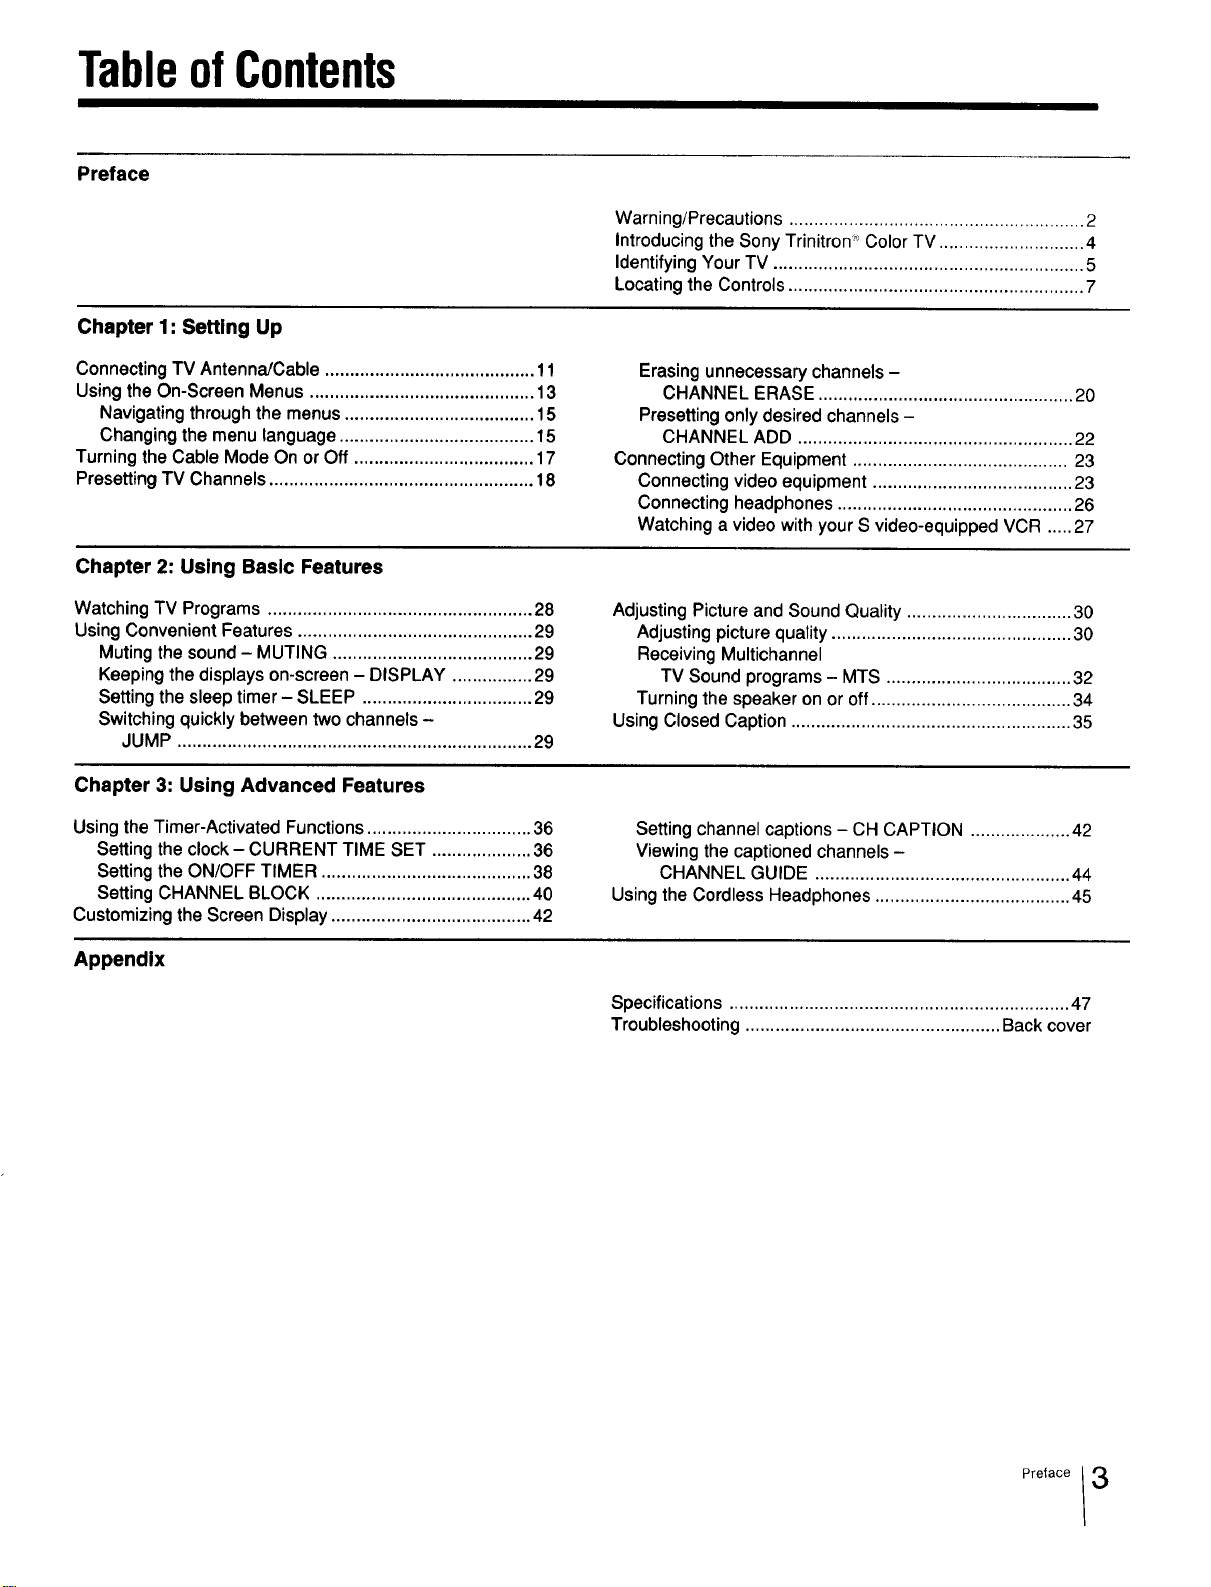
TableofContents
Preface
Chapter 1: Setting Up
Connecting TV Antenna/Cable .......................................... 11
Using the On-Screen Menus ............................................. 13
Navigating through the menus ...................................... 15
Changing the menu language ....................................... 15
Turning the Cable Mode On or Off .................................... 17
Presetting TV Channels ..................................................... 18
Chapter 2: Using Basic Features
Watching TV Programs ..................................................... 28
Using Convenient Features ............................................... 29
Muting the sound- MUTING ........................................ 29
Keeping the displays on-screen - DISPLAY ................ 29
Setting the sleep timer - SLEEP .................................. 29
Switching quickly between two channels -
JUMP ....................................................................... 29
Chapter 3: Using Advanced Features
Using the Timer-Activated Functions ................................. 36
Setting the clock - CURRENT TIME SET .................... 36
Setting the ON/OFF TIMER .......................................... 38
Setting CHANNEL BLOCK ........................................... 40
Customizing the Screen Display ........................................ 42
Appendix
Warning/Precautions ........................................................... 2
Introducing the Sony Trinitron _°_Color TV ............................. 4
Identifying Your TV .............................................................. 5
Locating the Controls ........................................................... 7
Erasing unnecessary channels -
CHANNEL ERASE ................................................... 20
Presetting only desired channels -
CHANNEL ADD ....................................................... 22
Connecting Other Equipment ........................................... 23
Connecting video equipment ........................................ 23
Connecting headphones ............................................... 26
Watching a video with your S video-equipped VCR ..... 27
Adjusting Picture and Sound Quality ................................. 30
Adjusting picture quality ................................................ 30
Receiving Multichannel
TV Sound programs- MTS ..................................... 32
Turning the speaker on or off ........................................ 34
Using Closed Caption ........................................................ 35
Setting channel captions -CH CAPTION .................... 42
Viewing the captioned channels -
CHANNEL GUIDE ................................................... 44
Using the Cordless Headphones ....................................... 45
Specifications .................................................................... 47
Troubleshooting ................................................... Back cover
Preface 3
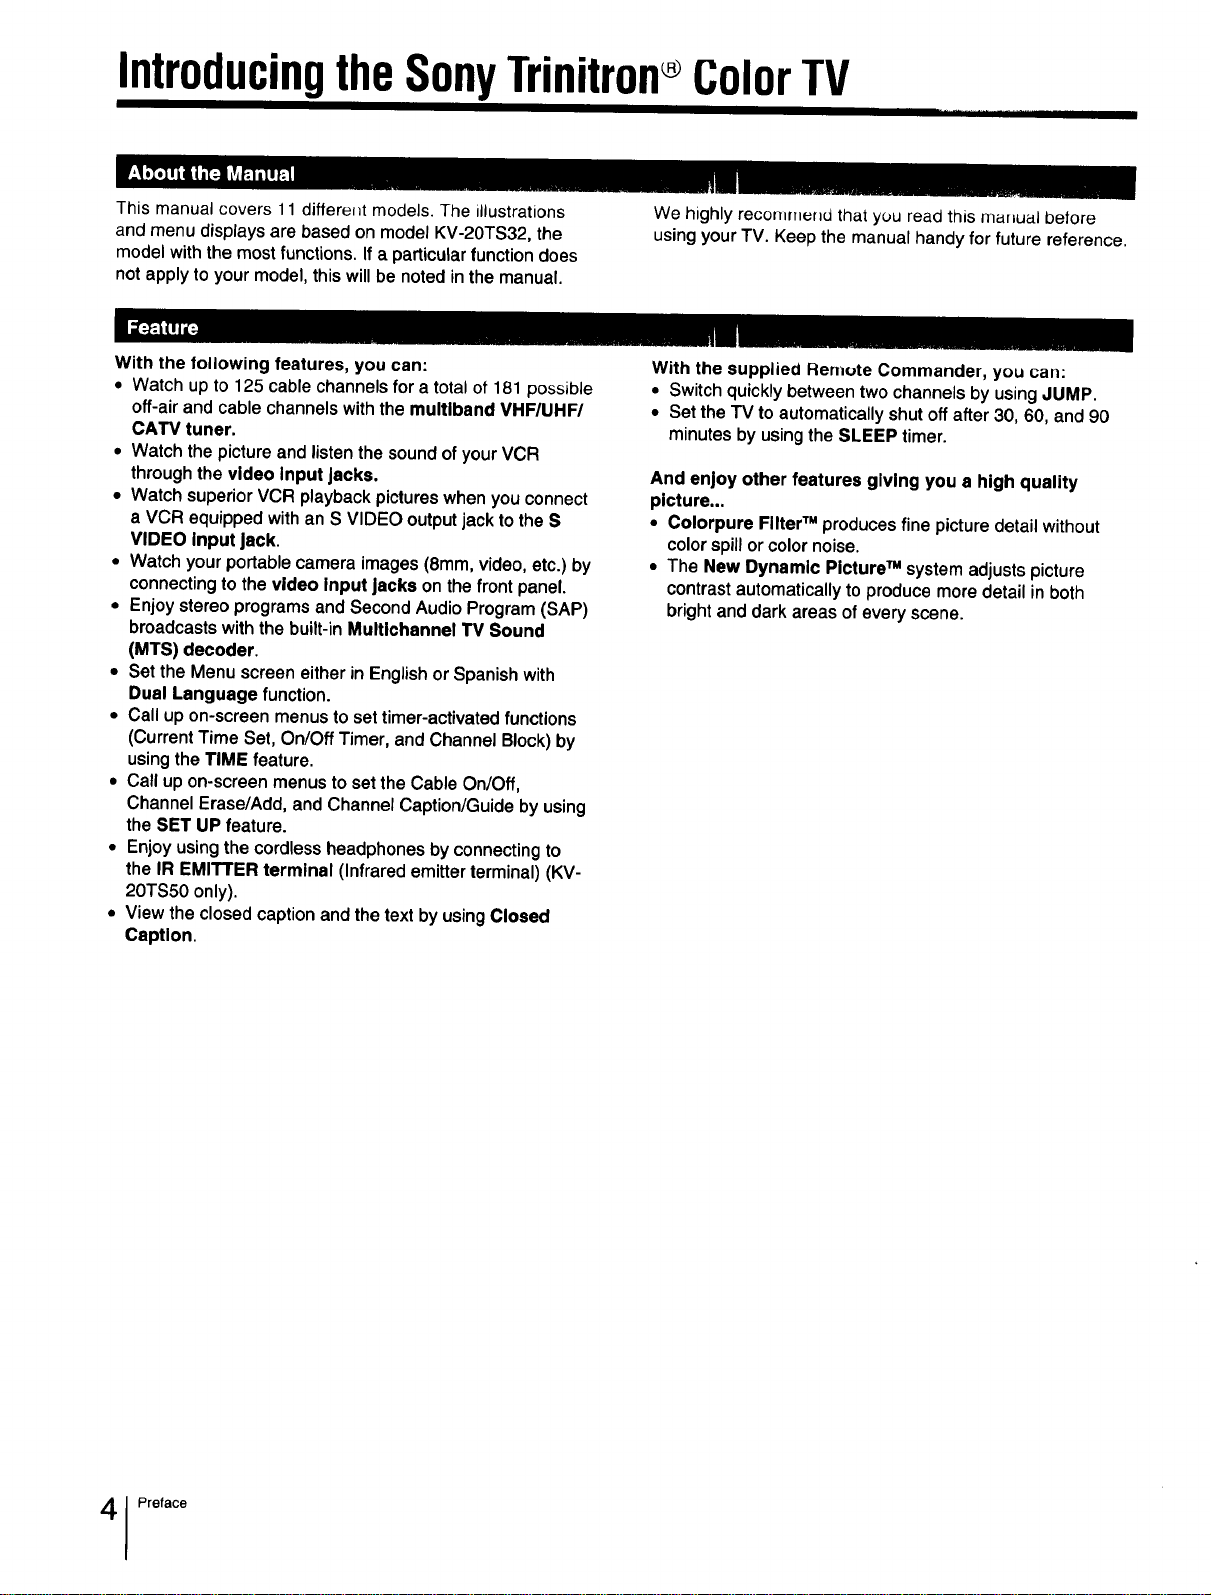
IntroducingtheSonyTrinitronColorTV
iTIHTbHi[I III I_II]T "
This manual covers 11 different models. The illustrations
and menu displays are based on model KV-20TS32, the
model with the most functions. If a particular function does
not apply to your model, this will be noted in the manual.
We highly recommerld that you read this mahual betore
using your TV. Keep the manual handy for future reference.
With the following features, you can:
• Watch up to 125 cable channels for a total of 181 possible
off-air and cable channels with the multlband VHF/UHF/
CATV tuner.
• Watch the picture and listen the sound of your VCR
through the video Input Jacks.
• Watch superior VCR playback pictures when you connect
a VCR equipped with an S VIDEO output jack to the S
VIDEO input Jack.
• Watch your portable camera images (8ram, video, etc.) by
connecting to the video input Jacks on the front panel.
• Enjoy stereo programs and Second Audio Program (SAP)
broadcasts with the built-in Multichannel TV Sound
(MTS) decoder.
• Set the Menu screen either in English or Spanish with
Dual Language function.
• Call up on-screen menus to set timer-activated functions
(Current Time Set, On/Off Timer, and Channel Block) by
using the TIME feature.
• Call up on-screen menus to set the Cable On/Off,
Channel Erase/Add, and Channel Caption/Guide by using
the SET UP feature.
• Enjoy using the cordless headphones by connecting to
the IR EMITTER terminal (Infrared emitter terminal) (KV-
20TS50 only).
• View the closed caption and the text by using Closed
Caption.
With the supplied Remute Commander, you can:
• Switch quickly between two channels by using JUMP.
• Set the TV to automatically shut off after 30, 60, and 90
minutes by using the SLEEP timer.
And enjoy other features giving you a high quality
picture...
• Colorpure FilterTM produces fine picture detail without
color spill or color noise.
• The New Dynamic Picture TM system adjusts picture
contrast automatically to produce more detail in both
bright and dark areas of every scene.
Preface

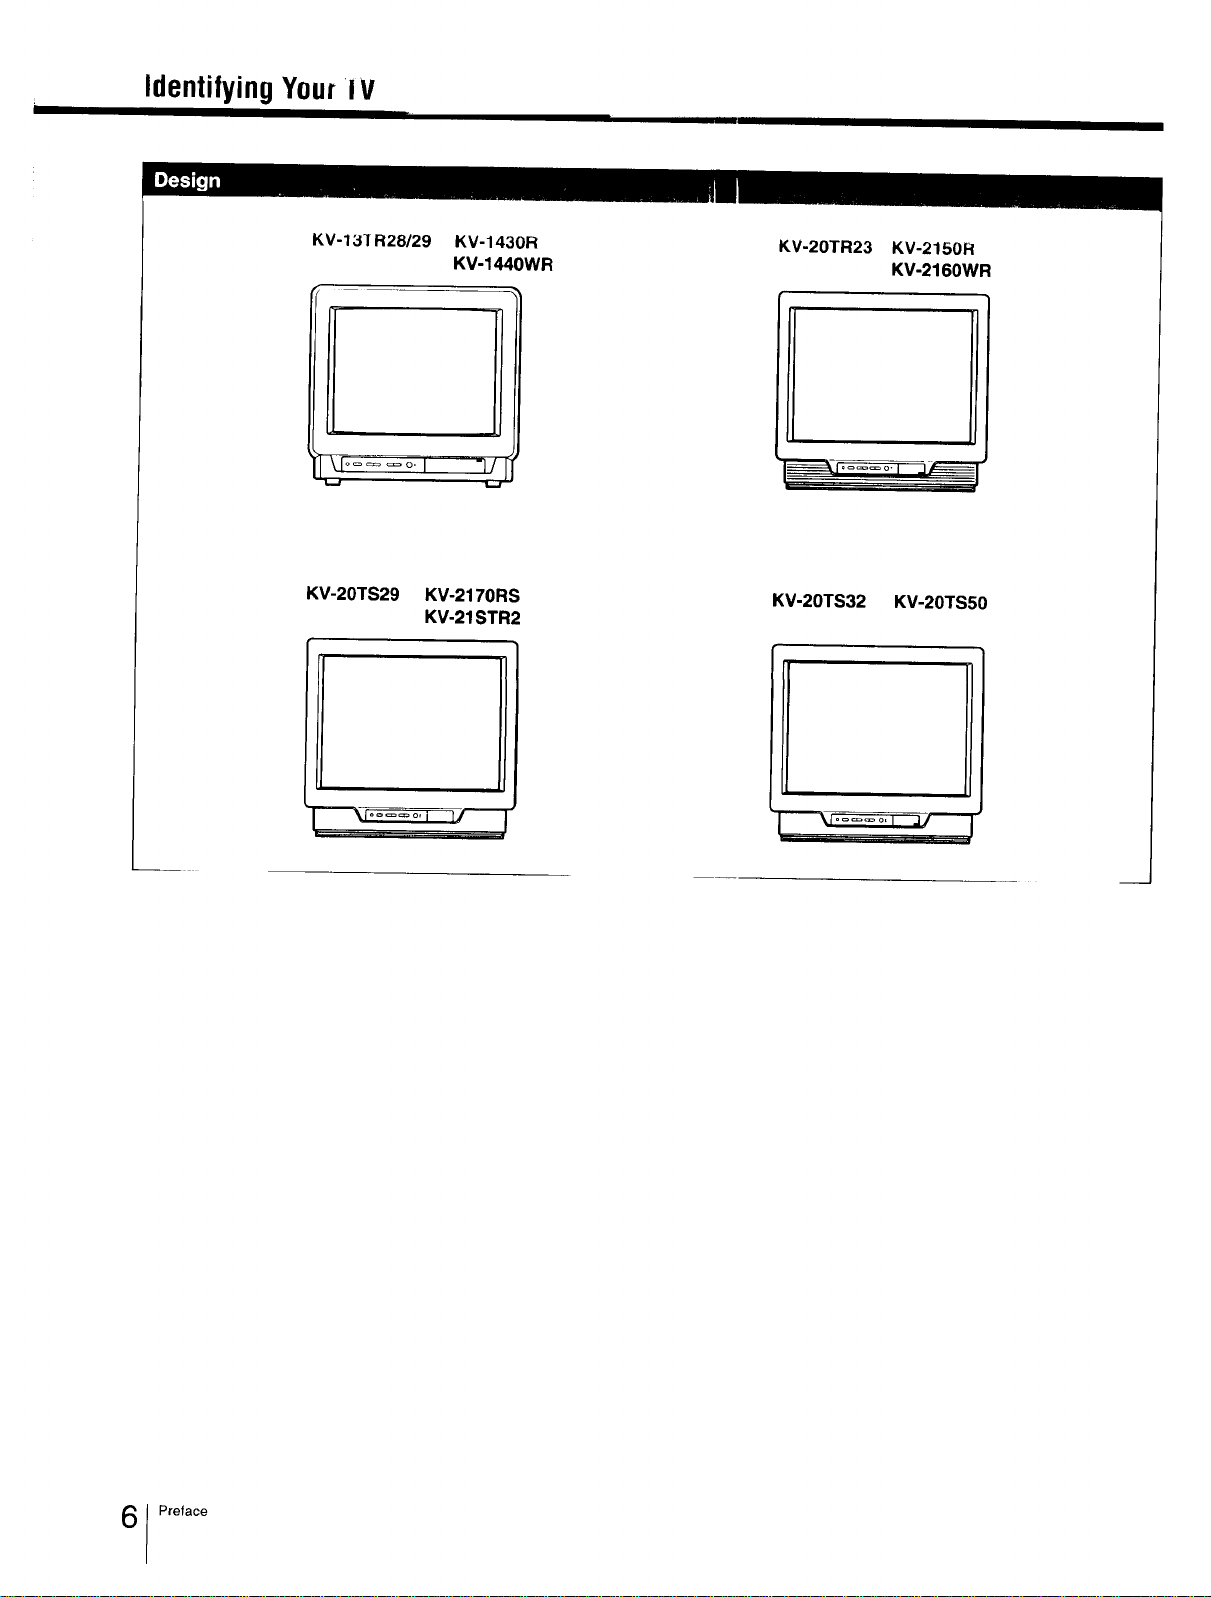
IdentifyingYourTV
_] i_ iivJ L
Check the model number of your TV set,
This manual covers 11 models and there are slight
differences among them. Check the table below to see what
your TV is equipped with before you start operating it.
Table of models
YES: equipped NO: not equipped
NO NO YES YES YES
YES* YES* NO YES NO
NO NO NO YES NO
YES NO NO YES YES
* Monaural sound is output by both headphone speakers.
m m
:¢1
_=
_'
,,,-t
-%
$
_idestlnation ,
_,1 _ar_u.Qe
** U.S.A. models only.
U.S.A,/Canda Central South America and other area
YES** NO
NO YES
Identifying Your/ V
I I I
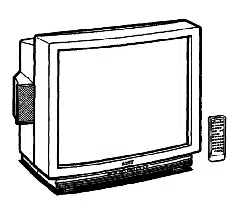
KV-131 R28/29 KV-1430R
KV-1440WR
!
_d...... I "]/
KV-20TR23 KV-2150R
KV-2160WR
KV-20TS29 KV-2170RS
KV-21STR2
KV-20TS32 KV-20TS50
]"_ I.... o,i 14
i
"--_T:_= _ o,_/---]-
Preface
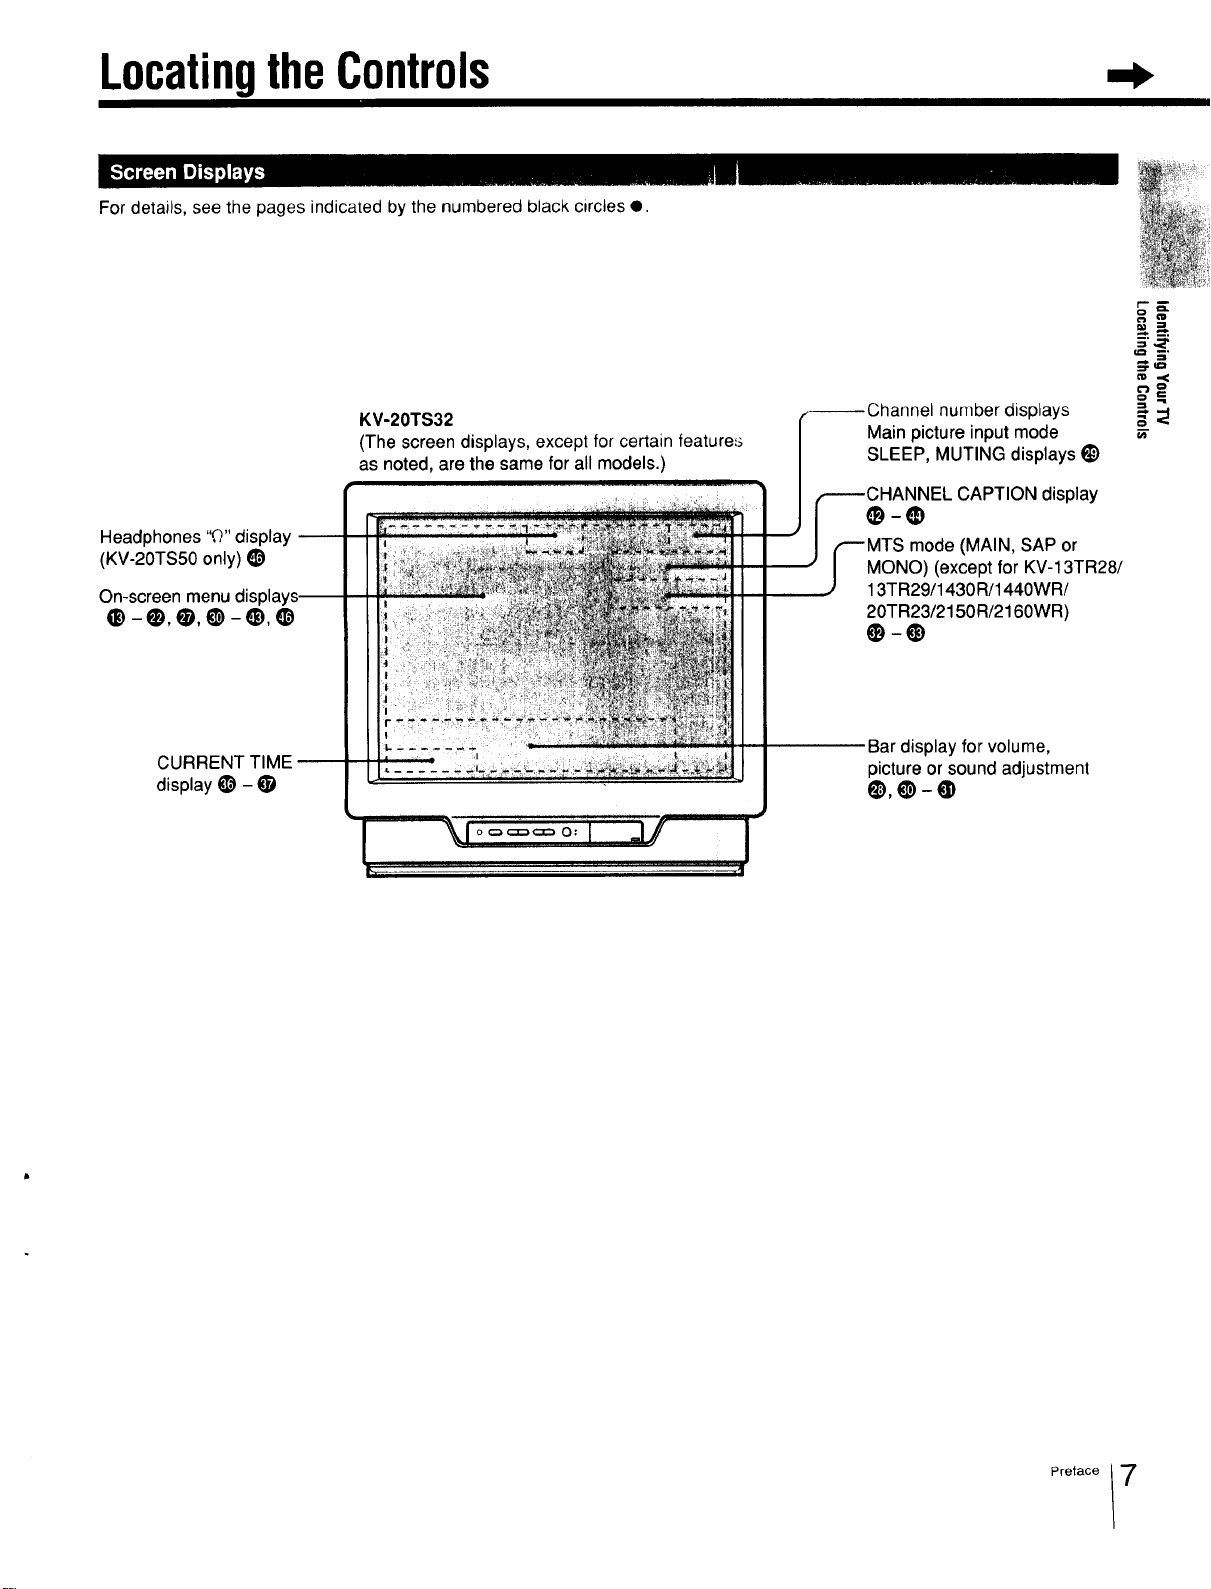
LocatingtheControls
For details, see the pages indicated by the numbered black circles e.
Headphones "Q" display --
(KV-20TS50 only) _)
On-screen menu
e-o,e,e-_,o
KV-20TS32
(The screen displays, except for certain feature=_
as noted, are the same for all models.)
number displays
Main picture input mode
SLEEP, MUTING displays l_
;HANNEL CAPTION display
mode (MAIN, SAP or
MONO) (except for KV-13TR28/
13TR29/1430R/1440WR/
20TR23/2150R/2160WR)
CURRENT TIME --
display t_) - •
....
Bar display for volume,
picture or sound adjustment
Q),O-@
Preface 7
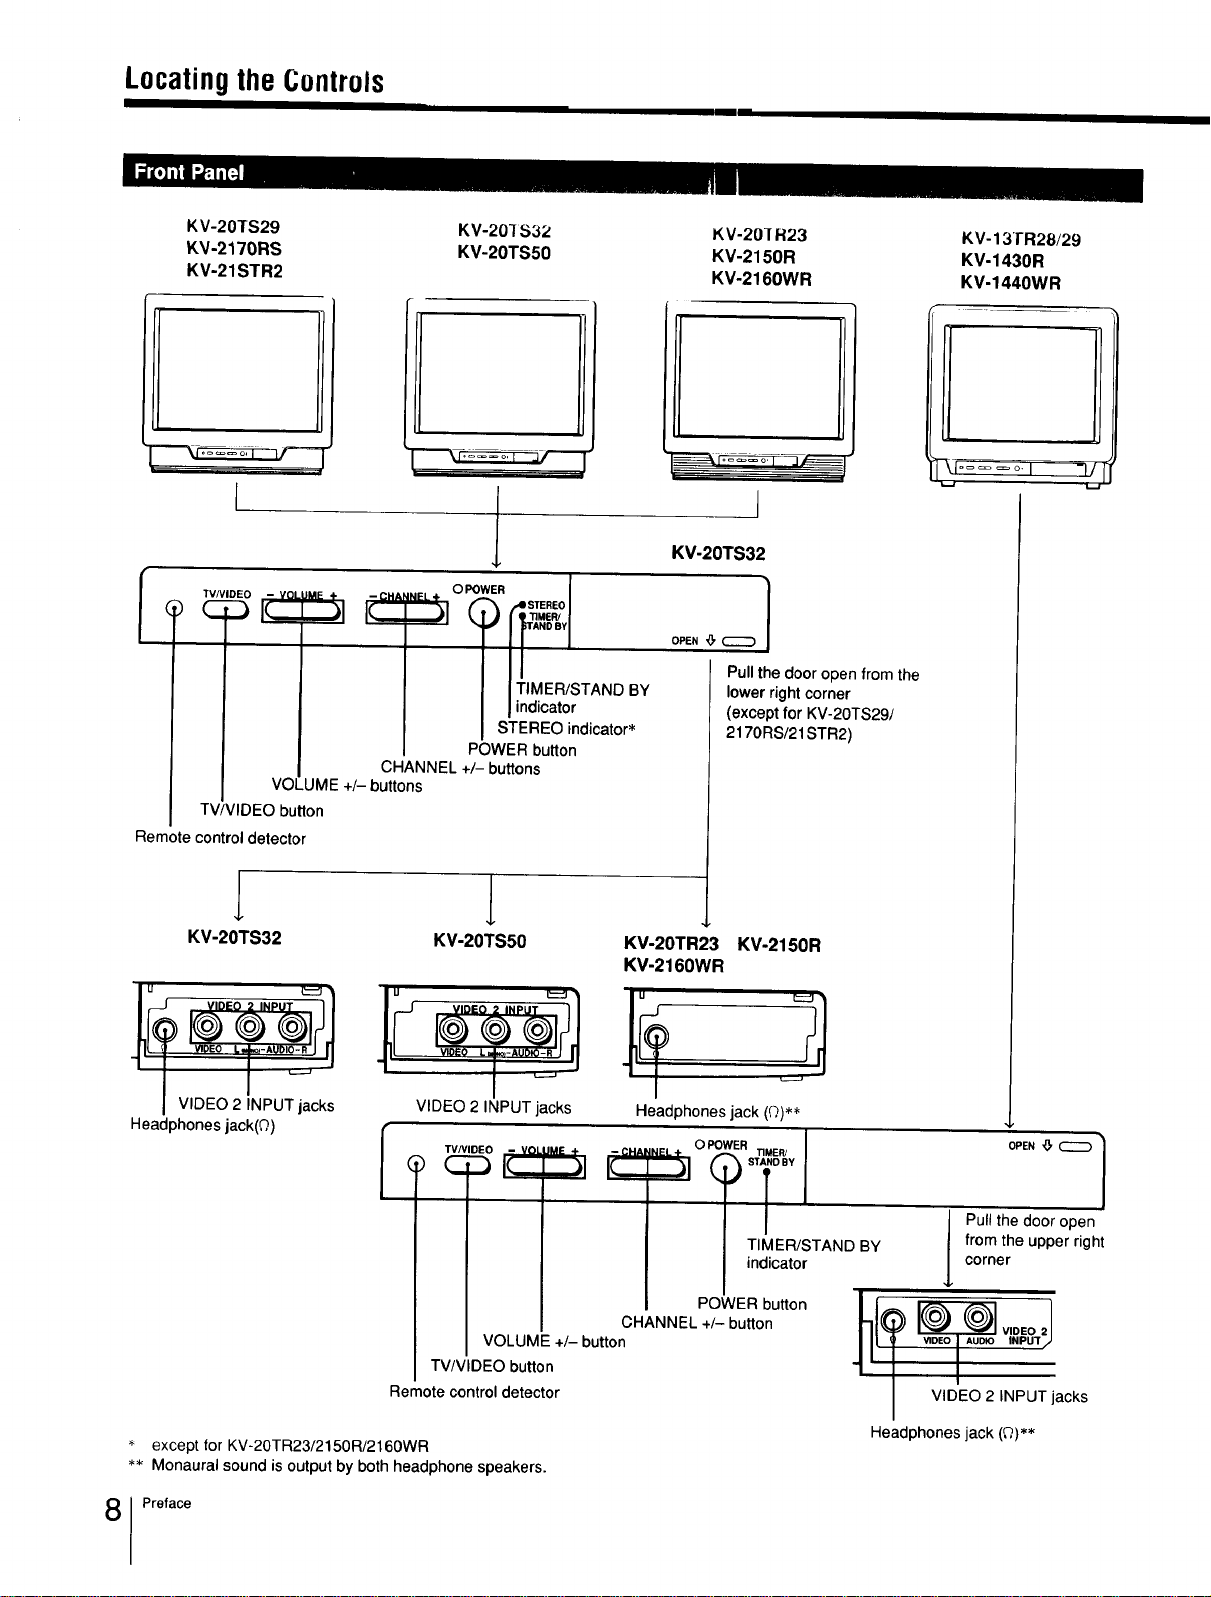
Locatingthe Controls
KV-20TS29
'_V-2170RS
KV-21STR2
KV-201S32
KV-20TS50
KV-20]R23
KV-2150R
KV-2160WR
KV-13TR28/29
KV-1430R
KV-1440WR
I
iNeL÷ O POWER I
| I TIMER/STAND BY
| I indicator
I STEREO indicator*
POWER button
CHANNEL +/- buttons
VOLUME +/- buttons
TV/VIDEO button
Remote control detector
KV-20TS32 KV-20TS50
VIDEO 2 INPUT jacks
I VIDEO 2 INPUT jacks
Headphones jack(Q)
_.-_--_
I
KV-20TS32
|
Pull the door open from the
lower right corner
(except for KV-20TS29t
2170RS/21 STR2)
KV-20TR23 KV-2150R
KV-2160WR
Headphones jack (0)**
TIMER/STAND BY
indicator
POWER button
CHANNEL +/- button
VOLUME +/- button
]l
OPEN _, _ /
/
J ull the door open
from the upper right
corner
VIDEO 2 INPUT jacks
TV/VIDEO button
Remote control detector
Headphones jack (Q)**
except for KV-20TR23/2150R/2160WR
** Monaural sound is output by both headphone speakers.
Preface

For details, seu the payus indicated by the Ilumbered black circles O.
VIDEO 1 IN jacks i_), _)
KV-20TS32 KV-20TS29*
KV-2170RS*
KV-21STR2*
VHt-/UHt- anteHna terminal
®,O,@,®
S VIDEO input jack i_)
(KV-20TS32 only)
,_=
:=1-
IR EMITTER terminal _)
Do not connect the
antenna cable.
VIDEO 1 IN jacks _)
KV-20TS50
IR EMITTER
[ _R - AUOIO- L o_,_ VIOIEO_
VIDEO 1 _ _ _ II
-!®?®lL
VHF/UHF antenna terminal
0,0,0
VIDEO 1 IN jacks i_)
KV-13TR28/29 KV-20TR23*
KV-1430R KV-2150R*
KV-1440WR KV-2160WR*
I
I®®1
I V_HF
VHF/UHF antenna terminal
O,O,@
* These models are equipped with only one set of video input jacks.

Locatingthe Controls
i
For details, see the pages indicated by the numbered black circles O.
RM-Y116
MUTING button _)
TV/VIDEO button
DISPLAY button 0, 0, •
CH GUIDE button _)
JUMP button _)
POWER button _), _), _)
SLEEP button _)
0 - 9 buttons
CHANNEL GUIDE directry keys _)
ENTER button
CH (channel) +/- scan button _), _)
VOL (volume) +/- button _)
Menu buttons • - _), 0, I_) - _), _)
WARNING
Batteriesmayexplode if mistreated. Do
notrecharge,disassemble,ordisposeof
infire.
Remove the battery
compartment cover.
(Rear of cuf=,l,lander)
Insert two size AA (R6)
batteries in correct polarity.
Battery life
With normal operation, batteries will last up
to half a year. If the Remote Commander
dose not operate properly, the batteries
might be exhausted. Replace both of them
with new ones.
To avoid damage from possible battery
leakage
Remove the batteries ifyou do not planto
usetheRemoteCommander for a fairly
longtime.
101Preface
Chapter1:SettingUp
ConnectingTVAntenna/Cable
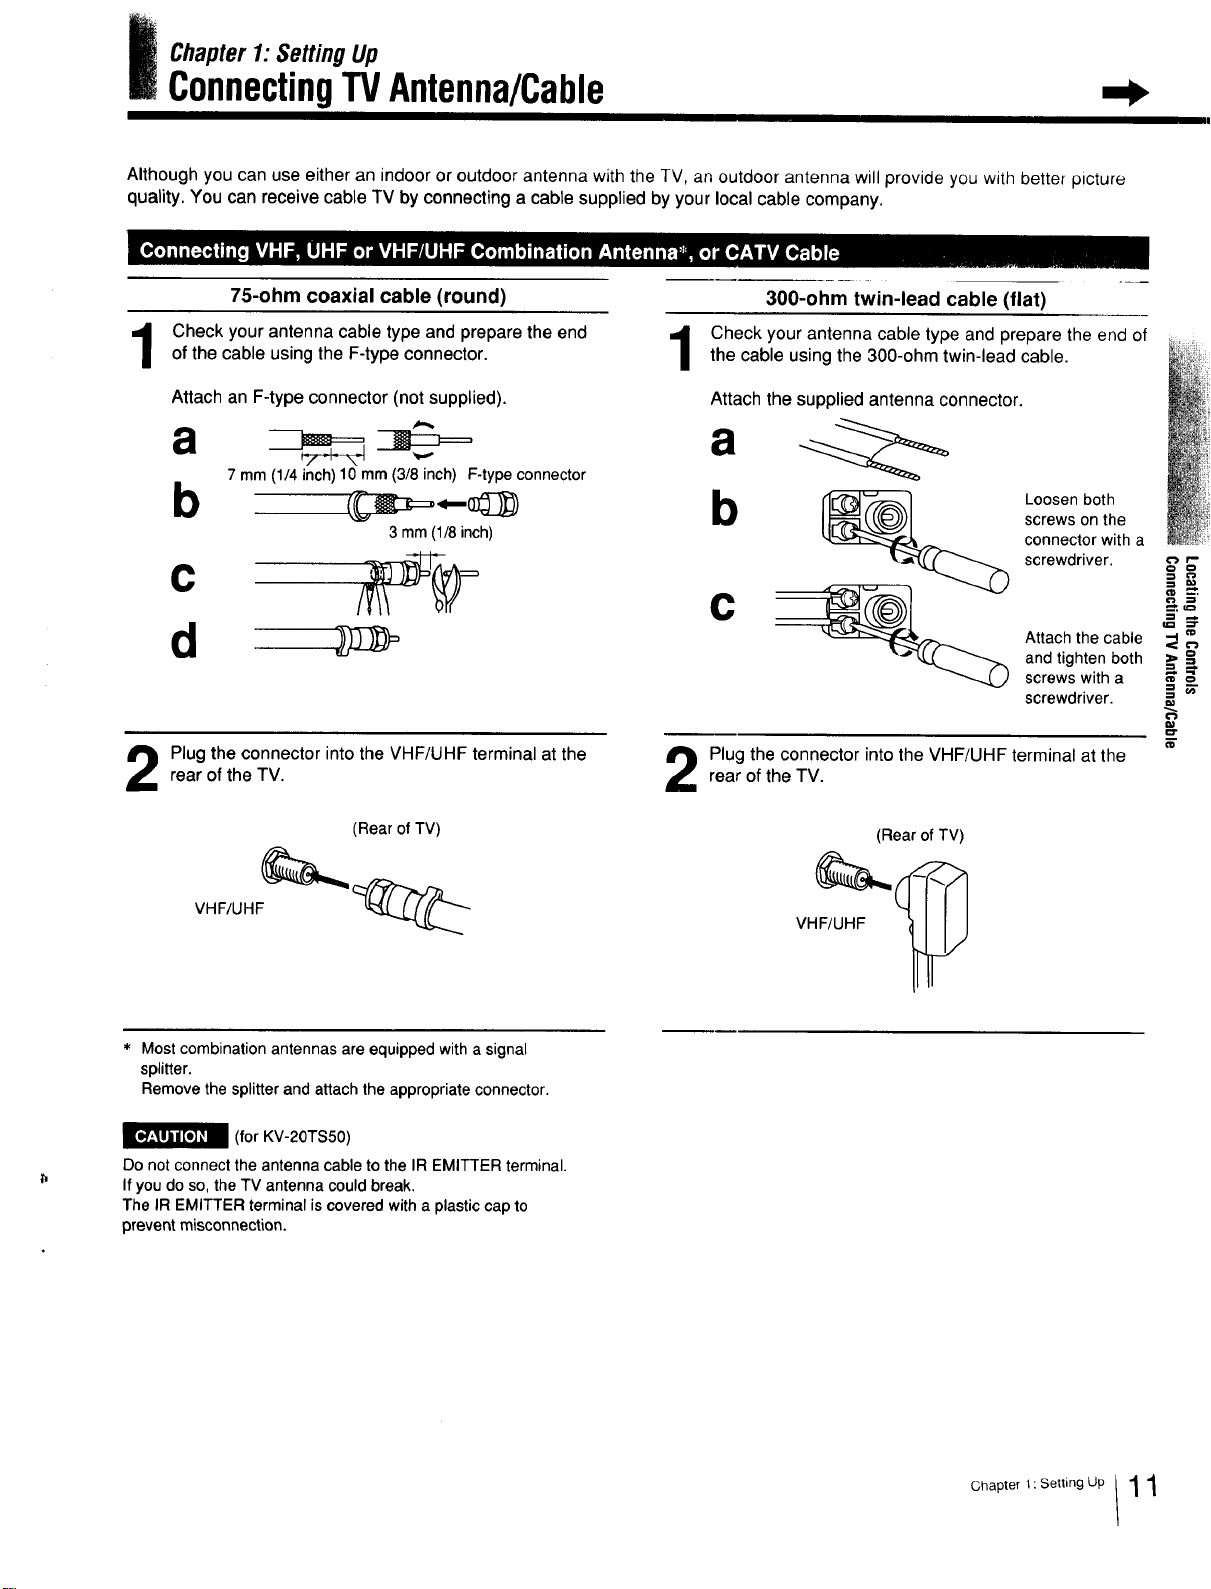
Although you can use either an indoor or outdoor antenna with the TV, an outdoor antenna will provide you with better picture
quality. You can receive cable TV by connecting a cable supplied by your local cable company.
75-ohm coaxial cable (round)
Check your antenna cable type and prepare the end
of the cable using the F-type connector.
Attach an F-type connector (not supplied).
a
7 mm (1/4 inch)10 mm (3/8inch) F-typeconnector
b
3mm(1/8inch)
d
Plug the connector into the VHF/UHF terminal at the
rear of the TV.
(Rear of TV)
VHF/UHF
300-ohm twin-lead cable (flat)
Check your antenna cable type and prepare the end ofthe cable using the 300-ohm twin-lead cable.
Attach the supplied antenna connector.
b Loosen both
screws on the
connector with a
screwdriver.
C
Attach the cable
and tighten both
screws with a
screwdriver.
Plug the connector into the VHF/UHF terminal at the
rear of the TV.
(Rear ofTV)
VHF/UHF
=_==
=_
#
* Most combination antennas are equipped with a signal
splitter.
Remove the splitter and attach the appropriate connector.
_(for KV-20TS50)
Do not connect the antenna cable to the IR EMITTER terminal.
If you do so, the TV antenna could break.
The IR EMITTER terminal is covered with a plastic cap to
prevent misconnection.
Chapter 1: Setting Up / 1 1
ConnectingTVAntenna/Cable
I Illl II III
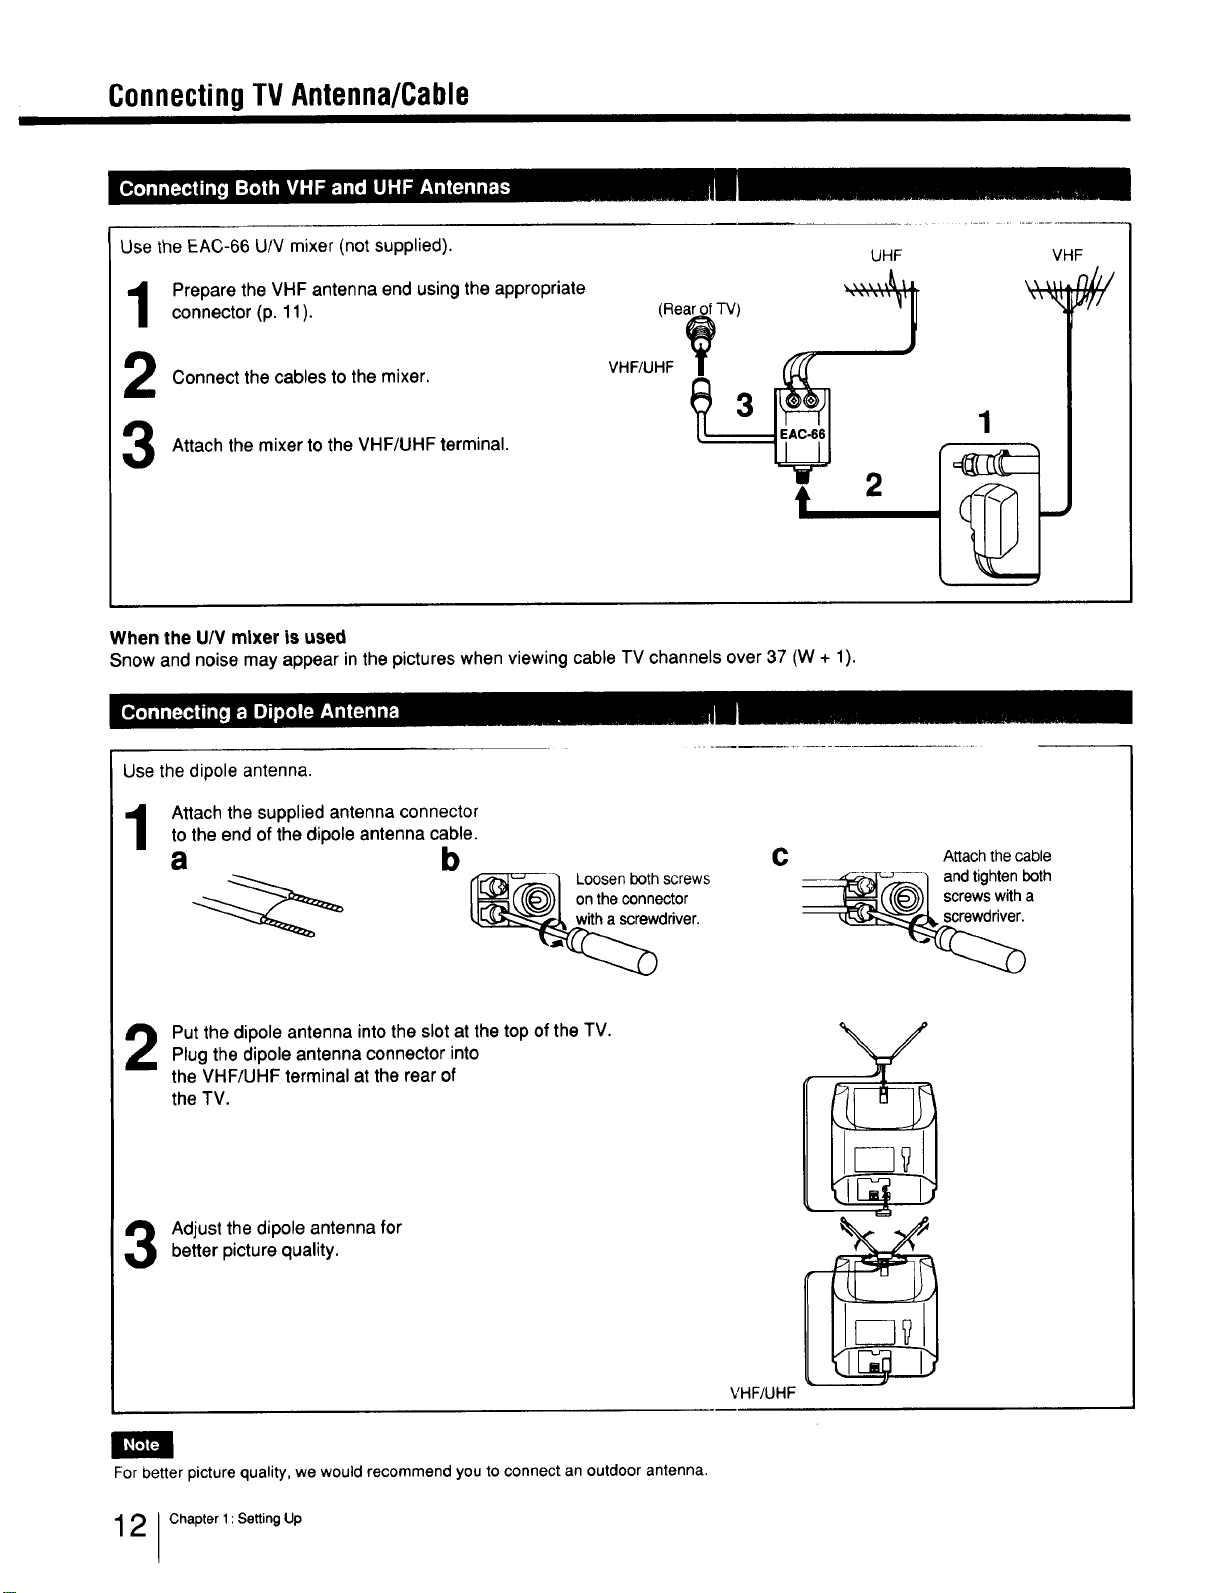
Use the EAC-66 U/V mixer (not supplied).
UHF
Prepare the VHF antenna end using the appropriate
connector (p. 11). (Rear.£ofTV)
"h
_ Connect the cables to the mixer. VHF/UHF__ 1
Attach the mixer to the VHF/UHF terminal. •
,
VHF
When the U/V mixer is used
Snow and noise may appear in the pictures when viewing cable TV channels over 37 (W + 1).
Use the dipole antenna.
Attach the supplied antenna connector
to the end of the dipole antenna cable.
a b c Attach the cable
---'_F_4_,,_,_] andtightenboth
(((@,))J screwswitha
_ Loosenbothscrews
on the connector
driver.
Put the dipole antenna into the slot at the top of the TV.
Plug the dipole antenna connector into
the VHF/UHF terminal at the rear of
the TV.
Adjust the dipole antenna forbetter picture quality.
VHF/UHF
\
%
/
For better picture quality, we would recommend you to connect an outdoor antenna.
2 Chapter 1: Setting Up
UsingtheOn-ScreenMenus
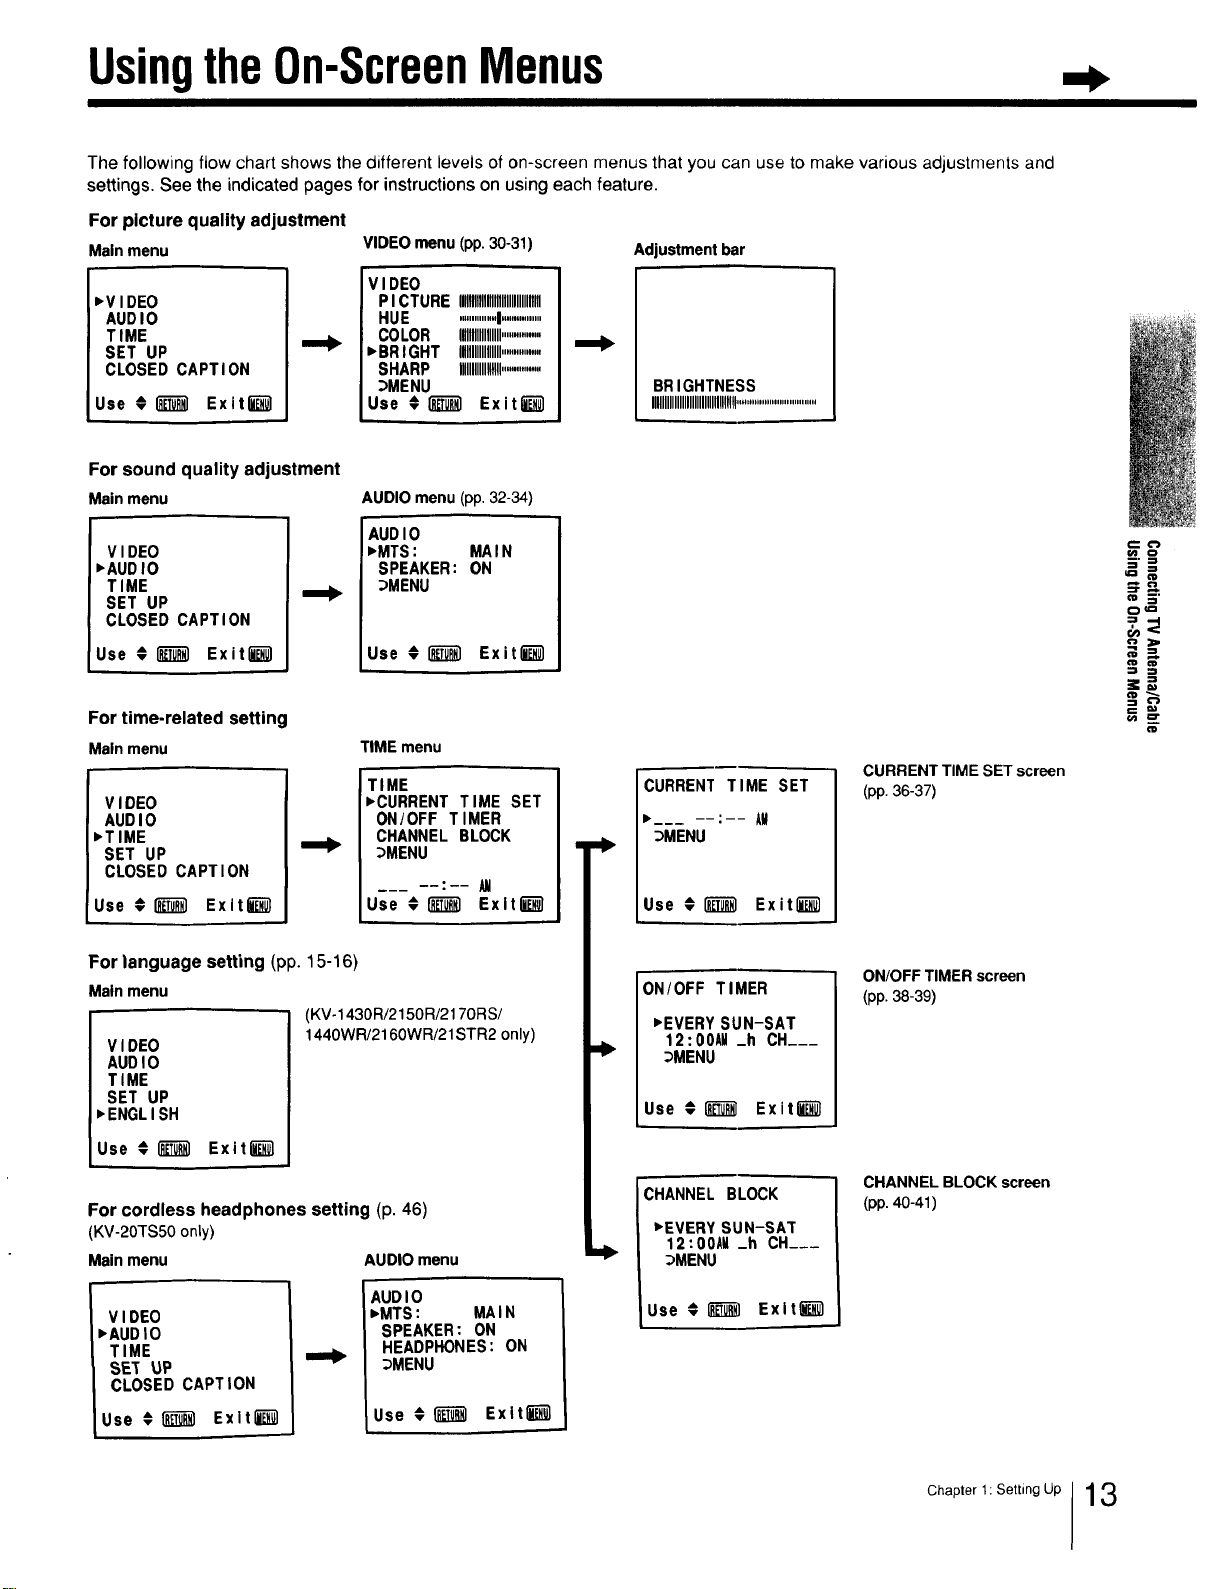
The following flow chart shows the different levels of on-screen menus that you can use to make various adjustments and
settings. See the indicated pages for instructions on using each feature.
For picture quality adjustment
Mainmenu
_VIDEO
AUDIO
TIME
SET UP
CLOSED CAPTION
Use €_ Exitli_l
VIDEO menu (pp. 30-31)
VIDEO
PICTURE ,llllllllllllI,llllllllllllllll
HUE ...............I................
COLOR IIIIIIIIIIlllllll..............
"BRIGHT Igllllllllllllll................
SHARP HIIIIIIIIIIIllll................
_MENU
Use ;1_) Exit_-_]
Adjustment bar
BRIGHTNESS
IIIIIIIIIIIIIIIIIIIIIIIIIIlUllll!................................
I
For sound quality adjustment
Mainmenu
VIDEO
,AUDIO
TIME
SET UP
CLOSED CAPTION
Use € _ Exitl_
AUDIO menu (pp. 32-34)
AUDIO
• MTS: MAIN
SPEAKER: ON
_MENU
Use €_ Exiti-_
For time-related setting
Mainmenu
VIDEO
AUDIO
,TIME
SET UP
CLOSED CAPTION
Use # _ Exit_
TIME menu
TIME
• CURRENT TIME SET
ON/OFF TIMER
CHANNEL BLOCK
_MENU
Use € _ Exlt_
For language setting (pp. 15-16)
Mainmenu
(KV-1430R/2150R/217ORS/
1440WR/2160WR/21STR2 only)
V I DEO
AUDI0
TIME
SET UP
• ENGLISH
Use € i_ Exitl_l
For cordless headphones setting (p. 46)
(KV-2OTS50only)
Mainmenu AUDIO menu
VIDEO
•AUDIO
TIME
SE_ UP
CLOSED CAPTION
Use € 1_ Exlt_
AUDIO
,MTS: MAIN
SPEAKER: ON
HEADPHONES: ON
_MENU
Use €1__1 Exltlk_
CURRENT TIME SET
"___ : AM
_MENU
Use €[_ Exitli_l
ON/OFF TIMER
• EVERY SUN-SAT
12:00AM _h CH___
_MENU
Use €_ ExitE-i_
i
CHANNEL BLOCK
"EVERY SUN-SAT
12:00AU _h CH___
_MENU
Use € _ Exitlk_l
i
CURRENT TIME SET screen
(pp. 36-37)
ON/OFF TIMER screen
(pp. 38-39)
CHANNEL BLOCK screen
(pp. 40-41)
m 3'
0¢=
=3
=+=,
OlD
Chapter l: Setting Up 13
Usingthe On-ScreenMenus
III II IIIII Ill[II_I
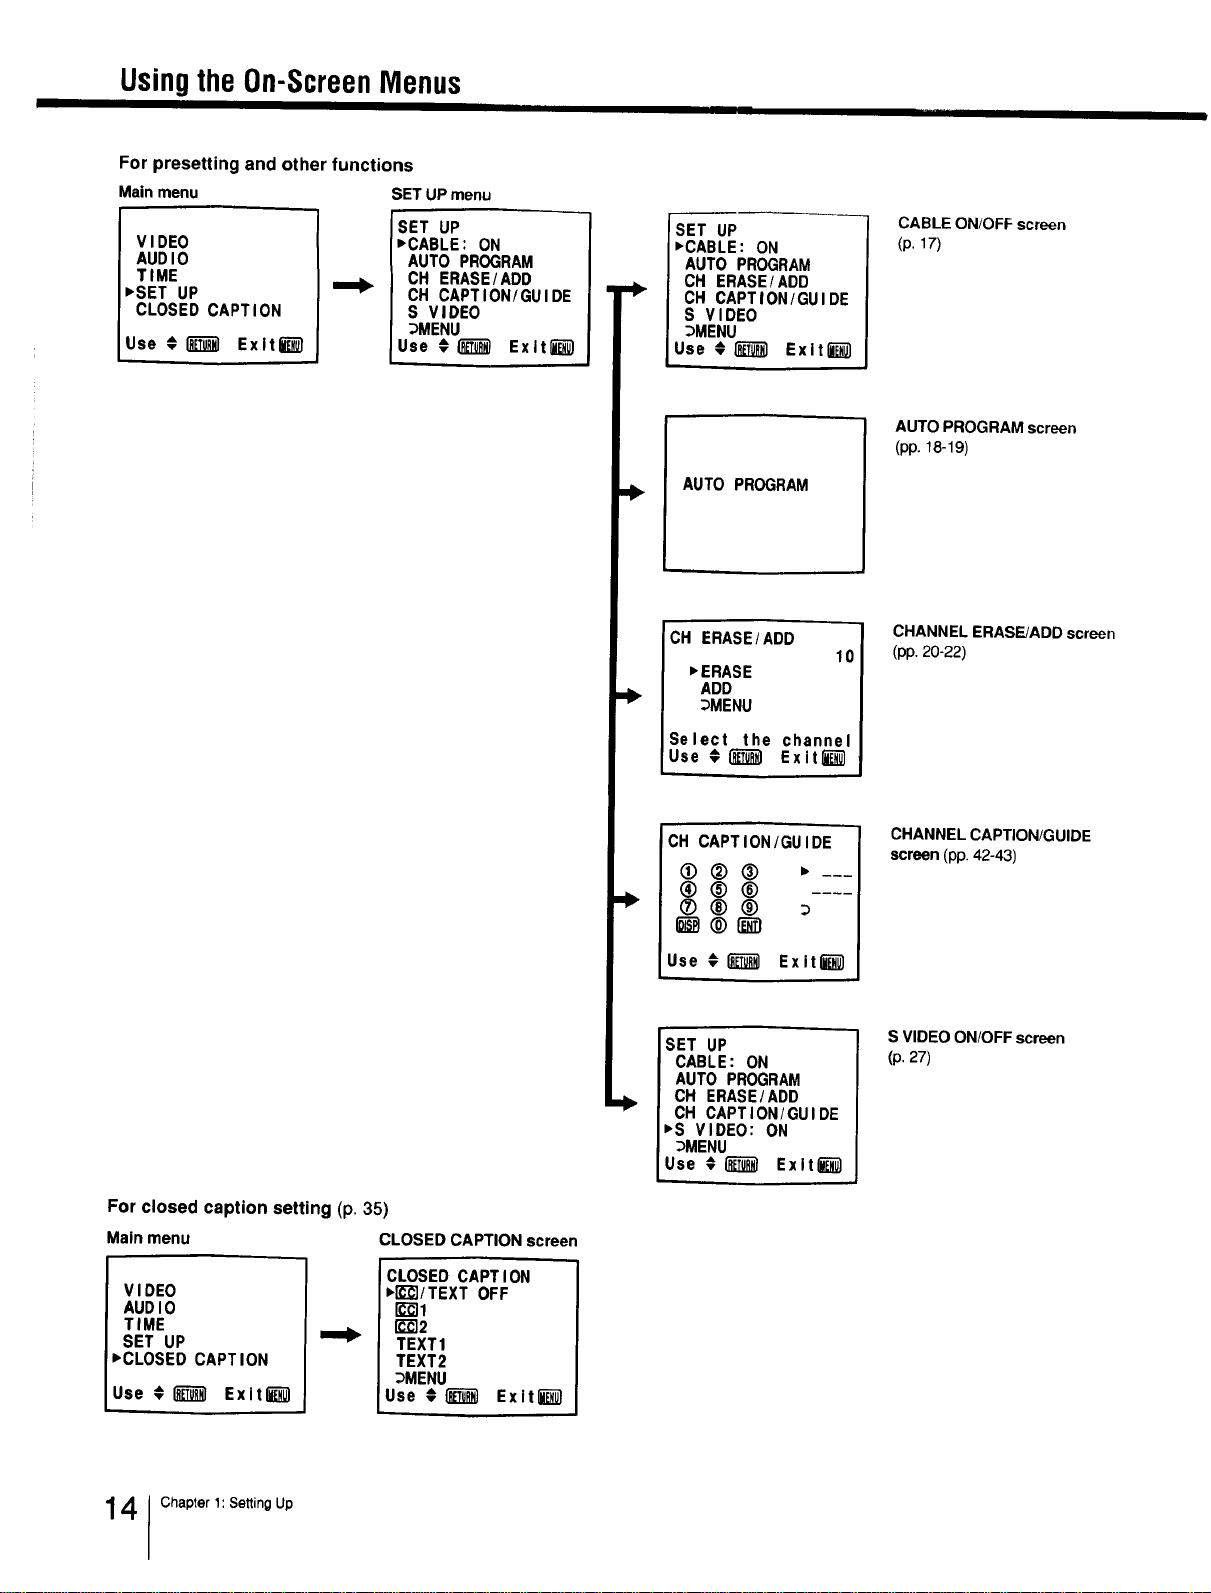
For presetting and other functions
Main menu SETUP menu
VIDEO
AUDIO
TIME
,SET UP
CLOSED CAPTION
Use €_ Exlt_
SET UP
,CABLE: ON
AUTO PROGRAM
CH ERASE/ADD
CH CAPTION/GUIDE
S VIDEO
_MENU
Use €1_ Exlt_
For closed caption setting (p. 35)
Main menu CLOSED CAPTION screen
VIDEO
AUDIO
TIME
SET UP
"CLOSED CAPTION
Use # I_ Exitl_T_l
CLOSED CAPTION
,I'L%1/TEXTOFF
FC_I
r__2
TEXT1
TEXT2
_MENU
Use _{m_) ExltE_]_
,>
>.
SET UP
,CABLE: ON
AUTO PROGRAM
CH ERASE/ADD
CH CAPTION/GUIDE
S VIDEO
_MENU
Use ¢I_T_ Exlt_)
AUTO PROGRAM
CH ERASE/ADD
10
,ERASE
ADD
_MENU
Select the channel
Use €1"_1 Exit l_
CH CAPTION/GUIDE
®®® "---
®®®
Use €1_ ExitjEj_
SET UP I
CABLE: ON
AUTO PROGRAM
CH ERASE/ADD
CH CAPTION/GUIDE
,S VIDEO: ON
_MENU
Use €(_ Exit_
CABLE ON/OFF screen
(p. 17)
AUTO PROGRAM screen
(pp. 18-19)
CHANNEL ERASE/ADD screen
(pp. 20-22)
CHANNEL CAPTION/GUIDE
screen (pp,42-43)
S VIDEO ON/OFF screen
(p. 27)
4 Chapter 1: Setting Up
f
MUTING(_ _SLEEP
"I_/NIDEO
®®®
®®®
®®®
VOL CH
I_jjl_ _ vL_._,_l_:_r_..,.]_ -
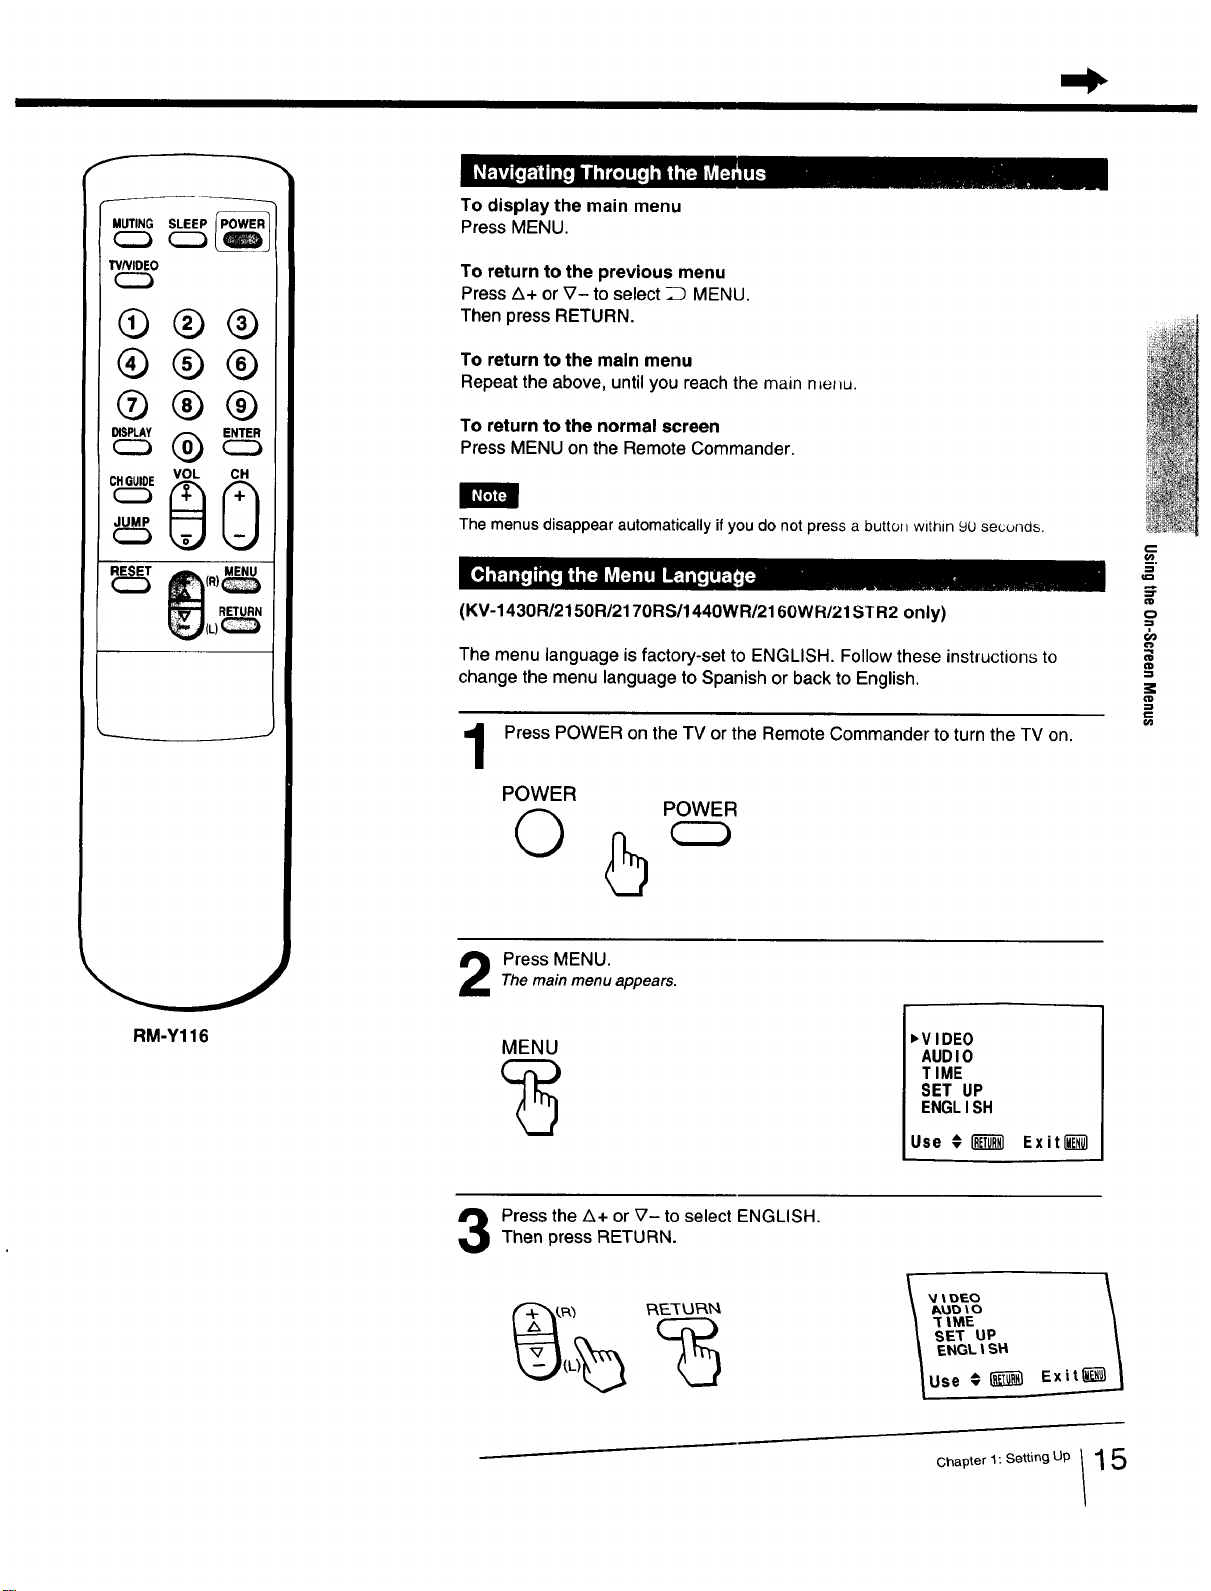
To display the main menu
Press MENU.
To return to the previous menu
Press Z_+or _7- to select _ MENU.
Then press RETURN.
To return to the main menu
Repeat the above, until you reach the main n=e_u.
To return to the normal screen
Press MENU on the Remote Commander.
The menus disappear automatically if you do not press a button within 9U secunas.
(KV-1430R/2150R/2170RS/1440WR/2160WR/21STR2 only)
The menu language isfactory-set to ENGLISH. Follow these instructions to
=0
03
change the menu language to Spanish or back to English.
Press POWER on the TV or the Remote Commander to turn the TV on. "
POWER
O
POWER
RM-Y116
Press MENU.The mainmenu appears.
MENU
,VIDEO
AUDIO
TIME
SET UP
ENGLISH
Use € _ Exit[_l
Press the Z_+ or _7- to select ENGLISH.Then press RETURN.
_DtO
_|ME
SET UP
ENGL|SH
Use _[_ Exit
Chapter 1: Setting Up 1 5
Using the On-ScreenMenu:;
f
MUTING(_I (_SLEEP
TVNIDEO
C_
Q®®
®®®
®®®
_vo._:_OcQ
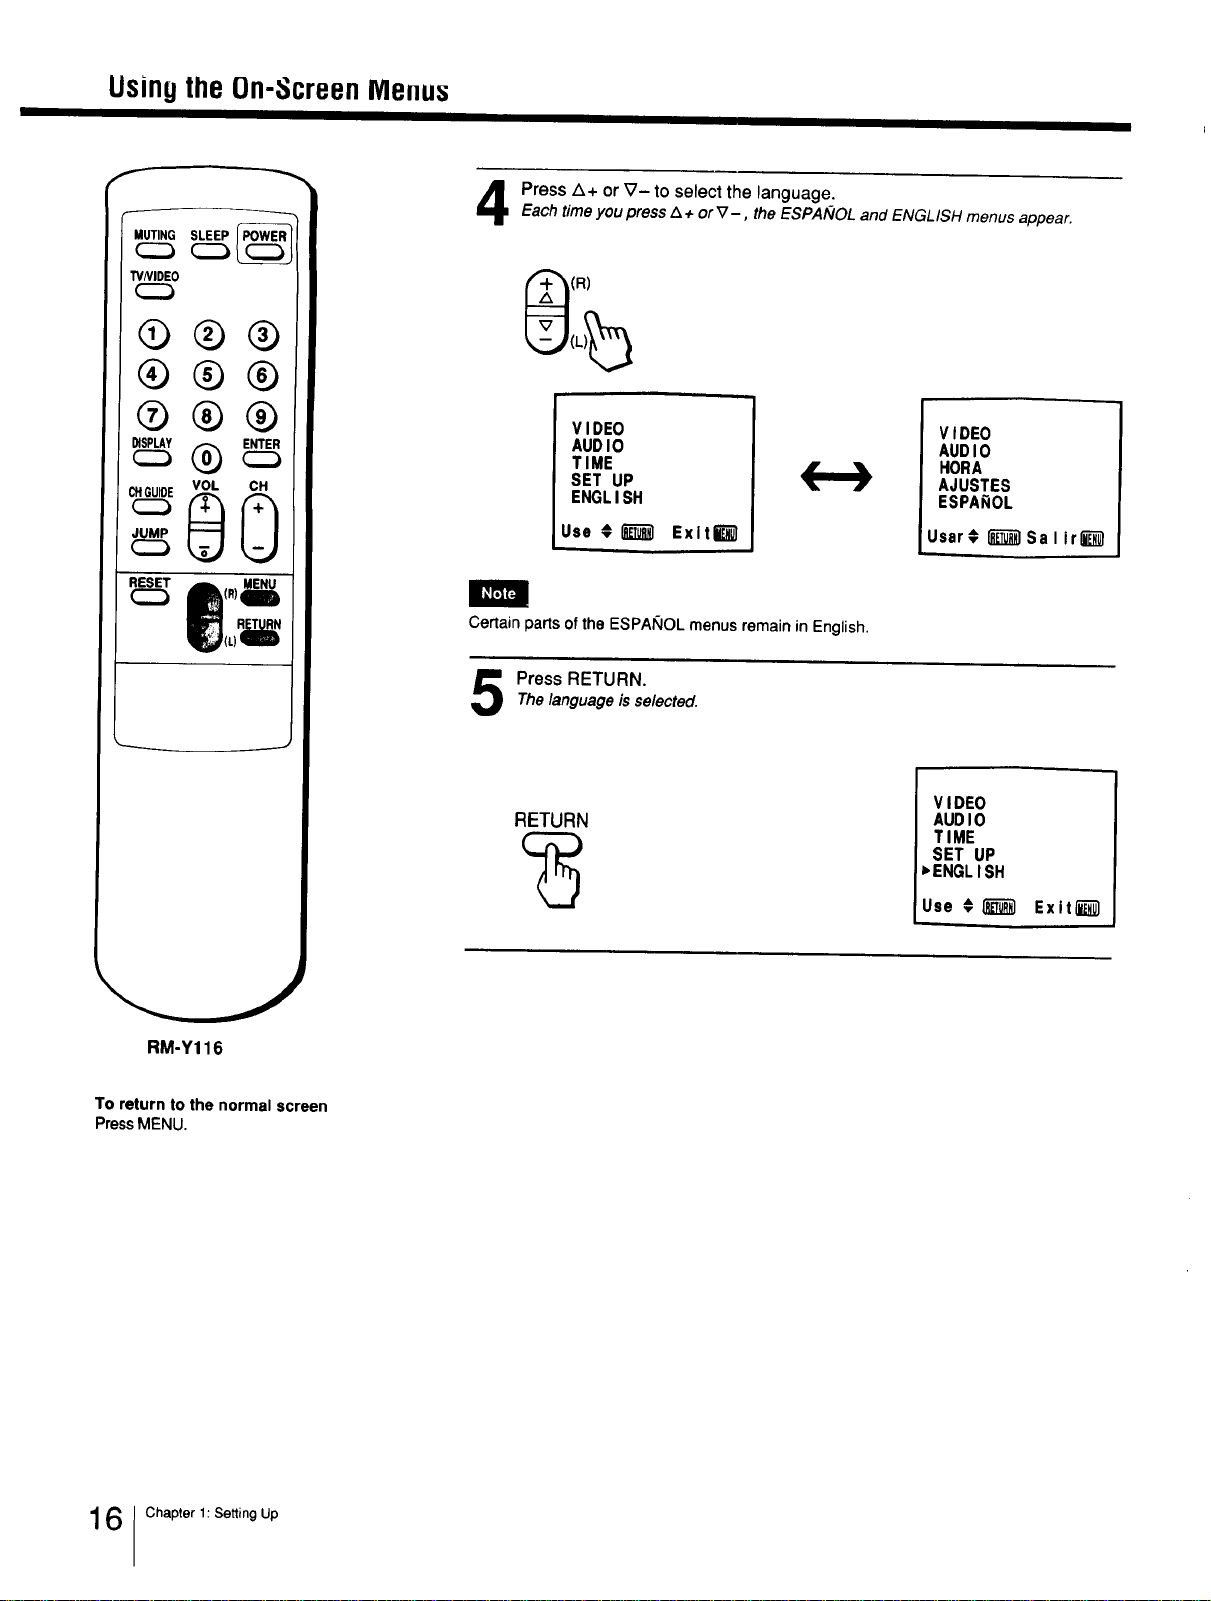
Press Z_+ or V- to select the language.Each timeyou press Z_+orV-, the ESPAIVOLand ENGLISH menus appear,
(R)
VIDEO
AUDIO
TIME
SET UP
ENGLISH
Use ,_ _ Exltk'_
(..-.)
VIDEO
AUDIO
HORA
AJUSTES
ESPA_OL
Usar € _ Sa I ir_
Certain parts of the ESPAI_IOL menus remain in English.
Press RETURN.Thelanguage is selected.
RETURN
VIDEO
AUDIO
TIME
SET UP
,ENGLISH
Use €_ Exit_
RM-Y116
To return to the normal screen
Press MENU.
6 Chapter 1: Setting Up
TurningtheCableModeOnorOff
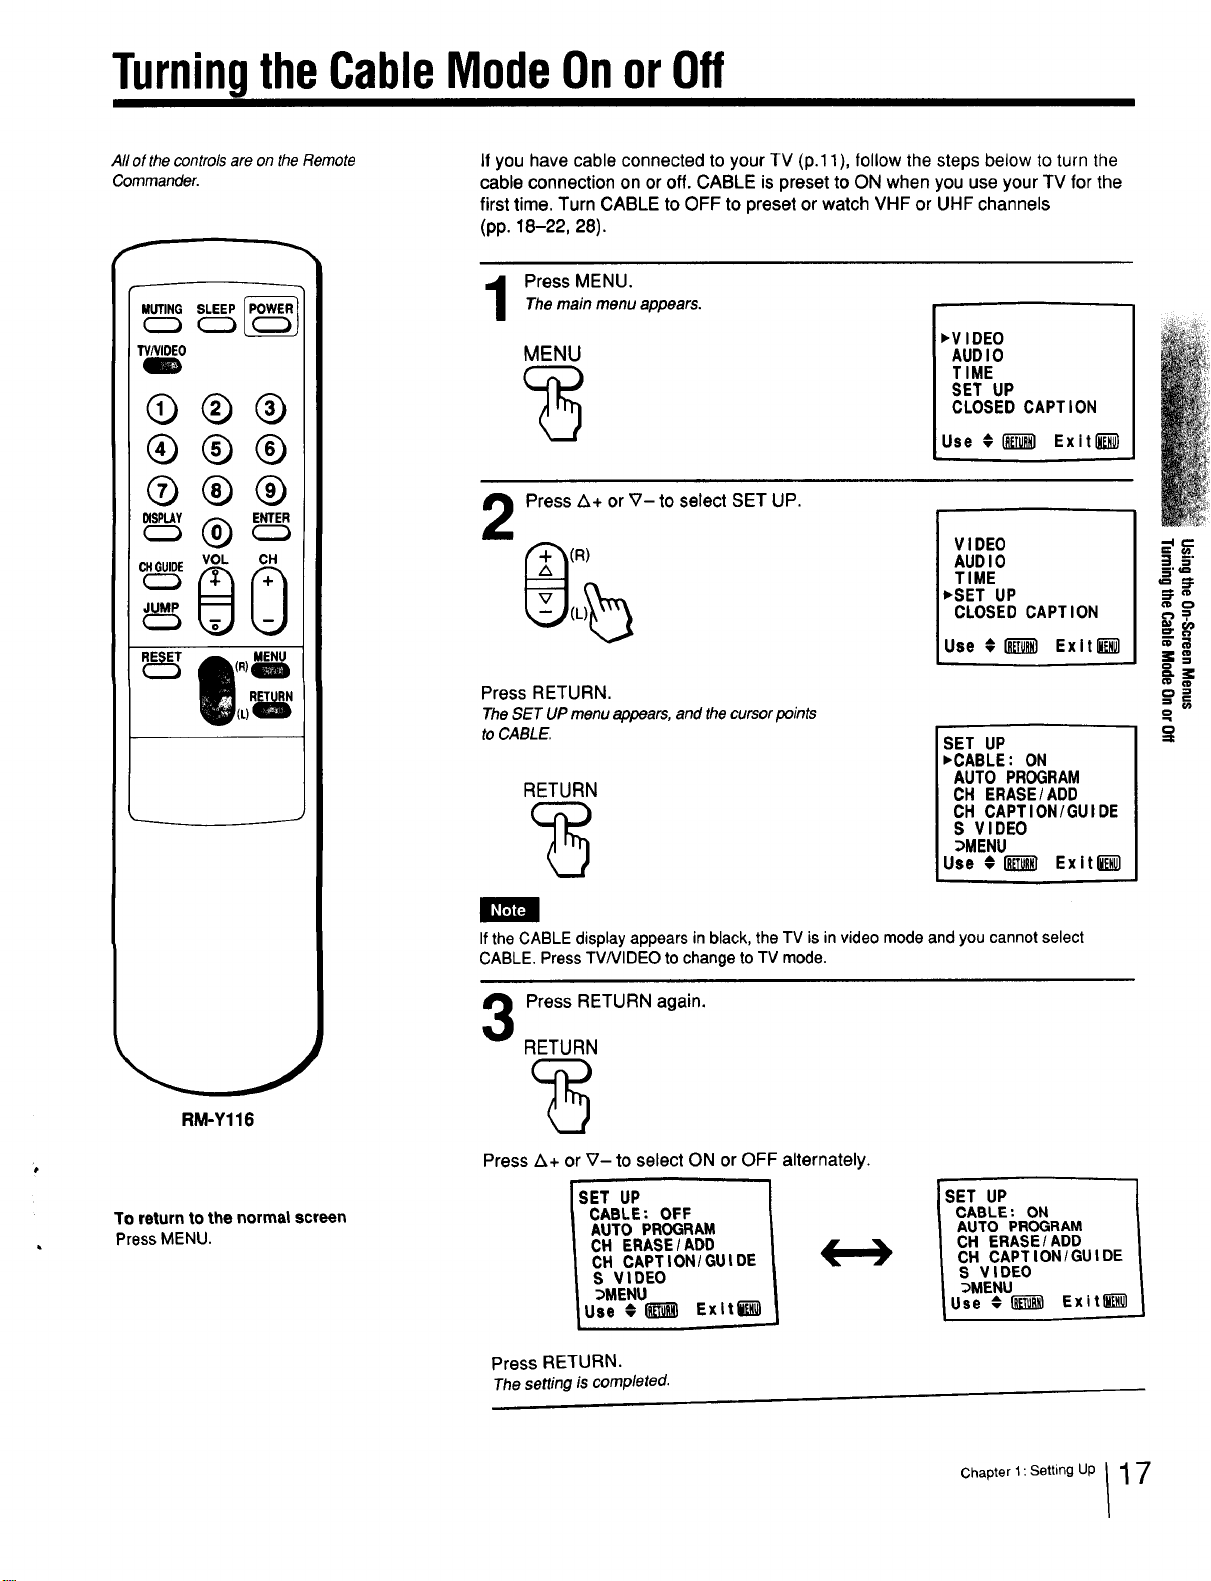
All of the controls are on the Remote
Commander.
f
MUTING SLEEP
W/VIDEO
RM-Y116
To return to the normat screen
Press MENU.
if you have cable connected to your TV (p.11), follow the steps below to turn the
cable connection on or off. CABLE is preset to ON when you use your TV for the
first time. Turn CABLE to OFF to preset or watch VHF or UHF channels
(pp. 18-22, 28).
Press MENU.Themainmenu appears.
MENU
,VIDEO
AUDIO
TIME
SET UP
CLOSED CAPTION
Use €_ Exit_}
Press A+ or V- to select SET UP.
(R)
Press RETURN.
The SET UP menu appears, and the cursor points
to CABLE.
RETURN
VIDEO
AUDIO
TIME
_SET UP
CLOSED CAPTION
Use #I__ Exltli_l
SET UP
,CABLE: ON
AUTO PROGRAM
CH ERASE/ADD
CH CAPTION/GUIDE
S VIDEO
_MENU
Use 01_T_I ExitE_l
If the CABLE display appears in black, the TV is in video mode and you cannot select
CABLE. Press TVNIDEO to change to TV mode.
3
Press RETURN again.
RETURN
Press Z_+ or V- to select ON or OFF alternately.
SET UP
CABLE: OFF
AUTO PROGRAM
CH ERASE/ADD
CH CAPTION/GUIDE
S VIDEO
_MENU
Use _l_ Exltt_)
SET UP
CABLE: ON
AUTO PROGRAM
CH ERASE/ADD
CH CAPTION/GUIDE
S VIDEO
_MENU
Use € _ Exit_
Press RETURN.
The setting is completed.
o
Chapter 1: Setting Up / 1 7
PresettingTVChannels
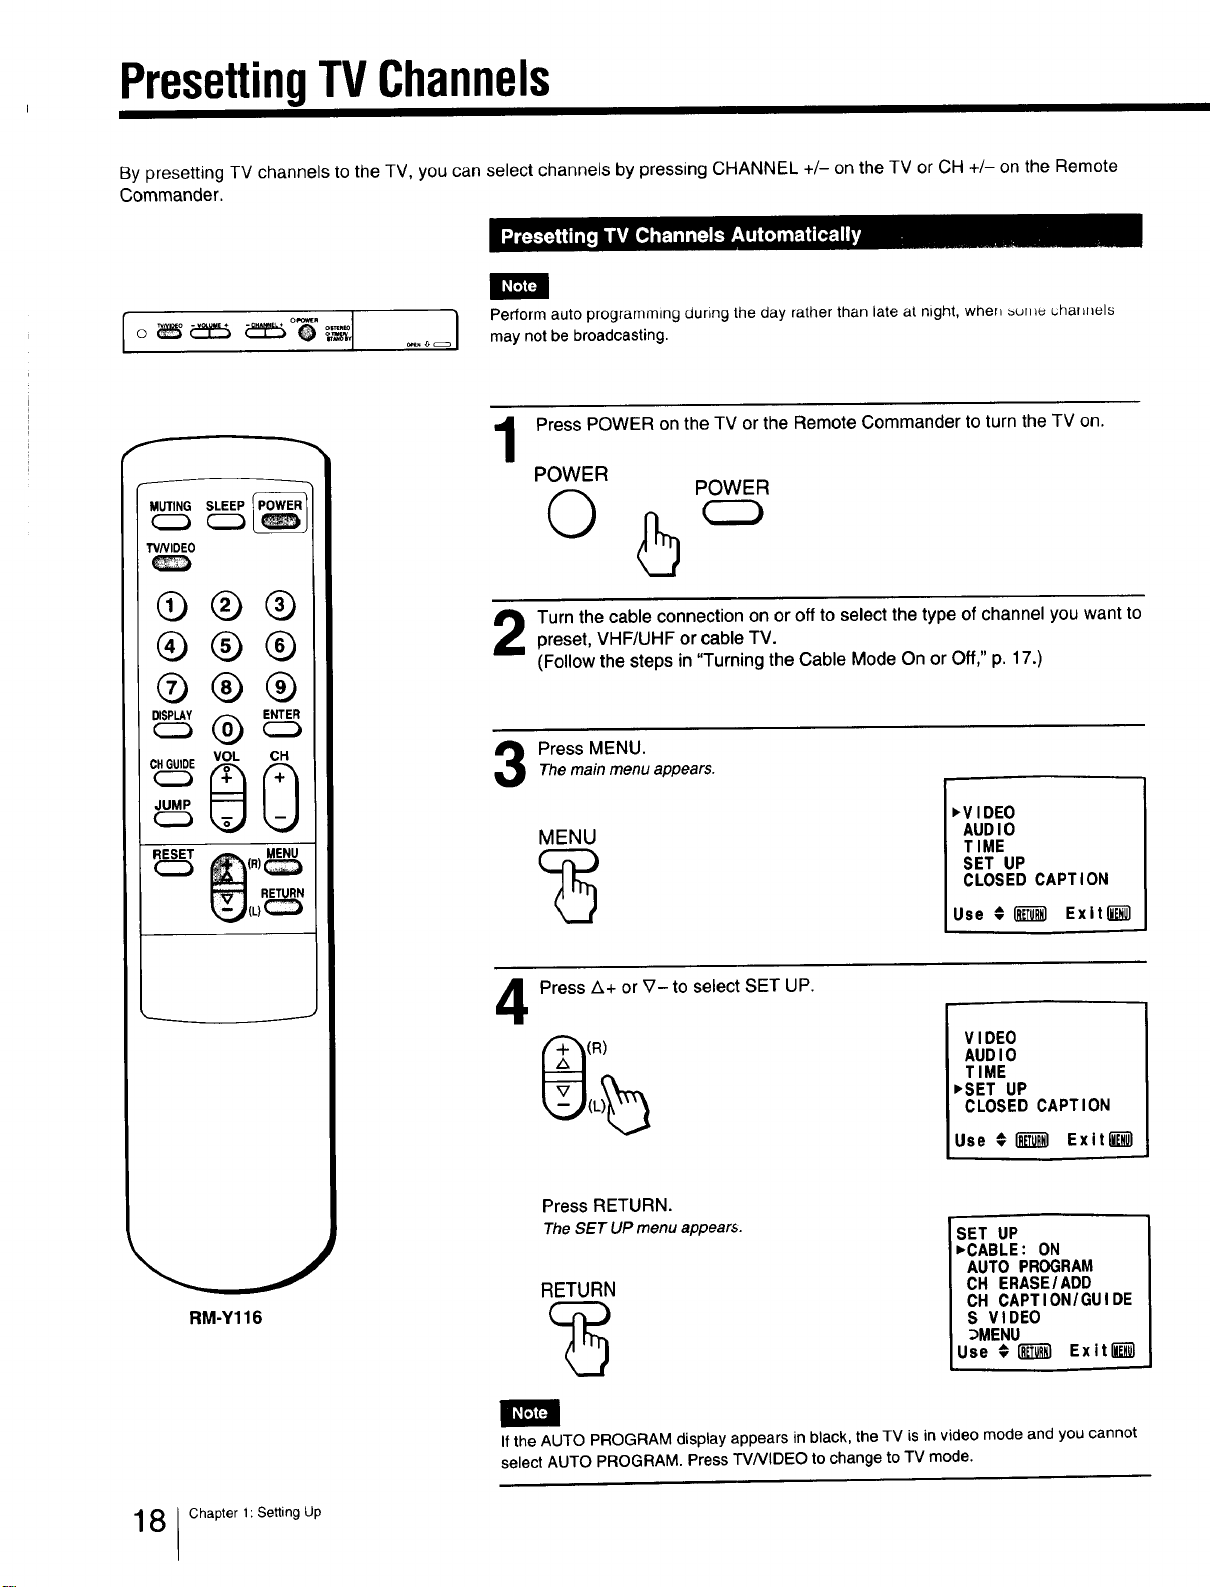
By presetting TV channels to the TV, you can select channels by pressing CHANNEL +/- on the TV or CH +/- on the Remote
Commander.
I_FIF4
I erform auto programming during the day rather than late at night, when sume chafznels
_,=_ may not be broadcasting.
MUTING(_ (_SLEEP ____
TVNIDEO
®®®
®®®
®®®
VOL CH
RM-Y116
Press POWER on the TV or the Remote Commander to turn the TV on.
POWER
Q
POWER
Turn the cable connection on or off to select the type of channel you want to
preset, VHF/UHF or cable TV.
(Follow the steps in "Turning the Cable Mode On or Off," p. 17.)
Press MENU.
The mainmenu appears.
MENU
,VIDEO
AUDIO
TIME
SET UP
CLOSED CAPTION
Use € _ Exitl_
4
Press A+ or V- to select SET UP.
1R)
VIDEO
AUDIO
TIME
,SET UP
CLOSED CAPTION
Use € _ Exit__l
Press RETURN.
The SET UP menu appears.
RETURN
SET UP
,CABLE: ON
AUTO PROGRAM
CH ERASEIADD
CH CAPTION/GUIDE
S VIDEO
_MENU
Use €1_ Exit_)
If the AUTO PROGRAM display appears in black, the TV is in video mode and you cannot
select AUTO PROGRAM. Press TVNIDEO to change to TV mode.
8 Chapter 1: Setting Up

5
Press A+ or V- to select AUTO PROGRAM.
SET UP
CABLE: ON
,AUTO PROGRAM
CH ERASE/ADD
CH CAPTION/GUIDE
S VIDEO
_MENU
Use €1_ Exit l_l
Press RETURN.
RETURN
"AUTO PROGRAM" appears on the screen and receivable
channels (other than the channels already preset) are preset in
numerical sequence. The channels previously preset will not remain
in the TV's memory.
When no more channels can be found, the programming stops and
the lowest numbered channel is displayed.
Receivable channels for this TV
VHF: 2 - 13
UHF: 14 - 69
Cable: 1 - 125
To select TV channels without
presetting
Press 0 - 9 and ENTER.
To return to the normal screen
Press MENU.
To erase unnecessary channels, or to add
channels that could not be preset
automatically because their signal was too
weak, follow the steps in "Erasing
Unnecessary Channels - CHANNEL ERASE"
(pp. 20-21) and "Presetting Only Desired
Channels - CHANNEL ADD" (p. 22).
"o
!
._=
ill
Chapter 1: Setting Up t 19
PresettingTV Channels
f
®®®
®®®
®®®
c_ VOL CH
RM-Y116
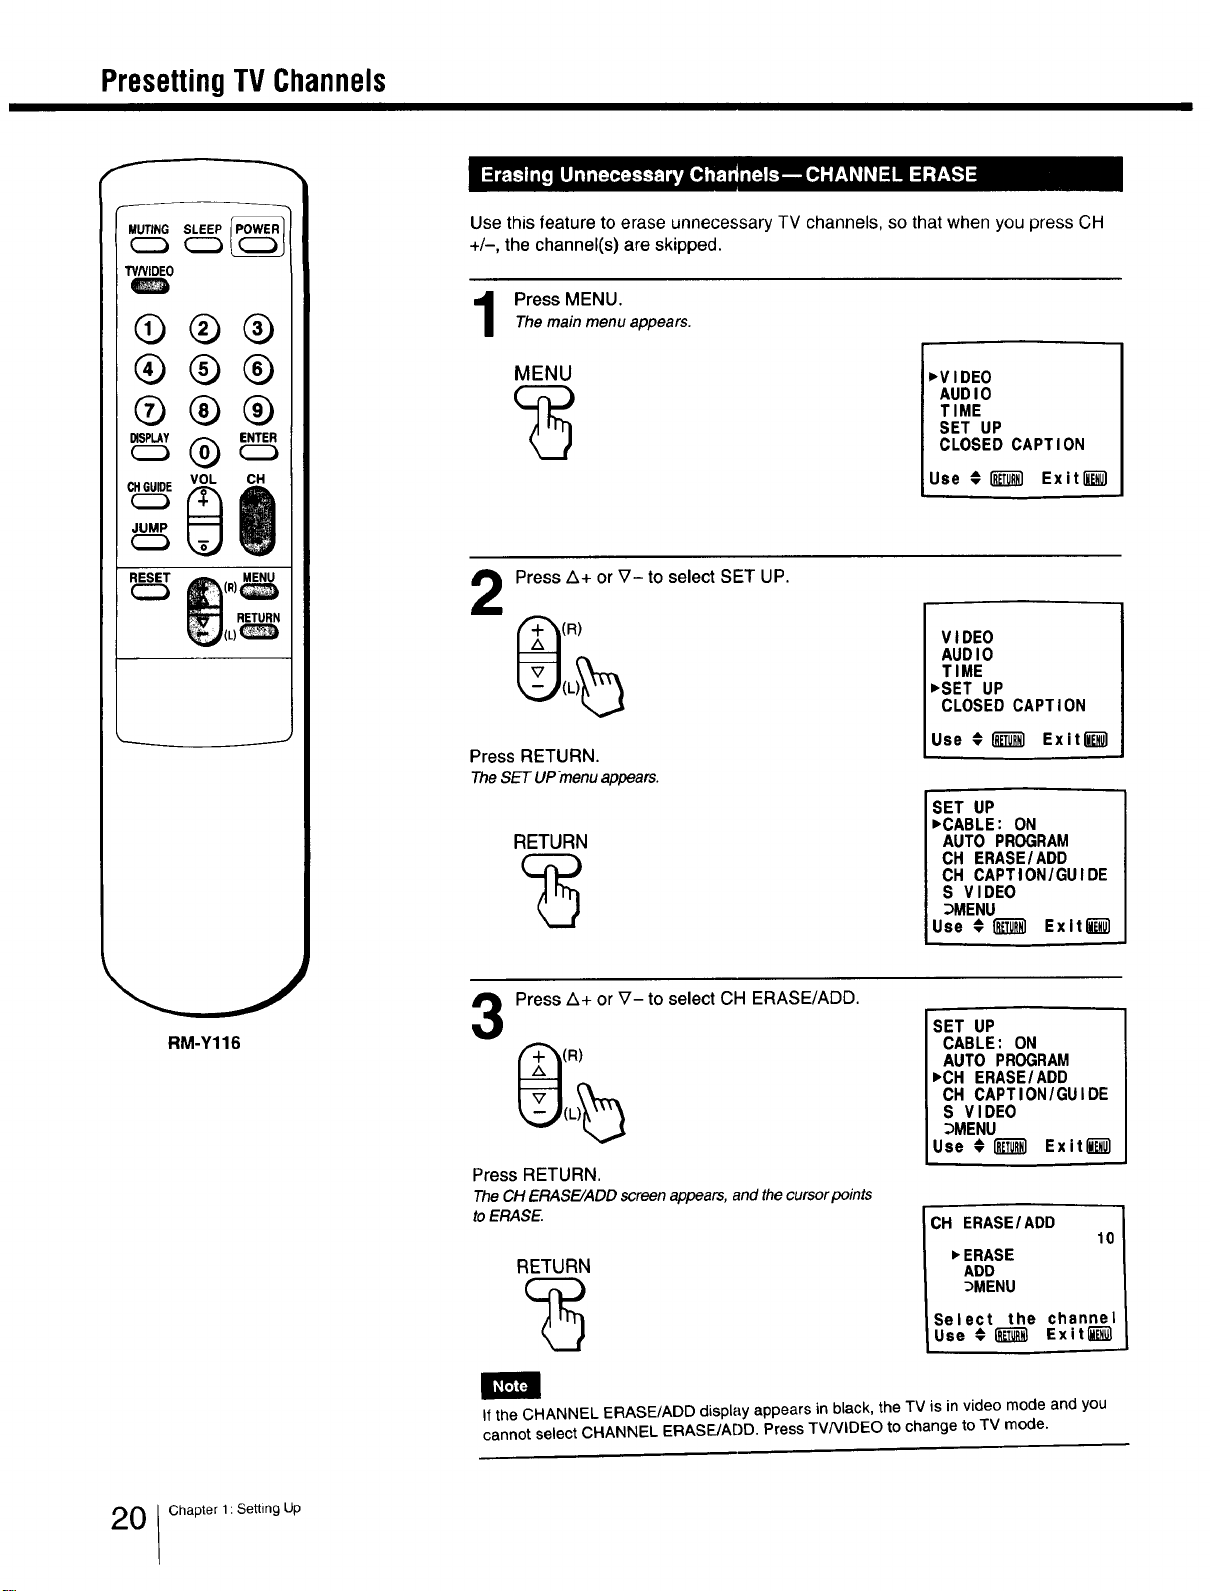
Use this feature to erase unnecessary TV channels, so that when you press CH
+/-, the channel(s) are skipped.
Press MENU.
The main menu appears.
MENU
,VIDEO
AUDIO
TIME
SET UP
CLOSED CAPTION
Use # _ Exit_
Press Z_+ or V- to select SET UP.
(R)
Press RETURN.
TheSETUPmenuappears.
RETURN
VIDEO
AUDIO
TIME
_SET UP
CLOSED CAPTION
Use #1_1 Exit_
SET UP
_CABLE: ON
AUTO PROGRAM
CH ERASE/ADD
CH CAPTION/GUIDE
S VIDEO
_MENU
Use #I_T_ Exltl_
3
Press A+ or V- to select CH ERASE/ADD.
(R)
Press RETURN.
The CH ERASE/ADD screen appears, and the cursor points
to ERASE.
RETURN
SET UP
CABLE: ON
AUTO PROGRAM
_CH ERASE/ADD
CH CAPTION/GUIDE
S VIDEO
_MENU
Use #i_ Exitl_
CH ERASE/ADD
10
_ERASE
ADD
_MENU
Select the channel
Use € _ Exit[_
llF'_]
If the CHANNEL ERASE/ADD display appears in black, the TV is in video mode and you
cannot select CHANNEL ERASE/ADD. Press TVNIDEO to change to TV mode.
0 Chapter 1: Setting Up
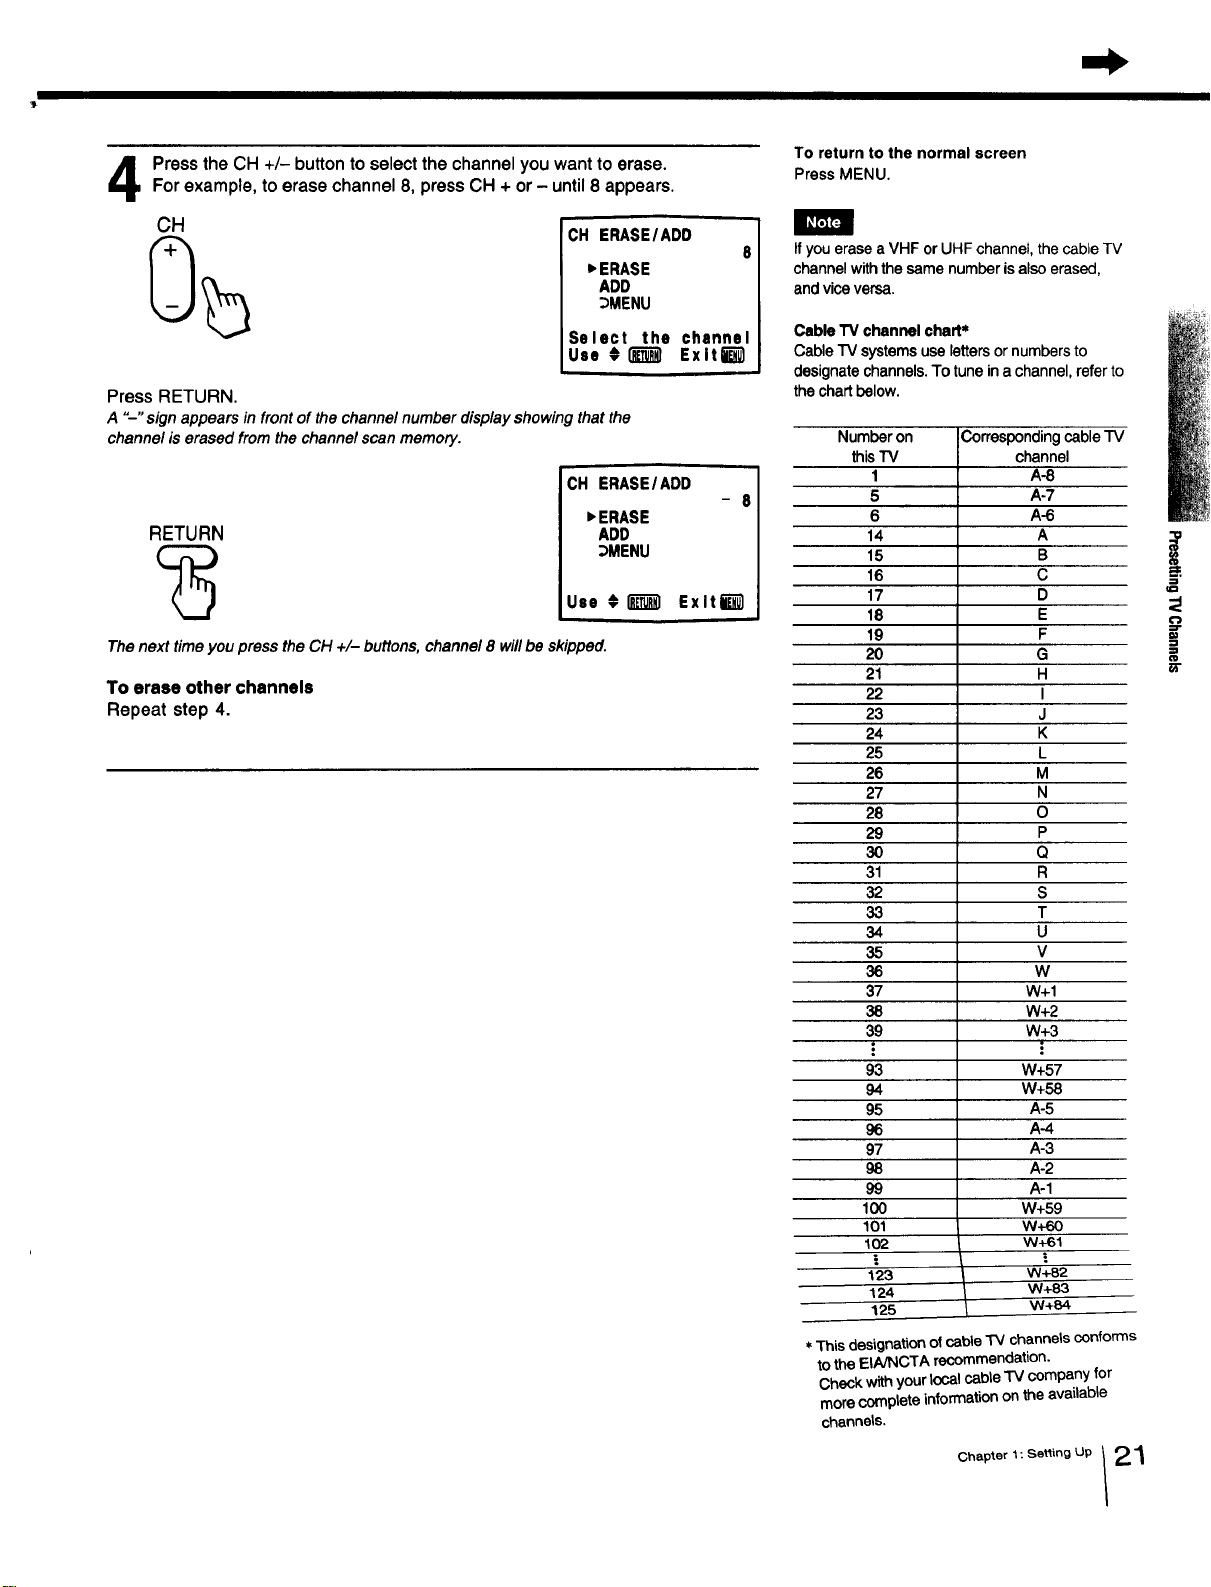
PresstheCH +/- buttontoselect the channelyouwant to erase.Forexample,toerasechannel8, pressCH + or- until8 appears.
CH
CH ERASE/ADD
8
_ERASE
ADD
_MENU
Select the channel
Use #_ Exlti_
Press RETURN.
A "--" sign appears in front of the channel number display showing that the
channel is erased from the channel scan memory.
RETURN
CH ERASE/ADD
- 8
_ERASE
ADD
_MENU
Use #l_'_l ExltW
The next time you press the CH +/- buttons, channel 8 will be skipped.
To erase other channels
Repeat step 4.
To return to the normal screen
Press MENU.
If you erase a VHF or UHF channel, the cable TV
channel withthe same numberisalso erased,
and vice versa.
Cable"IVchannelchart*
CableTV systemsuselettersornumbersto
designatechannels.Totuneina channel,referto
thechartbelow.
Number on
this"IV
I
5
6
14
15
16
17
18
19
2O
21
22
23
24
25
26
27
28
29
3O
31
32
33
34
35
36
37
38
39
93
94
95
96
97
98
99
IO0
1Ol
1o2
!
123
124
125
Correspondingcable "IV
channel
A-8
A-7
A-6
A
B
C
D
E
F
G
H
I
J
K
L
M
N
O
P
Q
R
S
T
U
V
W
W+I
W+2
W+3
.=
W+57
W+58
A-5
A-4
A-3
A-2
A-1
W+59
w+60
w+61
=.
W+82
W+83
W+84
* This designationof cable "IV channels conforms
to the EINNCTA recommendation.
Check with your local cable TV company for
more complete information on the available
channels.
Chapter 1 : Setting Up 2 "_
!
i
PresettingTV Channels
I IIIm' fliii i I
f
MUTING(_ (_)SLEEP[PO(_l:t__
WNIDE0
®®®
G®®
®®®
RM-Y116
To return to the normal screen
Press MENU.
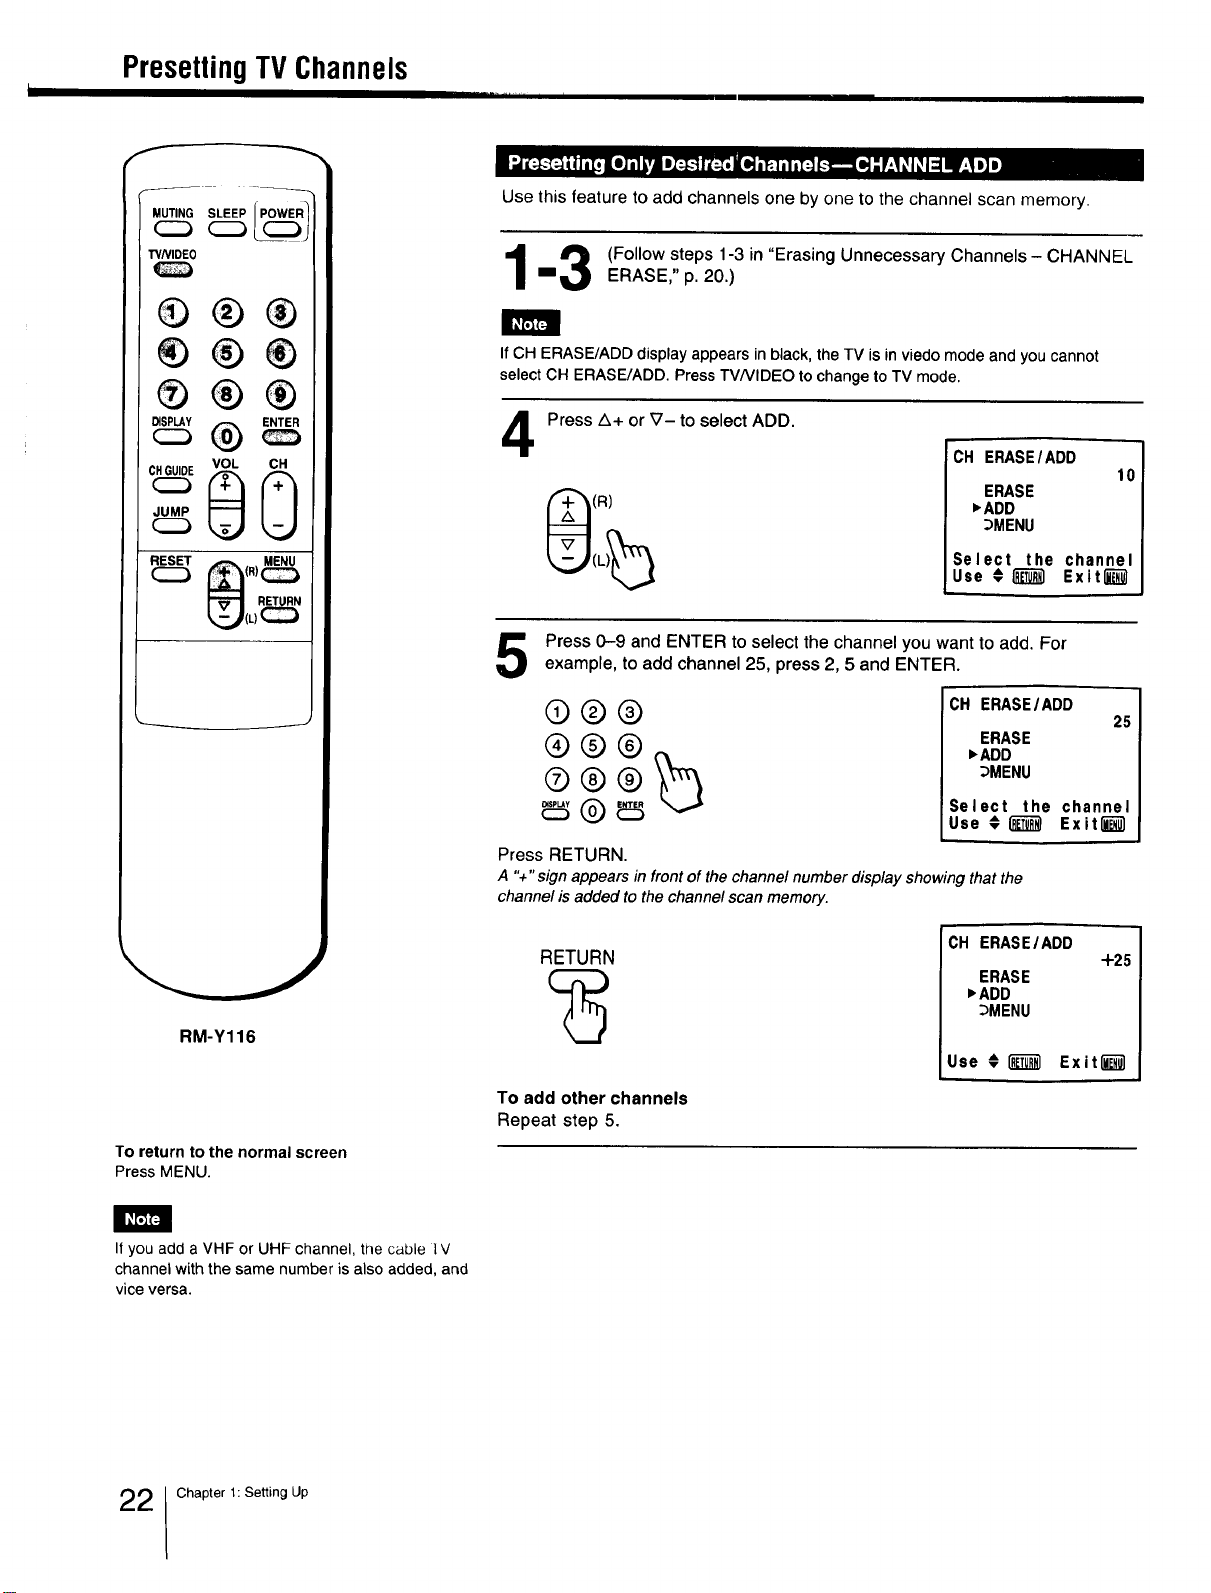
Use this feature to add channels one by one to the channel scan memory.
_ (Follow steps 1-3 in "Erasing Unnecessary Channels - CHANNEL
==_ ERASE," p. 20.)
If CH ERASE/ADD display appears in black, the TV is in viedo mode and you cannot
select CH ERASE/ADD. Press TV/VIDEO to change to TV mode.
4
Press A+ or _7- to select ADD.
(R)
CH ERASE/ADD
10
ERASE
_ADD
_MENU
Select the channel
Use €_ Exiting1
Press 0-9 and ENTER to select the channel you want to add. For
example, to add channel 25, press 2, 5 and ENTER.
®®®
®@®
CH ERASE/ADD
25
ERASE
_ADD
_MENU
Select the channel
Use €(_ Exiting1
Press RETURN.
A "+" sign appears in front of the channel number display showing that the
channel is added to the channel scan memory.
RETURN
To add other channels
Repeat step 5.
CH ERASEIADD
+2_
ERASE
)ADD
_MENU
Use € i_ Exit""""""""""_
I_F'JF4
If you add a VHF or UHF channel, the cable l V
channel with the same number is also added, and
vice versa.
2 Chapter 1: Setting Up

ConnectingOtherEquipment
After connecting, you will be able to play back video tapes.
KV-2OTSSO
I IR EMITTER*
1
Rear of:
KM-20TS50
KV-20TS29**
KV-2170RS**
KV-21STR2**
* KV-20TS50 only
**These models are equipped with only one
set of video input jacks.
to VHF/UHF
to VIDEO (yellow)
_ AUDIO-L
o (white),,,4__
to AUDIO-R (red) VMC-810S/820S (not supplied)]
\
tOaudio output _ _
,ov,_eoout_u,_ _l
:Signal tlow
r
VHF/
UHF
output
VCR
€'_ "u
ii
_1' €1
,5'm.
3_
If you connect a monaural VCR, connect the audio output of the
VCR to the L (MONO) jack of VIDEO IN on the TV.
The monaural sound will be heard from both speakers.
KV-13TR28/29
Rear of:
KM-131"R28/29 KV-20TR23*
KV-1430R KV-2150R*
KV-1440WR KV-2160WR*
* These models are equipped with only one
set of video input jacks.
: Signal flow
to VHI-/UHI-
to VIDEO (yellow)
to AUDIO (black)
VHF/
UHF
output
VMC-720M (not suppliedX
to video output _ [_
to audio output _ 1,0,1
I
\\ \ll
VCR
nil/
F
I
Chapter 1: Setting Up 23
ConnectingOtherEquipment
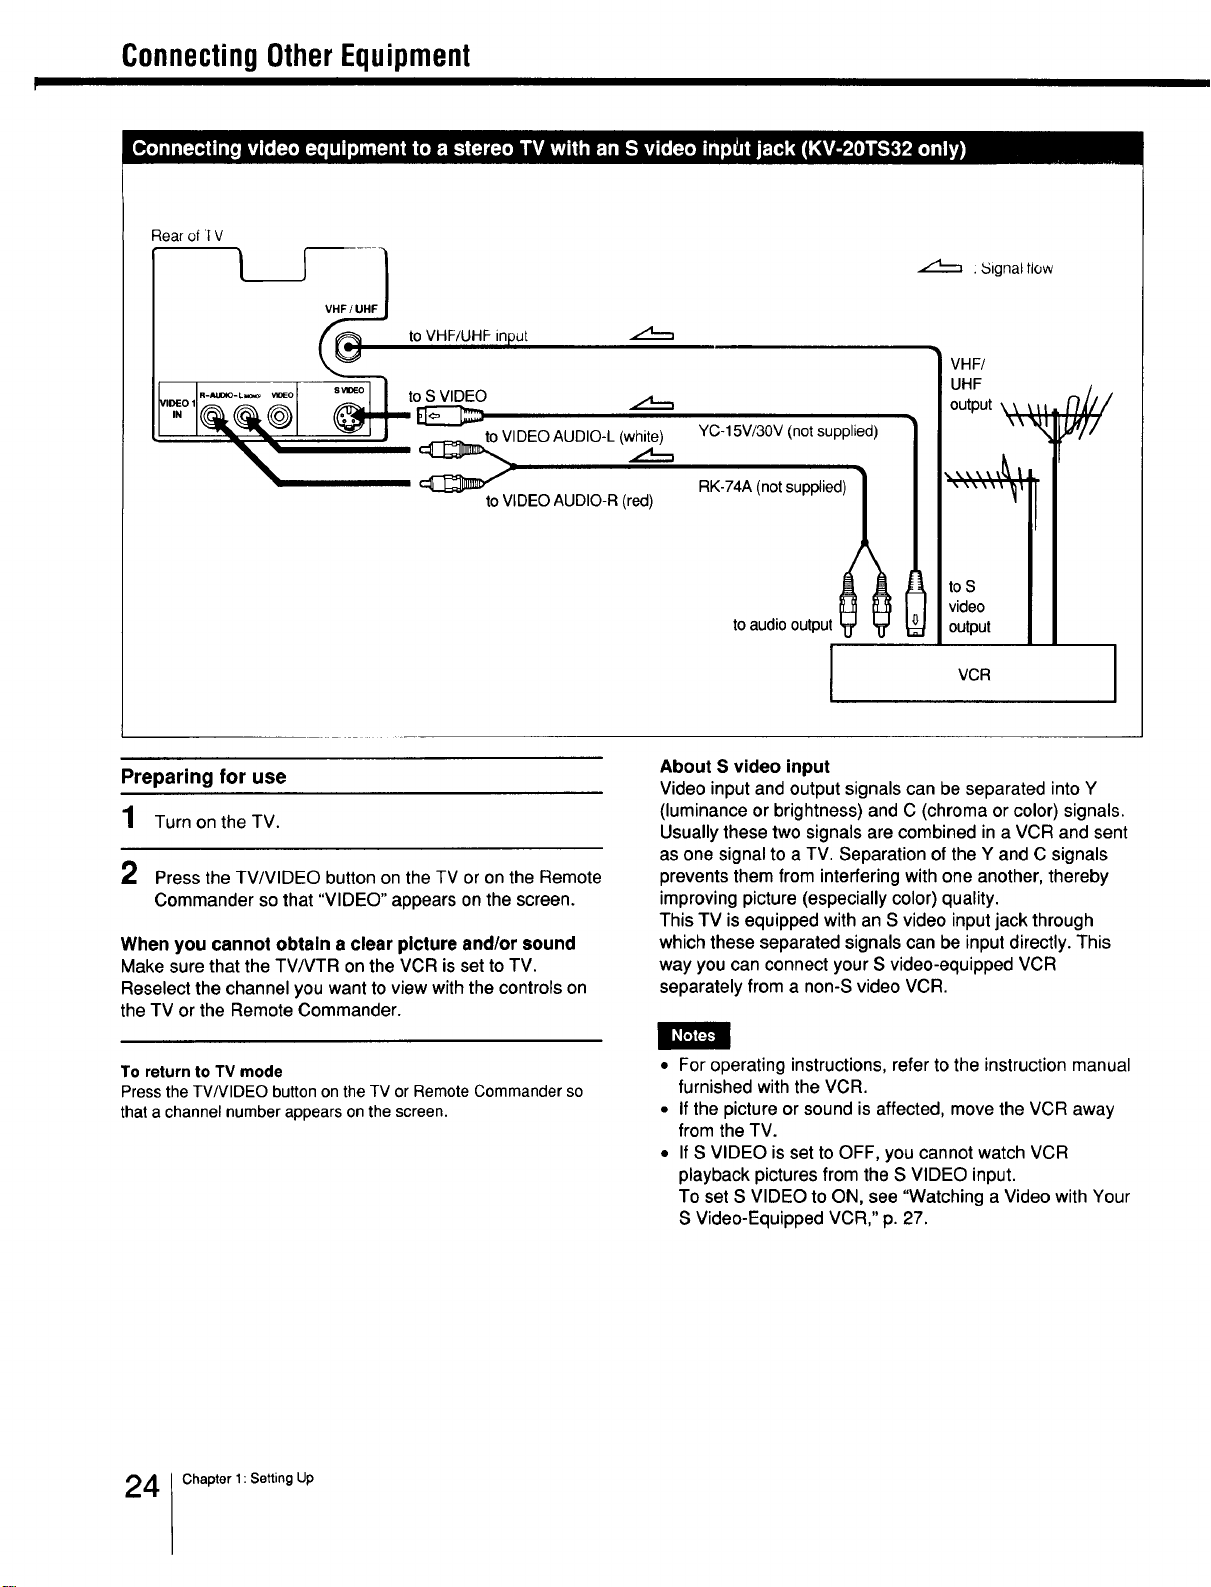
Rear of ! V
VHF/UHF
to VHF/UHF in )ut ,,.,4._._,
toS VIDEO
E3::
DEO AUDIO-L(white)
to VIDEOAUDIO-R(red)
YC-15V/30V(notsupplied)
RK-74A(notsupplied)
toaudiooutput
1
_Signalflow
VHF/
UHF
output k\ \it
I
to S
video
output
VCR
n/l/
J
Preparing for use
1 Turn on the TV.
2 Press the TV/VIDEO button on the TV or on the Remote
Commander so that "VIDEO" appears on the screen.
When you cannot obtain a clear picture and/or sound
Make sure that the TV/VTR on the VCR is set to TV.
Reselect the channel you want to view with the controls on
the TV or the Remote Commander.
About S video input
Video input and output signals can be separated into Y
(luminance or brightness) and C (chroma or color) signals.
Usually these two signals are combined in a VCR and sent
as one signal to a TV. Separation of the Y and C signals
prevents them from interfering with one another, thereby
improving picture (especially color) quality.
This TV is equipped with an S video input jack through
which these separated signals can be input directly. This
way you can connect your S video-equipped VCR
separately from a non-S video VCR.
To return to TV mode
Press the TV/VIDEO button on the TV or Remote Commander so
that a channel number appears on the screen.
• For operating instructions, refer to the instruction manual
furnished with the VCR.
• If the picture or sound is affected, move the VCR away
from the TV.
• If S VIDEO is set to OFF, you cannot watch VCR
playback pictures from the S VIDEO input.
To set S VIDEO to ON, see "Watching a Video with Your
S Video-Equipped VCR," p. 27.
4 Chapter 1: Setting Up
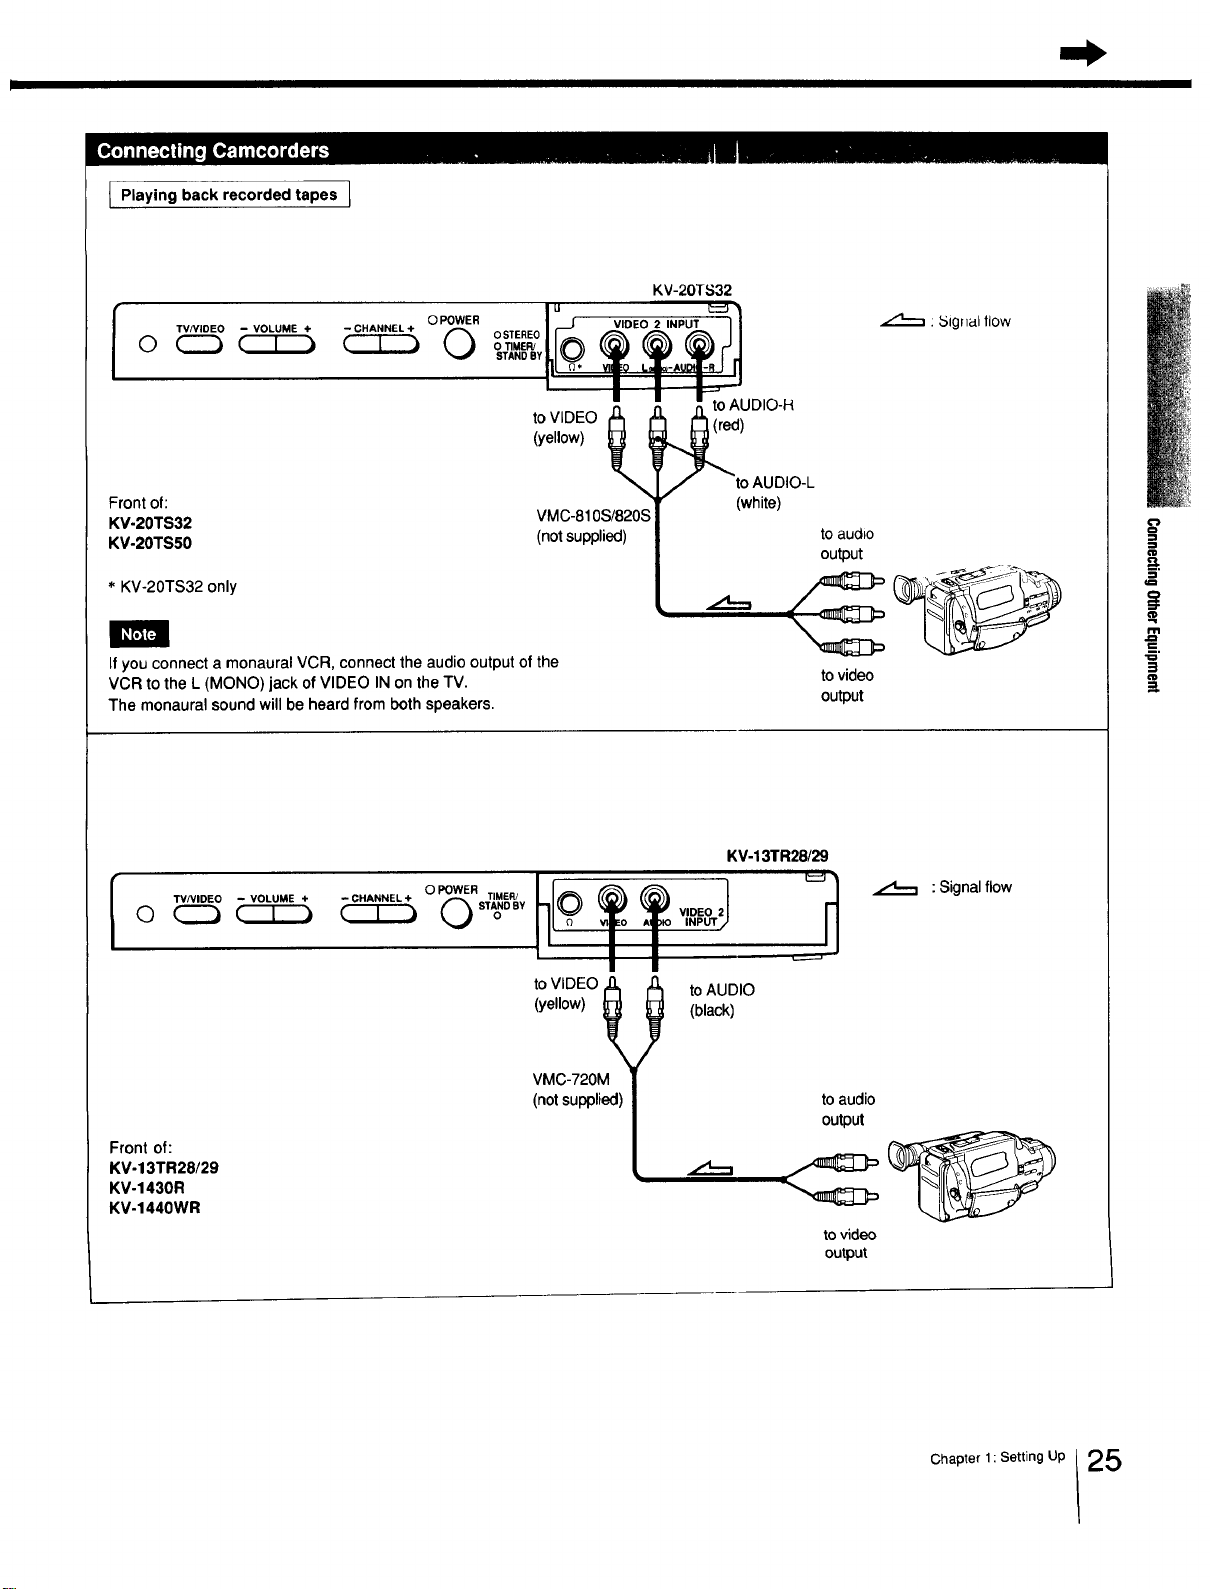
I Playing back recorded tapes 1
I 0 POWER
TVP/IDEO - VOLUME + - CHANNEL +
©
Front of:
KV-20TS32
KV-20TS50
* KV-20TS32 only
KV-20TS32
I _ WDEO2 =NPUT I/
- I I i_
,_ to AUDIO-H
toVIDEO _ _
(yellow) )
to AUDIO-L
(white)
VMC-810S/820S
(not supplied)
If you connect a monaural VCR, connect the audio output of the
VCR to the L (MONO) jack of VIDEO IN on the TV.
The monaural sound will be heard from both speakers.
: _5ignal llow
to audio
output
to video
output
l TVNIDEO - VOLUME +
Front of:
KM-13TR28/29
KV-1430R
KV-1440WR
hlot t v,,0oJ
t'11
KV-13TR28/29
--CHANNEL+
to VIDEO 1(_
(yellow) _
VMC-720M
(not supplied)
to AUDIO
(black)
.,,4---,
: Signal flow
to audio
output
to video
output
Chapter 1: Setting Up 25
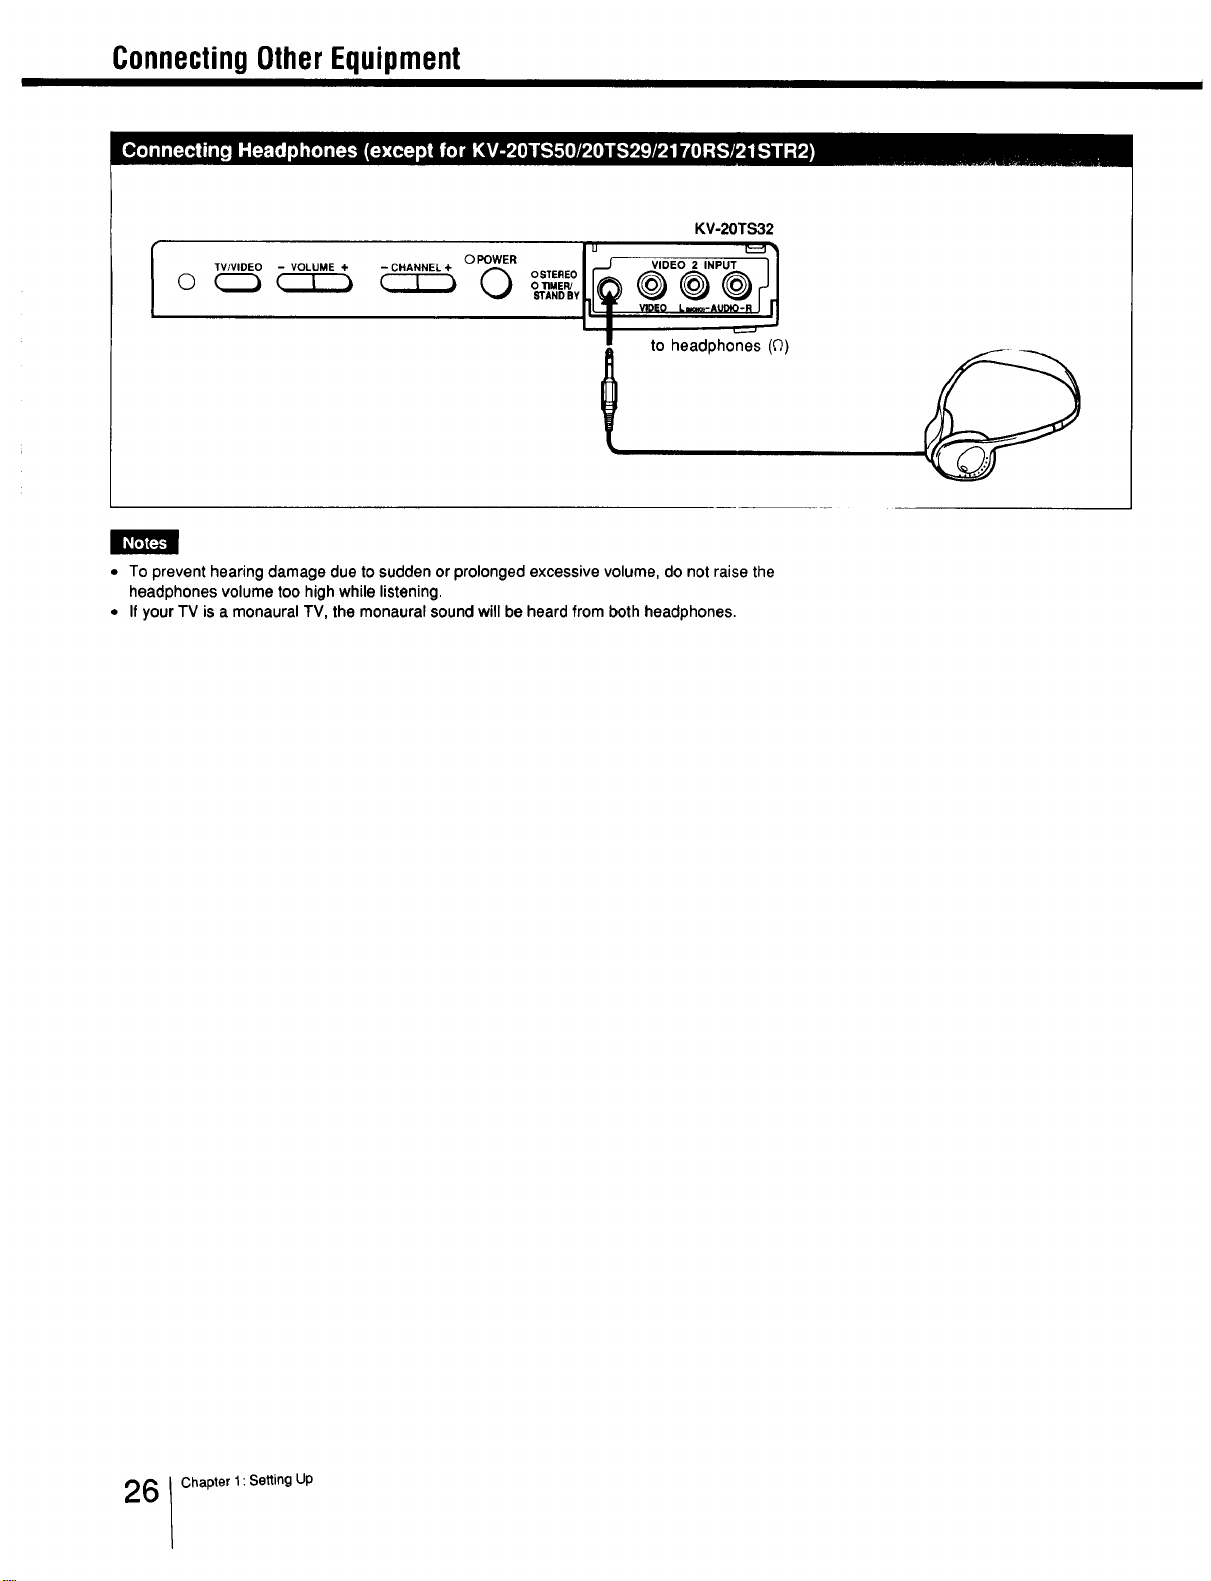
ConnectingOtherEquipment
/
O POWER
TV/VIDEO - VOLUME + - CHANNEL +
o _ (222223
L)
KV-20TS32
o STEREO _ E P
I to headphones (0)
• To prevent hearing damage due to sudden or prolonged excessive volume, do not raise the
headphones volume too high while listening.
• If your TV is a monaural TV, the monaural sound will be heard from both headphones.
6 Chapter 1: Setting Up
f
f
MUTINGC_CZ_SLEEP
W/VIDEO
®®®
®®®
®®®
vo, Q cQ
RM-Y116
To return to the normal screen
Press MENU.
If you set S VIDEO to ON, the TV
automatically receives S video signals
whenever a VCR with S video is connected.
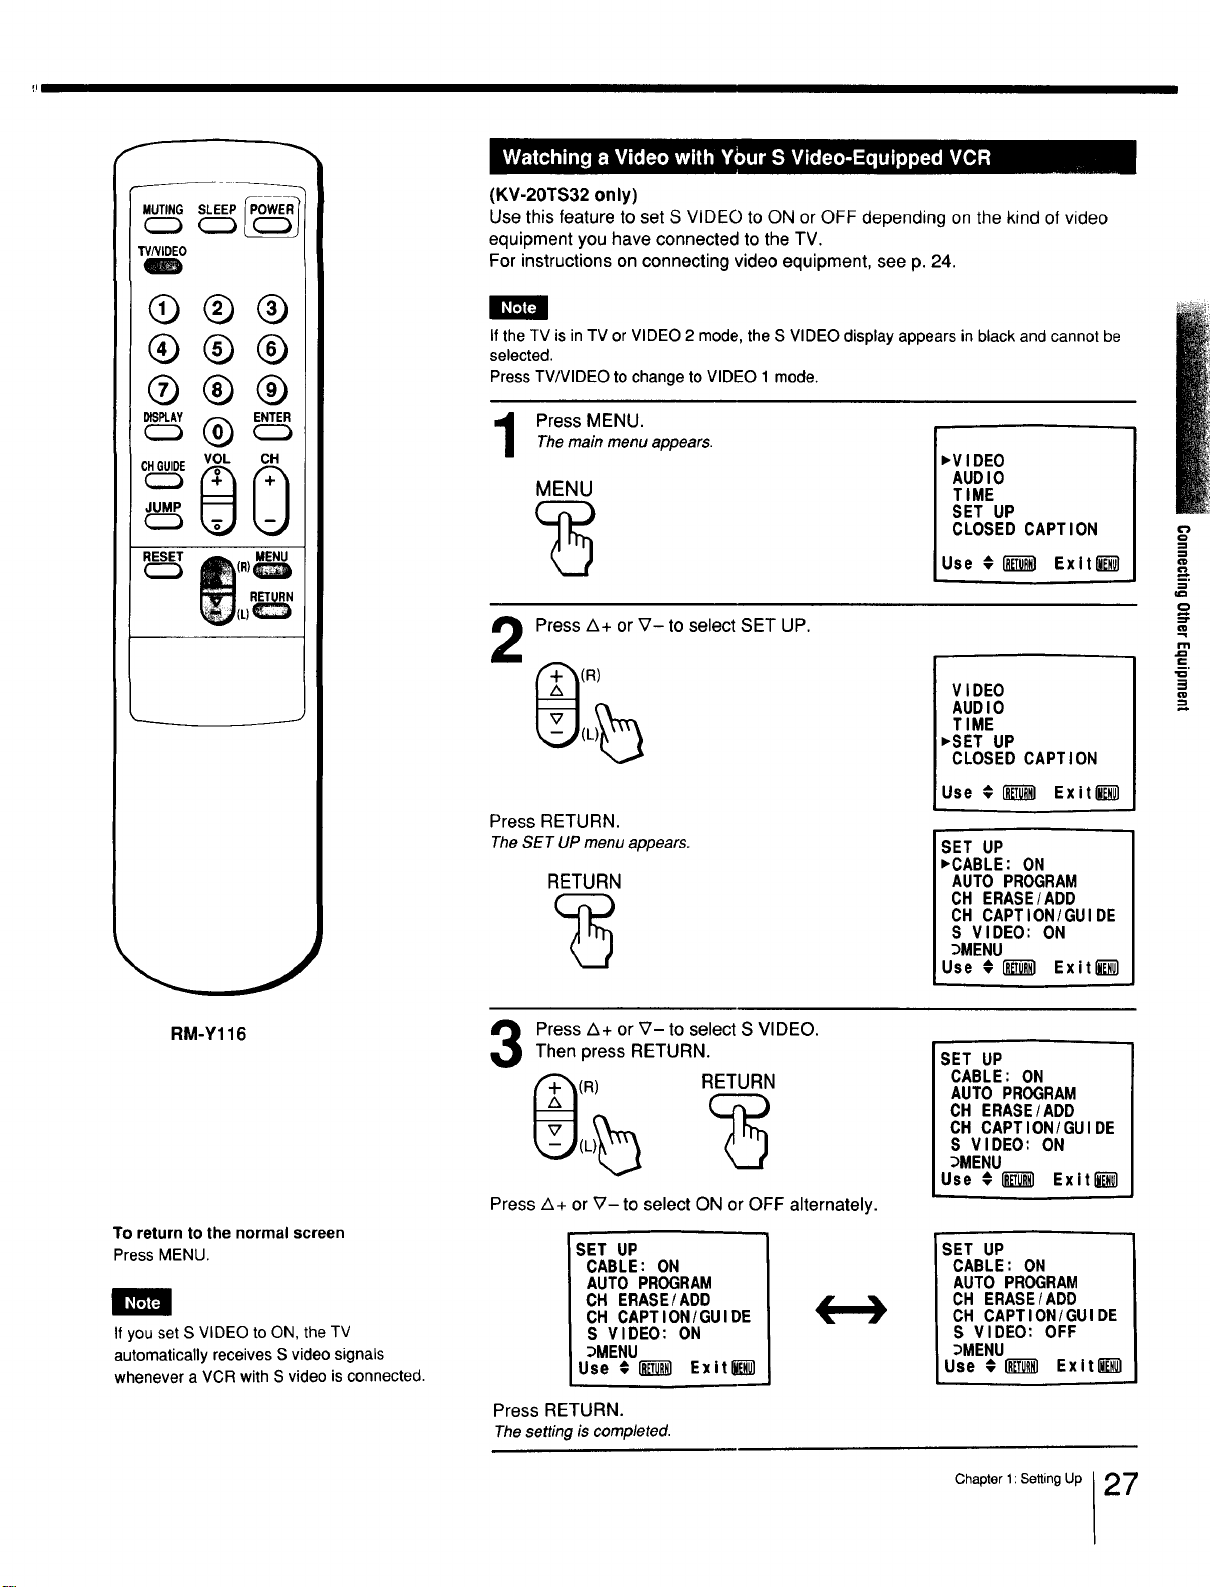
(KV-20TS32 only)
Use this feature to set S VIDEO to ON or OFF depending on the kind of video
equipment you have connected to the TV.
For instructions on connecting video equipment, see p. 24.
If the TV is in TV or VIDEO 2 mode, the S VIDEO display appears in black and cannot be
selected.
Press TV/VIDEO to change to VIDEO 1 mode.
Press MENU.Themain menu appears.
MENU
,VIDEO
AUDIO
TIME
SET UP
CLOSED CAPTION
Use #(_) Exlt_]
Press Z_+or_7- to select SET UP.
(R)
Press RETURN.
TheSET UP menu appears.
RETURN
VIDEO
AUDIO
TIME
,SET UP
CLOSED CAPTION
Use € _ Exit l_
SET UP
,CABLE: ON
AUTO PROGRAM
CH ERASE/ADD
CH CAPTION/GUIDE
S VIDEO: ON
_MENU
Use #_) Exit l_
3
Press Z_+or _7- to select S VIDEO.
Then press RETURN.
(R) RETURN
Press z_+ or _7- to select ON or OFF alternately.
SET UP
CABLE: ON
AUTO PROGRAM
CH ERASE/ADD
CH CAPTION/GUIDE
S VIDEO: ON
_MENU
Use € I_ Exitl_
Press RETURN.
Thesetting is completed.
SET UP
CABLE: ON
AUTO PROGRAM
CH ERASE/ADD
CH CAPTION/GUIDE
S VIDEO: ON
_MENU
Use #1_ Exit"_
SET UP
CABLE: ON
AUTO PROGRAM
CH ERASE/ADD
CH CAPTION/GUIDE
S VIDEO: OFF
_MENU
Use #1_ Exit_
Chapter 1: Setting Up 27
_ Chapler 2: Using Basic Features
WatchingTVPrograms
f
MUTING SLEEP
_C2_
W/VIDEO
®®®
VOL CH
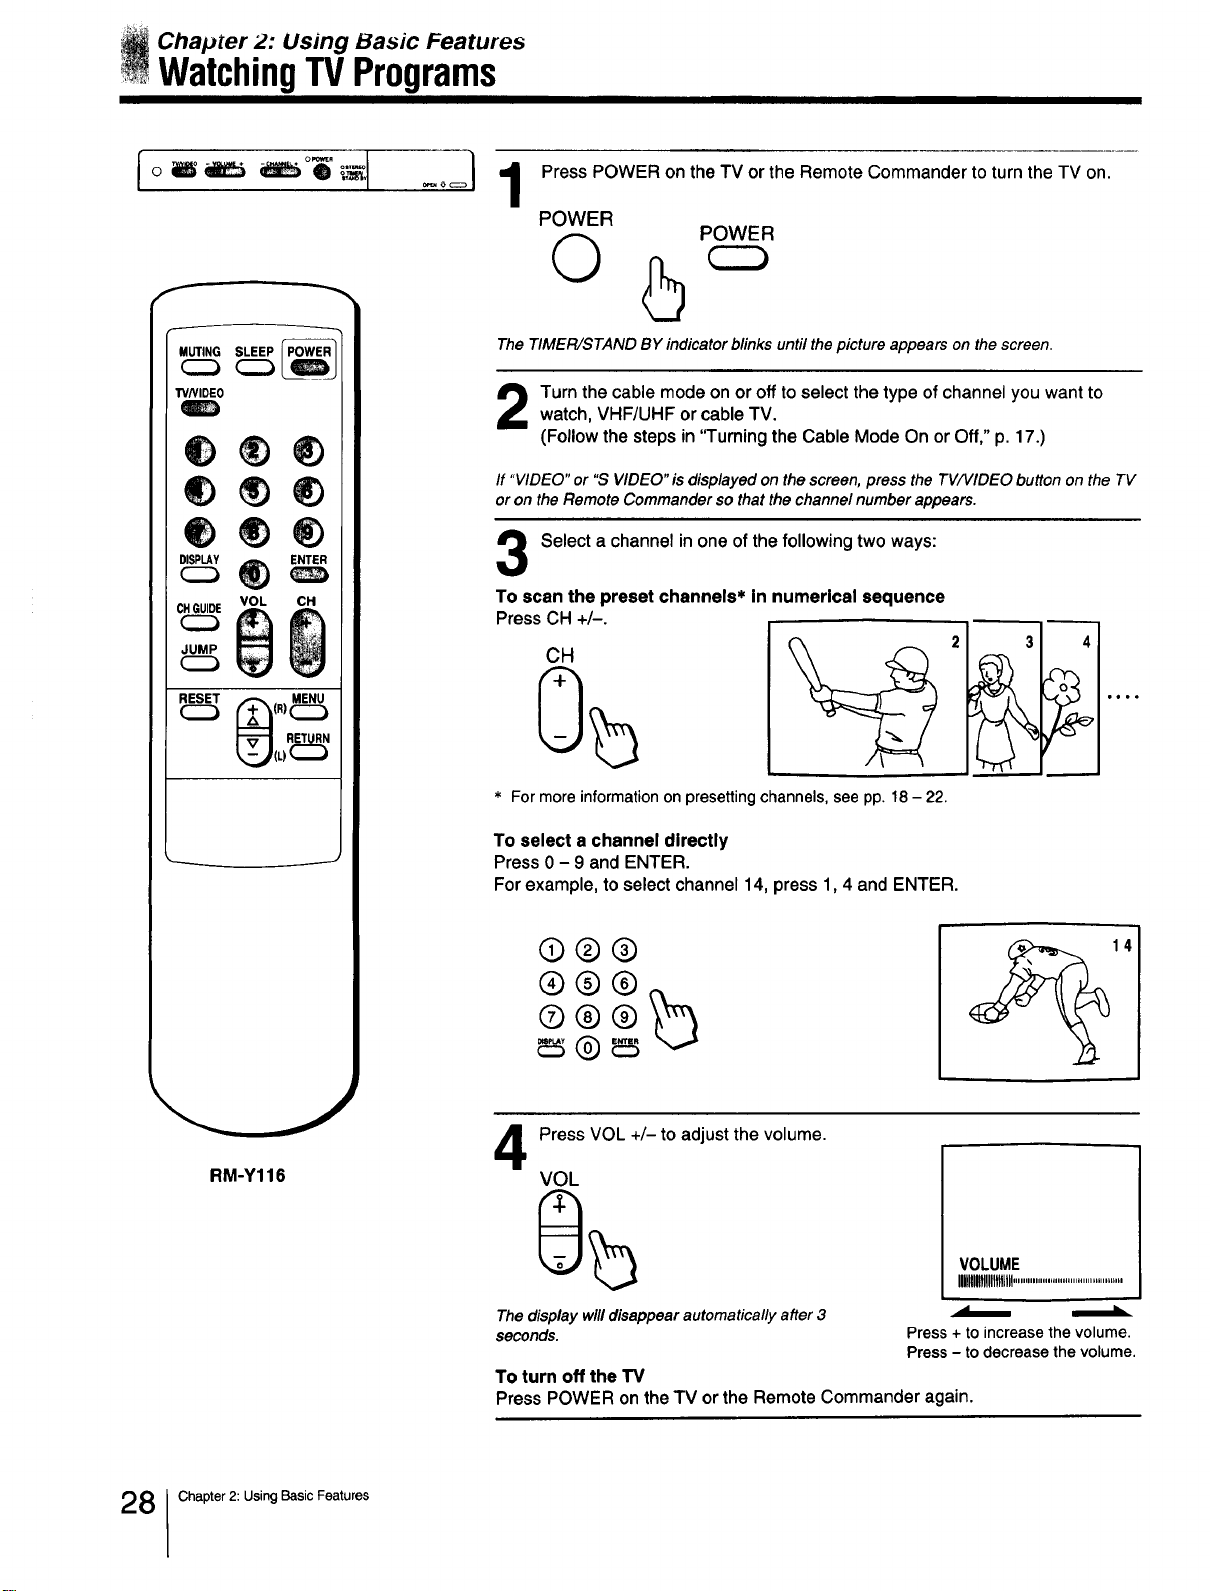
Press POWER on the TV or the Remote Commander to turn the TV on.
POWER
O
POWER
The TIMER/STAND BY indicator blinks until the picture appears on the screen.
Turn the cable mode on or off to select the type of channel you want towatch, VHF/UHF or cable TV.
(Follow the steps in 'q'urning the Cable Mode On or Off," p. 17.)
If "VIDEO" or "S VIDEO"is displayed on the screen, press the TV/VlDEO button on the TV
or on the Remote Commander so that the channel number appears.
Select a channel in one of the following two ways:
To scan the preset channels* in numerical sequence
Press CH +/-.
CH
* For more information on presetting channels, see pp. 18 - 22.
To select a channel directly
Press 0 - 9 and ENTER.
For example, to select channel 14, press 1,4 and ENTER.
©®®
®®®
14
RM-Y116
4
Press VOL +/- to adjust the volume.
VOL
VOLUME
IIIIlUMtltlllll............................................
The display will disappear automatically after 3 _
seconds. Press + to increase the volume.
Press - to decrease the volume.
To turn off the TV
Press POWER on the TV or the Remote Commander again.
8 Chapter 2: Using Basic Features
UsingConvenientFeatures
f
MUTING_ _SLEEP
TVNIDEO
Q®®
®®®
®®®
RM-Y116
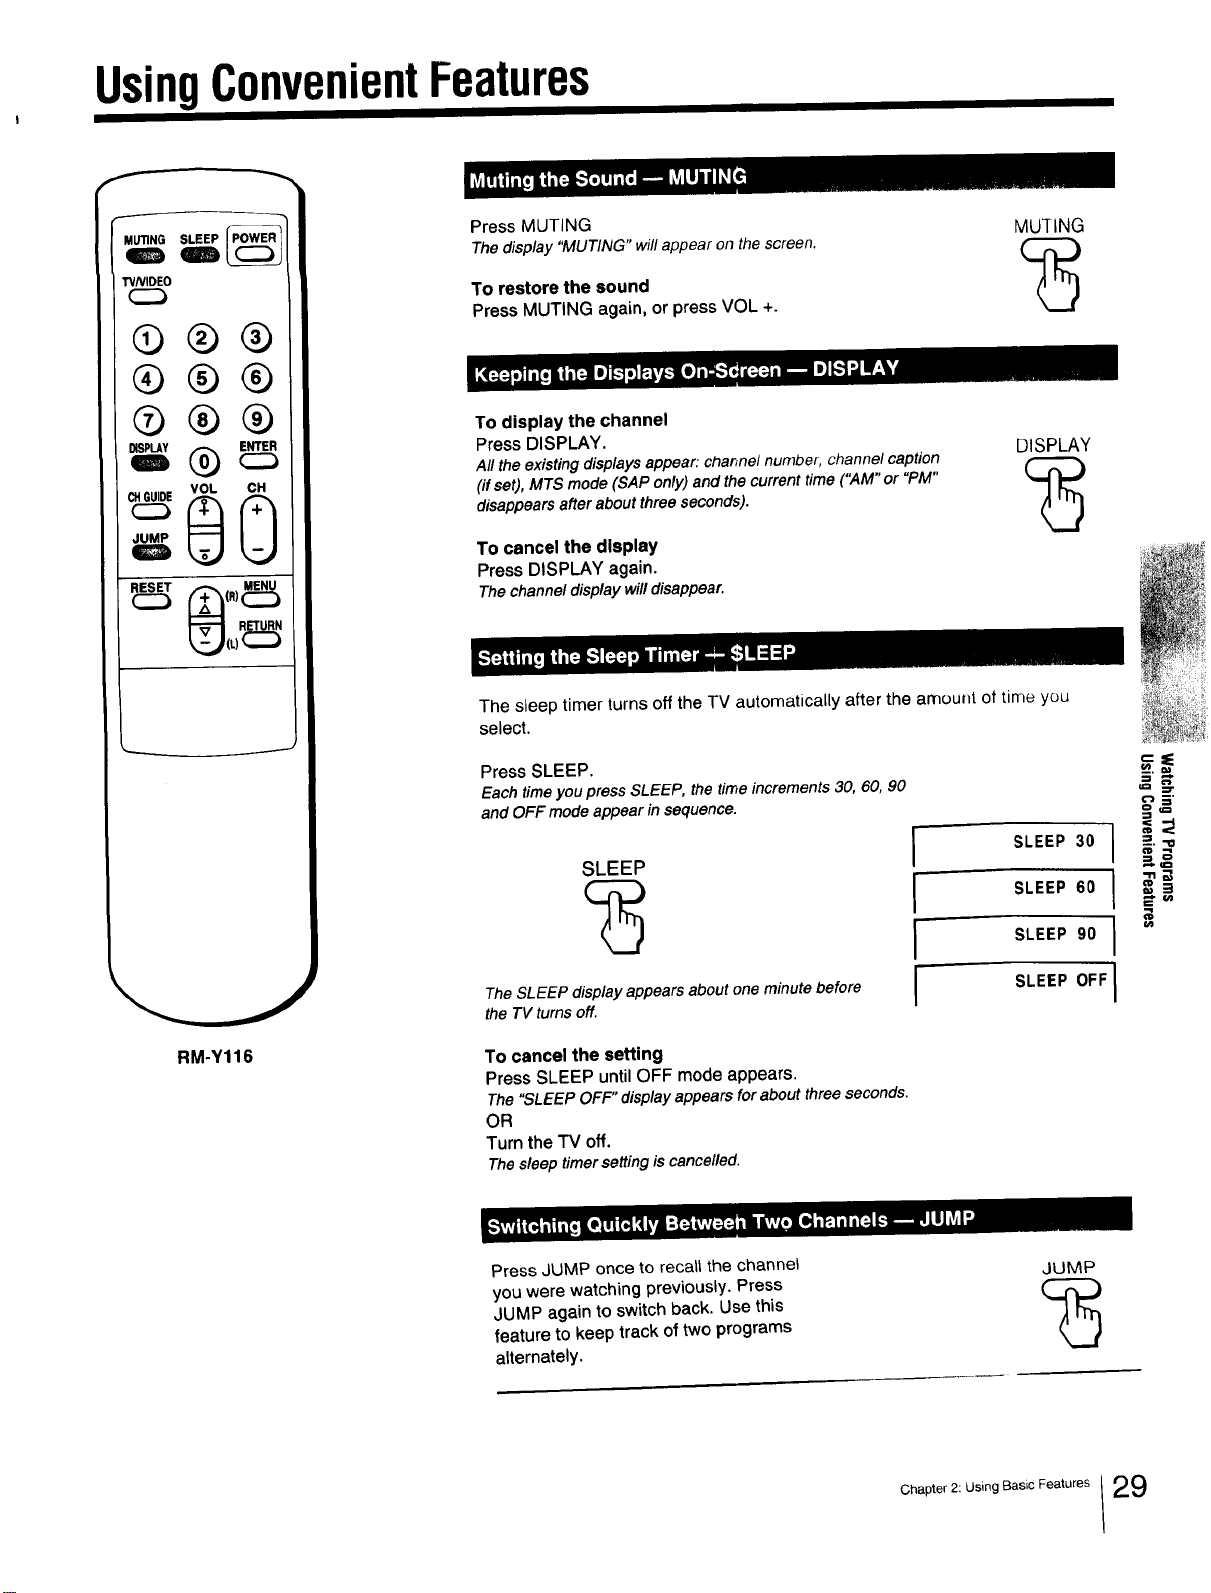
Press MUTING
Thedisplay "MUTING" will appearon the screen.
To restore the sound
Press MUTING again, or press VOL +.
MUTING
To display the channel
Press DISPLAY.
All the existing displays appear: channel number, channel caption
(if set), MTS mode (SAP only) and the current time ("AM" or "PM"
disappears after about three seconds).
To cancel the display
Press DISPLAY again.
The channel display will disappear.
DISPLAY
The sleep timer turns off the TV automatically after the amount of time you
select.
Press SLEEP.
Each timeyou press SLEEP, the time increments 30, 60, 90
and OFF mode appear in sequence.
SLEEP
The SLEEP display appears about one minute before
the TV turns off.
I
I
i
I
_.=._
_£
SLEEP 30 } _._.,.,
I °
SLEEP 60 i _
SLEEP 90 1
SLEEP OFF]
To cancel the setting
Press SLEEP until OFF mode appears.
The "SLEEPOFF"display appearsforaboutthree seconds.
OR
Turn the "IV off.
Thesleep timersettingiscancelled.
Press JUMP once to recatt the channel
you were watching previously. Press
JUMP again to switch back. Use this
feature to keep track of two programs
alternately.
JUMP
Chapter 2: Using Basic Features 29
AdjustingPictureandSoundQuality
I111Iflllll|llll IIlIIIIIHNI[IfllBIIII|III 11 I I I
MUTING SLEEP
TVNIDEO
q_
®®®
®®®
®®®
0_ vo,c_
-U
RM-Y116
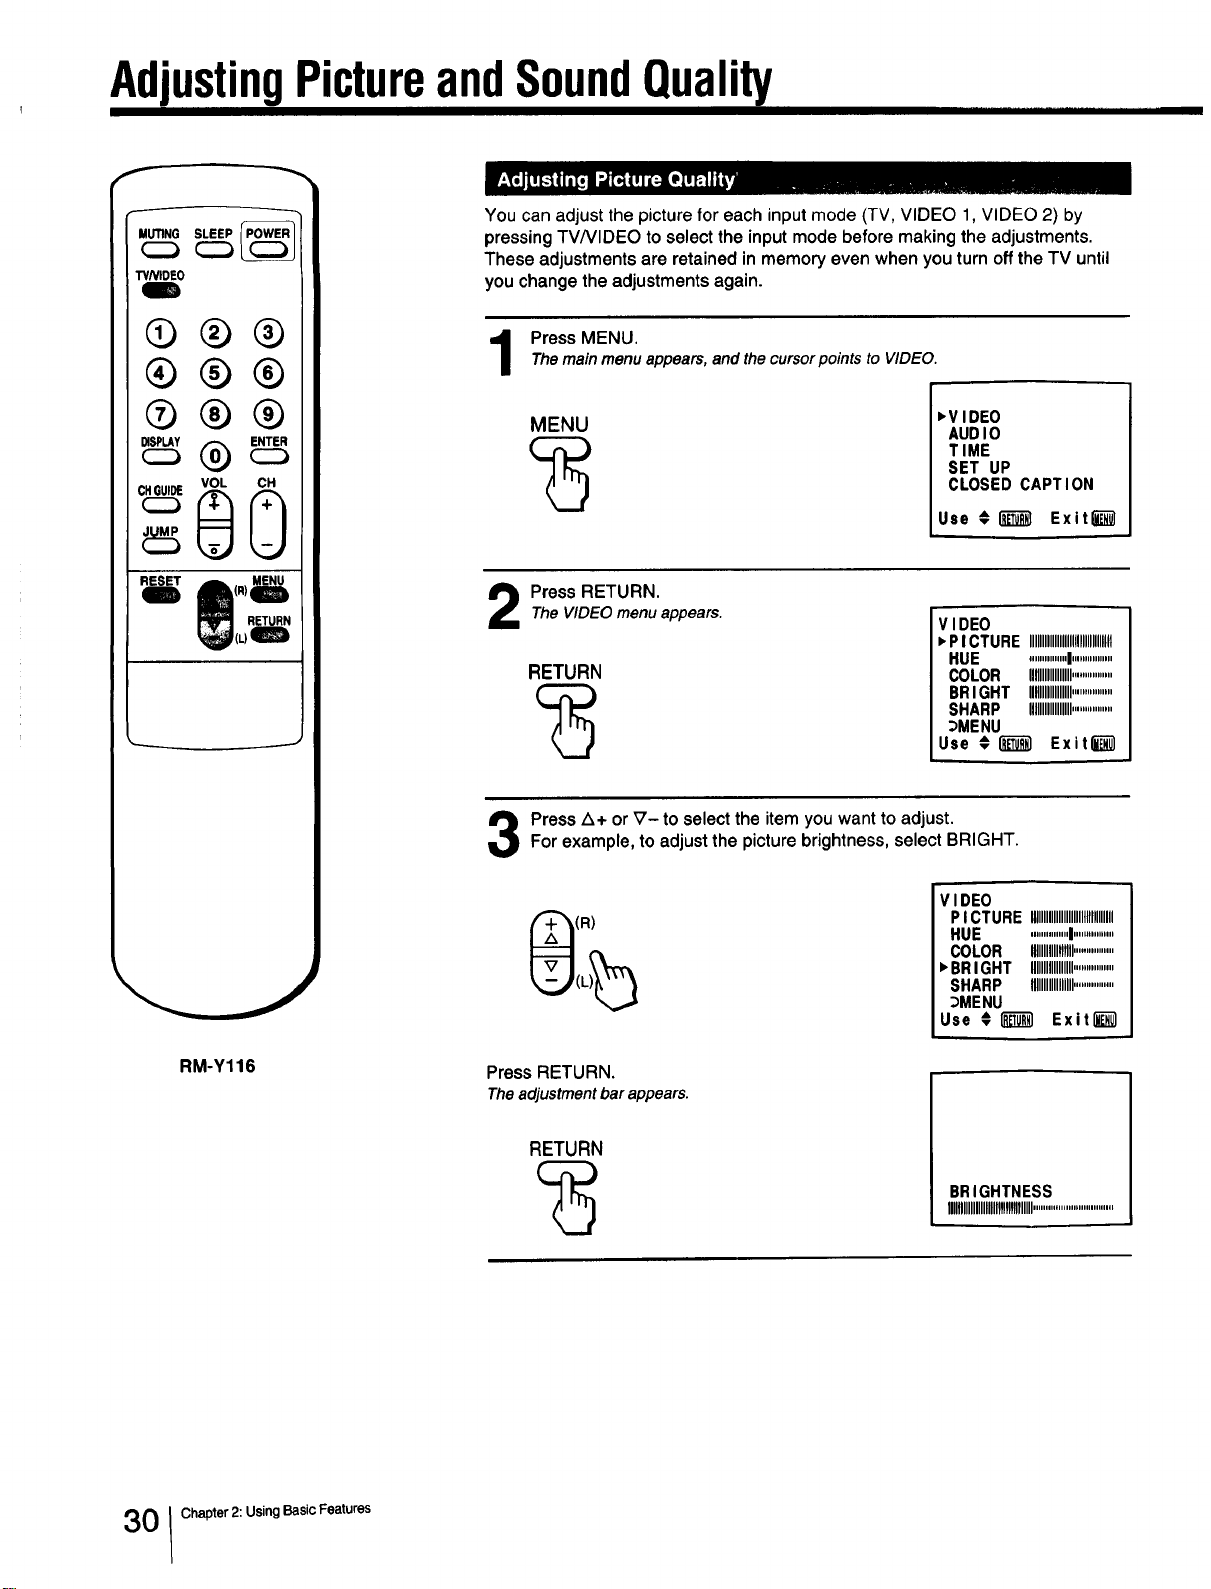
You can adjust the picture for each input mode (TV, VIDEO 1, VIDEO 2) by
pressing TV/VlDEO to select the input mode before making the adjustments.
These adjustments are retained in memory even when you turn off the TV until
you change the adjustments again.
Press MENU.The mainmenu appears,and the cursorpoints to VIDEO.
MENU
,VIDEO
AUDIO
TIME
SET UP
CLOSED CAPTION
Use _1__ Exit_
Press RETURN.
The VIDEOmenuappears.
RETURN
VIDEO
,PICTURE IIIIIIIIIIIIIIIIIIIIIIIIIIIIIIIit
HUE ...............I................
COLOR flHIIIIIIIII................
BRIGHT IMIIIIIIIIII................
SHARP IIIIIIIIIIIIIIIII................
DMENU
Use # I'_ Exit_
Press Z_+ or V- to select the item you want to adjust.For example, to adjust the picture brightness, select BRIGHT.
(R)
VIDEO
PI CTURE IIIIIIIIIIIIIIIIIIIHIIIIIIII
HUE ...............I................
COLOR IIIIIIIIIIIlltlll................
,BRIGHT IIIIIIIIIIIIIIIII................
SHARP IIIIIIIIIIIIIIIII................
DMENU
Use # [_ Exit[__l
Press RETURN.
Theadjustmentbarappears.
RETURN
BR IGHTNESS
IIIIIIIIIIIIIIIIIIIlIflflfimllll................................
0 Chapter 2: UsingBasic Features
4
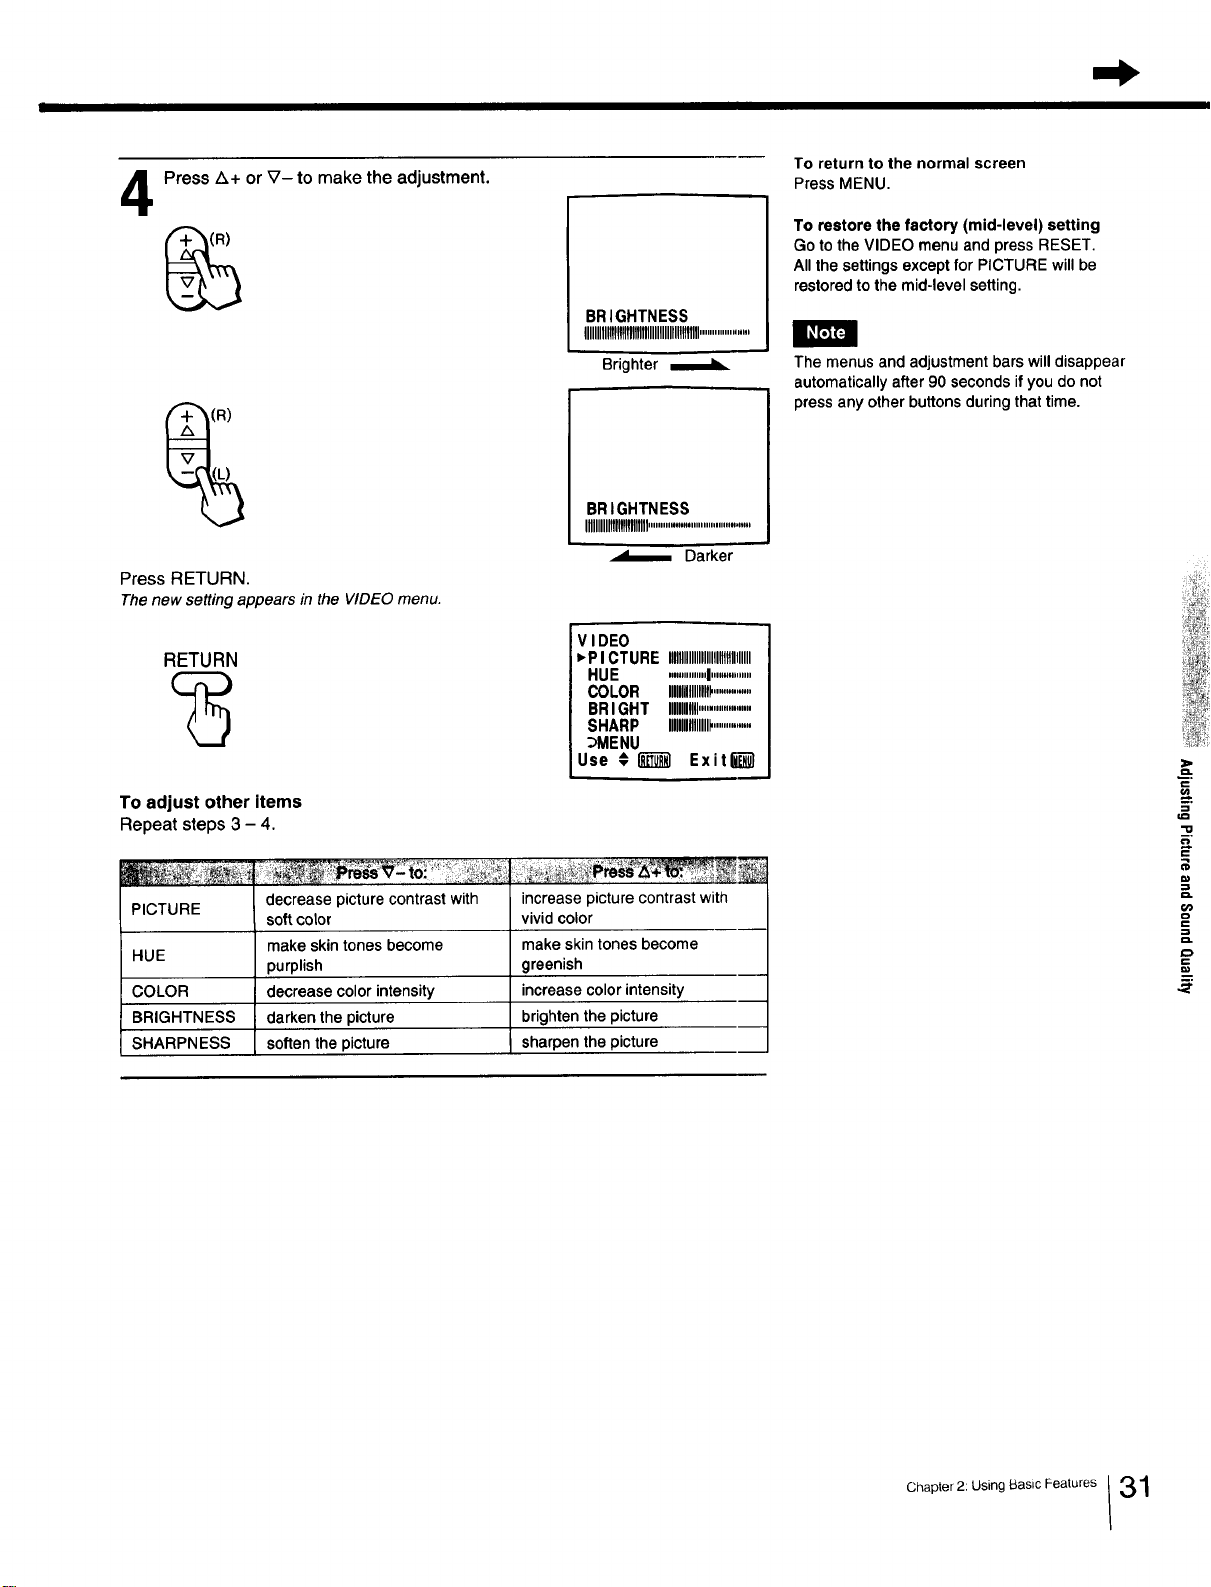
Press Z_+ or _7- to make the adjustment.
Press RETURN.
Thenew setting appears in the VIDEOmenu.
RETURN
To adjust other items
Repeat steps 3 - 4.
BRIGHTNESS
UlIIIIII!I!It!tTIIIIHHIIIlUtltlIII....................
Brighter
i BRIGHTNESS
IHHIMIIIII.........................................
Darker
V I DEO
_'PICTURE IIIIIIIIIIIIIIIIIllllllllllllllll
HUE ...............I................
COLOR IIIIIIIIIIIIIIIII...............
BRIGHT IMHI....................
SHARP lUlIIIMIIII...............
_MENU
Use # _ Exitl_01
PICTURE decrease picture contrast with increase picture contrast with
soft color vivid color
make skin tones become make skin tones become
HUE
purplish greenish
COLOR decrease color intensity increase color intensity
BRIGHTNESS darken the picture brighten the picture
SHARPNESS soften the picture sharpen the picture
To return to the normal screen
Press MENU.
To restore the factory (mid-level) setting
Go to the VIDEO menuand press RESET.
Allthesettingsexceptfor PICTURE willbe
restoredtothe mid-levelsetting.
The menus and adjustment bars will disappear
automatically after 90 seconds if you do not
press any other buttons during that time.
.=
m,
==
"o
m,
OlD
==
D.
==
€=.
Chapter2:Us,og asicFeatures/31
Adjusting Picture and SoundUuulJty
III
f
MUTING SLEEP
TVNIDE0
®®®
®®®
®®®
8voL
RM-Y116
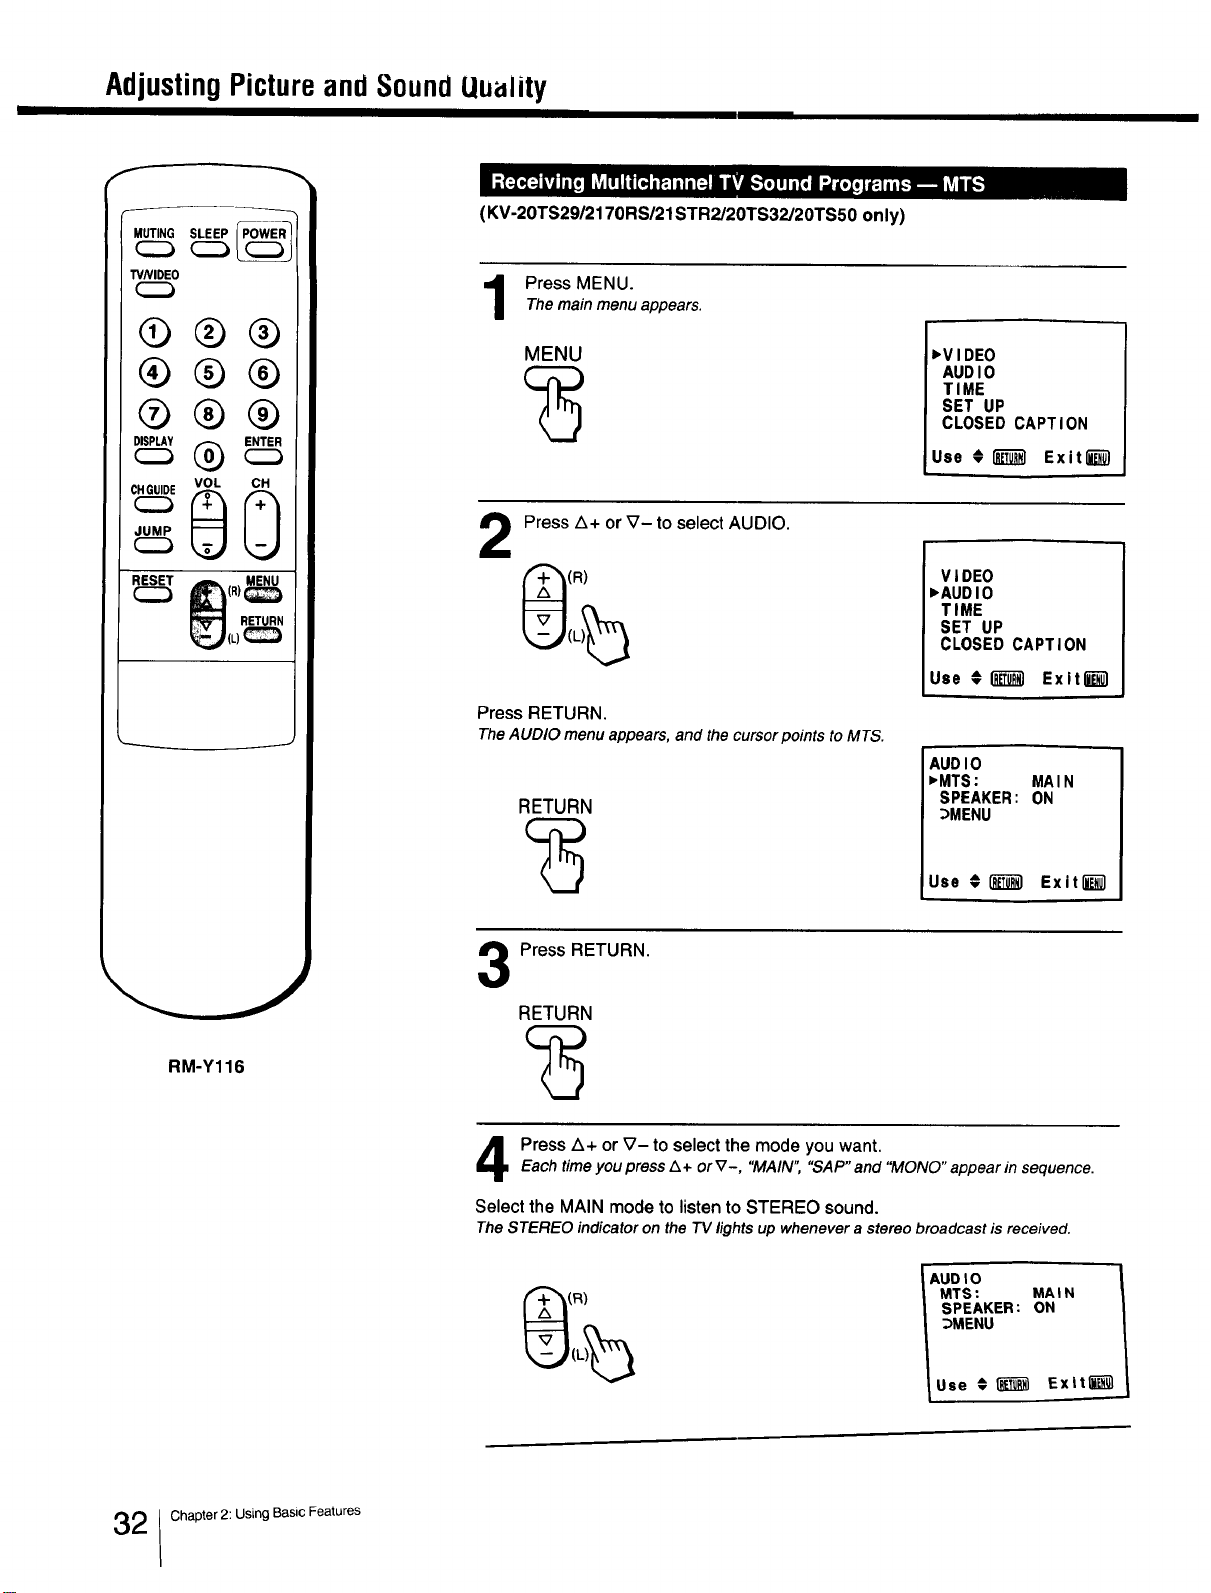
(KV-20TS29/2170RS/21STR2/20TS32/20TS50 only)
Press MENU.
Themain menu appears.
MENU 'VIDEO
AUDIO
TIME
SET UP
CLOSED CAPTION
Use O i_T_I Exit""""""""""_
2
Press Z_+ or V- to select AUDIO.
(R)
Press RETURN.
TheAUDIO menu appears, and the cursorpoints to MTS.
RETURN
VIDEO
_AUDIO
TIME
SET UP
CLOSED CAPTION
Use #1_ Exiting1
AUDIO
_MTS: MAIN
SPEAKER: ON
_MENU
Use €[_1 Exit[_l
Press RETURN.
RETURN
Press Z_+or _7- to select the mode you want.
Each time you press/k + or V-, "MAIN","SAP"and "MONO"appear in sequence.
Select the MAIN mode to listen to STEREO sound.
TheSTEREO indicatoron the 73/lightsup wheneverastereobroadcast is received.
AUOIO
MTS: MAIN
SPEAKER: ON
_MENU
Use € _ Exiting1
2 Chapter 2: Using Basic Features
II I
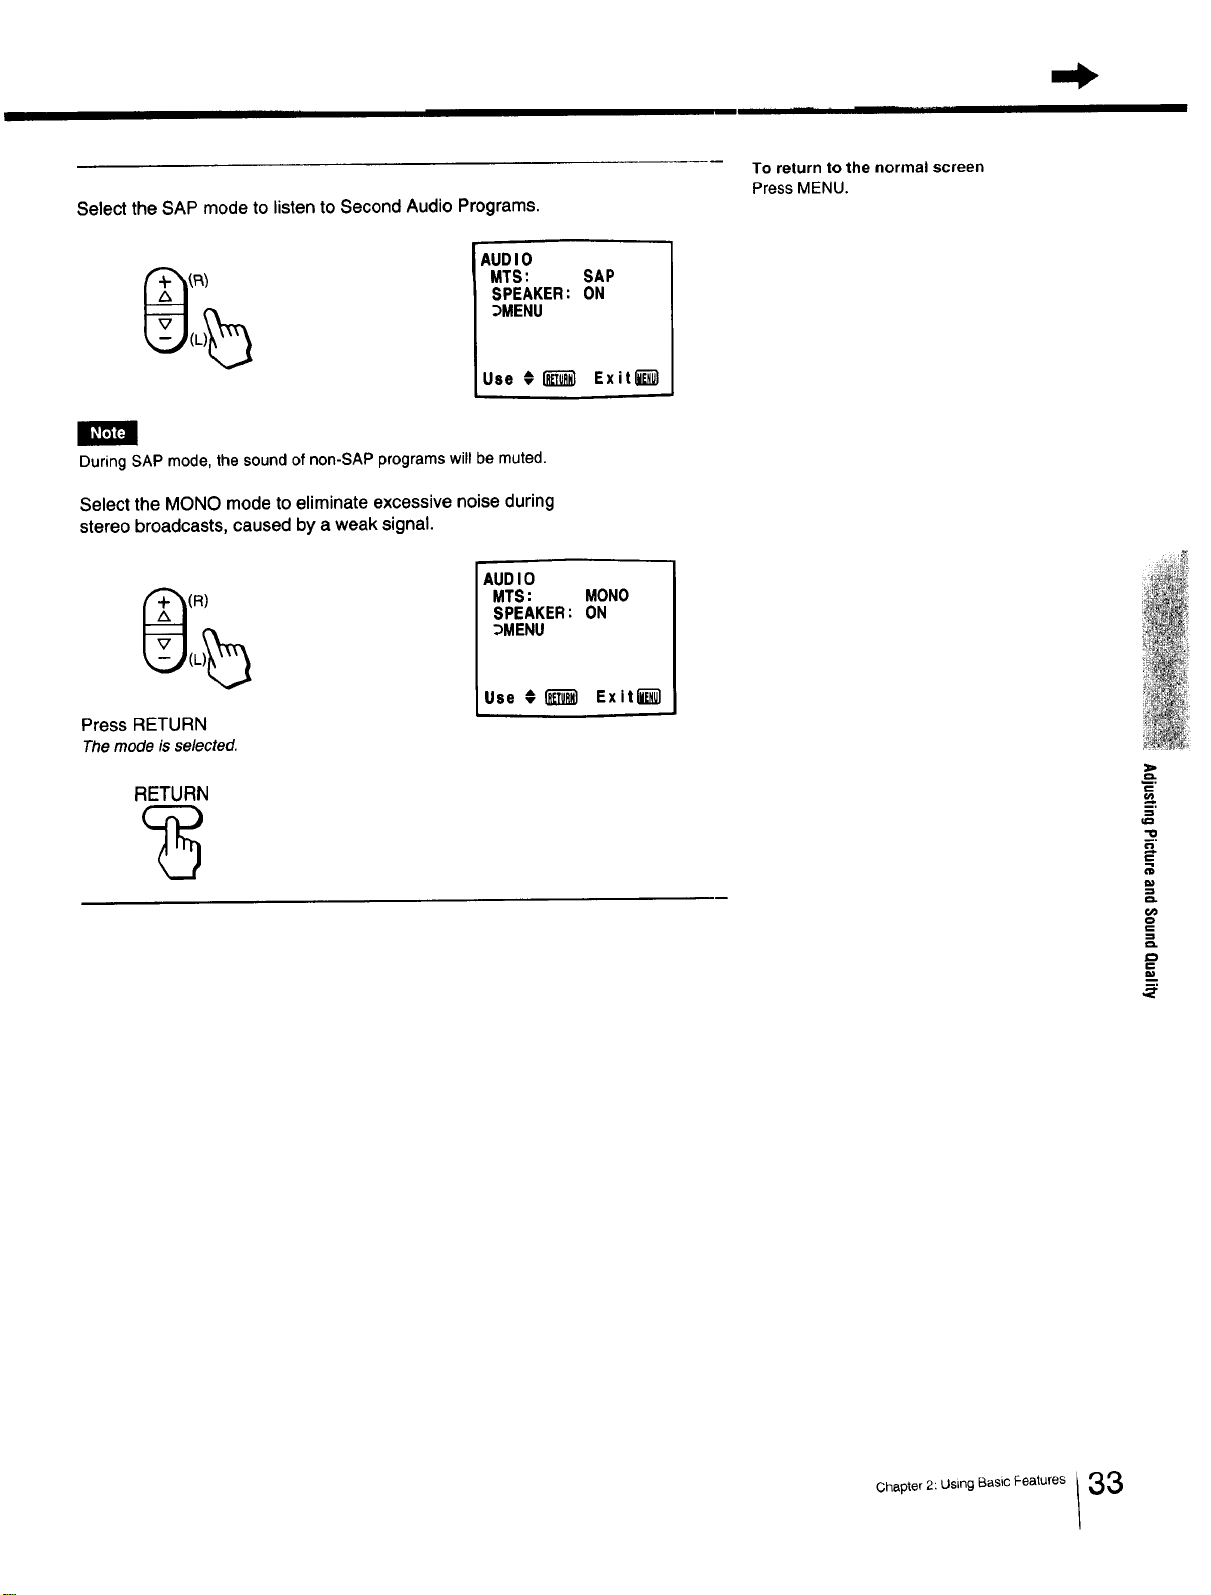
Select the SAP mode to listen to Second Audio Programs.
To return to the normal screen
Press MENU.
AUDIO
MTS: SAP
SPEAKER: ON
_MENU
Use €I_ Exit_
h,
During SAP mode,thesoundof non-SAP programswill be muted.
Select the MONO mode to eliminate excessive noise during
stereo broadcasts, caused by a weak signal.
(R)
Press RETURN
The mode is selected.
RETURN
AUDIO
MTS: MONO
SPEAKER: ON
_MENU
Use €1_'_ Exitl_l
m
o.op,o,2 us,ogB..,c ea,u.e.33
AdjustingPictureandSoundQuality
f
MUTING(_ (_SLEEP
TVNIDEO
®®®
®®®
®®®
VOL CH
RM-Y116
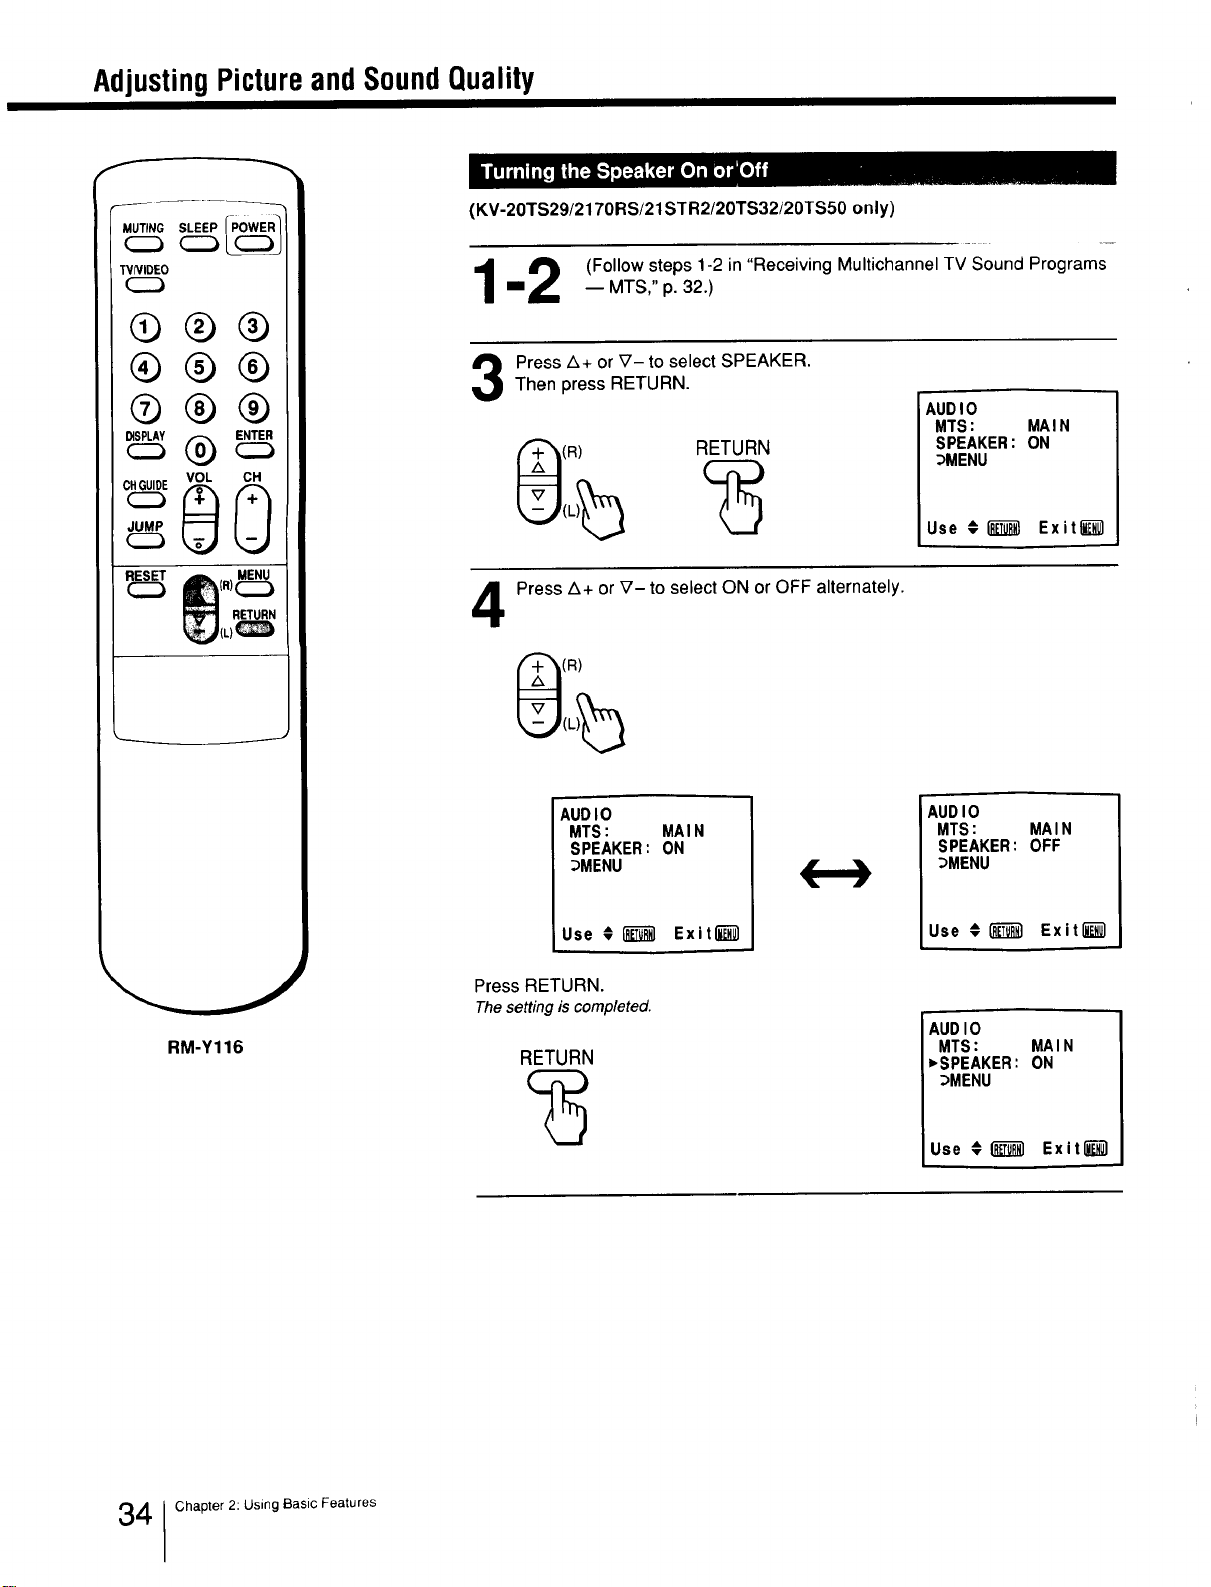
(KV-2OTS29/217ORS/21STR2/20TS32/20TS50 only)
_ (Follow steps 1-2 in "Receiving Multichannel TV Sound Programs
m_ -- MTS," p. 32.)
Press A+ or _7- to select SPEAKER.Then press RETURN.
(R) RETURN
AUDIO
MTS: MAIN
SPEAKER: ON
_MENU
Use @l_ Exitli_
4
Press A+ or _'- to select ON or OFF alternately.
(R)
AUDIO
MTS: MAIN
SPEAKER: ON
_MENU
Use € _ Exit_
AUDIO
MTS: MAIN
SPEAKER: OFF
_MENU
Use €1_ Exiting1
Press RETURN.
Thesetting is completed.
RETURN
AUDIO
MTS: MAIN
,SPEAKER: ON
_MENU
Use €1_ Exit_)
4 Chapter 2: Using Basic Features
UsingClosedCaption(U.S.A.modelsonly)
MUTING(_ C_SLEEP
WNIDEO
®®®
®®®
®®®
RM-Y116
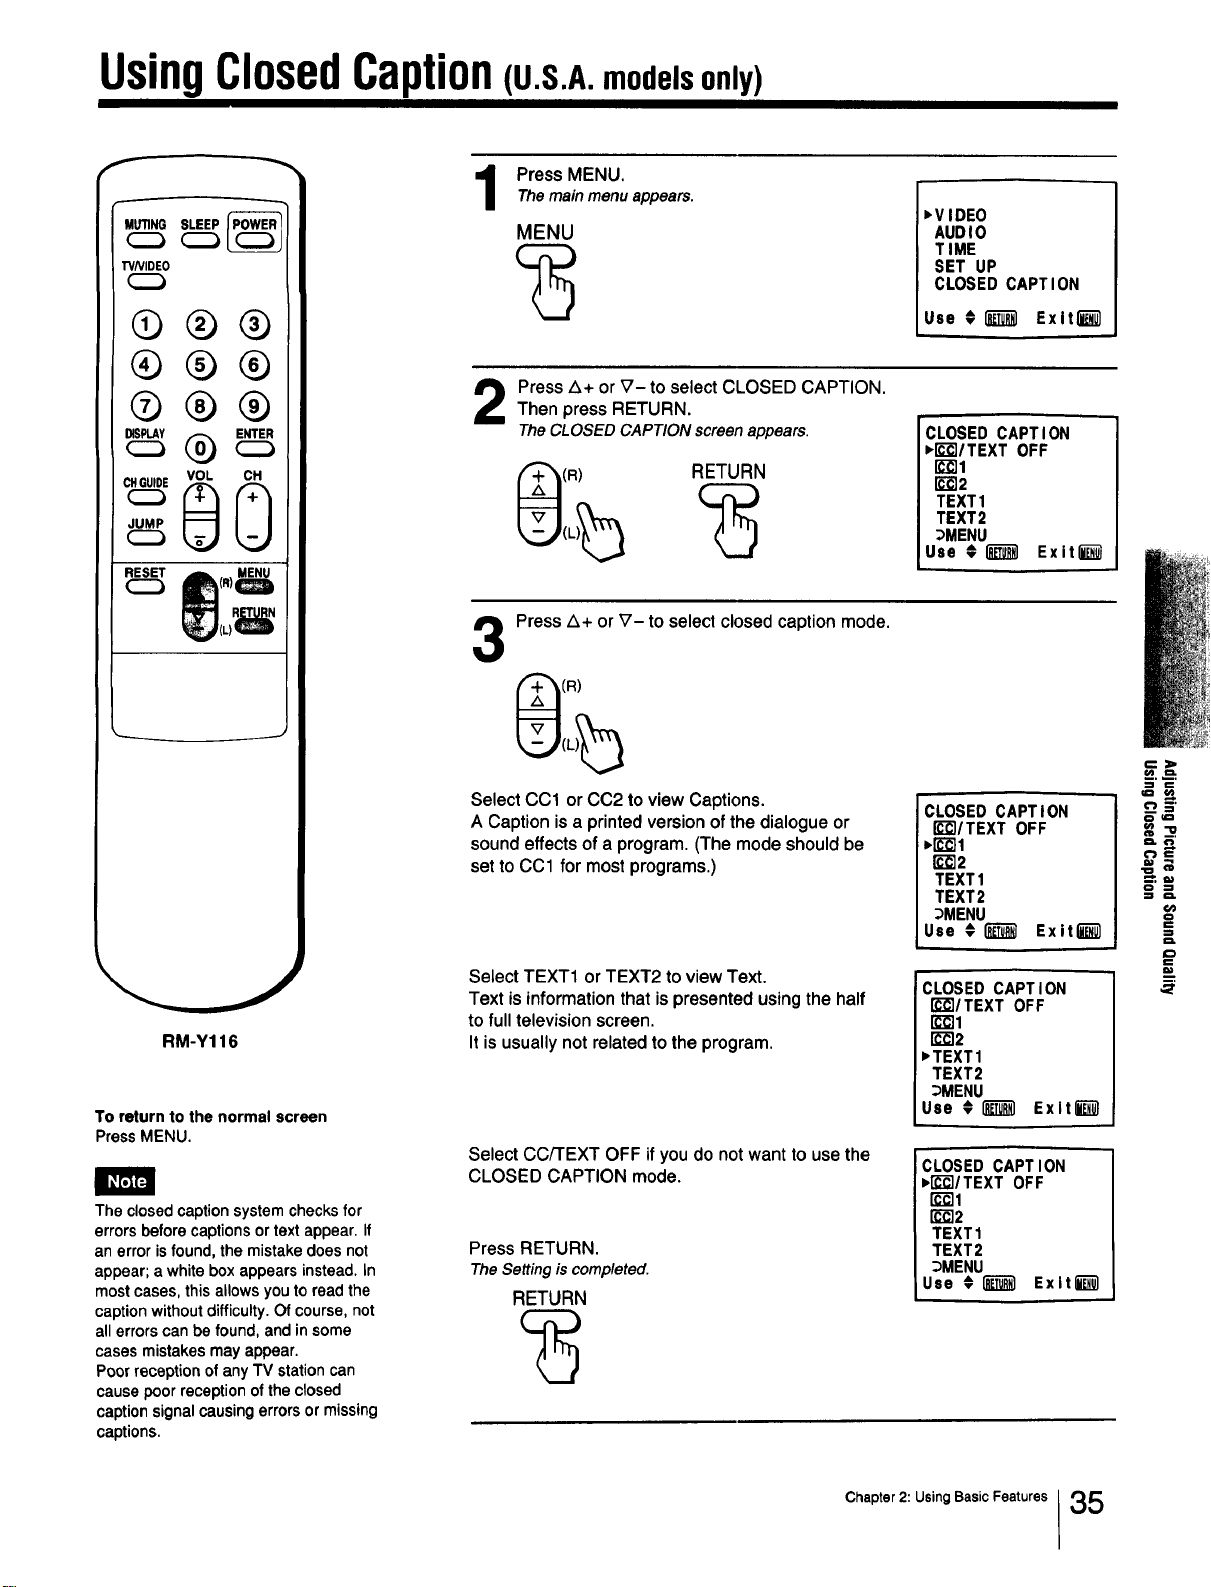
To return to the normal screen
Press MENU.
The closedcaptionsystemchecksfor
errorsbeforecaptionsortext appear.If
an errorisfound, themistakedoesnot
appear;a whiteboxappearsinstead,in
mostcases,thisallowsyouto readthe
captionwithoutdifficulty.Ofcourse,not
all errorscanbe found, andin some
cases mistakesmayappear.
Poorreceptionof anyTV stationcan
causepoorreceptionofthe closed
captionsignalcausingerrorsor missing
captions.
Press MENU.
The mainmenuappears.
MENU
,VIDEO
AUDIO
TIME
SET UP
CLOSED CAPTION
Use # (_ ExitO_)
Press A+ or V- to select CLOSED CAPTION.Then press RETURN.
The CLOSEDCAPTION screenappears.
(R) RETURN
CLOSED CAPTION
,IE-€'IITEXT OFF
I_]1
rc'_2
TEXT1
TEXT2
_MENU
Use €1"_1 Exit l_ul
3
Press A+ or V- to select closed caption mode.
(R)
Select CC1 or CC2 to view Captions.
A Caption is a printed version of the dialogue or
sound effects of a program. (The mode should be
set to CCl for most programs.)
Select TEXT1 or TEXT2 to view Text.
Text is information that is presented using the half
to full television screen.
It is usually not related to the program.
Select CC/FEXT OFF if you do not want to use the
CLOSED CAPTION mode.
Press RETURN.
The Settingis completed.
RETURN
CLOSED CAPTION
r_r'_/TEXT OFF
,1"€-_1
1_]2
TEXT1
TEXT2
_MENU
Use € _ Exitl_
CLOSED CAPTION ]
FC-_I/TEXTOFF
r__l
rc_2
,TEXT1
TEXT2
_MENU
Use € l_ Exltl_l
CLOSED CAPTION
,['€'EI/TEXT OFF
r_-_l
rc_2
TEXT1
TEXT2
_MENU
Use € _] ExltE-_l
==
m
Chapter 2: Using Basic Features 35
Chapter 3: Using Advanced Features
Usin_ltheTimer-ActivatedFunctions
f
r
MUTING SLEEP
TVNIDEO
Q®®
®®®
®®®
cG
RM-Y116
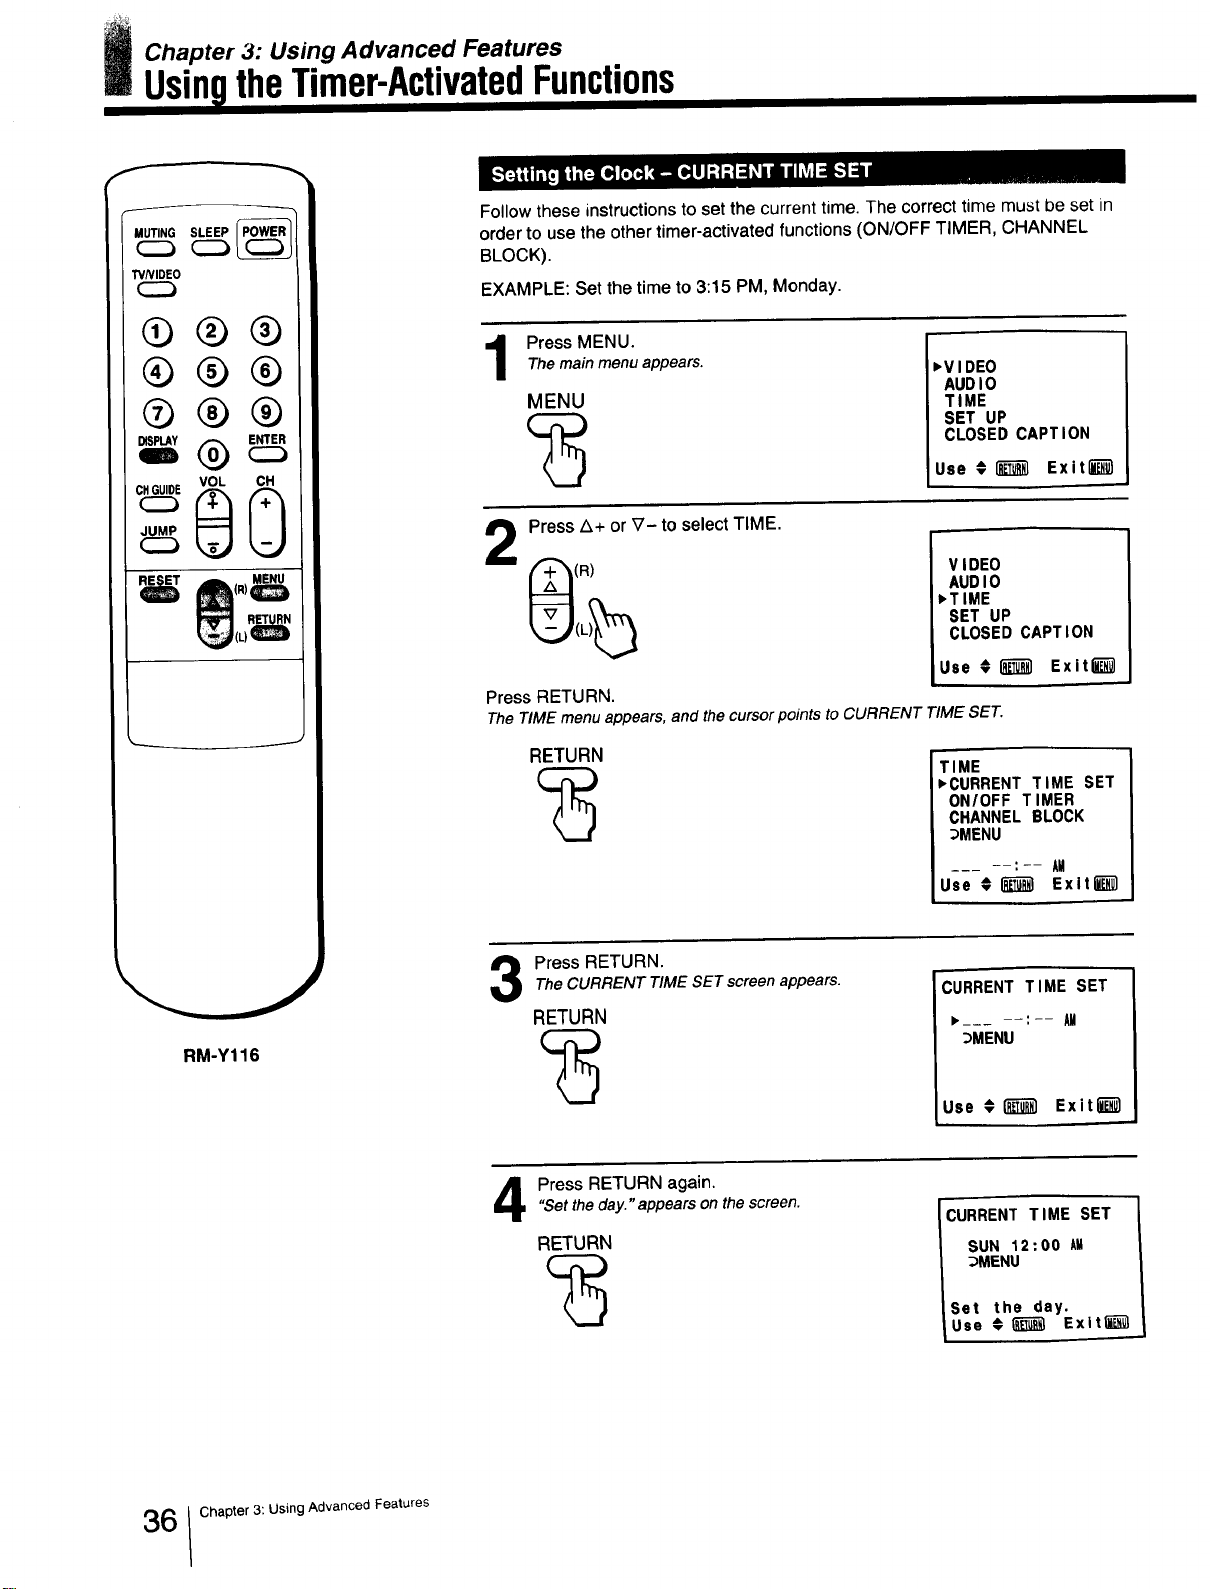
Follow these instructions to set the current time. The correct time must be set in
order to use the other timer-activated functions (ON/OFF TIMER, CHANNEL
BLOCK).
EXAMPLE: Set the time to 3:15 PM, Monday.
Press MENU.Themain menu appears.
MENU
>VIDEO
AUDIO
TIME
SET UP
CLOSED CAPTION
Use _ [_ Exit_
Press A+ or _7- to select TIME.
(R)
Press RETURN.
VIDEO
AUDIO
>TIME
SET UP
CLOSED CAPTION
Use #1_ Exiting1
The TIME menu appears, and the cursor points to CURRENT TIME SET.
RETURN
TIME
>CURRENT TIME SET
ONIOFF TIMER
CHANNEL BLOCK
_MENU
: AM
Use ;_ Exit_
Press RETURN.
The CURRENT TIME SETscreen appears.
RETURN
CURRENT TIME SET
>--- --:-- AM
:_MENU
'Use _ _ Exitl_
h,,•
Press RETURN again."Set the day." appears on thescreen.
RETURN
CURRENT TIME SET
SUN 12:00 AH
_MENU
Set the day.
Use € _ Exitti_
6 Chapter 3: Using Advanced Features
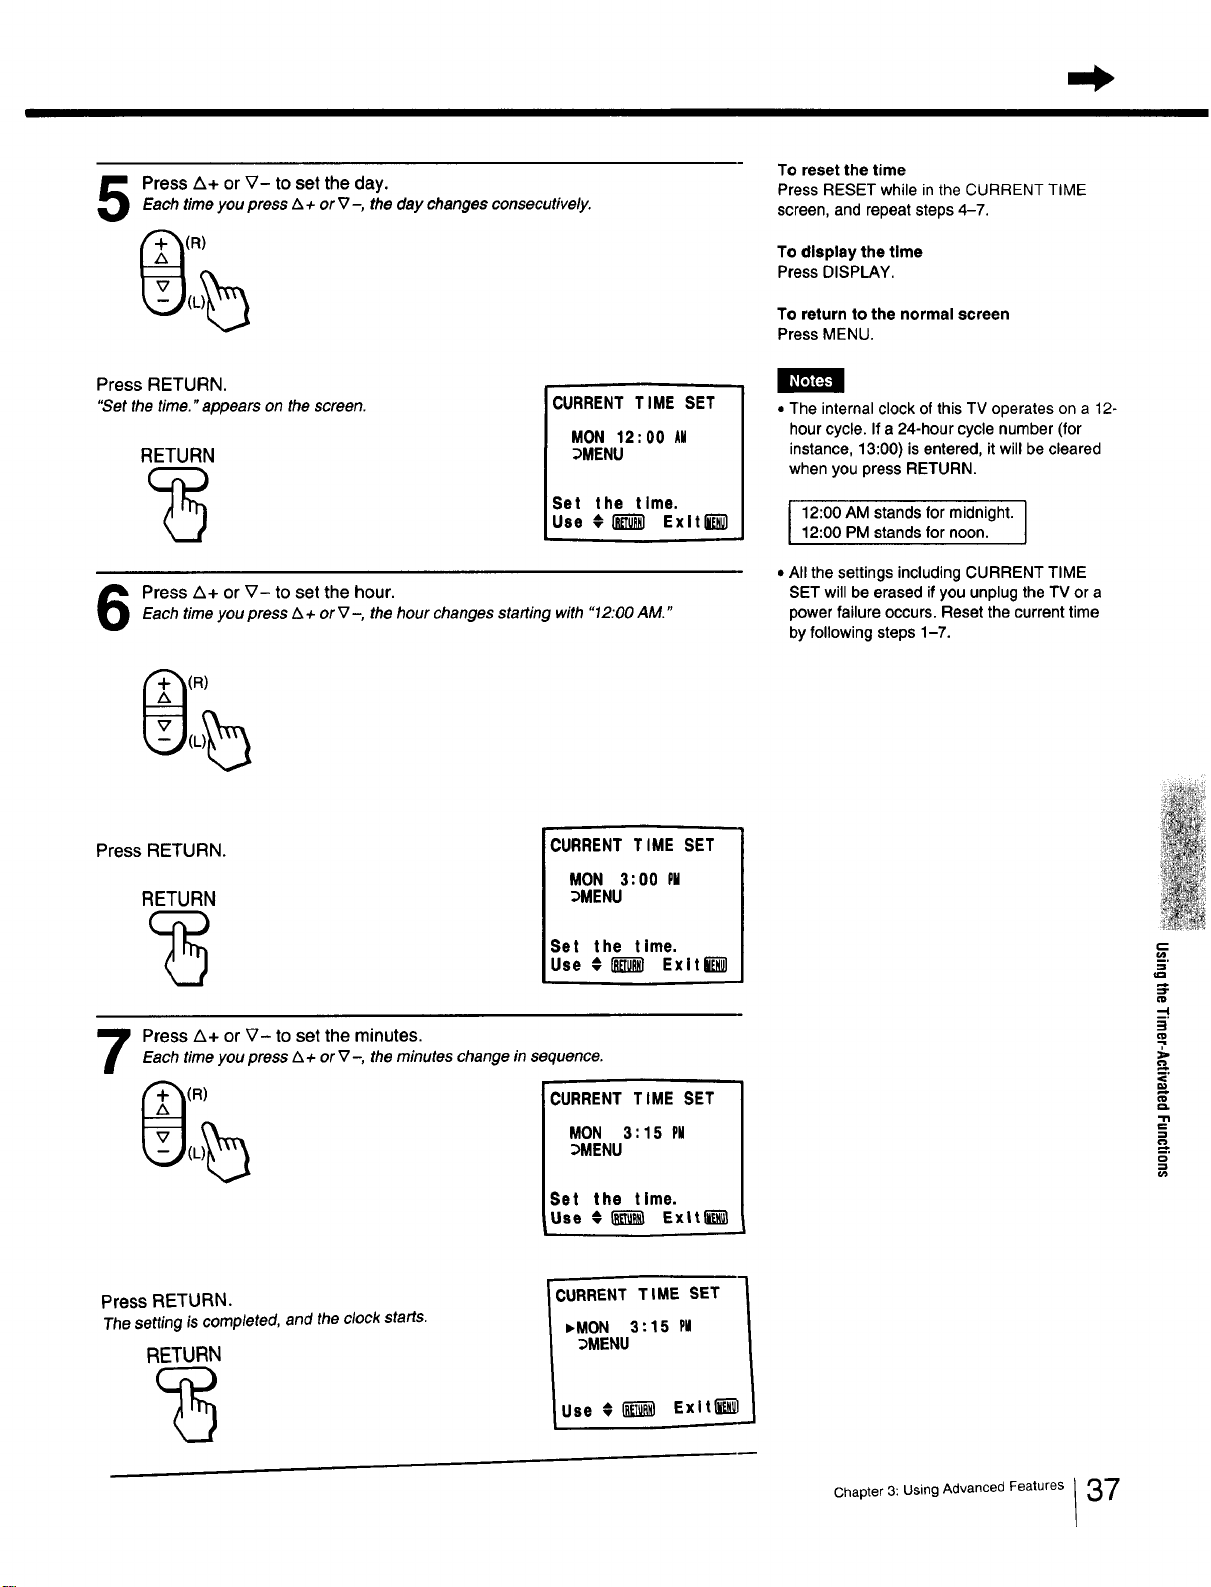
PressZ_+orV- toset theday.EachtimeyoupressZ_+or_7-,thedaychangesconsecutively.
(R)
To reset the time
Press RESET while in the CURRENT TIME
screen, and repeat steps 4-7.
To display the time
Press DISPLAY.
To return to the normal screen
Press MENU.
Press RETURN.
"Set the time." appears on the screen.
RETURN
CURRENT TIME SET
MON 12;00 All
;)MENU
Set the time.
Use €I_ Exlt_-_
Press Z_+or V- to set the hour.
Each timeyou press/x +or _7-, the hourchanges startingwith "12:00AM."
(R)
• The internal clock of this TV operates on a 12-
hour cycle. If a 24-hour cycle number (for
instance, 13:00) is entered, it will be cleared
when you press RETURN.
12:00 AM stands for midnight. ]
12:00 PM stands for noon.
J
• All the settings including CURRENT TIME
SET will be erased if you unplug the TV or a
power failure occurs. Reset the current time
by following steps 1-7.
Press RETURN.
RETURN
CURRENT TIME SET
MON 3:00 PM
_MENU
Set the time.
Use #_ ExltW
Press A+ or V- to set the minutes.Eachtime you press Z_+ or_7-, the minutes changein sequence.
(R)
CURRENT TIME SET
MON 3:15 PM
DMENU
Set the time.
Use ",__ Ex|tl'_
L
--I
§
€'D
O.
m.
C_
Press RETURN.
The settingis completed,and the clock starts.
RETURN
CURRENT TIME SET
,MON 3:15 PU
_MENU
Use # _ Exlt_
Chapter 3: Using Advanced Features /37
UsingtheTimer-ActivatedFunctions
MUTING SLEEP
TVNIDEO
Q®®
®®®
®®®
vo, o cQ
RM-Y116
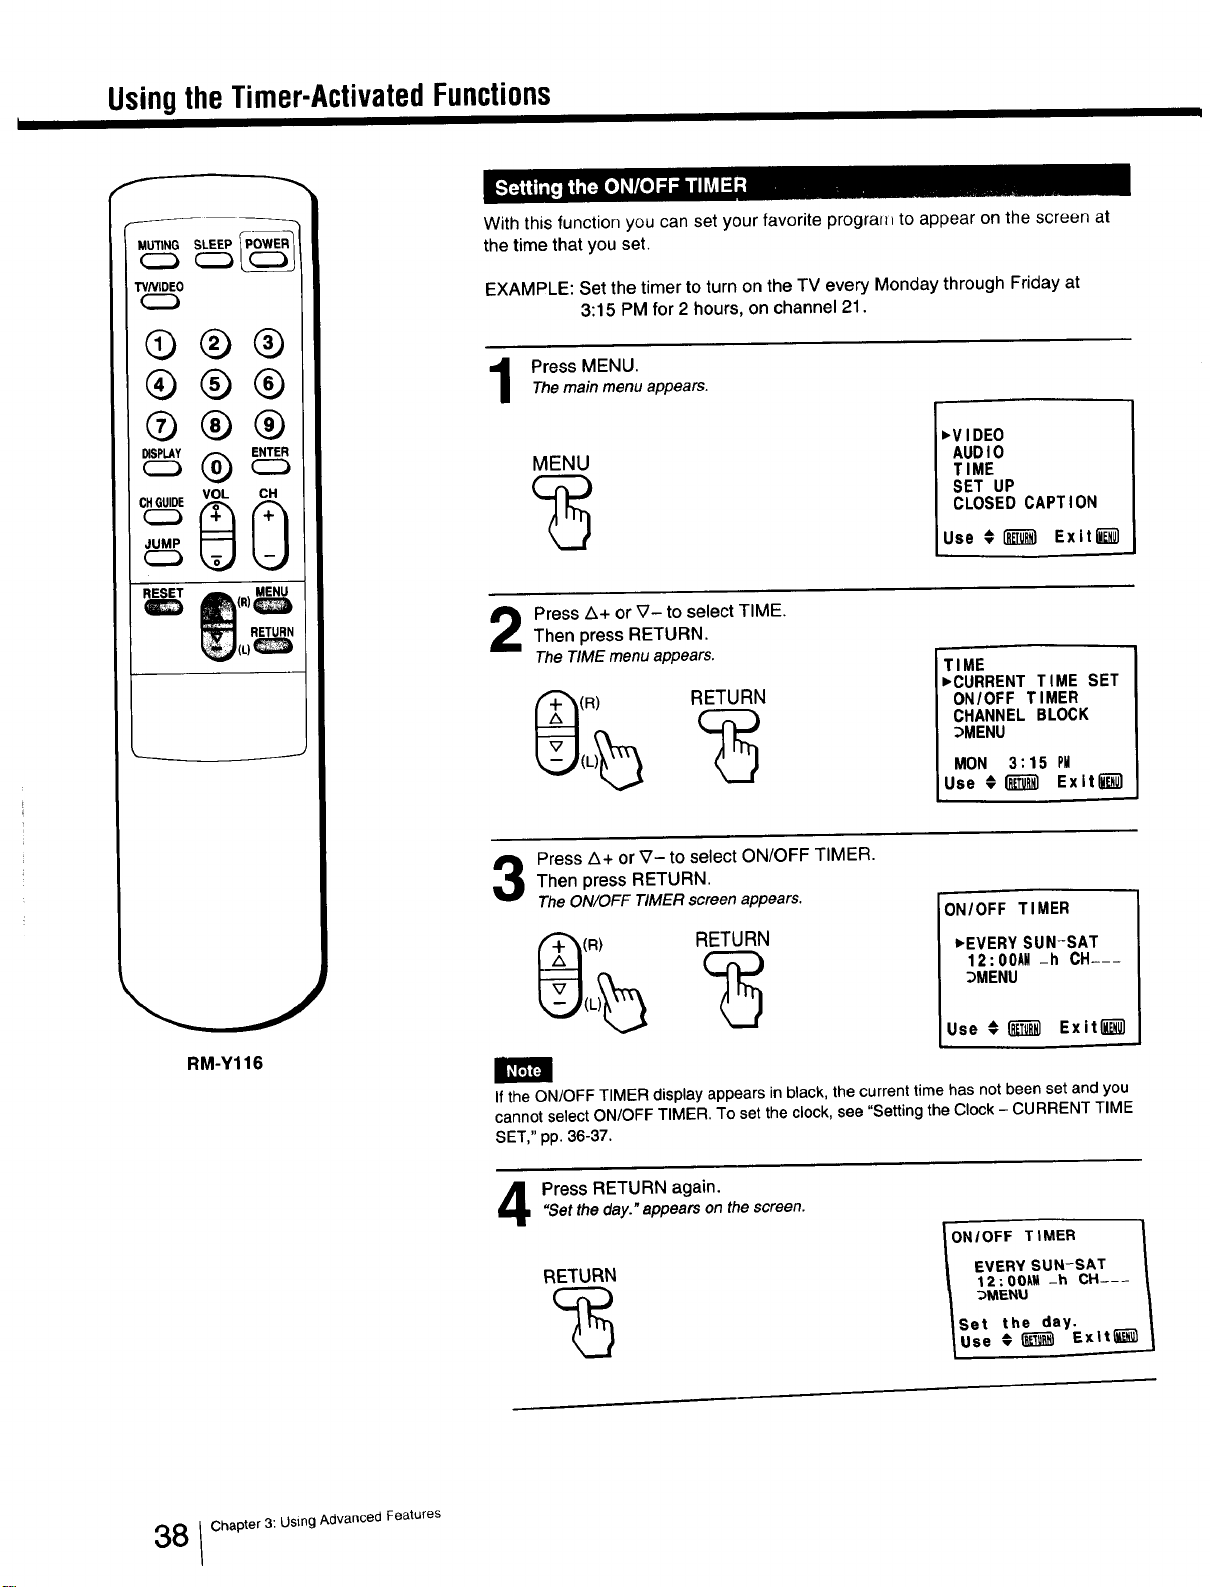
With this function you can set your favorite prografl_ to appear on the screen at
the time that you set.
EXAMPLE: Set the timer to turn on the TV every Monday through Friday at
3:15 PM for 2 hours, on channel 21.
Press MENU.Themainmenu appears.
MENU
,V IDEO
AUD I0
T IME
SET UP
CLOSED CAPT ION
Use _ _ Exiting1
Press A+ or ?- to select TIME.
Then press RETURN.
The TIME menu appears.
(R) RETURN
TIME
,CURRENT TIME SET
ON/OFF TIMER
CHANNEL BLOCK
_MENU
MON 3:15 PM
Use _!_ Exltl_
Press A+ or _7- to select ON/OFF TIMER.
Then press RETURN.
The ON/OFF TIMERscreen appears.
(R) RETURN
ON/OFF TIMER
,EVERY SUN-SAT
12:00AM -h CH---
3MENU
Use _(_ Exitli_
If the ON/OFF TIMER display appears in black, the current time has not been set and you
cannot select ON/OFF TIMER. To set the clock, see "Setting the Clock - CURRENT TIME
SET," pp. 36-37.
Press RETURN again."Setthe day." appearson the screen.
RETURN
%
ONIOFF TIMER 1
EVERY SUN-SAT
12:00_ _h CH---
_MENU
Set the day.
Use • _ Ex|tii_
8 / Chapter 3: Using Advanced Features

II11 I [/111111 TII lnl 11FII11TI1 in Inrl iin=,
Press Z_+ or V- to set the day.
Eachtimeyou pressZ_+or_7-, thedaysoftheweek changeas shownin Fig. I.
Then press RETURN.
"Setthetime."appearsonthescreen.
(R) RETURN
ON/OFF TIMER
EVERY MON-FRI
12:00A¥ _h CH___
_MENU
Set the time.
Use #1_3il Exit6
Press Z_+or V- to set the hour that you want the TIMER to start.
Eachtimeyou pressA + orV-, thehourchangesinsequence.
Then press RETURN. ON/OFF TIMER
(R) RETURN
EVERY MON-FRI
3:00PM _h CH___
_MENU
Set the time.
Use 0 _ Exit6
Press L_+or V- to set the minutes.
EachtimeyoupressA + orV--, the minuteschangeinsequence.
Then press RETURN.
"Setthe duration."appears on the screen.
(R) RETURN
ON/OFF TIMER 1
EVERY MON-FRI
3:lSPII _h CH___
_MENU
Set the duration.
Use _ _ Exlt_-_l
Press Z_+or V- to set the duration of time.
Eachtime you pressZ_+ or V-, the duration changes from "1" to "6" in sequence.
Then press RETURN.
"Select the channel" appears on thescreen. ON/ OFF TIMER
(R) RETURN
EVERY MON-FR I
3:15PN 2h CH___
_MENU
Select the channel
Use #1_ Exlti_l
9
Press Z_+ or _7- to set the channel that you want the TV to tune in.
Each time you press Z_+ or V-, the channel
number changes from I to 125 in sequence.
Press RETURN.
The setting is completed, and the TIMER indicator on
the front of the TV lights up.
RETURN
ON/OFF TIMER
EVERY MON-FR I
3:15PH 2h CH 21
_MENU
Select the channel
Luse ExltE--_l
ON/OFF TIMER
,EVERY MON-FRI
3:15PM 2h CH 21
_MENU
Use 0(_ Exlt_
]
I
I
I
To clear the ON/OFF TIMER setting
Press RESET while in the ON/OFF TIMER
screen.
To return to the normal screen
Press MENU.
• While the TIMER is set, the TIMER indicator
on the TV is on.
• One minute before the timer goes off, the "TV
will turn off" display will appear on the screen.
• If you have not set the clock correctly, the ON/
OFF TIMER will not operate at the proper
time. To set the clock, see "Setting the Clock-
CURRENT TIME SET," pp. 36-37.
• All the settings including ON/OFF TIMER will
be erased if you unplug the TV or a power
failure occurs. Reset the TIMER by following
steps 1-9.
Fig. 1
Selecting the day(s) of the week
When you press Z_+, the days of the week
appear in the following order,
EVERY SUN-SAT ---) I
1"
EVERYSAT r i
1"
EVERY FRI ]
1"
EVERYTHU I J
!"
EVERY WED
1`
EVERY TUE
1`
EVERY MON
1"
EVERYSUN I <--- I
EVERY MON-FRI
SUNDAY
MONDAY
¢
TUESDAY
WEDNESDAY
THURSDAY
FRIDAY
SATURDAY
J
I
(V-: reverse order)
Chapter 3: Using Advanced Features 139
i
i'
=_
=
B.
0

UsingtheTimer-ActivatedFunctions
TV/VIDEO
Q®®
®®®
®®®
vo, cO
RM-Y116
Use this function to block a channel from appearing on the screen during the
time you specify. You can use this function to prevent children from watching
undesirable programs.
EXAMPLE: Set CHANNEL BLOCK every Sunday at 8:45 PM for one hour, on
channel 38.
Press MENU.
The mainmenu appears.
MENU
,VIDEO
AUDIO
TIME
SET UP
CLOSED CAPTION
Use €1_1 Exit_
Press A+ or ?- to select TIME.Then press RETURN.
The TIME menu appears. TIME
,CURRENT TIME SET
ON/OFF TIMER
CHANNEL BLOCK
_MENU
MON 3:15 PM
Use €_ Exit_
Press/k+ or V- to select CHANNEL BLOCK.
Then press RETURN.
TheCHANNEL BLOCK screenappears.
(R)
RETURN
CHANNEL BLOCK
,EVERYSUN-SAT
12:00AM -h CH---
_MENU
Use € _ Exitl_l
If the CHANNEL BLOCK display appears in black, the current time has not been set and
you cannot select CHANNEL BLOCK. To set the clock, see "Setting the Clock - CURRENT
TIME SET," pp. 36-37.
Press RETURN again."Setthe day." appears on the screen.
RETURN
CHANNEL BLOCK
EVERY SUN-SAT
12:O0_U -h CH---
_MENU
Set the day.
Use _ Exlt(i_
0 I Chapter 3: Using Advanced Features
5
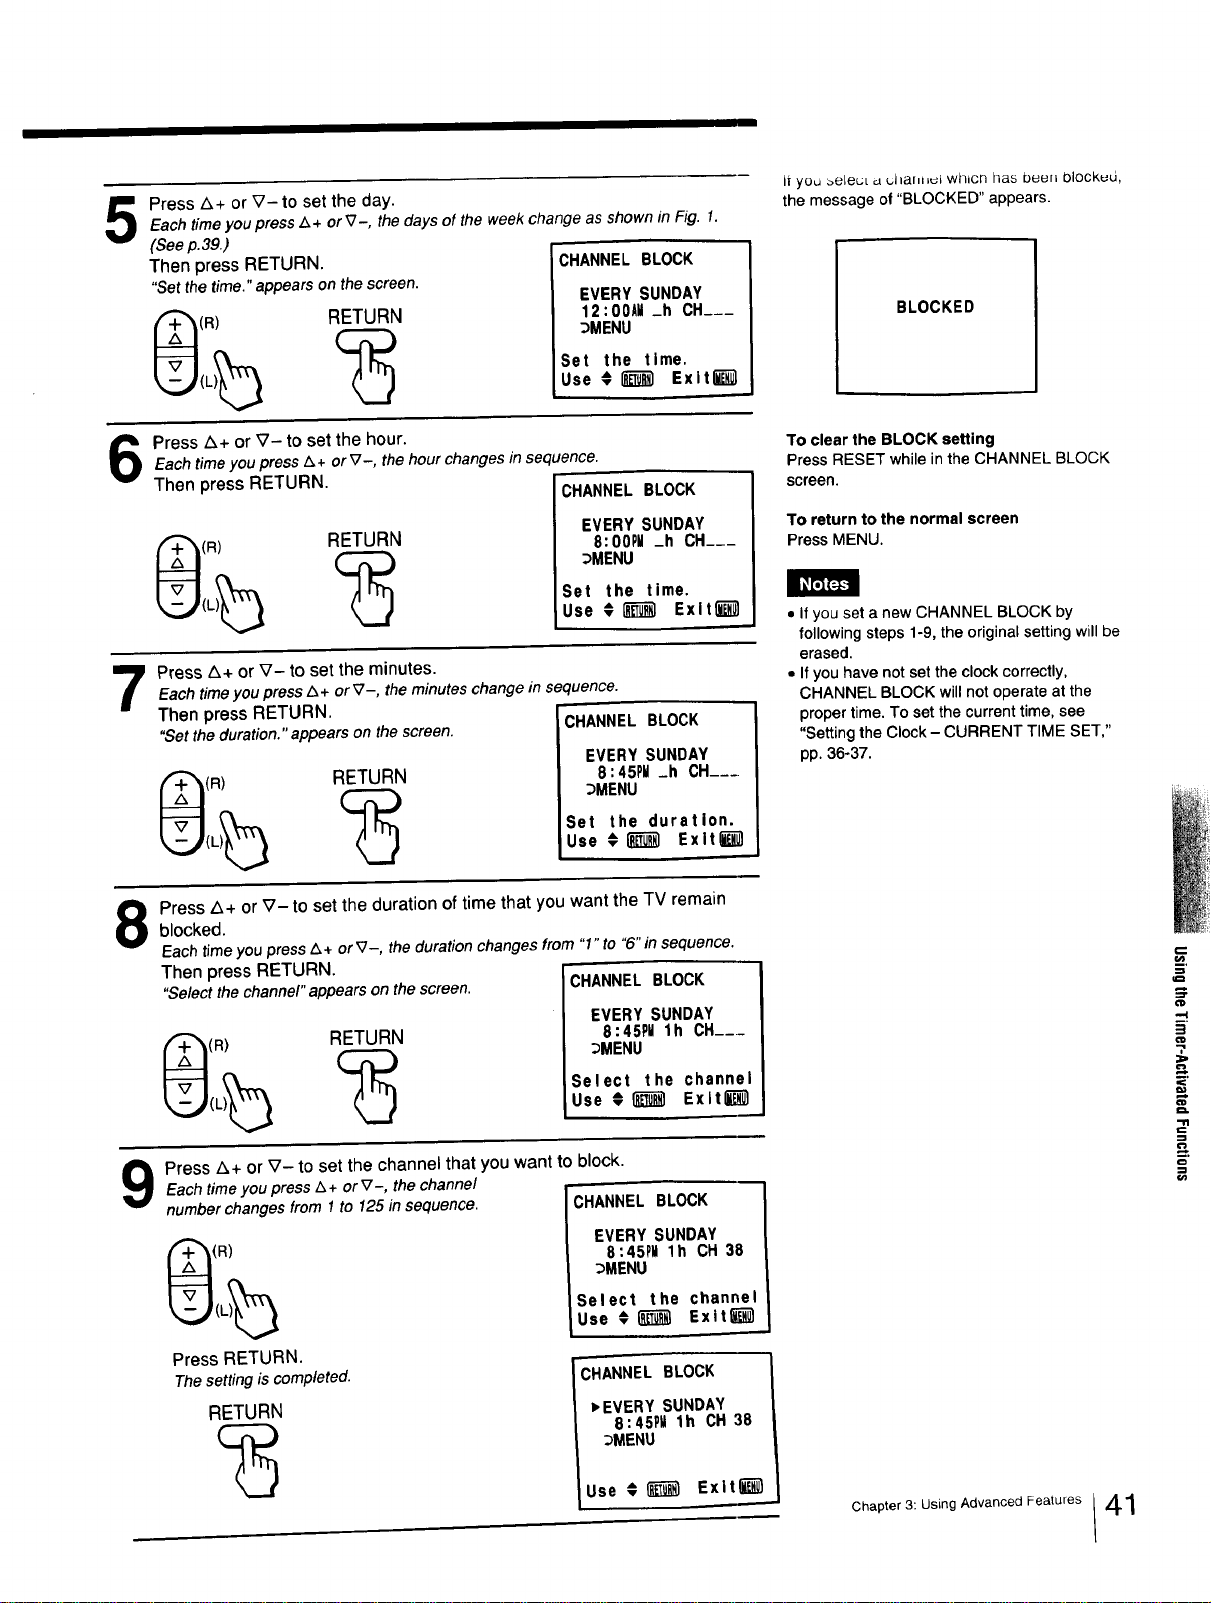
Press A+ or V- to set the day.
Each time you press A+ or _7-, the days of the week change as shown in Fig. 1.
(See p.39.)
Then press RETURN. CHANNEL BLOCK
"Set the time." appears on the screen.
(R) RETURN
EVERY SUNDAY
12 : 00All _h CH___
DMENU
Set the time,
Use € i_ Exitl_
Press A+ or V-to set the hour.Each time you press A+ or _-, the hour changesin sequence.
Then press RETURN.
(R) RETURN
CHANNEL BLOCK
EVERY SUNDAY
8:00PM _h CH___
DMENU
Set the time.
Use € I_ Exlt_
Press A+ or V- to set the minutes.
Each timeyou press A+ or_7-, the minuteschange insequence.
Then press RETURN.
"Setthe duration."appears on the screen.
(R) RETURN
CHANNEL BLOCK
EVERY SUNDAY
8:45PM _h CH....
DMENU
Set the duration.
Use €_ Exit_
8
Press A+ or _7- to set the duration of time that you want the TV remain
blocked.
Eachtime you pressA+ or V-, the duration changes from "1" to "6"in sequence.
Then press RETURN.
"Select the channel" appearson the screen. CHANNEL BLOCK
(R) RETURN
EVERY SUNDAY
8:45PU lh CH....
DMENU
Select the channel
Use €_ Exlt_
Press A+ or V- to set the channel that you want to block.
Eachtimeyou press A+ or_7-, thechanne/
numberchangesfrom1to 125in sequence.
(R)
Press RETURN.
The setting is completed.
RETURN
CHANNEL BLOCK
EVERY SUNDAY
8:45PU lh CH 38
DMENU
Select the channel
Use ¢(_m Exitl_
CHANNEL BLOCK
,EVERY SUNDAY
8:45PM lh CH 38
DMENU
Use €_) Exltl_
it you _eleuL _ ullaf,l_ul wI]IcN has been Dlockud,
the message of "BLOCKED" appears.
BLOCKED
To clear the BLOCK setting
Press RESETwhileinthe CHANNEL BLOCK
screen.
To return to the normal screen
Press MENU.
• If you set a new CHANNEL BLOCK by
following steps 1-9, the original setting will be
erased.
• If you have not set the clock correctly,
CHANNEL BLOCK will not operate at the
proper time. To set the current time, see
"Setting the Clock - CURRENT TIME SET,"
pp. 36-37.
Chapter 3: Using Advanced Features I 41
.=
£.
-,I
m.
3
o

CustomizingtheScreenDisplay
r
MUTING SLEEP
TVNIDEO
_lJ
®®®
®®®
®®®
,vo, 0 cG
RM-Y116
Use this feature to caption up to 12 channel number displays with the matching
channel call letters.
EXAMPLE: Caption channel 20 with ESPN at the caption position number 4.
Press MENU.
Themain menu appears.
MENU ,VIDEO
AUDIO
TIME
SET UP
CLOSED CAPTION
Use _ _ Exitfi_
Press Z_+or _7- to select SET UP.
Then press RETURN.
TheSET UP menu appears.
(R) RETURN
SET UP
,CABLE: ON
AUTO PROGRAM
CH ERASE/ADD
CH CAPTION/GUIDE
S VIDEO
_MENU
Use _]_] Exit_
Press Z&+or _7- to select CH CAPTION/GUIDE.Then press RETURN.
TheCH CAPTION/GUIDE screen appears.
:R)
RETURN
CH CAPTION/GUIDE
®®® ,
®®®
Use _ Exitl_l
If the CH CAPTION/GUIDE display appears in black, the TV is in video mode and you
cannot select CH CAPTION/GUIDE. Press TVNIDEO to change to TV mode.
Press RETURN again."Selecta position."appearson the screen.
RETURN
%
CH CAPTION/GU IDE
(!)®® ---
_®_ ....
Select a position.
Use € _ Ex|tt'_
2 Chapter 3: Using Advanced Features
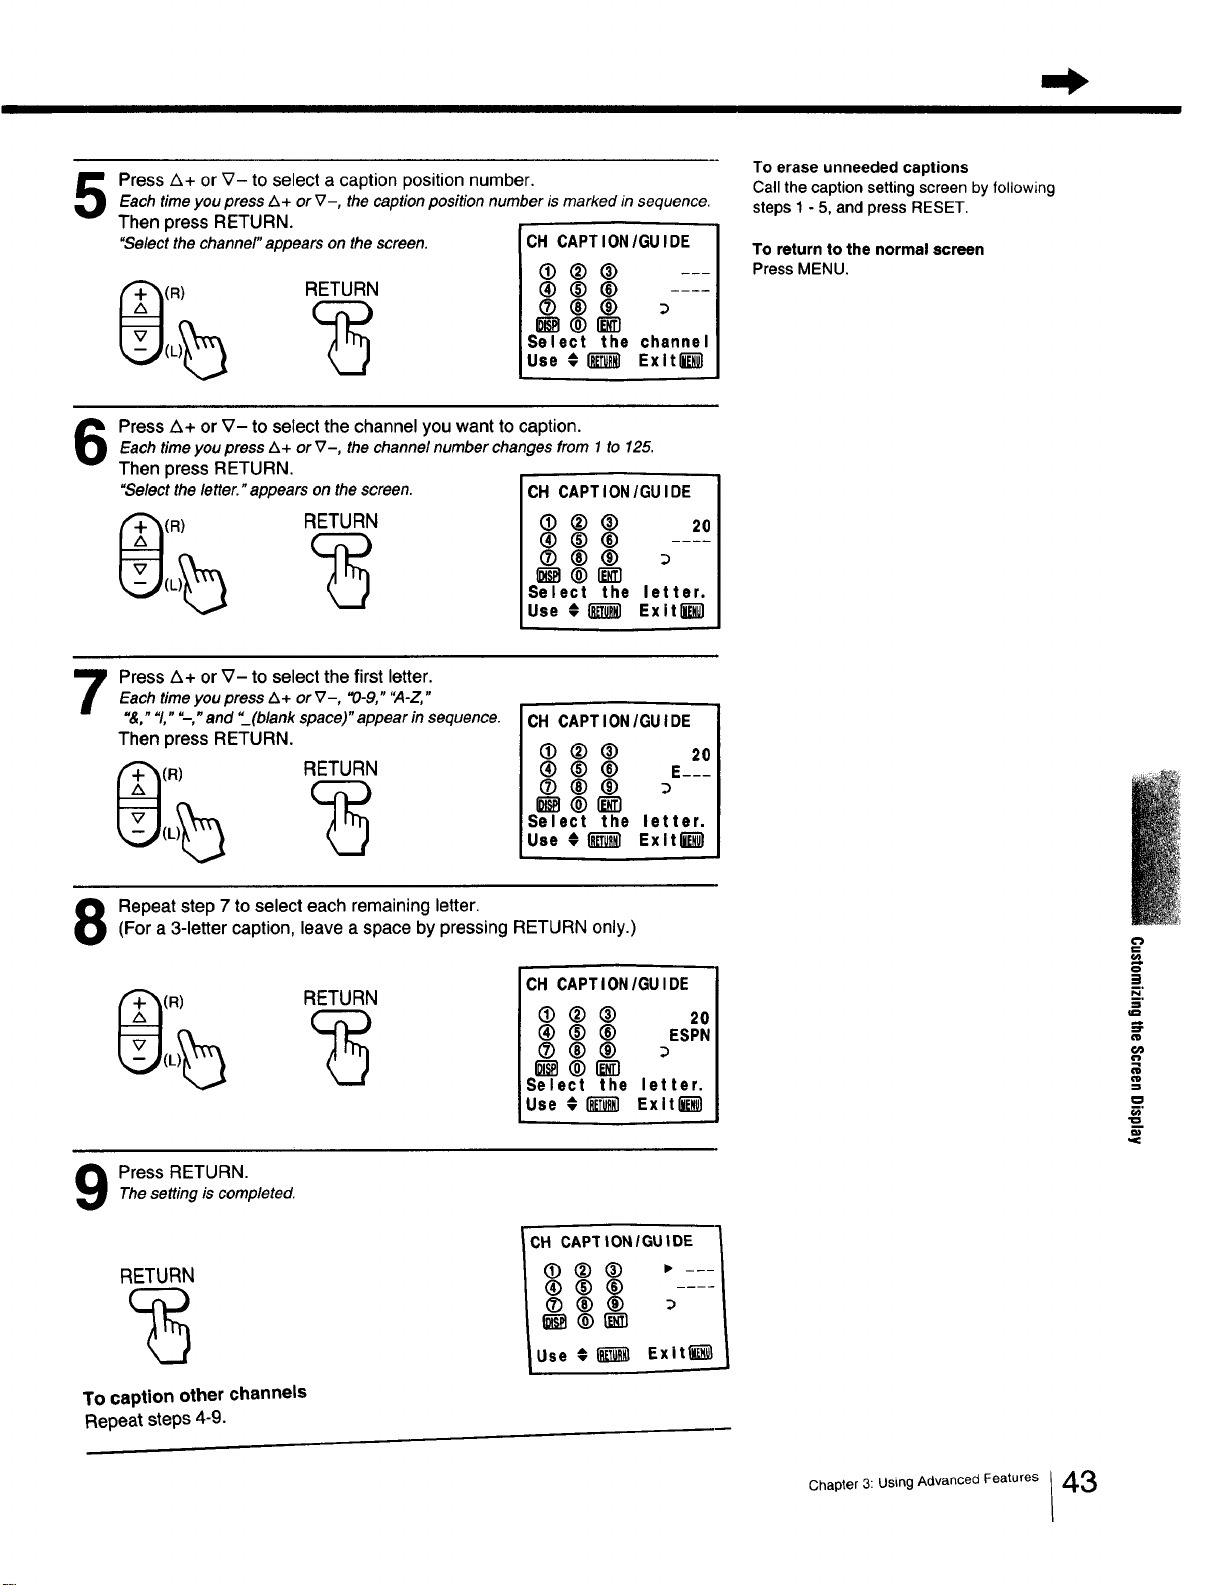
Press A+ or V- to select a caption position number.Each timeyou pressZ_+ or V-, the captionposition number is marked in sequence.
Then press RETURN.
"Selectthe channel" appears on the screen. CH CAPTION/GU IDE
(R) RETURN
®(_® ---
®®®
Select the channel
Use # _ Exltl_l
To erase unneeded captions
Call the caption setting screen by following
steps 1 - 5, and press RESET.
To return to the normal screen
Press MENU.
Press Z_+ or V- to select the channel you want to caption.
Each timeyou press A+ or V-, the channel number changes from 1 to 125.
Then press RETURN.
"Select the letter. "appears on the screen.
(R) RETURN
CH CAPTION/GUIDE
(]) ® ® 20
®®®
(2) 00
_ ® r_-_
Select the letter.
Use # _ Exit_
7
Press A+ or V- to select the first letter.
Each time you press Z_+ or _7-, "0-9," "A-Z,"
"&,""1,""--," and "_(blank space)" appear in sequence.
Then press RETURN.
(R) RETURN
CH CAPTION/GUIDE
• ®® 20
® ® ® E---
®®®
_®_'1
Select the letter.
Use # _ Exlt_
Repeat step 7 to select each remaining letter.(For a 3-letter caption, leave a space by pressing RETURN only.)
(R) RETURN
CH CAPTION/GUIDE
(D (_) ® 20
(_) ® ® ESPN
(2) 00
_®_-1
Select the letter.
Use € _ Exitl_-_
Press RETURN.Thesetting is completed.
RETURN
To caption other channels
Repeat steps 4-9.
CH CAPTIONIGUIDE
lUse € [_ Exit_
€'}
!
:l
o
m,
Chapter 3: Using Advanced Features /43
Customizingthe Screen Display
f
WNIDEO
®®®
c__v°LcQ
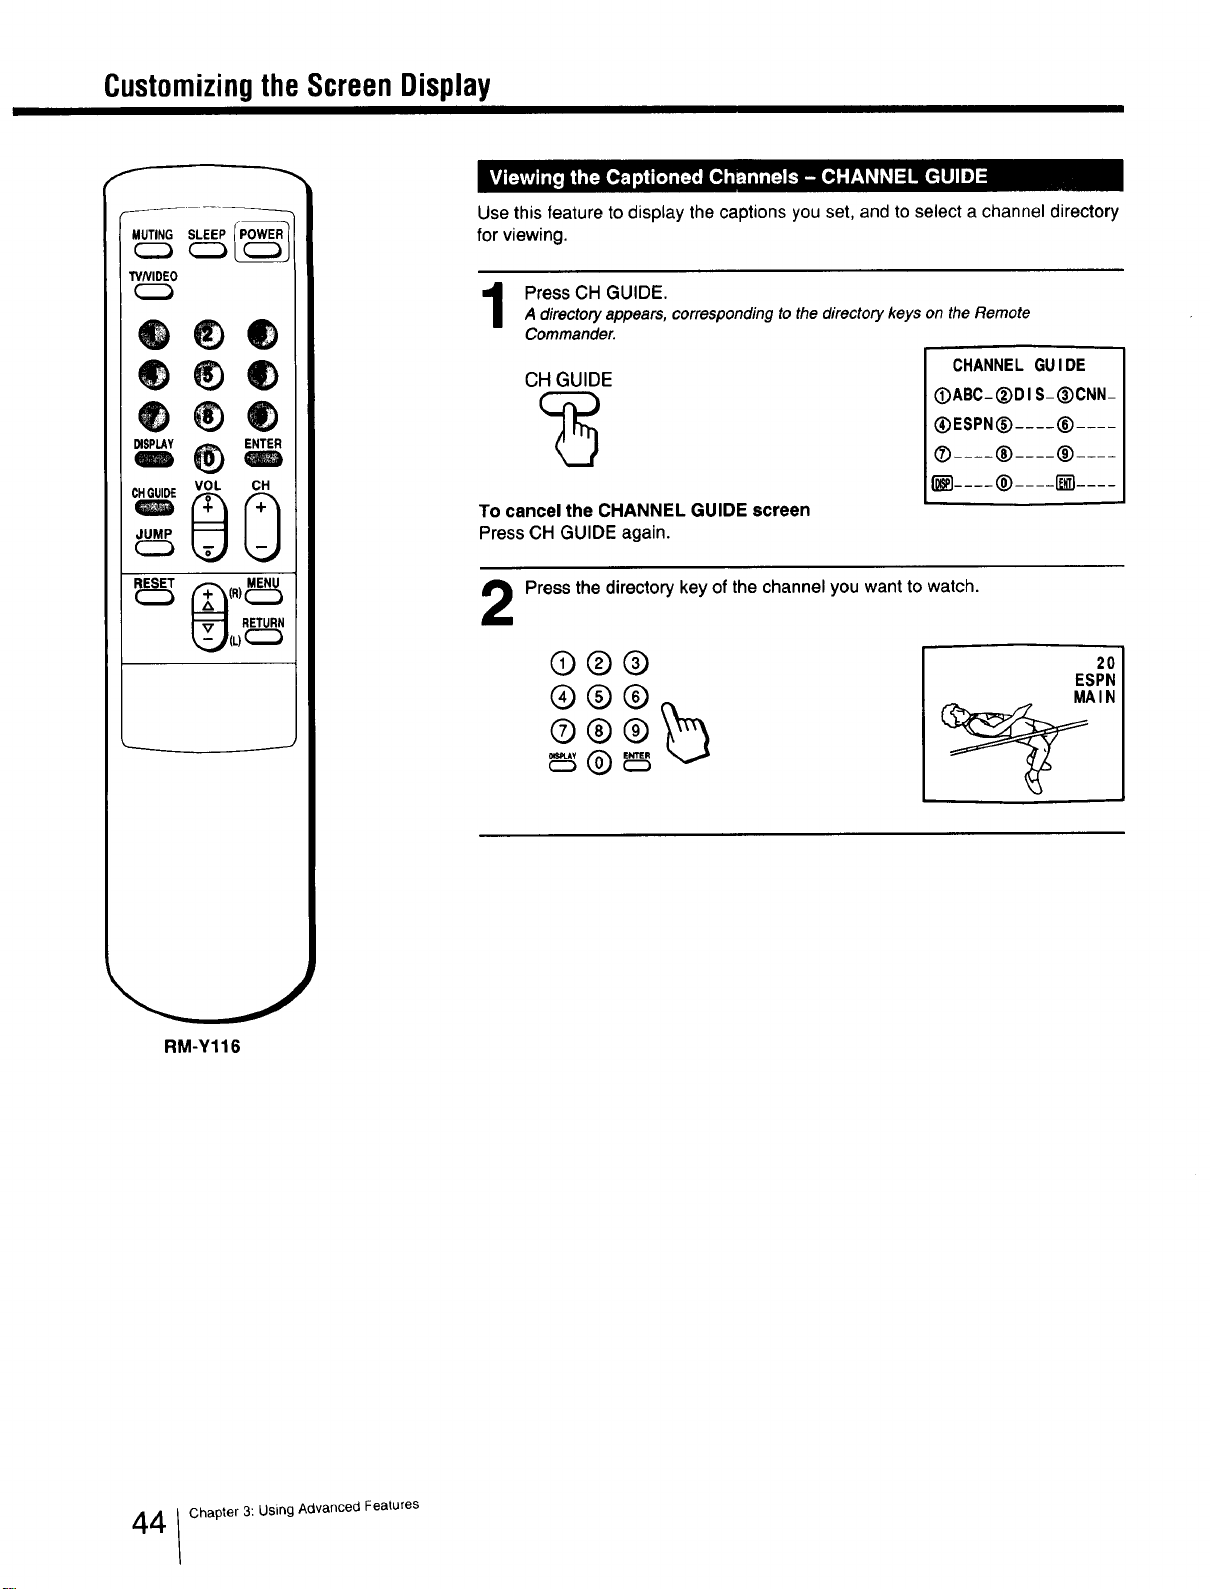
Use this feature to display the captions you set, and to select a channel directory
for viewing.
Press CH GUIDE.
A directory appears, corresponding to the directory keys on the Remote
Commander.
CH GUIDE
To cancel the CHANNEL GUIDE screen
Press CH GUIDE again.
CHANNELGUIDE
(DABC-®D I S-®CNN-
®ESPN® .... (_)....
® .... ® .... ®....
I'_.... ® .... _ ....
2
Press the directory key of the channel you want to watch.
©®®
®®®
®®®_
20
ESPN
MAIN
RM-Y116
4 / Chapter 3: Using Advanced Features
UsingtheCordlessHeadphones(KV-2OTS50only)
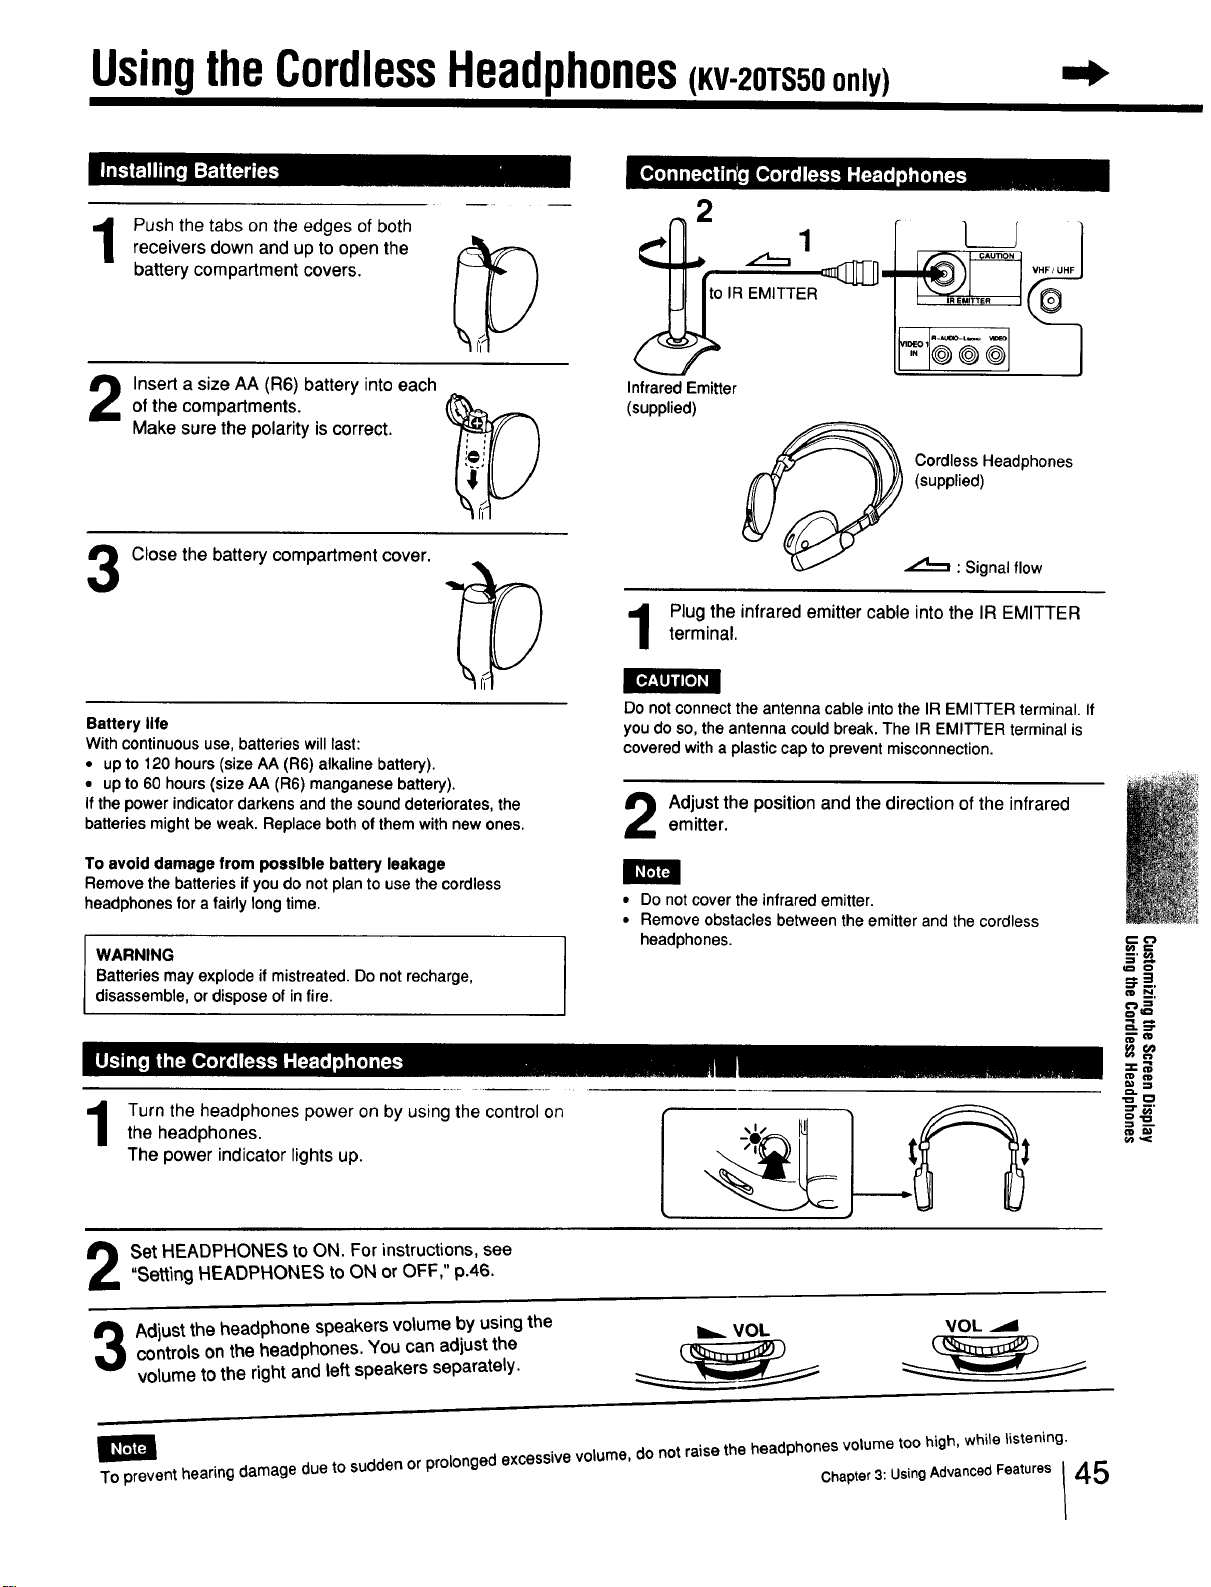
Push the tabs on the edges of both
receivers down and up to open the
battery compartment covers.
Insert a size AA (R6) battery into each
of the compartments.
Make sure the polarity is correct.
3
Close the battery compartment cover.
Battery life
With continuous use, batteries will last:
• up to 120 hours (size AA (R6) alkaline battery).
• up to 60 hours (size AA (R6) manganese battery).
If the power indicator darkens and the sound deteriorates, the
batteries might be weak. Replace both of them with new ones.
To avoid damage from possible battery leakage
Remove the batteries if you do not plan to use the cordless
headphones for a fairly long time.
J WARNING
Batteries may explode if mistreated. Do not recharge,
disassemble, or dispose of in fire.
2
Infrared Emitter
(supplied)
1
IR EMITTER
k
Cordless Headphones
(supplied)
.,,,,t._, : Signal flow
Plug the infrared emitter cable into the IR EMITTERterminal.
Do not connect the antenna cable into the IR EMITTER terminal. If
you do so, the antenna could break. The IR EMITTER terminal is
covered with a plastic cap to prevent misconnection.
Adjust the position and the direction of the infraredemitter.
• Do not cover the infrared emitter.
• Remove obstacles between the emitter and the cordless
headphones.
Turn the headphones power on by using the control on
the headphones.
The power indicator lights up.
Set HEADPHONES to ON. For instructions, see
"Setting HEADPHONES to ON or OFF," p.46.
Adjust the headphone speakers volume by using the
controls on the headphones. You can adjust the
volume to the right and left speakers separately.
_=
To prevent hearing damage due to sudden or prolonged excessive volume, do not raise the headphones volume too high, while listening.
Chapter3: UsingAdvancedFeatures _ 45
Usingthe CordlessHeadphones
f
.UT,.O
TVNIOEO
®®®
®®®
®®®
To return to the normal screen
Press MENU,
To display O on the screen
Press DISPLAY.
• If you want to listen to the sound from the
headphones only, turn off the TV speaker
sound by pressing VOL - or setting
SPEAKER to OFF. For details on setting
SPEAKER to OFF, see "Turning the
Speaker On or Off," p. 34.
• To listen to the sound from the
headphones clearly, adjust the direction
and the position of the infrared emitter.
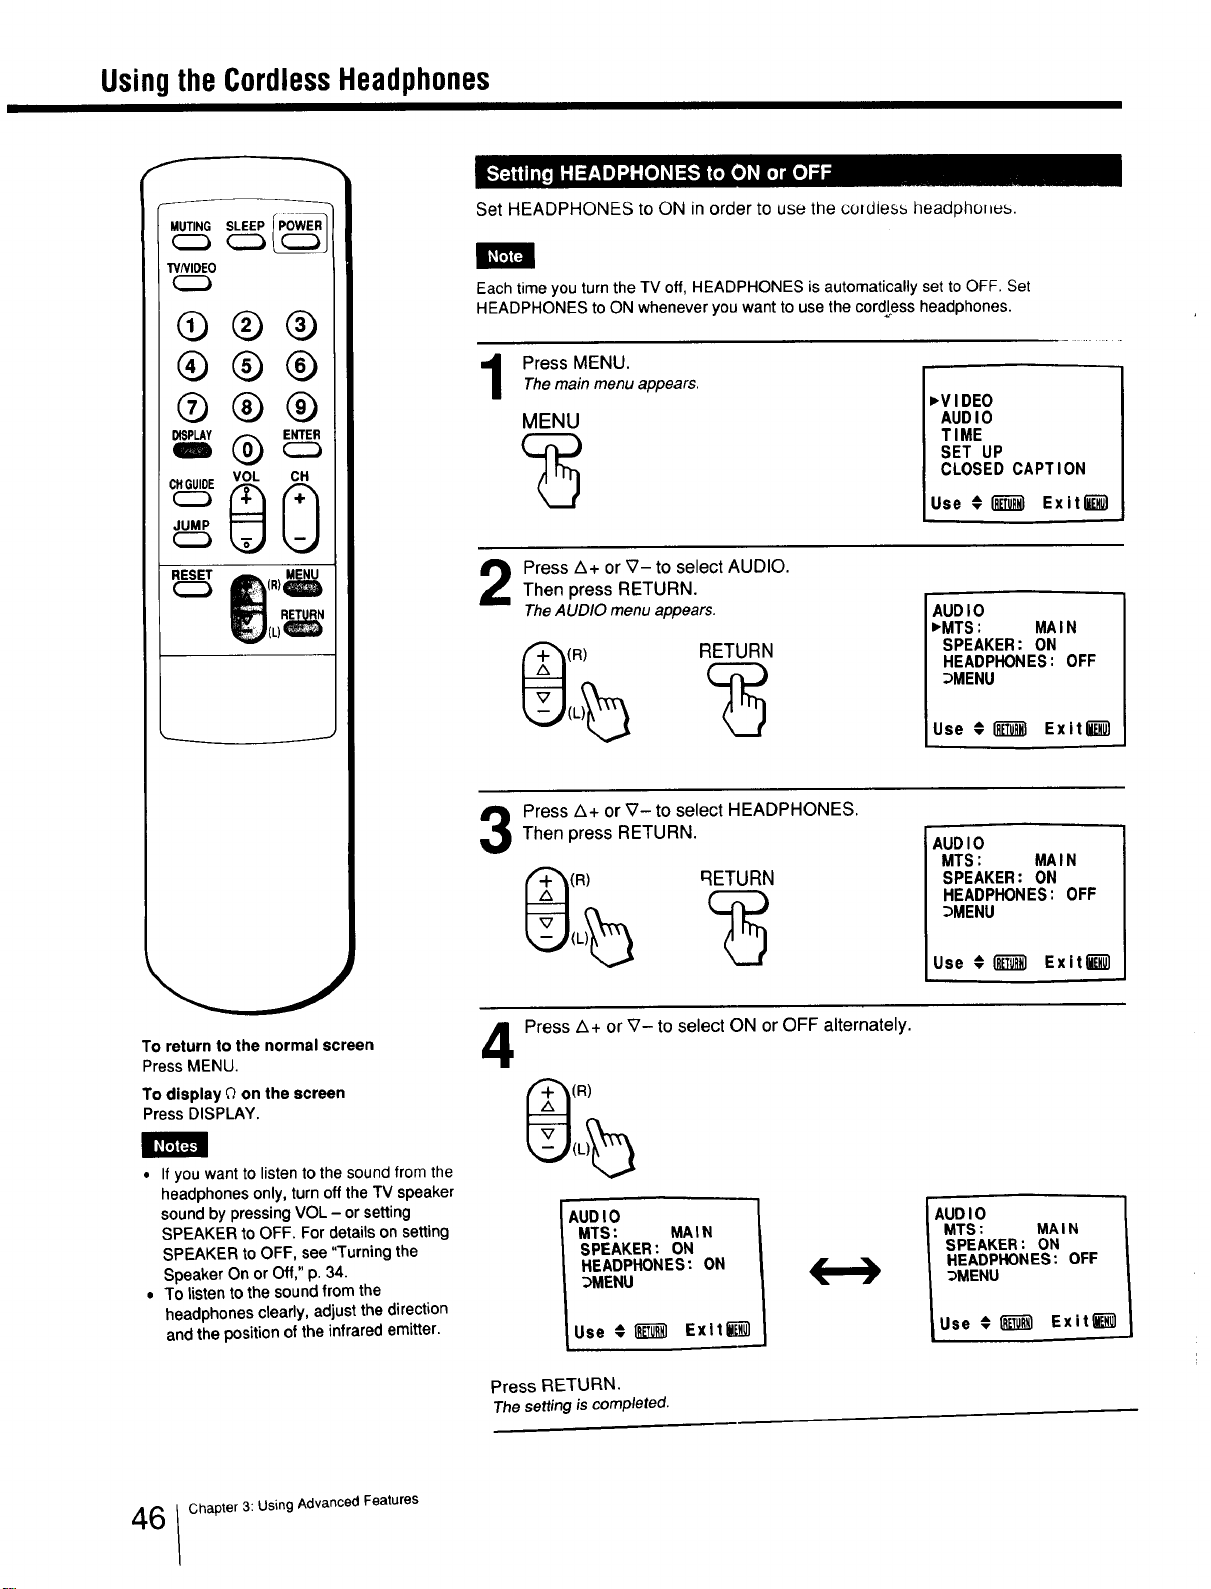
Set HEADPHONES to ON in order to use the coldless headphones.
Each time you turn the TV off, HEADPHONES is automatically set to OFF. Set
HEADPHONES to ON whenever you want to use the cordless headphones.
Press MENU.The main menu appears.
MENU
_VIDEO
AUDIO
TIME
SET UP
CLOSED CAPTION
Use #l_ Exit_
Press Z_+ or _7-to select AUDIO.
Then press RETURN.
TheAUDIO menu appears.
(R) RETURN
AUDIO
_MTS: MAIN
SPEAKER: ON
HEADPHONES: OFF
_MENU
Use €1_ Exiti_
Press Z_+ or _7- to select HEADPHONES.
Then press RETURN.
(R) RETURN
AUDIO
MTS: MAIN
SPEAKER: ON
HEADPHONES: OFF
_MENU
Use € I_ Exit"t_
4
Press A+ or _7- to select ON or OFF alternately.
(R)
AUDIO
MTS: MAIN
SPEAKER: ON
HEADPHONES: ON
_MENU
Use € _ Exlt_
AUDIO 1
MTS: MAIN
SPEAKER: ON
HEADPHONES: OFF
_MENU
iUse € _ Exit"lieu1
Press RETURN.
The settingiscompleted.
6 Chapter 3: Using Advanced Features
Appendix
Specifications
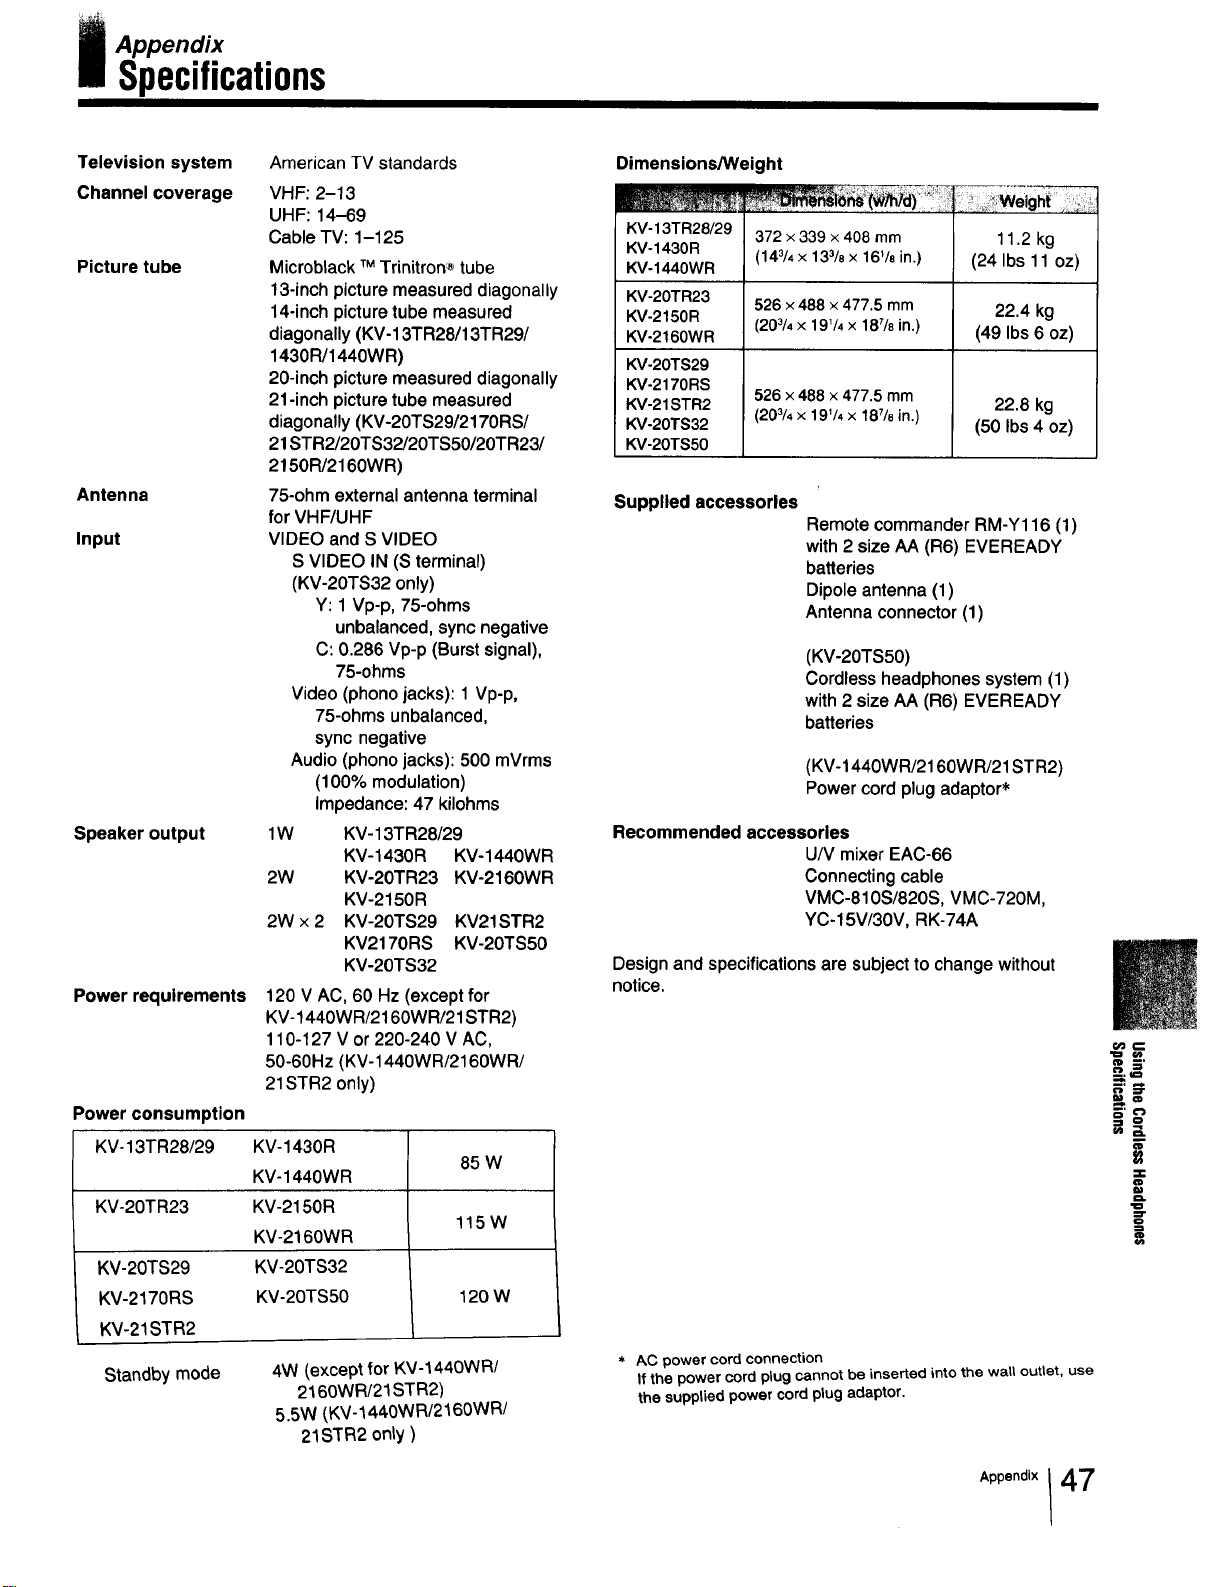
Television system
Channel coverage
Picture tube
Antenna
Input
American TV standards
VHF: 2-13
UHF: 14-69
Cable TV: 1-125
Speaker output
Microblack TMTrinitron_ tube
13-inch picture measured diagonally
14-inch picture tube measured
diagonally (KV-13TR28/13TR29/
1430R/1440WR)
20-inch picture measured diagonally
21-inch picture tube measured
diagonally (KV-20TS29/2170RS/
21STR2/20TS32/20TS50/20TR23/
21501°1/2160WR)
75-ohm external antenna terminal
for VHF/UHF
VIDEO and S VIDEO
S VIDEO IN (S terminal)
(KV-20TS32 only)
Y: 1 Vp-p, 75-ohms
unbalanced, sync negative
C: 0.286 Vp-p (Burst signal),
75-ohms
Video (phono jacks): 1 Vp-p,
75-ohms unbalanced,
sync negative
Audio (phono jacks): 500 mVrms
(100% modulation)
Impedance: 47 kilohms
1W KV-13TR28/29
KV-1430R KV-1440WR
2W KV-20TR23 KV-2160WR
KV-2150 R
2W x 2 KV-20TS29 KV21STR2
KV2170RS KV-20TS50
KV-20TS32
Power requirements 120 V AC, 60 Hz (except for
KV-1440WR/2160WR/21STR2)
110-127 V or 220-240 V AC,
50-60Hz (KV-1440WR/2160WR/
21STR2 only)
Power consumption
KV-13TR28/29 KV-1430R
65 W
KV-1440WR
KV-20TR23 KV-2150R
115W
KV-2160WR
KV-20TS29 KV-20TS32
KV-2170RS KV-20TS50 120 W
KV-21STR2
Standby mode 4W (except for KV-1440WR/
2160WR/21STR2)
5.5W (KV-1440WR/2160WR/
21STR2 only)
Dimensions/Weight
KV-13TR28/29
KV-1430R
KV-1440WR
KV-20TR23
KV-2150R
KV-2160WR
KV-20TS29
KV-2170RS
KV-21 STR2
KV-20TS32
KV-20TS50
372 x 339 x 408 mm
(143/4x 133/8 x 161/8in.)
526 x 488 × 477.5 mm
(203/4× 19V4 x 187/e in.)
526 x 488 x 477.5 mm
(203/4× 191/4x 187/8in.)
11.2 kg
(24 Ibs 11 oz)
22.4 kg
(49 Ibs 6 oz)
22.8 kg
(50 Ibs 4 oz)
Supplied accessories
Remote commander RM-Y116 (1)
with 2 size AA (R6) EVEREADY
batteries
Dipole antenna (1)
Antenna connector (1)
(KV-20TS50)
Cordless headphones system (1)
with 2 size AA (R6) EVEREADY
batteries
(KV-1440WR/2160WR/21STR2)
Power cord plug adaptor*
Recommended accessories
U/V mixer EAC-66
Connecting cable
VMC-810S/820S, VMC-720M,
YC-15V/30V, RK-74A
Design and specifications are subject to change without
notice.
* AC power cord connection
If the power cord plug cannot be inserted into the wall outlet, use
the supplied power cord plug adaptor.
=_7
47
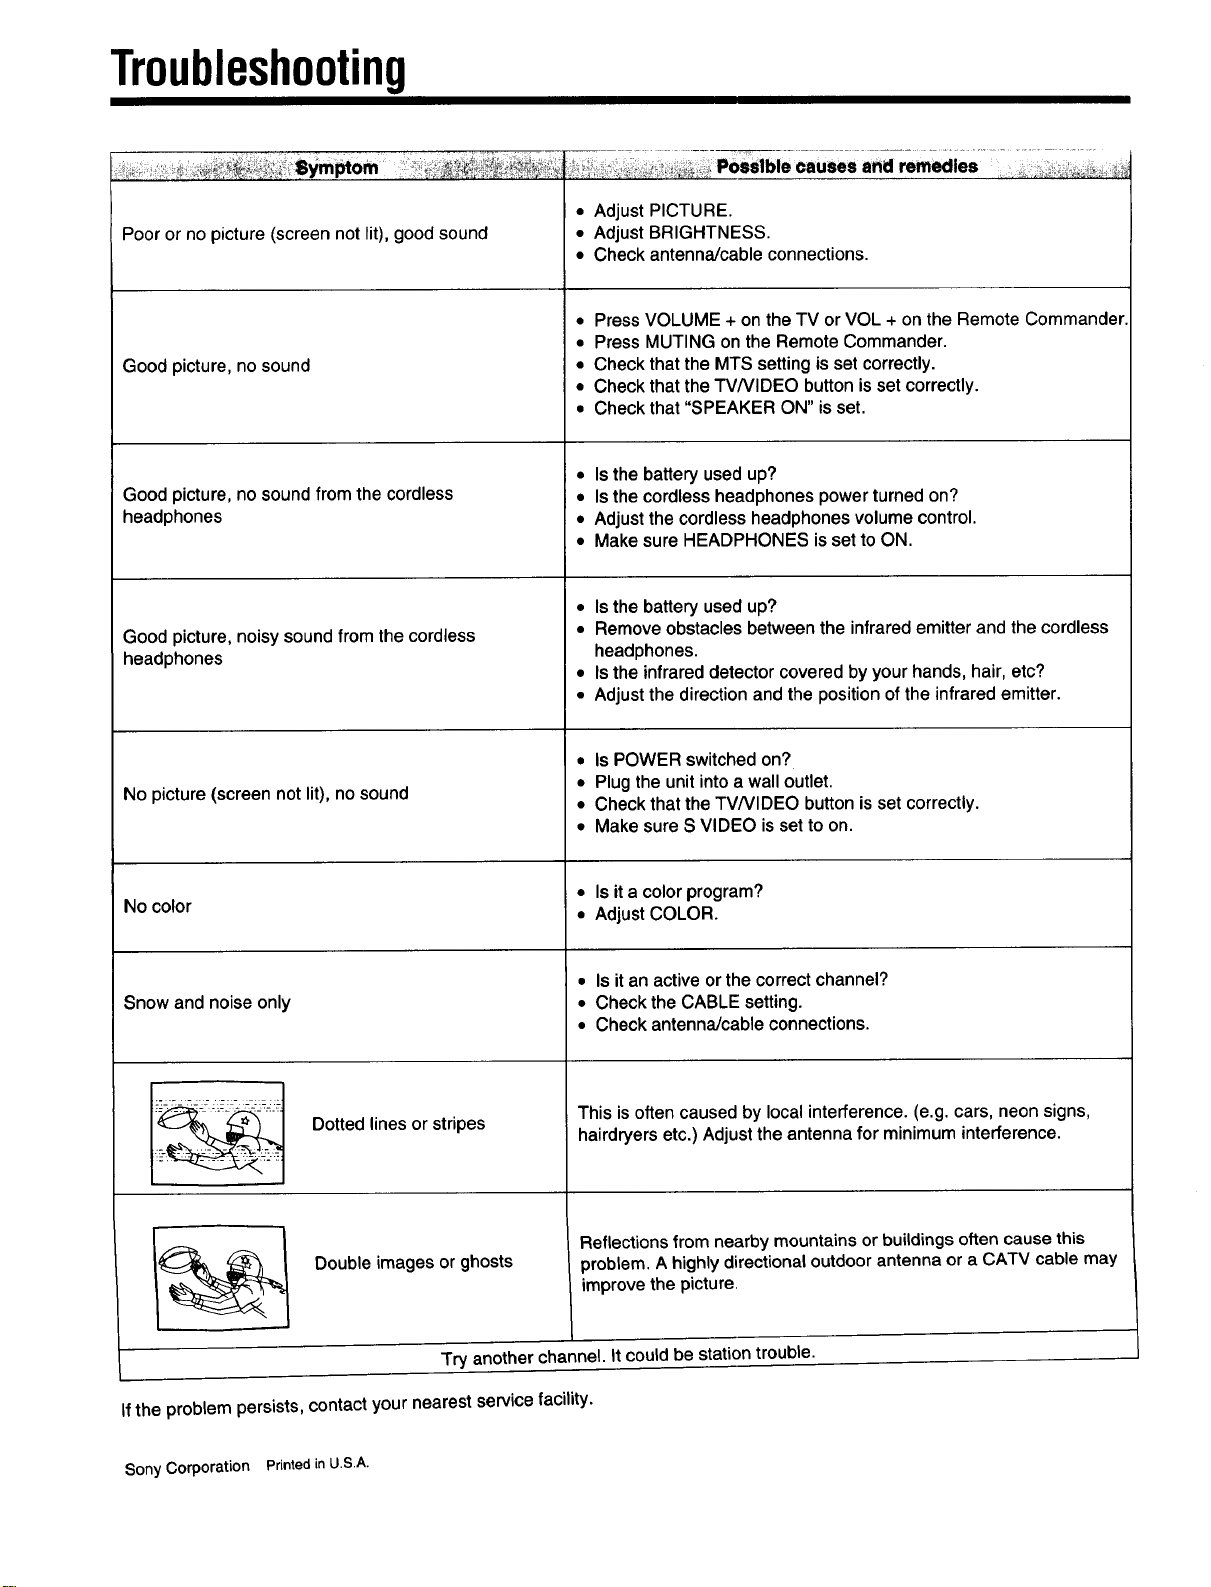
Troubleshooting
_ ' _i_;_::_ Sym_om _ _ • _,_,_:._,,_PoSsible causes and.....remedies _
Poor or no picture (screen not lit), good sound
Good picture, no sound
Good picture, no sound from the cordless
headphones
Good picture, noisy sound from the cordless
headphones
No picture (screen not lit), no sound
No color
Snow and noise only
Dotted lines or stripes
Double images or ghosts
• Adjust PICTURE.
• Adjust BRIGHTNESS.
• Check antenna/cable connections.
• Press VOLUME + on the TV or VOL + on the Remote Commander.
• Press MUTING on the Remote Commander.
• Check that the MTS setting is set correctly.
• Check that the TVNIDEO button is set correctly.
• Check that "SPEAKER ON" is set.
• Is the battery used up?
• Is the cordless headphones power turned on?
• Adjust the cordless headphones volume control.
• Make sure HEADPHONES is set to ON.
• Is the battery used up?
• Remove obstacles between the infrared emitter and the cordless
headphones.
• Is the infrared detector covered by your hands, hair, etc?
• Adjust the direction and the position of the infrared emitter.
• Is POWER switched on?
• Plug the unit into a wall outlet.
• Check that the TVNIDEO button is set correctly.
• Make sure S VIDEO is set to on.
• Is it a color program?
• Adjust COLOR.
• Is it an active or the correct channel?
• Check the CABLE setting.
• Check antenna/cable connections.
This is often caused by local interference. (e.g. cars, neon signs,
hairdryers etc.) Adjust the antenna for minimum interference.
Reflections from nearby mountains or buildings often cause this
problem. A highly directional outdoor antenna or a CATV cable may
improve the picture.
Try another channel, it could be station trouble.
If the problem persists, contact your nearest service facility.
Sony Corporation Printed in U.S.A.