
9-IN-1 AIRPRO XL GRILL
Instruction Manual
90100 BELLA PRO AirPro XL Grill_IM_R10.indd 190100 BELLA PRO AirPro XL Grill_IM_R10.indd 1 2020-10-30 6:26 PM2020-10-30 6:26 PM

Thank You for your purchase
Register & sign up for special
announcements and trendy recipes!
Tell us what you think!
Rate, review or ask us a question.
@bellahousewares.com
#getinspired
BellaLife BellaLifestyle
90100 BELLA PRO AirPro XL Grill_IM_R10.indd 290100 BELLA PRO AirPro XL Grill_IM_R10.indd 2 2020-10-30 6:26 PM2020-10-30 6:26 PM

Important Safeguards ..................................................................................................... 4-6
Additional Important Safeguards ...................................................................................7- 8
Notes on the Plug ................................................................................................................8
Notes on the Cord ................................................................................................................8
Plasticizer Warning ..............................................................................................................9
Electric Power .......................................................................................................................9
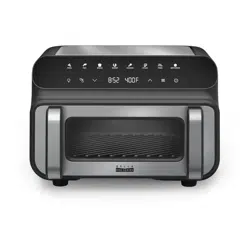
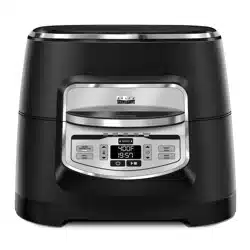
Getting To Know Your 9-in-1 AirPro XL Grill ................................................................10
Control Panel ................................................................................................................. 11- 12
Before Using for the First Time ....................................................................................... 13
Operating Instructions ......................................................................................................13
Preheating ...........................................................................................................................13
Air Fry .............................................................................................................................1 4 -15
Grill ...................................................................................................................................... 16
Roast ....................................................................................................................................17
Bake ................................................................................................................................18-19
Broil .....................................................................................................................................20
Sauté ...................................................................................................................................21
Sear ......................................................................................................................................22
Piz za ............................................................................................................................... 23 -24
Dehydrate ...........................................................................................................................25
User Maintenance Instructions ........................................................................................ 26
Care & Cleaning Instructions ...........................................................................................26
Storing Instructions ........................................................................................................... 27
Trouble Shooting ...............................................................................................................27
Cooking Charts ............................................................................................................. 28- 33
Grill ................................................................................................................................ 28
Roast .............................................................................................................................29
Bake ............................................................................................................................... 29
Air Fry ..................................................................................................................... 30-32
Dehydrate ............................................................................................................... 32-33
Warranty ....................................................................................................................... 34-35
TABLE OF CONTENTS
90100 BELLA PRO AirPro XL Grill_IM_R10.indd 390100 BELLA PRO AirPro XL Grill_IM_R10.indd 3 2020-10-30 6:26 PM2020-10-30 6:26 PM

4
IMPORTANT SAFEGUARDS
When using electrical appliances, basic safety precautions should always
be followed, including the following:
1. READ ALL INSTRUCTIONS.
2. Remove and discard the protective cover tted on the power plug of
this appliance.
3. This appliance can be used by persons with reduced physical, sensory
or mental capabilities or lack of experience and knowledge if they
have been given supervision or instruction concerning use of the
appliance in a safe way and understand the hazards involved.
4. Keep the appliance and its cord out of reach of children. DO NOT
allow the appliance to be used by children. Close supervision is
necessary when used near children.
5. This appliance is for household use only. DO NOT use this appliance
for anything other than its intended use. DO NOT use in moving
vehicles or boats. DO NOT use outdoors. Misuse may cause injury.
6. Ensure the surface is level, clean and dry. DO NOT place the appliance
near the edge of a countertop during operation.
7. ALWAYS ensure the appliance is properly assembled before use.
8. When using this appliance, provide at least 6 inches (15.25 cm) of
space above and on all sides for air circulation.
9. DO NOT use an extension cord. A short power-supply cord is used to
reduce the risk of children grabbing the cord or becoming entangled
and to reduce the risk of people tripping over a longer cord.
10. To protect against electrical shock DO NOT immerse cord, plugs, or
main unit housing in water or other liquid.
90100 BELLA PRO AirPro XL Grill_IM_R10.indd 490100 BELLA PRO AirPro XL Grill_IM_R10.indd 4 2020-10-30 6:26 PM2020-10-30 6:26 PM

5
11. DO NOT use the appliance if there is damage to the power cord or
plug. Regularly inspect the appliance and power cord. If the appliance
malfunctions or has been damaged in any way, immediately stop use
and call Customer Service.
12. NEVER use outlet below countertop surface.
13. DO NOT place appliance and let cord hang over edges of tables,
counters or touch hot surfaces.
14. Only use recommended accessories included with this appliance
or authorized by 9-in-1 AirPro XL Grill. The use of accessories or
attachments not recommended by 9-in-1 AirPro XL Grill may cause a
risk of re or injury.
16. Before placing any accessory into the cooker, ensure they are clean
and dry.
17. DO NOT use the appliance without the removable cooking pot and
splatter shield installed.
18. ALWAYS ensure hood is fully closed before operating.
19. DO NOT move the appliance when in use.
20. DO NOT cover the air intake vent or air outlet vent while unit is
operating. Doing so will prevent even cooking and may damage the
unit or cause it to overheat.
21. DO NOT touch hot surfaces. Appliance surfaces are hot during and
afteroperation. To prevent burns or personal injury, ALWAYS use
protective hot pads or insulated oven mitts and use available handles
and knobs.
90100 BELLA PRO AirPro XL Grill_IM_R10.indd 590100 BELLA PRO AirPro XL Grill_IM_R10.indd 5 2020-10-30 6:26 PM2020-10-30 6:26 PM

6
22. DO NOT touch accessories during or immediately after cooking. The
grilling plate and basket becomes extremely hot during the cooking
process. Avoid physical contact while removing the accessory from
the appliance. To prevent burns or personal injury ALWAYS use care
when interfacing with product. Recommend use of long handed
utensil and protective hot pads or insulated oven mitts.
23. DO NOT use this appliance for deep-frying.
24. To prevent possible illness, ALWAYS use a thermometer to check that
your food is cooked to the recommended temperatures.
25. should a grease re occur or the unit emits black smoke, unplug
immediately. Wait for smoking to stop before removing any cooking
accessories.
26. Please refer to the Cleaning & Maintenance section for regular
maintenance of the appliance.
27. Unplug from outlet when not in use and before cleaning. Allow to
cool before cleaning, dissasembly, putting in or taking off parts and
storage.
28. DO NOT clean with abrasive cleaners, steel wool, or scouring pads.
29. Cleaning and user maintenance shall not be made by children.
FOR HOUSEHOLD USE ONLY
SAVE THESE INSTRUCTIONS
90100 BELLA PRO AirPro XL Grill_IM_R10.indd 690100 BELLA PRO AirPro XL Grill_IM_R10.indd 6 2020-10-30 6:26 PM2020-10-30 6:26 PM

7
ADDITIONAL IMPORTANT
SAFEGUARDS
CAUTION, HOT SURFACES: This appliance generates heat andescaping
steam during use. Proper precautions must betaken toprevent the risk
ofburns, res or other injury to persons ordamage to property.
1. A person who has not read and understood all operating and safety
instructions is not qualied to operate this appliance. All users of this
appliance must read and understand this instruction manual before
operating or cleaning this appliance.
2. If this appliance falls or accidentally becomes immersed in water, unplug
it from the wall outlet immediately. Do not reach into the water!
3. To reduce the risk of re, do not leave this appliance unattended
during use.
4. If this appliance begins to malfunction during use, immediately press the
POWER button and unplug the cord. Do not use or attempt to repair a
malfunctioning appliance!
5. When using this appliance, provide adequate air space above and on
all sides for air circulation. Do not operate this appliance while it is
touching or near curtains, wall coverings, clothing, dishtowels or other
ammable materials.
6. Do not use this appliance in an unstable position.
CAUTION: To protect against damage or electric shock, do not cook in
the base.
90100 BELLA PRO AirPro XL Grill_IM_R10.indd 790100 BELLA PRO AirPro XL Grill_IM_R10.indd 7 2020-10-30 6:26 PM2020-10-30 6:26 PM

8
7. The cord of this appliance should only be plugged into a 120V AC
electrical wall outlet
8. To reduce the risk of burns or other injuries, do not touch hot surfaces.
Use a protective oven mitts or gloves as well as long-handled utensils
is recommended.
NOTES ON THE PLUG
This appliance has a polarized plug (one blade is wider than the other).
To reduce the risk of electric shock, this plug will t in a polarized outlet only
one way. If the plug does not t fully into the outlet, reverse the plug. If it still
does not t, contact a qualied electrician. Do not modify the plug in any way.
NOTES ON THE CORD
A. A short power-supply cord (or detachable power-supply cord) is to
be provided to reduce risks resulting from becoming entangled in or
tripping over a longer cord.
B. Longer detachable power-supply cords or extension cords are
available and may be used if care is exercised in their use.
C. If a long detachable power-supply cord or extension cord is used:
1) The marked electrical rating of the detachable power-supply
cord or extension cord should be at least as great as the
electrical rating of the appliance;
2) If the appliance is of the grounded type, the extension cord
should be a grounding- type 3-wire cord; and
3) The longer cord should be arranged so that it will not drape
over the counter top or table top where it can be pulled on by
children or tripped over.
90100 BELLA PRO AirPro XL Grill_IM_R10.indd 890100 BELLA PRO AirPro XL Grill_IM_R10.indd 8 2020-10-30 6:26 PM2020-10-30 6:26 PM

9
PLASTICIZER WARNING
CAUTION: To prevent Plasticizers from migrating from the nish
ofthecounter top or table top or other furniture, place
NON-PLASTIC coasters or place mats between the appliance and the
nish ofthecounter top or table top. Failure to do so may cause thenish
todarken; permanent blemishes may occur or stains can appear.
ELECTRIC POWER
If the electrical circuit is overloaded with other appliances, your appliance
may not operate properly. It should be operated on a separate electrical
circuit from other appliances.
90100 BELLA PRO AirPro XL Grill_IM_R10.indd 990100 BELLA PRO AirPro XL Grill_IM_R10.indd 9 2020-10-30 6:26 PM2020-10-30 6:26 PM
10
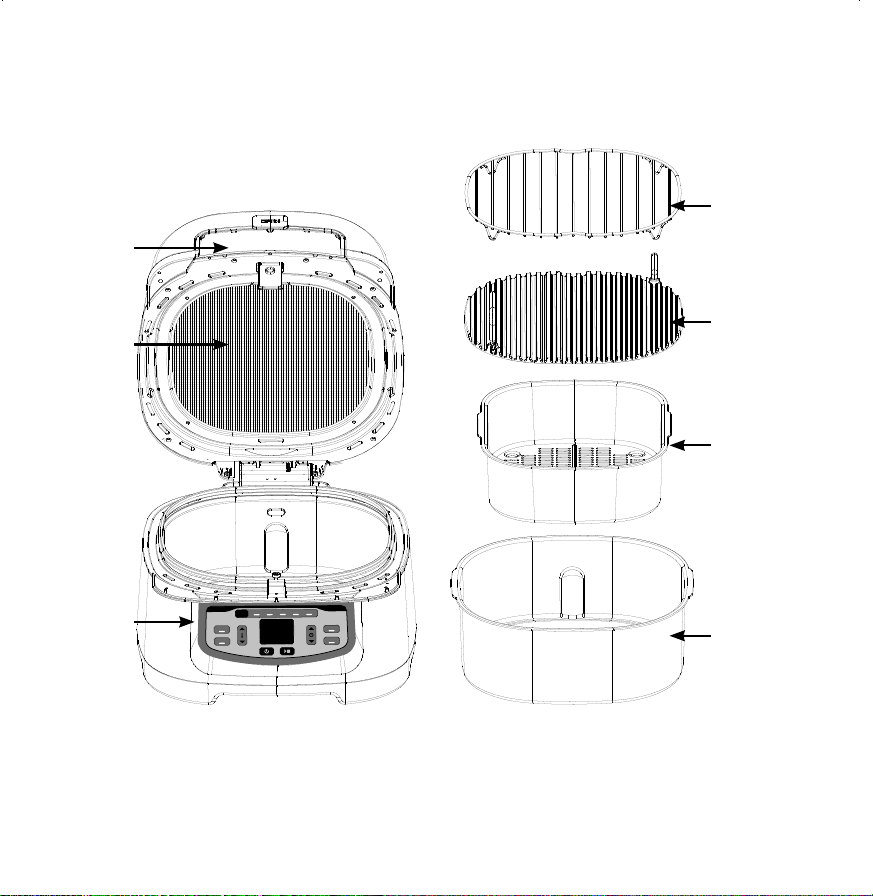
Getting To Know Your 9-in-1 AirPro XL Grill
Product may vary slightly from illustration
AIR FRY
CONVECTION
GRILL
ROAST
BAKE
PRESET
BROIL
SAUTÉ
SEAR
PIZZA
DEHYDRATE
Baking rack
Handle
Splatter
shield
(removable)
Control
panel
Power cord
(not shown)
Ceramic
coated
grilling plate
Ceramic
coated
air-fryer
basket
Ceramic
coated
cooking pot
90100 BELLA PRO AirPro XL Grill_IM_R10.indd 1090100 BELLA PRO AirPro XL Grill_IM_R10.indd 10 2020-10-30 6:26 PM2020-10-30 6:26 PM
11
AIR FRY
CONVECTION
GRILL
ROAST
BAKE
PRESET
BROIL SAUTÉ SEAR PIZZA DEHYDRATE
AIR FRY
CONVECTION
GRILL
ROAST
BAKE
PRESET
BROIL SAUTÉ SEAR PIZZA DEHYDRATE
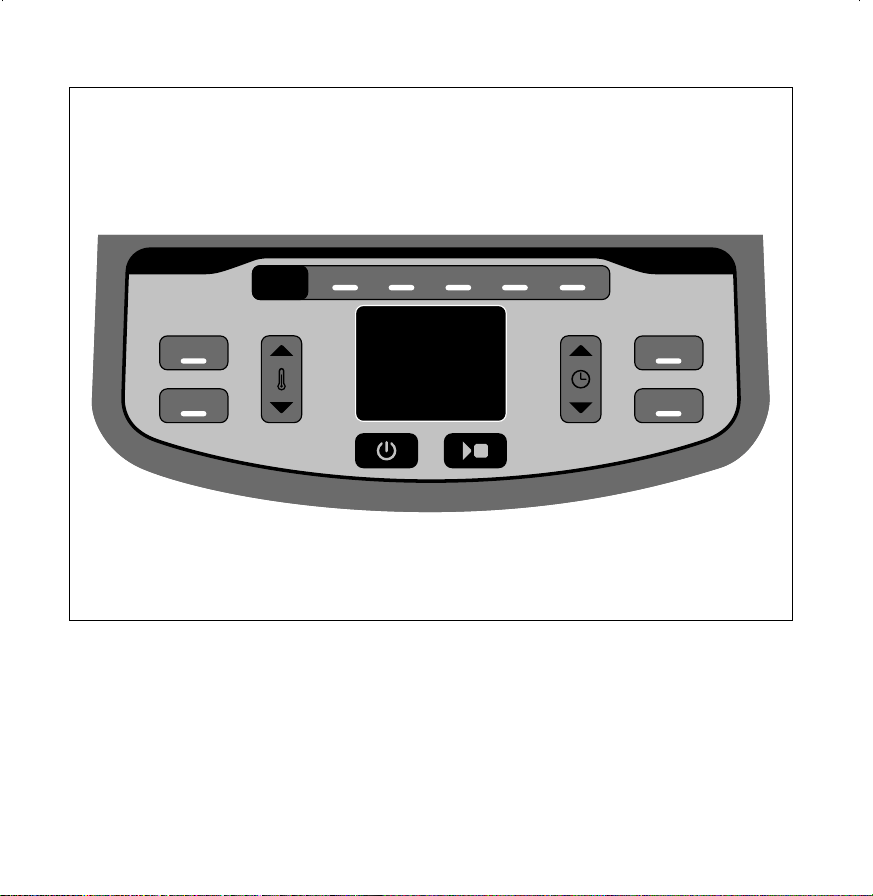
Control Panel
90100 BELLA PRO AirPro XL Grill_IM_R10.indd 1190100 BELLA PRO AirPro XL Grill_IM_R10.indd 11 2020-10-30 6:26 PM2020-10-30 6:26 PM
12
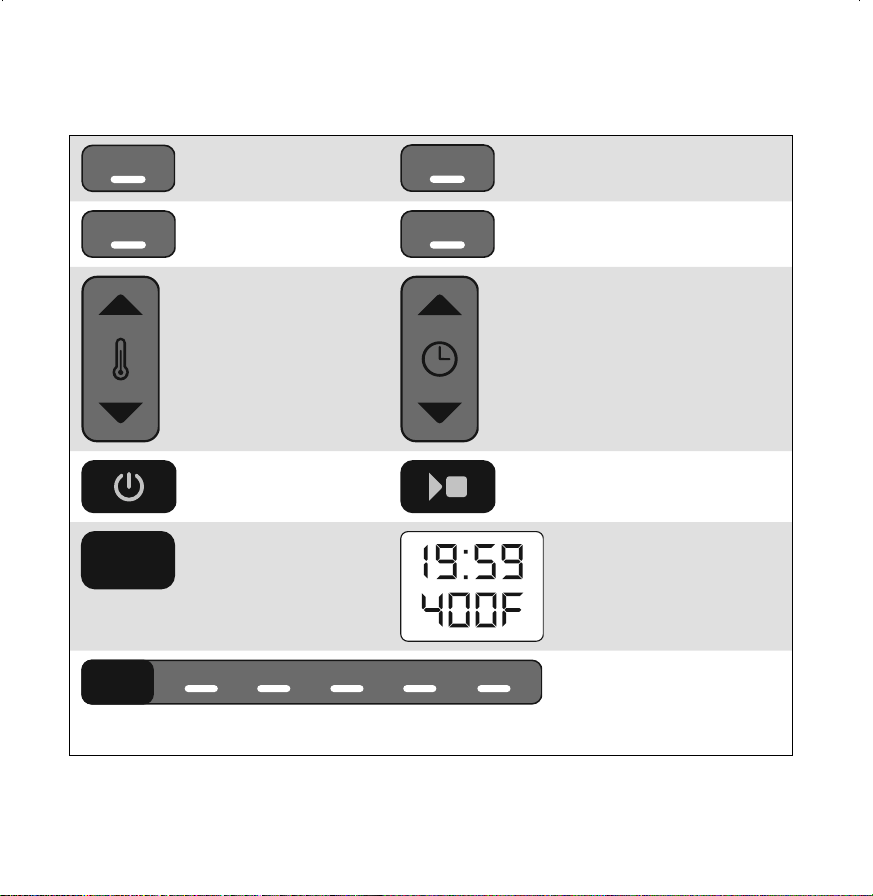
GETTING TO KNOW YOUR 9-in-1 AirPro XL Grill
Part of the panel function status diagram and key instructions
AIR FRY
CONVECTION
Air Fry Convection button
with indicator light
ROAST
Roast button with indicator light
GRILL
Grill button with indicator
BAKE
Bake button with indicator light
Temperature setting button
(up and down)
Press this key to set the
temperature in any function
or modify the time during
cooking.
Time setting button (up and down)
Press this key to set the time in
any function or modify the time
during cooking.
Power on/off button
Start up/shut down the unit
Start/Cancel Function. After
selecting the function, press
Start/Cancel to begin cooking
PRESET
Function settings button Display showing remaining time
on top and Temperature
in °F on bottom.
PRESET
BROIL
SAUTÉ SEAR PIZZA DEHYDRATE
Menu selection button
Press PRESET button to choose the
cooking function. Indicator lights
for selectable functions: Broil,
Sauté, Sear, Pizza and Dehydrate.
90100 BELLA PRO AirPro XL Grill_IM_R10.indd 1290100 BELLA PRO AirPro XL Grill_IM_R10.indd 12 2020-10-30 6:26 PM2020-10-30 6:26 PM

13
Before Using for the First Time
1. Remove all packing material and labels from the inside and outside of the 9-in-1 AirPro XL
Grill. Check that there is no packaging underneath and around the frying basket.
2. Place the unit on a at, clean work area.
3. Wash frying basket, grill plate and cooking pot in hot, soapy water.
4. DO NOT IMMERSE THE AIR FRYER BODY IN WATER. Wipe the air fryer body with a damp
cloth. Dry all parts thoroughly.
Operating Instructions
WARNING! This 9-in-1 AirPro XL Grill should not be used to boil water.
NOTE: During rst use, the appliance may emit a slight odor. This is normal.
1. Place the 9-in-1 AirPro XL Grill on a at, heat-resistant work area, close to an electrical
outlet.
2. Keep the cooking pot into the base of the unit and insert the air frying basket or grill plate
depending on the cooking mode to be used.
3. Arrange food on tray. Do not overll frying basket with food. To ensure proper cooking and
air circulation, NEVER ll any frying basket more than 2/3 full.
4. Plug cord in the wall outlet
5. To begin press power button and the Display will illuminate.
Preheating
Preheating the unit is strongly recommended for best results. This process will start automatically
after selecting some cooking function and it can take several minutes depending on the cooking
mode and temperature selected.
90100 BELLA PRO AirPro XL Grill_IM_R10.indd 1390100 BELLA PRO AirPro XL Grill_IM_R10.indd 13 2020-10-30 6:26 PM2020-10-30 6:26 PM
14
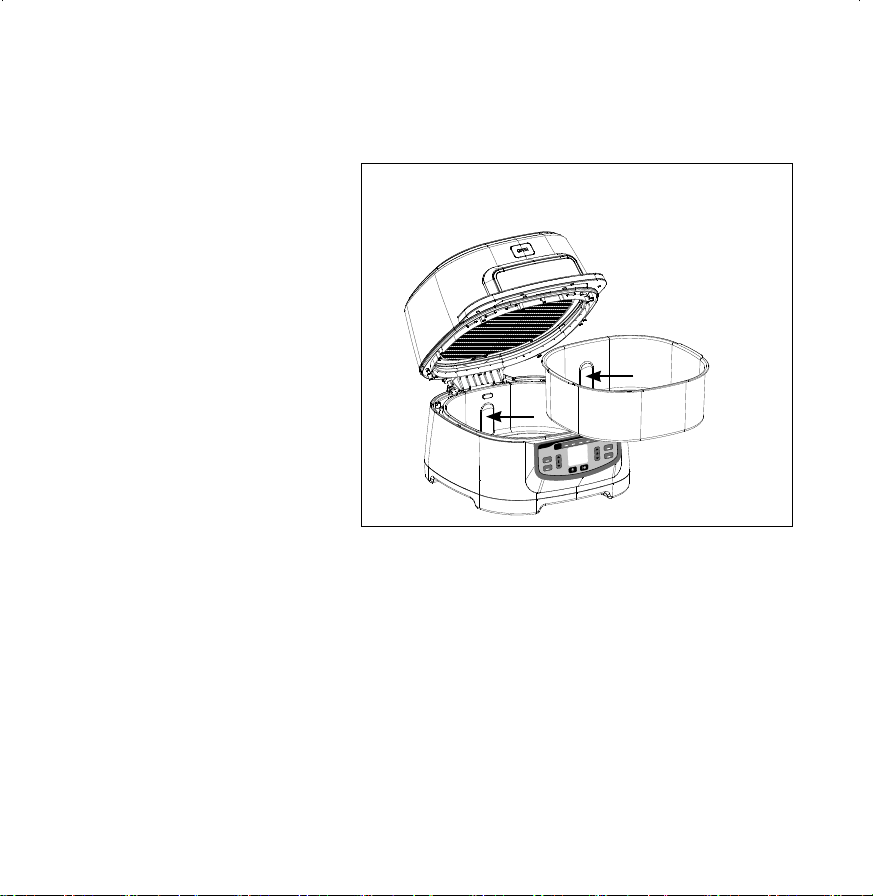
Air Fry
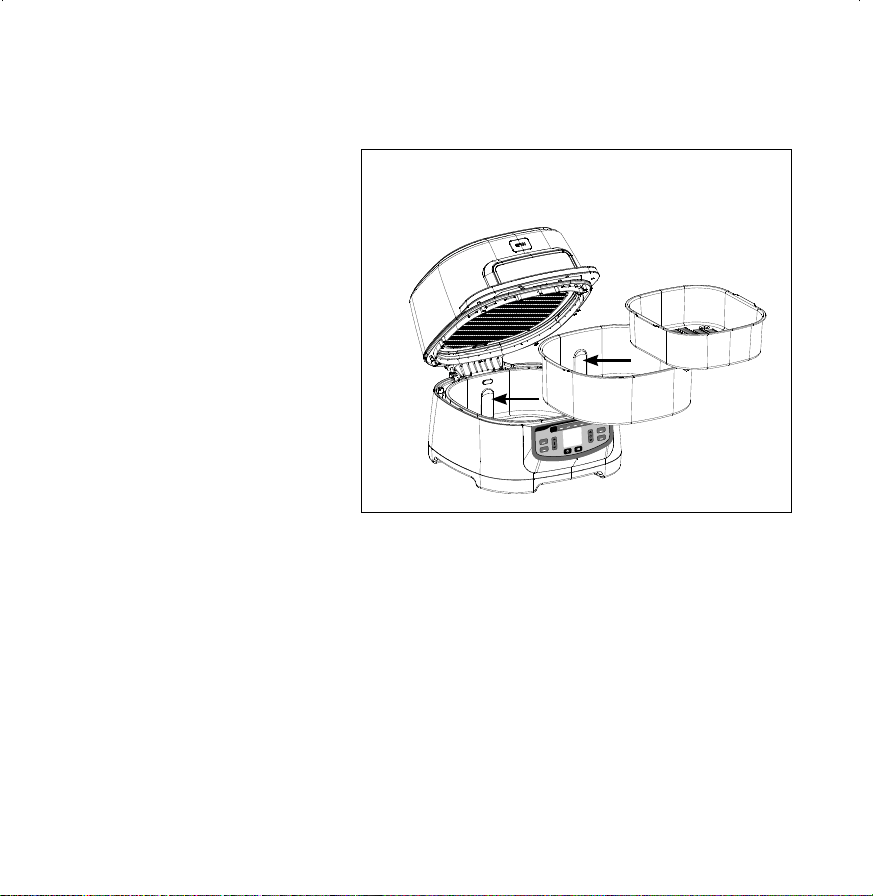
1. Place the cooking pot in the unit and then place the Air Fryer basket inside the pot.
NOTE: The main unit has a rear
bump that must be aligned with
the indent on the pot. Ensure
the splatter shield is in place
and close the lid. (See Figure 1)
2. Press the AIR FRY CONVECTION
button. The Display will show
the default time (20 min)
and temperature (400 °F).
3. Use the up and down
TEMP arrows to adjust the
temperature and the up
and down TIME arrows to set
the cooking time.
Temperature adjustment range:
from 300 °F to 450 °F.
Time adjustment range:
from 1 min to 60 mins.
4. Press the START/STOP button to
begin preheating. Progress bar will appear on the display screen. It can take several minutes
to preheat, depending on the selected temperature setting.
5. When preheating is complete, the unit will beep and “Add Food” will ash across on the
display screen.
6. Open the lid and place food in the basket. Once the lid is closed, cooking will begin and the
timer will start counting down.
AIR FRY
CONVECTION
GRILL
ROAST
BAKE
PRESET
BROIL
SAUTÉ
SEAR
PIZZA
DEHYDRATE
AIR FRY
CONVECTION
GRILL
ROAST
BAKE
PRESET
BROIL
SAUTÉ
SEAR
PIZZA
DEHYDRATE
Figure 1
90100 BELLA PRO AirPro XL Grill_IM_R10.indd 1490100 BELLA PRO AirPro XL Grill_IM_R10.indd 14 2020-10-30 6:26 PM2020-10-30 6:26 PM
15
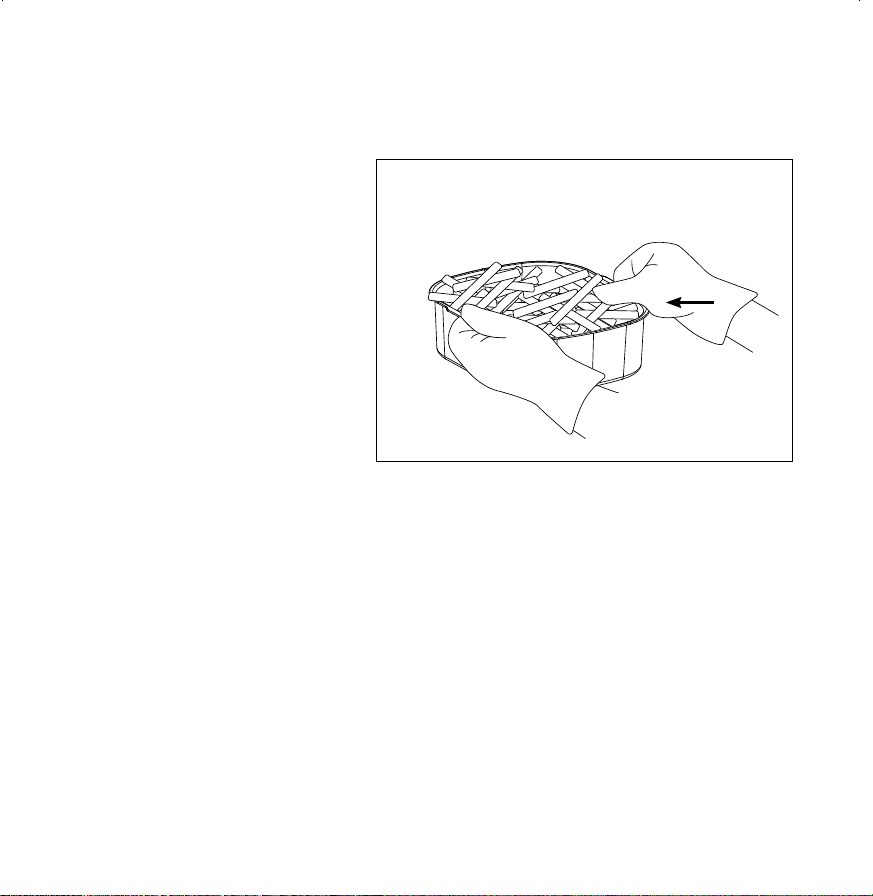
7. For best results, shaking ingredients frequently is recommended. When you open the lid, the
unit will pause. Use silicone tipped tongs when tossing your food or oven mitts to shake the
basket. (See Figure 2)
After shaking the food, place the
basket in the unit and close the
lid. Cooking will automatically
resume after hood is closed.
8. When cooking time is complete,
the unit will beep and END will
appear on the display screen.
Keep the lid open after removing
your food so the unit will cool
down faster.
NOTE: If you need to cook your
food longer, simply press the
TIME up arrow to add more time,
then press the START/STOP
button.
Figure 2
90100 BELLA PRO AirPro XL Grill_IM_R10.indd 1590100 BELLA PRO AirPro XL Grill_IM_R10.indd 15 2020-10-30 6:26 PM2020-10-30 6:26 PM
16
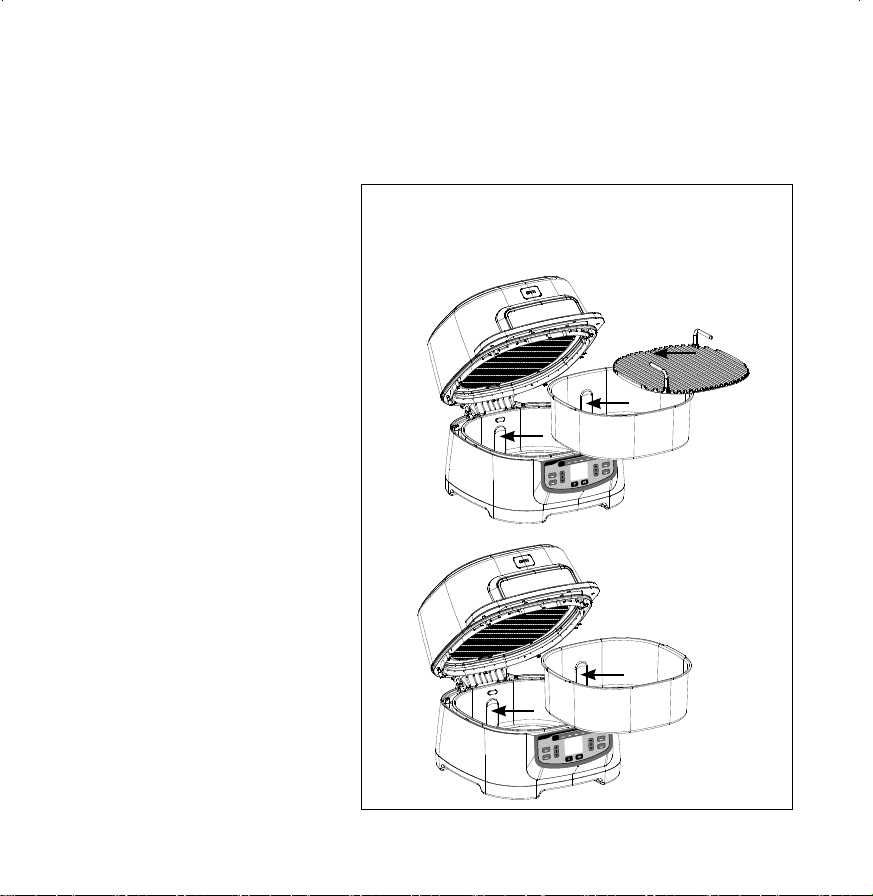
Grill
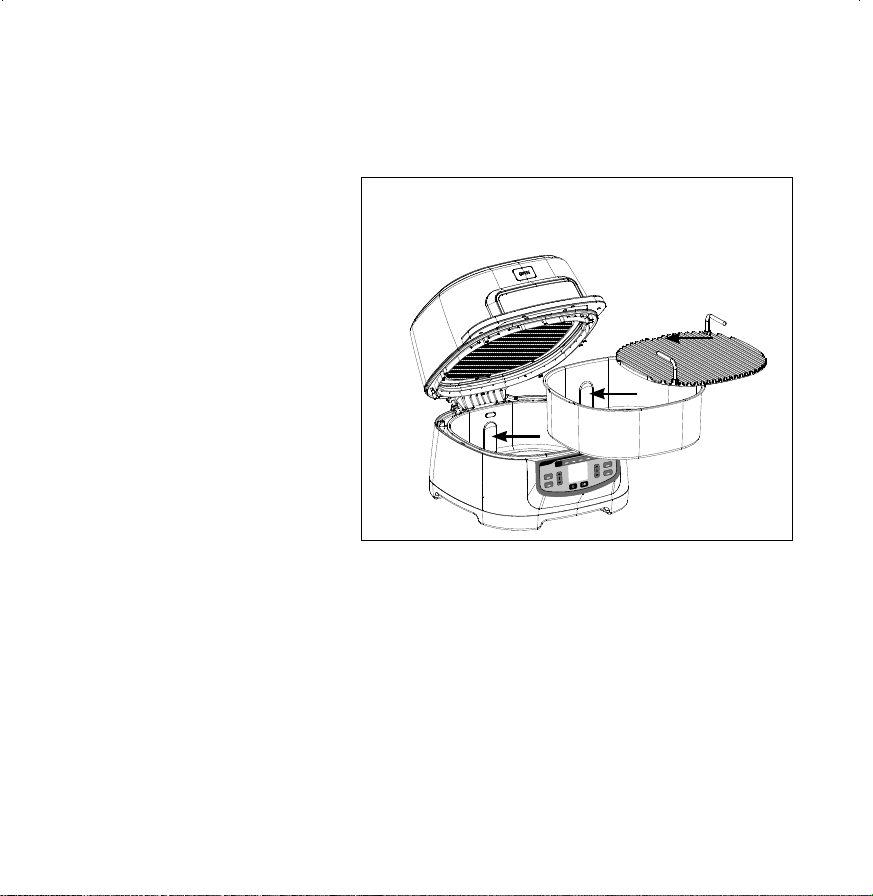
1. Place the cooking pot in the unit and then place the grilling plate inside the pot.
NOTE: The main unit has a rear bump that must be aligned with the indent on the pot and
also with the curve on the grilling plate. Ensure the splatter shield is in place and close the
lid. (See Figure 3)
2. Press the GRILL button. The
display will show the default
time (10 min) and temperature
(500 °F).
3. Press up and down TEMP
arrows to adjust the
temperature setting and press
TIME arrows to adjust the
cooking time.
Temperature adjustment range:
from 400 °F to 510 °F.
Time adjustment range: from
1 min to 30 mins.
4. Press the START/STOP button to
start the preheating process. The
display will show a progress
bar.
5. Once the preheating is complete, the unit will beep and “Add Food” will ash across on the
display screen.
6. Open the lid and add your food on the grilling plate. After closing the lid, the timer will
automatically begin and display will show the countdown.
NOTE: During the cooking process, you can open the lid to check on or ip your food. The
timer will pause when the lid is open and then automatically resume after it is closed.
7. Once the cooking has nished, the unit will beep, and the display will show “END”
8. After removing your food, keep the unit open to allow it to cool down faster.
NOTE: If batch cooking, empty the oil from the removable cooking pot before cooking the
next batch. This will help prevent grease from burning and causing smoke.
AIR FRY
CONVECTION
GRILL
ROAST
BAKE
PRESET
BROIL
SAUTÉ
SEAR
PIZZA
DEHYDRATE
AIR FRY
CONVECTION
GRILL
ROAST
BAKE
PRESET
BROIL
SAUTÉ
SEAR
PIZZA
DEHYDRATE
Figure 3
90100 BELLA PRO AirPro XL Grill_IM_R10.indd 1690100 BELLA PRO AirPro XL Grill_IM_R10.indd 16 2020-10-30 6:26 PM2020-10-30 6:26 PM

17
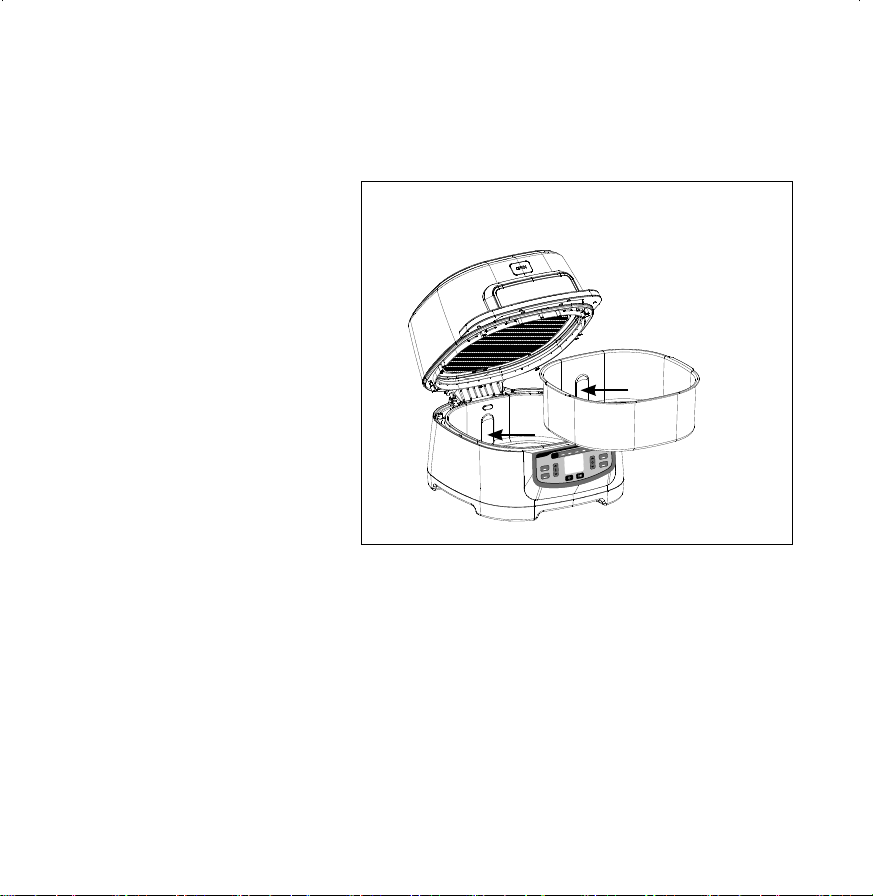
Roas t
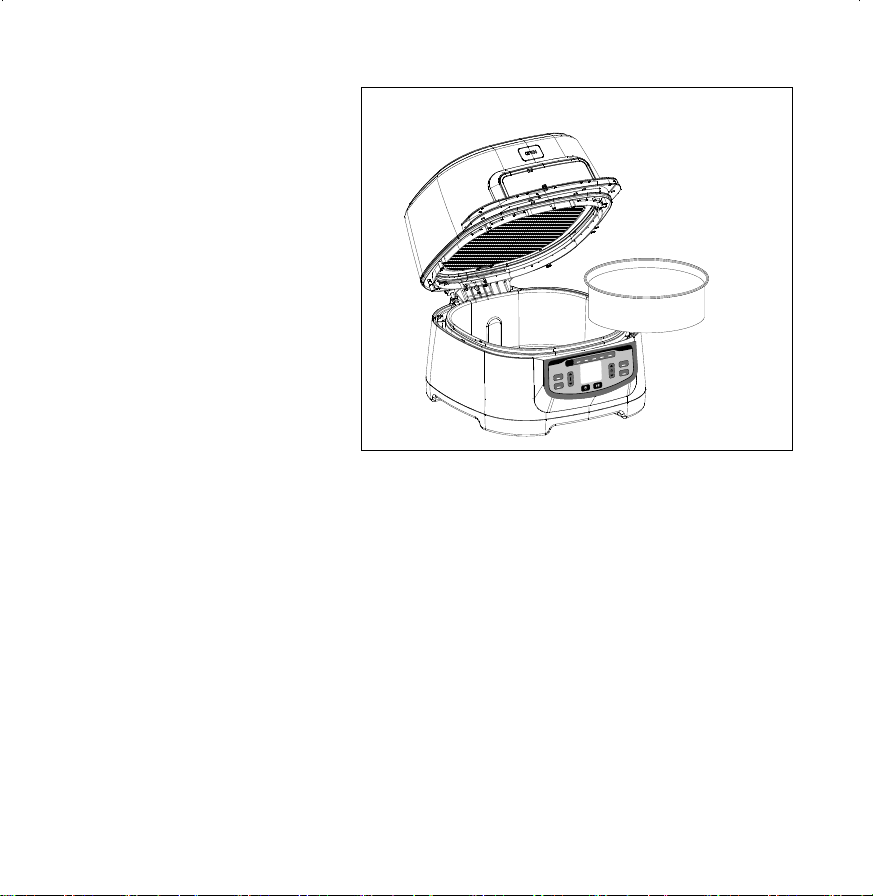
1. Place the cooking pot in the unit aligning the bump with the indent on the pot. Ensure the
splatter shield is in place and close the lid. (See Figure 4)
2. Press the ROAST button. The
display will show the default
time (15 min) and temperature
(375 °F).
3. Use the up and down
TEMP arrows to adjust the
temperature and the up and
down TIME arrows to set the
cooking time.
Temperature adjustment range:
from 250 °F to 500 °F.
Time adjustment range:
from 1 min to 4 hours.
4. Press the START/STOP button
to begin preheating. Progress
bar will appear on the display
screen. It can take several
minutes to preheat, depending
on the selected
temperature setting.
5. When preheating is complete, the unit will beep and “Add Food” will ash across on the
display screen.
6. Open the lid and place food in the pot. Once the lid is closed, cooking will begin and the
timer will start counting down.
NOTE: During the cooking process, you can open the lid to check on or ip your food. The
timer will pause when the lid is open and then automatically resume after it is closed.
7. When cooking time is complete, the unit will beep and END will appear on the display
screen. Keep the lid open after removing your food so the unit will cool down faster.
NOTE: If you need to cook your food longer, simply press the TIME up arrow to add more
time, then press the START/STOP button.
AIR FRY
CONVECTION
GRILL
ROAST
BAKE
PRESET
BROIL
SAUTÉ
SEAR
PIZZA
DEHYDRATE
AIR FRY
CONVECTION
GRILL
ROAST
BAKE
PRESET
BROIL
SAUTÉ
SEAR
PIZZA
DEHYDRATE
Figure 4
90100 BELLA PRO AirPro XL Grill_IM_R10.indd 1790100 BELLA PRO AirPro XL Grill_IM_R10.indd 17 2020-10-30 6:26 PM2020-10-30 6:26 PM

18
B ake
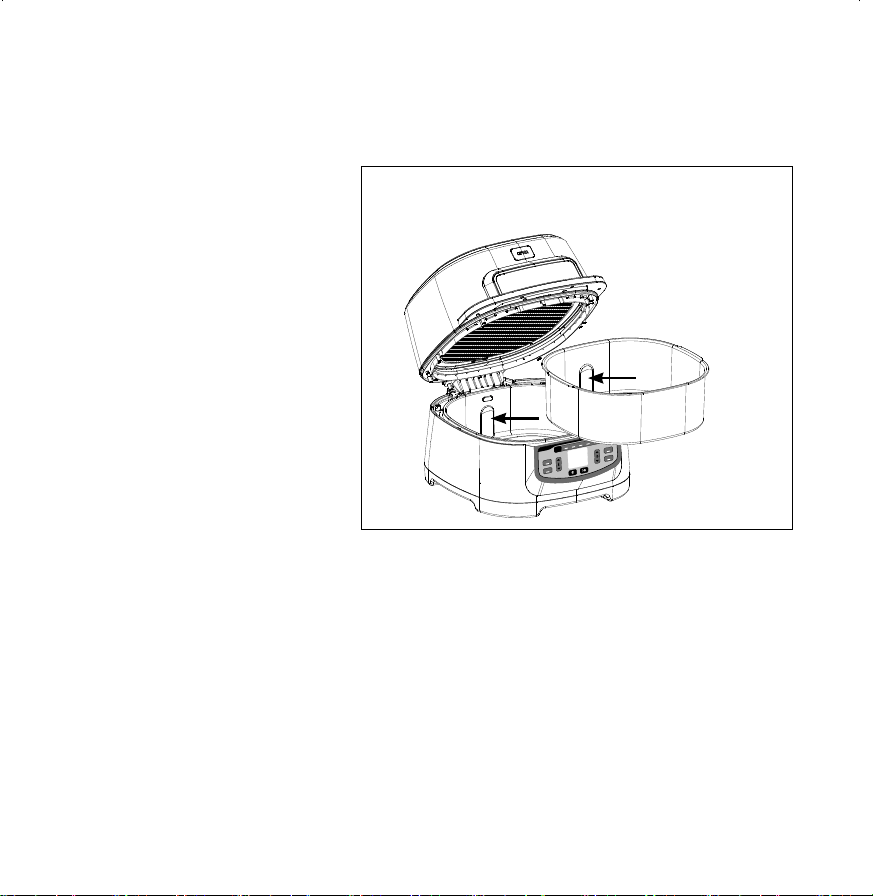
1. Place the cooking pot in the unit aligning the bump with the indent on the pot. Ensure the
splatter shield is in place and close the lid. (See Figure 5)
2. Press the BAKE button. The
Display will show the default
time (15 min) and temperature
(300 °F).
3. Use the up and down
TEMP arrows to adjust the
temperature and the up and
down TIME arrows to set the
cooking time.
Temperature adjustment range:
from 250 °F to 400 °F.
Time adjustment range:
from 1 hour to 2 hours.
4. Press the START/STOP button
to begin preheating. Progress
bar will appear on the display
screen. It can take several
minutes to preheat, depending
on the selected temperature
setting.
5. When preheating is complete, the unit will beep and “Add Food” will ash across on the
display screen.
AIR FRY
CONVECTION
GRILL
ROAST
BAKE
PRESET
BROIL
SAUTÉ
SEAR
PIZZA
DEHYDRATE
AIR FRY
CONVECTION
GRILL
ROAST
BAKE
PRESET
BROIL
SAUTÉ
SEAR
PIZZA
DEHYDRATE
Figure 5
90100 BELLA PRO AirPro XL Grill_IM_R10.indd 1890100 BELLA PRO AirPro XL Grill_IM_R10.indd 18 2020-10-30 6:26 PM2020-10-30 6:26 PM
19
6. Open the lid and set your bake
pan on the baking rack. Once
the lid is closed, cooking will
begin and the timer will start
counting down. (See Figure 6)
NOTE: During the cooking
process, you can open the lid to
check on. The timer will pause
when the lid is open and then
automatically resume after it is
closed.
7. When cooking time is complete,
the unit will beep and END
will appear on the display
screen. Keep the lid open after
removing your food so the unit
will cool down faster.
NOTE: If you need to cook your
food longer, simply press the
TIME up arrow to add more time, then press the START/STOP button.
AIR FRY
CONVECTION
GRILL
ROAST
BAKE
PRESET
BROIL
SAUTÉ
SEAR
PIZZA
DEHYDRATE
AIR FRY
CONVECTION
GRILL
ROAST
BAKE
PRESET
BROIL
SAUTÉ
SEAR
PIZZA
DEHYDRATE
Figure 6
90100 BELLA PRO AirPro XL Grill_IM_R10.indd 1990100 BELLA PRO AirPro XL Grill_IM_R10.indd 19 2020-10-30 6:26 PM2020-10-30 6:26 PM
20
Broil
1. Place the cooking pot in the unit aligning the rear bump on the unit with the indent on the
pot. Ensure the splatter shield is in place and close the lid. (See Figure 7)
2. Press the PRESET button once.
The BROIL indicator light
illuminates. The display will
show the default time (10 mins)
and temperature (450 °F).
3. Use the up and down TIME
arrows to set the cooking time.
Time adjustment range:
from 1 min to 30 mins.
4. Press the START/STOP button
to begin preheating. Progress
bar will appear on the display
screen. It can take several
minutes to preheat, depending
on the selected temperature
setting.
5. When preheating is complete,
the unit will beep and “Add
Food” will ash across on the
display screen.
6. Open the lid and place food in a oven safe dish directly in the cooking pot. Once the lid is
closed, cooking will begin and the timer will start counting down.
NOTE: During the broiling process, you can open the lid to check on or ip your food. The
timer will pause when the lid is open and then automatically resume after it is closed.
7. When broiling time is complete, the unit will beep and END will appear on the display
screen. Keep the lid open after removing your food so the unit will cool down faster.
NOTE: If you need to cook your food longer, simply press the TIME up arrow to add more
time, then press the START/STOP button.
AIR FRY
CONVECTION
GRILL
ROAST
BAKE
PRESET
BROIL
SAUTÉ
SEAR
PIZZA
DEHYDRATE
AIR FRY
CONVECTION
GRILL
ROAST
BAKE
PRESET
BROIL
SAUTÉ
SEAR
PIZZA
DEHYDRATE
Figure 7
90100 BELLA PRO AirPro XL Grill_IM_R10.indd 2090100 BELLA PRO AirPro XL Grill_IM_R10.indd 20 2020-10-30 6:26 PM2020-10-30 6:26 PM
21
Sauté
1. Place the cooking pot in the unit aligning the rear bump on the unit with the indent on the
pot. Ensure the splatter shield is in place and close the lid. (See Figure 8)
2. Press the PRESET button twice.
The SAUTE indicator light
illuminates. The display will
show the default time (20 min)
and temperature (400 °F) and
3. Use the up and down TIME
arrows to set the cooking
time and the Up and down
TEMP arrows to adjust the
temperature.
Time adjustment range:
from 1 min to 60 min.
Temperature adjustment range:
from 180 °F to 400 °F.
4. Press the START/STOP button
to begin preheating. Progress
bar will appear on the display
screen. It can take several
minutes to preheat, depending
on the selected temperature setting.
5. When preheating is complete, the unit will beep and “Add Food” will ash across on the
display screen.
6. Open the lid and place food in a oven safe dish directly in the cooking pot. Once the lid is
closed, cooking will begin and the timer will start counting down.
NOTE: During the cooking process, you can open the lid to check on or ip your food. The
timer will pause when the lid is open and then automatically resume after it is closed.
7. When cooking time is complete, the unit will beep and END will appear on the display
screen. Keep the lid open after removing your food so the unit will cool down faster.
NOTE: If you need to cook your food longer, simply press the TIME up arrow to add more
time, then press the START/STOP button.
AIR FRY
CONVECTION
GRILL
ROAST
BAKE
PRESET
BROIL
SAUTÉ
SEAR
PIZZA
DEHYDRATE
AIR FRY
CONVECTION
GRILL
ROAST
BAKE
PRESET
BROIL
SAUTÉ
SEAR
PIZZA
DEHYDRATE
Figure 8
90100 BELLA PRO AirPro XL Grill_IM_R10.indd 2190100 BELLA PRO AirPro XL Grill_IM_R10.indd 21 2020-10-30 6:26 PM2020-10-30 6:26 PM

22
Sear
1. Place the cooking pot in the unit aligning the rear bump on the unit with the indent on the
pot. Ensure the splatter shield is in place and close the lid. (See Figure 9)
2. Press the PRESET button three
times. The SAUTE indicator light
illuminates. The display will
show the default time (10 mins)
and temperature (450 °F)
3. Use the Up and down TIME
arrows to set the cooking
time and the up and down
TEMP arrows to adjust the
temperature.
Time adjustment range:
from 1 min to 60 min.
Temperature adjustment range:
from 180 °F to 450 °F.
4. Press the START/STOP button
to begin preheating. Progress
bar will appear on the display
screen. It can take several
minutes to preheat, depending
on the selected temperature
setting.
5. When preheating is complete, the unit will beep and “Add Food” will ash across on the
display screen.
6. Open the lid and place food in a oven safe dish directly in the cooking pot. Once the lid is
closed, cooking will begin and the timer will start counting down.
NOTE: During the cooking process, you can open the lid to check on or ip your food. The
timer will pause when the lid is open and then automatically resume after it is closed.
7. When cooking time is complete, the unit will beep and END will appear on the display
screen. Keep the lid open after removing your food so the unit will cool down faster.
NOTE: If you need to cook your food longer, simply press the TIME up arrow to add more
time, then press the START/STOP button.
AIR FRY
CONVECTION
GRILL
ROAST
BAKE
PRESET
BROIL
SAUTÉ
SEAR
PIZZA
DEHYDRATE
AIR FRY
CONVECTION
GRILL
ROAST
BAKE
PRESET
BROIL
SAUTÉ
SEAR
PIZZA
DEHYDRATE
Figure 9
90100 BELLA PRO AirPro XL Grill_IM_R10.indd 2290100 BELLA PRO AirPro XL Grill_IM_R10.indd 22 2020-10-30 6:26 PM2020-10-30 6:26 PM
23
Pizza
1. The 9-in-1 AirPro XL Grill allows you to cook fresh or frozen pizza. For frozen pizza, place the
cooking pot in the unit and then place the grilling plate inside the pot. For fresh pizza, insert
only the cooking pot and prepare the dough on parchment paper. (See Figure 10). Pick up
the fresh prepared pizza with
the parchment paper and place
them both in the cooking pot.
NOTE: The main unit has a rear
bump that must be aligned with
the indent on the pot and also
with the curve on the grilling
plate. Ensure the splatter shield
is in place and close the lid.
(See Figure 10)
2. Press the PRESET button four
times. The PIZZA indicator light
illuminates. The Display will
show the default time (10 mins)
and temperature (360 °F).
3. Use the up and down TIME
arrows to set the cooking
time and the Up and down
TEMP arrows to adjust the
temperature.
Time adjustment range: from
1 min to 60 mins.
Temperature adjustment range:
from 180 °F to 450 °F.
4. Press the START/STOP button
to begin preheating. Progress
bar will appear on the display
screen. It can take several
minutes to preheat, depending
on the selected temperature
setting.
AIR FRY
CONVECTION
GRILL
ROAST
BAKE
PRESET
BROIL
SAUTÉ
SEAR
PIZZA
DEHYDRATE
AIR FRY
CONVECTION
GRILL
ROAST
BAKE
PRESET
BROIL
SAUTÉ
SEAR
PIZZA
DEHYDRATE
Fresh Pizza
Figure 10
Frozen Pizza
AIR FRY
CONVECTION
GRILL
ROAST
BAKE
PRESET
BROIL
SAUTÉ
SEAR
PIZZA
DEHYDRATE
AIR FRY
CONVECTION
GRILL
ROAST
BAKE
PRESET
BROIL
SAUTÉ
SEAR
PIZZA
DEHYDRATE
90100 BELLA PRO AirPro XL Grill_IM_R10.indd 2390100 BELLA PRO AirPro XL Grill_IM_R10.indd 23 2020-10-30 6:26 PM2020-10-30 6:26 PM

24
5. When preheating is complete, the unit will beep and “Add Food” will ash across on the
display screen.
6. Open the lid. If making frozen pizza place it directly on the grilling plate. If you are making
fresh pizza, prepare the dough on parchment paper. Pick up the fresh prepared pizza with
the parchment paper and place them both in the cooking pot. Once the lid is closed, cooking
will begin and the timer will start counting down.
NOTE: During the cooking process, you can open the lid to check on your food. The timer
will pause when the lid is open and then automatically resume after it is closed.
7. When cooking time is complete, the unit will beep and END will appear on the display
screen. Keep the lid open after removing your food so the unit will cool down faster.
NOTE: If you need to cook your food longer, simply press the TIME up arrow to add more
time, then press the START/STOP button.
90100 BELLA PRO AirPro XL Grill_IM_R10.indd 2490100 BELLA PRO AirPro XL Grill_IM_R10.indd 24 2020-10-30 6:26 PM2020-10-30 6:26 PM
25
Dehydrate
1. Place the Cooking Pot in the unit.
NOTE: The main unit has a rear bump that must be aligned with the indent on the pot.
Ensure the splatter shield is in place and close the lid. (See Figure 11)
2. Press the PRESET button ve
times until DEHYDRATE light
illuminates. The Display will
show the default time (8 hours)
and temperature (130 °F).
3. Use the up and down
TEMP arrows to adjust the
temperature and the up and
down TIME arrows to set the
cooking time.
Temperature adjustment range:
from 90 °F to 180 °F.
Time adjustment range:
from 1 hour to 24 hours.
4. Press the START/STOP button to
begin dehydration process.
5. Open the lid and place food
in the cooking pot. Place
the baking rack on top (to
avoid ingredients ying around the inside of the unit; due to the powerful circular heat
technology). Once the lid is closed, press START/STOP button to start the dehydration
process and timer will start counting down.
NOTE: During the dehydration process, you can open the lid to check on or ip your food.
The timer will pause when the lid is open and then automatically resume after it is closed.
6. When dehydration time is complete, the unit will beep and END will appear on the display
screen. Keep the lid open after removing your food so the unit will cool down faster.
NOTE: If you need to dehydrate longer, simply press the TIME up arrow to add more time,
then press the START/STOP button.
AIR FRY
CONVECTION
GRILL
ROAST
BAKE
PRESET
BROIL
SAUTÉ
SEAR
PIZZA
DEHYDRATE
AIR FRY
CONVECTION
GRILL
ROAST
BAKE
PRESET
BROIL
SAUTÉ
SEAR
PIZZA
DEHYDRATE
Figure 11
90100 BELLA PRO AirPro XL Grill_IM_R10.indd 2590100 BELLA PRO AirPro XL Grill_IM_R10.indd 25 2020-10-30 6:26 PM2020-10-30 6:26 PM

26
User Maintenance Instructions
This appliance requires little maintenance. It contains no user-serviceable parts. Any servicing
requiring disassembly other than cleaning must be performed by a qualied appliance repair
technician.
Care & Cleaning Instructions
WARNING! Allow the unit to cool fully before cleaning. The 9-in-1 AirPro XL Grill should be
cleaned thoroughly after every use
1. Unplug the 9-in-1 AirPro XL Grill. Remove frying basket or grill plate and cooking pot. Make
sure the accessories have cooled completely before cleaning.
2. Wash the accessories (frying basket, grill plate, cooking pot and splatter shield) in hot soapy
water. Do not use metal kitchen utensils or abrasive cleansers or cleaning products as this
may damage the coating.
3. The frying basket, grill plate and cooking pot are dishwasher-safe. For best results, place in
the top rack of your dishwasher to clean.
4. Wipe the unit body with a soft, non-abrasive damp cloth to clean.
90100 BELLA PRO AirPro XL Grill_IM_R10.indd 2690100 BELLA PRO AirPro XL Grill_IM_R10.indd 26 2020-10-30 6:26 PM2020-10-30 6:26 PM

27
Storing Instructions
1. Make sure the 9-in-1 AirPro XL Grill is unplugged and all parts are clean and dry before
storing.
2. Never store the unit while it is hot or wet.
3. Store the unit in its box or in a clean, dry place.
Troubleshooting charts
1. “Add Food” appears on the control panel display.
The unit has completed its Grill preheating and it is now time to add your ingredients.
2. “Shut Lid” appears on the control panel display.
The hood is open and needs to be closed for the selected function to start.
3. “Add Pot” appears on the control panel display.
The pot is not installed in the unit.
90100 BELLA PRO AirPro XL Grill_IM_R10.indd 2790100 BELLA PRO AirPro XL Grill_IM_R10.indd 27 2020-10-30 6:26 PM2020-10-30 6:26 PM

28
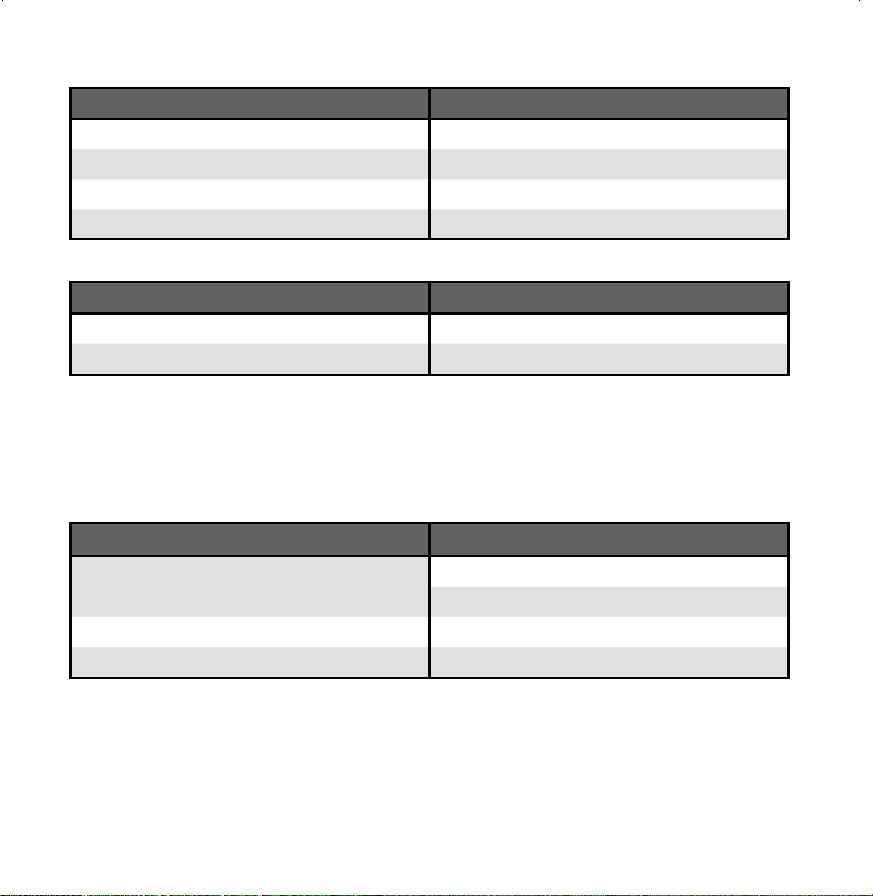
Cooking charts
GRILL
• Verify that the internal temperature follows USDA guidelines using an internal probe.
GRILL TEMP
TIME (DEPENDING
ON THICKNESS
)
INT.
TEMP.
ADDITIONAL INFO
Chicken Breasts boneless, skinless 500 ºF 5 – 6 min per side 165 ºF* Rest, covered, 5 min
Chicken Thighs boneless, skinless 500 ºF 5 – 7 min per side 165 ºF* Rest, covered, 5 min
Chicken/Turkey Burger
500 ºF 3 – 5 min per side 165 ºF* Rest, covered, 5 min
Steak Sirloin 1 1/2" thick 500 ºF Rare - 7 min, flip
halfway
125 ºF* Rest, covered, 5 min
Med rare - 8 1/2
min, flip halfway
135 ºF* Rest, covered, 5 min
Med - 10 min, flip
halfway
145 ºF* Rest, covered, 5 min
Med well - 11 min,
flip halfway
150 ºF* Rest, covered, 5 min
Well - 11 1/2 min,
flip halfway
160 ºF* Rest, covered, 5 min
Beef Burger
500 ºF 3 – 5 min per side 160 ºF* Rest, covered, 5 min
Pork Chops boneless 8oz 500 ºF 7 – 8 min per side 145 ºF*
Sausage
500 ºF 6 – 10 min, rotating
often
160 ºF* Rest, covered, 5 min
Bacon
500 ºF 2 – 4 min per side - Until desired
crispness
Salmon
400 ºF 3 – 4 min per side 145 ºF Serve immediately
Shrimp
500 ºF 1 – 2 min per side - Serve immediately
* Remove the meat when 5 ºF away from final cooking temperature (because of carryover cooking), allowing it to
rest, covered, for 5 minutes for juicier results.
90100 BELLA PRO AirPro XL Grill_IM_R10.indd 2890100 BELLA PRO AirPro XL Grill_IM_R10.indd 28 2020-10-30 6:26 PM2020-10-30 6:26 PM

29
ROAST
• Verify that the internal temperature follows USDA guidelines using an internal probe.
ROAST TEMP
TIME (DEPENDING ON
THICKNESS
)
INT. TEMP. ADDITIONAL INFO
Chicken Breast bone in 400 ºF 20 – 25 min 165 ºF* Rest, covered, 5 min
Chicken Thigh bone in 400 ºF 20 – 25 min 165 ºF* Rest, covered, 5 min
Chicken whole 375 ºF 14 min / lb (cover for half
the time)
165 ºF* Rest, uncovered, 10 min
Pork Loin Roast
375 ºF 16 min / lb 145 ºF* Rest, covered, 10 min
Beef Roast
350 ºF 20 – 25 / lb 140 ºF* Rest, covered, 10 min
* Remove the meat when 5 ºF away from final cooking temperature (because of carryover cooking), allowing it to
rest
for 5 or 10 minutes for juicier results.
BAKE
• Great for ready-to-use, ready-made store bought items!
• Always preheat the AirPro XL Grill
• TIP: reduce the temperature indicated on a packaging or a recipe by 25 ºF and the time by 20%
BAKE TEMP TIME ADDITIONAL INFO
Baked Potatoes
325 ºF 50 min – 1 hr 15 Poke potatoes all over with a fork before wrapping
in foil
Cinnamon Rolls
375 ºF 11 – 14 min Cover with foil halfway through for less brown tops if
preferred
Cookies
350 ºF 6 – 9 min Less time for chewy cookies, more time for crisp
cookies
Brownies
325 ºF 20 – 25 min Do not overbake - check doneness with a toothpick
90100 BELLA PRO AirPro XL Grill_IM_R10.indd 2990100 BELLA PRO AirPro XL Grill_IM_R10.indd 29 2020-10-30 6:26 PM2020-10-30 6:26 PM

30
AIR FRY
• For crispier results, stir ingredients often.
VEGETABLES TEMP TIME VEGETABLES TEMP TIME
Asparagus
1 bunch, thin spears
400 ºF 4 – 6 min Broccoli Florets
3 – 4 cups
400 ºF 12 – 16 min
Asparagus
1 bunch, thick spears
400 ºF 6 – 7 min Brussels Sprouts
1 lb
375 ºF 9 – 12 min
Cauliflower Florets
3 – 4 cups
400 ºF 11 – 14 min Corn on the Cob
4 ears
400 ºF 4 – 6 min
Eggplant
1 1/2 inch cubes (roasted)
400 ºF 12 min Carrots
2 1/2 cups, 1/2 inch
pieces
400 ºF 12 – 16 min
Kale
(place directly in
cooking pot, cover with
baking rack)
3 cups, stems removed
375 ºF 7 min Mushrooms
3 cups, sliced
400 ºF 8 – 10 min
Peppers, bell
1 inch chunks
375 ºF 8 min
Peppers, jalapeno,
poblano (roasted)
375 ºF 8 min
Pickles breaded 400 ºF 4 – 7 min Zucchini 1/4 inch discs 400 ºF 10 – 14 min
Potatoes, White
French Fries, (fresh, soaked,
1/4 to 1/3 inch thick)
400 ºF 13 – 16 min Root Vegetables
1/2 inch chunks (roasted)
400 ºF 12 – 16 min
Potatoes, White
1 inch cubes
400 ºF 10 – 12 min Potatoes, White
whole, 6 – 8 oz, pierced with
a fork
400 ºF 32 min
Potatoes, White
wedges
400 ºF 16 – 20 min Potatoes, Sweet
whole, 6 – 8 oz, pierced with
a fork
375 ºF 24 – 28 min
90100 BELLA PRO AirPro XL Grill_IM_R10.indd 3090100 BELLA PRO AirPro XL Grill_IM_R10.indd 30 2020-10-30 6:26 PM2020-10-30 6:26 PM

31
BEEF TEMP TIME BEEF TEMP TIME
Hamburgers
1/4 lb (up to 4)
360 ºF 12 – 16 min Steaks
2 (8 oz) steaks
360 ºF 8 – 12 min
Hot Dogs / Sausages
360 ºF 10 – 15 min Beef Tenderloin 1 lb, rare 360 ºF 16 min
Meatloaf
1 lb
360 ºF 35 – 40 min Beef Tenderloin
1 lb, medium
360 ºF 18 min
CHICKEN TEMP TIME CHICKEN TEMP TIME
Chicken Breast
boneless, skinless
360 ºF 15 – 16 min Chicken Tenders/Fingers
battered
360 ºF 11 – 13 min
Chicken Thighs
6 – 8 oz ea., boneless
360 ºF 16 – 18 min Chicken Wings
2 lbs
400 ºF 17 – 22 min
PORK AND LAMB TEMP TIME PORK AND LAMB TEMP TIME
Bacon
thick cut, up to 1 lb
400 ºF 6 – 8 min Pork Chops
1 inch thick
375 ºF 8 – 11 min
Ham
precooked, boneless, 3 lbs
300 ºF 50 min Pork Chops
2 inch thick (10 – 12 oz)
375 ºF 12 – 15 min
Lamb Loin Chops
1 inch thick
400 ºF 6 – 10 min
FISH AND SEAFOOD TEMP TIME FISH AND SEAFOOD TEMP TIME
Shrimp thawed, battered 325 ºF 9 min Shrimp thawed, sauced 325 ºF 4 – 6 min
Catfish Fingers
thawed, battered
400 ºF 8 – 12 min Salmon filets thawed, 2 400 ºF 7 – 10 min
90100 BELLA PRO AirPro XL Grill_IM_R10.indd 3190100 BELLA PRO AirPro XL Grill_IM_R10.indd 31 2020-10-30 6:26 PM2020-10-30 6:26 PM
32
FROZEN FOODS* TEMP TIME FROZEN FOODS* TEMP TIME
Cheese Sticks
350 ºF 5 – 7 min
Fish Sticks
400 ºF 10 – 14 min
Chicken Nuggets 12 oz box 360 ºF 8 – 12 min Meatballs 1 inch, pre-cooked 375 ºF 6 – 7 min
French Fries thick 2 cups 400 ºF 14 – 17 min
Onion Rings
360 ºF 10 – 13 min
French Fries thin 2 cups 400 ºF 12 – 14 min Pizza 7 inch x 8 inch 360 ºF 10 – 12 min
* All items are to be air fried from frozen (do not thaw).
DESSERTS TEMP TIME DESSERTS TEMP TIME
Apple Turnovers
400 ºF 8 min
Donuts
350 ºF 6 – 7 min
Cake
350 ºF 20 – 28 min
DEHYDRATE
• Position the herbs whole, on their stems, into the cooking pot
• Cover with the baking rack.
• Turn several times during DEHYDRATE for even drying.
HERB TEMP TIME HERB TEMP TIME
Kale Chips,
135 ºF 1 1/2 – 3 hrs
Rosemary
135 ºF 1 1/2 – 3 hrs
stems removed
Sage
135 ºF 1 1/2 – 3 hrs
Oregano
135 ºF 1 1/2 – 3 hrs
Tarragon
135 ºF 2 1/2 – 3 hrs
Parsley
135 ºF 1 1/2 – 3 hrs
Thyme
135 ºF 2 1/2 – 3 hrs
90100 BELLA PRO AirPro XL Grill_IM_R10.indd 3290100 BELLA PRO AirPro XL Grill_IM_R10.indd 32 2020-10-30 6:26 PM2020-10-30 6:26 PM

33
FRUIT / VEGETABLES
• Wash all fruit skins well.
• Slice fruit into 1/4 inch thick slices
• Arrange directly into the cooking pot with space between each slice to ensure even drying.
• Cover with the baking rack.
• Rotate foods halfway through DEHYDRATE time for even drying.
DEHYDRATE TEMP TIME
Apples rounds 135 ºF 6 – 7 hrs Core/slice into 1/4 inch slices
Kiwi
135 ºF 5 hrs 1/4 inch rounds
Mango/Papaya pieces 135 ºF 6 – 8 hrs Peel/slice into 1/4 inch slices
Orange Slices fully dried 135 ºF 8 hrs Citrus is crisp when fully dried
Tomatoes, Roma
150 ºF 6 – 7 hrs Skin side down
Tomatoes, Cherry/Grape
150 ºF 4 – 7 hrs Skin side down
DEHYDRATE TEMP TIME
Beef Jerky
150 ºF 4 – 5 hrs 1/2 lb London Broil or Flank
Chickpeas seasoned 160 ºF 8 – 10 hrs Canned, rinsed
90100 BELLA PRO AirPro XL Grill_IM_R10.indd 3390100 BELLA PRO AirPro XL Grill_IM_R10.indd 33 2020-10-30 6:26 PM2020-10-30 6:26 PM

Limited Two-Year Warranty
SENSIO Inc. hereby warrants that for
a period of TWO YEARS from the date
of purchase, this product will be free
from mechanical defects in material
and workmanship, and for 90 days in
respect to non-mechanical parts. At its
sole discretion, SENSIO Inc. will either
repair or replace the product found to
be defective, or issue a refund on the
product during the warranty period.
The warranty is only valid for the
original retail purchaser from the date
of initial retail purchase and is not
transferable. Keep the original sales
receipt, as proof of purchase isrequired
to obtain warranty validation. Retail
stores selling this product do not have
the right to alter, modify, or in any way
revise the terms and conditions of the
warranty.
Exclusions:
The warranty does not cover normal
wear of parts or damage resulting
from any of thefollowing: negligent
use of the product, use of improper
voltage or current, improper routine
maintenance, use contrary to the
operating instructions, disassembly,
repair, or alteration by anyone other than
qualied SENSIO Inc. personnel. Also,
the warranty does not cover
Acts of God such as re, oods,
hurricanes, or tornadoes.
SENSIO Inc. shall not be liable for any
incidental or consequential damages
caused by the breach of any express
or implied warranty. Apart from the
extent prohibited by applicable law, any
implied warranty of merchantability or
tness for a particular purpose is limited
in time to the duration of the warranty.
Some states, provinces or jurisdictions
do not allow the exclusion or limitation
of incidental or consequential damages,
or limitations on how long an implied
warranty lasts, and therefore, the above
exclusions or limitations may not apply
to you. The warranty covers specic
legal rights which may vary by state,
province and/or jurisdiction.
34
90100 BELLA PRO AirPro XL Grill_IM_R10.indd 3490100 BELLA PRO AirPro XL Grill_IM_R10.indd 34 2020-10-30 6:26 PM2020-10-30 6:26 PM

35
How To Obtain Warranty Service:
You must contact Customer Service at
our toll-free number: 1-866-832-4843.
A Customer Service Representative
will attempt to resolve warranty issues
over thephone. If the Customer Service
Representative is unable to resolve the
problem, you will be provided with a
case number and asked to return the
product to SENSIOInc. Attach a tag to
the product that includes: your name,
address, daytime contact telephone
number, case number, and description of
the problem.
Also, include a copy of the original sales
receipt. Carefully package the tagged
product with the sales receipt, and send
it (with shipping and insurance prepaid)
to SENSIO Inc.’s address. SENSIO Inc.
shall bear no responsibility or liability
for the returned product while in transit
to SENSIO Inc.’s Customer Service
Center.
90100 BELLA PRO AirPro XL Grill_IM_R10.indd 3590100 BELLA PRO AirPro XL Grill_IM_R10.indd 35 2020-10-30 6:26 PM2020-10-30 6:26 PM

For customer service questions or comments
1-866-832-4843
bellahousewares.com
90100 R9
Sensio Inc.
New York, NY 10016/USA
90100 BELLA PRO AirPro XL Grill_IM_R10.indd 3690100 BELLA PRO AirPro XL Grill_IM_R10.indd 36 2020-10-30 6:26 PM2020-10-30 6:26 PM