
THIS RANGE IS FOR RESIDENTIAL USE ONLY
GAS/ELECTRIC RANGE
for residential use only
Models: VEFSGE304P..
USERS OPERATING INSTRUCTIONS
IMPORTANT - PLEASE READ AND FOLLOW
• Beforebeginning,pleasereadtheseinstructionscompletelyandcarefully.
• Donotremovepermanentlyafxedlabels,warnings,orplatesfromtheproduct.Thismay
voidthewarranty.
• Pleaseobservealllocalandnationalcodesandordinances.
• Pleaseensurethatthisproductisproperlygrounded.
• The installer should leave these instructions with the consumer who should retain
for local inspector’s use and for future reference.
Installationmustconformwithlocalcodesorintheabsenceofcodes,theNationalFuelGas
CodeANSIZ223.1-Iatestedition.ElectricalinstallationmustbeinaccordancewiththeNatio-
nalElectricalCode,ANSI/NFPA70-latesteditionand/orlocalcodes.
INCANADA:InstallationmustbeinaccordancewiththecurrentCAN/CGA-B149.1National
GasInstallationCodeorCAN/CGA-B149.2,PropaneInstallationCodeand/orlocalcodes.
ElectricalinstallationmustbeinaccordancewiththecurrentCSAC22.1CanadianElectrical
CodesPart1and/orlocalcodes.
INSTALLATIONINMANUFACTURED(MOBILE)HOME:Theinstallationmustconformwith
theManufacturedHomeConstructionandSafetyStandard,Title24CFR,Part3280[formerly
theFederalStandardforMobileHomeConstructionandSafety,Title24,HUD(Part280)]
or,whensuchstandardisnotapplicable,theStandardforManufacturedHomeInstallations,
ANSI/NCSBCSA225.1,orwithlocalcodeswhereapplicable.
INSTALLATIONINRECREATIONALPARKTRAILERS:Theinstallationmustconformwith
stateorothercodesor,intheabsenceofsuchcodes,withtheStandardforRecreationalPark
Trailers,ANSIA119.5.
Installationofanygas-redequipmentshouldbemadebyalicensedplumber.Amanualshut-
offvalvemustbeinstalledinanaccessiblelocationinthegaslineexternaltotheappliance
forthepurposeofturningonorshuttingoffgastotheappliance(InMassachusettssuchshu-
toffdevicesshouldbeapprovedbytheBoardofStateExaminersofPlumbers&GasFitters).
Ifanexternalelectricalsourceisutilized,theappliance,wheninstalled,mustbeelectrically
groundedinaccordancewithlocalcodesor,intheabsenceoflocalcodes,withthenational
ElectricalCode,ANSI/NFPA70.
Some models are supplied with a protective lm on steel and aluminium
parts.Thislmmustberemovedbeforeinstalling/usingtheappliance.
R
2
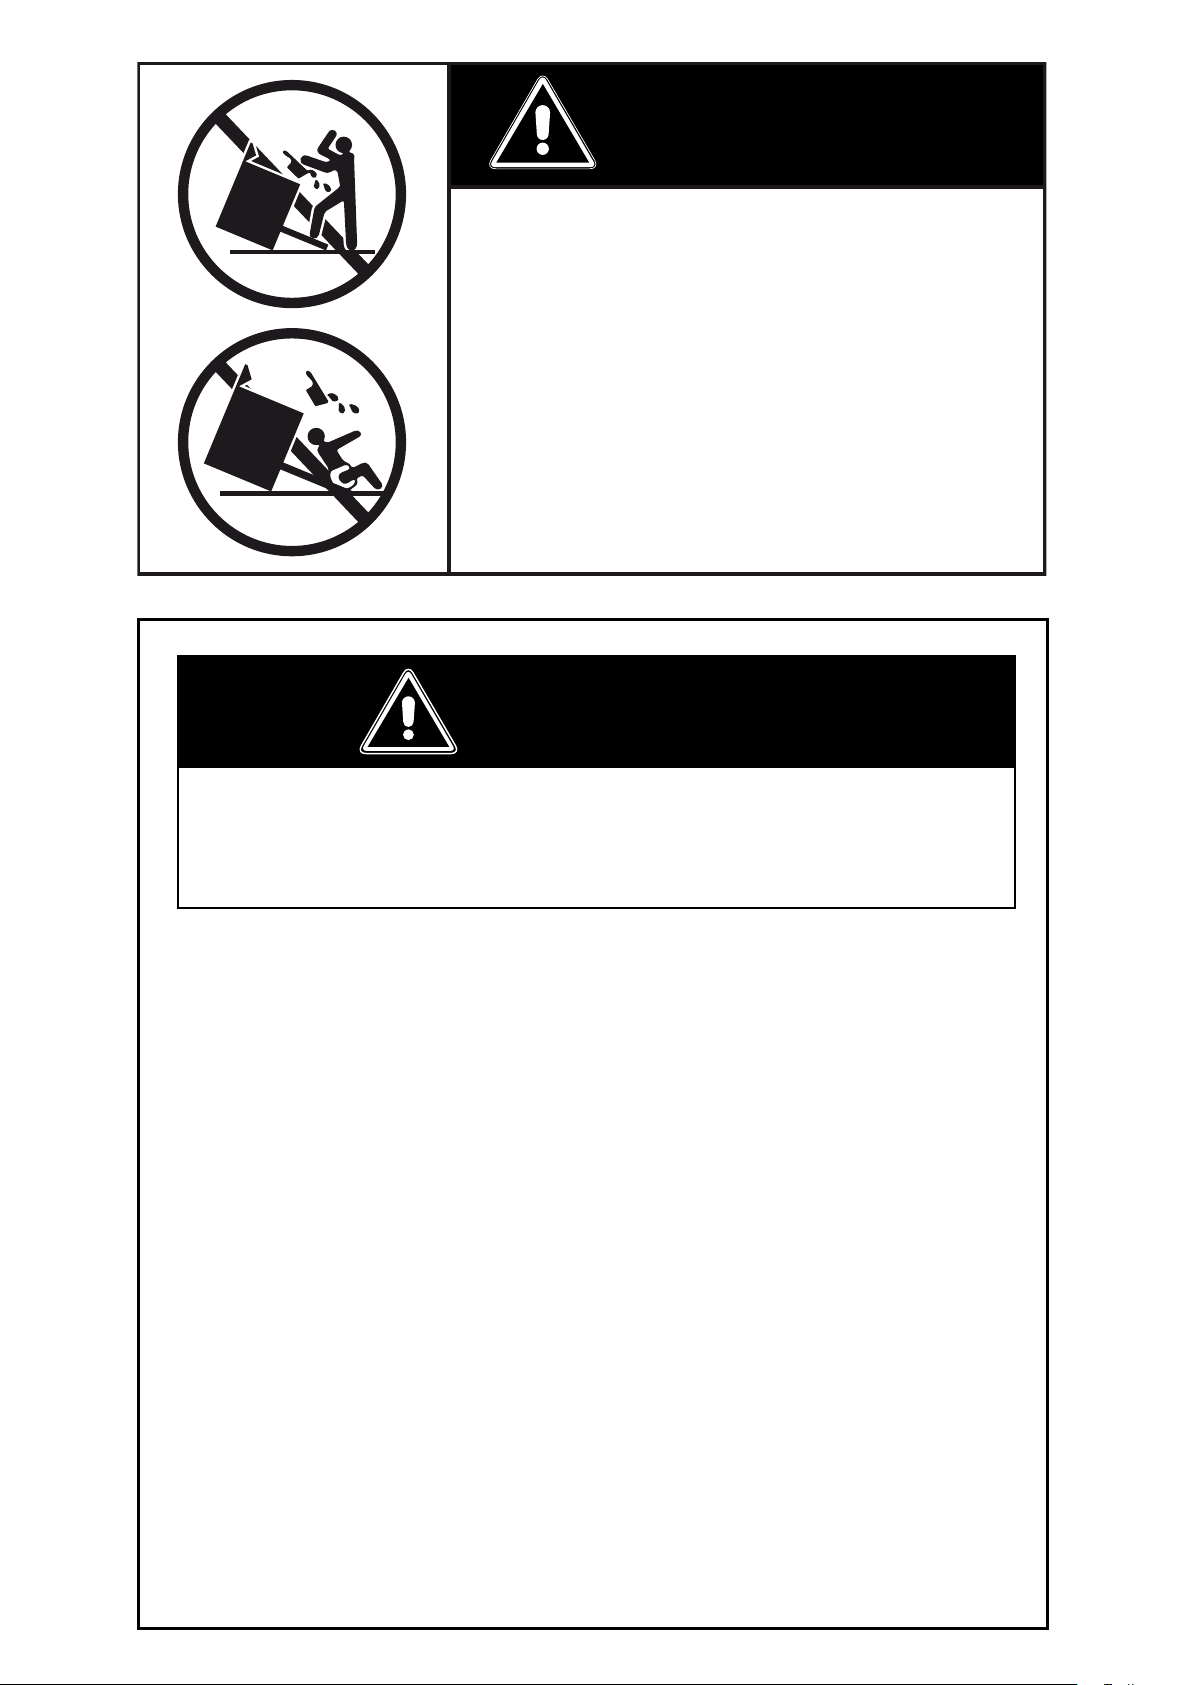
WARNING !
Toreducetheriskoftippingtheappliance,
theappliancemustbesecuredbyproperly
installed anti-tip device packed with the
appliance.
• ALL RANGES CAN TIP
• INJURY TO PERSONS COULD RESULT
• INSTALL ANTI-TIP DEVICE PACKED
WITH RANGE
• SEE INSTALLATION INSTRUCTIONS
– Donotstoreorusegasolineorotherammablevaporsand
liquids in the vicinity of this or any other appliance.
– NEVER use this appliance as a space heater to heat or warm
theroom.Doingsomayresultincarbonmonoxidepoiso-
ningandoverheatingoftheappliance.
– WHAT TO DO IF YOU SMELL GAS:
• Donottrytolightanyappliance.
• Do not touch any electrical switch.
• Donotuseanyphoneinyourbuilding.
• lmmediately call your gas supplier from a neighbor’s
phone.Followthegassupplier’sinstructions.
• lf you cannot reach your gas supplier, call the re de-
partment.
– Installationandservice must be performed by a qualied
installer,serviceagency,orthegassupplier.
Iftheinformationinthismanualisnotfollowedexactly,
areorexplosionmayresultcausingpropertydamage,
personalinjury,ordeath.
WARNING !

3
Thisapplianceisdesignedandmanufacturedsolelyforthecookingofdomestic(household)food
andinnotsuitableforanynonedomesticapplicationandthereforeshouldnotbeusedinacom-
mercialenvironmement.
Theappliancewarrantywillbevoidiftheapplianceisusedwithinanonedomesticenvironmement
i.e.asemicommercial,commercialorcommunalenvironment.
DearCustomer,
Thank you for having purchased and given your preference to our
product.
The safety precautions and recommendations reported below are
for your own safety and that of others. They will also provide a means
by which to make full use of the features offered by your appliance.
Please preserve this booklet carefully. It may be useful in future,
either to yourself or to others in the event that doubts should arise
relating to its operation.
This appliance must be used only for the task it has explicitly been
designed for, that is for cooking foodstuffs. Any other form of usage
is to be considered as inappropriate and therefore dangerous.
The manufacturer declines all responsibility in the event of dama-
ge caused by improper, incorrect or illogical use of the appliance.

4
USER INSTRUCTIONS
GENERAL INFORMATION
1.
WARNING!!
Thisapplianceshallnotbeusedforspaceheating.This
informationisbasedonsafetyconsiderations.
2. AlIopeningsinthewallbehindtheapplianceandintheoor
undertheapplianceshallbesealed.
3. Keepapplianceareaclearandfreefromcombustiblemate-
rials,gasoline,andotherammablevapors.
4. Donotobstructtheowofcombustionandventilationair.
5. Disconnecttheelectricalsupplytotheappliancebeforeser-
vicing.
6. Whenremovingapplianceforcleaningand/orservice;
A. Shutoffgasatmainsupply.
B. DisconnectACpowersupply.
C. Disconnectgaslinetotheinletpipe.
D. Carefullyremovetherangebypullingoutward.
CAUTION:Rangeisheavy;usecareinhandling.
10.
Electrical Requirement
Electrical installation should comply with national and local
codes.
11.
Air Supply and Ventilation
Theinstallermustreferstolocal/nationalcodes.
12.
Gas Manifold Pressure
Naturalgas-4.0”W.C.P.
LP/Propane-11.0”W.C.P.
13. Themisuseofovendoor(e.g.stepping,sitting,orleaningon
them)canresultinpotentialhazardsand/orinjuries.
14. Wheninstallingorremovingtherangeforservice,arollinglift
jackshouldbeused.Donotpushagainstanyoftheedgesof
therangeinanattempttoslideitintooroutoftheinstallation.
Pushingorpullingarange(ratherthanusingaliftjack)also
increases the possibility of bending the leg spindles or the
internalcouplingconnectors.
WARNING!!
ELECTRICAL GROUNDING INSTRUCTIONS
Therangemustbeelectricallygroundedinaccordancewith
localcodesor,intheabsenceoflocalcodes,withtheNatio-
nalElectricalCode,ANSI/NFPANo.70-latestedition,inCana-
da Canadian Electrical Code.
InstallationshouldbemadebyaIicensedelectrician.
FORPERSONALSAFETY,THISAPPLIANCEMUSTBEPRO-
PERLY GROUNDED.
Ifanexternalelectricalsourceisutilized,theinstallationmustbe
electrically grounded in accordance with local codes or, in the
absenceoflocal codes,withthe nationalElectrical Code,ANSI/
NFPA70.
Onlyforthemodelssuppliedwithplug:Thisapplianceisequip-
pedwithafour-pronggroundingplug(NEMA14-50P)foryourpro-
tectionagainstshockhazardandshouldbepluggeddirectlyintoa
properlygroundedsocket.
Do not under any circumstances cut or remove the fourth
(ground)prongfromthepowerplug.
REPLACEMENT PARTS
Onlyauthorizedreplacementpartsmaybeusedinperformingser-
viceontherange.Replacementpartsareavailablefromfactory
authorizedpartsdistributors.Contactthenearestpartsdistributor
inyourarea.

5
IMPORTANT PRECAUTIONS AND RECOMMENDATIONS
Afterhavingunpackedtheappliance,checktoensurethatitisnotdamaged.
Incaseofdoubt,donotuseitandconsultyoursupplieroraprofessionallyqualiedtech-
nician.
Packingelements(i.e.plasticbags,polystyrenefoam,nails,packingstraps,etc.)should
notbeleftaroundwithineasyreachofchildren,asthesemaycauseseriousinjuries.The
packagingmaterialisrecyclableandismarkedwiththerecyclingsymbol
.
• Do notattempt to modify the technical characteristics of theappliance as this may
becomedangeroustouse.
• Donotcarryoutcleaningormaintenanceoperationsontheappliancewithouthaving
previouslydisconnecteditfromtheelectricpowersupply.
• Afteruse,ensurethattheknobsarein
OFF
position.
• Donotallowchildrenorotherincapablepeopletousetheappliancewithoutsupervi-
sion.
• Duringandafteruseoftherange,certainpartswillbecomeveryhot.Donottouchhot
parts.
• Keepchildrenawayfromtherangewhenitisinuse.
• Somemodelsaresuppliedwithaprotectivelmonsteelandaluminiumparts.This
lmmustberemovedbeforeinstalling/usingtheappliance.
• Firerisk!Donotstoreammablematerialintheovenandinthewarmingdrawer.
• Makesurethatelectrical cablesconnectingotherappliancesintheproximityofthe
rangecannotcomeintocontactwiththehoborbecomeentrappedintheovendoor.
• Donotlinetheovenwallswithaluminiumfoil.Donotplaceshelves,broilerpan,pans
orothercookingutensilsonthebaseoftheovenchamber.
• Themanufacturerdeclinesallliabilityforinjurytopersonsordamagetopropertycau-
sedbyincorrectorimproperuseoftheappliance.
• Toavoidanypossiblehazard,theappliancemustbeinstalledbyqualiedpersonnel
only.Anyrepairsbyunqualiedpersonsmayresultinelectricshockorshortcircuit.
Inordertoavoidpossibleinjuriestoyourbodyortotheappliance,donotattemptany
repairsbyyourself.Suchwork shouldbecarried outby qualiedservicepersonnel
only.
• Dangerofburns!Theovenandcookingaccessoriesmaybecomeveryhotduringope-
ration.Makesurechildrenarekeptoutofreachandwarnthemaccordingly.Toavoid
burnsusekitchenclothesandgloveswhenhandlinghotpartsorutensils.
• Standawayfromtherangewhenopeningovendoor.Hotairorsteamwhichescapes
cancauseburnstohands,face,and/oreyes.
• Nevercleantherange,ovenandthewarmingdrawerwithahigh-pressuresteamcle-
aningdevice,asitmayprovokeashortcircuit.
• Thisapplianceisintendedforuseinyourhousehold.Neverusetheapplianceforany
otherpurpose!
• Ifyoushoulddecidenottousethisapplianceanylonger(ordecidetosubstituteanol-
dermodel),beforedisposingofit,itisrecommendedthatitbemadeinoperativeinan
appropriatemannerinaccordancetohealthandenvironmentalprotectionregulations,
ensuringinparticularthatallpotentiallyhazardouspartsbemadeharmless,especially
inrelationtochildrenwhocouldplaywitholdappliances.Removethedoorandthe
warmingdrawerbeforedisposaltoprevententrapment.
IMPORTANT PRECAUTIONS AND RECOMMENDATIONS FOR
USE OF ELECTRICAL APPLIANCES
Useofanyelectricalapplianceimpliesthenecessitytofollowaseriesoffundamentalrules.
Inparticular:
• Nevertouchtheappliancewithwethandsorfeet.
• Donotoperatetheappliancebarefooted.
• Donotallowchildrenordisabledpeopletousetheappliancewithoutyoursupervision.
Themanufacturercannotbeheldresponsibleforanydamagescausedbyimproper,incor-
rectorunreasonableuseoftheappliance.
6
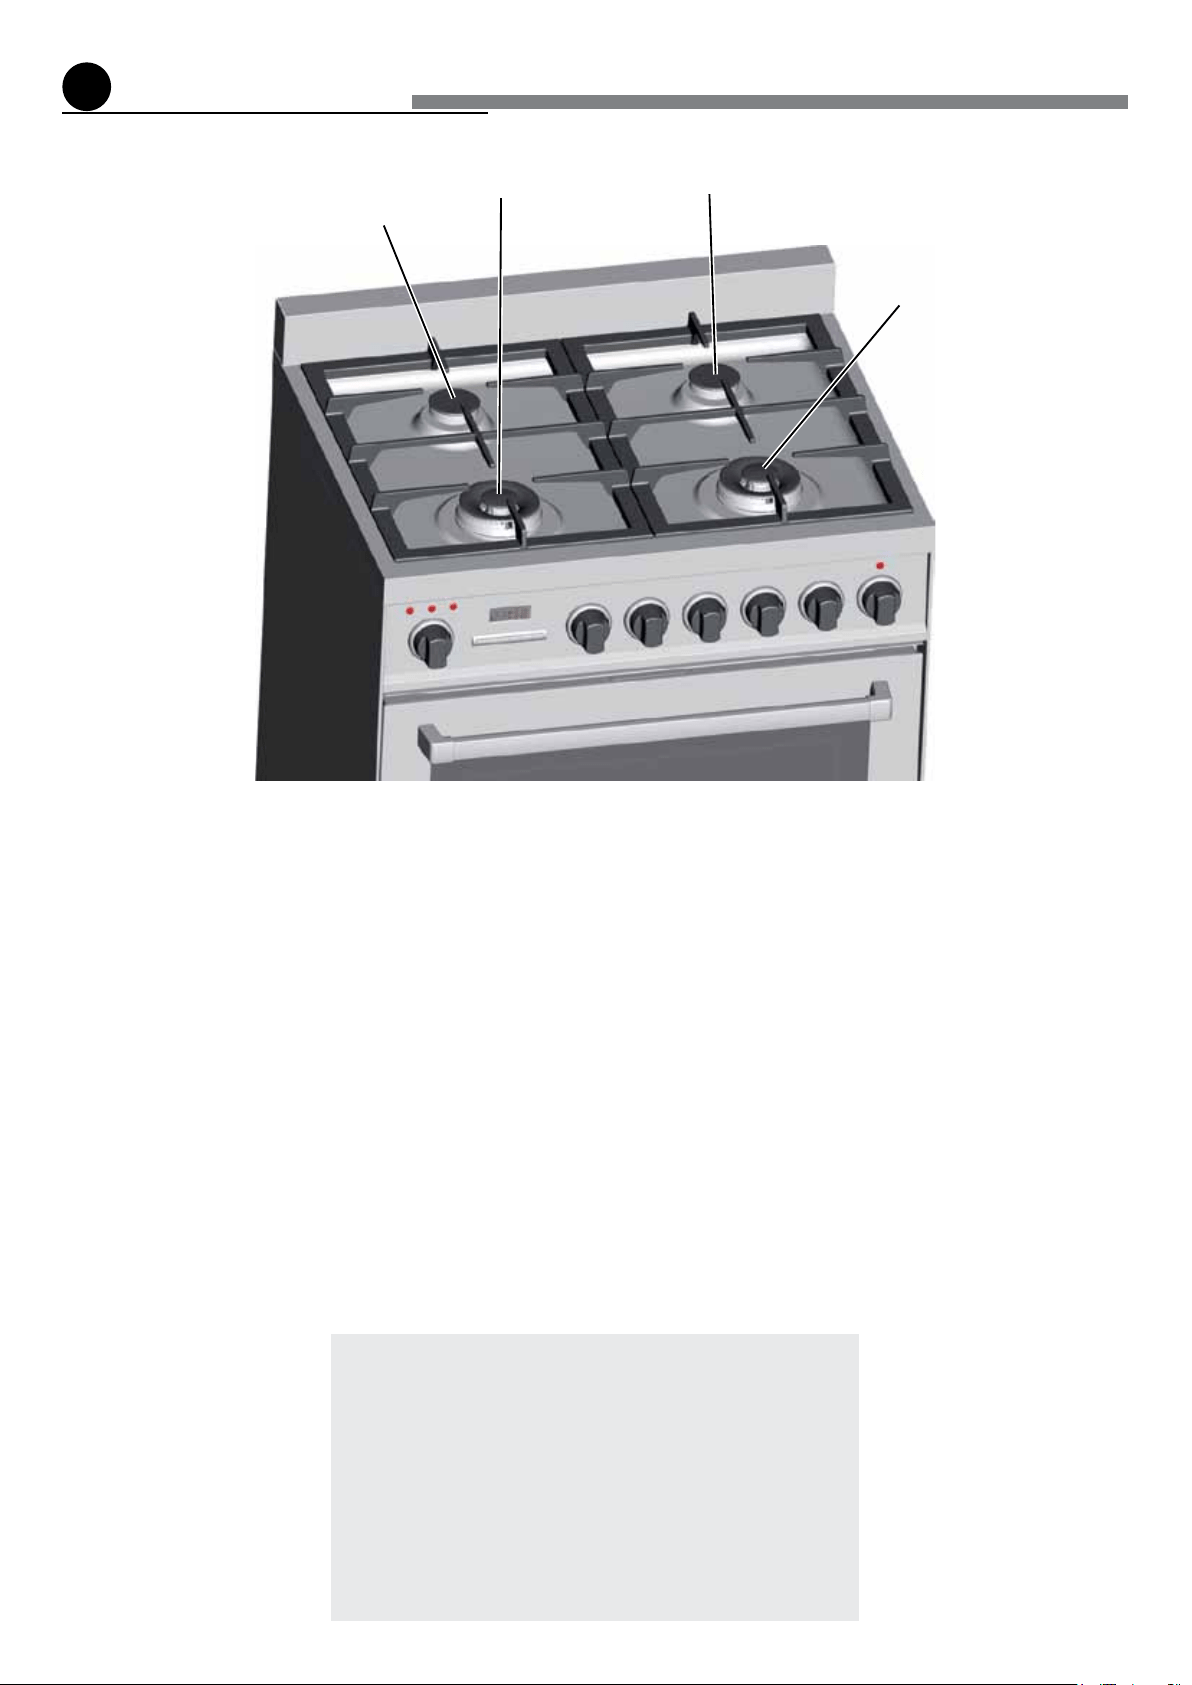
GASBURNERS
1. RearleftSemi-rapidburner(SR)-8000BTU/hr
2. RearrightSemi-rapidburner(SR)-8000BTU/hr
3. FrontrightDualburner(D)-17000BTU/hr
4. FrontleftDualburner(D)-17000BTU/hr
Note:
• Theelectricgas-lightingdeviceisincorporatedintotheknobs.
• Theappliancehasasafetyvalvesystemtted.
Theowofgaswillstopifandwhentheameshouldacciden-
tallygoout.
Fig. 1.1
features
1
CAUTION:
Iftheburnerisaccidentallyextinguished,turnthegas
offatthecontrolknobandwaitatleast1minutebefo-
reattemptingtorelight.
CAUTION:
Gas appliances produce heat and humidity in the en-
vironment in which they are installed.
Ensure that the cooking area is well ventilated fol-
lowingnational/localcodes.
1
4
2
3
7
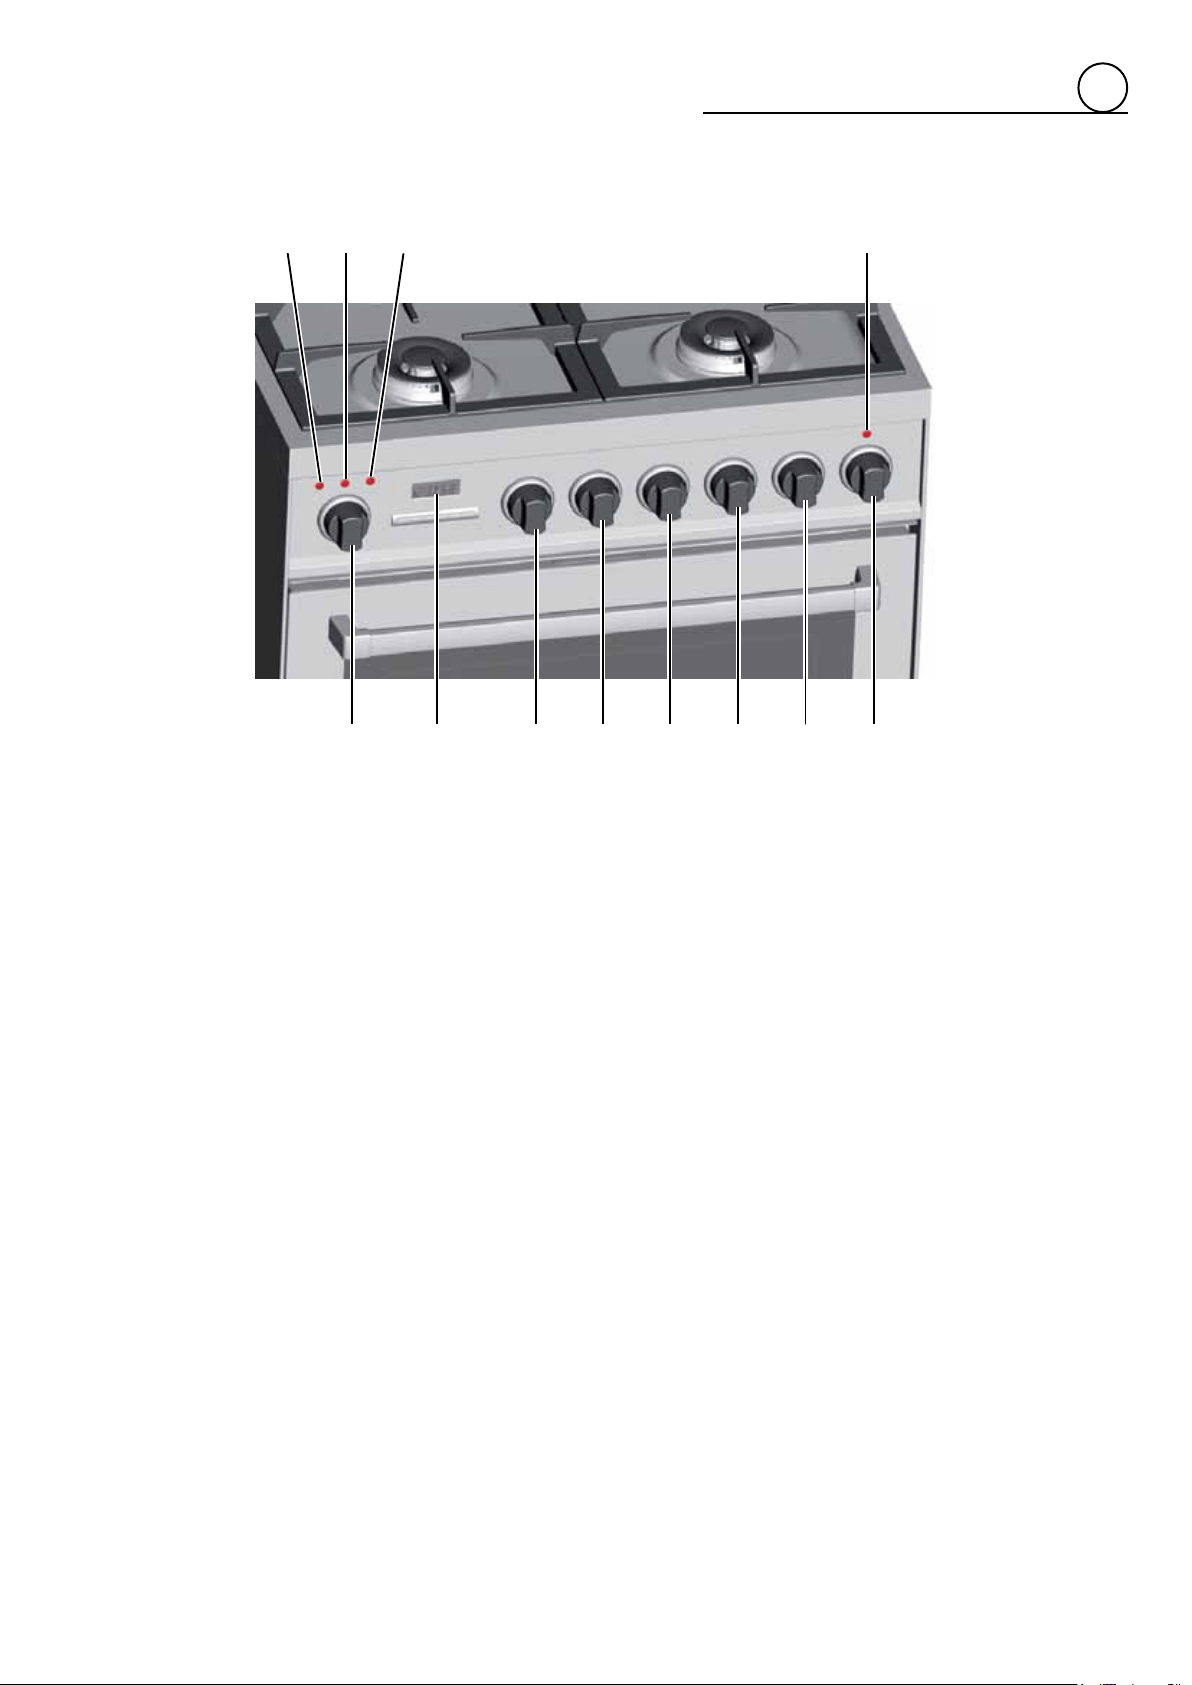
1
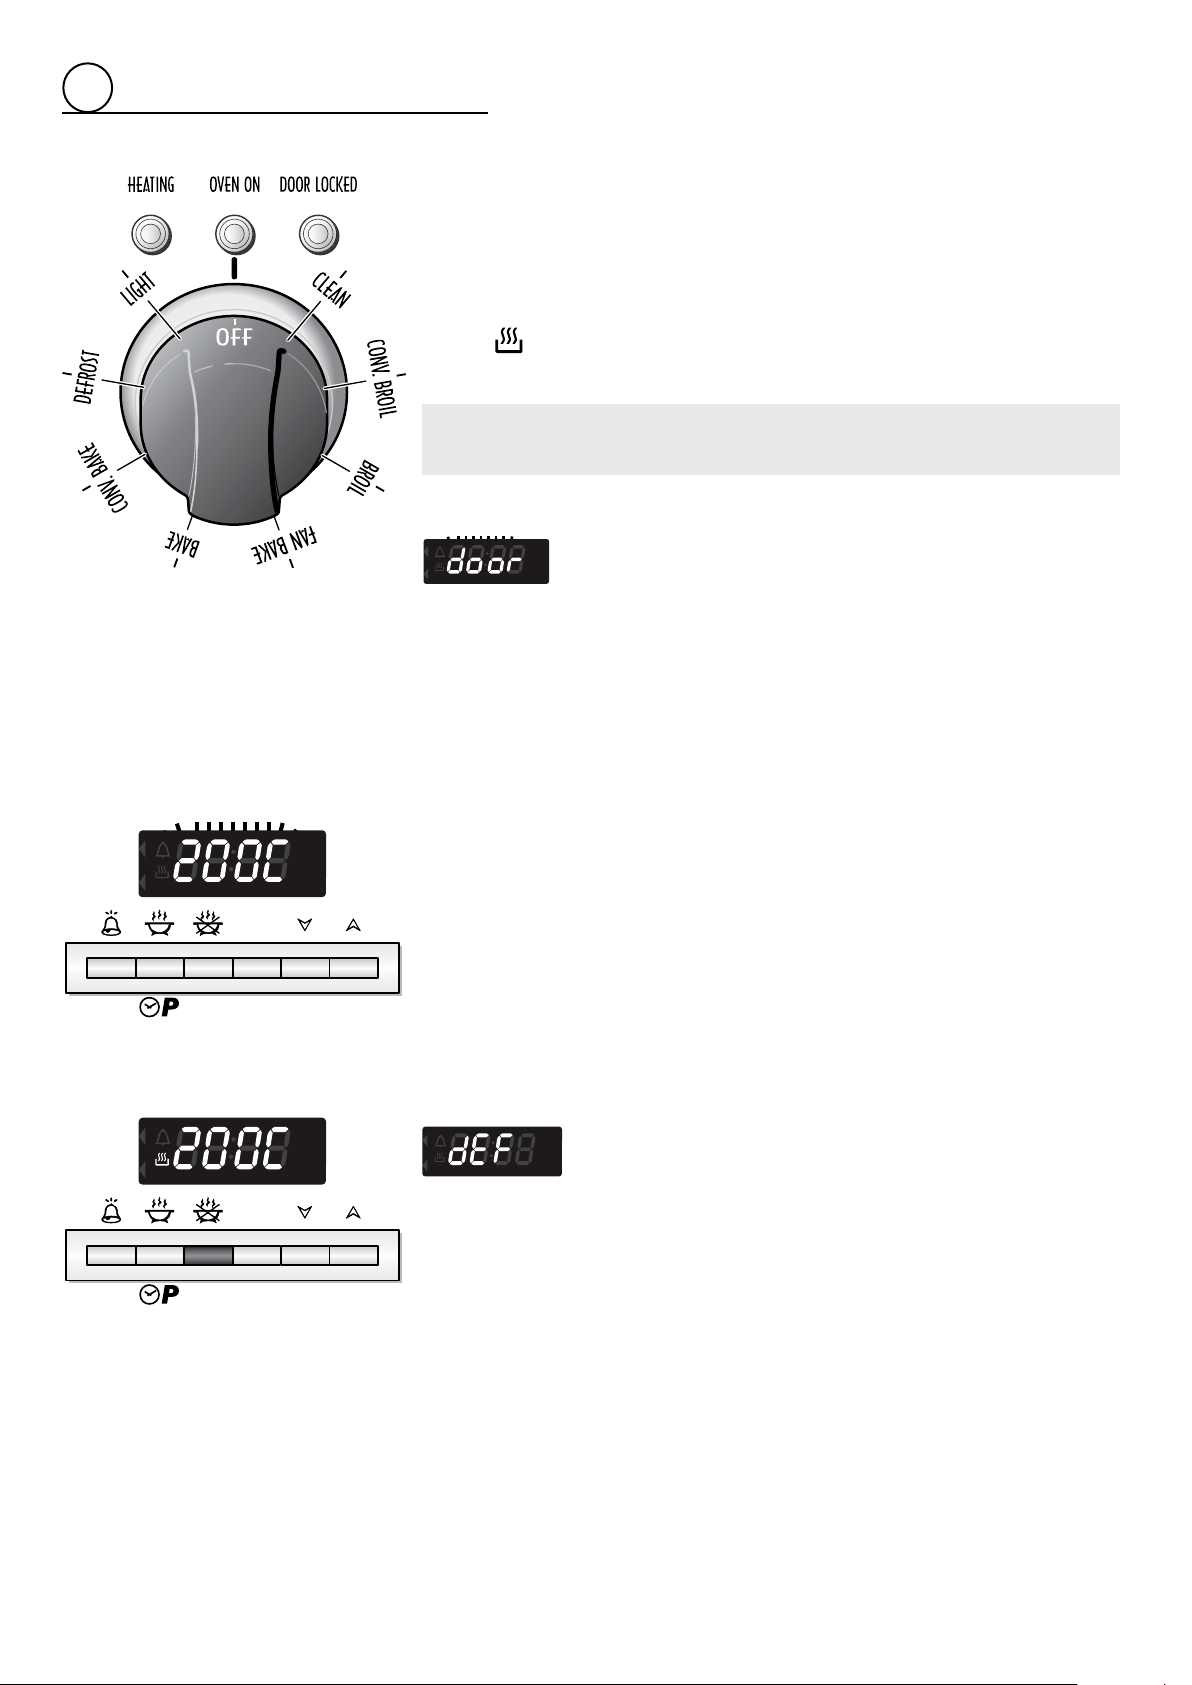
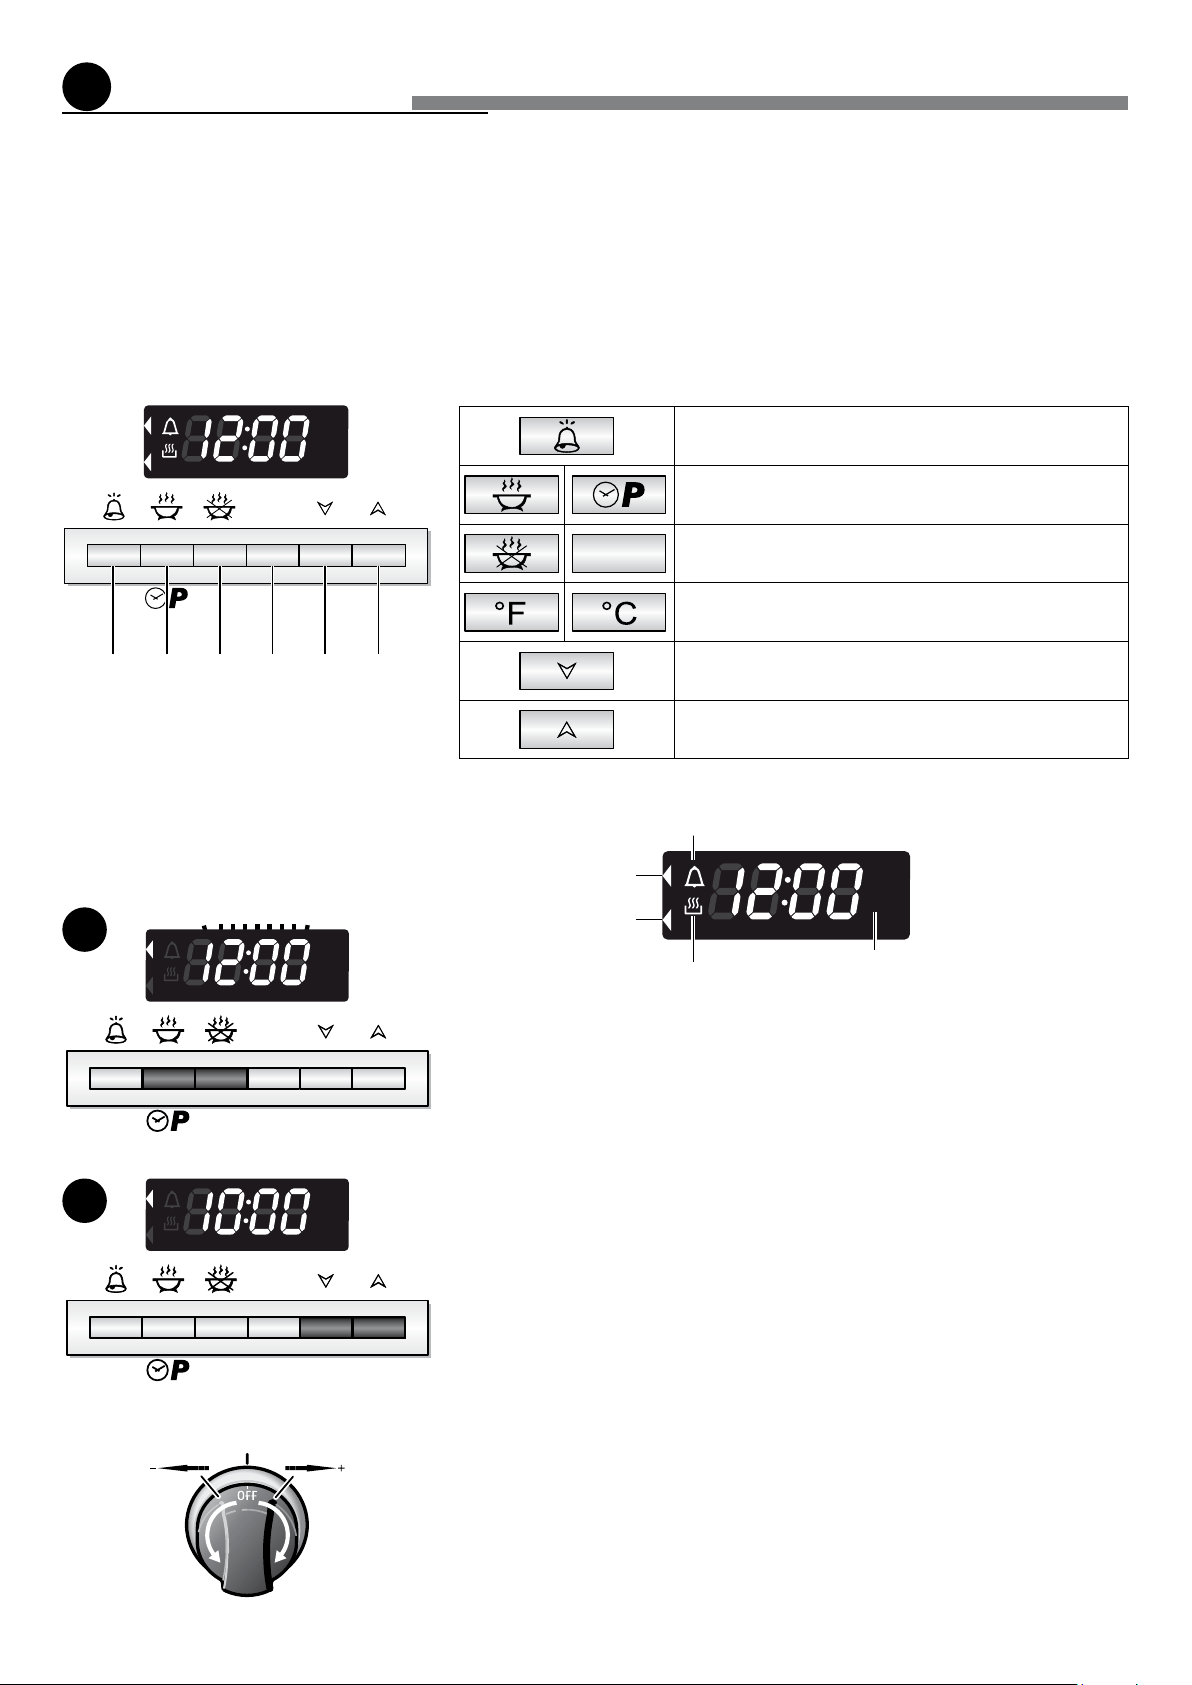
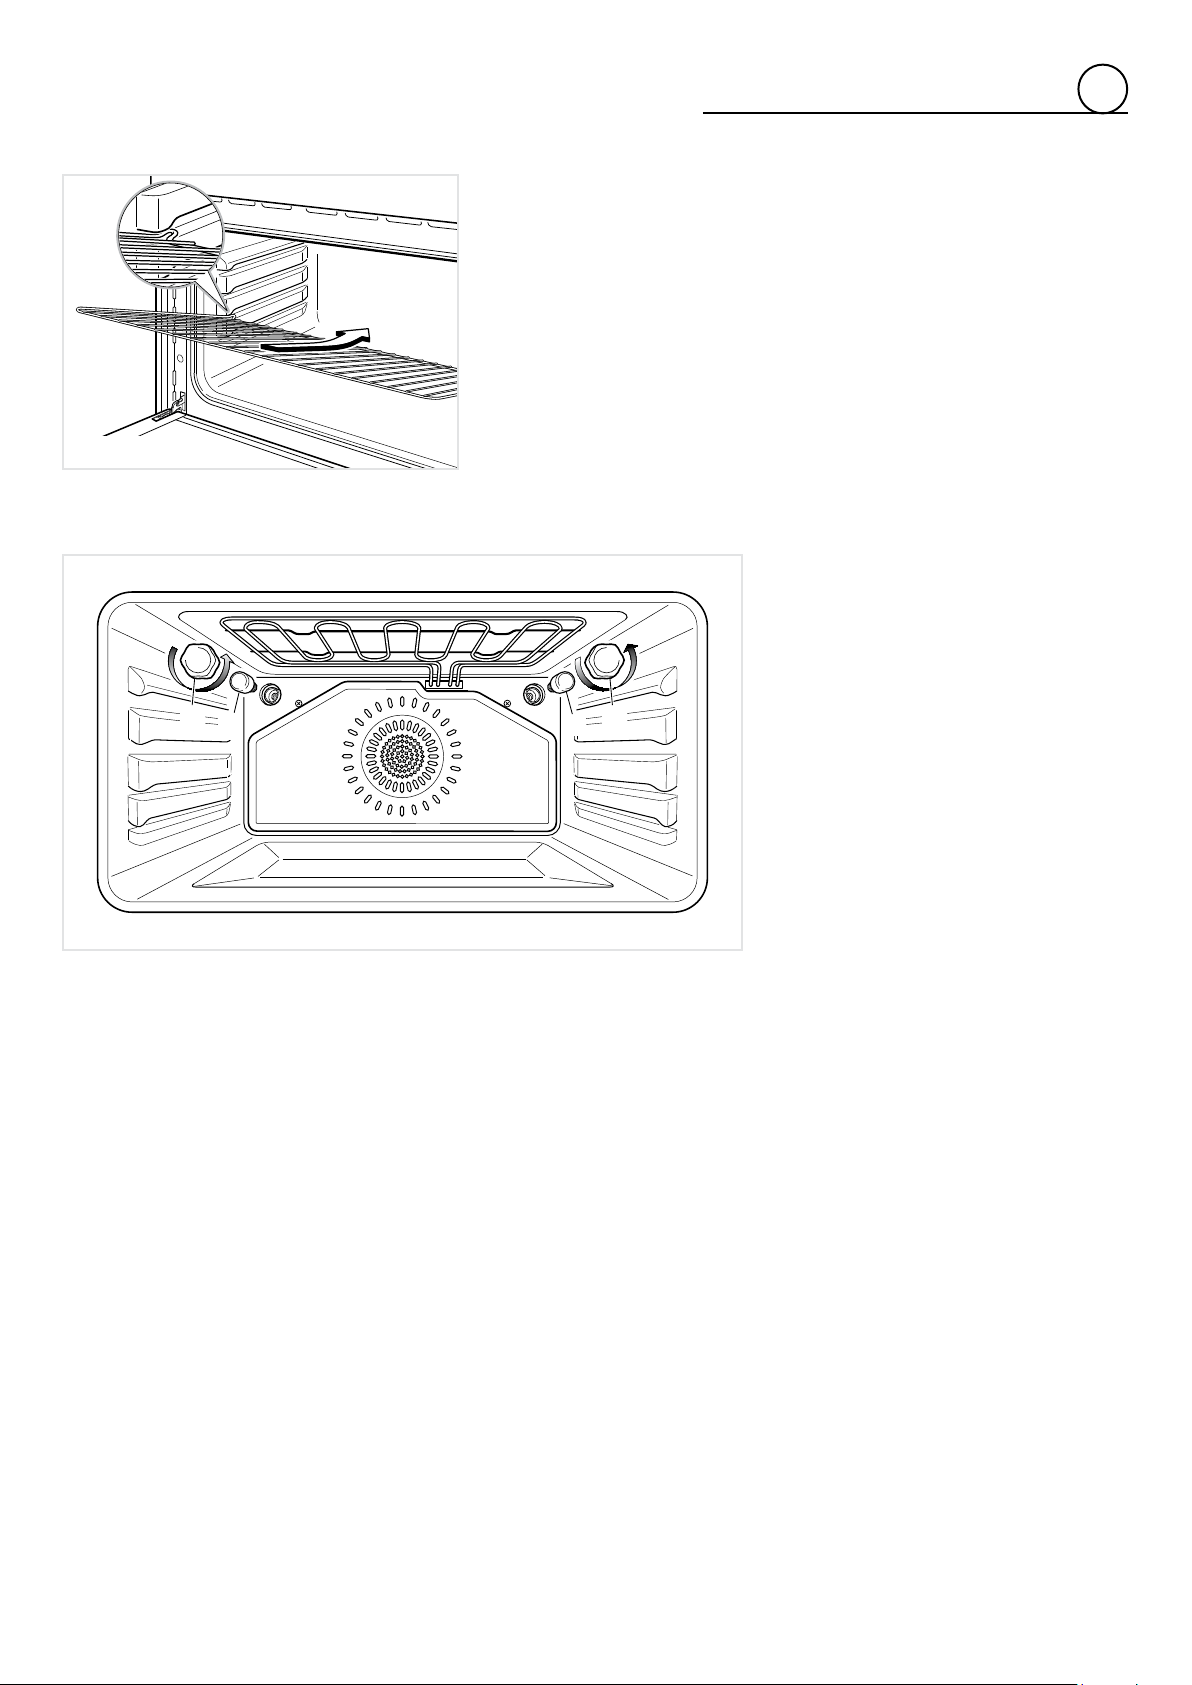
CONTROLS DESCRIPTION
Gascookinghobcontrols:
1. Frontleftburner(4)controlknob
2. Rearleftburner(1)controlknob
3. Rearrightburner(2)controlknob
4. Frontrightburner(3)controlknob
Oven controls:
5. Functionselectorknob
6. Temperatureknob(potentiometer)
7. Electronicprogrammer
8. Warmingdrawercontrolknob
9. Warmingdraweronpilotlight
10. Ovenheatingpilotlight
11. Ovenonpilotlight
12. Doorlockedpilotlight
Fig. 1.2
5 7 6 1 2 3 4 8
911 1210
8
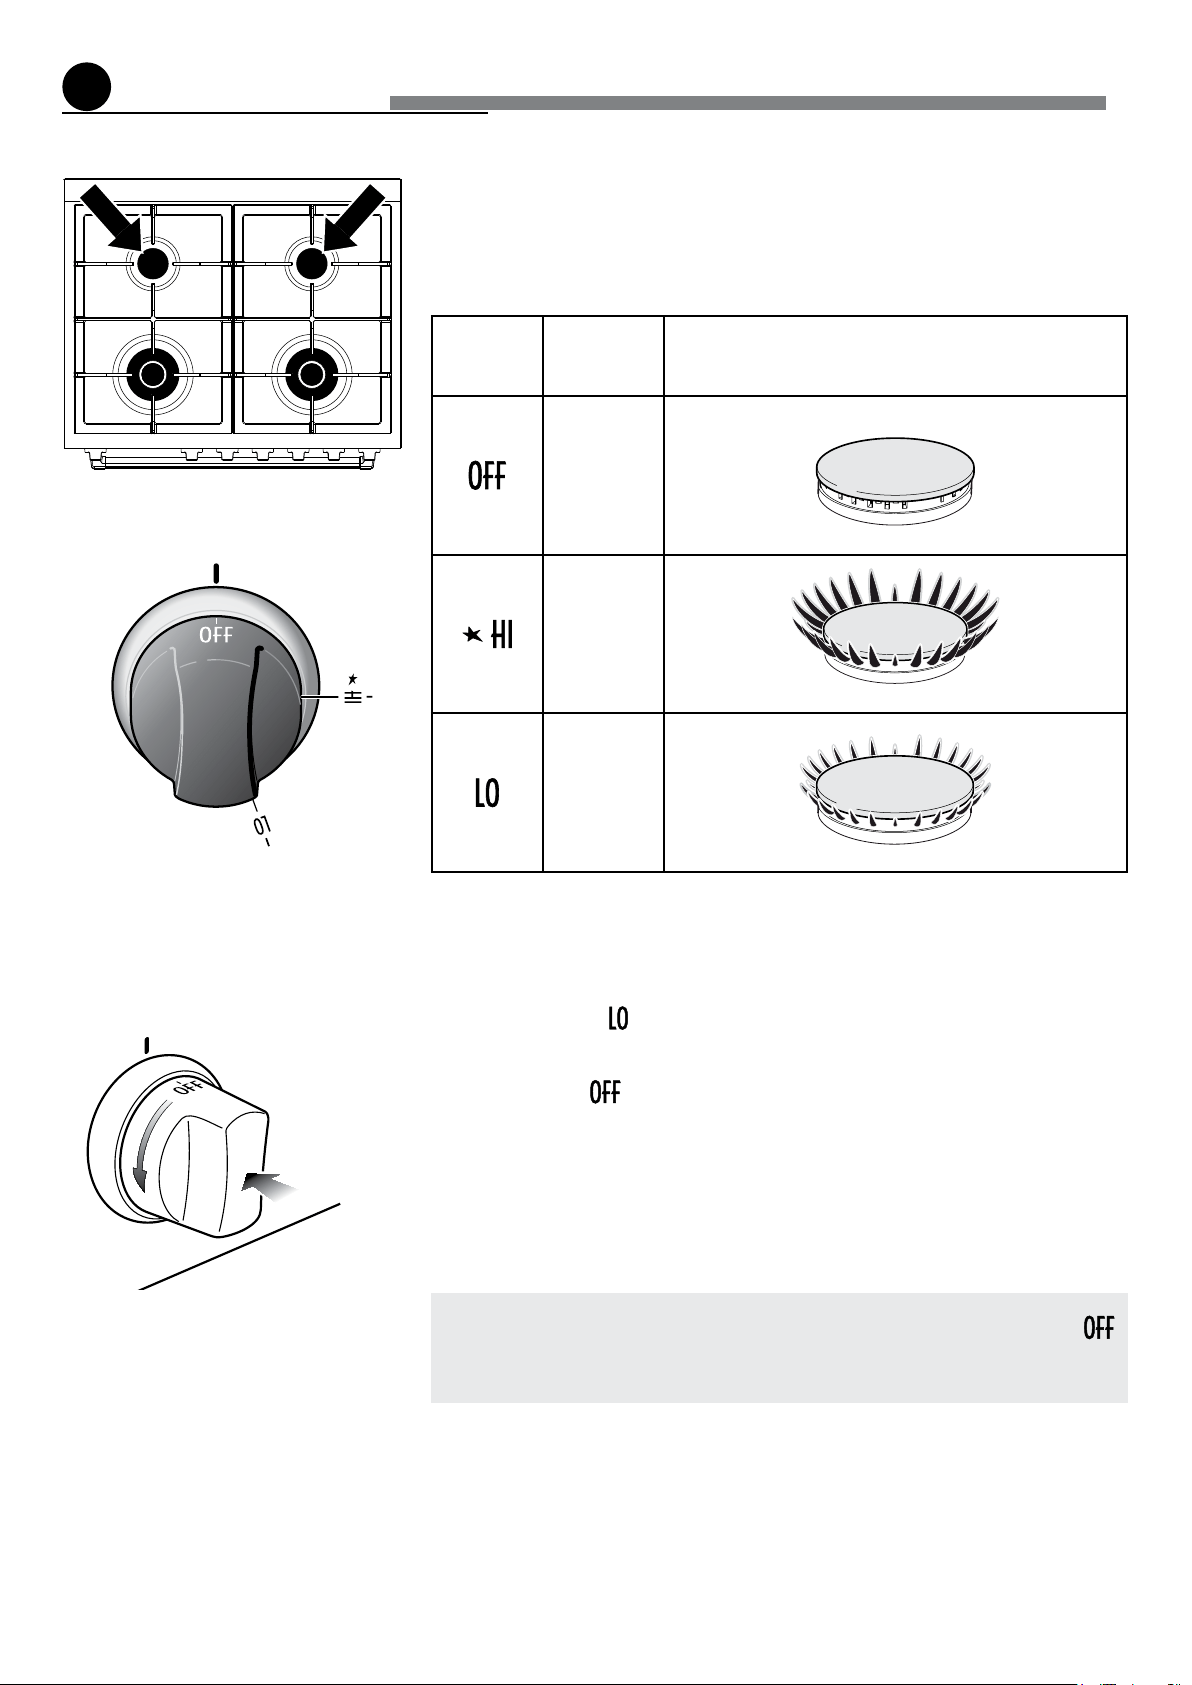
howtousethetopburners
2
GASBURNERS(Semi-rapid)
Gasow to theburners isadjustedby turningthe knobs (illustratedin g. 2.1)which
controlthevalves.
Turningtheknobsothatthesymbolsprintedonitselfpointtothesymbolprintedonthe
controlpanelachievesthefollowingfunctions:
Knob
position
Function SEMI-RAPIDburners
closed
valve
maximum
rate
minimum
rate
Themaximumaperturepositionpermitsrapidboilingofliquids,whereastheminimum
aperture position allows simmer warming of food or maintaining boiling conditions of
liquids.
Toreducethegasowtominimum,rotatetheknobfurtheranti-clockwisetopointthe
indicatortowardsthe
position(minimumrate).
Otherintermediateoperatingadjustmentscanbeachievedbypositioningtheindicator
betweenthemaximumandminimumaperturepositions,andneverbetweenthemaxi-
mumapertureand
position.
N.B.Whentherangeisnotbeingused,setthegasknobstotheir
positionsandalsoclosethegasshut-offvalveplacedonthemaingas
supply line.
Fig. 2.1
Fig. 2.2

9
2
LIGHTINGGASBURNERSFITTEDWITHFLAMEFAILURE
SAFETYDEVICE(Semi-rapidburners)
Inordertolighttheburner,youmust:
1. Pushandturntheknobinananti-clockwisedirectionuptothe
position(ma-
ximumrate),pushinandholdtheknobuntiltheamehasbeenlit(g.2.2).
Thesparksproducedbythelightersituatedinsidetherelativeburnerwilllightthe
ame.
Intheeventthatthelocalgassupplyconditionsmakesitdifculttolighttheburner
in
position(maximumrate),tryagainwiththeknobin position(minimum
rate).
Ifthereisnomainselectricalsupply,bringalightedmatchclosetotheburner.
2. Waitforabouttensecondsafterthegasburner hasbeenlitbeforelettinggothe
knob(safetydeviceactivationdelay).
3. Adjustthegasvalvetothedesiredposition.
Iftheburnerameshouldgooutforsomereason,thesafetyvalvewillautomaticallystop
thegasow.
Tore-lighttheburner, returntheknobtothe closed
position,wait foratleast1
minuteandthenrepeatthelightingprocedure.
Ifyourlocalgassupplymakesitdifculttolighttheburnerwiththeknobsettomaximum,
settheknobtominimumandrepeattheoperation.
Caution!
Therangebecomesveryhotduringoperation.
Keep children well out of reach.
10
2
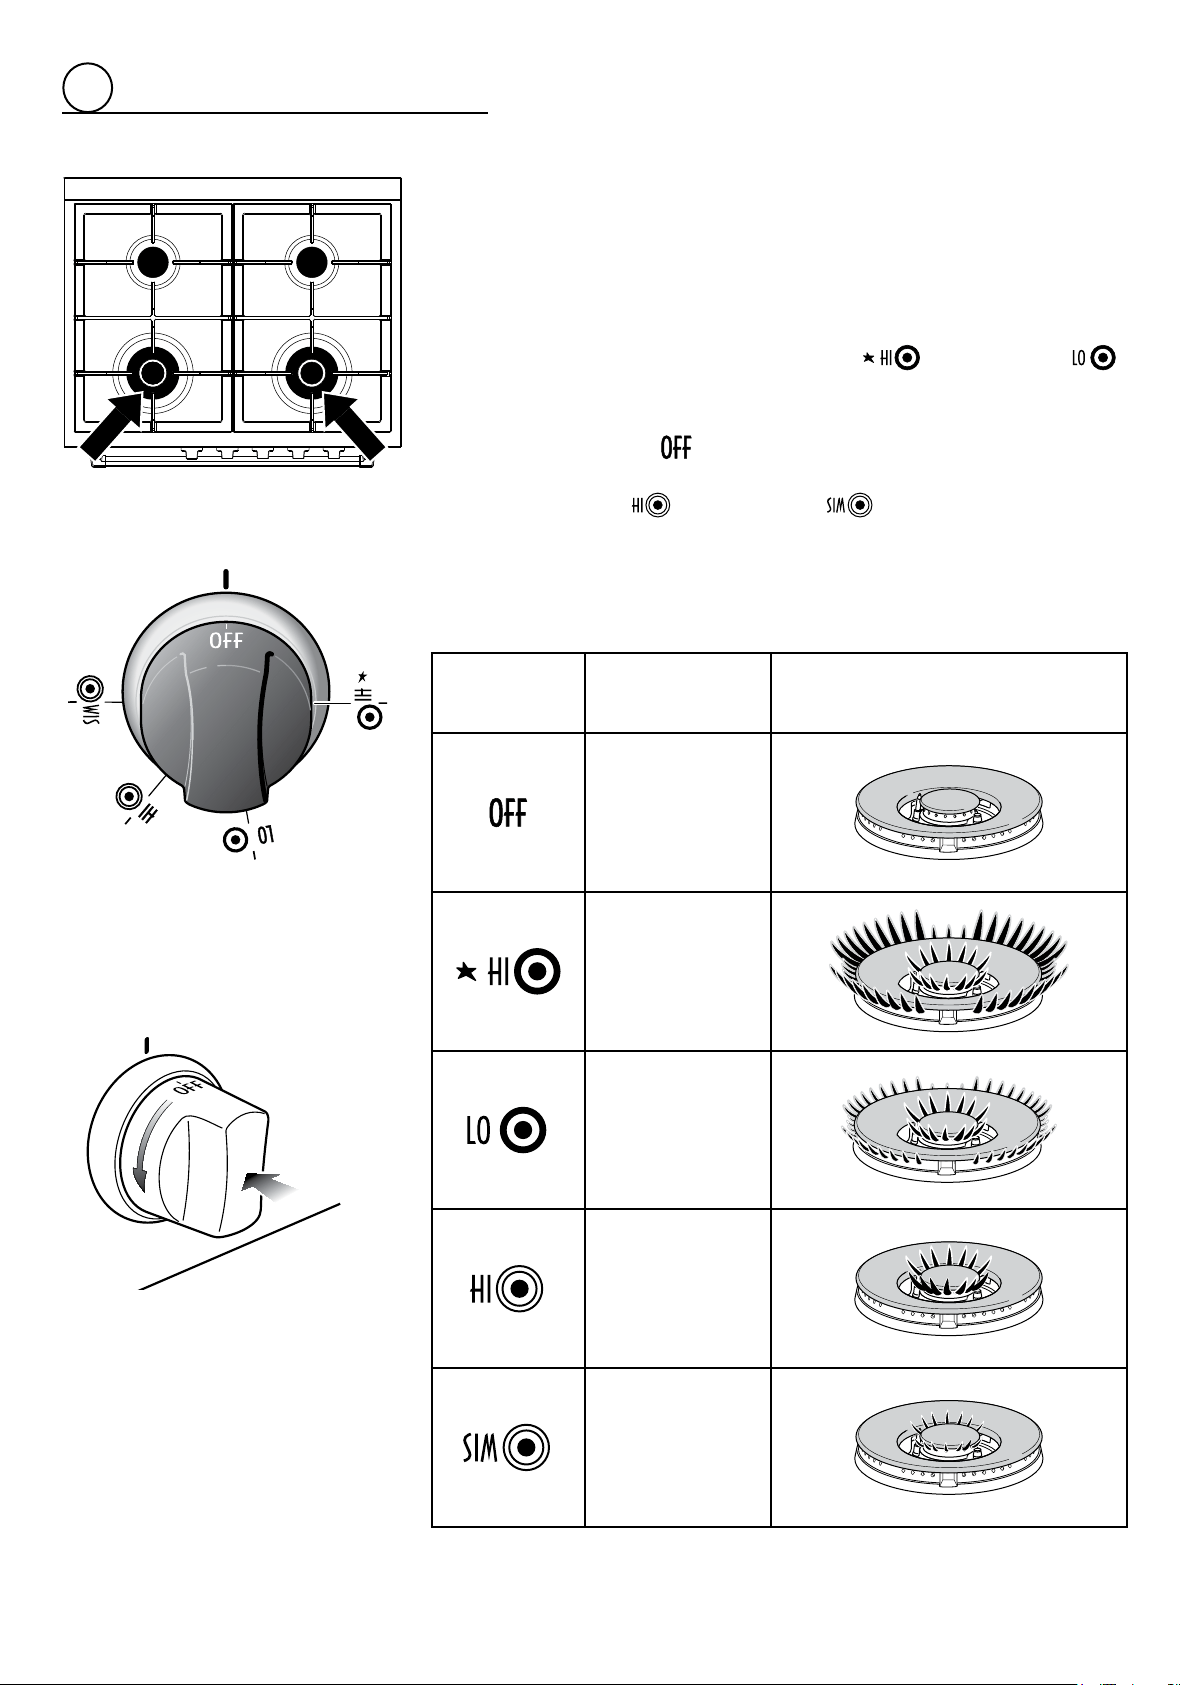
GASBURNERS(Dual)
TheDualBurnerisaveryexibleburnerwhichallowsdifferentregulationsandoptimal
cooking.
Itiscomposedbyoneinnerandoneoutercrown;theameoftheinnercrowncanbe
regulatedseparatelyfromtheamesoftheoutercrown.
TheDualBurnercanbeused:
• As a high-power burner (all ames produced simultaneously by inner and outer
crown)whichcanbeadjustedfromthemaximum( )totheminimum( )
position.
Intermediate operating adjustments can be achieved by positioning the indicator
between the maximum and minimum opening positions, and never between the
maximumopeningand
position.
• Asasmallburner(ameproducedonlybytheinnercrown)whichcanbeadjusted
fromthemaximum(
)totheminimum( )position.
Gasow to theburners isadjustedby turningthe knobs (illustratedin g. 2.3)which
controlthevalves.
Turningtheknobsothatthesymbolsprintedonitselfpointtothesymbolprintedonthe
controlpanelachievesthefollowingfunctions:
Knob
position
Function DUALburners
closed
valve
Maximumrateof
inner+outercrown
(insideandoutside
amesin
simultaneously
atthemaximum)
Minimumrateof
outercrownand
maximumrateof
innercrown
Maximumrate
ofinnercrown
(onlyinnerame
atthemaximum)
Minimumrate
ofinnercrown
(onlyinnerame
attheminimum)
Fig. 2.3
Fig. 2.4
11
2
N.B.Whentherangeisnotbeingused,setthegasknobstotheir
positionsandalsoclosethegasshut-offvalveplacedonthemaingas
supply line.
LIGHTINGGASBURNERSFITTEDWITHFLAMEFAILURE
SAFETYDEVICE(Dualburners)
Inordertolighttheburner,youmust:
1. Push and turn the knob in an anti-clockwise direction up to the position
(maximumrateofinner+outercrown);pushinandholdtheknobuntiltheame
hasbeenlit.
Thesparksproducedbythelightersituatedinsidetherelativeburnerwilllightthe
ame.
Intheeventthatthelocalgassupplyconditionsmakesitdifculttolighttheburner
inposition
,tryagainwiththeknobinposition .
Ifthereisnomainselectricalsupply,bringalightedmatchclosetotheburner.
2. Waitforabouttensecondsafterthegasburner hasbeenlitbeforelettinggothe
knob(safetydeviceactivationdelay).
3. Adjustthegasvalvetothedesiredposition.
Iftheburnerameshouldgooutforsomereason,thesafetyvalvewillautomaticallystop
thegasow.
Tore-lighttheburner, returntheknobtothe closed
position,wait foratleast1
minuteandthenrepeatthelightingprocedure.
Ifyourlocalgassupplymakesitdifculttolighttheburnerwiththeknobsettomaximum,
settheknobtominimumandrepeattheoperation.
Caution!
Therangebecomesveryhotduringoperation.
Keep children well out of reach.
12
2
CHOICEOFBURNER(g.2.5)
Thesymbolsorwordingsprintedonthepanelabovethegasknobsindicatethecorre-
spondencebetweentheknobandtheburner.
Themostsuitableburneristobechosenaccordingtothediameterandvolumecapacity
ofthecontainertobewarmed.
Itisimportantthatthediameterofthepotsorpanssuitablymatchtheheatingpotential
oftheburnersinordernottojeopardisetheefciencyoftheburners,bringingabouta
wasteofgasfuel.
Asmalldiameterpotorpanplacedonalargeburnerdoesnotnecessarilymeanthat
boilingconditionsarereachedquicker.
DIAMETERSOFPANSWHICHMAYBEUSEDONTHEHOBBURNERS
BURNER MINIMUM MAX.
Semi-rapid 16cm(6”19/64) 24cm(9”7/16)
Dual 26cm(10”3/16) 28cm(11”1/16)
Wokpansmin36cm(14”3/16)-max40cm(15”3/4)
Donotusepanswithconcaveorconvexbases
CORRECTUSEOFDUALBURNER(Fig.2.6a-2.6b)
Theat-bottomedpansaretobeplaceddirectlyontothepan-support.
WhenusingaWOKyouneedtoplacethesuppliedstandintheburnertoavoidanyfaulty
operationoftheDualburner(Figs.2.6a-2.6b).
IMPORTANT:
Thespecialgrillforwokpans(g.2.6b)MUSTBEPLACEDONLYoverthepan-restfor
theDualburner.
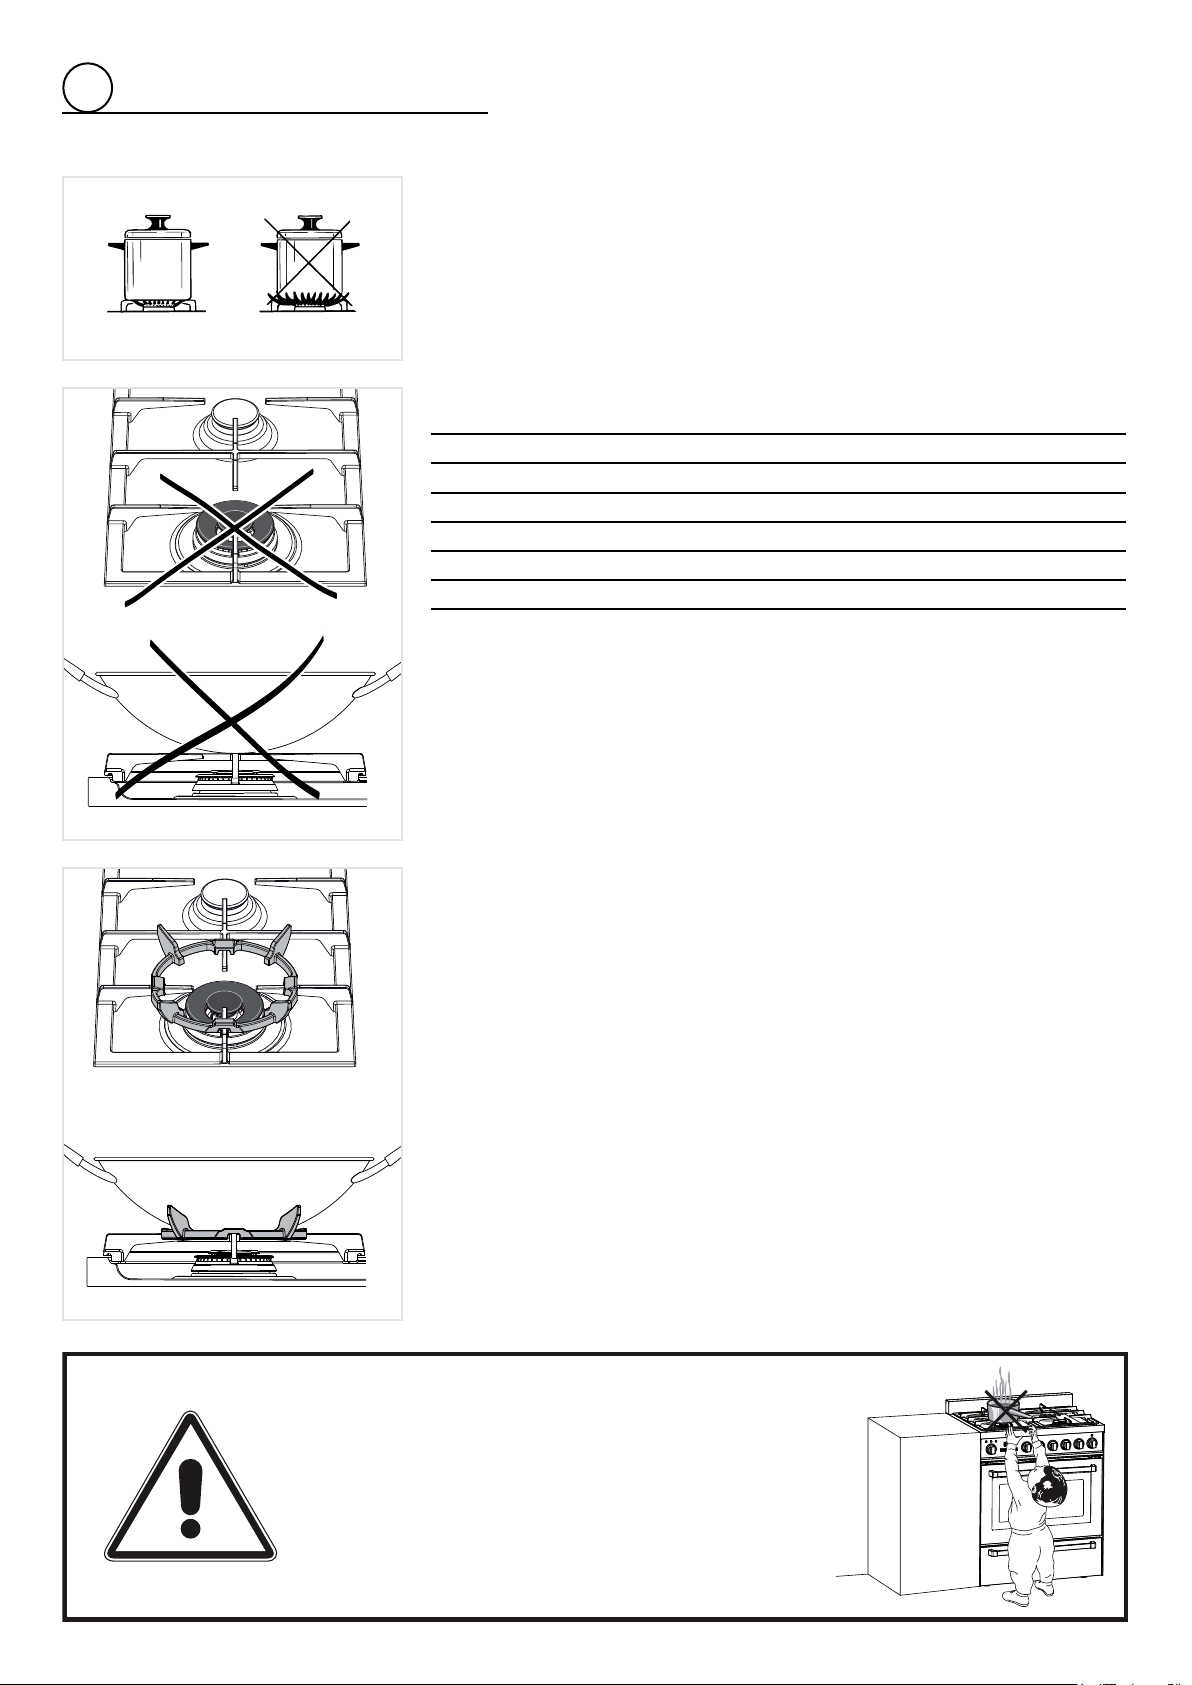
Ensure that the handles of
cookware do not stick out over
the edge of the range, to avoid
them being knocked over by
accident. This also makes it more
difficult for children to reach the
cooking vessels.
WRONG
CORRECT
Fig. 2.5
Fig. 2.6b
Fig. 2.6a
13
GENERAL FEATURES
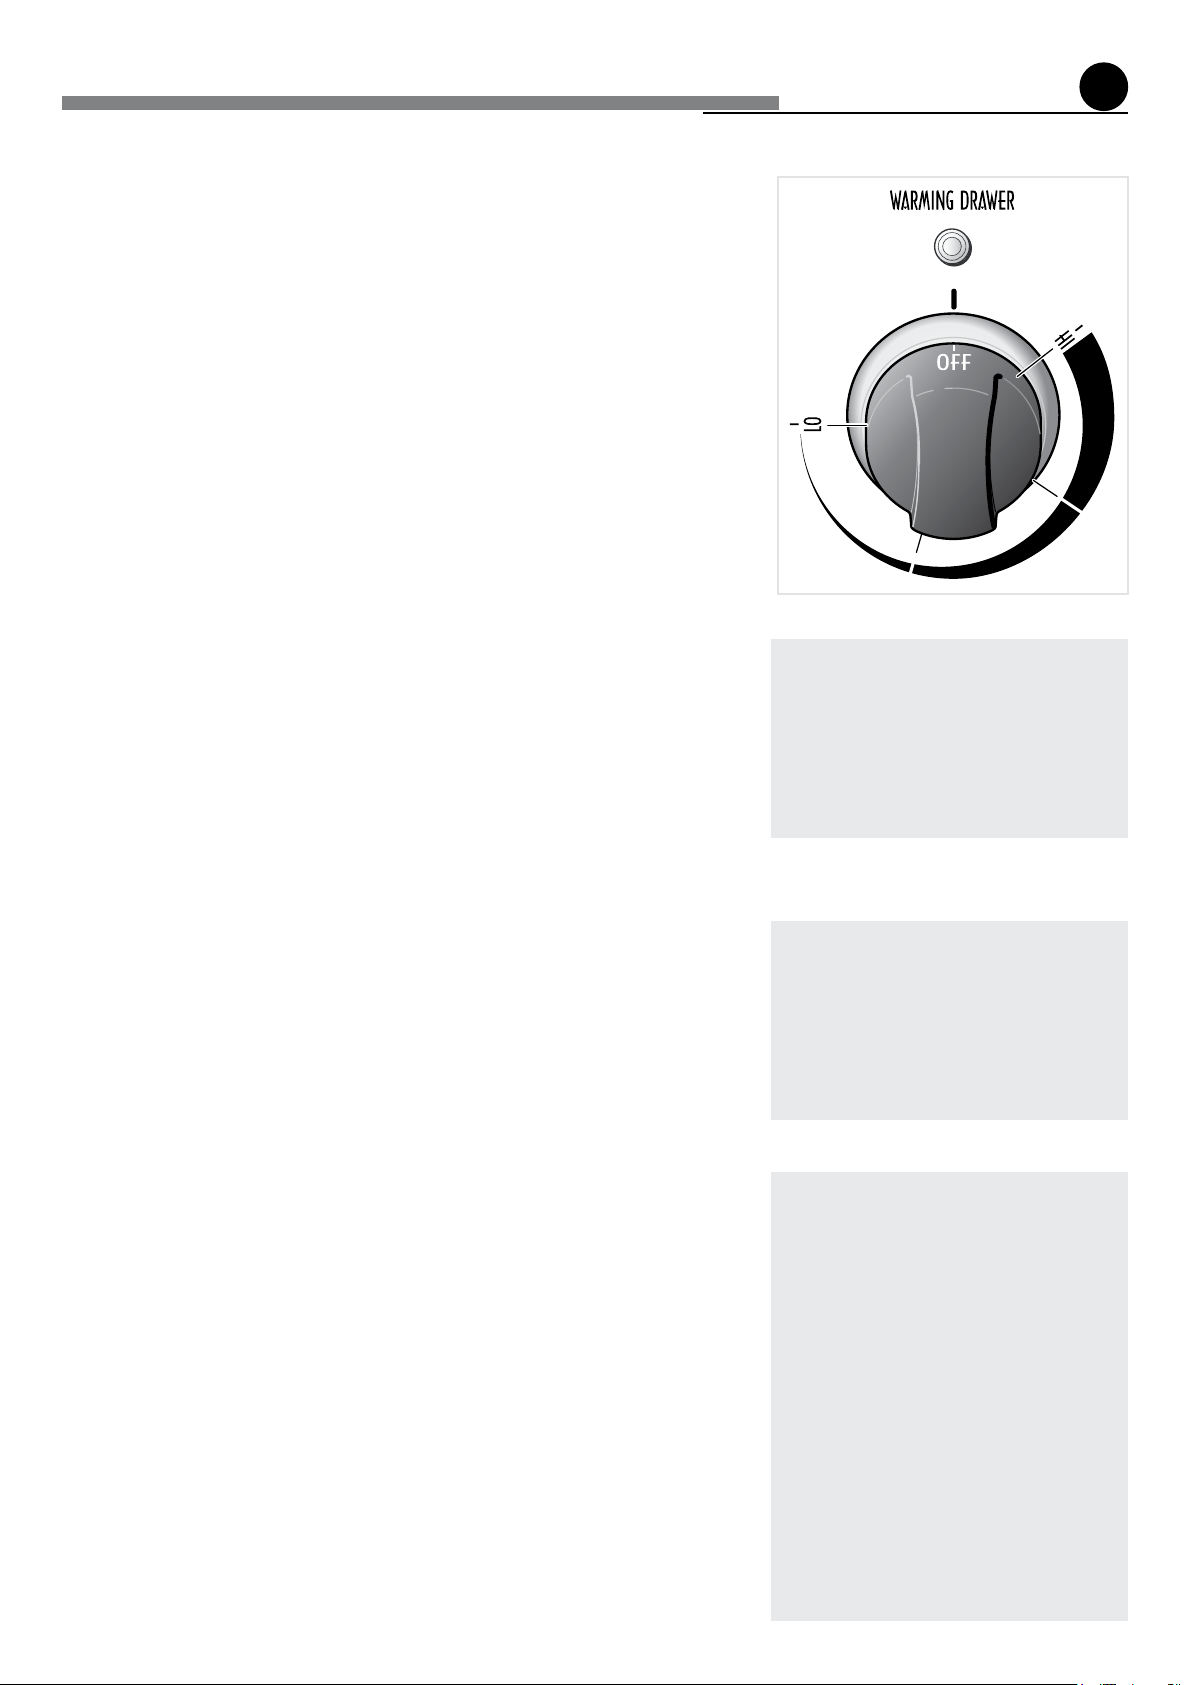
Thewarmingdraweristtedwithanheatingelement(500W)placedonthetop.
Theheatingcanberegulatedfrom86°F(30°C)[LOminposition]to203°F(95°C)[HI
maxposition].
USING THE WARMING DRAWER FOR THE FIRST TIME
• Switchontheemptywarmingdraweratmaximumpowerforabout2hoursto
removetracesofgreaseandsmellsfromthecomponents.
• Whenthewarmingdrawerhascooleddownandtherangehasbeenunplugged,
cleantheinsideofthedrawerwithaclothsoakedinwaterandneutraldetergent
anddryitperfectly.
WARNING:Thedrawerishotduringoperation,usethehandle.
TO USE THE WARMING DRAWER
• Pushandturnthecontrolknobtoatemperaturesetting:LO(min),HI(max)or
betweenminandmaxposition.
• Allowtimeforthedrawertobepreheated.
• Preheatwithrackinplaceifusingthatarrangement.
• Preheatemptyservingdishwhilepreheatingthedrawer.
• Addcooked,hotfoodinacookingutensilorinaheat-safeservingdishes.
• Foodmaybekepthotinitscookingcontainerortransferredtoaheat-safeser-
vingdish.
• Aluminumfoilmaybeusedtocoverfood.
CORRECT USE OF THE WARMING DRAWER
• Thewarmingdrawerwillkeephotcookedfoodsatservingtemperature.
• Alwaysstartwithhotfood.
• Donotusetoheatcoldfoodotherthanproongyeastdough,crispingcrackers,
chips,anddrycerea.Donotusetoheatwarmingdishesorplates.
• Usecarewhenopeningthedrawer.Opendooracrackandlethotairorsteam
escapebeforeremovingorreplacingfood.
• Donotplacefoodinunopenedcontainersinthedrawer.Pressurecouldbuildup
andcausecontainertoburst.
• Donottouchtheinteriorsurfaceofthedrawerwhileitisinuse.Theinteriorof
thedrawercouldbecomehotenoughtocauseburns.
• Useonlydrypotholders.Moistordamppotholdersonhotsurfacesmaycause
burnsfromsteam.Donotuseatowelorotherbulkyclothinplaceofpotholders.
Donotletpotholderstouchhotheatingelementlocatedupperthedrawer.
• Donotusealuminumfoiltolinethedrawer.Foilisanexcellentheatinsulator
andwilltrapheatbeneathit.Thiswillupsettheperformanceofthedrawerandit
coulddamagetheinteriornish.
• Donotstoreammablematerialsinthedrawer.
• Donotuseplasticcontainers.Donotusenoheatresistantcontainers.
• Donotusethewarmingdrawerasastoragedrawer.
howtousethewarmingdrawer
3
WARNING:
Thewarmingdrawerisforke-
epinghotfoodhot.Neveruse
it to warm or heat a room or
to warm plates.
CAUTION: Plastic containers
or plastic wrap can melt if in
direct contact with the dra-
wer or a hot utensil. If it melts
ontothedrawer,itmaynotbe
removed.
IMPORTANT:
Don’t operate the warming
drawer during the self-clea-
ningcycle.
If during self-cleaning cycle
the warming drawer control
knobhasbeenturnedONre-
turn the knob to the
OFF
(off)
position. Otherwise at the
endoftheself-cleaningcycle
and after having turned the
ovenselectorcontrolknobto
the
OFF
(off)position,thewar-
mingdrawerwilloperate.
Fig. 3.1

14
3
Knobposition °F °C
LO(min)
86 30
between
LO(min)andHI(max)
from87to247 from31to119
HI(max)
202 95
TEMPERATURE SELECTOR
ThesettingcanbeanywherebetweenLO
(min)andHI(max)position.
WARNING LIGHT
The warning light is located above the
control knob and turns “ON’ when the
warming drawer is set. It stays on until
the knob is turned back to the OFF (off)
position.
REVERSIBLERACK
Therackshallbepositionedaspergu-
res3.2and3.3.
Fig. 3.4
Fig. 3.3
Fig. 3.2

15
GENERAL FEATURES
Theovenhasspecialoperatingfeatures.
Fivedifferentfunctionscanbeusedtosatisfyallcookingneeds;italsohasaselfcle-
aningfunctionwhichcancleantheovencavityathightemperature,adefrostfunction
andanovenlightfunction.
Thesefunctionsaremanagedbyanelectronicprogrammerwhichkeepsthetempe-
raturesetconstantbymeansofaprobeinsidetheovencavity.
Theovenhasthefollowingheatingelements:
• Lowerheatingelement(double) 550+1750W
• Upperheatingelement 1200W
• Grillheatingelement 2850W
• Circularheatingelement 2450W
USING THE OVEN FOR THE FIRST TIME
• Putintheshelfandthetray.
• Switchtheovenonempty(onacookingfunction–NOTSELFCLEANING)at
maximumpowerforabout2hourstoremovetracesofgreaseandsmellsfrom
thecomponents.
• Whentheovenhascooleddownandunpluggingtherange,cleantheinsideof
theovenwithaclothsoakedinwaterandneutraldetergentanddryitperfectly.
WARNING:
Thedoorishot,usethehandle.
OPERATING PRINCIPLES
Heatingandcookinginthemultifunctionselfcleaningoventakesplaceasfollows:
• bynormalconvection
Theheatisproducedbytheupperandlowerheatingelements.
• bysemi-forcedconvection
Theheatproducedbytheupperandlowerheatingelementsisdistributedthrou-
ghouttheovenbythefan.
• byforcedconvection
Theheatproducedbythecircularelementisdistributedthroughouttheovenby
thefan.
• byradiation
Theheatisradiatedbytheinfraredbroilelement.
• byradiationandfan
Theradiatedheatfromtheinfraredbroilelementisdistributedthroughoutthe
ovenbythefan.
• byventilation
Thefoodisdefrostedbyusingthefanonlyfunctionwithoutheat.
THIS IS NOT A COOKING FUNCTION
• byselfcleaning
Theheatproducedbytheheatingelementscleanstheinternalovencavityre-
movingallresidueofgrease.
THIS IS NOT A COOKING FUNCTION
NOTES ON OVEN OPERATION
Acoolingfanstartsautomaticallywhenselectingacookingfunction,defrostorself
cleaningmode.
ItstopswhenturningtheselectorknobtoOFFpositionorLIGHTandtheinsideoven
cavitytemperaturedropsbelow150°C(302°F).
Thepurposeofthisfanistoreducethetemperatureinside/outsidetheappliance.
Note:Thersttimetheovenisusedorafterablack-outtheprogrammermustbe
startedbypressingkeys2and3simultaneously.Seethesectionontheuseofthe
electronicprogrammer.
howtousetheselfcleaningoven
4
ATTENTION: The oven door
becomesveryhotduringope-
ration. Keep children away.
VERY IMPORTANT:
The oven shall be always
used with the door closed.
NEVER USE THE RANGE
WHEN THE OVEN IS OPE-
RATING IN SELF CLEANING
MODE.
DO NOT OPERATE THE TOP
BURNERS.
WHEN THE SELF CLEANING
MODE HAS BEEN COMPLE-
TED:
Do not immediately start
a new self cleaning cycle.
LET THE RANGE TO COOL
DOWN.
IMPORTANT:
DON’T OPERATE THE WAR-
MING DRAWER DURING THE
SELF-CLEANING CYCLE.
If during self-cleaning cycle
the warming drawer control
knobhasbeenturnedONre-
turn the knob to the
OFF
po-
sition. Otherwise at the end
oftheself-cleaningcycleand
after having turned the oven
selector control knob to the
OFF
position, the warming
drawer will operate.
I I I I I I I
I
I
I
I
I
I
I
I
I I I I I I I
I
I
I
I
I
I
I
A
START
AM
PM
°F
°C
I I I I I I I
I
I
I
I
I
I
I
I
I I I I I I I
I
I
I
I
I
I
I
2 3
16
I I I I I I I
I
I
I
I
I
I
I
I I I I I I I I
I
I
I
I
I
I
I
A
START
AM
PM
°F
3
A
START
AM
PM
°F
°C
°C
I I I I I I I
I
I
I
I
I
I
I
I I I I I I I I
I
I
I
I
I
I
I
4
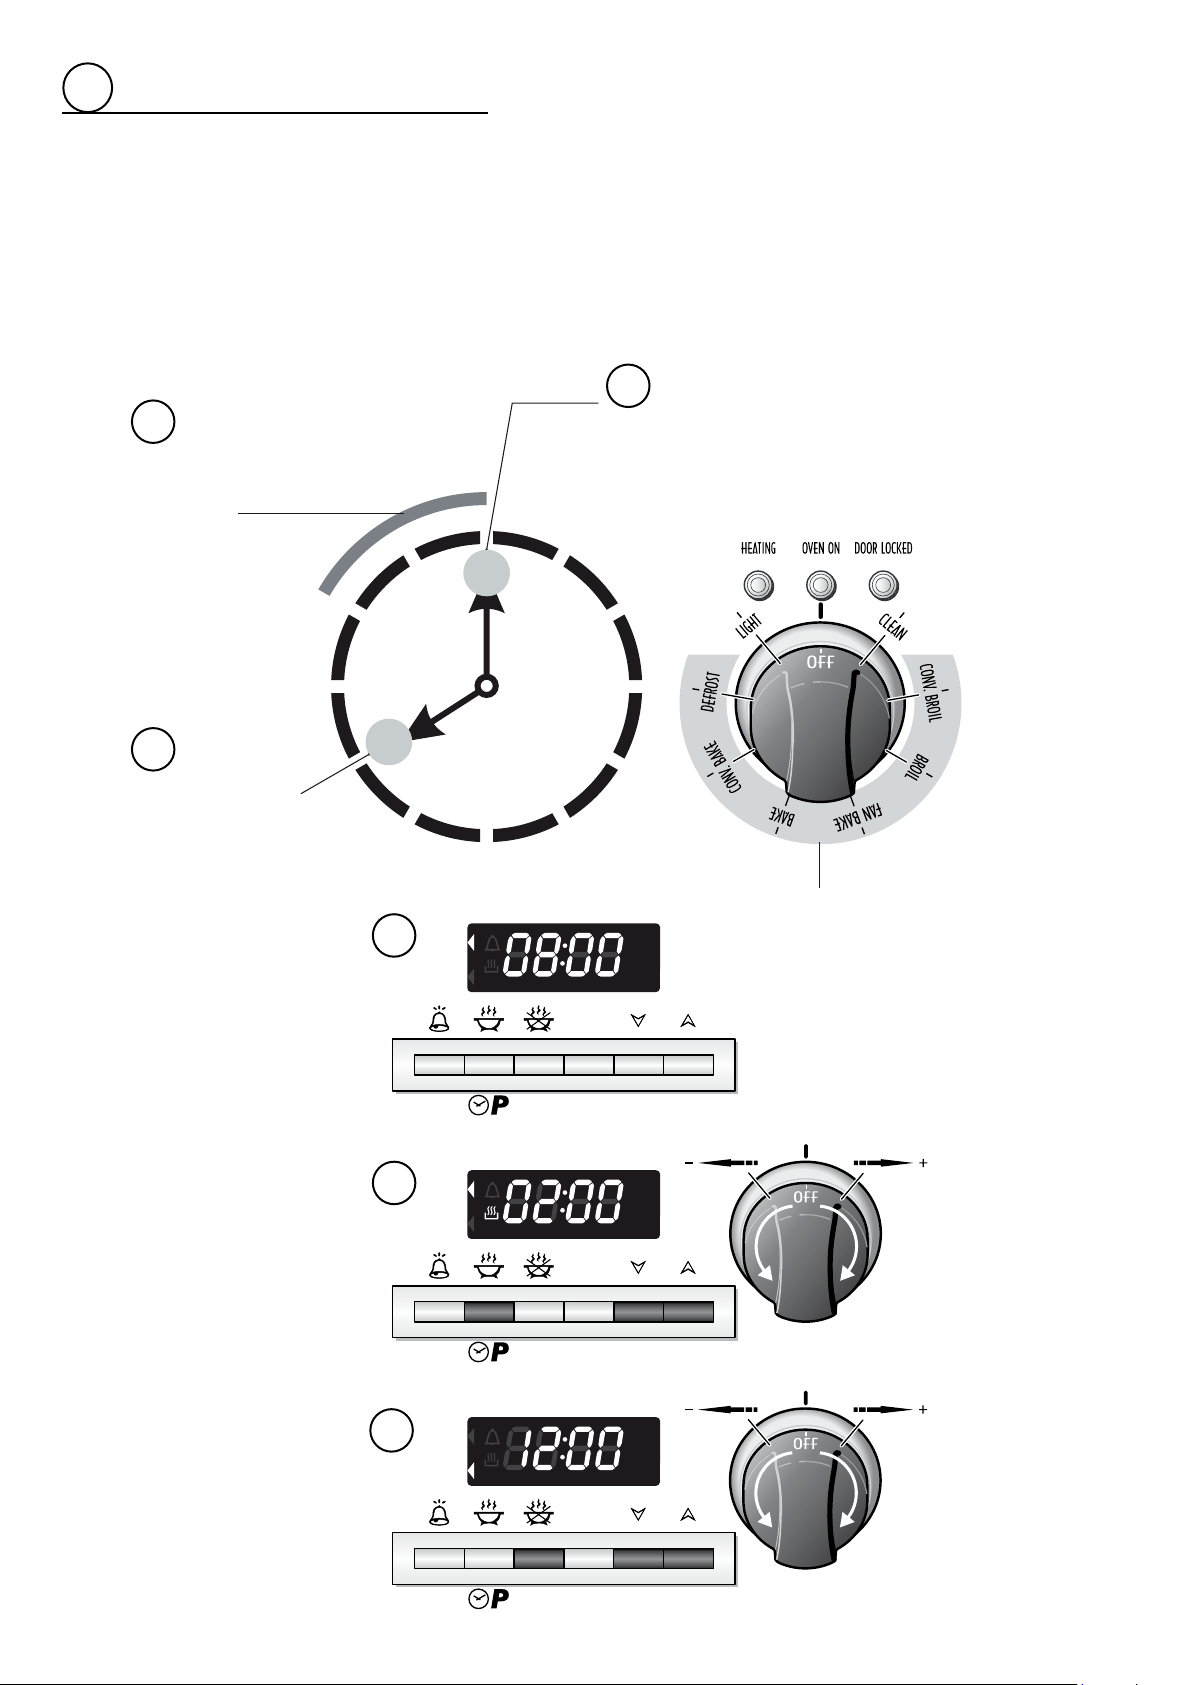
SELECTING THE FUNCTIONS(gs.4.1,4.2a,4.2b)
Thefunctionisselectedbyturningthefunctionselectorknobandmatchingthemarking
ontheknobwiththereferencemarkprintedonthecontrolpanel.
IMPORTANTNOTEFORTHECOOKINGFUNCTIONS:Onceselectingthefunction
andtemperature(the temperatureasheson theprogrammerdisplay-g.4.2a),
pressbutton3(“START”)ontheprogrammertostartthecooking(temperatureand
symbol
steadylitontheprogrammerdisplay-g.4.2b).
Important:Inallcookingfunctionstheovenmustalwaysbe
used with the DOOR CLOSED.
I I I I I I I
I
I
I
I
I
I
I
I
I I I I I I I
I
I
I
I
I
I
I
A
I I I I I I I
I
I
I
I
I
I
I
I
I I I I I I I
I
I
I
I
I
I
I
Ifthedoorstaysopen“door”ashesontheprogrammerdisplayand
aftersomeminutesanaudiblewarningsoundsforabout30seconds.
Tosilencetheaudiblewarningpressanyprogrammerbutton.
NOTE: The heating elements work even with the door open and this signal just
indicatesthatenergyisbeingwastedandthecontrolpanel/knobsareexcessively
heated.
LIGHT (OvenLight-Thisisnotacookingfunction)
Whenturningtheknobtothispositiononlytheovenlampslightup.
Thelampsarealwaysoninallthecookingfunctions(exceptforselfcleaningcycle).
DEFROST(DefrostingFrozenFoods-Thisisnotacookingfunction)
Onlythefanandtheovenlampsswitchon.Defrostingtakesplacebyfan,withoutheating.
TheelectronicprogrammershowsdEF.
A
Recommended for:
Torapidlydefrostfrozenfoods;2.2lbs(1kg)requiresaboutonehour.
Thedefrostingtimesvaryaccordingtothequantityandtypeoffoodstobedefrosted.
CONV.BAKE (ConvectionCookingwithVentilation)
Thecircularelementandthefanswitchon.
Theheatfromthebackisdiffusedbyfanconvection.
Thetemperaturecanbesetbetween120°F(50°C)and535°F(280°C).
On selecting this function the electronic programmer starts cooking with a pre-heating
temperaturesetat355°F(180°C).Tovarythetemperatureseethe“SETTINGTHECO-
OKING”section.
Recommended for:
Forfoodsoflargevolumeandquantitywhichrequirethesameinternalandexternalde-
greeofcooking;forex:rolledroasts,turkey,legs,cakes,etc.
Fig. 4.1
Fig. 4.2b
Fig. 4.2a

17
BAKE(TraditionalConvectionCooking)
Theupperandlowerheatingelementsswitchon.
The heat is diffused by natural convection and the temperature must be set between
120°F(50°C)and535°F(280°C).
On selecting this function the electronic programmer starts cooking with a pre-heating
temperaturesetat390°F(200°C).Tovarythetemperatureseethe“SETTINGTHECO-
OKING”section.
Recommended for:
Forfoodswhichrequirethesamecookingtemperaturebothinternallyandexternally,i.e.
roasts,spareribs,etc.
FAN BAKE (TraditionalConvectionCookingWithFan)
Theupperandlowerheatingelementsandthefanareswitchedon.
Theheatfromthetopandthebottomisdiffusedbyfanconvection.
Thetemperaturecanbesetbetween120°F(50°C)and535°F(280°C).
On selecting this function the electronic programmer starts cooking with a pre-heating
temperaturesetat355°F(180°C).
Tovarythetemperatureseethe“SETTINGTHECOOKING”section.
Recommended for:
Forfoodsoflargevolumeandquantitywhichrequirethesameinternalandexternal
degreeofcooking;e.g.rolledroasts,turkey,legs,cakes,etc.
BROIL (Broiling)
Theinfraredheatingelementswitcheson.
Theheatisdiffusedbyradiation.
Thetemperaturecanbesetbetween120°F(50°C)and520°F(270°C).
On selecting this function the electronic programmer starts cooking with a pre-heating
temperaturesetat410°F(210°C).
Tovarythetemperatureseethe“SETTINGTHECOOKING”section.
Forcorrectuseseethe“BROILING”section.
Recommended for:
Intensebroilingactionforcookingwiththebroiler;browning,crisping,“broiling”,toasting,
etc.
CONV.BROIL(VentilatedBroiling)
Theinfraredheatingelementandthefanswitchon.
Theheatismainlydiffusedbyradiationandthefandistributesitinthewholeoven.
Thetemperaturecanbesetbetween120°F(50°C)and520°F(270°C).
On selecting this function the electronic programmer starts cooking with a pre-heating
temperaturesetat430°F(220°C).
Tovarythetemperatureseethe“SETTINGTHECOOKING”section.
Forcorrectuseseethe“VENTILATEDBROILING”section.
Recommended for:
Forgrillcookingwhenafastoutsidebrowningisnecessarytokeepthejuicesin,i.e.veal
steak,steak,hamburger,etc.
4

18
4
CLEAN
(SelfCleaningFunction-thisisnotacookingfunction)
IMPORTANT NOTES:
Thisisnotacookingfunctionbutisonlyusedtoclean
the oven.
Beforestartingtheselfcleaningcycle:
• Take all the accessories out of the oven (drip tray and
shelves).
• Cleananytracesofliquidwhichhaveoverowed.
• Close the oven door and make sure that it is closed
properly.
Iftherearecracksorawsontheovendoorglass(insi-
de/outside)orifthegasketsareruinedorwornorifthe
doordoesnotcloseperfectly,disconnecttheappliance
from the electrical supply and contact the Service Centre.
GENERAL INFORMATION
• In this function the residual cooking greases on the inside walls of the oven
cavityarepulverisedbythehightemperature.Thefumesproducedduringthis
processarelteredbyaspecialcatalystintheupperpartoftheappliance.
• Smellsandfumesproducedduringselfcleaningarenotacauseofalarm.Ade-
quateventilation shouldhoweverbe providedin theroom where therange is
installed,e.g.byopeningawindow.
• Donot waitforthe ovento beverygreasy beforeperforming thiscleaning.It
shouldnotbeperformedaftereverycooking,either,butonlywhenthelevelof
dirtjustiesit(onaverage1–2timesamonthdependingonovenuse).
• Forsafetyreasons(hightemperatureoftheovencavity),whentheselfcleaning
startstheovendoorisautomaticallylockedbyanelectronicdevice(afterafew
seconds,onthecontrolpanel,the
DOOR LOCKED
pilotlightlightsup).Thedoorcan
nolongerbeopenedandisonlyunlockedattheendofthecleaningcycleor,
stoppingthecycle,whentheovencavityhascooledtoatemperaturelowerthan
570°F(300°C).
• Whentheselfcleaningfunctionstartsaninternalfanstartsautomaticallytocool
theovenwalls.Itonlystopsattheendofthecycle,whentheovencavitytempe-
raturehasdroppedbelow302°F(150°C).
• Theproceduresforstarting,stoppingandcompletingtheselfcleaningcycleand
dealingwithanyproblemsaredescribedinthefollowingsections:
– “HOWTOSTARTTHESELFCLEANINGCYCLE”;
– “PROBLEMS ON STARTING AND DURING THE SELF CLEANING
CYCLE”;
– “HOWTOSTOPTHESELFCLEANINGCYCLE”;
– “WHATTODOWHENTHESELFCLEANINGCYCLEHASFINISHED”;
– “ABNORMALSITUATIONSAND/OROPERATINGPROBLEMS”.
CAUTION: During the self
cleaning cycle the accessi-
ble parts may become hot.
Keep children away.
NEVER USE THE RANGE
WHEN THE OVEN IS OPE-
RATING IN SELF CLEANING
MODE.
DO NOT OPERATE THE TOP
BURNERS
IMPORTANT: DO NOT
OPERATE THE WARMING
DRAWER DURING THE
SELF-CLEANING CYCLE
Ifduringself-cleaningcycle
thewarmingdrawercontrol
knobhasbeenturnedONre-
turntheknobtothe
OFF
po-
sition. Otherwise at the end
of the self-cleaning cycle
andafterhavingturnedthe
oven selector control knob
to the
OFF
position,thewar-
mingdrawerwilloperate.
WHEN THE SELF CLEA-
NING MODE HAS BEEN
COMPLETED: do not start
immediately a new self clea-
ningcycleontheoven.
LET THE RANGE COOL
DOWN.
IMPORTANT:
Thehealthofsomebirdsis
extremely sensitive to the
fumes given off during the
self-cleaningcycle.
Exposuretothefumesmay
result in death to certain
birds.
Always move birds to ano-
ther closed and well ventila-
ted room.
19
I I I I I I I
I
I
I
I
I
I
I
I
I I I I I I I
I
I
I
I
I
I
I
A
START
AM
PM
°F
5
A
START
AM
PM
°F
3
A
START
AM
PM
°F
°C
°C
°C
4
I
I I
I
I
I
I
I
I
I
I
I I
I
I
I
I
I
I
I
A
I
I I
I
I
I
I
I
I
I
I
I I
I
I
I
I
I
I
I
I
I I
I
I
I
I
I
I
I
I
I I
I
I
I
I
I
I
I
A
I
I I
I
I
I
I
I
I
I
I
I I
I
I
I
I
I
I
I
I I I I I I I
I
I
I
I
I
I
I
I
I I I I I I I
I
I
I
I
I
I
I
4
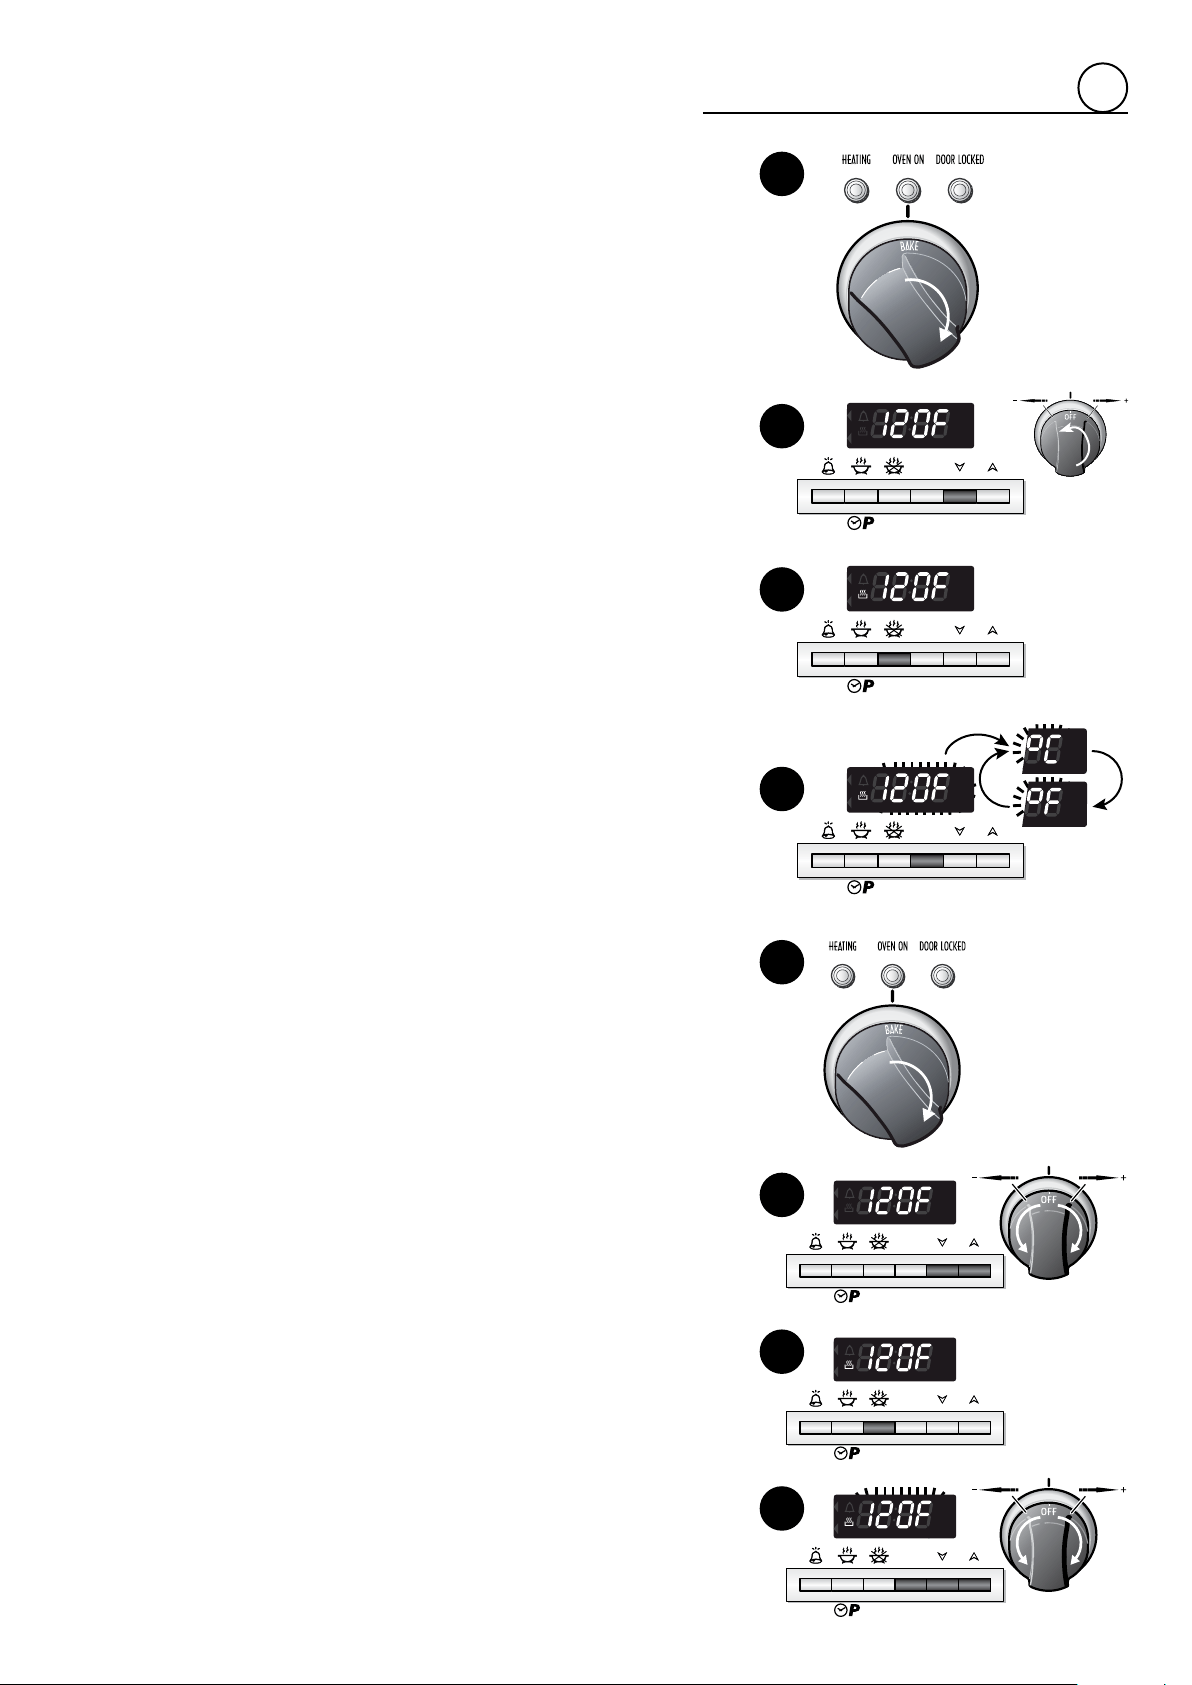
SELECTING °F/°C ON THE DISPLAY
1. Turntheovenselectorknobtoacookingfunction(i.e.
BAKE
).
2. Press key5 on the programmer (oruse the temperature knob) to reducethe
temperatureuntilyoureachtheminimumvalue(120°F/50°C).
3. Presskey3ontheprogrammer.
4. Keepkey4pressed(thetemperatureashes)until“°F”or“°C”isashing;then
presskey4againtochangefrom°Fto°Corviceversa.Duringselection“°C”
or“°F”isashing.
Afterselecting°For°C,turntheovenselectorknobtothe
OFF
position.
SETTING THE COOKING
(ONLYFORTHECOOKINGFUNCTIONS)
Thetemperaturesetisshownontheelectronicprogrammerdisplayandcanbeva-
ried,with5°F(5°C)intervals,bymeansoftheprogrammerkeysorthetemperature
knob.
Duringcookingtheoventemperature(°For°C)ismeasuredbyasensorinsidethe
cavity and is shown on the programmer display until set temperature is reached.
Ifsettemperature islessthaninsideoven temperature,thedisplay showstheset
temperature.
1. SELECTING THE COOKING FUNCTION
Turntheselectorknobtothecookingfunctionrequired.
2. SETTING THE COOKING TEMPERATURE
Thepre-settemperatureappearsontheprogrammerdisplay.
Turnthetemperatureknobtotherighttoincreasethetemperatureortotheleft
toreduceit.Alternativelypresskey6oftheprogrammertoincreasethetempe-
ratureorkey5toreduceit.
3. START THE COOKING
Presskey3oftheprogrammertostartthecooking.
IMPORTANT:Thecookingdoesnotstartifthekey3isnotpressed.
4. CHANGING THE SET TEMPERATURE DURING COOKING
Thetemperaturecanbechangedbyusingthetemperatureknob.
Alternativelyitcanbechangedbyusingtheprogrammer:presskey4andthen
key6toincreasethetemperatureorkey5toreduceit.
Duringtheregulationthetemperatureisashing.
The minimum temperature which can be set is 120°F (50°C) while the maxi-
mumtemperatureis:520°F(270°C)forthebroilingandventilatedbroiling;535°F
(280°C)fortheothercookingfunctions.
SWITCHING OFF
Turntheselectorknobtoposition
OFF
(ovenOFF).Theprogrammerdisplayshows
thetime.
1
2
3
4
HEATING
I I I I I I I
I
I
I
I
I
I
I
I
I I I I I I I
I
I
I
I
I
I
I
A
START
AM
PM
°F
5 6
A
START
AM
PM
°F
3
A
START
AM
PM
°F
°C
°C
°C
4 5 6
I I I I I I I
I
I
I
I
I
I
I
I
I I I I I I I
I
I
I
I
I
I
I
HEATING
HEATING
1
2
3
4
20
I
I
I
I
I
I
I
I
I
I
I
A
START
AM
PM
°F
A
START
AM
PM
°F
2 5 6
A
START
AM
PM
°F
°C
°C
°C
3
I
I
I
I
I
I
I
I
I
I
I
A
HEATING
4
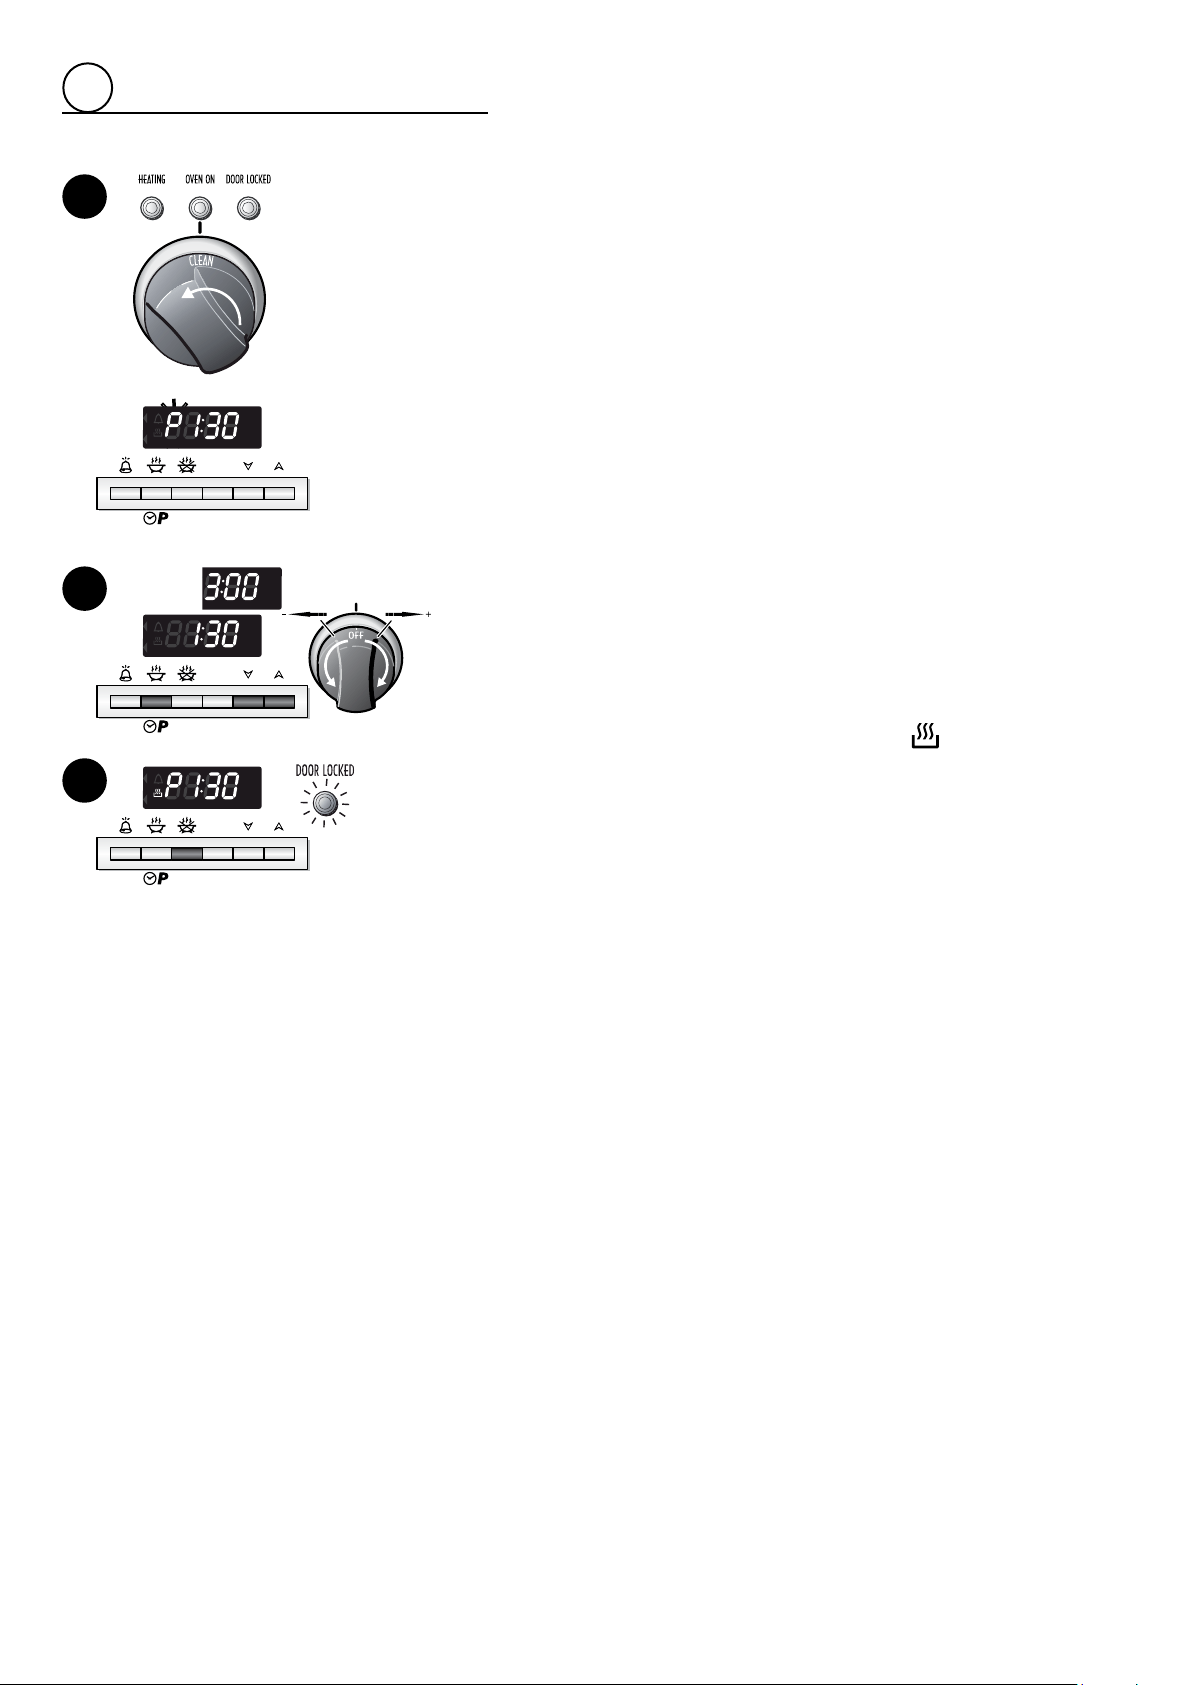
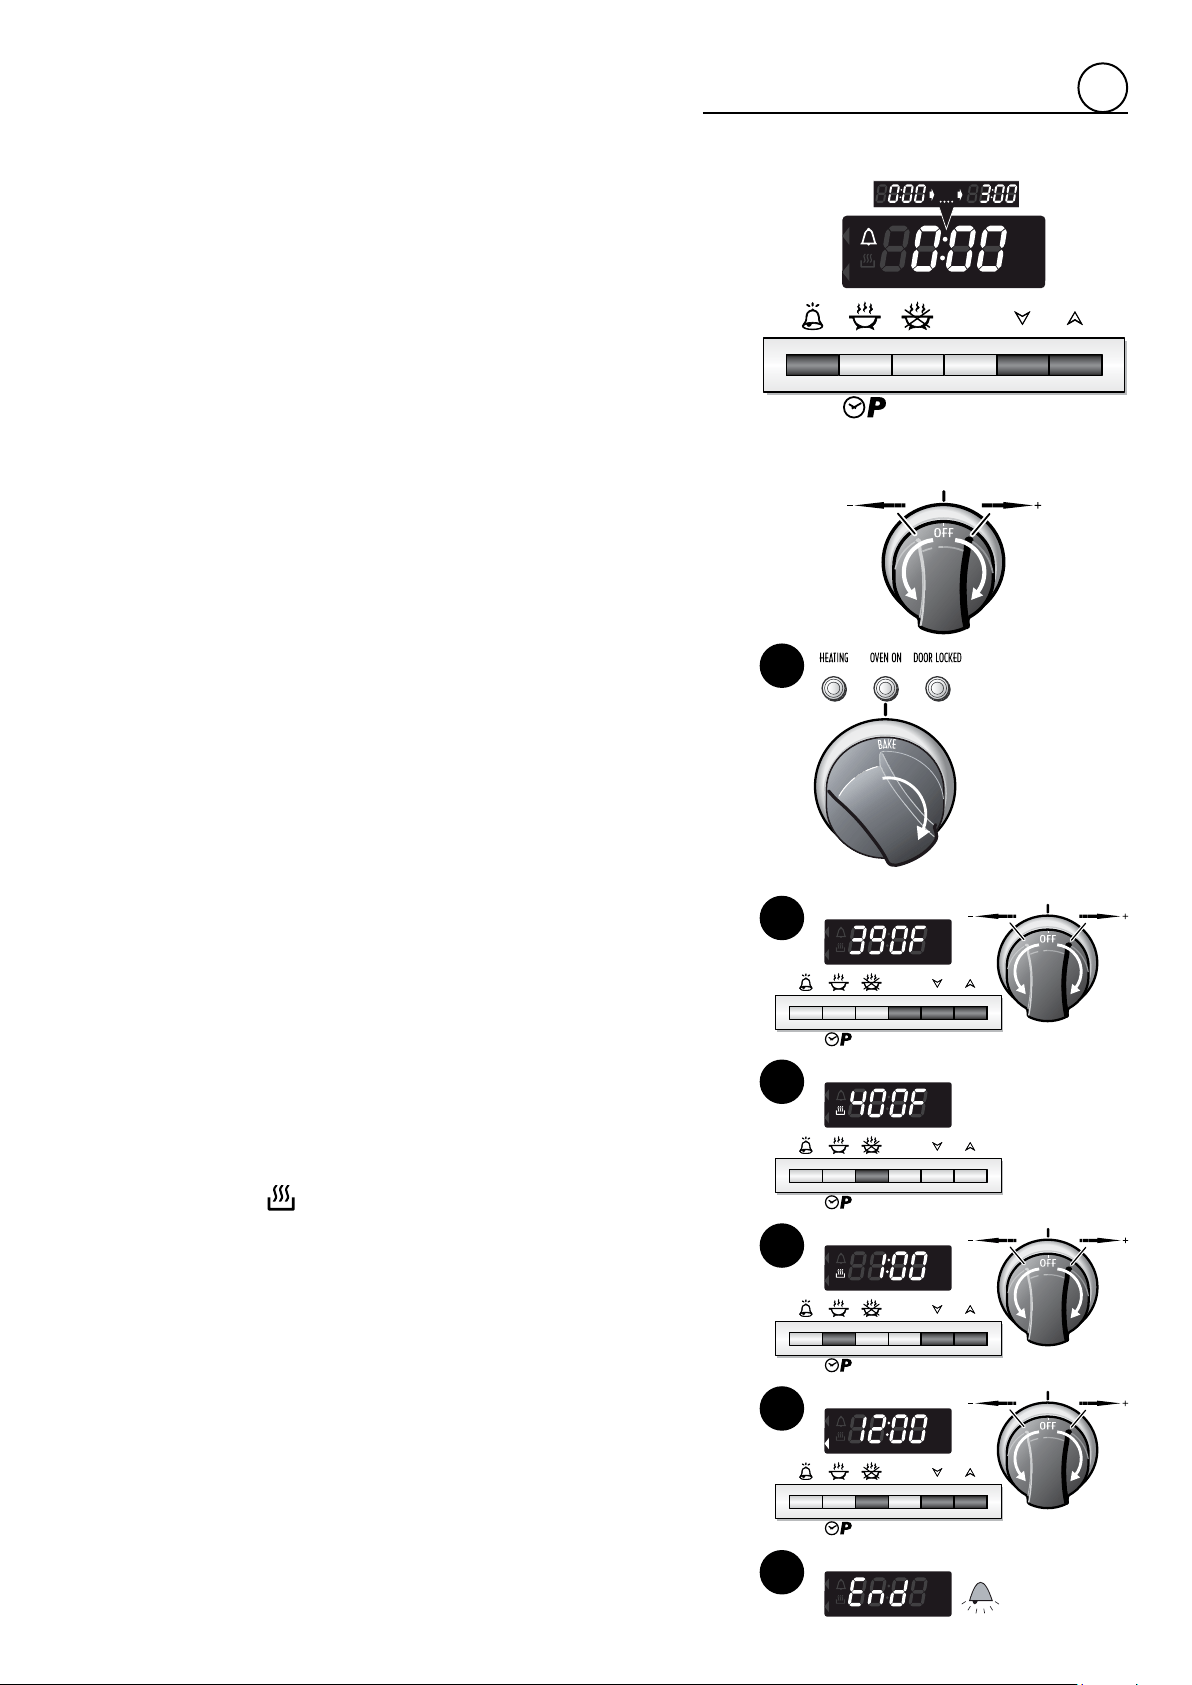
HOW TO START THE SELF CLEANING CYCLE
Important:Theselfcleaningcyclemustonlybeperformedwiththeovenempty;
so,beforestartingthecycletakealltheaccessories(shelves,driptray,...)out
oftheovencavityanddryanytracesofoverowedliquid.
Donotuseanydecreasingproducts(e.g.decreasingsprays,detergents,etc.).
1. Closetheovendoor(ifitisopenornotclosedproperly,“door”ashingonthe
display,theselfcleaningcyclewillnotstart).
2. Turntheovenselectorknobtotheselfcleaningposition
CLEAN
;“P1:30”(selfclea-
ningtime,1hourand30minutes)appearsontheelectronicprogrammerdisplay
withtheletter“P”ashing.
3. Toincreasetheselfcleaningcycletime(max3hours)presskey2ofthepro-
grammerthenkey6.Togobackwardstotheminimumof1hourand30minutes
presskey2thenkey5.Alternativelypresskey2oftheprogrammerandthen
turnthetemperatureknobtotherighttoincreasethetimeortothelefttoreduce
it.Duringthesetting“P”isnotshownonthedisplay.
4. Pressbutton3ontheprogrammertostartthecycle.
This combined conrmation operation offers greater safety when there are
children;infactturningtheknobtotheselfcleaningfunctionhasnoeffectifkey
3oftheprogrammerisnotthenpressed.
TheprogrammerdisplayreadsPH:MM(H:MM=selfcleaningtimewhereH=hours
andMM=minutes)andthedoorislockedaftersomeseconds.
Onthecontrolpanelthedoorlockedpilotlightlightsuptoindicatethatthedoor
islocked.
Theselfcleaningcyclestartsimmediately(thesymbol
lightsup)andiscom-
pletedintheprogrammedtime.Throughouttheselfcleaningcycletheprogrammer
displaysthetime(hoursandminutes)remaininguntilthecycleisnished.
VERY IMPORTANT:
The self cleaning cycle only starts with the oven door closed. If the door is
openornotclosedproperly(“door”ashingonthedisplay)theovenCANNOT
performtheselfcleaningcycle;electronicsafetydevicespreventtheselfcle-
aningcyclefromstarting.
2
3
4

21
4
PROBLEMSONSTARTINGANDDURINGTHESELFCLEA-
NING CYCLE
1. “door”(ashing)appearsontheprogrammerdisplay
Thefunctionselectorhasbeenturnedtotheselfcleaningpositionwiththeoven
dooropenornotperfectlyclosed.Orthedoorhasbeenopenedbeforethecycle
hasbeenstartedwithconrmationfromkey3.
Whattodo:
• Closethedoorandrepeattheoperationstostartthecycle.
2. “F0:00”and“A”(“A”ashing)appearontheprogrammerdisplay
Theselfcleaningcyclehasbeenstoppedandthenre-started(immediately).
Themessageisdisplayedafterabout15minutesandtheselfcleaningcycleis
zeroed.
Whattodo:
• Turntheovenselectorknobto
OFF
(ovenoff).
• Waitforatleast30minutes.
• Repeattheoperationstostarttheselfcleaningcycle.
• IfafterseveralattemptsthemessagecontinuescontacttheServiceCentre.
Caution:Itisadvisablenottostoptheselfcleaningcycleandthenstartitagain
whenitisquiteawaythrough.
3. “Fdor”appearsontheprogrammerdisplay
Malfunctioningofdoorlocksystem.
Whattodo:
• Turnthefunctionselectorto
OFF
(ovenOFF).
• Waitfortheoven tocooldowncompletelyand disconnecttherangefromthe
mains.
• Reconnecttheappliancetothemain.
Ifafterthisprocedurethedisplaystillreads“Fdor”:
• Disconnecttherangefromthemains.
• CallService.Therangemustnotbeused.
A
I
I
I
I
I
I
I
I
I
I
I
I
I
A
I I I I I I I
I
I
I
I
I
I
I
I
I I I I I I I
I
I
I
I
I
I
I
A
I I I I I I I
I
I
I
I
I
I
I
I
I I I I I I I
I
I
I
I
I
I
I
22
I
I
I
I
I
I
I
I
I
I
I
A
START
AM
PM
°F
I
I
I
I
I
I
I
I
I
I
I
I
I
A
START
AM
PM
°F
°C
°C
I
I
I
I
I
I
I
I
I
I
I
I
I
I
I
I
I
I
I
I
I
I
I
I
I
I
I
I
I
I
I
I
I
I
I
I
I
I
I
I
I
I
I
I
I
I
A
AM
PM
4
HOW TO STOP THE SELF CLEANING CYCLE
1. Turnthefunctionselectorto
OFF
(ovenOFF).
Iftheovencavitytemperatureishigherthan570°F(300°C):
• Thetimeofdayappearsontheprogrammerdisplay.
• Whentheovencavitytemperaturedropsbelow570°F(300°C):
– thedoorlockedpilotlightgoesout;
– thedoorunlocksandcanbeopened.
Iftheovencavitytemperatureislowerthan570°F(300°C):
• Thetimeofdayappearsontheprogrammerdisplay.
• Afteratechnicaltime:
– thedoorlockedpilotlightgoesout;
– thedoorunlocksandcanbeopened.
IMPORTANT:Waitfortheoventocooldowncompletelybeforestartingacoo-
kingfunction.
2. ACCIDENTAL INTERRUPTION OF THE SELF CLEANING CYCLE.
Thefunctionselectorhasbeenturnedtoanycookingfunction.
Iftheovencavitytemperatureishigherthan570°F(300°C):
• Pre-settemperatureoftheselectedfunctionashesontheprogrammerdisplay.
• Whentheovencavitytemperaturedropsbelow570°F(300°C):
– thedoorlockedpilotlightgoesout;
– thedoorunlocksandcanbeopened.
• Toresetnormalconditionsturnthefunctionselectorto
OFF
(ovenOFF).
Thetimeappearsontheprogrammerdisplay.
Iftheovencavitytemperatureislowerthan570°F(300°C)
• Pre-settemperatureoftheselectedfunctionashesontheprogrammerdisplay.
• Afteratechnicaltime:
– thedoorlockedpilotlightgoesout;
– thedoorunlocksandcanbeopened.
• Toresetnormalconditionsturnthefunctionselectorto
OFF
(ovenOFF).
Thetimeappearsontheprogrammerdisplay.
IMPORTANT: Wait for the oven to cool down completely before starting a
cookingfunction.
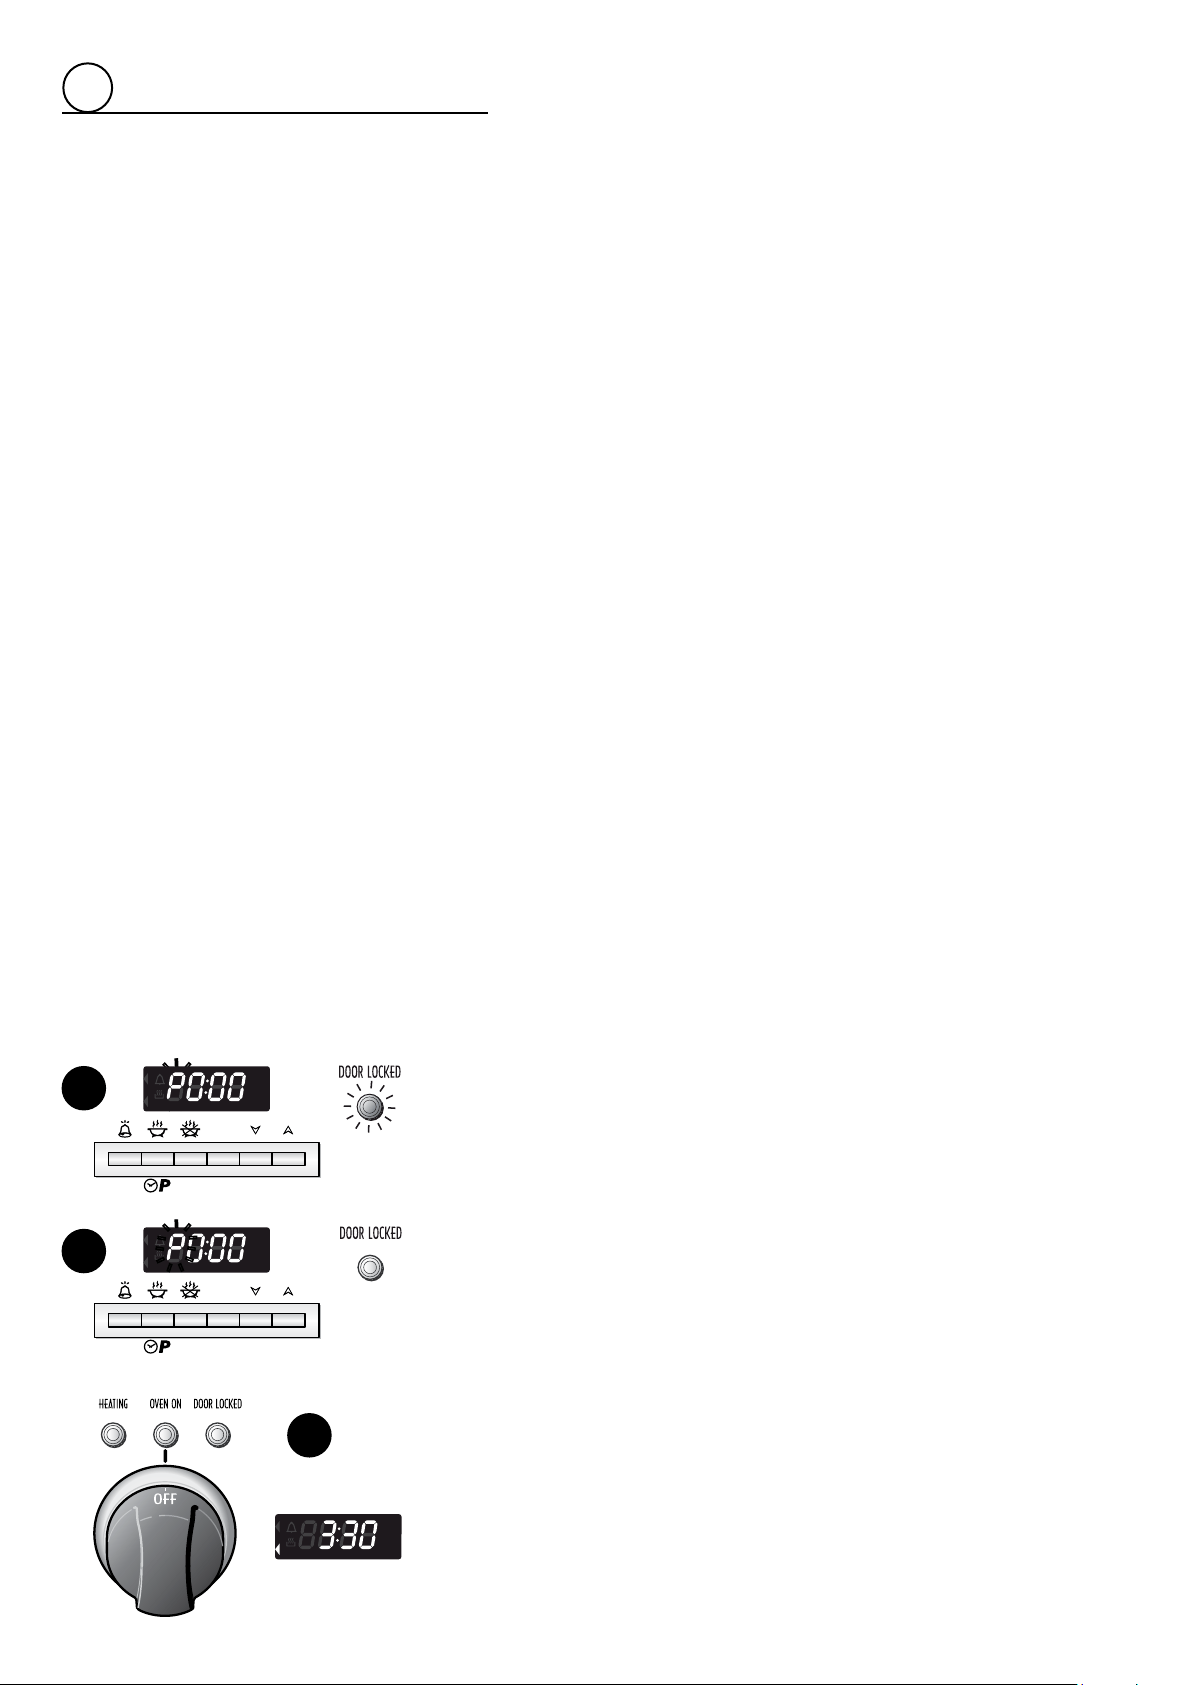
WHAT TO DO WHEN THE SELF CLEANING CYCLE HAS FINISHED
1. “P0:00”and“A”appearontheprogrammerdisplay(“P”and“A”ashing)
Waitfortheoventocooldownandthedoortounlock.
Theself cleaningcycle hasnished.The doorremains lockeduntil thecavity
temperaturehasdroppedbelow570°F(300°C).
2. Thedoorlockedlightgoesout(whenthetemperaturehasdroppedbelow570°F
-300°C).Thedoorisunlockedandcanbeopened.
3. Turnthefunctionselectorknobto
OFF
(ovenOFF).
Thetimeappearsontheprogrammerdisplay.
4. Waitfortheoventocooldowncompletely.
5. Removethepulveriseddirt.
Opentheovendoorandremovetheresidueofpulveriseddirtinsidetheoven
withadampcloth.
IMPORTANT: Let the appliance cool down completely before switching the
ovenonagain.
1
2
3
23
4
ABNORMALSITUATIONSAND/OROPERATIONPROBLEMS
duringcookingortheselfcleaningcycle
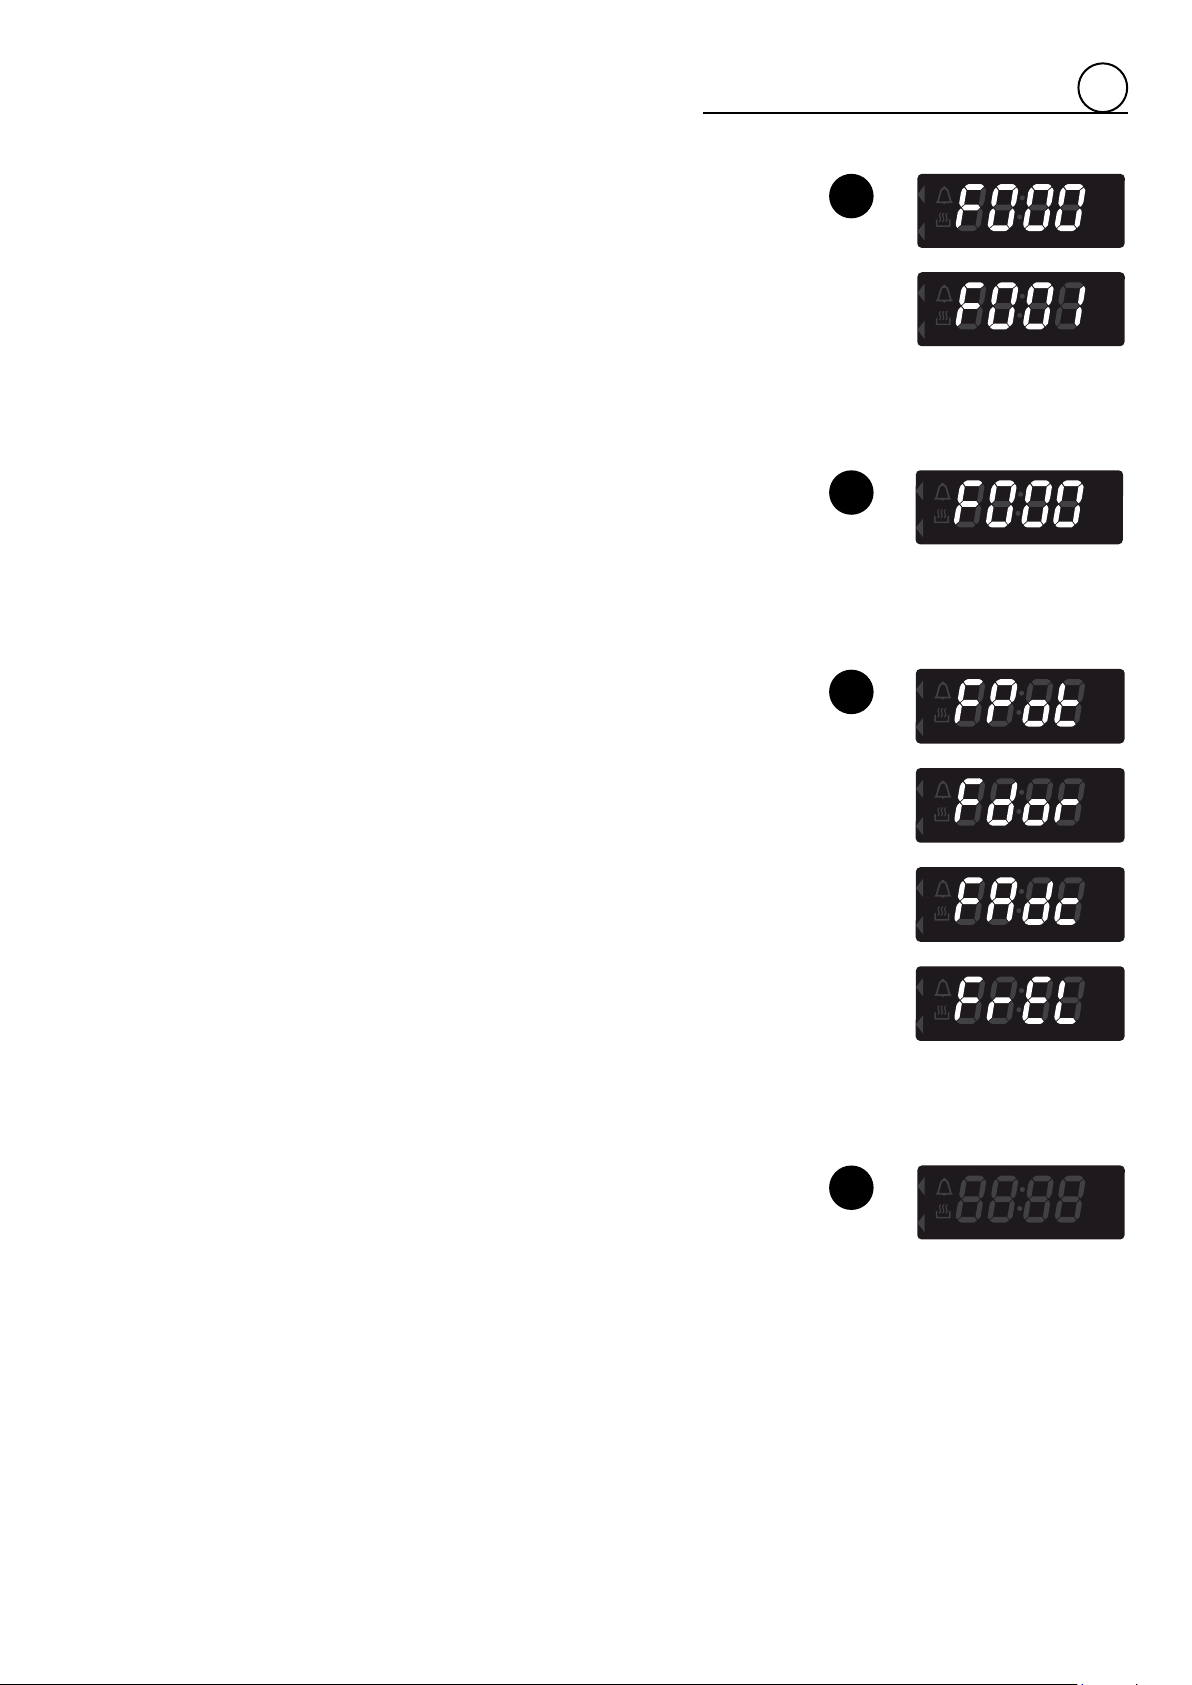
1. “F000”or“F001”appearduringcookingorselfcleaningcycle
Oven temperature sensor is broken or not working properly. The cooling fan
staysonandiftheselfcleaningcycleisinprogressthedoorremainslocked.
Whattodo:
• Turnthefunctionselectorto
OFF
(ovenOFF).
• Waitfortheoven tocooldowncompletelyand disconnecttherangefromthe
mains.
• Reconnecttheappliancetothemain.
Ifafterthisprocedurethedisplaystillreads“F000”or“F001”:
• Disconnecttherangefromthemains.
• CallService.Therangemustnotbeused.
2. “F000”and“A”(“A”ashing)appearduringtheselfcleaningcycle
Thisindicatesatemperaturesensormeasurementerrorduringtheselfcleaning
cycle. This may be due to the self cleaning cycle being stopped and started
againwhenitwasquiteawaythrough.
Whattodo:
• Turntheovenselectorknobto
OFF
(ovenOFF).
• Waitforatleast30minutesbeforerepeatingtheoperationstostarttheselfcle-
aningcycle.
• IfthemessageisstillgivenafterseveralattemptscallService.
3. “FPot”,“Fdor”,“FAdc”or“FrEL”appearduringcookingorselfcleaning
cycle
Thisindicatesanerrorormalfunctioning.
Whattodo:
• Turnthefunctionselectorto
OFF
(ovenOFF).
• Waitfortheoven tocooldowncompletelyand disconnecttherangefromthe
mains.
• Reconnecttheappliancetothemain.
Ifafterthisprocedurethedisplaystillreads“FPot”,“Fdor”,“FAdc”or“FrEL”:
• Disconnecttherangefromthemains.
• CallService.Therangemustnotbeused.
4. Display OFF
Ovennotworkingproperly.
Whattodo:
• Turnthefunctionselectorto
OFF
(ovenOFF).
• Waitfortheoventocooldowncompletelysothatthedooropens.
• Switchtherangeoffforafewseconds.
Ifafterthisprocedurethedisplayisstilloff:
• Disconnecttherangefromthemains.
• CallService.Therangemustnotbeused.
A
A
A
A
I
I
I
I
I
I
I
I
I
I
I
I
I
1
2
4
3
A
A
A
A

24
4
COOKING ADVICE
STERILIZATION
Sterilizationoffoodstobeconserved,infullandhermeticallysealedjars,isdonein
thefollowingway:
a. TurntheswitchtopositionCONV.BAKE(convectioncookingwithventilation).
b. Setthethermostatknobtoposition350°F(175°C)andpreheattheoven.
c. Fillthegrillpanwithhotwater.
d. Setthejarsintothegrillpanmakingsuretheydonottoucheachotherandthe
doorandsetthethermostatknobtoposition260°F(130°C).
Whensterilizationhasbegun,thatis,whenthecontentsofthejarsstarttobubble,
turnofftheovenandletcool.
ROASTING
Toobtainclassicalroasting,itisnecessarytoremember:
• thepre-settemperatureshouldbemaintained;
• thatthecookingtimedependsonthequantityandthetypeoffoods.
COOKING DIFFERENT DISHES AT THE SAME TIME
TheMULTIFUNCTIONovenatpositionsCONV.BAKE(convectioncookingwithventila-
tion)ofthefunctionselectorcancookvariousdifferentfoodsatthesametime.
Fish,cakesandmeatcanbecookedtogetherwithoutthesmellsandavoursmixing.
Theonlyprecautionsrequiredarethefollowing:
• Thecookingtemperaturesmustbeascloseaspossiblewithamaximumdiffe-
renceof70-80°F(20-25°C)betweenthedifferentfoods.
• Differentdishesmustbeplacedintheovenatdifferenttimesaccordingtothe
cookingtimerequiredforeachone.Thistypeofcookingobviouslyprovidesa
considerablesavingontimeandenergy.
VENTILATEDBROILING
Broilingmaybe donebyselectingCONV.BROIL (Ventilated Broiling)withthe function
selectorknob,becausethehotaircompletelyenvelopsthefoodthatistobecooked.
Setthetemperatureifatemperaturedifferentfromthepre-setoneisrequired.
Introducethefoodtobecooked,positioningthebroilingpanasclosetotheinfra-red
elementaspossible.
Closethedoorandlettheovenoperateuntilbroilingisdone.
Broilingwiththeovendoorclosed.
Important:Alwaysusesuitableprotectivegloveswheninserting/removingthe
broilingpanfromtheoven(seenextpage).
Itisadvisabletohandlethe
oven accessories using
ovengloves.
25
4
WRONG
CORRECT
BROILING
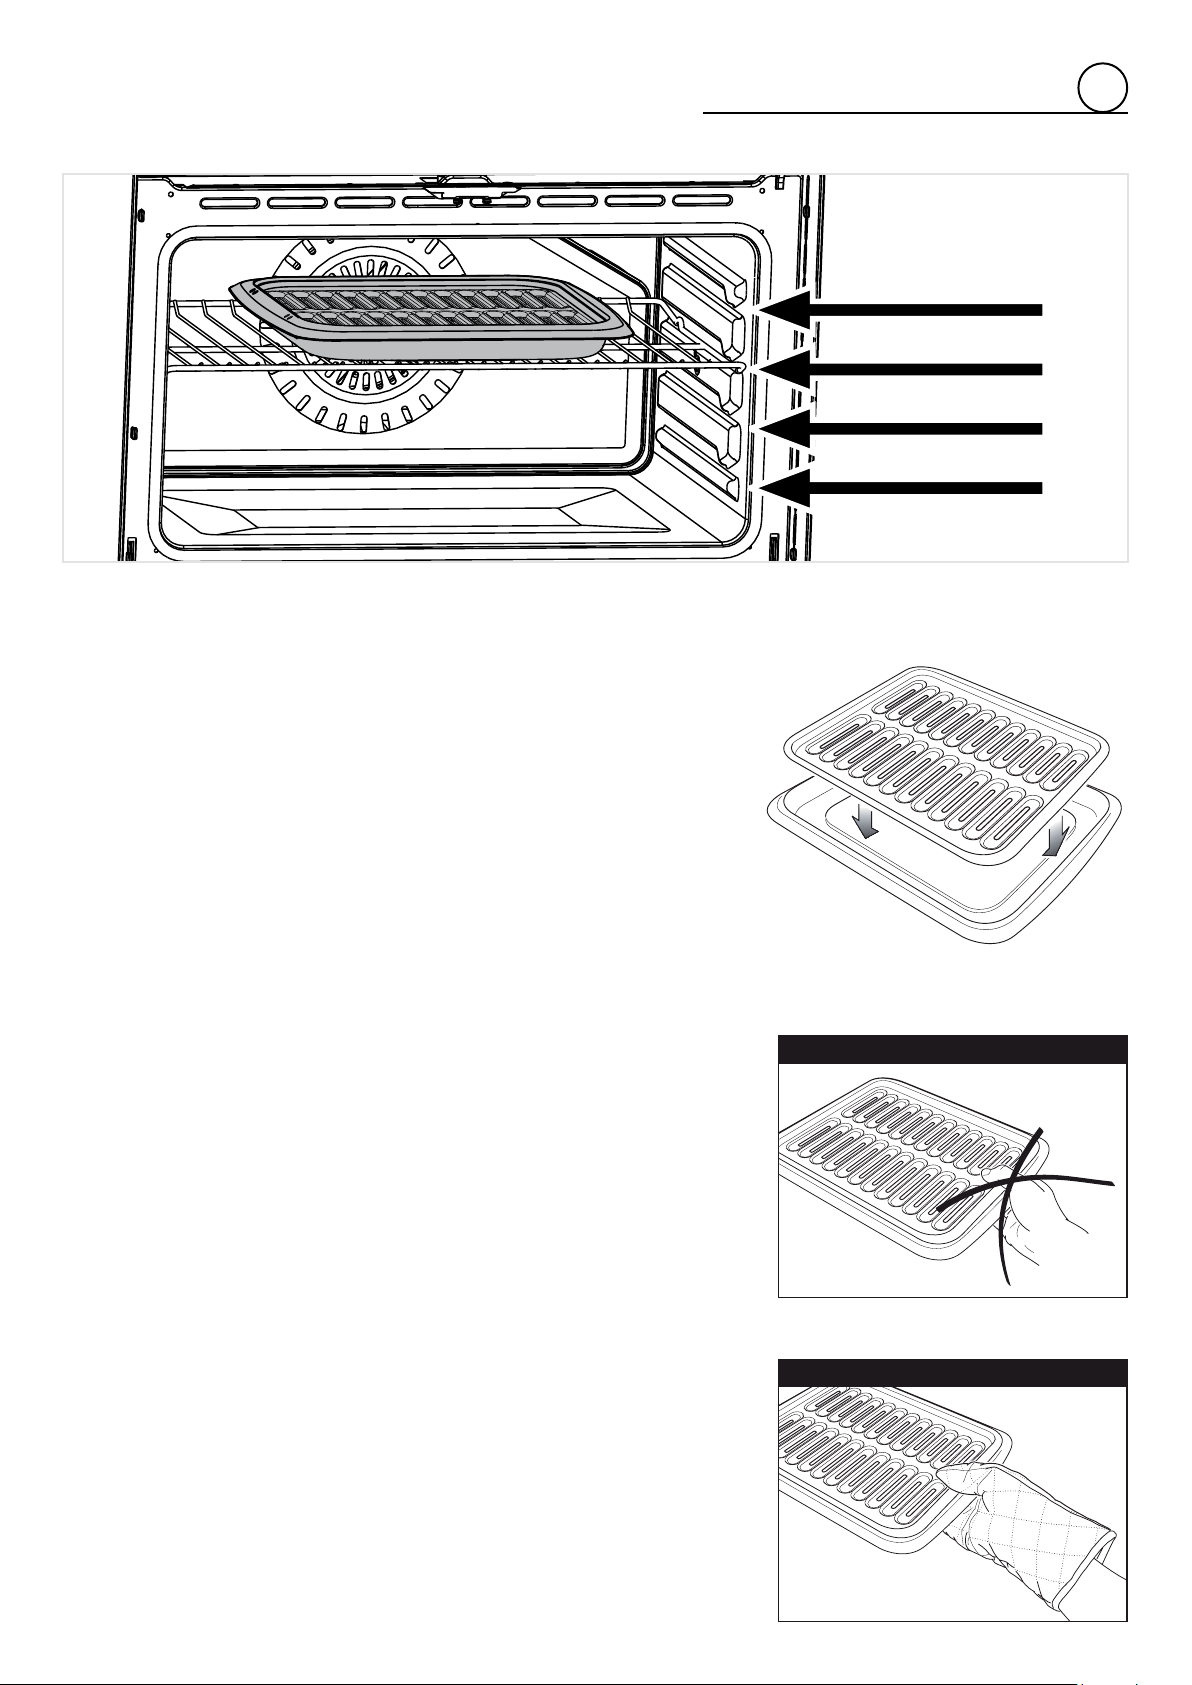
Veryimportant:thebroilelementmustalwaysbeusedwiththeovendoorclosed.
• Positiontheshelfontherstorsecondlevelfromthetop(g.4.3).
• Turnonthebroilelement,asexplainedintheprecedingparagraphsandletthe
ovenpreheatforabout5minuteswiththedoorclosed.
• Placethefoodtobecookedabovethebroilertray.
• Introducethebroilertray(g.4.4)intheoven.Thebroilertrayshouldbeplaced
abovetheshelfanditshouldbecenteredwiththebroilelement(g.4.3).
Donotbroilwithoutusingthebroilingpan.
Important:Alwaysusesuitableprotectivegloveswheninserting/removingthe
broilingpan,shelves,pansonothercookingutensilsfromtheoven.
Fig. 4.3
Fig. 4.6
Fig. 4.5
Fig. 4.4
1
ST
STEP
2
ND
STEP
3
RD
STEP
4
TH
STEP
26
howtousetheelectronicprogrammer
5
Theelectronicprogrammerisadevicewhichgroupstogetherthefollowingfunctions:
• 12hoursclockwithilluminateddisplay.
• Timer(upto3hours).
• Programforsemi-automaticovencooking.
• Programforautomaticovencooking.
• Managementofthecookingfunctions.Theprogrammercanmanagesettingthe
temperatureinthevariouscookingfunctions.
• Managementoftheselfcleaningfunction.
Descriptionofthebuttons:
Timer(1)
Cookingtimeorselfcleaningtime(2)
START
Endof cookingtime orallowance tostartthe cooking
functionsorselfcleaningcycle(3)
Settingoventemperature(4)
Countdownoftheguresofallthefunctions orofthe
temperaturetobeset(5)
Advanceoftheguresofallthefunctionsorofthetem-
peraturetobeset(6)
Descriptionofthelightsymbols:
SWITCHINGONFORTHEFIRSTTIMEORAFTERABLACK-OUT
After the appliance has been connected to the mains or after there has been a
blackouttheprogrammermustbeactivatedsothatitcanwork.
“12:00”ashesonthedisplay.
1. Presskeys2and3atthesametime.Theprogrammerstartstowork.
SETTING THE TIME
Theprogrammerhasanelectronicclock(12hours)withluminousgureswhichindi-
catehoursandminutes.
Note:Itisnotpossibletosetthetimeduringamanualorautomatic/semi-au-
tomaticcooking.
1. Pressbuttons2and3atthesametime;thetimewillashonthedisplay
2. Pressbuttons5or6untiltheexacttimeisset(orturnthetemperatureknobto
therighttoincreasethetimeandtothelefttoreduceit).Iftheplusorminuskeys
arekeptpressedforafewseconds,thegureswillscrollmorequickly.
AUDIBLESIGNAL
Theintermittentaudiblesignalsoundswhenthetimerorsemi-automaticorautomatic
cookinghavereachedtheendofthetimeset.
Tosilencetheaudiblesignalpressanyoftheprogrammerkeys.
Fig. 5.1
A
START
AM
PM
°F
°C
1 2 3 4 5 6
A
Indicatesthattheheating
elementsareworking
IndicatesPMtime
IndicatesAMtime
Indicatesthatthetimerisworking
Indicatesthatanautomaticor
semi-automaticprogramhas
beenset(includingself-cleaning)
I I I I I I I
I
I
I
I
I
I
I
I
I I I I I I I
I
I
I
I
I
I
I
A
START
AM
PM
°F
°C
I I I I I I I
I
I
I
I
I
I
I
I
I I I I I I I
I
I
I
I
I
I
I
2 3
A
START
AM
PM
°F
°C
5 6
HEATING
1
2
27
TIMER
Thetimerfunctionisonlyusedtocountthetimeanddoesnotinuenceovenopera-
tionoranyprogrammeswhichareinprogressorset.
1. Pressbutton1-“0:00”appearsontheprogrammerdisplay.
2. Presskeys5or6tosetthetimerequired(orturnthetemperatureknobtothe
righttoincreasethetimeandtothelefttoreduceit)-thebellsymbollightsup
onthedisplay.
3. Thecountdownstartsimmediatelyandthetimeappearsagain.
4. Toseethecountdownpressbutton1.Thetimewillbeindicatedinhours and
minutes;thesecondsareonlyindicatedforthelastminute.
5. Attheendofthecountdownanaudiblesignalsoundsandthebellsymbolgoes
out.Pressanybuttontostoptheaudiblesignal.
IMPORTANT WARNING: This function is only an electronic alarm and does not
switchOFFtheoven.Remembertoturnto
OFF
(ovenOFF)manually the selector
knobattheendofthecountdown.
AUTOMATIC COOKING - Start cooking at the programmed time and
switchtheovenoffautomaticallyaftertheprogrammedcookingtime
OR SEMI-AUTOMATIC COOKING - Start immediate cooking and
switchtheovenoffautomaticallyaftertheprogrammedcookingtime
Setting
1. Setthecookingfunctionbyturningtheovenselectortothefunctionrequired.
2. Thepre-setcookingtemperatureappearsonthedisplay.Tochangeitproceed
asdescribedinthe“SETTINGTHECOOKING”chapter.
3. Presskey3oftheprogrammertoconrmthecookingfunction.
4. Pressbutton2:“0:00”appearsontheelectronicprogrammerdisplay.
Pressbuttons5or6tosetthecookingtimeorturnthetemperatureknobtothe
righttoincreasethetimeandtothelefttoreduceit(cookingtimeinhoursand
minutes:setittotenminuteslessthanthetimerequiredbecausethestoredheat
willcompletethecooking).“A”appearsonthedisplay.
5. Pressbutton3;thenpressbuttons5or6tosetthetimewhenthecookingshould
nishorturnthetemperatureknobtotherighttoincreasethetimeandtothe
lefttoreduceit.
6. Thedisplayreadsthesettemperature.
Semi-automaticcooking:If you are already at home to turn the oven on and
onlywanttheoventoturnoffautomatically,startcookingasnormal,thenfol-
lowstep4orstep5tosetthecookingtimeoratimetostoptheoven.
Startingcooking
7. Thecookingsymbol
lightsup.Theovenswitchesonandthecookingcycle
setstarts.
Duringcooking
8. Duringthecookingcycle,thedisplayshowstheoventemperaturemeasuredby
theprobeorpre-settemperature.Presskey2todisplaythelengthofcooking
set.Presskey3todisplaythestoptimeset.Thecookingtime,endofcooking
timeandcookingtemperaturecanbevariedatanytime,asdescribedabove.
Attheendofcooking
9. “End”appearson thedisplay,“A”ashesandthe audiblesignalsounds.The
cookingcyclehasnishedandtheovenisOFF.Pressanyprogrammerbutton
tostoptheaudiblesignal.
10. Turn the function selector to
OFF
(oven OFF).The programmer display shows
thetime.
Note:Attheendoftheprogramalwaysturnthefunctionselectorknobto
OFF
(ovenOFF).
IMPORTANT:DuringAUTOMATICCOOKINGPROGRAMtheovenlightisalways
on,alsobefore starting(heatingelements onorcycling) oftheprogrammed
cooking.
5
A
START
AM
PM
°F
°C
51 6
HEATING
A
START
AM
PM
°F
2
A
START
AM
PM
A
°F
°C
°C
3 5 6
5 6
A
START
AM
PM
°F
3
°C
A
START
AM
PM
°F
54 6
°C
HEATING
HEATING
HEATING
I
I
I
I
I
I
I
I
I
I
I
I
I
1
2
3
5
4
9
28
2
3
4
5
6
7
8
9
10
11
1
12
A
START
AM
PM
°F
A
START
AM
PM
°F
2
A
START
AM
PM
°F
°C
°C
°C
3 5 6
5 6
HEATING
HEATING
CANCELLING A SET PROGRAM
Tocancelanyprogramjustpressthebuttons5and6atthesametimeformorethan3secondsorturnthefunctionselectorknobto
OFF
(ovenOFF).
Note:Ifduringasetprogramthefunctionselectorknobisturnedto
CLEAN
(selfcleaning),
LIGHT
(ovenlighting),
DEFROST
(defrostingfrozen
foods)ortoanothercookingfunction,theprogramiscancelled.
EXAMPLE OF PROGRAMMING AUTOMATIC COOKING
5
1
2
3
1
2
3
Fig. 5.2
Timewhenthefood
tobecookedmust
beready
(12:00PM)
Programmable
functions
Timeneededtocook
thefood(2hours)
Timewhencooking
thefoodisprogrammed
(08:00AM)

29
cleaningandmaintenance
6
GENERAL RECOMANDATION
• Important: Before any operation of cleaning and maintenance disconnect the
appliancefromtheelectricalsupply.
• Itisadvisabletocleanwhentheapplianceiscoldandespeciallyforcleaningthe
enamelledparts.
• Avoidleavingalkalineor acidicsubstances (lemon juice,vinegar, etc.)on the
surfaces.
• Avoidusingcleaningproductswithachlorineoracidicbase.
• IMPORTANT:Theuseofsuitableprotectiveclothing/glovesisrecommen-
dedwhencleaningandmaintainingtheappliance.
• WARNING
Whencorrectlyinstalled,yourproductmeetsallsafetyrequirementslaid
downfor this typeof product category. Howeverspecial care shouldbe
taken around the rear or the underneath of the appliance as these areas are
notdesignedorintendedtobetouchedandmaycontainsharporrough
edges,thatmaycauseinjury.
ENAMELLED PARTS
• Alltheenamelledpartsmustbecleanedwithaspongeandsoapywateronlyor
othernon-abrasiveproducts.
Drypreferablywithamicrobreorsoftcloth.
PAINTED PARTS AND SILK-SCREEN PRINTED SURFACES
• Cleanusinganappropriateproduct.Alwaysdrythoroughly.
IMPORTANT: these parts must be cleaned very carefully to avoid scratching and
abrasion.Youareadvisedtouseasoftclothandneutralsoap.
STAINLESS STEEL ELEMENTS
• Stainlesssteelpartsmustberinsedwithwateranddriedwithasoftandclean
cloth.
• Fordifcultdirt,useaspecicnon-abrasiveproductavailablecommerciallyora
littlehotvinegar.
• Note:regularusecouldcausediscolouringaroundtheburners,becauseofthe
highametemperature.
INSIDE OF OVEN
Theovenshouldalwaysbecleanedafterusewhenithascooleddown.
Thecavityshouldbecleanedusingamilddetergentsolutionandwarmwater.
Suitable proprietary chemical cleaners may be used after rst consulting with the
manufacturersrecommendationsandtestingasmallsampleoftheovencavity.
Abrasivecleaningagentsorscouringpads/clothsshouldnotbeusedonthecavity
surface.
NOTE:Themanufacturersofthisappliancewillacceptnoresponsibilityfordamage
causedbychemicalorabrasivecleaning.
Lettheovencooldownandpayspecialattentionnototouchthehotheating
elements inside the oven cavity.
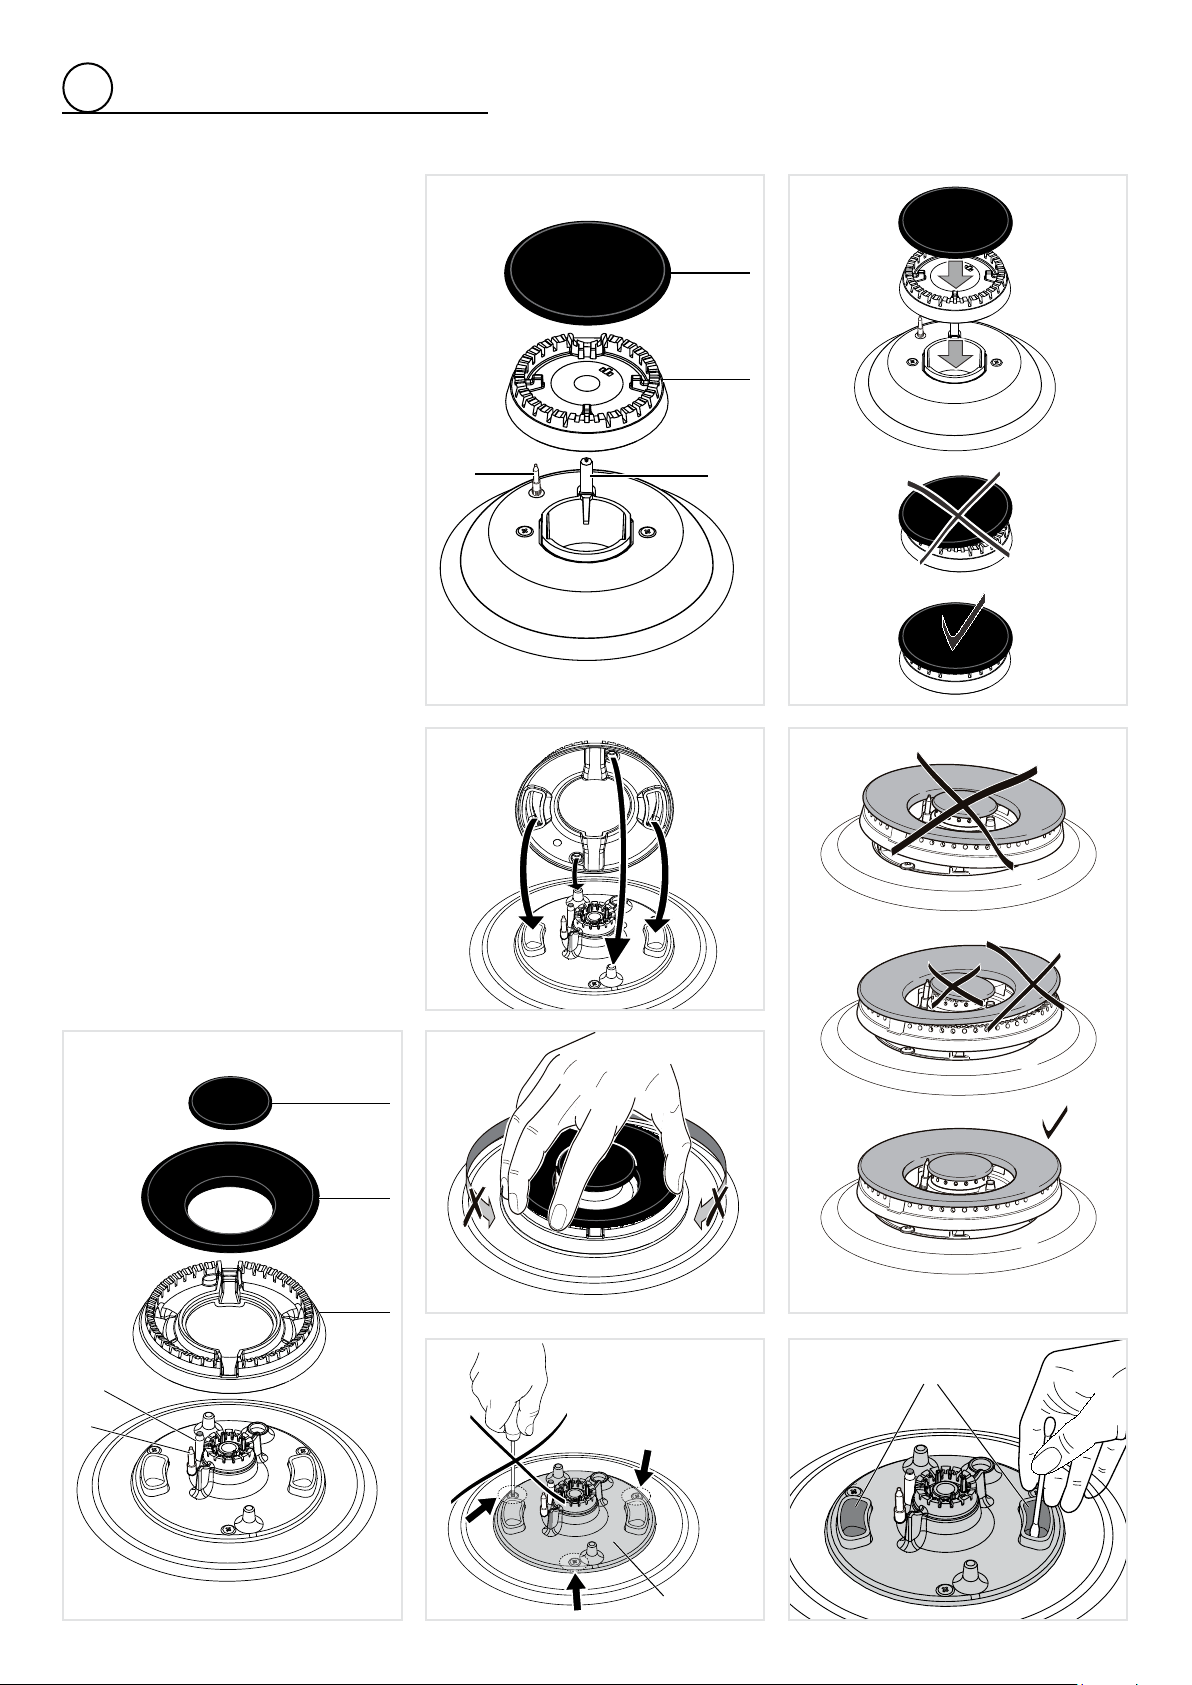
BURNERSANDGRIDS
• Thesepartscanberemovedandcleanedwithappropriateproducts.
• Aftercleaning,theburnersandtheiramedistributorsmustbe welldriedand
correctlyreplaced.
• Itisvery importantto checkthatthe burneramedistributorandthe caphas
beencorrectlypositioned-failuretodosocancauseseriousproblems.
• Checkthattheprobe“T”(gs.6.1,6.3)nexttoeachburnerisalwayscleanto
ensurecorrectoperationofthesafetyvalves.
• Checkthattheelectrode“S”(gs.6.1,6.3)isalwayscleantoensuretrouble-free
sparking.
• Note:Toavoiddamagetotheelectricignitiondonotuseitwhentheburnersare
notinplace.
• Boththeprobeandignitionplugmustbeverycarefullycleaned.
Do not use steam jet clea-
ners because the humidity
could inltrate into the ap-
pliance making it dange-
rous.
Do not use harsh abrasi-
ve cleaners or sharp metal
scrapers to clean the oven
door glass since they can
scratch the surface, which
may result in shattering of
theglass.
WARNING
VERY IMPORTANT
Before any operation of
maintenance
disconnect
the appliance from the
electrical main supply.
30
6
CORRECT POSITION OF THE
SEMI-RAPIDBURNERS
Itisveryimportanttocheckthattheburner
ame spreader “B” and the cap “A” have
beencorrectlypositioned(seegs.6.1and
6.2 ). Failure to do so can cause serious
problems.
CORRECT POSITION OF THE
DUALBURNERS
TheDualburnermustbecorrectlypositio-
ned (see g. 6.3); the ame spreader “E”
mustbettedasshownbythearrows(g.
6.4).Thenpositionthecap“C”andthering
“D”(gs.6.3and6.6).Correctlypositioned
burnershouldnotrotate(g.6.5).
IMPORTANT: NEVER unscrew the bur-
ner inner ame speader xing screws
(g.6.7).Theinnerame spreadercan
beremovedONLYbyanauthorisedser-
viceagent.Damagetotheappliancewill
occur if not observing this condition
and this may result in serious injury
to the user. The manufacturer declines
every responsibility for any inconve-
nienceresultingfromtheinobservance
of this condition.
CLEANINGTHEDUALBURNER
Payspecialattentiontothisburner:thetwo
holes“H”ontheinneramespreader(g.
6.8)mustalwaysbekeptclean.
When cleaning, remove the external a-
mespreader“E”(g.6.3)anduseacotton
bud,toothbrush,orsomeotheritemtocle-
anoutanyincrustationsordirtfromthetwo
holesmarked“H”(Fig.6.8).Thisprocedure
isnecessarytoensuretheburnerfunctions
correctly.
Iftheburnerdoesnotfunctioncorrectly
and it is not possible to clean out any
incrustationsordirtfromthetwoholes,
contact the After-Sales Service.
Fig. 6.6
Fig. 6.4
Fig. 6.3
Fig. 6.2
Fig. 6.1
T
S
B
A
Fig. 6.5
T
S
D
C
Fig. 6.7
Fig. 6.8
H
Inner
amespreader
Fixingscrews
E
31
B B
A
A
6
OVEN SHELF INSTALLATION AND REMOVAL
Theovenshelfisprovidedwithasecurityblocktopreventaccidentalex-
traction.
Itmustbeinsertedaspergure6.9.
Topullitoutremoveshelfintheinverseorder.
Keepattentiontoinserttheshelfcorrectly(seegure6.10).
REPLACING THE OVEN LIGHT (g.
6.10)
Beforeanymaintenanceisstartedinvolving
electricalpartsoftheappliance,itmustbe
disconnectedfromthepowersupply.
• Let the oven cavity and the heating
elementscooldown.
• Switchofftheelectricalsupply.
• Removethe protective cover“A” (g.
6.10).
• Unscrewandreplacethebulb“B”with
anewonesuitableforhightemperatu-
res(300°C)havingthefollowingspeci-
cations:120V,60Hz,E14andsame
power(checkwattpowerasstamped
inthebulbitself)ofthereplacedbulb.
• Rettheprotectivecover.
NOTE: Ovenbulbreplacementisnotcove-
redbyyourwarranty.
Fig. 6.10
Fig. 6.9
32
6
2
2
3
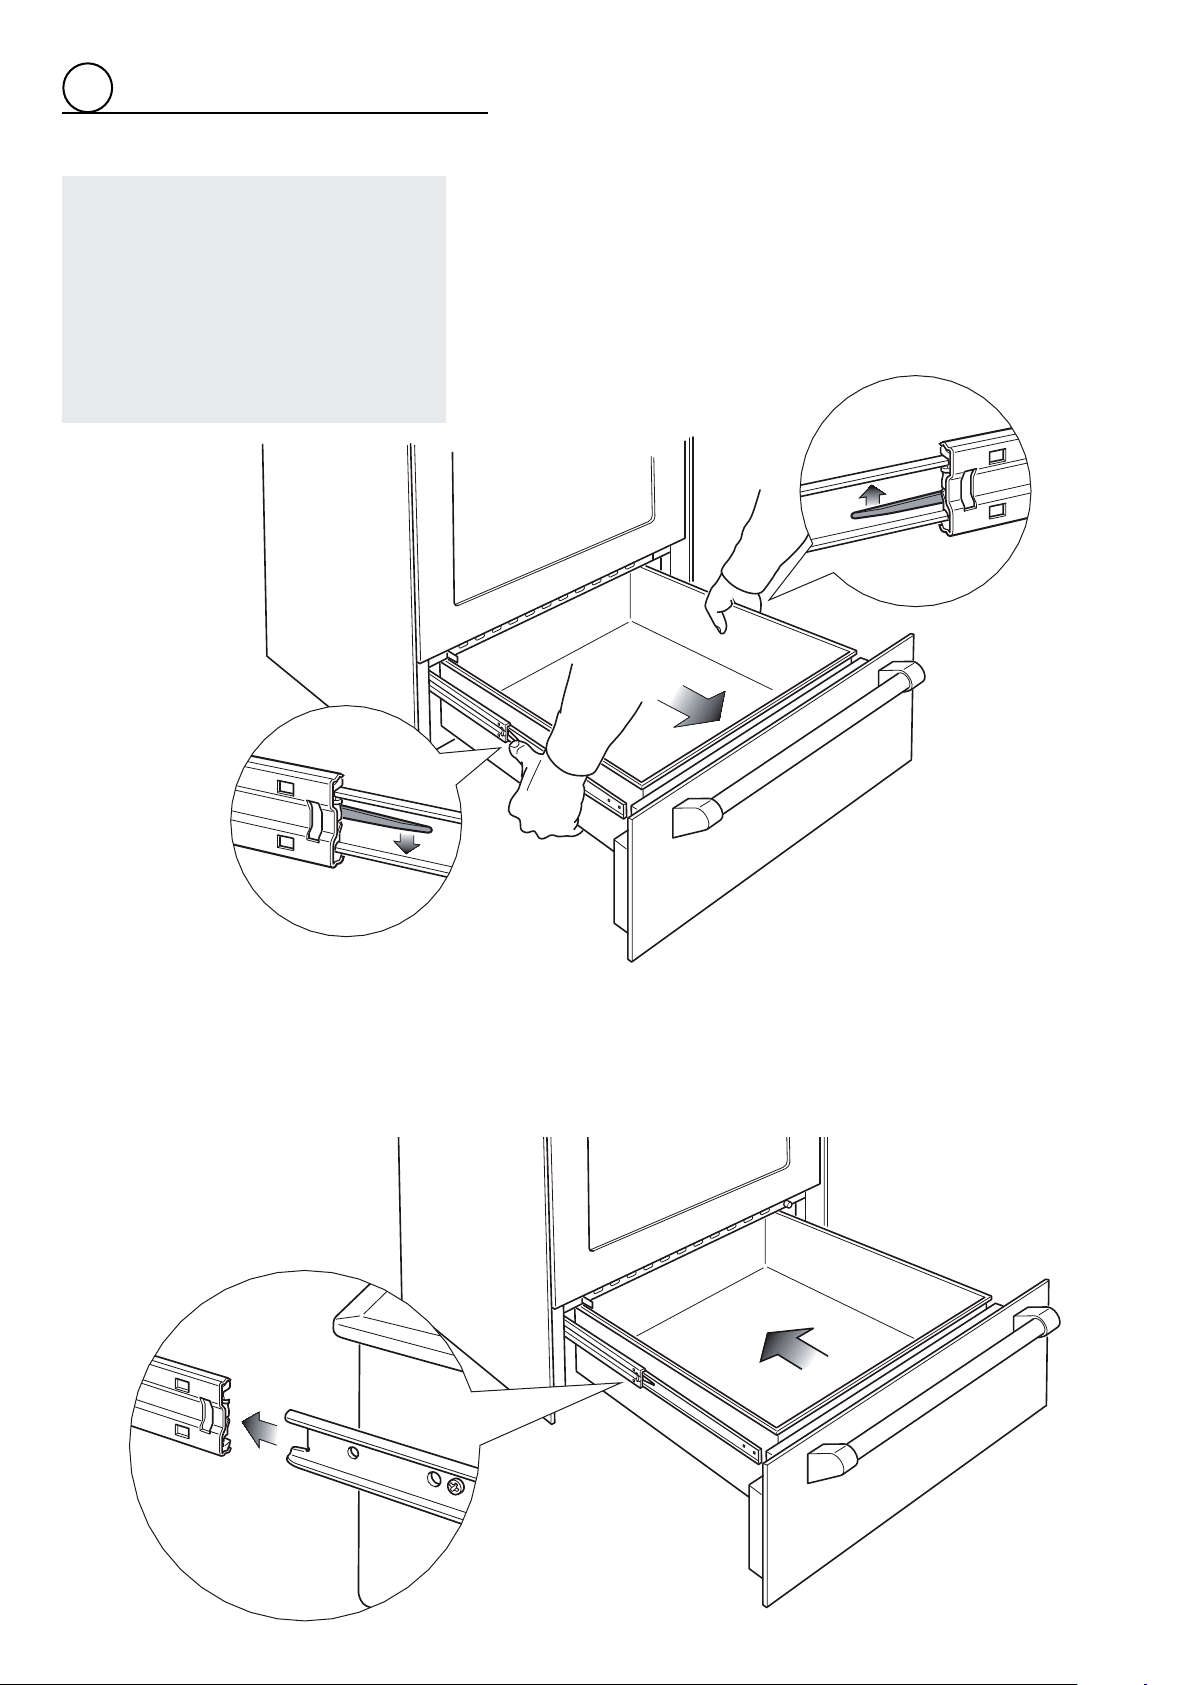
WARNING:
• Do not remove drawer while
hot.
• Donotremovedrawerduring
• operation.
• Besuredrawerisemptybefore
removing.
REMOVING THE WARMING DRAWER
1. Openthedrawercompletely(g.6.11)
2. Movedowntheleverofleftguide(g.6.12)anduptheleverofrightguide
(g.6.13).
3. Removethedrawer;thelevershavetobekeepmoved(g.6.11).
FITTING THE WARMING DRAWER
1. Insertthedrawerguidesintotherangeguides(g.6.14)
2. Gentlyclosethedrawercompletely;thesafetycatchswillbeautomatically
hooked.
Fig. 6.14
Fig. 6.11
Fig. 6.13
Fig. 6.12

33
6
REMOVING THE OVEN DOOR
Theovendoorcaneasilyberemovedasfollows:
• Openthedoortothefullextent(g.6.15a).
• Openthelever“A”completelyontheleftandrighthinges(g.6.15b).
• Holdthedoorasshowning.6.15.
• Gentlyclosethedoor(g.6.15c)untilleftandrighthingelevers“A”arehooked
topart“B”ofthedoor(g.6.15b)
• Withdrawthehingehooksfromtheirlocationfollowingarrow“C”(g.6.15d).
• Restthedooronasoftsurface.
• Toreplacethedoor,repeattheabovestepsinreverseorder.
B
A
C
Fig. 6.15a
Fig. 6.15d
Fig. 6.15c
Fig. 6.15b
Fig. 6.15

34
6
DO’S AND DO NOT’S
• Doalwaysusetheovenwiththedoorclosed.
• Doreadtheuserinstructionscarefullybeforeusingtherangeforrsttime.
• Doallowtheoventoheatforabouttwohours,beforeusingforthersttime,inordertoexpelanysmellfromthe
newoveninsulation,withouttheintroductionoffood.
• Docleanyourovenregularly.
• Doremovespillsassoonastheyoccur.
• Doalwaysuseovengloveswhenremovingfoodshelvesandtraysfromtheovenandfromthewarmingdrawer.
• Donotallowchildrenneartherangewheninuse.
• Donotallowfatoroilstobuildupintheovenbase,orovenaccessories.
• Donotplacecookingutensilsorplatesdirectlyontotheovenbase.
• Donotplacehotenamelpartsinwater.Leavethemtocoolrst.
• Donotallow vinegar,coffee,milk,saltwater,lemonortomato juicetoremain incontactwith enamelparts(i.e.
insidetheoven).
• Donotuseabrasivecleanersorpowdersthatwillscratchthesurfaceofthestainlesssteelandtheenamel.
• Donotattempttorepairtheinternalworkingsofyourrange.
• Doremovetheprotectivelmbeforetherstuse.
• Firerisk!Donotstoreammablematerialintheovenandinthewarmingdrawer.
• Donotplacefoodinunopenedcontainersinthewarmingdrawer.
• Donottouchtheinteriorsurfaceofthewarmingdrawerwhileitisinuse.
• Donotusealuminumfoiltolinethewarmingdrawer.
• Donotuseplasticcontainersinthewarmingdrawer.
• Donotusethewarmingdrawerasastoragedrawer.
• Donotusetheovenwiththeovendooropen.
• Donotusethewarmingdrawertowarmingplates.
• Donotusetheovenandthewarmingdrawertowarmorheataroom.
• Donotusetherangewhentheovenisoperatinginselfcleaningmode.
• Whentheselfcleaningmodehasbeencompleteddonotstartimmediatelyanewselfcleaningcycle:lettherange
tocooldown.
FOR YOUR SAFETY
Undernocircumstancesshouldanyexternalcoversberemovedforservicingormaintenanceexceptbysuitablyqua-
liedpersonnel.

35

Cod.1103876-ß1
Themanufacturercannotbeheldresponsibleforpossibleinaccuraciesduetoprin-
tingortranscriptionerrorsinthepresentbooklet.
Themanufacturerreservestherighttomakeallmodicationstoitsproductsdeemed
necessaryformanufactureorcommercialreasonsatanymomentandwithoutprior
notice,withoutjeopardisingtheessentialfunctionalandsafetycharacteristicsofthe
appliances.