Loading ...
D861B_QSG_EN_R1
Once you have completed all steps for initial setup on the front of this guide, please refer
to the following sections to learn more about using your system.
Search through and play video recordings from the hard drive.
To search for and play recordings:
1. From live view, right-click and then click Playback. If prompted, log in using the system user name (default:
admin) and your new, secure password.
2. Congure the following:
a. Use the calendar on the right to
select the date to playback.
b. Check channels you want to
play back. Click the icon beside
each selected channel to select
Mainstream (M) or Substream (S)
video quality.
c. Click inside the video bar to select
the playback time. Playback starts
immediately at the selected time.
Back up recordings from the hard drive to a USB ash drive (not included).
Changing the Recorder’s Output Resolution
The system will automatically match the resolution of the connected monitor the rst time you use the
recorder.
a. Set Resolution to match the
highest resolution supported by
your monitor. For example, select
3840×2160 for 4K monitors, or
1920×1080 for 1080p.
b. Click Apply. The recorder will
restart before changes take
effect.
Motion, Smart Motion, & Face Detection
a
b
a. Select your USB drive and the
folder for the backup.
b. Select the channel(s) and
recording types to search by.
c. Select a start and end time.
d. Choose a le format.
e. Click Search to see recordings
that match your search.
f. Check boxes next to recordings
you want to back up.
g. Click Backup.
a
b
c
d
e
f
g
Backup
Playback
b
a
c
Right-click anywhere on the live viewing screen to open the
Quick Menu.
b
a
c
d
e
f
g
h
i
a. Open Main Menu.
b. Search and playback recordings.
c. Control PTZ cameras (not included).
d. Select camera / live display view.
e. View previous / next channel(s).
f. View system information.
g. Start/stop sequence mode.
h. Temporarily disable all current audible warnings.
i. Open manual recording controls.
j. Adjust camera color and image settings.
j
Using the Quick Menu
To lter for person and vehicle recordings:
d. Click to stop
current playback.
d
e
e. Hover over the icon. Check Person and Vehicle to lter available playback events.
Wait a few seconds for the video bar to show detection events.
PREREQUISITE: You must enable Smart Motion Detection on any and all channels you would like to lter for
person and vehicle detection. See the section Motion & Smart Motion Detection for details.
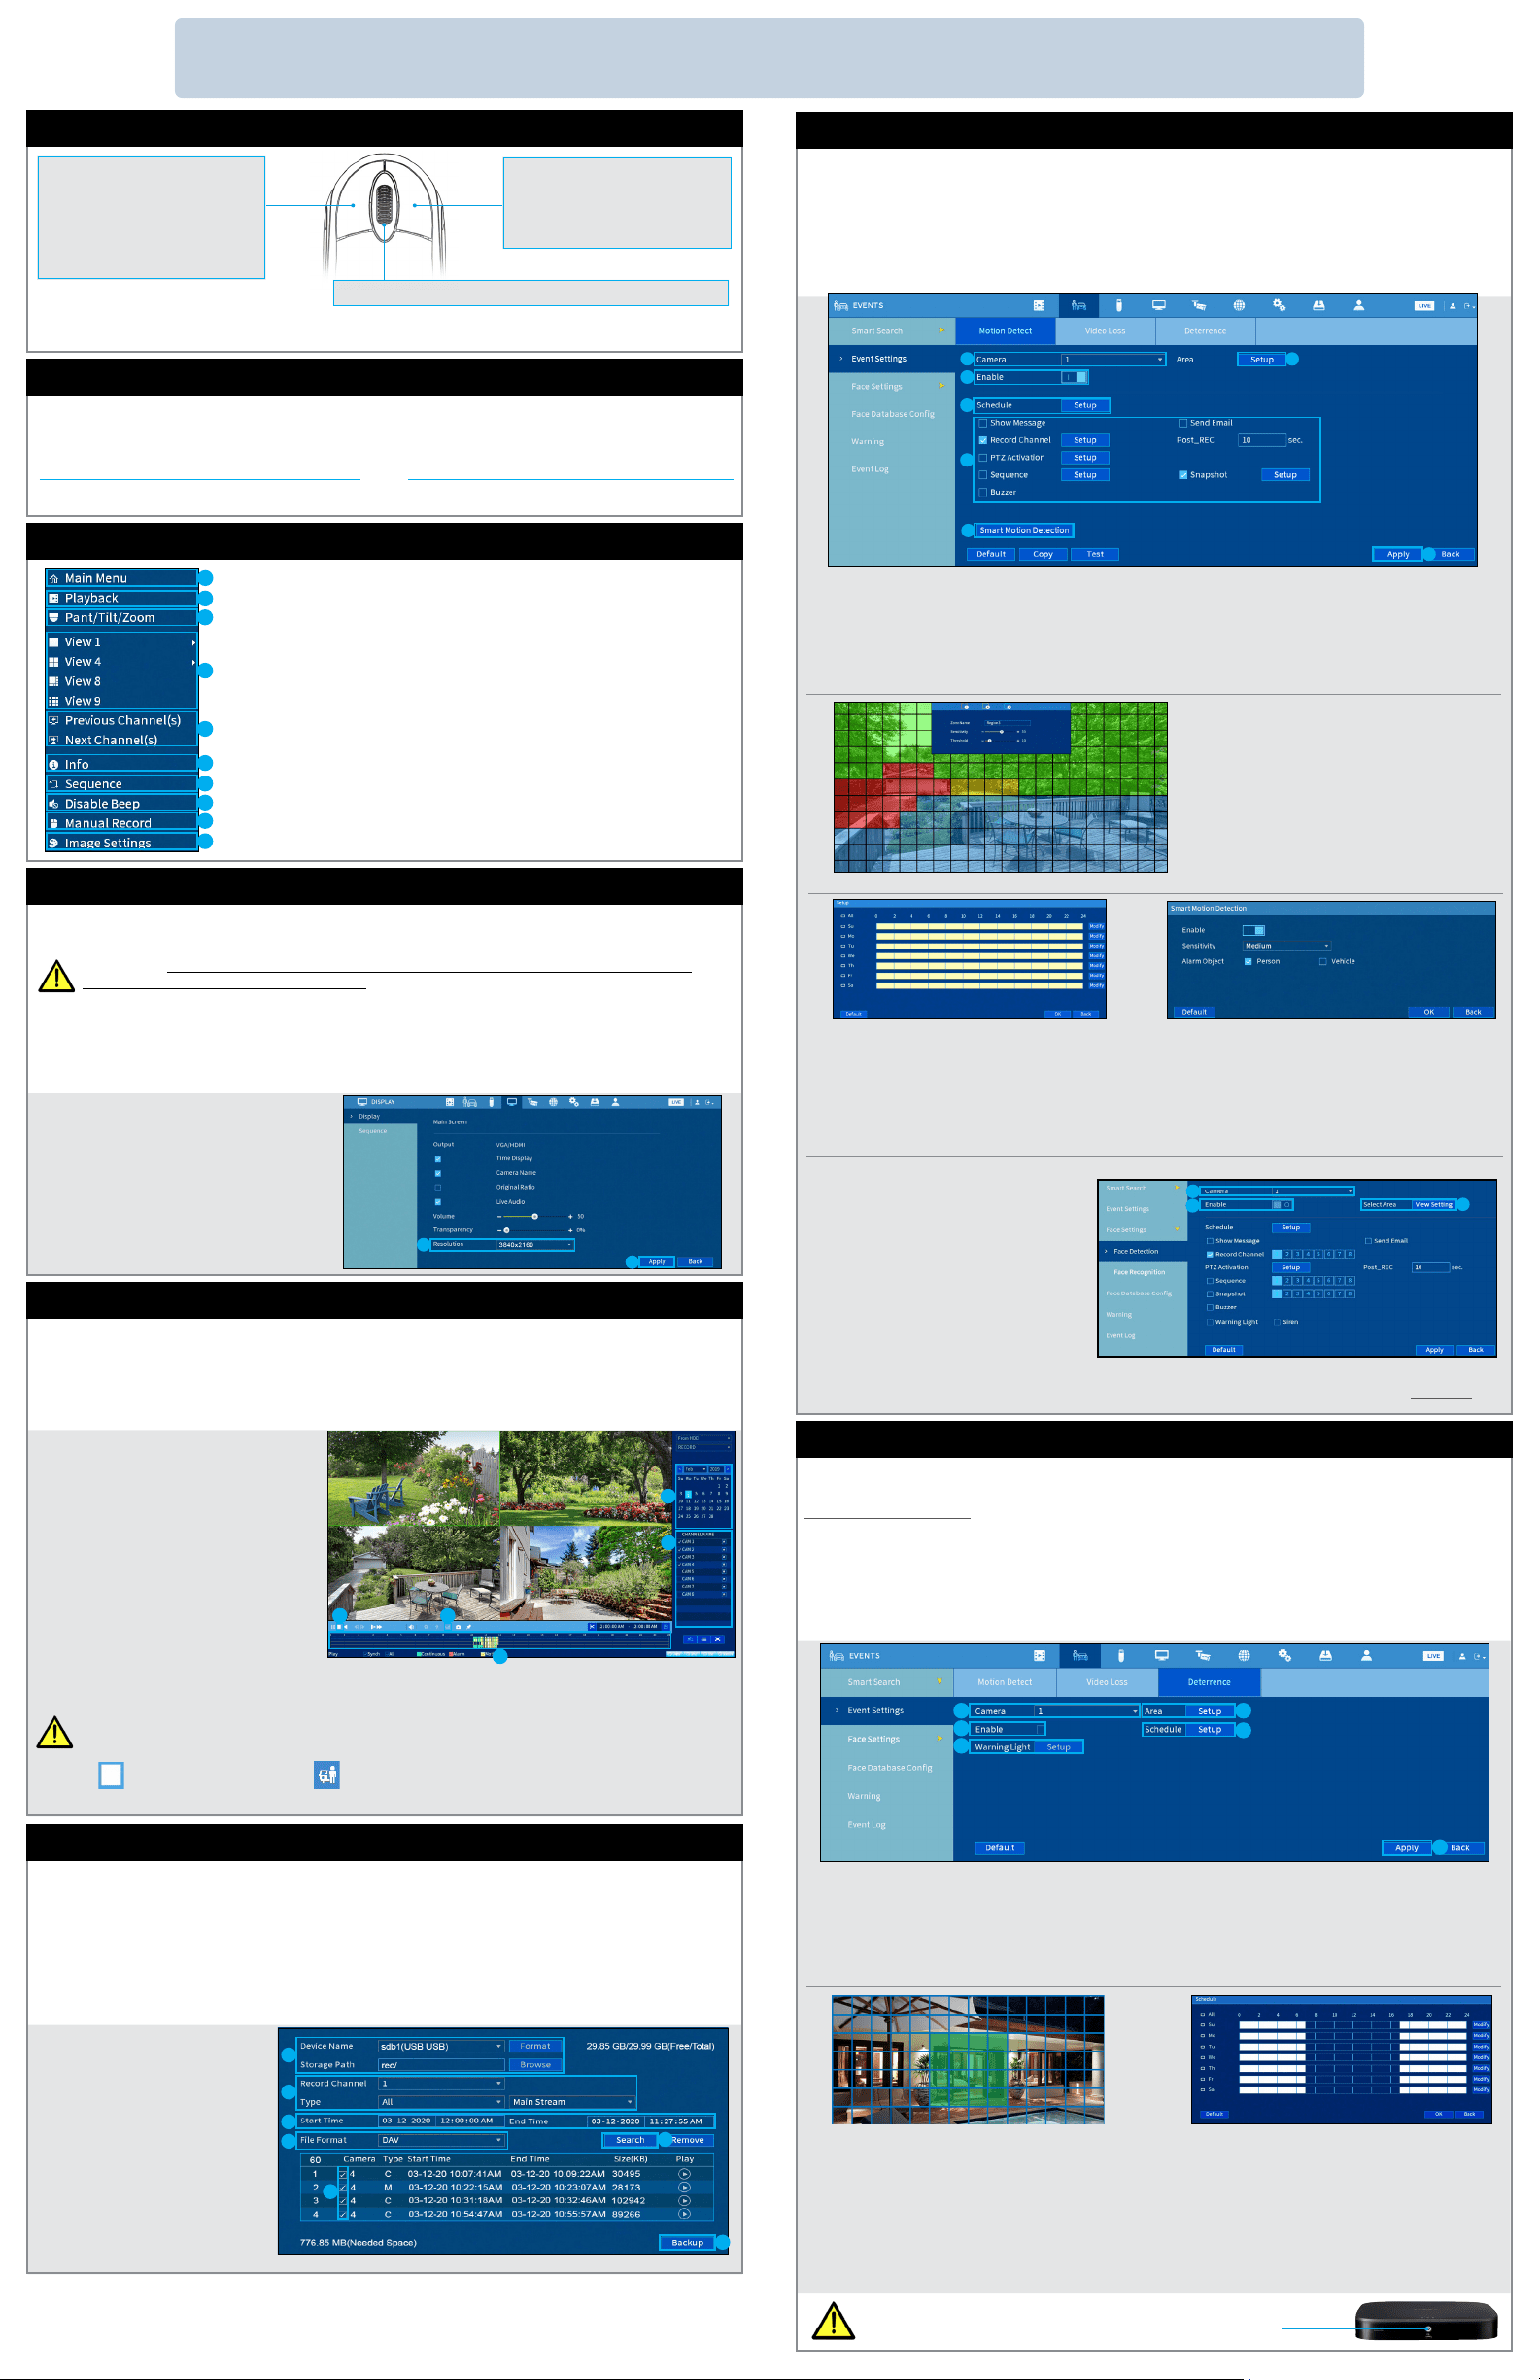
Set motion and face detection preferences. This section includes setup of person and vehicle detection.
To congure motion:
1. From live view, right-click and then click Main Menu. If prompted, log in using the system user name (default:
admin) and your new, secure password.
2. Click EVENTS. Click Events Settings on the far-left, then click the Motion Detect tab.
3. Congure the following:
a
b
d
c
g
e
a. Select the channel you would like to congure.
b. Click Enable.
c. Click Setup next to Area to set an active area for motion
detection. See Figure 1 below for details.
d. Click Setup next to Schedule to set the weekly schedule
for motion detection. See Figure 2 below for details.
a. Select the channel you would like to
congure.
b. Face Detection is disabled by default.
Click Enable.
IMPORTANT: Face Detection is only
available up to two channels. You must
disable smart motion detection on all
channels to enable Face Detection.
c. Press Select to set the desired area for
face detection.
e. Set preferences for how the system
reacts to motion detection events.
f. Click Smart Motion Detection to
enable person and vehicle detection.
See Figure 3 below for details.
g. Click Apply to save changes.
f
Figure 1: Motion Detection Area
• Click Enable to allow detection of people and vehicles
on the selected channel.
• Select a Sensitivity level (a high sensitivity value will
detect smaller objects than a low value).
• Check Person and/or Vehicle.
• Click OK when nished.
• The default schedule, shown in Figure 2, is
active at all times.
• Click Modify to change the schedule for the
corresponding day of the week.
• Click OK when nished.
Figure 3: Smart Motion DetectionFigure 2: Motion Schedule
• The camera image appears with a red grid overlay.
This means the entire image is enabled for motion
detection.
• Click or click-and-drag to add / remove boxes from
the active area. Cells that have been removed from
the active area appear green.
• Hover near the top of the image to reveal zone
selection. You can set up to 3 different zones with
different sensitivity and threshold values.
• Right-click when nished.
1. In live view, right-click and click Main Menu. If prompted, log in using the system user name (default: admin) and
your new, secure password.
2. Click EVENTS. Click Event Settings on the far-left, then click the Deterrence tab.
3. Congure the following:
To congure deterrence settings:
Set preferences for automatic warning light triggering on compatible Lorex deterrence cameras.
For a complete list of compatible deterrence cameras, navigate to your recorder series at
lorex.com/compatibility.
NOTE: For more information on conguring your Face Database and
Face recognition set-up, refer to the DVR’s manual at lorex.com.
• The camera image appears with a grid overlay. The
green area is the active area for deterrence.
• Click or click-and-drag to add / remove boxes from the
active area.
• In Figure 4, only motion around the doorway will trigger
warning light.
• Right-click when nished.
• The default schedule, shown in Figure 5, is active
during the night, between 5pm and 7am.
• Click Modify to change the schedule for the
corresponding day of the week.
• Click OK when nished.
a. Select the channel of a connected
deterrence camera.
b. Check Enable.
c. Click Setup next to Warning Light to
congure preferences.
d. Click Setup next to Area to set an
a
a
b
b
c
c
d
f
e
active area for automatic deterrence. See Figure 4 below for
details.
e. Click Setup next to Schedule to set the weekly schedule for
automatic deterrence. See Figure 5 below for details.
f. Click Apply.
Figure 5: Deterrence Schedule
Figure 4: Deterrence Area
Configuring Deterrence Settings
To set off all connected deterrence cameras’ warning lights and
sirens, press and hold the front panel button for 3 seconds.
To change the recorder’s output resolution:
1. From live view, right-click and then click Main Menu. If prompted, log in using the system user name (default:
admin) and your new, secure password.
2. Click DISPLAY, then congure the following:
IMPORTANT: If you need to switch the monitor, make sure you set the recorder to an output resolution
supported by the new monitor before switching.
To back up recordings:
1. Insert a formatted USB ash drive (not included) into a free USB port on the recorder.
2. From live view, right-click and then click Main Menu. If prompted, log in using the system user name (default:
admin) and your new, secure password.
3. Click BACKUP.
4. Congure the following:
To quickly open a window that displays vital system information such as device ID, model number,
rmware version, and IP address:
Using the Mouse
Quick Access to System Information
• Tap the button on the front panel of the recorder.
• Right-click to open the Quick Menu and click Info.
OR
NOTE: In live view, hover the mouse cursor over the top of the screen to open the Navigation Bar. Move the mouse
cursor away from the top of the screen to close the Navigation Bar.
During live view: Use the scroll wheel to zoom in / out.
• During live view: Click anywhere
on the screen to open the Quick
Menu.
• While navigating menus: Click to
exit menus.
• During split-screen display
mode: Click an individual channel
to view it in full-screen. Click
again to return to the split-screen
display mode.
• While navigating menus: Click to
open a menu option.
To congure face detection:
1. Click Face Settings on the far-left, then
click the Face Detection tab.
2. Congure the following:
Loading ...
Loading ...